
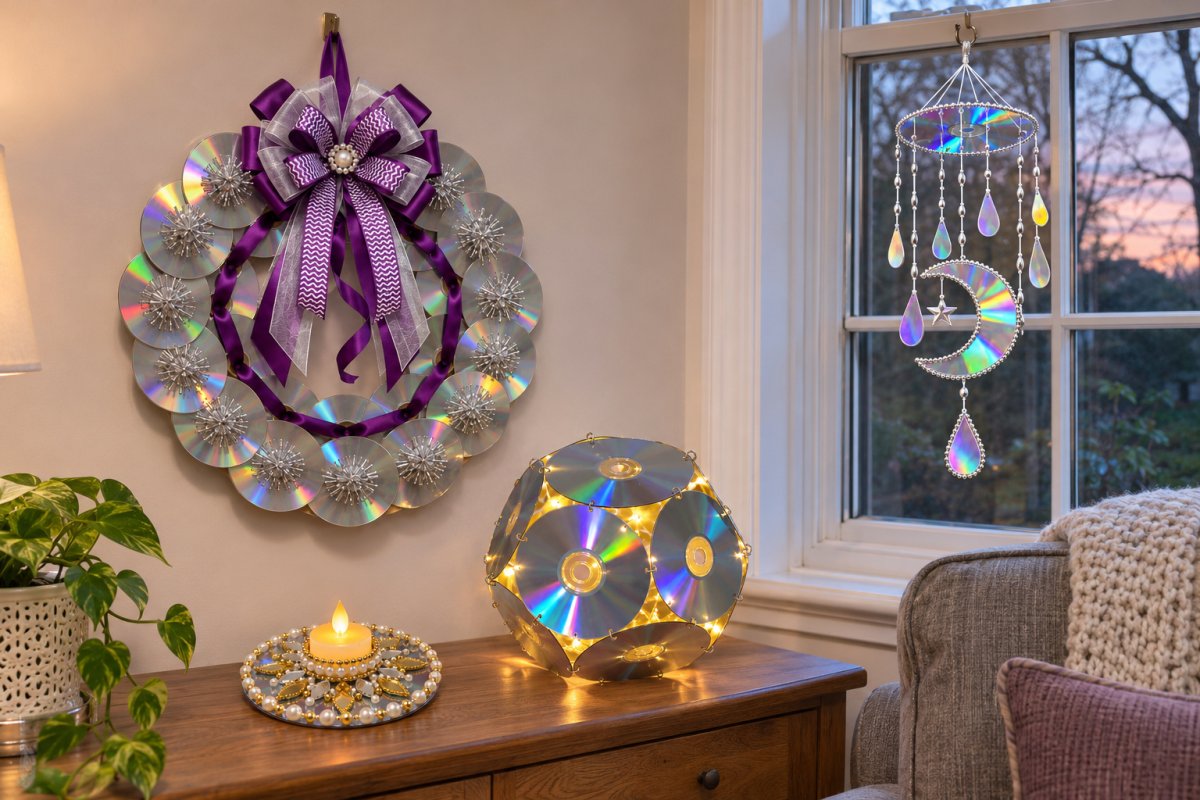
Most of us still have a spindle of old CDs somewhere, and they are surprisingly good craft material. They are rigid, waterproof, perfectly round and already have a hole in the middle for hanging. The 25 projects below use them in three different ways: as whole discs you paint or build with, as cut pieces for mosaics and petals, and as clear plastic once the shiny layer is peeled away.
The ideas are grouped by technique, so if you do not want to cut anything you can stay in the first two sections. Each photo strip runs from the supplies to the finished piece.
Table of Contents
- Three Ways to Work with an Old CD
- Painted Whole Discs
- Hand Painted Black CD Wall Plates
- Dot Mandala CD Garden Hanging
- Branch Wall Hanging with Five Mandala CDs
- Doodle CD Wall Grid Above a Desk
- Whole Discs as Building Blocks
- Geometric CD Globe Lamp with a Battery LED Bulb
- Pearl and Gold CD Tealight Holder
- Red Tulle CD Toran with Mirrors and Tassels
- CD Door Wreath with Purple Ribbon Bow
- Fabric Covered CD Coasters with Jute Edges
- CD Fish Craft for Kids
- CD Party Backdrop with Mirror Balls
- Hanging CD Doorway Curtain with Color Dots
- Yarn Wrapped CD Tricycle Pen Holder
- Cut Shapes and Mosaics
- Crescent Moon CD Suncatcher Mobile
- Gold Edged CD Petal Lotus
- Lotus CD Door Hanging with a Brass Bell
- CD Petal Flower in a Concrete Pot
- CD Mosaic Welcome Sign with Mini Planters
- Light Up Swan Heart CD Mosaic
- Sparkling CD Flower Wall Medallions
- Purple CD Mosaic Serving Tray
- Framed Geometric CD Mosaic Art
- CD Mosaic Round Coffee Table
- Clear Discs with the Shine Removed
- Floral Fabric CD Wall Hanging with Jute Tassel
- Clear CD Stained Glass Iris Garden Stake
- Looking After CD Crafts
- Splinters, Small Parts and Lights
Three Ways to Work with an Old CD
Keep it whole. A whole disc has no sharp edges and takes paint, fabric, yarn and glue well. Rub the shiny side lightly with fine sandpaper before painting so the paint grips, and use thin coats. If a disc once held personal files, back them up and rub off the metal coating on the label side first so nothing can be read.
Cut it into pieces. CDs are polycarbonate, which cuts with strong scissors but cracks easily, especially along thin strips and sharp points. Leaving a disc in very hot water for several minutes takes a little of the brittleness out of it. It will not turn soft, but it chips less, so cut it while it is still warm. Work slowly from the edge inward in small bites rather than one long snip, and file or trim every point flat as you go.
Strip it to clear plastic. On many recordable discs, a strip of strong packing tape pressed onto the label side lifts the label and metal coating away in one pull. Pressed music CDs often need patient scraping instead. Wipe the clear disc with rubbing alcohol before you paint or glue it.
For gluing, hot glue joins whole discs quickly and clear craft glue suits small pieces and embellishments. Mosaics that need to last are better set with a flexible clear adhesive of the E6000 type, which grips polycarbonate well, sets in about twenty minutes and needs a full day to cure, or up to three where it was laid on thickly, before grout or sealer goes over it. Discs you do not use can usually go to an electronics recycling collection point rather than the trash, since the polycarbonate is worth recovering.
Painted Whole Discs
Hand Painted Black CD Wall Plates
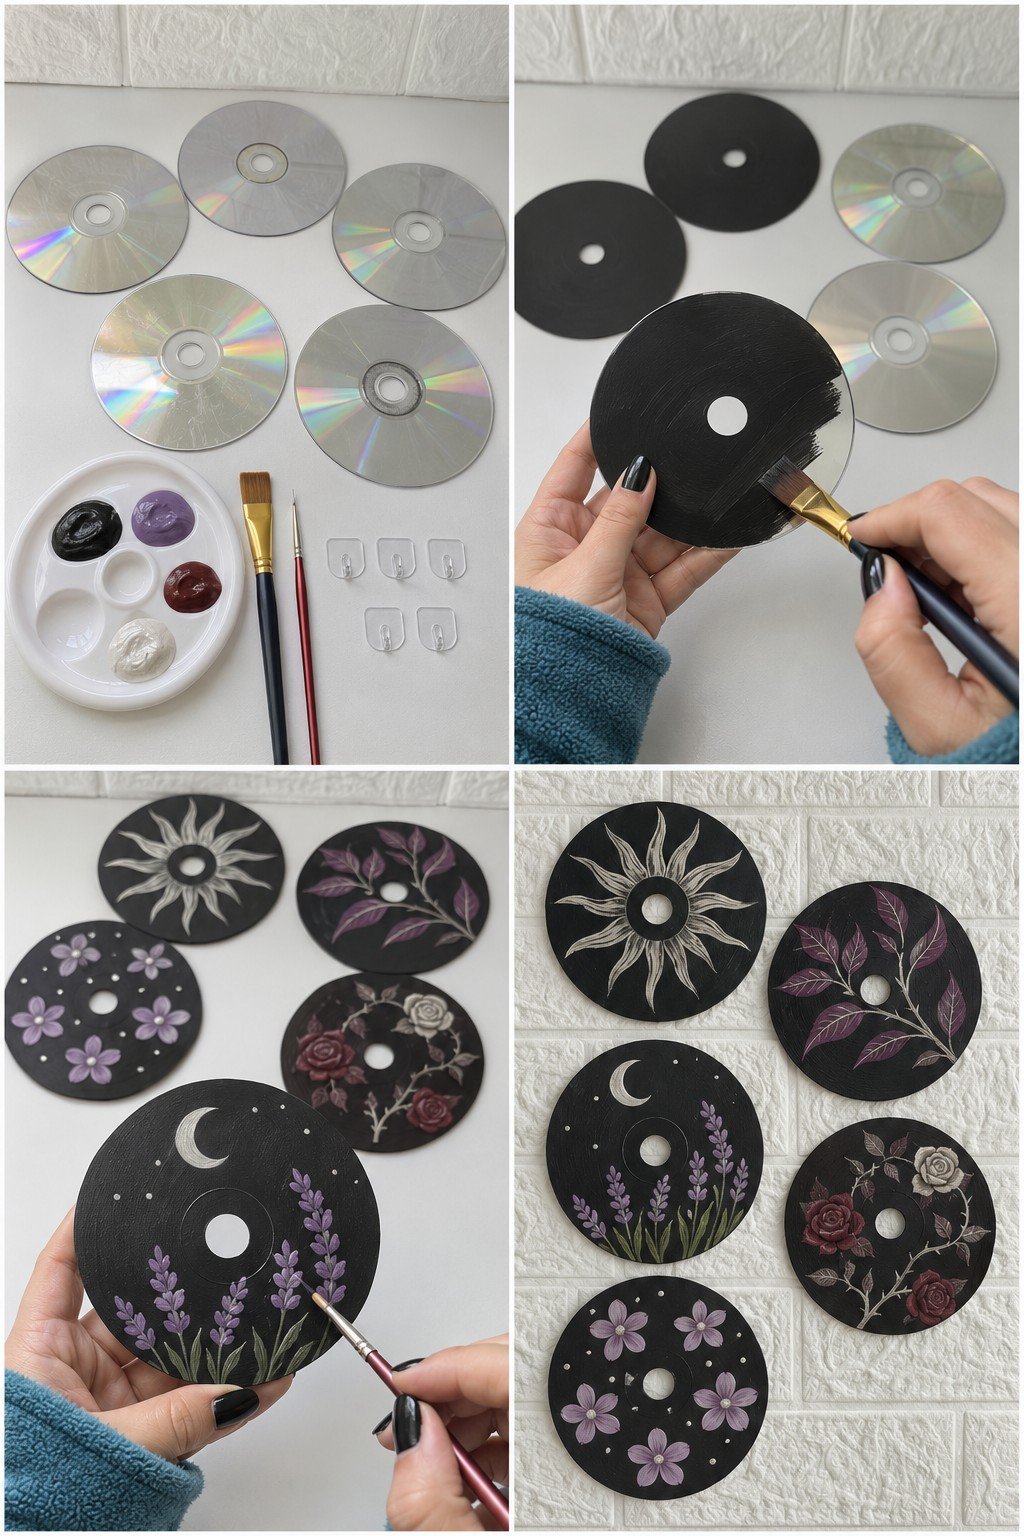
Five discs painted matte black turn into a little gallery of folk style plates: a cream sun, a branch of purple leaves, a crescent moon over lavender, burgundy and cream roses on a thorny stem, and scattered lilac flowers with white dots. The center holes stay open and become part of each design. On a white brick wall they look like a set of painted ceramics.
You need five discs, black, purple, burgundy and white acrylic paint, a flat brush, a fine detail brush and five small clear adhesive hooks. Paint the shiny side black in thin coats until no silver shows through, let it dry, then add one motif per disc with the fine brush, leaving the tiny white dots for last. Lay the discs out on a table to settle the arrangement before pressing the hooks onto the wall.
Dot Mandala CD Garden Hanging
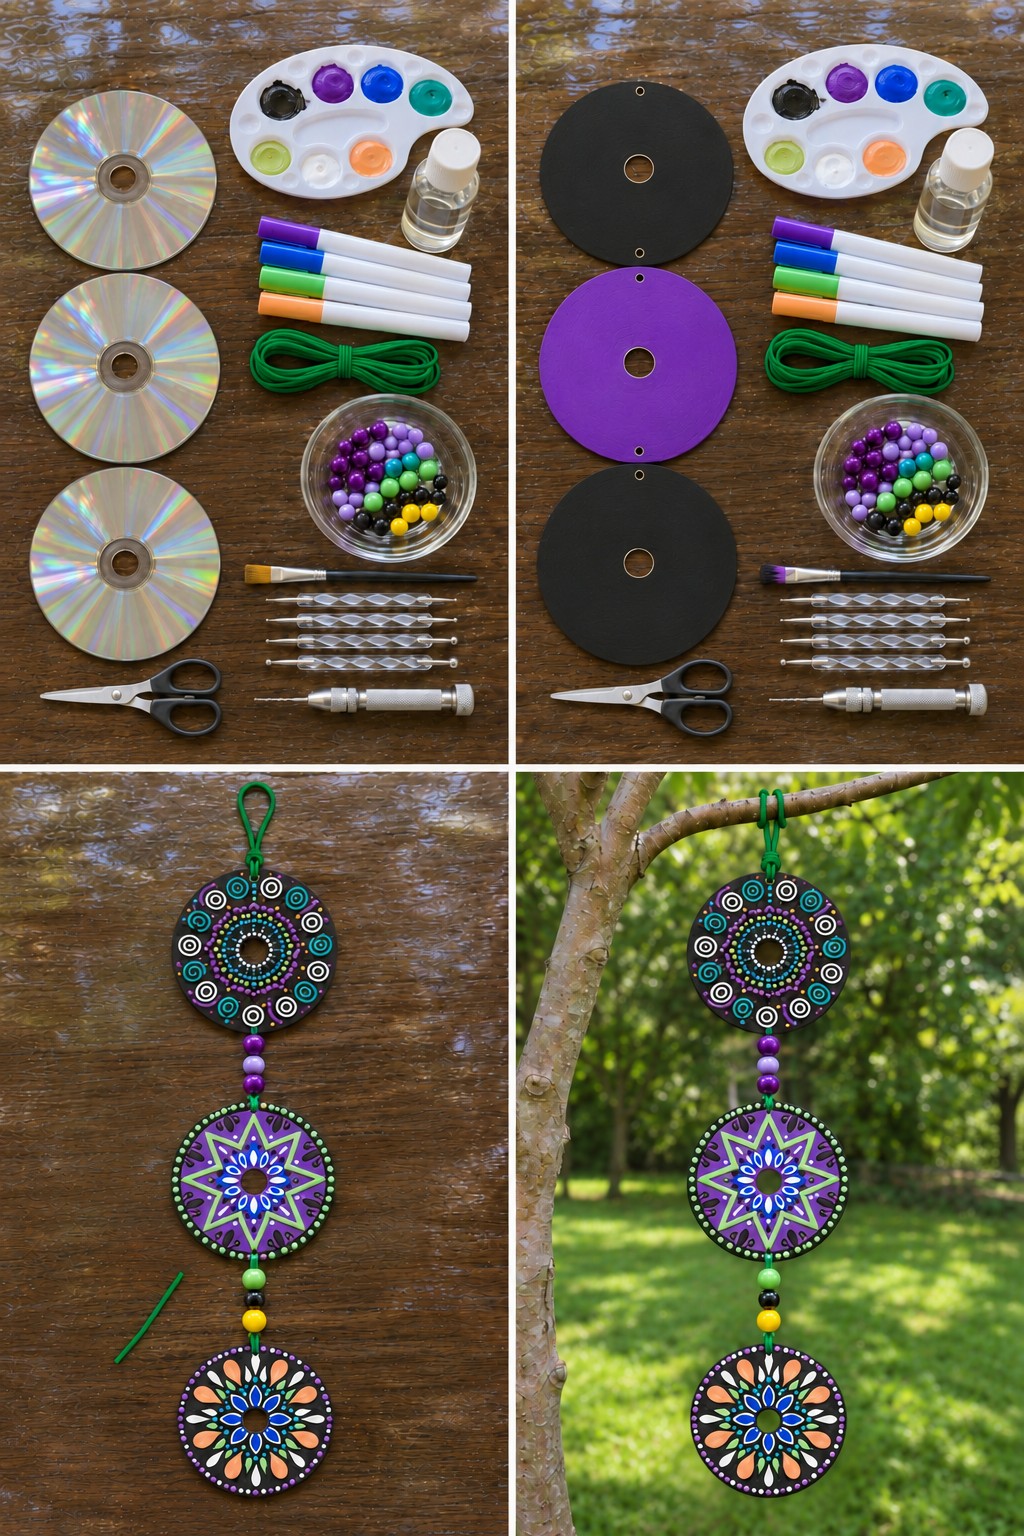
Three dot painted discs hang in a column from a tree branch on green cord. The top one is black with teal and white rings, the middle one purple with a lime green eight point star, and the bottom one black with orange, white and blue petals. Purple and lilac beads sit between the first two, green, black and yellow beads between the last two.
- Make a small hole at the top and bottom edge of the upper two discs and at the top of the last one, using a hand drill.
- Paint two discs black and one purple and let them dry completely.
- Build each mandala from the center outward with dotting tools and paint pens. Let the big dots dry before adding small ones next to them, or they merge.
- Seal both sides with clear varnish, then link the discs with cord and beads and tie a loop at the top.
Outdoors, hang it where it gets some shade; strong sun fades paint and slowly makes the plastic brittle.
Branch Wall Hanging with Five Mandala CDs
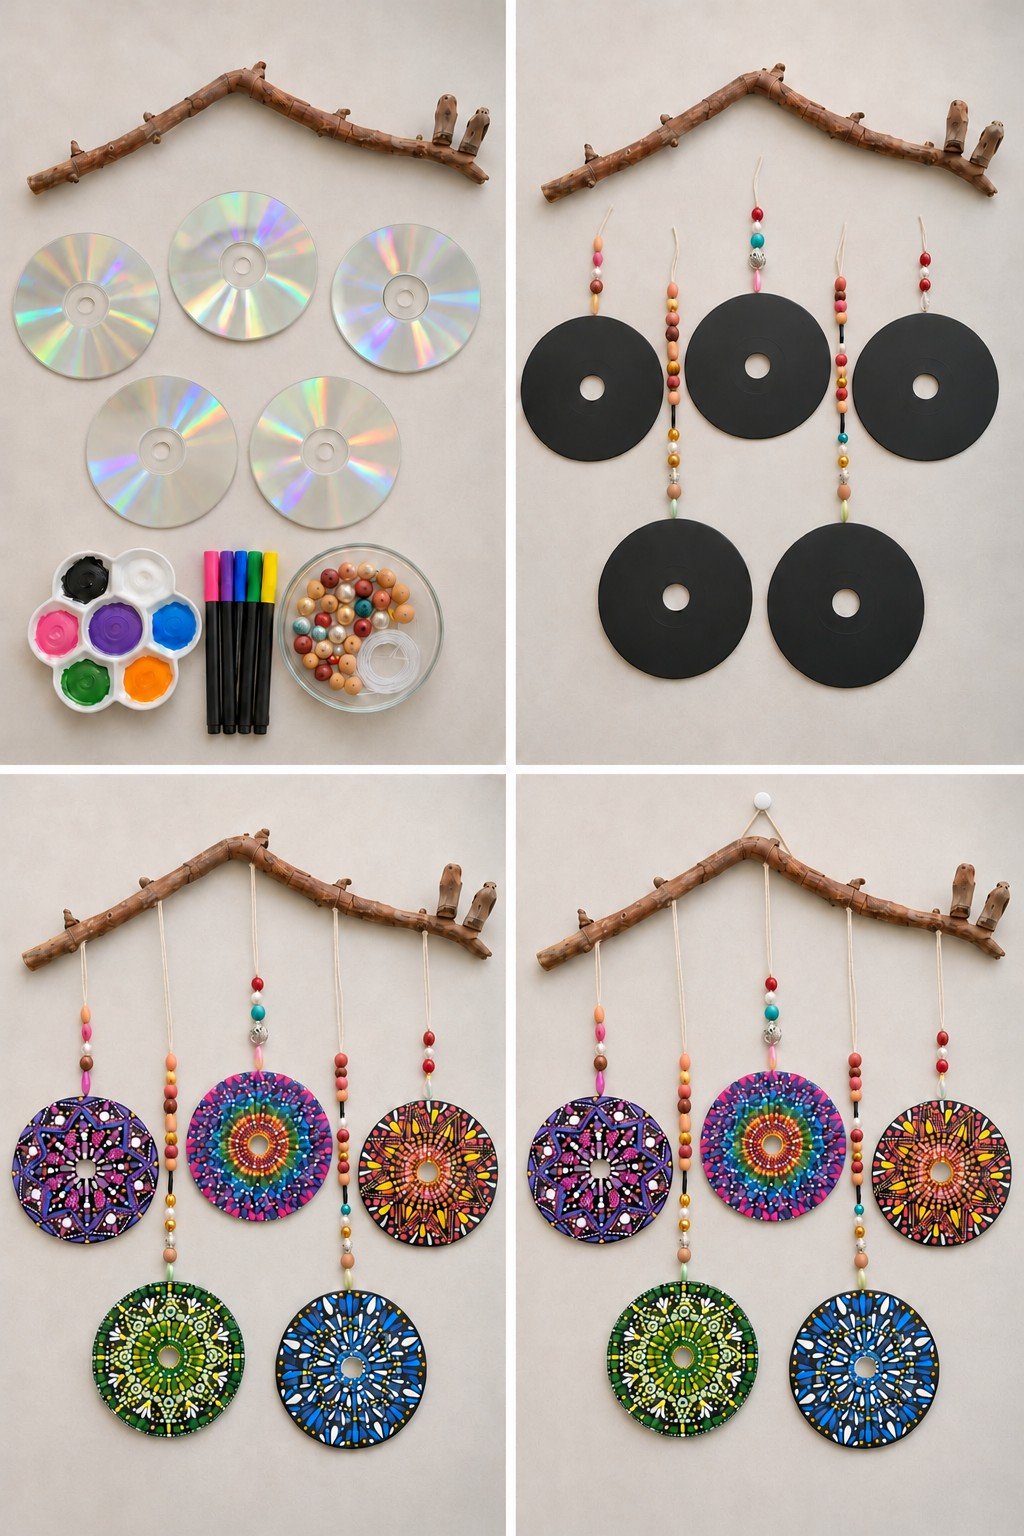
The indoor cousin of the garden hanging. A dry branch carries five discs on cream cords strung with wooden, red, pearl and metallic beads: purple, rainbow and orange mandalas in the top row, green and blue ones hanging lower between them. The staggered heights let every design show in full.
Paint all five discs black first and tie on the beaded cords so you can judge the lengths before decorating. Then paint the mandalas with dots and paint marker lines, working out from the center hole. A single cord loop tied at the middle of the branch hangs it from one wall hook; slide the loop until the branch sits level.
Doodle CD Wall Grid Above a Desk
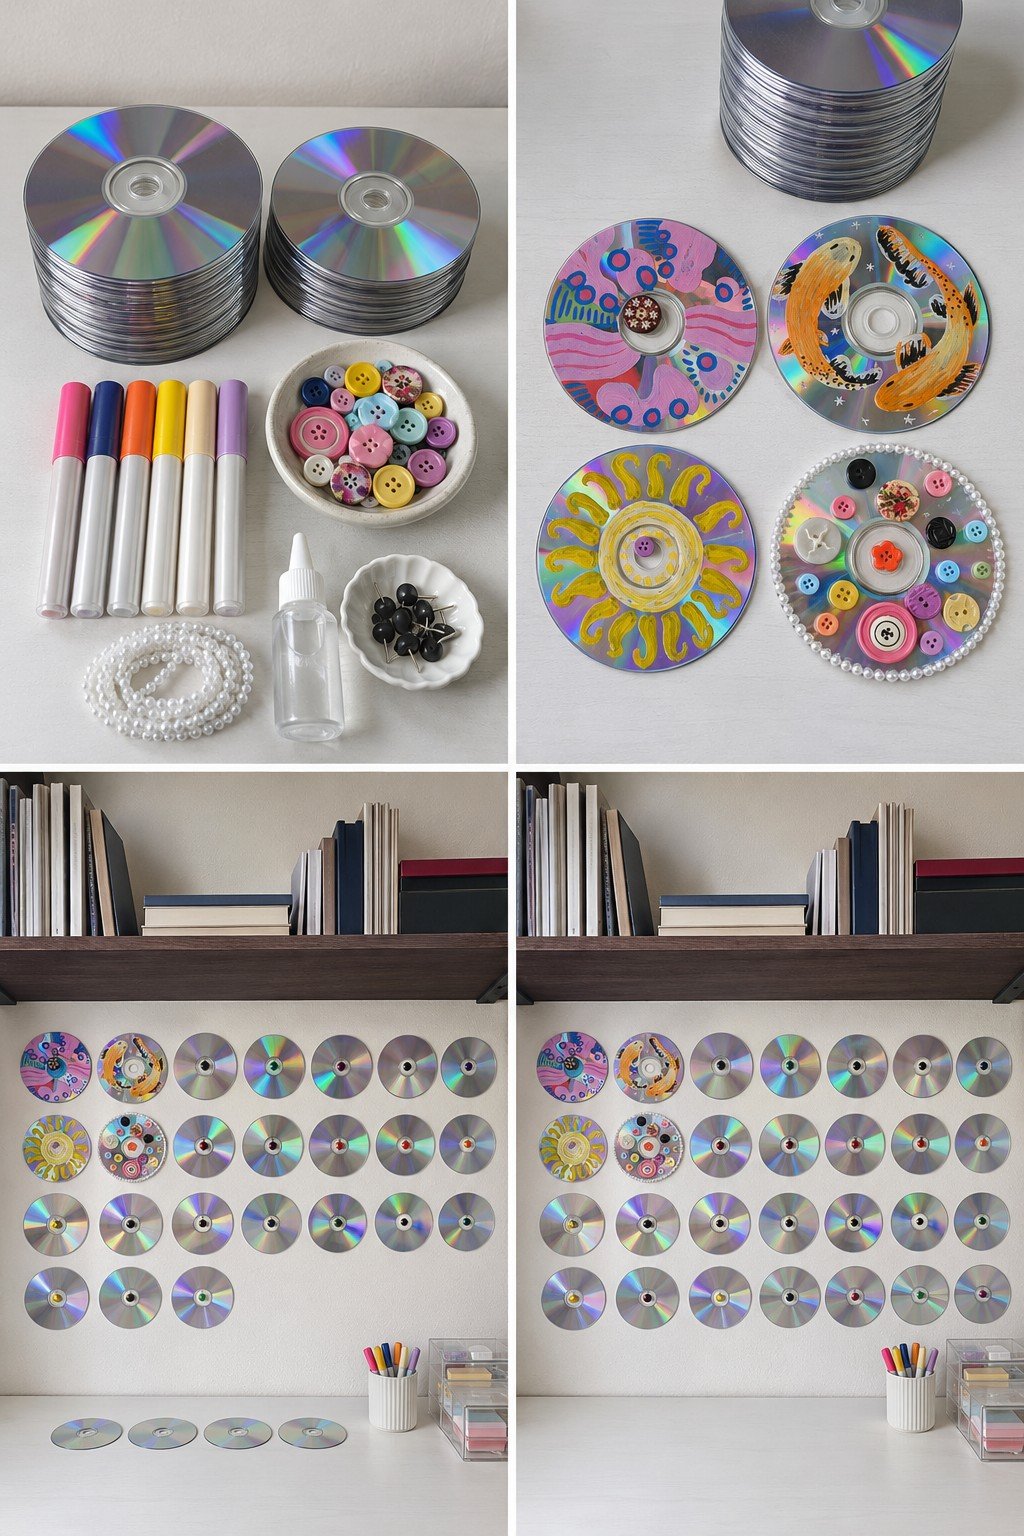
Twenty eight discs in four tidy rows of seven fill the wall between a white desk and a dark wood shelf. Most stay plain silver with a push pin through the middle, while four in the top left corner are decorated: pink abstract doodles, two orange koi, a yellow sun and a disc covered in buttons with a pearl border.
Decorate the four special discs first with paint markers, buttons and pearls. Then pin the top row along a level pencil line and space the other rows to match. Before pinning the last row, sit at the desk at the time of day you use it most, because a disc that catches the window light can shine straight into your eyes.
Whole Discs as Building Blocks
No cutting at all in this group. The discs are glued, wrapped, stacked or strung, which makes these the safest projects to share with older children.
Geometric CD Globe Lamp with a Battery LED Bulb
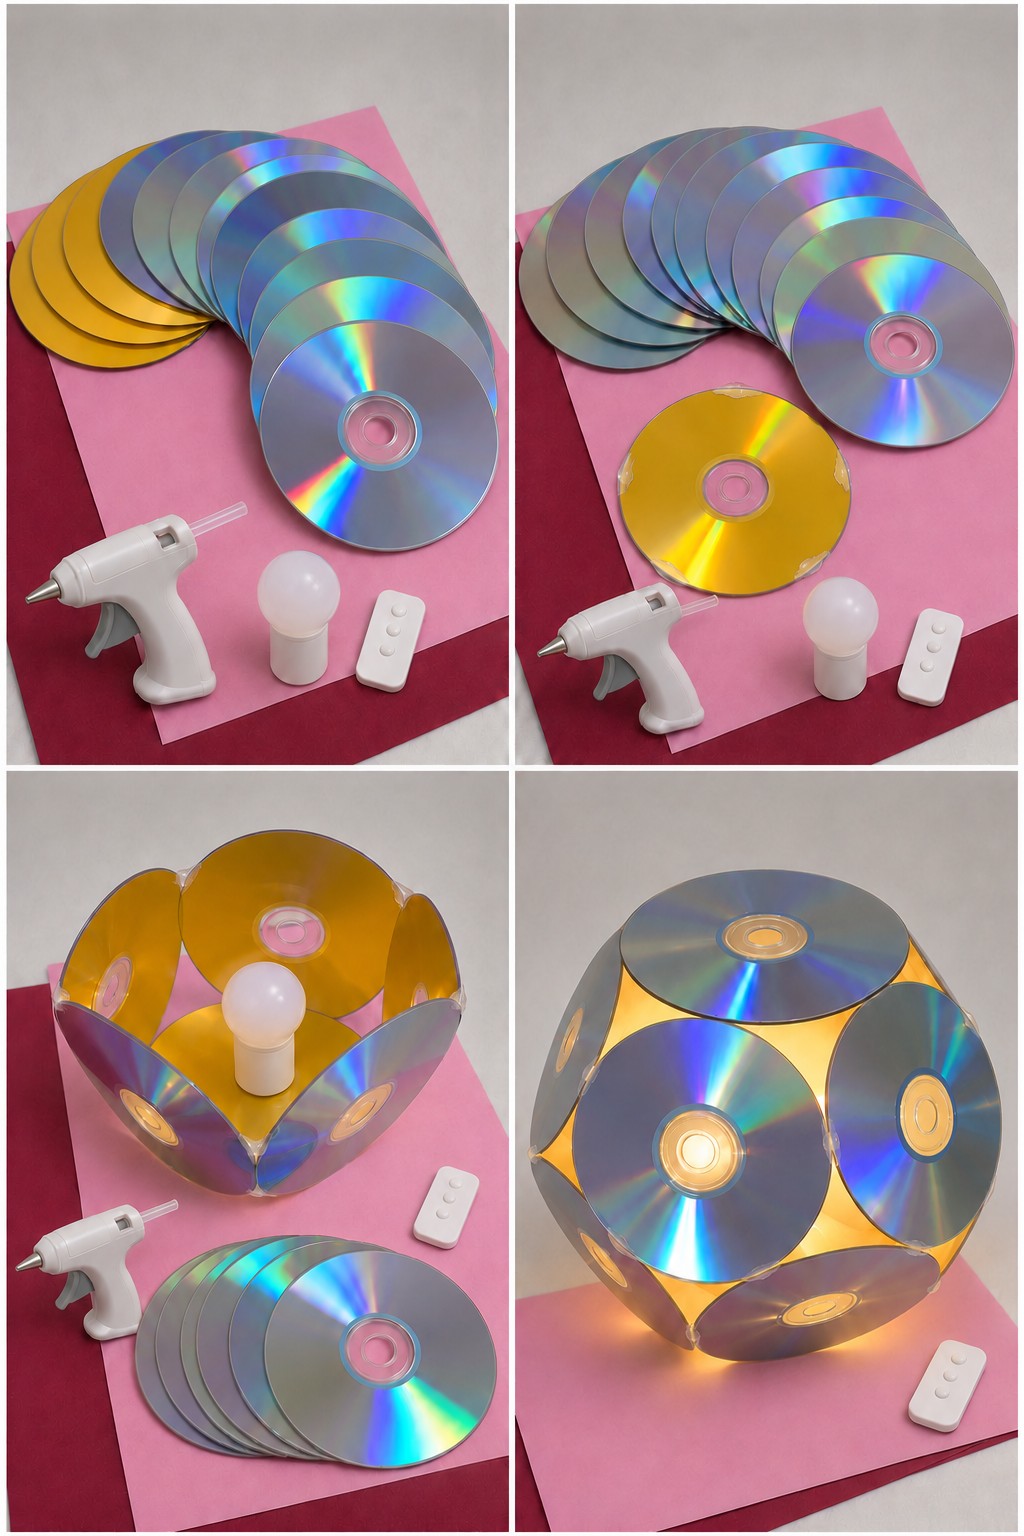
Twelve whole discs glued edge to edge close into a ball, holographic side out and gold side in. A battery LED bulb sitting inside lights up the gold backs, so warm light spills out through the triangular gaps and the center holes. In daylight it still sparkles on a shelf.
- 12 discs (gold backed ones give the warm glow; silver gives a cooler light)
- A small hot glue gun
- A battery LED bulb with a flat base and a remote
- Lay one disc gold side up as the base and stand five discs around it, gold sides facing in, gluing each one to the base and to its neighbor with small dots of hot glue.
- Set the bulb in the middle, then glue a second ring of five discs above the first, tilted inward.
- Rest the last disc on top without glue. It works as a lid when the batteries need changing.
Pearl and Gold CD Tealight Holder
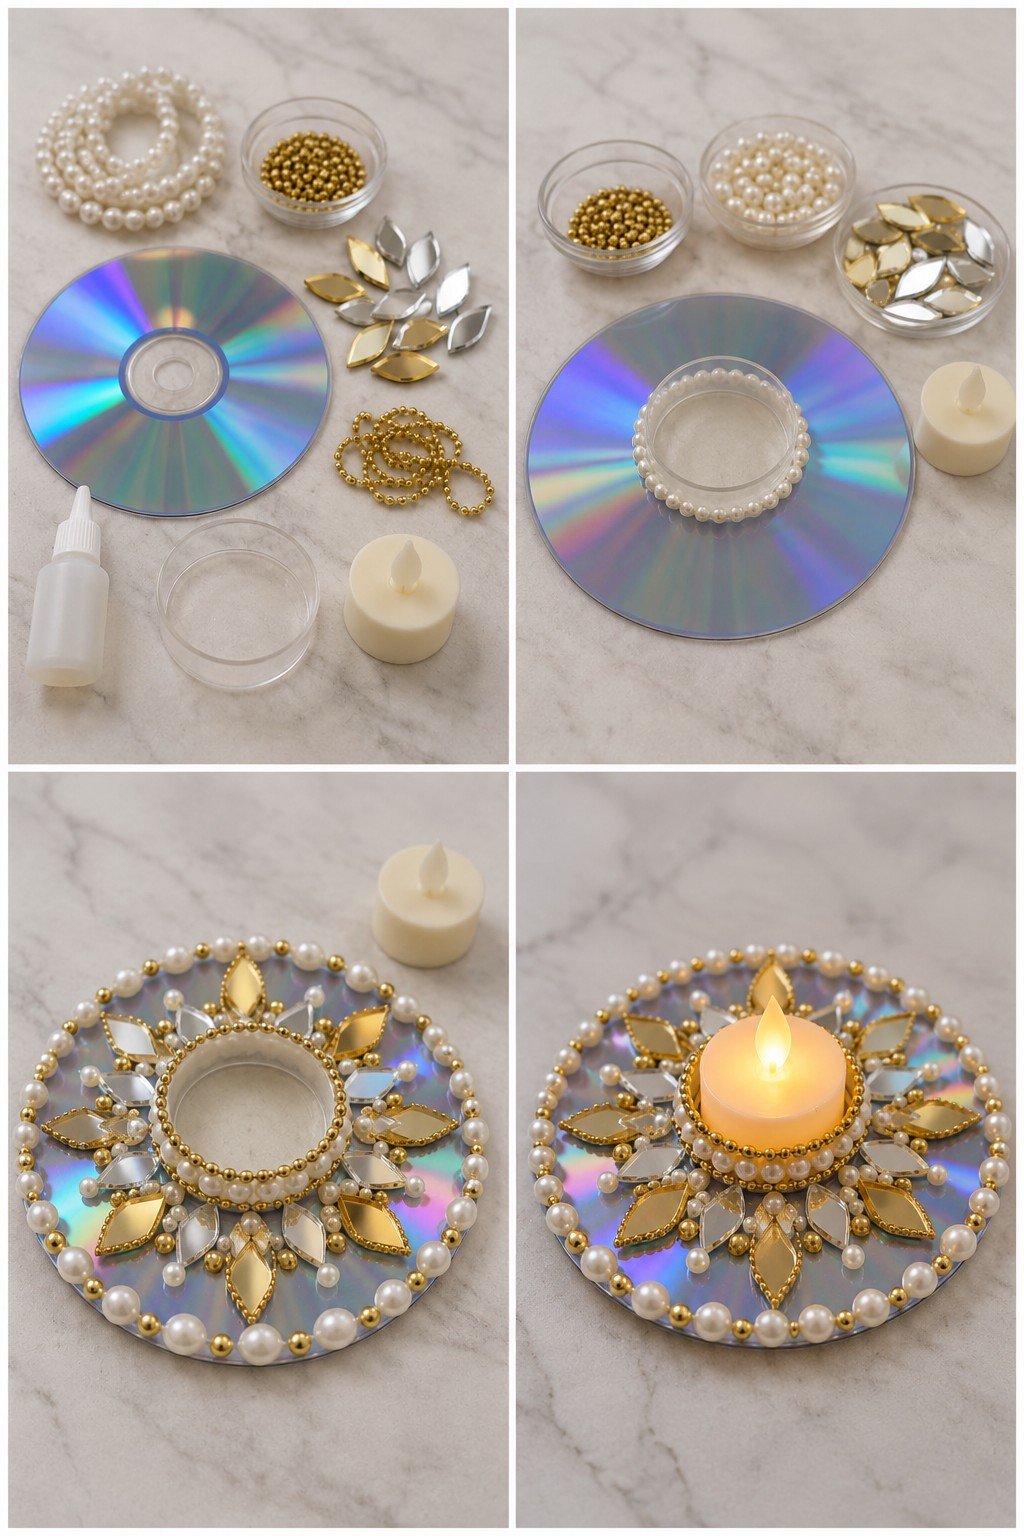
A short clear ring glued to the middle of a disc holds a flickering LED tealight. Gold and silver marquise mirror gems fan out around it like a sunburst, pearls and gold bead chain trim the ring, and a border of cream pearls alternating with gold beads follows the edge. It takes about an hour and looks lovely on a holiday table.
Supplies: one disc, a clear plastic ring (the bottom of a clear cup works), clear craft glue, a pearl strand, loose pearls, gold beads, gold bead chain, gold and silver marquise gems and an LED tealight. Glue the ring first and wrap pearls around its base, add the bead chain on top, then set the gems with their points facing out and fill the gaps with pearls and beads. Finish with the outer border and let the glue cure overnight.
Red Tulle CD Toran with Mirrors and Tassels
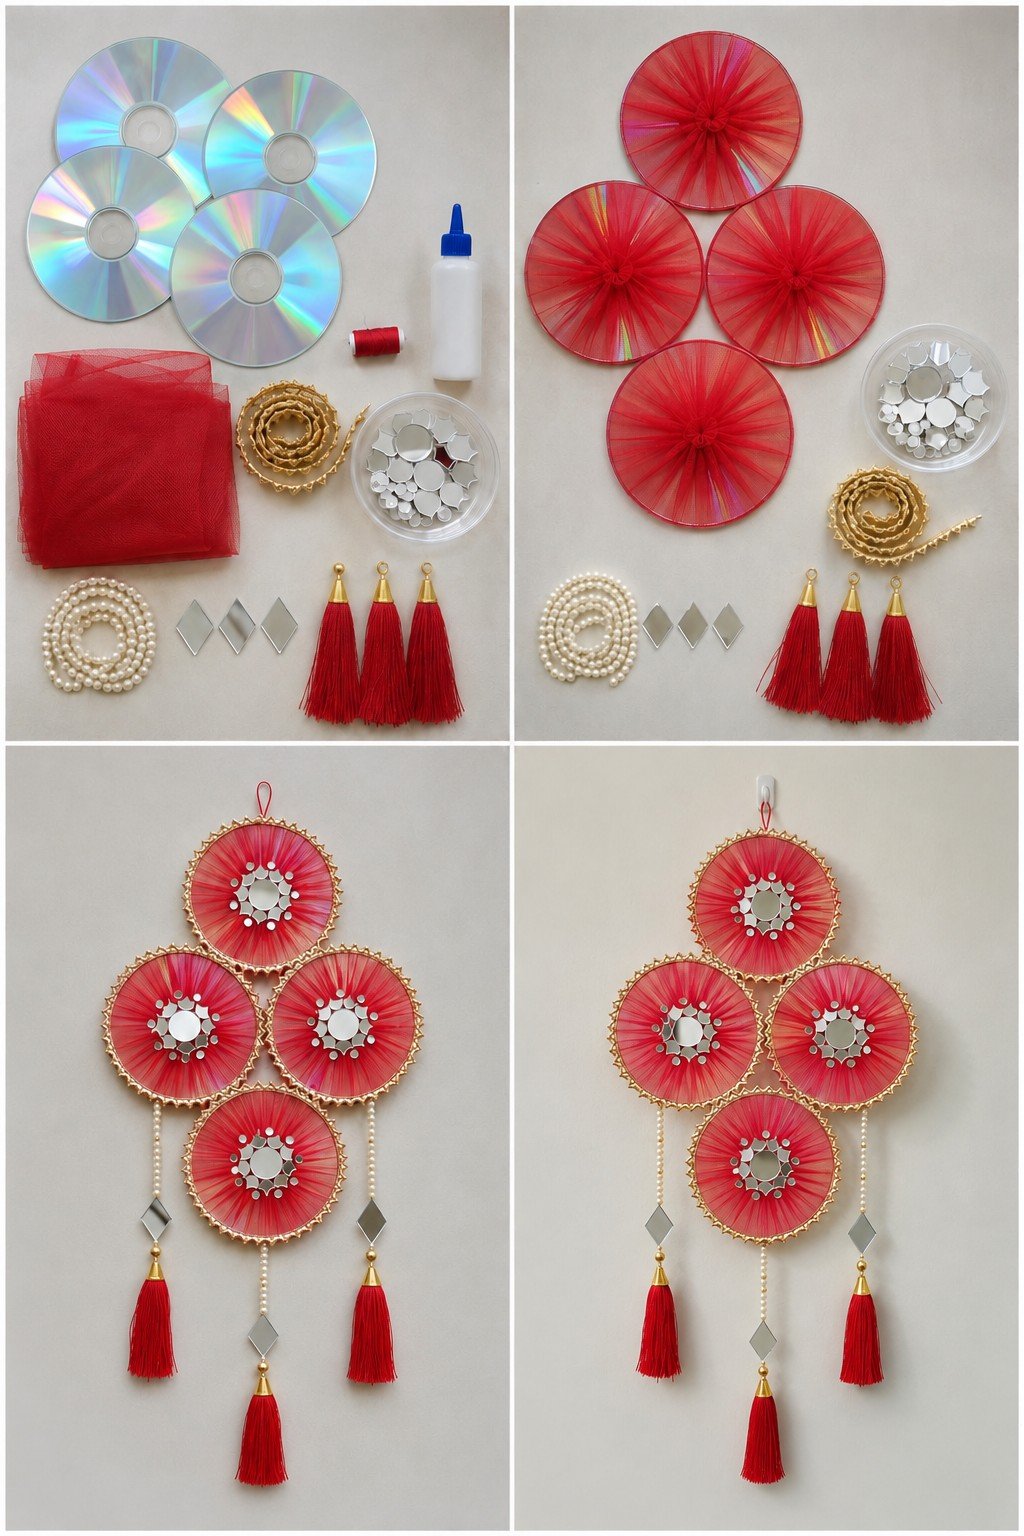
Four discs wrapped in gathered red tulle form a diamond, with the fabric fanning out in fine pleats from each center. A round mirror ringed with small ones sits in every middle, gold trim edges the rims, and three pearl strands end in diamond mirrors and red tassels with gold caps. It takes its look from the festive toran hangings used beside doorways.
- Lay a square of tulle over each disc and gather it at the center with a few stitches of red thread so the pleats spread evenly to the rim.
- Glue a large mirror over the gathered center and surround it with small ones.
- Glue gold trim around each rim, then glue the four discs together in a diamond where the trims touch.
- Hang a pearl strand with a diamond mirror and a tassel from the two side discs and the bottom disc, and add a loop at the top.
CD Door Wreath with Purple Ribbon Bow
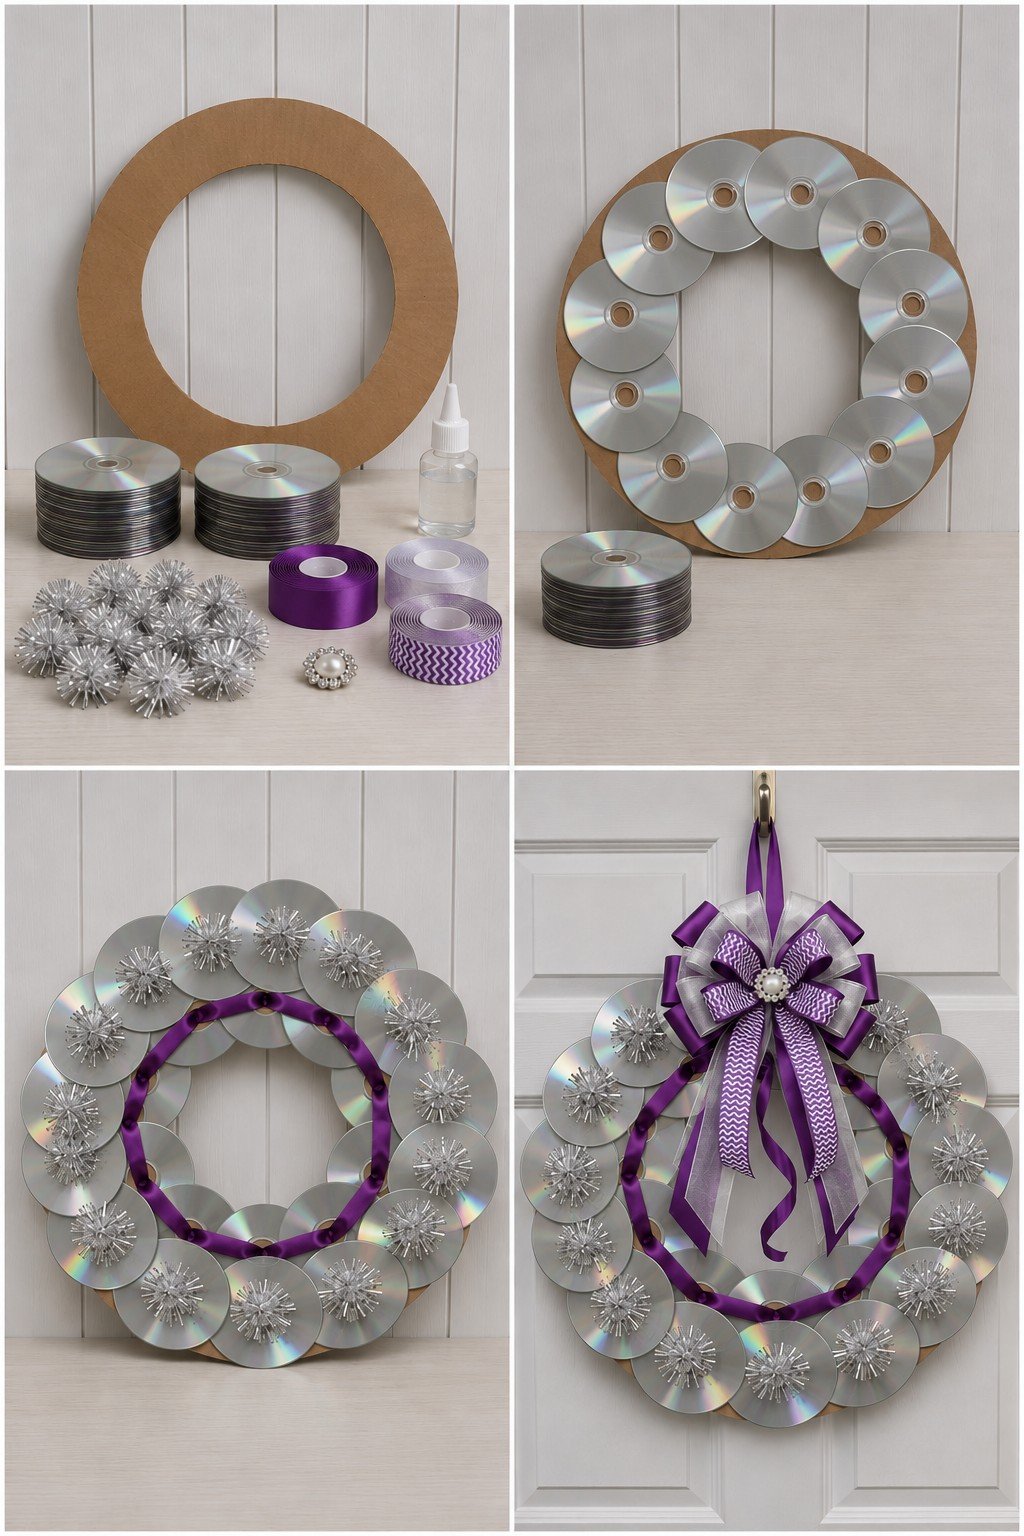
Two rings of overlapping silver discs cover a cardboard wreath base. A silver tinsel pom pom sits over each outer disc, purple satin ribbon runs around the inner ring, and a big layered bow of purple satin, silver sheer and purple chevron ribbon with a pearl brooch crowns the top. It hangs from an over the door hook on a purple ribbon.
You will need a cardboard ring, about 30 discs, clear glue, tinsel pom poms, the three ribbons and a brooch. Glue the inner ring of discs first, each overlapping the next, then the outer ring over the edge. Add the pom poms and the satin ribbon, and tie the bow last so it sits right over the hanging loop. The cardboard base does not like damp, so keep this one for an indoor door.
Fabric Covered CD Coasters with Jute Edges
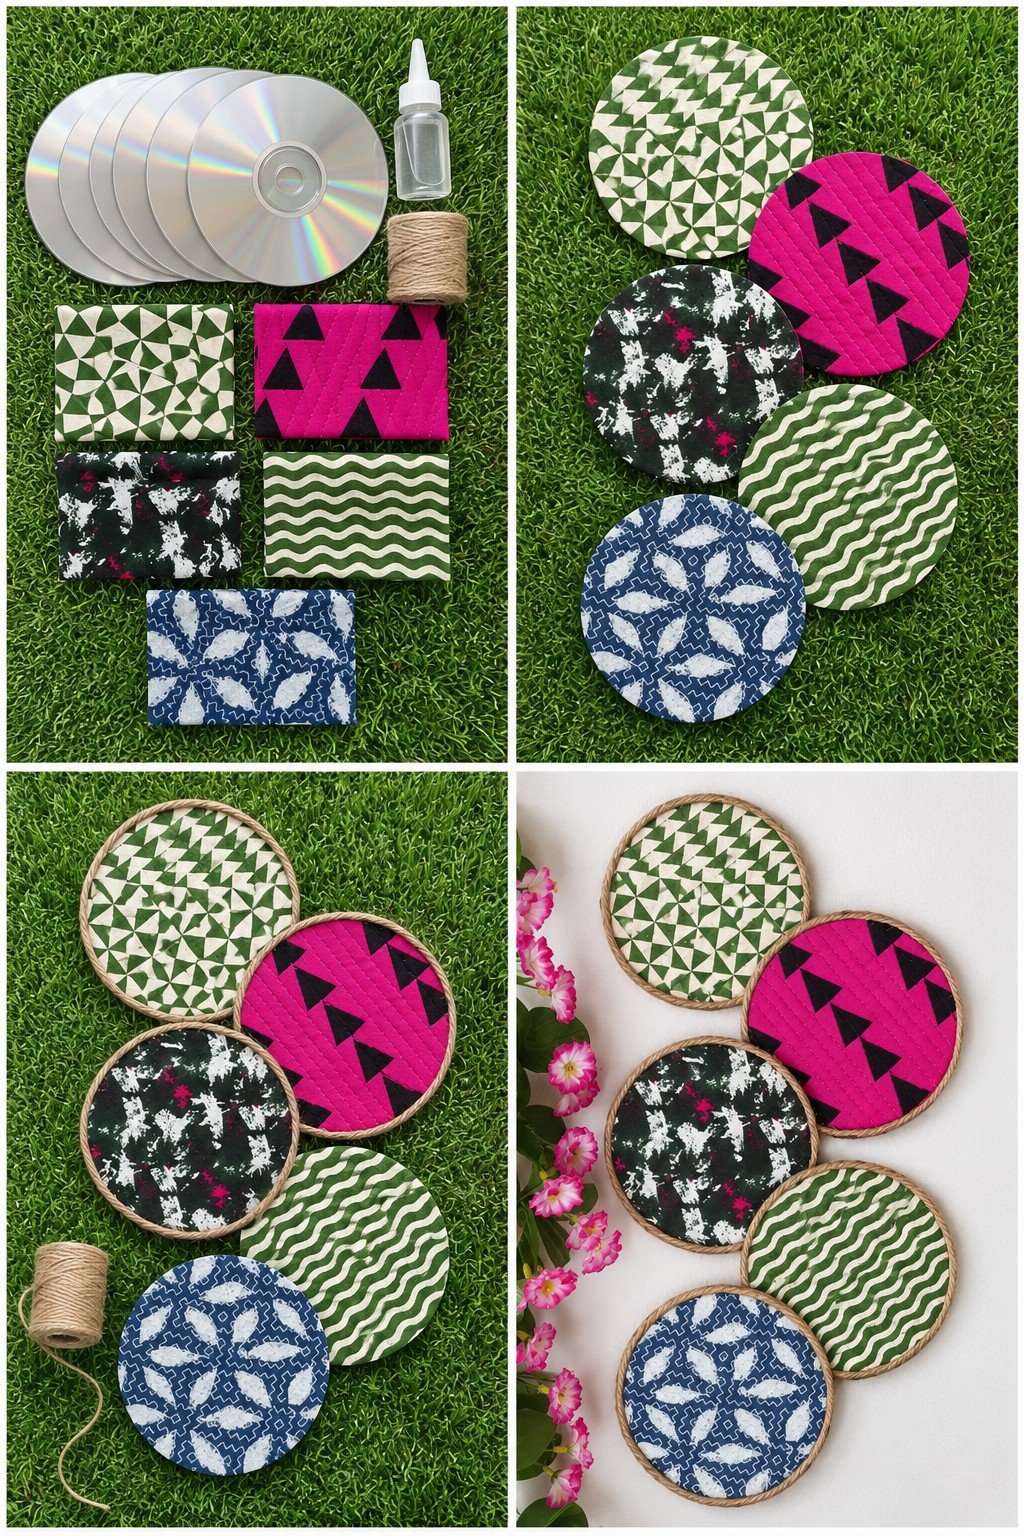
Five scraps of quilted fabric, five discs and a ball of jute make a matching coaster set: green and cream triangles, hot pink with black triangles, dark green with white splashes, green waves and blue with white leaves. Glue a fabric circle on top of each disc, then glue jute around the rim, starting and finishing at the same point so the join hardly shows.
Glue a circle of felt or cork underneath so the hard plastic does not scratch the table. They are fine for cold drinks and mugs of tea, but not for hot pans. A set tied with twine also makes an easy present.
CD Fish Craft for Kids
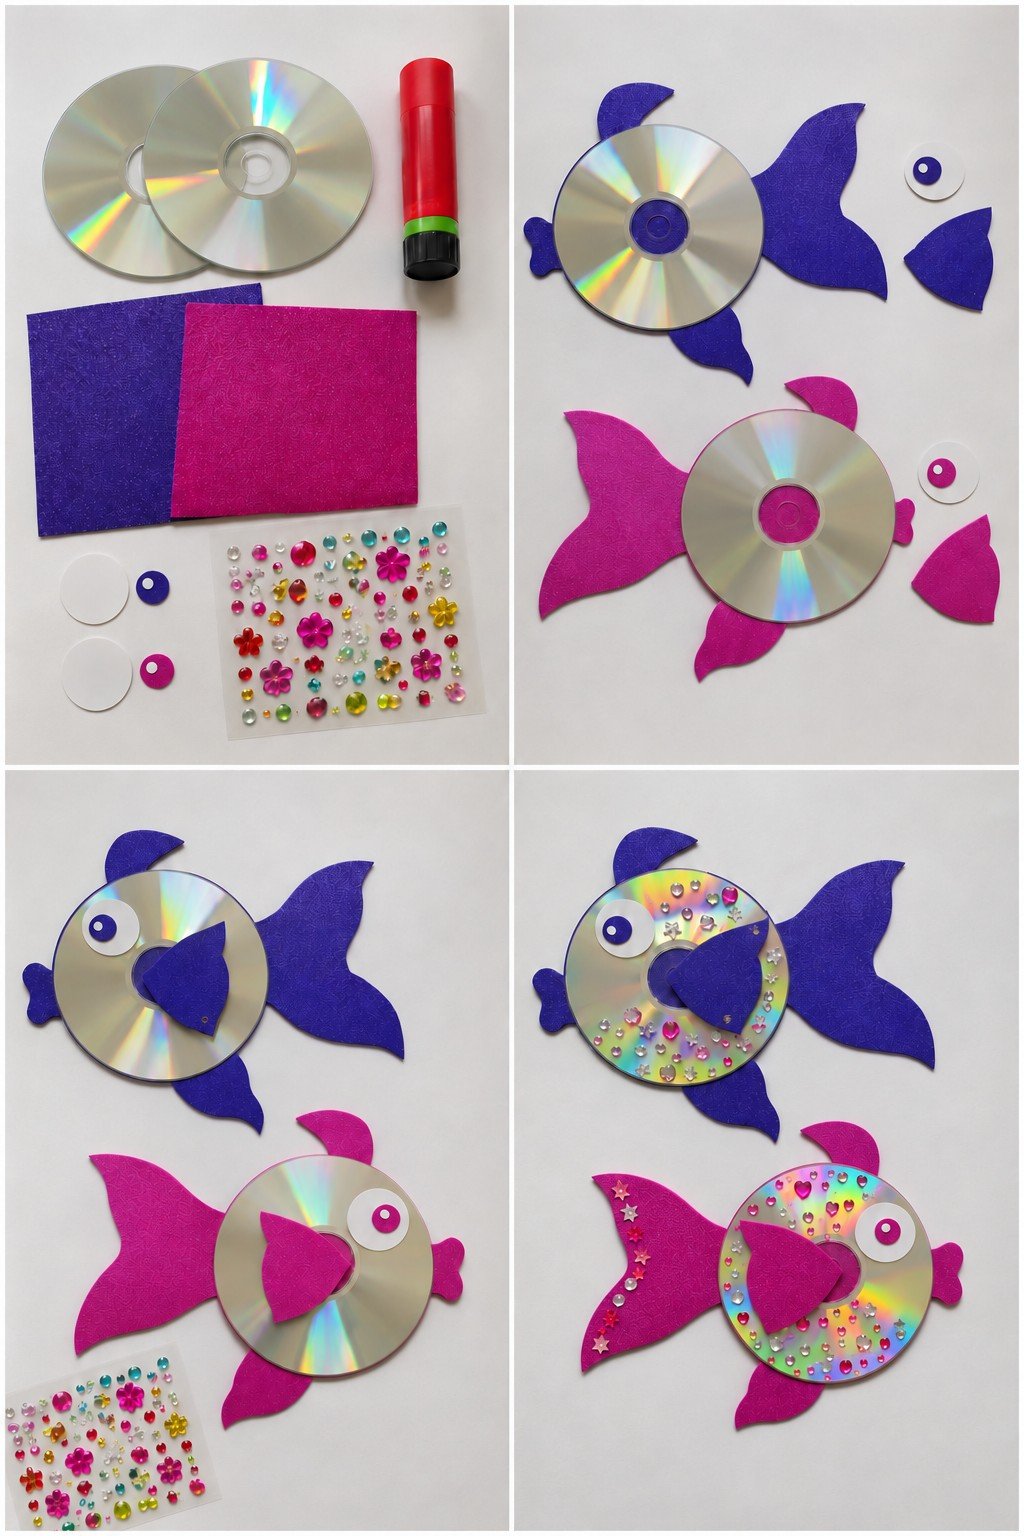
Two discs, two sheets of sparkly craft foam, paper eyes and a sheet of gem stickers become a purple fish and a pink fish swimming in opposite directions. Because the discs stay whole, this is the one to make with young children.
- An adult cuts the tail, top fin, bottom fin, small mouth fin and a triangle side fin for each fish.
- Glue the tail and fins behind the disc so they stick out around the edge, then glue on the eye and the triangle fin over the center hole.
- Press gem stickers all over the shiny body, and a few stars on the pink tail.
CD Party Backdrop with Mirror Balls
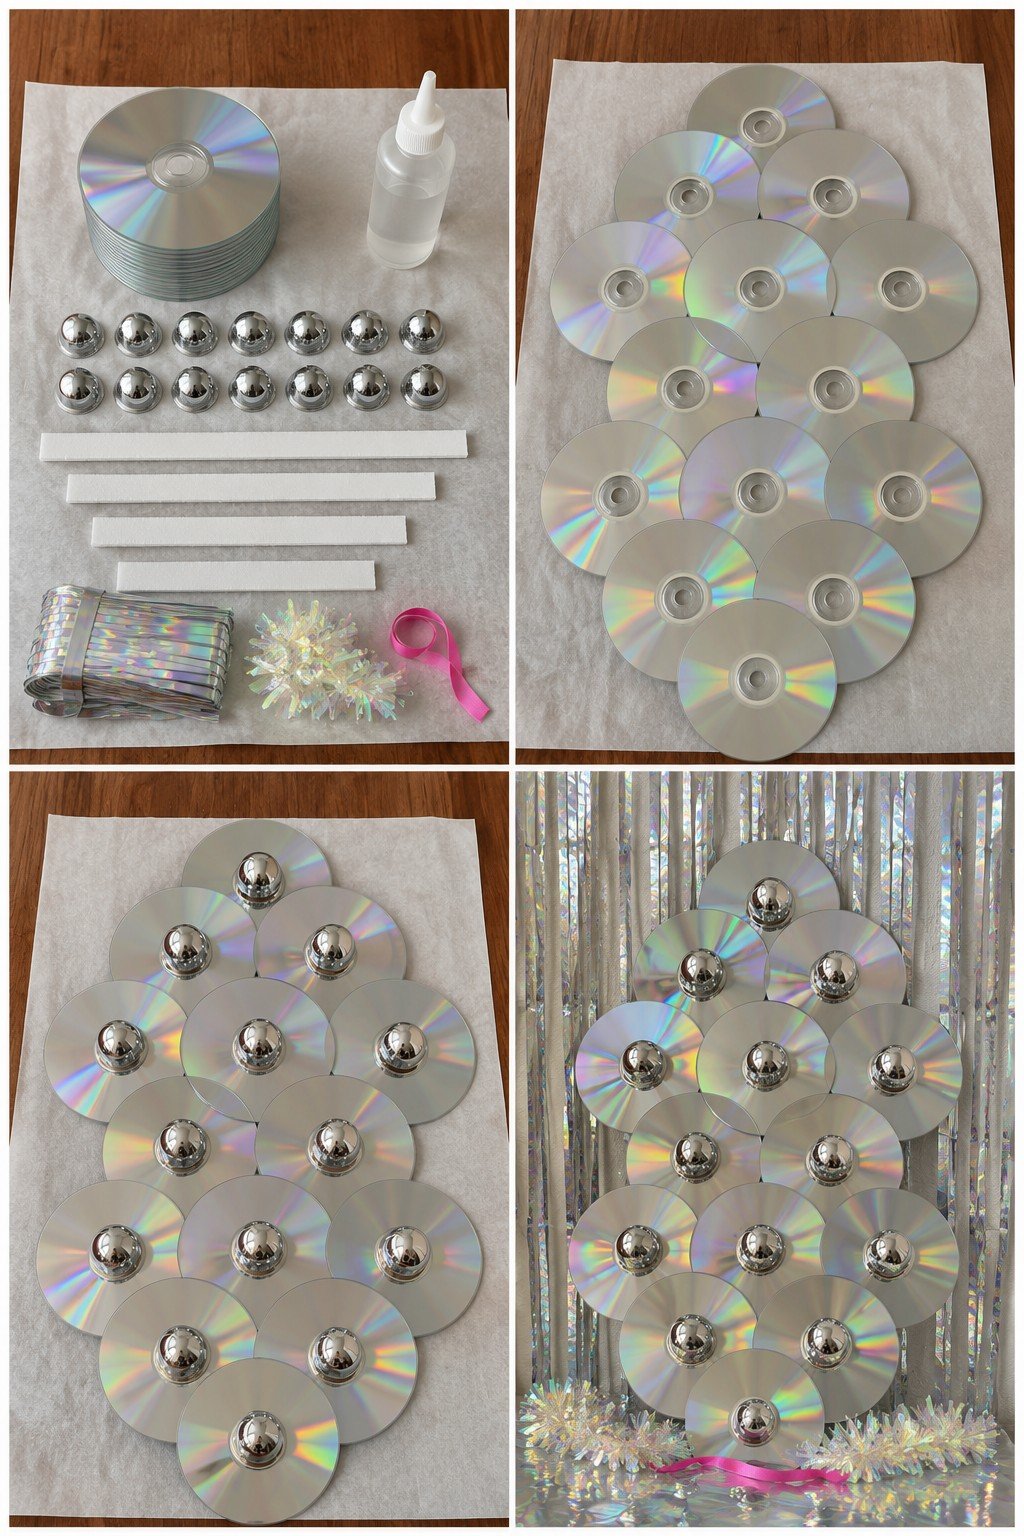
Fourteen discs overlapping in rows of one, two, three, two, three, two and one make a tall shimmering panel, with a silver half dome over every center hole. Placed in front of a tinsel curtain with iridescent tinsel and a pink ribbon at its foot, it is an instant disco or birthday photo spot.
Glue the discs where they overlap on a flat surface, then glue white foam strips across the back to stiffen the panel before adding the domes. Let it set overnight before lifting it. Lean it against a wall or fix it to a stand so a guest cannot knock it over.
Hanging CD Doorway Curtain with Color Dots
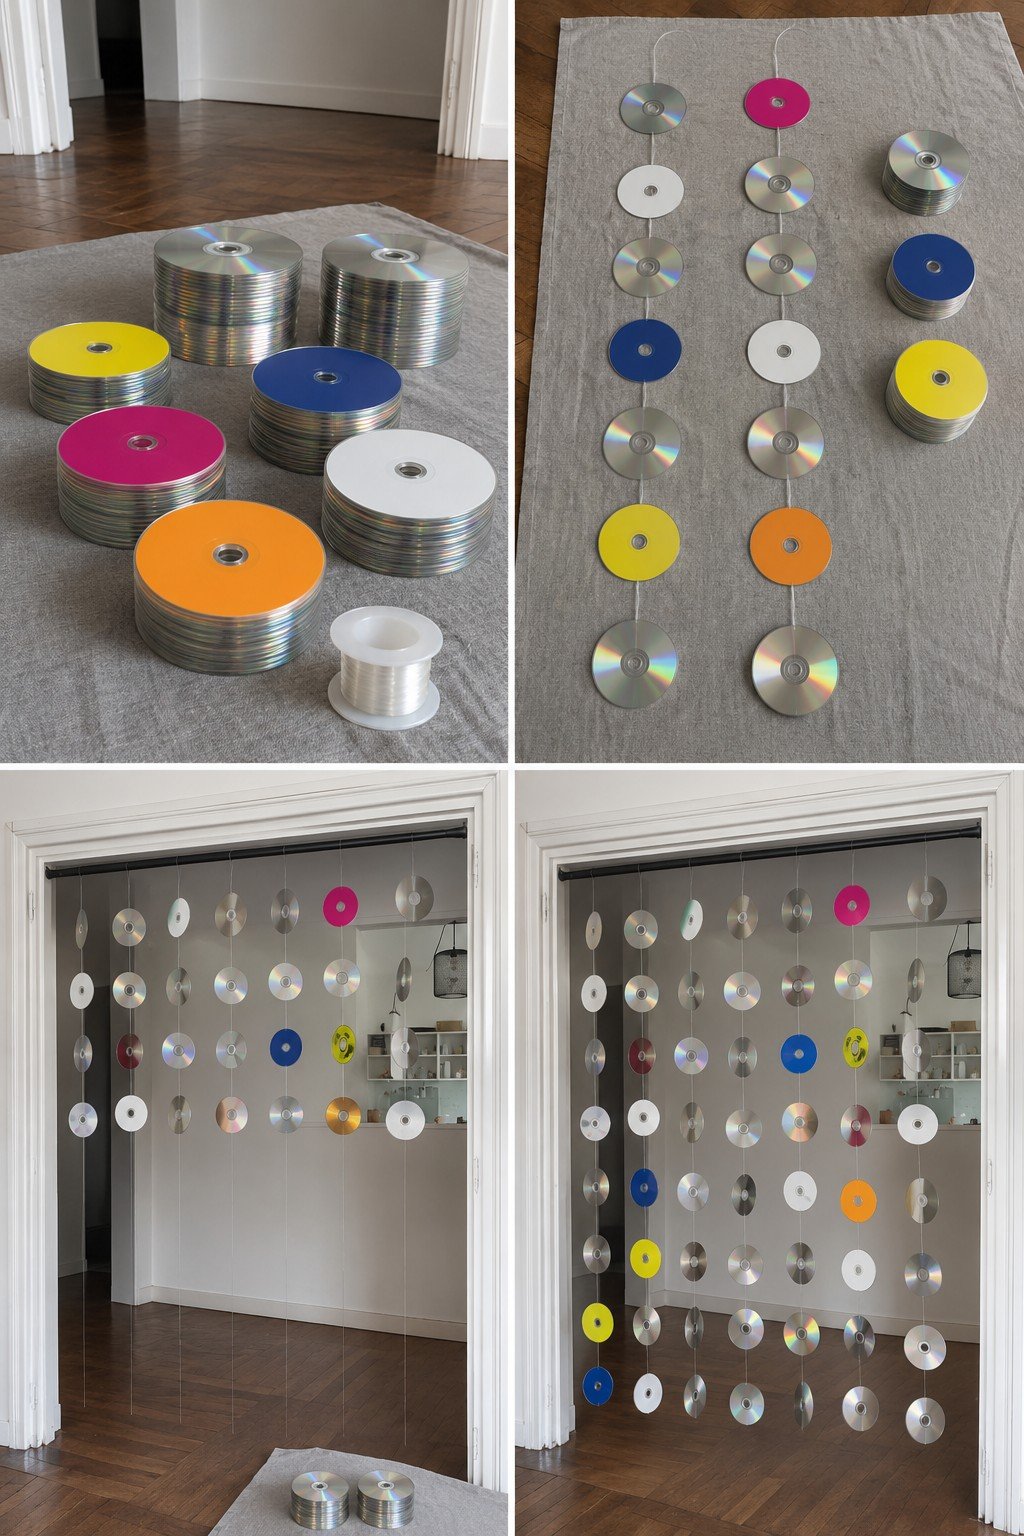
Seven strands of clear line hang from a dark rod across a wide doorway, each carrying a column of discs. Most are silver, with solid yellow, pink, blue, orange and white discs scattered through. The discs turn in the slightest draft, flashing between colors, and the gaps keep the next room in view.
Lay each strand out on the floor and tie the discs on at even spacing, mixing in the colored ones. Printable discs already have plain colored label sides; on ordinary discs, a painted or paper circle does the same job. Hang the strands from a tension rod at even intervals. Take the strands down after the party, or keep them for a doorway the household does not walk through every day.
Yarn Wrapped CD Tricycle Pen Holder
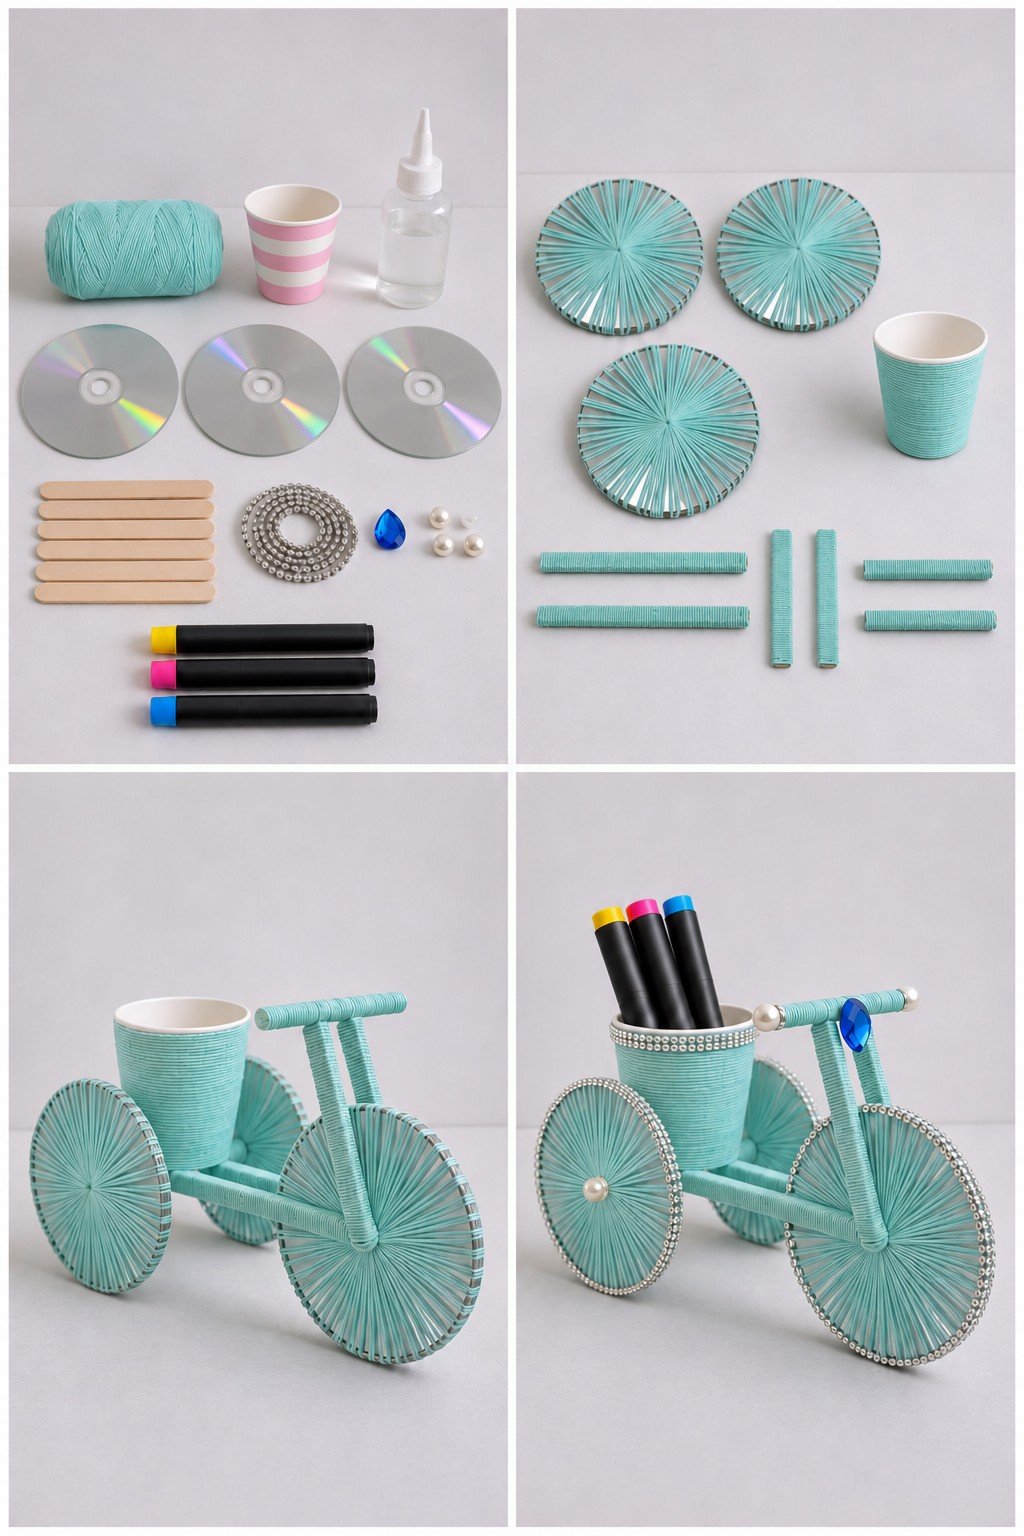
Three discs wrapped in mint yarn become spoked wheels, a yarn covered paper cup sits over the back wheels as a basket, and six yarn covered craft sticks make the axle, frame and handlebar. Silver bead chain edges the wheels and the cup, a pearl marks the hub, and a blue gem sits on the handlebar.
Wrap each disc by passing the yarn through the center hole and over the rim again and again until it is covered in spokes. Wrap the cup and sticks, gluing the ends, then join the back wheels with a stick axle, glue the cup on top, and build the frame and handlebar forward to the front wheel. It holds a few markers and makes a sweet gift for a teacher.
Cut Shapes and Mosaics
Here the discs get cut, from a handful of petals to a full tabletop of triangles. Warm the discs first and keep a dish nearby so the pieces do not end up in the carpet.
Crescent Moon CD Suncatcher Mobile
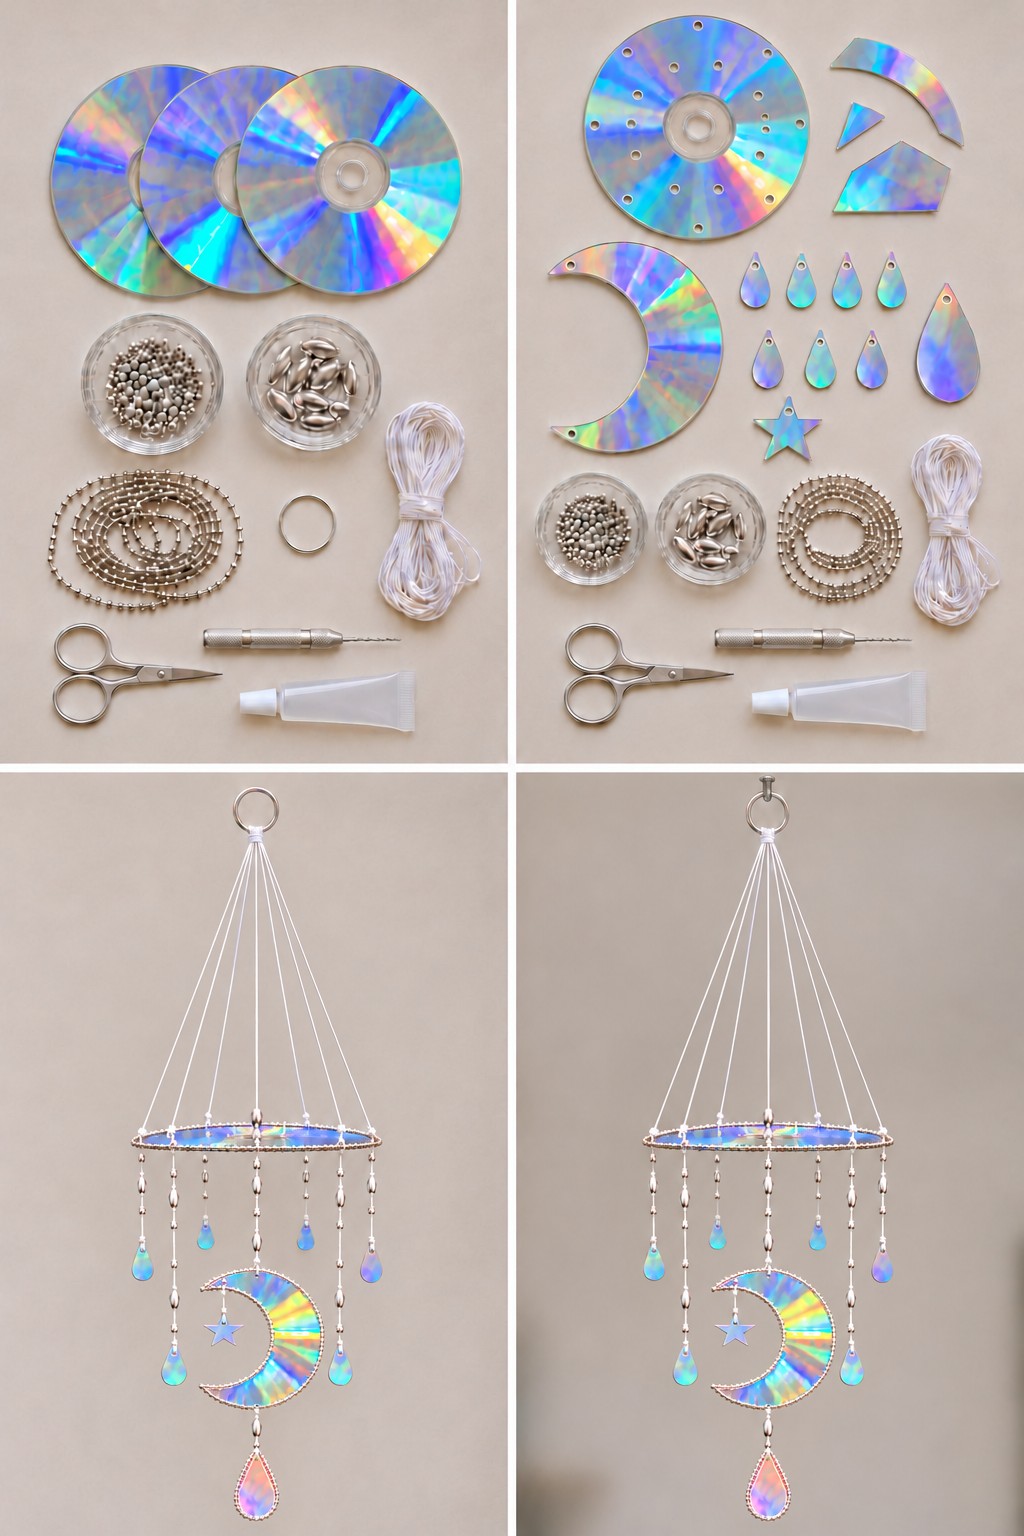
Hang this in a sunny window and the room fills with moving rainbow spots. A whole disc drilled with a ring of small holes is the canopy, white cords gather above it at a metal ring, and beaded strands hang below with small CD teardrops at their ends. The center strand carries a crescent moon edged in silver ball chain, a little star swinging inside its curve and a larger teardrop underneath.
Three discs are enough. Cut the crescent, star and teardrops from two of them with small sharp scissors, keep the third whole, and drill a hole in each piece with a hand drill. Glue ball chain around the crescent and the big teardrop, then string the silver round and rice beads and tie on the pieces. Hang it before trimming the cords so you can level the canopy.
Gold Edged CD Petal Lotus
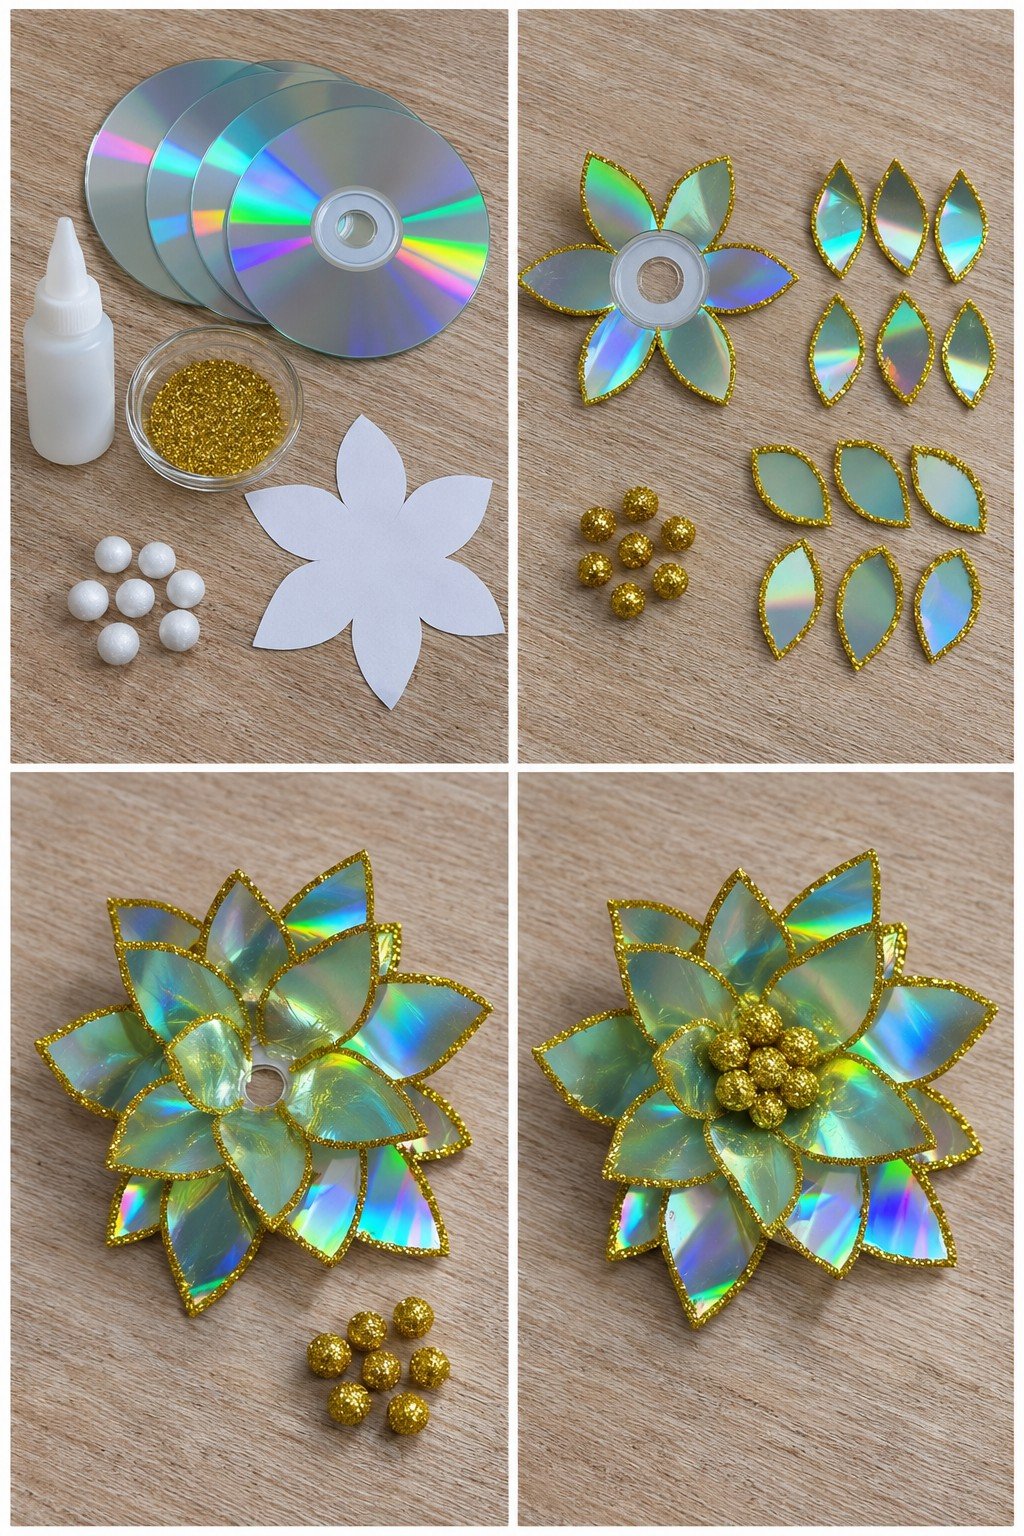
Eighteen pointed petals edged in gold glitter rise in layers around a cluster of gold balls. The bottom layer is a six petal flower cut from a whole disc so it keeps the sturdy center, and twelve loose petals are glued on top in two rings.
- Trace a paper six petal template onto one disc and cut it out around the hub.
- Cut twelve more petals from three other discs.
- Run clear glue along the edge of every petal and dip it in fine gold glitter. Roll seven small foam balls in glue and glitter too.
- Glue six petals between the base petals, then a smaller inner ring of six, curving them up a little, and fill the middle with the gold balls.
Let the glitter edges dry completely before layering, or they smudge onto the shiny faces.
Lotus CD Door Hanging with a Brass Bell
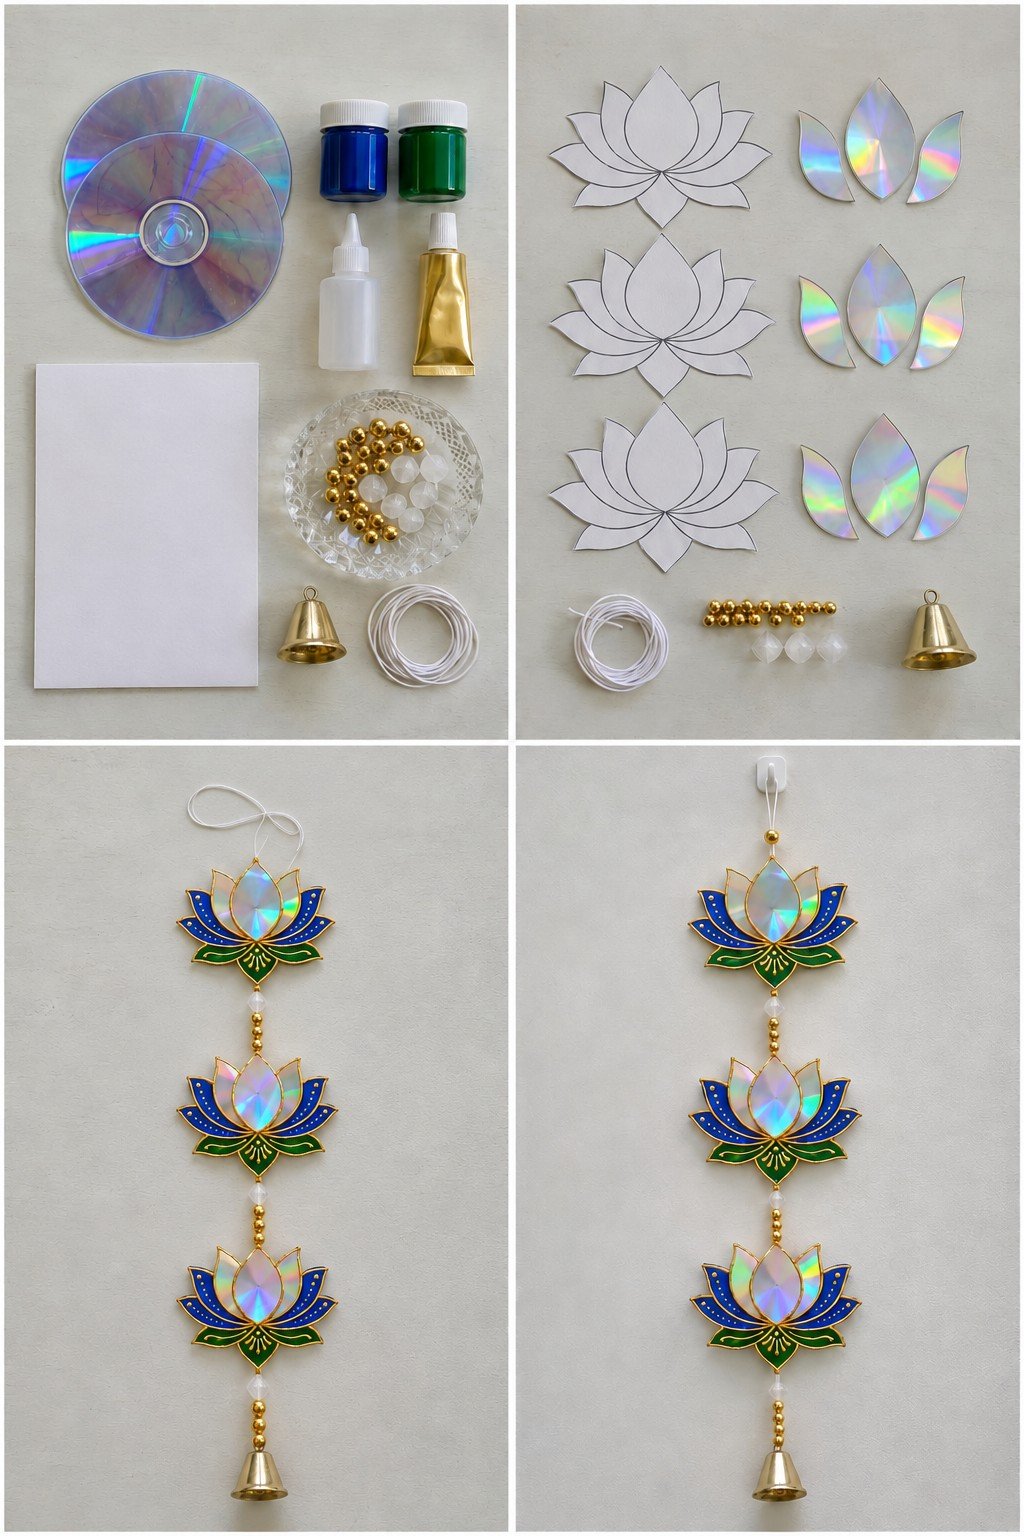
Three paper lotus flowers, each with three CD petals in the middle, line up on a white cord above a small brass bell. The outer petals are painted blue, the leaves green, and fine gold outliner traces every edge with gold dots along the blue. Gold and frosted beads space the flowers evenly.
Cut the three lotus shapes from white cardstock, then cut one wide center petal and two narrow side petals from the discs for each flower. Paint the cardstock, glue the CD petals on, and outline everything in gold once the paint is dry. String the flowers with beads between them, tie the bell at the bottom and hang it from a small hook by the front door.
CD Petal Flower in a Concrete Pot
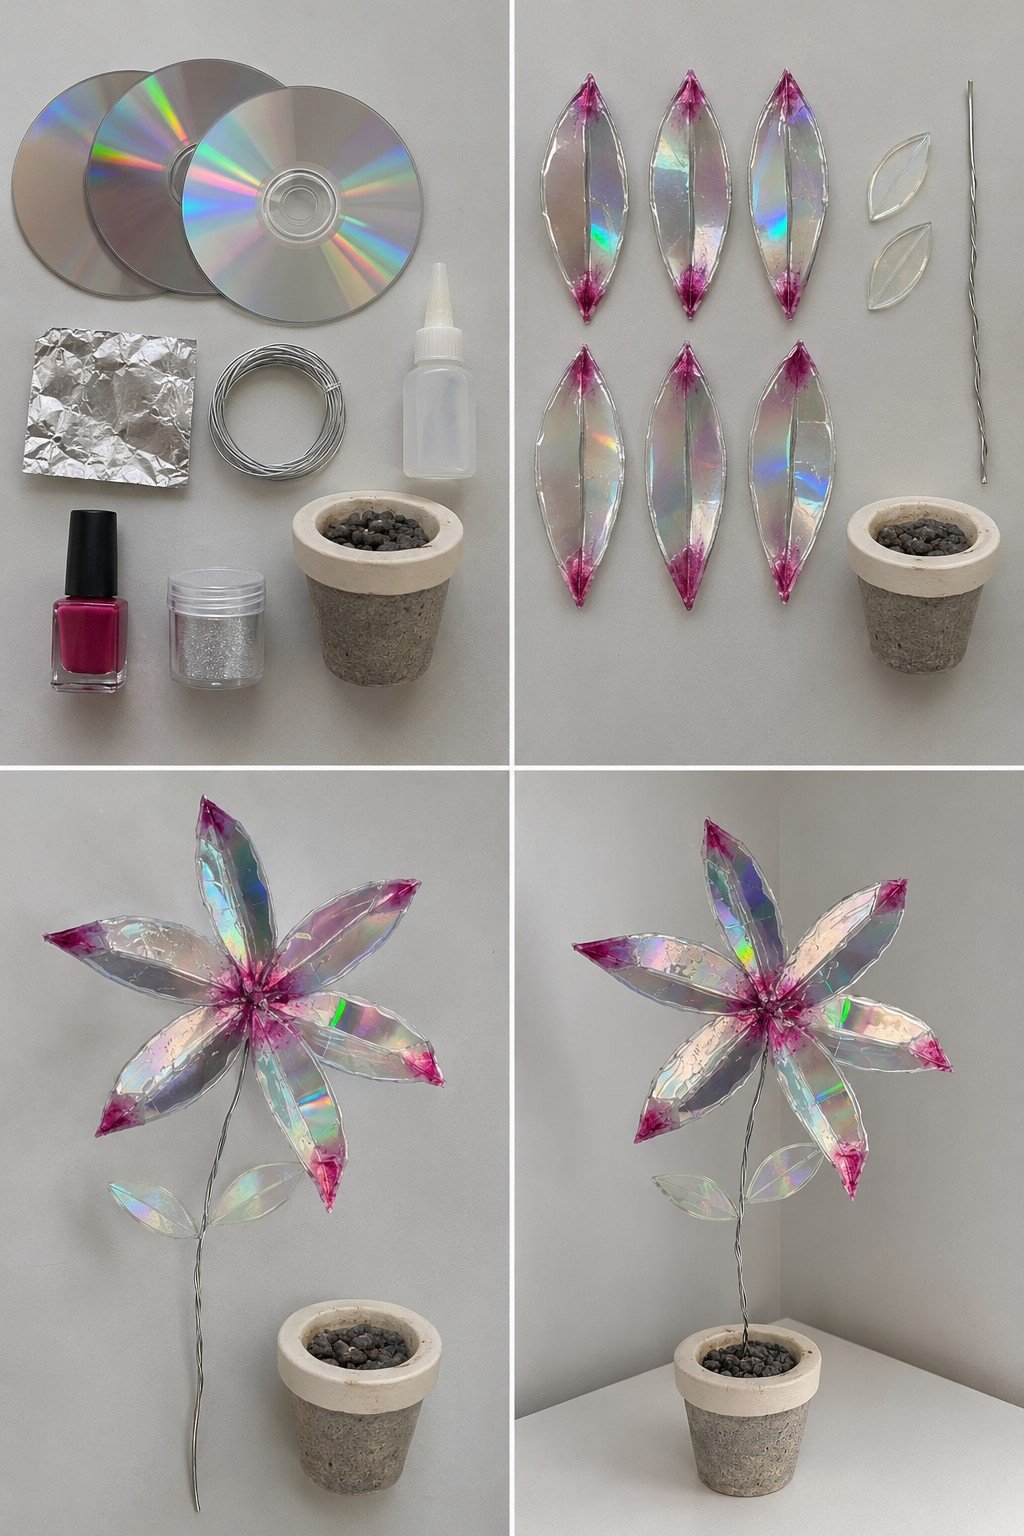
Six long petals tipped with pink nail polish open into a star shaped flower on a twisted wire stem, with two clear leaves partway down. It stands in a small concrete pot of dark pebbles and never needs watering.
Supplies: three discs, a sheet of aluminum foil to work on, wire, clear glue, pink nail polish, silver glitter and a small pot filled with gravel. Cut six long pointed petals and, from a stripped clear disc, two small leaves. Paint both tips of each petal with polish, then run a line of glue and silver glitter down the middle and around the edge. Twist the wire into a stem, glue the petals around the top and the leaves lower down, and push the stem deep into the gravel.
CD Mosaic Welcome Sign with Mini Planters
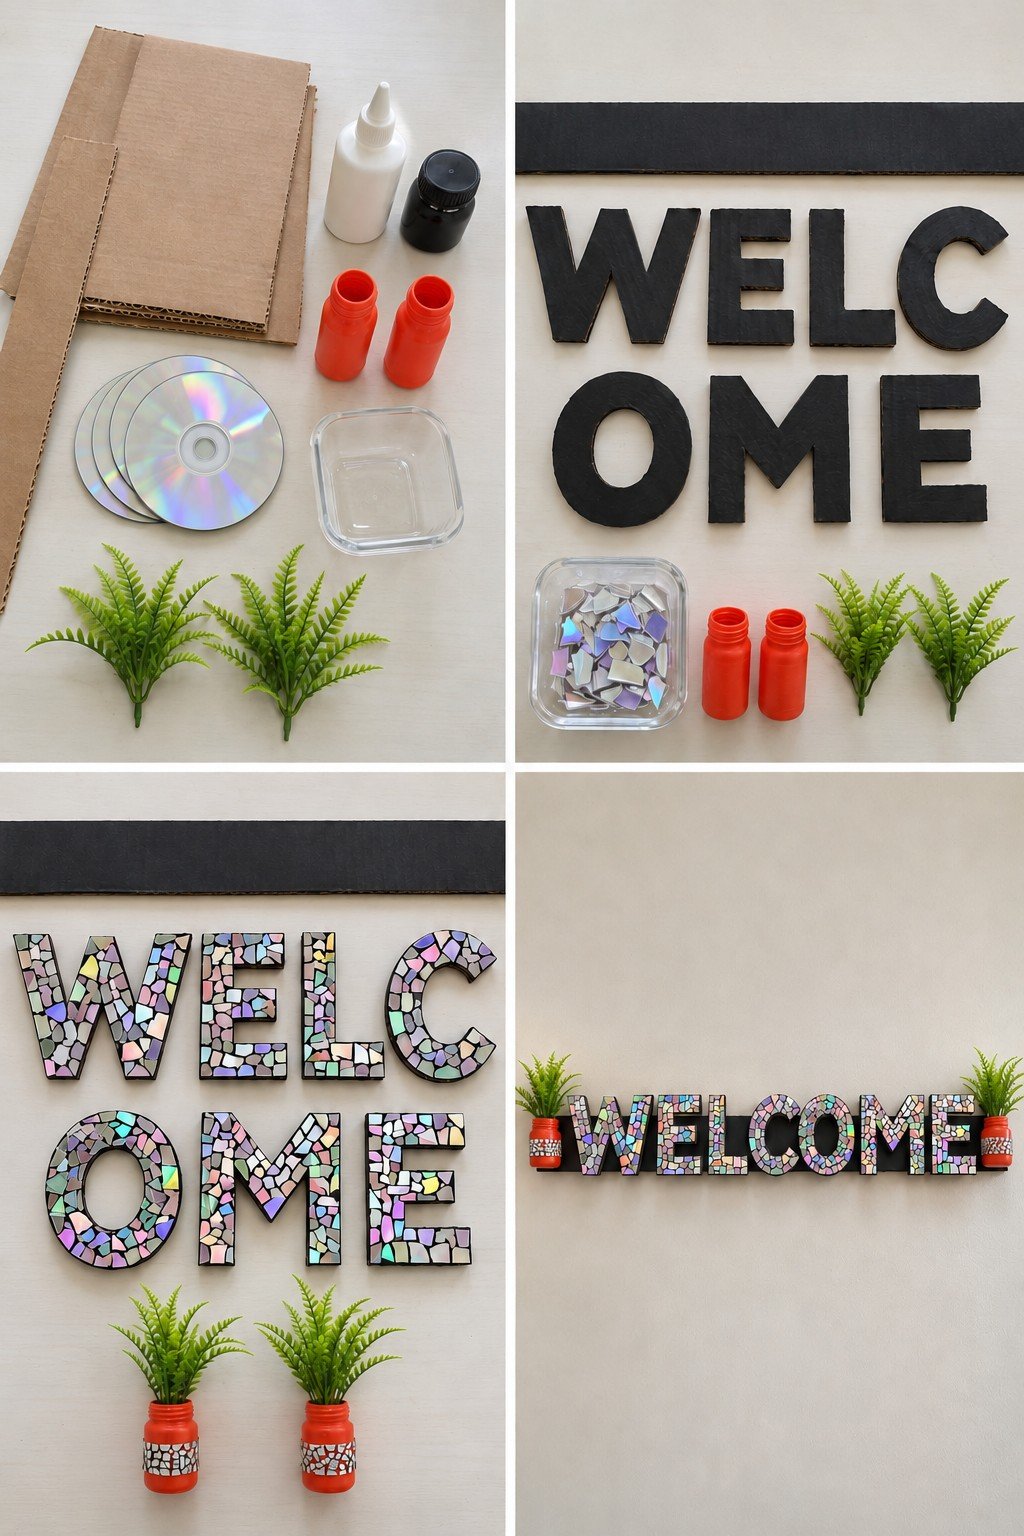
Seven thick cardboard letters covered in CD fragments spell WELCOME along a slim black base, with a small orange bottle planter and a faux fern at each end. The black paint shows between the fragments like grout and frames every letter.
- Draw the letters and a long base strip on corrugated cardboard, cut them out and glue two or three layers together so they stand thick.
- Paint every piece black, edges included.
- Cut about four discs into small irregular pieces and glue them onto each letter with thin gaps, saving the tiniest pieces for the curves of the C and O.
- Glue a band of mosaic around each bottle, fix the letters along the base and add the bottles and ferns at the ends.
Cardboard swells in damp air, so hang this in a dry hallway rather than outside the front door.
Light Up Swan Heart CD Mosaic
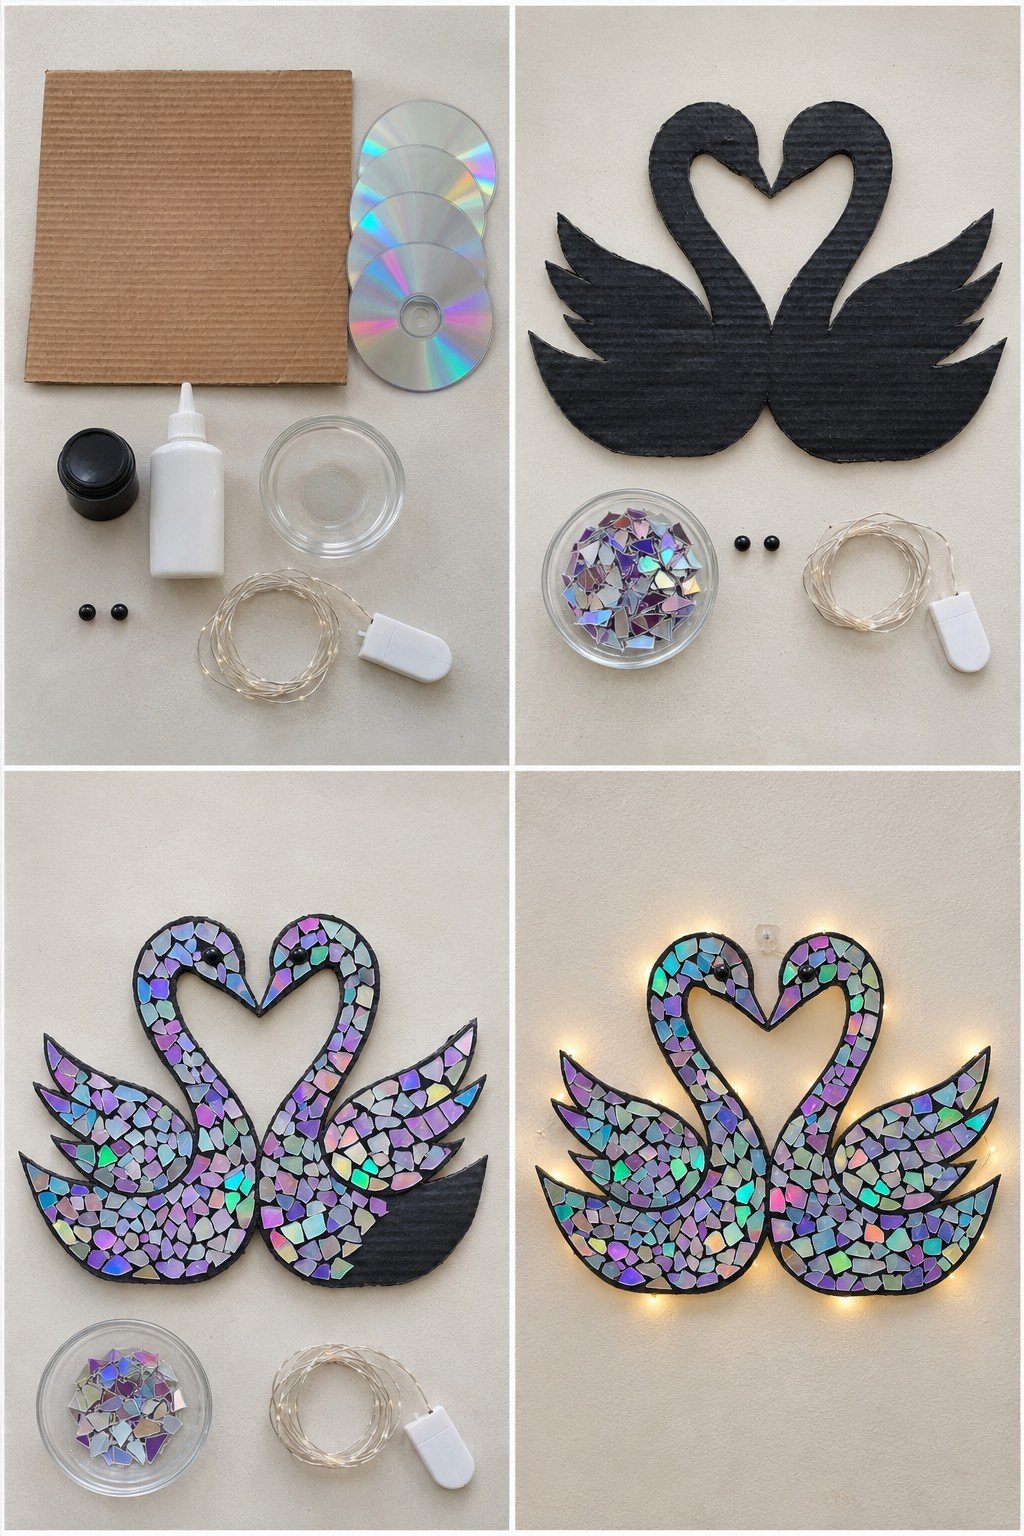
Two swans meet beak to beak so their necks form a heart. Small holographic pieces cover the black cardboard shape, black bead eyes finish the heads, and battery fairy lights taped around the back edge throw a warm halo onto the wall. It makes a soft night light for a bedroom or a sweet backdrop for an anniversary table.
Cut both swans as one connected shape and paint it black. Glue on the eyes, cover the slender necks with the smallest pieces first, then fill the wings and bodies, leaving a thin black outline all round. Tape the light wire just inside the edge on the back, put the battery box where you can reach the switch, and hang it from a clear adhesive hook behind the heads.
Sparkling CD Flower Wall Medallions
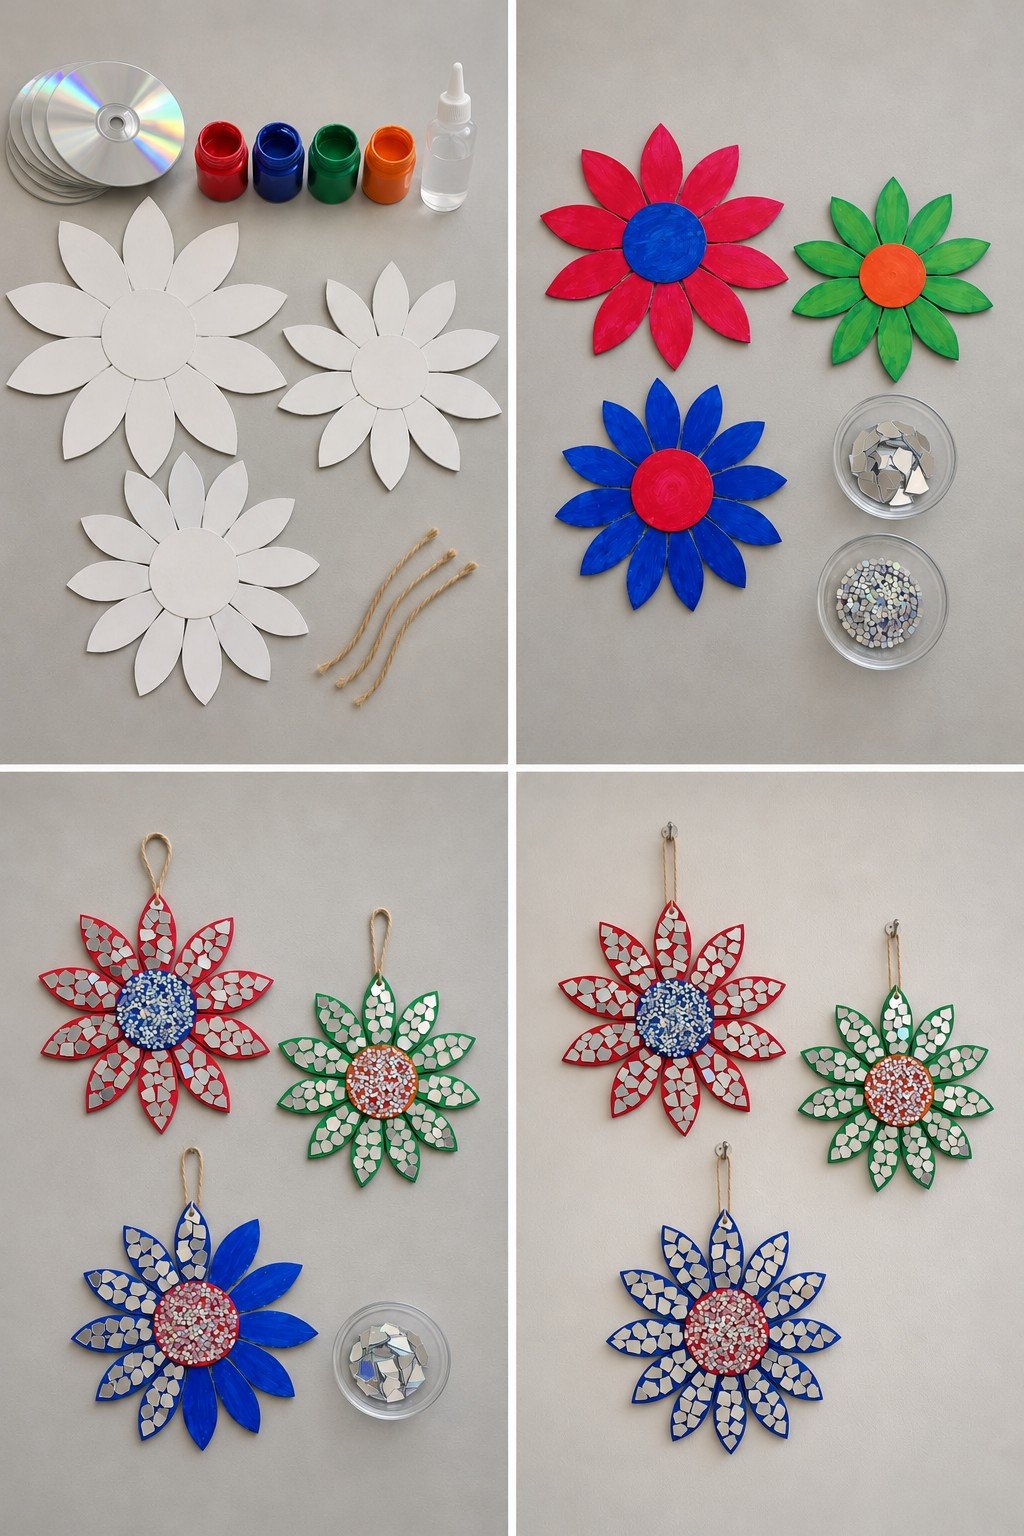
Three cardboard daisies, red with a blue center, green with an orange center and blue with a red center, are covered in CD chips on the petals and much finer sparkle in the middles. A narrow border of paint shows around each petal, which keeps the colors strong.
Paint the flowers first and let them dry. Cut some discs into small chips for the petals and some into tiny bits for the centers; spread glue over each center and press the fine pieces into it. Thread a jute loop through a hole in the top petal and hang them on small hooks.
Purple CD Mosaic Serving Tray
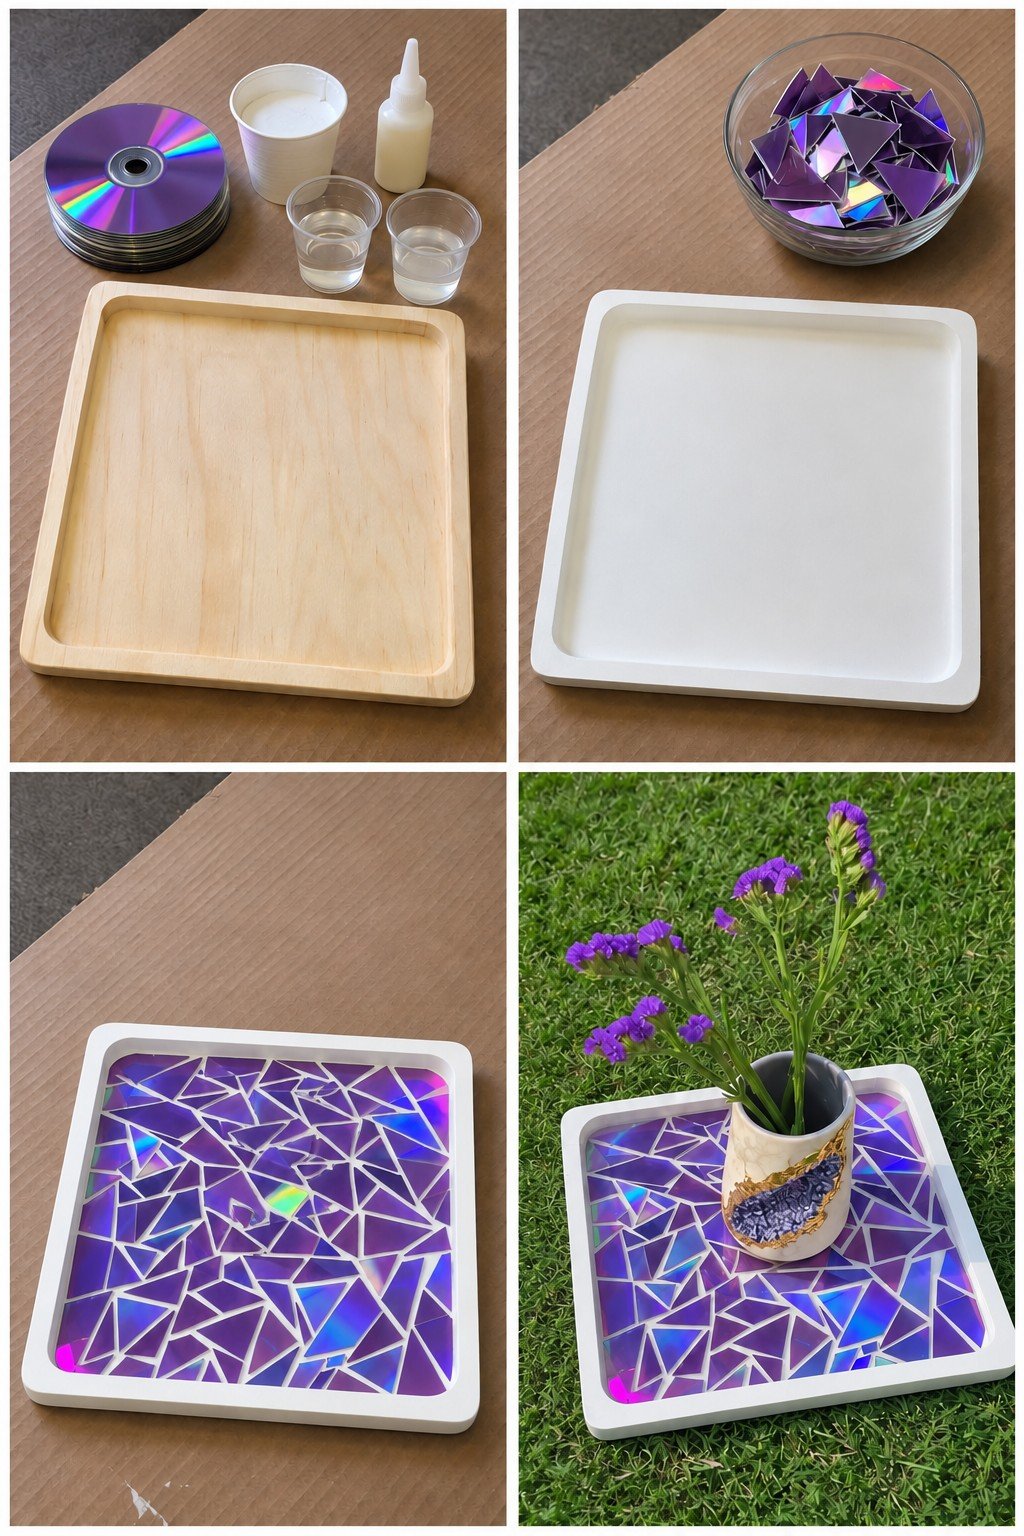
Purple tinted discs bring their own color, so this mosaic needs no paint on the pieces. Irregular triangles cover the bottom of a wooden tray painted white, and the white shows between them like grout. In the last photo it carries a small vase of purple statice out onto the lawn.
Paint the tray white inside and out, cut the purple discs into triangles, and glue them down with narrow, even gaps, fitting the corners and edges before filling the middle. Seal the mosaic with a clear finish so it wipes clean. Use it for carrying cups, a potted plant or a small vase of flowers like the one in the photo.
Framed Geometric CD Mosaic Art
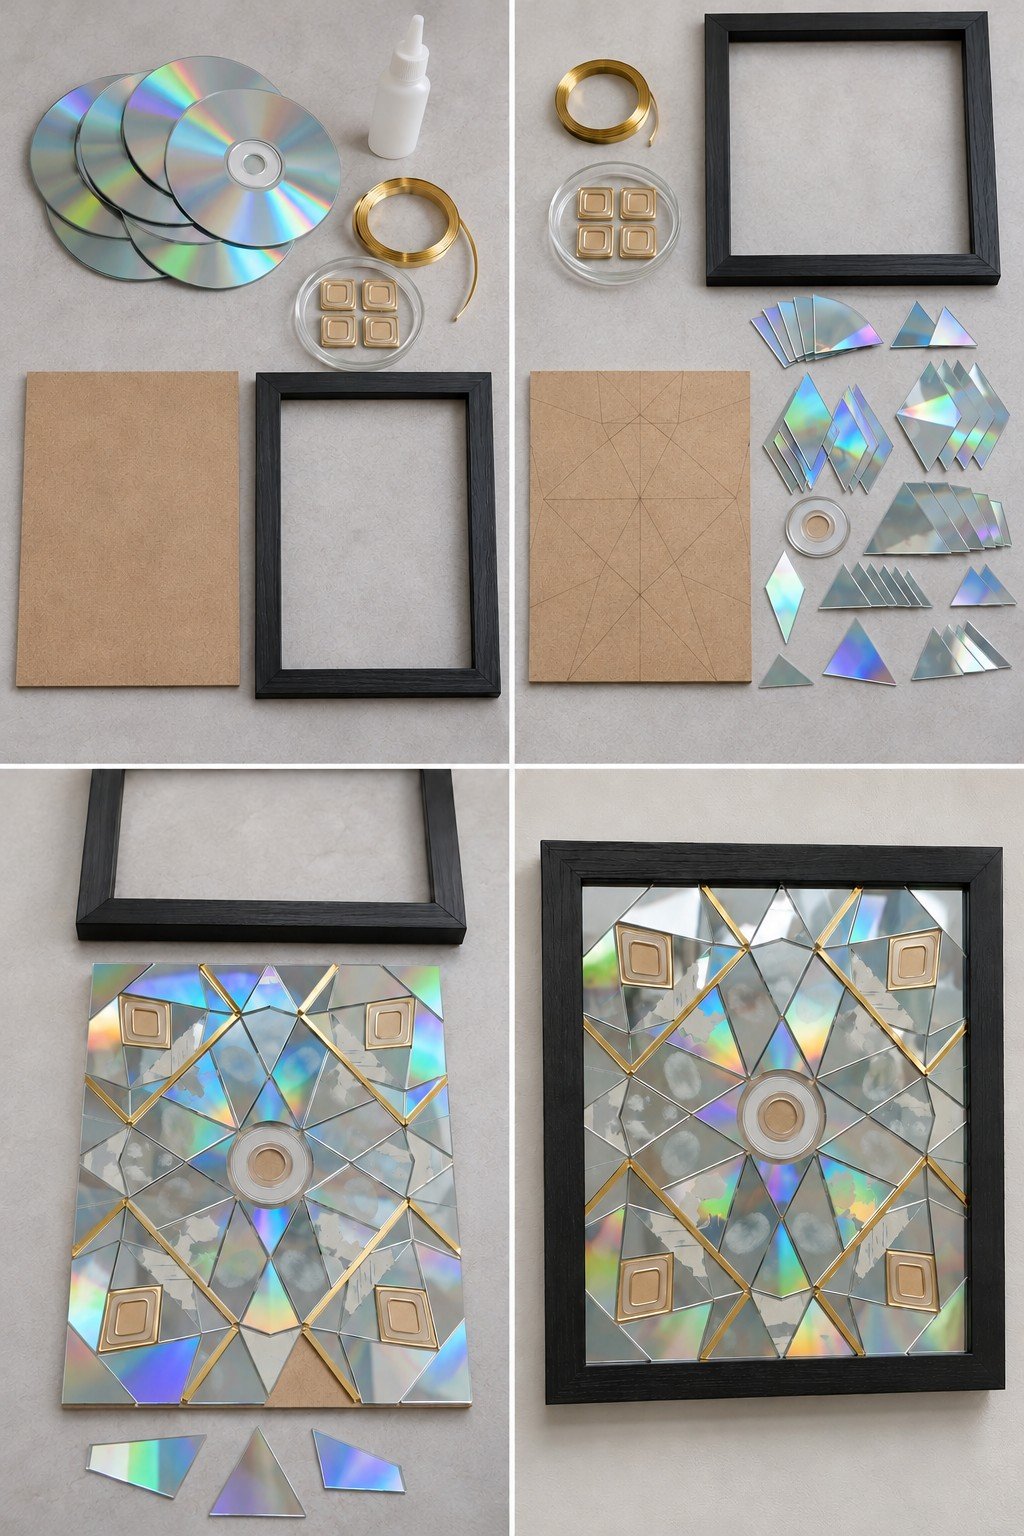
The most precise project here. A layout of diamonds and triangles is drawn on an MDF board, every section is cut to fit from CD plastic, thin gold strips trace the main lines, four gold squares sit near the corners, and a clear disc hub forms the round center. A plain black frame keeps all the shine in check.
- Draw the geometric design on the board with a ruler, starting from the center.
- Cut and sort the pieces by shape, along with one clear center hub.
- Glue the hub first, then fit the pieces section by section, checking each one against the drawing.
- Glue flat gold craft strip along the main lines, add the gold squares and let it dry before setting the board in the frame.
Measure the frame opening before you cut the board so the finished mosaic drops in snugly.
CD Mosaic Round Coffee Table
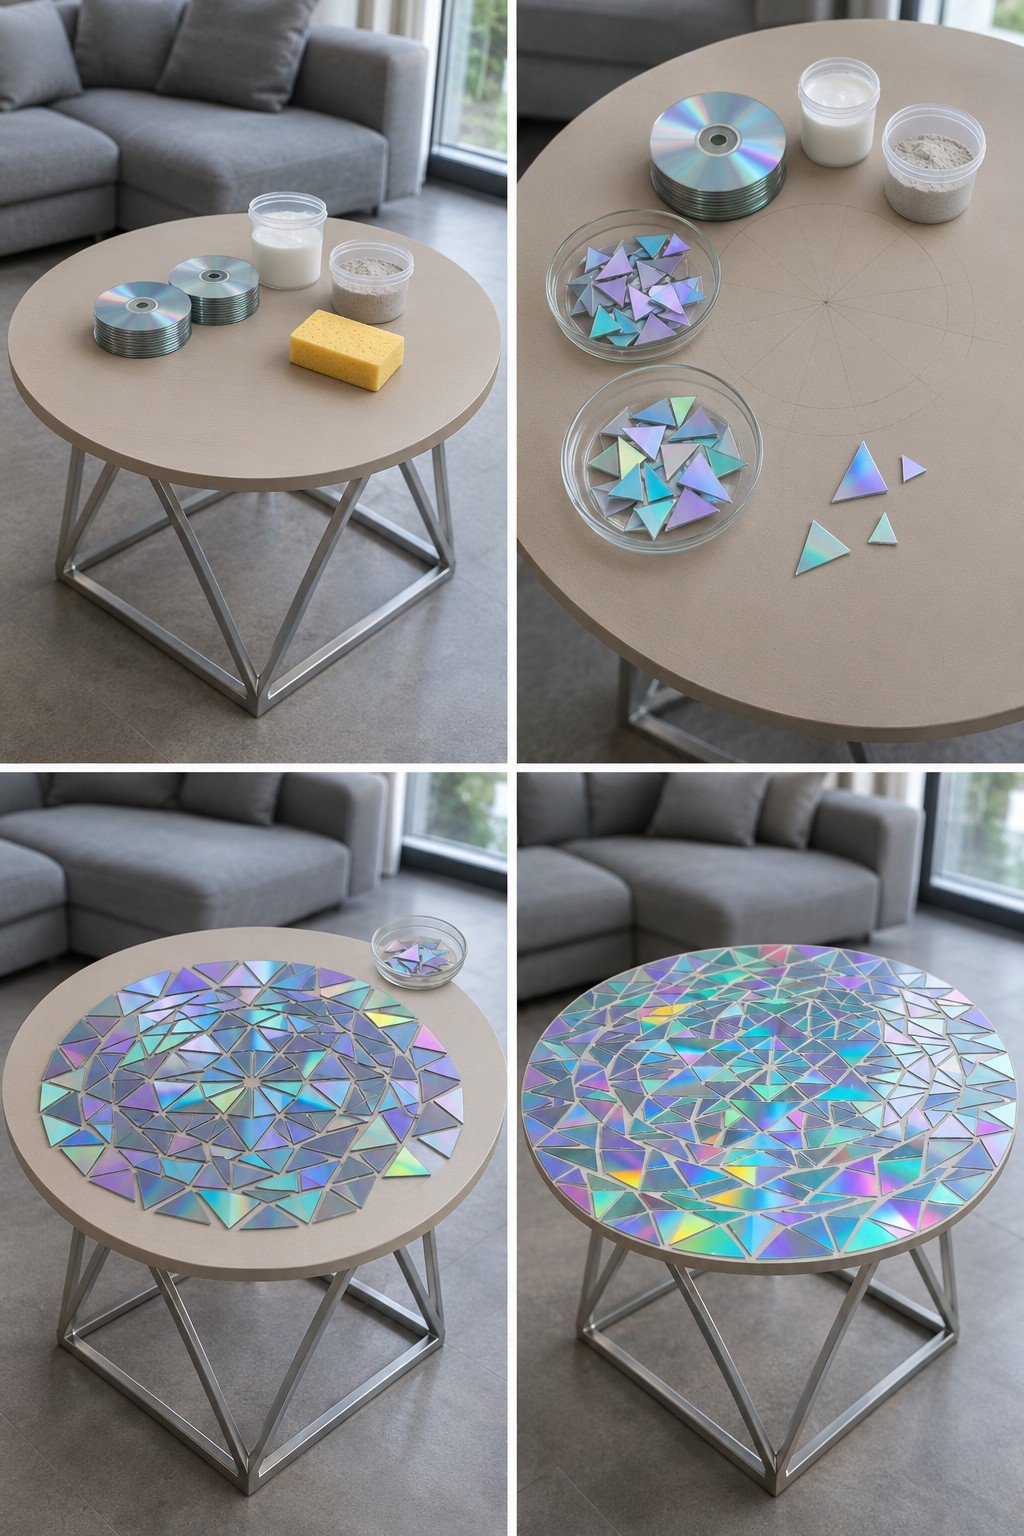
A plain round coffee table with geometric silver legs gets a full top of CD triangles set in pale grout. The pieces follow rings around a drawn center, so the top reads as one big pattern rather than scattered shards, and next to a gray sofa it adds sparkle without adding color.
This one takes two big stacks of discs and a weekend. Draw a circle and divide it into wedges, cut triangles in a few sizes, and glue them in rings from the center out with small even gaps, dry fitting the outer ring before you glue it. Once the adhesive has cured, press grout into the gaps, sponge it off and buff away the haze. For a table you actually put drinks on, a clear tabletop epoxy coat or a round glass top over the mosaic makes it smooth and level. Tabletop epoxy is poured about 3 mm at a time and needs roughly three days before a cup goes on it.
Clear Discs with the Shine Removed
Once the metal layer is gone, a CD is a disc of clear plastic, perfect for fabric and glass paint.
Floral Fabric CD Wall Hanging with Jute Tassel
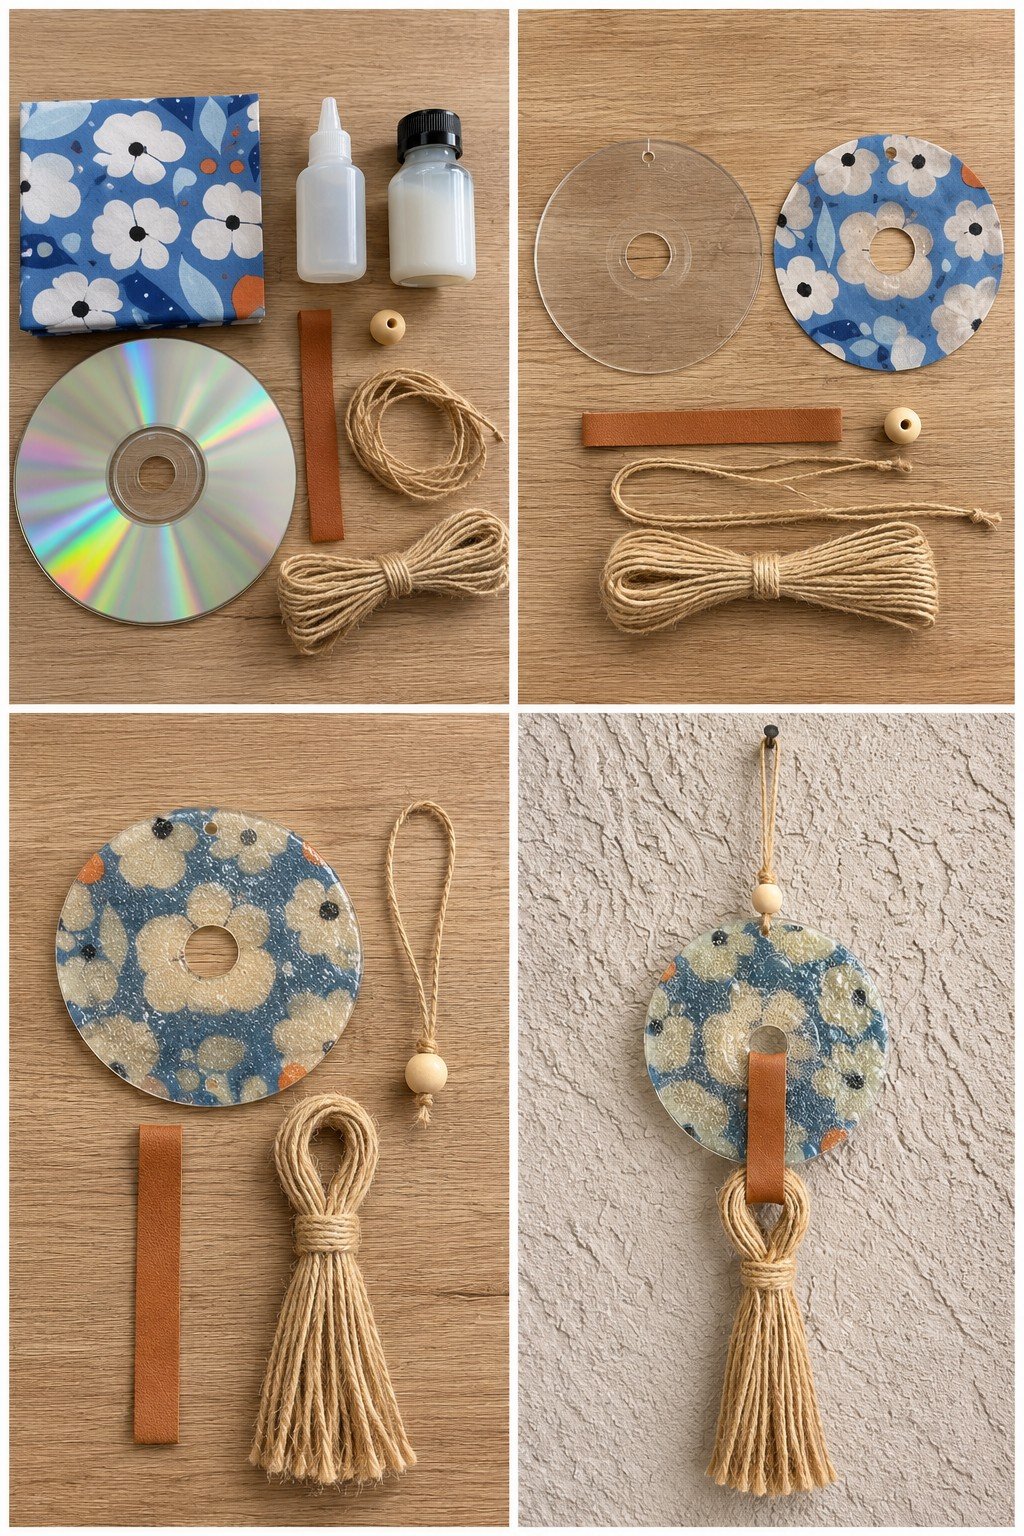
A clear disc covered in blue cotton with white flowers turns glossy and slightly see through after a coat of decoupage sealer, and the white flowers warm to cream. A tan leather strap through the center hole carries a thick jute tassel, and a thin jute loop with a wooden bead hangs it from a nail.
- Strip one disc to clear plastic and make a small hole near the top edge.
- Cut a fabric circle to fit, cut out the middle and the top hole, and glue it on, smoothing from the center out.
- Brush sealer over the fabric and let it dry clear.
- Wind thick jute into a looped tassel and tie it tightly near the top. Pass the leather strip through the center hole and around the tassel loop, glue the ends at the back, and tie the bead loop through the top hole.
Clear CD Stained Glass Iris Garden Stake
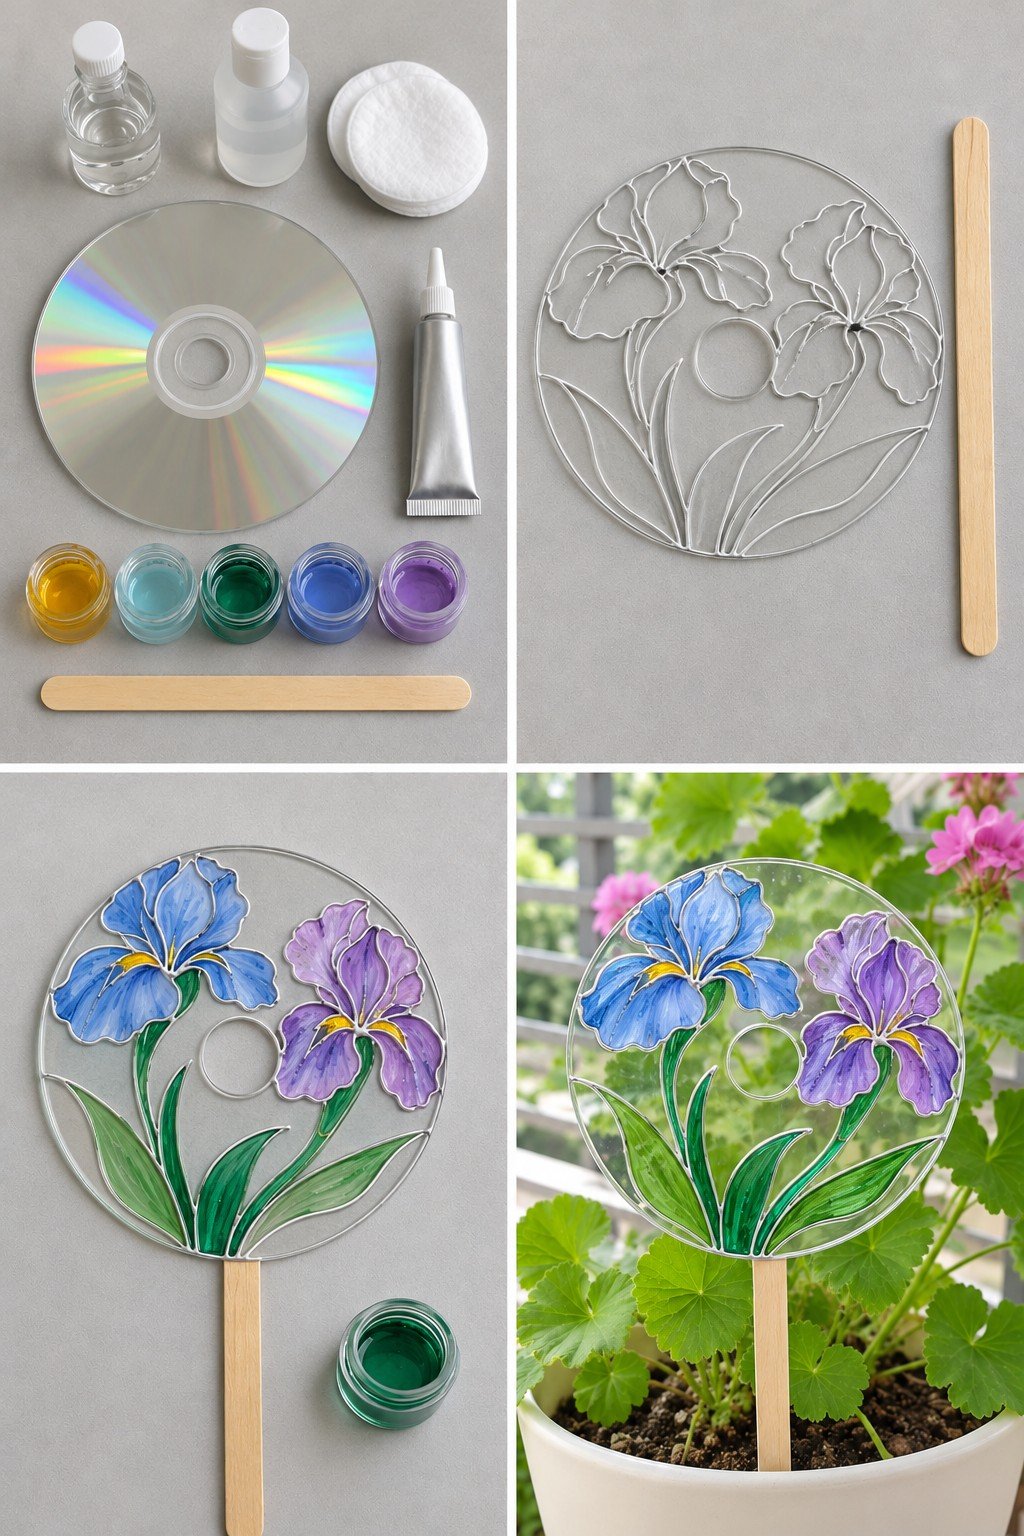
A stripped disc becomes a small stained glass panel with a blue iris and a purple iris, yellow centers and green leaves, all outlined in silver. A craft stick glued to the bottom turns it into a plant stake, and in a pot of pink geraniums the leaves show through the clear background.
Wipe the clear disc with cleaning liquid and a cotton pad so the outliner grips, draw the flowers with silver outliner and let it dry completely. Then fill each section with glass paint: blue and purple petals, yellow centers, green stems and leaves. Glue the stick on once everything is dry.
Looking After CD Crafts
Indoors, CD crafts last for years with nothing more than a dry cloth. Outdoors, sun and rain slowly fade paint, cloud the plastic and can make the metal layer flake, so bring garden pieces in for winter and keep anything with cardboard, fabric or paper inside. If you have never cut a disc, start with the painted plates, the fish or the coasters, try a small mosaic like the welcome sign next, and leave the coffee table for when you have a stack of discs and a free weekend.
Splinters, Small Parts and Lights
Cut polycarbonate does not bend before it breaks. It snaps, and the snap can flick a sliver across the table, so whoever is cutting should wear safety glasses and work over a deep tray or box lid that catches the pieces. Sweep stray bits up with a damp paper towel rather than a bare hand. Cutting is an adult job; children can still lay out pieces for the welcome sign or the flower medallions once every edge has been filed. The mosaic pieces stay a little sharp even when they are glued down, so hang those projects above toddler height, and serve food on plates on the purple tray rather than straight on the pieces and craft glue.
Plenty of the decorations here come with tiny extras: the gem stickers on the fish, pearls, beads, small mirrors and the silver domes on the party backdrop. All of them are the right size for a child under three to choke on. The doorway curtain has a risk of a different kind, because long strands of fishing line hanging at child height can wrap around a small child's or a pet's neck, which is why it works best as a party piece that comes down afterward.
Both lights, the globe lamp and the pearl tealight holder, are meant for battery LEDs only. A candle flame or a hot household bulb softens the plastic and lets go of the glue. Many LED tealights hold a flat coin cell, and a swallowed coin cell can burn a child's throat within a couple of hours, so pick ones with a screwed battery door and go straight to the emergency room if you even suspect one has been swallowed.
Last, the smells. Nail polish, glass paint and tabletop epoxy all deserve an open window, and epoxy also deserves nitrile gloves, since repeated skin contact can leave people allergic to it. Keep acetone and nail polish remover away from the discs themselves too: those solvents attack polycarbonate and can leave a cloudy or cracked surface.




Leave a Reply