
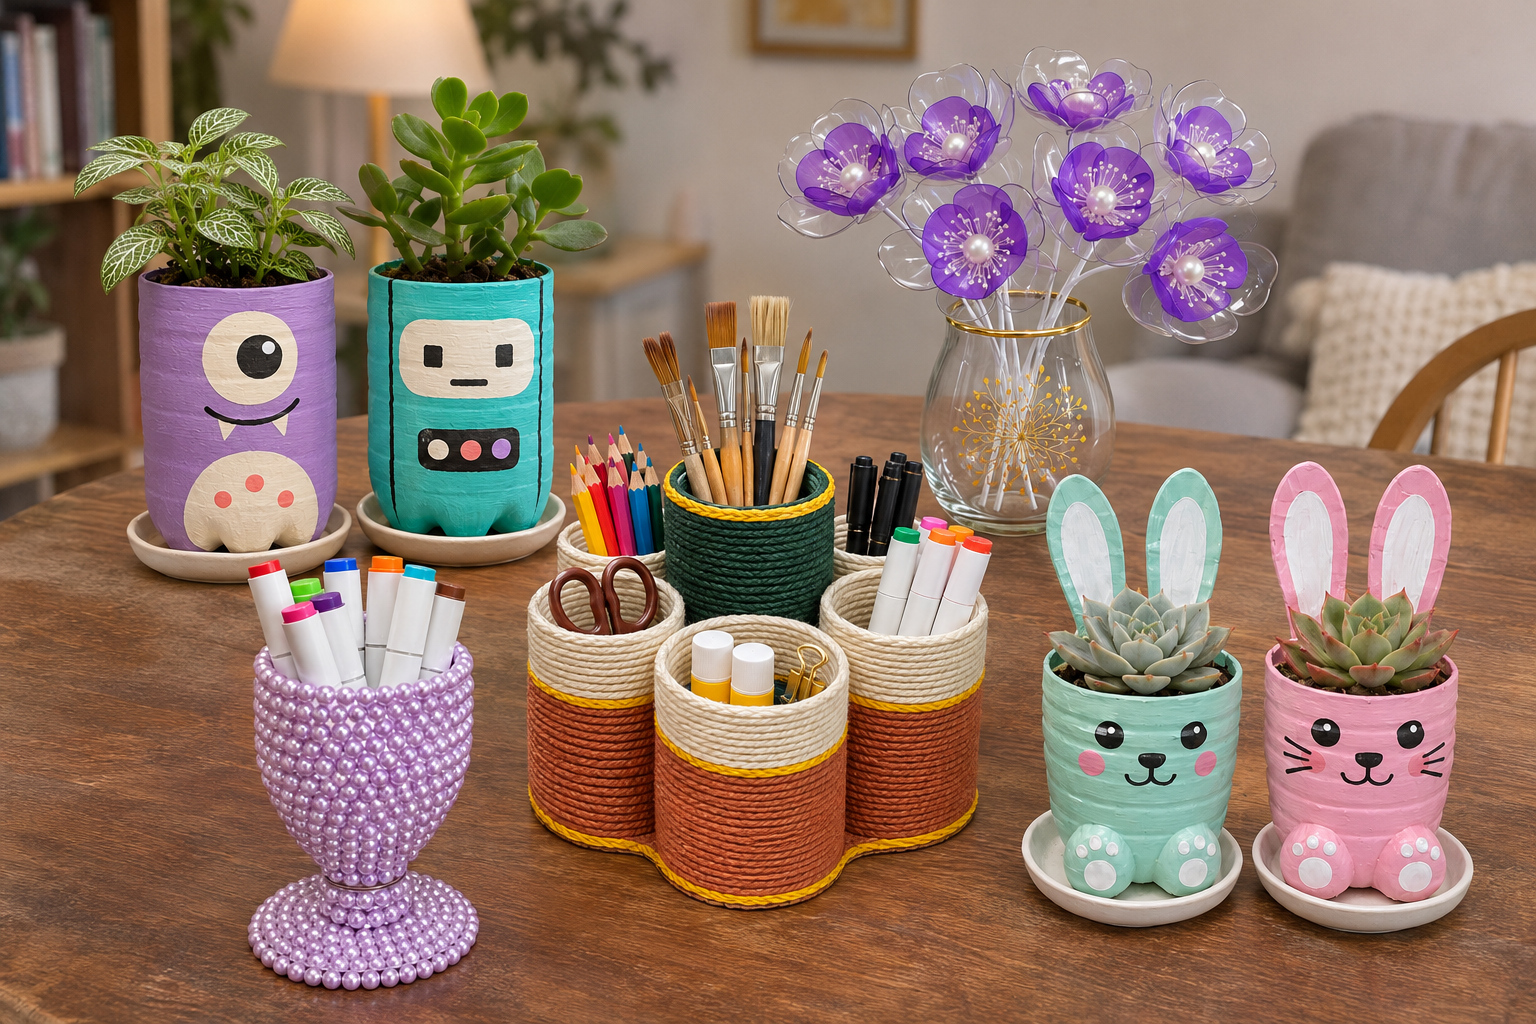
A plastic bottle gives you three useful shapes in one. The footed base already stands like a cup, the curved shoulder splits into petals or turns into a dome, and the straight middle cuts into rings and strips. The 24 projects below use all three, from painted planters and battery lamps to desk organizers, bangles, bottle flowers and a row of herb pockets on a fence.
Each collage reads left to right and top to bottom, starting with the supplies and ending with the finished piece in use, and the steps under every photo follow that same order. Read the short prep notes first. They cover the three things that most often go wrong with bottle crafts: ragged edges, paint that peels and planters that stay waterlogged.
Table of Contents
- What to Know Before You Cut
- Mini Green Watering Can with Mosaic Tiles
- Lilac Monster and Teal Robot Planters
- Painted Bottle Ring Bangles
- Glowing Flower Dome Night Light
- Four Tier Celestial Desk Organizer
- Gem Tipped Starburst Bottle Lamp
- Purple Bottle Flowers in a Gold Detailed Vase
- Lilac Pearl Goblet Pen Cup
- Twine Wrapped Six Cup Desk Caddy
- Silver Glitter Heart Keepsake Box
- Woodland Mushroom Treat Basket
- Green Spiky Bottle Flower Stem
- Hanging Water Propagation Mobile
- Plum Owl Pencil Cup
- Mini Green Bottle Umbrella
- Red and White Layered Bottle Flowers
- Pallet Style Painted Wall Vases
- Lotus Fairy Light Pendants
- Mint and Pink Bunny Succulent Planters
- Faux Brick Wall Planter Pockets
- Clear Hourglass Bottle Planters
- Gold Star Balloon Lanterns
- Fence Rail Herb Pockets
- Spider Plant Basket Centerpiece
- Questions About Plastic Bottle Crafts
- Which bottles work best?
- Does acrylic paint stay on plastic bottles?
- Can bottle planters stay outdoors?
- Heat, Sharp Edges and Balloons
What to Know Before You Cut
Clean drink bottles with firm walls work best. Most are PET, marked with a 1 inside the recycling triangle, and that plastic cuts cleanly and holds its shape. Soak off the label, rub away the glue residue and let the bottle dry inside and out. Skip anything that held cleaning products or chemicals, and keep each cap with its own bottle, because several projects screw the cap back on to lock two parts together.
Unless a project says otherwise, you will also need a marker, a craft knife and sharp scissors. A few habits make a big difference:
- Draw every cut line first. An adult makes the starting slit with the knife, then the cut is finished with scissors while the bottle turns slowly.
- Sand each cut edge, hole and thin strip with fine sandpaper or a nail file. Bottle plastic is sharper than it looks.
- Scuff the plastic lightly where hot glue will go so it grips. Clear craft glue suits beads, pearls and gems, and double sided tape is easiest for wrapping straws, twine or paper.
- For paint, sand lightly or use a primer made for plastic, then build thin coats. Let acrylic cure for the time on its label before the piece is handled, worn or watered.
- Any bottle that holds potting mix needs drainage holes. The only exceptions are the cups meant to hold water for rooting cuttings.
If you want an easy start, the owl pencil cup, the monster and robot planters and the mushroom basket need only straight cuts plus paint or felt. The umbrella, the lotus pendants and the layered red and white flowers take more careful cutting and some heat shaping.
Mini Green Watering Can with Mosaic Tiles
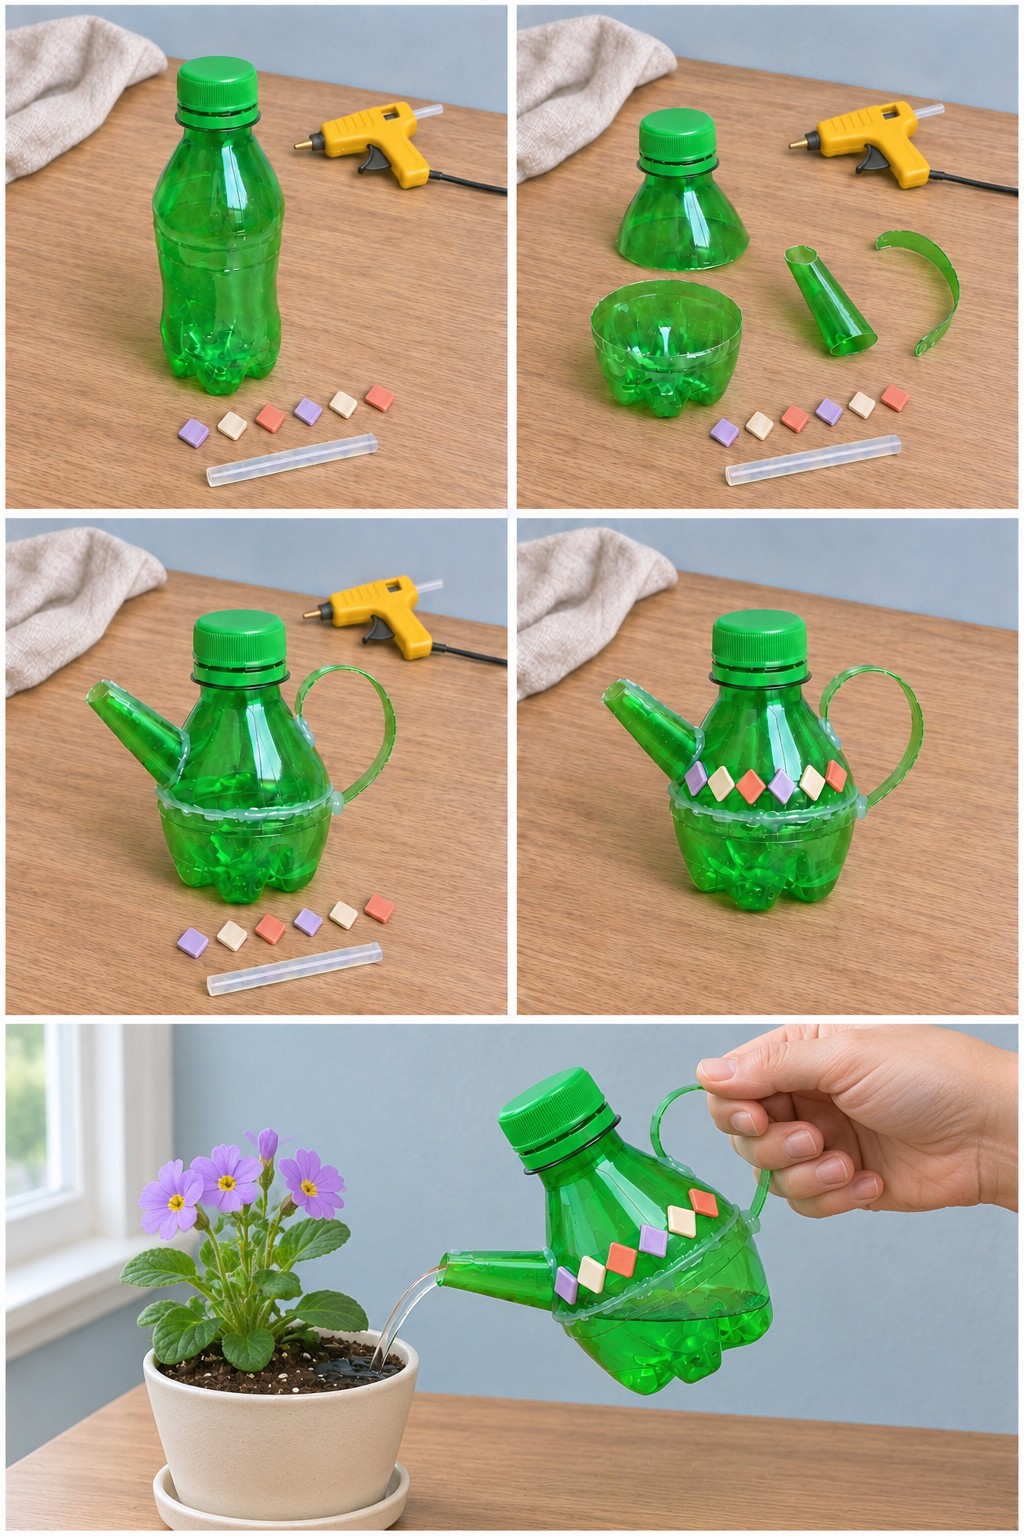
A small green soda bottle becomes a watering can for the windowsill, with a tapered spout, a looped handle and a band of diamond tiles around its middle. It pours a slow, gentle stream, just right for a single pot like the purple primrose in the last photo.
You need one small green bottle with its cap, mosaic tiles in lilac, cream and coral, and a hot glue gun.
- Cut the bottle into three pieces: the capped top cone, a shallow bowl from the base and a band from the middle.
- Roll one piece of the band into a narrow tapered tube for the spout, and cut one long curved strip from it for the handle.
- Cut a small hole low on one side of the cone and glue the spout in. Join the cone to the bowl with a continuous bead of hot glue, then fix the handle on the opposite side, from just under the neck down to the seam.
- Glue the tiles in a ring just above the seam, set on their points and repeating lilac, cream and coral.
To fill it, unscrew the cap, pour water in through the neck and close it again. Try the first fill over the sink, and if the seam drips, run another thin bead of glue around it once it is dry. When it is full, support the can by its body as well as the handle.
Lilac Monster and Teal Robot Planters
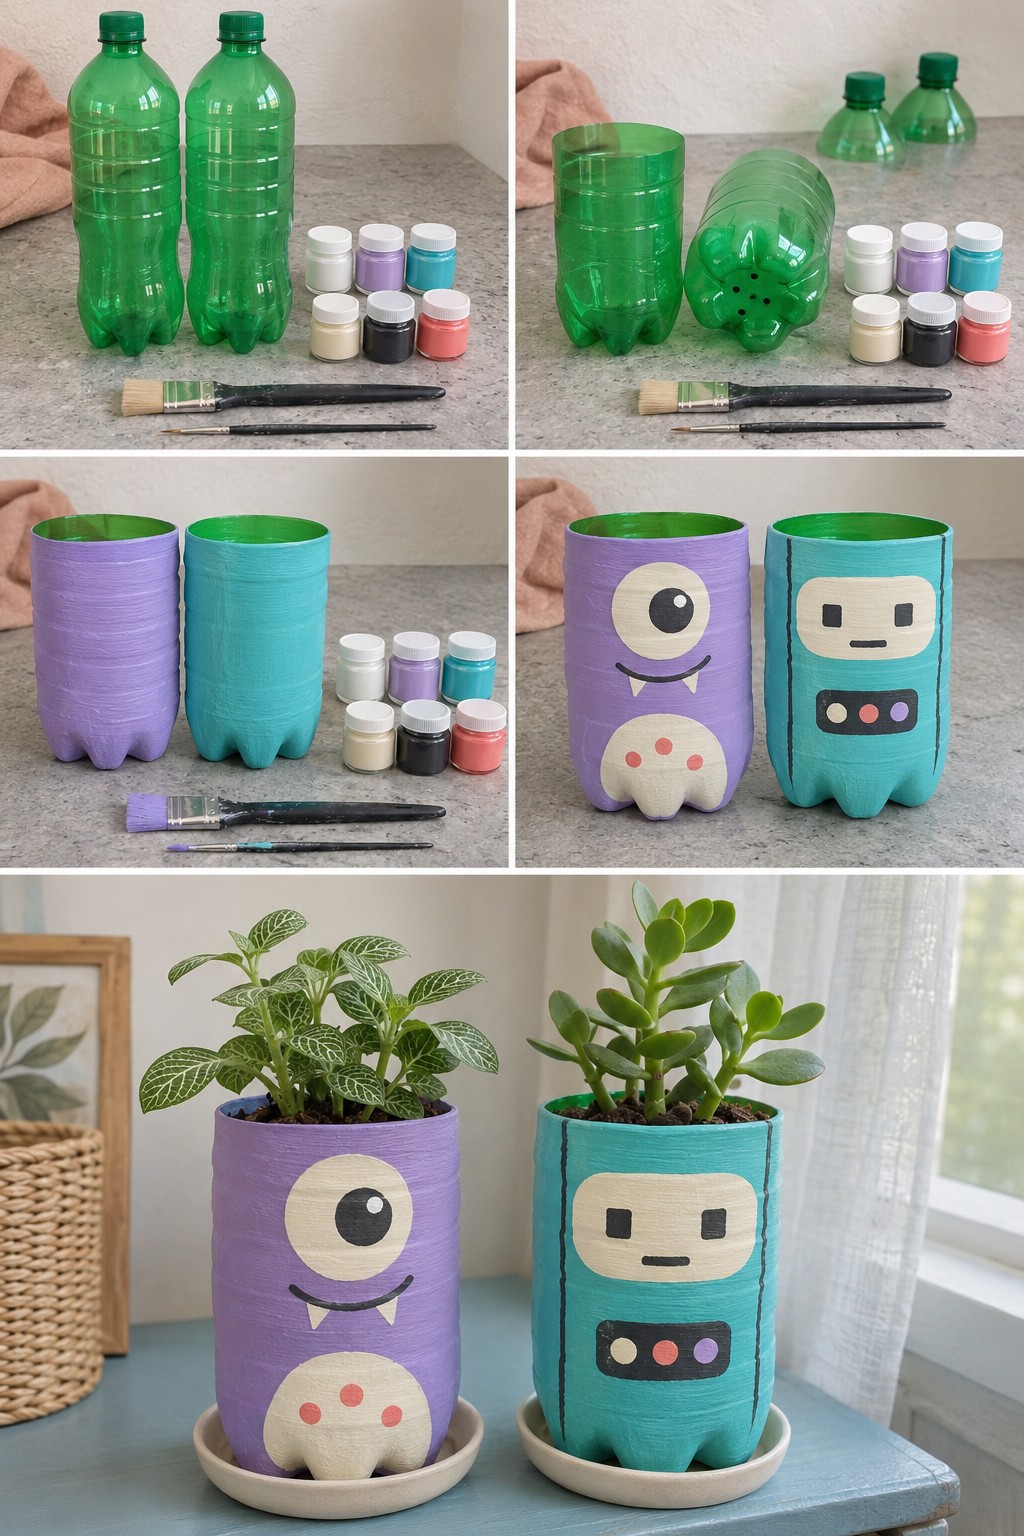
These two use the tall lower half of green bottles. The monster gets a lilac coat, one big eye, two little fangs and a cream belly with three coral spots. The robot is teal with a cream face panel, square eyes, a black line down each side and a control panel of cream, coral and lilac buttons. The green rim is left bare on both, which gives a tidy edge where the soil starts.
Cut the top third off two bottles and punch a few drainage holes in each base. Paint the outside only, lilac on one and teal on the other, then add the faces with cream, black, coral and white and a fine brush. When the paint has cured, plant a nerve plant in the monster and a jade plant in the robot, and stand each one on a cream saucer.
They look like a pair, but they should not be watered as one. A nerve plant likes its soil kept lightly moist, while a jade plant should dry out between waterings, so check each pot separately.
Painted Bottle Ring Bangles
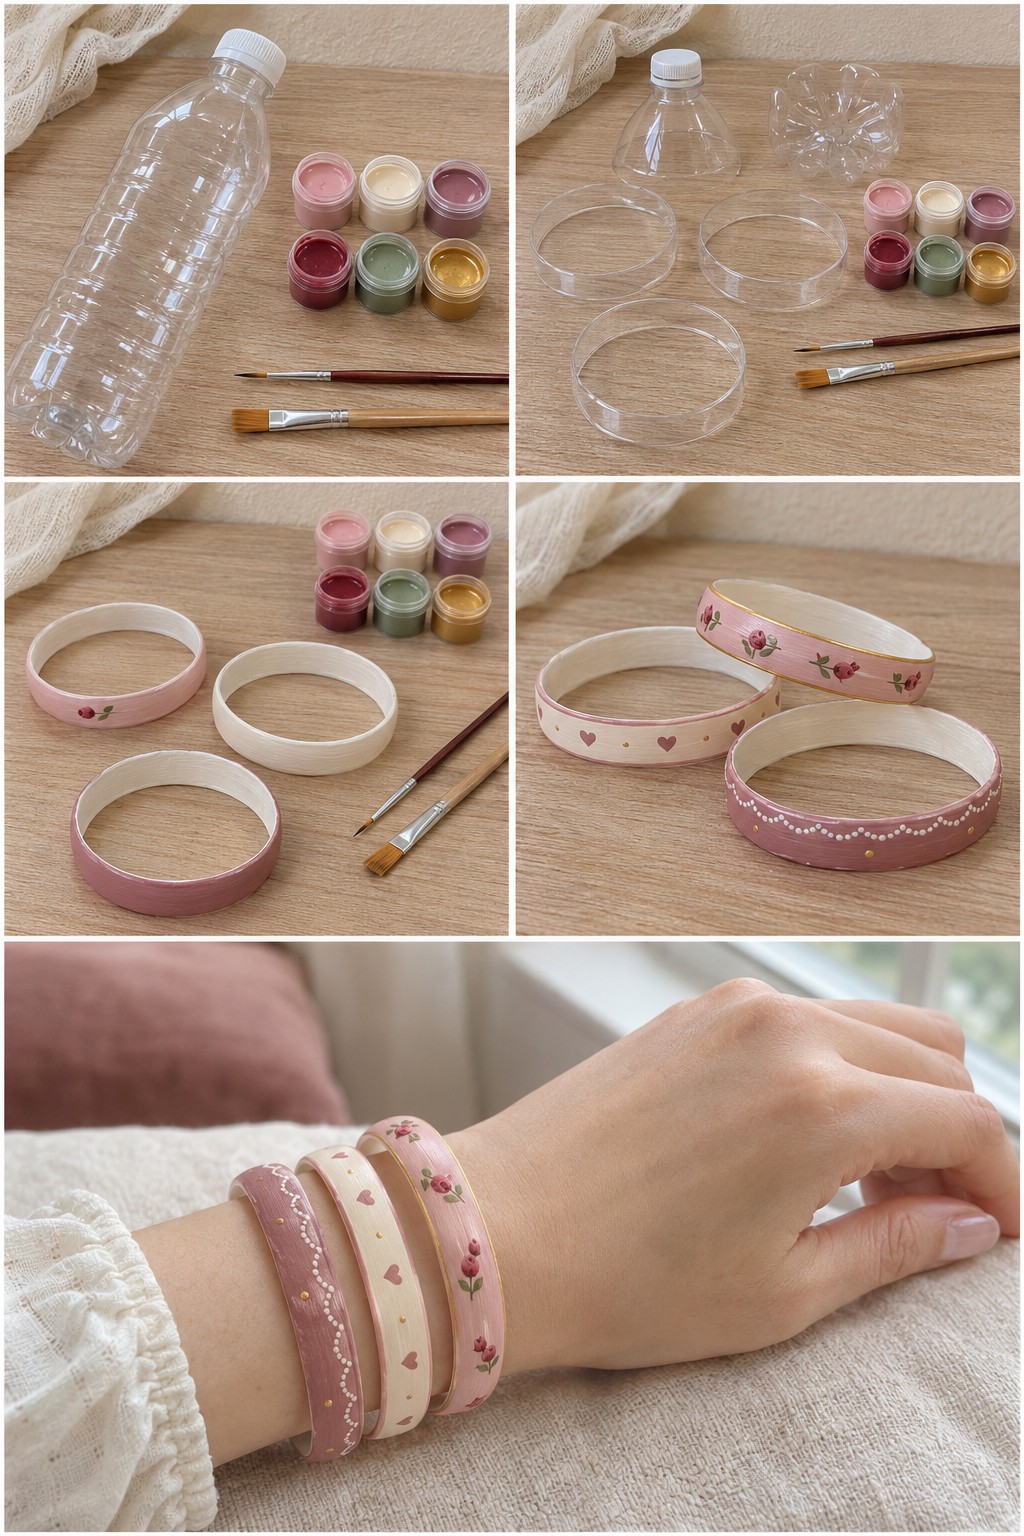
The straight middle of one clear bottle gives three rings of the same width, enough for a stacked set. One is pink with burgundy rosebuds, one cream with mauve hearts and one mauve with a white dotted scallop, and fine gold details tie the three together.
Before you cut anything, slide the bare bottle over your hand. A closed ring cannot stretch, so if the bottle does not pass easily over the widest part of your hand, look for a wider one.
- Cut off the top cone and the base, then cut the straight section into three rings of equal width. Sand both edges until they feel smooth against your skin.
- Paint the outside of the rings pink, cream and mauve, and the insides cream. A single rosebud on the pink ring is a good way to test the fine brush before the full pattern.
- Finish the patterns. The pink ring gets burgundy rosebuds with sage leaves and a gold line along each edge, the cream ring mauve hearts, small gold dots and mauve edges, and the mauve ring a white dotted scallop with gold dots.
- Let the paint cure fully before wearing. A coat of clear acrylic varnish helps it stand up to everyday knocks.
Glowing Flower Dome Night Light
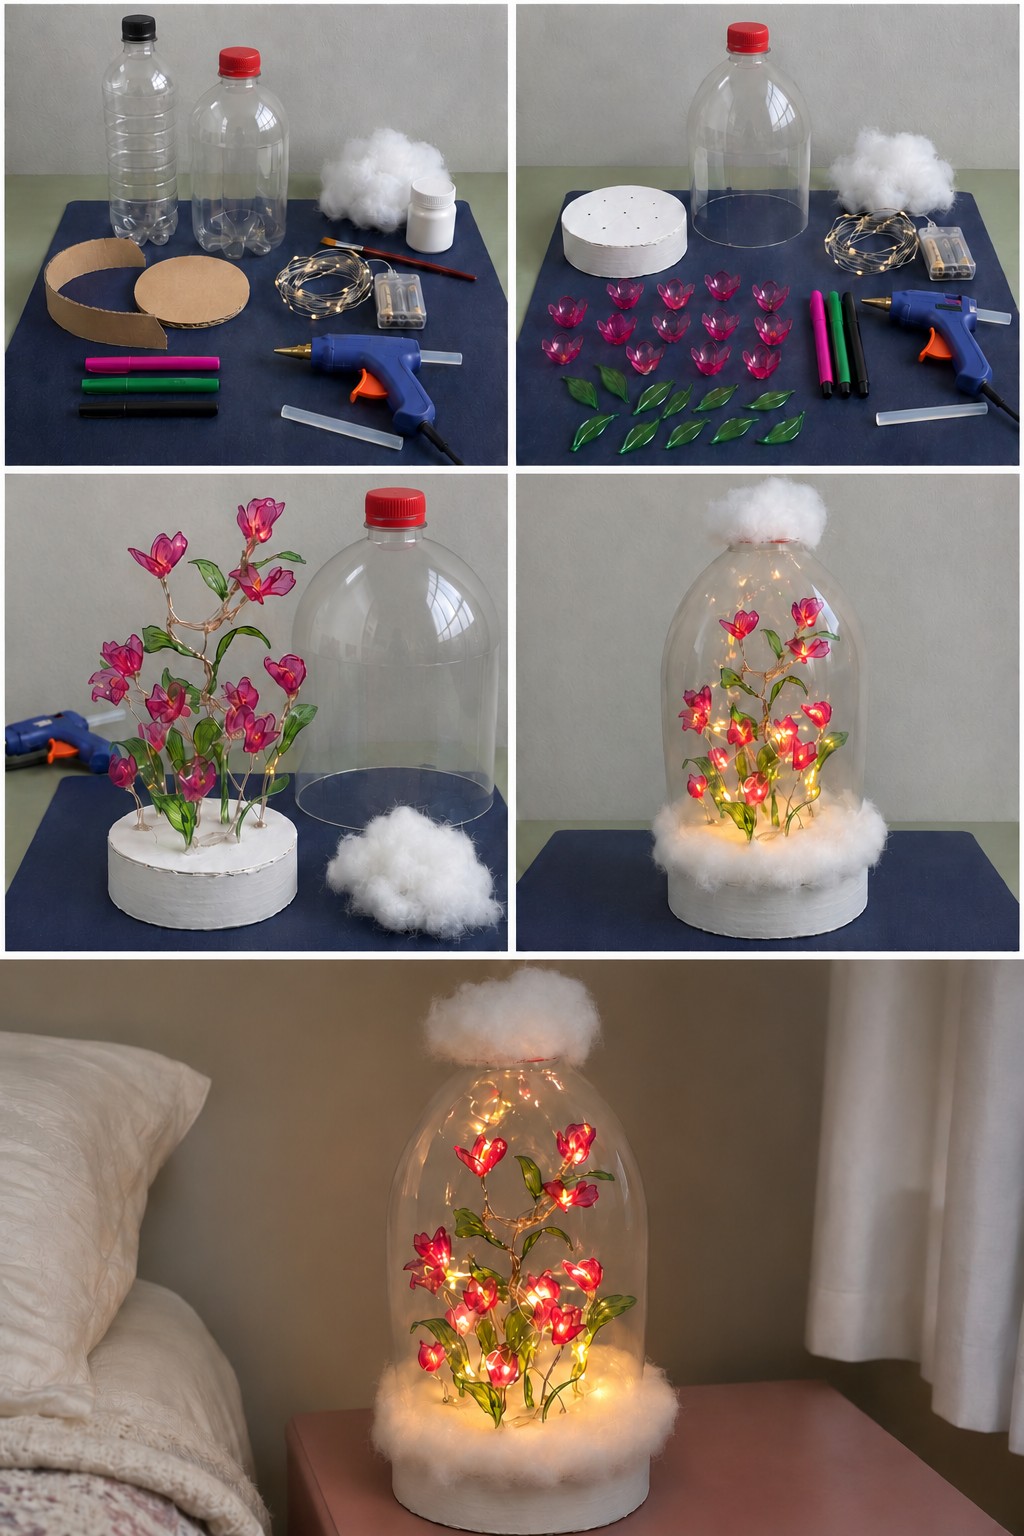
Magenta flowers and green leaves, cut from a clear bottle and colored with marker, grow along fairy light branches under a bottle dome. Fiberfill around the base and over the cap makes the whole piece look as if it sits in a small cloud. The glow is soft, more of a bedside night light than a lamp to read by.
- A large clear bottle for the dome and a smaller one for the flowers
- A cardboard circle and a cardboard strip
- White paint and a brush
- Warm white LED fairy lights on thin wire, with a battery box
- Pink, green and black permanent markers
- Polyester fiberfill
- Hot glue gun
- Cut the bottom off the large bottle and keep the capped top as the dome. From the smaller bottle, cut small flowers and pointed leaves. Color the flowers pink and the leaves green, then draw fine black veins on the leaves.
- Glue the cardboard strip around the circle to make a shallow drum that fits inside the dome. Paint it white and pierce a few small holes in the top.
- Twist the fairy light wire into branching stems, glue the flowers and leaves along them and push the ends into the holes.
- Lower the dome over the flowers, wrap fiberfill around the bottom edge and set a puff of it over the cap.
Decide where the battery box will sit before the dome goes on. Tucked behind the base, with the switch facing out and clear of the fiberfill, it stays out of sight and easy to reach.
Four Tier Celestial Desk Organizer
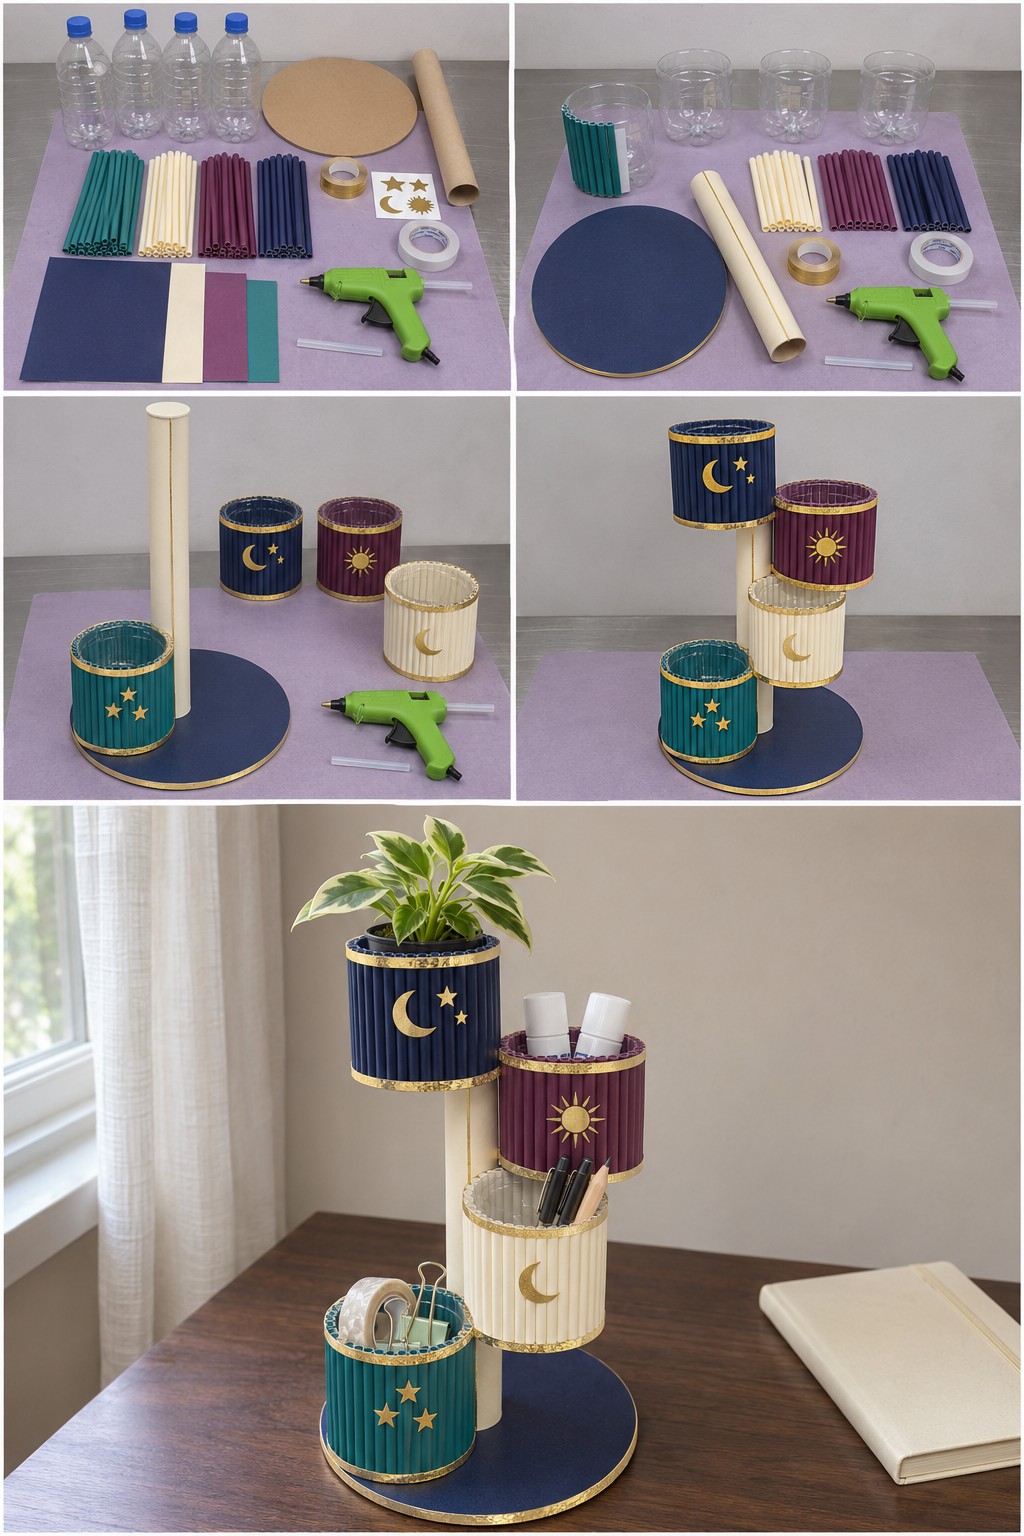
Four bottle cups climb a cream post on a navy base. Each cup is wrapped in upright paper straws, edged with gold tape and marked with a gold sticker. The teal cup with three stars sits on the base, the cream cup with a moon and the plum cup with a sun step up the post, and the navy cup at the top, with a moon and two stars, is roomy enough for a small plant.
The supply list is longer than the build: four clear bottles, a cardboard circle and a cardboard tube, paper straws and cardstock in teal, cream, plum and navy, gold tape, gold moon, star and sun stickers, double sided tape and a hot glue gun.
Cut a cup from the lower part of each bottle. Cover the circle with navy cardstock and a gold tape edge, and wrap the tube in cream. For each cup, run a band of double sided tape around the outside and press the straws on upright, side by side, then edge the top and bottom with gold tape and add the stickers. Glue the post upright with the teal cup beside it, then fix the cream cup a little above the base, the plum cup higher on the opposite side and the navy cup at the very top, so the four spiral upward.
In the photo the teal cup holds tape and binder clips, the cream cup pens and a pencil, and the plum cup glue sticks. Leave the plant in its plastic nursery pot and lift it out to water, so no water reaches the paper or cardboard.
Gem Tipped Starburst Bottle Lamp
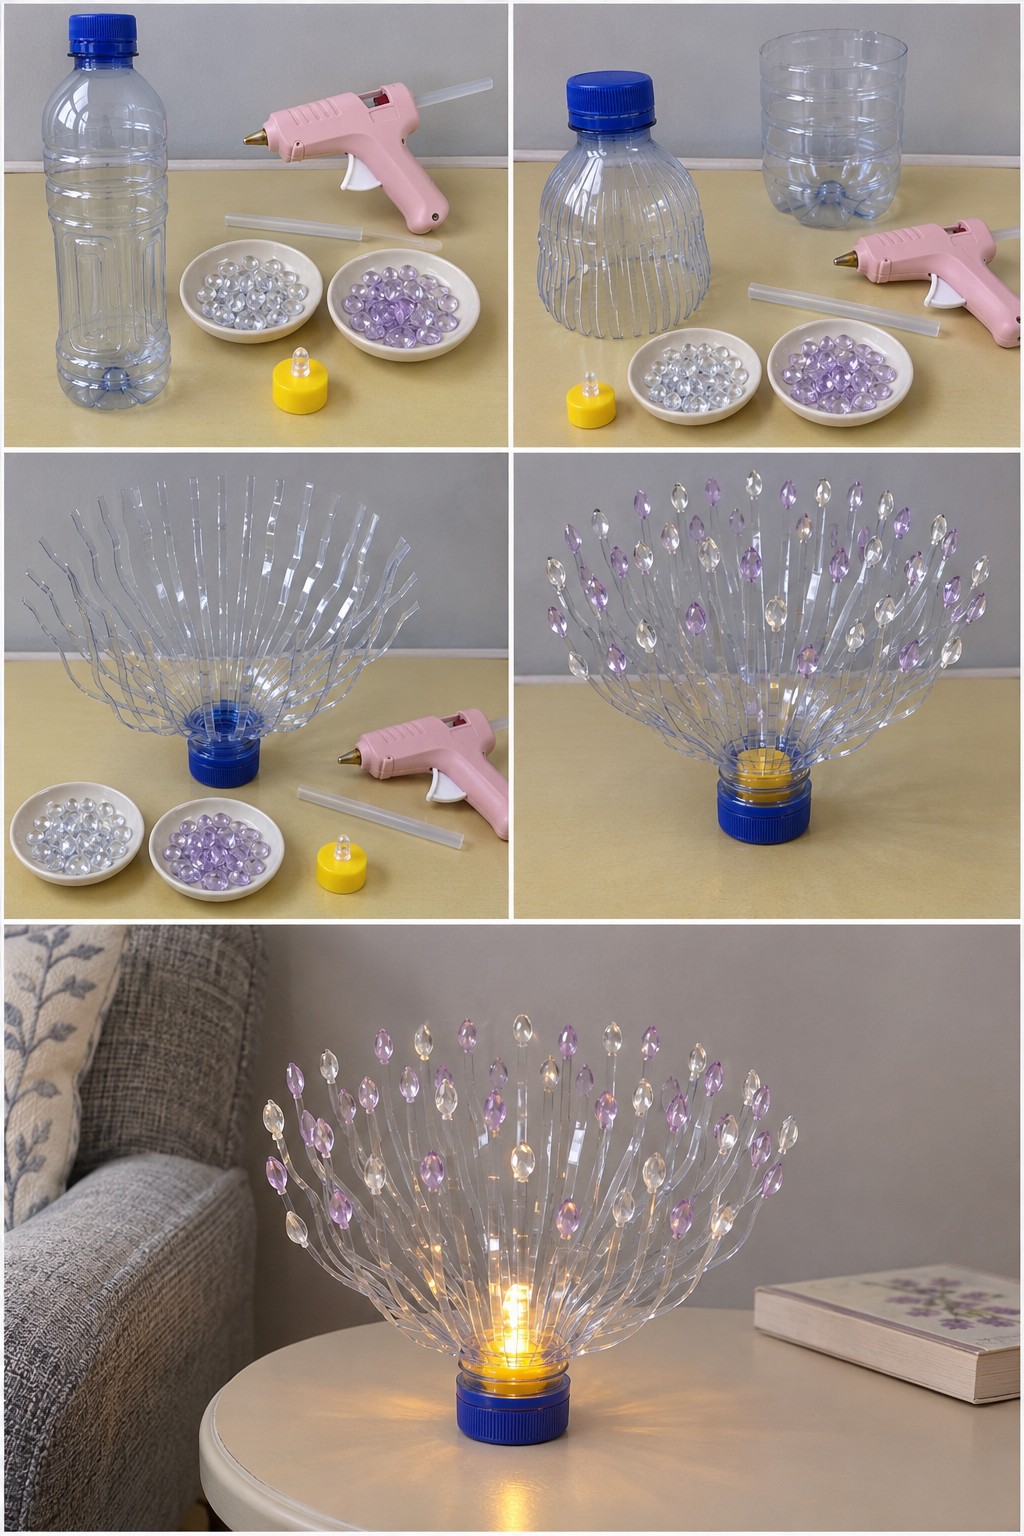
This one is almost all scissor work. The top half of a clear bottle is cut into dozens of thin strips that open into a wide fan, the piece stands upside down on its own blue cap, and a clear or lilac teardrop gem tips every strip. A yellow battery tea light dropped into the neck lights the spray from below.
- Cut the bottle around the middle and keep the capped top.
- Cut narrow strips from the open edge up to where the shoulder meets the neck, and stop there so every strip stays attached.
- Stand the piece on its cap and bend the strips outward into an even fan. Work around the circle a few strips at a time so one side does not end up flatter than the other.
- Hot glue a gem to each tip, mixing the clear and lilac ones.
- Set an LED tea light in the open neck and switch it on.
The cap is a small footprint for such a wide fan, so test it on the table where it will stay. If it wobbles, glue the cap onto a heavier disk. Use an LED tea light only.
Purple Bottle Flowers in a Gold Detailed Vase
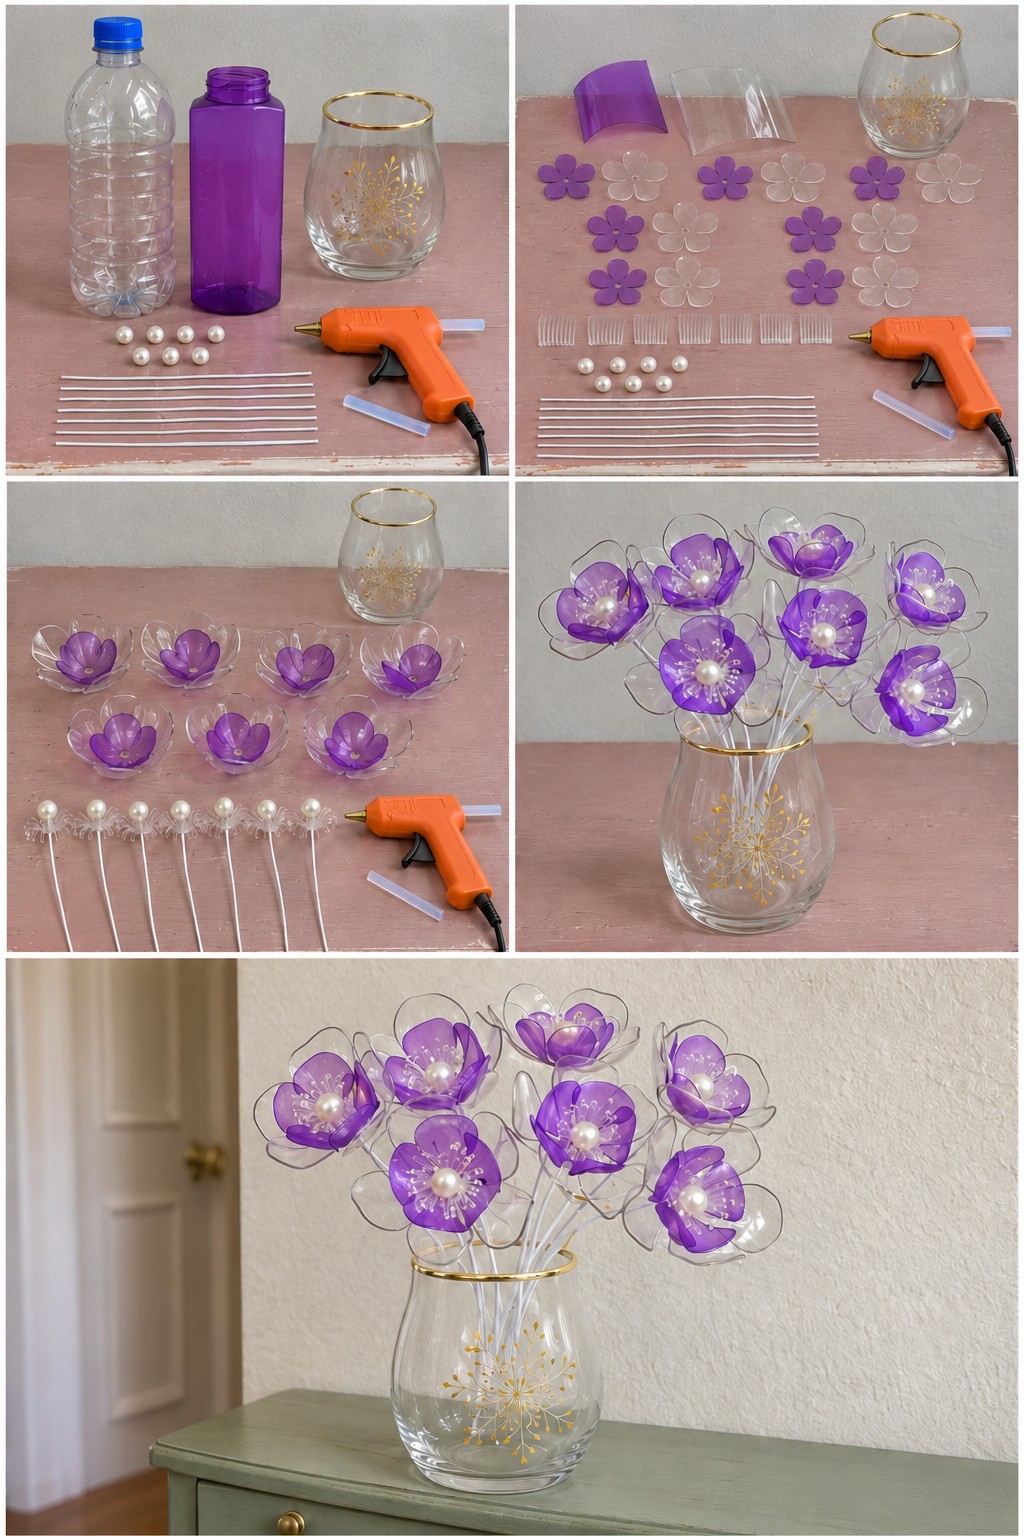
Each of the seven flowers is a cupped purple bloom set inside a slightly bigger clear one, so every flower has a see through outer ring. A pearl and a fine clear fringe make the center, white plastic stems hold them up, and the glass vase with its gold rim and gold starburst picks up the pearls.
Cut a flat panel from a clear bottle and another from a purple one, taking them from the curved wall so the flowers keep a natural cup. From the purple panel cut seven small five petal flowers, from the clear panel seven larger ones, and cut seven short clear strips into a fine fringe. Glue each purple flower into a clear one. Wrap a fringe strip around the top of each white stem with a pearl glued in its middle, then push the stem through the center of a layered flower and glue it just under the stamens. Arrange the seven stems at slightly different heights.
The bouquet looks best where light passes through the clear petals, such as a dresser near a window. It needs no water, only a soft dry brush now and then for dust.
Lilac Pearl Goblet Pen Cup
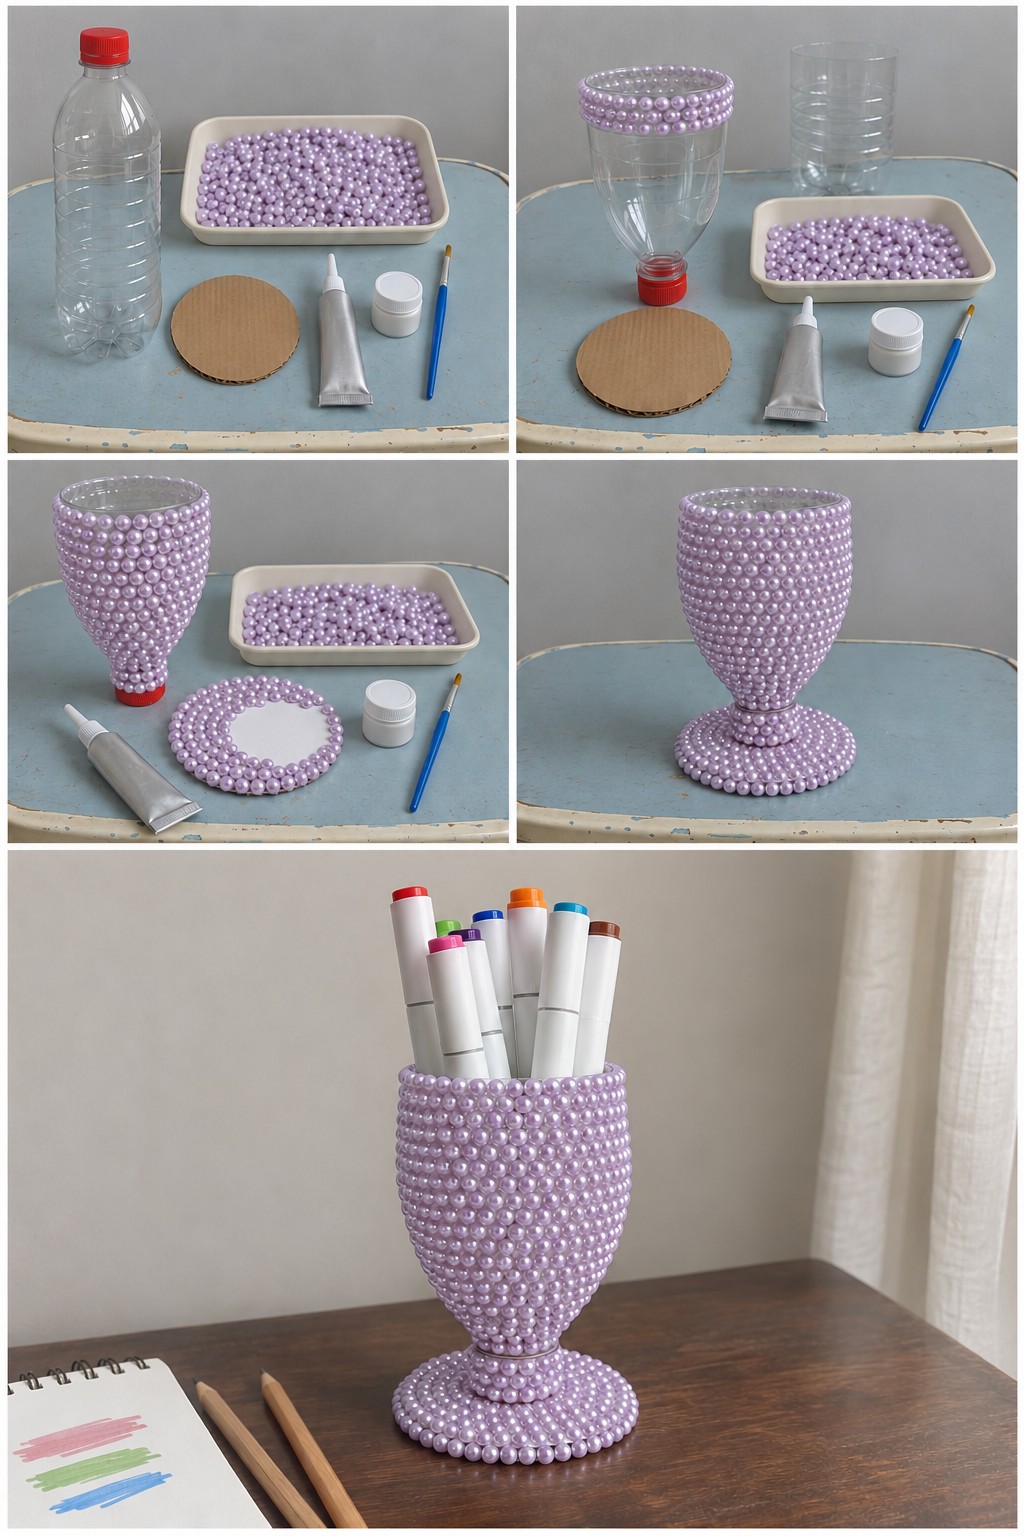
Turn the top of a bottle upside down and it is already shaped like a goblet: the cut edge becomes the rim and the neck becomes the stem. Hundreds of lilac pearls cover it, a pearl covered cardboard circle forms the foot, and a plain cup of markers suddenly looks like something from a gift shop.
You will need one clear bottle with its cap, a tray of lilac pearl beads, a cardboard circle, a strong craft glue for plastic and cardboard, and white paint with a brush.
- Cut the bottle about halfway down and keep the top. Stand it neck down on its cap and glue the first rows of pearls around the cut rim.
- Work down the bowl in rings toward the neck, letting each section grab before you turn the piece.
- Paint the cardboard circle white so no brown shows between the beads, then cover it with rings of pearls from the edge inward.
- Glue the capped neck to the middle of the foot and fill in around it with pearls. A thin collar of clear neck can stay visible just under the bowl, as it does in the photo.
Let it cure overnight before filling it. It suits light markers best, since heavy scissors make the narrow stem easier to tip, and loose pearls should stay out of reach of small children.
Twine Wrapped Six Cup Desk Caddy
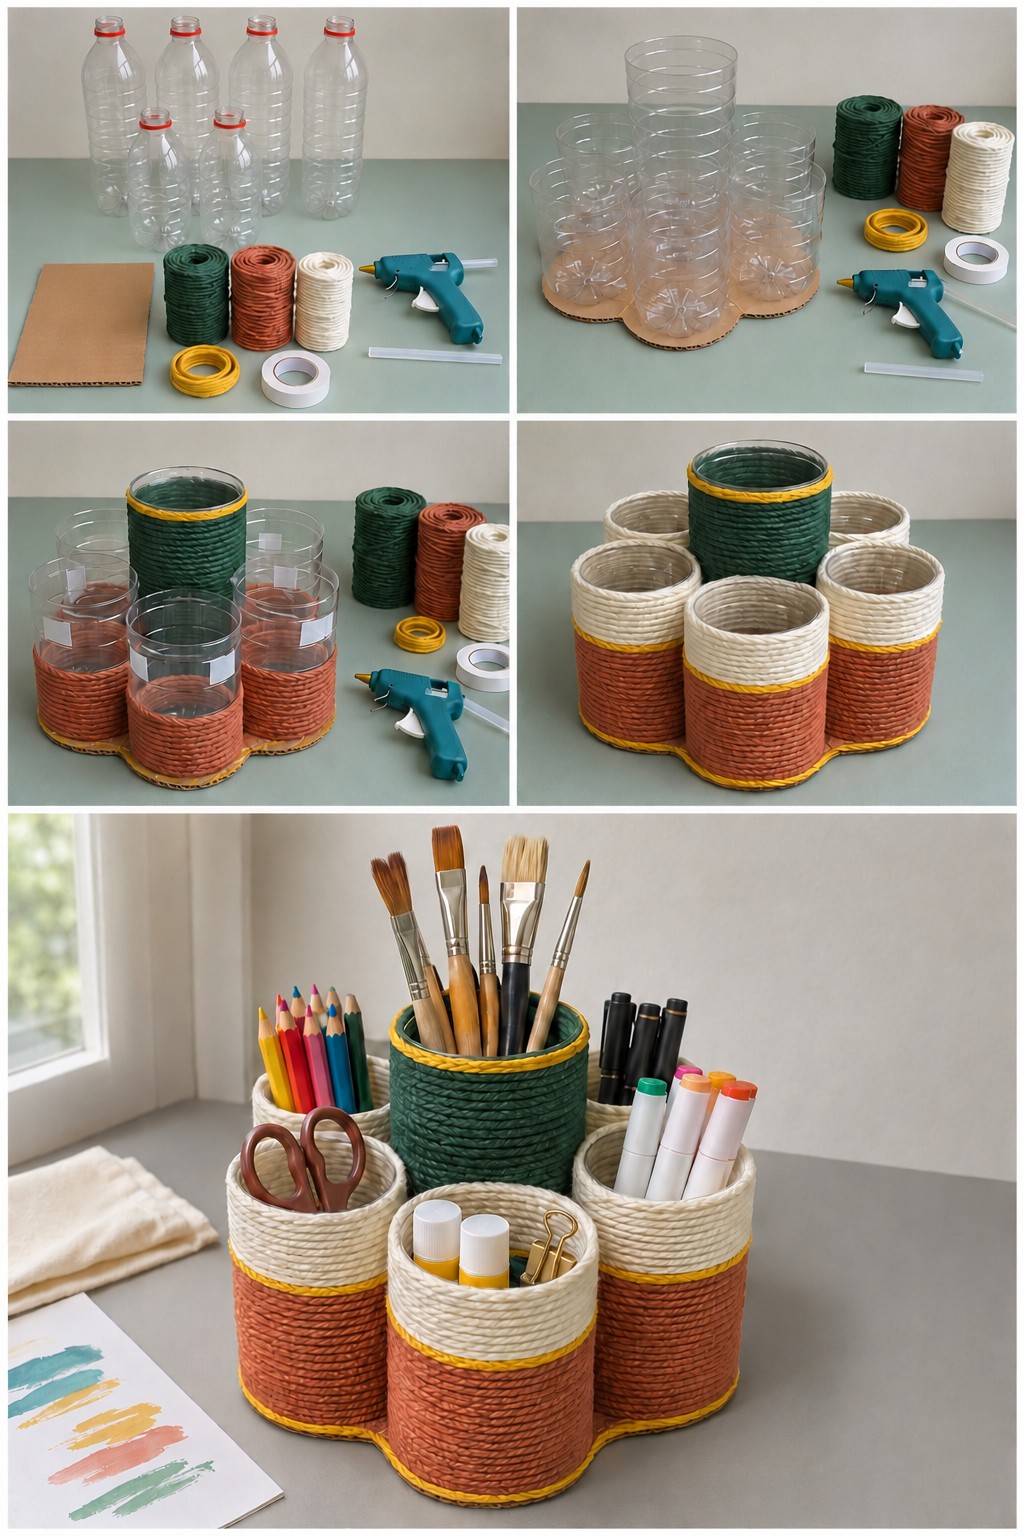
Six cups stand together on a flower shaped cardboard base. The tall forest green one in the middle holds brushes, and the five shorter cups around it are wrapped in terracotta twine below and cream twine above, with thin yellow cord along every join and edge. In the finished photo they hold colored pencils, scissors, glue sticks with a binder clip, markers and pens.
- Cut six cups from clear bottles, keeping the center one taller than the rest.
- Stand the tall cup in the middle with five around it, trace the outline onto cardboard, cut out the flower shaped base and glue the cups down.
- Wrap the center cup in green twine and the lower half of each outer cup in terracotta, laying the rows onto strips of double sided tape and pushing them tight together so no plastic shows.
- Wrap the upper halves in cream twine. Glue yellow cord around the green rim, along each color change and around the bottom edge of the base.
Gluing the cups to the base before wrapping keeps them from shifting, and the twine hides any glue that squeezes out.
Silver Glitter Heart Keepsake Box
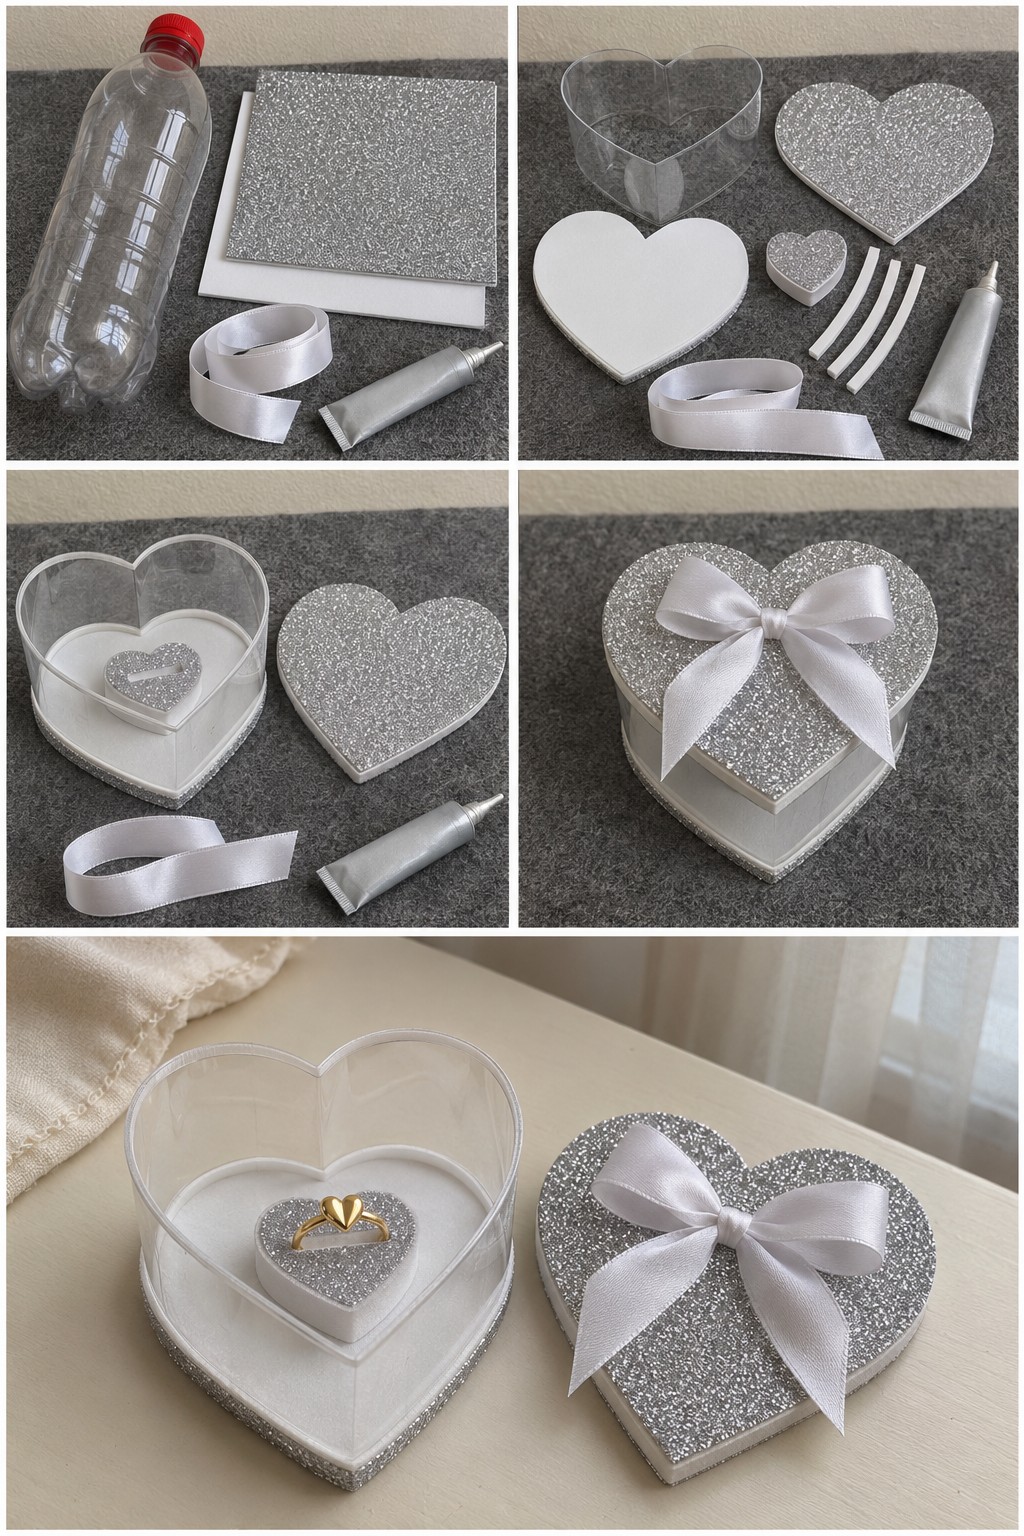
A wide band of clear bottle, pinched into a heart, forms the walls of this little gift box. It sits on a white foam base edged with silver glitter, closes with a glitter foam lid and a white satin bow, and hides a small glitter pad inside with a slit that holds a ring.
Cut a wide band from a clear bottle and pinch it into a heart. Using the band as a guide, cut a white foam heart for the base and a silver glitter heart for the lid, both a little larger than the band. Cut a small heart from each foam for the ring pad and three narrow white strips. Glue the band onto the base and run a thin line of glitter foam around the base edge. Line the inside bottom of the wall with the white strips, glue the stacked pad in the middle and cut a slit across it. Tie a bow from the satin ribbon and glue it to the lid.
Check the fit before the bow goes on: the lid should rest on the clear wall without squeezing it out of shape. A ring or a pair of stud earrings fits comfortably inside.
Woodland Mushroom Treat Basket
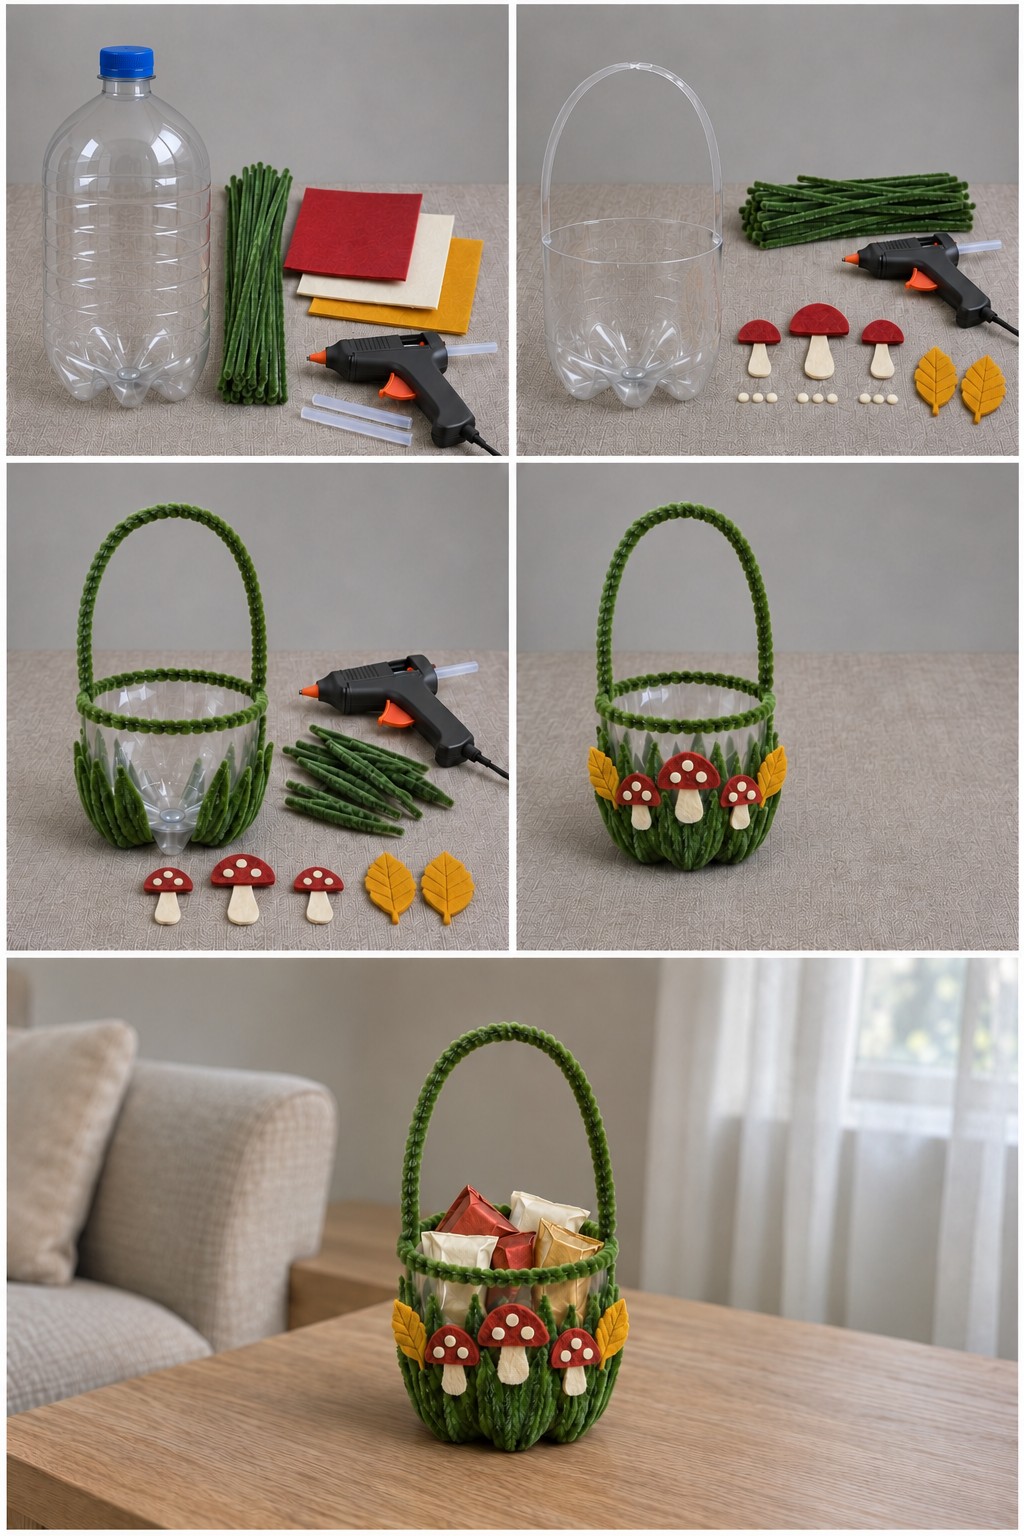
The handle on this basket is part of the bottle. You cut around a large clear bottle but leave two opposite strips of the upper wall standing, then join them at the top into an arch. Green chenille stems wrap the handle and rim and stand around the sides like grass, and three red felt mushrooms with two mustard leaves finish the front.
All it takes is one large clear bottle, green chenille stems, red, cream and mustard felt and a hot glue gun.
- Cut around the middle of the bottle, leaving the two handle strips attached, and glue their ends together at the top.
- From felt, cut three red mushroom caps with the middle one larger, three cream stalks, nine small cream dots and two mustard leaves.
- Wrap chenille around the handle and the rim. Fold short pieces into narrow points and glue them upright around the lower basket, overlapping, so they read as grass.
- Glue three dots on each cap and a stalk under it, then line the mushrooms up across the front with a leaf at each end.
Filled with wrapped sweets, it works as a party favor or a small spring gift. Chenille has a wire core, so tuck every cut end inward and run a fingertip over the basket before it goes to a child.
Green Spiky Bottle Flower Stem
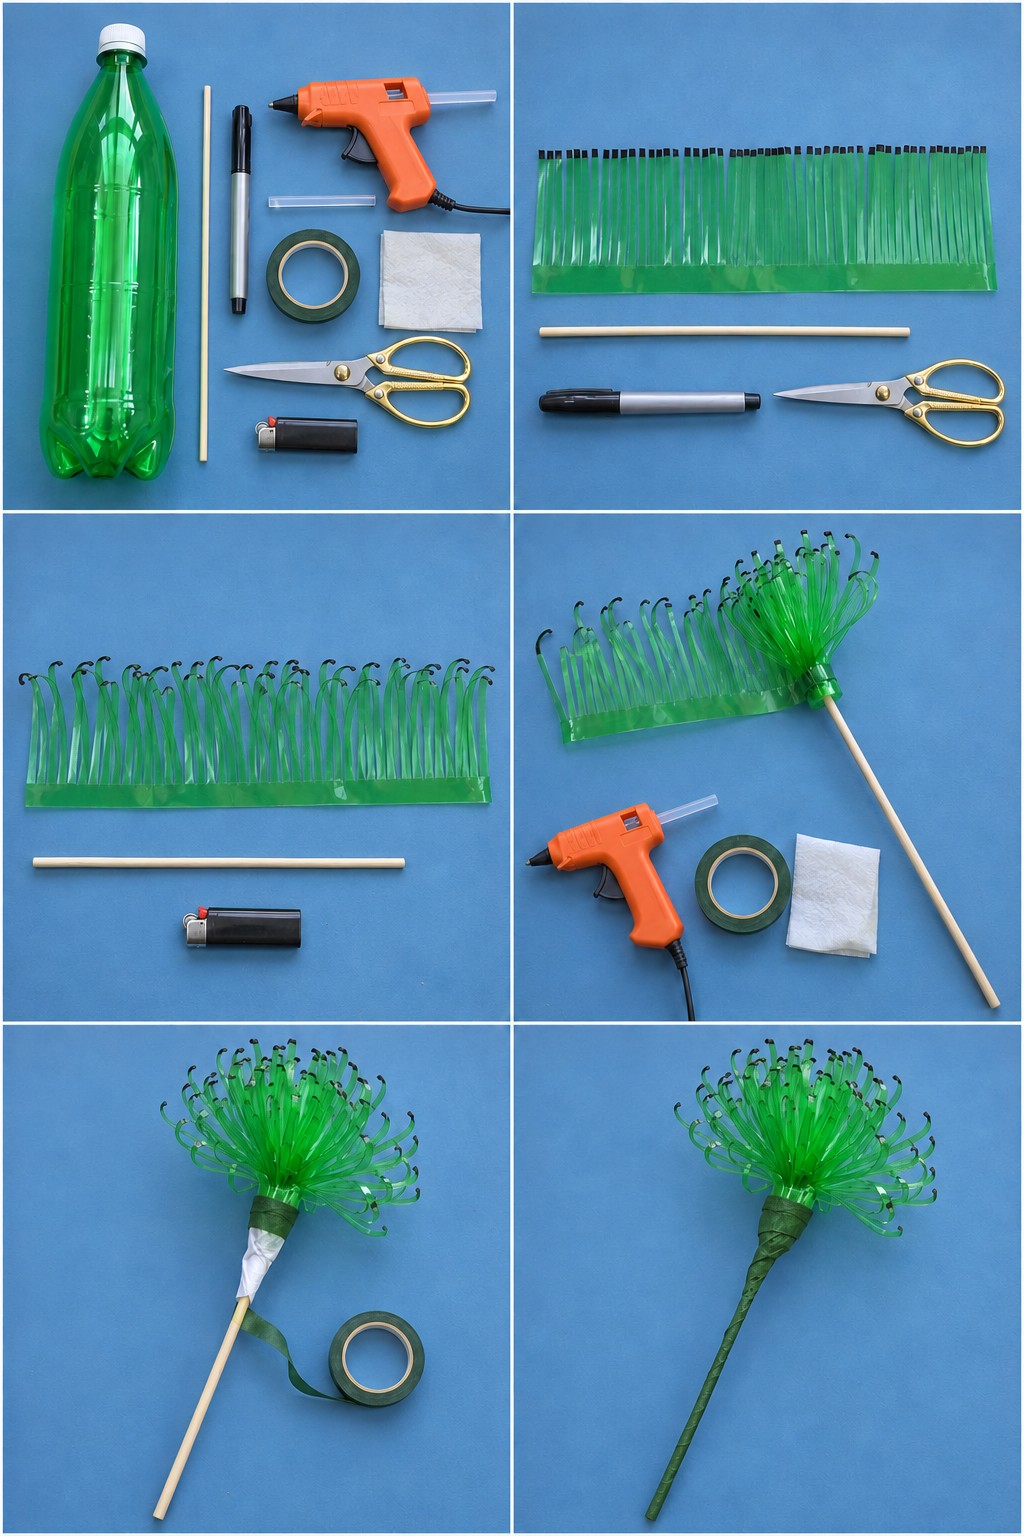
One long fringed strip of green bottle, rolled tightly around a dowel, becomes a round, spiky flower head. The tips are colored black with marker and then curled with brief heat, which gives them their little hooked ends. Green floral tape covers the stem, so the flower can stand alone in a dry vase or join a bunch.
Gather one green bottle, a wooden dowel, a black permanent marker, a hot glue gun, green floral tape, a small square of tissue, scissors and a lighter.
- Cut a wide band from the bottle and open it flat. Cut a fine fringe along one long edge, leaving about a finger's width uncut along the other, and color each tip with the marker.
- An adult passes the fringe tips quickly above the lighter flame, not into it, so they curl over. Stop as soon as they bend; darkening or smoke means it has gone too far.
- Run hot glue along the uncut edge and roll the strip tightly around one end of the dowel, building a full, round head.
- Wrap the tissue around the join under the head, then wind floral tape from there down the whole dowel, stretching it a little as you go and overlapping each turn.
The black tips come from the marker, not from scorching. Plastic that has actually burned looks dull and gives off fumes.
Hanging Water Propagation Mobile
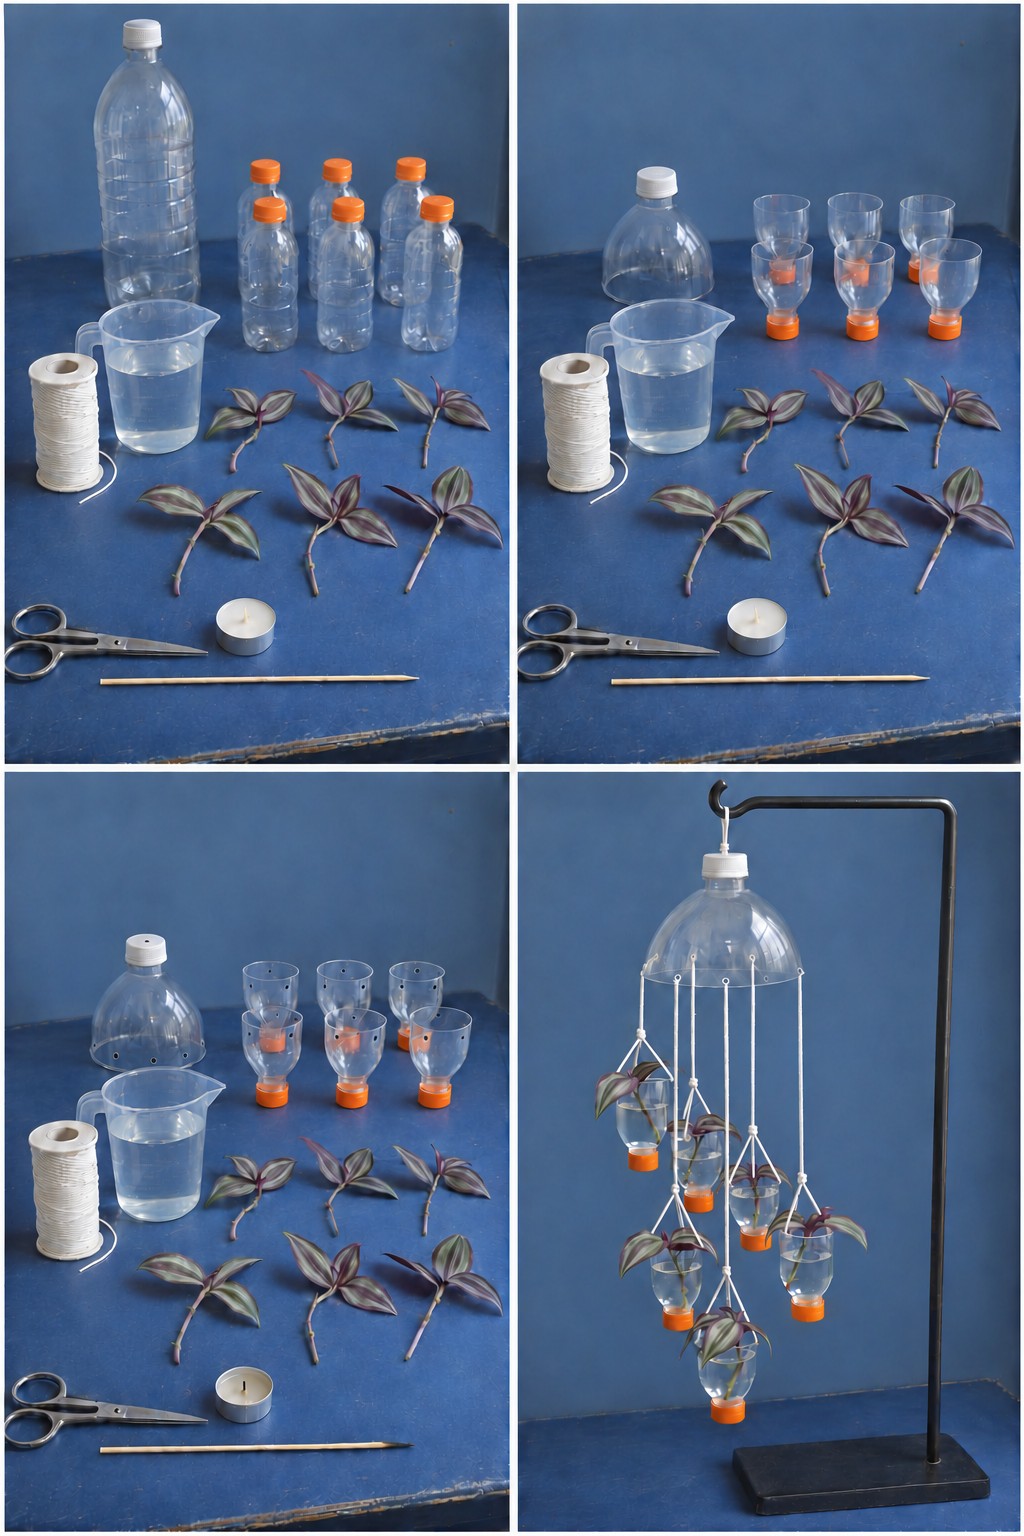
Six small bottle tops, turned upside down with their orange caps screwed on, become water cups that hang on white string from a dome cut from a large bottle. Each one holds a purple and silver Tradescantia zebrina cutting, and because the cups are clear you can watch the roots grow.
- 1 large clear bottle with its cap
- 6 small bottles with orange caps
- White cotton string
- 6 Tradescantia zebrina cuttings and a jug of water
- Scissors and a wooden skewer
- A black metal hanging stand
- Cut the shoulder from the large bottle and keep it, cap on, as the dome. Cut the top off each small bottle and turn it neck down with the cap screwed on tight.
- With the skewer, pierce three evenly spaced holes near the rim of each cup and a ring of holes around the edge of the dome, twisting as you push. The dome's cap is much thicker, so an adult starts that hole with the tip of the craft knife and widens it with the skewer.
- Thread three strings through each cup and knot them together above it. Tie the cups to the dome at different lengths so they do not knock into each other, and add a loop through the cap to hang the mobile from the stand.
- Fill each cup with water and set a cutting in it.
Pull off any leaves that would sit below the waterline, and change the water whenever it turns cloudy. Once the roots are a few centimeters long, the cuttings can go into soil.
Plum Owl Pencil Cup
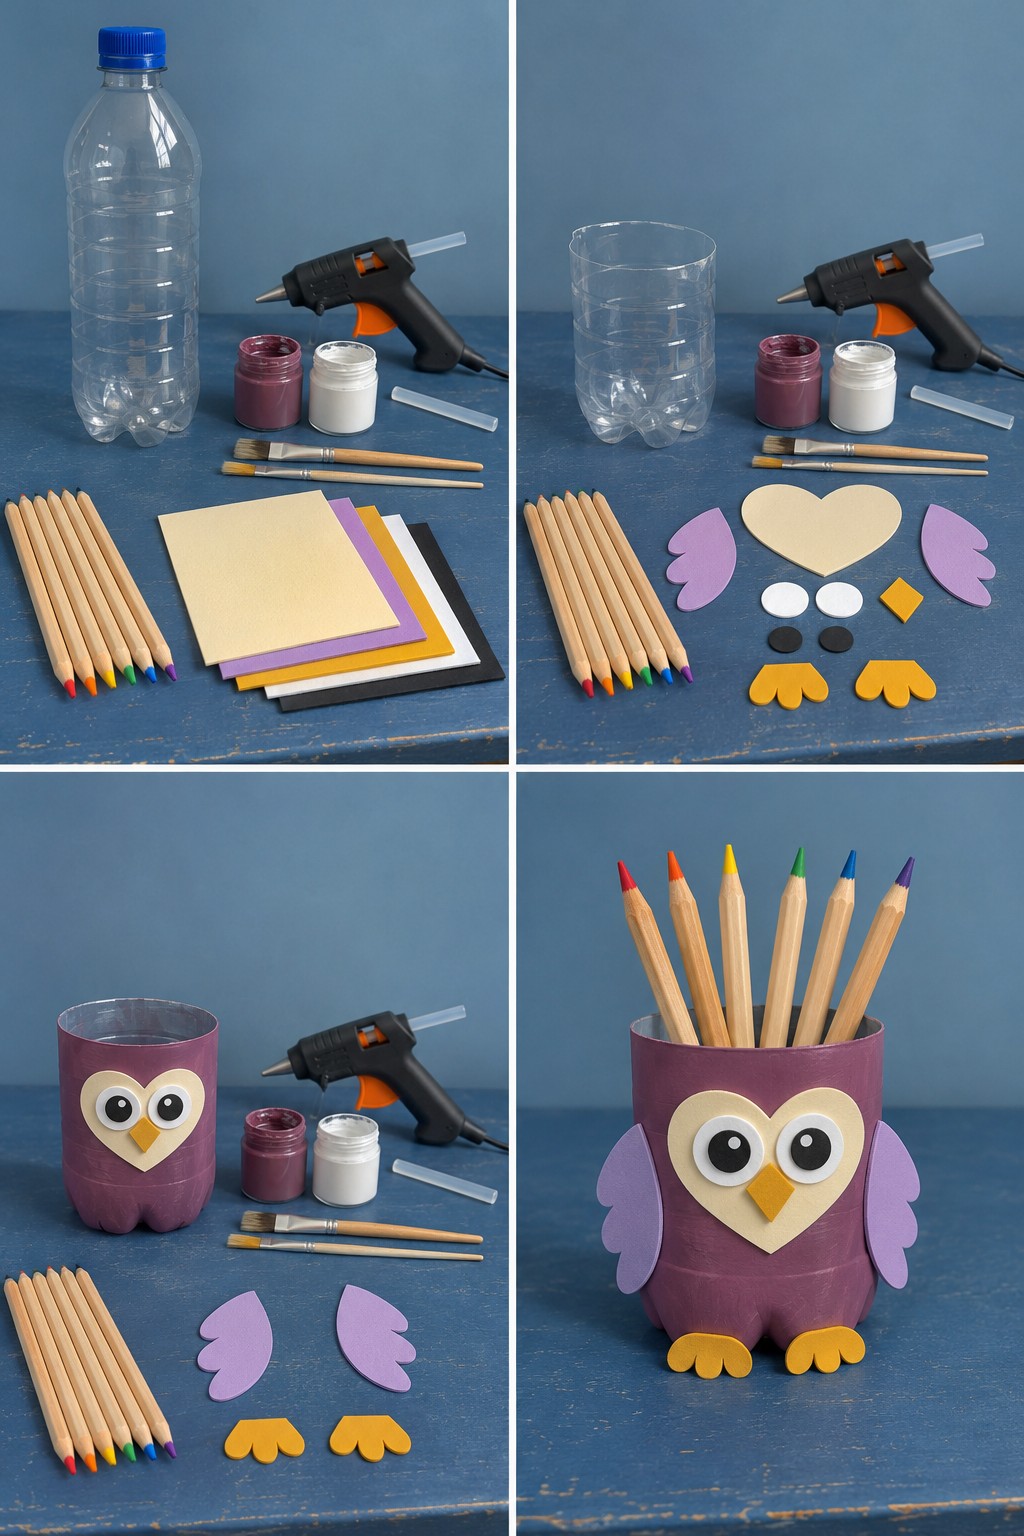
A short bottle cup painted plum becomes an owl with a cream heart shaped face, big round eyes, a mustard beak, lilac wings and mustard feet, all cut from craft foam. It needs one straight cut and no heat at all, which makes it a good first project to share with kids.
Cut the bottle into a short cup. From foam, cut a cream heart, two lilac wings, two white circles and two smaller black ones, a small mustard diamond for the beak and two mustard feet. Paint the outside of the cup plum and let it dry. Glue on the face, the eyes and the beak, then dot a white highlight on each pupil. Add a wing on each side and the feet at the front of the base, and fill the cup with colored pencils.
Children can do the painting and arrange the foam pieces while an adult handles the cutting and the hot glue.
Mini Green Bottle Umbrella
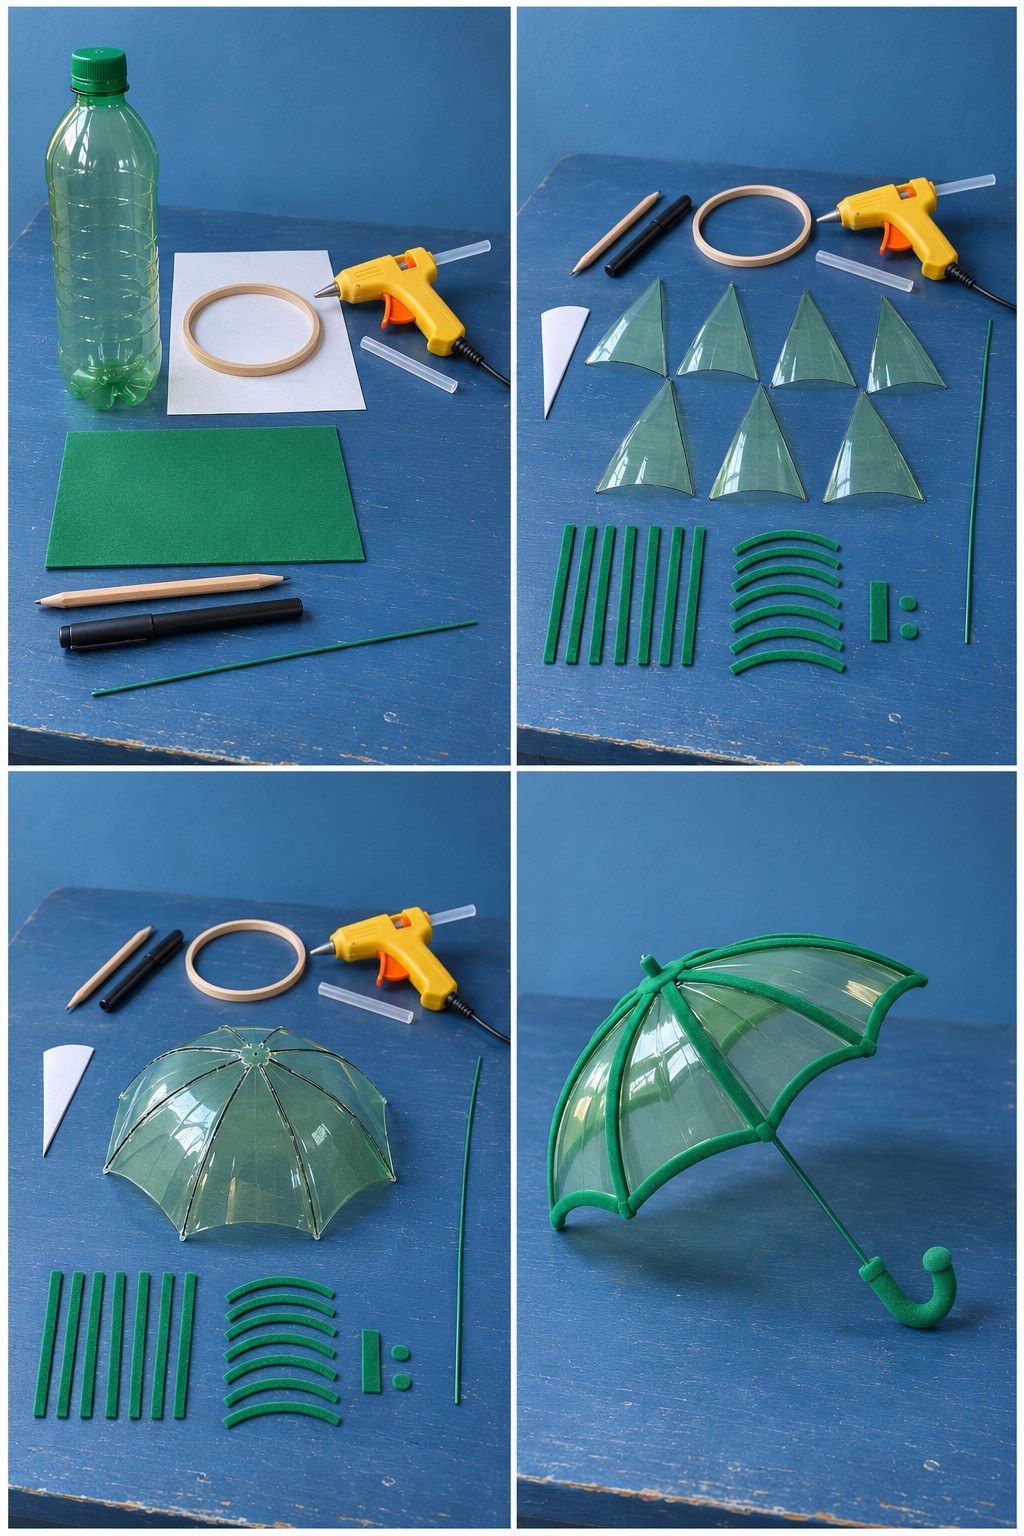
Seven curved wedges cut from a green bottle meet at a point to make a translucent canopy, and green felt covers every seam and the scalloped edge. A thin green wire rod with a felt hooked handle completes a little umbrella for a shelf display or a doll house.
Besides the bottle, you need paper for a template, a pencil, a black marker, a wooden embroidery hoop, green felt, the wire rod and a hot glue gun.
- Draw a narrow wedge with a curved bottom edge on paper and cut it out. Trace it seven times onto the bottle wall, taking every panel from the same height so they share the same curve, and cut them out.
- From felt, cut seven straight strips for the ribs, seven curved strips for the edges and the small pieces for the tip and handle.
- Lay all seven panels out together to check that the points meet, then glue them edge to edge into a dome. The embroidery hoop makes a handy round guide for keeping the rim even.
- Glue a straight felt strip over each seam and a curved strip along each scalloped edge. Fix the rod under the center and the felt tip on top, then bend the lower end of the rod into a hook and cover it with felt.
Red and White Layered Bottle Flowers
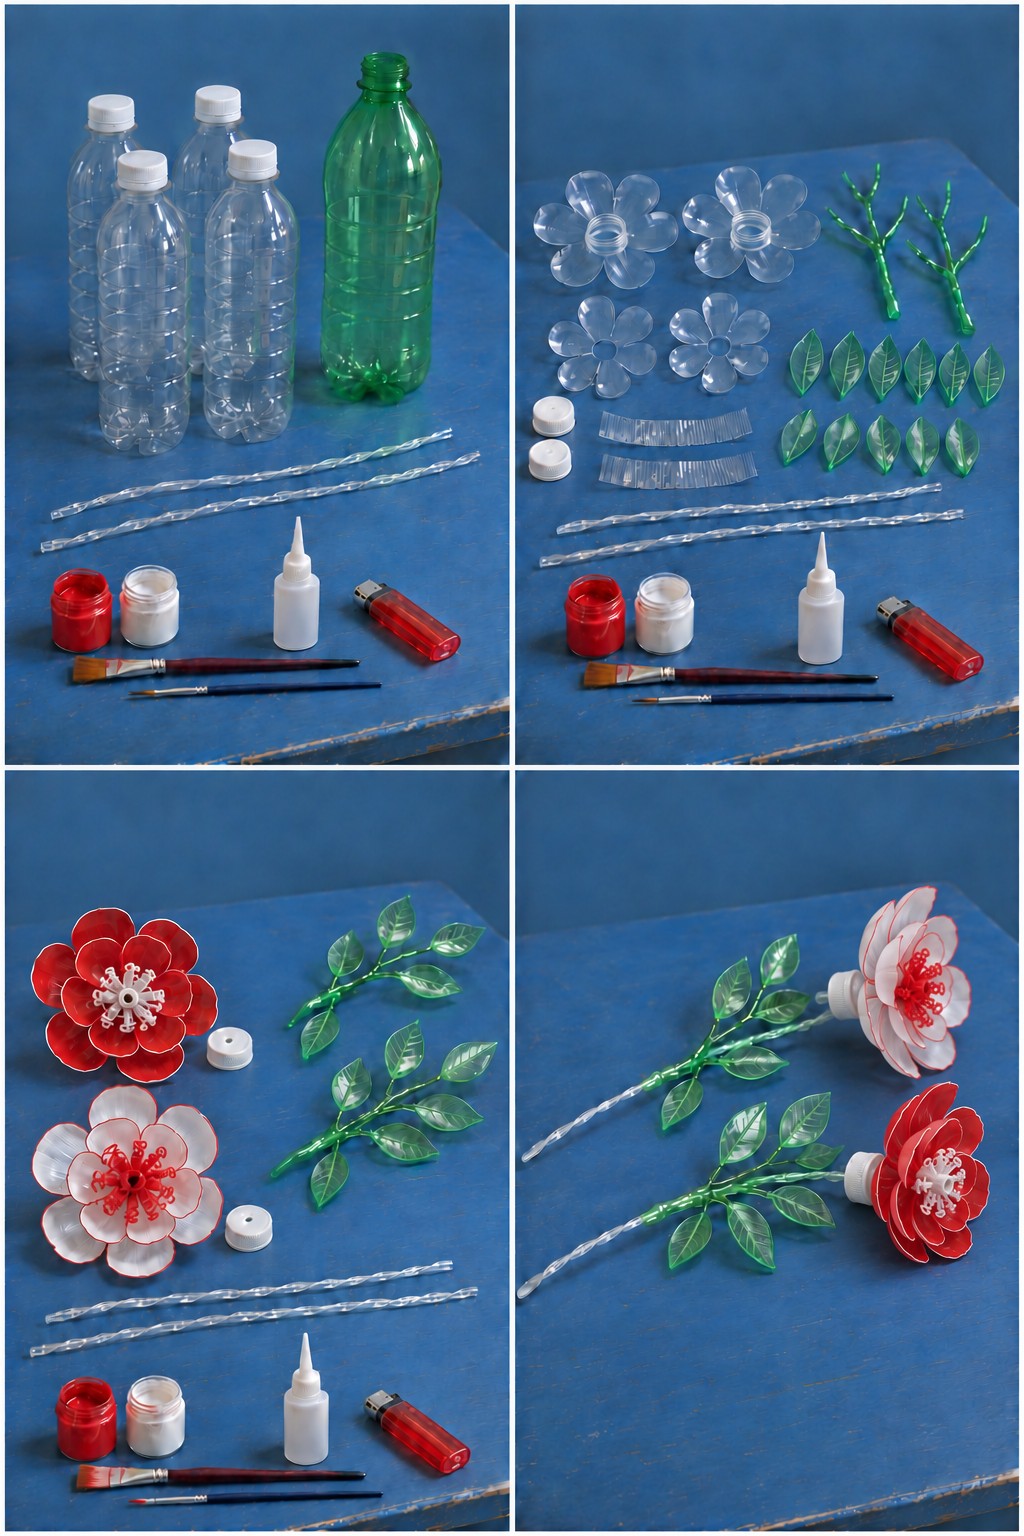
These two blooms are fuller than they first look. Each one combines a large six petal flower cut around a bottle neck, a smaller six petal layer and a curled fringe in the center, all painted after assembly. One is red with white stamens, the other white with fine red edges and red stamens, and both sit on twisted clear stems with branches of green bottle leaves.
- 4 clear bottles with white caps
- 1 green bottle
- 2 twisted clear stems
- Red and white paint, a flat brush and a fine brush
- Craft glue
- A lighter
- Cut two large six petal flowers from bottle shoulders, keeping the neck ring at the center, and two smaller six petal flowers with a hole in the middle. Cut two fringed strips for the stamens. From the green bottle, cut about a dozen leaves and two thin branching stems.
- An adult warms the petal edges and the fringe briefly above the lighter so they cup and curl, holding them well clear of the flame.
- Stack the small flower on the large one with the fringe in the center. Paint one flower red with white stamens, and the other white with red petal edges and red stamens. Glue the leaves along the green branches.
- Screw a white cap onto the neck behind each flower, glue the cap to the top of a clear stem and glue a leafy branch along each stem.
Pallet Style Painted Wall Vases
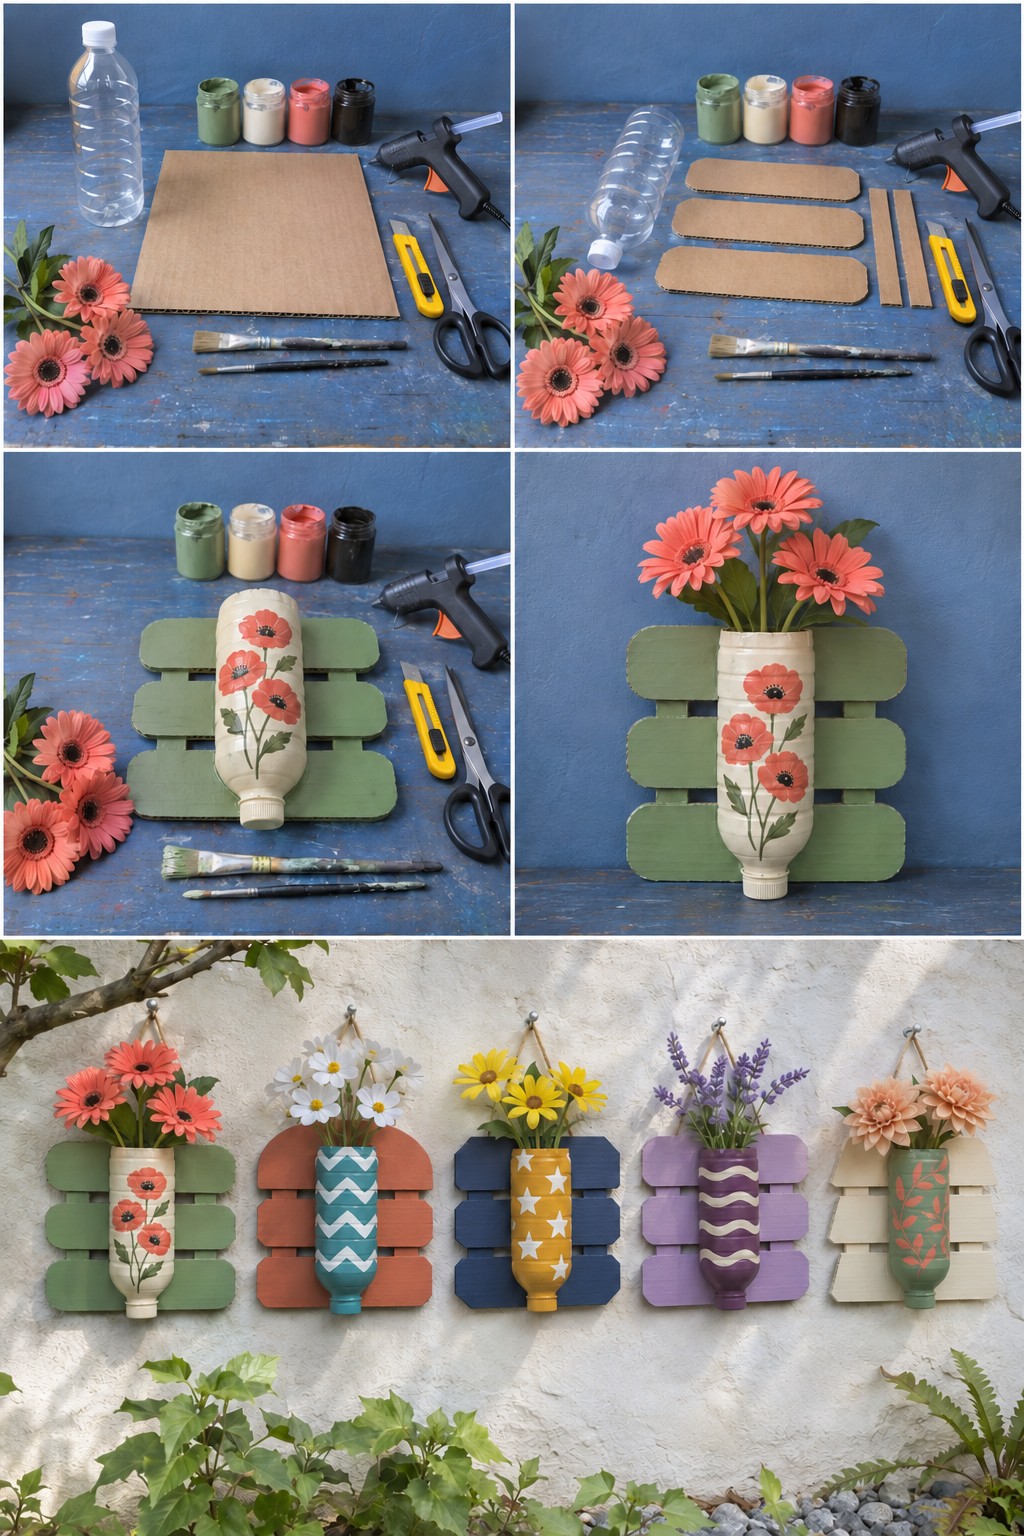
Three cardboard slats with rounded ends, glued across two narrow strips, make a tiny pallet, and an upside down painted bottle on the front becomes the vase. The first one pairs a sage pallet with a cream bottle covered in coral poppies. The last photo shows a whole row: terracotta with teal chevrons, navy with yellow stars, lilac with purple waves and cream with a sage bottle painted with coral leaves.
For one vase you need a clear bottle with its cap, corrugated cardboard, sage, cream, coral and black paint, two brushes, a craft knife, scissors, a hot glue gun and a few gerberas. A length of jute twine makes the hanging loop.
- Cut three wide slats with rounded ends and two narrow strips from the cardboard. Glue the slats across the strips with small gaps between them and paint the pallet sage.
- Cut the bottom off the bottle, turn it neck down with the cap on and paint it cream. Add coral poppies with black centers and sage stems.
- Glue the bottle to the front of the pallet and the jute loop to the back.
- Hang it on a small hook and arrange the flowers in the open top.
The finished row hangs outdoors, and cardboard does not cope well with damp. Seal the pallets with a clear outdoor varnish, hang them under an overhang where rain cannot reach, and use faux flowers rather than fresh ones that need water.
Lotus Fairy Light Pendants
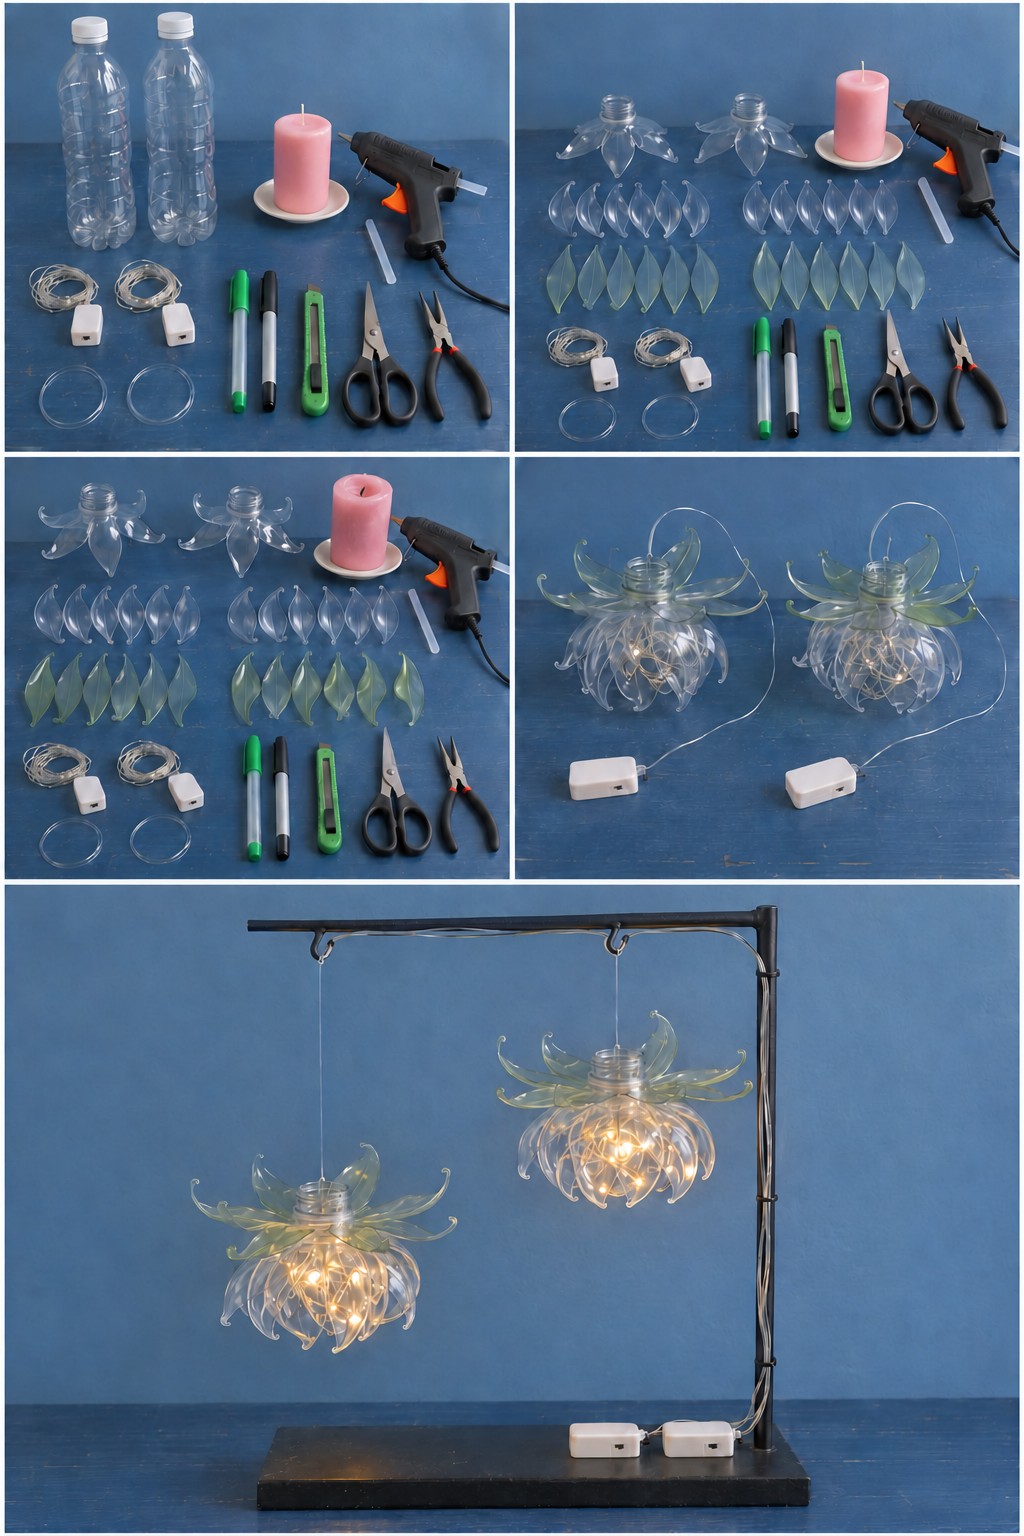
Each pendant keeps the bottle neck at the top. Pale green leaves fan out around it, and layers of curled clear petals form a round bloom underneath with fairy lights glowing inside. The pair hangs at two heights from a black stand, with the battery boxes resting on its base.
- 2 clear bottles
- 2 strings of battery LED fairy lights
- 2 clear plastic rings
- Green and black markers
- Craft knife, scissors and pliers
- Hot glue gun
- A pillar candle on a saucer, used only for shaping
- A black hanging stand
- Cut the shoulder of each bottle into a crown of pointed petals around the neck. From the bottle walls, cut six loose petals and six leaves for each pendant, and tint the leaves with the green marker.
- An adult lights the candle and holds each petal and leaf tip above the flame for a moment so it curls, gripping the small pieces with the pliers. Blow the candle out as soon as the shaping is finished.
- Glue the leaves around the neck, then build the clear petals in layers below, with a clear ring inside as a frame that keeps the bloom round. Tuck the fairy lights inside and leave the wire free.
- Hang the pendants from the stand at two heights, run the wires down the post and set the battery boxes on the base.
Mint and Pink Bunny Succulent Planters
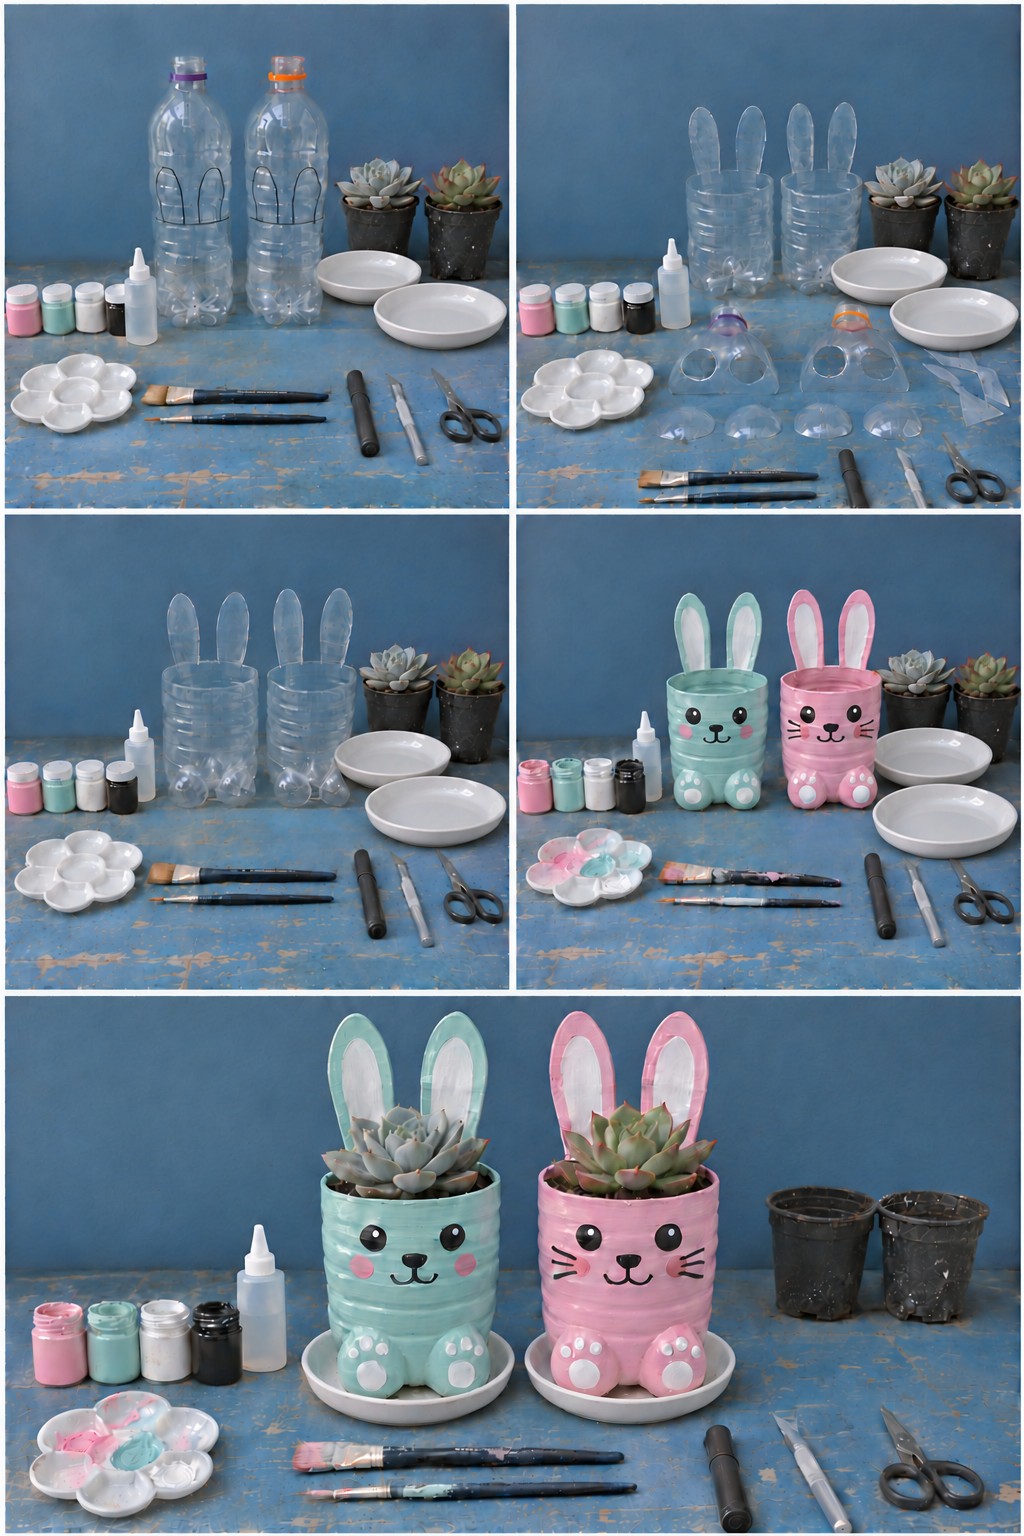
Two tall ears are drawn on each bottle and cut so they stay attached to the cup, and two small plastic domes glued to the front become round feet. One bunny is mint and the other pink, both with white inner ears, rosy cheeks, white paw pads and simple faces. The pink one also gets whiskers.
Gather two clear bottles, pink, mint, white and black paint, a palette and two brushes, clear craft glue, a marker, a craft knife, scissors, two rosette succulents and two white saucers.
- Draw the ears with the marker. Cut around each ear, then straight around the bottle at the base of the ears, so the ears rise from the cup.
- From the leftover tops, cut four small round domes. Glue two to the front base of each cup and let the glue set.
- Paint one bunny mint and the other pink. Add white inside the ears, black eyes with a white highlight, a black nose and smile, pink cheeks, white paw pads with toe dots, and black whiskers on the pink bunny.
- Pierce a few drainage holes in the base, fill with a gritty cactus and succulent mix and move the succulents in from their nursery pots.
Stand each bunny on its saucer and tip out any water that collects there after watering. Rosette succulents rot quickly when their roots sit wet.
Faux Brick Wall Planter Pockets
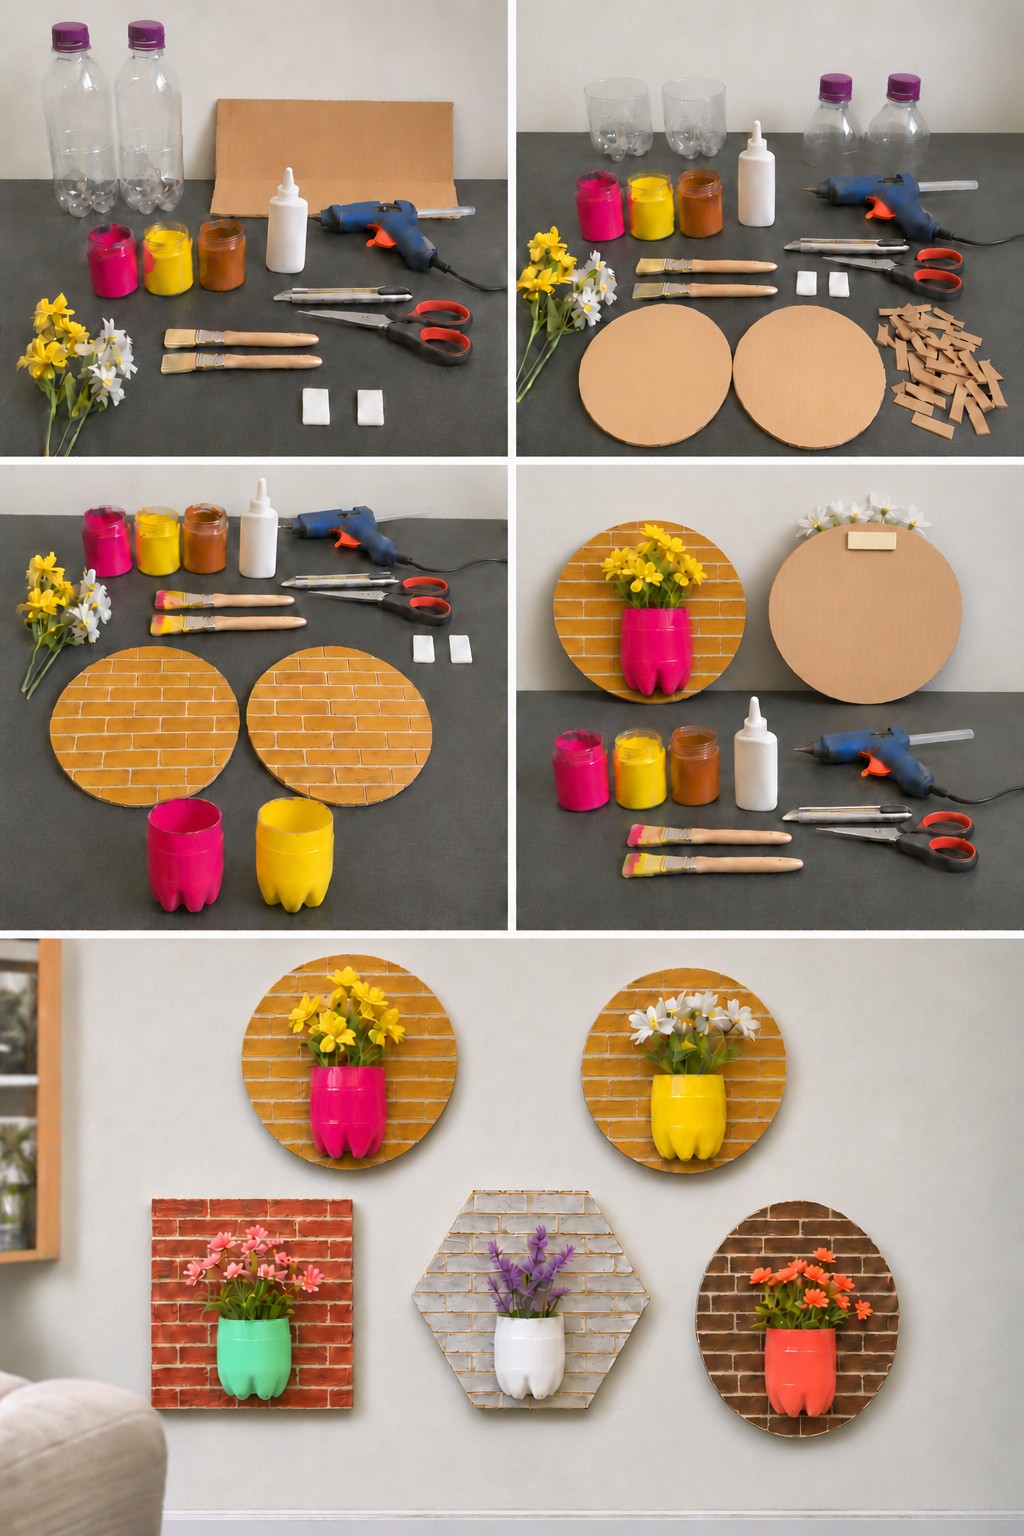
Dozens of tiny cardboard rectangles, glued in staggered rows, give these round plaques a raised brick texture. A magenta pot of yellow flowers and a yellow pot of white daisies sit on two ochre brick circles. The last photo shows how far the idea can stretch, adding a mint pot on red brick, a white pot on a pale gray hexagon and a coral pot on dark brown brick.
For the first pair you need two clear bottles, cardboard, magenta, yellow and brown paint, white glue, a hot glue gun, a craft knife, scissors, two brushes, mounting pads and yellow and white faux flower stems.
- Cut the bottom off each bottle as a short pot. Cut two cardboard circles and a pile of small rectangles for the bricks.
- Glue the rectangles onto the circles with white glue in staggered rows, leaving narrow gaps. Paint the bricks in mixed yellow and brown tones and keep the gaps paler so they read as mortar.
- Paint one pot magenta and the other yellow, then hot glue each onto its plaque.
- Fill the pots with the faux stems and press a mounting pad onto the upper back.
Faux flowers are the right choice here, since water would soften the cardboard. Pick mounting pads rated for the finished weight and for your wall surface.
Clear Hourglass Bottle Planters
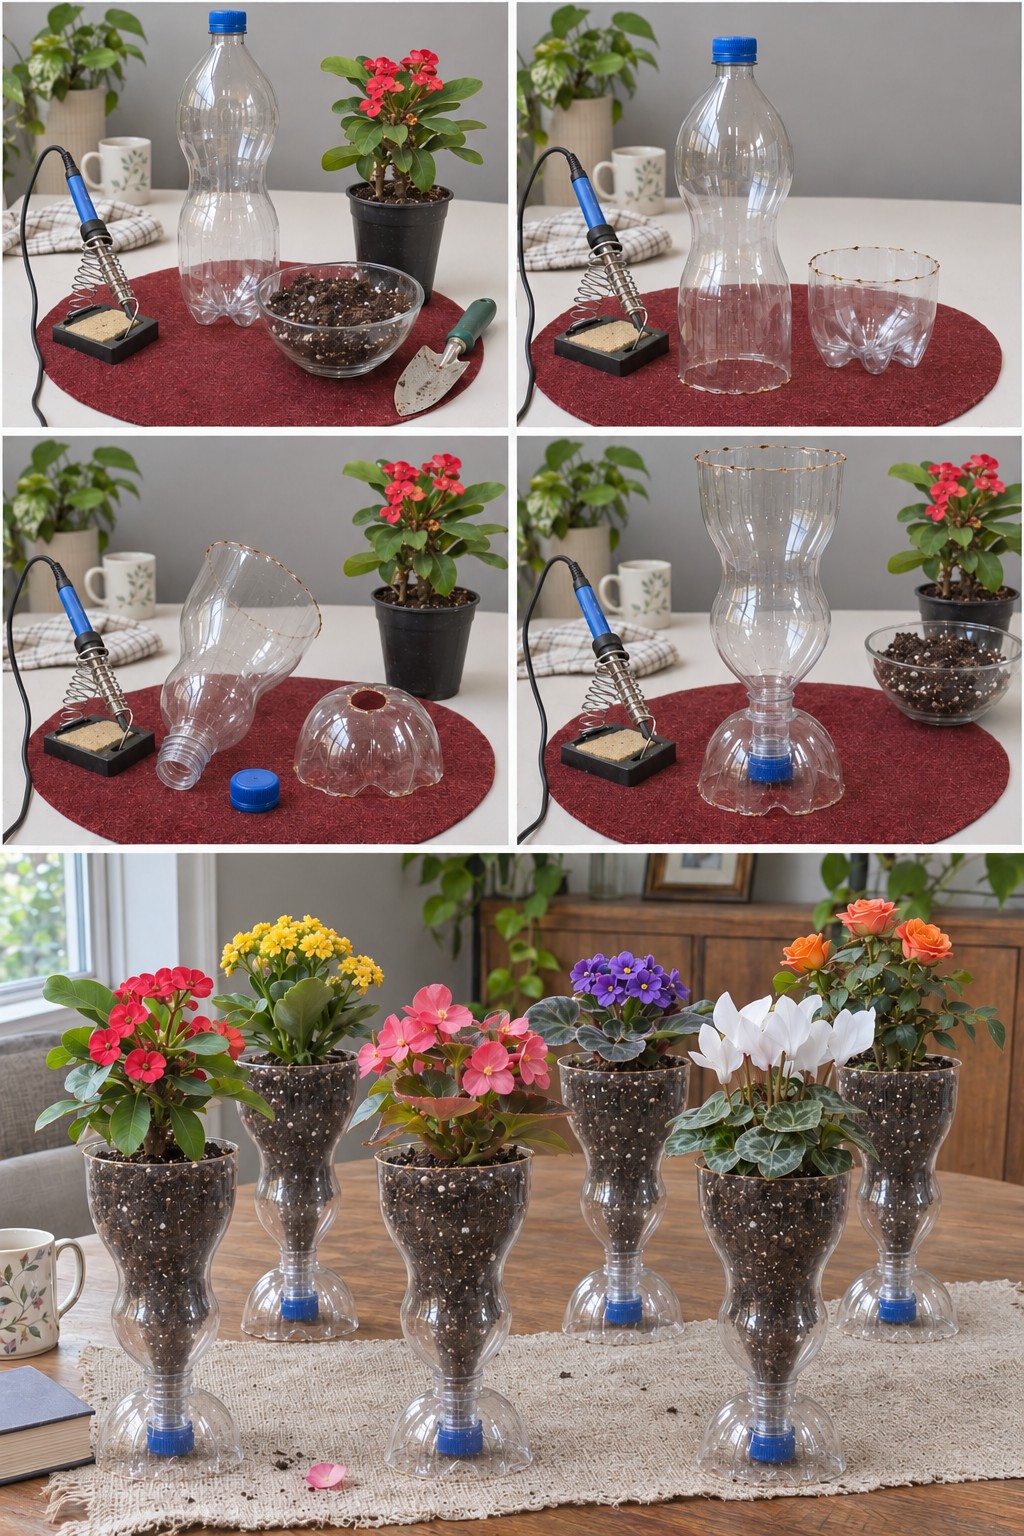
The bottle body becomes a tall planting vase and its own base, flipped over, becomes a small domed stand. The neck passes through a hole in the dome and the blue cap screws on underneath, locking the two parts together. Six of them in a row, each with a different flowering plant such as an African violet, a white cyclamen or a miniature rose, make a long table centerpiece.
- Cut the bottle a few centimeters above the base. A craft knife and scissors give a clean, clear edge. The photos use a soldering iron, which goes through faster but leaves a brown rim.
- Turn the base over into a dome and cut a hole in its center just wide enough for the neck. Unscrew the cap.
- Turn the bottle neck down, push the neck through the dome and screw the cap back on underneath.
- Fill with potting mix using a small trowel and plant, leaving a little space below the rim for watering.
With the cap closed nothing can drain, so water in small, measured amounts. Drilling a few holes through the cap lets extra water out, but then the planter needs a tray beneath it.
Gold Star Balloon Lanterns
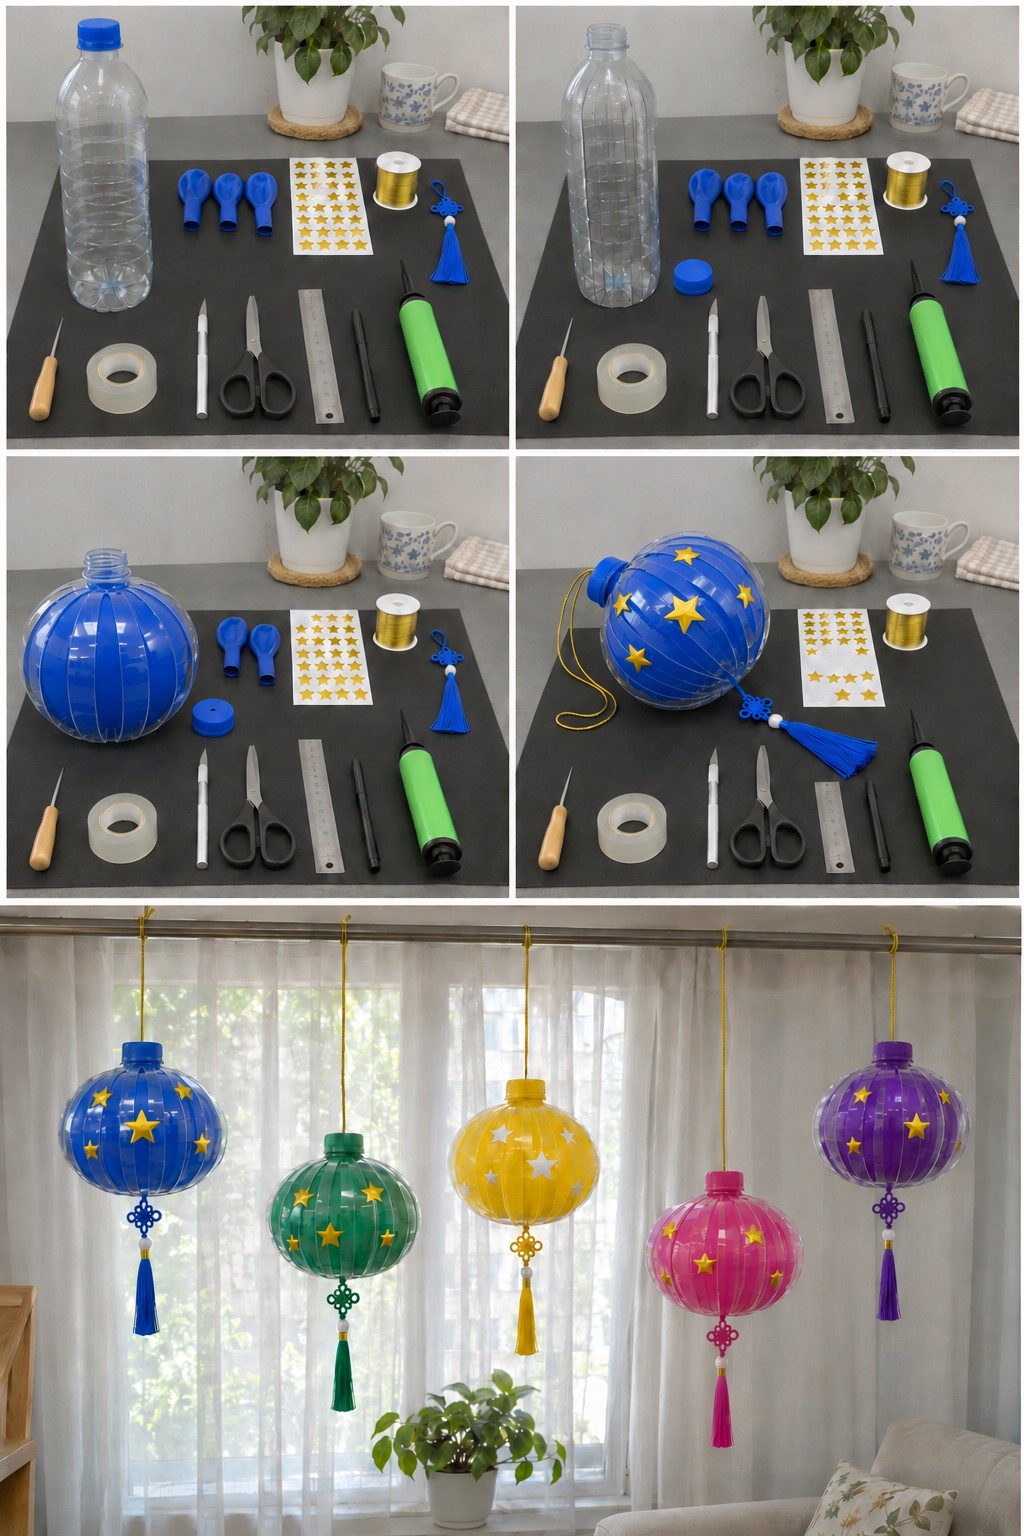
A balloon inflated inside a bottle that has been slit into vertical strips pushes the strips outward into a round lantern, and the color of the balloon shows through the clear ribs. Star stickers, a gold hanging cord and a tasseled knot charm finish each one. In the window row of five, every lantern has gold stars except the yellow one, which gets white stars so they stand out. There is no light inside; these are purely decorative.
You need a clear bottle with its cap, balloons in the lantern color, star stickers, gold cord, a tassel with a knot charm, an awl, a craft knife, scissors, a ruler, a pen, clear tape and a hand pump.
- Draw evenly spaced vertical lines around the bottle with the ruler and pen. Cut along them from the shoulder to just above the base, so the strips stay joined at both ends.
- Remove the cap and pierce a small hole in its center with the awl, then another in the center of the bottle base.
- Push a balloon in through the neck and pump it up until the strips bow out into an even globe, then tie it off.
- Stick the stars over the strips. Thread the gold cord through the cap and screw it back on, then pass the tassel loop through the hole in the base and tape its end inside.
Balloons slowly lose air, so expect to replace one from time to time.
Fence Rail Herb Pockets
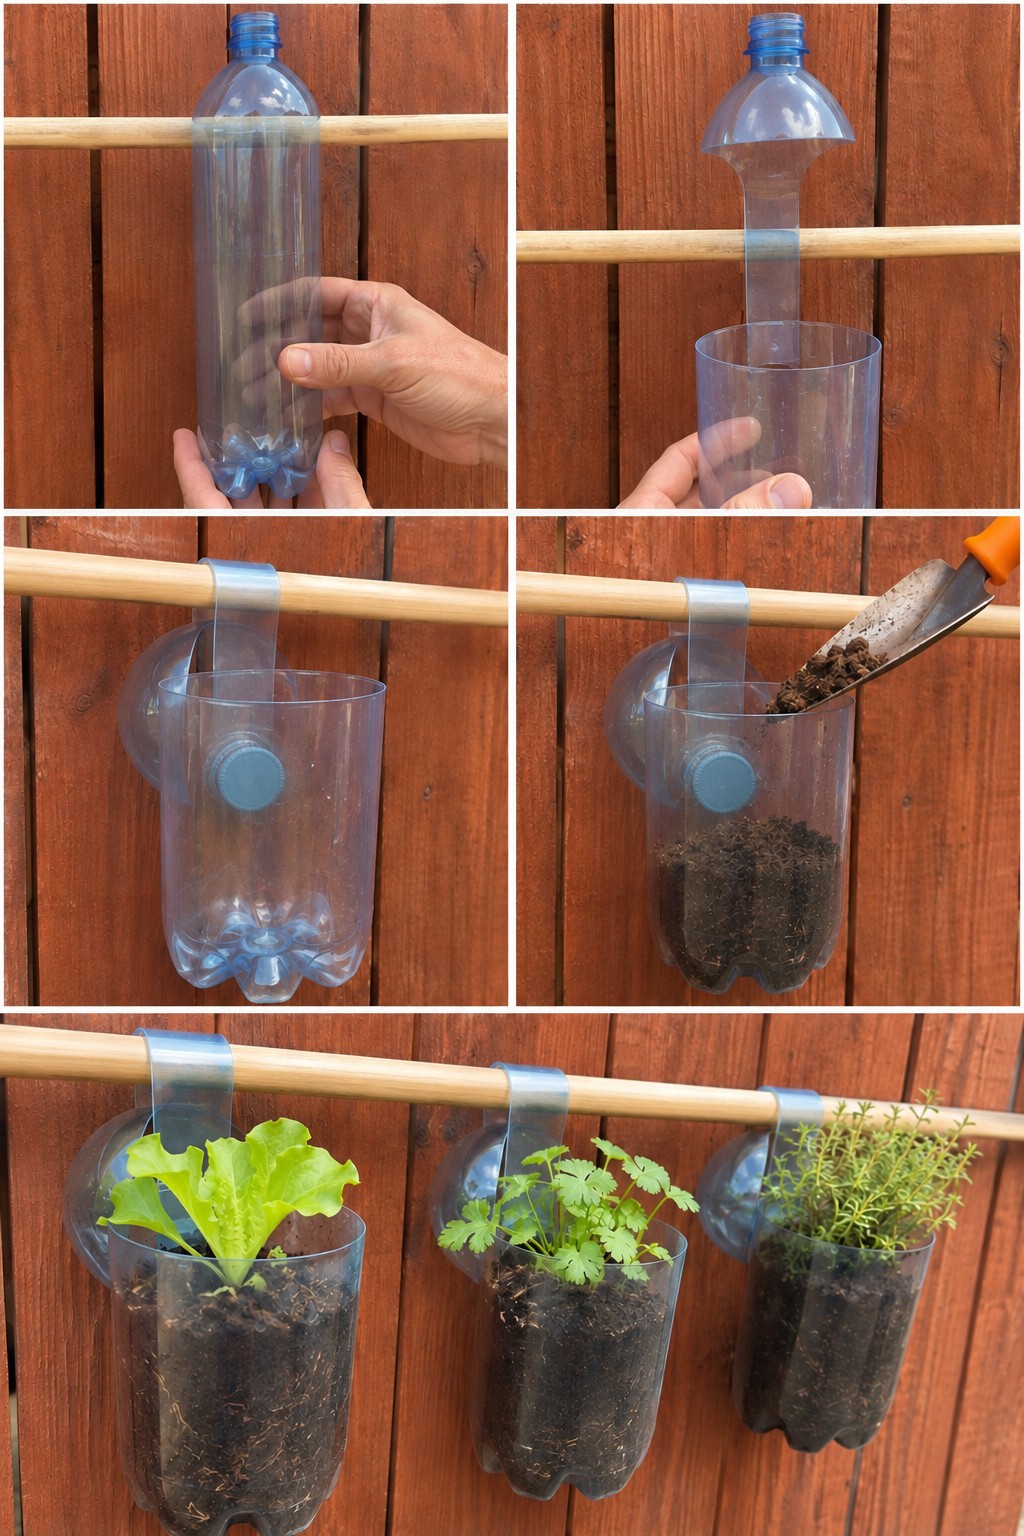
One bottle, no glue. The sides are cut away to leave a single wide strap joining the cup to the domed top. The strap goes over a wooden rail, the dome drops behind the cup, and the neck pushes through the back wall of the cup, where the cap screws on from inside and locks the pocket in place. The row in the photo holds lettuce, cilantro and thyme.
- Hold the bottle against the rail to judge how deep the cup should be and how long the strap needs to be to loop over.
- Cut away the sides between the base and the shoulder, leaving one wide strip that connects the lower cup to the top. Sand the edges.
- Loop the strap over the rail and bring the dome down behind the cup. Cut a small hole in the back of the cup, push the neck through and screw the cap on from the inside.
- Make a few drainage holes in the bottom, then fill with potting soil using a trowel and plant.
Small pockets dry out fast in summer sun, so check them every day or two when it is hot. Sunlight also makes thin plastic brittle over time; replace any pocket whose strap starts to crack before it gives way.
Spider Plant Basket Centerpiece
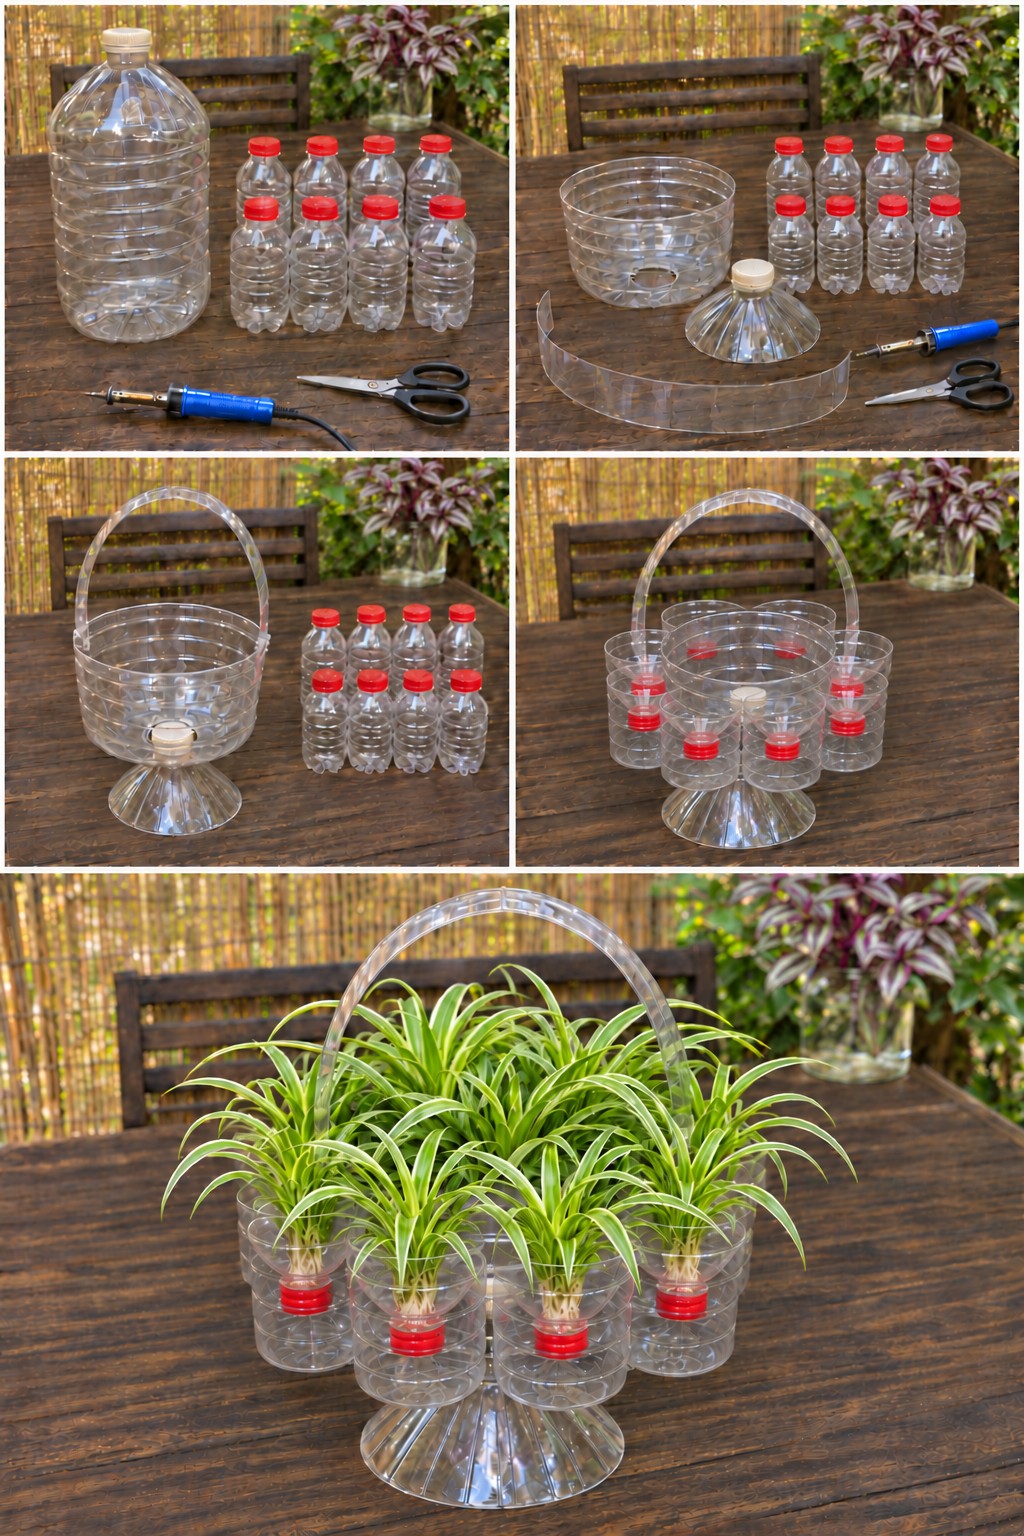
A 5 liter water bottle supplies all three parts of this basket: the bowl, the cone shaped foot and the arched handle. Eight small bottles with red caps become water cups around the outside, and spider plant babies fill the cups and the center, spilling over the rim.
- 1 clear 5 liter bottle with its cap
- 8 small bottles with red caps
- Scissors and a craft knife
- Clear glue suitable for plastic
- Spider plant babies and water
- Cut the large bottle into three parts: the shoulder with its cap as a cone, a deep bowl from the base and one long strip from the wall for the handle. Cut a hole in the middle of the bowl's bottom just big enough for the neck.
- Unscrew the cap, push the cone's neck up through the hole from below and screw the cap back on inside the bowl, so the cone becomes the foot. Fix the strip to opposite sides of the rim as an arched handle.
- Cut each small bottle in two, turn the capped top neck down inside its own base and glue the parts together. Glue the eight cups closely around the outside of the bowl.
- Fill the cups with water and set a spider plant baby in each, with more in the bowl.
The photos show a soldering iron for the cutting, but scissors and a knife give the same cups with cleaner edges. Once the cups are full, lift the basket by the bowl and foot rather than the handle, and top up the water as it drops.
Questions About Plastic Bottle Crafts
Which bottles work best?
Clean drink bottles with firm, smooth walls are the easiest to cut and paint. Match the shape to the job: straight sides for rings and cups, rounded shoulders for petals and domes, and a large water jug when you need a bowl, a foot and a handle from one piece.
Does acrylic paint stay on plastic bottles?
It holds much better with a little preparation. Remove all the label glue, wash and dry the bottle, then sand the outside lightly or use a primer made for plastic. Thin coats chip less than one thick coat, and the paint needs its full curing time before the piece is handled or watered.
Can bottle planters stay outdoors?
For a season or two, yes. Sunlight slowly makes thin plastic brittle, so check straps, rims and glued joins now and then and replace any part that starts to crack. Pieces with cardboard or paper on them belong indoors or under cover.
Keep your offcuts until a project is finished, because a spare strip or shoulder often turns into a leaf, a handle or a foot.
Heat, Sharp Edges and Balloons
Three projects here use heat to shape the plastic. The spiky flower stem curls its fringe over a lighter, the red and white flowers and the lotus pendants are softened above a candle, and a couple of the bottles in the photos were trimmed with a soldering iron. Bottle plastic goes soft well before it burns, which is why a second or two above the flame is all it needs. Keep these steps for an adult, hold the piece above the flame instead of in it, and stop the moment an edge turns brown or starts to smoke, because at that point the plastic is burning and the smoke is not something anyone should breathe. Work next to an open window, and wherever scissors can make the same cut, pick up the scissors.
Freshly cut bottle plastic is sharper than people expect, the thin strips of the starburst lamp and the fringe on the flower stem most of all, so sand those edges before small hands get near them. Beads, pearls, gems and teardrop tips are exactly the size a toddler can choke on, so the pieces that carry them belong on a shelf rather than in a toy box.
The balloon lanterns need their own thought. An inflated balloon sitting inside a bottle is harmless enough, and the photos use a hand pump so nobody has to blow them up by mouth. The danger comes from deflated or burst balloons, which can be drawn into a young child's airway and are very hard to dislodge, so keep the spare balloons in a drawer, pick up every scrap if one pops, and keep children under about eight away from them unless an adult is right there.
Finally, every glowing piece in this list, from the flower dome to the lotus pendants, runs on battery fairy lights, and a real flame should never go inside a bottle. Keep the battery boxes closed, and if your lights use small coin cells rather than regular batteries, store them out of reach, since a swallowed coin cell can injure a child's throat within a couple of hours.
Leave a Reply