
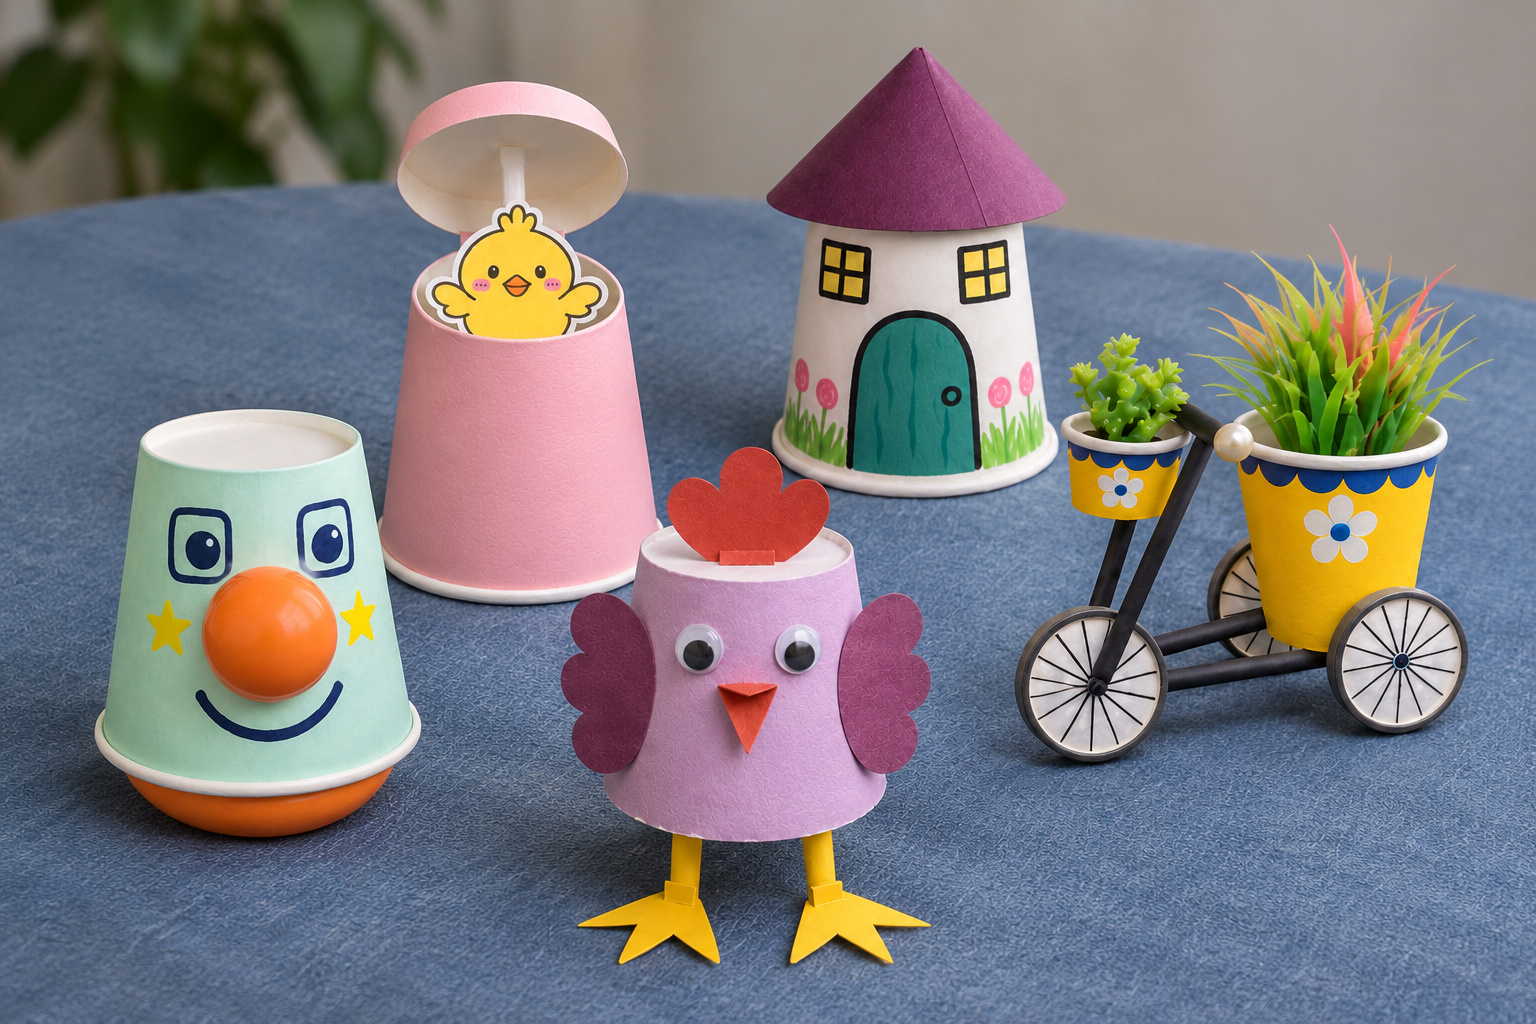
A sleeve of paper cups goes a long way on a rainy afternoon. Every cup already has a rim, a flat base and a tapered wall, so a few cuts turn it into a pop up toy, a tiny house, a lampshade or a flower. The 38 crafts below start with quick toys that move, then go on to games, storytime props, lamps and a few wall pieces that take an evening or a weekend.
Each photo strip reads left to right and top to bottom, from the supplies to the finished craft, and the instructions under it follow the same panels. The short section below explains why glue sometimes refuses to stick to a cup, and a note at the very end covers the few materials that need an adult close by.
Table of Contents
- How Paper Cups Take Glue and Paint
- Hungry Monster Paper Cup with a Pop Up Lid
- Smiling Flower Cut from One Pink Paper Cup
- Princess Paper Cup with a Turning Dress
- Paper Cup Tricycle Planter
- Balloon Nose Clown That Wobbles
- Pop Up Chick Surprise Paper Cup
- Cat Puppet with Lifting Arms
- Hungry Dinosaur Feeding Paper Cups
- Ginkgo Leaf Table Lamp
- Fairy House with a Purple Cone Roof
- Rolling Paper Cup Car with Bottle Cap Wheels
- Spotted Cow on Rolled Paper Legs
- Phone Flashlight Projector Paper Cup
- Giant Glowing Owl from Stapled Paper Cups
- Light Up Flower Bouquet on a Rainbow Base
- Party Glasses from Paper Cup Rings and Straws
- Mirror and Pearl Hanging Mobile
- Peekaboo Ghost on a Stick
- Lace Mini Lamp with an LED Tealight
- Polka Dot Top Hat
- Pellet Drum on a Stick
- Red and Yellow Paper Cup Wall Medallion
- Curled Strip Pendant Light
- Heart Cutout Desk Lamp
- Blue Fairy House with an Opening Door
- Wheel Wall Hanging with Pansy Paper Cups
- Floating Sailboats with Striped Sails
- Blossom Tree Slotted into a Paper Cup
- Shelf Sitter Puppy with Dangling Legs
- Beach Scene Card with a Paper Cup Pocket
- Catch the Ball Paddle
- Shoebox Football Table
- Paper Cup Chicks on Paper Legs
- Train Pencil Holder
- Jumping Frog Popper
- Smoke Ring Cannon Paper Cup
- Hot Air Balloon Ball Run
- Cat Face Hanging Lantern
- Quick Cups for a First Afternoon
- Balloons, Batteries and the Other Small Stuff
How Paper Cups Take Glue and Paint
Most hot drink cups are paperboard with a thin plastic lining on the inside. The outside takes markers, paint and a glue stick well, but the lined inside is slick, so anything that has to hold in there, such as a straw, a light or a paper tab, needs clear tape, double sided tape or a dot of hot glue. Ripple wall cups have a ridged outer layer that holds paint nicely but gives glue very little to grab, so give ears and other add ons a folded tab and glue the tab instead.
A few habits make cups much easier to work with:
- To draw a level line around a cup, rest a marker on a stack of books at the right height and turn the cup against its tip.
- Start a cut by pushing a pencil point or an awl through the wall onto a lump of modeling clay, then finish with small scissors. The cup stays round instead of crushing.
- Use acrylic paint or paint markers on printed cups. Ordinary water based markers tend to bead up on the coating.
- Make holes smaller than you think you need and widen them. A snug hole holds a straw or a stick better than glue does.
Hungry Monster Paper Cup with a Pop Up Lid
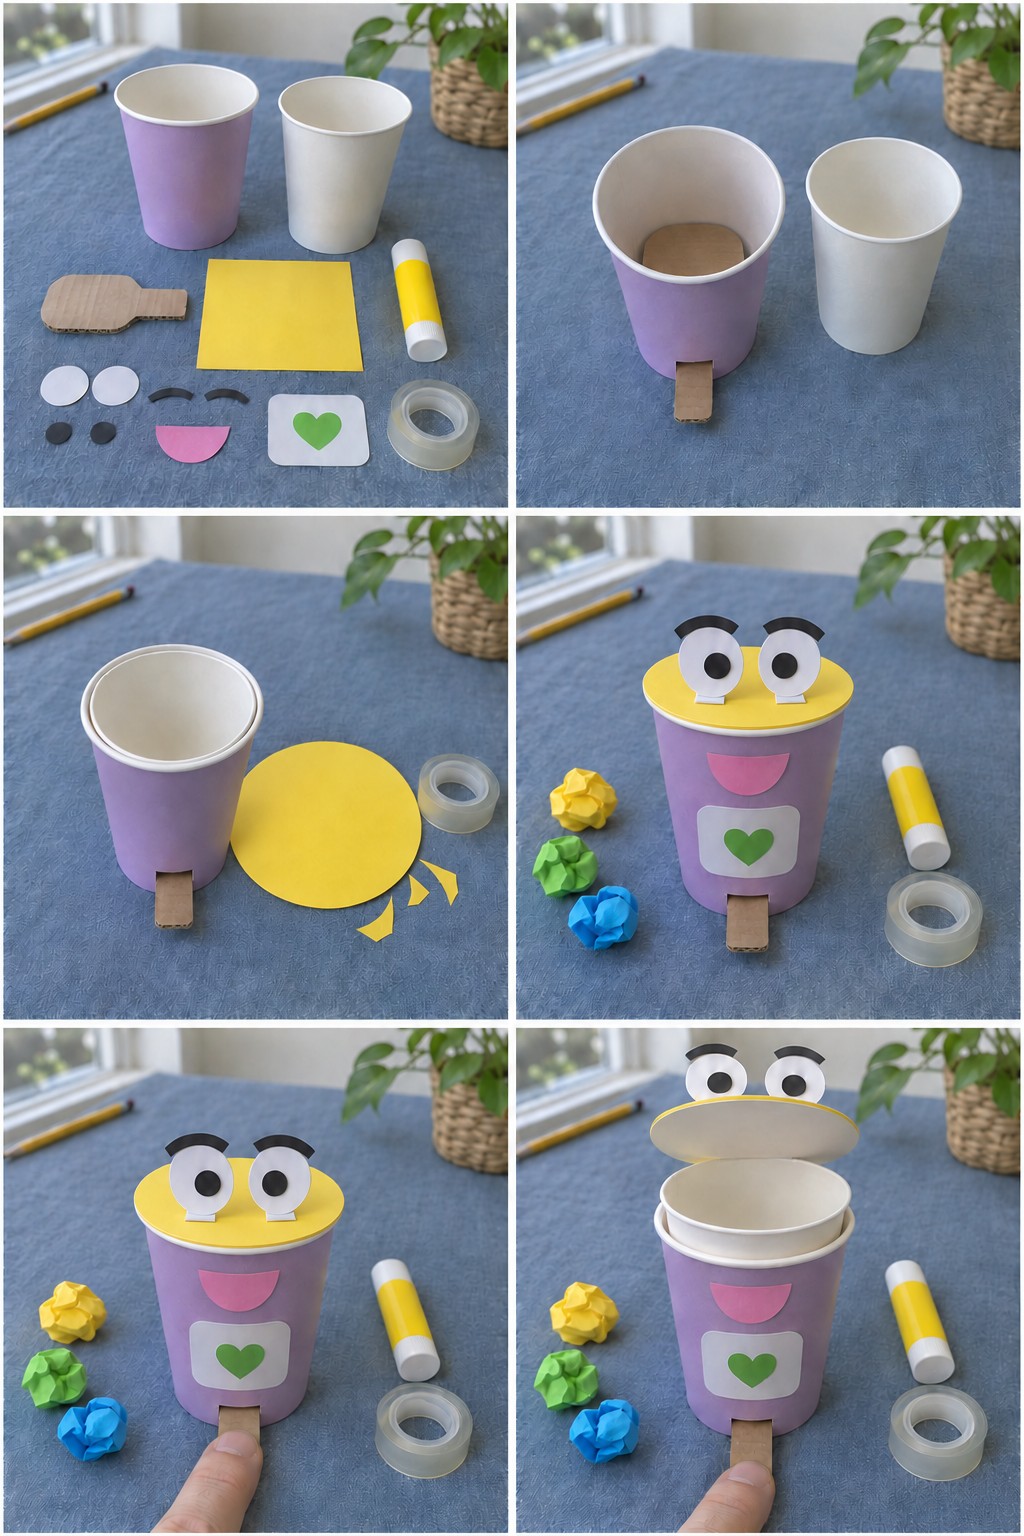
Push the cardboard tab up and the monster opens its yellow lid, ready for a paper ball snack. The trick is a white cup sitting inside the lilac one on a cardboard paddle: lifting the paddle lifts the inner cup, and its rim pushes the hinged lid open.
Supplies: a lilac cup and a white cup of the same size, a cardboard paddle with a narrow handle, a square of yellow card, a glue stick, clear tape, paper eyes, pupils and brows, a pink paper mouth, a small white label with a green heart, and a few crumpled tissue paper balls to feed it.
- Cut a slot near the base of the lilac cup, just wide enough for the paddle handle. Lay the paddle flat inside with the handle sticking out.
- Set the white cup on top of the paddle. Cut a yellow circle a little larger than the rim and tape its back edge to the lilac cup so it swings like a lid.
- Fold a tiny foot at the bottom of each eye and glue the eyes standing up on the lid, then add the pupils and brows. Glue the mouth and the heart label to the front.
- Press the handle up to open the mouth, drop in a ball and let the handle down again.
If the lid sticks, the slot is usually too tight, so trim it until the handle slides freely. Keep glue off the white cup, because it has to move.
Smiling Flower Cut from One Pink Paper Cup
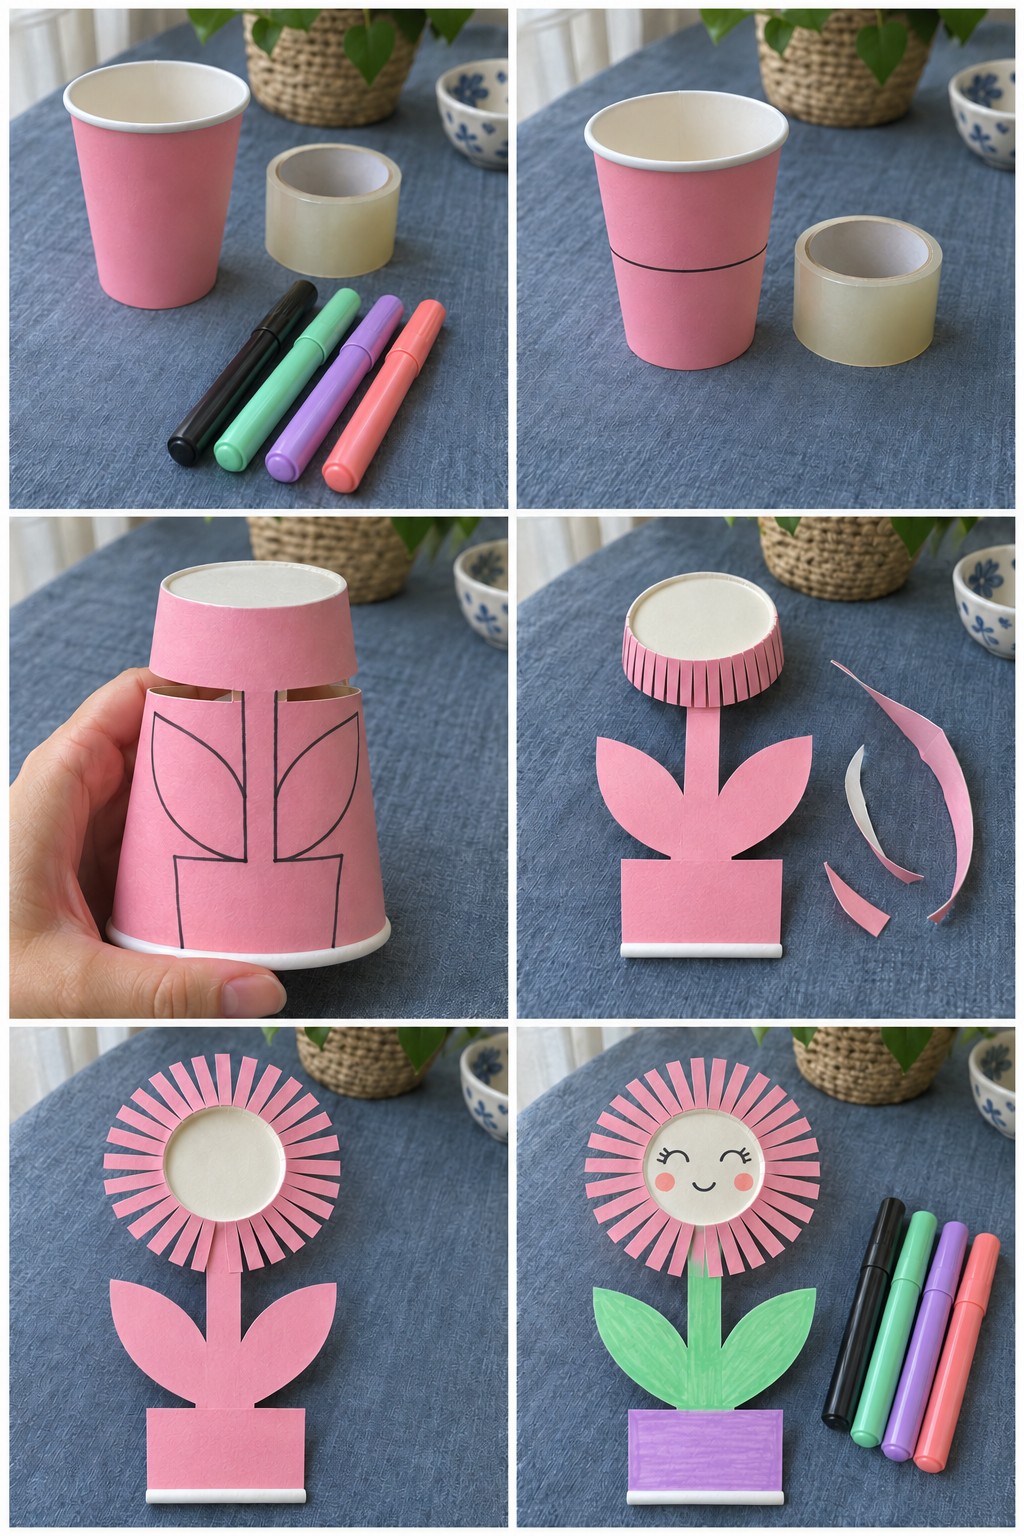
No glue at all for this one. The petals, stem, leaves and pot all come from the same pink cup, so the flower stays in one piece and lies flat when it is done.
Draw a line around the middle of the cup. Turn it upside down and draw a straight stem, two leaves and a square pot on the wide half, between the line and the rim. Cut away the rest of that half, keeping the stem joined to the band above the line and the pot joined to a strip of the rolled rim. Snip the band around the base into a fine fringe, stopping at the base disc, and spread it out flat as petals. Color the stem and leaves mint, the pot purple, and draw a sleepy smile with coral cheeks in the white center.
Leave the stem a little wider than looks necessary. It is the weakest point, and if it creases, a strip of clear packing tape on the back fixes it without covering the face.
Princess Paper Cup with a Turning Dress
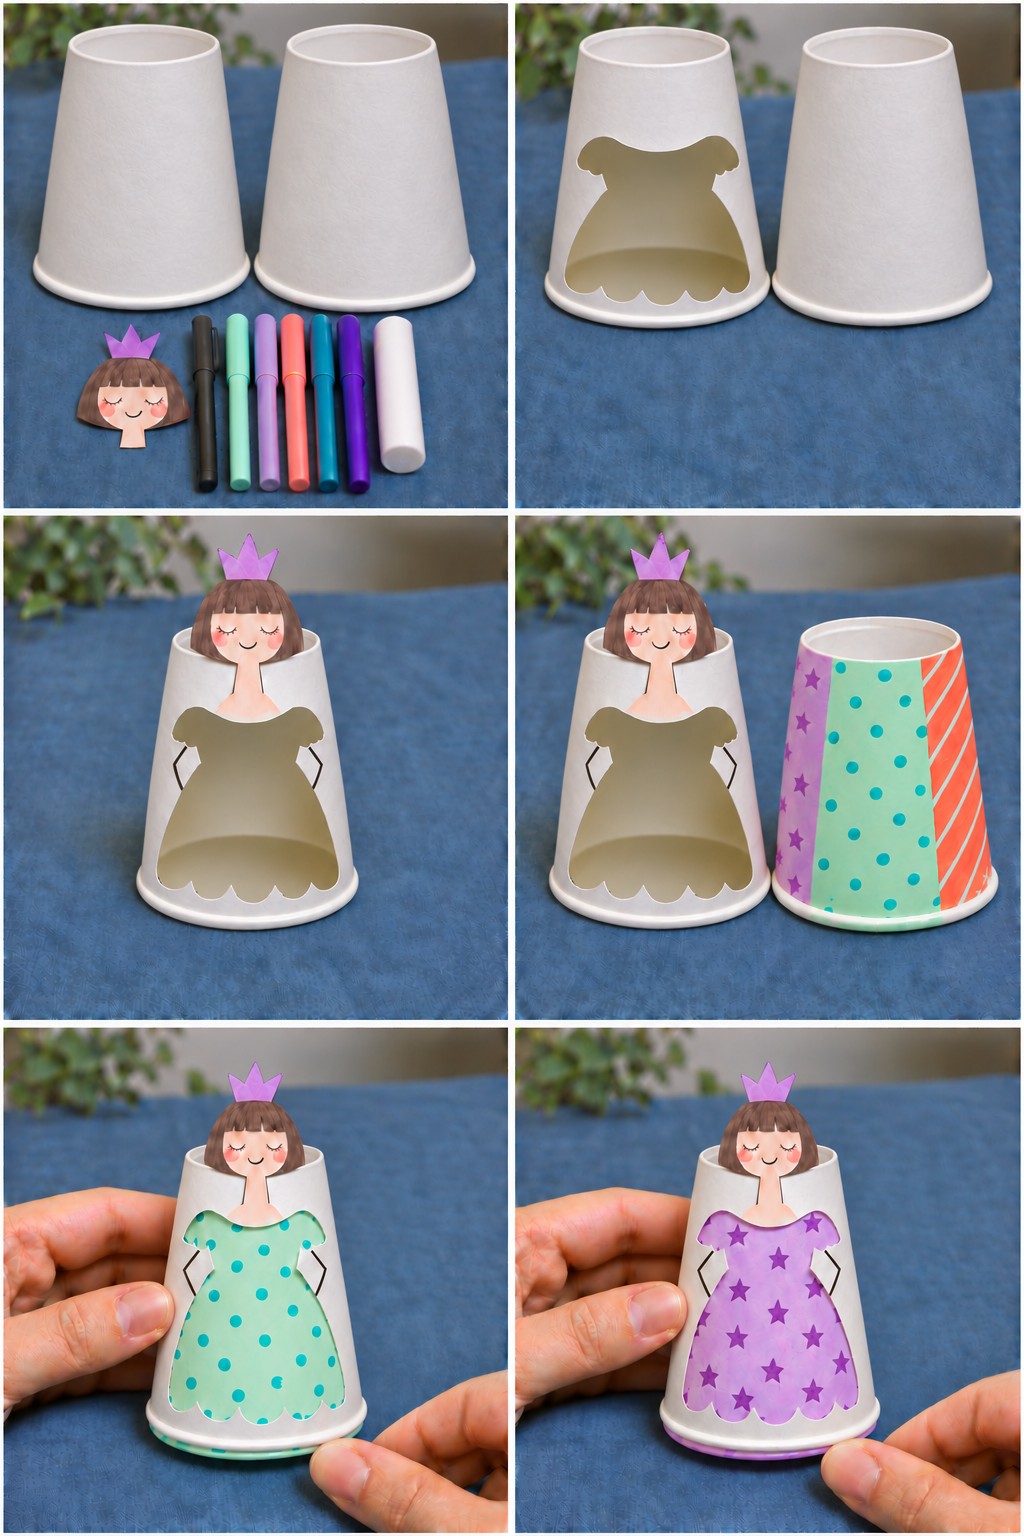
One cup is the princess and the other is her wardrobe. Turn the inner cup and a new dress fills the window: mint with teal dots, lilac with purple stars or coral stripes.
You will need two white cups of the same size, a paper head with a crown, a black marker, markers in mint, teal, lilac, purple and coral, and a glue stick.
- On one upside down cup, draw a dress with puff sleeves and a scalloped hem and cut it out as a window. The curves are fiddly, so an adult may want to cut this for younger kids.
- Glue the head just above the small base end and draw two bent arms beside the dress.
- Color the second cup in three wide vertical bands: lilac with purple stars, mint with teal dots, and coral lines with white stripes left between them.
- Slide the patterned cup up inside the princess and turn it by its bottom rim to change the dress.
Make each band a bit wider than the dress window, otherwise two patterns show at once.
Paper Cup Tricycle Planter
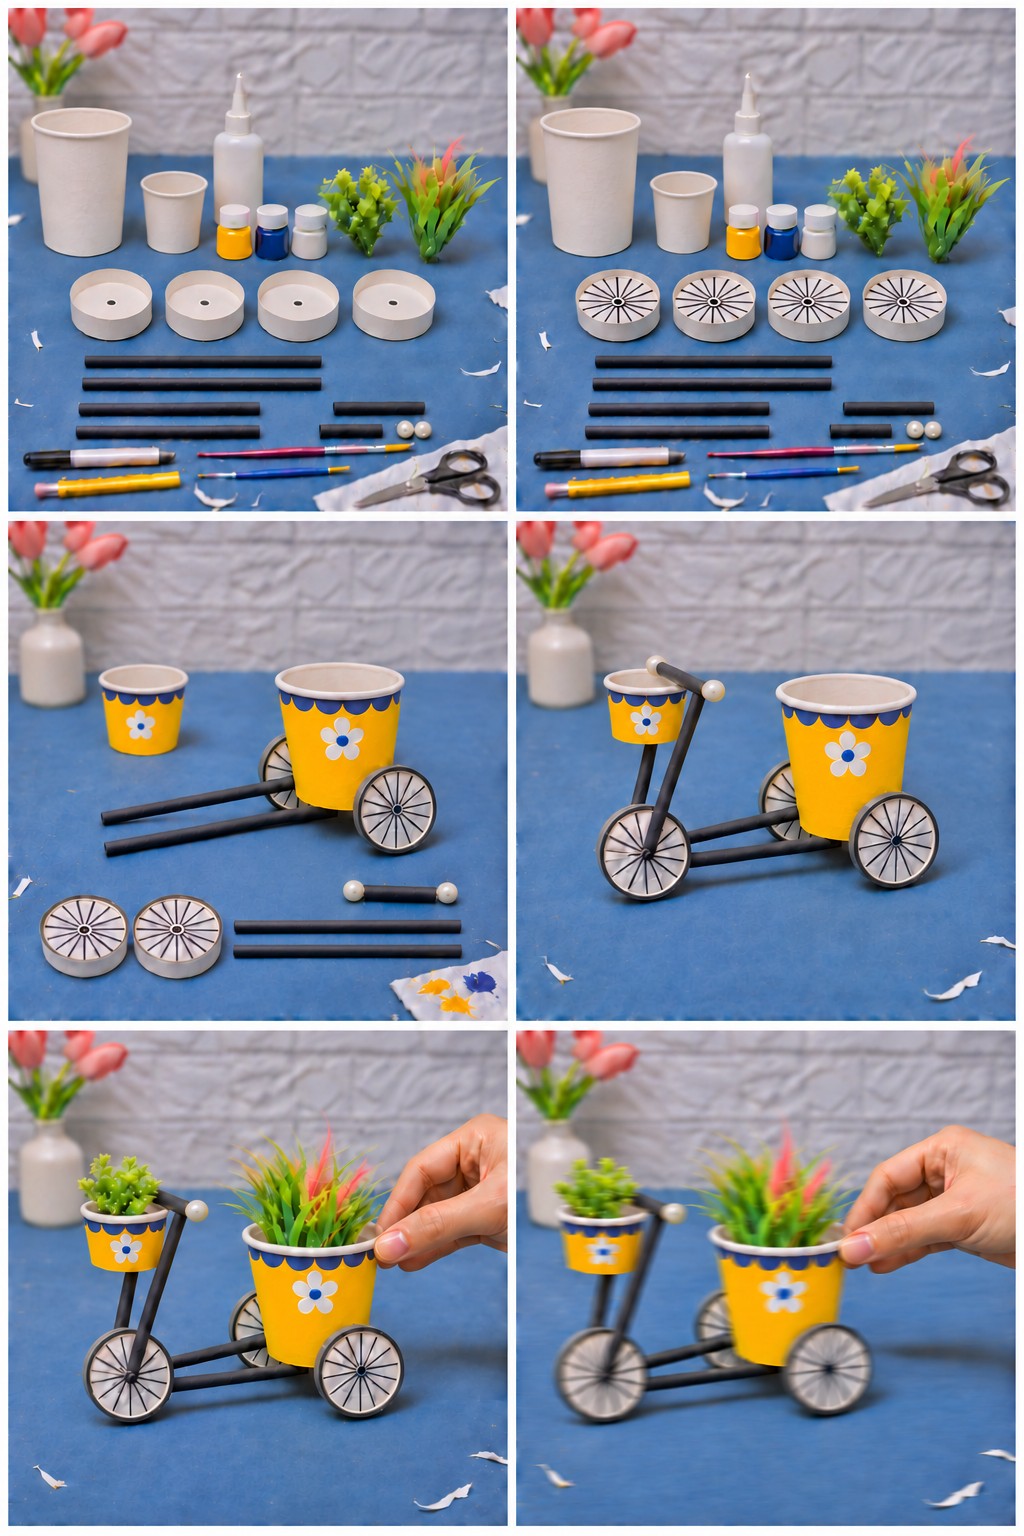
A tall cup makes the back basket, a short one rides up front, and thin black paper rods join them into a little tricycle. Faux plants keep it light; real soil and water would be far too heavy for a paper frame.
Gather a tall and a short white cup, a few cup bottoms with a hole in the center for the wheels, black paper rods in several lengths, two pearl beads, white glue, yellow, navy and white paint, a black marker, brushes, scissors and two small artificial plants.
- Draw spokes around the hole on each wheel with the black marker.
- Paint both cups yellow, then add a navy scalloped border under each rim and a white flower with a navy center on the front.
- Glue a rear axle rod under the tall cup with a wheel at each end, and glue two long rods under it pointing forward as the frame.
- Set the front wheel between two upright rods, join them to the frame and glue a short handlebar across the top with a pearl at each end. The small cup sits at the top of the front fork as a basket.
- When the glue is dry, put the low succulent in the front basket and the tall grass in the back.
Balloon Nose Clown That Wobbles
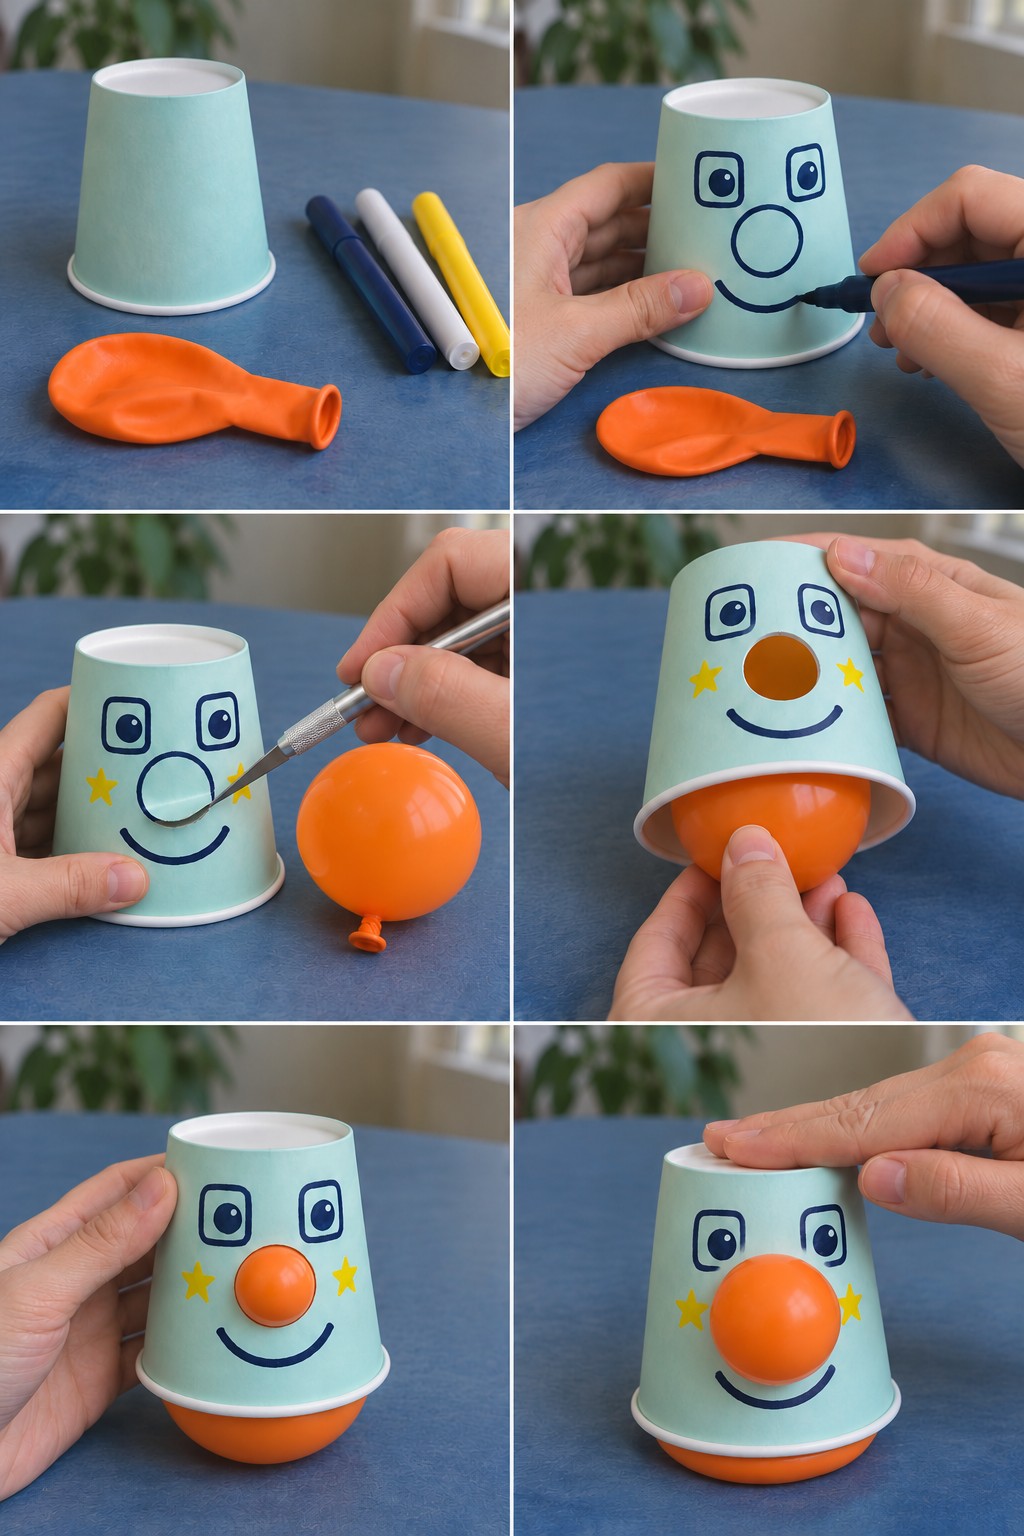
A small balloon does two jobs here. Pushed into the open end of the cup, it becomes a round, wobbly base, and the top of it bulges through a hole as the clown's nose. Press down on the cup and the nose pops out even further.
Draw the face on an upside down mint cup with navy, white and yellow markers: square eyes, a circle for the nose, a wide smile and a yellow star on each cheek. Blow the orange balloon up only a little, until it is about as wide as the cup opening, and tie it. An adult cuts out the nose circle with a craft knife. Push the balloon up into the cup from below until the top shows through the hole and the rest rounds out under the rim, then set the clown down and give it a nudge.
Smooth the cut edge of the nose hole first, because a sharp paper point will pop the balloon.
Pop Up Chick Surprise Paper Cup
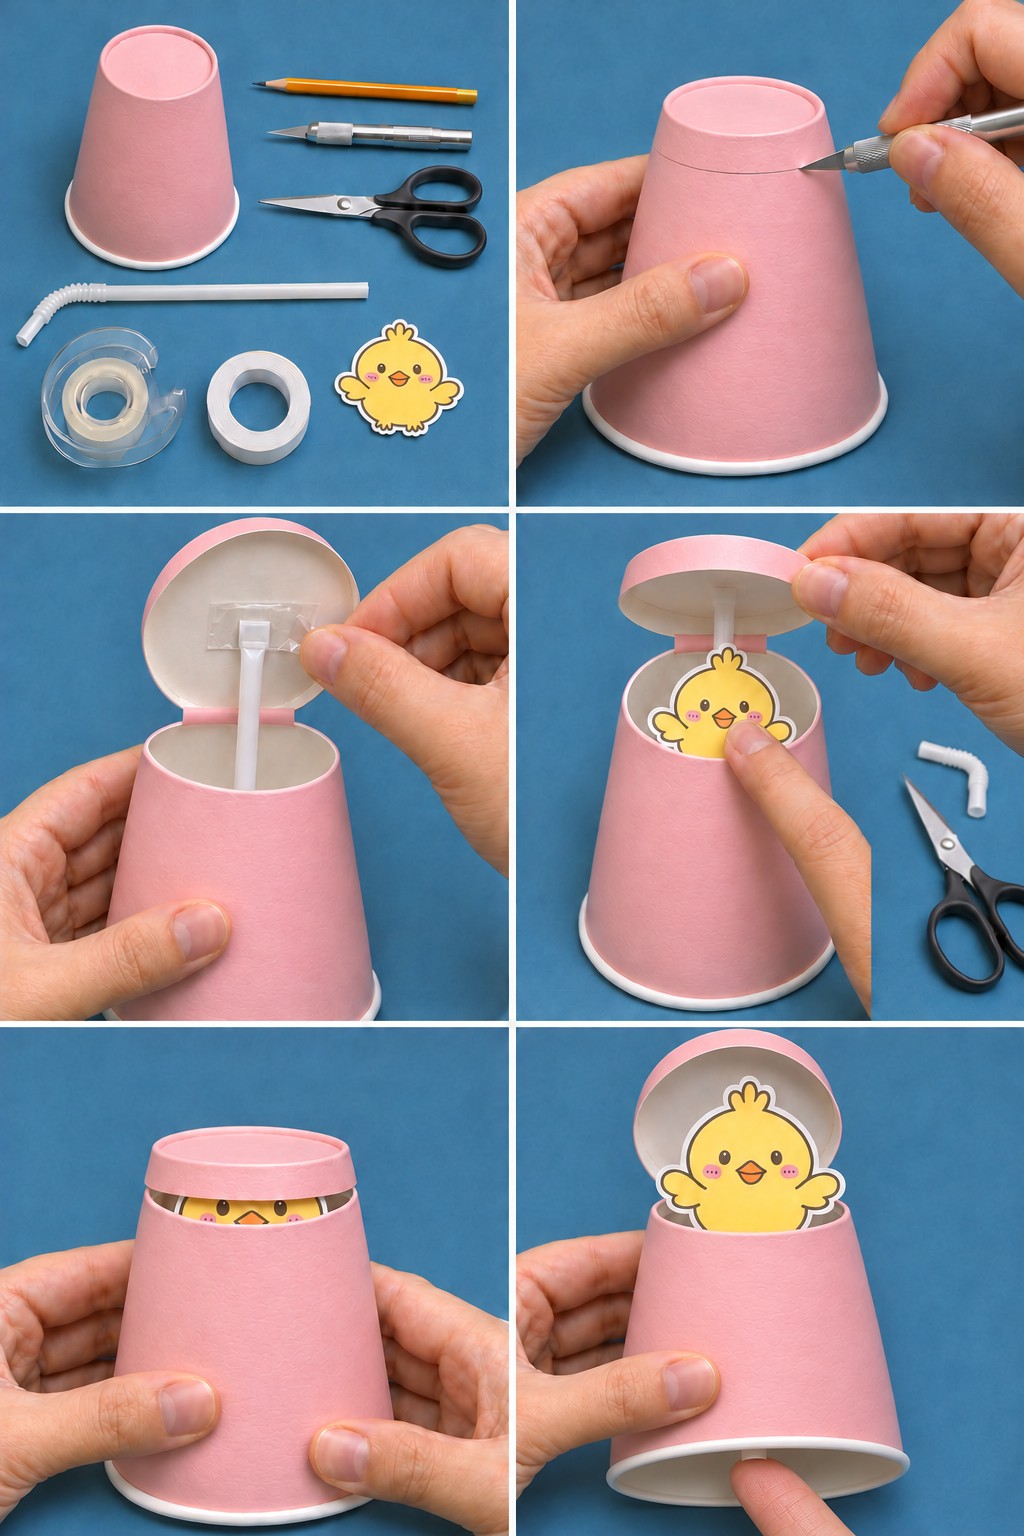
The lid is cut from the cup itself and left attached at the back, so it opens like a hinged cap. A straw taped under it runs down through the cup, and pushing the straw up from below lifts the lid and brings the chick out of hiding.
Supplies: a pink cup, a pencil, a craft knife, scissors, a bendy straw, clear tape, white tape and a paper chick.
- Pencil a line around the upside down cup just below the base. An adult cuts along it, leaving a short section uncut at the back as the hinge.
- Lift the lid and tape one end of the straw to the middle of its underside so the straw hangs down inside the cup.
- Snip off the bendy section. Tape the chick to the straw with white tape, facing forward, low enough to hide under the closed lid.
- Hold the cup and push the end of the straw up through the open bottom. Pull it down to hide the chick again.
Keep tape off the hinge itself. A stiff or torn fold makes the lid fight the straw, or fall off altogether.
Cat Puppet with Lifting Arms
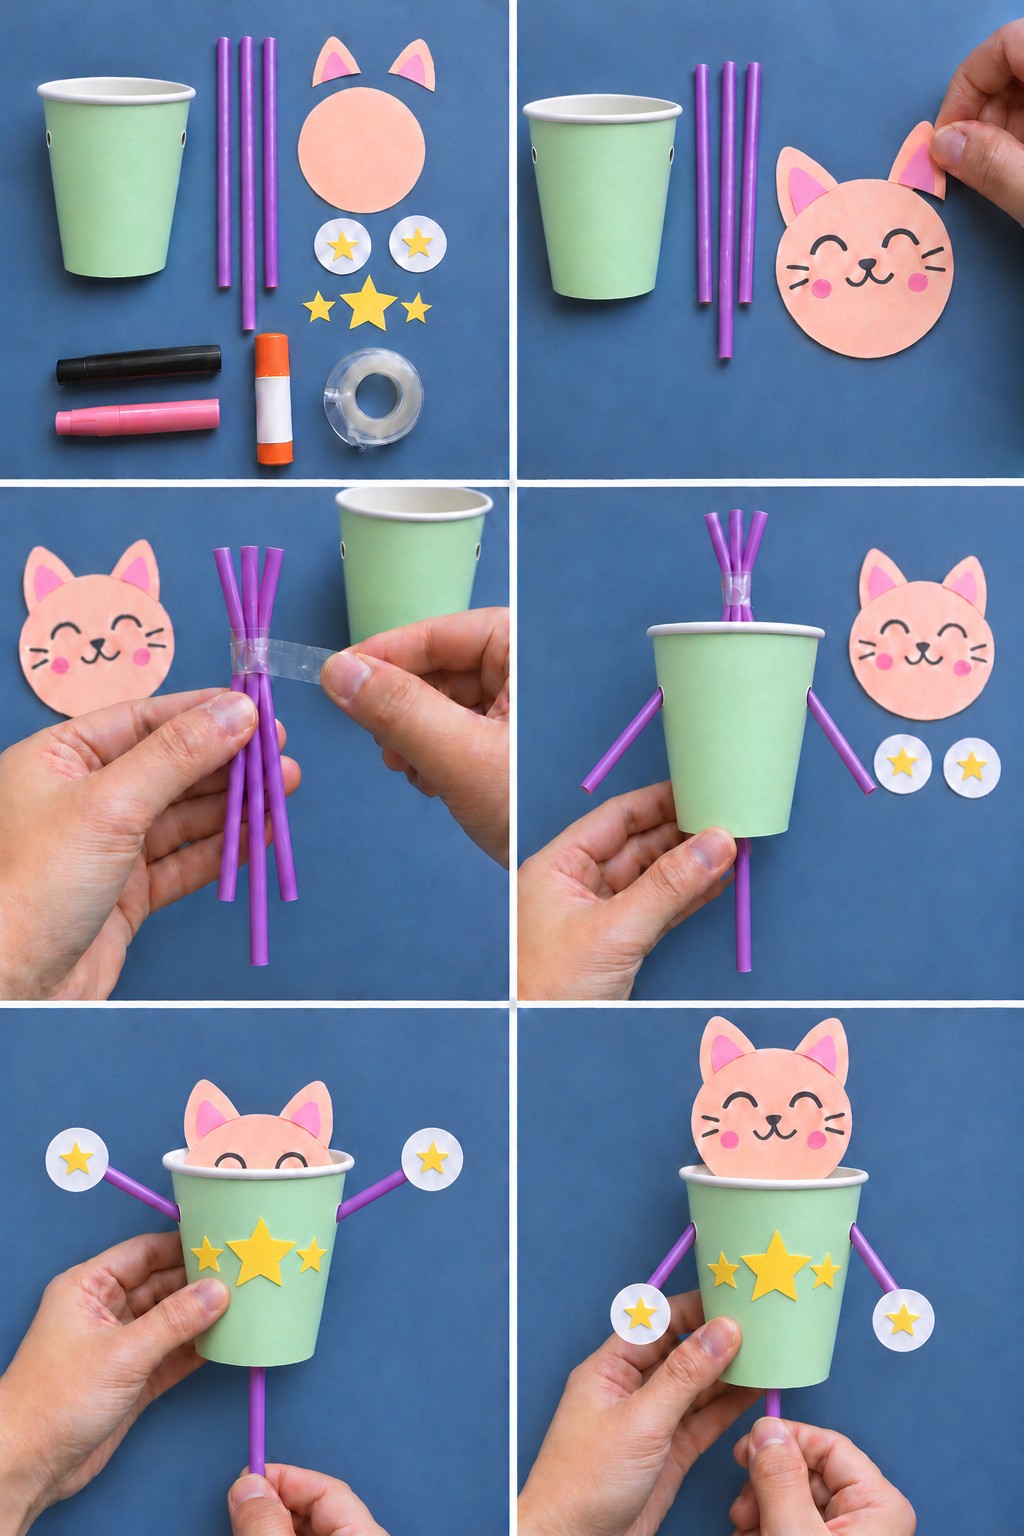
Three straws taped together at the top make this puppet work. The middle straw is the handle and comes out through the base, while the two outer straws bend out through holes in the sides as arms. Pull the handle down and the cat ducks into the cup as its arms fly up; push it up and the cat pops out with its arms down.
You need a mint cup, three purple straws, a peach paper circle and ears, two white circles with yellow stars, three yellow paper stars, black and pink markers, a glue stick and clear tape. Poke a hole in each side of the cup near the rim and one in the center of the base. Draw a smiling cat face with whiskers and pink cheeks on the peach circle and glue the ears on. Tape the three straws together near one end, thread the middle one down through the base and the outer two out through the side holes. Glue the face to the taped ends above the rim, a star circle to each arm tip and the stars across the front.
Wrap tape only around the bundle at the top. The lengths that slide through the side holes have to stay free to bend.
Hungry Dinosaur Feeding Paper Cups
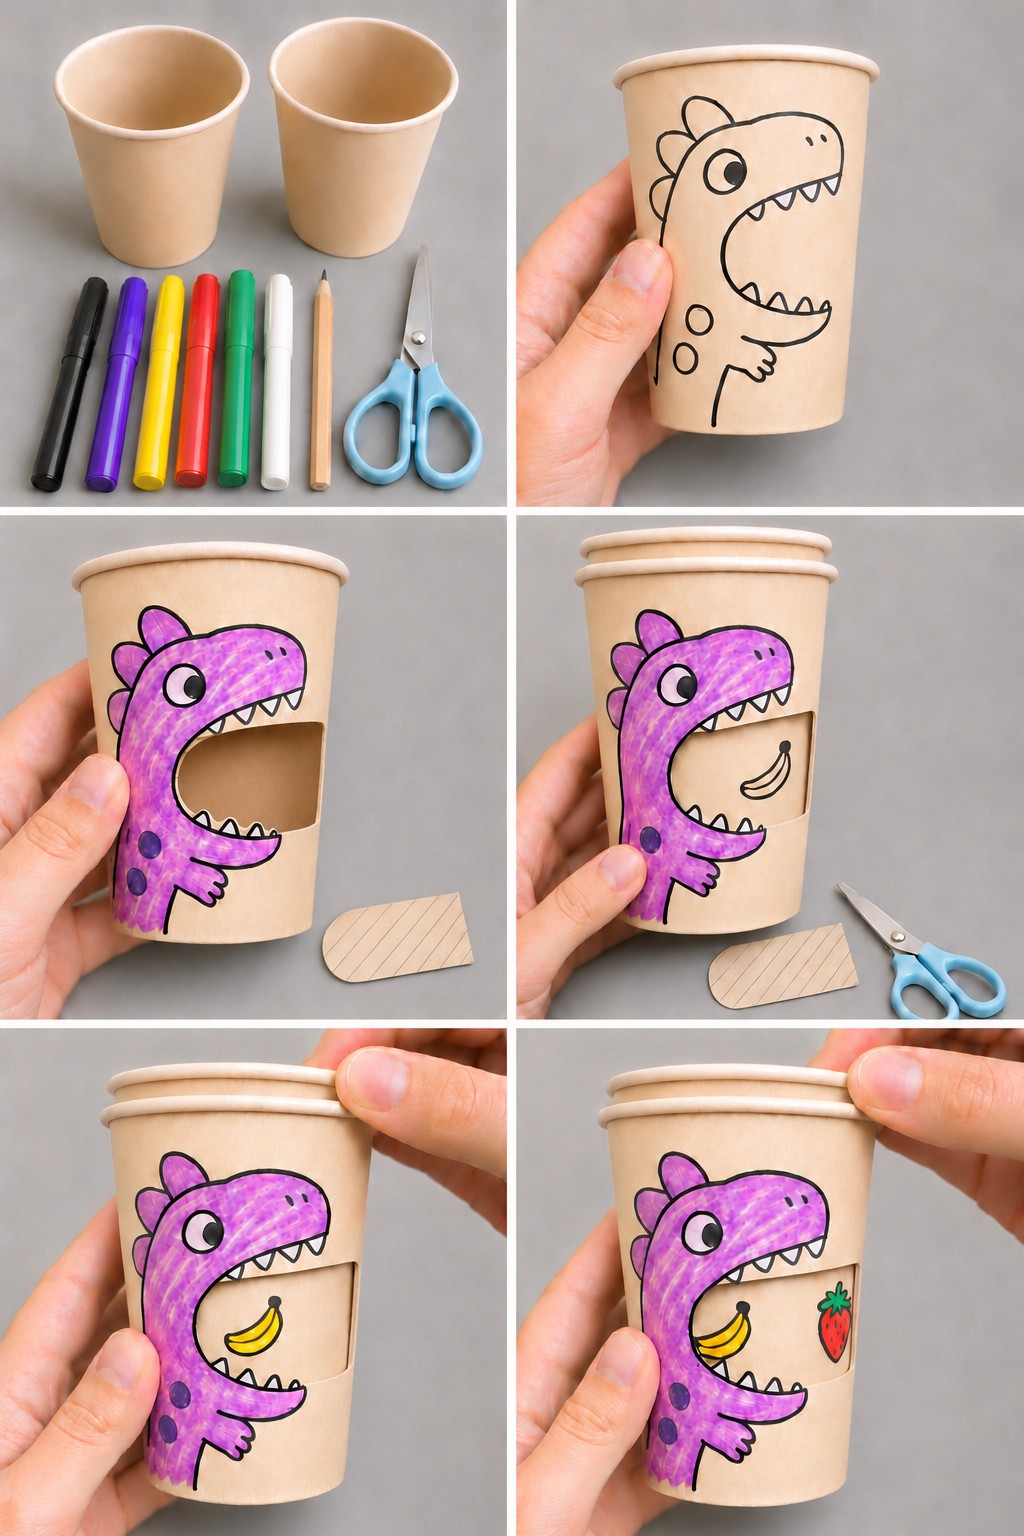
Two kraft cups, markers, a pencil and scissors are all it takes. The dinosaur's open jaw is a window in the outer cup, and the food is drawn on the inner cup, so turning it feeds the dinosaur a banana and then a strawberry.
- Sketch a dinosaur with a wide open mouth on one cup and go over the lines in black. Color it purple with darker spots and leave the teeth white.
- Cut out only the space between the top and bottom teeth.
- Slip the second cup inside. Draw a banana in the window, turn the inner cup a little and draw a strawberry beside it, then color both.
Drawing the food while the cups are nested keeps it at the right height for the mouth. Once the idea clicks, kids can fill the whole inner cup with snacks.
Ginkgo Leaf Table Lamp
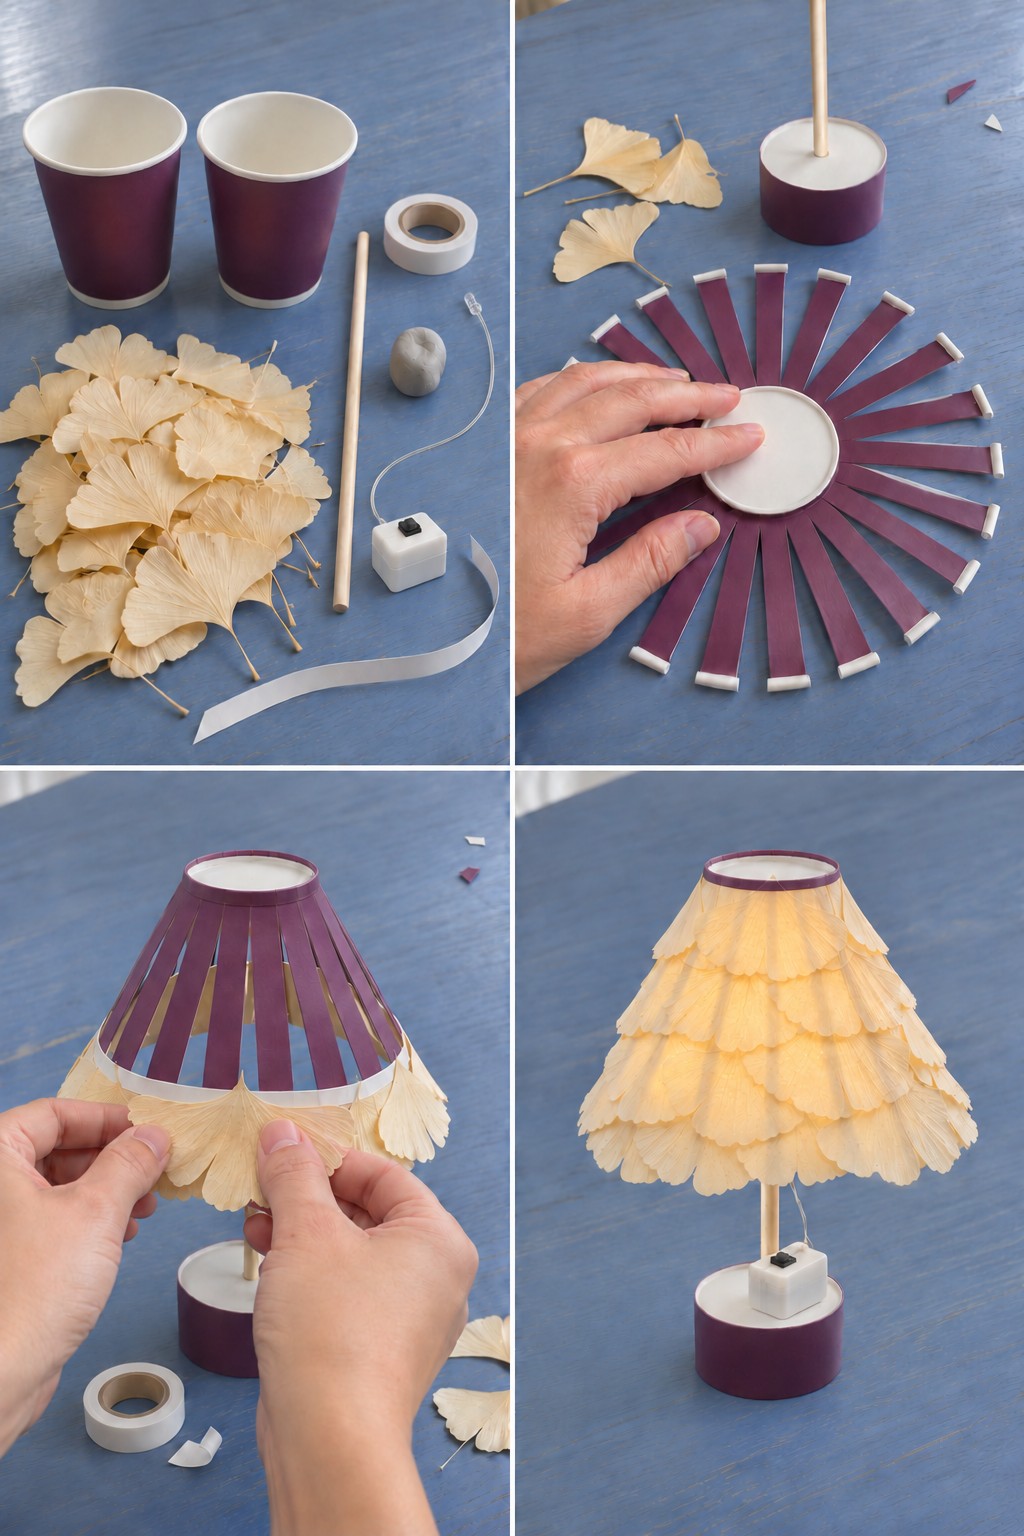
Dried ginkgo leaves overlap like scales on this little lamp, and the light glows through them in warm layers. The frame of the shade is a plum cup slit into strips, and a second cup cut short becomes the base.
- 2 plum paper cups
- A wooden dowel and a lump of modeling clay
- White double sided tape and a strip of white paper
- A small battery LED with a push switch
- A big handful of pressed, dried ginkgo leaves
- Cut the first cup into narrow strips from the rim down to the base, leaving the base disc whole, and fan the strips out.
- Cut the second cup down to a short drum. Press clay inside and push the dowel up through the center of its base.
- Bend the strips down into a cone below the base disc and tape the white paper strip around their lower ends to hold the shape.
- Lay double sided tape along the strips and press the leaves on in overlapping rows, starting at the bottom edge and working up.
- Tuck the LED inside the top of the shade, set the shade on the dowel and run the wire down to the switch on the base.
Dry leaves crack easily, so press each one on gently and let the glue grab before moving to the next.
Fairy House with a Purple Cone Roof
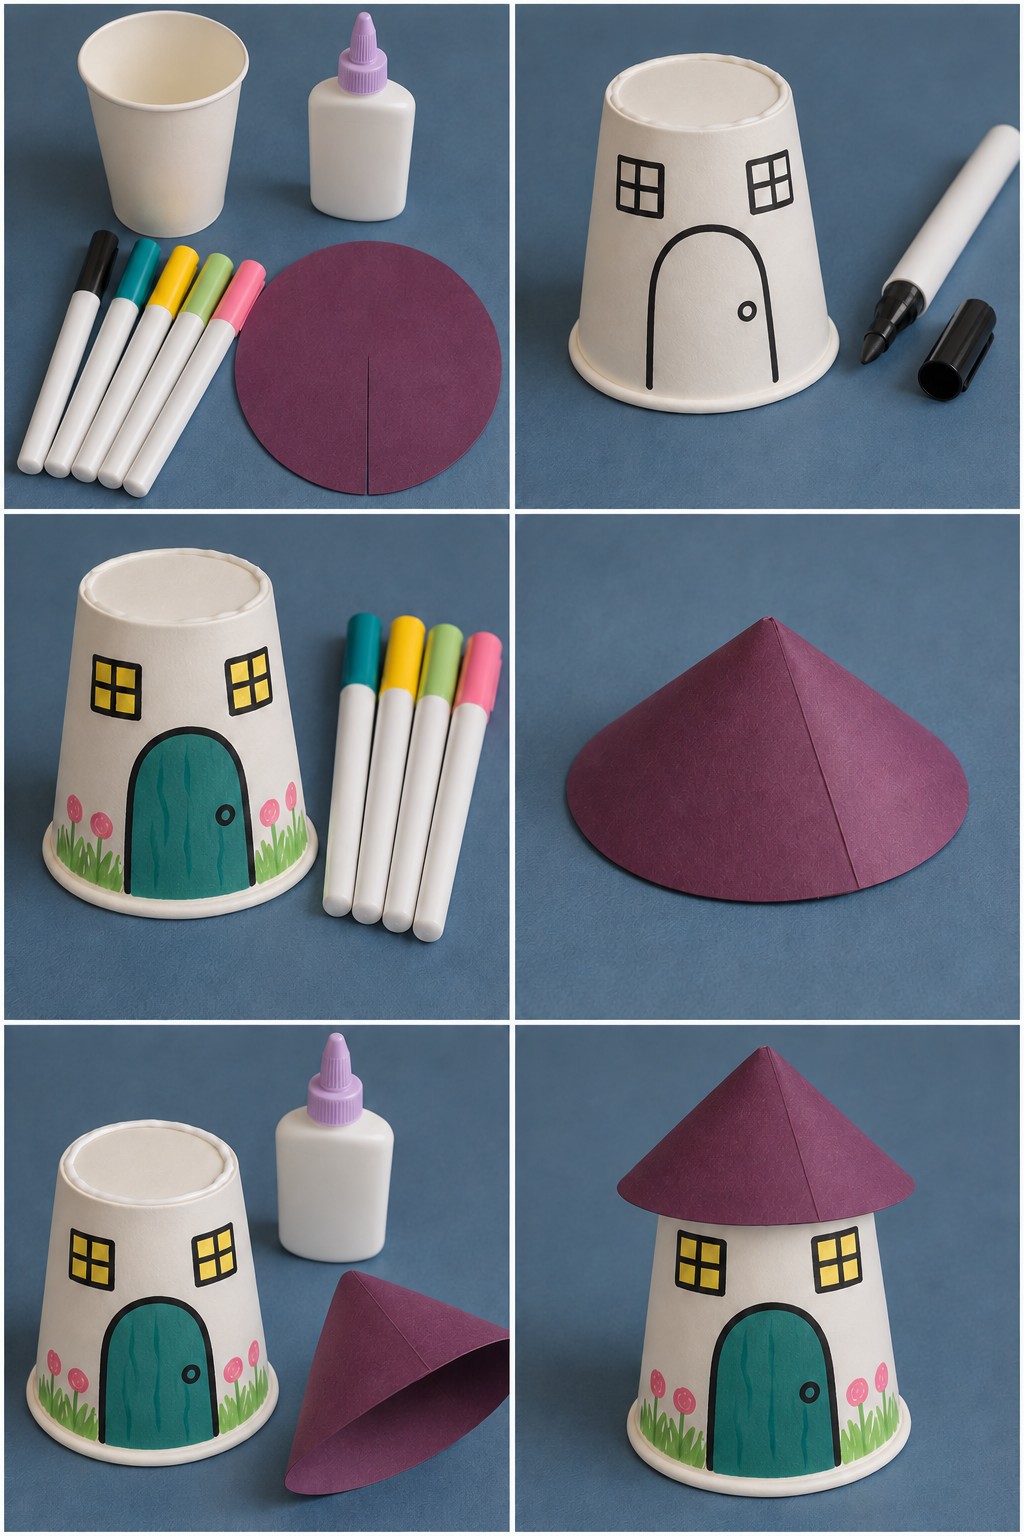
This is mostly drawing plus one paper cone, which makes it a good first project for small hands. Turn a white cup upside down and draw two windows and an arched door in black. Color the windows yellow and the door teal with a small black knob, then add pink flowers and green grass around the bottom. For the roof, cut a purple card circle with a slit from the edge to the center, overlap the edges into a cone and glue it. Glue the cone over the top of the cup so it overhangs evenly all round.
Hold the cone seam with a paper clip while the glue dries. If it springs open, the roof flattens and sits crooked.
Rolling Paper Cup Car with Bottle Cap Wheels
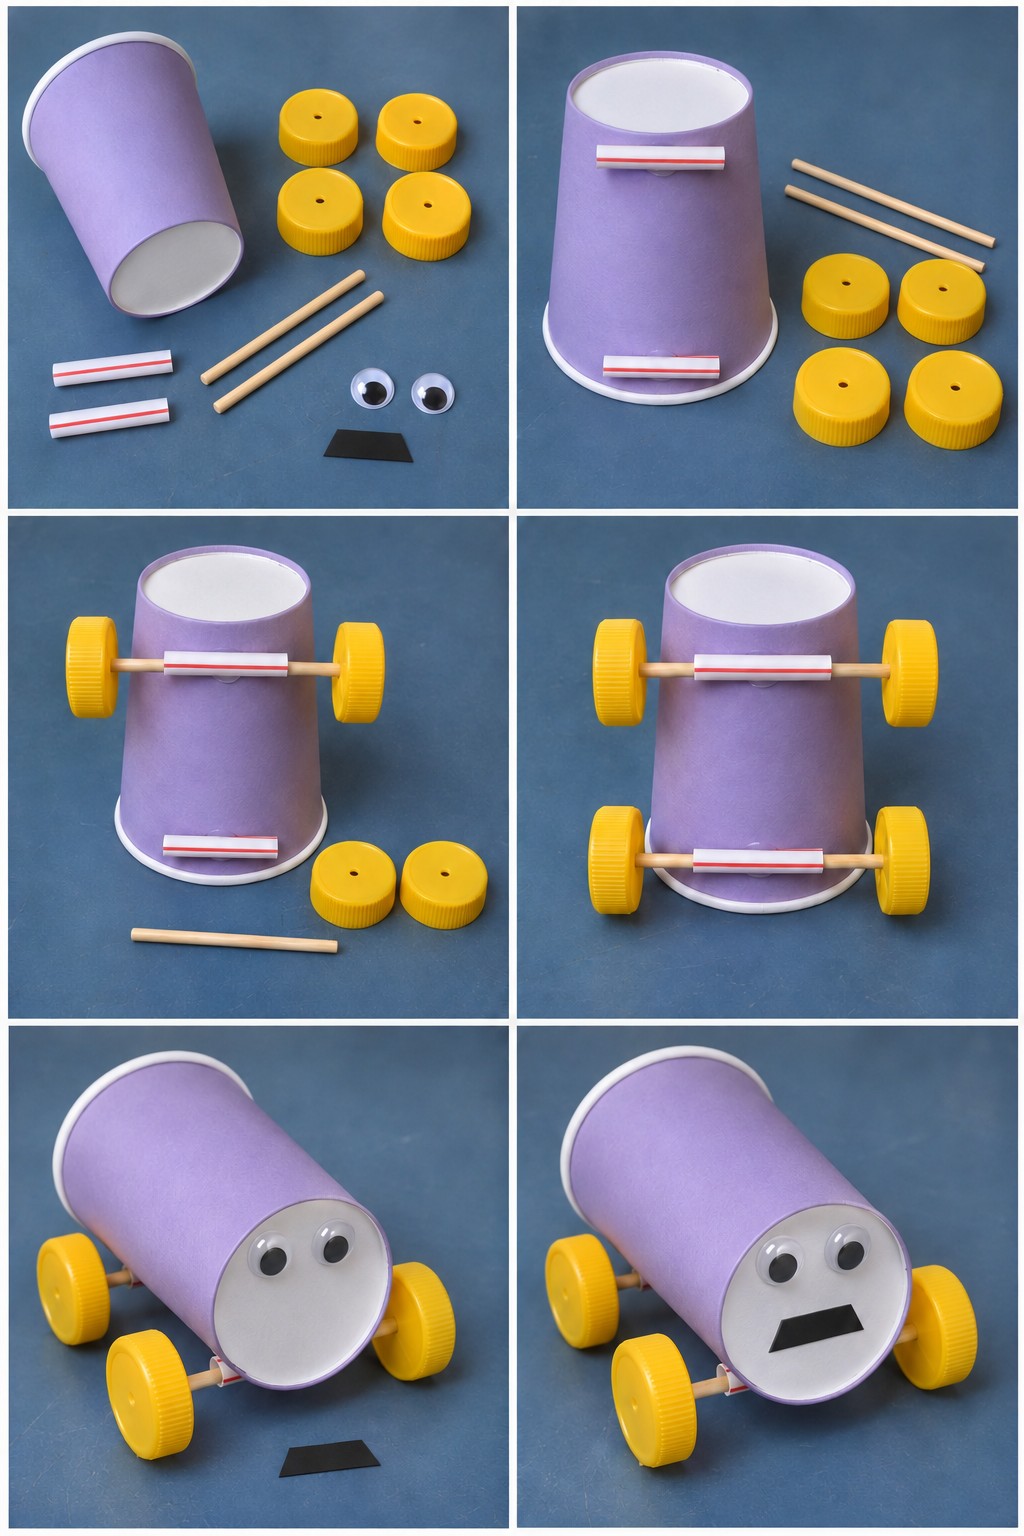
The car is a lilac cup lying on its side, with its round white base as the face. It really rolls, because the wooden axles turn freely inside straw sleeves.
Collect a lilac cup, four yellow bottle caps with a hole in the middle, two short pieces of red striped straw, two thin wooden sticks, two googly eyes and a black paper mouth.
- Glue the straw pieces across the same side of the cup, one near the base and one near the rim, parallel to each other.
- Push a stick through each straw and press a cap onto both ends.
- Turn the car onto its wheels and stick the eyes and mouth onto the white base.
Leave a small gap between each cap and its straw so the wheels spin, and make the cap holes a tight fit on the sticks. An adult should make the holes in the caps.
Spotted Cow on Rolled Paper Legs
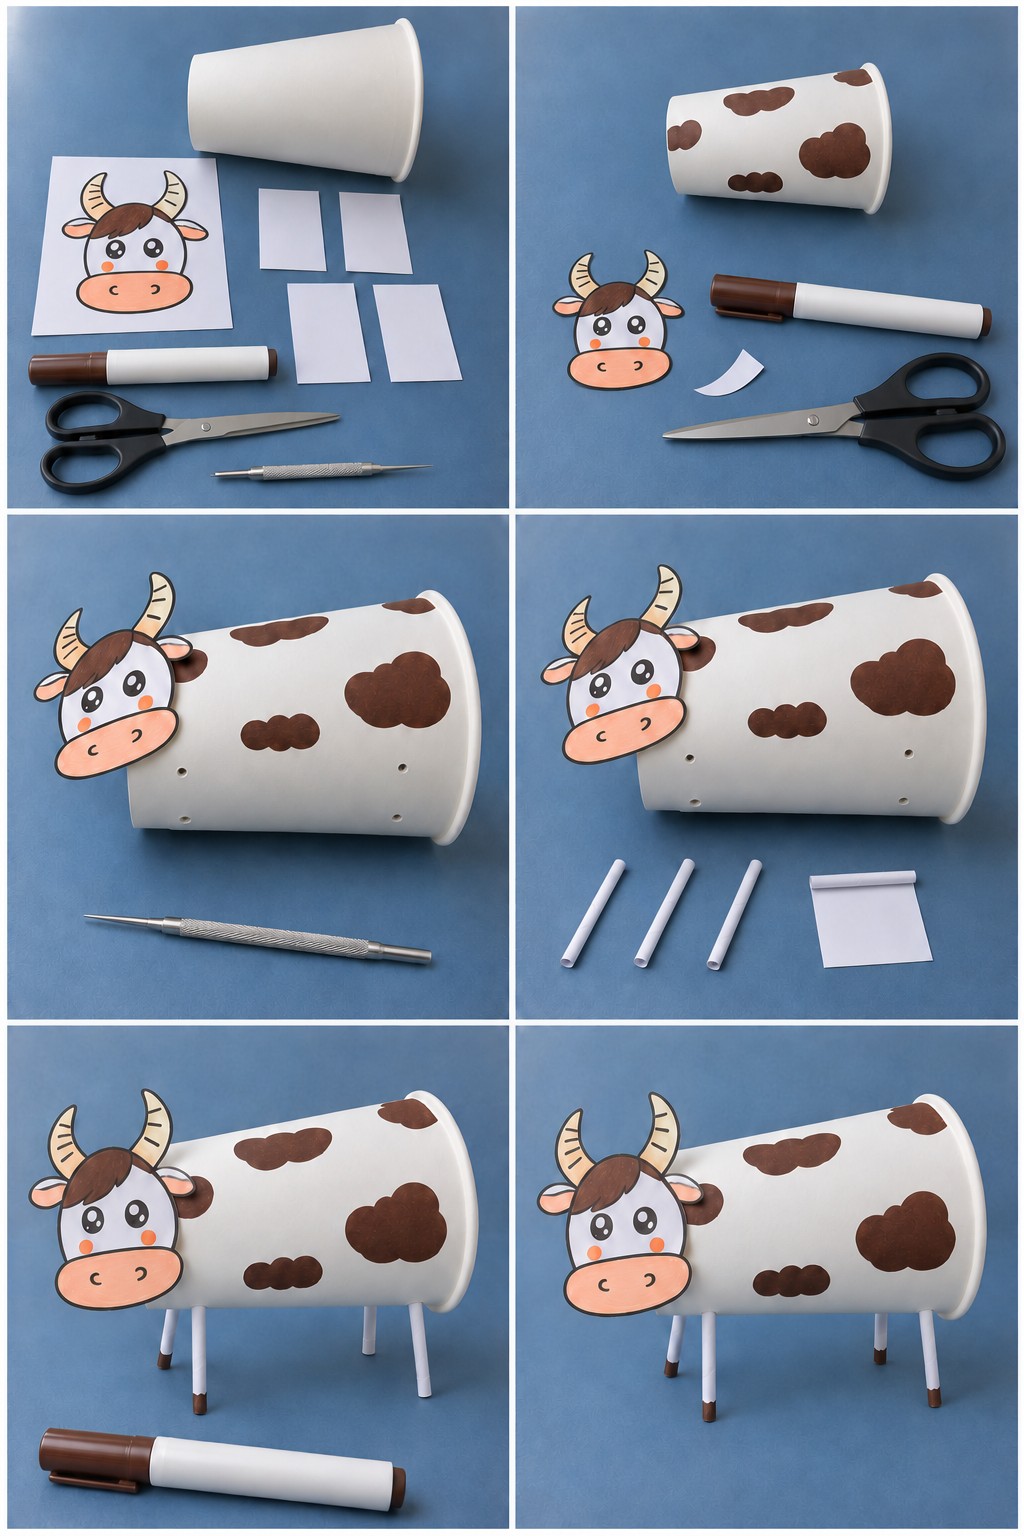
Lay a white cup on its side and it already looks like a body. Brown patches, a printed cow face and four rolled paper legs do the rest.
Draw rounded brown patches all over the cup and cut out the face, keeping the horns. Glue the face over the base end. An adult makes four small holes along the underside with a needle tool, two near the face and two near the rim. Roll each white paper rectangle tightly around a pencil into a thin tube, push one into each hole and color the ends brown as hooves. Slide the legs in or out until the cow stands level.
Start with holes a little smaller than the legs and widen them only if needed. Loose legs splay out and the cow sits down.
Phone Flashlight Projector Paper Cup
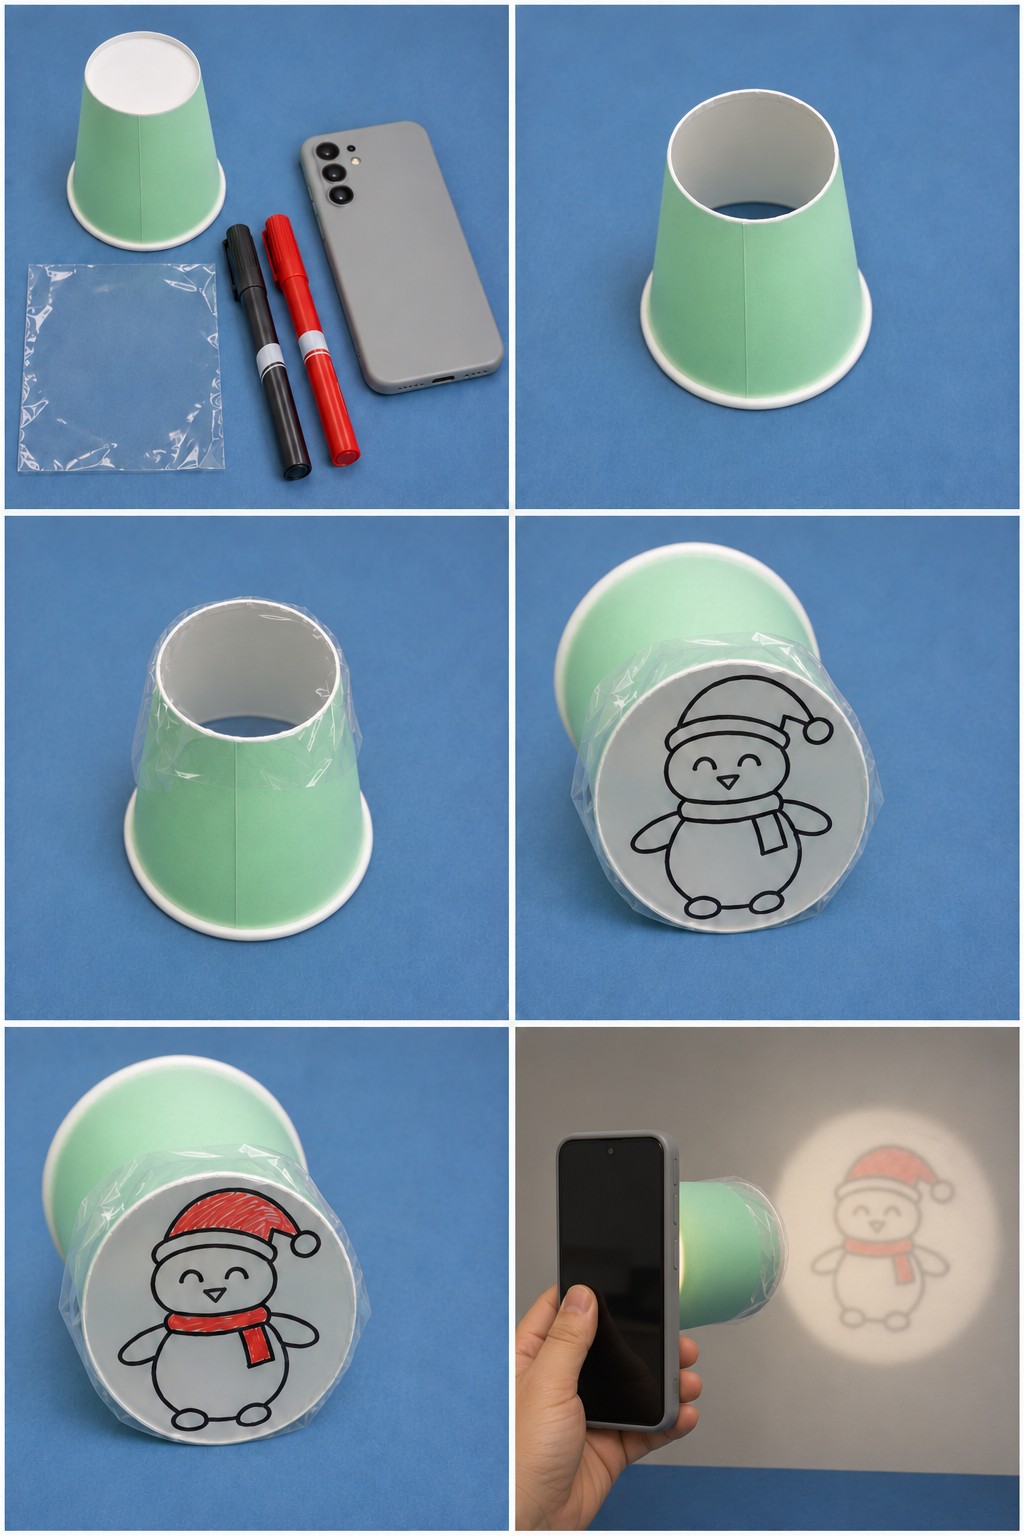
Shine a phone flashlight through this cup in a dark room and a penguin in a red hat and scarf appears on the wall. It works like a tiny shadow projector.
- Cut the base out of a mint cup so the small end is open.
- Stretch a piece of clear plastic, such as part of a clean freezer bag, over the small end and fold the extra down the sides so it is tight and smooth.
- Draw a penguin with a hat and scarf in bold black lines on the plastic, then color the hat and scarf red.
- Turn off the lights, hold the phone's flashlight against the wide end and point the cup at a wall. Move closer or further until the picture looks clearest.
Thick, simple lines show up best, and wrinkles in the plastic blur them. Anything you write comes out back to front on the wall, so stick to pictures or write letters in reverse.
Giant Glowing Owl from Stapled Paper Cups
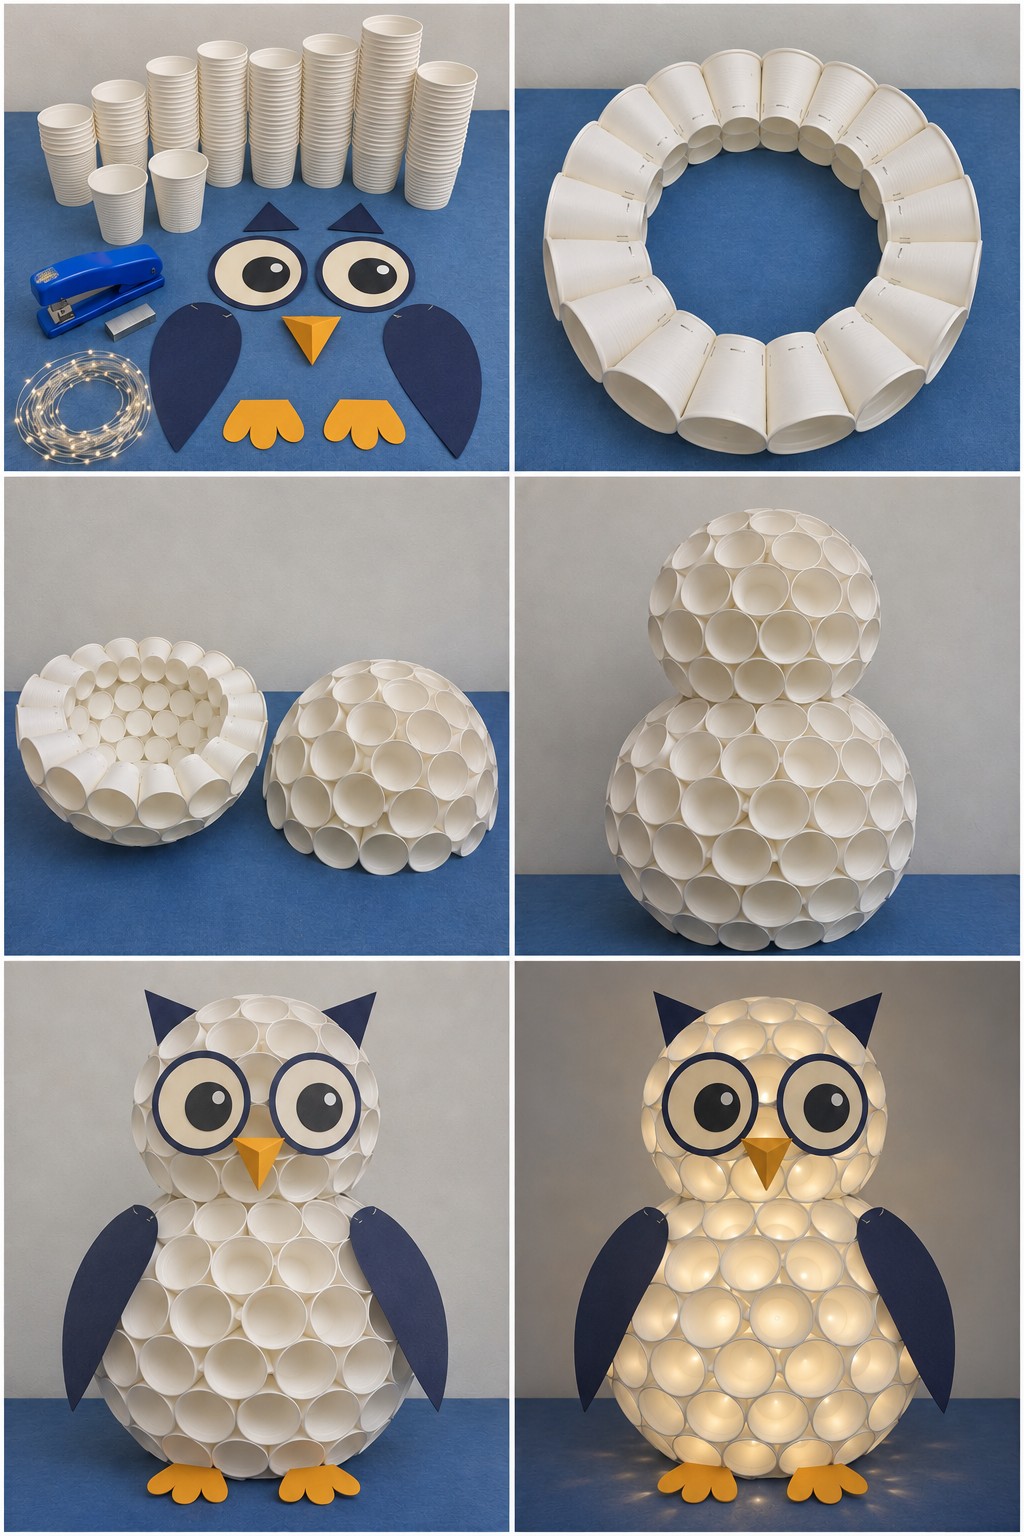
This one is for a family or a classroom: it takes several sleeves of cups and a lot of stapling, and the result is a glowing owl big enough to stand on the floor. No glue, no paint, just white cups, a stapler, navy and orange card, cream eyes and a string of warm battery fairy lights.
- Stand cups side by side in a ring with the open ends facing out and staple each one to its neighbor.
- Staple on smaller rings, one after another, so the shape curves into a dome. Make two domes and staple them rim to rim into a ball for the body.
- Build a smaller ball the same way for the head and fix it on top.
- Before you close the last gap, feed the fairy lights inside and leave the battery box where you can reach the switch.
- Add the navy ears, the layered eyes, the folded orange beak, the navy wings and the orange feet.
Let each ring sit naturally before starting the next one; forcing gaps shut warps the dome. Check that every staple is pressed flat, since a loose end is sharp.
Light Up Flower Bouquet on a Rainbow Base
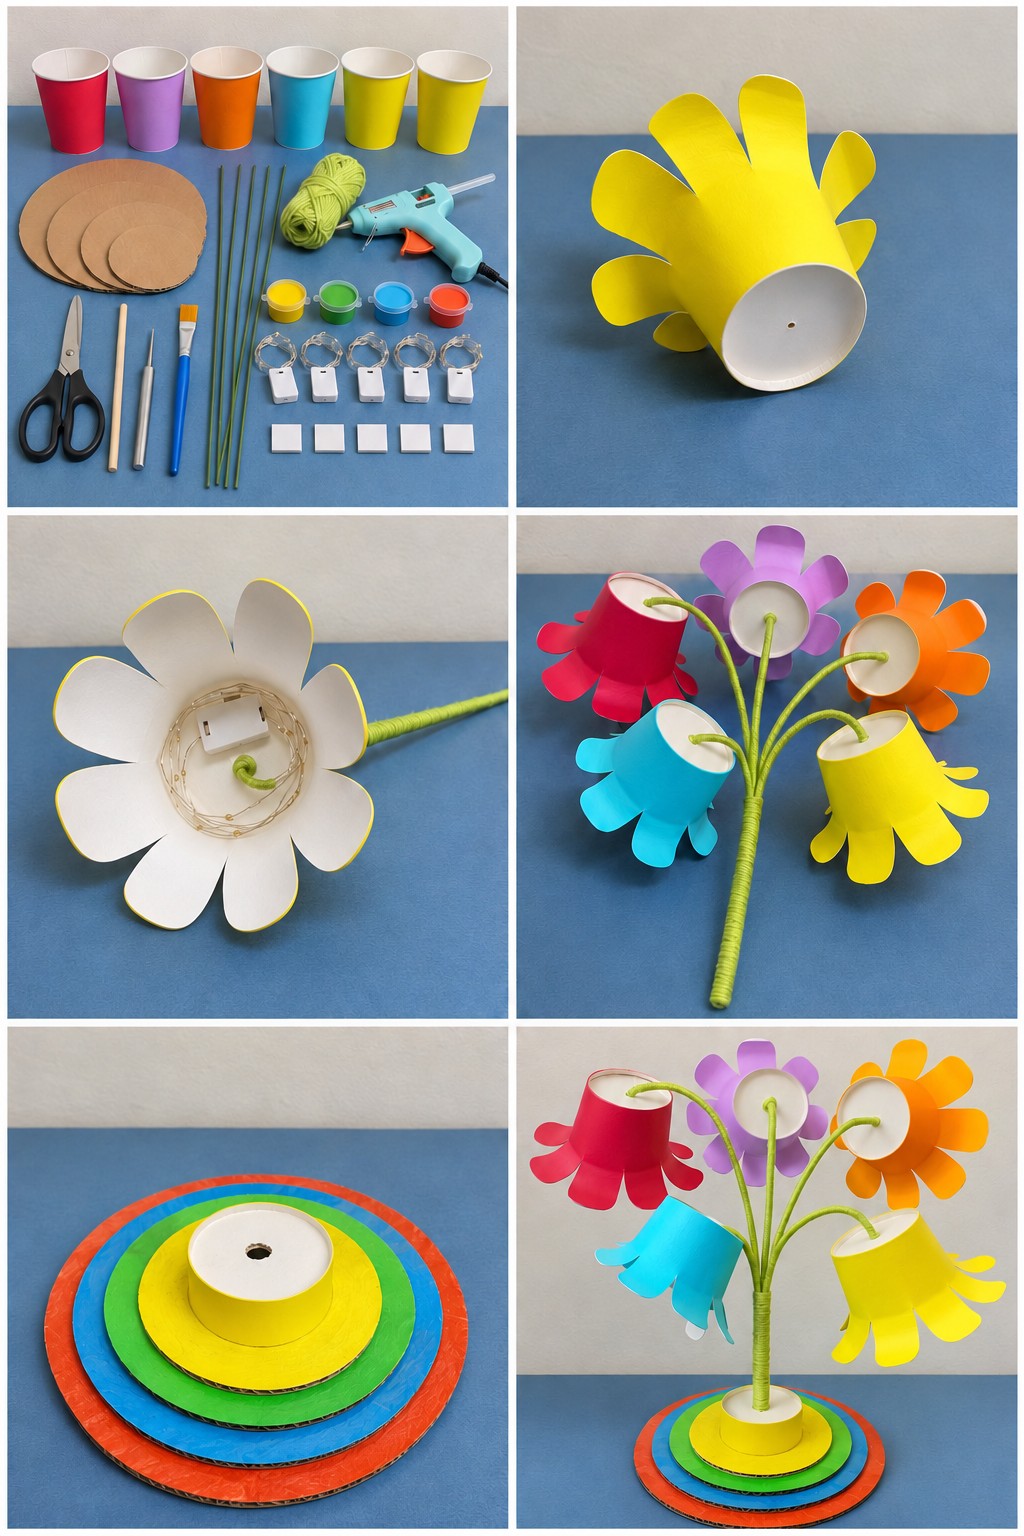
Five cup flowers, each with its own string of tiny lights, sit on yarn wrapped stems in a stepped rainbow stand. Switch them on and the color of each cup glows through.
The full list: six cups (red, purple, orange, blue and two yellow), four cardboard circles in graded sizes, five green floral wires, green yarn, a hot glue gun, scissors, a wooden dowel, an awl, a flat brush, red, blue, green and yellow paint, five mini LED light strings with battery boxes and five foam mounting squares.
- Cut five cups into rounded petals down to the base and curl the petals outward over the dowel.
- An adult pierces the center of each base with the awl. Wrap the floral wires in green yarn, push one through each base and curl the end inside so it cannot pull out.
- Coil a light string inside each flower and stick its battery box to the base with a foam square, switch facing out.
- Paint the cardboard circles red, blue, green and yellow and glue them in a stack with the largest at the bottom. Cut the spare yellow cup short, pierce its base and glue it upside down on top.
- Gather the stems, wrap the lower part together with yarn, bend each flower into place and push the bundle into the hole in the stand.
Bend the stems before the bundle goes into the stand. Five battery boxes weigh more than you would expect, so spread the flowers evenly or the stand tips.
Party Glasses from Paper Cup Rings and Straws
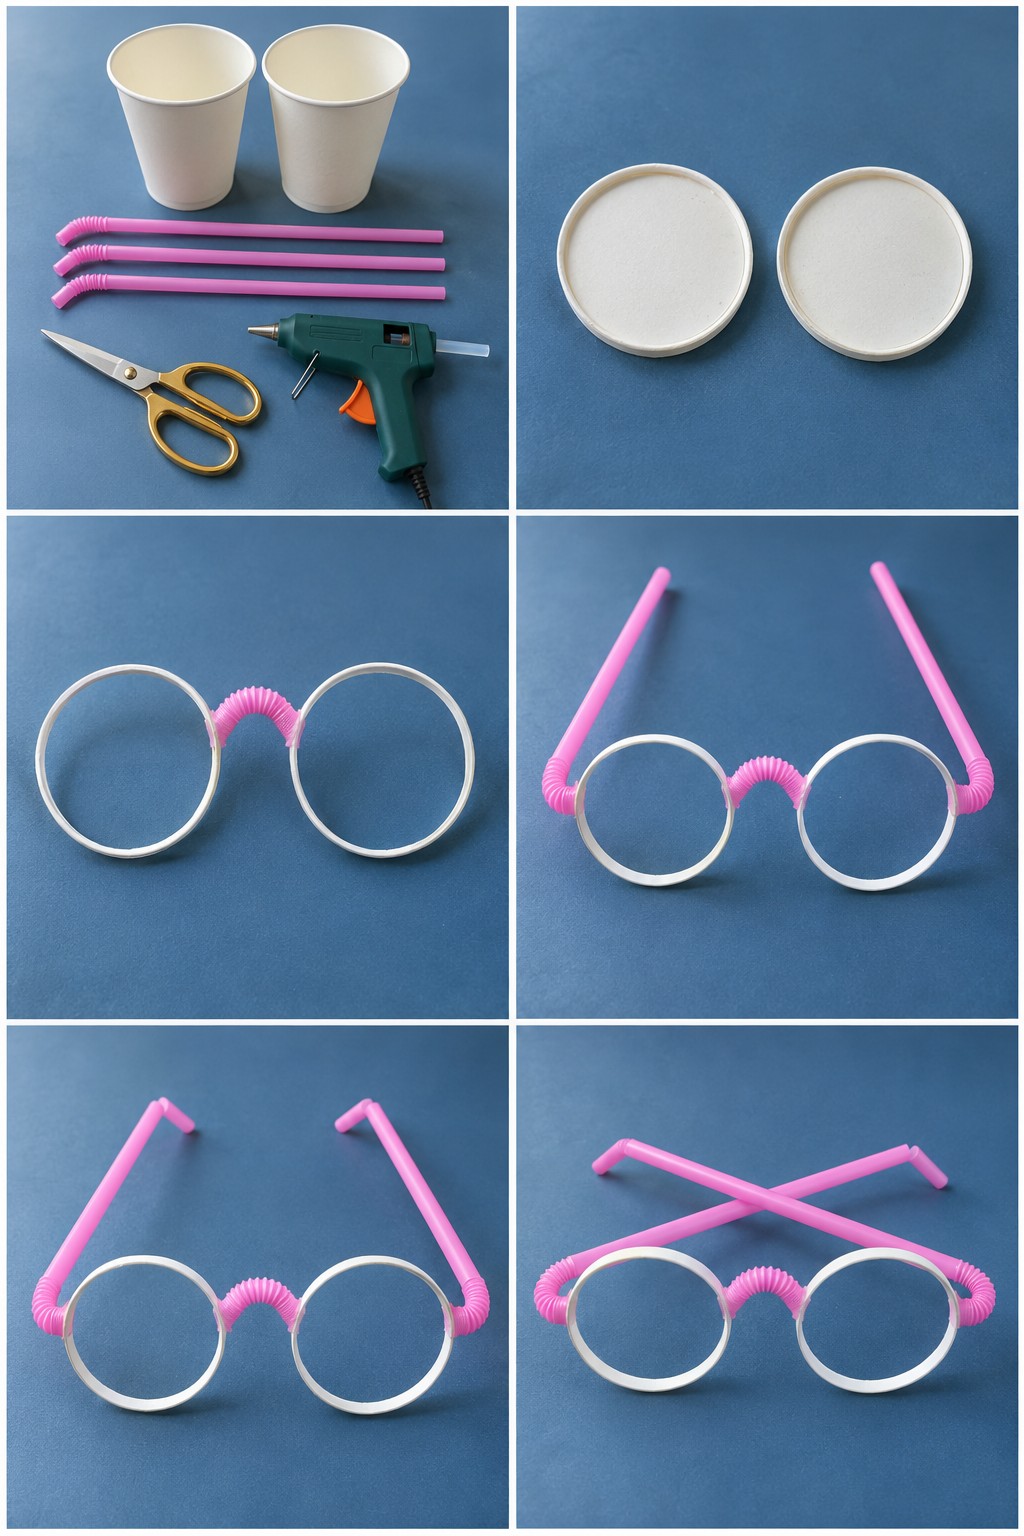
Two cup bottoms and three pink bendy straws make a pair of round dress up glasses with no lenses at all.
Cut a shallow section from the bottom of each white cup and push out the base disc so only a ring is left. Cut the bendy part from one straw and glue it between the rings as the nose bridge. Glue a straw to the outer edge of each ring with its bendy section right at the frame, bend those sections back to make the arms, and fold the far tips down so they hook behind the ears. The bendy joints let the arms fold flat, like real glasses.
The hot glue is an adult job. Keep glue off the bendy parts so the arms still fold, and run a finger around the cut rings to check they are smooth before anyone tries them on.
Mirror and Pearl Hanging Mobile
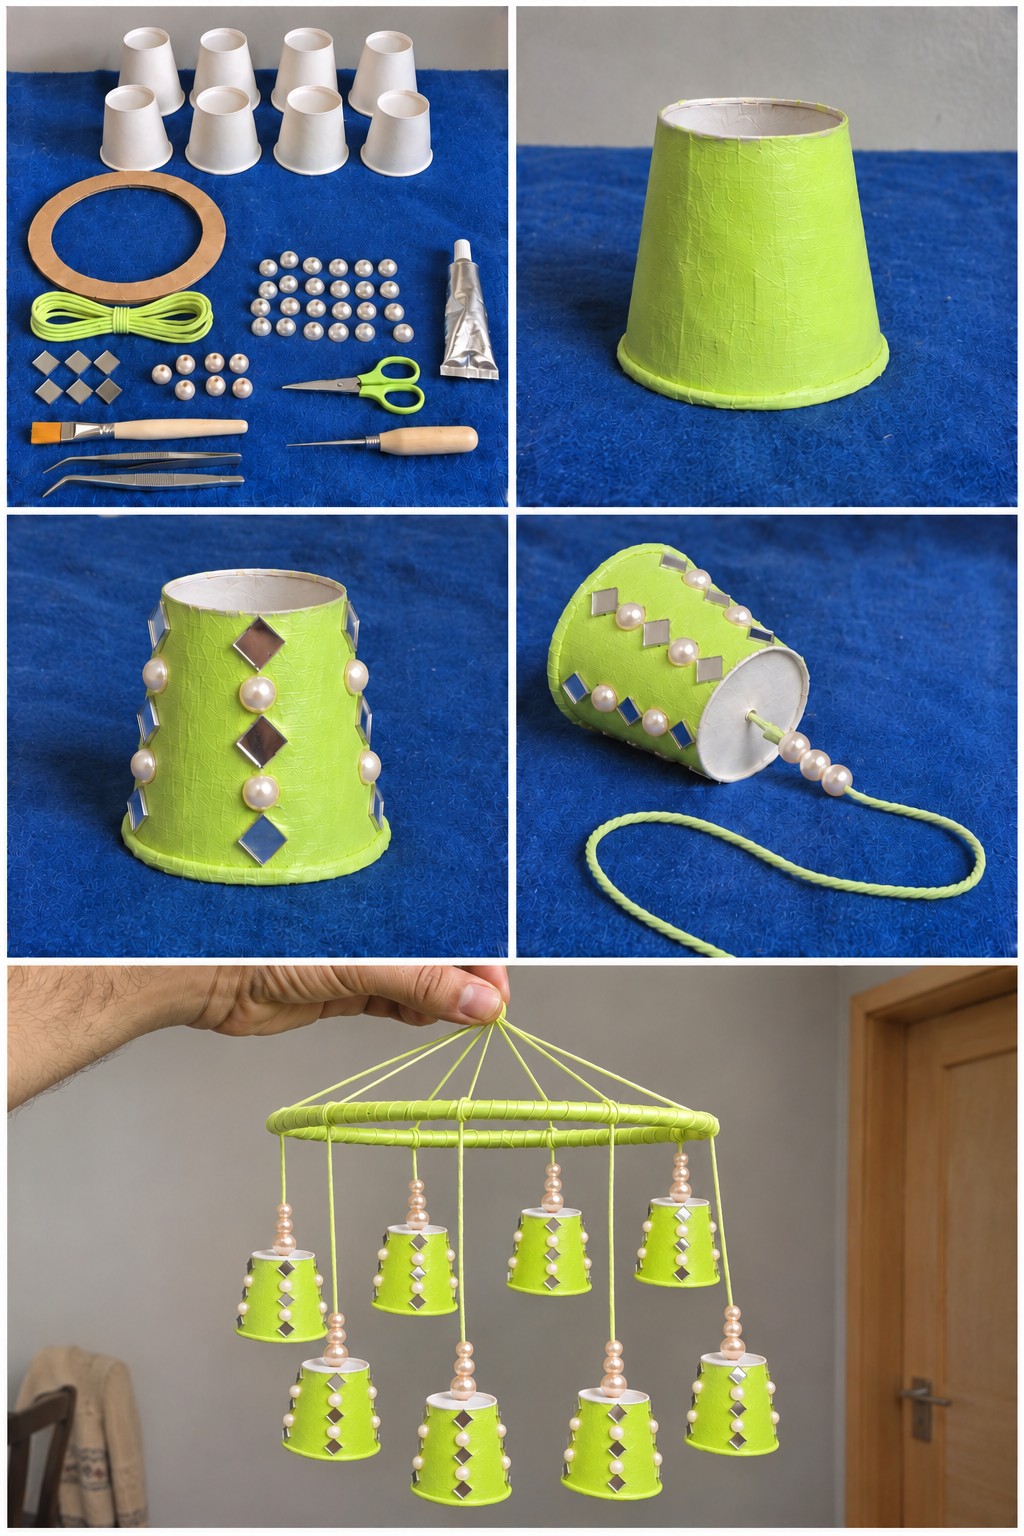
Eight small cups covered in bright lime paper and studded with mirror diamonds and pearls hang from a cord wrapped ring like little bells. Four hang high and four hang low, so every cup catches the light.
Supplies: eight small white cups, a cardboard ring, lime green tissue paper, lime green cord, small square mirrors, flat back half pearls, a handful of round pearl beads, a tube of craft glue, a flat brush, scissors, tweezers and an awl.
- Brush glue over a cup and smooth tissue paper onto it. The paper wrinkles a little as it dries, which gives the fine crackled texture in the photos. Glue a piece of cord around the rim.
- With tweezers, set the mirrors on their points in vertical rows, with rows of half pearls in between.
- An adult pierces the center of each base with the awl. Thread cord through, knot it inside the cup and slide three pearl beads down to rest on top.
- Wrap the ring in cord and tie the cups on at two lengths. Tie eight more cords around the ring, gather them above the center and knot them into a hanging loop.
Hold the mobile up by the loop and slide the knots until the ring hangs level before trimming the ends.
Peekaboo Ghost on a Stick
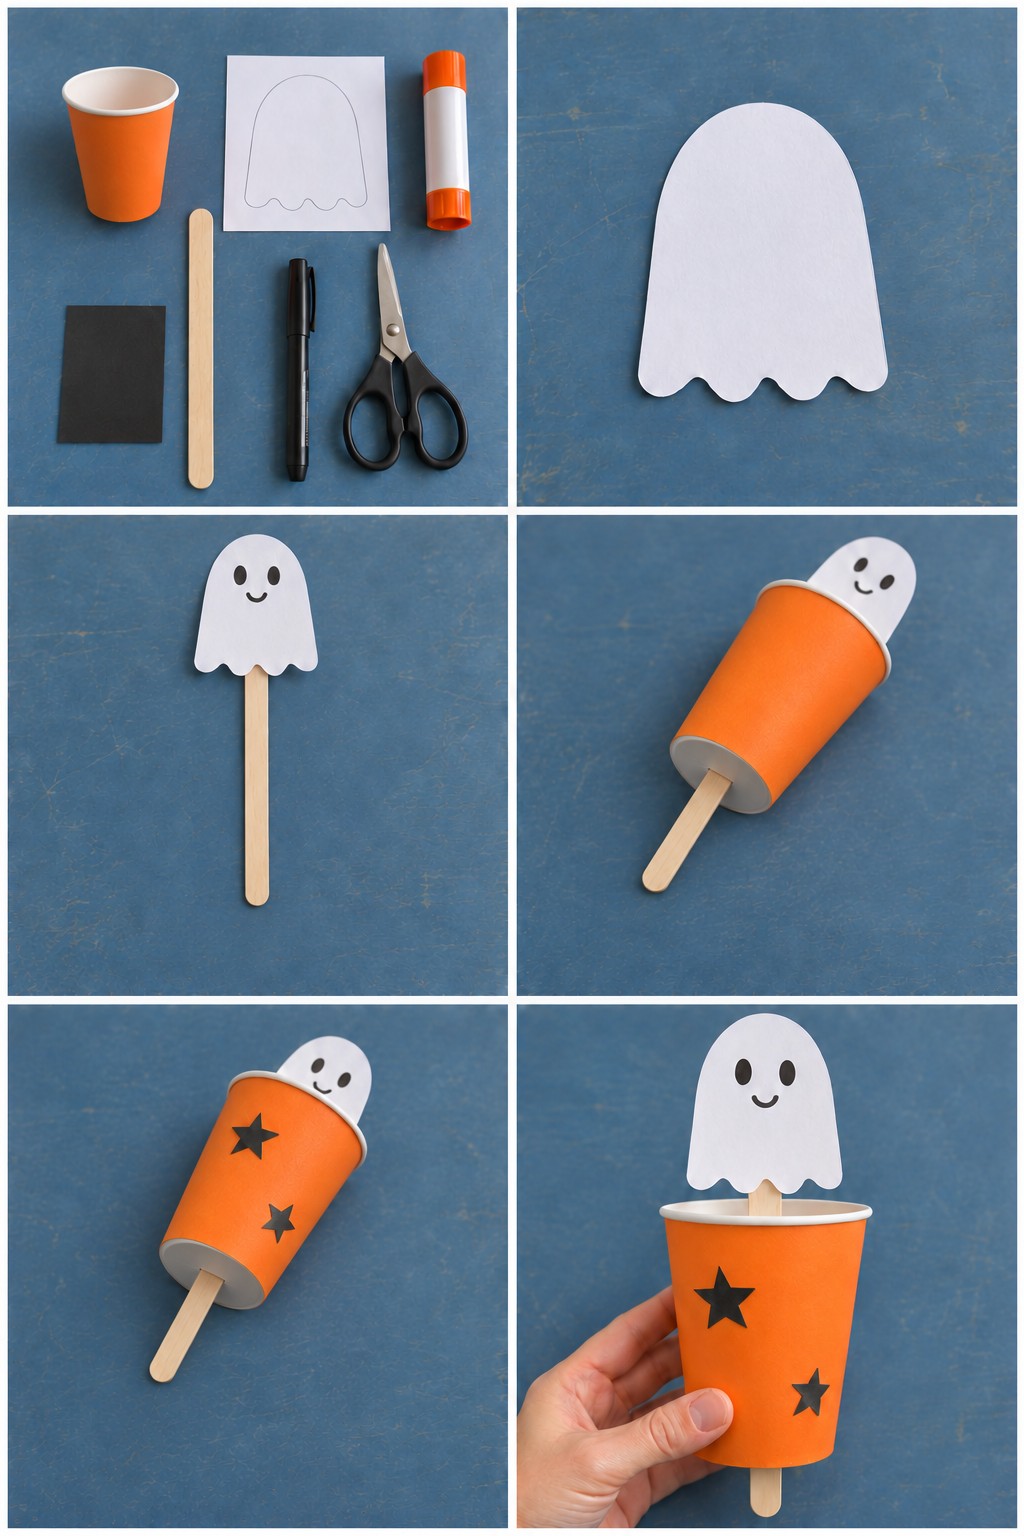
A quick Halloween toy that preschoolers can mostly make on their own. Cut out the white paper ghost, draw a face with the black pen and glue it to the top of a craft stick. An adult cuts a slit in the base of an orange cup just big enough for the stick, and the stick goes in through the open end and out through the slit, so the ghost hides inside. Glue a few black paper stars on the cup, then push the stick up to make the ghost peek out and pull it down to hide it.
A snug slit keeps the ghost standing straight.
Lace Mini Lamp with an LED Tealight
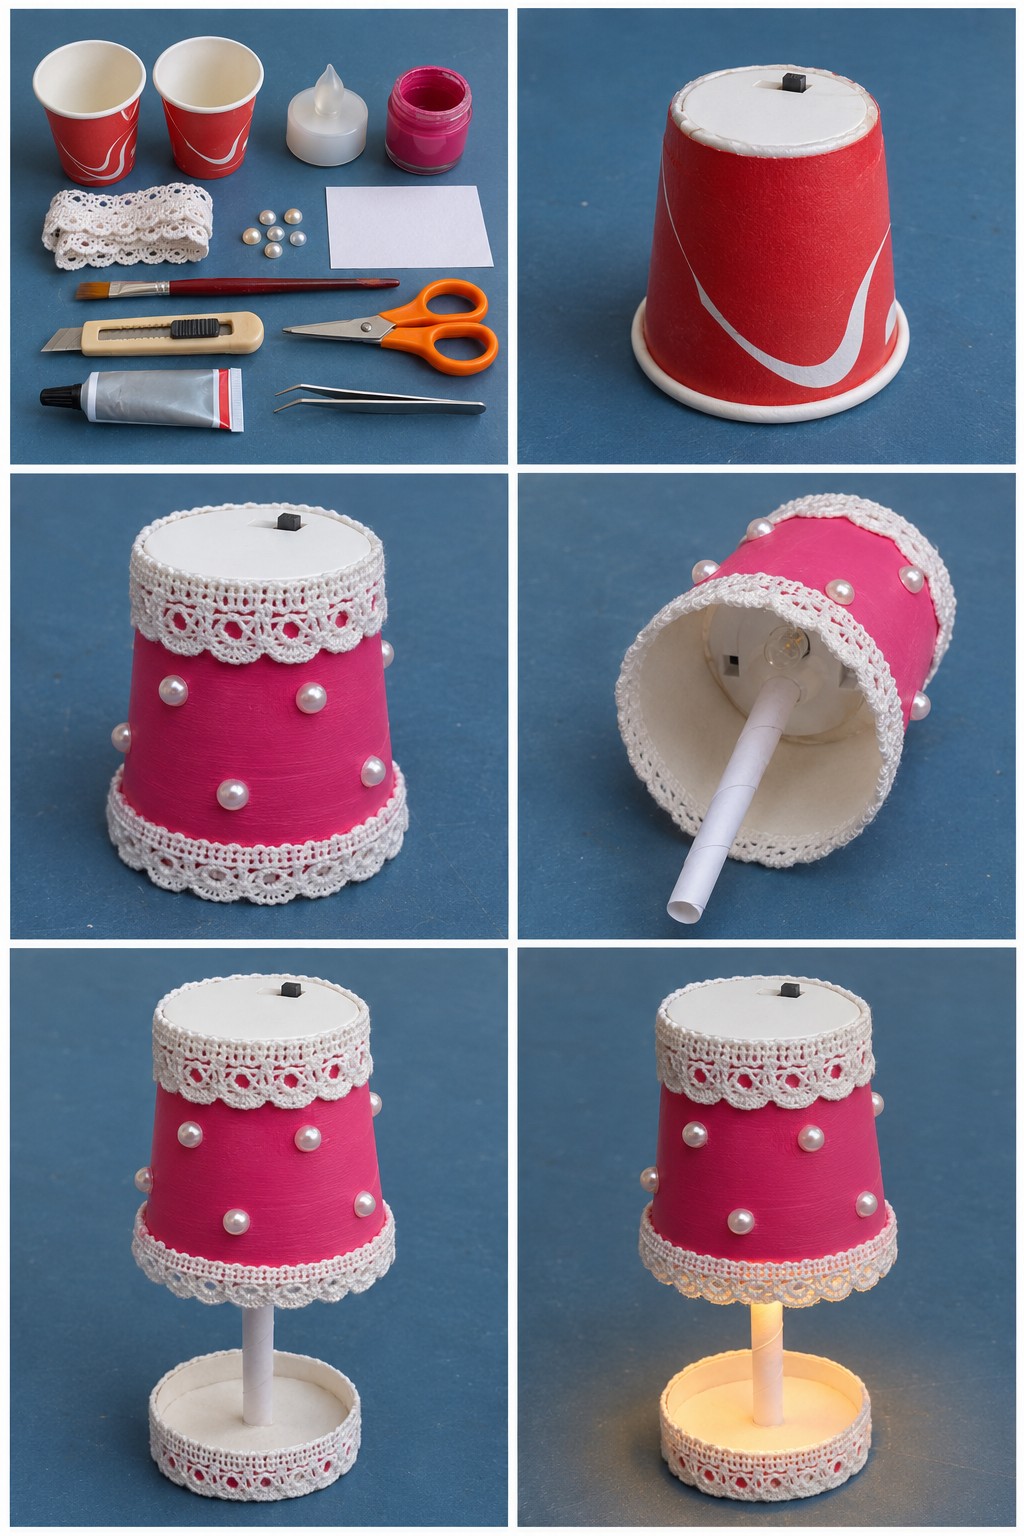
A battery tea light turns two small red cups into a doll sized table lamp with lace trim and pearls. The switch pokes through the top of the shade, so it is easy to turn on.
Besides the cups and the tea light you need magenta paint, cotton lace trim, half pearls, a square of white paper, a flat brush, a utility knife, scissors, a tube of glue and tweezers.
- An adult cuts a small slot in the base of one cup and pushes the tea light in from inside so the switch sticks out on top.
- Paint that cup magenta. Glue lace around the top and bottom edges and dot half pearls over the sides with tweezers.
- Roll the white paper into a tight tube and glue one end to the tea light housing inside the shade.
- Cut the second cup into a shallow tray, trim its edge with lace and glue the other end of the paper stem in the middle.
Glue the stem to the plastic housing, not to the bulb.
Polka Dot Top Hat
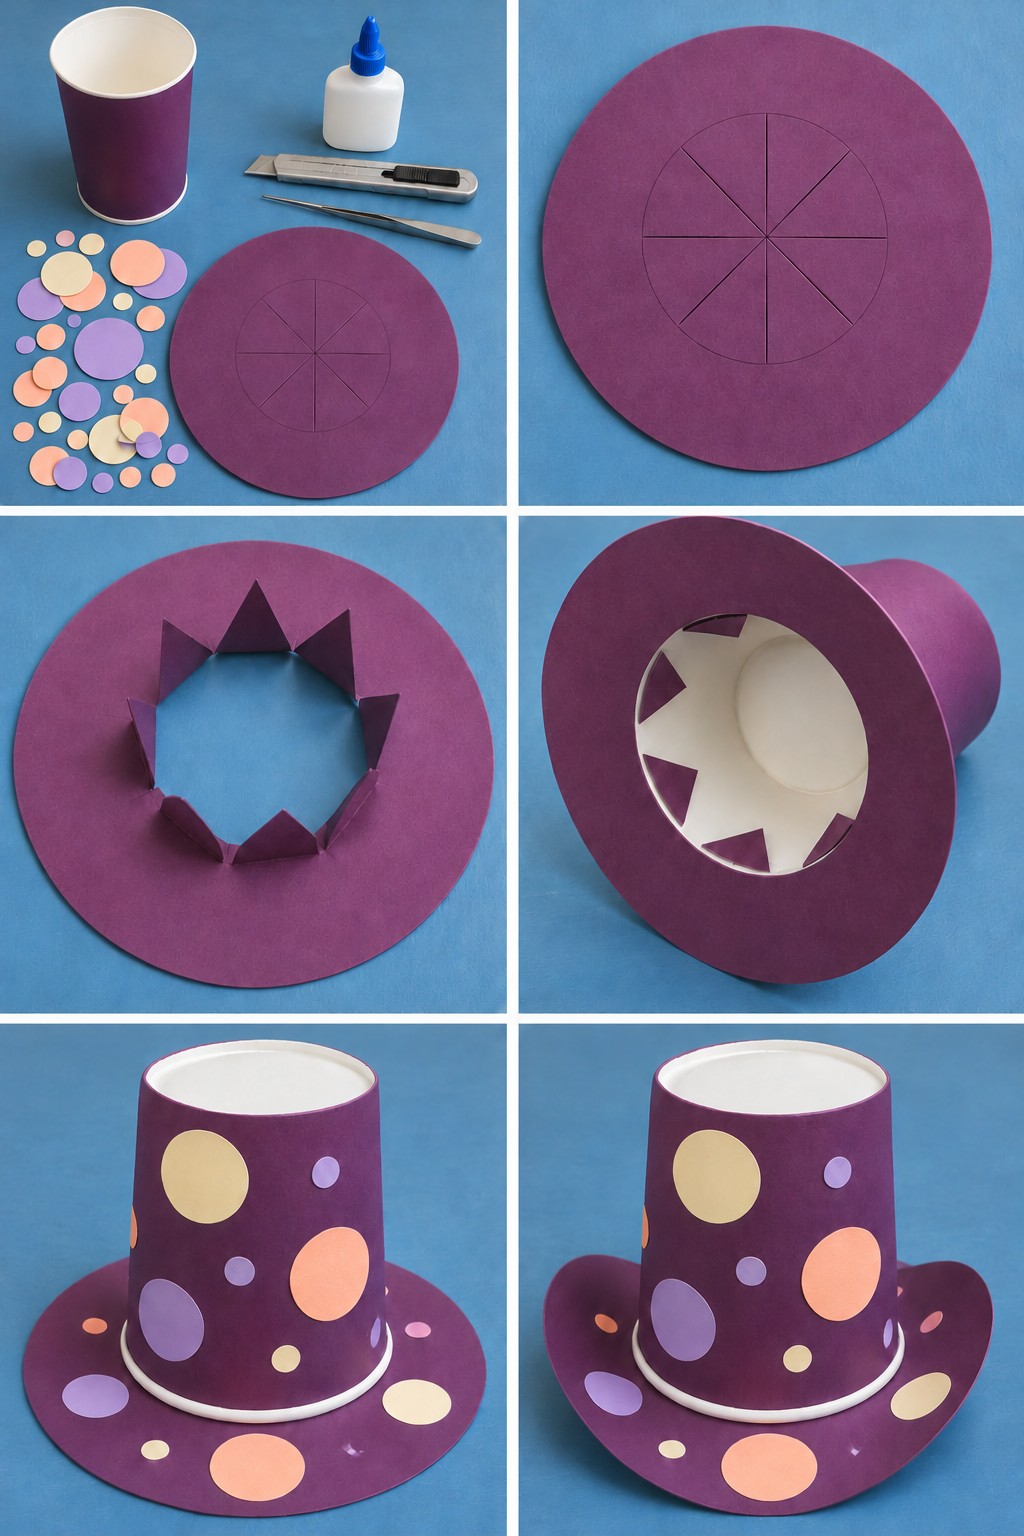
Sized for a doll, a teddy or a party table centerpiece. You need a plum cup, a larger plum card circle for the brim, white glue, a utility knife, tweezers and paper dots in lilac, peach and cream.
- In the middle of the card circle, draw a smaller circle the size of the cup's rim and divide it into eight wedges.
- An adult cuts along the wedge lines only, not around the circle, so eight triangles stay attached at their outer edges. Fold them up.
- Lower the upside down cup over the triangles so they sit inside it and the rim rests on the brim. Glue the triangles to the inside wall.
- Glue on the dots, using tweezers for the tiny ones, then gently curl the two sides of the brim upward.
Pellet Drum on a Stick
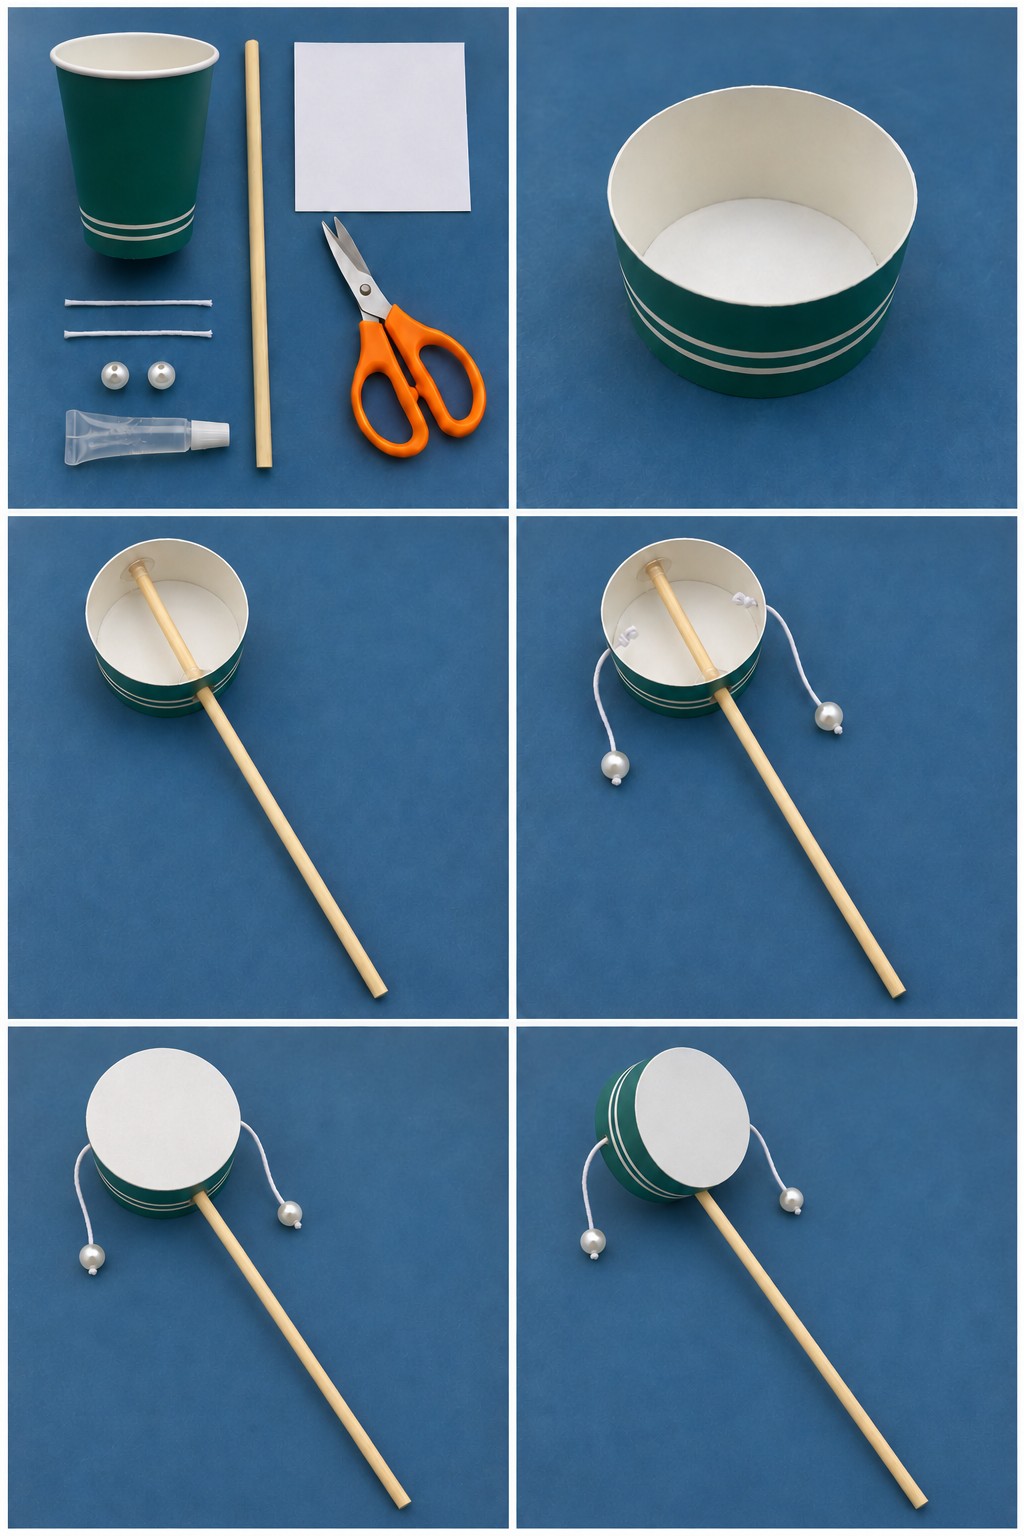
Roll the stick between your palms and two beads on cords swing round to tap the drum. It is a paper version of a pellet drum, the kind of toy known in Japan as den den daiko.
Cut a green striped cup down to a shallow drum, keeping its base. Push a wooden dowel through one side so its tip rests against the far wall inside, and glue it where it touches. Thread a short white cord through the wall on each side of the handle, knot it inside, and glue a pearl bead to the outer end of each cord. Finish by gluing a white card circle over the open face.
Before the face goes on, spin the drum to check that each bead reaches the middle of the face without wrapping around the handle. Tie the knots well, because the beads are small parts.
Red and Yellow Paper Cup Wall Medallion
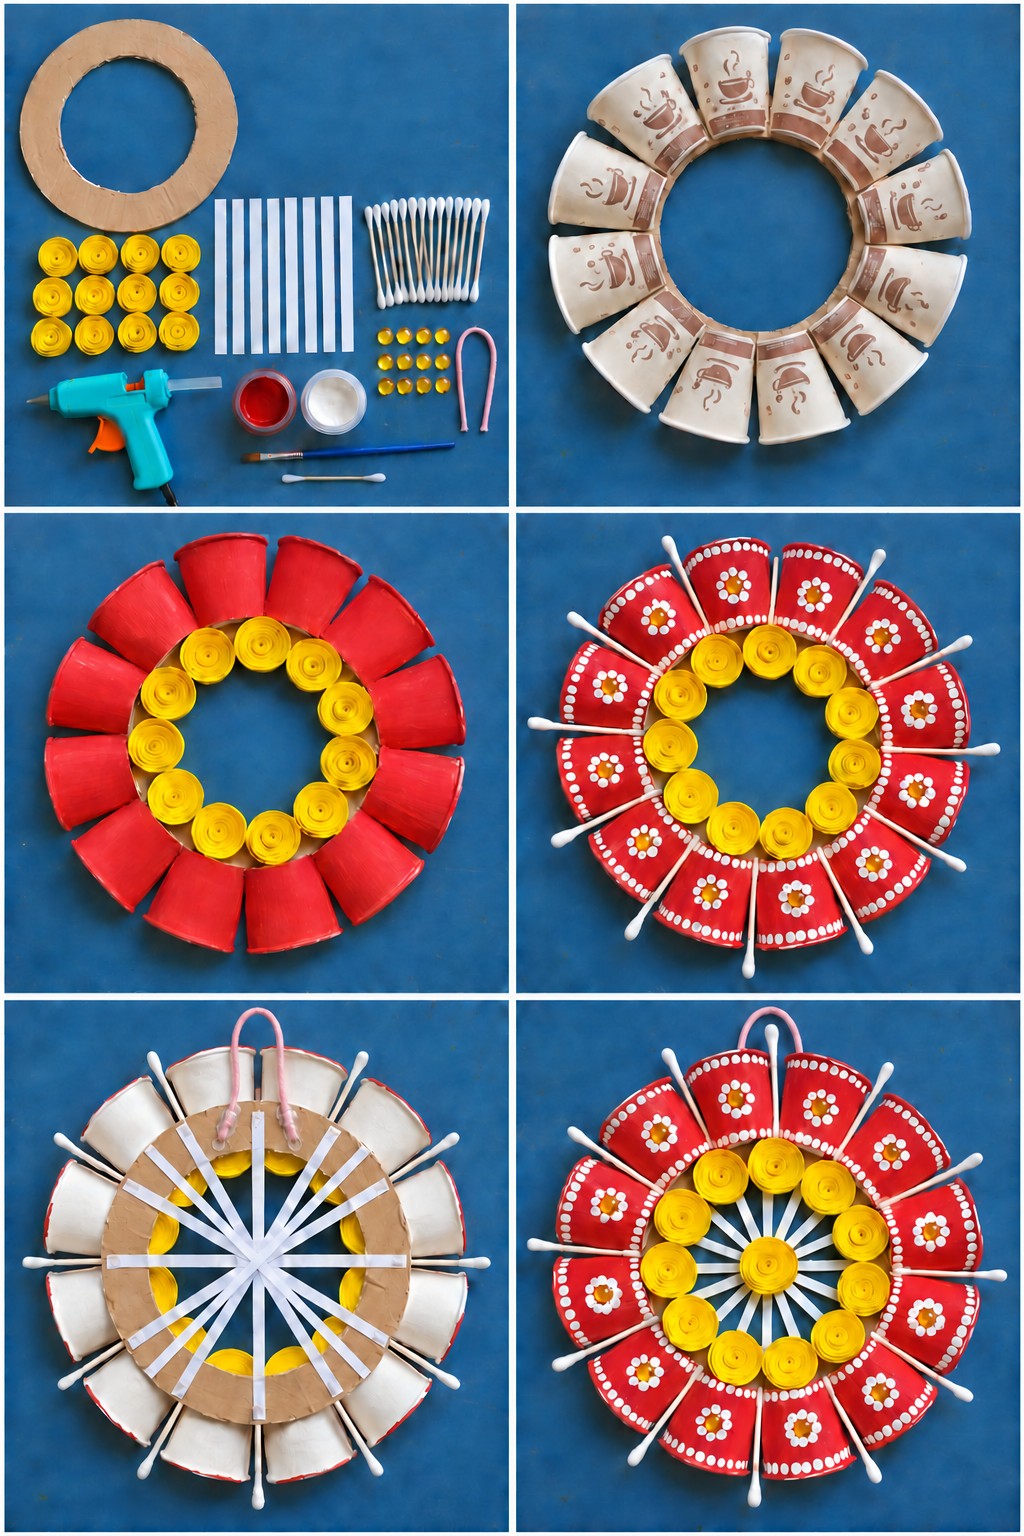
Coffee cups painted red, rolled yellow paper roses and cotton swab rays make a bold round piece for a door or a bare wall.
Supplies: about a dozen printed paper cups, a cardboard ring, rolled yellow paper roses, white paper strips, cotton swabs, small yellow flat gems, a pink pipe cleaner, a hot glue gun, red and white paint and a brush.
- Lay the cups around the ring with their bases pointing in. Space them all out before gluing, since small gaps add up around a circle, then an adult hot glues them down.
- Paint the cups red and glue the roses in a circle on the cardboard ring.
- Dip the tip of a cotton swab in white paint and dot a border along each rim and a small daisy on every cup. Press a yellow gem into each daisy center.
- Glue a cotton swab between each pair of cups so its tip sticks out like a ray.
- On the back, glue white strips across the center opening so they cross in the middle, and fix the pipe cleaner as a hanging loop. On the front, cover the crossing with one more rose.
Curled Strip Pendant Light
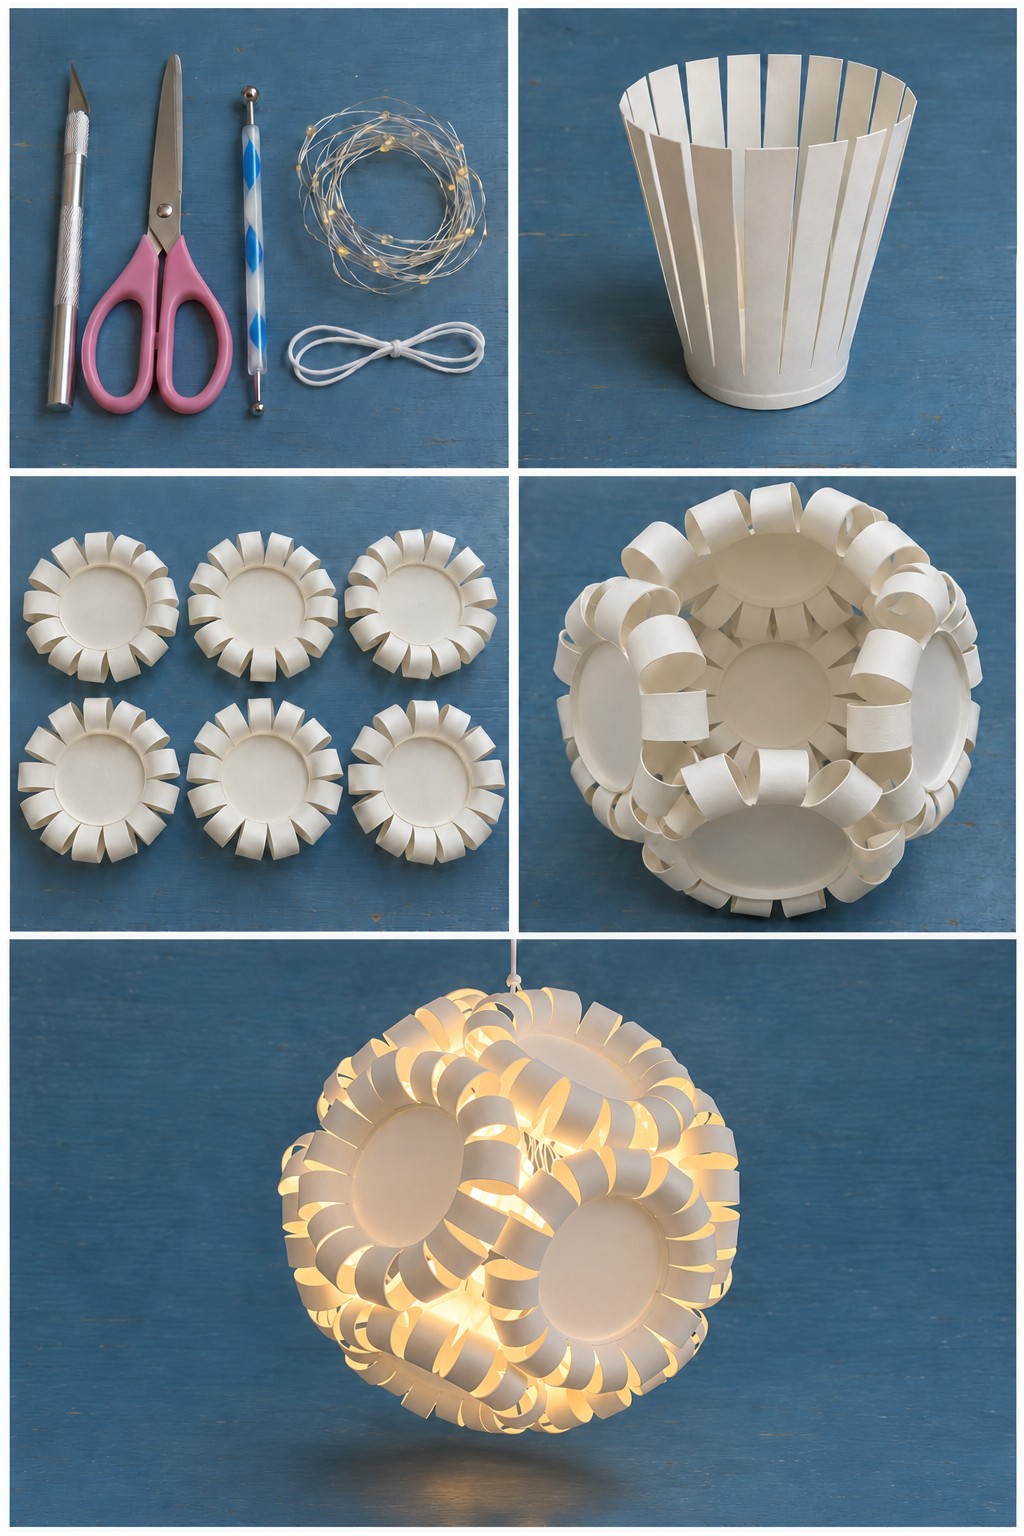
Six white cups become six paper flowers, and the flowers join into a round lampshade. With fairy lights inside, the curls throw soft shadows across the room.
- Cut each cup wall into even strips from the rim down to the base, without cutting into the base disc. An adult can start the cuts with a craft knife.
- Curl each strip outward over a ball tool, bring its tip back to the base and glue it there. Each cup turns into a round flower of loops.
- Glue the six flowers together loop to loop with their bases facing out: one on top, one at the bottom and four around the middle. Leave the last joint open.
- Feed battery fairy lights inside, close the last joint and tie white elastic cord through a firm loop at the top for hanging.
Curl one test strip before cutting all of them; it shows how wide the strips need to be for a loop that does not crease.
Heart Cutout Desk Lamp
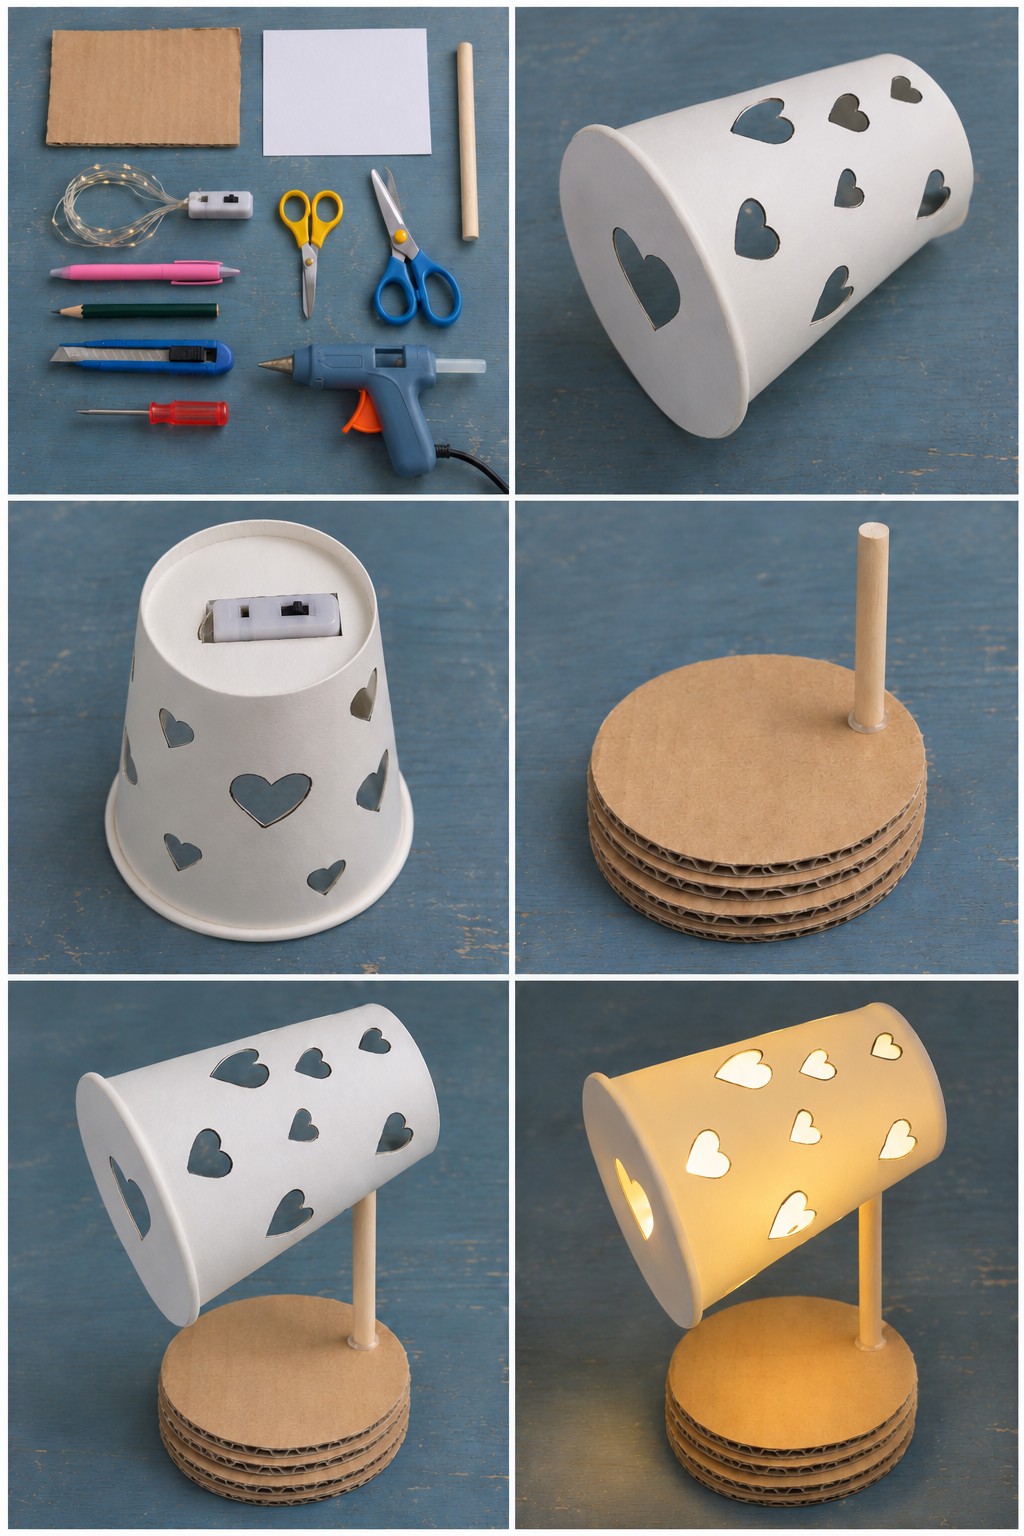
Heart shaped openings let the light spill out of this angled cup shade, and the switch box sits at the back like a real desk lamp.
Gather a white cup, corrugated cardboard, white paper, a wooden dowel, warm white fairy lights with a switch box, a pink pen, a pencil, a utility knife, a small screwdriver, scissors and a hot glue gun.
- Draw a heart on white paper, cut it out and trace it around the cup in pink, leaving plenty of space between the hearts.
- An adult starts each heart with the knife and trims the curves with small scissors.
- Cut a slot in the base of the cup for the battery box, push it in with the switch facing out and spread the lights inside.
- Cut five matching cardboard circles and glue them into a thick stand. Make a hole with the screwdriver and glue the dowel in upright.
- Glue the cup to the top of the dowel at an angle, with the open end pointing forward.
Leave solid paper around the spot where the dowel joins the cup. Too many hearts there and the shade tears.
Blue Fairy House with an Opening Door
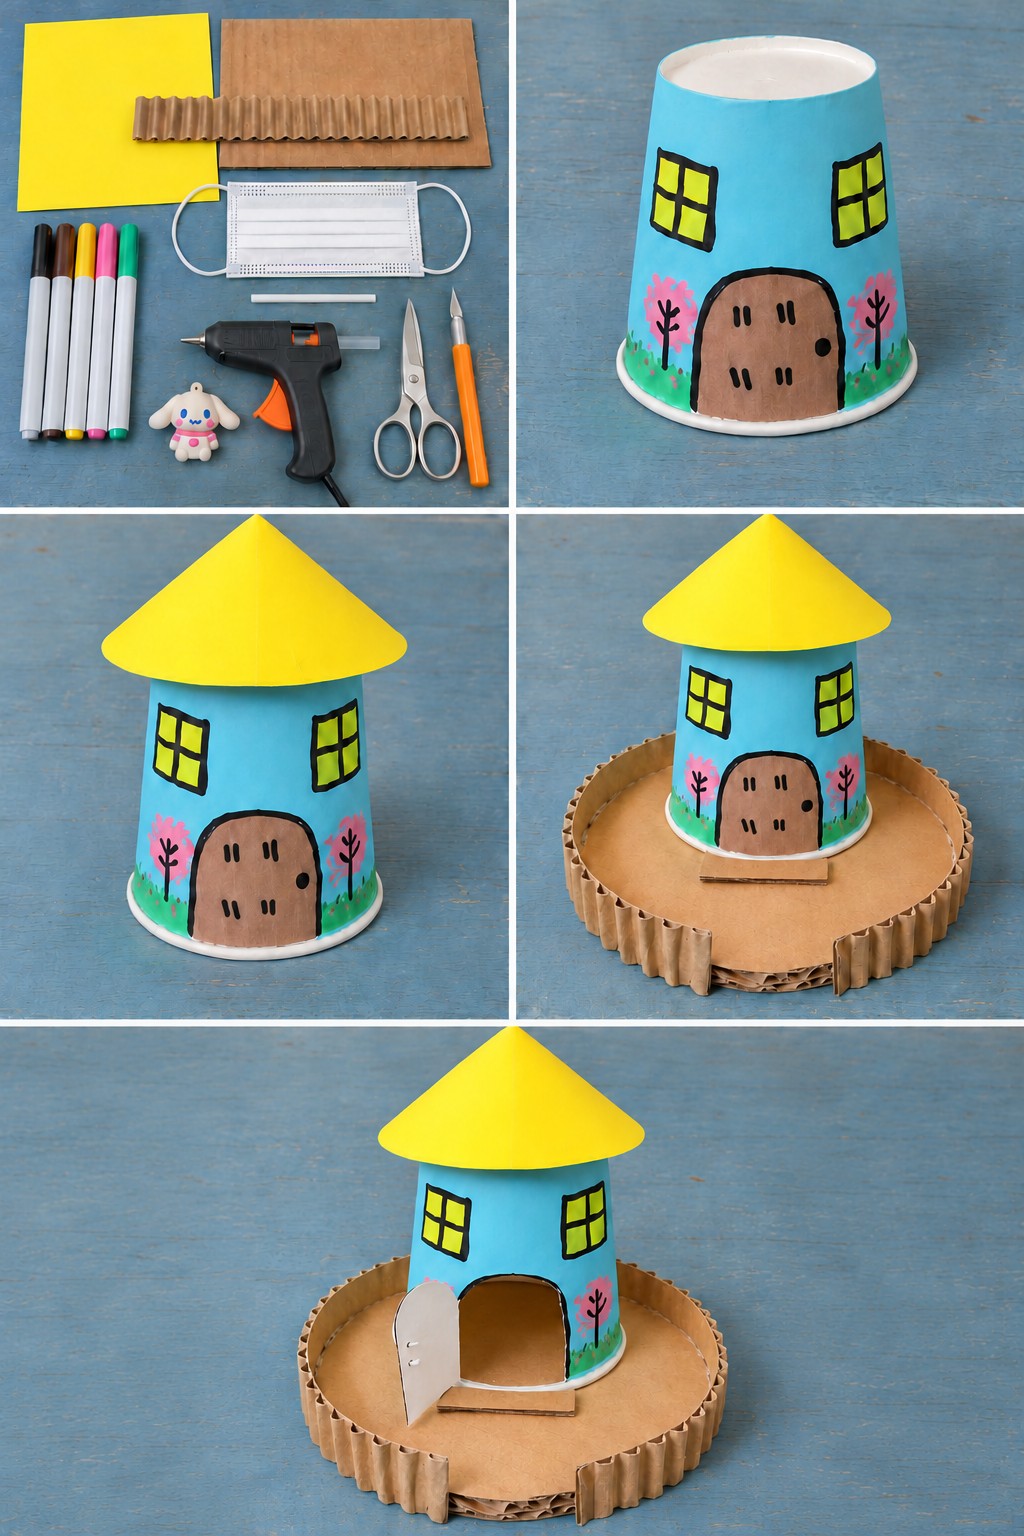
A step up from the purple roof house: this one has a door that really swings open, a fenced yard and a doorstep. You need a light blue cup, yellow card, a cardboard sheet, a strip of corrugated cardboard, black, brown, yellow, pink and green markers, a hot glue gun, scissors and a craft knife.
Outline two windows and an arched door in black on the upside down cup. Color the windows yellow and the door brown with short plank lines and a knob, then draw pink blossom trees and grass on both sides. Roll yellow card into a cone and glue it on as the roof. Cut a cardboard circle for the yard and hot glue the corrugated strip around its edge as a fence, leaving a gap for a gate. Glue the house in the middle. An adult then cuts the door along the top, one side and the bottom, leaving the other side as a hinge, and folds it open gently.
Glue the little cardboard doorstep in place last, low enough that the door swings over it.
Wheel Wall Hanging with Pansy Paper Cups
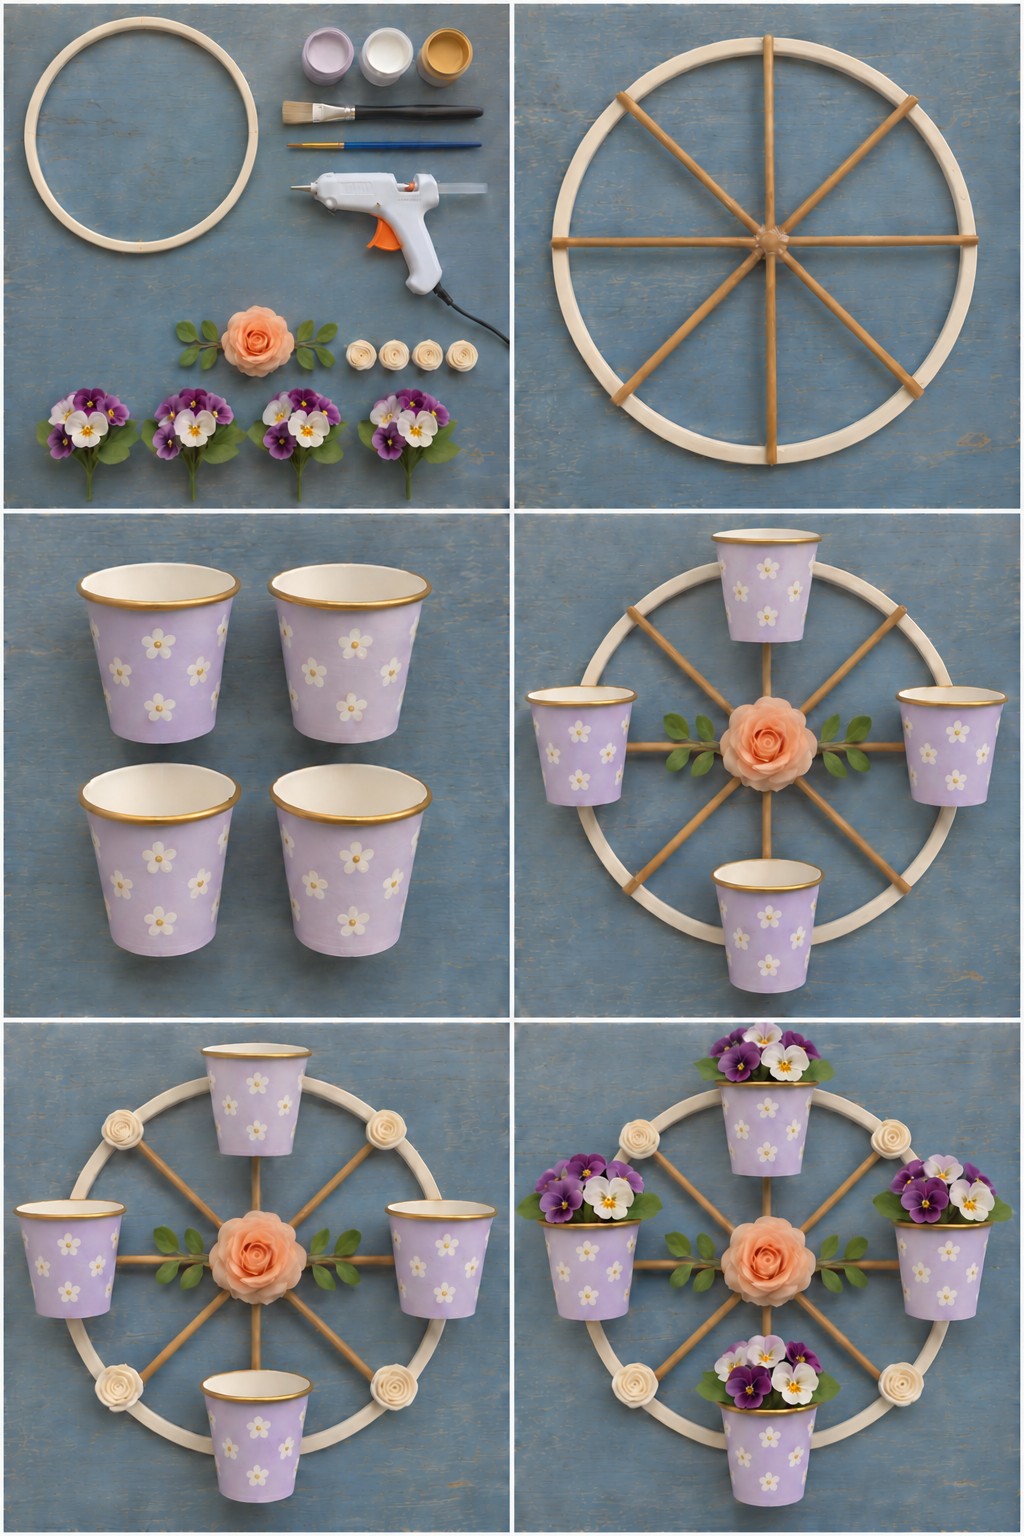
An embroidery hoop with thin wooden spokes becomes a cart wheel, and four painted cups at the top, bottom and sides hold bunches of faux pansies.
- Lay eight thin wooden sticks across the cream hoop so they meet in the middle, and glue them at the hub and at the rim.
- Paint four cups lilac. With a fine brush, add gold rims and small white flowers with gold centers.
- Glue the cups to the wheel at the top, bottom, left and right, fixing the back of each one along a spoke for support.
- Glue the peach rose and its leaves over the hub and the four small cream roses on the hoop between the cups. Tuck a pansy bunch into each cup.
Stick to faux flowers. A paper cup glued along a single spoke cannot hold the weight of wet soil.
Floating Sailboats with Striped Sails
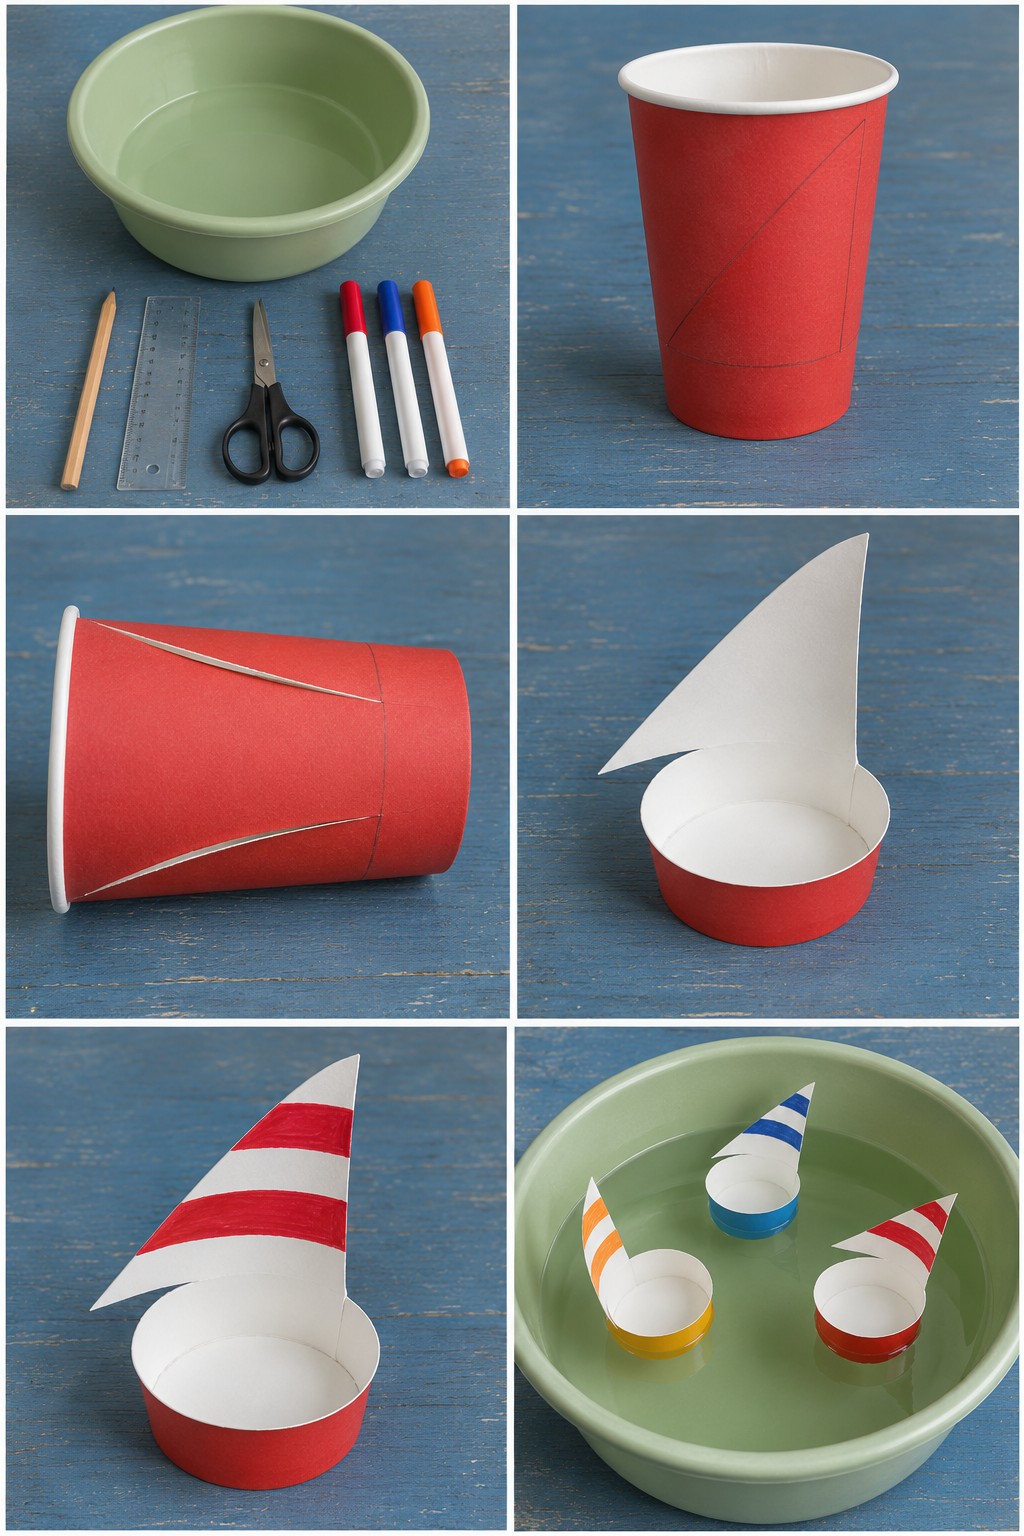
Each boat is a single cup: a short ring at the bottom becomes the hull and a tall triangle of wall left standing becomes the sail, so there is no mast to glue.
Draw a line around a colored cup about a quarter of the way up from the base. With a ruler, draw a tall triangle from that line up to the rim, then cut away the rest of the wall above the line, keeping the triangle joined to the hull. Draw stripes on the white inside of the sail. The finished fleet has a red boat with red stripes, a blue one with blue stripes and a yellow one with orange stripes, all floating in a basin of water.
The cup coating keeps water out for a while, but the cut edges soak it up, so let the boats dry after play. Stay with young children whenever there is water out, even a shallow basin.
Blossom Tree Slotted into a Paper Cup
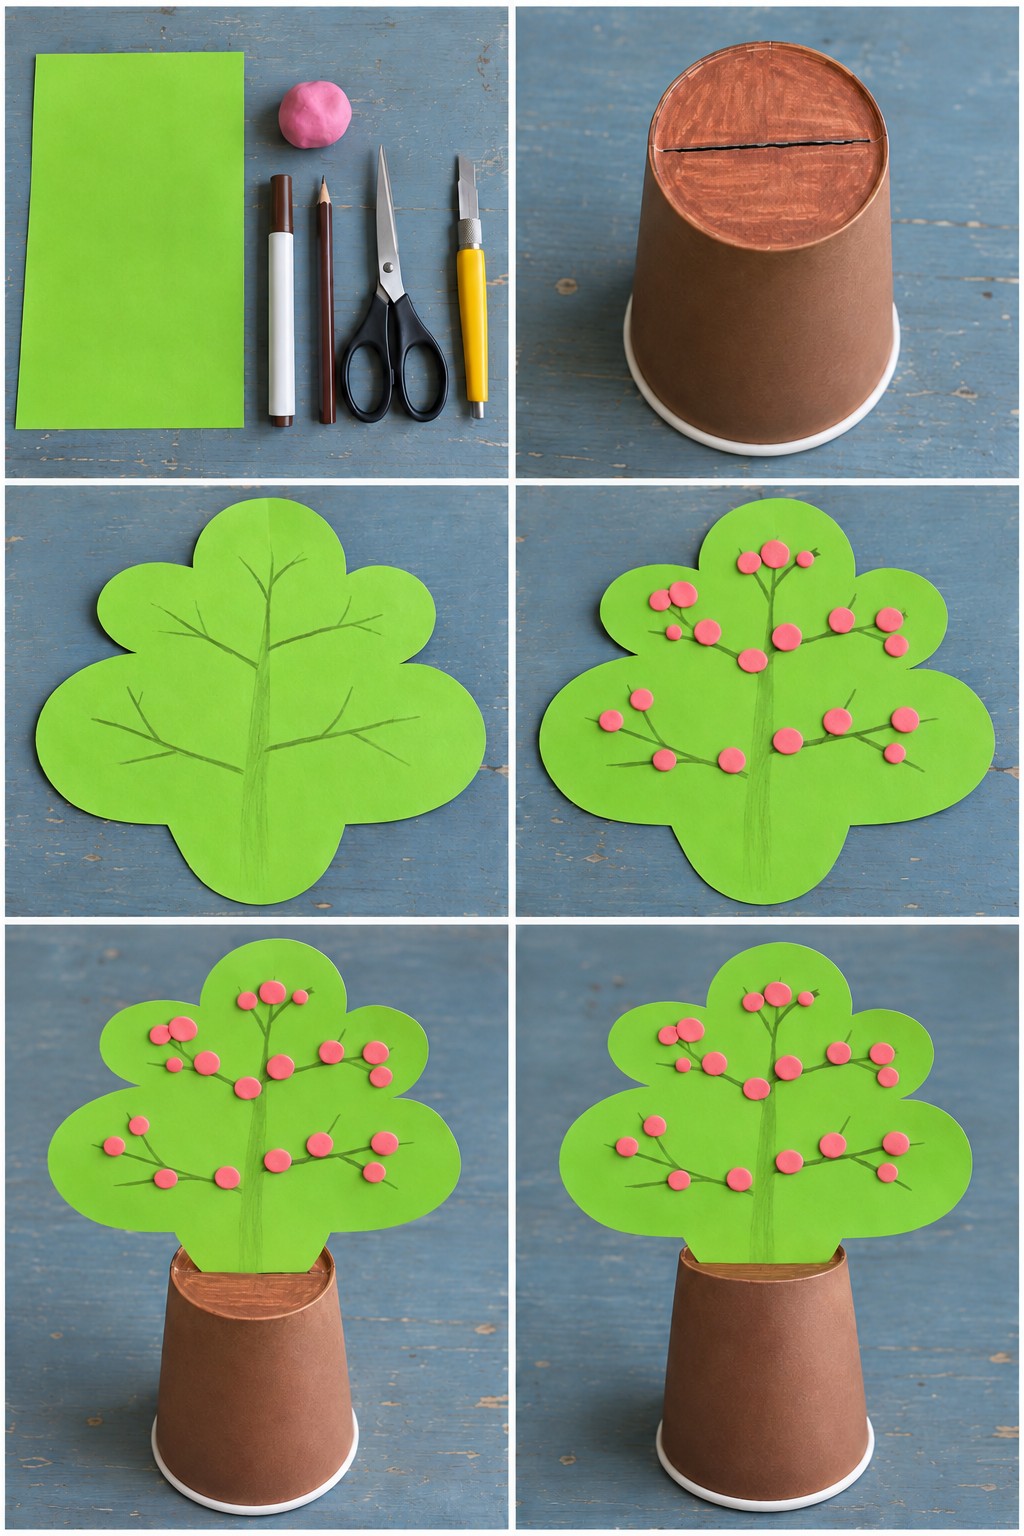
A slit in the cup holds this tree upright, so it needs no stand. Color the base of an upside down brown cup with a brown marker, and have an adult cut a straight slit across it. Cut a cloud shaped tree from green paper with a flat bottom edge and draw a trunk and branches with a brown pencil. Flatten small balls of pink modeling clay into blossoms and press them along the branches. Slide the bottom edge of the tree into the slit and it stands on its own.
Keep the clay dots thin. Heavy blossoms pull the tree forward, especially if the slit is a little too wide.
Shelf Sitter Puppy with Dangling Legs
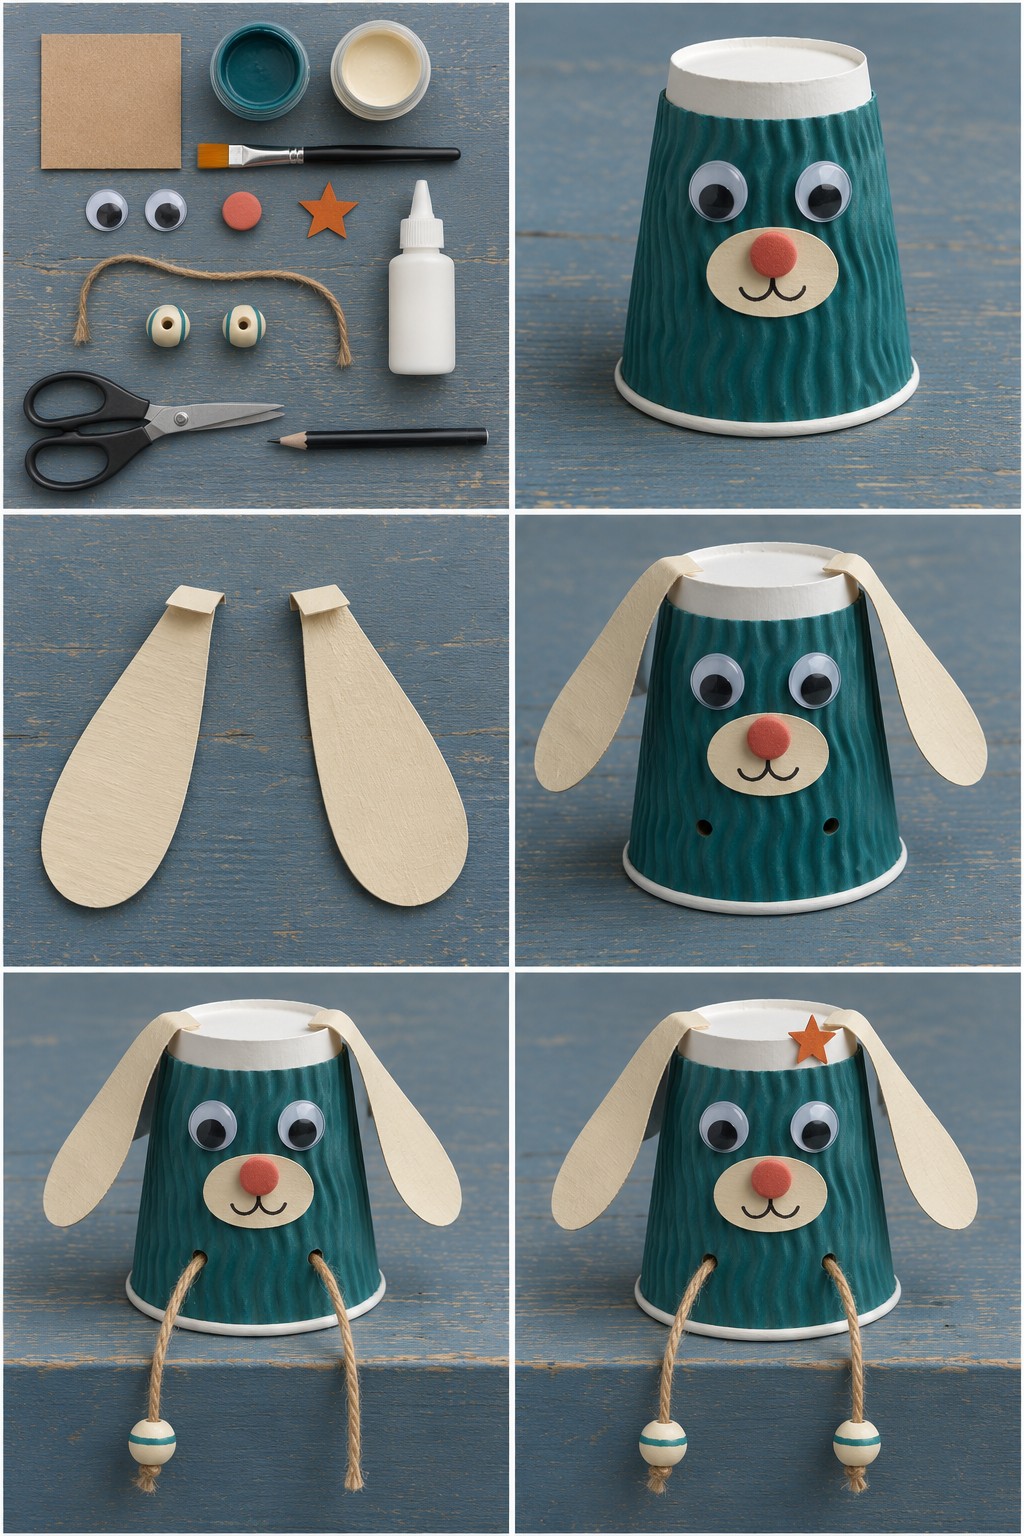
Ripple wall cups have a ridged surface that looks like fur once it is painted. Set this puppy on the edge of a shelf and its twine legs dangle over the side.
Supplies: a ripple wall cup, kraft card, teal and cream paint, a flat brush, two googly eyes, a round coral nose, a small orange star, jute twine, two striped wooden beads, white glue, scissors and a pencil.
- Paint the cup teal, leaving the white band at the base. Cut an oval muzzle from card, paint it cream and draw the mouth. Glue on the muzzle, the nose and the eyes.
- Cut two long ears with a small tab at the top, paint them cream and fold the tabs over the top edge to glue them.
- An adult makes two holes near the bottom of the front. Thread twine through so a leg hangs from each hole, slide a bead onto each one and knot under it.
- Glue the star next to one ear.
Double knot the twine, and keep the beads and googly eyes away from children under three.
Beach Scene Card with a Paper Cup Pocket
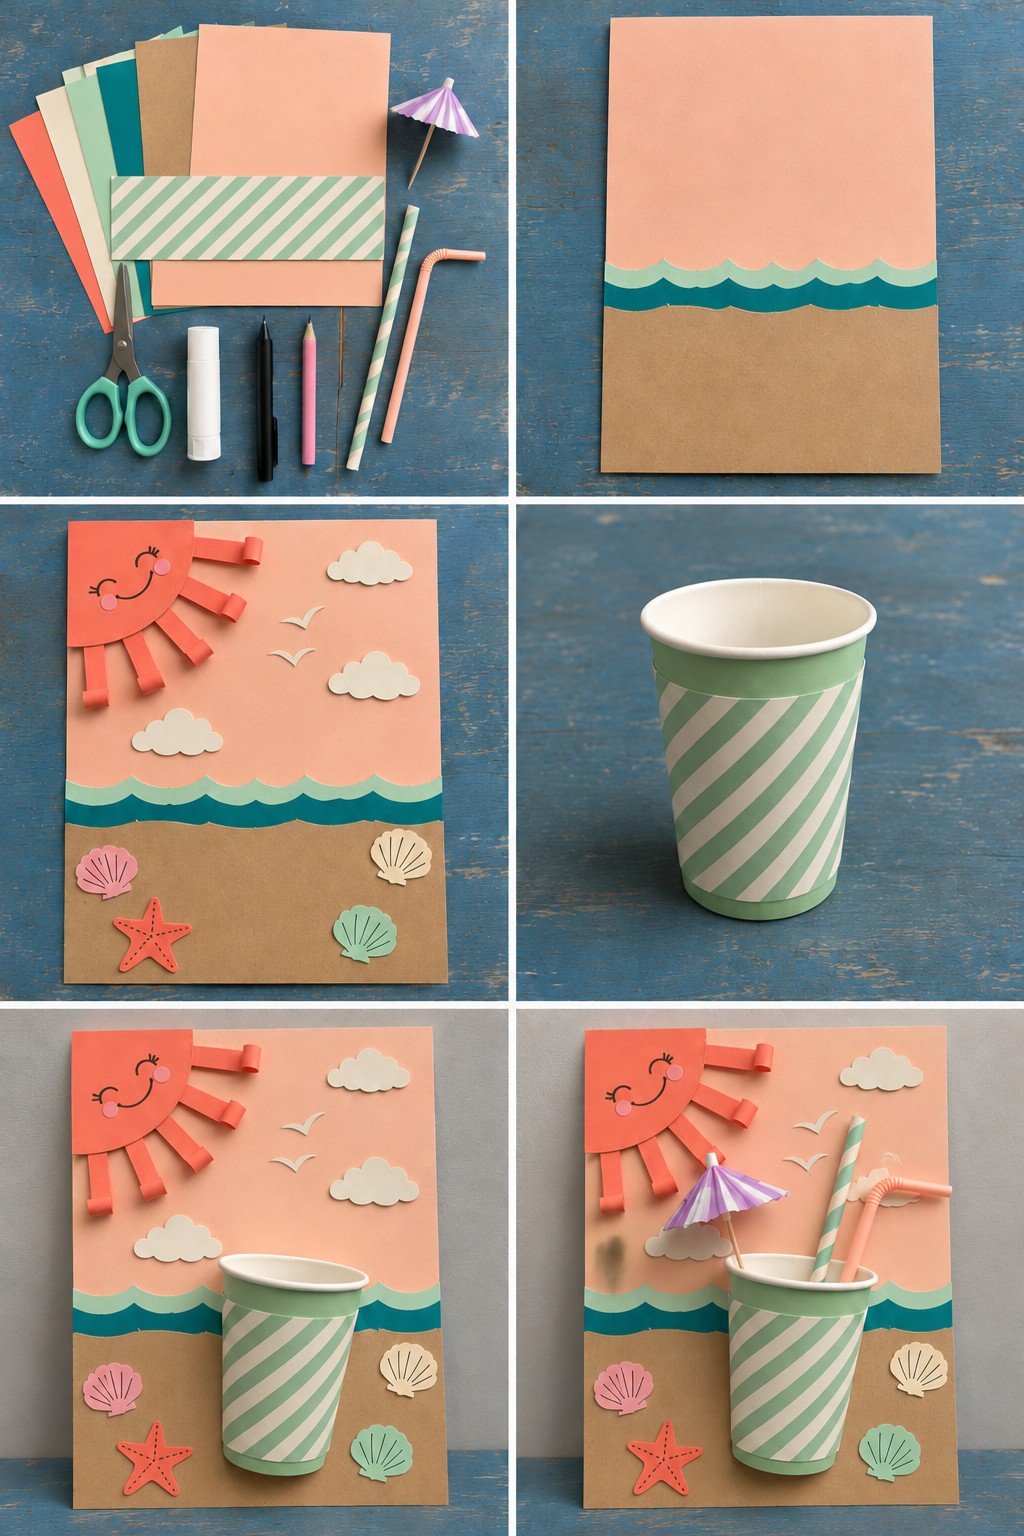
A cup wrapped in striped paper stands out from this beach picture as a real drink, complete with a cocktail umbrella and two straws. You will need coral, cream, mint, teal, kraft and peach card, striped mint paper, a paper cup, a cocktail umbrella, a striped paper straw, a peach bendy straw, scissors, a glue stick, a black pen and a pink pencil.
- Use peach card for the sky. Glue on wavy strips of mint and teal, then a band of kraft card for the sand.
- Cut a coral half sun with curled paper rays and give it a sleepy smile and pink cheeks. Add cream clouds and birds, shells in pink, cream and mint, and a coral starfish.
- Wrap the cup in striped paper and glue its back firmly onto the picture so it stands over the waves and the sand.
- Put the umbrella and both straws in the cup and bend the peach straw over.
The curved cup only touches the card along a thin strip, so press it on well and keep the props light. Cocktail umbrellas have a sharp wooden point; snip it off for little ones.
Catch the Ball Paddle
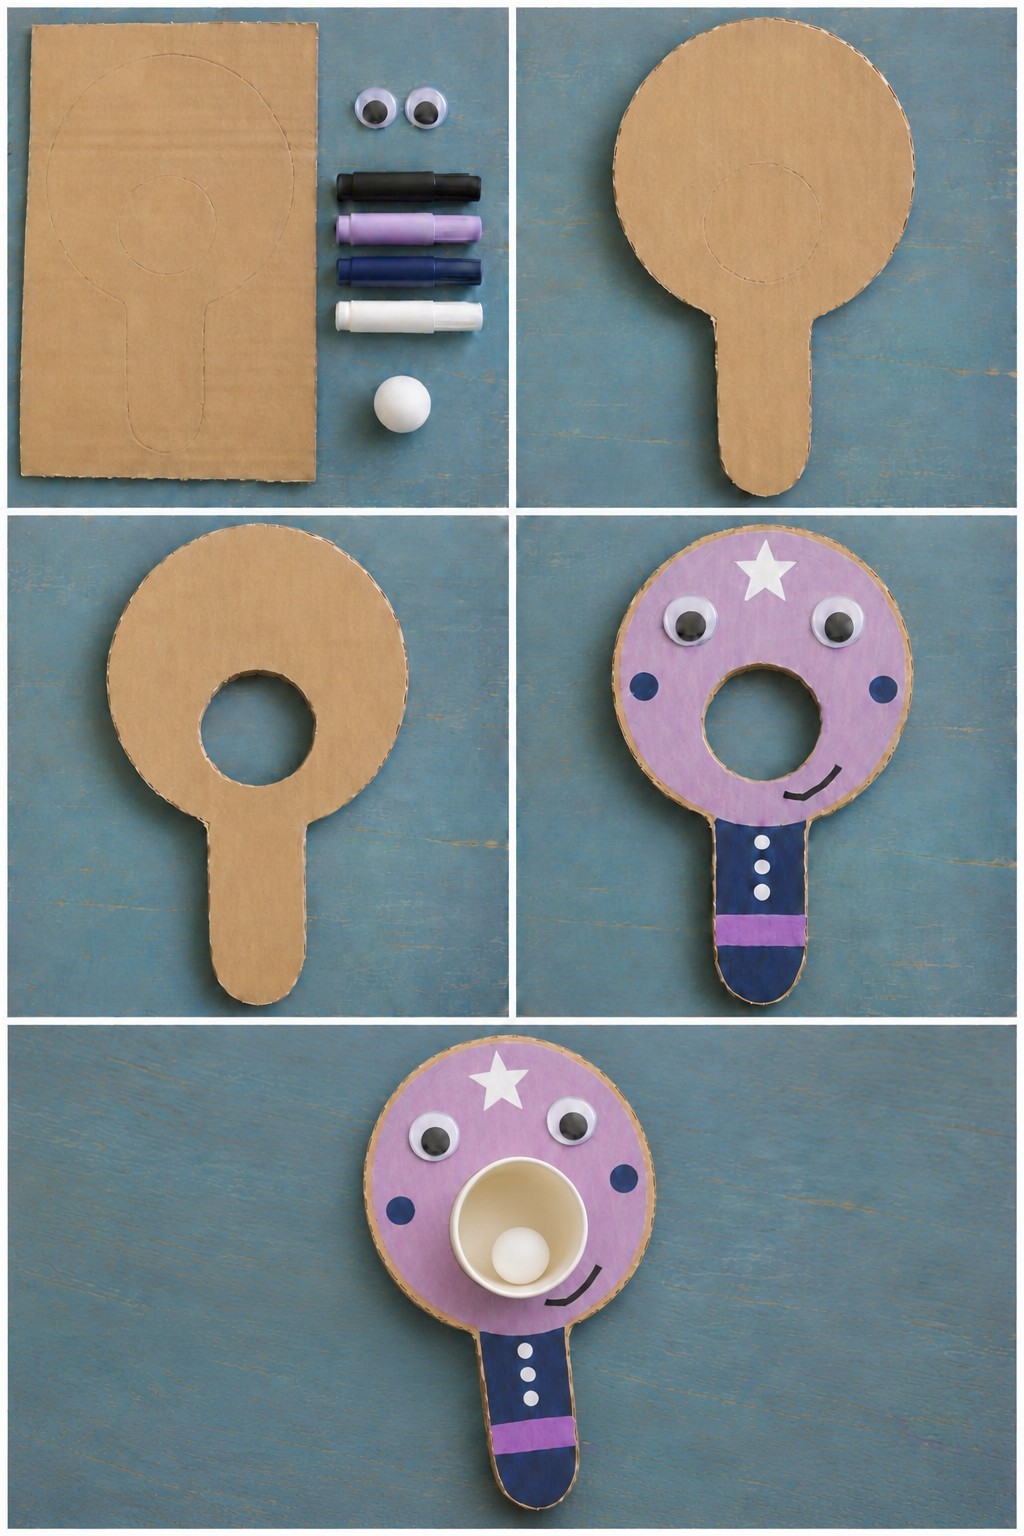
A cup and ball game with a friendly face. An adult cuts the paddle shape from cardboard and then a circle in its head, a little smaller than the rim of a small paper cup. Color the face lilac and the handle navy, and add a white star, navy cheeks, a black smile, white buttons and a lilac band. Glue on the googly eyes and push the cup into the hole from the front so its rim catches on the cardboard. Toss a ping pong ball up and try to catch it.
Cut the hole slowly and test the cup as you go. If the hole ends up wider than the rim, the cup drops through the first time the ball lands in it.
Shoebox Football Table
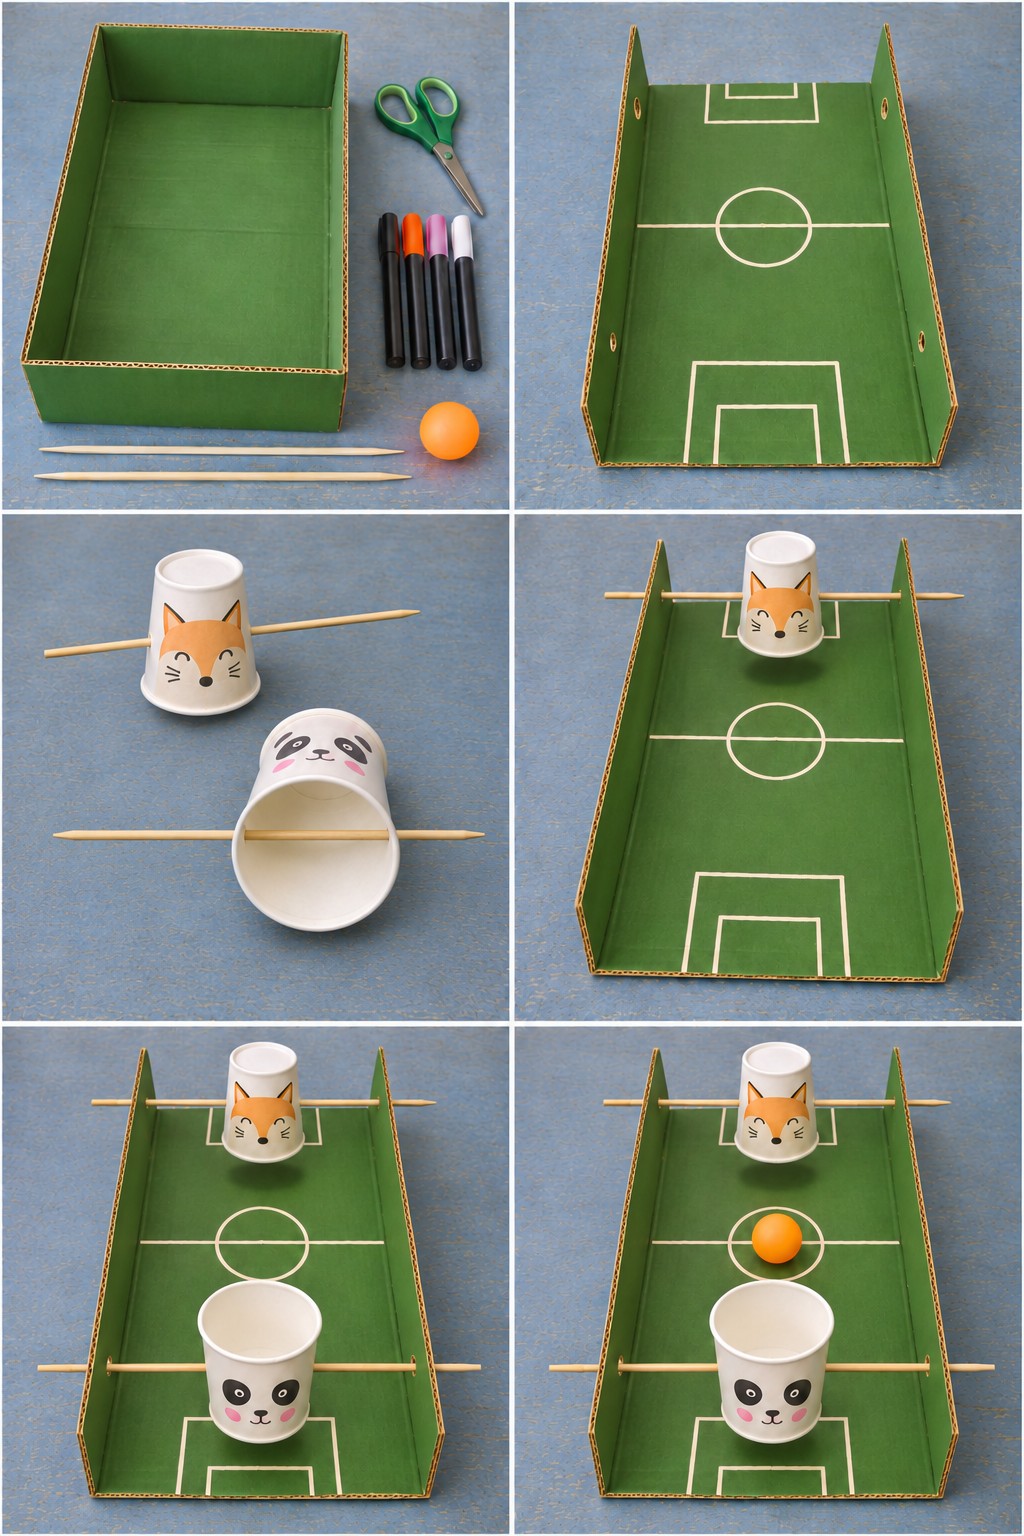
A green box, two skewers and two cups make a table football game for two players.
- Cut off both short ends of the box so the ends become open goals. Draw the halfway line, the center circle and the goal boxes in white.
- An adult makes a pair of holes across the long walls near each goal.
- Draw a fox on one cup and a panda on the other. Push a skewer through opposite sides of each cup and then through its pair of box holes. In the photos the fox hangs upside down and the panda stands upright.
- Put the orange ping pong ball in the center and spin the rods to swing the players at it.
The holes in the box should let the skewers turn freely, while the holes in the cups should grip them tightly, otherwise the cup just spins on the rod. Snip the sharp points off the skewers before kids play.
Paper Cup Chicks on Paper Legs
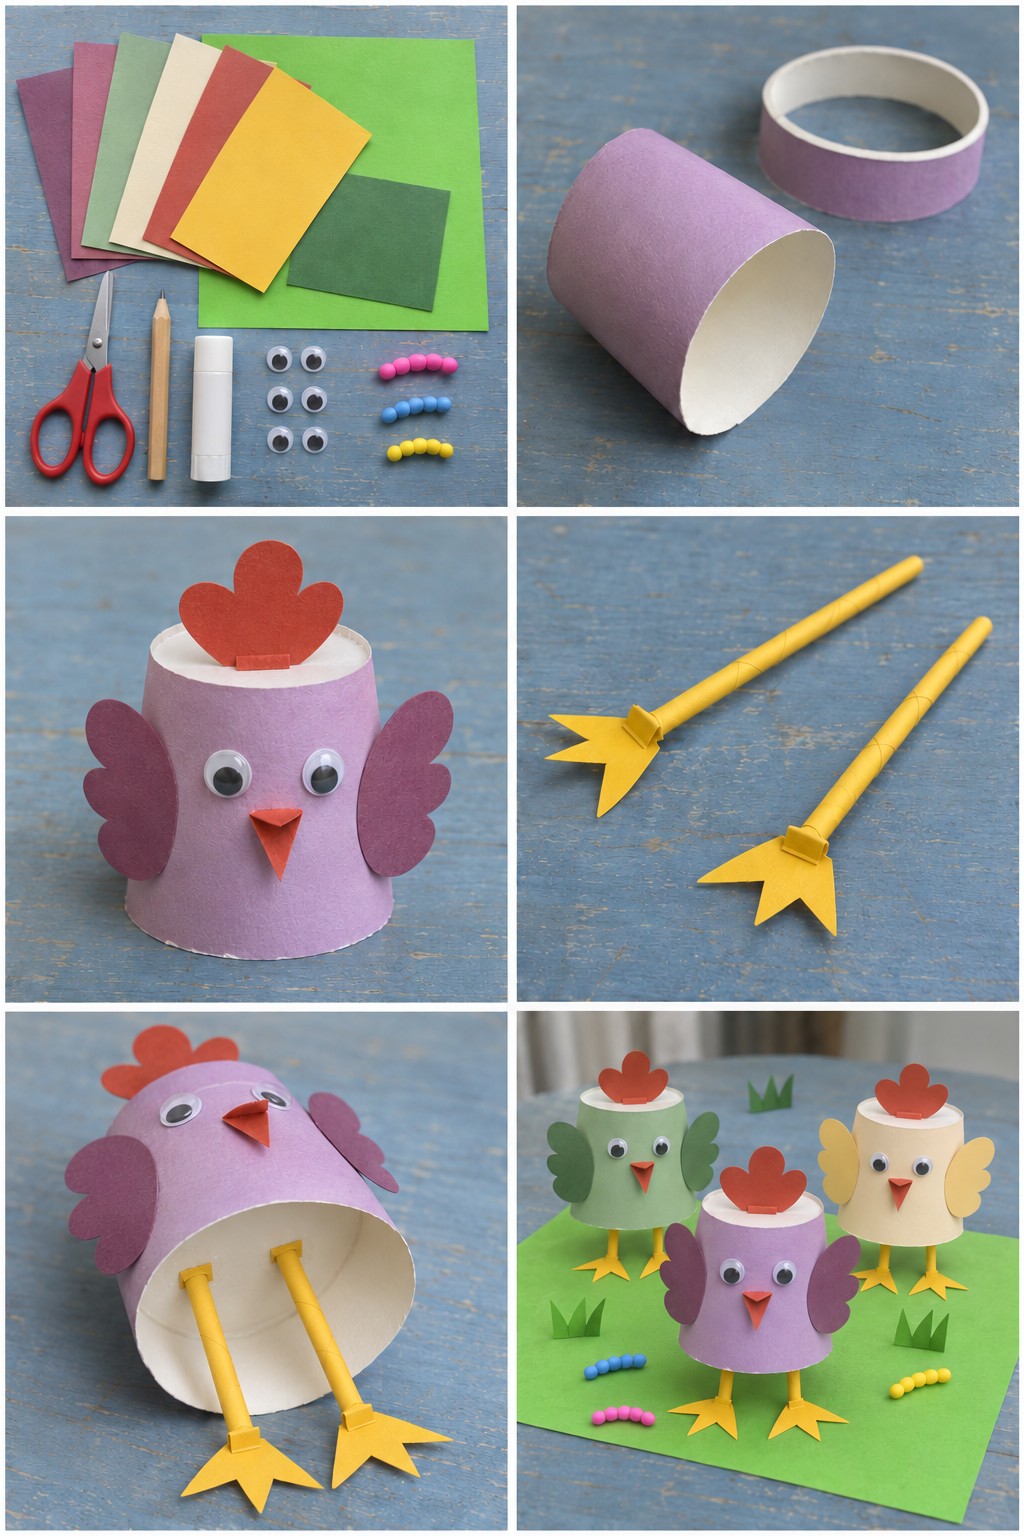
These chicks stand up on their own, thanks to rolled paper legs and wide paper feet. Shorten a lilac cup by cutting a ring off its open end. Cut plum wings, a red comb and a small folded beak from colored paper and glue them on, with googly eyes above the beak. For the legs, roll yellow paper tightly into two thin tubes, cut two feet with three pointed toes and fold a tab on each to join it to a leg. Glue the tops of the legs inside the cup near the lower edge. Make a sage chick with dark green wings and a cream one with yellow wings the same way, and stand all three on a sheet of green paper with folded paper grass and small bead caterpillars.
Let the leg joints dry with both feet flat on the table, so the chick does not tip once it is finished. Keep the googly eyes and beads for kids old enough to handle small parts.
Train Pencil Holder
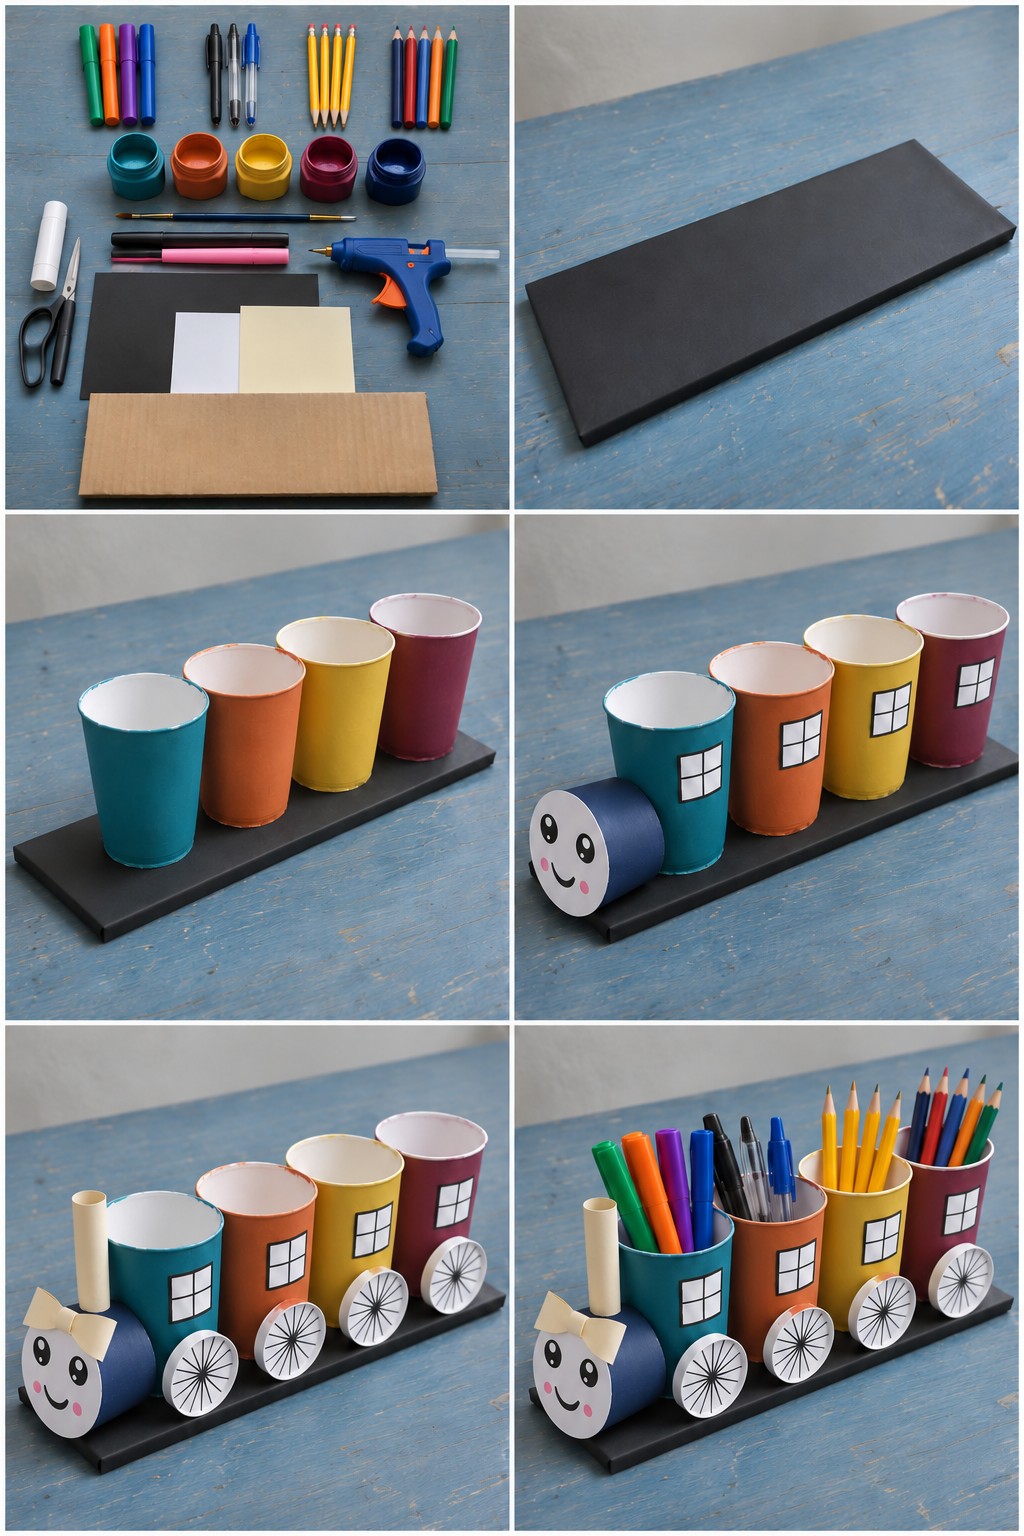
Four upright cups are the cars and a fifth, lying on its side, is the engine. Once it is filled, every color of marker and pencil has its own car.
- Cover a strip of cardboard with black paper for the track base.
- Paint four cups teal, orange, yellow and maroon and glue them upright in a row. Cut white paper windows, draw the frames in black and stick one on each car.
- Paint a fifth cup navy, cut it shorter and glue it on its side at the front as the engine. Draw a smiling face with pink cheeks on its white base.
- An adult hot glues white paper wheels with black spokes along the sides. Roll cream paper into a chimney, make a cream bow and add both to the engine.
- Fill the cars with markers, pens, pencils and colored pencils.
Glue the cars down before loading them and spread the heavier pencils along the train, since one overfilled end car can pull away from a light cardboard base.
Jumping Frog Popper
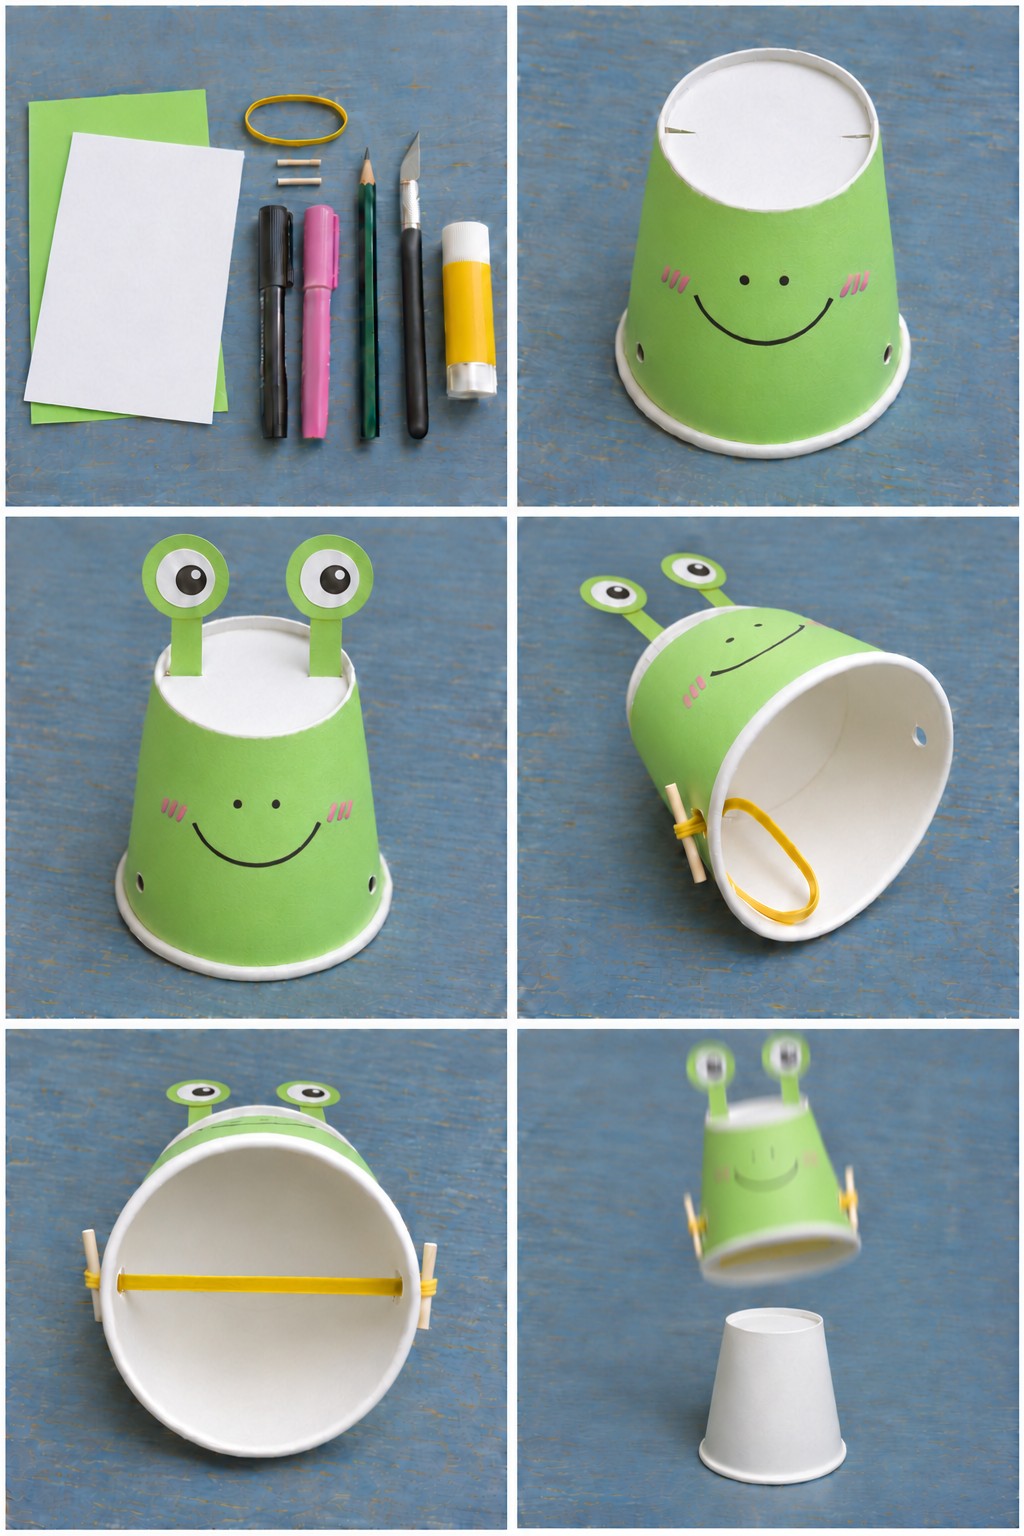
A rubber band stretched across the inside of the frog stores the energy. Press the frog down over a plain cup, let go, and it jumps.
Supplies: a green cup, a plain white cup, green and white paper, a rubber band, two short pieces of wooden stick, black and pink markers, a pencil, a craft knife and a glue stick.
- An adult cuts two short slits in the base of the upside down green cup and makes a hole on each side near the rim.
- Draw a smile, two nostrils and pink cheeks. Cut two green eye stalks, glue white eyes with black pupils on top and slide the stalks into the slits.
- Push the rubber band through the side holes from inside and loop each end around a wooden piece outside, so the band stretches straight across the cup.
- Stand the white cup upside down, press the frog down over it until the band stretches, then let go.
Point the frog away from faces when it launches, and throw the band away as soon as it starts to crack.
Smoke Ring Cannon Paper Cup
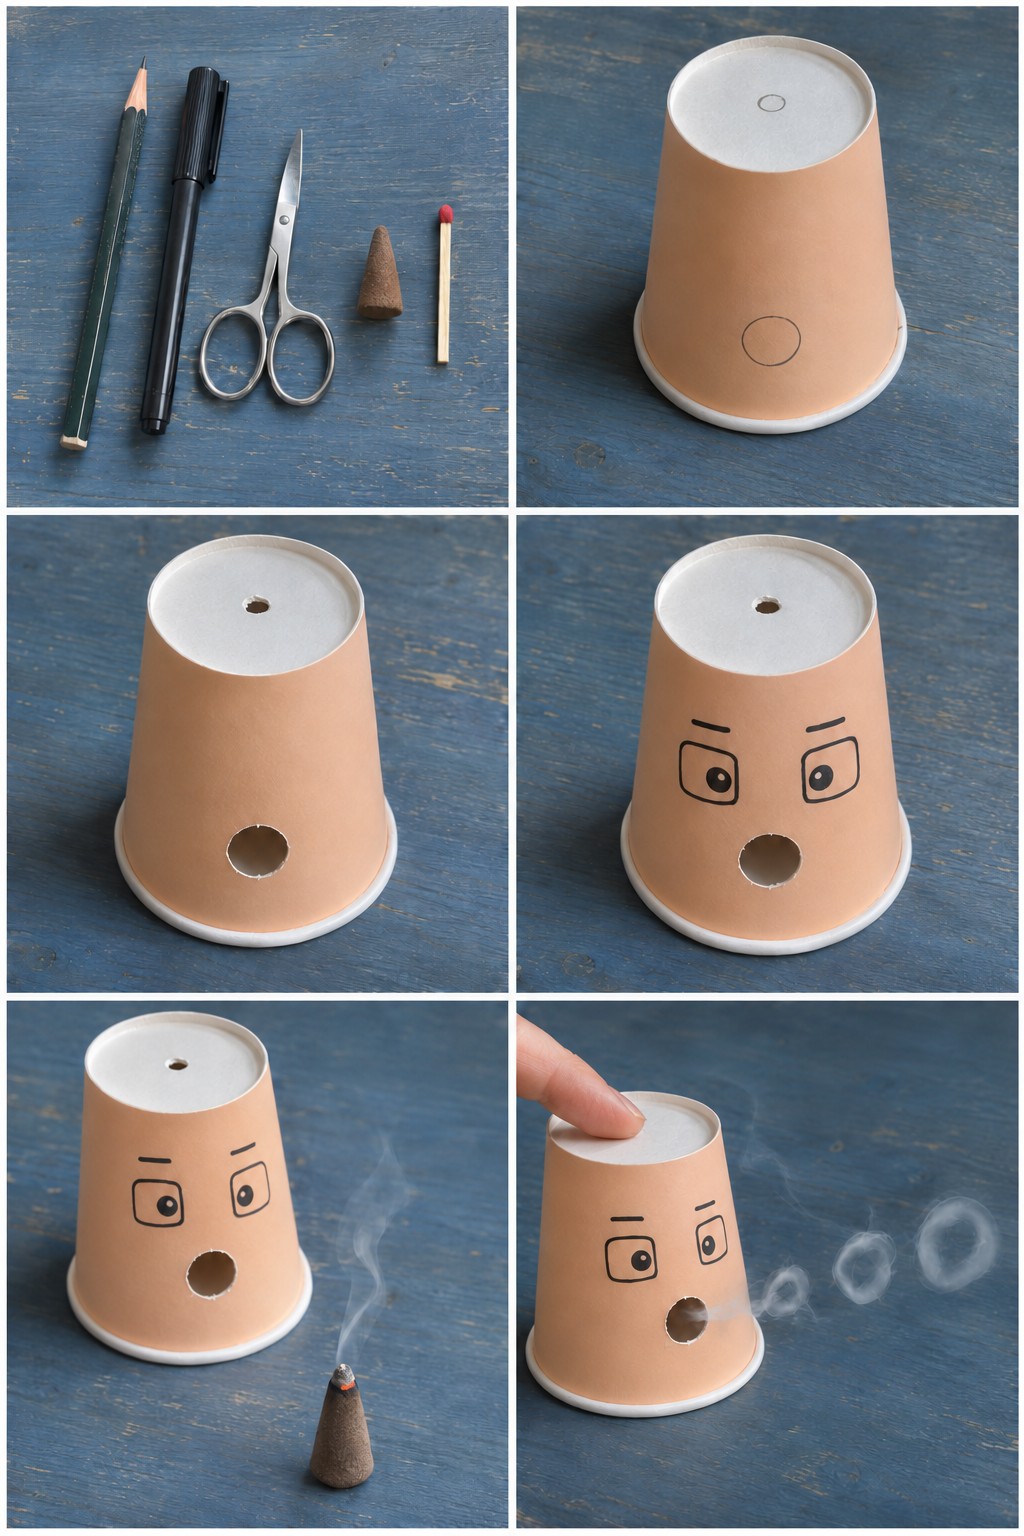
This one is a science demonstration for an adult to run while children watch from a step back. You need a paper cup, a pencil, a black marker, small scissors, an incense cone and a match.
Mark a small circle on the base of the upside down cup and a larger one on the side near the rim. An adult cuts both holes, then draws surprised eyes and brows above the side hole so it becomes a mouth. The adult lights the incense cone on a fireproof dish in a well aired room. Hold the cup open end down above the smoke for a few seconds so it fills, set it on the table, and tap the top lightly with one finger. Each quick tap pushes a puff of air out of the mouth, and the air rolls into a spinning ring; the smoke simply makes that ring visible.
A sharp, light tap works far better than squeezing the cup, which only pushes out a shapeless cloud.
Hot Air Balloon Ball Run
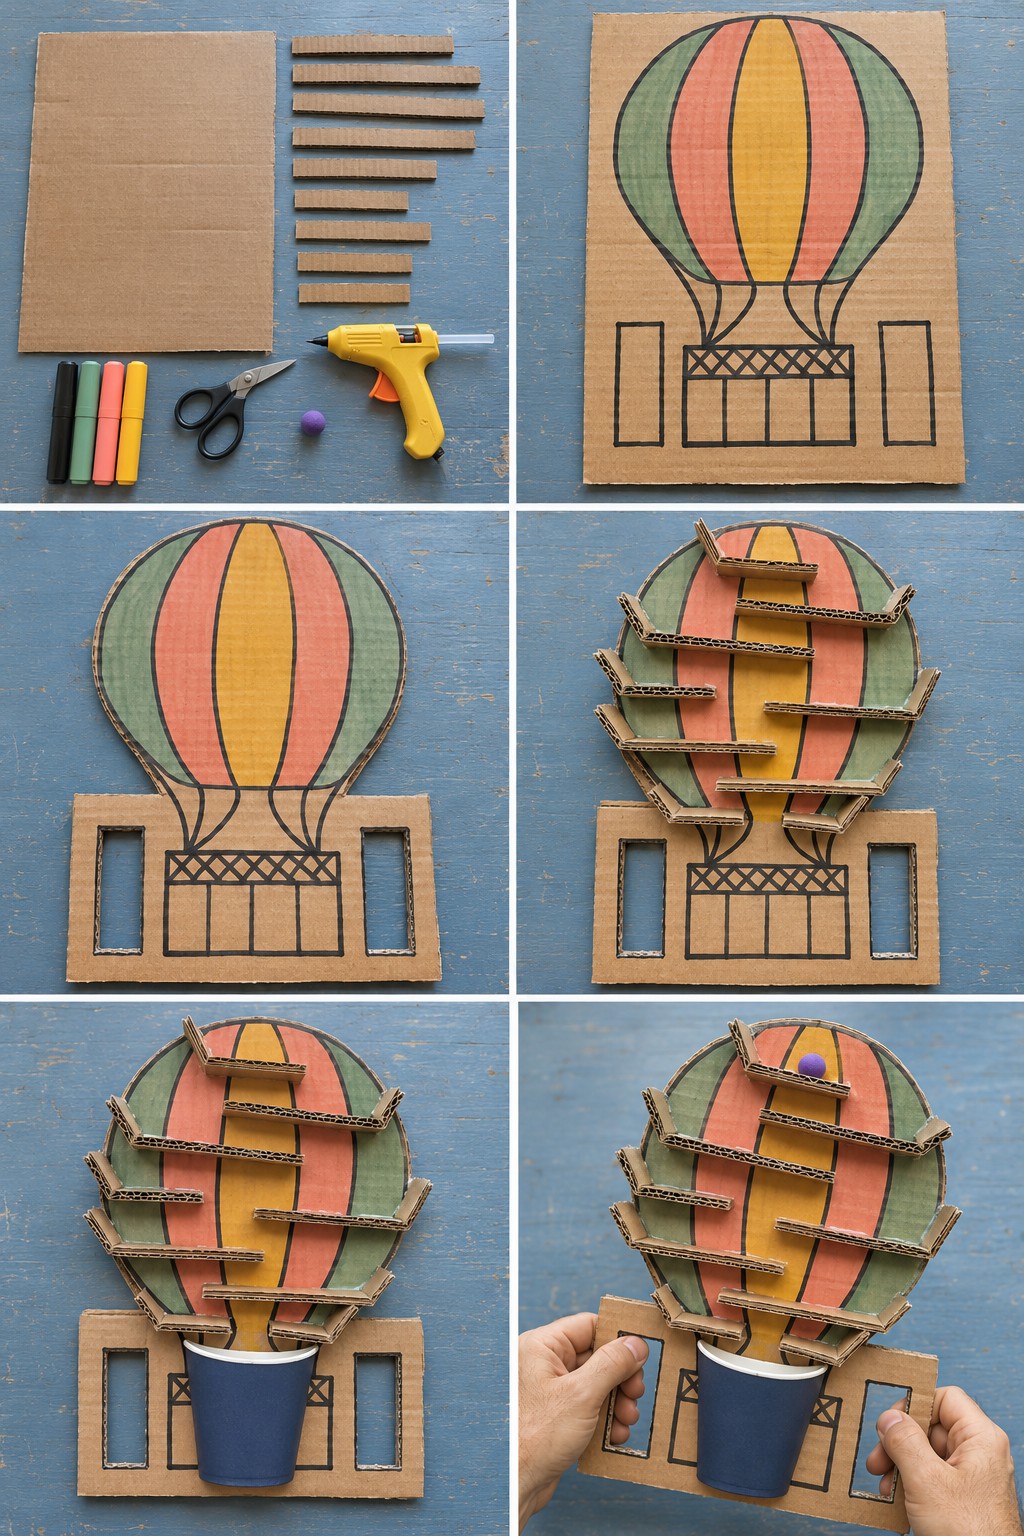
Tilt the board left and right and a felt ball zigzags down the cardboard ramps into the cup basket. It is a good test of patience for kids and grownups alike.
You will need a large piece of cardboard, cardboard strips, black, sage, coral and yellow markers, scissors, a hot glue gun, a purple felt ball and a navy paper cup.
- Draw a big hot air balloon with its basket and a tall rectangle on each side below it. Go over the lines in black and color the balloon in sage, coral and yellow stripes.
- Cut around the balloon and the base, then cut out the two rectangles as handles, leaving a strong border around each.
- Fold up both ends of each cardboard strip as stoppers. An adult hot glues the strips onto the balloon as sloping ramps, alternating left and right, with a drop from each ramp to the next.
- Glue the cup over the drawn basket below the last ramp. Hold both handles and tip the board to send the ball down.
Test each drop with the ball before you glue the next ramp. Too narrow a gap traps the ball, and a ramp that ends too far out sends it off the board.
Cat Face Hanging Lantern
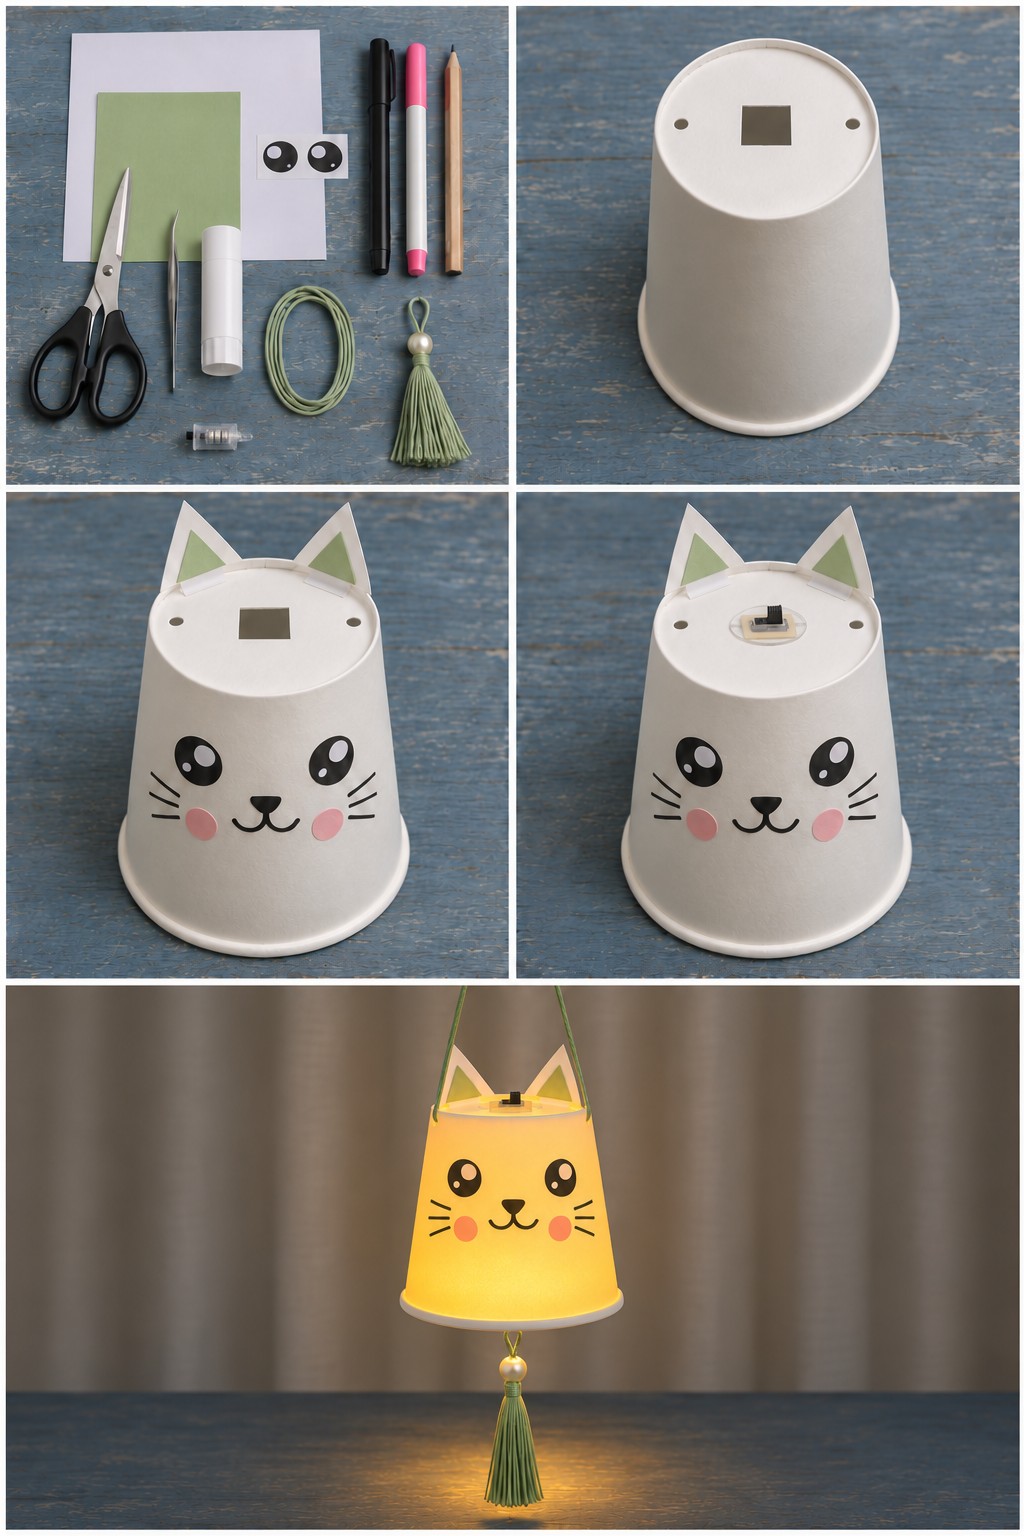
A small LED turns a white cup into a glowing cat lantern, with a sage cord above and a tasseled pearl charm swinging below.
Supplies: a white cup, white and sage paper, printed eyes, a black pen, a pink marker, a pencil, scissors, tweezers, a glue stick, sage cord, a sage tassel with a pearl bead and a small battery LED with a switch.
- Mark a square opening and two small holes on the base of the upside down cup, and have an adult cut them out.
- Cut white ears with sage centers, fold a tab at the bottom of each and glue them along the top edge. Place the printed eyes with tweezers, then draw the nose, mouth and whiskers and add pink cheeks.
- Press the LED into the square opening, light facing in and switch on top.
- Thread the cord through the two holes as a hanger, and tie the tassel to it inside so the pearl and fringe hang below the open rim.
Cut the square just big enough to grip the LED, and check that the knots cannot slip through the holes.
Quick Cups for a First Afternoon
For a first afternoon, the dinosaur, the ghost, the purple roof fairy house and the projector need little more than markers and one or two cuts. Save the owl, the bouquet and the lamps for a weekend when an adult can stay at the table.
Balloons, Batteries and the Other Small Stuff
Most of these crafts are safe in a child's hands once the cutting is done. Drawing, coloring, folding, rolling paper and sticking shapes on with a glue stick are all kid jobs. The craft knife, the awl, skewer points, the hot glue gun and the match for the smoke ring cannon stay with an adult, and a low temperature glue gun is the better pick whenever small fingers are anywhere near the nozzle.
The clown is the one to plan around. A balloon that is fully blown up is not the problem; an uninflated one, or the scraps left after it pops, can be sucked into a young child's throat and stretch over the airway in a way that is very hard to clear. So the adult blows up the nose, any burst balloon gets picked up piece by piece straight away, and children under about eight play with it only with someone right beside them. Googly eyes, pearl beads, gems and the little felt ball from the hot air balloon run are a different kind of risk, the ordinary choking size kind, and they matter most for toddlers under three.
Every lamp in this list, from the ginkgo leaf lamp to the giant owl and the cat lantern, is lit by battery LEDs and should stay that way. Paper and dry leaves catch quickly, and a candle or a hot bulb has no place inside a cup. The tiny flat batteries in many LED tea lights deserve extra respect: if a child swallows one, it can start burning the inside of the throat within about two hours, often before anything seems wrong. Choose lights whose battery door closes with a screw, tape the cover if it opens easily, and treat even a suspected swallow as a trip to the emergency room right away.
A few last details. Hang the mirror mobile and the cat lantern above toddler height, since mirror tiles have sharp edges and a dangling cord or tassel is something a small child can pull down or wrap around their neck. Run the smoke ring cannon on a plate, keep the lit cone away from the cup, put it out in water when you are finished and open a window afterward, skipping it altogether if someone in the room has asthma. And on the stapled owl, run a hand over the outside before it goes on display, flattening any staple that stands up.
Leave a Reply