
A handful of bottle caps can become a sunset mosaic, a tiny sewing accessory, a moving ornament, or a game you can bring out on a rainy afternoon. These bottle cap crafts explore 27 ways to use both metal crown caps and plastic screw caps, with materials and assembly suggestions tailored to each design. You will find practical home accessories alongside decorative miniatures, photo displays, and activities for making together.
Start with the kind of caps you already have. Shallow metal caps suit mosaics and small painted details, while deeper plastic caps can hold fabric, paper inserts, or matching pieces. Below, a six step pincushion tutorial introduces a gathered fabric cushion mounted with hot glue before the individual ideas show how to adapt different caps into something worth keeping.
Table of Contents
- Prepare Your Caps and Choose a Reliable Connection
- Make a Bottle Cap Pincushion in Six Steps
- 27 Bottle Cap Craft Ideas to Adapt to Your Collection
- 1. A Sunset Mosaic Side Table Beneath Glass
- 2. A Lemon Mosaic Tray with a Cobalt Border
- 3. A Blue Cloud Hanging with Beaded Raindrops
- 4. Jewel Colored Ladybugs for a Wall Panel
- 5. A Peacock Letter Holder with Painted Cap Feathers
- 6. A Watermelon Napkin Holder with a Wooden Base
- 7. Macaron Style Pincushions in Three Colors
- 8. Round Bottle Cap Coasters in a Matching Rack
- 9. A Striped Cap Tote with a Canvas Lining
- 10. A Beach Shadow Box with Cap Crabs
- 11. A Bottle Cap Octopus with Pull Tab Arms
- 12. A Tiny House Beneath a Bottle Cap Balloon
- 13. A Mini Ferris Wheel with Swinging Cap Gondolas
- 14. A Reading Frog with a Crown Cap Head
- 15. Felt Owls with Layered Bottle Cap Eyes
- 16. A Caterpillar Photo Stand on a Painted Leaf
- 17. An Emoji Hanging with Linked Metal Caps
- 18. A Velvet Lined Keepsake Box from Two Caps
- 19. A Pastel Ribbon Jellyfish Wall Ornament
- 20. A Dinosaur Board for Matching Shapes
- 21. A Flexible Snake Strung from Pastel Caps
- 22. A Tiny Burger Charm with Felt Fillings
- 23. A Fruit Memory Game with Sixteen Matching Caps
- 24. A Reusable Date Tracker with Numbered Caps
- 25. Smiling Sponge Figures with Cap Hats and Bases
- 26. A Bear Board with Changeable Expressions
- 27. A Christmas Photo Tree with Fifteen Green Caps
- Choose a First Project That Suits Your Caps
Prepare Your Caps and Choose a Reliable Connection
Wash caps with dish soap, rinse them, and let the interiors dry completely. Remove loose liners only when the project needs access to the bare surface. Discard rusty metal, cracked plastic, and caps with damaged edges. Sort the remainder by diameter and depth: a matching set matters for a memory game, and consistent height matters beneath a glass tabletop.
- For metal caps on wood: use an epoxy adhesive whose label covers both materials. Lightly scuff the hidden contact areas, remove dust, and apply the recommended amount. Support hollow caps with fitted inserts where necessary so the adhesive has a useful contact surface.
- For plastic caps: check for PP or PE markings. These plastics can be difficult to bond. Select a system specifically approved for that plastic and the second material, including its activator when required. Ordinary craft glue is useful for paper and fabric details, but it is not a dependable structural fixing for every cap.
- For moving parts: make smooth holes and use closed jump rings, cord, or stitching. A mechanical connection is often easier to inspect and repair than a small blob of adhesive.
- For painted details: choose paint intended for the substrate, using the matching primer where specified. Test one spare cap before painting the whole collection. Preserve the original plastic color whenever it already suits the design.
Follow each product's preparation and full curing instructions. A surface that feels dry may still be too soft to handle repeatedly. Adults should prepare drilled holes, cut wire, and handle epoxy or instant adhesives, with ventilation and protective equipment as directed on the label. Clamp caps over scrap wood for drilling and smooth the holes afterward; do not melt holes with a heated tool.
Loose caps, beads, and other small components are unsuitable for children under three or anyone who still mouths objects. The activity ideas here need adult supervision and secure parts. Keep hanging cords away from beds and play areas, and reserve wire sculptures and delicate moving models for display.
Make a Bottle Cap Pincushion in Six Steps
In this small sewing project, you stitch the fabric into a stuffed cushion, then glue the completed cushion inside an intact cap. No holes are needed in the plastic. For a cap about 4 cm across, begin with a fabric circle about 9 cm across and adjust the filling until the cushion fits snugly. These are starting dimensions, since cap depth and fabric thickness vary.
Materials: one clean, intact plastic cap, a tightly woven cotton or linen circle, polyester stuffing, a hand sewing needle, strong thread, scissors, narrow lace, a low temperature hot glue gun with clear glue sticks suitable for the cap plastic and fabric, and a few sewing pins.
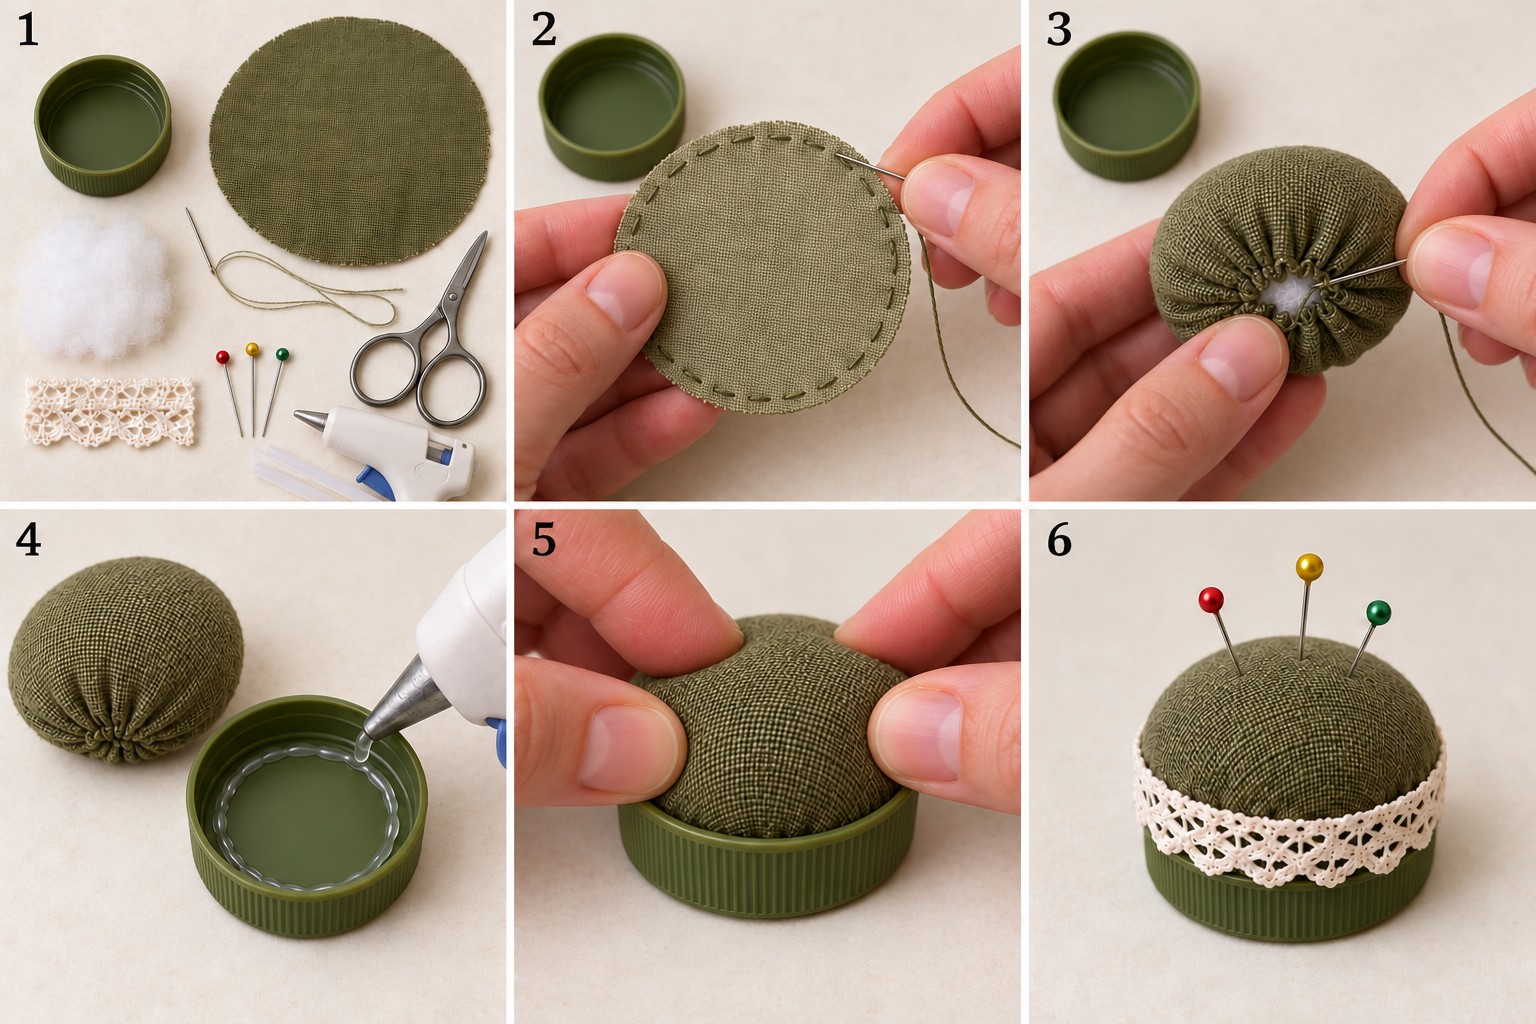
- Gather the materials. Wash and dry the intact cap, cut the fabric circle, and prepare the filling, thread, lace, and glue gun. Test your glue on a spare cap first: the cooled bond should resist gentle peeling.
- Stitch around the fabric. With the wrong side of the fabric facing you, work a running stitch roughly 5 mm inside the raw edge. Keep the center untouched and leave a thread tail for gathering. This edge will become the hidden underside, not the exposed top.
- Fill and close the cushion. Pull the thread partway closed, insert a small amount of polyester filling, and distribute it evenly. Tighten the gathering thread, secure it with stitches, and knot it at the gathered underside. Turn the cushion so the smooth face is on top. Keep the dome firm but not rigid.
- Apply glue inside the cap. An adult should apply a small bead of hot glue to the inner base. Keep it below the rim and use only enough to contact the gathered underside of the fabric, without filling the whole cap.
- Press the cushion into place. Set the gathered closure down into the glued interior. Press gently on the fabric dome, keeping fingers away from the hot glue, and hold it steady until the adhesive cools. Leave the smooth dome above the rim.
- Finish the edge. Sew the lace to the fabric around the rim, overlap its ends, and secure them. Test the cushion with short pins, keeping their points within the padded area.
Check the cushion after the glue cools completely. If it lifts out, change to an adhesive specified for your cap plastic and fabric rather than adding more of the same glue. Ordinary hot glue may peel from PP or PE caps. Keep pin points inside the padded dome and do not force them against the cap base.
27 Bottle Cap Craft Ideas to Adapt to Your Collection
Use the following ideas as individual projects rather than a single shopping list. Choose one design, measure your own caps, and build its support before adding decorative details. For more ways to combine discarded materials, explore these recycled art project ideas.
1. A Sunset Mosaic Side Table Beneath Glass
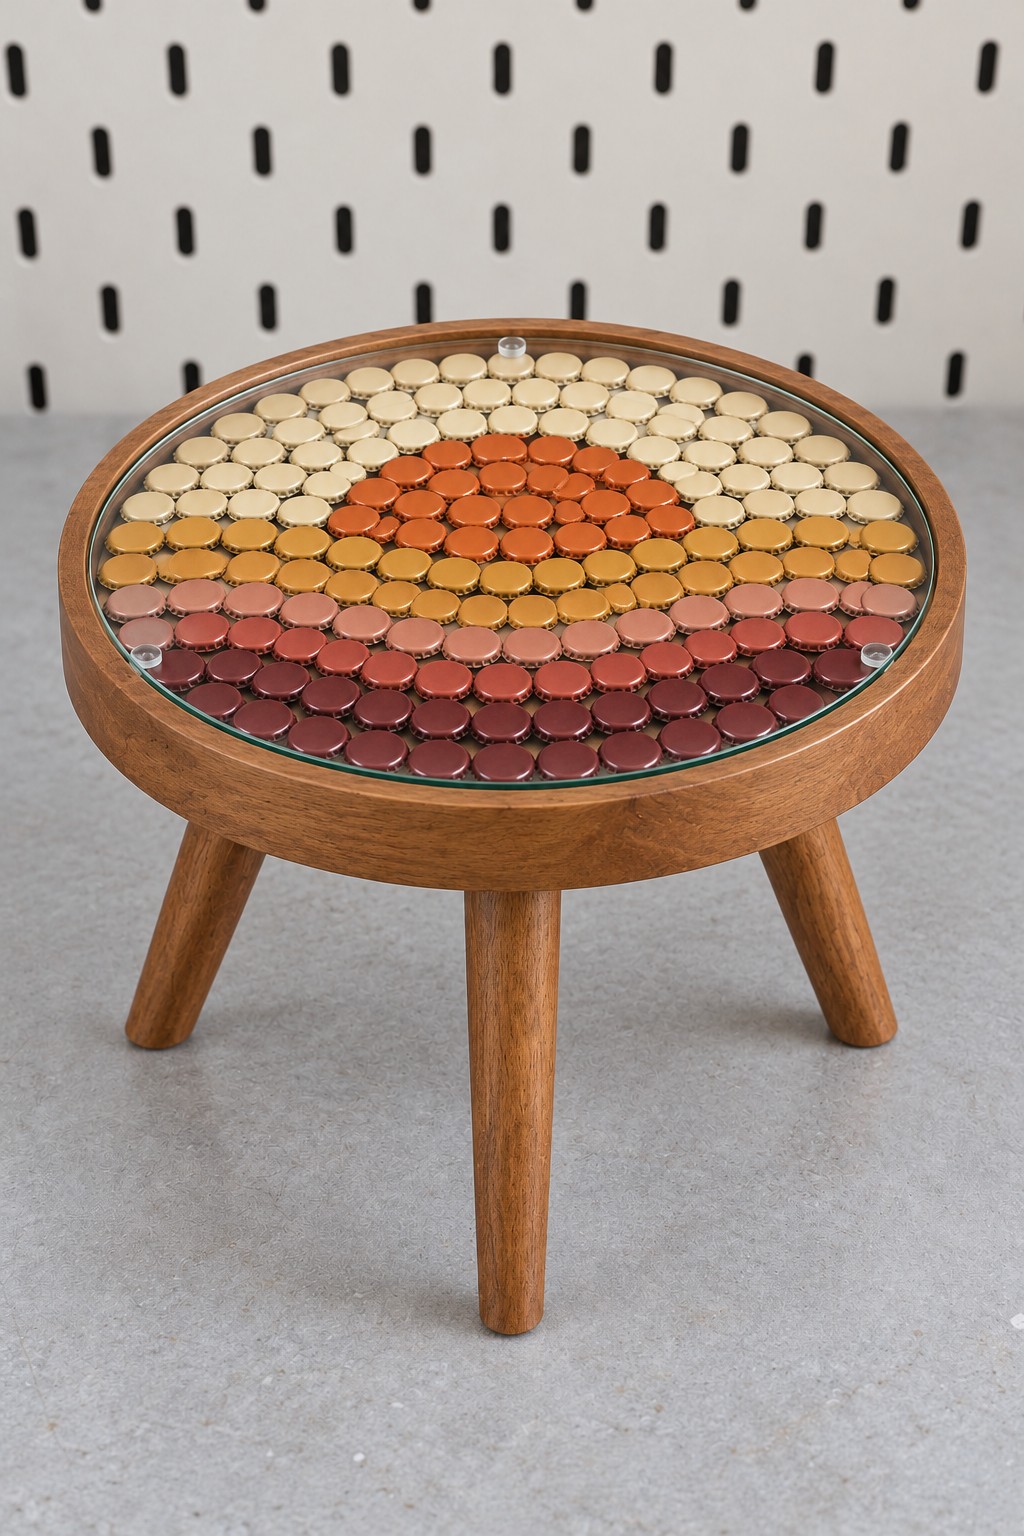
Cream caps form the sky above an orange sun, while mustard, dusty pink, and burgundy rows create the landscape below. The rounded timber rim keeps this large mosaic feeling like a finished piece of furniture.
Materials: a sound recessed side table, matching metal caps, substrate suitable paint, metal to wood epoxy, and a professionally sized safety glass top with appropriate supports.
Trace the recess onto paper and arrange the complete sunset before attaching anything. Transfer the caps with their flat faces upward, keeping their heights consistent. Bond them to the insert, allow a full cure, and fit the glass above them on supports carried by the table frame. The glass needs a continuous, stable seating arrangement or suitably specified pads; loose caps should not carry its load. Keep the original table's intended use and weight limit.
2. A Lemon Mosaic Tray with a Cobalt Border
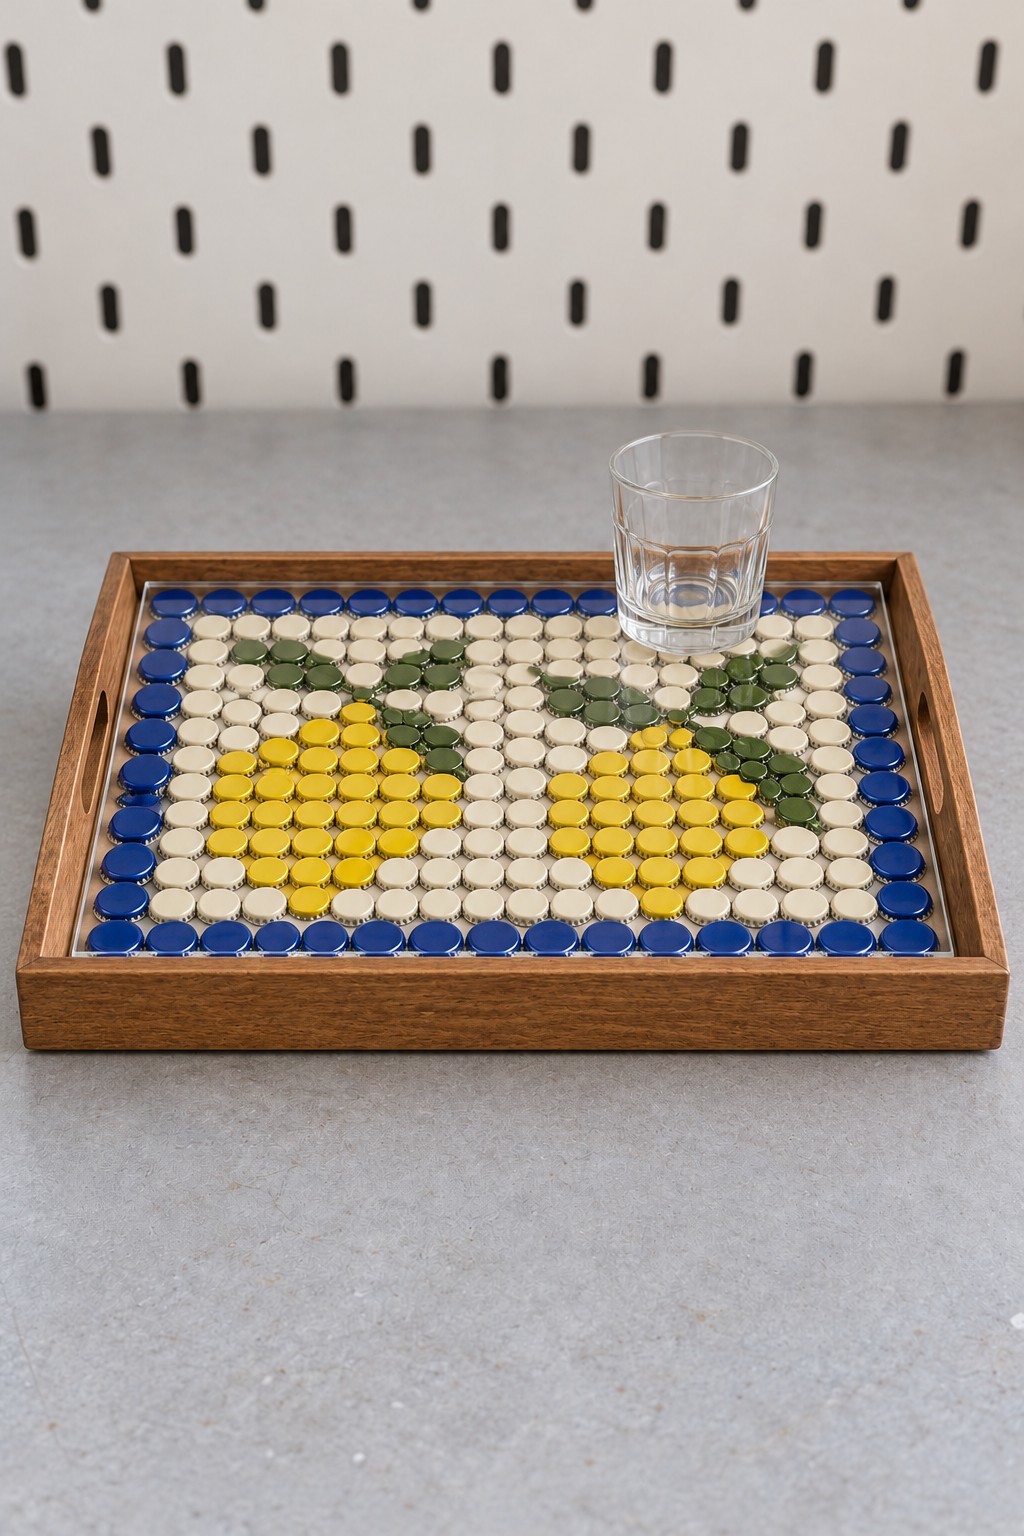
Two yellow lemons and dark green leaves turn a rectangular tray into a cheerful kitchen accent. A blue border separates the mosaic from the wood and makes the pattern readable even when a glass sits on top.
Materials: a rigid wooden tray with a recess, equal height metal caps, paint, compatible epoxy, and a smooth removable clear insert supported above the mosaic.
Lay out the blue perimeter first, then arrange the fruit and fill the remaining space with cream caps. Attach the caps only after checking that the pattern fits inside the rim. Fit the clear cover on a ledge or supports rather than balancing it on uneven cap edges. Keep drinks and wrapped snacks on that washable cover. Wipe the decorated tray clean without soaking the wooden base.
3. A Blue Cloud Hanging with Beaded Raindrops
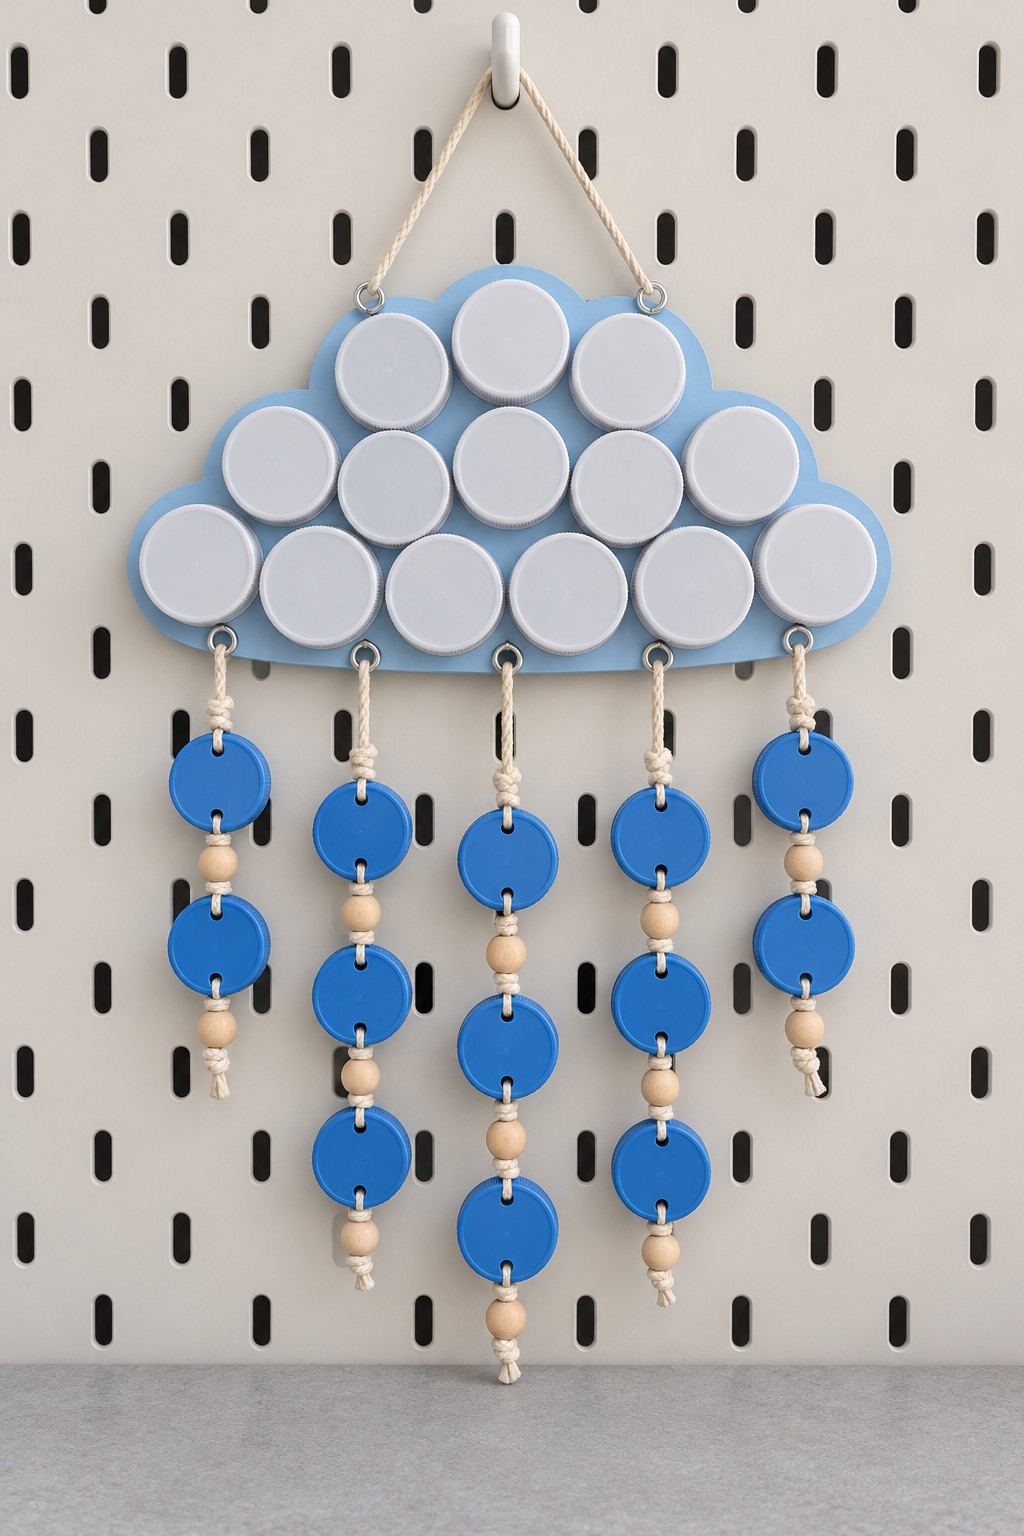
White cap circles soften the face of a blue cloud, while five strings of blue caps and natural wooden beads create the falling rain. The staggered lengths give the hanging a gentle outline.
Materials: a cloud shaped backing, white and blue plastic caps, cotton cord, wooden beads, paint, and reinforced hanging holes.
Paint the backing and position the white caps before fixing them with a compatible adhesive or ties through concealed holes. Prepare two smooth holes in each raindrop cap so the cord can enter and leave without twisting the face sideways. Knot beads between caps, secure every strand through the cloud's lower edge, and add a separate upper hanging loop. Test the balance before mounting. Display this corded decoration beyond children's reach.
4. Jewel Colored Ladybugs for a Wall Panel
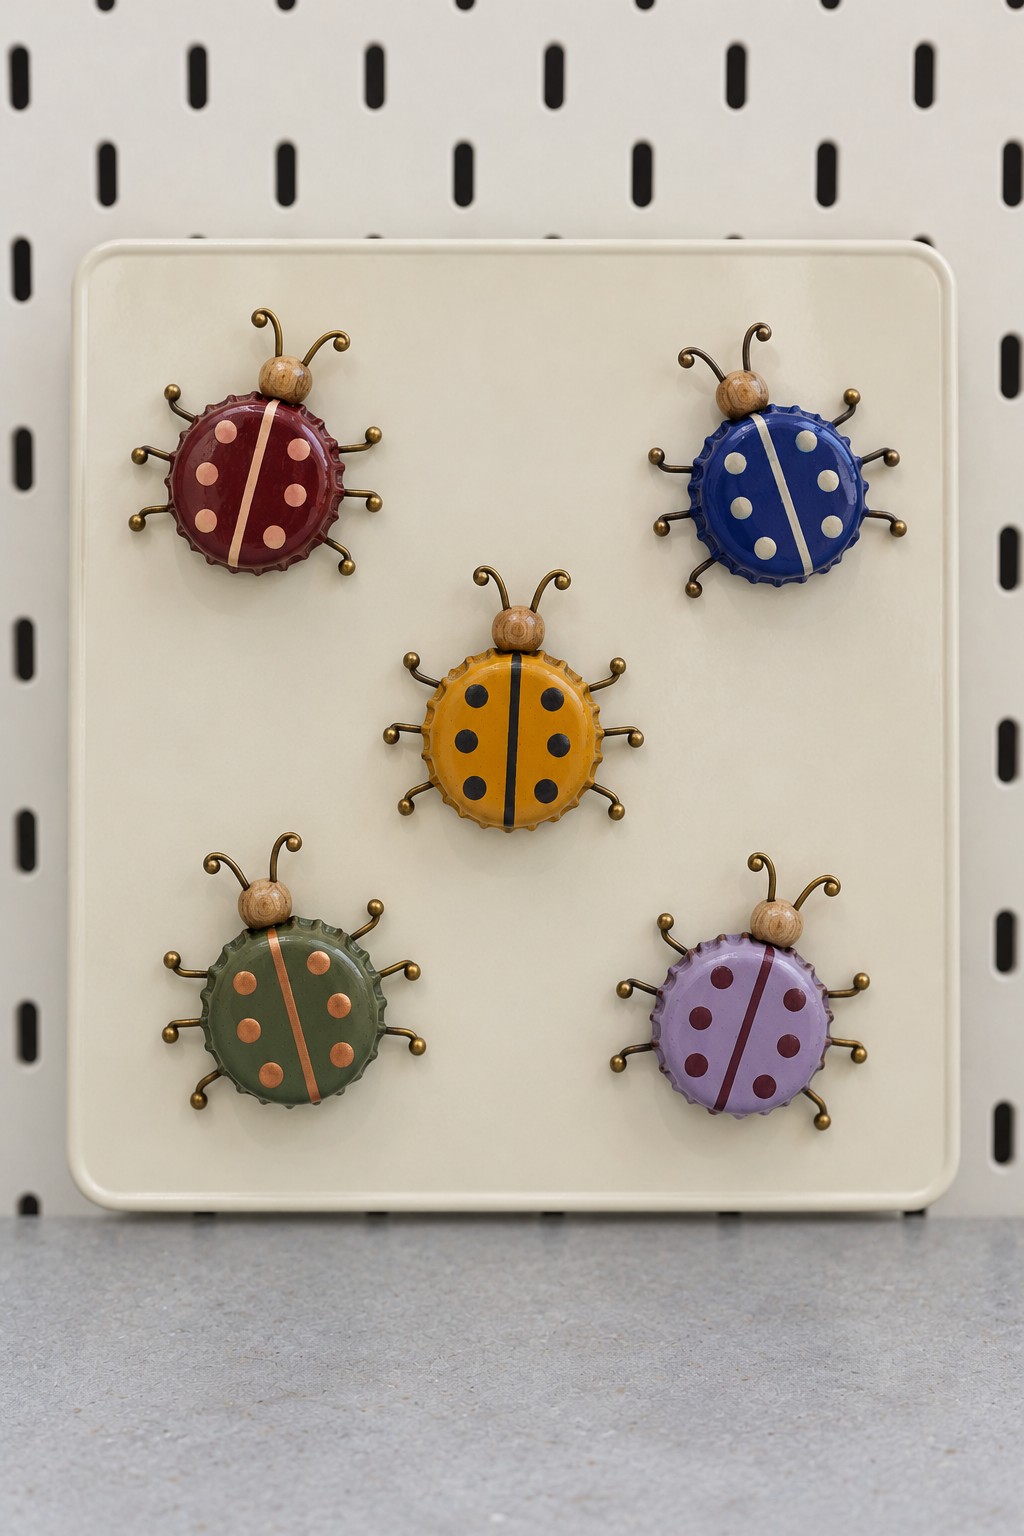
Burgundy, blue, mustard, green, and lilac give these ladybugs a softer character than the familiar red and black version. Pale dots and a contrasting central line keep each curved shell easy to recognize.
Materials: metal crown caps, paint suitable for metal, thin craft wire, small wooden beads, a rigid cream panel, and epoxy approved for the contact materials.
Paint the shells first. Bend three wire lengths per bug into six legs and curl every exposed end. Trap the wire centers behind a fitted insert inside each cap, then add a bead head and two curled antennae. Mount the completed bugs to the panel with their legs clear of its edges. Keep this delicate wire work as decorative wall art rather than a handling activity.
5. A Peacock Letter Holder with Painted Cap Feathers
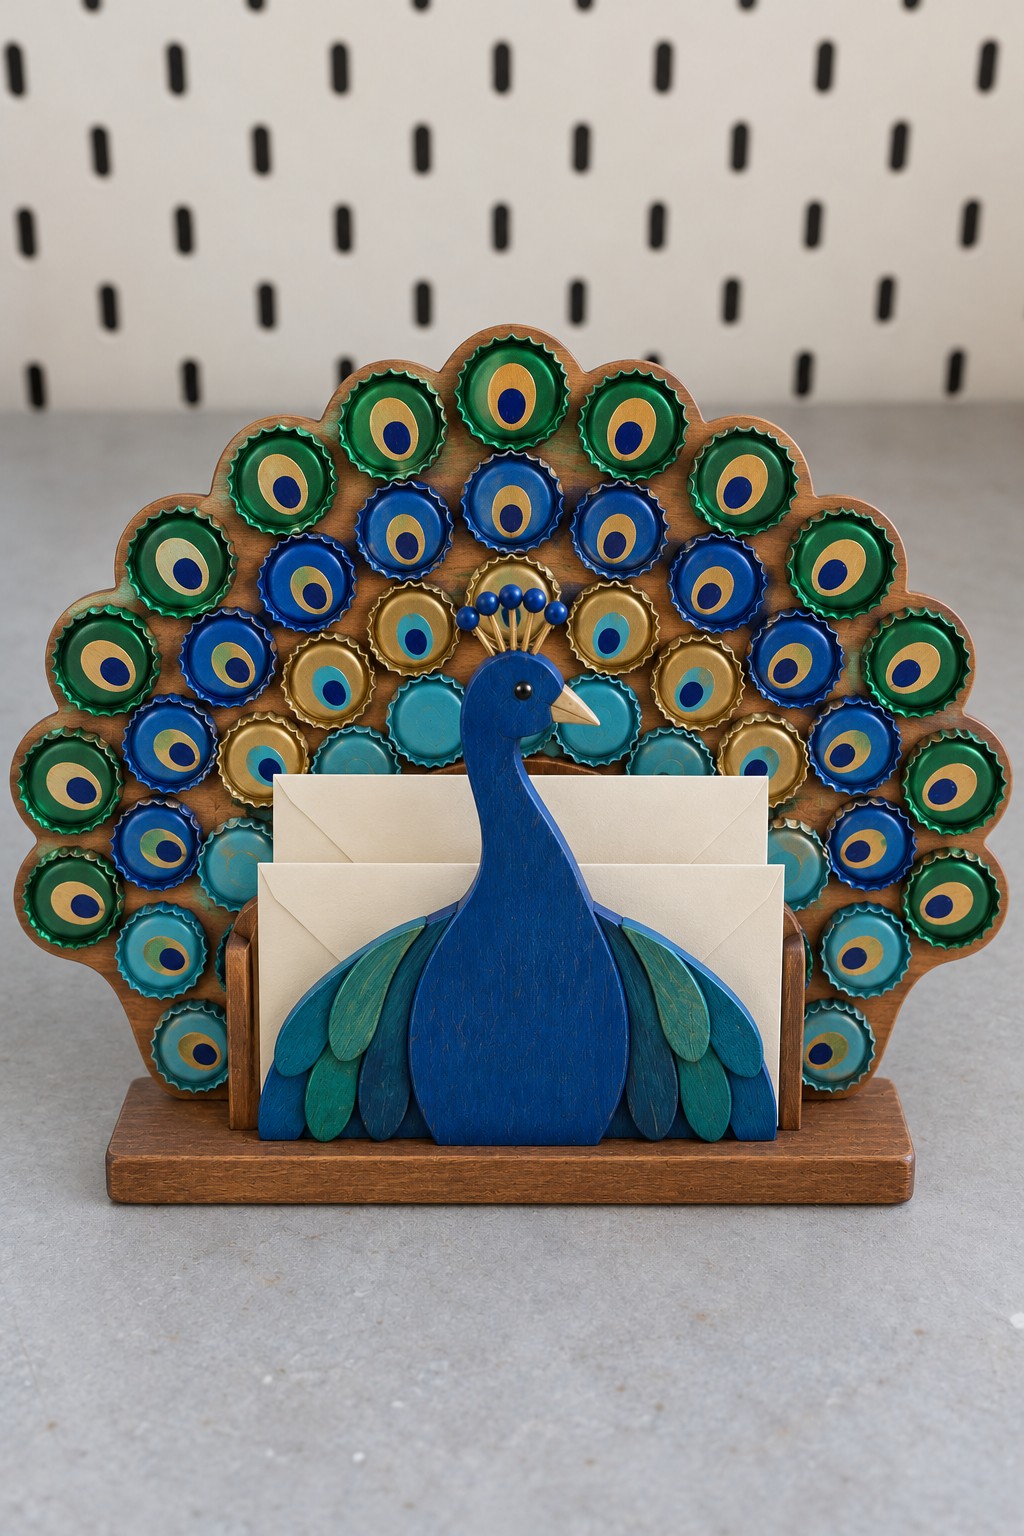
Rows of concentric green, gold, and blue circles turn individual caps into the eyes of a peacock's tail. A blue body hides the front of a small letter pocket, giving the decorative fan a useful purpose.
Materials: a plywood fan backing, a smaller peacock front, wooden side spacers, a broad base, metal caps, paints, wood glue, and compatible epoxy.
Build the letter pocket first, leaving enough width for the envelopes you actually use. Join its wooden parts securely and check that it stands without tipping. Paint the feather circles inside the caps and fix them open side forward in rows across the fan. Attach the peacock front after the pocket has cured. Leave its upper opening unobstructed so letters slide in without catching on cap rims.
6. A Watermelon Napkin Holder with a Wooden Base
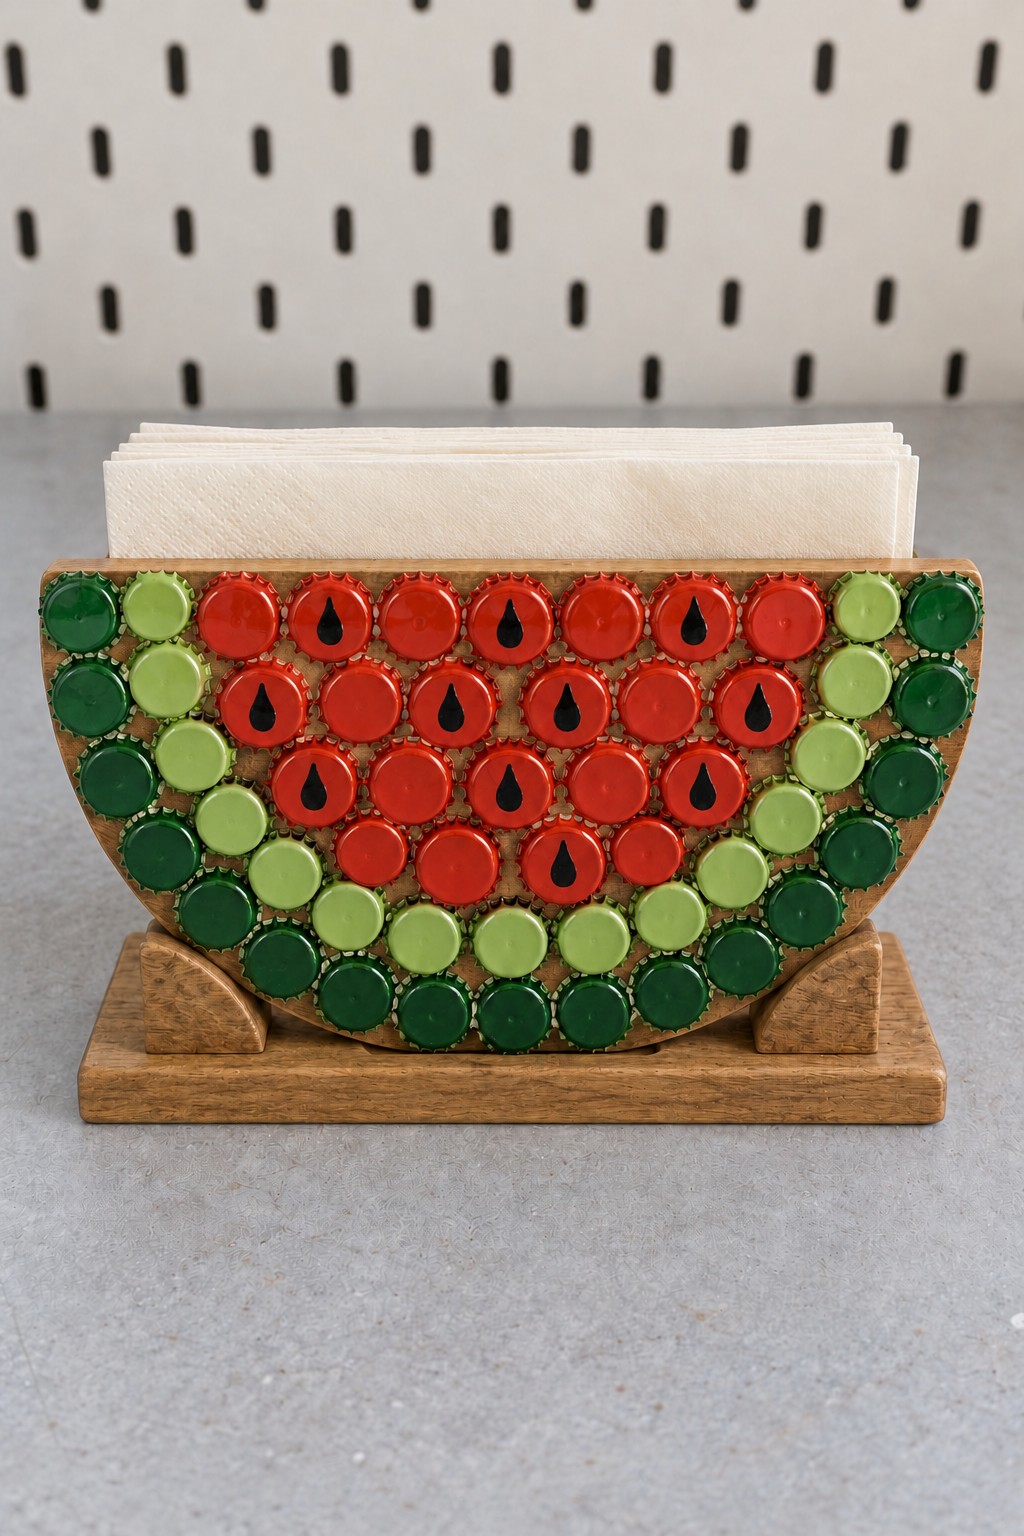
Red caps create the fruit, pale green caps suggest the inner rind, and dark green caps finish the outside curve. A few black seed shapes make the watermelon readable without decorating every cap.
Materials: two semicircular wooden panels, a rectangular base, spacer blocks, metal caps, suitable paints, black paint for seeds, wood glue, and epoxy.
Set the panels far enough apart for your folded napkins, then fix them upright with the spacer blocks and base. Arrange the cap colors on the outward faces, keeping all rims below the panel's top edge. Add seeds only after the red finish dries. Seal exposed wood as appropriate for an indoor table accessory. Napkins should rest inside the smooth wooden channel, away from rough metal edges.
7. Macaron Style Pincushions in Three Colors
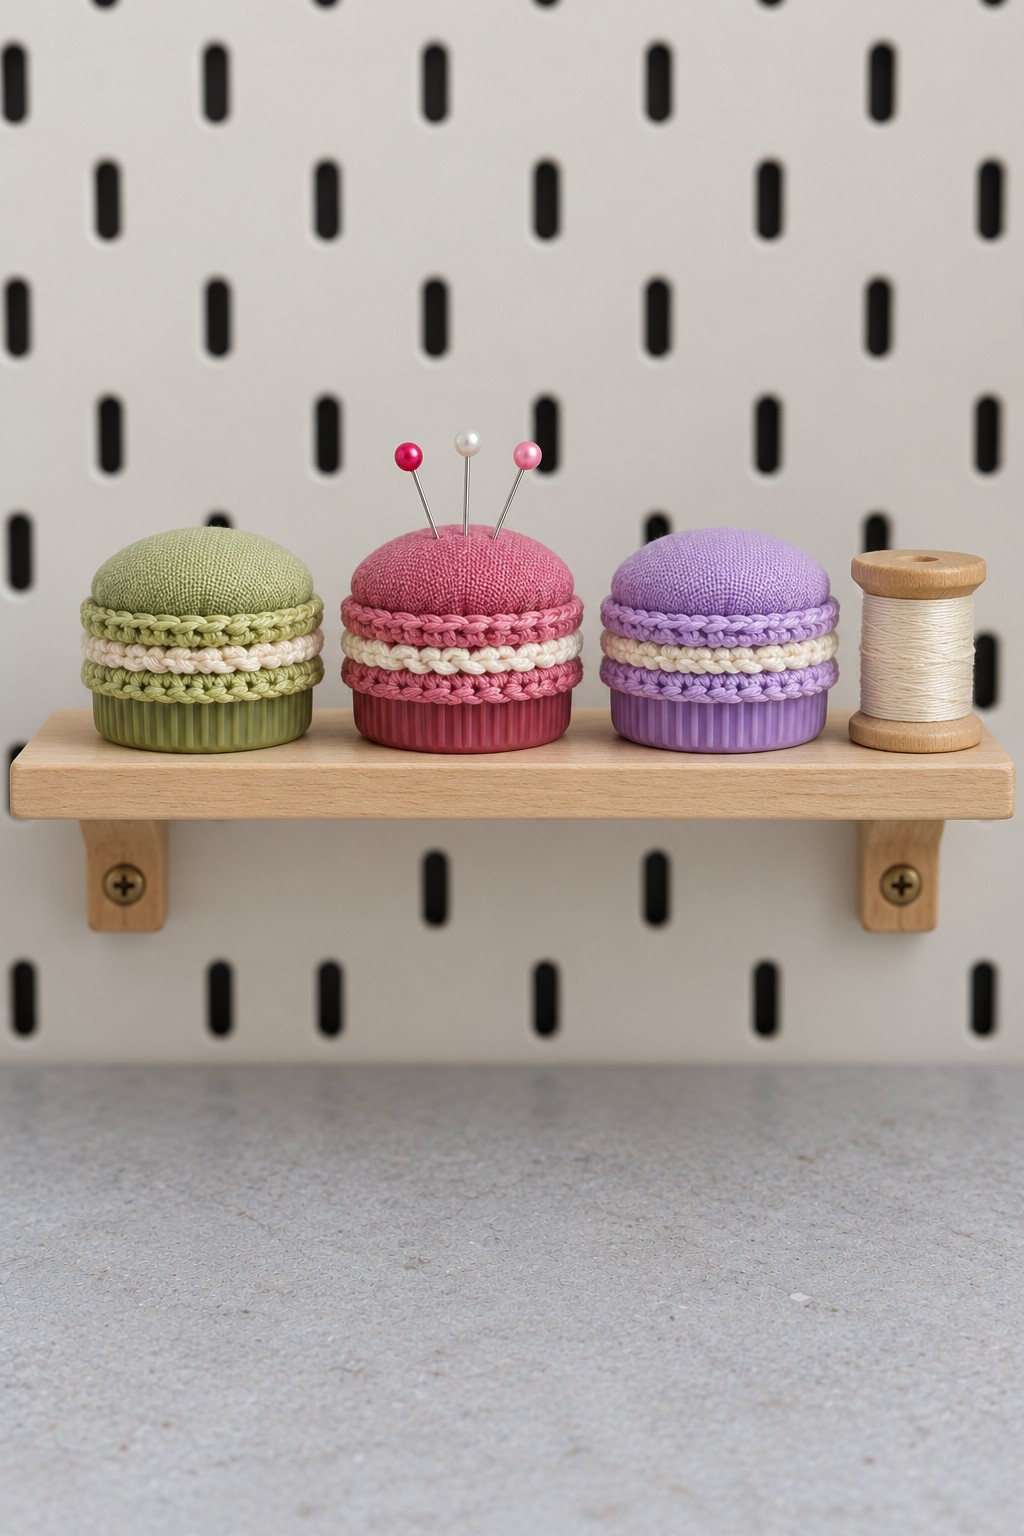
Olive, raspberry, and lavender fabric domes make these tiny pincushions resemble macarons. Narrow lace bands and visible cap ribs provide the layered detail, while the padded tops keep them useful beside a sewing machine.
Materials: plastic caps, coordinating fabric circles, polyester filling, needle, strong thread, narrow lace or braid, and a low temperature glue gun with compatible glue sticks.
Use the six step method above, adjusting the circle size to suit each cap. Sew and stuff the fabric first, then hot glue its gathered underside inside the intact cap. Let the adhesive cool fully before testing the attachment. Sew the trim to the fabric around the rim. Group a few colors on a small shelf, and keep their pins out of reach of children and pets.
8. Round Bottle Cap Coasters in a Matching Rack
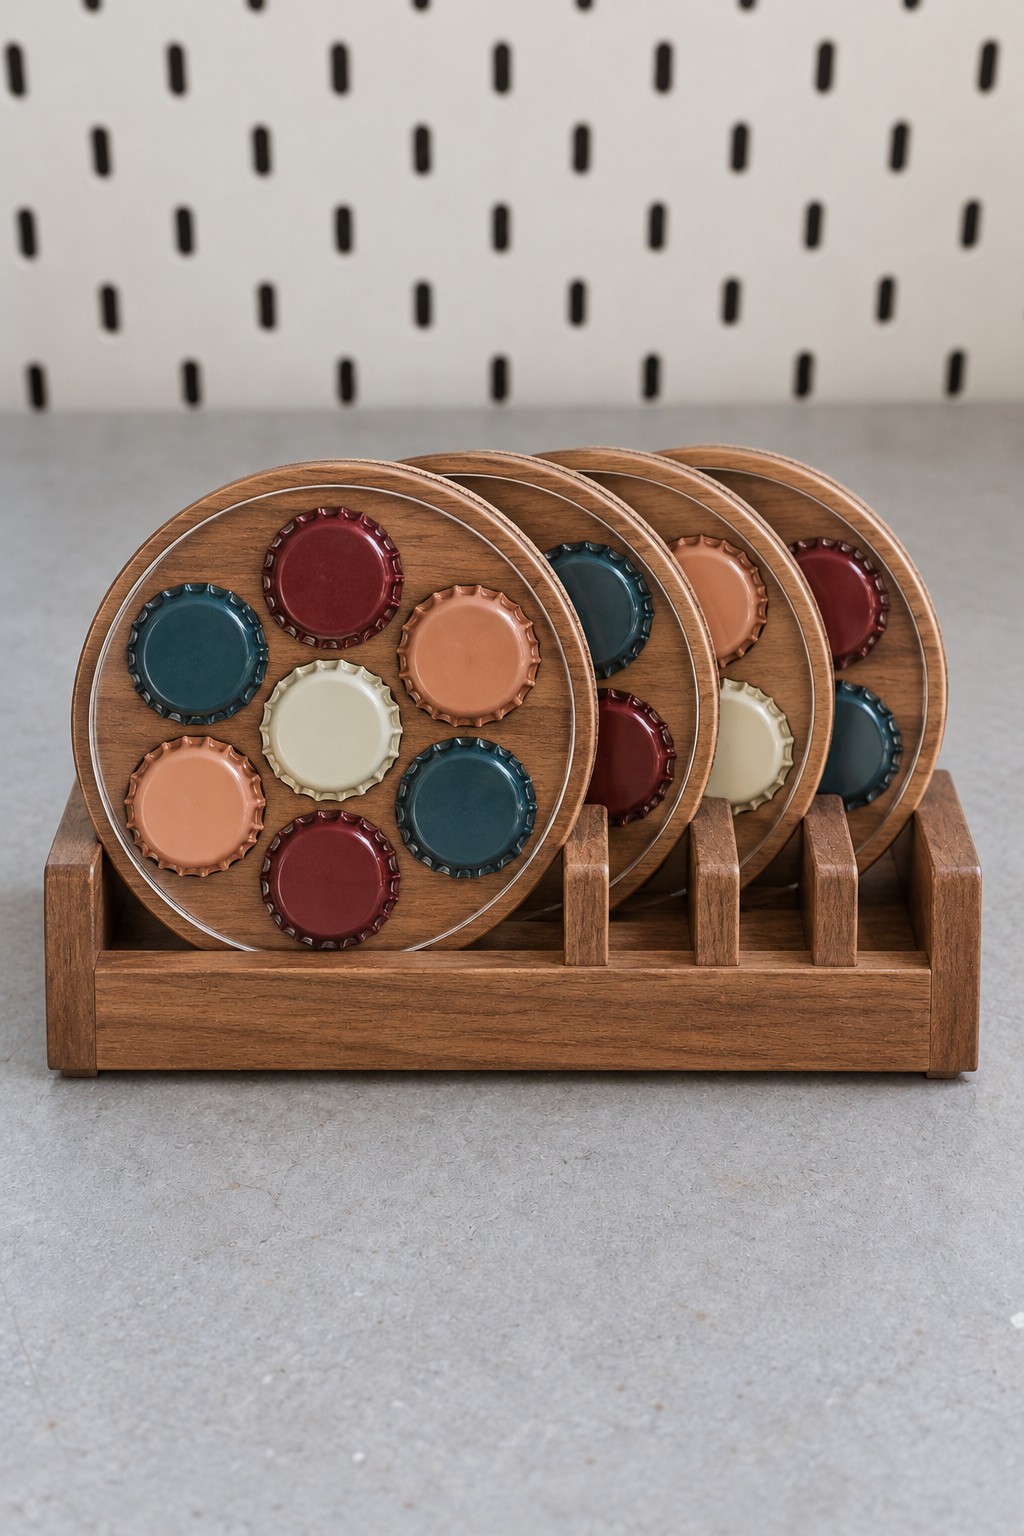
A cream center surrounded by burgundy, teal, and peach caps creates a compact flower pattern. Repeating the arrangement across four rounds makes the set feel coordinated, even when the color order changes.
Materials: recessed wooden coaster blanks, equal height metal caps, paint, compatible epoxy, cork backing, and fitted clear top discs.
Plan seven caps on each blank, leaving enough room for the clear disc to sit securely on the coaster's rim above the metal. Bond the mosaic, cure it, and install the smooth cover using a method appropriate to the blank. Add cork underneath to protect furniture. Check a flat bottomed drinking glass on every finished coaster. Use these for ordinary drinks within the cover material's temperature limits, rather than as trivets for hot cookware.
9. A Striped Cap Tote with a Canvas Lining
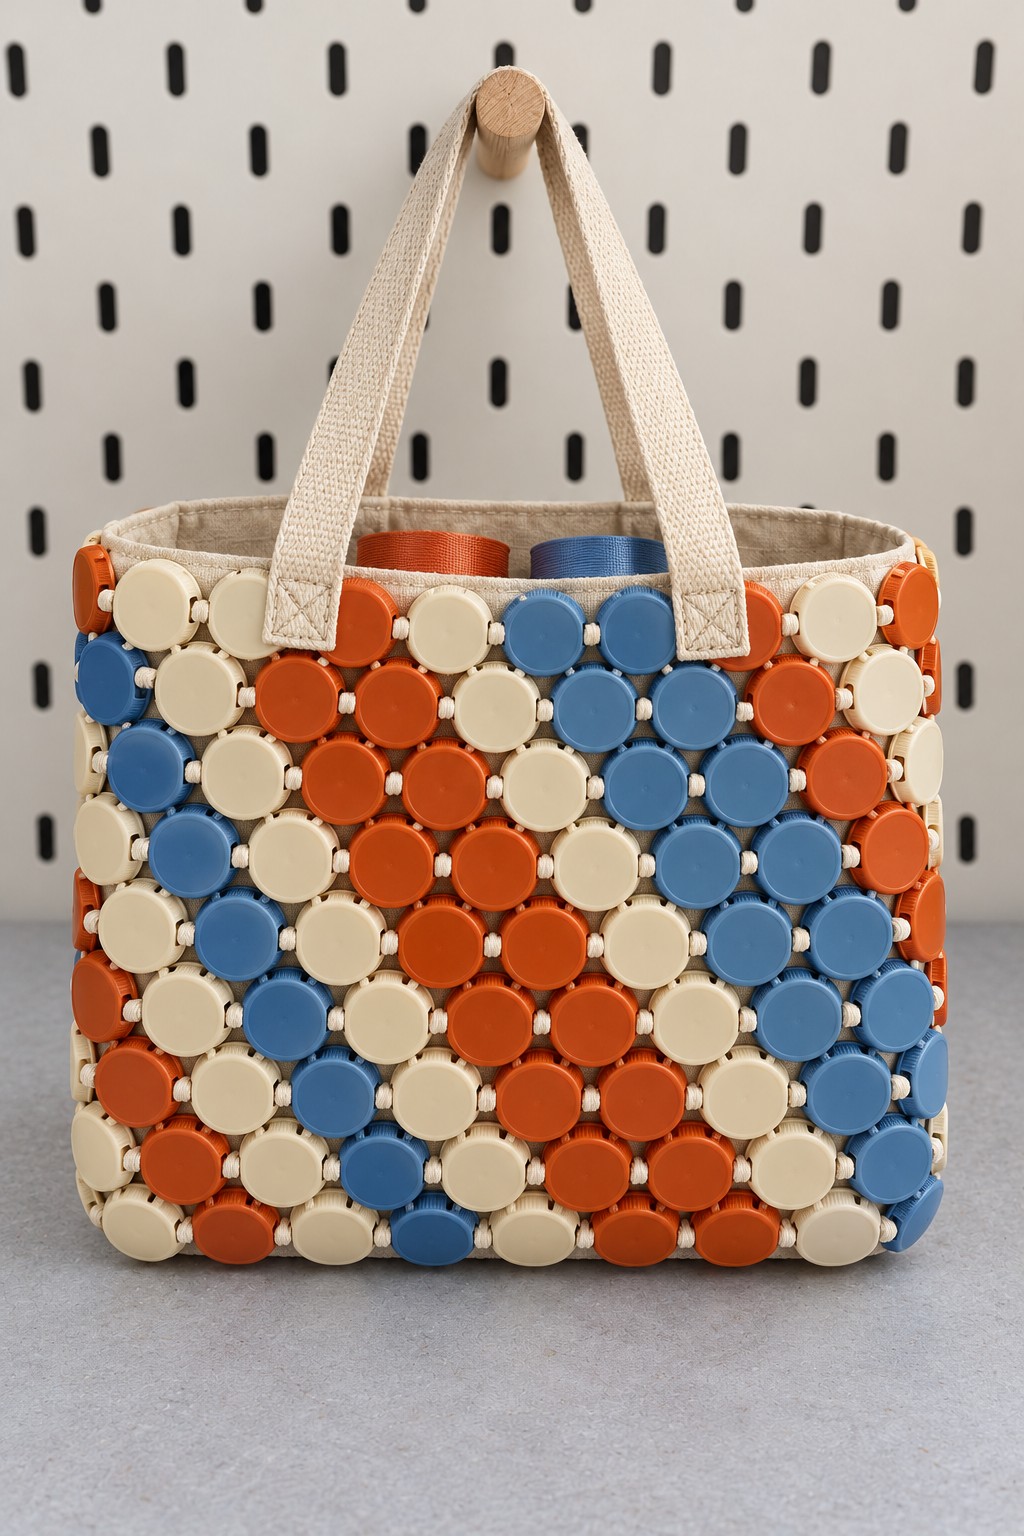
Diagonal orange, cream, and blue stripes give this tote the look of a flexible mosaic. A fabric lining and broad woven handles make the interior more practical than an open mesh of caps alone.
Materials: matching plastic caps, strong cord, a sturdy canvas tote or sewn lining, webbing handles, needle, thread, and tools for preparing smooth holes.
Lay out flat panels before connecting the caps through holes in their sidewalls. Use short cord links with enough slack for slight movement, then lace the panels together around a reinforced base. Sew the shell to the canvas bag at multiple reinforced points. Let the canvas and its handle seams carry the contents. Begin with light craft supplies and check the connections regularly for wear.
10. A Beach Shadow Box with Cap Crabs
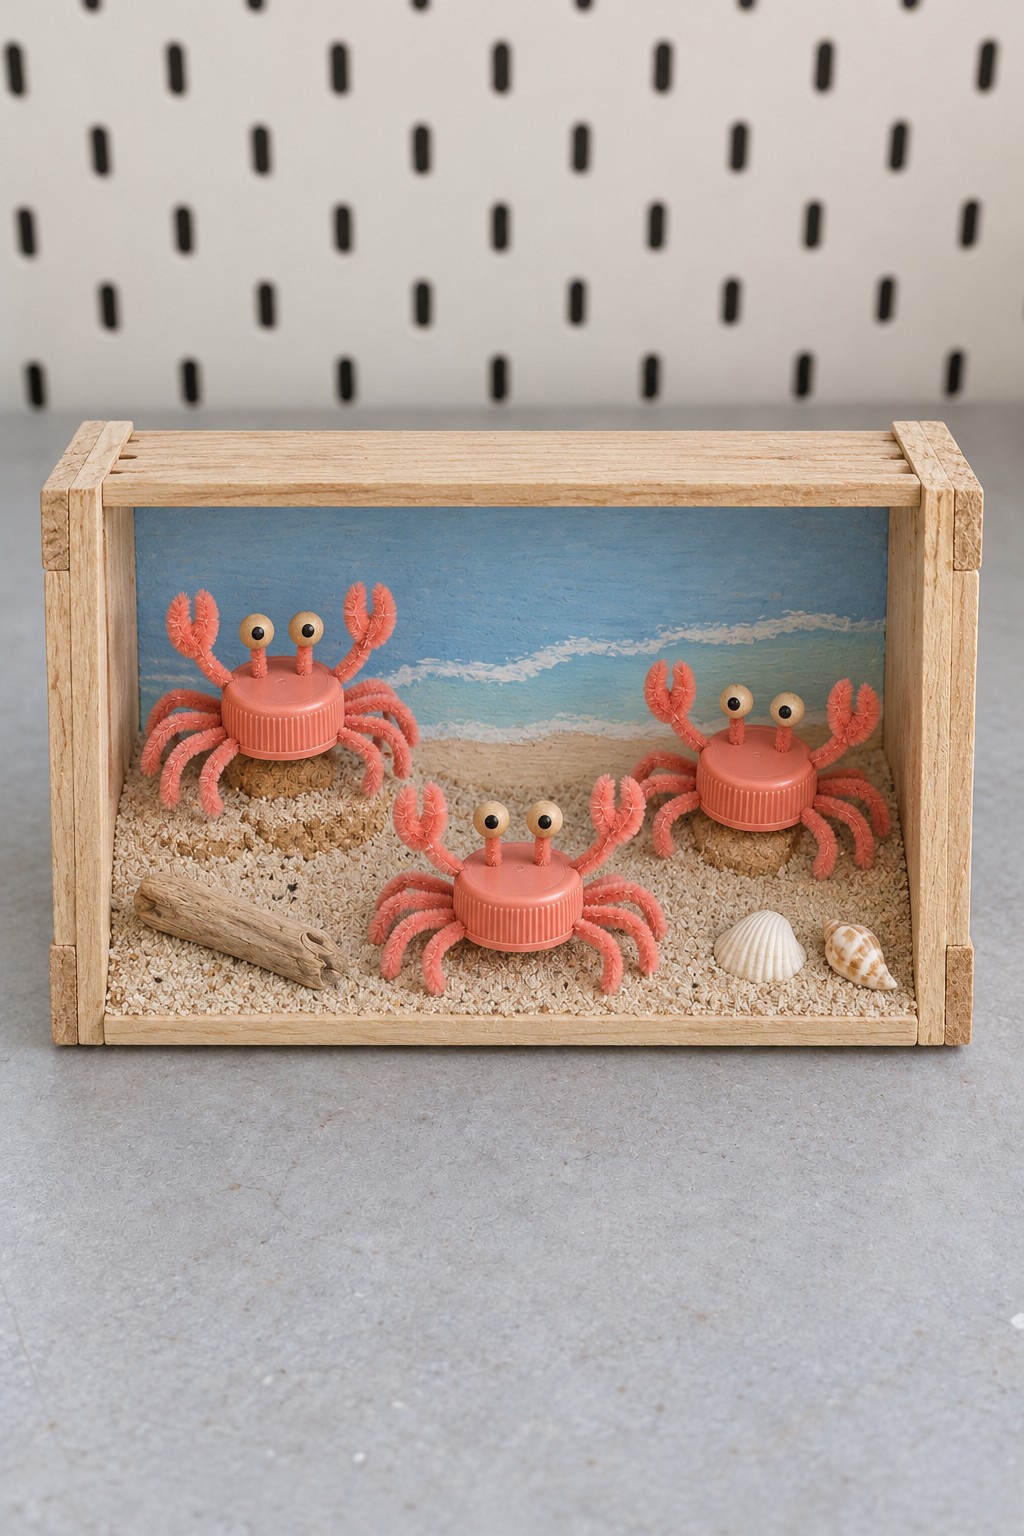
Coral cap bodies, curved legs, and raised claws create a little beach scene inside a wooden frame. A blue horizon keeps the background simple enough for the three crabs to remain the focus.
Materials: a deep shadow box, plastic caps, coral chenille stems or coated wire, bead eyes, card, clean dry craft sand, small shells, and appropriate adhesives.
Paint the sea on the backing and glue a thin layer of sand to its lower area. Build each crab on a small card insert that fits inside its cap, anchoring the legs and eye stalks to the insert. Fix the completed crabs to the scene after the sand dries. Secure shells individually so they cannot slide when the frame stands upright. Treat the finished box as a display piece with small parts.
11. A Bottle Cap Octopus with Pull Tab Arms
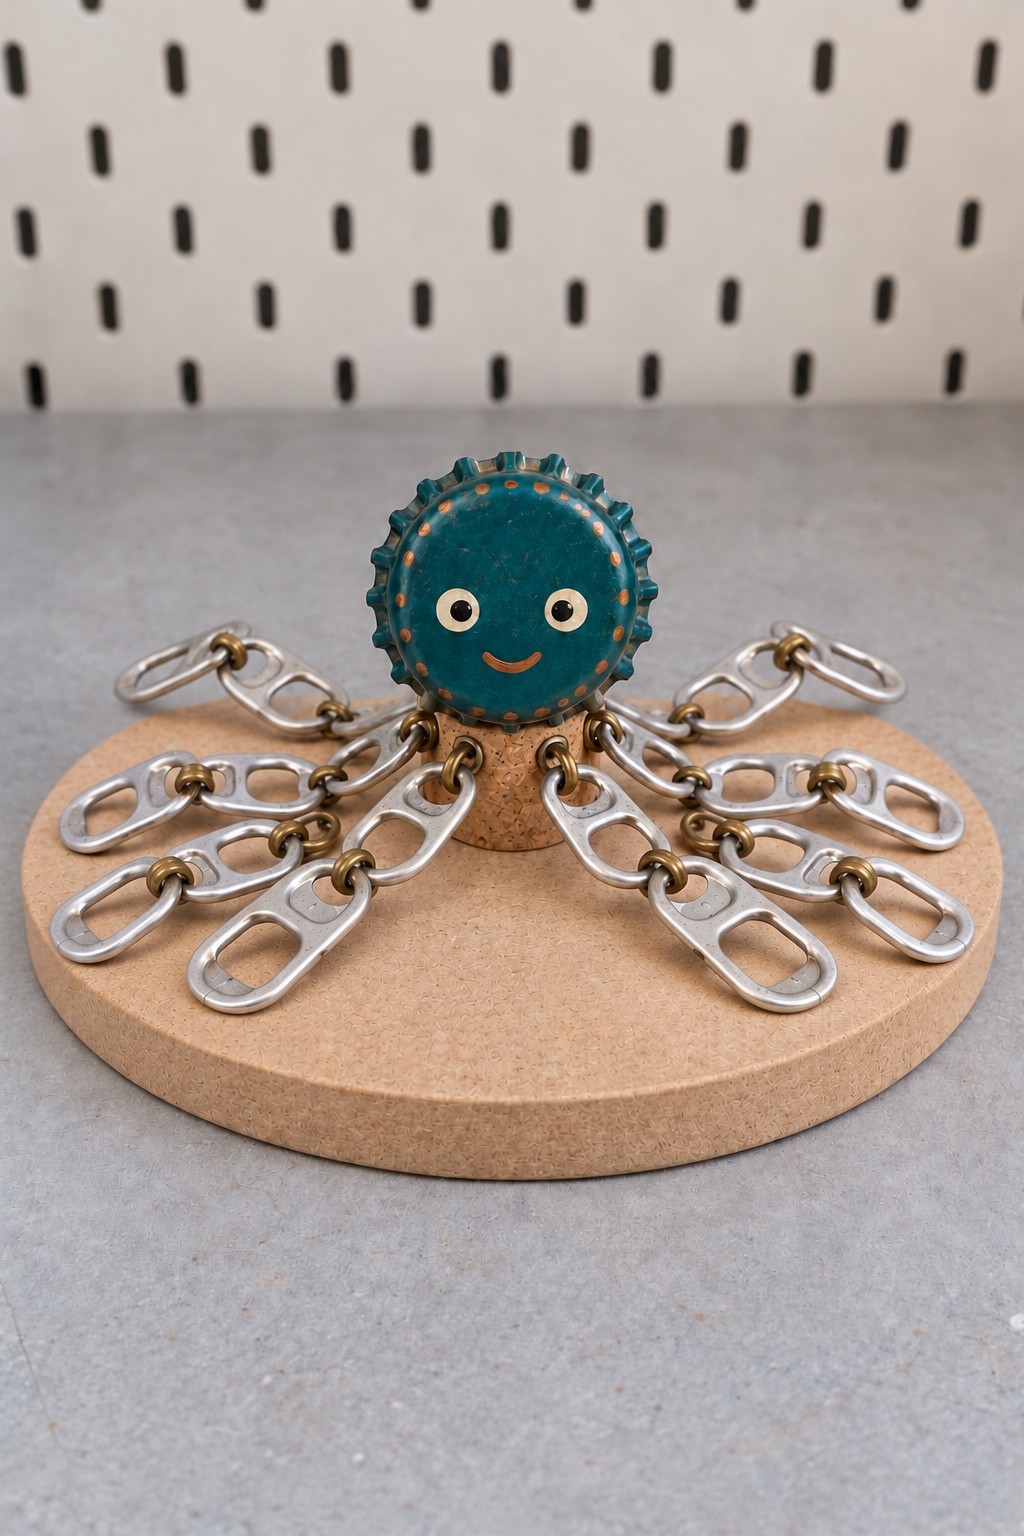
A teal crown cap becomes the face of an octopus, with eight articulated arms spreading from a cork body. Silver pull tabs and brass colored rings give it a playful mechanical texture.
Materials: one metal cap, a cork body, a rigid round base, intact drink can pull tabs, closed jump rings, small screw eyes, paint, and compatible adhesive.
Sort the tabs carefully and discard any with sharp or torn edges. Link several tabs for each of eight arms, closing every ring with pliers. Anchor the arms evenly around the cork body, then attach the painted face and secure the body to the base. Keep the arms loose enough to rest naturally. This sculpture belongs on a display shelf, where the metal links will not be pulled or handled as a toy.
12. A Tiny House Beneath a Bottle Cap Balloon
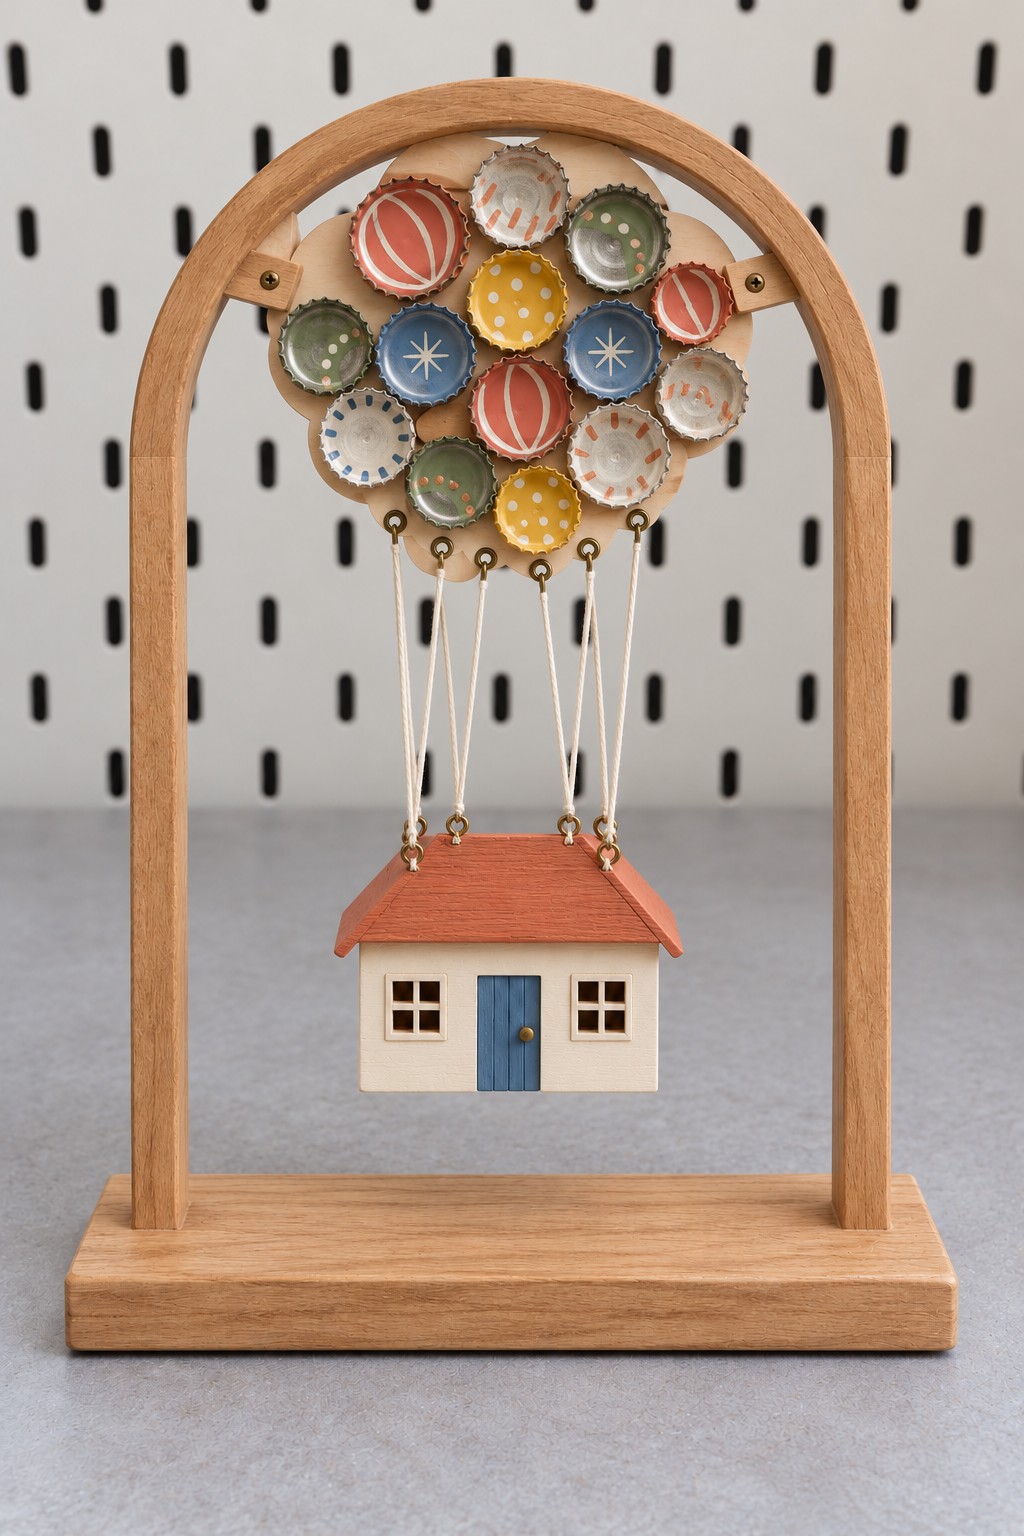
A cluster of patterned caps suggests a buoyant balloon above a cream house with a blue door and terracotta roof. The wooden arch carries the whole scene and makes the suspended house feel intentional.
Materials: a stable wooden arch, a lightweight shaped balloon backing, metal caps, a hollow miniature house, small screw eyes, cord, paints, and compatible glue.
Attach the balloon backing securely to the arch before adding its caps. Install eyelets in solid parts of the backing and house, then suspend the house with paired cords. Adjust the lengths until the roof sits level and the house clears the base. Keep the house lightweight; the cap mosaic is decorative, while the backing and frame carry the suspension. Place the model away from drafts and passing hands.
13. A Mini Ferris Wheel with Swinging Cap Gondolas
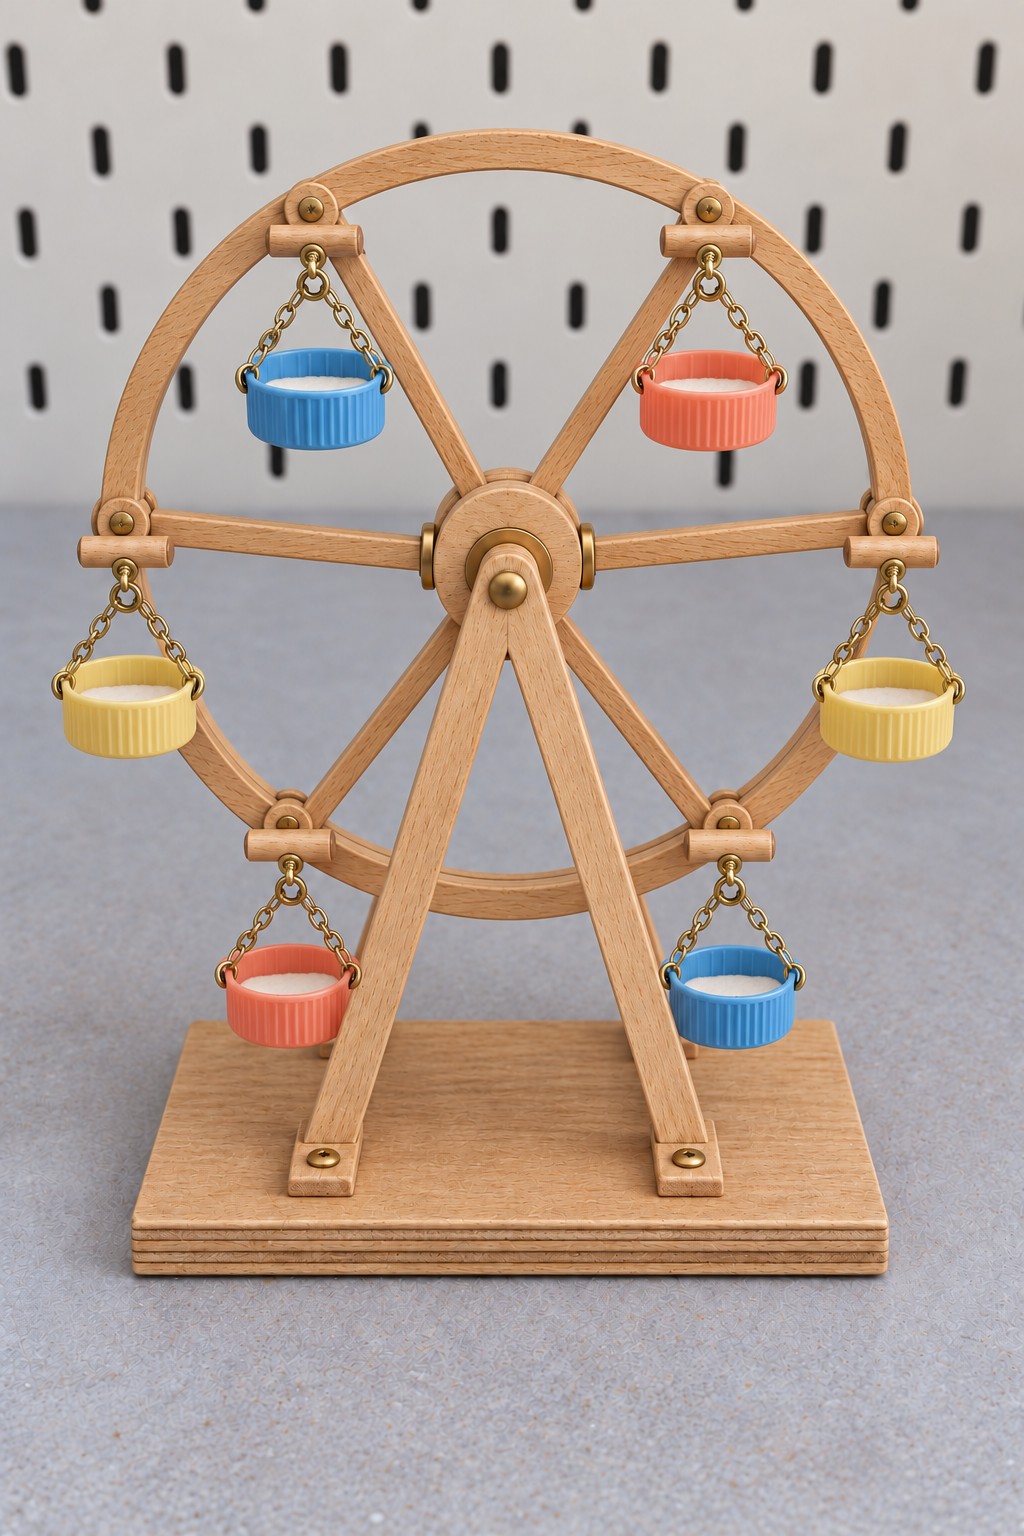
Blue, coral, and yellow caps become six open gondolas on a wooden wheel. Short paired chains let the little baskets hang downward as the wheel turns slowly by hand.
Materials: a wooden wheel or model kit, an axle, two aligned supports, a broad base, six matching caps, small eyelets, jump rings, and equal chain lengths.
Build and test the frame before decorating it. The axle should rotate without wobbling, and the support spacing must leave room for the gondolas. Prepare opposite holes near each cap's rim and attach a short chain to each side, bringing the chains together at the hanger. Rotate the wheel through a full turn to check clearance. Keep the baskets empty and use the model as a delicate display, with fingers clear of the axle and supports.
14. A Reading Frog with a Crown Cap Head
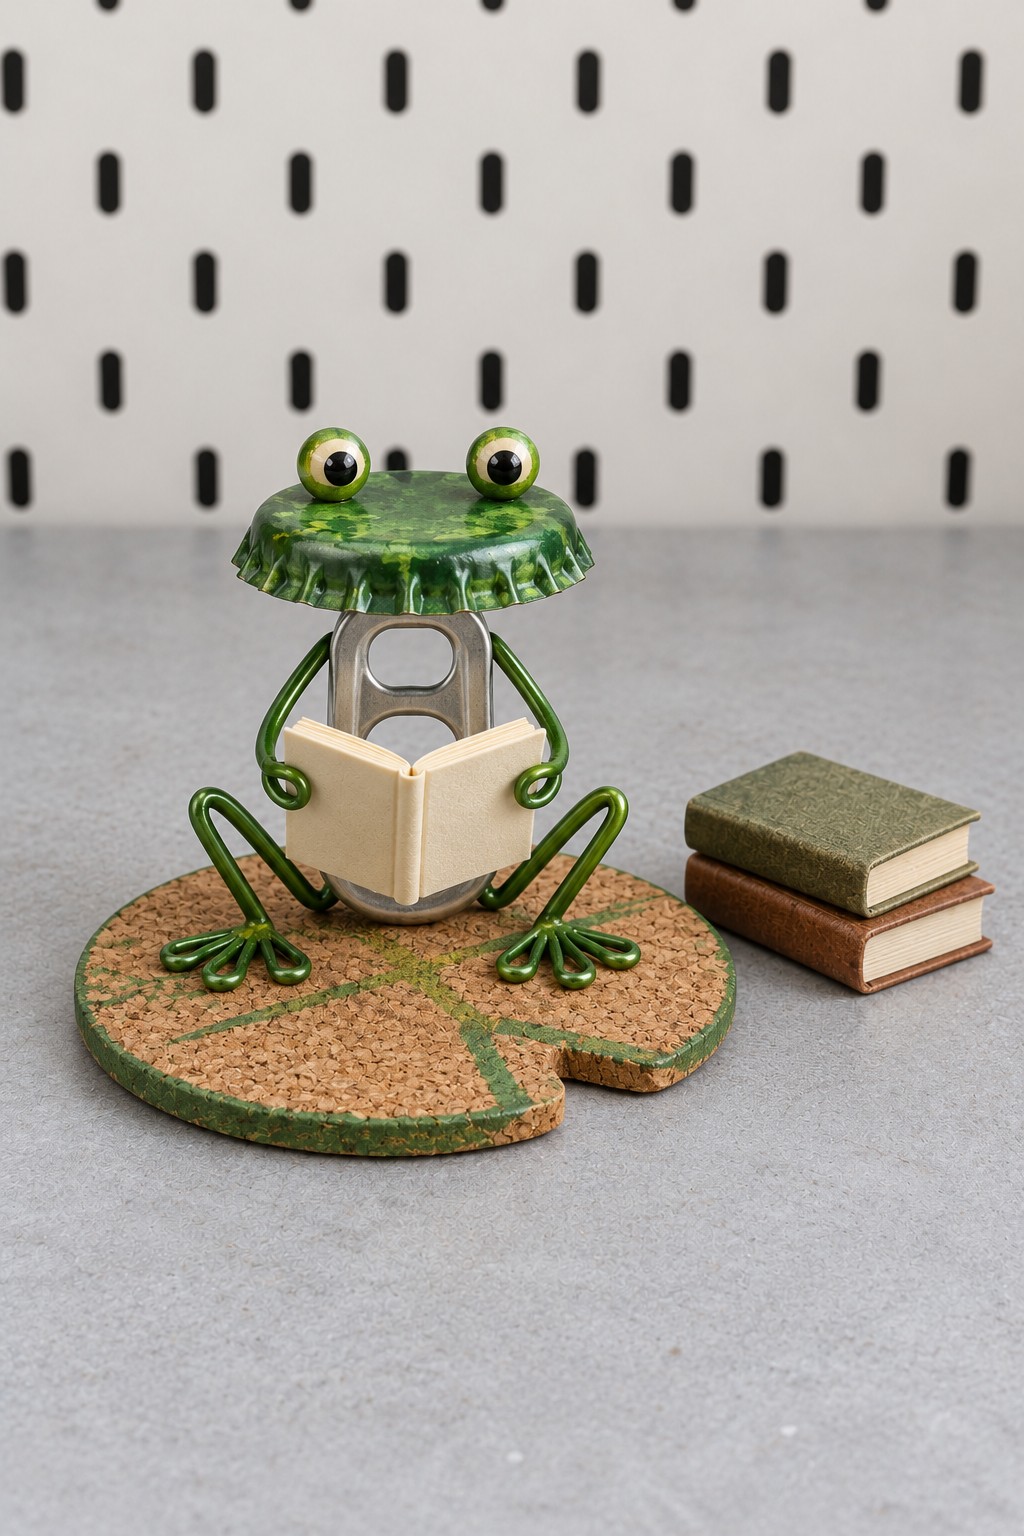
A green crown cap forms the frog's broad head above a pull tab torso. Curled wire limbs, raised eyes, and a tiny open book give the figure a relaxed reading pose.
Materials: a metal cap, an intact pull tab, coated craft wire, two eye beads, cream card, a cork lily pad on a rigid backing, paint, and compatible adhesive.
Bend the legs and feet as paired supports, then anchor them through the rigid backing rather than relying on thin cork alone. Add the torso and arms, folding every wire end away from exposed edges. Fix the painted head above the body and secure the folded card book between the hands. Check the balance before setting the frog beside books. Keep it indoors and handle it by the base.
15. Felt Owls with Layered Bottle Cap Eyes
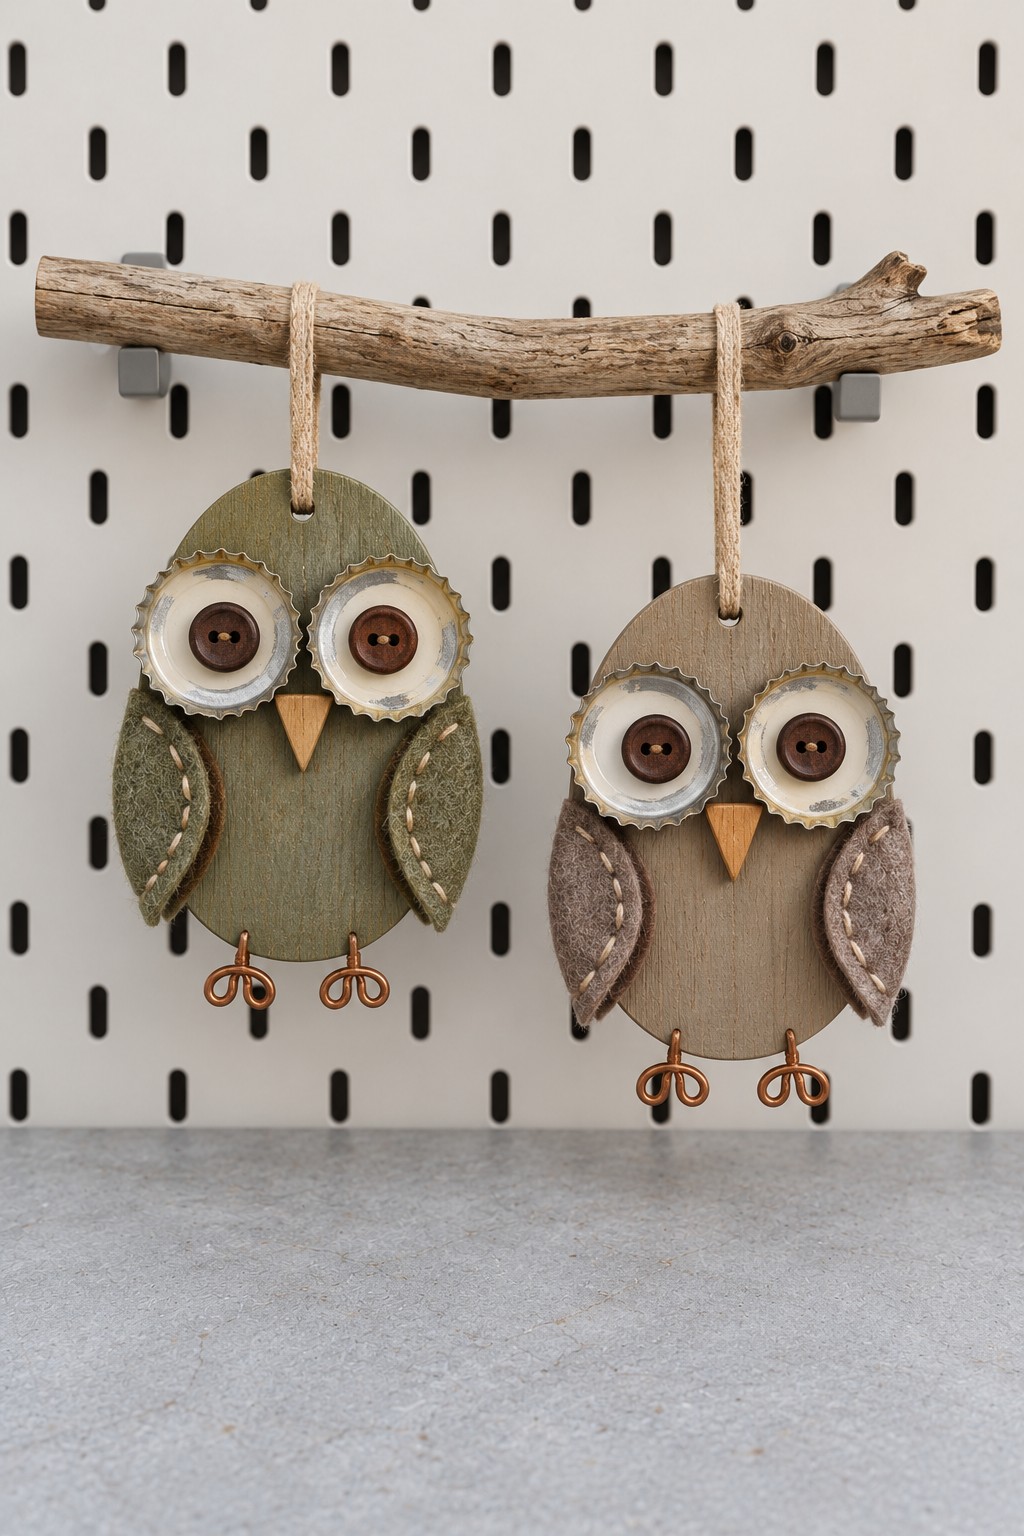
Cream caps and dark button centers create oversized eyes for these olive and brown felt owls. Blanket stitched wings, small triangular beaks, and curled wire feet add detail without covering the soft bodies.
Materials: felt, sturdy card or thin plywood cores, cream caps, buttons, thread, cord, craft wire, a dry branch, and suitable fixings.
Cover each rigid core with felt and sew the wings before closing the body. Attach the eye assemblies to the core, using a plastic compatible fixing or concealed stitches through prepared holes. Secure the hanging loop through the reinforced top, then add the beak and curled feet. Mount the branch on proper brackets before hanging the owls. Felt and wire make this an indoor decoration best kept out of reach of small children.
16. A Caterpillar Photo Stand on a Painted Leaf
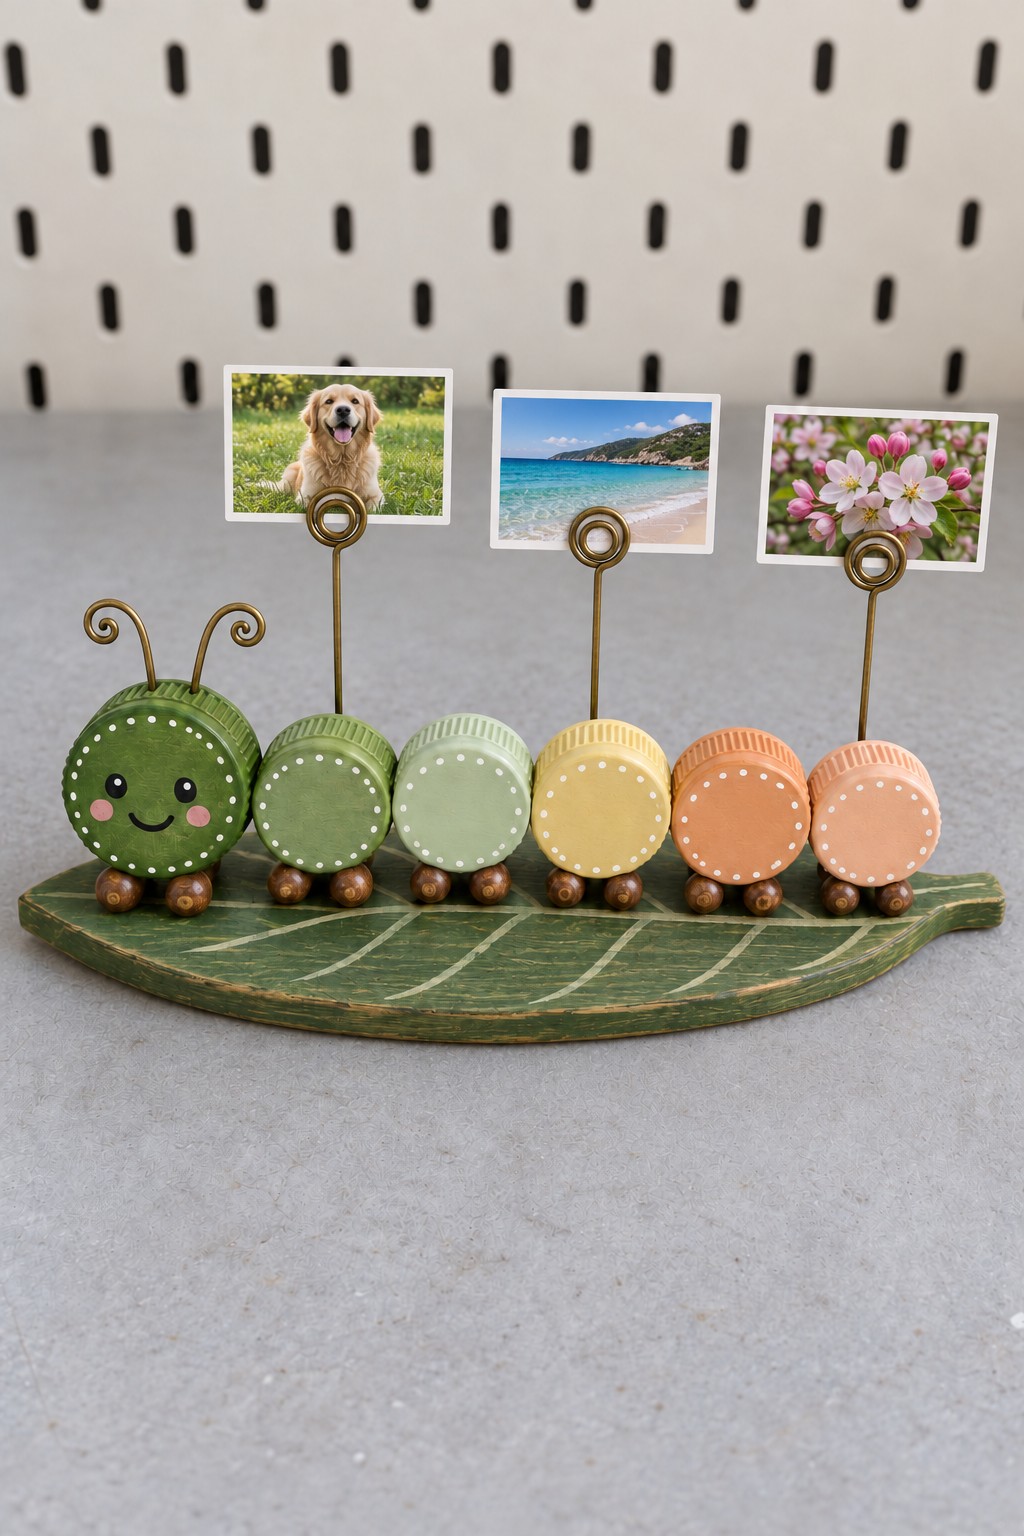
Six upright caps move from deep green to peach across a painted wooden leaf. Bead feet lift the body slightly, and three spiral wire stems hold small photographs above it.
Materials: plastic caps, a leaf shaped wooden base, wooden beads, stiff craft wire, paints, and compatible fixings.
Paint the leaf and cap faces, then position the bead feet to support each upright segment. Anchor the photo wires into drilled holes in the wooden base behind the caps; the plastic shells can conceal those connections. Bend each wire end into a double spiral that grips a photo gently. Attach the cap bodies and curled antennae after checking the wire spacing. Use small lightweight prints so the stand remains balanced.
17. An Emoji Hanging with Linked Metal Caps
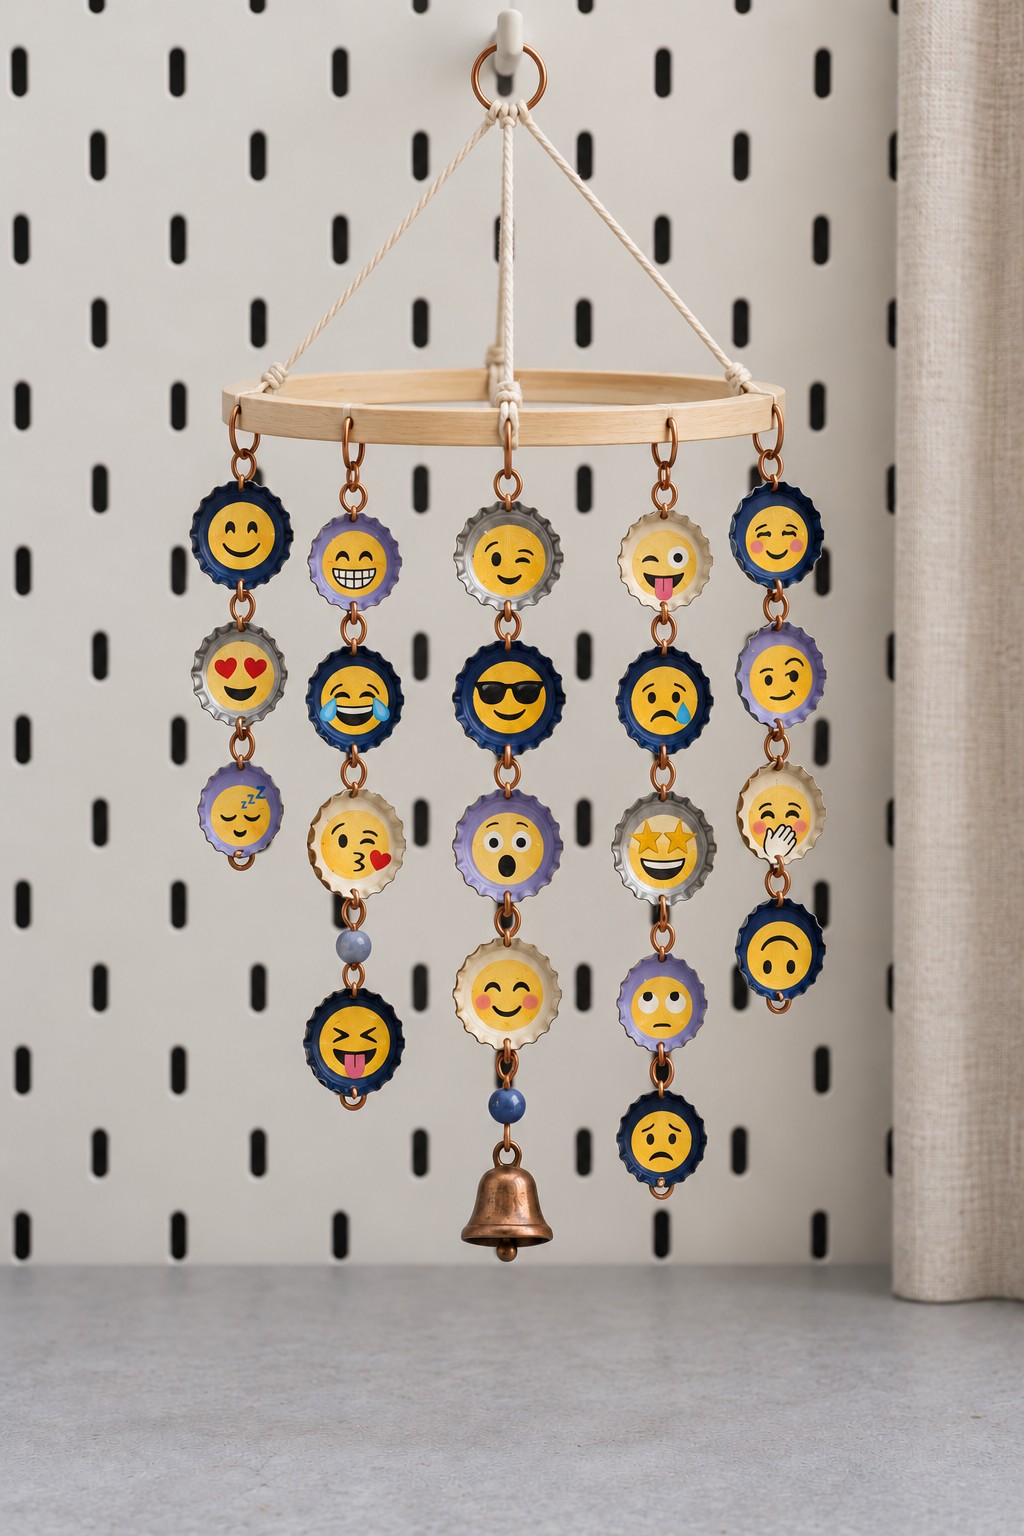
A collection of smiling, sleepy, surprised, and worried faces gives this hanging plenty of personality. Copper colored rings connect the caps, and one small bell finishes the center strand.
Materials: metal caps, a wooden hoop, cotton hanging cord, jump rings, paint pens or paper face inserts, a few beads, and a lightweight bell.
Prepare smooth holes near the upper and lower edges of each cap before painting. Add faces, seal paper inserts if used, and assemble strands with fully closed rings. Attach them to the hoop at balanced intervals, then adjust the suspension cords until it hangs level. Leave enough space for neighboring strands to move without catching. Use it as an indoor decorative mobile; any sound depends on the bell and the amount of movement.
18. A Velvet Lined Keepsake Box from Two Caps
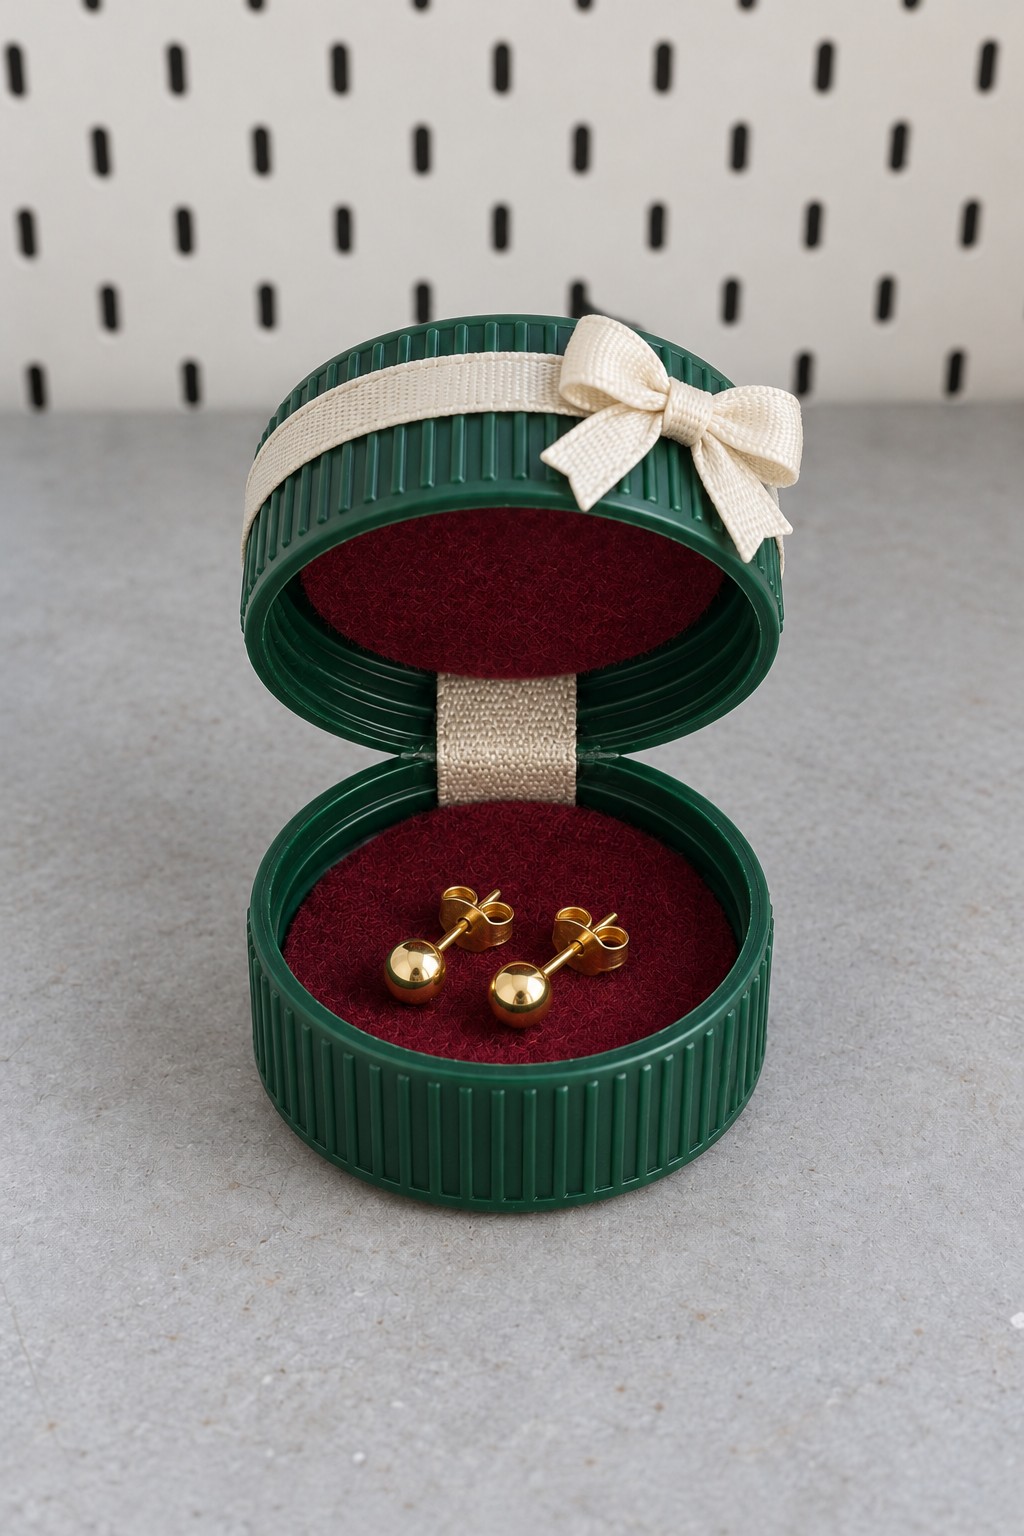
Two deep green caps open like a tiny clamshell around burgundy velvet. A cream ribbon hinge and a small bow make the box feel like a miniature gift presentation.
Materials: two matching deep caps, velvet, thin padding, woven ribbon, a needle and thread, and adhesive compatible with the plastic and lining materials.
Fit padded velvet circles inside both caps and cover the inner sidewalls if space allows. Join the backs with a ribbon hinge secured through prepared holes, keeping the knots beneath the lining. Test the opening before finishing the bow. Use the box for a pair of studs or a small charm on a dresser. Without a fitted clasp, it is a presentation box rather than secure storage for travel.
19. A Pastel Ribbon Jellyfish Wall Ornament
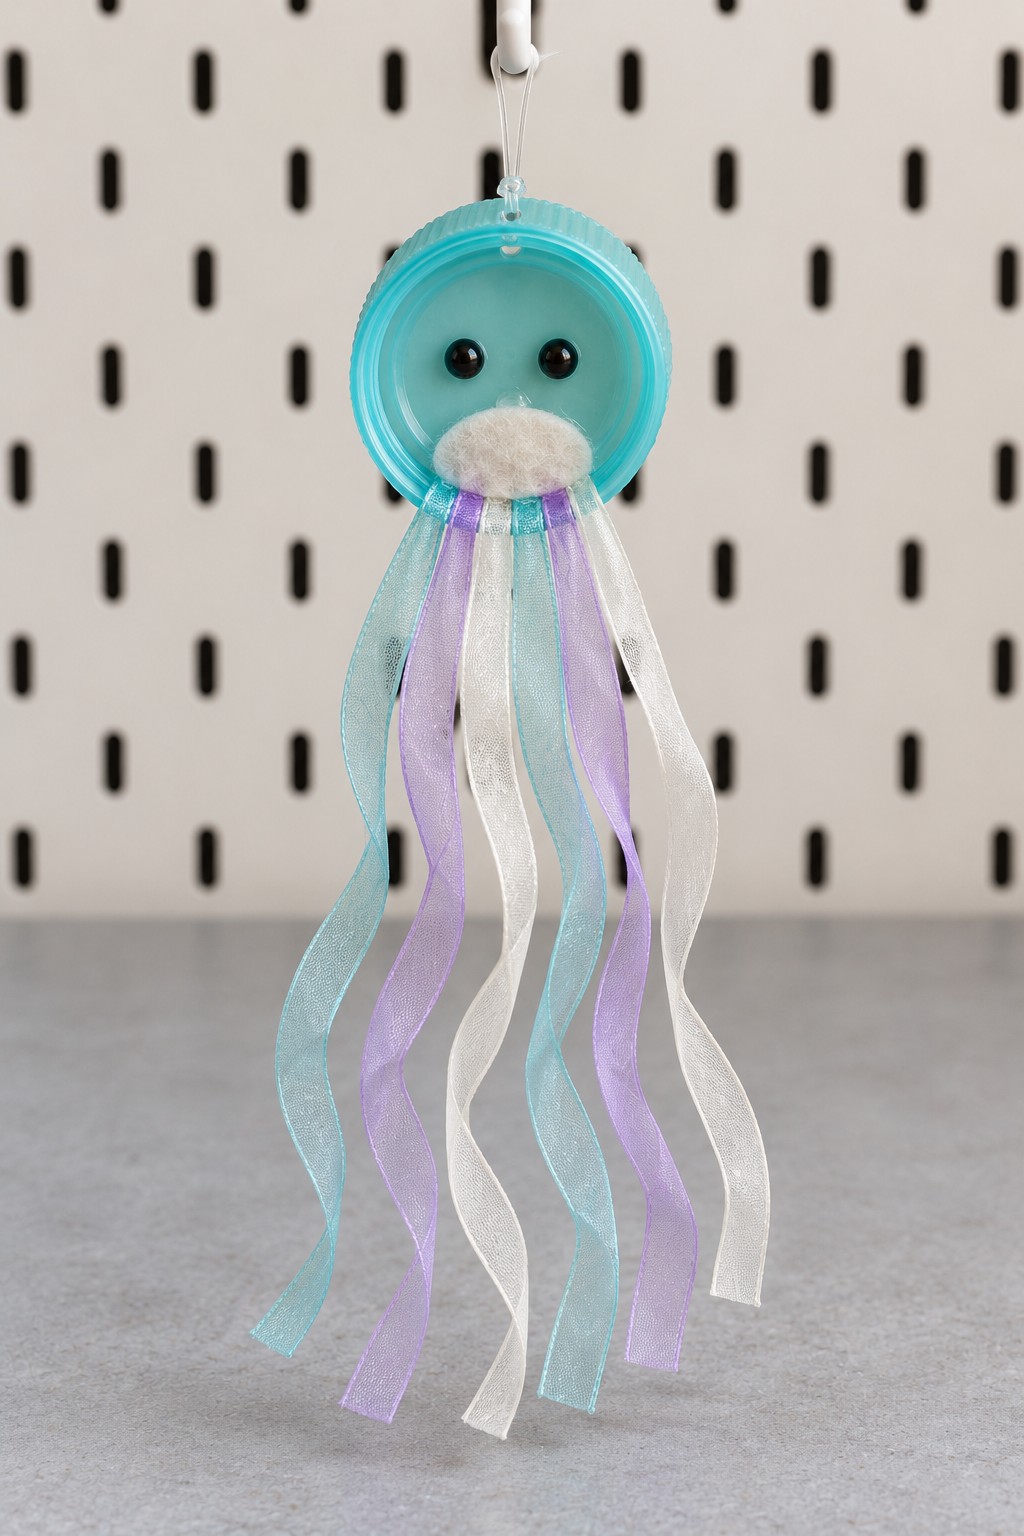
A turquoise cap gives this jellyfish a simple round head, while mint, lilac, and white ribbons provide most of the movement. A small face keeps the ornament expressive without adding much weight.
Materials: a large plastic cap, soft ribbon, felt for facial details, strong thread, a hanging cord, and a small inner backing disc.
Stitch the ribbons onto the backing disc and secure that disc inside the cap through prepared holes. Add a separate hanging loop at the top so the ornament's weight does not pull on the tentacles. Vary ribbon lengths slightly, finishing their ends with small hems or a suitable fray treatment. Keep it as a dry indoor wall decoration, mounted well away from beds, cots, and places where children could become tangled in the ribbons.
20. A Dinosaur Board for Matching Shapes
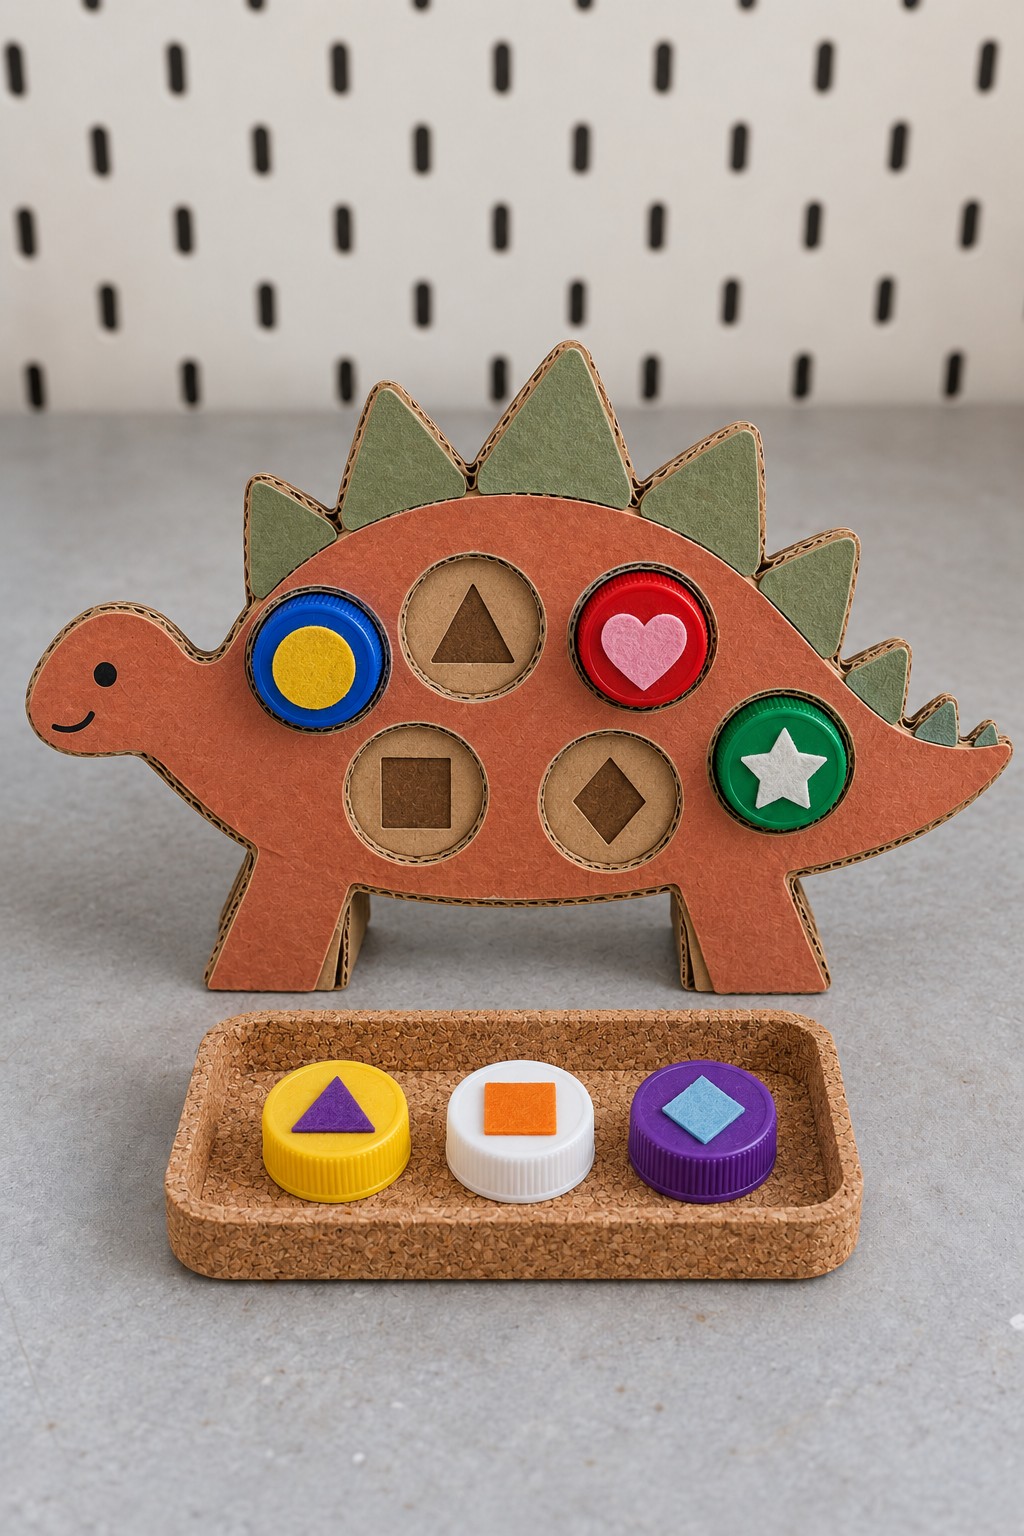
An orange dinosaur with green back plates provides a friendly setting for matching circles, triangles, squares, diamonds, hearts, and stars. Every cap fits a circular recess; the symbol on its face determines the match.
Materials: layered corrugated cardboard, equal diameter plastic caps, colored paper, felt shapes, PVA for the cardboard layers, and a storage tray.
Cut six round openings in the front dinosaur layer and glue it to an uncut backing. Add a reference symbol inside each recess and the corresponding felt symbol to a cap. Keep enough clearance for the caps to lift out easily, then add a wide folding support behind the board. Start with three matches and introduce the rest gradually. This is a supervised matching activity with loose parts, rather than a shape insertion toy for toddlers.
21. A Flexible Snake Strung from Pastel Caps
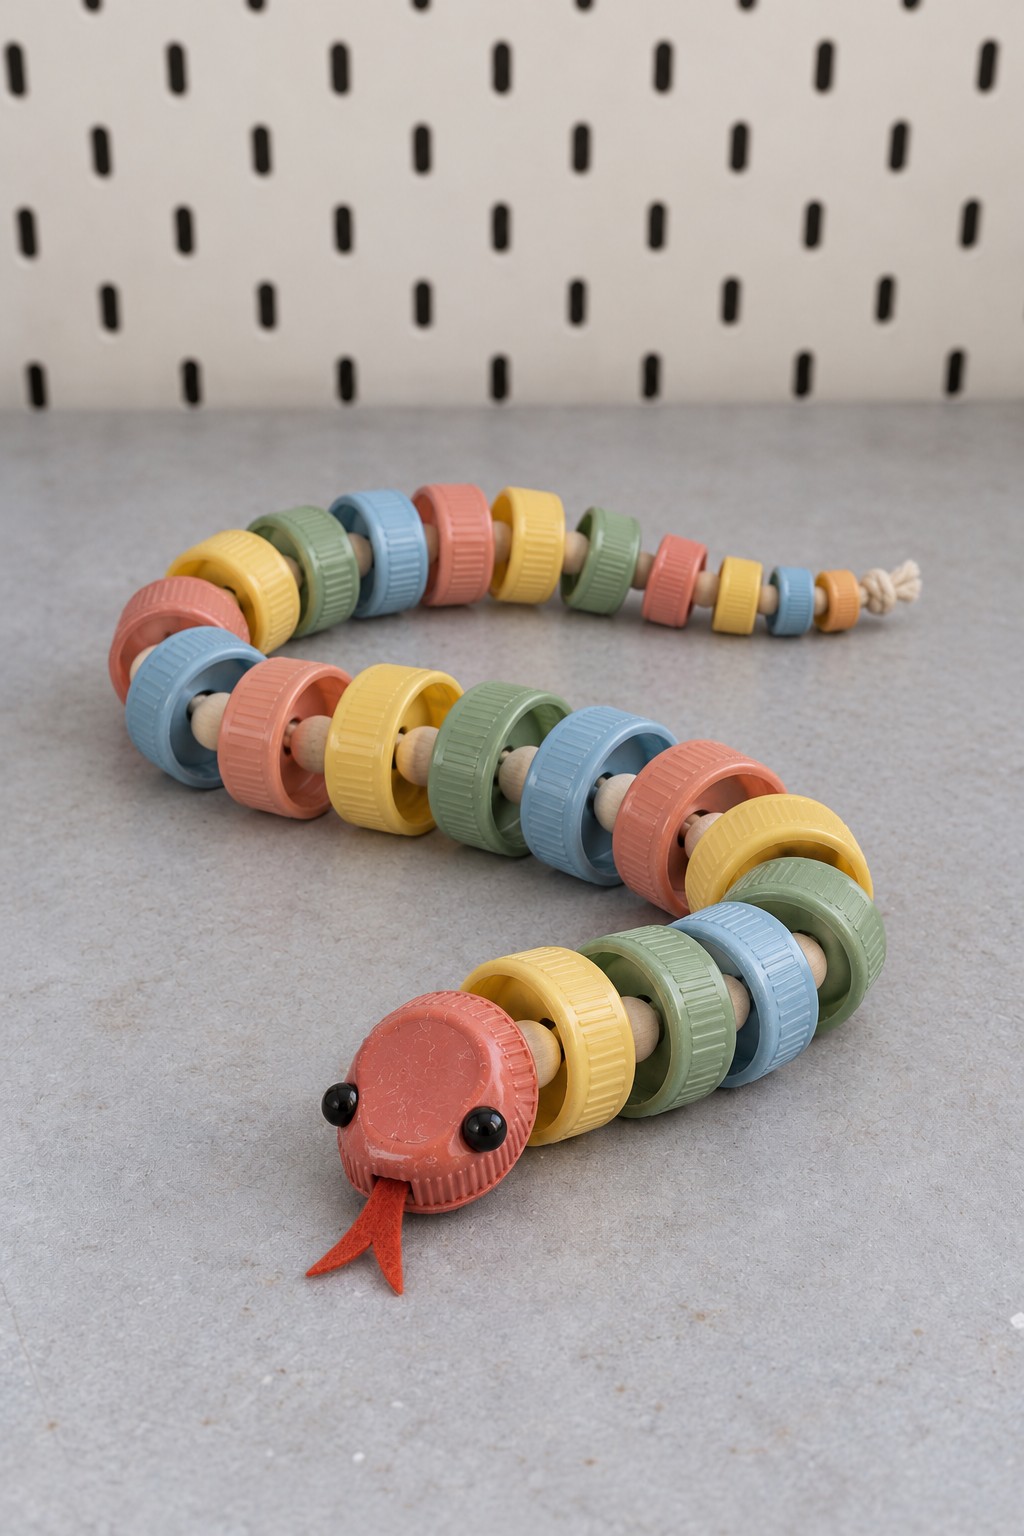
Pastel yellow, mint, blue, and coral caps create a long body that can bend into an S shape. A coral head with two eyes and a forked felt tongue gives the sequence a clear starting point.
Materials: plastic caps, strong cotton cord, felt, paint or securely fixed eyes, and tools for preparing smooth central holes.
Thread the caps through their bases, keeping their orientation consistent and leaving a little slack between them for movement. Tie substantial stopper knots at both ends and test that they cannot pass through the holes. Add the face after the body is assembled. Make a short tabletop version for supervised use by older children; the long decorative version should be stored away when the activity ends. Never turn the cord into a wearable loop.
22. A Tiny Burger Charm with Felt Fillings
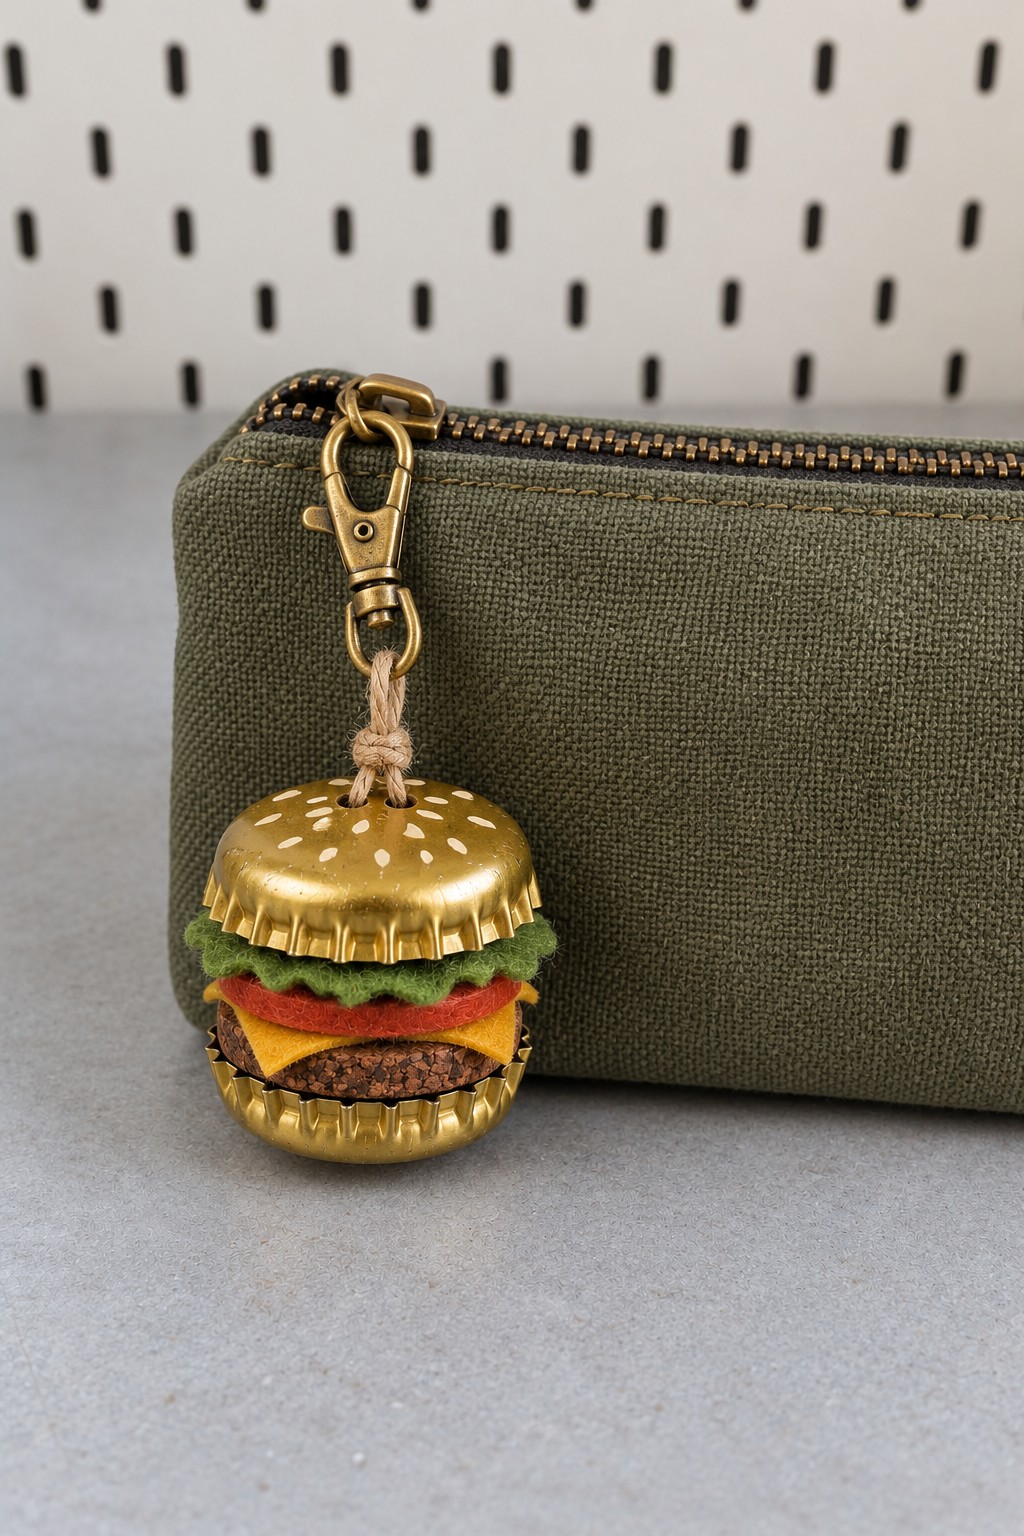
Two gold crown caps become burger buns around wavy green lettuce, red tomato, yellow cheese, and a brown felt patty. Small cream marks on the upper cap suggest sesame seeds.
Materials: two metal caps with smooth edges, colored felt, a small split ring, a zipper clasp, thin cord, paint, and suitable adhesive.
Prepare a hole in the upper cap and secure the connector through it before adding the filling. Cut the felt layers slightly wider than the cap interiors so their colors remain visible. Stack and stitch the felt together, then bond the stack into the caps with an adhesive approved for the materials. Keep the charm light, and use it on a pouch or bag where repeated tugging will be limited.
23. A Fruit Memory Game with Sixteen Matching Caps
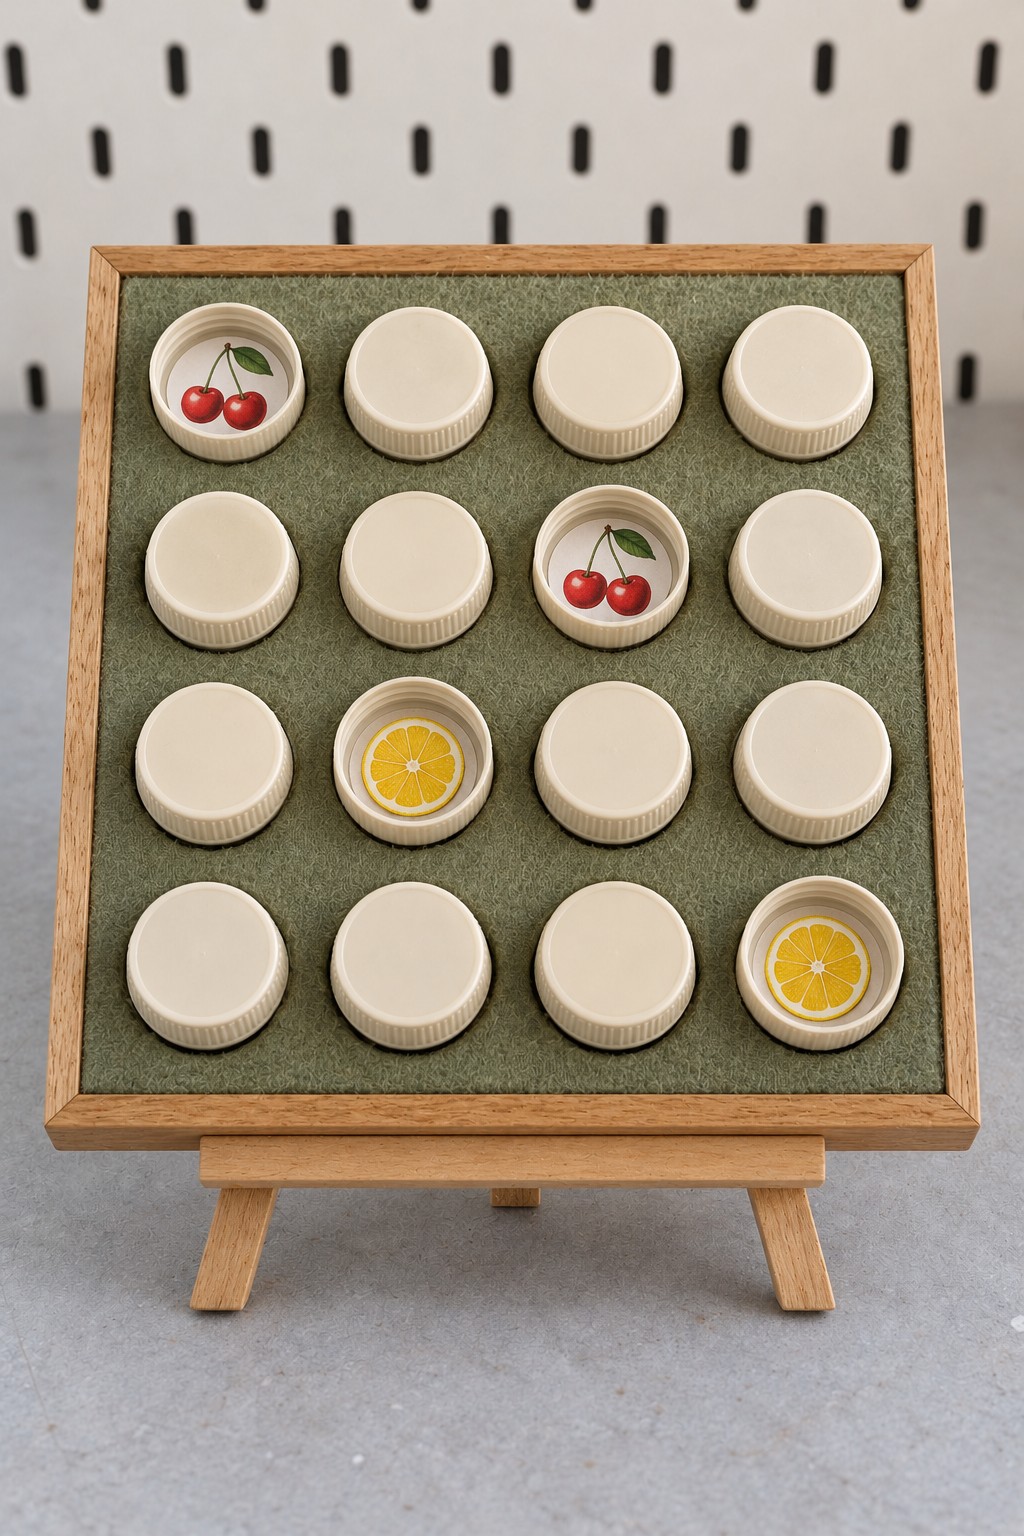
Identical cream backs conceal fruit pictures inside sixteen caps. A green felt board makes the pieces easy to see, and the raised wooden frame keeps the activity contained on a table.
Materials: sixteen identical caps, eight pairs of fruit illustrations, cardstock, a felt covered board, and paper adhesive appropriate to the prepared inserts.
Measure the inner diameter of one cap, print the pictures to fit, and mount each on a small cardstock disc. Secure the discs inside the caps without changing their plain outer faces. Arrange all sixteen face down. Players turn over two at a time, keeping a pair or returning a mismatch to the same positions. Start with fewer pairs if needed. For more activities using familiar packaging, browse these recycling projects for kids.
24. A Reusable Date Tracker with Numbered Caps
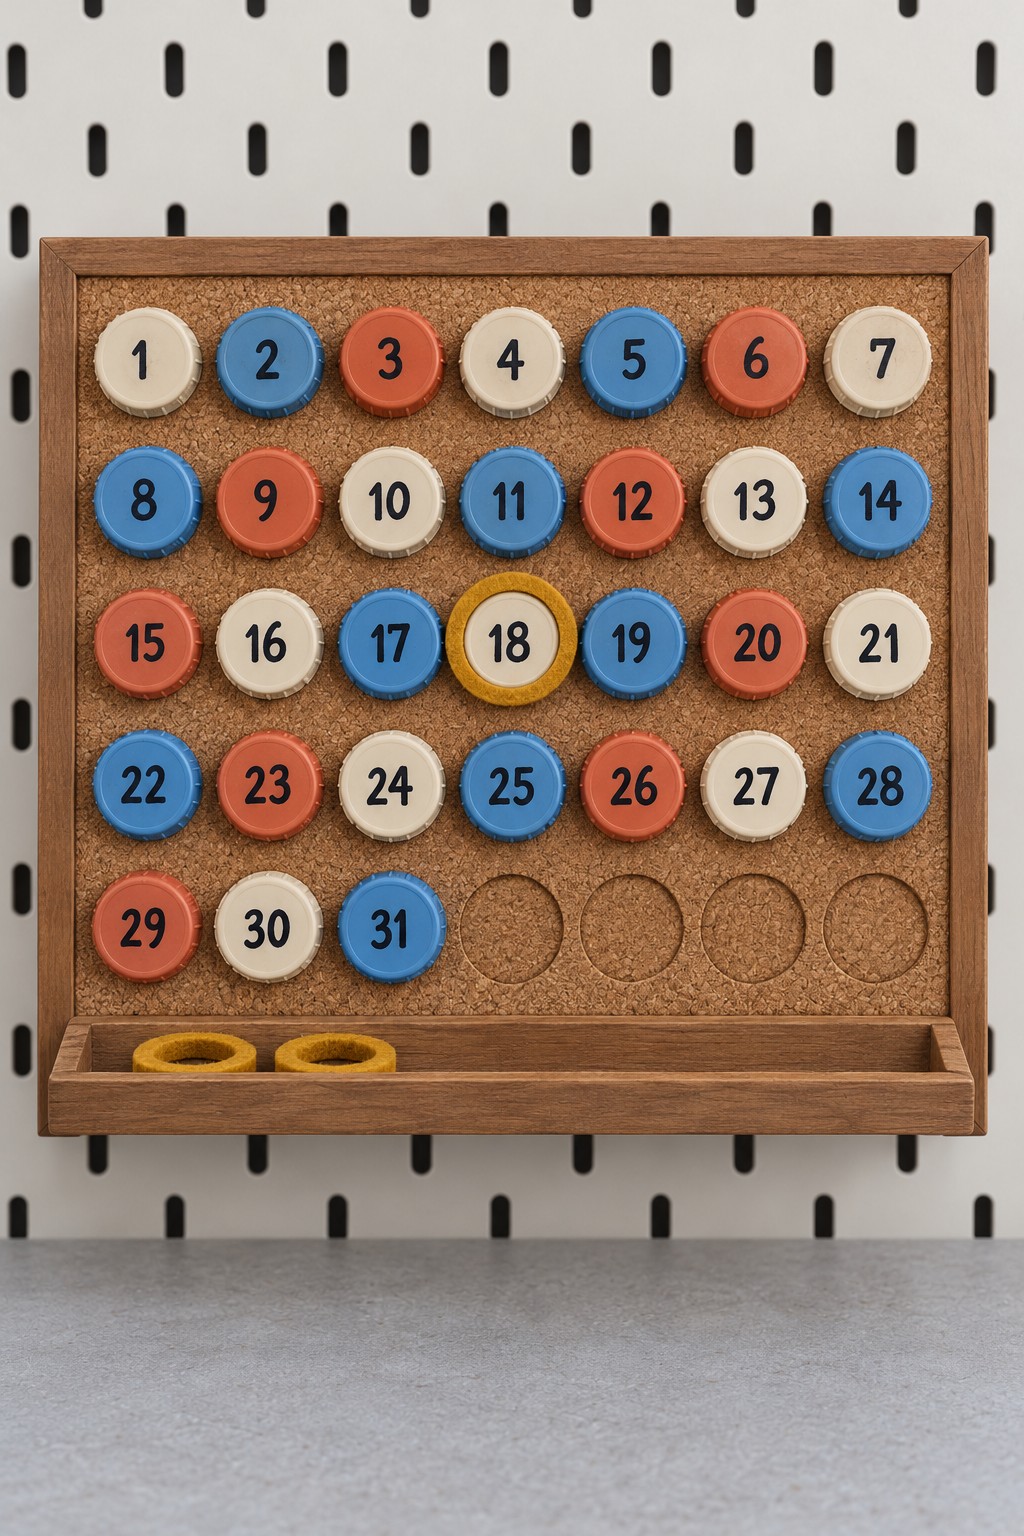
Numbered cream, coral, and blue caps turn a cork panel into a colorful date tracker. A yellow felt ring identifies the selected day, while a narrow lower shelf stores extra markers.
Materials: a framed cork board, 31 matching caps, number labels or paint pens, removable hook and loop fixings, thick felt, and a small wooden ledge.
Mark a seven column grid and check that the caps and marker rings have room to fit. Attach the caps with removable fixings, then add numbers in sequence. Cut a felt ring that slips securely around a cap without obscuring its number. In this simple layout, the board tracks dates rather than weekdays. If you want a true monthly calendar, add weekday labels and six rows so every month's starting position can fit.
25. Smiling Sponge Figures with Cap Hats and Bases
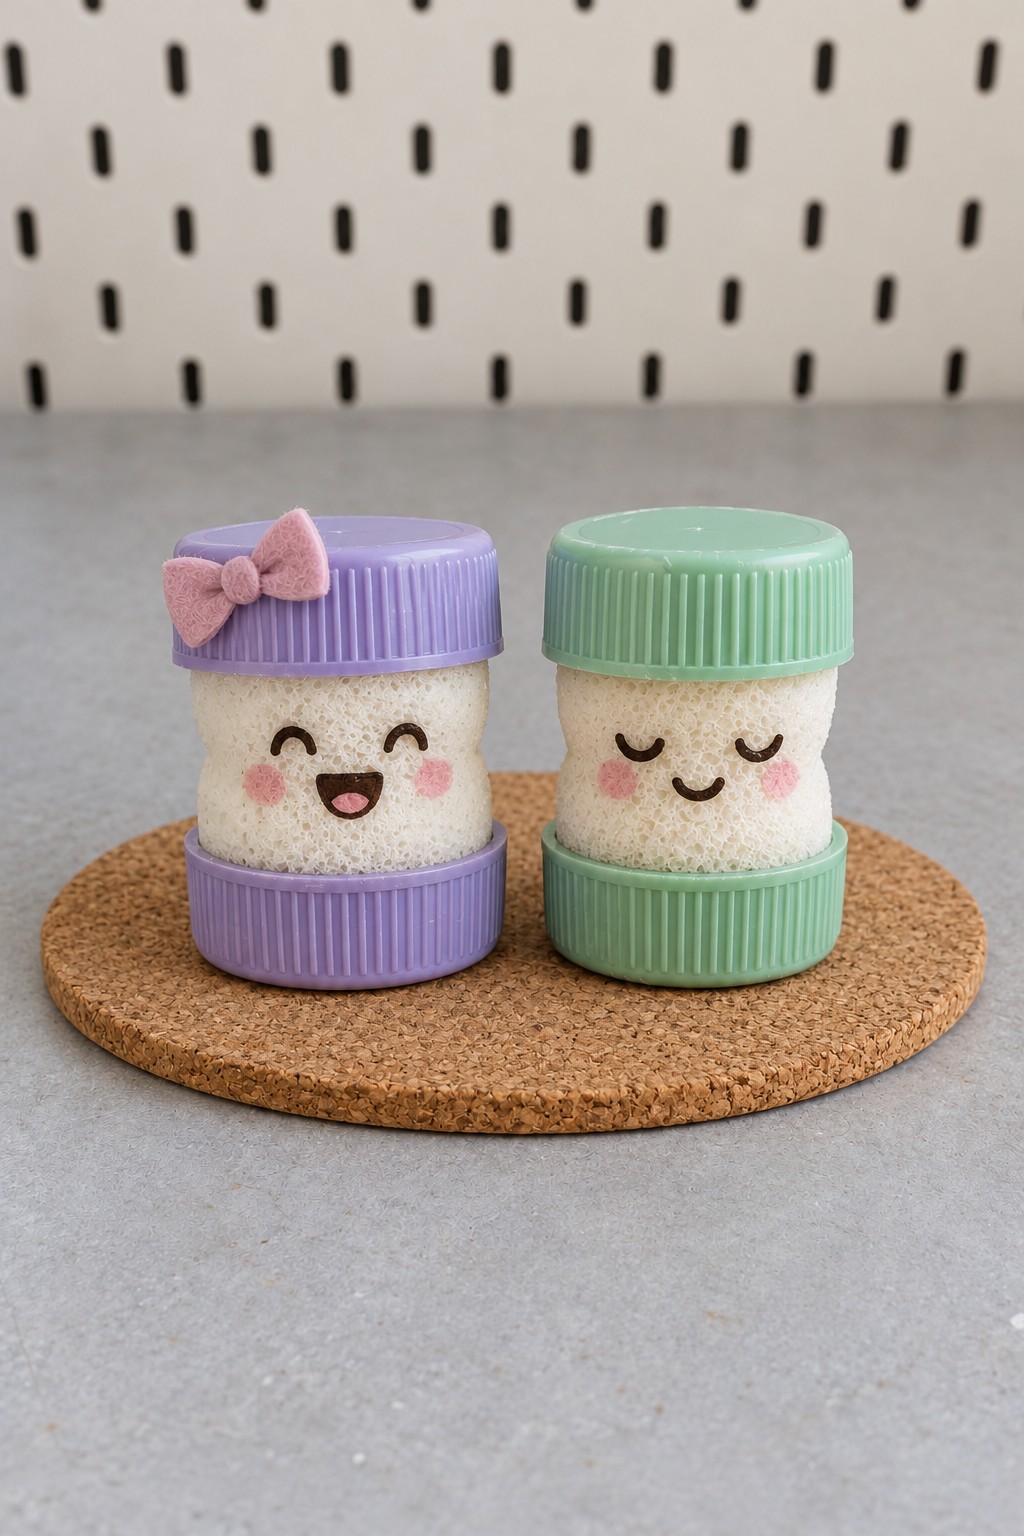
Short cream sponge cylinders sit between matching pairs of mint and lavender caps. Painted expressions and a small felt bow turn the simple stacked forms into cheerful shelf companions.
Materials: clean craft foam or a new dry sponge, four deep plastic caps, felt, suitable markers or fabric paint, and an adhesive compatible with both the foam and plastic.
Cut two even cylinders that fit inside the cap rims without bowing outward. Decorate the faces on spare material first to check for bleeding. Fix each cylinder into its lower cap, then add the upper cap and bow. Leave the figures to cure upright. Their porous bodies make them decorative characters, not containers or rattles. Keep them dry and replace the foam if it becomes dirty or starts to crumble.
26. A Bear Board with Changeable Expressions
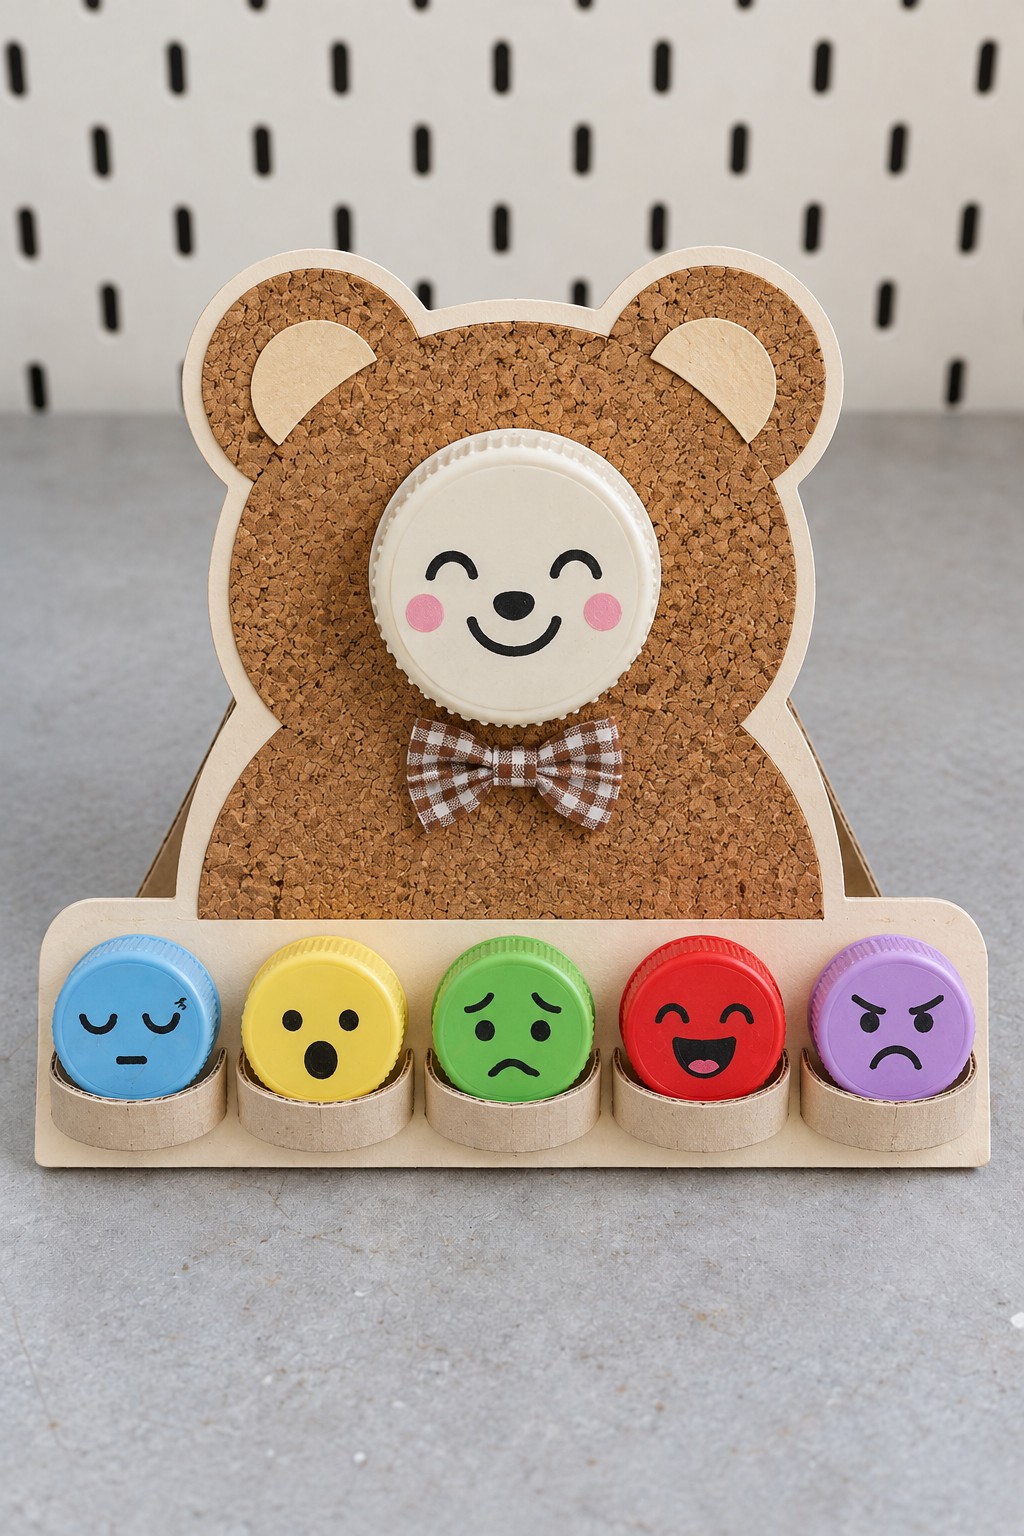
A cork bear with a gingham bow holds a cheerful cream face, with sleepy, surprised, worried, excited, and grumpy caps stored below. The changing expressions can become prompts for stories or conversations about feelings.
Materials: sturdy card, cork sheet, a large cream cap, five colored caps, felt or paint pens, hook and loop dots, card strips for holders, and a folding support.
Cut the bear and backing together so the ears remain fixed. Add a reinforced attachment point in the center and a matching dot on each cap. The smaller expression caps can use the same central fixing even though they cover less of the bear's face. Make five shallow holders along the bottom, then brace the board from behind. Invite a child to choose or describe a face without treating their choice as an assessment.
27. A Christmas Photo Tree with Fifteen Green Caps
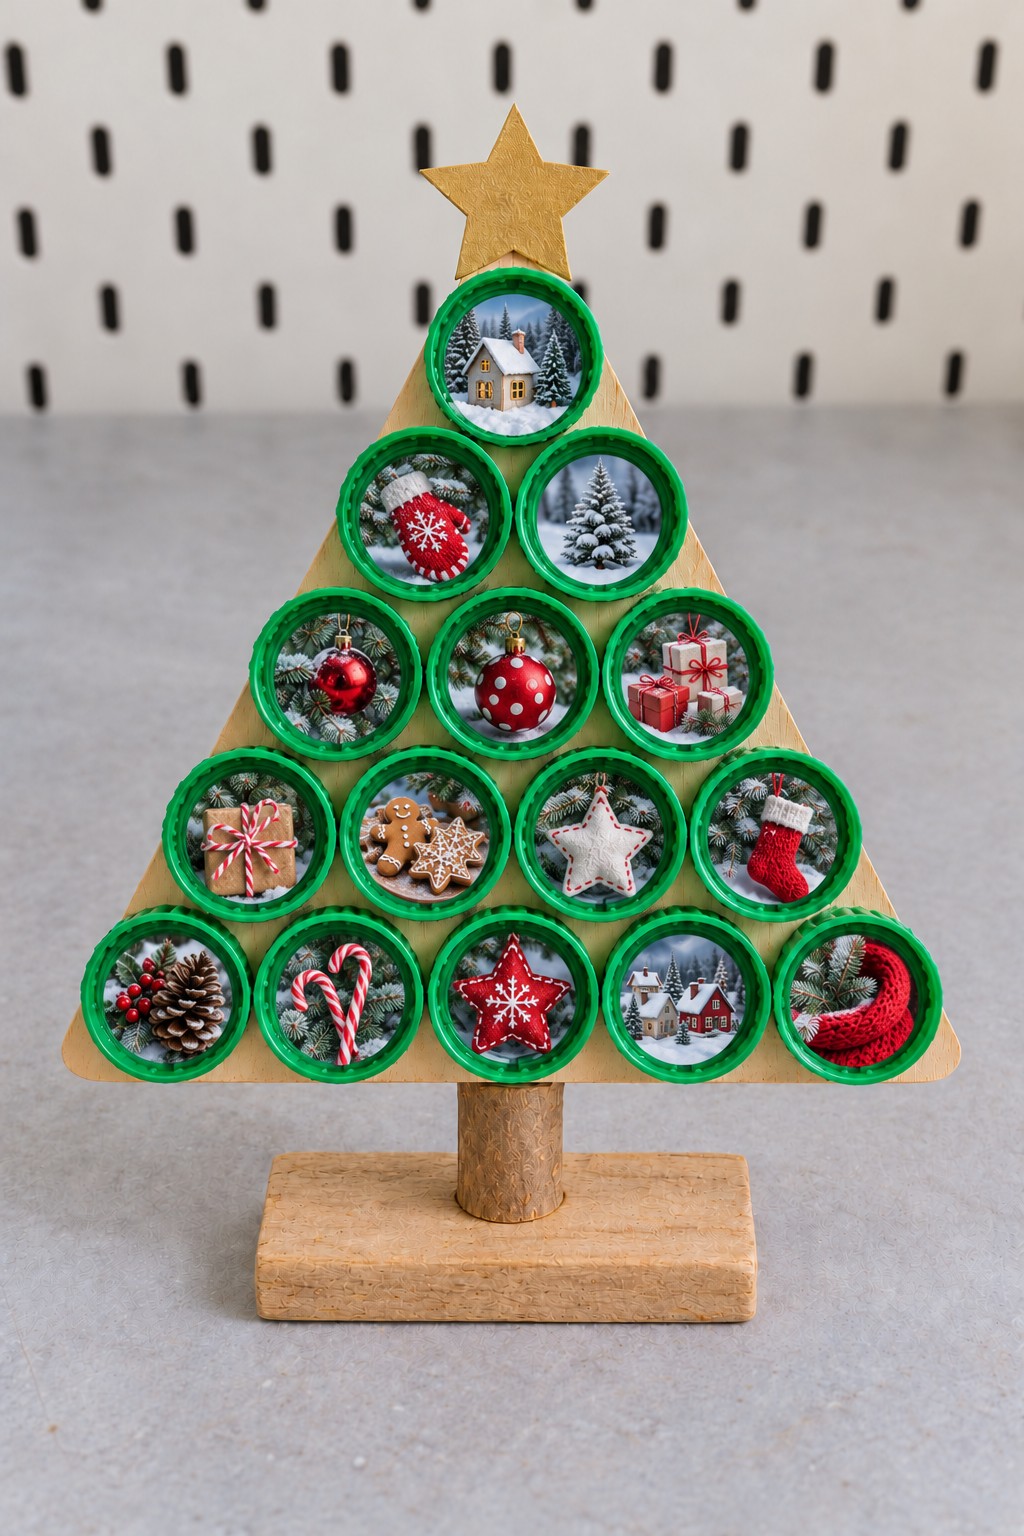
Fifteen green caps hold tiny pictures of snowy cottages, ornaments, gifts, gingerbread, and winter greenery. Their arrangement in five triangular rows makes a complete Christmas tree, finished with a gold star.
Materials: a triangular wooden backing, fifteen matching caps, printed photo circles, paper adhesive, fixings suitable for the caps, a wooden trunk, a broad base, and a star.
Build the stand first and check that the tree remains upright. Cut each picture to the measured cap interior and mount it on a cardstock disc. Fix the caps in rows of one, two, three, four, and five, open side forward, then add the pictures. Keep every photo centered and oriented upright before the adhesive sets. Small family holiday pictures can personalize the same layout without changing its construction.
Choose a First Project That Suits Your Caps
A single cap and a fabric scrap are enough to try the pincushion. An identical collection suits the memory game, while assorted metal caps give mosaics more character. Save the wheel, tote, and suspended house for a session when you can measure, prepare connections, and test the structure before decorating.
Store spare caps by material and size so the next project starts with a useful selection. Keep finished mosaics dry unless their entire construction is designed for moisture, inspect cord and ring connections occasionally, and repair loose pieces before displaying them again. If you enjoy reworking everyday materials into coordinated accessories, these 1950s craft ideas offer another direction for colorful handmade details.



Leave a Reply