16 Unusual DIY Lampshades Made With Unexpected Materials

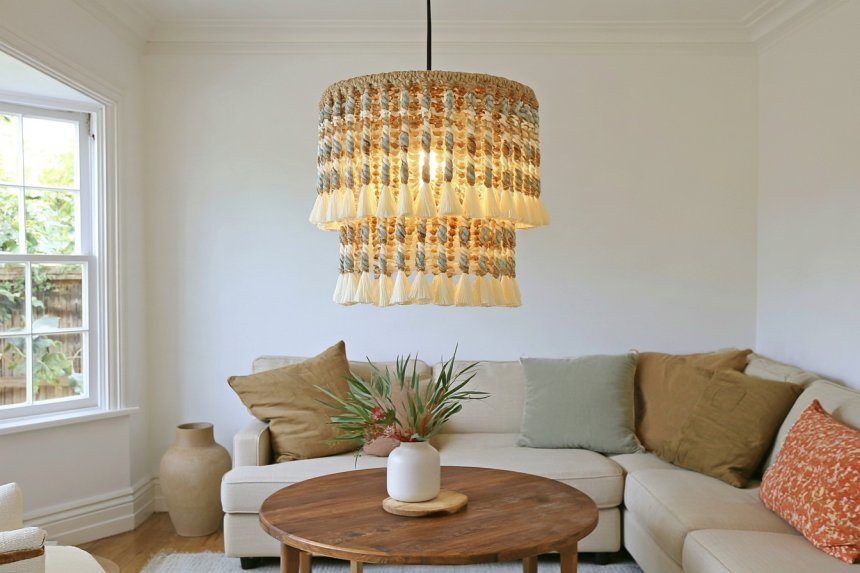
A memorable lampshade does not have to begin with conventional fabric. Thin wood veneer can bend into sculptural fins, perforated cork can scatter tiny points of light, two layers of metal mesh can create a shifting moiré pattern, and sun-printed linen can turn an ordinary table lamp into something completely personal. The trick is separating the decorative shell from the electrical fixture itself. That makes it possible to experiment with unusual materials while keeping the bulb, socket, wiring, and heat-resistant inner structure properly designed for lighting. The projects below explore lampshades as small pieces of functional art, with practical guidance on materials, construction, light effects, and where each design can work best.
1. Build a Lampshade From Curved Walnut Veneer Ribbons
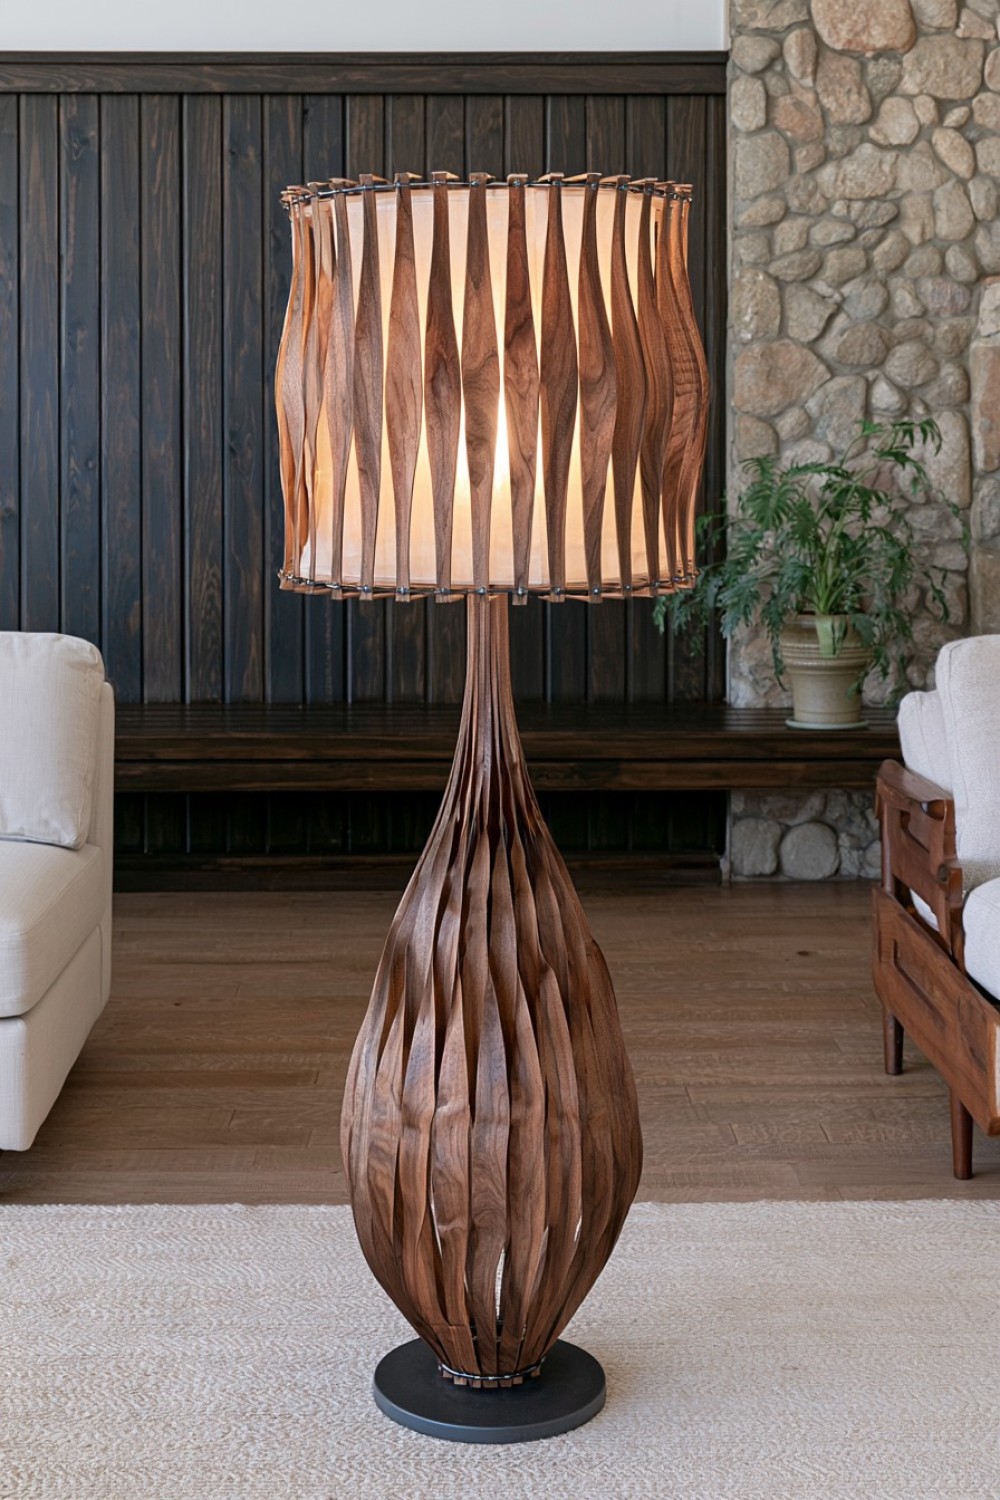
Instead of wrapping a shade completely in wood, turn thin walnut veneer into individual curved ribbons that reveal light between them. The result can look more like a small architectural sculpture than a conventional lamp.
You will need flexible wood veneer, two metal lampshade rings, a craft knife, metal ruler, fine sandpaper, small mechanical clips or suitable fasteners, and a certified inner diffuser.
Cut the veneer into equal vertical strips, lightly sand the edges, then attach each strip between the upper and lower rings with a slight outward curve. Leaving consistent gaps creates narrow columns of warm light.
For an even more unusual silhouette, alternate slightly wider and narrower strips rather than making every piece identical.
Walnut gives the lamp a rich mid-century feel, while ash or maple creates a lighter Scandinavian version. Keep the wood as an external decorative shell and use an LED bulb so the veneer stays well away from significant heat.
2. Create a Double-Layer Metal Mesh Shade That Changes as You Walk Past
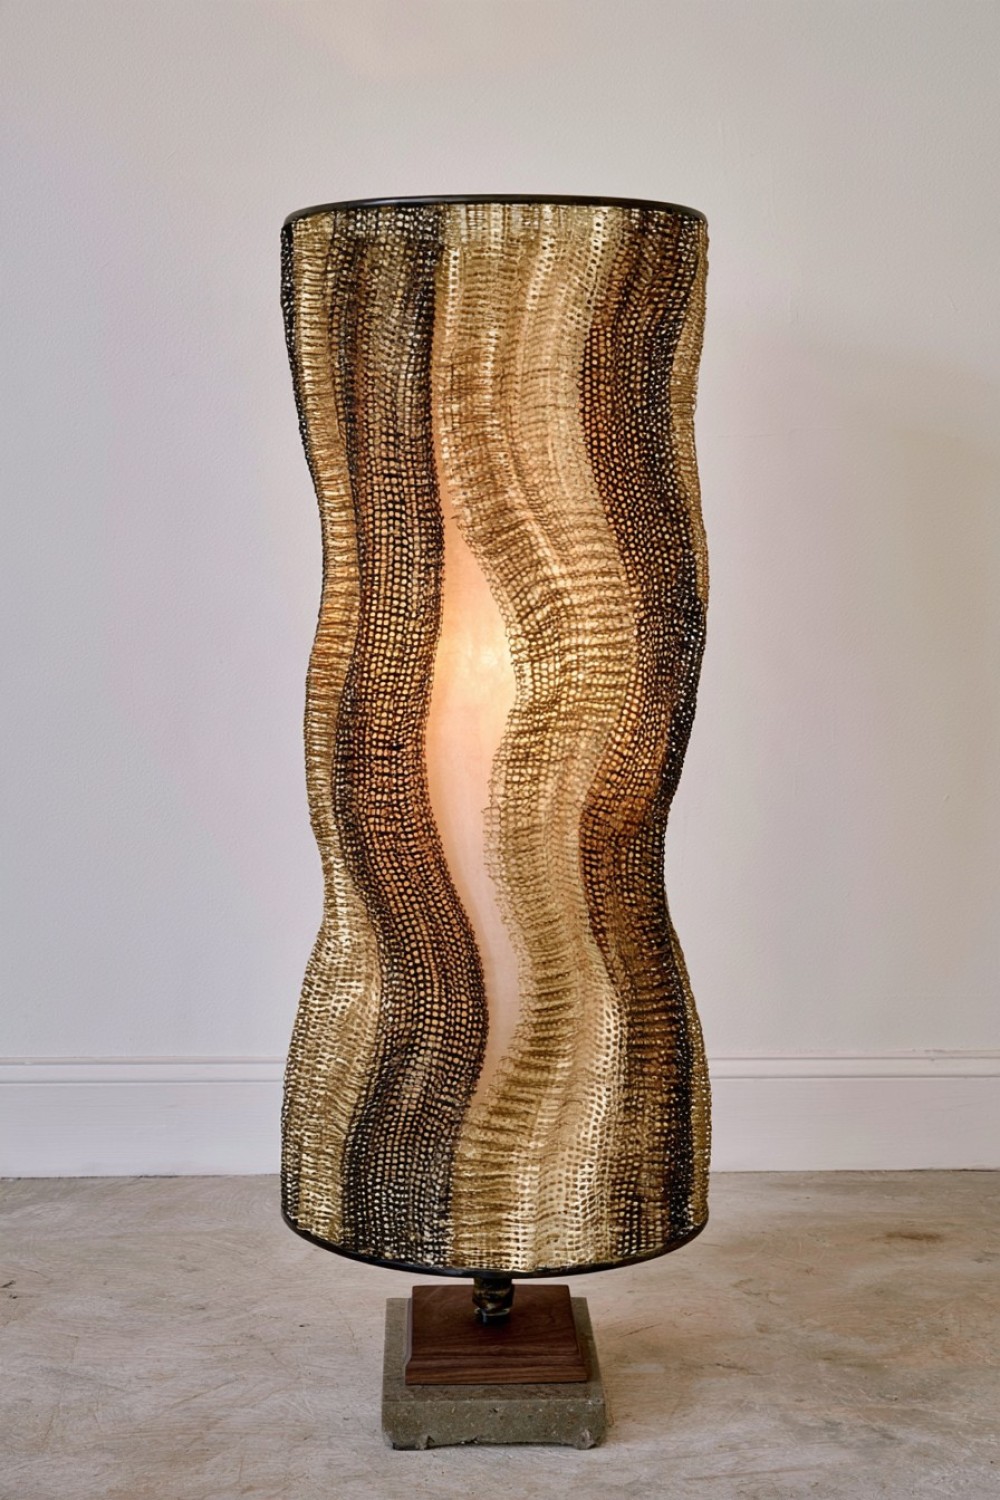
Two sheets of fine perforated metal can produce an optical effect that a single lampshade material cannot.
Use fine aluminum or brass mesh, a cylindrical shade frame, metal snips, gloves, a file, small metal fasteners, and a translucent inner diffuser.
Form one mesh cylinder around the frame. Then create a second layer outside it, rotating the perforation pattern slightly before securing it. Where the two patterns overlap, a moiré effect appears—subtle waves and shifting geometric bands that seem to change as the viewing angle moves.
During the day, the lamp feels industrial and sculptural. When illuminated, the diffuser behind the mesh prevents harsh glare while making the overlapping pattern much more visible.
A brass-toned mesh can work beautifully with dark timber, while blackened aluminum suits contemporary rooms. Carefully smooth every cut metal edge, and do not let the decorative shell interfere with the socket or electrical connections.
3. Make a Cyanotype Lampshade Using Real Leaves and Sunlight
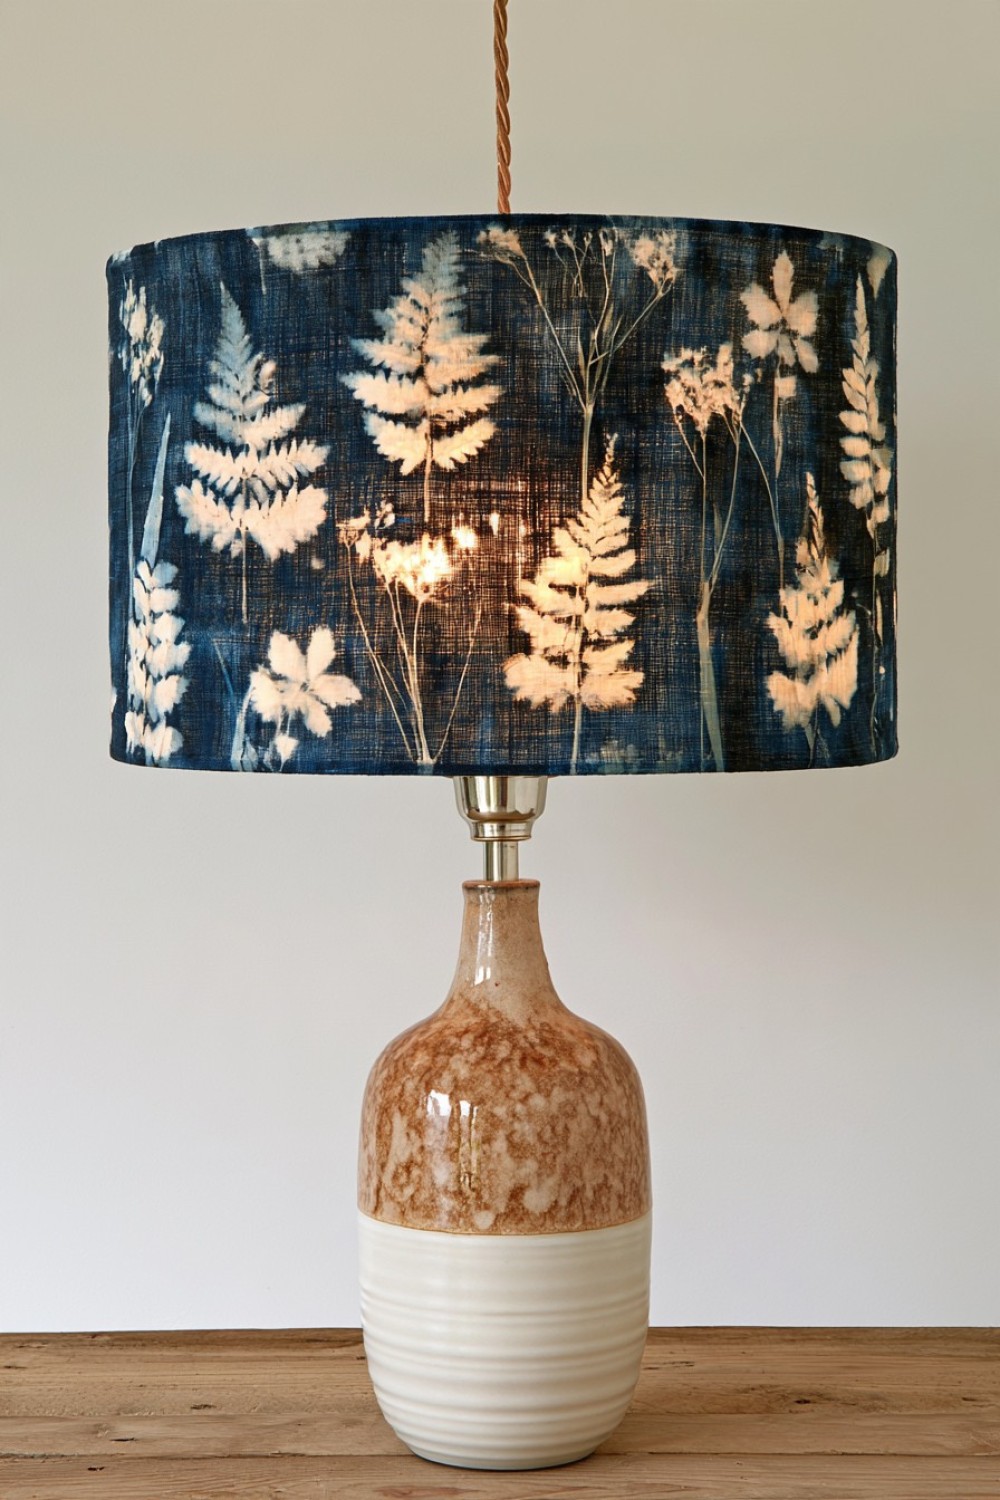
Instead of printing a botanical pattern commercially, you can create one from actual plant silhouettes using cyanotype-treated fabric.
Start with lampshade-safe cotton or linen suitable for mounting onto an existing lined drum shade, cyanotype fabric solution or pretreated fabric, pressed fern leaves or grasses, a transparent acrylic sheet, fabric scissors, and textile adhesive.
Arrange the botanical pieces across the sensitized fabric and expose it to sunlight according to the cyanotype product instructions. Washing the material afterward reveals deep blue areas around pale plant silhouettes.
Once completely dry, mount the fabric onto the outside of a structurally sound lampshade.
The interesting part happens when the lamp turns on: the botanical pattern becomes softer and more atmospheric than it appears in daylight.
Because cyanotype designs are inherently unique, no two shades will be identical. Keep the original heat-resistant liner and use an LED rather than placing treated fabric close to a hot bulb.
4. Turn Fluted Acrylic Into a Glowing Architectural Cylinder
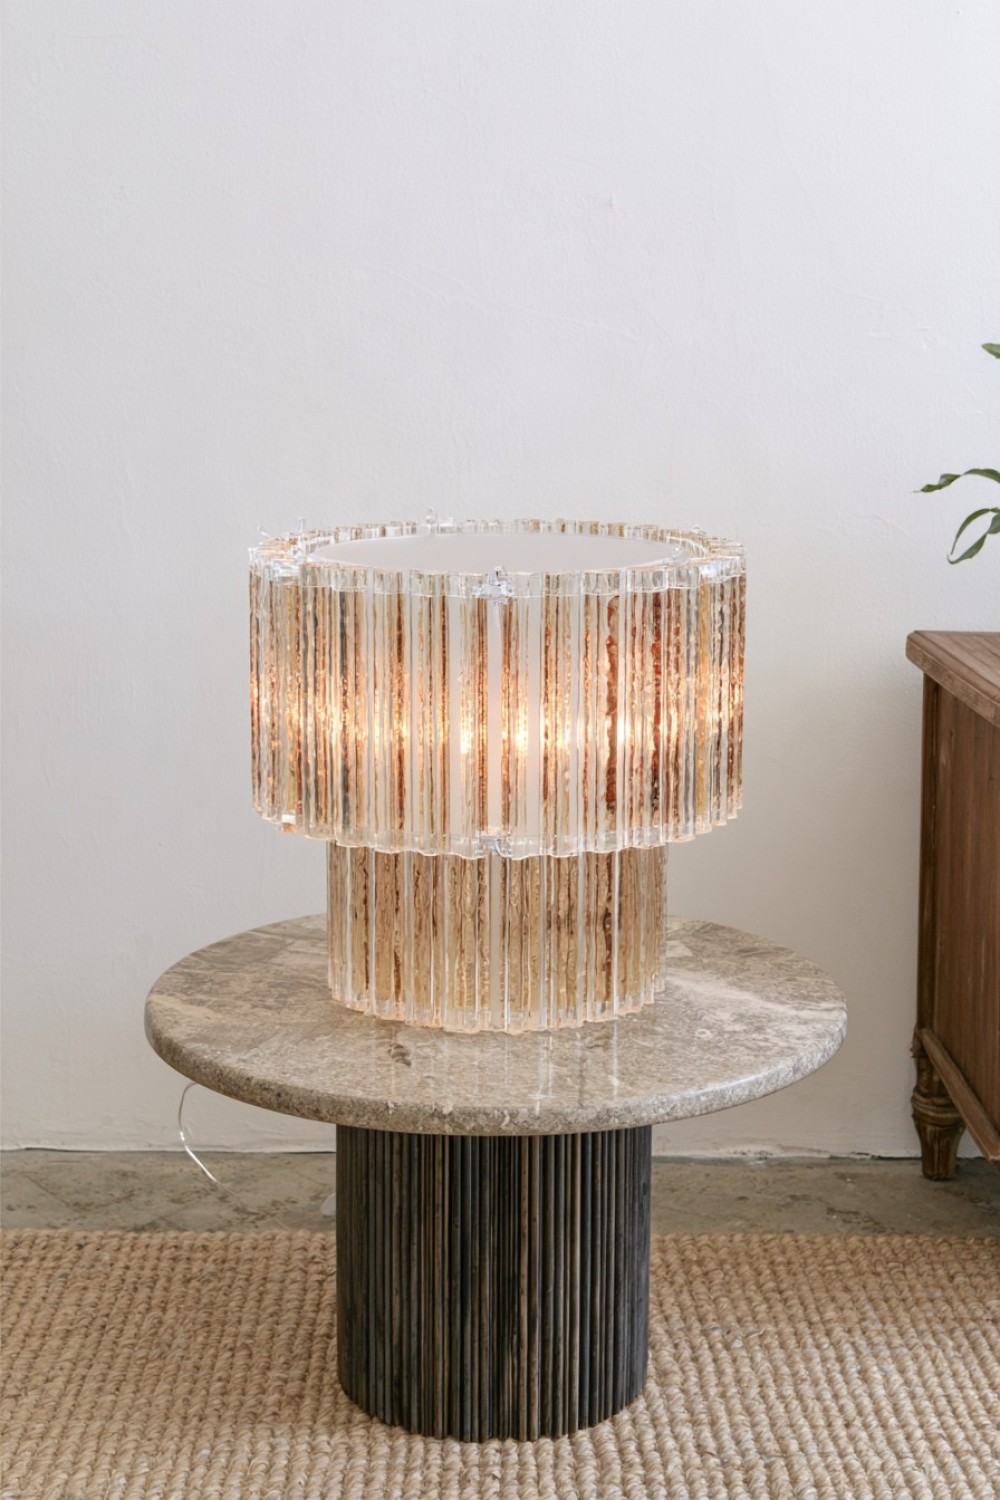
Fluted acrylic is normally associated with cabinet doors and privacy panels, but thin versions can create a remarkably refined lampshade.
You will need lightweight translucent fluted acrylic, a suitable cylindrical outer frame, fine-tooth cutting tools appropriate for acrylic, edge-finishing supplies, clear mechanical clips, and an internal diffusing shade.
Instead of using acrylic as the only barrier around the bulb, build it as an outer shell around a conventional diffuser. The vertical ridges distort the internal light and create soft bands around the cylinder.
For a more custom result, leave a narrow vertical opening at the back rather than creating a perfectly continuous tube. That small break gives the shade a crafted architectural detail.
Frosted clear acrylic feels minimal, while amber-tinted material can produce a much warmer evening glow.
This works particularly well on sideboards and console lamps where the texture is visible at eye level. Follow manufacturer guidance when cutting acrylic and keep the electrical lamp body completely independent from the decorative shell.
5. Make a Topographic Shade From Stacked Plywood Contours
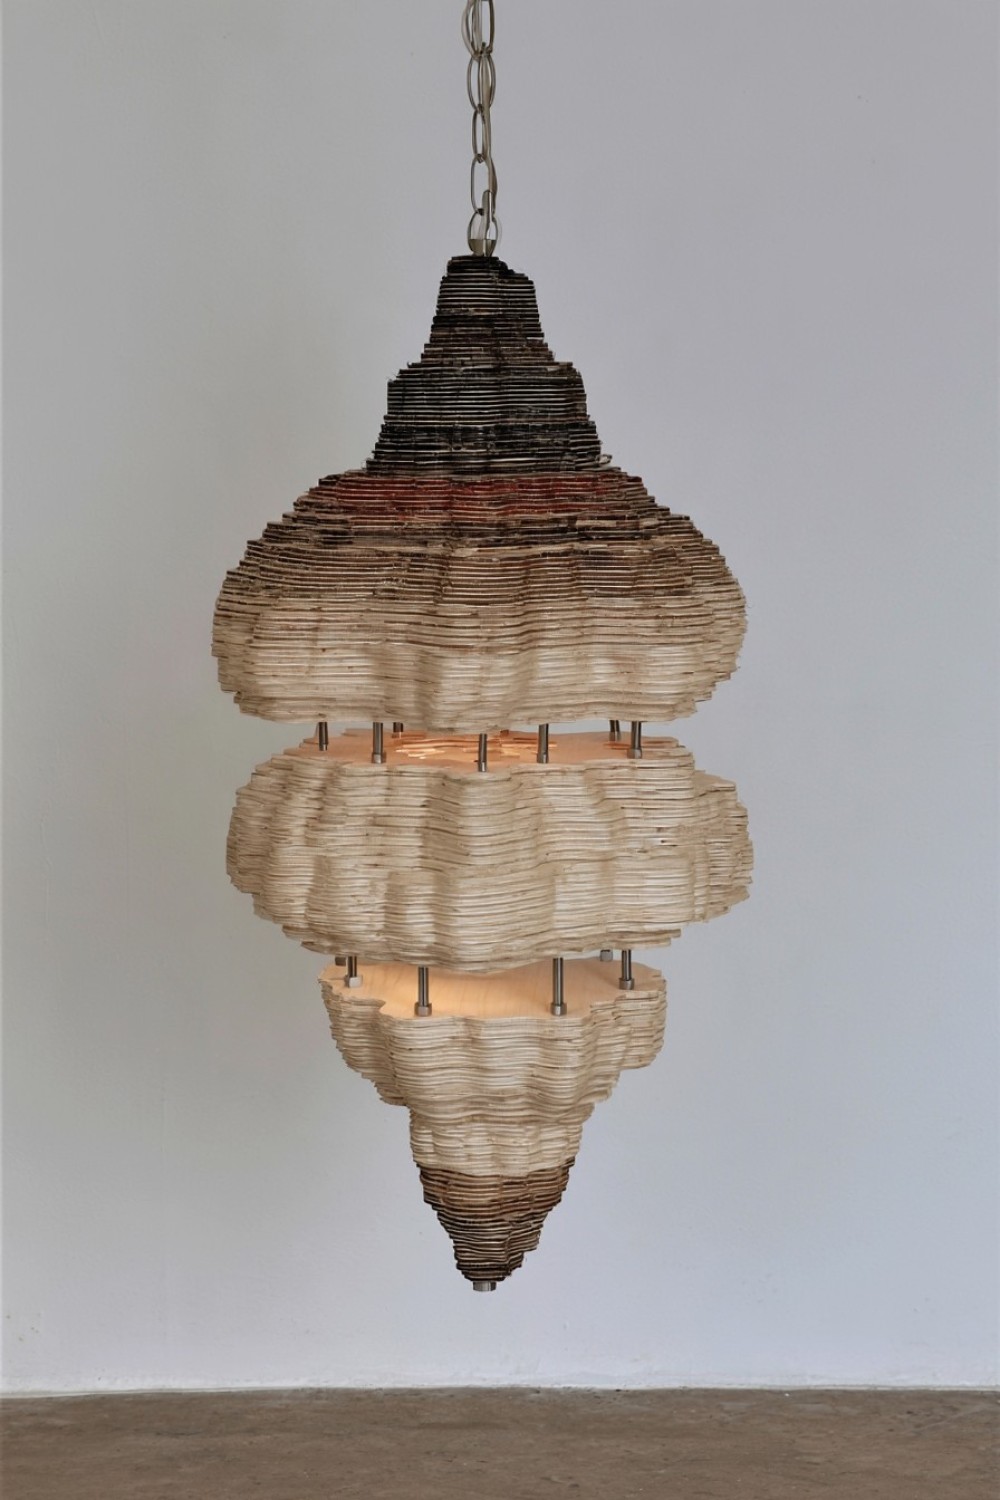
A lampshade can borrow the logic of a contour map.
Using thin plywood sheets, draw or digitally prepare a series of irregular concentric shapes. Each layer should be slightly different from the one beside it.
You will need thin birch plywood, a jigsaw or laser-cutting service, sandpaper, spacers, threaded rods or another secure mechanical support system, and a certified internal lamp assembly.
Cut the shapes, sand every edge, then stack them vertically with small spaces between the layers. From the side, the result resembles a miniature topographic landscape.
Light escapes through the gaps rather than through the wood itself, creating horizontal shadow lines across nearby walls.
This is particularly striking as a small pendant over a reading corner or as a statement table lamp in a contemporary interior.
Keep generous clearance around the bulb and use the plywood only as an external structure. If suspension hardware or wiring must be altered, that portion should be handled by someone qualified to work with lighting fixtures.
6. Use Marbled Bookbinding Paper Inside a Plain Shade
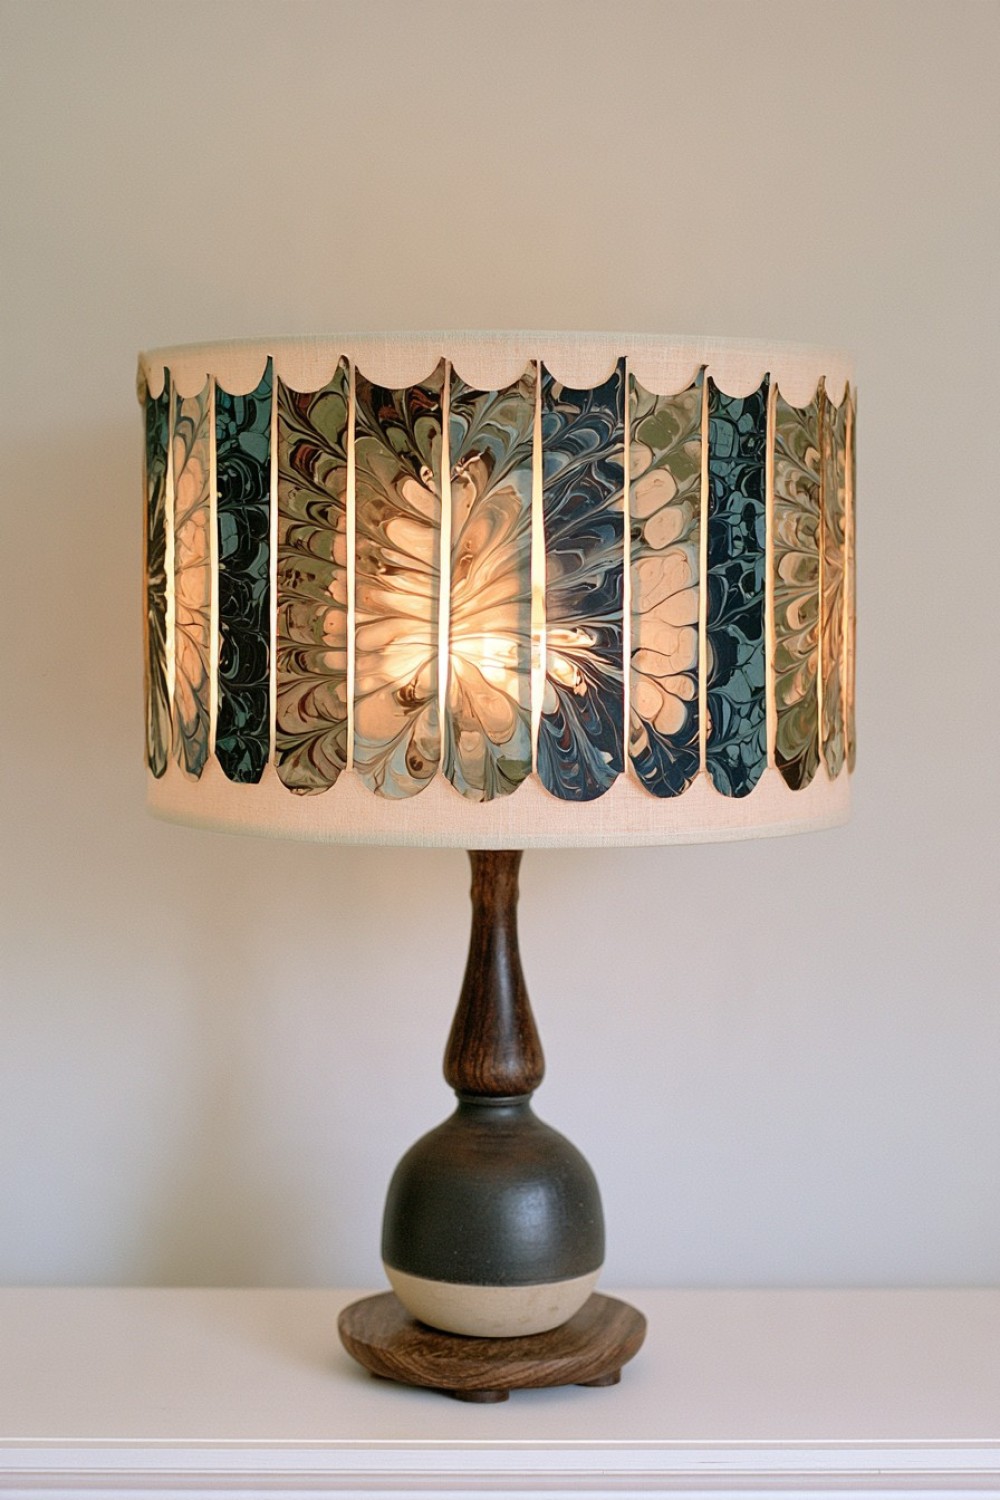
Most decorative lampshades place the pattern on the outside. Reversing that idea can produce a much more surprising result.
Take a plain translucent drum shade and add marbled bookbinding paper selectively to its inner decorative layer, provided the shade construction and material manufacturer allow it.
Choose thin, light-transmitting lampshade paper or another lighting-rated material rather than ordinary thick craft paper. Cut several curved panels instead of lining the entire interior.
When the lamp is off, the shade remains understated. Once illuminated, the marbling appears through the outer fabric like a hidden pattern.
Deep burgundy, indigo, tobacco, or moss marbling can create particularly rich results.
This works beautifully on bedside lamps because the decorative effect only becomes obvious in the evening.
Do not attach ordinary paper directly near the bulb or socket. Maintain the original diffuser and clearances, and treat the patterned material only as an approved decorative layer.
7. Perforate Cork Veneer Into a Constellation Pattern
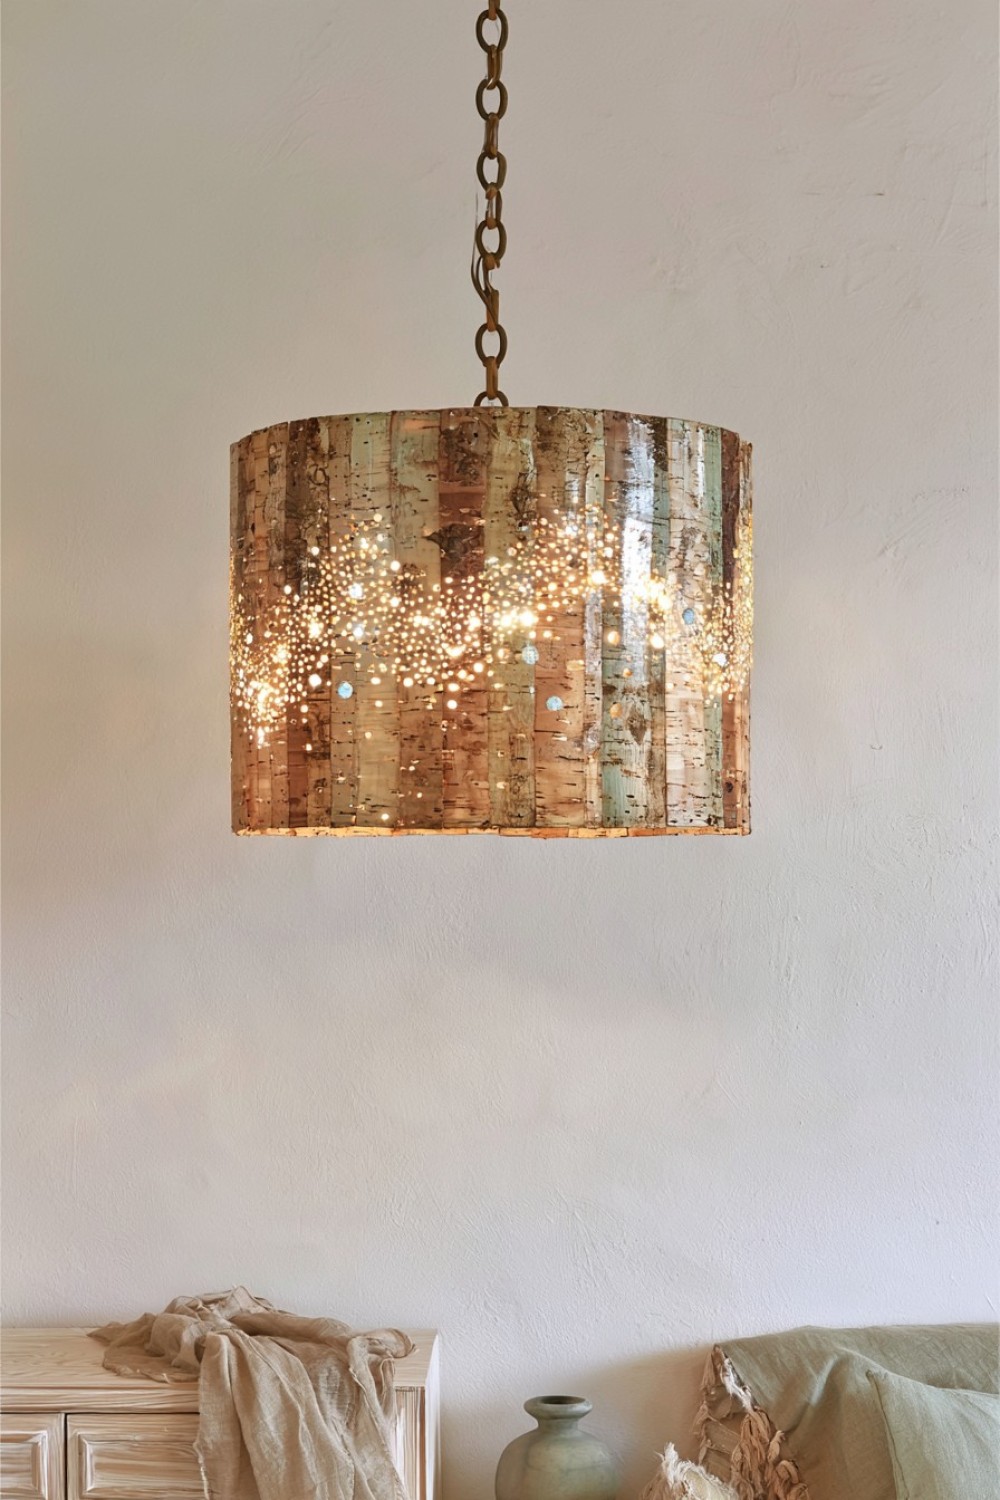
Cork veneer offers a way to create a warm natural shade without relying on the usual woven-rattan look.
Use thin cork veneer, a cylindrical outer form, paper template, hole punches in several sizes, ruler, cutting mat, adhesive suitable for the frame, and a properly lined inner shade.
Before attaching the cork, draw an irregular constellation-like pattern across the back. Punch tiny and medium openings through selected areas, keeping some sections almost untouched.
Once wrapped around the outer frame, the cork appears relatively solid during the day. At night, small points of light emerge through the perforations.
You could create an abstract pattern rather than copying an actual constellation, which keeps the design from feeling themed.
Cork pairs particularly well with plaster walls, pale oak, linen, and muted earth tones. Since cork is combustible, it should remain an external decorative skin with adequate clearance and a low-heat LED inside the certified shade structure.
8. Build a Shade From Reclaimed Venetian Blind Slats
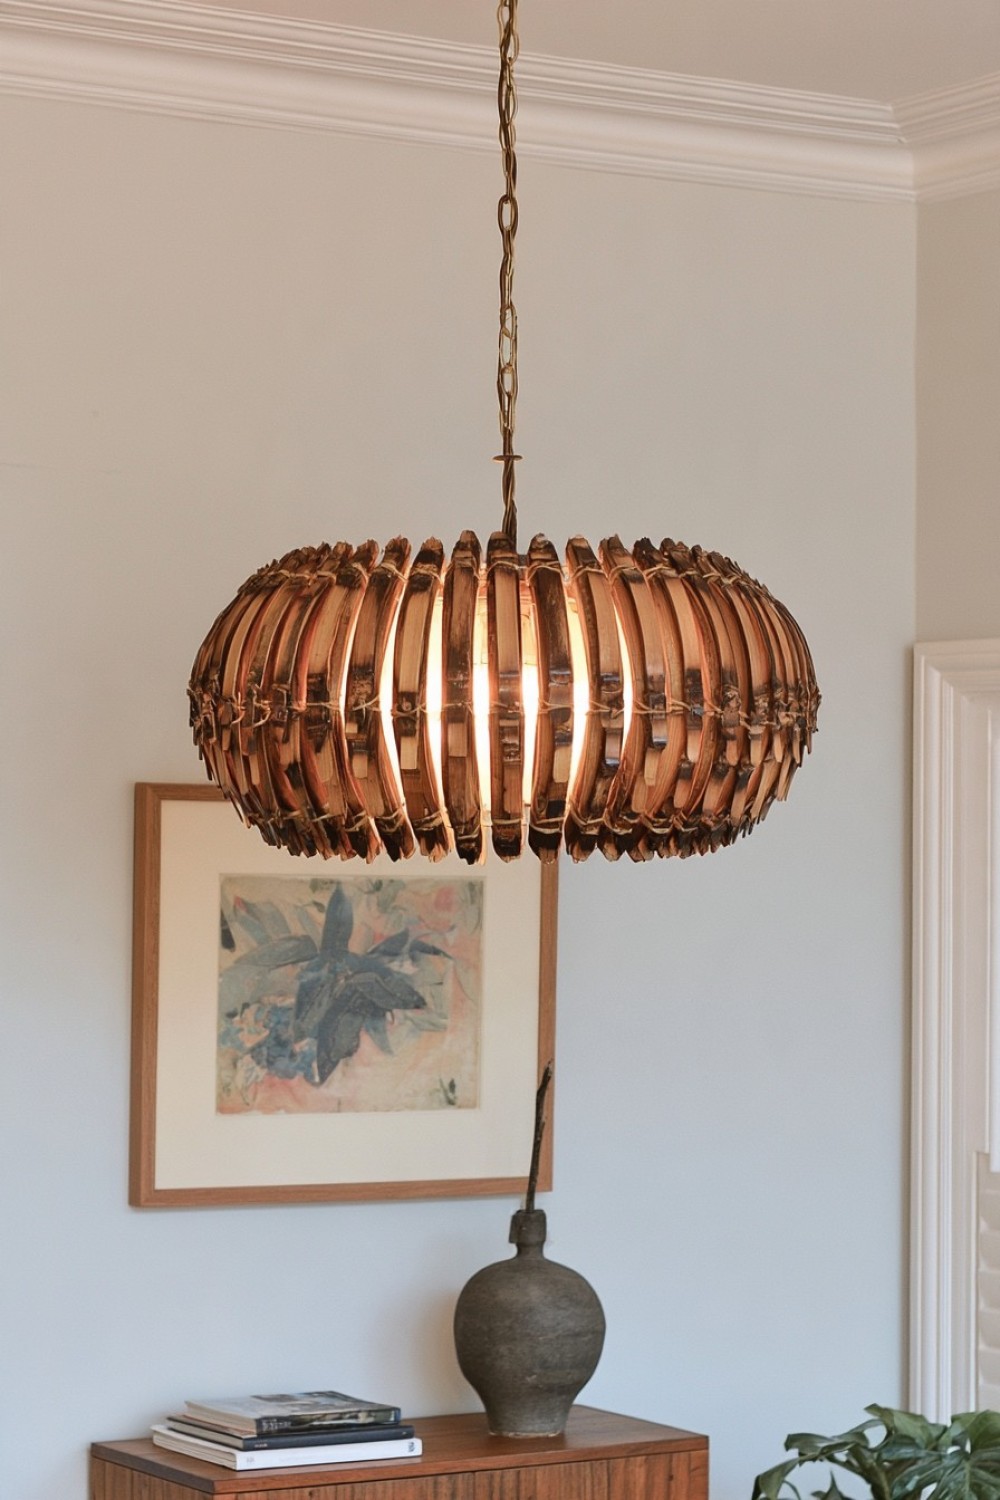
Old wooden or bamboo blinds can become a completely different object instead of being discarded.
Remove intact slats, clean them thoroughly, then cut them into equal lengths. You will also need two circular shade rings, a drill with a very small bit, cord or small mechanical fasteners, sandpaper, and an inner light diffuser.
Arrange the slats vertically around the rings but rotate each one slightly. Rather than forming a flat cylinder, the angled slats create a spiral-like surface.
The lamp changes character depending on where you stand: from one angle it appears almost closed, while from another the gaps become much more visible.
Keeping traces of the original finish can give reclaimed timber extra personality, although damaged coatings should be removed.
This is a good way to create a genuinely upcycled object rather than a project that merely looks handmade. Keep the slatted structure external to the certified lighting components.
9. Create a Miniature Shoji-Inspired Shade With Dark Wood Ribs
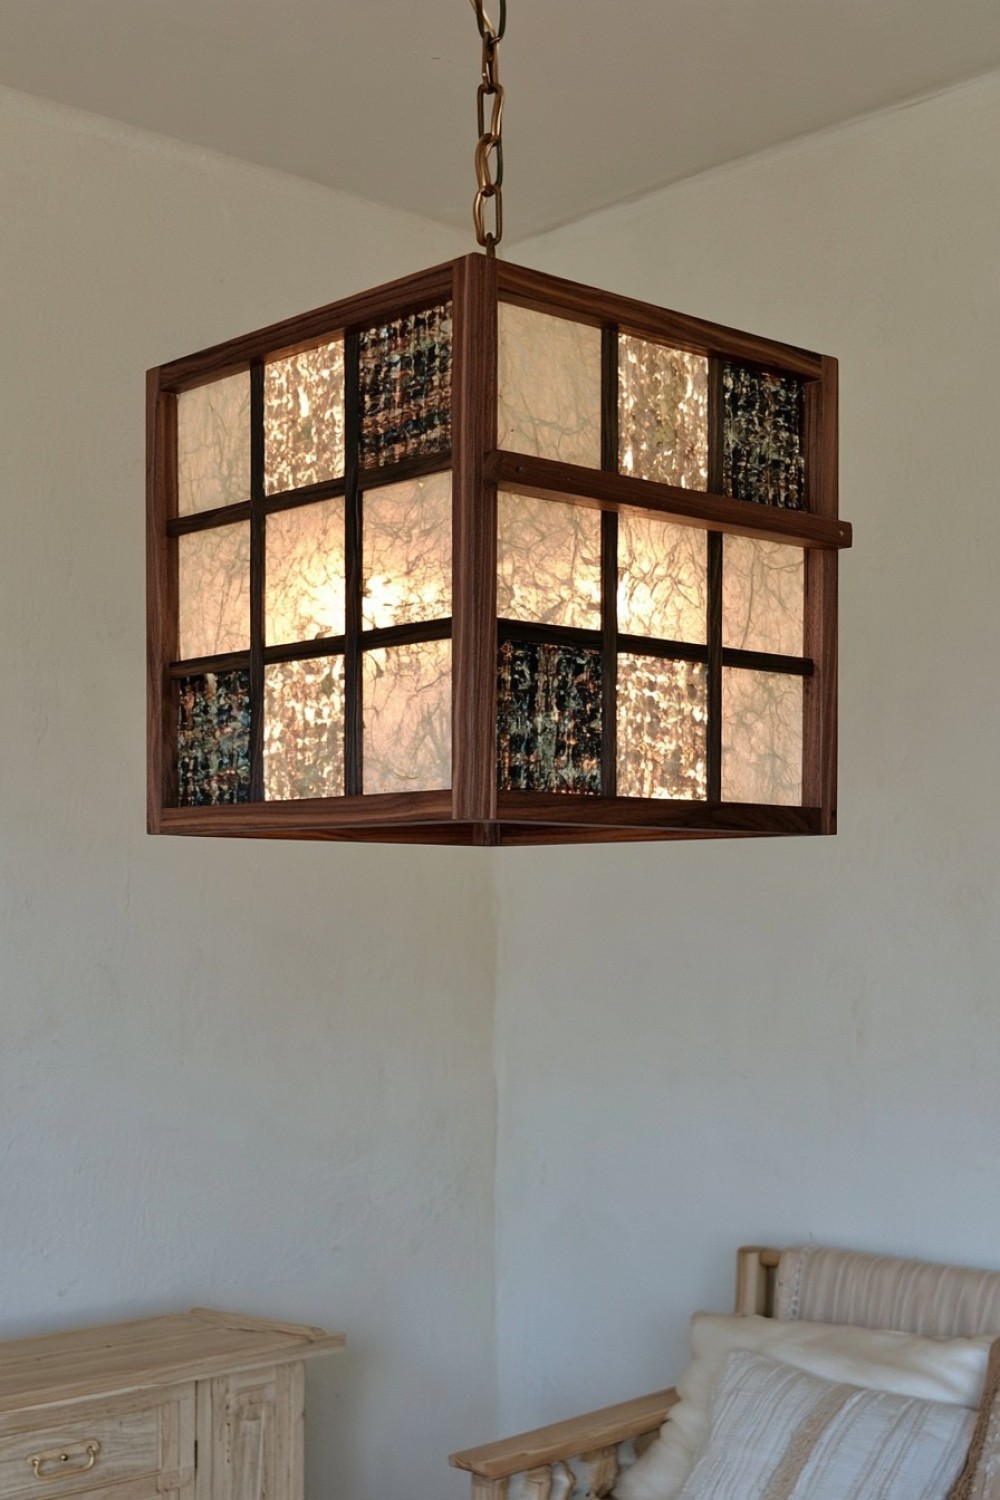
Instead of copying a traditional Japanese lantern directly, borrow the logic of shoji screens and reinterpret it on a smaller scale.
You will need narrow basswood or walnut strips, lampshade-grade translucent paper, wood glue, a small square or rectangular outer frame, craft knife, and an independent internal LED light source.
Build a simple grid from the thin wood strips, but avoid making every rectangle identical. Introducing one wider panel or an offset crossbar can make the design feel contemporary rather than historically imitative.
Attach translucent lighting paper behind the grid so the timber remains visible from the outside.
When illuminated, each small panel becomes a softly glowing plane while the ribs form dark graphic lines.
This shade works particularly well in calm bedrooms, reading areas, and Japandi-inspired spaces.
Paper should be rated or suitable for lampshade construction, and the decorative housing must retain proper clearance from the bulb and electrical hardware.
10. Stitch Leather Strips Into a Loose Lattice Around a Linen Core
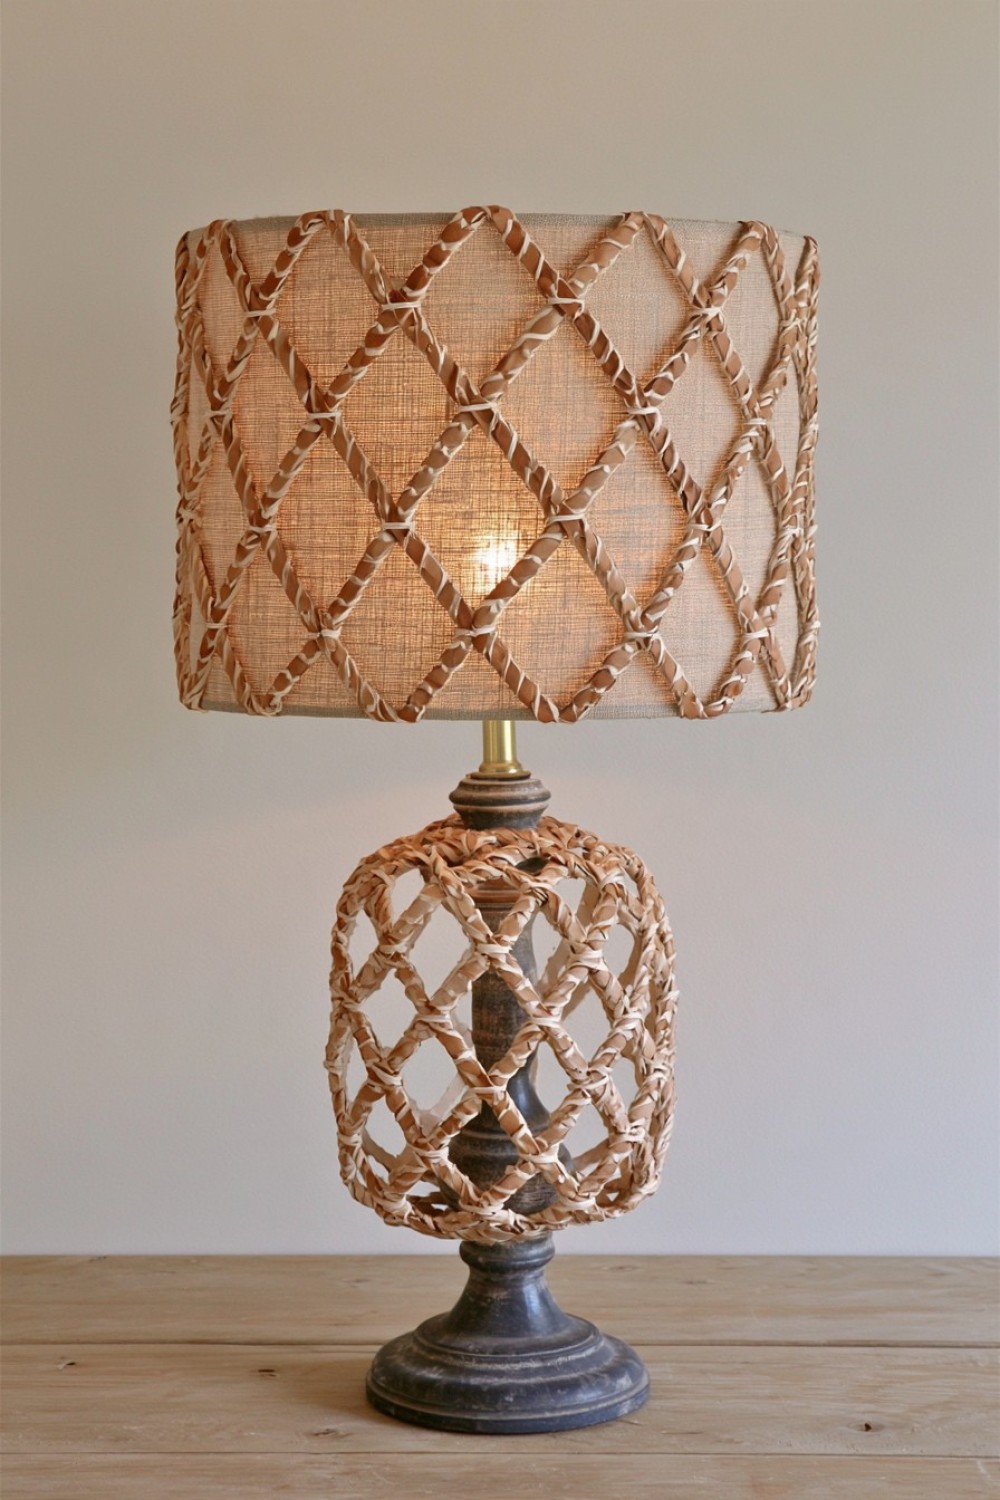
Leather does not need to form a solid shade. Used sparingly, it can become an outer structural detail.
Begin with a ready-made linen drum shade. Add thin vegetable-tanned leather strips, leather punch, waxed thread, ruler, cutting mat, and removable clips.
Cut the leather into narrow bands and punch small holes near each crossing point. Wrap the strips diagonally around the outside of the shade, stitching intersections together to create an open diamond lattice.
The linen underneath still handles light diffusion, while the leather adds shadow, texture, and craftsmanship.
Natural tan leather will slowly develop a deeper patina; dark brown or black can create a more tailored version for a study or library.
Do not cover the ventilation openings at the top and bottom of the original shade. The leather should remain an external decorative layer rather than part of the electrical or heat-management structure.
11. Create an Iridescent Mica Mosaic Shade
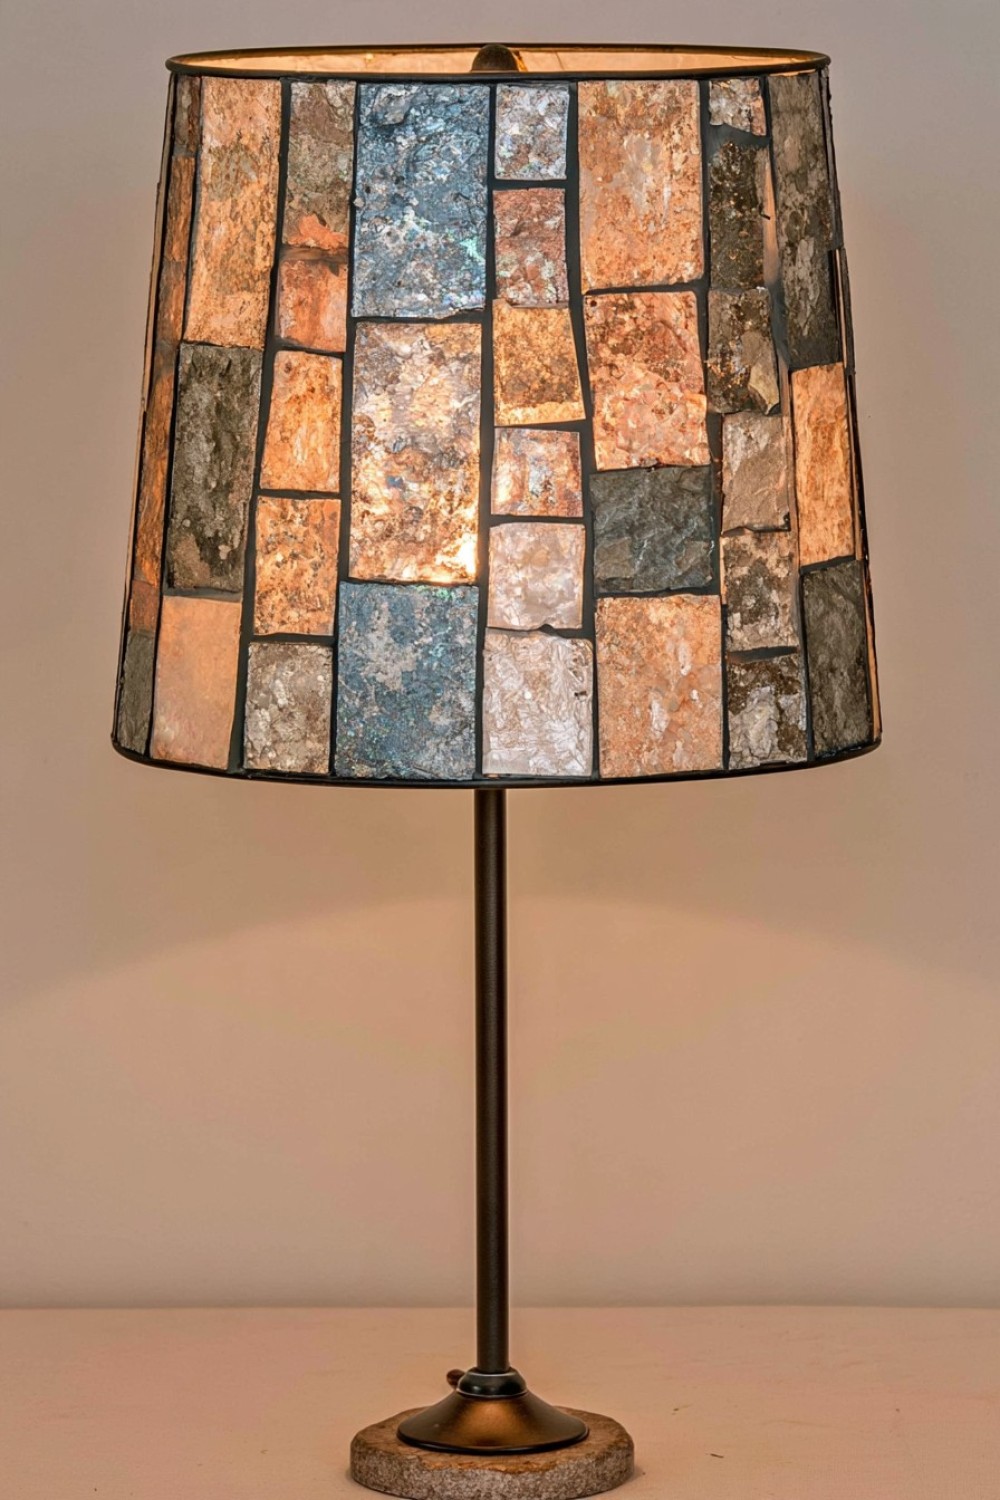
Natural mica sheets can create a glow somewhere between stained glass and stone.
Use lighting-suitable mica or mica laminate, a metal frame, cutting scissors appropriate for the material, translucent heat-resistant backing recommended for lampshade use, and mechanical clips or approved adhesive.
Instead of forming one continuous sheet, cut mica into irregular geometric panels and assemble them like a restrained mosaic. Leave narrow dark frame lines between pieces.
Amber, champagne, smoky gray, and pale copper mica can look especially interesting because the material changes character between daylight and artificial light.
When switched off, the surface resembles mineral fragments. When illuminated, internal layers become visible and the shade develops a subtle depth that ordinary colored plastic cannot imitate.
This can suit Art Deco, eclectic, or contemporary interiors depending on the geometry.
Because material specifications vary considerably, only use mica products explicitly appropriate for lamp or heat-adjacent applications.
12. Turn Thin Aluminum Into Folded Light Fins
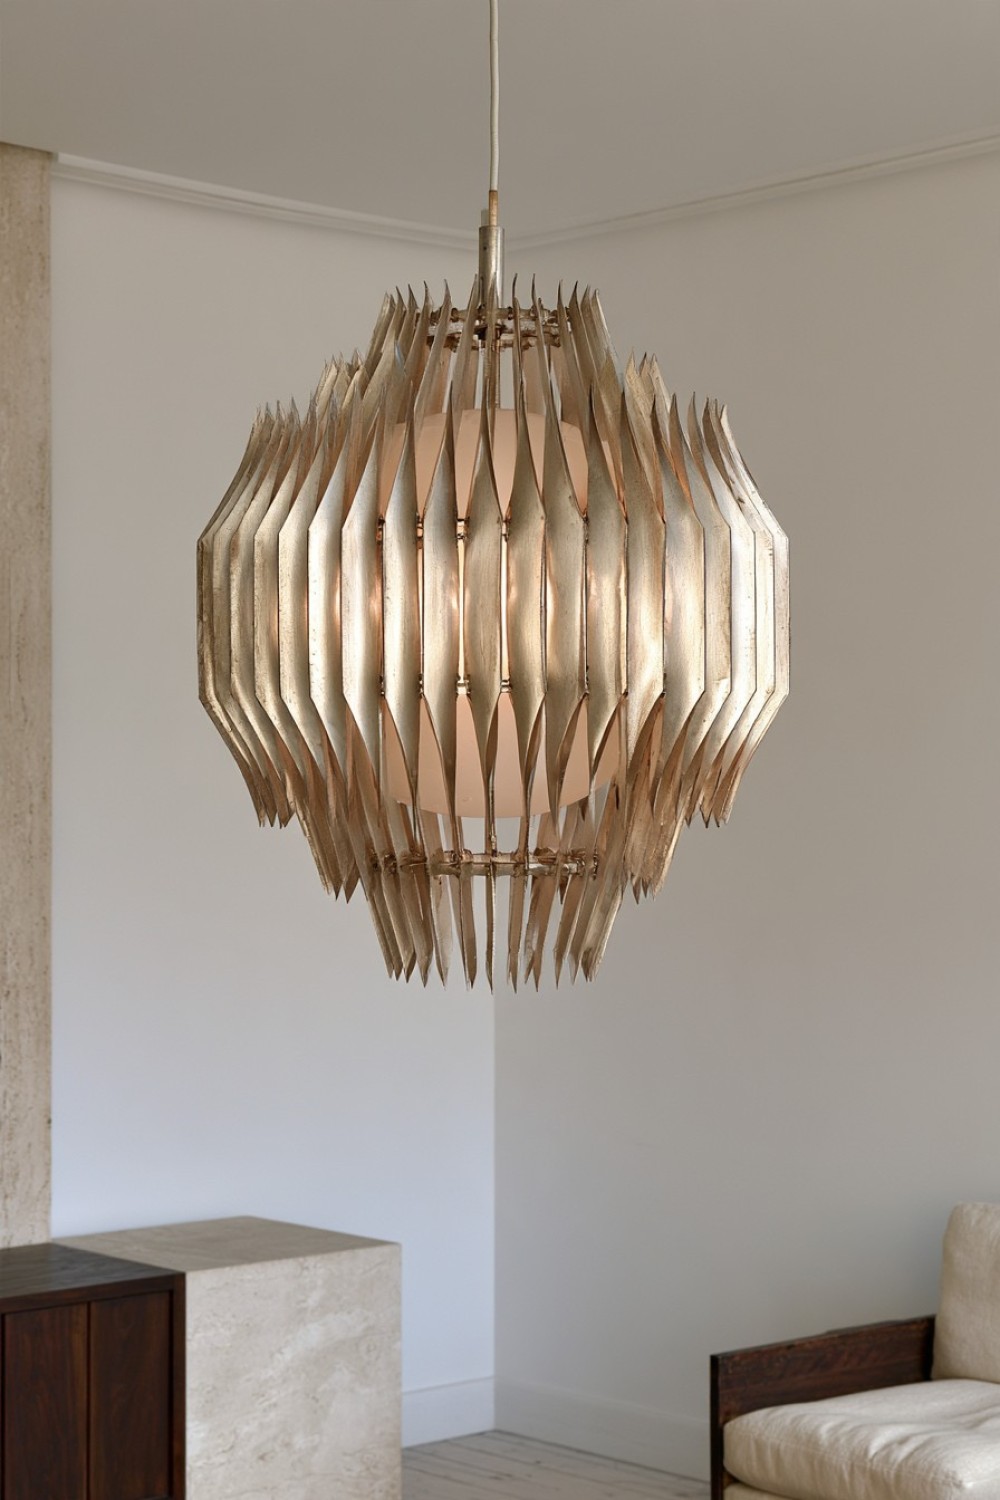
A sheet of aluminum can become surprisingly delicate when divided into narrow folded fins.
You will need thin craft-grade aluminum suitable for forming, metal snips, gloves, straightedge, bending tool, file, two supporting rings, and an internal diffuser.
Cut equal strips, carefully fold each strip along its center so it forms a shallow V, then arrange the fins vertically around the frame.
Rotate them gradually as you move around the circumference. The changing angles catch daylight differently and break the emitted light into narrow alternating bands after dark.
A brushed finish keeps the piece refined, while a matte-painted exterior can make it visually quieter.
This approach is ideal for a home office or minimalist living room where a woven or fabric shade might feel too soft.
Every edge must be thoroughly deburred. The aluminum shell should remain electrically isolated from the lamp hardware unless the fixture has been professionally designed to incorporate metal components.
13. Make a Shade From Suspended Ceramic Tiles
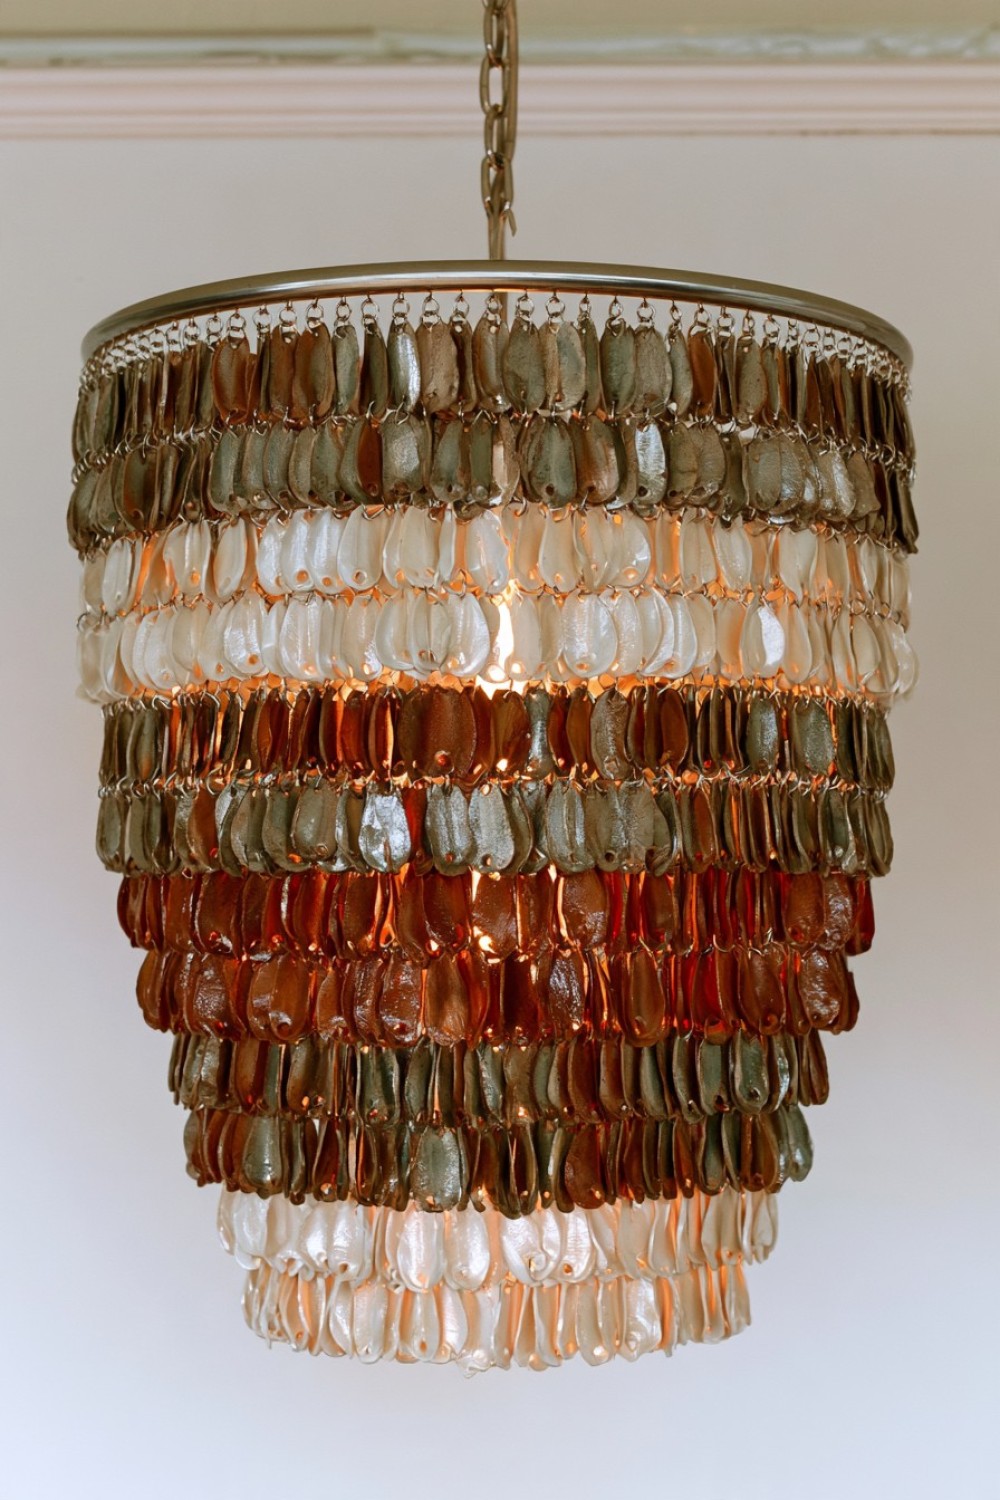
Instead of building one continuous shell, hang a series of small ceramic pieces around an open metal frame.
The safest and most practical method is to use commercially made lightweight ceramic charms or thin professionally fired pieces rather than heavy handmade tiles.
You will need a sturdy outer shade ring, small ceramic pieces with preformed holes, stainless jewelry wire or heat-resistant mechanical links, pliers, and a separate internal diffuser.
Hang the ceramic pieces in overlapping rows with a few millimeters of movement between them. When the lamp is switched on, light slips through the gaps while the ceramic remains mostly opaque.
Unglazed terracotta creates an earthy appearance, while white porcelain pieces produce a cleaner graphic effect.
The slight movement of individual pieces can give the lamp an unexpected tactile quality.
Weight is critical: the shade support must be rated for the completed load, and the decorative ceramic must never hang from electrical wiring.
14. Make a Woven Shade From Paper Cord in an Oversized Grid
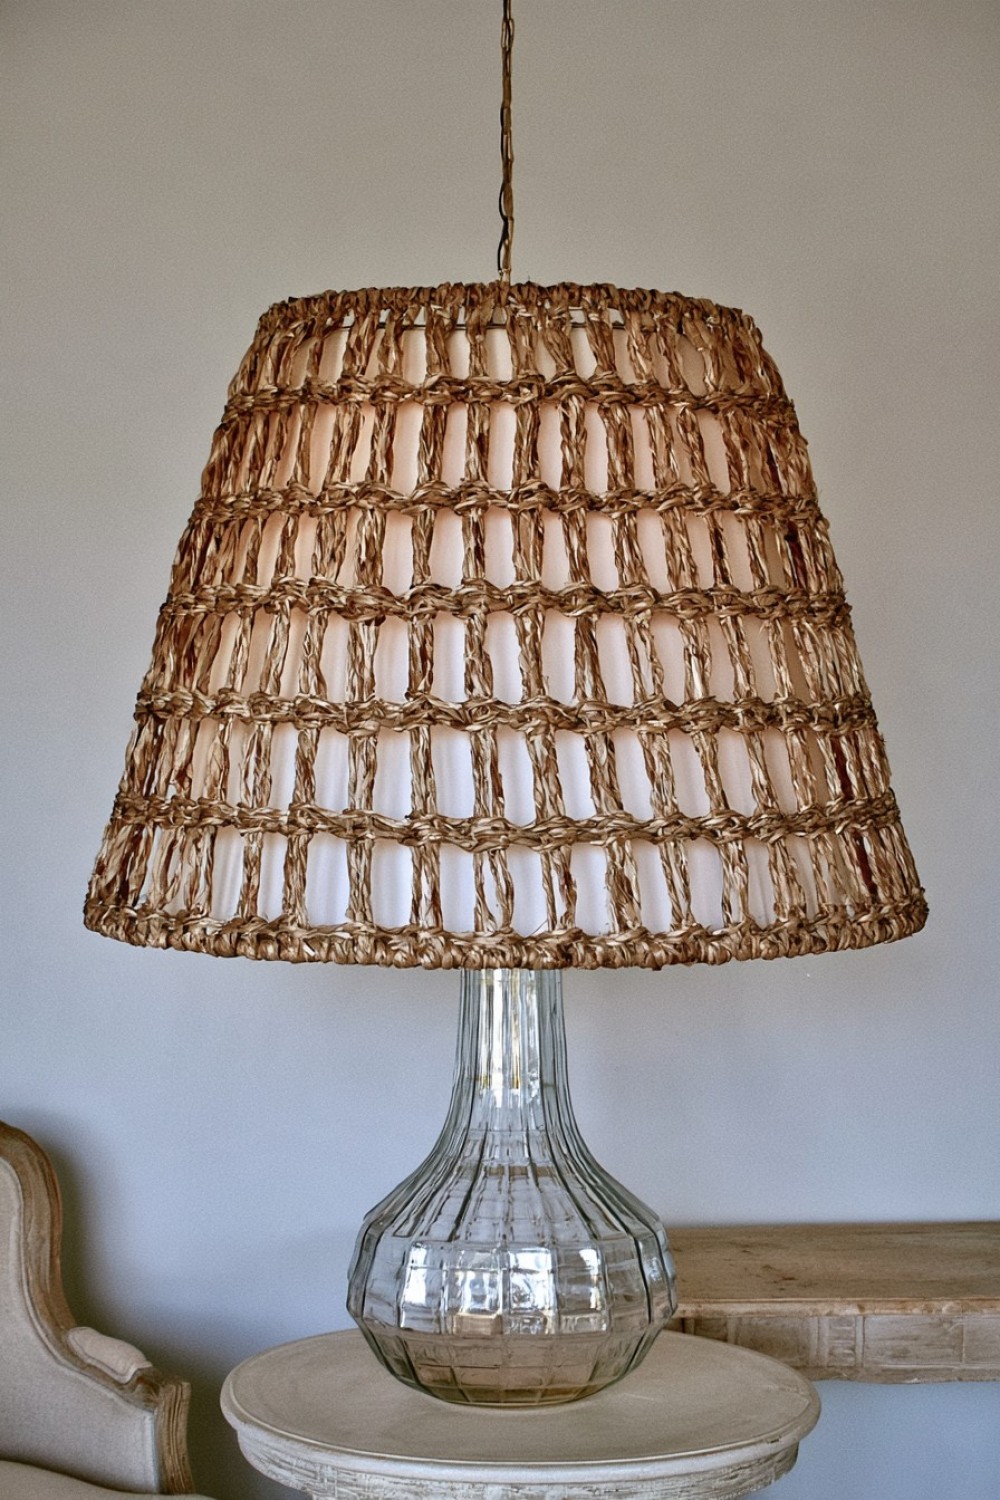
Instead of tightly weaving paper cord like a basket, exaggerate the openings.
Use strong paper cord designed for craft or furniture weaving, a rigid lampshade frame, clips, scissors, and a separate translucent inner diffuser.
Wrap several vertical structural cords around the frame first. Then weave horizontal strands with generous spaces between them, intentionally creating large rectangular openings.
The inner diffuser keeps the bulb from appearing exposed, while the oversized weave casts broad geometric shadows.
A natural kraft color works well, but black paper cord over an ivory diffuser can make the pattern much more graphic.
The unexpected scale is what differentiates this from ordinary woven shades: the goal is not to imitate rattan but to create a visibly oversized textile structure.
Paper cord is combustible, so preserve significant separation from the light source and use it solely as an outer decorative layer around an LED-based fixture.
15. Create a Removable Shade From Interchangeable Magnetic Panels
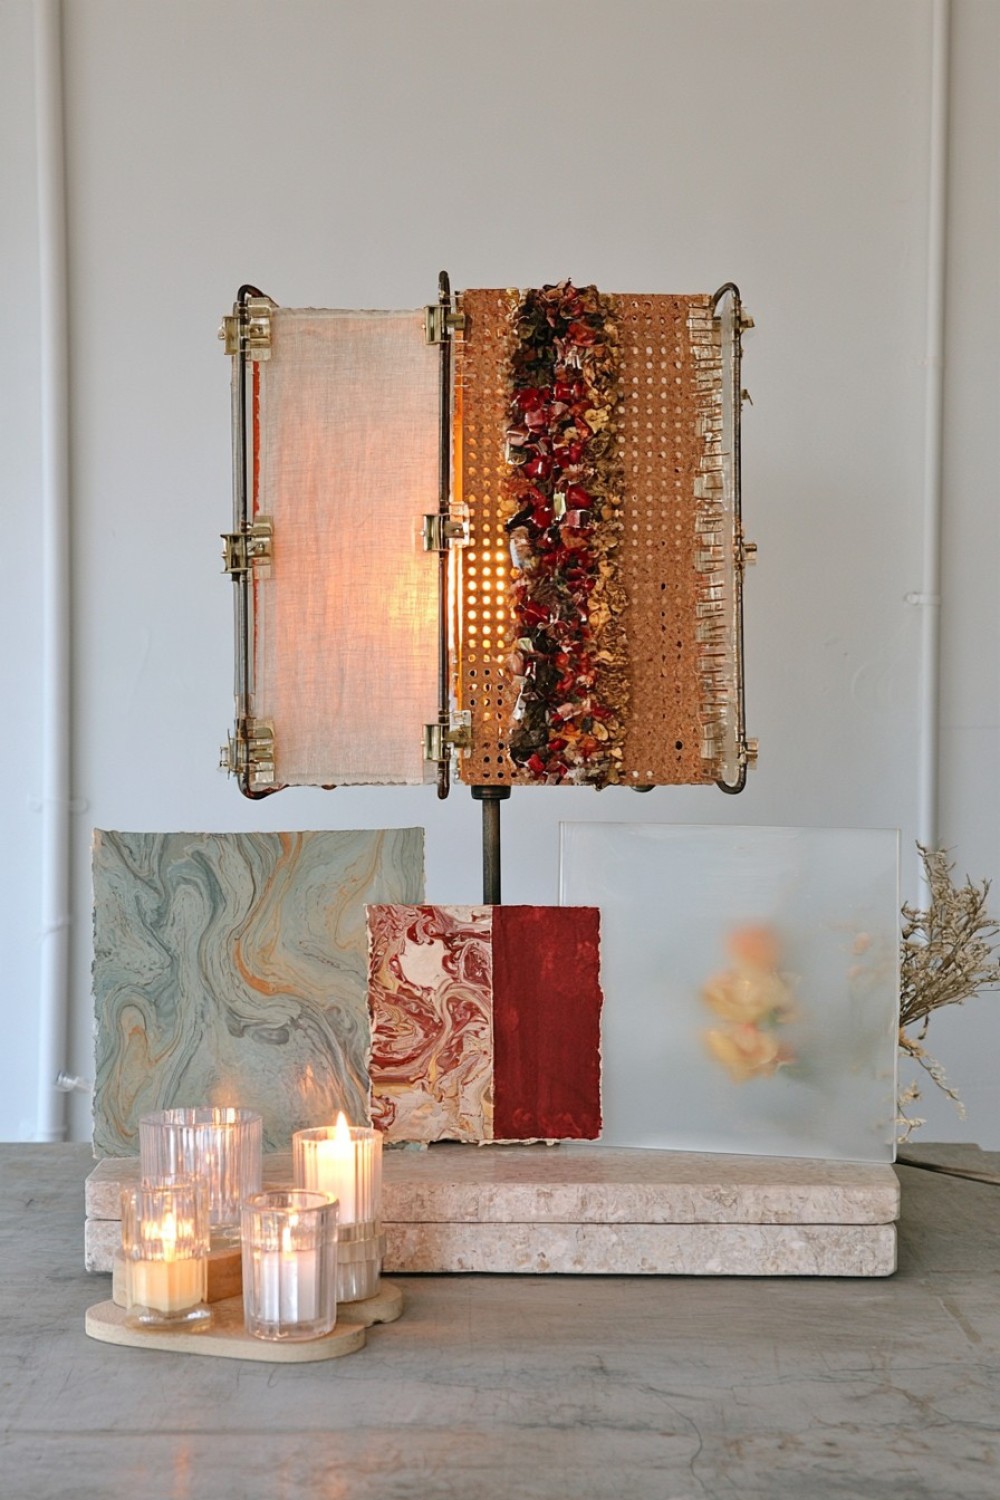
A lampshade does not have to remain visually fixed after it is built.
Start with a metal outer cage designed so lightweight decorative panels can attach to it without approaching the electrical components. Use thin perforated metal tabs or another safe mechanical mounting method rather than placing loose magnets near wiring or electronics.
Prepare several interchangeable panel sets: translucent linen for everyday use, perforated cork for autumn, marbled lampshade paper for a more decorative look, or frosted acrylic for a cleaner modern version.
The proportions stay identical, but the entire personality of the lamp can change in minutes.
This concept is especially useful for people who enjoy changing decor seasonally but do not want to store multiple lamps.
All interchangeable materials should be suitable for their position on the fixture, lightweight, securely attached, and kept outside the certified inner diffuser and electrical assembly.
16. Combine Three Materials Into a Day-to-Night Shadow Shade
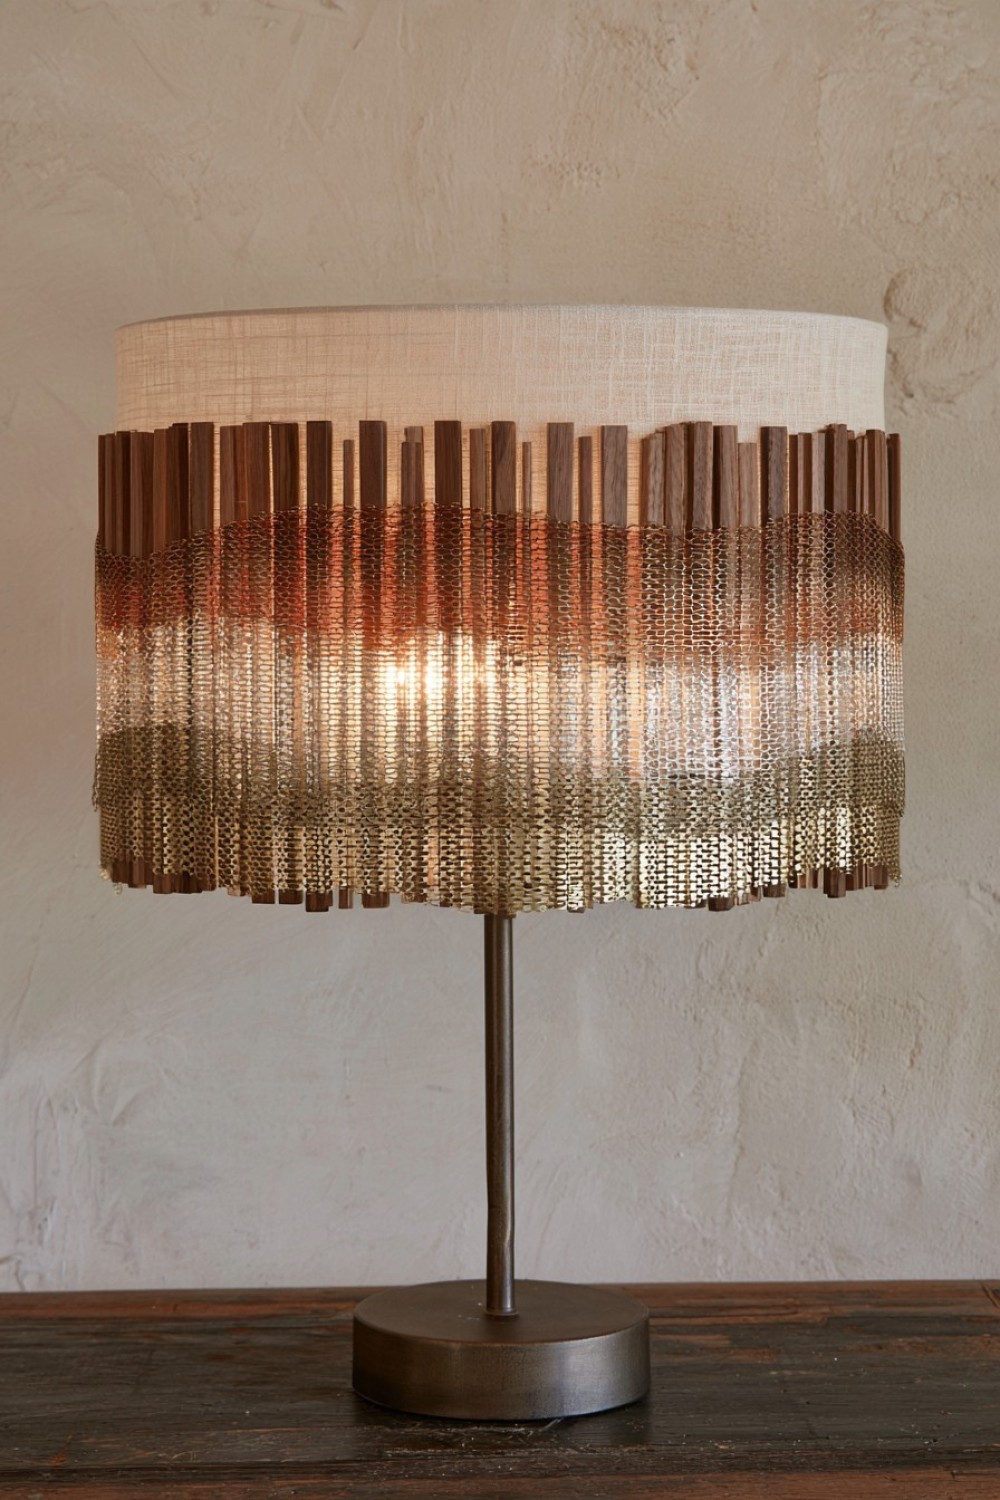
For the most distinctive project, treat the lampshade as several layers rather than one surface.
Begin with a translucent linen inner drum. Outside it, add a sparse framework of narrow walnut strips. Over only part of that framework, introduce a section of fine brass mesh.
The materials overlap asymmetrically instead of wrapping uniformly around the entire shade.
During daylight, the eye reads linen, wood, and metal as separate tactile surfaces. At night, the linen glows, the walnut creates dark vertical interruptions, and the brass mesh adds a finer secondary pattern.
You will need a ready-made lined drum shade, thin finished veneer strips, fine metal mesh, external support rings, clips or mechanical fasteners, and basic cutting tools appropriate for each material.
This works best when the rest of the lamp base is simple.
Rather than making the shade visually complicated with color, let transparency, shadow, and material contrast provide the decoration.
What Makes an Experimental Lampshade Actually Work
The most interesting DIY lampshades are not necessarily the ones made from the strangest objects. They are the ones where the material changes what the light does.
A perforated cork surface creates pinpoints. Layered mesh introduces optical movement. Translucent paper turns botanical prints into silhouettes. Angled timber slats make the fixture look different from every side. That relationship between material and illumination is what can make a handmade shade feel like genuine design rather than a decorated craft project.
It is equally important to separate experimentation from electrical work. Whenever possible, start with a certified lamp, diffuser, or lampshade frame and modify only the removable decorative exterior. Keep ventilation openings clear, maintain manufacturer-recommended bulb clearance, and favor low-heat LED bulbs. If a project requires changes to sockets, wiring, earthing, or suspension hardware, that portion should be handled by a qualified professional.
The goal is simple: make the material unexpected, not the safety.
MORE IDEAS


Share
What's Your Reaction?
 Like
0
Like
0
 Dislike
0
Dislike
0
 Love
0
Love
0
 Funny
0
Funny
0
 Angry
0
Angry
0
 Sad
0
Sad
0
 Wow
0
Wow
0