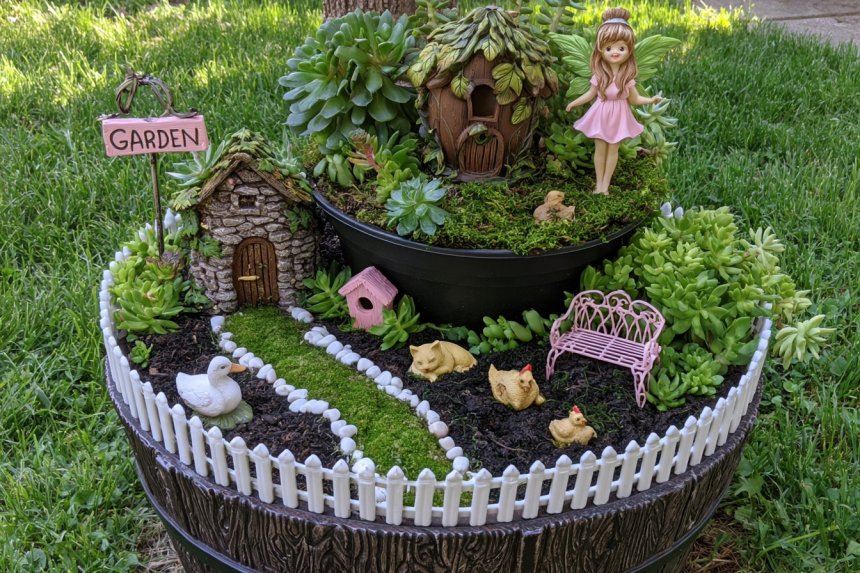
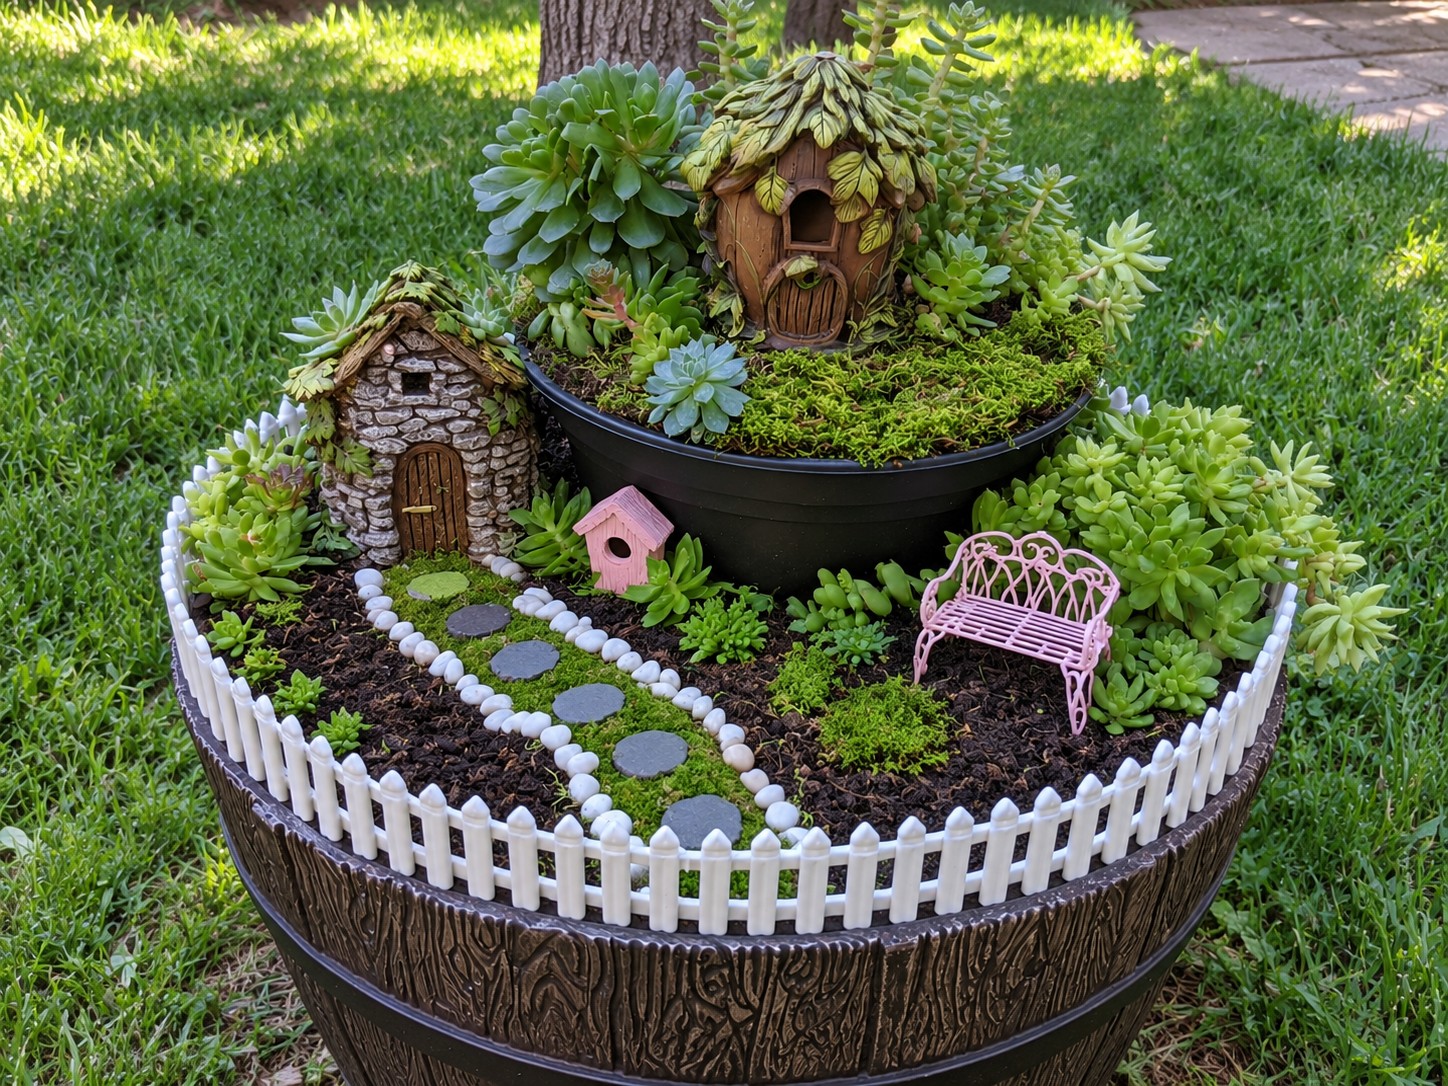
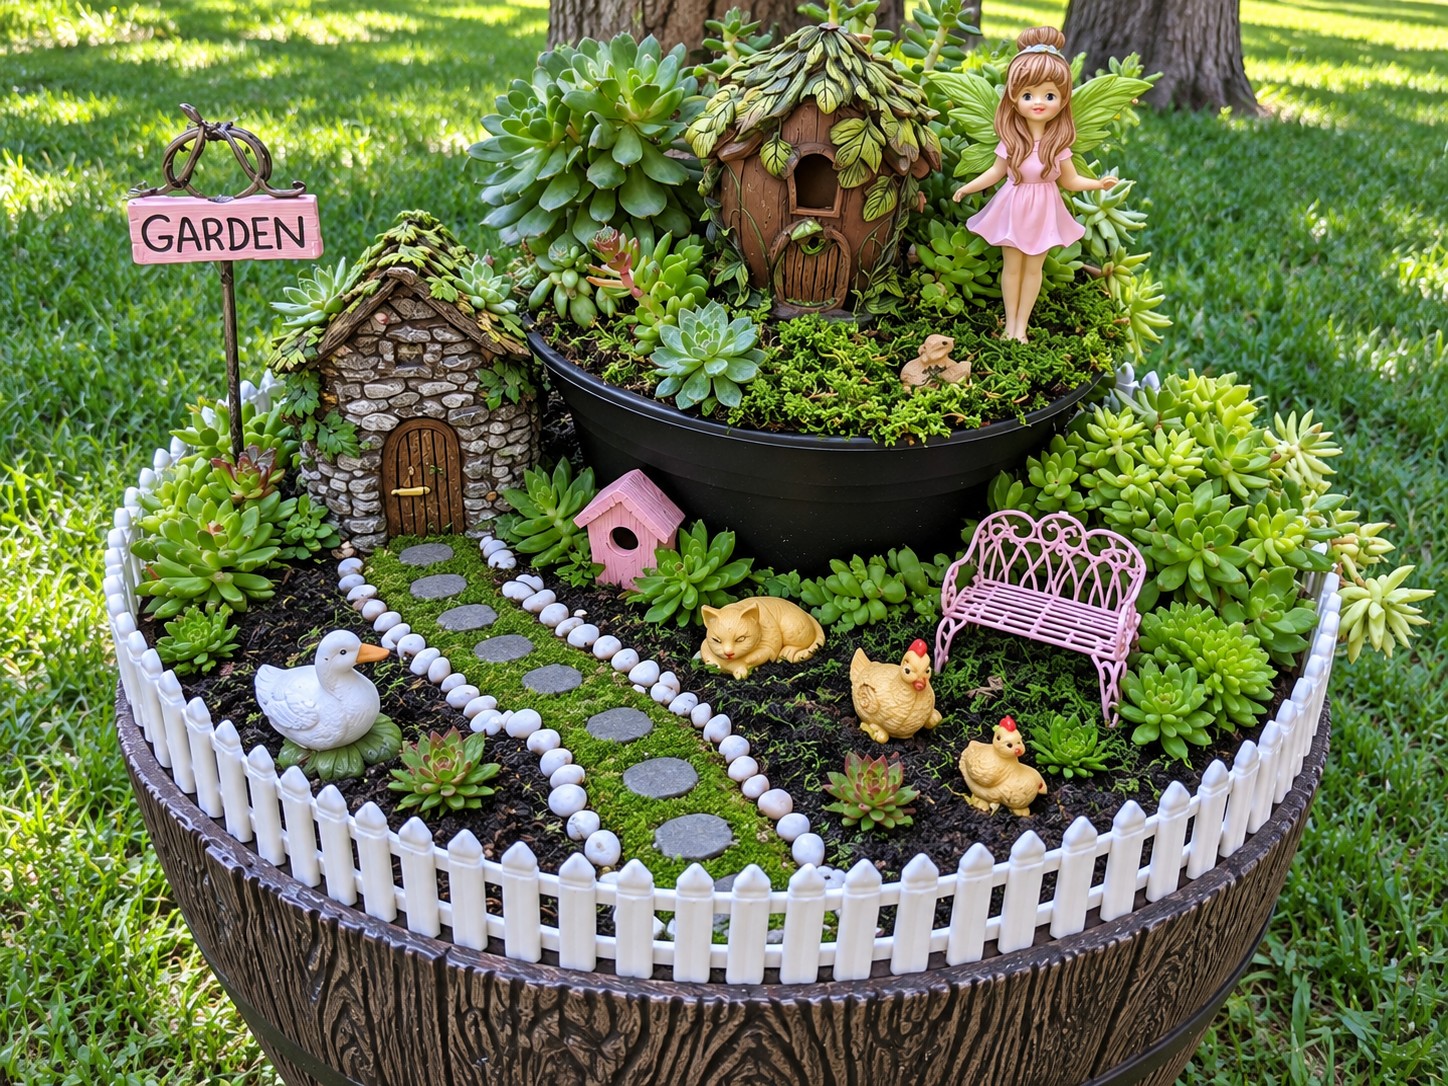
A raised pot fairy garden creates two miniature landscapes inside a single container. The lower level provides room for a path, cottage, bench, tiny animals, and surrounding plants, while a smaller black planter positioned toward the back creates a second elevated garden with a leafy fairy house and focal figurine.
The design works because the height difference makes the scene easier to read. Instead of placing every miniature object on one flat surface, the upper planter becomes a destination above the lower garden. Succulents provide most of the planting structure, moss softens exposed soil, and a white stone path visually connects the entrance area with the houses.
This project is best suited to a bright location where the chosen succulents can receive appropriate light. Plant selection should be adjusted to the actual exposure and climate rather than chosen only for appearance.
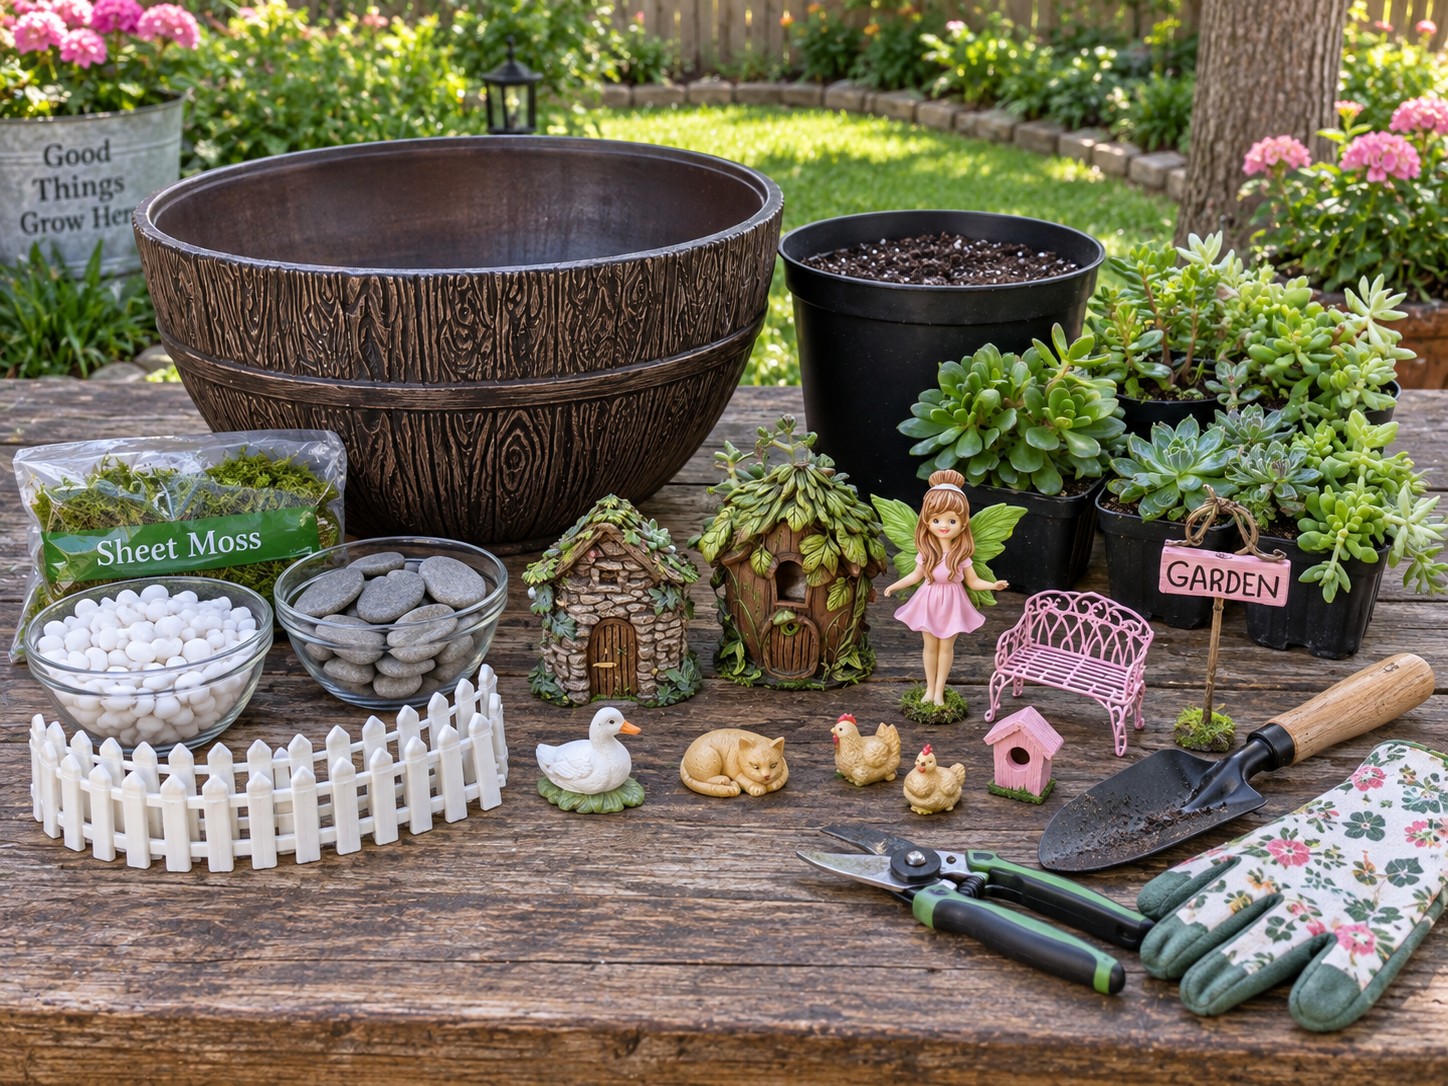
Step 1: Gather the Materials
Begin with a wide decorative planter that provides enough surface area for both planting and miniature landscaping. A deep brown container with a bark or wood grain texture works particularly well because it creates a natural backdrop without competing with the smaller details.
You will need:
One large, wide planter with drainage
One smaller black nursery pot or low round planter
Well draining potting mix appropriate for succulents
Several compact succulents with different growth habits
Decorative moss
Small white pebbles
Several flat gray stepping stones
One miniature stone cottage
One miniature woodland style cottage with a leafy roof
One small fairy figurine
One pink miniature bench
One small pink birdhouse
One white miniature picket fence
One duck figurine
One resting cat figurine
Several small chicken figurines
One small decorative garden sign if desired
Gardening gloves
Hand trowel
Small pruning scissors
Soft brush for cleaning soil from decorative pieces
Choose succulents with relatively compact growth rather than varieties likely to spread rapidly across the path or cover the miniature buildings. Rosette forming plants create strong focal shapes, while smaller trailing or clustered succulents are useful for filling the edges.
Before assembly, check that both containers drain properly. Decorative fairy gardens often fail when miniature landscaping blocks the drainage opening or when moss keeps the soil continuously wet.
The miniature pieces should also be weather suitable if the arrangement will remain outside. Painted resin, plastic fencing, and small metal accessories can fade or deteriorate differently under strong sunlight and moisture.
Step 2: Build the Two Level Garden
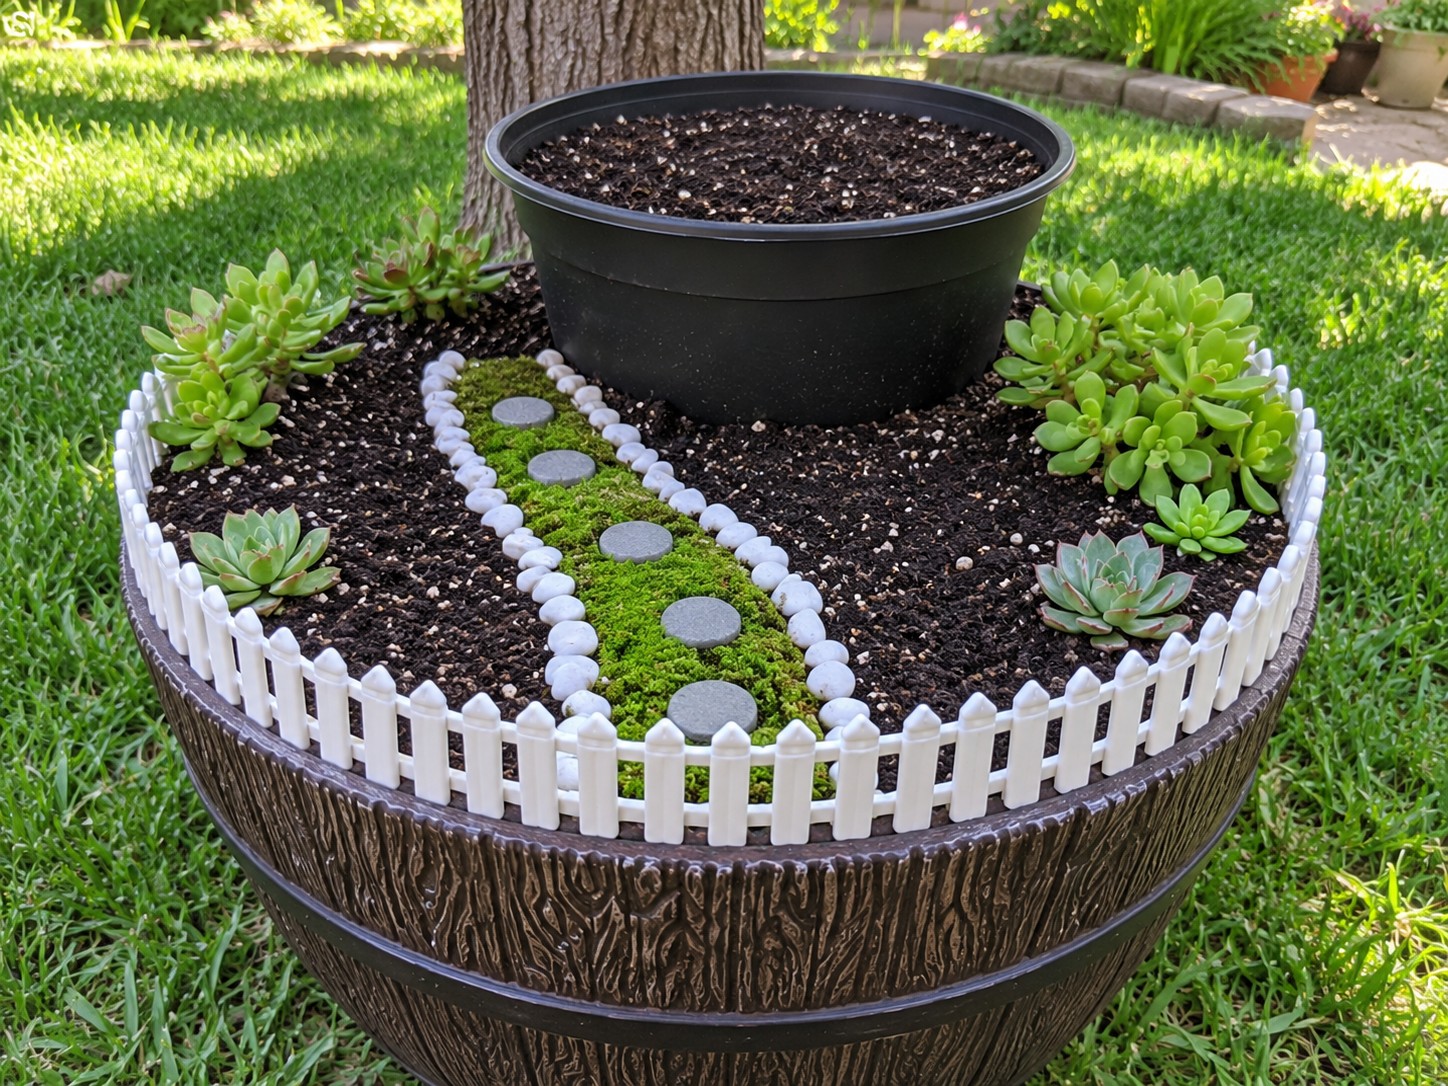
Fill the main planter with suitable potting mix, leaving enough space below the rim to prevent soil from washing out during watering.
Position the smaller black planter toward the rear center rather than directly in the middle. This creates a broad foreground where the path, animals, cottage, and bench can remain visible.
The smaller planter should sit securely and should not wobble when gently touched. If it is partially recessed into the growing medium, keep its drainage opening clear.
Fill the upper pot with the same growing medium if the plants have compatible requirements.
Next, establish the basic composition before installing the decorative pieces permanently.
Create the lower path first. Run a narrow strip from the front center toward the stone cottage. Edge it with small white pebbles and place several flat gray stones through the middle.
The path should remain slightly irregular rather than perfectly straight. A gentle curve makes the miniature landscape feel more natural and gives the eye a clear route through the scene.
Place the white picket fence around the front perimeter of the large planter. Keep an opening aligned with the pathway so the fence looks like part of a miniature garden rather than simply a decorative border.
At this stage, avoid adding the animal figures and small accessories. Establishing the structure first prevents the scene from becoming crowded before the major elements are positioned.
Step 3: Plant the Succulents and Add the Houses
Plant the largest succulents first.
Around the outer planter, position fuller specimens near the sides and rear where their foliage can frame the miniature landscape. Keep the central path and foreground relatively open.
Place smaller rosette succulents near the cottage and path edges. This helps maintain scale because oversized plants positioned directly beside a tiny doorway can make the house appear unnaturally small.
The stone cottage works well on the left side of the lower garden. Surround it with small succulents while keeping its doorway completely visible.
On the upper level, position the leafy woodland cottage toward the rear center. Use several larger succulents behind and beside it to create height, while smaller plants can occupy the front edge of the black planter.
The fairy figurine should stand beside the upper cottage rather than directly in front of it. This keeps both features readable as individual focal points.
Apply moss selectively after planting. Use it:
Around the cottage foundations
Between groups of succulents
Along selected sections of the upper planter
Around parts of the pathway
Avoid covering all exposed soil with a thick continuous layer. Succulents generally benefit from good air movement around their crowns, and dense wet moss can retain moisture longer than the plants need.
The visual balance comes from contrast. Deep green succulents and moss stand out against the black upper planter, while the dark lower soil makes the white fence and pebble path clearly visible.
Step 4: Complete the Miniature Scene
Now add the smaller features that give the garden its character.
Position the pink bench on the right side of the lower garden. Surrounding it with low succulents rather than tall foliage prevents the bench from disappearing as the plants grow.
Place the small pink birdhouse nearer the center, close to the path but outside the main walking line. Repeating pink in both the bench and birdhouse creates a subtle color connection with the fairy figurine above.
The animal figures should be separated rather than clustered together.
Place the duck near the left foreground, where the white figure visually relates to the white fence and path stones.
The resting cat fits well near the central or right side of the path, where it can remain visible without blocking the route.
Position the chickens around the bench and open soil areas. Vary their orientation slightly so the arrangement feels more like a miniature garden scene than a row of ornaments.
A small garden sign can be positioned near the left side if desired. Use it as a secondary detail rather than the main focal point.
Finally, inspect the composition from normal viewing height. The important elements should remain easy to distinguish:
White fence
Central moss and stone pathway
Stone cottage
Raised black planter
Leafy woodland house
Fairy figurine
Pink bench
Pink birdhouse
Duck, cat, and chickens
Surrounding succulents
If any feature disappears behind foliage, reposition it now rather than cutting plants later simply to reveal a decoration.
Keep the Plants and Miniatures in Balance
Succulents will gradually change the proportions of the garden. A small rosette can eventually become wide enough to cover part of a path or miniature house.
Leave expansion space around major ornaments and avoid tightly filling every gap on the first day.
The black upper planter should remain partly visible. Hiding it completely with moss or trailing plants removes the strong visual separation that makes the two level design effective.
The white path also benefits from negative space around it. Too many plants touching both edges can make the central route disappear.
Water Without Damaging the Scene
Water according to the needs of the actual plant varieties rather than following a fixed schedule.
The upper planter may dry at a different rate from the larger container, so check them separately.
Direct water toward the soil rather than pouring it across the miniature buildings, moss, bench, or painted figurines. A narrow spout watering can makes this easier.
If white stones become covered with soil after watering, allow the area to dry and clean them with a small soft brush.
Standing water is a warning sign. Check drainage immediately if the soil remains saturated for unusually long periods.
Common Problems and Fixes
The Upper Planter Looks Too Dominant
Use taller planting behind it and keep the foreground open. Do not try to hide the pot entirely. Its dark color provides useful contrast between the two levels.
Succulents Cover the Miniatures
Trim only when appropriate for the plant or relocate fast growing specimens. Repositioning a plant is often better than continuously pruning a naturally vigorous variety.
The Path Disappears
Remove plants encroaching on the pebble borders and restore a clear line of white stones around the moss strip.
The Scene Feels Overcrowded
Remove one or two ornaments rather than adding more. The cottage, fairy house, bench, animals, and path already provide several focal points.
Moss Remains Constantly Wet
Reduce its coverage and improve airflow around succulent crowns. Decorative moss should not create a permanently damp layer around plants adapted to drier growing conditions.
Care and Seasonal Maintenance
Check the arrangement regularly for plant growth, faded decorations, loose fence sections, and displaced stones.
Succulent offsets can be removed or replanted when they begin covering paths or miniature objects. Dead leaves should also be cleared from beneath rosettes because accumulated organic material can hold unwanted moisture.
Clean the white fence and pale path stones occasionally so they continue to provide contrast against the soil and greenery.
If the miniature cottage, bench, birdhouse, or figures are not rated for year round outdoor exposure, move the planter to a protected location during severe weather or temporarily remove the more delicate pieces.
In areas with cold winters, plant hardiness should also determine whether the complete arrangement can remain outdoors.
Why the Raised Design Works
The smaller black planter gives the garden a natural hierarchy.
The lower level feels like a miniature yard, with its fence, stone cottage, path, animals, and bench. The raised section then becomes a second destination containing the more whimsical woodland house and fairy figure.
Color reinforces that separation. White stones and fencing brighten the lower scene, pink details repeat across several accessories, and the dense green succulents connect both levels.
Because the display uses height instead of simply adding more ornaments across one flat surface, it can contain many small details while still remaining visually organized.
Daria Kuznetsova brings a thoughtful approach to interiors, handmade projects, and everyday living through her work at Decovive.com. She focuses on approachable ways to give rooms more character, improve organization, update furnishings, and make better use of both indoor and outdoor areas.
Her articles often explore clever makeovers, repurposed materials, decorative details, garden touches, and accessible projects that can be completed without advanced skills. Rather than following a single aesthetic, Daria draws from changing trends, practical needs, and personal expression.
Her goal is to offer readers useful starting points they can shape around their own taste, budget, and space, turning simple changes into homes that feel considered, comfortable, and individual.


 Like
0
Like
0
 Dislike
0
Dislike
0
 Love
0
Love
0
 Funny
0
Funny
0
 Angry
0
Angry
0
 Sad
0
Sad
0
 Wow
0
Wow
0