
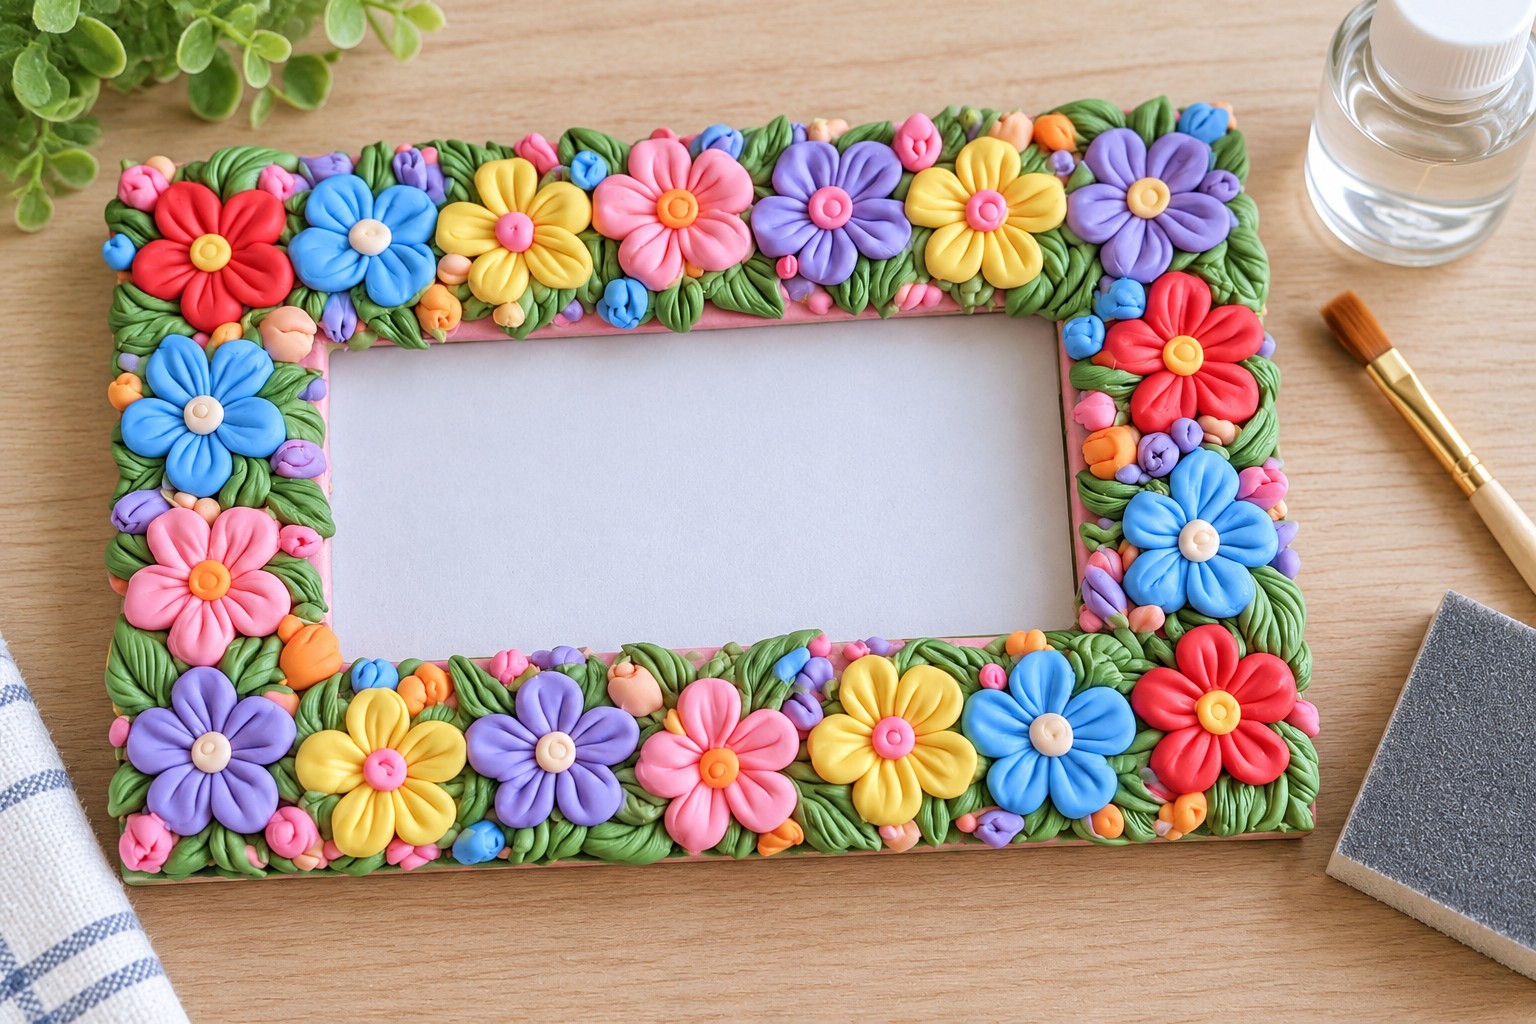
This floral clay photo frame turns a simple rigid frame into a colorful border of handmade flowers, textured leaves, and miniature buds. The design combines blue, pink, yellow, red, lavender, peach, and orange details over a soft pink clay-covered base.
A lightweight air dry clay with low to moderate shrinkage is a practical choice because the project contains many thin petals, narrow leaves, and small attachment points. Choose a clay that keeps fine impressions after drying, does not become extremely brittle, and can be lightly sanded if the manufacturer permits it.
The measurements below are planning guides for an approximately 20 × 25 cm outer frame with a visible border around 35 to 45 mm wide . Because clay density, shrinkage, and drying behavior vary, make a few small test pieces before producing the full batch and use those results to adjust your own material quantities.
Table of Contents
- Project Preview
- Project Overview
- Materials and Tools
- Choose the Assembly Workflow First
- Record a Small Clay Test
- Step 1: Prepare and Cover the Frame
- Step 2: Sculpt the Large Flowers
- Step 3: Shape the Leaves and Miniature Buds
- Step 4: Build the Top Border
- Step 5: Decorate the Side Borders
- Step 6: Complete the Bottom Border
- Step 7: Fill the Remaining Gaps and Secure the Decoration
- Step 8: Dry, Inspect, Repair, and Finish
- When a Sealer Is Useful
- Common Problems and Fixes
- Petals Crack Near the Center
- Leaves Curl During Drying
- Pink Seams Open
- Buds Come Loose
- The Border Looks Too Dense
- The Photo Opening Becomes Obstructed
- Check the Finished Weight Before Hanging
- Safety Notes
- Care and Display
Project Preview
Project Overview
Difficulty: Intermediate. Active working time: Approximately 4 to 6 hours. Full drying time: Product dependent and should follow the clay manufacturer's instructions.
A dense 20 × 25 cm frame can use approximately 18 large flowers, 45 to 60 leaves, and 30 to 40 miniature buds .
The main techniques are rolling clay evenly, covering a rigid frame, sculpting repeated petals, creating veined leaves, making small buds, attaching fresh or fully dried parts, and balancing the decoration across four frame sides.
Materials and Tools
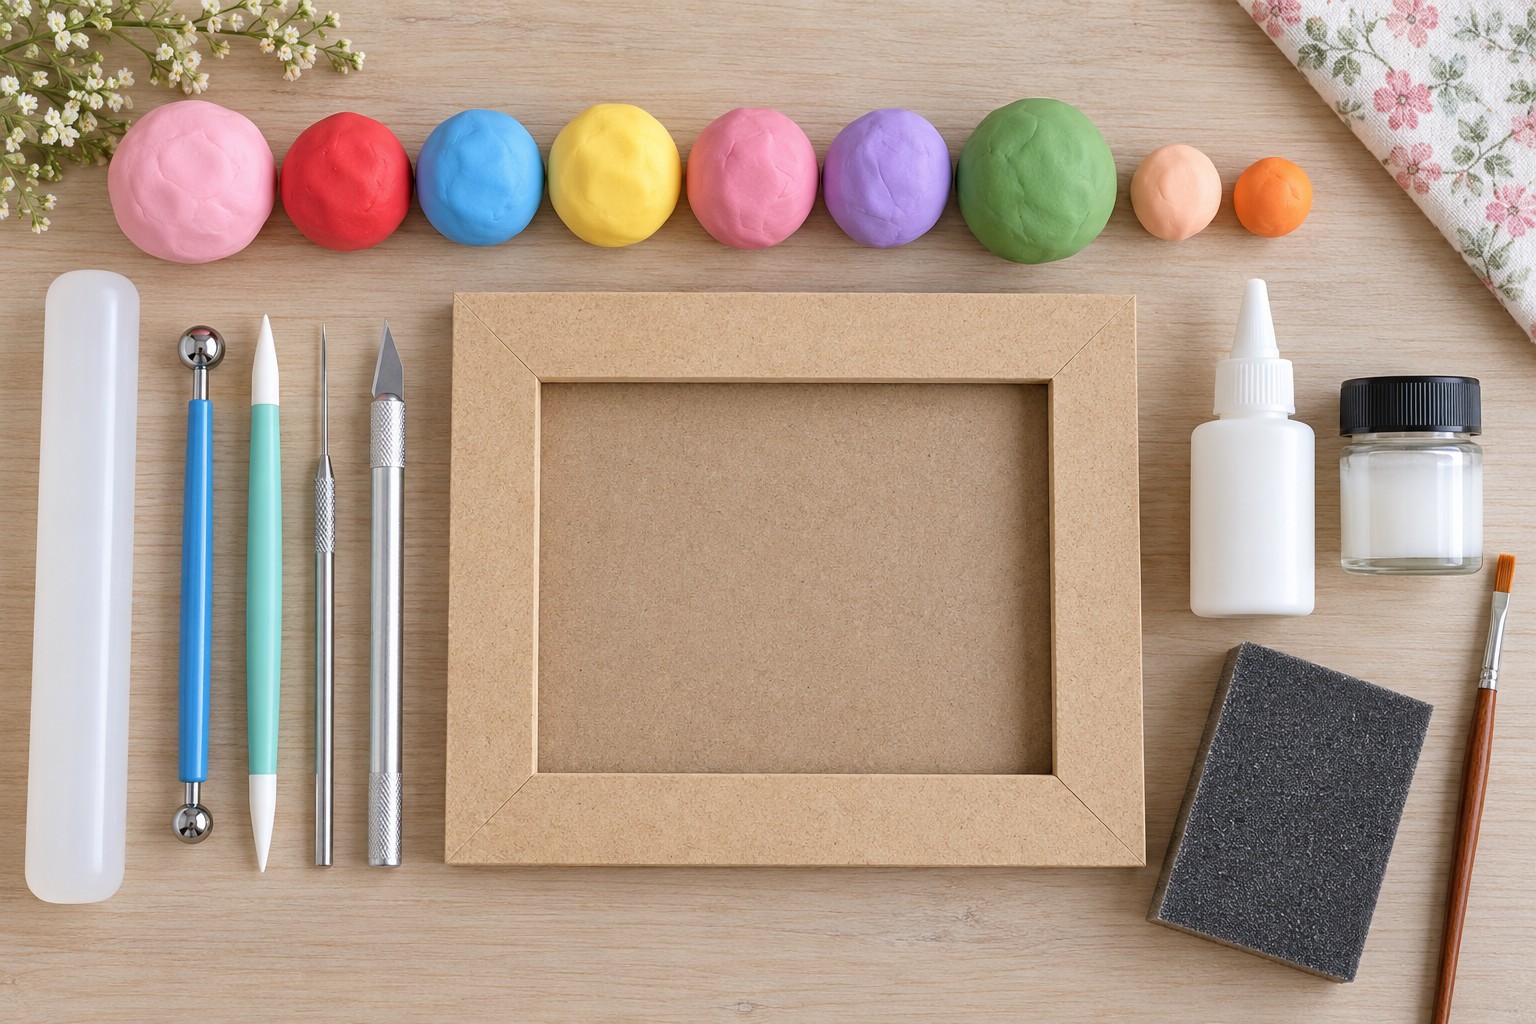
For one approximately 20 × 25 cm frame, prepare:
- One rigid unfinished wood or MDF photo frame
- Approximately 80 to 120 g soft pink lightweight air dry clay for covering the frame
- Approximately 15 to 25 g red clay
- Approximately 20 to 30 g blue clay
- Approximately 20 to 30 g yellow clay
- Approximately 20 to 30 g pink clay for flowers and small accents
- Approximately 15 to 25 g lavender clay
- Approximately 30 to 45 g green clay
- Small amounts of peach and orange clay
- Acrylic or clay roller
- Ball stylus
- Silicone shaping tool
- Fine needle or veining tool
- Craft blade
- Small dedicated brush
- Fine sanding sponge if approved for the selected clay
- Optional acrylic gesso for porous wood or MDF
- Clear drying craft adhesive suitable for porous wood or MDF
- Clear drying adhesive suitable for dried air dry clay and the frame material
- Optional compatible clear sealer
The colored clay amounts are estimated totals for everything made in each color , not just the large flowers. Pink, blue, lavender, yellow, and other colors may be shared between large blooms, miniature buds, and filler details.
The pink frame-covering quantity varies because a 35 mm flat border uses less clay than a 45 mm border with a beveled or stepped profile. Thickness matters as well. Covering the same surface at 3 mm instead of 2 mm uses about 50% more clay by volume , so the upper end of the range is more appropriate for wider or thicker applications.
Choose the Assembly Workflow First
There are two sensible ways to organize the project.
With fresh assembly , the flowers, leaves, and buds are attached while the frame covering is still workable. If the selected clay supports score-and-slip joining, lightly texture both contact surfaces, apply a very small amount of compatible slip, press them together, and blend only the hidden joint. This method creates an integrated clay surface.
With dry assembly , the flowers, leaves, and buds are sculpted separately, allowed to dry completely, and then attached to the finished frame with a clear drying adhesive suitable for dried air dry clay and wood or MDF. This method makes it easier to move flowers around before committing to the final layout. For more decorative forms made from air dry clay, explore these air dry clay ideas and adapt the motifs to the available frame space.
For a decoration with dozens of pieces, do not try to complete the entire fresh assembly in one uninterrupted session. Work one frame side at a time . Prepare only enough flowers, leaves, and buds for that section, attach them while the clay remains workable, then continue to the next edge. This reduces the chance of earlier pieces becoming too firm to join properly while later parts are still being sculpted.
Record a Small Clay Test
Before covering the full frame, make one pink strip, one leaf, and one petal using the thicknesses planned for the project.
Measure the fresh strip in millimeters and write the number down. After the strip reaches the manufacturer's full drying condition, measure the same dimension again.
A simple way to record linear shrinkage is:
Shrinkage % = (fresh measurement − dry measurement) ÷ fresh measurement × 100
For example, if a strip measures 100 mm when fresh and 96 mm after complete drying, the recorded linear shrinkage is 4%.
Do not treat that result as a universal value for every thickness or shape. Use it as information about your clay, your sample thickness, and your drying conditions .
If the change is very small, continue with the planned dimensions. If the strip contracts noticeably, use slightly more overlap at frame seams rather than fitting fresh strips edge to edge. If the leaf curls strongly, make another test slightly thicker before producing 50 leaves. If the petal becomes fragile near the center, increase only the inner connection thickness rather than making the whole flower bulky.
These tests also affect material planning. For the same leaf area, increasing thickness from 2.5 mm to 3.5 mm uses about 40% more clay by volume . If your test shows that thicker leaves are necessary, increase the green clay allowance accordingly.
Step 1: Prepare and Cover the Frame
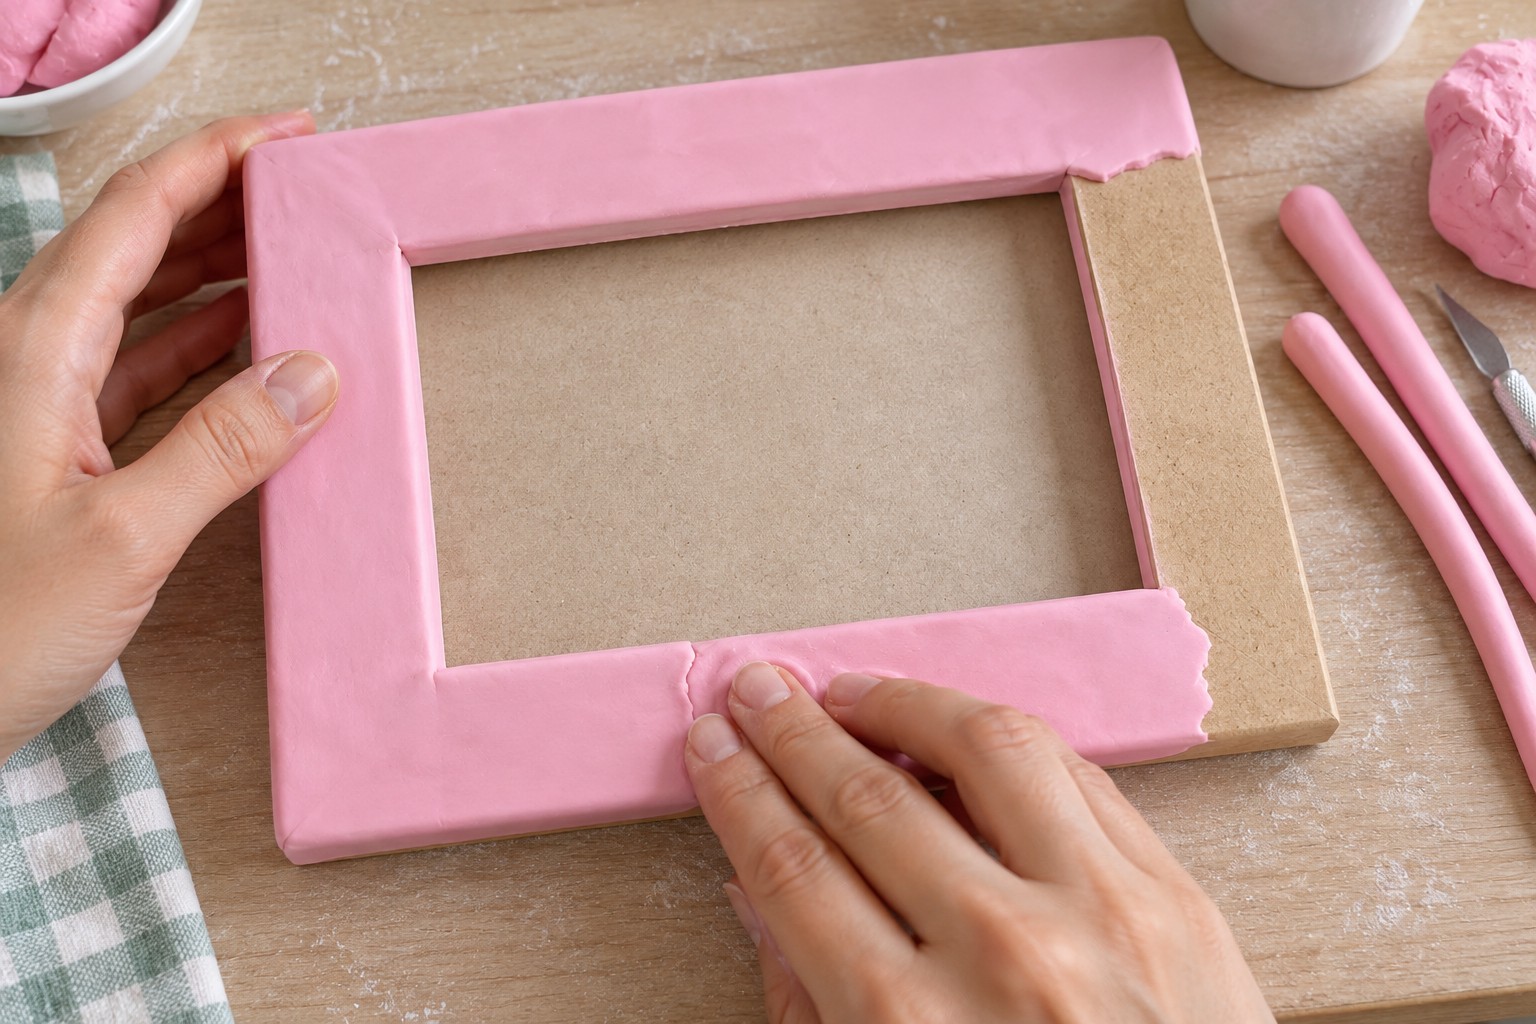
Remove the glass, backing, photograph insert, and any removable hardware.
Clean dust and loose fibers from the wood or MDF. If the surface is highly porous, apply a thin coat of compatible acrylic gesso and let it dry completely.
Condition the soft pink clay and roll it into strips approximately 2 to 3 mm thick .
Cover one frame side at a time.
If the clay manufacturer permits adhesive beneath fresh clay, spread only a thin film of clear drying craft adhesive suitable for porous wood or MDF. Too much glue can create raised areas beneath the clay.
Press the pink strip onto the frame from the center outward and trim the outside edge and inner photo opening with a craft blade.
Where two strips meet, overlap their fresh edges slightly and blend the seam with a silicone tool. Avoid joining two perfectly straight cut edges with no overlap, because shrinkage can make that seam more visible after drying.
Continue until all four sides are covered.
Keep clay away from backing grooves, tabs, clips, and hanging hardware.
Step 2: Sculpt the Large Flowers
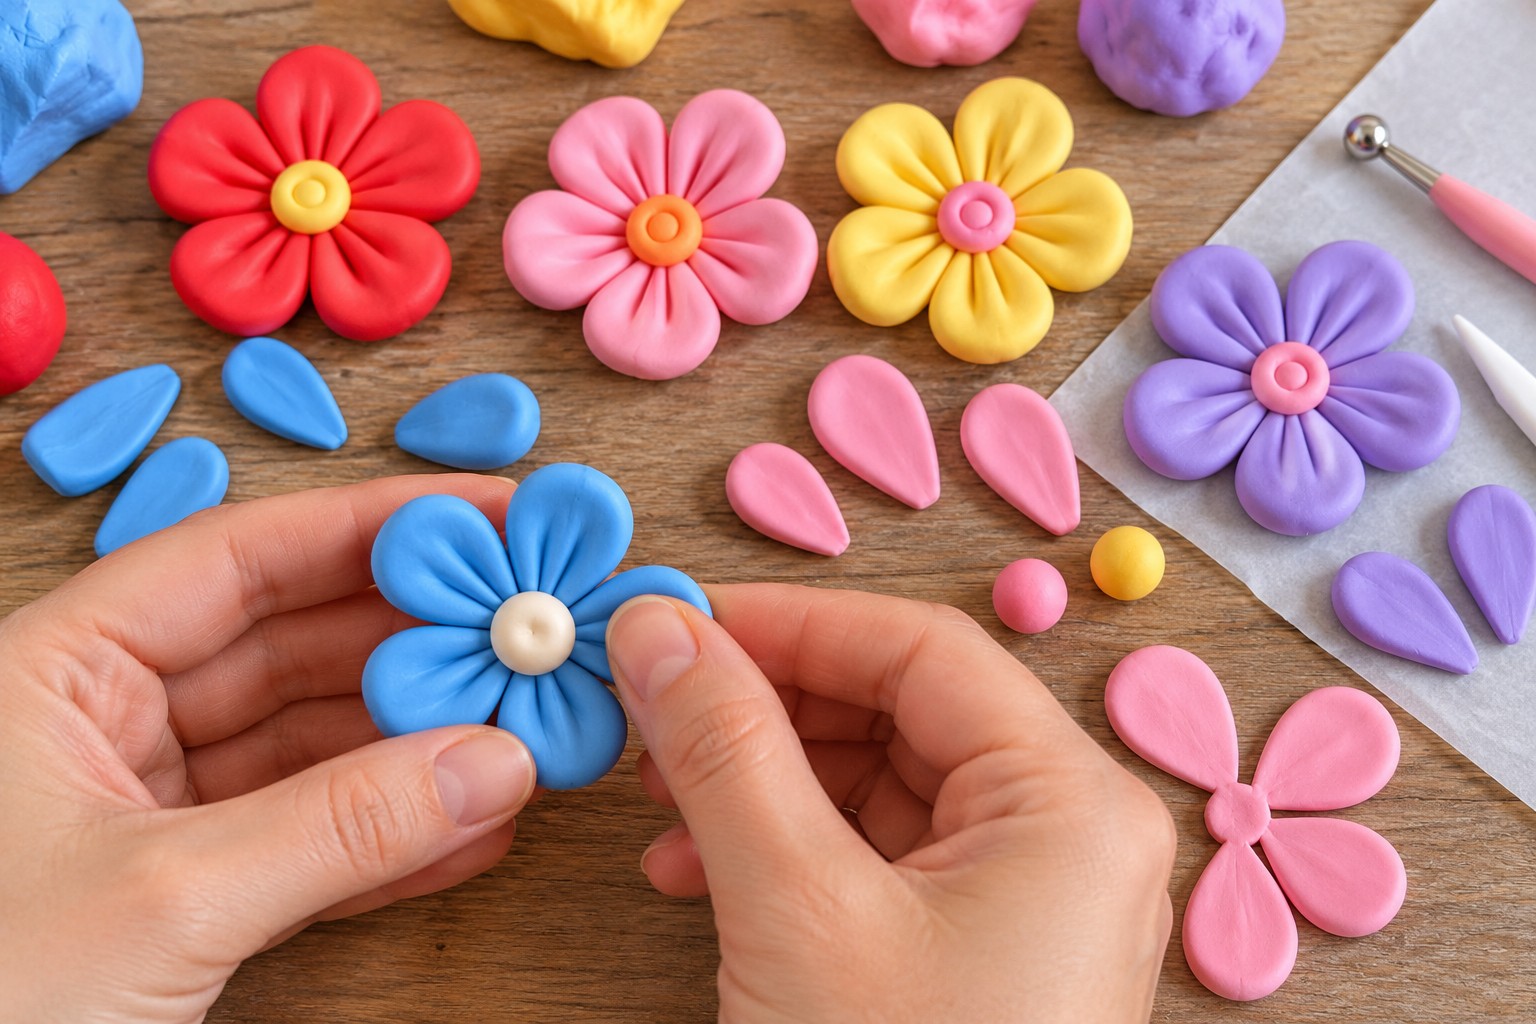
Plan approximately 18 large flowers for a densely decorated 20 × 25 cm frame.
A useful starting arrangement is five flowers across the top, four down each side, and five across the bottom.
For flowers approximately 35 to 50 mm wide , allow roughly 4 to 7 g of lightweight clay per flower . Smaller five-petal blooms will use less, while fuller 50 mm flowers with thicker centers can approach the upper end of the range.
For each flower, divide the clay into five or six portions.
Roll each portion into a small ball, then taper it into a rounded teardrop.
Flatten the visible part of each petal to approximately 3 to 4 mm thick .
Keep the narrow inner end around 4 to 5 mm thick . This is the area where the petals converge and where an overly thin connection is more likely to crack.
Arrange the petals around the center and use a rounded sculpting tool to press a shallow groove into each one.
Add a contrasting center.
For an 18-flower composition, a practical distribution might be four blue, four pink, four yellow, three lavender, and three red flowers. The objective is not strict symmetry; it is simply to keep one strong color from collecting in a single corner.
If you are using the dry assembly workflow, flatten the hidden underside of each finished flower slightly while the clay is still workable. Aim for a reasonably broad contact patch beneath the center, around 15 to 20 mm across on a 35 to 50 mm flower. This flat area gives the dried flower a much more useful adhesive surface than a rounded underside touching the frame at only one point.
Step 3: Shape the Leaves and Miniature Buds
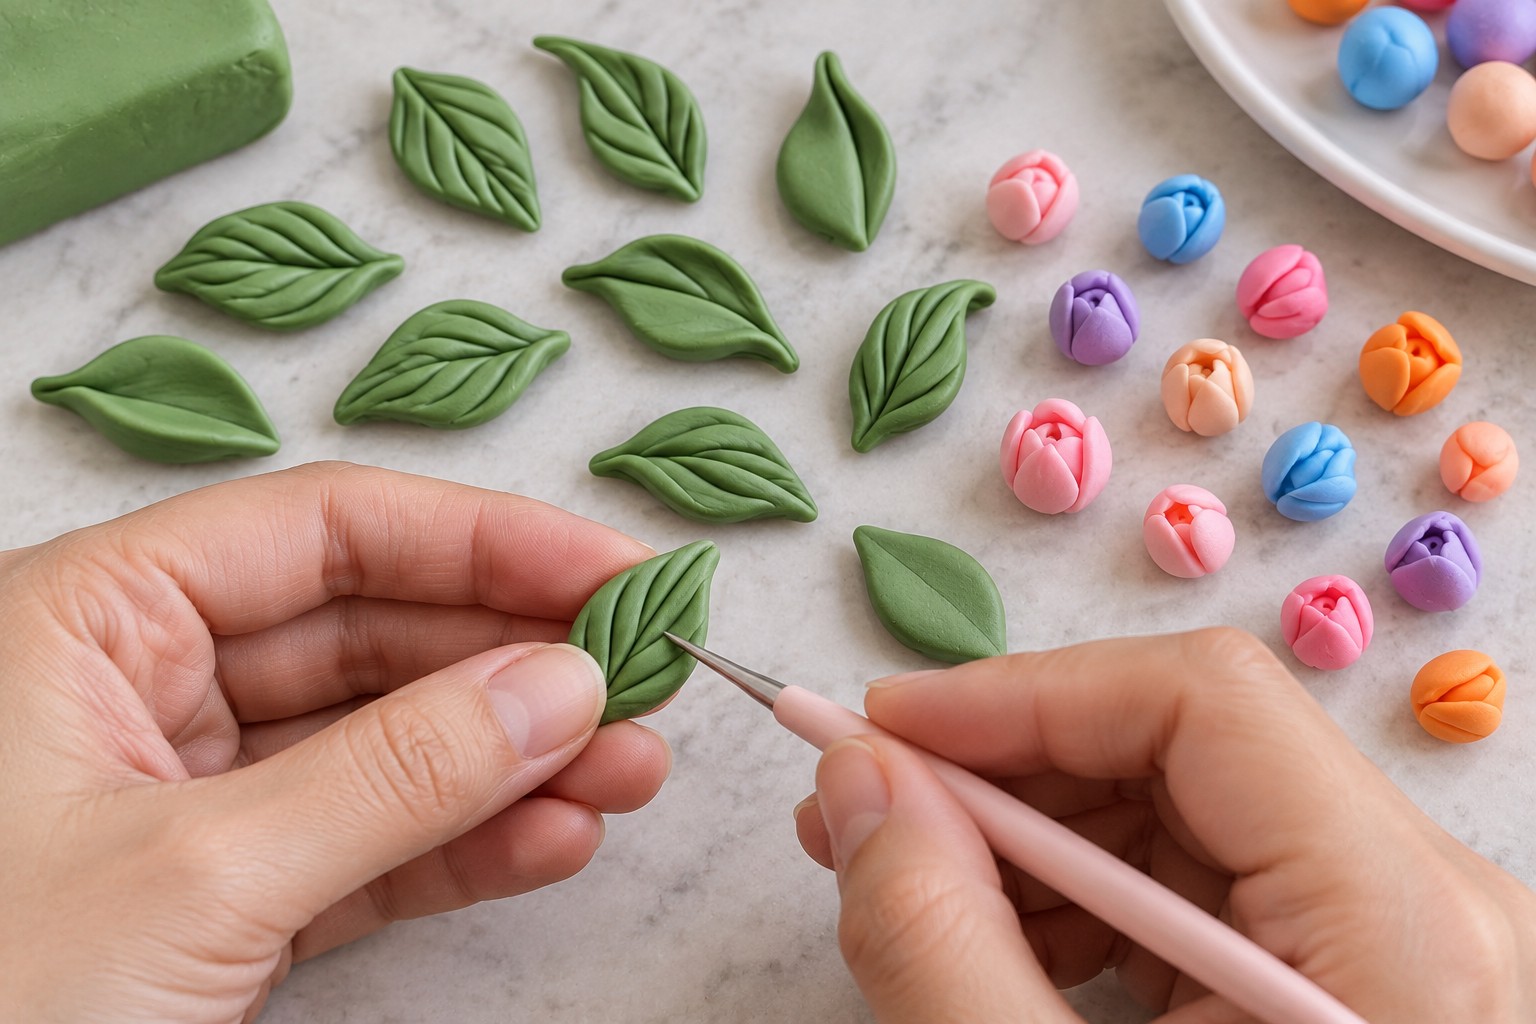
Plan approximately 45 to 60 leaves .
Shape each green clay piece into a pointed oval around 20 to 35 mm long .
Flatten the leaves to a starting thickness of approximately 2.5 to 3.5 mm .
Use the result from your test leaf to decide where within this range to work. If the thinner sample curls noticeably, move toward the thicker end before making the full batch.
Press one center vein from the base to the tip and add smaller diagonal veins on both sides.
Curve some leaves gently so the foliage does not all sit perfectly flat.
For the miniature buds, make approximately 30 to 40 pieces using pink, lavender, blue, peach, and orange clay.
Shape each one around 8 to 15 mm long .
Keep the hidden attachment base approximately 4 to 6 mm wide and flatten it slightly. A broader base gives the bud more usable contact area than a pointed teardrop end.
Press two or three shallow divisions into the rounded top to suggest folded petals.
Step 4: Build the Top Border
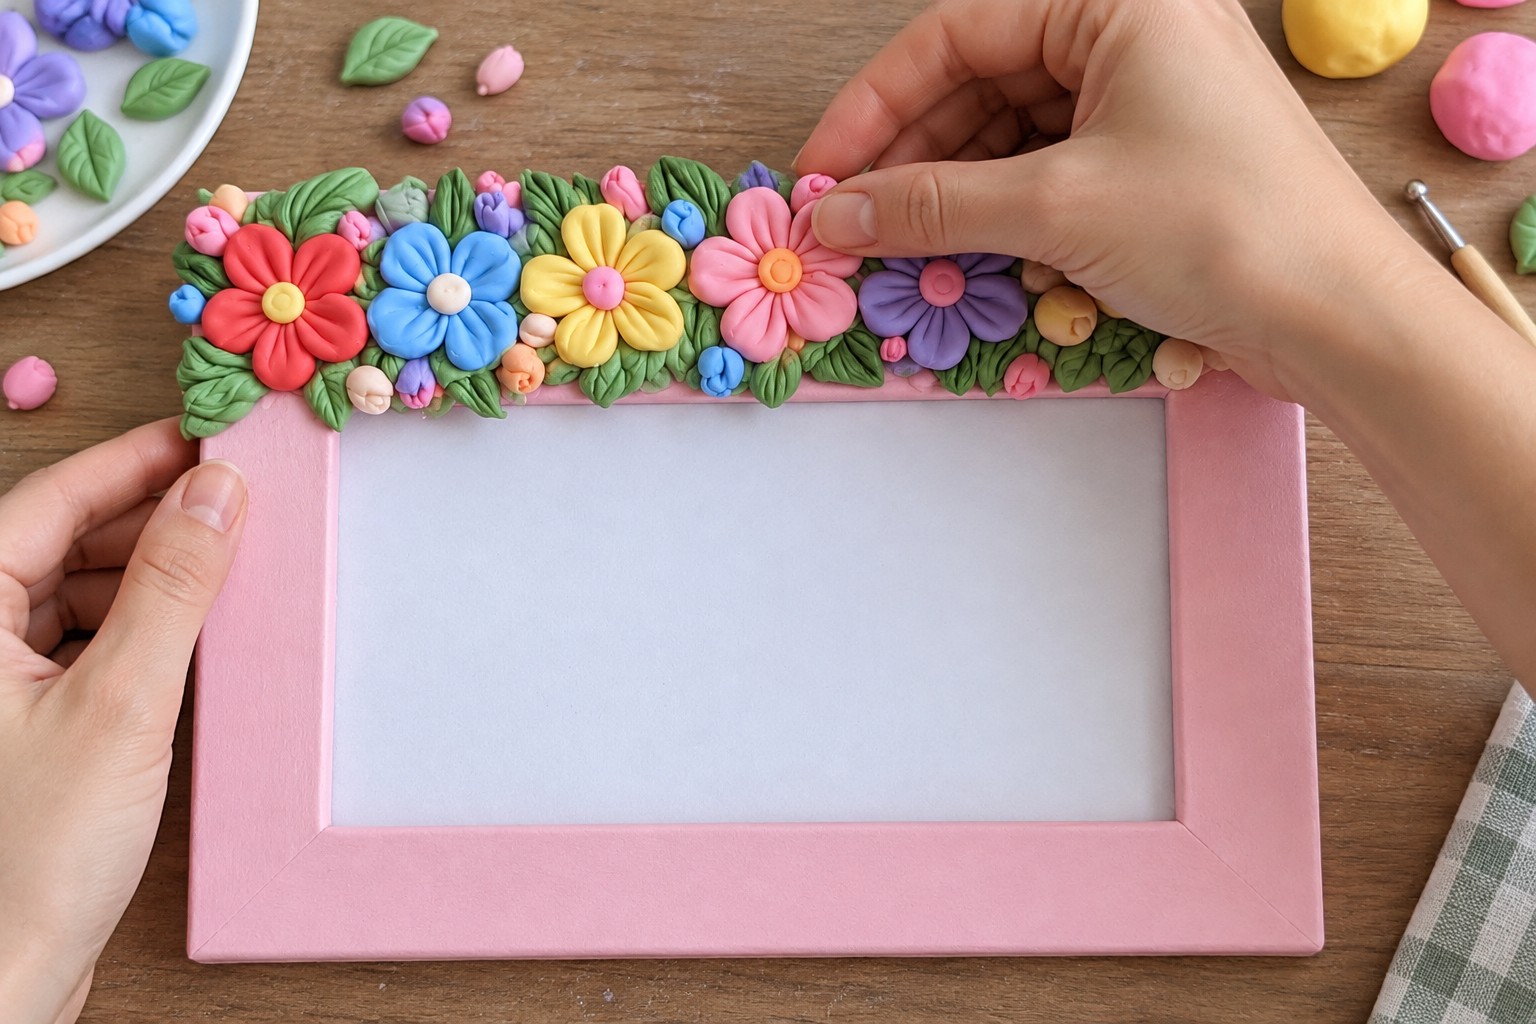
Treat the upper edge as the first full-scale composition test.
Arrange approximately five large flowers across the top before attaching them permanently.
Place around 12 to 15 leaves behind and between the flowers.
Use approximately 8 to 10 miniature buds for smaller spaces.
Instead of repeating a rigid color sequence, separate strong repeated colors where possible. For example, place a pink or yellow bloom between two blue-dominant areas rather than clustering several blue flowers together.
Once this top section is arranged, view the frame from normal display distance.
If five large flowers make the border feel too dense, reduce the count on the remaining sections and compensate with leaves or buds. If the flowers still feel widely spaced, add foliage before deciding that another large flower is necessary.
This gives you a real decision point from the actual frame rather than relying only on a theoretical piece count.
Step 5: Decorate the Side Borders
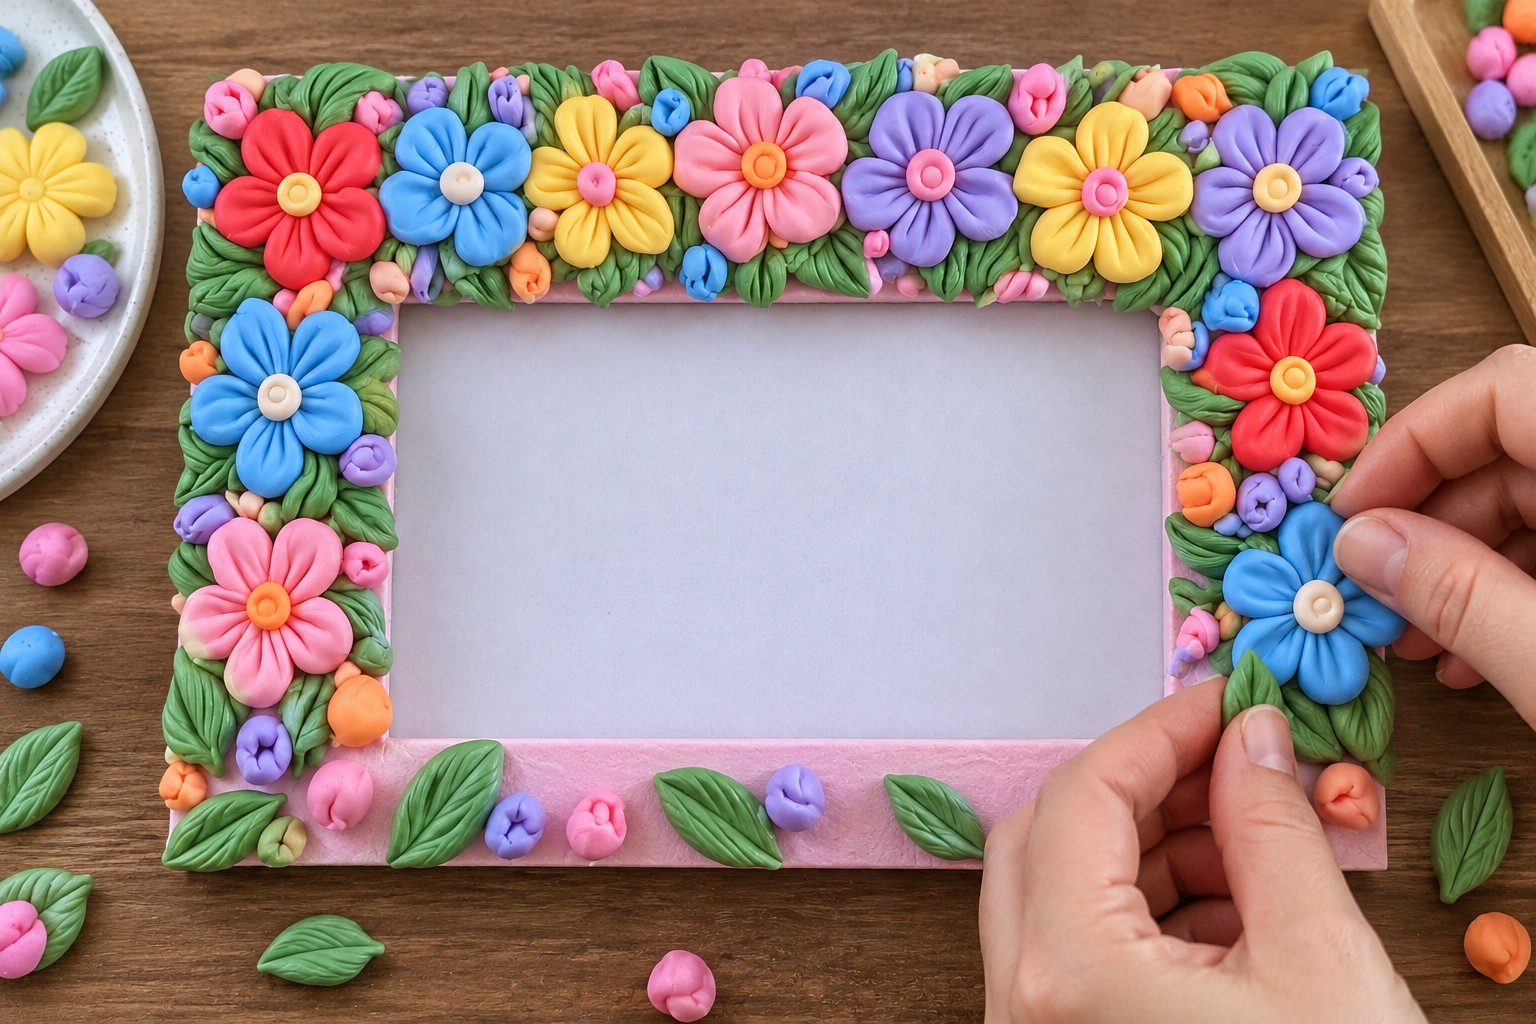
Work on one vertical side at a time.
Use approximately four large flowers per side.
Stagger them instead of placing them in a perfectly straight column.
Add around 9 to 12 leaves and 6 to 8 buds to each side.
Near the top corners, angle some leaves diagonally so the upper decoration flows naturally into the vertical border.
Keep checking the photo opening while you work. A large petal can move farther inward than expected once leaves and buds are added around it.
If you are using fresh assembly, complete the flowers, leaves, and buds for one side before moving to the opposite edge. This keeps the clay within a manageable working window.
Step 6: Complete the Bottom Border
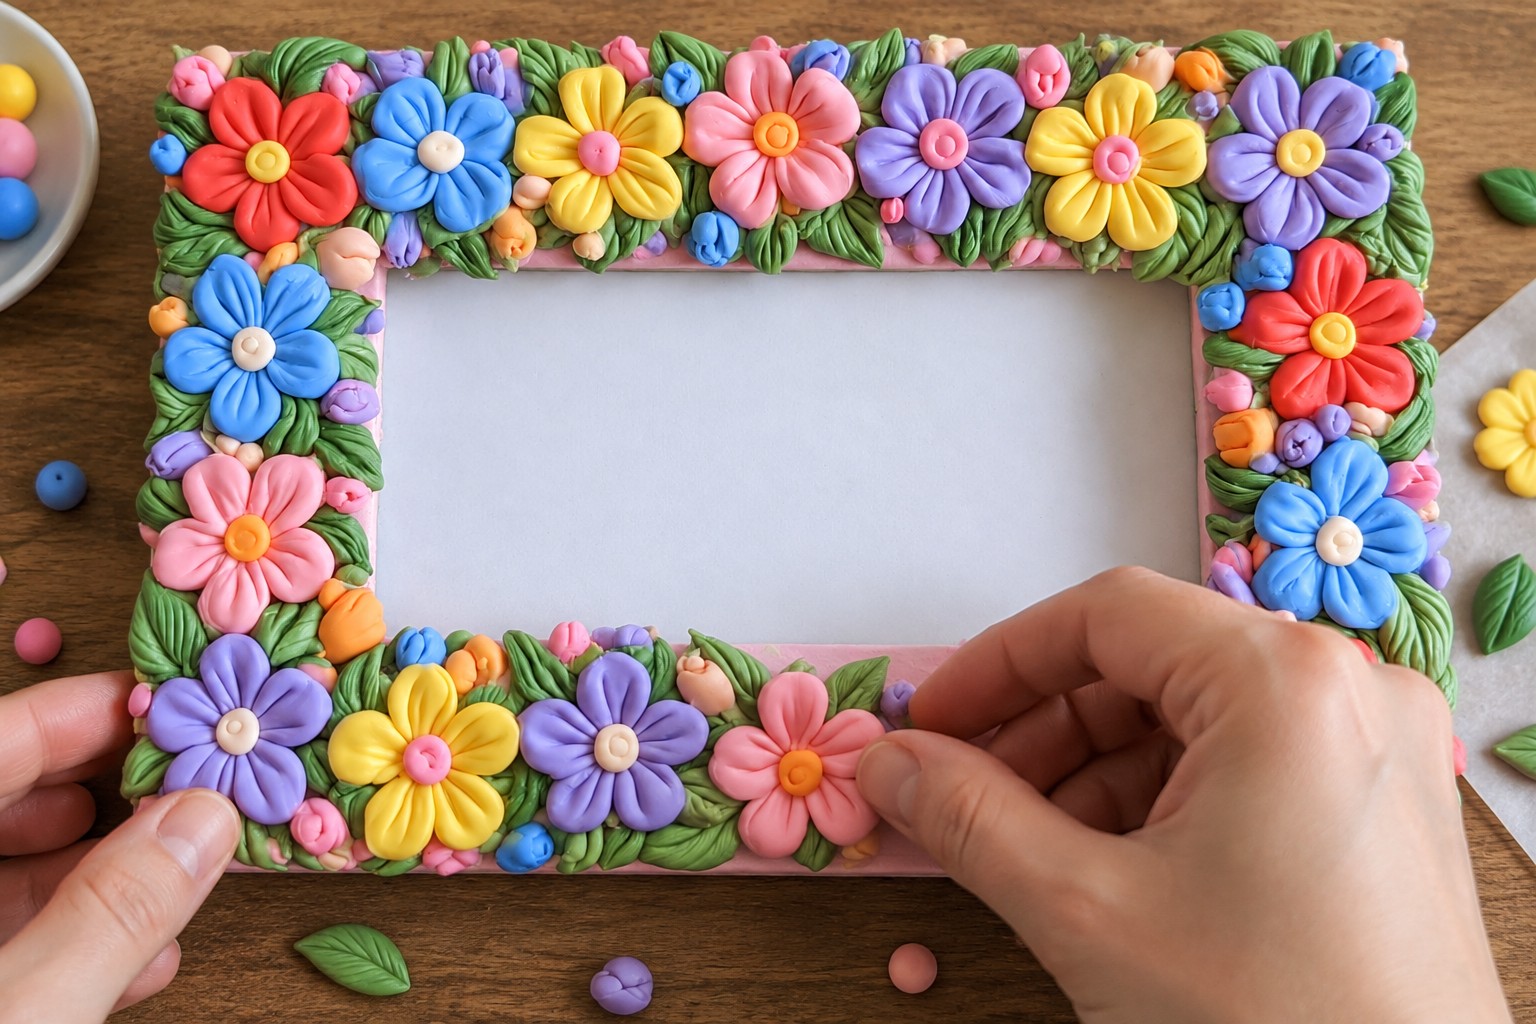
Use approximately five large flowers along the lower edge.
Add around 14 to 18 leaves and 8 to 10 miniature buds.
Allow the flower heights to vary slightly rather than forming a perfectly level row.
Leave a few small areas of the pink base visible between floral clusters. These breaks help individual flowers remain readable instead of turning the lower edge into one continuous block of color.
Because the bottom section often receives more foliage than the sides, keep several extra leaves available here rather than using every filler piece earlier in the project.
Step 7: Fill the Remaining Gaps and Secure the Decoration
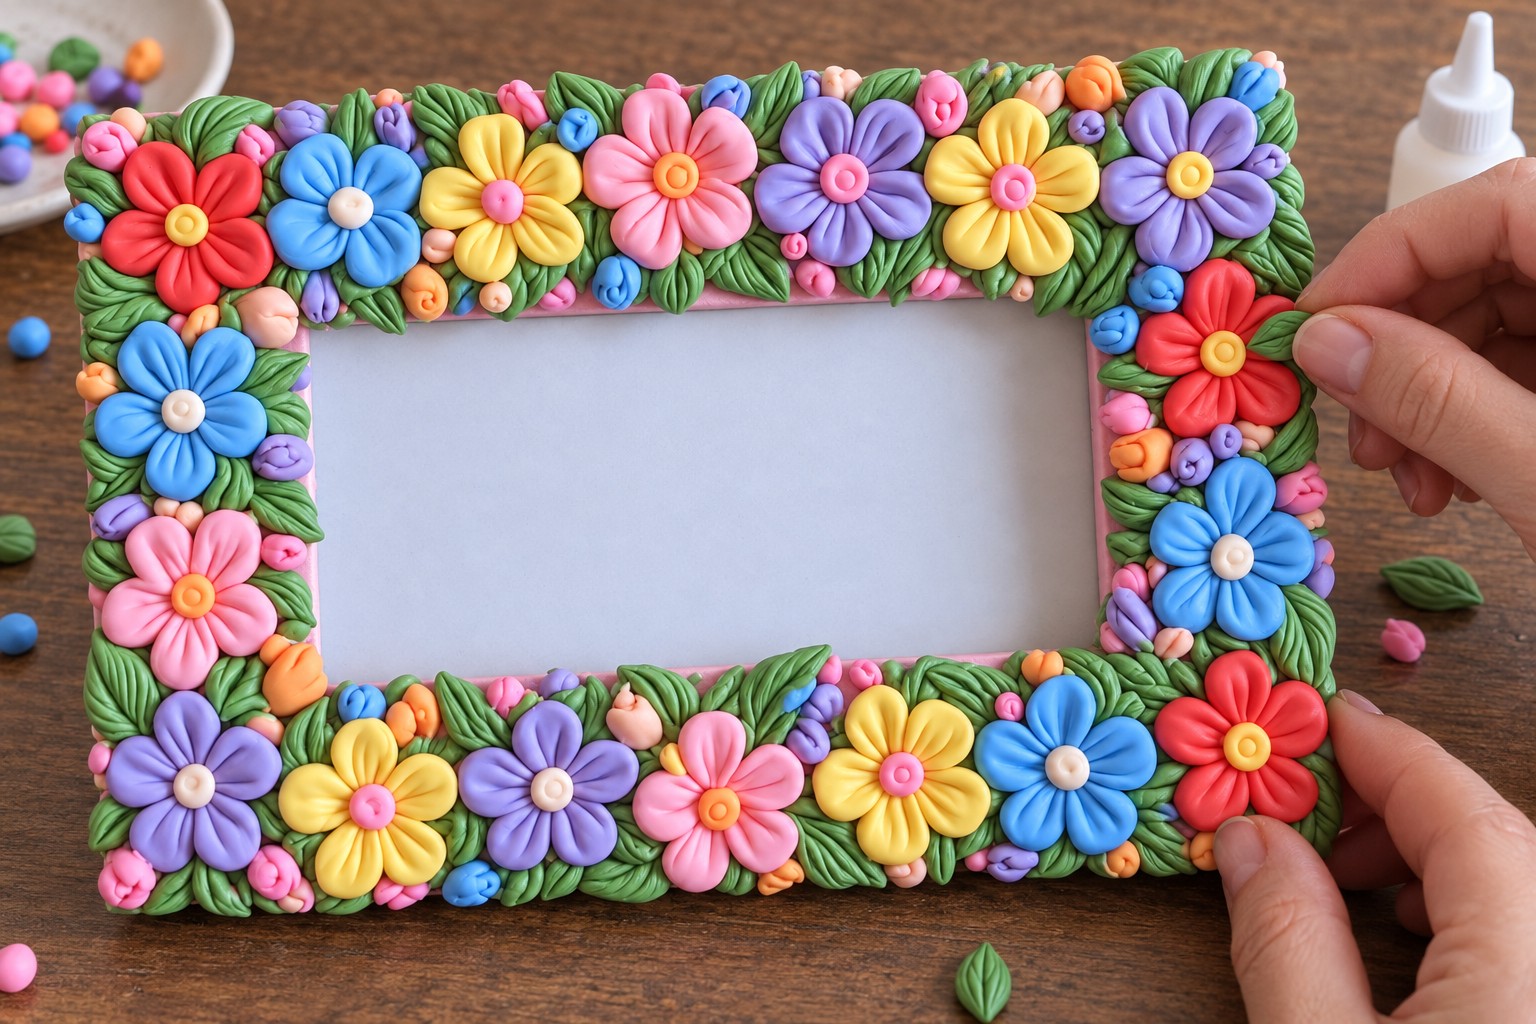
Inspect all four edges together before adding anything else.
Use remaining leaves and buds to correct small irregular spaces.
A narrow gap may need only one leaf. A wider space may take two overlapping leaves and one bud.
Avoid adding another large flower simply because a small patch of pink remains visible.
For dry assembly, apply adhesive to the flattened hidden contact surface of each piece.
For a large flower, use the 15 to 20 mm flat area beneath the center as the primary bonding zone. Spread adhesive across that surface rather than coating the visible petals.
For a bud, use the flattened 4 to 6 mm base.
Choose an adhesive that dries clear, bonds dried air dry clay to wood or MDF, and does not become extremely brittle after curing.
Step 8: Dry, Inspect, Repair, and Finish
Place the completed frame flat on a stable surface.
Allow all clay and adhesive to reach their stated full drying or curing condition.
Do not judge the entire project by the thin leaves. A leaf can feel dry while thick flower centers still contain moisture internally.
After drying, inspect the pink seams, flower centers, leaf tips, buds, and inner frame opening.
If a narrow pink seam opens but both clay sections remain securely attached, fill the gap with compatible repair clay or filler and allow the repair to dry fully.
If one pink section has lifted from the wood or MDF, repair the underlying bond first. Filling only the visible crack will not correct the structural problem.
If a dried flower moves independently from the frame, remove it carefully and reattach it using the prepared flat contact area and compatible adhesive.
When a Sealer Is Useful
A sealer is optional.
It can help reduce surface dust pickup, make gentle cleaning easier, and provide light protection against routine handling.
It is usually unnecessary if the frame will remain indoors, receive little handling, and the natural clay finish already looks appropriate.
A clear sealer does not turn ordinary air dry clay into a waterproof material.
Test any finish on leftover dried clay first. Check for color darkening, unwanted gloss, surface softening, adhesive reaction, or changes to painted details.
Apply it only after the clay, adhesive, and repairs are completely dry.
Common Problems and Fixes
Petals Crack Near the Center
Keep more clay at the narrow inner end where the petals meet. Increasing only this area is better than making the entire flower unnecessarily thick.
Leaves Curl During Drying
Compare the result with the test leaf. If the thinner sample curls strongly, increase the thickness slightly and repeat one test before making the remaining batch.
Remember that thicker leaves also increase green clay consumption.
Pink Seams Open
First determine whether you have a small shrinkage crack or a lifted section.
Fill a stable hairline seam. Rebond a section that has separated from the frame before repairing its surface.
Buds Come Loose
Check whether the hidden base is broad enough.
A flattened 4 to 6 mm base gives the adhesive or fresh-clay joint more contact area than a pointed end.
The Border Looks Too Dense
Use the completed top section as your reference.
If five large flowers already dominate that border, reduce the remaining flower count and use smaller leaves or buds instead.
The Photo Opening Becomes Obstructed
Move large pieces outward before the clay or adhesive sets.
The glass, photograph, and backing should still fit normally when the decoration is complete.
Check the Finished Weight Before Hanging
Even lightweight clay increases the total weight of the frame.
Install the glass, photograph, backing, clay decoration, and any sealer before evaluating the hanging hardware.
The rear hanger, D-rings, wire, screws, and wall fixing should all be appropriate for the finished total weight , not the undecorated frame.
Also inspect where the hardware connects to the frame itself. Strong wall hardware will not compensate for a loose fitting attached to weak MDF.
For tabletop display, check that the rear stand still supports the additional forward weight without tipping.
Safety Notes
Use craft blades and pointed sculpting tools carefully.
Keep miniature buds and detached clay pieces away from young children and pets because they can present a swallowing hazard.
Follow adhesive and sealer ventilation instructions.
If sanding dried clay, minimize dust and follow the clay manufacturer's safety guidance.
Care and Display
Reinstall the glass, photograph, and backing only after the clay, adhesive, repairs, and optional sealer are completely dry.
Move the frame by holding its rigid structure rather than the raised flowers.
Use a soft dry brush to clean dust from petal grooves and leaf veins.
Avoid prolonged moisture unless the clay, adhesive, frame material, and finish are all specifically suitable for that environment.


Leave a Reply