
A fairy tropical backyard combines generous foliage with little moments of discovery: a glimpse of water, a curved route, a small storybook accent, or a seat surrounded by leaves. These 26 ideas cover ponds, paths, planted corners, fountains, arches, and places to pause. Measure your garden and plan the planting, paths, and supporting structures before adapting a design. Three short videos alongside the related ideas illustrate a possible visual sequence while leaving site-specific planting and structural decisions to be resolved separately.
Table of Contents
- Prepare a Tropical Garden Layout
- Find an Idea for Your Garden
- Choose Plants for Your Climate and Available Light
- Plan Water, Structures, and Everyday Access
- 1. Layer Tropical Foliage Around a Small Garden Pond
- 2. Build Privacy with Bamboo and Layered Planting
- 3. Turn a Narrow Side Yard into a Tropical Passage
- 4. Create a Mini Bridge Retreat with Tropical Flowers
- 5. Design a Fairy Tea Corner Surrounded by Greenery
- 6. Shape a Stream Route Through Tropical Planting
- Video Inspiration: Developing a Curved Garden Stream
- 7. Use a Tree Stump as a Vertical Fairy Garden Focal Point
- 8. Create a Fairy Courtyard with Winding Stone Trails
- 9. Lead the Eye with a Curved Pebble Path
- 10. Build a Secret Nook Around a Tiny Pond
- 11. Frame a Fairy Pond with Colorful Tropical Planting
- 12. Make a Decorative Storybook House the Garden Destination
- 13. Frame a Winding Path with a Flower Covered Arch
- 14. Mark the Garden Entrance with a Tropical Flower Arch
- 15. Create a Fairy Lagoon with a Mini Wooden Bridge
- 16. Add a Tea Terrace Inside the Tropical Garden
- 17. Add a Tiered Fountain to a Tropical Fairy Corner
- 18. Turn a Narrow Patio Edge into a Tiny Fairy Walk
- 19. Build a Tropical Island Bed Around a Fairy Gateway
- 20. Soften a Patio Corner with a Small Water Feature
- 21. Create a Compact Oasis with Layered Tropical Foliage
- 22. Shape a Polished Tropical Courtyard with One Fairy Accent
- 23. Build a Decorative Fairy Alcove with Tropical Flowers
- Video Inspiration: Layering an Arched Fairy Alcove
- 24. Reveal a Hidden Pond Through a Flowering Border
- 25. Brighten a Fence Corner with Colorful Tropical Foliage
- Video Inspiration: Turning a Fence Corner into a Planting Bed
- 26. Make a Small Fairy Garden Feel More Expansive
- Keep the Garden Magical as It Grows
Prepare a Tropical Garden Layout
Find an Idea for Your Garden
For a narrow side yard or patio edge, begin with 3, 18, and 21. For a compact focal point, compare the miniature dry-channel bridge, the planted stump, and the colorful fence corner. Water can stay openly visible in the patio basin or appear gradually in the planted pond retreat. For seating, compare a small tea scene with a terrace for regular use; 13 and 14 show different ways to use an arch.
Choose Plants for Your Climate and Available Light
Before choosing foliage, sketch the garden and observe how light changes through the day. Note shaded walls, exposed corners, water that lingers after rain, and the routes used for carrying tools or moving pots. A tropical appearance can come from a mixture of locally hardy plants and tender seasonal specimens; it does not mean every plant needs the same conditions.
Build the scheme in three parts: a permanent framework that can remain outdoors through the local winter, seasonal plants used during favorable weather, and container plants with a realistic winter protection plan. Check named varieties for mature height and width. If a pot must be moved indoors, its eventual weight and the available protected space matter as much as its summer appearance. Match watering to each plant and root environment instead of giving the whole border one routine.
Plan Water, Structures, and Everyday Access
Choose the job of each feature before its decorative finish. A miniature bridge or house belongs to the scene; a bridge people cross or an arch supporting heavy growth needs an appropriate structural design. Keep a dependable main route through the garden, with room for the people and equipment that will use it. Decorative stepping patterns can remain separate from that route.
Decide whether water is intended for wildlife, reflection, or a circulating fountain or stream. Plan cleaning access and any equipment around that purpose. Where young children may reach water, establish effective access control and close adult supervision; a small pond, dense leaves, or decorative edging does not provide that protection. Powered water features also need an electrical arrangement appropriate to the location and professionally assessed where required.
Check plant identity before placing foliage within reach of children or pets. Caladium and plants sold as elephant ears can contain irritating calcium oxalates; they are not plants for casual tasting, and caladium sap can irritate skin. Common names cover different species, so confirm the botanical name and handling guidance for the plant actually selected.
1. Layer Tropical Foliage Around a Small Garden Pond
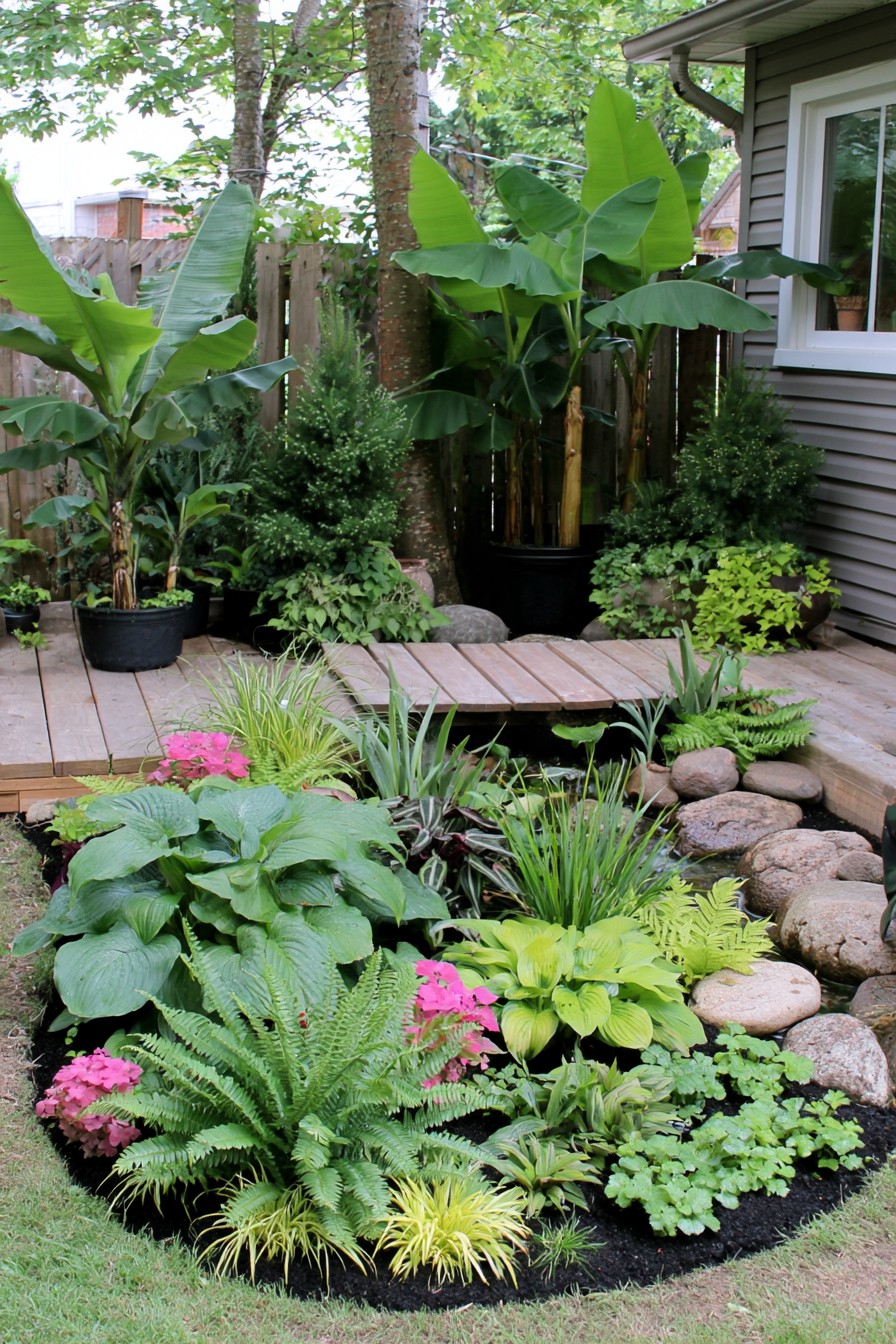
The pond gives this densely planted corner a resting point: a visible patch of water between large leaves, finer foliage, and a timber crossing. Taller plants form the background, while lower growth lets the stone edge and reflections remain readable. This is a useful direction for a garden that needs one strong destination without several competing ornaments.
Plan the view from the nearest seat before positioning the planting. Keep one side of the water reachable, then arrange portable tender plants where they can be lifted out for winter. A small bridge may serve as scenery; a crossing intended for people needs a separately resolved span, supports, wet-surface grip, and approach route. Compare these garden bridge planning considerations before choosing a bridge for daily use.
2. Build Privacy with Bamboo and Layered Planting
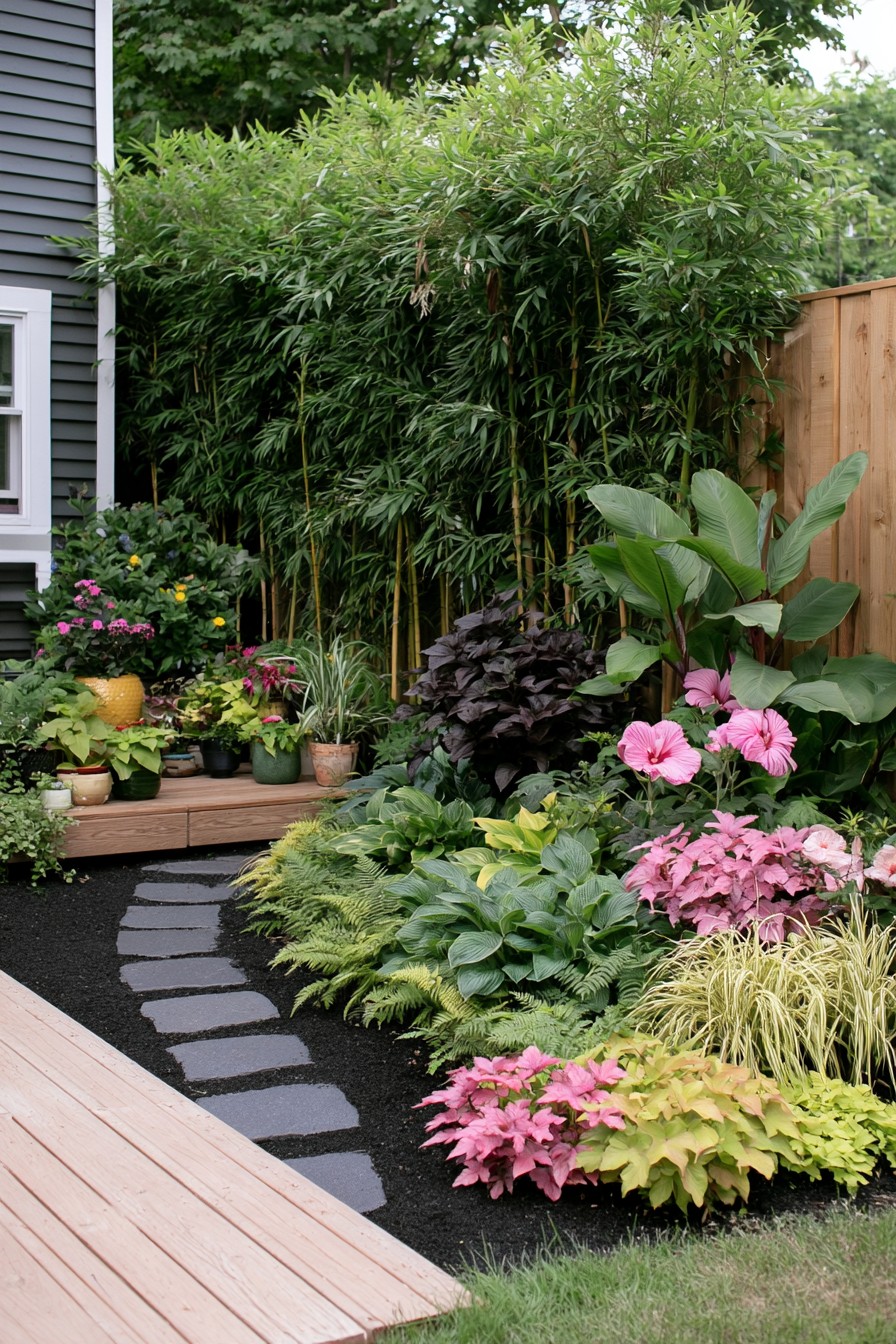
A tall bamboo backdrop can screen a neighboring view while broad leaves and low flowers soften its base. The contrast between slender upright stems and wider foliage creates depth, so the boundary feels planted rather than simply covered. This idea suits a garden that needs privacy but still has room for the screen’s eventual width.
Check the named bamboo’s mature footprint and whether it forms a clump or spreads through running rhizomes. Clumping growth still needs space, and growth beyond the intended boundary needs monitoring. Containers can make placement more flexible, but they add regular watering and eventual repotting or division. Reserve an accessible edge for those tasks, and use the foreground planting to soften the screen without hiding its base completely.
3. Turn a Narrow Side Yard into a Tropical Passage
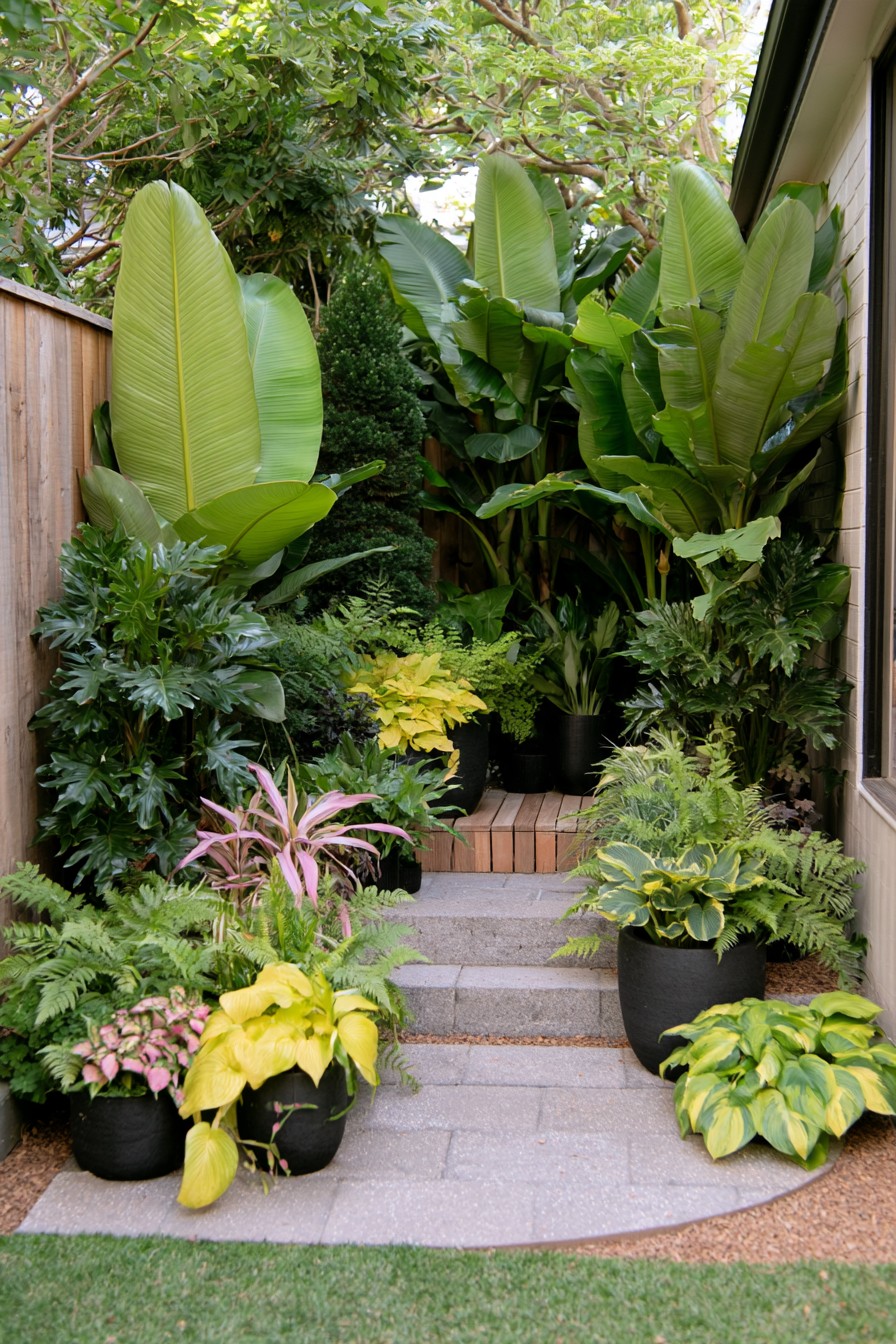
A paved side passage becomes a leafy transition when pots and narrow planting pockets sit along its edges. Large leaves draw attention toward the far end, while lower containers give the nearer view detail. The value here is transforming a route already used for daily access, without making the corridor itself disappear into the planting.
Observe the actual light between the fence and house; a bright open end can have very different conditions from the shaded middle. Choose pots that can be carried through the remaining gap, including when foliage has expanded, and leave access to doors, taps, and service points. Plant groupings belong beside the route.
4. Create a Mini Bridge Retreat with Tropical Flowers
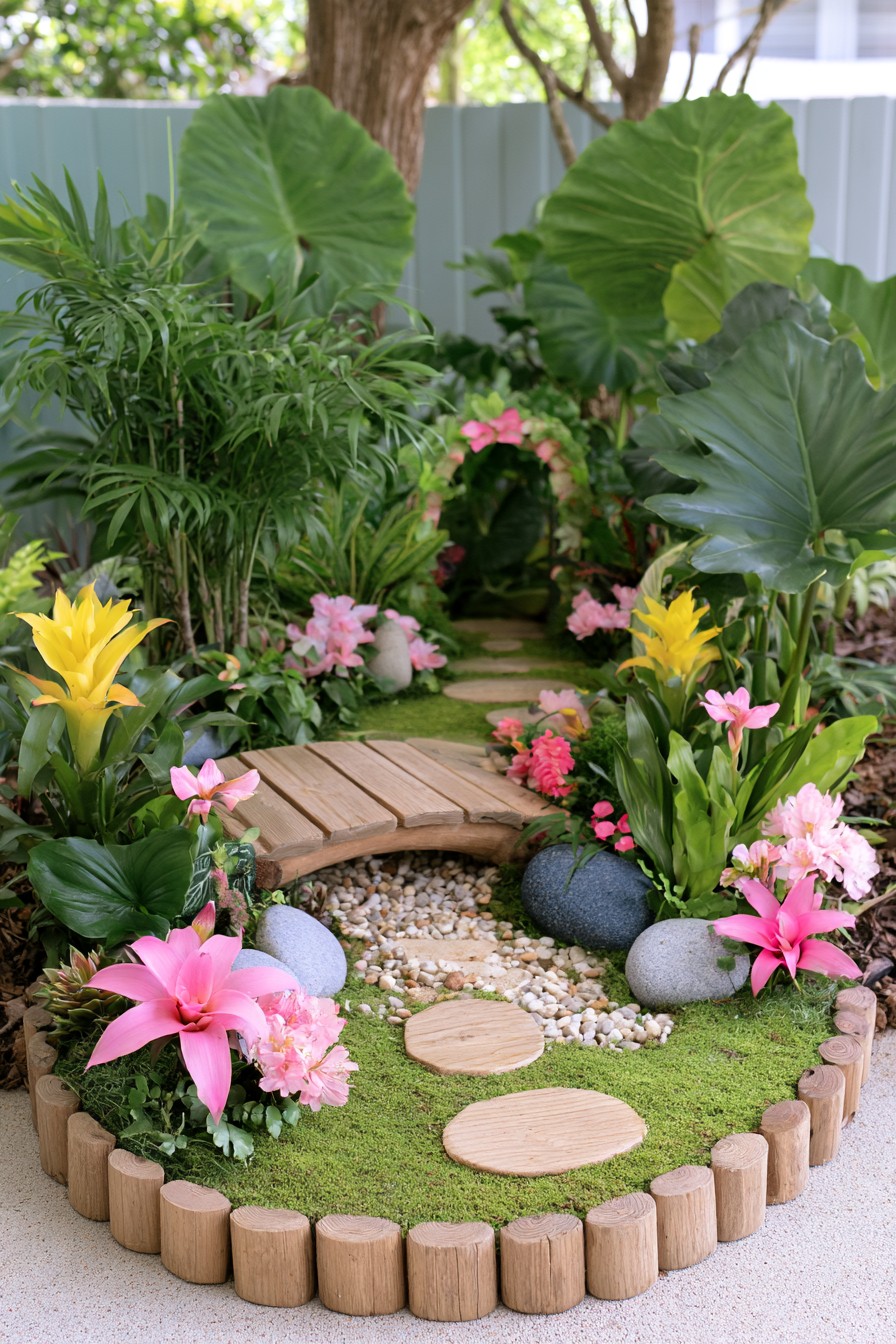
A miniature bridge above pale pebbles turns a small planted circle into a fairy scene. Broad leaves provide an oversized backdrop, and bright flowers make the tiny crossing stand out. Because this arrangement uses a dry pebble channel, it can suggest a stream without introducing a pond or moving-water equipment.
Treat the bridge as a decorative prop, not a route for visitors. Place it where it can be seen from a nearby path, then keep the surrounding plants low enough to reveal its shape. A container display or a small section of an existing border can capture the same effect. Choose exterior-use ornaments and leave room to lift them out when weeding, refreshing the pebbles, or dividing plants.
5. Design a Fairy Tea Corner Surrounded by Greenery
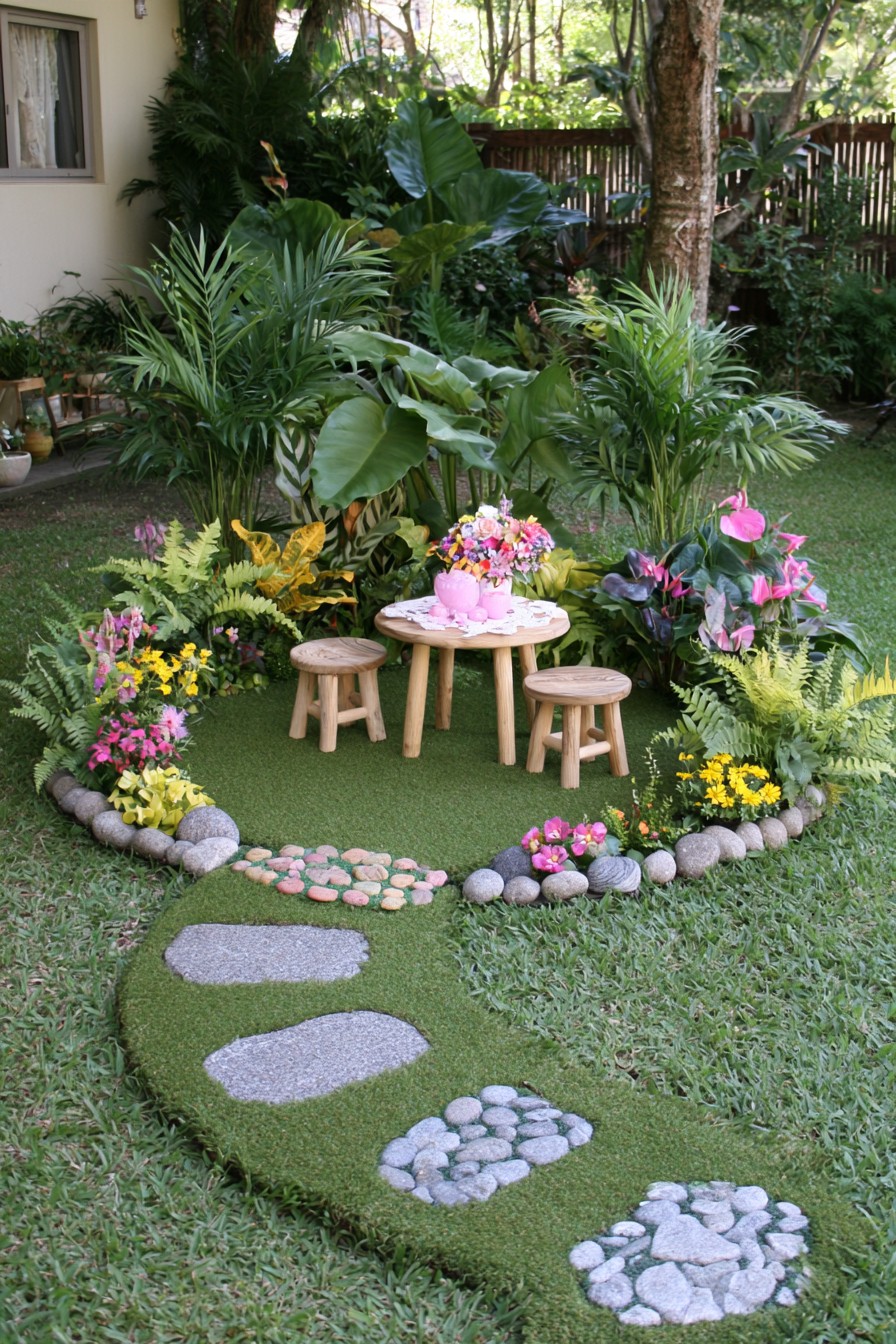
A little table and two stools create the impression of a tea stop inside an abundant planted pocket. The large leaves make the furniture appear even smaller, which strengthens the storybook scale. It works as a compact decorative scene or as inspiration for a brief sitting spot beside an established path.
The apparent size of the furniture is not a reliable guide to human seating. For actual tea breaks, choose full-size pieces, test their comfort, and give each stool a firm, level base with enough space to pull away from the table. Keep the central arrangement simple so cups have somewhere to go. If the available gap only fits miniature furniture, present it as a fairy display and use a separate seat nearby.
6. Shape a Stream Route Through Tropical Planting
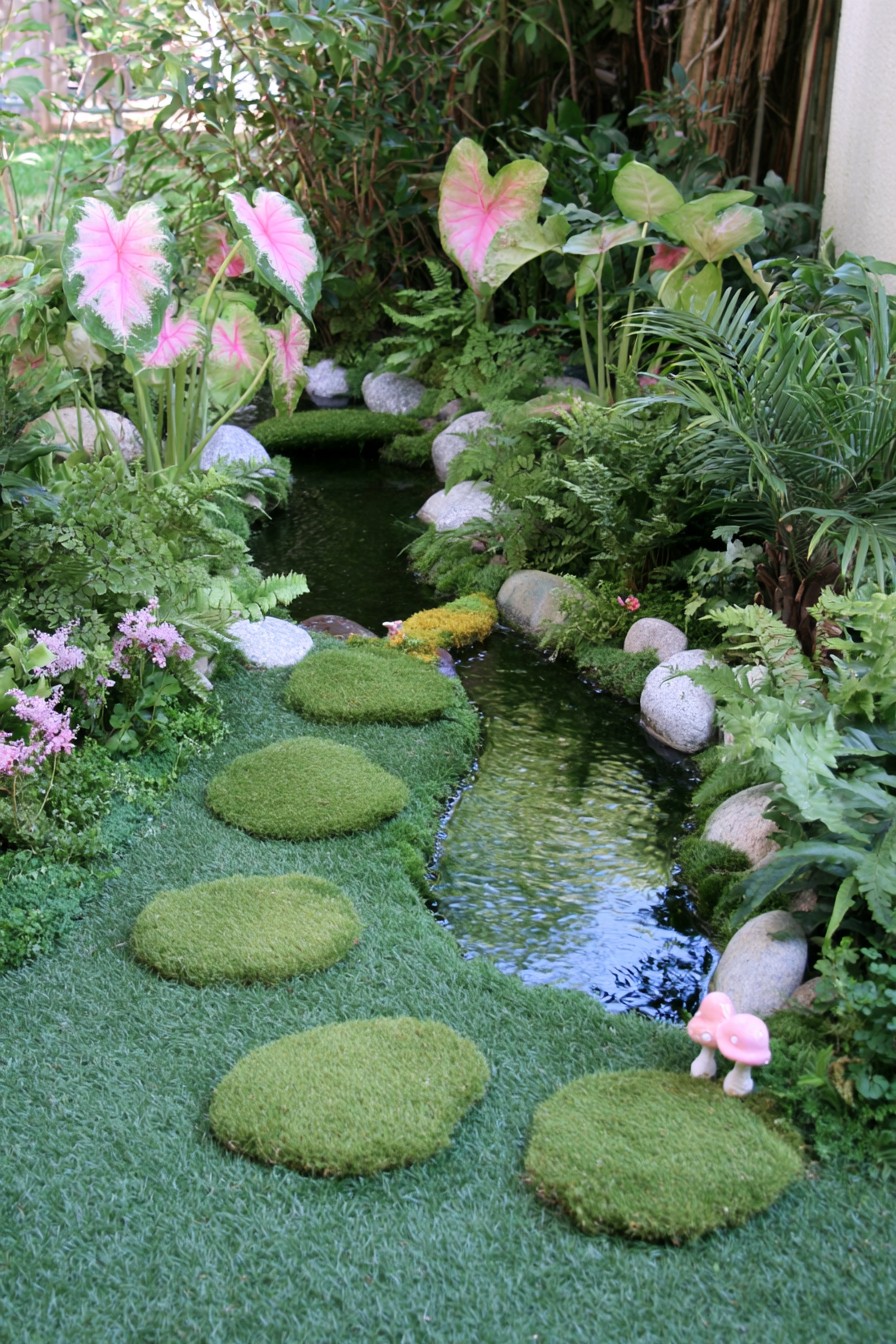
A narrow stream brings movement through the planting instead of keeping water at a single focal point. Its curved edge leads the eye between fine fern-like textures, broad leaves, and small patches of color. This suits a border with enough length to reveal the water gradually from several viewpoints.
Decide where the moving water should be visible and where the adjacent maintenance route will run. For a recirculating design, the reservoir, pump, and connections need reachable service positions; hiding equipment beneath inaccessible planting creates extra work. Keep decorative pads beside the water separate from the main walking surface. The stream’s water-holding and circulation design needs to be resolved before stones or foliage disguise its edges.
Video Inspiration: Developing a Curved Garden Stream
This short visual sequence moves from an excavated curved outline to a lining, stone edging, and a finished water scene with plants and small accents. It illustrates how defining the water’s shape first can guide the border around it. Notice the different roles of the rocky edge and the greener bank, rather than treating every visible patch as a walking surface.
Plan the liner protection, water circulation and equipment access before adding stone around the basin. Leave room to reach the pump for cleaning and keep surrounding paving clear.
7. Use a Tree Stump as a Vertical Fairy Garden Focal Point
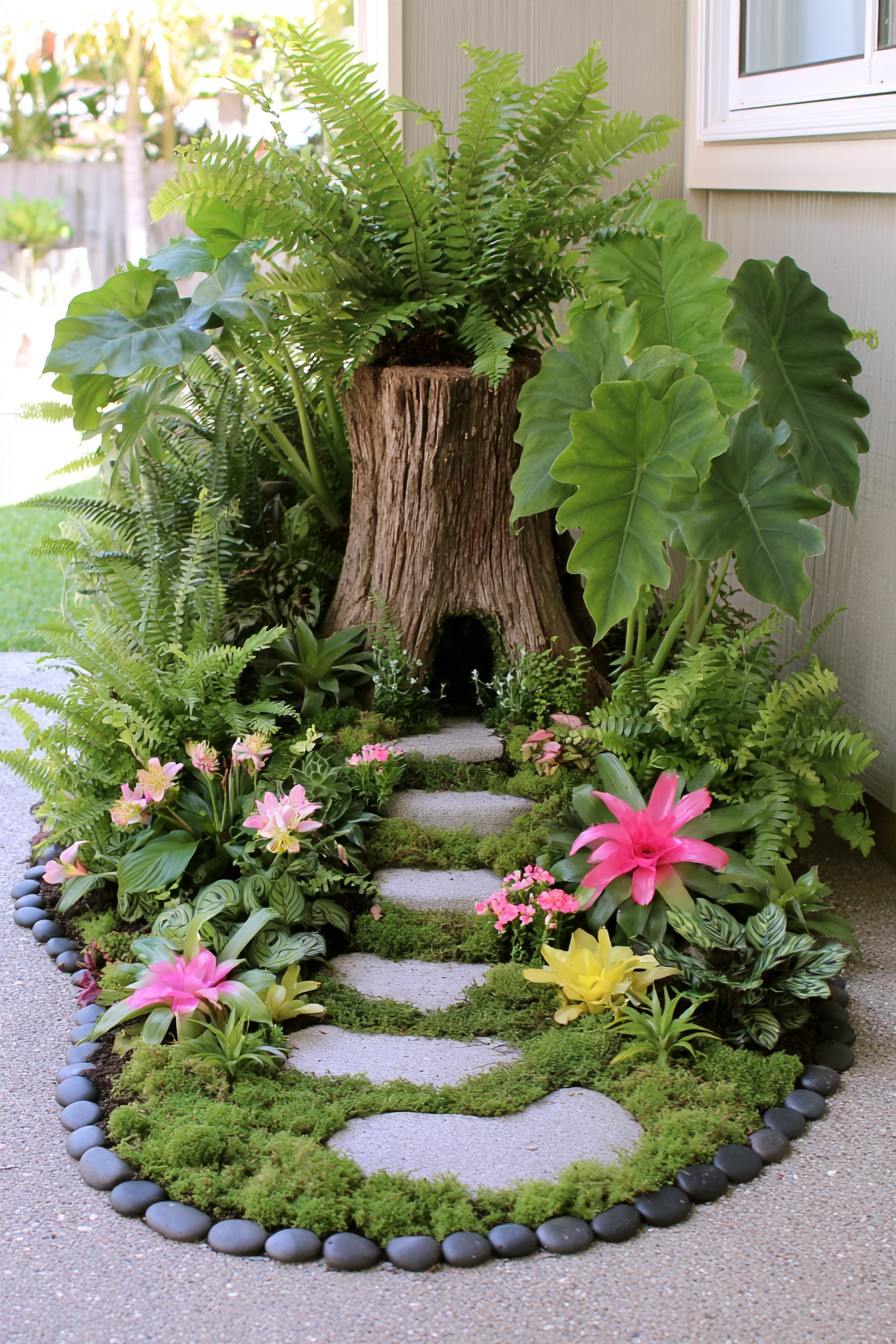
An old tree stump provides a vertical focal point without adding a large garden structure. Fern-like foliage at the top and softer planting around the base turn the weathered timber into a small green tower. The fairy character comes from the contrast in scale and texture; a tiny house or carved doorway is not necessary.
Use this approach where a retained stump already occupies a border, provided its condition allows it to remain in that location. Decay can change its stability, so it should not become a seat, climbing feature, or support for a heavy planter. Separate growing pots can make the upper planting easier to refresh. Keep watering and inspection access at the base, and leave the nearby path clear of expanding fronds.
8. Create a Fairy Courtyard with Winding Stone Trails
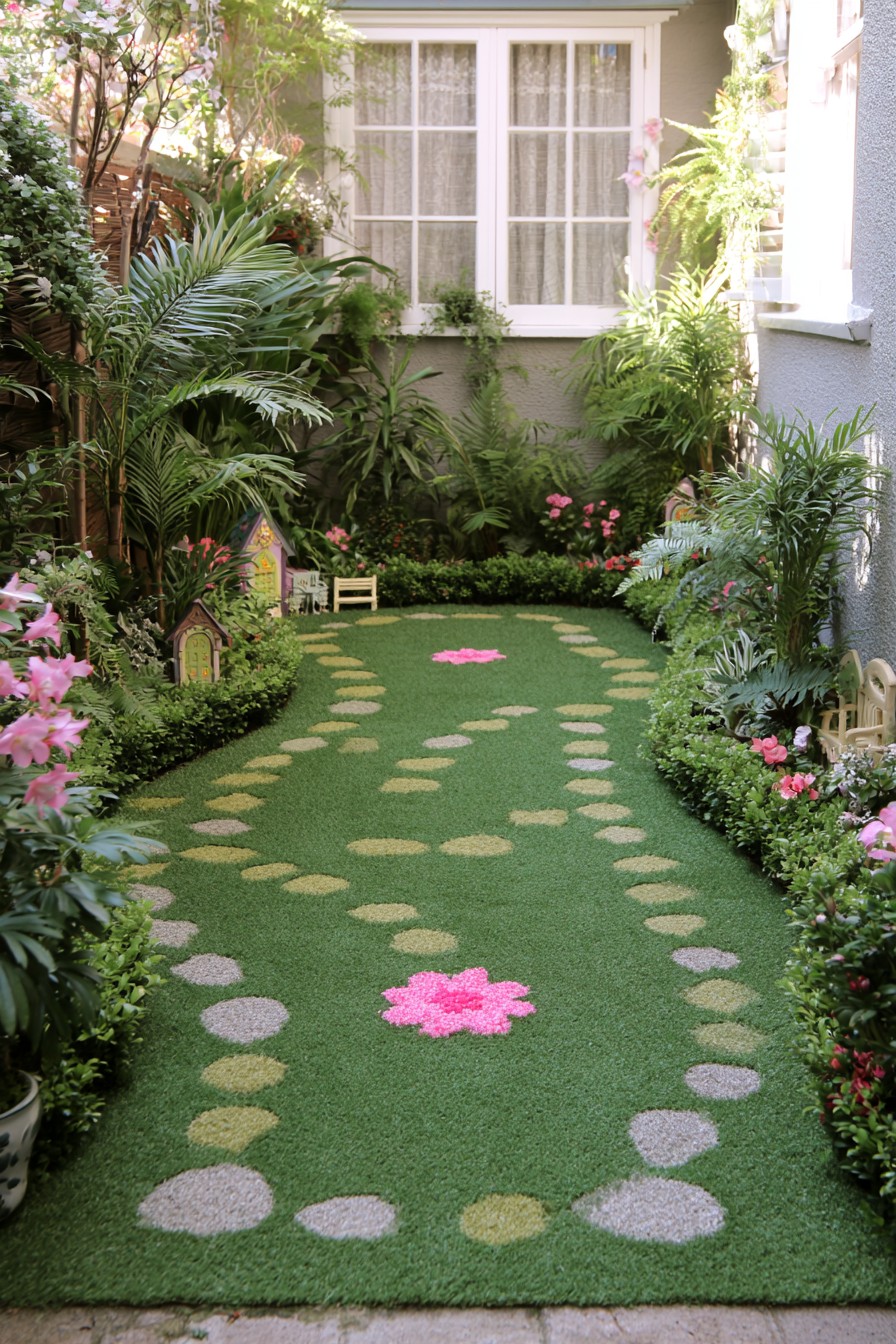
A courtyard with an open green center and small houses tucked into the far border creates a village-like destination. The dotted trails add a sense of wandering, while the miniature buildings give the planting a playful scale. Keep these small houses as decorative accents, positioned where their doors and windows remain visible among the planting.
Keep the larger open area as the organizing element, then position a few small structures where they can be noticed without filling every gap. The scattered stones can suggest a fairy trail within the display. If people need to cross this space regularly, provide a continuous route that works for them independently of those decorative dots. Give the rear border enough access to remove ornaments and tend plants without stepping across the whole scene.
9. Lead the Eye with a Curved Pebble Path
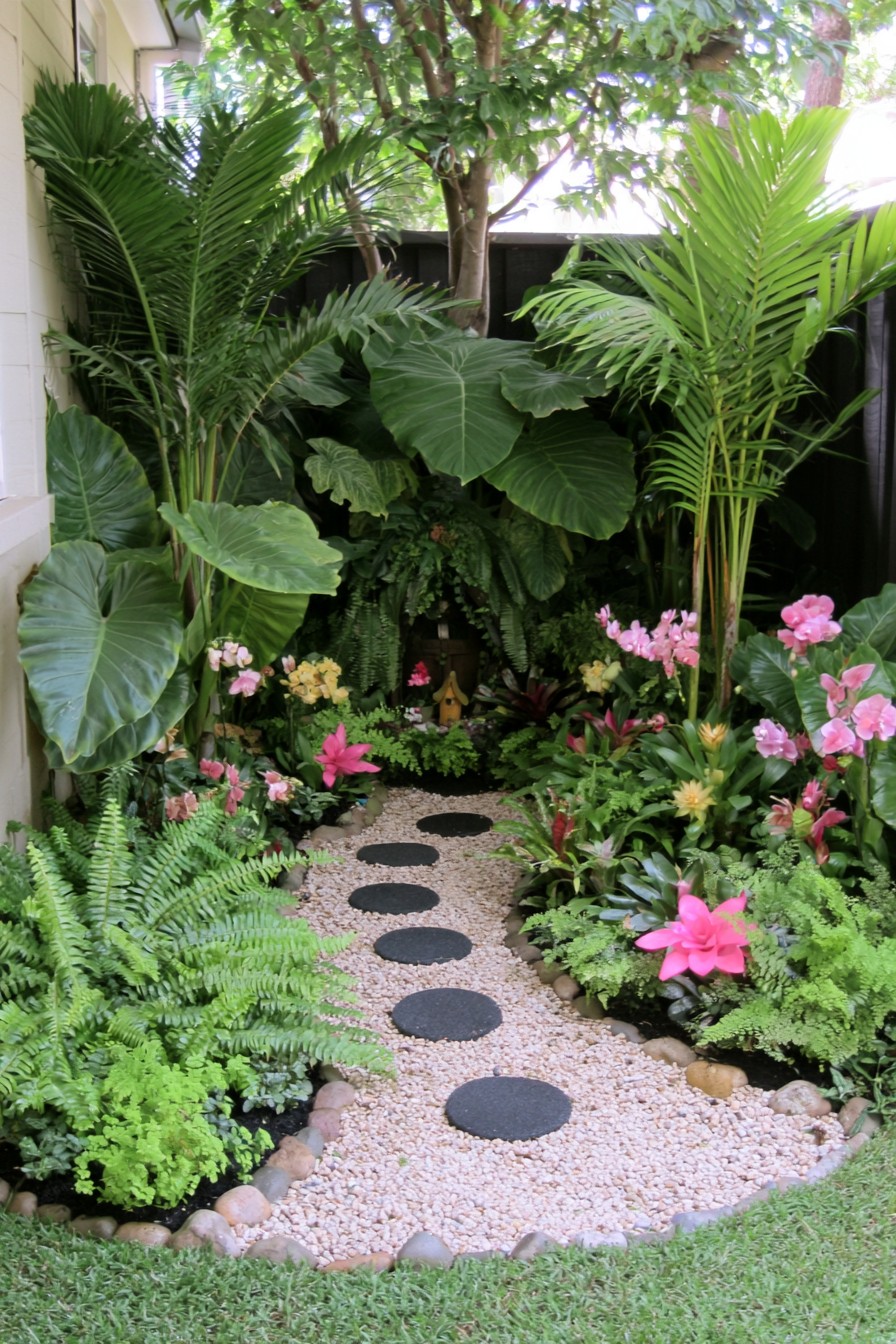
A curved line of pale stones and pebbles becomes the main graphic feature between dense foliage. The changing direction breaks a straight view and makes the garden feel longer, especially when the next section is partly screened by leaves. This is a strong visual idea for linking two planted areas.
Choose the surface according to the route’s job. Loose pebbles and gaps between stones can be awkward for small wheels or walking aids, even when the stones themselves look flat. A primary route may need a firm, continuous surface with the same curved outline. Preserve the layered planting beside it, but allow for mature leaf width so the curve stays usable. A short decorative spur can use a different surface from the everyday path.
10. Build a Secret Nook Around a Tiny Pond
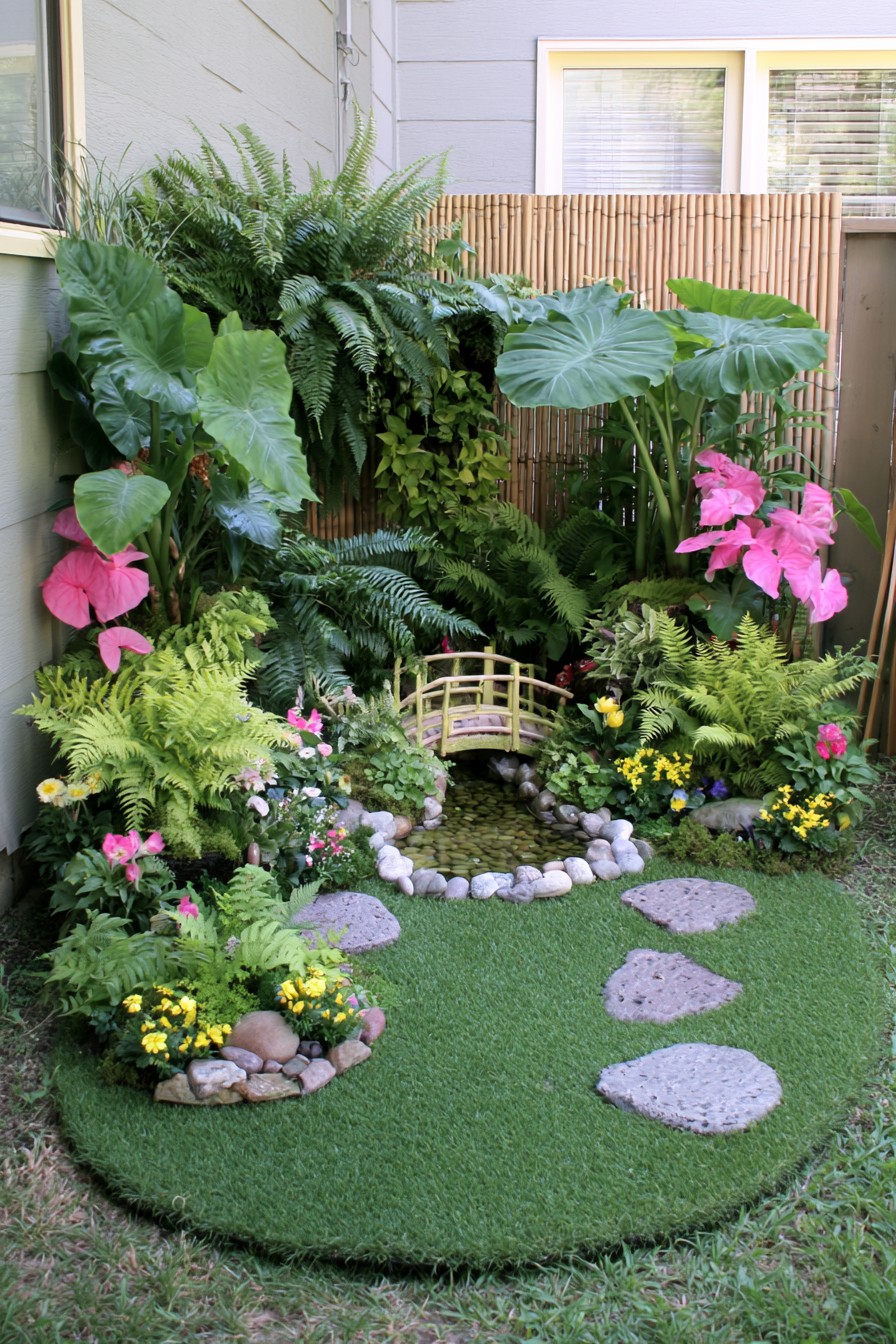
A tiny pond, pink-toned foliage, and a miniature bamboo-style bridge create a secluded scene at the end of a short approach. The water remains the center of attention, while the bridge gives it a storybook scale. It suits a viewing corner more readily than a place where people must cross the water.
Keep the small bridge decorative unless a separate design establishes a walkable crossing. The low bamboo-like edging also belongs to the visual composition; it should not be described as an access barrier. Where children may reach the water, effective access control and close supervision need to be planned before installing the pond. Choose a viewpoint from outside that boundary so the little scene can still be enjoyed without requiring visitors to stand at the water’s edge.
11. Frame a Fairy Pond with Colorful Tropical Planting
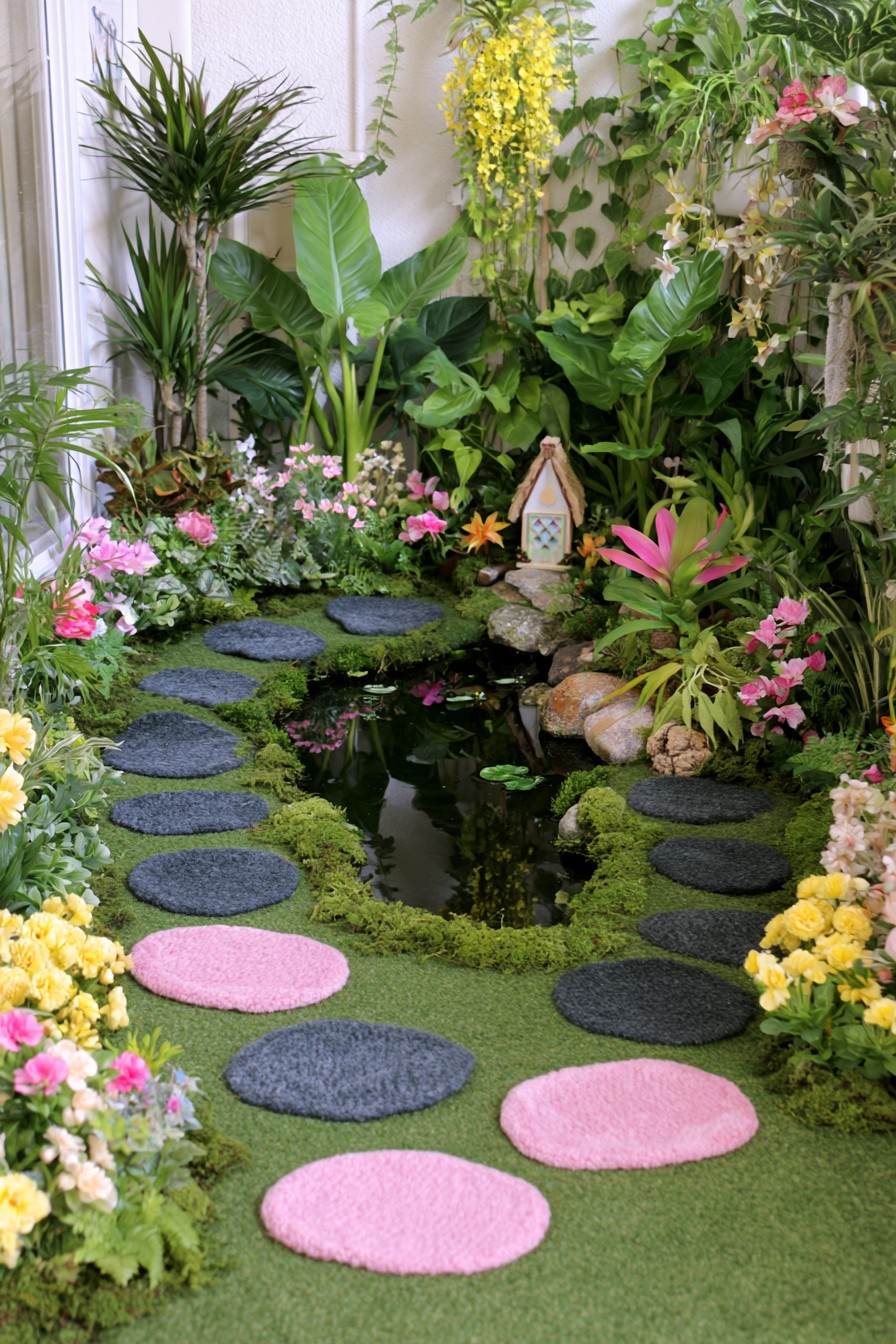
An open patch of water surrounded by varied leaves and small flowers creates a softer fairy garden than a heavily ornamented pond. Colored accents at the edge lead toward a miniature house, but the reflection remains visible. This arrangement suits someone who wants a planted water corner with a modest amount of decoration.
Decide whether the pond’s purpose is wildlife habitat, fish keeping, or moving-water display before selecting equipment. A wildlife pond does not inherently require a filter; a pump may be added to operate a fountain or cascade. Those choices have different care requirements. Position ornaments outside the areas needed for planting and cleaning, and leave part of the water unfilled by foliage so the pond retains its role in the composition.
12. Make a Decorative Storybook House the Garden Destination
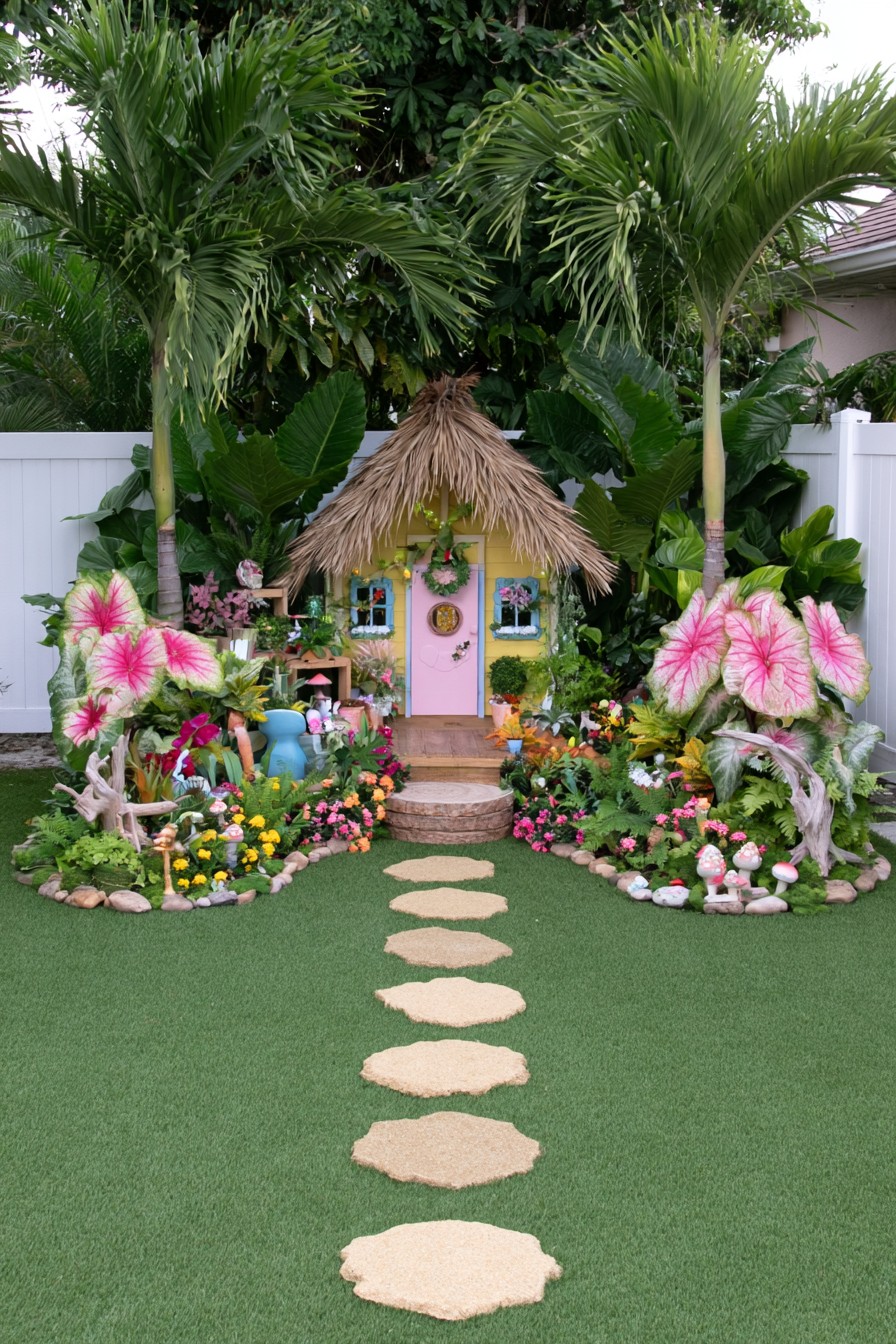
A decorative storybook house makes the end of the garden feel like a destination. Its pointed roof and colorful facade contrast with the loose shapes of large leaves, giving the route a clear visual finish. This is especially effective where a plain rear boundary would otherwise hold the view.
Select the house as an outdoor ornament, with a base that keeps it stable and allows removal for care. For a garden house intended for people to enter, start with a building design that provides suitable dimensions, access, and structural support. Put the house where the approach can be seen, then frame it with planting that will not bury the doorway detail as it grows. In a smaller bed, one miniature facade backed by foliage can provide the same destination effect with less space devoted to the prop.
13. Frame a Winding Path with a Flower Covered Arch
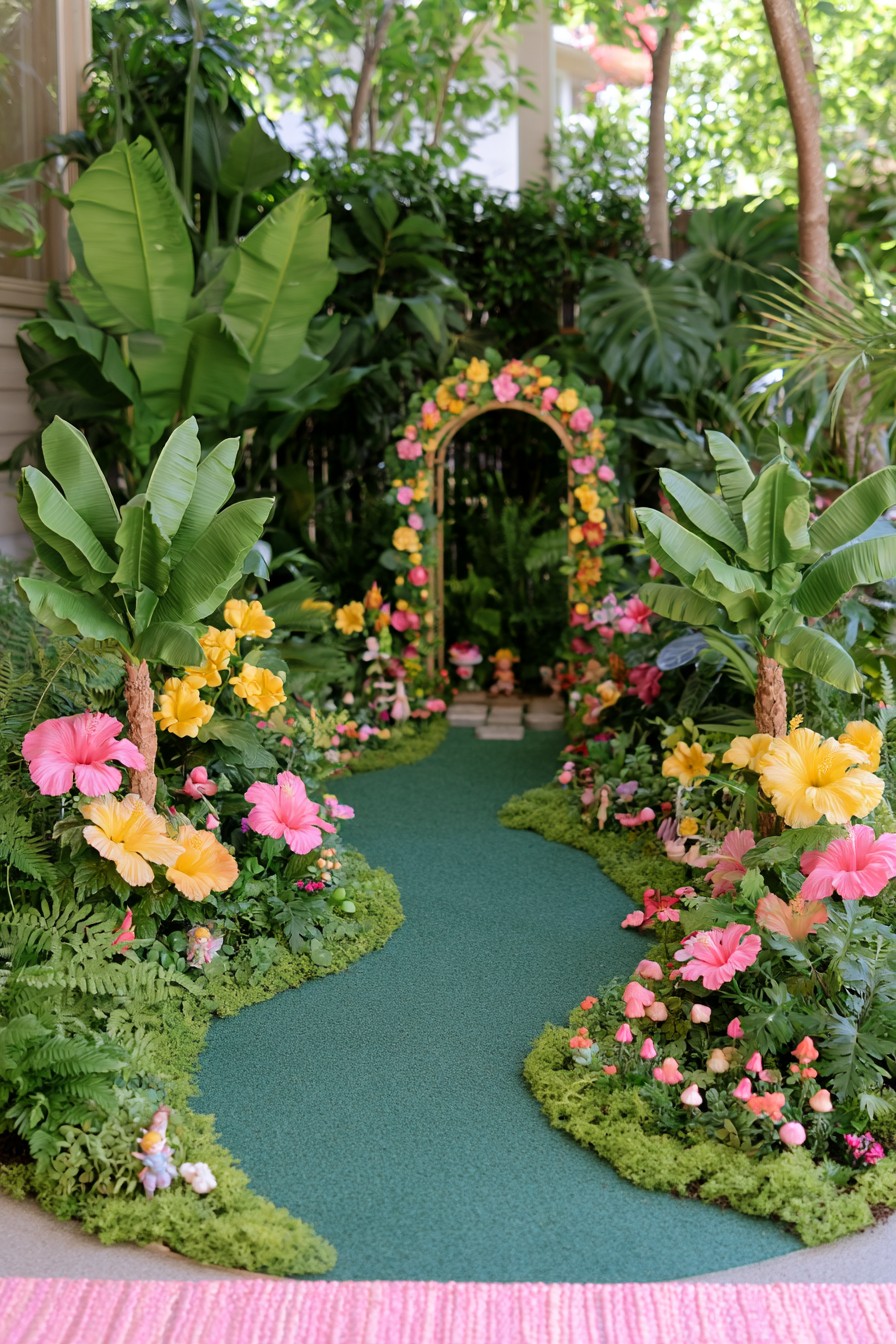
A flower-covered arch at the far end of a winding route gives the journey a visible goal. Tall leaves beside the path create enclosure, while the distant flowers mark where that enclosure opens. This differs from decorating the entrance: the arch rewards the view through the garden instead of announcing it from outside.
Choose whether flowers will be applied decorations or living climbers. Decorative flowers need appropriate outdoor materials and access for removal; living climbers need a support matched to their growth, plus space for tying in and pruning. Plan the structure independently of the plants. As the arch fills out, retain enough clearance beneath and beside it for the intended users, rather than letting its floral outline determine the usable opening.
14. Mark the Garden Entrance with a Tropical Flower Arch
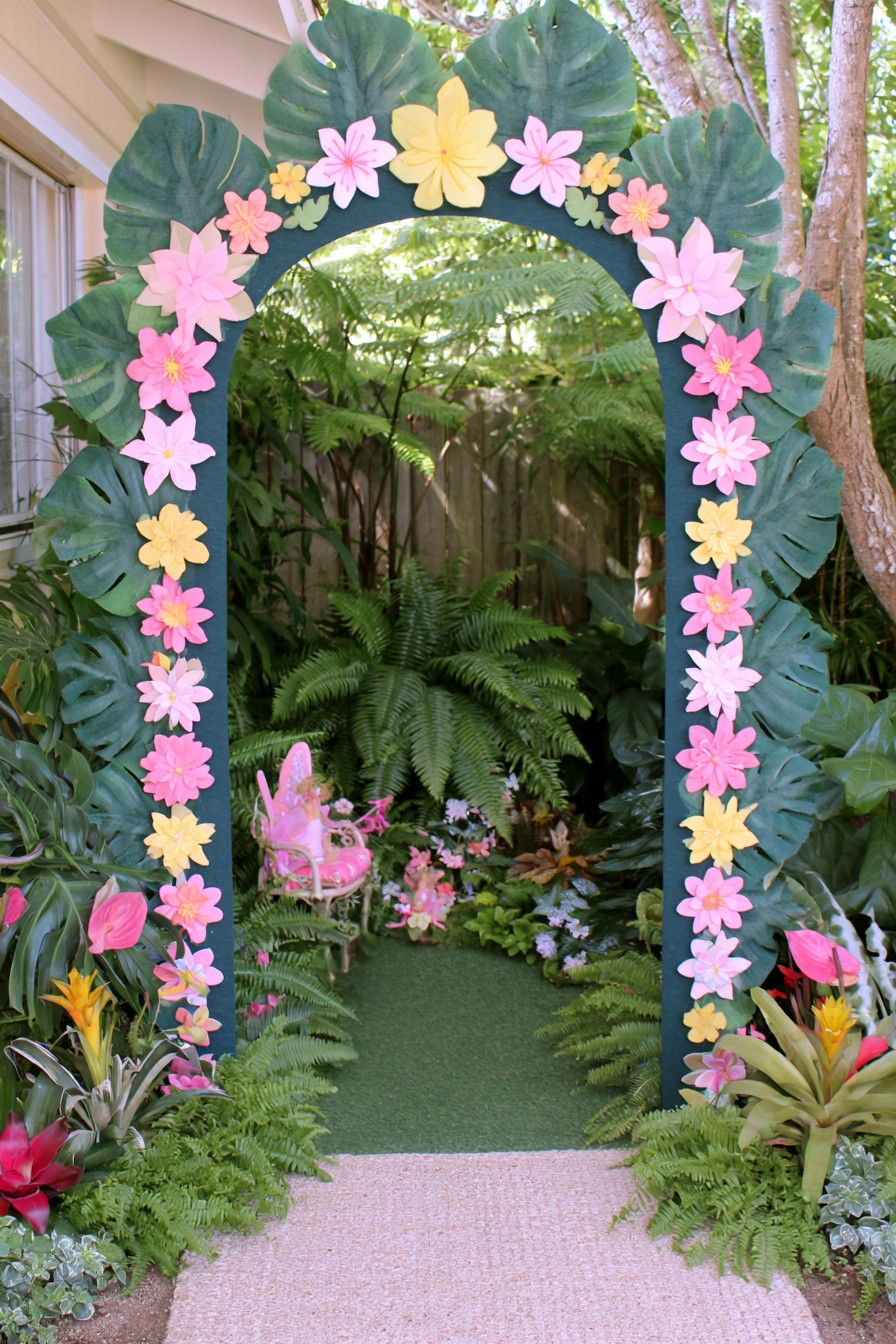
Large flower and leaf shapes around an entrance make the fairy theme visible immediately. The frame is the focal point here, with the path and greenery continuing behind it. It can suit a party entrance or a seasonal garden display where one theatrical element carries most of the theme.
The applied floral shapes suggest a decorative treatment, so their care differs from that of a living vine. Choose materials for the intended exposure and duration; paper-like pieces may need a sheltered position or removal before rain. Keep the clear opening independent of the decoration, and arrange projecting shapes away from passing shoulders. A smaller cluster on one side of an existing frame can retain the welcome without enclosing the entire entrance.
15. Create a Fairy Lagoon with a Mini Wooden Bridge
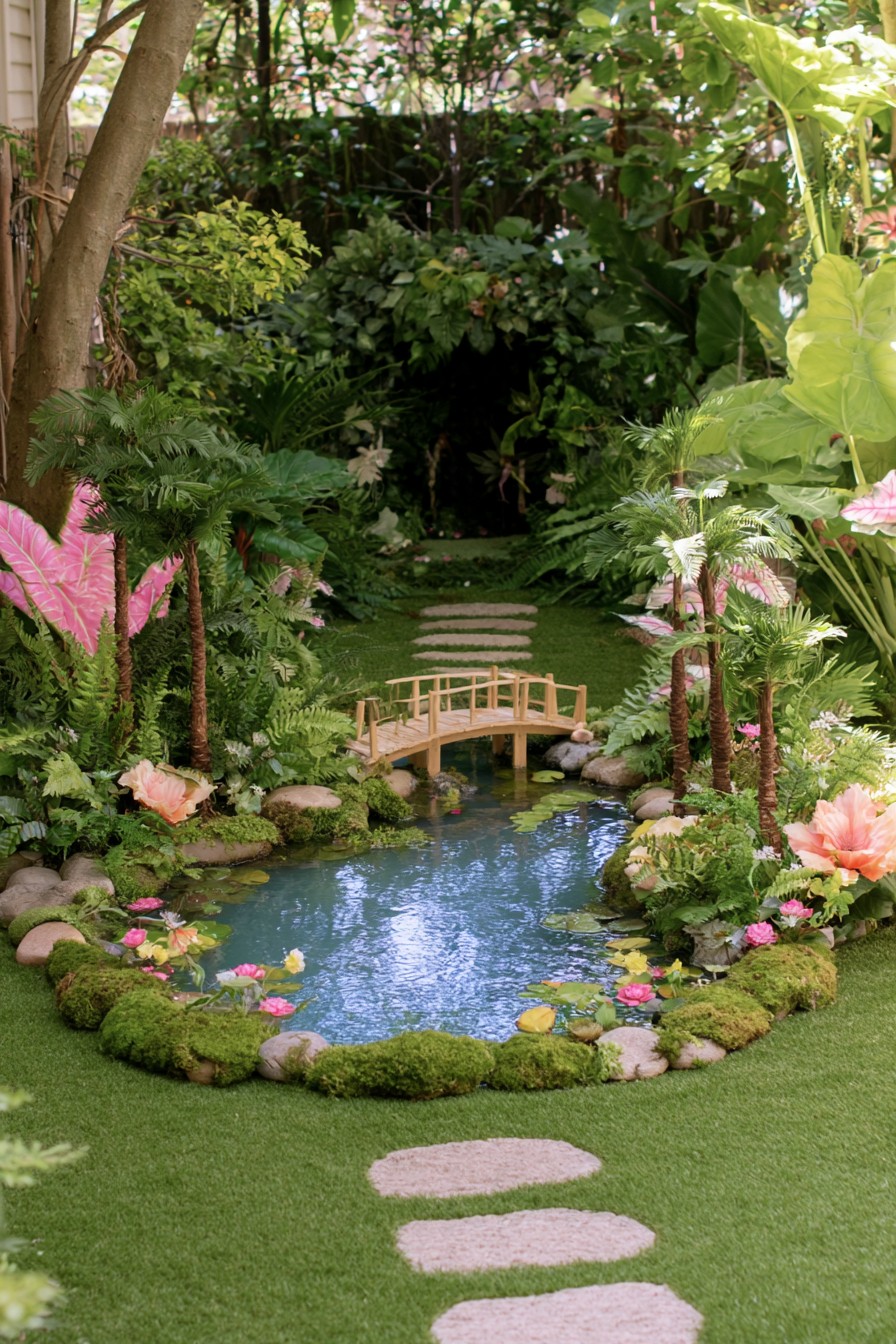
A larger pool of open water creates a lagoon-like pause between lush planting groups. A miniature wooden bridge at the far edge gives the scene scale, while the foreground remains relatively uncluttered. This idea is useful when reflections and a broad view matter more than a tightly packed collection of fairy props.
Protect that open-water view by keeping the tallest plants toward the sides and rear. Locate any actual walking route outside the planted edge, with a separate design for a crossing if one is needed. The little bridge can remain a visual accent. Before adding a lagoon, consider how its shape affects cleaning access and how nearby users will be kept away from the water when supervision is unavailable.
16. Add a Tea Terrace Inside the Tropical Garden
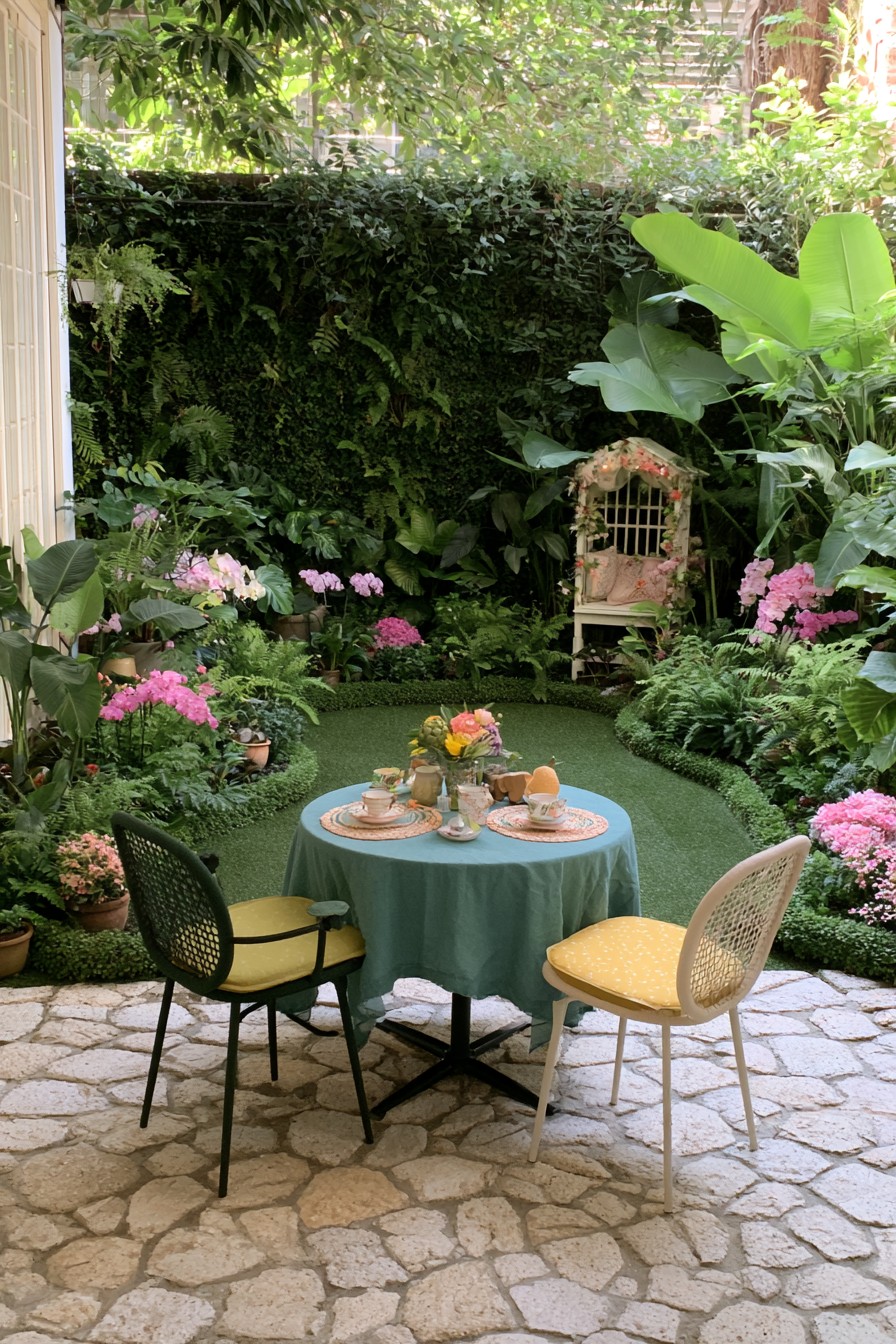
A paved tea terrace places regular seating within the planting, rather than using furniture mainly as a miniature scene. Chairs and a round table form a clear center, while large leaves and a distant fairy accent provide atmosphere. This suits a garden where people want to sit for longer periods, read, or share a drink.
Test the furniture arrangement before filling the edges with plants. Chairs need room to move back, the table must remain reachable from each seat, and the paving should support the furniture evenly. Position containers where watering will not repeatedly soak chair cushions or leave the seating approach wet. Keep the small fairy feature in the background, allowing the practical terrace and the layered garden to contribute equally to the experience.
17. Add a Tiered Fountain to a Tropical Fairy Corner
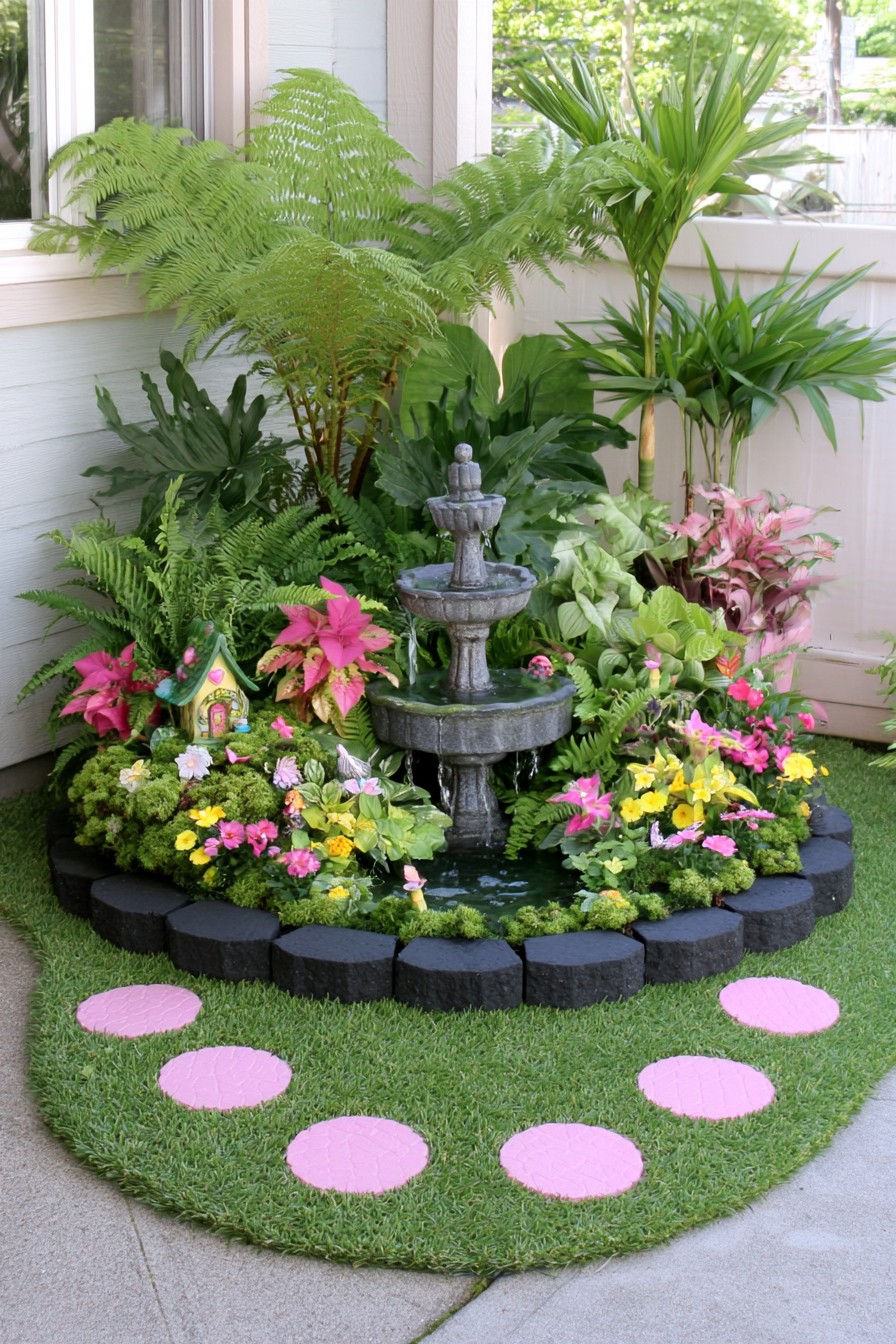
A tiered fountain concentrates sound and motion into one compact planted corner. Its stacked bowls add vertical shape among spreading leaves, so it can become a focal point without an extensive stream or lagoon. An open foreground lets the fountain’s outline remain visible from the nearby garden.
Choose a fountain system with accessible bowls, reservoir, and pump, then leave room to reach those parts when cleaning or checking water levels. Falling leaves can collect in the tiers, so placement beneath dense foliage affects maintenance as well as appearance. Follow the product’s filling and cleaning instructions instead of assuming every fountain operates the same way. Plant the surrounding bed after confirming that service access remains workable from the edge.
18. Turn a Narrow Patio Edge into a Tiny Fairy Walk
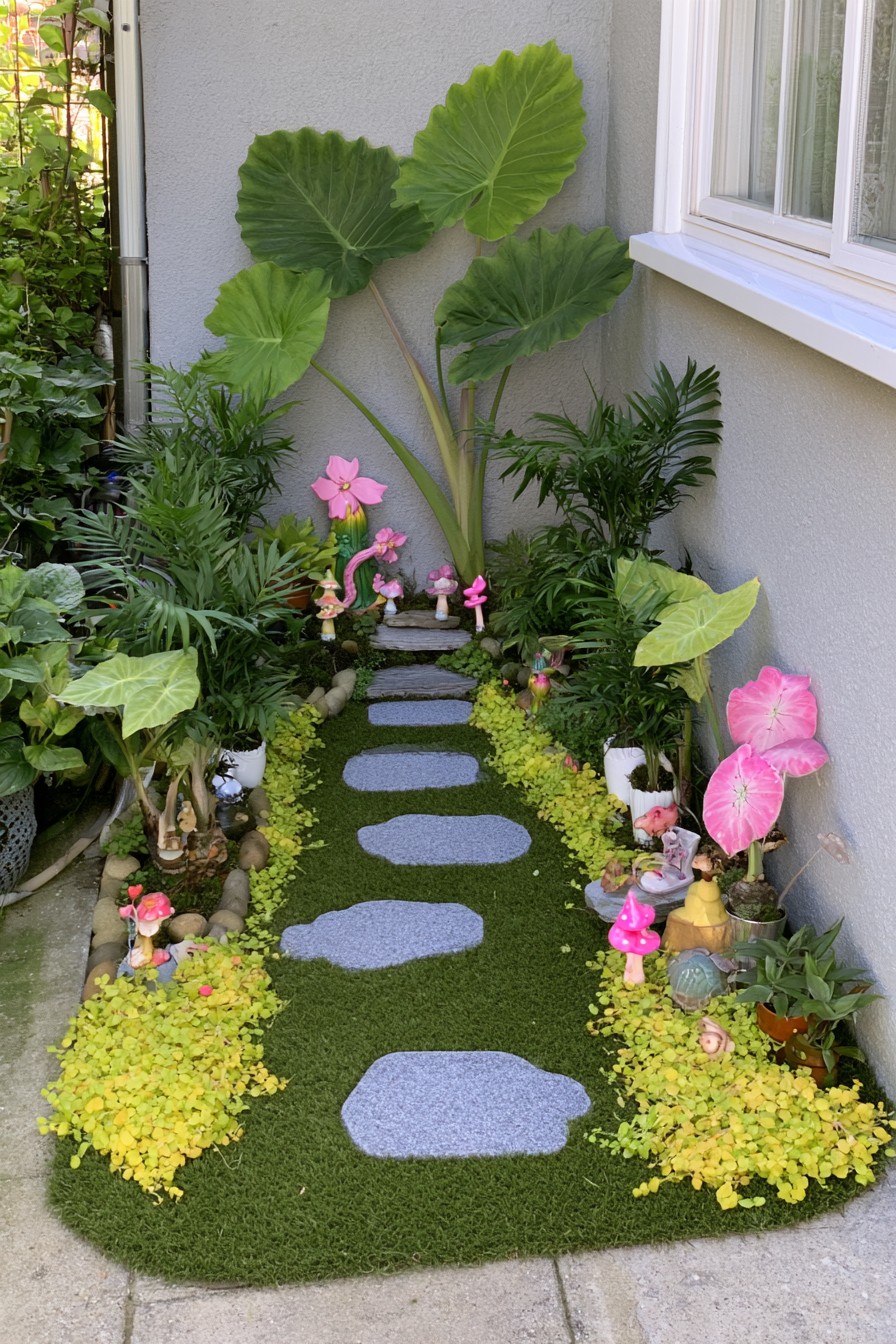
A slim strip beside a patio or house can carry a miniature garden approach, with a few stones drawing attention through the leaves. This creates interest along an otherwise plain edge, particularly where the feature is viewed from adjacent paving. Its decorative role should be distinguished from a route used to reach doors or services.
Flat stones alone do not make a narrow passage comfortable. For everyday access, consider gaps, the equipment carried through, and the width left once plants mature; the existing paved route may be the better surface. Keep the little stone sequence inside the display if it cannot meet those needs. Choose foliage with a manageable spread and leave wall fittings and inspection points accessible instead of hiding them behind the densest planting.
19. Build a Tropical Island Bed Around a Fairy Gateway
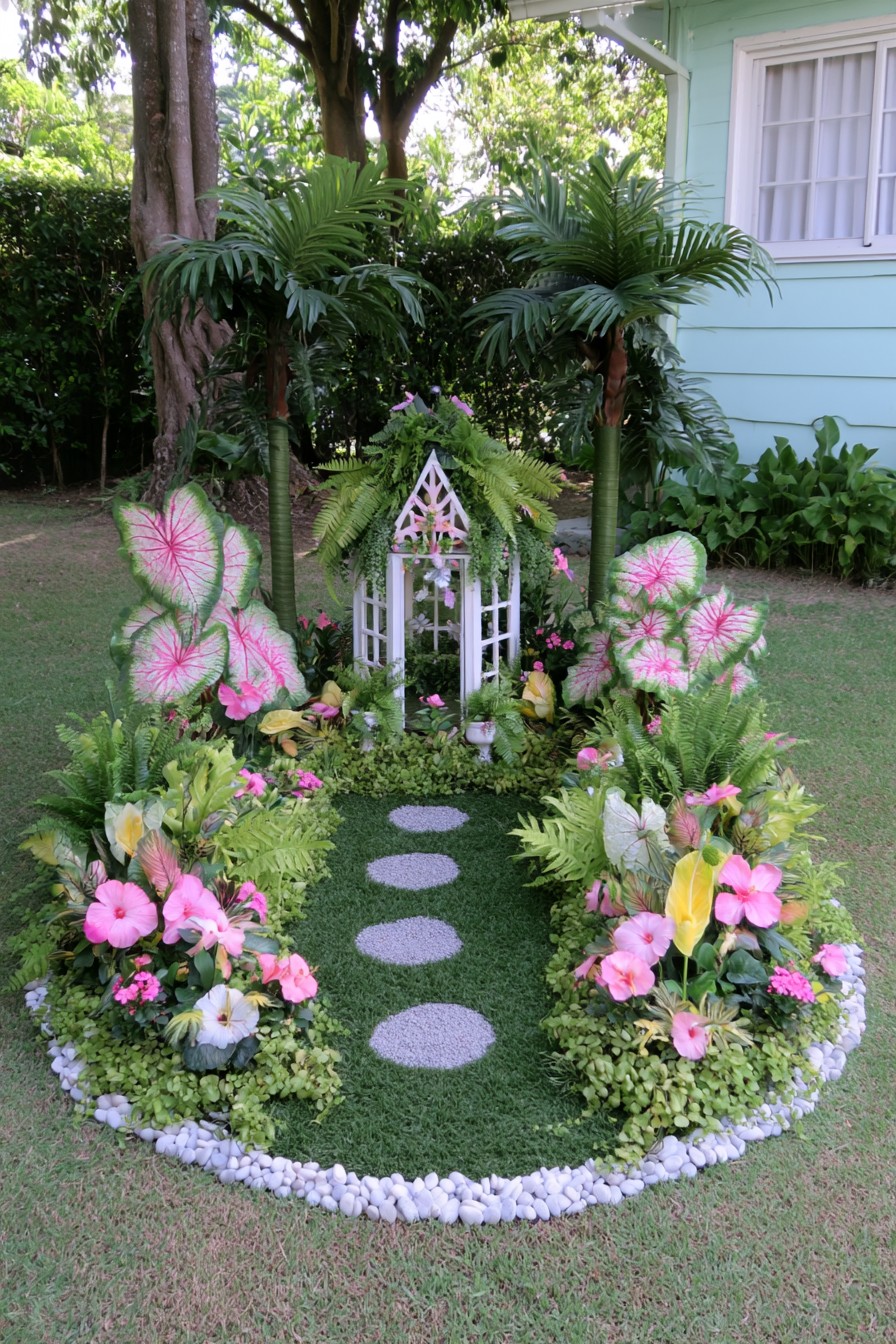
An island-shaped bed gathers colorful foliage around a small fairy gateway, creating a destination within an open lawn. The rounded edge separates the display from the surrounding space, while the miniature gateway gives the leaves a playful sense of scale. It works when the garden needs a focal point away from the house wall.
Mark the bed’s outline first and walk around it before planting. Retain a useful route to the rest of the garden, then put taller foliage toward the rear of the main viewing angle. The gateway is a decorative object, not an opening visitors need to pass through. A modest island using one upright plant and a lower foliage layer can establish the idea before a larger planting scheme is considered.
20. Soften a Patio Corner with a Small Water Feature
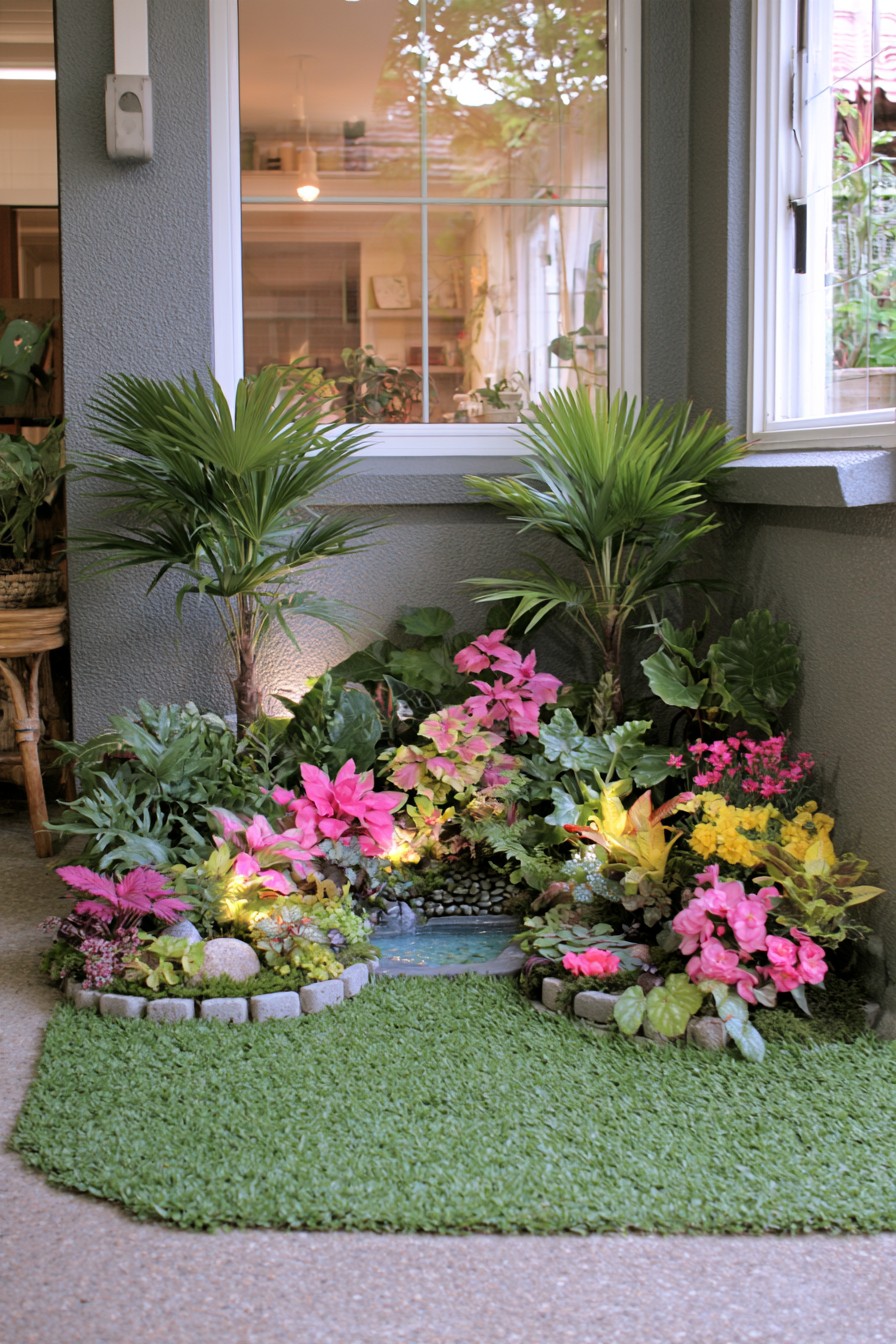
A water feature beside the patio connects a sitting area with the planted edge of the house. The basin is openly visible, so its reflections can be enjoyed from nearby seating. This layout is about the relationship between water, wall, and terrace, rather than concealing a pond deep within a border.
Check the view from the chair and leave space to clean the basin. Keep the wall accessible and direct splash away from the building and seat. Where digging is impractical, choose an above-ground water feature with a base designed for its filled weight.
21. Create a Compact Oasis with Layered Tropical Foliage
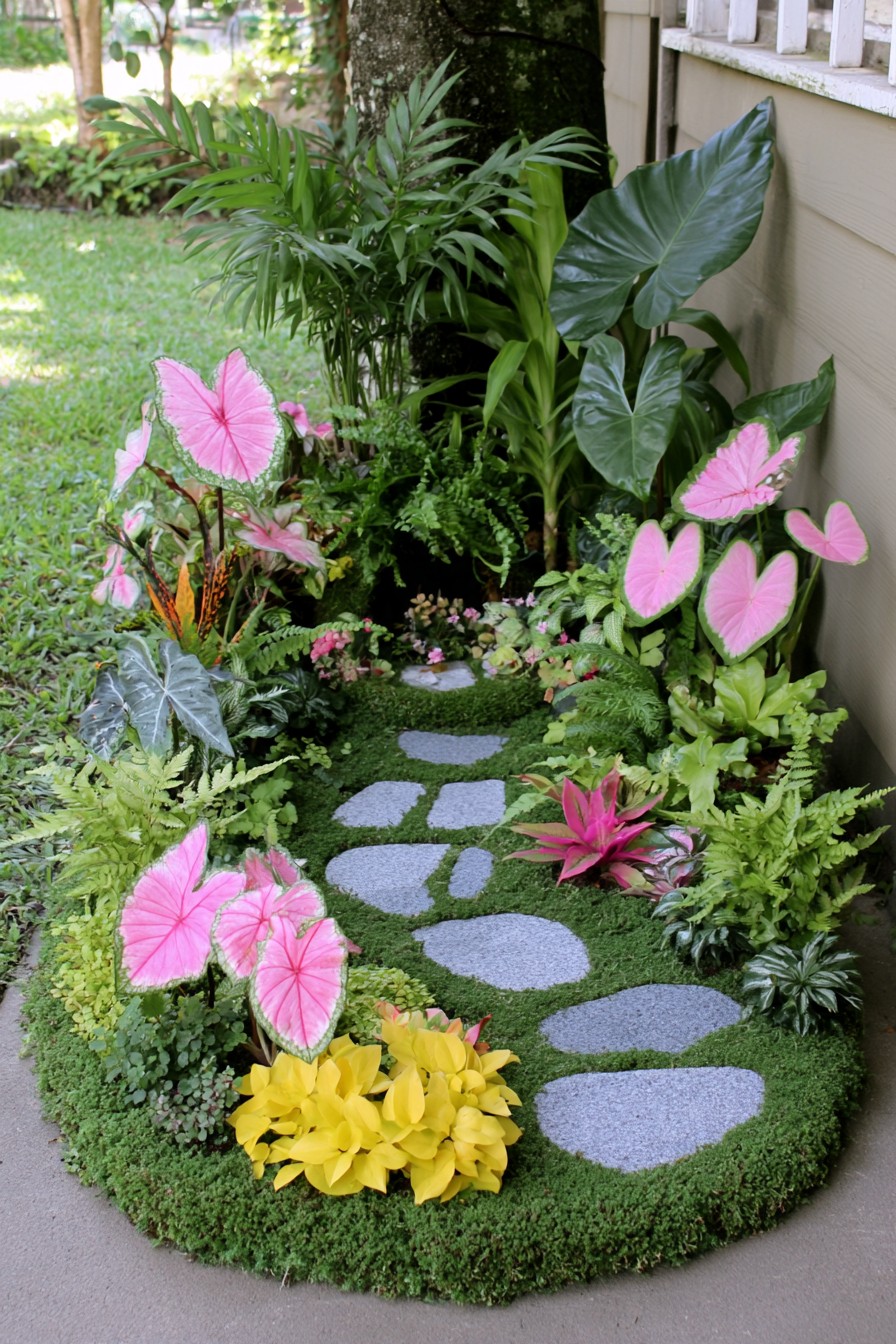
A compact foliage corridor gains richness from contrasting leaf size and color, with pink-toned leaves interrupting the green layers. Unlike the bamboo screen, this idea builds enclosure at several heights along a short route. It suits a narrow garden corner where a single tall backdrop would feel too flat.
Choose the largest plant for its eventual width, then use lower companions to fill the view without taking over the passage. Color can come from a few seasonal containers that are replaced or protected when conditions change. Place those pots where they can be removed without lifting other plants out first. Keep leaf tips away from the walking line and select the mix for the light actually available at each end of the corridor.
22. Shape a Polished Tropical Courtyard with One Fairy Accent
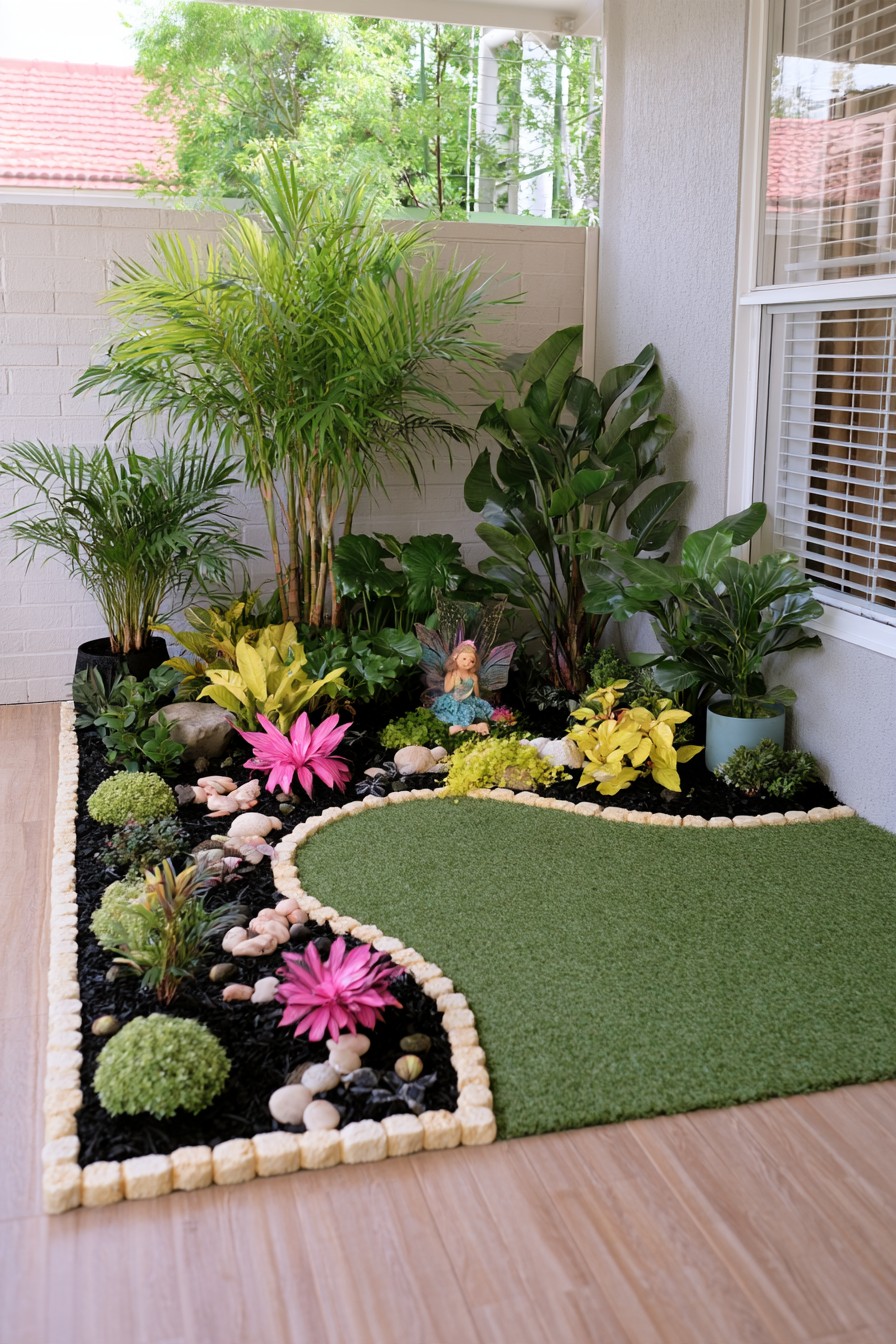
A sheltered courtyard can feel tropical through one tall canopy-like plant, a curved lower border, and an uncluttered foreground. A small fairy accent provides the storybook detail without competing with the courtyard’s architecture. This suits a semi-covered space where the planting needs to look deliberate from both indoor and outdoor viewpoints.
Check where rain actually reaches the soil and containers. Pots beneath the roof can stay dry while those near the open edge receive substantial rain, so they need separate moisture checks. Available light can also change across the courtyard. Select the main plant for both its height beneath the cover and its local winter needs. Keep the access area open, and use the curve of the bed to soften the hard surfaces.
23. Build a Decorative Fairy Alcove with Tropical Flowers
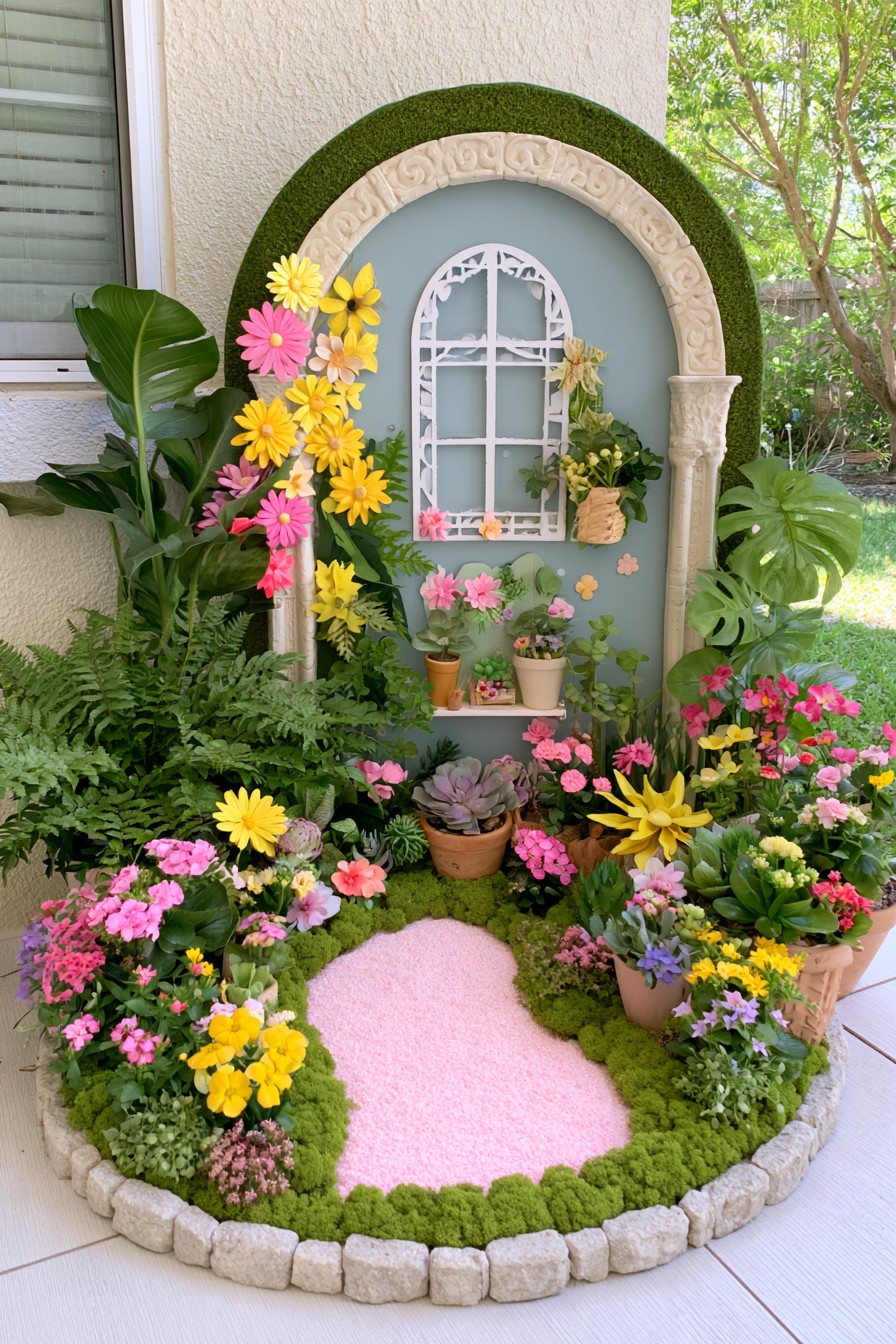
An arched decorative backdrop and a faux window turn a plain wall into a fairy alcove. A little pot shelf adds depth, while flowers and broad foliage connect the wall treatment with the bed below. The effect comes from the facade and planting together; it does not depend on creating a usable room behind the arch.
Plan the backdrop’s position before filling the foreground. Wall compatibility, the weight of the display, and access to the pot shelf affect whether the arrangement can be maintained comfortably. A freestanding decorative panel may offer an alternative where fixing to the wall is inappropriate, provided its support is properly designed. Keep plants and the colored pebble area within the display boundary, with a separate clear approach for tending the pots.
Video Inspiration: Layering an Arched Fairy Alcove
The sequence begins with an outlined bed beside a plain wall, then adds an arched backdrop, a decorative window detail, a small shelf, colored stones, and layered planting. It offers a useful order for visual planning: establish the background first, then place the features that project forward, and finally soften their edges with plants.
Mount a decorative facade on suitable outdoor supports, with its weight, wind exposure and maintenance access planned first. Keep the faux window as a surface detail and frame it with flowers suited to the location.
24. Reveal a Hidden Pond Through a Flowering Border
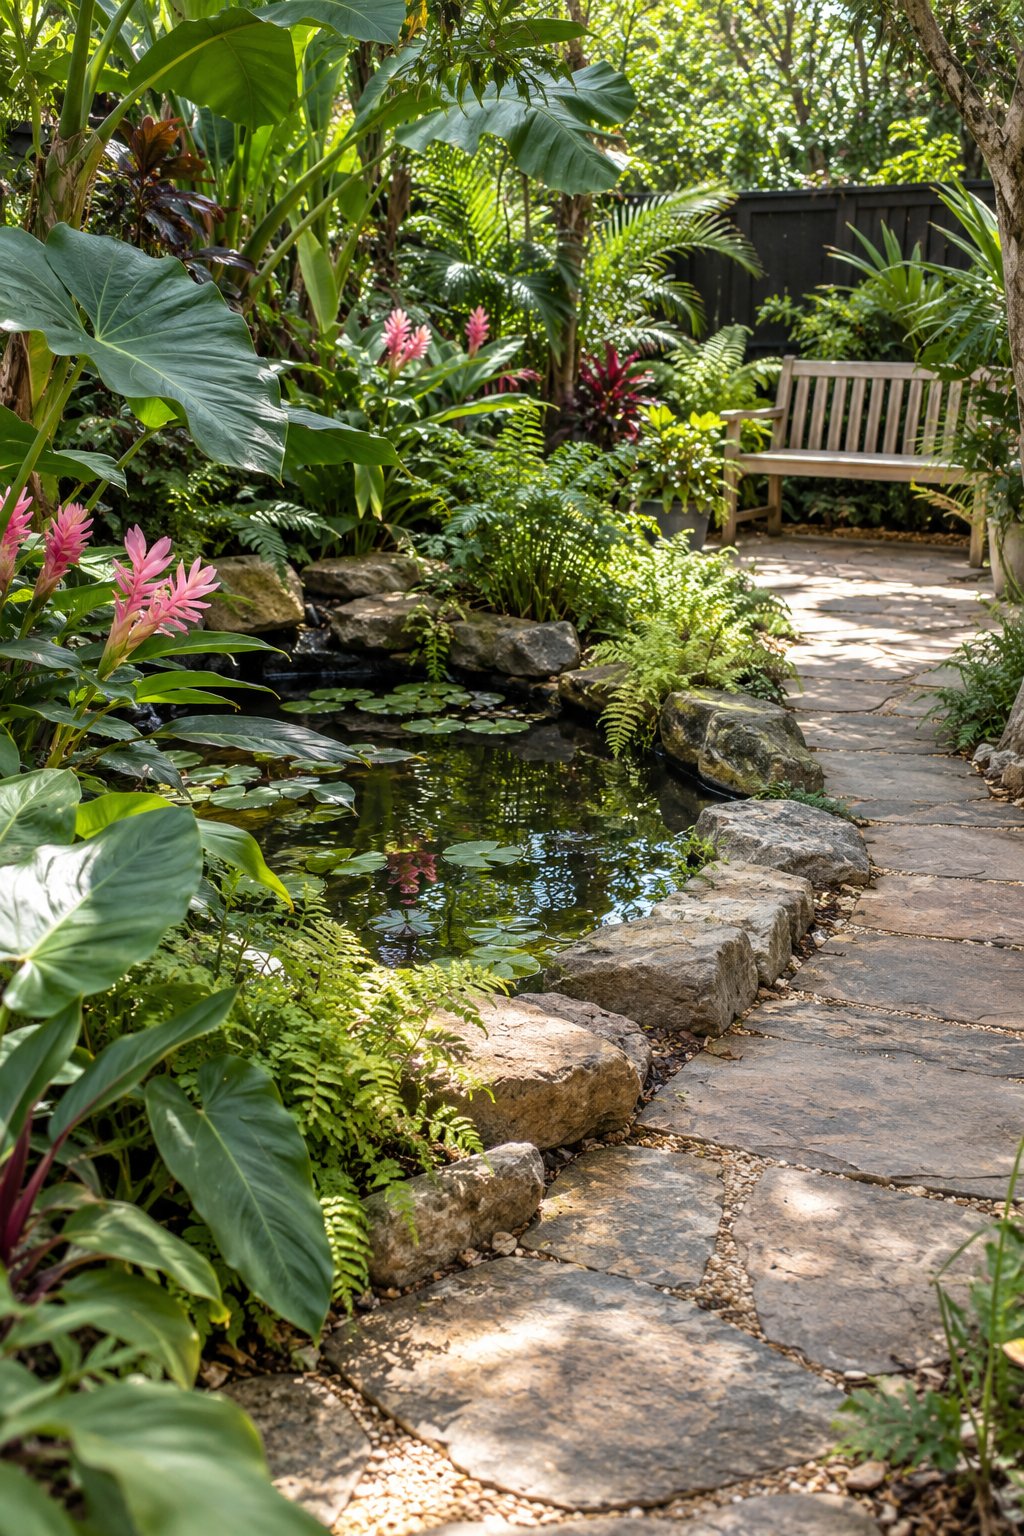
A pond partly screened by flowers creates a gradual reveal on the way toward a quiet seat. This flower-led interpretation differs from the openly displayed patio basin: nearby planting overlaps the water’s outline, while a portion of the surface stays visible. The sense of discovery gives the fairy theme depth without adding another miniature building.
For a tropical adaptation, combine climate-appropriate broad leaves with a softer flowering edge, choosing heights that frame the water from the approach. Visual concealment should still leave physical access: retain a reachable side for cleaning and tending the pond edge. Keep the route to the seat separate from that service space. Compare a secluded pond and seating arrangement to see how a planted border can join water and a destination without filling the foreground.
25. Brighten a Fence Corner with Colorful Tropical Foliage
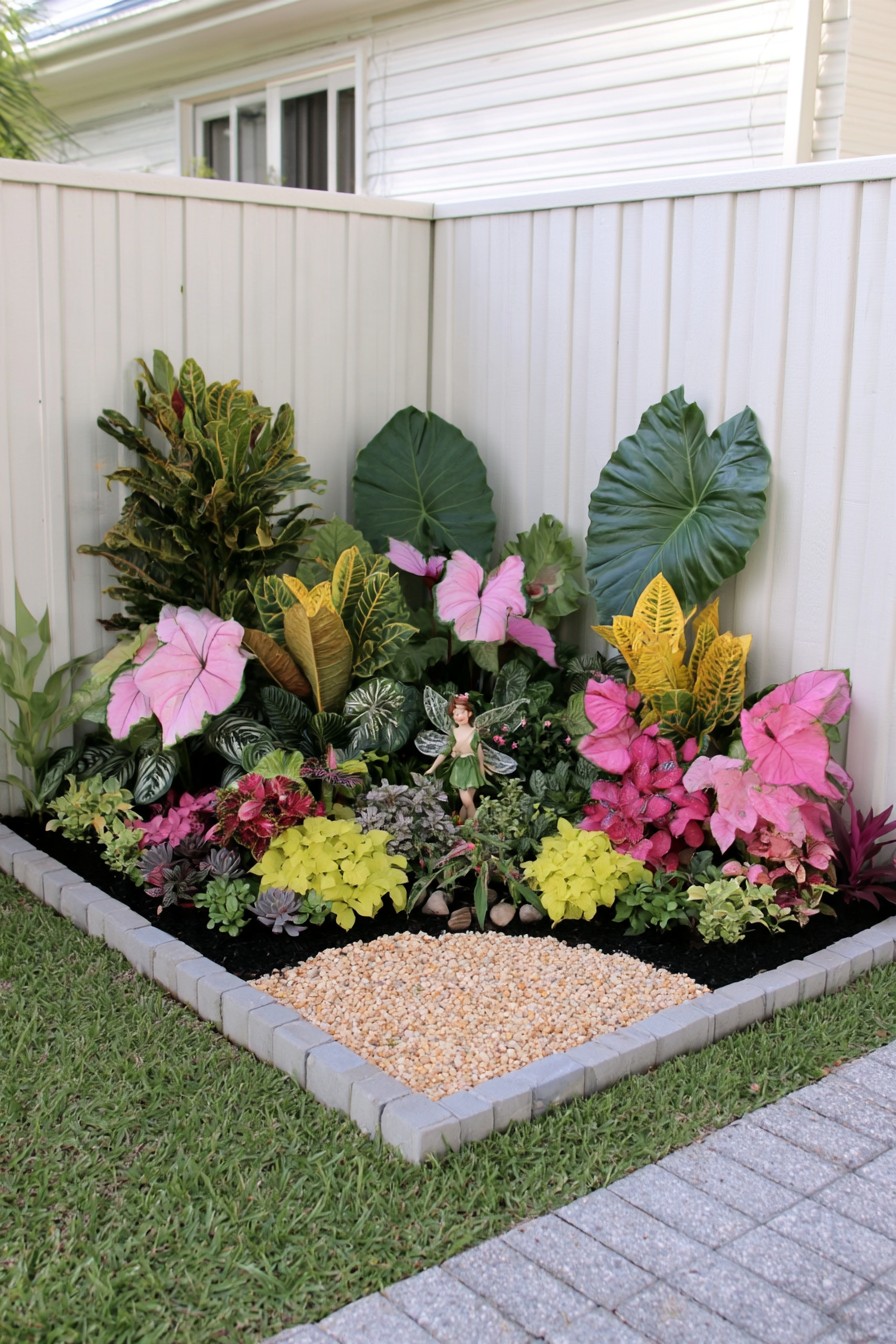
A fence corner becomes a colorful planting pocket when large leaves form the rear layer and lower pink, yellow, and green foliage fills the front. The small gravel area keeps part of the foreground open, helping the bed feel organized. This is a useful option when a plain boundary needs interest without another freestanding garden structure.
Choose plants by their mature spread as well as their color. Broad leaves can eventually press against the fence or conceal the gravel access area, so allow space to inspect the boundary and tend the back of the bed. In a cool climate, a hardy framework with a few removable tender pots can provide seasonal variation. Keep the fairy accent small enough that the planting remains the feature, and position it where it can be lifted out easily.
Video Inspiration: Turning a Fence Corner into a Planting Bed
The clip shows a corner being outlined and cleared, followed by soil preparation, a stone boundary, an open gravel patch, and planting arranged from larger leaves at the back to lower color near the front. Its useful lesson is the relationship between the planted area and the small access space, not simply the final combination of colors.
This compressed sequence does not supply planting depths, a drainage assessment, or reliable species identification. Use the layering as inspiration, then choose plants for the corner’s light, local climate, and mature dimensions. Keep the foreground access visible as the bed grows.
26. Make a Small Fairy Garden Feel More Expansive
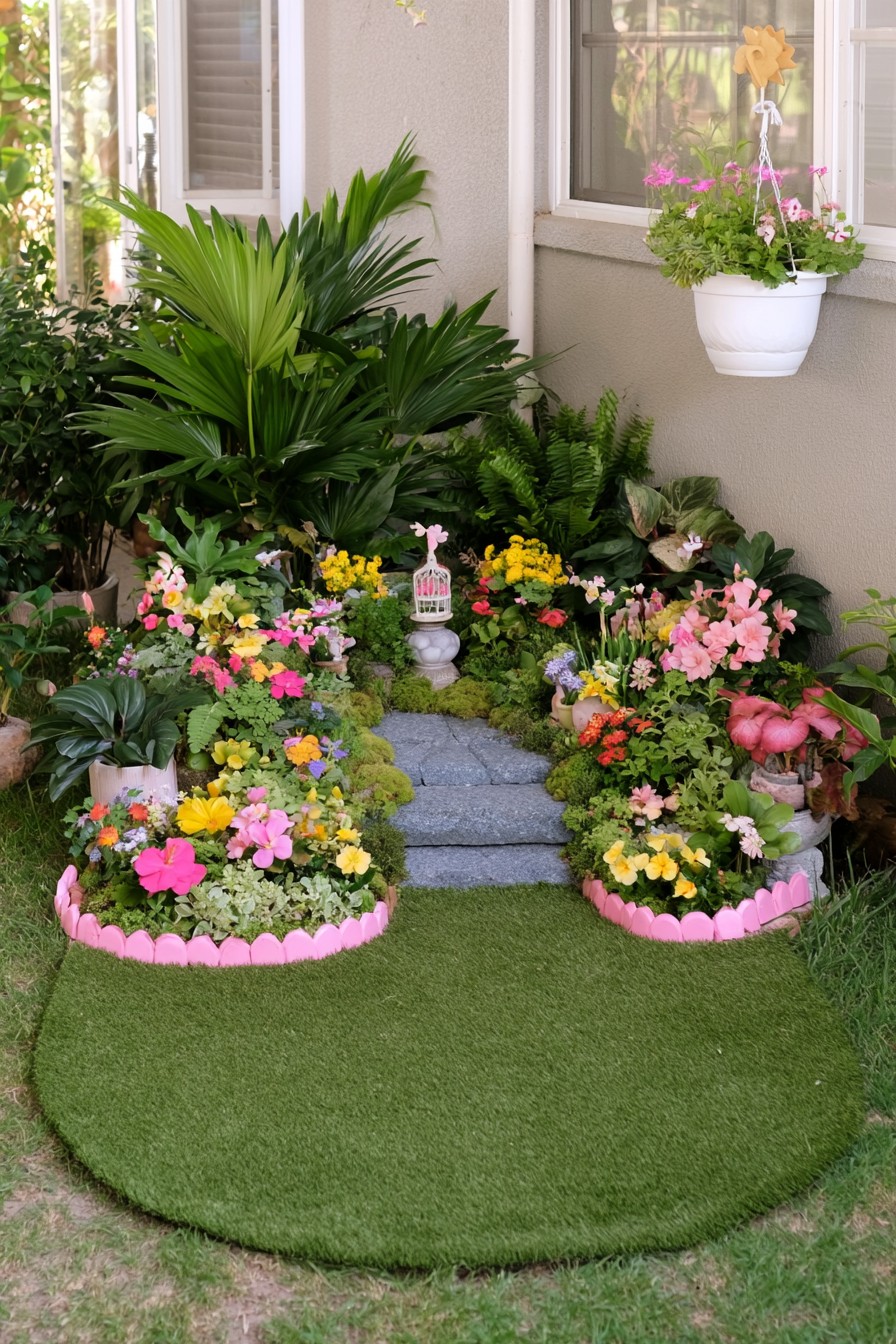
An open foreground makes a small planted garden feel deeper. Taller foliage at the rear and flowers along the sides frame the view toward the raised background, leaving the center visually quiet. This differs from the vertical stump display: the main effect comes from space between the planted layers, not from a single tall object.
Resist filling the open area simply because more ornaments will fit. Use it to preserve the main view and the access needed for tending the side beds. The background steps should be considered as an existing circulation feature, with planting kept away from the usable edges. A few repeated flowers can connect both sides of the scene, while one discreet fairy detail provides the theme without interrupting the depth created by the clear foreground.
Keep the Garden Magical as It Grows
Choose one role for the first change: a better route, a planted screen, a place to sit, or a water focal point. Mark its footprint and maintenance space before buying the decorative pieces. Then select the planting for that position, including where tender pots will go when the growing season ends.
As the garden develops, look for leaves narrowing the paths, plants hiding service access, and containers drying differently beneath shelter. Clean fountain bowls and reachable water edges according to the system’s needs, inspect retained timber and decorative supports, and lift out seasonal ornaments before they obstruct pruning or winter care. The fairy effect lasts longer when discovery comes from a manageable layout rather than from inaccessible corners.

Leave a Reply