
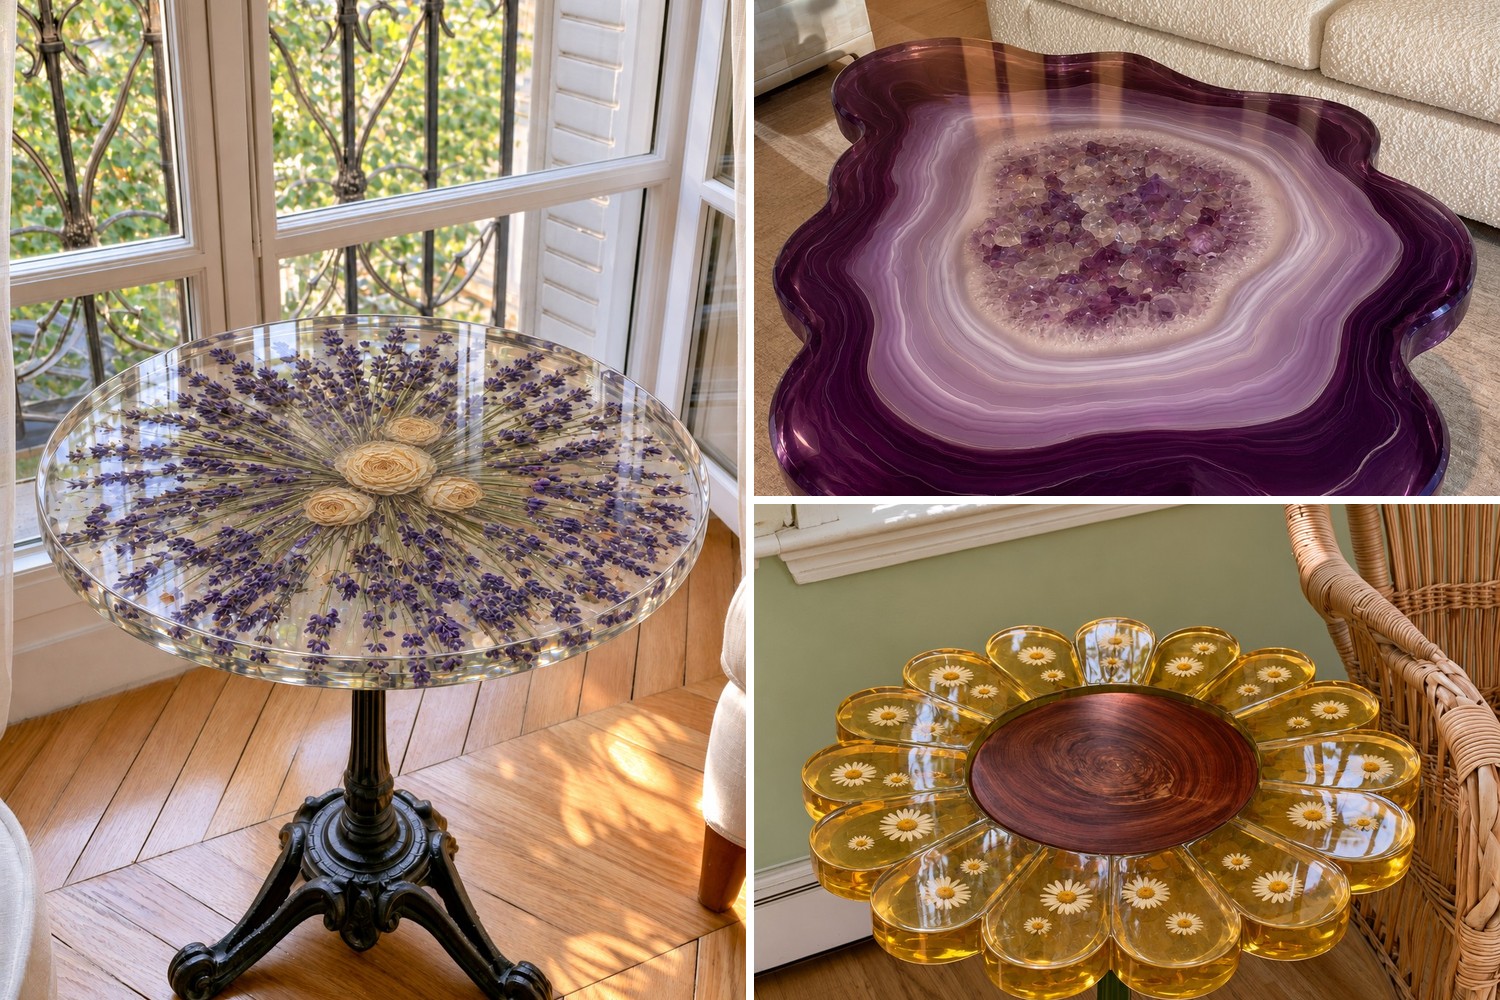
A resin table is really two projects in one. There is the casting itself, a slab of clear or tinted epoxy that can hold pressed petals, coffee beans, broken china or crushed amethyst, and there is the furniture around it: legs, a pedestal, a frame that has to carry the weight without wobbling. Get both right and you end up with a piece that catches the light differently every hour of the day.
The 47 resin table ideas below cover bedside tables, coffee tables, dining tops, children's furniture and a few sculptural pieces shaped like flowers, planets and even a pair of lips. Each one explains what the table brings to a room and which detail makes it work, so you can borrow the method even if your design ends up completely different.
Table of Contents
- Before You Pour a Resin Table
- Which resin does a table need?
- How do you build the mold?
- What can go inside, and how should it be prepared?
- How long does it take to cure?
- How do the legs attach?
- Living with a resin surface
- Clover Bedside Table with a Preserved Bridal Bouquet
- Daisy Ring Side Table with a Wooden Heart
- Jigsaw Puzzle Play Table for a Children's Room
- Walnut Chess Coffee Table with Emerald and Gold Squares
- Coffee Bean Bistro Table with a Copper Band
- Maple Leaf Side Table with Real Autumn Foliage
- Fly Agaric Mushroom Stool Table
- Amethyst Geode Coffee Table with Floating Acrylic Legs
- Herringbone Wine Cork Side Table
- Saturn Table for a Space Themed Bedroom
- Nautilus Shell Table in Pearl and Blush
- Pocket Watch Coffee Table with Brass Legs
- Lily Pad Nesting Tables on Brass Legs
- Wildflower Meadow Coffee Table on a Rustic Oak Base
- Champagne Glitter Nesting Side Tables
- Blue and White China Mosaic Kitchen Table
- French Provincial Nightstand with a Rose Petal Top
- Olive Branch Dining Table in Mediterranean Style
- Triple Lobe Console with Pressed Flowers and Skeleton Leaves
- Evil Eye Mosaic Coffee Table
- Succulent Rosette Balcony Table
- Snowflake Coffee Table in Icy Blue
- Hydrangea Petal Oval Dining Table
- Iridescent Cloud Table for a Little Girl's Room
- Alphabet Activity Table for Early Learners
- Parisian Lavender Bistro Table
- Spa Coffee Table with River Stones and Hydrangea
- Pink Blossom Garden Table with a Golden Center
- Pansy Shaped Patio Table
- Hibiscus Flower Side Table for a Tropical Patio
- Set of Dahlia Pink Side Tables
- Retro Amber Cloud Table with Floating Dots
- Minimal Clear Triangle Table on a Pyramid Base
- Lightning Bolt Table for a Kid's Room
- Pop Art Red Lips Side Table
- Bumblebee Side Table with Translucent Wings
- Red Marble Resin Table on a Wrought Iron Base
- Red and Black Organic Edge Side Table
- Malachite Green Table with an Agate Center
- Chunky Pink Bubble Table with Pillar Legs
- Deep Purple Resin Table with Silver Leaf Flakes
- Rose Gold Flake Nightstand with Crossed Legs
- Lilac Cloud Table with a Glittering Edge
- Gothic Red Coffee Table with a Black Iron Cross
- Fern Pedestal Table for a Sunroom
- Blue Agate Dining Table with Gold Veins
- Confetti Terrazzo Coffee Table
- Working Safely with Epoxy Resin
Before You Pour a Resin Table
Which resin does a table need?
Tables usually call for two products. A deep pour casting epoxy forms the body of the slab, because it cures slowly and stays cool enough to be poured thick. Slow formulas typically allow about 5 cm (2 inches) per layer, but the safe depth is always the one printed on your label, and going past it can make the resin overheat, crack or turn yellow. A thicker table top or coating epoxy is the finisher: it is poured only 3 to 6 mm (1/8 to 1/4 inch) thick, levels into a hard glossy skin and protects the surface from daily wear. Measure both parts exactly as the maker states, by weight or by volume, then stir slowly for the full mixing time while scraping the sides and bottom of the bucket.
How do you build the mold?
For straight sided tops, a box of melamine board works well. Seal every seam inside and out with pure silicone caulk, cover the inner surfaces with sheathing tape or a release agent, and set the box perfectly level on a surface that will not sag under the weight. Molds made from HDPE plastic release cured epoxy without tape or wax, so they are worth buying if you plan several tables. Curved outlines such as clouds, petals or leaves can be formed with a flexible plastic strip screwed around a melamine base and sealed with silicone, while small shaped tops come out cleanly from ready made silicone molds.
What can go inside, and how should it be prepared?
Anything that holds water will eventually spoil a casting. Fresh petals, leaves and fruit cloud the resin, release bubbles and brown or rot over time, so flowers are dried in silica gel or pressed flat first, and a petal is ready when it feels like tissue paper. Porous pieces such as dried flowers, wood, cork and stone hold air, so they get a thin brushed coat of resin or a clear spray sealer before the main pour. Paper prints need clear drying decoupage glue on both sides to stop dark wet patches. Light objects float, so glue them down or press them into a thin layer that has started to thicken, then cover them with the next pour. If you have only cast small pieces so far, our resin coaster projects show the same layering on a scale that is easy to practice.
How long does it take to cure?
Plan on a week, not a weekend. Deep pours often need two or three days before they can come out of the mold and keep hardening for a week or more after that. A table top coat feels dry within about a day but needs several more before it can take hot mugs and heavy books. Keep the room around 21 to 24°C (70 to 75°F) and cover the pour against dust. Once the slab is fully hard, level the faces with a sander starting near 120 grit and working gradually finer, then either polish to a shine or pour a thin final coat.
How do the legs attach?
Ordinary wood screws do not grip resin well. Threaded metal inserts set into the underside of a thick slab, or into a hidden wooden subframe, let you bolt legs and mounting plates on securely and take them off again when you move house. Thin tops and very heavy ones are happier sitting on a frame or pedestal with a wide plate beneath them. Whatever the base, check that it is rated for the weight, because a solid resin top is much heavier than glass of the same size.
Living with a resin surface
Cured epoxy shrugs off water, yet strong heat can soften it, and a hot pan or a mug straight off the stove can leave a ring once the surface passes roughly 55 to 60°C (130 to 140°F). Coasters and trivets solve that. Direct sunlight is the other enemy: it slowly yellows and dulls clear resin, so choose a UV stable formula for anything near a bright window and keep outdoor pieces under a roof or a cover. For cleaning, a soft cloth with mild soapy water is enough.
Clover Bedside Table with a Preserved Bridal Bouquet
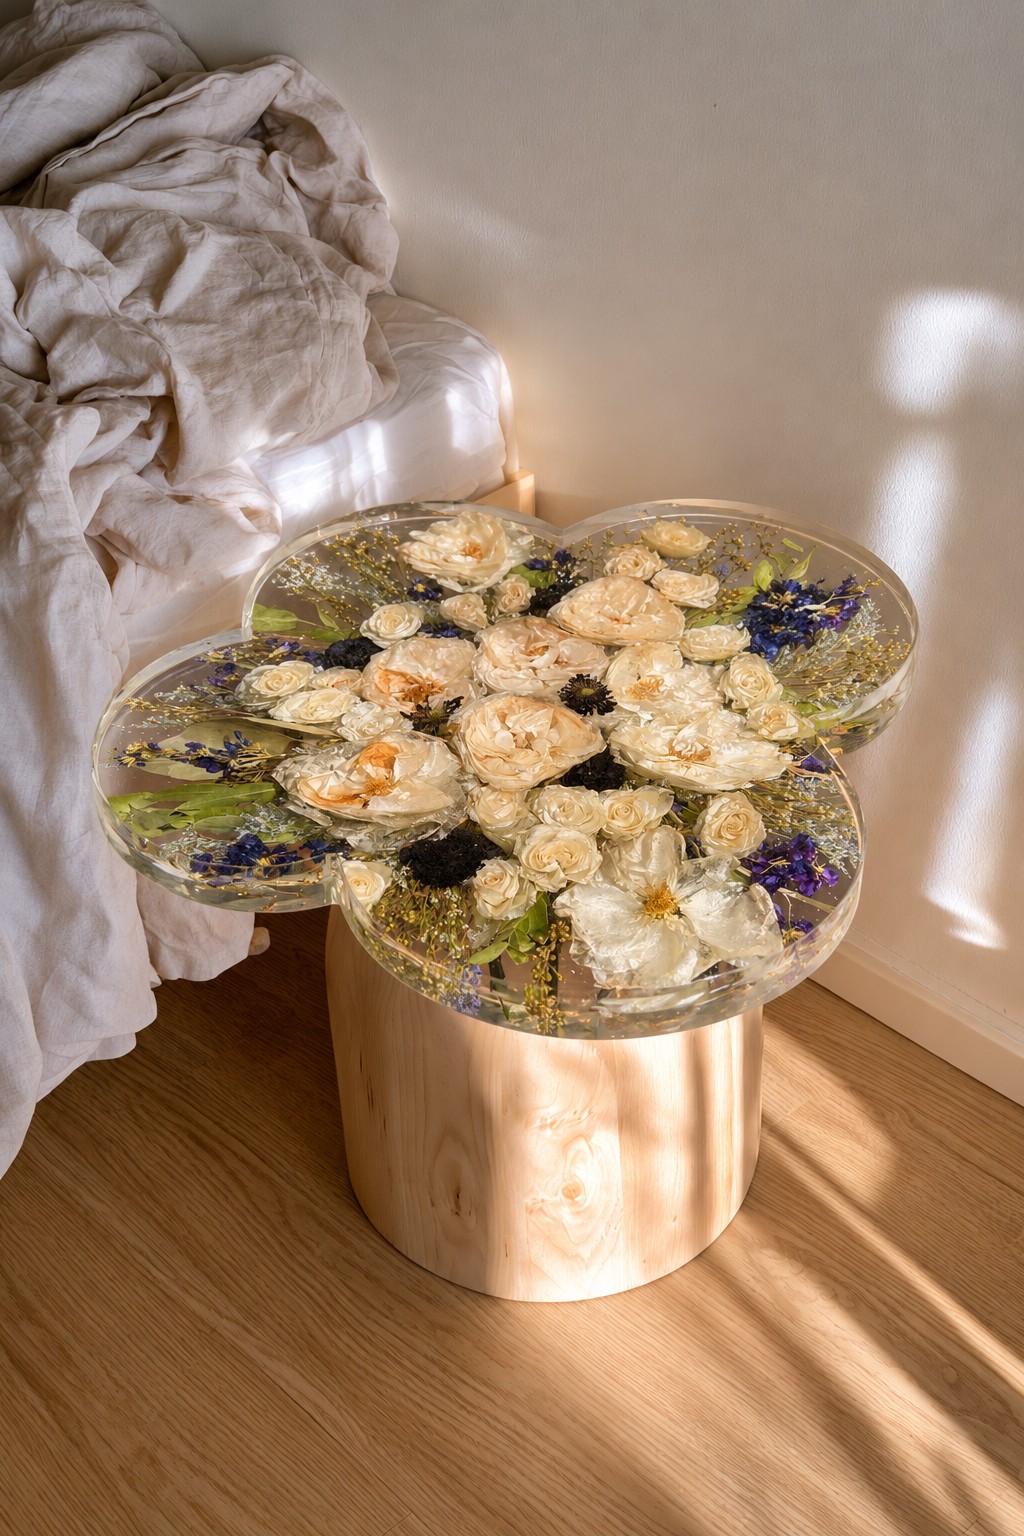
White garden roses, spikes of blue larkspur, dark scabiosa pods and clouds of baby's breath fill this four lobed clear top, which sits on a plain pale wood cylinder beside the bed. It is the kind of table people make to keep a wedding bouquet, and the soft white and blue palette suits a calm bedroom with linen bedding.
Fully rounded roses are the challenge here. Bury them in silica gel until the petals feel papery, seal them with a light resin spray, then build the casting in several deep pour layers so each bloom is locked into place before the next pour rises over it. Lay the flowers face up at different heights rather than all on the floor of the mold, and the bouquet looks as if it is floating.
Daisy Ring Side Table with a Wooden Heart
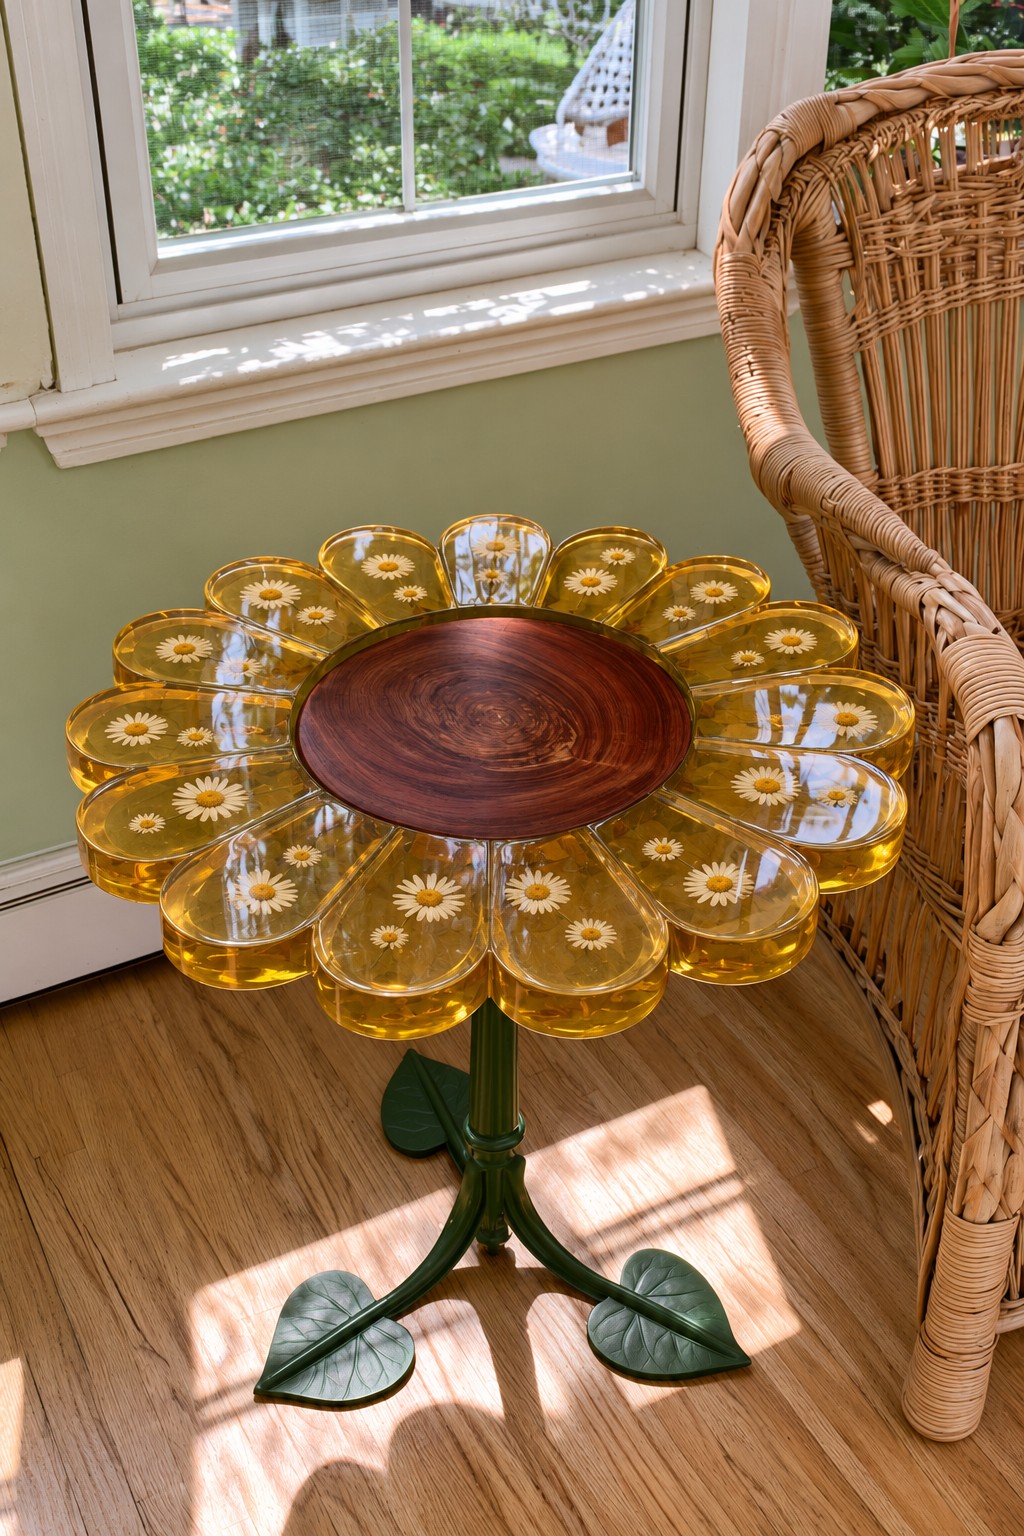
A full ring of rounded petals in honey yellow resin, each holding a few pressed daisies, circle a polished round of reddish wood with visible growth rings. A green metal stem with two leaf shaped feet turns the whole piece into a giant flower, which feels cheerful next to a wicker chair in a sunny corner.
Seal the wood round on every face before casting and make sure it is fully dry, since timber that still holds moisture keeps moving and can pull away from the resin later. Cast the petals in a scalloped mold around the round, keeping the yellow tint light enough for the daisies to stay visible. Press the flowers properly flat, because thick centers trap air under the petals.
Jigsaw Puzzle Play Table for a Children's Room
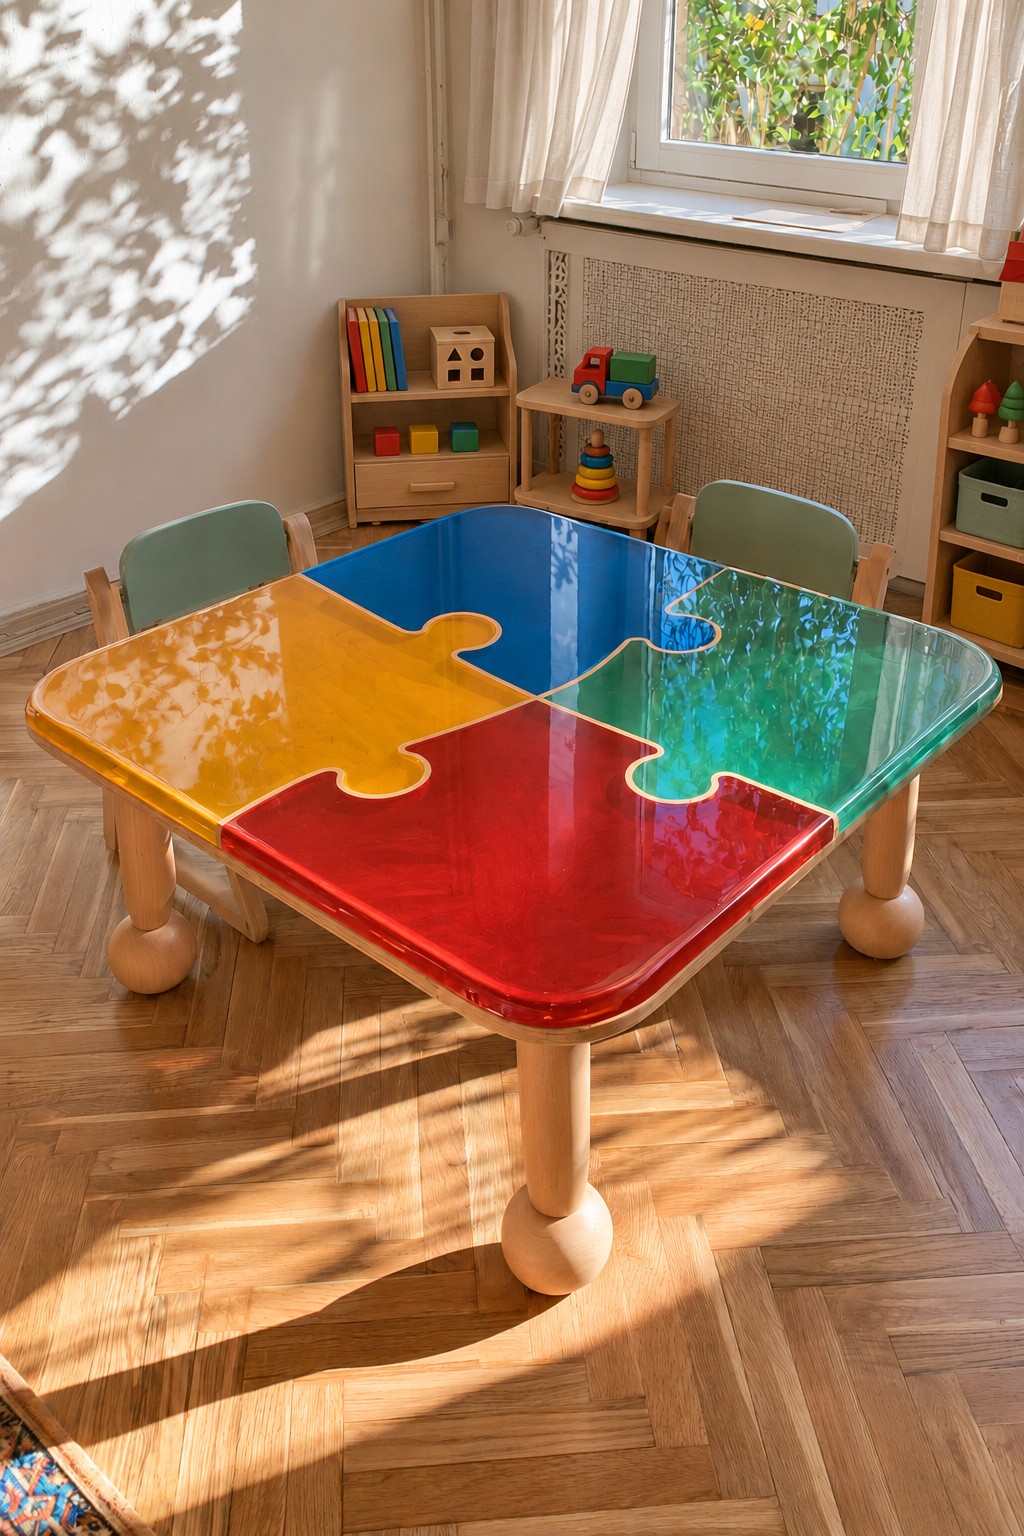
Four interlocking puzzle pieces in see through yellow, blue, red and green make up this square top, with thin lines of pale plywood tracing each outline and wrapping the edge. Chunky round legs ending in wooden balls keep it sturdy, and the bright jewel colors glow like stained glass when the afternoon sun reaches the floor.
The cleanest way to build it is to cut the puzzle shapes as pockets in a birch plywood panel, or to bend thin wooden strips into the outlines and glue them to a base, then fill each pocket separately with its own translucent tint. Because small hands will lean on it, round every corner generously, sand the edges smooth and let the epoxy cure completely before the table goes into the playroom.
Walnut Chess Coffee Table with Emerald and Gold Squares
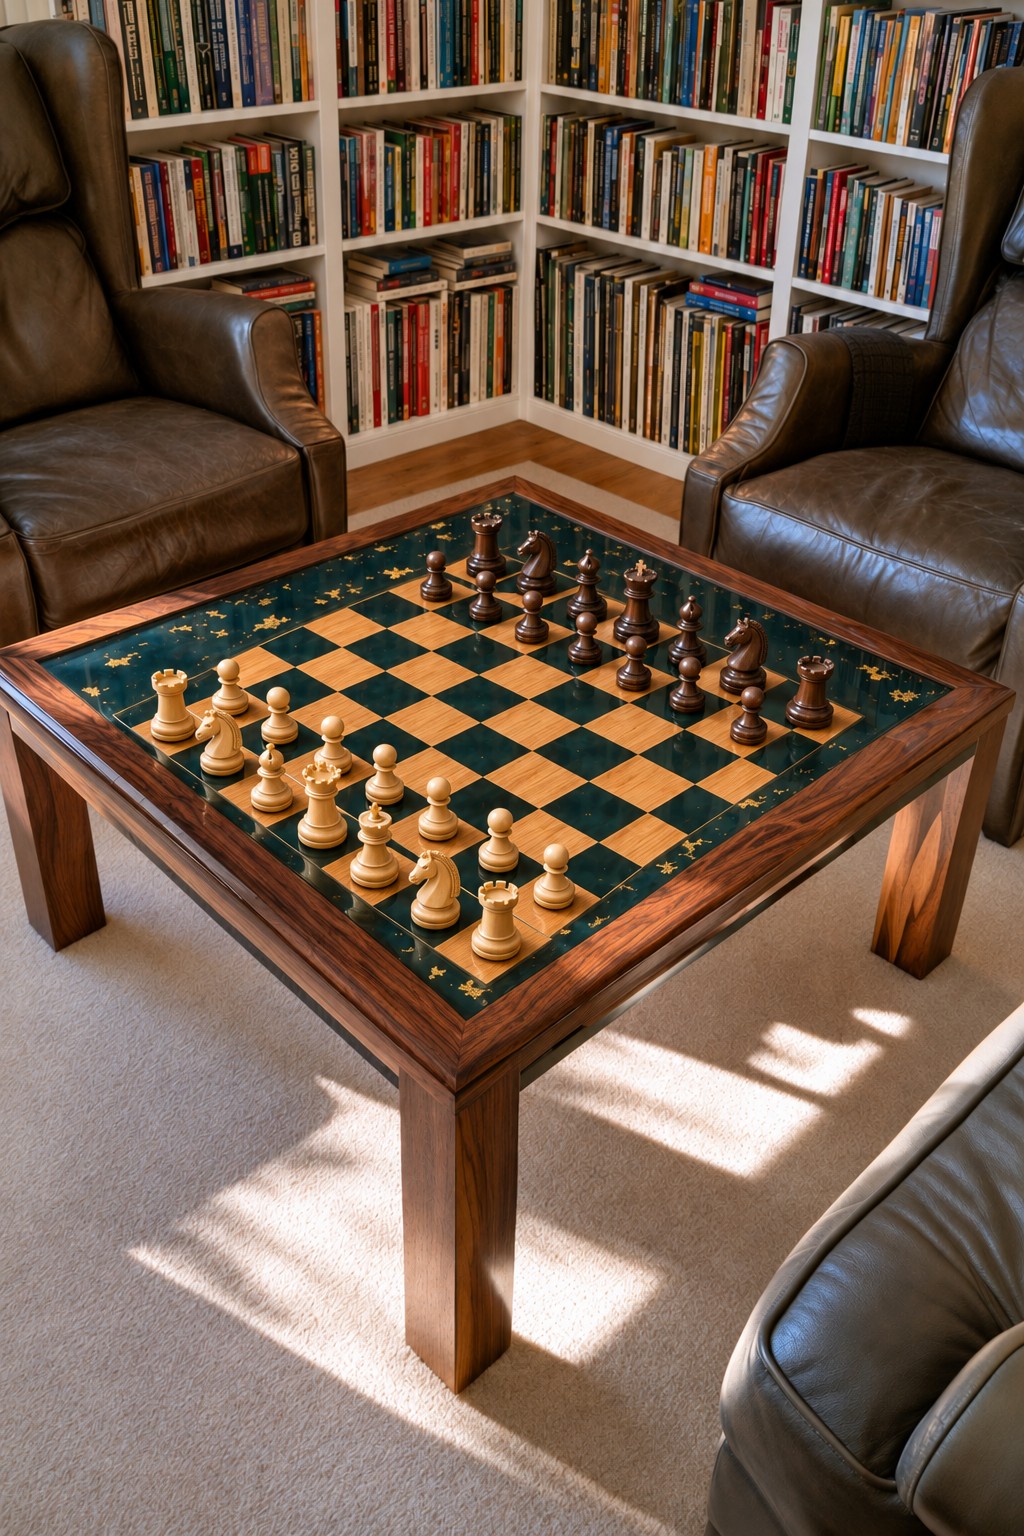
Here the board itself is the tabletop. Light maple squares alternate with deep emerald resin flecked with gold leaf, the same green runs around the playing field as a wide border, and a walnut frame and square legs hold everything together. In a library corner between two leather armchairs it invites a game every evening.
Glue the maple squares onto a flat substrate on an exact grid, leaving the dark squares empty, and seal the wood before pouring the green resin into the gaps. Gold flakes are scattered into the resin while it is still liquid. When everything has cured, sand the top flat until wood and resin sit perfectly level, then finish with a clear coat so the pieces glide.
Coffee Bean Bistro Table with a Copper Band
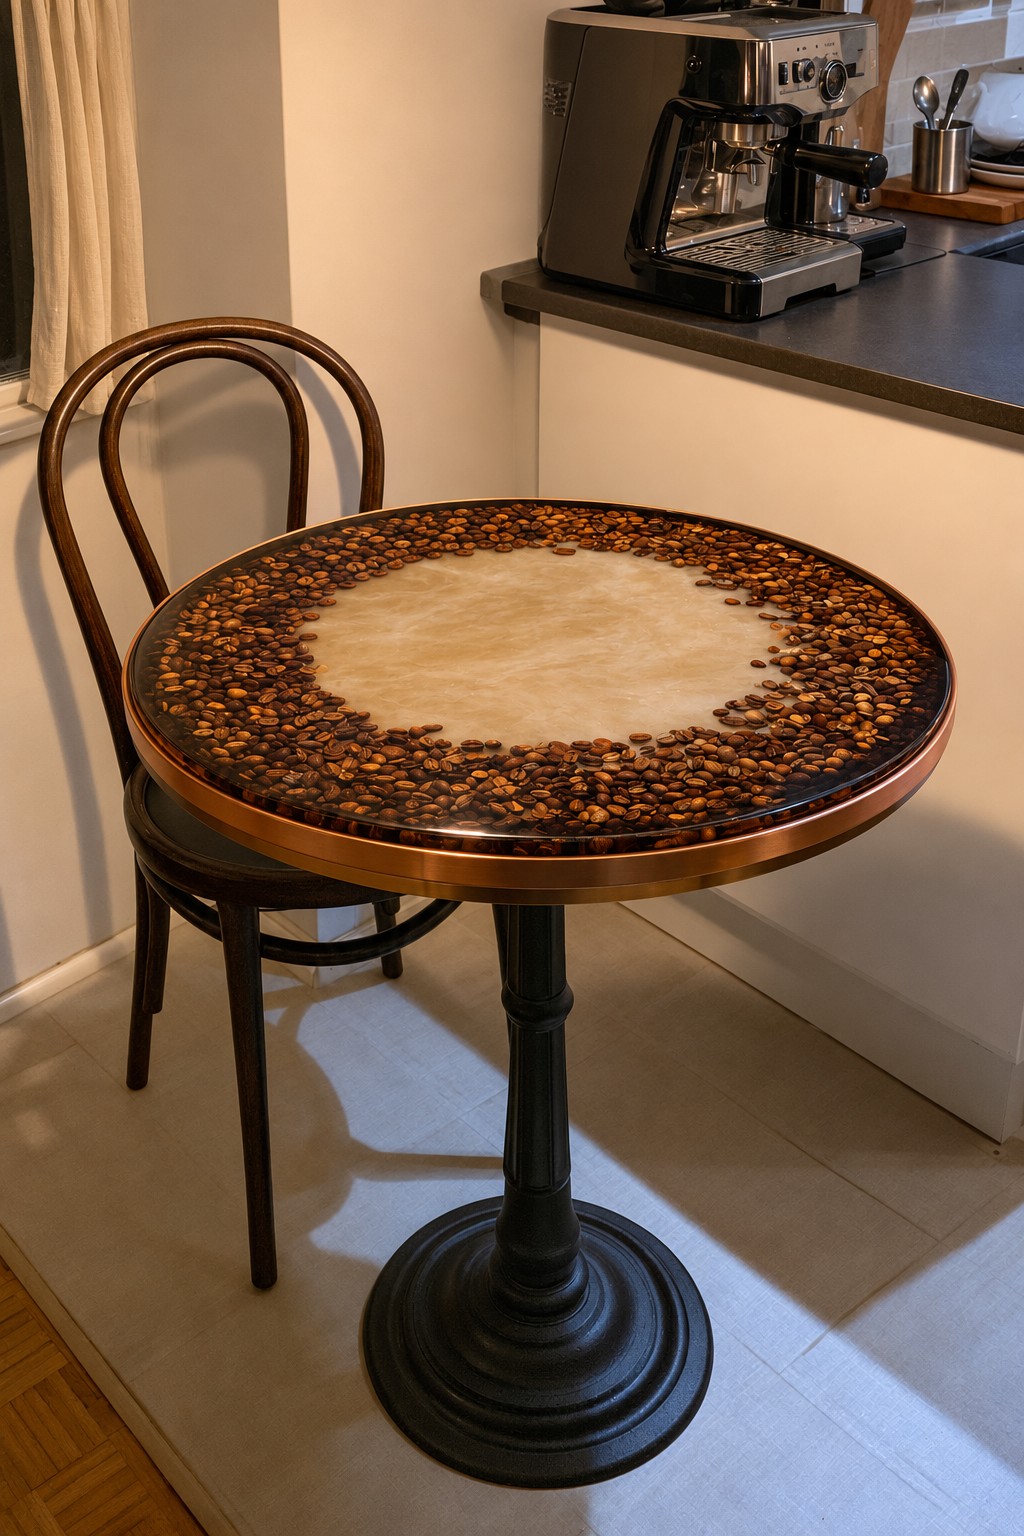
A thick ring of roasted coffee beans frames a creamy, softly swirled center on this round bistro top, finished with a copper edge band and raised on a black cast iron base. Paired with a bentwood chair in a kitchen nook, it turns the espresso corner into a tiny café.
Roasted beans are oily and light, so coat them with a thin seal layer and press them into a base pour that has started to thicken, otherwise they drift upward. The pale center comes from white and pearl pigment swirled gently into clear resin. Fit the copper band around the cured slab and give it a clear coat as well so it keeps its warm color.
Maple Leaf Side Table with Real Autumn Foliage
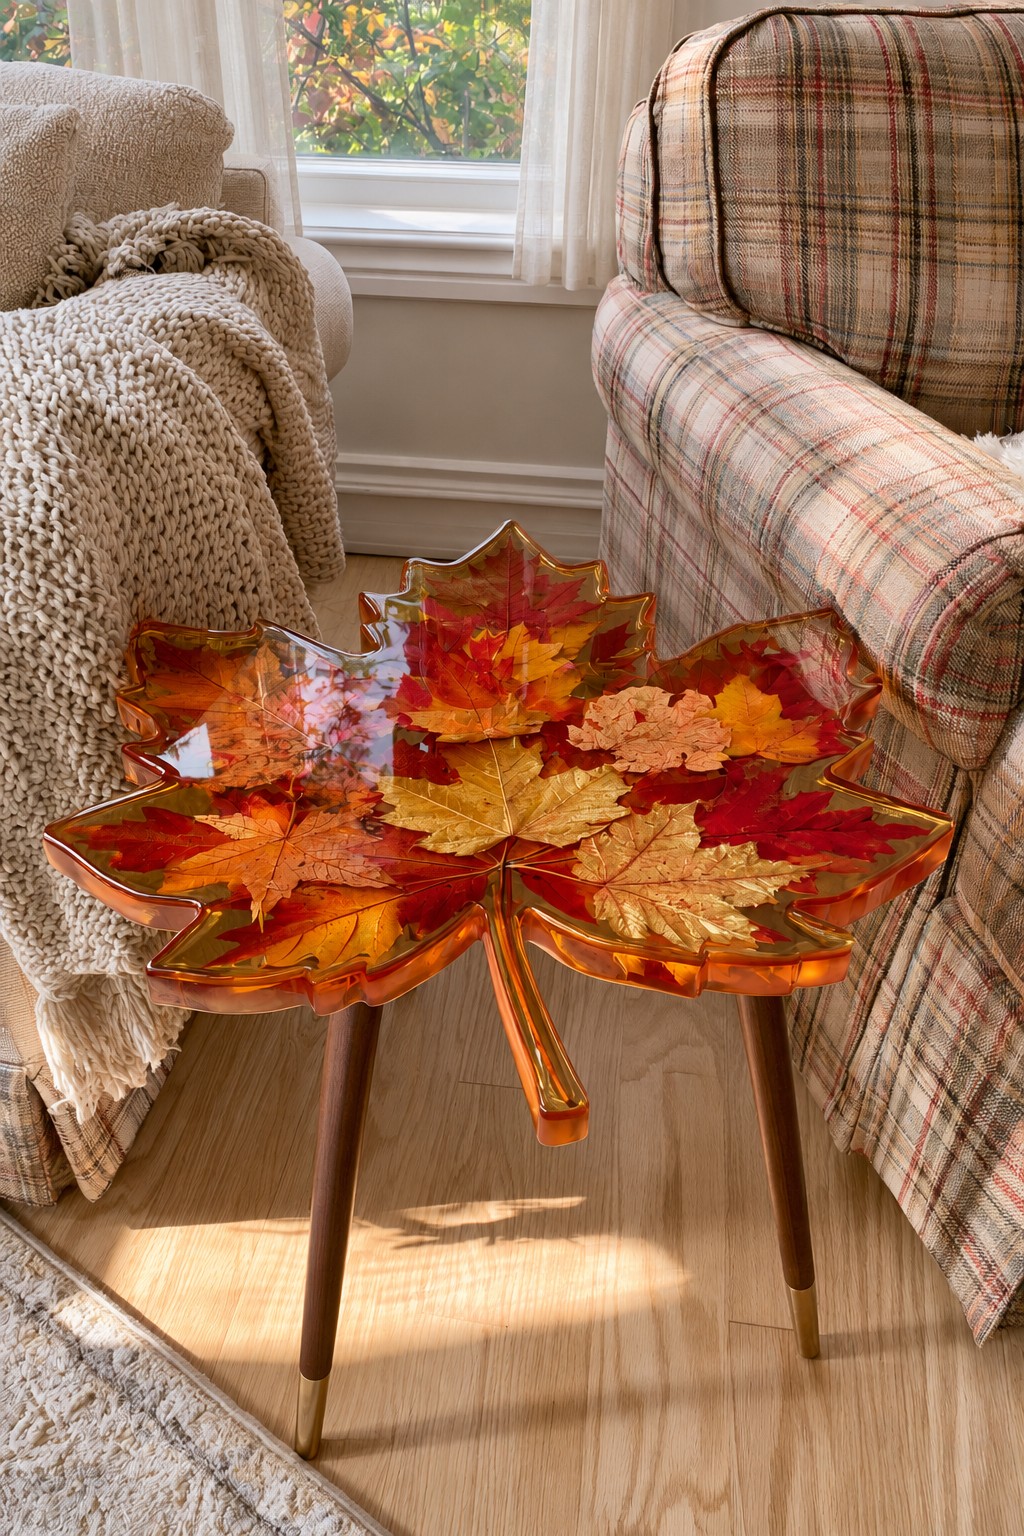
The top is cut in the outline of a maple leaf, stem and all, and filled with pressed red, orange and golden maple leaves under amber tinted resin. Tapered walnut legs with brass caps keep it light, and it looks at home beside a plaid armchair and a chunky knitted throw.
Press the leaves between paper under weight for a couple of weeks, then lay them in overlapping drifts so no gaps of empty resin show. Natural leaf colors soften over time, especially in sunlight, so a UV stable resin and a spot away from the window help the autumn tones last. Bring the stem out as a separate tongue of resin, but keep it short enough to stay rigid.
Fly Agaric Mushroom Stool Table
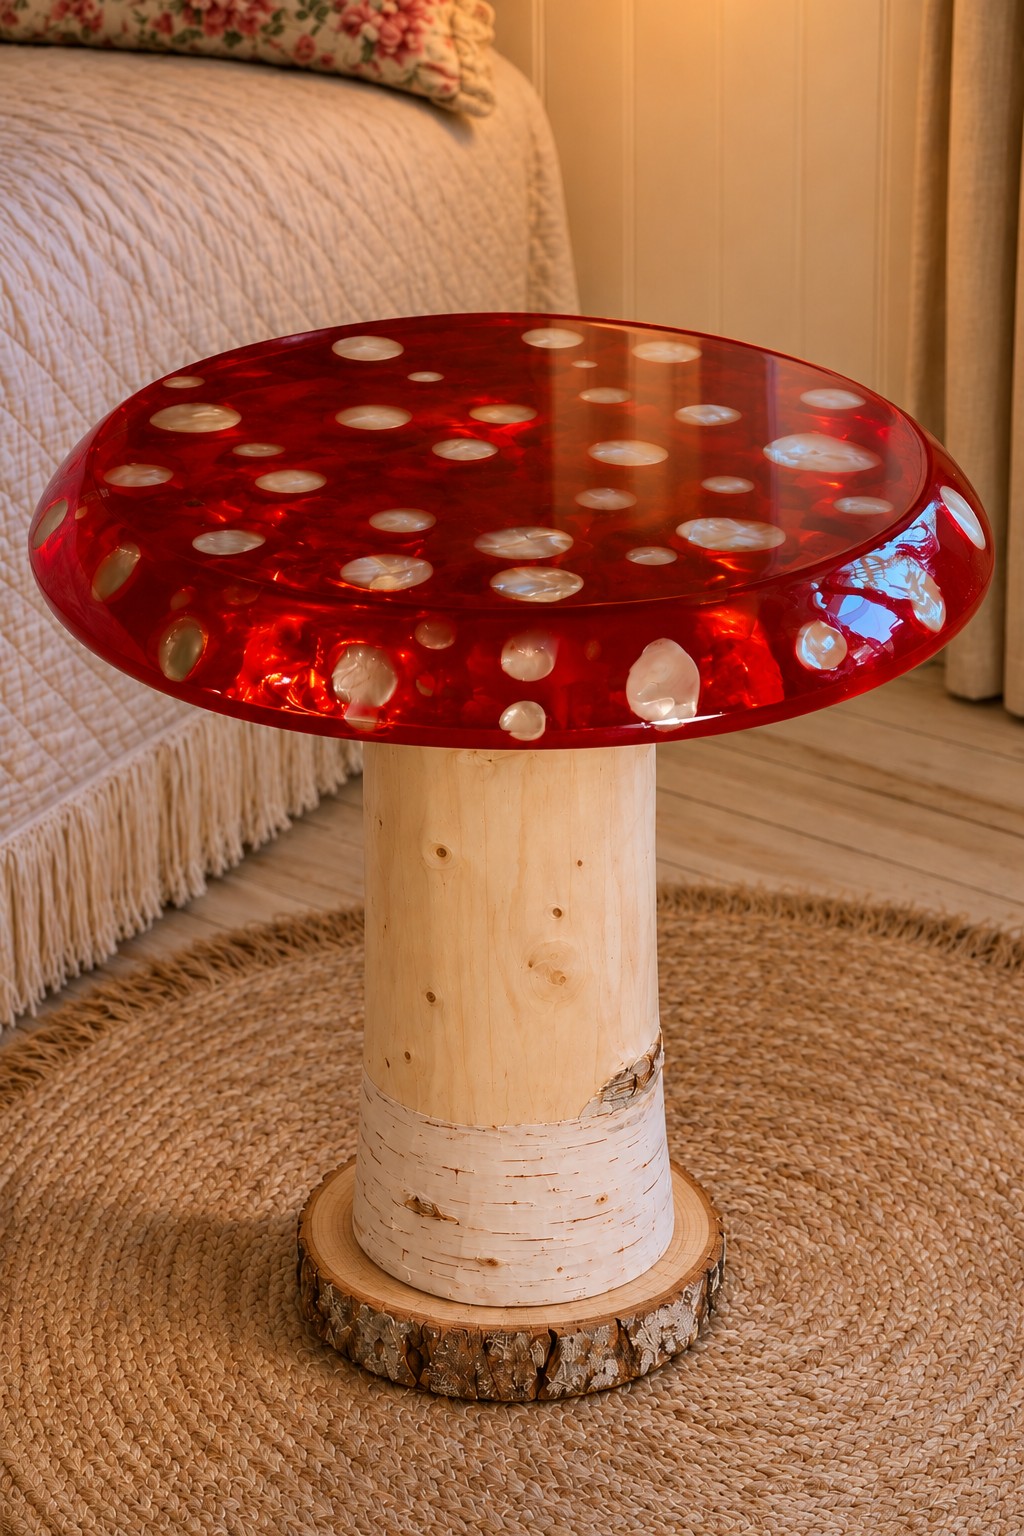
A domed cap of glossy red resin dotted with pearly white spots sits on a stem of birch log, which stands on a bark edged wood slice. It is a playful piece for a cottage style bedroom or a reading nook, and the jute rug underneath keeps the woodland mood going.
Cast the white spots first as small pearl tinted discs, place them on the floor of a curved mold, then pour the red over them so they show through the surface. The log must be well seasoned and sealed, because fresh birch splits as it dries. Join cap and stem with a wide mounting plate rather than a single screw, since kids will inevitably try to sit on it.
Amethyst Geode Coffee Table with Floating Acrylic Legs
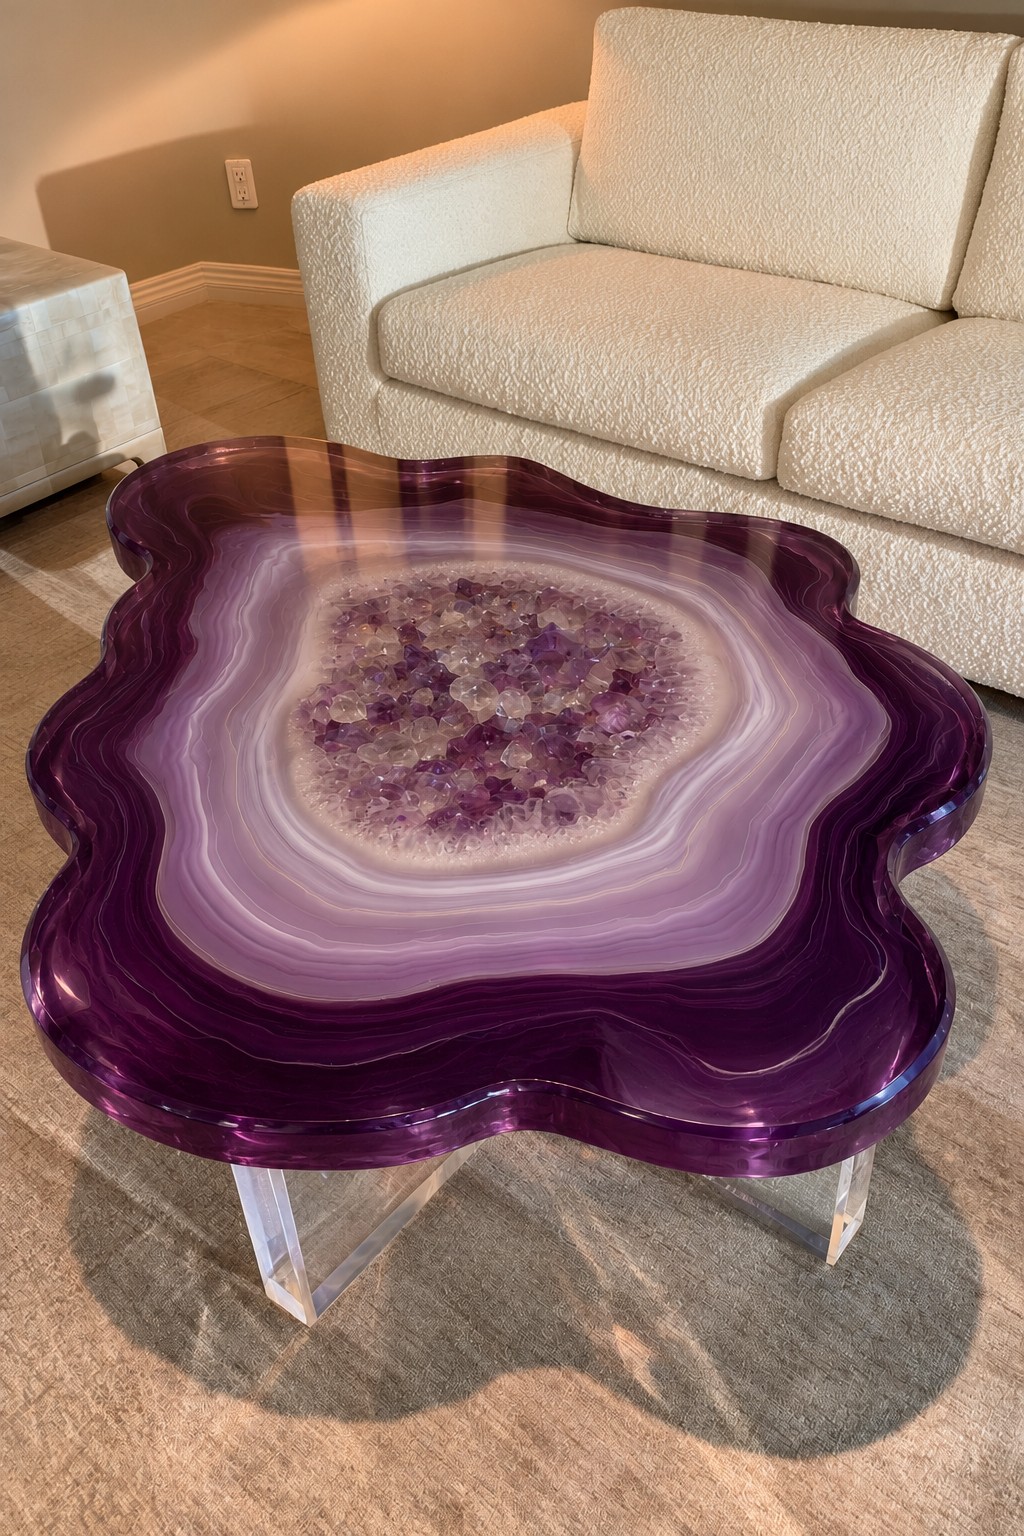
Banded rings of violet, lavender, white and clear resin spread out from a center packed with real amethyst chips, and the wavy outline looks like a geode slice cut from a giant stone. Clear acrylic legs make the slab seem to hover in front of a cream bouclé sofa.
Build the bands in stages, letting each tinted pour thicken a little before the next goes in so the lines stay crisp, and use a fine white line between bands for that agate look. Crushed crystals are perfectly happy in epoxy, but rinse and dry them first and seal them so they do not release air. Smooth and polish the thick edges carefully, because they are as visible as the top.
Herringbone Wine Cork Side Table
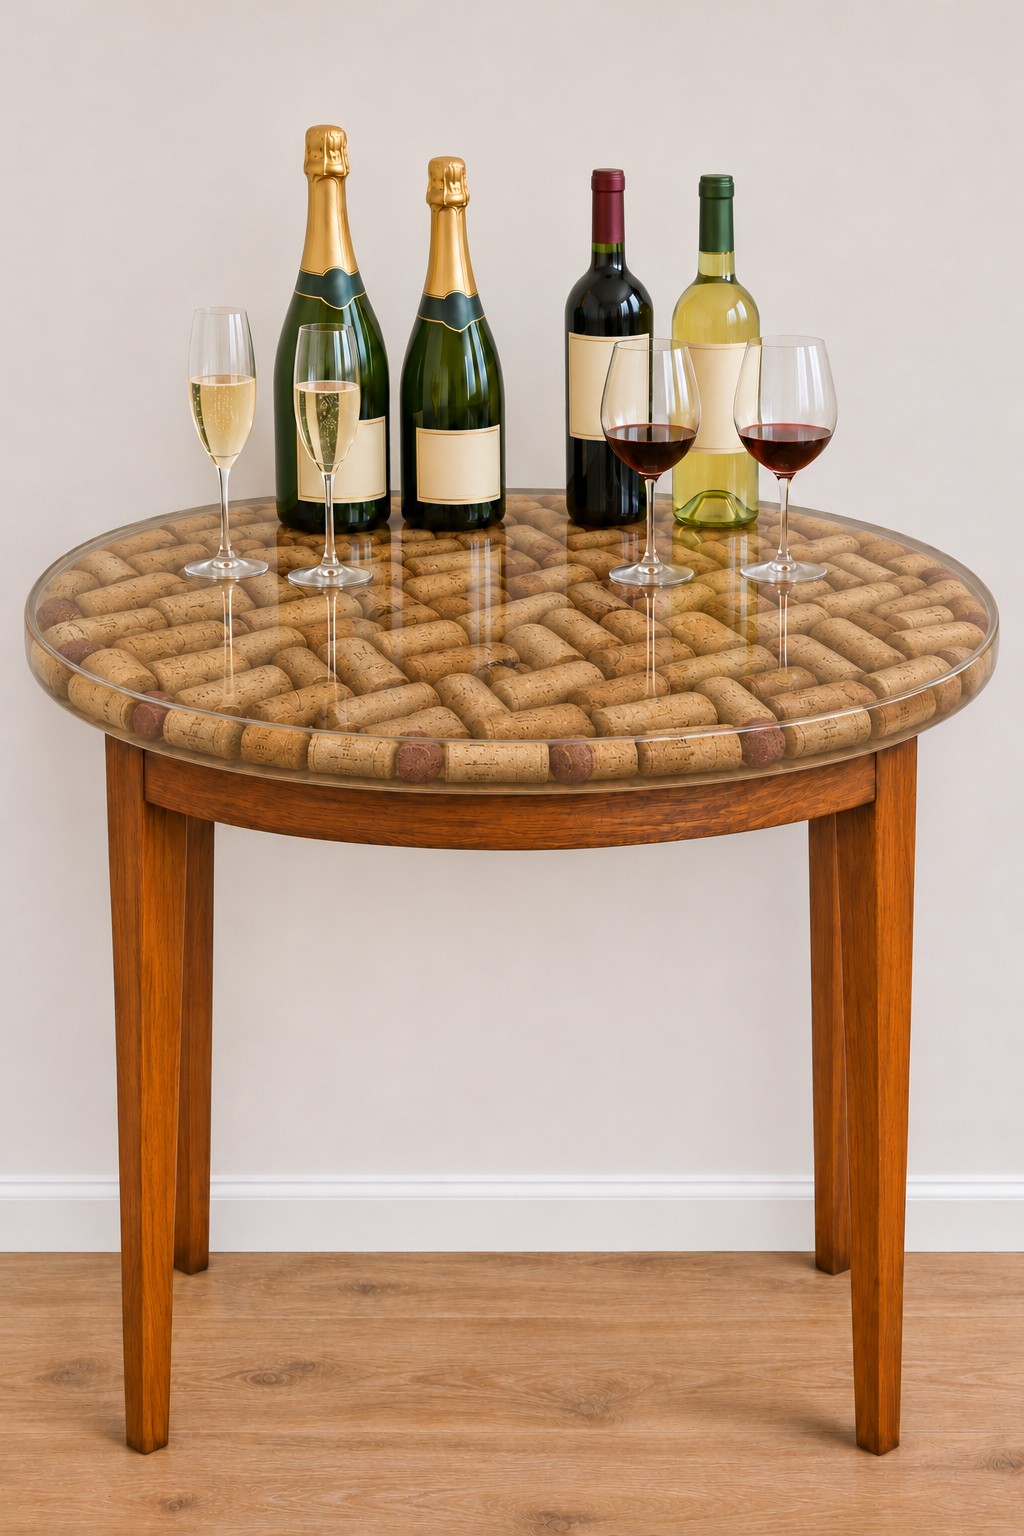
Dozens of wine corks laid in a herringbone pattern sit under a clear layer on this round top with simple wooden legs. Next to a bar cart or in a dining room, it turns a collection of corks from memorable dinners into a usable surface.
Corks float, so fix each one to a plywood base with white PVA glue, or a small dot of hot glue, before any resin goes on. Brush a thin seal coat over the whole layer to close the pores, then pour the clear coat in stages, letting the first one cure before adding enough to cover the tallest cork. Sorting corks by color before you start, red wine stained ends on one side, pale ends on the other, makes the herringbone read more clearly. For smaller ways to use the rest of the collection, browse our wine cork craft ideas.
Saturn Table for a Space Themed Bedroom
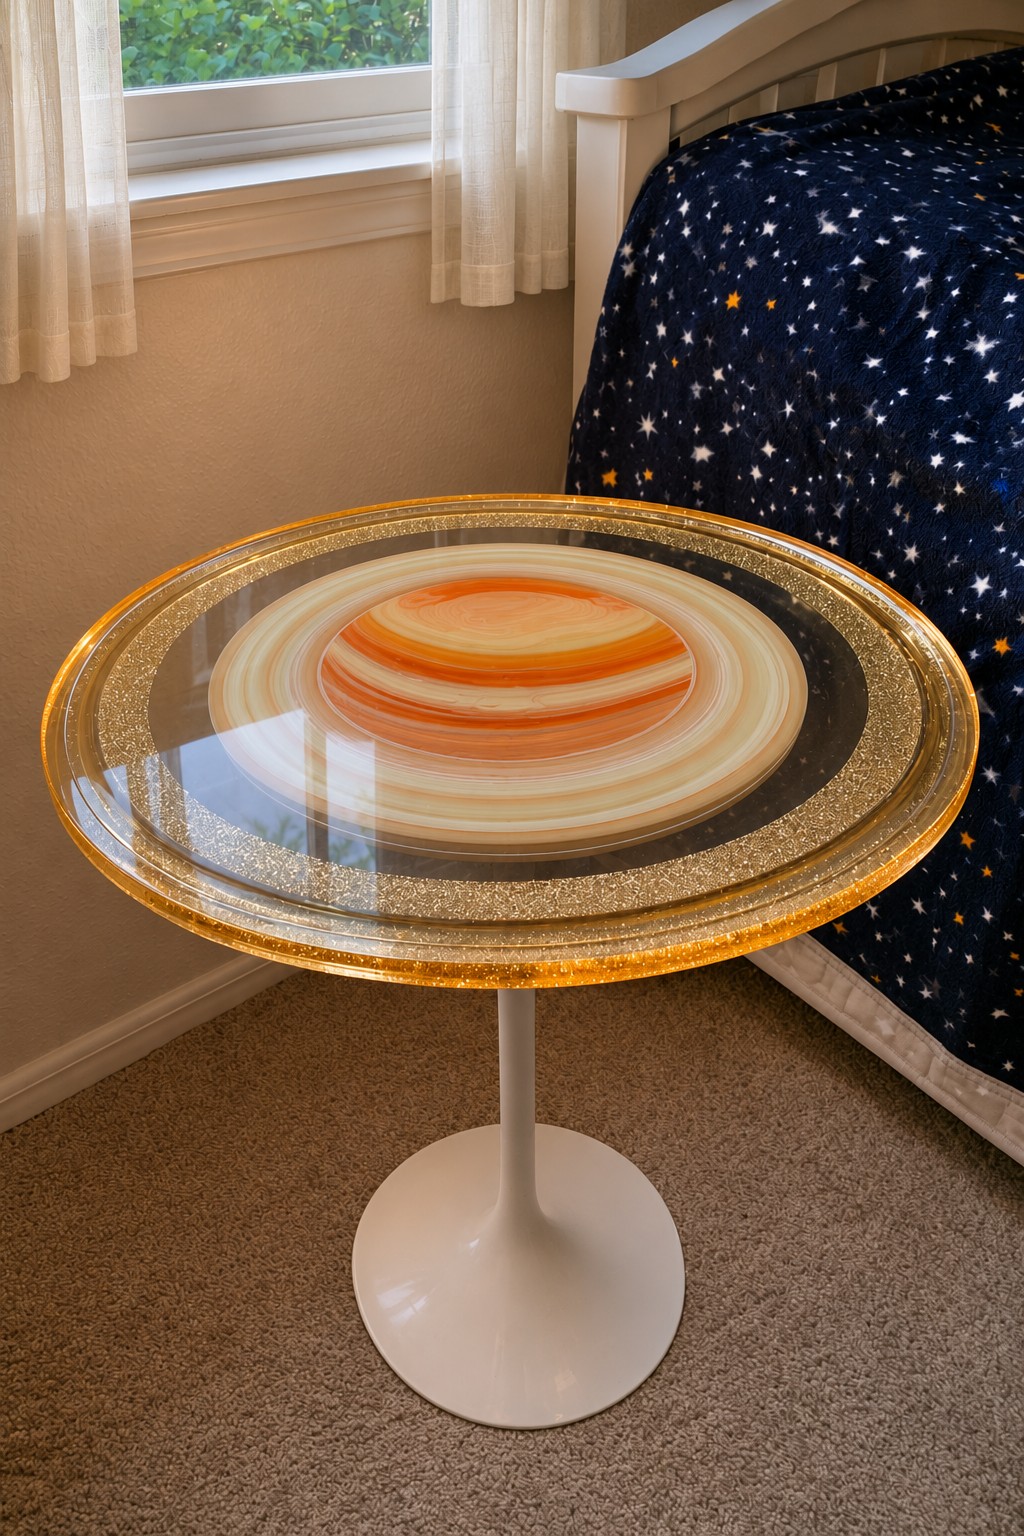
An orange and cream banded planet floats in the middle of a clear round top, a band of gold glitter forms its ring, and the edge has a faint amber glow. Set on a white tulip base beside a starry bedspread, it is a bedside table that a young astronomy fan will actually want to keep tidy.
Pour the planet first as a separate small disc, dragging thin lines of orange, cream and white pigment around in circles while it is still fluid. Once cured, set it in the main mold, add the glitter band in a slightly thickened layer so the sparkle does not sink, and finish with clear resin. Keep the tulip base wide enough that the round top cannot tip when someone leans on the edge.
Nautilus Shell Table in Pearl and Blush
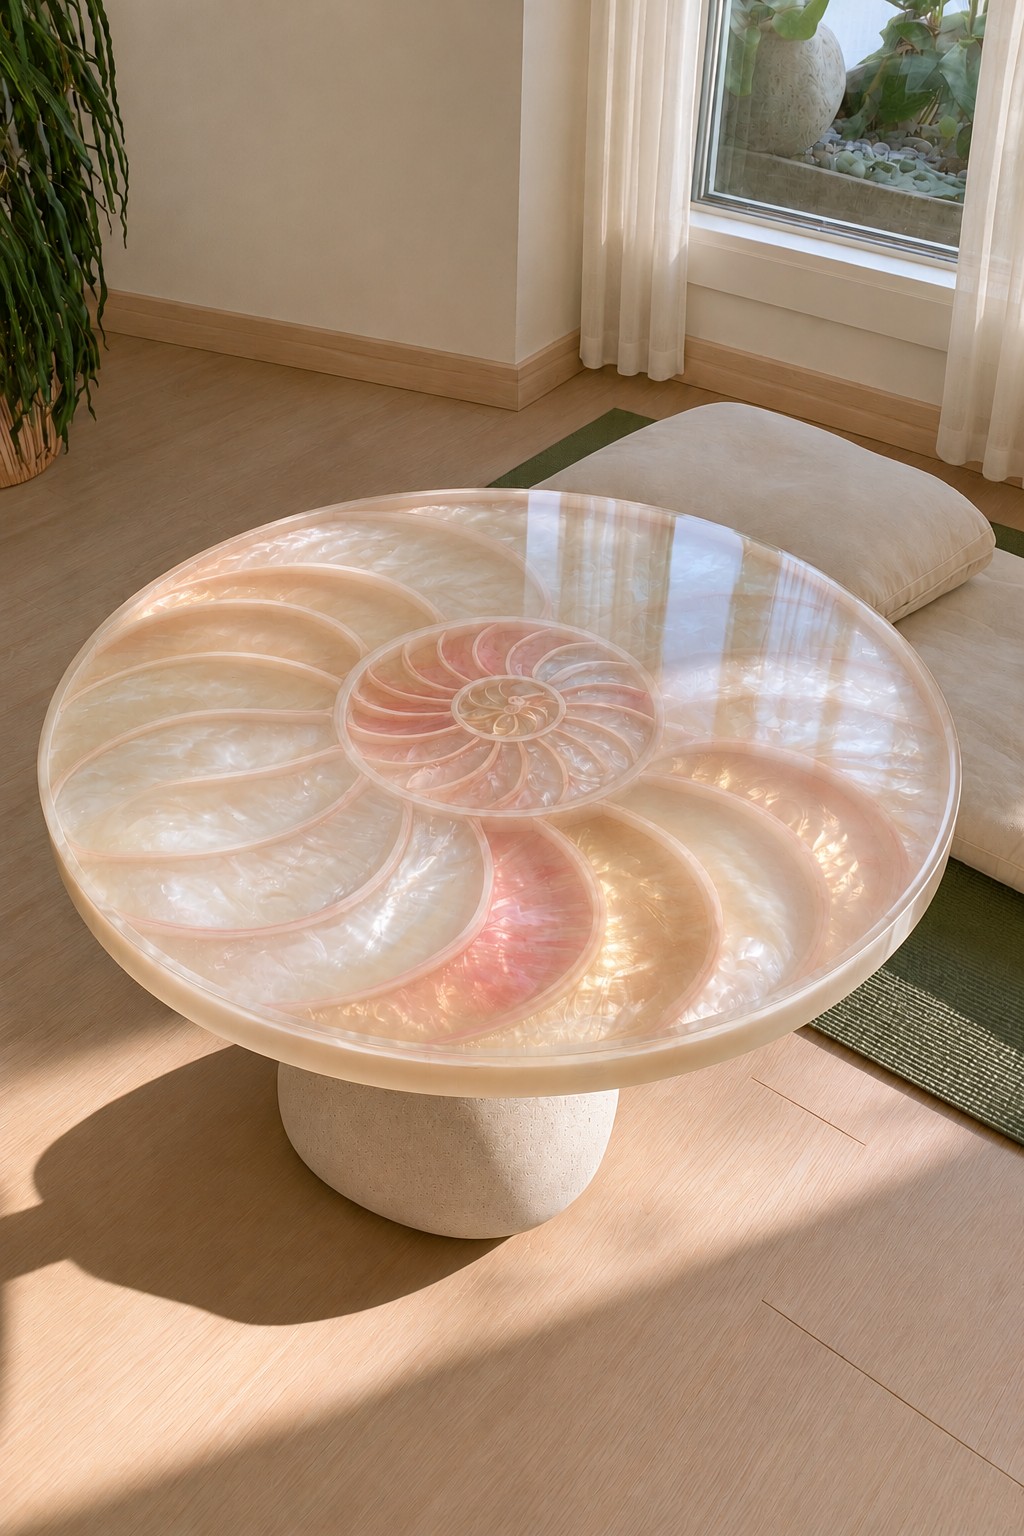
The spiral chambers of a nautilus shell fill this round top, each one glowing with pearly white, peach or blush pink shimmer, and the whole thing rests on a pale stone pedestal. It brings a quiet, coastal elegance to a sunlit room without leaning on obvious seaside props.
The shimmer comes from pearl mica powders made for resin, which create that silky, shifting sheen as they settle. Draw the spiral on the mold floor, separate the chambers with thin strips or with lines of white resin poured first, then fill each chamber with its own tint. A final clear layer gives the whole spiral depth and protects it.
Pocket Watch Coffee Table with Brass Legs
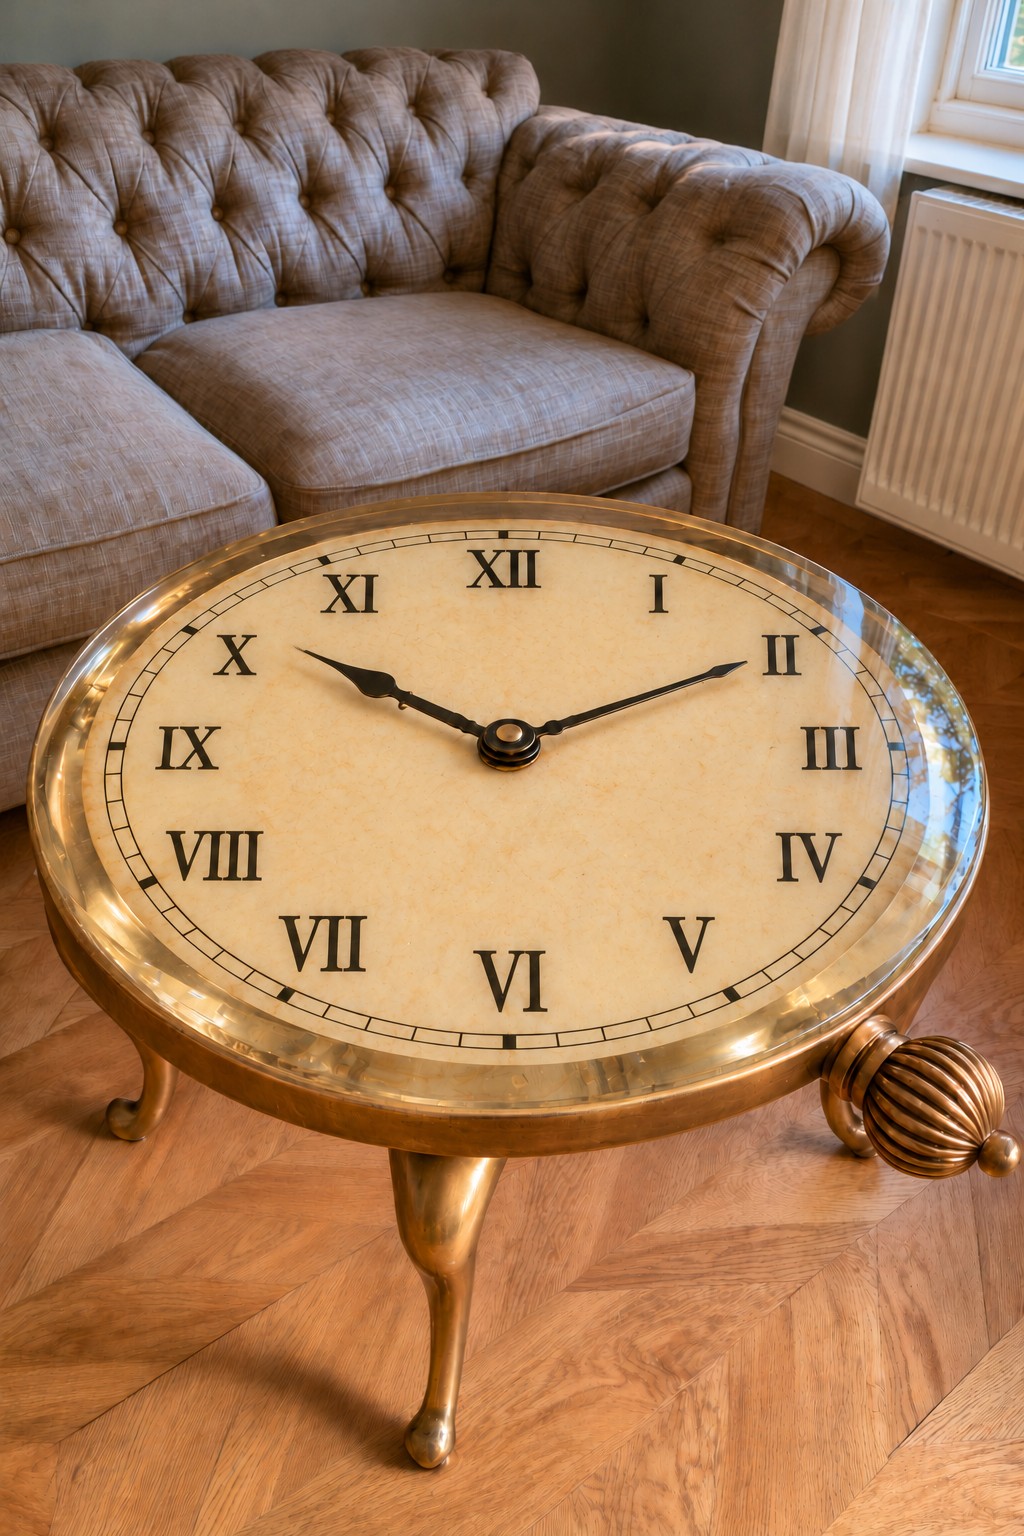
A vintage clock face with Roman numerals and slender black hands sits under a thick clear layer, framed by a brass rim with a ridged winding crown on one side. Curved brass legs complete the giant pocket watch, which suits a living room with a tufted sofa and warm parquet.
Print the dial on heavy matte paper, coat it on both sides with clear drying decoupage glue and let it dry fully, otherwise the resin will soak in and leave blotchy dark areas. Glue it flat to the base so it cannot lift. Real clock hands can be fixed to the center before pouring, giving a subtle raised detail under the gloss.
Lily Pad Nesting Tables on Brass Legs
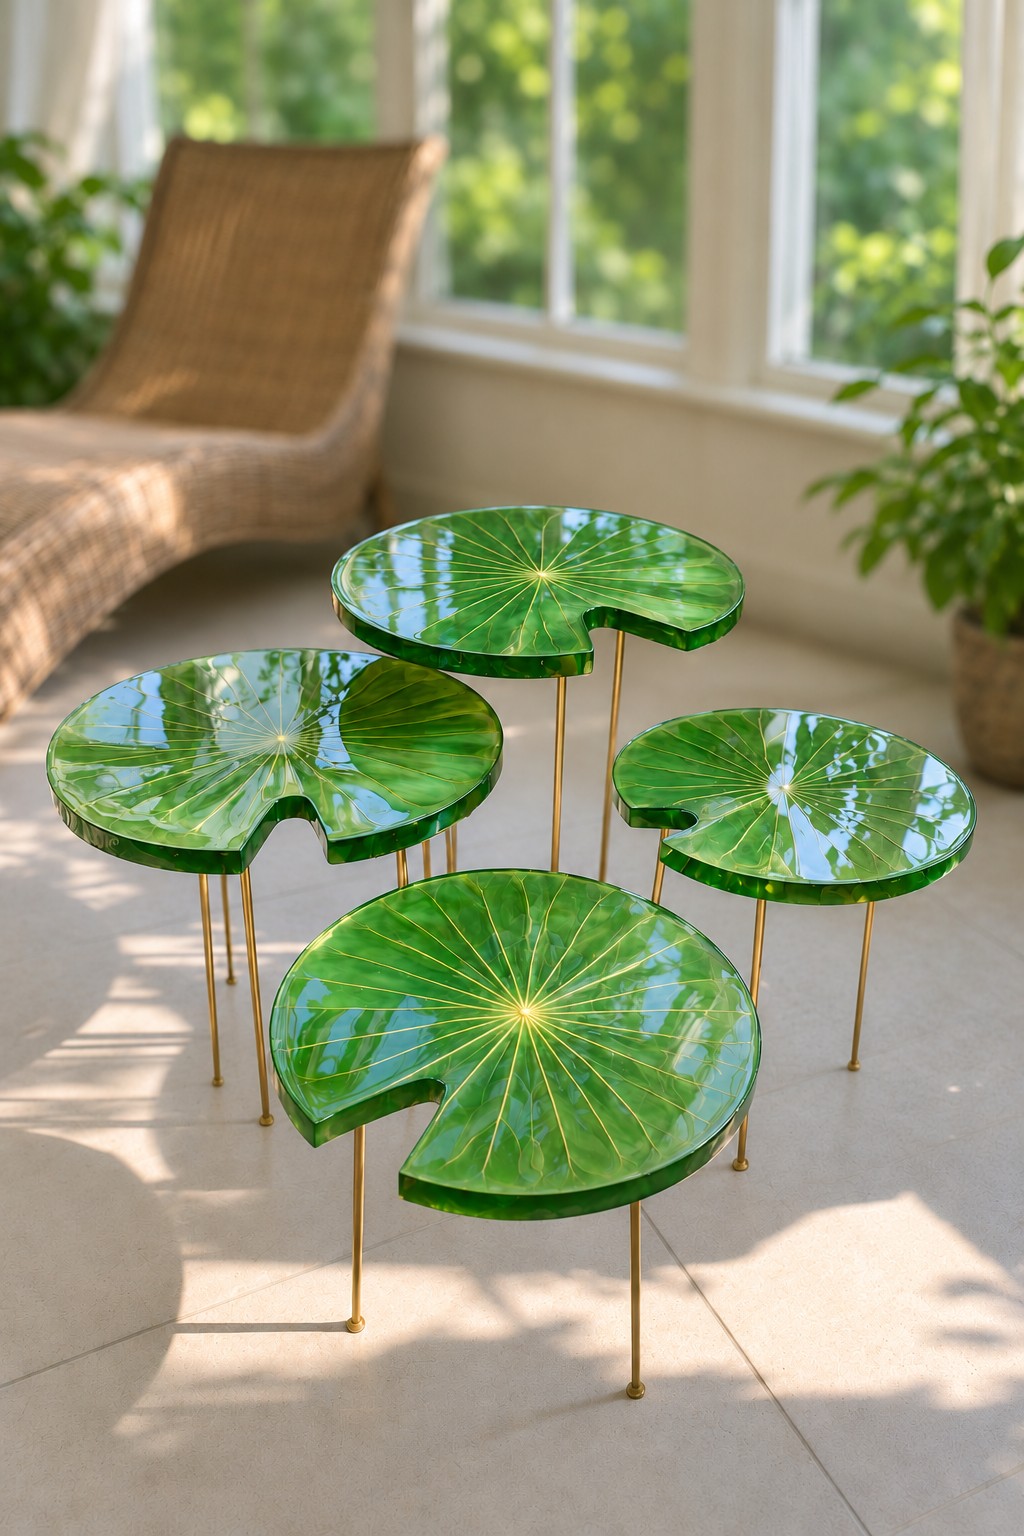
Four round pads of glossy green resin, each with the classic notch and fine gold veins fanning out from the center, stand at different heights on thin brass legs. Grouped in a conservatory near a lounge chair, they look like a pond spreading across the floor, and you can pull one out whenever you need a spot for a cup.
Tint the resin a transparent leaf green, cast each pad in a round mold with a wedge cut away, and draw the veins with a gold paint pen or lay strips of gold leaf on the first cured layer. A clear top coat then seals the lines in. Staggered leg heights let the pads overlap without touching.
Wildflower Meadow Coffee Table on a Rustic Oak Base
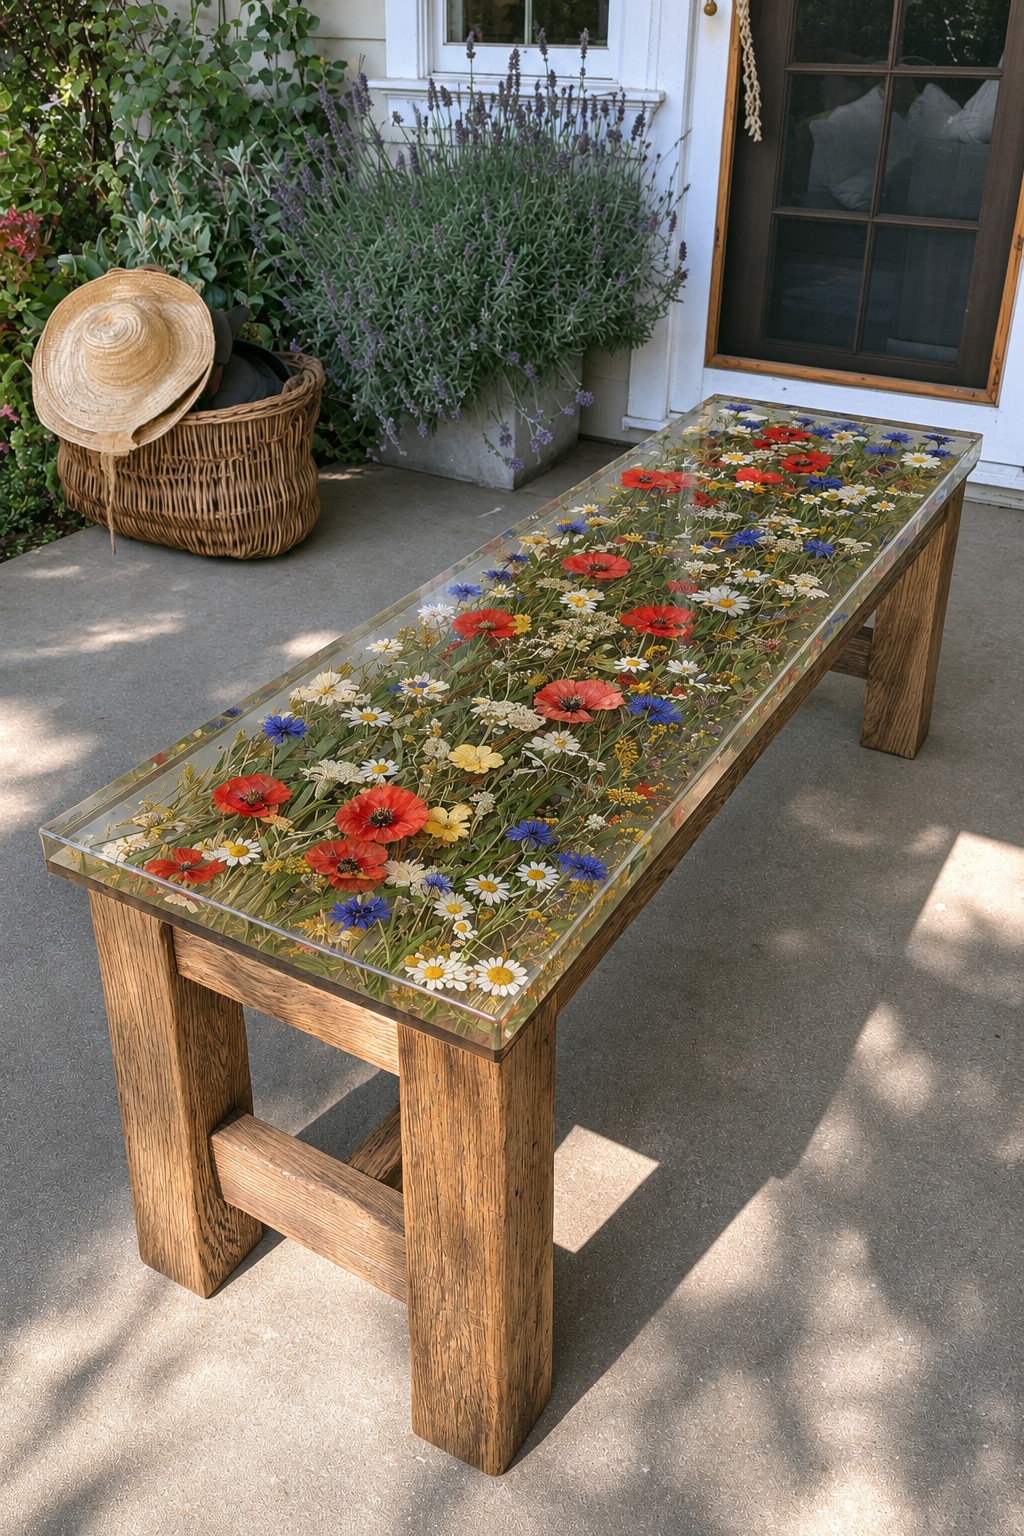
Red poppies, blue cornflowers, chamomile, oxeye daisies, small yellow blooms and wild grasses are packed edge to edge in this long clear top, which rests on a chunky weathered oak base. On a porch beside lavender and a straw hat, it captures a summer meadow you can keep all year.
Poppies are delicate, so press them rather than drying them upright, and fill the background with plenty of grass stems so no empty clear patches appear. For a piece used on a porch, choose a UV stable resin and keep it under a roof, because full sun fades petals and yellows epoxy. Move it indoors for the winter if the porch gets freezing.
Champagne Glitter Nesting Side Tables
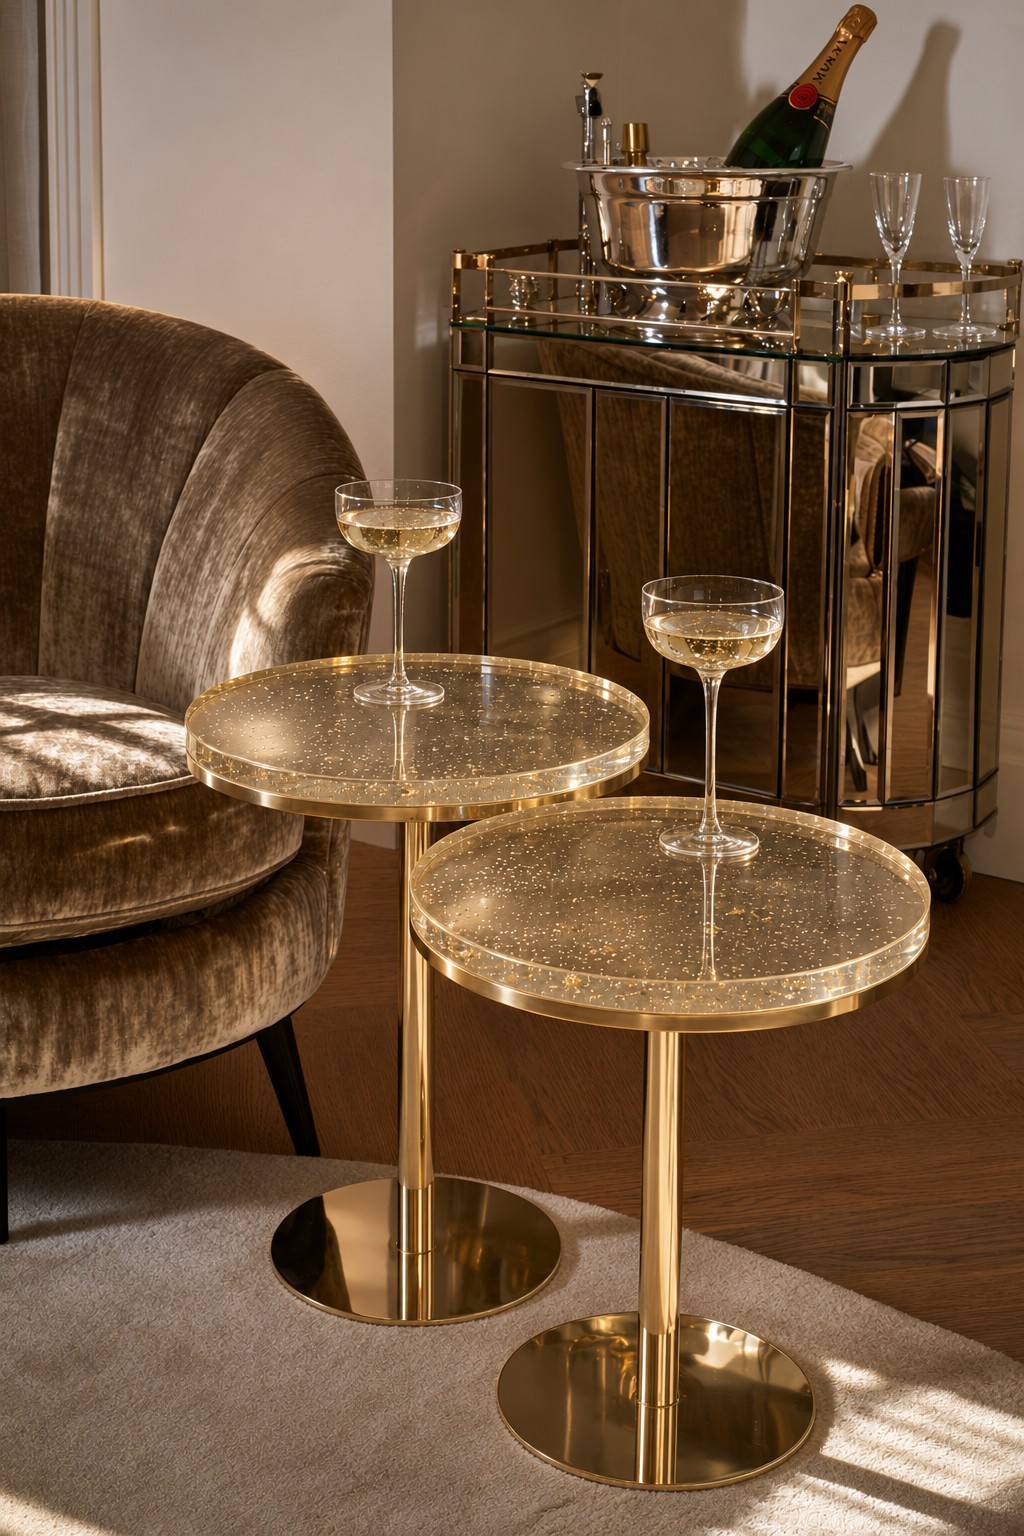
Two thick round tops of clear resin, full of tiny suspended gold glitter, sit on polished brass pedestals at slightly different heights. Next to a velvet armchair and a mirrored bar cart, they set the scene for an evening drink and catch candlelight beautifully.
Glitter tends to sink to the bottom while resin is thin, so stir it in once the mix has thickened a little, or spread it through several thin layers. The thick, crisp edges are part of the look, so sand them gradually and polish until they are glassy. Use coasters for chilled glasses too, as condensation rings are easier to prevent than to buff out.
Blue and White China Mosaic Kitchen Table
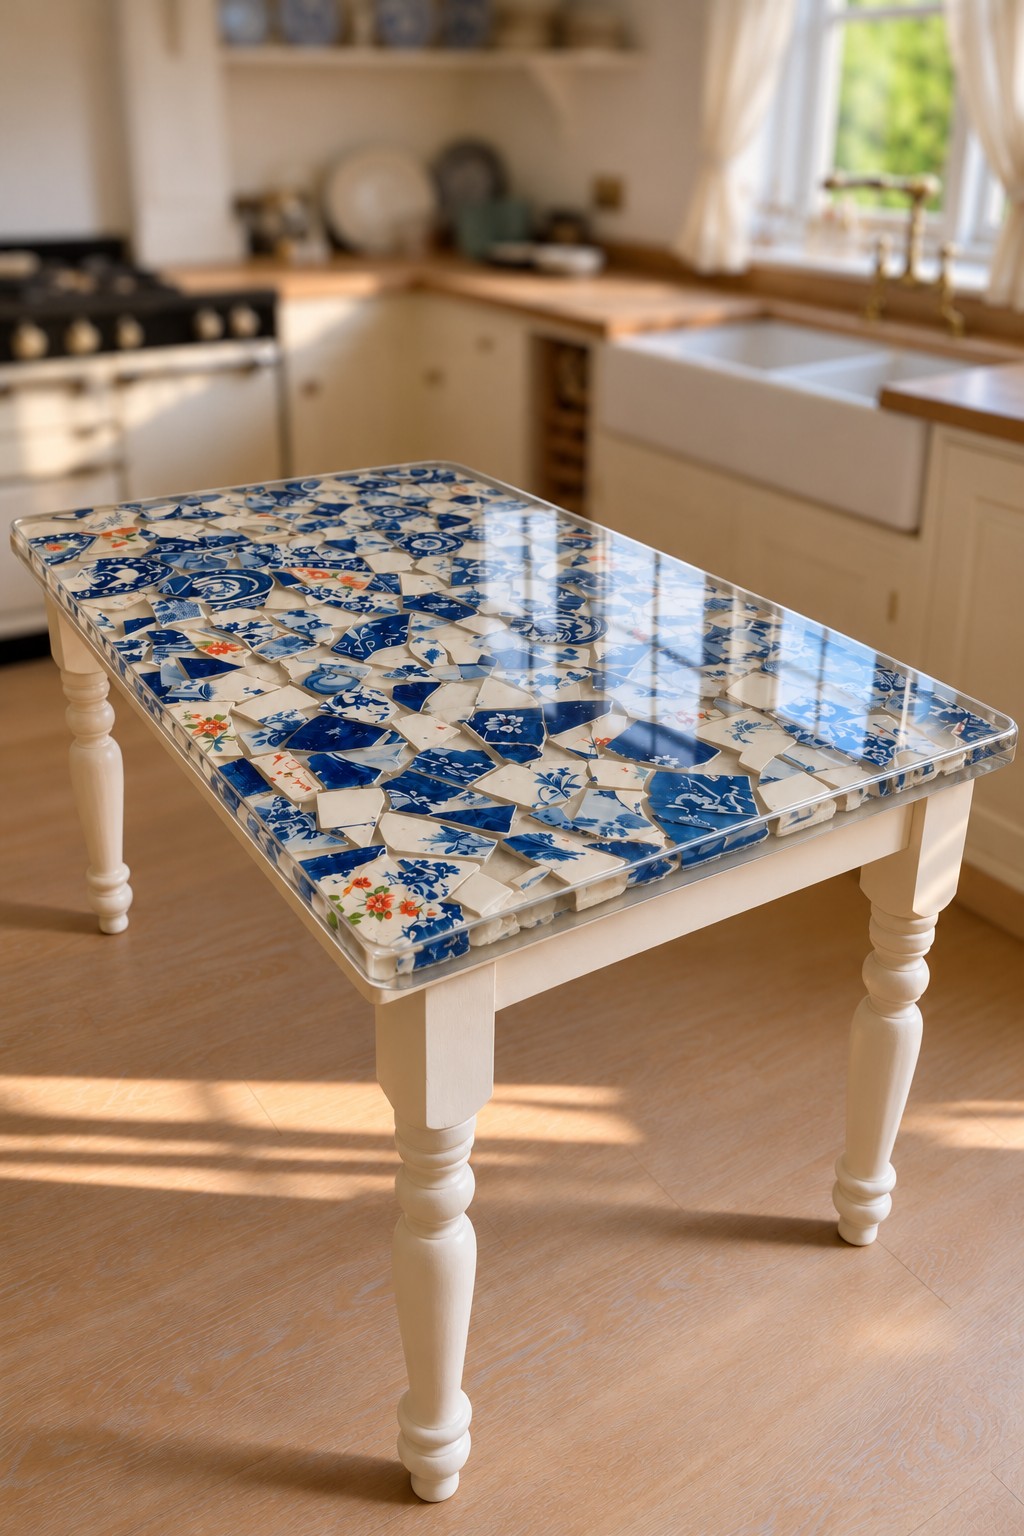
Shards of blue and white china, with a few pieces carrying little orange flowers, cover this farmhouse tabletop under a clear layer, and the white painted turned legs keep the cottage kitchen feel. Every fragment comes from a different plate, so the table tells a story about family dishes.
Break plates inside a towel, then smooth any sharp points with a file or rubbing stone. Glue the shards face up, as flat as possible, onto a sealed plywood top with a mosaic adhesive or a clear drying PVA, fill the gaps with white tinted resin or with a seal coat, then pour clear over the whole surface. If you would rather start smaller, our broken china mosaic projects use the same pieces on trays, pots and frames.
French Provincial Nightstand with a Rose Petal Top
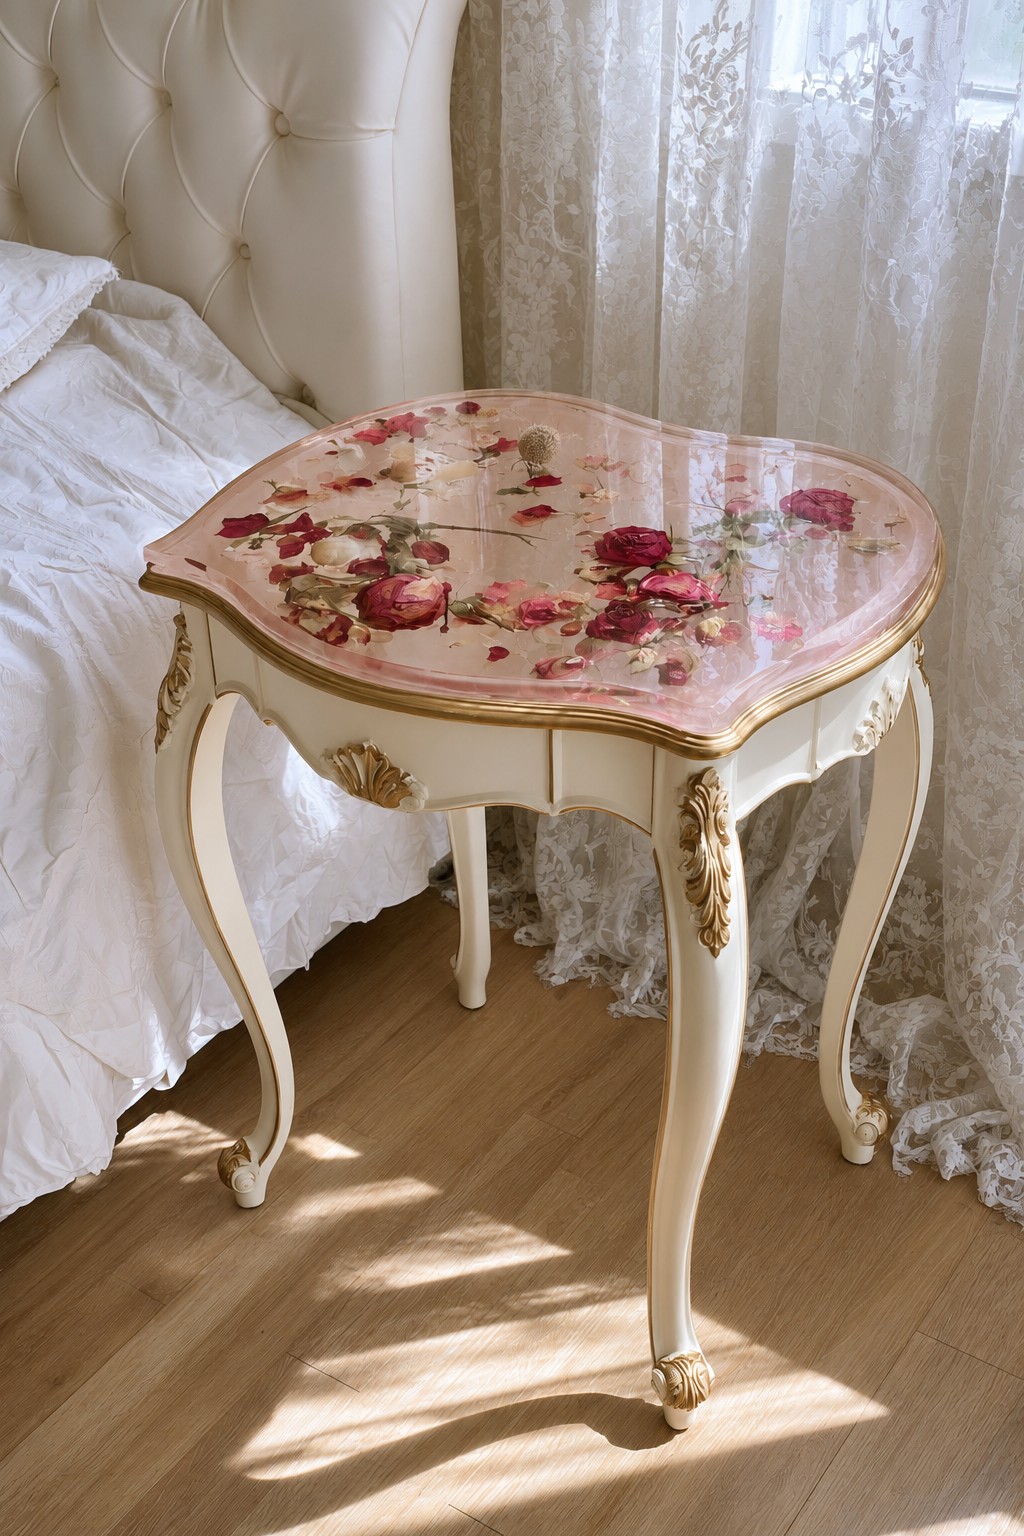
A shaped, softly pink tinted resin top filled with dried rose petals and small rosebuds crowns a cream nightstand with curved legs and gilded carving. With lace curtains and a tufted headboard, it gives a romantic bedroom a gentle focal point.
This idea works well for refreshing an existing nightstand. Remove any old varnish, run mold release tape around the top edge to form a dam, apply a seal coat, then scatter the petals and pour. Rose petals deepen in color inside resin, so test a few first if you want to keep a pale pink.
Olive Branch Dining Table in Mediterranean Style
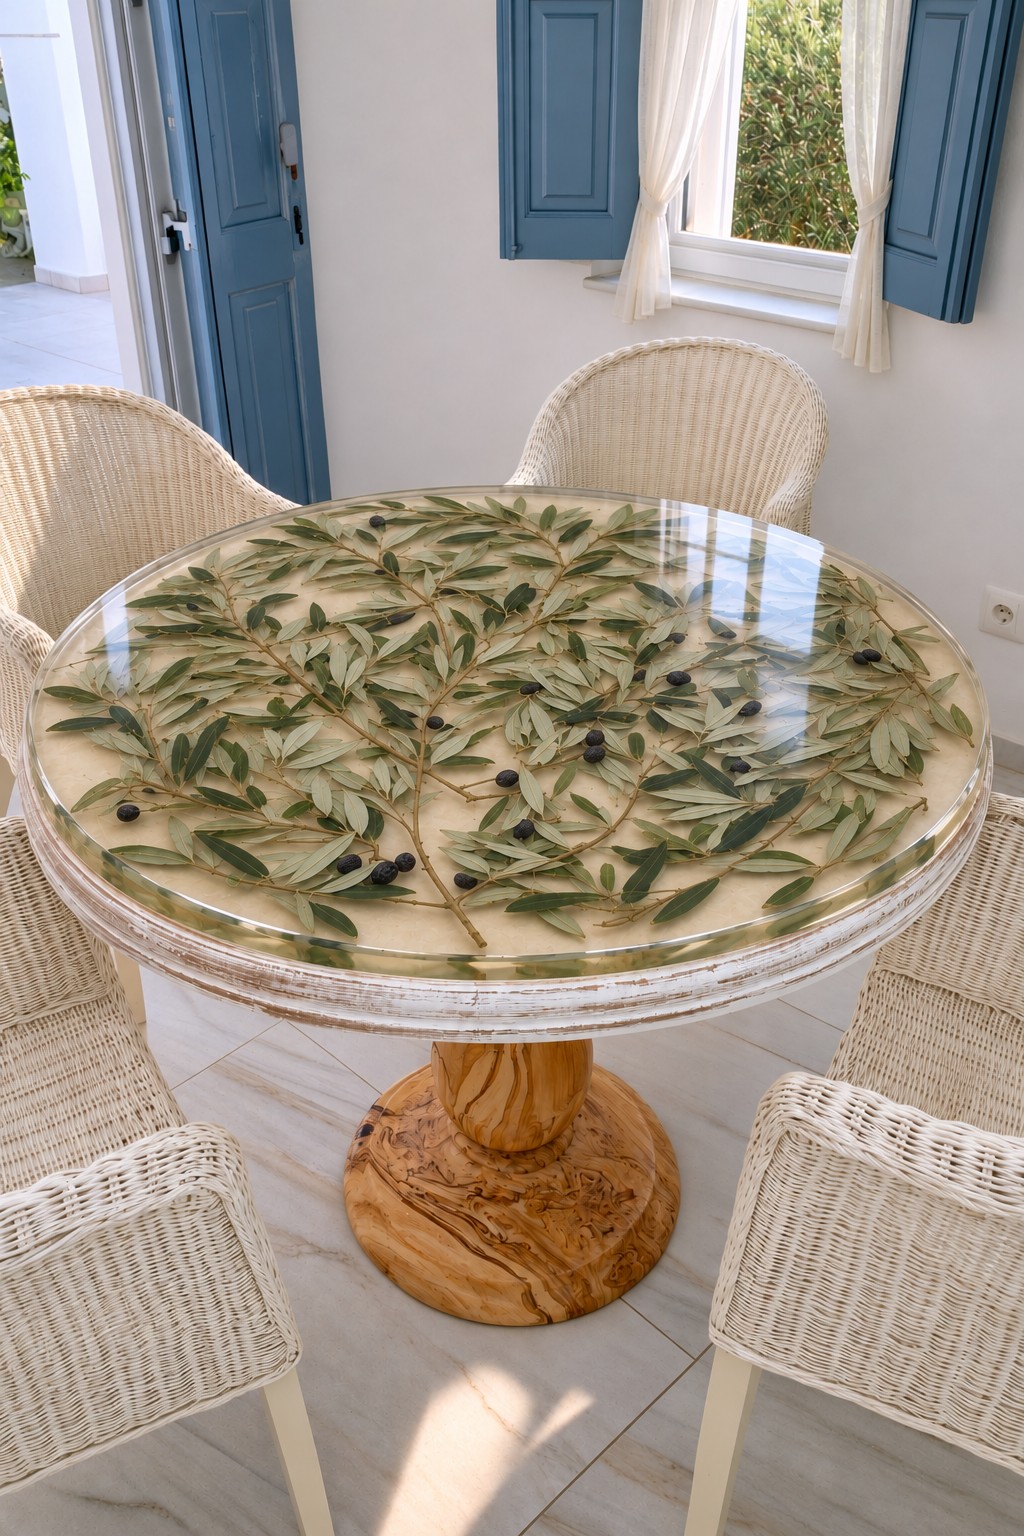
Long olive branches heavy with silvery leaves and dark fruit stretch across a creamy background under clear resin, with a whitewashed wooden rim and a sculpted olive wood pedestal. Paired with white wicker chairs and blue shutters, it brings an island terrace to the dining room.
The leaves press well and keep their gray green tone, but real olives are full of water and oil and would spoil inside the casting. Model the fruit from polymer clay, bake and paint it, then set it among the dried leaves. Fix each branch to the cream base with dots of clear drying PVA so nothing shifts during the deep pour.
Triple Lobe Console with Pressed Flowers and Skeleton Leaves
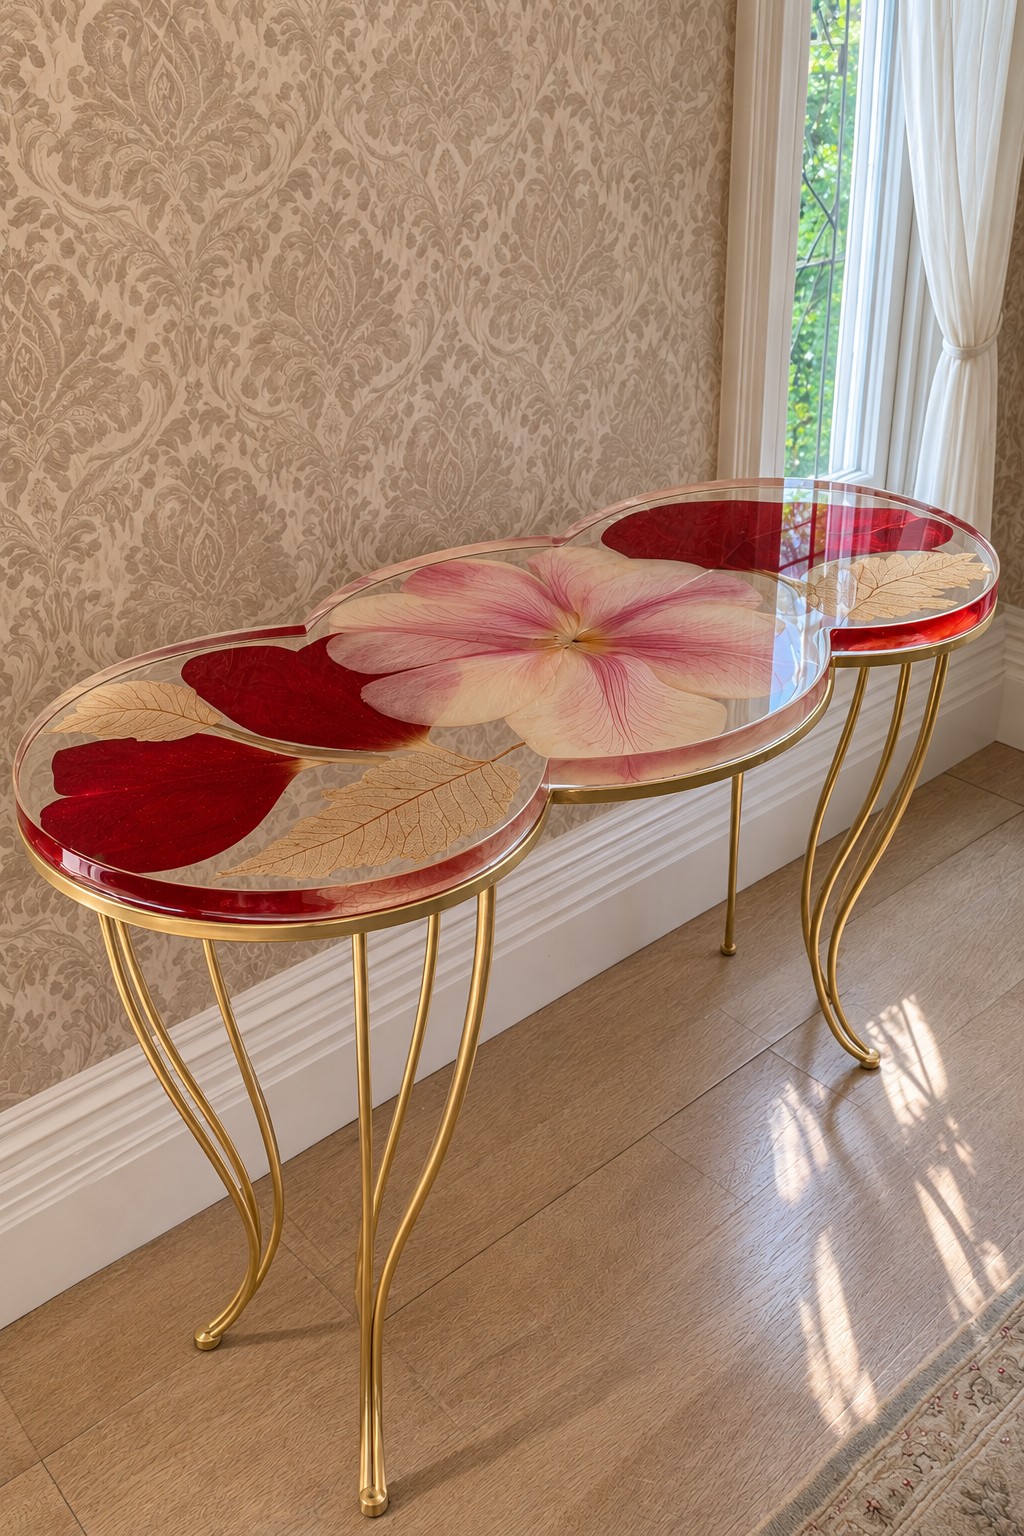
Three overlapping rounds make up this console top, which holds deep red petals, a large pale pink bloom and golden skeleton leaves, with a hint of red tint along the edge. Thin gold legs curve like stems below, and against damask wallpaper the piece looks like it belongs in an elegant hallway.
Skeleton leaves are lacy and fragile, so seal them with a light spray before casting to keep air out of the veins. Lay out the arrangement on paper the exact shape of the top before you commit, because large single blooms decide the whole composition. A console is narrow, so fix it to the wall or give it a wide base if pets or children pass by.
Evil Eye Mosaic Coffee Table
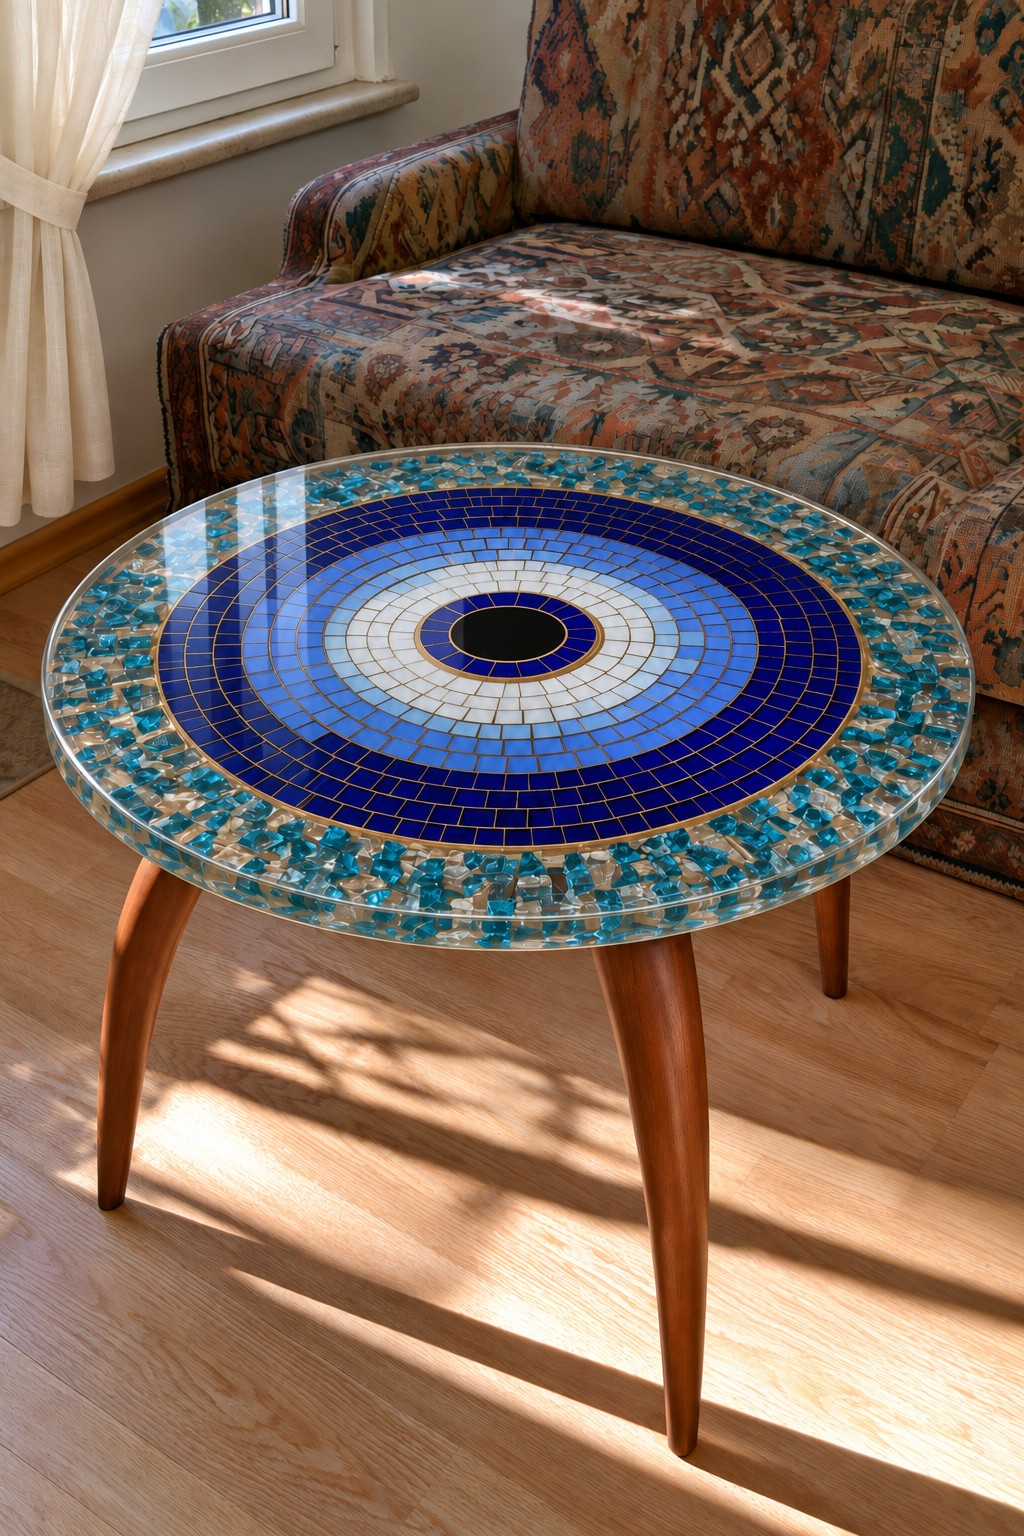
Square glass tiles in cobalt, sky blue, white and black form a large evil eye, with fine gold lines running between the rings and the tiles, and a border of turquoise glass chunks floats in clear resin around it. Raised on splayed wooden legs in front of a kilim covered sofa, it brings Anatolian color and a sense of protection to a living room.
Glue the tiles to a round plywood base with a clear drying PVA made for glass, following circles drawn with a compass, keeping the gaps narrow and even. For the gold lines, fill the joints with gold tinted resin or a metallic grout before the clear pour. Glass needs no sealing but must be completely clean and dry. Scatter the turquoise glass in a thickened layer around the outer ring, then flood the whole top with clear resin, and sand or file any glass edge that pokes above the surface before the final coat.
Succulent Rosette Balcony Table
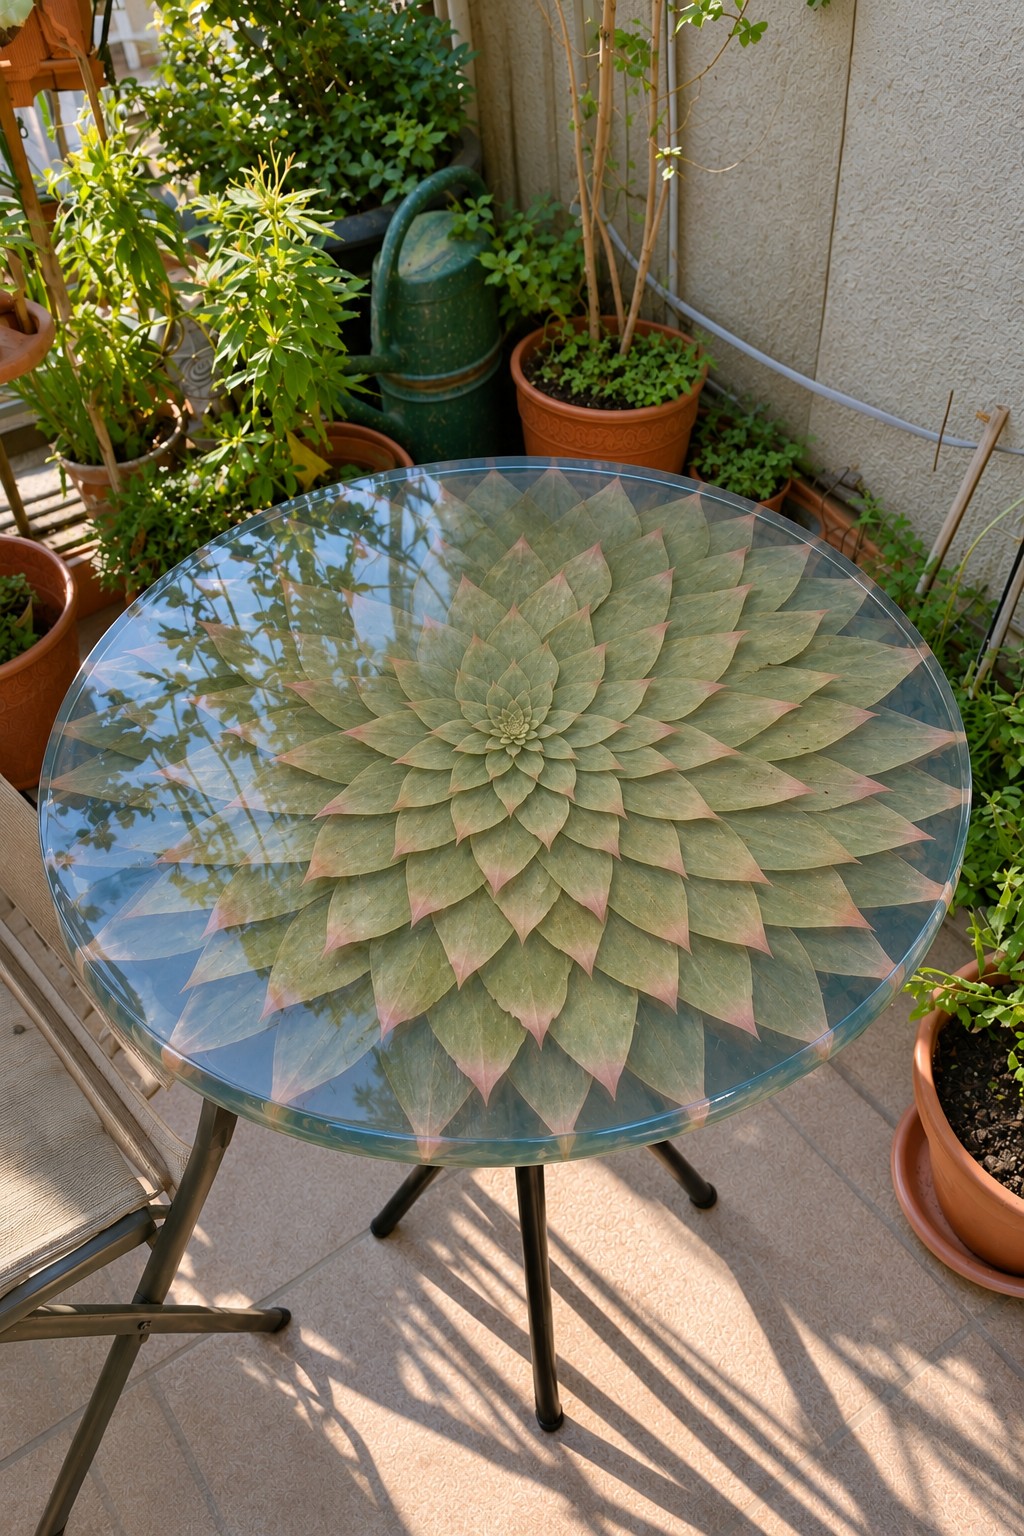
A huge green rosette with blush tipped leaves spirals out from the center of this clear round top, which sits on a slim folding metal frame among potted herbs. On a small balcony, it mirrors the plants around it and makes even a narrow space feel like a garden.
Real succulents are too fleshy to dry well and would rot inside resin, so the reliable route is a high resolution printed rosette, sealed on both sides, or a mandala of thin pressed leaves arranged leaf by leaf in a spiral. Outdoors, sun is the main concern, so pick a UV stable resin, cover the table in summer and store it inside in winter.
Snowflake Coffee Table in Icy Blue
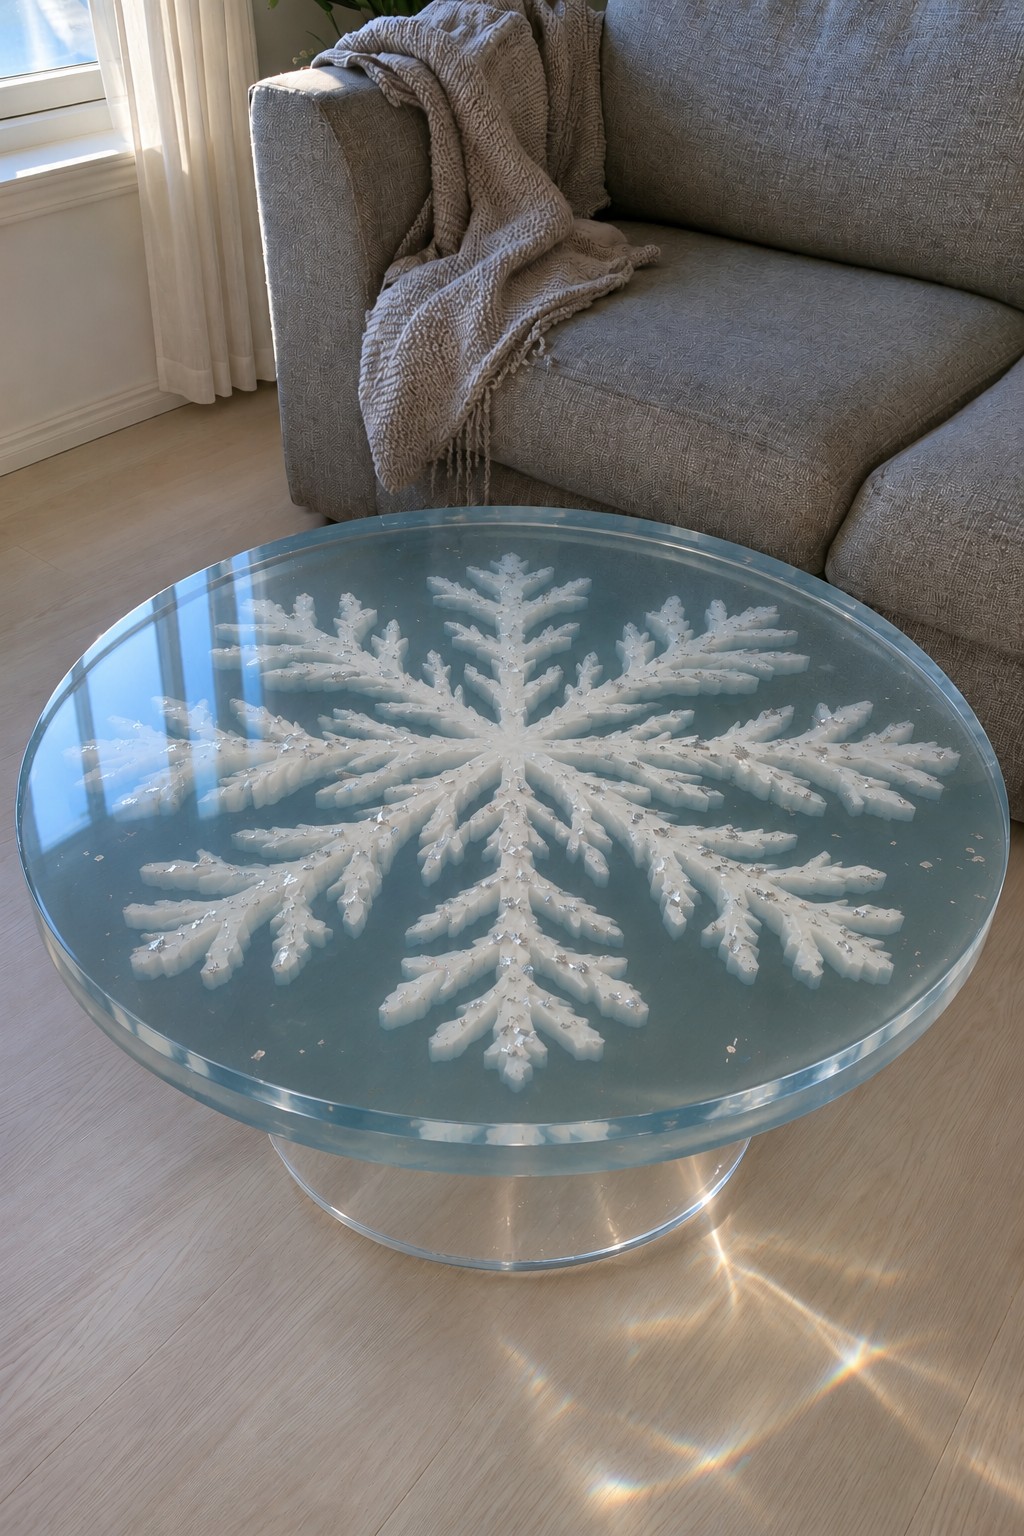
A large white snowflake with feathery arms sits in pale, icy blue resin, sprinkled with tiny silver flakes, and the top rests on a clear round base. As light passes through it throws soft patterns on the floor, and next to a gray sofa it gives a living room a crisp winter look.
Cast the snowflake on its own in opaque white resin using a silicone mold, or build it up with white tinted resin piped in fine lines, and add crushed clear glass for sparkle. Set it in the main mold and pour a lightly tinted blue around it. Keep the blue tint very light so the snowflake stays the star.
Hydrangea Petal Oval Dining Table
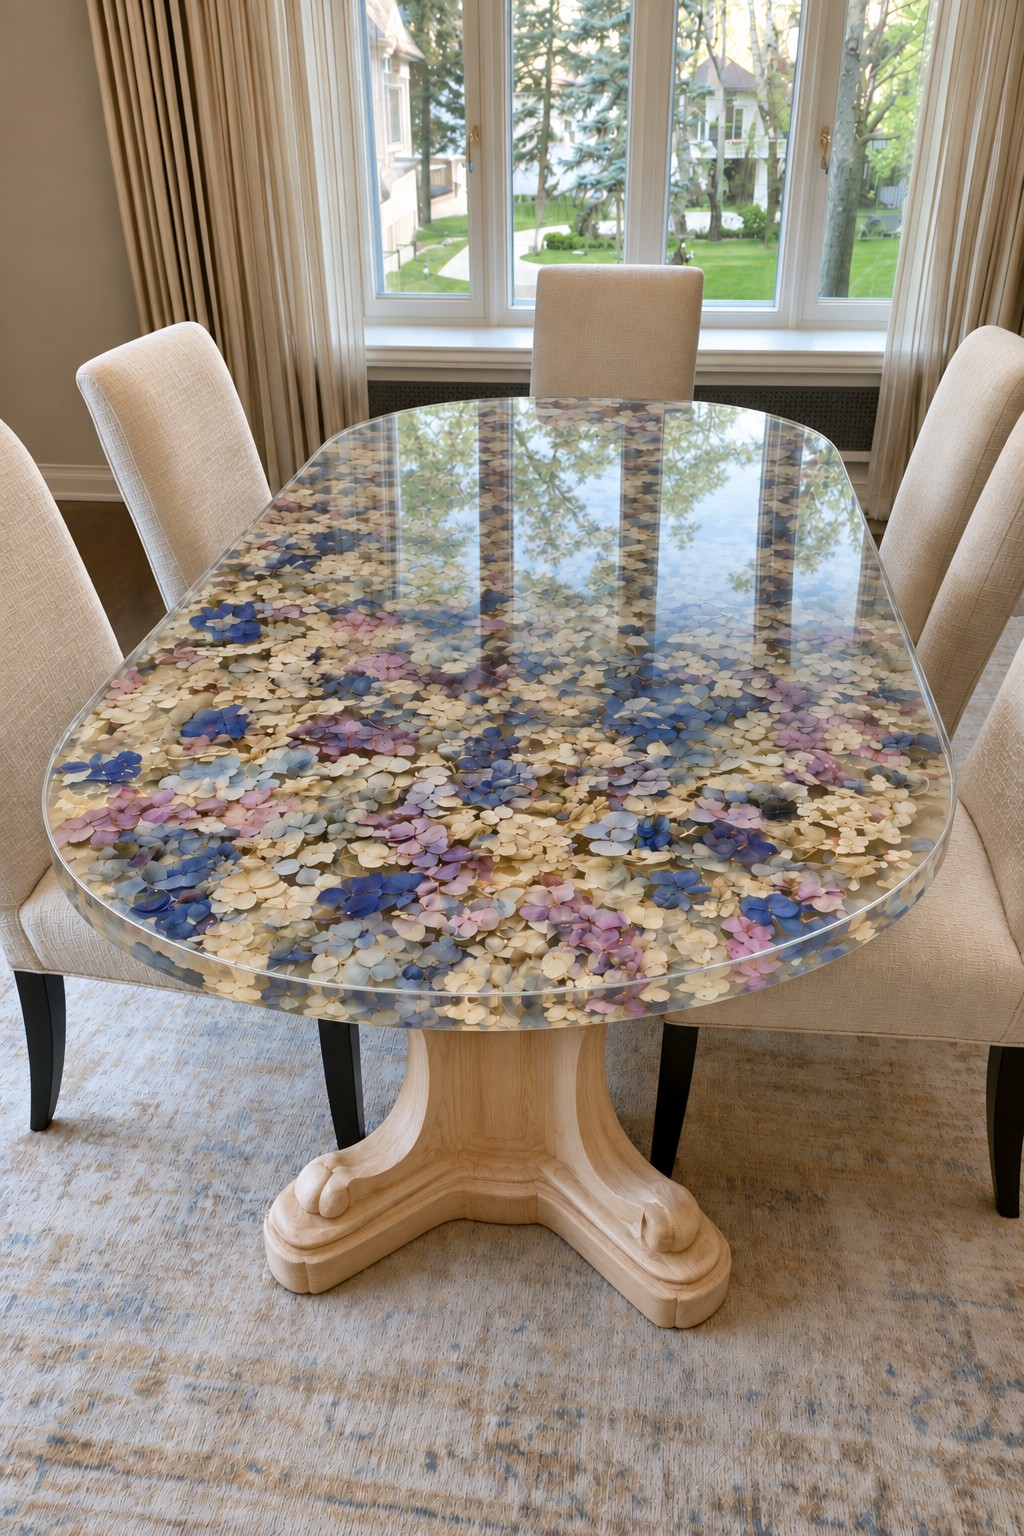
Thousands of hydrangea florets in cream, powder blue, lilac and deep blue cover this oval dining top, which stands on a carved pale wood pedestal surrounded by upholstered chairs. The soft blend of colors feels like a garden in late summer and suits a bright dining room with large windows.
Hydrangeas are among the easiest flowers to dry because the florets air dry on the stem, so pick them late in the season when the petals feel slightly papery. Scatter the florets in two or three layers rather than one, so the color looks deep. A large dining top needs plenty of resin and a lot of curing time, so plan the pours carefully.
Iridescent Cloud Table for a Little Girl's Room
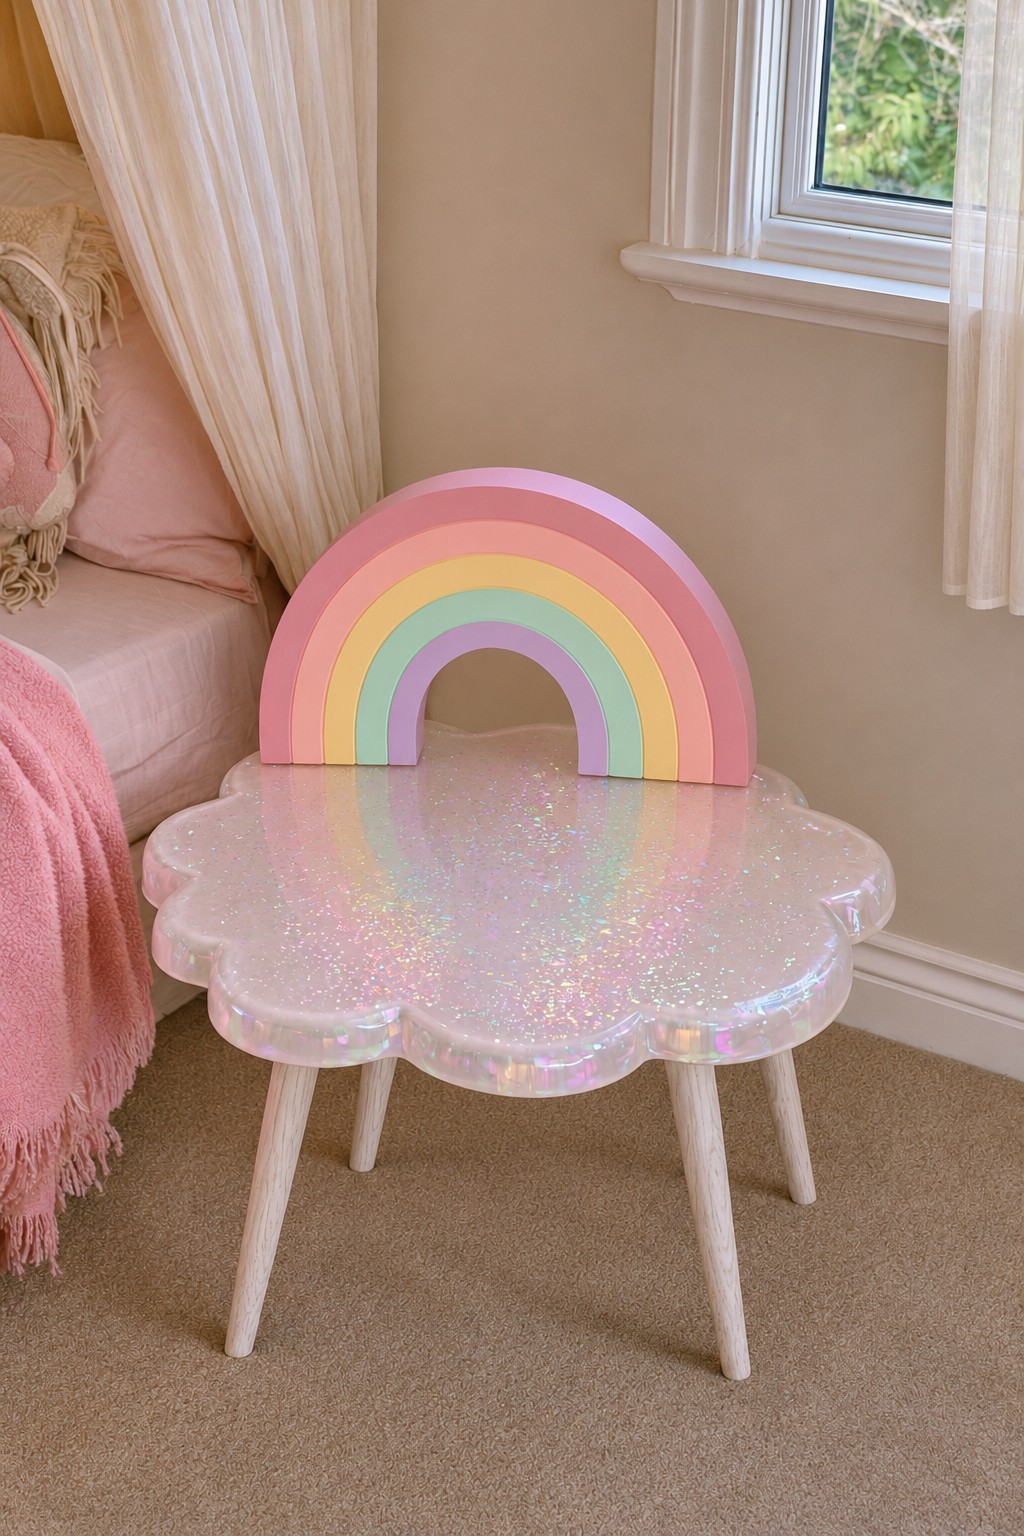
A scalloped cloud shape filled with holographic glitter and a pearly sheen sits on whitewashed wooden legs, with a pastel rainbow ornament resting on top. In a pink bedroom with a canopy, it becomes the dreamy spot for hair clips, stories and night lights.
Mix fine holographic glitter and a touch of white pearl mica into clear resin so the color shifts from pink to blue as you walk past. A cloud outline is easy to form with a flexible strip around a melamine base. Sand the scalloped edges well so no sharp rim remains, and keep the table light enough for a child to move without strain.
Alphabet Activity Table for Early Learners
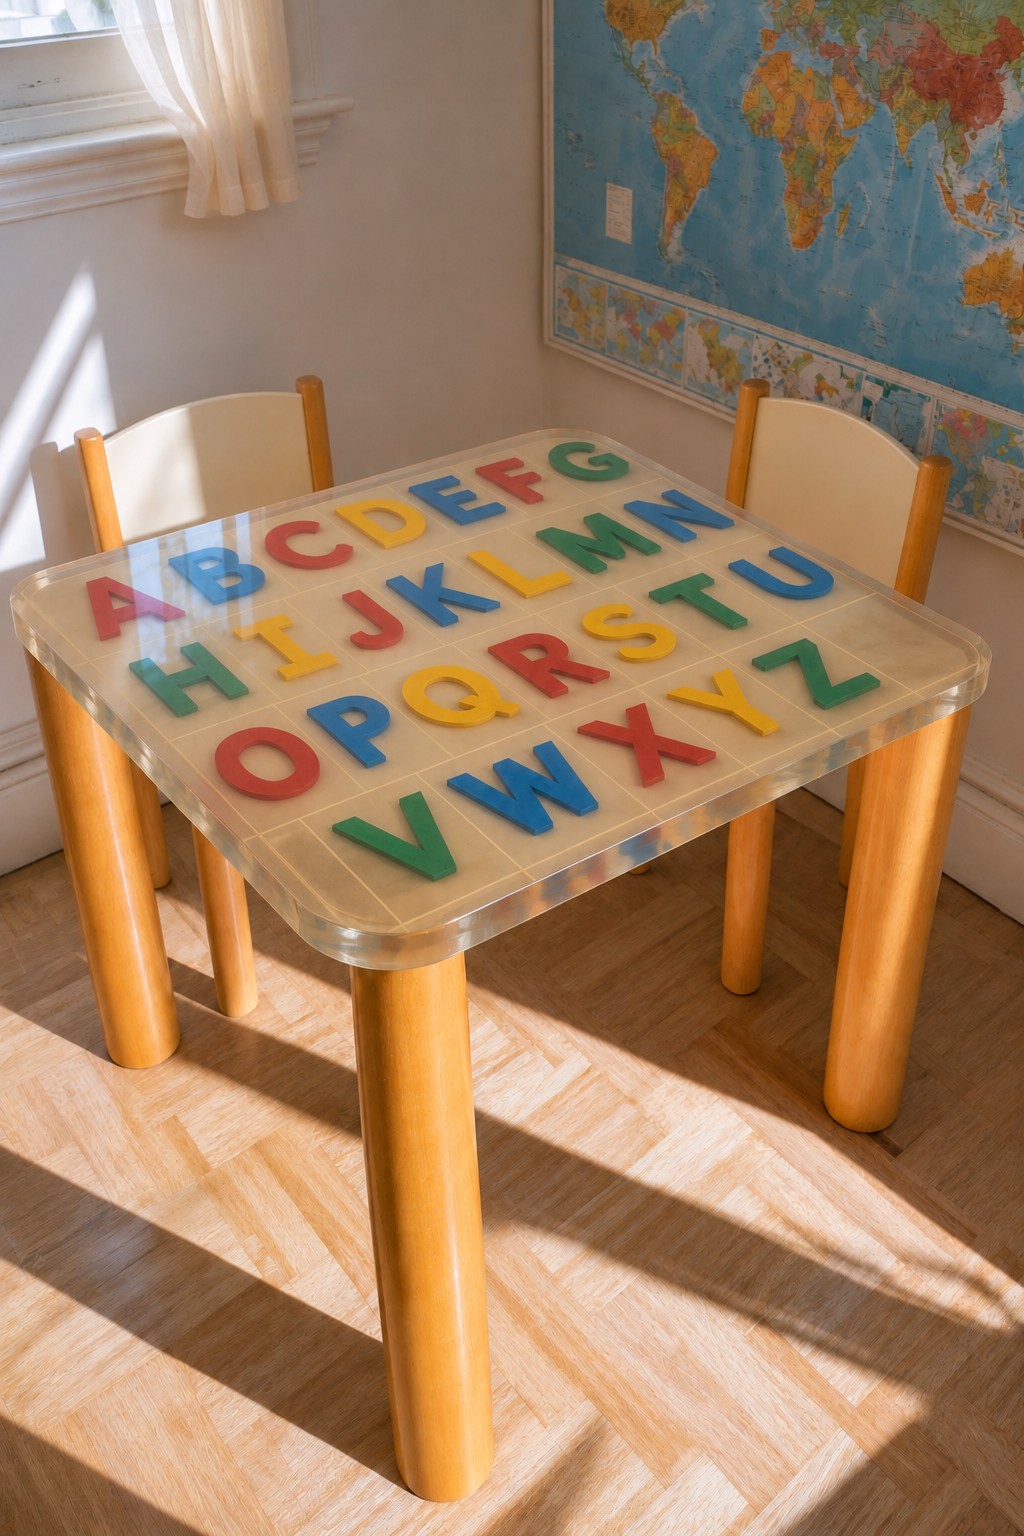
Bright letters from A to Z, in red, blue, yellow and green, sit in neat rows on a pale grid under clear resin, and thick rounded wooden legs carry the top. Next to a world map in a playroom, it doubles as a learning tool and a craft surface.
Use painted and sealed wooden letters rather than foam ones, because foam is buoyant and porous. Fix them with wood glue onto a sealed base marked with a light grid, then cover with clear resin. Round the corners and soften every edge with sandpaper, and only bring the table into the playroom after a full cure.
Parisian Lavender Bistro Table
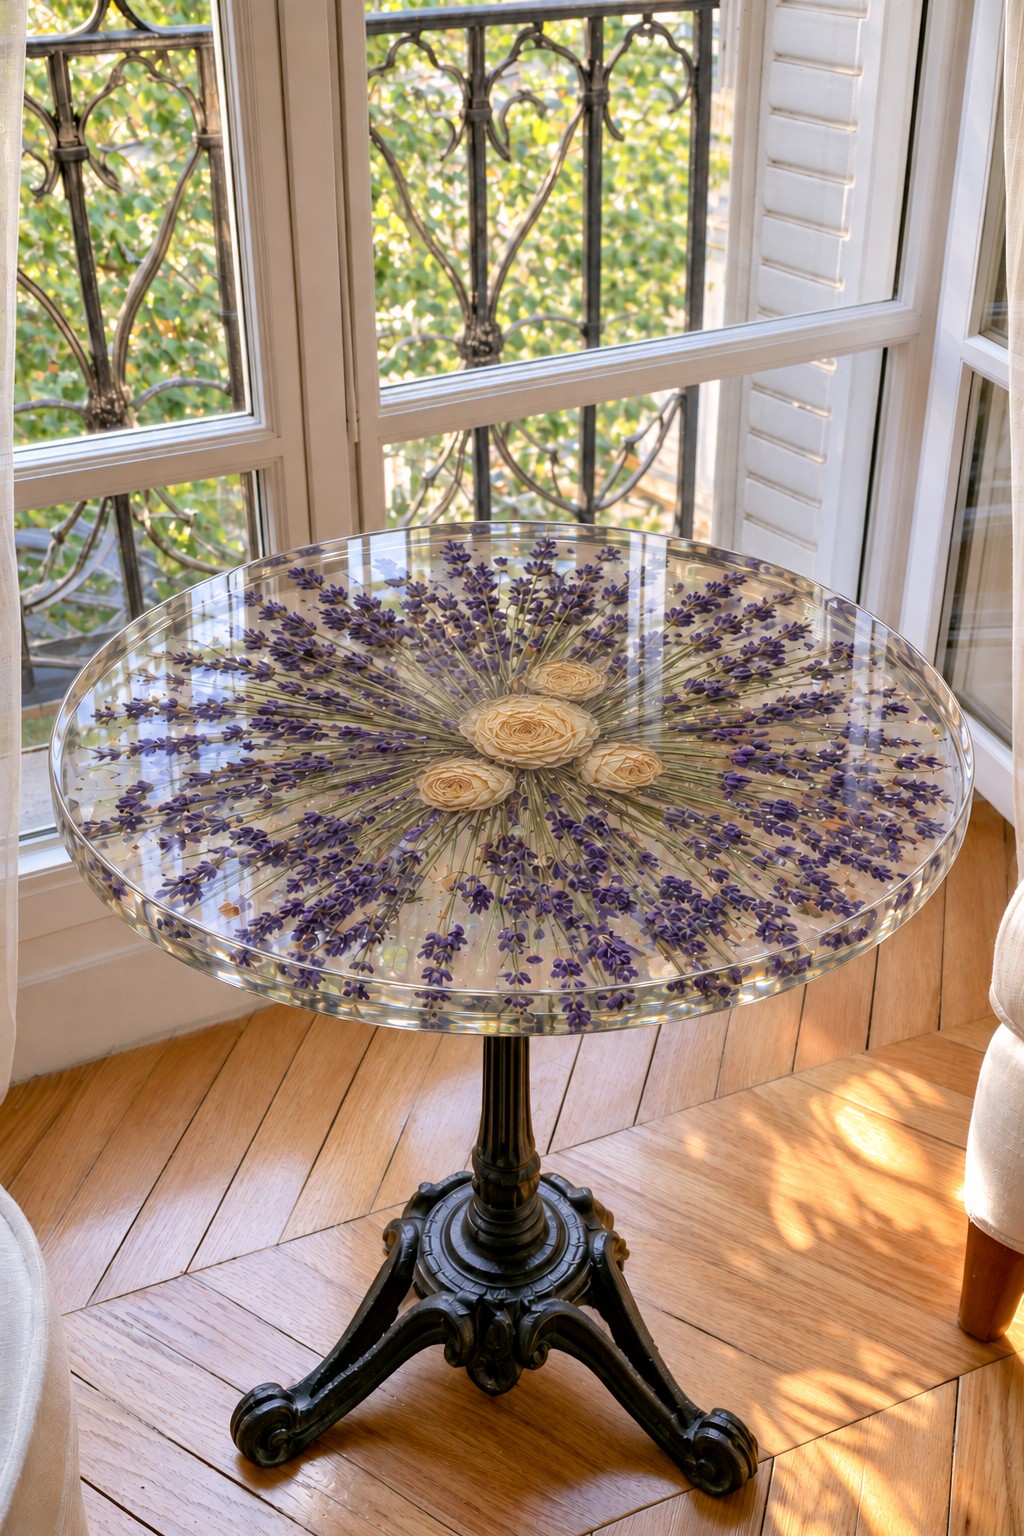
Hundreds of lavender sprigs radiate from a small cluster of cream roses at the center of this clear round top, which sits on a black cast iron bistro base. Placed by tall French doors with a wrought iron balcony rail, it brings Provence to a city apartment.
Dry the lavender in bunches hung upside down, then fix each stem onto the base with a tiny dab of clear drying craft glue, in a radiating line, starting at the outer edge and working inward. Dried buds shed easily, so handle them gently and brush loose ones away before the pour. Seal the roses with a light spray to keep bubbles from rising.
Spa Coffee Table with River Stones and Hydrangea
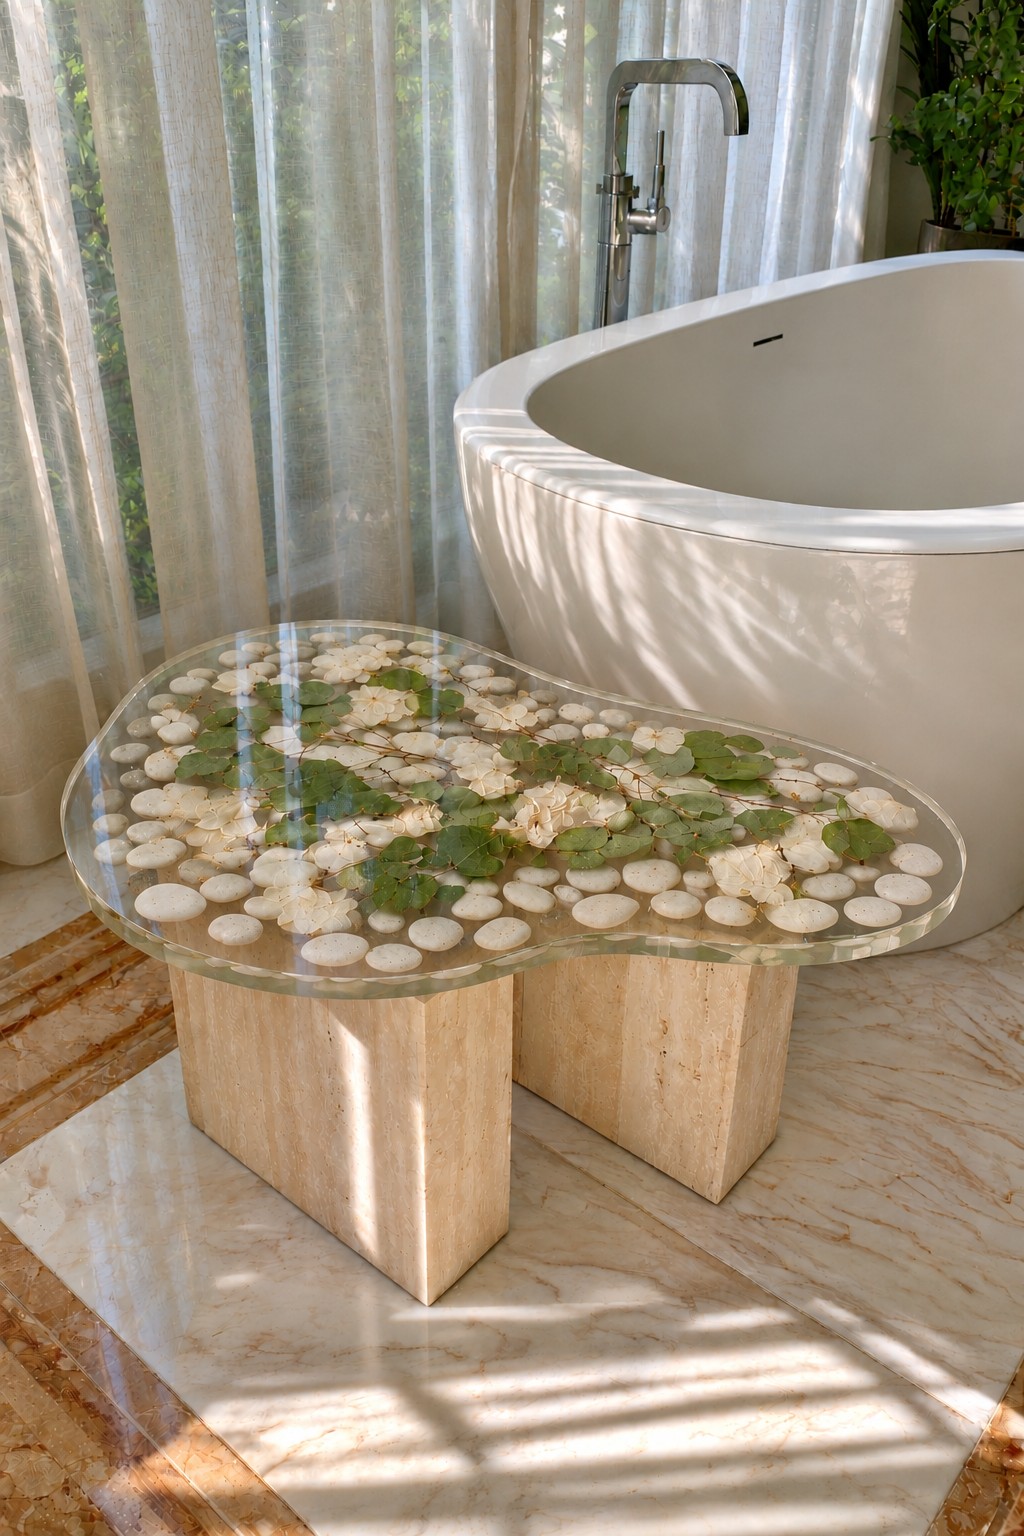
White river stones, cream hydrangea blossoms and round eucalyptus leaves fill this kidney shaped clear top, which rests on two travertine blocks beside a freestanding bathtub. It suits a spa style bathroom and holds towels, a candle or a cup of tea while you soak.
Cured epoxy is waterproof, which makes it a good bathroom choice as long as the inclusions are well sealed. Wash and dry the stones and seal their porous surface first. Travertine is heavy, so the blocks give the top a stable footing, but glue rubber pads under them so they do not scratch the marble floor.
Pink Blossom Garden Table with a Golden Center
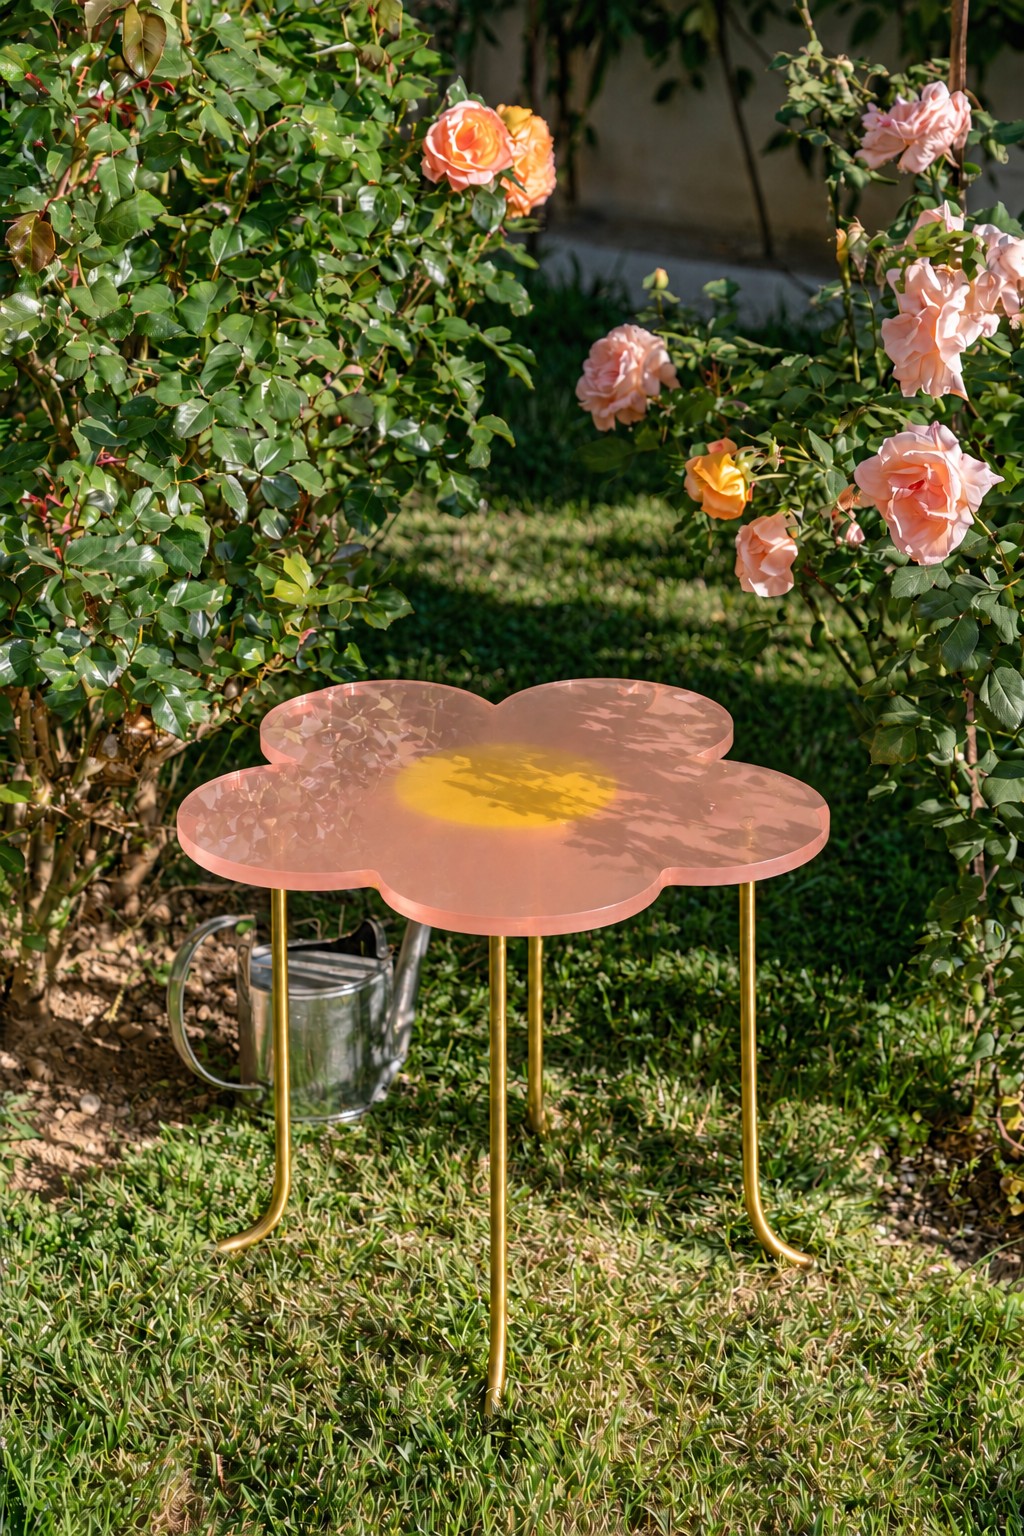
A four petal blossom of translucent coral pink resin with a soft yellow heart sits on slim gold legs among climbing roses. It works as a little garden table for a teacup and a book, and its color echoes the roses all around it.
Create the center by letting a pool of yellow resin bleed slightly into the pink, so the transition looks natural. Since the table lives outside, choose a UV stable resin and bring it under cover when not in use, because sunlight fades pink tones quickly. Fit the legs with plates screwed into threaded inserts so you can take them off for winter storage.
Pansy Shaped Patio Table
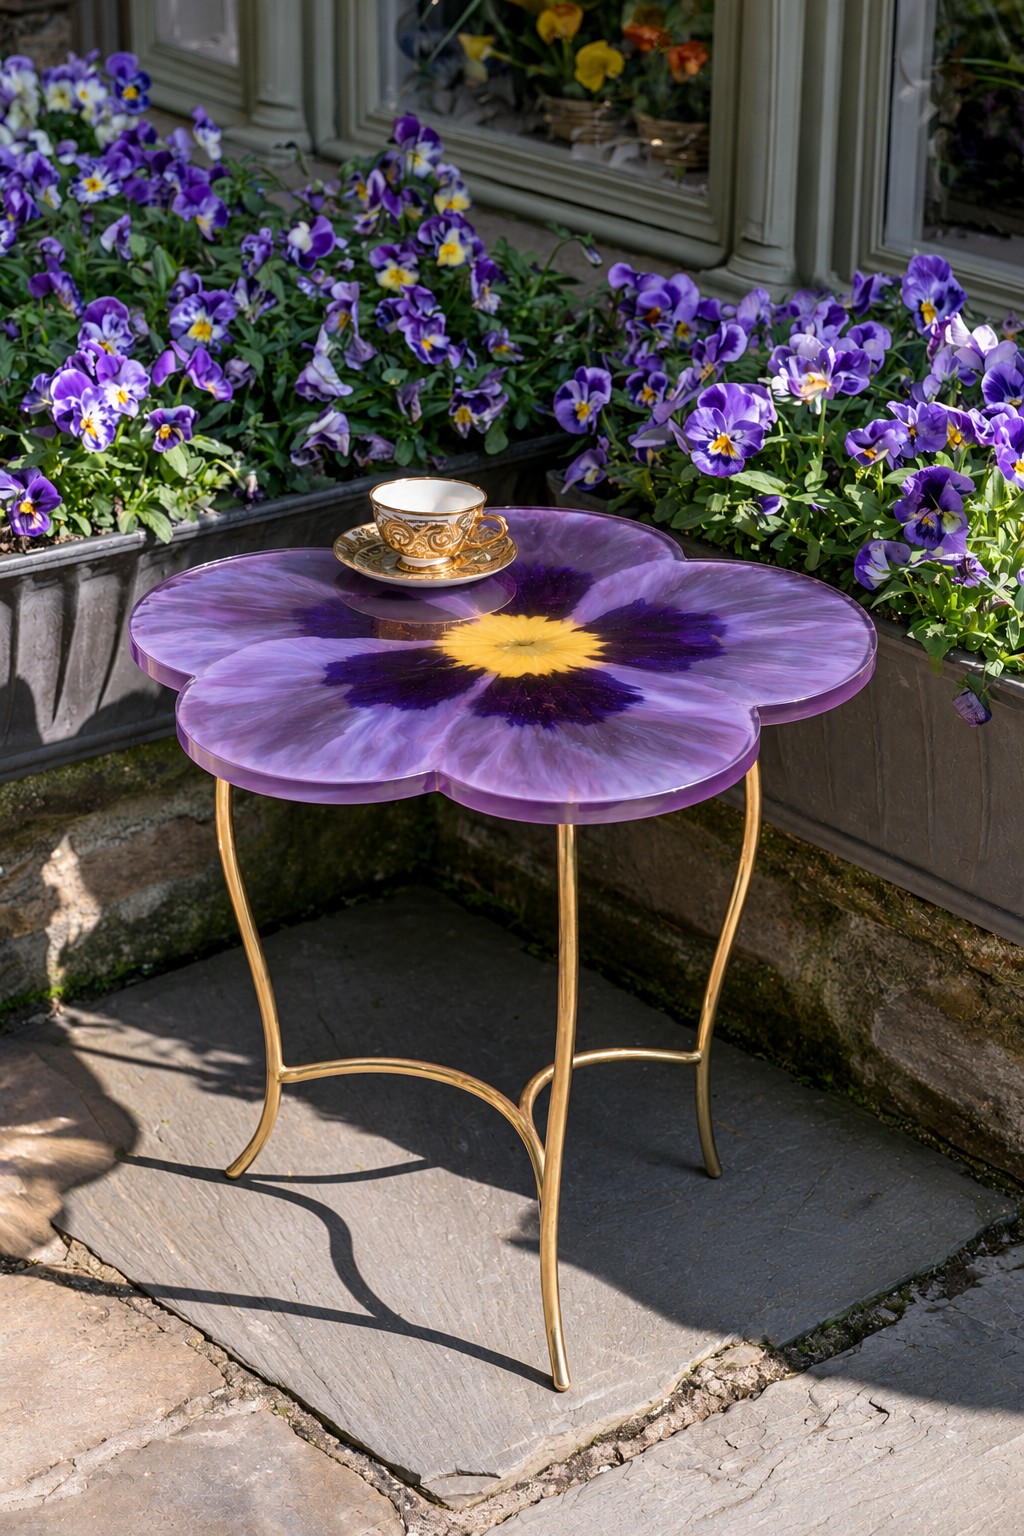
A five petal pansy in shades of violet, with a dark purple blotch and a sunny yellow eye, makes the top of this small patio table, held up by curving gold legs. Beside a window box overflowing with real pansies, it shows how a garden planting can inspire furniture.
Pour each petal zone in tinted resin, then drag a darker violet from the center outward with a thin stick to create the natural lines of the flower. A spot of yellow in the middle completes the face. Because pansy colors are deep, they hide small flaws well, which makes this a forgiving project for a first shaped pour.
Hibiscus Flower Side Table for a Tropical Patio
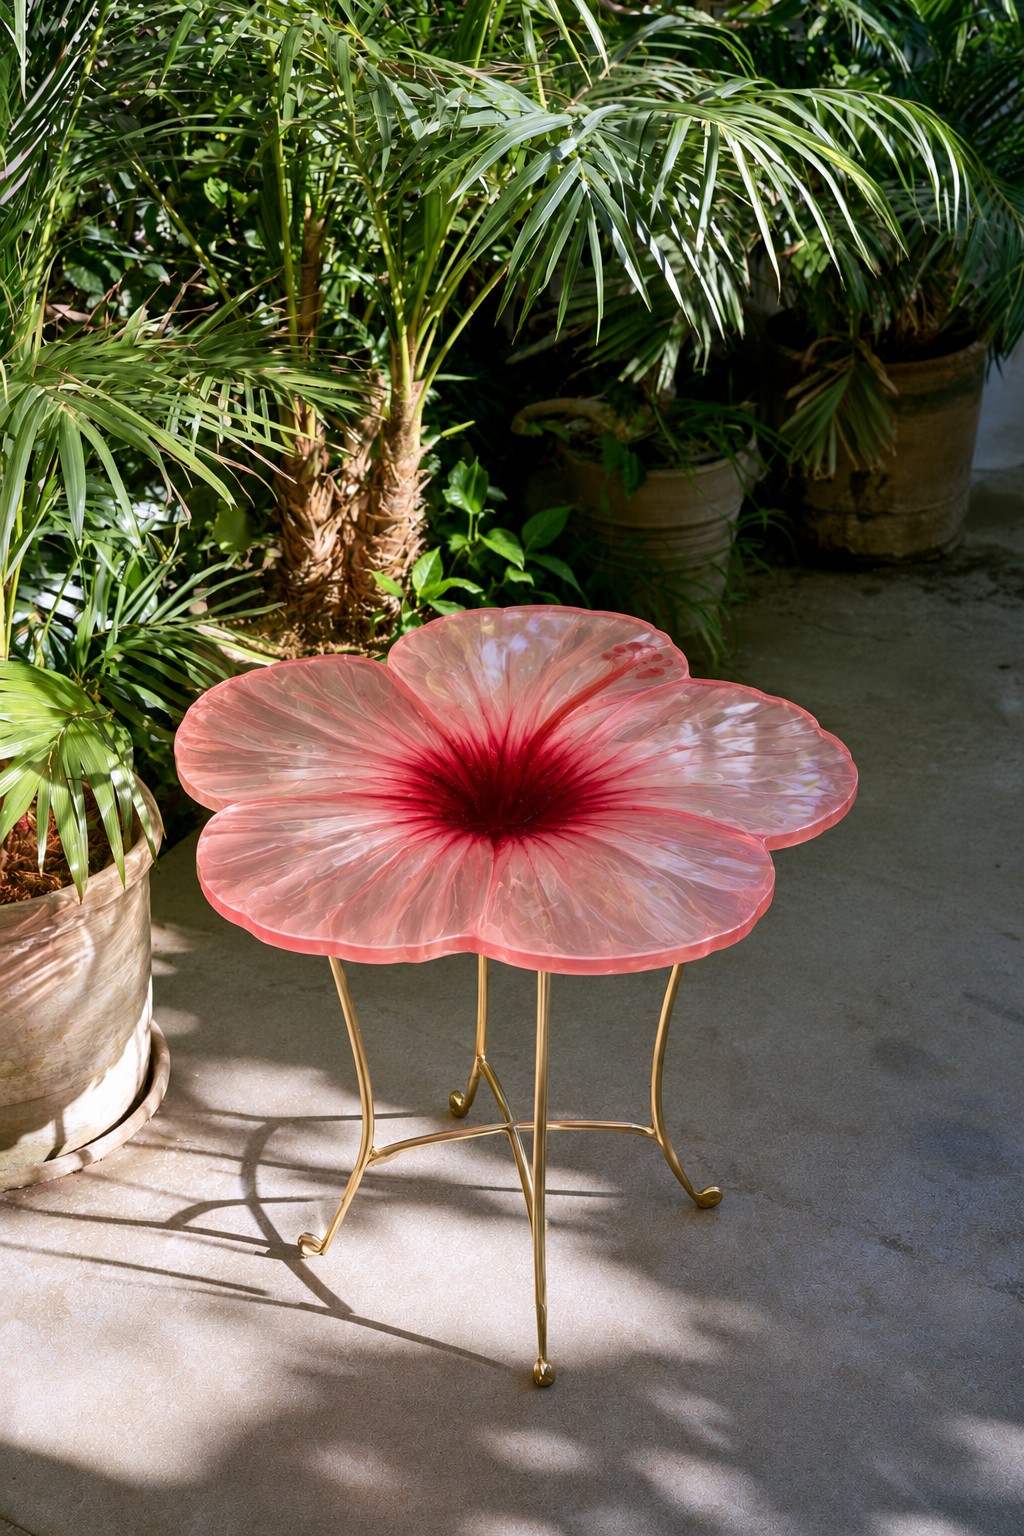
A wide pink hibiscus spreads across this table, with deep crimson streaks running from the center into each ruffled petal, and slender gold legs curl underneath. Surrounded by potted palms, it creates a warm, tropical corner on a shaded patio.
The streaks come from dropping concentrated red pigment into the center of the wet pink pour and pulling it out in thin lines with a toothpick or fine brush. Work quickly, before the resin starts to gel. Keep it out of the midday sun so the pink stays fresh, and lift it indoors in winter.
Set of Dahlia Pink Side Tables
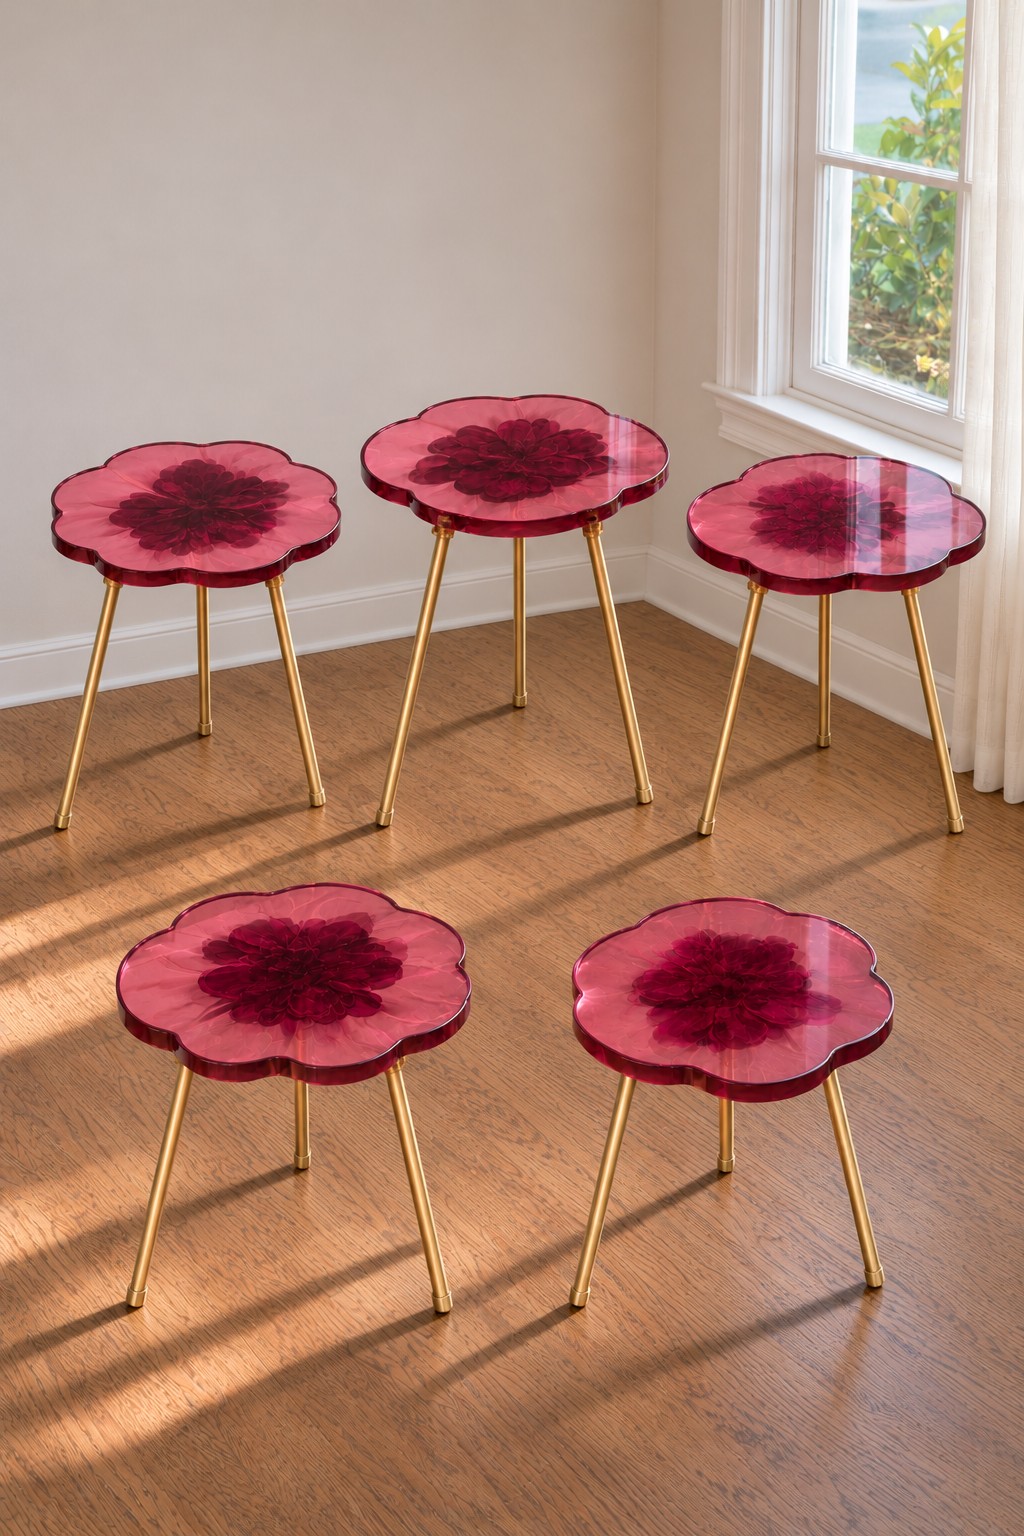
Five small flower shaped tops in raspberry pink, each with a deeper burgundy bloom pattern in the middle, stand on gold tapered legs. Scattered around a living room, they work as side tables, plant stands or extra surfaces for a party.
A set like this is easiest when you cast every top in the same silicone flower mold, using one batch of pink for consistent color. Swirl the darker burgundy into the center while the resin is still fluid. If anyone might sit on them, make the tops thicker and use sturdier legs with mounting plates, since thin resin flexes under weight.
Retro Amber Cloud Table with Floating Dots
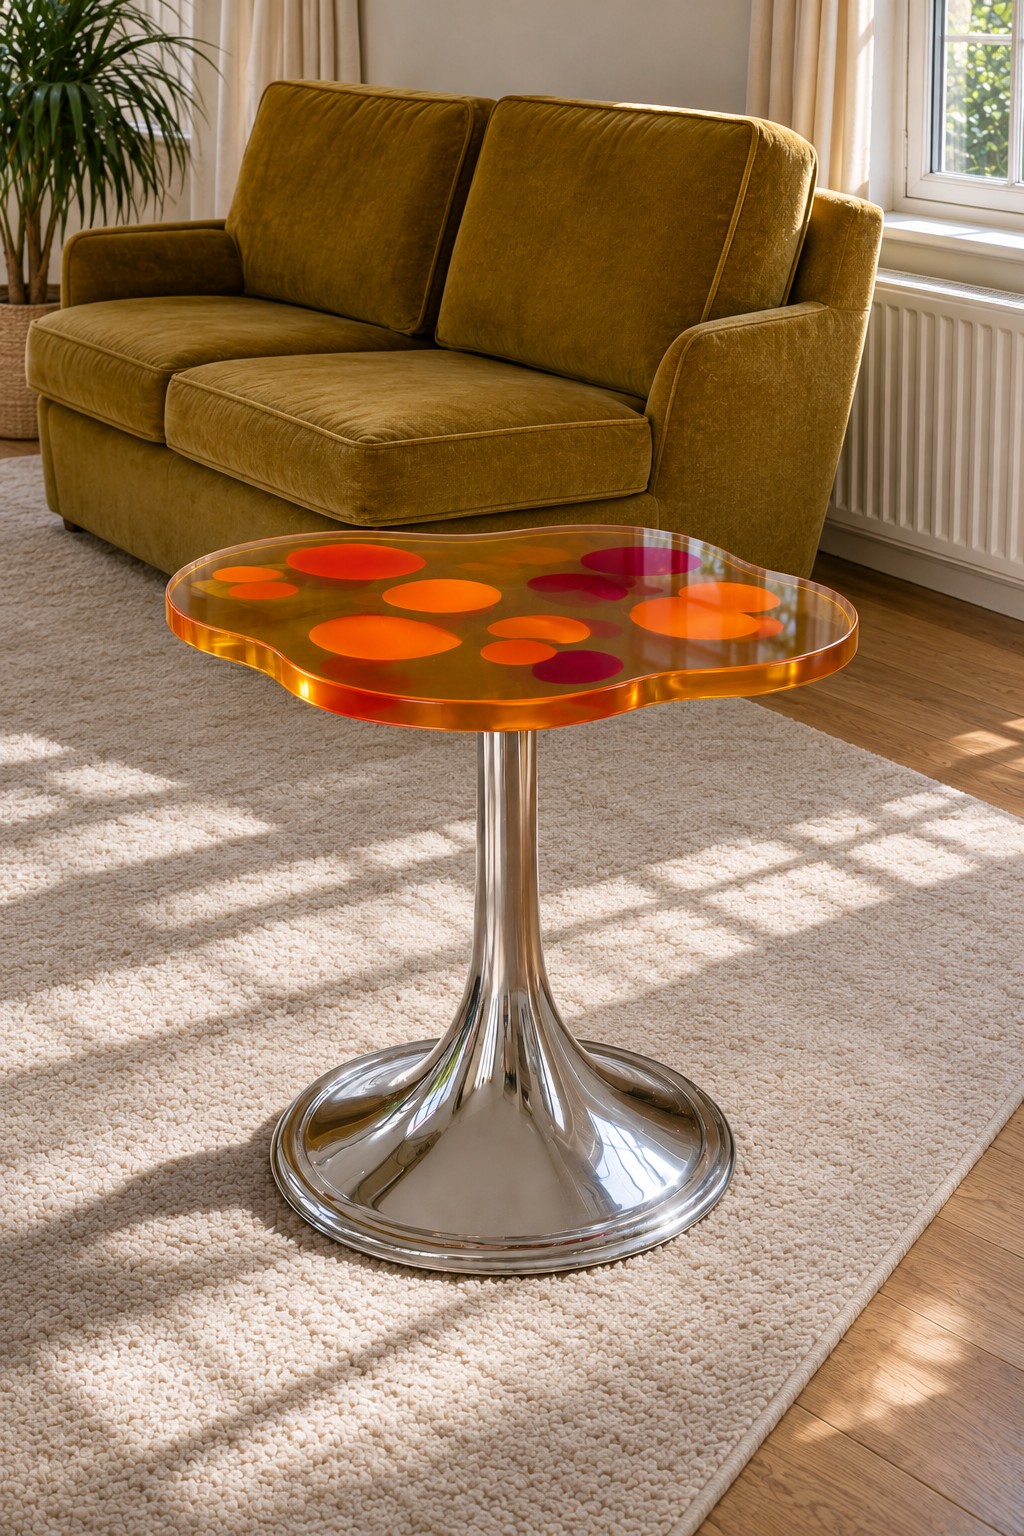
An amber orange cloud shaped top holds round discs in orange, tangerine and berry red, raised on a polished chrome tulip base. With a mustard velvet sofa and a sunny rug, it fits perfectly in a seventies inspired living room.
Cast the dots in advance in small round molds using opaque pigments, then arrange them in the main mold and pour amber tinted resin over them. Their different sizes create depth. Chrome and amber reflect each other, so place the table where afternoon sun can pass through the top.
Minimal Clear Triangle Table on a Pyramid Base
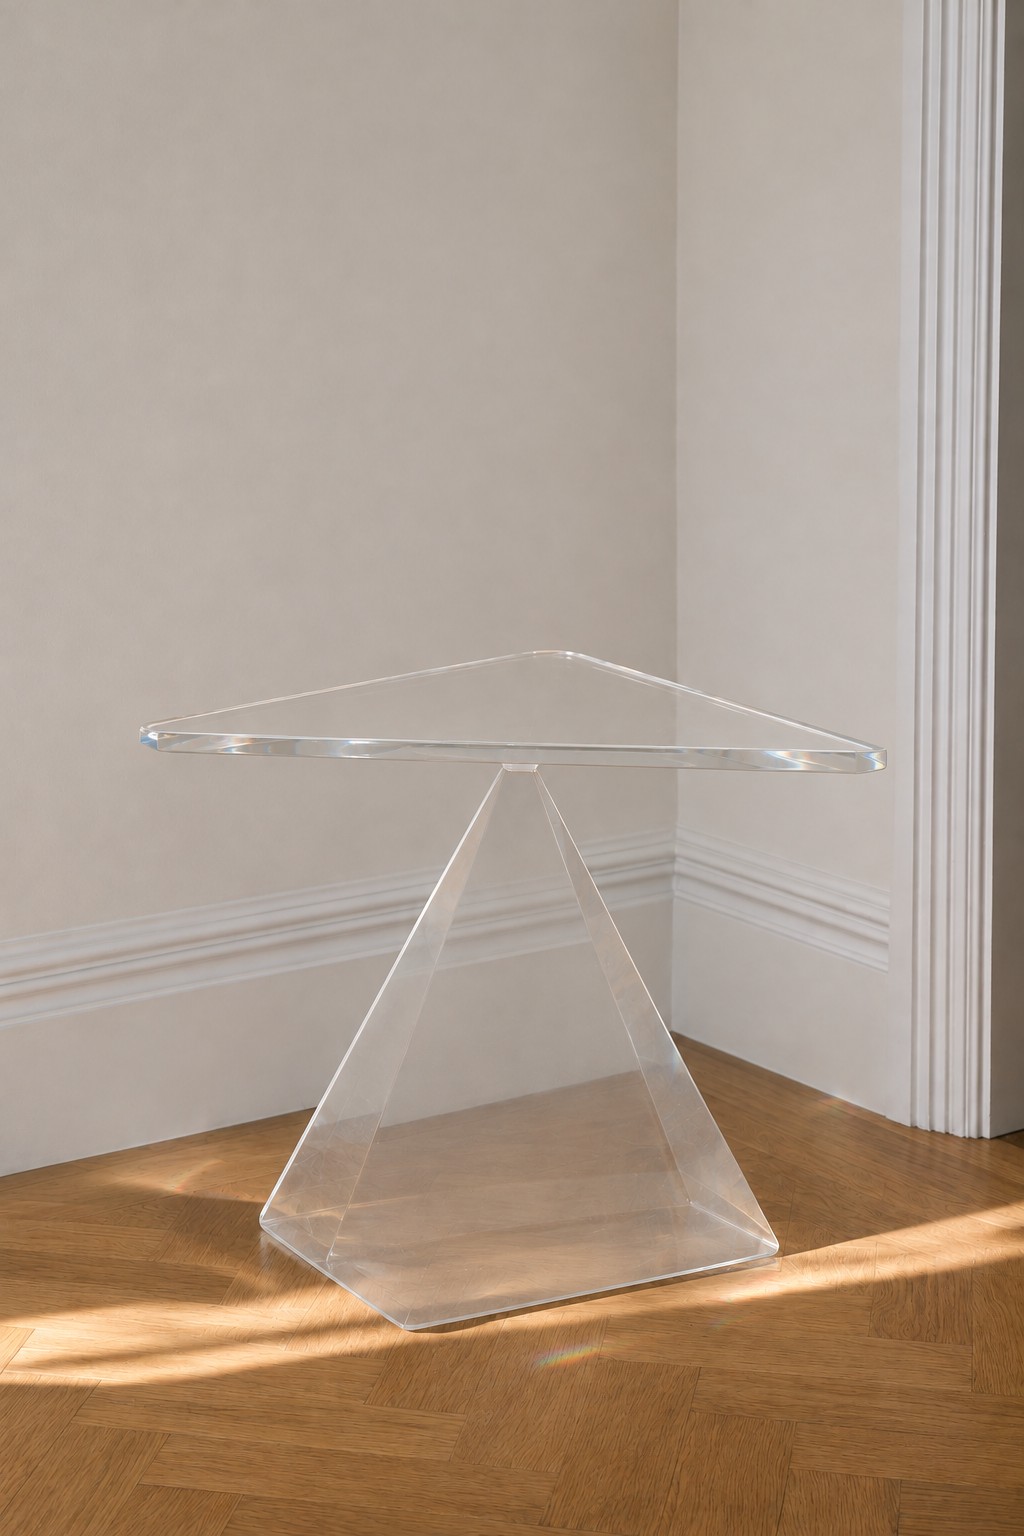
A triangular top of crystal clear resin balances on a transparent pyramid, and the whole table almost disappears into the corner of a pale room with herringbone floors. It takes up very little visual space, which is ideal for a small entrance or a minimalist living room.
Perfect transparency demands careful bubble removal and very patient sanding and polishing of the edges. The pyramid is easier to build from clear acrylic sheets bonded with solvent cement than to cast, and it pairs neatly with a resin top. Make the top thick enough to stay rigid, and keep the point of the pyramid well under the center of gravity.
Lightning Bolt Table for a Kid's Room
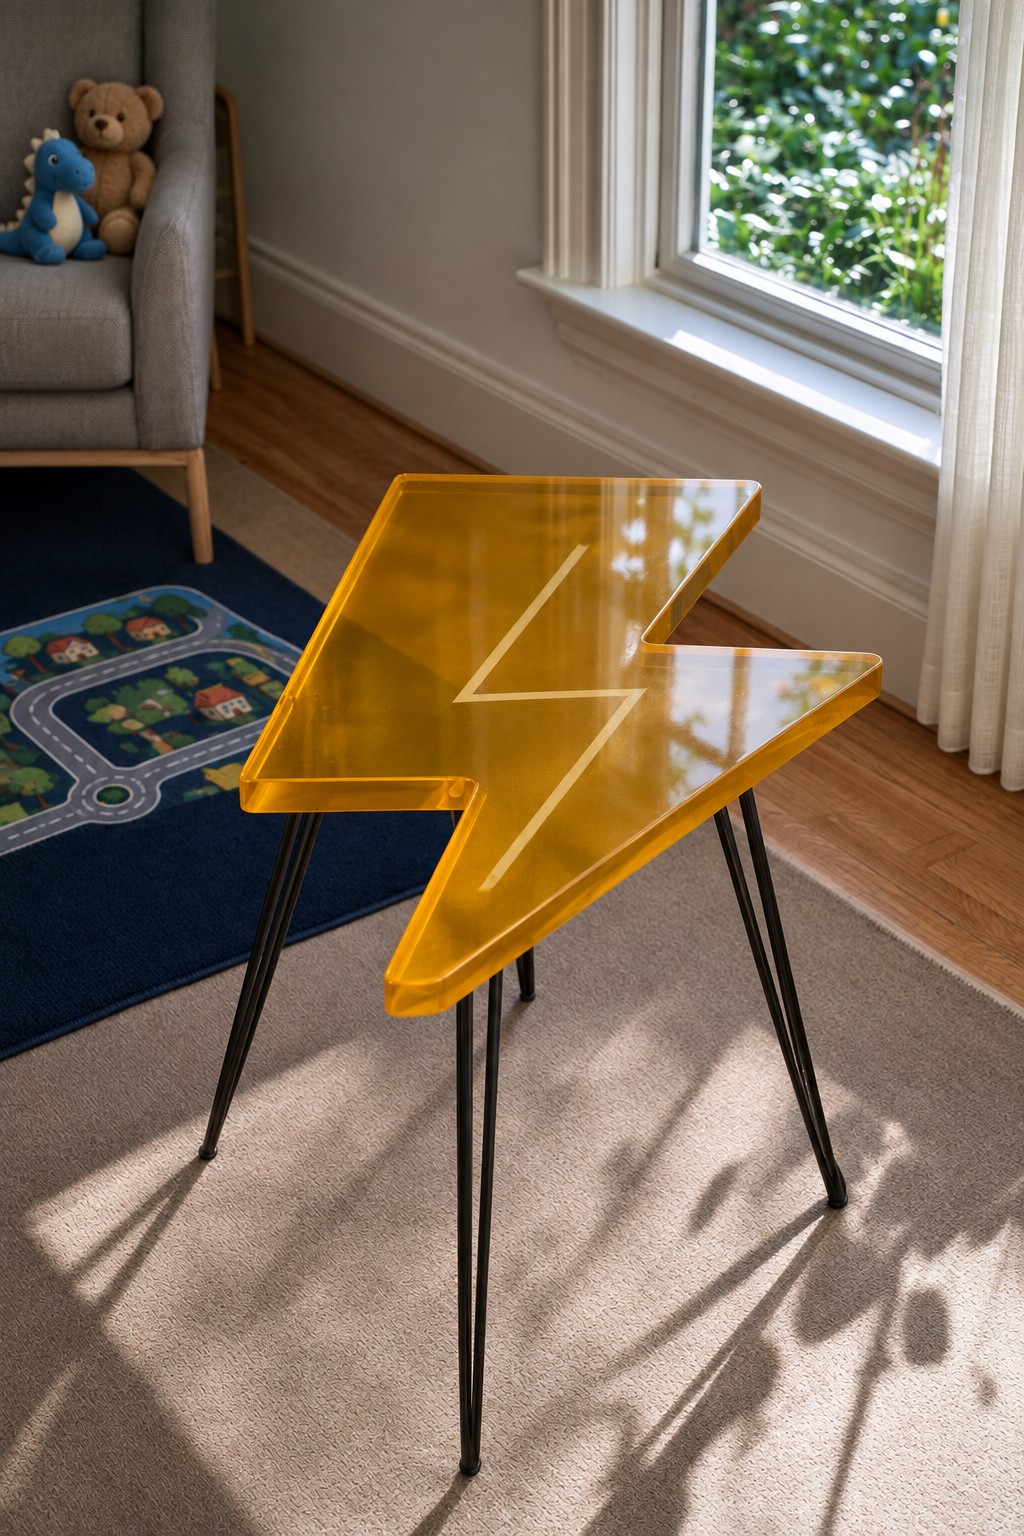
A bold lightning bolt in translucent golden yellow resin, with a thin outline of a smaller bolt inlaid in its surface, stands on black hairpin legs. Next to a road map rug and a teddy bear, it gives a child's room a superhero mood.
The inner bolt can be engraved into the cured top with a rotary tool and filled with pale resin, or a thin strip can be set in place before pouring. Points are the weak spots of such a shape, so keep them slightly rounded and thick enough not to snap. Hairpin legs need mounting plates screwed into threaded inserts to stay steady.
Pop Art Red Lips Side Table
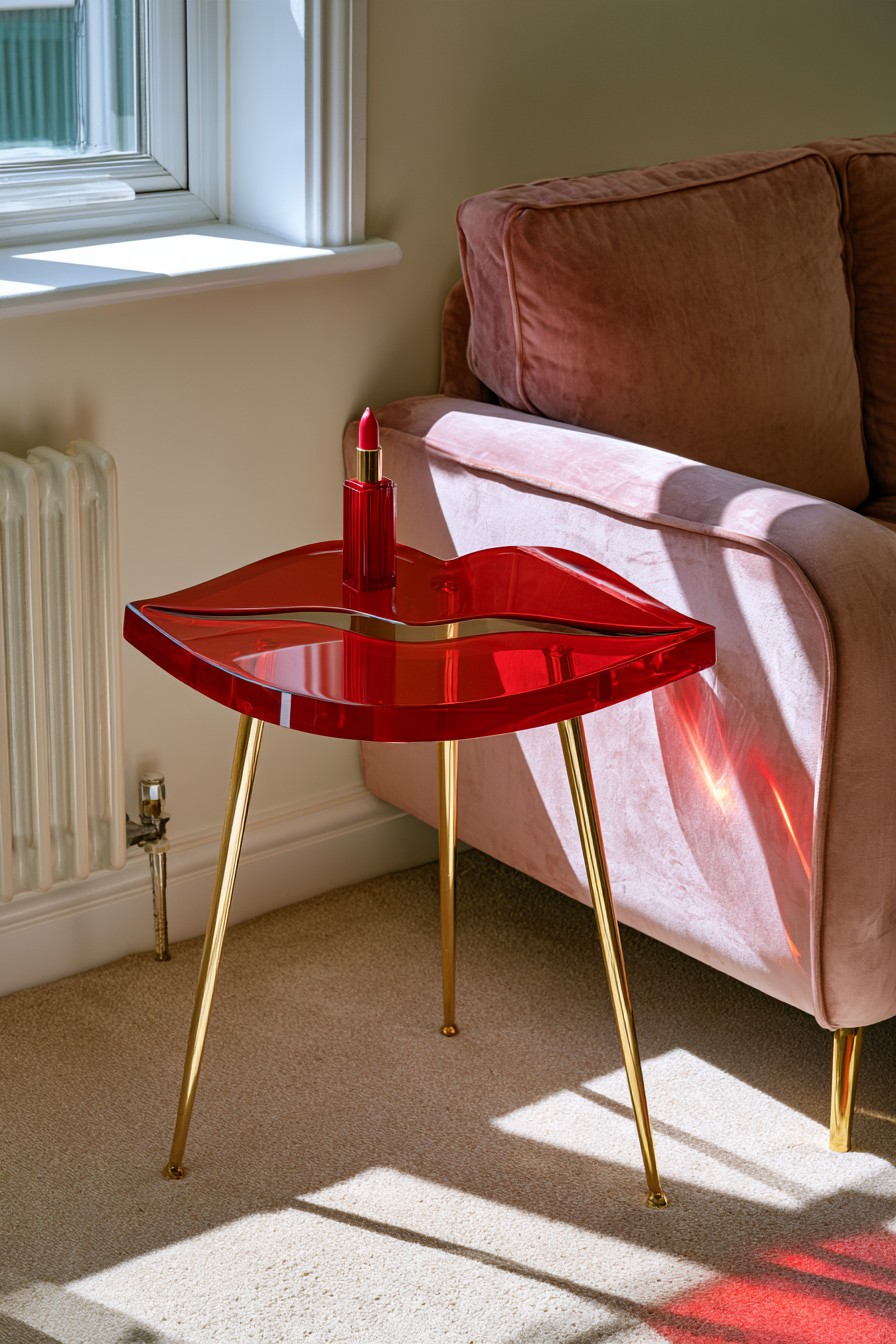
A pair of glossy red lips, divided by a fine gold line where they meet, rests on slender, outward angled gold legs beside a dusty pink velvet sofa. It is pure pop art fun and fits a playful living room or dressing area.
A deep, clear red needs a generous amount of transparent pigment and a smooth mold, as every flaw in a red surface shows. For the center line, cast the upper and lower lip as two pieces and join them over a thin brass strip, or set the strip into the mold before pouring. Gold legs angled outward give the slim top a stable stance.
Bumblebee Side Table with Translucent Wings
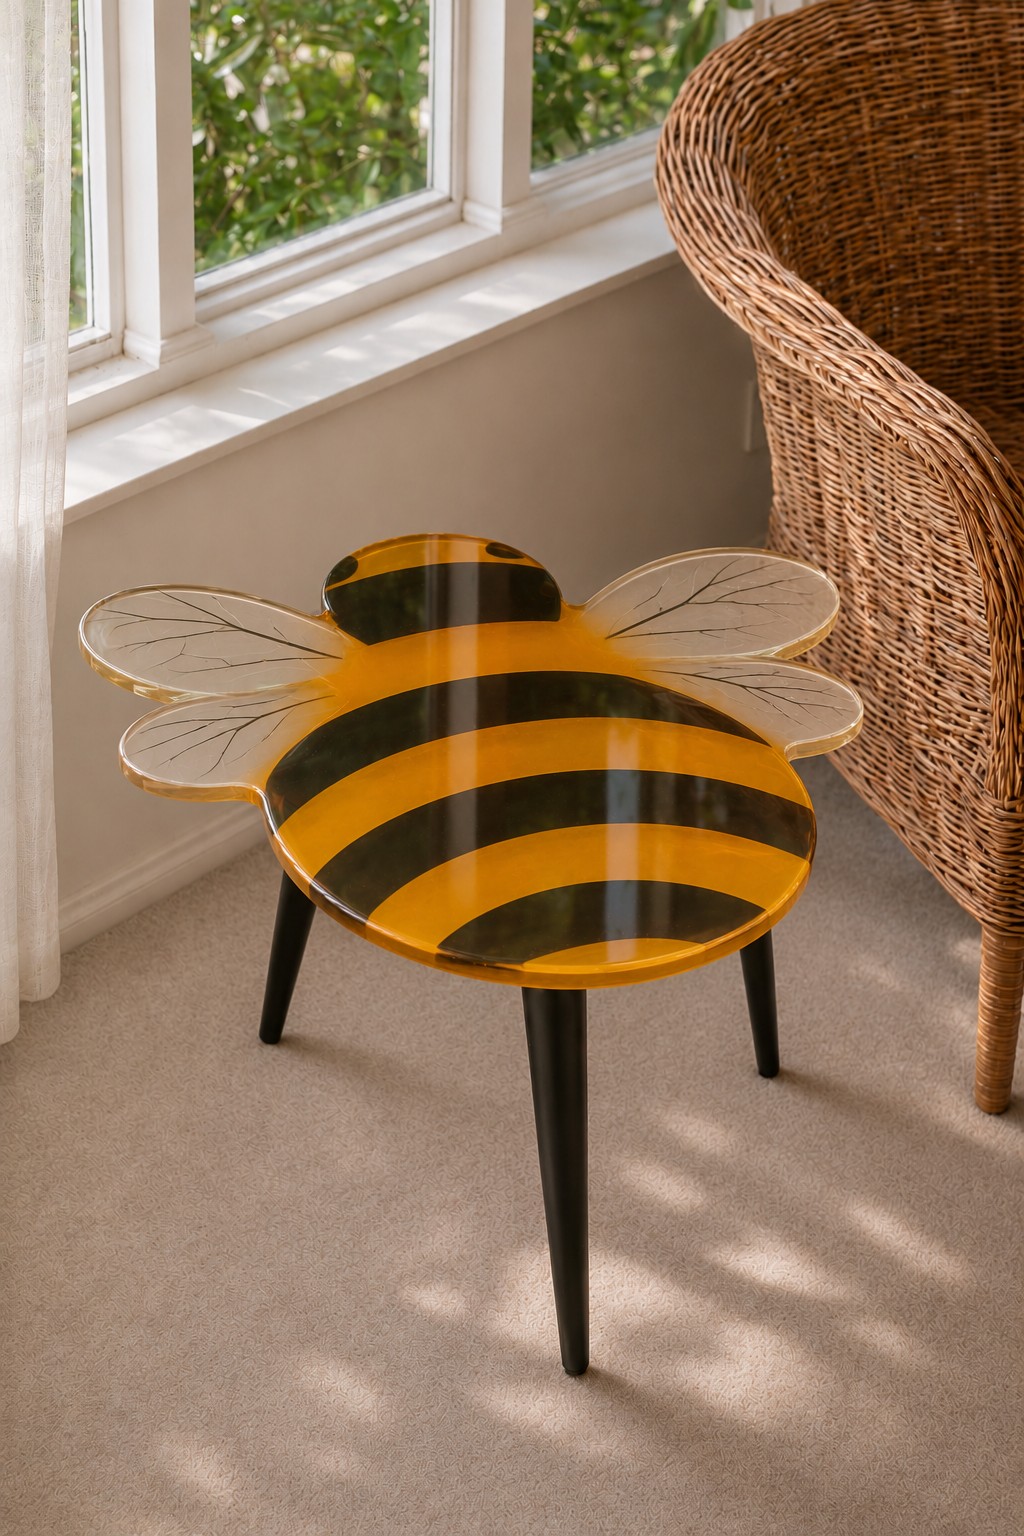
A round body striped in amber yellow and black and two pairs of clear wings with delicate vein lines make up this charming side table on black legs. Next to a wicker chair in a sunny window, it suits a nursery or a garden themed room.
- Cast the body stripes one color at a time, separating them with thin strips of sheathing tape that you peel away once each section has set.
- Pour a thin first layer of clear resin for the wings, let it cure, and draw the veins with a fine black paint pen.
- Seal the drawing with a second clear layer, then sand the outline so the wing tips stay rounded and thick enough to survive knocks.
Red Marble Resin Table on a Wrought Iron Base
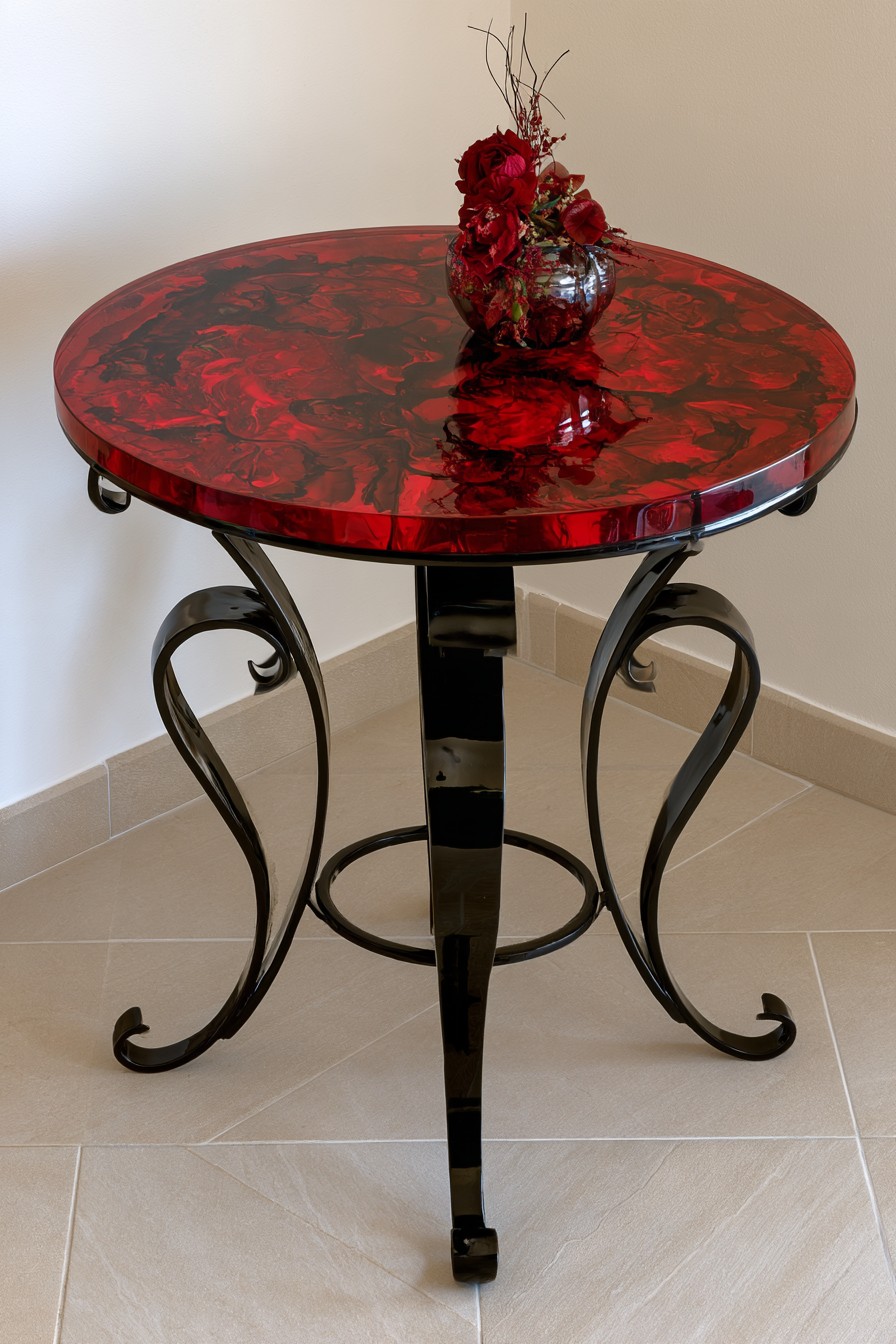
Swirls of ruby red, crimson and near black flow across this round top, giving it the look of polished marble, and a scrolling wrought iron base carries it. Topped with a bouquet of red roses in a tiled entrance, it makes a dramatic first impression.
Pour red resin and then drizzle lines of black and darker red, pulling them gently with a stick or a heat gun on low to form soft veins. Stop before the colors blend completely, because the contrast is what creates the marble effect. Wrought iron bases are heavy and stable, so this table stays put in a busy hallway.
Red and Black Organic Edge Side Table
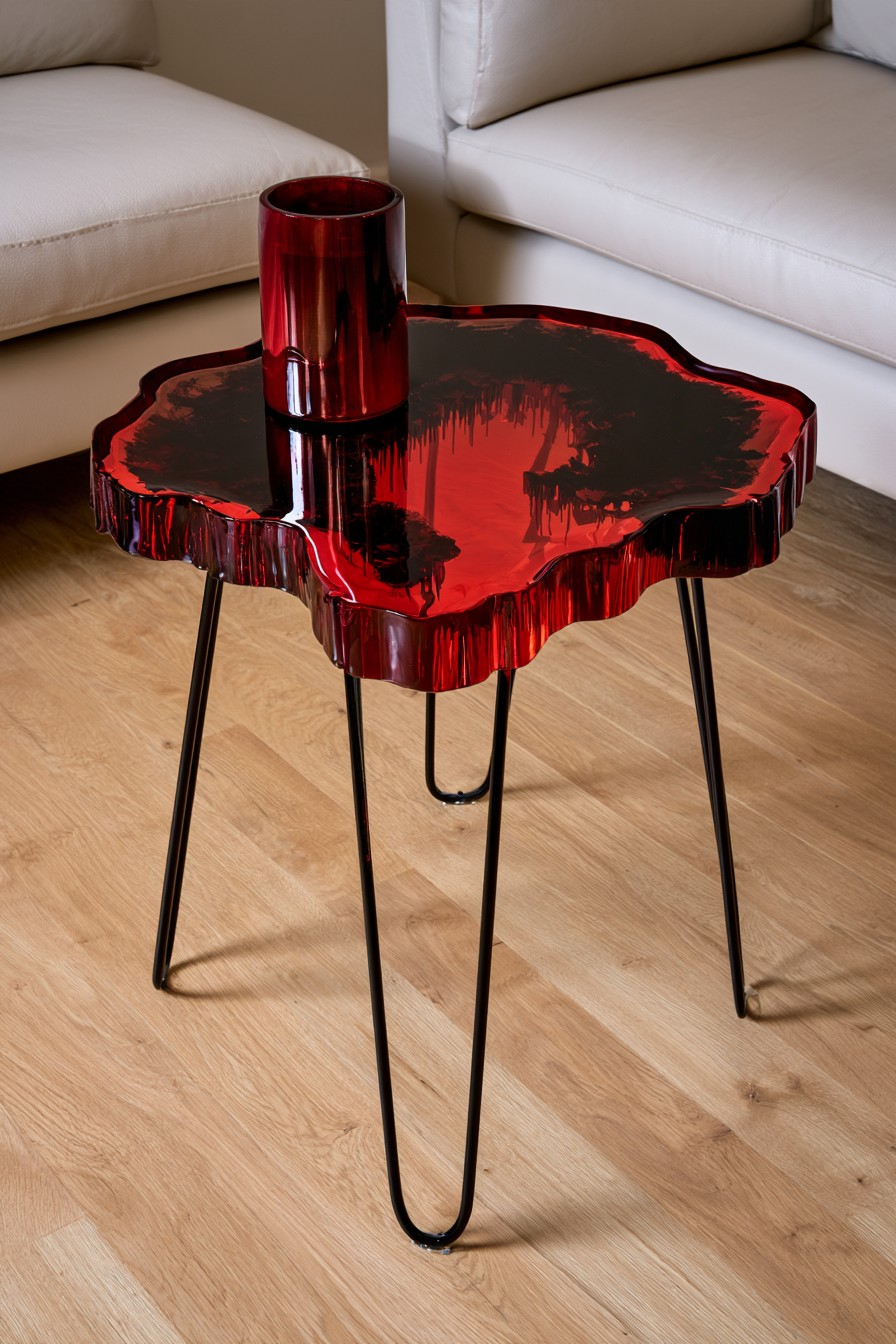
Glossy crimson and black resin form a top with a wavy, live edge style outline, and the streaks run down the sides like melted wax. Black hairpin legs keep it light, and next to a cream sofa it becomes a bold accent.
Let some resin flow over the edge of the mold on purpose, or pour the final coat so it drips naturally down the sides, to get those vertical streaks. Sand away any sharp drips underneath after curing. A matching tall red vase on top repeats the color and ties the look together.
Malachite Green Table with an Agate Center
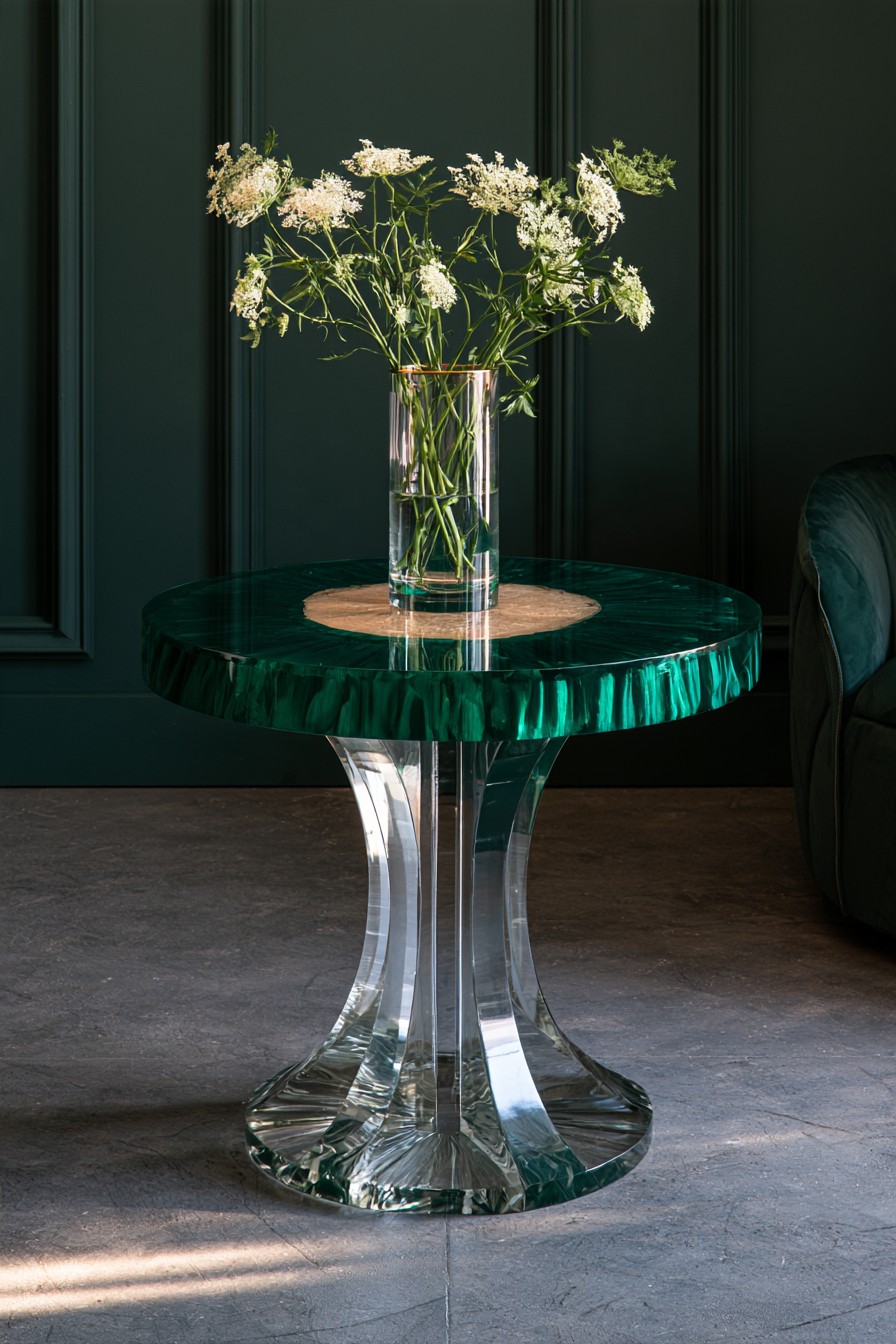
Deep green bands with lighter stripes copy the pattern of malachite stone across this round top, and a pale agate slice sits in the middle. A faceted clear pedestal makes the green look even richer against a dark painted wall.
The banding comes from layering dark and bright green tints and combing them in curves with a notched tool or plastic card. Real agate slices are ideal inclusions, as stone holds no moisture, but seal any porous edges. The clear base can be cast in sections or built from acrylic and polished to a high shine.
Chunky Pink Bubble Table with Pillar Legs
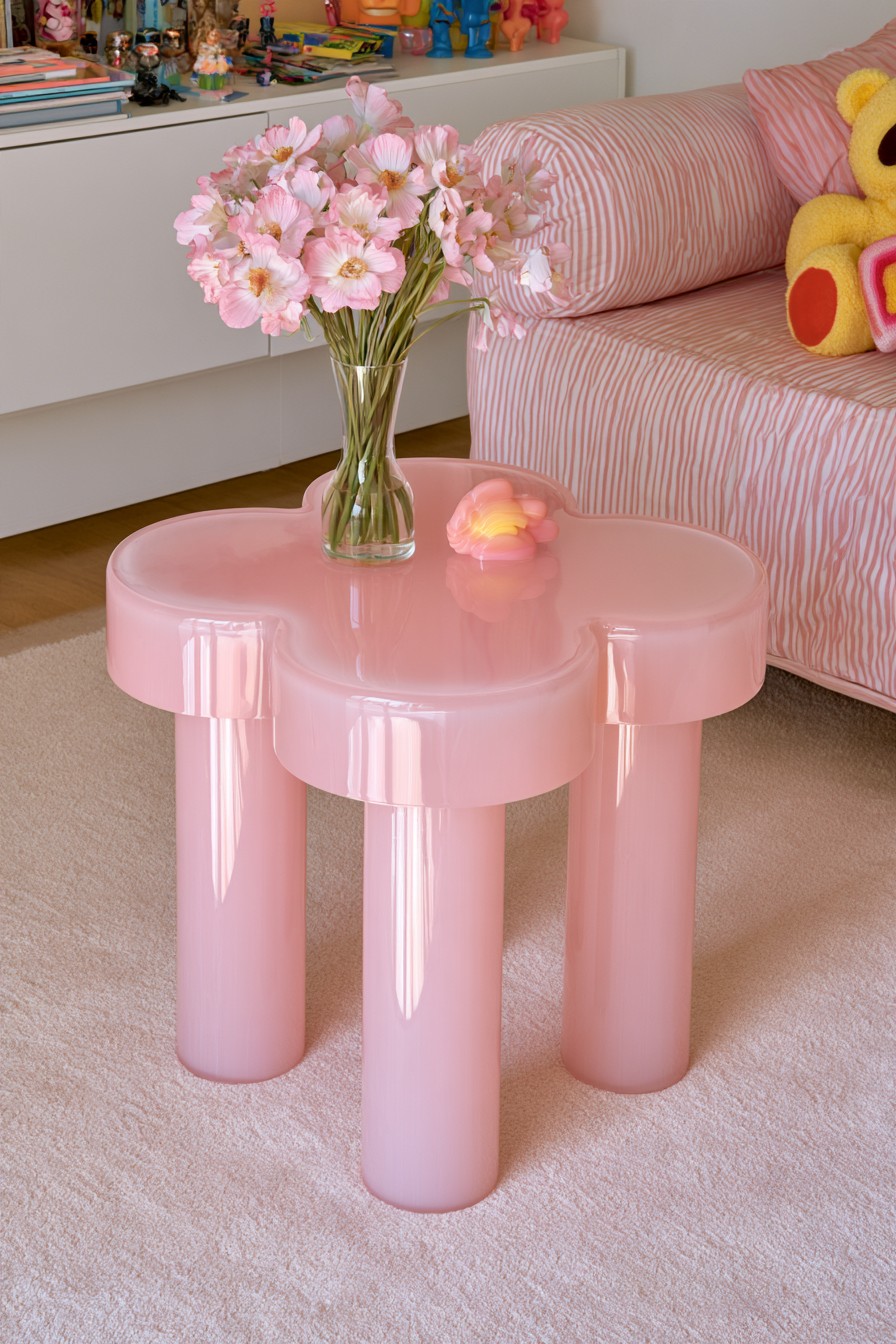
A rounded clover shaped top and three thick pillar legs, all in opaque bubblegum pink, give this table a soft, sculptural look. Next to a striped sofa and colorful toys, it is a playful centerpiece for a modern kids' room or a cheerful studio.
Solid legs this thick hold a lot of resin, and a single huge pour can overheat. Cast them around a core such as a sealed wooden dowel or tube, in layers that stay within the rated depth. Opaque pink pigment hides the core completely, and the result is much lighter and safer to make.
Deep Purple Resin Table with Silver Leaf Flakes
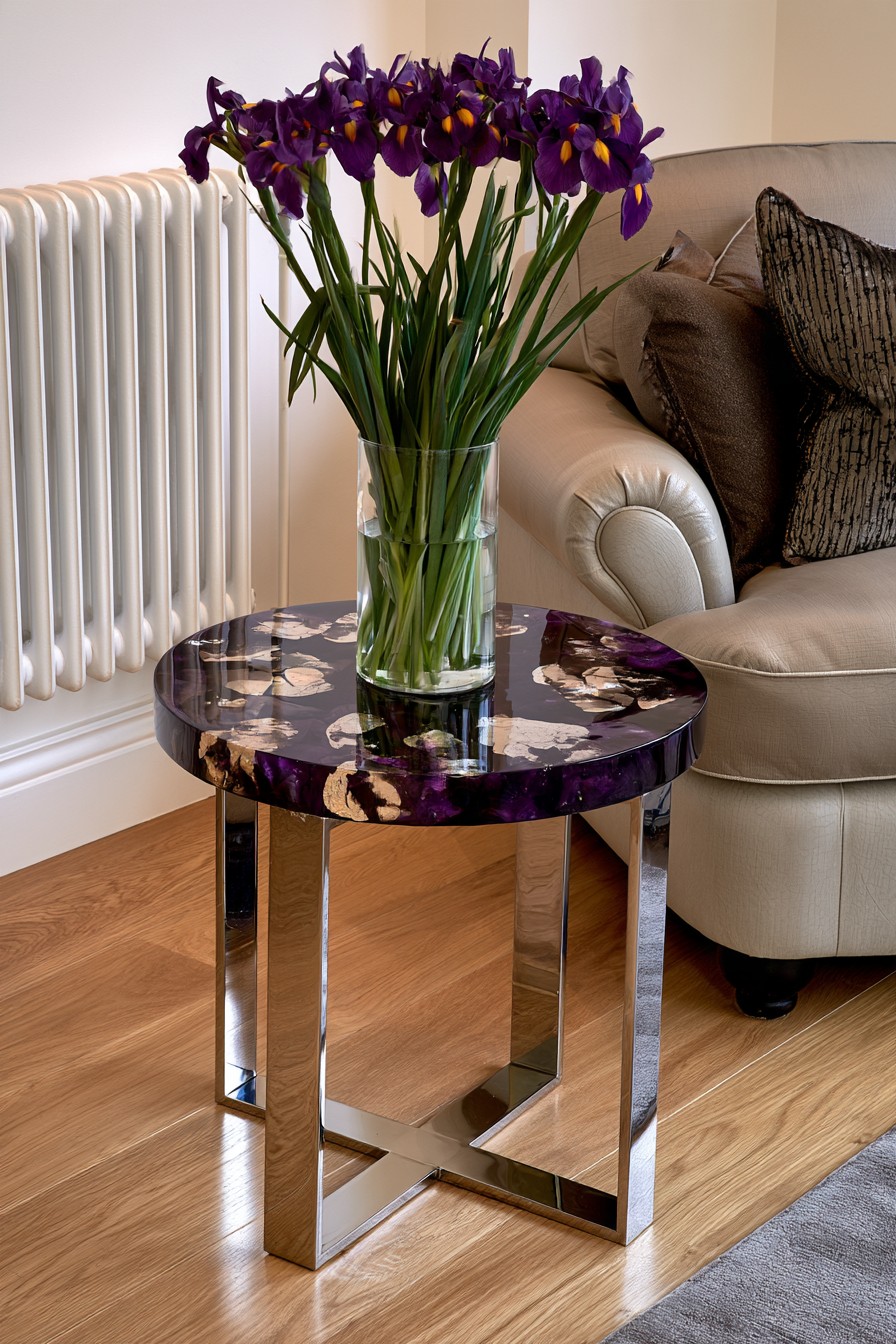
Dark violet resin full of silvery metal leaf flakes covers this round top, which sits on a polished chrome base. With a vase of irises and a soft armchair, it gives a living room a luxurious, moody accent.
Imitation metal leaf can tarnish when exposed to air, so make sure every flake is fully enclosed inside the resin. Handle the leaf with tweezers or a dry brush, as fingerprints leave visible marks. A clear top coat over the dark purple brings out the depth of the color.
Rose Gold Flake Nightstand with Crossed Legs
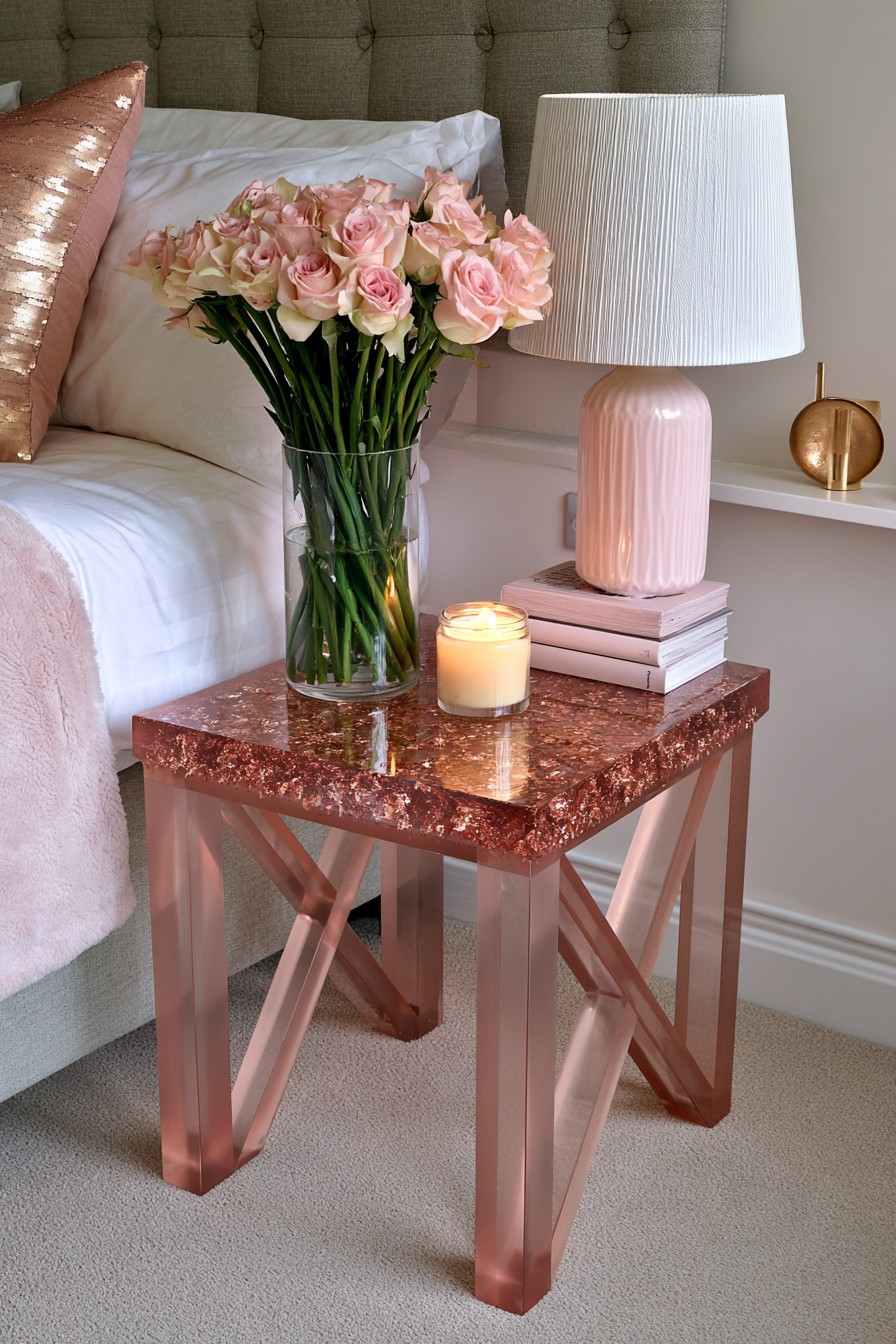
A thick square top packed with copper and rose gold flakes in pink resin sits on translucent pink legs braced with crossed supports. With roses, a candle and books, it suits a soft, glamorous bedroom.
Spread the flakes through the full depth of the resin in several layers so the edges sparkle as much as the top. Translucent legs can be cast in long rectangular molds or cut from pink acrylic. Keep candles in a glass jar on a coaster, because direct flame and heat can mark the surface.
Lilac Cloud Table with a Glittering Edge
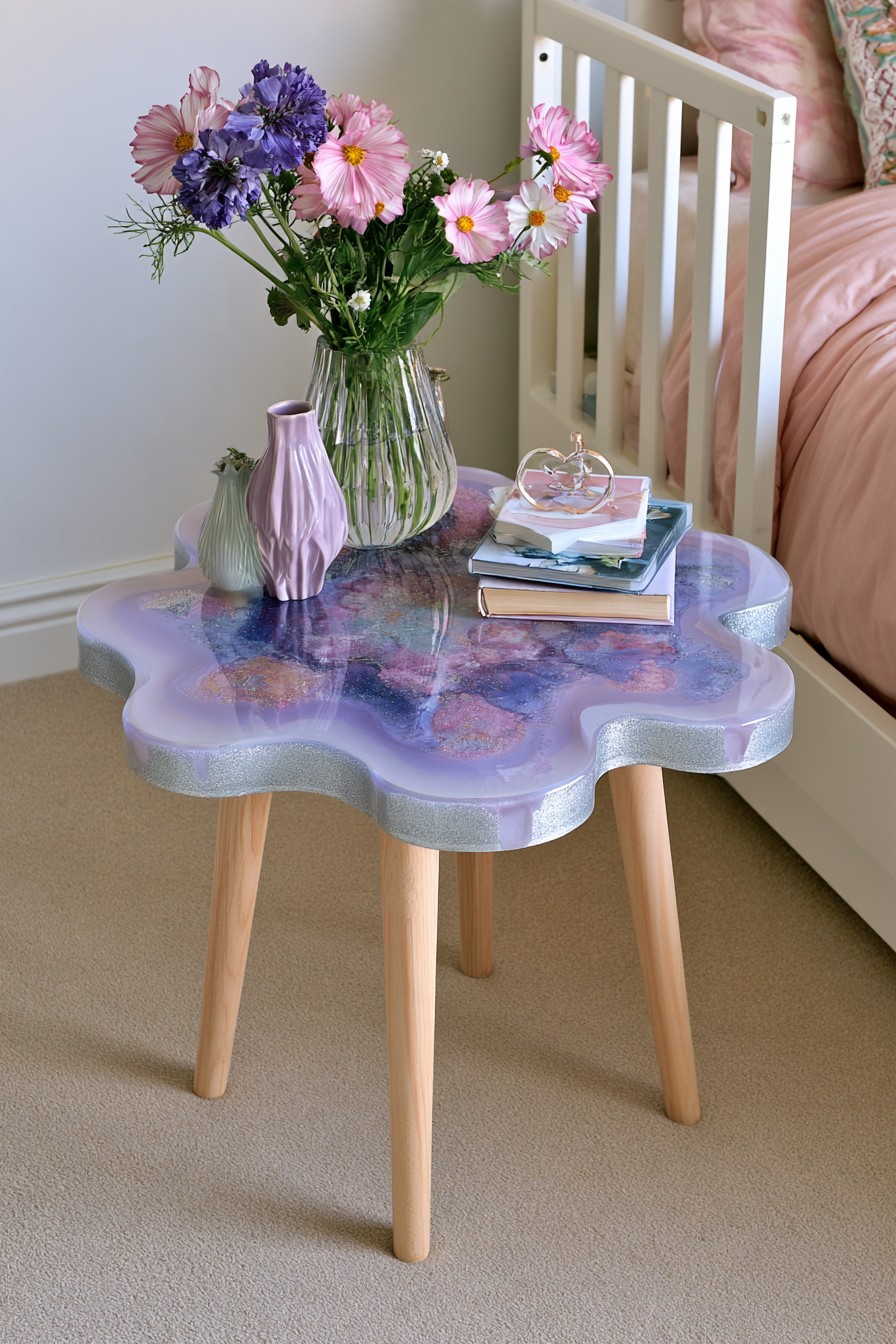
Swirls of lilac, violet and pink with lacy cell patterns fill a wavy cloud shaped top, edged in silver glitter, on light wooden legs. Beside a crib with fresh flowers, it gives a nursery a dreamy, soft touch.
The cell effect appears when a little silicone based additive or a light pass with a heat gun breaks up the mixed colors. Add the silver glitter around the edge in a slightly thickened mix. In a nursery, place the table where a baby cannot reach it from the crib, and keep small objects off it.
Gothic Red Coffee Table with a Black Iron Cross
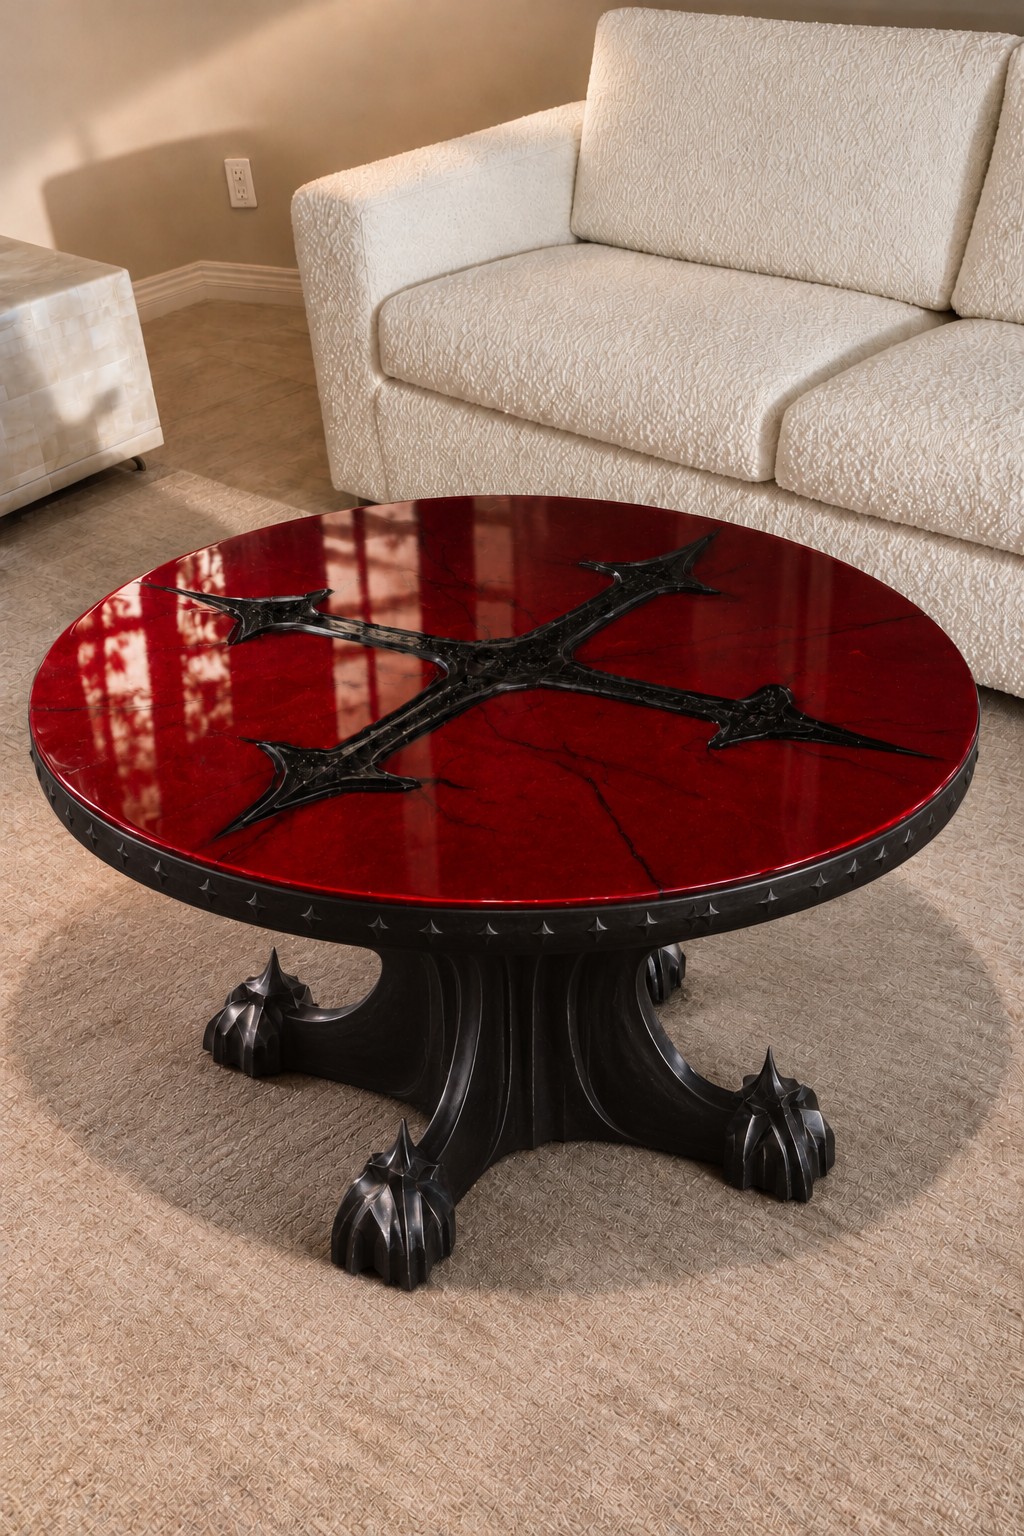
A deep blood red surface with fine dark crackle veins holds a spiky black cross in its center, framed by a studded black apron and a heavy pedestal with claw feet. In front of a cream sofa, it makes a dramatic statement for gothic interiors.
The cross can be cut from metal or cast separately in black resin, then bonded to the base with a two part epoxy glue before the red pour. Fine veins come from black pigment dragged lightly through the red. Pointed ends must sit below the surface, never above it, so nothing snags clothing or skin.
Fern Pedestal Table for a Sunroom
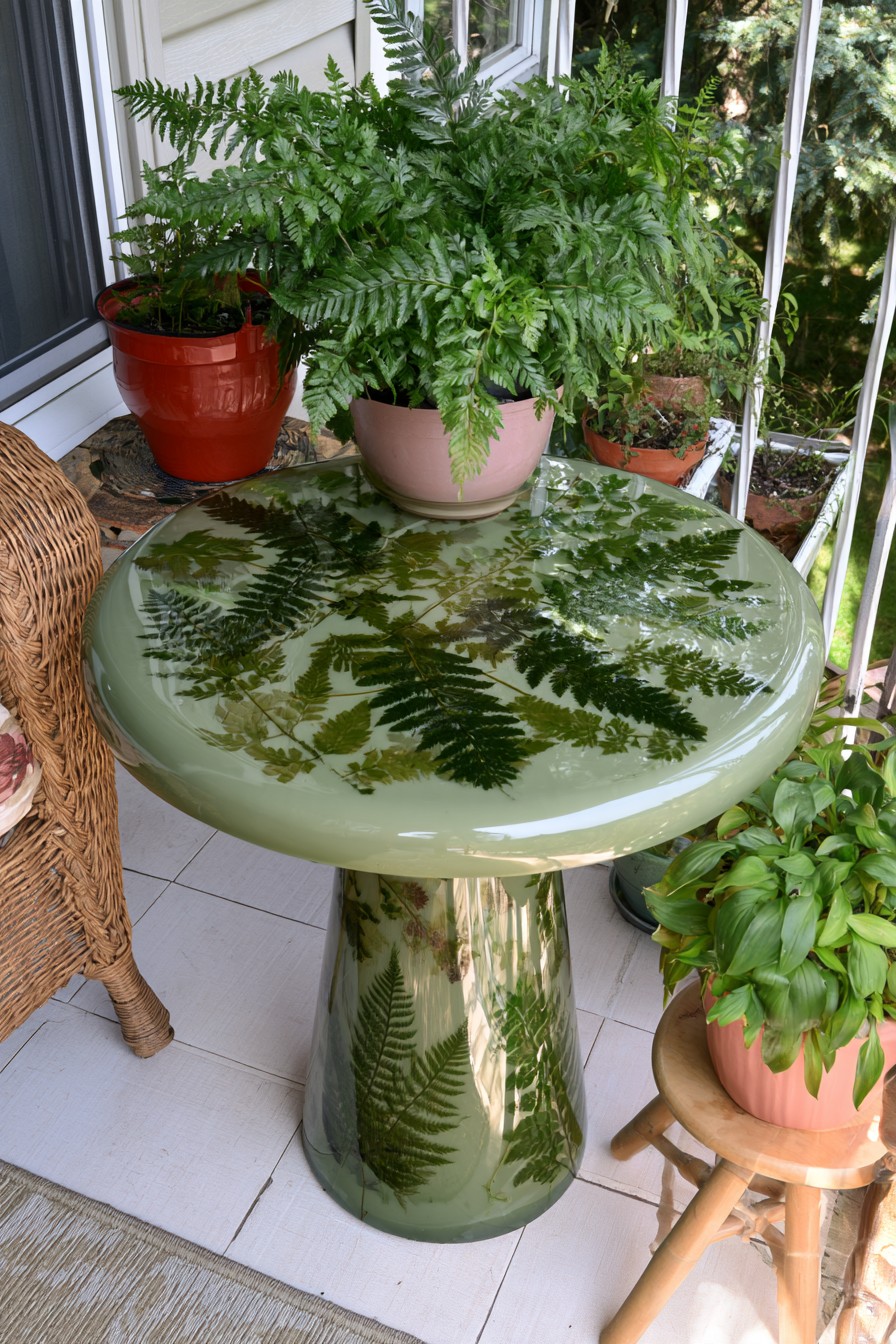
Pressed ferns of different shapes are embedded across a sage green top, and more fronds wrap around the matching tapered pedestal. Among potted plants in a sunroom, it feels like a natural extension of the greenery.
Ferns press easily and keep their shape, but they fade in strong sunlight, so a UV stable resin or a bit of shade helps. The sage background can be a translucent green tint so the leaves look slightly submerged. Put a saucer under pots, since constant damp and heavy pots can still mark the finish.
Blue Agate Dining Table with Gold Veins
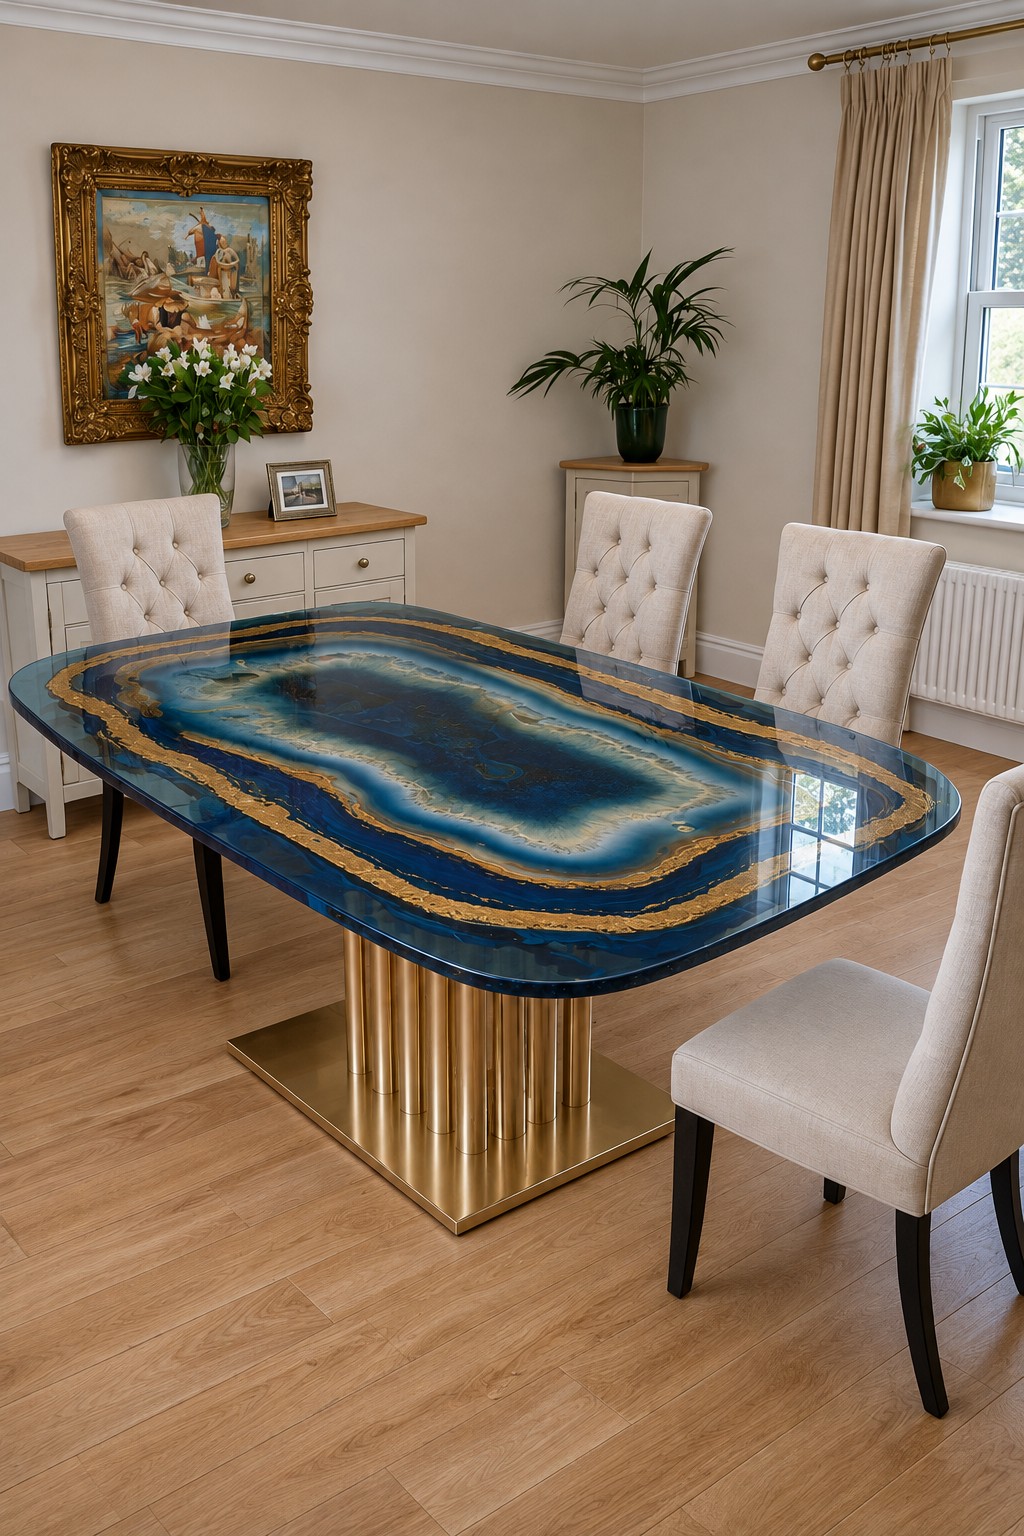
Concentric bands of deep sapphire, sky blue, white and clear resin are traced with gold leaf lines, imitating a giant slice of blue agate. A fluted gold pedestal and upholstered chairs give it a refined look in a formal dining room.
Build the bands from the outside in, letting each tinted layer settle before pouring the next, and apply gold leaf along the borders between colors. A large dining top needs a level mold, plenty of curing time and a final clear coat for durability. The pedestal must be wide and heavy enough to support the weight of the slab.
Confetti Terrazzo Coffee Table
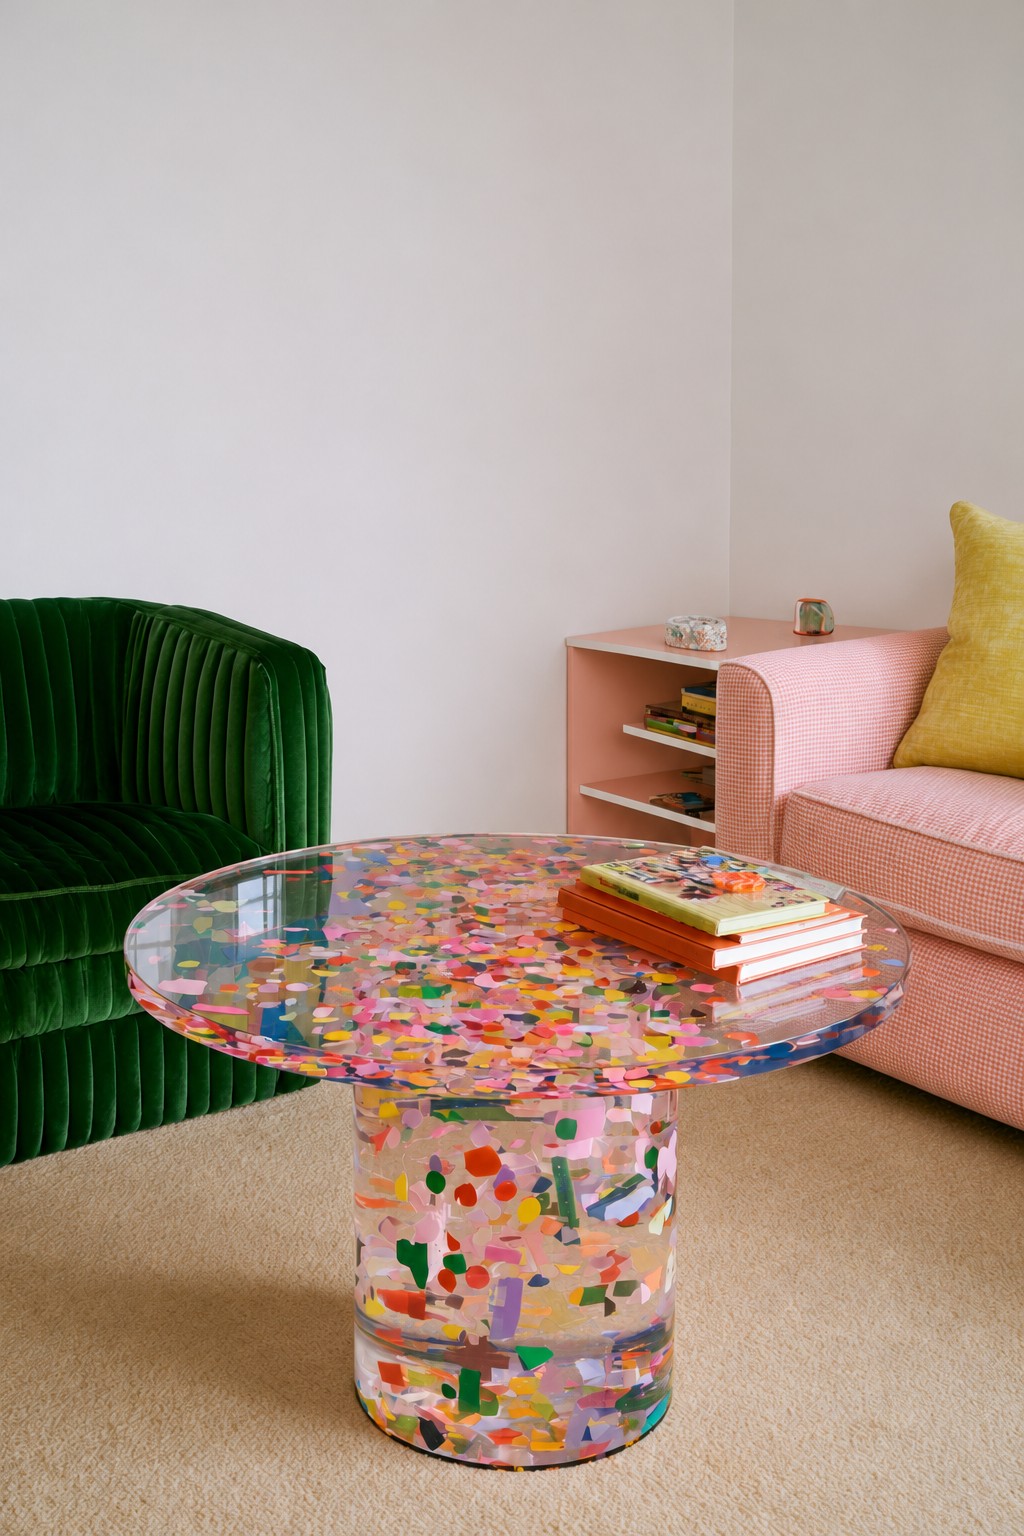
Colorful chips in pink, red, green, yellow, blue and lilac float in clear resin across a round top and a thick cylindrical base. With a green velvet armchair and a pink sofa, it brings a joyful burst of color to a living room.
Tip: make the chips yourself by pouring thin sheets of colored resin, letting them cure and breaking them into pieces, or by cutting scraps of colored acrylic. Add them in layers so they appear at different depths. The base holds a lot of resin, so cast it in stages or around a core to avoid overheating.
Working Safely with Epoxy Resin
Uncured resin and hardener can irritate skin, and repeated contact can cause a lifelong allergy, so wear nitrile gloves, long sleeves and safety glasses every time. Work in a well ventilated room and use a respirator with organic vapor cartridges for large pours or small enclosed spaces. Keep pets and children out of the room while the resin cures.
Mixed resin generates heat. A large batch left in the bucket can get very hot, smoke or crack, so pour it immediately after mixing and never exceed the depth on the label. Dried flowers, paper and glitter can catch fire, so keep heat guns and torches moving and away from exposed inclusions.
Sanding cured resin creates fine dust, and dust from resin that has not fully hardened is especially irritating, so wait for a full cure and wear a dust mask or respirator while sanding. Broken china, glass chunks and metal edges cut easily, so file them before embedding. Leftover mixed resin should cure completely in its cup before disposal, and heavy tops need stable bases that cannot tip.


Leave a Reply