
A collection of saved wine corks can become a textured frame, a botanical display or a small seasonal keepsake. This guide brings together 17 craft ideas with illustrated making stages, material and tool choices, and practical advice for assembly and display. Learn how to arrange whole corks and cut pieces, choose suitable supports and adhesives, and adapt the same approach to projects that hold flowers, frame a picture or hang from a branch.
Table of Contents
- Choose a Project That Fits Your Cork Collection
- Materials and Tools for Working with Cork
- How to Arrange, Attach and Finish Wine Cork Crafts
- Use These Making Methods in the 17 Ideas Below
- 1. Succulent Planter with a Cork Exterior
- 2. Heart Wall Panel with a Cork Mosaic
- 3. Illustrated Cork Markers for Herb Pots
- 4. Cork Surround for a Flameless Table Candle
- 5. Miniature Birdhouse for Decorative Display
- 6. Botanical Wreath with Angled Cork Layers
- 7. Round Mirror with a Cork Border
- 8. Flower Vase with a Cork Sleeve
- 9. Cork Topiary with a Rounded Crown
- 10. Decorative Bowl with Cork Texture
- 11. Picture Frame with Mixed Cork Pieces
- 12. Arched Cork Display for Botanical Stems
- 13. Bookends with Cork Cladding and Separate Support
- 14. Branch Mobile with Cork, Beads and Metal Details
- 15. Dragonfly Ornament with a Cork Body
- 16. Cork Couple with Fabric Clothing and a Parasol
- 17. Upright Cork Reindeer with Yarn Scarves
- Keep the Texture, Make Maintenance Possible
Choose a Project That Fits Your Cork Collection
A small frame border or a few plant markers uses a limited collection. A wreath, heart panel or layered arch needs more pieces and careful fitting. A container sleeve works around an existing vessel; bookends and mirrors need support beyond the cork decoration. Decide where the finished piece will sit before choosing its size. Lay out the corks to count what you need, keeping a few matching pieces for adjustments. Start with plant markers for a few corks, a picture border for a flat layout, or a branch mobile if you enjoy wire and bead work.
Materials and Tools for Working with Cork
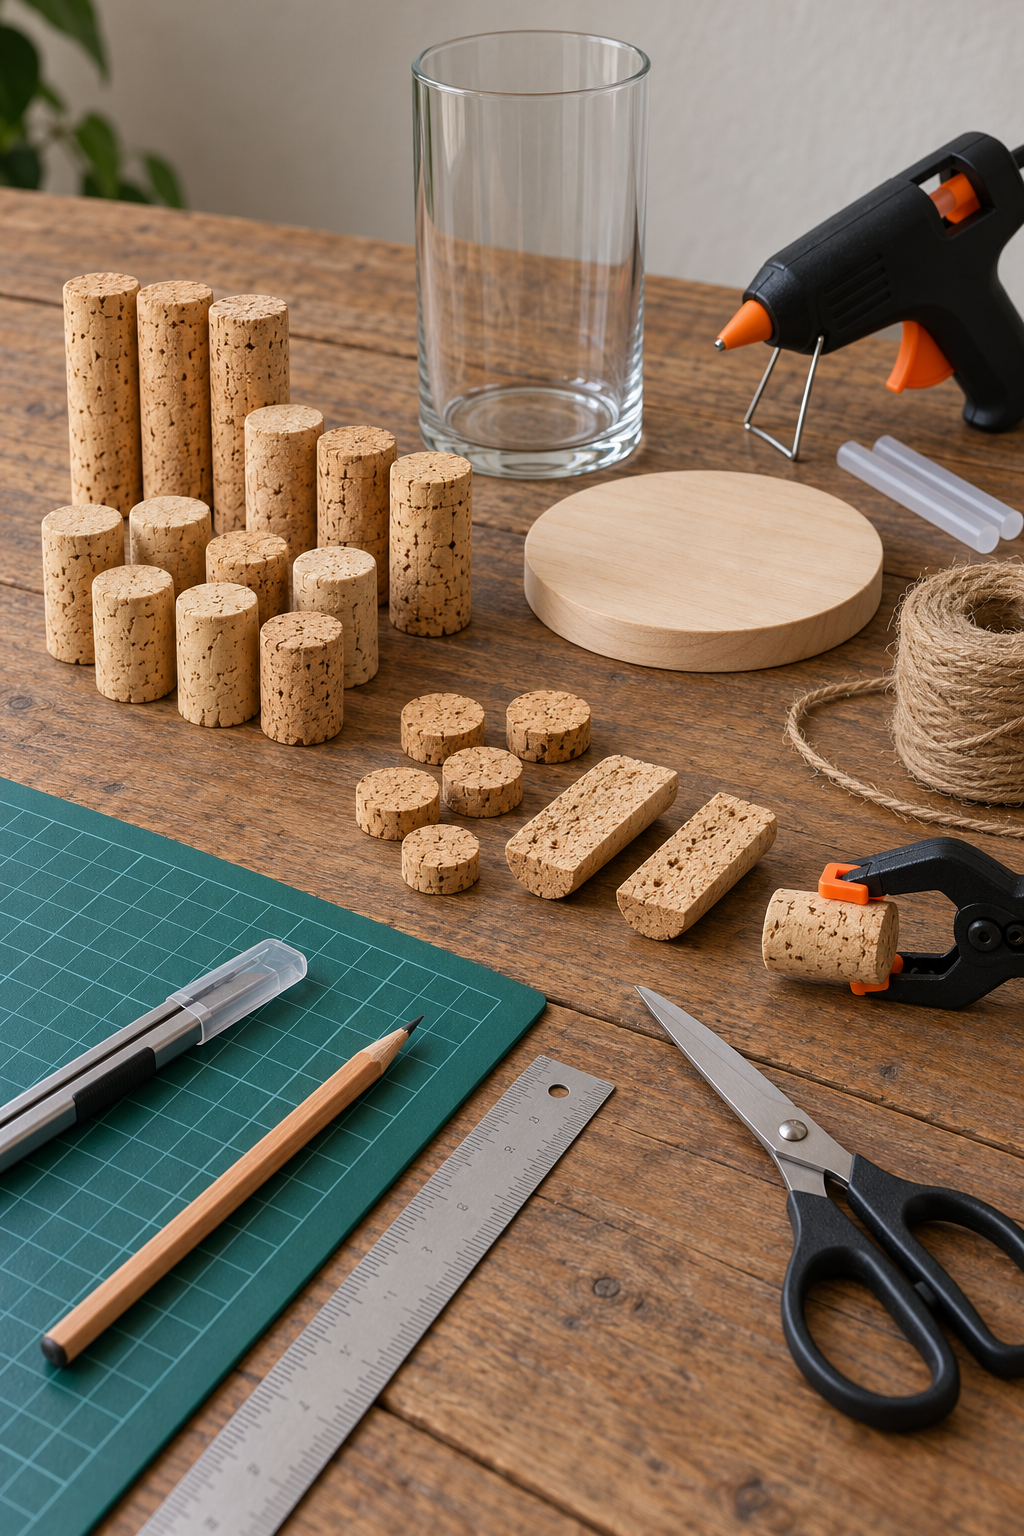
Sort clean, dry corks by height, diameter and condition. Set aside crumbling or moldy pieces, and separate synthetic stoppers because they can cut and bond differently. Whole corks suit upright borders; round slices make mosaics; lengthwise halves offer flatter contact surfaces. Retain interesting markings or wine colored ends when you want a varied natural finish.
A ruler and pencil help plan spacing. Use scissors for cord and fabric, and a suitable cutting tool with a stable mat and clamp when cork needs trimming. Do not hold a rolling cork in your fingers while cutting. Pliers and wire cutters are needed only for wired ornaments. Choose the backing, inner container and hanging fittings for the particular project rather than collecting every supply for all 17 ideas.
How to Arrange, Attach and Finish Wine Cork Crafts
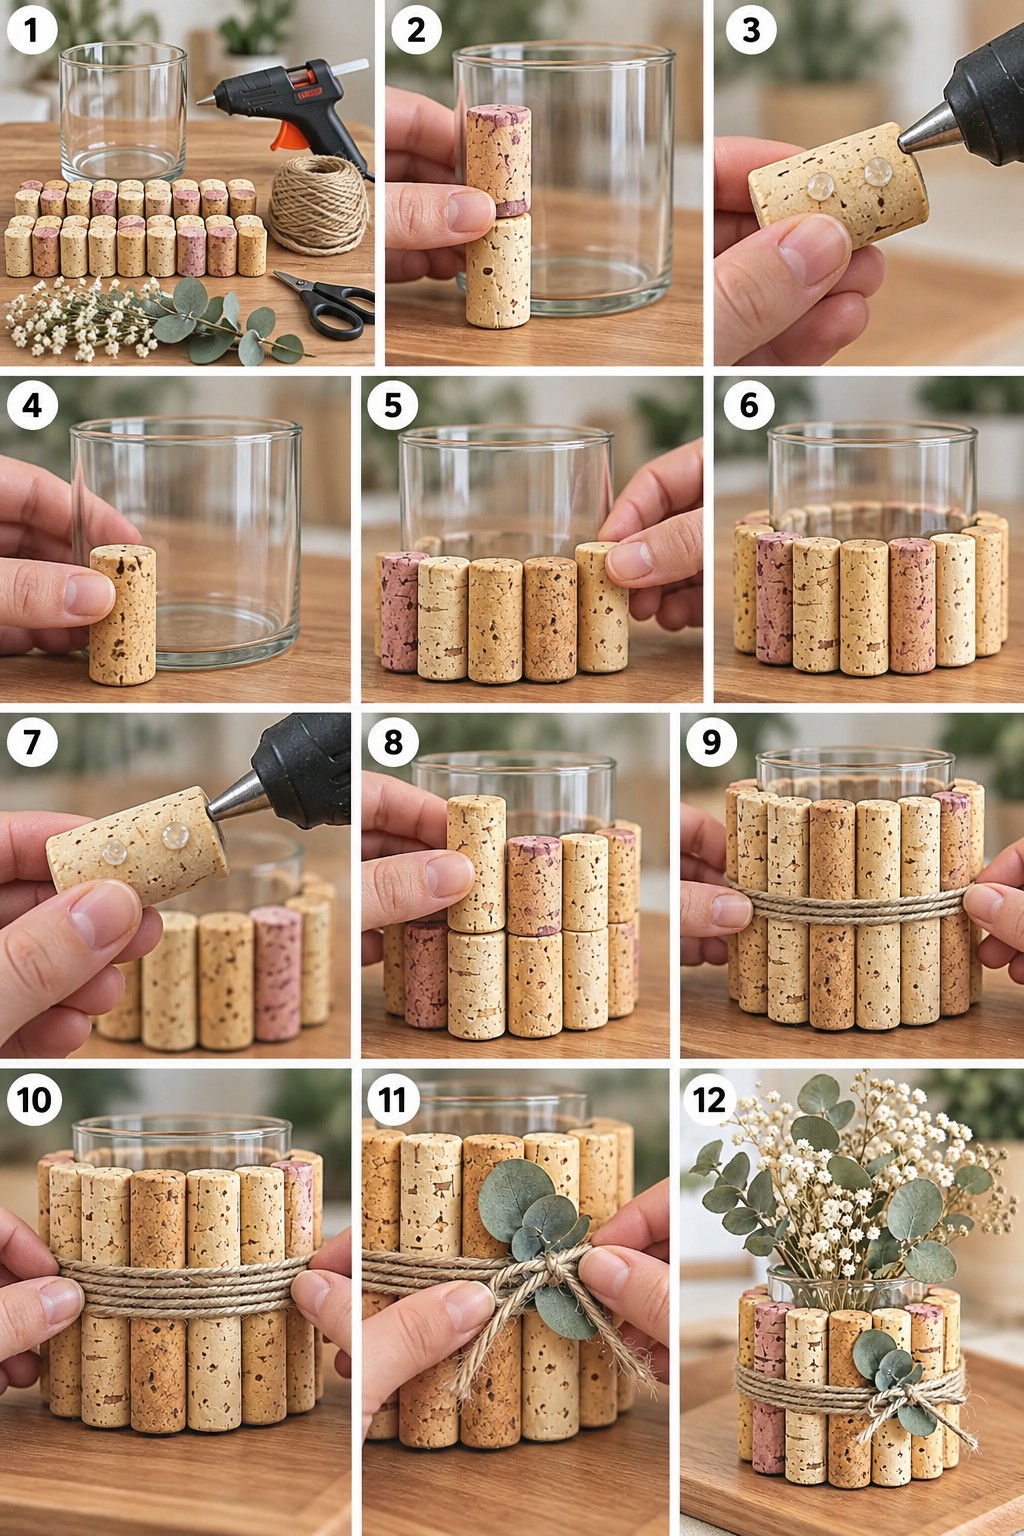
The making stages show a useful sequence: compare cork heights, test the arrangement, apply adhesive to the hidden contact face, press each piece into position, then add further rows and a cord finish. This sequence can guide many cork projects. A curved vessel needs upright rows fitted around its perimeter; a frame or wall panel needs its pattern arranged flat before attachment.
Complete a trial layout without glue first. Check the outer edge, corner joins and any opening that must remain accessible. Attach the first row or outline before filling the center or building another layer. Apply adhesive where the cork meets its support, not over its visible face. Hold or brace pieces as the product requires, keeping fingers away from hot glue and using the ventilation stated on the label.
Match the adhesive to both materials. Cork against wood, glass, painted surfaces and craft foam presents different bonding conditions. A hot glue gun appears in the making stages, but its presence does not make hot glue suitable for every design. Test a spare cork on the actual backing, check temperature or solvent compatibility where relevant, and follow the product's holding and curing instructions. An initial grip is not the same as readiness for hanging or loading.
Finish with twine, ribbon, fabric or a few botanical accents after the main arrangement is secure. Cord can tidy a join, but it does not automatically replace a structural connection. The shown glass covering is attached directly to its vessel; if cleaning access is important, build the decoration on a separate sleeve or base so a glass liner can lift out. Likewise, keep plant pots removable and attach hanging hardware to a suitable backing.
Use These Making Methods in the 17 Ideas Below
Take the fitting, contact face gluing and finishing sequence into the following projects, changing the support to suit the job. You can create warm neutral decor by leaving the cork visible, add restrained color to selected ends, or use fabric and beads for a more playful finish. The photographs provide design inspiration; the suggested assembly methods explain ways to adapt their appearance without assuming hidden connections or load capacities.
1. Succulent Planter with a Cork Exterior
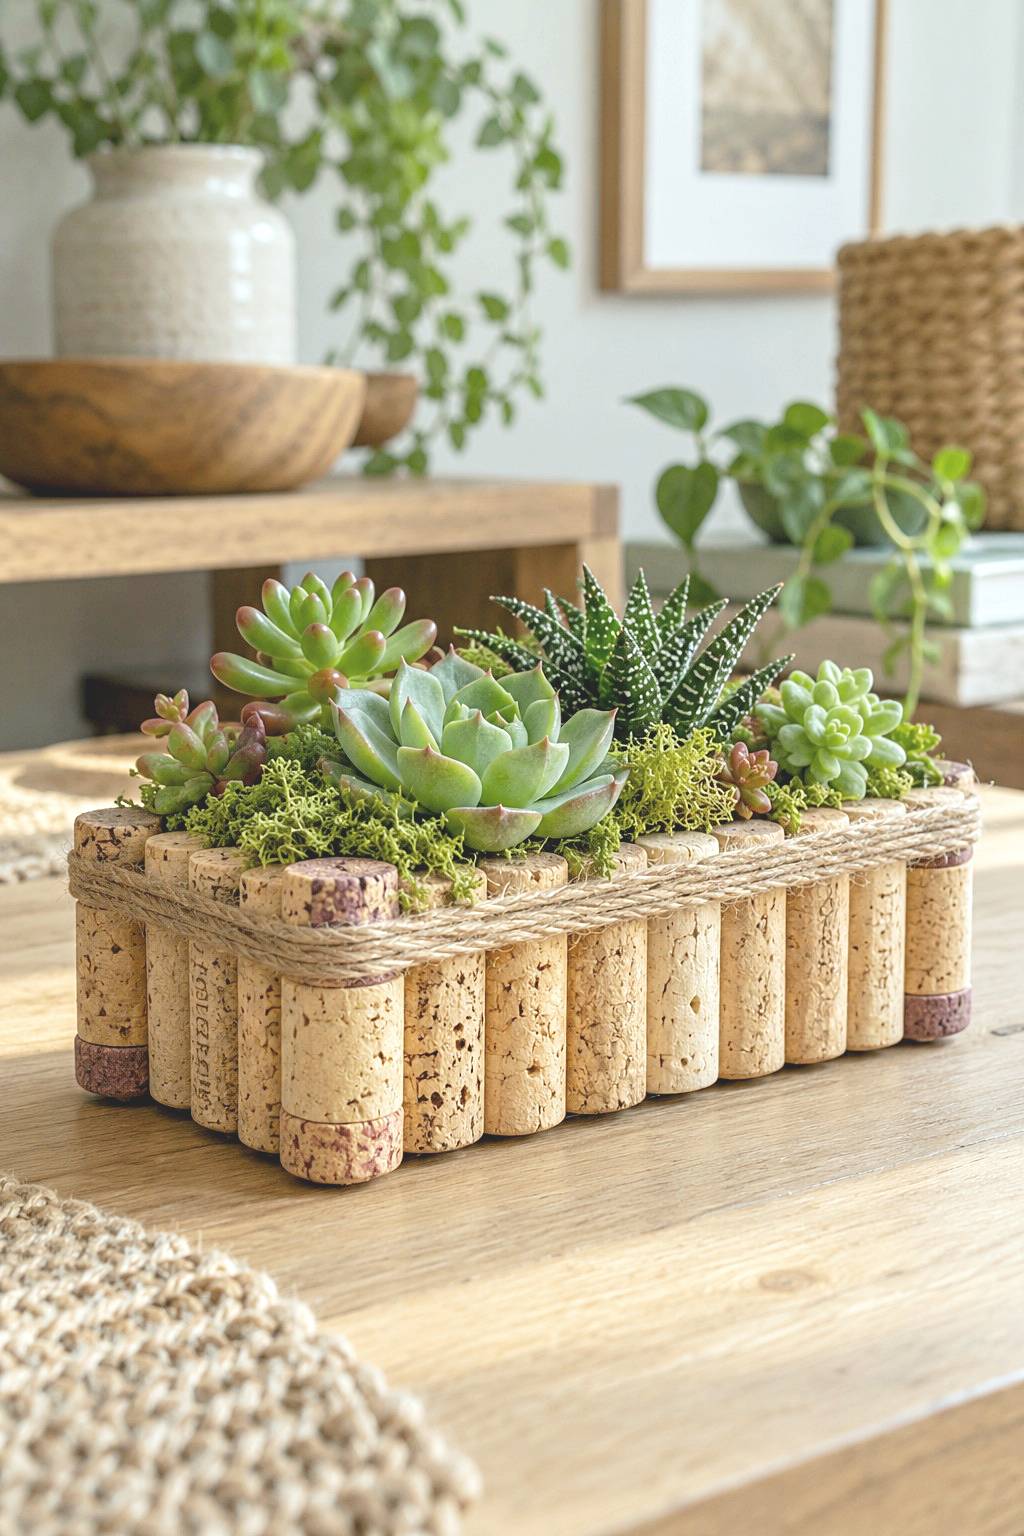
Upright corks and a twine border give this rectangular planter a textured edge beneath a mixed succulent display. Choose the removable planting pot first, then build the decorative surround to its outside dimensions. Align similar cork heights along the front and sides on a rigid base, checking the corners before attaching them. Keep the top edge clear so the inner pot can be lifted without pulling on the corks.
Use a drained pot with a suitable way to catch runoff; the cork exterior is not a soil container or waterproof lining. Remove the pot for watering and let its outside dry before returning it. Choose plants with compatible light and watering needs, allowing room for growth rather than packing the display tightly.
2. Heart Wall Panel with a Cork Mosaic
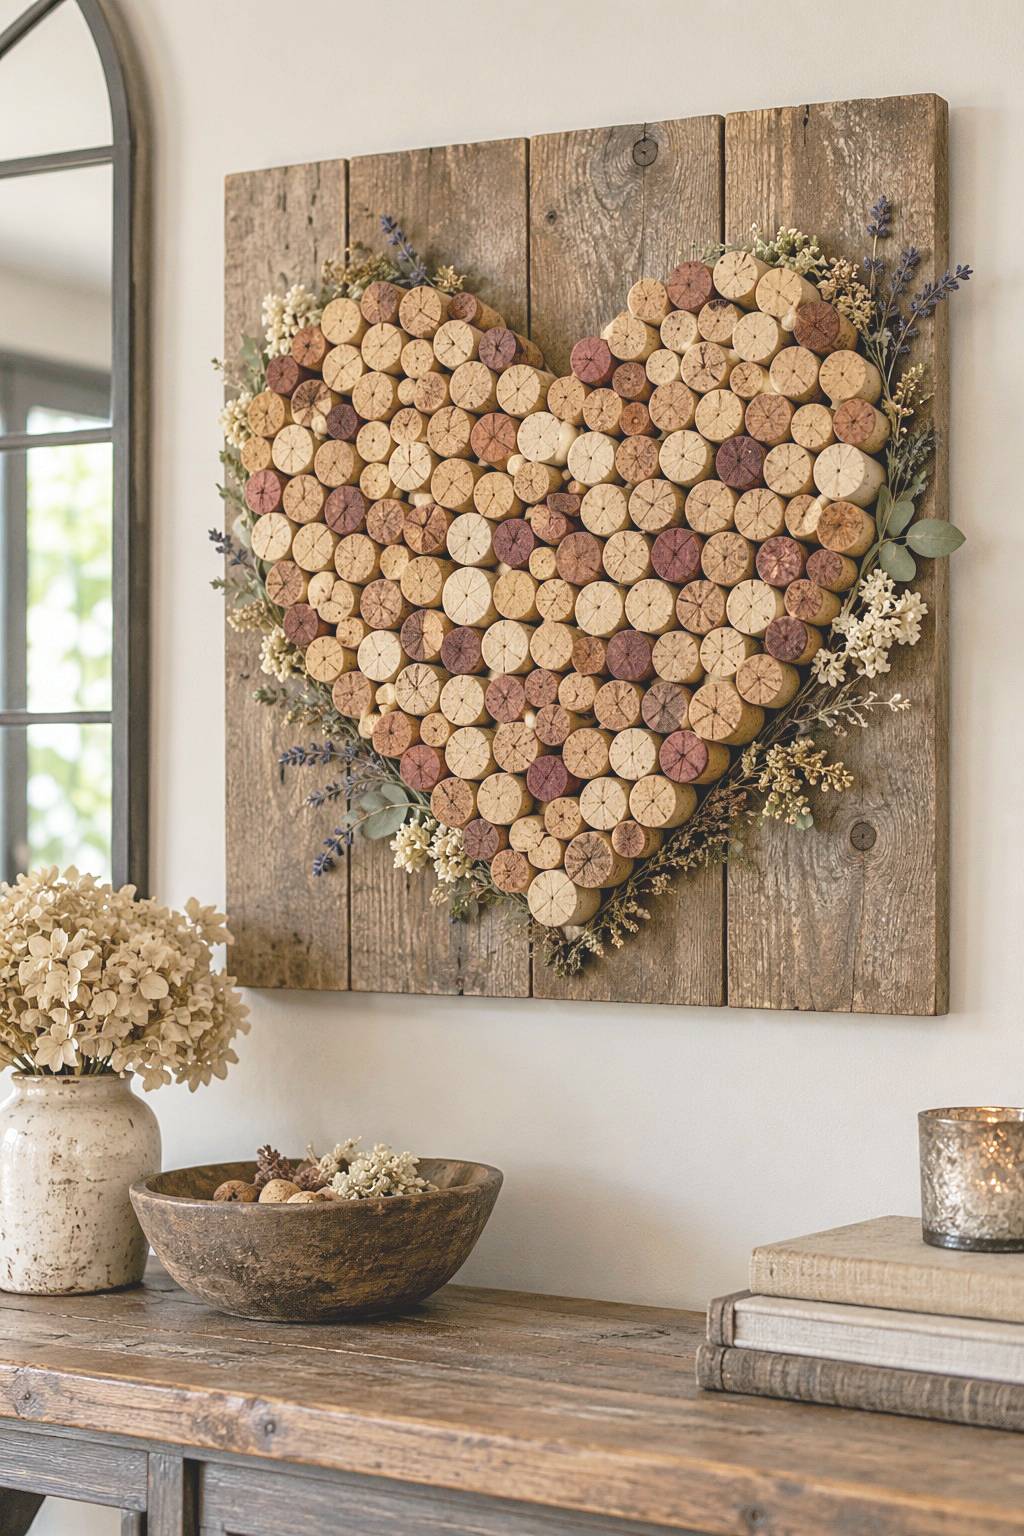
Round cork faces form a heart against a visible wooden panel, with darker ends scattered through the shape. Draw a paper template and transfer its outline to the backing, then arrange the pieces without adhesive. Adjust the two upper curves and the lower point before filling the center. A mixture of diameters gives the mosaic variety, but very large gaps can make the heart harder to read.
Lift and attach pieces one at a time from their rear contact faces, preserving the trial arrangement. Add a small botanical border only after the cork pattern is secure. Mounting belongs on the panel rather than on individual corks: select fittings for the complete weight and the wall material. Leave access to those fittings, and position the panel where brushing against its raised surface is unlikely.
3. Illustrated Cork Markers for Herb Pots
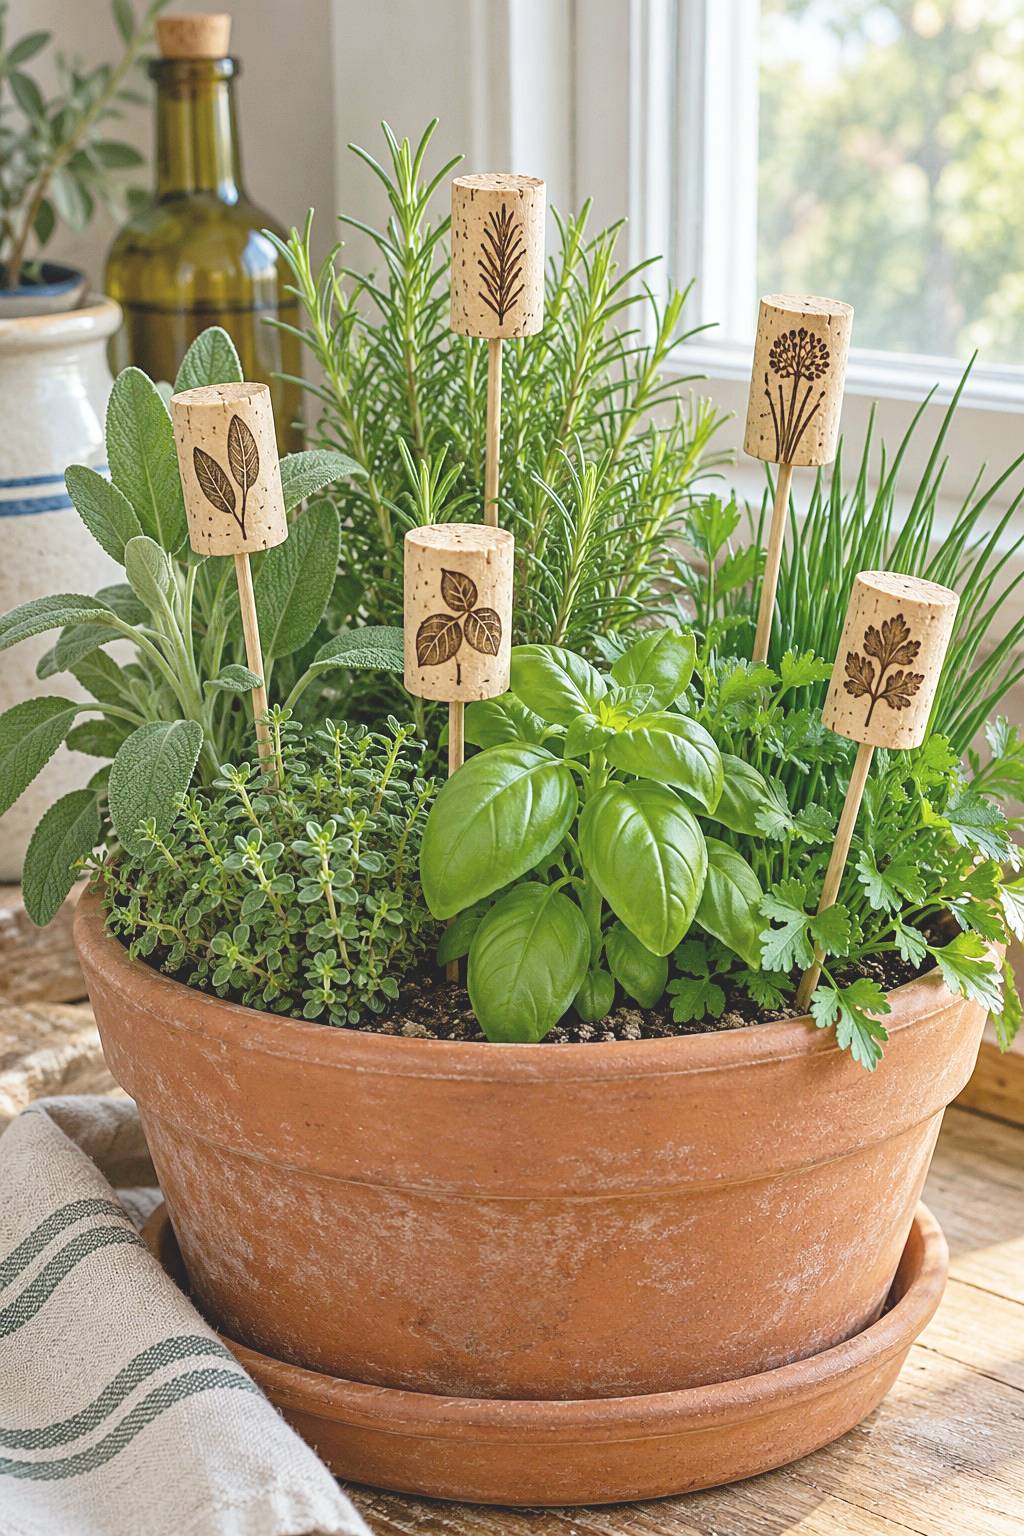
The markers show plant drawings on corks rather than readable herb names. Their upright position on sticks makes each drawing easy to see among the foliage. To make a similar set, choose firm corks with an even area for a simple outline and use a marker suitable for the surface. Add the plant name beside or beneath the drawing when identifying similar seedlings matters.
An adult prepares a pilot opening with the cork securely supported, then fits a stick that remains stable without splitting it. Keep exposed sharp points out of handling areas. Test the lettering on a spare piece and allow it to set as directed before placing the marker in a pot.
4. Cork Surround for a Flameless Table Candle
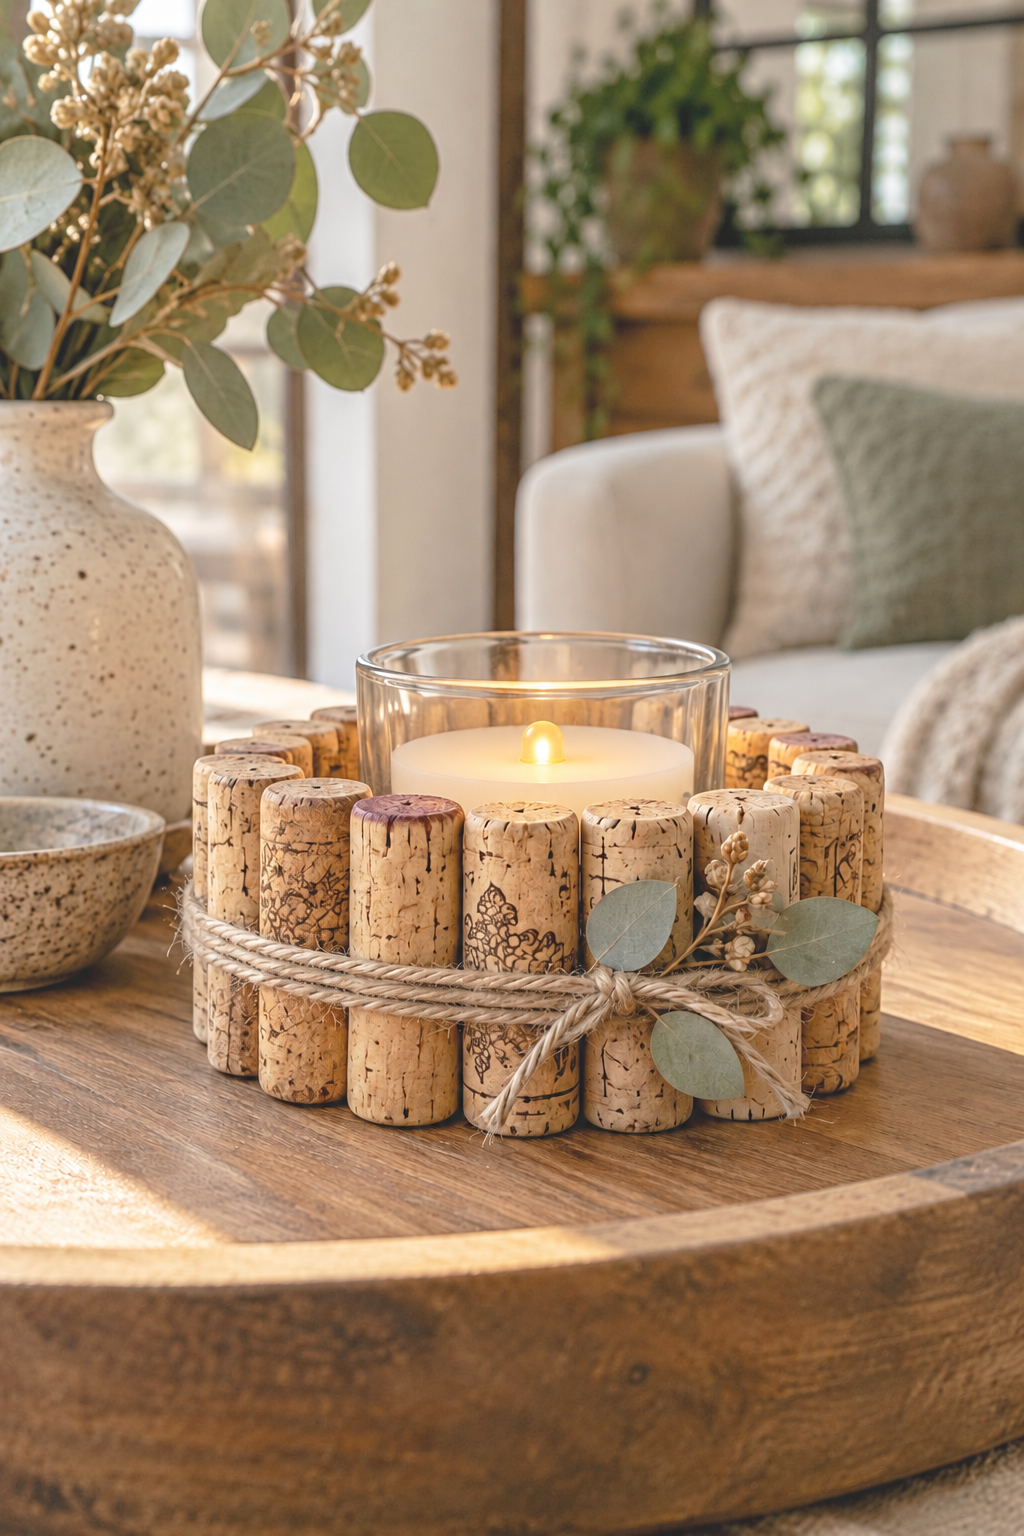
A glass cylinder sits within an upright cork ring, finished with twine and a small botanical bow. Use a battery operated flameless candle for this close arrangement. Cork, cord and dried decorations are combustible; a glass vessel does not provide the clearance needed for a real flame among them. The electric candle supplies the visual focal point while the outer ring contributes texture.
Build the ring on a separate base or sleeve and check that the glass lifts out without catching the decoration. Leave access to the candle switch and battery compartment, following its instructions. Fit the corks before adding the bow so neither blocks removal. Place the completed piece on a steady surface and dust the outer texture separately from cleaning the glass. Keep real burning candles away from this display.
5. Miniature Birdhouse for Decorative Display
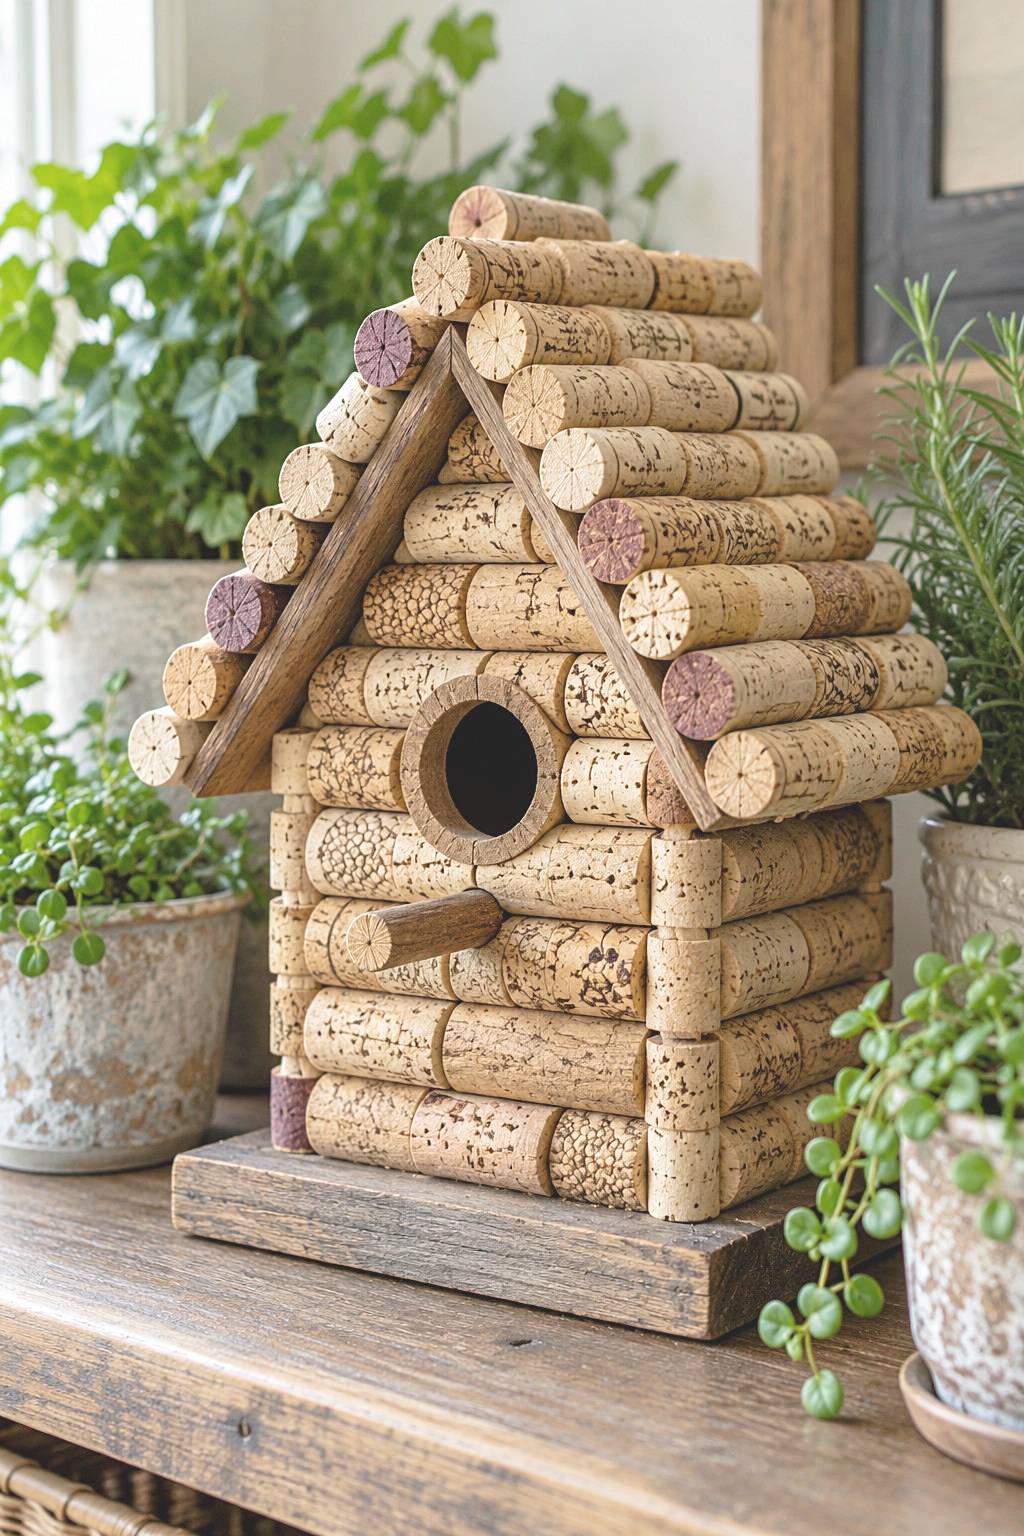
Horizontal cork rows, a pitched roof and a round entrance detail give this ornament its birdhouse silhouette. A wooden base and trim add definition around the opening and roof edges. For an adaptation, prepare a small rigid house form first and fit the cork cladding to it, aligning the front and side rows before working up each roof slope. Check that the base rests evenly.
Display it as a decorative object, not a verified nesting box. Keep this piece as a decorative display; for live birds, choose a separate nesting box designed for the species, including suitable dimensions, ventilation, and drainage. A dry indoor shelf avoids the added exposure of a porch; outdoor display requires materials and connections suitable for those conditions.
6. Botanical Wreath with Angled Cork Layers
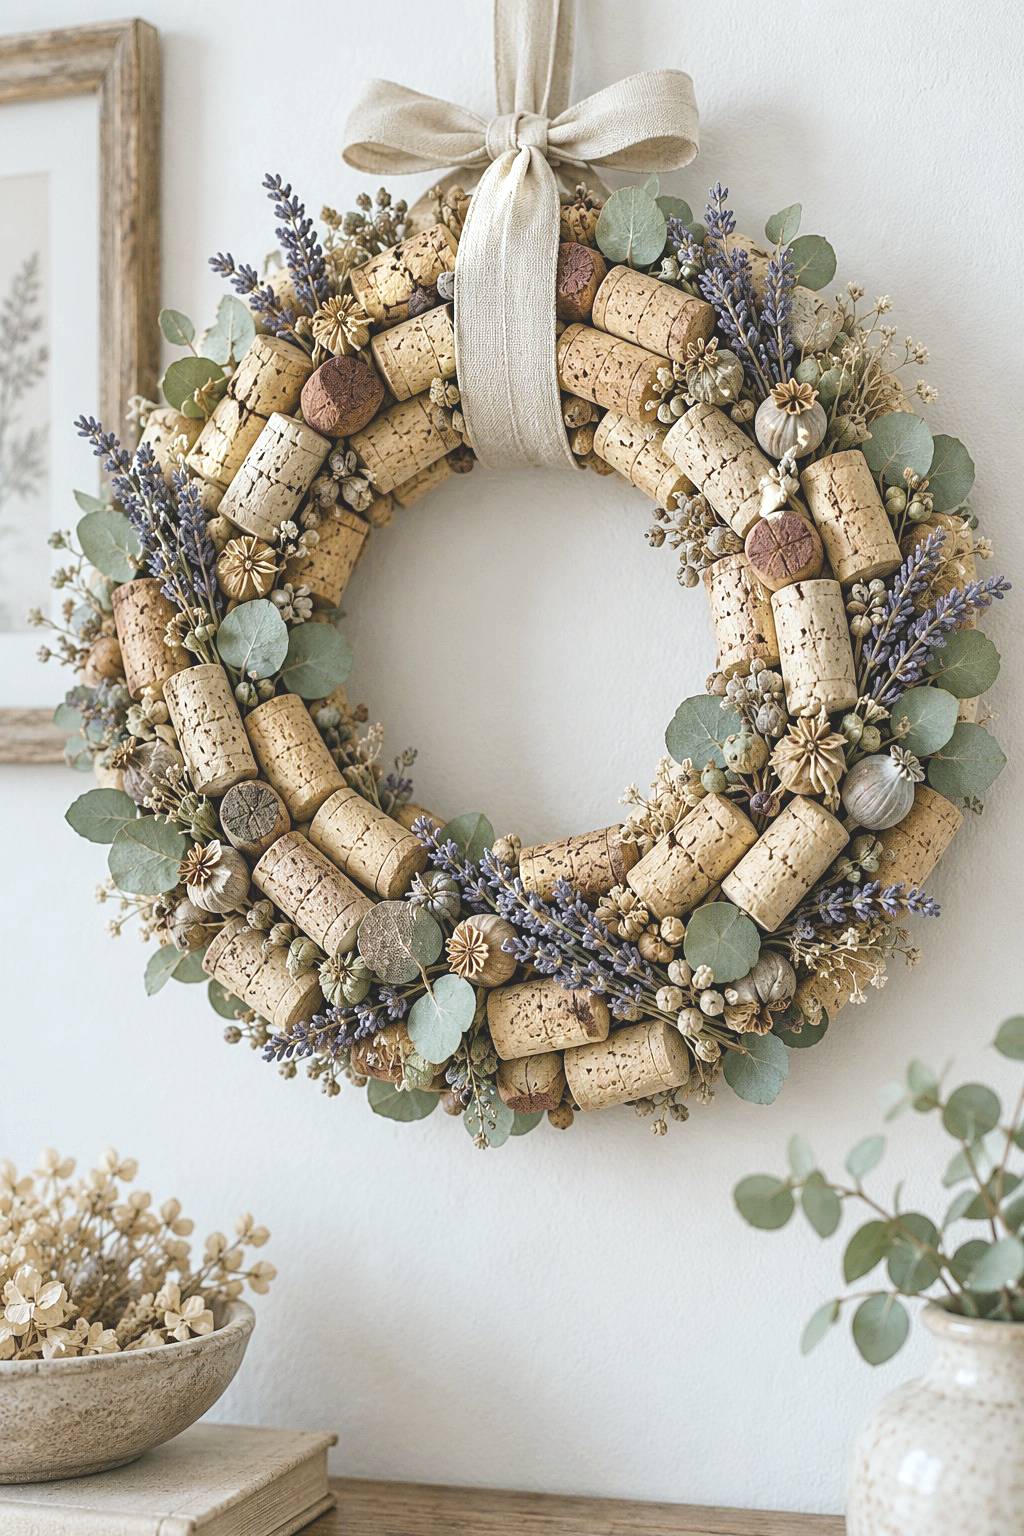
Angled corks build an irregular ring, with small botanical accents tucked between them and a broad ribbon above. Begin with a firm wreath base and arrange a trial section before continuing around it. Alternate directions to fill spaces without creating one bulky side. Set the hanging position early so the eventual ribbon and decorative cluster agree with the wreath's balance.
Attach corks to the base at their actual contact points rather than relying on neighboring pieces alone. Add dried stems sparingly after the main ring is secure, leaving the center opening distinct. The hanger should connect to the supporting base and carry the finished weight. Let the adhesive reach its specified handling strength before lifting the wreath, and its required cure before use.
7. Round Mirror with a Cork Border
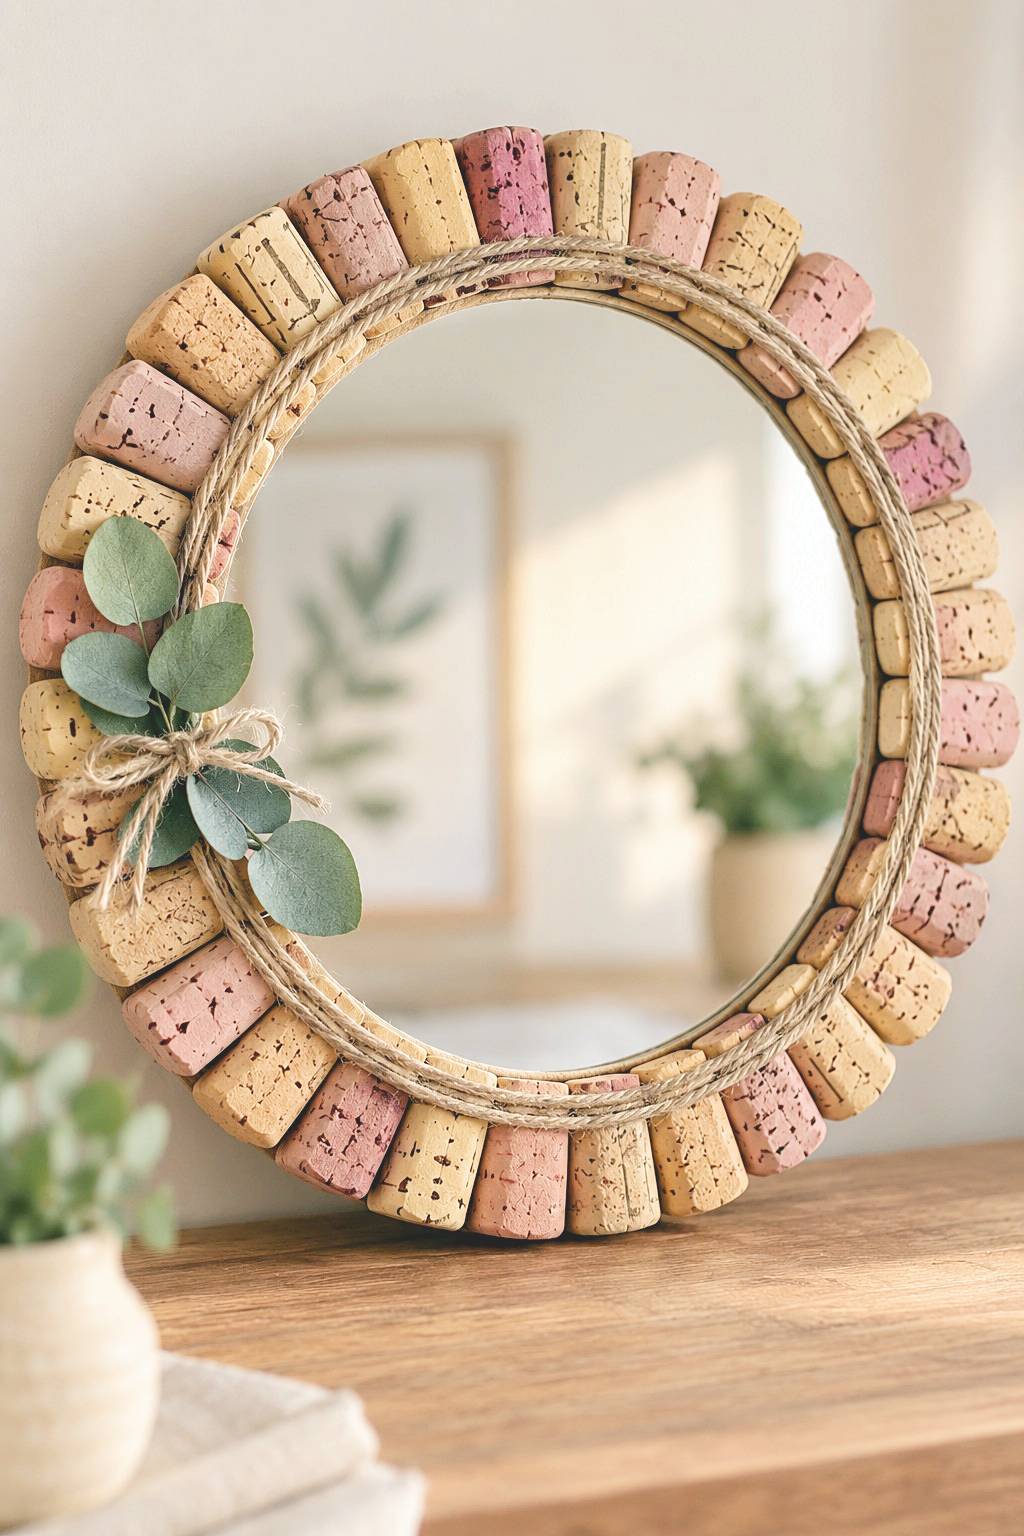
The cork border radiates around a round mirror, mixing pale cork with pink toned ends and a fine cord edge. Use an existing mirror whose glass and original support are sound. Test the cork arrangement on a surrounding backing, keeping the reflective surface and any mounting access clear. The pieces can be shortened where needed, but measure their visible lengths before cutting so the border stays balanced.
Cork decoration should not become the mirror's only support. Preserve an appropriate mirror fixing system, and use an adhesive approved for the actual mirror backing if a new bond is required. Check the complete assembly's weight before selecting wall hardware. For shelf display, provide a stable support rather than assuming a leaning mirror will remain secure.
8. Flower Vase with a Cork Sleeve
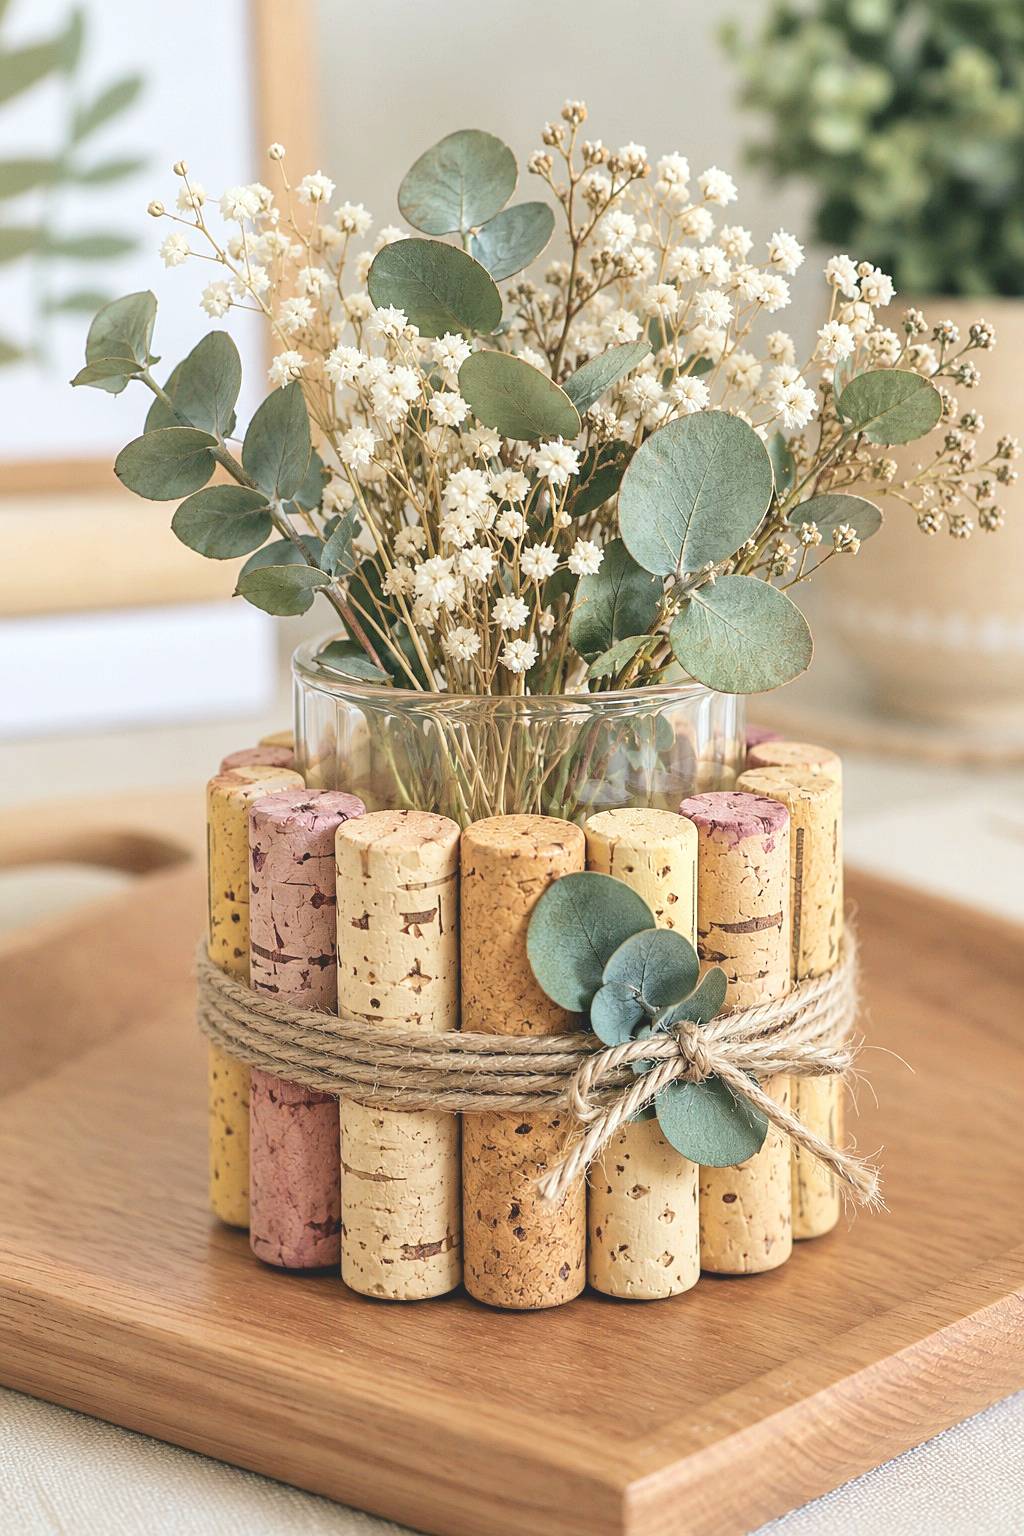
A clear glass mouth rises above the cork exterior, with a small bouquet and cord bow linking the floral and textured surfaces. Select a straight sided vase, then fit an outer sleeve or base around it while preserving removal access. Similar cork heights make a neat top edge; occasional darker ends add variation without another layer of decoration.
The glass holds the water. Lift it out to change water and clean it, then dry its outside before returning it to the cork surround. Choose a few stems that suit its opening and keep the vessel steady rather than forcing in a heavy bouquet. These flower arrangement ideas for small displays offer related choices for stem placement and proportions. Dried stems provide a different option when regular water changes are impractical.
9. Cork Topiary with a Rounded Crown
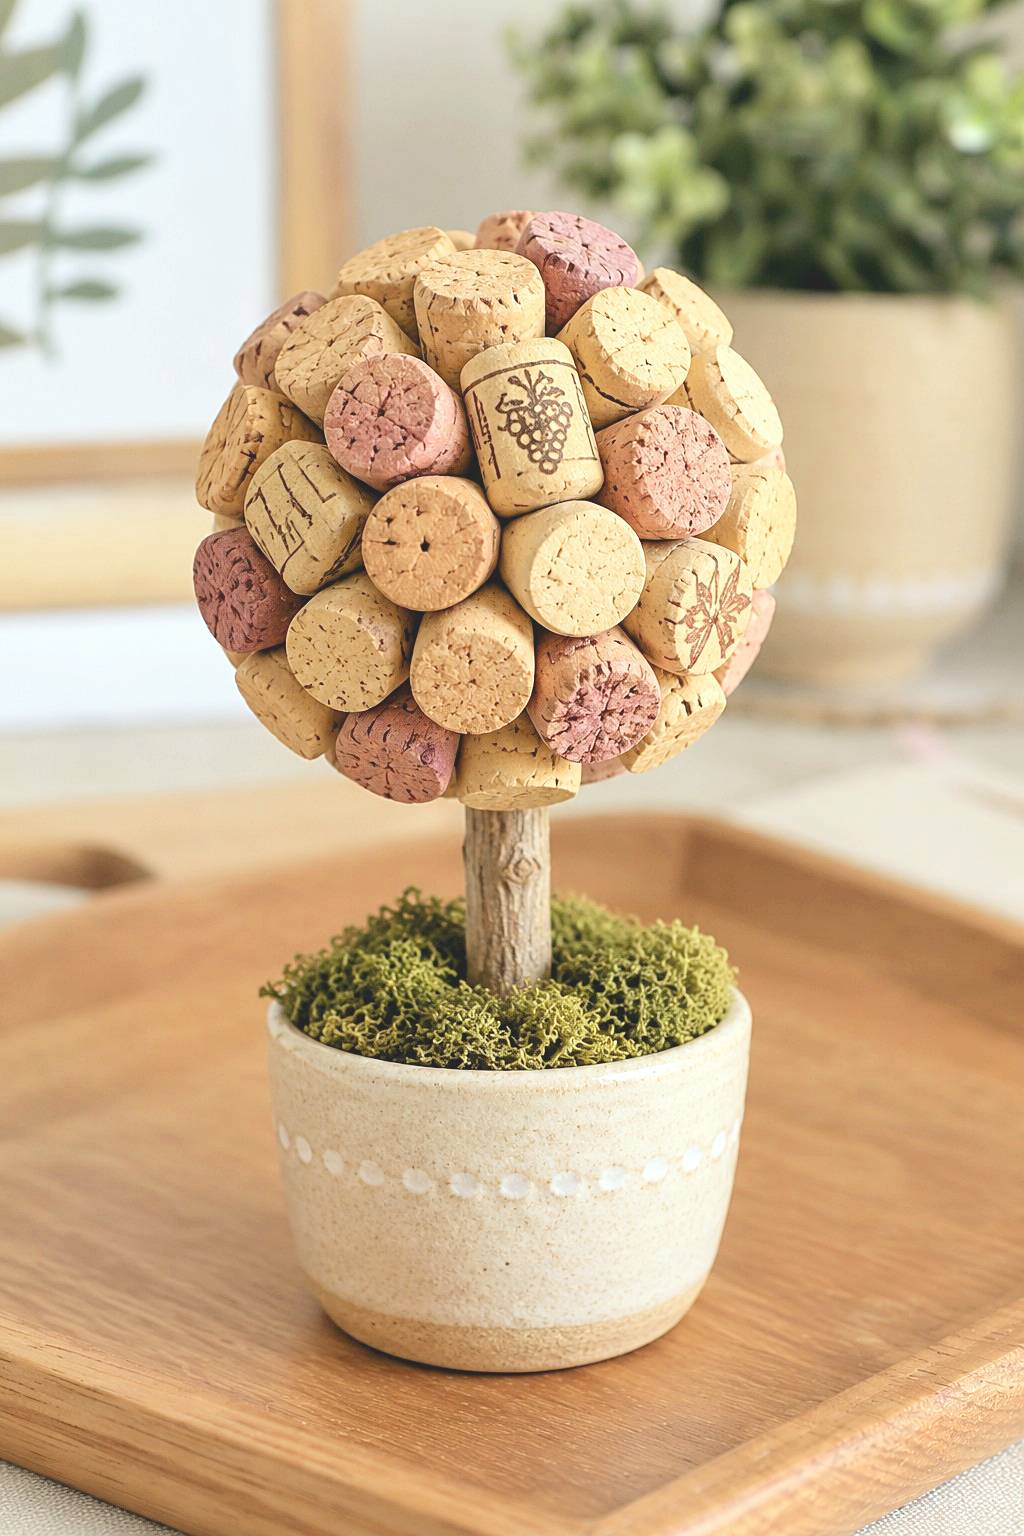
Outward facing cork ends create a rounded crown above a stem and a small pot. Plan the proportions with the crown support, stem and base before gluing. A foam sphere is one possible core for this appearance, but its type must be identified so the adhesive is compatible with both foam and cork. Product names such as glass glue or craft glue do not establish that compatibility.
Make a small bonding trial and avoid temperatures or solvents unsuitable for the core. Fit the stem securely into the crown and an appropriately supported base; preserved green material can conceal the pot's top afterward. As corks are added, reassess balance because the crown's weight increases.
10. Decorative Bowl with Cork Texture
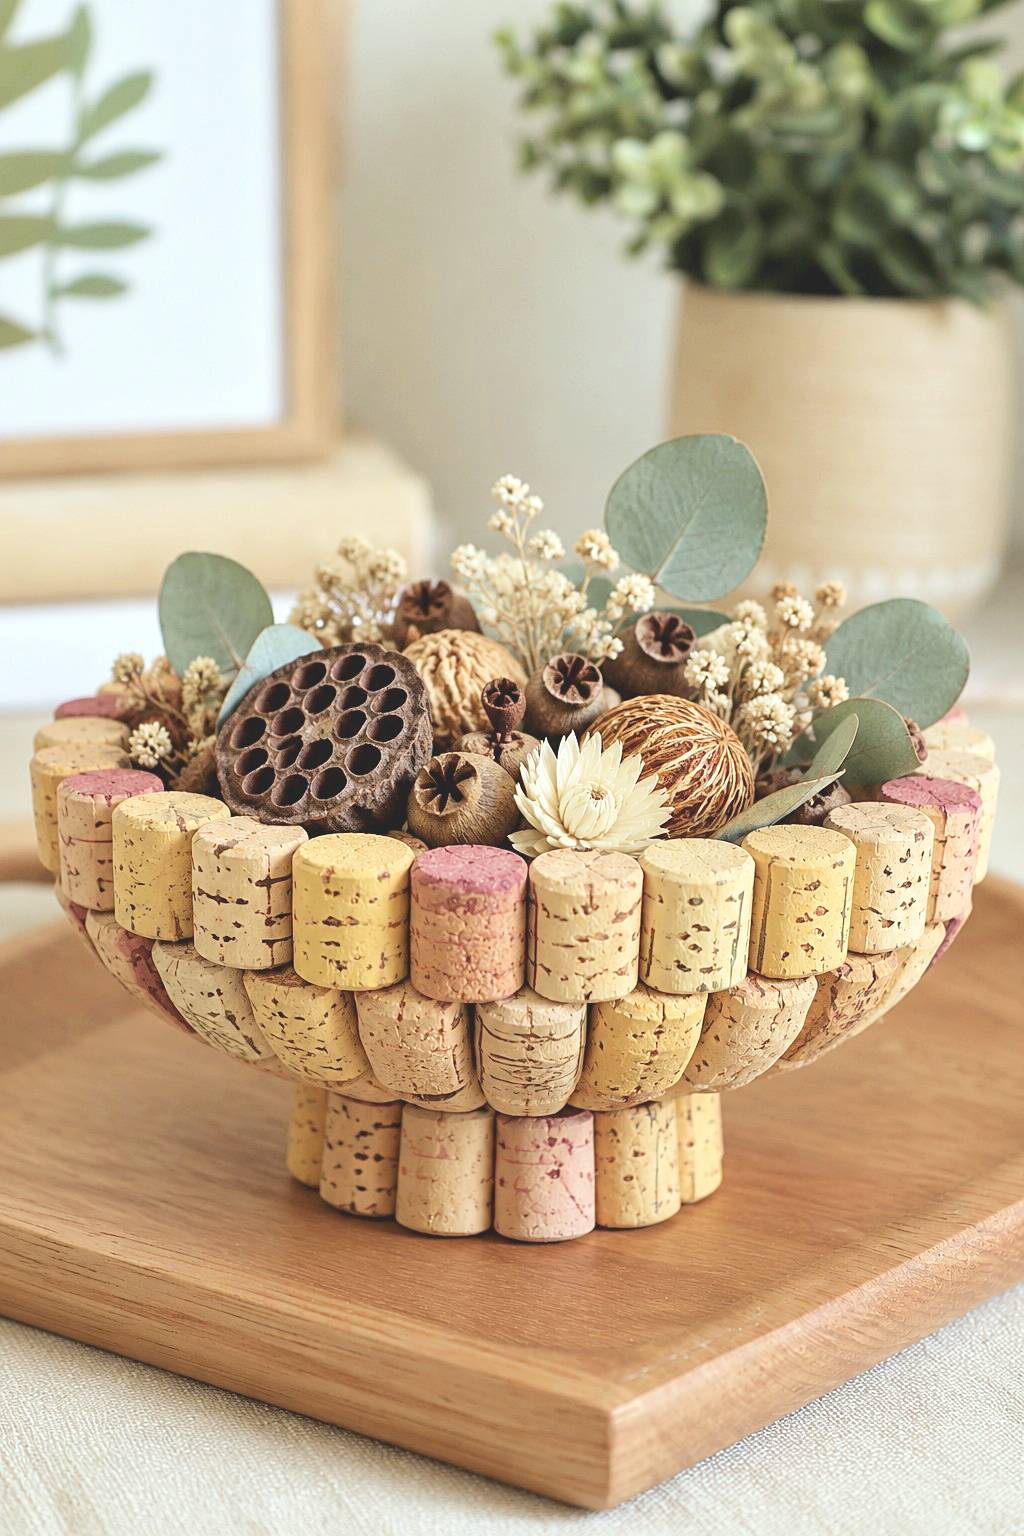
Several cork rows curve around a shallow bowl shape, holding a display of dry botanical pieces above a wooden base. A rigid inner bowl offers a practical form to decorate while preserving an even rim. Arrange the lower row first, checking how pieces meet around the curve, then fit the next row without forcing corks into gaps. Shorter pieces can help adjust the contour.
Keep this as a dry decorative display, not a food serving bowl or a vessel for water. The insert carries the contents while the cork provides texture. Select lightweight fillers and leave space to lift the insert if removal is part of your design. Dust the exposed cork gently with a soft brush, remove loose plant fragments, and inspect the lower joins where the bowl meets its base before carrying it.
11. Picture Frame with Mixed Cork Pieces
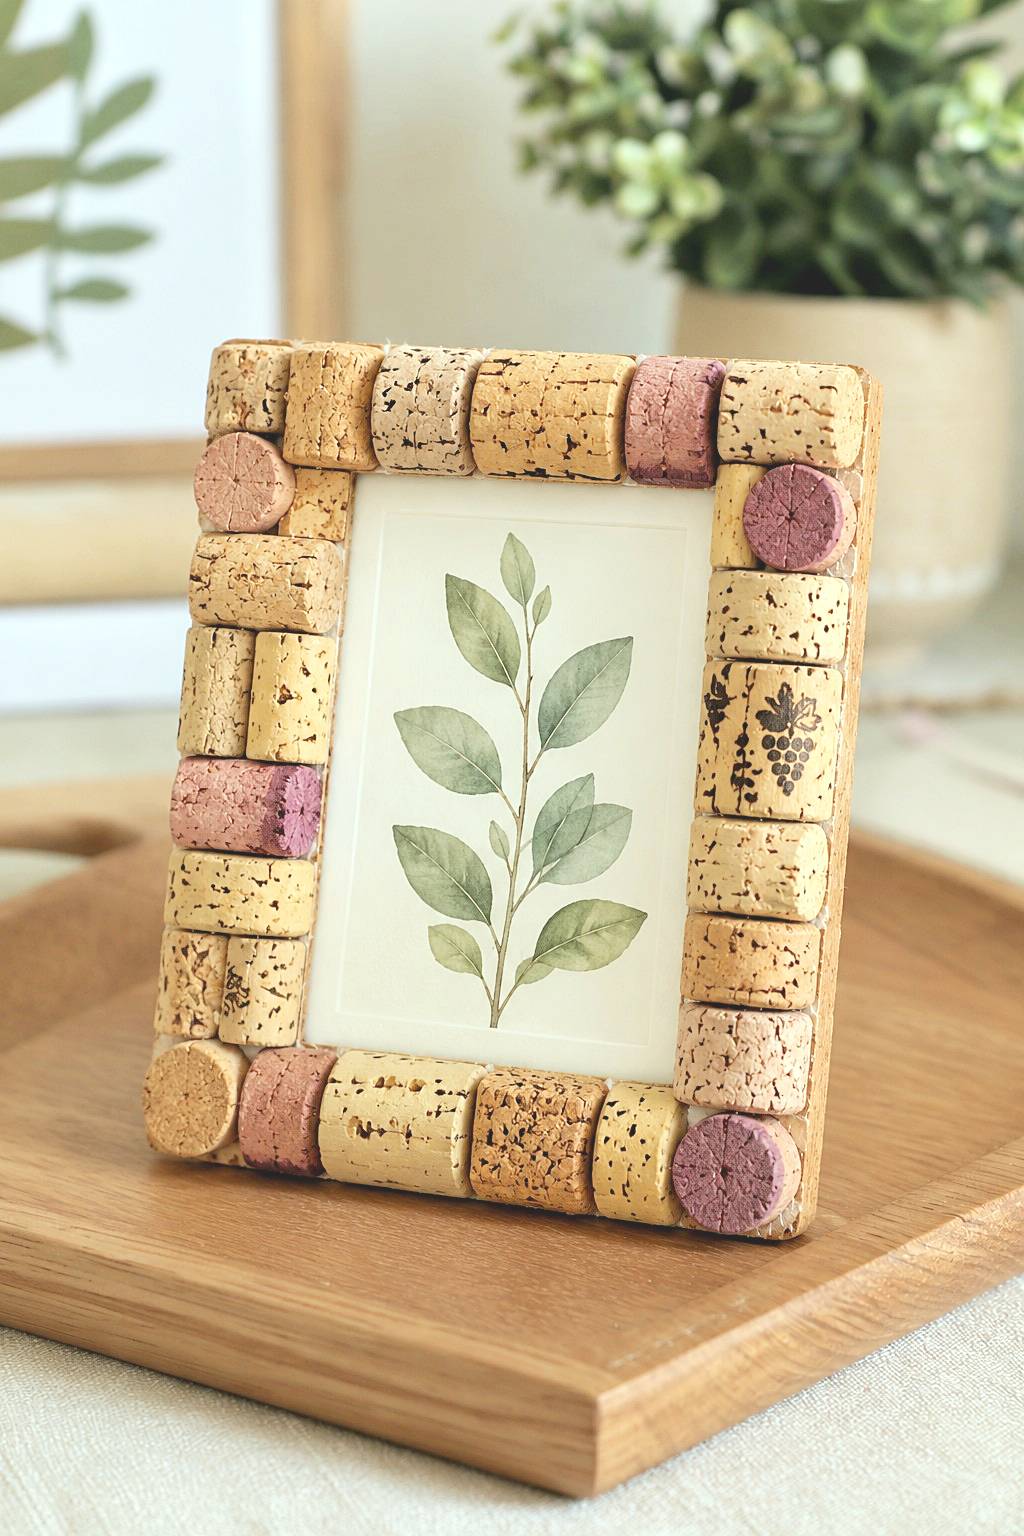
Whole corks and shorter pieces alternate around the rectangular frame, leaving the botanical image visible at the center. Begin with an existing frame and arrange the entire border without glue. Resolve the corners first, then fill the straight sections, placing the markings and darker ends where they strengthen the composition. Check that the frame's back can still open and its stand or hanger remains accessible.
Attach each piece from its hidden contact face and keep adhesive out of the image opening. Maintain the original glazing and photograph mounting rather than bonding cork or glue directly to a photograph. Raised corner pieces should not stop the frame from standing evenly or lying correctly against a wall.
12. Arched Cork Display for Botanical Stems
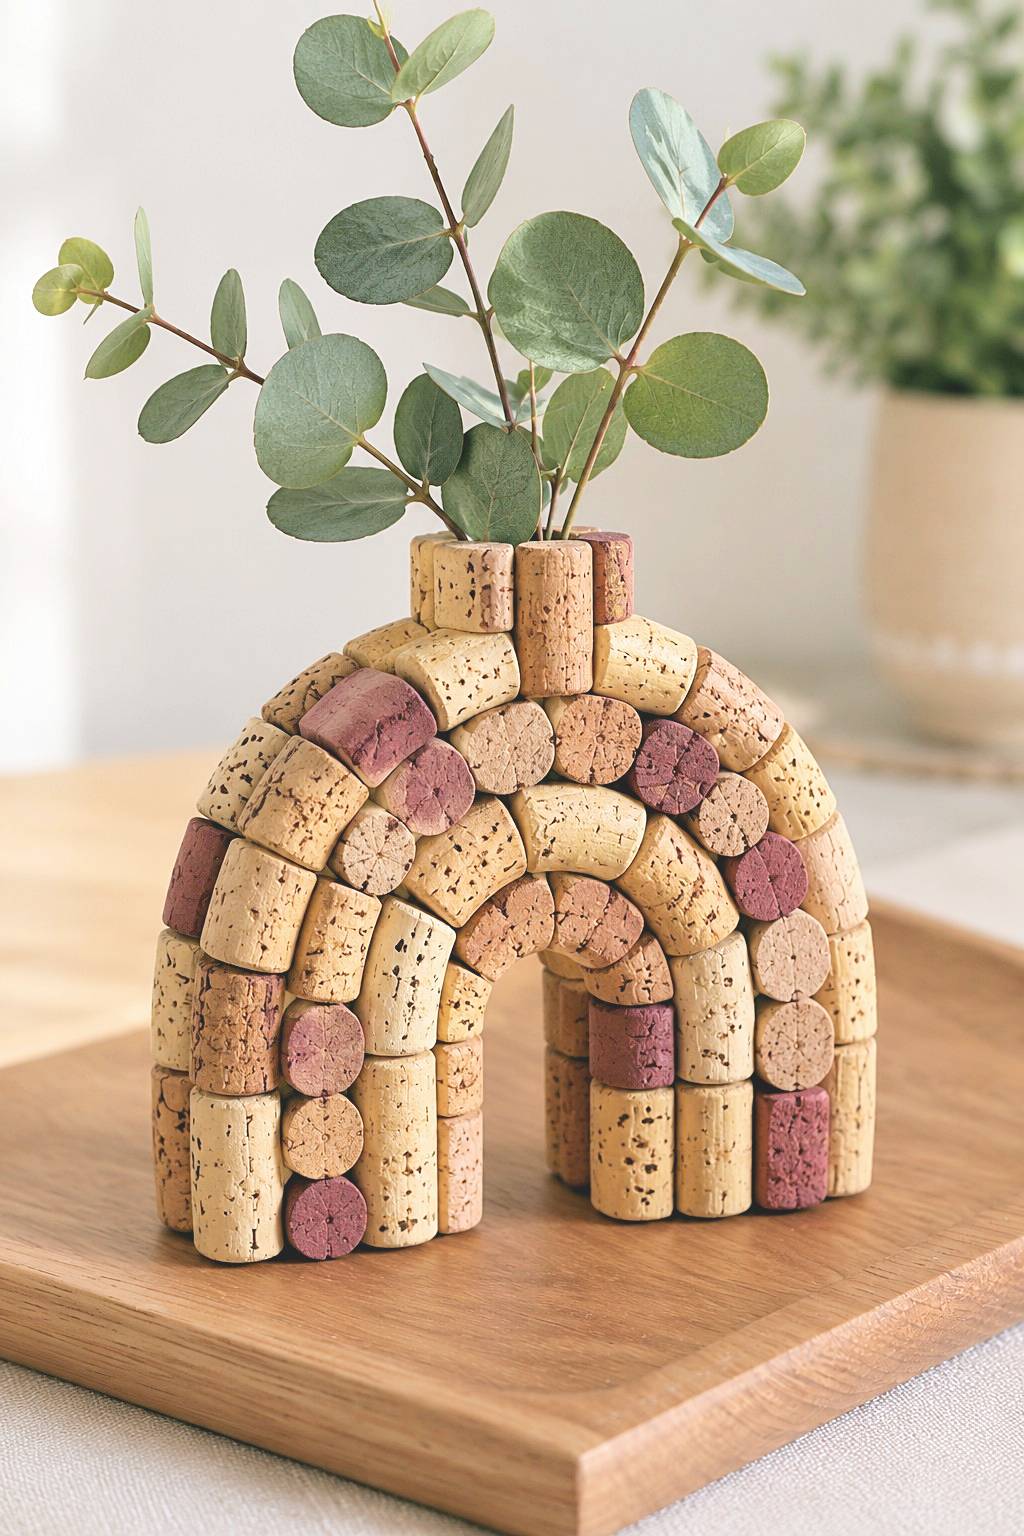
Concentric cork rows make an arch, with an opening below and stems emerging at the top. The hollow center gives this piece a sculptural role even without a large bouquet. Draw the arch at its intended size and arrange both sides together on a template. Mix whole and cut pieces to follow the curve, checking that the two feet reach the same base level.
Build the cork arch around a rigid backing or supporting form, securing the joints before adding decorative layers. Keep any stem tube removable and separately supported. Use dried material, or a watertight insert that prevents fresh flower water from reaching the cork. The cork arch itself is not a watertight vase.
13. Bookends with Cork Cladding and Separate Support
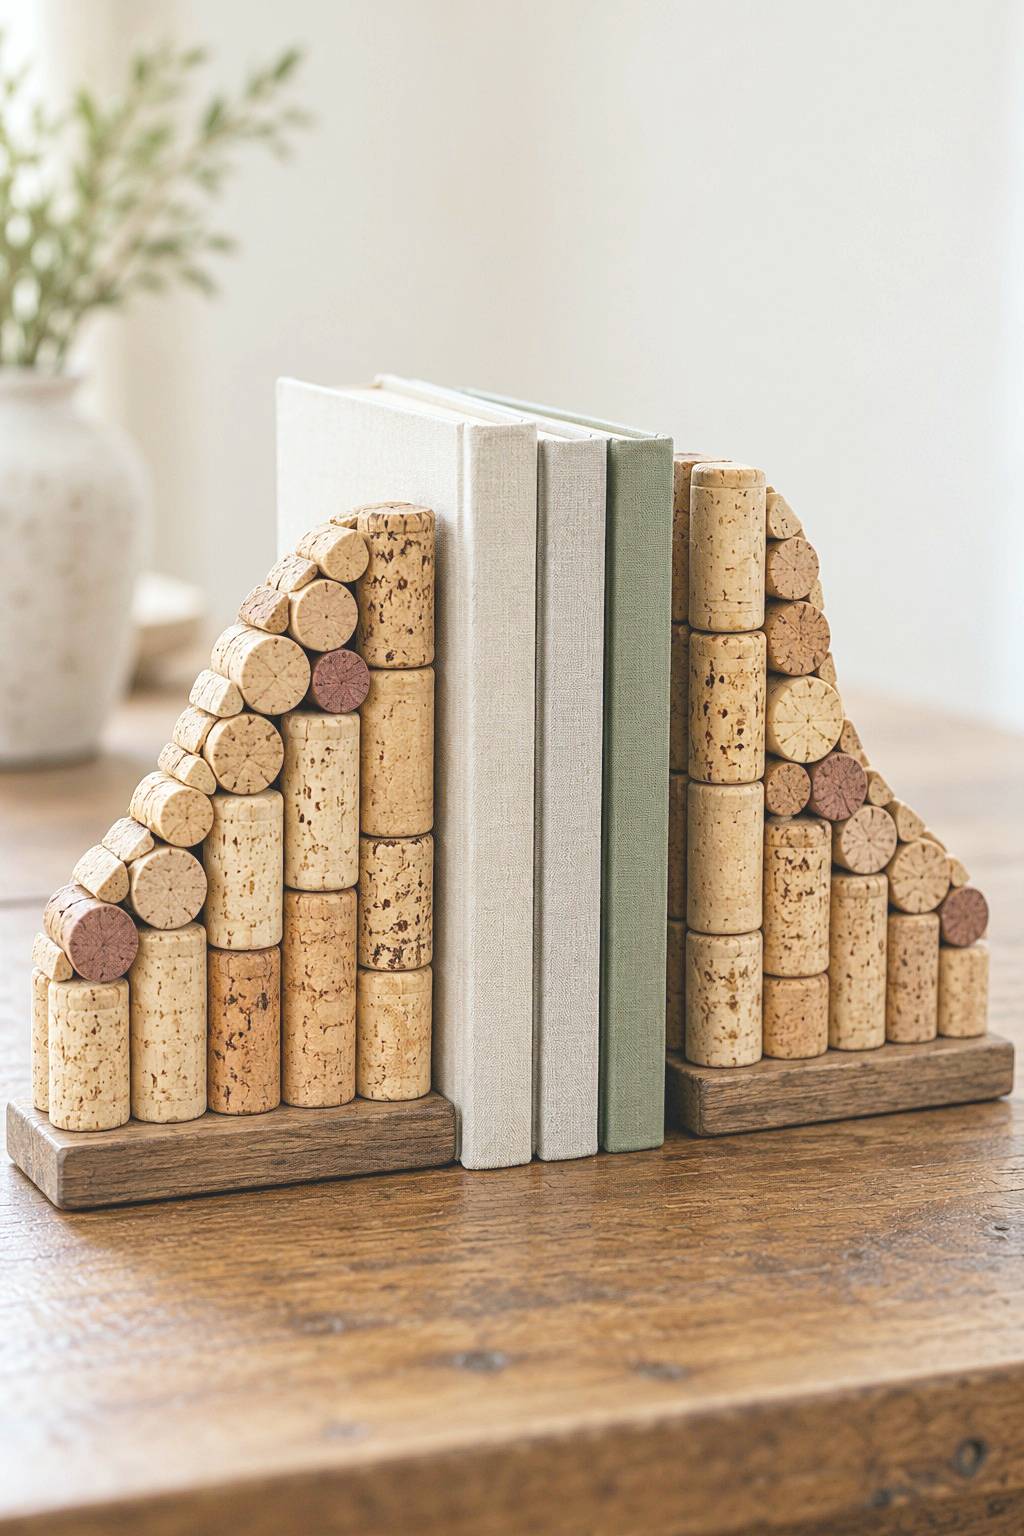
Sloping cork profiles frame a small group of books, combining vertical pieces with visible circular ends. The wood bases establish a visual boundary beneath each side. Plan the bookends around the books you actually want to support, then arrange the cork cladding on a rigid form. A narrow display of light volumes creates a different requirement from a shelf of large, heavy books.
Cork's lightness makes a separate supporting structure important. A suitable weighted base or metal bookend support extending beneath the books can supply that function; its presence is not confirmed by the photo. Keep cork decoration clear of the surface where books must sit flat. Try the assembly with the intended books on the actual shelf, checking sliding and tipping. Move each bookend by its base and repair loosened cladding before reuse.
14. Branch Mobile with Cork, Beads and Metal Details
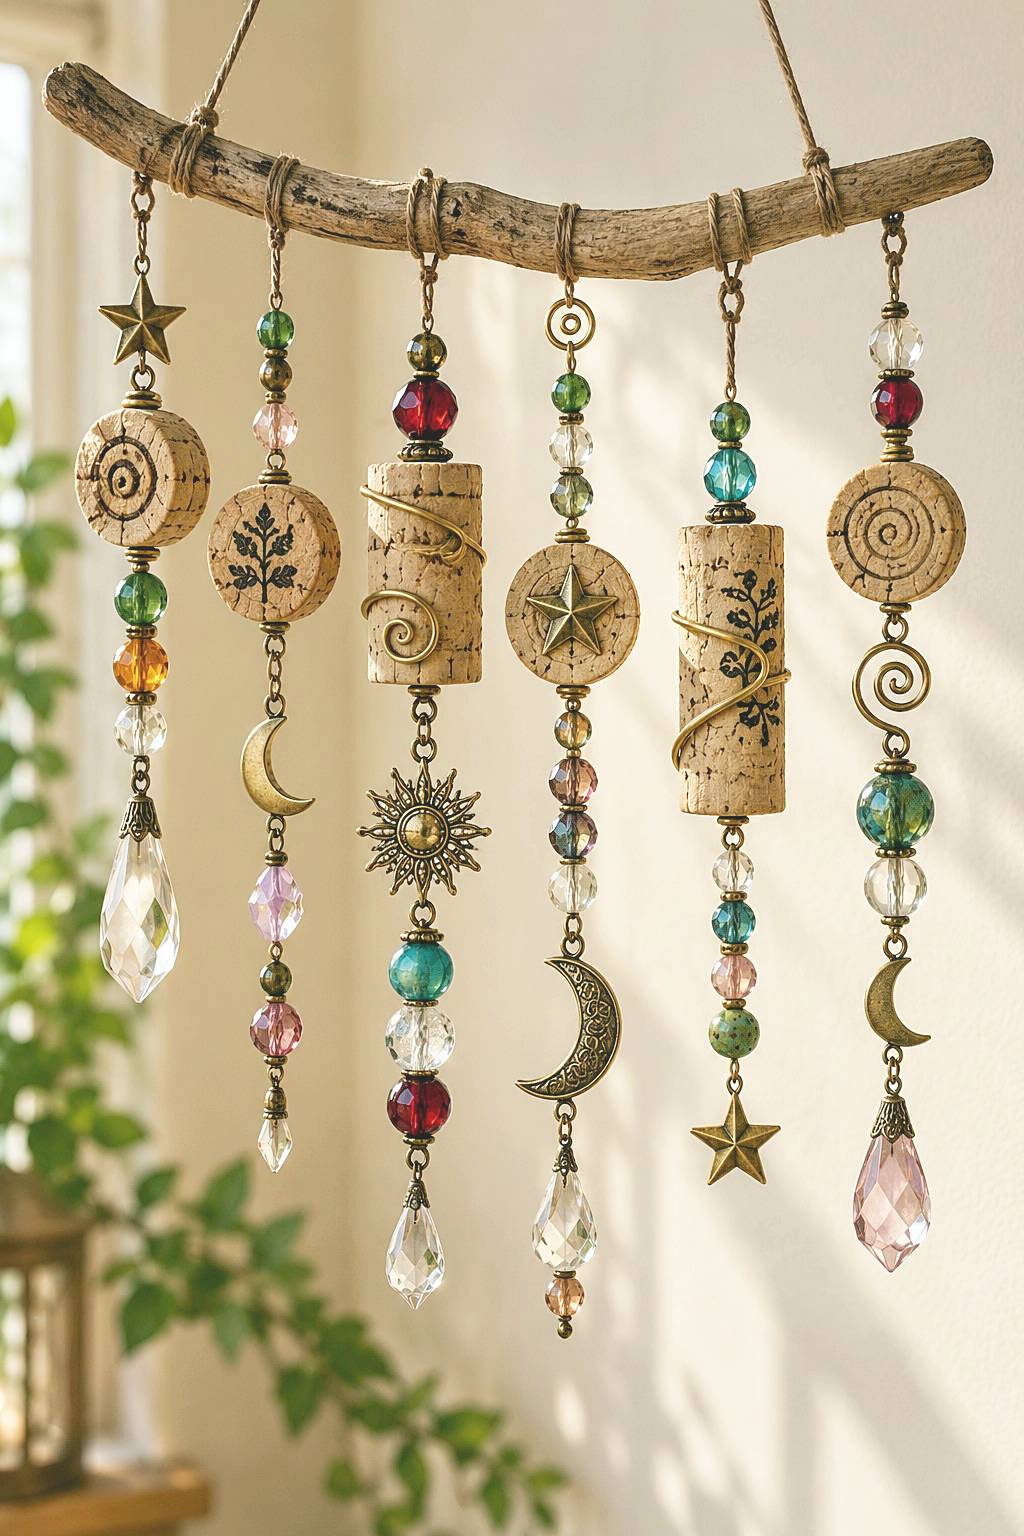
A curved branch supports strands of cork discs, whole stoppers, beads and small metal shapes at varied lengths. Plan each strand flat before attaching it, arranging the cork pieces among lighter or heavier details rather than simply repeating one pattern. A through wire connection is one possible adaptation for suitable cork pieces: prepare the opening with the cork secured, then form closed retaining loops with pliers.
Balance the branch with all strands in place and leave enough spacing to reduce tangling. These branch mobile designs with natural materials provide related hanging arrangements. Use mounting hardware for the complete weight and check each loop or cord connection before display. Keep the mobile away from fans, passages and children's reach. Replace fraying cord or a cracked cork rather than relying on surrounding beads to hold it together.
15. Dragonfly Ornament with a Cork Body
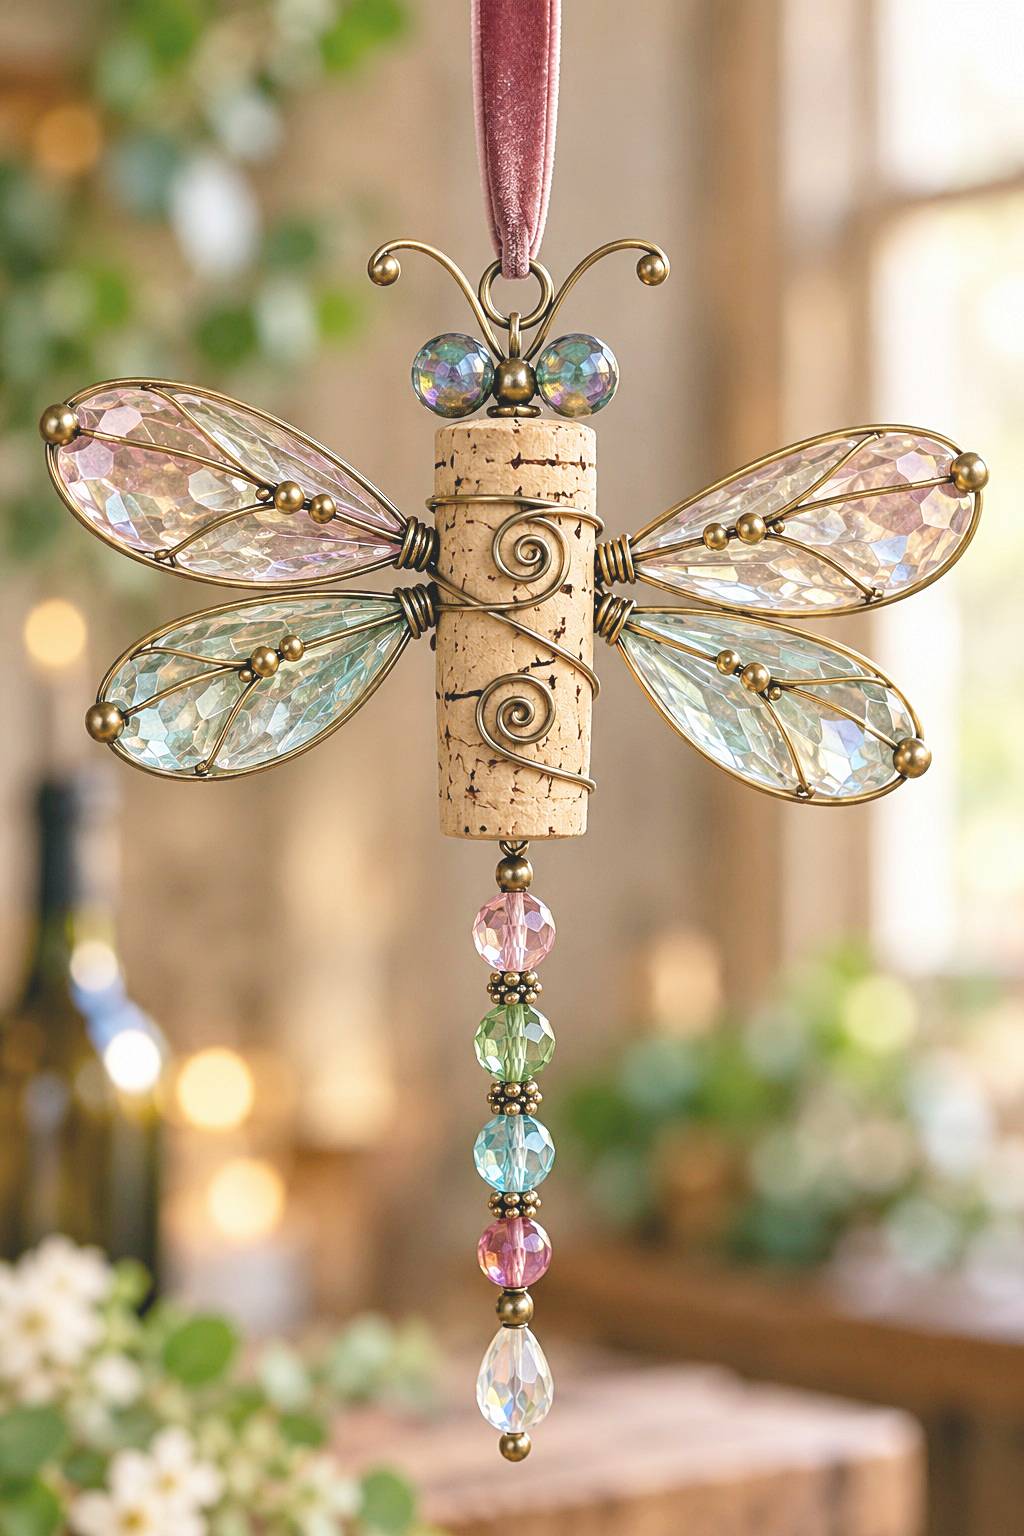
A vertical cork forms the dragonfly's body, with four translucent wings, wire curves and a beaded tail. Prepare the wing shapes as two balanced pairs before attaching them, using lightweight material inside a shaped wire outline for a similar effect. The exact wing material is not established by the photograph. Arrange the pairs around the body to check symmetry and clearance before adding the decorative tail.
A wire wrap around the cork can provide a broader attachment than a tiny glued contact point, with all ends folded inward. Plan the hanging loop as part of the supporting wire arrangement, not merely as a glued ribbon on top. Keep beads captured by properly closed connections and ensure the tail does not pull the ornament out of balance. This is a display piece with small parts, not a children's toy.
16. Cork Couple with Fabric Clothing and a Parasol
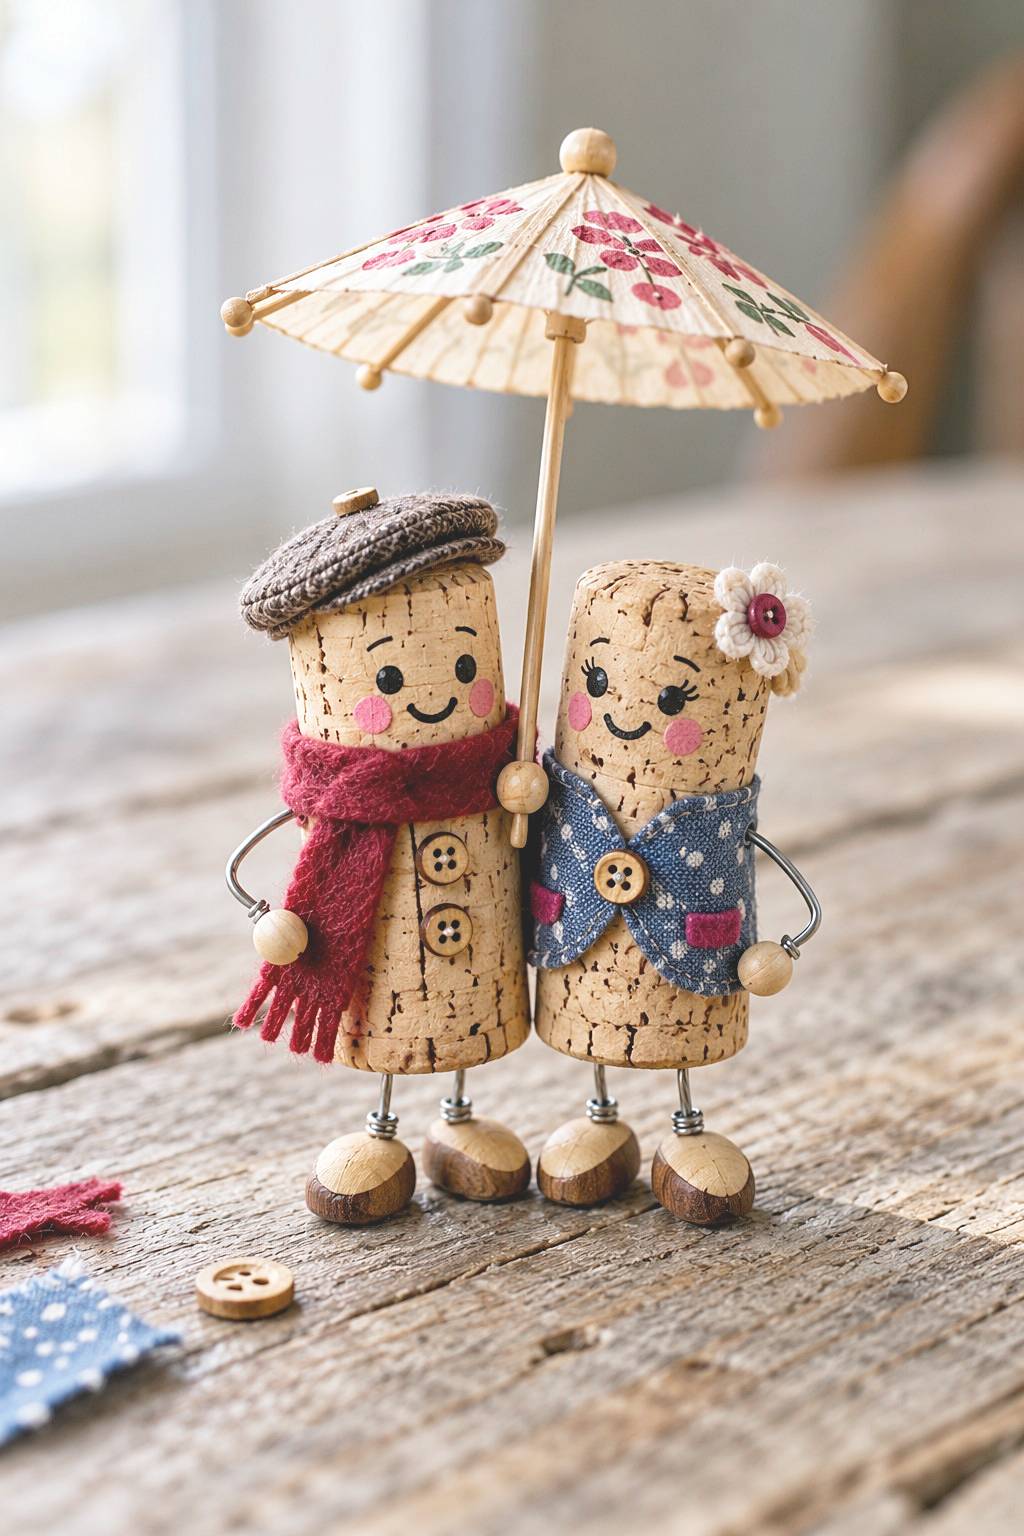
Two painted cork faces, fabric clothing, wire limbs and small feet create a shared scene beneath a parasol. Choose corks that sit comfortably beside one another, then sketch simple faces on a spare piece before marking the figures. Cut clothing around the body circumference without covering the expressions, and fit the arms before attaching accessories. A scarf and a single flower can suggest personalities without many separate details.
The narrow legs and parasol make balance more demanding than a plain upright cork figure. For an adaptation, secure the pair and parasol to a shared wooden base rather than expecting small feet alone to prevent tipping. Conceal sharp wire ends and let fabric connections set before posing the figures. Keep them for shelf display, protecting the parasol from knocks and checking detachable buttons or beads when packing them away.
17. Upright Cork Reindeer with Yarn Scarves
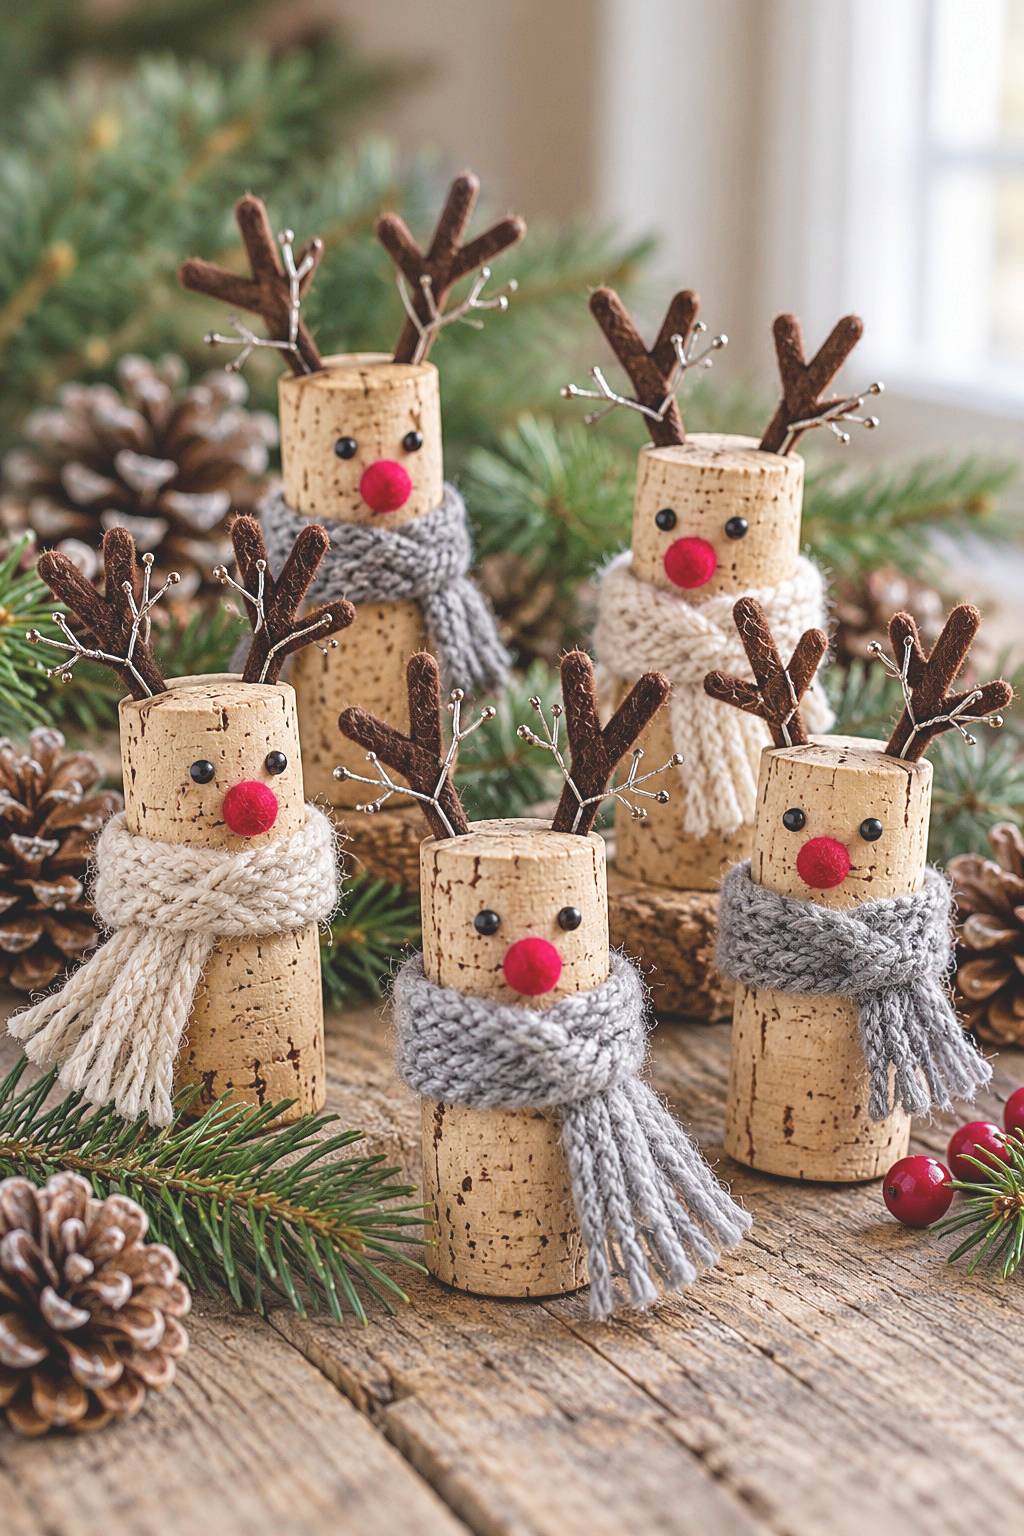
Whole upright corks give these reindeer their simple bodies, with branching antlers, red noses and wrapped yarn scarves. Choose corks with sound, level bottom ends and plan each face before adding the scarf. Cut soft antler shapes and fit them at the top, then attach a small decorative nose and eyes or substitute painted details.
Preserve the upright body rather than slicing it lengthwise, which would flatten a side rather than its bottom. If a figure needs support, attach its bottom end to a small wooden disc or mount several on one base. Keep scarves clear of that contact area. Display the finished group away from open flames and children who may pull off small details. Pack the figures separately so antlers and decorative branches are not crushed.
Keep the Texture, Make Maintenance Possible
Before choosing a final position, check that liners lift out, frame backs open and hanging connections remain accessible. Gently remove dust without soaking the cork assembly. A protective coating, if used, must suit the cork and decorations; it does not automatically make a glued project waterproof or washable. Store seasonal pieces dry, support delicate ornaments during packing and keep a few matching corks for future repairs.

Leave a Reply