
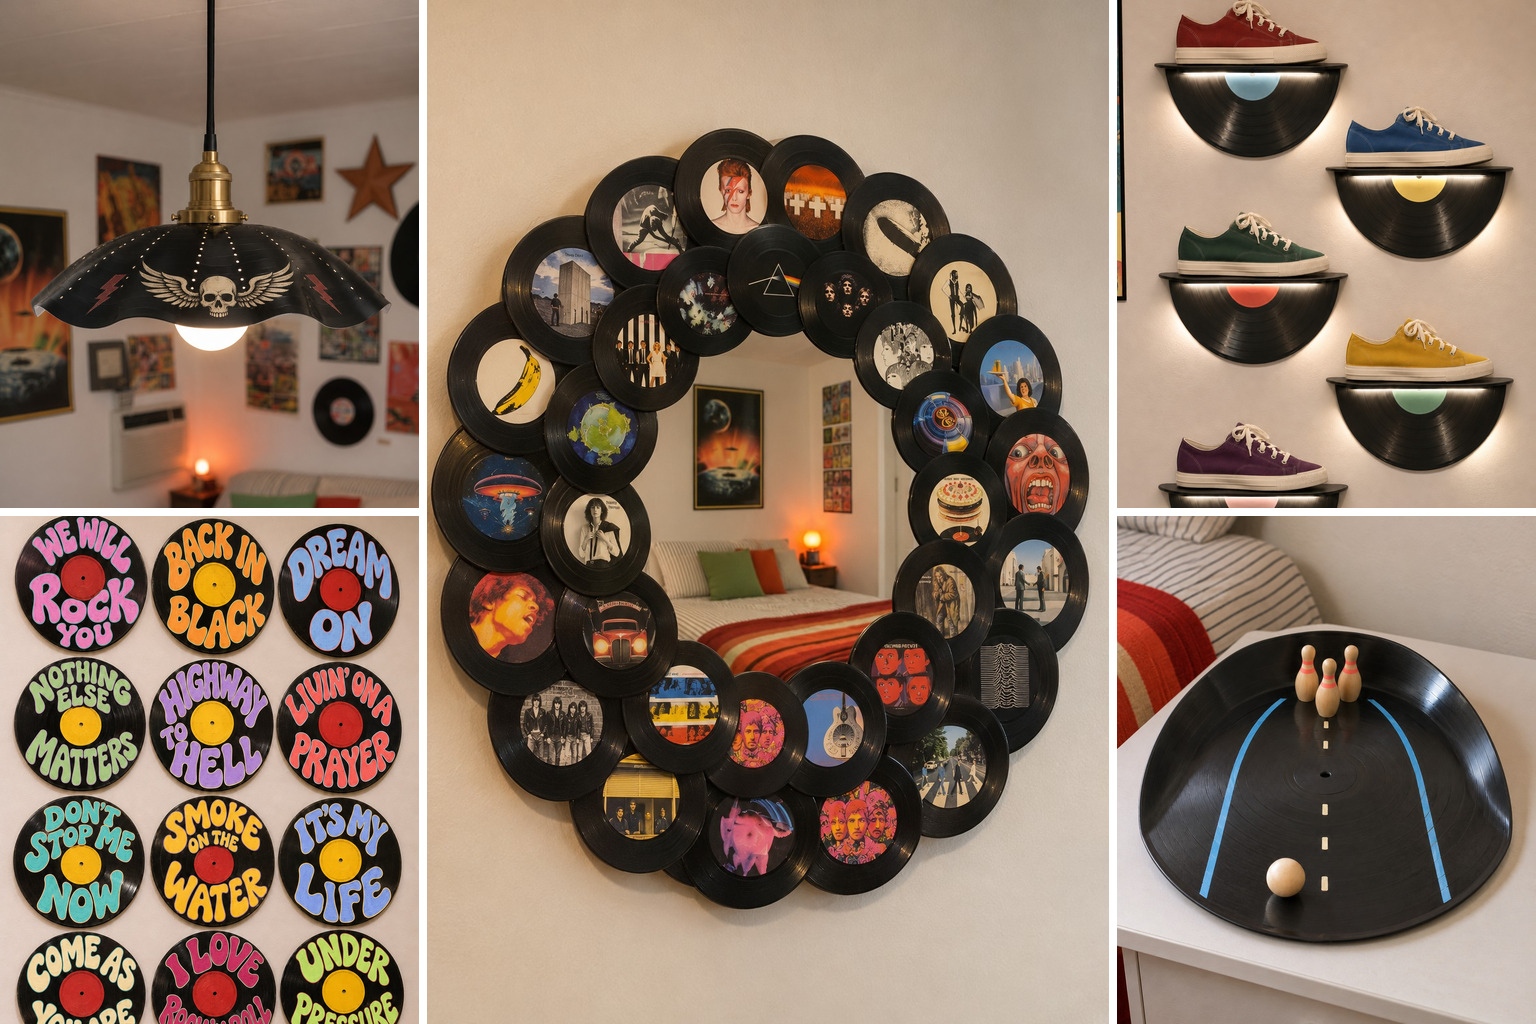
Every thrift shop crate has them: scratched albums that skip, warped LPs nobody will play again, and the record your uncle swore he would fix one day. They are cheap, light, glossy black, and surprisingly easy to reshape, which makes them one of the friendliest materials for home projects.
The 24 ideas below turn worn records into lamps, a mirror frame, stair risers, shelves, trays and wall art, plus a few pieces that exist mostly to make people smile. Some only need paint and a nail. Others call for a warm oven and a few minutes of quick hands. If you also have a drawer of discs from the CD era, the same playful approach carries over to old CD crafts.
Table of Contents
- How Old Records Behave When You Shape, Cut and Glue Them
- Wall Art and Statement Walls
- Rock Silhouettes Cut Into Whole Records
- Backlit Record Wall With a Soft Halo
- Hand Lettered Song Titles
- Lightning Bolts and Stars Above the Bed
- Concert Photo Headboard
- Records Framing a Doorway
- Stairs and Railings
- Half Records on Stair Risers
- Album Art Along the Banister
- Lamps and Glowing Pieces
- Wavy Pendant Shade With Pinholes of Light
- Devil Horns Table Lamp
- Four Record Accent Light
- Shelves, Stands and Small Furniture
- Tiered Corner Stand
- Side Table With Records Under Glass
- Lit Sneaker Shelves
- Arched Headphone Stand
- Mirrors, Trays and Vanity Pieces
- Mirror Framed in Album Art Singles
- Pressed Flower Vanity Mirror and Jewelry Tray
- Two Tier Valet Tray With Flames
- Curved Cup Tray With a Painted Guitar
- Playful Pieces and Small Gifts
- Tabletop Bowling Lane
- Miniature Rocking Chair
- Rock and Roll Jellyfish
- Painted Stage With a Guitarist Cutout
- Wall Planter With Record Pockets
- Safety When Working With Records
How Old Records Behave When You Shape, Cut and Glue Them
Records are pressed from PVC, a plastic that is stiff and brittle at room temperature and turns floppy once it warms up. A low oven is the usual tool: set it to around 200 to 220°F (about 93 to 104°C), lay the record on an upturned metal or glass bowl on a baking sheet, and watch it. Within three to eight minutes the edges sag like soft leather. You then have roughly a minute to press, pinch or fold it before it stiffens. If the shape goes wrong, put it back for a minute or two and it relaxes again. Never raise the heat to speed things up, and pull the record out the moment you notice a sharp chemical smell.
Cold vinyl cracks when you cut it, so cut while it is still warm. Sturdy kitchen scissors handle simple shapes such as bolts, stars or a half circle. Detailed silhouettes are cleaner on a scroll saw with a fine spiral or reverse tooth blade run slowly, with painter's tape over the cutting line to stop chipping. For holes, clamp the record onto a scrap board, cover the spot with tape and use a step drill bit at moderate speed with light pressure. A sanding sponge removes burrs from every cut edge.
For gluing, E6000 is the practical choice for most joints, since it grips PVC, metal, wood and glass and stays slightly flexible. It sets in about ten minutes, can be handled after 24 hours and reaches full strength in two to three days. Where something carries weight, such as a seat on a base or a record set into a wooden slot, switch to a two component epoxy whose label lists PVC or vinyl, because not every epoxy bonds to this plastic. Paint needs a little preparation too: wash the record with dish soap, wipe it with rubbing alcohol, then spray a primer made for plastic. Acrylic paint or acrylic paint markers go on top, and a clear acrylic sealer protects the finish once everything has dried overnight.
Printed images, from album art to concert posters, are applied with decoupage medium. Print them on plain paper with a laser printer, because inkjet ink smears when it gets wet, then smooth them flat with a brayer and seal them with two thin coats. One last rule covers every project here: a shaped record can soften again from about 140°F (60°C), so keep finished pieces out of direct sun, away from radiators, and use LED bulbs only in anything that lights up.
Wall Art and Statement Walls
A wall is the easiest place to start, because records are light and most of these hang on a single small nail or an adhesive strip.
Rock Silhouettes Cut Into Whole Records
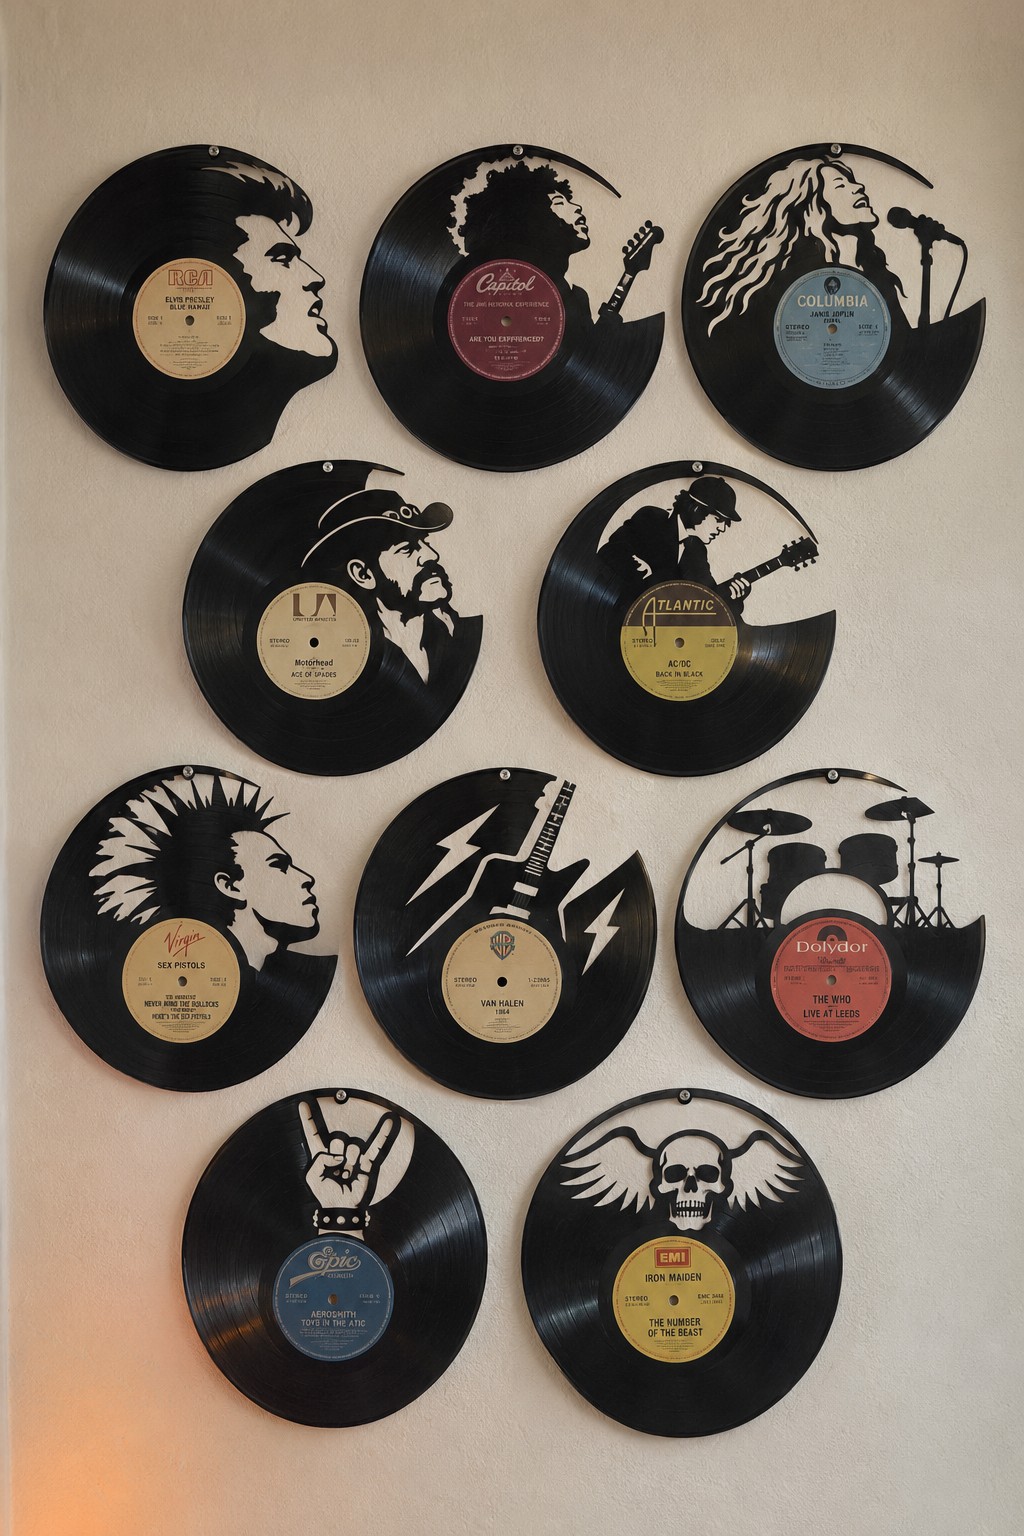
Cut silhouettes turn a plain record into graphic art, because the wall color shows through the open areas and becomes part of the design. A group of them gives a music room, a teen bedroom or a home studio a strong focal point without the bulk of framed posters, and black shapes on a light wall read clearly from across the room. Choose motifs that connect to whoever lives there: an instrument they play, a favorite stage pose, a symbol from a band they love. If you cut your own, keep every shape joined to the outer rim in at least two places so thin parts do not snap, drill a starter hole inside each enclosed area, and work slowly on a scroll saw with a fine spiral blade. Leaving the original label in the middle keeps each piece recognizable as a record. Staggered rows feel more like a gig poster wall than a strict grid.
Backlit Record Wall With a Soft Halo
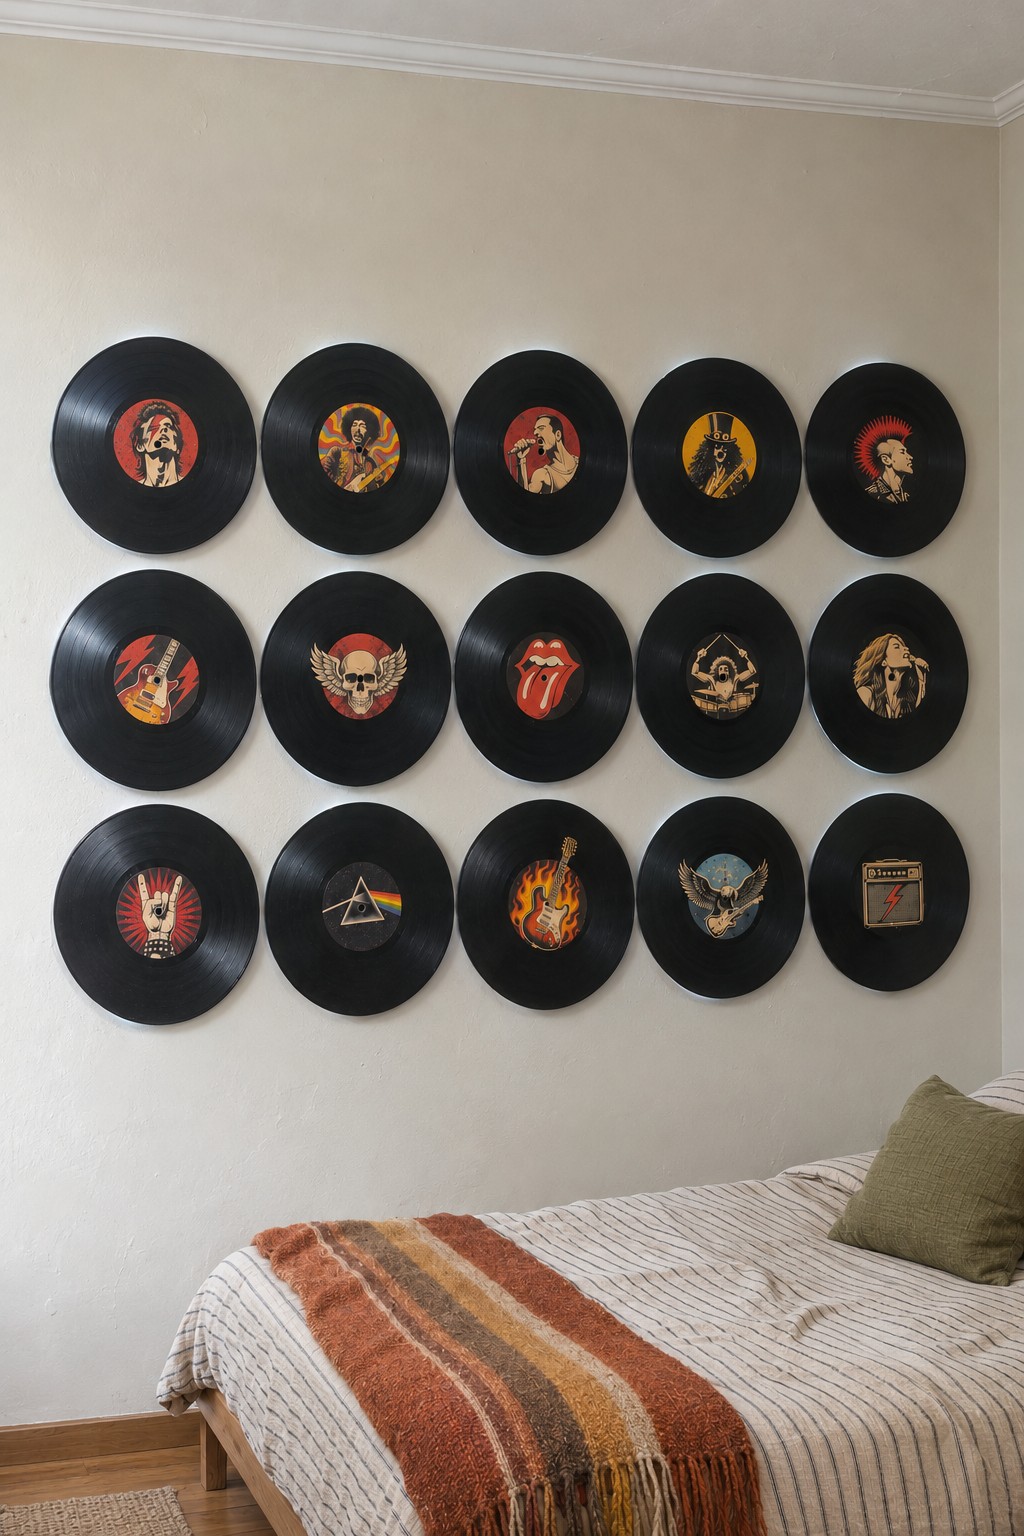
Lighting behind records changes them from flat discs into floating objects. A soft halo outlines each circle, adds depth to a wall after dark and doubles as gentle ambient light for a media room, a bar corner or a gaming setup. Custom label art sets the mood: illustrated rock icons feel loud and graphic, while plain colored labels look calmer and more modern. To build it, fix a round wooden spacer about an inch thick behind each record, wrap a self adhesive LED strip around the spacer's edge so it faces the wall, and connect every strip to one low voltage power supply. Plan the cable route before hanging anything so the wires stay hidden behind the discs. Neutral white keeps black vinyl crisp, warm white makes the room cozier, and a dimmer lets you move between the two. Our guide to LED lighting ideas covers how to get a clean, even line from a strip.
Hand Lettered Song Titles
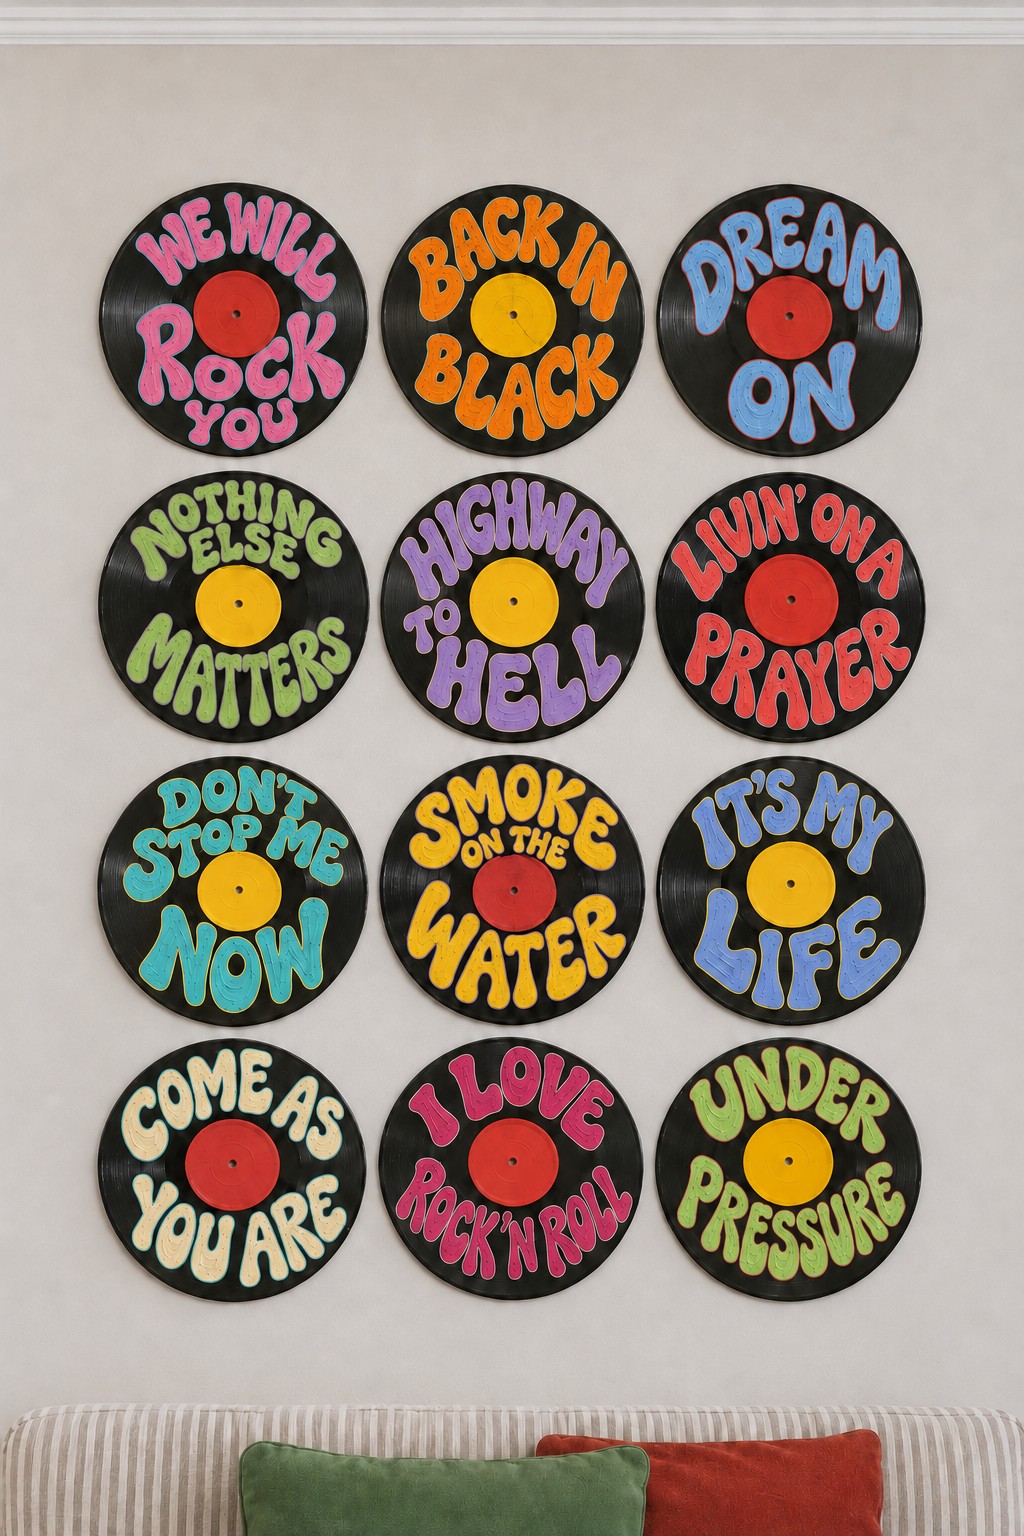
Hand lettering turns records into a personal playlist on the wall. Song titles, a line that means something to you or the names of family members in retro bubble letters bring color and humor to a living room, a kitchen nook or a teen bedroom, especially where a wall needs cheer more than seriousness. Bright pastels against black vinyl feel playful and seventies; one color repeated on every disc looks more graphic. After priming, sketch the words with a white chalk pencil so mistakes wipe away, fill the letters with acrylic paint markers and add a thin outline in a second color for contrast. Painting the center labels in two alternating colors ties a set together. A matte or satin clear spray protects the paint without adding glare.
Lightning Bolts and Stars Above the Bed
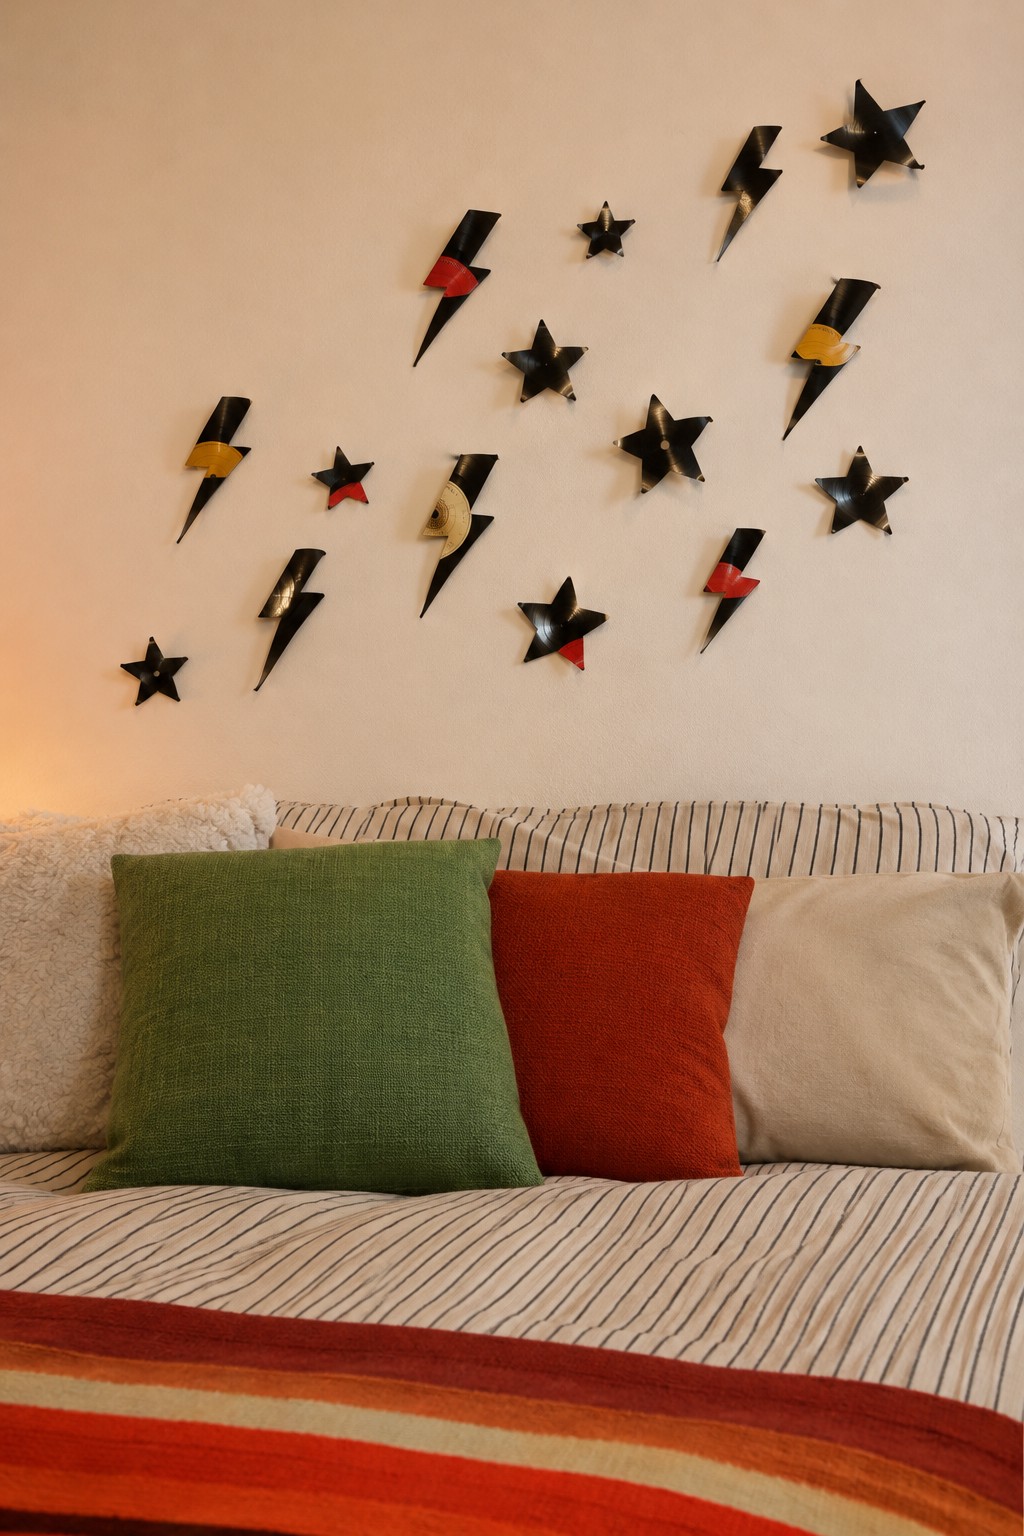
Small cut shapes are the quickest way to bring records into a room, and they give a wall movement instead of one heavy focal point. Bolts add energy, stars feel dreamy, and together they fit a kid's room, a dorm or the space above a bed or desk where a full headboard would be too much. Keeping a sliver of colored label on a few pieces adds sparks of color, and a gentle twist while the vinyl is warm makes each shape catch the light differently. Snip simple outlines with sturdy scissors while the record is still soft from the oven, then smooth the edges with a sanding sponge. Mix three or four sizes and let the cluster drift diagonally. Above a pillow, use a small panel pin through a drilled hole or strong mounting tape rather than putty.
Concert Photo Headboard
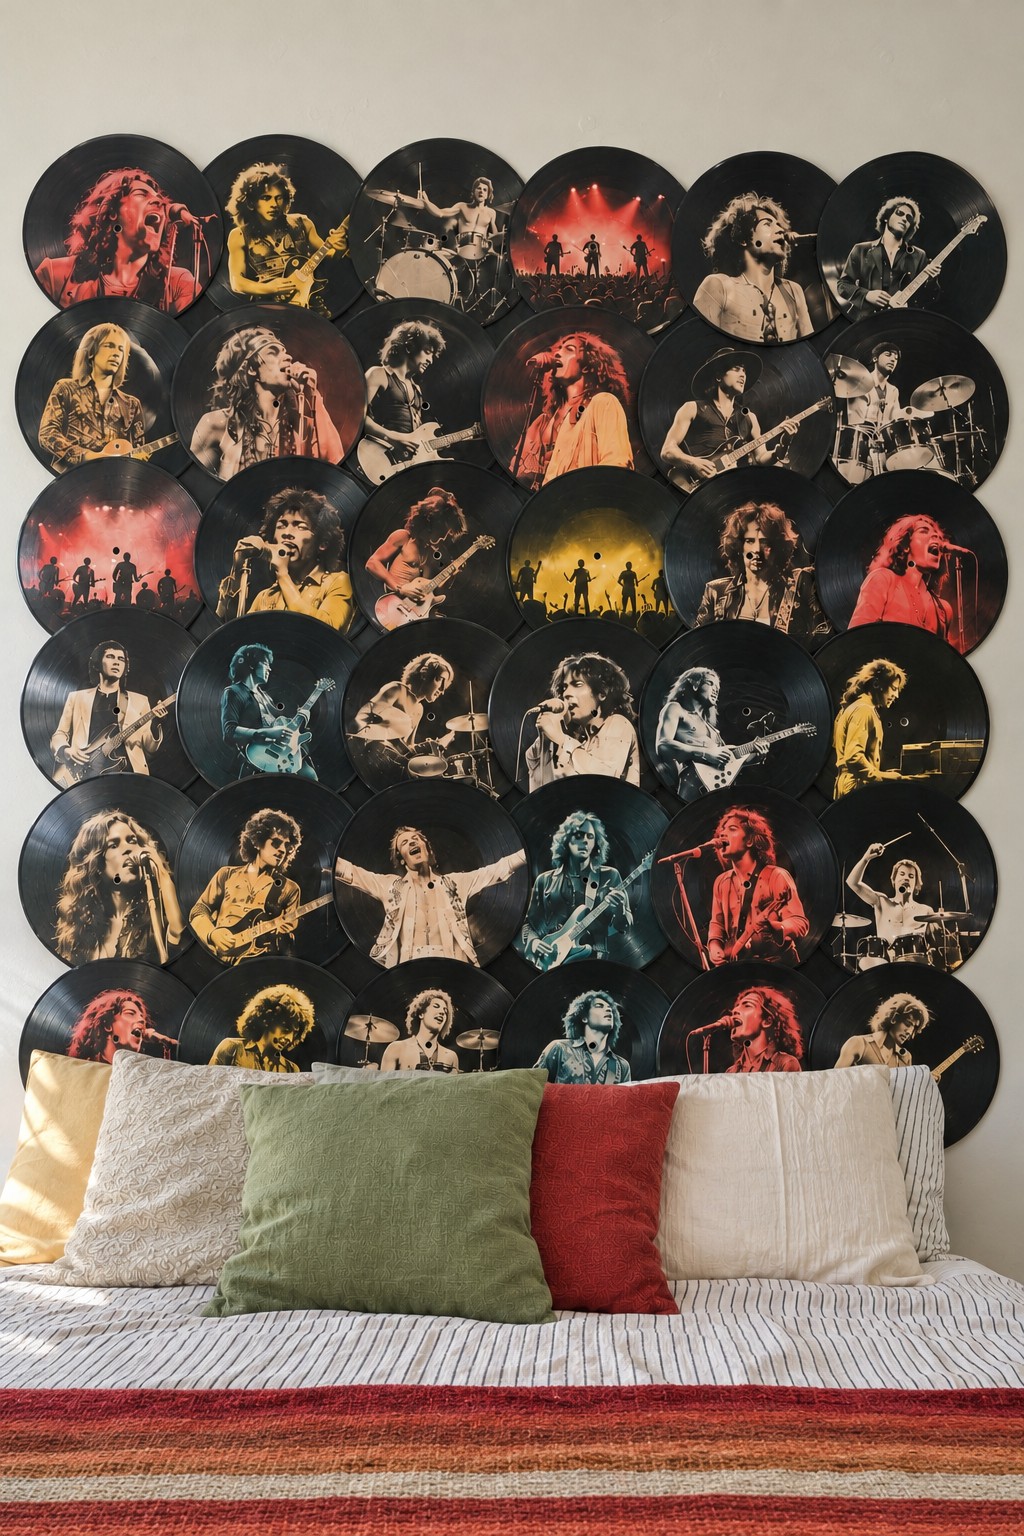
Covering the wall behind a bed with records creates an instant headboard that feels bold, personal and full of texture. Tinted concert photos printed over the discs give a bedroom a warm, vintage mood, while plain black records would look minimal and graphic. Slight overlaps hide the wall and make the panel read as one surface, which works well in a guest room that needs character or for a teenager who wants a space that feels like their own. Rather than gluing straight to plaster, screw a thin plywood panel to the wall and fix the records to that, so the headboard can come down in one piece later. Print images on plain paper with a laser printer, apply them with decoupage medium, roll them flat with a brayer and seal them. Limiting the palette to three or four tones keeps the wall restful enough for sleep.
Records Framing a Doorway
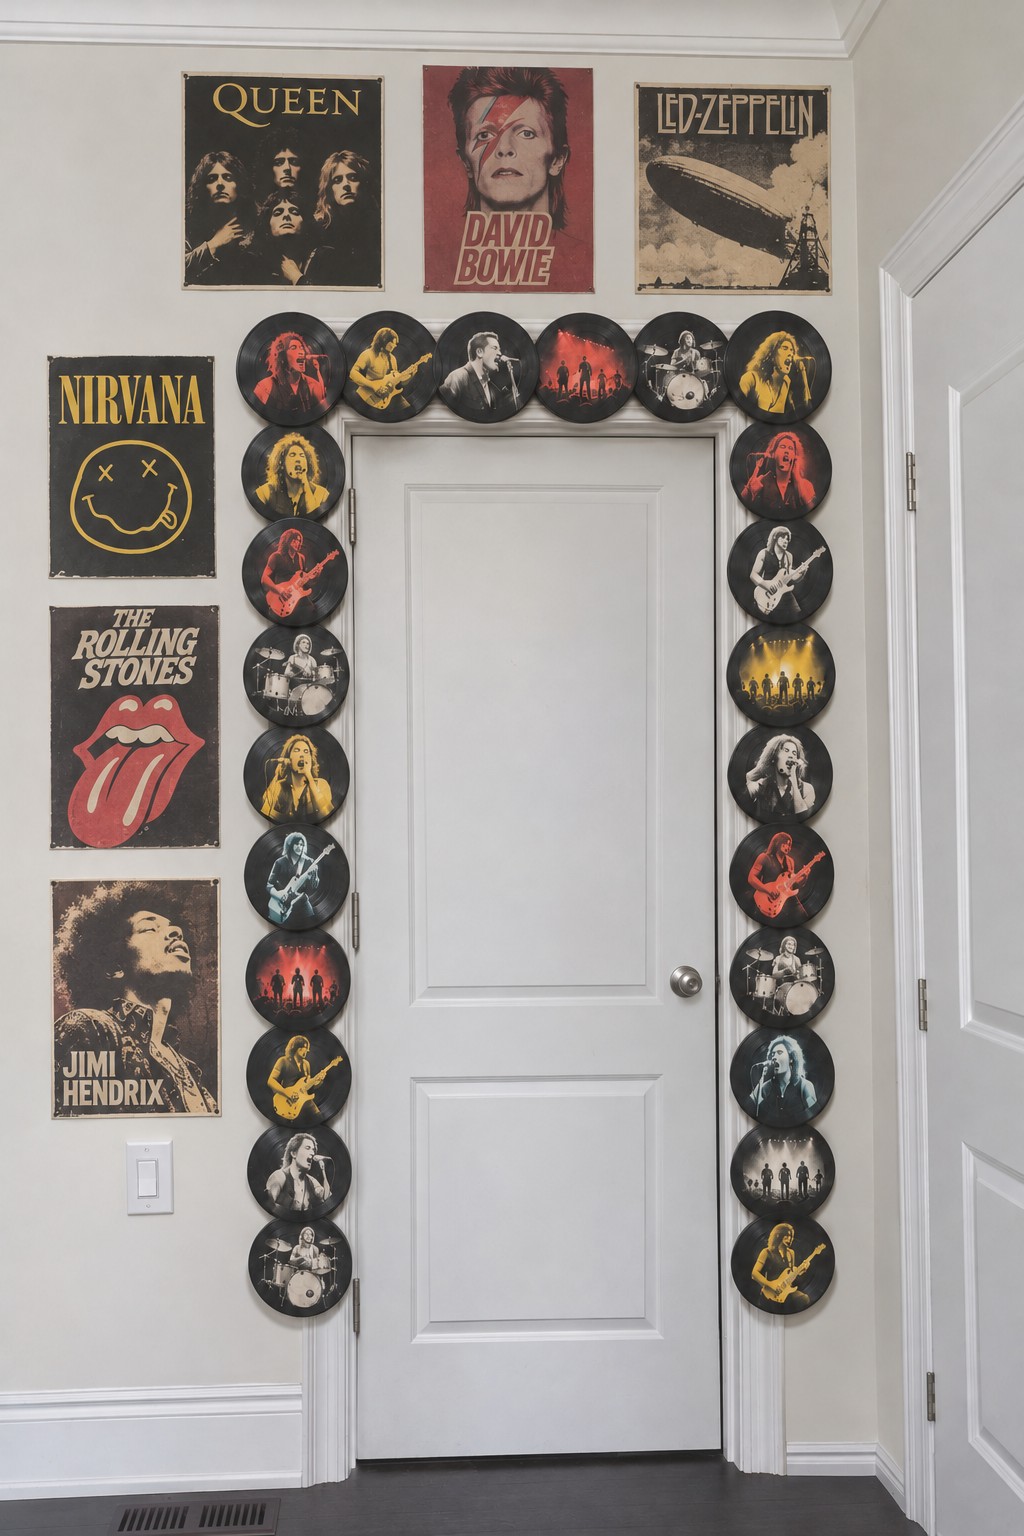
Framing a doorway with records turns an ordinary passage into an entrance, a nice touch for a music room, a home studio or a teen bedroom. Because the decoration follows the outline of the door instead of filling a whole wall, even a narrow hallway can carry it. Records printed with full face concert photos feel like a backstage pass, while discs painted in solid colors give a cheerful retro look. When applying paper prints, press them firmly with a brayer while the decoupage medium is wet so the grooves show through as fine rings and the vinyl character stays visible. Before fixing anything on the hinge side, open the door fully and check that nothing rubs. Removable mounting strips work well on painted trim, and our tips on hanging things without losing a deposit apply here too.
Stairs and Railings
Staircases are seen from every angle, which makes them a natural gallery for a record collection.
Half Records on Stair Risers
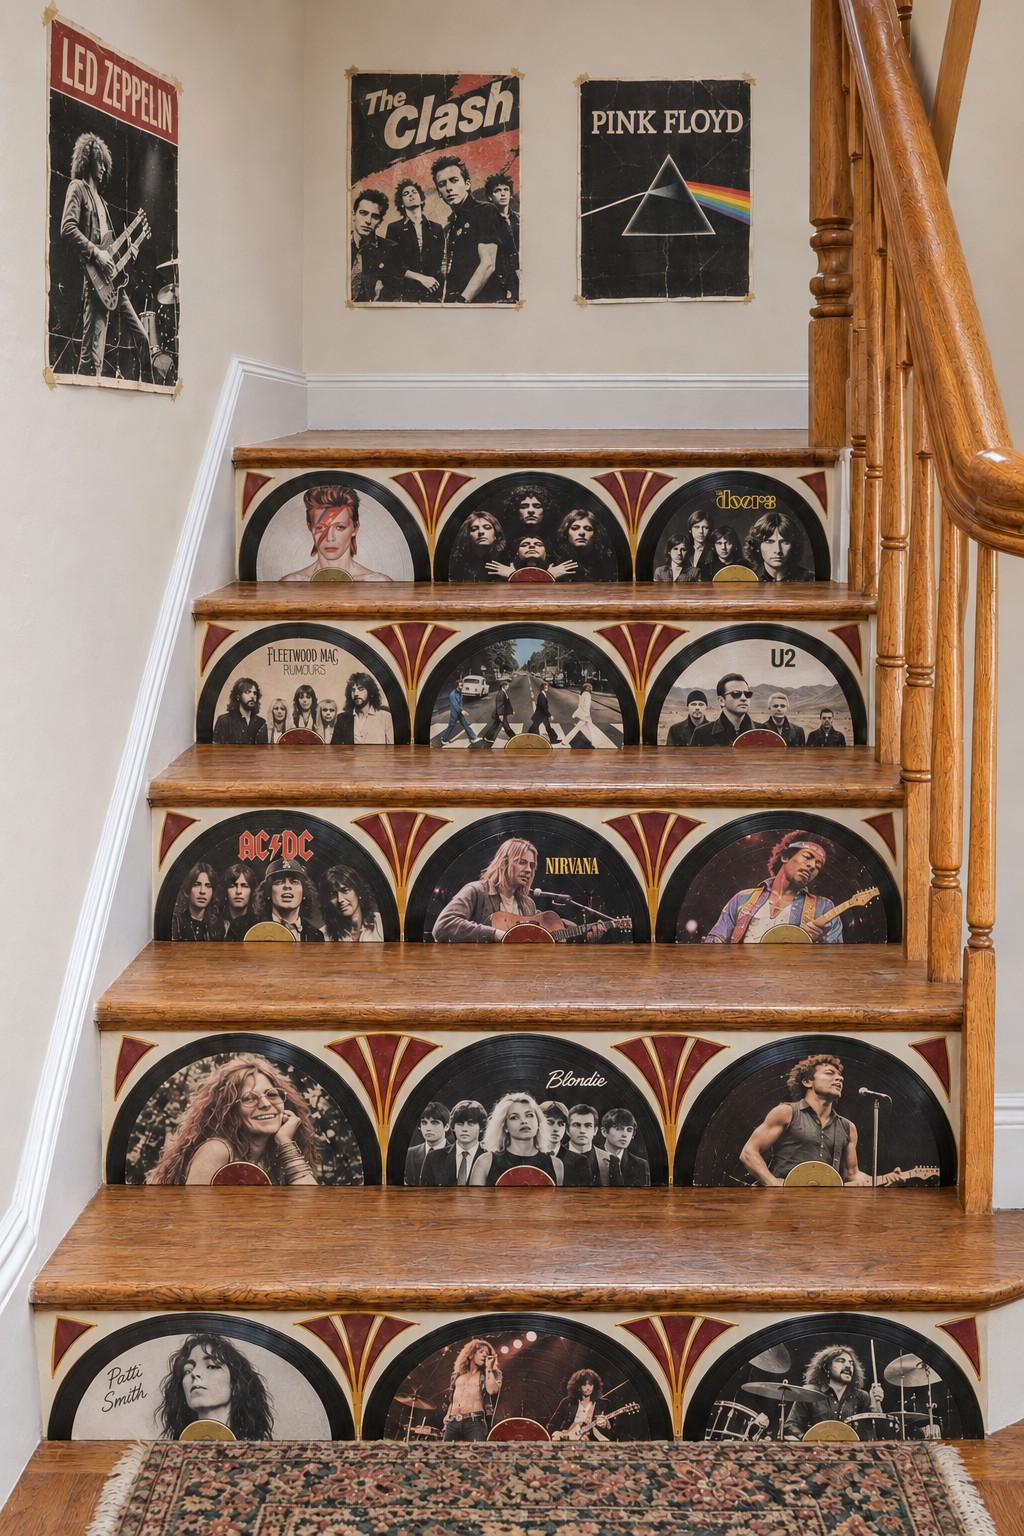
Half records on stair risers give a staircase the feel of an old theater entrance and make every climb a little more fun. Since risers are vertical, the decoration is seen from below and never stepped on, so this idea is ideal when the stairs are a main feature of the home. Pair the half discs with painted art deco fans or a simple stripe so the risers look designed rather than collaged. A half LP stands about six inches tall, which fits most risers without touching the tread above. Cut the records in half while warm, glue them flat with construction adhesive, and seal the whole riser with a clear water based varnish, since toes will scuff it. Treads should stay bare and grippy. For paint choice and curing on risers, see our painted staircase ideas.
Album Art Along the Banister
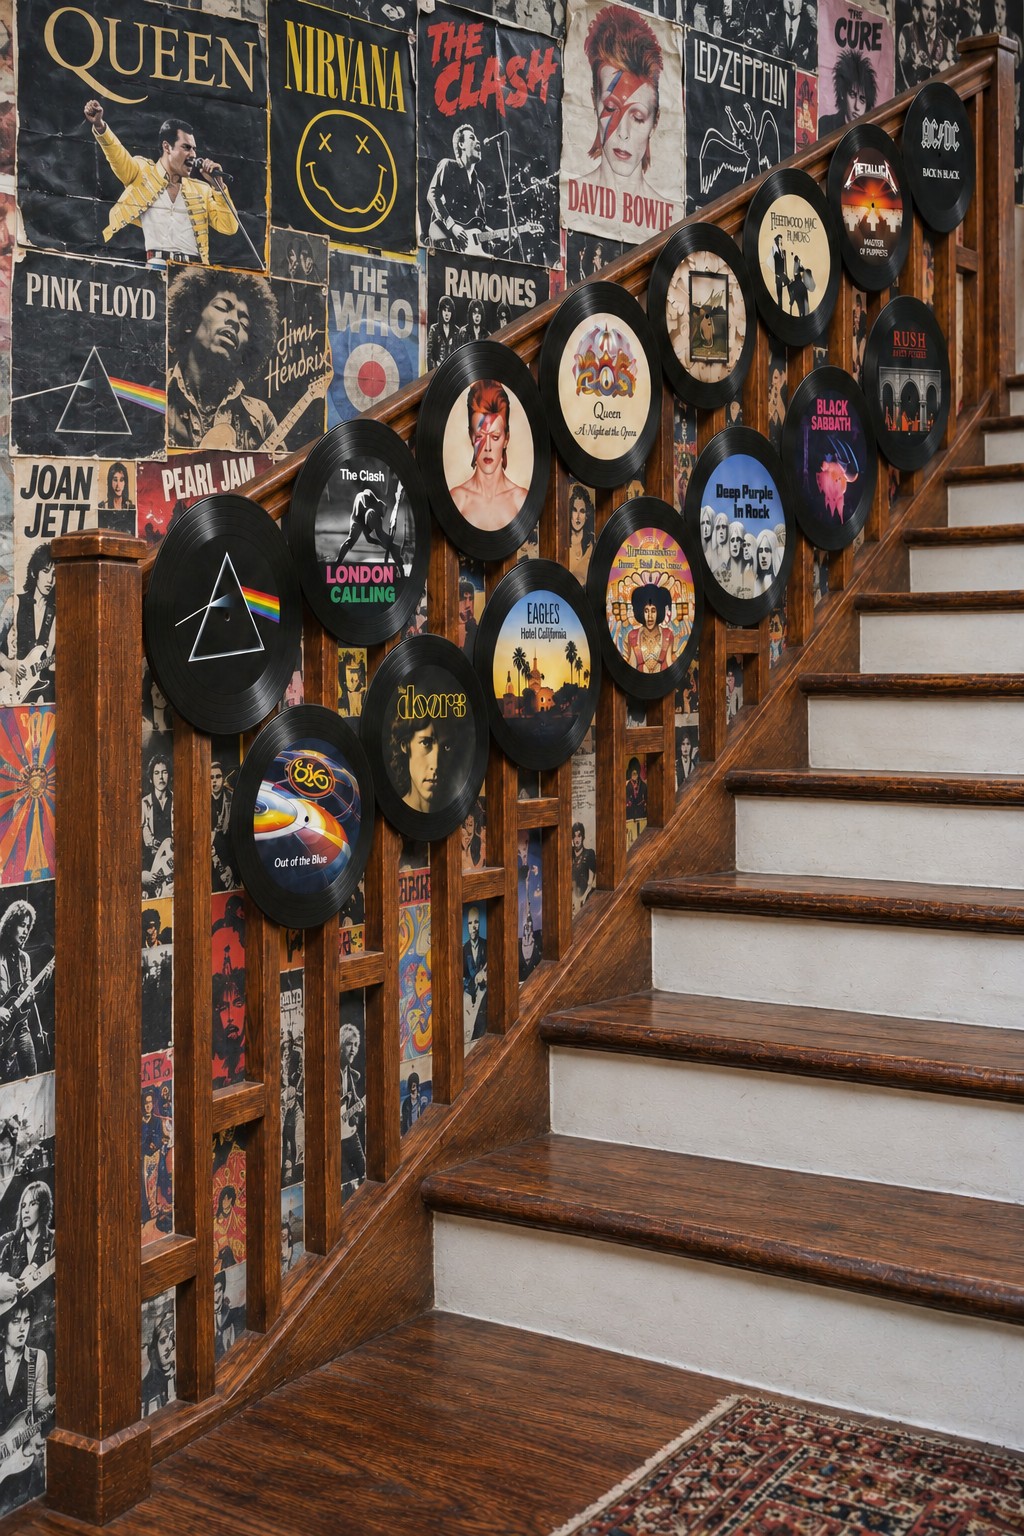
Records fixed along the balusters turn a staircase into a gallery you pass every day, and the rising line naturally reads like a timeline, from early favorites at the bottom to recent finds at the top. Colorful album art livens up a wooden railing and warms a hallway that might otherwise feel plain. Staggered rows look lively; a single row feels calmer and more orderly. Small screws through holes drilled near the record's edge hold well on wood, and clear cable ties are the renter friendly choice. Keep every disc below the handrail so hands can slide freely, and make sure nothing sticks out into the walking side of the stairs.
Lamps and Glowing Pieces
Shaped records make beautiful shades, but they are still plastic. Use LED bulbs only, keep the bulb from touching the vinyl, and buy a complete lamp kit rather than wiring loose parts.
Wavy Pendant Shade With Pinholes of Light
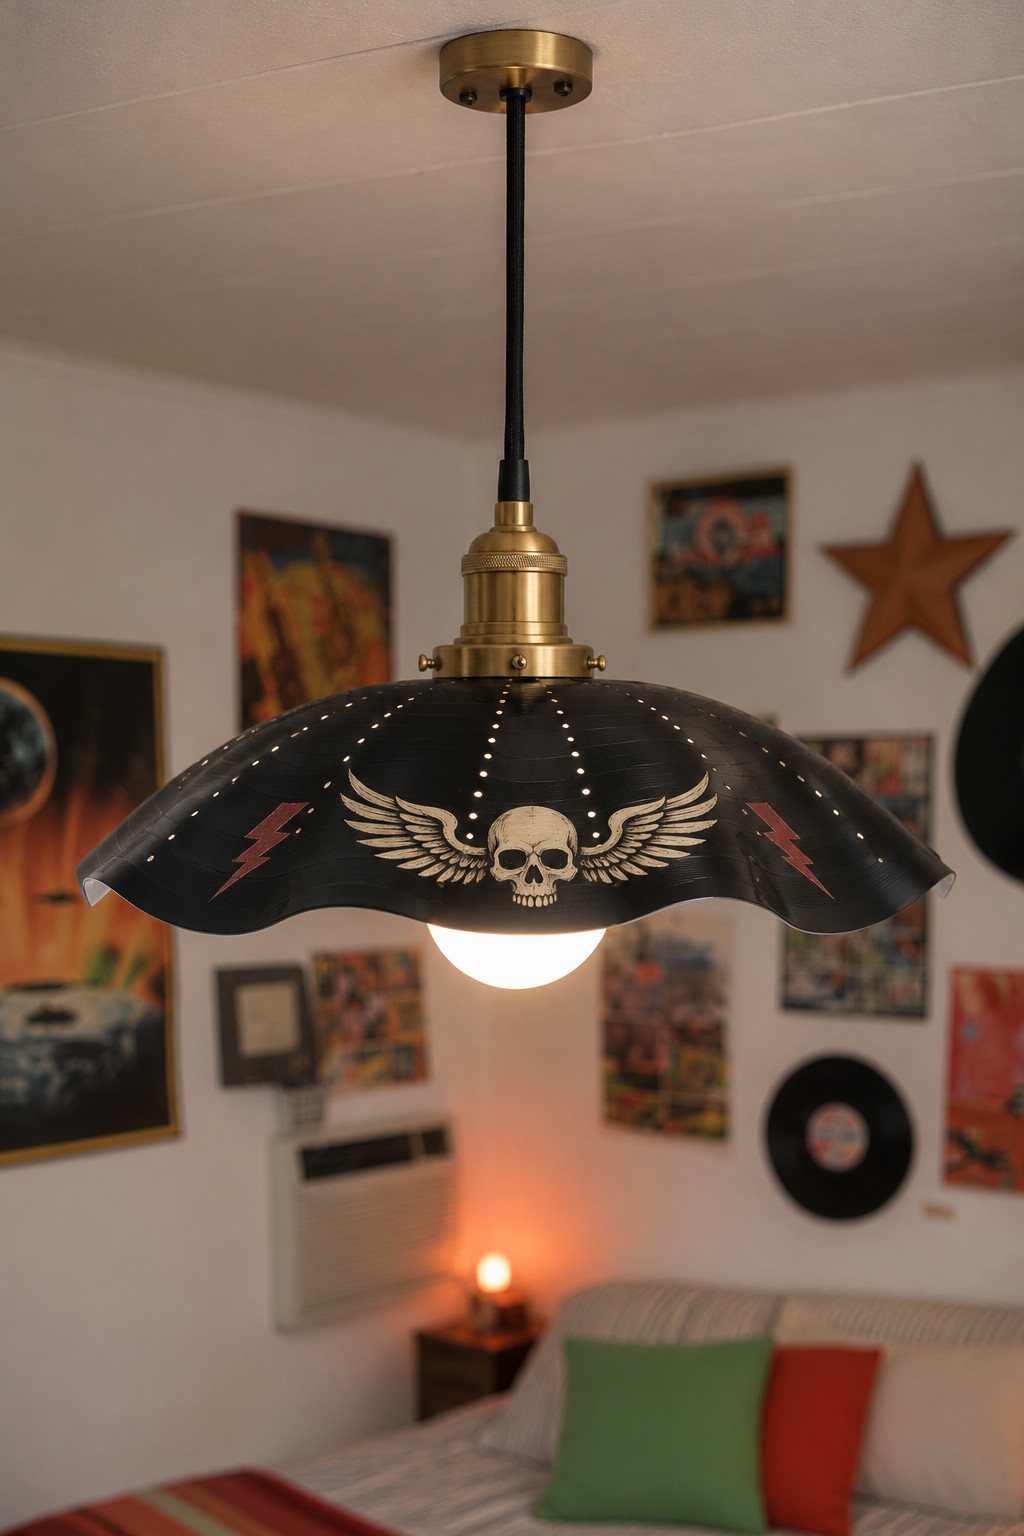
A record pendant gives a room a playful, slightly industrial centerpiece, and the soft waves of heated vinyl look far more expensive than they are. Drilled pinholes add a second effect once the light is on, scattering tiny points of light across the ceiling and walls, which is lovely above a bed, a reading chair or a bar counter. Painted motifs decide the mood: a winged skull feels rock, while gold dots or a single stripe feel softer. Drill the holes and enlarge the center to fit the socket while the record is still flat, then heat it over an upturned bowl and pinch the rim into waves. Paint after shaping, use a complete pendant kit, and fit an LED globe bulb that never touches the vinyl. A frosted bulb gives a gentler glow than a clear one.
Devil Horns Table Lamp
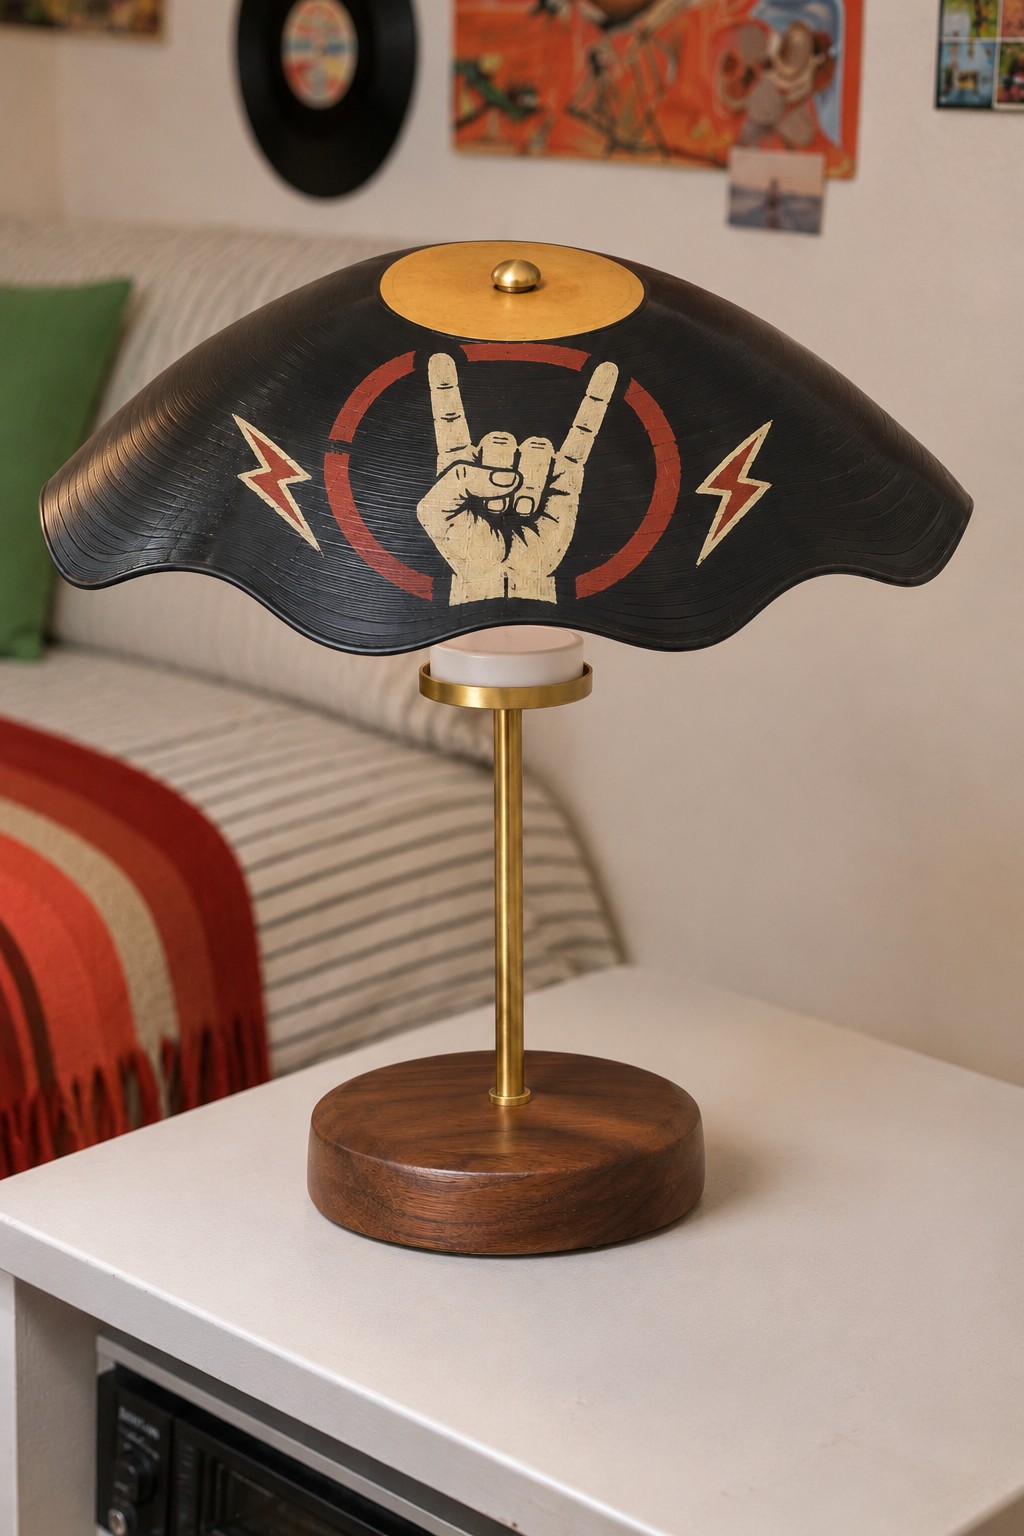
A wavy record shade on a slim brass stem blends retro music with mid century style, so it settles easily on a nightstand, a desk or a sideboard. The dark shade sends light downward into a cozy pool instead of brightening the whole room, which makes it a good evening lamp. A bold hand painted symbol turns it into a statement, while a gold painted label and nothing else keeps it elegant. Shape the shade the same way as a pendant, then attach it to a lamp kit with a finial through the center hole. A low profile LED module or bulb under the shade stays cool, which matters because vinyl softens at modest heat. Wood and brass in the base warm up the black vinyl and help the lamp fit in with existing furniture.
Four Record Accent Light
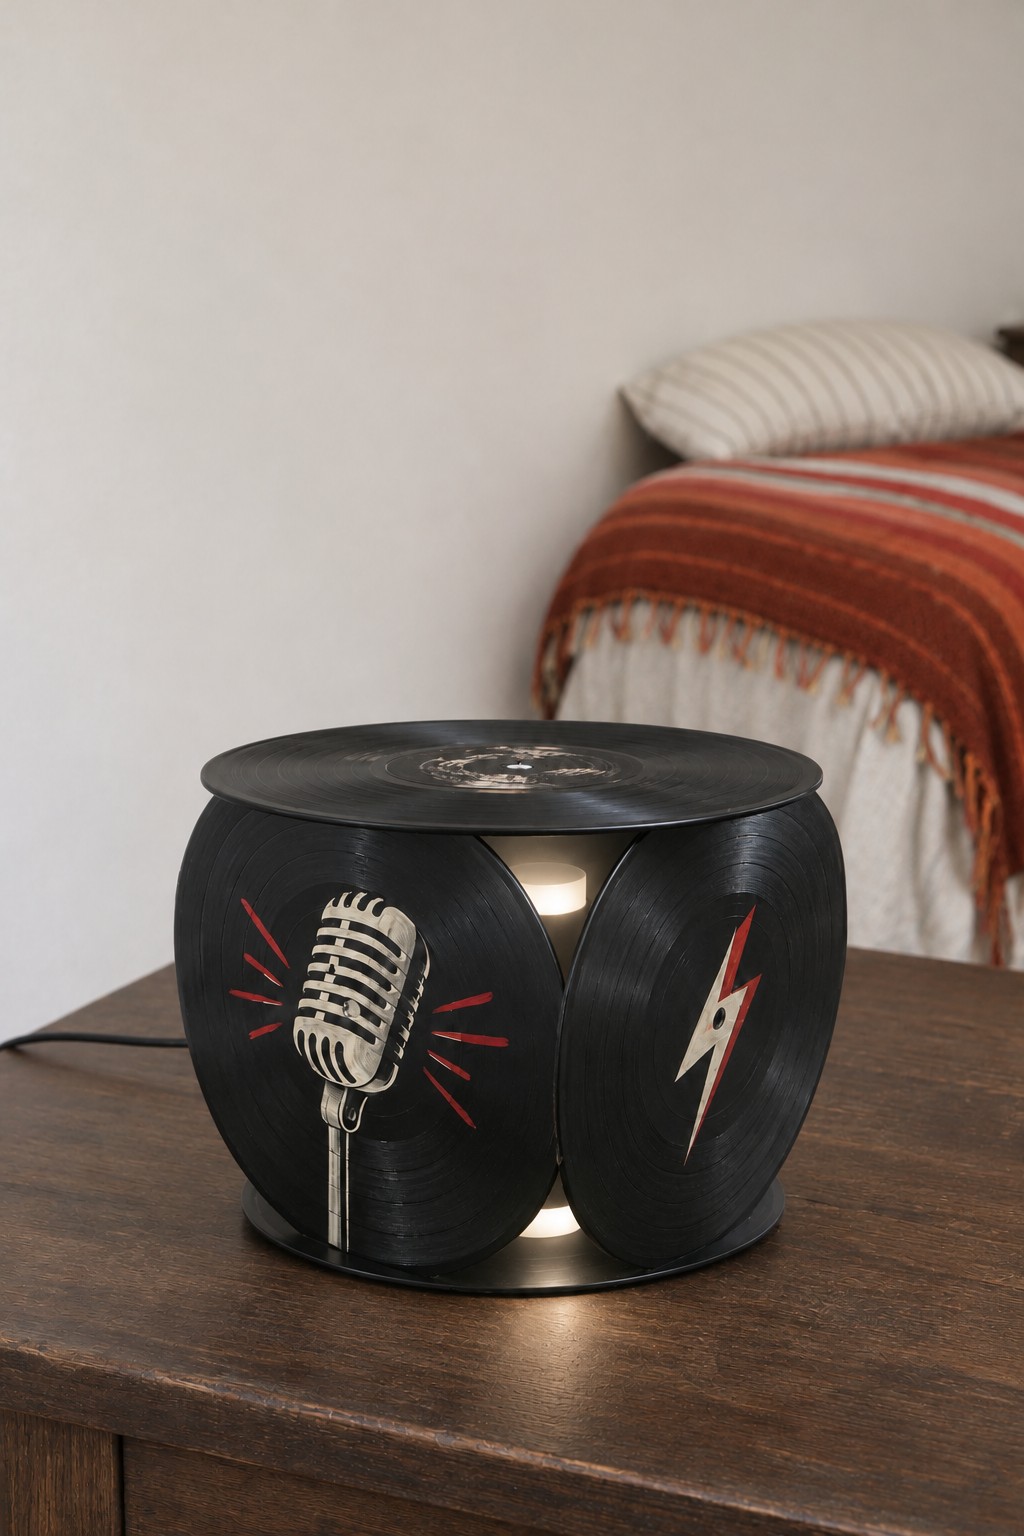
Records standing on edge around a glowing core make an accent light that is as much a sculpture as a lamp. Light escaping through the gaps throws stripes across the table and wall, a low, calm effect for a bedside, a TV console or a shelf in a listening corner. Painting a different symbol on each side, such as a vintage microphone or a lightning bolt, keeps the piece interesting from every angle. Build it around a small wooden frame or metal L brackets so the records have something solid to grip, and bond them with E6000. A plug in LED puck or a short LED strip inside provides the light; leave the top record loose so you can reach it. Setting it on a polished metal base bounces the glow and makes it look finished.
Shelves, Stands and Small Furniture
Records cannot carry real weight on their own, so in these projects a hidden support does the work while the vinyl provides the look.
Tiered Corner Stand
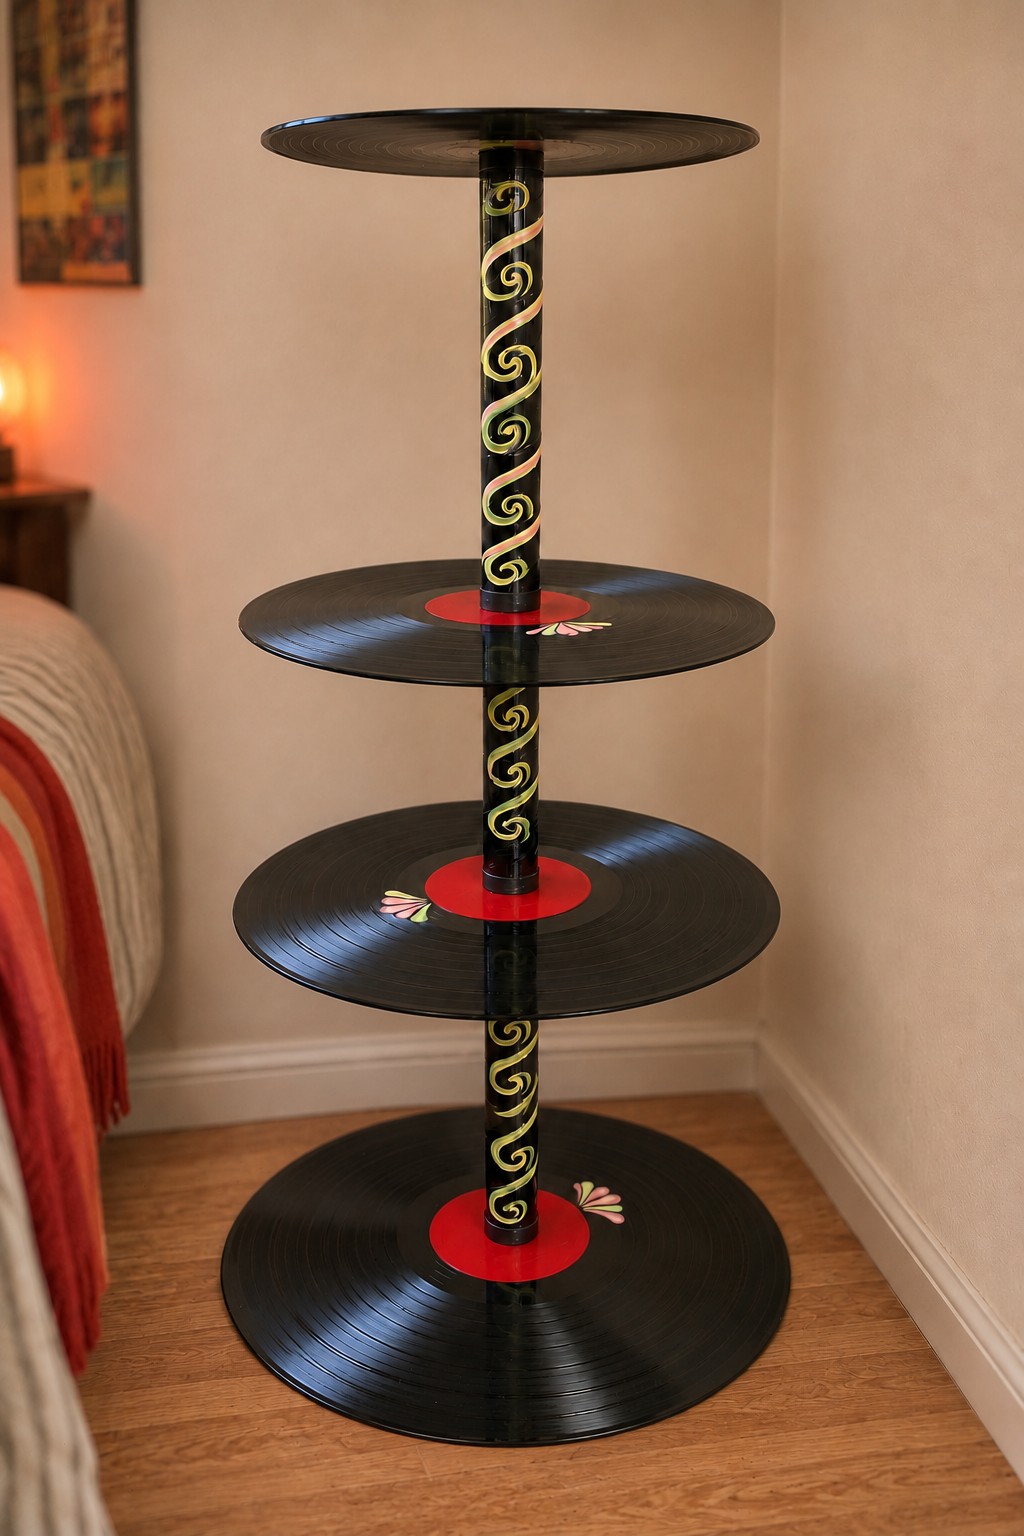
A tiered stand made of records brings a playful, folk art touch to a corner that usually stays empty. Stacked discs draw the eye upward, so a small bedroom or entry gains height and interest without a bulky piece of furniture. It is best for light things: a trailing plant, a candle jar, a few paperbacks or small collectibles. Painting the center pole with swirls or stripes and coloring the labels makes the stand look deliberate rather than improvised. To build it, run a threaded rod through the center holes, slide equal lengths of painted tube between the records as spacers, and tighten nuts above and below each tier. Glue the bottom record to a round plywood disc so the tower stays steady.
Side Table With Records Under Glass
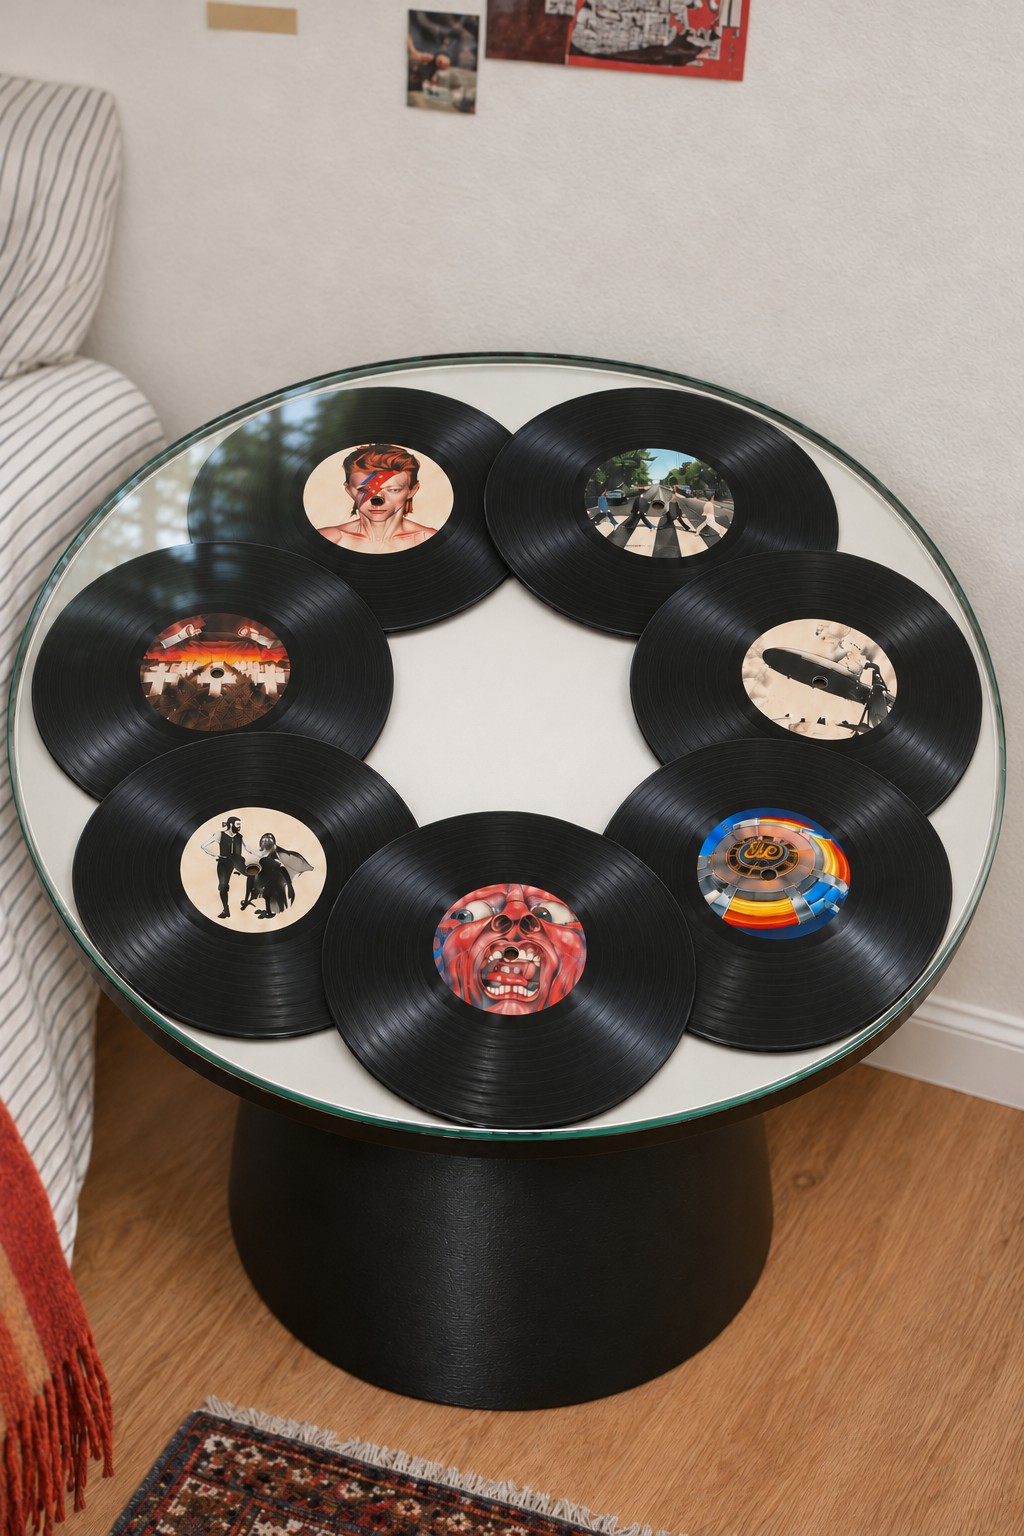
Records displayed under glass turn a side table into a rotating exhibition. The arrangement brings color and nostalgia to a living room or bedroom, while the glass keeps everything dust free and easy to wipe. Because the glass lifts off, you can swap discs whenever your mood or the season changes. A flower layout with one record in the middle looks balanced on a round top; a straight row suits a rectangular coffee table better. Paint the tabletop a light color so the black vinyl stands out, keep the center disc flat so the glass sits level, and order tempered glass cut to size with clear bumper pads at the edge to stop it rocking.
Lit Sneaker Shelves
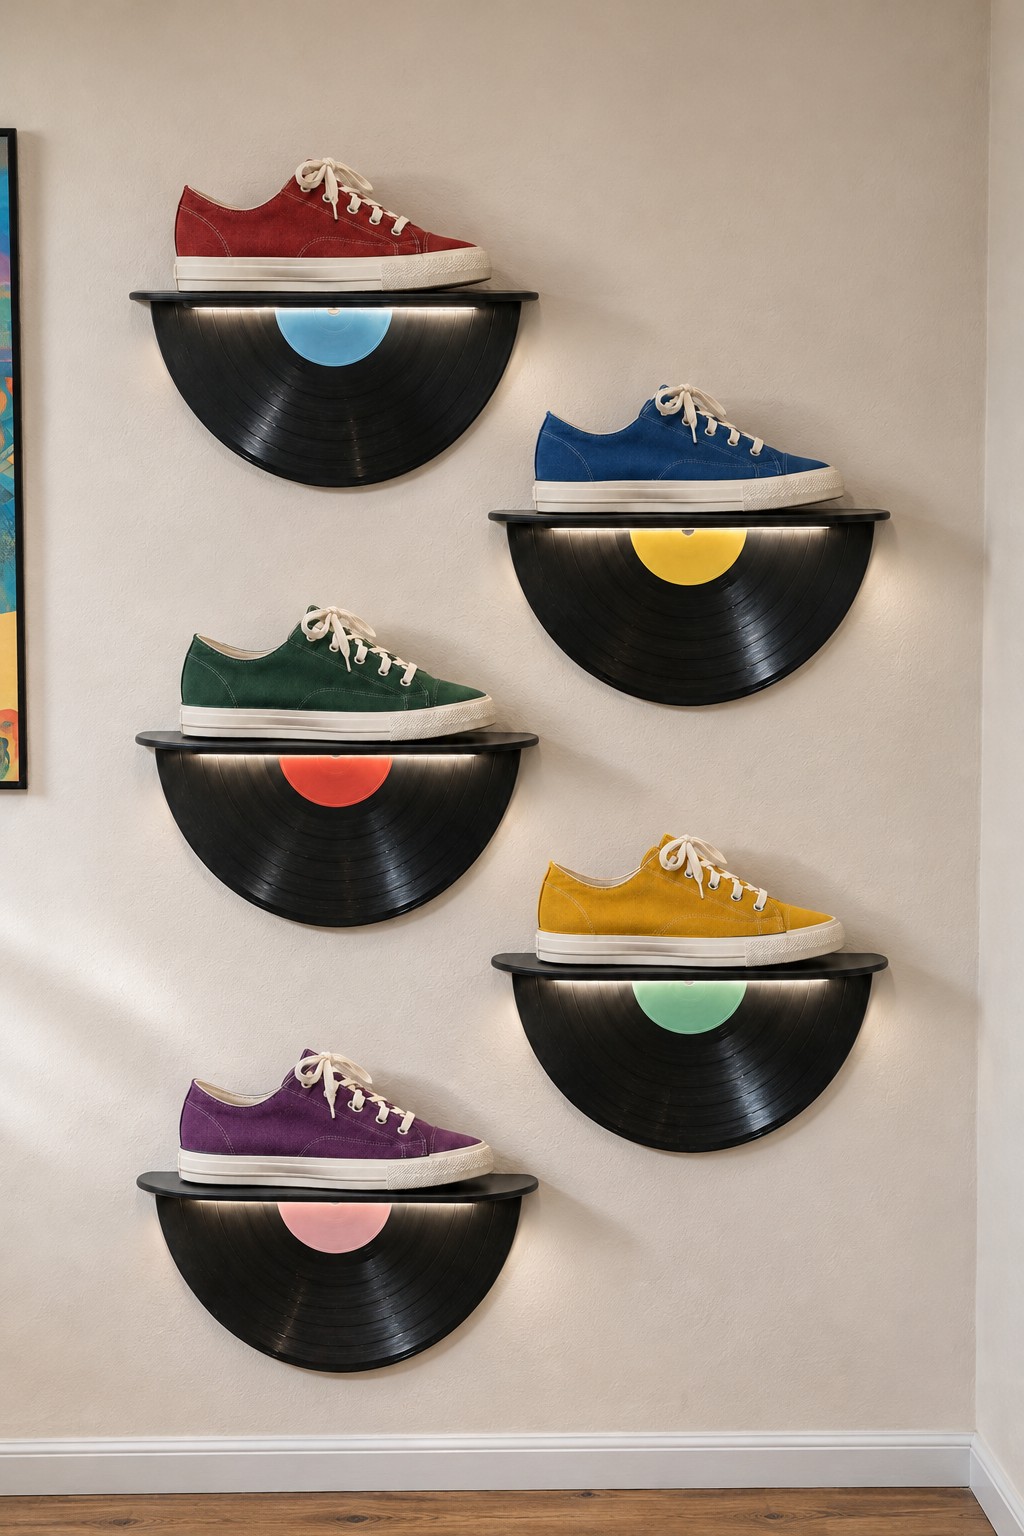
Half records under slim shelves create a wall display with a boutique feel, a good match for sneaker lovers, a teen room or an entry where shoes are part of the style. LED strips under each shelf wash light down over the grooves, so the wall glows softly at night and a collection becomes decoration instead of clutter. Painting each label a different pastel adds color without competing with what sits on top. The shelf should rest on a hidden floating bracket screwed into the wall, since the record only acts as a backplate. Cut the records in half while warm, sand the cut edge and fix each one just below its shelf. The same setup works for perfume bottles, small speakers or framed photos.
Arched Headphone Stand
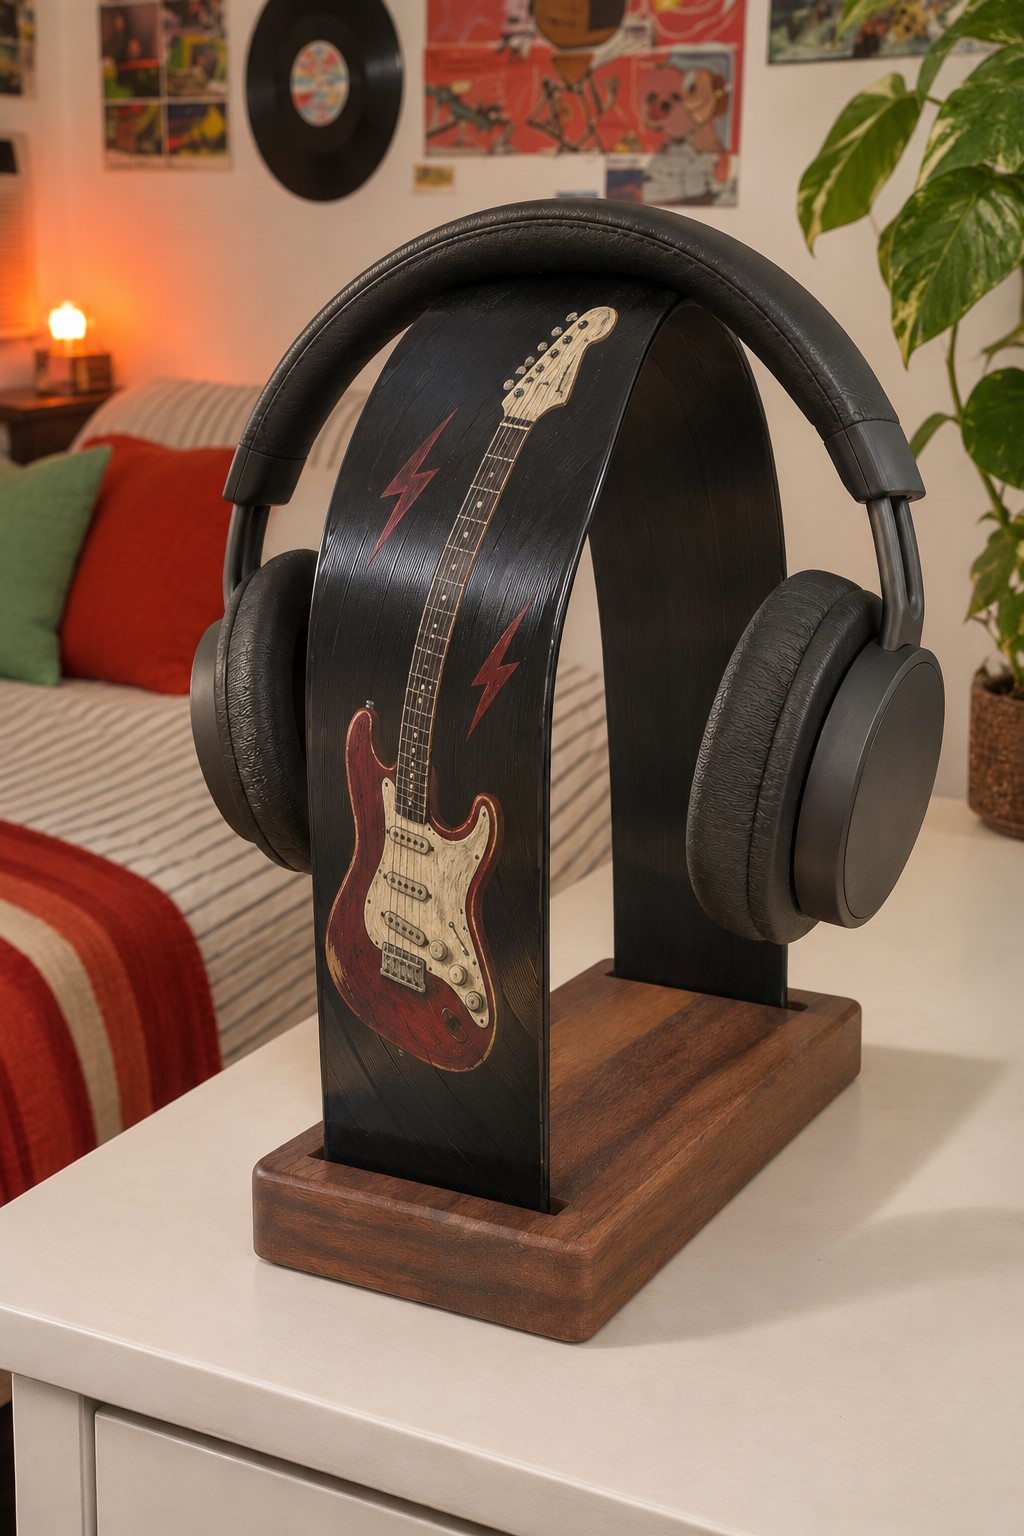
A record headphone stand keeps a desk tidy and gives a gaming setup or home studio a custom touch that store bought stands rarely have. A black arch looks sleek next to dark electronics, and a walnut base adds warmth and stability. Painted art such as a guitar or lightning bolts personalizes it; a plain arch looks more minimal. A full size arch is longer than one record is wide, so join two warm bands at the crown, where the headband covers the seam, and back the joint with a strip of vinyl and epoxy. Bend the band around a large can while it cools for a smooth curve, then glue the ends into slots in the base with two component epoxy.
Mirrors, Trays and Vanity Pieces
Records frame glass beautifully, and a shallow dish shape turns them into catchalls for small treasures.
Mirror Framed in Album Art Singles
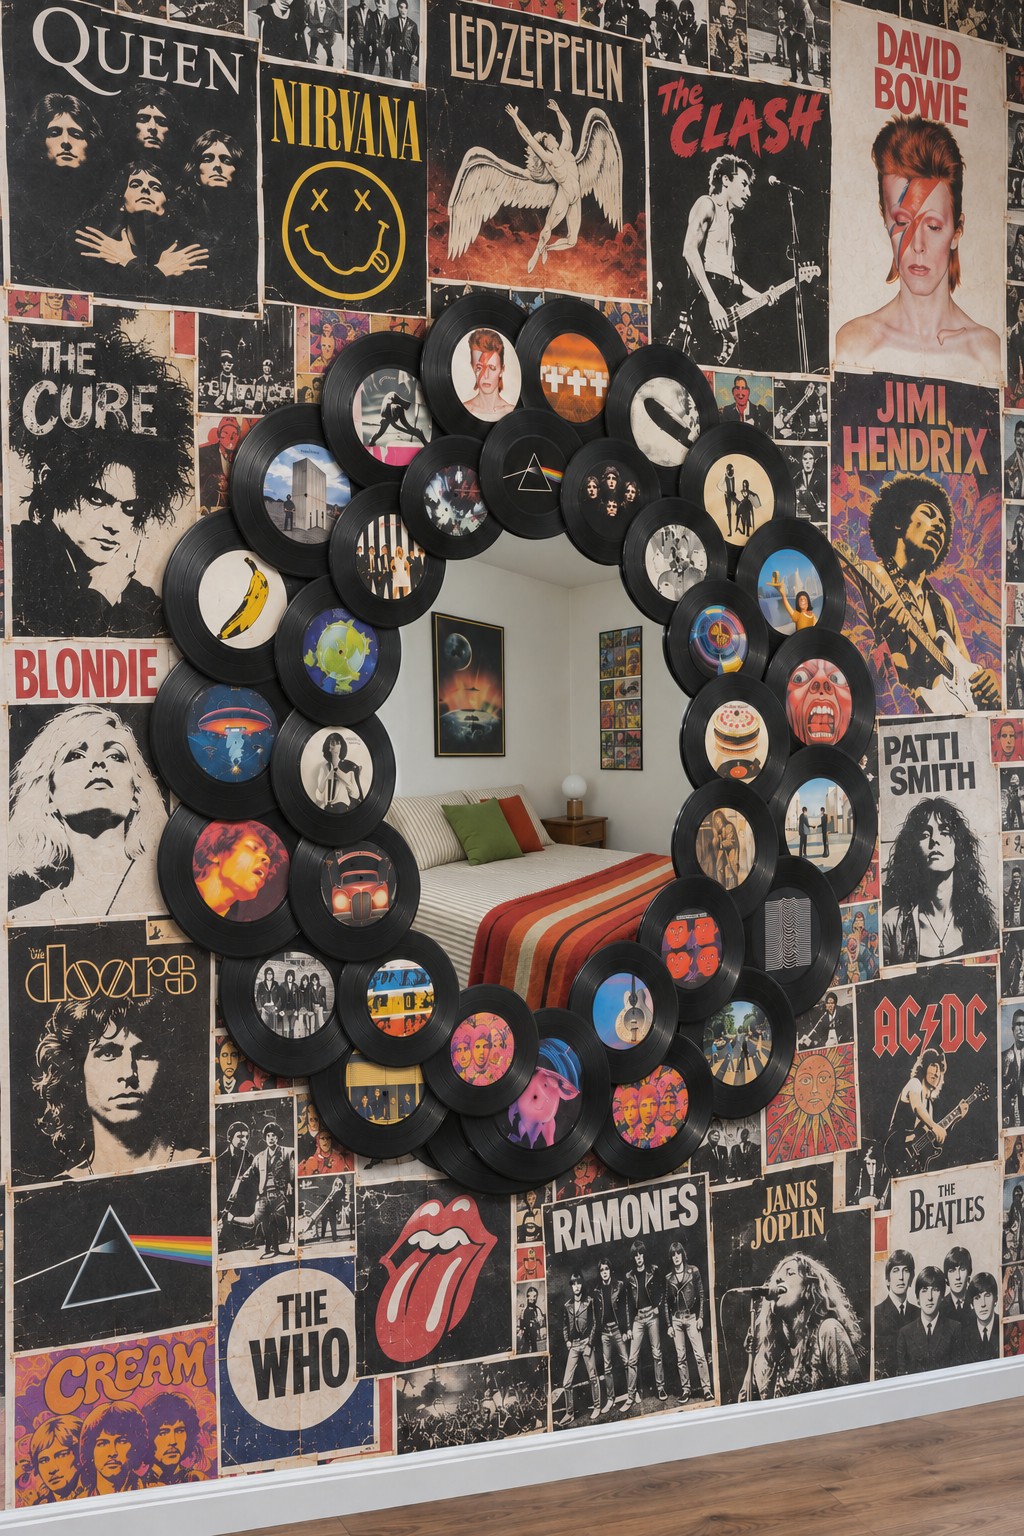
A mirror framed in small records doubles the impact of a collection: you get the art of the frame and the light the glass bounces around the room. It works well in a narrow hallway, a teen bedroom or above a dresser, and overlapping circles add texture that a plain frame cannot. Printed album covers in each center make it colorful, while the original labels give a quieter look. Cut a plywood ring as a base, glue the mirror into the middle with an adhesive labeled safe for mirror backing, then fix the records around it with E6000, working from the outer ring inward. Screw D rings to the plywood and use wall anchors, because the frame ends up heavier than it looks. For more ways to dress up glass, browse our upcycling ideas for old mirrors.
Pressed Flower Vanity Mirror and Jewelry Tray
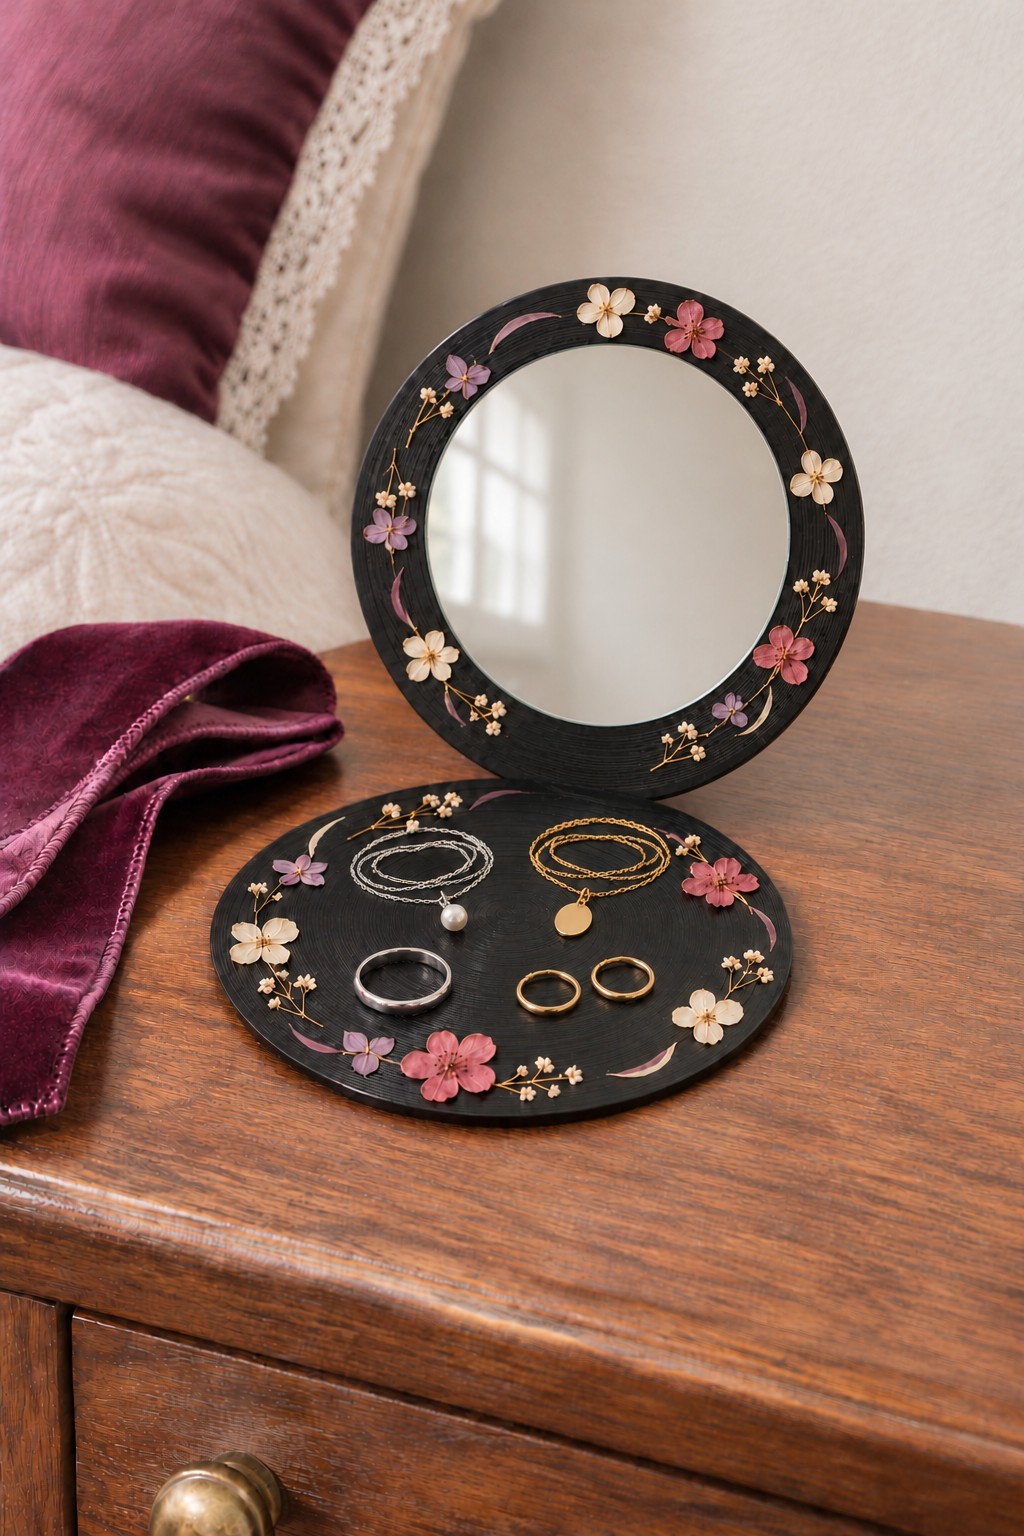
Pressed flowers soften the hard look of vinyl, so this pairing belongs in a romantic bedroom, on a cottage style dresser or in a gift for someone who loves delicate things. An upright record holding a small mirror, with a flat record in front as a tray, forms a compact vanity set: rings and chains stay in one place and the floral edge makes the dresser look styled. Lay dried blossoms on a coat of decoupage medium, brush a thin coat over them and finish with a clear gloss sealer to protect the petals from dust. Stems drawn with a gold paint pen link the flowers into a garland. A small brass hinge or a wedge glued behind the upright record keeps it at a steady angle. Our jewelry display ideas show other ways to keep a dresser tidy.
Two Tier Valet Tray With Flames
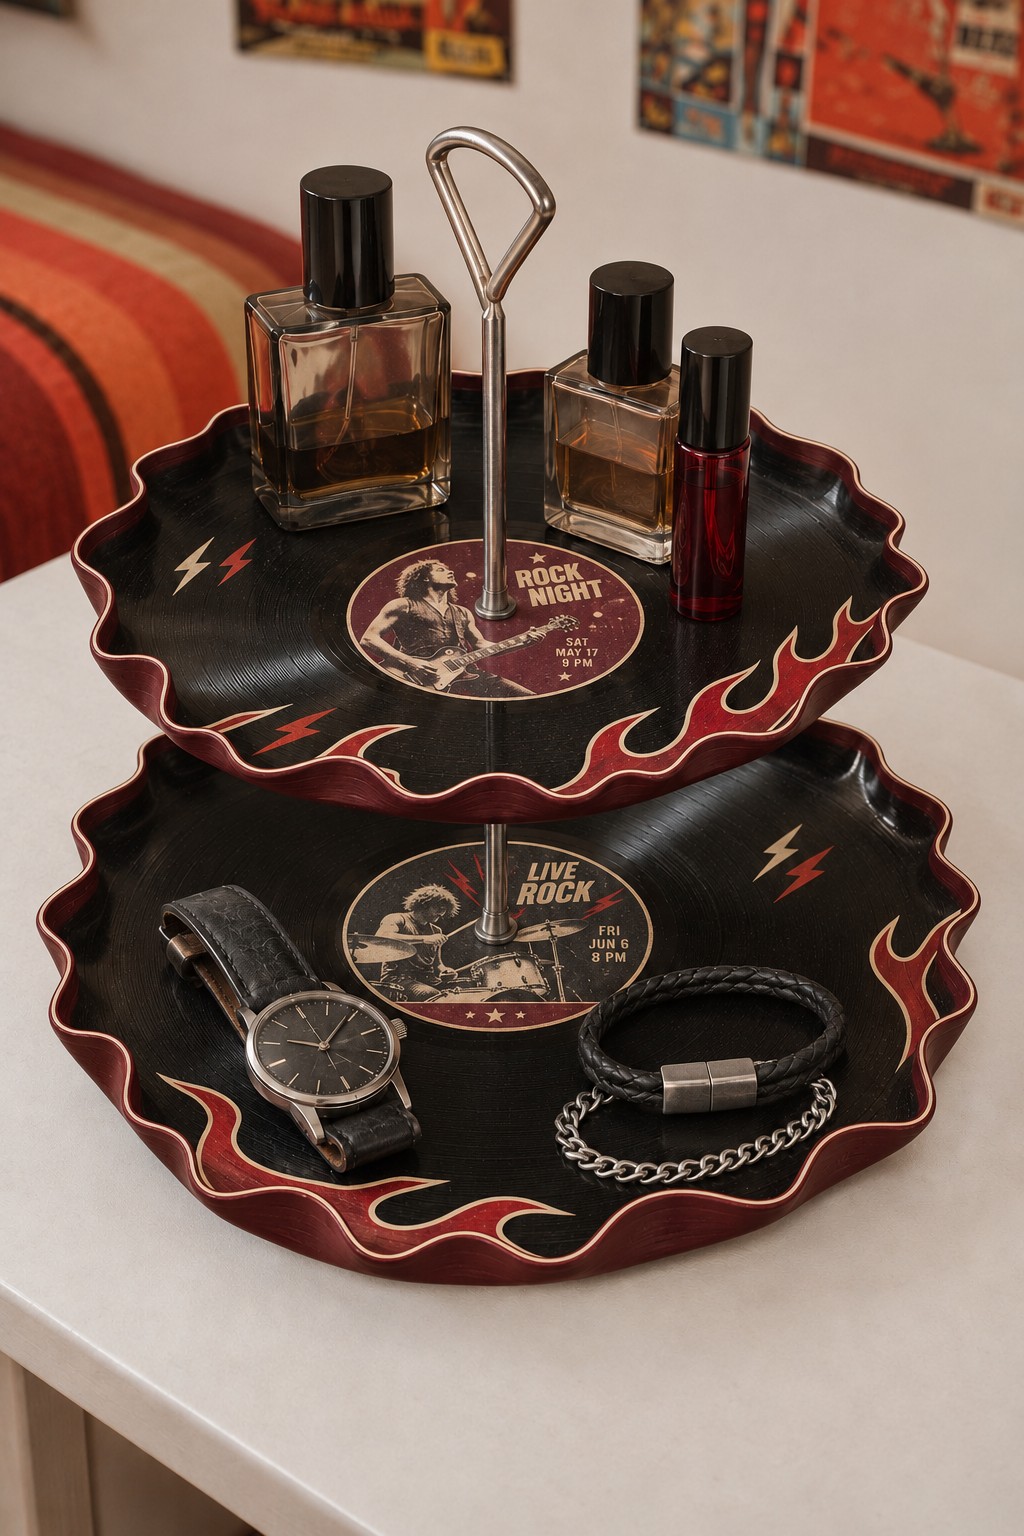
A two tier tray made from records brings instant order to a dresser or bathroom counter, and the extra height makes it feel like a display rather than a catchall. Crimped, wavy rims hold small items in place, and painted flames or concert style centers add a rock edge for a music themed guest room or a teen space. Heat only the outer edge and pinch it into ripples with gloved fingers. A chrome tray handle kit, the kind sold for cake stands, joins the two tiers; widen the center hole with a step drill bit if the rod is thicker than the record's hole. Use it for perfume, watches and jewelry rather than snacks, since reheated vinyl is not food safe. More shapes and finishes are waiting in our DIY tray ideas.
Curved Cup Tray With a Painted Guitar
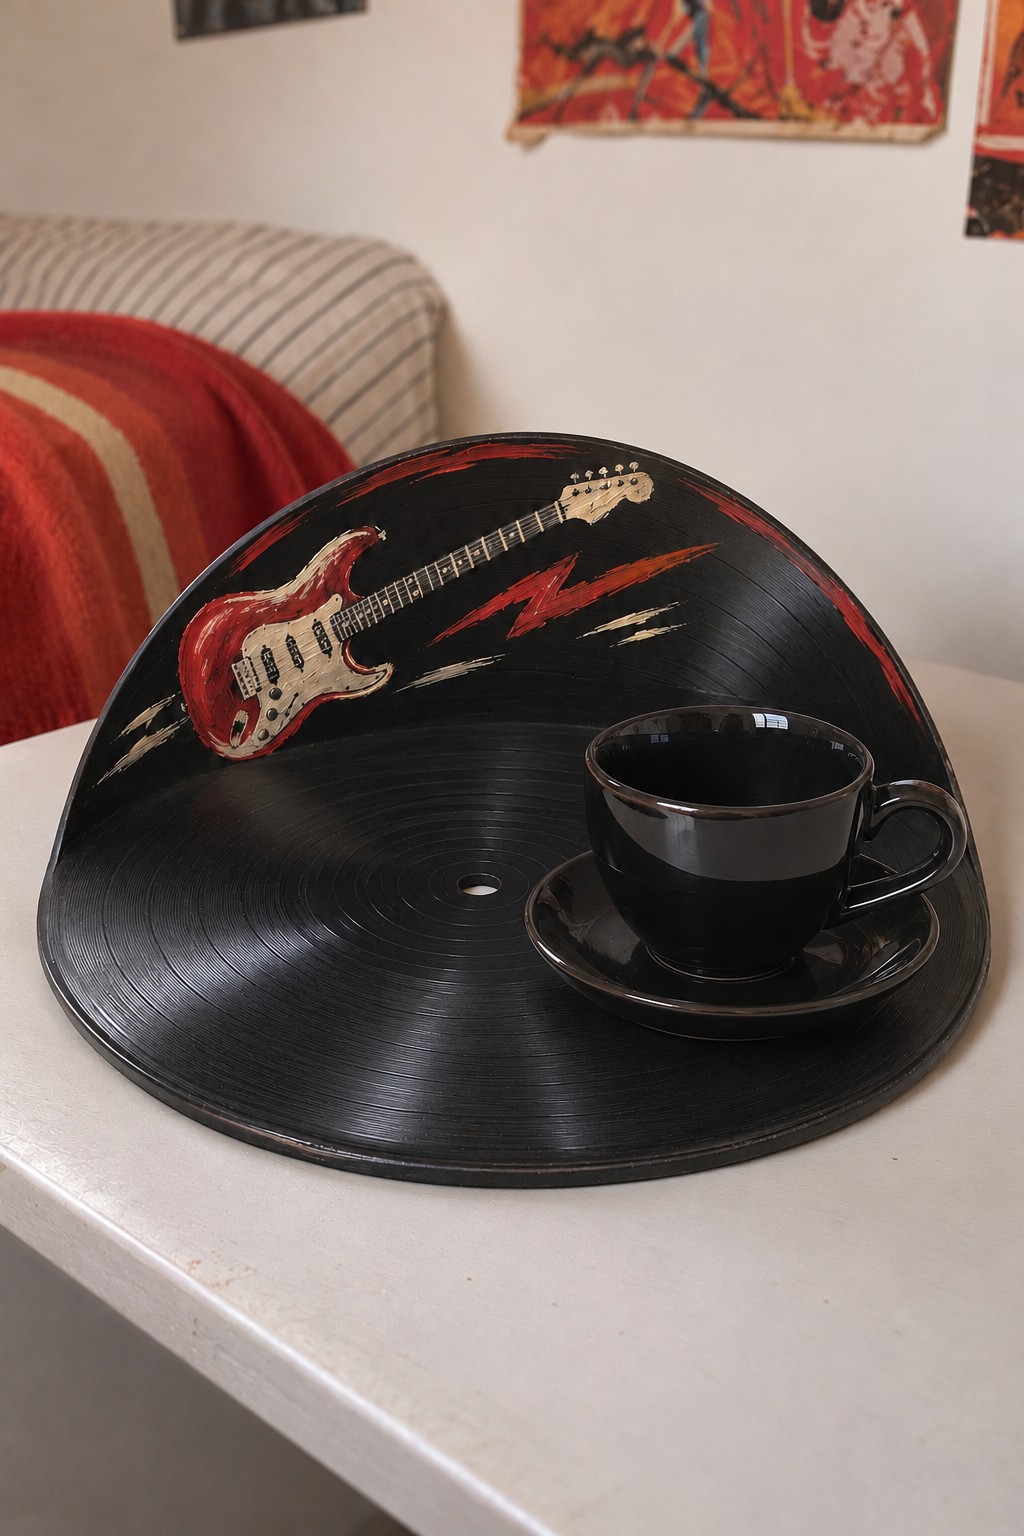
Bending half a record upward turns a flat disc into a tray with its own backdrop, a small piece that gives a nightstand or reading corner a sense of place. The raised curve shields the wall from splashes and becomes a canvas for a painted motif. It is a sweet way to frame a morning coffee spot or keep a candle, a book and reading glasses together. Let the warm record rest half on a baking sheet and lift the other half over a rolling pin until it cools into a smooth curve. Always set a saucer or coaster under a hot drink, because a freshly filled mug can be warm enough to soften vinyl.
Playful Pieces and Small Gifts
Not everything has to be practical. These are the projects that start conversations.
Tabletop Bowling Lane
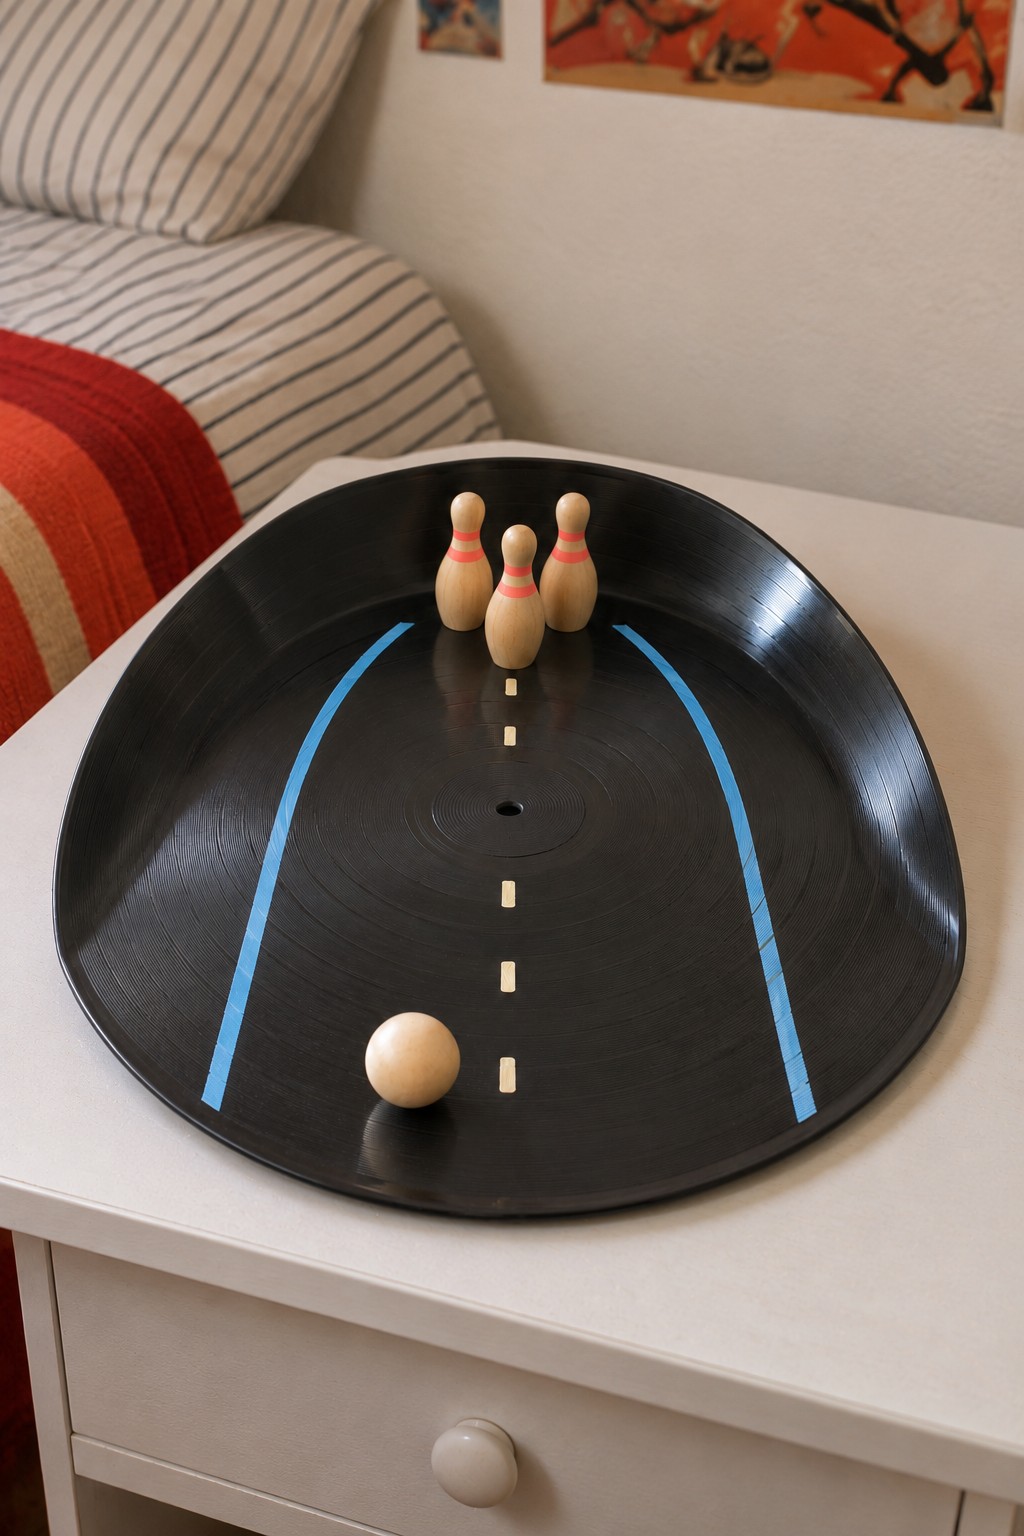
A record shaped into a tiny bowling lane is the kind of object guests pick up and play with, which makes it fun for a game room, a coffee table or a gift for a bowling fan. It adds humor to a space and shows how one record can become something completely different. While the vinyl is warm, lift the far end and both sides so the lane sits in a shallow, curved tray. Mark the lane lines with masking tape and fill them with a paint marker for crisp edges. Small wooden pins and a ball from a craft store complete the set. Keep it away from toddlers, since small parts can be swallowed.
Miniature Rocking Chair
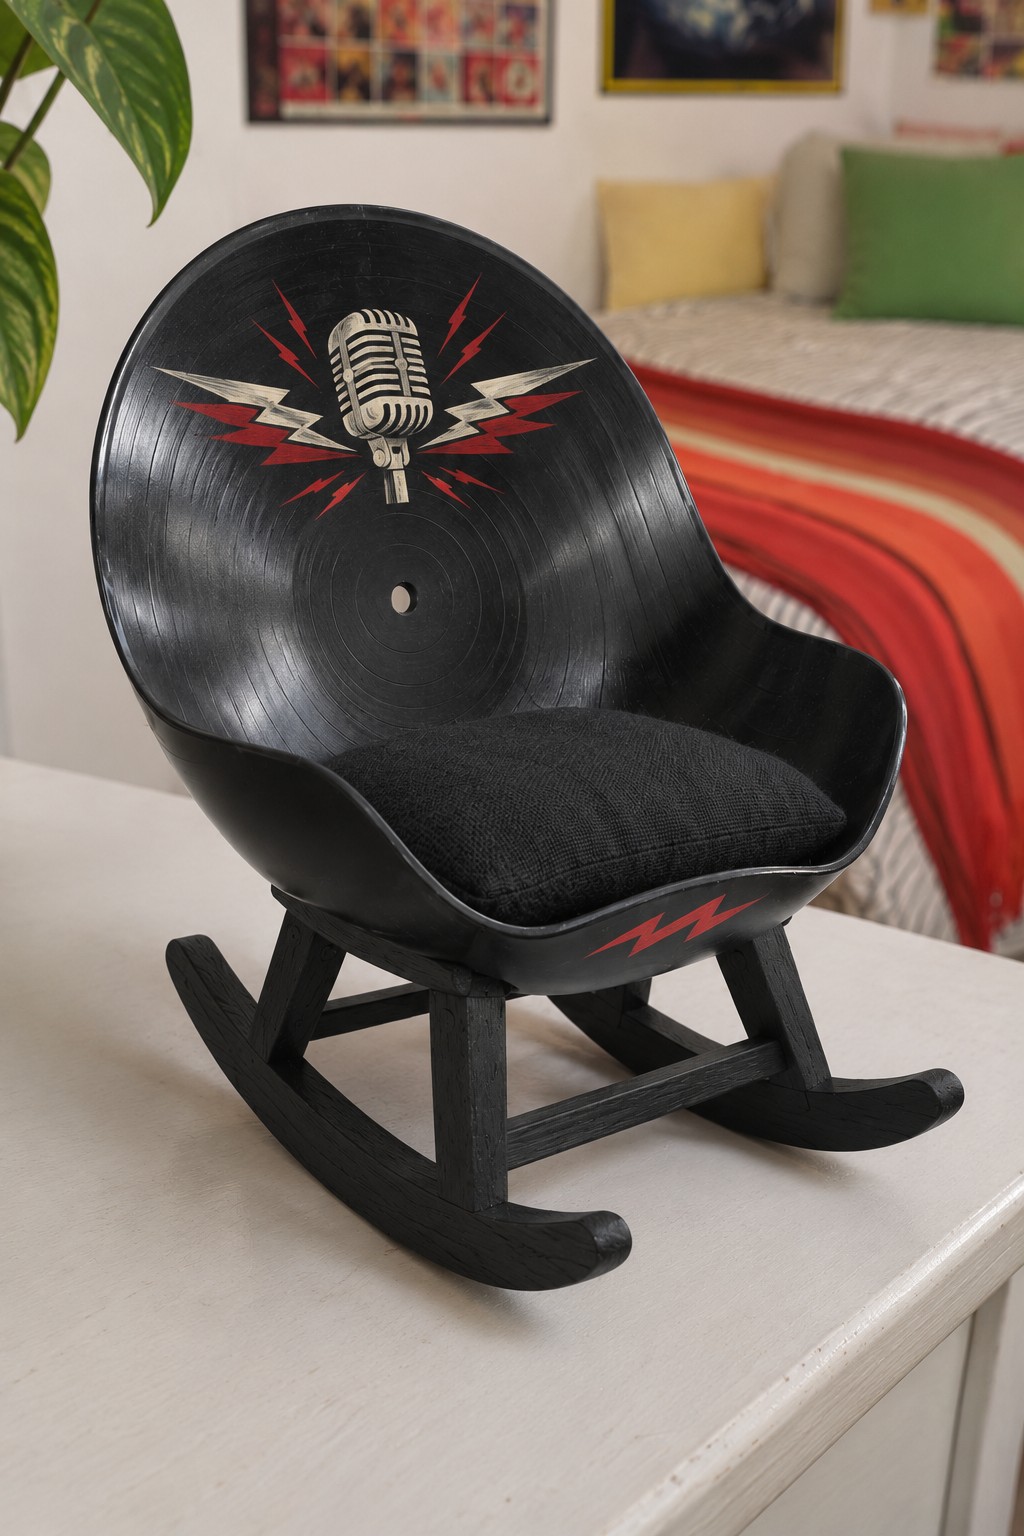
A miniature rocking chair with a record seat is pure charm. It can hold a phone on a desk, seat a plush toy on a nursery shelf, or show off one special record on a bookcase. The curved vinyl shell has a modern, sculptural feel, while black stained rockers keep the look cohesive. Push a warm record into a bowl to form the seat, then fold the front edge lower so things sit in it easily. Screw the shell to a wooden rocker base from below with small screws and washers, or bond it with epoxy. A small fabric cushion adds softness, and a painted motif on the back gives it personality.
Rock and Roll Jellyfish
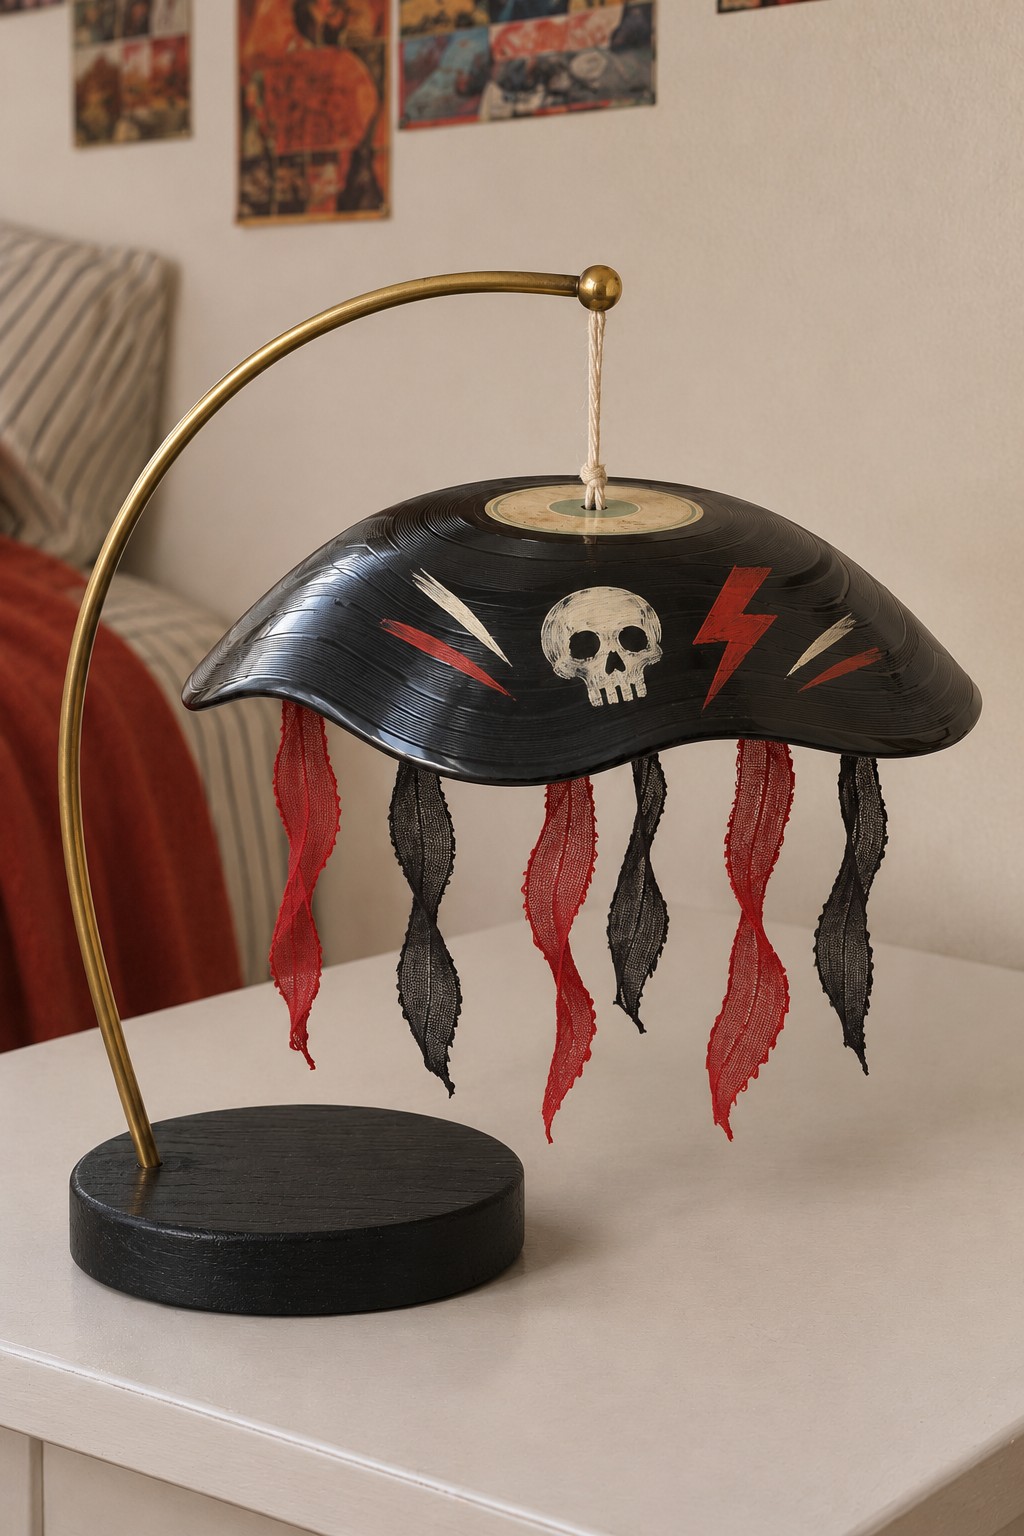
A record jellyfish is a whimsical sculpture that brings motion to a shelf or desk, because the ribbons sway whenever someone walks by. With blue and white ribbons it fits a beach themed room; with red and black it leans rock. Shape a soft dome from a warm record, thread a cotton cord through the center hole and knot it inside. Glue mesh or lace ribbons around the inner rim, twisting them before the glue sets so they curl like tentacles. A bent brass rod set into a drilled wooden base with epoxy makes an elegant stand, though the jellyfish can also hang from the ceiling on fishing line.
Painted Stage With a Guitarist Cutout
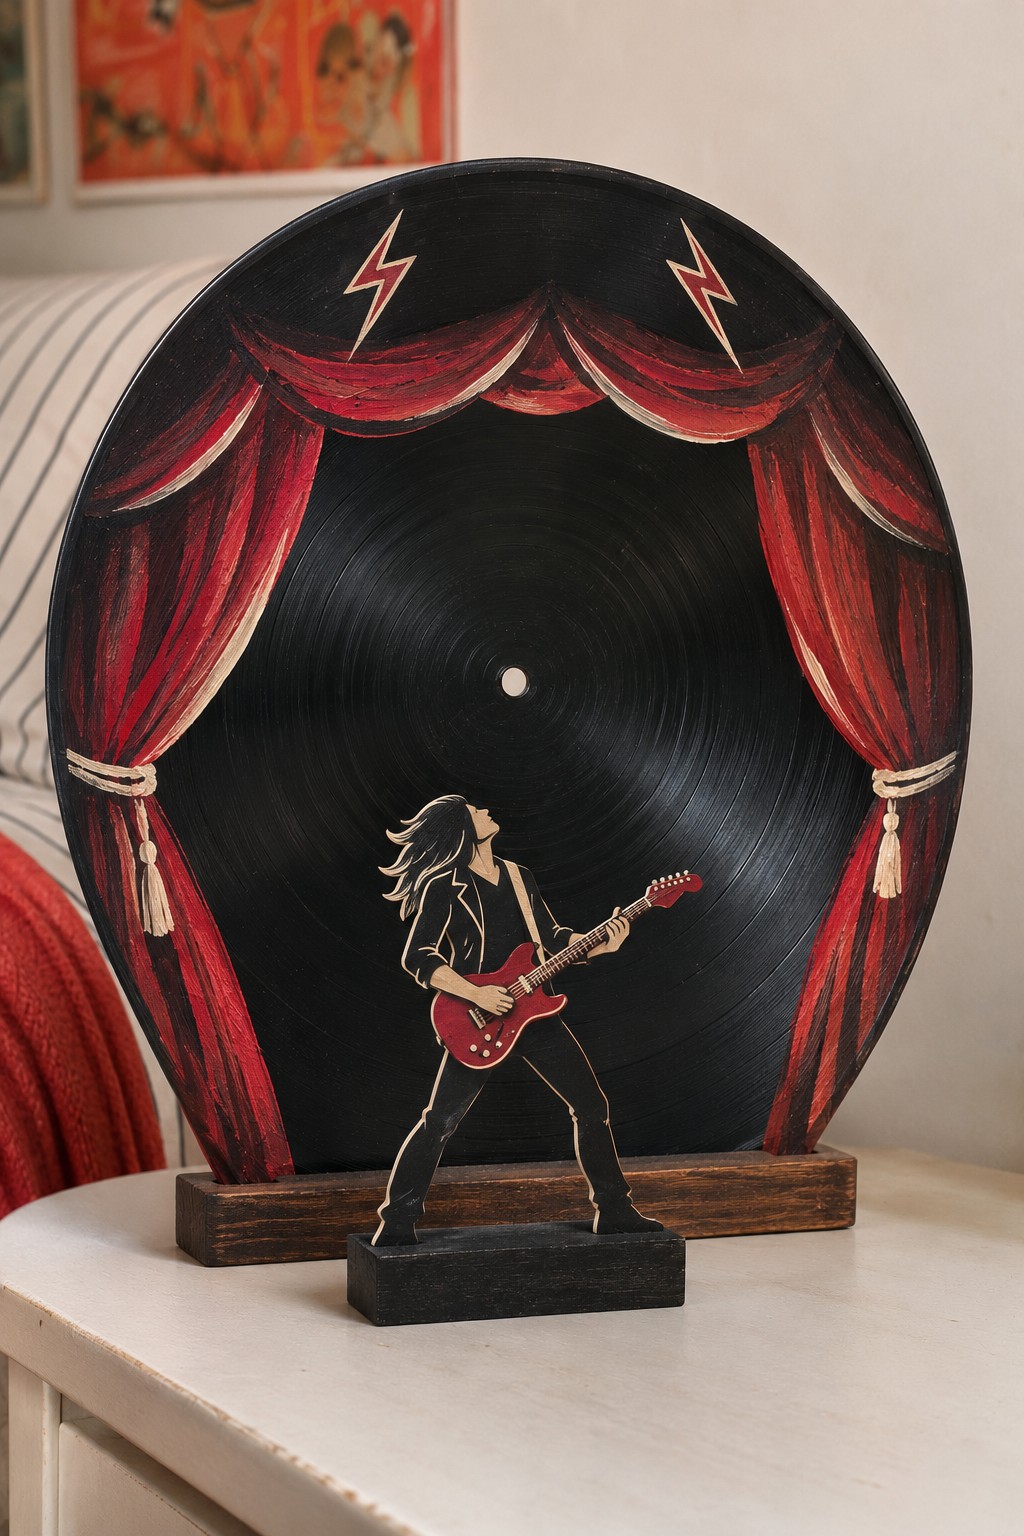
A painted stage turns a record into a little theater, perfect for a music lover's shelf, a child's room or a gift for a performer. The curtain frame gives the round shape a focal point, and a separate cutout figure standing in front creates real depth. Swap the guitarist for a dancer, a singer or the silhouette of someone special. Build the curtains in layers, dark red first, then brighter red, then cream highlights, for the look of heavy velvet. Cut a narrow groove into a wooden block so the record slides in without glue, and cut the figure from thin plywood on a scroll saw before painting it.
Wall Planter With Record Pockets
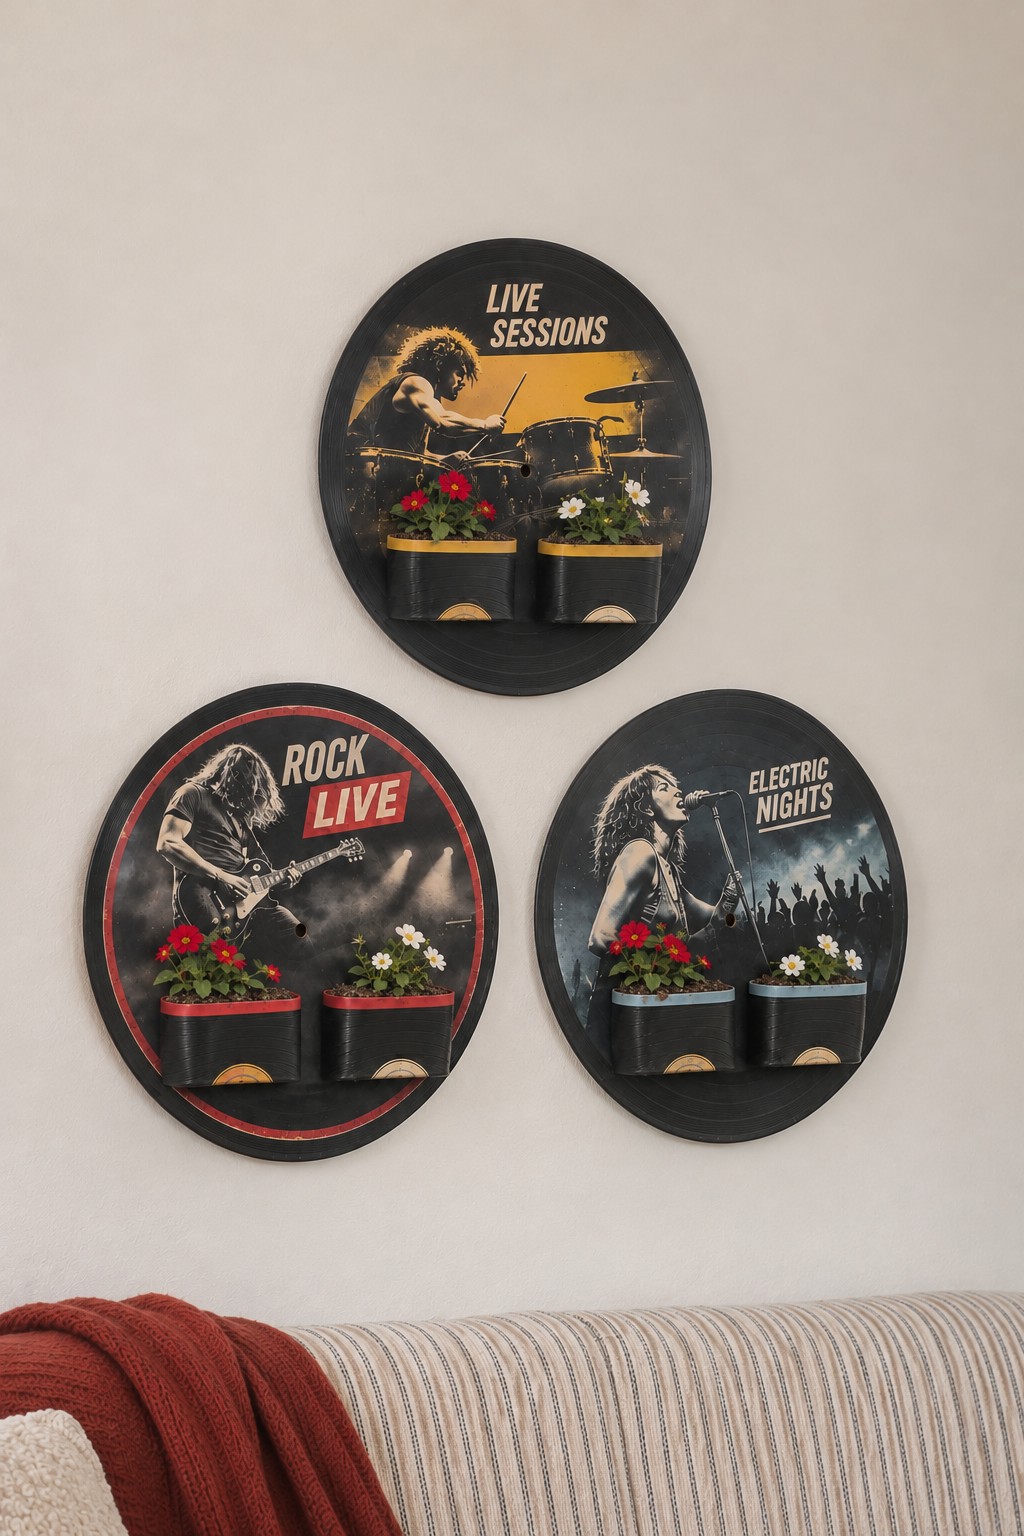
Folding record pieces into pockets lets you add greenery where there is no shelf, and pairing plants with a graphic backboard brings color and life to a hallway, a balcony door or a teen room. A printed poster on the backing record sets the theme, while a plain painted disc looks more minimal. Cut two pieces, heat them and fold each into a pouch, then glue the sides with epoxy and paint the rims for a clean finish. The pockets have no drainage, so keep plants in small plastic nursery pots inside and empty any extra water after watering. Hang the board on a screw with a wall anchor, since damp soil adds weight; faux flowers are an easy swap for a low light spot.
Safety When Working With Records
Heating vinyl releases fumes that should not be breathed in. Work with a window open and the kitchen fan running, keep children and pets, especially birds, out of the room, and stay with the oven the entire time. If possible, use a small oven that is not used for food. Never shorten the job with a torch, a lighter or a higher temperature, and stop at once if the record scorches or smells sharp.
A warm record and the bowl underneath can burn your hands, so wear thick oven gloves while shaping. Cold vinyl can split into sharp shards, so wear safety glasses when cutting or drilling, and a dust mask when sanding edges.
Records that have been heated or painted are not food safe. Use bowls and trays for keys, jewelry, wrapped sweets or faux fruit only.
Use only LED bulbs in record lamps, keep the bulb clear of the vinyl and rely on a complete lamp kit with its own instructions. Fix wall pieces above beds and along stairs securely, keep them clear of the handrail and the walking line, and use anchors for anything that holds a mirror or soil.

Leave a Reply