

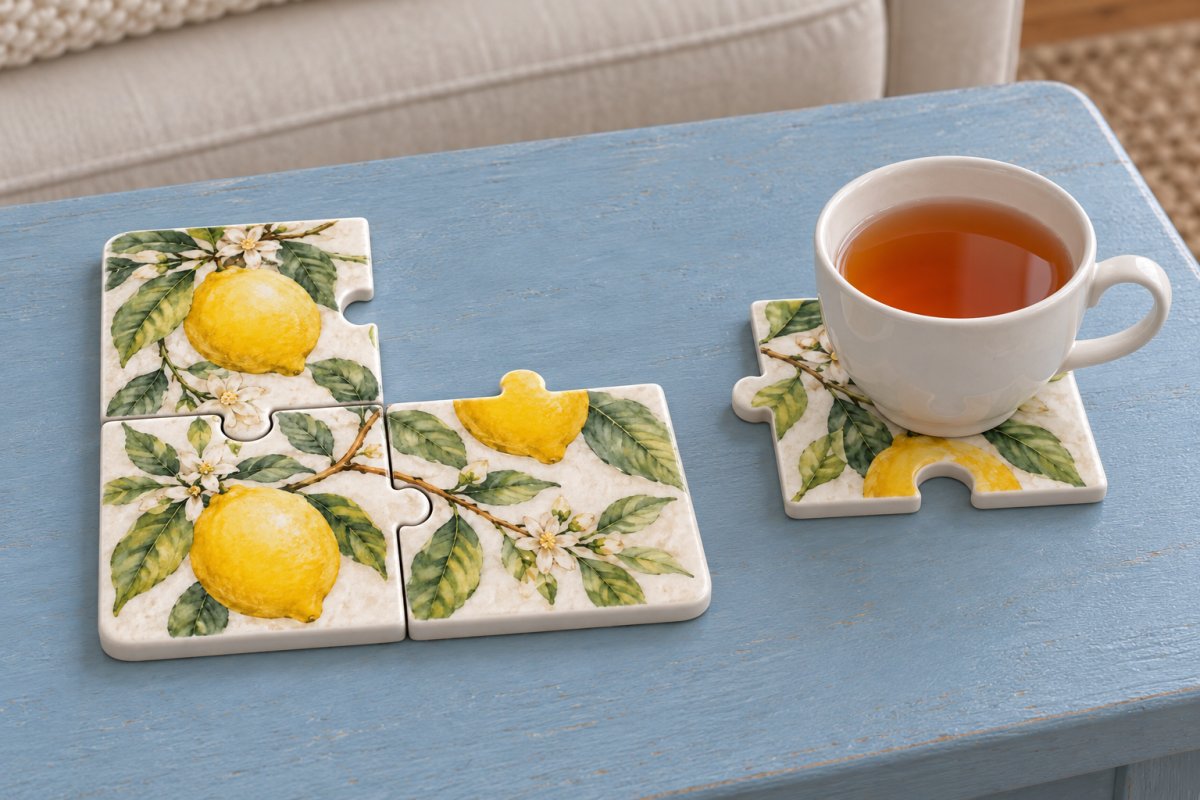
A lemon print runs across these four clay coasters, so the set makes one picture when you slide the pieces together. Pull out a piece when you need somewhere to rest a cup. The shape starts with a 22 cm square of air dry clay, and the decoration comes from a paper napkin. A thin coat of clear epoxy finishes the printed tops.
Time: Plan about 75 to 90 minutes of active work over several sessions. Allow roughly 48 to 72 hours for the clay, then at least 24 hours for the thin decoupage layer to dry completely. These are planning allowances; thickness, room conditions and product instructions take priority. The two part epoxy specified below needs 3 to 7 days to cure fully. Keep the pieces unused during that period.
Size and yield: Four coasters from a 22 cm square, rolled 7 mm thick. Each quadrant is 11 cm across before its tab or socket is cut. A piece reaches approximately 13 cm at its widest point. Drying shrinkage can reduce these dimensions. This is an adult craft using a sharp blade and liquid epoxy.
Table of Contents
- Materials and Tools
- Print the Puzzle Pattern
- Step 1. Roll an Even Slab
- Step 2. Cut the Outer Square
- Step 3. Transfer the Puzzle Lines
- Step 4. Separate the Four Pieces
- Step 5. Dry on a Flat Board
- Step 6. Smooth the Dry Edges
- Step 7. Check the Puzzle Fit
- Step 8. Separate the Napkin Layers
- Step 9. Apply the Continuous Design
- Step 10. Trim and Reopen the Joins
- Step 11. Mix and Spread the Epoxy
- Step 12. Cure and Check the Fit
- Using the Finished Set
- Cost of the Materials Used
- Safety and Everyday Care
- Small Checks Before Using
Materials and Tools
- One 1 kg pack of white mineral air dry clay. Keep clean offcuts airtight and weigh what you use if you want an exact material cost.
- One lemon print paper napkin with a usable printed area at least 23 cm square when unfolded.
- About 15 ml of napkin decoupage medium, such as Mod Podge Matte, with a little extra available for an absorbent surface.
- One clean, soft flat brush for applying the decoupage medium and smoothing the tissue.
- A clear two part coating epoxy. The example used for the mixing instructions and cost calculation is Mod Podge Resin, 8 fl oz kit. Plan a small 30 ml mixed batch for a thin top coat: 15 ml resin and 15 ml hardener, measured by volume. Actual consumption depends on coverage and waste.
- Graduated measuring cups, a clean mixing cup, wooden stirring sticks, silicone applicator, level silicone work mat and a rigid dust cover that clears all four separated pieces.
- Paper, ruler, pencil, ballpoint pen, scissors, precision craft knife and cutting mat.
- Acrylic roller long enough to span both rails, two equal 7 mm thickness guides, nonstick sheet, baking paper, paper towels and 320 to 400 grit sandpaper.
- Nitrile gloves, chemical safety goggles, protective clothing and the respiratory protection specified by the epoxy maker. Plaid's resin guide specifies a NIOSH approved respirator with an organic vapor cartridge.
Use a coating epoxy whose instructions cover your intended surface and use. The manufacturer’s resin guide gives the mixing and protective equipment requirements for the example above. Keep the white clay as the background for the translucent napkin. For another small clay make, try this air dry clay photo frame.
Print the Puzzle Pattern
Download the 22 cm Puzzle Coaster Pattern
The PDF contains one complete A3 pattern and two A4 tiles of the same design.
For A3, print page 1 only. For A4, print pages 2 and 3, align the dashed lines across the 20 mm overlap and tape the sheets together. Select Actual Size or 100% and turn off Fit or Shrink. Check that the scale bar measures 50 mm and that the joined outer square is 220 mm across before cutting. Keep the original pattern nearby to check the four tab directions.
Step 1. Roll an Even Slab
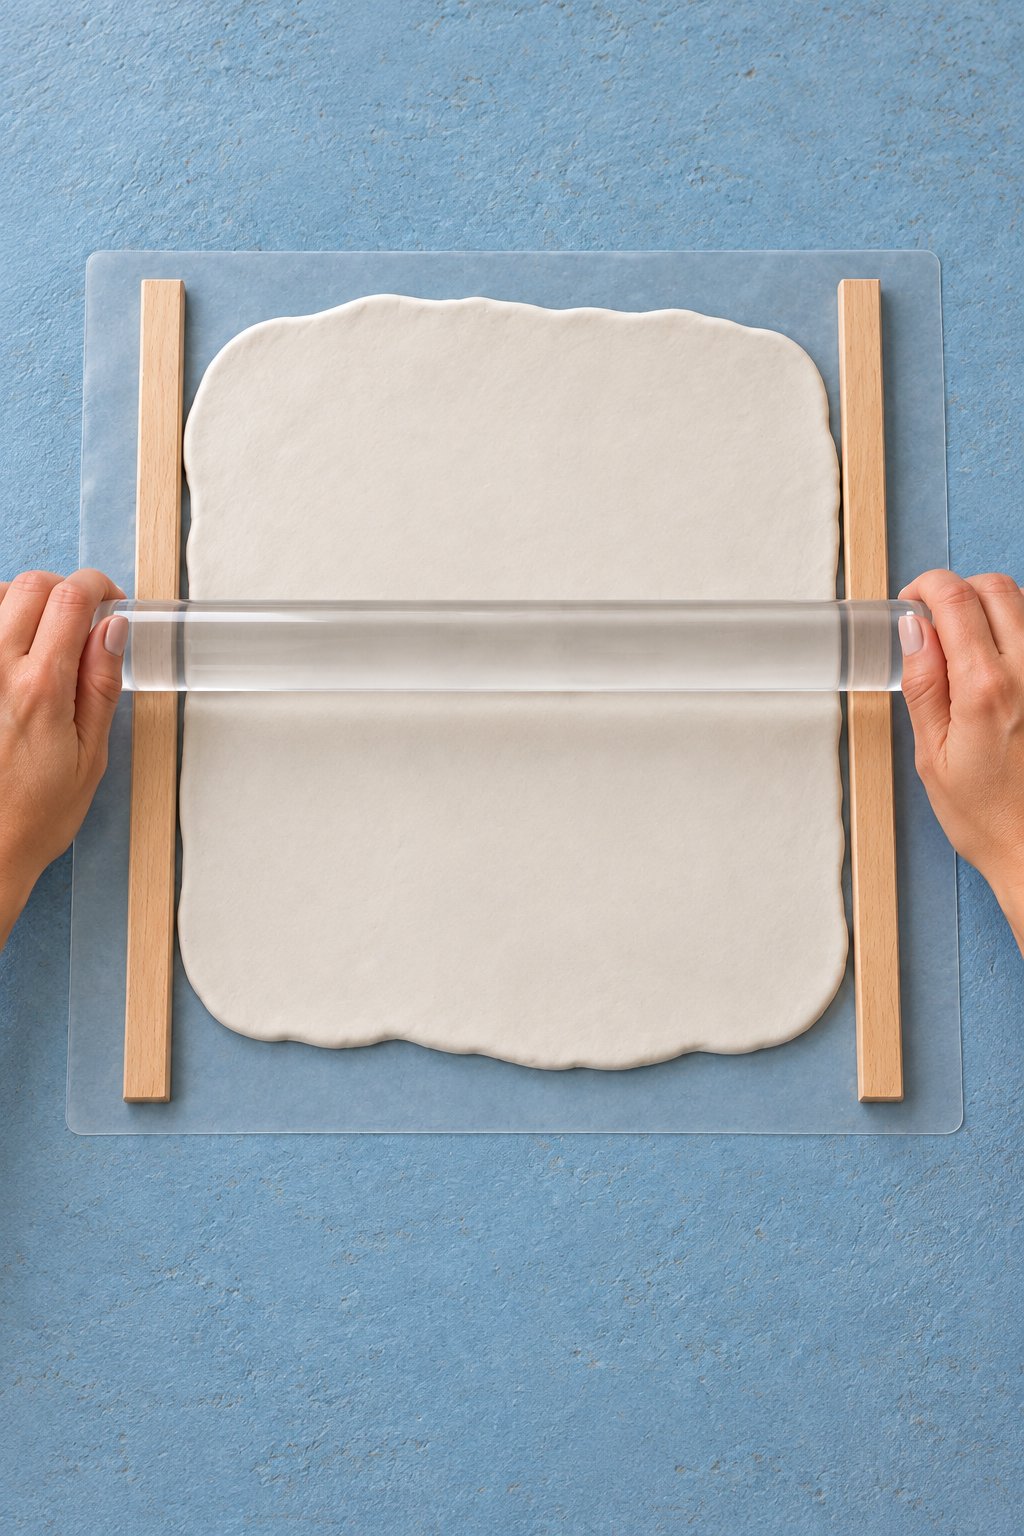
Knead the clay until it bends without crumbling. Place the two 7 mm guides parallel on the nonstick sheet, far enough apart for the 22 cm square. The roller must rest on both guides as it passes over the clay. Roll a slab slightly larger than the pattern, then check the center and edges against the same guide height. Reposition the slab as needed while keeping it supported.
Step 2. Cut the Outer Square
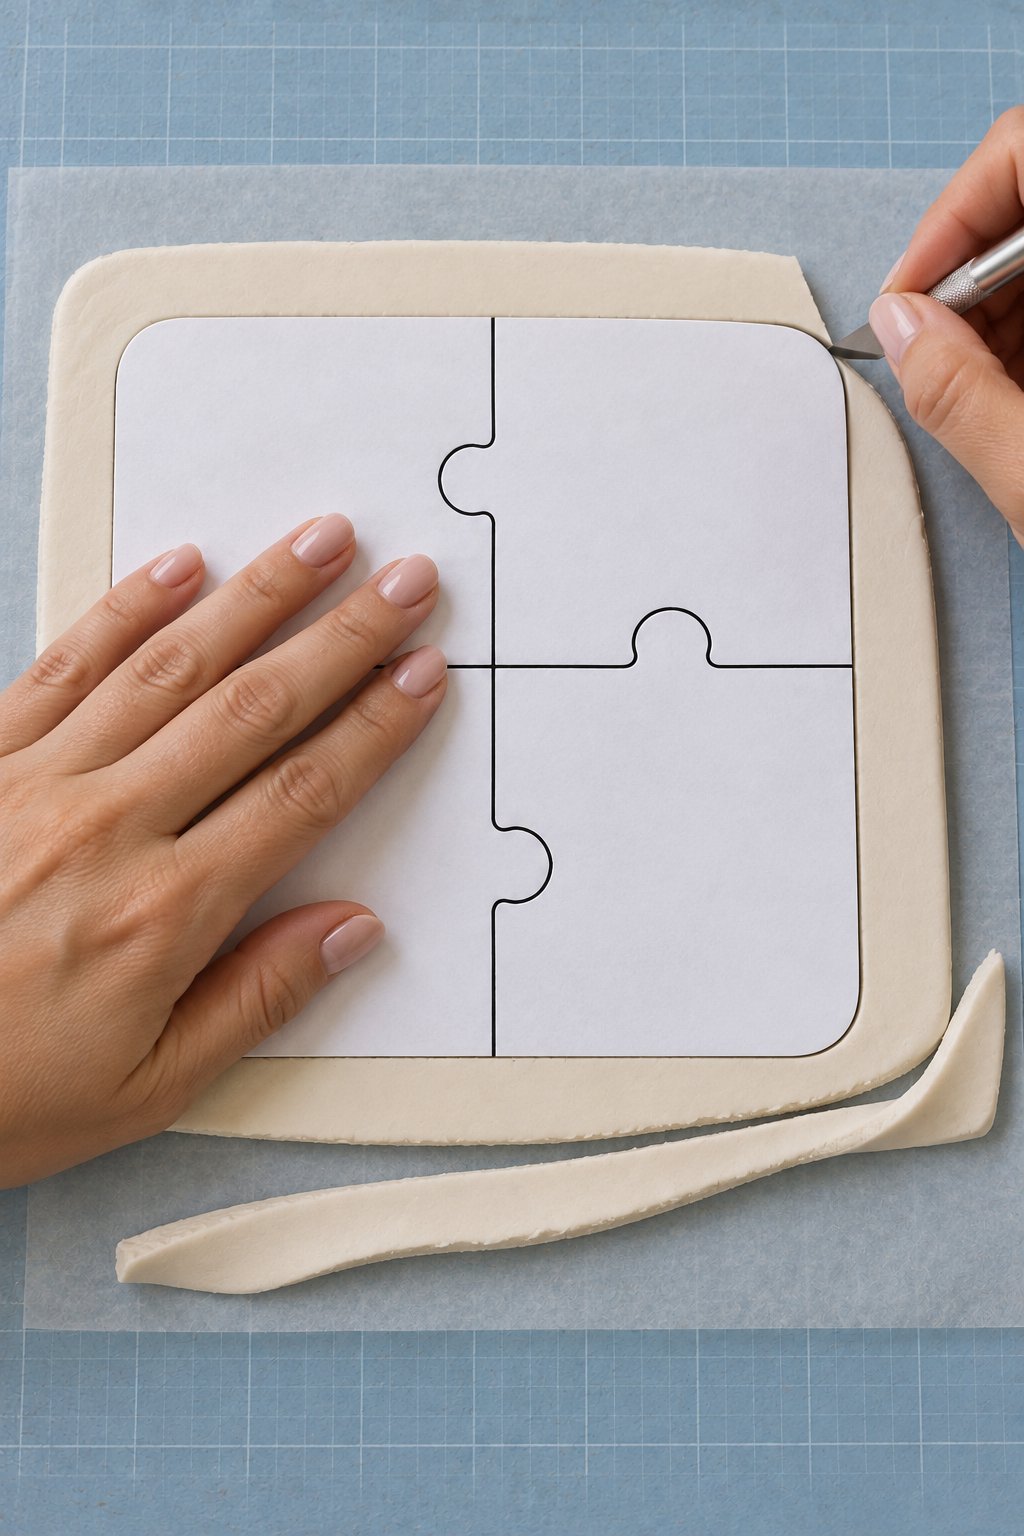
Cut out the printed 22 cm paper square and place it on the clay. Keep the four inner joins intact on the paper for now. Follow the rounded outside edge with the craft knife and lift away the offcuts. The upper vertical tab points left, the left horizontal tab down, the right horizontal tab up and the lower vertical tab right. Using one pattern keeps each tab paired with its matching socket.
Step 3. Transfer the Puzzle Lines
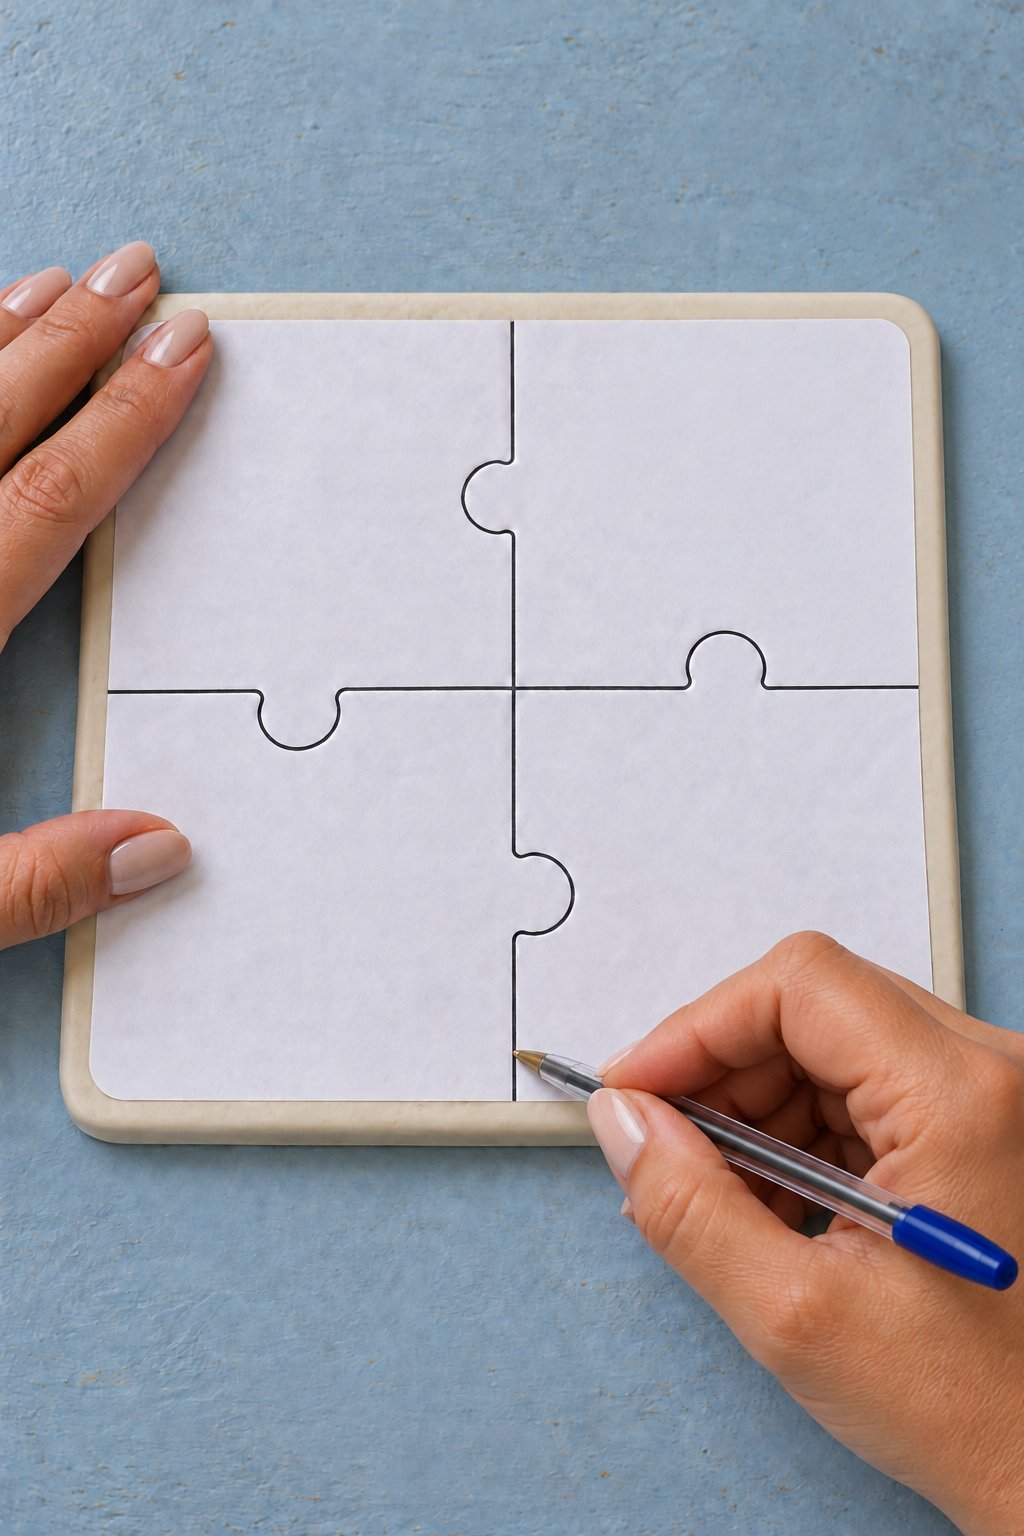
Hold a corner of the paper and trace the four inner joins with a ballpoint pen. Press enough to leave a shallow mark in the clay without dragging the paper sideways. Lift one corner first to check the impression. Once every curve is clear, remove the pattern and keep it beside the mat as a guide.
Step 4. Separate the Four Pieces
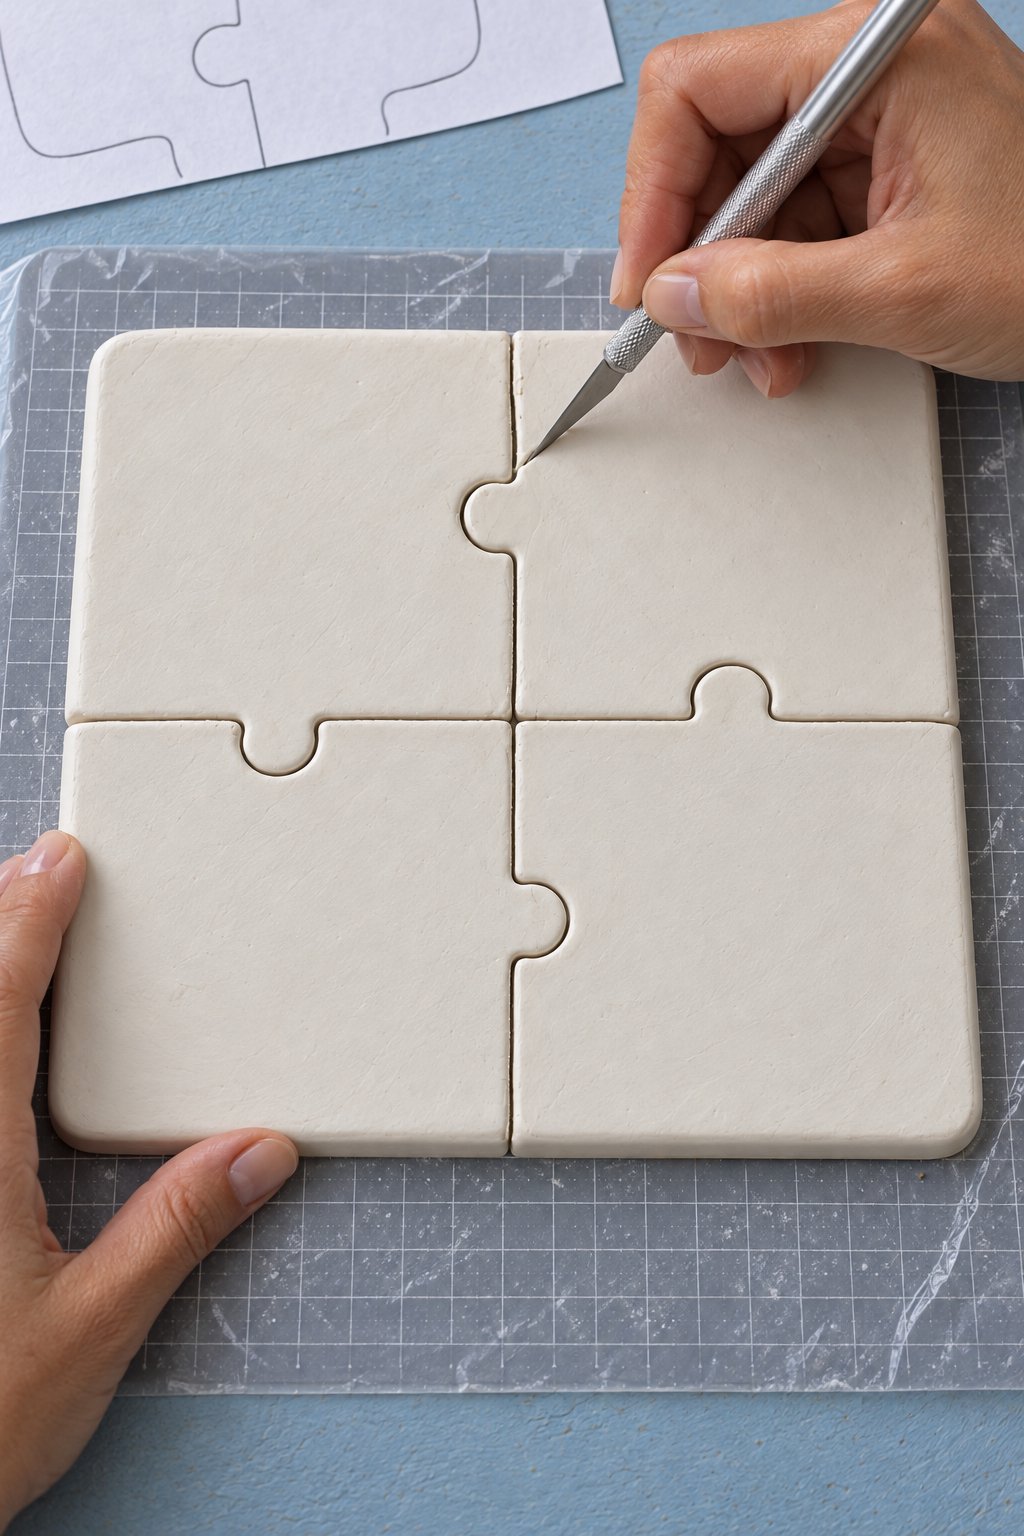
Follow the marks with the precision knife, cutting through to the protective surface. Take short passes around the curves and cut all four joins before moving a piece. Slide support beneath the broad part of each coaster when lifting it; pulling on a tab can stretch its shape. Keep the four pieces in their original order.
Step 5. Dry on a Flat Board
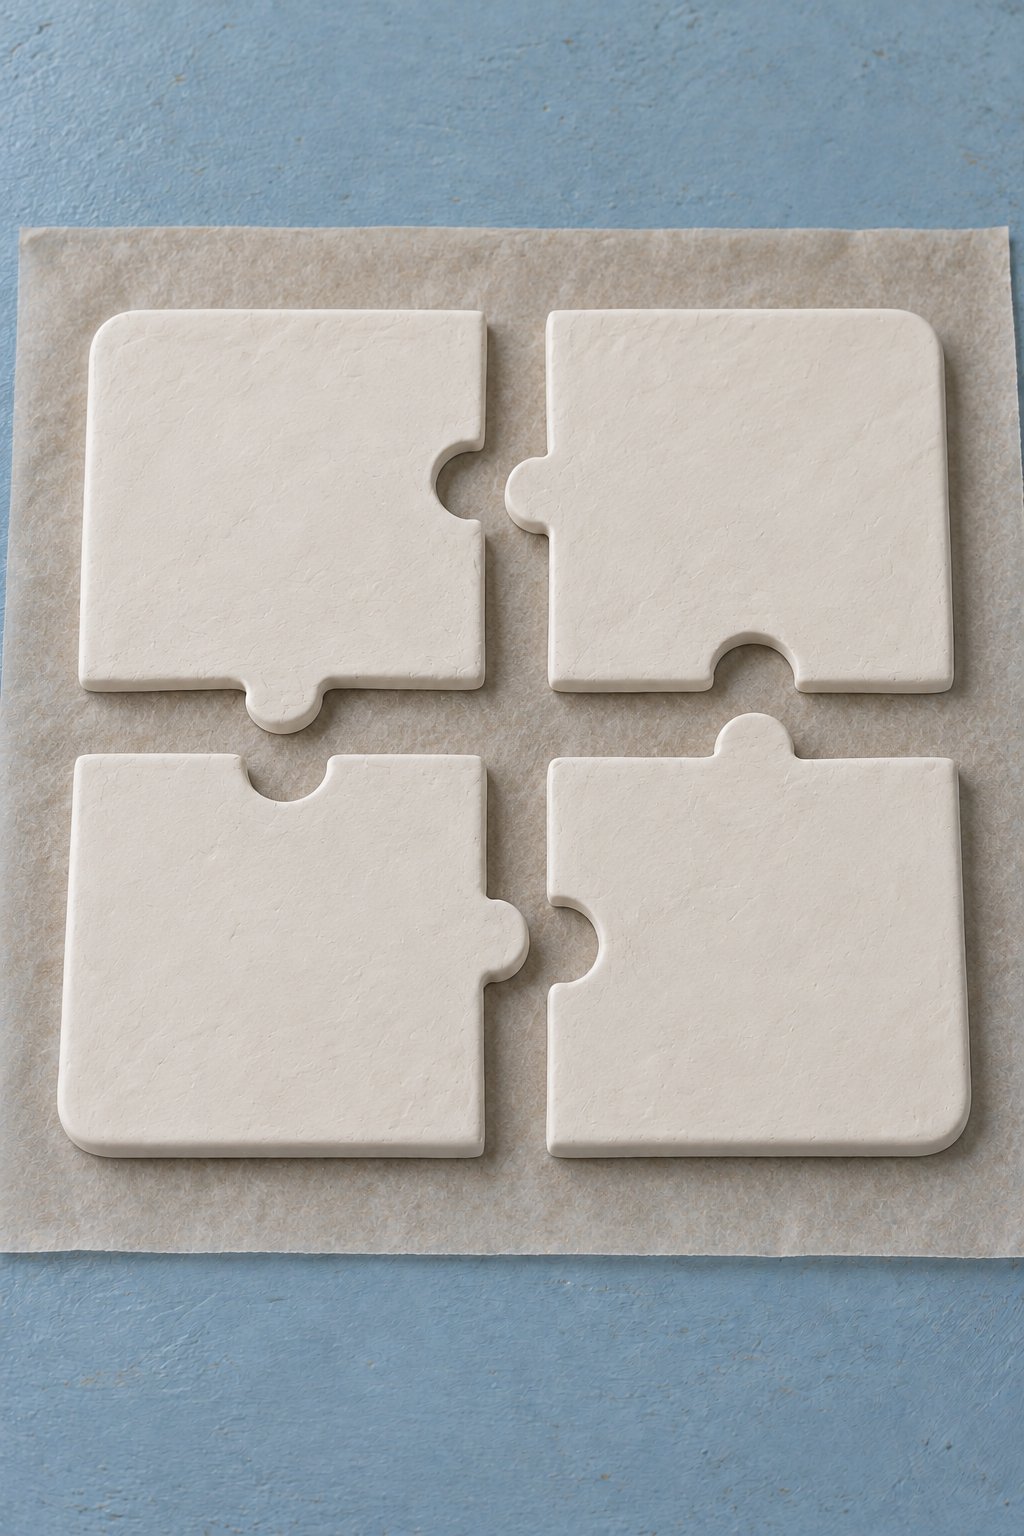
Leave space between the pieces on baking paper over a flat board. Let them air dry according to the clay instructions. Once a piece is firm enough to lift without bending, turn it gently if needed for even drying. Give the center of each piece time to dry through. Keep the board away from direct heat and do not put this air dry clay in an oven.
Step 6. Smooth the Dry Edges
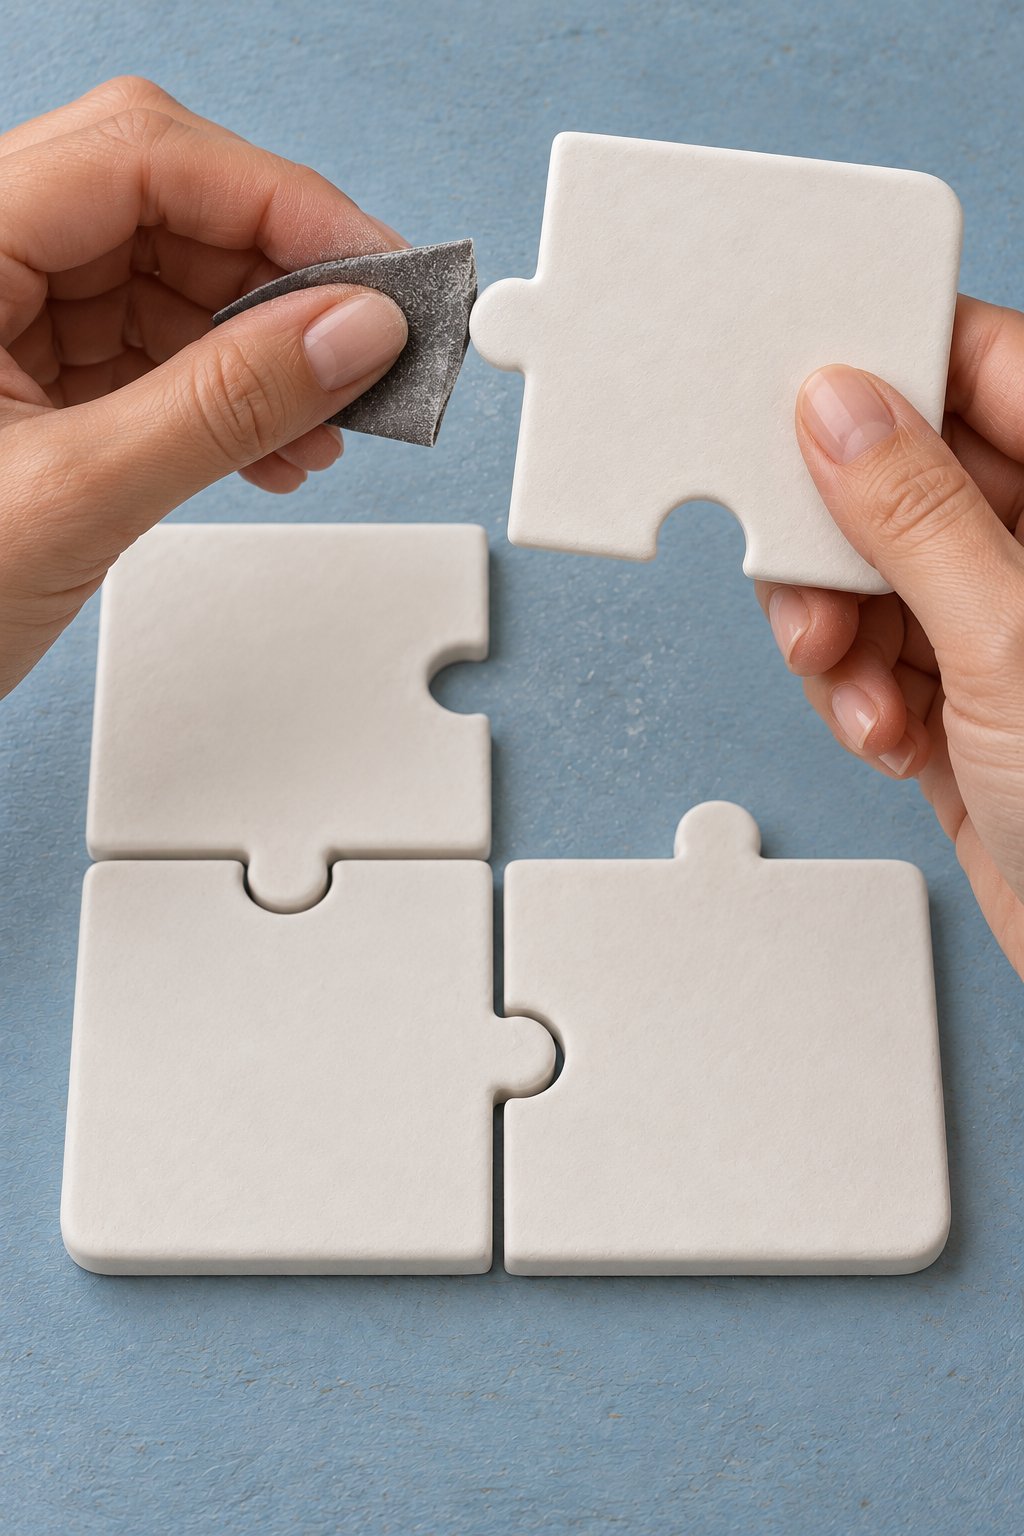
Support each tab while smoothing rough edges with fine sandpaper. Work lightly around the sockets and keep the broad faces flat. Turn a piece over to check for rough spots underneath, then collect the dust and wipe it away with a barely damp cloth. Let the surface dry again before decorating.
Step 7. Check the Puzzle Fit
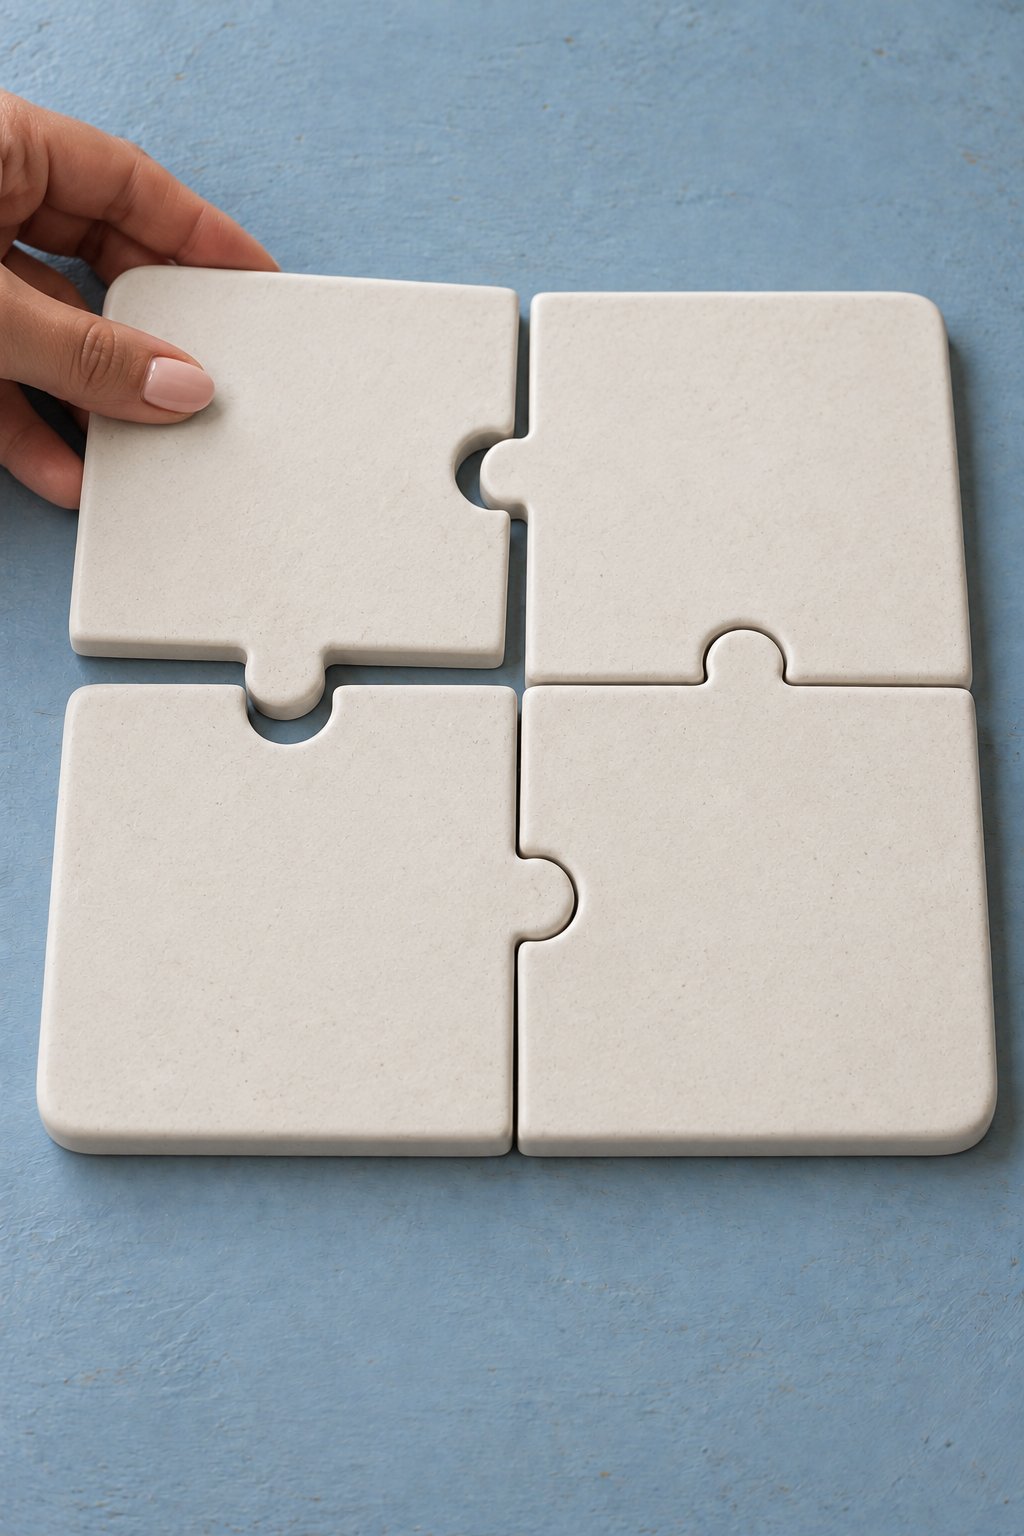
Slide the pieces together on a flat surface. Each tab should enter its own socket without pressure, and the four broad faces should sit level. Mark only the spots that catch and sand those areas a little at a time. Leave a small working clearance for the paper and finish, and check the fit again after each adjustment. Keep the layout intact for positioning the napkin.
Step 8. Separate the Napkin Layers
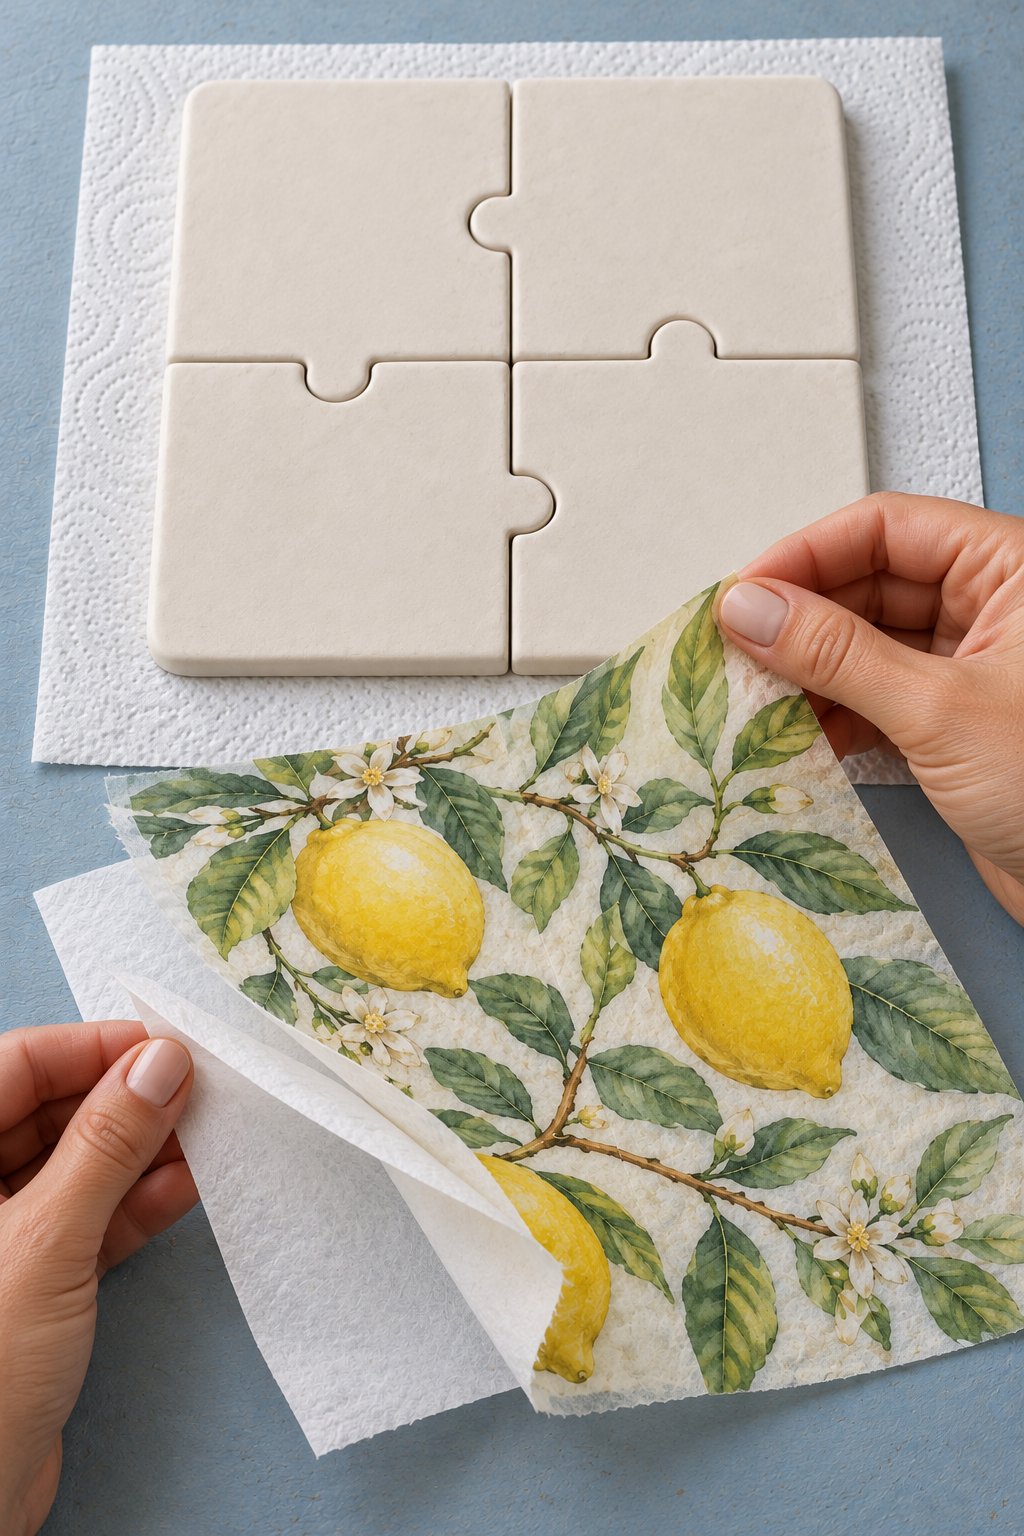
Arrange the napkin over the assembled square and choose where the lemons and branches will cross the joins. Cut the napkin slightly larger than the square while its backing layers still support it. Peel away every plain layer, keeping only the printed tissue. Handle that layer by its corners and keep it dry until the glue is ready.
Step 9. Apply the Continuous Design
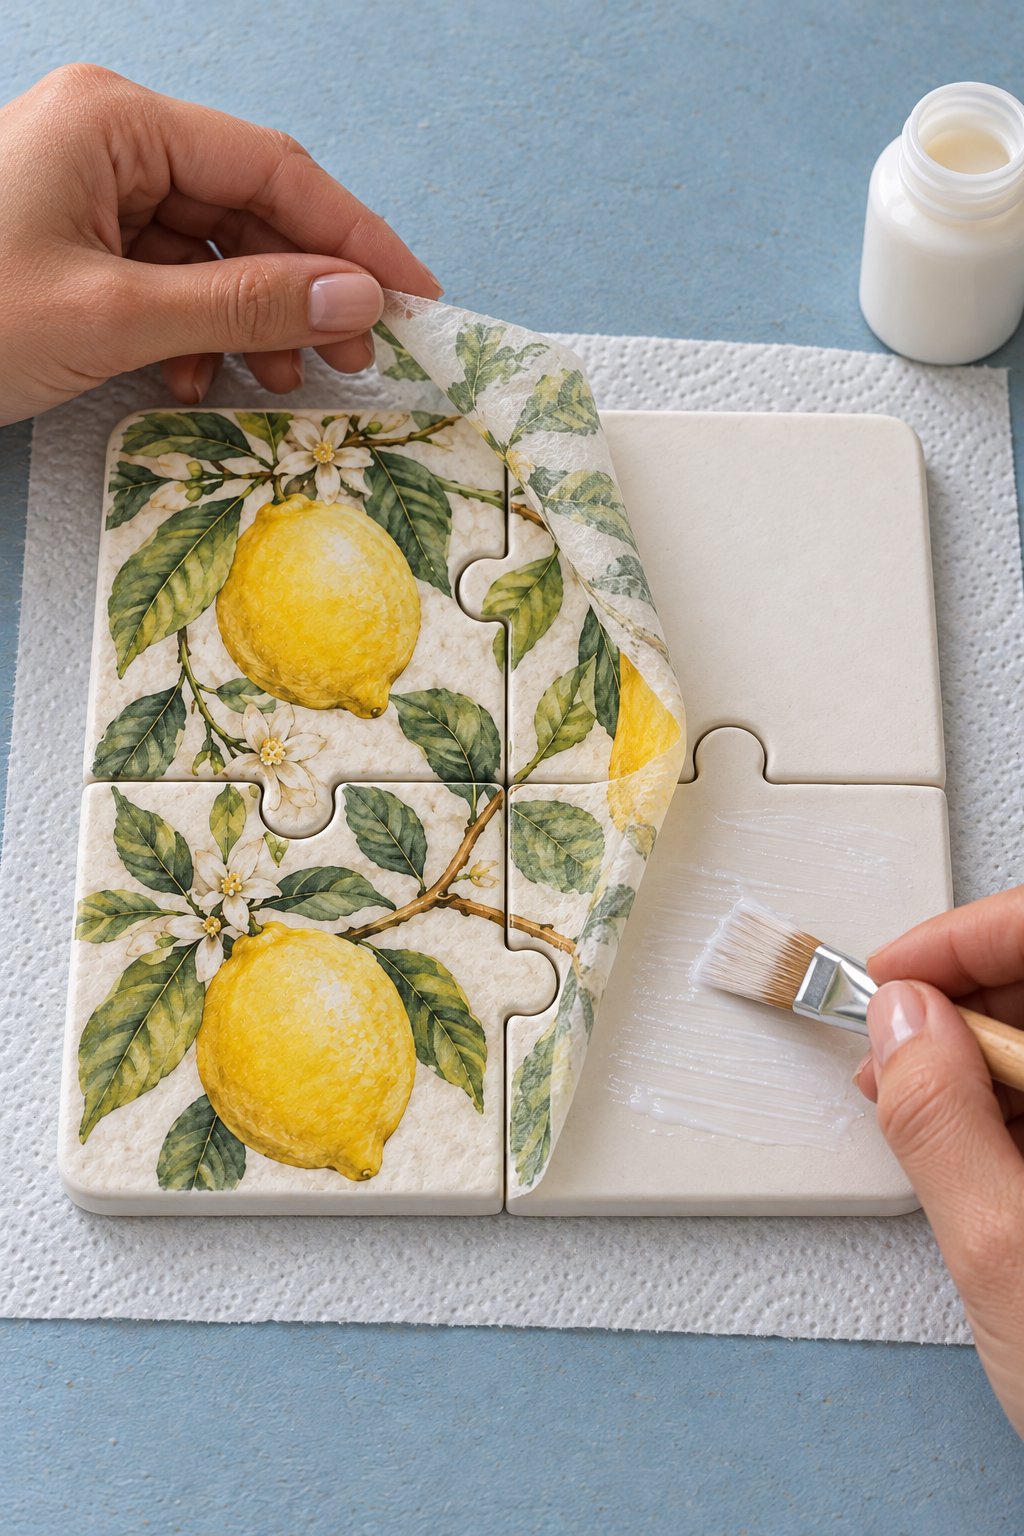
Brush a thin layer of decoupage medium onto half of the dry clay square. Lower the printed tissue gradually, then repeat on the other half without shifting the branch alignment. Smooth from the middle toward the edges with a soft brush dampened with the medium. Plaid’s napkin guidance recommends applying glue to the base and using a dampened brush so the delicate paper is easier to smooth.
Step 10. Trim and Reopen the Joins
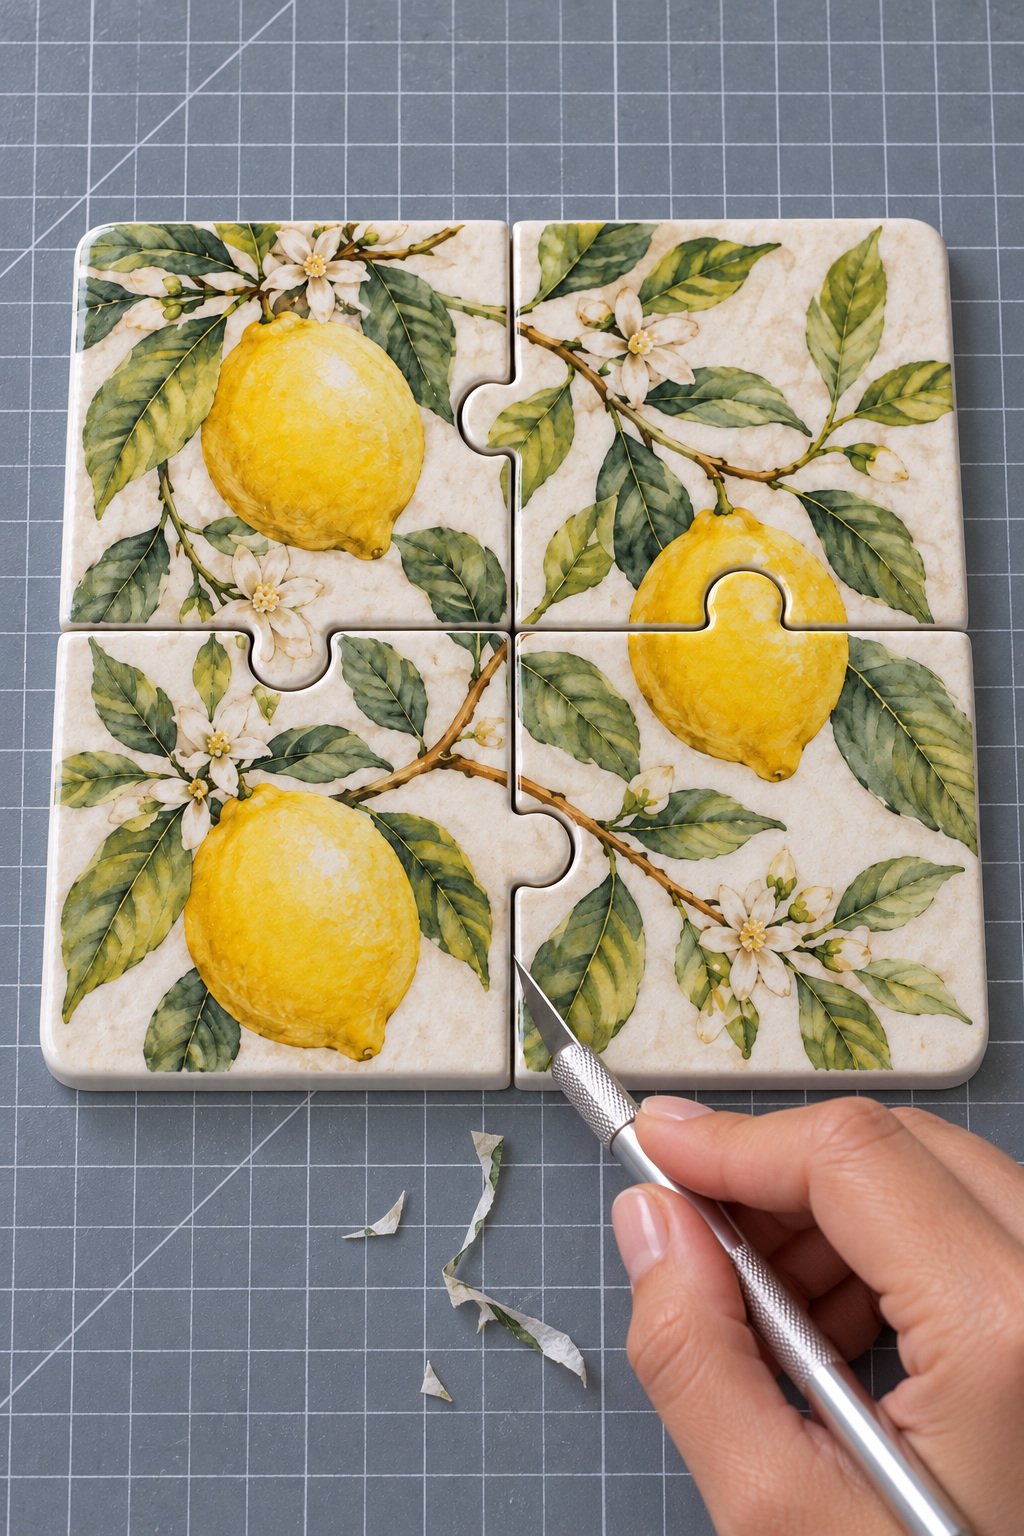
Wait until the tissue and glue are dry throughout. Trim the outside edge, then guide a fresh blade through the paper over each existing clay join. Let the gap guide the blade; avoid widening the clay socket. Lift each piece carefully and remove loose tissue from its fitting edges. Give the adhesive its full recommended drying time before covering it with epoxy.
Step 11. Mix and Spread the Epoxy
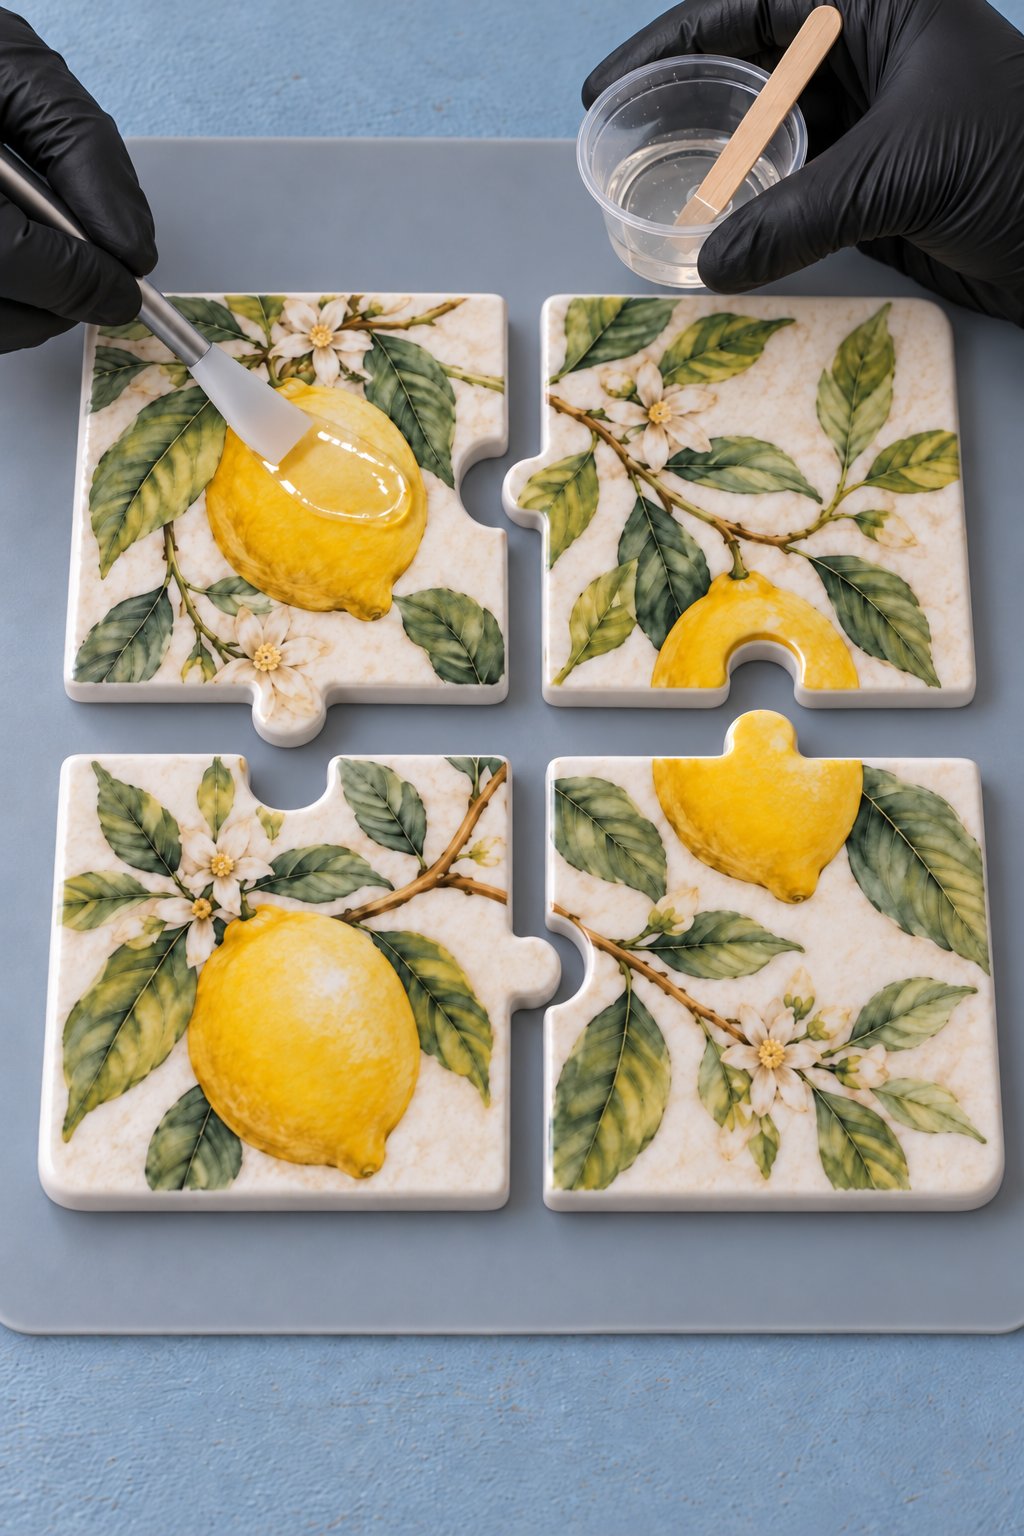
Prepare a ventilated workspace and put on the protective equipment listed above. Work within the temperature range on the resin label; Plaid's guide calls for at least 70°F (about 21°C). Set the four pieces apart on a level silicone mat. For Mod Podge Resin, measure equal volumes of resin and hardener into a clean cup. Its instructions call for 3 minutes of slow stirring, scraping the sides, followed by a 2 minute rest. Follow the current packaging if it differs; another epoxy may require a different ratio.
Spread a thin coat over each printed top with the silicone applicator. Work within the maker’s working time and keep the fitting edges clear. The pieces stay apart so the epoxy cannot join them together. Remove a drip from a clay side with the applicator while it is still workable.
Step 12. Cure and Check the Fit
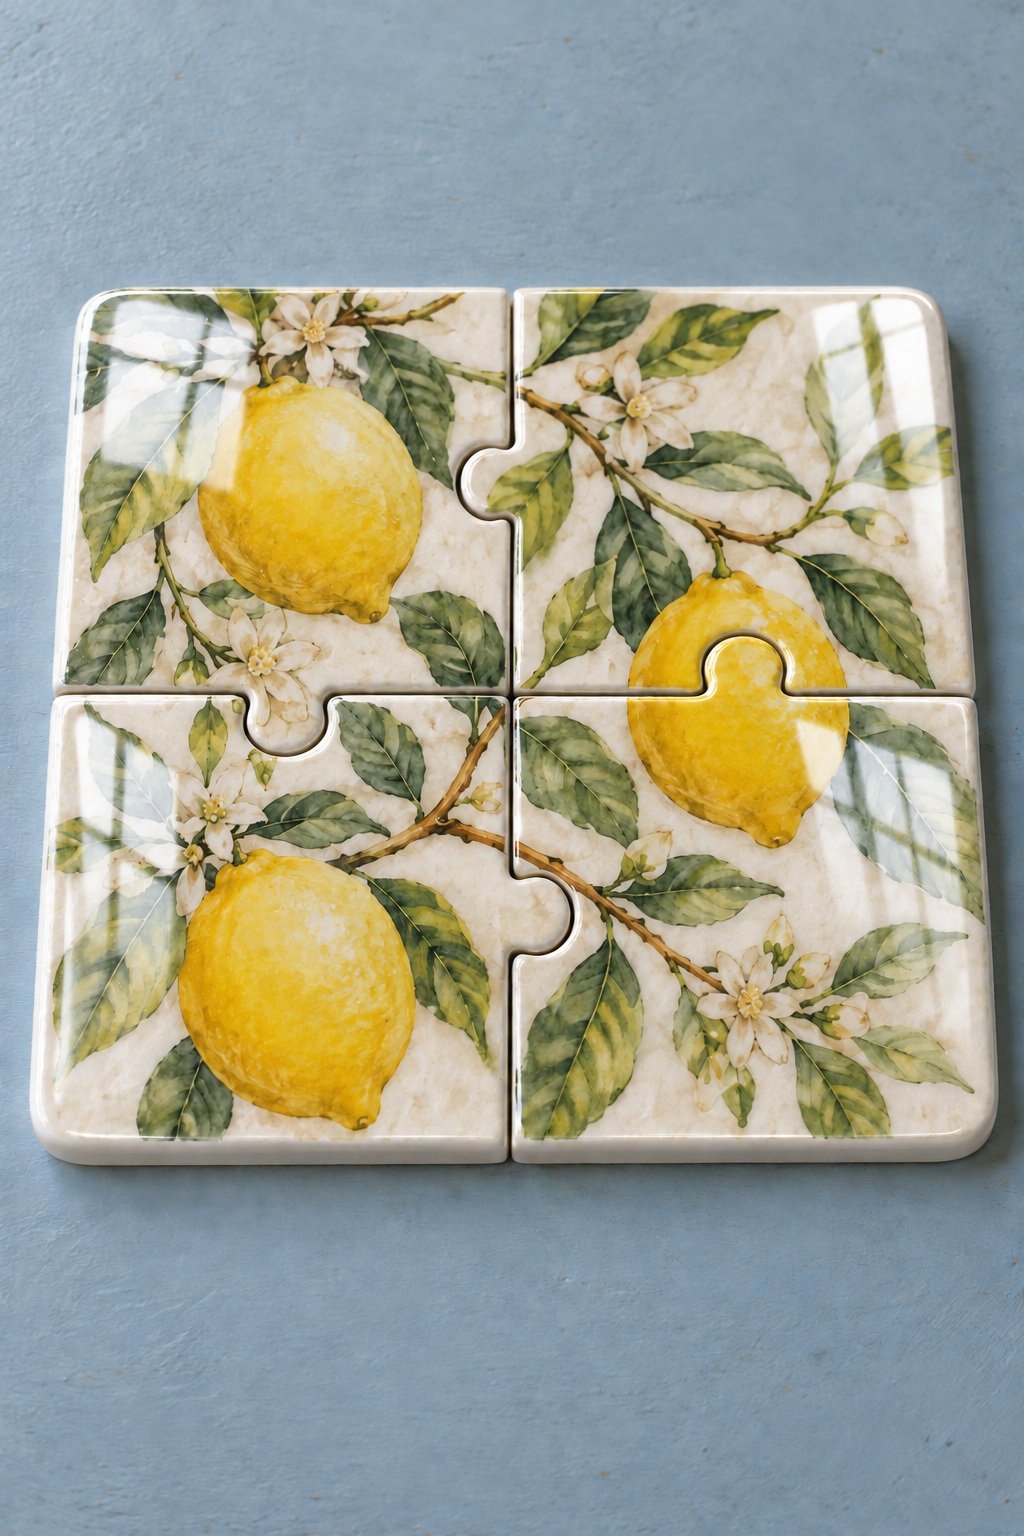
Keep the coated pieces flat and separate beneath a rigid dust cover with clearance above the wet surfaces. Let the epoxy cure for the full period on its label. Mod Podge Resin lists 3 to 7 days for a full cure; a surface that feels dry earlier is not ready for use. This finish cures by a chemical reaction and does not use a lamp.
After full curing, slide the same four pieces together as shown. Check that the printed branches line up, each tab enters its matching socket, and the square rests flat. Separate the pieces again by holding their broad bodies. If a joint catches, inspect it for a coating drip instead of forcing the tab.
Using the Finished Set
For a drink, take one coaster from the set and center the cup on its broad area. Keep weight off the projecting tab. Join the pieces again between uses to bring the lemon picture back together. Use room temperature drinks unless your chosen epoxy explicitly permits the temperature of the cup you want to use.
Cost of the Materials Used
Separate the cost of the portions used from the cost of buying whole packs. This price example uses the maker's U.S. listings checked on October 30, 2026: $17.99 for the 8 fl oz Mod Podge Resin kit and $4.99 for 8 fl oz Mod Podge Matte. Select the 8 oz, CS11301 option for the Matte example. Each pack contains about 236.6 ml in total. Prices can change, and tax and shipping are extra.
- Epoxy: 30 ml divided by 236.6 ml, multiplied by $17.99, is about $2.28.
- Decoupage medium: 15 ml divided by 236.6 ml, multiplied by $4.99, is about $0.32.
- Clay: weigh the clay retained in the four wet pieces, divide that weight in grams by 1,000, then multiply by your 1 kg pack price.
- Napkin: divide the pack price by the number of usable napkins. This project uses one.
The epoxy and glue portions total about $2.60. Add your clay and napkin costs to calculate the material portion total. Include extra batches or discarded material if you use them. Buying the full epoxy and glue packs alone comes to $22.98, before clay, napkins, tax, shipping, tools and protective equipment. Check the current price and pack size before buying.
Safety and Everyday Care
- Cut on a cutting mat, keep fingers out of the blade path and cap the knife between sessions.
- Minimize clay dust when sanding and follow the clay label. Collect dust with a damp cloth.
- Read the epoxy label and manufacturer’s safety instructions before mixing. Use the specified gloves, eye protection, protective clothing and respirator. Keep liquid epoxy off skin and keep children, pets, food and drinks away from the work area.
- Keep the mixing batch small and the work surface level. Mixed epoxy can generate heat. Follow the maker’s handling, cleanup and disposal instructions.
- Wait for full curing before using the coasters. Sticky or soft resin needs investigation under the product instructions, not use beneath a cup.
- Use hot cups only when the epoxy maker explicitly allows that temperature and application. Keep cookware and candles off this set.
- The exposed clay sides and underside still need care. Wipe spills promptly, keep cup bottoms dry and avoid soaking, dishwashers, microwaves and direct heat.
- Lift each coaster over polished furniture and keep food off the decorated surface.
Small Checks Before Using
Small finishing problems are easier to catch between stages. If a dry piece rocks, check its underside on the flat board before sanding. If tissue starts to drag under the brush, stop working that area and let it settle. At the final check, a cup should rest steadily on the broad part of each piece.
In Jolly Festive’s air dry clay coaster project, the maker describes struggling to cut a damp napkin cleanly with a blunt cutter and improving the edges with sanding. This guide keeps those jobs separate: shape and dry the clay first, then add the tissue and reopen the joins after it dries.
Keep any clean, unused clay sealed in its original packaging for another make. These 32 air dry clay decor ideas can help you choose a shape for the leftovers.
Leave a Reply