
Discover 32 air dry clay decor ideas, from organic vases and botanical trays to picture frames, miniature displays and sculptural wall accents. The illustrated making stages introduce shaping, texturing and finishing methods you can adapt to the designs below. You will also find guidance on choosing clay and tools, understanding drying and curing, planning separate supports and deciding which creations suit dry display, fresh flowers or everyday storage.
Table of Contents
- Choose the Shape and Purpose Before Opening the Clay
- Shaping, Texture and Finishing Through the Making Stages
- Clay Drying and Finish Curing Are Different Waiting Periods
- Put These Methods to Work in 32 Clay Decor Ideas
- 1. Sculptural Arch Vase for a Modern Console Display
- 2. Botanical Clay Trays for Jewelry and Small Accessories
- 3. Wavy Clay Holder for a Flameless Taper
- 4. Botanical Clay Mirror Frame with Raised Floral Details
- 5. Textured Clay Table Lamp with a Ribbed Base
- 6. Miniature Clay Houses for a Layered Shelf Display
- 7. Floral Clay Bowl with Layered Leaves and Petals
- 8. Miniature Clay Landscape for Decorative Display
- 9. Colorful Clay Mushrooms for a Whimsical Console Display
- 10. Organic Pedestal Clay Bowl with a Wavy Edge
- 11. Abstract Clay Face Sculpture for Artistic Shelf Styling
- 12. Clay Leaf Catchall Tray with Carved Botanical Texture
- 13. Wavy Clay Picture Frame with a Soft Sculptural Border
- 14. Mini Clay Arch Shelves for Small Decorative Collections
- 15. Clay Centerpiece Tray with Flameless Tealights
- 16. Clay Pedestal Stand for Elevated Decorative Styling
- 17. Spiral Clay Vase Trio for Layered Flower Displays
- 18. Scalloped Clay Tray for Decorative Kitchen Styling
- 19. Air Dry Clay Wall Pocket Vase with a Floral Shape
- 20. Textured Clay Cone Trees for a Colorful Display
- 21. Botanical Clay House Number Plaque for the Entry
- 22. Scalloped Clay Wall Shelf for Colorful Accessories
- 23. Wavy Clay Wall Shelf with Sculptural Cutout Details
- 24. Floral Clay Switch Frame for a Small Wall Accent
- 25. Clay Plant Pot Feet for an Elevated Planter Display
- 26. Mini Clay Frames for Rotating Pictures
- 27. Clay Tabletop Mobile with Botanical and Abstract Charms
- 28. Decorative Clay Finials for a Sculptural Console Arrangement
- 29. Botanical Clay Propagation Stand with Glass Tubes
- 30. Clay Checkerboard Set for Playful Coffee Table Decor
- 31. Miniature Clay Wall Niches for a Botanical Gallery
- 32. Hanging Clay Curtain Charms with Botanical Texture
- Keep the Handmade Finish Looking Its Best
Choose the Shape and Purpose Before Opening the Clay
Air dry craft clay lets you model decorative shapes that become firm at room temperature without kiln firing. It is not interchangeable with oven cured clay or fired ceramic. Choose a product by its working thickness, joining instructions and intended use, rather than color alone. Drying can cause shrinkage, and the finished material may remain sensitive to moisture. Keep unused clay in the airtight packaging recommended by its manufacturer.
A shallow tray or a few botanical charms offer a smaller starting project than a tall vase or a large wall installation. Decide what the piece will hold, where it will sit and whether it needs to be moved or cleaned regularly. Sketch the outline at its intended size, allowing for the product's shrinkage. Modern organic styling comes from flowing curves, tactile surfaces and space around each object; cream, sand and soft earth colors help different shapes belong together.
Gather air dry clay, a washable work surface, a rolling tool, thickness guides, paper templates, a craft knife, a wooden modeling tool and a lightly damp sponge. Paintbrushes, suitable paint and a compatible protective finish belong to the later finishing stage. Choose thickness and drying conditions from the clay instructions. For optional sanding, follow the product's guidance and control dust; use cutting tools carefully on a protected surface.
Shaping, Texture and Finishing Through the Making Stages
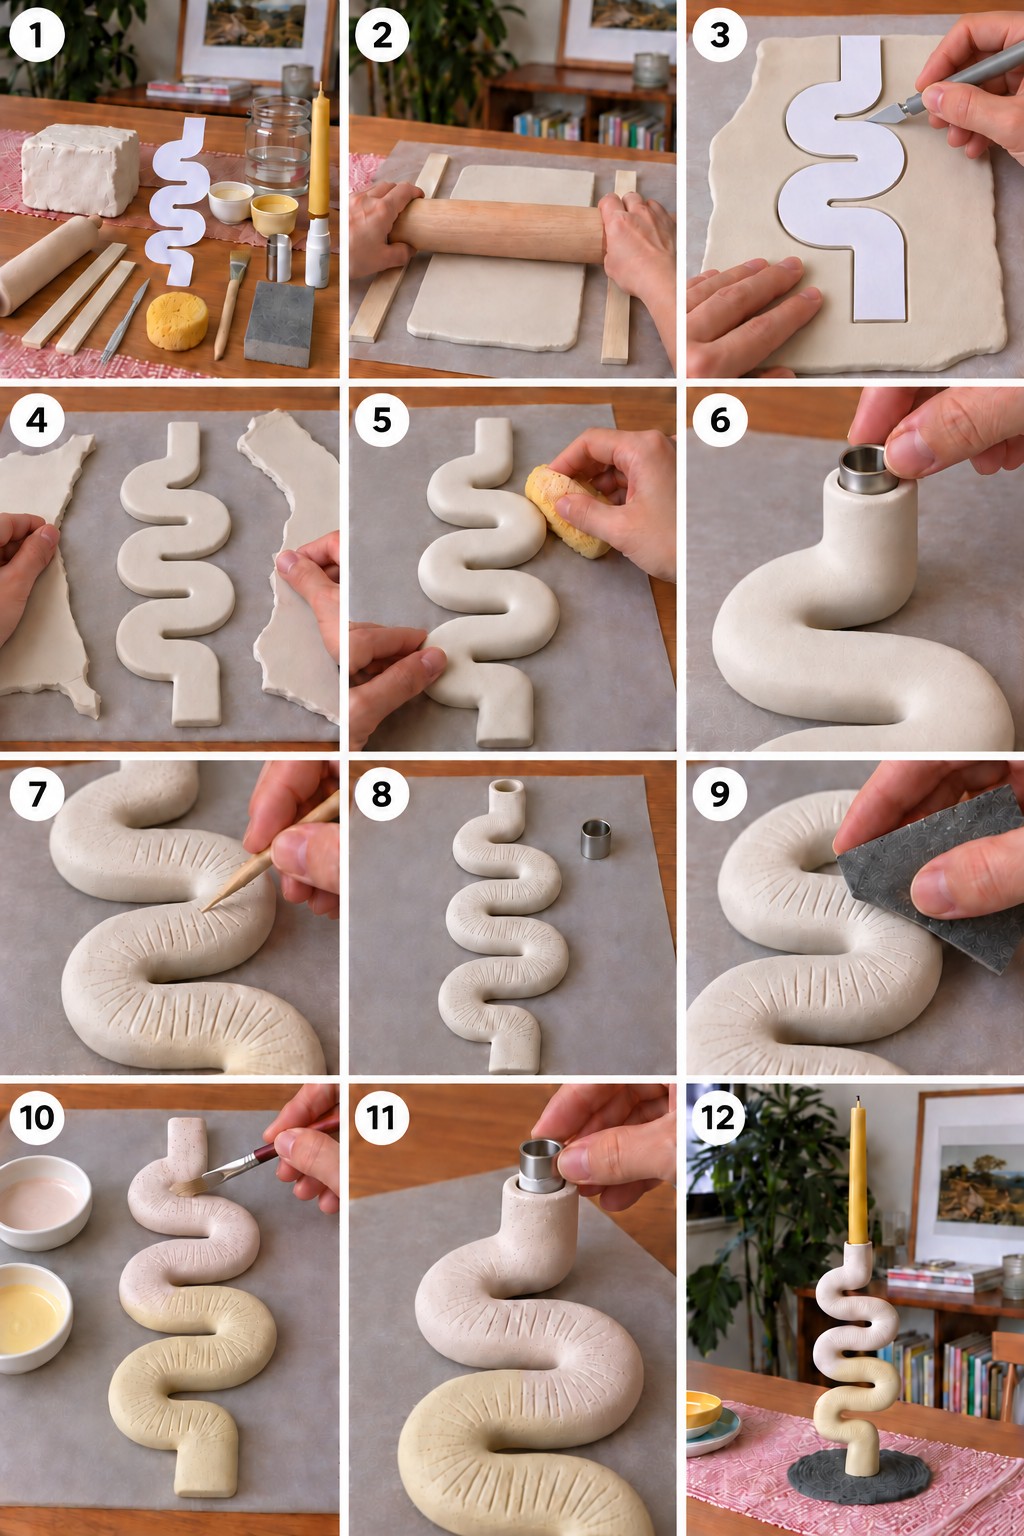
The making sequence shows clay rolled between guides, cut around a curved paper template, smoothed and marked with a pointed tool. These operations also translate to tray outlines, frame borders, leaves and hanging ornaments. Roll a reasonably even sheet rather than leaving a thin edge around a thick center. Cut openings and hanging holes while the clay is workable, then smooth rough edges without soaking the surface.
Change the forming method to suit the design. A slab can become a shallow dish using a removable support allowed by the clay manufacturer. Rolled coils create ridges and stems; flattened pieces become petals or architectural panels. Join wet pieces using the product's recommended technique, which may involve scoring and a little slip. Keep joins broad enough for the intended decorative form. Wet clay can crack as it shrinks around a rigid core, so do not assume a permanent glass, metal or wooden insert is suitable during drying.
Fit the metal collar around the opening before the clay dries, and use a suitable flameless light in the finished decorative holder. Use a flameless taper when the clay is not approved for heat. Ordinary craft clay should not become a direct food surface, a water reservoir or the structural part of a shelf. A sealer does not automatically change those limits. Keep water in removable watertight vessels and use independent supports where the project needs to carry weight.
Clay Drying and Finish Curing Are Different Waiting Periods
For water based air dry clay, the first wait allows moisture to leave the shaped piece. A firm surface can develop while a thick center remains damp. Use the manufacturer's drying guidance and account for thickness, room temperature and humidity. For example, Crayola specifies 72 hours before sealing its Air Dry Clay; that figure should not become a deadline for every product or shape. Do not substitute an oven, microwave or direct heat for the stated drying method.
Keep thickness reasonably even, avoid unnecessary water during shaping and allow drying in the conditions the product recommends. If permitted, expose the underside of flat trays to air so the edges do not dry much faster than the center. Turn or move a piece only when it can be handled without deforming. A pale color or dry feel alone does not prove readiness. A spare sample made at a similar thickness can help you plan the process, but follow the product guidance for the finished object.
The second wait concerns paint, glue or sealer. Touch dry means the surface can feel dry; full curing means the product has reached the condition specified for its intended use. Recoating, handling and regular use may each require different waits. Test compatible finishes on spare clay and follow their labels before attaching decorations, filling trays or hanging charms. A clear coating that feels dry may still need more time. Curing does not turn ordinary clay into fired ceramic or automatically approve it for water, food or heat.
Put These Methods to Work in 32 Clay Decor Ideas
Use the making stages as a starting approach, then choose the shaping method and support each design needs. For a compact first project, consider the trays in 2 and 12 or the charms in 32. The vases in 1 and 17 suit botanical styling, while the shelves in 14, 22, 23 and 31 require separate carrying structures. The following ideas connect each appearance with a practical way to adapt it at home.
1. Sculptural Arch Vase for a Modern Console Display
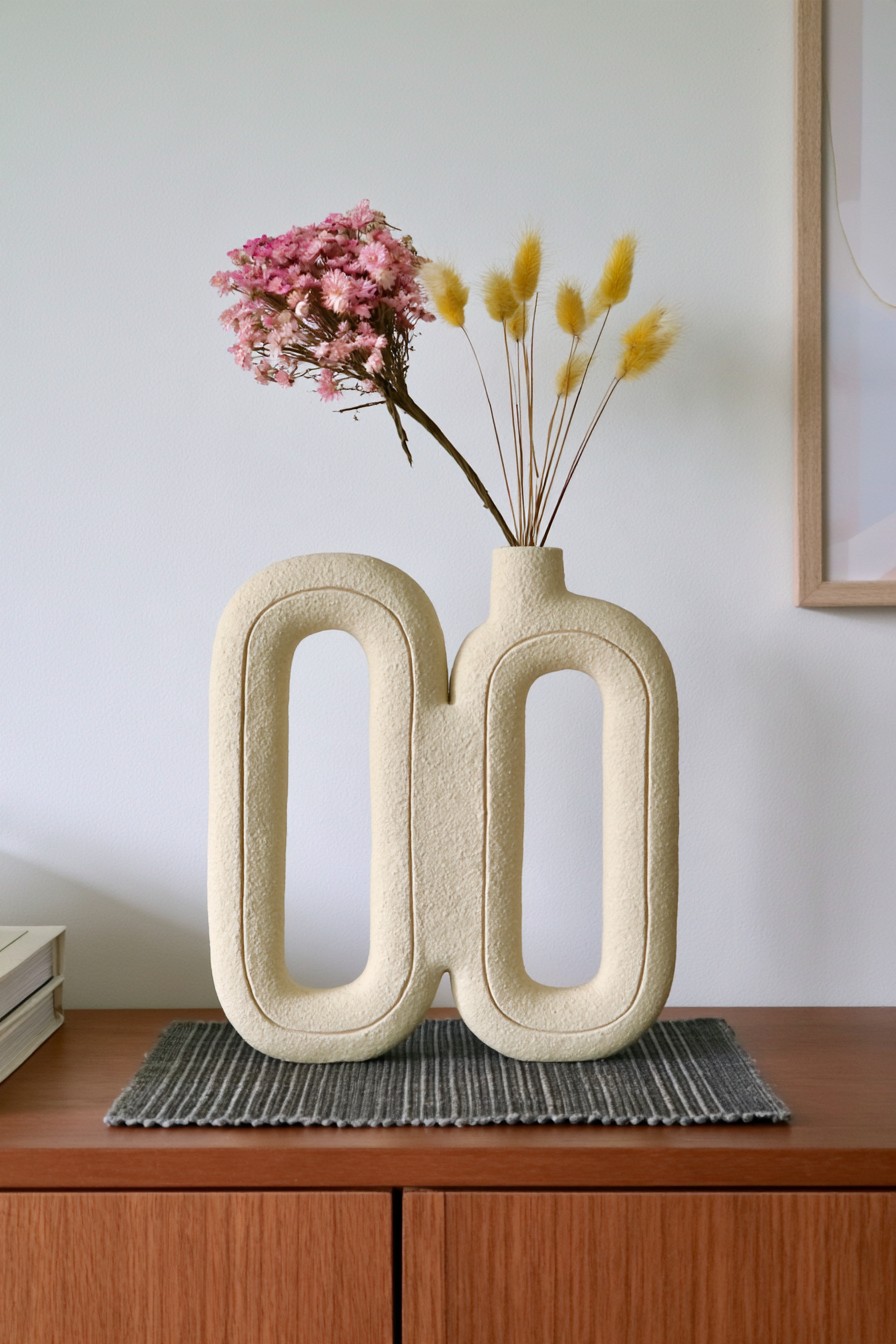
The double arch turns an empty console into a small architectural display. Its open center gives the pale form breathing space, and a few dried stems add height without hiding the curves. This is a good choice when you want one substantial focal point beside books or a lamp rather than several unrelated ornaments.
Sketch both arches together so their proportions relate, then choose slab building or another hollow forming method permitted by your clay. Plan the flower opening before joining sections and support the curves during drying as directed. Fresh flowers need a separate removable watertight vessel that fits after shrinkage. Fill and clean that vessel away from the clay, and keep the arch visible by limiting the number of stems.
2. Botanical Clay Trays for Jewelry and Small Accessories
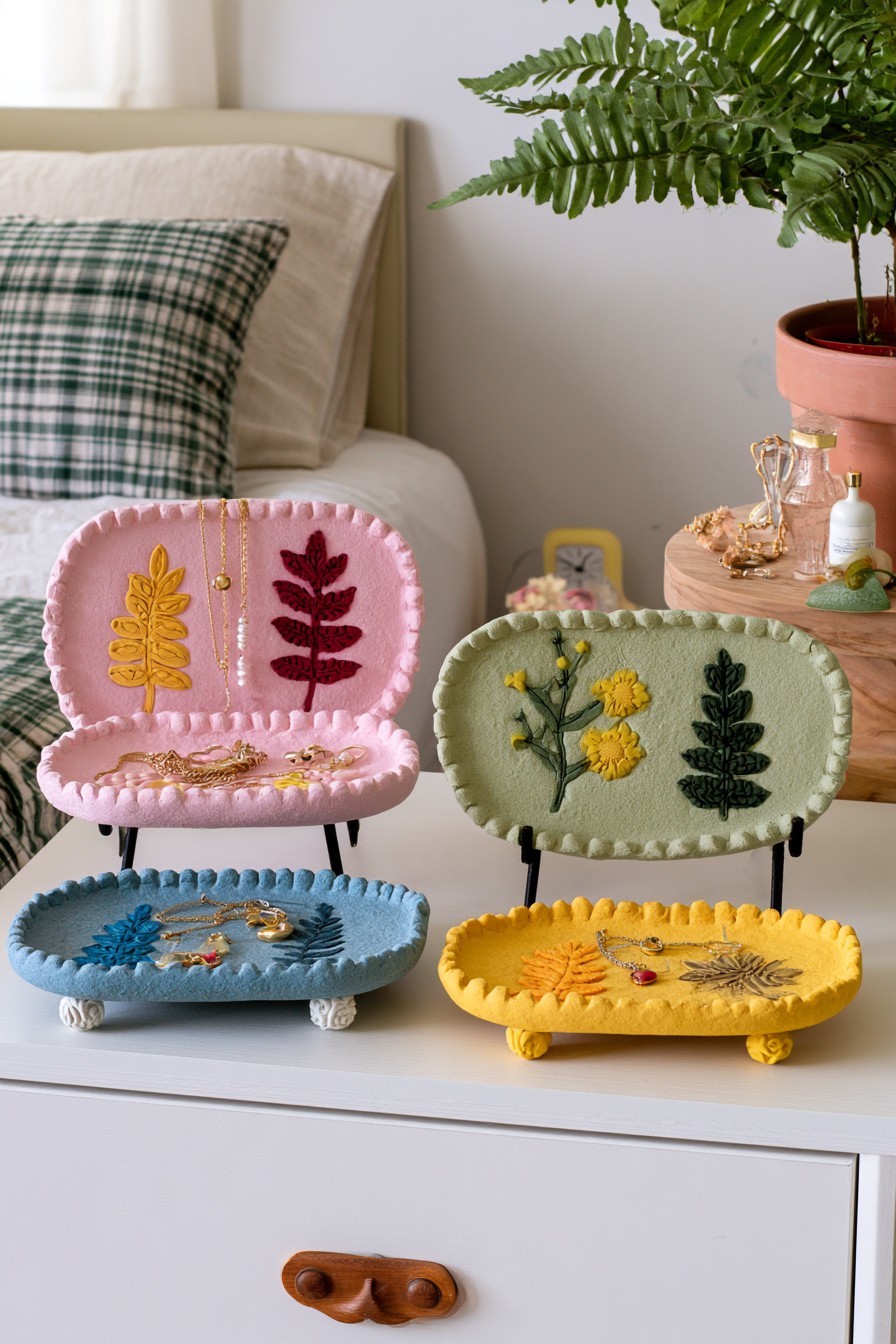
The small pastel trays combine shallow bowls, botanical relief and short raised feet. Their colors can separate rings, hair clips and other dry accessories while the low rims keep everything easy to find. Unlike a large storage box, each dish gives a small collection its own visible boundary on a dresser or bedside table.
Begin with an evenly rolled outline and add leaf impressions or shallow petals before forming the rim. Plan the feet with broad contact areas and a level arrangement, following the clay's joining instructions. Check the finished tray for rocking before adding belongings. Keep delicate jewelry away from rough relief, and avoid overfilling the center. A compatible coating may help with light cleaning, but it does not turn the tray into a washable basin.
3. Wavy Clay Holder for a Flameless Taper
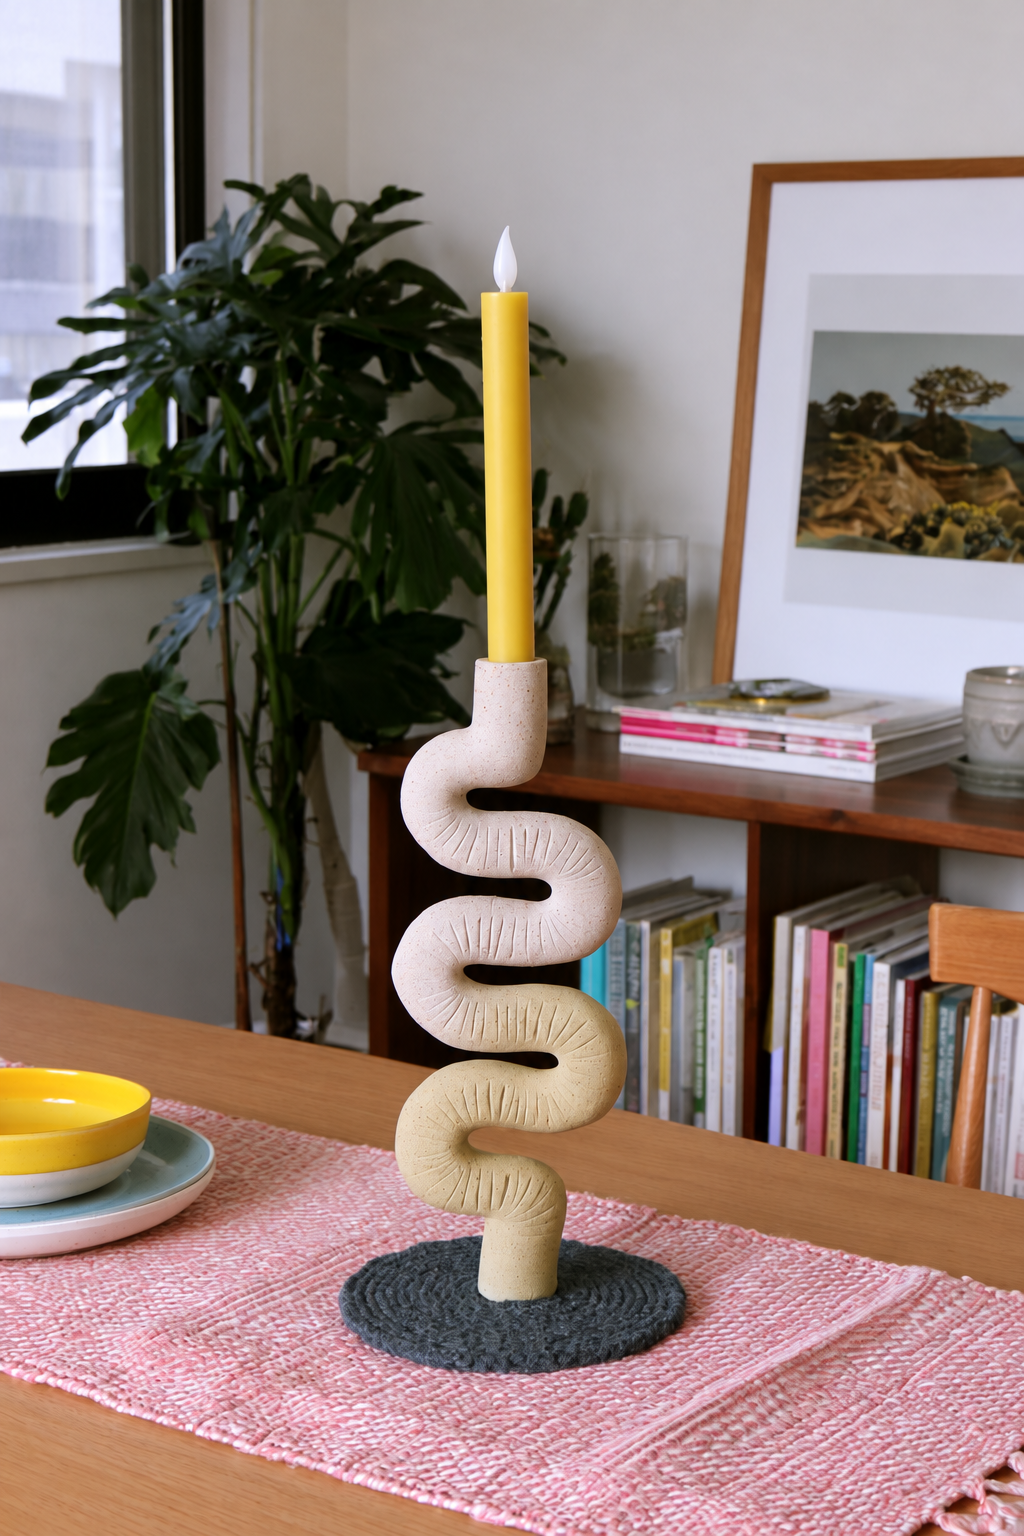
The winding pink and pale yellow holder brings vertical movement to a table without needing a large arrangement. Fine grooves follow its bends, so daylight makes the surface interesting even when the taper is switched off. The updated display uses a battery operated taper, allowing the candle shape to remain part of the composition without an open flame.
Use the making stages to plan the wavy profile, keeping the narrow sections and the standing base in proportion. Form the opening around the dimensions of the chosen flameless product, allowing for shrinkage and access for removal. Check that the assembled piece stands steadily on a level surface. Adding a metal collar does not override a clay manufacturer's heat restrictions; choose another material if actual flame use is required.
4. Botanical Clay Mirror Frame with Raised Floral Details
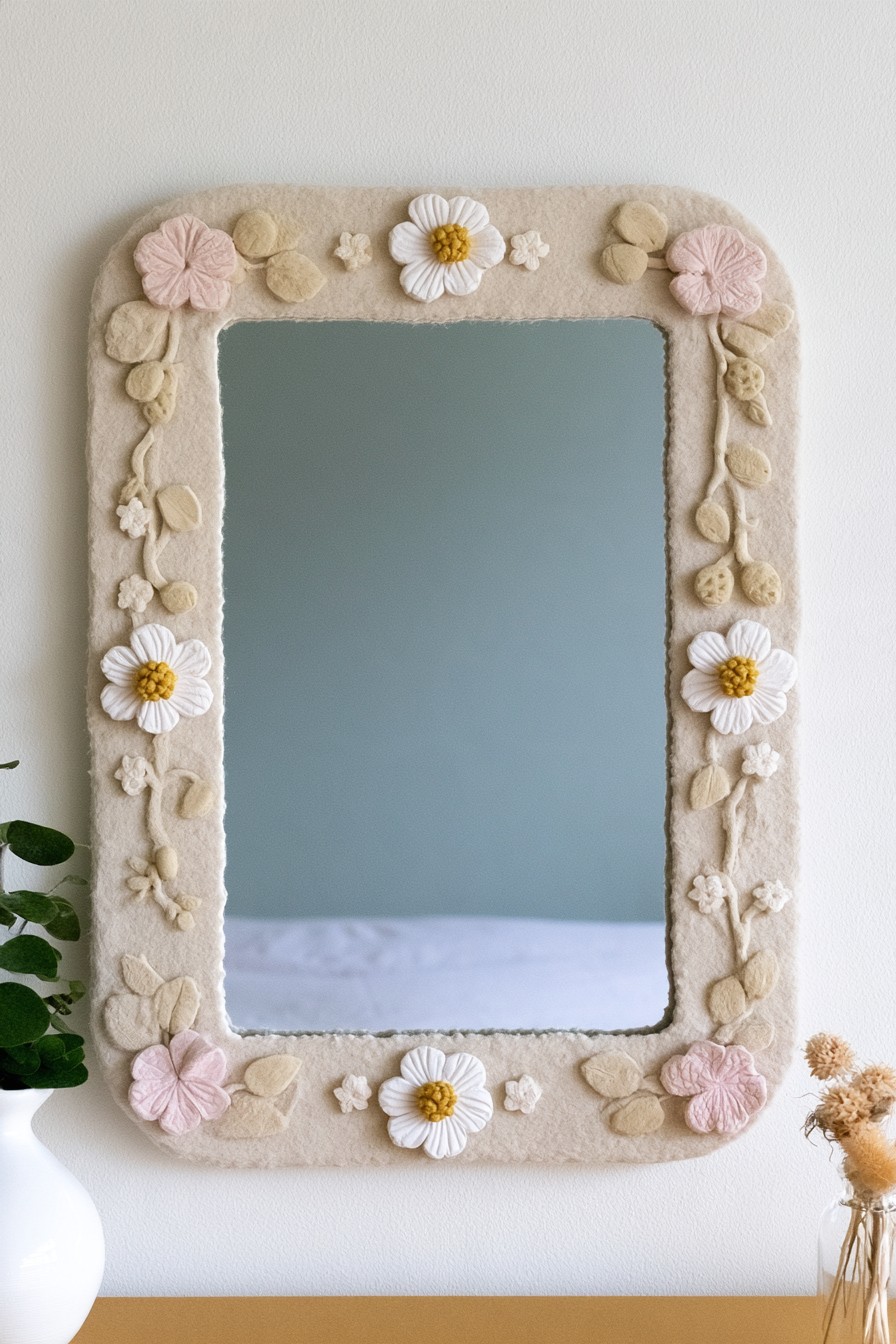
Raised leaves and small flowers give the mirror a botanical border while leaving its reflective center useful. Pale pink, cream and muted green connect the relief to soft bedroom or vanity styling. You can borrow the arrangement for an existing mirror, placing larger flowers near corners and allowing smaller leaves to bridge the gaps.
Make paper outlines to check that the decoration leaves enough mirror visible. Form the clay pieces separately and let them dry before testing an adhesive suitable for both the pieces and the existing frame. This avoids assuming that wet clay can dry successfully against a rigid surround. Keep the mirror's original backing and mounting system responsible for its support, and account for the added ornament weight. Leave fasteners accessible and protect the glass during finishing.
5. Textured Clay Table Lamp with a Ribbed Base
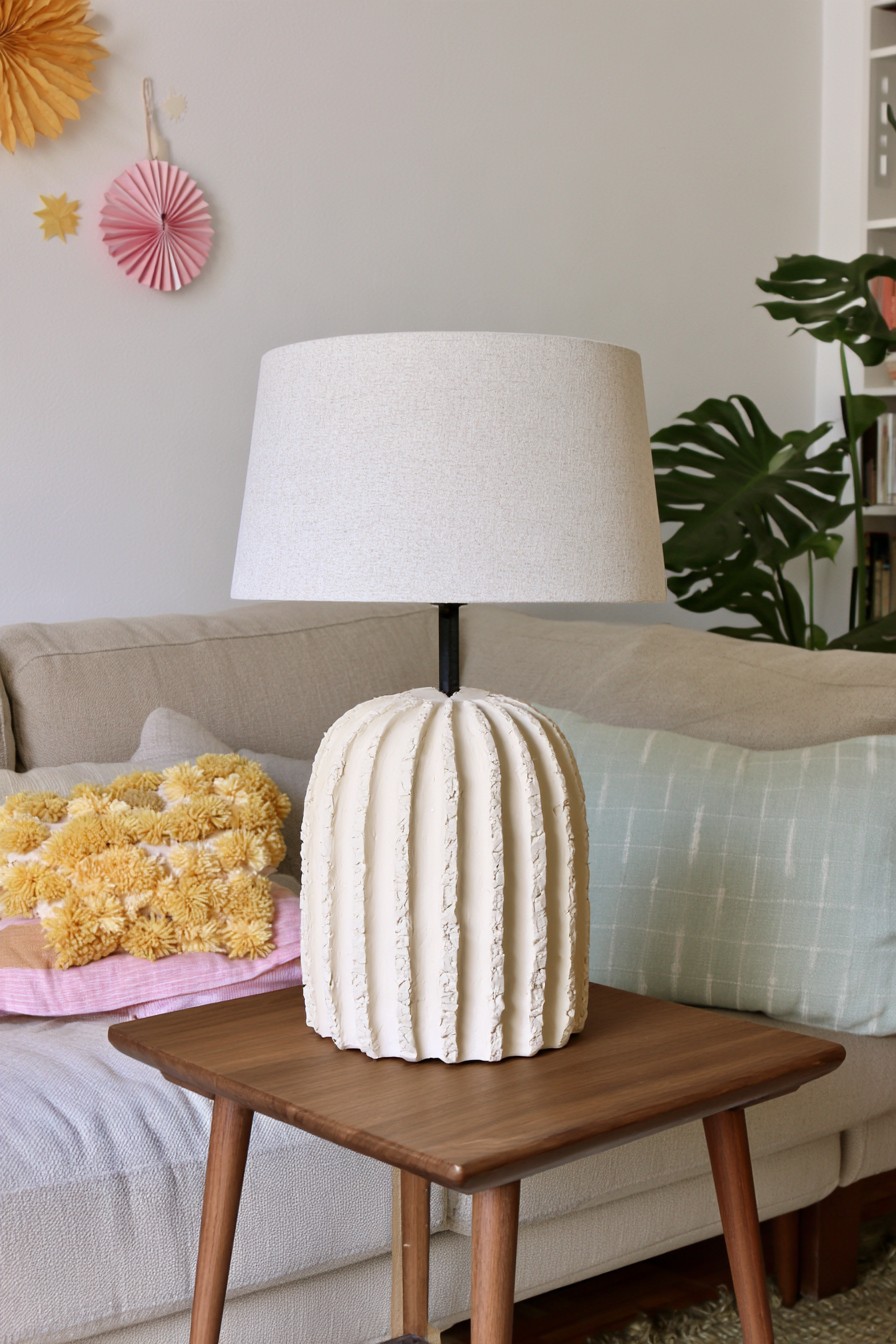
Vertical ribs make this lamp base resemble sculptural pottery, while the plain shade keeps the overall effect calm. The texture suits a room with timber furniture or soft woven fabrics because the grooves supply detail without demanding a bright color. Its visual idea can also inspire a separate decorative column displayed beside a lamp.
For an actual lamp adaptation, retain a properly constructed lamp body and check whether its instructions allow the intended decoration. Separately formed, dried clay details avoid an unverified wet coating over a rigid core. Their placement must leave cables, switches, ventilation and electrical access clear. A low heat bulb alone does not prove the clay treatment suitable. Keep electrical work separate from shaping and painting; if material or lamp compatibility cannot be established, use the shape as an unlit sculpture.
6. Miniature Clay Houses for a Layered Shelf Display
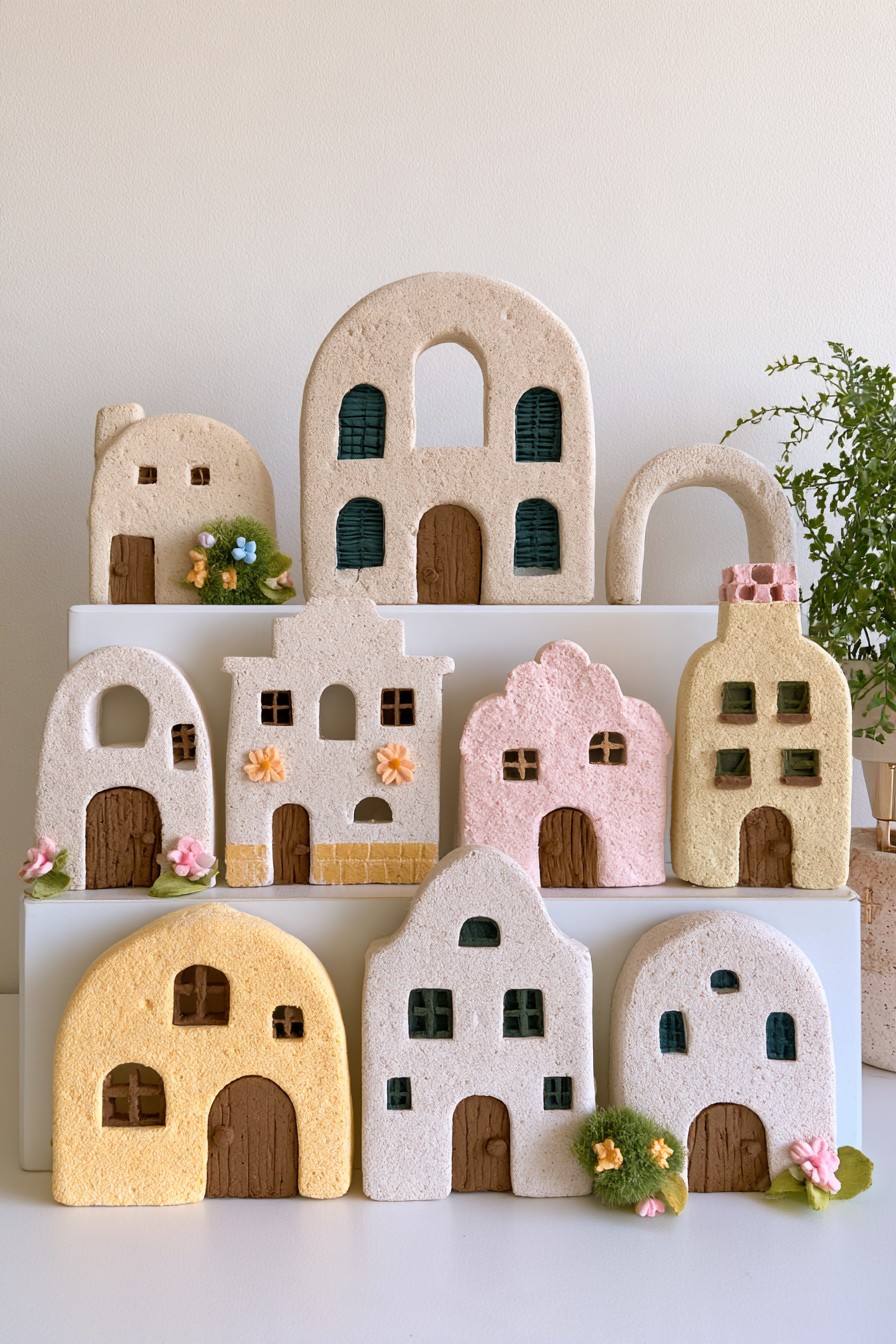
The little houses gain character from varied rooflines, doorways and facade colors rather than a single repeated shape. They fit a narrow shelf where a full size accessory would dominate. Cream, dusty pink and pale yellow keep the miniature village connected, while small gaps let each building remain recognizable from across the room.
Cut simple wall and roof profiles from paper first, then adapt them to clay panels or small modeled bodies. Mark windows and door details before drying and use the product's joining method for attached parts. Avoid exceptionally thin chimneys or shutters that will be difficult to handle. Arrange taller houses behind shorter ones, but leave enough access to lift each piece for dusting. Choose a few architectural details per house so painting stays manageable.
7. Floral Clay Bowl with Layered Leaves and Petals
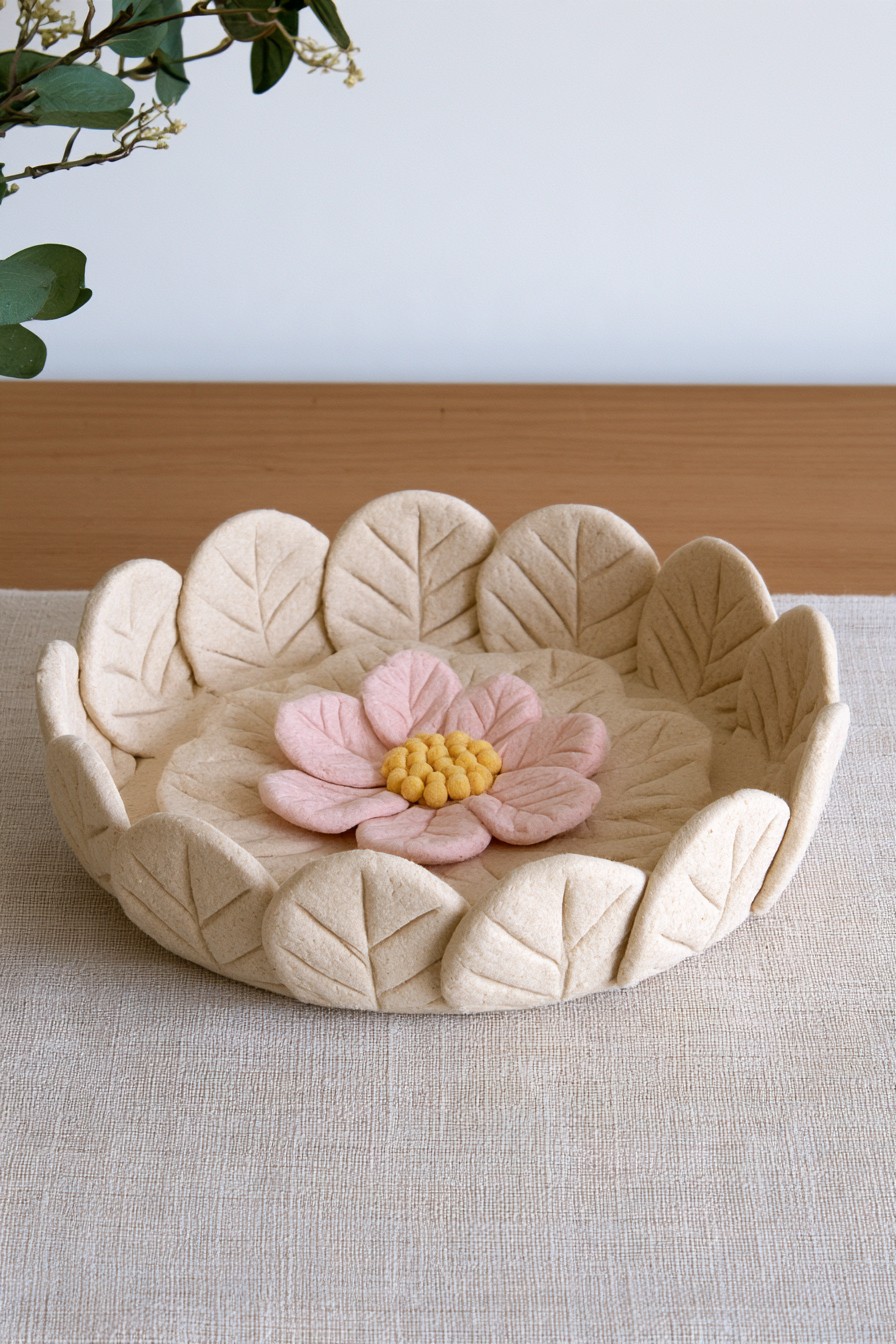
The bowl's leafy rim and central flower turn a dry catchall into a small botanical sculpture. Warm ivory with blush petals works well beside linen or pale timber. Its shallow interior suits a few lightweight keepsakes, although the raised flower takes up space that a plain jewelry dish would leave open.
Shape the basin first and plan where everyday objects can rest without catching on petals. Add leaves and the central bloom with the recommended clay joining technique, smoothing contact areas while the material is workable. A few incised veins are enough to distinguish the foliage without fragile edges. Let the entire form dry before coloring the relief. Reserve this version for dry decorative use; a floral bowl made with ordinary craft clay should not serve uncovered food or hold water.
8. Miniature Clay Landscape for Decorative Display
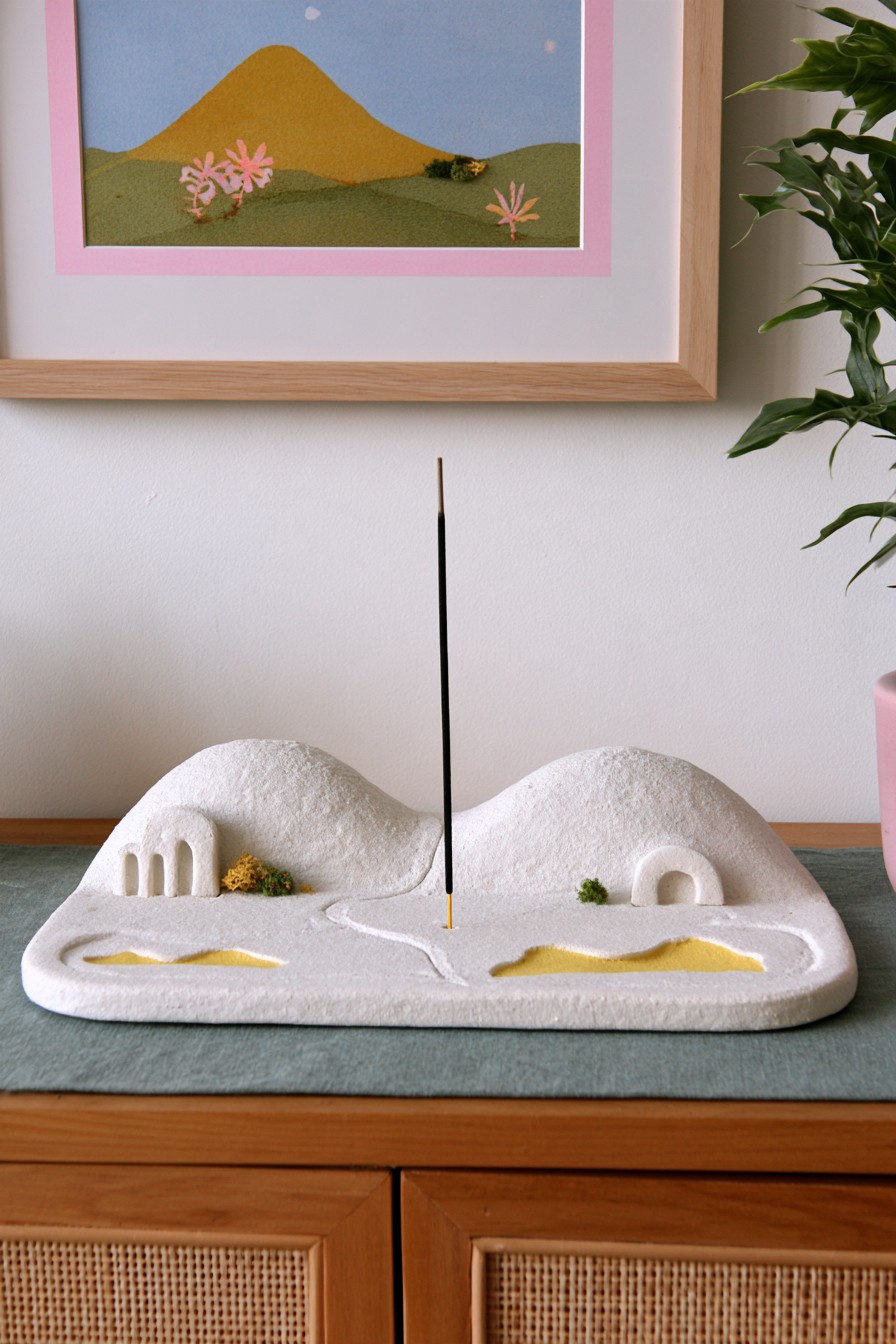
Sloping ground, a small tunnel and miniature architectural details make this landscape interesting from several viewpoints. Use this clay arrangement as an unlit incense themed decoration; for burning incense, choose a purpose made heat resistant holder. Treat this adaptation as a miniature display when the chosen product prohibits flame or high heat.
Start with a simple base outline and build the hills and openings in stages using the clay's recommended joining method. Keep passages readable rather than crowding them with tiny additions. A removable unlit stick can complete the composition, or it can be omitted entirely. Neither a metal insert nor a nonflammable surface cancels the clay manufacturer's restrictions. If you want functional incense use, select a purpose made product approved for that task and display the clay scene separately.
9. Colorful Clay Mushrooms for a Whimsical Console Display
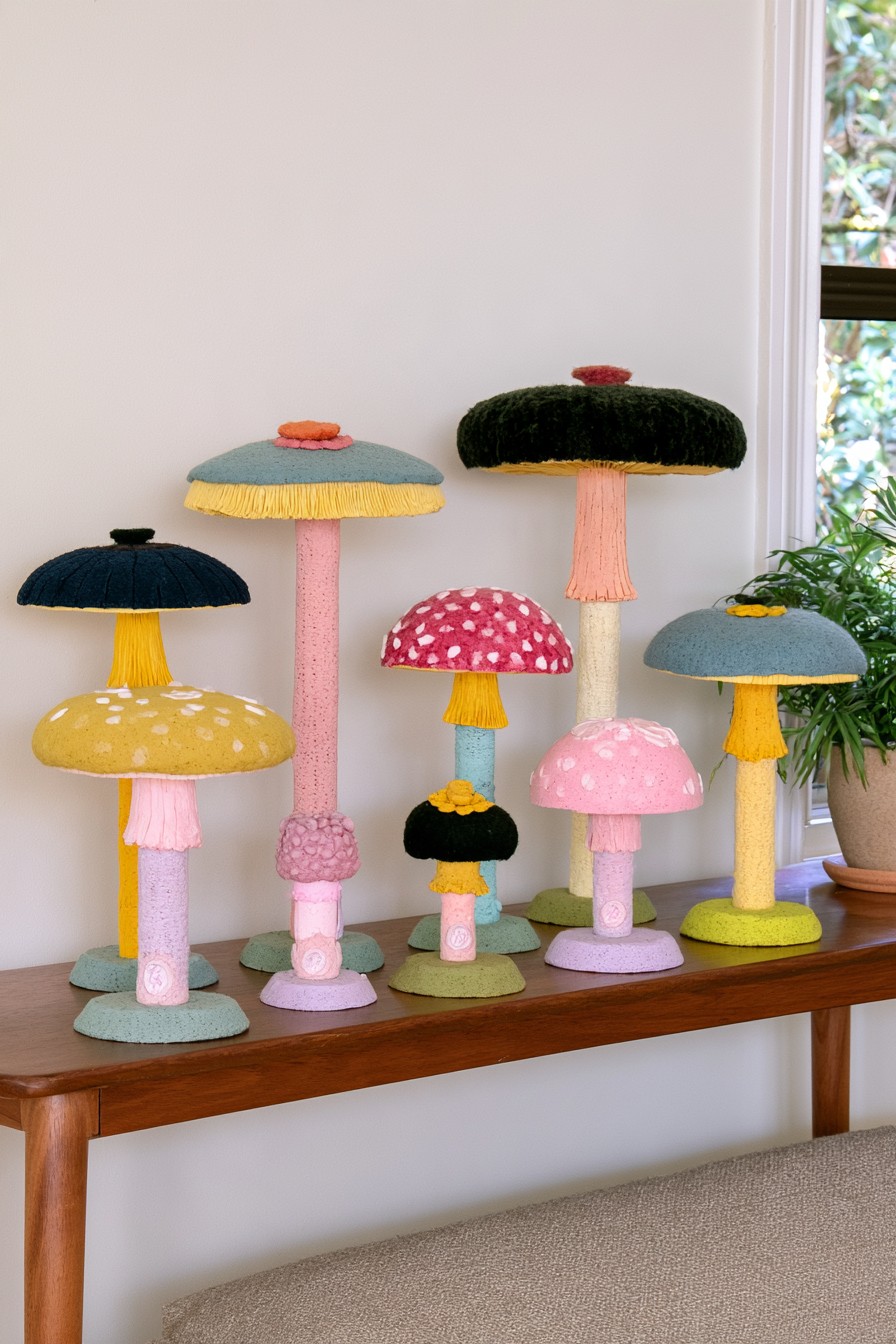
Mushrooms are a useful way to explore organic proportions without making a complicated container. Broad caps, narrow stems and shorter foreground pieces create a little landscape across a console. Sage, mustard, dusty pink and muted blue give the collection variety while repeating enough color to make it feel intentional.
Model a few cap and stem sizes, then test their proportions before joining. Plan each contact area so a wide cap does not depend on a very narrow connection, and support the parts during drying according to the clay instructions. Add spots or shallow gills while the surfaces remain workable. Display the finished group with taller shapes at the back and space between their caps. Lift individual pieces from sturdy sections when dusting rather than pulling on their stems.
10. Organic Pedestal Clay Bowl with a Wavy Edge
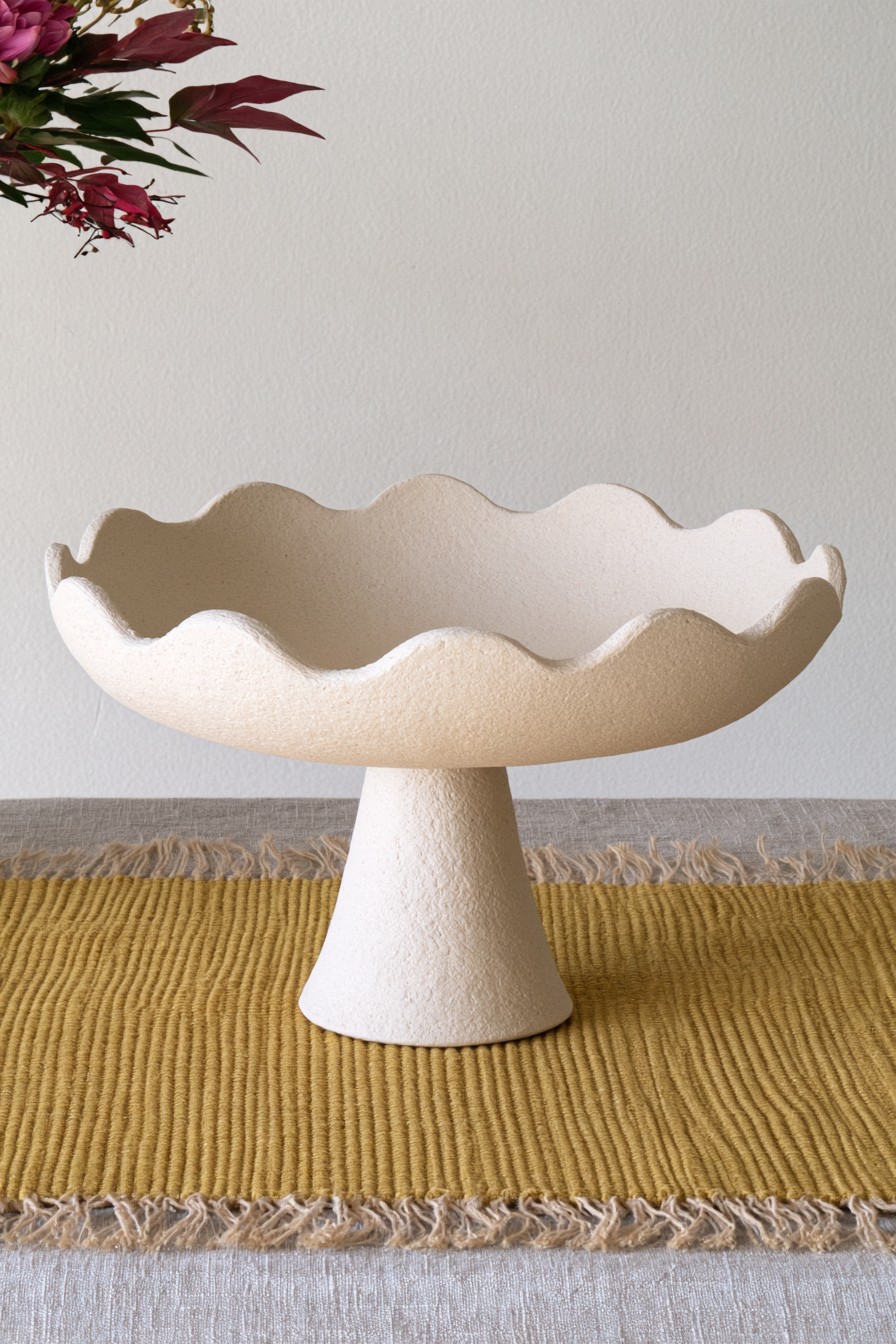
A broad basin on a short pedestal creates a low centerpiece that leaves conversation across a table unobstructed. The uneven ivory rim is the main decorative feature, so the bowl can stand empty beside a woven runner. A few lightweight dry objects may suit the interior, but the shape does not need to be filled to look complete.
Plan the bowl and pedestal together so the upper width suits the base. Shape an even slab on an appropriate forming support and join it using the clay’s method. Keep the piece for lightweight decorative contents; use materials expressly approved for food or water if either is intended.
11. Abstract Clay Face Sculpture for Artistic Shelf Styling
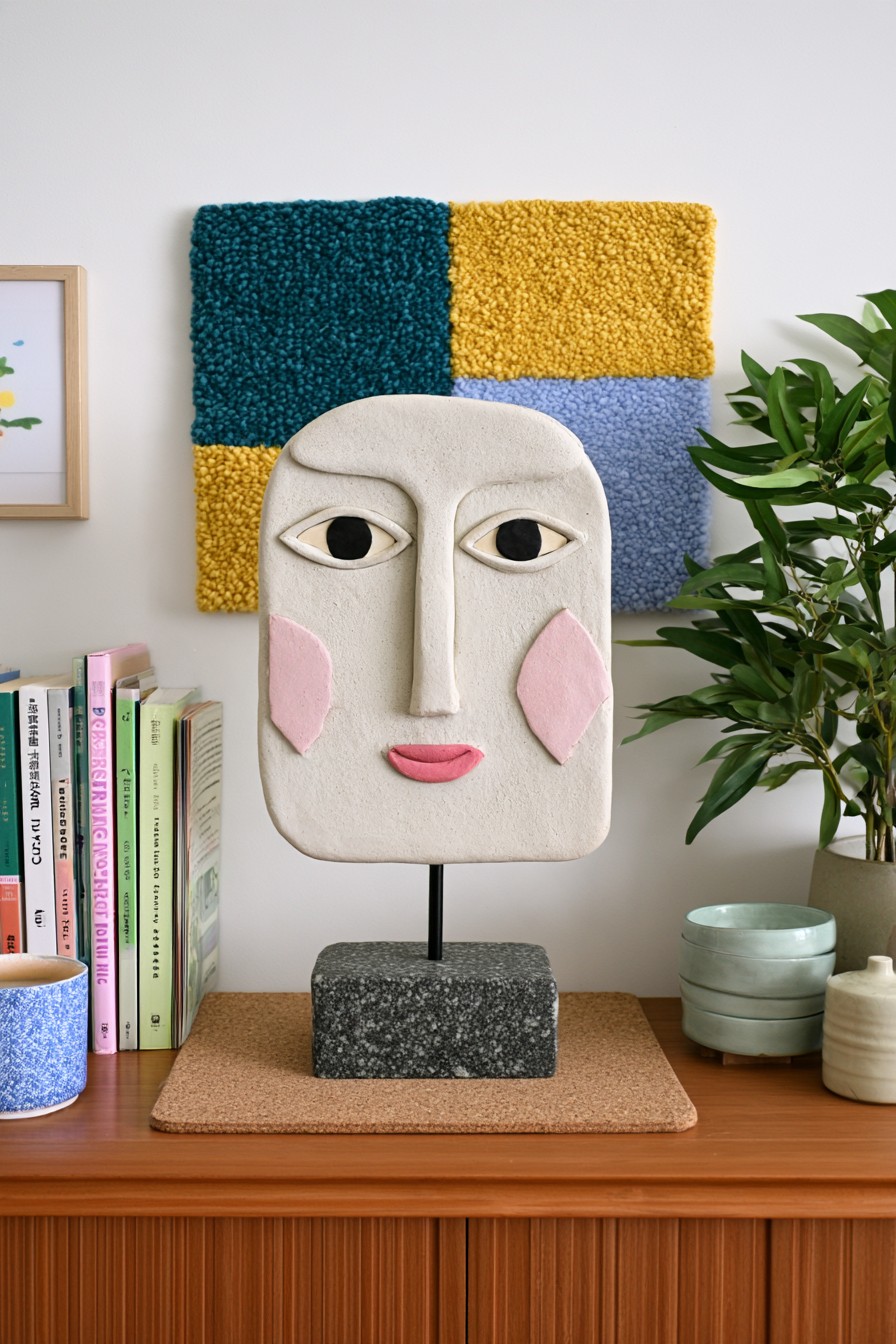
The abstract face introduces an artwork to the shelf without another rectangular picture frame. Shallow brows, lips and eye shapes carry the expression, and slight asymmetry reinforces the handmade finish. The slim display support lifts the face above nearby books, letting a relatively small sculpture remain visible in a layered arrangement.
Draw the face at its intended size and build the relief on a consistent clay base rather than adding a thick lump behind every feature. Consider the display connection before drying, following the product's rules for openings and supports. Do not embed a rigid rod in wet clay unless that method is permitted. A suitable independent stand can support the finished dry piece, with a stable base planned for its weight. Keep adjacent objects simple so the expression remains the focus.
12. Clay Leaf Catchall Tray with Carved Botanical Texture
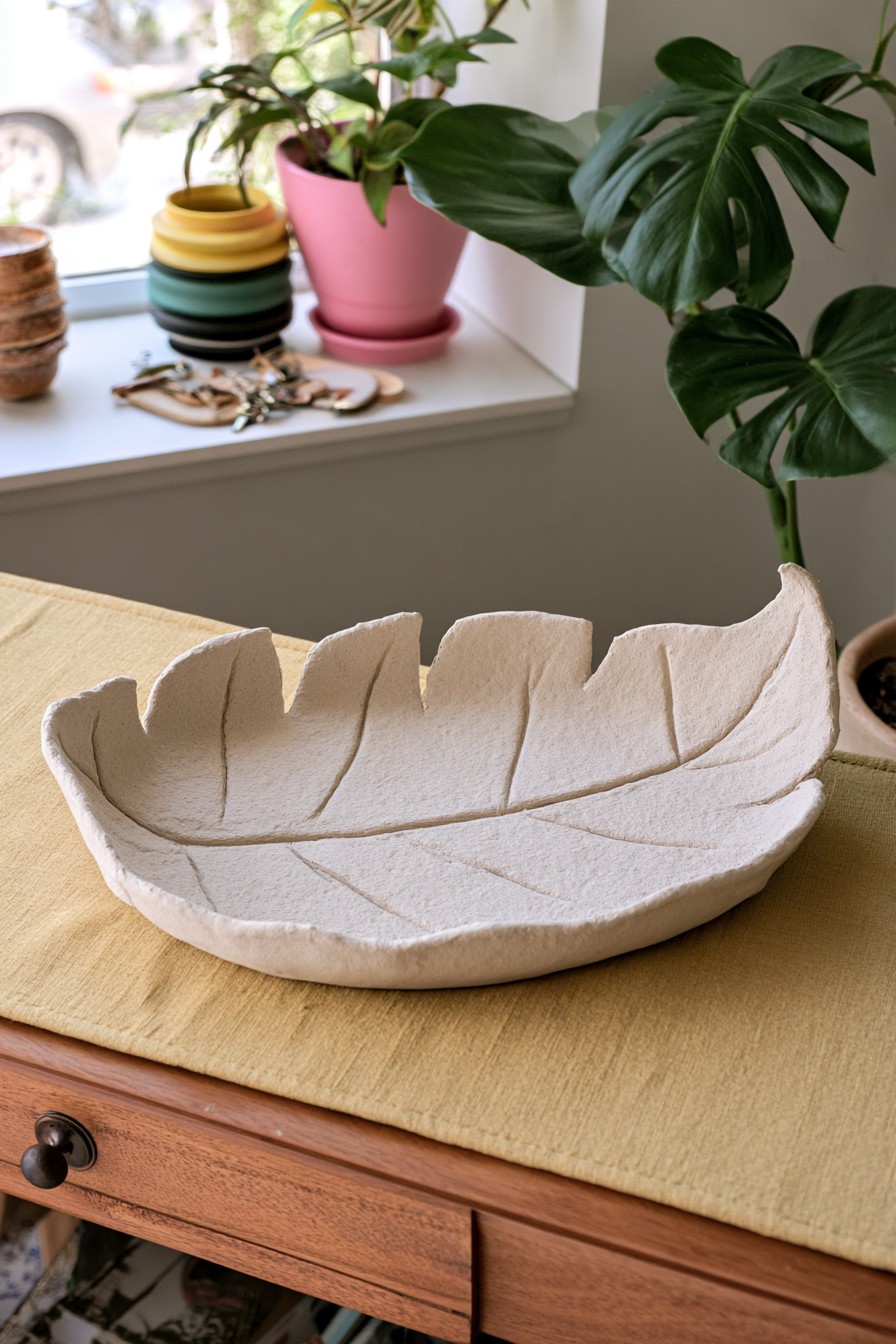
The elongated leaf occupies little depth, making it useful on a narrow entrance shelf or beside a bed. Its veins supply the decoration, so a single warm neutral color can work even when the surrounding room palette changes. A gently raised edge gives dry rings or small accessories a clearer place than an unbounded tabletop.
Sketch the leaf outline, roll the clay evenly and mark the veins before curving the sides. A real leaf impression is another approach; the leaf impression clay dish tutorial shows how botanical texture can guide the shape. Lift the leaf carefully and avoid thinning the tip excessively. Dry using a support allowed by the product. Keep the finished dish for dry items and use only the cleaning method permitted for its clay and coating.
13. Wavy Clay Picture Frame with a Soft Sculptural Border
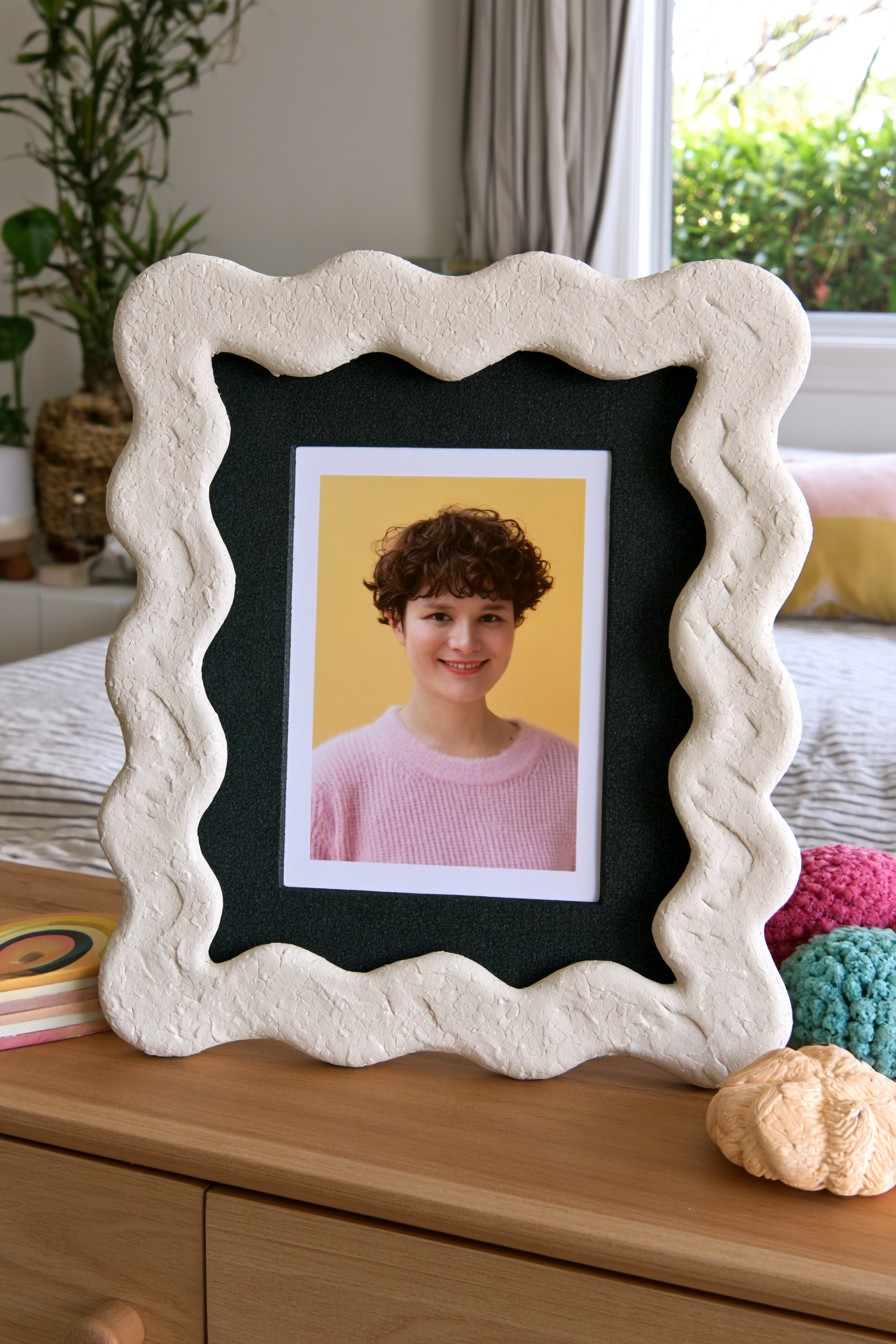
The wavy border softens the straight edges of a photograph and gives a small print more presence on a bedside table. Its quiet finish puts emphasis on shape rather than additional color. Broad waves can echo curved furniture or a nearby vase while still leaving the image itself easy to see.
Keep a suitable existing frame or backing responsible for holding the photograph. Form the ornamental border separately and attach it after drying with a compatible adhesive, unless your clay expressly permits another method. Check the standing balance and leave the back accessible for changing the picture. Avoid covering the frame's support or fastening points. For a different decorative treatment, the DIY floral clay photo frame guide explores arranging flowers around a picture.
14. Mini Clay Arch Shelves for Small Decorative Collections
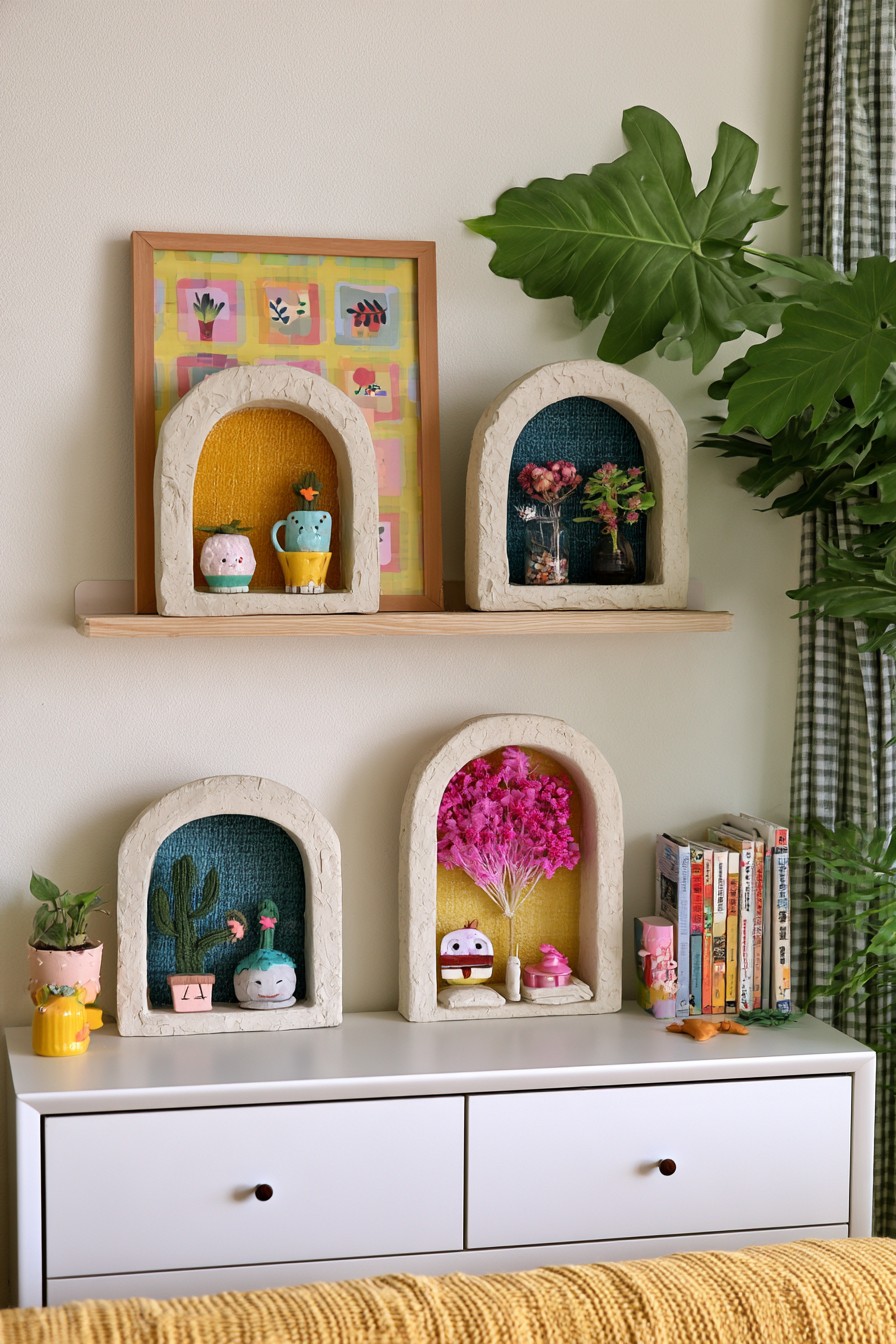
Small arched niches give miniature objects a defined setting rather than leaving them scattered along a shelf. Colored recesses help pale ornaments stand out, while the curved openings contrast with ordinary rectangular furniture. This idea suits a small collection that benefits from individual display spaces and does not need frequent rearrangement.
Measure the chosen objects first, allowing room to place and remove them without catching the arch. Use a suitable rigid structure for the shelves and backing, with clay serving as separately dried decorative trim. Wet clay wrapped around a rigid core can shrink unevenly, so check product guidance before choosing that construction. Keep the openings generous and the display modest. Build or select a separate carrying structure for the contents, then add the clay surround as decoration.
15. Clay Centerpiece Tray with Flameless Tealights
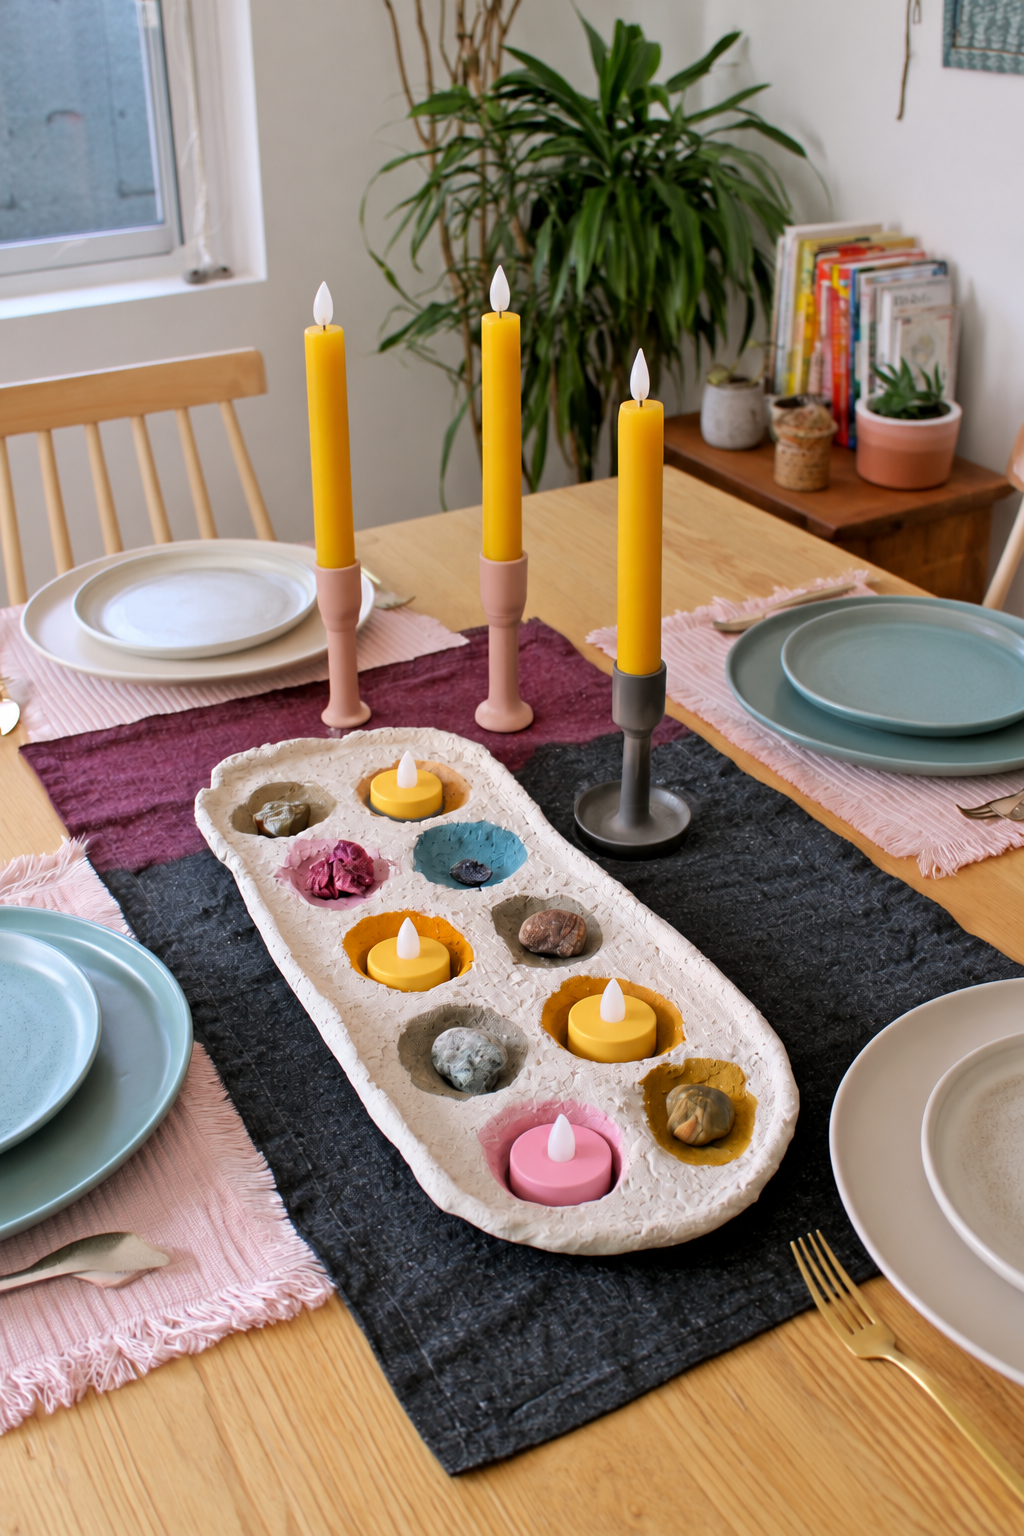
The long tray groups small stones, colorful recesses and flameless tealights inside one low boundary. This gives a dining table a coordinated centerpiece while keeping guests' views clear. Yellow and pink lighting accents repeat the textiles without requiring every compartment to contain the same object, and the arrangement can change for different meals.
Mark the compartments on a paper outline before forming shallow depressions in an even clay slab. Keep enough material between them and avoid creating sharply thin edges. Fit the chosen battery operated lights after drying, leaving access to switches and batteries. Use flameless products when the clay is not approved for heat; glass or metal inserts do not automatically authorize real candles. Leave room around the tray for serving dishes, and remove the display before wiping the table.
16. Clay Pedestal Stand for Elevated Decorative Styling
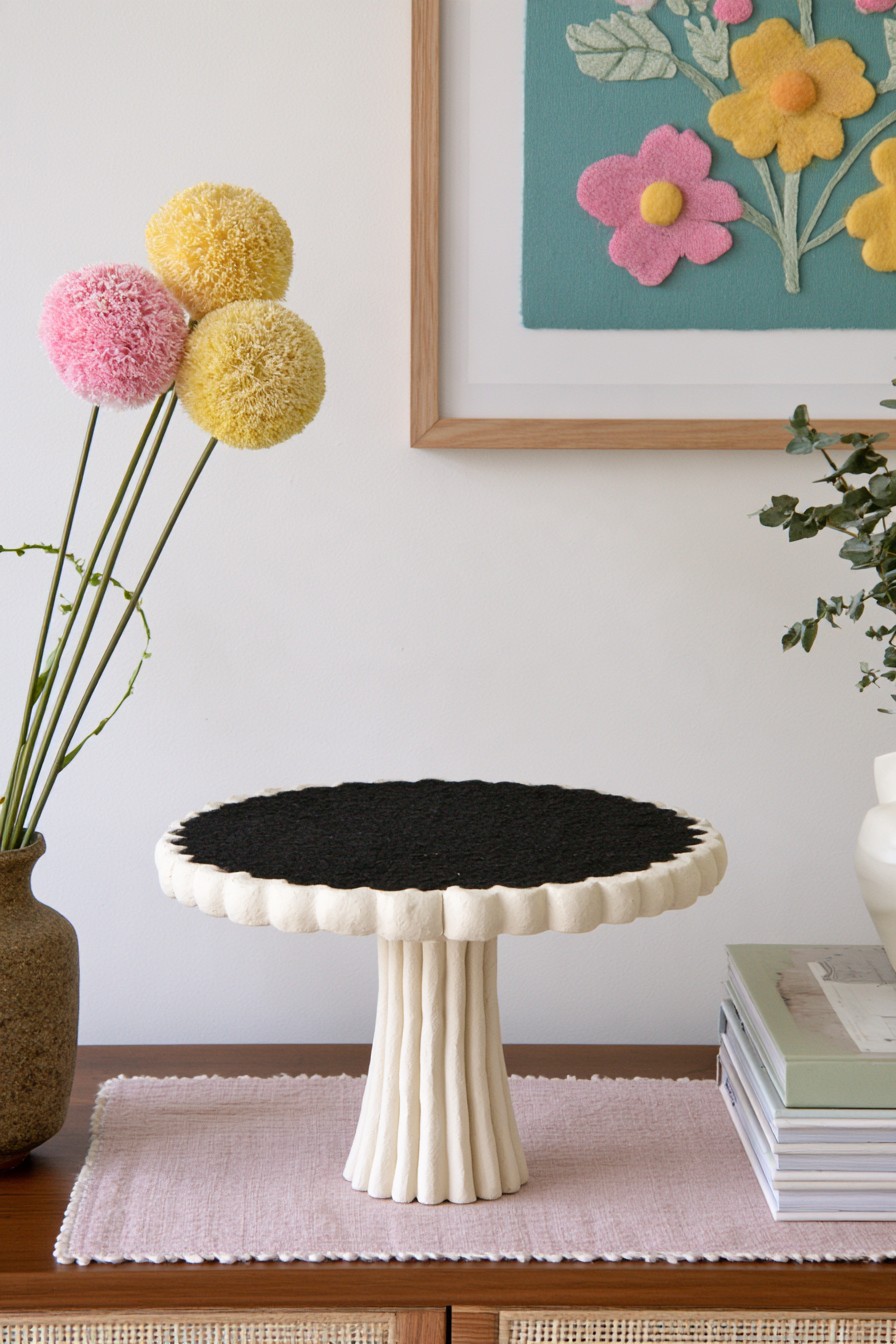
A small pedestal adds height to a tabletop arrangement without needing another large vase. The fluted column and scalloped edge make the stand decorative even when it holds only one light ornament. Its dark upper surface also gives pale objects a clear backdrop against the surrounding neutral furniture.
Plan the platform width, column height and base together so the top does not dominate the footprint. Model shallow flutes before drying and keep the joins consistent with the clay instructions. For an adaptation that must carry a meaningful load, use an independently suitable support with clay as ornament. Support the contents on a sound inner container and secure its handle to that structure. Keep this version for decorative display and avoid presenting it as a cake stand; a separate food plate does not by itself make an unverified pedestal suitable for that load.
17. Spiral Clay Vase Trio for Layered Flower Displays
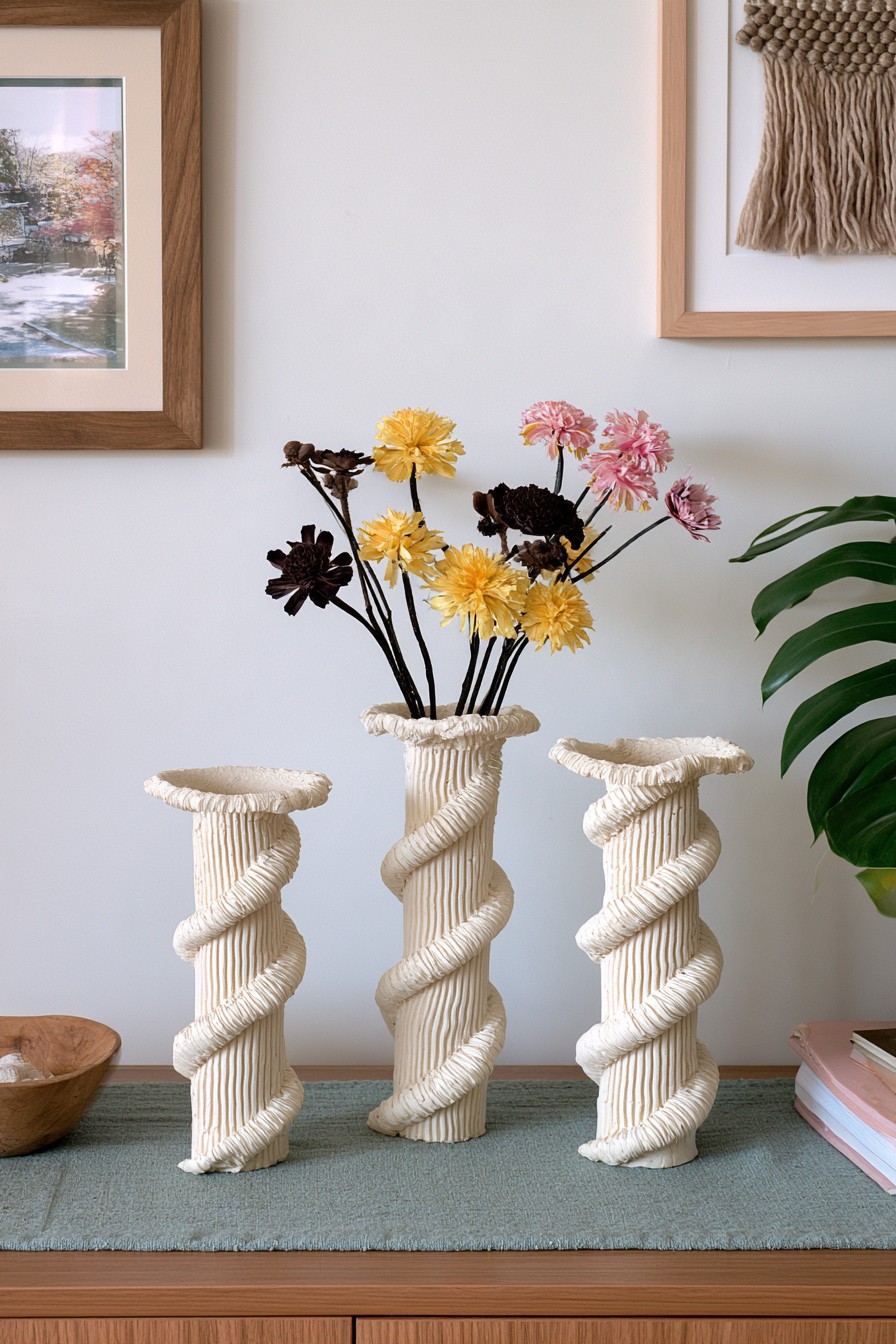
The three spiral vases repeat one texture at different heights, creating a console display with a clear family resemblance. Leaving some vessels empty can make the flower filled one feel more deliberate. Select a few related flower colors and vary stem heights so the blooms complement the ridges rather than hiding all three silhouettes.
Plan the openings around removable watertight vessels if you want fresh stems. Shape the outer bodies and spiral relief using a method compatible with the clay, allowing for shrinkage before fitting the inserts. Fill and wash those containers separately, and dry their exteriors before returning them. For help balancing the flowers across the group, consider flower styling with grouped vases. Position the tallest arrangement where it does not obscure an adjacent lamp or picture.
18. Scalloped Clay Tray for Decorative Kitchen Styling
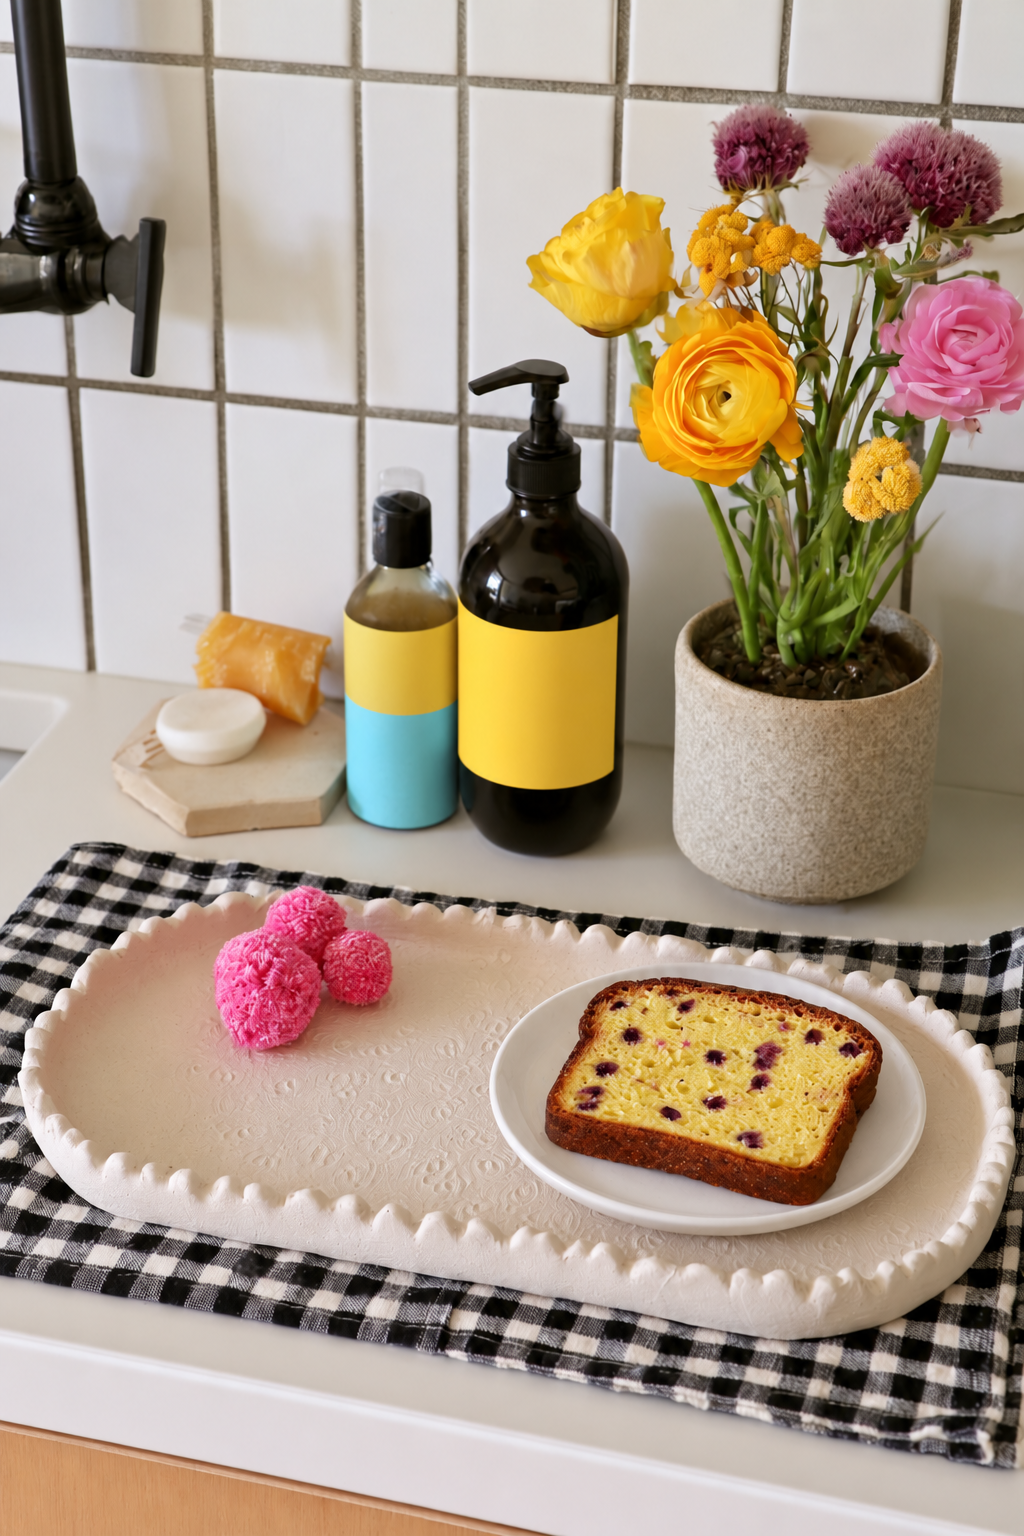
The scalloped tray brings texture to a kitchen counter without repeating the straight lines of the cabinets. Its updated arrangement places the cake on a separate ceramic plate, with pink decorative pompoms on the other side. The plate provides the food surface; the clay tray supplies the outline, relief and background color.
Cut a long slab, plan the scallops and impress the center before shaping the edge. Check the final size against the plate and display objects, allowing for shrinkage rather than assuming the wet dimensions will remain unchanged. Ordinary air dry clay and a decorative sealer are not automatic food contact materials. Lift the food plate separately and keep the clay away from sink splashes. Its location near washing products makes dry placement and access for counter cleaning especially useful.
19. Air Dry Clay Wall Pocket Vase with a Floral Shape
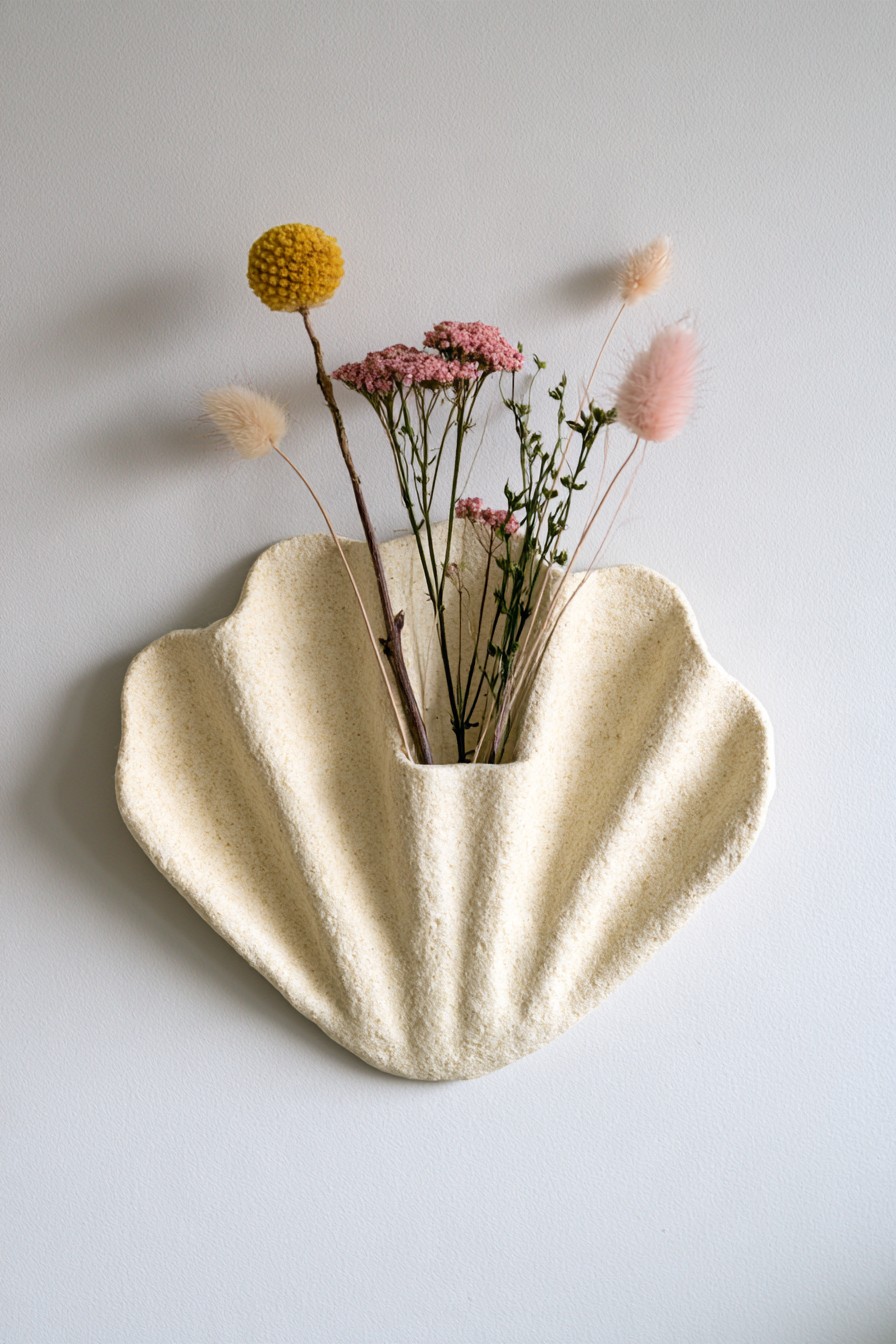
A broad flower shaped wall pocket brings botanical texture to a room with little spare tabletop space. Its petal outline functions as relief sculpture, and a few narrow dried stems add a second layer. The pale body leaves muted ochre, pink and green flowers visible without demanding a large bouquet.
Work out the pocket depth and hanging arrangement before forming the clay. A paper profile helps determine how far the finished piece will project from the wall. Use the recommended method to join the front pocket to its back, and plan mounting for the whole finished weight. Fresh stems require a removable watertight tube, filled away from the clay. Keep the arrangement light and accessible for removing stems; the floral outline should not hide the mount or make maintenance difficult.
20. Textured Clay Cone Trees for a Colorful Display
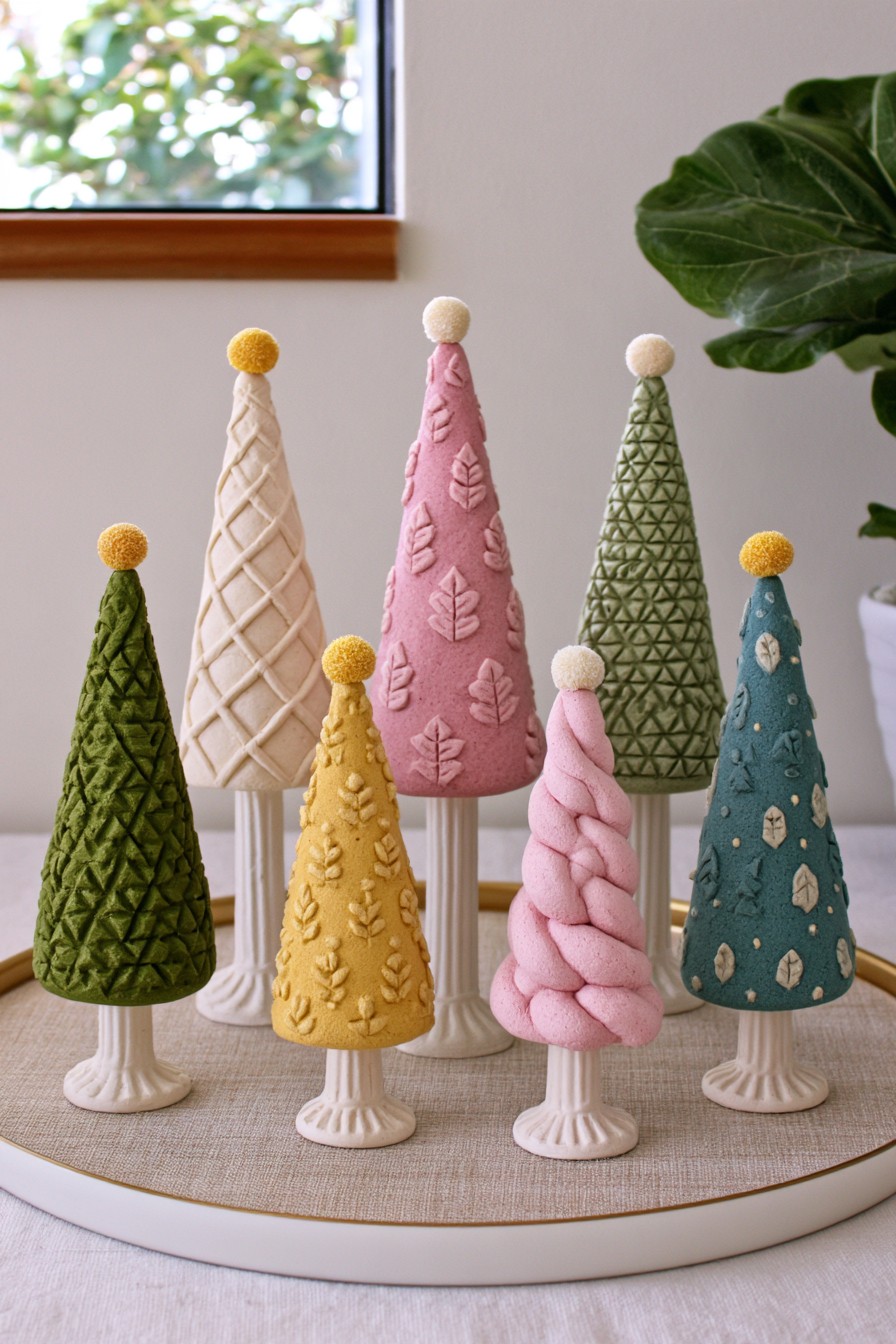
The cone trees keep one recognizable silhouette while changing surface pattern and color. Raised lines, leaf marks and small geometric impressions let the collection feel varied without becoming a mixture of unrelated ornaments. They can suit seasonal styling, but cream, muted green and dusty pink also work beyond a particular holiday.
Draw cone profiles in a few sizes and select a forming method the clay permits. An even slab can receive its texture while flat before being shaped with a suitable removable support. Follow the product's guidance for joining the seam and drying; do not assume a rigid core should stay inside. Arrange shorter forms in front of taller ones and leave their patterns visible. Gentle handling matters more than a fixed number of ornaments or an exact color sequence.
21. Botanical Clay House Number Plaque for the Entry
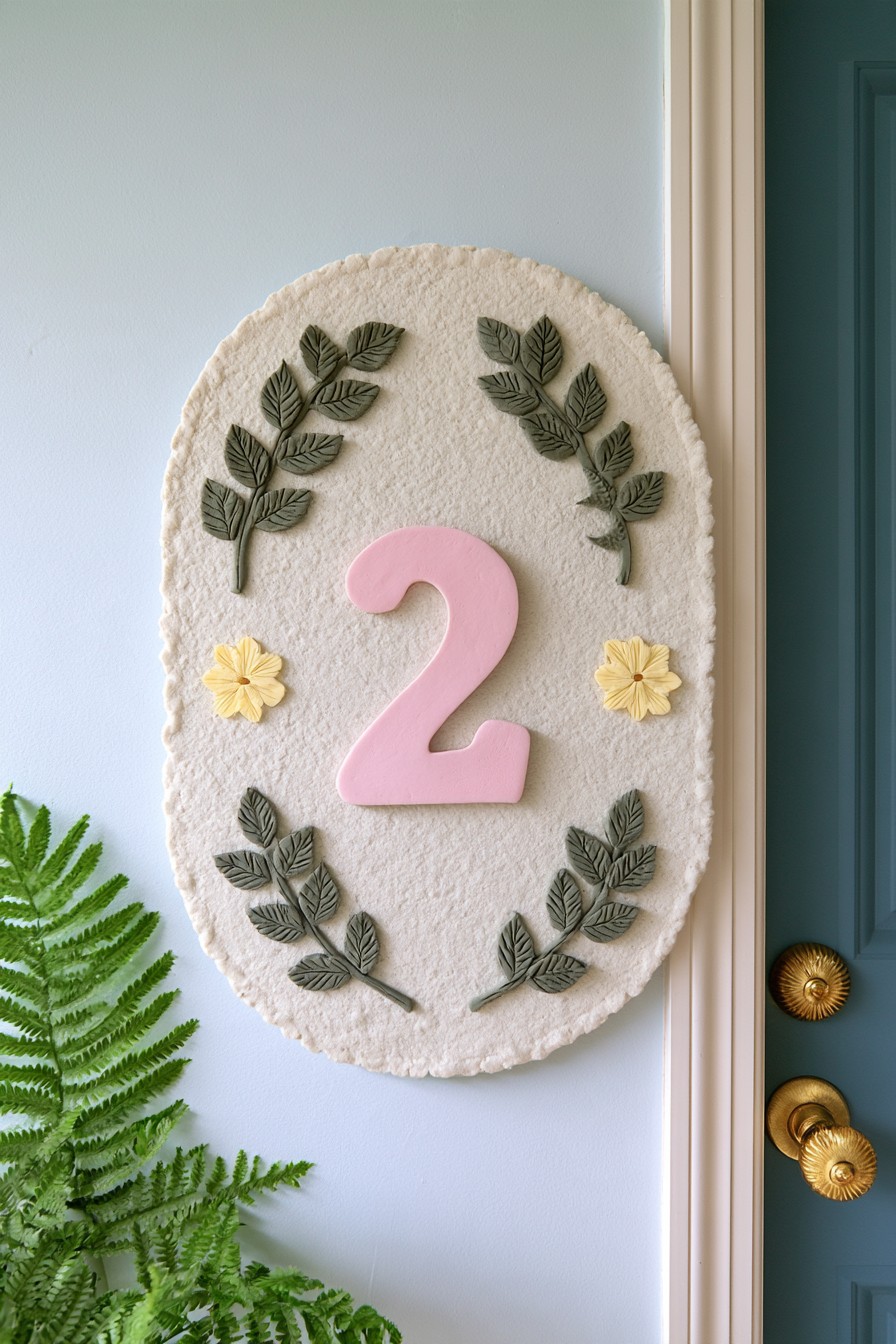
The oval plaque uses one prominent numeral with flowers and leaves around it. This is a useful approach when the number should remain readable despite the decorative detail. Put the numeral first in your sketch, then add botanical shapes in the remaining space rather than letting stems cross its outline.
Make the plaque and relief with the product's joining technique and plan the mounting before drying. Choose placement from the clay instructions: an indoor only product belongs inside the entry even after sealing. A covered porch does not automatically provide acceptable conditions because humidity, temperature and wind driven moisture still reach it. For an exterior address sign, select a material explicitly suited to those conditions. Check visibility from the intended viewing position and keep any decorative flowers from concealing the number.
22. Scalloped Clay Wall Shelf for Colorful Accessories
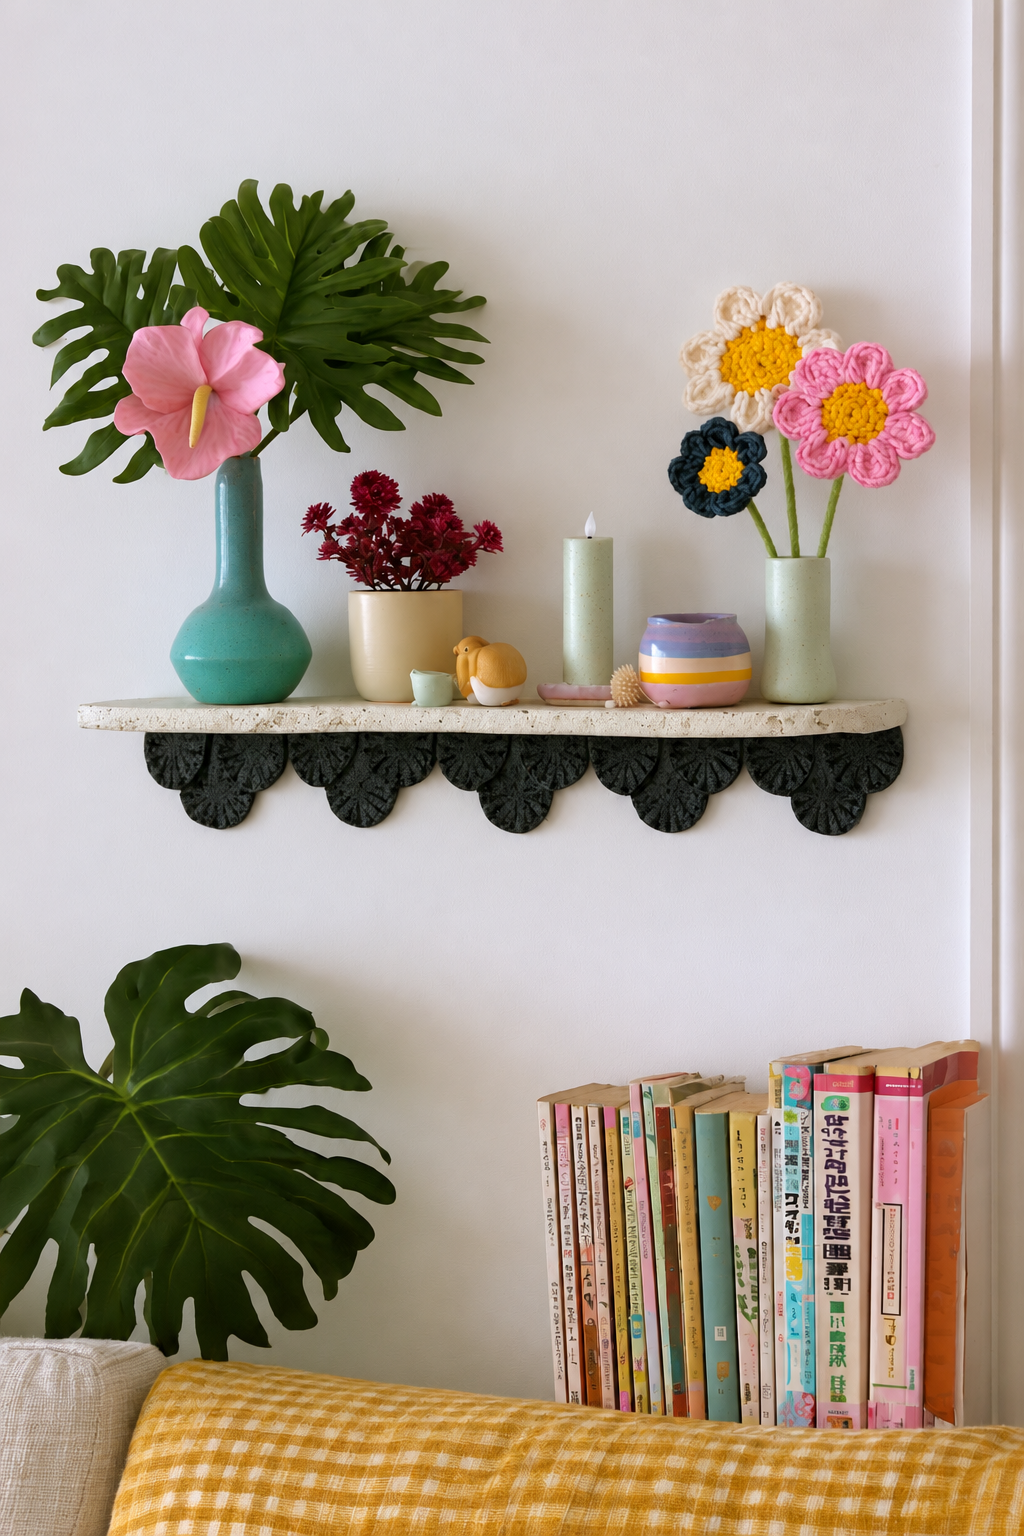
The shelf's dark scalloped edge acts as decoration beneath a pale display surface. Colorful vases and textile flowers make the top feel cheerful, while the repeated curves provide visual order below. A flameless pillar candle now echoes the soft green accessories without placing a burning wick among the surrounding decorations.
Use a suitable shelf and mounting system to carry the objects, with separately formed clay scallops added as ornament after drying. Assess attachment to the actual shelf material and keep fixing access clear. Select a supporting structure rated for the intended contents before adding the clay decoration. Remove plant containers for watering and return them with dry bases or protective saucers. Keep the display spaced enough that each object can be lifted without scraping the ornamental edge.
23. Wavy Clay Wall Shelf with Sculptural Cutout Details
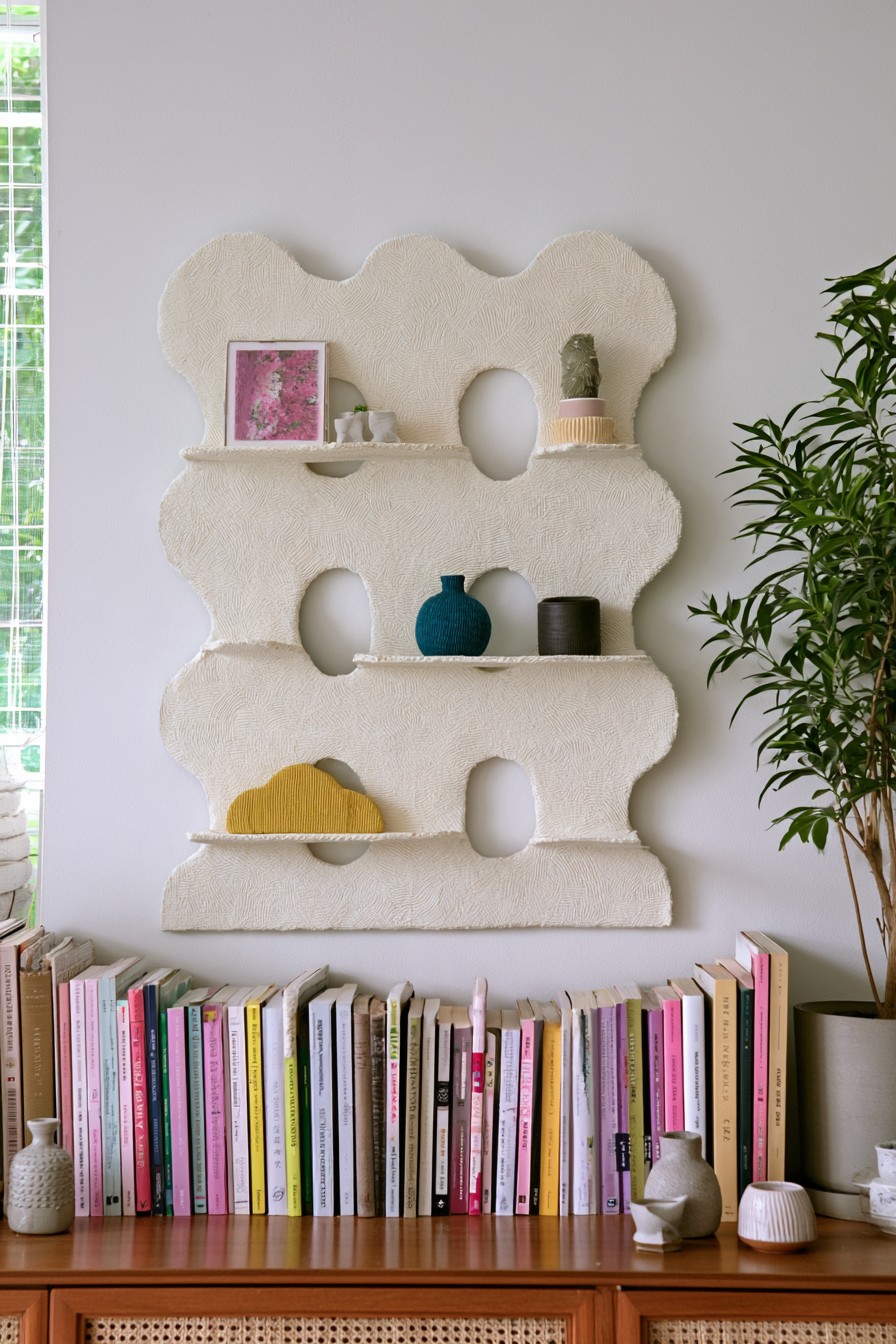
Rounded cutouts and a flowing outer edge make this wall unit feel like an architectural feature. The openings prevent the pale surround from becoming a solid block, while narrow ledges offer separate places for small ornaments. Leaving several areas empty is part of the effect, especially when the surrounding room already contains patterned textiles.
Start with a full size paper layout and a suitable carrying framework rather than treating the clay silhouette as the shelf structure. Plan the ledges, backing and wall connections together, then add separately dried clay decoration where the chosen materials allow. Do not assume a wet coating will dry successfully around a rigid base. The mounts must carry the unit, decoration and contents. Keep access to them clear, and choose small objects whose removal will not require reaching through fragile cutout edges.
24. Floral Clay Switch Frame for a Small Wall Accent
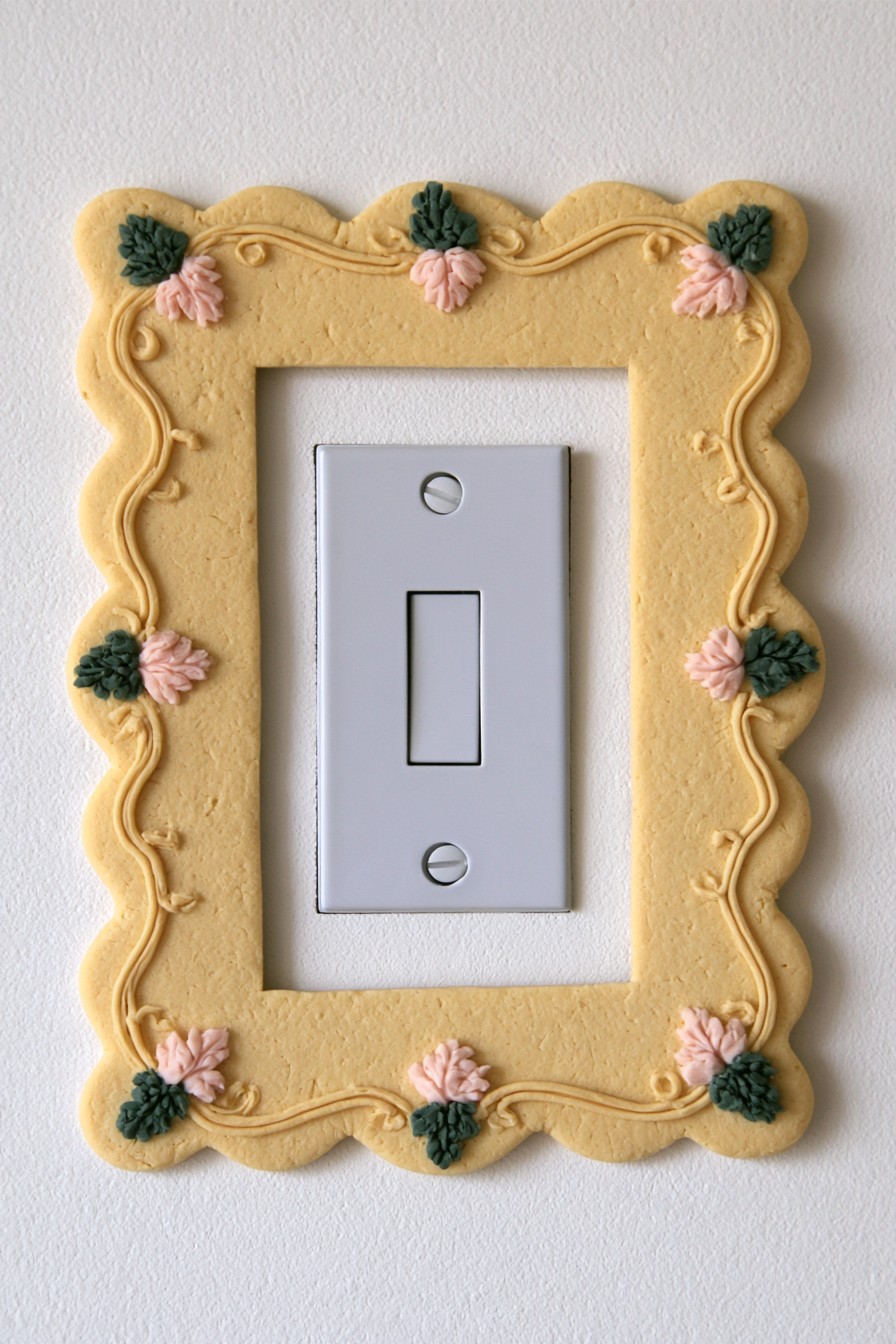
The floral surround turns a small wall fixture into a decorative detail without changing its practical purpose. A golden border, leaves and little blooms suit an otherwise plain section of wall. Because the accent is compact, it can repeat colors from a nearby picture or textile without introducing a new large focal point.
Measure around the existing approved switch plate and make a paper outline that leaves controls and screws accessible. Shape and finish the ornamental pieces away from the electrical fitting, then use an attachment method suitable for the surrounding surface. Keep clay, paint and adhesive out of the mechanism and wiring access. The finished surround must not interfere with operation or required clearances. If the planned installation requires electrical alterations, have them handled by a qualified person rather than making them part of the clay craft.
25. Clay Plant Pot Feet for an Elevated Planter Display
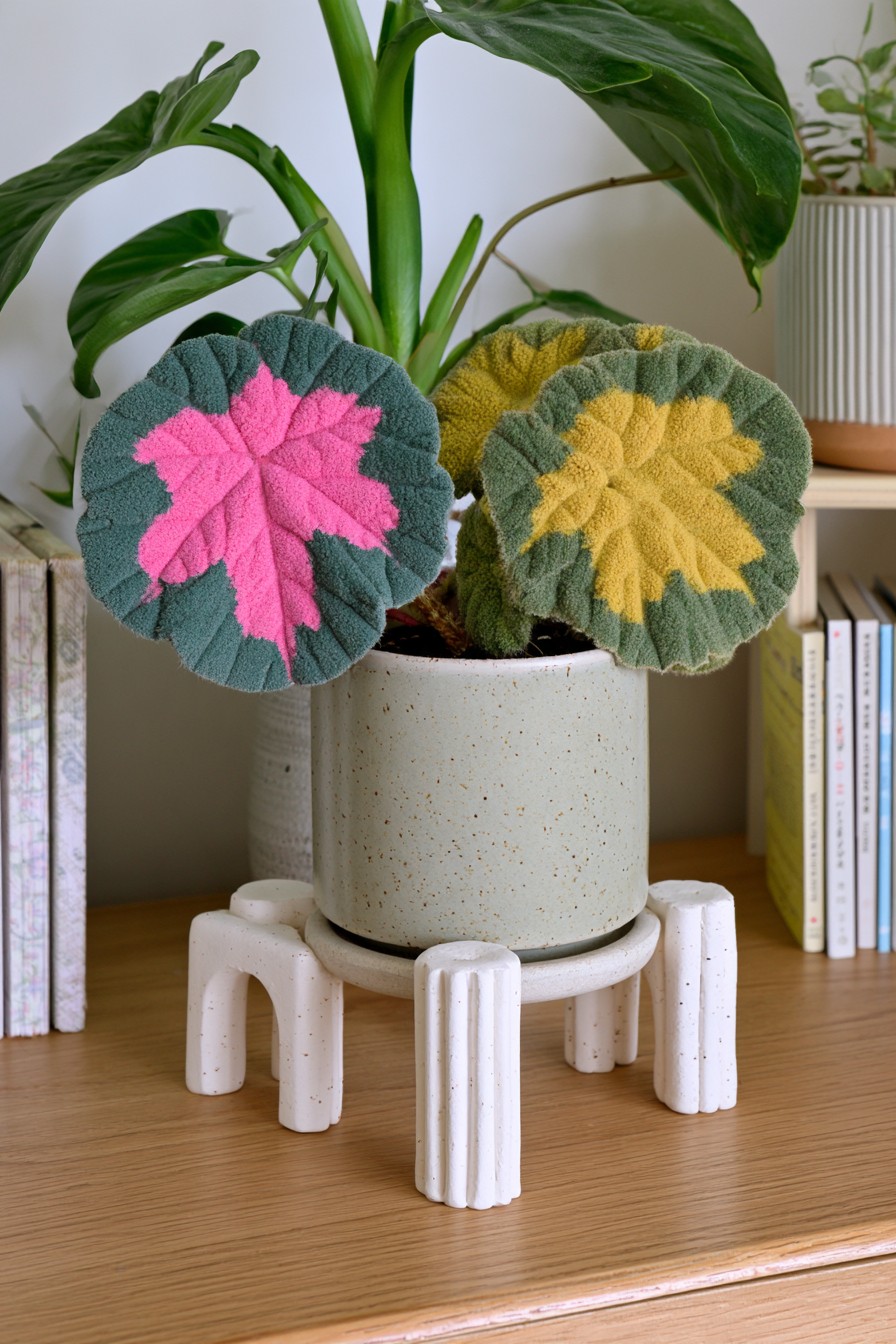
Repeated pale arches give the planter a raised outline and a small gap above the cabinet. The visual rhythm works especially well with a simple round pot because the stand supplies the decorative detail. Use the clay feet as decorative accents around a plant stand whose structure supports the filled pot.
For a practical adaptation, choose an independently suitable stand or carrying supports and use dried clay arches as the decorative treatment. Plan for the pot, wet soil, saucer and plant together rather than assessing an empty container. Keep water away from the clay with a separate waterproof saucer and remove the plant for watering where possible. Check that the stand sits level and that the pot cannot slide between its supports. Avoid placing an unverified clay support above furniture or a busy walkway.
26. Mini Clay Frames for Rotating Pictures
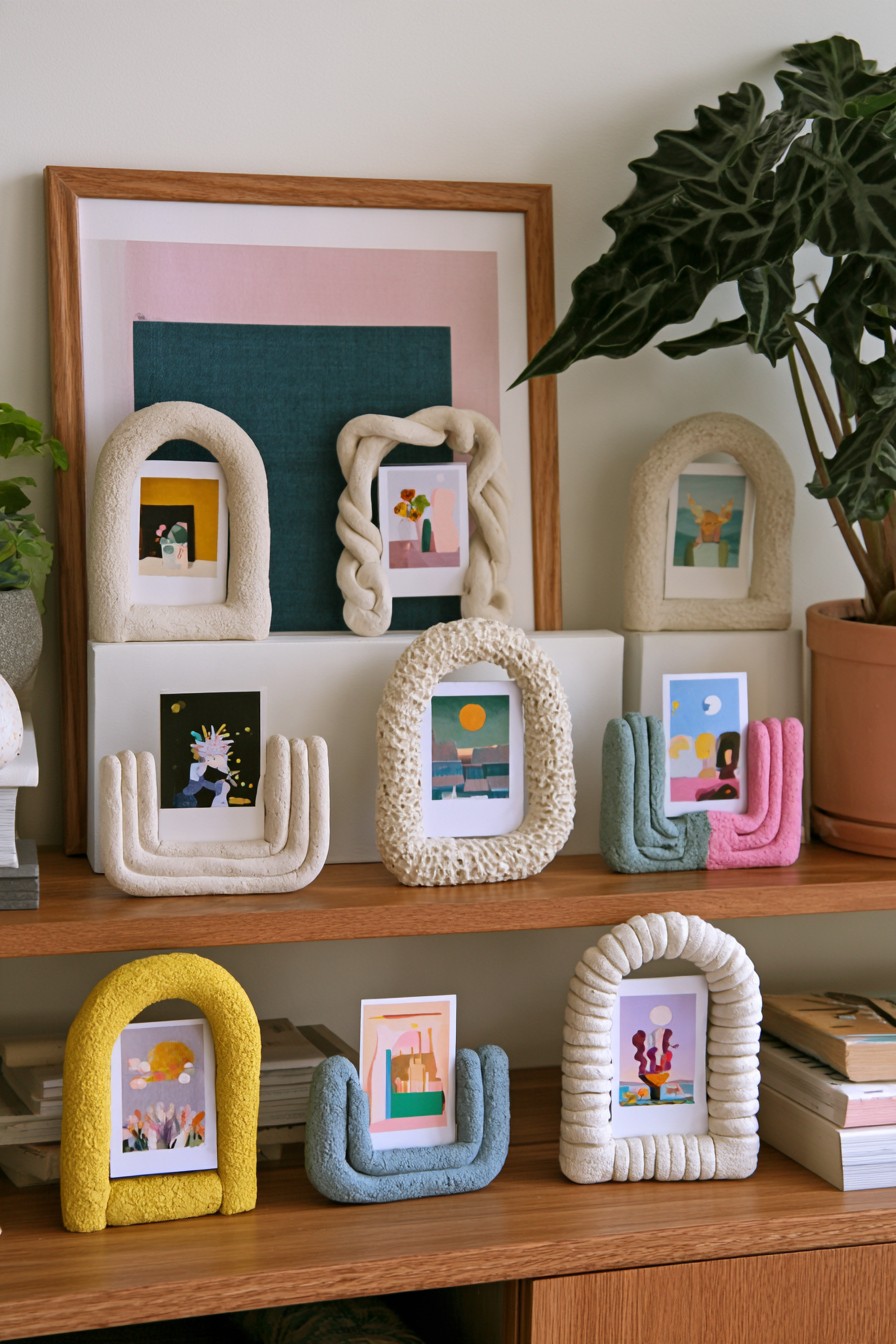
These small frames use arches, braided looking borders and relief patterns to give each picture its own decorative setting. Their varied colors make a collection lively without requiring large artwork. The visible arrangement is best understood as miniature picture frames, with images contained inside their surrounds rather than loose prints resting in exposed slots.
Adapt the shapes around suitable small frame backings that allow pictures to be changed. Make the clay borders separately, checking the picture opening and standing balance before attachment. Keep any backing fasteners accessible and allow the finish and adhesive to reach their specified stage for use. Use copies for the decorative display and leave delicate originals properly protected. Rotate photographs or small illustrations through a few selected frames so the console stays readable rather than filling every gap with another image.
27. Clay Tabletop Mobile with Botanical and Abstract Charms
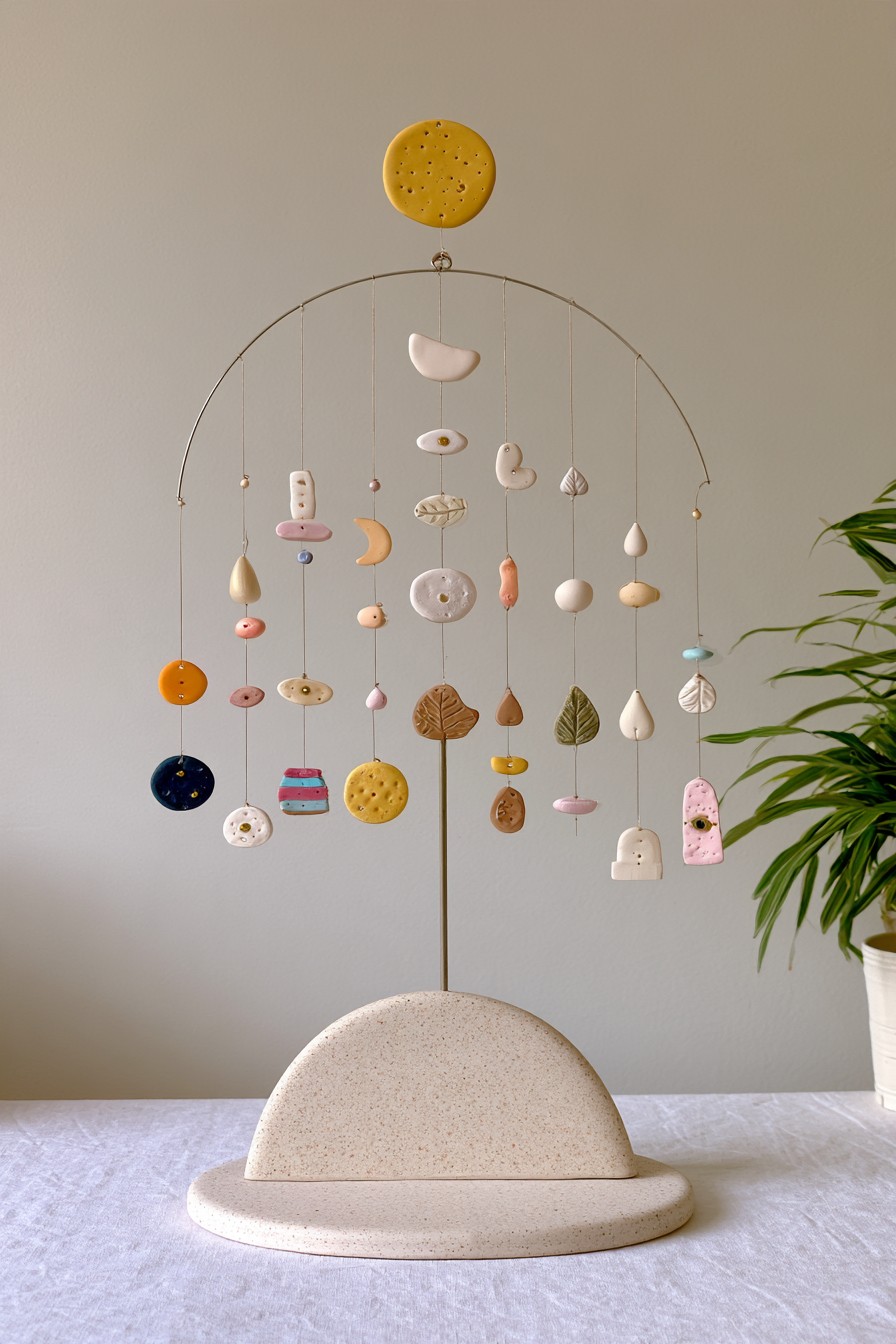
The tabletop mobile pairs a slim arch with hanging botanical and abstract shapes. It adds gentle movement to a console without a ceiling installation, and varying cord lengths keep the ornaments from becoming one rigid line. A restrained palette lets the silhouettes carry the interest beside books or a small vase.
Cut the charms from clay of a thickness permitted by the product and create hanging holes before drying. Check hole edges, cord attachment and spacing once the pieces are finished. Select a frame and stable base appropriate for the completed assembly; a delicate looking arch does not guarantee balance. Place the hanging pieces so they do not strike each other or nearby objects. This is a decorative display rather than an infant mobile or toy, and should remain away from areas where it can be pulled down.
28. Decorative Clay Finials for a Sculptural Console Arrangement
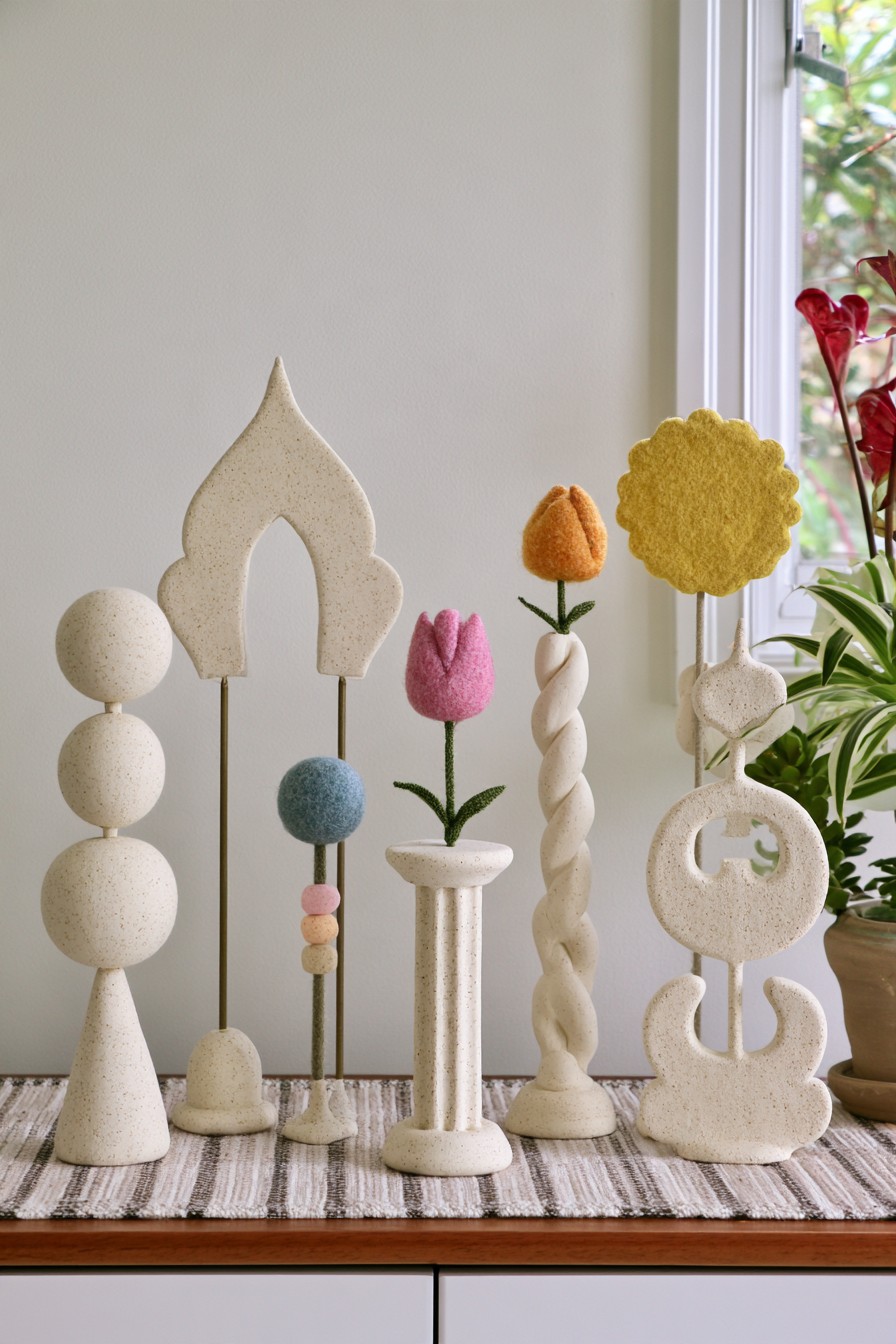
Stacked spheres, curved stems and botanical forms create a collection with several distinct silhouettes. A shared neutral finish makes the variety feel coordinated, particularly on a long console that needs height changes. Spacing matters here: open areas around each ornament let its outline remain recognizable instead of merging into one dense cluster.
Sketch the profile and footprint of each form before making narrow details. Follow the clay's instructions for support during drying and do not assume rigid internal rods are suitable, since shrinkage around them can cause cracking. Independently supported, separately dried components may offer an appropriate alternative where the materials and joints permit. Check the finished balance on its intended surface and avoid handling pieces by thin extensions. A shorter, broader version can preserve the visual idea while reducing fragile proportions.
29. Botanical Clay Propagation Stand with Glass Tubes
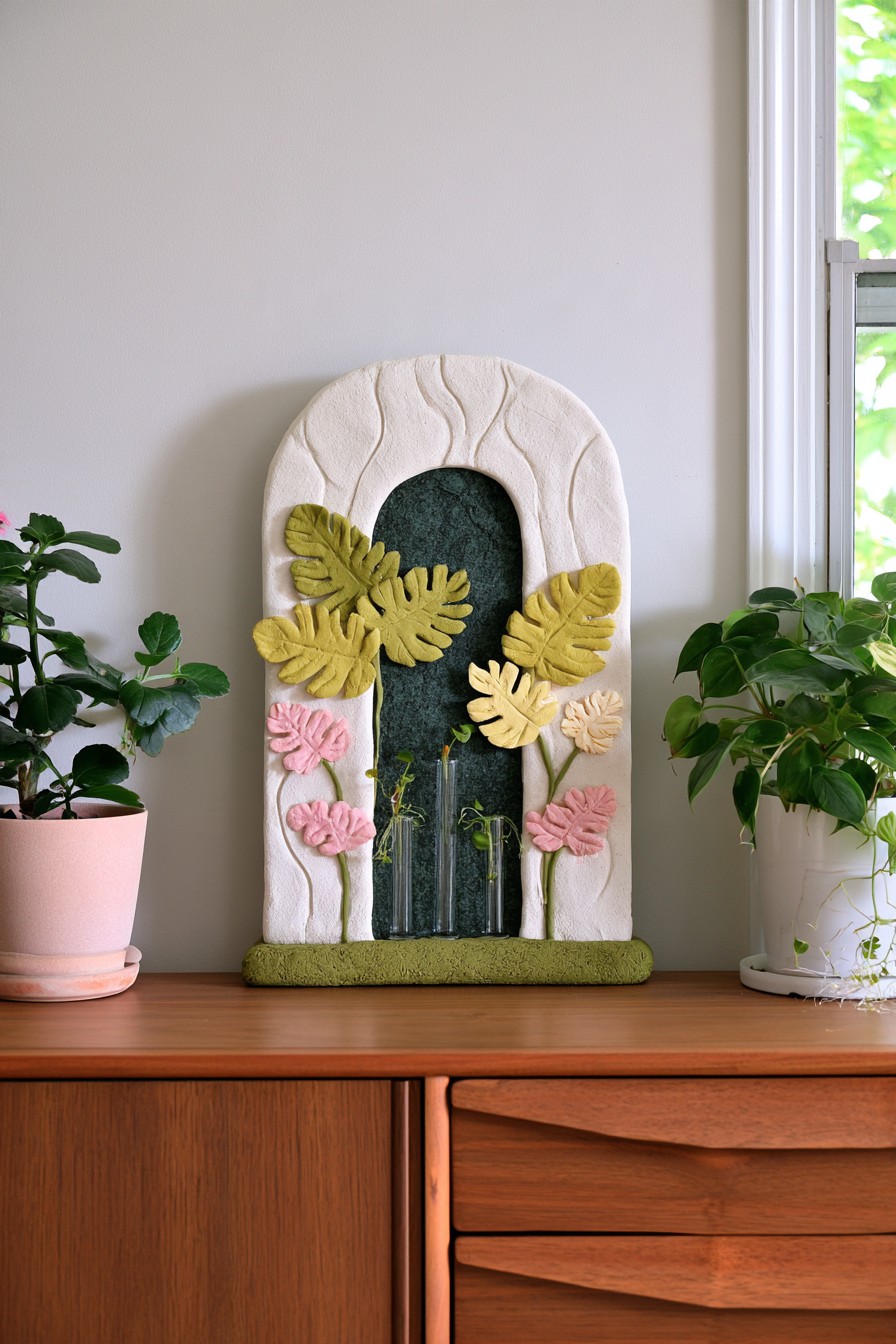
An arched surround makes propagation tubes look like a planned botanical display. The green backing and raised leaves repeat the living cuttings, while the clear vessels let roots remain visible. This suits a shelf where plants can be checked easily rather than hidden among a dense arrangement of other ornaments.
Select the removable glass tubes first and build a suitable support for them, keeping clay as decoration rather than assuming it can carry the filled vessels. Form the ornamental parts separately and account for shrinkage before fitting them to the support. Tubes should stay secure yet remain accessible for water changes and cleaning. Fill them away from the clay and dry their exteriors before replacing them. Choose cuttings suited to water propagation and provide the light and maintenance their species needs.
30. Clay Checkerboard Set for Playful Coffee Table Decor
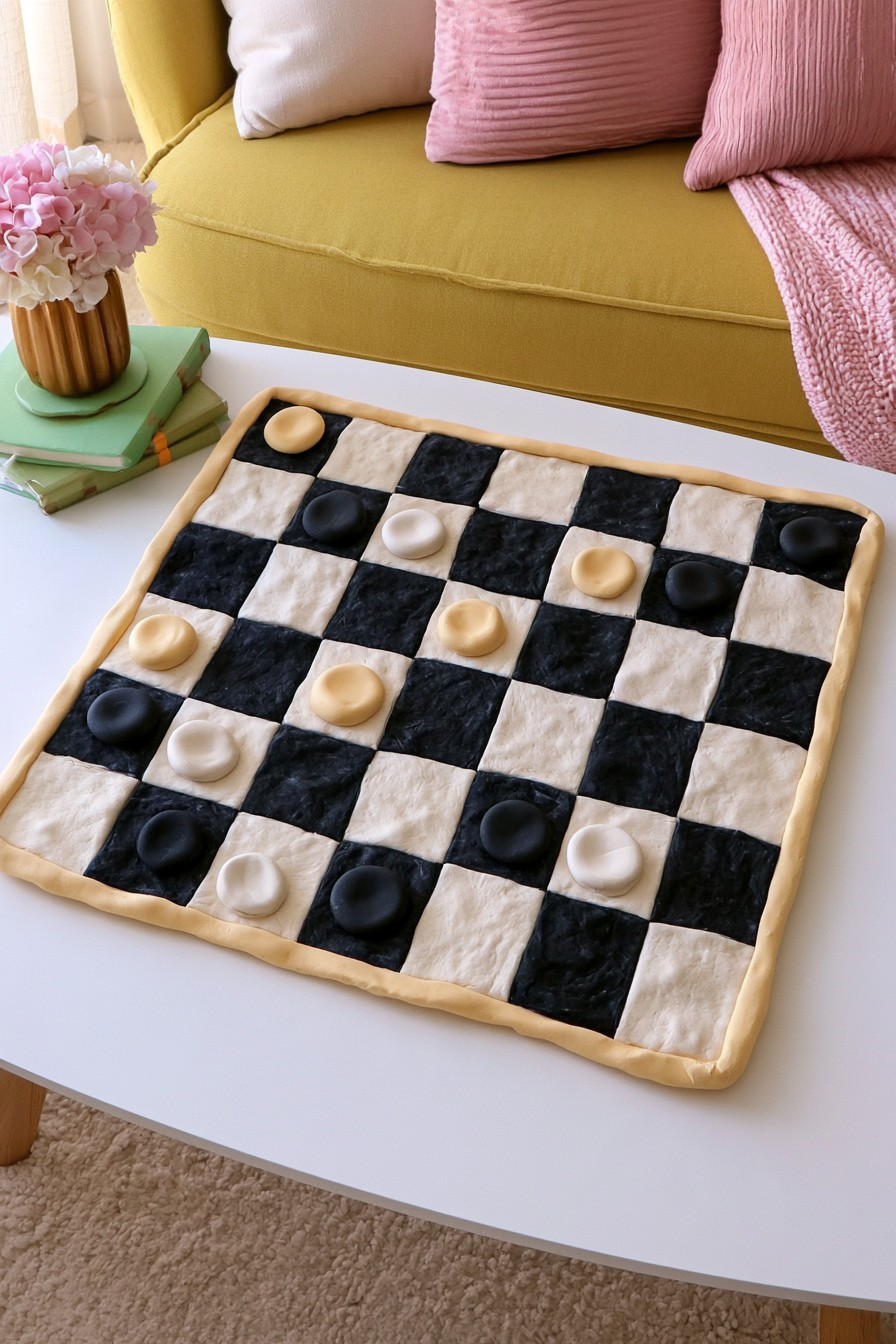
Cream and black squares turn this game inspired set into a graphic coffee table accent. Rounded pieces and slightly irregular edges soften the pattern, while a small ochre detail connects it to warmer room colors. The arrangement can be displayed between games rather than needing to disappear into a cupboard.
Choose the game first and draw its correct grid and piece sizes on paper. Keep the slab even and dry it gradually as the clay requires to reduce warping. Shape pieces that the intended users can handle comfortably, finish them compatibly and replace any chipped pieces with rough edges.
31. Miniature Clay Wall Niches for a Botanical Gallery
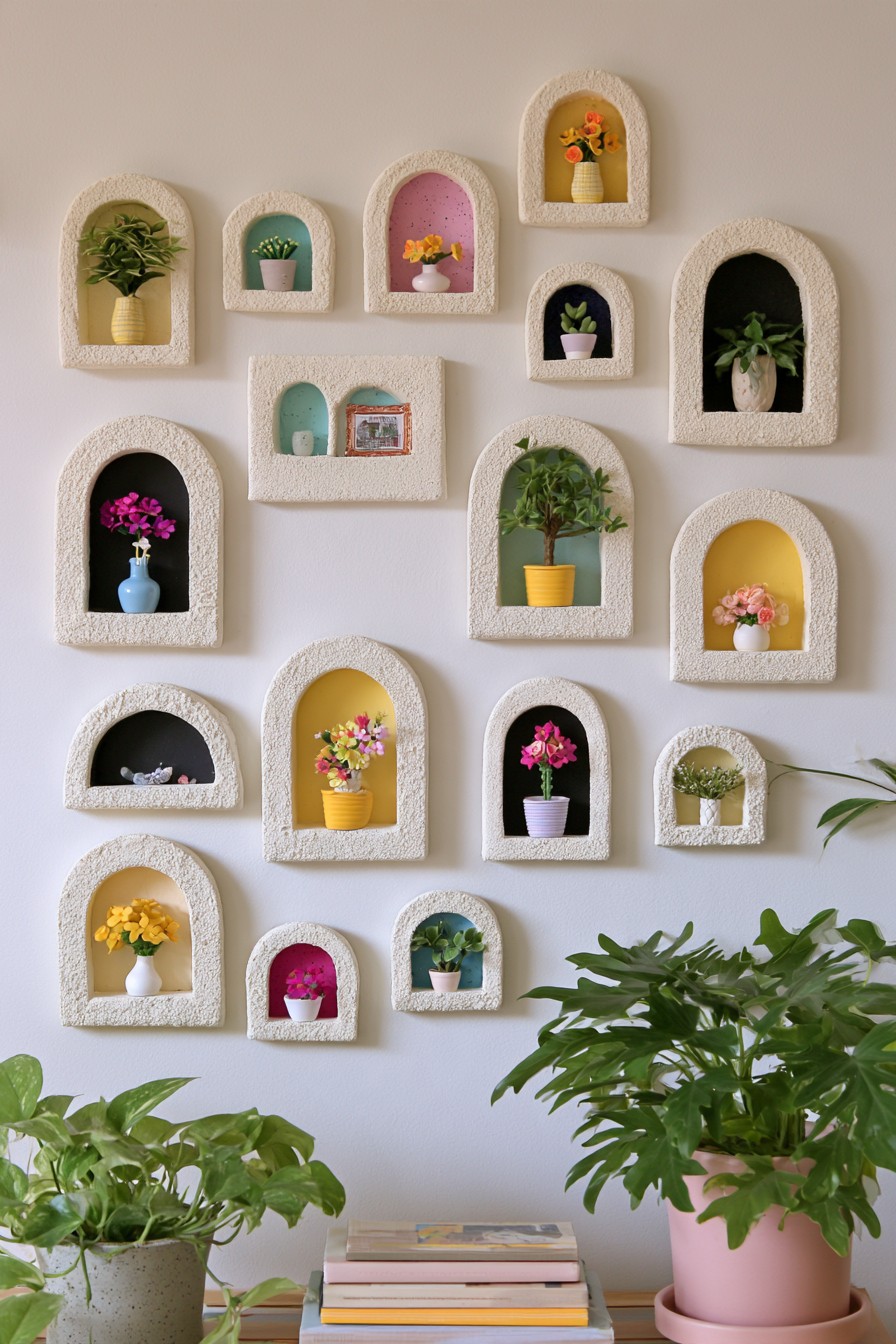
A collection of small wall niches brings the gallery idea into three dimensions. Arched openings repeat across different sizes, and colored recesses help pale vases and botanical objects stand out. One or two objects per niche allow the architecture to remain visible, giving a narrow wall a display without a broad console beneath it.
Plan the group with paper outlines before drilling, checking spacing and access to each opening. Use independently suitable backings and ledges to carry the display, with clay added as separately dried ornament rather than assumed structural shells. Select mounts for the actual wall and the complete loaded weight. Keep plants in removable protected vessels and avoid arrangements that require watering against the wall. Leave enough room to lift each object without brushing the arched rim or catching neighboring decorations.
32. Hanging Clay Curtain Charms with Botanical Texture
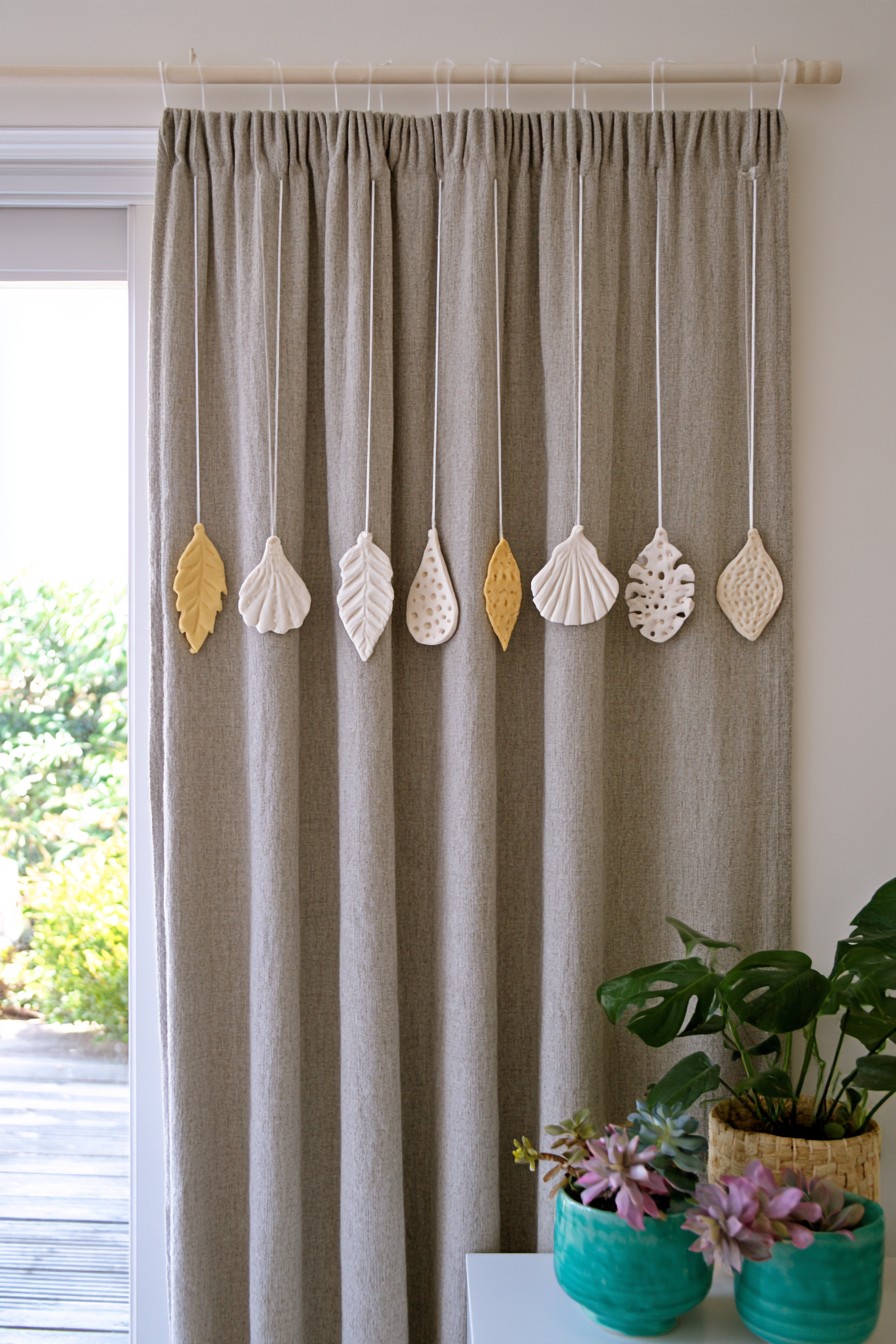
The leaf and seed shapes hang from cords in front of the curtain, adding a botanical layer to the neutral fabric. They are removable hanging decorations, not weights attached to the lower hem. Their elongated outlines follow the curtain's vertical lines, and pale ivory with muted ochre keeps the effect quiet beside woven textures.
Cut the shapes, add shallow veins and form the cord holes before drying, keeping the edges appropriate for the selected clay. Finish and attach them only after the material and coating are ready. Plan the hanging points so the curtain can open and close without snagging the cords or striking the charms against the wall. Remove the pieces before laundering and inspect cords and holes when rehanging. Keep them clear of routine handholds and places where children or pets might pull them.
Keep the Handmade Finish Looking Its Best
Let paint, adhesives and coatings reach the stage their instructions specify before putting the finished pieces into use. Keep ordinary indoor clay decor dry, dust it gently using an approved method and check thin edges, joins and hanging cords when moving it. Remove glass flower vessels for washing and inspect supports separately from the ornament. Start with one shape that suits a real place in your home, then repeat its texture or color across another design when you want a coordinated collection.


Leave a Reply