
A bottle cap can become a frog’s eye, a carton can turn into a seaside bus, and a scrap of clear packaging can make a dragonfly’s wings. These 29 recycling projects for kids bring together animal characters, miniature vehicles, ocean scenes, and hanging decorations. Start with the illustrated paper rocket method, then adapt the same preparation and assembly habits to the ideas below. Each project explains what to gather, how to approach the construction, and where children can make their own creative choices.
Gather materials around one idea. Choose clean, dry packaging with a useful shape: cardboard for flat bodies and supports, cartons for hollow models, and lightweight containers for rounded shells. Keep a small supply of leftover colored paper, fabric, ribbon, and cardboard tubes. Add a pencil, brushes, age appropriate scissors, tape, and paints and glues labeled for children’s intended use. You do not need every material in this collection to make one project; choose the base first and collect only the details it needs.
Prepare the parts before decorating. An adult should inspect reused items, remove staples, and reject sharp, cracked, dirty, or damaged pieces. Do not collect containers that held medicines or household chemicals. Adults should handle thick cardboard cuts, plastic trimming, holes, and any structural work. Caps, buttons, beads, and detachable eyes are unsuitable for children who may put them in their mouths; use drawn features and larger paper shapes instead. Follow the school’s policy for reused food packaging and keep food away from the craft table.
Match the glue to the material. A glue stick is useful for paper decorations but may not hold a plastic cap to a curved container. Read the adhesive label and make a small trial join before building around it. Children can arrange pieces and add paper layers while an adult completes joins that require specialist products or equipment. Apply thin paint coats to absorbent cardboard and allow paint and adhesive to dry as directed. Wash hands after the activity and save usable offcuts for the next project.
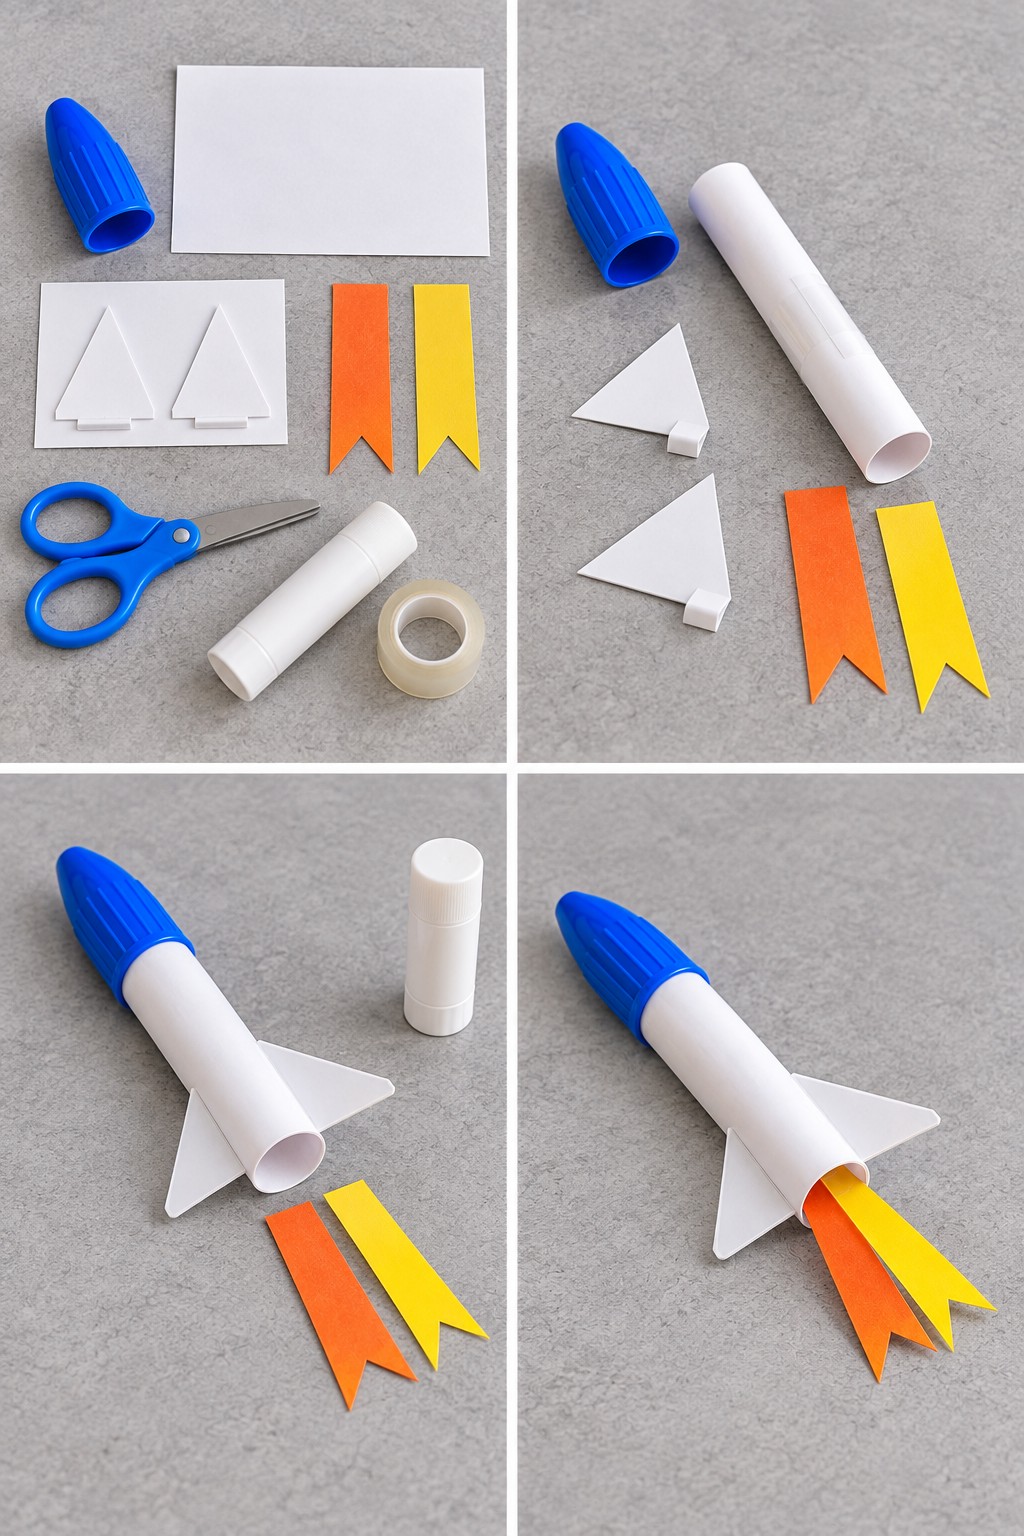
A four stage example: the paper rocket. Read the collage from the top left across, then continue across the bottom row. Gather one clean blue marker cap, white scrap paper for a narrow tube, leftover white card for two fins, one orange and one yellow paper strip, scissors, a glue stick, and tape. An adult can prepare the fin shapes and forked strip ends beforehand, as shown in the materials panel. Size the paper tube to the cap you actually have rather than following a fixed measurement.
Shape the body and prepare the details. Roll the white paper into a hollow cylinder and tape its seam. Check that one end slips a short distance into the cap without forcing it. Cut two triangular fins, leaving a small foldable tab on each, and prepare the two flame strips. Keep the opposite tube end open: that is where the paper flames will attach.
Assemble, then finish. Attach the cap to the front with an adult checking the connection. Fold the fin tabs and glue them to opposite sides near the rear, allowing the joins to set. Finally, secure the straight ends of the orange and yellow strips inside the rear opening. The finished model is for tabletop storytelling; its flames are paper, and it has no launch mechanism.
Use this sequence with the other ideas. Prepare a sound base, make decorative parts separately, arrange them before gluing, and finish with the smallest details. Change the joining method to suit each material. Boats need a stable mast, animals need supported feet, and rolling vehicles need freely turning axles. For another activity built around separate parts and a clear assembly order, try the paper cup pull tail dragon craft.
The ideas below range from simple paper layering to shared model building. Younger children can choose colors, tear collage scraps, and decorate parts prepared by an adult. Children ready for more involved tasks can measure, fold, and compare how pieces fit. Choose by the child’s abilities and the construction involved, leaving room for a different expression, pattern, or story rather than expecting identical results.
Table of Contents
- 1. Cardboard Ocean Mobile with Recycled Sea Characters
- 2. Bottle Cap Aquarium in a Clear Reused Container
- 3. Upside Down Cup Frog with a Curled Paper Tongue
- 4. Striped Tin Can Bee with Transparent Wings
- 5. Clear Bottle Piggy Bank with Pink Cap Feet
- 6. Red Textured Ladybug from Molded Paper Packaging
- 7. Plastic Bottle Base Turtle with a Spotted Shell
- 8. Carton Seaside Bus with Bottle Cap Wheels
- 9. Blue Whale from a Reused Rectangular Carton
- 10. Open Carton Sailboat with a Brown Paper Sail
- 11. Painted Bottle Base Flower on a Cardboard Stem
- 12. Round Metal Lid Crab with Red Cardboard Claws
- 13. Red and White Cardboard Lighthouse with a Clear Lookout
- 14. Patchwork Cup Jellyfish with Curled Magazine Tentacles
- 15. Shiny CD Snail with a Paper Spiral Shell
- 16. Cardboard Box Train with Colorful Cap Wheels
- 17. Spotted Packaging Dome Beetle with Folded Legs
- 18. Egg Carton Pirate Ship with a Paper Bag Sail
- 19. Cardboard Hedgehog with Reused Plastic Fork Spines
- 20. Miniature Camping Tent from an Old Umbrella Canopy
- 21. Cardboard Sunglasses Character with Button Details
- 22. Mini Bottle Cap Skateboard for Tabletop Play
- 23. Cardboard Ferris Wheel with Reused Box Gondolas
- 24. Cardboard Space Shuttle with Clear Packaging Cockpits
- 25. Striped Paper Straw Dragonfly with Clear Wings
- 26. Sliding Matchbox Bed with Fabric Scrap Bedding
- 27. Mesh Pouf Cloud with a Ribbon Rainbow
- 28. Paper Plate Crescent Moon with Three Hanging Stars
- 29. Blue Marker Cap Rocket with Paper Flames
1. Cardboard Ocean Mobile with Recycled Sea Characters
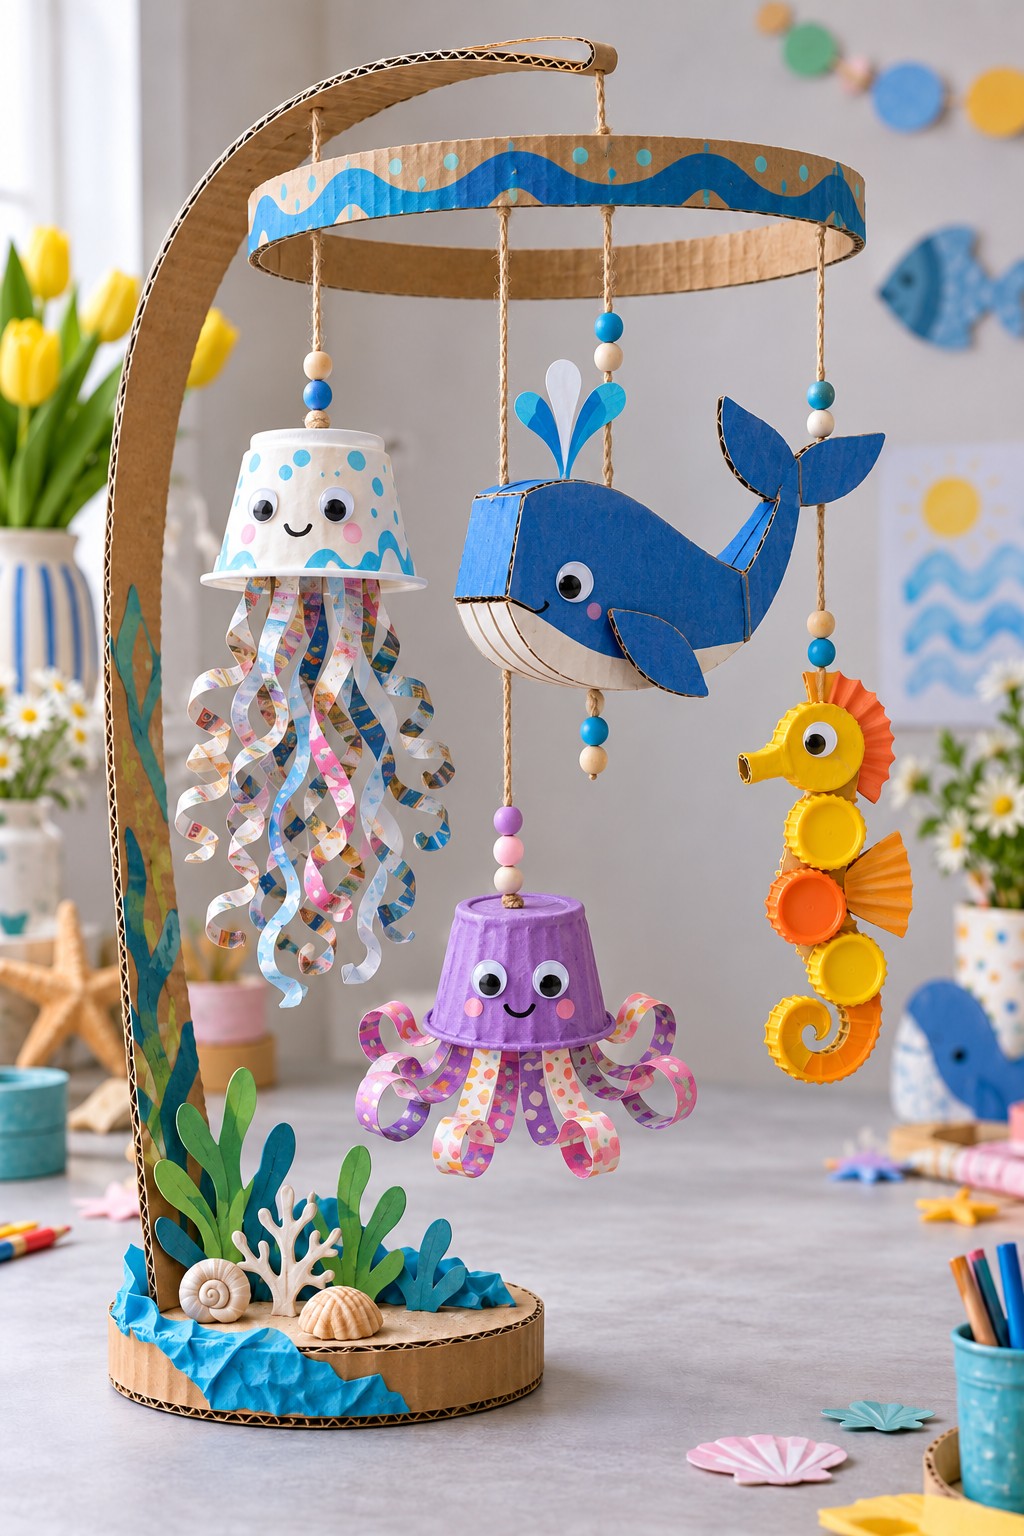
A wave painted cardboard ring brings a blue whale, two cup jellyfish, and a bottle cap seahorse into one miniature ocean. Gather corrugated cardboard for the ring, curved support, and broad base; clean cups for the jellyfish; patterned paper for their tentacles; and lightweight scraps for seaweed. Build each character separately so children can concentrate on one animal before arranging the whole scene.
An adult should laminate and brace the curved support, check the base against tipping, and make the suspension holes. Attach the characters at different heights with short cords, adjusting their positions until the ring hangs level. Children can curl paper tentacles around a pencil and decorate the waves. Treat the finished piece as a supervised display, with cords and small decorations kept away from younger children.
2. Bottle Cap Aquarium in a Clear Reused Container
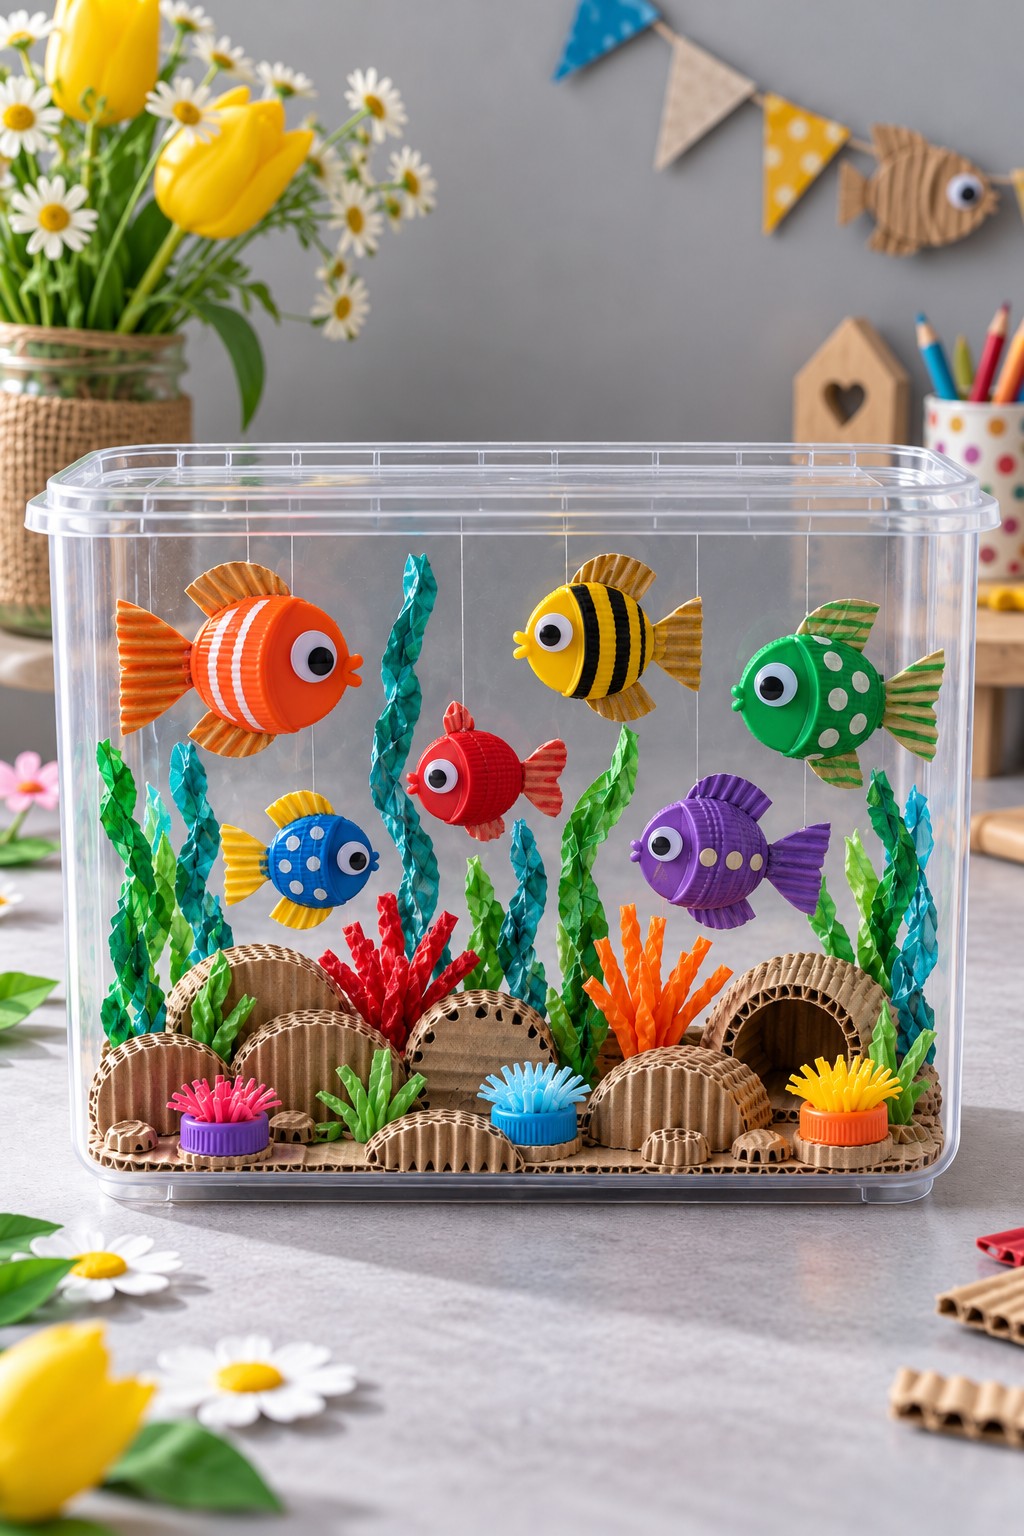
Turn a clear, clean storage or food container into a dry aquarium with bottle cap fish, twisted paper seaweed, and corrugated cardboard caves. The transparent sides give the scene depth without water or live animals. Gather six caps for a varied fish group, paper scraps for fins and plants, and cardboard pieces for the seabed. Children can choose a different stripe or spot pattern for each fish.
Build the seabed on a separate cardboard insert, then place it inside the container. An adult can suspend lightweight fish from the upper rim with securely attached fine thread, keeping the hanging lines contained within the display. Space the fish above and between the plants so their outlines remain clear. Ask children to describe who lives in each cave or sort the fish by color before putting the aquarium on a shelf.
3. Upside Down Cup Frog with a Curled Paper Tongue
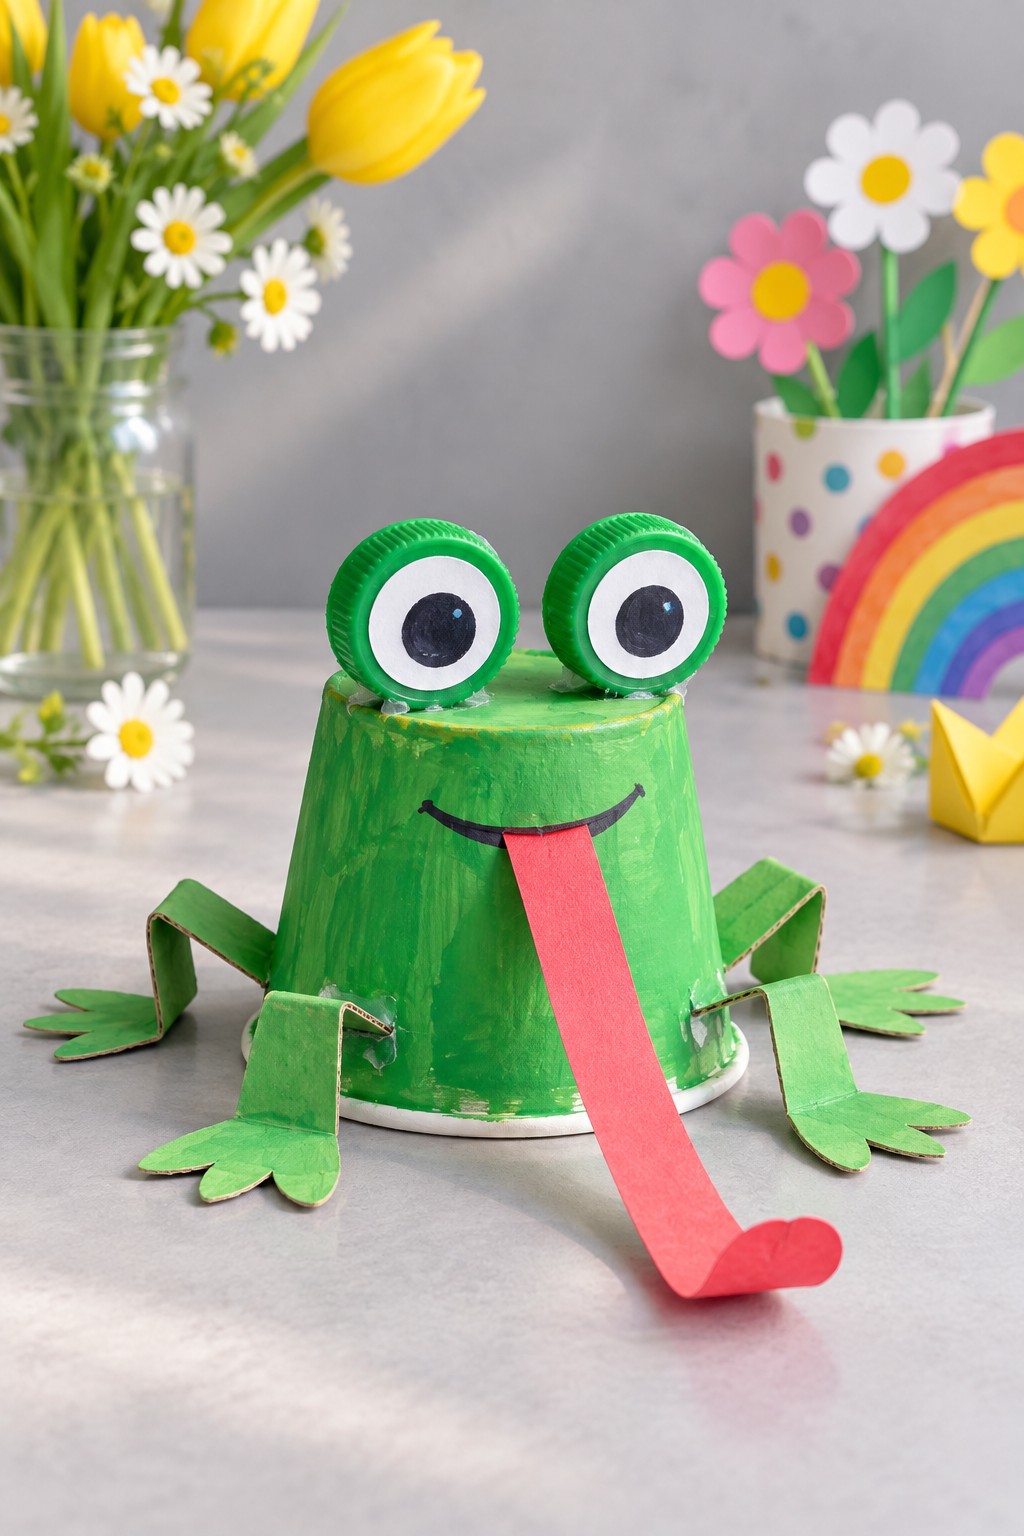
An inverted paper cup gives this frog a sturdy rounded body, while two green caps create its raised eyes. Collect one clean cup, two matching caps, thin cardboard for four legs, white paper for the eyes, and a red strip for the tongue. Paint the cup green and prepare the feet separately, making broad folded attachment areas rather than narrow points.
Once the paint is dry, attach the legs around the lower sides and secure the eyes to the closed top. Draw a smile, glue the tongue just below it, and curl the loose end around a pencil. Children can compare short and long tongues or invent a pond story for their frog. The tongue is a fixed decoration; a moving version would need a separate mechanism. Substitute paper eyes when caps are unsuitable for the child.
4. Striped Tin Can Bee with Transparent Wings
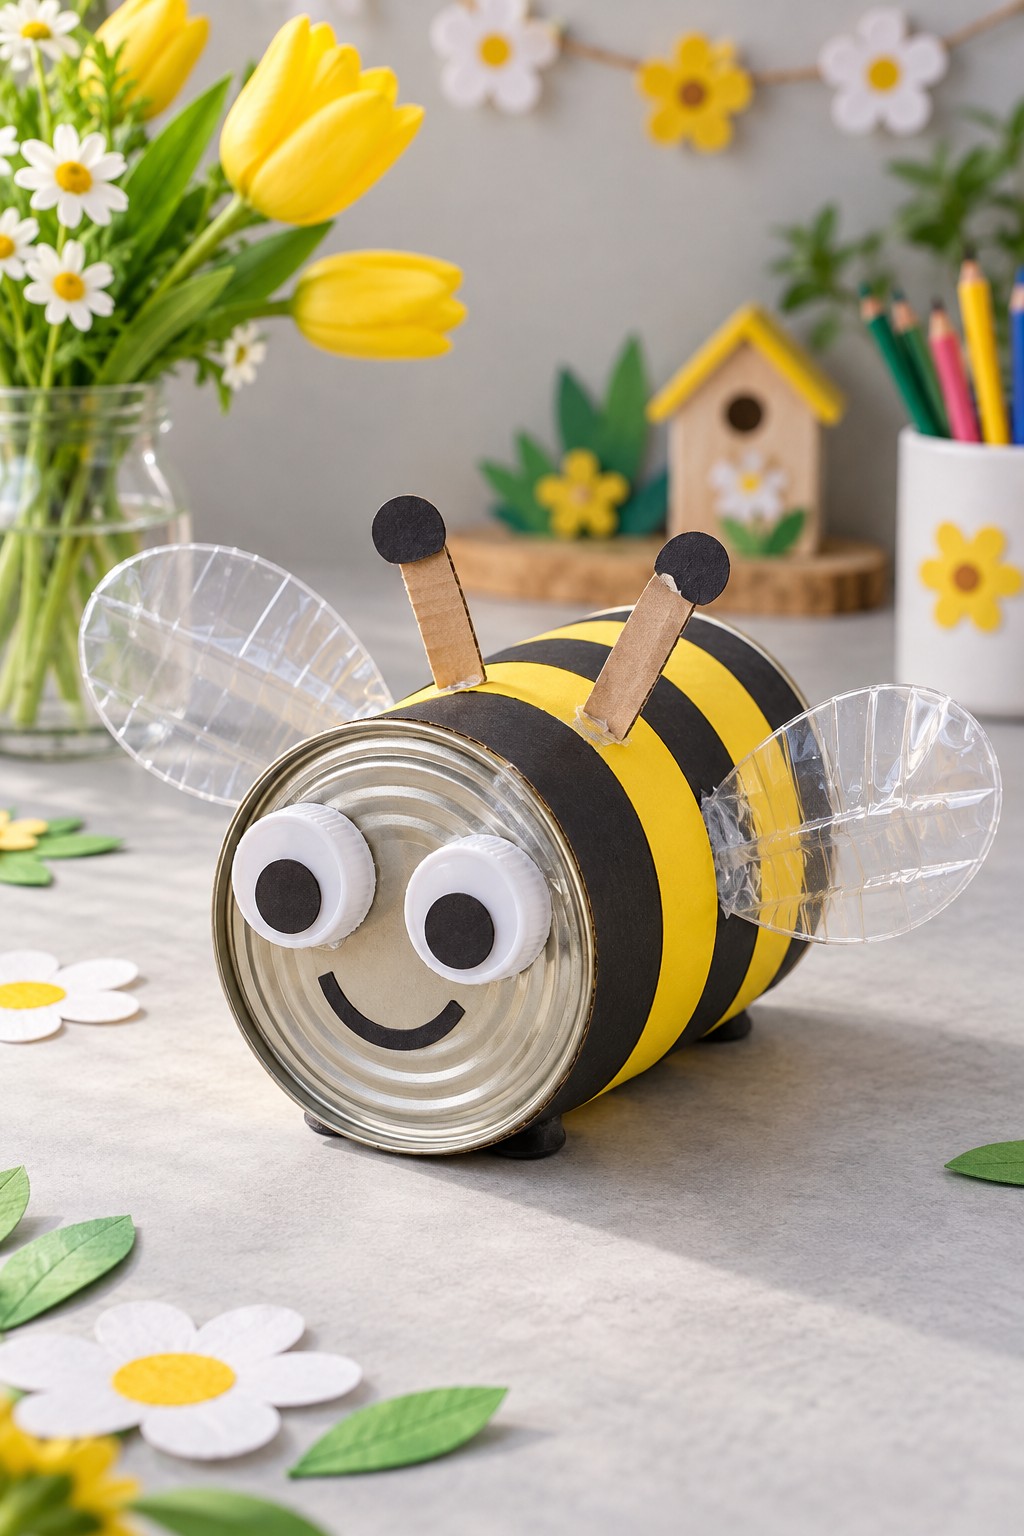
Yellow and black paper bands transform a horizontal food can into a friendly bee. Its circular metal end becomes the face, with white caps for eyes, cardboard antennae, and transparent packaging wings. Use only a can an adult has inspected inside and out; a paper covered cardboard cylinder is an alternative if suitable metal packaging is unavailable.
Wrap the body in yellow paper, then add evenly spaced black strips. Prepare the face and antennae while the can rests securely, and let an adult trim the clear wings and check their edges before attaching them. Small supports beneath the cylinder help stop it rolling. Children can plan the repeating stripe pattern and give the bee an expression. Keep the result as a display model, with the metal rim inaccessible and the reused wings free of sharp corners.
5. Clear Bottle Piggy Bank with Pink Cap Feet
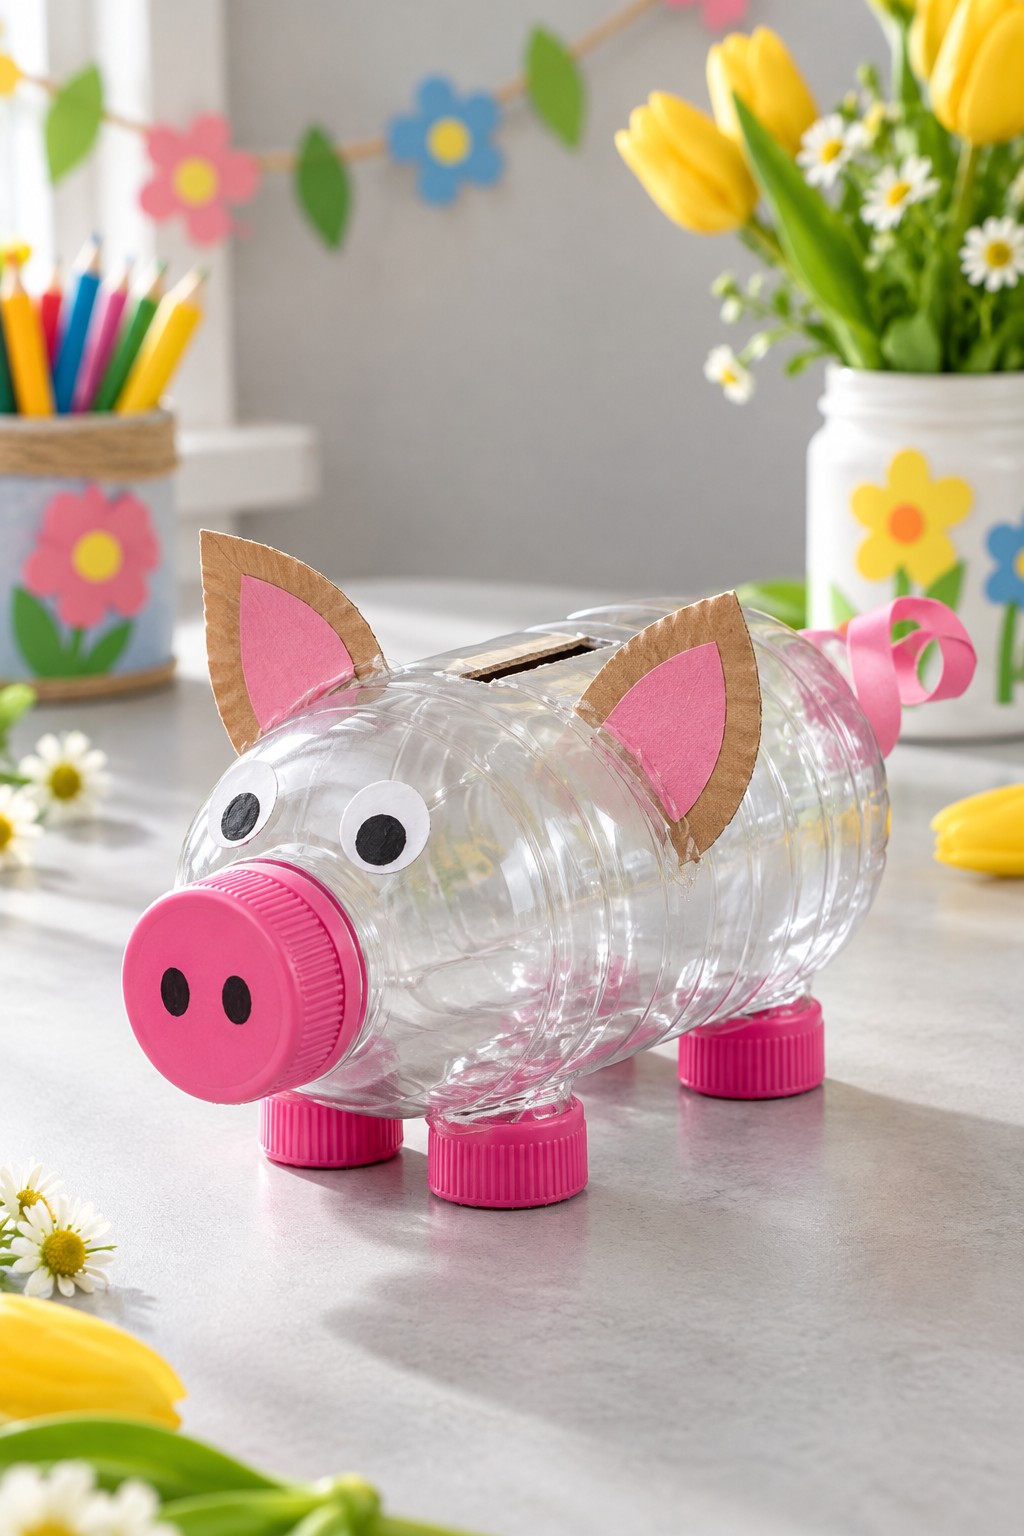
A clear bottle makes a piggy bank whose contents remain visible as savings grow. Gather one clean bottle with its cap, four matching caps for the feet, cardboard ears with pink paper centers, paper eyes, and a narrow pink strip for the curled tail. The original bottle cap becomes the snout, so there is no need to reshape the neck.
An adult should cut the coin slot, finish its edges, and attach the feet with a product suited to the plastic. Check that all four feet sit evenly before decorating the face. Children can curl the tail and decide what they want to save for. Leave the snout cap removable so an adult can empty the bank. Handle coins together and store the finished bank away from children who mouth small objects.
6. Red Textured Ladybug from Molded Paper Packaging
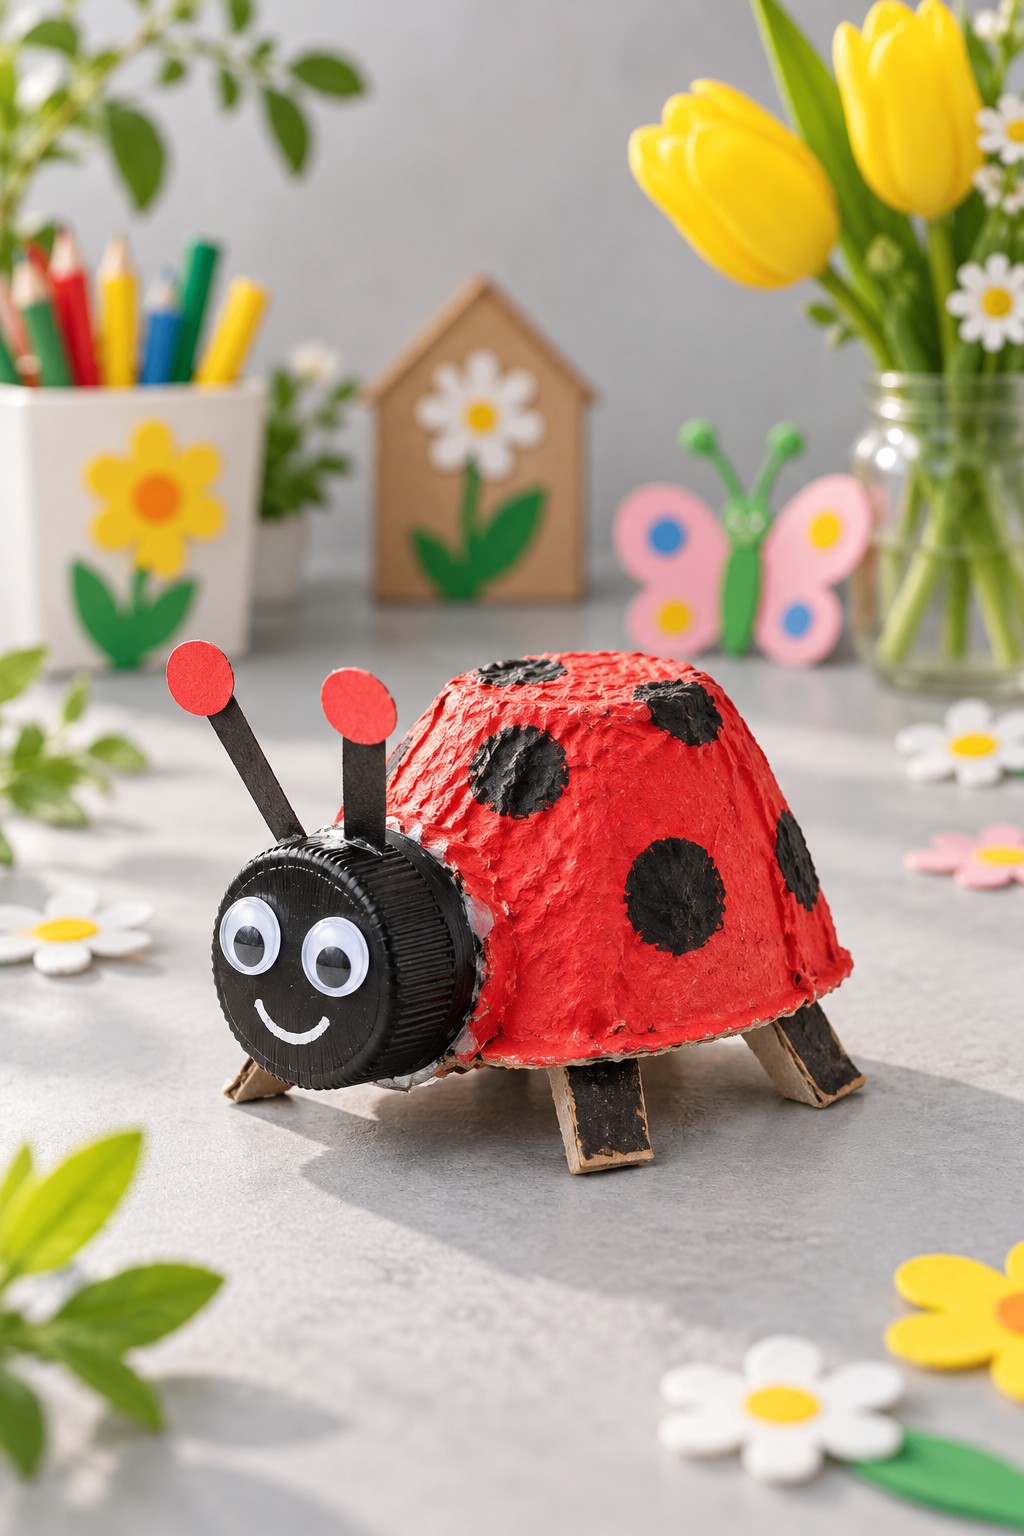
A rounded piece of molded paper packaging provides the bumpy shell of this red ladybug. Keep that texture visible rather than trying to smooth it away. Add a clean black cap for the face, cardboard legs and antennae, paper or suitable craft eyes, and red and black paint. An adult can trim the shell into a stable dome before children start decorating.
Paint the shell red in light coats, let it dry, and add bold black spots. Attach folded legs beneath the lower edge and make the face separately before joining it to the front. Children can count and arrange the spots without aiming for perfect symmetry. If the project accompanies an insect lesson, plan six legs in total; the side view will hide some of them. Leave the textured model dry and indoors.
7. Plastic Bottle Base Turtle with a Spotted Shell
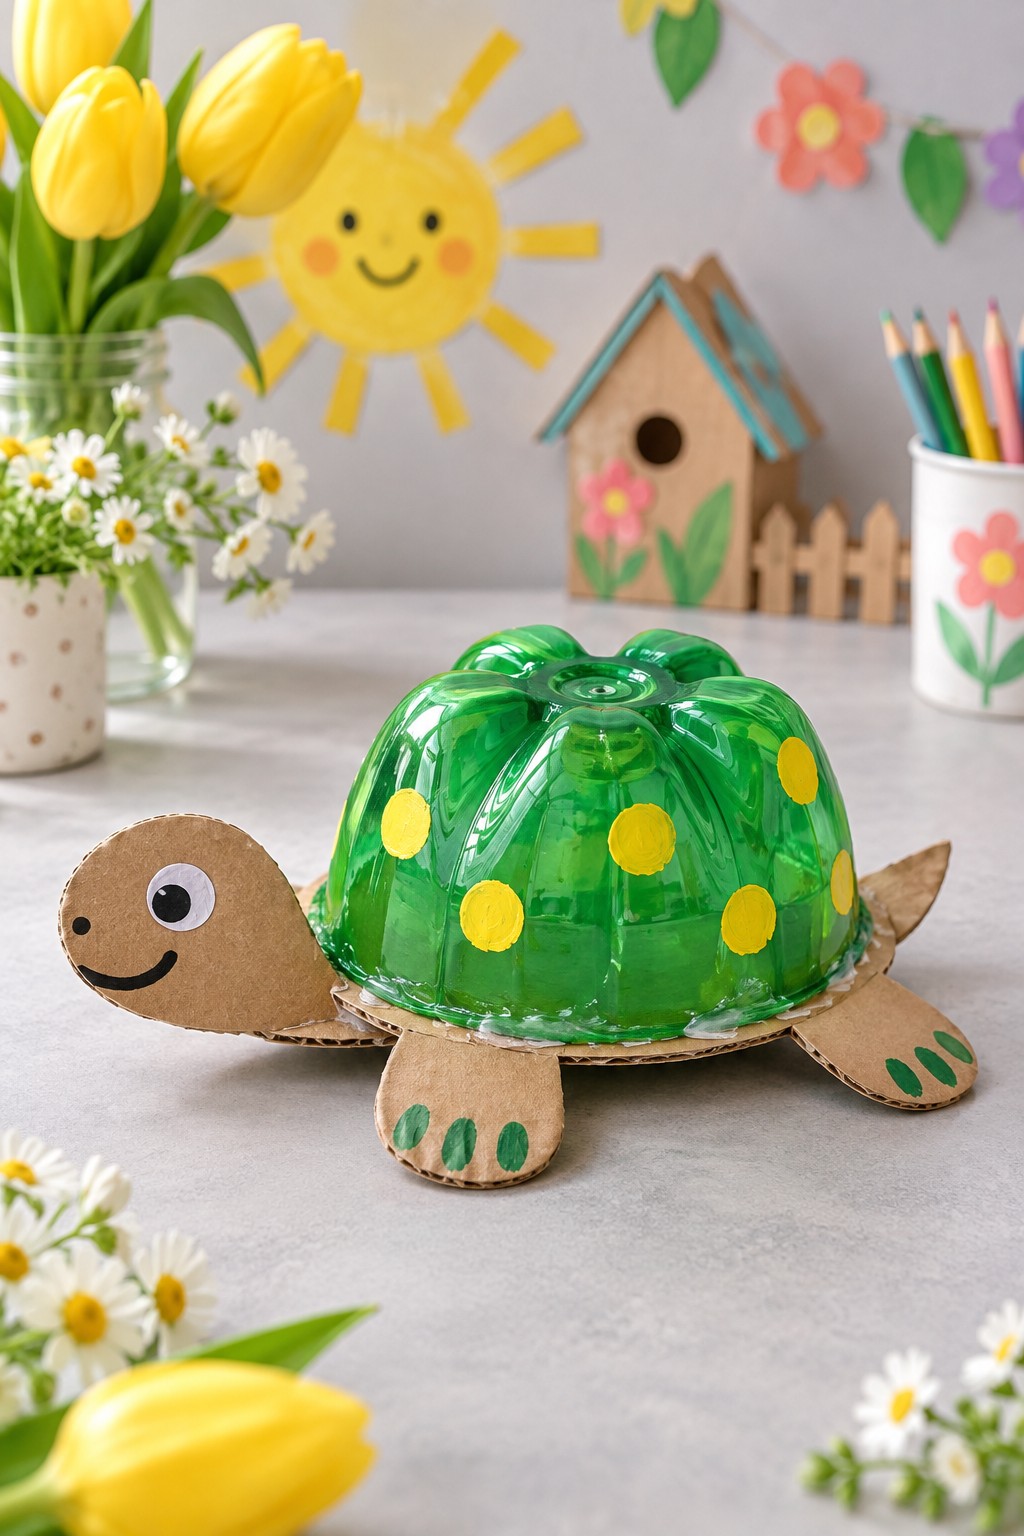
The rounded bottom of a drinks bottle already suggests a turtle shell. Pair it with a cardboard oval, four broad feet, a head, and a small pointed tail. Green and yellow markings give the transparent dome a cheerful pattern, while the natural cardboard makes the other parts easy to distinguish. Let an adult cut the bottle section and prepare its lower edge.
Decorate the shell using a paint labeled as suitable for both the plastic and the intended activity; try it on an offcut first. Children can paint the cardboard pieces and arrange them around the oval before attachment. Join the shell around its rim with adult help. Ask which parts belong underneath the shell and which must remain visible. This is a dry animal model for a tabletop habitat, rather than a water toy.
8. Carton Seaside Bus with Bottle Cap Wheels
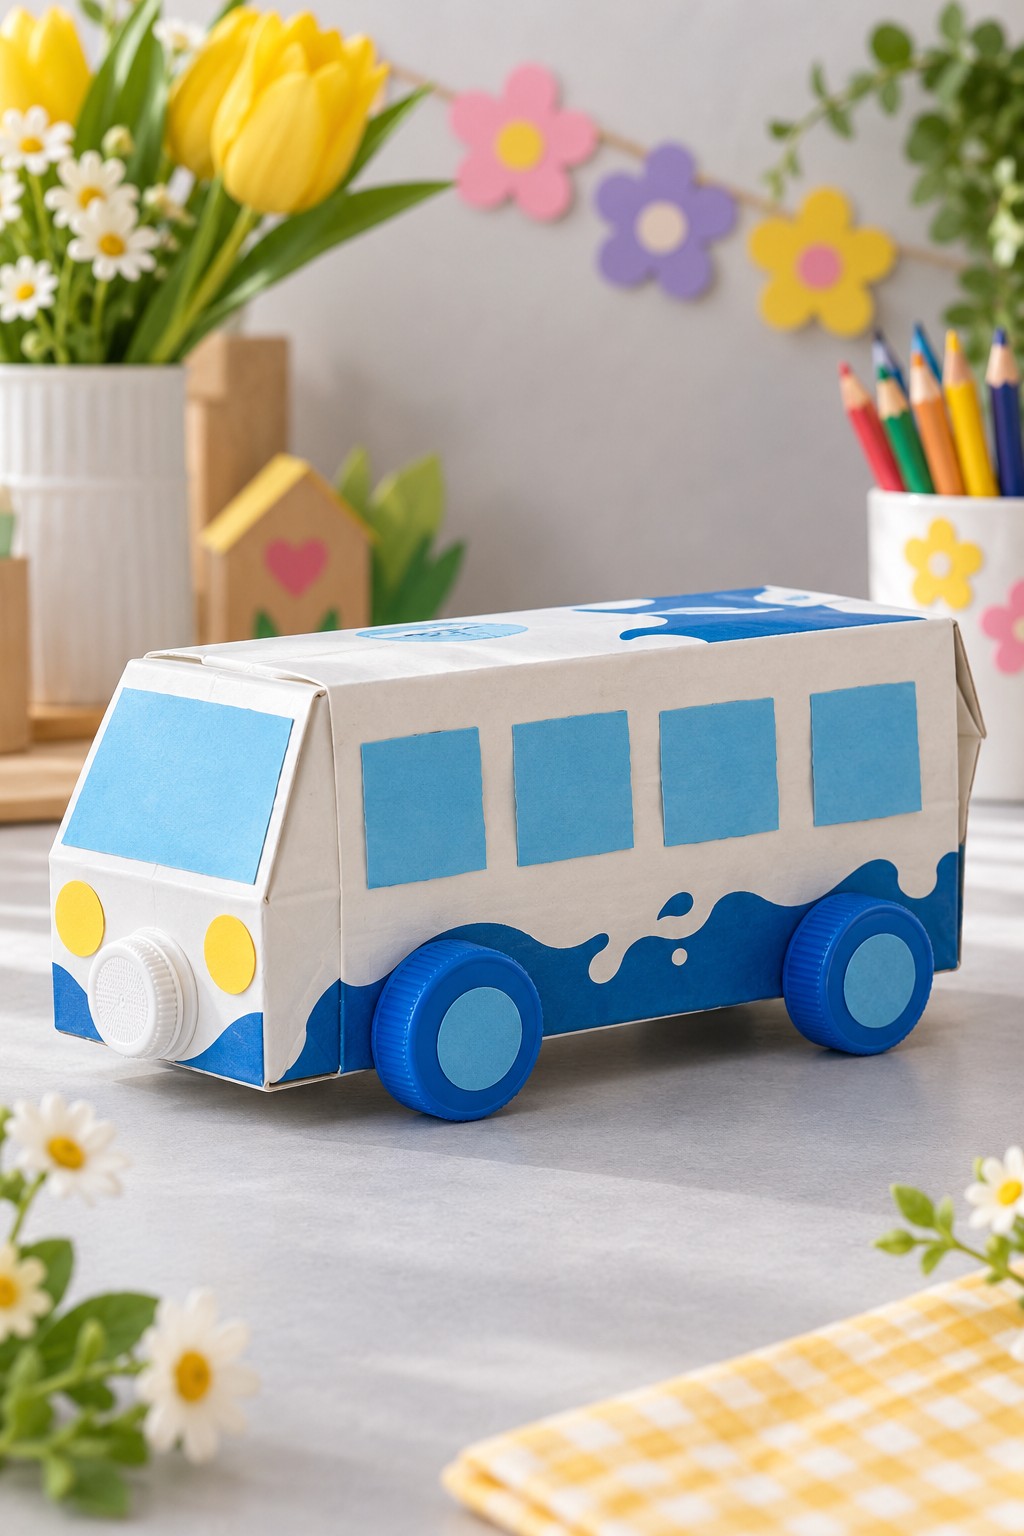
A rectangular carton turns into a seaside bus with blue windows, a wave border, and bright yellow headlights. Gather a thoroughly cleaned and dried carton, white and blue paper, four similar sized caps for wheels, and two yellow circles. Keep the carton’s folded end as the front, using its shape to suggest a windscreen instead of building a separate cab.
Cover the carton one face at a time, then arrange the windows and wave strip before gluing. Children can choose where passengers sit and describe the bus route. Caps glued directly to the sides make a stationary model. For a rolling adaptation, an adult must plan two parallel axles and secure the caps while allowing the axles to turn. Check the wheel clearance before covering any holes or supports.
9. Blue Whale from a Reused Rectangular Carton
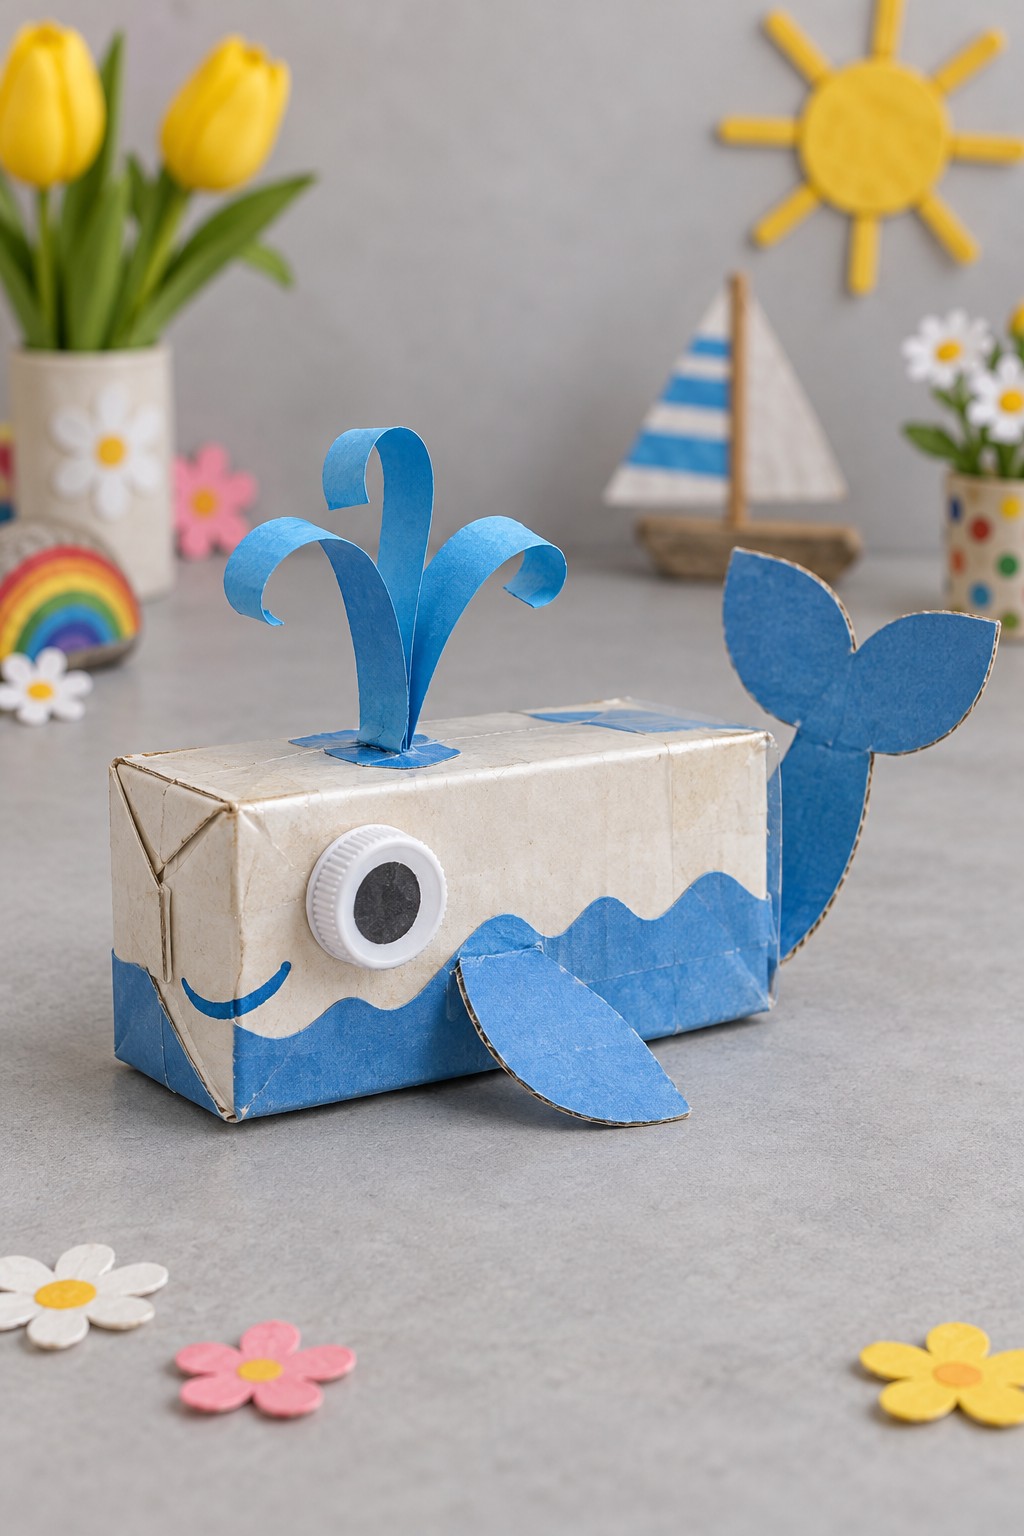
A blue wave band softens the straight sides of this carton whale, while its raised tail and curled paper spout establish the character. Use one clean, dry carton or similarly shaped box, blue paper, cardboard for the tail and fins, and a white cap or paper circle for the eye. The body can remain box shaped; the added outline does the storytelling.
Cover or paint the carton, then prepare the tail with a generous attachment tab and glue it to the rear. Add the side fins and a smiling face. Fold the lower ends of three blue paper strips into tabs, attach them together on top, and curl their upper ends around a pencil. Children can compare the whale’s broad tail with the narrow spout. Keep the model in a dry ocean scene so the paper parts retain their shape.
10. Open Carton Sailboat with a Brown Paper Sail
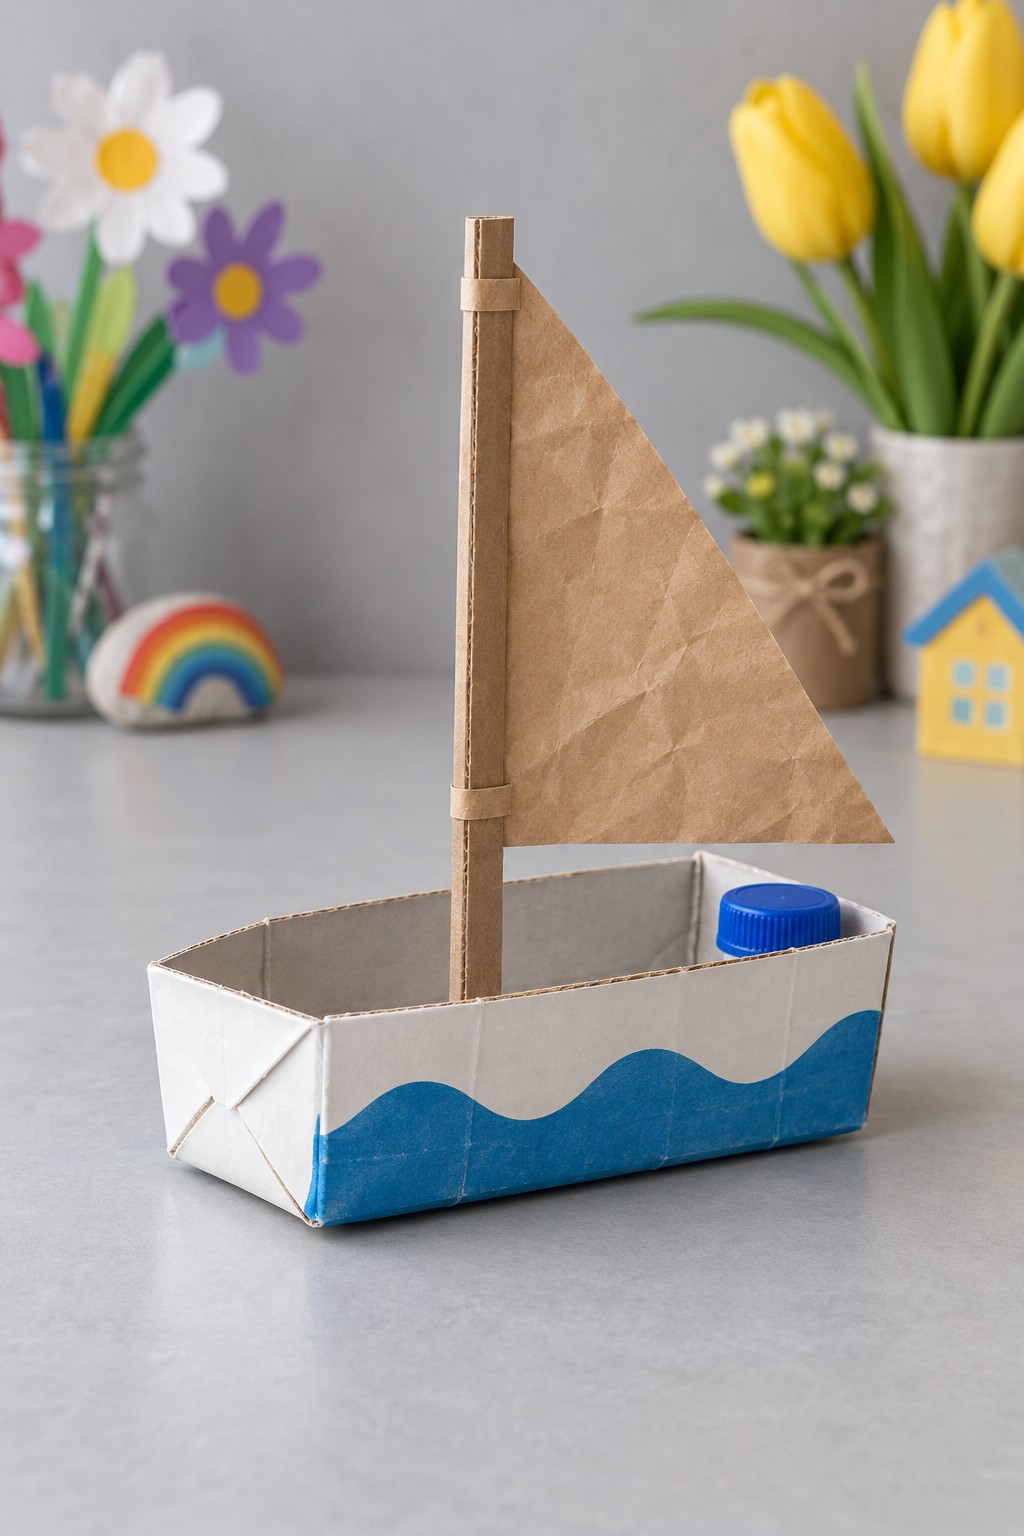
An opened carton creates the hull of a small sailboat, with a cardboard mast and a triangular sail cut from a clean paper bag. Gather one washed and fully dried carton, brown paper, cardboard strips, and blue paper or paint for the waves along the sides. An adult should make the opening and finish the rim before children handle the hull.
Fix the mast to a broad support inside the boat, bracing it against a side if needed so it stays upright. Fold or roll a cardboard strip into the mast, then attach the sail with paper bands. Children can decorate the hull and imagine a coastal journey. Try the model on a flat table and adjust the mast before adding any cargo. Its paper sail and joins suit pretend play on a dry surface; floating requires a separately designed water suitable version.
11. Painted Bottle Base Flower on a Cardboard Stem
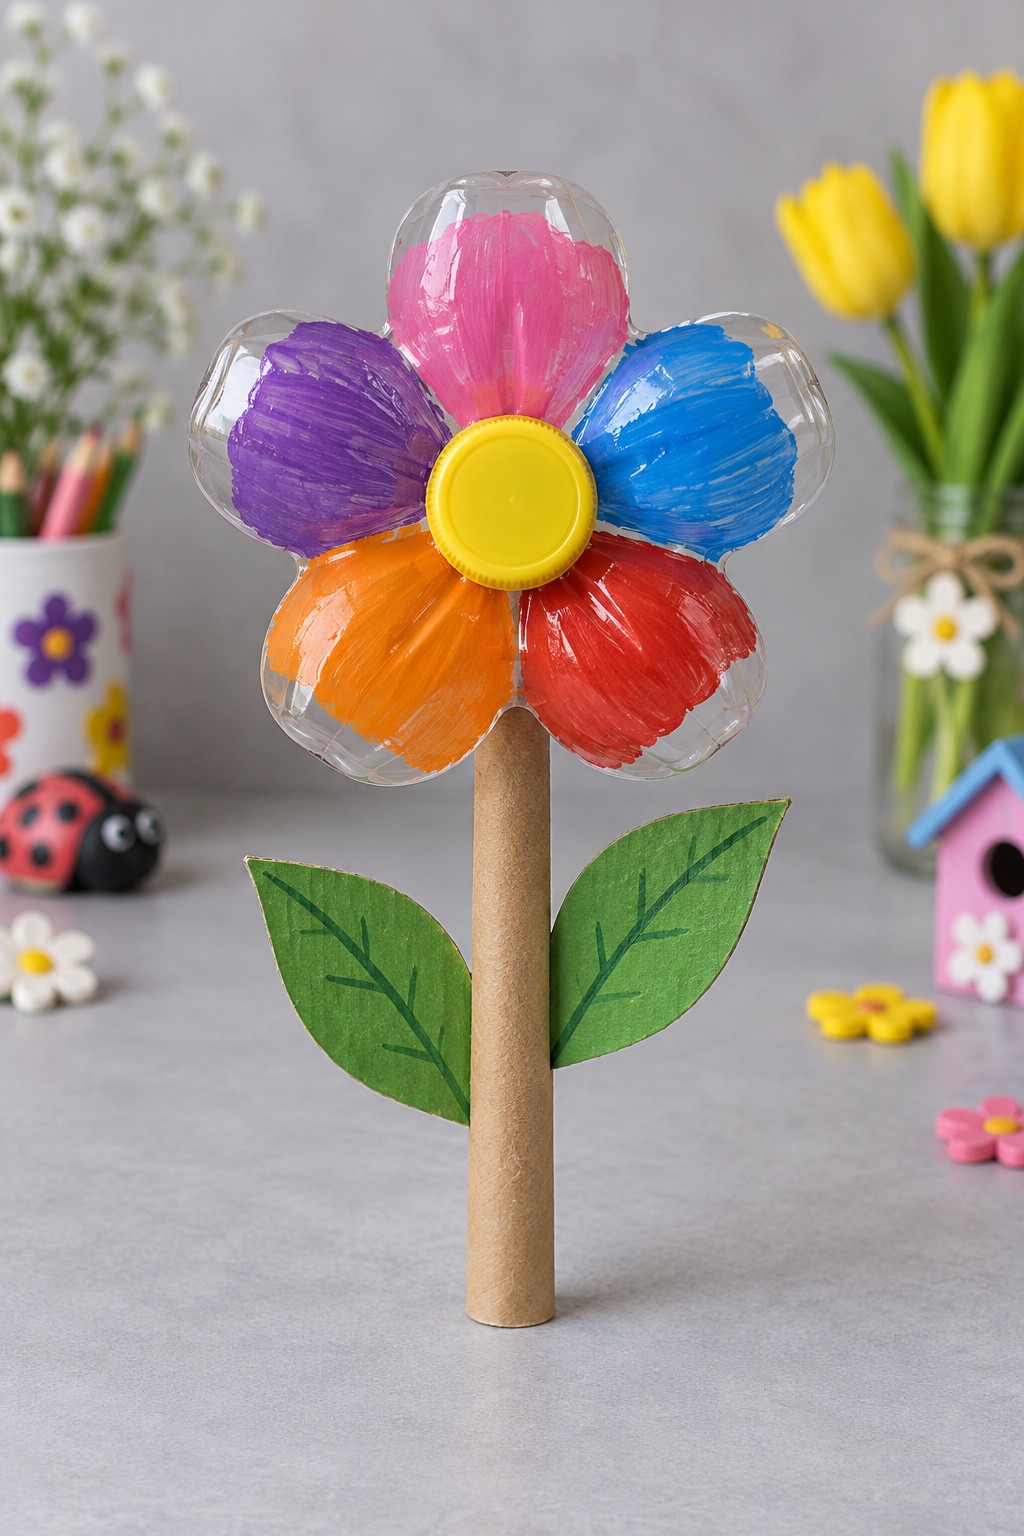
The five rounded sections of a plastic bottle base become colorful petals around a yellow cap center. A narrow cardboard tube forms the stem, with two painted cardboard leaves. Choose a bottle with a clearly divided base and let an adult trim it into a flower outline, removing or covering any rough edges before decorating begins.
Paint the petal sections in different colors with a suitable product, leaving some clear plastic visible if you want the handmade brush marks to show. After drying, attach the center and secure the flower to the stem with adult help. Children can paint leaf veins and compare their petal color choices. Keep a tall flower in a stable reused container, or add a broad base if it tips; a narrow upright stem alone may not balance the head reliably.
12. Round Metal Lid Crab with Red Cardboard Claws
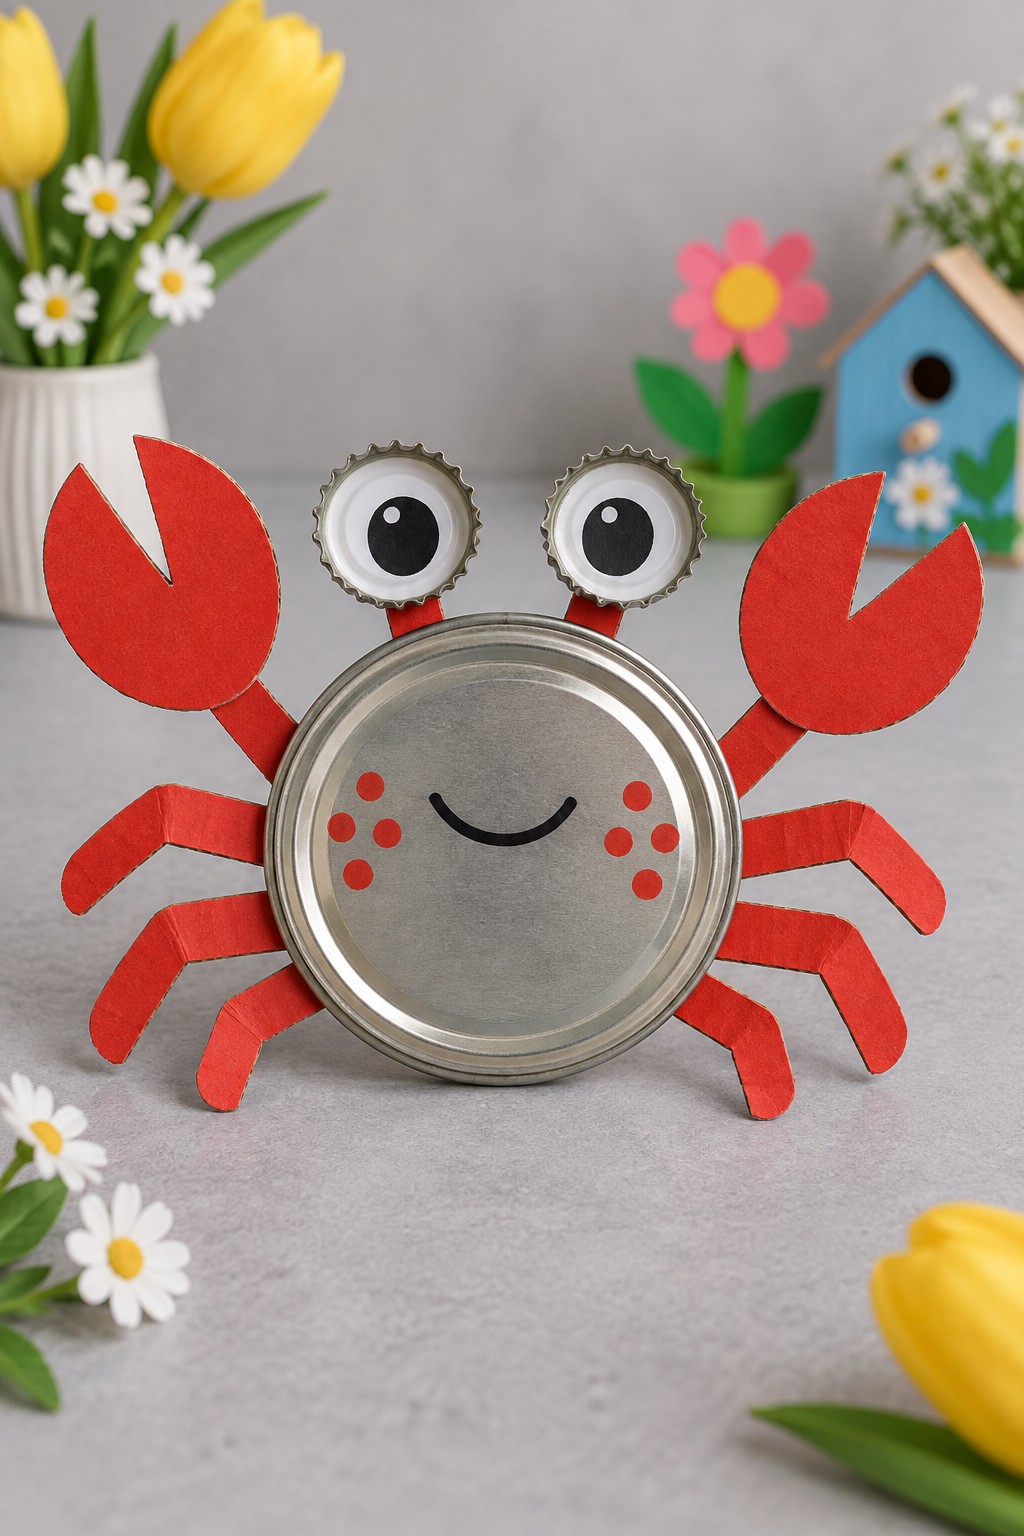
A round lid gives this smiling crab a shiny body, while red cardboard creates its angular legs and oversized claws. Collect a smooth edged lid, red card or painted packaging cardboard, and two safe caps or paper discs for raised eyes. An adult should reject any sharp metal lid; a silver paper covered cardboard circle can provide a similar effect.
Work with the body lying flat, arranging the limbs behind it before attaching their overlapping ends. Add the eyes to two short cardboard stalks, then draw the mouth and red cheek dots. Children can explore folded joints and create sideways walking stories. This simplified character is suitable for imaginative play; for a crab anatomy activity, make eight walking legs as well as the two claws. Mount it on a small backing support if it will stand upright.
13. Red and White Cardboard Lighthouse with a Clear Lookout
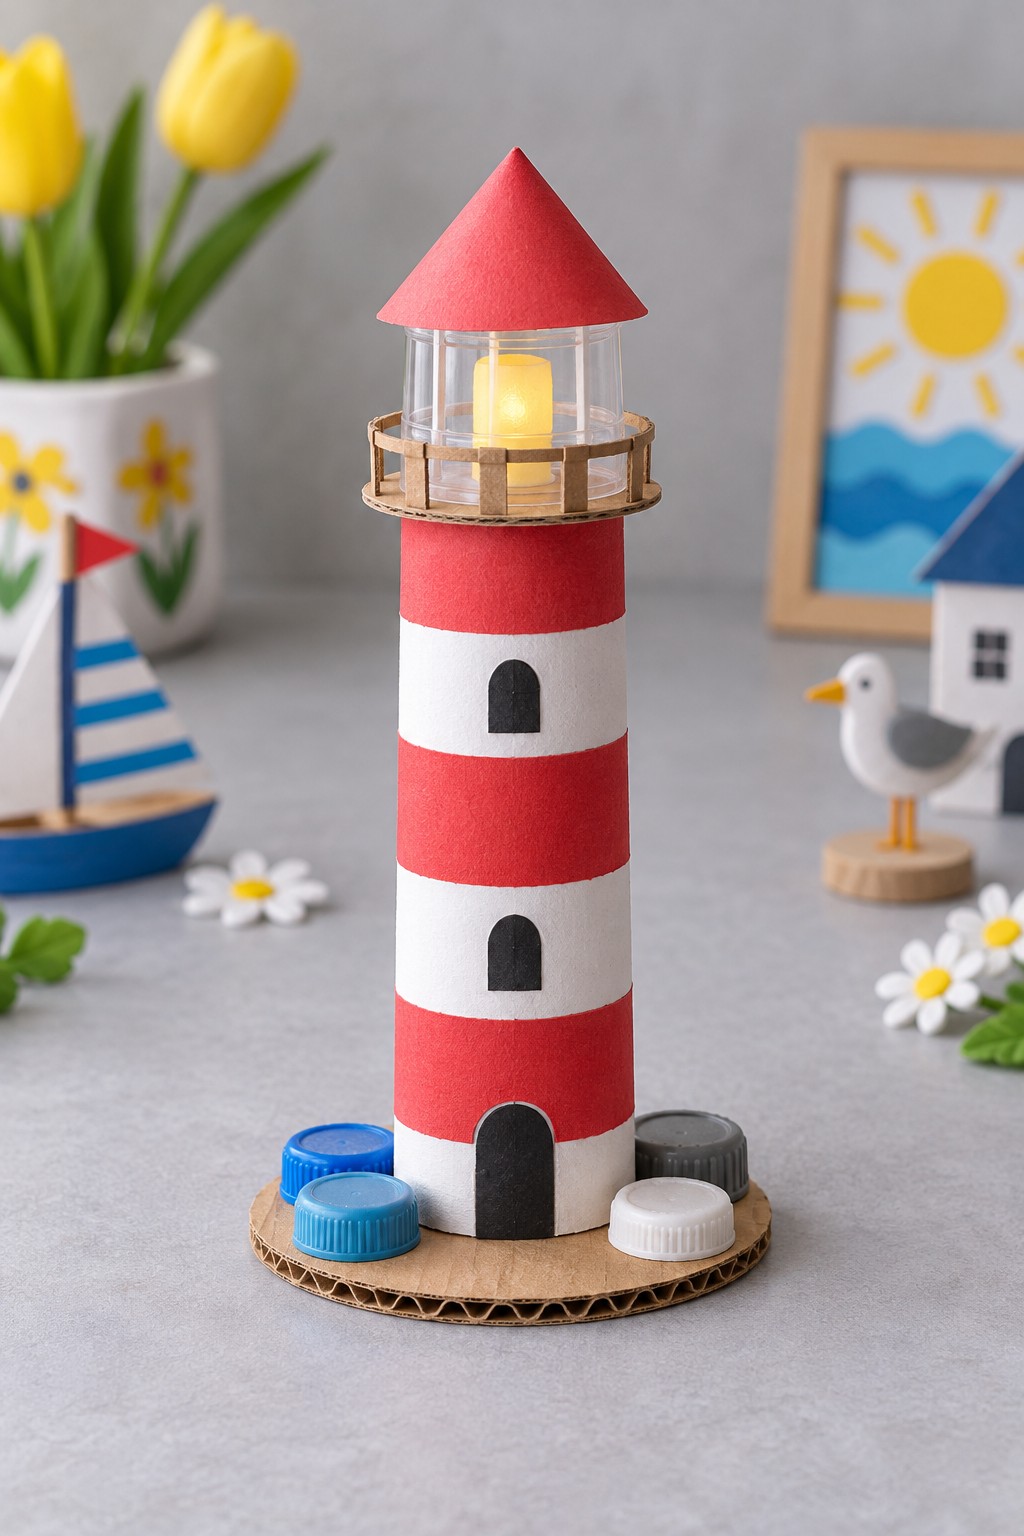
A tall cardboard tube, red and white bands, and a clear upper chamber create a miniature lighthouse. Gather a tube, a broad cardboard base, red and black paper, a clean transparent container for the lookout, and narrow cardboard strips for the balcony railing. Children can decorate the door and windows while an adult prepares the circular supports and assembles the top.
Fix the tower upright, wrap the color bands around it, and add a supported lookout platform. A removable paper cone roof allows access to the upper chamber. If you include the battery tea light, choose an intact unit with a securely fastened battery compartment and keep battery handling with an adult. Use no flame. Leave the light removable and follow its instructions; an unlit yellow paper insert is a simpler option for a classroom display.
14. Patchwork Cup Jellyfish with Curled Magazine Tentacles
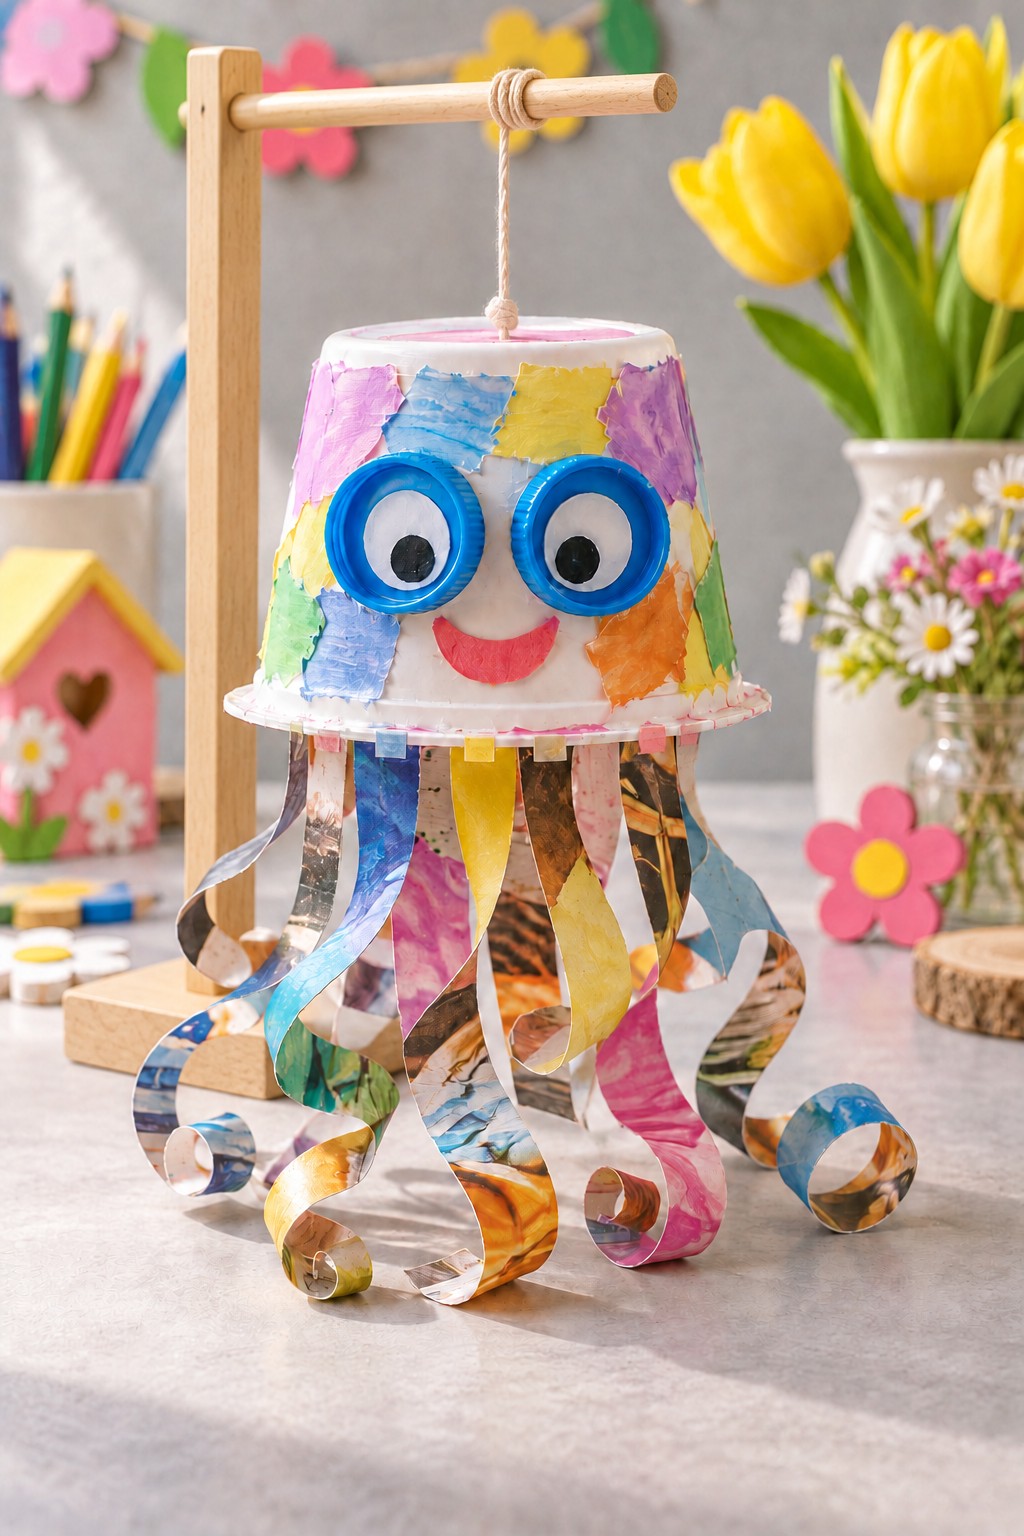
An inverted cup becomes a jellyfish bell covered in colorful paper patches, with long curled magazine strips hanging below. Collect a clean cup, lightweight printed paper, two matching blue caps or large paper eyes, glue, and a short suspension cord. The paper can come from different pages; a mix of colors gives the tentacles their varied appearance.
Cover the cup with small patches and let the surface dry. Attach the straight upper ends of the tentacle strips around the inside rim, then curl the free ends gently around a pencil. An adult should make the hanging hole and secure the cord inside the closed end. Children can arrange long and short tentacles or give the jellyfish a name. Display it where its cord and loose strips stay clear of little hands, rather than above a cot or play space.
15. Shiny CD Snail with a Paper Spiral Shell
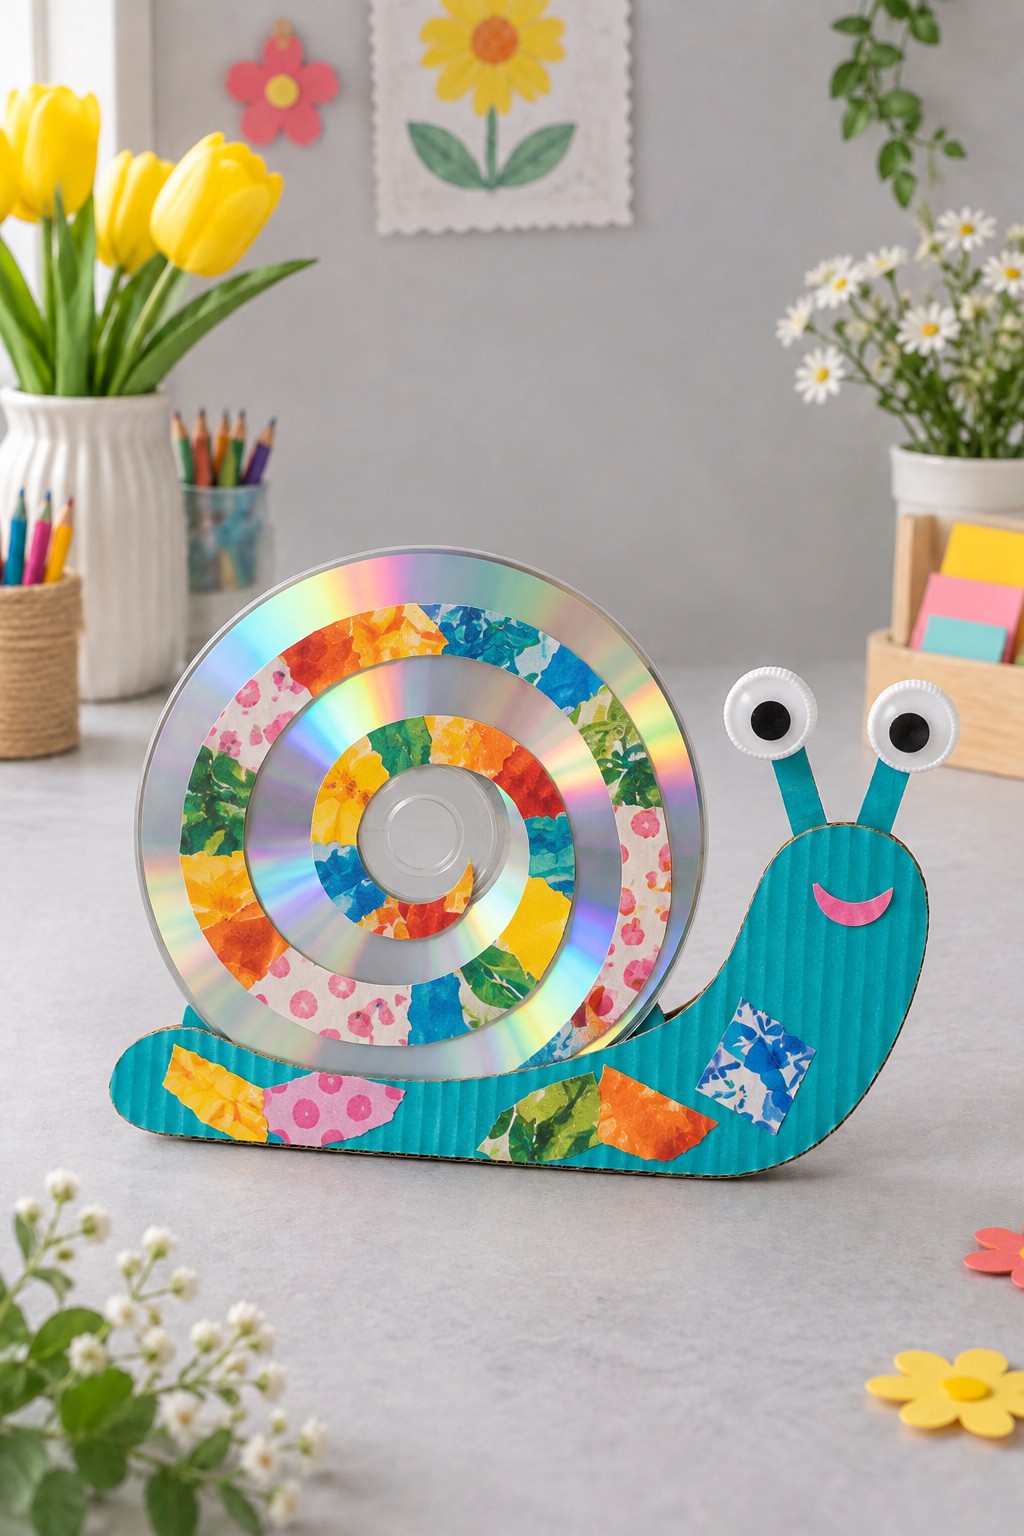
An unwanted, intact CD becomes a shiny snail shell when paired with a turquoise cardboard body and a colorful paper spiral. Gather corrugated cardboard, one undamaged disc, patterned paper offcuts, and two white caps or paper circles for the eyes. Keep the disc whole; cracked or chipped discs should not be used for this activity.
Draw and cut the body with a broad bottom edge, then paint it and add the face. Make the spiral from a continuous paper strip or closely arranged curved pieces, leaving bands of the CD exposed. An adult can secure the disc to a reinforced cardboard backing and add a rear stand. Children can follow the spiral inward with a finger and experiment with their scrap colors. Arrange the finished snail in a miniature garden display, avoiding pressure on its thin eye stalks.
16. Cardboard Box Train with Colorful Cap Wheels
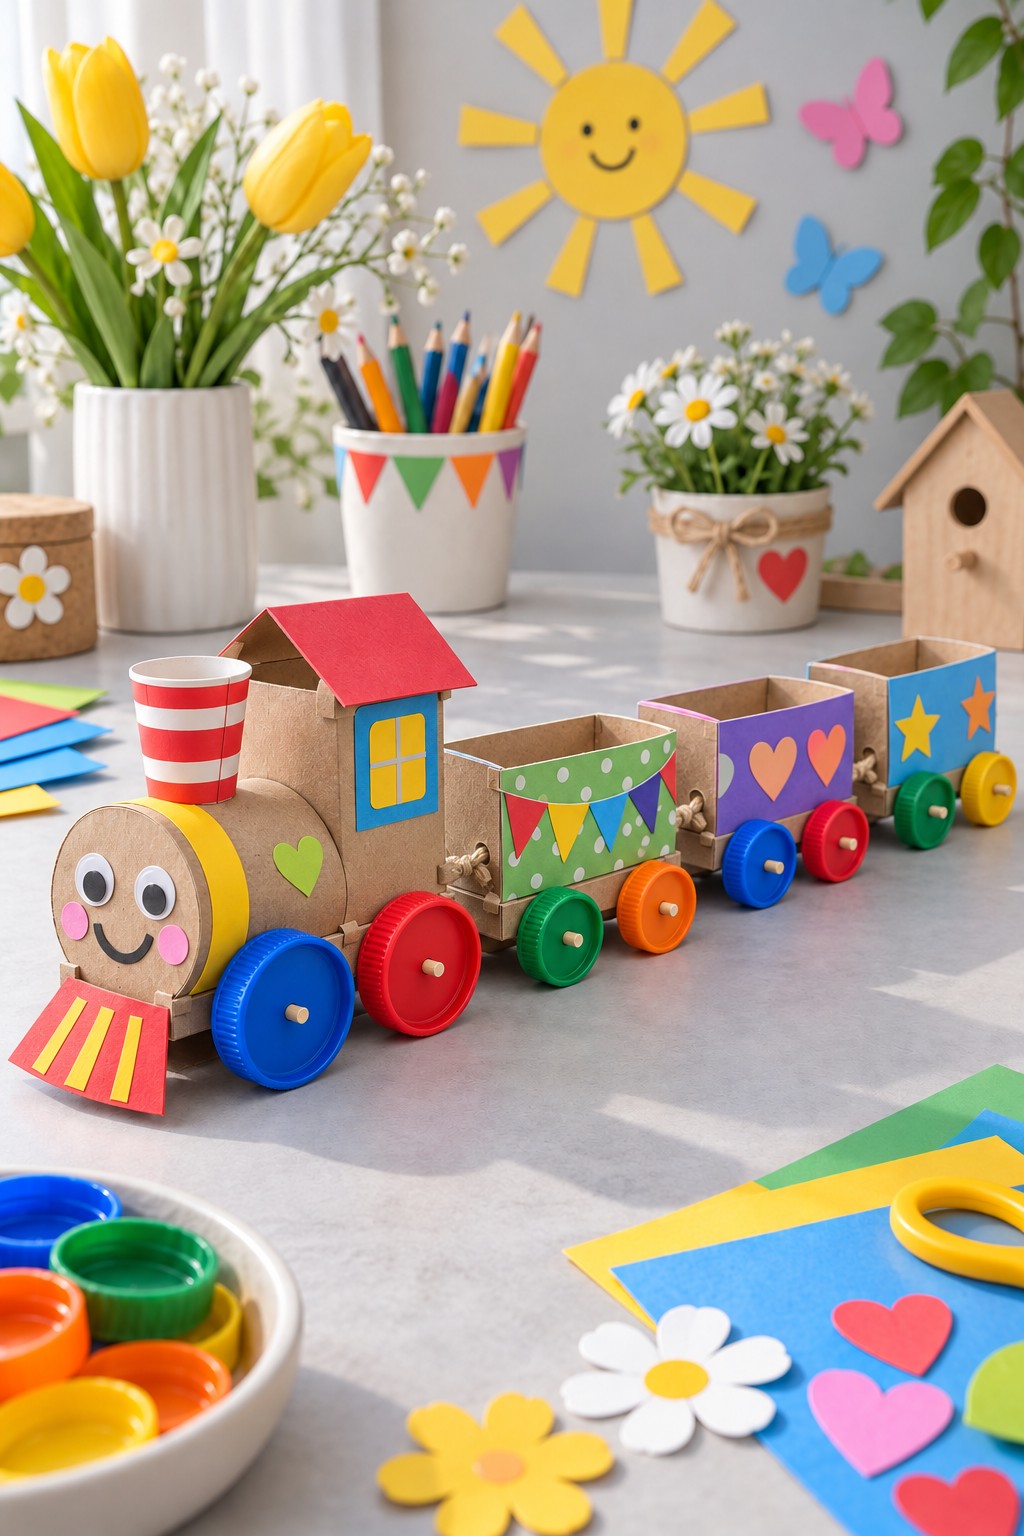
Several small packaging boxes make a train whose carriages can each carry a different paper pattern. A cardboard cylinder provides the locomotive’s rounded front, while a small cup becomes its chimney. Collect one box for the cab, three open carriage boxes, caps for wheels, and scraps for the roof, windows, and smiling face. Keep the carriages similar in width so they form a coherent set.
Decorate the separate sections before joining them. An adult can prepare axle holes, trim blunt axle ends, and connect the carriages with short ties. Test each section for free wheel movement before coupling the train. Children can sequence the carriage colors and invent deliveries for its route. Use lightweight paper cargo and tabletop play; this handmade model is not built to carry children or heavy objects.
17. Spotted Packaging Dome Beetle with Folded Legs
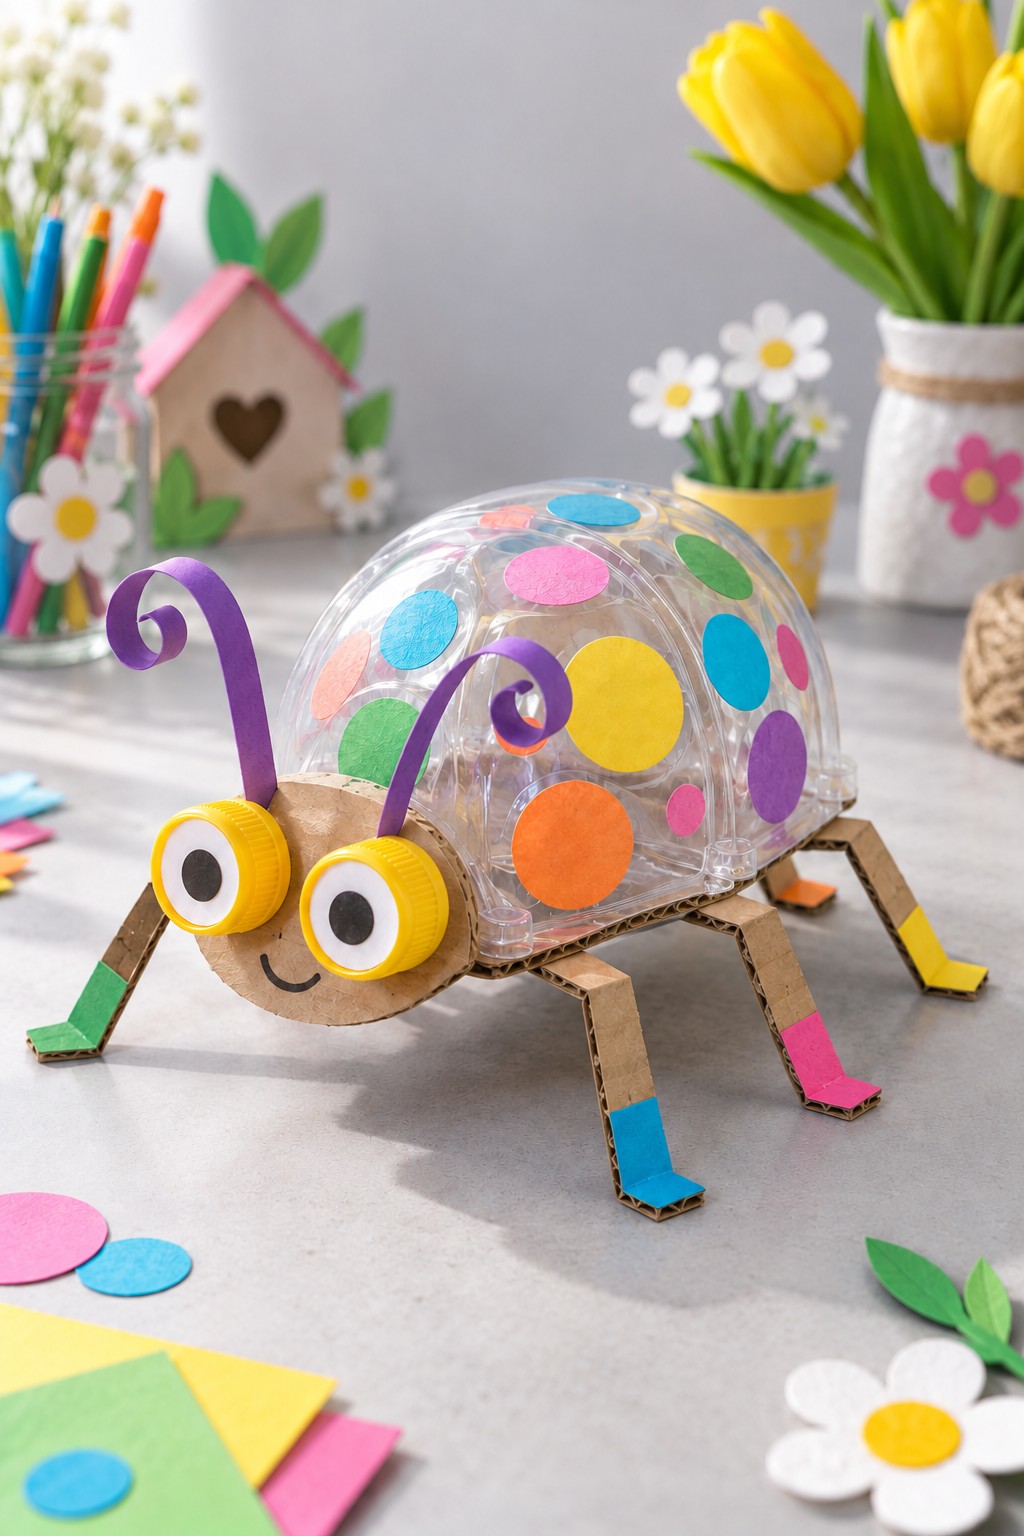
A clear domed packaging lid gives this beetle a see through shell covered in cheerful colored circles. Use a clean, unbroken dome, a firm cardboard base, a round cardboard face, two caps or paper eyes, and purple paper antennae. An adult should check the packaging rim before children arrange the decorations on its exterior.
Cut and fold six broad cardboard legs, leaving attachment areas beneath the base. Decorate their feet, fix the dome to the base, and join the face at the front. Curl the antennae and attach them behind the eyes. Children can distribute the colored circles, naming colors or comparing sizes as they work. Keep the model low and stable, adjusting the foot folds on the table before the joins set. Its transparency is a design feature, so the dome does not need a solid coat of paint.
18. Egg Carton Pirate Ship with a Paper Bag Sail
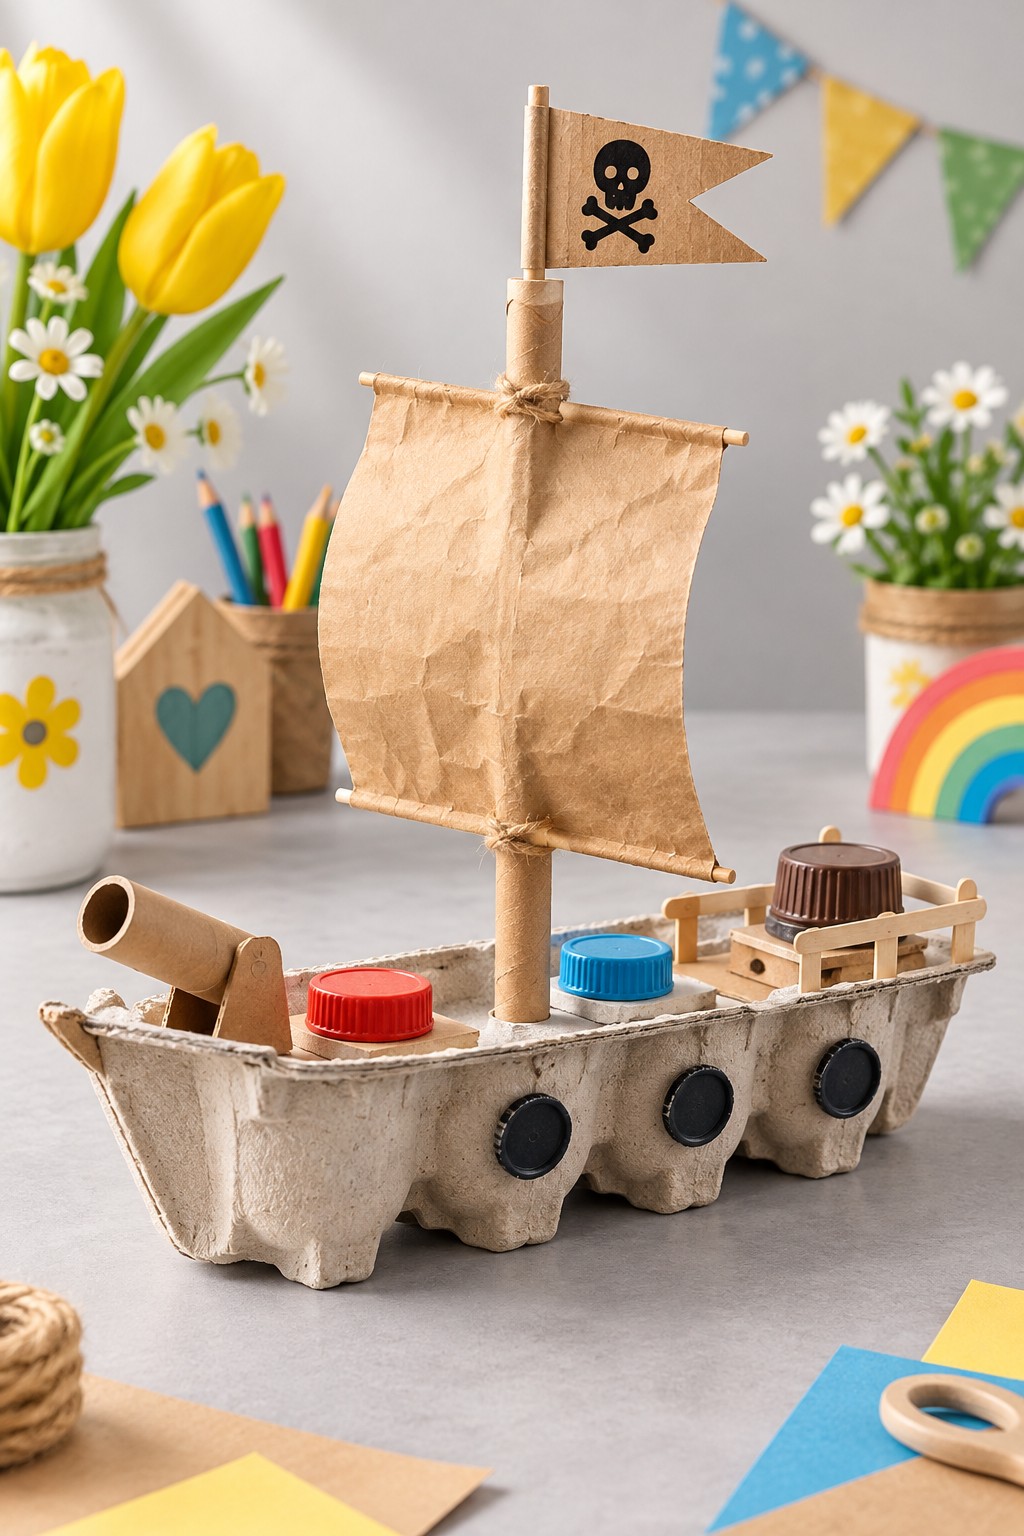
The lower half of a carton becomes a pirate ship with a brown paper sail, cap portholes, and a short cardboard tube cannon. Use only clean packaging accepted by your school or household craft routine; choose an unused molded paper tray or a cardboard hull if an egg carton is unsuitable. Add a rolled paper mast, blunt supports, and scrap card for the flag and deck details.
An adult can anchor the mast through a reinforced deck section, while children decorate the flag and position the portholes. Attach the sail to two short crosspieces, keeping their ends blunt and contained within the display. The cardboard cannon is decorative and does not launch anything. Use the finished ship with paper islands and spoken adventure stories. The absorbent hull and paper sail belong on a dry tabletop rather than in water.
19. Cardboard Hedgehog with Reused Plastic Fork Spines
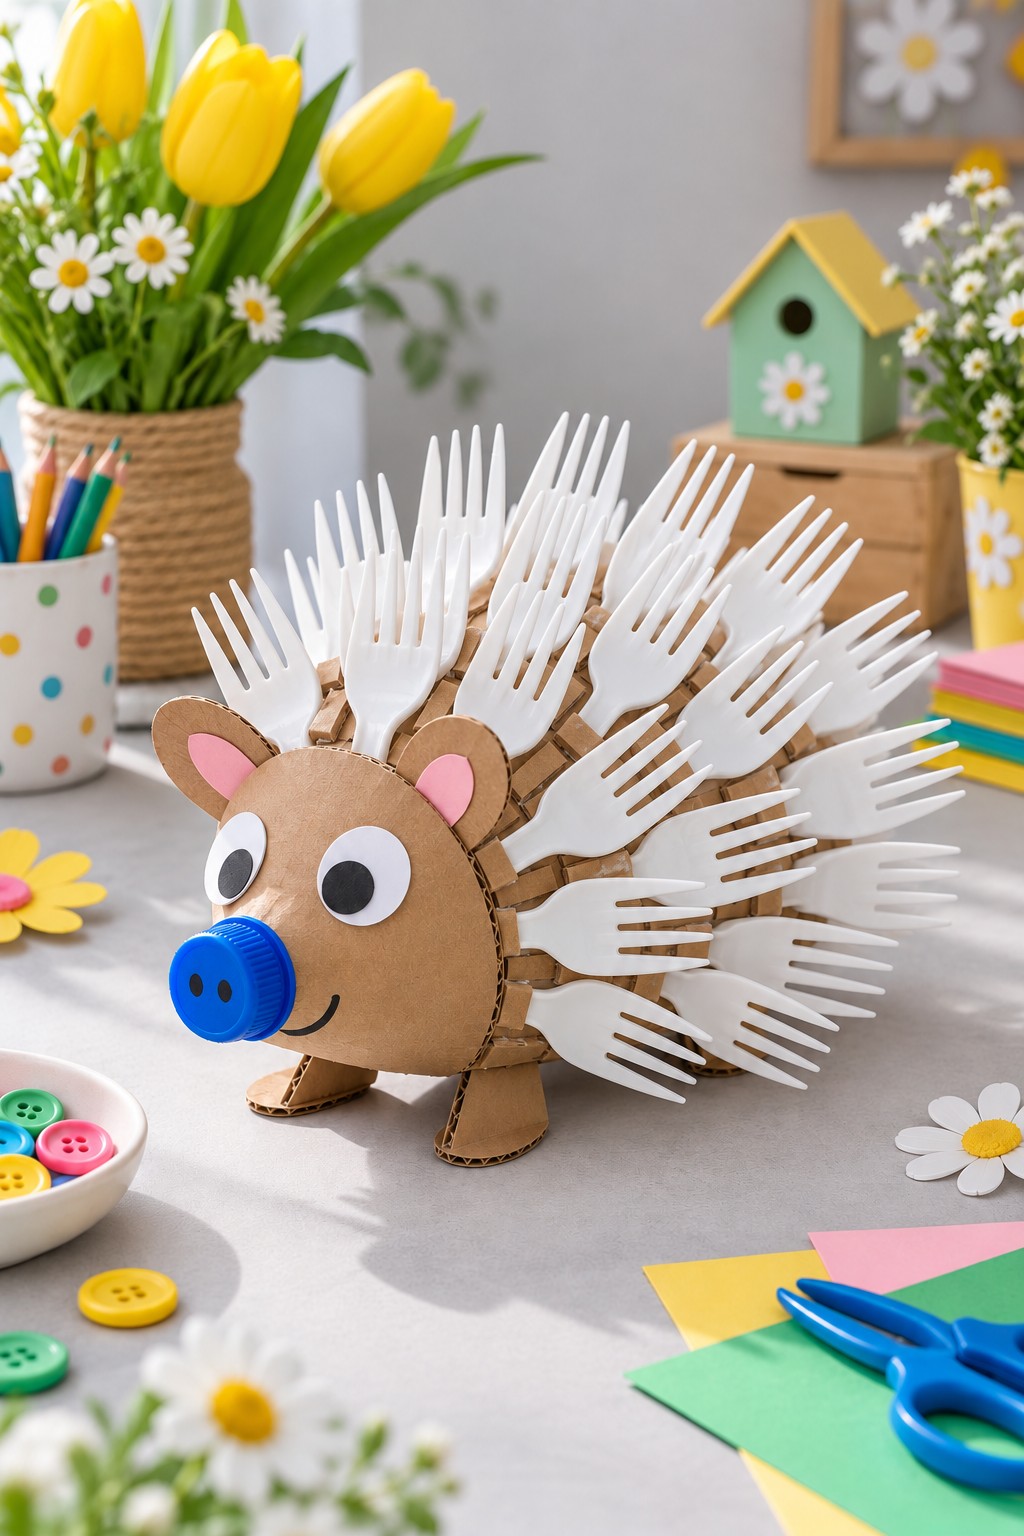
White plastic forks create the radiating spine texture of this cardboard hedgehog. Its face, ears, and feet use sturdy packaging cardboard, with pink paper ear centers and a blue cap nose. Collect only clean, intact cutlery and let an adult assess its pointed ends. This project is better suited to a supervised display than a toy handled by young children.
Build a broad body with internal cardboard supports, then arrange fork handles inward and tines outward before fastening them securely. Children can make the facial features and decide how the overlapping rows should spread. An adult should complete the spine attachment and check for loose pieces. For a version children will handle, substitute rounded cardboard strips for the forks. Discuss how the repeated shapes suggest spines without making the completed model part of rough play.
20. Miniature Camping Tent from an Old Umbrella Canopy
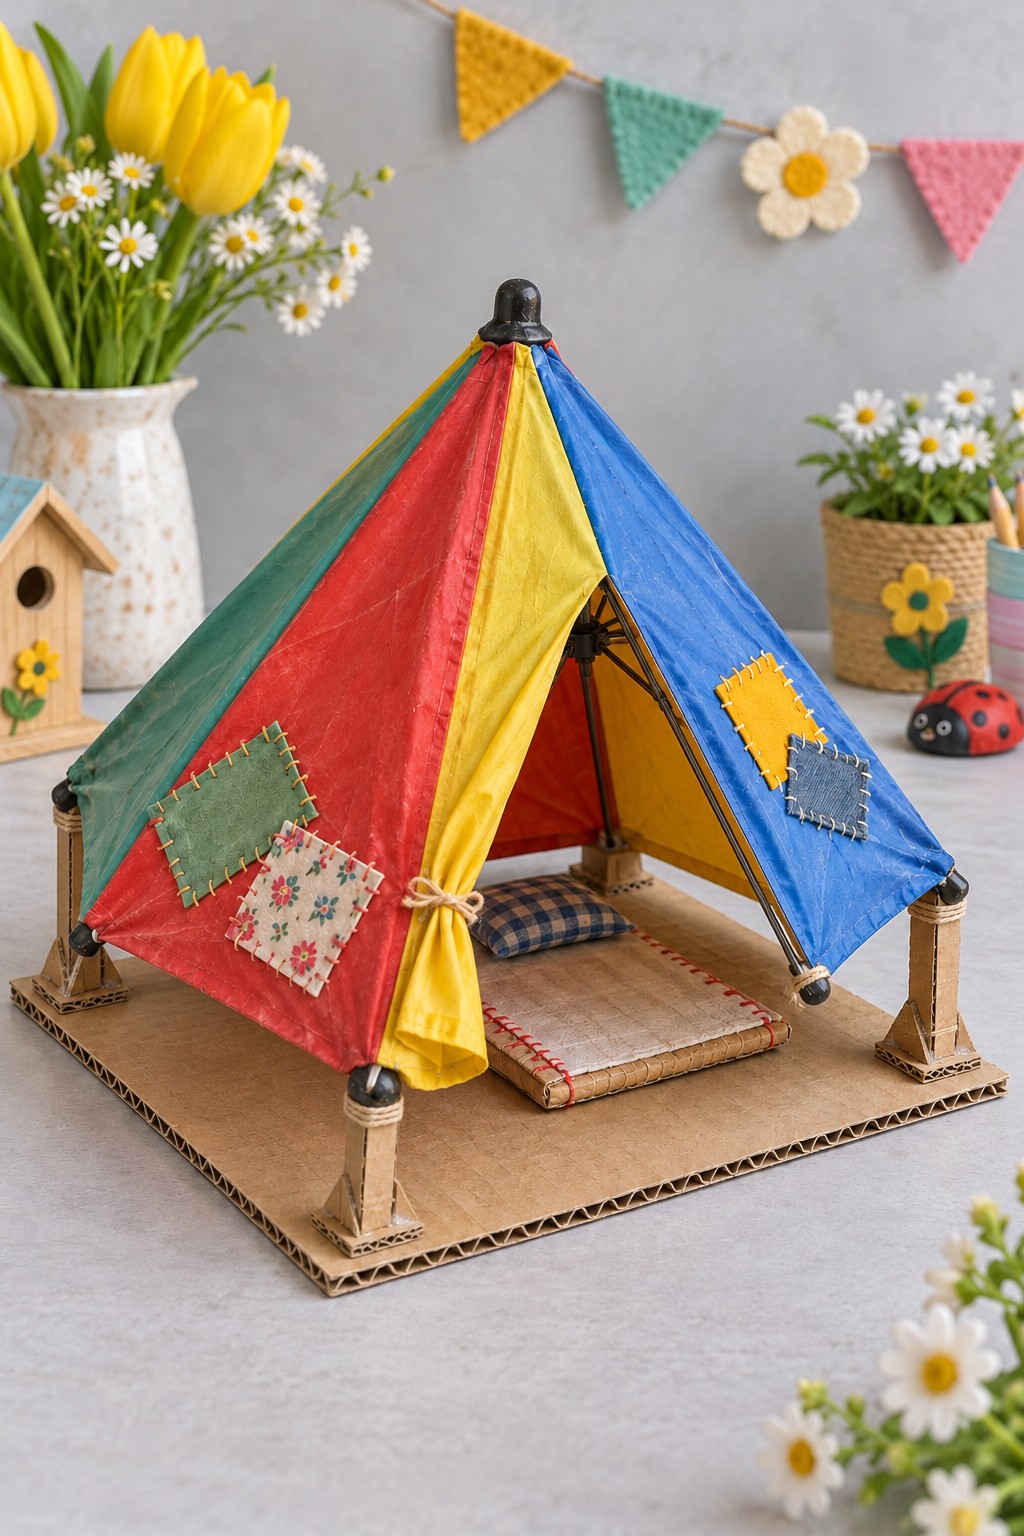
A colorful umbrella canopy suggests the roof of a miniature camping tent, with fabric patches and scrap bedding adding character. This is a shared model project with substantial adult preparation. An adult should dismantle an old umbrella and assess every part; exposed wire ends, damaged ribs, and opening mechanisms should not become children’s craft components. A newly made blunt frame can support the reused canopy fabric instead.
Secure the frame to a broad cardboard base, drape the fabric over it, and leave an opening for miniature campers. Children can choose the patches and make a small blanket and pillow from fabric scraps. Adults should handle frame connections and sewing where needed. Use the tent as a dry diorama, not a shelter for a child. Its small doorway can become the starting point for a camping story.
21. Cardboard Sunglasses Character with Button Details
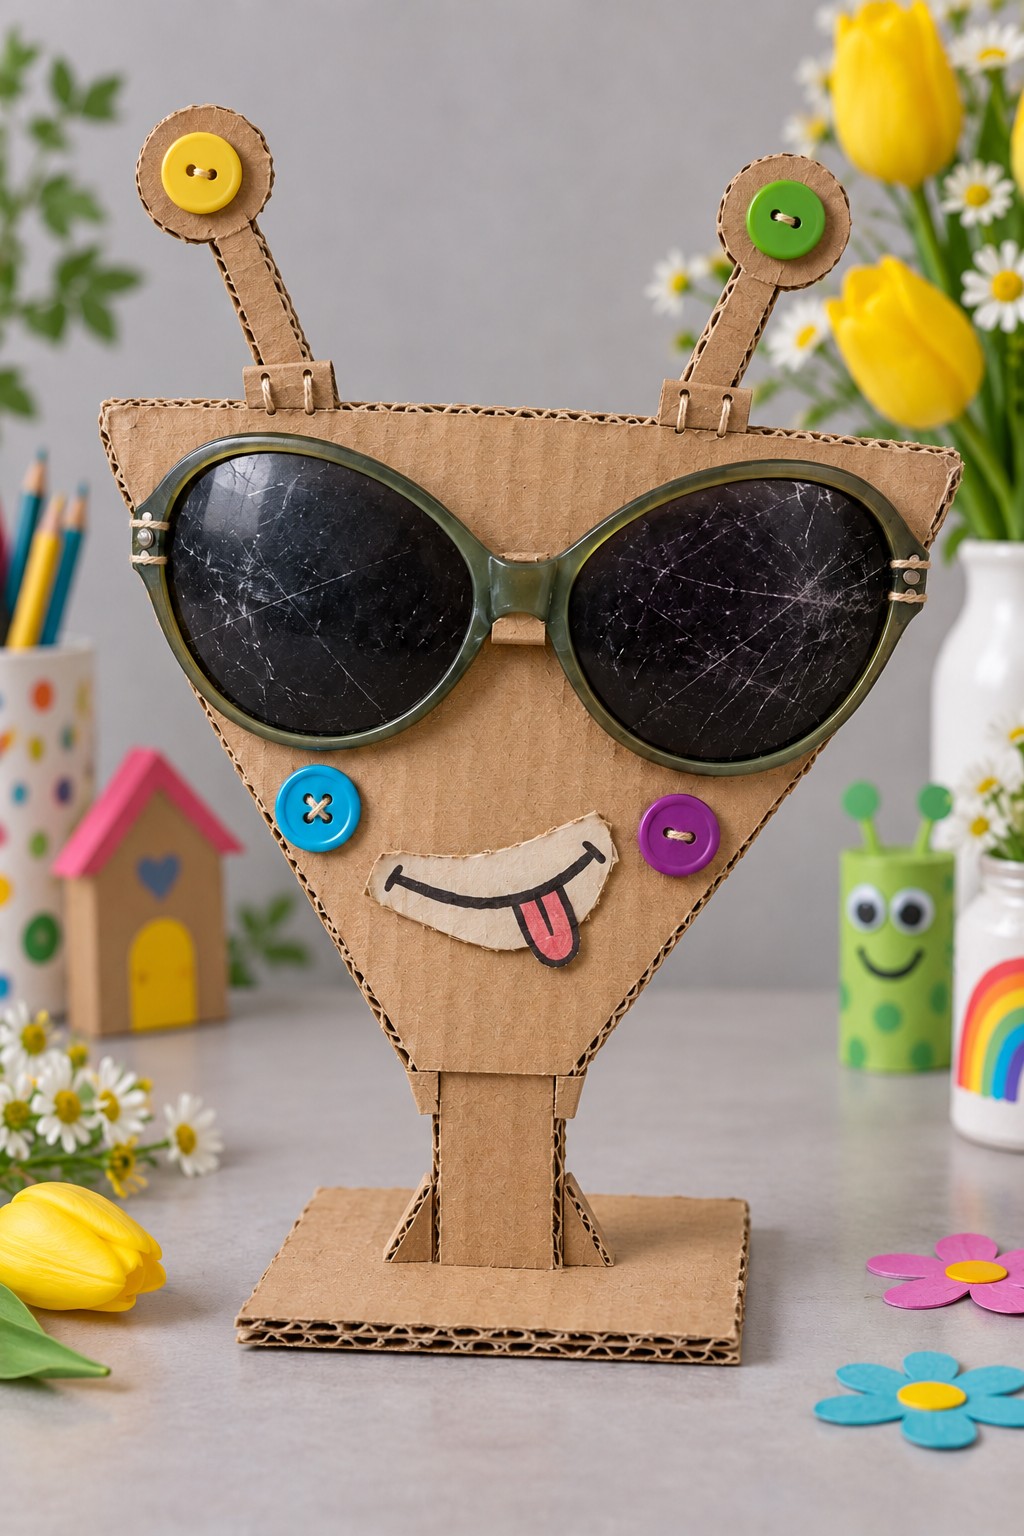
A triangular cardboard face takes on an oversized personality with old sunglasses, button cheeks, and two tall antennae. Gather firm cardboard for the face and base, paper for the smiling mouth, and a sound pair of frames. An adult must inspect the glasses: remove cracked lenses and reject sharp or broken parts. Opaque paper inserts can replace unsuitable lenses in this decorative character.
Work flat to place the glasses and facial features, using reinforced tabs or short adult fitted ties to hold the frame. Add the antennae, then brace the face on a broad stand. Children can choose an expression and invent the character’s voice. Buttons can be replaced with paper circles for younger makers. Keep the glasses attached to the display; this project does not restore damaged eyewear or make it suitable to wear.
22. Mini Bottle Cap Skateboard for Tabletop Play
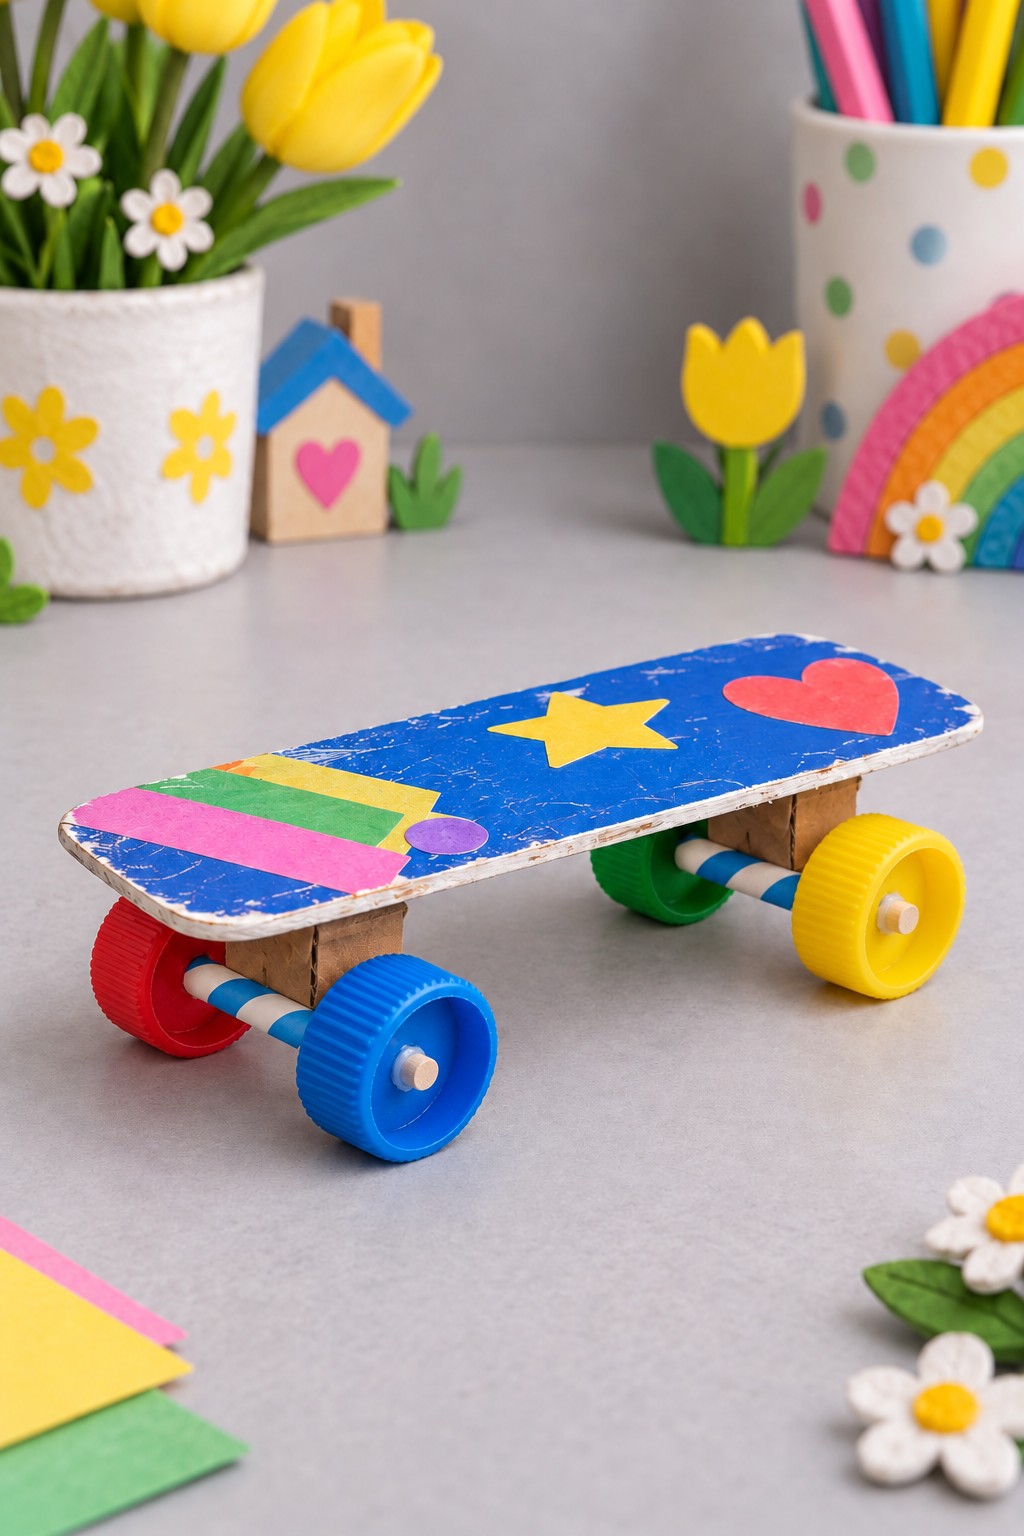
A rounded cardboard deck and four bottle caps create a miniature skateboard for finger sized play. Gather layered packaging card, four similar sized caps, two blunt dowels, short paper tube sleeves, and paper scraps for the deck design. The bright wheels can be different colors, but their diameters should match closely if you want the board to sit level.
An adult should prepare the cap holes and mount the two axles in sleeves beneath the deck. Fix the wheels to the axle ends, keeping adhesive out of the sleeves so the axles can turn. Children can paint the top blue and arrange a star, heart, and geometric strips. Check that the wheels clear the deck and rotate before use. This is a small craft model; it cannot support a child standing on it.
23. Cardboard Ferris Wheel with Reused Box Gondolas
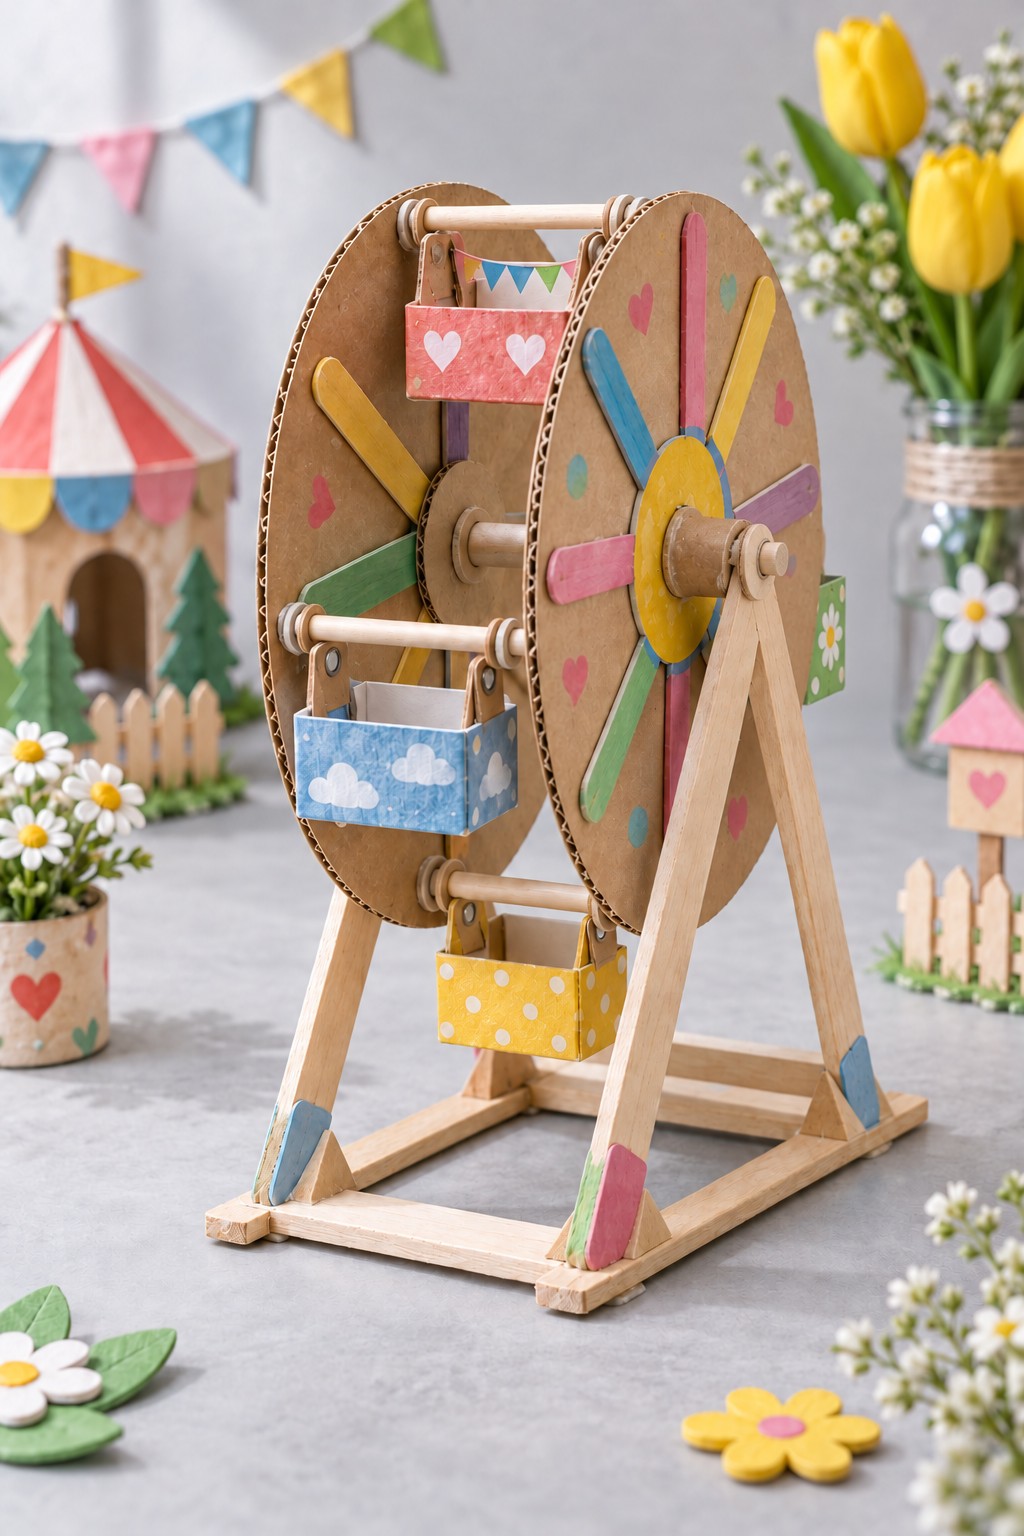
Two cardboard circles, painted craft stick spokes, and three tiny box gondolas form a miniature Ferris wheel. The support frame and pivoting seats make this one of the more involved projects. Gather strong corrugated cardboard, small clean boxes, smooth wood offcuts or suitable blunt structural pieces, and dowels. Children can design the wheel colors and decorate each gondola before assembly.
An adult should build and brace the frame, align the wheel’s central axle, and make the gondola pivots. Seats need clearance between the discs and connections that let them hang upright as the wheel turns. Check movement slowly by hand, keeping fingers clear of the pivots and stopping if anything catches. For a simpler version, fasten the wheel and gondolas as a stationary fairground display.
24. Cardboard Space Shuttle with Clear Packaging Cockpits
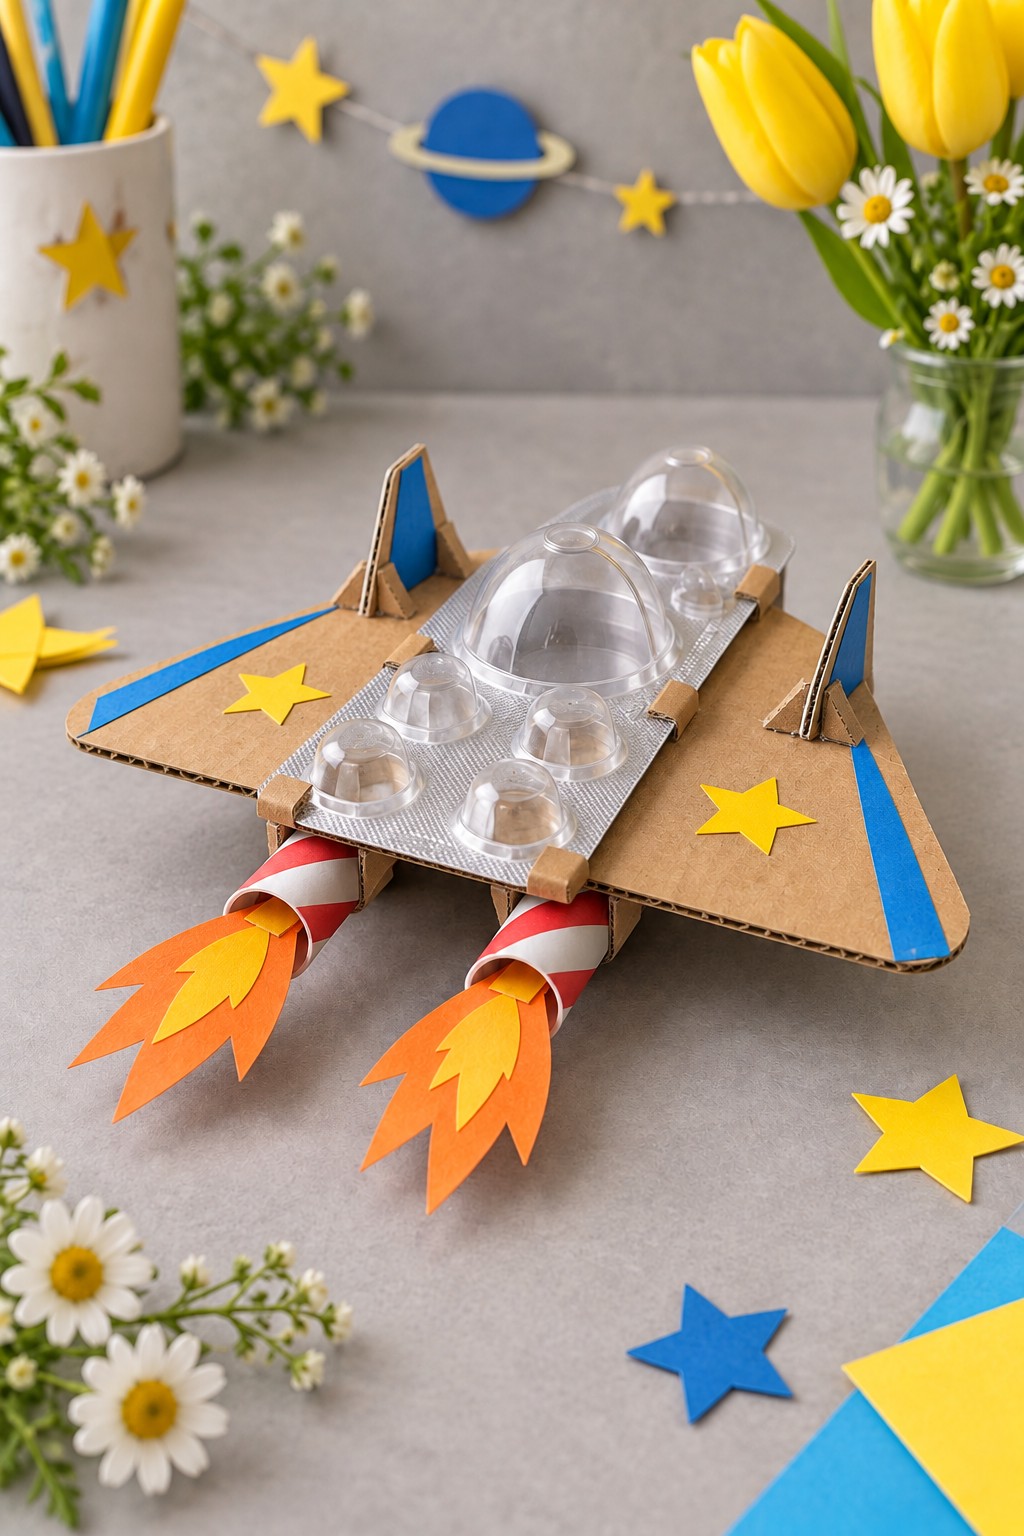
Clear domed packaging gives this cardboard shuttle a row of futuristic cockpits, while two short paper tubes become engines. Choose clean food or craft packaging with a similar shape; do not use medicine blister packs. Gather a firm cardboard wing panel, extra cardboard for upright fins, blue and yellow paper, and orange paper for the flames. An adult should trim the transparent parts and assess the edges.
Decorate the flat wing first, then add the domed section with small overlapping cardboard retaining tabs. Brace the upright fins with triangular supports and fix the engine tubes beneath the rear. Children can layer yellow flames over orange ones and place stars across the wings. Keep the paper flames fixed and decorative. The model suits hand held storytelling or a tabletop space station; it has no propulsion and is not intended for throwing.
25. Striped Paper Straw Dragonfly with Clear Wings
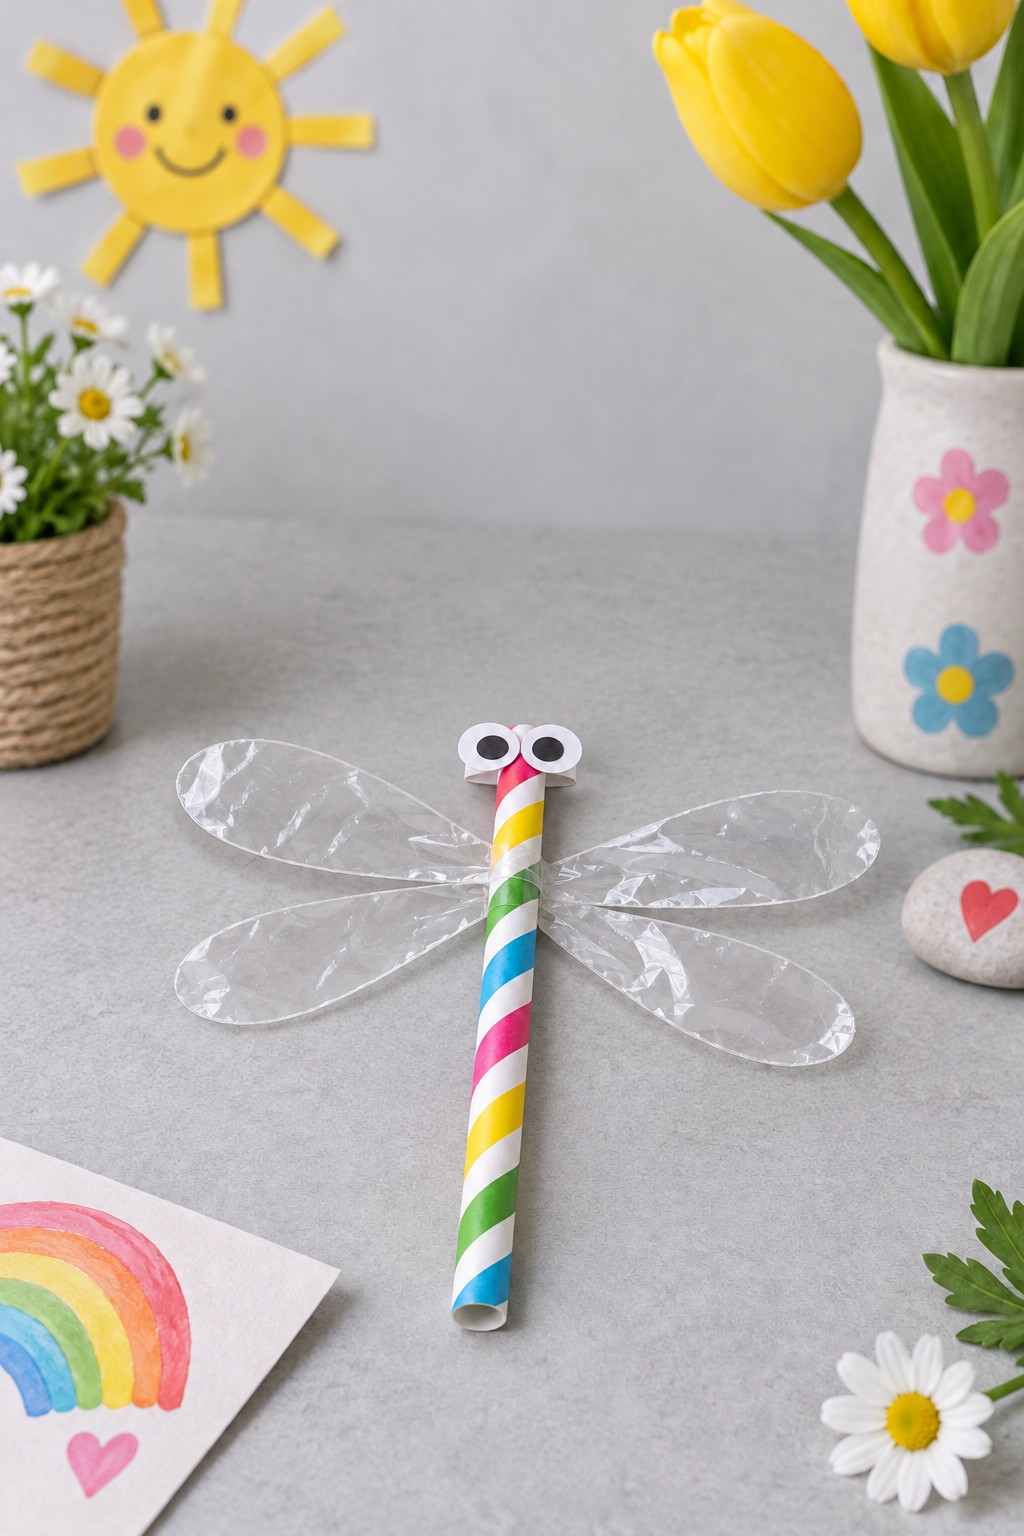
A striped paper straw provides the narrow body of a dragonfly, with four transparent wings arranged in two pairs. Gather a clean paper straw, thin clear packaging or a clean transparent wrapper, white paper, a black drawing tool intended for the activity, and tape. An adult can prepare the wing outlines if the material is difficult to cut or has troublesome edges.
Lay the body and wings on the table, matching the left and right shapes before attachment. Secure the wing bases around the middle of the straw with small tape tabs, then add two paper eyes at one end. Children can compare the transparent wings with the colorful body and arrange several dragonflies over a paper pond. Keep the straw as a model component, rather than using it for drinks after paint, tape, or glue has been added.
26. Sliding Matchbox Bed with Fabric Scrap Bedding
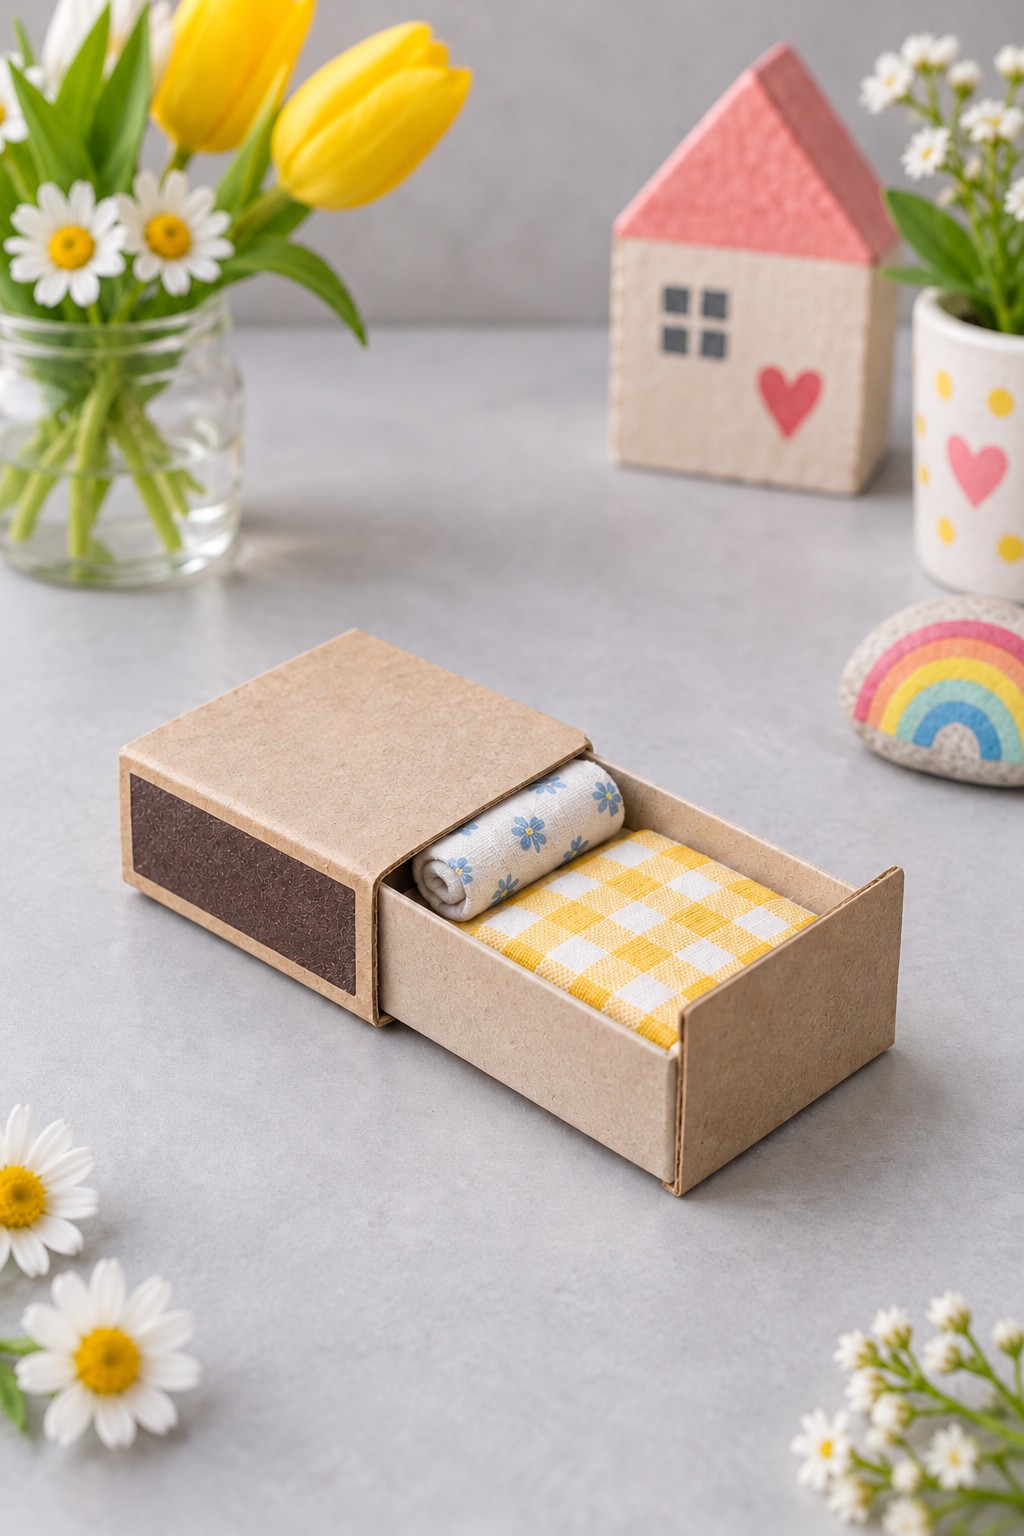
An empty sliding box becomes a tiny bed with a checked blanket and a rolled fabric pillow. Use a clean craft box with a drawer and sleeve, or an adult emptied and inspected matchbox with no matches or loose residue. Collect small fabric scraps and a thin piece of cardboard for a mattress insert. The bed’s proportions should suit the miniature character you want to tuck inside.
Cut the insert to fit the drawer and wrap it in fabric without making it too bulky. Fold a separate blanket and roll a short scrap into a pillow, securing the seams with a suitable adhesive or adult sewing. Children can choose the bedding and arrange a bedtime scene. Keep fabric away from the sliding edges so the drawer still moves. This project also offers a useful reason to save small, clean textile offcuts.
27. Mesh Pouf Cloud with a Ribbon Rainbow
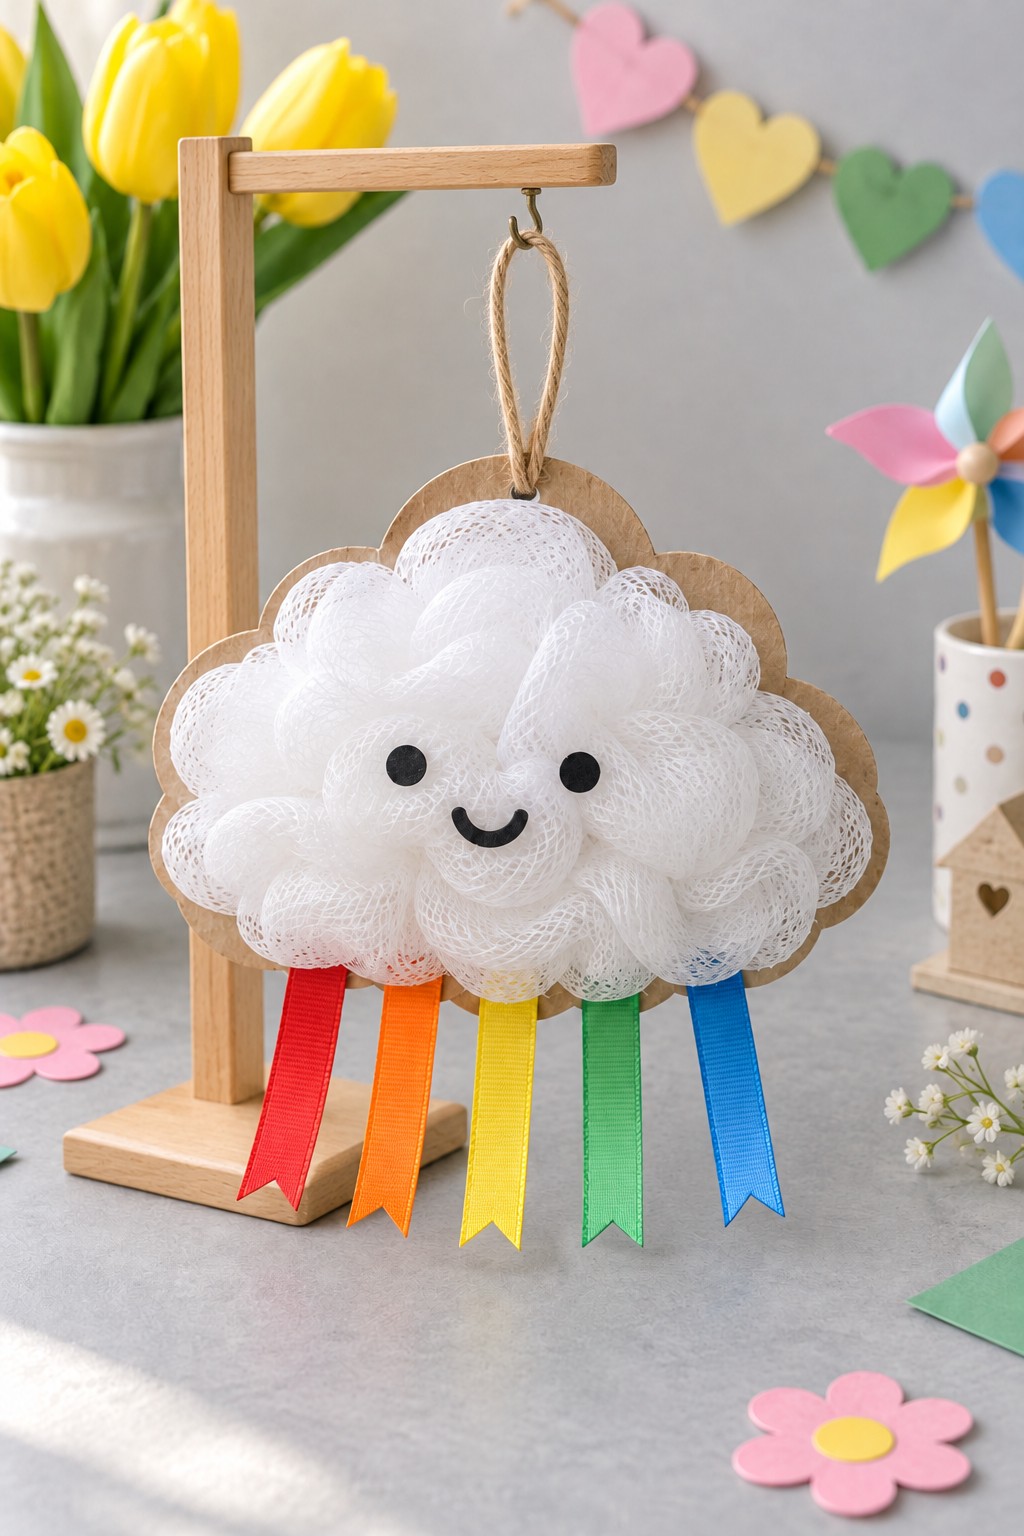
White mesh pouf material gives this cloud a billowy texture, with five ribbon strips forming a small rainbow below it. Choose a clean, thoroughly washed and dried pouf that is still sound, or unused leftover mesh. Add a cardboard cloud backing, black paper facial features, and red, orange, yellow, green, and blue ribbon offcuts. The texture comes from gathered mesh rather than cotton stuffing.
An adult can separate the mesh and secure short gathered sections to the backing, checking that no long loose loops remain. Children can arrange the rounded puffs and choose where the smile belongs. Fasten the ribbon ends on the back before adding a short hanging loop. Display the finished cloud out of young children’s reach. Use it to name its five colors; it is a simplified rainbow decoration rather than a complete color spectrum diagram.
28. Paper Plate Crescent Moon with Three Hanging Stars
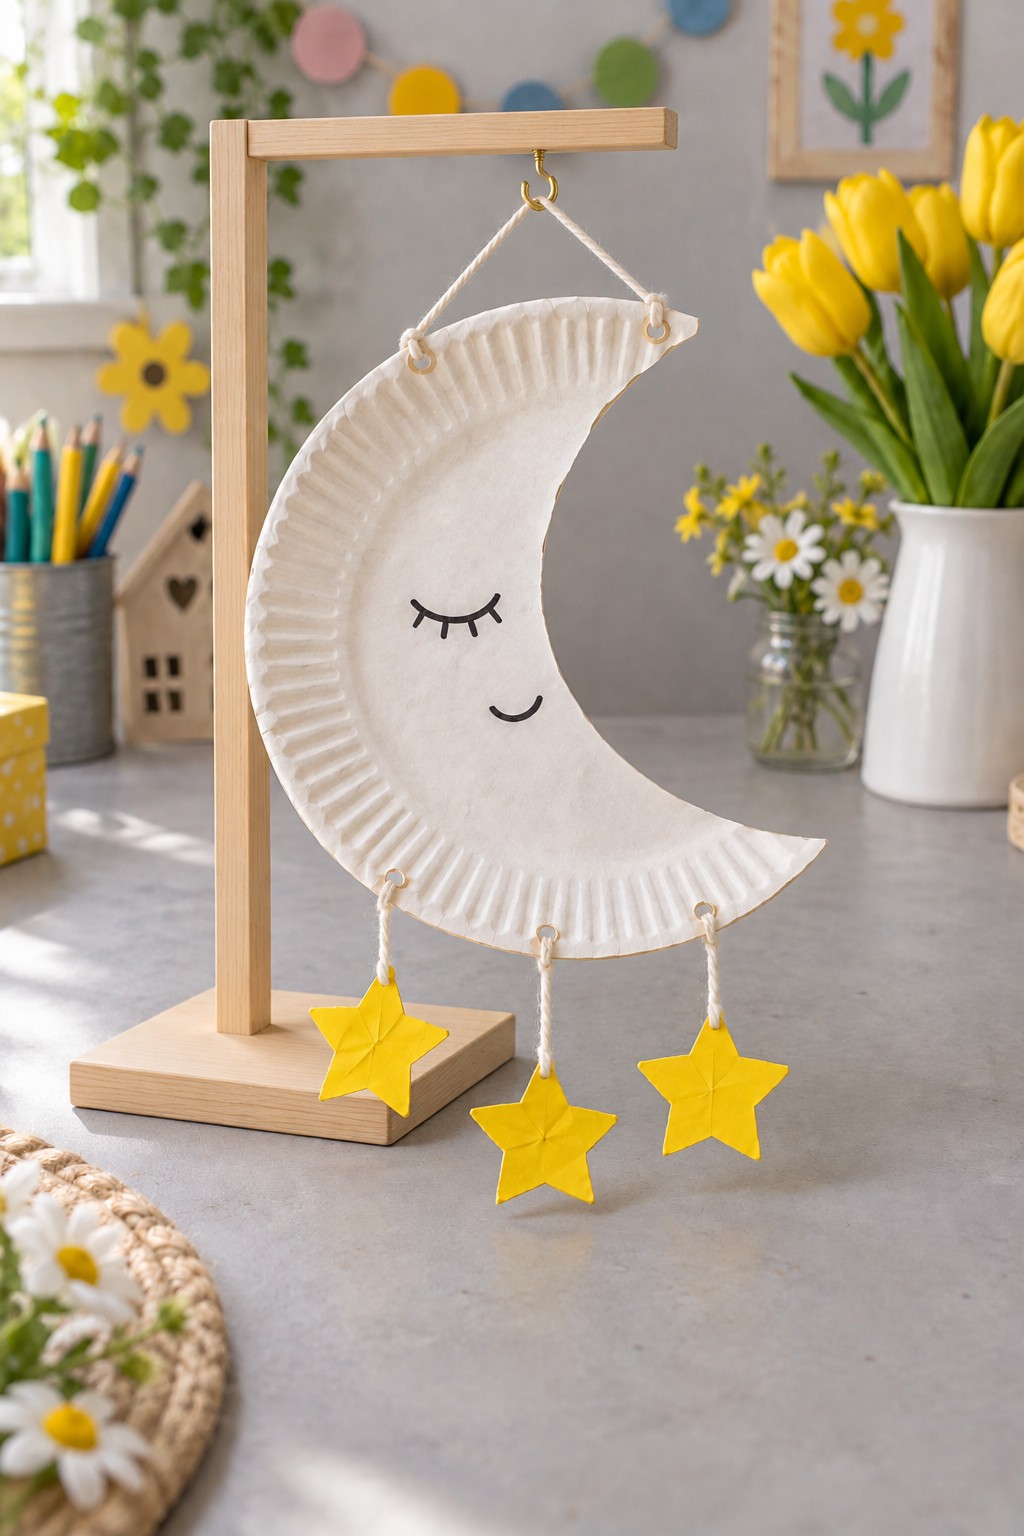
A plain paper plate supplies the curved outline and ridged edge of a sleepy crescent moon. Gather a clean plate, yellow paper scraps, short lengths of string, a drawing tool, and a little cardboard for reinforcing the hanging points. A clean leftover plate is preferable to one stained with food or grease. An adult can draw the crescent curve and help cut through the stiff rim.
Draw a closed eye and small smile, then prepare three yellow stars, folding or layering the paper if you want raised details. Reinforce and punch the hanging holes before adding the short star cords. Children can arrange the stars at different heights and describe a nighttime sky. An adult should mount the decoration away from beds, cots, and places where children can reach its cords. Keep the plate dry so the crescent retains its shape.
29. Blue Marker Cap Rocket with Paper Flames
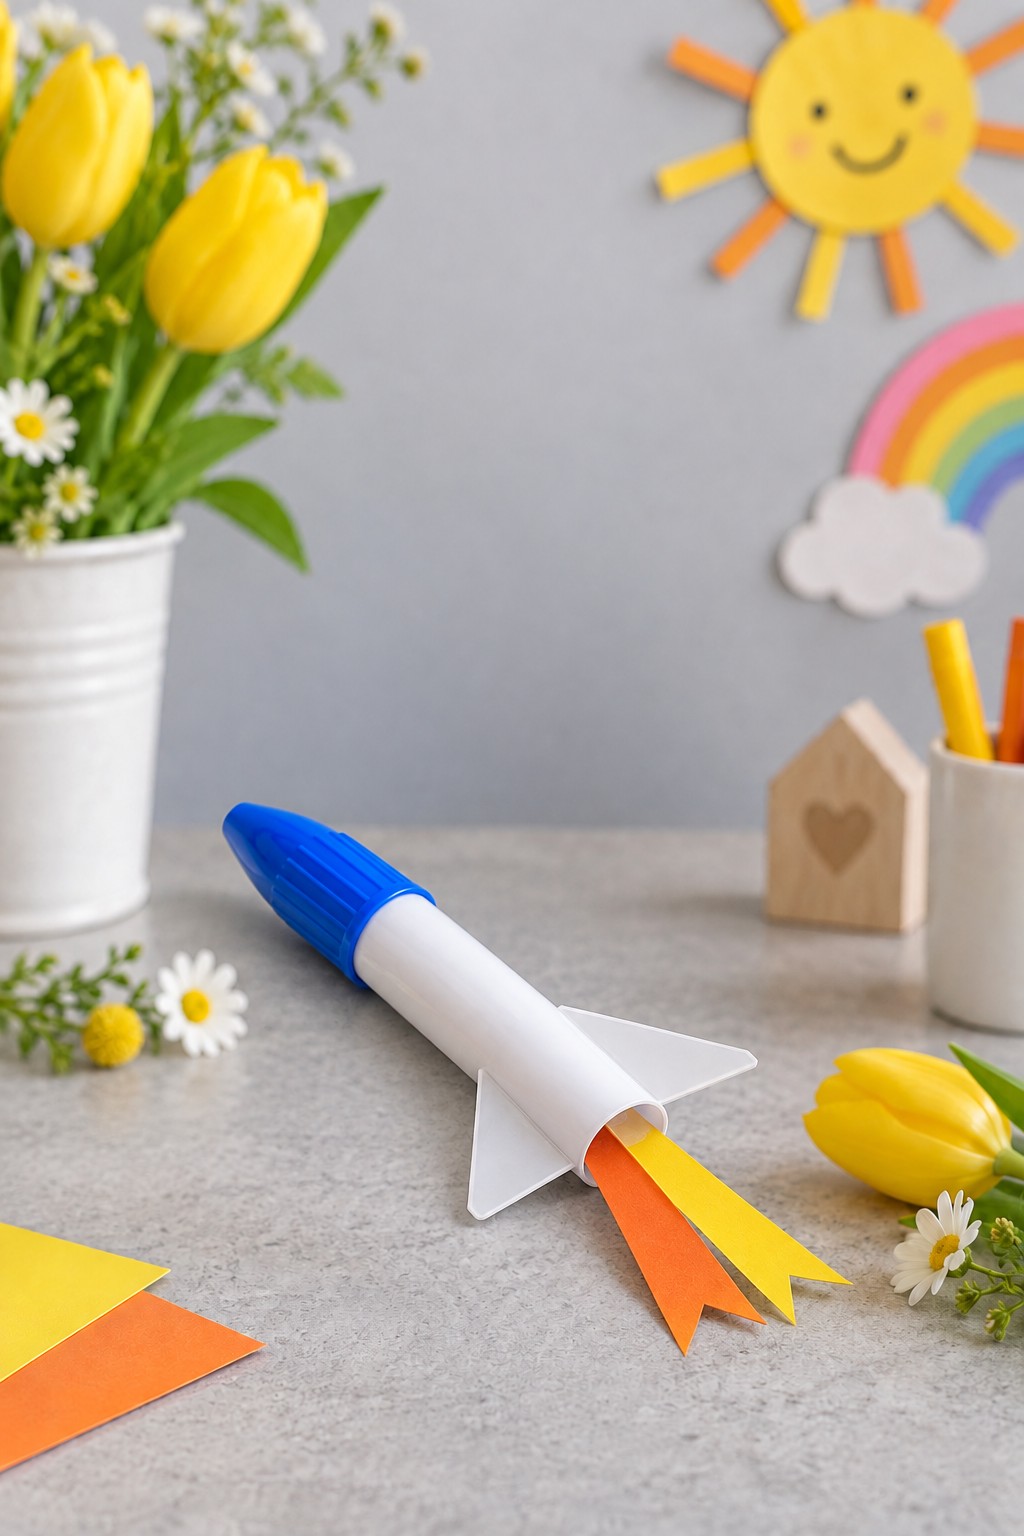
A reused blue marker cap becomes the nose of a narrow white paper rocket. Gather the cap, white scrap paper for the hollow body, leftover card for two fins, and orange and yellow strips for the flames. This is the project used in the opening collage, making it a convenient choice when children want to follow the same sequence rather than adapt a different base.
Roll and tape the body to fit the cap, add two fins with folded attachment tabs, and secure the flame strips inside the rear opening. An adult should check the cap attachment and supervise access to the loose cap. Children can cut the paper details according to their ability and invent a mission for the finished rocket. Lay it on a cardboard landing pad for storytelling, keeping it as a decorative model without a launching mechanism.
Give the finished project a purpose. Put an ocean character in a story scene, use a train to carry paper messages, or group the moon and cloud on a supervised display shelf. Let children explain one choice they made: why they used a clear shell, how they kept a mast upright, or which scraps became a face. That conversation connects the original packaging to its new use without requiring every maker to produce the same result.
Keep the models dry, handle them gently, and check attached parts before another play session. Sort usable leftovers by material and keep small components in an adult managed container. For a group activity using the same approach, explore these recycled art projects for kids at school. If your group enjoys paper characters and simple seasonal decorations, the Halloween crafts for preschoolers collection offers another direction for the next craft session.

Leave a Reply