
An old mirror can become a handmade accent without replacing its glass or rebuilding its frame. These 29 upcycling ideas explore painted patterns, reclaimed fabric, rope, paper shapes, clay decorations, and small salvaged objects. Start with a simple rope frame tutorial, then choose a finish that suits the mirror you already own. Each idea explains suitable materials, how you can arrange and attach the decoration, where the finished mirror works, and what to check before hanging it.
Table of Contents
- Prepare the Mirror Frame and Add a Rope Border
- Check the Mirror Before Choosing a Design
- Choose Materials for the Frame You Have
- Make a Simple Rope Border in Four Stages
- Find a Finish That Belongs in Your Room
- 1. Give an Oval Mirror a Scalloped Cardboard Flower Frame
- 2. Gather Fabric Scraps into a Patchwork Ruffle Border
- 3. Shape Recycled Cardboard Loops into a Pink and Red Border
- 4. Wrap a Round Mirror Frame with Natural Rope
- 5. Layer Cream Lace over a Muted Blue Frame
- 6. Cover a Wooden Frame with Clean Reclaimed Twigs
- 7. Paint Bottle Caps for a Pastel Circle Border
- 8. Paint a Quiet Botanical Border on a Tall Mirror
- 9. Use Reclaimed Zippers as Metallic Frame Trim
- 10. Create a Lavender Postage Stamp Silhouette
- 11. Add an Iridescent Mosaic Crescent to a Navy Frame
- 12. Top a Red Oval Frame with a Large Gingham Bow
- 13. Make Cream Clay Tiles with Biscuit Style Edges
- 14. Arrange Spare Building Bricks around a Rectangular Frame
- 15. Paint a Cobalt Drip Pattern over a Peach Frame
- 16. Build a Leaf Like Border from Reused Plastic Spoon Bowls
- 17. Paint a Winding Snake across a Cream Frame
- 18. Line a Dark Frame with Reclaimed Dominoes
- 19. Arrange Old Keys on a Charcoal Oval Frame
- 20. Set Pale Ceramic Fragments inside a Forest Green Border
- 21. Attach Felt Triangles with Small Stitched Details
- 22. Cluster Folded Paper Stars around an Arched Frame
- 23. Thread Cream Cord through a Burgundy Decorative Surround
- 24. Paint Burgundy Flowers along a Dusty Pink Oval Frame
- 25. Create a Cream Pearl Border on a Round Mirror
- 26. Sew Floral Fabric Hearts for a Cream Wooden Frame
- 27. Decoupage Blossom Paper onto an Arched Mirror Frame
- 28. Cut Clay Hearts for an Alternating Blush and Burgundy Border
- 29. Shape Tiny Clay Envelopes for a Dusty Rose Frame
- Keep the Finished Mirror Secure and Easy to Care For
Prepare the Mirror Frame and Add a Rope Border
Check the Mirror Before Choosing a Design
Inspect the glass, frame joints, backing, retaining clips, and hanging fittings. Decoration cannot repair cracked glass, loose glass, or a frame that is coming apart. Have damaged glass replaced or assessed before continuing. A valuable antique may need conservation advice rather than paint or permanent adhesive. If an old painted finish has an unknown history, check it before sanding or scraping; do not create dust from a potentially hazardous coating.
Keep the mirror supported on a padded, level work surface. Decorate the frame outside the glass, leaving the reflective opening and all retaining parts accessible. Remove the glass only if the frame is designed for safe disassembly and you know how to handle it. Otherwise, protect it while working. Cardboard, paper, and fabric are decorative coverings; they should never replace the backing or fittings that support a glass mirror.
Choose Materials for the Frame You Have
A broad, flat wooden frame offers space for caps, felt shapes, clay hearts, and mosaic pieces. A narrow or curved frame is often easier to refresh with paint, slim trim, or a few small decorations. Gather a ruler, scissors, pencil, clean cloths, a brush, and an adhesive explicitly suitable for both the decoration and the existing frame surface. Test the adhesive and finish on a spare piece first. Glue intended for porous paper is not automatically suitable for plastic, metal, or a varnished frame.
Use a compatible primer when the paint system requires one. Acrylic craft paint is convenient for small motifs on a suitably prepared surface; furniture paint can provide a more uniform frame finish. Apply thin coats and allow the stated drying and curing times. For clay designs, shape the pieces separately, allow them to dry completely according to their instructions, then paint and attach them. A clear finish may help protect the surface, but ordinary air dry clay does not become waterproof when varnished.
Make a Simple Rope Border in Four Stages
This example uses an existing round mirror with a sound wooden frame, natural twisted rope, scissors, a ruler, a cloth, and an adhesive labeled for rope and the frame surface. For a glass opening approximately 30 cm across and a flat frame about 3 cm wide, test three rows of rope around 8 mm thick. Allow approximately 3.5 m of rope for the three rings and trimming; measure your own frame before cutting because the outer rings need longer lengths.
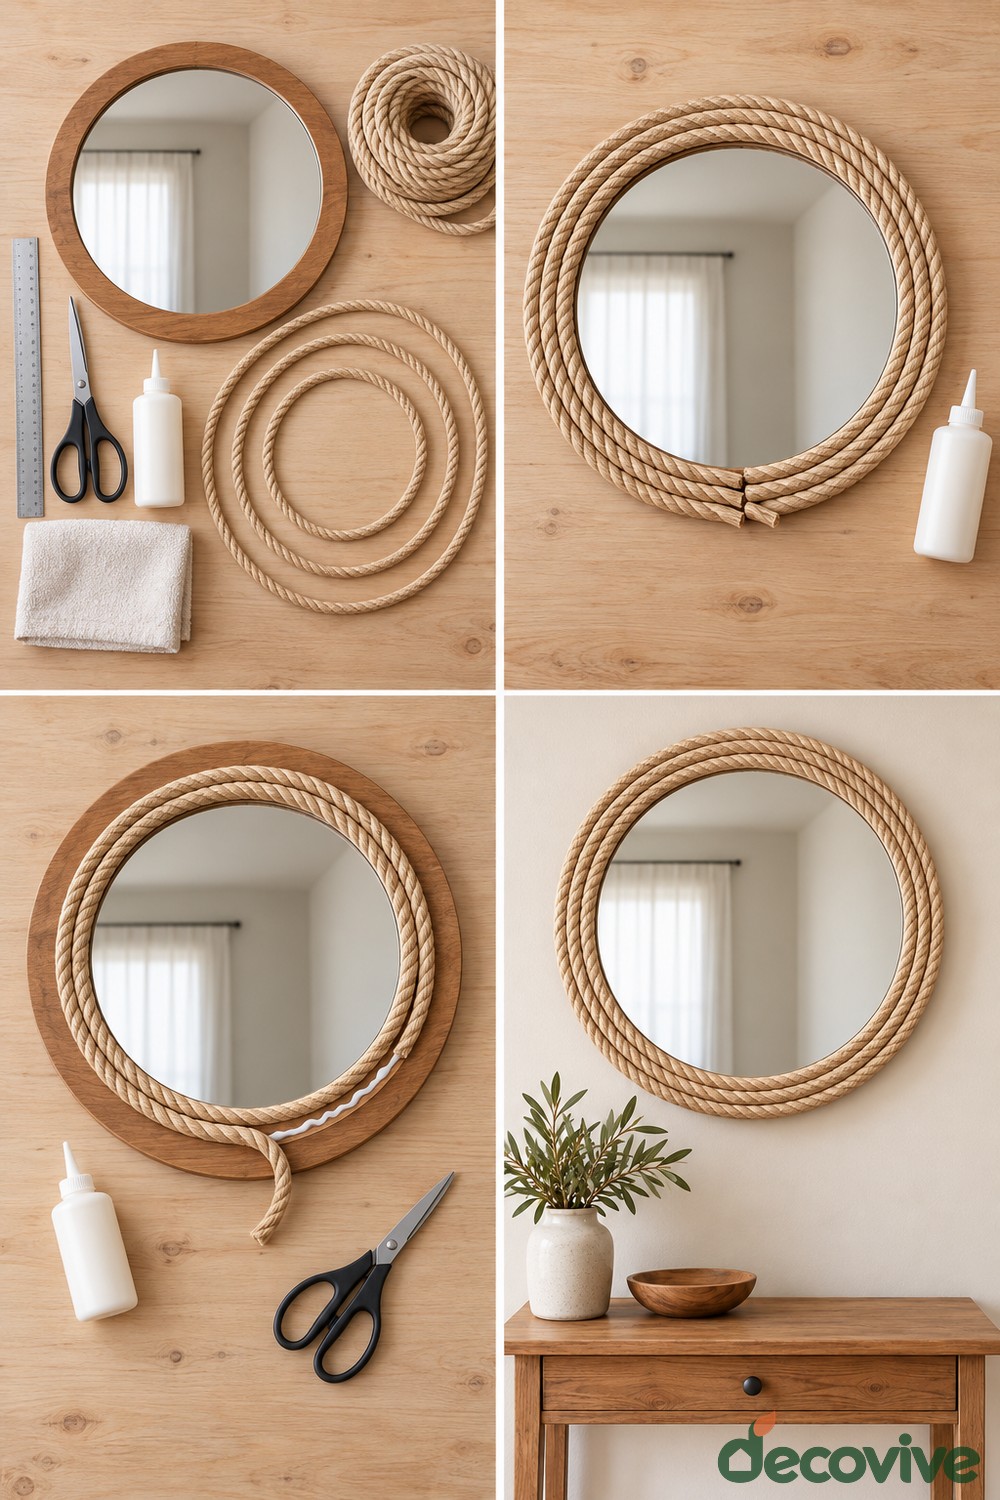
- Prepare the frame and materials. Clean the wooden rim and let it dry. Check that the mirror is securely retained before beginning. Keep the glass protected while measuring and applying adhesive.
- Arrange the rope without glue. Lay three concentric rings on the exposed frame, starting beside the glass. Adjust their lengths so each ring lies flat without crossing the reflective surface. Trim carefully and plan the end joins near the bottom; slightly stagger them rather than building one bulky seam.
- Attach the rings from the inside outward. Follow the adhesive instructions and work in manageable sections. Press the rope onto the wooden rim, keeping glue away from the glass. The lower left panel shows the outer row being attached after the inner rows. Hold the rope as directed until it stays in position, then allow the full curing time.
- Inspect and hang the finished mirror. Remove any temporary glass protection and check every rope join. Weigh the finished mirror and use hanging fittings suitable for that weight and the wall construction. The rope is decorative and must not carry the mirror.
You can adapt the same sequence to many of the ideas below: prepare a sound frame, arrange the decoration before attaching it, use a compatible adhesive or finish, then inspect the completed piece. Paper folds, clay shapes, sewn details, and mosaics each need their own preparation, so follow the material guidance within the design you choose.
Find a Finish That Belongs in Your Room
Choose one detail to lead the makeover: a fabric print, an unusual collection of small objects, a repeated shape, or a painted color. Leave enough plain frame visible for that detail to read clearly. A mirror above a console should remain useful at a comfortable viewing height, while a decorative hallway piece can carry a wider border. The following ideas range from quiet botanical finishes to playful craft designs, with practical ways to recreate the effect using materials you can source or reuse.
1. Give an Oval Mirror a Scalloped Cardboard Flower Frame
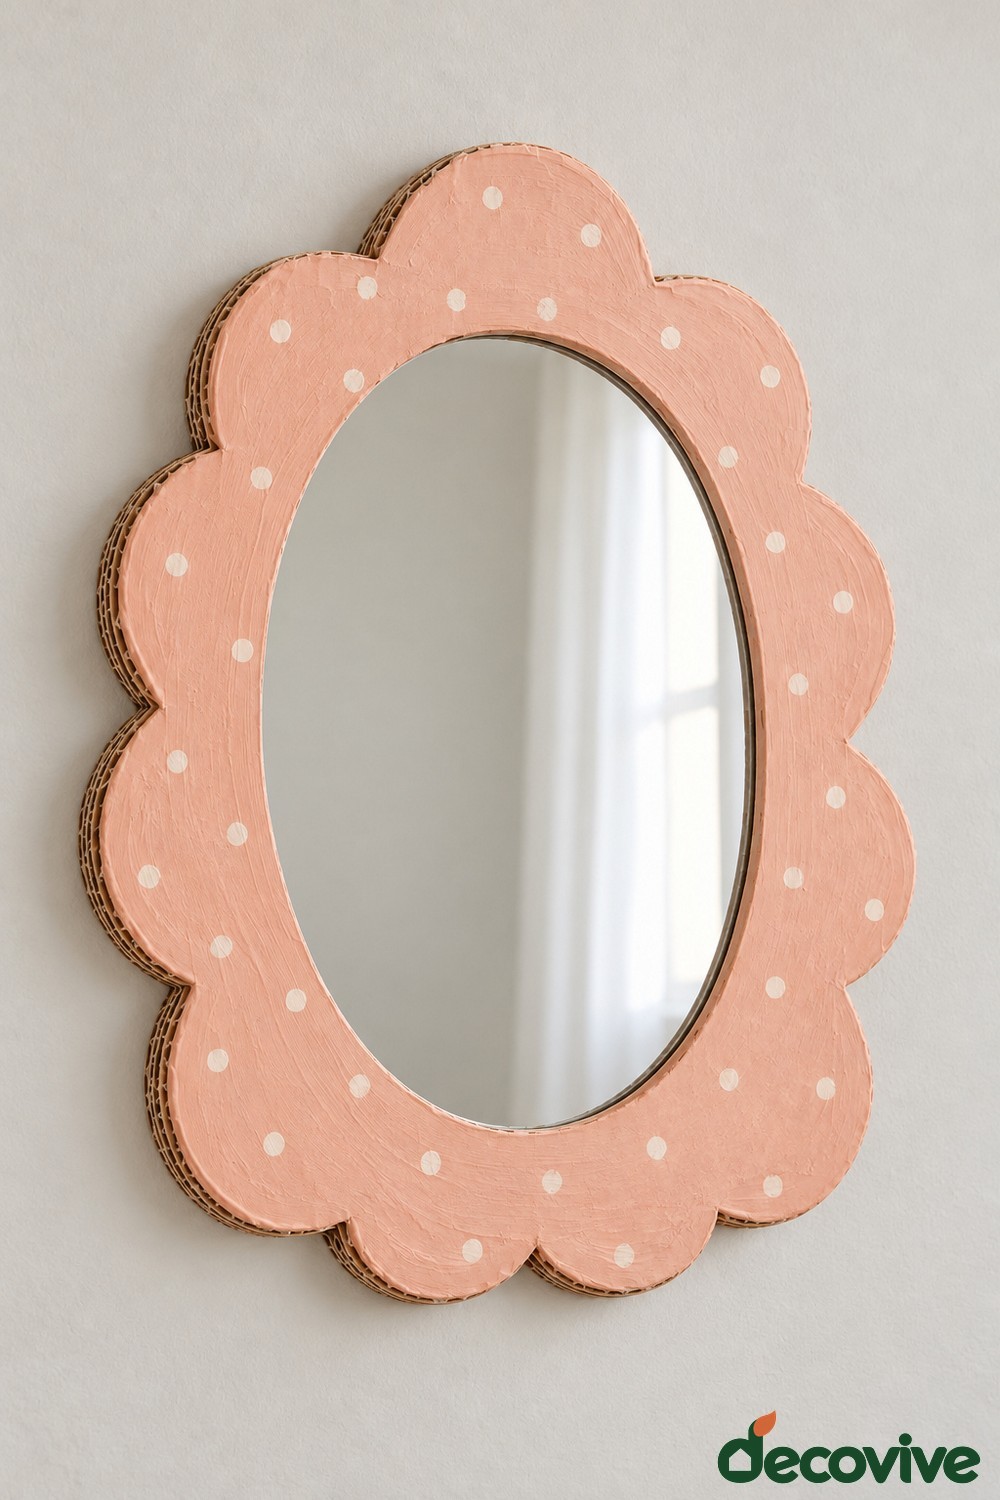
Layered corrugated cardboard can turn a plain oval frame into a large flower silhouette. Use clean packaging cardboard, a paper template, craft adhesive suitable for cardboard, peach pink acrylic paint, and a small brush for the cream dots. Trace the mirror opening first, then draw rounded petals outside it. Cut matching layers and join them so the decorative border feels firm rather than floppy. Keep the original frame and mirror supports intact beneath this lightweight covering.
Paint the cardboard before fixing it to the frame, using thin coats to avoid soaking the exposed edges. Space the dots loosely so the surface retains its handmade character. This cheerful design suits a dry craft corner or dressing area. Keep it away from splashes, and lift the mirror by its structural frame rather than the cardboard petals.
2. Gather Fabric Scraps into a Patchwork Ruffle Border
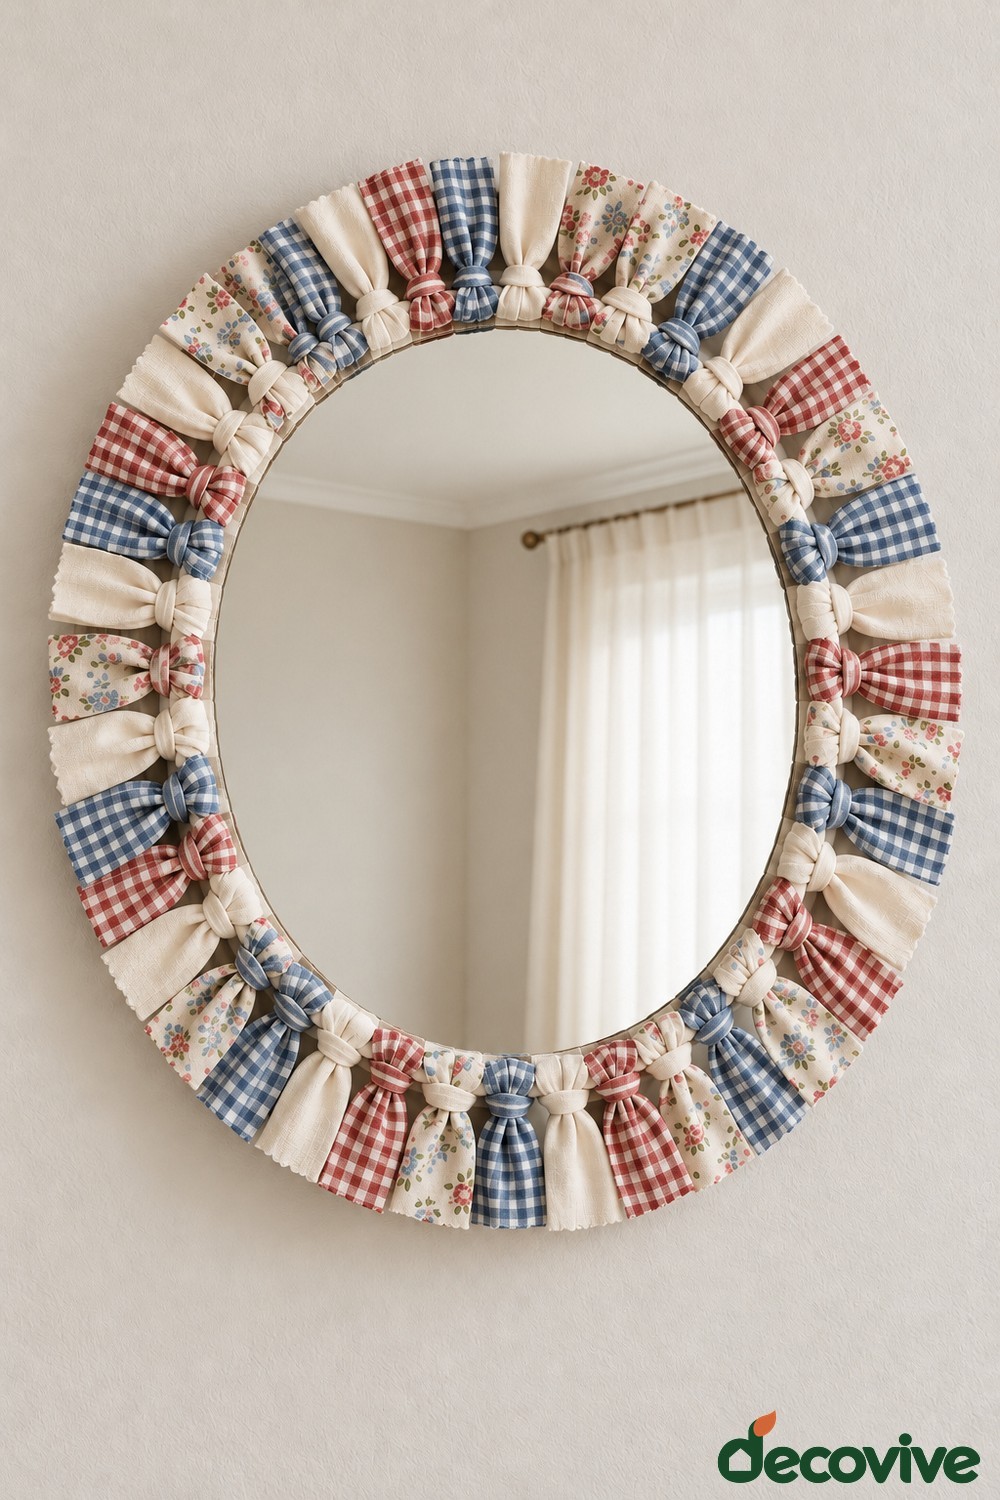
A collection of floral cotton and checked fabric offcuts can give a round mirror a soft patchwork border. Gather clean fabric scraps, a needle and thread, scissors, and an adhesive suitable for fabric and your frame. Cut short strips of similar width, turn under any edges that fray, and gather one edge with a running stitch. Arrange alternating cream, red, and blue sections around the rim before attaching them.
The gathered edge belongs on the frame, with the fuller fabric facing outward. Keep the folds shallow enough to avoid hiding the glass. A quiet wall color lets the mixed patterns remain readable, making this a good choice beside a sewing table or cottage dressing area. Dust between the folds with a soft brush, and avoid placing the fabric where condensation collects regularly.
3. Shape Recycled Cardboard Loops into a Pink and Red Border
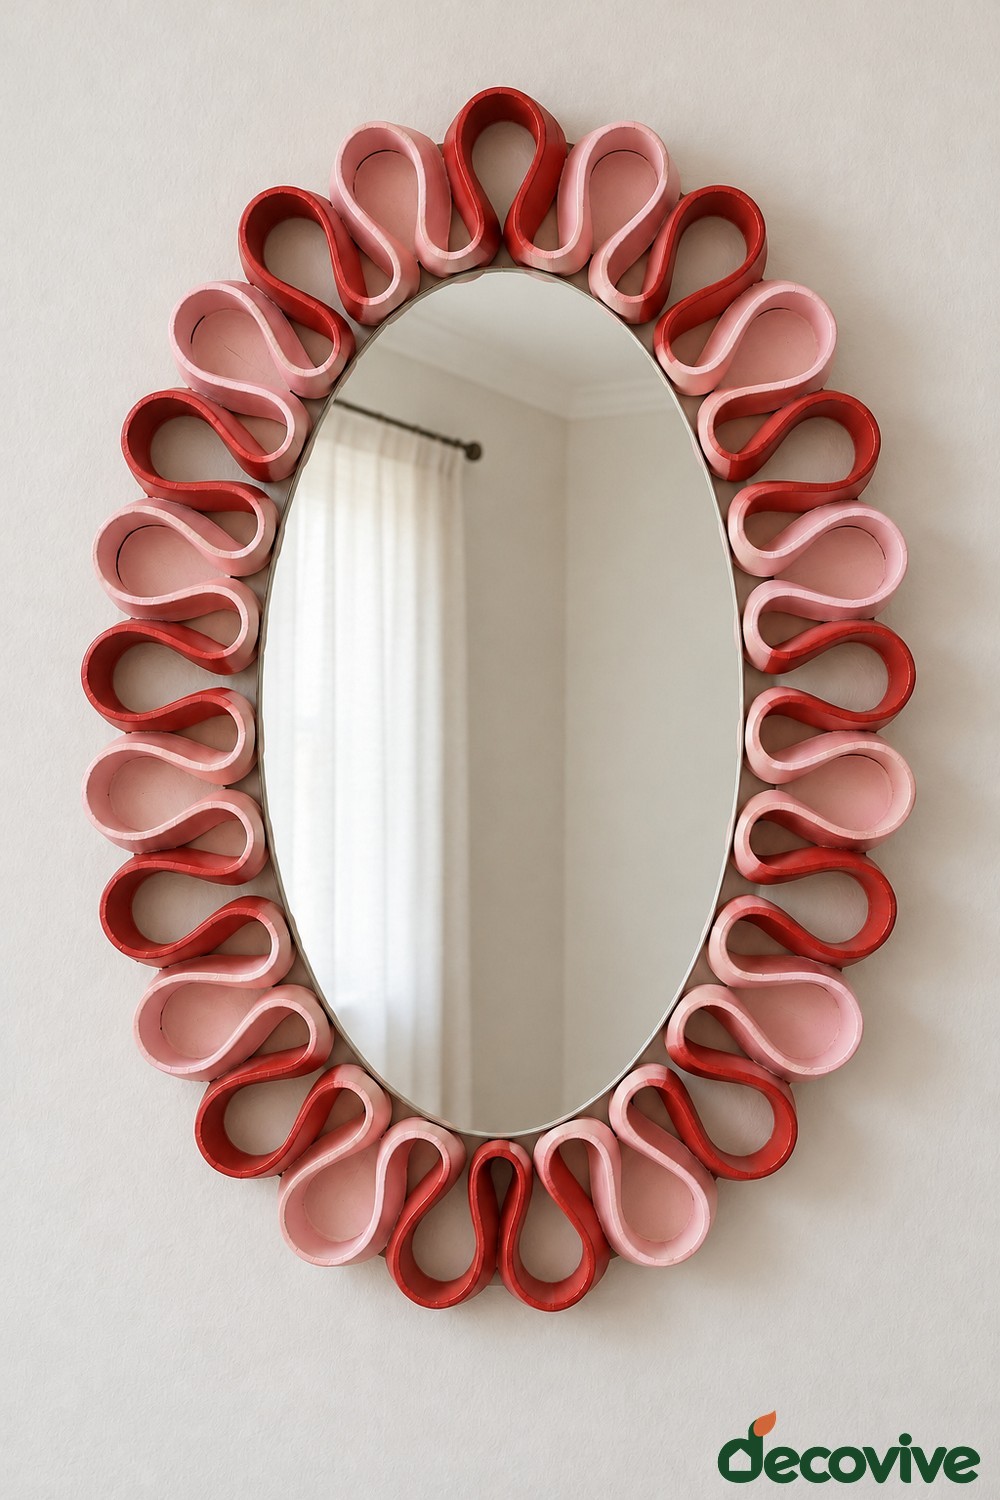
Flattened cardboard tubes or strips of firm recycled card can become a sculptural loop border around an oval mirror. Use clean, dry card, scissors, a ruler, pink and red acrylic paint, and a compatible adhesive. Make one loop as a sizing sample, then repeat it with enough width at the joined ends to provide an attachment point. Paint the inside and outside before assembling the border, allowing each piece to dry fully.
Arrange the loops alternately around the existing frame, with their narrow ends pointing toward the glass. Adjust the spacing at the top and bottom of the oval before gluing anything. The red and blush combination works as a playful accent in a craft room. These loops are vulnerable to crushing and moisture, so keep them clear of door swings and avoid using the outer decoration as a handle.
4. Wrap a Round Mirror Frame with Natural Rope
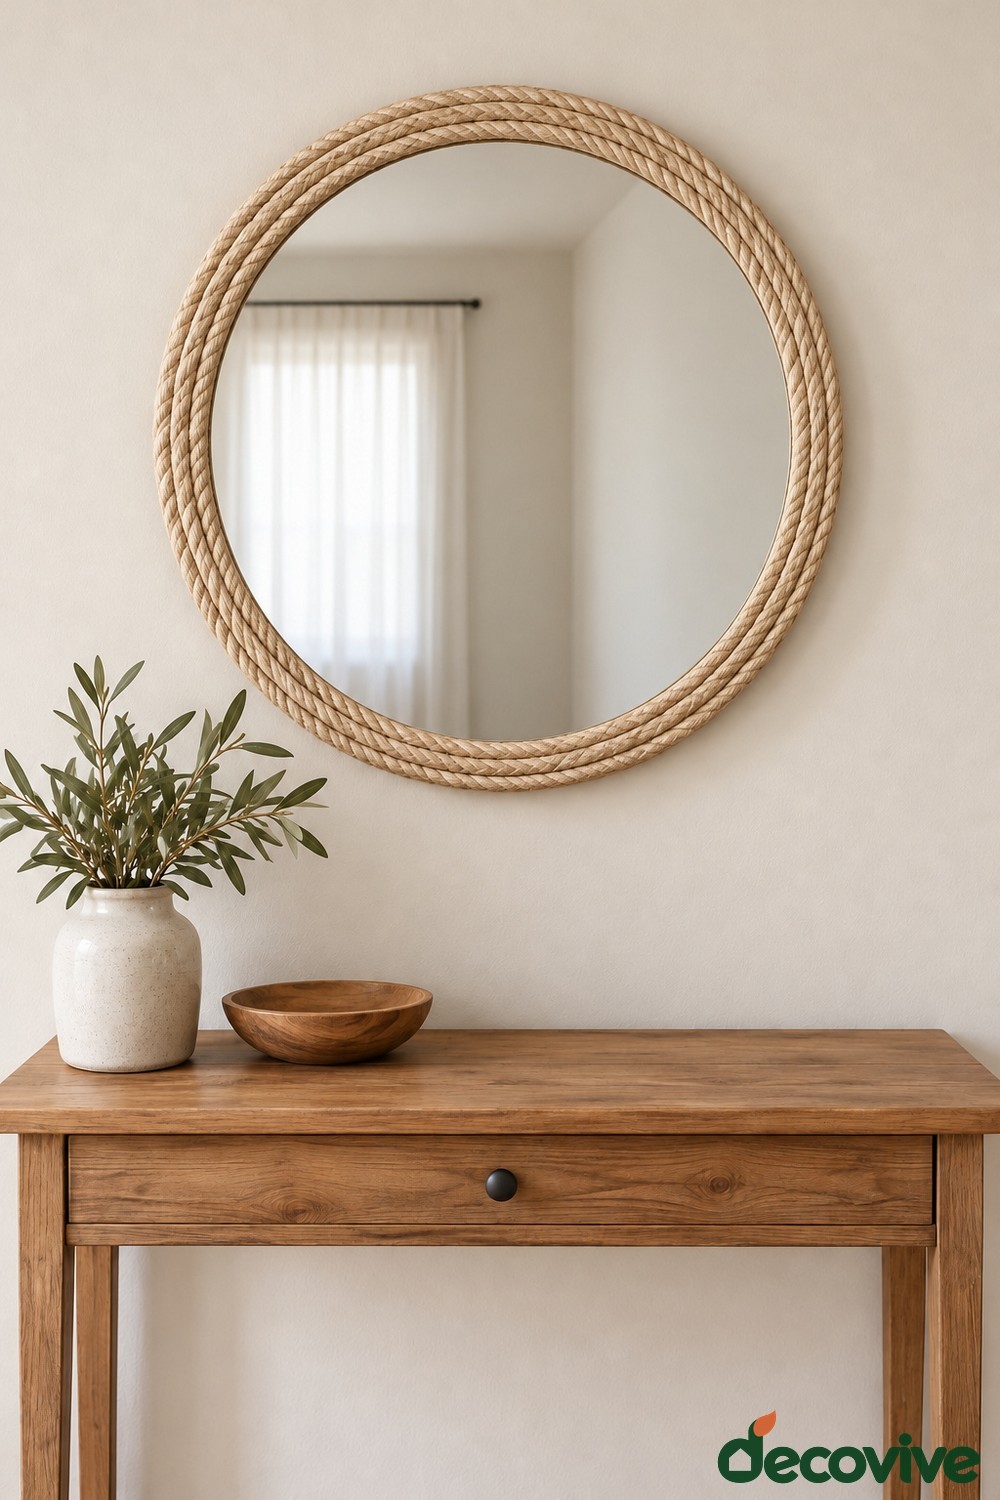
Natural twisted rope can refresh a worn round frame while keeping the overall design simple. Use three measured lengths of rope, sharp scissors, and an adhesive labeled for the rope fibers and the actual frame surface. Follow the opening tutorial to arrange the rings before attaching them. Aim for consistent spacing, with each row resting fully on the frame and the mirror opening left clear.
The narrow repeated border looks comfortable above a wooden hallway console, especially when nearby accessories share its natural texture. Choose a rope thickness that bends around the frame without springing away from the adhesive. Finish the cut ends neatly and keep any fraying under control. Rope collects dust between its strands, so use a soft brush for occasional cleaning. The original frame and proper wall fittings must carry the finished mirror.
5. Layer Cream Lace over a Muted Blue Frame
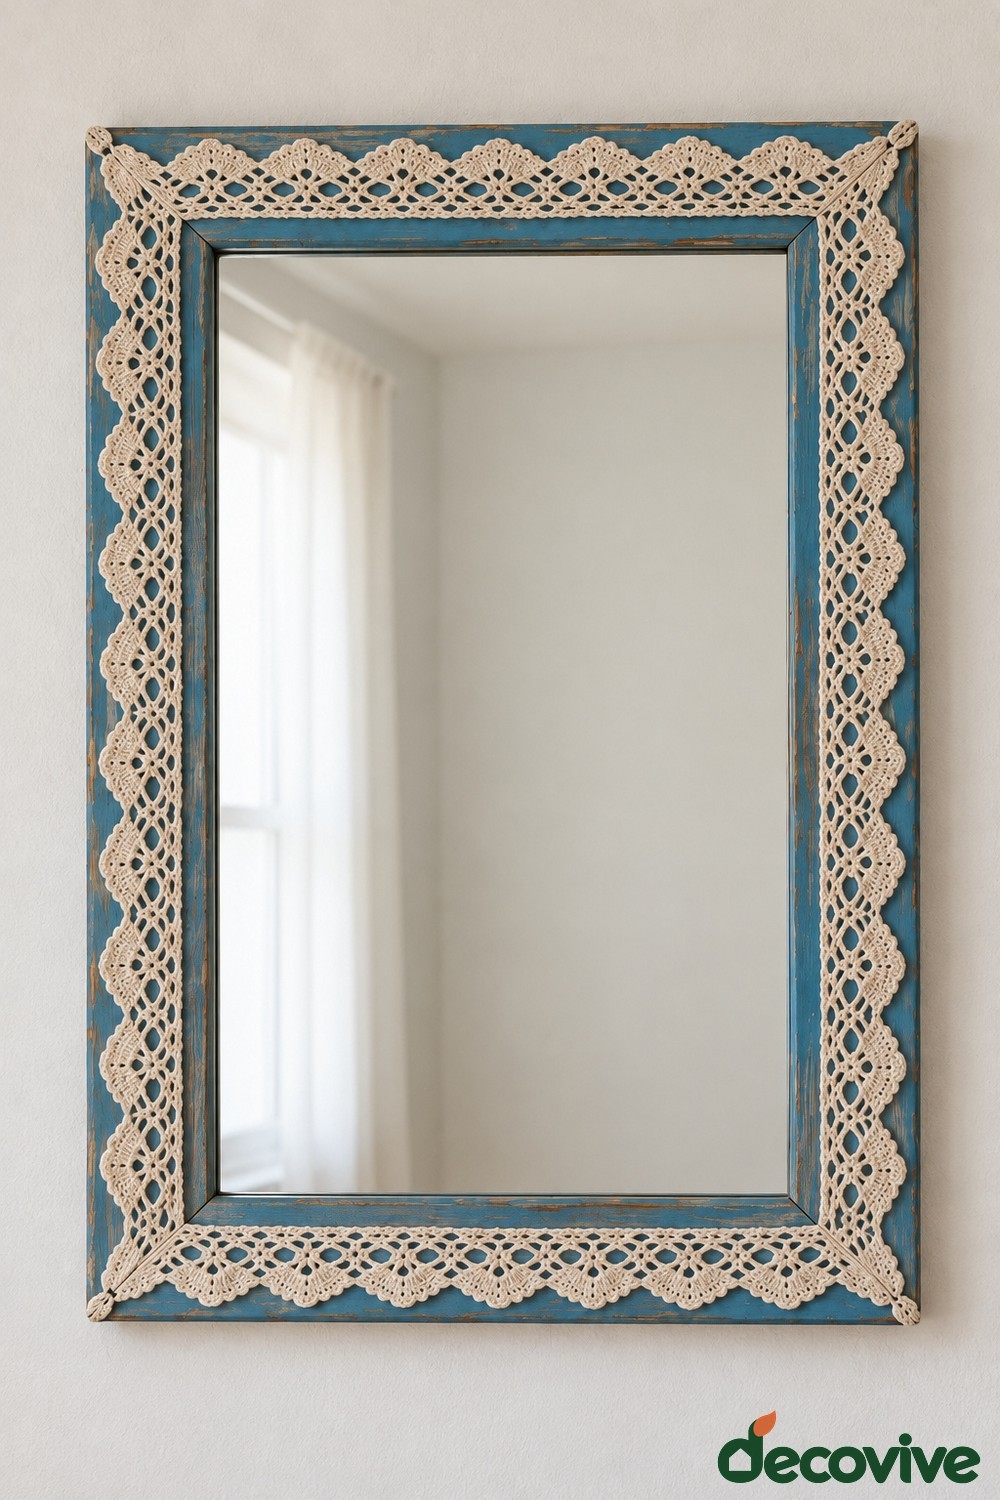
A muted blue painted frame and cream lace create a decorative finish without changing the mirror shape. Reuse a clean lace offcut or an unwanted textile trim, then gather compatible primer and paint, scissors, and an adhesive approved for the fabric and painted surface. Paint the frame first and let the coating cure before testing the lace attachment. Cut separate lengths for each side rather than stretching one strip tightly around the corners.
Keep the lace away from the glass opening and align its repeated points along the outside border. Fold or miter the corners neatly so the trim does not form thick lumps. This finish suits a bedroom or sewing corner with plain surrounding textiles. Lace should be dusted gently and kept dry; select a painted alternative if the mirror will sit beside a frequently splashed basin.
6. Cover a Wooden Frame with Clean Reclaimed Twigs
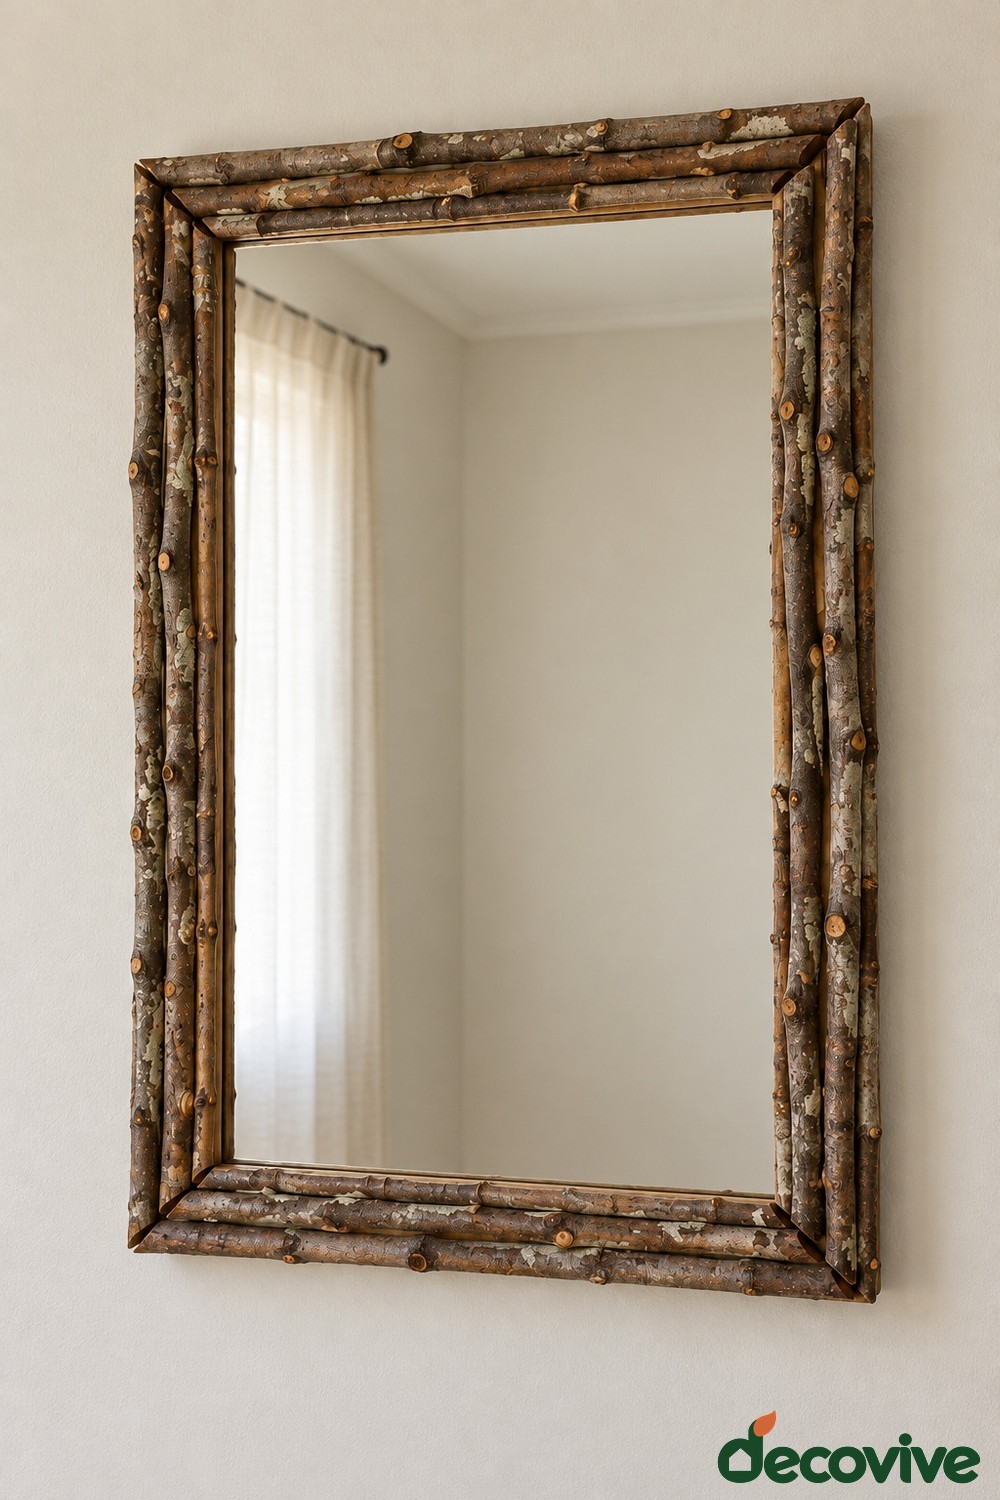
Short twigs can add woodland texture to an existing rectangular wooden frame. Collect only suitable fallen material, then choose straight pieces that fit the width of the border. You will need a small saw or pruning tool, a brush, suitable wood adhesive, and a compatible optional clear finish. Clean the branches and let them dry thoroughly. Reject pieces with mold, active pests, loose bark, or rotten areas rather than sealing those problems inside the decoration.
Lay the twigs along each frame side and trim their ends for tidy corner transitions. Retain the supporting frame beneath the branches, and keep sharp ends away from the glass and outer edges. The finished mirror works beside natural wood furniture in a dry hallway. Check the added weight before hanging, and brush out dust rather than soaking the bark.
7. Paint Bottle Caps for a Pastel Circle Border
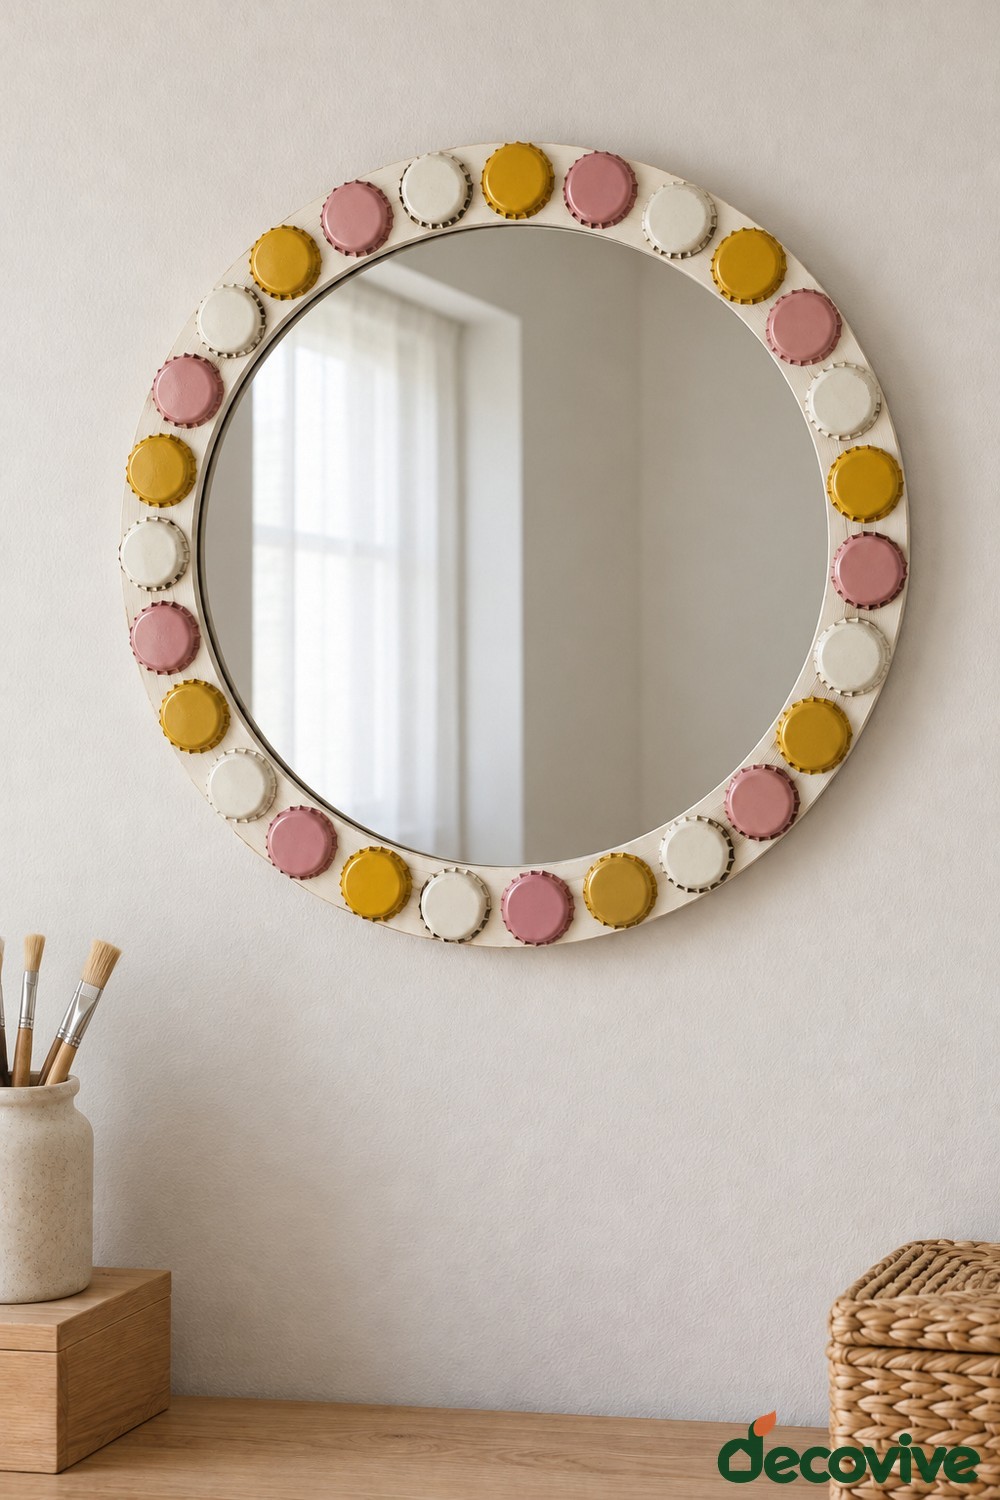
Reclaimed metal bottle caps offer a repeated circular shape that can be painted in a small, coordinated palette. Use clean caps of similar diameter, a primer suitable for the metal if required, cream, pink, and mustard paint, and an adhesive compatible with both metal and the frame finish. Check every cap for rust and rough edges. Paint the exposed top faces and let the finish cure before arranging them around a broad circular rim.
Position the painted faces outward, with the recessed undersides against the frame. Because those undersides are not flat, test the bond on one spare cap rather than assuming ordinary paper glue will hold. This border adds cheerful detail near a craft desk without making the mirror bulky. Keep it beyond small children's reach and replace any cap that loosens during cleaning.
8. Paint a Quiet Botanical Border on a Tall Mirror
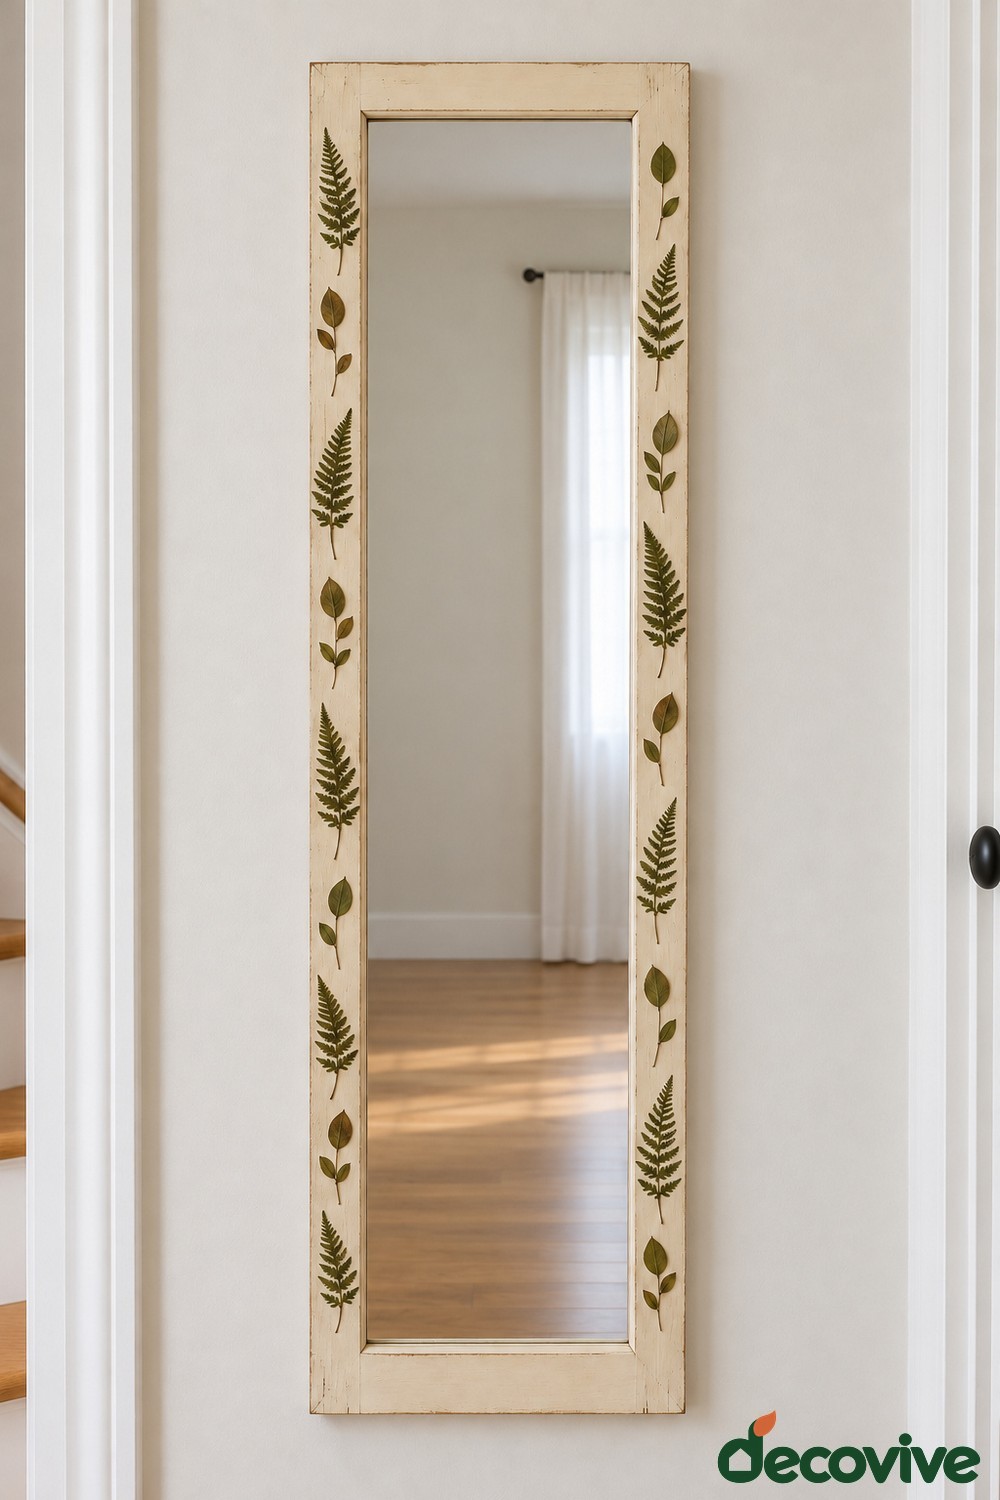
A tall cream frame provides enough length for a simple painted botanical rhythm. Gather a fine brush, a pencil, compatible base paint, and green and muted brown acrylic paints. Sketch a few leaf stems on paper first, then lightly mark their positions on the two side borders. Vary fern shaped leaves with small rounded sprigs, leaving clear spaces between them instead of painting one continuous dense vine.
Complete the base coat before the details and keep all paint on the frame. A narrow botanical border works in a hallway because it introduces pattern without competing with the long mirror opening. If freehand painting feels difficult, practice one repeated leaf shape and change only its size or direction. Wipe the frame gently after the finish has cured, and avoid rubbing delicate painted marks with abrasive cleaners.
9. Use Reclaimed Zippers as Metallic Frame Trim
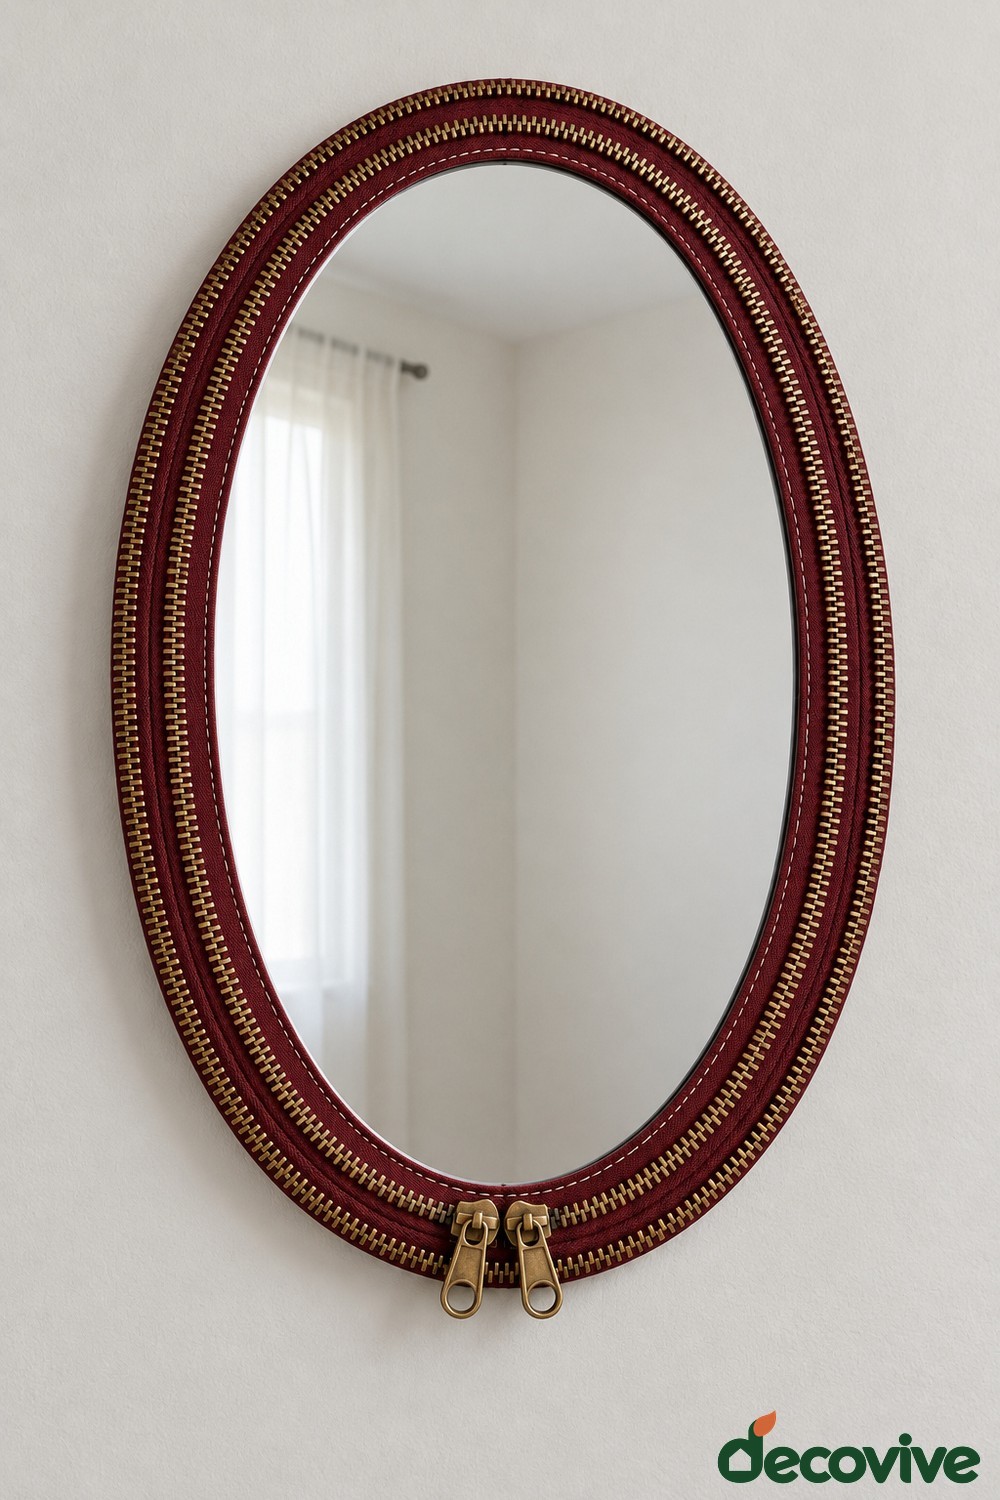
Old zippers can give an oval mirror a surprisingly tailored border. Use clean zipper lengths with sound teeth, burgundy fabric to cover the existing frame, scissors, and an adhesive suitable for the fabric and frame surface. Remove the zippers from unwanted clothing carefully, then test whether they bend smoothly around the oval. Select enough matching lengths to keep the brass colored teeth visually consistent.
Fit the burgundy textile smoothly over the rim, keeping any tucked edges clear of the glass retainers and hanging fittings. Position the zipper teeth in two curved rows with their fabric tape supported underneath. Secure the ends so nothing protrudes. Two decorative pulls at the bottom can finish the arrangement, but they should not operate or bear weight. This unusual texture works in a dressing area; dust the teeth with a soft brush and check that the pulls remain firmly attached.
10. Create a Lavender Postage Stamp Silhouette
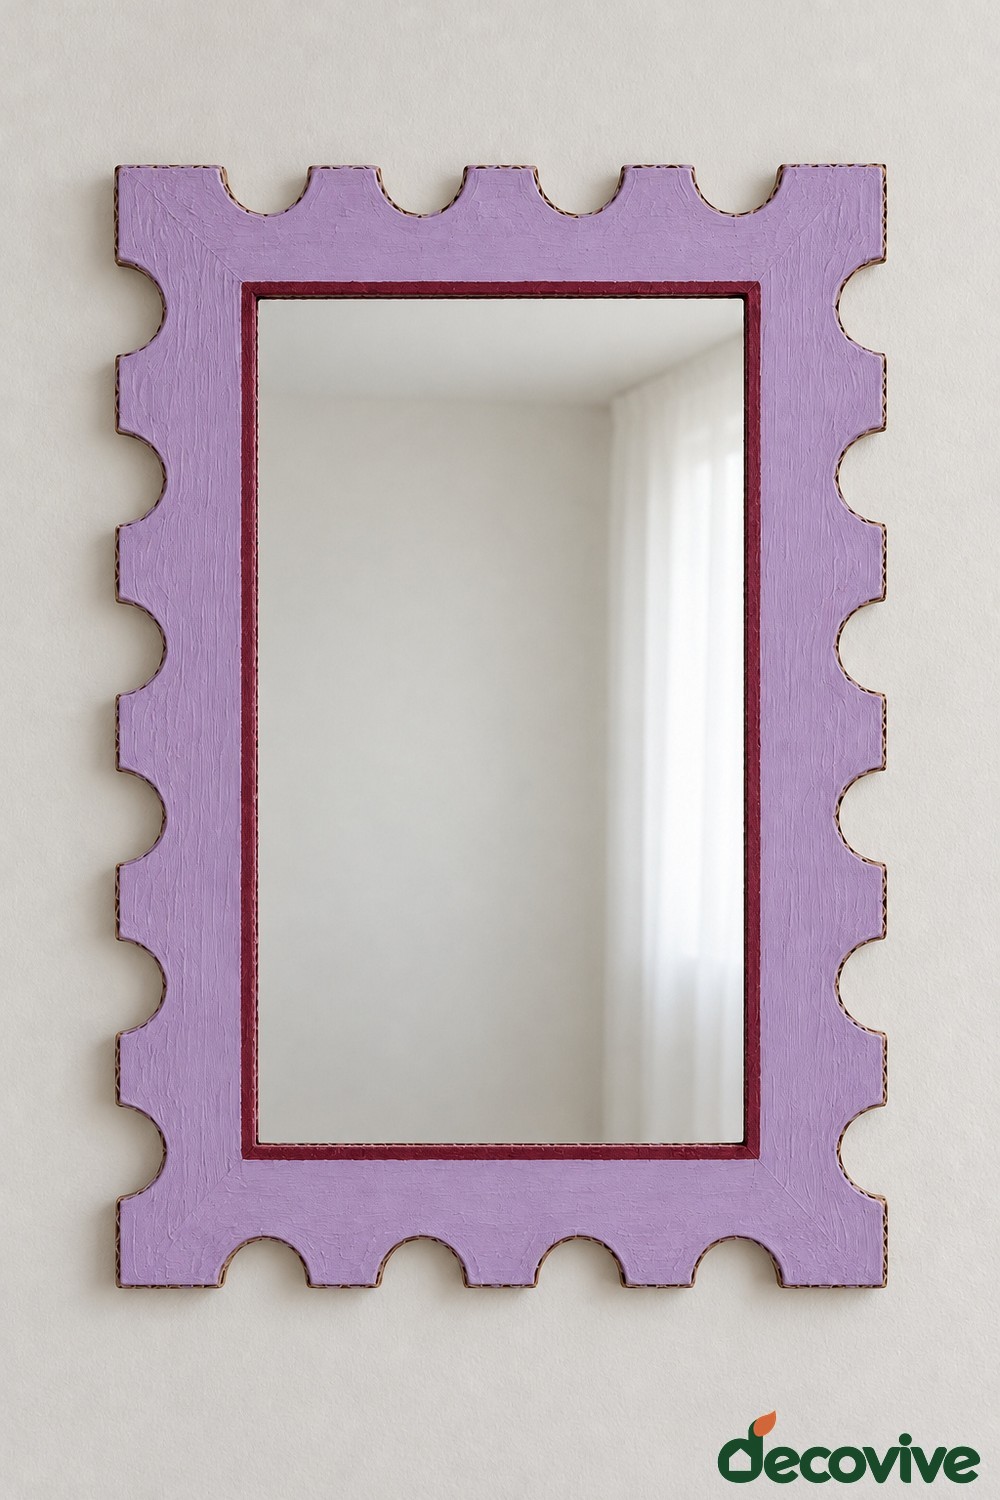
A postage stamp outline gives a rectangular mirror a playful shape without adding loose ornaments. Recreate the silhouette with layered corrugated packaging cardboard, a paper template, craft adhesive, lavender acrylic paint, and a burgundy accent color. Mark evenly spaced semicircular notches along the outside edge and resolve the corners on the template before cutting. Cut matching layers on a separate protected work surface, with the mirror safely away from the cutting area.
Join the cardboard layers, then fit the decorative surround to the existing structural frame rather than asking cardboard to support glass. Paint the main surface lavender and outline the opening in burgundy for a crisp contrast. Thin paint coats help prevent warping. This design works well near stationery storage in a dry creative workspace. Keep the notches broad enough to leave sturdy sections, and avoid crushing the exposed corrugated edges when moving the mirror.
11. Add an Iridescent Mosaic Crescent to a Navy Frame
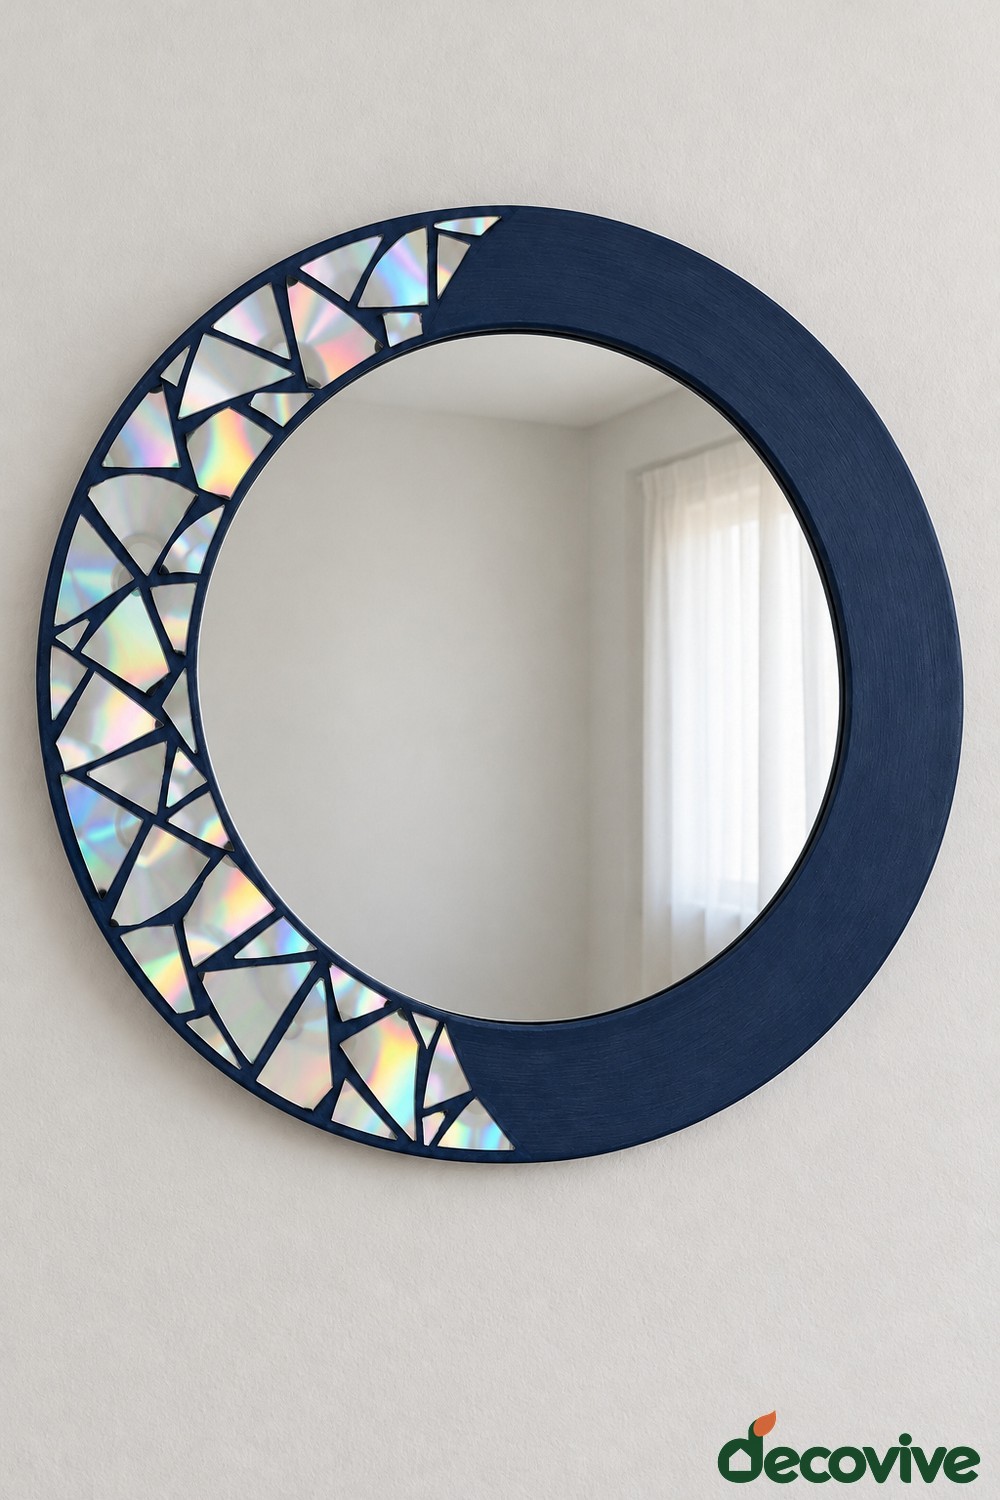
Reclaimed CD pieces can create an iridescent crescent while leaving part of a navy frame calm. Use a broad round frame, navy paint, suitable smooth edged disc pieces, and an adhesive explicitly compatible with their plastic backing and the painted surface. Arrange the pieces along one side before attaching them, varying their sizes while leaving navy gaps between them. The exposed painted gaps provide the dark outlines without needing a heavy layer of grout.
Disc preparation needs care because cutting can produce sharp edges or split the reflective layers. Keep the glass away from that work, use appropriate tools and eye protection, and reject splintered pieces. If you cannot prepare safe edges, use smooth iridescent craft mosaic shapes for the same effect. This asymmetric shimmer suits a dry creative hallway. Keep every piece within the supporting frame and check for loose edges during gentle cleaning.
12. Top a Red Oval Frame with a Large Gingham Bow
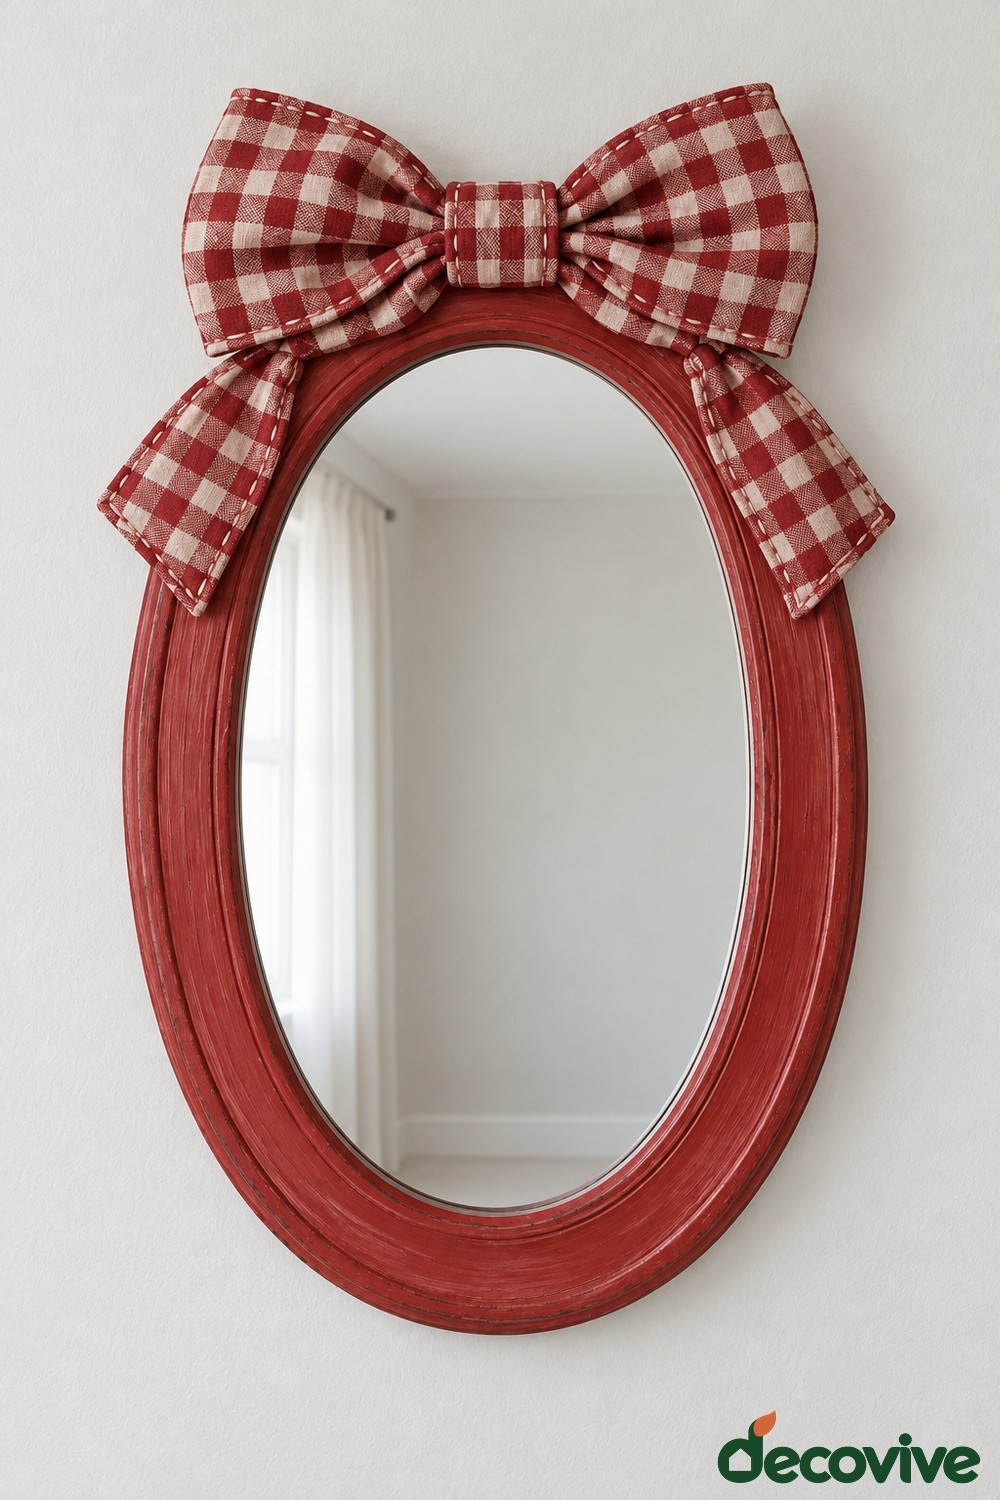
A single oversized bow can refresh an oval mirror without covering the whole frame. Use red and cream gingham fabric from a clean old shirt or tablecloth, coordinating frame paint, thread, a needle, and a suitable attachment method. Sew a broad rectangular bow section, gather its center, and add two finished fabric tails. For extra body, use a small amount of suitable interfacing inside the bow rather than filling it heavily.
Paint the frame a muted red and let it cure before fixing the fabric to the upper frame edge. Keep the tails beside the rim so they do not obscure the reflection. This is an approachable choice for a cottage bedroom or craft corner. Check clearance above the mirror before choosing the bow size, and dust or carefully remove the textile for cleaning when its attachment allows.
13. Make Cream Clay Tiles with Biscuit Style Edges
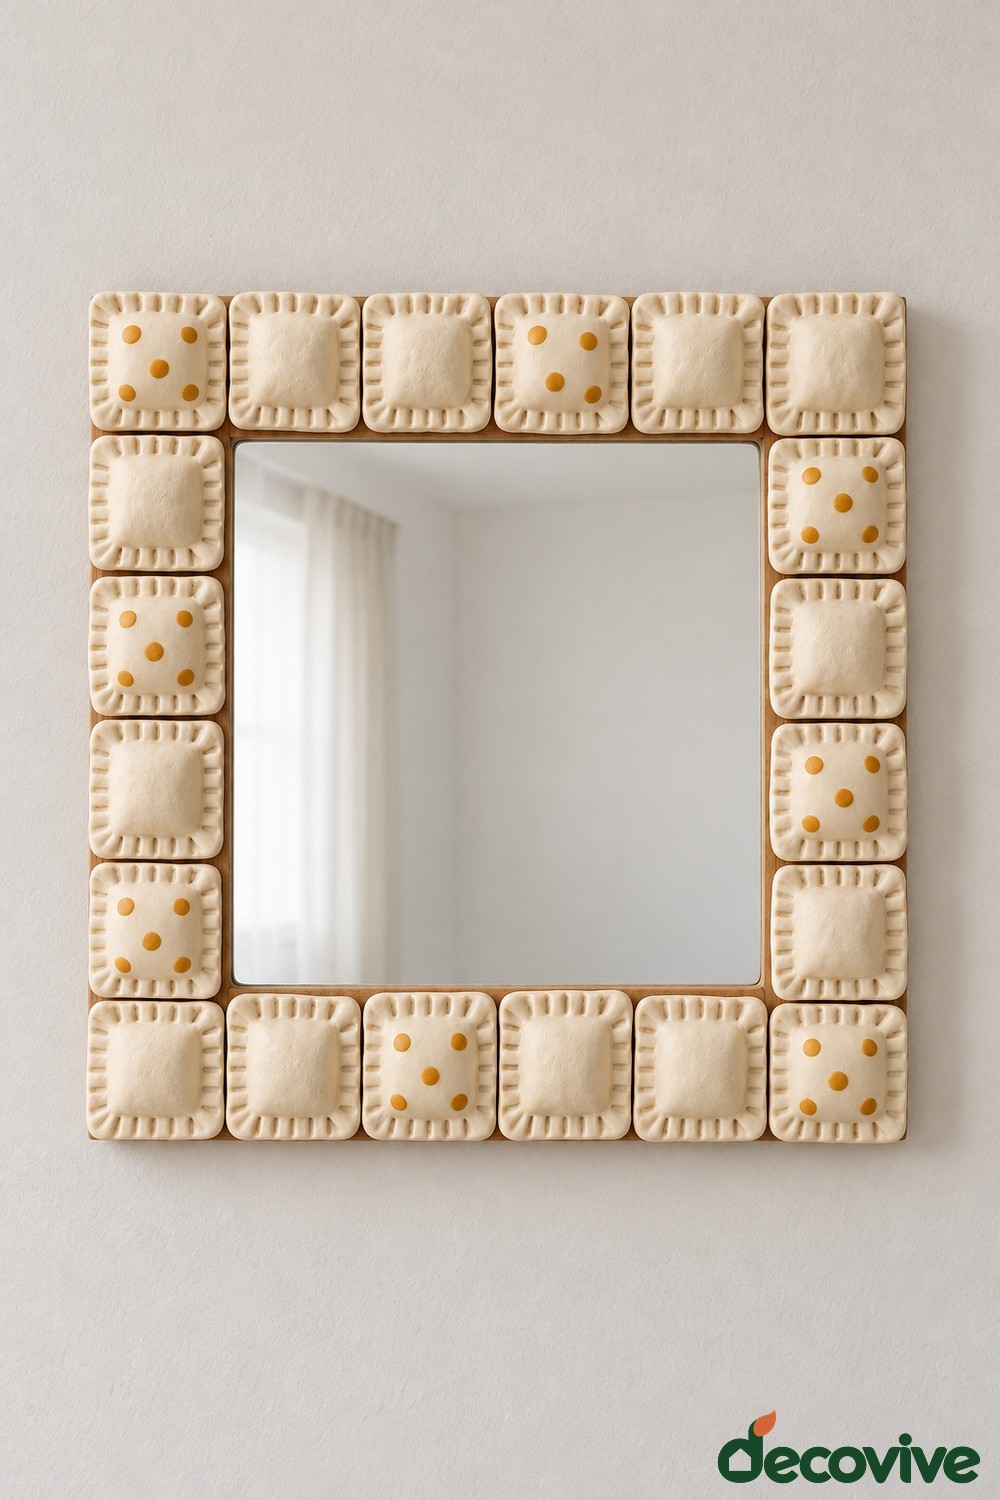
Small cream clay squares can give a mirror a soft, biscuit inspired border. Use air dry clay, a roller, a square template, a fork, cream and mustard acrylic paints, and an adhesive compatible with dried clay and the frame. Make a paper layout to establish the tile size first. Roll the clay to a consistent thickness, cut rounded squares, and press shallow fork marks around their edges while the clay is workable.
Dry the tiles separately according to the clay instructions before painting selected faces with small mustard dots. Arrange them closely around the existing frame, with plain tiles breaking up the dotted pattern. This playful finish suits a dry craft or breakfast nook wall. The tiles are decorative, not food, and the clay remains vulnerable to water even after an ordinary clear finish. Handle the frame carefully to avoid chipping the corners.
14. Arrange Spare Building Bricks around a Rectangular Frame
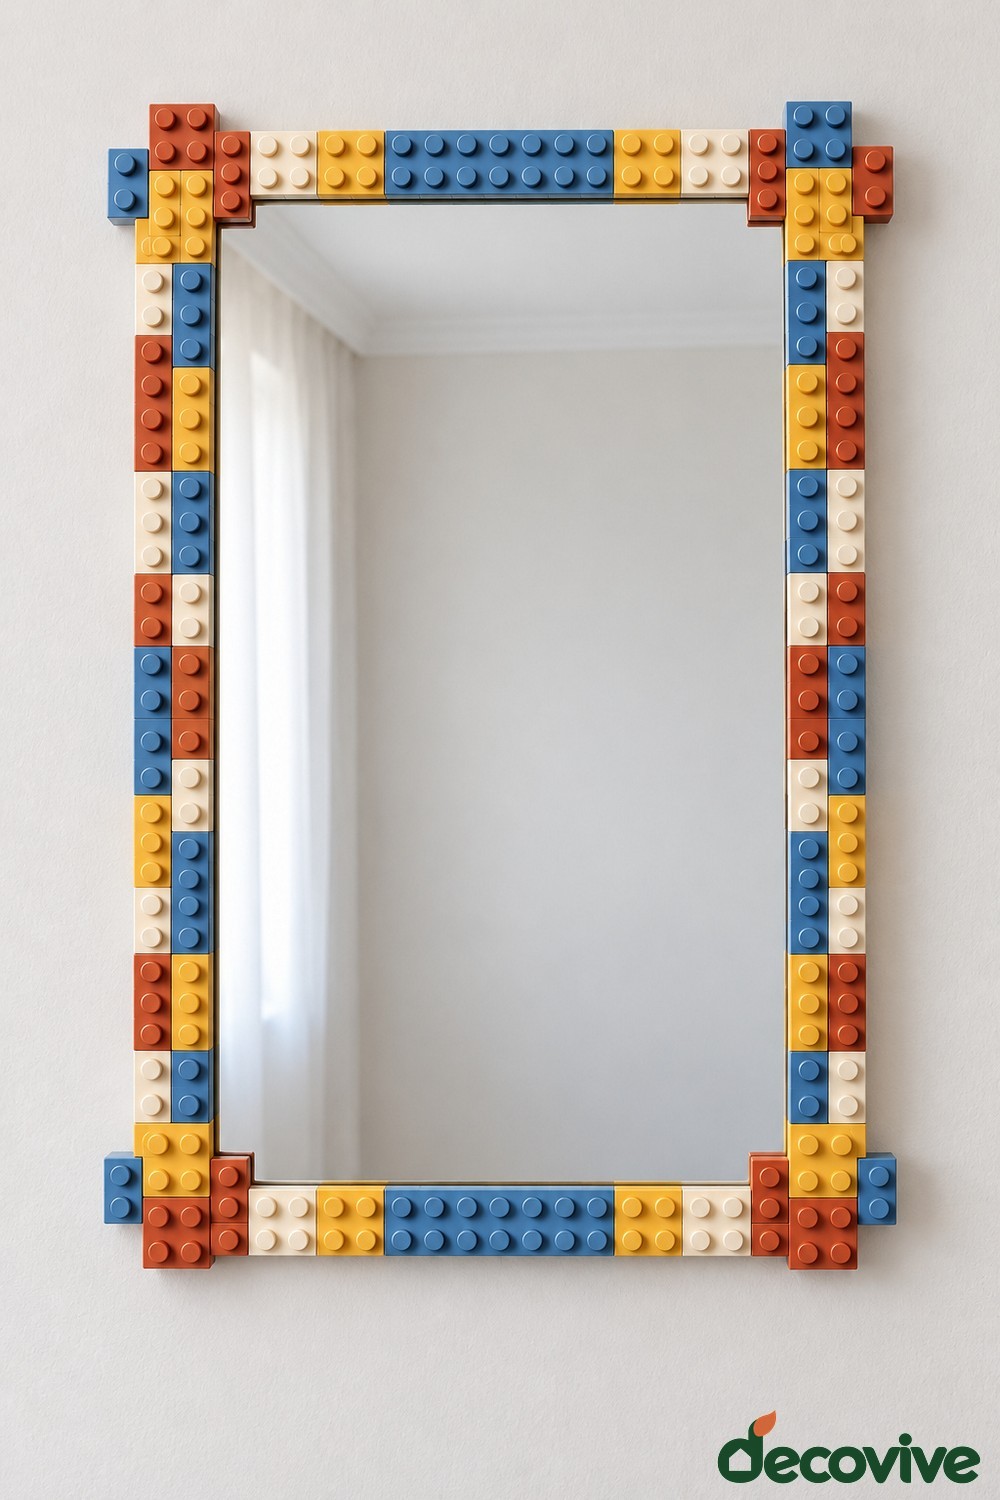
Spare plastic building bricks can turn a plain mirror into a colorful graphic accent. Choose clean, undamaged bricks in a limited palette of blue, yellow, cream, and orange. Arrange them on a wide, flat frame, using longer bricks along the sides and small blocks to resolve the corners. You will need an adhesive specifically suitable for the plastic and your frame surface; different plastics do not all bond with the same product.
Test a sample attachment before assembling the whole border. Keep the bricks decorative and fixed securely so they are not treated as detachable toys on a hanging glass object. This mirror works above an adult supervised craft area or collection shelf. Leave the reflective opening clear, avoid unstable towers of stacked pieces, and dust around the studs with a small soft brush.
15. Paint a Cobalt Drip Pattern over a Peach Frame
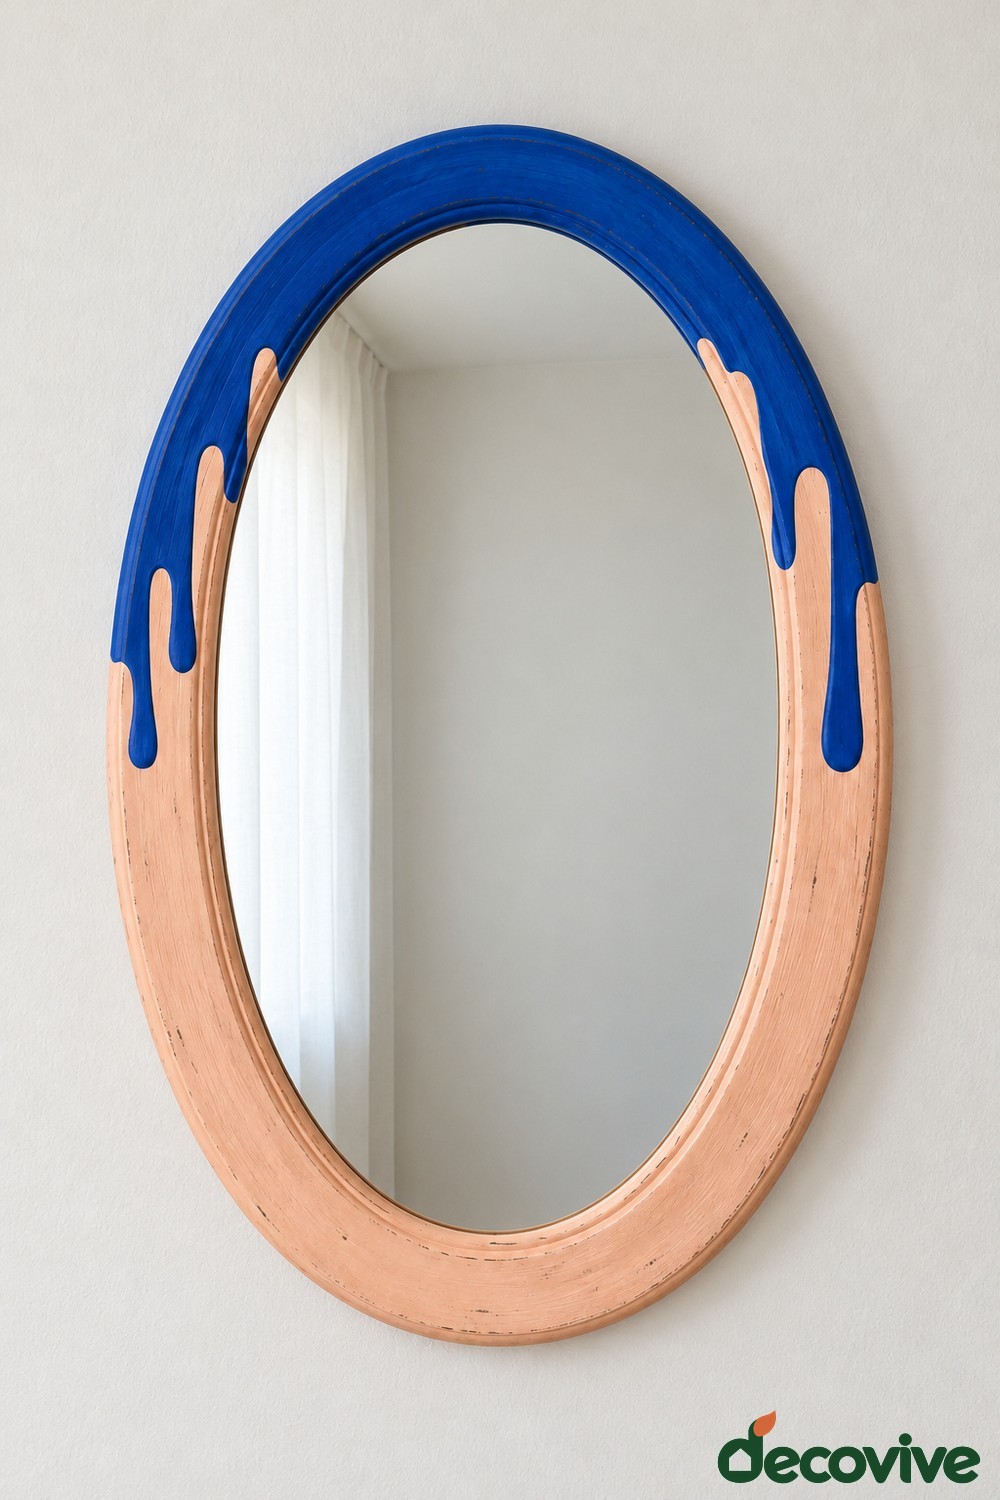
A painted drip pattern gives an oval frame a bold finish using only a few materials. Gather compatible peach base paint, cobalt blue acrylic paint, a pencil, and a small round brush. Prepare the frame according to the paint instructions and protect the glass. After the peach coat dries, sketch several rounded drip shapes along the top, making their lengths different so the pattern feels fluid rather than mechanically repeated.
Paint the blue shapes within the sketch instead of pouring paint and hoping it stops at the right point. This keeps the inner glass edge clean and prevents runs down the back. Leave the lower half mainly peach to balance the strong upper color. The result suits a creative workspace with a simple wall backdrop. Allow the finish to cure before handling, and touch up mistakes with the base color.
16. Build a Leaf Like Border from Reused Plastic Spoon Bowls
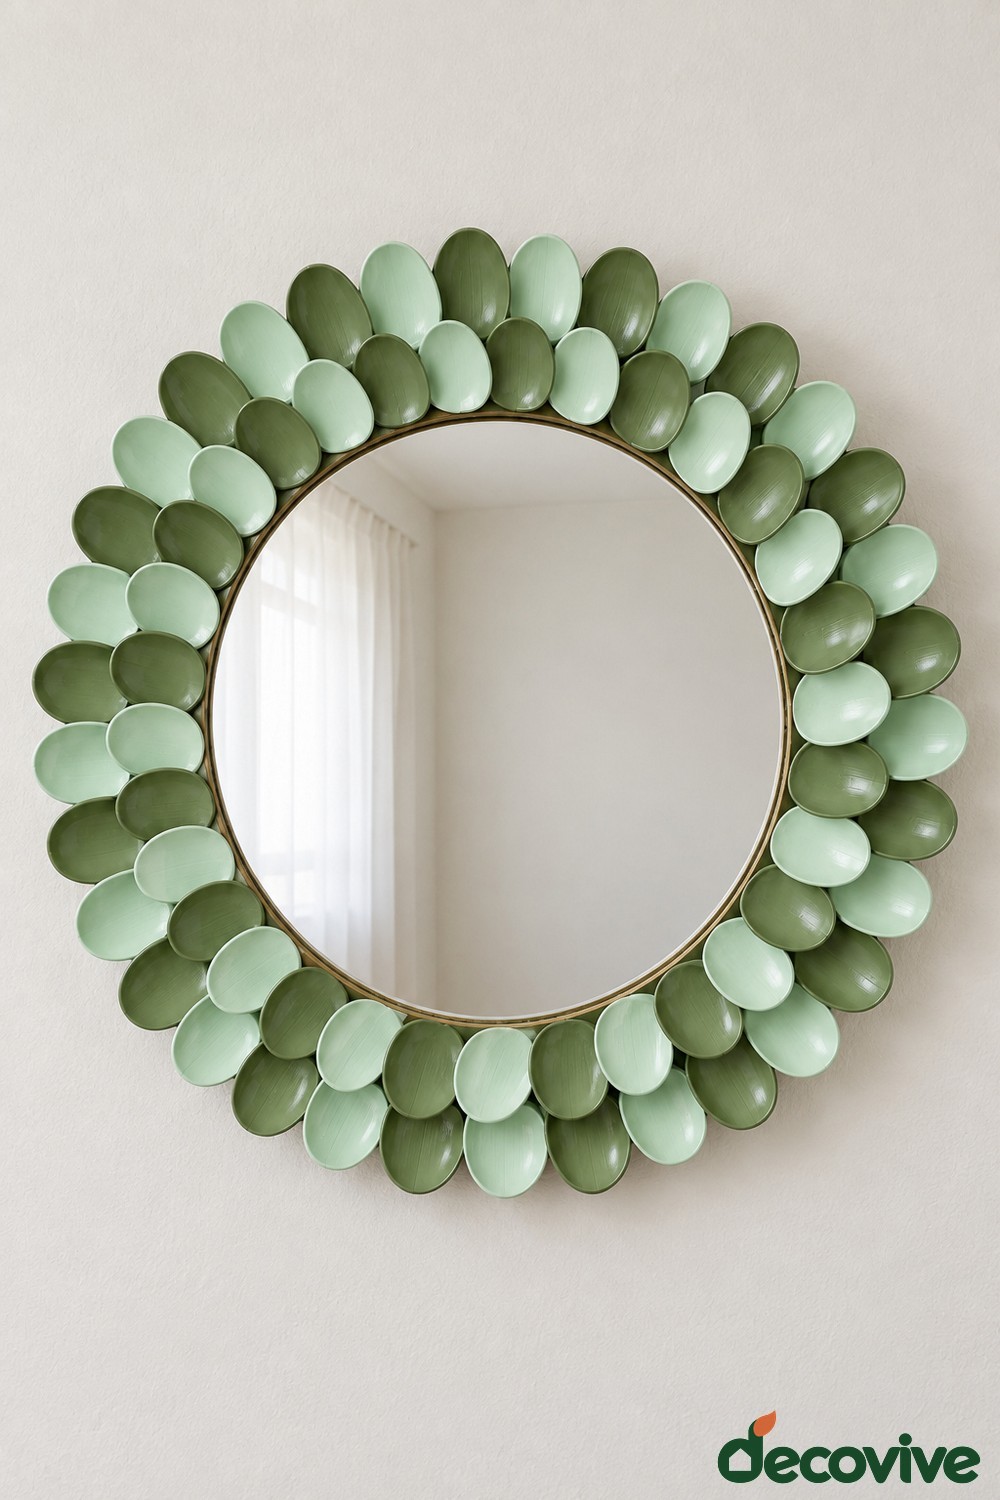
The shallow oval bowls of unwanted plastic spoons can form a layered leaf border. Use clean spoons you already have, a sturdy decorative surround fixed to the original frame, green paint approved for the plastic, and a compatible adhesive. Have an adult separate the handles safely and smooth any rough cut edges. Arrange the spoon bowls in overlapping rows with their rounded ends facing outward, checking that the layout stays balanced around the circle.
Paint the bowls in several related greens before attaching them. Support each piece on the surround, rather than leaving the outer row attached only to another spoon tip. The layered shape brings playful botanical texture to a dry craft room wall. Choose another design if the plastic cannot be cut and finished safely. Keep the pieces beyond young children's reach and inspect for loose edges when dusting.
17. Paint a Winding Snake across a Cream Frame
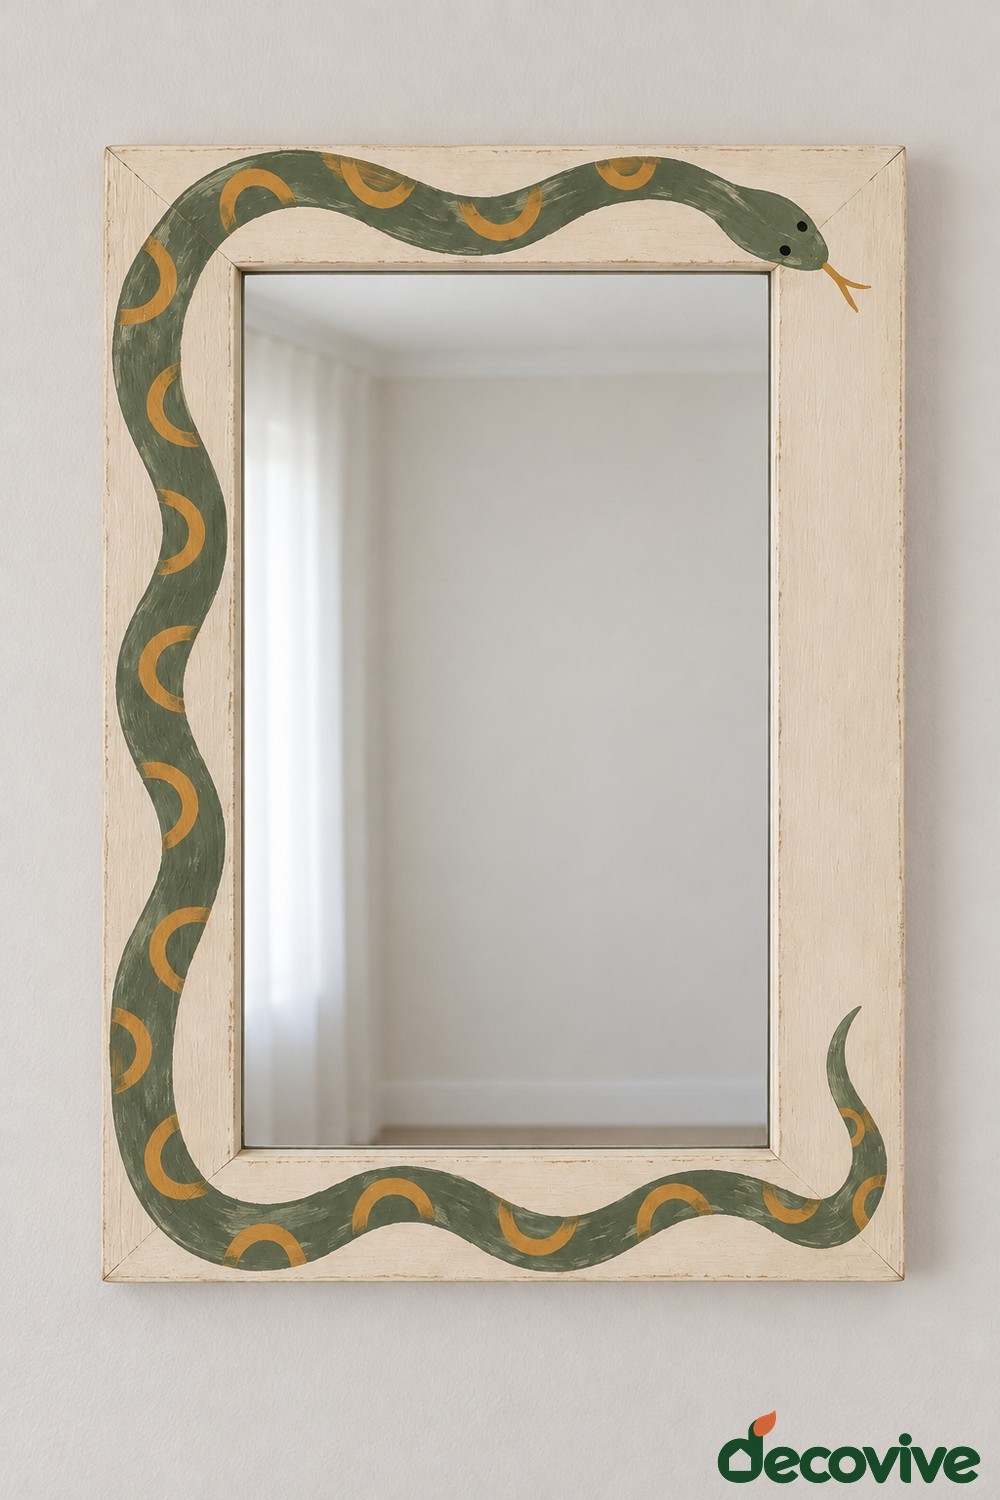
A winding snake motif uses the existing frame as a continuous painted canvas. Gather cream base paint, green and muted gold acrylic paints, a pencil, and fine brushes. Sketch the path around the rectangular border on paper first, planning a distinct head near the upper corner and a tapered tail along the lower side. Keep the snake wide enough for visible markings without letting its body cross the reflective opening.
Apply the green silhouette after the cream base has dried, then add simple gold curves or patches and a small eye. Treat the snake as painted decoration, with no separate heavy sculpture needed. This choice suits a nature inspired creative corner or a room that welcomes playful motifs. Practice the head on scrap card before painting it, and leave some cream frame visible so the winding shape remains easy to follow.
18. Line a Dark Frame with Reclaimed Dominoes
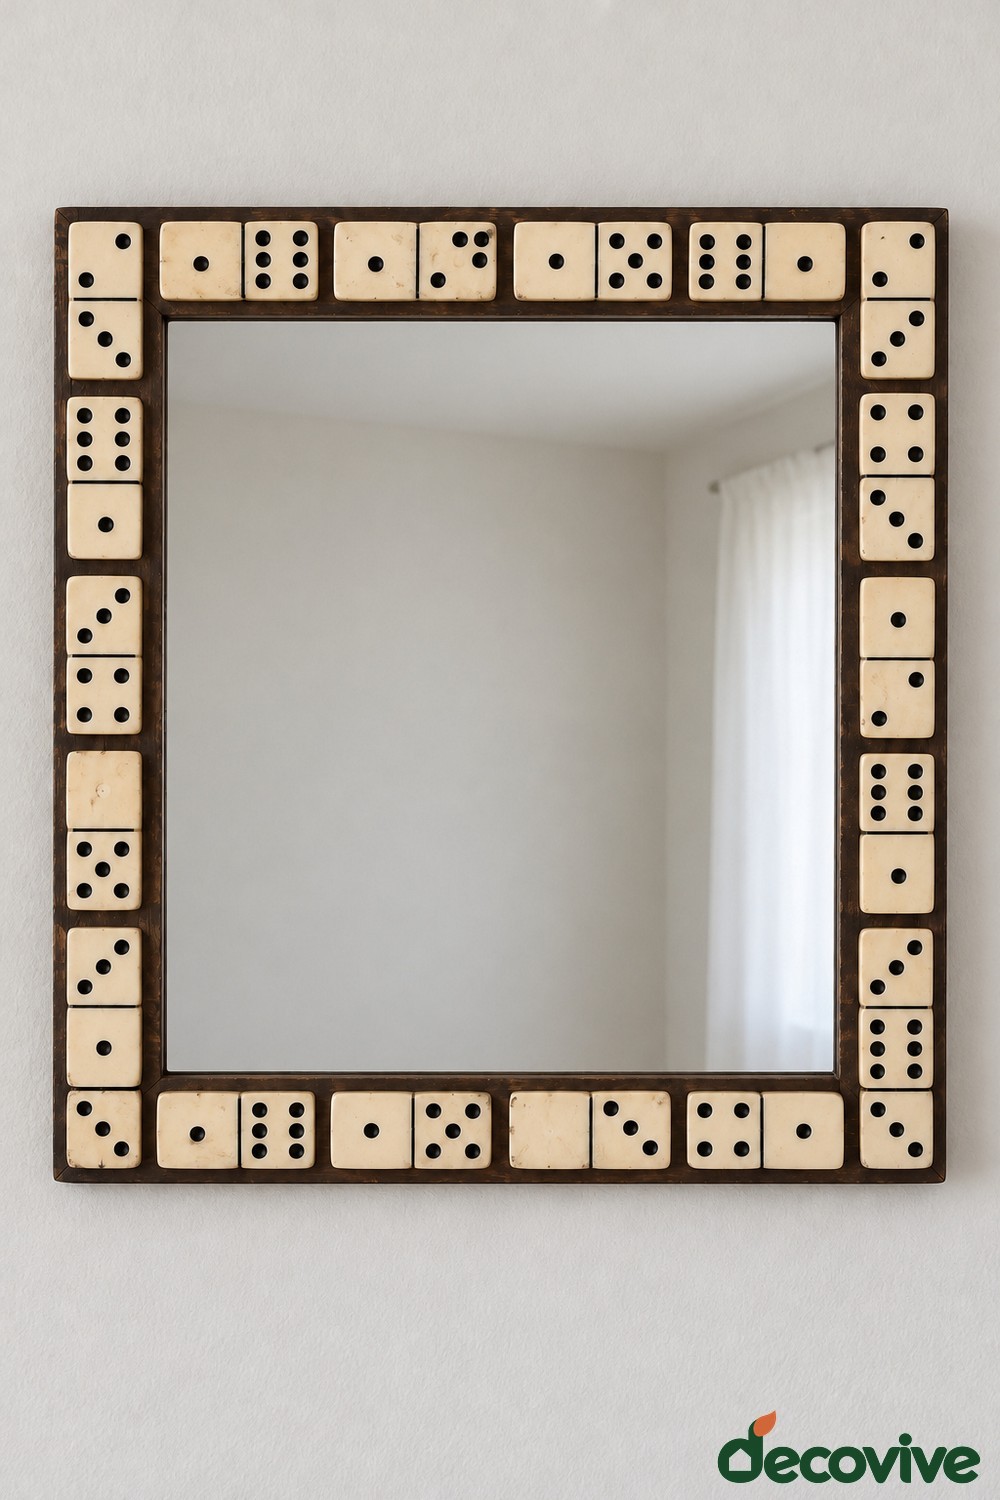
An incomplete domino set can provide a ready made geometric border for a rectangular mirror. Use clean dominoes of similar thickness, a dark painted or stained frame, and an adhesive appropriate for the domino material and frame finish. Lay out the entire border before attaching it. Horizontal pieces work across the top and bottom, while vertical ones can fill the sides; measure the corners carefully to prevent awkward overlapping blocks.
Leave the printed dots exposed and distribute darker faces rather than concentrating them in one section. This graphic treatment fits beside a games shelf or in a casual study. Dominoes made from wood, plastic, or other materials need different bonding choices, so identify what you have before selecting glue. The added pieces must remain fixed securely, and the finished mirror should be weighed before its wall fittings are chosen.
19. Arrange Old Keys on a Charcoal Oval Frame
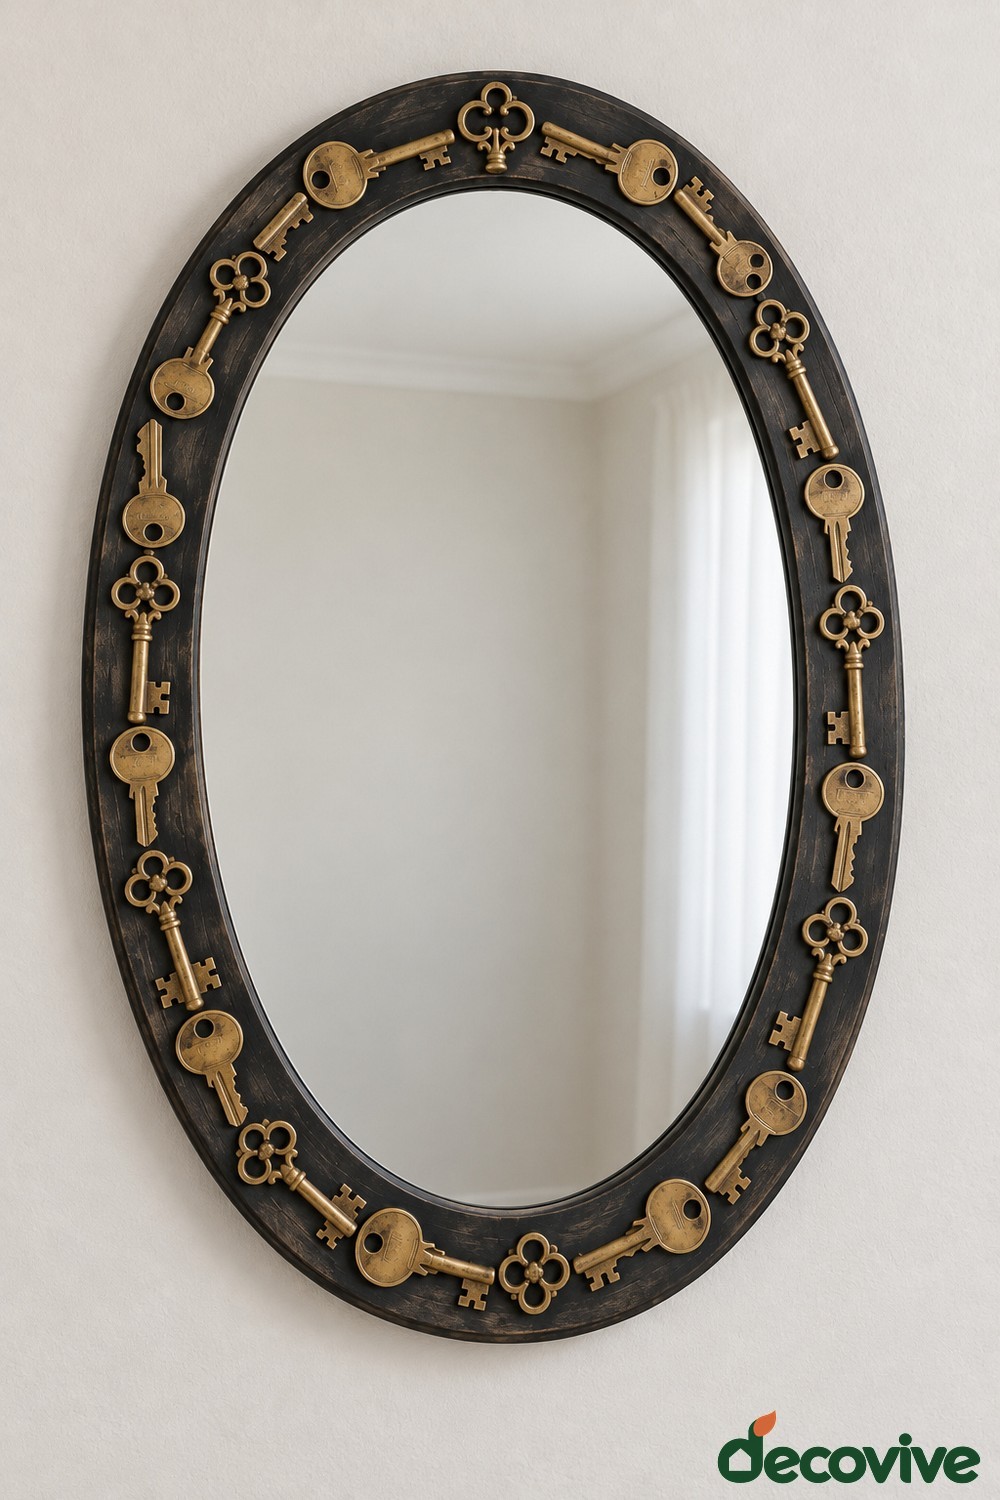
Unused keys can make a decorative collection feel purposeful on a dark oval frame. Choose only keys that no longer operate locks, and gather charcoal paint, a suitable metal cleaner, and an adhesive approved for metal and the cured frame surface. Clean the keys without removing every trace of their patina. Arrange their shafts along the oval, alternating long and short examples so the shapes follow the border naturally.
Keep every key completely supported on the frame and turn sharp or projecting ends away from the outer edge. The brass colored forms stand out against charcoal without needing a second decorative material. This idea suits a hallway or study with older wood furniture. Keys add more weight than fabric or paper, so inspect the frame joints and hanging system carefully. Dust the collection gently and check small contact points for movement.
20. Set Pale Ceramic Fragments inside a Forest Green Border
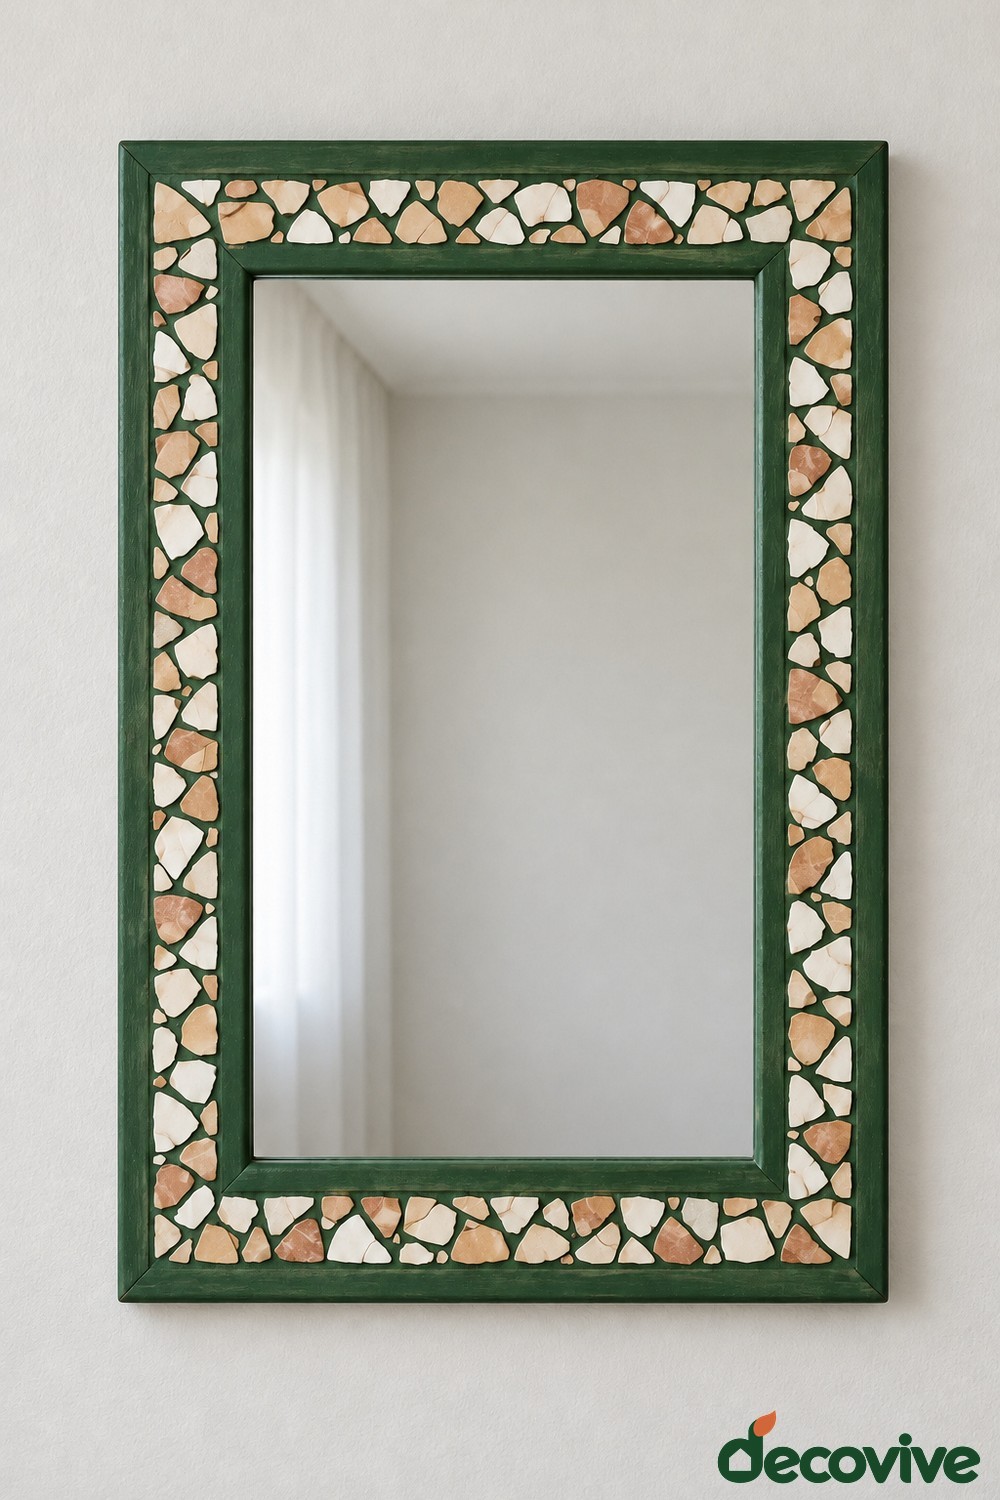
Pale ceramic fragments can create a quieter mosaic when a dark green outer and inner border contains the pattern. Use smooth craft mosaic pieces or suitably prepared ceramic offcuts, a rigid frame, compatible mosaic adhesive, and an appropriate grout. Plan the pale cream and blush pieces across the flat central band, leaving the green edges exposed. Small fragments should fill gaps without producing thin sharp slivers near the mirror opening.
Follow the chosen mosaic system for fixing and finishing, protecting the glass from adhesive and grout. Cutting and shaping ceramic require suitable tools and protection; this is more involved than a simple painted refresh. The forest green outline gives the finished mirror a clear architectural shape, making it useful above a console. Check the extra weight, remove all exposed sharp edges, and avoid using a flexible cardboard base under ceramic pieces.
21. Attach Felt Triangles with Small Stitched Details
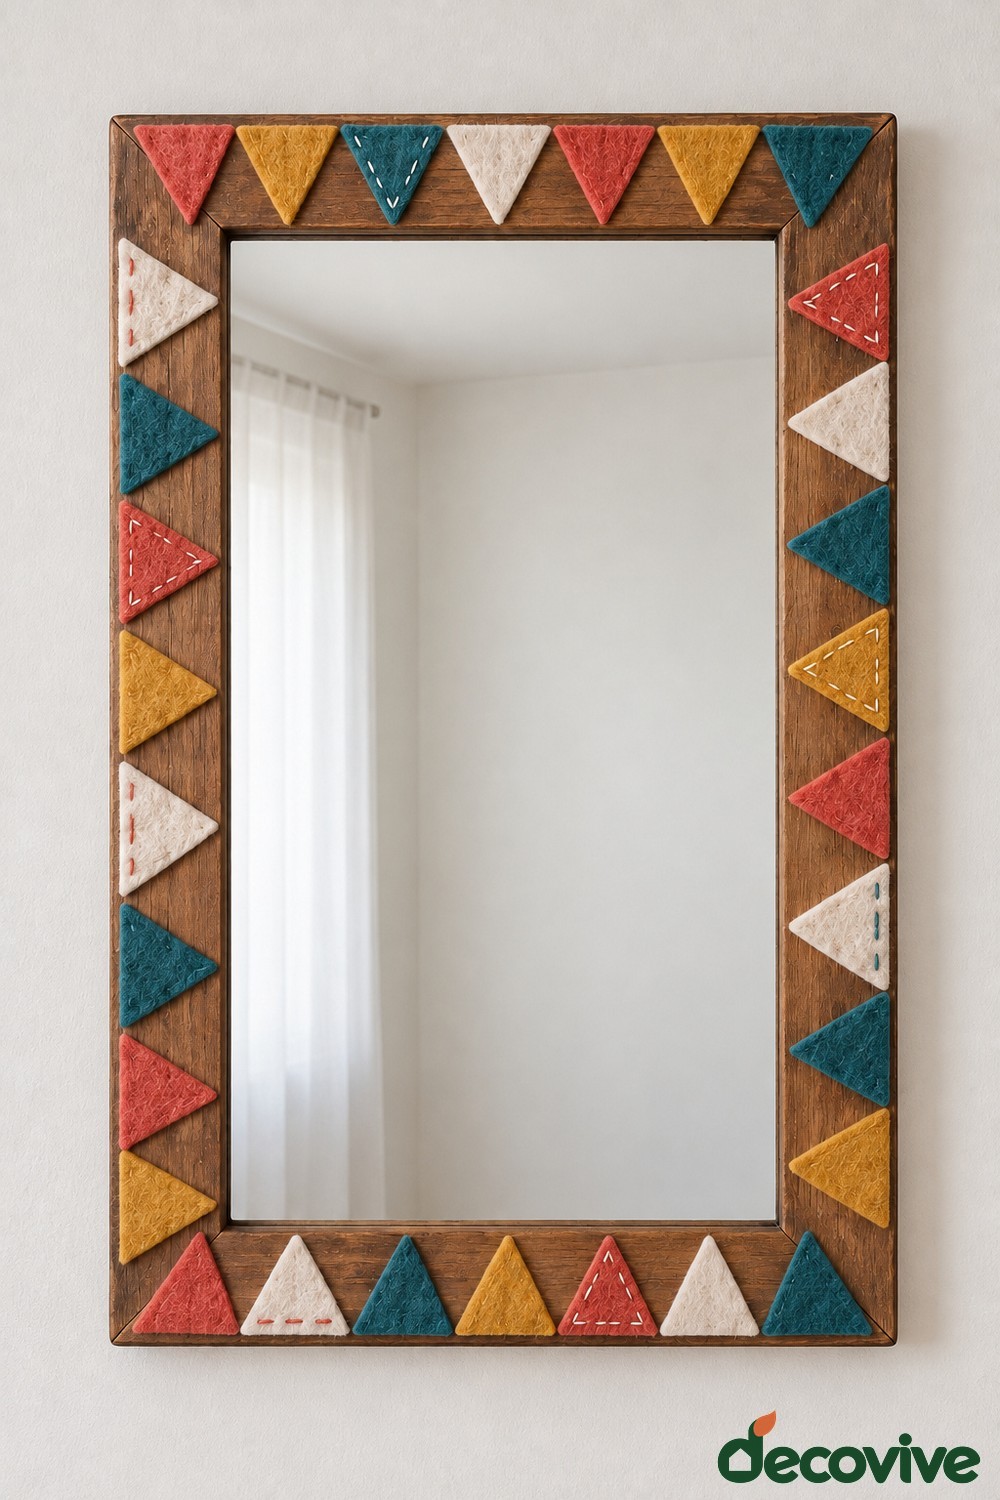
Felt offcuts can add color while leaving the original wood grain visible. Gather firm felt in red, mustard, teal, and cream, scissors, a paper triangle template, embroidery thread, a needle, and an adhesive compatible with felt and the frame. Cut matching triangles, then add small running stitches around selected pieces. Complete the sewing before attachment so you never need to push a needle beside the installed mirror glass.
Arrange the triangles around the rim with their points facing toward the opening. Leave a little wood between neighboring shapes and adjust the corner spacing before gluing. The repeating colors suit a sewing corner or relaxed creative workspace. Firm felt keeps a clearer outline than a thin floppy scrap, and careful trimming makes the border tidier. Brush away lint occasionally and keep the textile decoration away from repeated moisture.
22. Cluster Folded Paper Stars around an Arched Frame
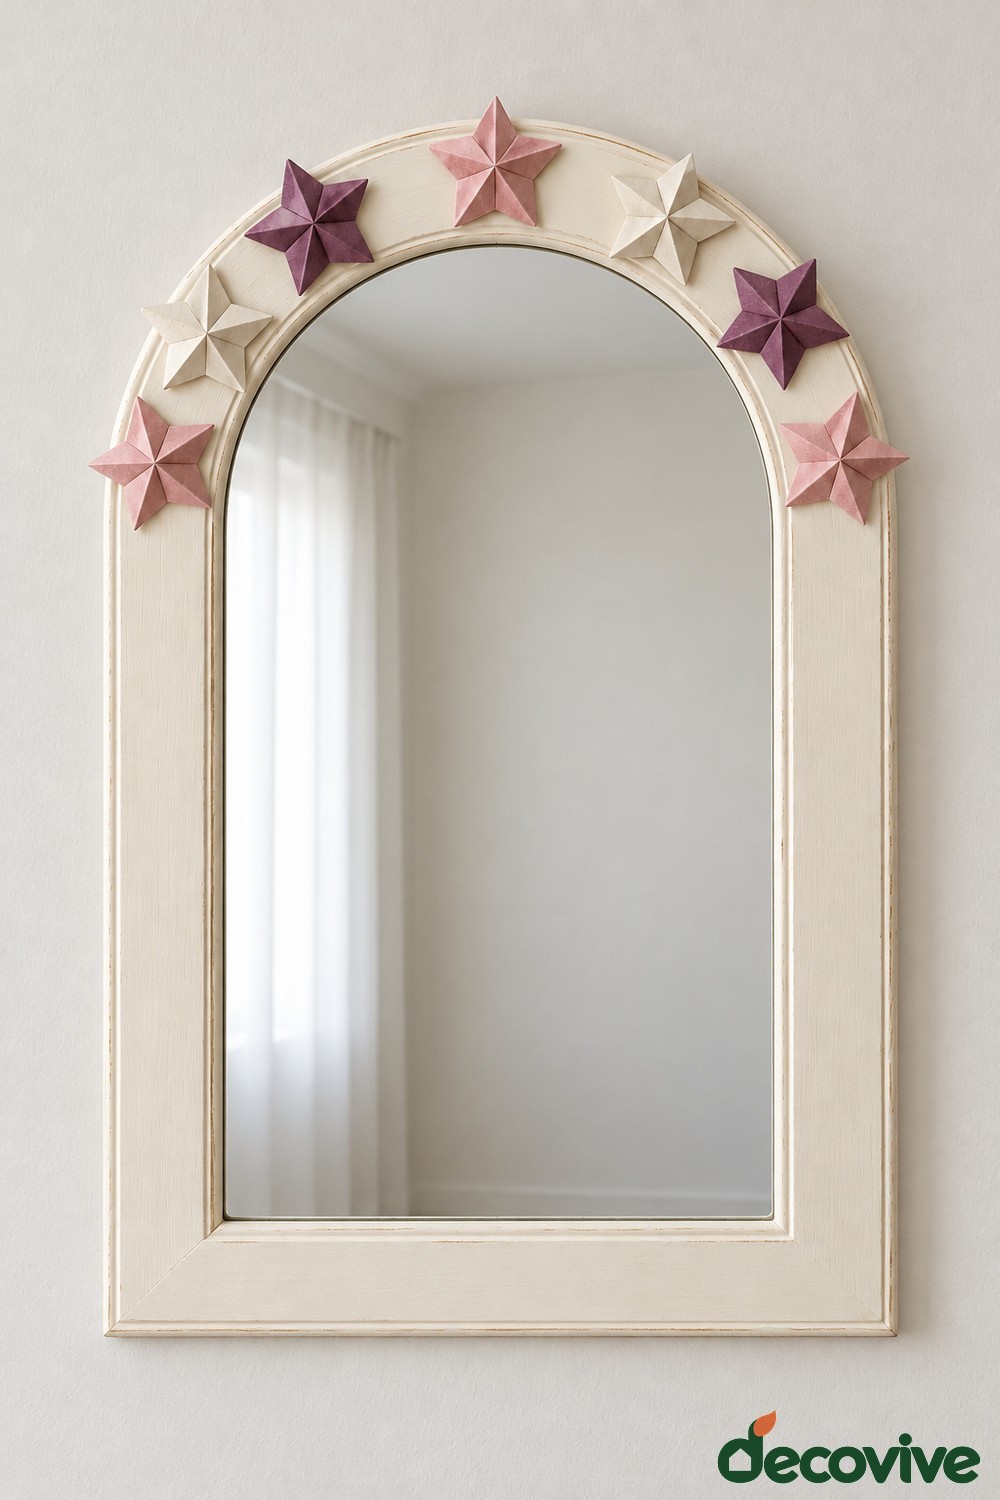
Folded paper stars can emphasize an arched frame without filling every edge. Use clean paper from leftover gift wrap or colored paper scraps, a ruler, scissors, and an adhesive suitable for paper and the frame finish. Practice one star first, then repeat the same folded shape in blush, ivory, and plum. Choose paper firm enough to hold a raised fold but light enough to avoid pulling away from its attachment point.
Arrange the stars across the upper curve and down only part of each side, keeping the lower frame plain. Attach the flat contact areas rather than relying on a single pointed tip. This gentle composition works near a writing desk or bedroom dressing spot. Paper can fade or crease, so keep it out of strong prolonged sun and away from steam. Dust with a very soft brush rather than a damp cloth.
23. Thread Cream Cord through a Burgundy Decorative Surround
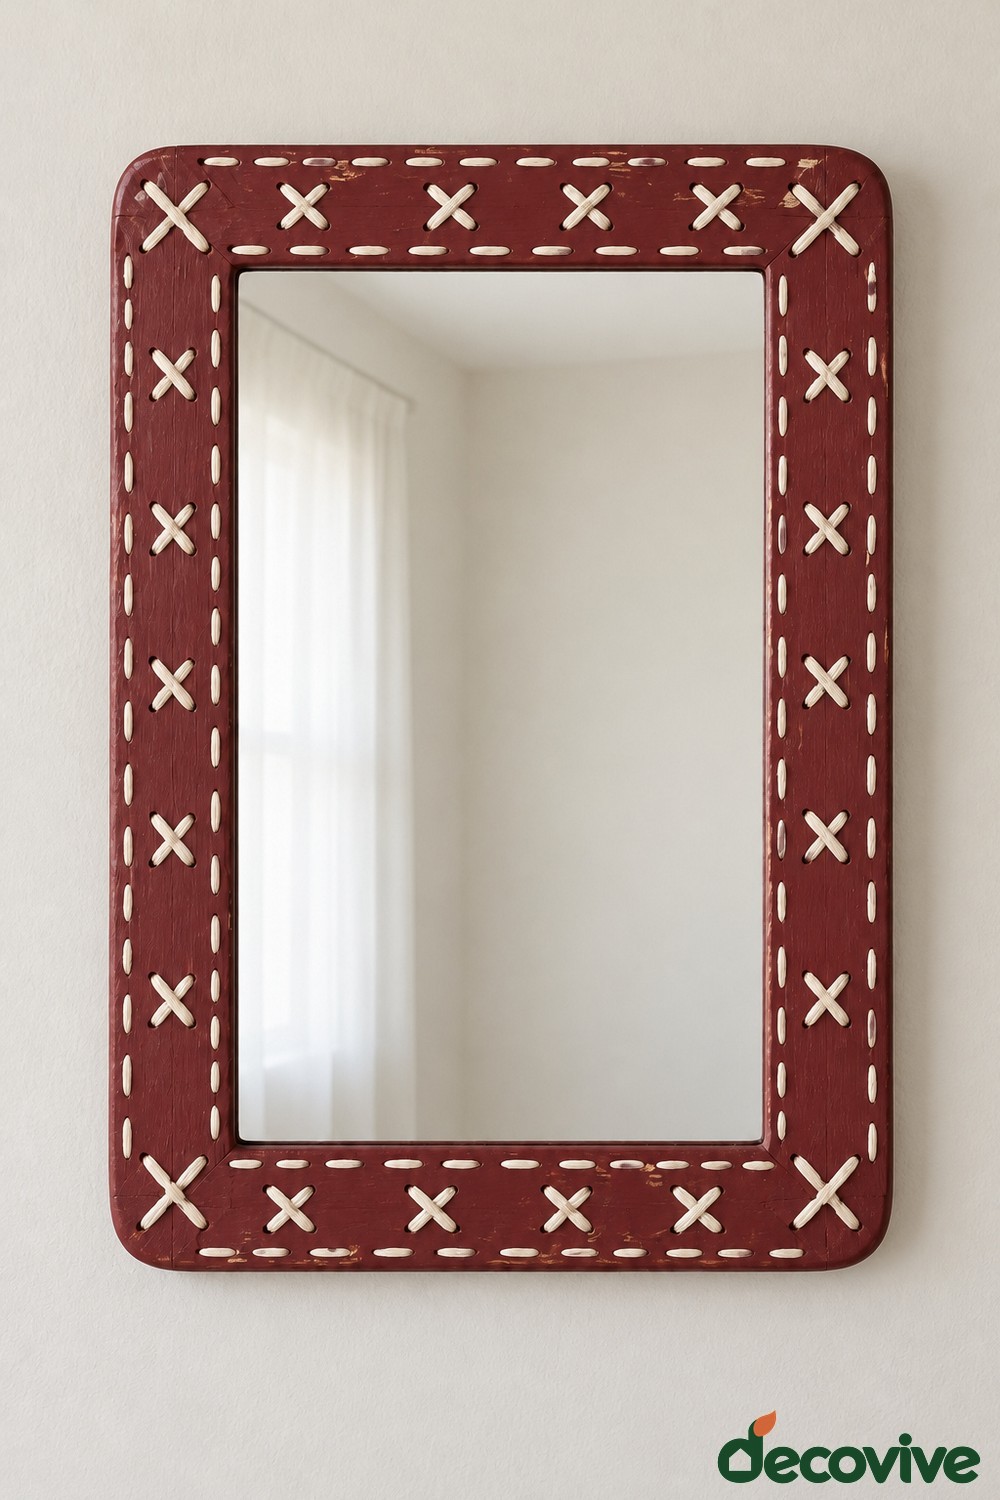
Cream cord against a burgundy surround creates the look of an embroidered frame. For actual stitching, use a separate wooden decorative surround, a paper hole template, a drill, cotton cord, and suitable paint. Mark paired holes for short running stitches and groups of four holes for the larger crosses. Complete all drilling before fitting the surround to the mirror, with the glass absent from the work area. Smooth the hole edges so they do not abrade the thread.
Paint the surround first, let it cure, then thread the cream cord and secure the ends discreetly at the back. Keep the surround attached to a sound original frame. This tactile border suits a sewing or craft room. If drilling is beyond your tools or experience, painted stitch marks offer a simpler adaptation. Never drill an assembled mirror or rely on the decorative cord as hanging hardware.
24. Paint Burgundy Flowers along a Dusty Pink Oval Frame
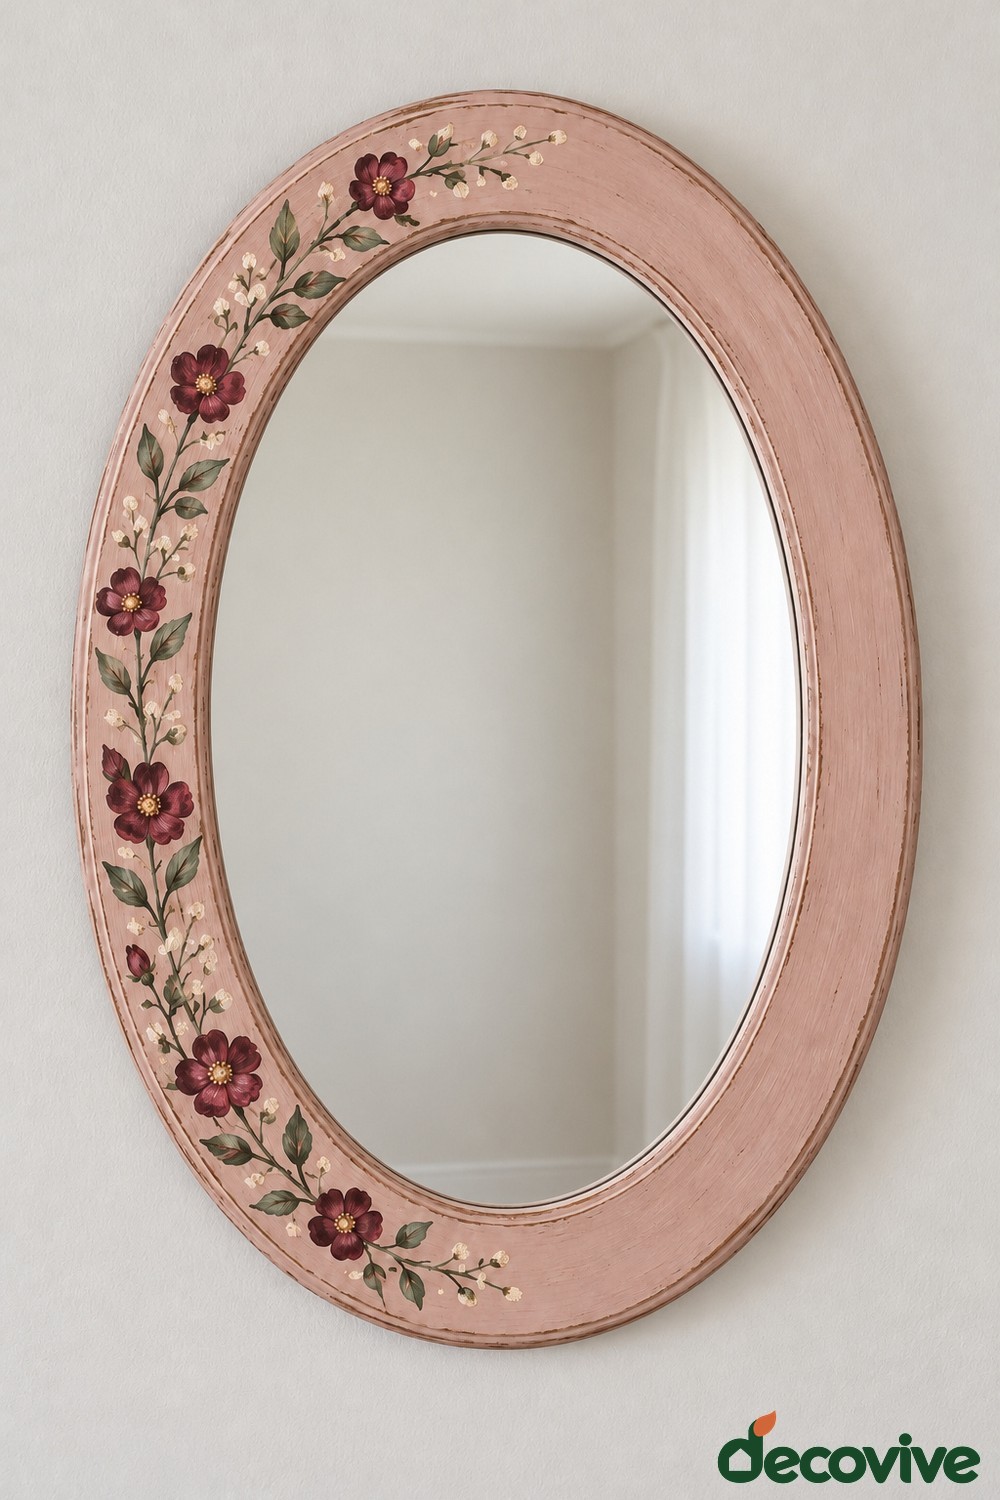
A floral painting focused on one side can refresh an oval mirror without overwhelming its shape. Use compatible dusty pink frame paint, fine brushes, burgundy and cream acrylic paints for the blooms, and muted green for stems and leaves. Plan the arrangement as a loose curved stem running along the left rim. Vary the flower sizes and leave small gaps between clusters so each blossom remains distinct.
Complete the pink base first, then paint stems, leaves, petals, and centers in manageable layers. You can practice simple five petal flowers on scrap card before working on the frame. This approach fits a romantic dressing corner, and its palette can connect with the floral details in these shabby chic bathroom ideas. For actual bathroom use, choose a suitable coating system and keep the mirror outside direct splash areas.
25. Create a Cream Pearl Border on a Round Mirror
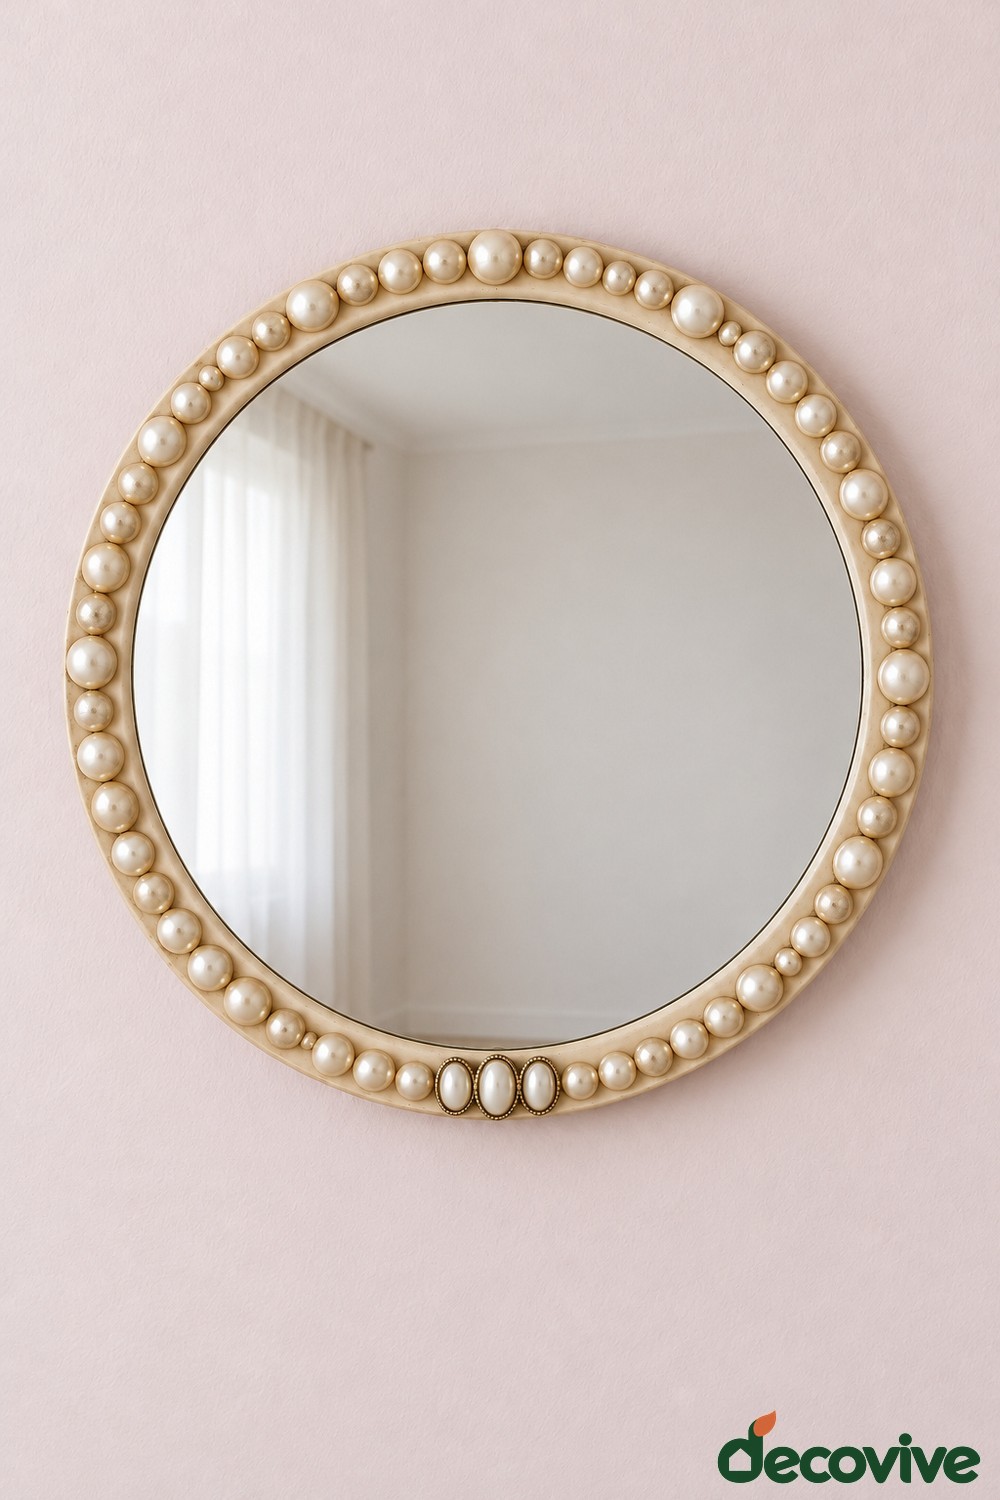
Cream faux pearls can give a narrow round frame a delicate raised edge. Use lightweight pearl half beads with flat backs, three oval pearl effect cabochons in small brass colored settings, a pale painted base, and an adhesive approved for the decoration and frame finish. Lay out the round beads first, reserving a space at the bottom for the oval details. Flat backs provide a more useful contact area than complete spheres.
Keep the entire border on the frame, with no bead overlapping the glass. A dusty pink wall helps the pale shapes stay visible, while the three oval accents give the bottom a subtle focal point. Apply adhesive sparingly so it does not squeeze out between neighboring pieces. Wipe the glass separately, dust the pearls softly, and inspect for loose attachments. Small beads should remain beyond the reach of young children.
26. Sew Floral Fabric Hearts for a Cream Wooden Frame
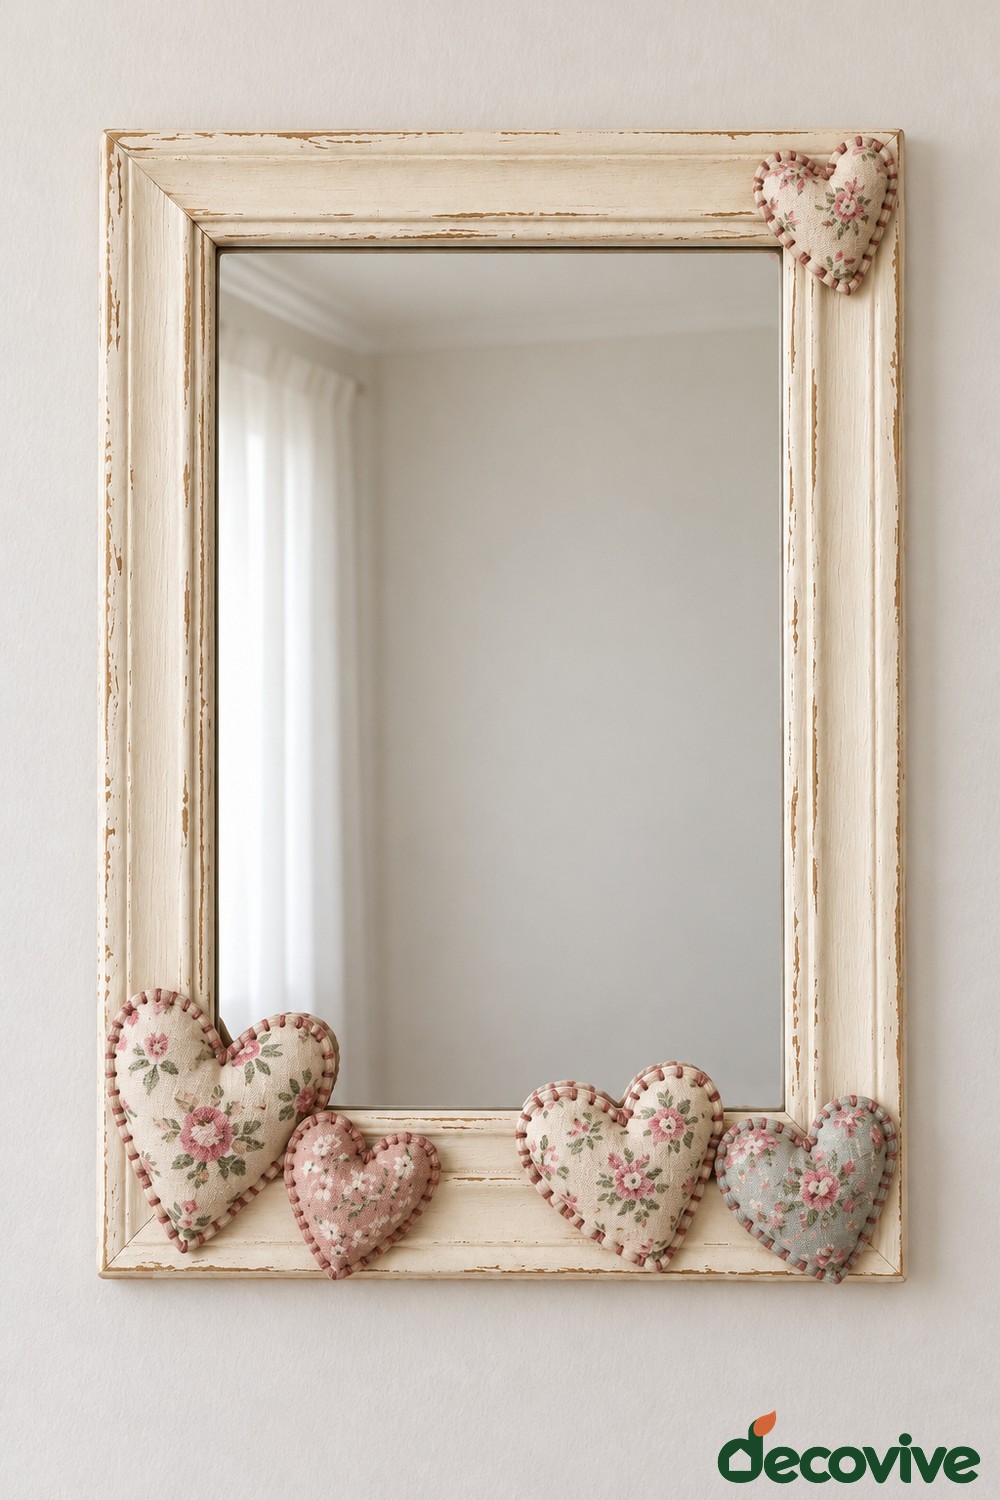
Small sewn hearts can soften a cream wooden frame while preserving most of its original surface. Reuse clean floral cotton, then gather thread, a needle, a heart template, scissors, a small amount of stuffing, and a suitable attachment method. Cut paired hearts, sew around their edges with an opening left for turning, and add just enough filling to create a gentle rounded face. Close each opening securely before arranging the hearts.
Place a few hearts along the lower edge and one near an upper corner, rather than covering every side. Keep the stuffed shapes supported by the frame and away from the reflection. The design suits a cottage bedroom or handmade gift corner. For a flatter result, omit the stuffing and use felt behind the cotton. Dust gently and avoid installing fabric hearts beside a frequently wet sink.
27. Decoupage Blossom Paper onto an Arched Mirror Frame
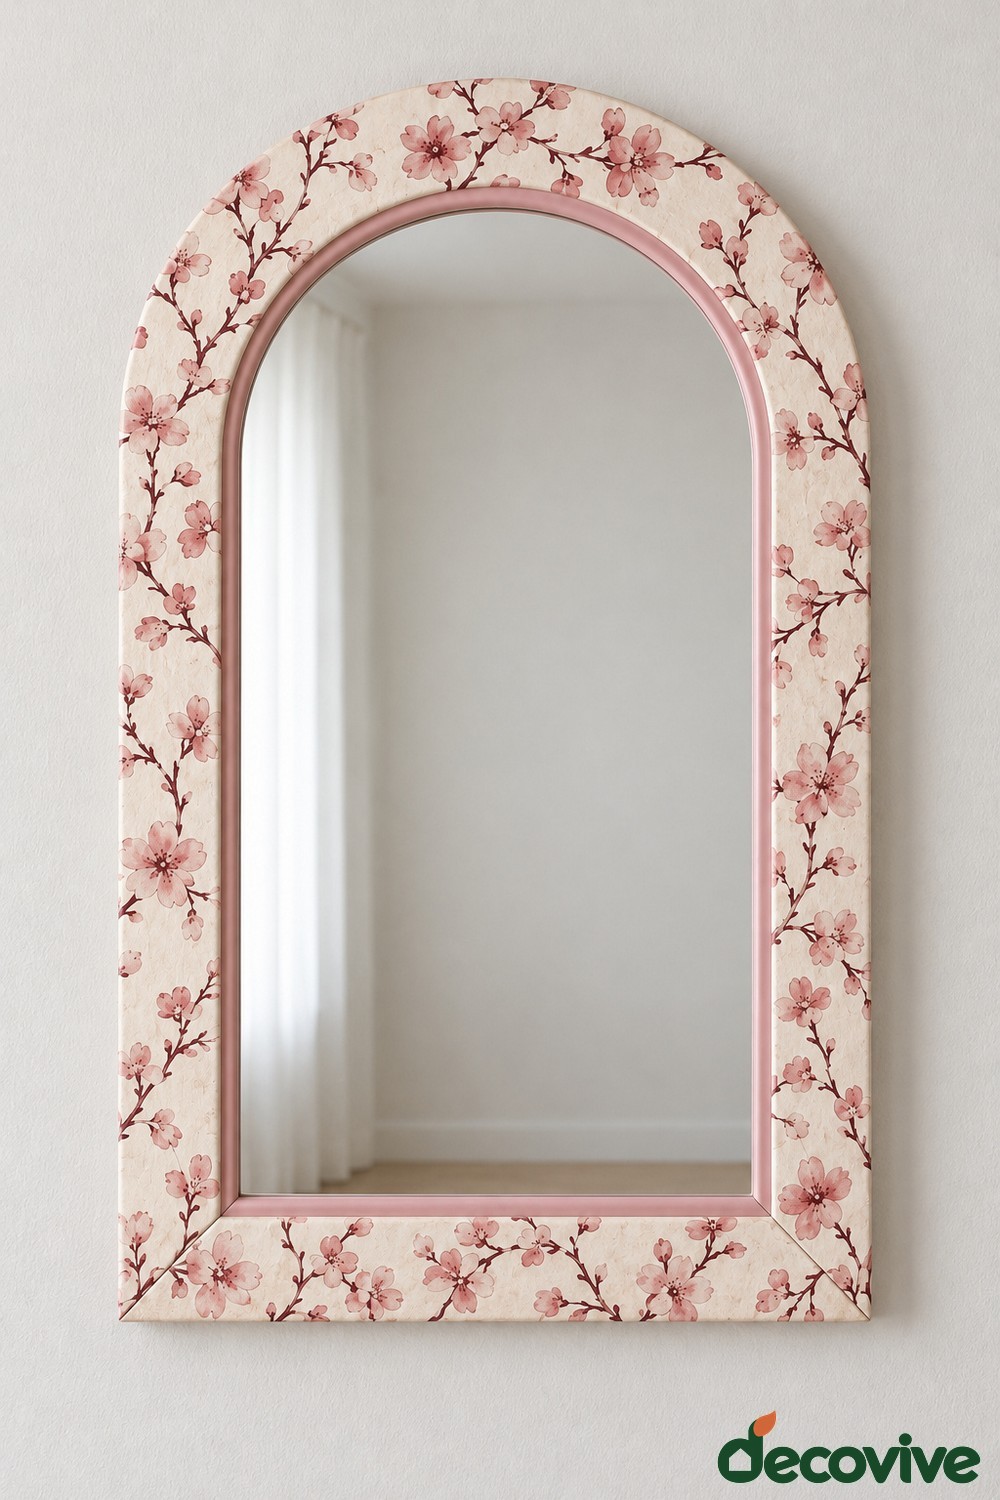
Blossom patterned paper can make an arched mirror look decorative without requiring detailed freehand painting. Use leftover floral paper or the printed top layer of suitable napkins, a compatible decoupage medium, a soft brush, scissors, cream base paint, and pink paint for the inner trim. Plan the branches around the arch before attaching them. Separate napkin layers when necessary and work in small sections to control wrinkles and tearing.
Apply the paper to the prepared frame following the medium instructions, then add the recommended compatible protective finish. Keep the pink inner rim visible as a clean boundary around the glass. This approach suits a bedroom or sheltered hallway, and you can carry the same blossom colors into a storage accent using these jar painting ideas. Let all layers dry fully, and keep the paper finish away from repeated splashes.
28. Cut Clay Hearts for an Alternating Blush and Burgundy Border
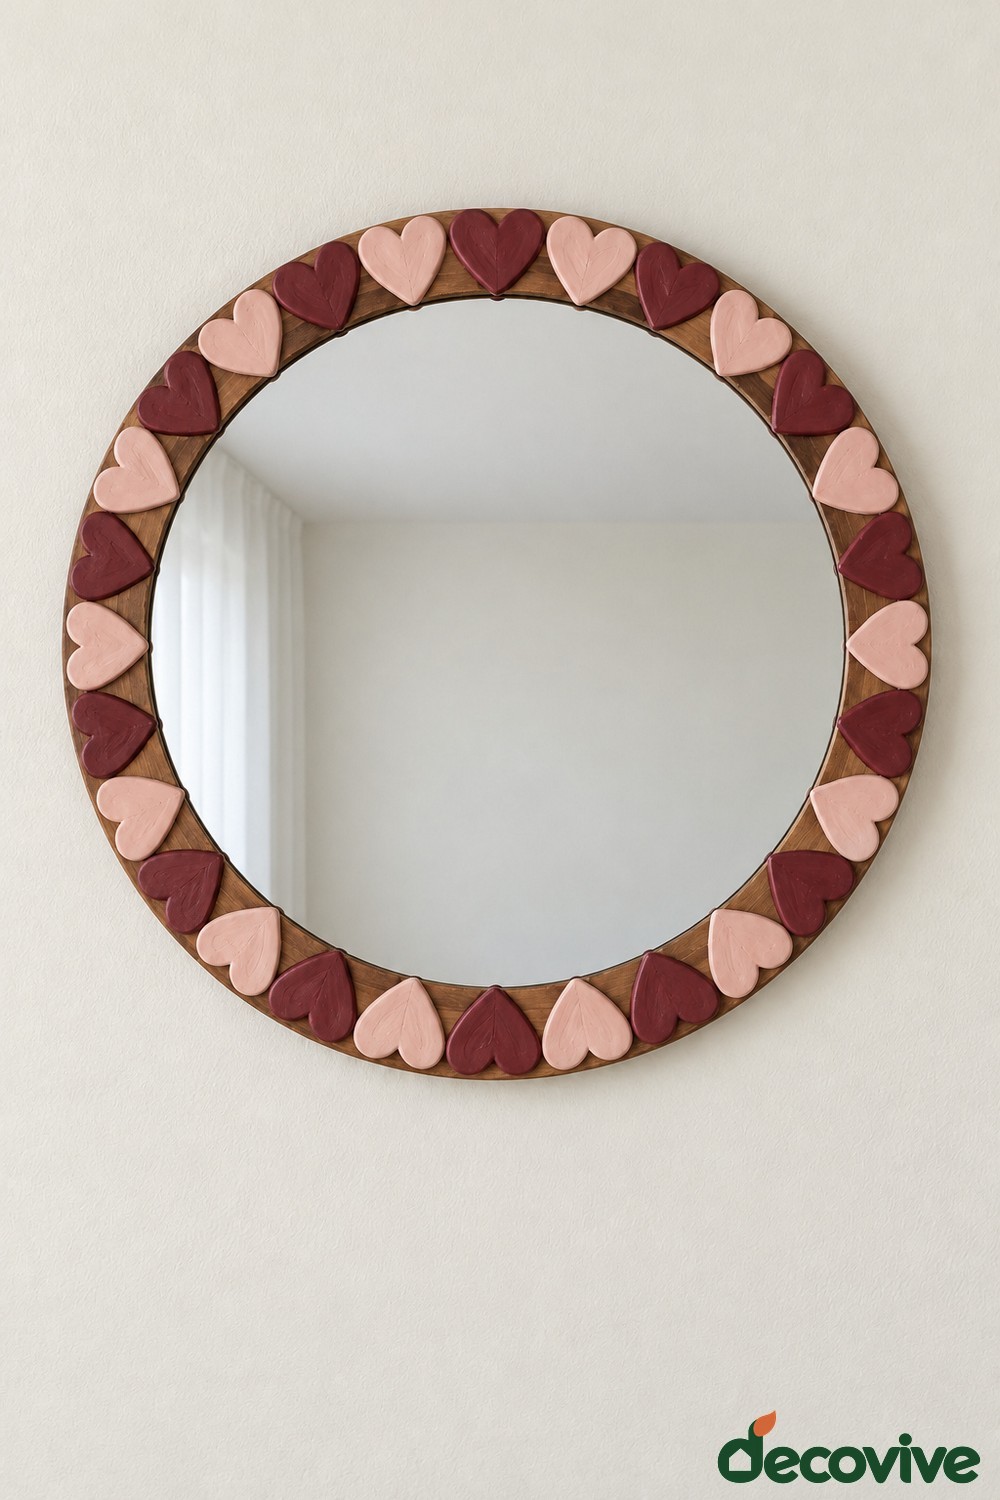
Flat clay hearts create a romantic border with more structure than soft fabric. Use air dry clay, a roller, a small heart cutter or template, blush and burgundy acrylic paints, and an adhesive suitable for dried clay and the frame. Measure the available rim before choosing the heart size. Roll the clay evenly and cut extra hearts so you can reject any that crack or curl during drying.
After the pieces dry completely, paint them and arrange alternating colors with the points facing inward. Keep each heart entirely on the frame so the glass remains usable. For related shaping guidance, explore the floral clay photo frame tutorial and adapt the decoration to the mirror border. This finish works in a dry dressing area. Use a gentle brush for dusting and avoid squeezing fragile heart tips when moving the mirror.
29. Shape Tiny Clay Envelopes for a Dusty Rose Frame
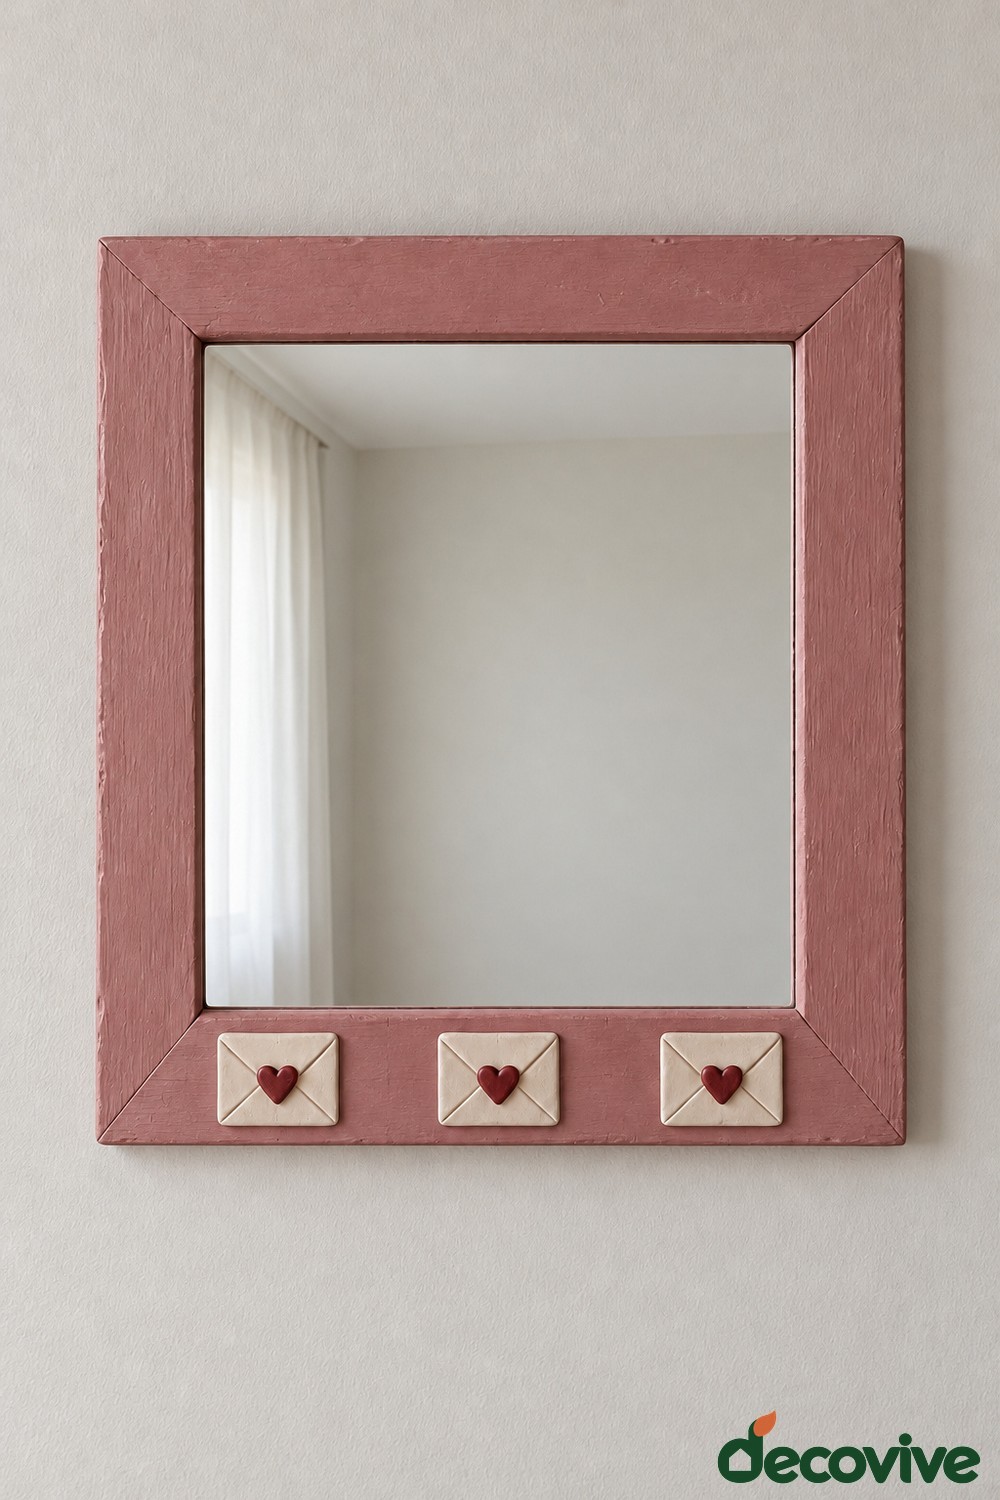
Three miniature clay envelopes can give a plain rectangular mirror a personal, letter inspired detail. Use air dry clay, a roller, a rectangular template, a blunt modeling tool, cream and burgundy acrylic paints, dusty rose frame paint, and an adhesive suitable for dried clay and the frame. Cut three flat rectangles with gently rounded corners. Press shallow diagonal lines into their faces to suggest folded envelope flaps, then make small separate clay hearts for the seals.
Let the pieces dry fully before painting and attaching them, leaving enough space between the envelopes to show the rose background. These are solid decorative shapes rather than storage pockets. The idea suits a writing desk, dressing corner, or handmade gift. If you also need useful organization nearby, these upcycled storage ideas offer separate ways to reuse household materials. Keep the clay details dry and dust them carefully.
Keep the Finished Mirror Secure and Easy to Care For
Let paint, decoupage layers, clay pieces, and adhesives reach the condition specified by their manufacturers before hanging the mirror. Check the glass retention and frame joints again, then weigh the finished piece. Use fittings and wall fixings rated for that weight and suited to the wall. An existing hook is not automatically adequate after adding metal objects or ceramic tiles. Decorative rope, bows, cardboard borders, and stitching must never carry the mirror.
Keep most paper, fabric, and ordinary air dry clay designs in dry indoor rooms. Clean the reflective glass with a soft cloth, applying cleaner to the cloth rather than spraying directly over the frame. Do not let liquid soak the edges or backing. Dust raised details separately and repair any loose attachment before it can fall. If a material is difficult to clean in the location you have chosen, a simple painted design may serve the space better than a heavily textured border.


Leave a Reply