
Yarn can wrap a rail, soften a handle or form a removable furniture cover. Choose among 21 applications by how the object moves and how the textile will be cleaned. A short sleeve-fitting video introduces tied closures; the guide also covers measuring, supports and keeping storage openings or watering access usable.
Table of Contents
- Choose Between Wrapping, Sleeves, and Motifs
- Materials, Tools, and Fit
- Plan the Closure Before Adding Decoration
- Video Example: Tie a Crochet Sleeve Around a Baluster
- 21 Yarn Bombing Ideas to Adapt
- 1. Wrap Stair Railings with Colorful Yarn
- 2. Give a Wooden Chair a Crochet Makeover
- 3. Frame a Mirror with Layered Fiber Textures
- 4. Dress Up a Plant Stand with Chunky Crochet Covers
- 5. Turn a Coat Rack into a Sculptural Yarn Accent
- 6. Refresh a Side Table with Wrapped Yarn Details
- 7. Create a Textured Yarn Feature Above the Bed
- 8. Use Crochet Baskets for Colorful Storage
- 9. Transform a Decorative Ladder with Mixed Yarn Techniques
- 10. Build a Floral Crochet Bench Arrangement
- 11. Add a Patchwork Yarn Pouf for Layered Texture
- 12. Make Open Shelves Part of the Yarn Display
- 13. Bring Color to a Porch Railing with Yarn Wraps
- 14. Make a Decorative Birdhouse Display with Yarn
- 15. Give a Mailbox a Playful Crochet Accent
- 16. Hang Crochet Flowers from a Garden Pergola
- 17. Combine a Tiered Plant Stand with Yarn Decor
- 18. Style a Decorative Bicycle with Floral Yarn Details
- 19. Soften a Garden Swing with Crochet Panels
- 20. Style a Decorative Garden Lantern Post
- 21. Decorate a Garden Fence with Crochet Flowers
- Care for the Yarn and the Surface Beneath It
Choose Between Wrapping, Sleeves, and Motifs
Direct wrapping means winding yarn around a surface in successive turns. It suits a narrow band or a small section of a post, but removing it may require unwinding many turns. A knitted or crocheted sleeve is prepared separately, then slipped on or closed around the object. Separate motifs and panels decorate selected areas without covering the whole surface.
For a limited first project, choose one railing sleeve in idea 13 or a basket accent in idea 8. A chair in idea 2 needs several fitted pieces, while the wall installation in idea 7 combines textiles with supporting wood. Existing motifs can reduce the amount of new crochet, but their sizes and attachment points still need planning.
Materials, Tools, and Fit
Gather yarn or prepared panels, a flexible measuring tape, scissors, and a blunt yarn needle for joining edges and weaving ends. Use a crochet hook or knitting needles if you are making the fabric yourself, selecting their size for your yarn and chosen pattern. Stitch markers can help locate matching closure points. Measure the height and circumference of the actual section, including any change in shape; a turned baluster is not a straight cylinder.
Make a sample in the same yarn and stitch before preparing a fitted cover. Gauge is the number of stitches and rows within a measured area, and it affects the final size. Measure the sample after the care or finishing process your yarn instructions call for. Use it to estimate the panel, then test the fit on the object. One universal stitch count cannot fit different chairs, pots, or railings.
Plan the Closure Before Adding Decoration
For an opening sleeve, bring the two edges together on the less visible side and lace through matching edge stitches with a yarn needle. Keep the closure accessible so you can undo it. Tie ends where they cannot rub against a sitter, catch a hand, or enter a moving part. A panel can instead have separate ties at its corners. These are proposed attachment methods, not claims about hidden connections in the photographs.
Try one section before making the complete set. It should remain in its intended position without hiding inspection points or interfering with the object. Finish loose yarn ends within the textile, leaving enough length to secure them properly. Avoid relying on a tiny trimmed knot alone to hold a large panel. Permanent glue usually makes the removable approach harder to maintain.
Video Example: Tie a Crochet Sleeve Around a Baluster
The clip begins with measuring a railing section, then a prepared red crochet rectangle is brought around a wooden baluster. Its yarn ends are crossed and tightened at the meeting edges, and the loose length is trimmed. This illustrates fitting a separate panel around an existing object instead of winding every strand directly onto the wood. It does not show how the crochet rectangle was made or establish a complete stitch pattern.
Apply the idea by making a panel to your own measurements and choosing an accessible closure. For a longer cover, a laced seam can distribute the attachment along the edges rather than depending on one central tie. Keep sufficient ends to weave them into the fabric, and use scissors away from the finished stitches. The same separate panel approach can inform chair covers, post sleeves, and shelf accents, with the attachment adjusted for their use.
21 Yarn Bombing Ideas to Adapt
These designs range from small accents to elaborate display pieces. Each explanation connects the visible texture to a practical adaptation; raised ornaments, structural supports, and hidden fastening methods still need to be assessed for your own object.
1. Wrap Stair Railings with Colorful Yarn
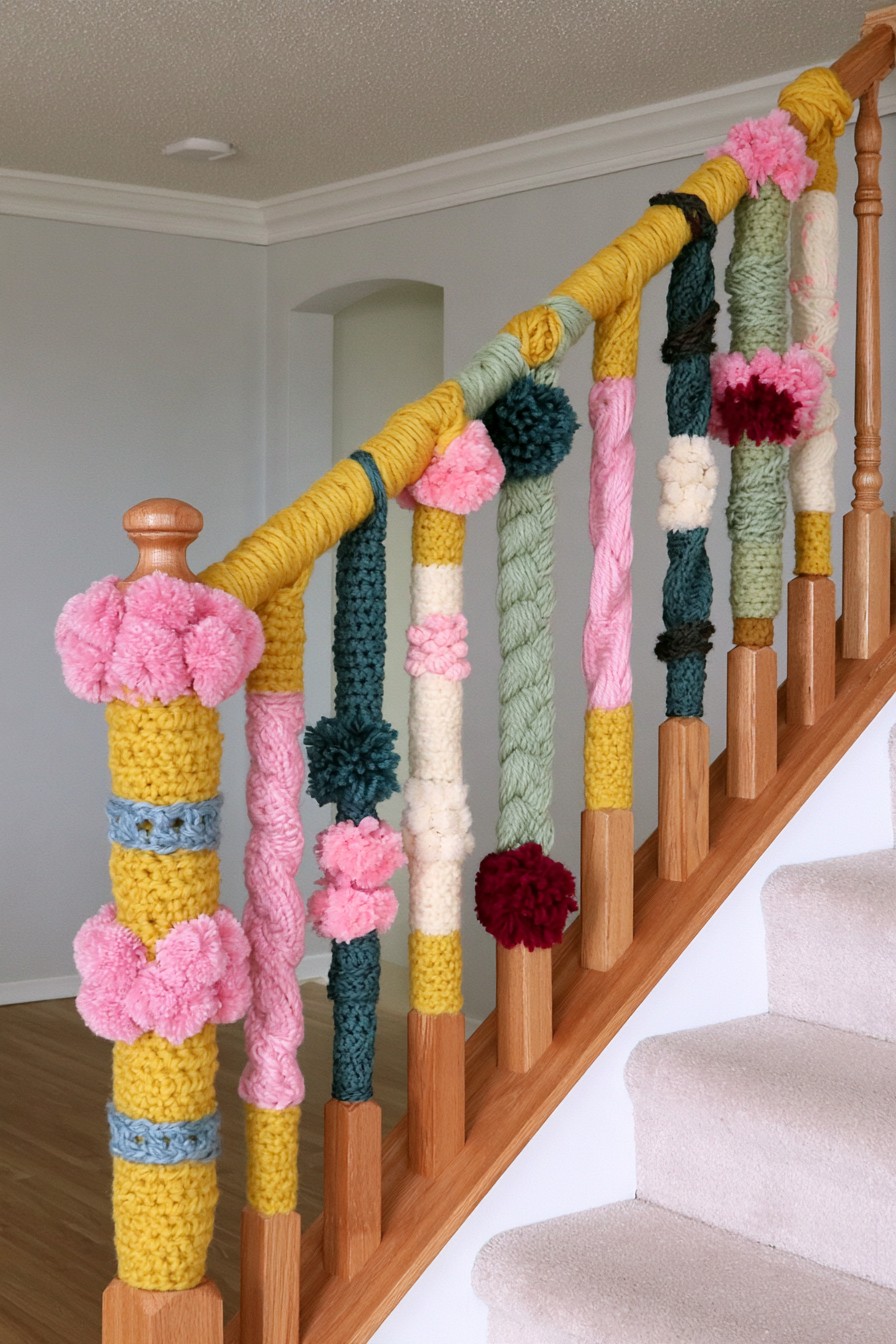
Yellow wrapping follows the handrail while varied textured bands decorate the balusters and newel post. Repeated pink, cream, green, and mustard give the staircase a lively rhythm. The photograph includes yarn on the main gripping surface, making it a more extensive decorative treatment than a few wrapped uprights.
For a staircase used daily, preserve the handrail’s normal grasp and keep the decoration on selected vertical bars. Measure those sections individually and use short opening sleeves where a turned shape makes direct wrapping awkward. Put their closures toward the less visible side, clear of the walking route. Raised flowers can sit on a decorative section only if they cannot catch clothing or interrupt access; the textile does not replace the railing’s structural function.
2. Give a Wooden Chair a Crochet Makeover
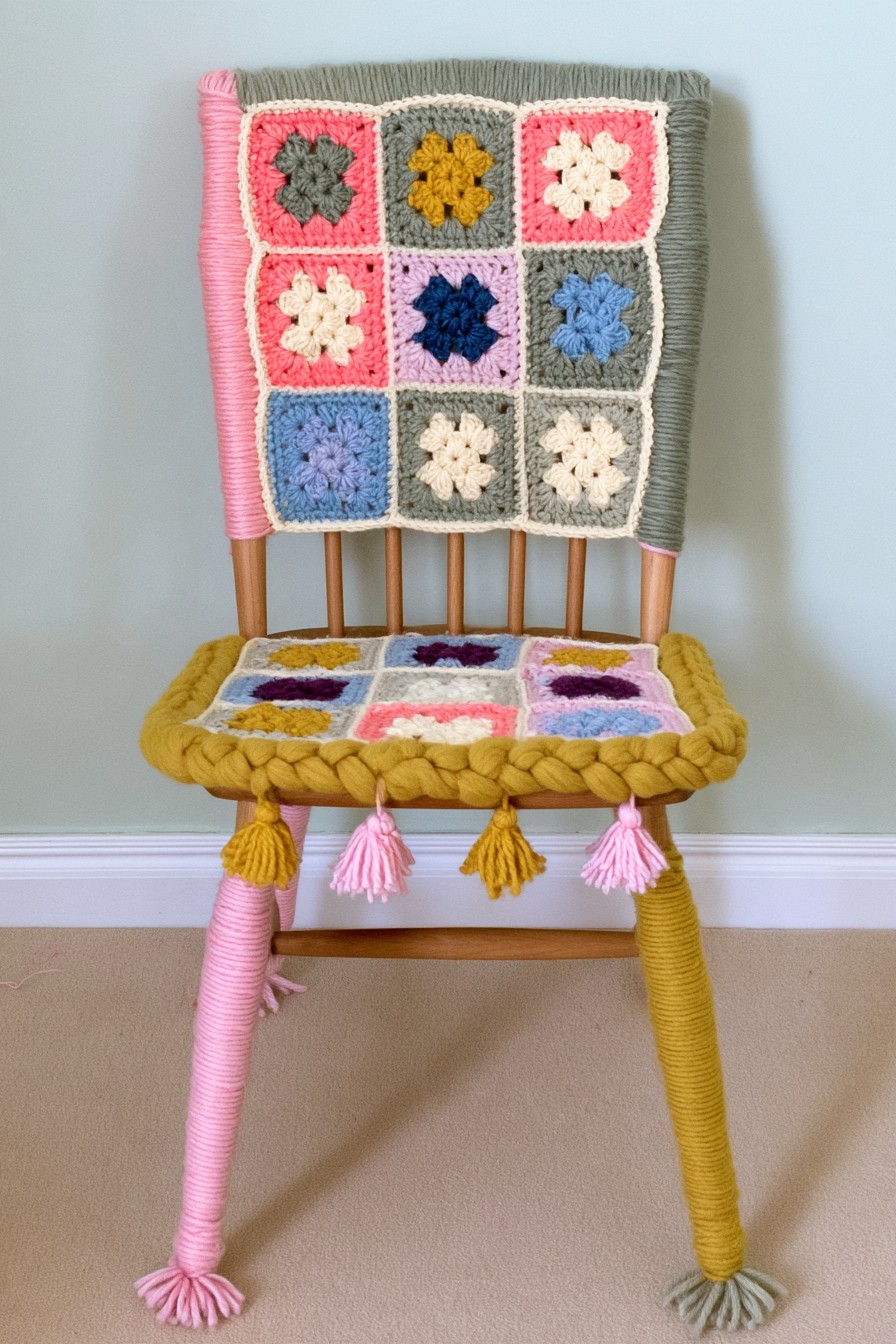
A floral square panel covers the chair back, with matching squares on the seat and colored yarn along the legs. Tassels hang from the front edge. The repeated motif connects several surfaces, while the wooden frame remains recognizable between the textile sections.
Make the seat and back panels separately so each can fit its own dimensions. For a working chair, use flat stitches in the sitting area and position corner ties underneath, away from thighs and the seat edge. Close the back panel behind the frame. Shorten or omit tassels where they would catch during movement. Test sitting, standing, and moving the chair before adding more detail; decoration should not make the chair unstable or hide damaged joints.
3. Frame a Mirror with Layered Fiber Textures
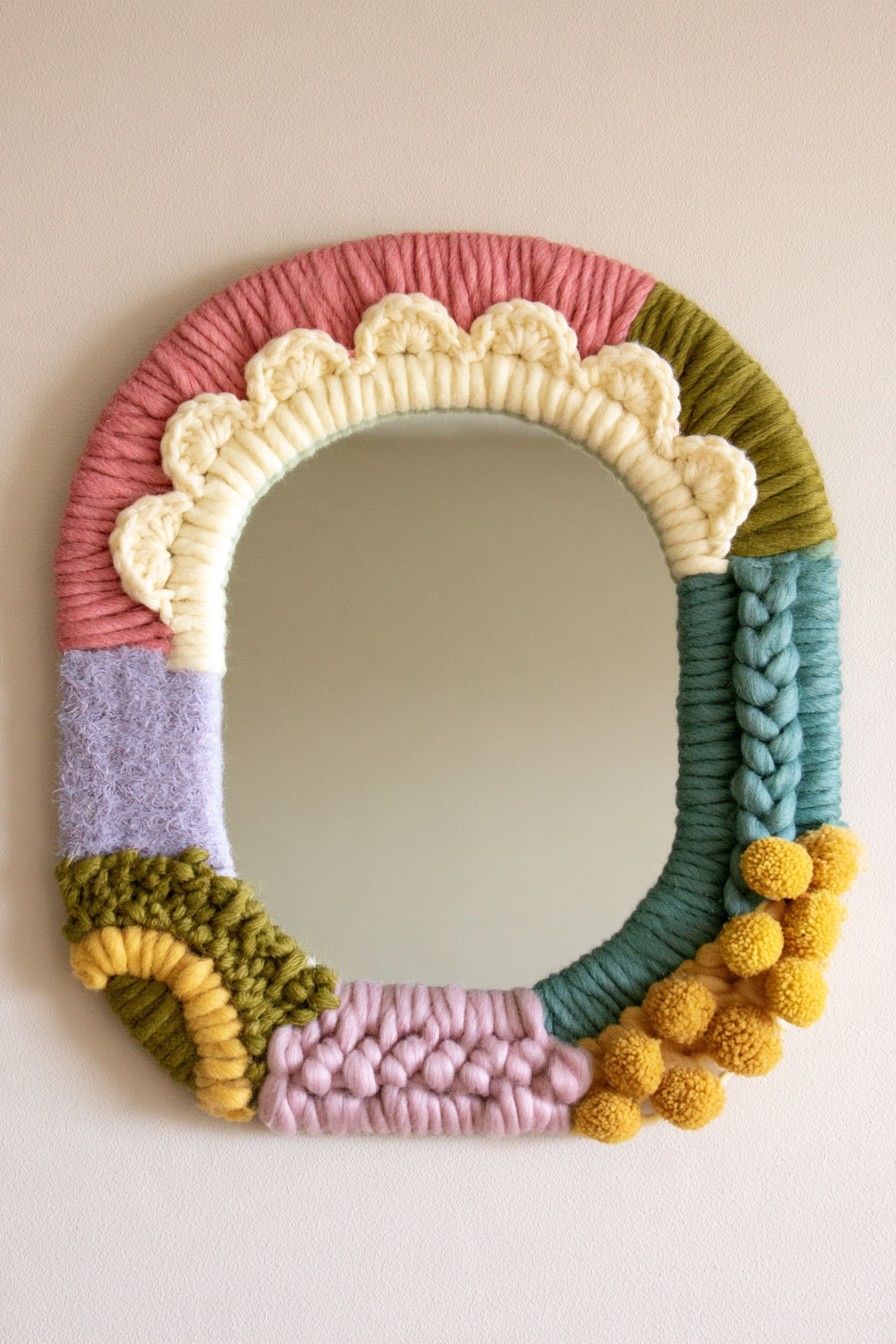
Broad color blocks surround a round mirror, interrupted by cream scallops, braids, and small textured spheres. The pale inner border separates the reflective surface from the stronger outer textures. Dividing the frame into distinct zones lets several yarn techniques coexist without looking like an undifferentiated border.
Fit the decoration to the existing frame, leaving the glass and its cleaning access clear. A removable textile band can close on the back if the mirror’s construction and hanging arrangement allow access. Keep its attachment separate from the mirror’s wall support, which must carry the full object. Choose compact accents that stay within the frame outline so loose fibers cannot drift across the glass or catch while it is being cleaned.
4. Dress Up a Plant Stand with Chunky Crochet Covers
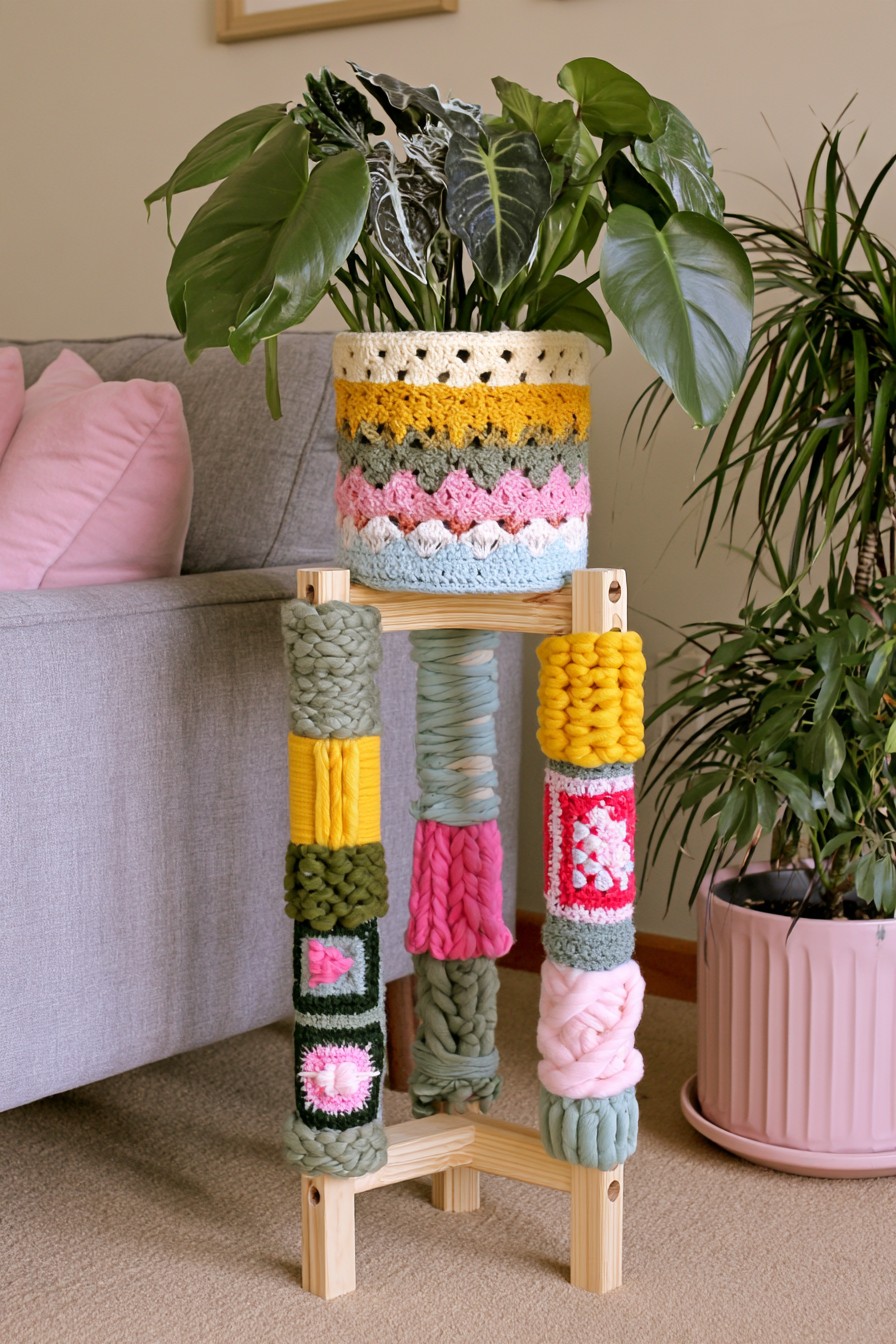
Thick sleeves decorate a small plant stand’s uprights, and a patterned outer cover repeats the colors around the pot. Exposed wooden edges keep the support shape visible. The plants supply their own organic texture, so the strong yarn bands work as accents rather than needing a fully covered stand.
Use separate sleeves that can open away from the watering area. The pot decoration should surround an appropriate container without obstructing drainage or resting in collected water. Remove it for watering if splashes would reach the textile, then replace it only when the pot’s outside is dry. Measure around the actual pot taper, and keep stand joints accessible. Yarn on a support is decoration, not a means of strengthening it.
5. Turn a Coat Rack into a Sculptural Yarn Accent
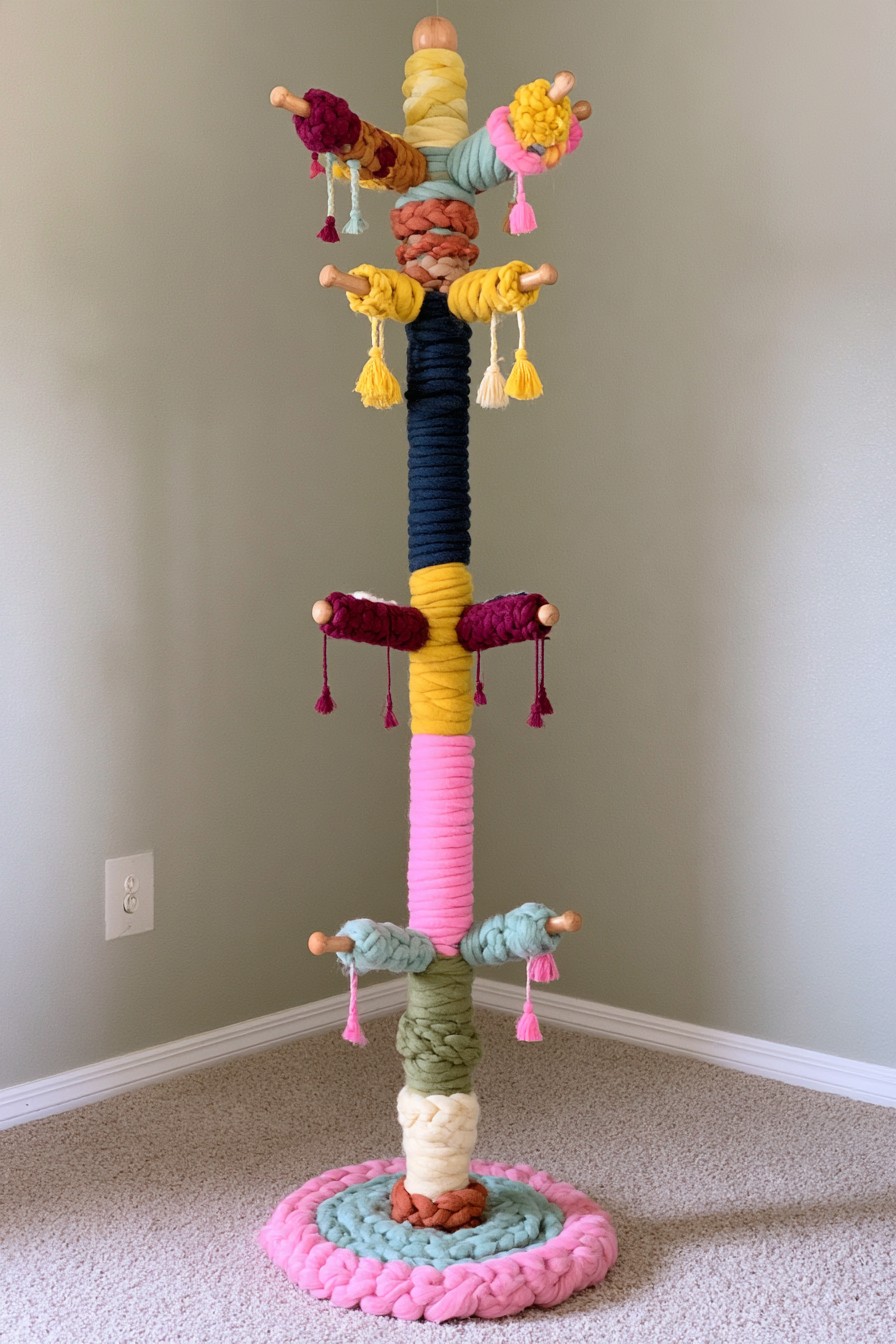
A tall coat rack becomes a vertical textile composition through wrapped bands, padded looking motifs, braids, and tassels. Different colors repeat along the post instead of clustering at one height. The circular decorated base visually completes the piece.
If coats and bags will still be hung here, keep the peg ends usable and move raised flowers away from their contact areas. Prepare short opening bands for the post so individual sections can be cleaned. Keep the base trim close to the rack instead of allowing it to spread across the floor. Test with the items you normally hang; a decorative flourish that catches sleeves or reduces reliable hook space belongs elsewhere on the post.
6. Refresh a Side Table with Wrapped Yarn Details
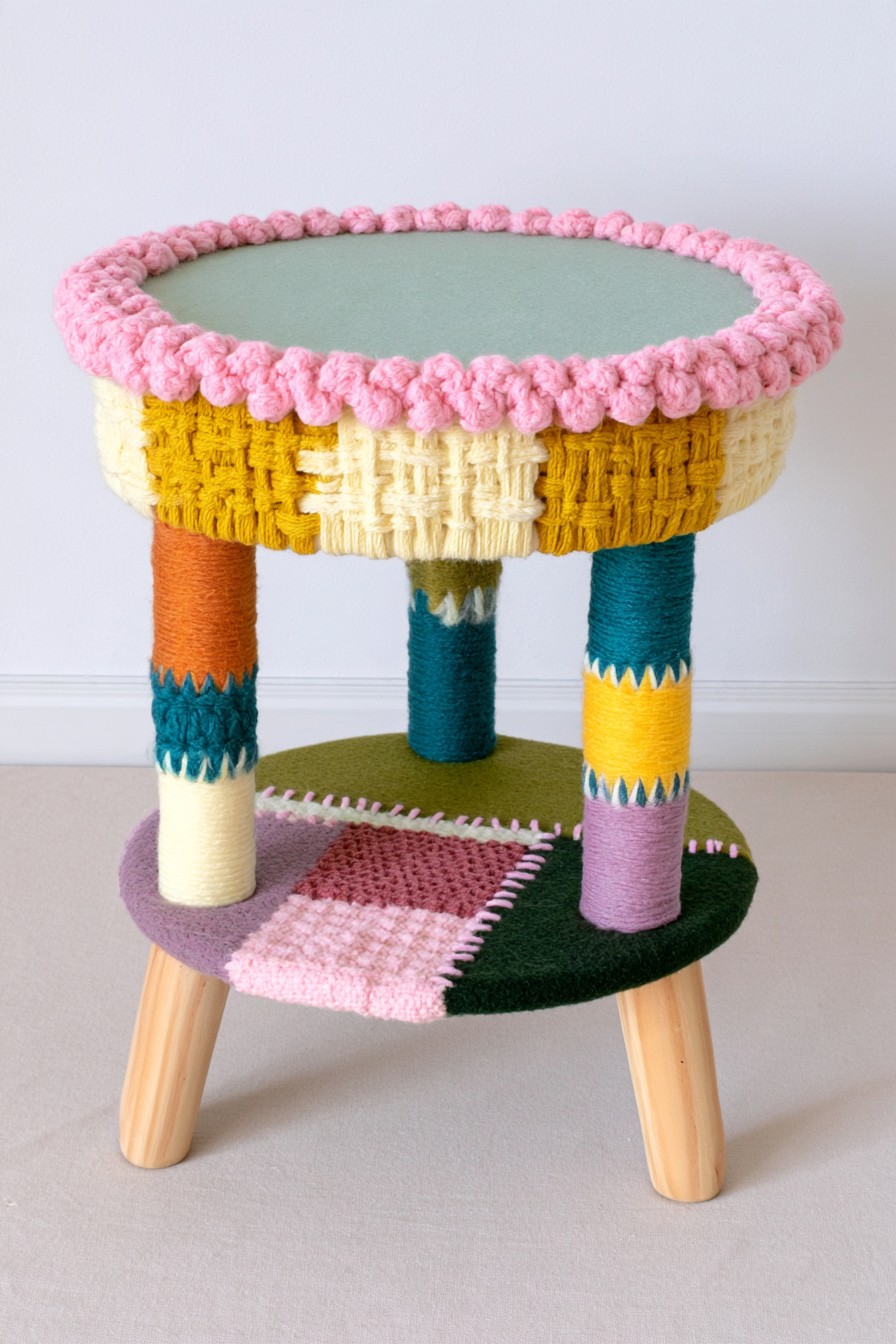
A side table retains a clear top while crochet edging surrounds its perimeter and yarn bands decorate the supports. A patchwork section occupies the lower shelf. This balances a working surface with a more detailed textile area underneath.
Measure the edge panel separately from each leg cover, placing closures below the rim where they remain reachable. Keep knots and loose fibers away from the tabletop so a drink or book rests on the original surface. The lower panel can lie on a removable backing if that helps it stay in position, but check that it does not obstruct shelf access. Keep yarn clear of feet and floor contact points where dragging would wear it quickly.
7. Create a Textured Yarn Feature Above the Bed
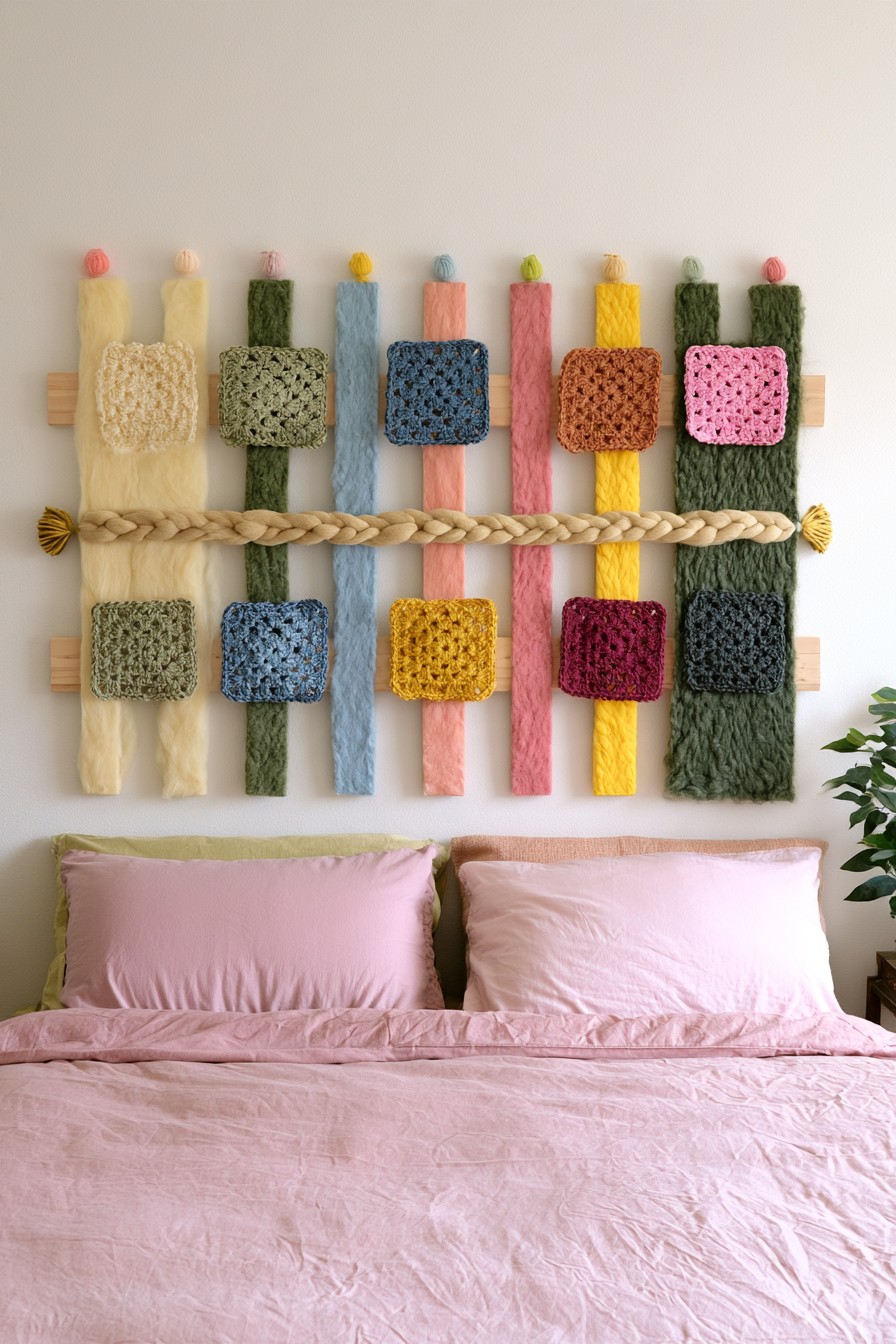
Vertical fiber strips and colored motifs are arranged with horizontal wooden pieces above the bed. A thick braid runs across the middle, connecting the smaller panels. The wood contributes structure and weight, so this is not simply a lightweight soft hanging.
Plan mounting for the combined wood and textile assembly, using hardware appropriate to its total weight and the wall. Attach individual fiber panels so one can be removed without releasing the supporting framework. A smaller version can use fewer short panels at an accessible wall position.
8. Use Crochet Baskets for Colorful Storage
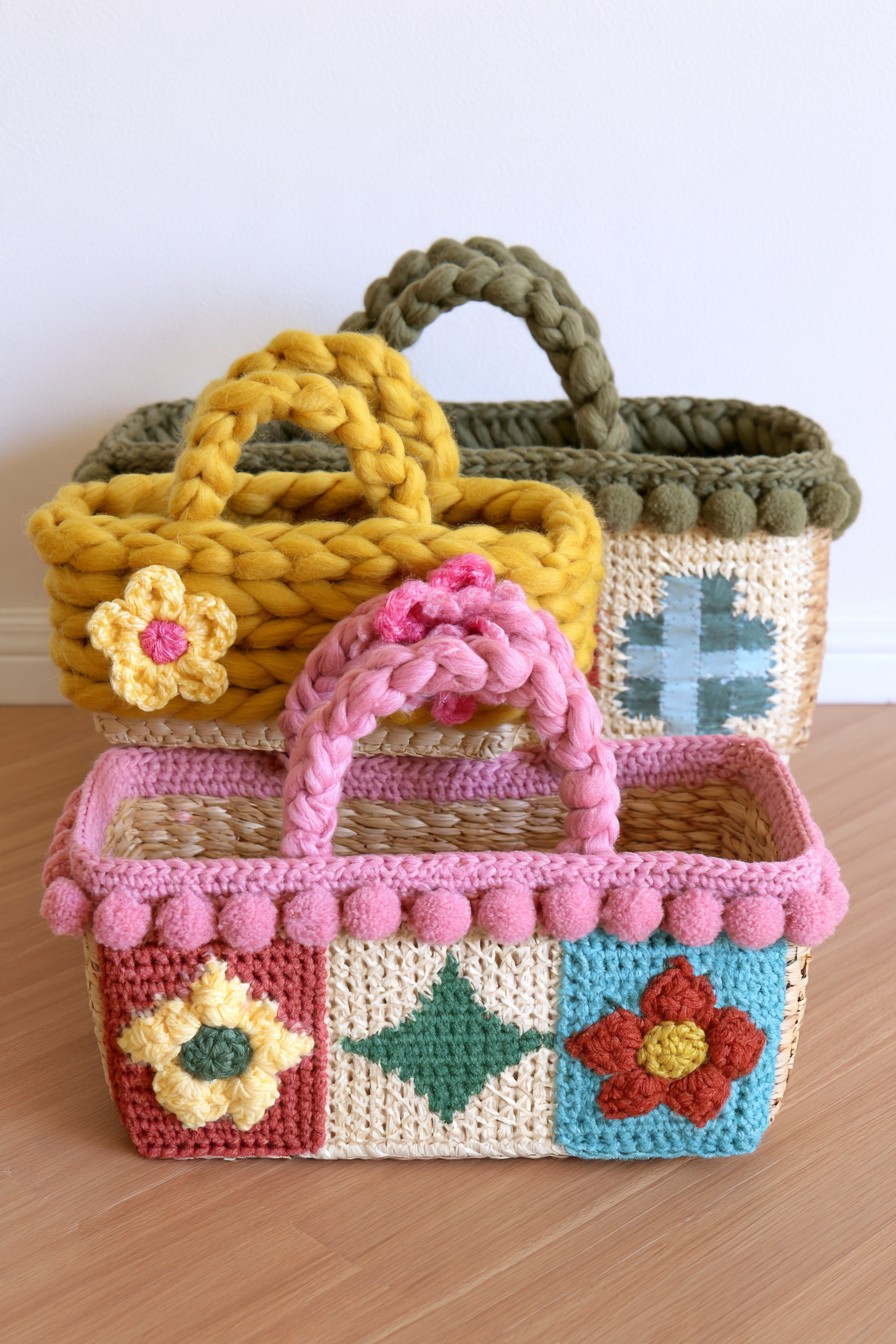
The baskets have substantial yarn bodies, thick handles, floral motifs, and patterned sides. Their crochet texture is the main feature. A separate wicker basket beneath the textile is not visible, so the design should not be described as a confirmed cover over an existing woven container.
You can either make a complete crochet basket using a suitable pattern or add a removable accent to a basket you already own. The first needs a base, side structure, and handles appropriate to its contents; the second relies on the original basket. Keep decorative ties clear of grip areas. Use the photographed appearance as a color and motif reference, then test shape and handling with lightweight intended contents before treating the piece as a carrying basket.
9. Transform a Decorative Ladder with Mixed Yarn Techniques
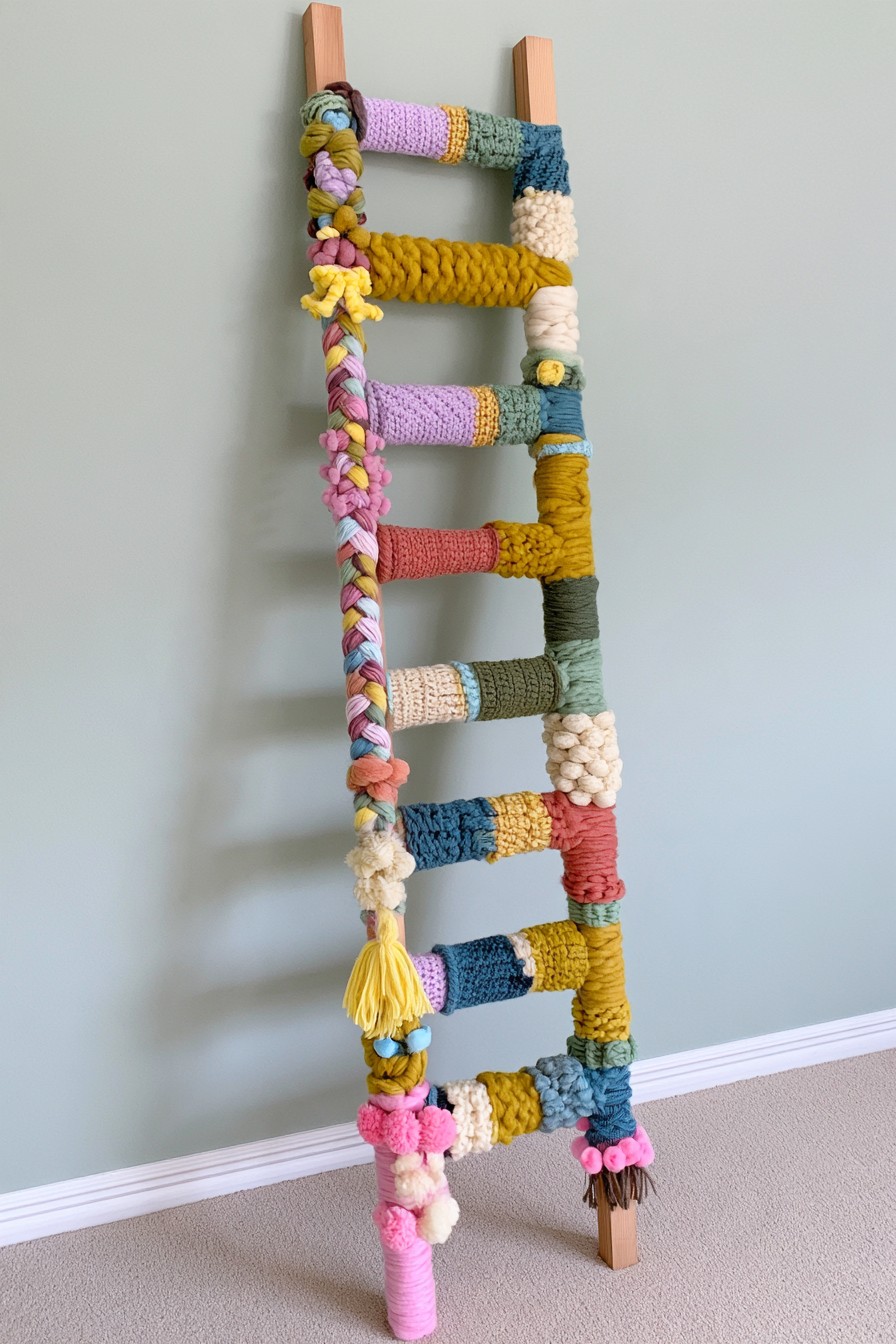
Different yarn treatments mark the rungs and sides of a wooden decorative ladder. Smooth wrapping, chunky bands, and braided lengths give each section a distinct texture, with wood still visible between them. The repeated frame creates order despite the variety.
Use a display ladder, not climbing equipment. Prepare short panels for individual rungs and close them underneath or behind, keeping the upper surface convenient for a lightweight blanket. Limit hanging strands where they could catch the fabric when it is lifted. The ladder still needs a stable position and an appropriate means of securing it for its intended use. Yarn should leave enough of the frame exposed to check its condition rather than conceal splits or loose connections.
10. Build a Floral Crochet Bench Arrangement
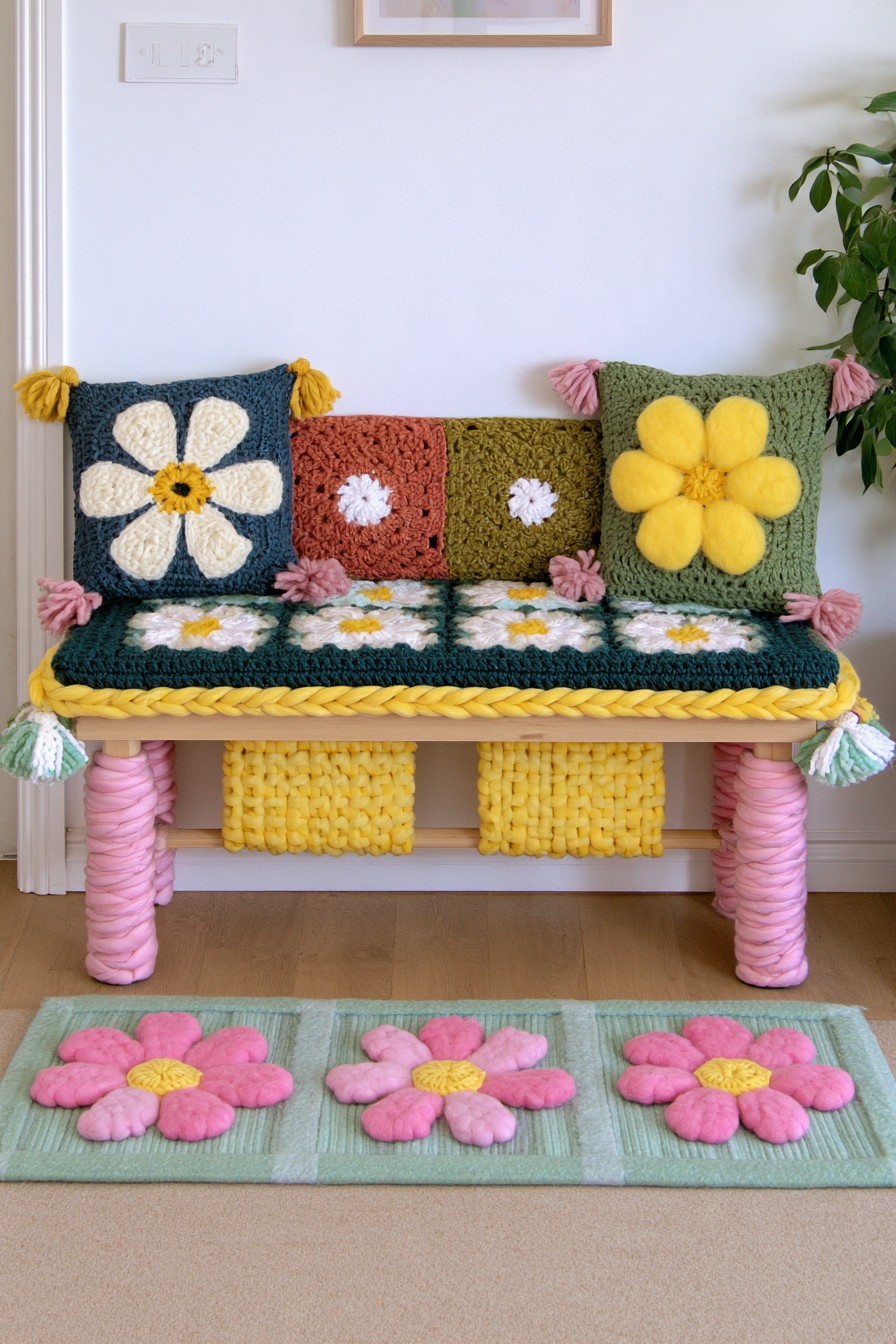
Floral square cushions and a matching seat panel create a coordinated bench, with colored legs and small corner tassels extending the pattern. Large raised flowers appear on cushions, while the long seat gives the arrangement a clear horizontal base.
Keep the sitting surface flatter than the display cushions and secure a removable seat panel beneath the bench. If a flower cushion is uncomfortable against the back, move it to the side during use. The motif palette can connect to other green crochet decor ideas without implying that those designs provide this bench’s stitch pattern. Test the cover against normal sitting and cleaning needs before adding wrapped frame details.
11. Add a Patchwork Yarn Pouf for Layered Texture
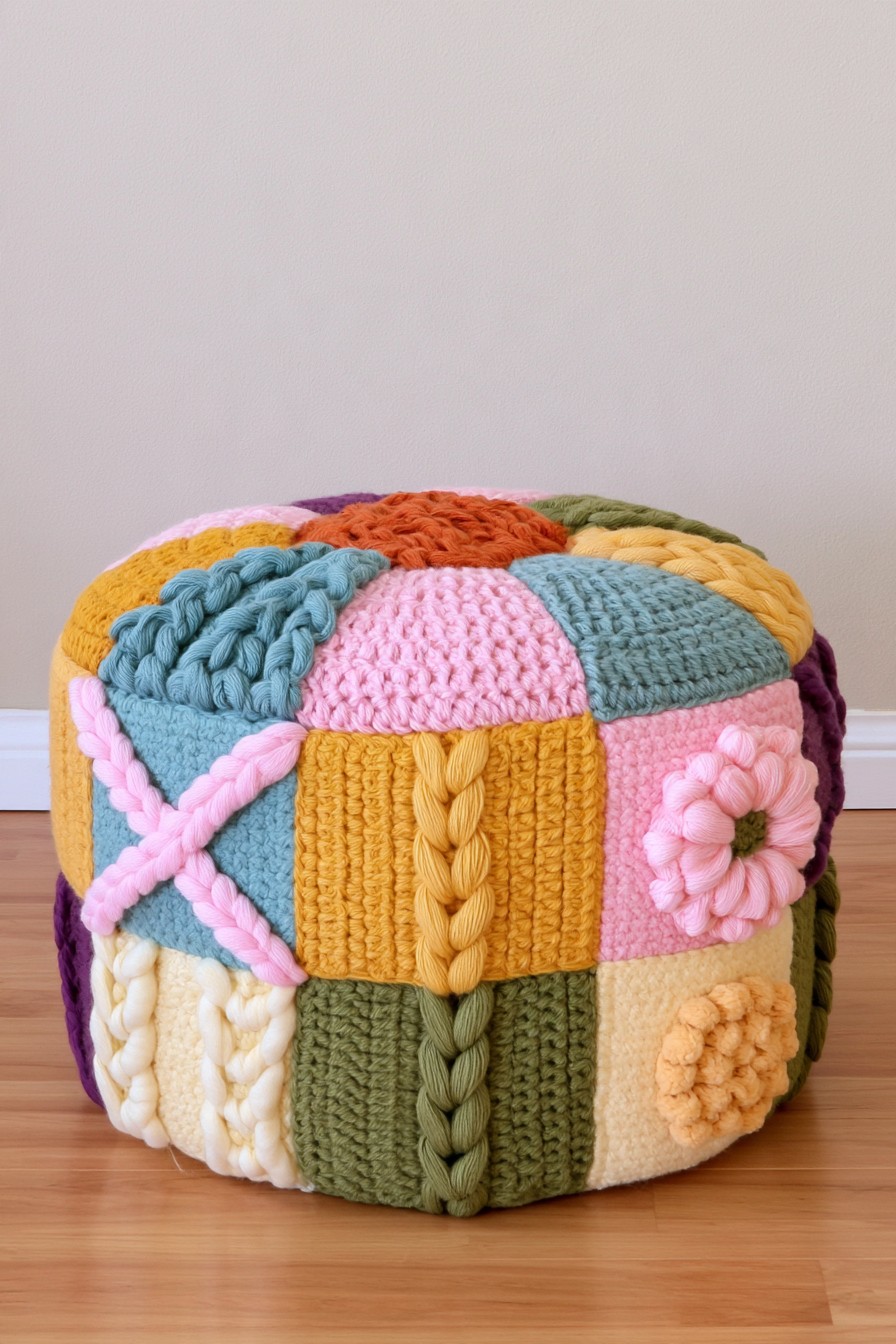
A rounded pouf combines ribbing, braids, smooth stitch areas, and raised flowers in patchwork sections. Repeated mustard, pink, green, blue, and cream connect the different textures. The compact shape makes it a focal accent without requiring changes to surrounding furniture.
Choose a cover pattern suited to the pouf’s actual form and measure a sample before assembling the panels. Place flatter sections where feet or seating will press, with dimensional flowers around the sides. Plan an opening that lets the cover come off without pulling hard against the filling. Follow the underlying pouf's intended use and carrying limits when deciding whether it will serve as a seat or a footrest. Check the closing point for rubbing before placing it in daily use.
12. Make Open Shelves Part of the Yarn Display
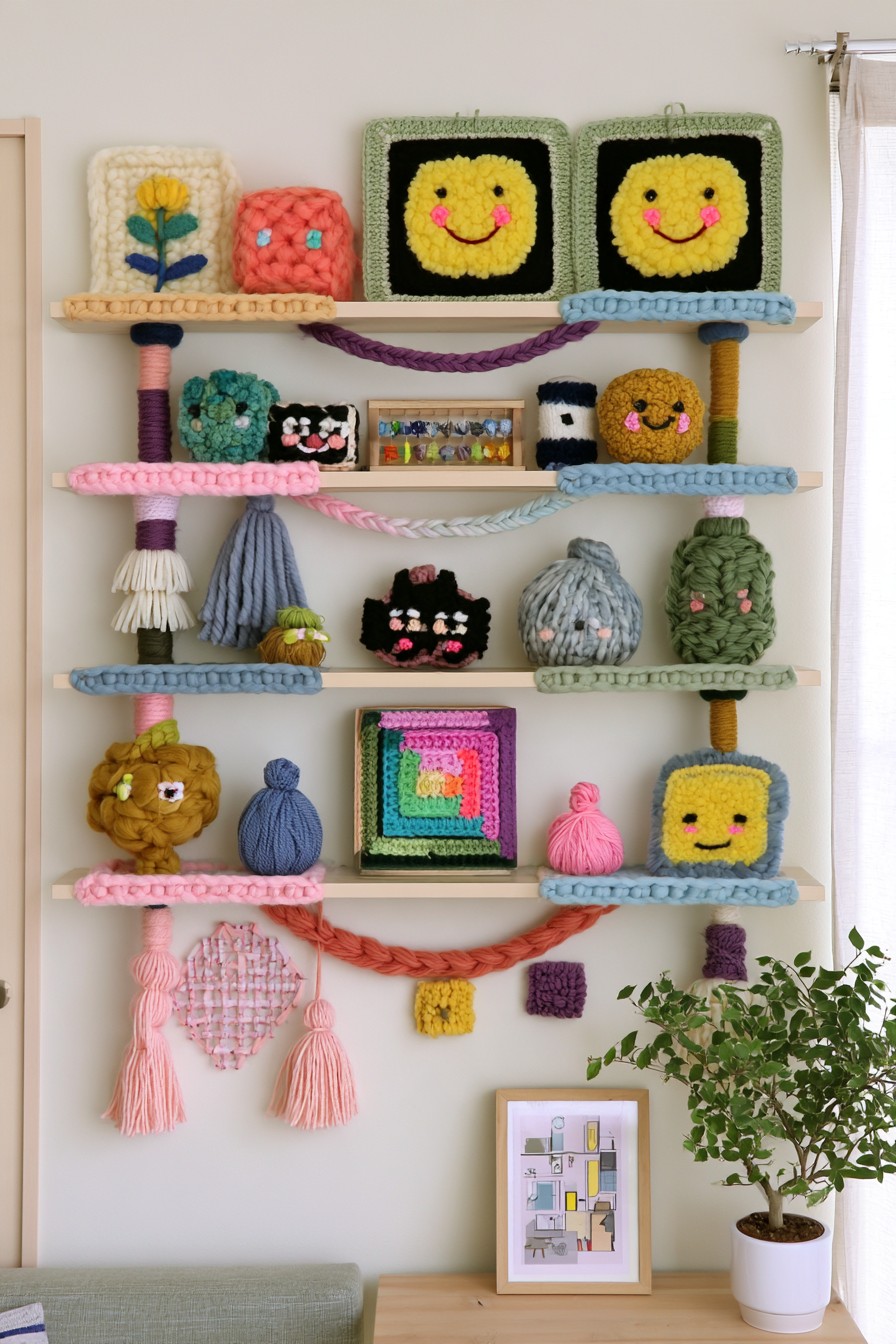
Wrapped shelf supports and colorful edging connect the shelving to a collection of small yarn objects. Some open shelf space remains visible between the accessories. The repeated colors make the furniture part of the display without requiring textile across every horizontal surface.
Decorate selected front edges with short panels, closing them beneath or behind where you can reach the attachment. Keep shelving brackets, fasteners, and working surfaces available for inspection and normal storage. Shorten dangling strands near books or containers that will be removed often. Choose one shelf as the main motif display and leave another quieter if objects begin to merge visually. The textile accents should not obscure the original support arrangement or reduce access to frequently used items.
13. Bring Color to a Porch Railing with Yarn Wraps
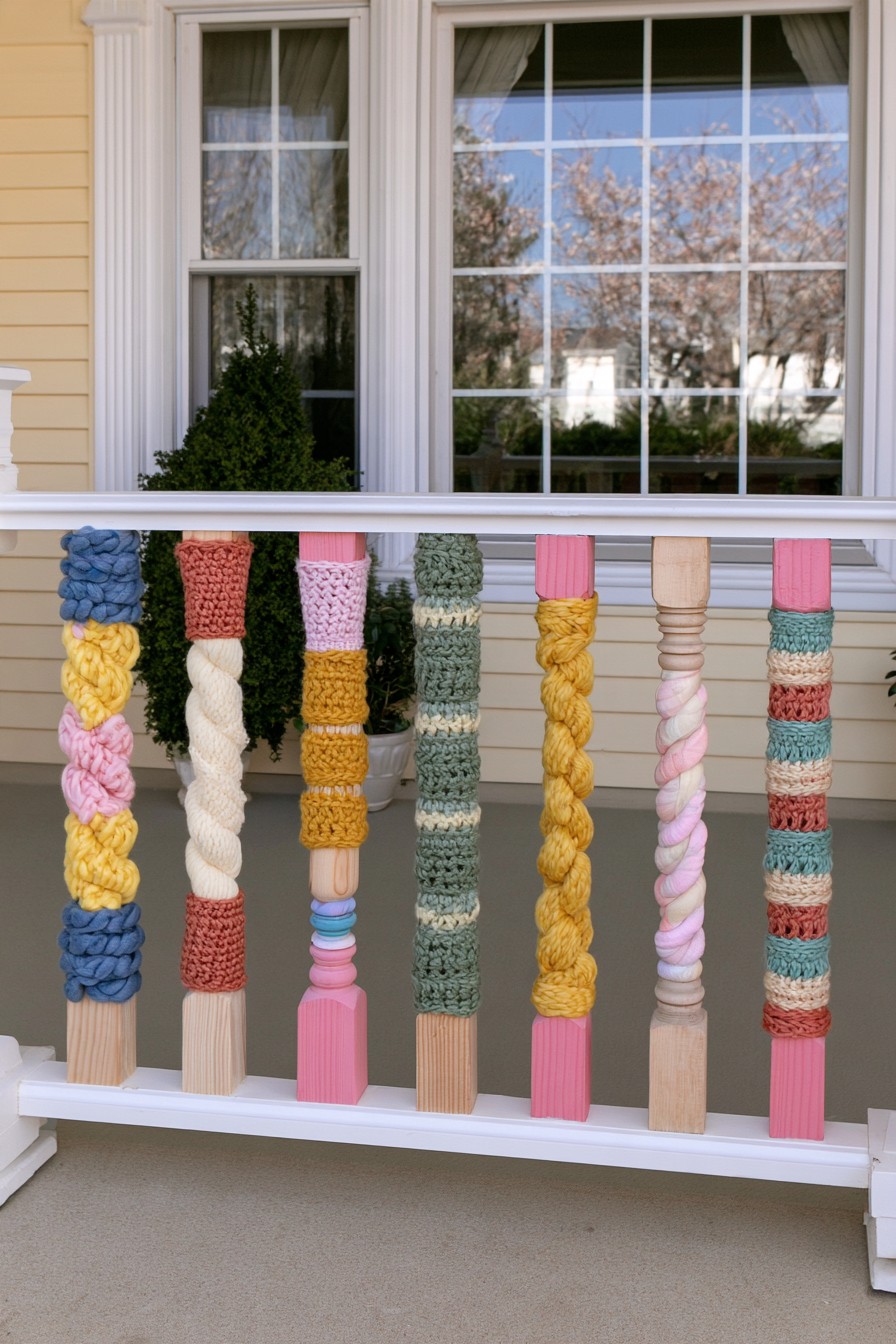
Patterned bands decorate porch balusters while the upper white rail remains exposed. Alternating thick and narrow sections create a repeated color rhythm, with some original timber visible between them. This is a more selective treatment than the fully wrapped staircase rail in idea 1.
Measure each covered section’s circumference and height, then place an opening sleeve’s closure on the less visible side. Lace through corresponding edge stitches so it can be undone for cleaning. Direct wrapping is another option, but cleaning may require unwinding the turns; it is not equally convenient. Keep rail joints and the hand contact surface uncovered. Begin with one fitted section and observe slipping or moisture before preparing the remaining decorative bands.
14. Make a Decorative Birdhouse Display with Yarn
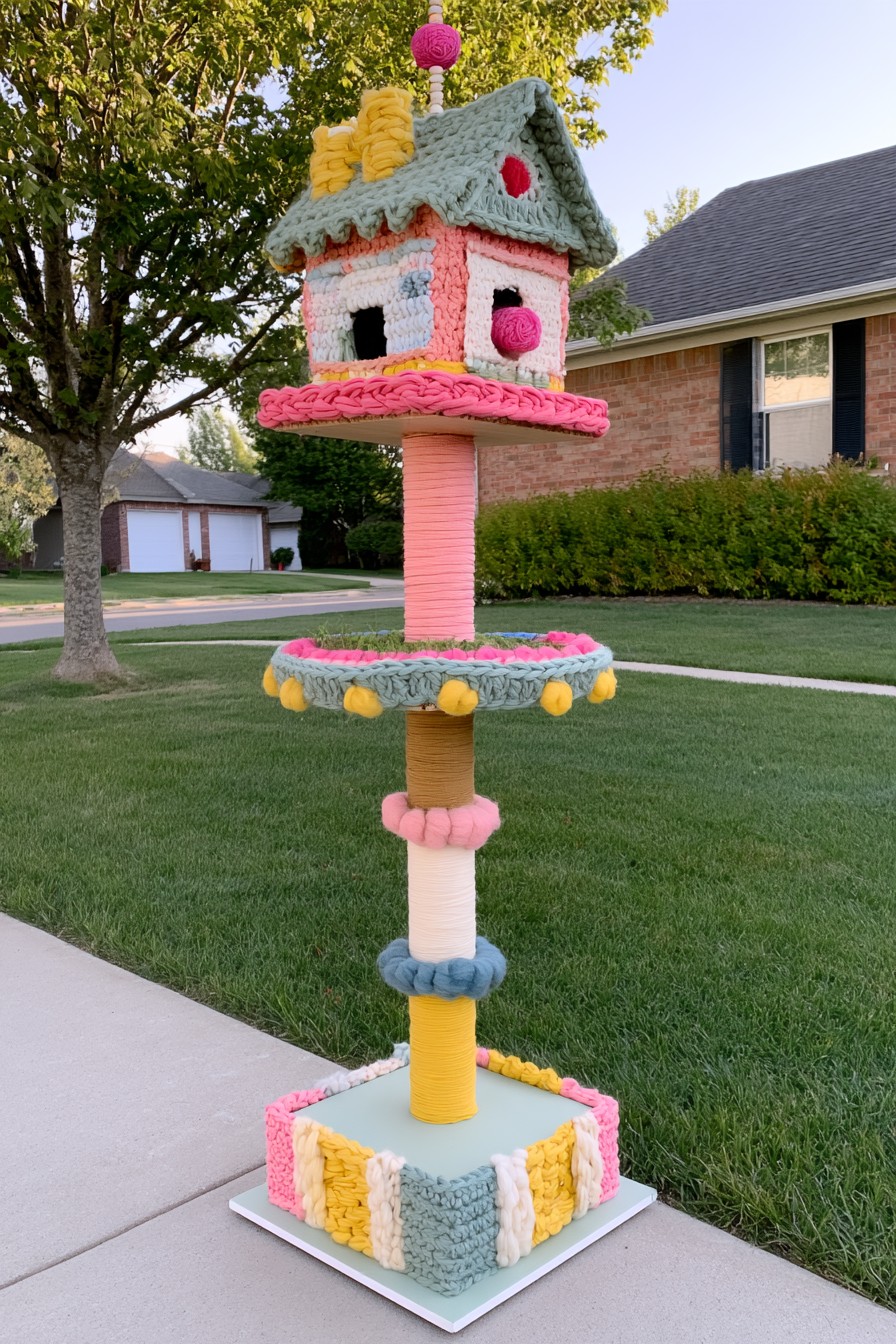
The birdhouse’s roof and body are covered in yarn, with additional bands and motifs on its tall support. The whole structure reads as a decorative garden object rather than just an accented stand. Strong color makes the small house visible against the planting and lawn.
Keep this version ornamental. For a working nest box, preserve its entrance, ventilation, drainage, roof access, and interior, and place textile decoration separately from the box. Yarn and string should not be offered as nesting material. Finish ends securely and remove fraying or detached pieces promptly, especially where birds can reach them. A decorative post away from active nesting offers a clearer way to borrow the palette without treating the covered house as wildlife housing.
15. Give a Mailbox a Playful Crochet Accent
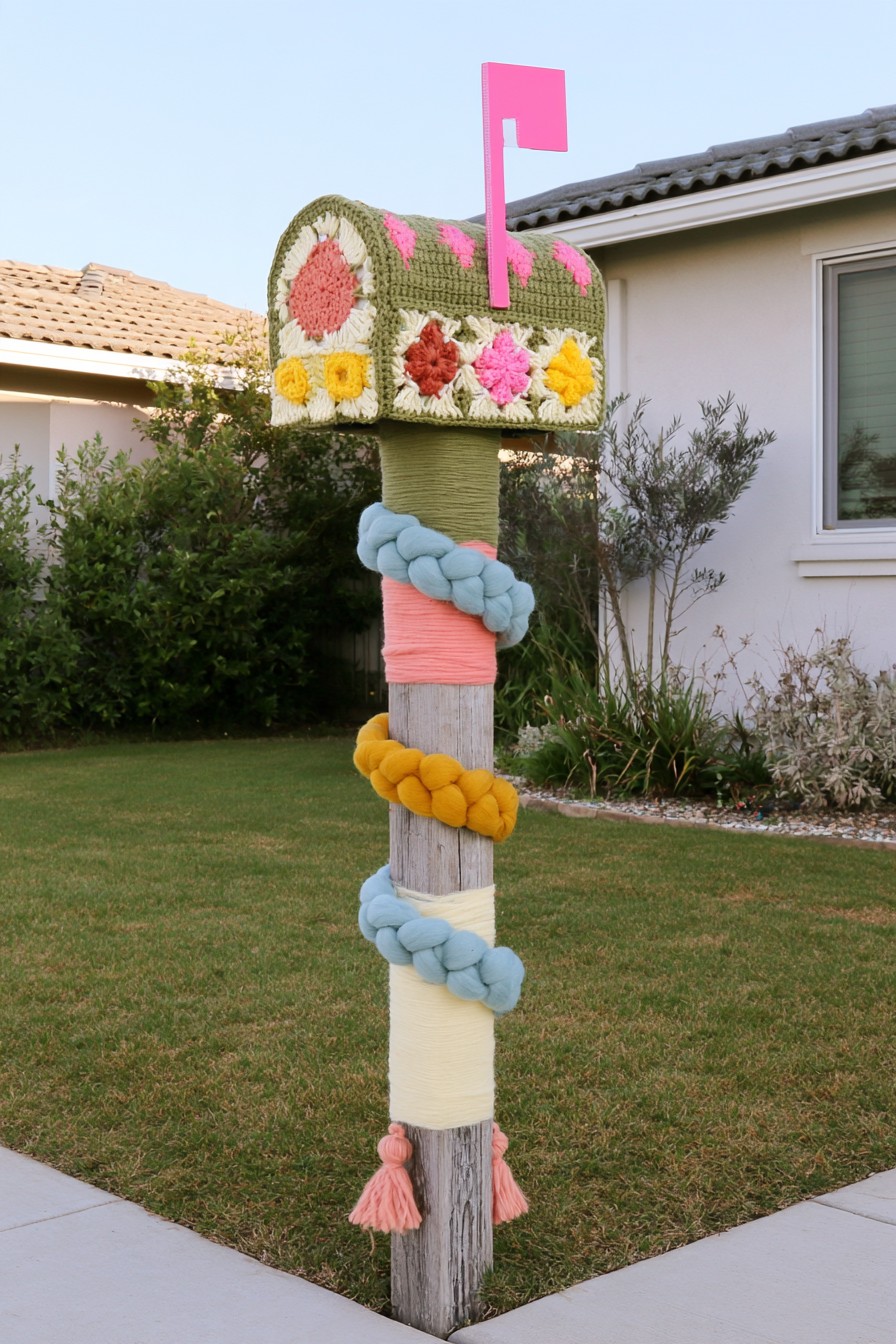
A patterned crochet cover surrounds the mailbox body, while wrapped bands and a thick braid continue down the post. Floral motifs soften the curved outline and connect the display to nearby planting. The amount of decoration makes this a strong garden accent.
For a working mailbox, adapt the cover around its actual opening, handle, hinges, flag, and address information. Position an accessible closure away from those moving parts. Keep seams from trapping water along the door or hiding damage on the post. A simple side panel can preserve the floral theme with less coverage. Remove wet decoration and allow both textile and surface to dry before refitting; repeated wrapping may take longer to remove than an opening cover.
16. Hang Crochet Flowers from a Garden Pergola
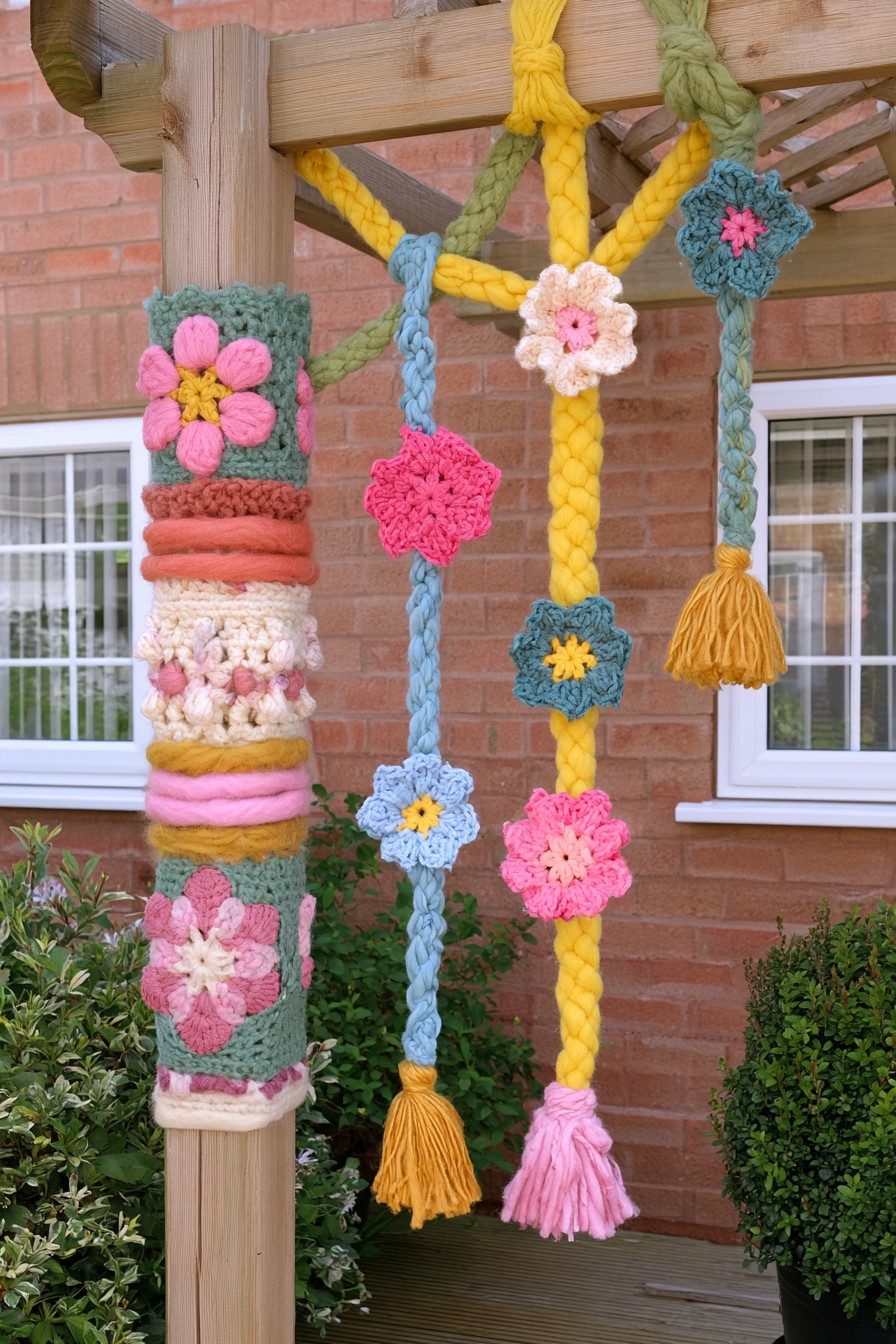
Braided lengths, flowers, and tassels hang below a pergola, with several bands on the nearby post. Different lengths give the display movement and connect the overhead structure to the vertical support. The open spacing lets the timber remain a visible part of the scene.
Attach each decorative strand separately to an appropriate point, keeping the fastening accessible for removal. Assess the existing structure and the added decoration instead of assuming every beam can accept another attachment. Keep the hanging ends clear of heads and everyday movement, including their range in wind. Use fewer pieces for a small seating area. Before prolonged wet weather, take the textile lengths down as individual components so they can dry without dismantling the whole color arrangement.
17. Combine a Tiered Plant Stand with Yarn Decor
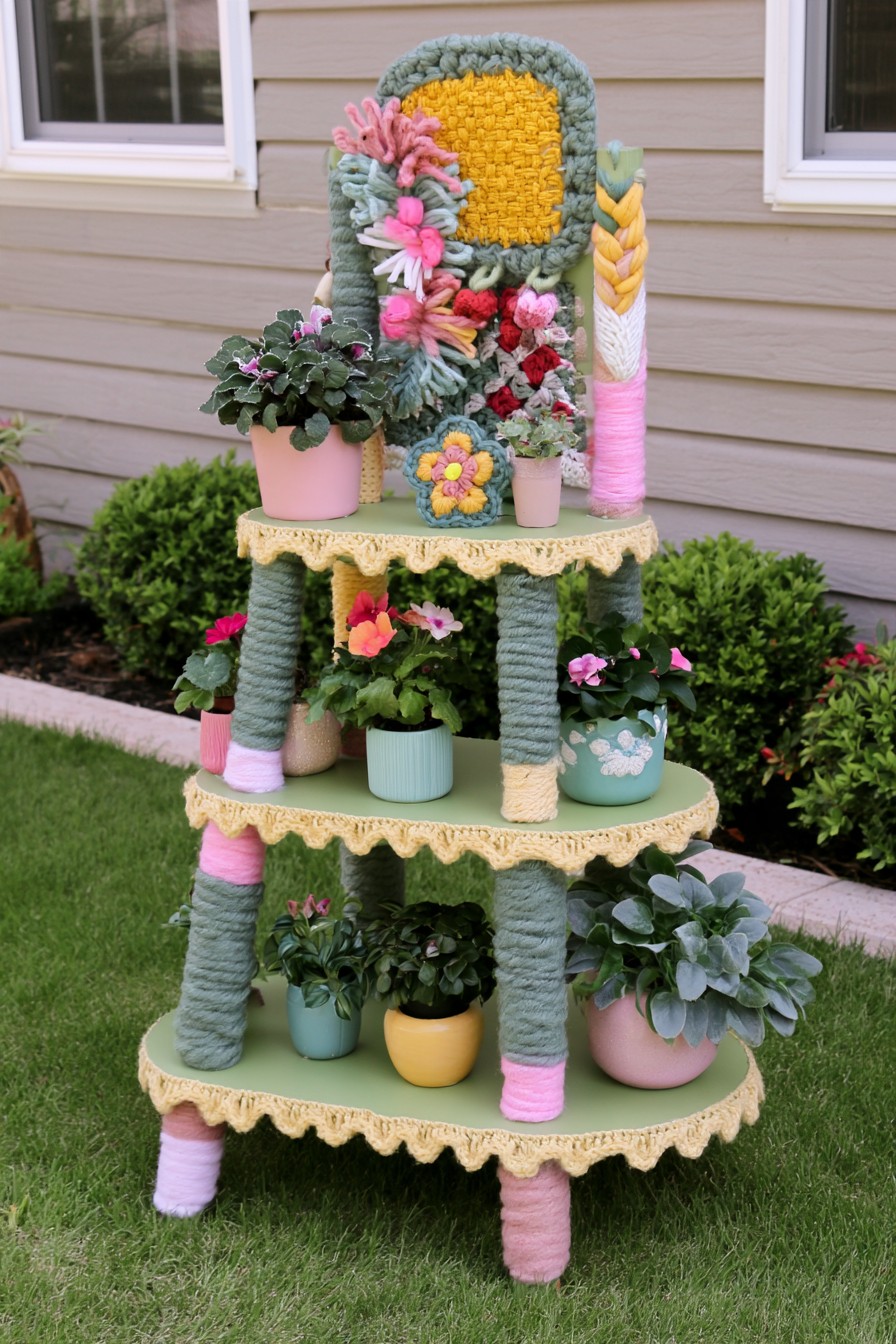
A tiered plant stand combines decorated uprights, scalloped shelf edges, potted plants, and a small upper textile panel. The stepped arrangement guides the eye upward, while repeated pink, green, and yellow link the pots to the yarn. Some of the stand’s original surfaces remain visible.
Tie the edge panels beneath each shelf where they can be removed independently. Keep them clear of saucers and water outlets, and make sure the attachment does not tip or shift a pot. Arrange plants for access and the stand’s supported capacity, not just to expose the trim. Remove textile where watering regularly wets it. The upper decorative panel can be simplified or omitted if it makes reaching a plant awkward.
18. Style a Decorative Bicycle with Floral Yarn Details
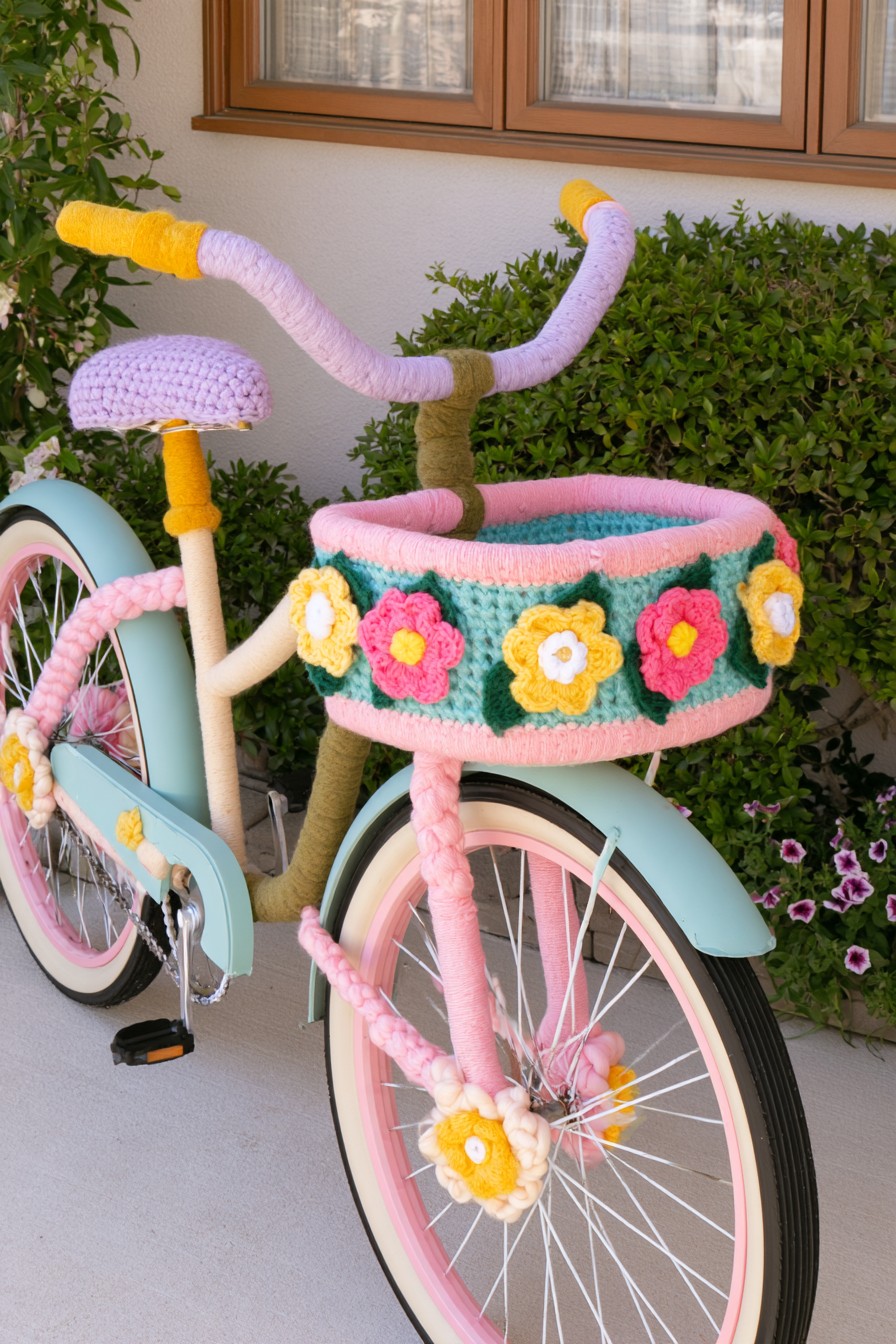
A bicycle’s basket, frame sections, handlebar, and seat carry pastel yarn, with flower motifs near the wheel and basket. The original silhouette makes the display recognizable immediately. The flowers connect it to a planted garden setting rather than a conventional bicycle storage area.
Treat the extensive version as a stationary decorative bicycle, secured against tipping. A rideable bicycle requires its brakes, wheels, steering, drivetrain, cables, pedals, and other operating areas to remain unobstructed. Remove display decoration before any return to riding and have the bicycle’s condition checked as appropriate. For a simpler garden version, concentrate on a removable basket accent, keeping loose fibers clear of the wheels even while it is parked.
19. Soften a Garden Swing with Crochet Panels
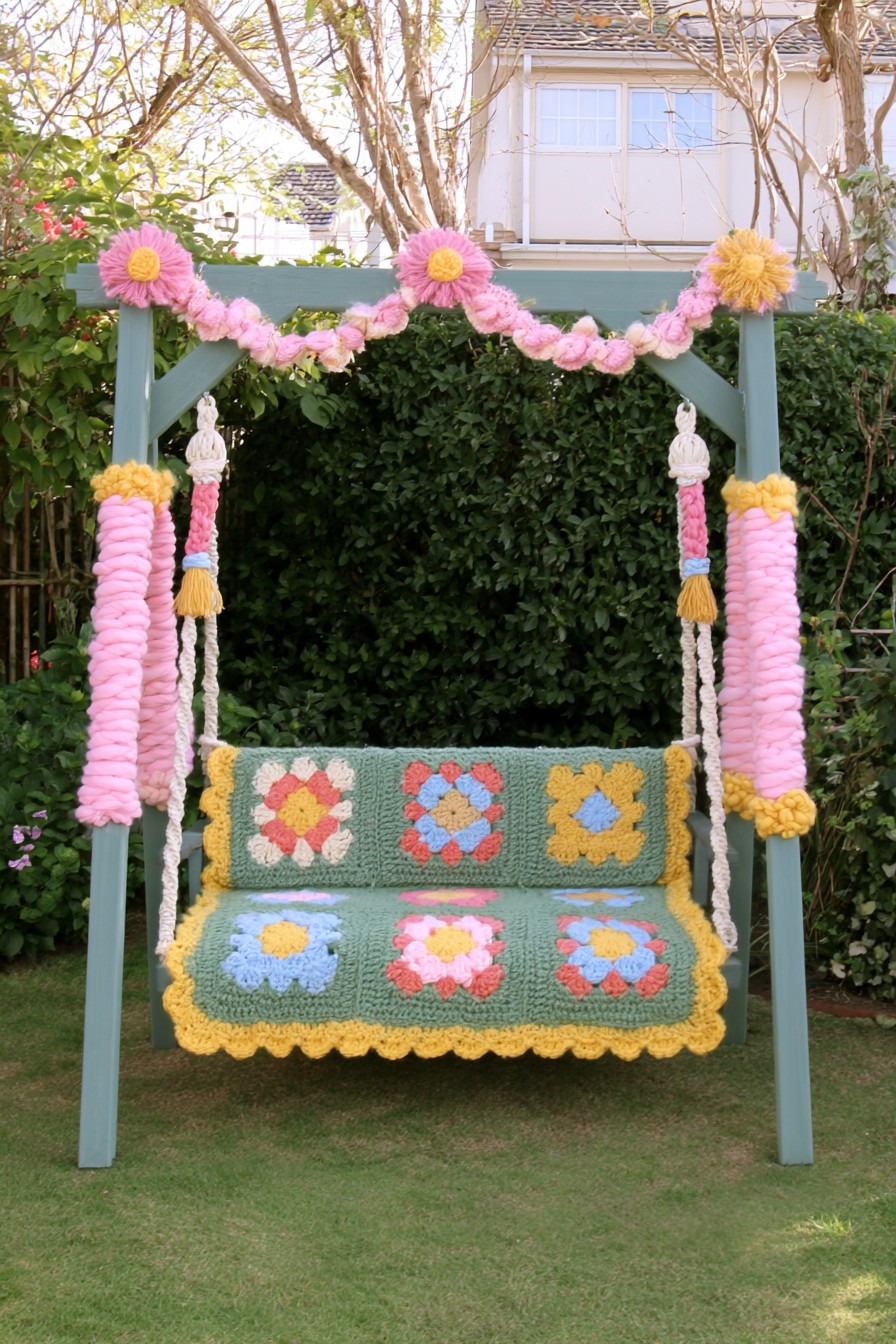
Floral crochet panels cover the swing’s back and seat, while wrapped suspension areas and an upper garland extend the garden color story. The rectangular panel shapes work like soft furnishings against the straight frame. A repeated flower motif connects the sitting area to the top decoration.
For a swing that will be used, keep suspension and load bearing connections exposed for inspection and follow the swing’s own instructions. Tie a flat seat panel underneath and close the back panel behind, keeping knots out of contact areas. Coordinate the removable textiles with these bohemian garden seating ideas, then store them indoors during prolonged rain. The decorative garland should stay clear of the swing’s movement.
20. Style a Decorative Garden Lantern Post
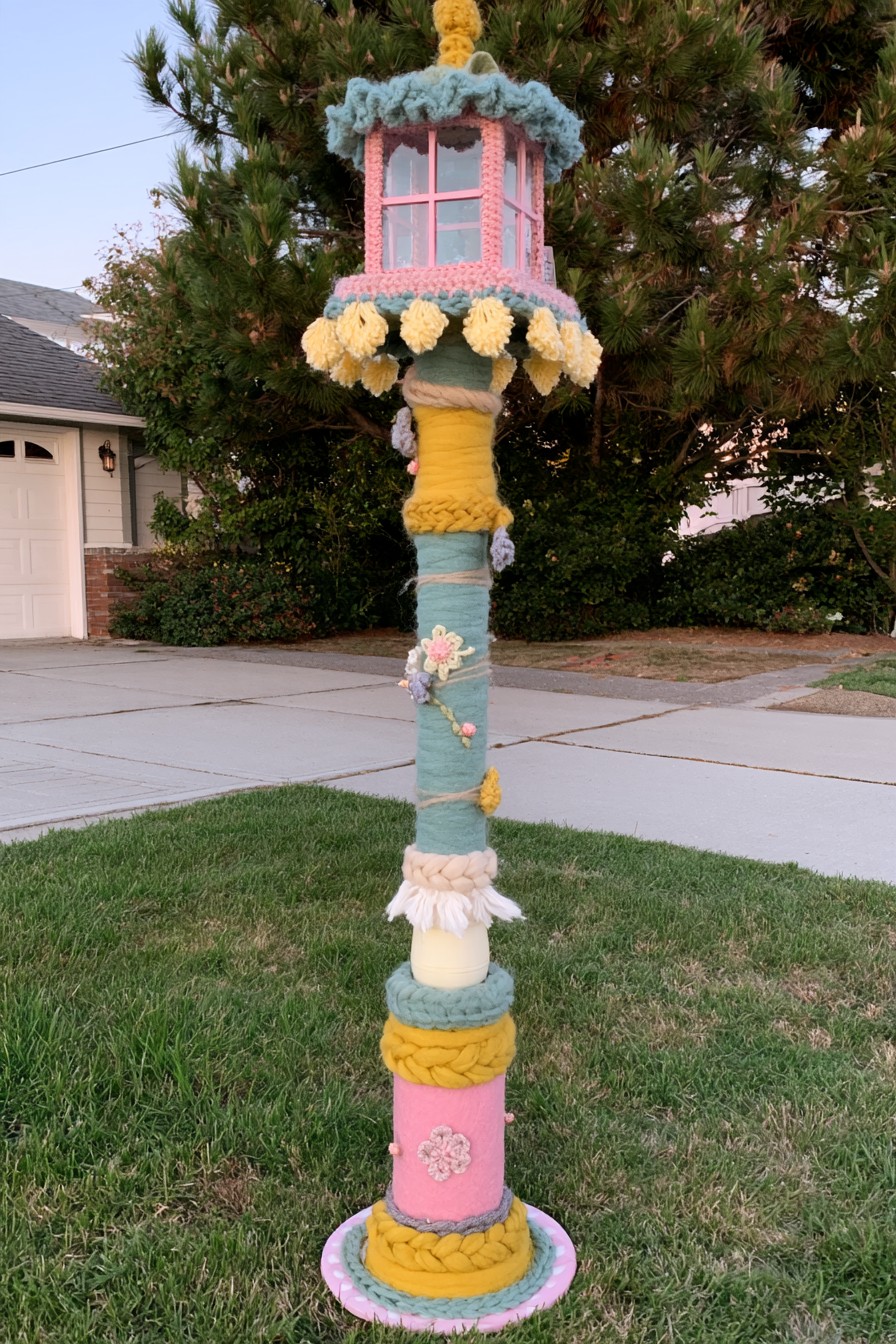
The yarn covered post supports a pink lantern shaped top with a textured green roof and tassel trim. Several wrapped bands and floral motifs mark the column below. Make an unpowered ornamental lantern post for this version; for working light, choose a complete suitable fitting and plan it separately from the textile decoration.
Use an unpowered ornamental version to recreate the complete appearance. For an actual light fitting, assess any proposed lower cover against the product’s instructions and operating conditions as well as the lamp housing. Keep yarn away from heat producing parts and follow the fitting's clearances and ventilation requirements at every height. Preserve electrical access, ventilation, wiring, and inspection areas. Separate nearby textile decoration is an option when the fitting itself cannot accept a cover.
21. Decorate a Garden Fence with Crochet Flowers
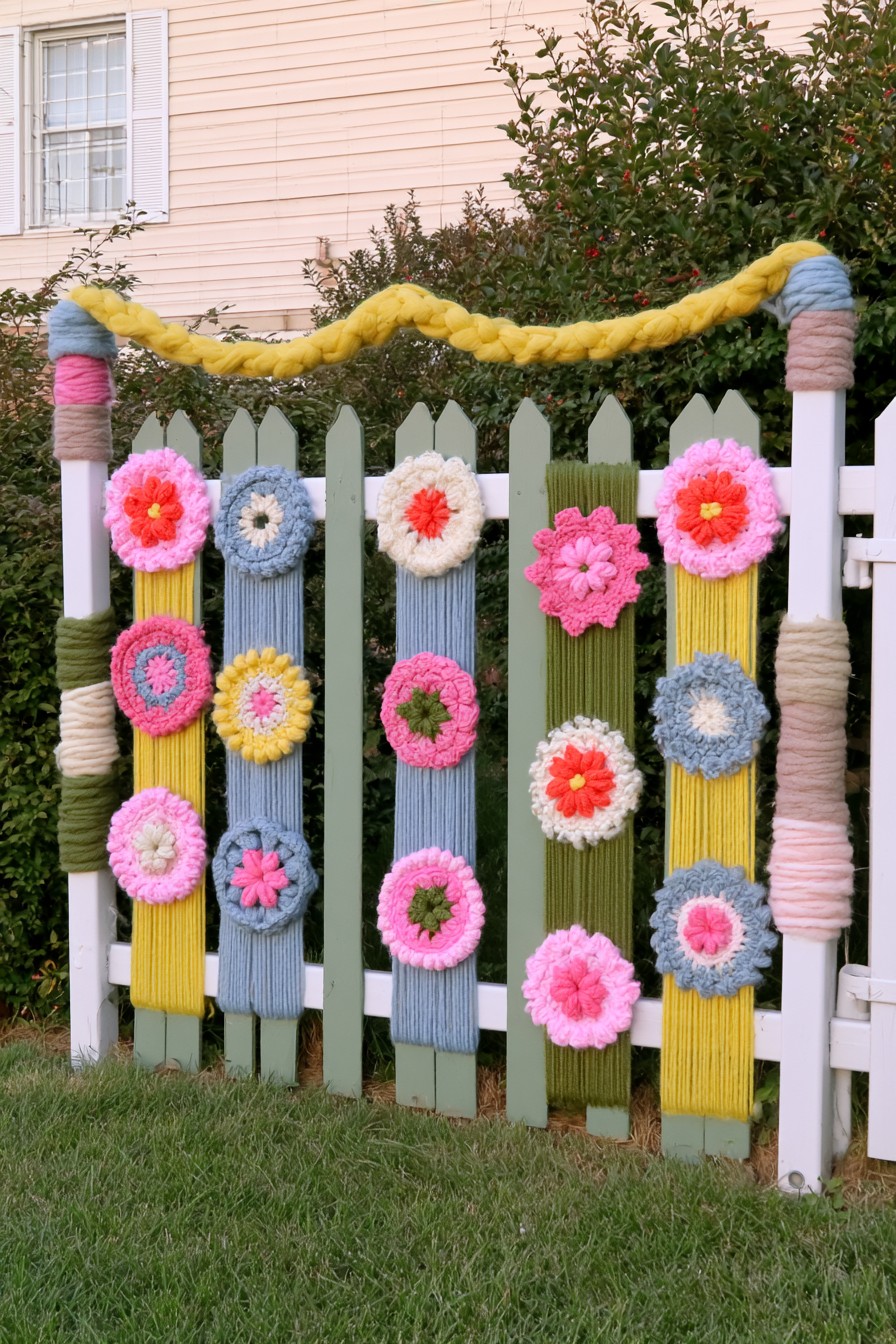
Crochet flowers appear at different heights on a pale picket fence, with selected vertical yarn panels and a thick braid spanning the top. The uneven flower placement echoes a border planting. Most of the fence remains visible, keeping the installation from becoming a continuous fabric wall.
Give each flower its own attachment through stitches on the back, tied around an appropriate picket section with the closure behind. That lets you remove one damaged motif without releasing its neighbors. Use separate sleeve sections for the longer vertical accents if regular removal matters. Keep gates, latches, joints, and damaged timber accessible. Take down any sagging braid or unraveling strand promptly, and check the fence surface for trapped moisture when textile pieces are removed.
Care for the Yarn and the Surface Beneath It
Keep the yarn labels and follow their washing and drying instructions. A removable panel is not automatically machine washable. Where several yarns, trims, or motifs meet, consider whether their care requirements are compatible before assembling them. Inspect seams and closures after cleaning, and reshape pieces according to the yarn and pattern guidance.
Outdoors, check after rain and before reusing the installation. Remove sections that sag, fray, or develop loose closures. Let both the textile and the underlying wood or metal dry before refitting. Choose smaller components if taking down a whole cover would discourage regular care. The useful result is a decorative layer you can maintain, not coverage that prevents the original object from being used or inspected.



Leave a Reply