
A mirror can become the window of a diving helmet. A shelf can carry books across a painted suspension bridge. Even a hand towel can turn into a waterfall when a few carefully placed lines give it a different setting. These clever wall art ideas use real household objects as part of the artwork, bringing personality to useful corners without filling them with extra decorations.
The 31 ideas below range from small kitchen utensils to full size laundry appliances. Each one explains how the object completes the drawing, which colors and materials support the effect, and what to consider when adapting it to your home. You can borrow a single character for a narrow wall or use a larger outline to give an everyday storage spot a more intentional place in the room.
Table of Contents
- How to Connect a Real Object with Wall Art
- Choose the Position Before Drawing
- Gather Materials That Suit the Wall
- Give the Object Real Support
- 1. A Wall Clock on a Painted Victorian Bracket
- 2. A Brass Mirror Inside a Vintage Diving Helmet
- 3. A Hand Towel That Becomes Cloth on a Loom
- 4. A Woven Mail Basket Beneath a Hot Air Balloon
- 5. Coat Hooks Growing from a Slender Tree
- 6. A Bookshelf Across a Suspension Bridge
- 7. An Inverted Colander with Jellyfish Tentacles
- 8. A Toilet Roll Emerging from an Instant Camera
- 9. A Column Radiator as Accordion Bellows
- 10. A Round Speaker at the Heart of a Gramophone
- 11. A Balloon Whisk Wearing a Ballerina’s Tutu
- 12. A Hair Dryer Giving a Little Dragon Its Snout
- 13. A Light Switch with a Friendly Robot Body
- 14. A Wall Fan at the Nose of an Airplane
- 15. A Wire File Basket Riding a Cable Line
- 16. A Fedora Balanced on Long Bird Legs
- 17. A Tissue Dispenser with a Whale’s Water Spout
- 18. An Oval Wall Fixture Turned into an Airship
- 19. A Blue Towel Falling Through a Rocky Waterfall
- 20. A Box Grater Standing as a Coastal Lighthouse
- 21. A Spice Rack Carrying the Train’s Cargo
- 22. A Metal Funnel Finishing a Painted Trumpet
- 23. A Ceramic Soap Dish as a Tiny Clawfoot Tub
- 24. A Watering Can with an Elephant’s Raised Trunk
- 25. A Comb Making a Crocodile Grin
- 26. A Wi Fi Router Becoming a Tiny Robot
- 27. A Cello Between Delicate Butterfly Wings
- 28. A Washing Machine in a Polar Bear’s Embrace
- 29. A Longboard Shaped into a Seahorse
- 30. A Tall Refrigerator Imagined as a Submarine
- 31. A Stored Ironing Board with Penguin Flippers
- Start with One Object and Let the Drawing Do Less
How to Connect a Real Object with Wall Art
The most convincing designs give the object one clear role. A funnel becomes a trumpet bell because both share a flared shape. A comb supplies a crocodile’s teeth because its repeated points already suggest them. Start with that relationship, then draw only what is needed to make the new subject recognizable. Avoid outlining an entire second object around the real one.
Choose the Position Before Drawing
Begin with the way you use the item. A towel should be reachable, a mirror should sit at a useful height, and an appliance should retain its required clearances. Make a paper template of the visible outline and sketch the surrounding design at the same scale. Check it from the doorway and from the spot where you normally stand. Because the object projects from the wall, an alignment that works from the front may look different from the side.
Choose a wall color that relates to the material: sage with warm wood, lavender with steel, peach with wicker, or muted blue with white fixtures. Test the combination in your room’s daylight and evening lighting. Keep nearby decoration restrained so the connection between the drawing and the object stays easy to see.
Gather Materials That Suit the Wall
- Planning supplies: Measuring tape, a level, plain paper, a lightly used pencil and a clean eraser.
- Surface preparation: A soft cloth, an appropriate wall cleaner, and compatible filler and primer wherever the existing surface requires repair.
- Paint: A wall coating suitable for the room and a contrasting water based acrylic mural paint approved for the prepared surface. Check the product instructions rather than assuming every craft paint is suitable for walls.
- Detail tools: A small round brush or liner brush, a wider brush for larger areas, and painter’s tape suitable for the existing finish. A water based paint marker may suit fine lines if its manufacturer approves that surface.
- Mounting supplies: The object’s own bracket, hook or storage holder, with screws and anchors selected for the wall construction and the actual loaded weight.
Clean the wall and let it dry before painting. Repair loose or damaged areas and use the preparation specified for your existing finish and chosen coating. Trial the drawing materials on a small inconspicuous area, checking both adhesion and appearance. A lightly penciled layout can then guide the painted lines. Allow the stated drying and curing times before replacing objects against the surface or cleaning it.
Keep the finished artwork on the wall. Remove portable objects while painting, or protect fixed fittings without letting paint reach controls, openings or electrical parts. Ordinary charcoal can rub off onto hands and towels; for a similar visual effect, use controlled dark painted lines. Do not apply a generic spray fixative or clear varnish without checking that it is suitable for the wall coating and indoor use.
Give the Object Real Support
A painted bracket, cable or pair of legs is decorative. The real object still needs a secure fixing or a stable stand. Include the weight of books, jars or damp towels when choosing supports. Check for concealed services before drilling, and follow the fixing manufacturer’s instructions for your wall material. Hot glue and general craft adhesive are not substitutes for the mounting system of a mirror, shelf or appliance.
For lightweight items, removable adhesive hooks may be an option only when the product is approved for the surface, environment and load. Follow its cleaning, paint curing and waiting instructions exactly. If you rent, obtain permission before painting or drilling; a removable wall decal can reproduce simple linework, but it also needs a compatibility test and approval for the existing finish.
With those decisions in place, explore the ideas below and choose an object that already belongs in the room. Look for the few lines that transform its meaning while keeping it practical to use.
1. A Wall Clock on a Painted Victorian Bracket
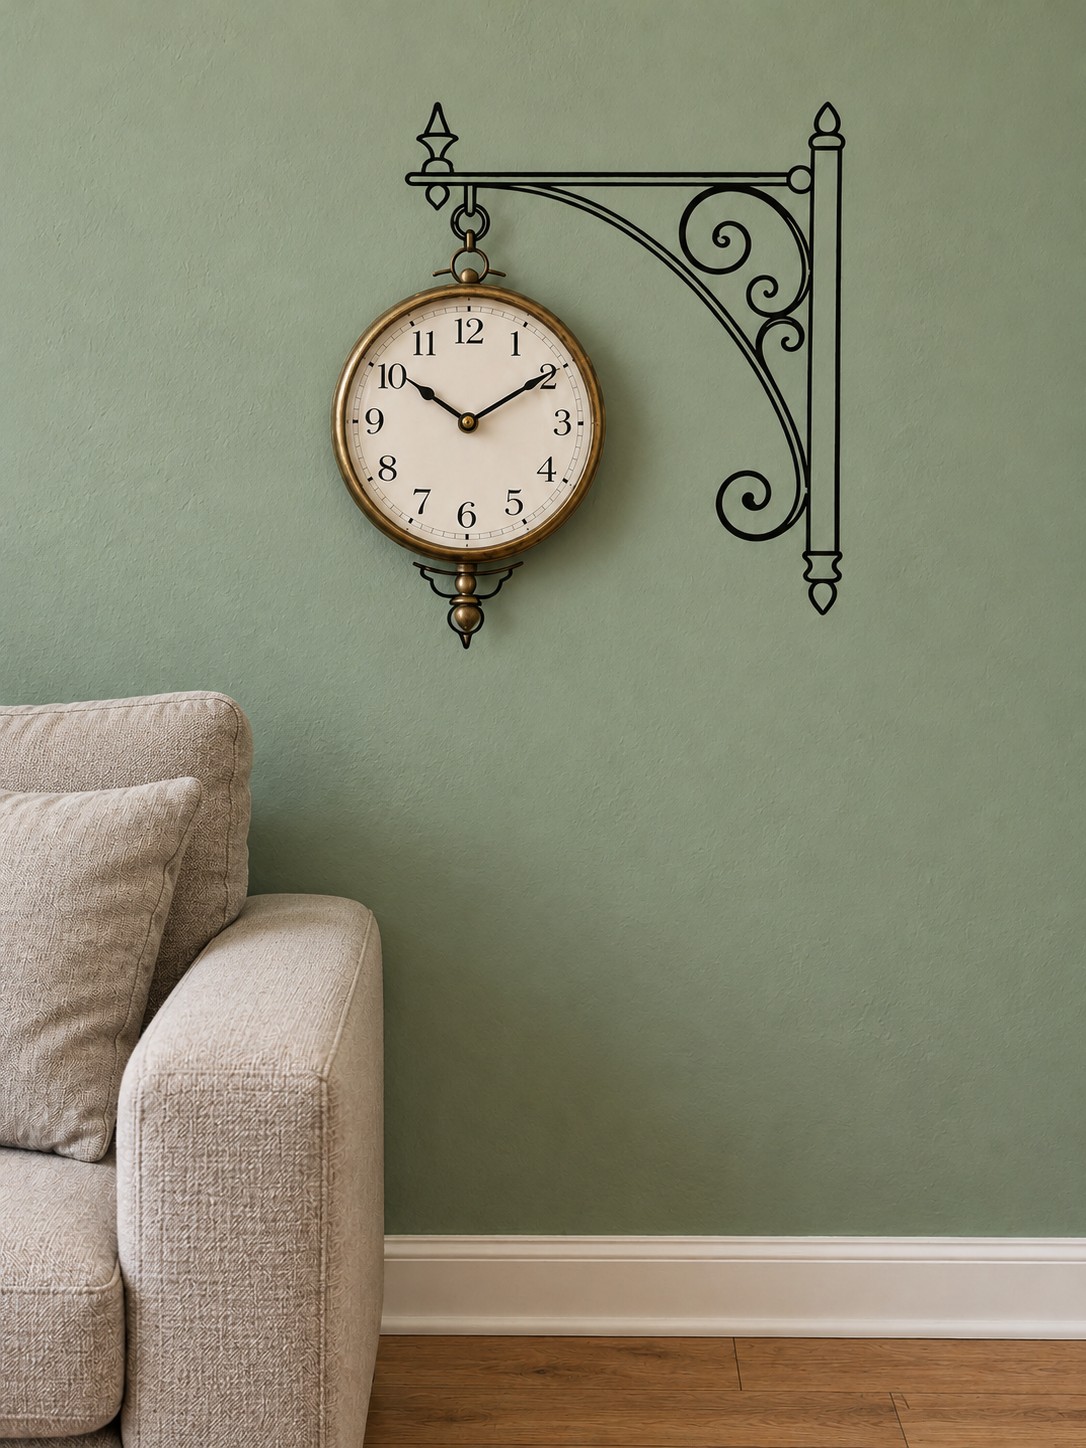
A round brass clock gains the character of an old station timepiece when a decorative bracket is painted above and beside it. The sage wall softens the black scrollwork, while the clock face remains the brightest part of the arrangement. This is a useful direction for a reading corner where a larger mural would compete with the furniture.
Use the clock’s top loop as the visual connection point and sketch the bracket around that position. A fine round brush helps keep the curls crisp. The clock still needs its own suitable wall fixing behind it; the painted arm only creates the illusion of support. Leave enough room to lift the clock off for battery changes.
2. A Brass Mirror Inside a Vintage Diving Helmet
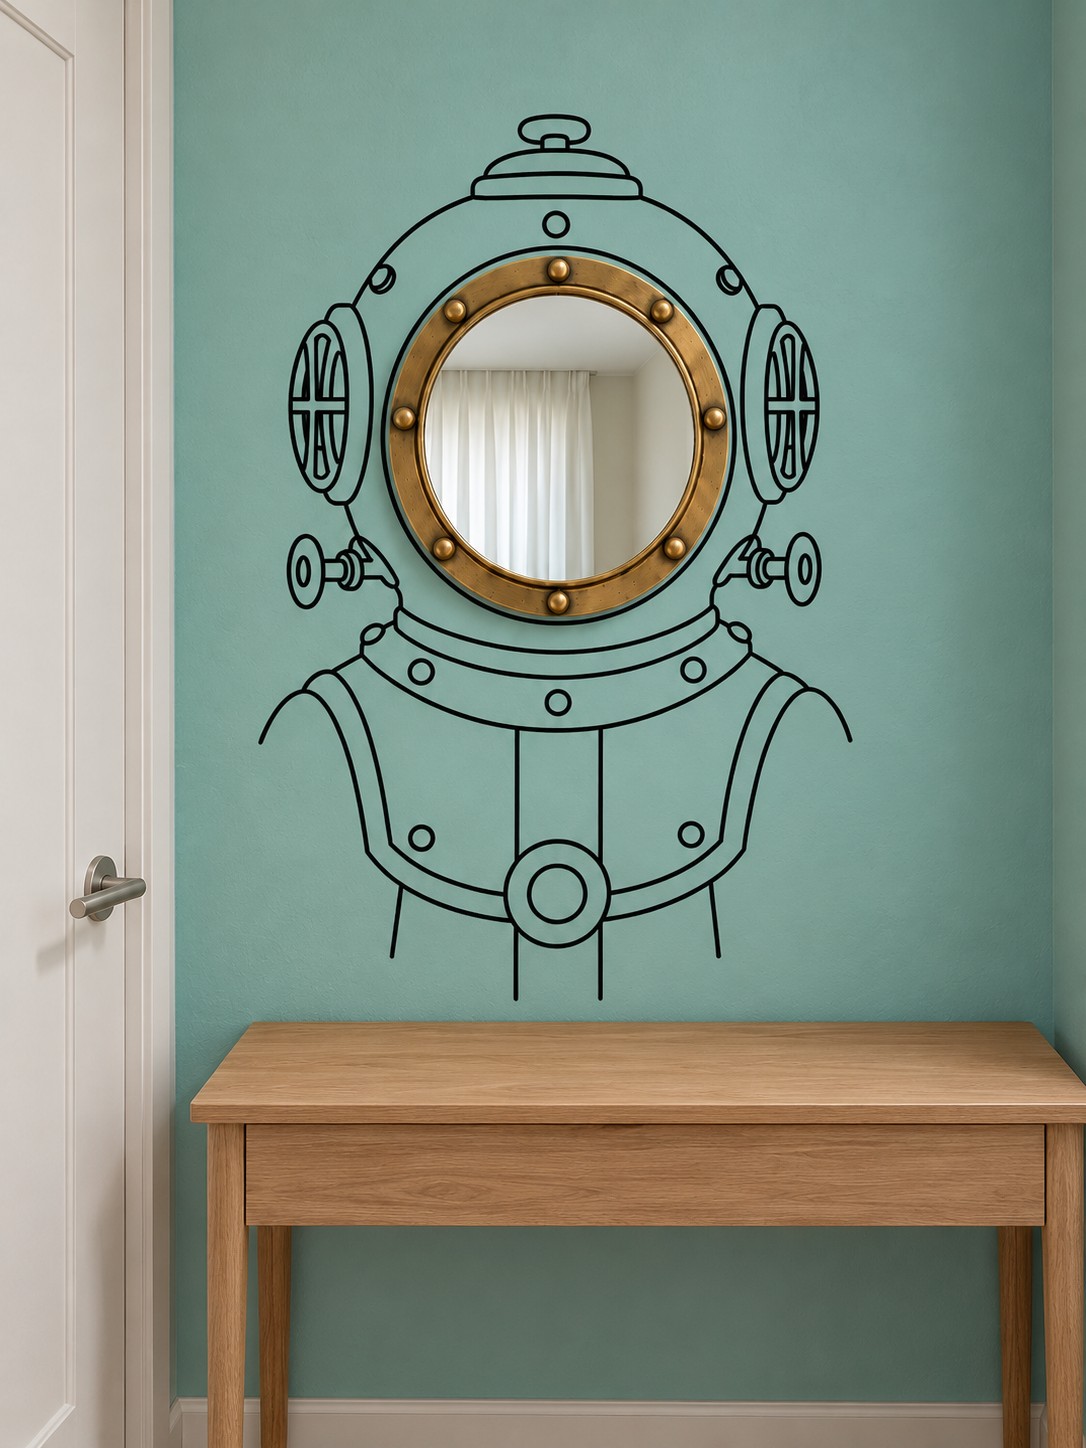
The raised rim of a brass mirror makes a convincing viewing window for a vintage diving helmet. Black outlines supply the helmet, side fittings and shoulder plate, allowing the reflective center to do most of the visual work. A muted teal background gives the idea an underwater association without needing waves, fish or additional ornaments.
Choose a mirror position that works for everyday use before planning the helmet. Mark its diameter on a paper template, then extend the drawing outward with enough clearance around the frame. Use the mirror’s specified hanging system and suitable wall fixings. Keeping the console below relatively clear makes the helmet silhouette easier to read.
If you already have a sound mirror with a frame that needs attention, these upcycling ideas for old mirrors can help you choose a finish before planning the surrounding wall drawing.
3. A Hand Towel That Becomes Cloth on a Loom
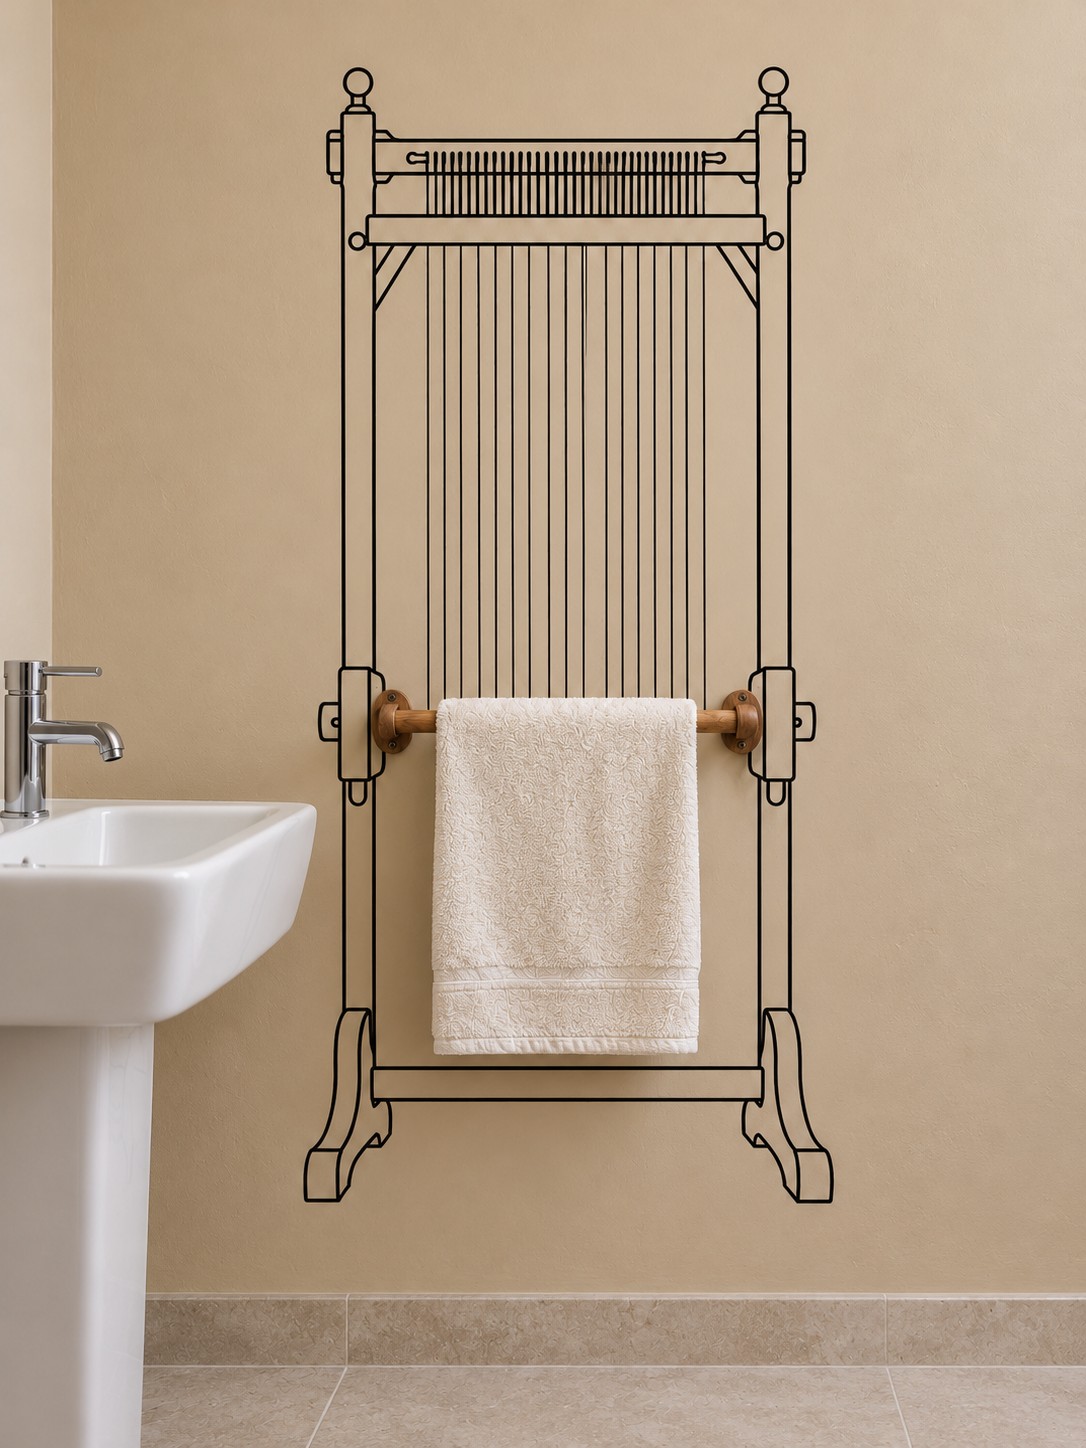
A wooden towel rail becomes the crossbar of a tall loom, with the hand towel standing in for freshly woven cloth. Closely spaced vertical lines above the rail establish the warp threads, while the drawn legs give the composition its workshop character. Beige paint, pale fabric and warm wood keep the bathroom calm despite the playful idea.
Set the width of the drawn loom from the actual rail, then use a ruler for the threads and a small brush for the frame. Keep every line on the wall. Secure the rail for the pulling force of daily use, and leave enough open space below for the towel to hang and dry without touching another surface.
4. A Woven Mail Basket Beneath a Hot Air Balloon
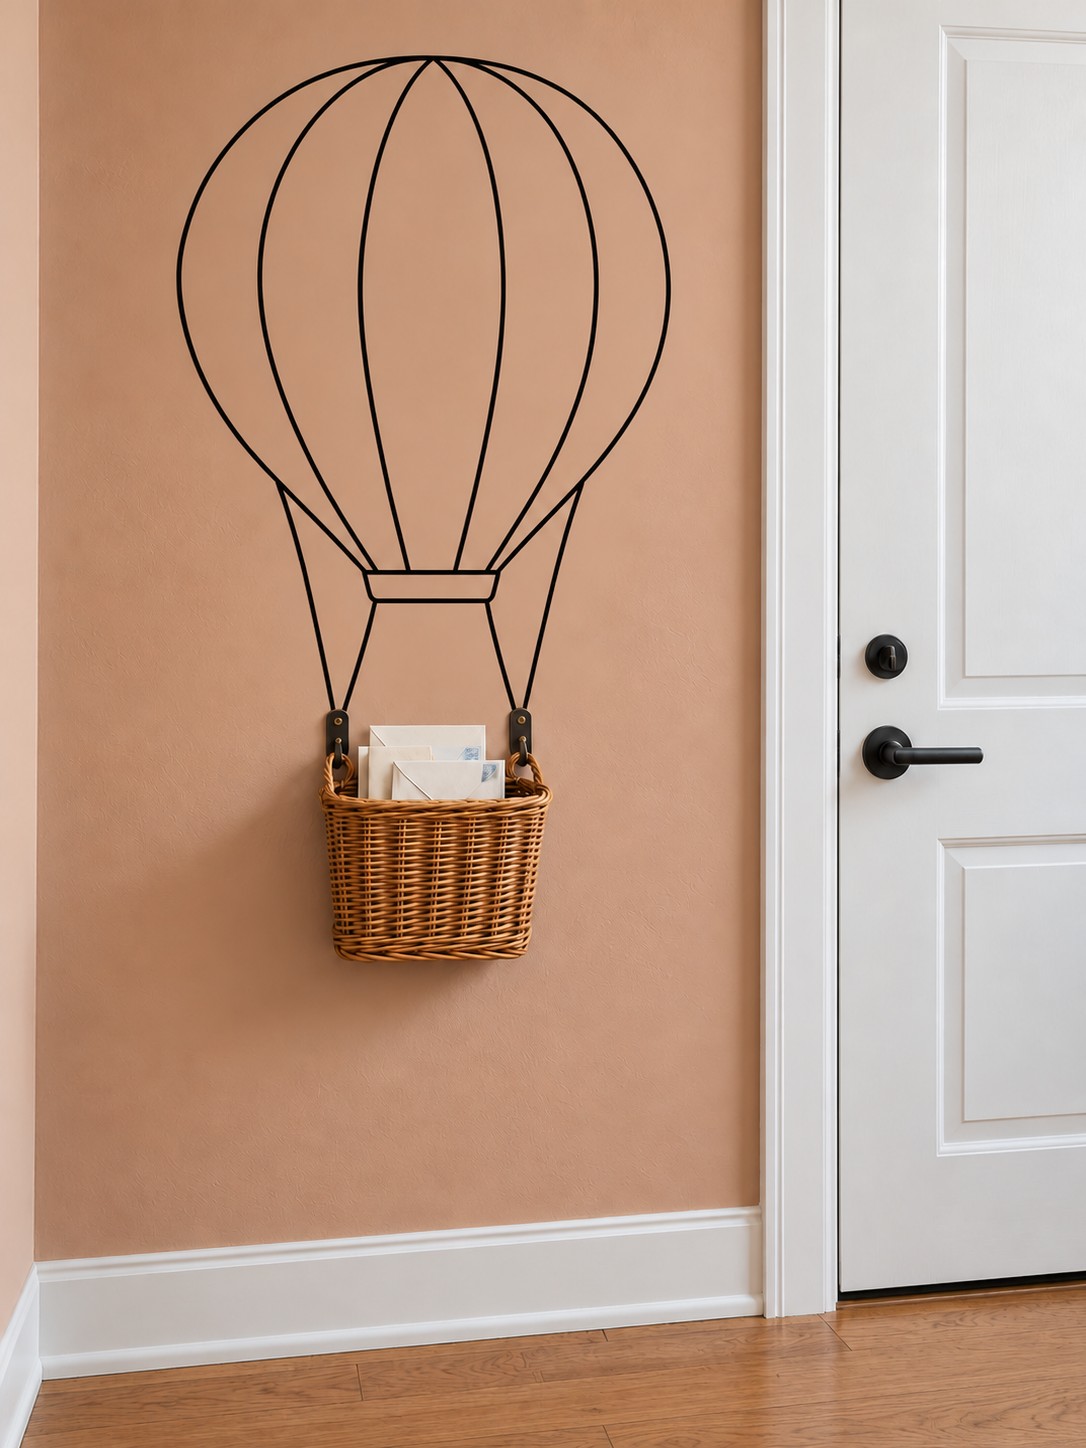
An entryway mail basket becomes the passenger basket of a hot air balloon. Long curved panels lead upward from its handles, making a small storage piece feel like part of a much taller composition. The warm peach wall echoes the wicker and keeps the black outline from feeling too stark beside the white door.
Start with a basket intended for wall hanging, then center a paper balloon template over it. Bring the painted suspension lines toward the basket’s upper corners without drawing across the weave. Check the door swing before choosing the position, and size the real fixings for the basket plus the mail it will hold.
5. Coat Hooks Growing from a Slender Tree
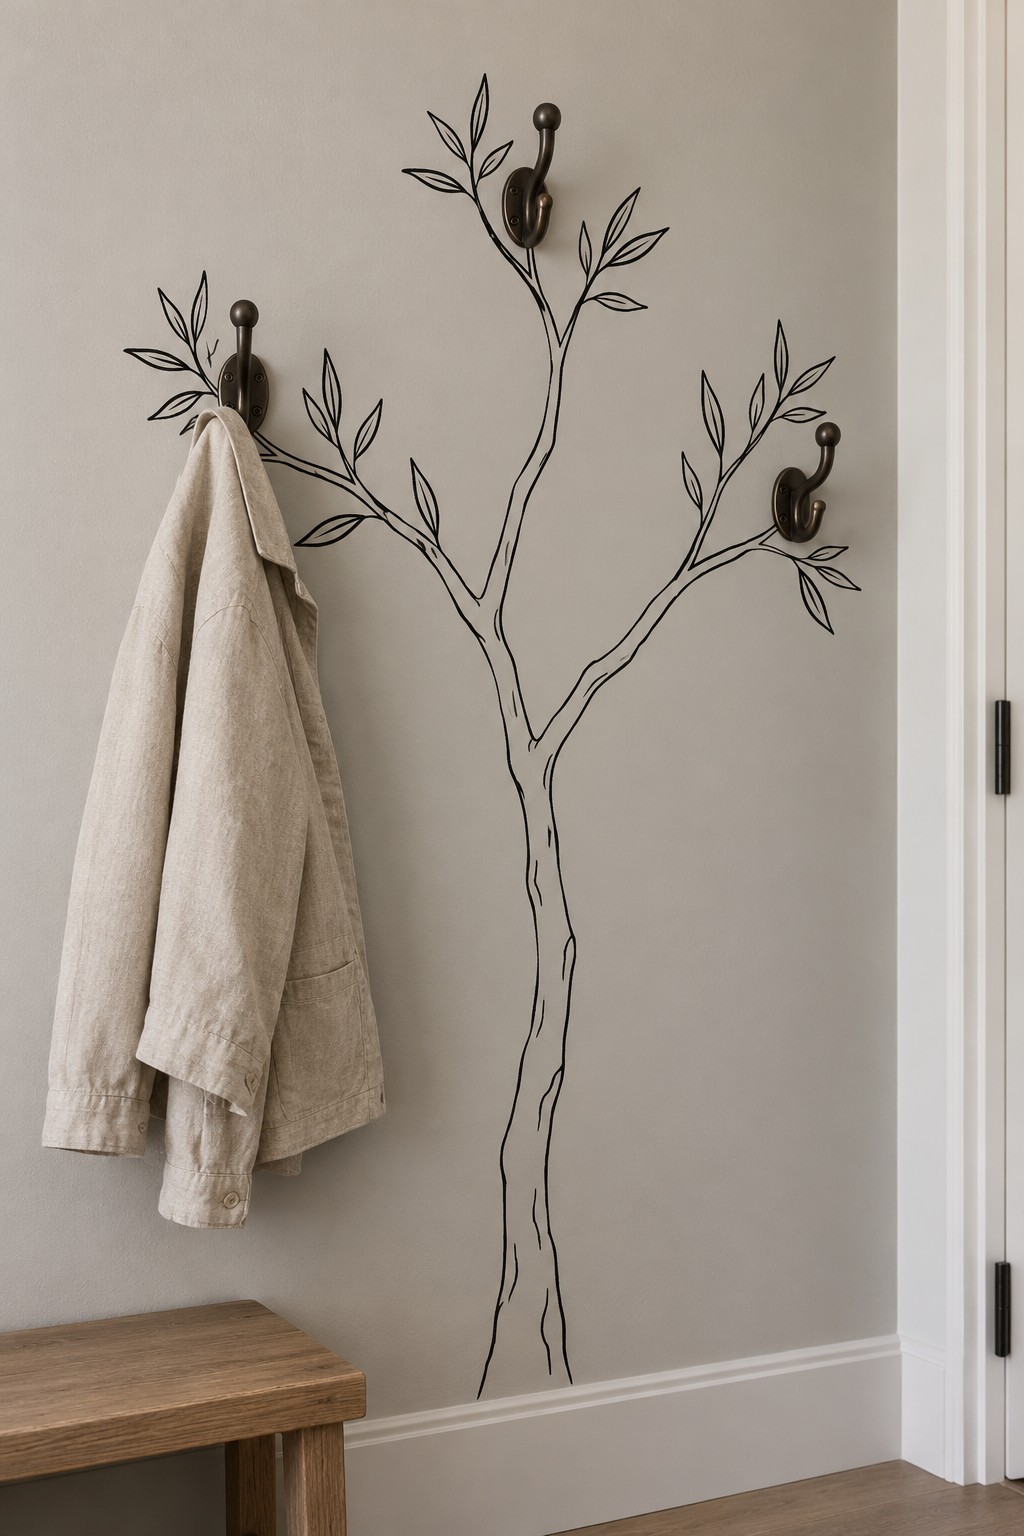
A lightly drawn tree gives three ordinary coat hooks a shared purpose. Each hook sits near a branch tip, so a hanging jacket seems to belong to the tree. The narrow trunk and scattered leaves suit the strip of wall beside an entry bench without making that small area feel crowded.
Place the hooks at useful heights first, allowing for the width and length of hanging clothes. Draw branches toward those fixed points instead of arranging the hooks only for symmetry. Thin brown black paint can echo the dark metal. Use fixings appropriate for repeated pulling and the expected coat weight, and keep painted foliage outside the areas that clothing usually covers.
6. A Bookshelf Across a Suspension Bridge
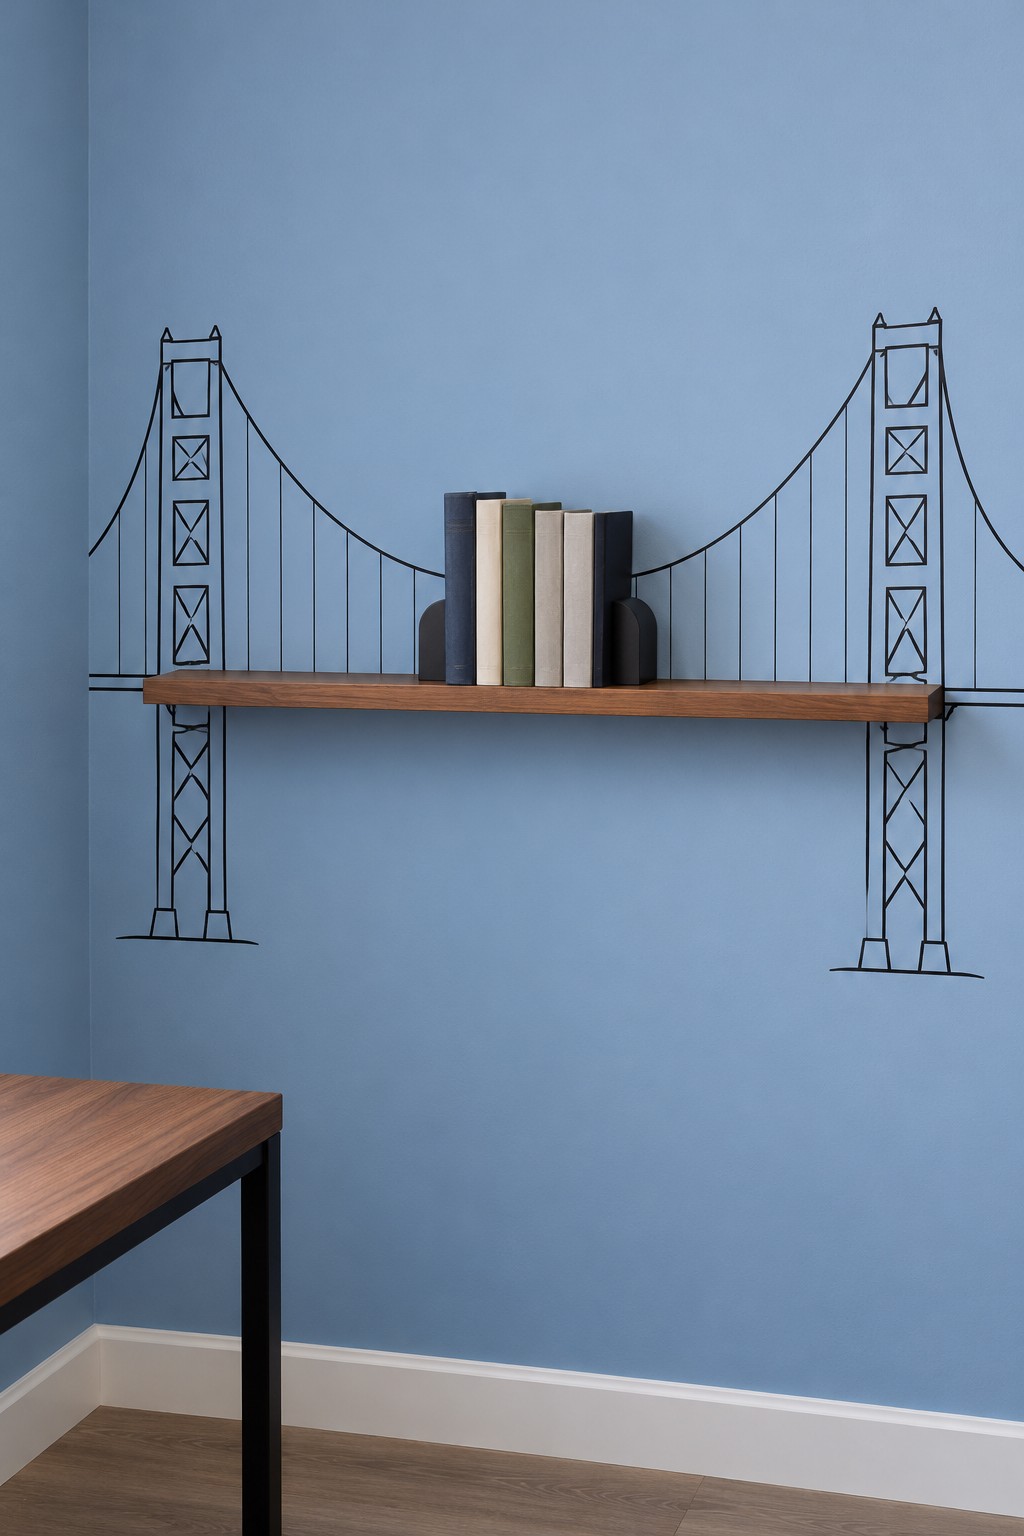
A straight wooden shelf becomes the deck of a suspension bridge, with towers rising at either end and curved cables dipping toward the books. Blue wall paint suggests open sky, while the natural wood provides a warm horizontal anchor. A small group of upright books leaves the bridge structure visible.
Install and level the shelf using its proper bracket system before finalizing the drawing. Match the tower positions to the shelf ends, then add the main cable curves and vertical hangers. The painted towers carry no weight, so the shelf’s actual support and load limit must suit the books. Avoid filling the whole span if you want the bridge illusion to remain clear.
7. An Inverted Colander with Jellyfish Tentacles
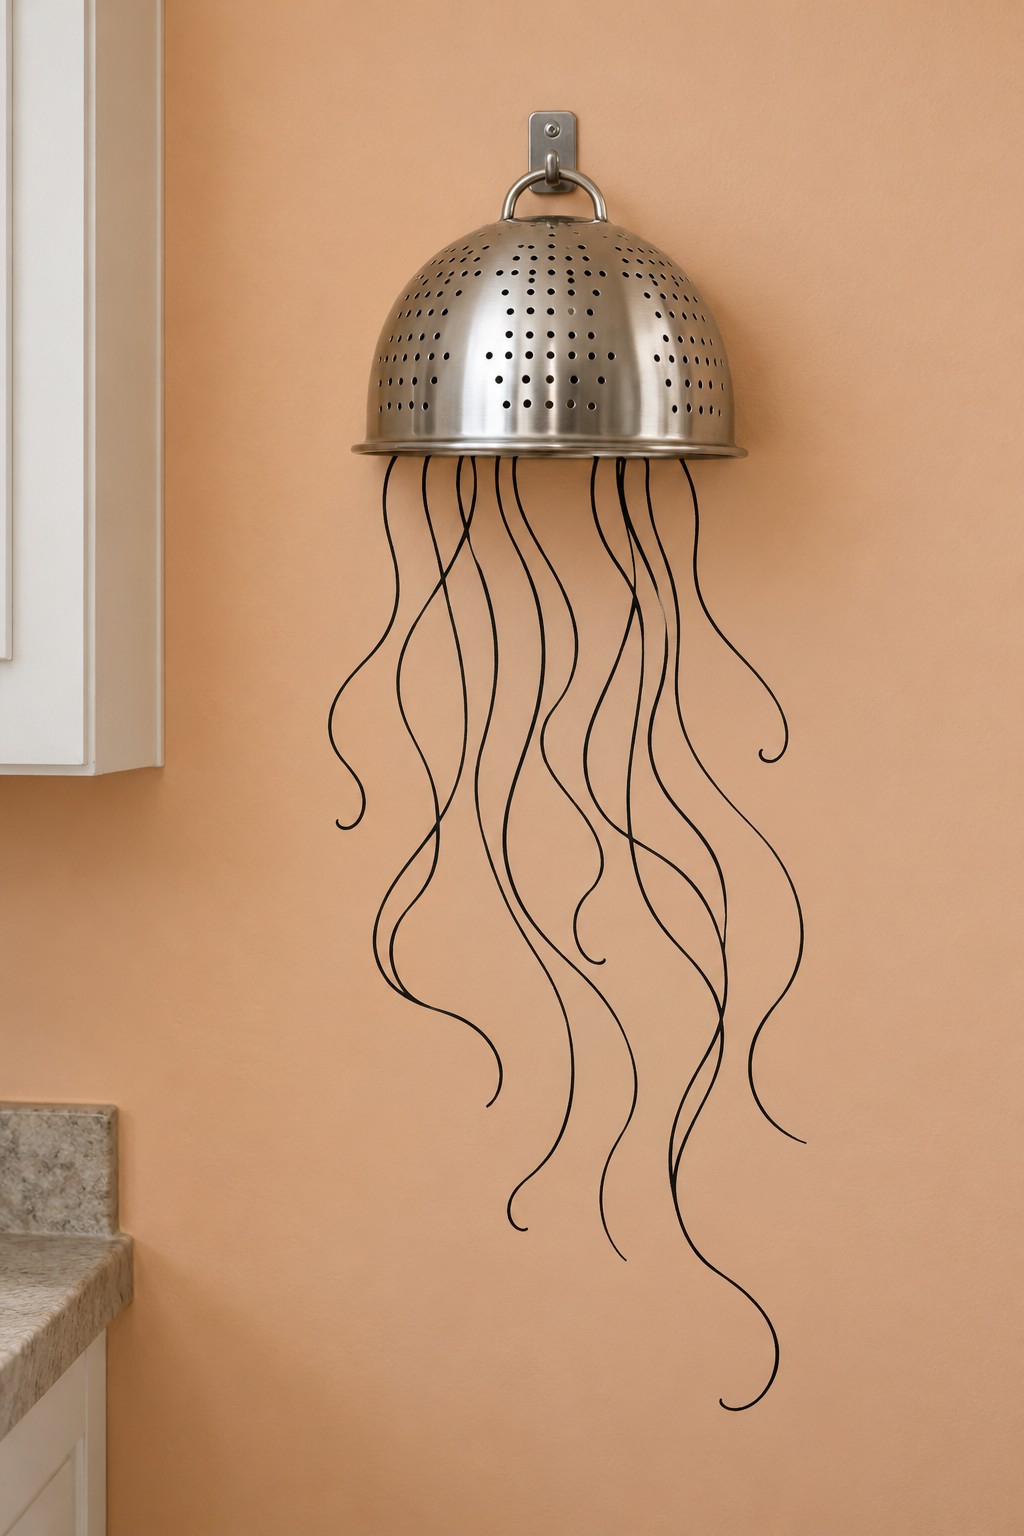
Turn a domed metal colander upside down and its perforated bowl becomes a jellyfish bell. Loose black lines descend from the rim, alternating in length and curvature to suggest drifting tentacles. A warm orange wall creates a lively contrast with the cool steel without adding more objects to the kitchen corner.
Use a colander with a secure hanging loop or handle and a suitable hook. Once its resting position is established, mark the rim and paint the tentacles on the wall beneath it. Let the lines begin at different points along the lower edge, but avoid a dense knot in the center. The utensil should lift off for cleaning without scraping the painted surface.
8. A Toilet Roll Emerging from an Instant Camera
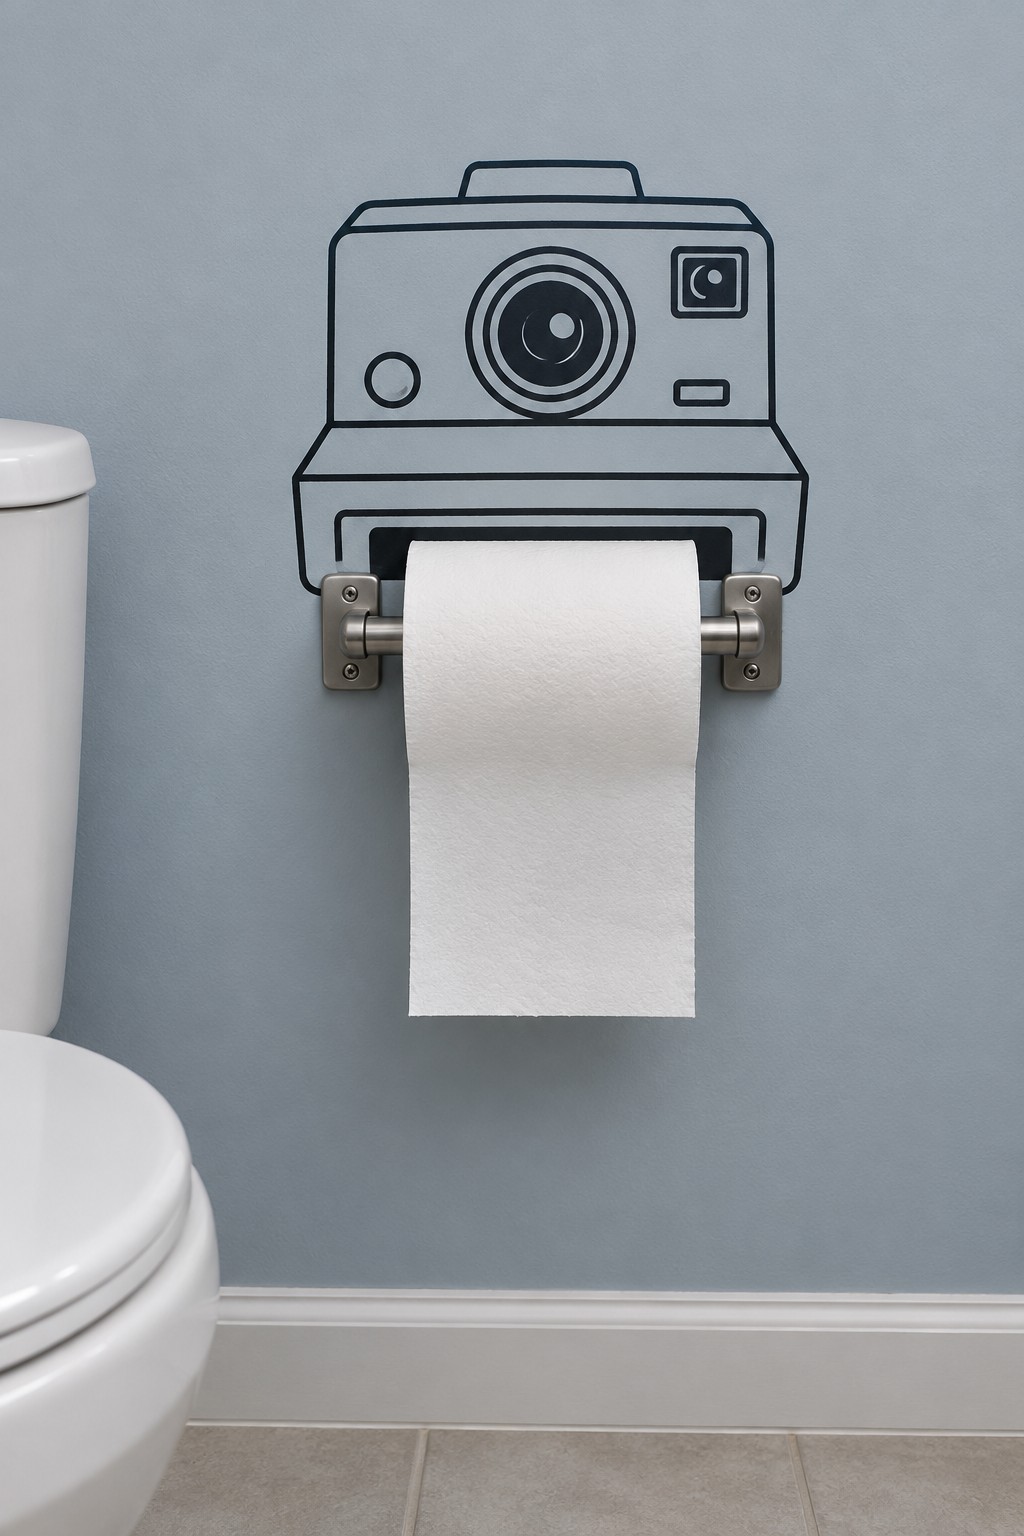
The hanging sheet of toilet paper becomes an oversized instant photograph in this compact bathroom idea. A camera body, lens and small flash sit above the real roll holder, with a rectangular output slot linking the drawing to the paper. The blue gray background keeps the result understated enough for a small room.
Build the camera template around the holder’s actual width and the roll’s normal position. Use a circular template for the lens and keep the lower outline clear of the spindle ends. The holder must remain easy to open and refill. A washable wall coating is helpful here, but follow its curing instructions before wiping the finished drawing.
9. A Column Radiator as Accordion Bellows
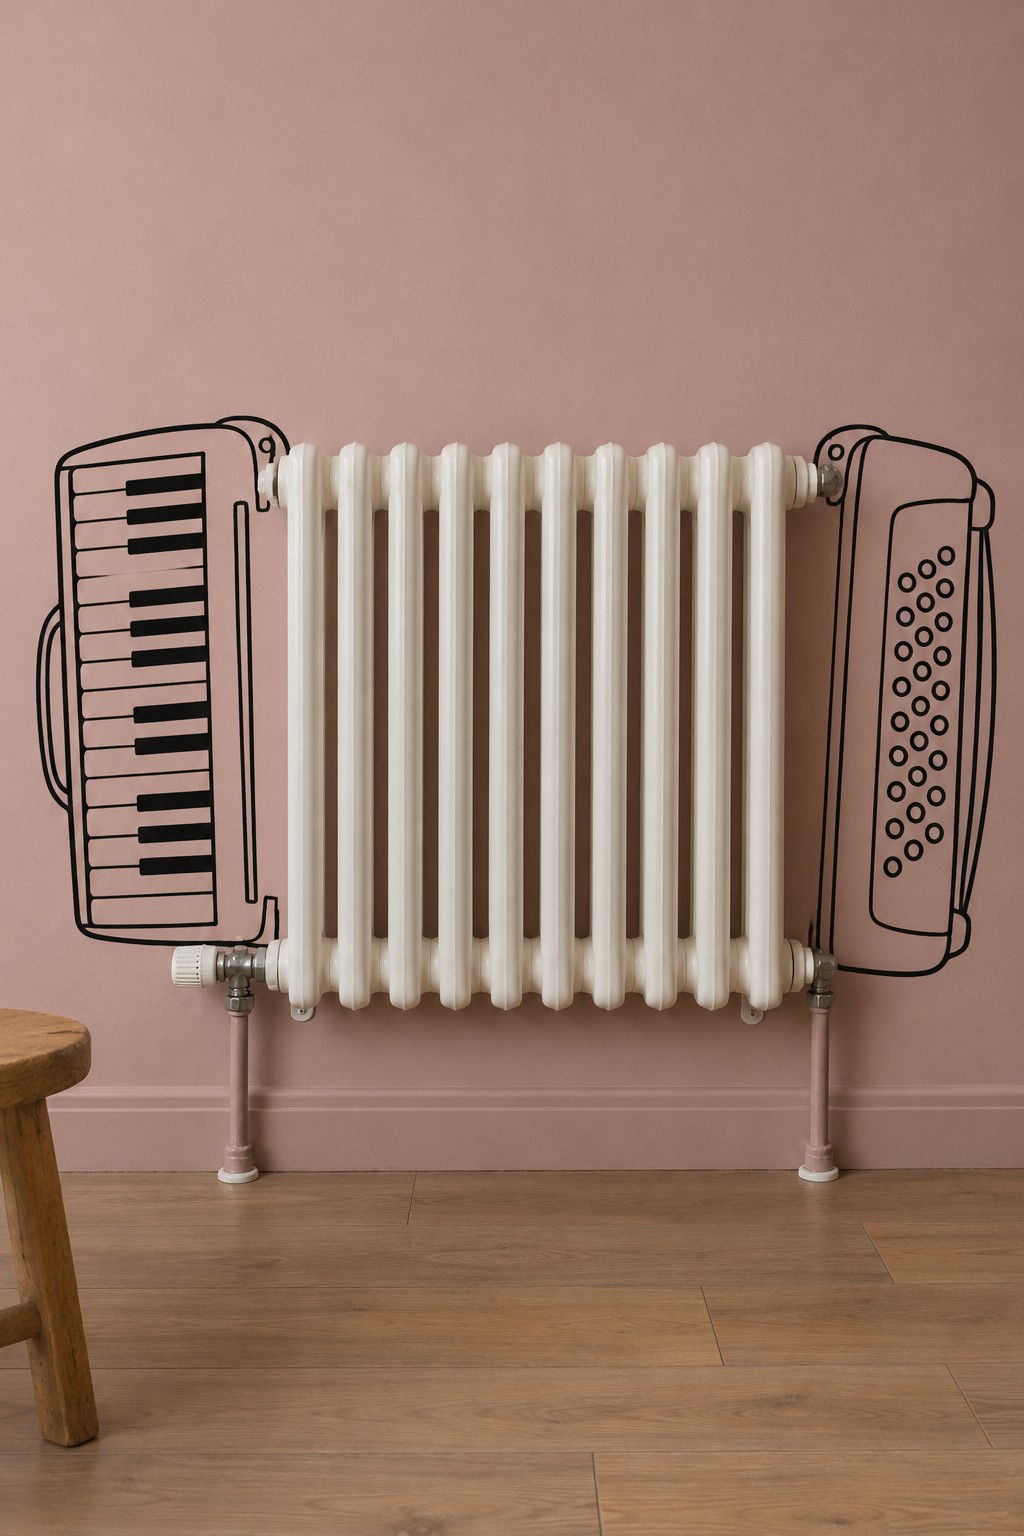
The repeated ribs of a white radiator suggest accordion bellows almost immediately. A keyboard painted on one side and a rounded button panel on the other complete the instrument, while dusty pink wall paint gives the arrangement a softer domestic setting. The radiator itself supplies all the central texture.
Fit the two drawn end panels to the radiator’s height and keep the keyboard proportions bold enough to read from across the room. Apply the artwork only to the wall with the heating off and surfaces cool. Leave valves, pipework, airflow and service access unobstructed. There is no need to cover, modify or add decorative parts to the radiator.
10. A Round Speaker at the Heart of a Gramophone
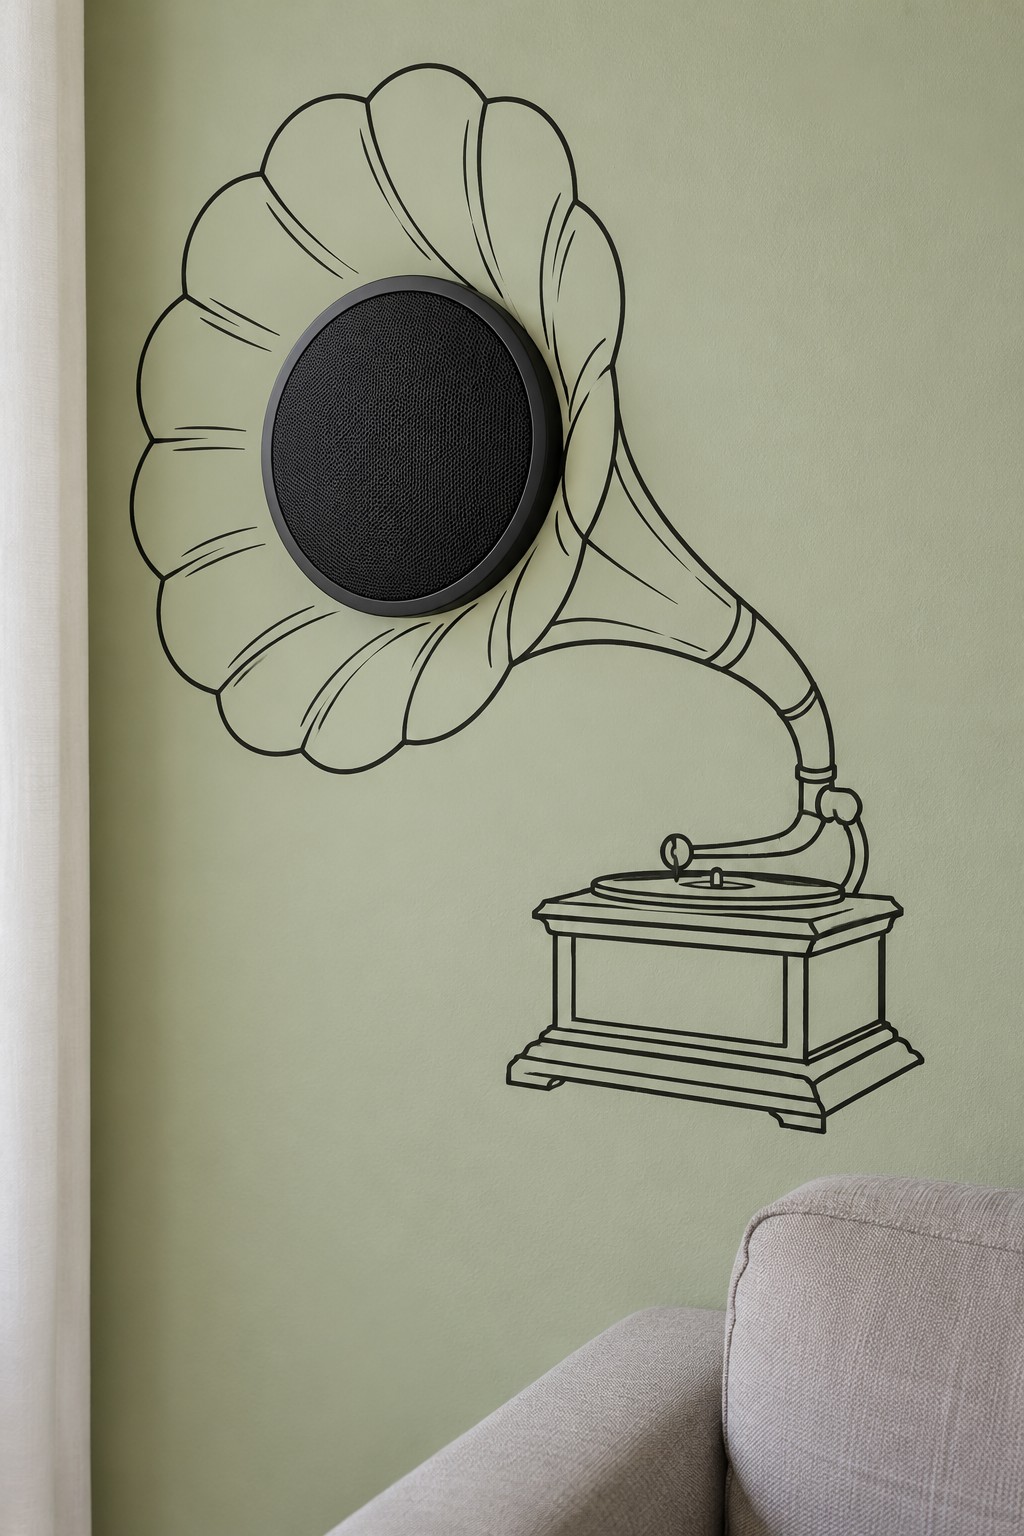
A circular black speaker becomes the dark opening of a gramophone horn. Broad scalloped curves surround it, narrowing into a bent neck and a small drawn cabinet below. Pale green paint and simple black lines give the idea a vintage character that works beside a plain upholstered sofa.
Choose a speaker designed for wall mounting and keep its grille, controls and ventilation uncovered. Draw the horn to suit the speaker’s existing diameter rather than forcing the device into a smaller motif. A paper template helps establish the outer curves. Keep any necessary cable route accessible, and use the maker’s mounting hardware instead of attaching the speaker with craft glue.
11. A Balloon Whisk Wearing a Ballerina’s Tutu
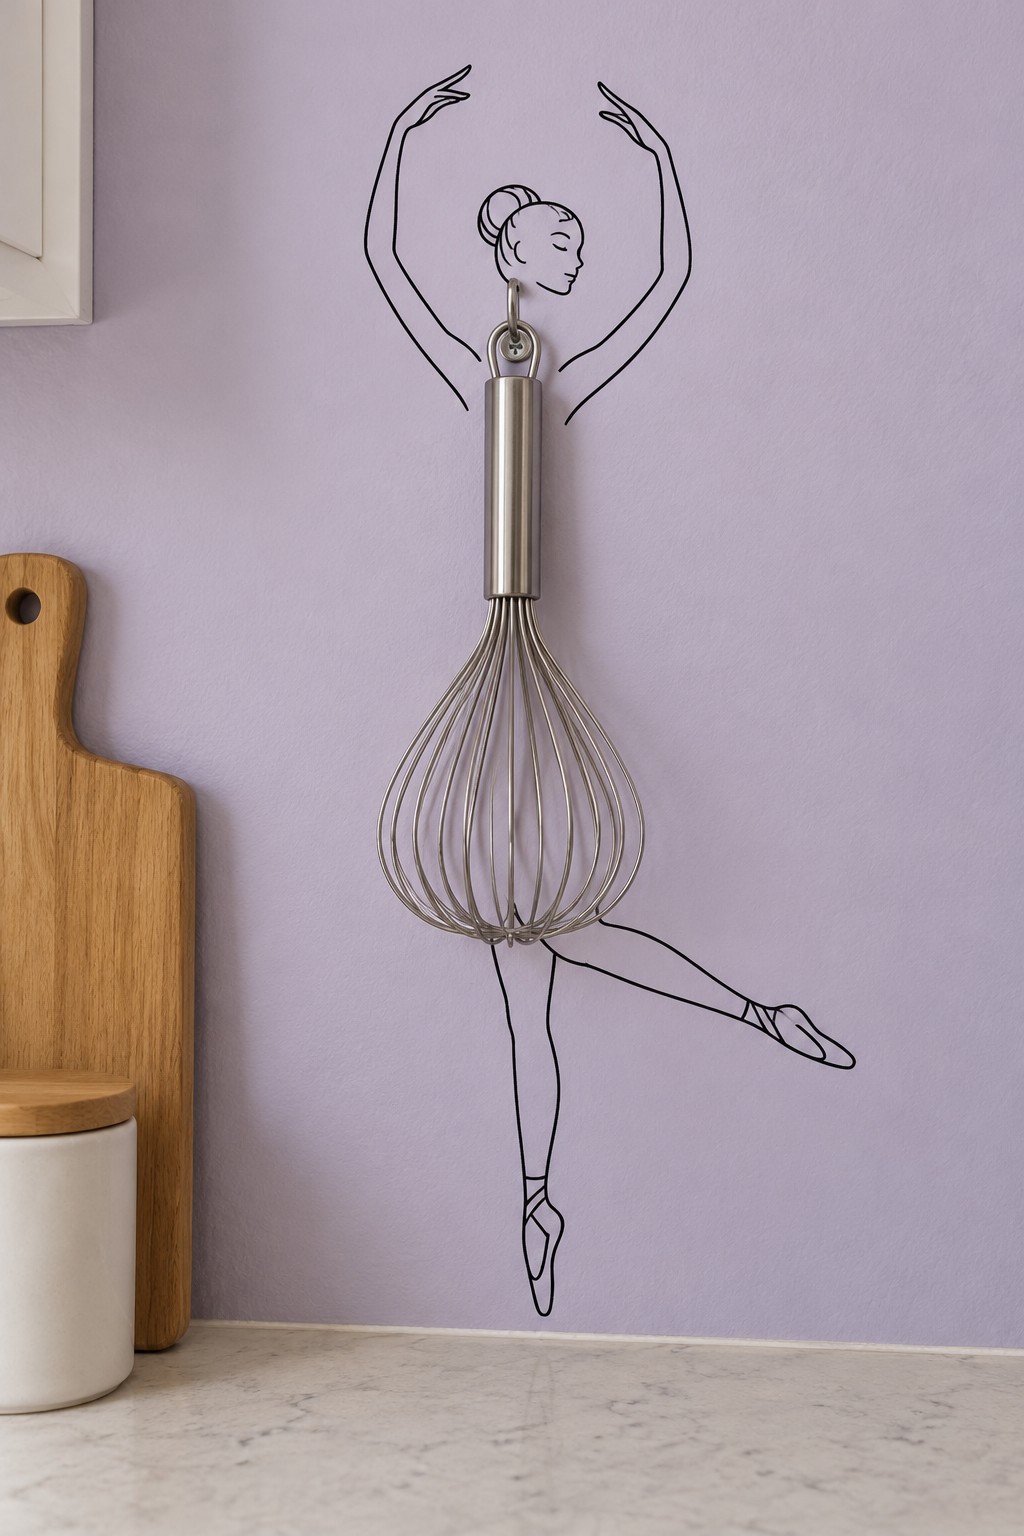
The open wires of a balloon whisk make a surprisingly delicate tutu. Its handle forms the dancer’s torso, while a painted head, raised arms and pointed legs supply the movement. Lavender wall paint suits the lightness of the drawing and allows the reflective steel to remain distinct from the black lines.
Hang the whisk from its handle loop, then mark where the wire cage ends. Place the dancer’s legs below that edge and the arms above the handle, testing the proportions on paper first. A small utensil hook keeps the whisk removable. Position this decorative storage spot away from greasy cooking splashes so the wire loops remain easy to keep clean.
12. A Hair Dryer Giving a Little Dragon Its Snout
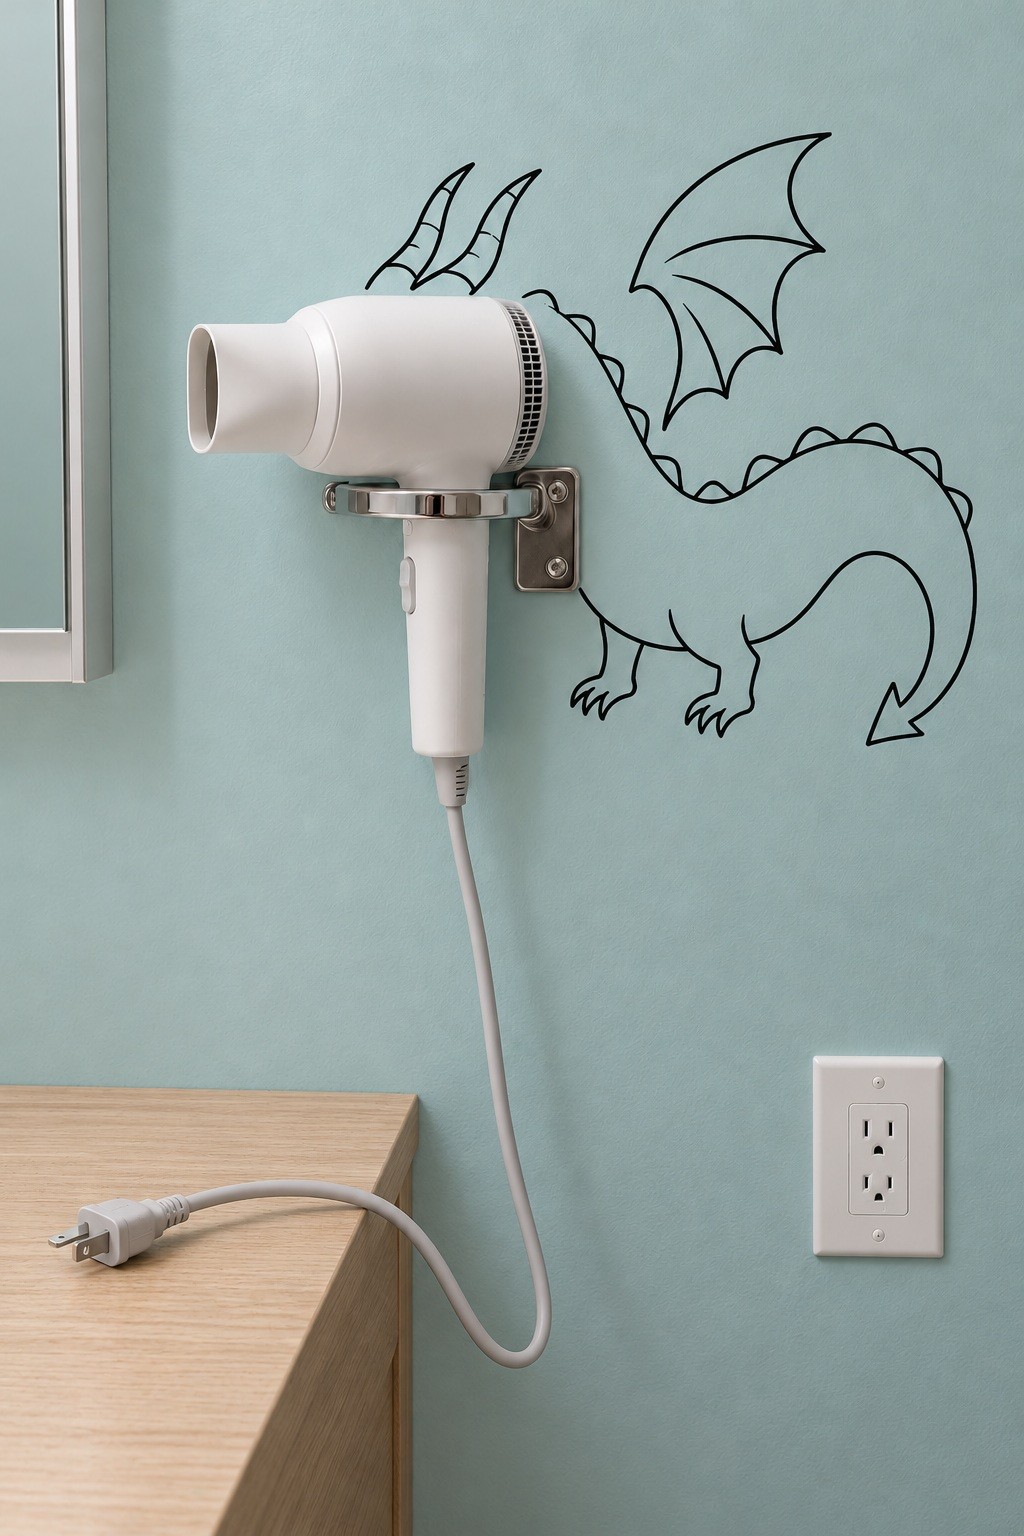
A white hair dryer supplies the head and projecting snout of a small dragon, while horns, a wing, feet and a curled tail remain entirely on the mint wall. The metal holder gives the appliance a clear resting place beside a dry wooden dressing table. This suits a getting ready corner where the dryer already belongs.
Choose a holder compatible with the dryer and sketch the creature around the appliance’s stored position. Leave its air intake and controls clear, and lift the dryer out to use it. Let it cool before returning it to the holder, keep it unplugged when stored, and route the loose cord away from water and walking paths.
For a coordinated setting around this detail, these colorful vanity room ideas offer ways to connect wall color, seating and useful storage.
13. A Light Switch with a Friendly Robot Body
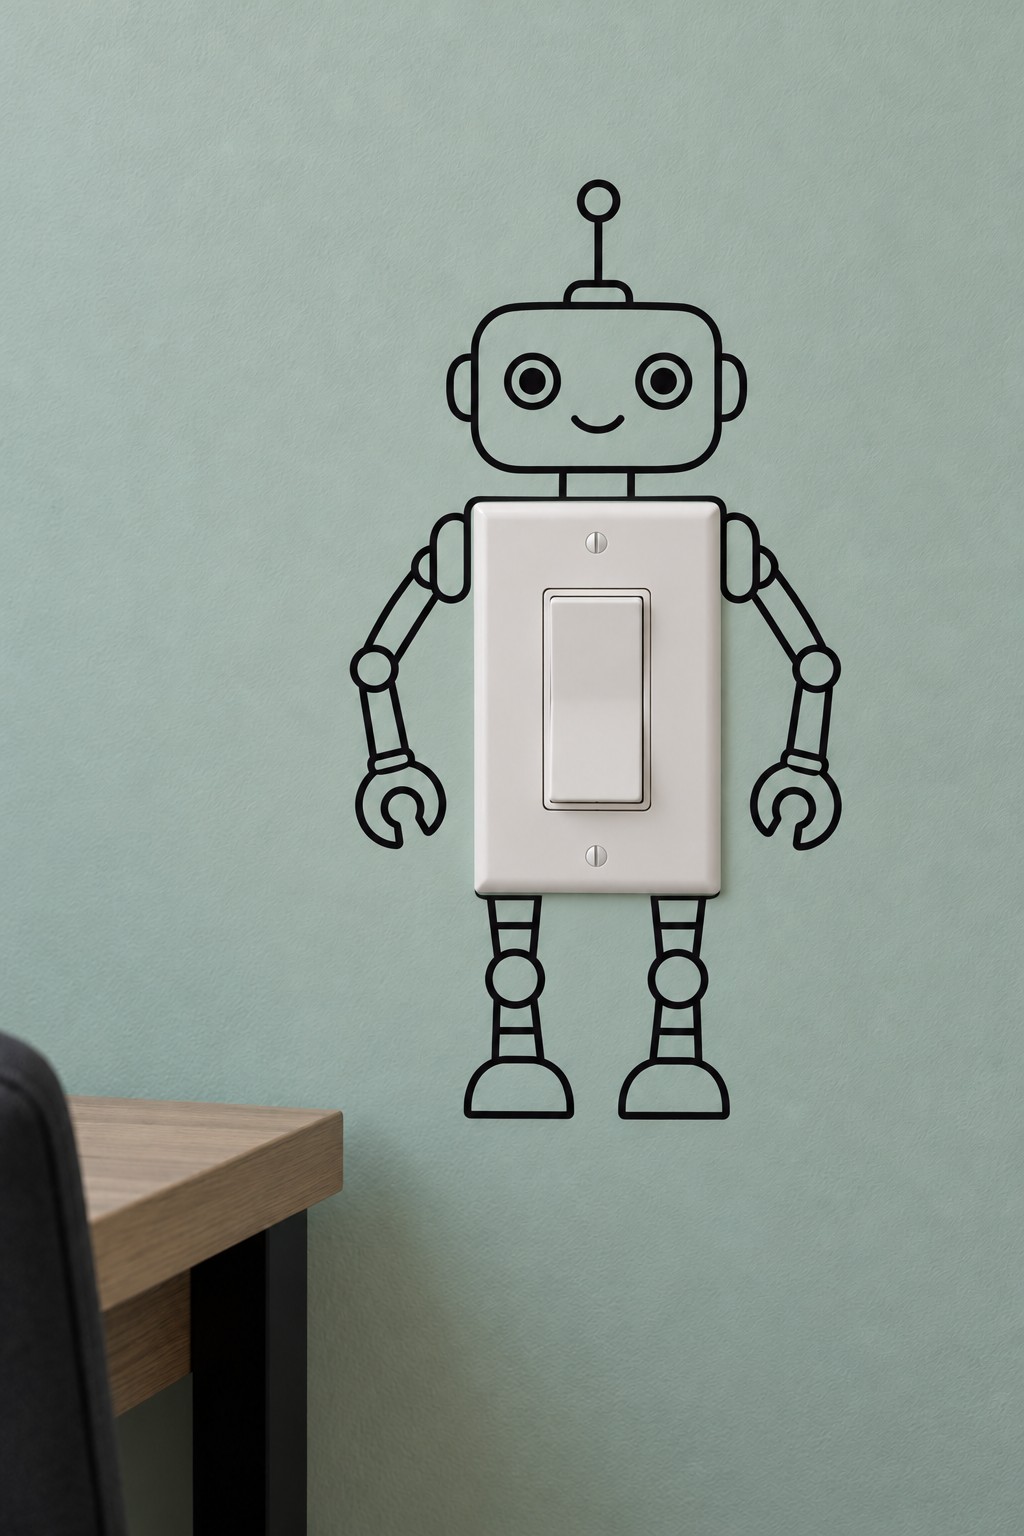
A rectangular switch plate is already the right shape for a little robot’s torso. A rounded head, antenna, hinged arms and sturdy feet turn it into a character without changing the switch itself. The restrained mint background and open linework keep the design small enough for a study corner.
Measure the plate and make a template that leaves the switch, cover and screws completely accessible. Paint only the surrounding wall, keeping paint and liquids away from electrical parts. An adult can plan the character on paper while children choose its expression. If any electrical fitting needs moving or repair, leave that work to a qualified electrician.
14. A Wall Fan at the Nose of an Airplane
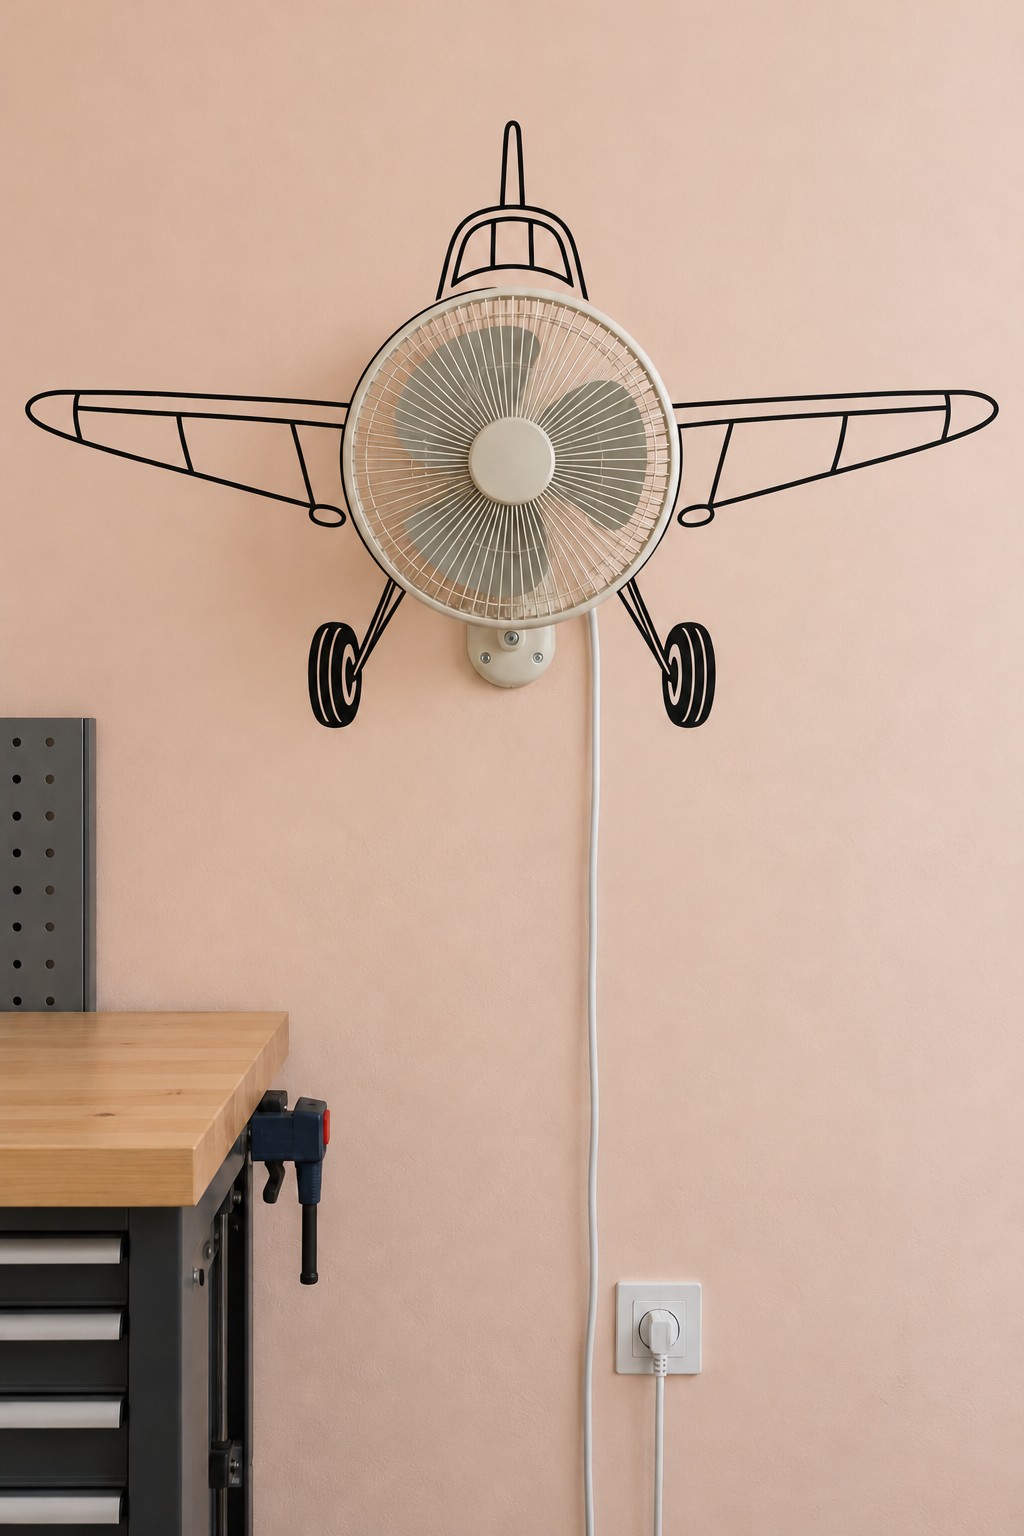
A wall fan supplies the circular engine and propeller impression of an airplane seen from the front. Long wings stretch to either side, with a cockpit above and small wheels below. The peach wall gives the white fan a soft background and lets the thin aircraft outline stay readable above a desk.
Plan the drawing from the fan’s normal resting position and leave its full movement range free. Install the fan only with its approved mounting system, without attaching anything to the grille. The blades, guard and controls should remain untouched. Accept that the illusion changes when the fan turns; the appliance’s safe operation matters more than maintaining perfect alignment at every angle.
15. A Wire File Basket Riding a Cable Line
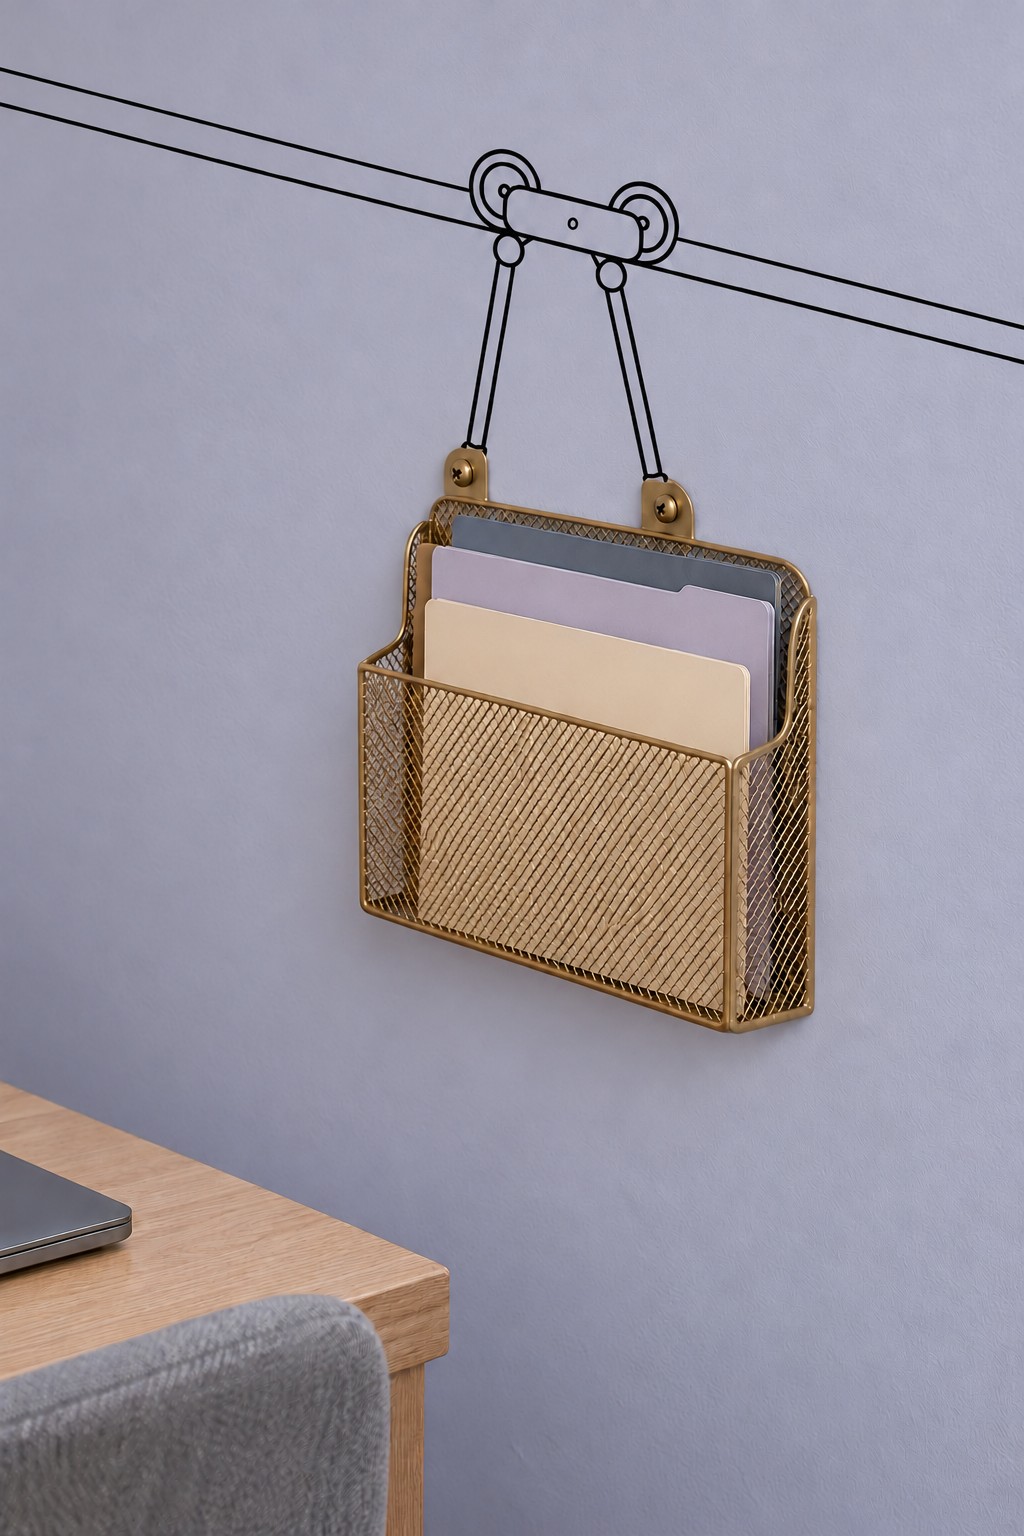
A gold mesh file basket becomes a cable car cabin when a pair of suspension lines and a wheeled carriage are drawn above it. The diagonal cable adds movement to the lavender office wall, while folders provide quiet blocks of color inside the basket. It is a storage idea that still looks intentional when only partly filled.
Use both real mounting points to keep the organizer level, then align the painted suspension lines with its upper corners. Allow space above for sliding folders in and out. Keep the cable clear of adjacent shelves and choose a basket depth that holds papers upright without projecting too far into the desk area.
16. A Fedora Balanced on Long Bird Legs
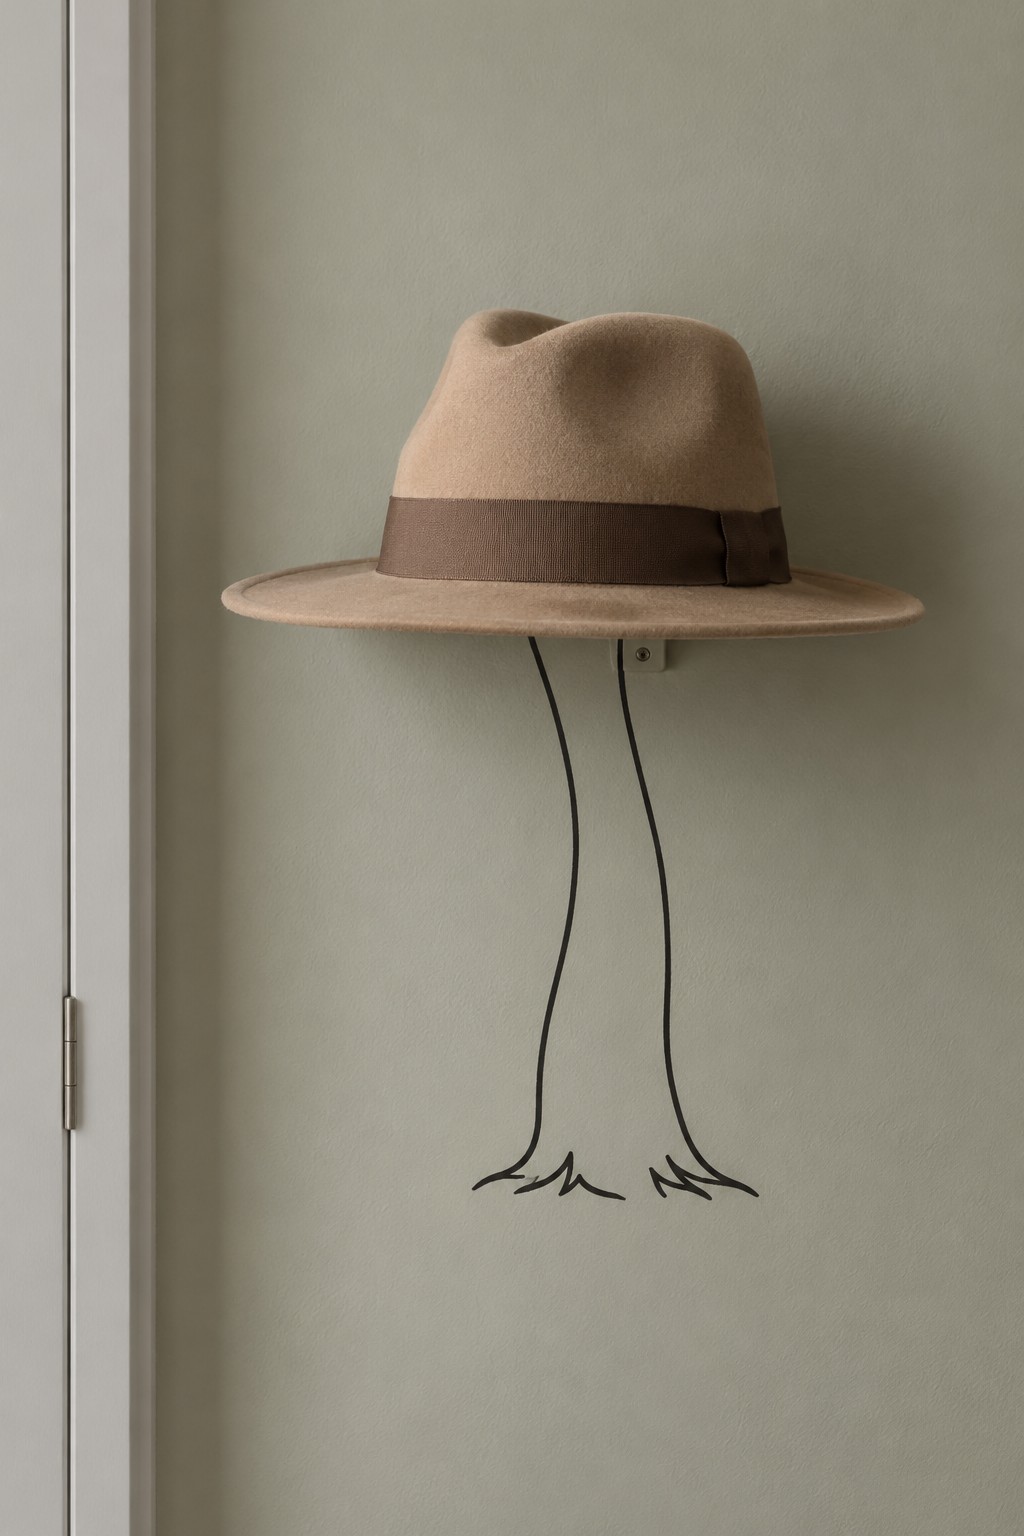
A tan fedora with a dark band becomes a curious little character with just two long bird legs beneath it. The missing body is the joke: the hat seems to be walking on its own. A muted olive gray wall supports the warm felt without requiring extra color or a detailed background scene.
Choose a hat hook that supports the hat without crushing its crown or distorting the brim. Place the painted legs under the center of the hanging hat and let the feet spread slightly for balance. Keep the strokes loose and spare. This works especially well beside a wardrobe, where removing the hat leaves a small, amusing fragment of the drawing behind.
17. A Tissue Dispenser with a Whale’s Water Spout
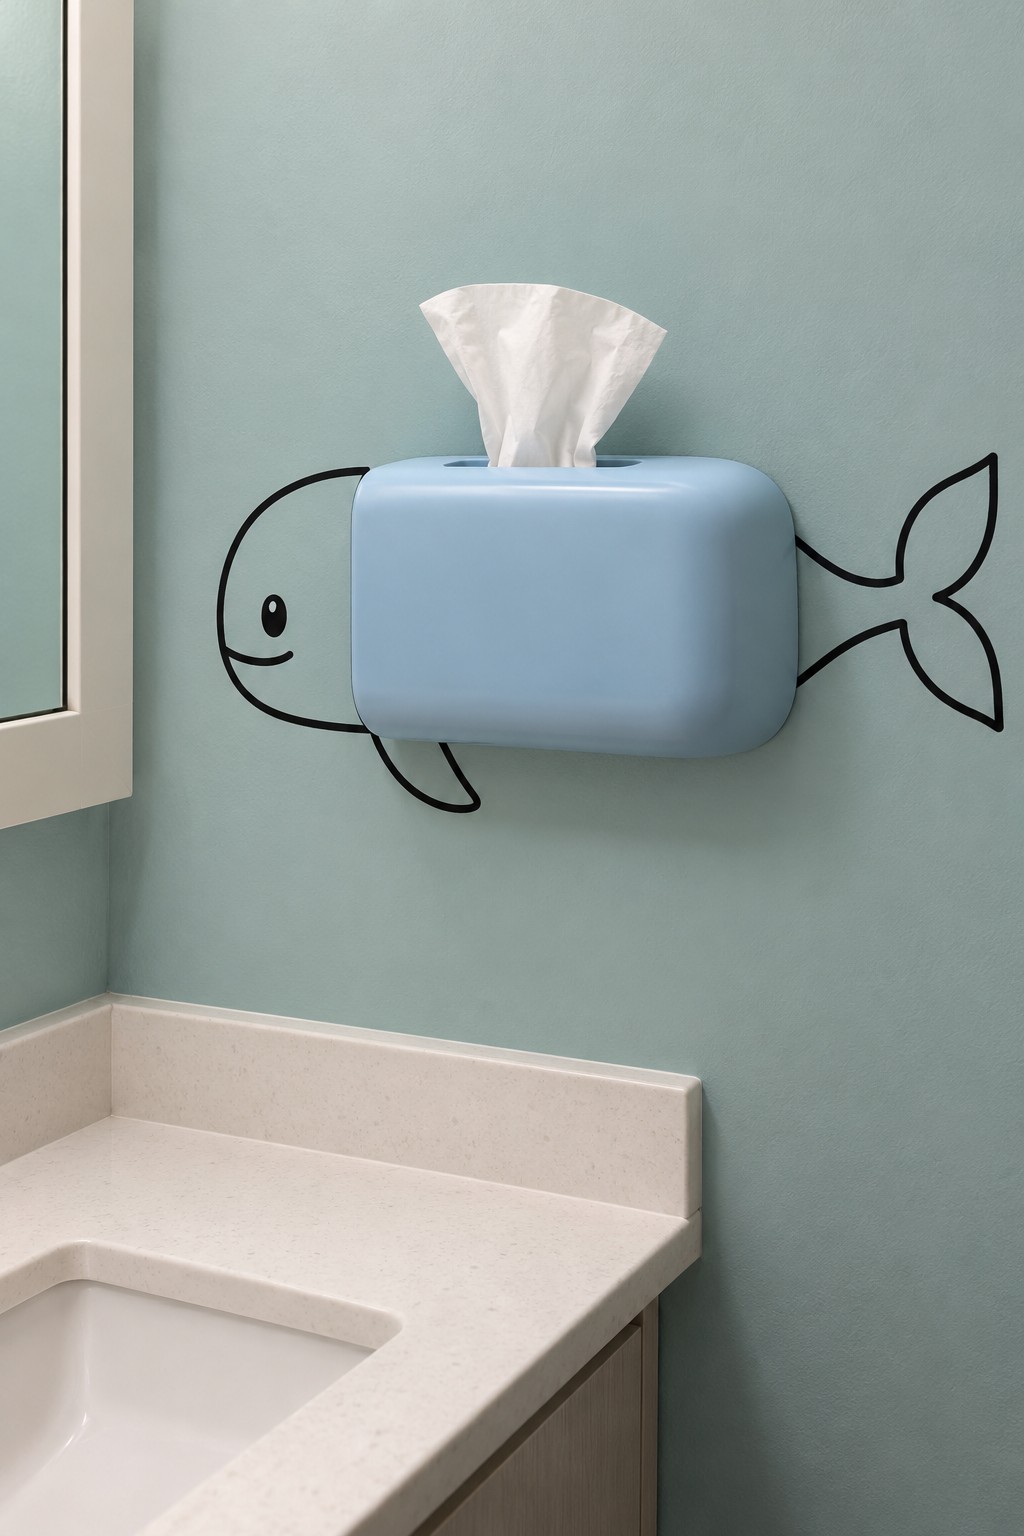
A blue tissue dispenser becomes a whale’s rounded body, and the tissue emerging from the top resembles a water spout. A small smiling head on one side, a tail on the other and a lower fin are enough to complete the animal. The surrounding blue green wall keeps the separate elements visually connected.
Choose a dispenser intended for wall use and check how its lid opens before drawing. Keep the head and tail outside the case so the design stays on the wall. Mount it where it is protected from basin splashes and within easy reach. Leave the tissue opening and refill mechanism free rather than adding decorative pieces directly to the container.
18. An Oval Wall Fixture Turned into an Airship
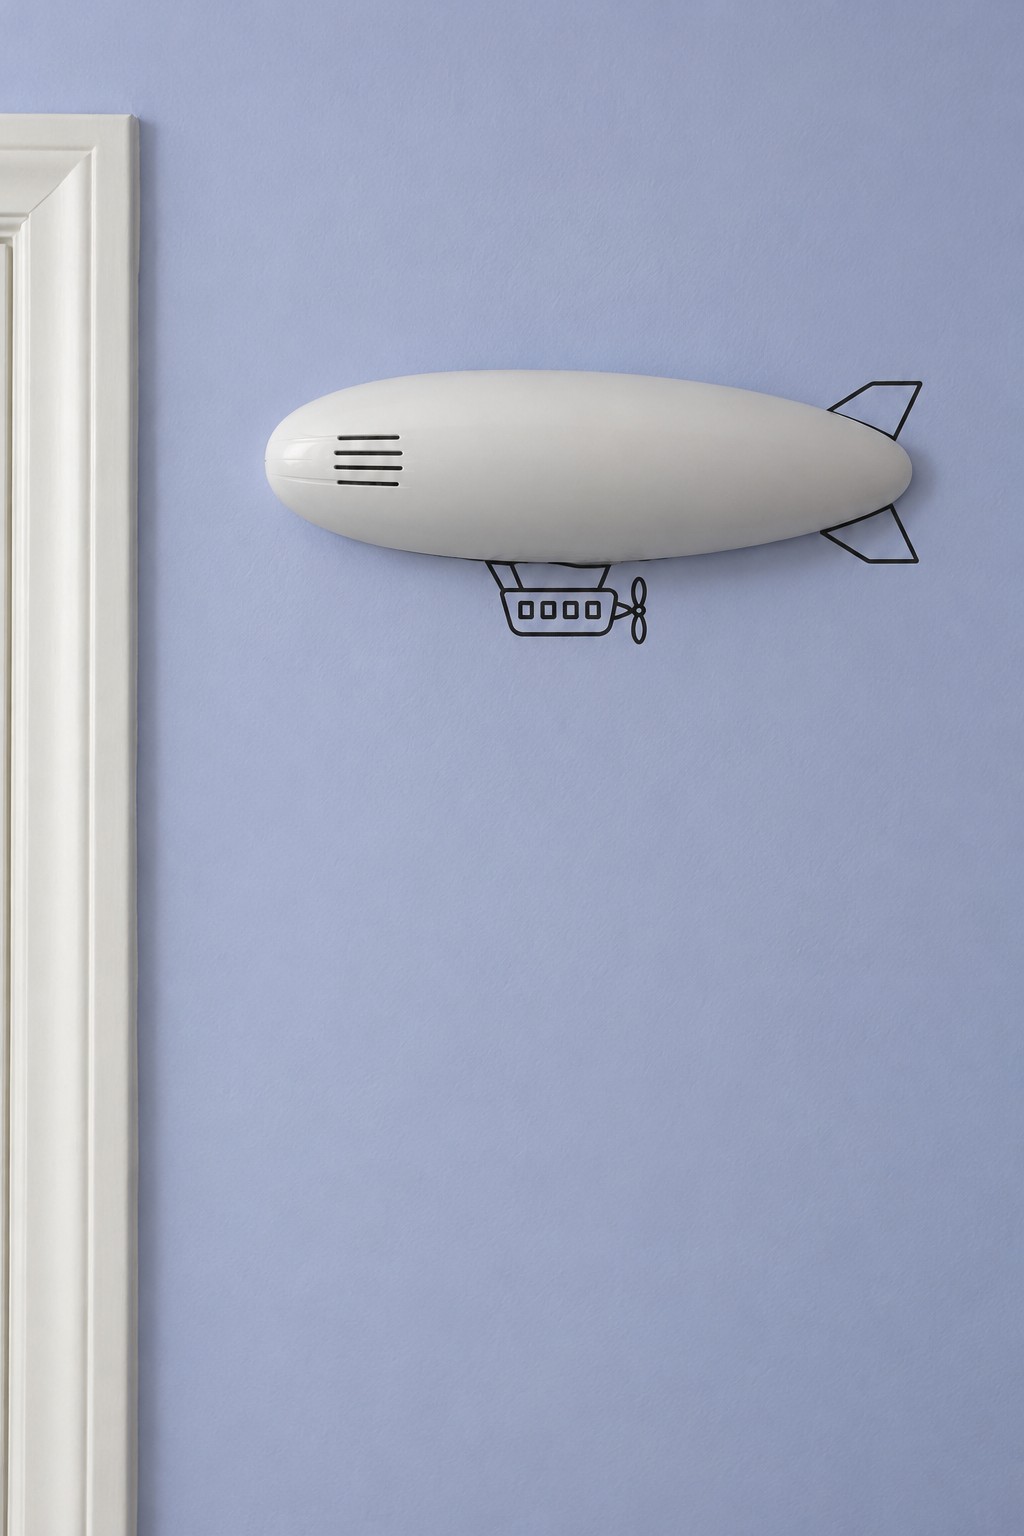
An elongated white wall fixture provides the rounded envelope of an airship. Small tail fins and a gondola drawn underneath establish the idea without obscuring the object. Against a lavender blue wall, the restrained outline feels like a tiny aircraft crossing an otherwise quiet patch of sky.
Adapt this approach to an existing oval wall unit only if its position and function suit the design. Trace its outline onto a paper template and add the fins outside that boundary. Keep vents, sensors and access points clear, and do not move or open an electrical fixture for the artwork. The drawing should respond to the fitting rather than interfere with it.
19. A Blue Towel Falling Through a Rocky Waterfall
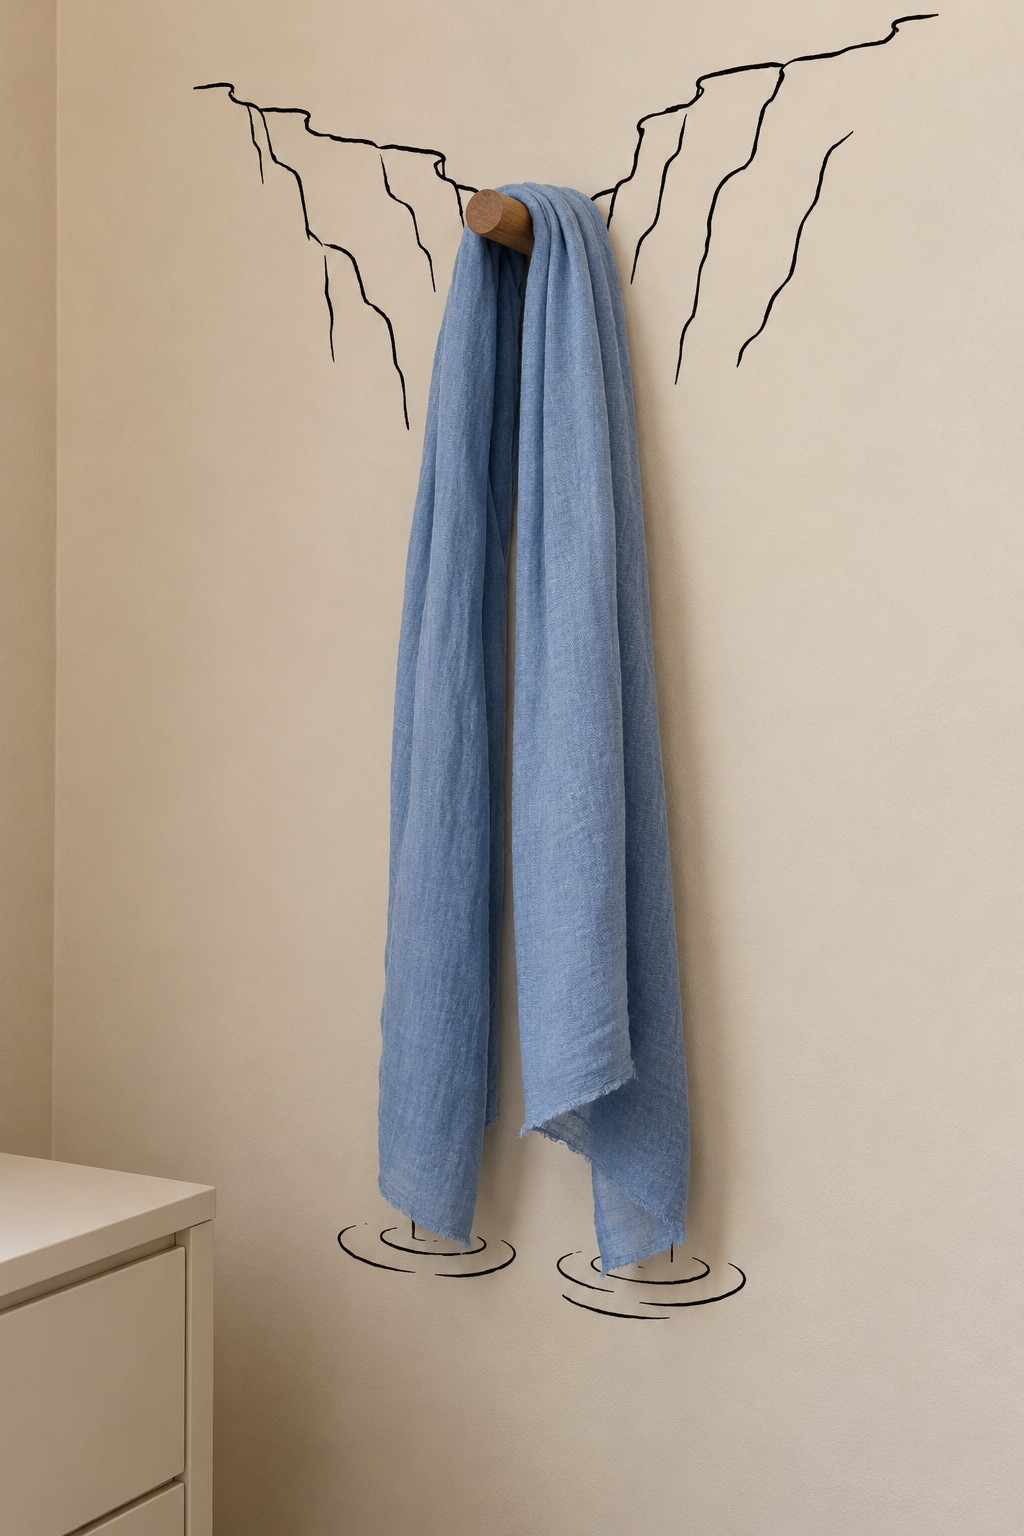
A long blue towel becomes a waterfall when irregular rock edges are drawn above and beside its upper folds. Two small groups of ripples below suggest where the falling water lands. The warm beige wall keeps the scene simple, letting the towel’s texture provide the movement and color.
Hang the towel as you normally would before deciding where the rocks and ripples should sit. Leave room for changes in the folds rather than tracing every fabric edge. Use a securely fixed peg suited to the damp towel’s weight, and allow the fabric to dry fully between uses. Keep the lowest painted ripples above the skirting and clear of nearby cabinet doors.
20. A Box Grater Standing as a Coastal Lighthouse
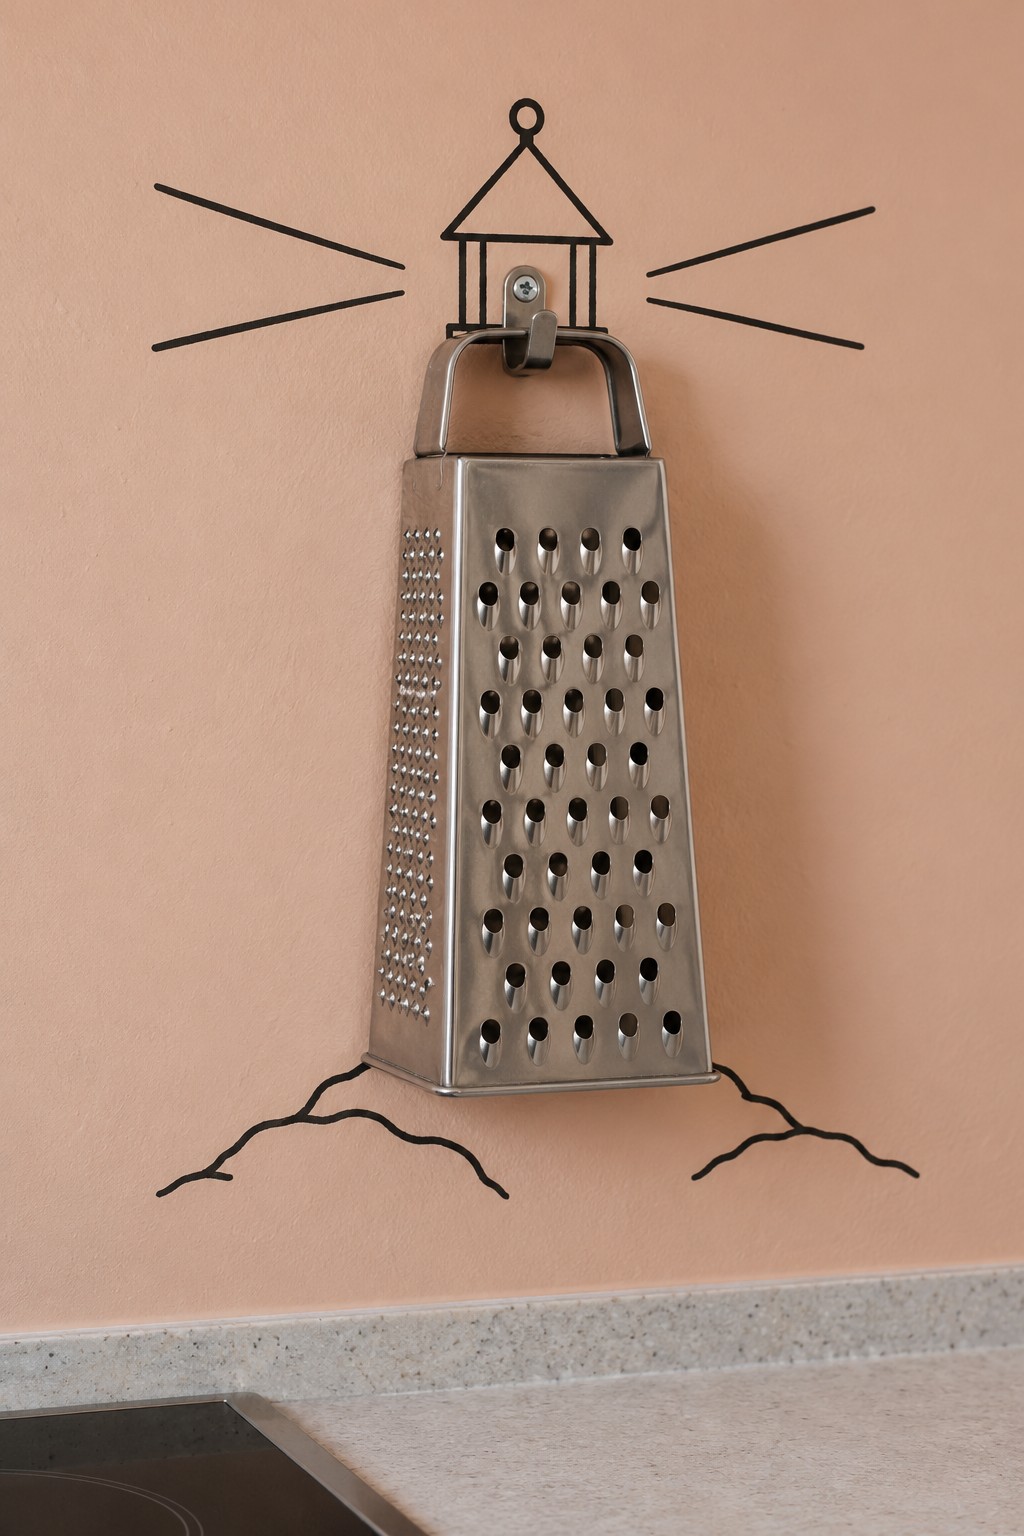
The tall taper of a box grater makes an effective lighthouse tower. Its handle sits below a little painted lantern roof, while a few outward lines suggest beams of light and an uneven base suggests coastal rocks. Warm peach paint prevents the metal from looking too severe in a kitchen setting.
Hang the clean grater securely by its handle and draw the lantern directly above its center. Keep the rays short enough that they do not dominate nearby cabinetry. Because the grating faces are sharp, position the display away from passing shoulders and children’s reach. Choose a location outside the cooktop’s heat and splash zone, with room to remove the grater safely.
21. A Spice Rack Carrying the Train’s Cargo
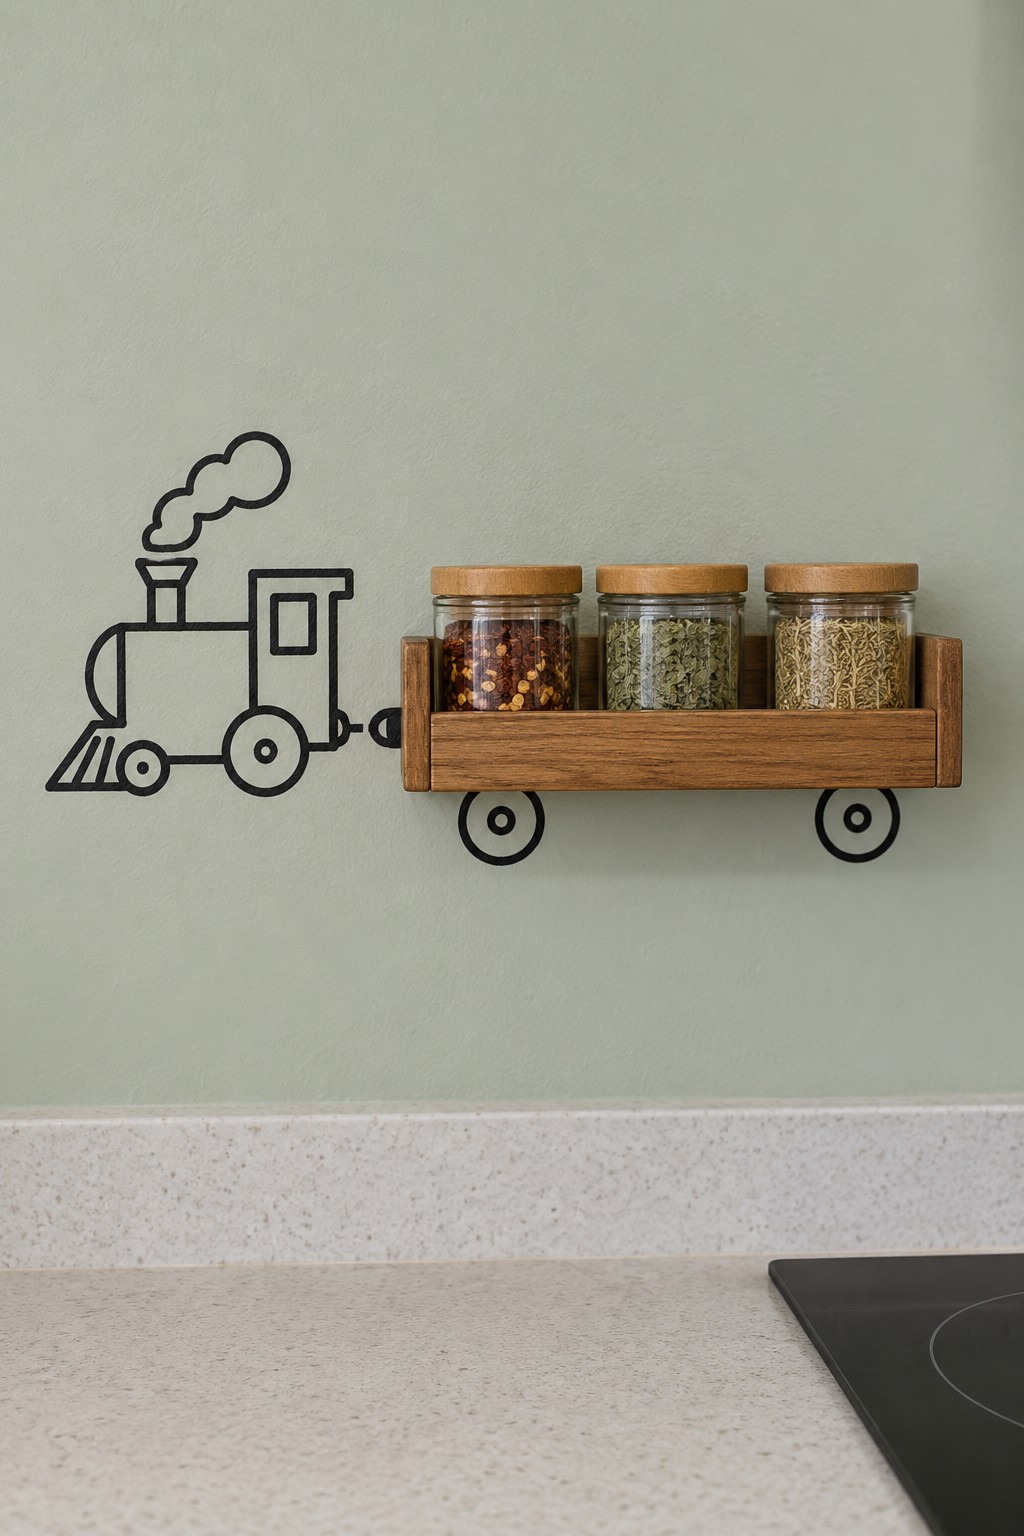
A shallow wooden spice rack becomes a freight wagon with a pair of painted wheels beneath it. A small locomotive to the left appears to pull the jars along the wall, turning useful kitchen storage into a short illustrated story. Pale green paint and matching jar lids keep the arrangement visually tidy.
Mount the rack for the combined weight of the shelf and filled jars, then draw the wheels beneath its ends. Add a short coupling line between the engine and the wooden wagon. Keep the retaining rail high enough for the jars you use, and locate spices away from direct cooking heat and strong sunlight. Leave room above each jar for a comfortable grip.
22. A Metal Funnel Finishing a Painted Trumpet
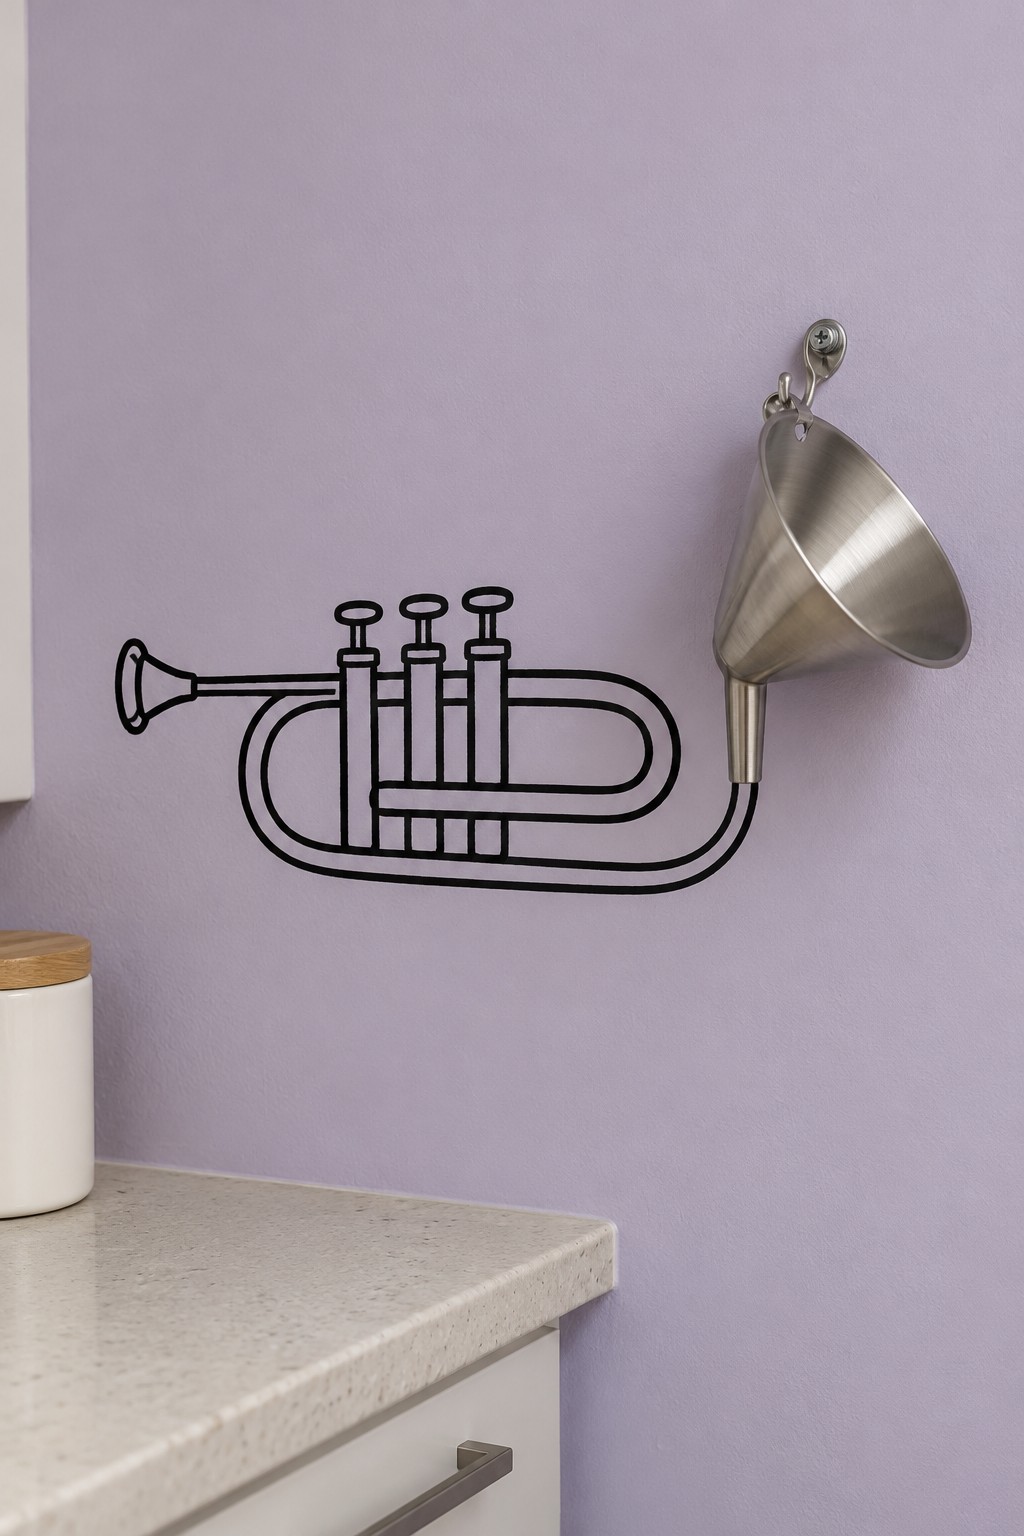
A stainless steel funnel supplies the flared bell of a trumpet, while the mouthpiece, looping tubes and three valves are painted on the wall. The real metal gives the instrument a bright focal point against lavender paint. It is a particularly good match for a small kitchen wall because one familiar utensil completes the entire idea.
Use the funnel’s hanging loop with a suitable hook and let it settle naturally before sketching. Bring the painted tube up to the narrow stem so the transition reads clearly from the main viewing position. Keep the funnel removable for washing. A simple outline works better than dense shading, which could compete with the metal’s natural reflections.
23. A Ceramic Soap Dish as a Tiny Clawfoot Tub
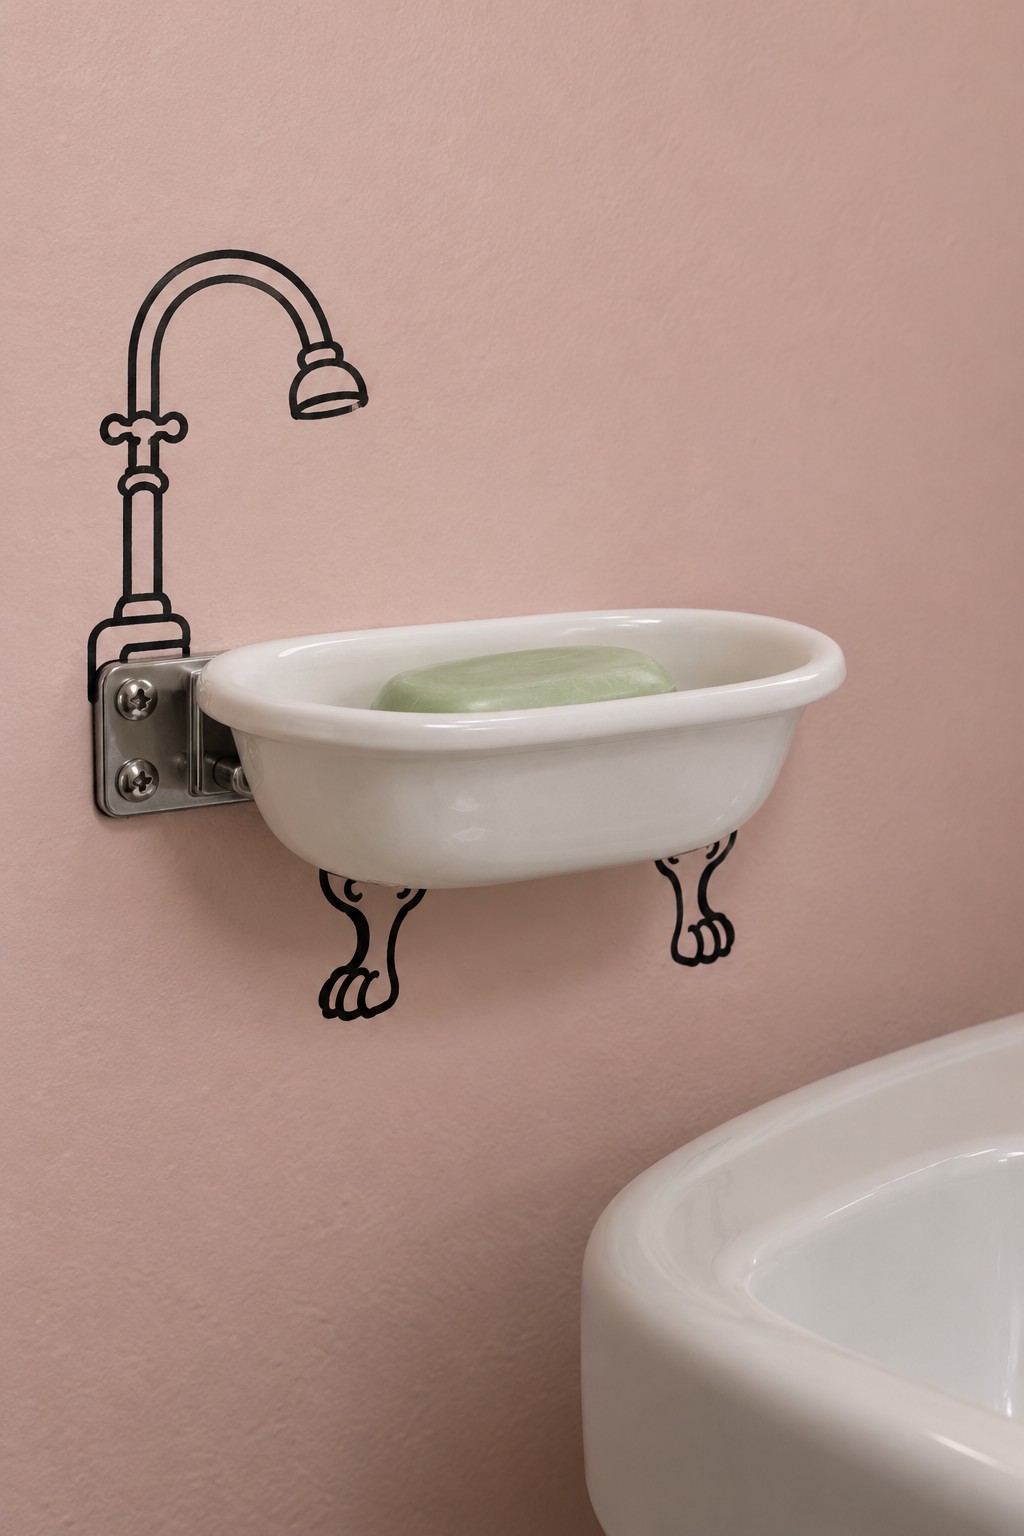
An oval white soap dish becomes a miniature bathtub with a curved faucet above and little claw feet below. The green bar of soap reinforces the idea of something sitting inside a tub, while the pink wall adds warmth. This is a compact option for the narrow space beside a basin.
Use a wall soap dish with its own proper bracket and drainage provision. Mark the bowl’s position before adding the feet, keeping them visible below its lower edge. The faucet is purely painted, so there is no plumbing to alter. Leave the bracket screws accessible and choose wall paint suitable for the surrounding bathroom conditions.
24. A Watering Can with an Elephant’s Raised Trunk
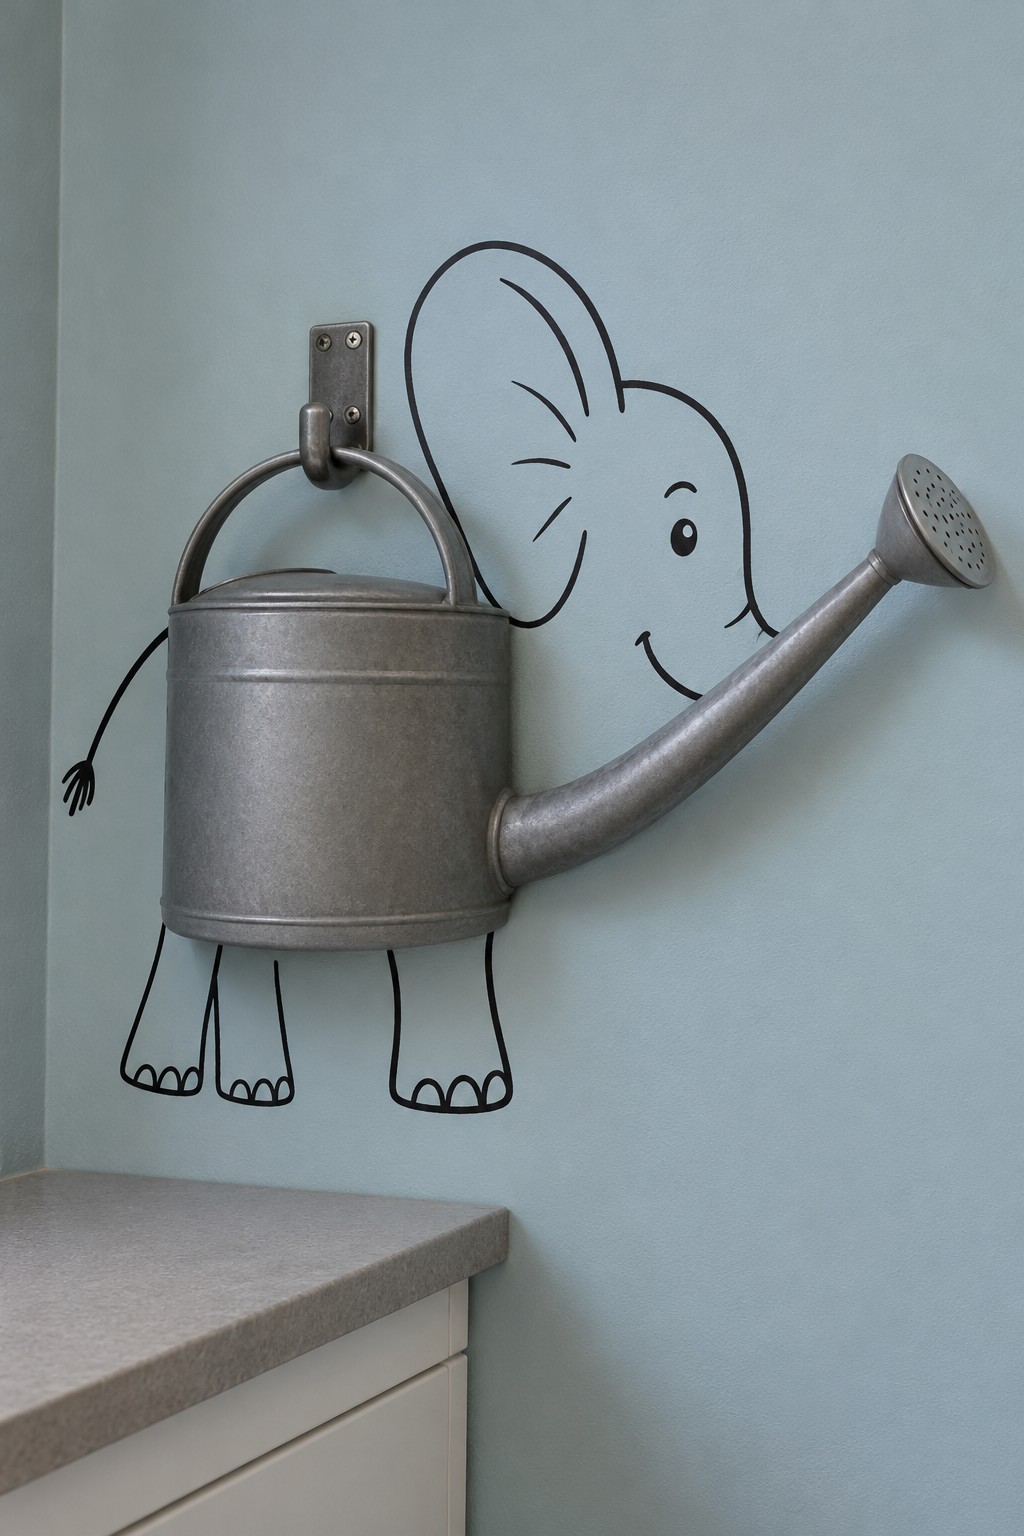
A galvanized watering can supplies both the elephant’s body and its lifted trunk. The drawn ear, eye, feet and tail make the animal recognizable while leaving the can’s handle and metal surface untouched. A muted blue wall complements the zinc finish and keeps the result gentle rather than busy.
Choose a lightweight can and store it empty on a secure hook. Position the head so the real spout reads as the trunk, then place the feet beneath the can’s body. Do not add a second painted trunk. Keep the spout out of a walkway and allow the can to dry before hanging it back in its place.
25. A Comb Making a Crocodile Grin
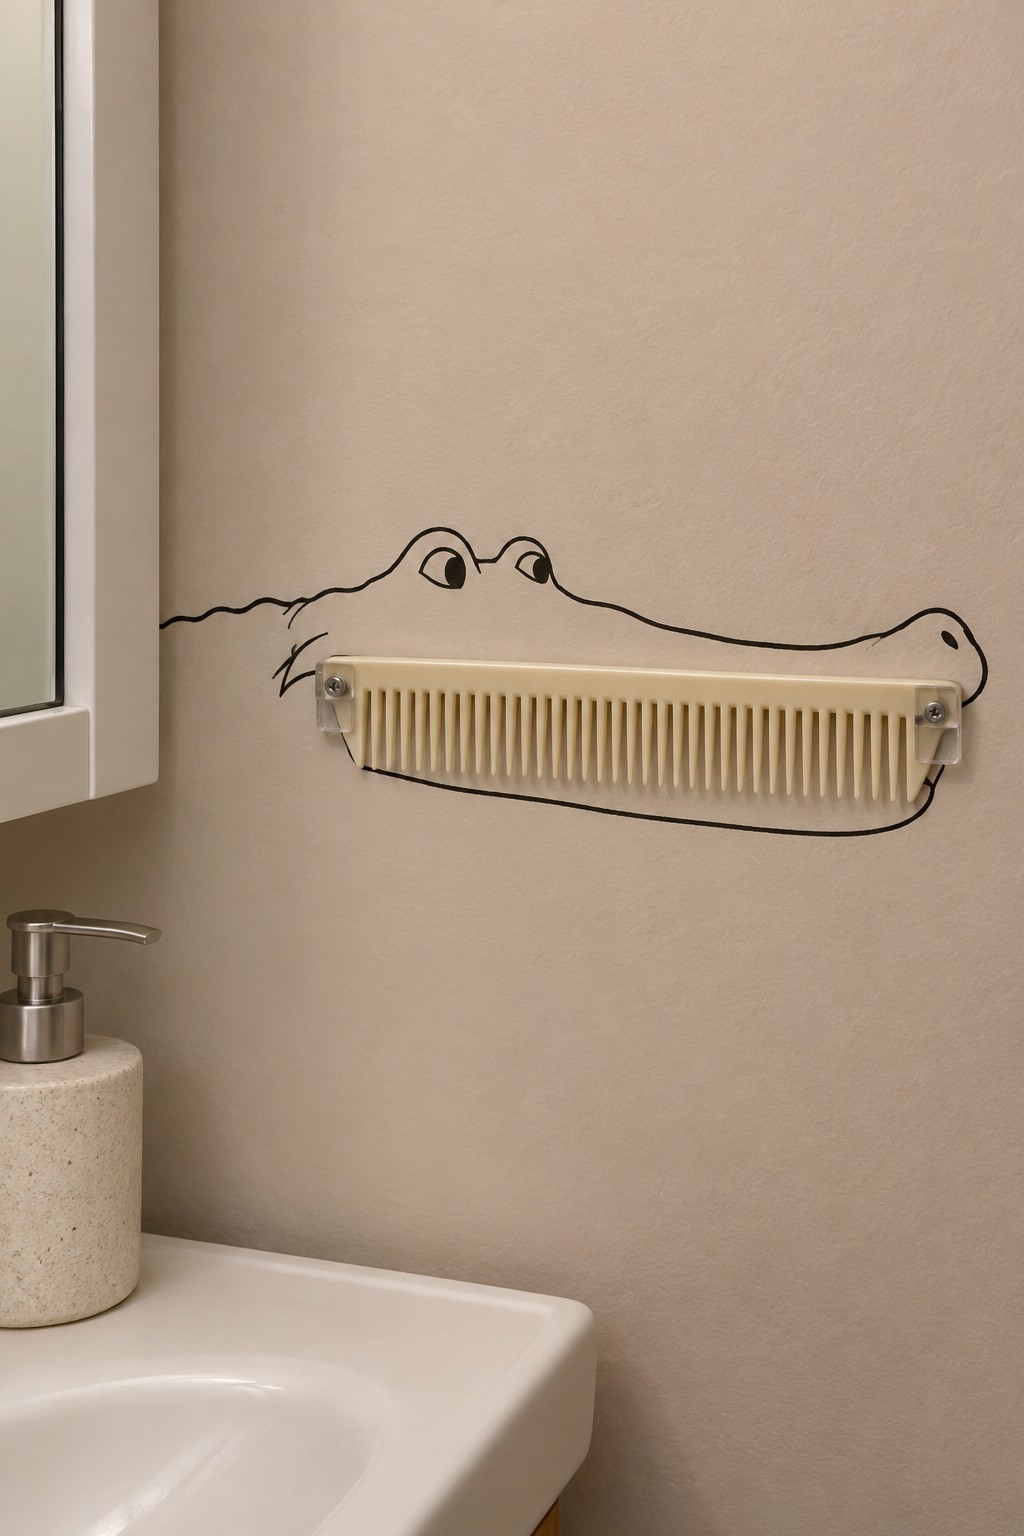
The evenly spaced teeth of a cream comb become a crocodile’s grin. A long snout, two raised eyes and a curved lower jaw complete the head on the beige bathroom wall. Because the comb supplies the most distinctive detail, the rest of the animal can stay very simple.
Use a pair of compatible clips or a purpose made comb holder that allows the comb to slide out without bending. Do not drill through a comb intended for daily grooming. Plan the jaw around the comb’s full length, leaving the ends accessible. Keep the holder clear of basin splashes and clean both the comb and its support regularly.
26. A Wi Fi Router Becoming a Tiny Robot
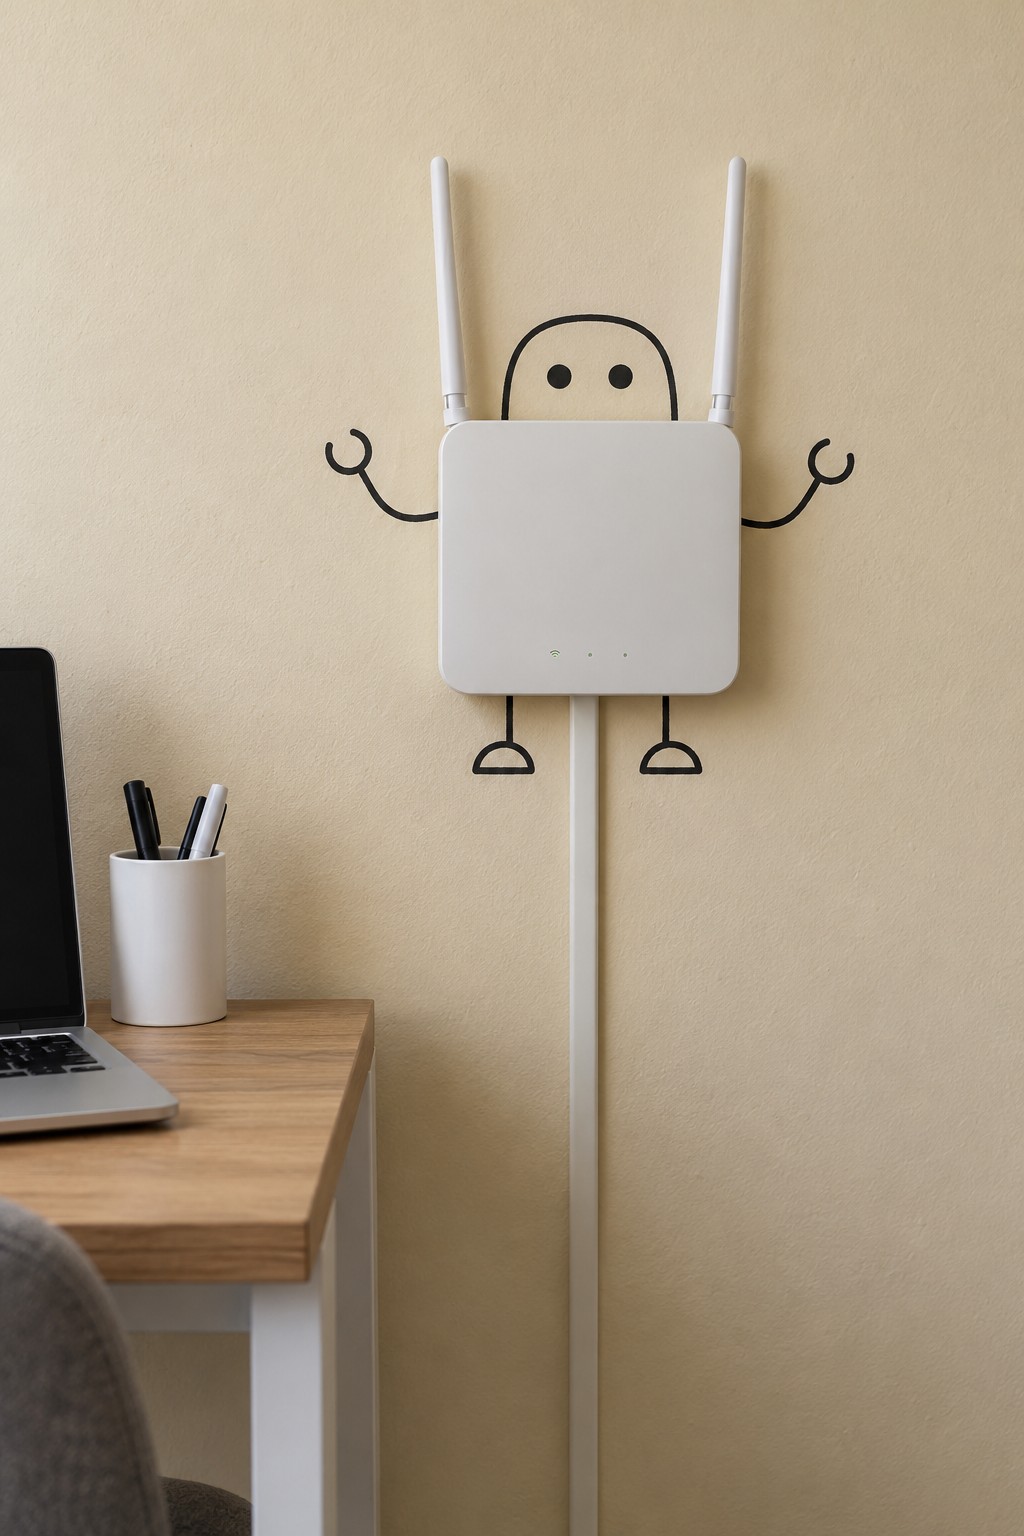
A square white router becomes a compact robot with two real antennas rising beside its painted face. Small curved arms and simple feet give it personality without crowding the device. The cream wall keeps the composition quiet enough for a working desk area, and the straight cable route below remains visible and orderly.
Only use this idea if the router’s manufacturer allows the intended wall orientation. Keep ventilation slots, ports, status lights and reset access clear. Paint around the device’s outline without covering it or changing antenna positions merely for symmetry. Leave cables with enough slack for servicing, and avoid enclosing the router in a decorative box.
27. A Cello Between Delicate Butterfly Wings
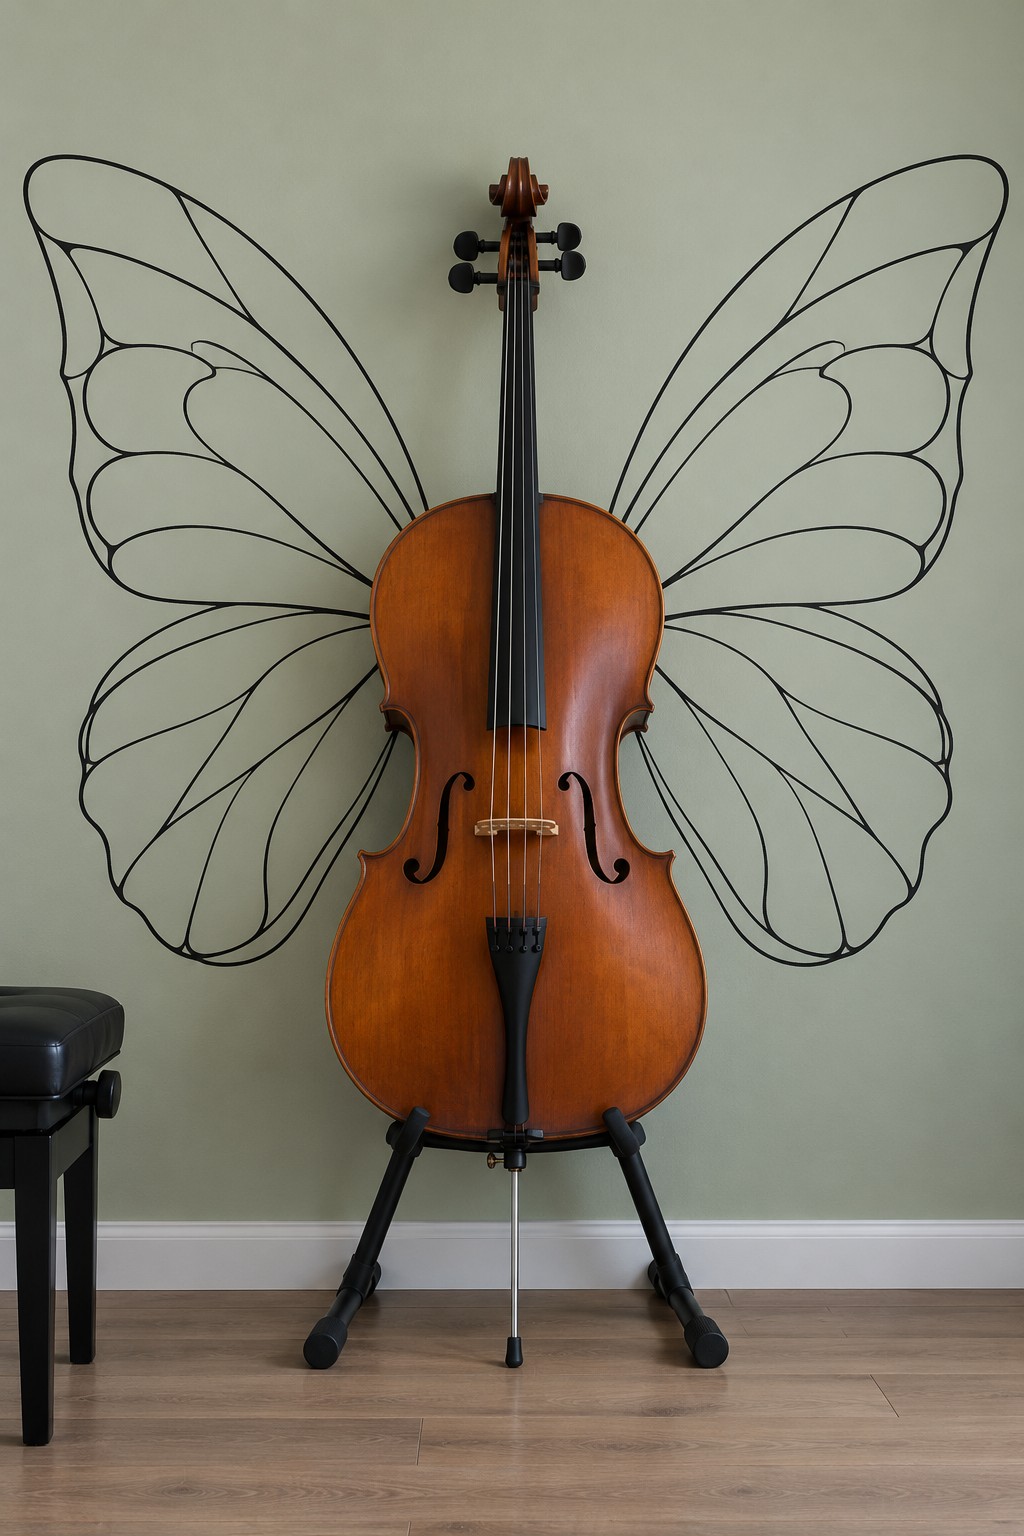
A cello’s long neck and curved body become the center of a large butterfly. Sweeping wing outlines extend across the sage wall, with a few internal divisions that echo the instrument’s graceful curves. The warm wood provides the only strong color, giving a music corner a focal point without adding shelves or ornaments.
Keep the cello on a stable, padded stand designed for its size. Establish the stand’s position first, then draw the wings around the instrument’s silhouette from the main viewing angle. Remove the instrument from the area while painting and let the coating cure before returning it. Keep the display away from direct sun, radiators and unstable humidity.
28. A Washing Machine in a Polar Bear’s Embrace
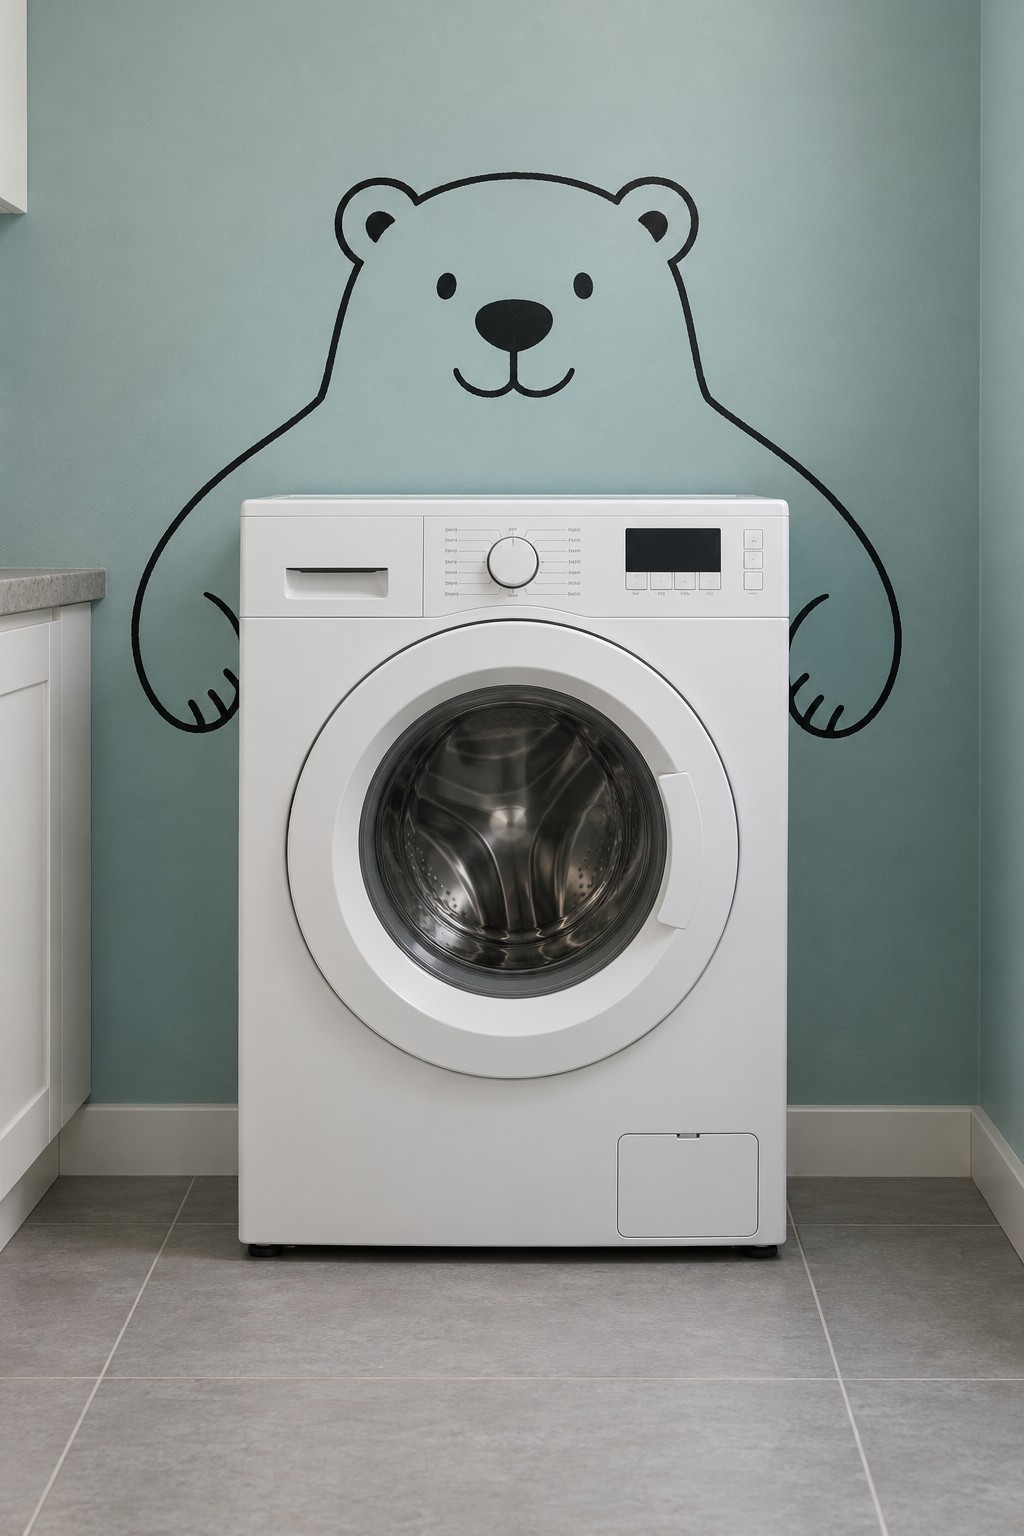
A white washing machine becomes the broad center of a polar bear, with a smiling head above and curved arms visible at the sides. The large round door adds a second focal point without needing any paint on the appliance. A blue green laundry wall makes the white machine feel deliberately included in the room’s design.
Plan the bear around the machine’s installed position, keeping the control panel, detergent drawer and door swing clear. Paint only the wall and preserve the appliance’s required ventilation and service space. The machine should remain level and accessible; do not pull it against the wall or restrict hoses just to tighten the outline.
29. A Longboard Shaped into a Seahorse
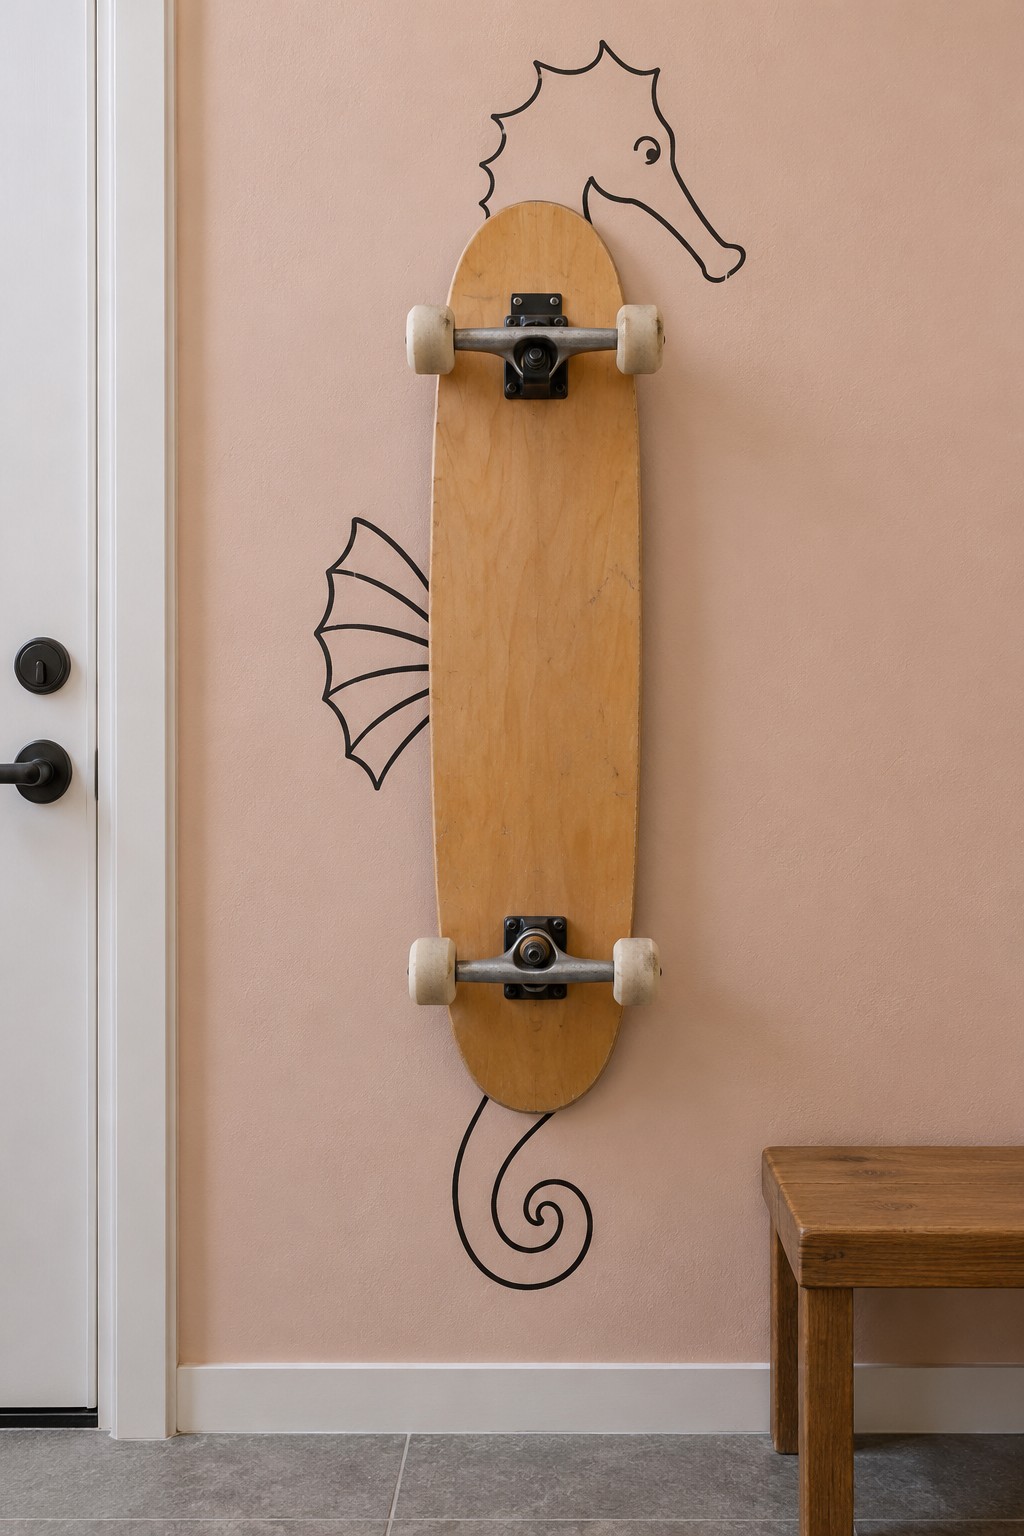
A vertically stored longboard becomes the elongated body of a seahorse. A small horse shaped head appears above the deck, a ribbed fin extends to one side, and a curled tail finishes the bottom. The natural wood and peach wall create a warm entryway feature while keeping the board recognizable.
Use a dedicated skateboard storage mount compatible with the complete board, including its trucks and wheels. Set the position high enough to leave room for the curled tail, but within comfortable reach. Draw around the deck rather than across it, and check the nearby door swing. The board should come off its mount without catching the wall or neighboring furniture.
30. A Tall Refrigerator Imagined as a Submarine
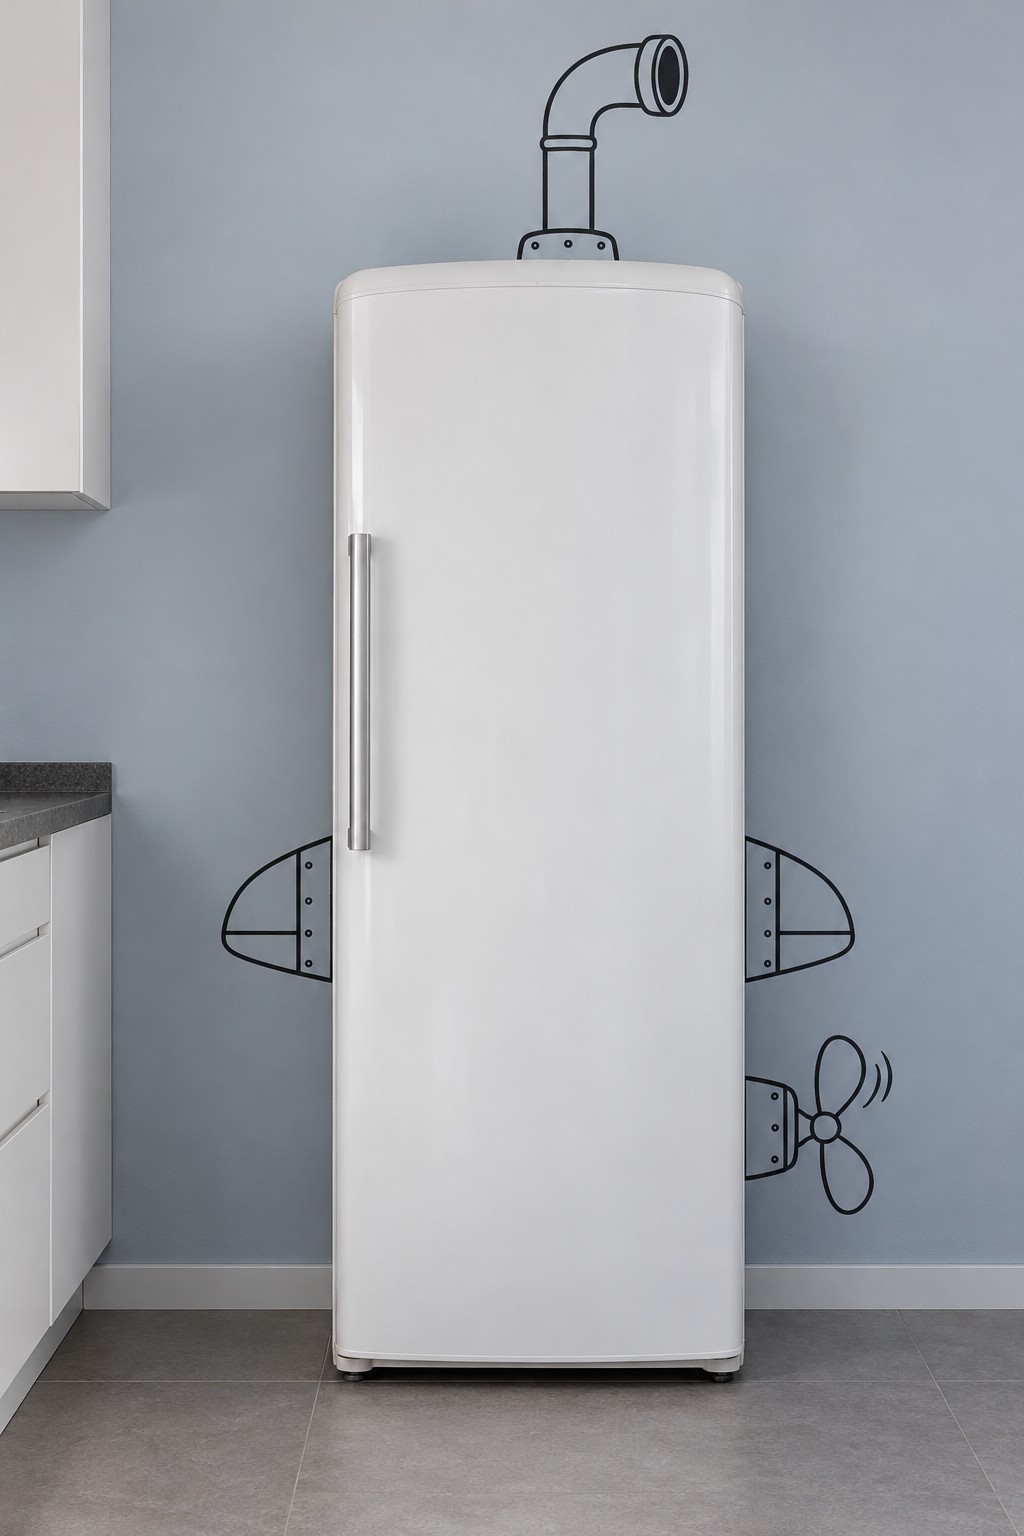
A tall white refrigerator becomes an upright submarine through a handful of details on the wall: a periscope above, small side fins and a propeller near the base. The gray blue background suggests an underwater setting while leaving the appliance front clean and usable. The vertical composition suits a narrow kitchen recess.
Map the drawing from the refrigerator’s final installed position, allowing the clearances specified in its manual. Keep the door handle, ventilation and service access unobstructed. Painted fins can extend into visible wall space without touching the appliance. Check the full door opening before adding the artwork, especially when the refrigerator stands beside a counter or cabinet.
31. A Stored Ironing Board with Penguin Flippers
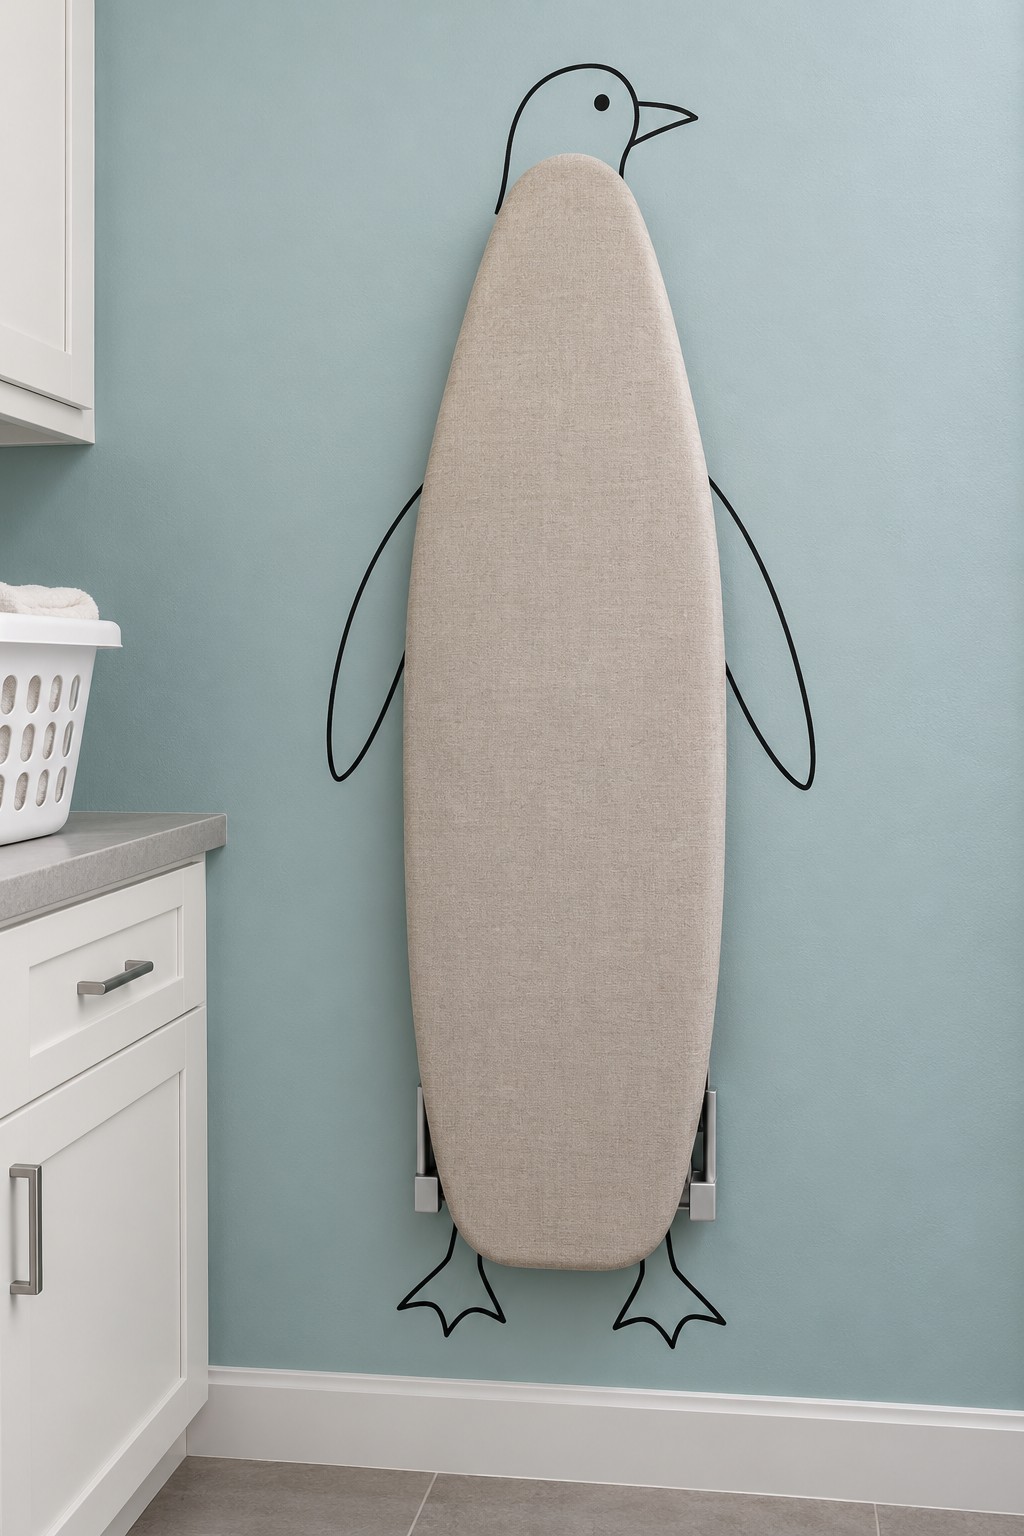
A folded ironing board with a plain fabric cover becomes a penguin’s long body. A small head peeks above the rounded end, slim flippers extend from the sides, and webbed feet appear below. The cool blue wall and oatmeal fabric create a gentle laundry room feature with very little added detail.
Use a storage bracket that retains the board securely and is rated for its weight. Check how the folded legs fit before marking the outline. Place the painted flippers beyond the cover’s edges and keep enough space to lift the board out without scraping the wall. Let the board and cover cool and dry before putting them away.
Start with One Object and Let the Drawing Do Less
A clear connection is more memorable than a crowded mural. Choose one item, keep its normal use intact, and add the smallest set of lines that gives it another identity. After the object is in place, check the composition from across the room and remove any extra detail that competes with it. A little space around the artwork helps the visual idea register.
If you want to carry painted detail into another part of the room, explore these floor painting ideas for borders and patterns. Repeat a color or simple curve while choosing a coating intended for each surface, so the room feels connected without repeating the same motif everywhere.

Leave a Reply