
A bundle of lavender, a crooked branch and a few scraps of dark linen can become a wall decoration with a distinctly witchy character. This collection brings together 33 witchy crafts for home, including botanical wreaths, moon hangings, stitched organizers, small witch figures and larger Gothic wall pieces. Natural textures do much of the work, while plum, charcoal, cream and muted brass give the details a shared mood.
Begin with the illustrated botanical hanger below to understand how a wooden support, metal connectors and decorative additions fit together. Then explore the individual ideas for suitable materials, a practical making approach and details worth adjusting for your own room. You can borrow the same principles across the collection: prepare the base, establish its hanging points, attach the heavier parts, and finish with lighter ornament.
Table of Contents
- Materials That Give Witchy Crafts Their Character
- Make a Botanical Branch Hanger Step by Step
- Gather the Materials
- 1. Check the Parts Before Assembly
- 2. Prepare the Branch and Its Holes
- 3. Install Three Closed Screw Eyes
- 4. Fill and Close the Mesh Spheres
- 5. Connect Each Infuser to Its Chain
- 6. Attach the Chains and Black Fabric
- 7. Tie the Main Hanging Cord
- 8. Hang and Check the Finished Arrangement
- Find a Witchy Craft for Your Wall
- 1. Botanical Wreath with Three Miniature Brooms
- 2. Evergreen Star Wreath with Dried Orange
- 3. Blush Diamond Web with a Crystal Pendant
- 4. Pointed Moon Frame with Lavender Fringe
- 5. Harvest Hexagon with Strawflowers and Ochre Thread
- 6. Twig Witch Hat with Rust and Charcoal Ribbons
- 7. Lunar Wing Hanging with Three Clay Charms
- 8. Forked Branch Moon Hanging with Woven Strips
- 9. Stitched Wooden Palm with an Eye Motif
- 10. Black Double Hoop with a Star and Beaded Fringe
- 11. Natural Crescent with Green Beads and Feathers
- 12. Purple Bead Ring with a Black Pentagram
- 13. Dark Twig Star with a Fine Web
- 14. Beaded Pentagram in Black and Berry Pink
- 15. Rose Ribbon Star on a Vine Ring
- 16. Twig Star with Four Brass Bells and Two Keys
- 17. Spider Web in a Forked Branch
- 18. Looped Black Rope Motif with Three Bells
- 19. Small Cloth Witch in a Hanging Basket
- 20. Knotted Herb Cord with a Single Bell
- 21. Linen Wall Organizer with Three Rustic Pockets
- 22. Three Botanical Infusers on a Wooden Branch
- 23. Layered Paper Witch in a Shadow Box
- 24. Birch Look Cone for Dried Herbs
- 25. Garlic Braid with Rosemary and a Wooden Tag
- 26. Long Yarn Witch with a Plum Hat
- 27. Crossed Twig Brooms with a Central Pouch
- 28. Braided Fabric Serpent Ring with a Key
- 29. Veiled Oval Frame with Burgundy Stitches
- 30. Laced Coffin Shaped Textile Banner
- 31. Rag Wrapped Hoop with Three Dark Bells
- 32. Nine Linen Parcels on a Dark Display Board
- 33. Gothic Shutter Plaque with Cord and a Sealed Tag
- Keep the Handmade Details Looking Their Best
Materials That Give Witchy Crafts Their Character
Choose the structure before choosing the decoration. A small stitched charm needs a different support from a wooden plaque or a hanging with several metal bells. Make a paper outline at the size you intend to use, then hold it against the wall to check the available space.
- Wood and branches: Use sound, dry wood without soft patches or crumbling bark. Smooth cut ends and cord holes. Pliable willow suits curved frames; dry rigid twigs suit straight arrangements.
- Fabric and cord: Linen, cotton, felt, gauze and braided cord create different textures. Sew hanging loops into reinforced fabric, and use separate bindings for decorative strips.
- Botanical details: Work with fully dried flowers, herbs, seed heads and fruit. Bind substantial bundles to the frame with twine or florist wire, tucking wire ends inward.
- Glue: A small amount of clear drying craft glue can hold light dried stems against a paper backing. Choose a felt or fabric adhesive for fabric embellishments and test a scrap first. Bells, heavy charms and the main hanger need mechanical connections.
- Color: For new wooden craft blanks, sand lightly, remove the dust and apply compatible craft primer where required. Brush on thin coats of acrylic paint and let each dry. Use fabric paint for flexible painted textiles.
Keep the finished pieces indoors unless every material and fixing is suitable for the intended exposure. Leave dried plants, gauze and loose cords away from flames and heaters. Select wall hardware for the assembled weight and the wall construction, especially for the larger framed designs.
Make a Botanical Branch Hanger Step by Step
Three mesh tea infusers turn dried lavender, rosemary and orange peel into small botanical displays. The branch carries the weight through metal screw eyes and chains; the black fabric knots add texture. This project develops the same arrangement used in idea 22, and its connector method can also help when planning separate dangling charms.
The dimensions below are suggested starting sizes for a compact version. Match the screw length, chain links and connector openings to your actual materials before assembling anything.
Gather the Materials
- One dry branch about 32 cm long and 3 cm thick, with two smooth hanging holes near its ends
- Three hinged metal mesh tea infusers about 6 cm across, each with a secure clasp and a metal hanging eye
- Three small closed screw eyes suitable for the branch
- Three metal chains, approximately 9 cm, 16 cm and 9 cm long
- Six split rings sized to pass through the chain links and hanging eyes
- About 90 cm of strong natural cord, with extra length left for tying
- Three narrow strips of black cotton, cut before assembly
- Small amounts of completely dry lavender, rosemary and orange peel
- Fine sandpaper, pencil, scissors, drill and suitable bits, clamps, a wood backing block and split ring pliers
- A wall hook and fixings appropriate to the wall and finished weight
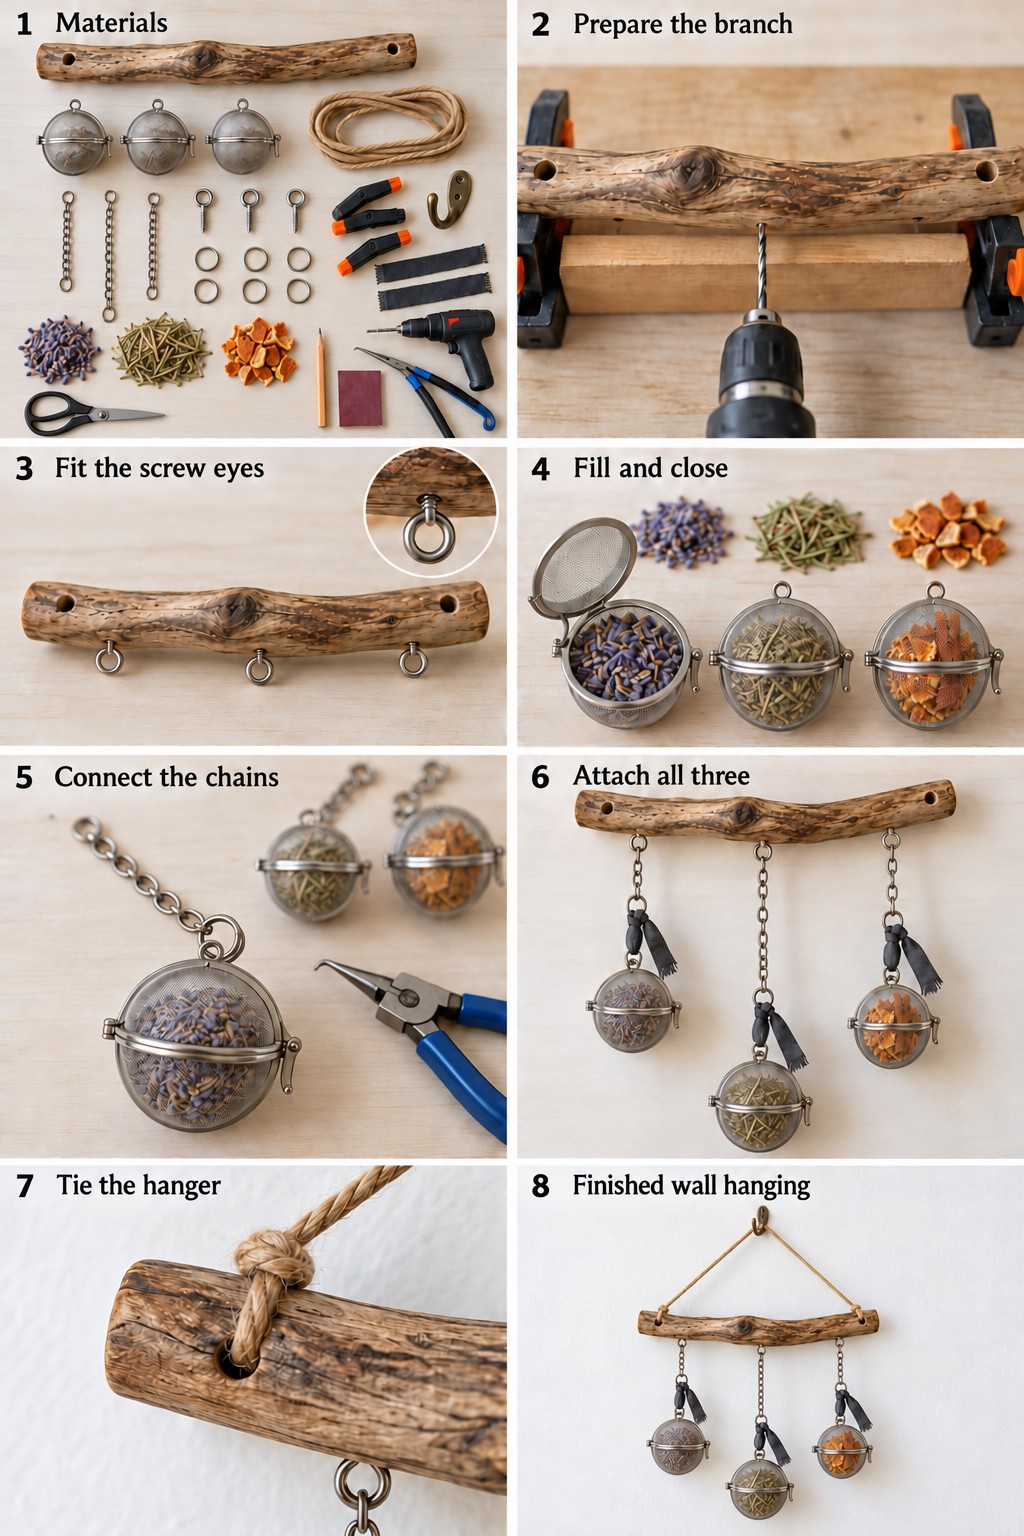 Read the panels from left to right. Lavender stays on the left, rosemary hangs lower in the center, and orange peel stays on the right throughout assembly.
1. Check the Parts Before Assembly
Open and close each infuser to check its hinge and clasp. Lay out the chains in their final order, with the longest in the middle. Test one split ring through an infuser eye and a chain link so you know the connectors fit. The branch in the example already has its two end holes; an unprepared branch needs those added in the next stage.
2. Prepare the Branch and Its Holes
Brush away loose debris and smooth rough areas. Keep the same face of the branch toward you as you mark the three evenly spaced underside attachment points. If needed, drill the two suspension holes from front to back near the ends, leaving sound wood around each opening. Clamp the branch against a backing block rather than holding it by hand. Drill shallow pilot holes underneath to suit the screw eyes, without breaking through the opposite surface.
3. Install Three Closed Screw Eyes
Turn one screw eye into each pilot hole until its threaded section is securely seated. Stop if the wood begins to split, or if an eye turns freely without gripping. The three eyes must face downward and remain accessible for the chain connectors. Check them before adding the infusers.
4. Fill and Close the Mesh Spheres
Add lavender to the left sphere, rosemary to the center sphere and orange peel to the right sphere. Use a loose filling that allows every lid to close normally. Clear the rims and clasps of stray stems, then latch all three containers. Damp plant material can spoil inside a display, so dry it thoroughly before filling.
5. Connect Each Infuser to Its Chain
Use split ring pliers to lift the end of a split ring just enough to feed on a chain link and the infuser's hanging eye. Rotate both components around the ring until they sit securely within its overlapping coils. Add a second split ring to the other end of the chain. Repeat for the other two infusers, keeping the longer chain with the rosemary.
6. Attach the Chains and Black Fabric
Connect each upper split ring through its matching screw eye beneath the branch. The two outside chains should hang at the same height, with the middle chain lower. Tie a black cotton strip around each lower connector, leaving the infuser clasp accessible. Check that metal supports each sphere from branch to hanging eye and that the fabric does not substitute for a link.
7. Tie the Main Hanging Cord
Thread one cord end through each end hole and bring it back toward its standing length. Secure each return with two snug half hitches around the standing cord, leaving a short tail. Pull gently while the branch is supported to seat the knots. Adjust the two sides until the branch hangs level, then check that neither knot slides.
8. Hang and Check the Finished Arrangement
Place the cord over the installed wall hook and lower the weight gradually. Check both cord attachments, all three screw eyes, the six split rings and the three infuser clasps. The spheres should hang freely without pressing against one another. To refresh the contents, take the arrangement down and open the infusers over a tray.
If the branch tilts, adjust the hanger before adding decorative weight. If a connector catches on a link, use compatible hardware with more clearance instead of forcing it. These checks are useful for the bell and charm hangings below as well.
Find a Witchy Craft for Your Wall
The following ideas range from delicate botanical frames to substantial textile and wooden pieces. Choose a design for the space you actually have, then adapt its materials and scale using the preparation and attachment principles above. Each suggestion focuses on a particular finish, shape or construction detail so you can decide where to begin.
1. Botanical Wreath with Three Miniature Brooms
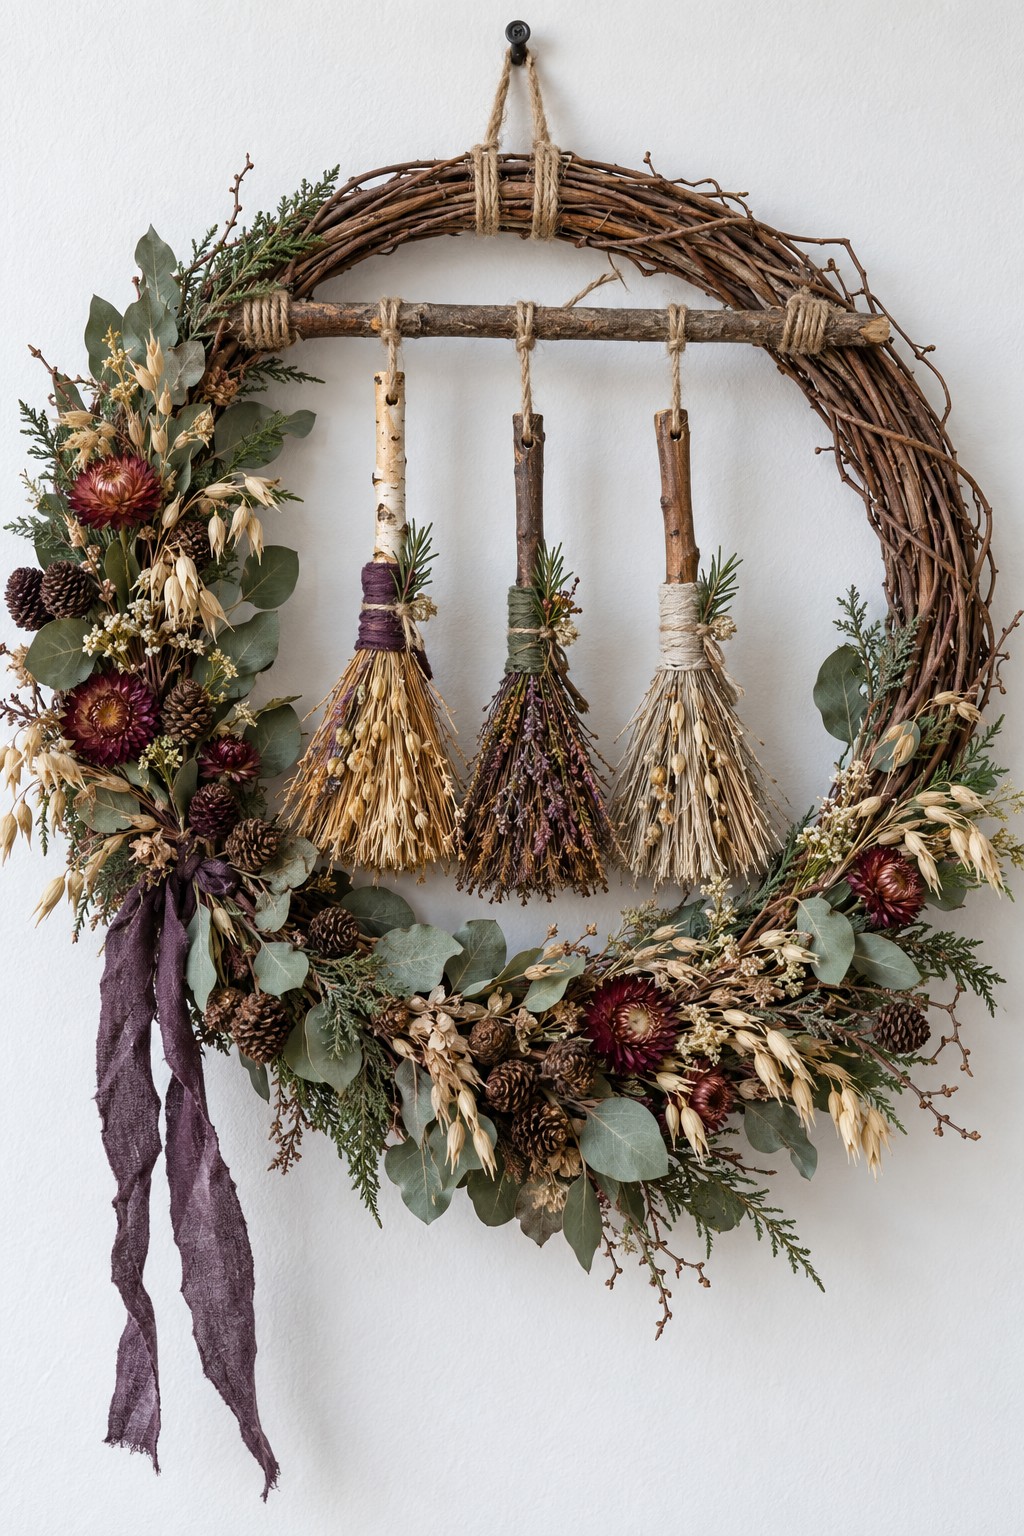
Three small brooms suspended inside a grapevine wreath make the open center part of the design. Use short twig handles and small bundles of dried grasses or herbs, binding each bundle firmly around its handle with cotton thread. Leave the upper handle exposed so it reads clearly as a broom.
Lash a straight branch across the wreath and hang the brooms from separate cord loops. Add wired botanical bundles around the lower edge and one side, letting pale leaves sit behind the darker flower heads. A loose plum ribbon balances the dense arrangement. Keep the bristles clear of the lower foliage so the three silhouettes remain distinct.
2. Evergreen Star Wreath with Dried Orange
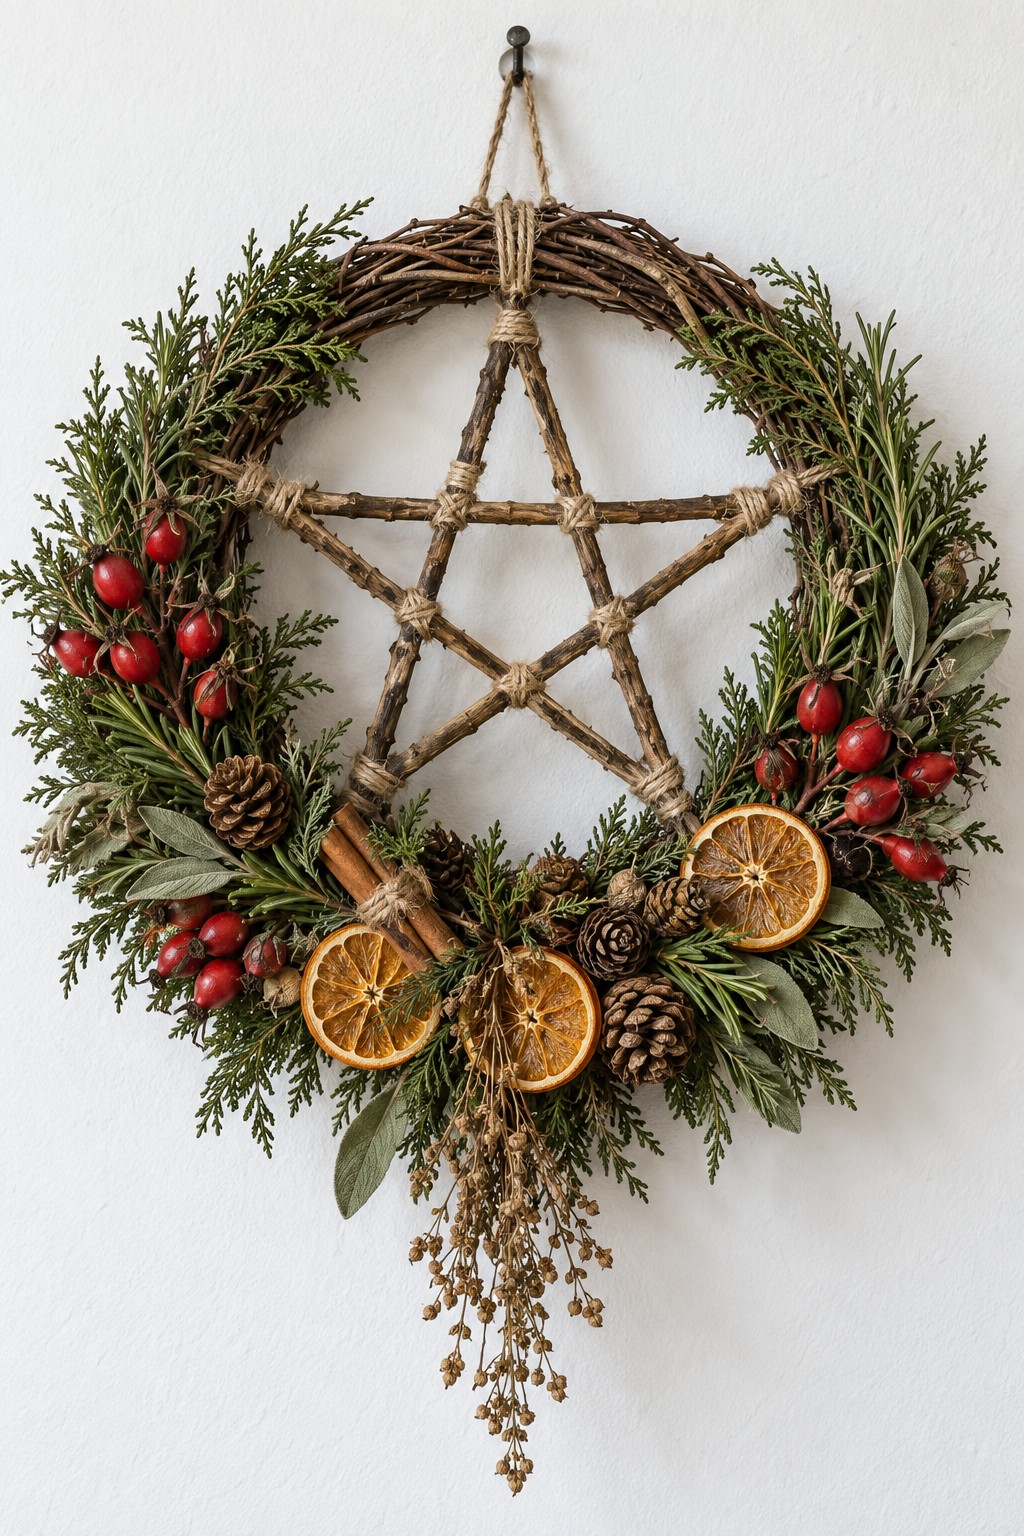
A twig star gives this evergreen wreath a clear center, while dried orange slices and cinnamon add warm brown and amber tones. Make the star separately from five slender sticks, tying their meeting points and securing loose crossings before fastening it inside a sturdy vine ring.
Wire small foliage bundles around the base in a consistent direction, then attach cones and completely dried citrus with their own ties. Artificial red berries are a practical option for a lasting display. Leave space around the star's points rather than hiding them beneath greenery. A wide natural cord loop at the top should support the wreath base itself.
3. Blush Diamond Web with a Crystal Pendant
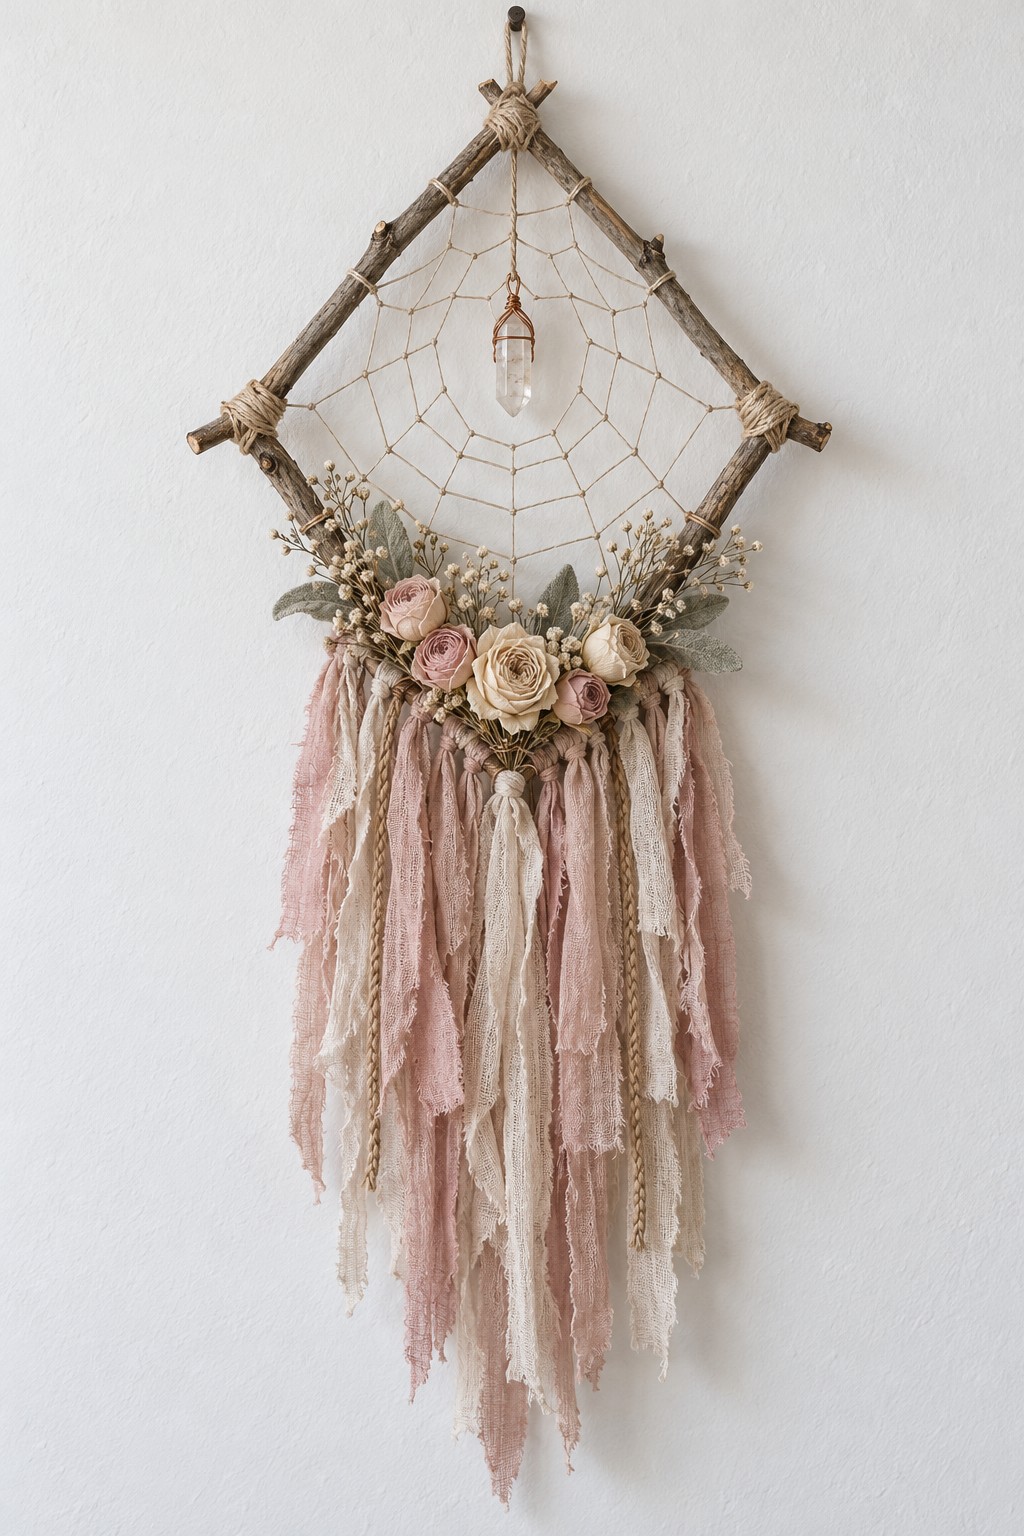
Four overlapping twigs create a diamond frame that feels lighter than a full wreath. Bind each corner before adding the web, then work fine cord inward from evenly spaced points around the perimeter. Keep the tension gentle enough that the frame stays flat.
Suspend a clear pendant from its own secure loop at the upper corner, allowing the web to remain decorative. Tie pale pink and cream fabric strips along the lower sides, then cover their attachment area with small dried roses and seed stems. The soft colors suit a bedroom wall, especially where the long fringe can hang without brushing furniture.
4. Pointed Moon Frame with Lavender Fringe
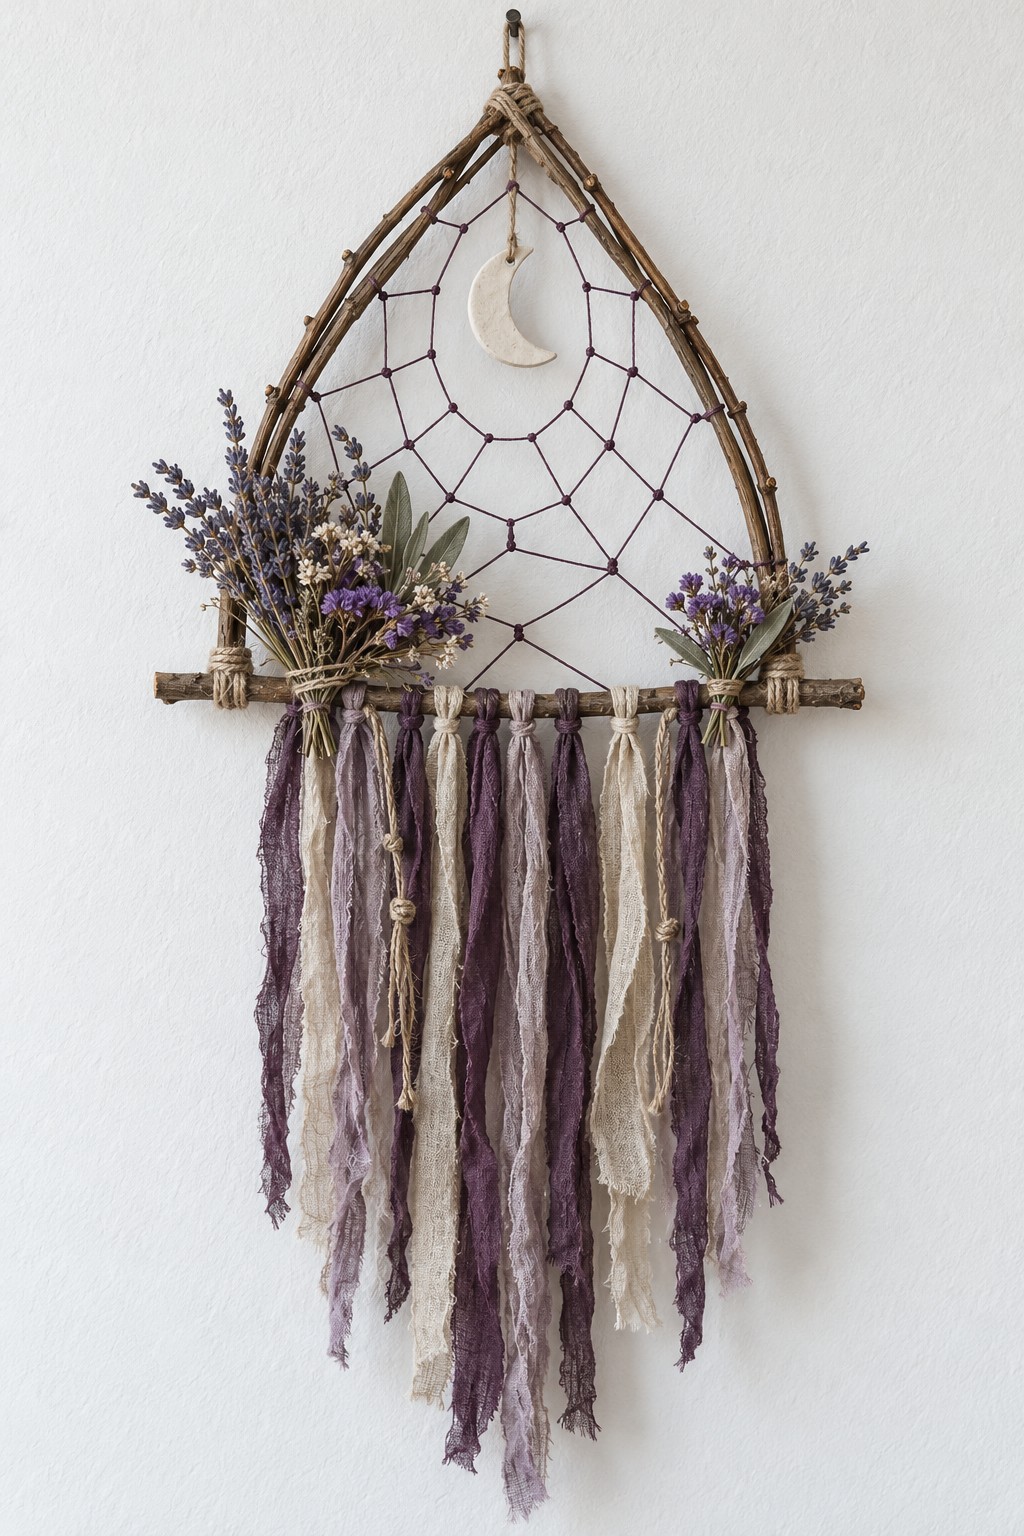
A narrow pointed arch makes the pale crescent moon the focal point. Use pliable willow rods for the curved sides and lash their lower ends to a straight crossbar. Tie the upper meeting point securely, then add a burgundy web between the sides.
Make a lightweight crescent from air drying clay or use a wooden blank. Form its hanging hole before the clay dries, and suspend it independently from the apex. Bind lavender bundles near the lower corners and loop fabric strips over the crossbar. Mix cream with muted purple so the fringe has depth without overwhelming the small moon.
5. Harvest Hexagon with Strawflowers and Ochre Thread
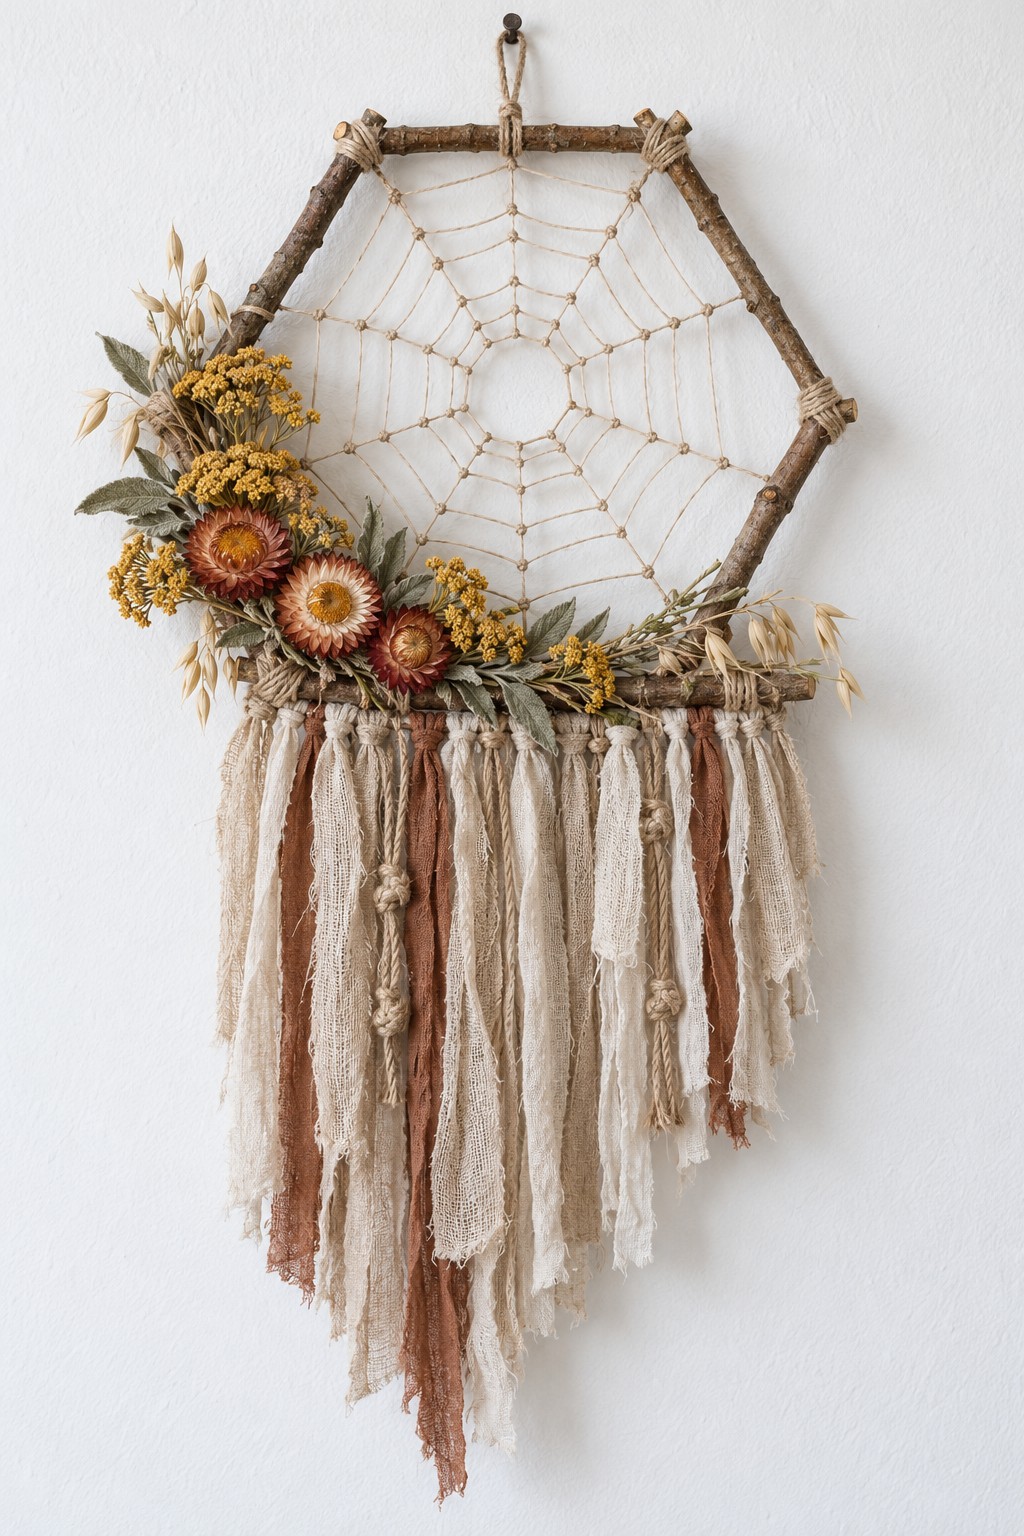
Six short branches form an angular frame for a delicate web and a warm cluster of dried flowers. Lay the branches over a paper hexagon before binding the corners, keeping the central opening broad enough for the cord pattern.
Work the web with fine natural thread and leave a small opening at its center. Attach strawflowers, yellow dried stems and oats along the lower left side using separate fine wire ties. Add cream, taupe and terracotta fabric strips beneath the bottom branch. Gather the stems into a few compact bundles first; this makes their placement easier to adjust and avoids a bulky line of glue across the wood.
6. Twig Witch Hat with Rust and Charcoal Ribbons
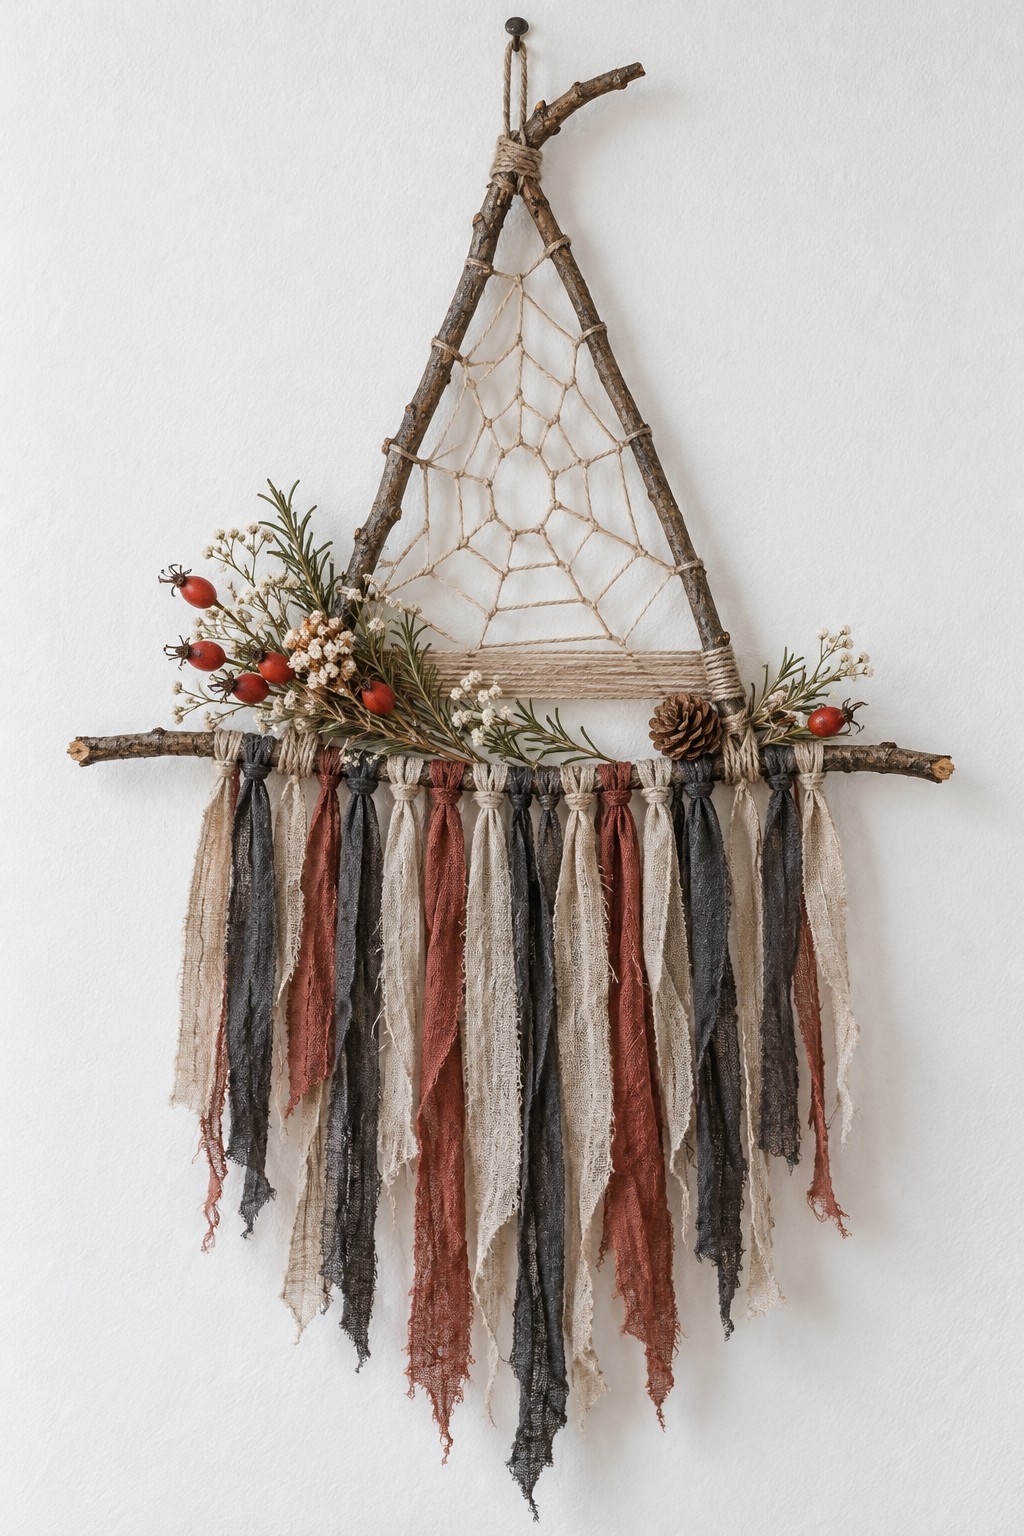
Two rising branches and an extended horizontal brim suggest a pointed witch hat without needing a solid fabric shape. Assemble the triangular crown first, bind it to the brim and fill the opening with a loose natural cord web.
Keep the greenery concentrated where the crown meets the brim, using small sprigs, cones and decorative berries. Fold narrow rust, gray and cream fabric strips over the brim and pull their ends through the folded loops. These loops are suitable for the light fringe; use separate secure lashings for the wooden structure. An uneven fringe edge reinforces the rustic shape while the long brim keeps it recognizable.
7. Lunar Wing Hanging with Three Clay Charms
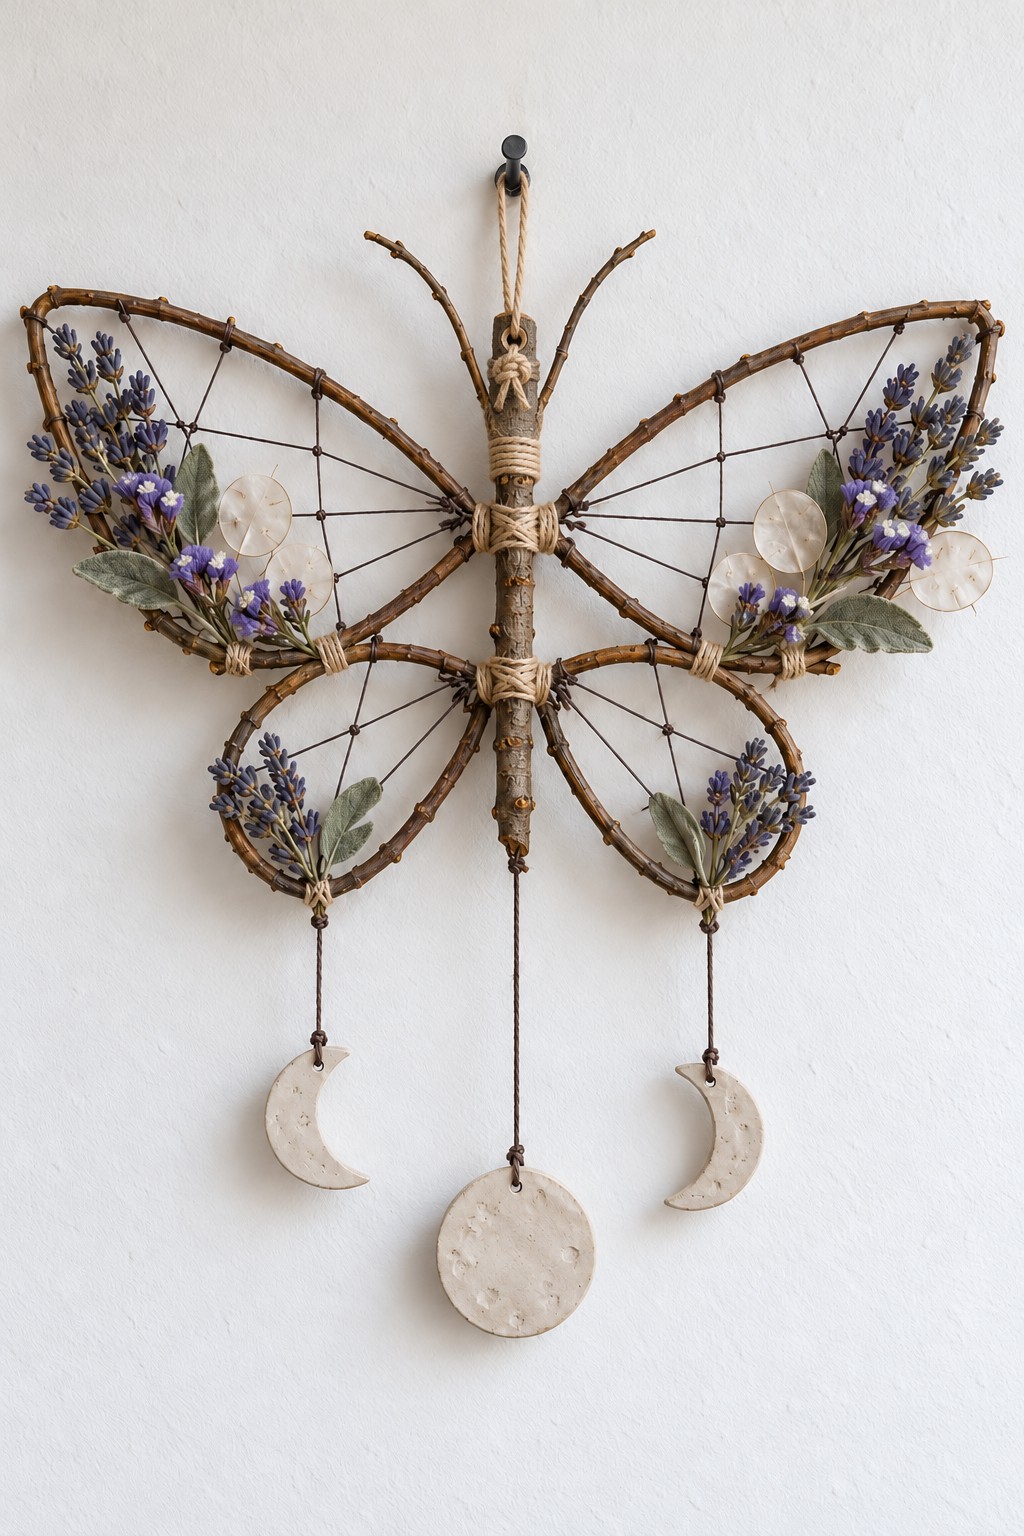
Four open wing sections give this piece a delicate silhouette, with lavender tucked near their inner edges. Shape the wings from flexible twigs around a central wooden spine, binding each attachment before weaving the fine dark cord.
Cut two crescents and one round disc from evenly rolled air drying clay. Make their suspension holes while soft, allow them to dry completely according to the product instructions, and hang them on separate beaded cords. Position the round moon beneath the center and the crescents beneath the outer wings. These air dry clay ideas offer other ways to use the same material for small home accents.
8. Forked Branch Moon Hanging with Woven Strips
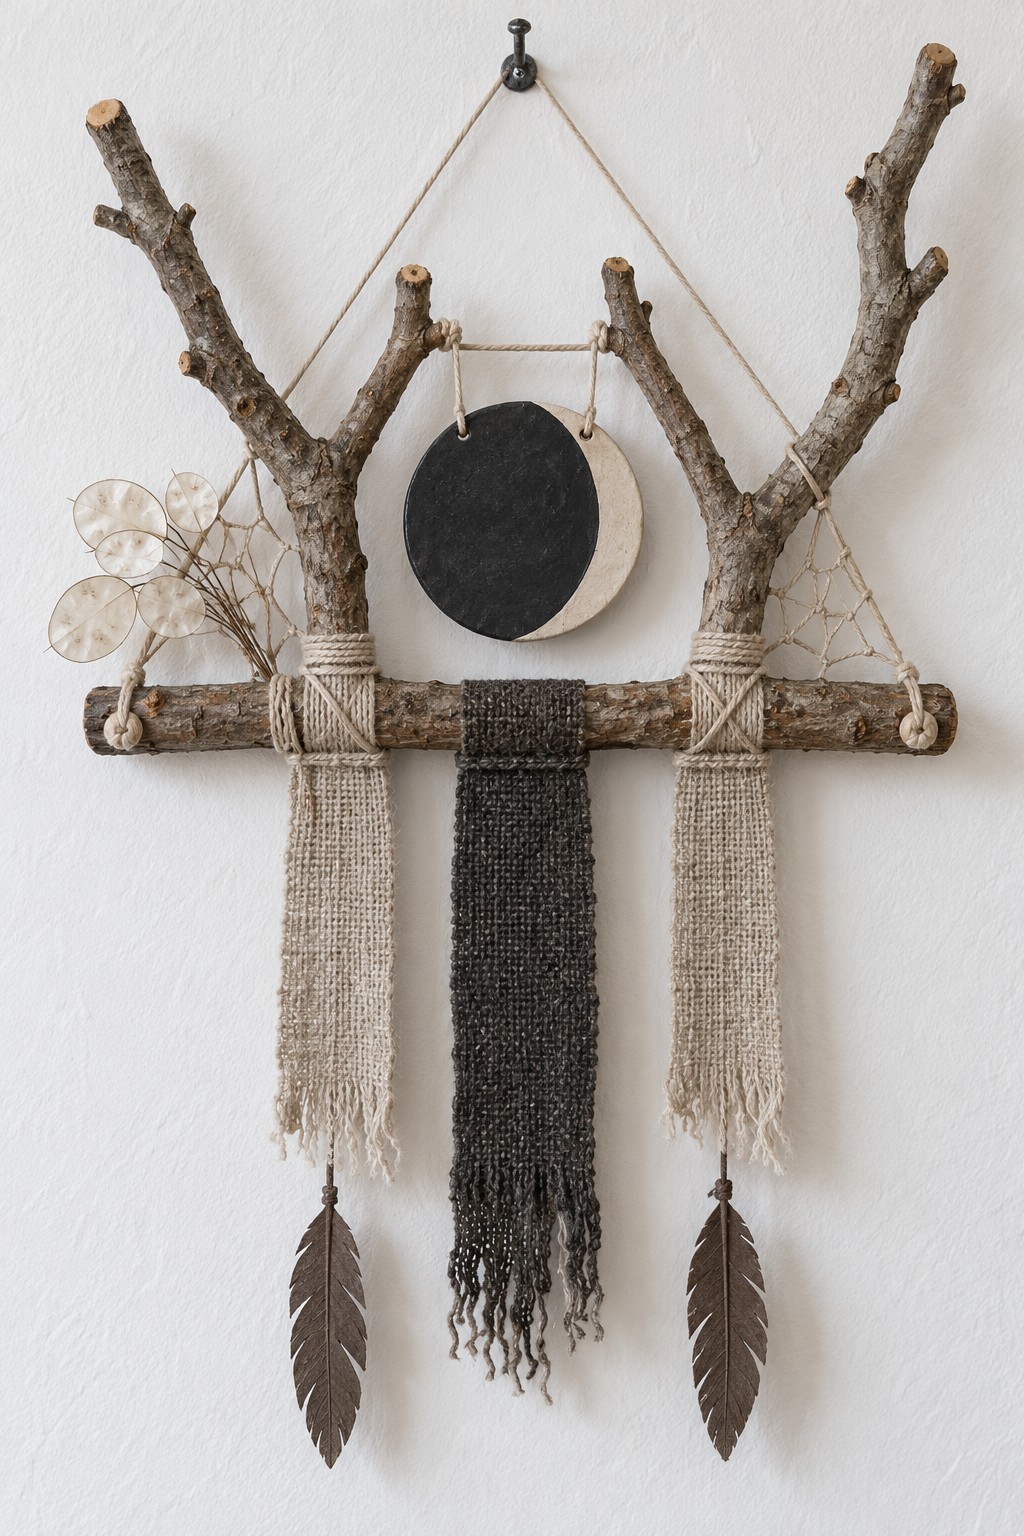
Two naturally forked branches create an architectural outline around a dark moon disc. Lash them to one horizontal branch, then tie a narrow cross cord between the inner tips to carry the lightweight moon. Paint a thin wooden disc black with a cream crescent along one side.
Loop two pale woven strips around the outer supports and a darker strip over the center of the crossbar. Secure purchased craft feathers to the pale strips with small cord bindings. The main hanging cord should connect to the strong wooden base, leaving the small upper cross cord responsible only for the moon ornament.
9. Stitched Wooden Palm with an Eye Motif
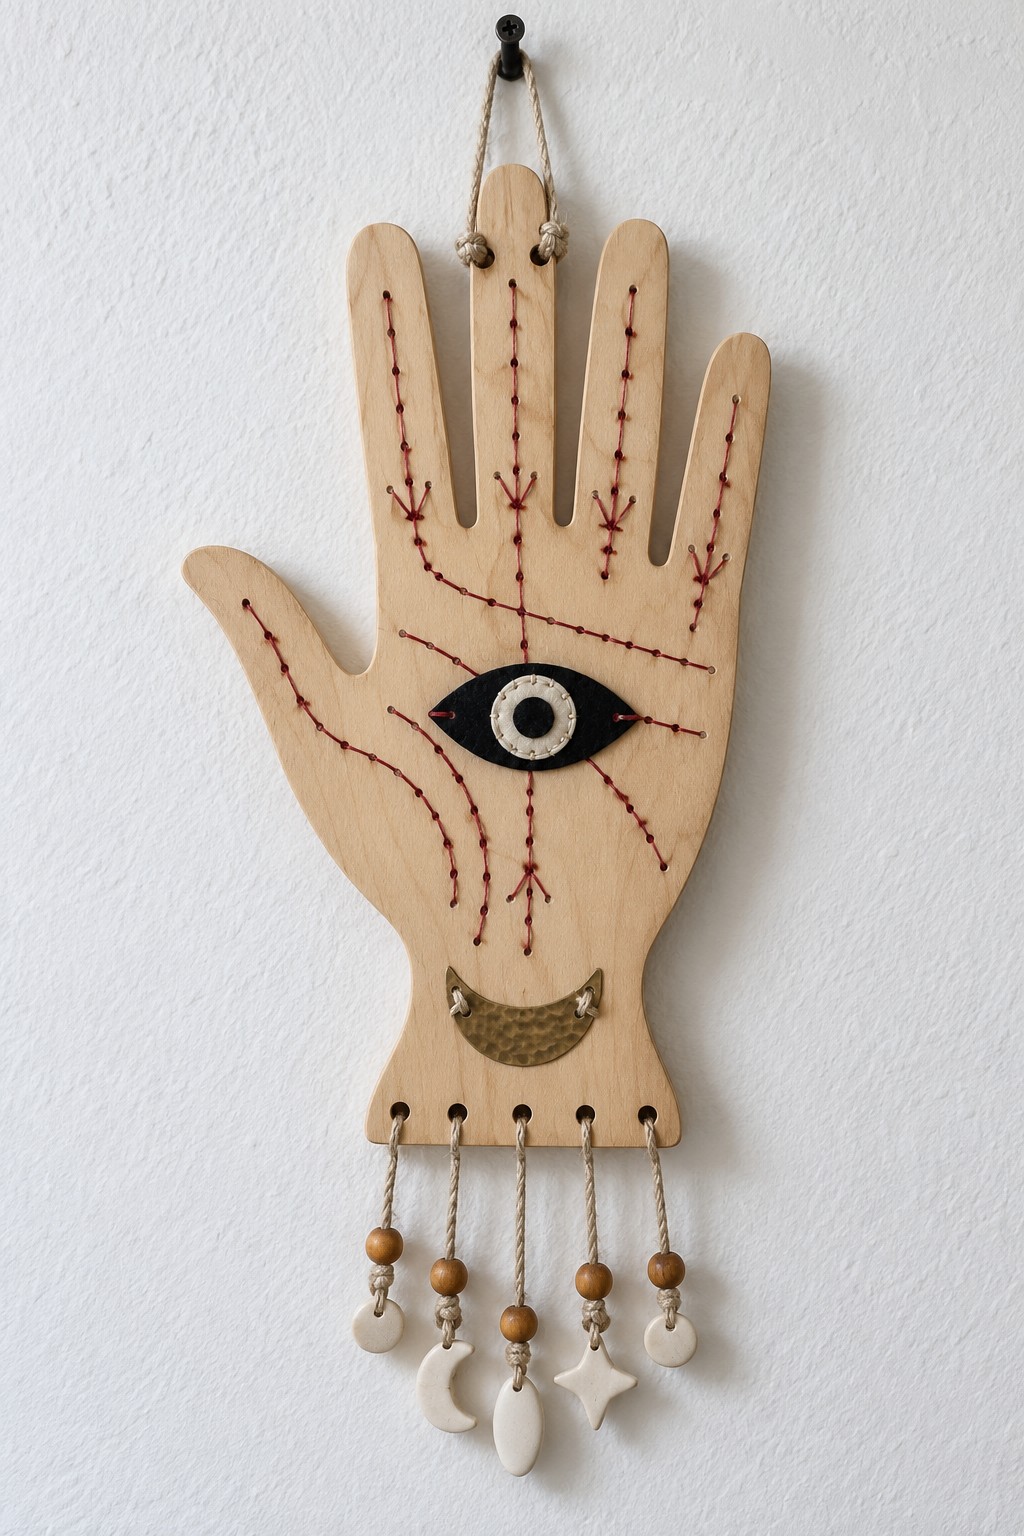
A pale wooden hand becomes a graphic wall piece through burgundy stitching and a bold eye in the palm. Start with a smooth precut plywood hand, draw a simple branching line pattern and drill small holes along it with the wood supported on a backing block.
Stitch through the holes with embroidery thread, fastening the ends on the reverse. Add a felt eye with a light circular center, a crescent embellishment near the wrist, and small bead and clay drops through separate bottom holes. Keep those holes away from the cut edge. Two upper hanging points help the hand remain upright rather than rotating around a single finger.
10. Black Double Hoop with a Star and Beaded Fringe
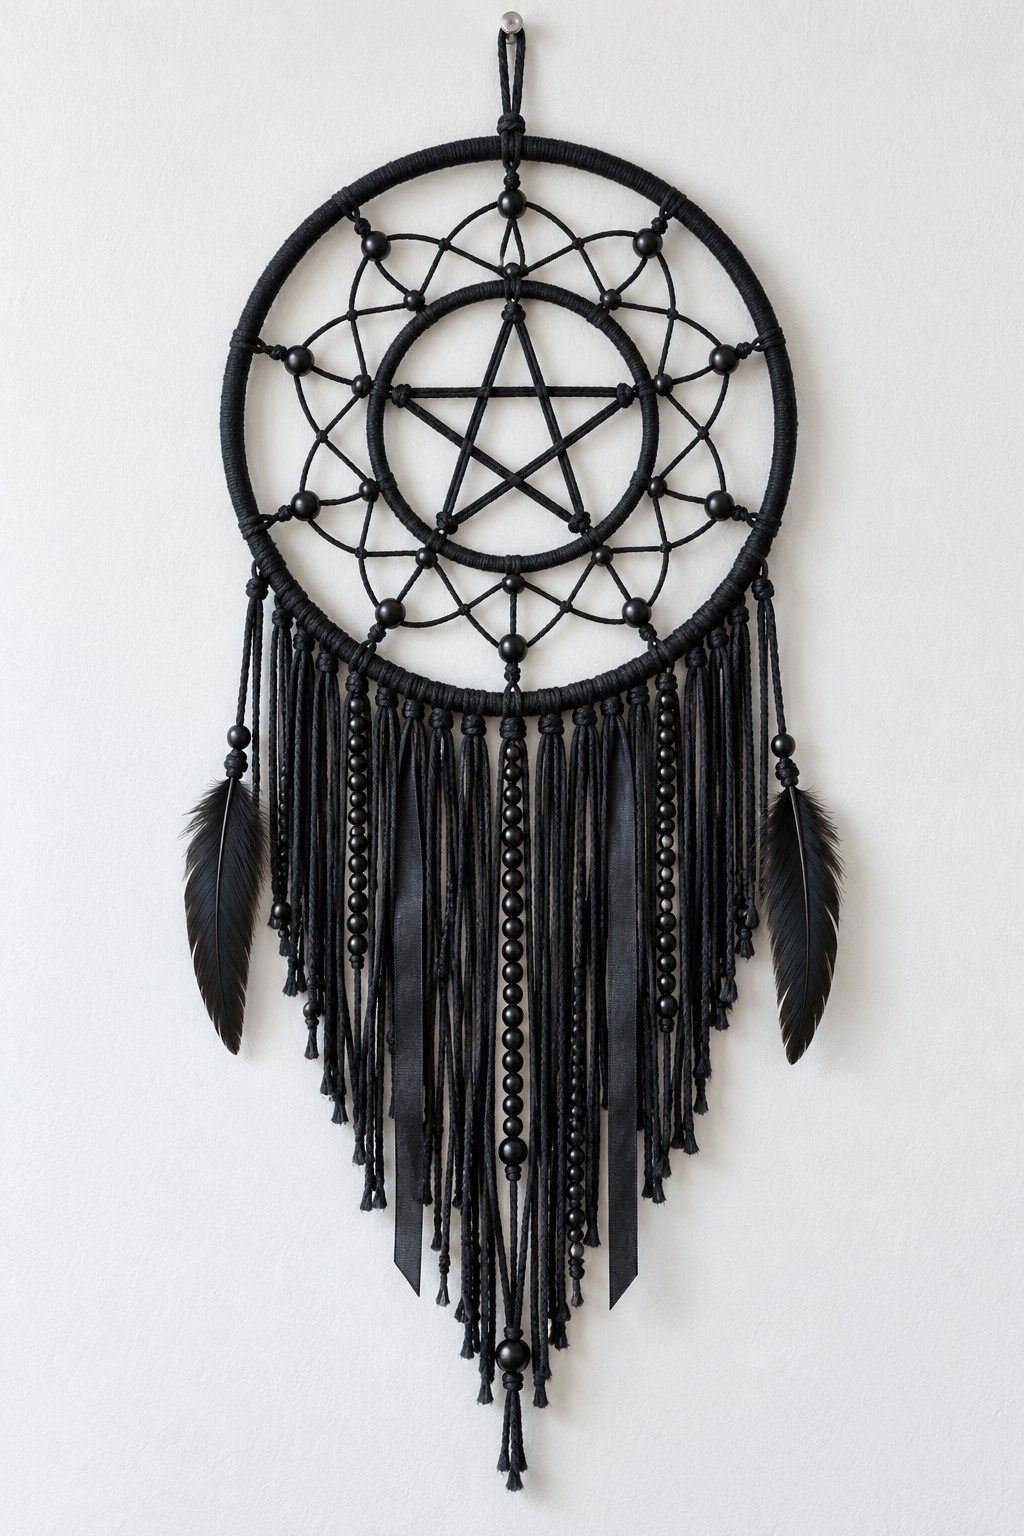
Two concentric hoops make this dark hanging feel structured even with a long fringe. Wrap both hoops in black cotton tape and stitch the tape ends on the reverse. Connect the smaller hoop to the larger one at several evenly spaced points before weaving the surrounding web.
Secure a lightweight star inside the smaller ring and add black beads as you work the web. Attach separate fringe cords along the lower outer hoop, trimming the central strands longest. Small side feathers soften the circular outline. Keep the star, hoop connections and suspension cord structurally separate from the loose fringe so trimming a strand cannot loosen the frame.
11. Natural Crescent with Green Beads and Feathers
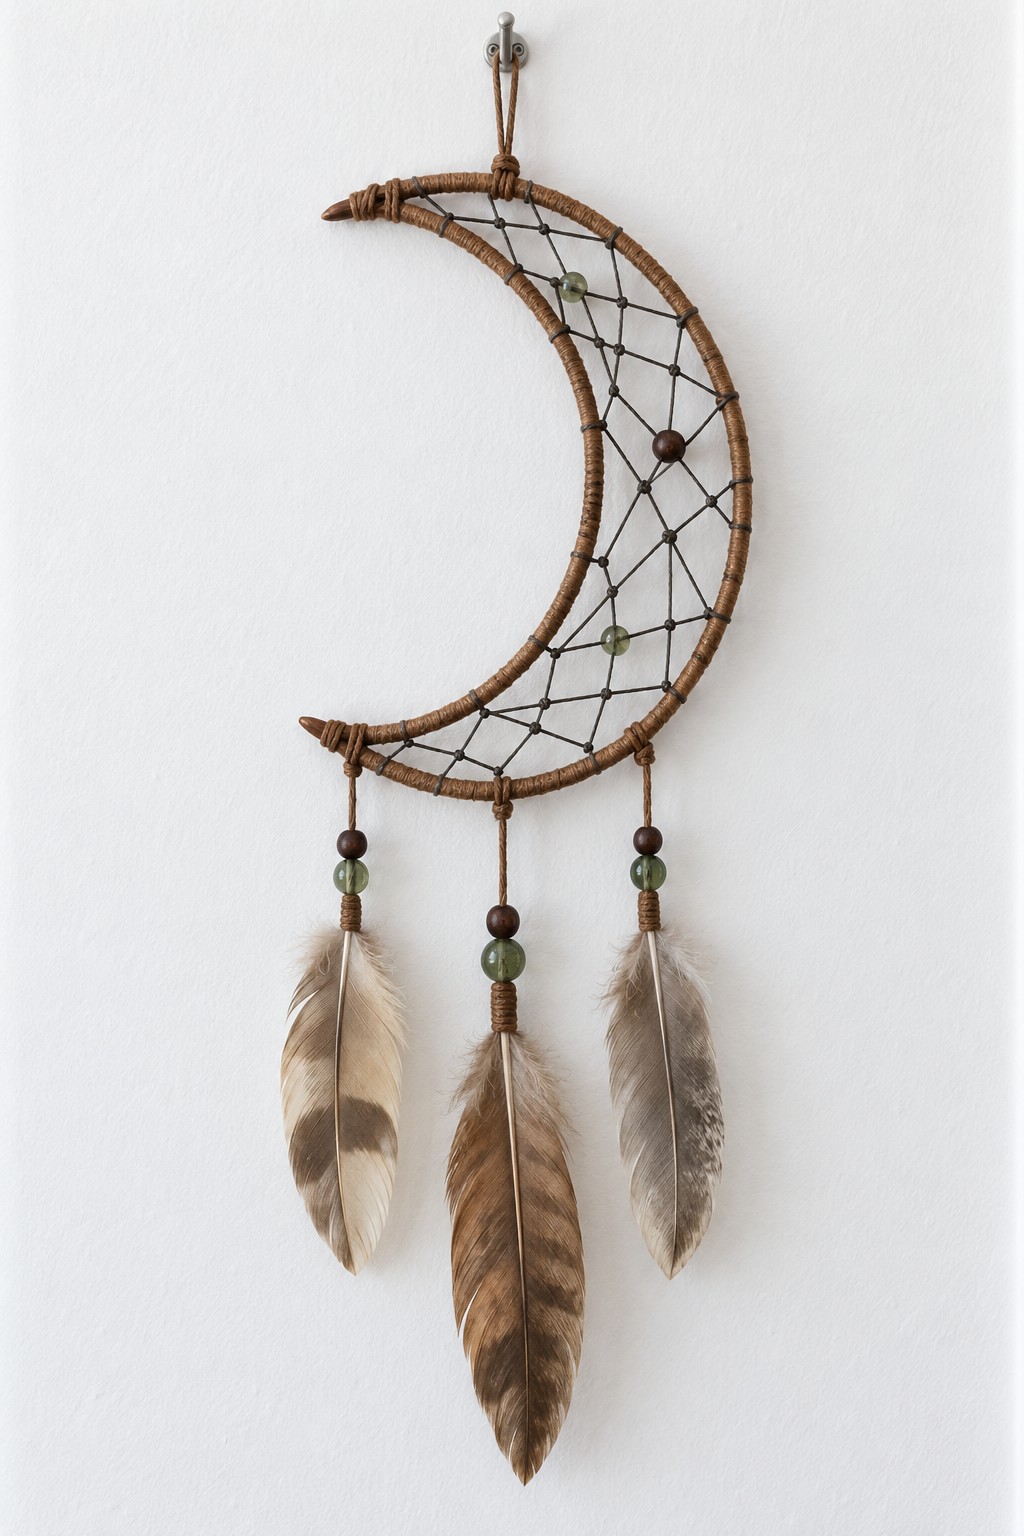
A narrow crescent keeps this hanging compact while leaving room for three feather pendants. Use a premade crescent frame, or form one from two flexible rods joined at their tips and bound with natural cord. Add a fine dark web between the inner and outer curves.
Thread olive and brown beads onto the pendant cords, using stopper knots that cannot pass through the bead holes. Bind the feather shafts at the lower ends and conceal the binding beneath the final bead where the fit allows. Hang the middle feather lower than the two outside feathers. The earthy palette works well beside light wood and plain linen.
12. Purple Bead Ring with a Black Pentagram
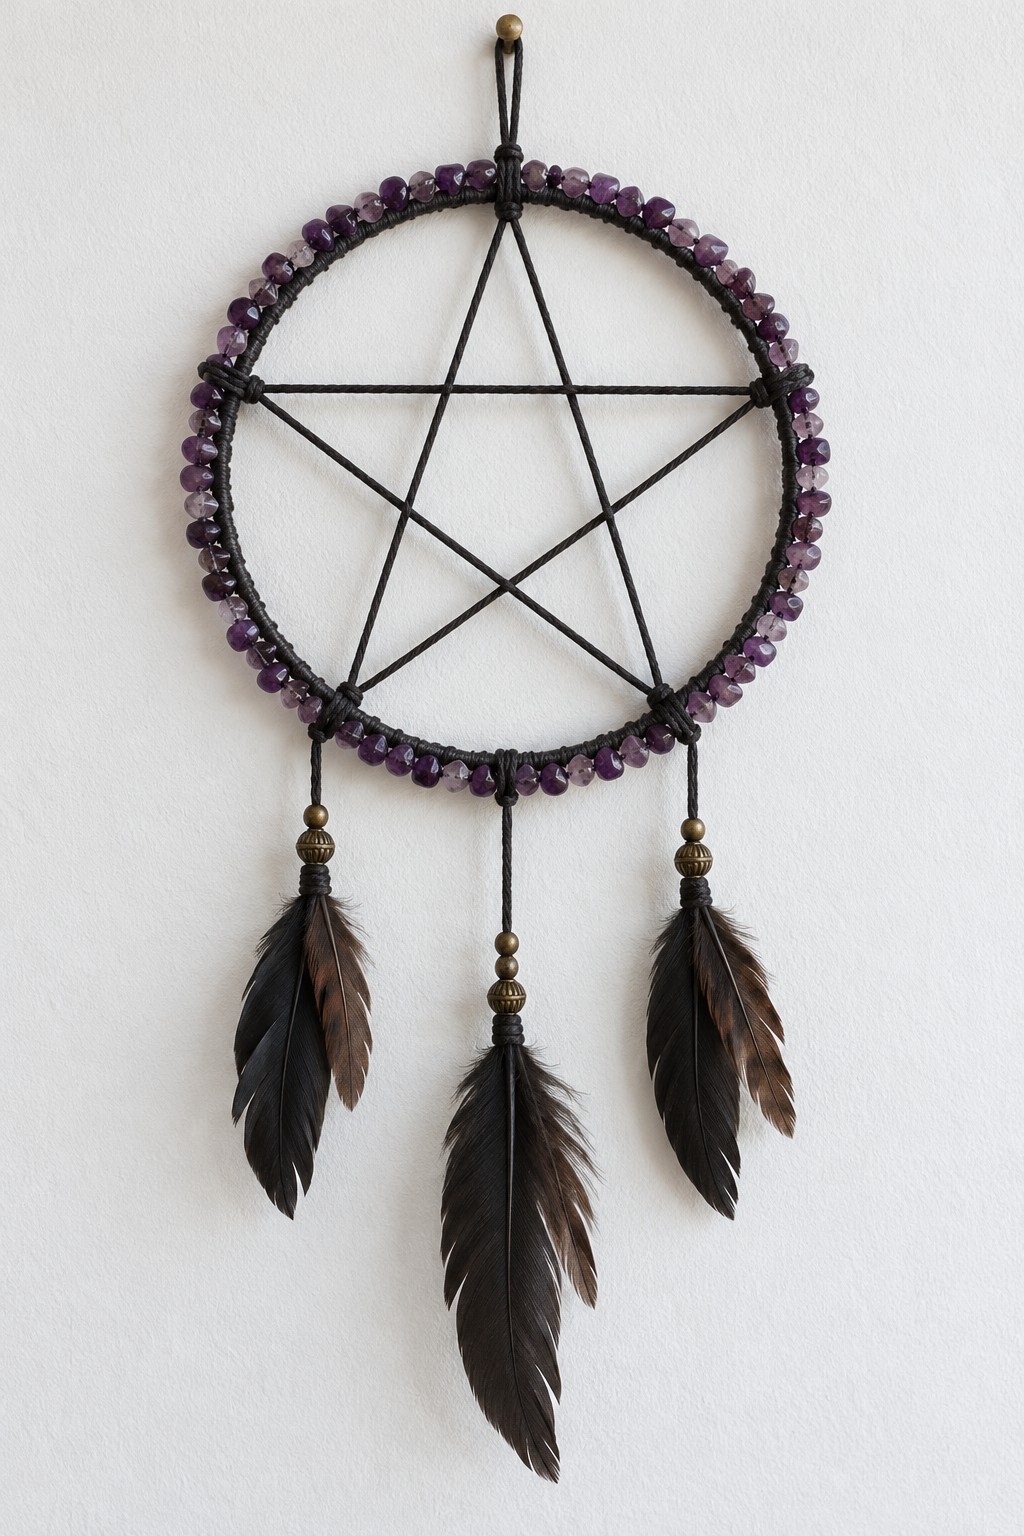
Purple chip beads give the outside edge texture while a black star keeps the center visually clear. Choose drilled chip beads rather than relying on glue to hold loose stones. Wrap them around a rigid hoop with fine jewelry wire, securing both wire ends neatly on the back.
Form the star from stiff coated craft wire or use a ready made star insert, fixing all five points to the hoop. Add three beaded feather drops through independent loops at the bottom. Check the finished weight before choosing the hanging cord; a ring covered in stone beads can be considerably heavier than a plain cord version.
13. Dark Twig Star with a Fine Web
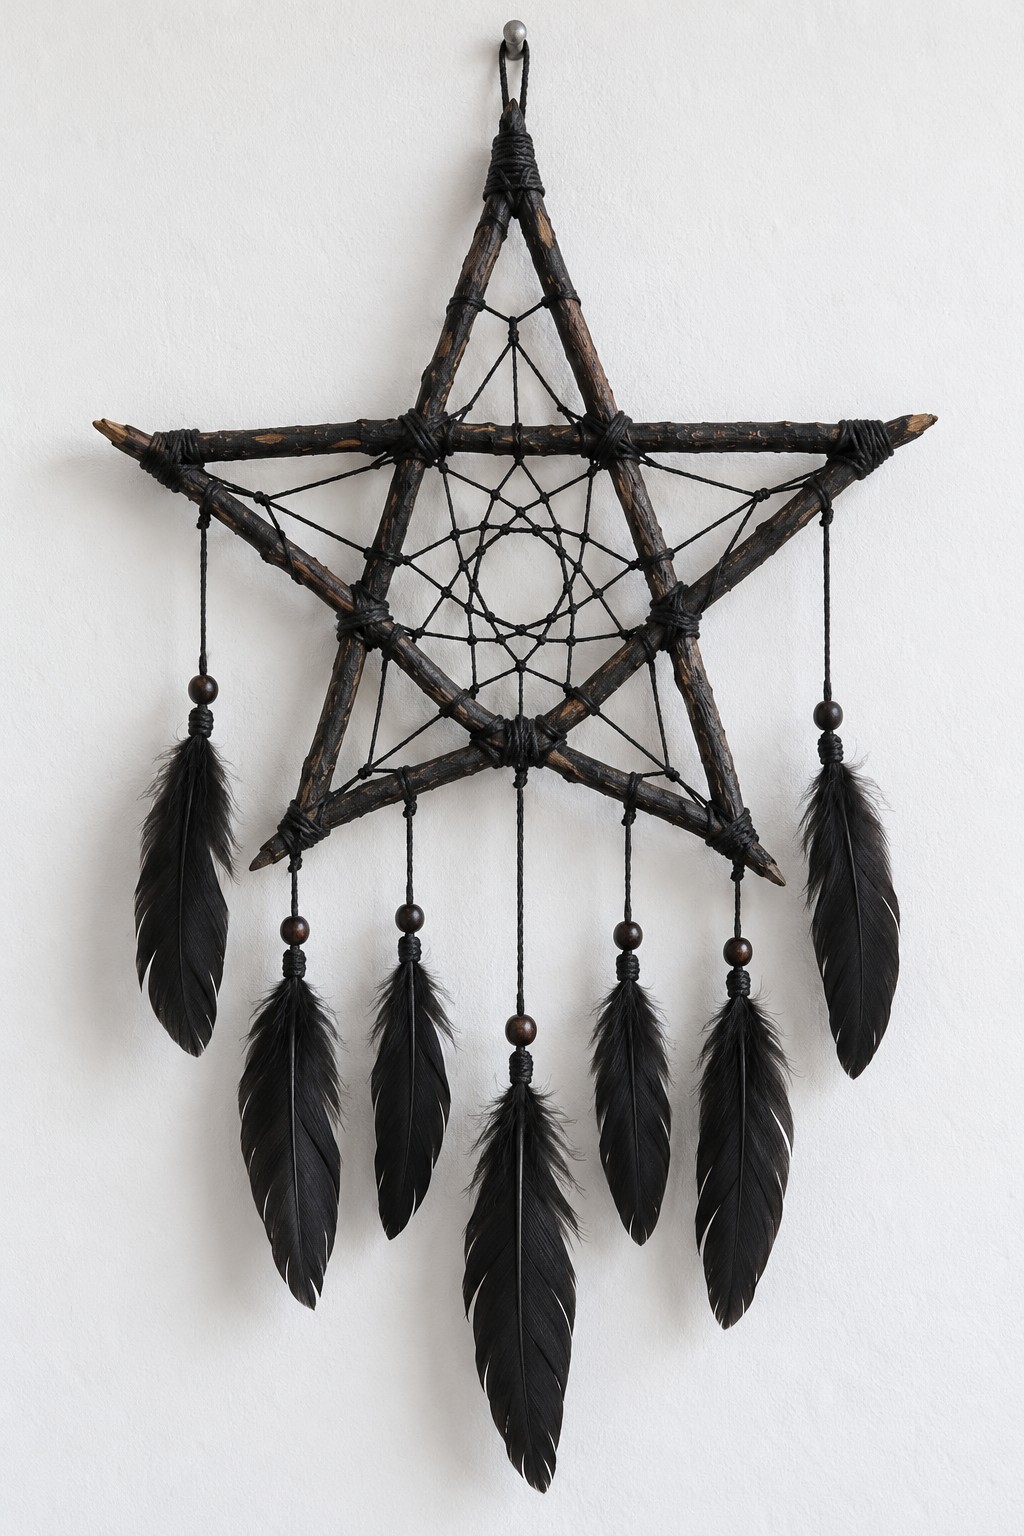
This open star combines rough branches with the much finer lines of a web. Arrange five similar twigs over a paper template and bind the points and crossings, allowing the natural wood to sit in shallow layers rather than forcing every joint flat.
For a dark finish, paint the cleaned twigs before the final bindings and let them dry. Work the web within the center, then add separate black feather drops along the lower outline. Use small beads to cover the feather bindings and vary the cord lengths to create a deeper center. Test the star's shape before hanging any ornaments from it.
14. Beaded Pentagram in Black and Berry Pink
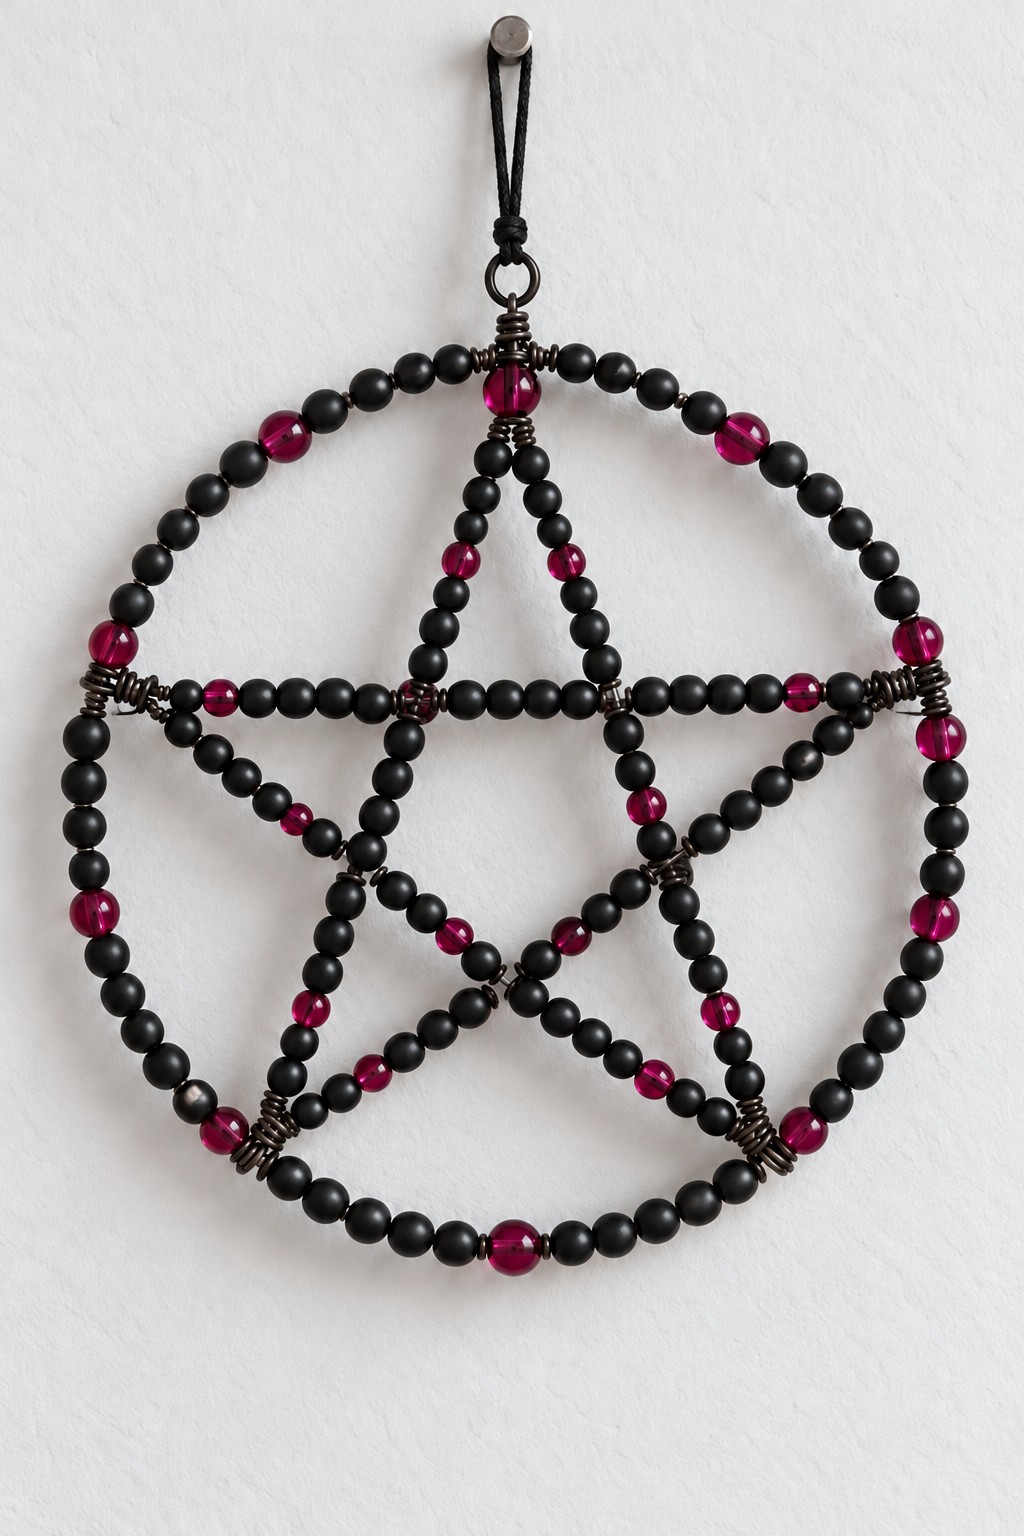
Scattered berry colored beads interrupt the black surface without blurring the star. Build this piece over a rigid circular wire frame, then form five beaded lengths for the star and secure their ends at the correct points around the circle.
Use a paper template to check the five points before tightening the wire wraps. At each internal crossing, let one beaded length pass in front of the other rather than trying to force two beads into the same space. Fold cut wire ends inward and cover them with neat bindings. A small upper connector makes the hanging point clear and keeps the circular frame from twisting.
15. Rose Ribbon Star on a Vine Ring
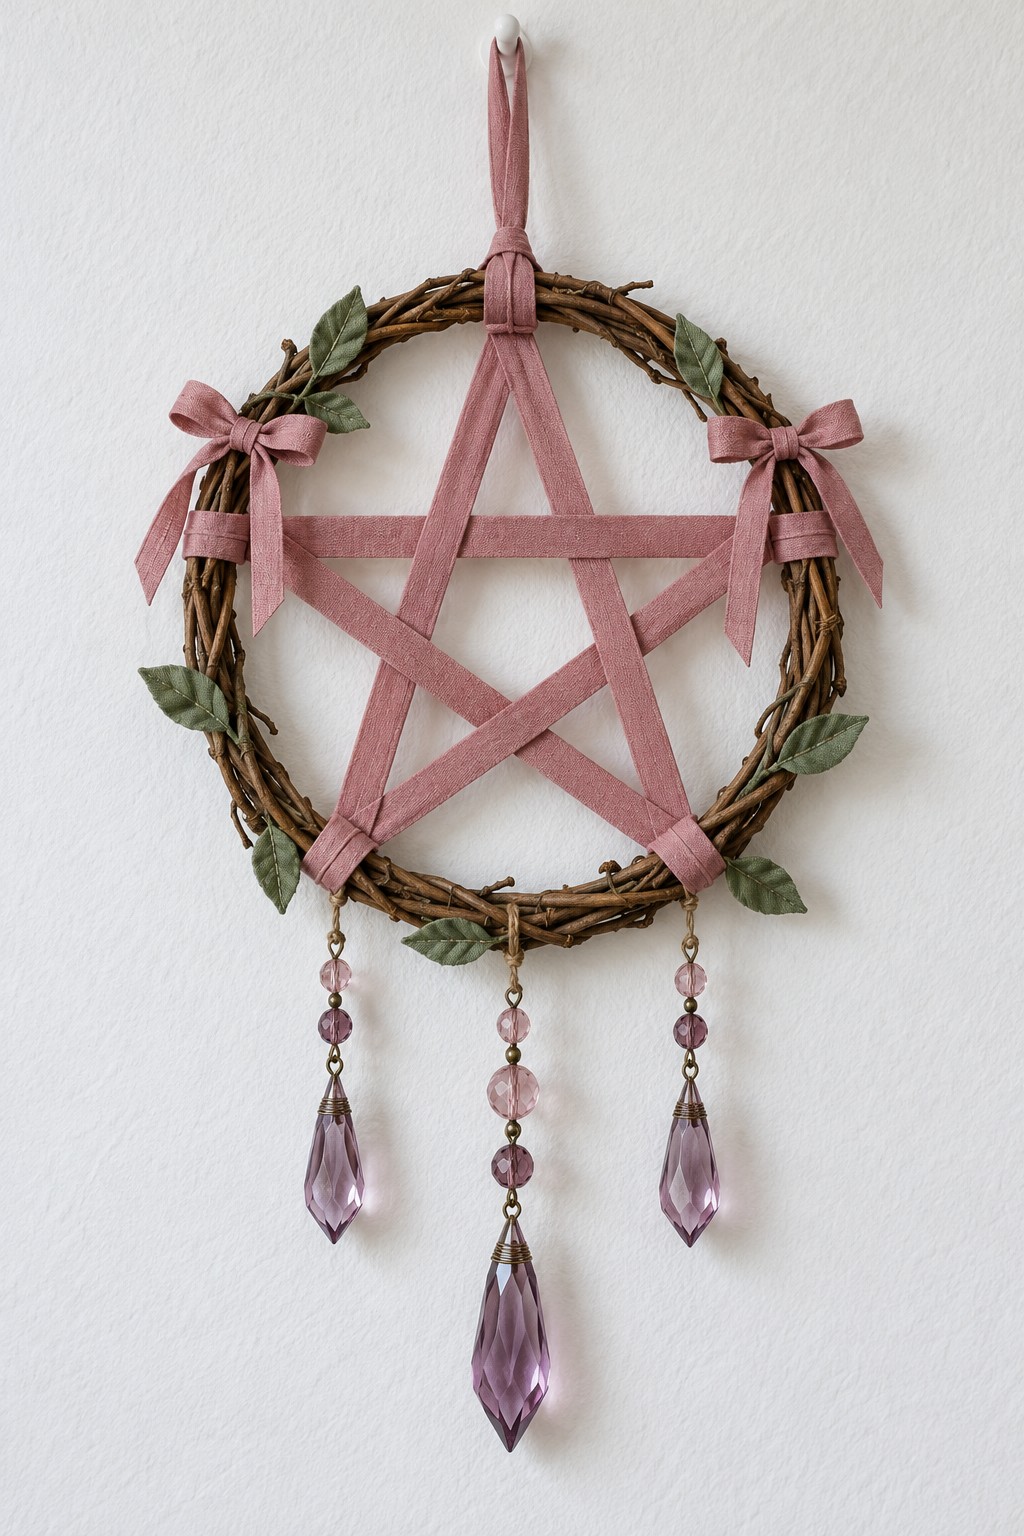
Dusty rose ribbon turns the familiar star shape into a softer wall accent. Stretch five flat ribbon sections across a small vine ring, checking the geometry before securing their ends with stitched wraps around the frame. Smooth the ribbon at the crossings so its edges remain readable.
Add a few fabric leaves and small side bows, keeping most of the vine visible. Hang three lightweight faceted pendants from metal connectors attached directly to the lower ring, with the middle drop longest. The decorative star ribbons should not carry the pendants. This palette is especially effective where dark furniture needs a gentler color nearby.
16. Twig Star with Four Brass Bells and Two Keys
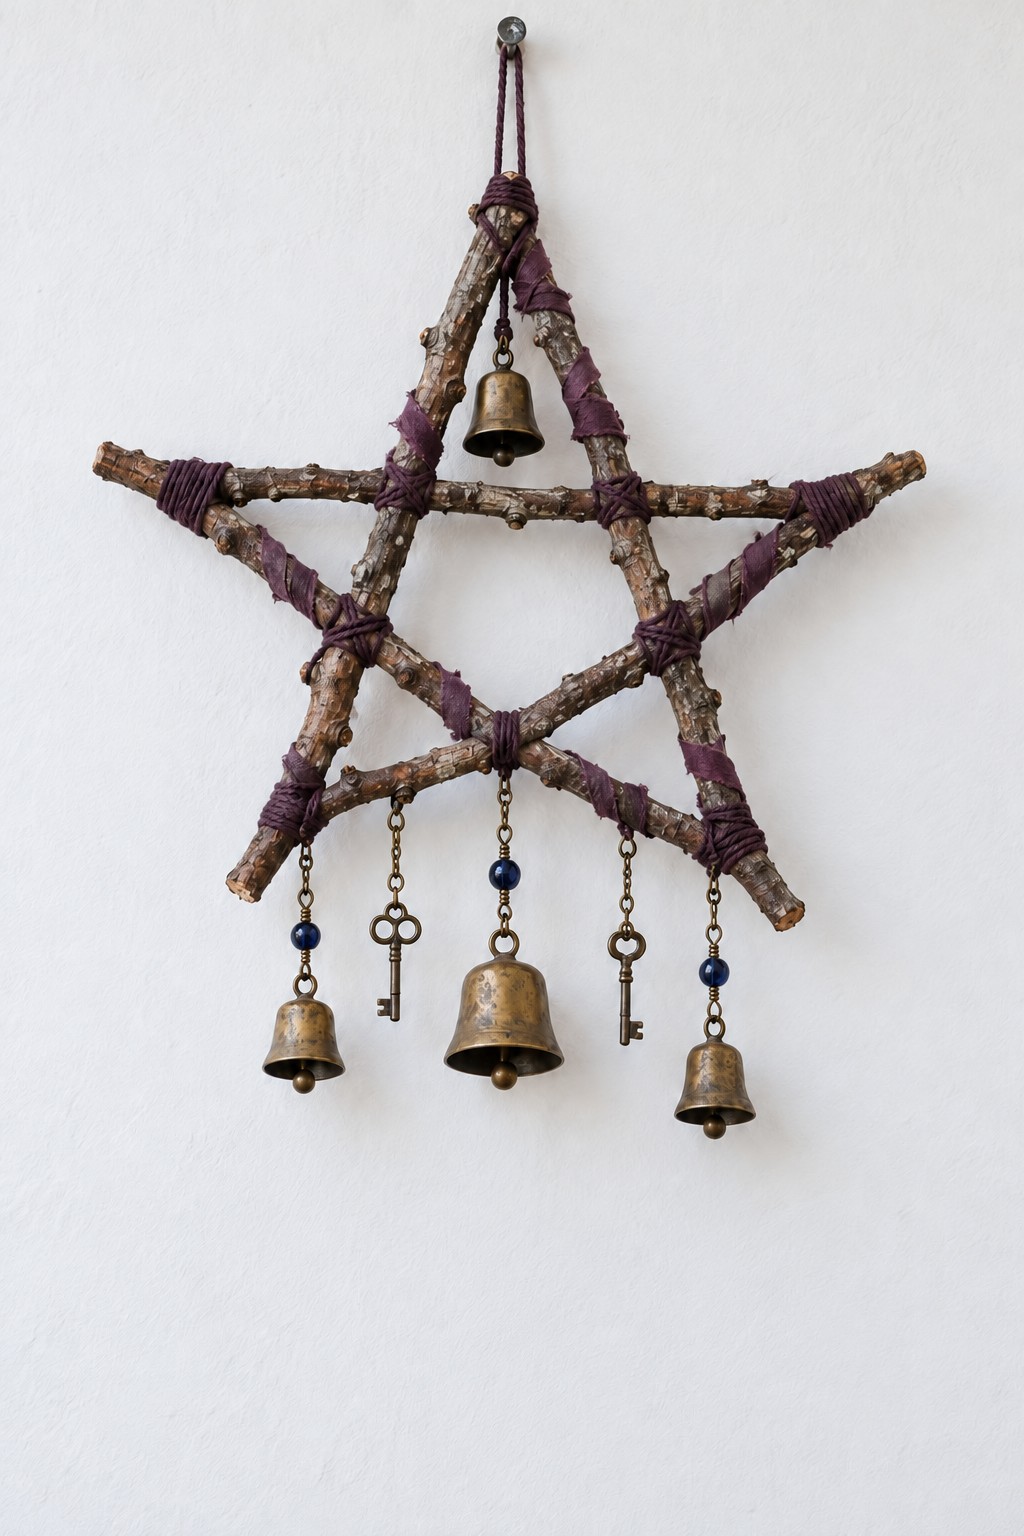
Plum bindings tie together a rustic star, aged brass bells and small ornamental keys. Build the star from five sound branches, securing each contact point before wrapping the joints with fabric. The fabric can cover a firm cord lashing, but it should not hide a loose joint.
Keep the arrangement deliberate: one small bell hangs inside the upper point, while the lower row alternates bell, key, bell, key and bell. Use separate chains and closed connectors for all six drops. Add dark blue beads only where their wire loops are secure. Leave clearance around each bell so the neighboring key does not catch its rim.
17. Spider Web in a Forked Branch
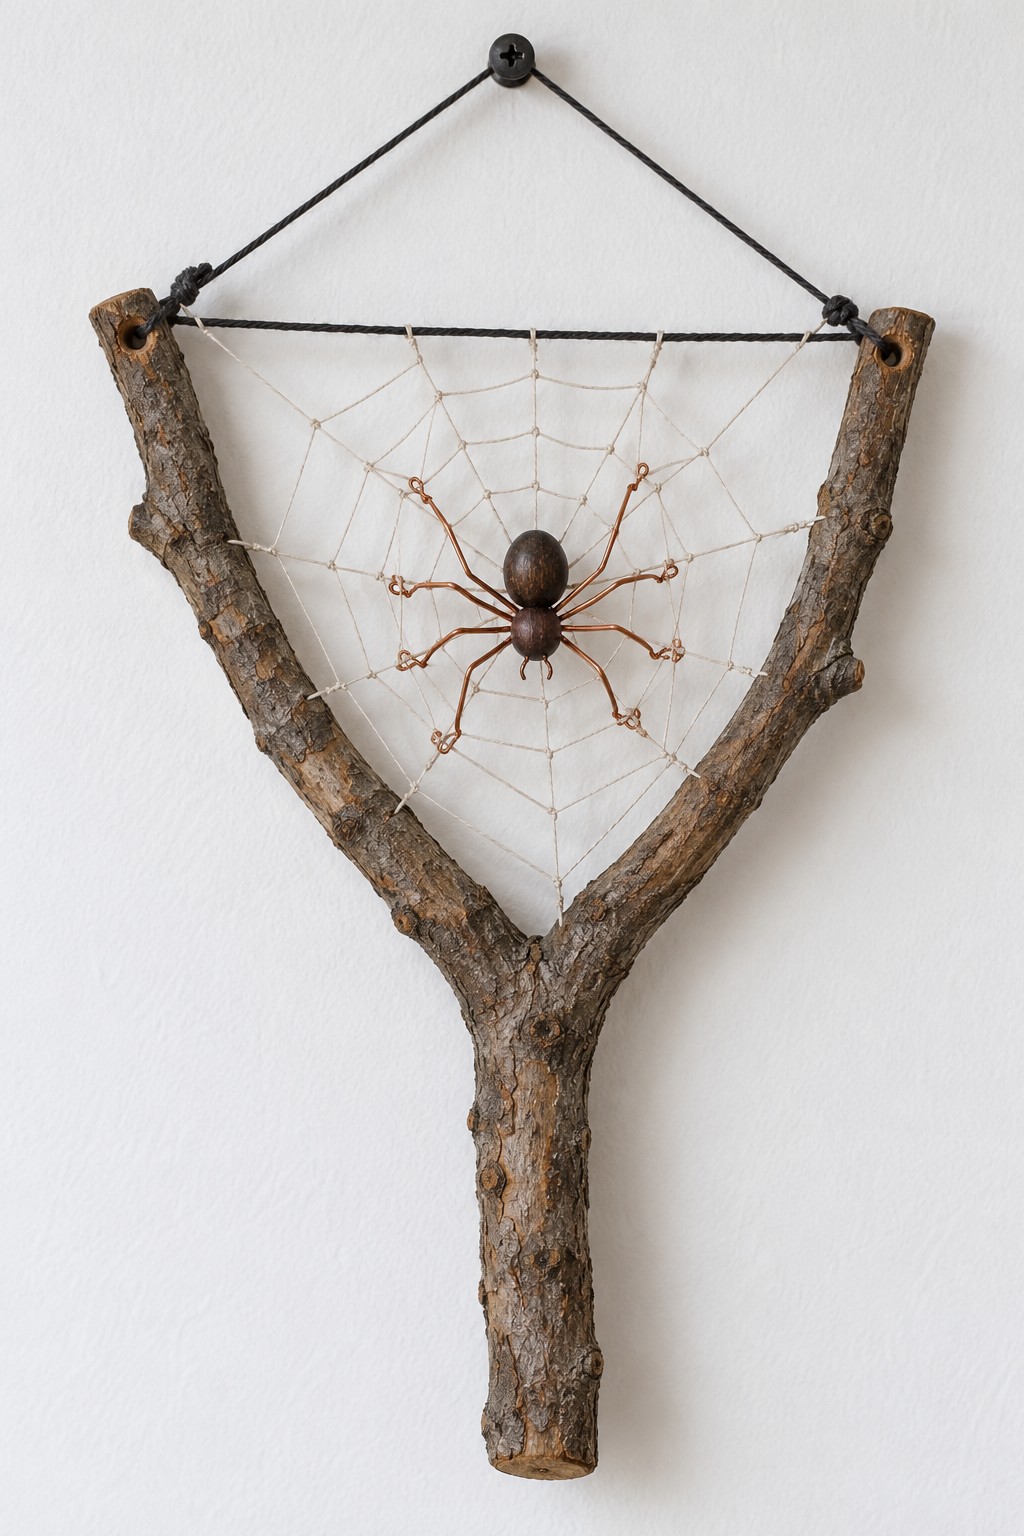
A naturally forked branch supplies the frame for this spare, slightly eerie hanging. Tie a taut cross cord between the two upper tips, then use the fork and that cord as the three sides of the web. Start with a few radial strands before connecting them with lighter looping thread.
Make the spider from two wooden beads and four pieces of fine craft wire, each forming a pair of legs. Turn sharp wire ends inward and bind the body to the web at more than one point. The hanging cord should connect to the branch tips independently of the web so the delicate threads carry only the spider.
18. Looped Black Rope Motif with Three Bells
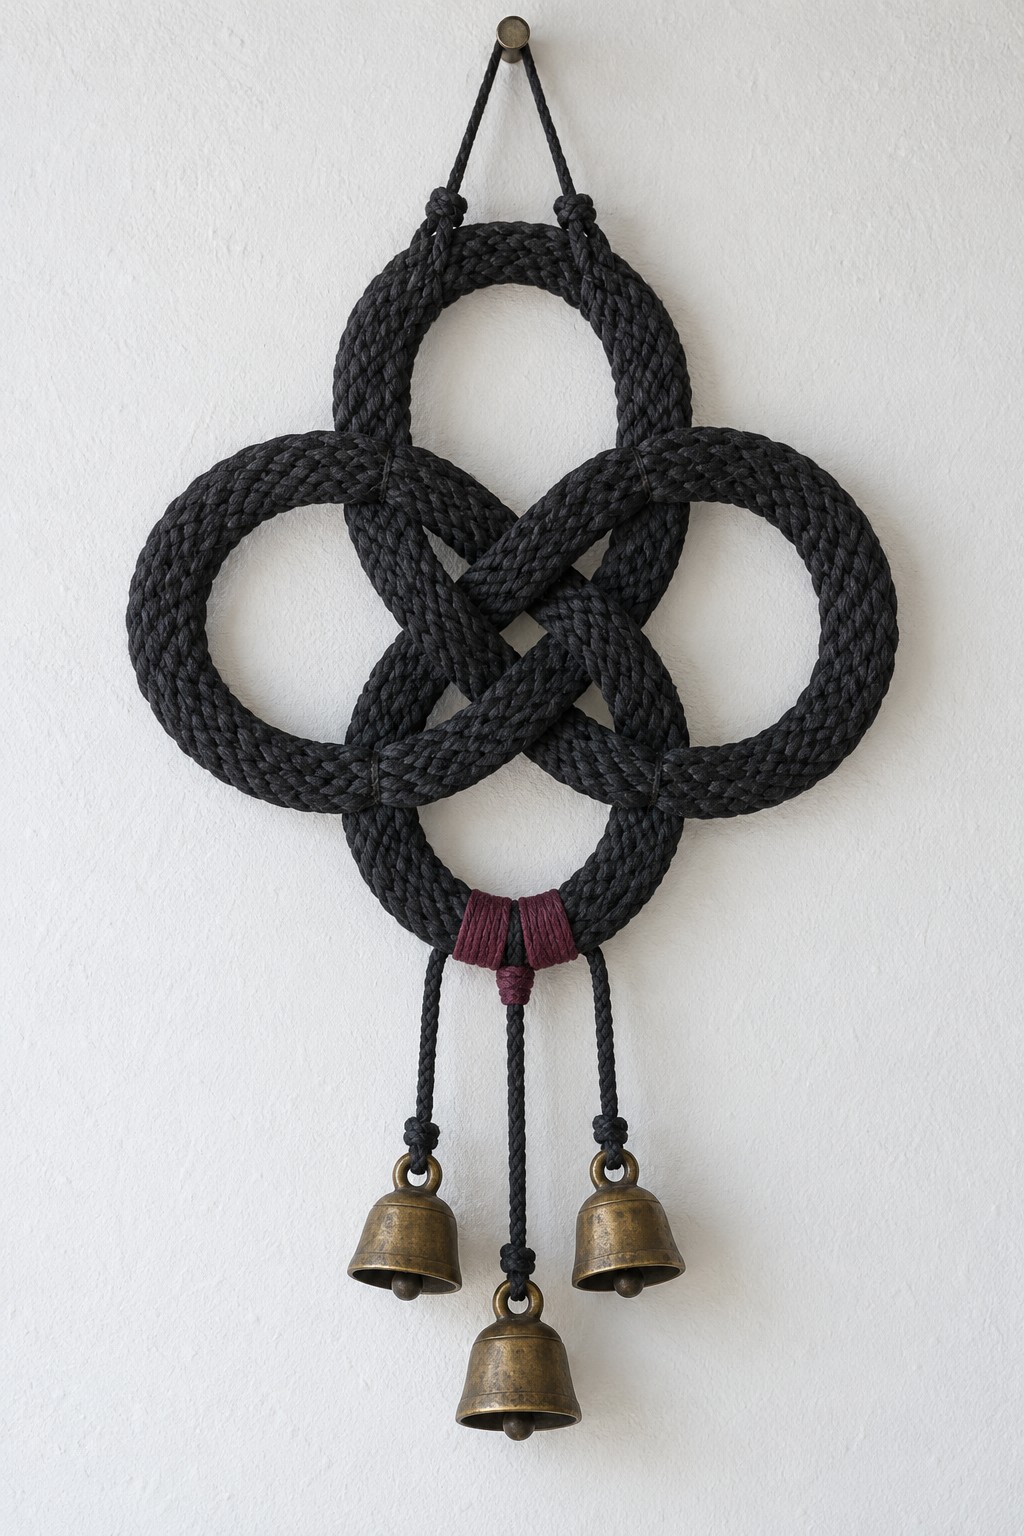
Thick black cord creates a rounded, interlaced motif with four open lobes. Lay the rope over a full size paper pattern before committing to the crossings, keeping every strand traceable through the design. Tack the crossings together on the reverse with strong matching thread.
Add a narrow hidden backing where needed to hold the shape. Bind the bottom section with plum thread and attach three bell cords to reinforced areas, allowing the middle bell to hang lower. Sew two upper suspension loops into the secured structure. A loose decorative knot alone may change shape under the weight of the bells, so test the support before displaying it.
19. Small Cloth Witch in a Hanging Basket
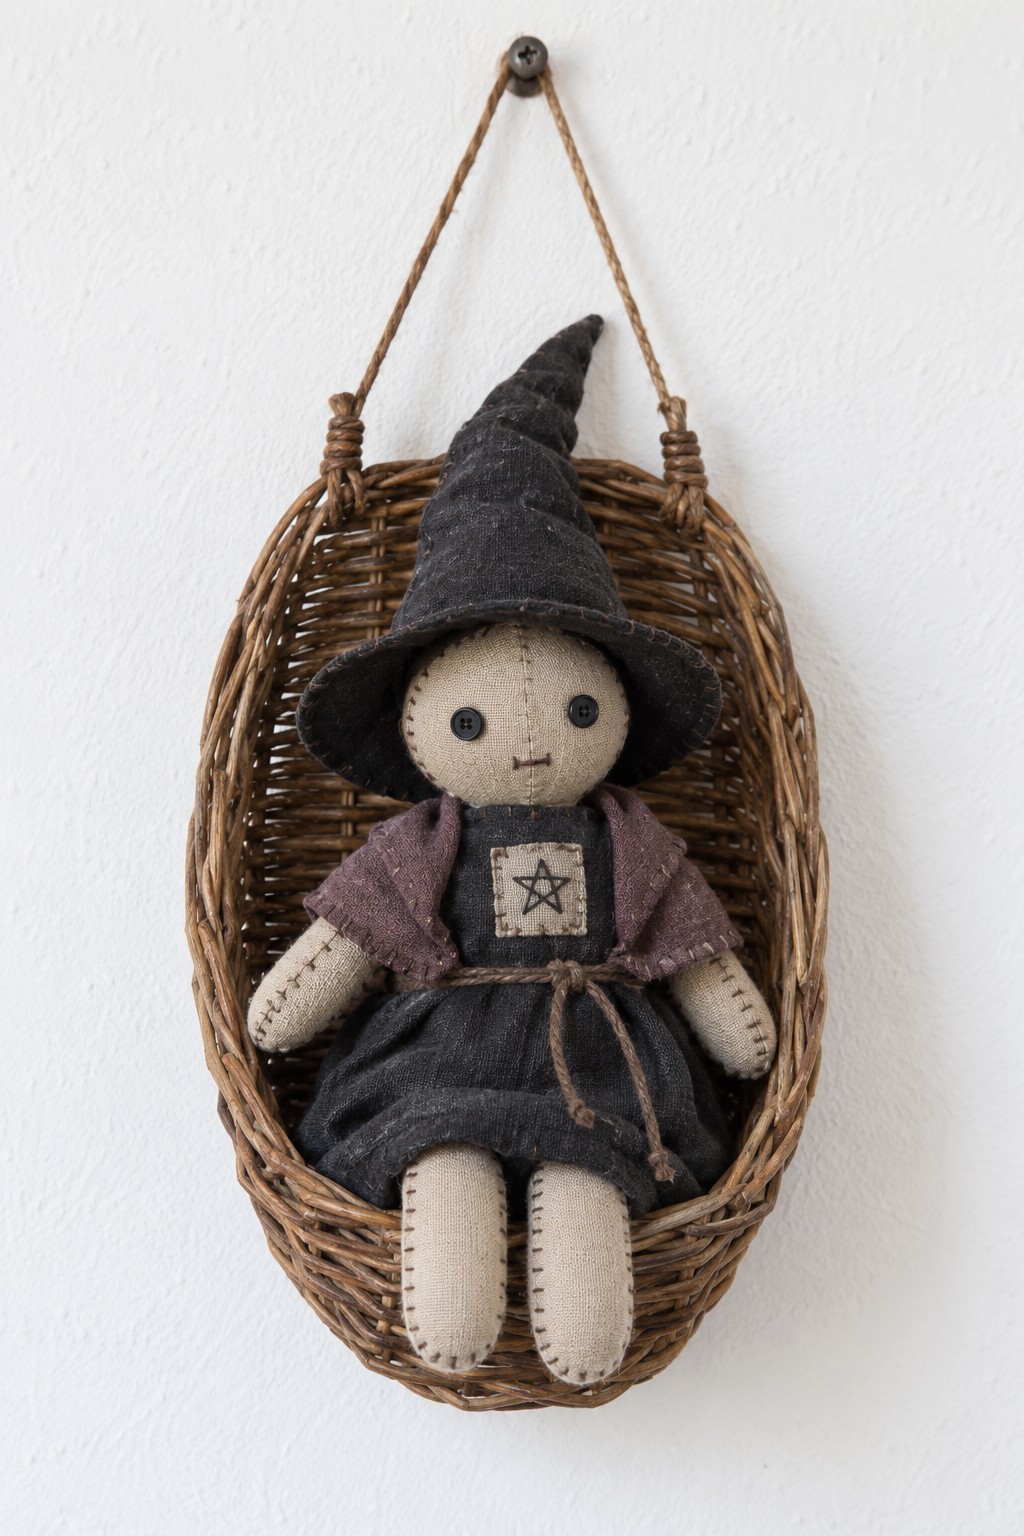
A shallow wicker basket gives this small witch a defined place to sit. Sew a simple cotton body with lightly stuffed limbs, then add a charcoal dress, a plum shoulder wrap and a soft felt hat. Button eyes and visible edge stitches suit the restrained handmade character.
Secure the doll to the basket through discreet fabric ties at the waist and back. Attach the basket's hanging cord to its sound rim or handle structure rather than a single thin weaving strand. Treat the completed piece as decor. For another suspended character project, the witch ghost swing tutorial explores a different fabric silhouette and hanging arrangement.
20. Knotted Herb Cord with a Single Bell
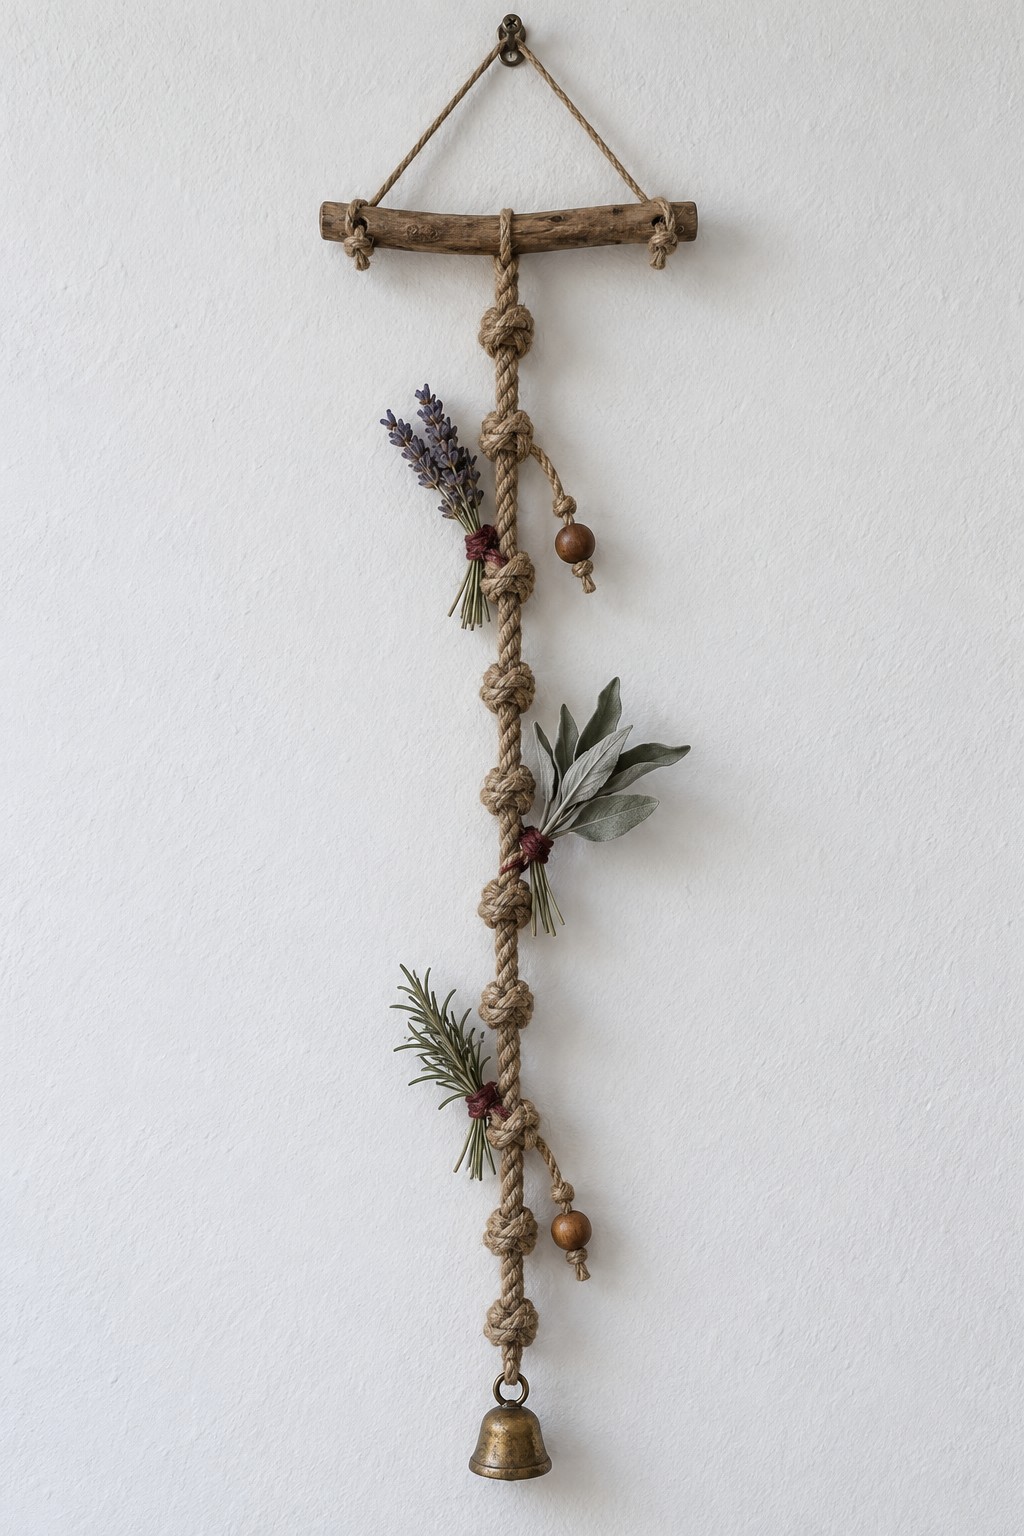
A narrow wall between shelves is enough for a long herb cord. Tie a strong main cord to the center of a short branch, then add spaced decorative knots down its length. Bind small herb bundles separately between the knots so you can replace them without undoing the whole piece.
Use lavender near the top, broader pale leaves in the middle and a small rosemary sprig lower down. Add wooden beads on short side ties and connect one bell through its closed top eye at the bottom. Support the branch from both ends with a separate hanger, which helps the central cord fall straight.
21. Linen Wall Organizer with Three Rustic Pockets
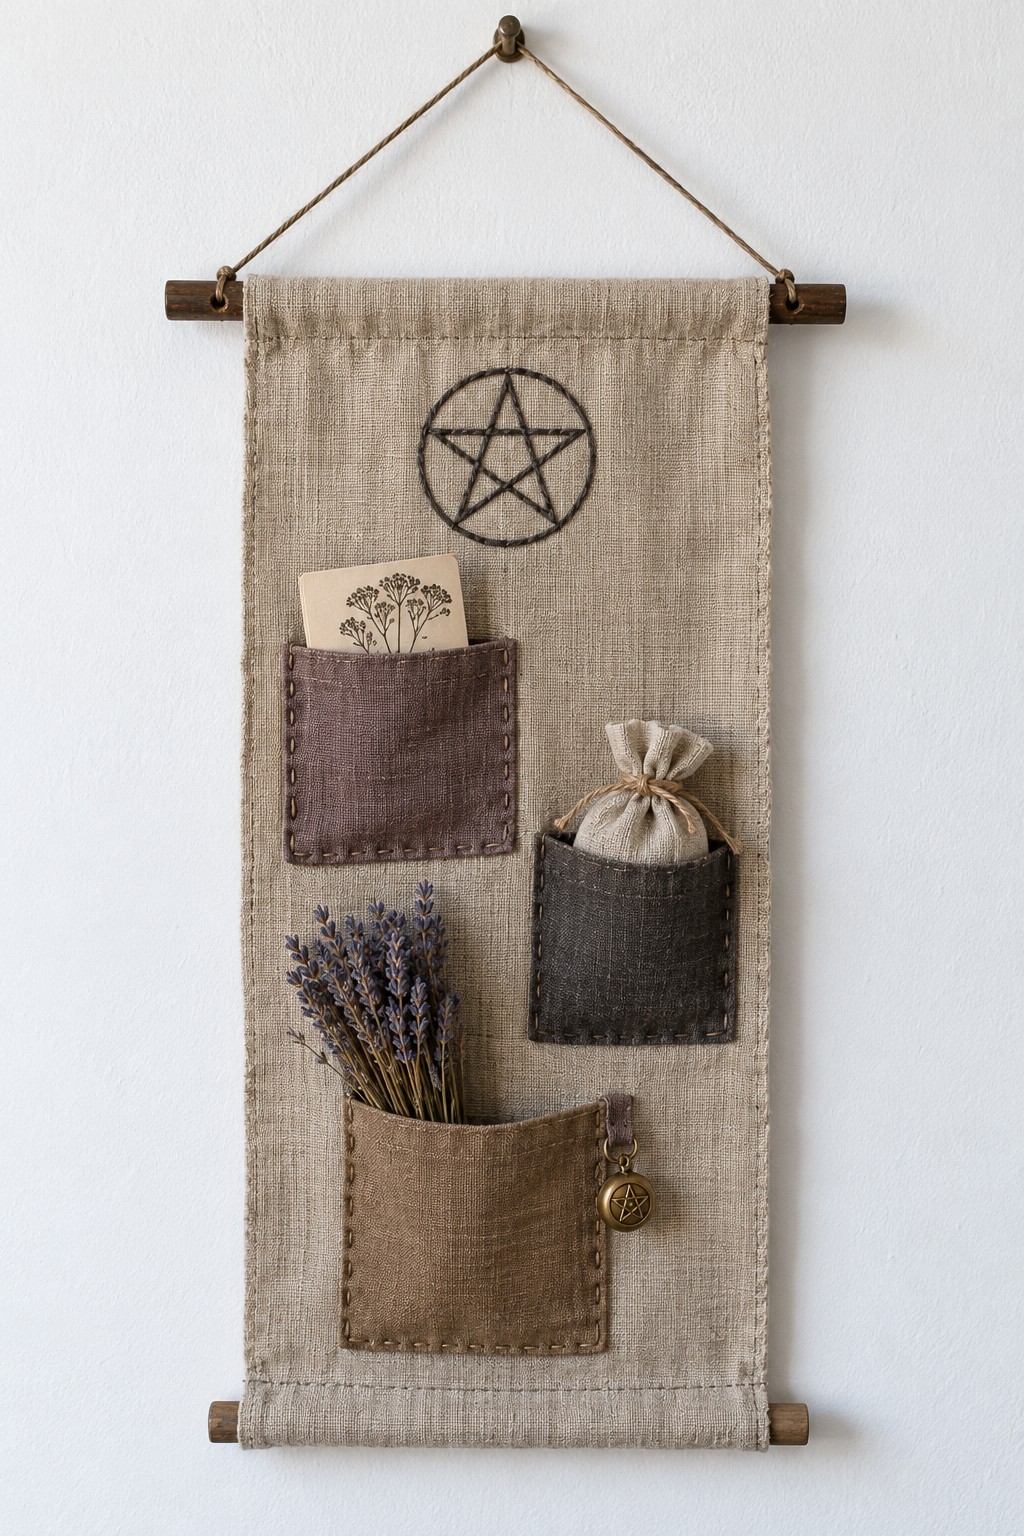
Three patch pockets make this witchy wall hanging useful for lightweight notes, herb sachets and small keepsakes. Cut a linen rectangle, finish its side edges and sew channels across the top and bottom for wooden dowels. A second fabric layer helps the panel resist sagging.
Hem the pocket openings before stitching their other three sides to the backing. Reinforce the upper corners, then embroider the simple star above them. Keep the larger pocket low and the smaller pockets staggered to leave room for the motif. Suspend the top dowel from both ends, and keep the contents light enough that the linen hangs smoothly.
22. Three Botanical Infusers on a Wooden Branch
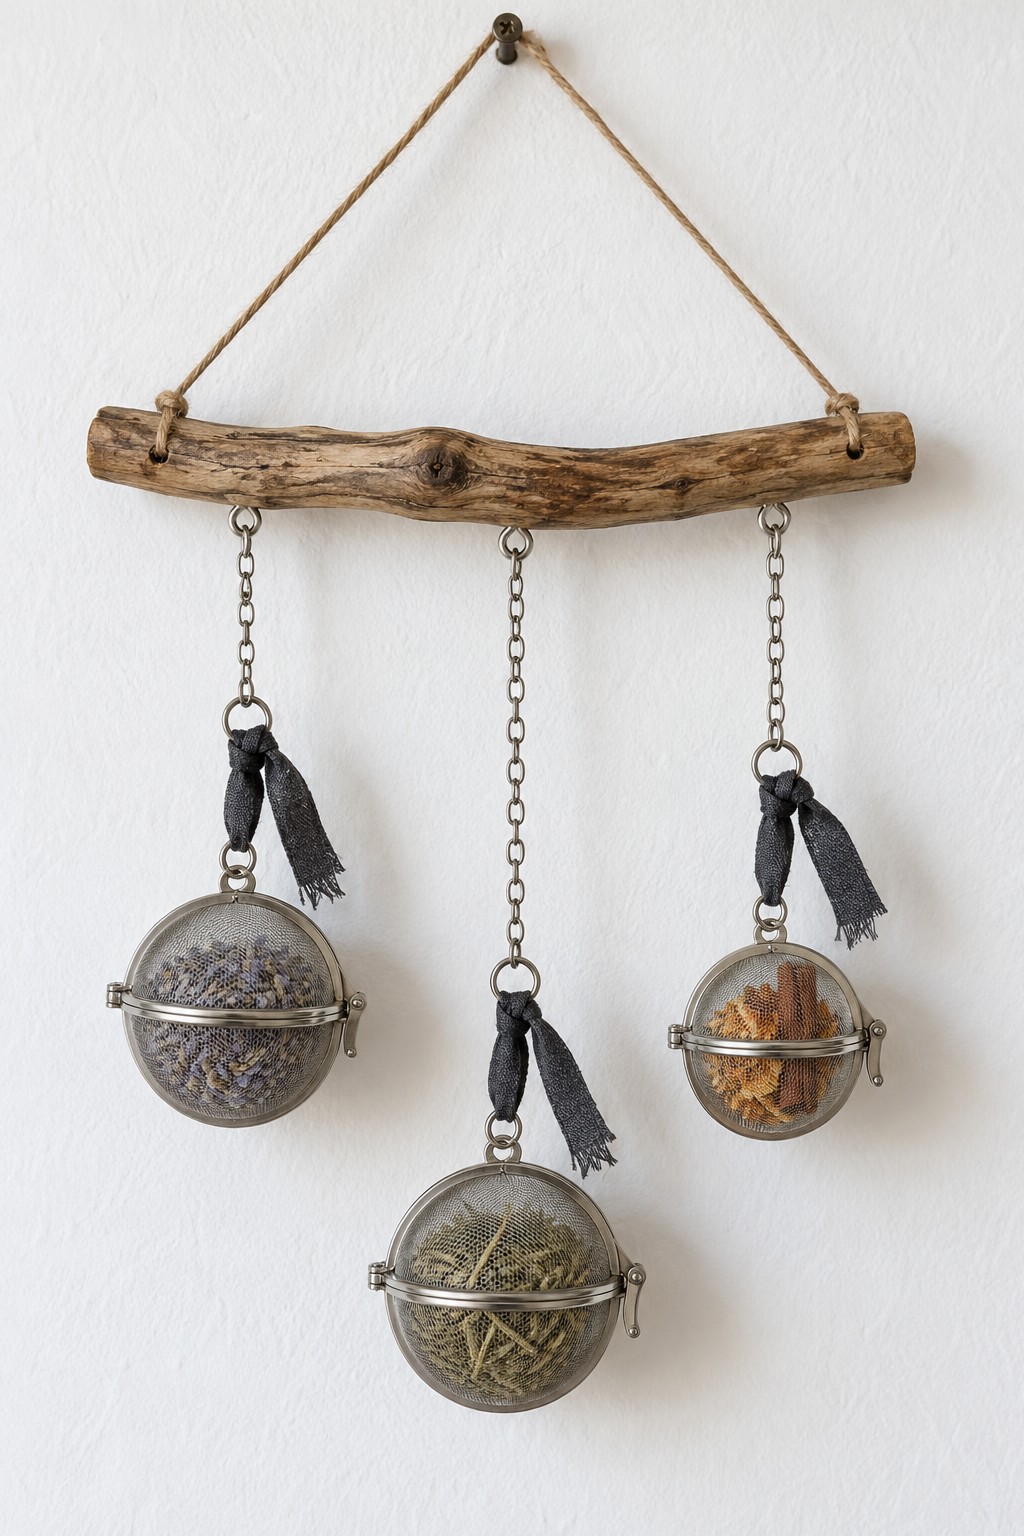
Visible mesh makes the contents part of the decoration: purple lavender at the left, green rosemary lower in the center and orange peel at the right. The black fabric ties add a darker accent without concealing the metal containers.
Use the making sequence above for the branch, screw eyes, split rings and chain connections. Preserve the longer central drop when adjusting the overall size, and choose spheres with clasps you can reopen easily. These are decorative botanical containers. Their accessible lids make seasonal changes straightforward, while the natural branch keeps the three separate pieces visually connected.
23. Layered Paper Witch in a Shadow Box
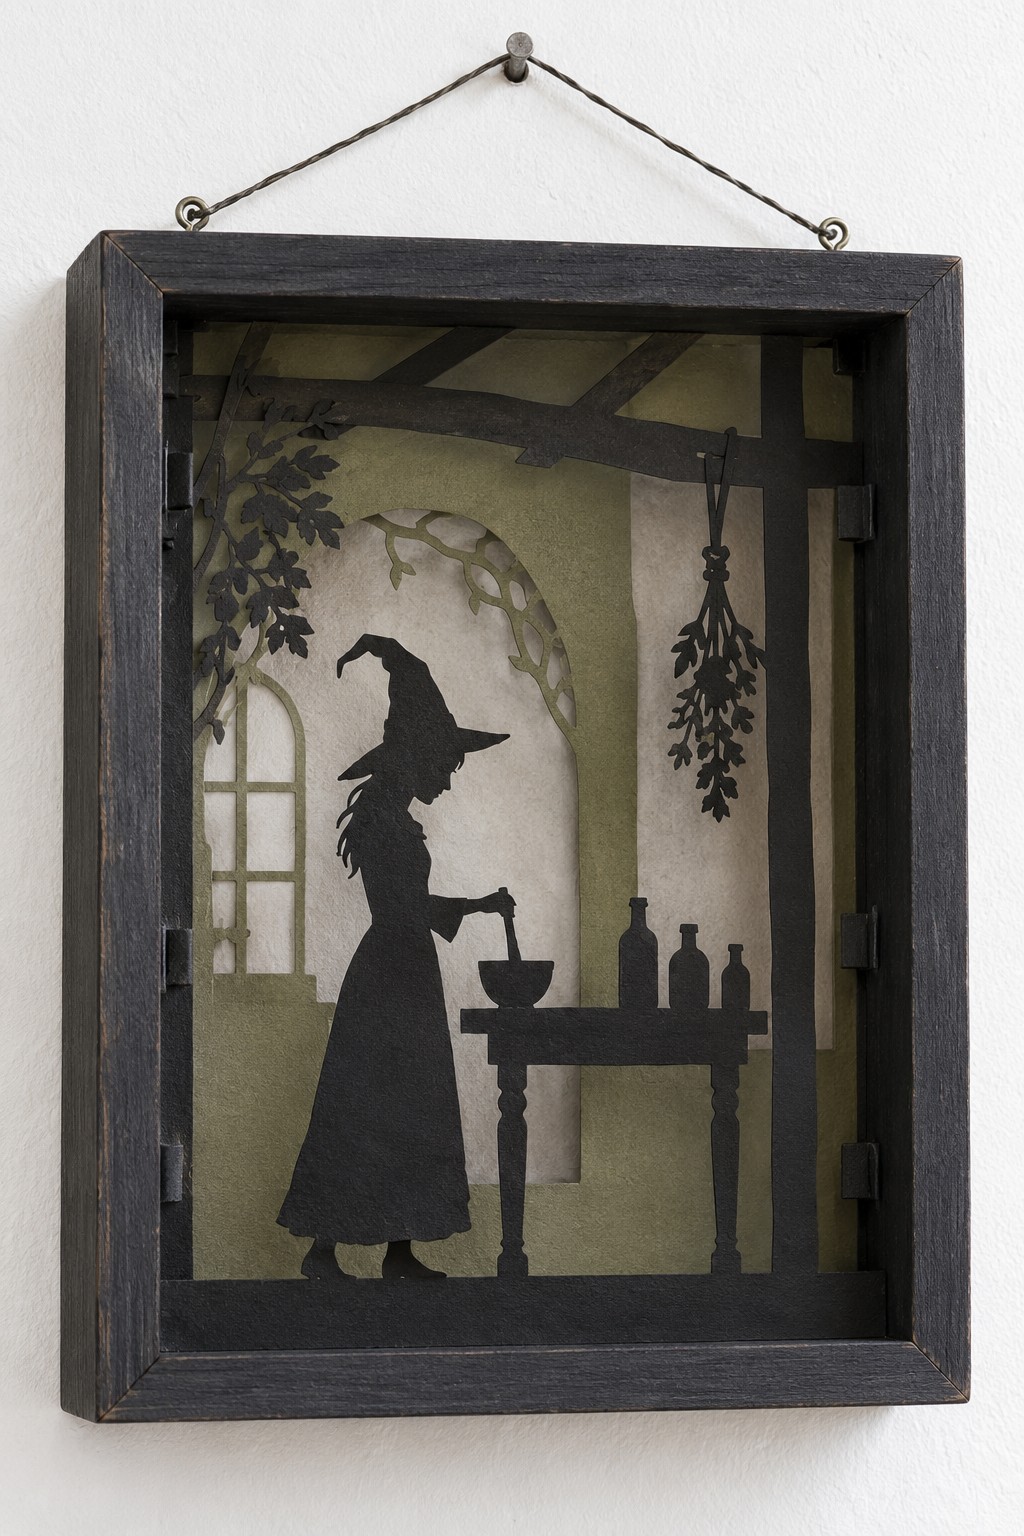
A witch stirring a small bowl becomes a quiet miniature scene inside a deep frame. Cut the figure and table from black cardstock, then use lighter olive and gray papers for the window, wall and background vegetation. Plan the silhouette first so the hands and bowl remain legible.
Separate the layers with narrow strips of foam board concealed behind solid areas, attaching the paper with a compatible paper adhesive. Build from the back forward and check the view before fixing the final layer. Use the frame's proper hanging hardware. The shallow depth creates its own shadows, so the scene does not need internal lighting to read clearly.
24. Birch Look Cone for Dried Herbs
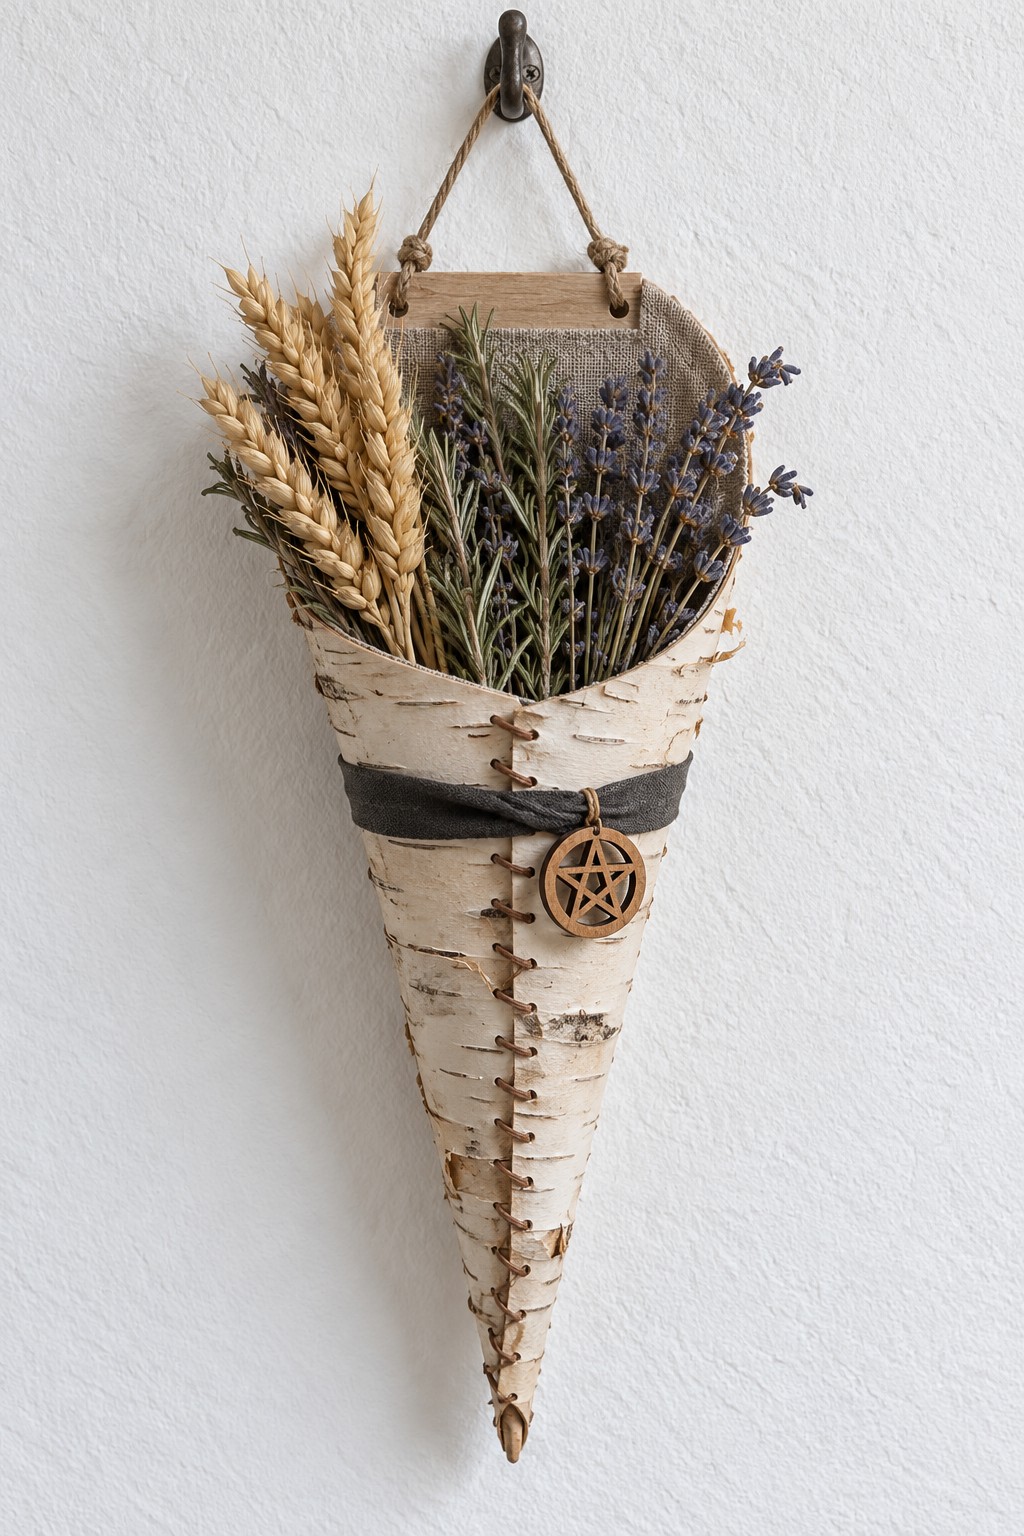
A pale cone brings contrast to the darker crafts in the collection. Form the shape around a sturdy card support using purchased craft bark or birch patterned paper, then make paired holes along the overlapping front edges. Lace the seam with thin cord without pulling so hard that the outer layer tears.
Add a fabric liner and attach the back to a small wooden hanger with two cord holes. A black band and a lightweight wooden star charm finish the front. Fill the cone with dry wheat and herb stems. This construction is intended for dry material; it is not a watertight vase for fresh flowers.
25. Garlic Braid with Rosemary and a Wooden Tag
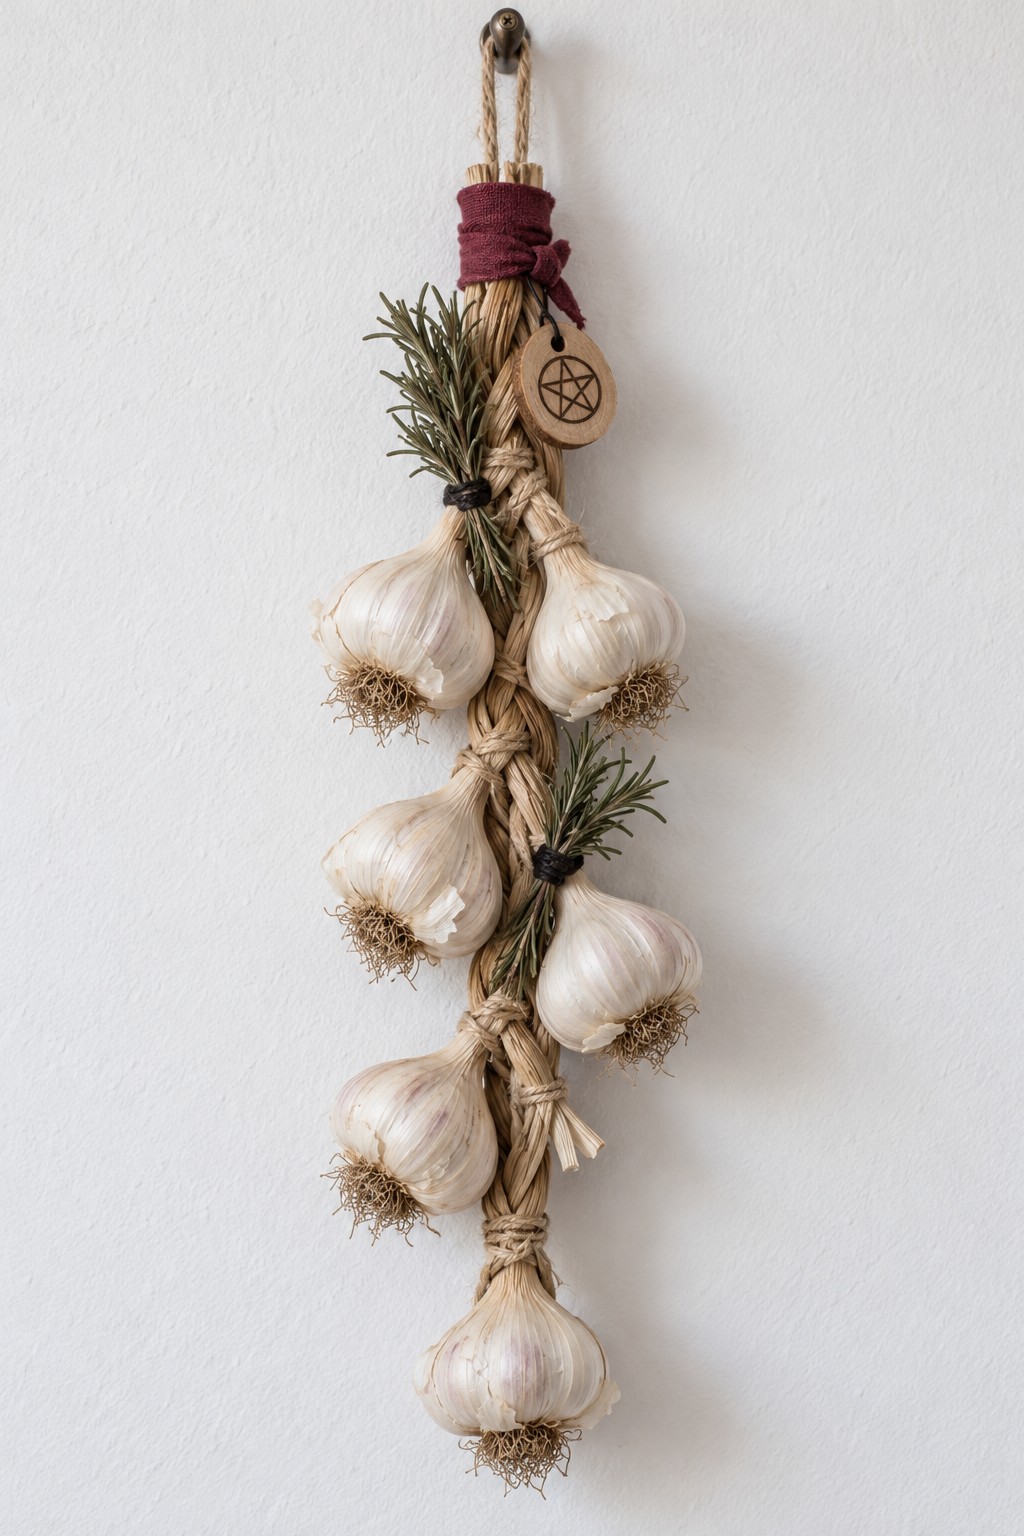
Garlic bulbs create a sculptural vertical rhythm against a pale wall, with rosemary and burgundy fabric bringing the braid into the wider color palette. Use cured softneck garlic with flexible stems, or choose imitation bulbs for a purely decorative piece.
Work the stems into a braid around a supporting cord, adding bulbs gradually and keeping their necks secure. Bind the top firmly before adding the fabric wrap and wooden tag. Hang real garlic in a dry, airy location away from steam, and inspect it periodically. Keep any garlic intended for cooking free of paint, glue and decorative finishes.
26. Long Yarn Witch with a Plum Hat
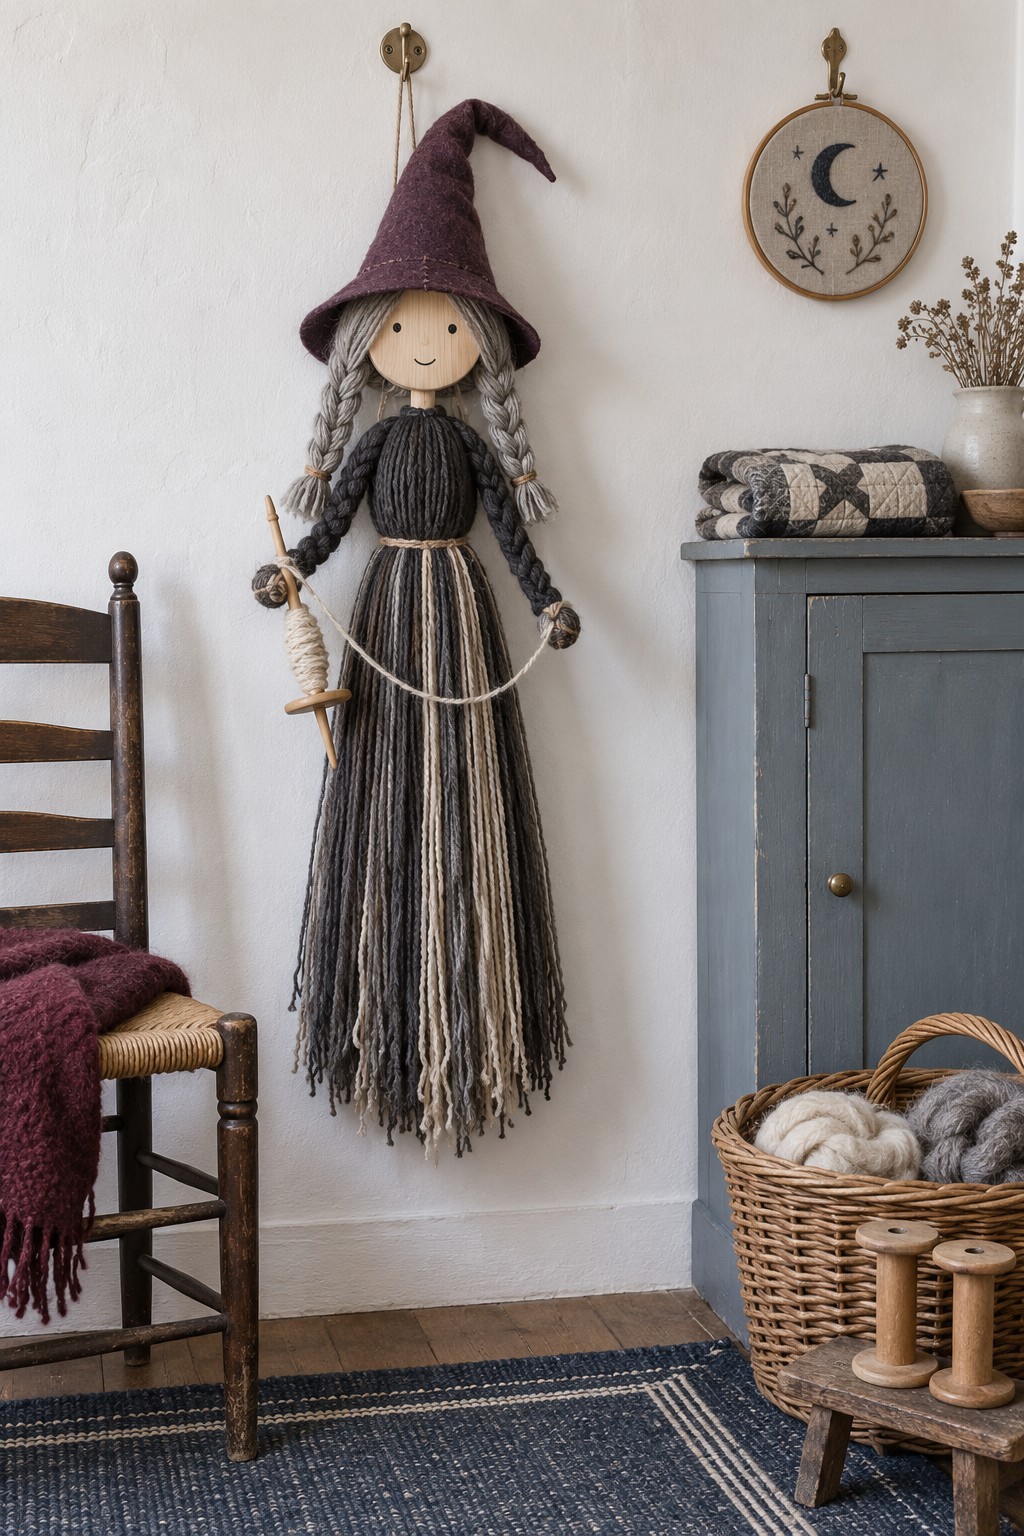
Long lengths of charcoal, gray and cream yarn give this witch most of her scale. Fold the skirt yarn over a concealed support bar or firmly stitched fabric band, then gather the upper section into a narrow bodice. Add a pale wooden or fabric face and two separate yarn braids.
Sew the plum hat from felt, attaching it to the reinforced head backing. Make the arms from smaller braided bundles and fasten the small broom through a stitched hand loop. Put the main suspension loop into the backing behind the head and shoulders. The hat tip and loose hair should not support the figure's weight.
27. Crossed Twig Brooms with a Central Pouch
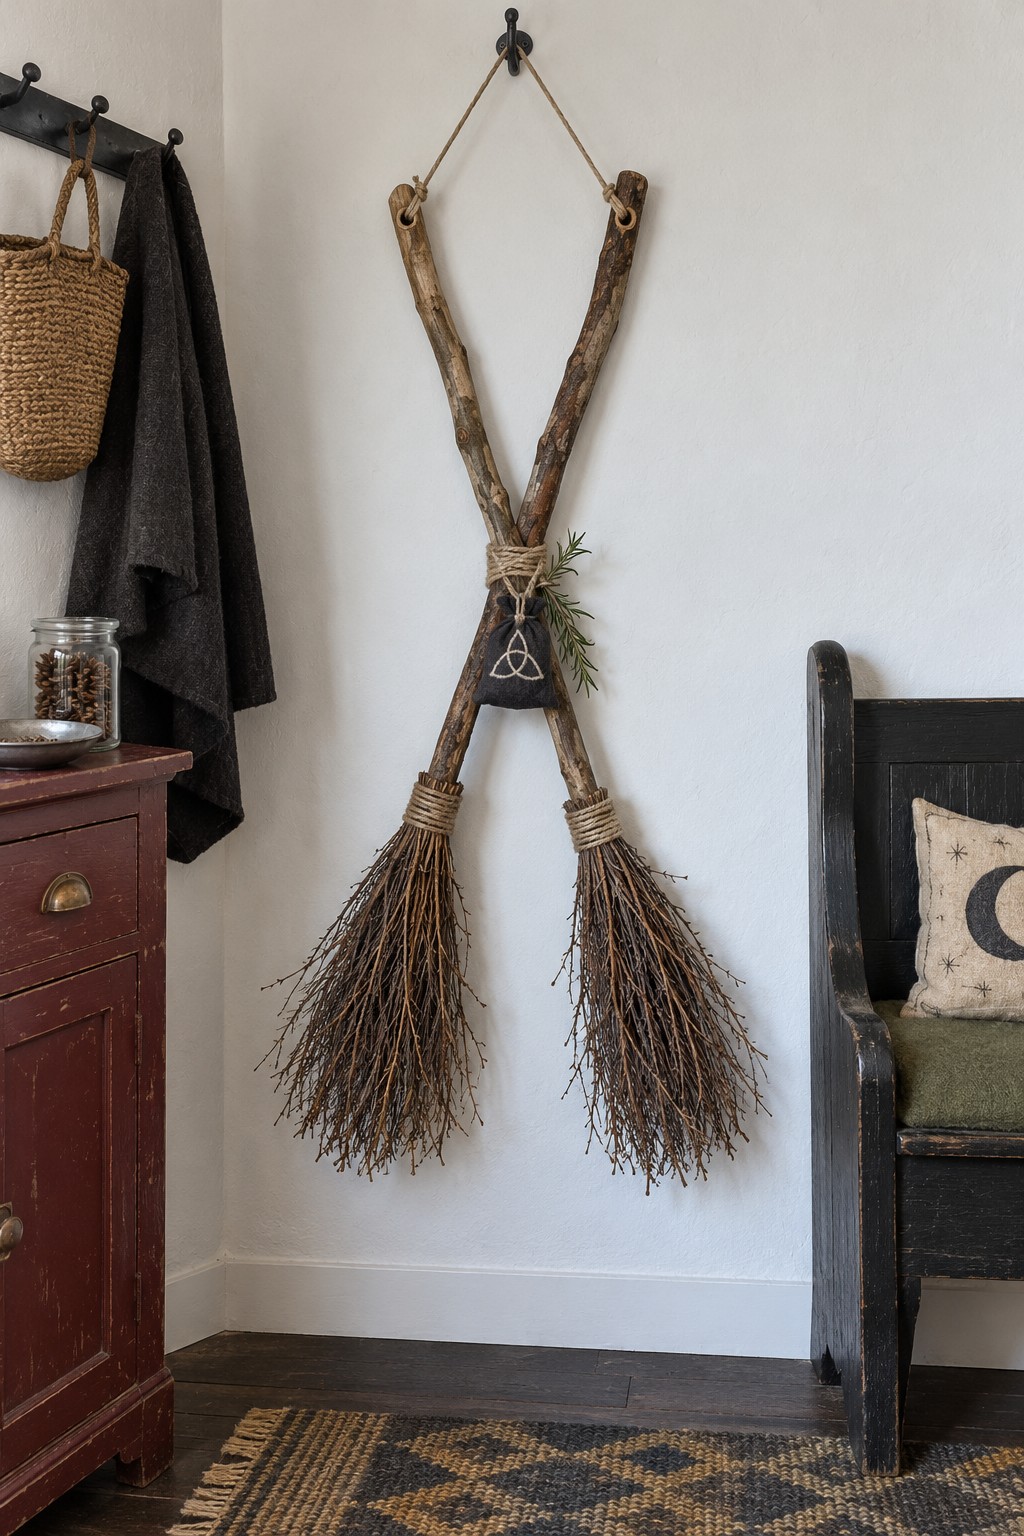
Two slim brooms create a large wall feature while leaving most of the wall visible. Bundle fine dry twigs around the lower end of each wooden handle, secure them with strong cord, and cover the binding with natural twine. Trim the bristles gradually to preserve a loose, tapered outline.
Cross the completed handles and lash their intersection firmly. Tie the small black pouch and herb sprig over this joint as decoration. Connect the upper handle ends to a suitable hanging arrangement and check that the crossed handles cannot slide apart. Allow space around the bristles so they do not catch coats or passing shoulders.
28. Braided Fabric Serpent Ring with a Key
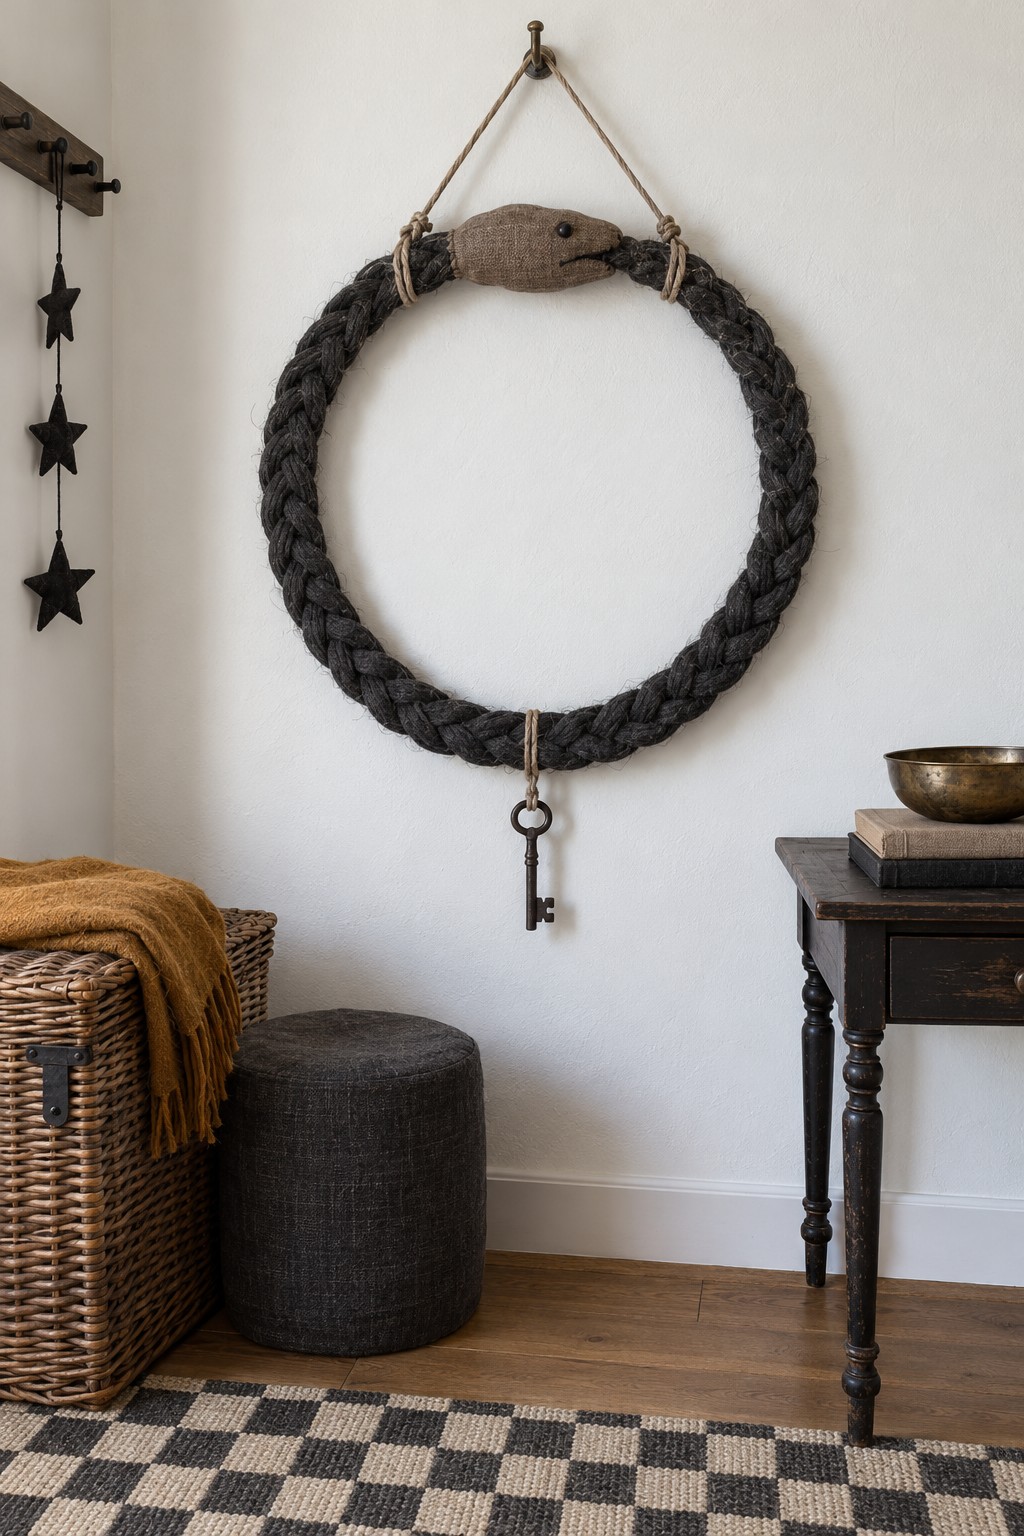
A small linen head turns a dark braided ring into a restrained serpent motif. Braid long charcoal fabric strips and stitch the braid around a rigid wreath base. Shape the head from two small fabric pieces with light stuffing, adding a tiny dark eye and a simple mouth seam.
Join the head to the covered ring at the top, with the braid's end tucked into the mouth area. Hang a decorative key from a separate bottom loop tied around the underlying base. Two suspension points near the upper sides keep the face level. The open center helps this substantial piece work in a relatively narrow entrance.
29. Veiled Oval Frame with Burgundy Stitches
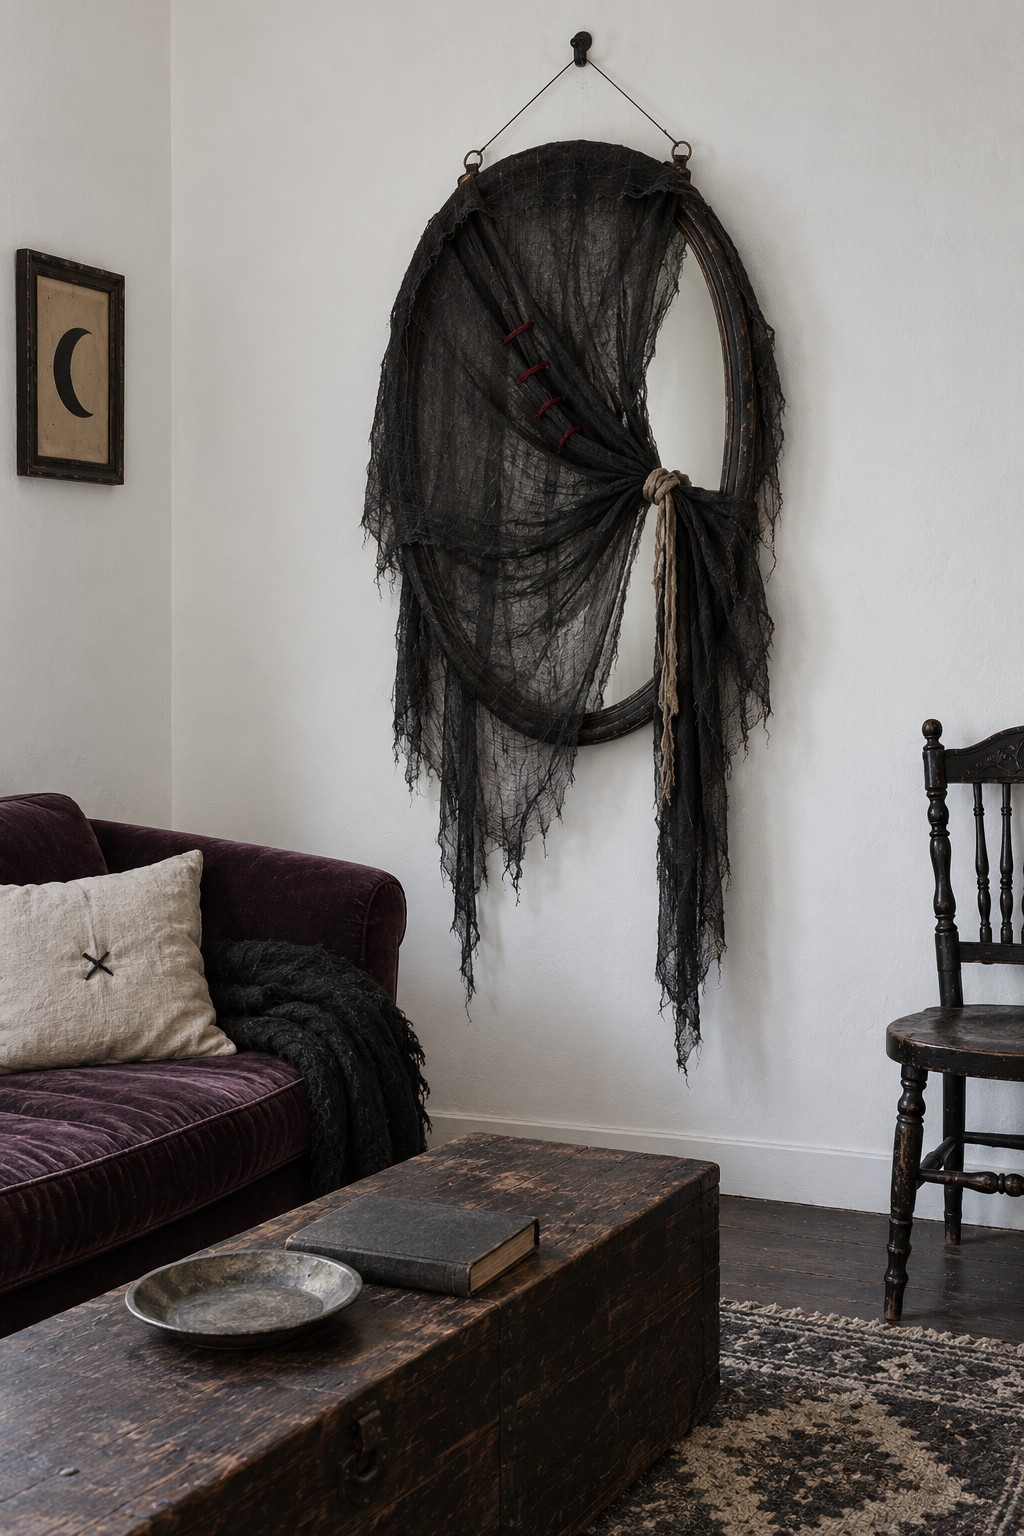
Black gauze changes a simple oval frame into a dramatic wall hanging. Choose a sound empty wooden frame and attach the fabric around the upper back with a stitched fabric sleeve or discreet upholstery attachments suited to the frame. Let the fabric drape diagonally across the opening.
Gather it at one side with natural cord and add a few burgundy stitches across selected folds. Keep the lowest fringe clear of nearby seating. For other ways to adapt an existing frame, explore these ideas for reusing old mirrors and their frames. If removing glass from an old frame, handle that preparation before adding any fabric.
30. Laced Coffin Shaped Textile Banner
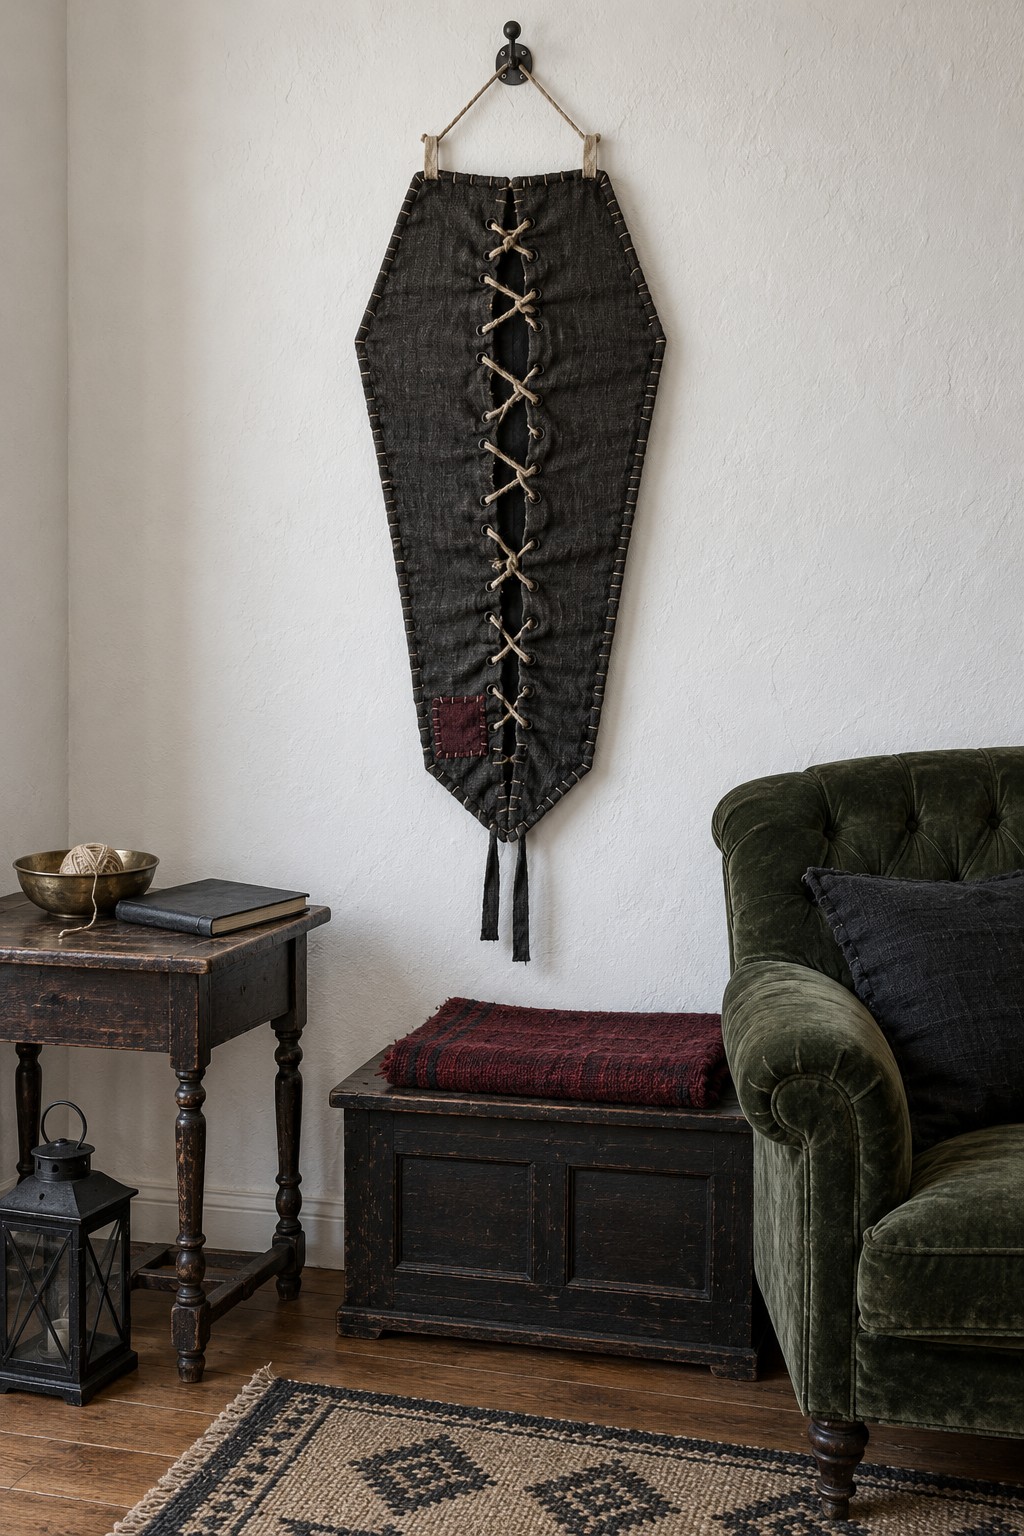
A coffin outline becomes a textile feature through a narrow center opening and pale crossed lacing. Cut two charcoal fabric fronts and a matching sturdy backing, allowing extra fabric around the edges for seams. Reinforce the center edges before adding eyelets or closely stitched cord loops.
Lace the front loosely enough to retain the shape, then add a small burgundy patch and a top hanging channel. A concealed light insert can keep the sides crisp. For a different use of the same silhouette, the cardboard coffin shelf tutorial develops a separate storage project.
31. Rag Wrapped Hoop with Three Dark Bells
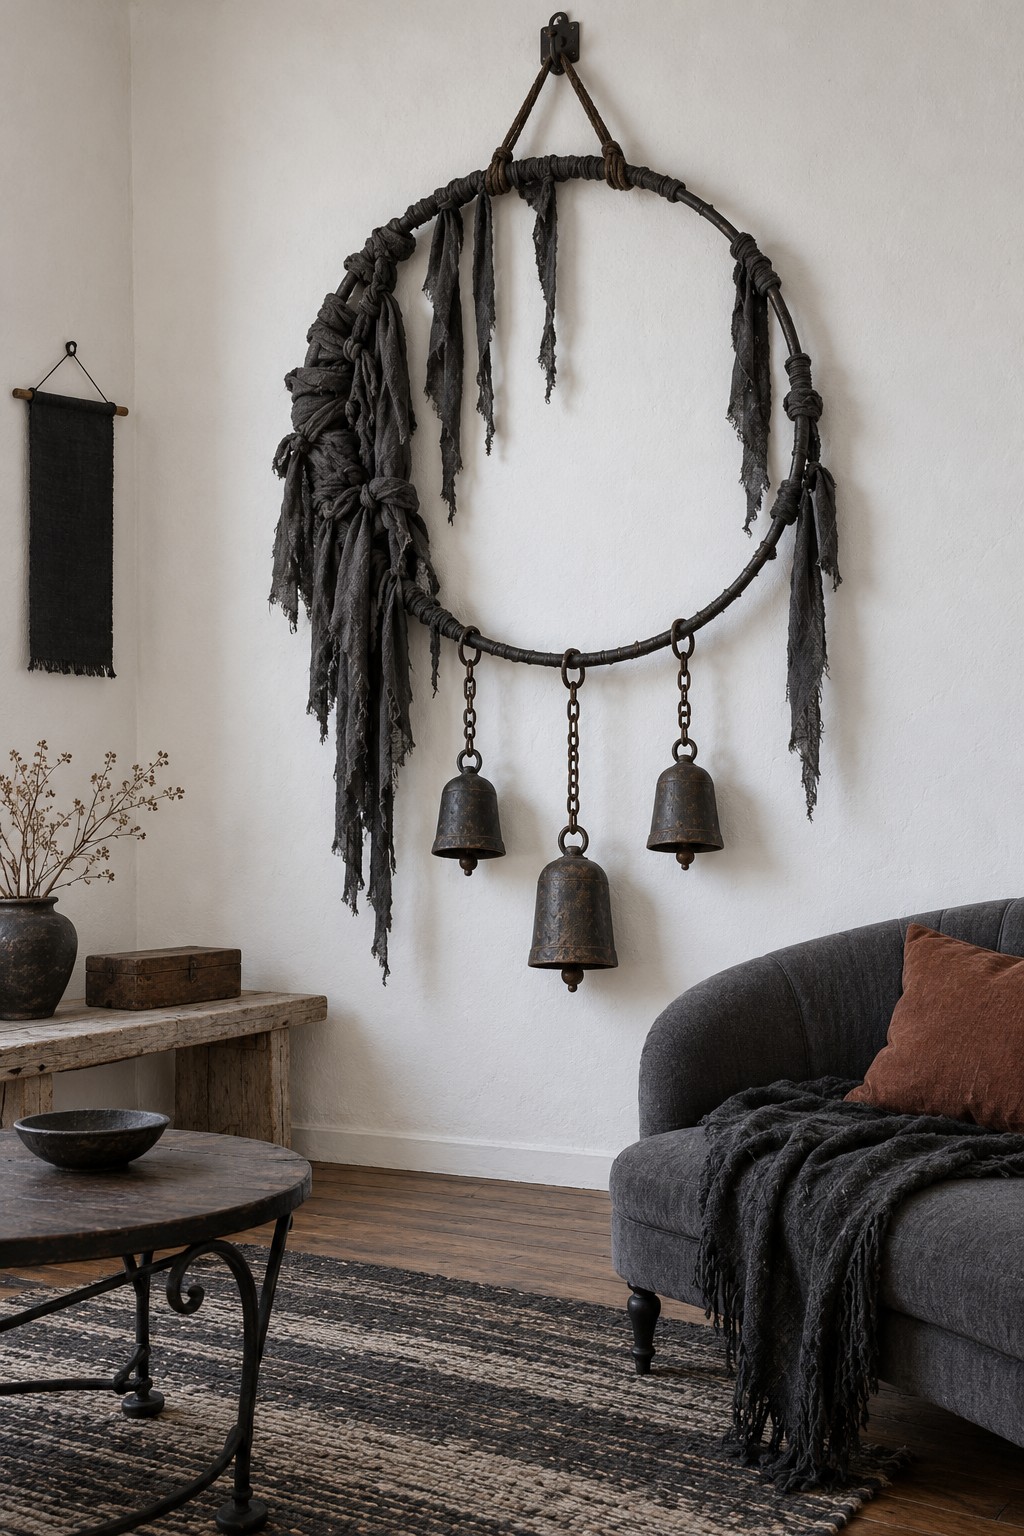
A large open hoop gives torn charcoal fabric room to move without creating a solid dark panel. Use a strong rigid ring, wrap selected areas with narrow strips and knot longer fabric lengths mainly along one side. Stitch loose wrapping ends on the back.
Attach three bells on separate chains, keeping the center bell lower. Secure the upper chain connectors at fixed points with firm bindings so they cannot slide toward the lowest part of the hoop. Keep fabric clear of the bell rims. This larger version needs hardware chosen for the actual metal weight, along with enough wall space for the asymmetrical fringe.
32. Nine Linen Parcels on a Dark Display Board
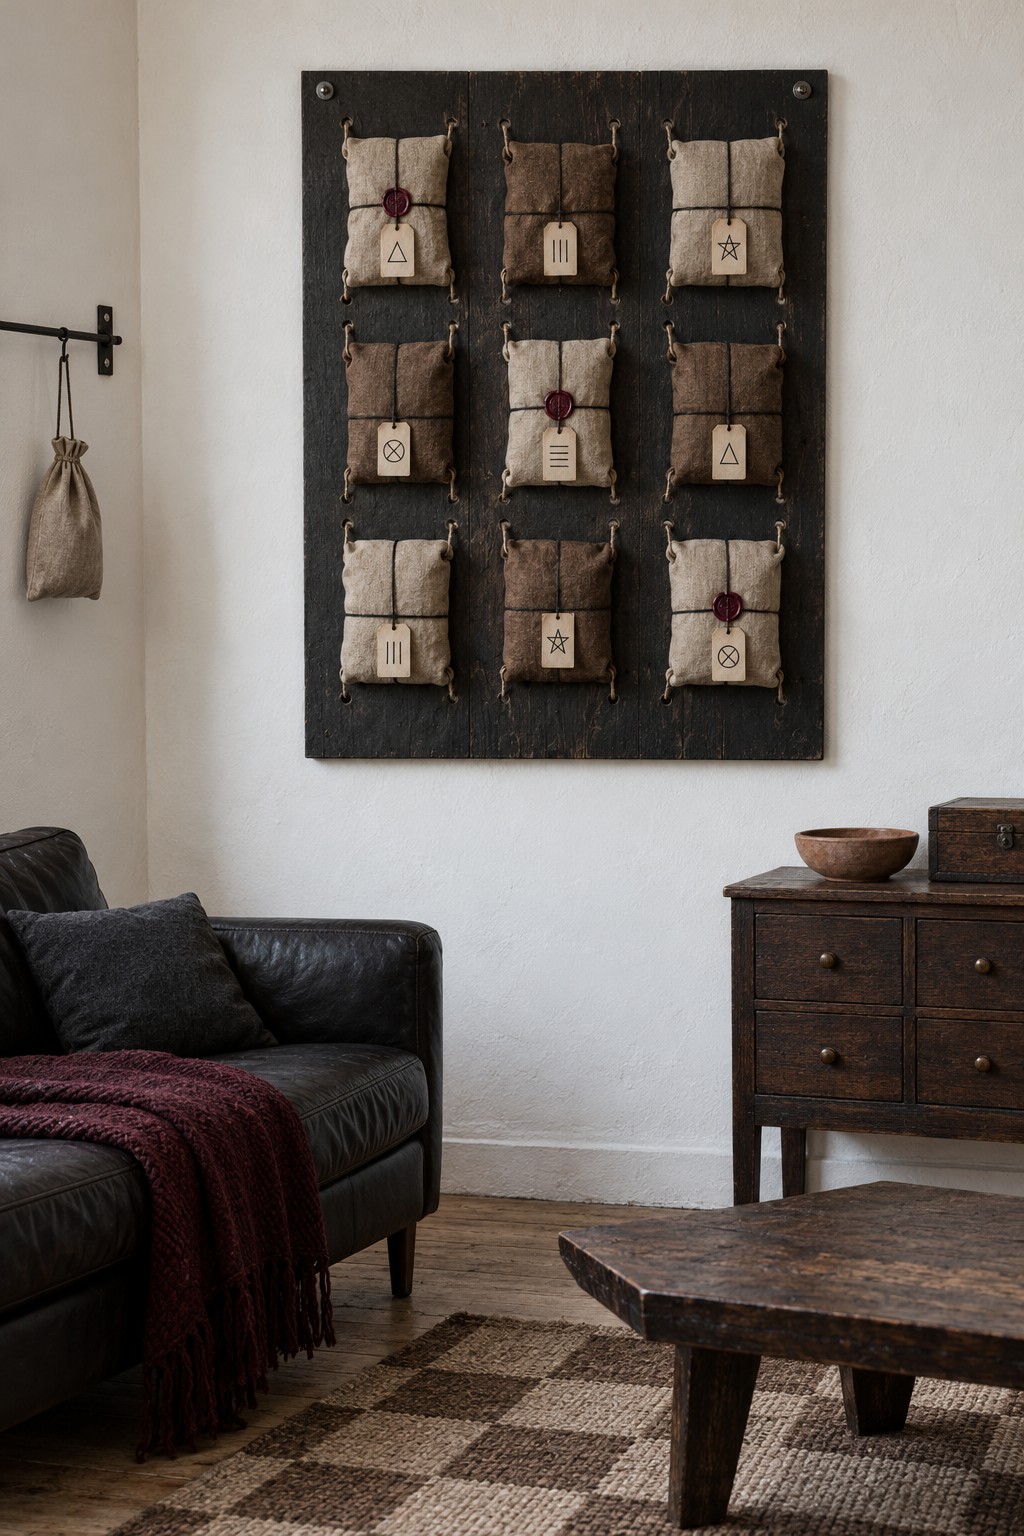
Nine small fabric parcels create a tidy grid against a dark wooden board. Sew simple flat sachets from cream, taupe and brown linen, filling them lightly with clean fabric scraps or a small inner bag of dried herbs. Wrap each with dark cord and add a small handwritten or stamped tag.
Mark the grid on paper before transferring the attachment positions to the board. Tie the parcels through small prepared holes or suitable fixed eyes, keeping their top edges level. Burgundy seal details can be made separately and attached to the cord. Finish and dry the board before mounting the textiles so its color cannot transfer onto them.
33. Gothic Shutter Plaque with Cord and a Sealed Tag
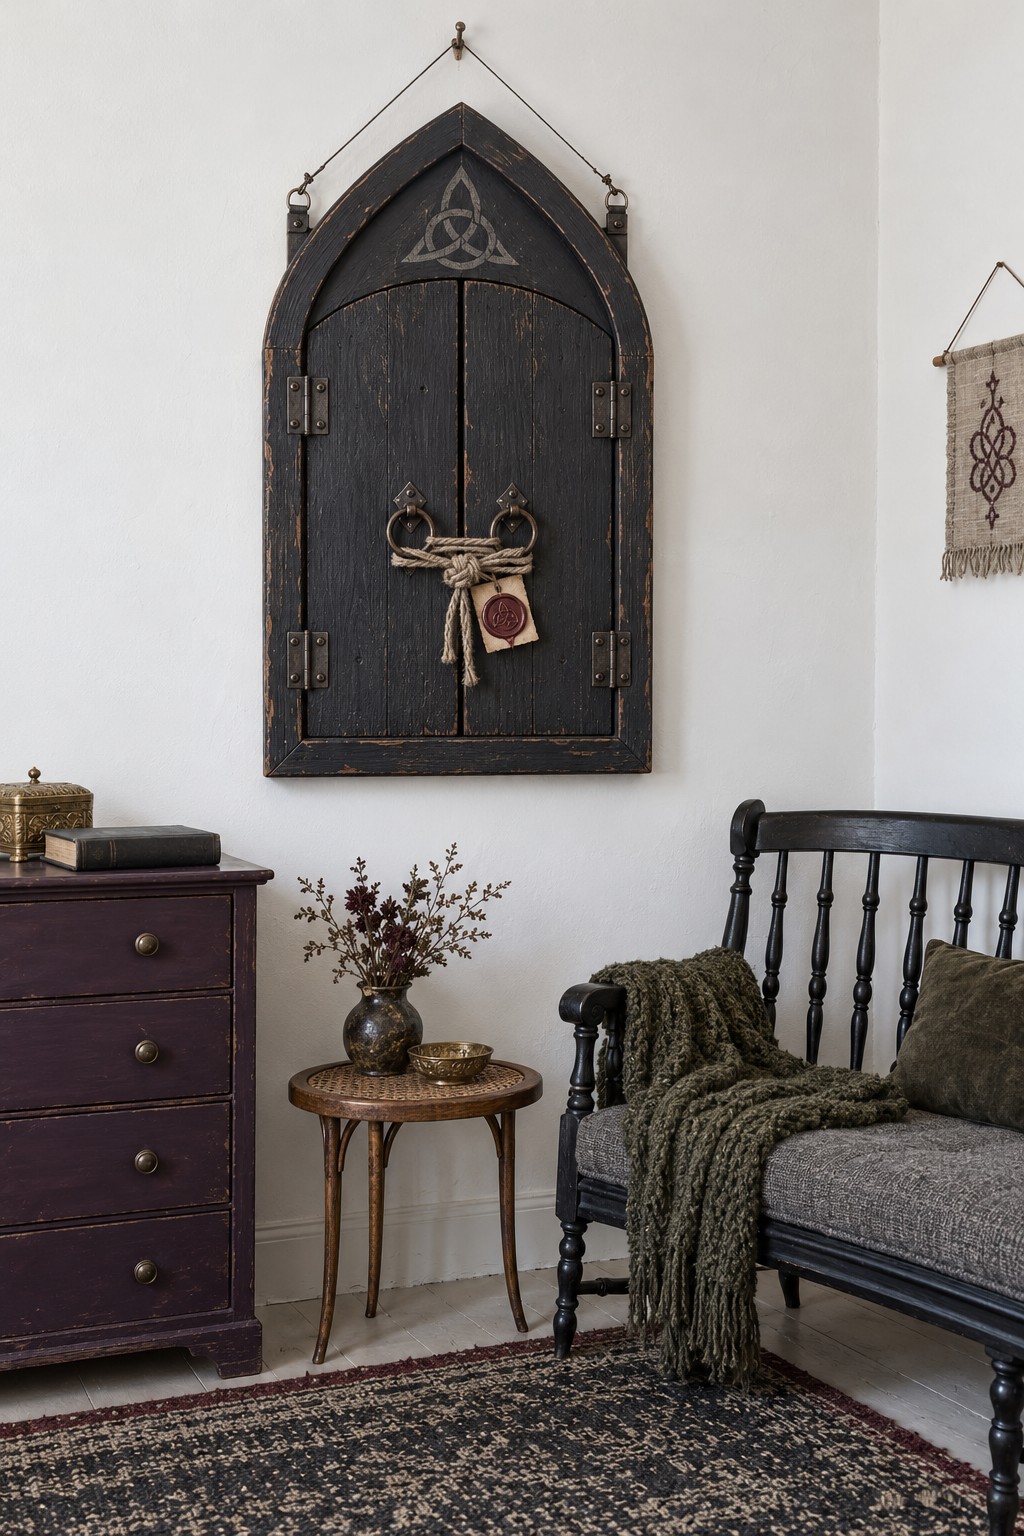
A pointed arch and two closed shutter shapes create an architectural ending to the collection. For a manageable craft version, use precut thin wooden panels fixed to a stable backing, then add decorative hinges and ring handles. Paint the new wood in charcoal acrylic and lightly brush brown along selected raised edges for a worn effect.
Add the upper interlaced motif with a stencil and tie natural cord through the handles with a small sealed tag. The handles are ornament, so use dedicated hardware attached to the backing for wall support. These Gothic decorating ideas can help connect the finished plaque with the furniture and colors around it.
Keep the Handmade Details Looking Their Best
Dust botanical pieces gently with a soft brush and replace brittle stems before they shed heavily. Check cord bindings as natural materials settle, especially where bells or pendants hang. Store fabric and dried plant decorations completely dry, with delicate drops separated so they cannot tangle. A few well supported pieces with room around them will make the texture, stitching and silhouettes easier to appreciate.



Leave a Reply