
A stitched record coaster beside a glass, a red diner booth holding up cookbooks, or a turquoise board keeping necklaces in reach can bring a little 1950s character into an ordinary room. This collection explores 32 craft ideas through useful objects, tactile materials and distinctive details, with practical suggestions for adapting each design at home.
Begin with a small felt coaster to learn the sequence of cutting, decorating and joining layers. Then choose from sewing accessories, paper decorations, mosaics, painted containers and compact storage projects. Each idea explains the materials you can use, a workable construction approach and the detail that deserves the most attention. The measurements in the starter project are suggested working dimensions; larger pieces should be fitted to your own furniture, fittings and supplies.
Table of Contents
- What Gives These Crafts Their 1950s Character?
- Materials to Choose Before You Start
- Make a Felt Record Coaster in Six Clear Stages
- Supplies for One Coaster
- Choose a Handmade Detail for Your Room
- 1. A Curved Mosaic Tray with an Atomic Star
- 2. A Sewing Case with Little Record Pockets
- 3. A Pink Lampshade with a Textured Poodle
- 4. An Embroidered Starburst Photo Hoop
- 5. Red Diner Booth Bookends
- 6. A Turquoise Jewelry Board with a Tiny Shelf
- 7. A Pleated Wall Fan in Abstract Colors
- 8. A Kitchen Print Apron with Red Binding
- 9. A Felt Teapot Pocket for Folded Cloths
- 10. Pastel Paper Bead Curtain Tiebacks
- 11. Record Coasters in a Felt Sleeve
- 12. A Polka Dot Glove Dish for Rings
- 13. A Miniature Screen of Cocktail Dresses
- 14. Ballet Slipper Sachets for a Linen Drawer
- 15. A Harlequin Switch Plate with Button Details
- 16. A Foldable Checkerboard with a Storage Flap
- 17. An Oval Pattern Pelmet for a Plain Blind
- 18. Cocktail Motifs on Tall Glasses
- 19. A Woodland Embroidered Chair Back Cover
- 20. A Rooster Canister with a Checker Border
- 21. A Geometric Headscarf as a Dressing Table Accent
- 22. A Painted Harbor Plate for the Wall
- 23. A Jointed Paper Jumping Jack
- 24. A Sewing Print Wastebasket with Red Binding
- 25. A Narrow Mosaic Border for a Favorite Photograph
- 26. A Cat Eye Glasses Stand in Felt
- 27. Striped Crochet Sleeves for a Pair of Bottles
- 28. A Spun Cotton Style Snowman for a Shelf
- 29. A Rainy Day Umbrella Stand
- 30. An Embroidered Travel Bag for Small Linens
- 31. Wire Napkin Rings with Abstract Clay Accents
- 32. Paper Sailboats for Place Cards
- Keep the Finished Pieces Useful
What Gives These Crafts Their 1950s Character?
The decade offered more than one decorative direction. Atomic patterns and abstract botanical shapes sat alongside cheerful domestic prints and familiar handmade textiles. Here, starbursts, slender lines, asymmetric outlines and compact geometric repeats provide the strongest period cues. Poodles, diner seating and record motifs add a playful popular culture influence.
Use cream or natural wood as a quiet background, then repeat two or three colors such as turquoise, coral, mustard or soft pink. A small amount of black can sharpen a pattern. These projects are contemporary interpretations of that visual language, with modern materials and construction options, rather than claims to reproduce original period objects.
Materials to Choose Before You Start
Match the supplies to the object’s job. Firm felt suits flat coasters and little organizers; washable cotton works better for aprons and linen bags. Stable wood supports shelves, while a proper glass or ceramic paint system belongs on smooth glazed surfaces. Paper and cotton ornaments should stay in dry display areas.
- For sewn details: fabric scissors, paper templates, a suitable needle, sewing thread or embroidery floss, and felt or cotton chosen for the project. Stitch handles, pockets and other moving parts instead of relying on craft glue alone.
- For paper and fabric covering: use PVA craft glue for paper joins, felt adhesive for compatible decorative felt surfaces, or fabric decoupage medium for fabric on a rigid base. Test a small offcut for staining and stiffness.
- For wood: smooth bare contact surfaces, wood glue, clamps and mechanical fasteners where the joint must carry weight. Follow the selected glue’s clamp and full cure times before loading the piece.
- For painted surfaces: use the primer and paint specified for the substrate. Apply thin coats and distinguish between a dry surface and a fully cured finish. A clear coating does not automatically make a decoration waterproof or suitable for food contact.
- For mosaics: choose a rigid base, tiles of similar thickness, compatible mosaic adhesive and appropriate grout. Protect your eyes when cutting tiles and smooth sharp edges before assembly.
Make a Felt Record Coaster in Six Clear Stages
This flat coaster is a manageable starting point for the record set in idea 11. It uses two matching black felt layers, a small mint label and shallow embroidery. Complete the front decoration before joining the layers so the knots remain hidden inside.
Supplies for One Coaster
- Black felt about 1 to 2 mm thick, enough for two circles measuring 10 cm across
- A mint felt scrap for one circle measuring 3 cm across
- Fine charcoal and mint embroidery thread, plus a little black thread for the center
- A hand sewing needle, sharp scissors, a ruler and paper circle templates
- Fabric chalk that has been tested on a scrap of the felt
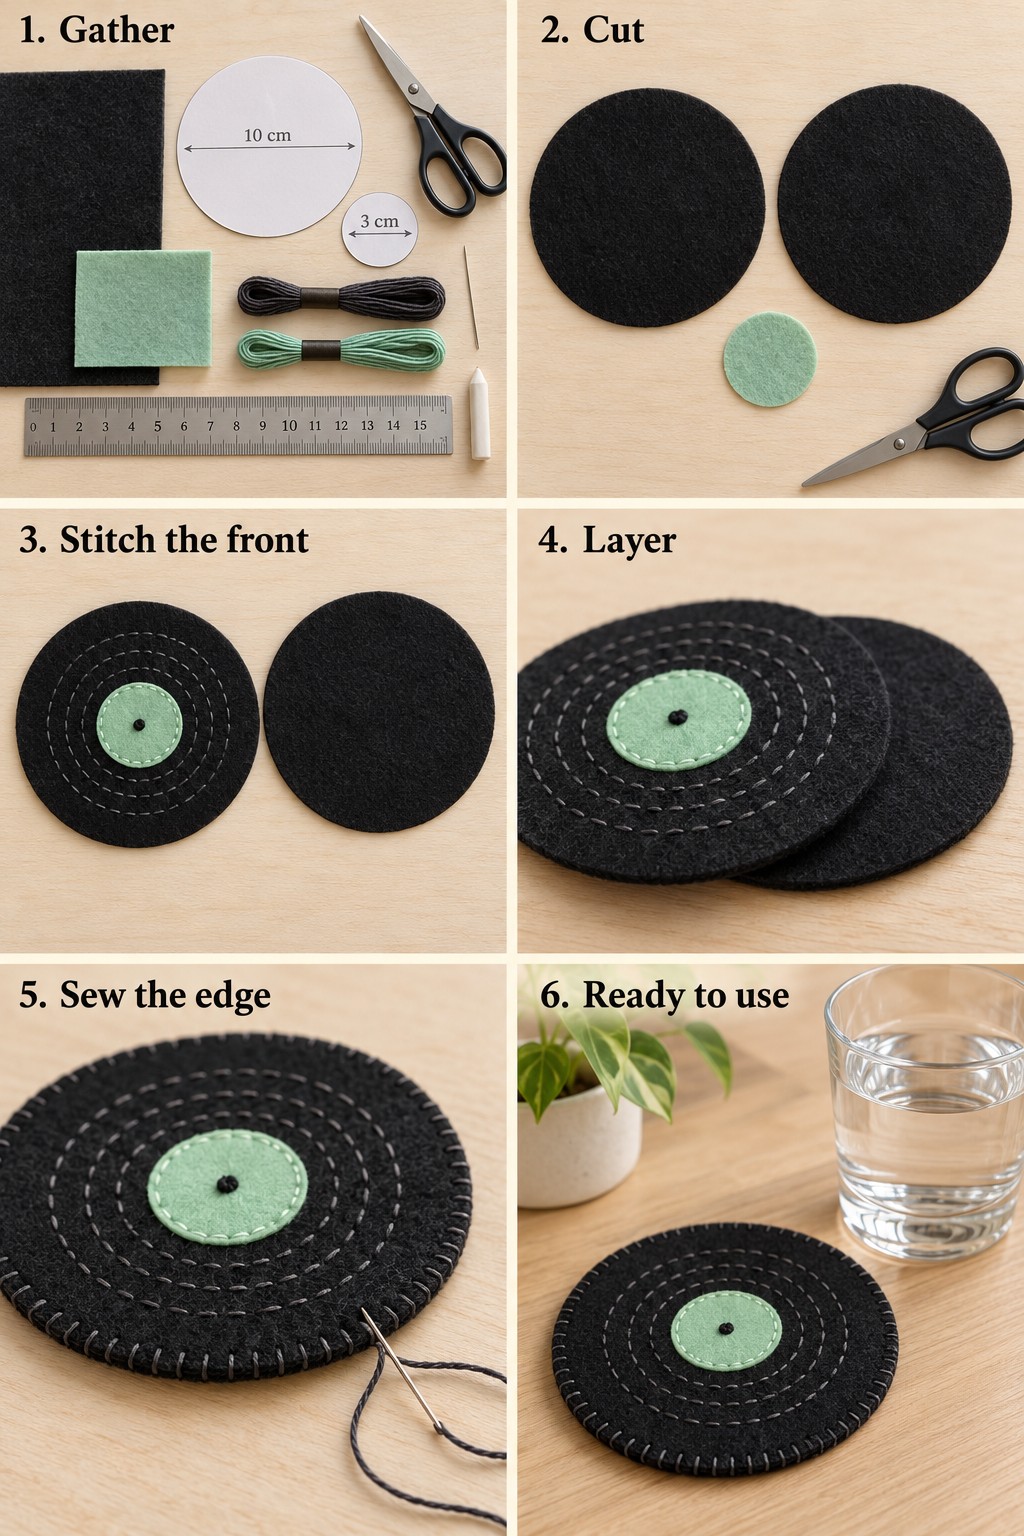
- Gather and check the materials. Make the two paper templates and choose thread that will lie close to the felt. Test a few stitches on an offcut before cutting the main pieces.
- Cut the three pieces. Cut two identical black circles and one mint circle. Stack the black pieces briefly to check that their edges match, then separate them again.
- Decorate the front. Center the mint label on one black circle and attach it with small running stitches. Work three concentric circles of charcoal running stitch around the label. Add a tiny black stitched dot at the center and secure the thread ends on the reverse without bulky knots.
- Align the layers. Place the decorated circle over the plain backing with the knots enclosed. Match the edges all the way around. Keep both layers flat rather than adding stuffing.
- Join the edge. Sew through both layers with evenly spaced blanket stitches. Pass the needle through the loose thread loop before tightening each stitch, keeping the tension gentle enough that the felt does not curl. Secure the final stitch and hide the thread tail between the layers.
- Check before use. Place the coaster on a level surface and check that an empty glass sits steadily. Trim loose fibers and remove any temporary marks as the felt allows. Air dry after damp use and keep the coaster away from hot pans; it is not a trivet.
You can use the same order of work for several of the ideas below: prepare the separate parts, decorate the accessible surfaces, assemble the structure, and check the finished object in its intended place. Painted and mosaic pieces need their own compatible products and curing steps, so treat each material separately.
Choose a Handmade Detail for Your Room
Start with the object you would actually use, then choose the motif and palette. The following ideas range from small tabletop accents to wall storage and soft furnishings. Each offers a way to adapt the design while keeping its construction and everyday purpose in view.
1. A Curved Mosaic Tray with an Atomic Star
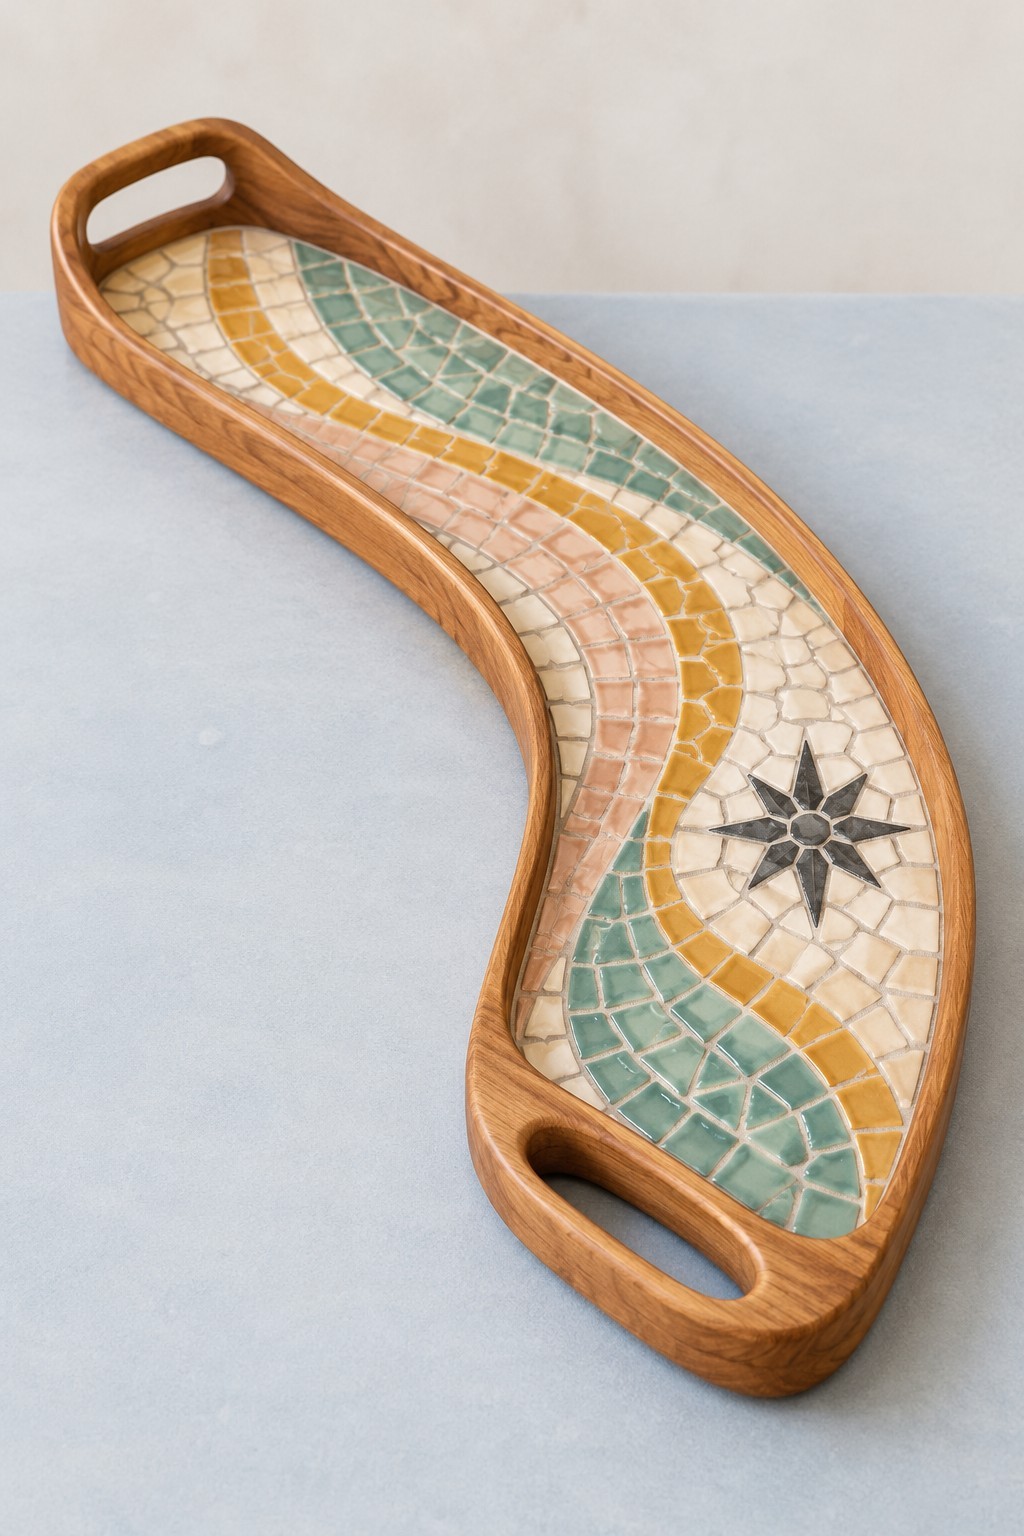
A sweeping wooden outline gives this mosaic tray its character before the first tile is placed. Cream, mint and mustard bands follow the curve, while a small black star supplies a crisp focal point. The exposed wooden rim keeps the pattern contained and makes the handles comfortable to hold.
Start with a sound tray whose base can support the added tile weight without flexing. Arrange small, equally thick ceramic mosaic pieces on a paper tracing, keeping gaps consistent. Use a mosaic adhesive specified for both tile and the prepared wooden substrate, then let it cure before grouting. Wipe away residue with a barely damp sponge and follow the grout instructions for curing and sealing. Keep food on separate dishes and avoid soaking the tray.
2. A Sewing Case with Little Record Pockets
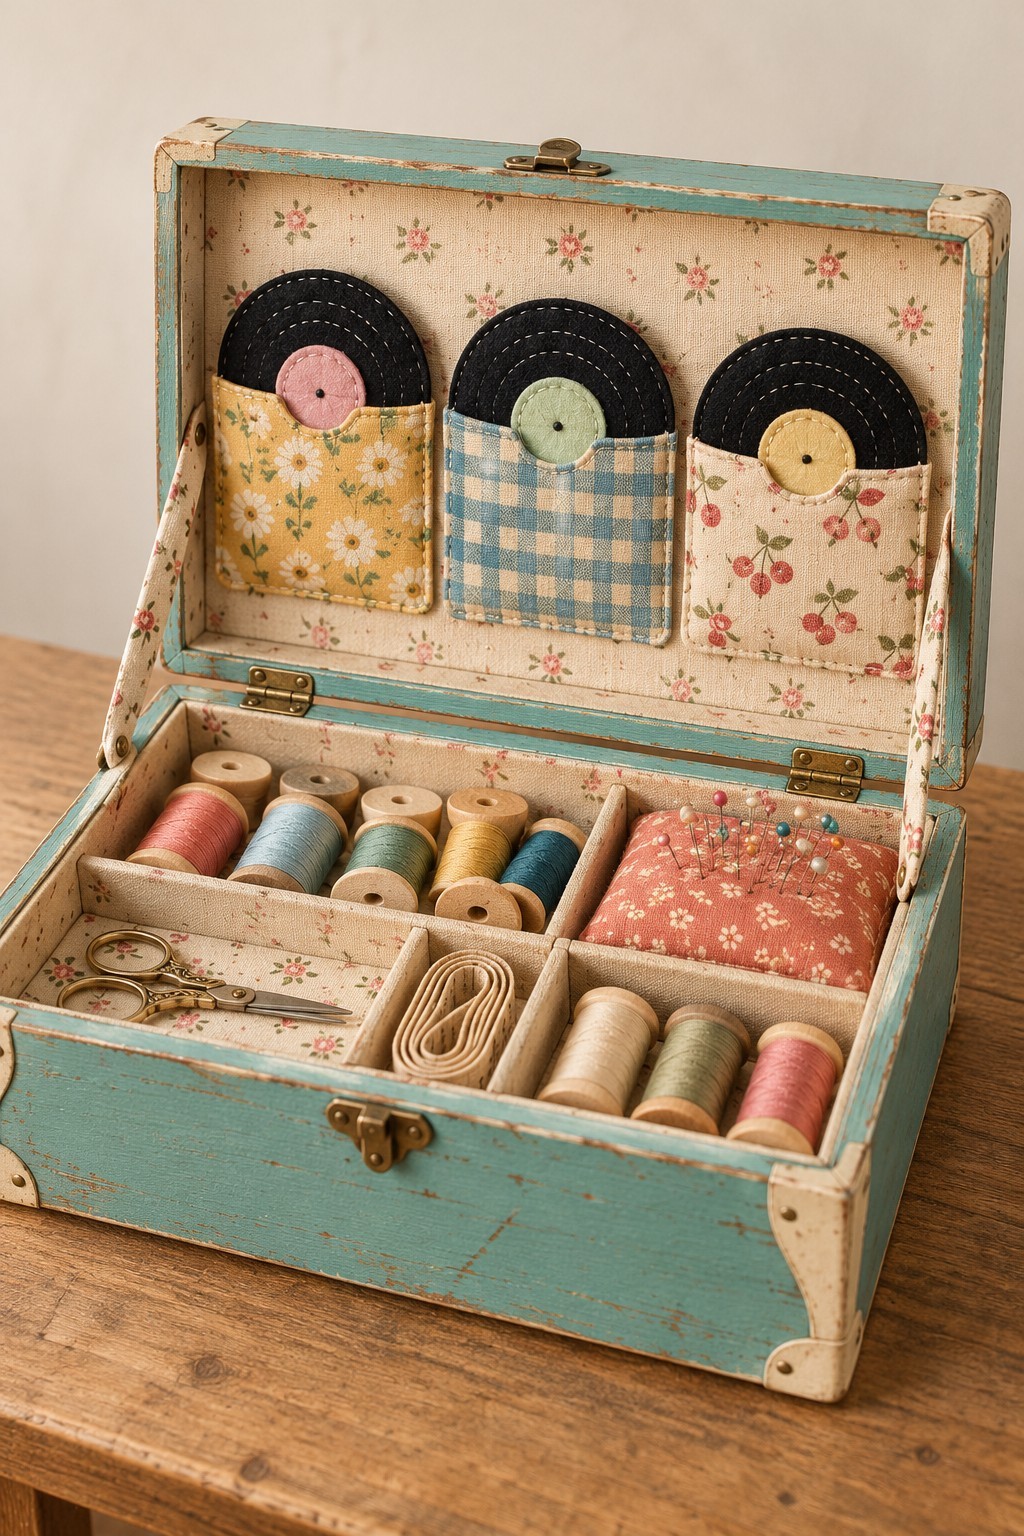
A turquoise case turns everyday sewing supplies into an inviting display. Floral fabric softens the inside, while three pockets in the lid hold small record shaped felt pieces. The lower compartment has room for thread, folded fabric and a pincushion, so the decoration supports an actual organizing task.
Use a sturdy modern wooden case or a sound secondhand box with working hinges. Make a removable fabric covered lid insert, sew the pockets onto its fabric before wrapping the board, and fit lightweight dividers into the bottom. Leave clearance around the hinges and latch. The felt records can become needle holders when opened into two layers; store sharp needles securely inside. Use freshly painted wood for the distressed effect rather than sanding an unidentified old coating.
3. A Pink Lampshade with a Textured Poodle
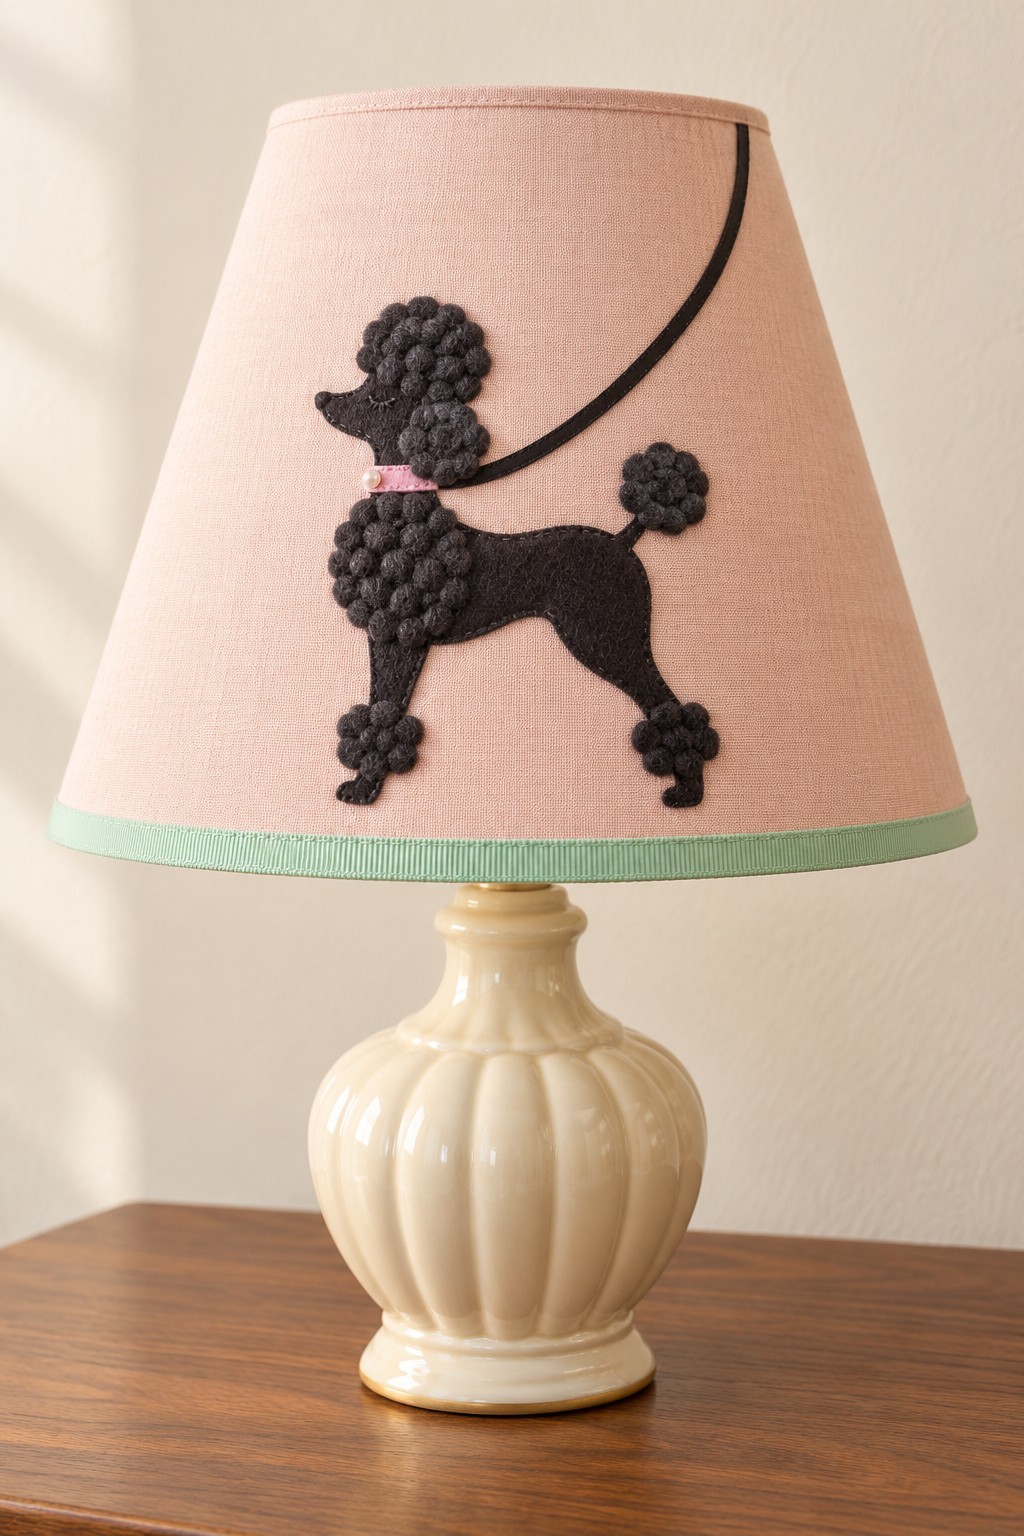
The combination of blush pink, mint edging and a black poodle creates a playful dressing table accent. The poodle needs a clear silhouette: a narrow muzzle, slim legs and rounded tufts at the head, chest and tail. A curved black leash connects the animal to the upper edge without filling the whole shade.
Build the motif separately from black felt and small stitched yarn tufts. Choose a new shade intended for external fabric embellishment and use only the adhesive and trim method its maker permits. Position the finished applique on the outside, leaving the lining and ventilation openings intact. Use the lamp maker’s specified bulb type and wattage, with all decorations clear of the bulb. A matching unlit decorative shade is an alternative when the existing shade’s suitability is unknown.
4. An Embroidered Starburst Photo Hoop
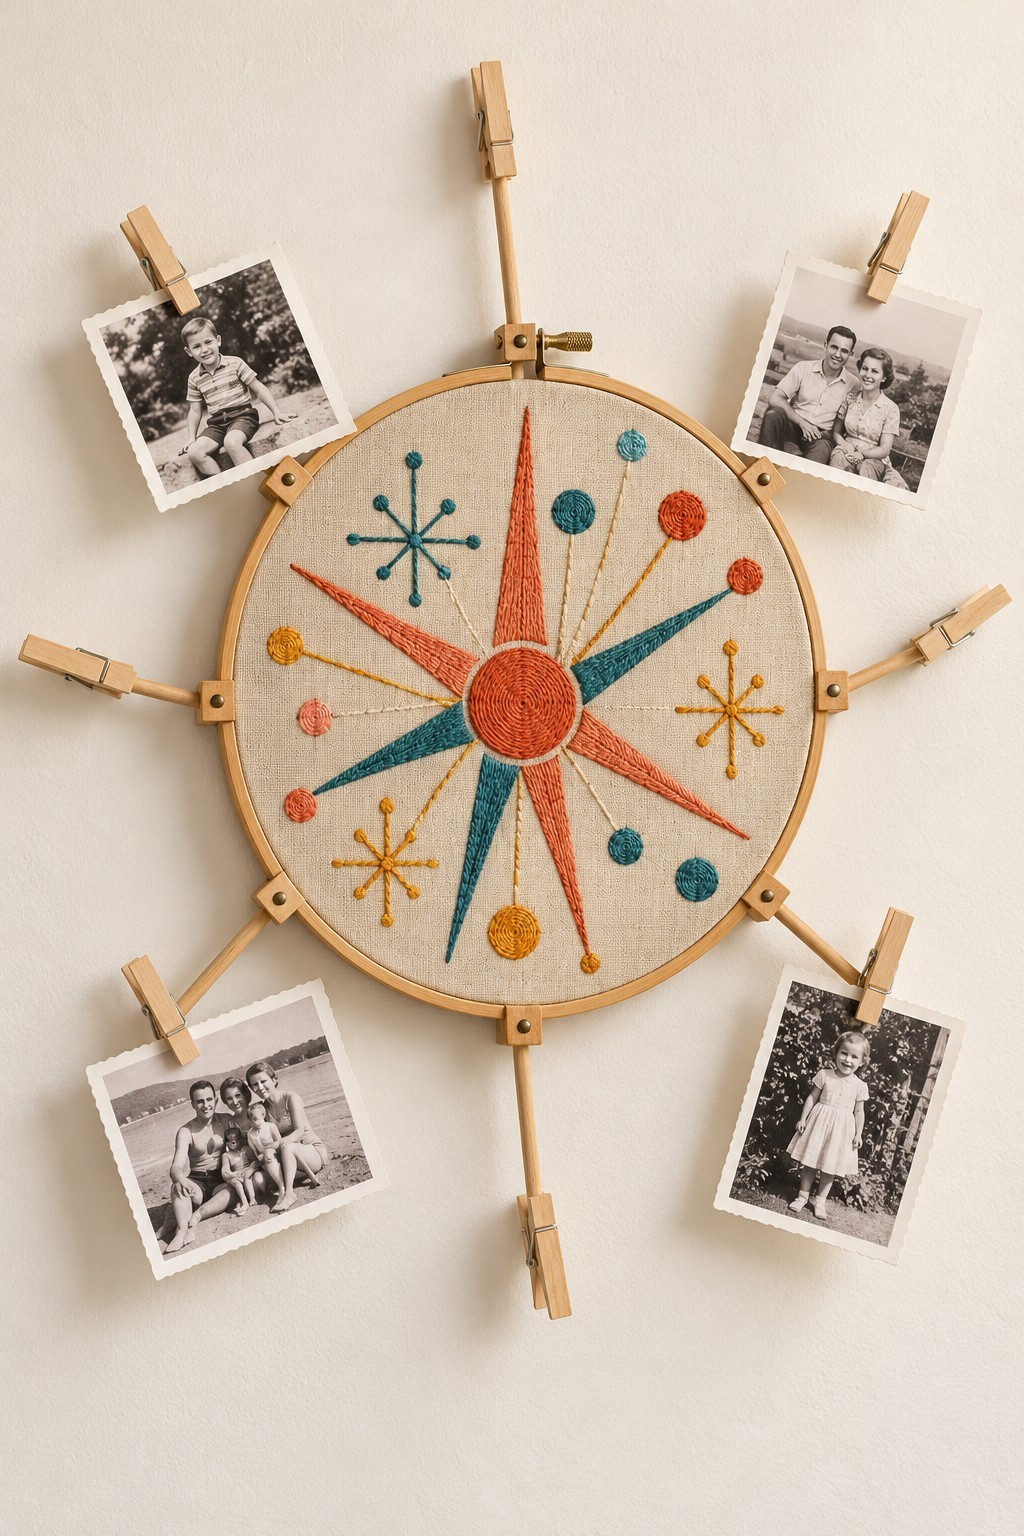
Coral rays, teal circles and fine mustard lines give this photo holder the energy of an atomic pattern. Small monochrome prints sit around the outside, leaving the embroidered center visible. Repeating the same clip size helps the irregular shapes feel intentional.
Embroider sturdy linen before tightening it in a wooden hoop. Use straight stitches for fine rays and closely spaced filling stitches for solid circles. Fix short wooden spokes to a separate rigid backing ring, then attach small clothespins at their ends with wood glue and let the joints cure. Secure the hoop to that backing and hang the assembly from its rigid support. The fabric should hold the embroidery, while the backing carries the photographs.
5. Red Diner Booth Bookends
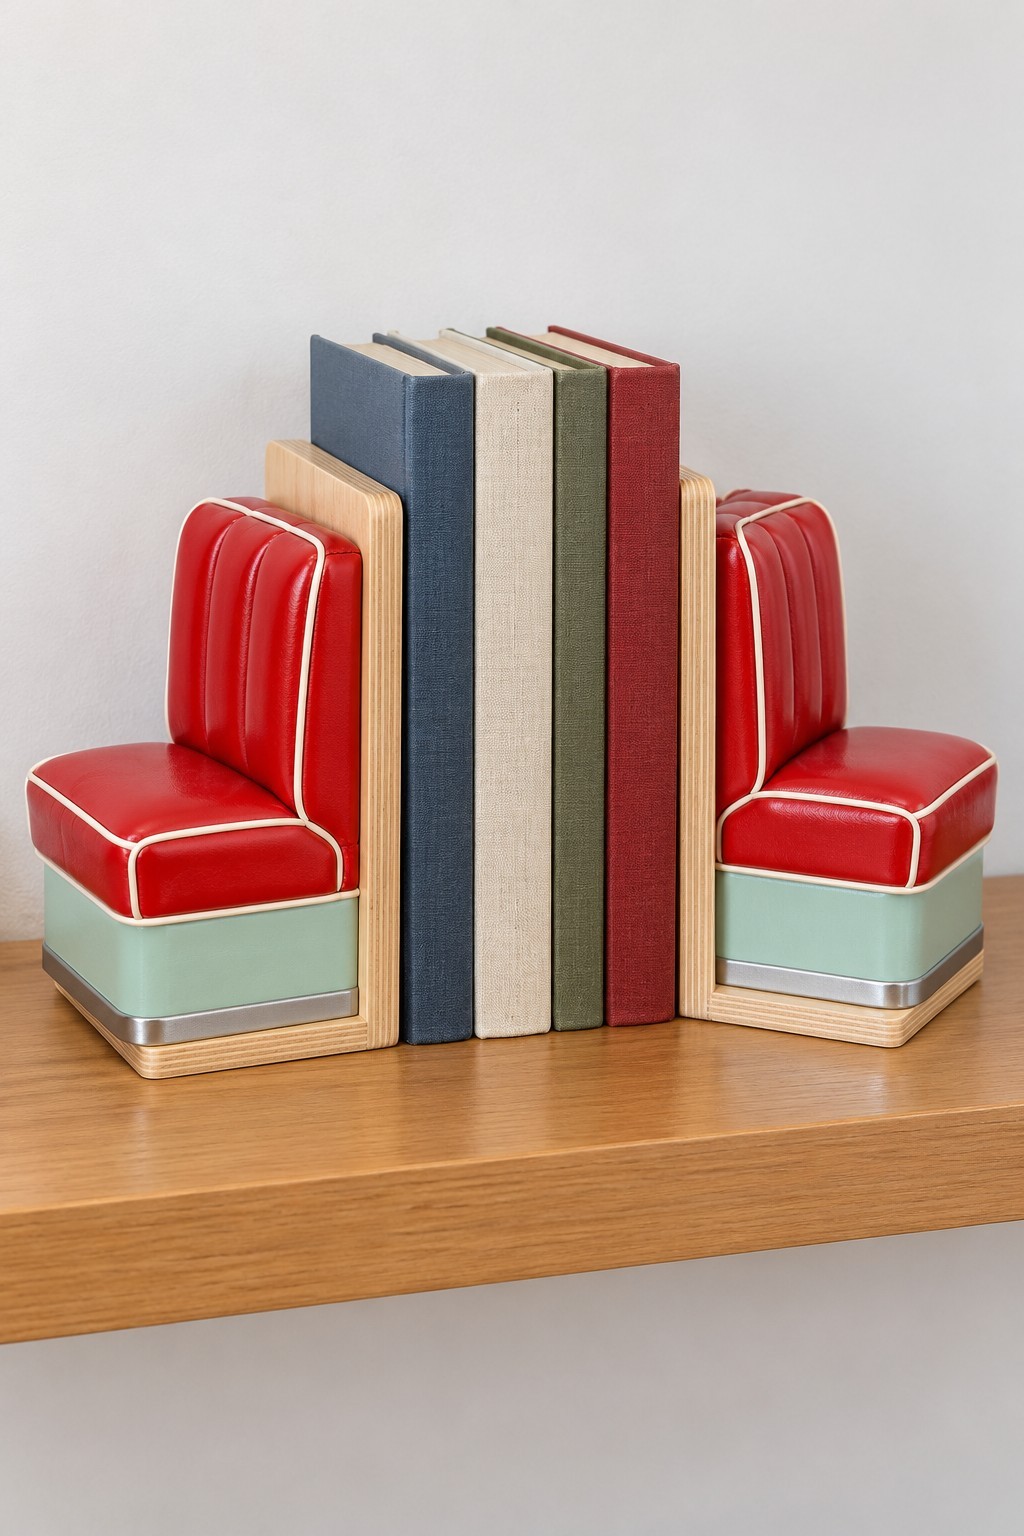
Tiny diner seats make a witty pair of bookends for a cookbook shelf. Red upholstered backs, pale blue bases and cream piping recreate the booth shape in miniature. Keep the seats facing outward so the padded backs can sit beside the books.
Build each decorative booth around a proper metal bookend with a foot that slides under the books. Use small wood blocks for the seat and back, thin upholstery foam, red vinyl and a suitable upholstery adhesive. Tuck raw edges underneath and secure the miniature structure to the bookend without covering its supporting foot. Add narrow piping along the cushion edges. The hidden metal support should resist the books’ weight; lightweight foam alone will slide or tip.
6. A Turquoise Jewelry Board with a Tiny Shelf
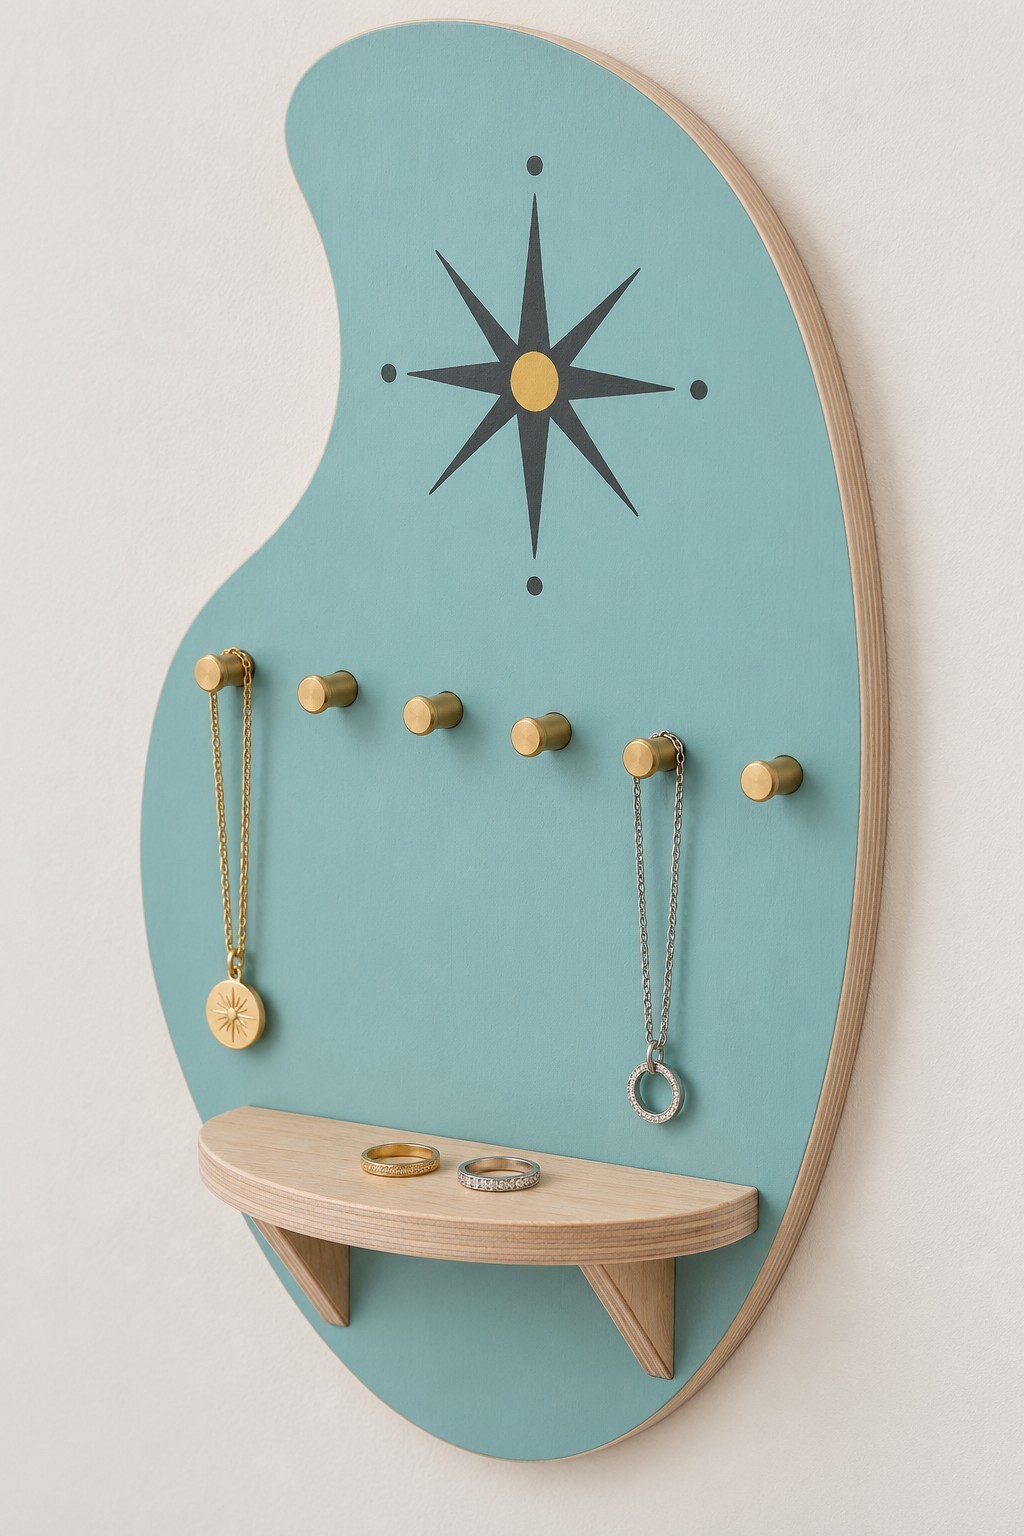
An asymmetric turquoise board makes a compact home for necklaces and rings. The black star at the top balances a row of brass pegs, while a small curved shelf catches pieces that cannot hang. Natural plywood edges add warmth beside the cool painted face.
Cut and smooth a plywood outline, prime it, and apply thin coats of acrylic wood paint. Paint the star through a simple stencil once the background has dried. Attach the shelf with screws through the back and two supporting brackets, then fit the pegs with suitable hardware. Mount the finished board using fixings selected for the wall and loaded weight. For other practical arrangements, explore these small wooden storage projects.
7. A Pleated Wall Fan in Abstract Colors
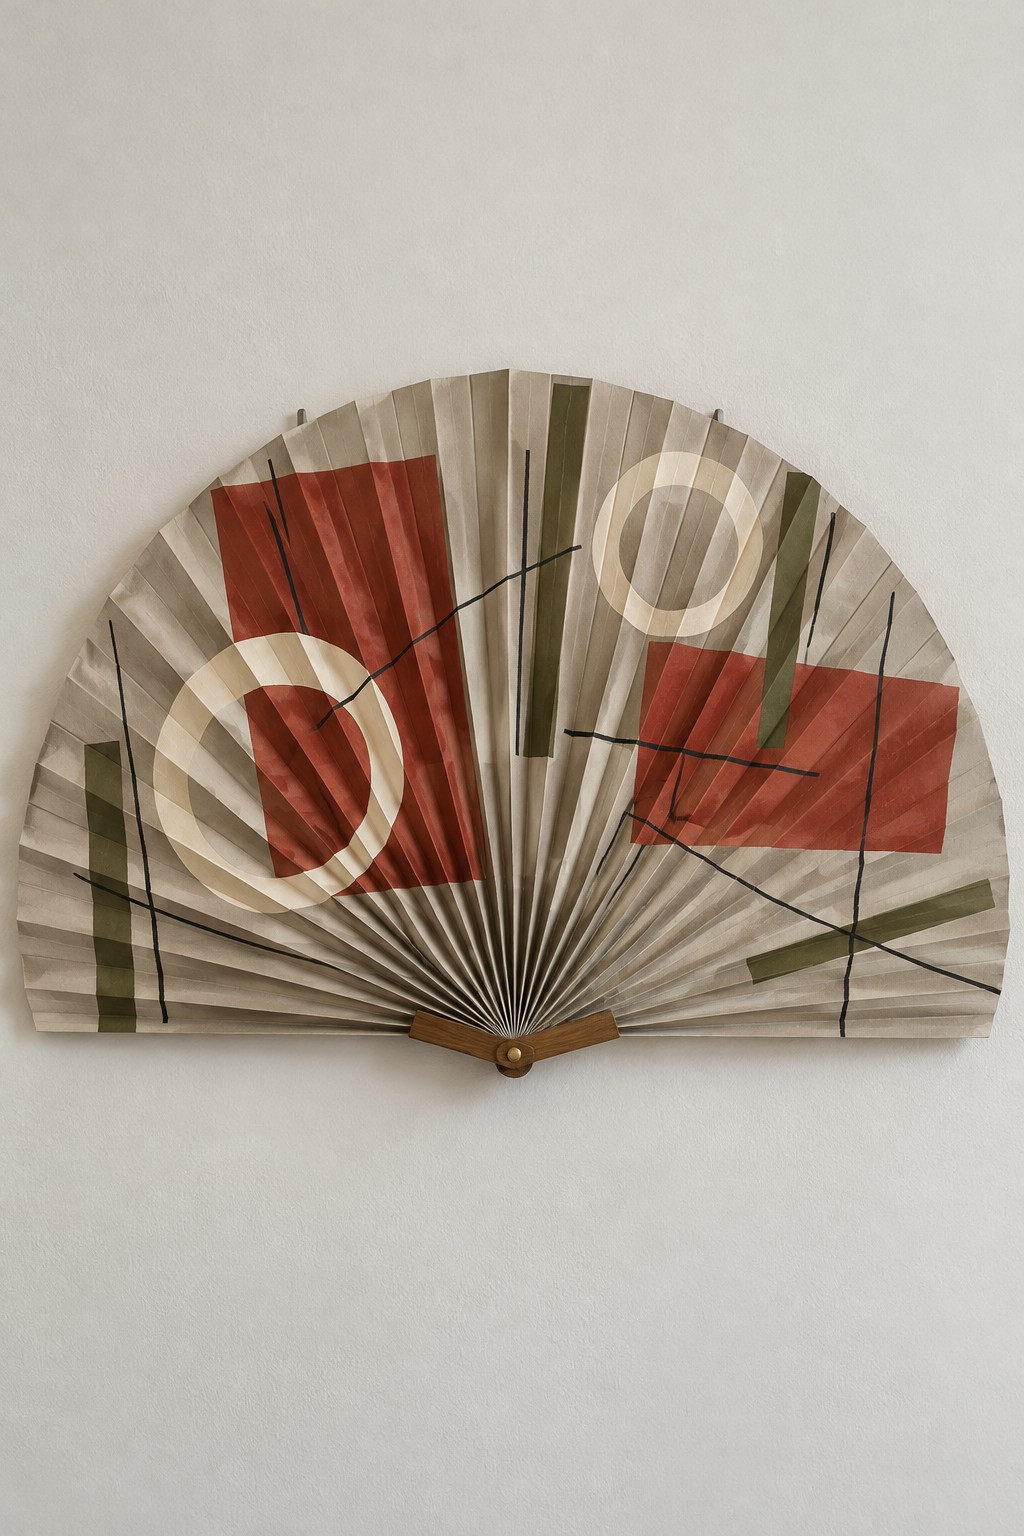
Wide pleats transform an abstract print into a sculptural wall fan. Rust blocks and pale circles look especially effective because the folds break up the geometry without hiding it. An uncluttered wall gives the semicircular outline room to read.
Use a lightweight decorative fan frame as the support. Lay thin paper over the fully opened ribs to plan the shape, leaving a narrow margin for the outer edge. Paint broad motifs before folding, allow the paper to dry, then crease evenly and attach it to the ribs with small amounts of paper adhesive. Fit a discreet hanging loop to the frame rather than to the paper. Display it away from moisture and direct sun.
8. A Kitchen Print Apron with Red Binding
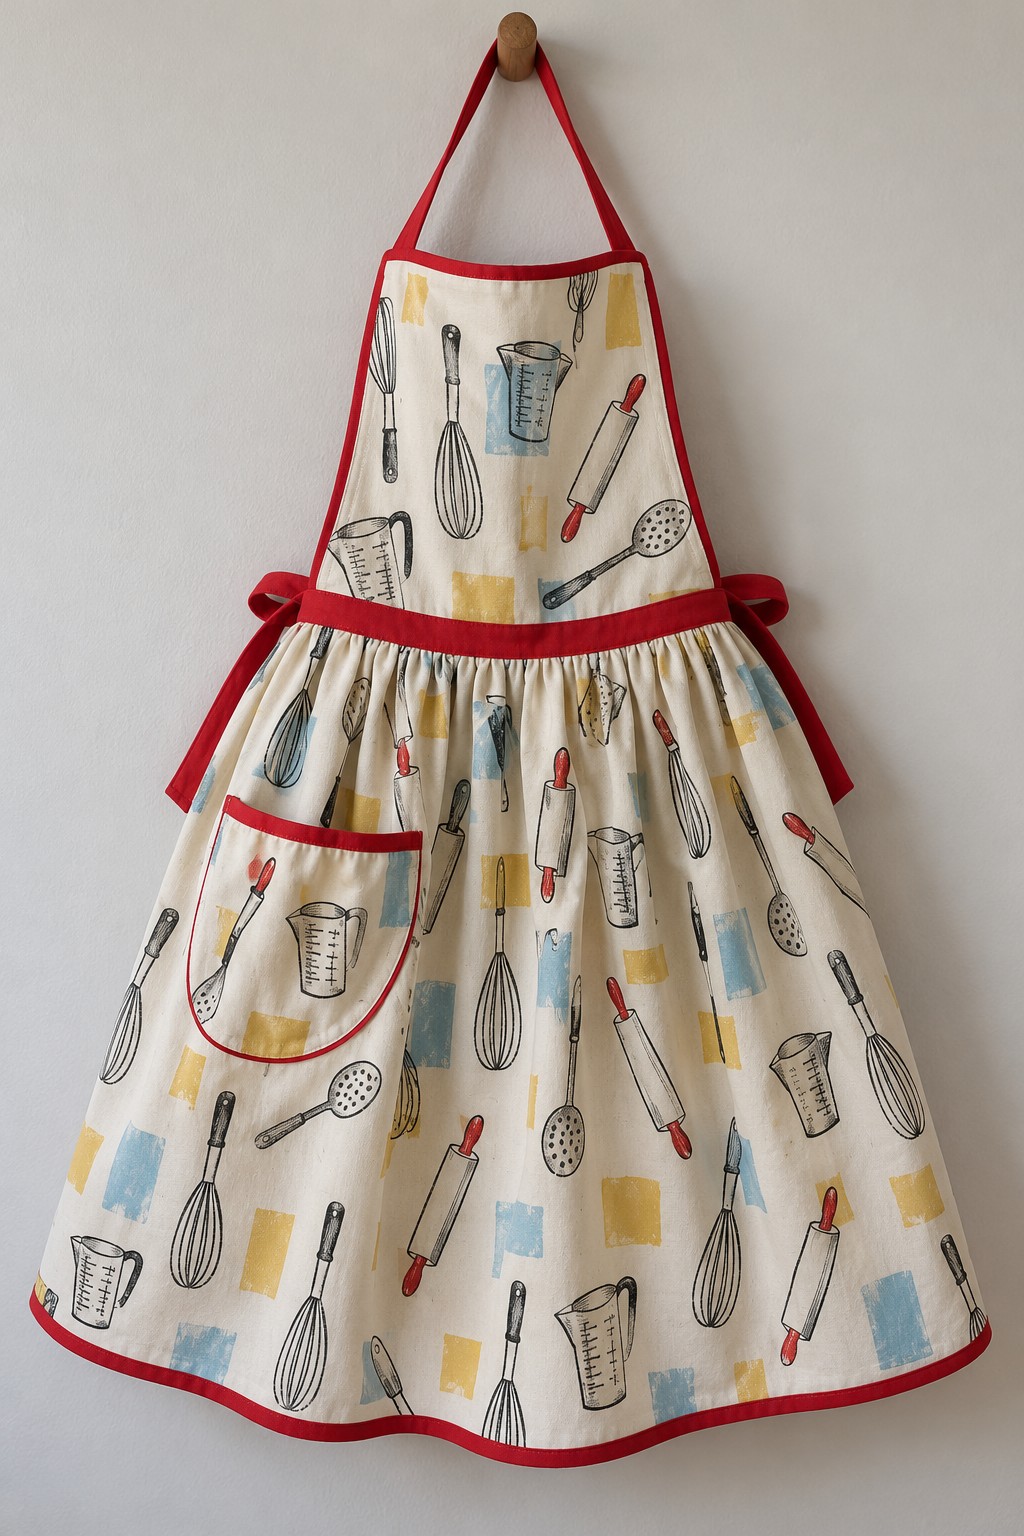
A generous skirt and bright red edging make this apron feel cheerful even when it hangs on a kitchen hook. The small utensil print supplies the detail, so the bib and waistband can stay simple. Red ties repeat the border and bring the whole shape together.
Choose washable cotton and an apron pattern sized to the wearer. Wash and press the fabric first, then cut the bib, skirt, waistband and ties with the pattern’s stated seam allowances. Gather the skirt evenly into the waistband, attach the bib, and finish curved edges with cotton bias binding. Reinforce the points where the neck strap and waist ties join. Check the fit before the final stitching, keeping ties short enough to stay clear of cooking surfaces.
9. A Felt Teapot Pocket for Folded Cloths
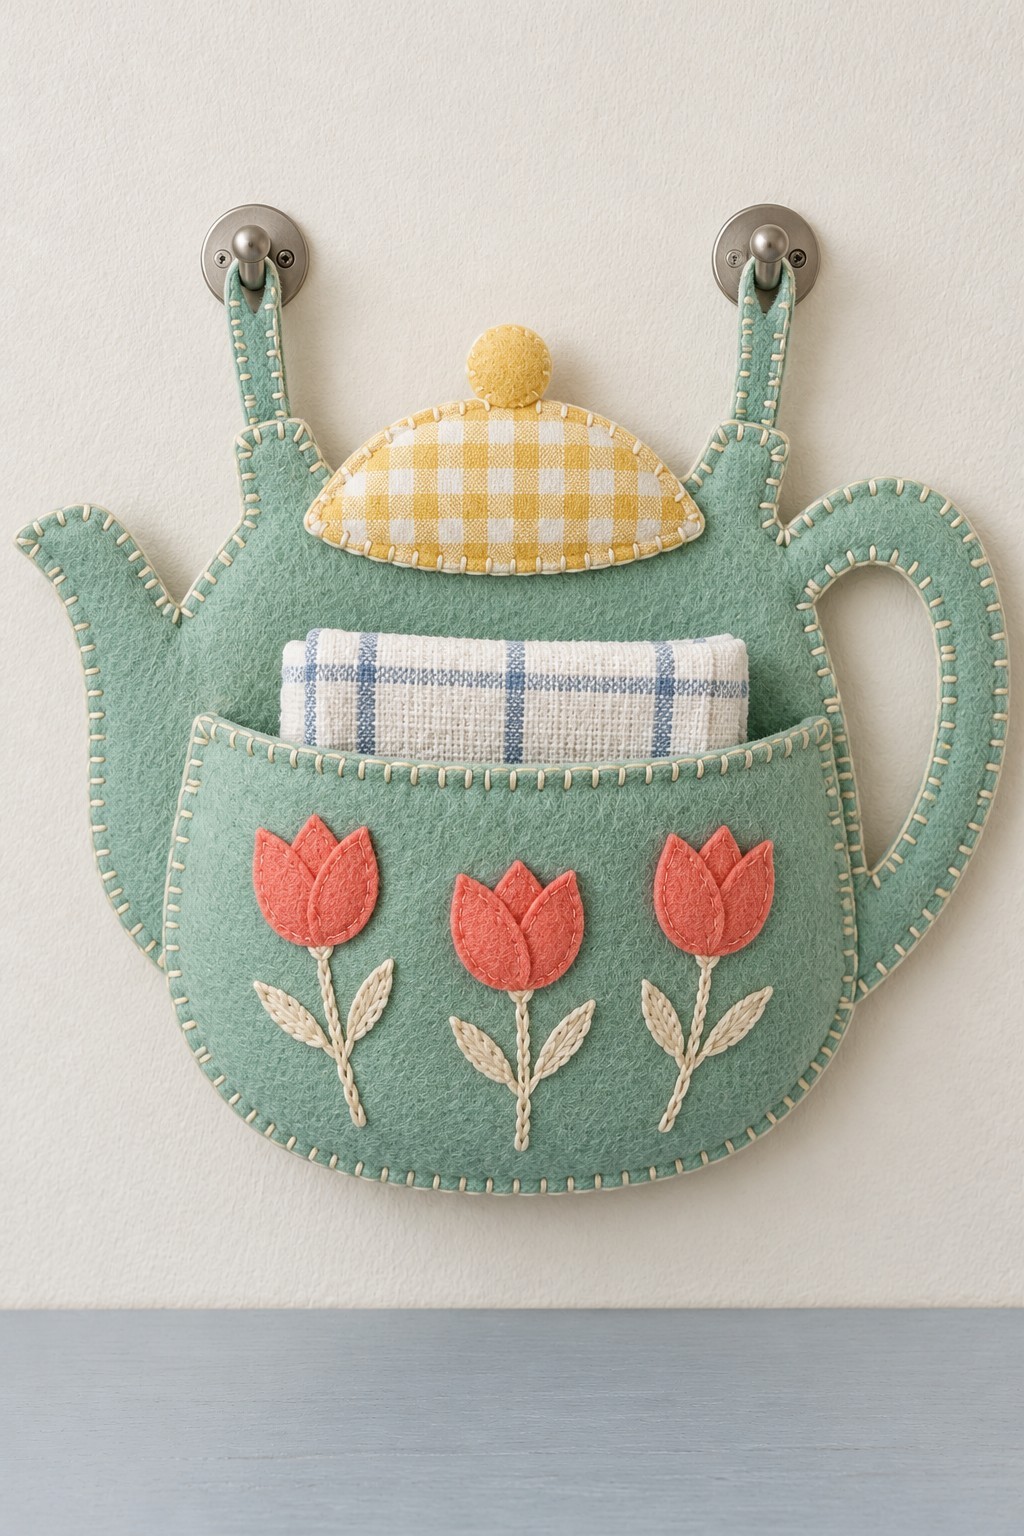
This sage teapot uses its rounded body as a shallow pocket, with coral tulips decorating the front. The checked yellow lid adds a second texture without competing with the flowers. Two hanging loops keep the pocket level when a small cloth is tucked inside.
Cut a complete teapot backing and a separate front pocket from firm felt. Sew the tulips, leaves and stems onto the front first. Join that piece to the backing along its sides and bottom, leaving the upper pocket edge open. Reinforce both loops through the backing and keep the spout and handle decorative rather than load bearing. Use the pocket for dry lightweight cloths. More petal shapes can be adapted from these felt flower decoration ideas.
10. Pastel Paper Bead Curtain Tiebacks
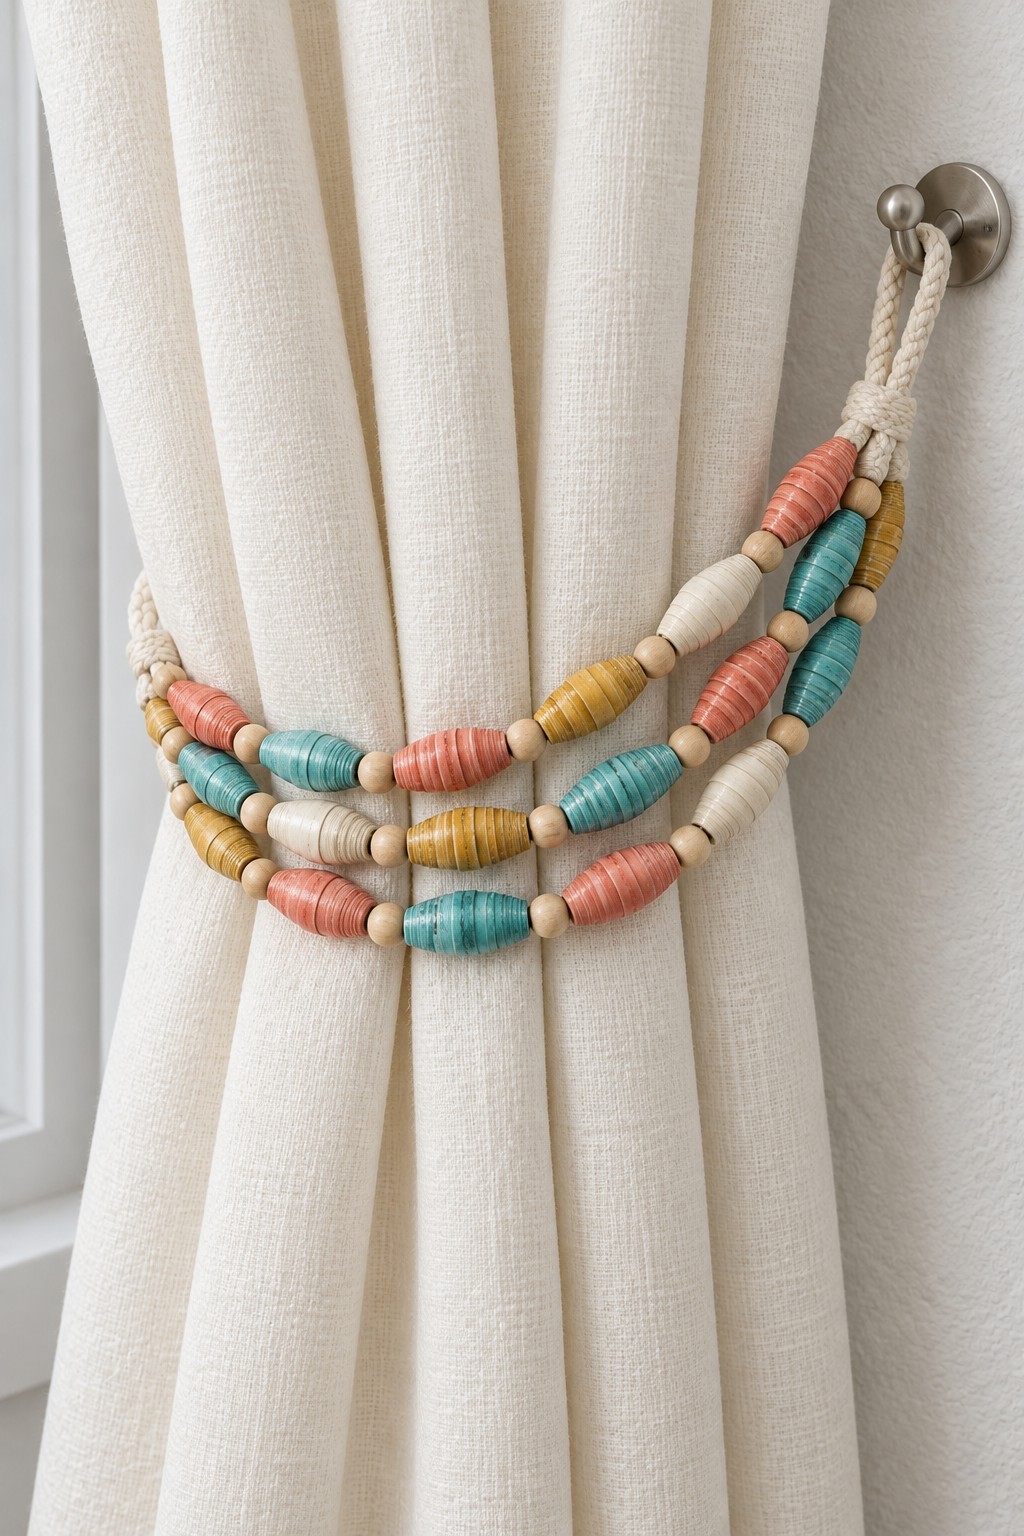
Paper beads give a plain curtain a soft ribbon of color. Three gently draped strands create more depth than a single cord, especially when cream beads separate the coral, mustard and turquoise sections. Visible rolled edges are part of the handmade appeal.
Cut long tapered strips from colored paper and roll each one tightly around a smooth skewer. Fix the final tip with a small amount of PVA craft glue, remove the bead and let it dry. Apply a compatible paper varnish in thin coats without blocking the hole. Thread the beads onto strong cord and secure the ends to reinforced loops. Let the cord carry the tension, and fit the tieback loosely enough that the beads are not crushed against the curtain.
11. Record Coasters in a Felt Sleeve
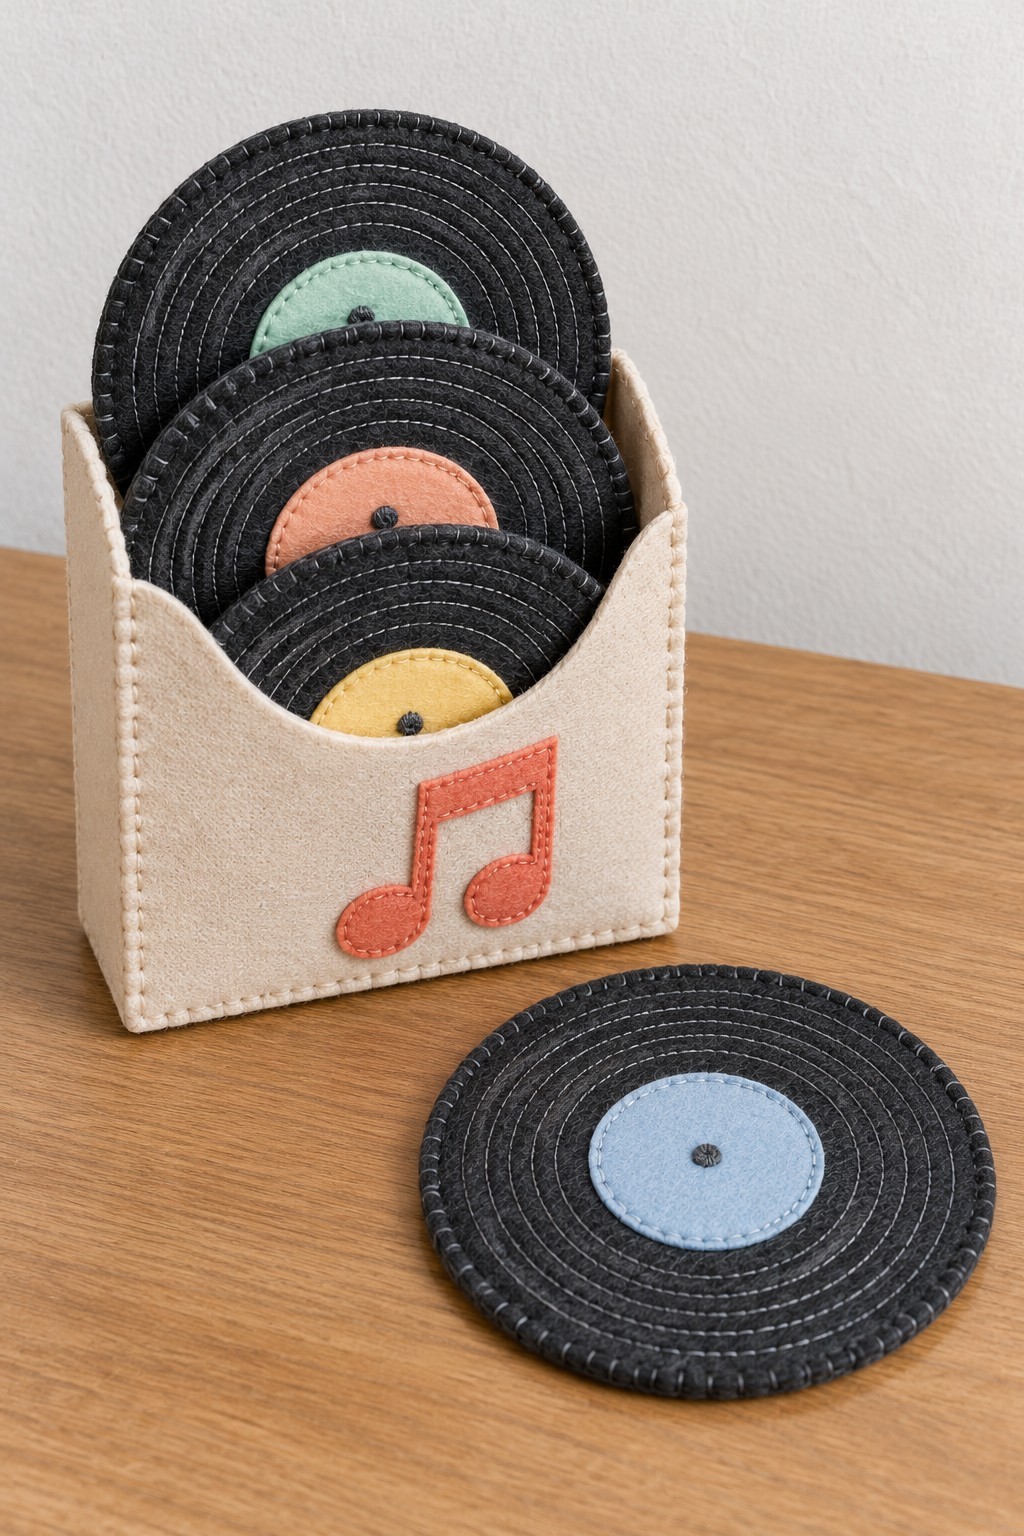
Black stitched circles and pastel centers turn a useful coaster set into a miniature record collection. A cream storage sleeve with an orange music note keeps the discs upright and easy to reach. The effect works best when all the outer circles match in size.
Use the coaster tutorial above for the discs, changing the center colors to mint, peach, yellow and pale blue. Keep embroidery shallow so a glass can sit level. To make the sleeve, measure the finished stack and sew a firm felt pocket with a separate base and narrow side panels. Add the music note before assembling the pocket. Let damp coasters dry completely outside the sleeve, and do not use them beneath hot cookware.
12. A Polka Dot Glove Dish for Rings
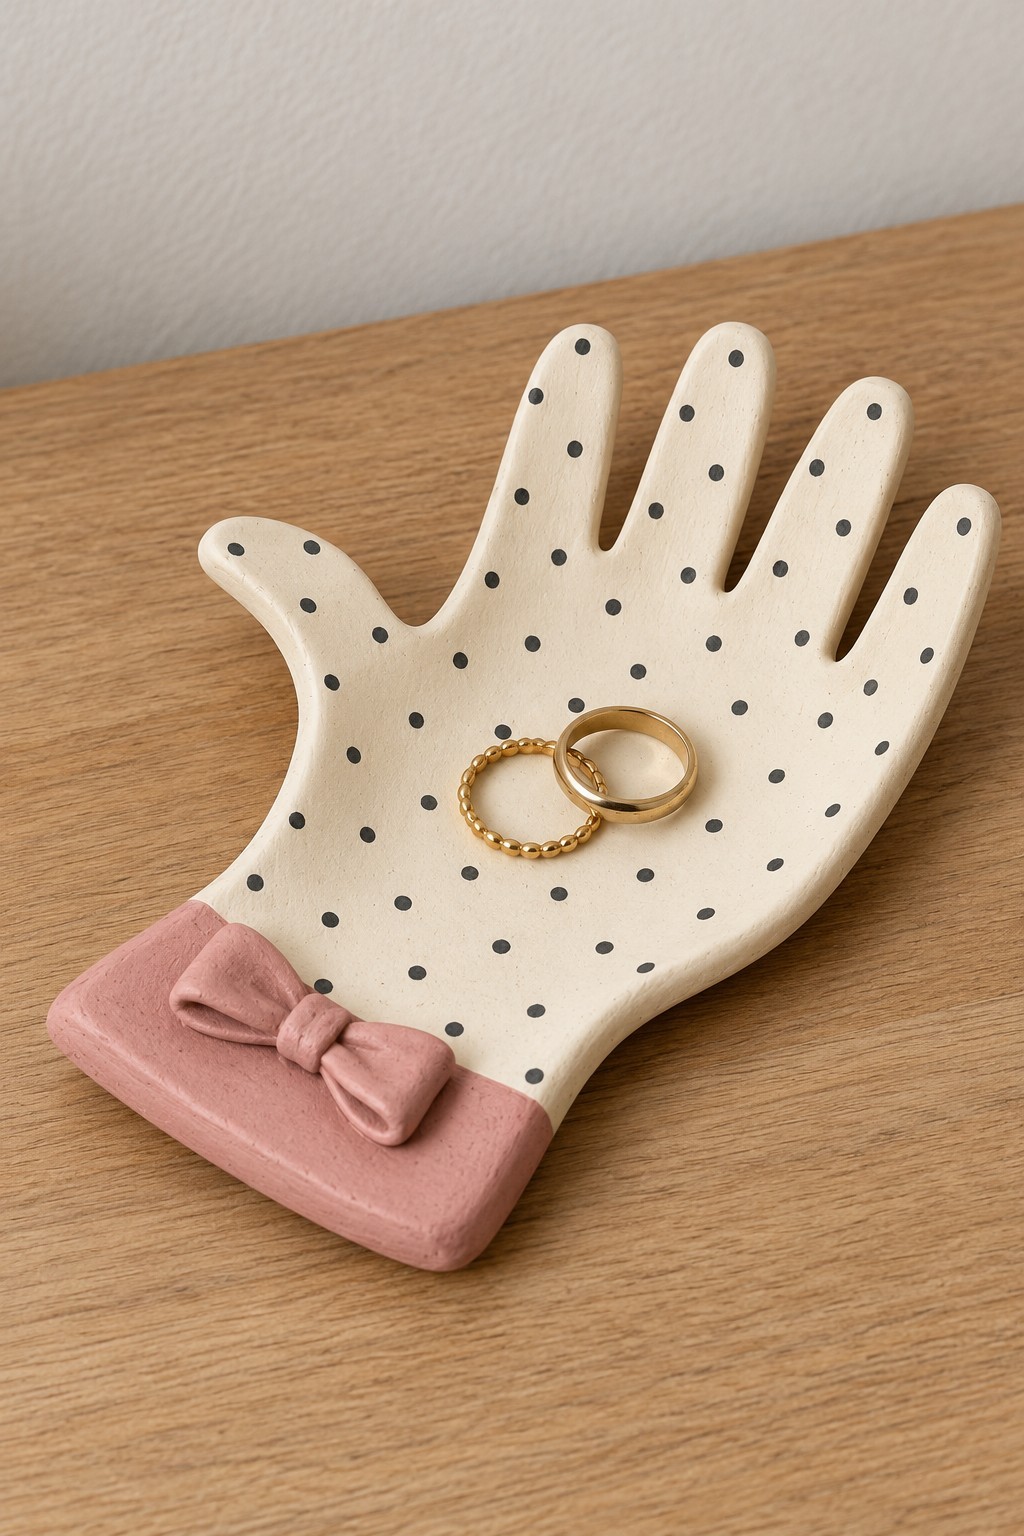
A glove shaped dish gives rings a deliberate landing place beside a bed or dressing table. The cream palm stays shallow, the fingers spread gently, and a pink cuff makes the outline instantly recognizable. Tiny black dots are enough decoration for the broad central area.
For a home craft version, roll polymer clay to an even thickness and cut a rounded glove outline with generous spaces between the fingers. Shape a slight hollow over an oven safe support and add a small cuff and bow with well joined contact surfaces. Cure using the exact clay package instructions and let it cool before decorating with compatible acrylic paint. Keep the fingers substantial to reduce breakage. This is a jewelry dish, not a food dish.
13. A Miniature Screen of Cocktail Dresses
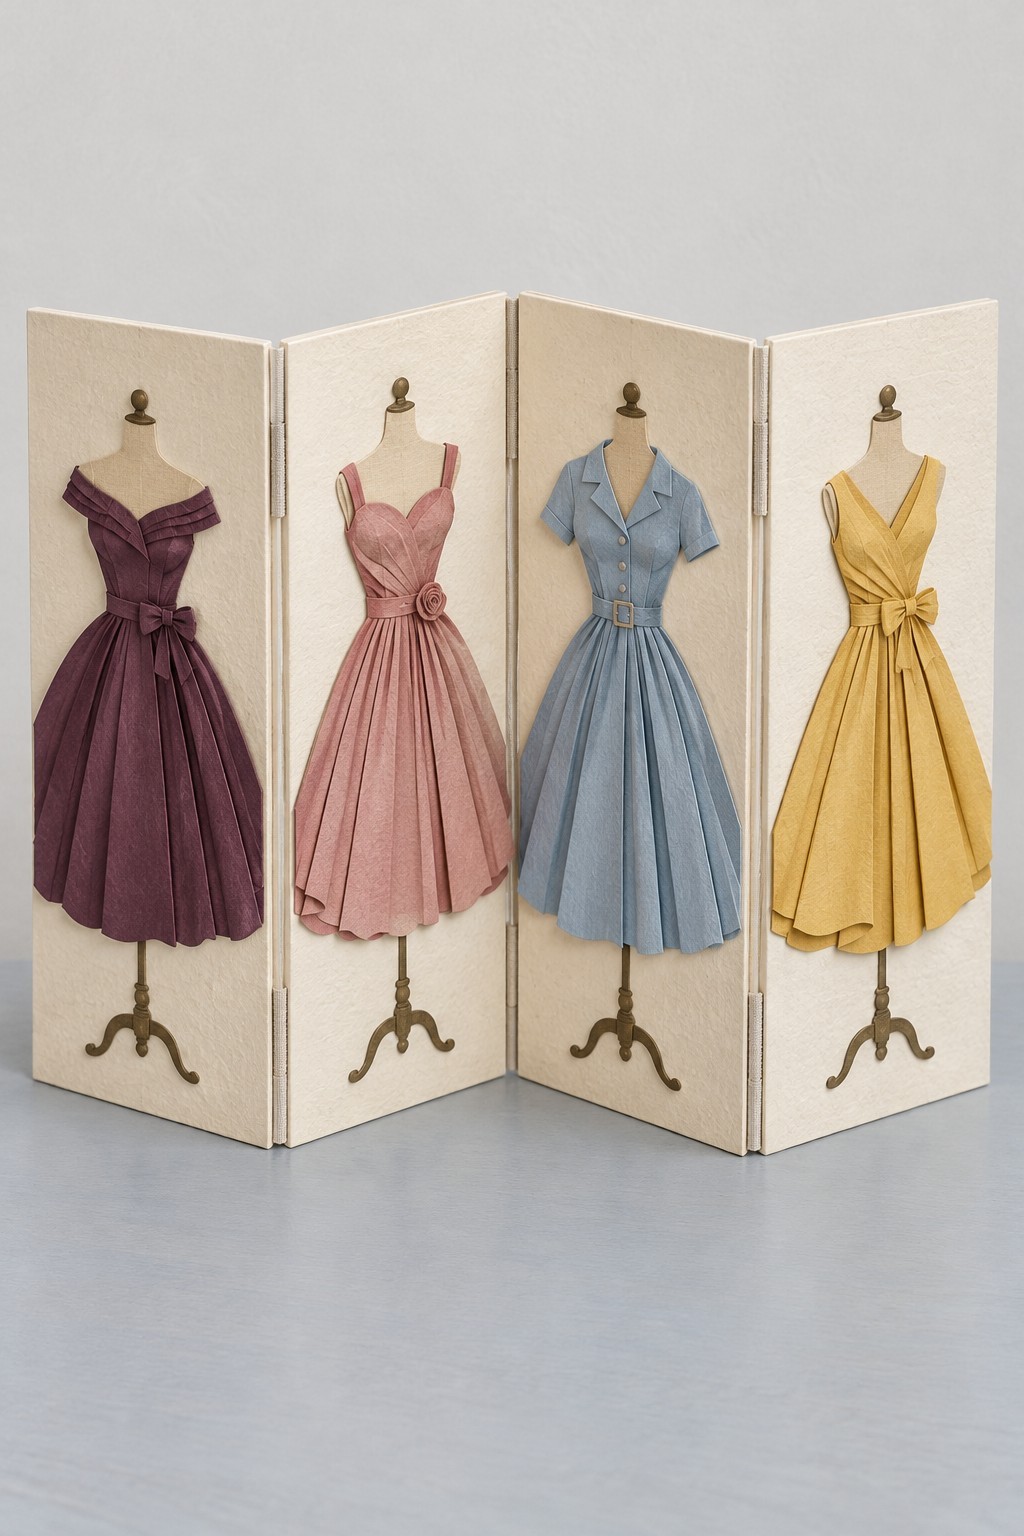
Four fitted bodices and full skirts turn a small folding screen into a dressing table display. Purple, rose, powder blue and yellow give each panel its own character while the cream background keeps the group calm. Fine black dress stands make the silhouettes appear lighter.
Cut four matching bookboard panels and cover both sides with paper. Join them with bookbinding cloth hinges, alternating the hinge direction so the screen folds like an accordion. Draw the stands first, then add dress shapes cut from colored paper, using folded or pleated paper for the skirts. Apply a thin coat of paper adhesive and allow the panels to dry flat before opening. Keep the lower edges aligned so the screen stands securely.
14. Ballet Slipper Sachets for a Linen Drawer
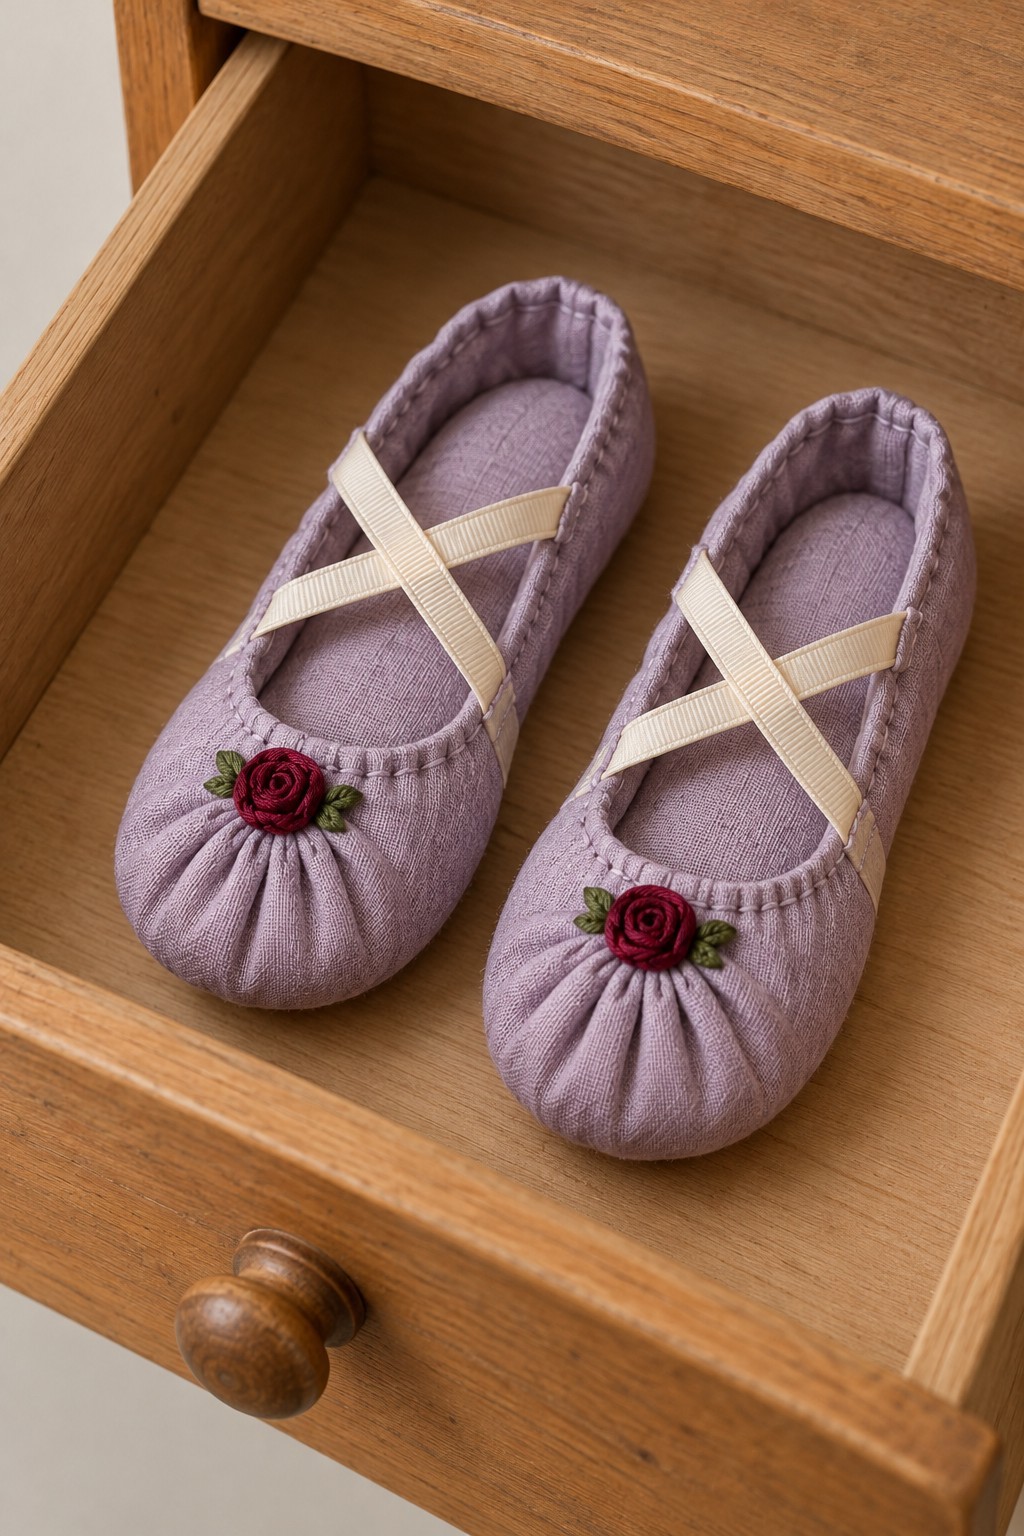
Lavender fabric, crossed ribbons and tiny rose details give these drawer sachets the appearance of miniature ballet slippers. Their low shape lets them sit between folded linens without taking up much space. The pair can share the same fabric while having slightly different gathers.
Sew each slipper from a small oval sole and a gathered fabric upper, then add a lining to contain the filling. Put dried lavender in a separate tightly woven sachet before placing it inside the decorative shell. Stitch the cream ribbons across the opening and attach the roses firmly. Keep scented filling away from delicate surfaces, replace it when the fragrance fades, and use an unscented filling when fragrance is unwelcome. These are ornaments rather than wearable slippers.
15. A Harlequin Switch Plate with Button Details
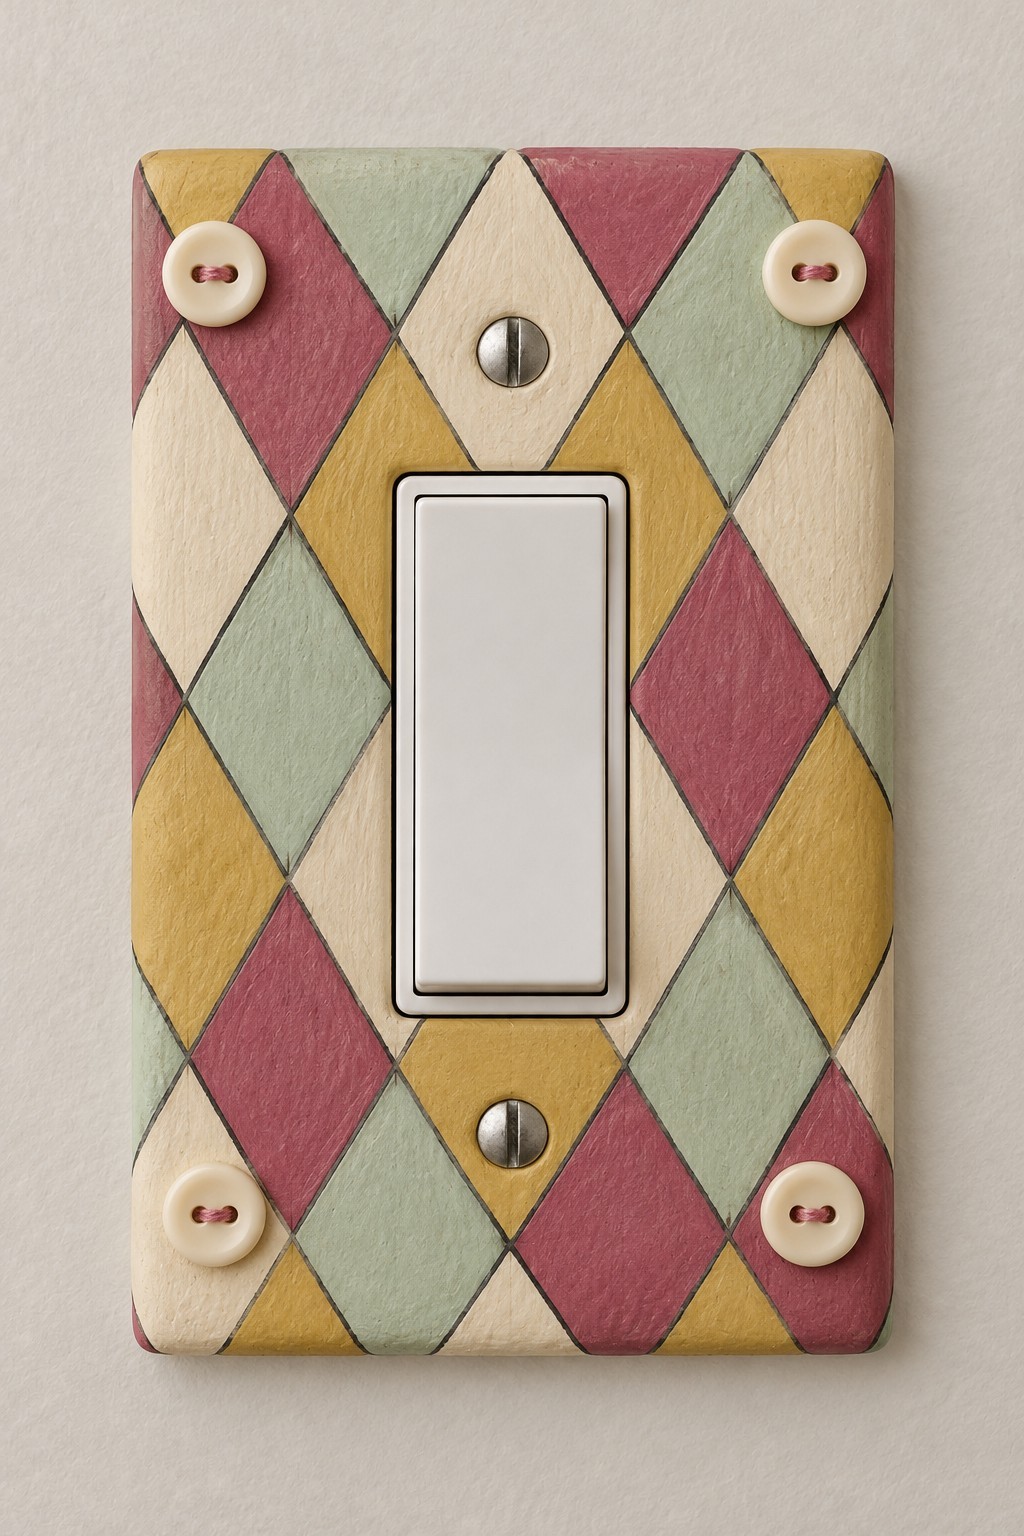
Muted mint, rose, mustard and cream diamonds make a small switch plate feel considered. Dark outlines define the harlequin pattern, and cream button details echo a sewing basket. The central opening remains plain so the switch is easy to find and use.
For a working installation, choose a manufactured decorative plate approved for the switch, or a paintable plate whose maker permits the intended finish. A paper diamond template helps plan the color arrangement before painting the removed cover. Keep the switch opening, fixing holes and rear surface free of added material. Reserve glued buttons and fabric layers for a separate decorative sample if they are not permitted by the plate manufacturer. Electrical fittings should be handled by someone qualified for the work.
16. A Foldable Checkerboard with a Storage Flap
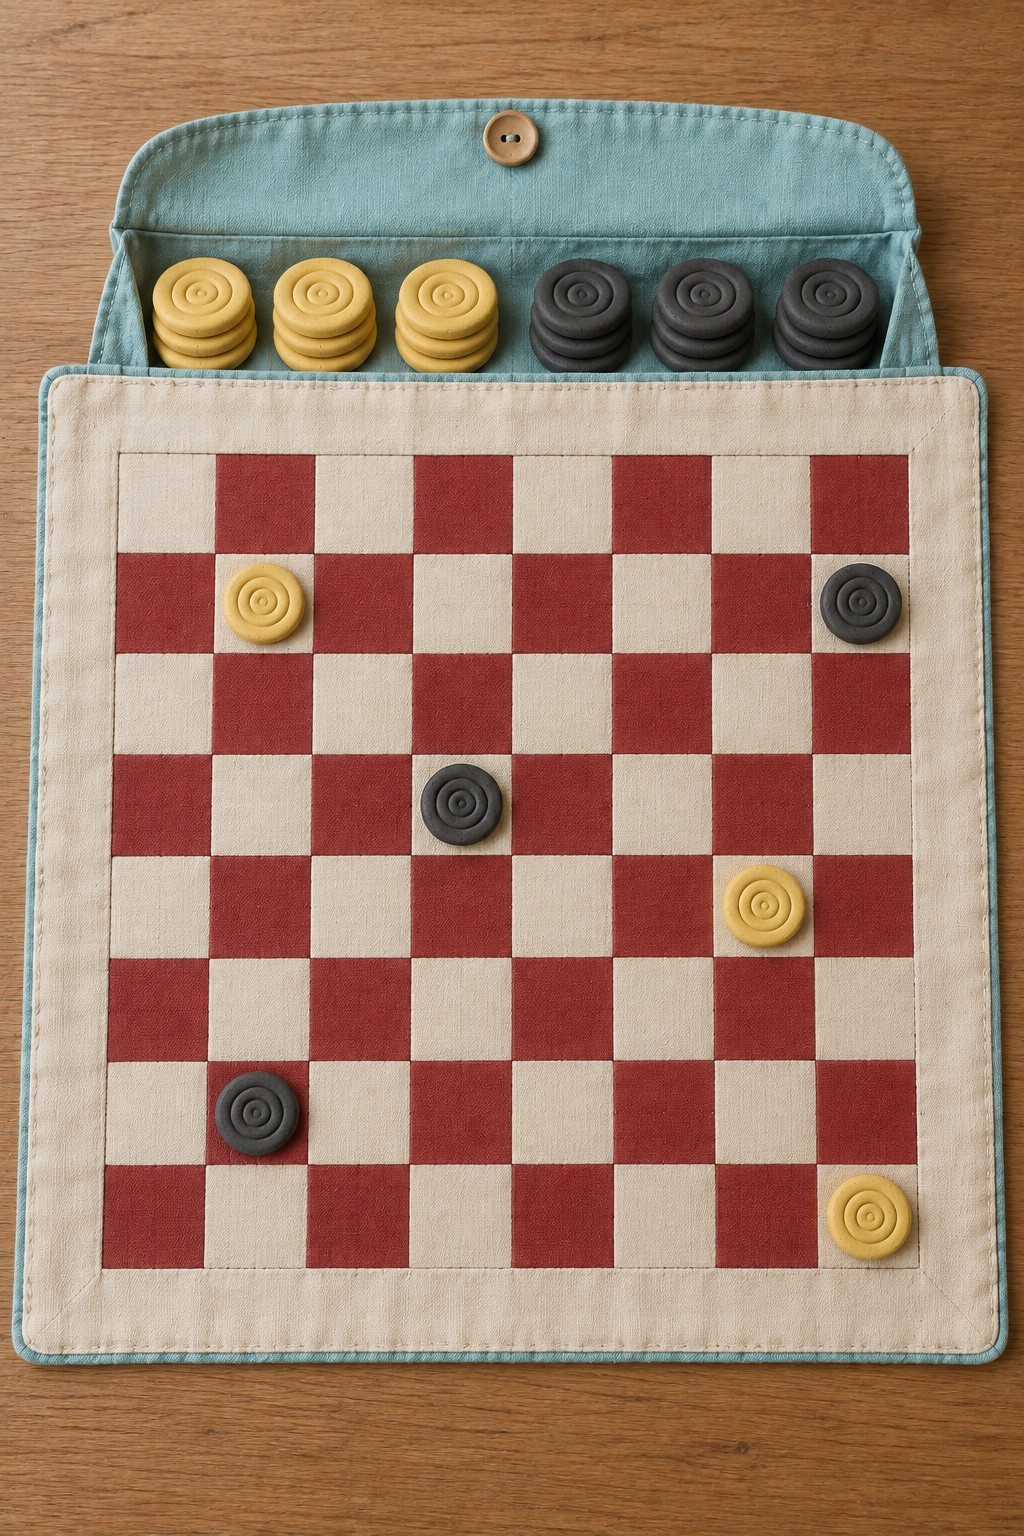
Red and cream squares give this fabric game board the familiar look of a kitchen tablecloth. A pale blue flap creates a dedicated place for counters, making the set easy to tuck into a drawer. Rolled felt pieces provide a quiet, tactile alternative to hard counters.
Mark an exact grid of eight rows and eight columns on stable cotton, then stencil alternate squares with fabric paint. Let the paint dry and fix it according to its label before adding a backing and edge binding. Sew a separate pocket above the playing area, with a flap long enough to close over the contents. Make 12 counters in each of two colors and keep their diameter smaller than a square. Check the full grid before sewing.
17. An Oval Pattern Pelmet for a Plain Blind
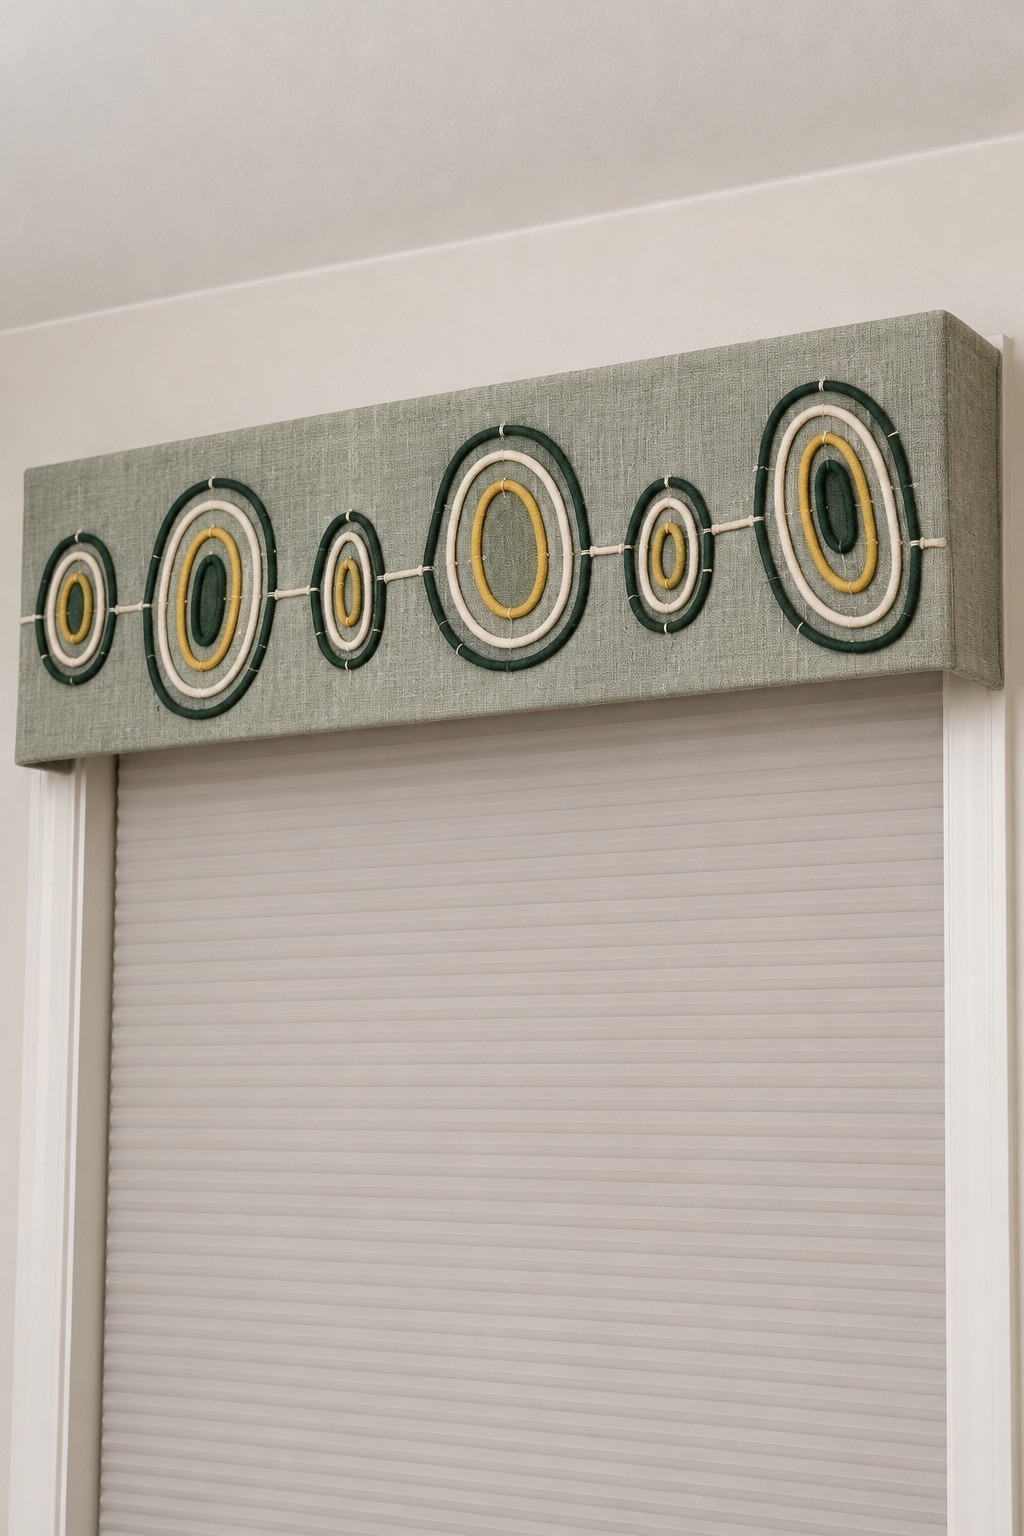
A row of linked ovals adds pattern above a simple roller blind without covering the window. The sage background lets the cream and mustard rings stand out, while darker outlines give the design definition from across the room. Alternating large and small ovals keeps the rhythm lively.
Begin with a lightweight ready made pelmet board or a properly supported plywood box. Cut the fabric with enough allowance to wrap around the edges, and sew or couch the oval shapes onto it before fitting. Stretch the cover evenly over a thin layer of batting and fasten it to the back. Mount the structure on suitable brackets above the blind mechanism, leaving space for the blind to operate. Keep its controls accessible.
18. Cocktail Motifs on Tall Glasses
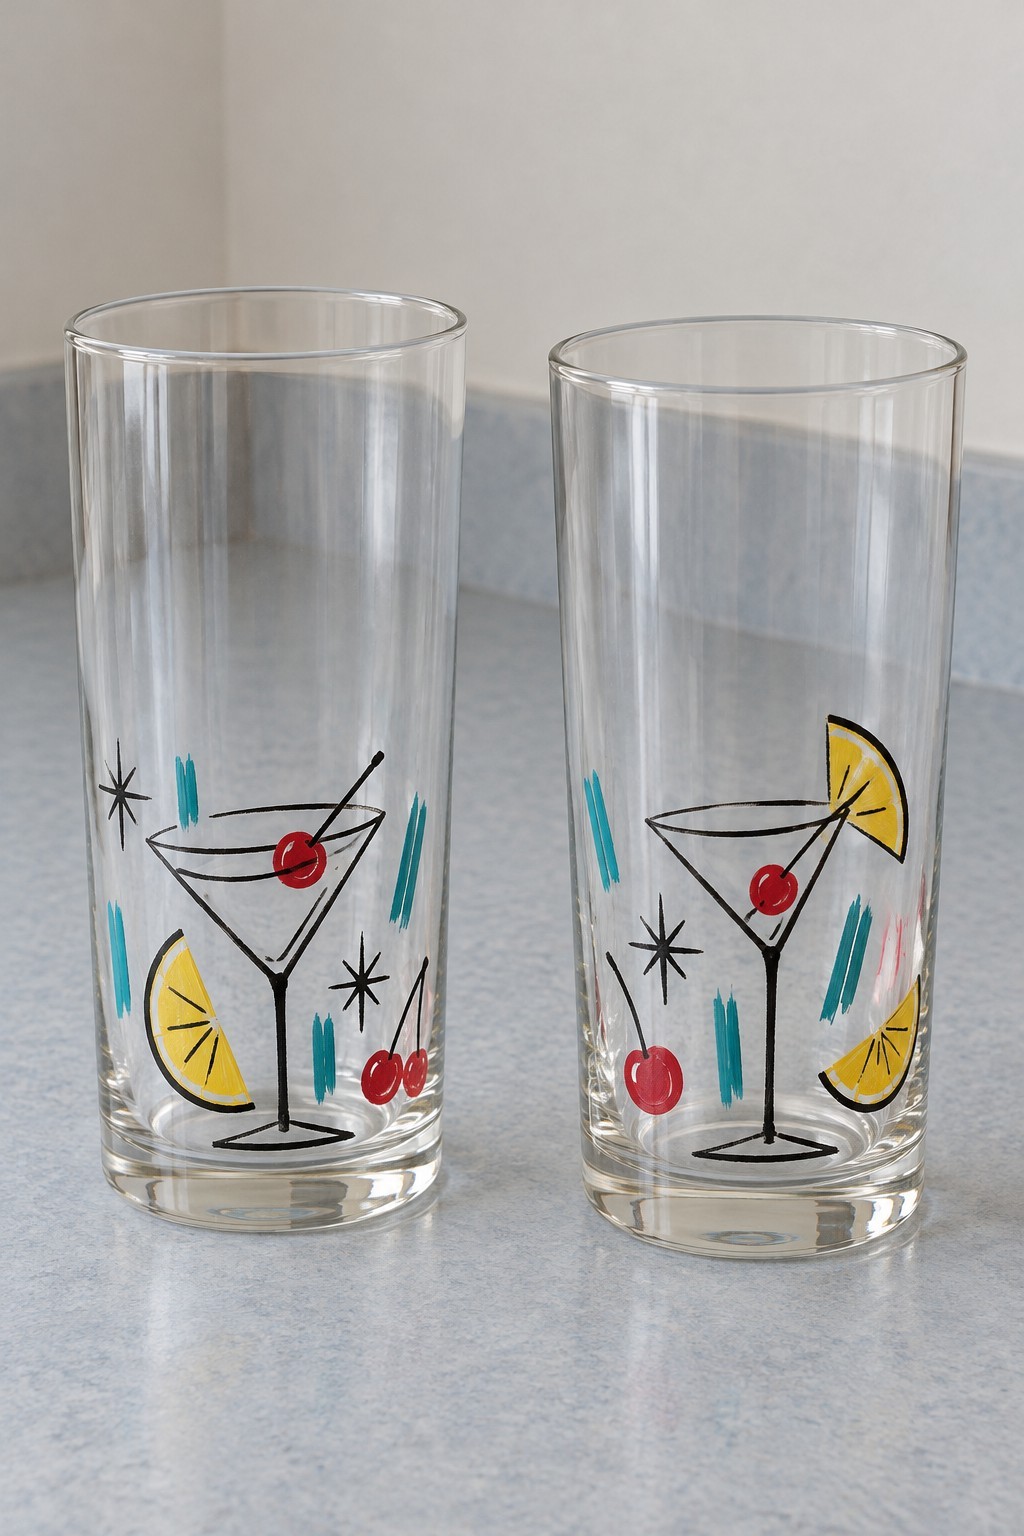
Slender cocktail shapes, red cherries and yellow citrus slices bring movement to the lower half of these clear glasses. Small black starbursts connect the motifs while the clear upper area keeps the design airy. Slight variations between the two glasses make the pair feel hand painted.
Clean the glass thoroughly and use an acrylic enamel specifically intended for glass, following its preparation instructions. Tape a paper sketch inside the glass as a guide, paint the colored shapes first, and add fine outlines after the underlying layer dries. Leave the inside and drinking rim undecorated. Follow the particular paint’s curing and care directions; do not bake glass unless both the glass and paint makers allow it. Decorative paint should not be assumed safe for direct food or mouth contact.
19. A Woodland Embroidered Chair Back Cover
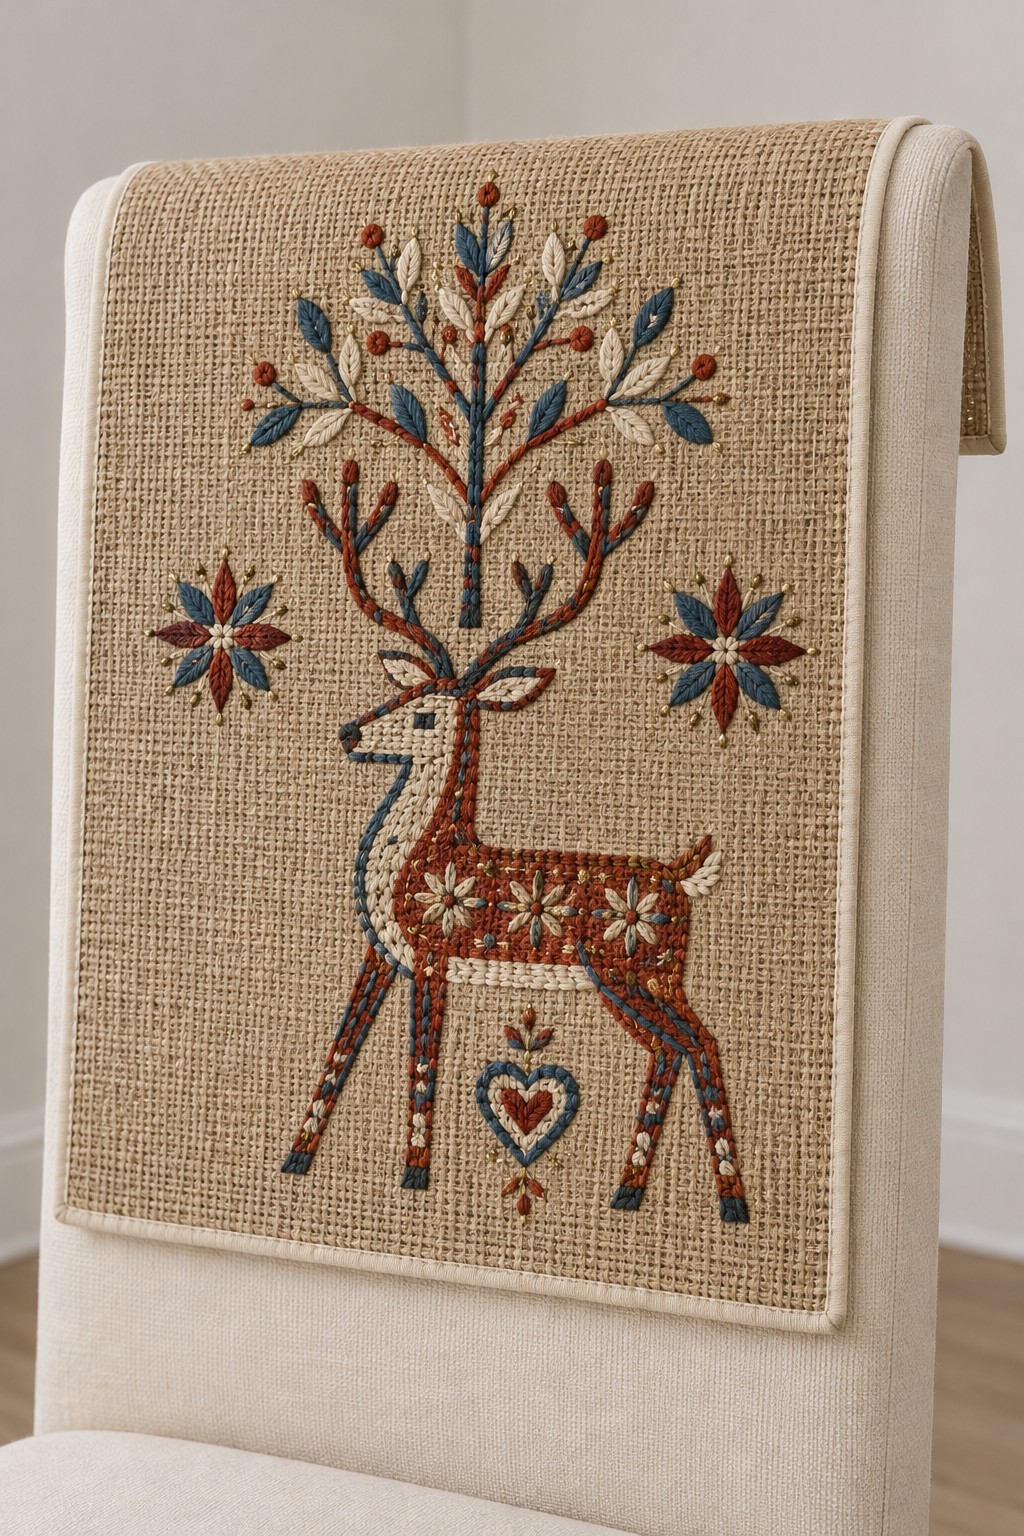
A deer beneath a branching tree gives this chair cover a quiet folk character. Rust, mustard and blue stitches show clearly against the open weave, while small star flowers fill the side spaces. The heart near the lower edge finishes the composition without a heavy border.
Use firmly woven linen or needlework canvas backed with cotton, rather than scratchy loose burlap against upholstery. Transfer a simple deer and tree outline, then fill the body with small counted stitches and work the branches in stem stitch. Keep the reverse smooth and cover it with the lining. Make the upper section long enough to drape securely over the chair back. This folk inspired piece can sit alongside atomic patterns without being presented as an exact historical reproduction.
20. A Rooster Canister with a Checker Border
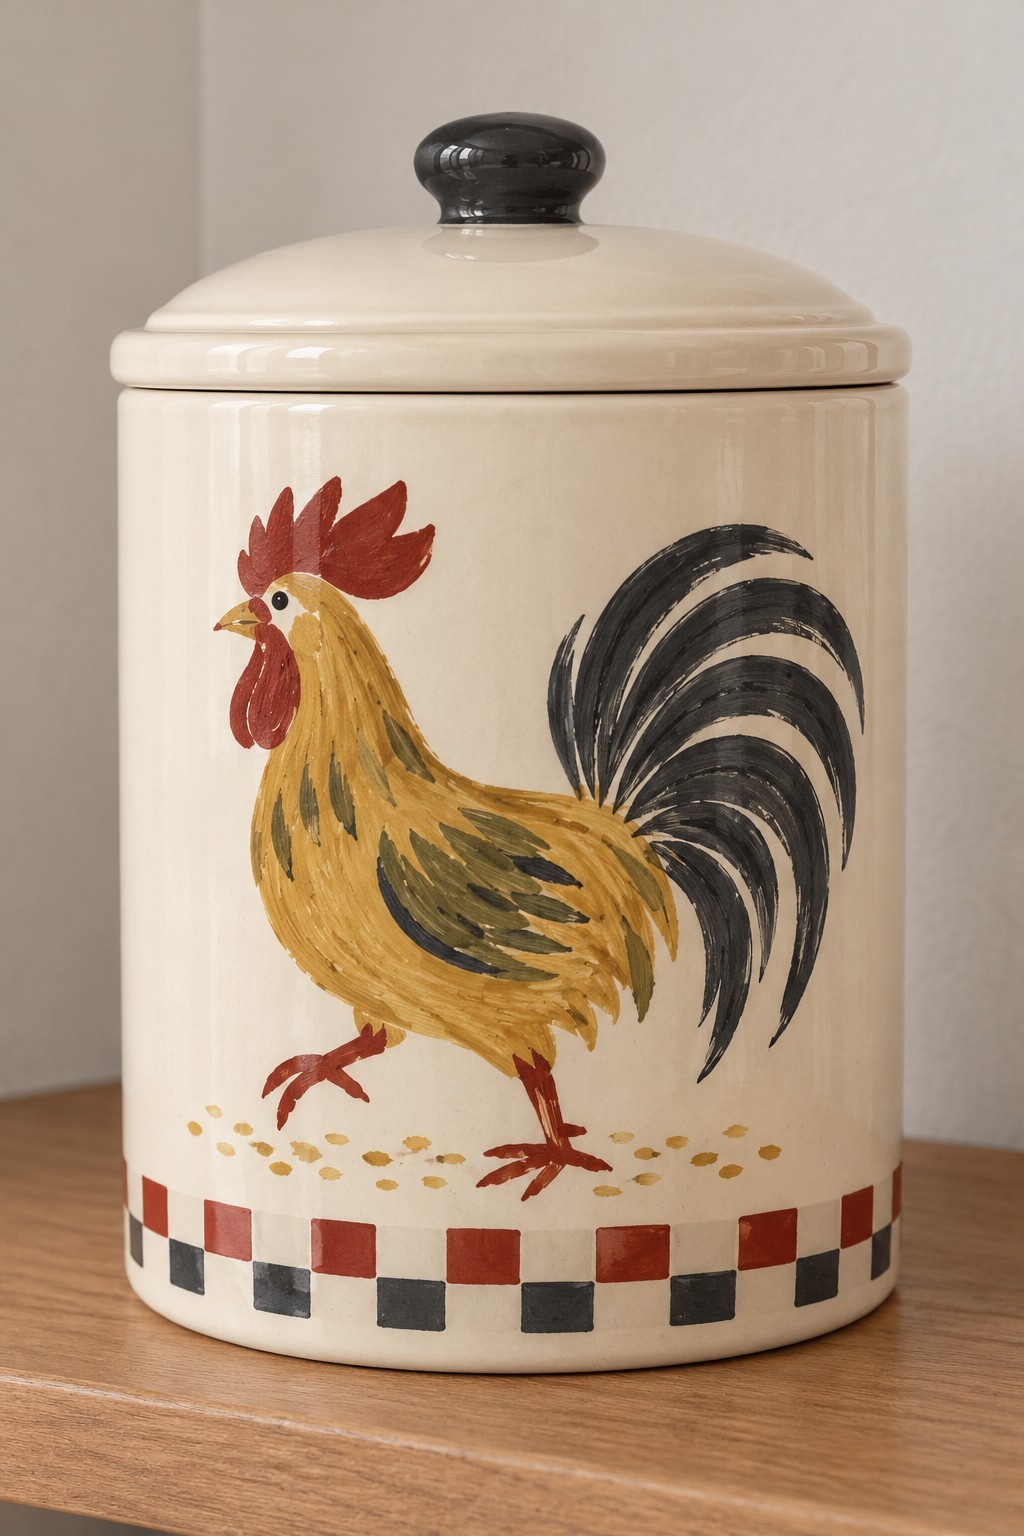
A bold rooster gives this cream canister a farmhouse note within a colorful retro kitchen. The small red and black checker border anchors the design, while the dark lid knob repeats the tail feathers. Keeping the rest of the jar plain prevents the painting from feeling crowded.
Start with a clean glazed ceramic canister and paint only its exterior with a product made for glazed ceramics. Sketch the rooster lightly, block in the yellow body and dark tail, then add the comb and fine feather strokes. Mark the border before painting the alternating squares. Leave the interior, lid seal and rim untouched, and observe the paint’s full cure time. For other surface patterns, browse these decorative jar painting ideas.
21. A Geometric Headscarf as a Dressing Table Accent
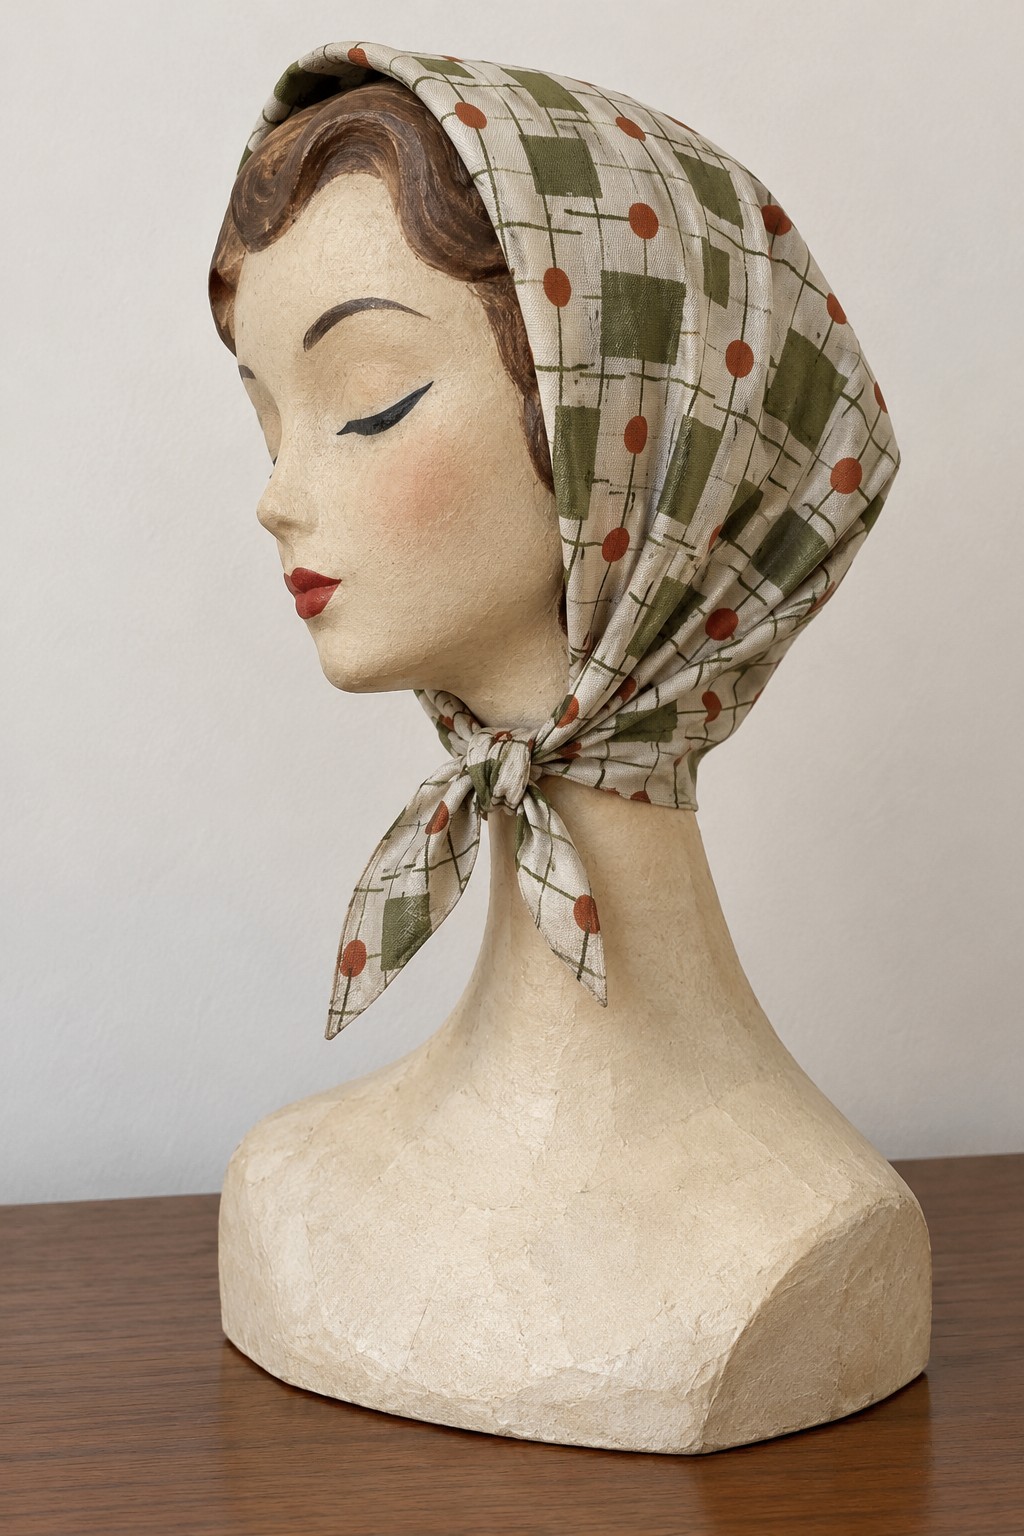
A scarf tied around a display bust brings fabric into a dressing area without needing another cushion or curtain. Small rust and olive motifs suit the compact folds, and the cream ground keeps the face of the bust visible. The same scarf can remain a wearable accessory.
Use a lightweight cotton square or a soft fabric with enough drape to tie neatly. For a painted version, test fabric paint on a scrap, then repeat a few small shapes across the cloth rather than covering it heavily. Fix the paint as directed and finish the edges with a narrow rolled hem. Fold the square diagonally and tie it loosely beneath the display bust’s chin. Remove it for cleaning so dust does not settle permanently into the folds.
22. A Painted Harbor Plate for the Wall
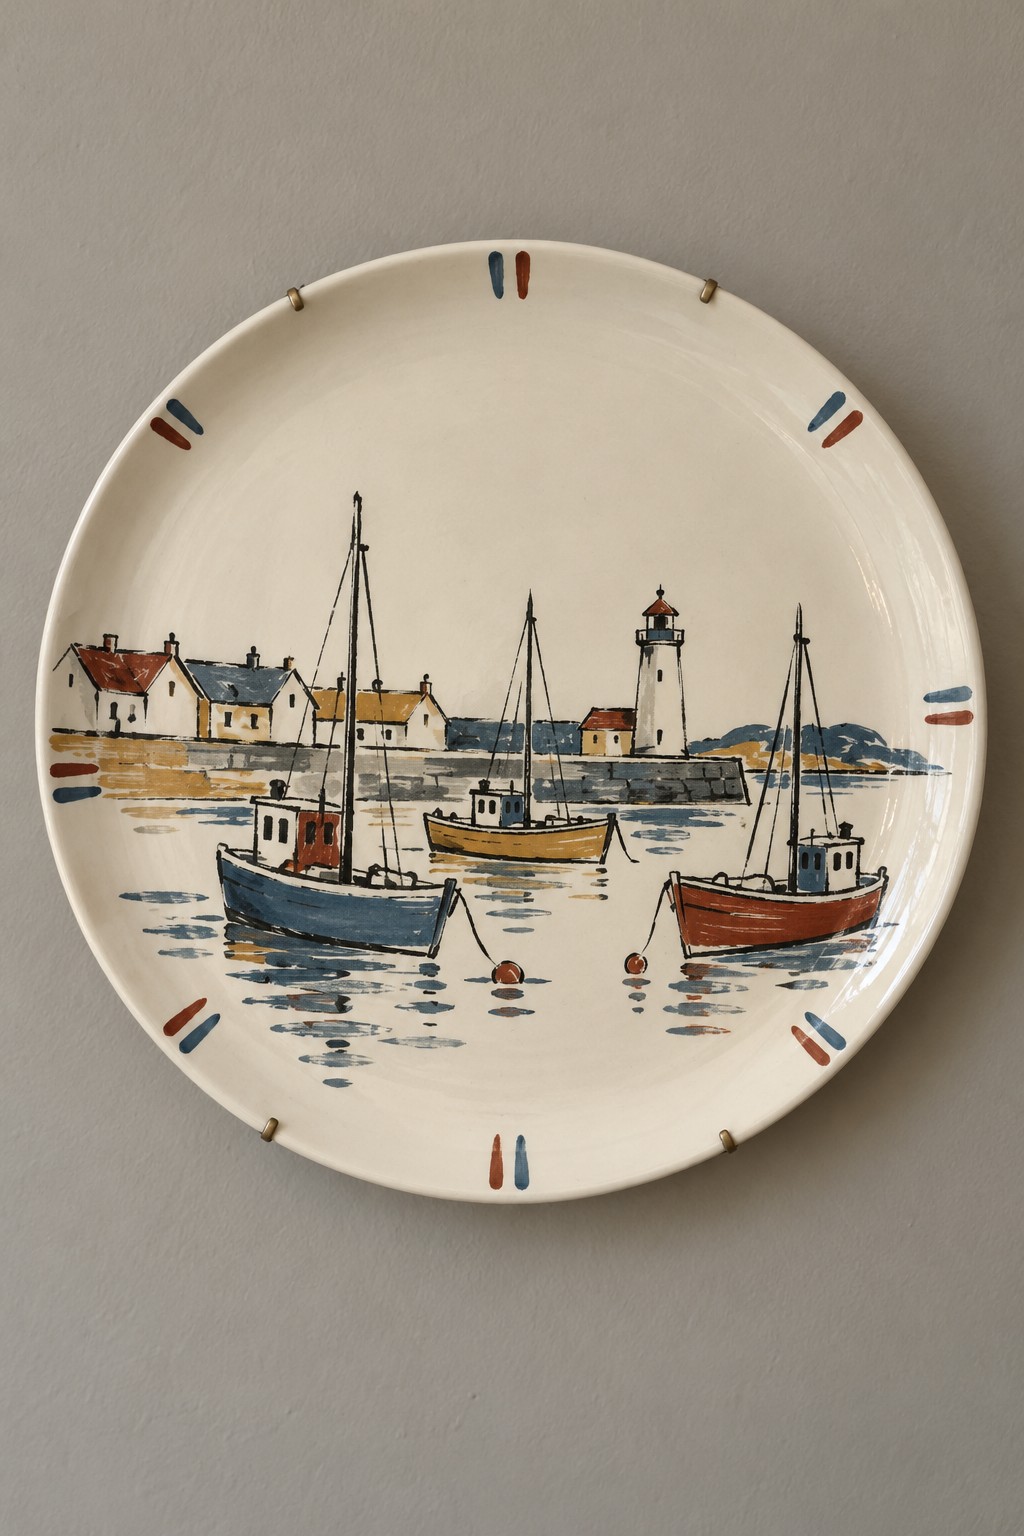
Small boats, fine masts and a low row of buildings give this decorative plate a seaside story. The composition leaves plenty of cream around the harbor, making it readable from a distance. Short colored marks around the rim frame the scene without creating a heavy border.
Choose a sound plate reserved for display and paint it with a product suitable for its surface. Establish the horizon and hull shapes first, then add buildings, rigging and broken reflections with a fine brush. Let each color dry before layering lines over it. Cure the finish according to the label and hang the plate with a properly sized plate hanger rated for its weight. Keep painted decorative plates separate from everyday serving dishes.
23. A Jointed Paper Jumping Jack
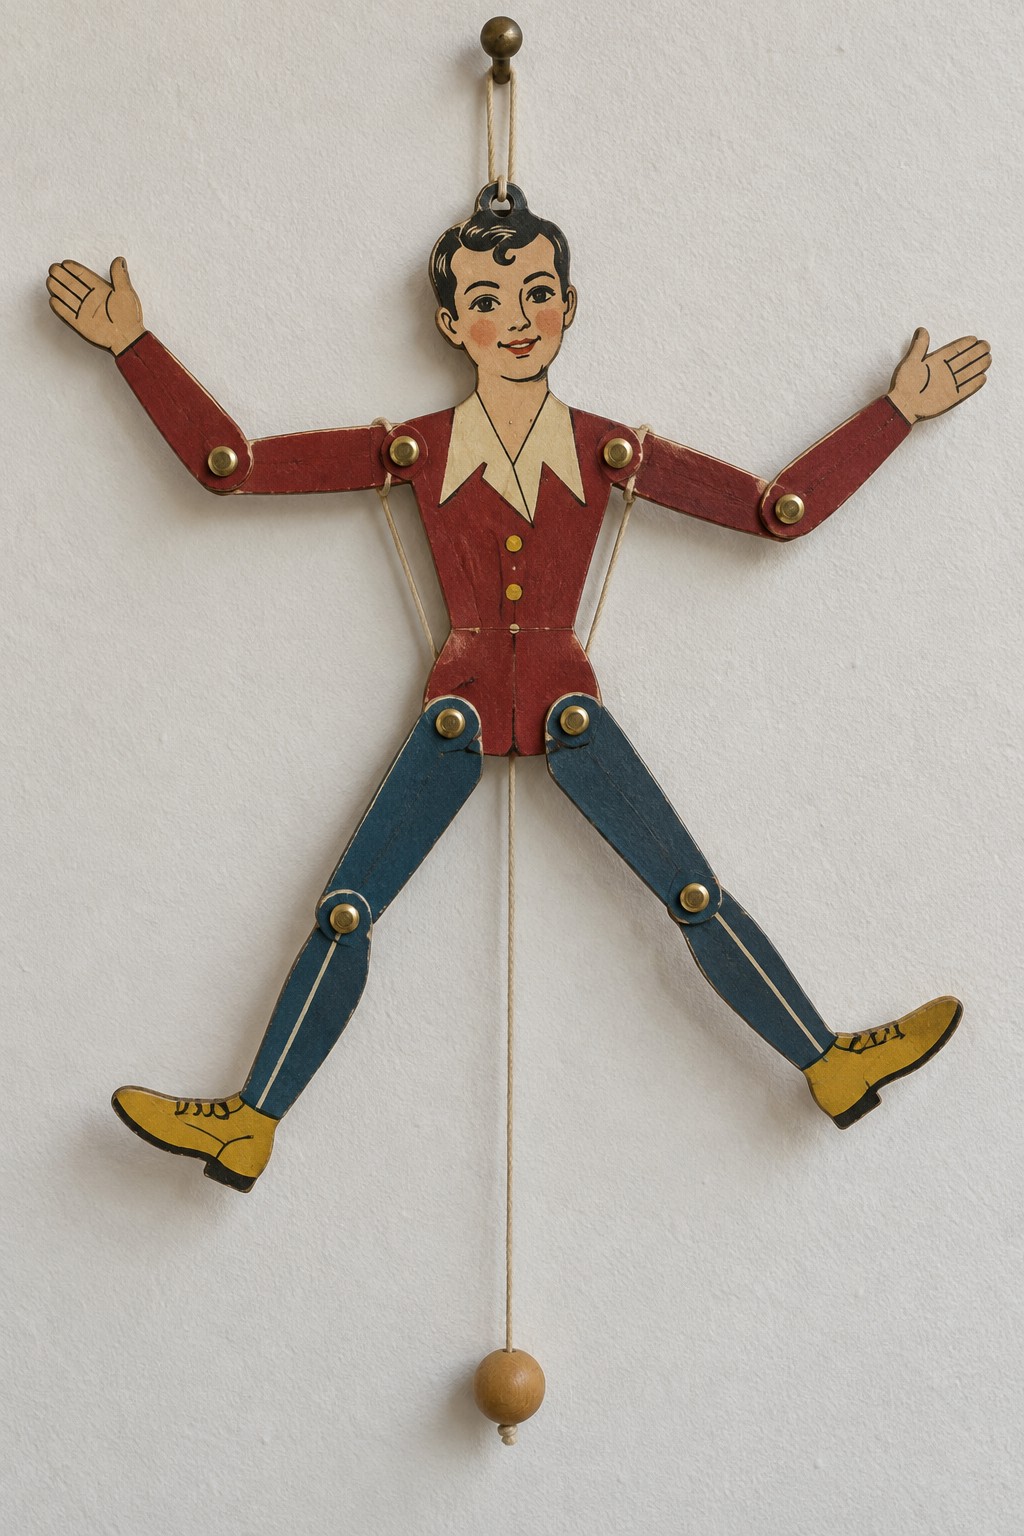
A smiling figure with an open collar and bright jacket adds a playful accent beside a desk or craft shelf. Separate arms and legs give the shape movement, and a wooden bead finishes the pull cord. The simple palette helps the face and joints remain easy to see.
Draw the torso, upper limbs and lower limbs on sturdy card, paint them, and cut the pieces separately. Join the visible pivots with paper fasteners that are loose enough to move. On the reverse, add control holes above the shoulder and hip pivots, connect the paired limbs with short cords, and link those cords to a central pull string. Test the movement before adding the bead, adjusting slack as needed. Treat it as a decorative mechanism with small parts and cord.
24. A Sewing Print Wastebasket with Red Binding
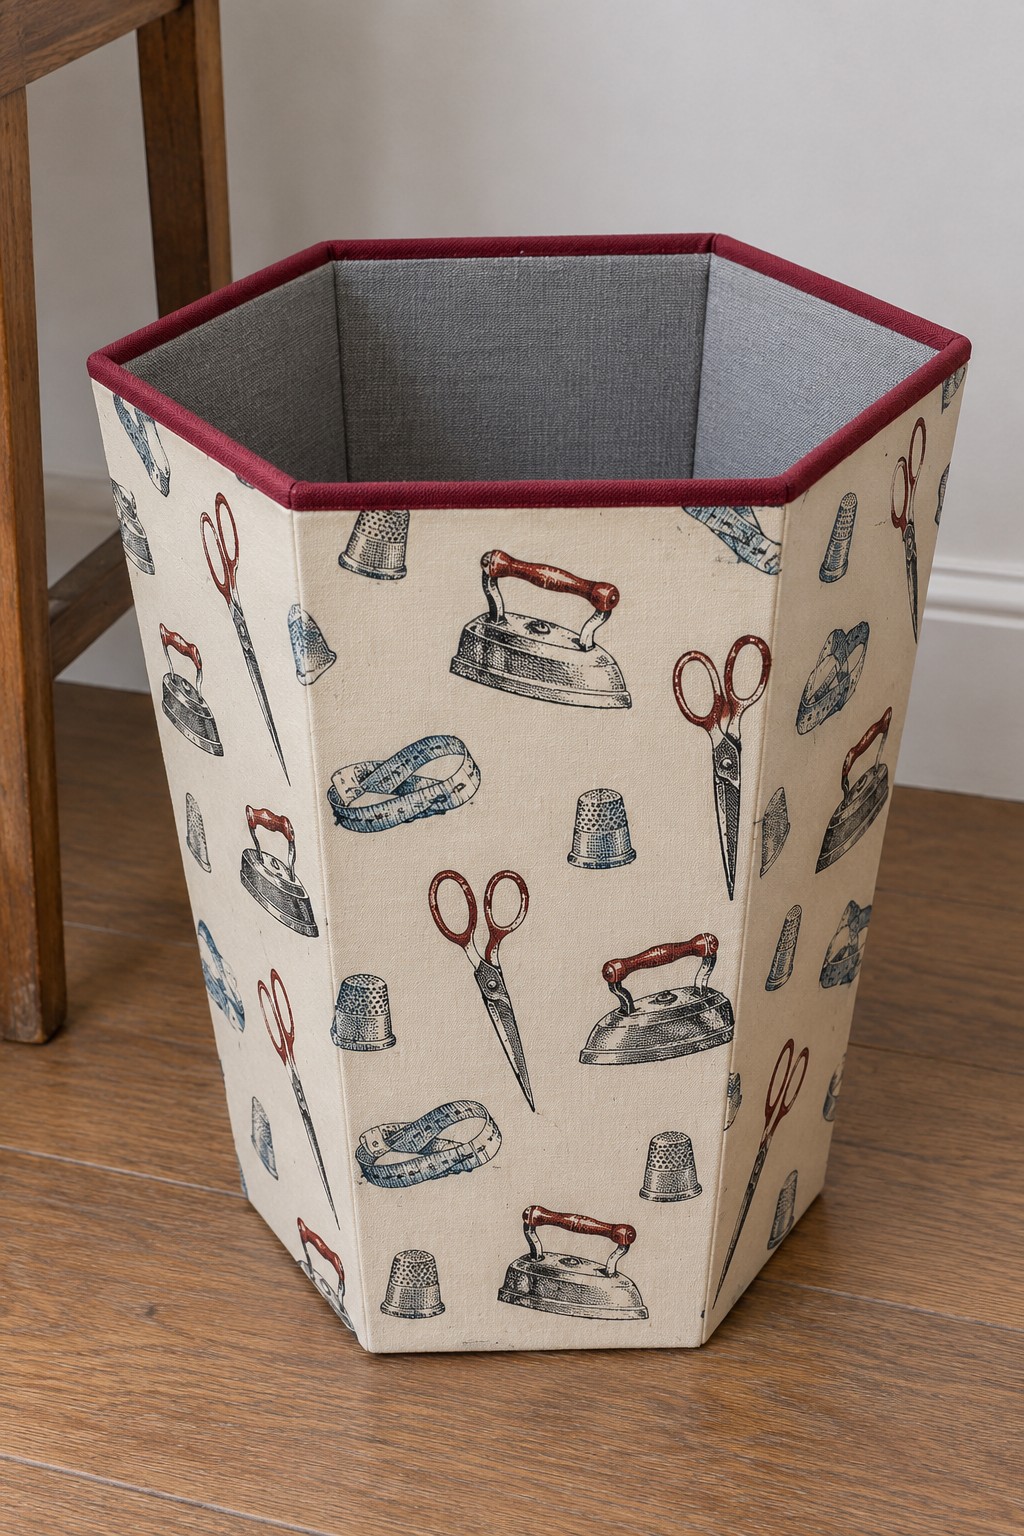
A sewing print makes a small wastebasket feel at home beside a worktable. The hexagonal sides give the fabric a structured shape, and red binding creates a clean top edge. A plain gray interior keeps the patterned outside from becoming visually busy.
Use an existing rigid basket or construct a decorative sleeve around a removable inner bin. Cut a paper template for each face, match the print direction, and attach the fabric with a suitable fabric decoupage medium in thin layers. Turn raw edges under the top binding and finish the bottom neatly. Keep liquid waste out and empty fabric scraps regularly. The removable liner makes cleaning easier and protects the decorative covering from pins and other sharp sewing debris.
25. A Narrow Mosaic Border for a Favorite Photograph
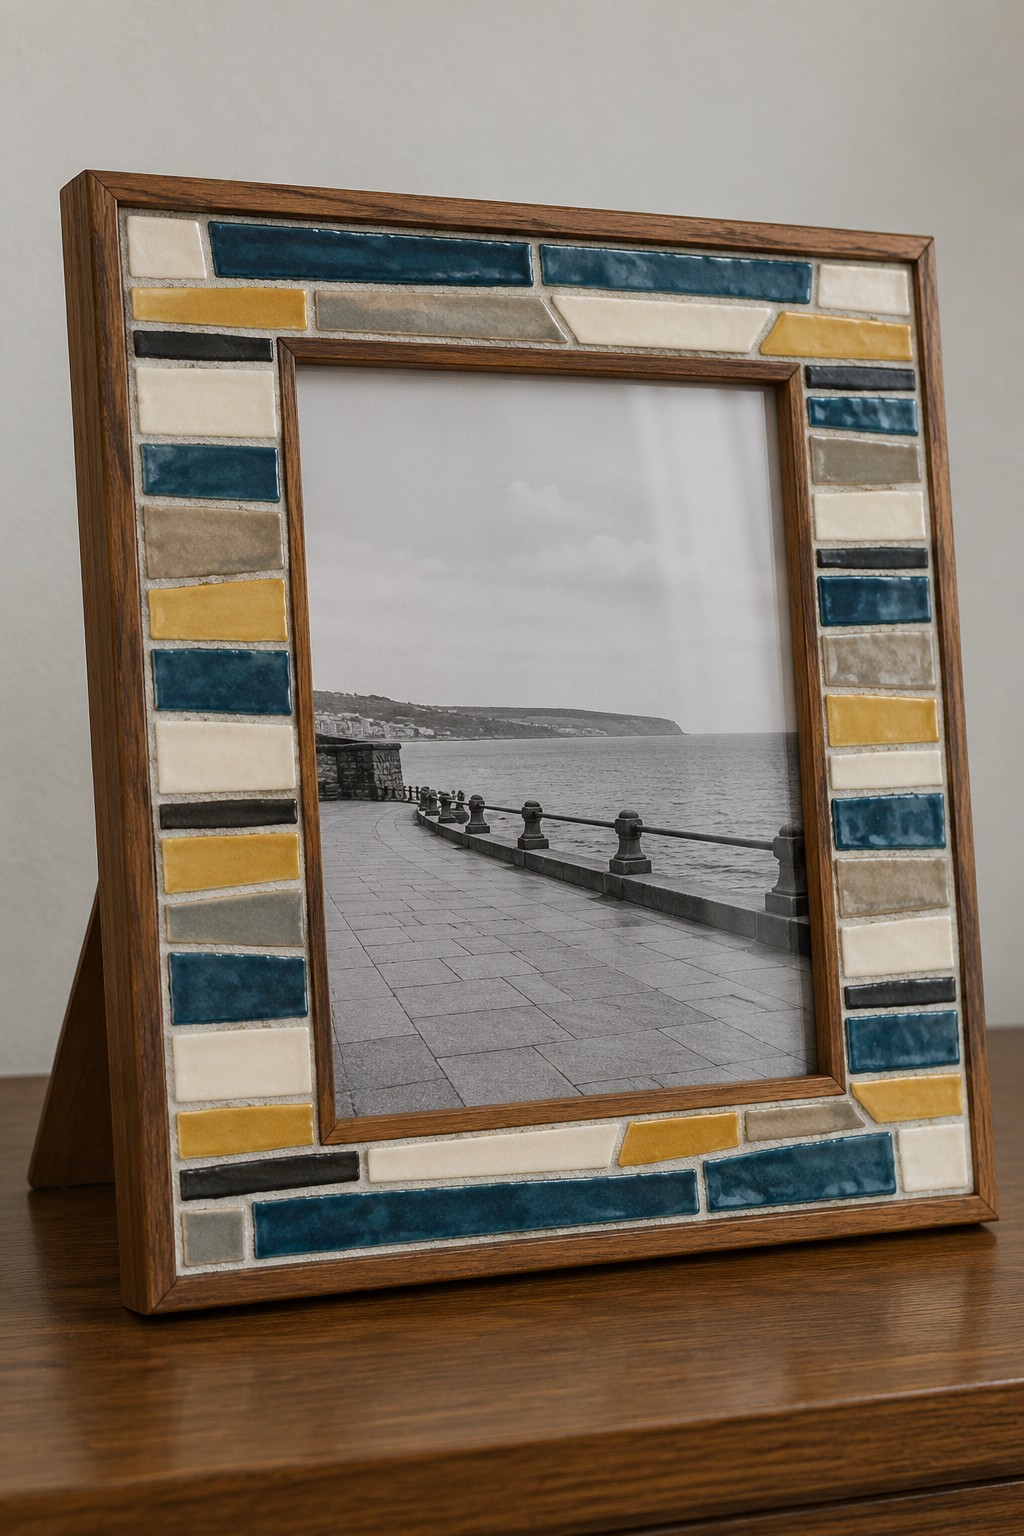
Long strips of blue, mustard and cream give this frame a restrained geometric border. The thin wooden edges separate the mosaic from the photograph, so the surrounding pattern does not swallow the image. A simple monochrome photograph makes the colored fragments particularly effective.
Choose a broad, rigid frame and remove the glazing and photograph before working. Lay out ceramic mosaic strips of similar thickness, preserving the inner opening and the frame’s outer edge. Bond them with an adhesive specified for the tile and frame material, let it cure, then grout the small gaps if the chosen system requires it. Keep grout out of the glazing channel. Refit the backing only when everything is dry and confirm that the stand supports the heavier frame.
26. A Cat Eye Glasses Stand in Felt
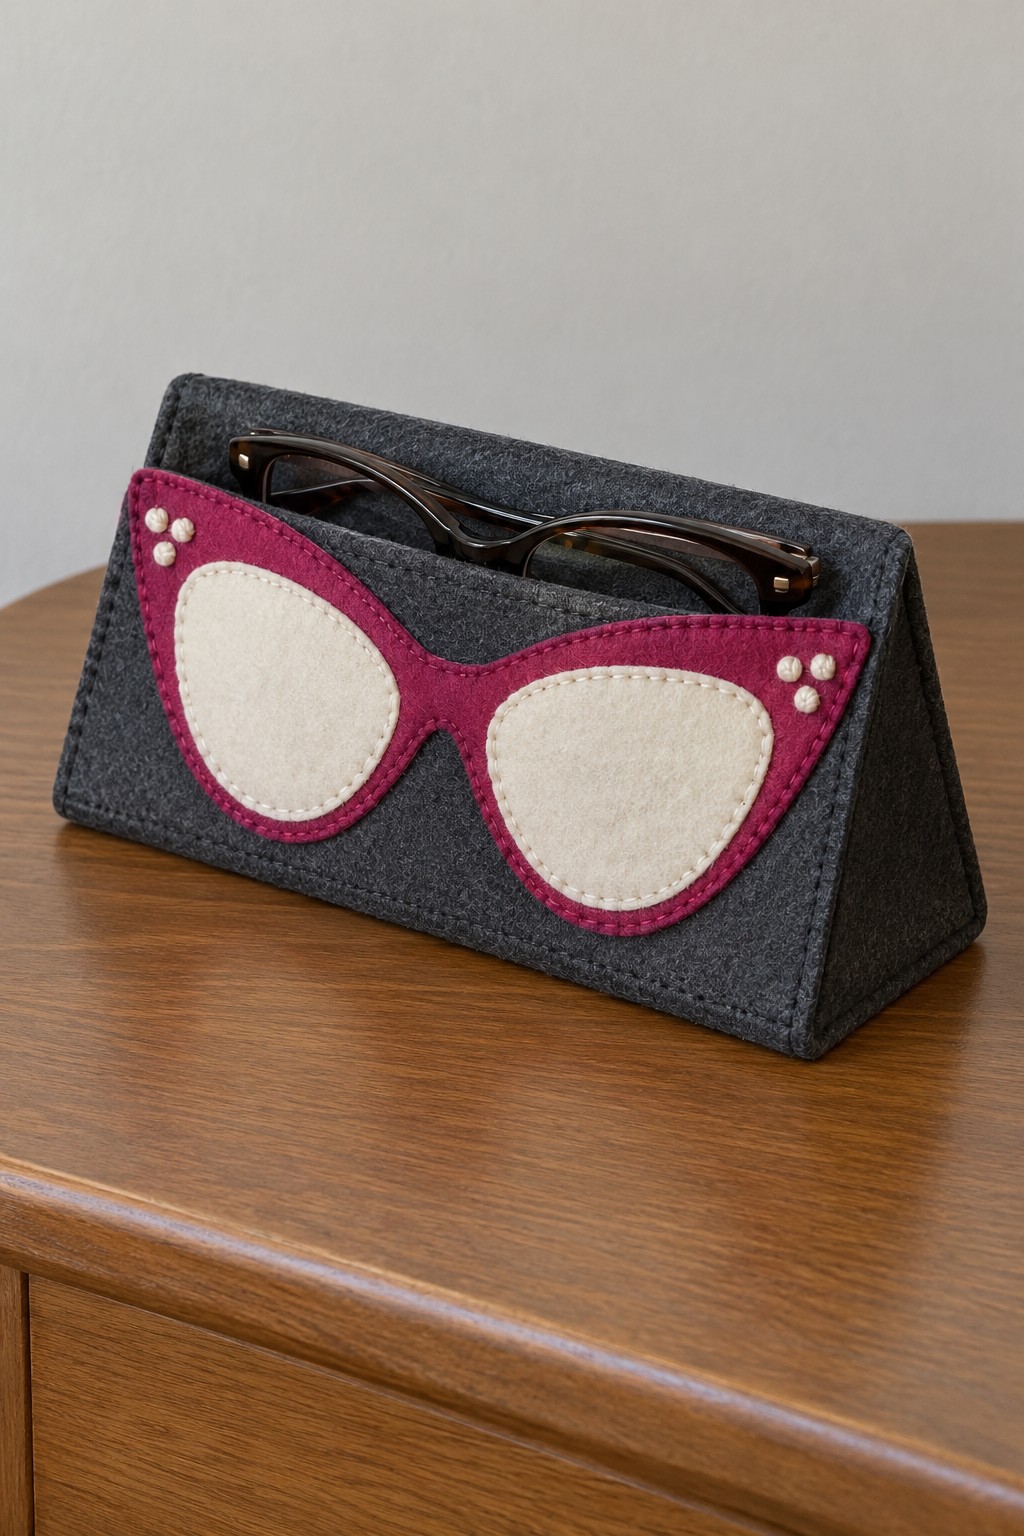
A pink cat eye motif makes this charcoal stand easy to recognize on a bedside table. The triangular sides create a stable profile, while the open upper cradle holds a real pair of spectacles. Tiny pale details at the corners echo decorative eyewear without adding bulky ornaments.
Make a folded rigid core with two sloping faces and a broad flat base, then cover every exposed edge with soft felt. Test the cradle with your own glasses before closing the side panels. Sew the pink and cream applique onto the front covering first, then attach the covering to the core with a thin layer of felt adhesive. Keep glue, rough seams and raised decoration away from the lenses. Use the stand on a dry, level surface.
27. Striped Crochet Sleeves for a Pair of Bottles
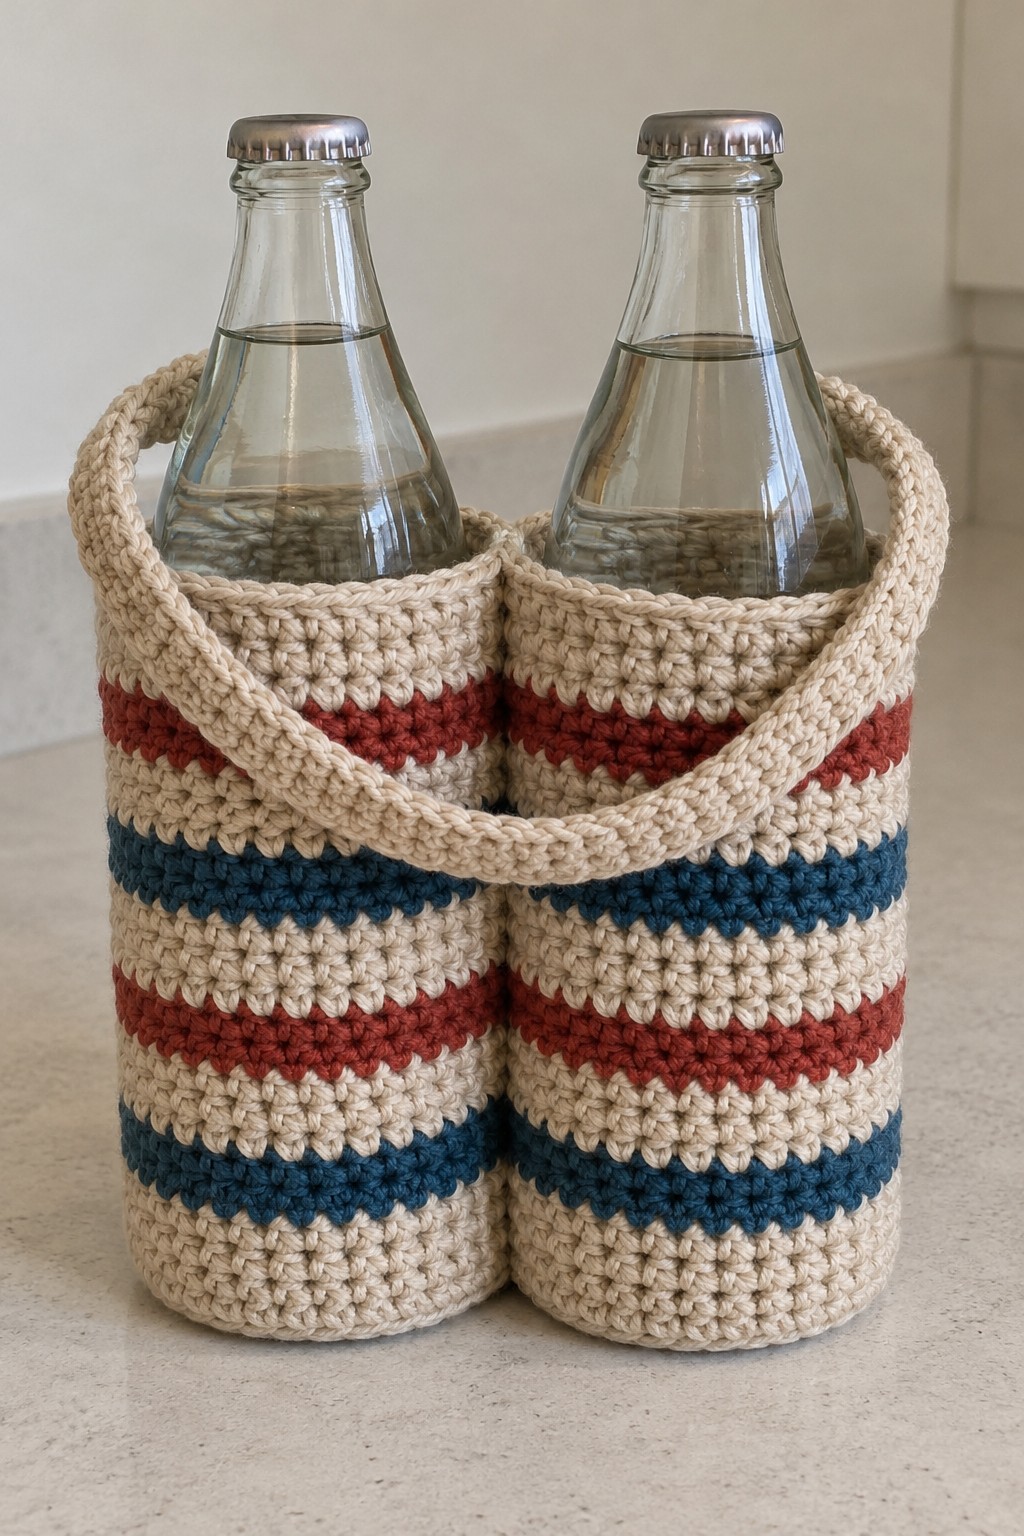
Cream crochet with rust and blue stripes makes two glass bottles look like a coordinated table set. Separate fitted sleeves stop the bottles from rubbing together, while the shared handle visually links them. Dense stitches give the stripes a crisp appearance.
Measure both bottles and use firm cotton yarn with a hook that creates a close fabric. Crochet a flat circular base for each sleeve, work upward in rounds, and change color at consistent heights. Join the sleeves securely and reinforce the handle with cotton webbing stitched into both sides. Test the support over a padded surface before lifting. For filled glass bottles, a rigid carrier beneath the crochet is the more dependable choice; the decorative yarn covering should not be assumed strong enough on its own.
28. A Spun Cotton Style Snowman for a Shelf
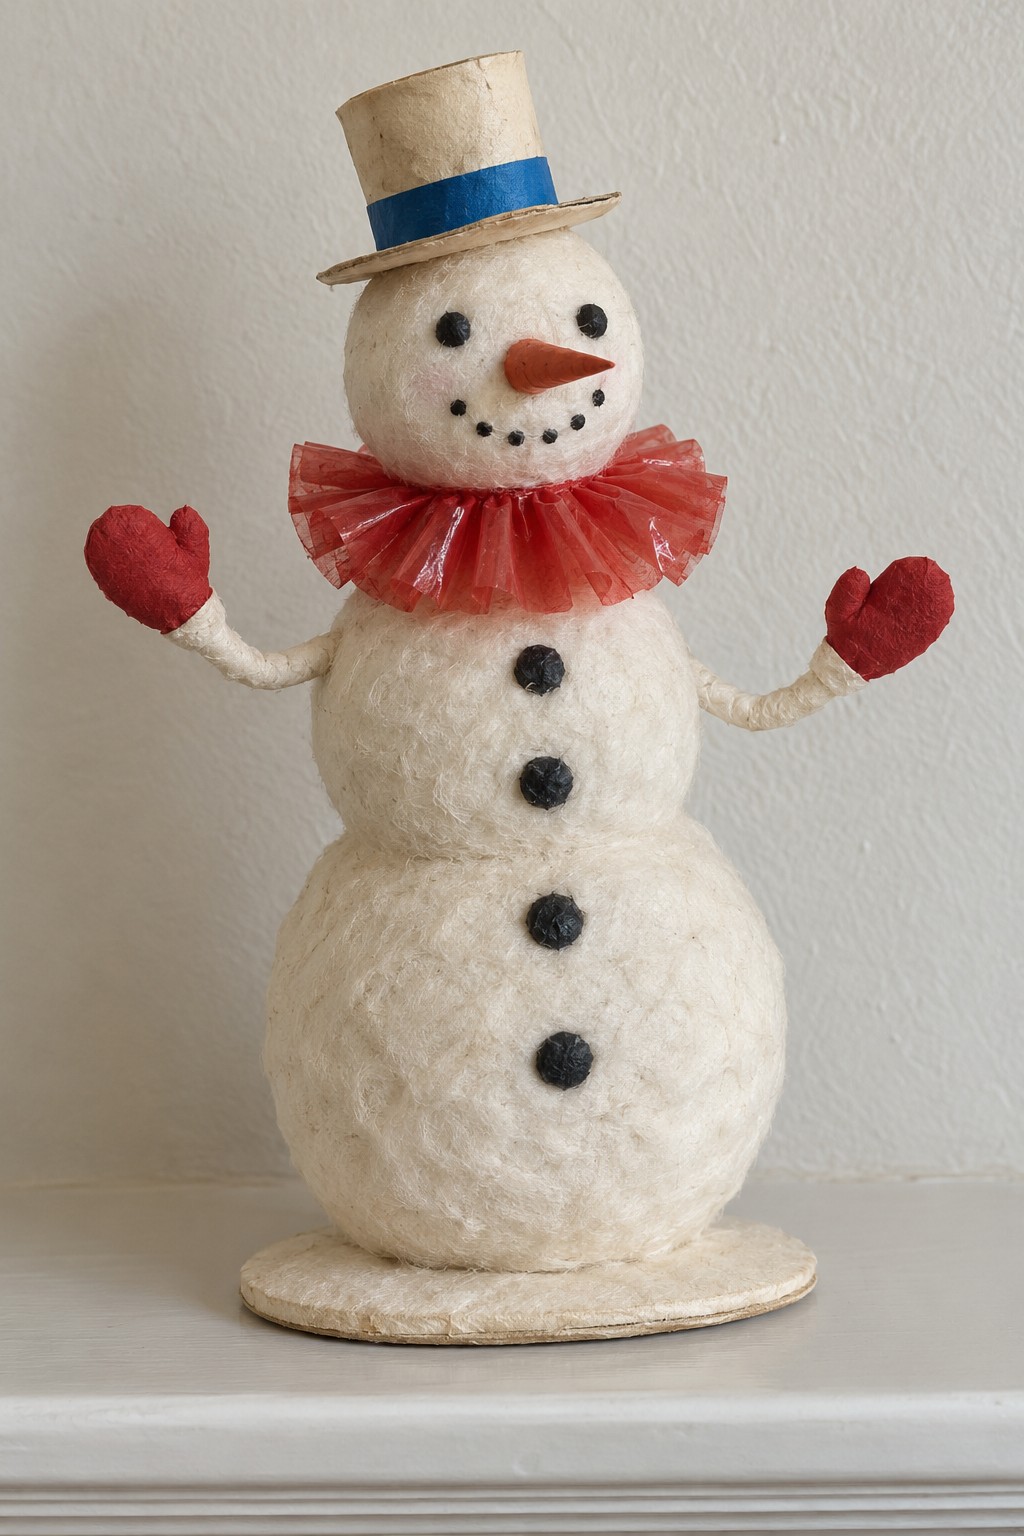
A textured white body, paper collar and tall cream hat give this snowman the look of a nostalgic tabletop ornament. The red mittens balance the collar, and a narrow blue hatband adds a small unexpected color. A low oval base makes the figure easier to display.
Build a light body from firmly crumpled paper shapes attached to a stable base. Add thin cotton batting over small amounts of PVA craft glue, preserving the outline instead of saturating the fibers. Form the hat from card and the collar from pleated tissue, then attach them after the body dries. Use covered wire for the arms and enclose every wire end inside the mittens or body. Keep this cotton and paper ornament away from candles and other heat sources.
29. A Rainy Day Umbrella Stand
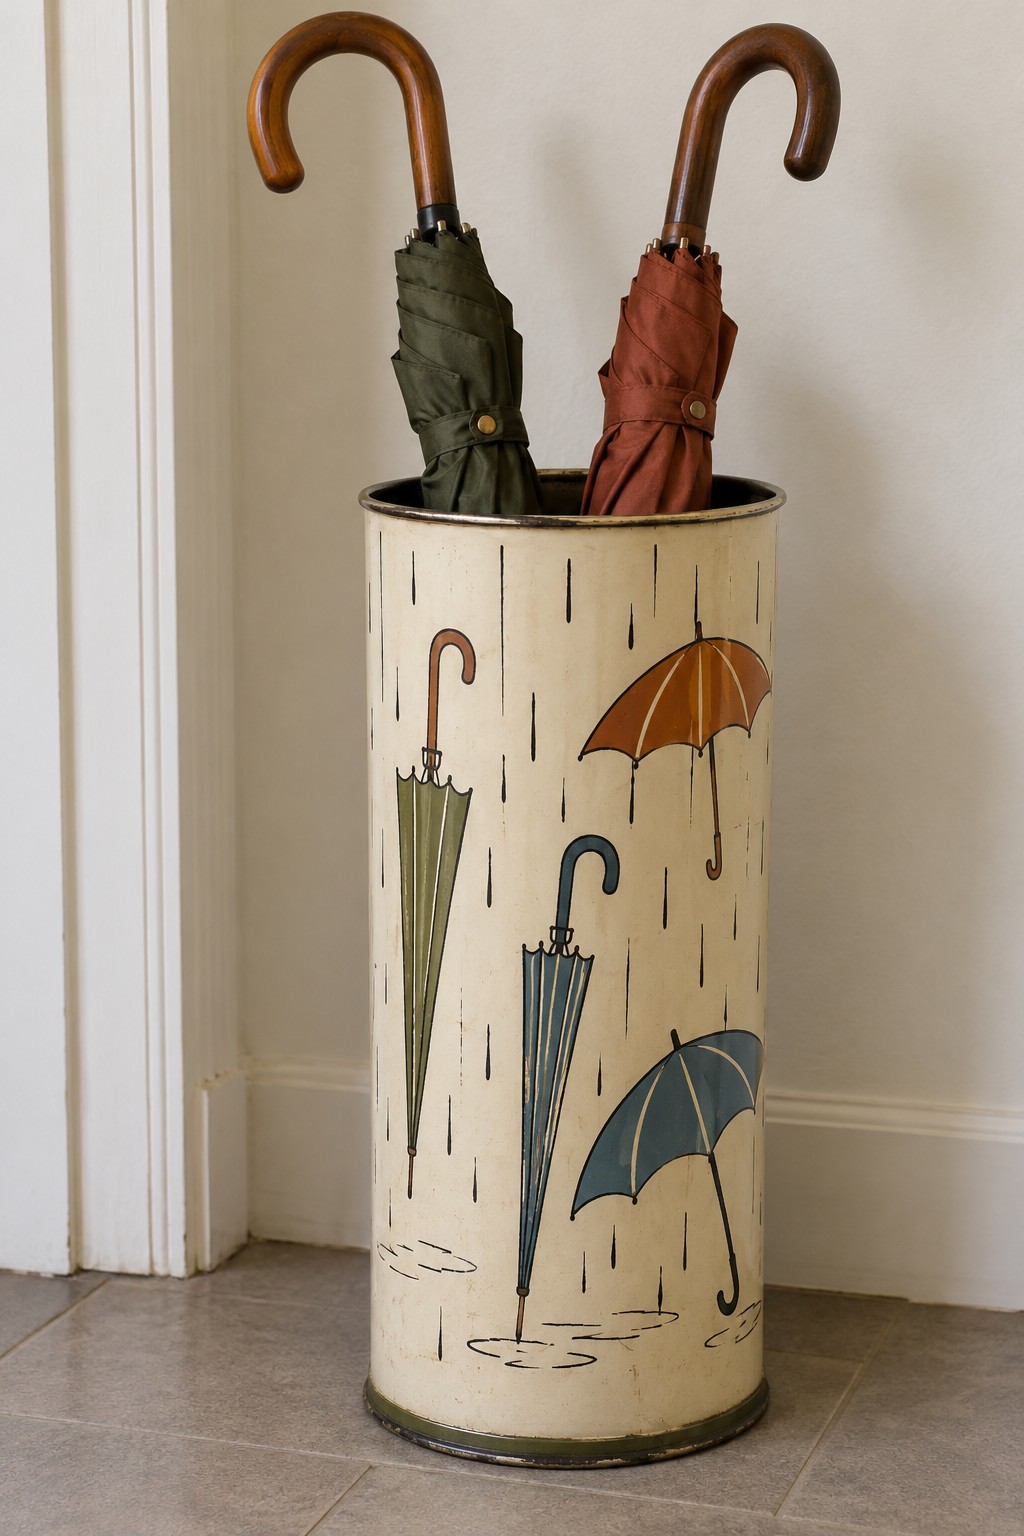
Painted umbrellas make this entryway container explain its purpose at a glance. Mustard, olive, rust and blue canopies break up the tall cream surface, while fine rain marks fill the gaps. The dark rim and base give the narrow cylinder a finished outline.
Decorate a heavy, stable umbrella stand rather than a lightweight cardboard tube. Select paint for the actual surface, using metal primer on suitable bare metal or a ceramic paint system on a glazed vessel. Space the umbrella silhouettes around the cylinder before adding handles and rain lines. Keep the inside functional with a removable drip tray, and empty collected water regularly. Check that the stand remains steady with several umbrellas leaning in the same direction.
30. An Embroidered Travel Bag for Small Linens
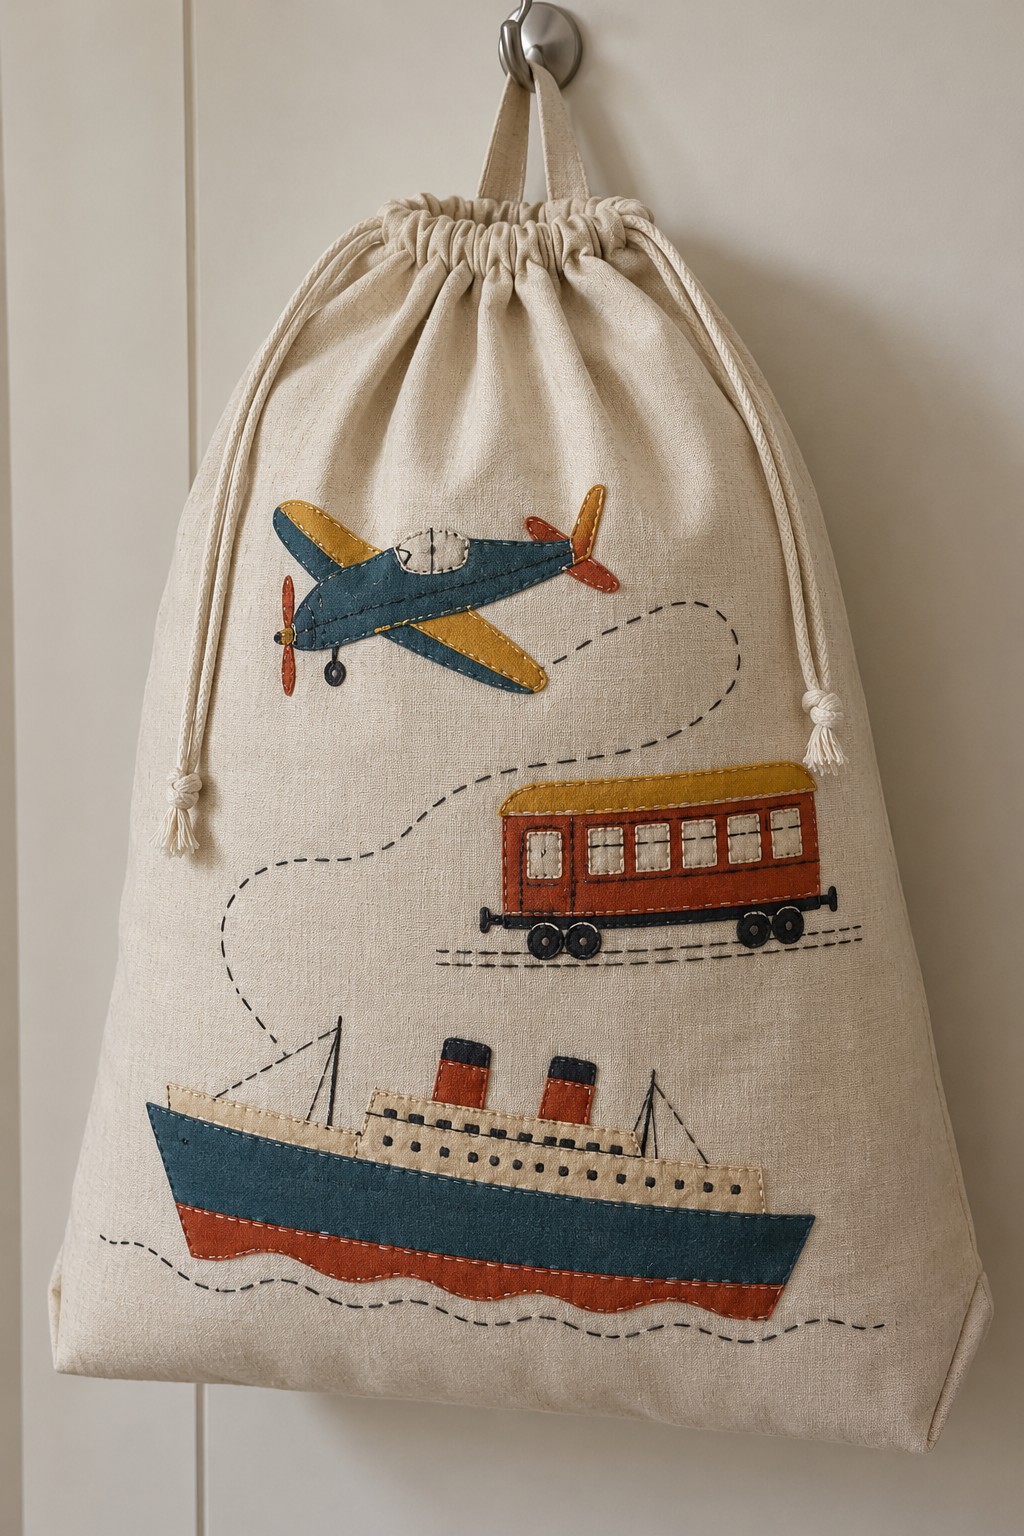
An airplane, tram and ocean liner turn a plain drawstring bag into a compact travel story. Dashed stitched lines link the vehicles without needing lettering. The cream fabric keeps the red, navy and mustard details readable when the bag hangs from a hook.
Cut two cotton panels and decorate the front before joining them. Apply simple fabric vehicle shapes with small edge stitches, then embroider the travel paths with running stitch. Sew the side and bottom seams, finish the raw edges, and fold the top into a casing. Thread cotton cord through the casing and secure its ends. Size the bag for handkerchiefs, scarves or other lightweight linens, and hang it from the cord only when the seams can support the contents.
31. Wire Napkin Rings with Abstract Clay Accents
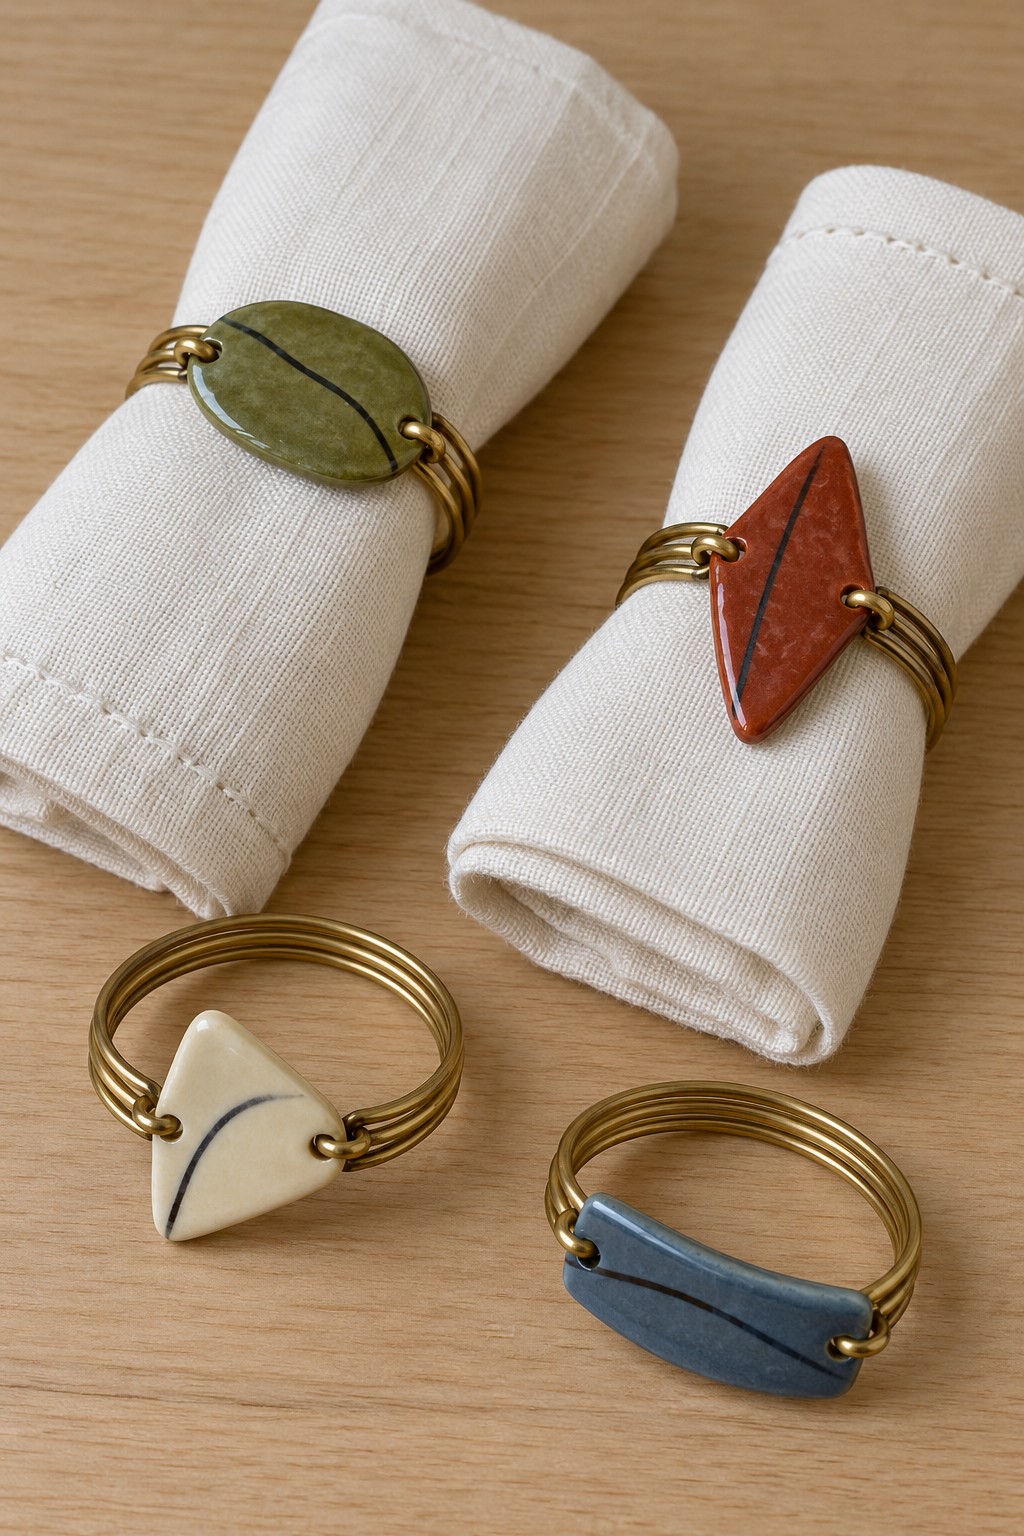
Small abstract shapes turn plain wire napkin rings into a coordinated table detail. Olive, rust, cream and blue accents give each setting a different color while the repeated warm metal keeps the group together. The flattened shapes sit neatly against folded white linen.
Form matching rings from smooth jewelry wire around a cylindrical mandrel, turning all cut ends inward with pliers. Shape small polymer clay accents and make two attachment holes before curing them according to the package. Once cool, connect each accent to the ring with smooth wire loops through those holes. Check the joins against scrap fabric to catch anything that snags. Keep the pieces removable for napkin washing, and do not place the decorative clay in direct contact with food.
32. Paper Sailboats for Place Cards
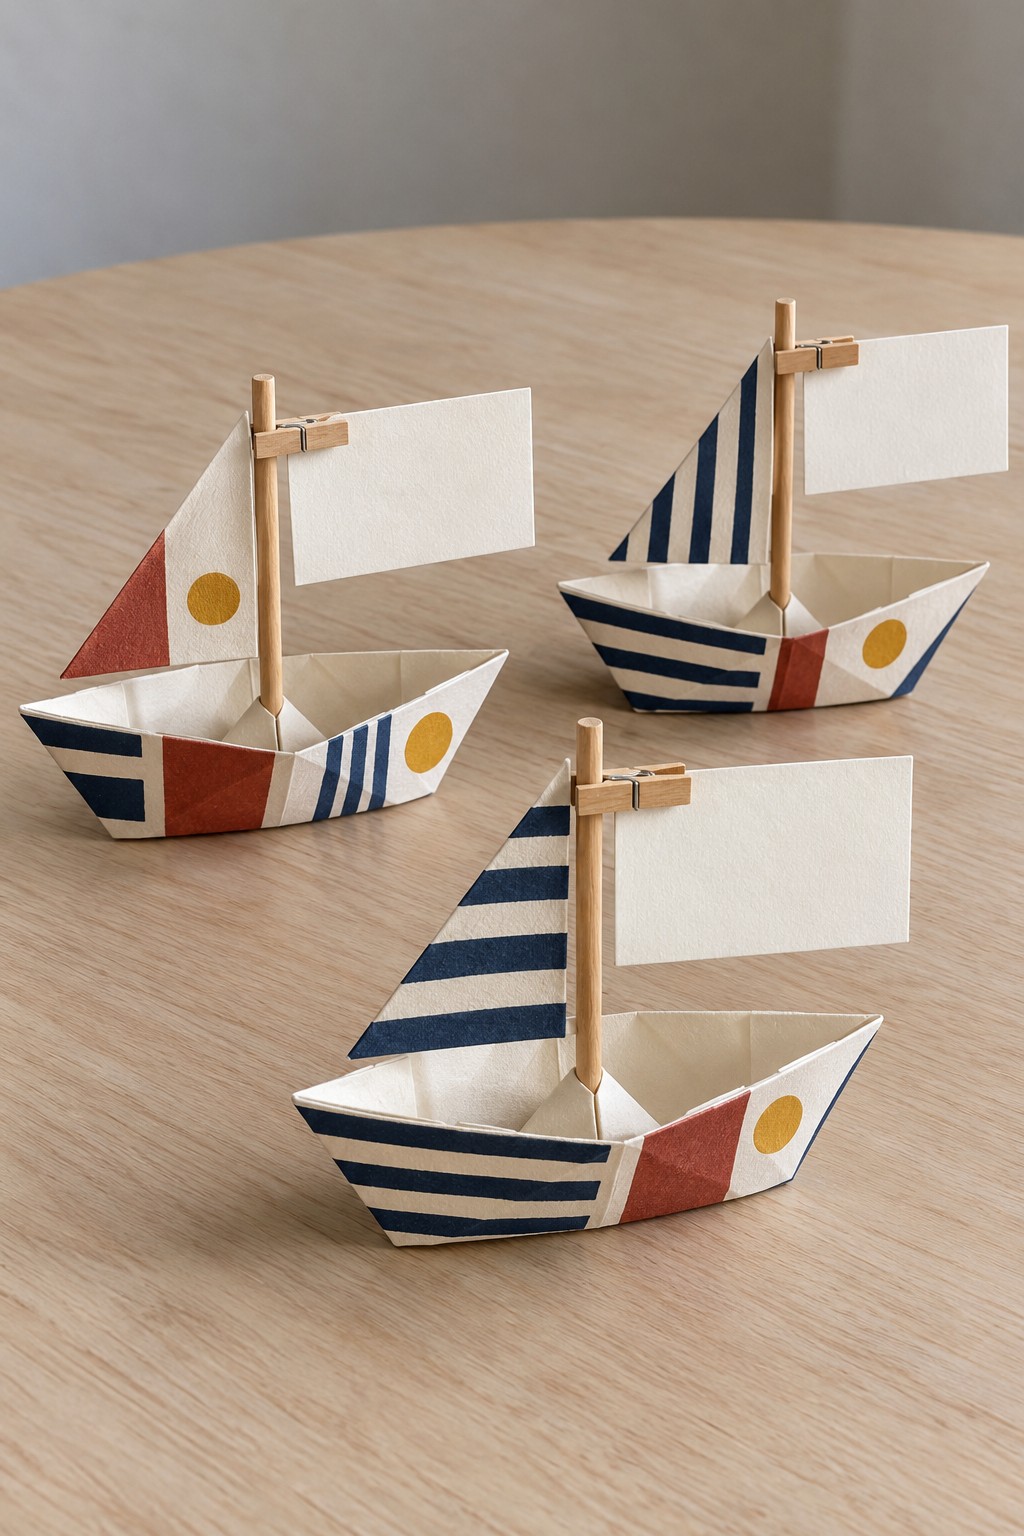
Striped hulls and small triangular sails give these place card boats a breezy tabletop character. Rust, navy and mustard repeat across the group, while white flags leave space for guests’ names. Different stripe arrangements make a set feel lively without changing its overall palette.
Fold each hull from firm paper, crease the base so it rests level, and add a small concealed card brace inside. Secure a short wooden mast to that brace and attach a triangular paper sail with paper glue. Fix a miniature clothespin near the top to hold the name flag. Keep the flag light enough that the boat does not tip. These are dry table decorations, so skip water displays and place them clear of spills.
Keep the Finished Pieces Useful
One repeated color can connect a few handmade objects without making the room feel like a themed display. Try a turquoise jewelry board with a quiet cream textile, or let the red apron be the strongest accent in a kitchen corner. Leave some plain surfaces around patterned pieces so their details remain visible.
Care for the materials individually: dry felt before storing it, dust paper ornaments gently, keep mosaic woodwork out of standing water, and follow the paint maker’s washing instructions. Check hanging loops, shelf fixings and handles periodically. A neatly finished object that fits its space will stay enjoyable long after the making is complete.

Leave a Reply