
Explore 28 furniture painting ideas, including floral benches, ombre chairs, patterned tables, colorful storage and illustrated drawer fronts. The making stages show how preparation, a sketched design, decorative brushwork and a compatible finish can transform existing furniture. Alongside the inspiration, you will find paint and tool choices, ways to adapt patterns to different shapes, and guidance on masking, drying and curing so the result fits its everyday use.
Table of Contents
- Match Your Paint and Tools to the Furniture
- Use the Making Stages to Plan Your Own Finish
- Drying, Masking and Curing Need Separate Decisions
- Adapt These Methods to 28 Painted Furniture Ideas
- 1. Ombre Painted Nightstand for a Soft Color Transition
- 2. Checkerboard Painted Coffee Table for a Playful Retro Accent
- 3. Floral Painted Bench with Natural Wood Showing
- 4. Floral Painted Desk with Soft Blue and Natural Wood Details
- 5. Ombre Painted Rocking Chair with a Graduated Color Fade
- 6. Color Block Painted Bar Cart with Natural Wood Accents
- 7. Abstract Painted Vanity with Bold Organic Shapes
- 8. Striped Painted Stools with Natural Wood Legs
- 9. Floral Painted Dining Table with a Natural Wood Top
- 10. Color Block Painted Stools with Playful Geometric Details
- 11. Color Blocked Tree Coat Rack with a Sculptural Finish
- 12. Folk Art Painted Pet Bed with Colorful Floral Details
- 13. Painted Cabinet with Layered Floral Front Panels
- 14. Color Banded Bookshelf with Textured Painted Sections
- 15. Galaxy Inspired Painted Mirror Frame with Playful Color Blocks
- 16. Color Block Ladder Bookshelf with Graduated Painted Sections
- 17. Drip Painted Pedestal Table with a Bold Graphic Finish
- 18. Painted Fold Down Wall Desk with an Abstract Sky Effect
- 19. Floral Wall Panel Above an Existing Headboard
- 20. Color Blocked Wooden Armchair with Textured Spindles
- 21. Multicolor Painted Plant Stand with Speckled Shelves
- 22. Abstract Painted Wardrobe with a Layered Landscape Effect
- 23. Painted Crate Shelving with Mix and Match Color Blocks
- 24. Dollhouse Style Painted Storage Cabinet with Pastel Details
- 25. Celestial Painted Nightstand with Moon and Star Details
- 26. Painted Cube Storage Unit with Playful Character Panels
- 27. Painted Wardrobe with Playful Animal Art Panels
- 28. Pastel Rainbow Dresser with Textured Color Block Drawers
- Make the Color Change Fit Your Room and Routine
Match Your Paint and Tools to the Furniture
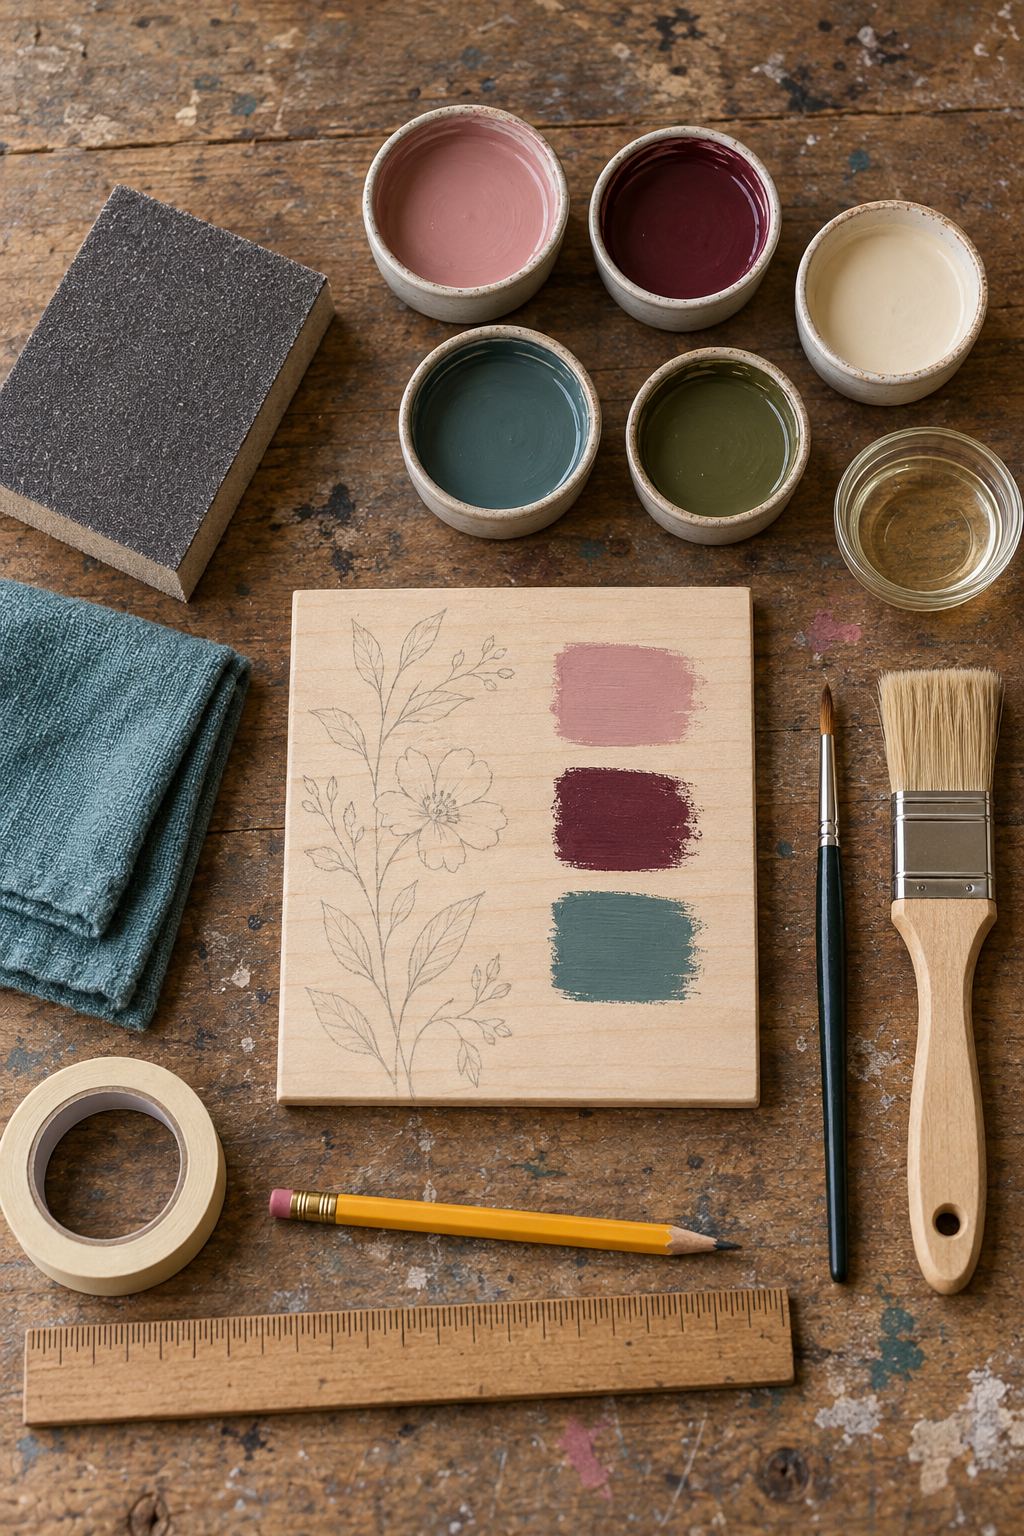
Choose the finish by the surface and the amount of contact it receives. A furniture or cabinet coating can suit a desk, seat or drawer front when its instructions cover the substrate. Chalk style furniture paint offers a matte decorative route, with its specified wax or lacquer where required. Acrylic craft paint can add small motifs over a compatible prepared base, but should not be assumed to provide the entire protective system for a busy tabletop.
Useful tools include a screwdriver for removable hardware, cloths and a suitable cleaner, measuring tools, a pencil, surface appropriate masking tape, a flat brush or small finishing roller, and fine round brushes for details. Sanding materials, filler, primer and a protective finish depend on the existing coating. Test the whole planned paint system on a discreet area or sample. Keep ventilation and protective measures consistent with each product's instructions.
Use the Making Stages to Plan Your Own Finish
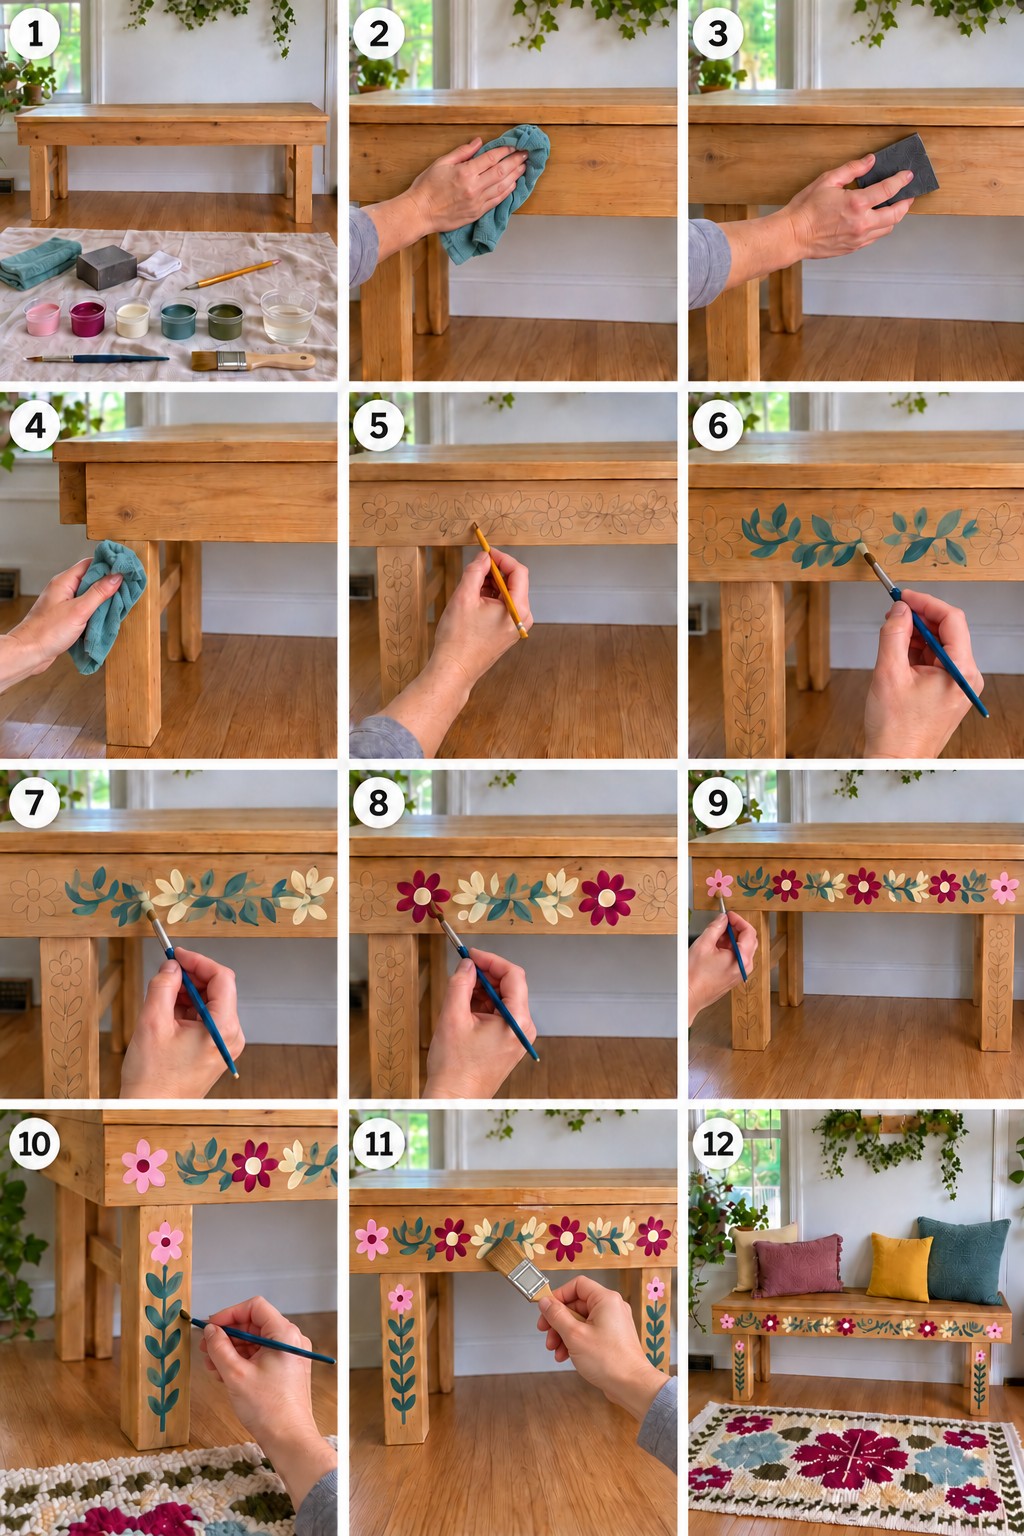
The sequence starts with cleaning, surface preparation and removal of residue, then moves into a penciled floral layout, colored leaves, petals, smaller details and a final coating. Borrow that order for other furniture rather than copying only the finished flowers. Inspect loose joints and damaged surfaces first. Identify bare timber, veneer, laminate or an existing finish, then choose the preparation it needs. Do not sand or scrape an unknown old paint layer before assessing it, because some old coatings can produce hazardous lead dust. Thin veneer also needs care to avoid sanding through it.
After the prepared surface is ready, map the design around actual drawers, doors, rails and handles. For flowers, establish larger blooms and leaves before filling gaps with smaller petals. For geometric blocks, use measurements and tape suited to the surface. For ombre, test neighboring shades and work the transition while the chosen paint remains blendable, using an approved method rather than freely diluting it. Protect retained timber, glass and hardware, and keep moving joints clear.
Finish the painted surface with a clear coating compatible with the paint and the furniture's intended use, following its curing instructions. Choose a finish compatible with your paint and intended use; some furniture paints do not require an extra clear coat. Where one is needed, test its effect on color and sheen before coating the piece. Raised flowers and fibrous textures in some inspirations require an additional surface technique or separately attached details; ordinary thin paint coats supply their colors and arrangement, not necessarily their relief.
Drying, Masking and Curing Need Separate Decisions
Touch dry paint can still be vulnerable to tape, pressure or objects resting on it. Wait until the base is ready for masking according to both paint and tape instructions, and test a small area first. Recoating time and full curing time are also different: curing is the stage at which the finish develops its specified hardness and durability. Follow the selected system's guidance before regular use, reloading shelves or keeping freshly painted drawers closed. Use suitable mats or coasters afterward; curing does not remove every heat or spill limitation.
Adapt These Methods to 28 Painted Furniture Ideas
With the preparation and finishing sequence in place, choose an inspiration that fits your furniture's shape. Flat surfaces suit the checkerboard in 2 and broad artwork in 7 or 22. Spindles and frames offer smaller color zones in 5, 11 and 20. For a lighter change, keep timber visible as in 3 or 9. Use the following designs to guide your palette and placement, then adjust the method to your surface and daily routine.
1. Ombre Painted Nightstand for a Soft Color Transition
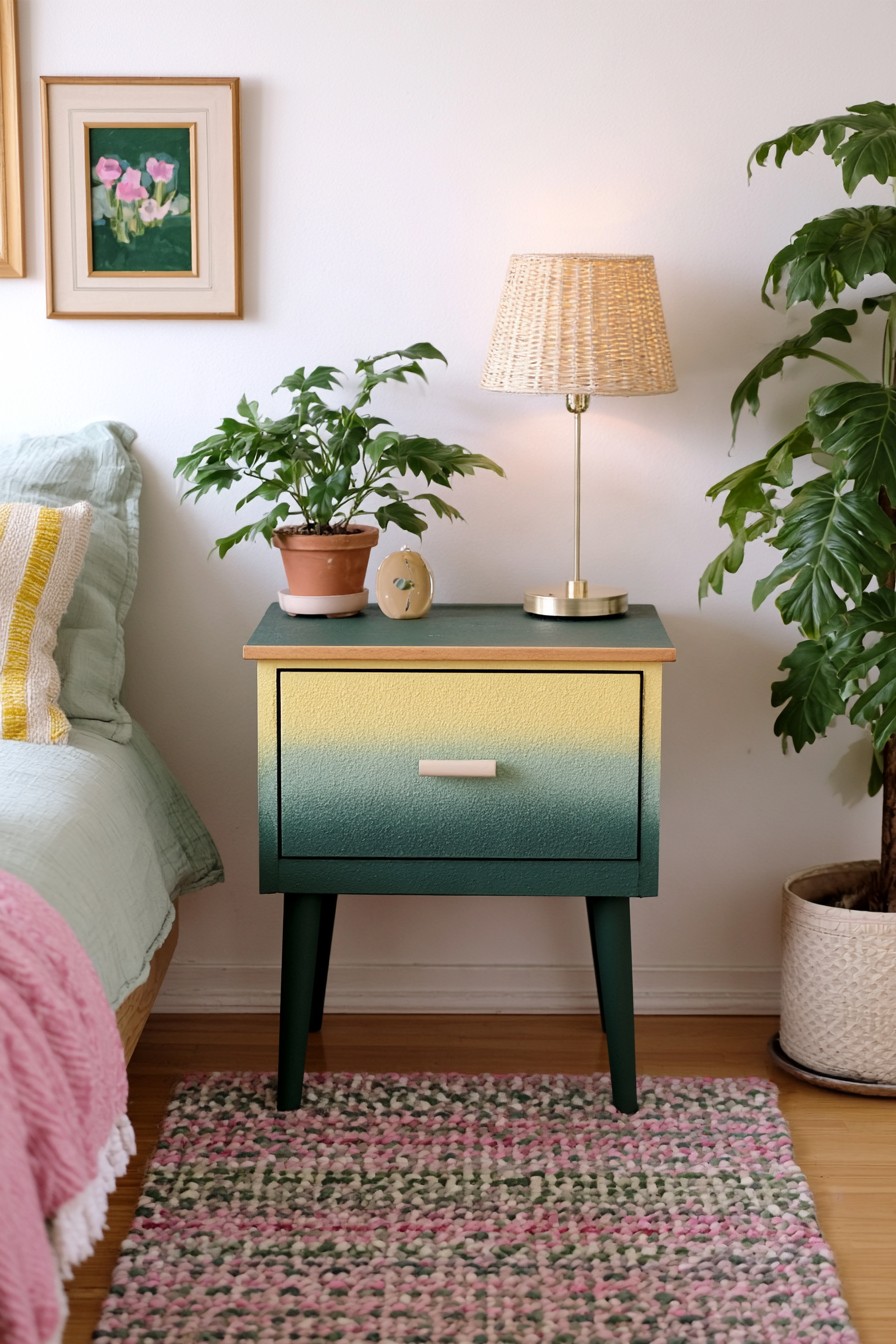
This nightstand uses a gradual transition from pale yellow through muted green to a deeper forest tone. The darker tabletop, legs, and outer structure act almost like a frame around the lighter drawer front, so the gradient remains noticeable without making the entire piece visually busy.
Test the gradient on a sample before painting the drawer so you know whether the selected colors blend smoothly. Place the main bands first, then soften only their meeting edges with a clean brush using a method allowed by the paint. Avoid repeatedly brushing paint once it begins to set. Remove the handle and keep the drawer's closing edges thin. Decide whether the darker top needs repainting or can retain a sound existing finish; matching the whole piece is a design choice, not a requirement. Let the drawer coating reach its stated readiness before replacing belongings against it.
2. Checkerboard Painted Coffee Table for a Playful Retro Accent
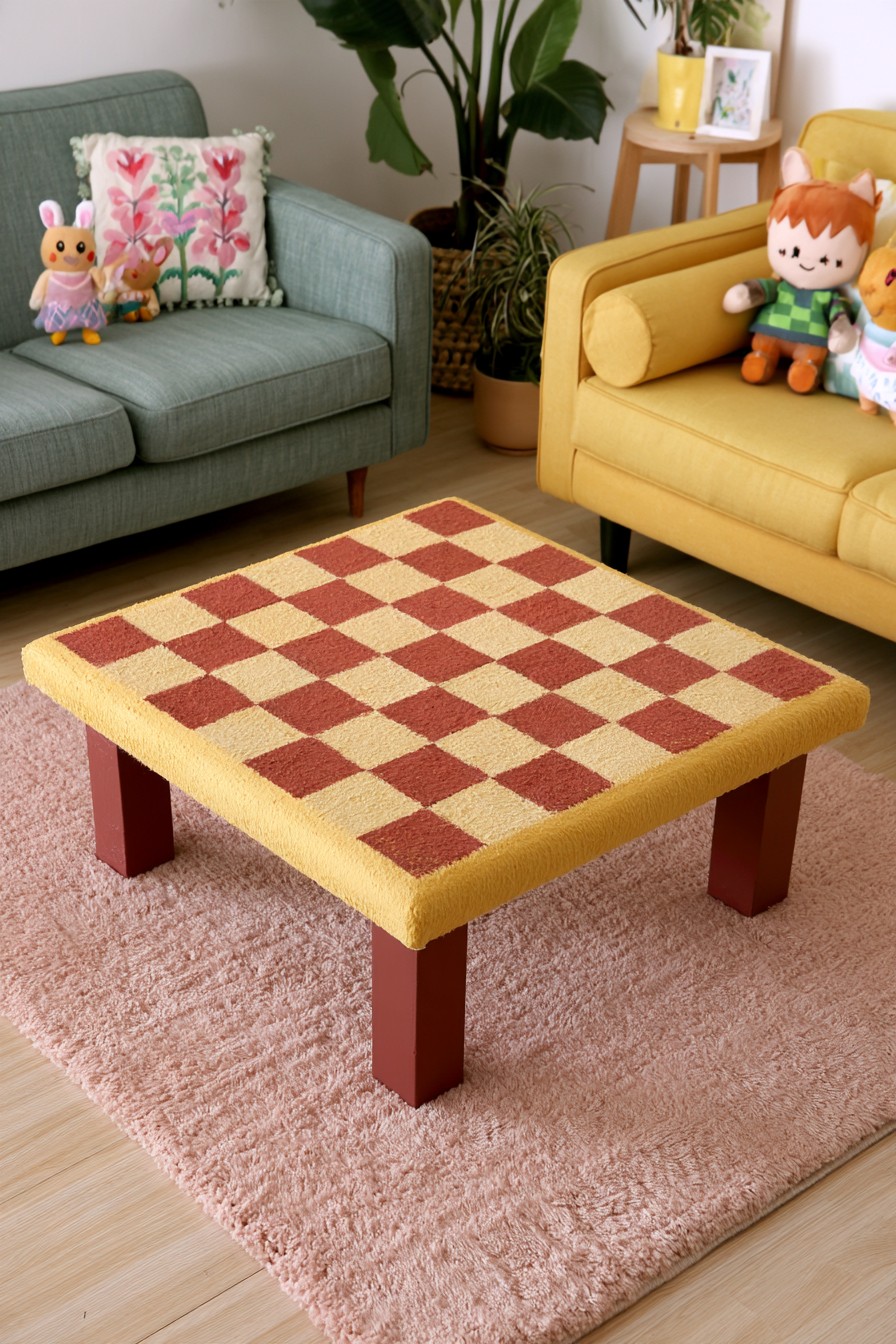
A checkerboard tabletop gives this coffee table a strong graphic identity using warm rust and cream squares surrounded by a golden toned edge. Painting the legs in a deeper reddish shade keeps the lower half visually connected to the patterned surface without continuing the grid across every part of the table.
Lay out the grid from the tabletop's center so partial squares at opposite edges remain balanced. Paint the light base first and wait until both the paint and chosen tape instructions permit masking; a dry feel is not enough. Test tape on a small prepared area, then mask alternate squares and use a restrained amount of paint near the edges. The photograph also has a tactile surface that simple color blocks may not reproduce. A smooth interpretation is easier to wipe. Select the finish for regular table contact and let it cure before cups and books return.
3. Floral Painted Bench with Natural Wood Showing
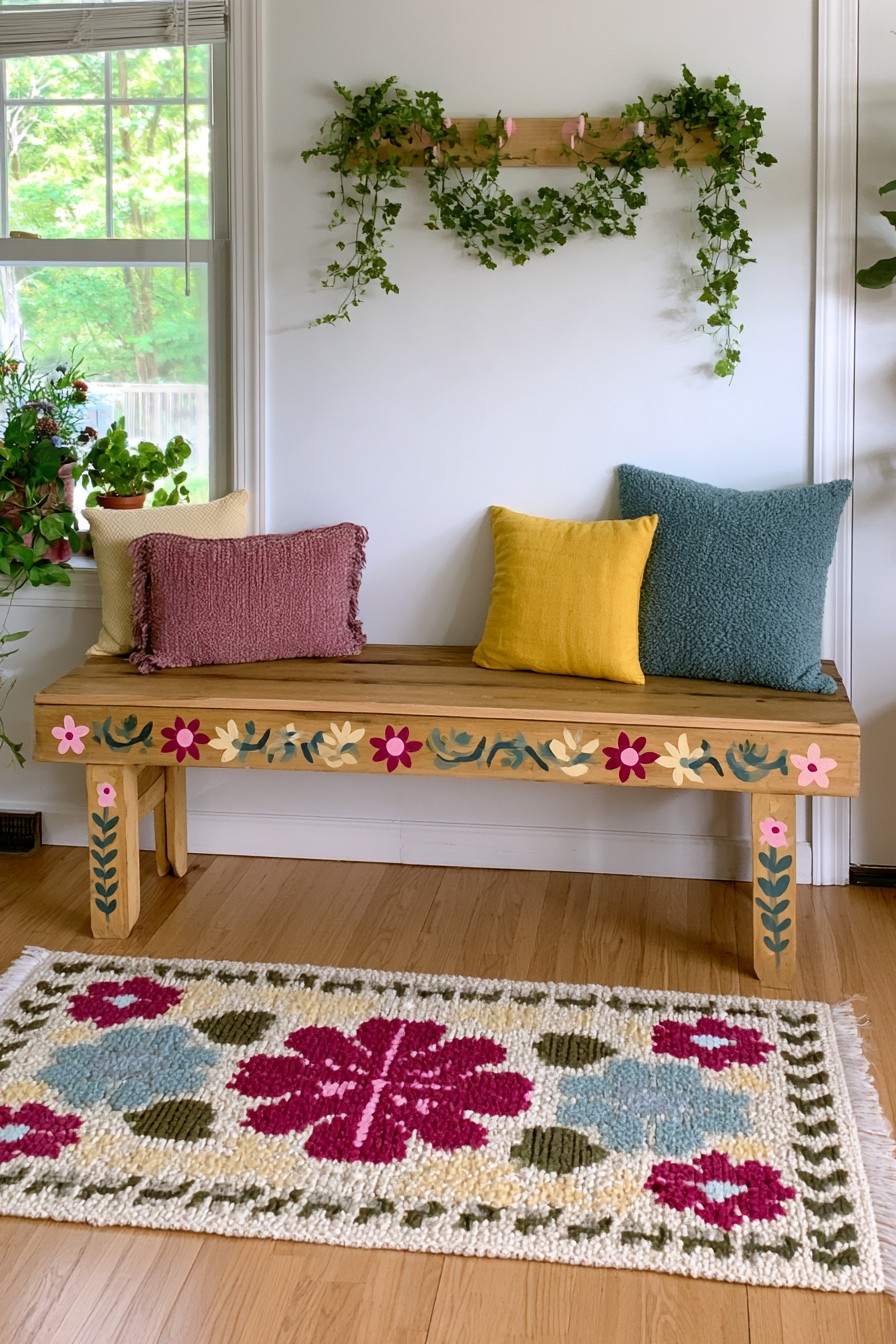
Instead of covering the wood completely, this bench uses small flowers and leafy motifs across the apron and legs. Pink, burgundy, cream, and muted blue green details add a folk inspired character while allowing the warmth and grain of the original timber to remain part of the design.
The making sequence translates particularly well to this selective floral treatment. Sketch clusters along the apron and legs, then paint leaves, larger petals and flower centers in a controlled order. Try brush shapes on spare timber before decorating the bench, keeping enough grain visible between motifs. Retained wood may already be sealed, so check adhesion where the paint will touch it and choose preparation for that finish. The seat can remain visually quiet and easier to maintain. Complete any joint repairs before painting and choose a compatible finish for decorated areas that receive regular contact.
4. Floral Painted Desk with Soft Blue and Natural Wood Details
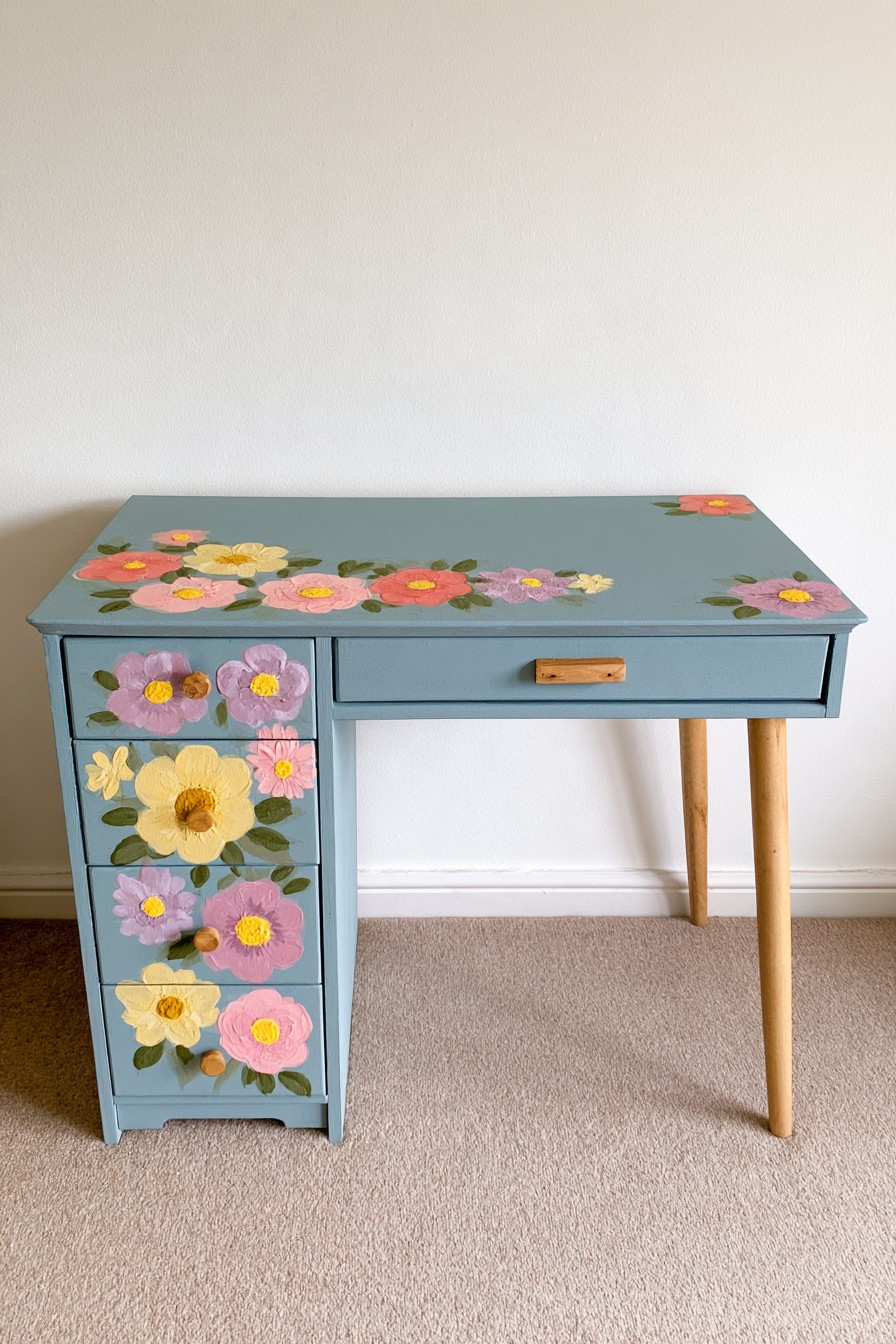
The dusty blue body gives this compact desk a calm foundation, while pink, lavender, cream, and coral flowers introduce color across selected areas of the desktop and drawer unit. Natural legs and wooden pulls provide enough contrast to keep the floral treatment from covering the character of the whole piece.
Set out the flowers with the desk in its normal working position so you can preserve a clear writing zone. Remove the pulls, label drawers if needed and protect wood you want to retain. Prepare the blue base for the actual substrate, then add the larger flower shapes before leaves and centers. Some pictured flowers have dimension; a flat painted adaptation repeats their placement and colors without promising the same relief. Keep decorative buildup away from drawer gaps and the area where your wrist rests. Let the desktop system reach its stated use stage before setting equipment on it.
5. Ombre Painted Rocking Chair with a Graduated Color Fade
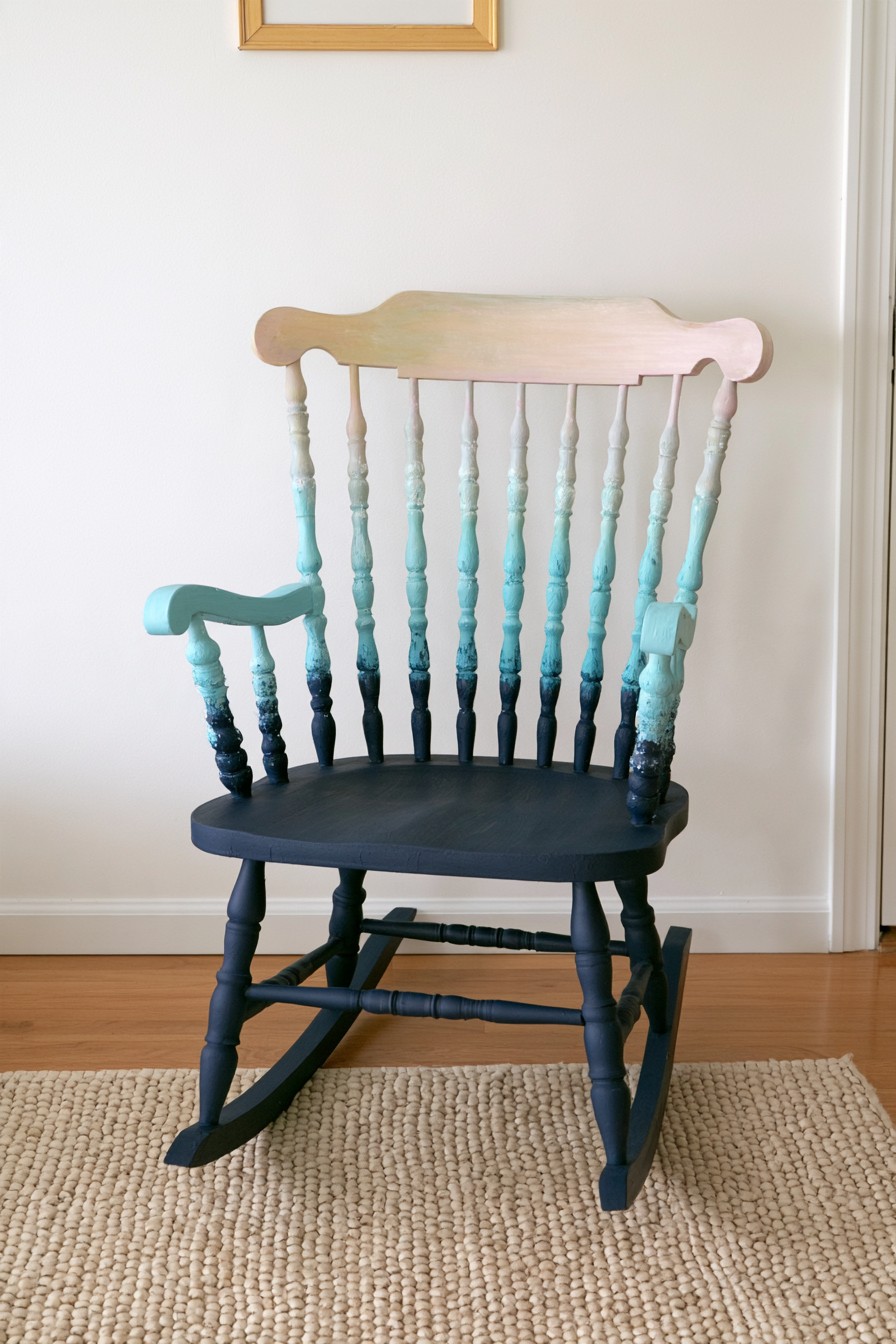
The many vertical spindles of a rocking chair create a natural framework for an ombre finish. Here, deep navy anchors the seat, lower frame, and rockers before shifting through turquoise and pale aqua toward a lighter blush toned upper rail.
Build a color progression on paper before working around the turned spindles. Several related shades applied in short sections can give a graduated effect without blending every part continuously. A small brush reaches the profiles and joints more easily than a broad roller. This example has curved rocking supports, so preserve their function and inspect the chair's joints before any cosmetic work. Keep the seat and arms comfortable to touch, with no paint ridges where hands rest. Follow the paint system's waiting periods before sitting in the chair or letting freshly coated contact points press together.
6. Color Block Painted Bar Cart with Natural Wood Accents
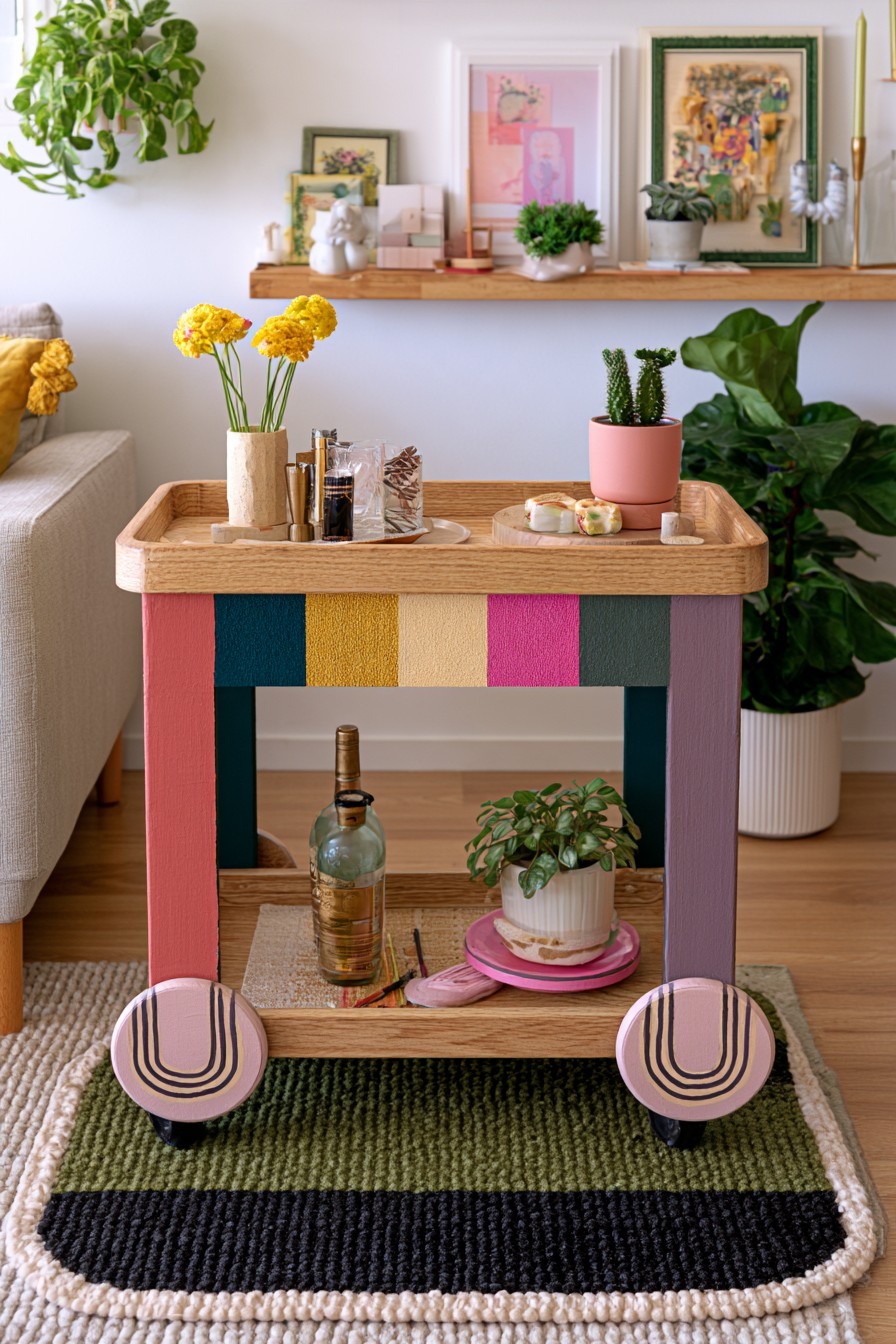
Coral, teal, mustard, cream, magenta, muted green, and lavender turn the structural parts of this rolling cart into separate color blocks. The natural wooden shelves keep that varied palette under control and preserve a practical surface for storage and serving.
Use the rails and joints to mark the limits of each color rather than dividing the frame arbitrarily. Protect the wooden trays and remove detachable fittings when their instructions allow. Wheel surfaces can also carry decorative color where appropriate, but paint must stay away from axles, bearings, braking parts and contact areas that need to move freely. After reassembly, check rolling and braking before loading the trays. Choose the serving layout around what you actually carry, leaving items easy to lift. Do not assume every decorative coating will tolerate drink spills; select and maintain the finish for that exposure.
7. Abstract Painted Vanity with Bold Organic Shapes
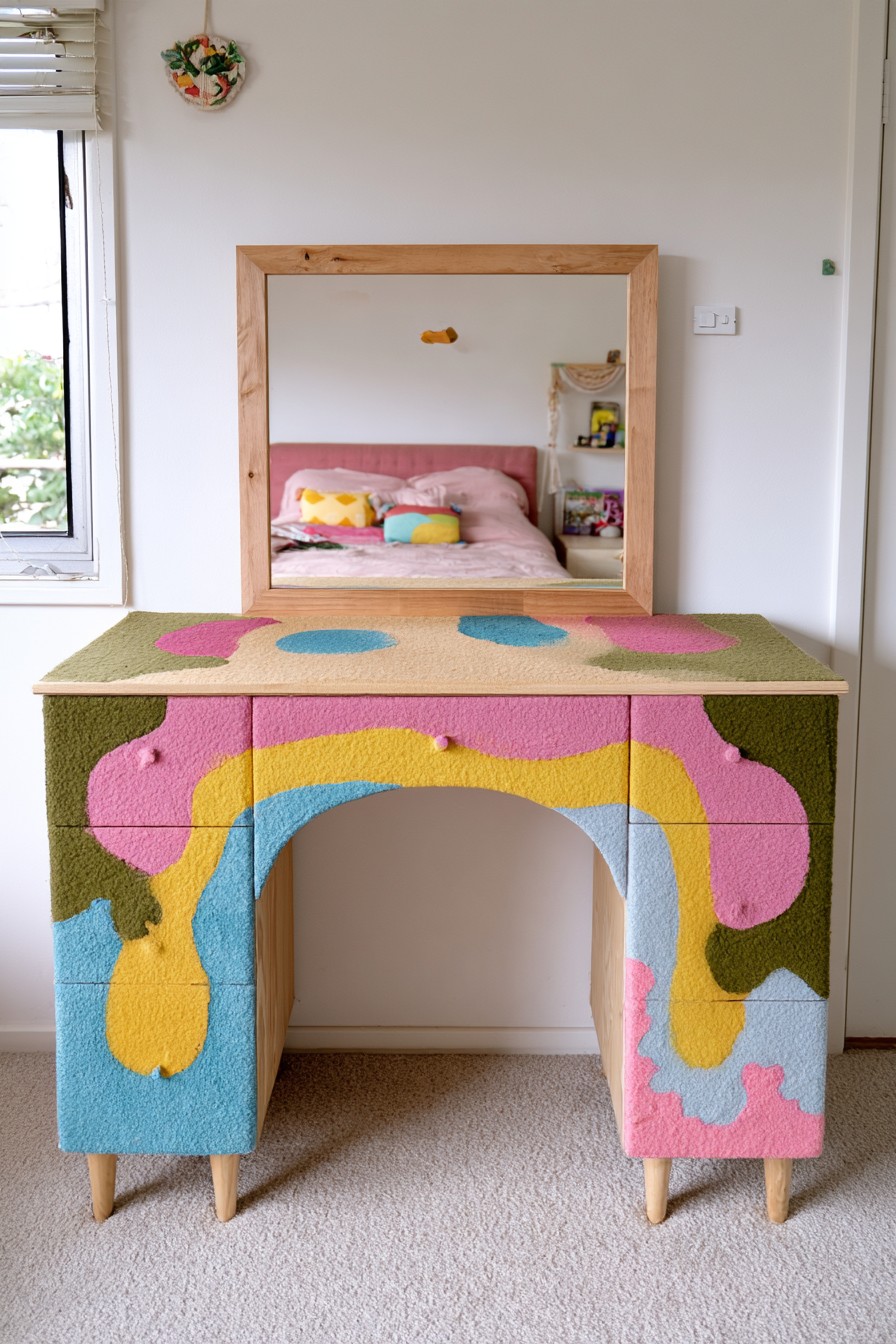
Broad olive, pink, mustard, blue, and lilac shapes flow across the drawers, side panels, and tabletop of this vanity. Allowing individual forms to cross furniture boundaries makes the artwork read as one larger composition instead of a series of separately decorated drawers.
Draw the broad composition across the closed drawers first, then remove or open them to paint each face separately. This keeps curves aligned while preventing paint from bridging the moving gaps. Use a removable marking method tested on the surface, and keep the mirror and retained timber protected. The pronounced texture can be interpreted as smooth color fields if straightforward cleaning is the priority. Work the biggest shapes before adding smaller accents, and check their balance from across the room. Refit the hardware only when the coating is ready, then confirm that drawers travel without rubbing newly painted edges.
8. Striped Painted Stools with Natural Wood Legs
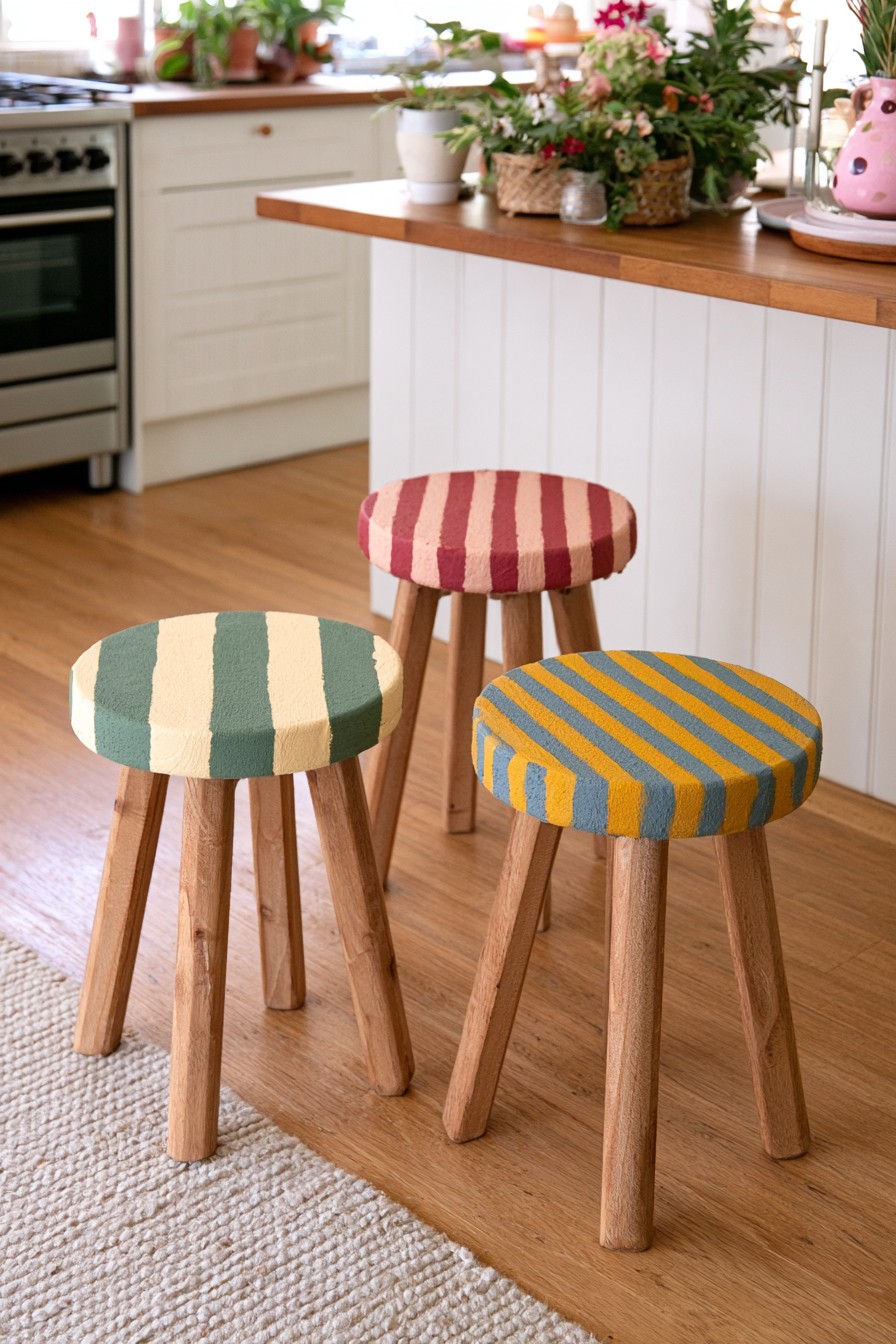
Painting only the stool seats makes these stripes feel decorative without hiding the timber construction. Sage and cream, dusty rose and burgundy, and mustard with muted blue create three different combinations while the repeated stripe width visually ties the set together.
Choose stripe width by the seat diameter and mark from one reference line so spacing remains consistent. Let the light base become ready for masking according to the coating and tape guidance before applying the second color. Protect the natural legs instead of allowing drips to build near their joints. The visible seat texture is a separate appearance to evaluate; smooth bands can retain the palette while being more comfortable for frequent sitting. Use a furniture suitable system and follow its regular use wait. Decide whether the stools should match exactly or share stripe spacing while carrying different color pairs.
9. Floral Painted Dining Table with a Natural Wood Top
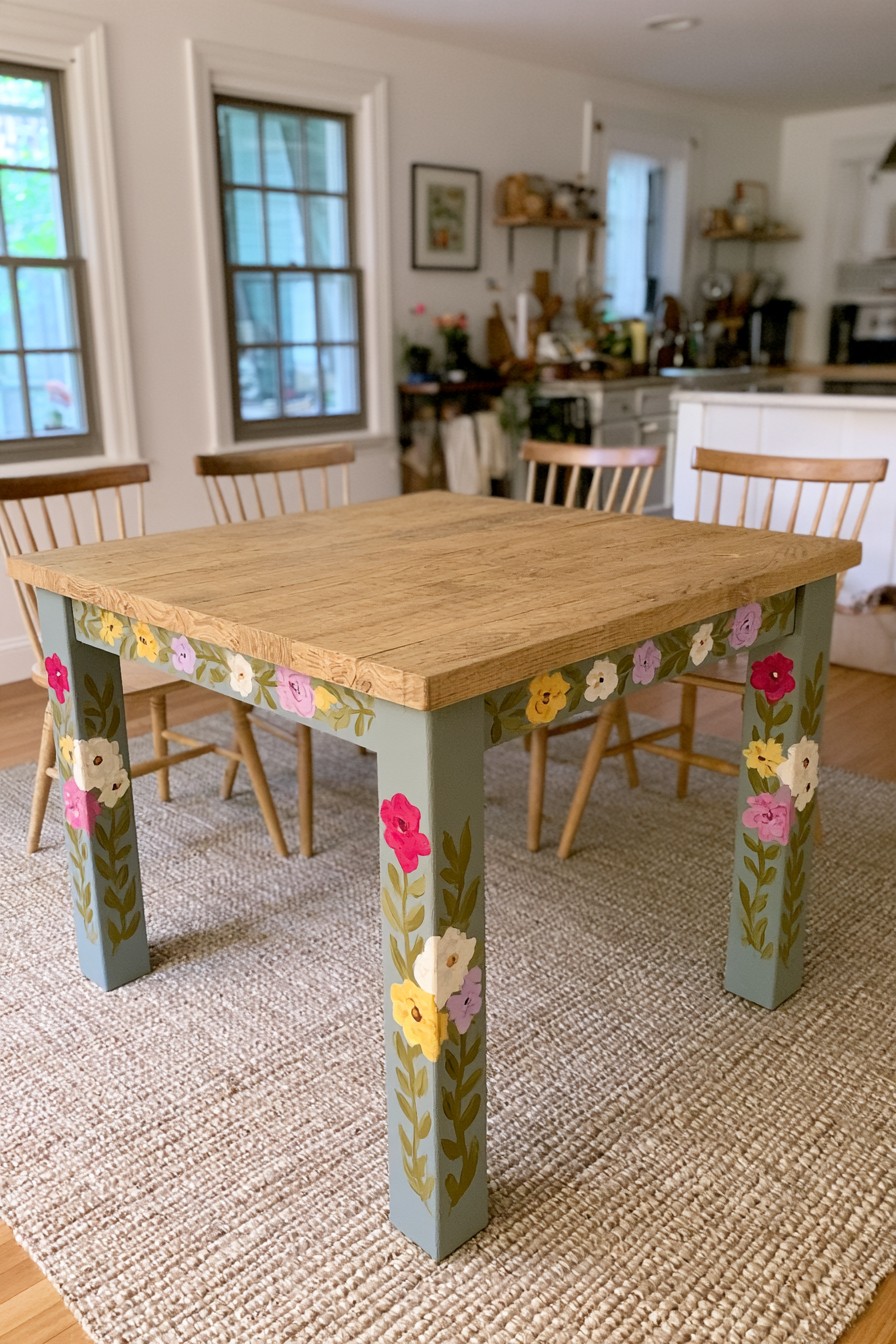
This table concentrates the decoration below the tabletop. A muted blue gray base covers the apron and legs, where loosely arranged pink, yellow, cream, and lavender flowers add detail while the natural wooden top remains the dominant functional surface.
Work on the apron and legs as their own painting zone, protecting the tabletop and its existing finish. Check the table's joints and any extension fittings before starting. A small floral cluster on each leg can echo the larger apron pattern without requiring identical motifs everywhere. Paint the base color, then layer petal shapes, leaves and centers once it is ready for decoration. If you add physical floral relief, keep it out of knee space and cleaning routes. Maintaining the wood top separately lets you choose its protective treatment for dining use rather than treating decorative base paint as a tabletop finish.
10. Color Block Painted Stools with Playful Geometric Details
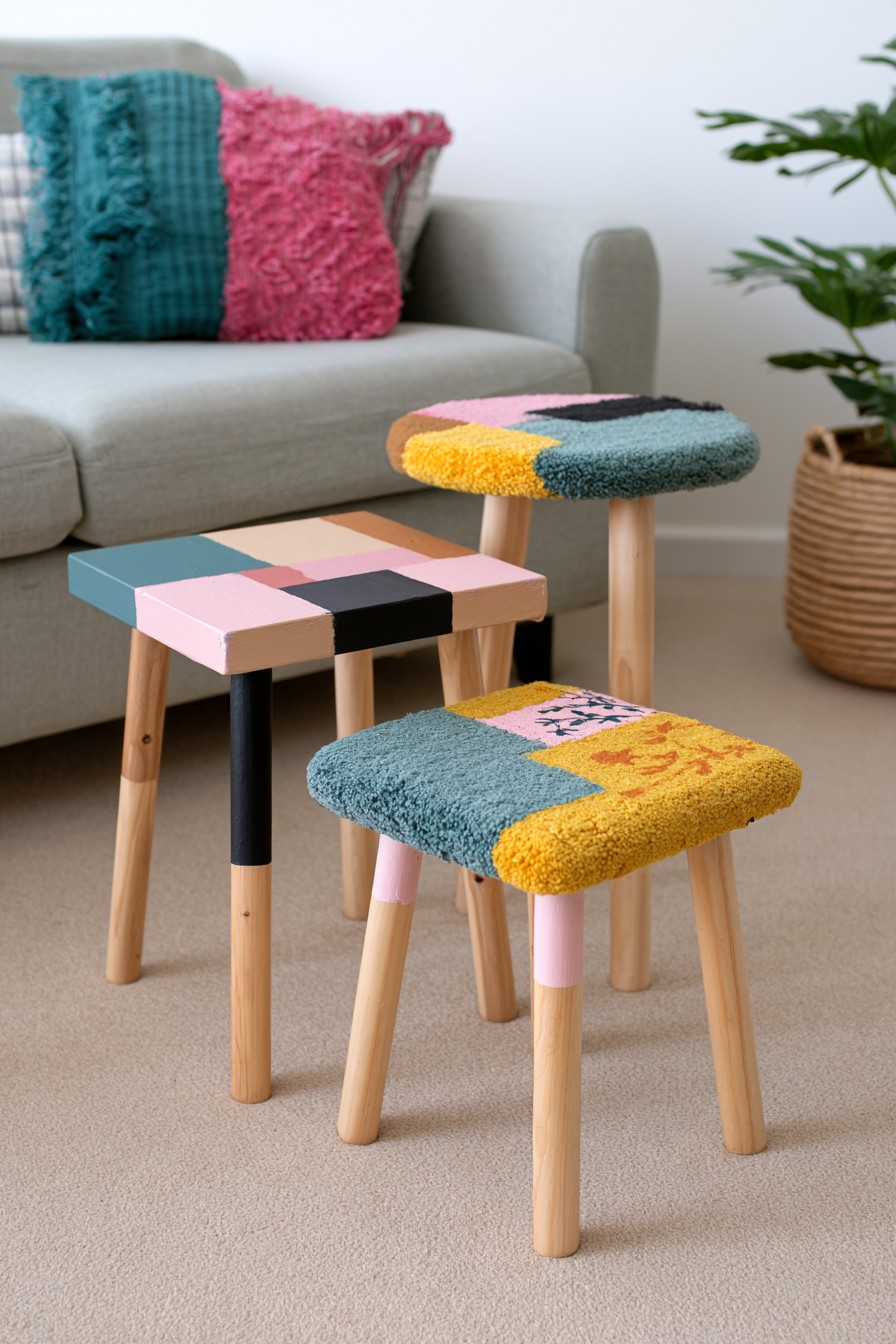
These stools use larger geometric areas rather than narrow repeated stripes. Pink, teal, mustard, peach, and black create distinct graphic sections, while areas of visible timber prevent the compact furniture from feeling overloaded with color.
The stools differ from the striped set through their larger blocks and, in some seats, strongly textured areas. Sketch the divisions over simple seat outlines before choosing which edges to mask. A smooth painted version can preserve these shapes while avoiding a rough sitting surface. If using another surface treatment, confirm its suitability for seating and cleaning instead of assuming its soft appearance makes it practical. Retain a few natural leg sections to link the group, and keep paint away from fitted joints. Check seating stability before refinishing; decorative color cannot correct a loose leg or damaged connection.
11. Color Blocked Tree Coat Rack with a Sculptural Finish
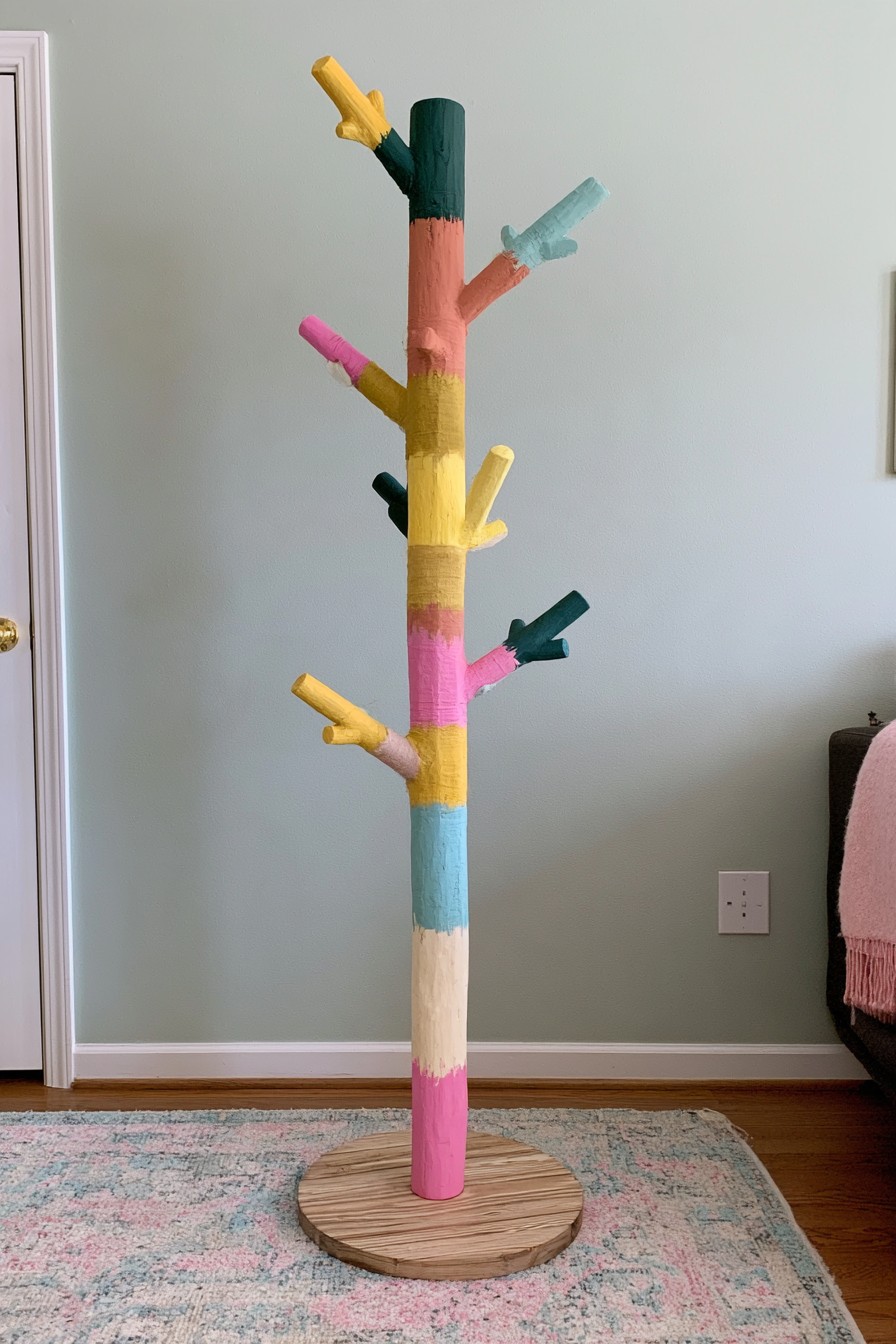
A tree form coat rack already has a sculptural silhouette, so color can emphasize its branching construction. Broad sections of pink, mustard, coral, pale blue, cream, and deep green move irregularly through the trunk and hooks while the wooden base remains visible.
Plan blocks around the branching form, varying their lengths so the trunk does not look like a rigid repeated stripe. Paint with enough space around the rack to reach the reverse sides without leaning it against freshly coated sections. Use a small brush near hook joints and keep the hanging ends smooth because fabric repeatedly moves over them. Inspect the base and connections before decoration, then judge stability with the intended hanging arrangement. Bags on one side change the balance differently from a photograph of an empty rack. Let the finish reach its prescribed use stage before loading the hooks.
12. Folk Art Painted Pet Bed with Colorful Floral Details
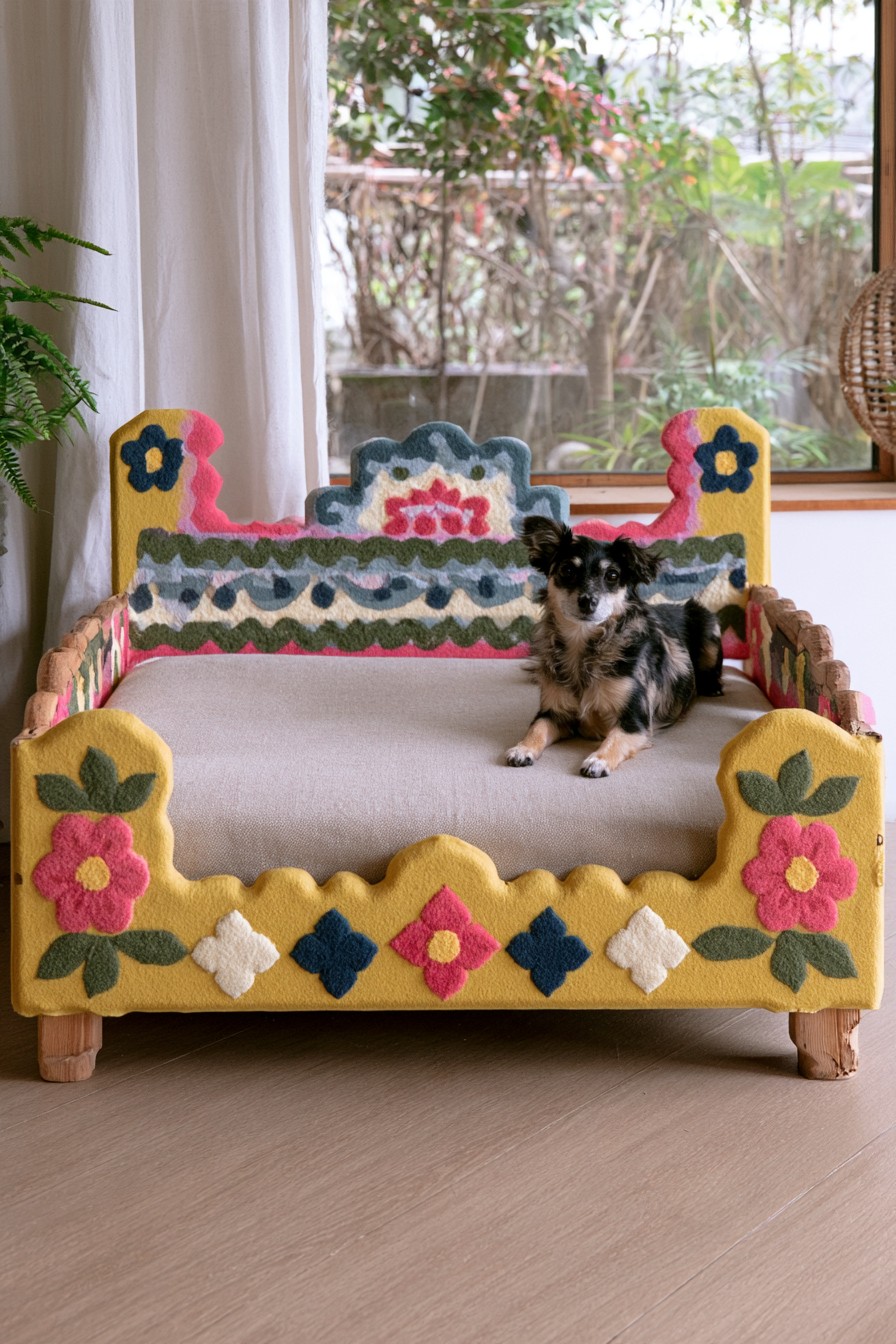
A mustard base turns this small wooden pet bed into a decorative object, while pink flowers, dark blue motifs, olive leaves, cream details, and patterned borders bring a folk art influence to the frame. Repeated colors create consistency even though the individual motifs vary.
Keep the removable cushion separate during preparation and choose the frame coating for the expected contact, cleaning and pet behavior. Mark the borders around the actual entrance height so ornament does not create an awkward or rough edge where the animal climbs in. The photo's dimensional floral look is not produced by color choice alone; a flat motif can retain the folk palette with fewer pieces to damage or chew. Follow product suitability, ventilation and curing guidance before returning the bed to use. Do not describe a coating as suitable for chewing just because it is labeled nontoxic.
13. Painted Cabinet with Layered Floral Front Panels
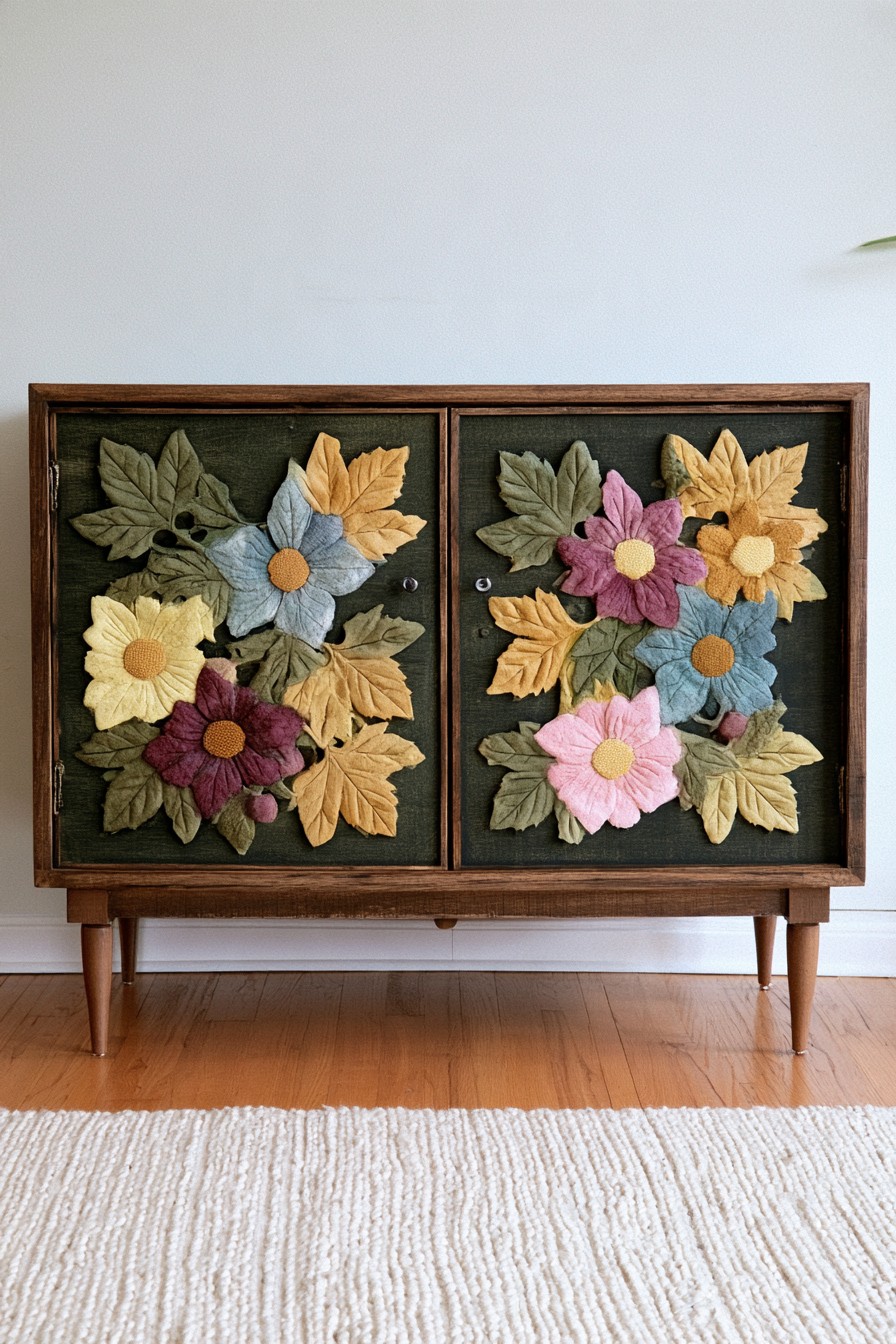
The contrast in this cabinet comes from its restrained frame and richly decorated doors. Dark natural wood remains visible around deep olive panels, while large floral forms in blue, burgundy, pink, cream, mustard, and muted green concentrate attention on the front.
Lay out any raised floral elements with the doors flat and confirm their position against handles, hinges and neighboring edges before attaching them. Their exact material is not identified by the photograph, so select lightweight decorations and an adhesive compatible with both surfaces if adapting the relief. A painted floral version is another option, with a flatter cleaning surface. Preserve the dark frame to contain the composition and choose a few repeated bloom colors. After the adhesive and finish reach their stated use stage, rehang the doors and check the full swing rather than assuming a front facing arrangement provides enough clearance.
14. Color Banded Bookshelf with Textured Painted Sections
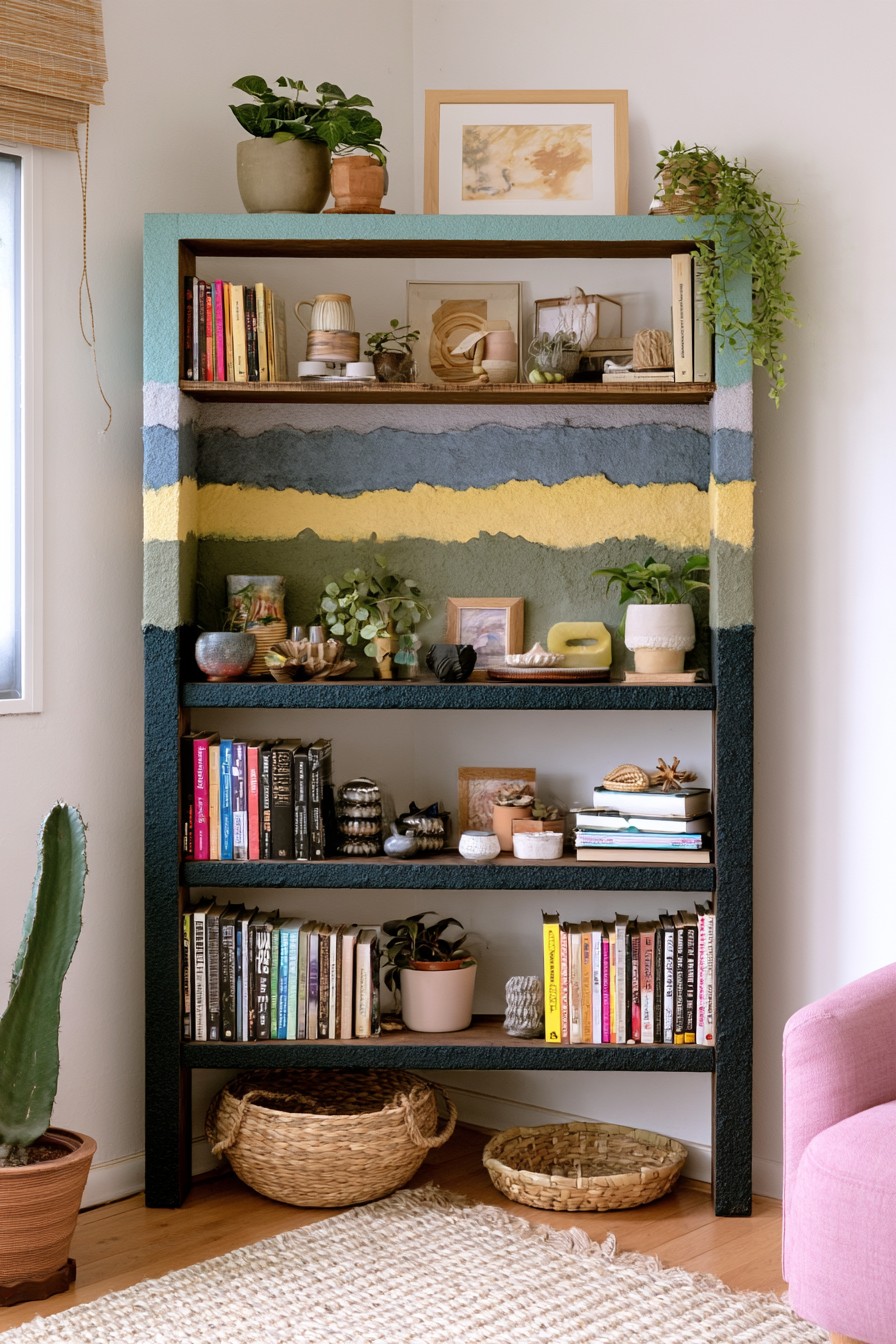
Broad bands of turquoise, lavender, blue, yellow, olive, and deep teal divide this tall bookshelf into visual zones. Textured painted areas contrast with the exposed shelves, giving the upright frame more presence without covering every usable surface.
Use the shelf heights to place the band boundaries, deciding whether they continue onto side panels or remain mainly on the front. The pictured surface has substantial texture; a smooth coating can repeat its palette without adding relief. Keep support holes, bracket positions and shelf joints clear while preparing and painting. This idea suits a bookcase whose shelves remain visually quieter than its frame. Assess existing shelf stability before decoration and keep access to any wall restraint. Once the finish is ready for loading, return books gradually in a practical arrangement instead of using paint to hide damaged connections.
15. Galaxy Inspired Painted Mirror Frame with Playful Color Blocks
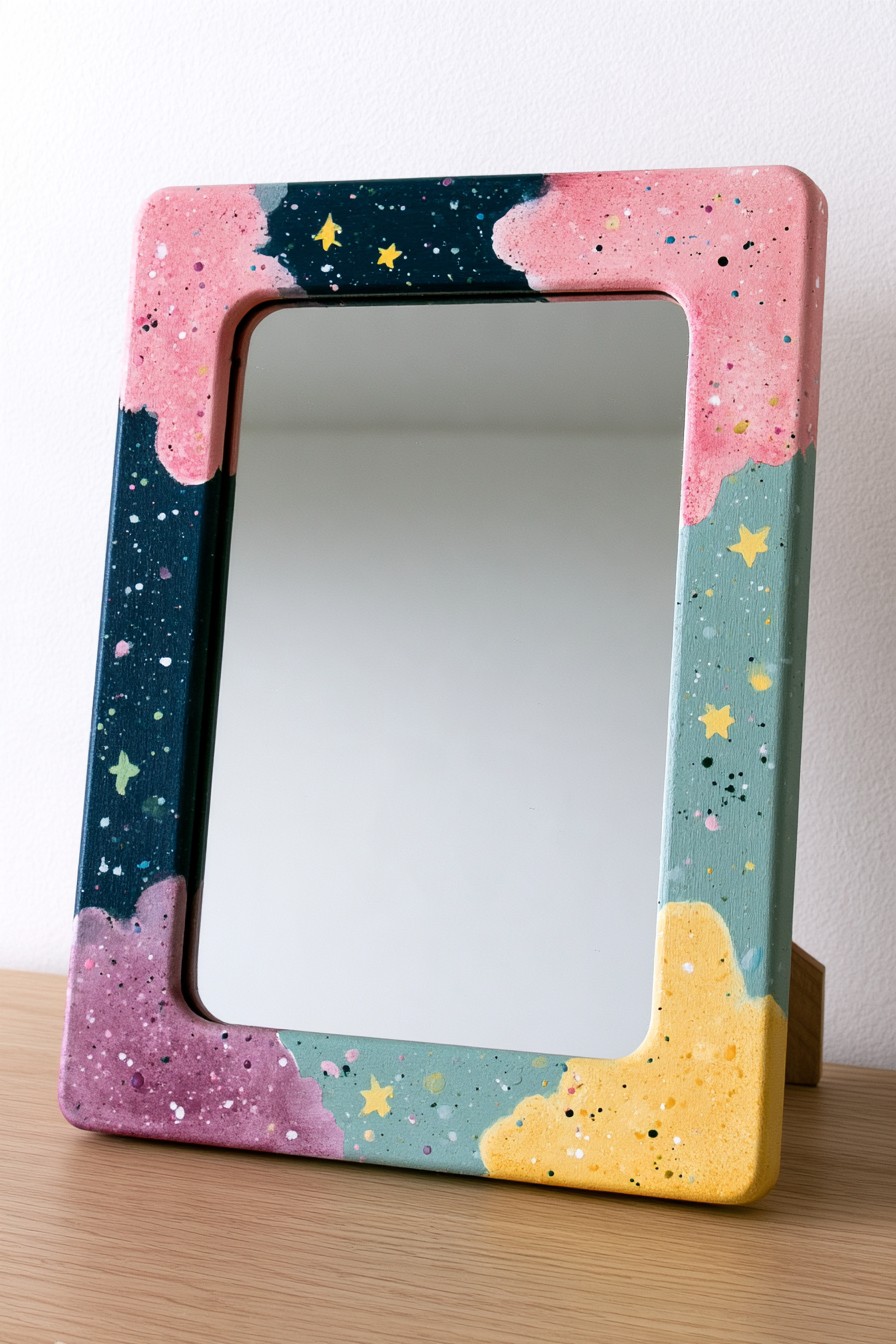
Dusty pink, navy, teal, lavender, and warm yellow form irregular color fields around this mirror. Fine speckles and simple celestial motifs add a second scale of detail, turning a relatively small frame into an accent without changing the mirror itself.
Mask or otherwise protect the glass fully before preparing the surround. Draw the broad color fields around a paper outline, checking which darker sections will carry stars most clearly. Paint those larger areas first, then add small celestial motifs when the base is ready. Controlled speckles can be tested on a sample to keep them from landing on the reflective surface. The visible frame texture need not be reproduced for the palette to work. Preserve access to the original backing and stand, and account for any extra weight if adding physical ornament rather than only paint.
16. Color Block Ladder Bookshelf with Graduated Painted Sections
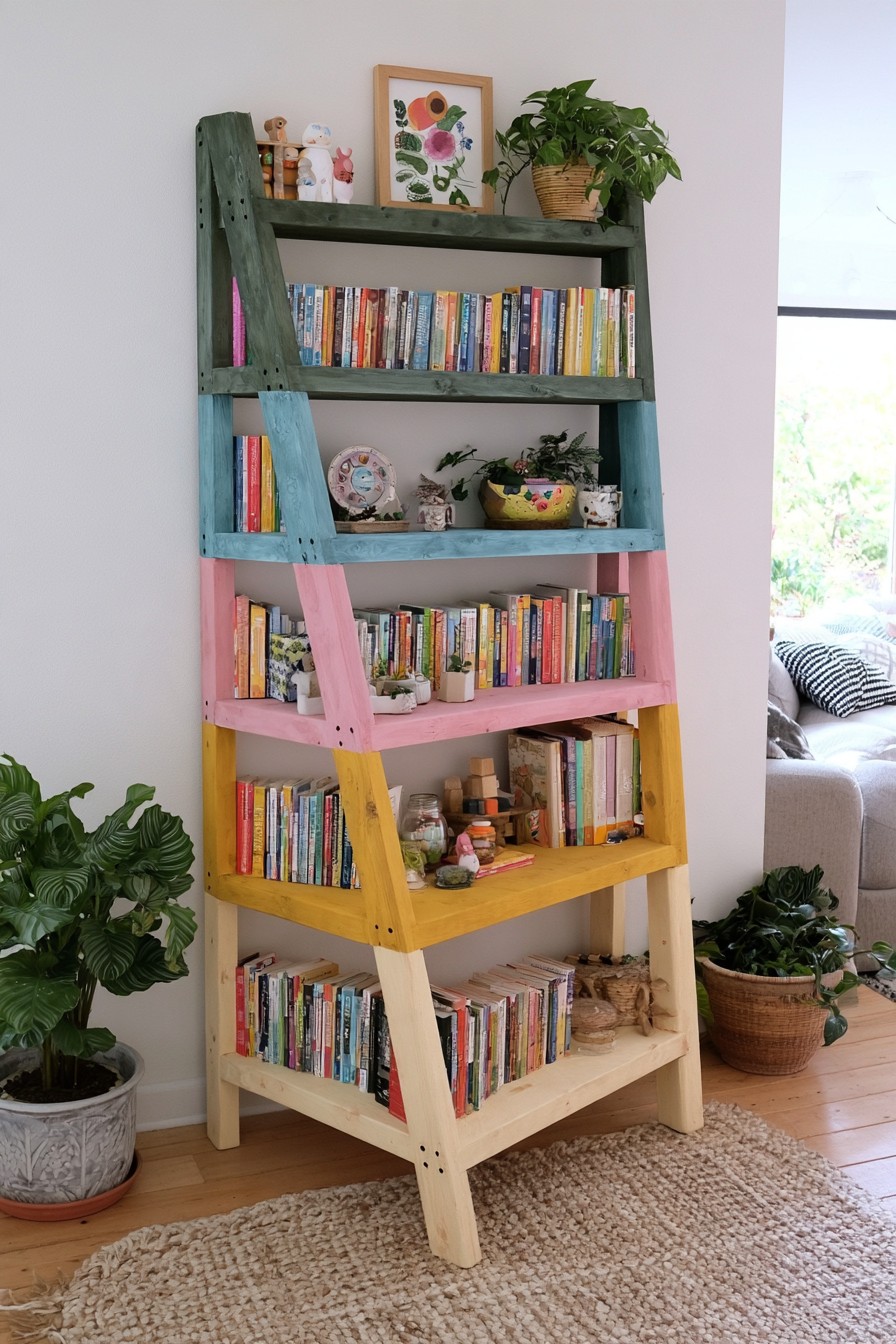
The tapered construction of this ladder bookshelf becomes more noticeable when the frame progresses through different colors. Natural wood at the bottom leads into mustard, soft pink, muted blue, and deep green, creating a clear vertical sequence.
Treat the shelf levels as reference points for the progression, leaving enough natural wood at the bottom to connect the stronger colors. Mark the divisions before separating removable components so reassembly restores the planned sequence. Use preparation appropriate to each existing surface and keep paint away from screw seats and fitted connections. The tapered outline draws attention upward, but daily storage should still keep substantial objects in positions suited to the unit. Check the manufacturer's wall restraint requirements and mounting conditions after reassembly. Let the coating become ready for loading before books or plant containers sit against newly painted shelves.
17. Drip Painted Pedestal Table with a Bold Graphic Finish
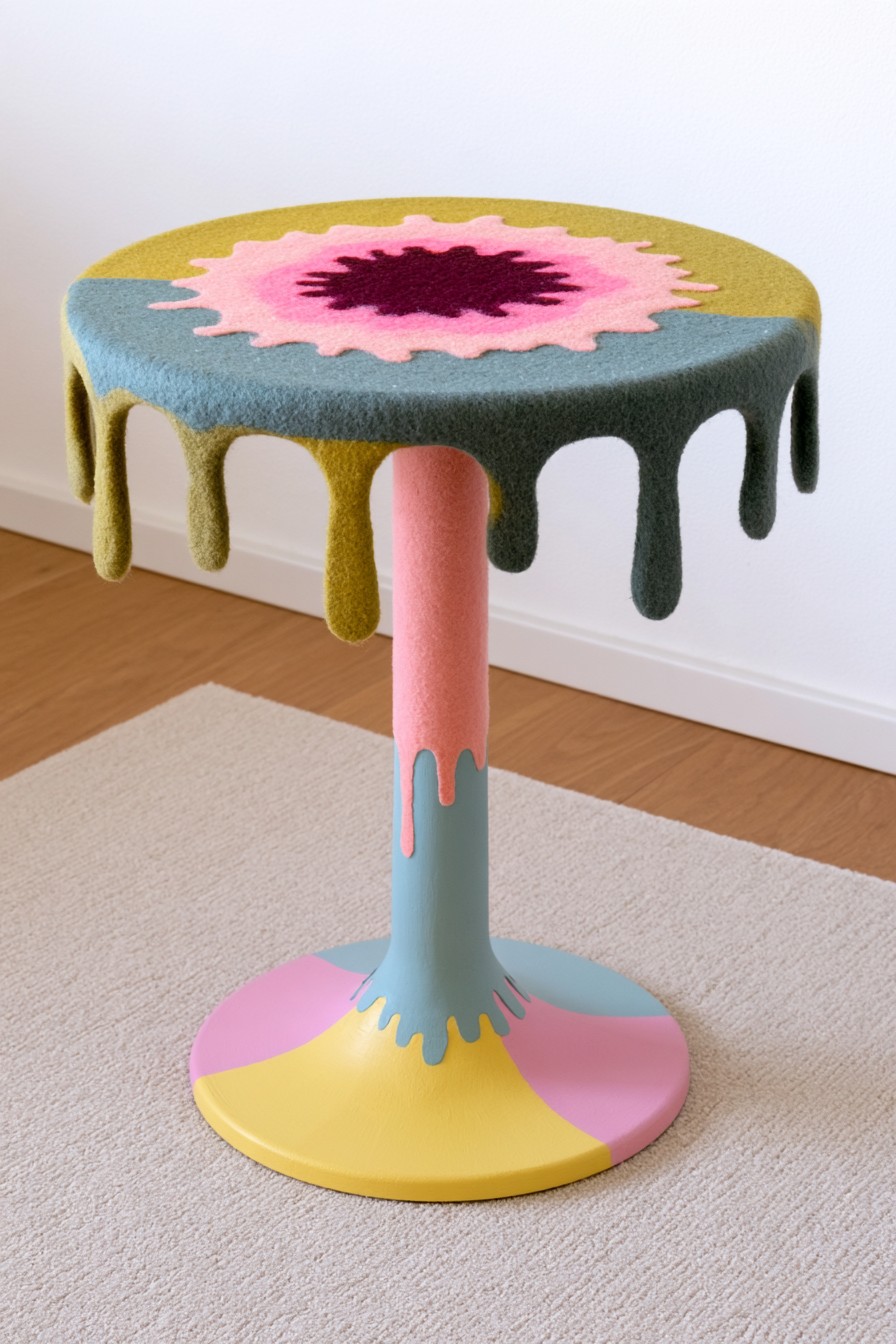
Mustard, dusty blue, pink, and burgundy follow the rounded form of this pedestal table through exaggerated drip like edges. Repeating the palette on the top, central support, and base makes the irregular shapes feel deliberate instead of random.
Sketch the drip shaped boundaries so the graphic effect comes from controlled outlines rather than uncontrolled paint running down the furniture. Mark how a few colors connect the tabletop, pedestal and base before filling the large areas. The pictured edges and top have visible dimension, which ordinary thin paint does not recreate. For a table used for drinks, a smoother adaptation can keep the same rounded pattern while making wiping easier. Keep the pedestal connection sound and the base level during preparation. Choose the final surface for its real use rather than assuming a decorative texture is a durable table coating.
18. Painted Fold Down Wall Desk with an Abstract Sky Effect
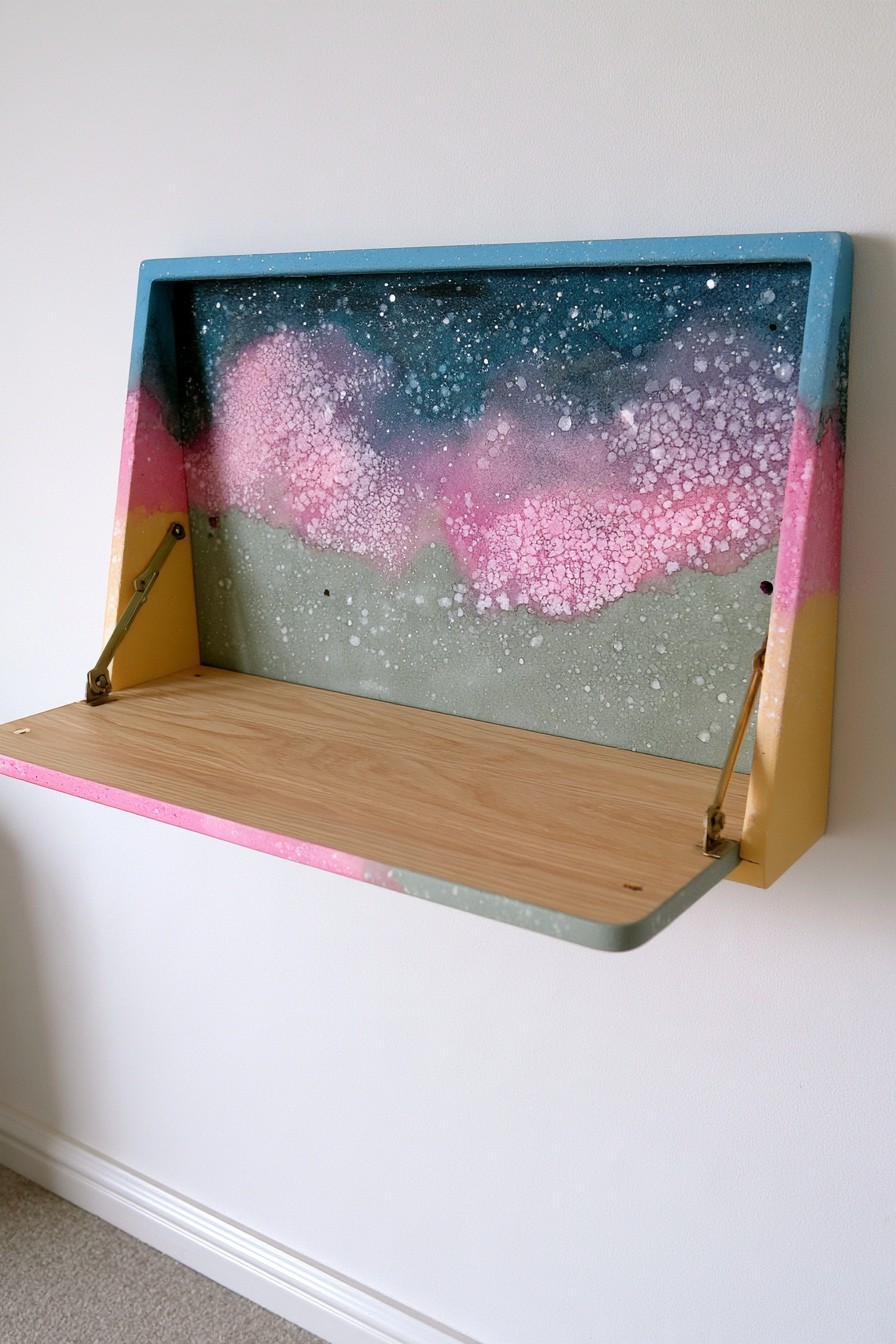
The back panel of this fold down desk carries most of the decoration, combining teal, dusty pink, muted green, mustard, pale blue, and fine speckled texture. Leaving the working surface in natural wood separates the artwork from the area that receives daily contact.
Concentrate soft blending and speckles on the vertical backing while protecting the plain work surface. Test the color transitions on a sample so the layered sky effect stays controlled. Keep hinges, catches, support connections and closing edges free from paint buildup, checking their action before and after refinishing. For a folding desk, check the frame, locking parts, and wall fixings for the intended working load before painting. Preserve or assess its independent mounting for the actual wall and expected use. Allow painted contact surfaces to become ready before closing the desk for an extended period.
19. Floral Wall Panel Above an Existing Headboard
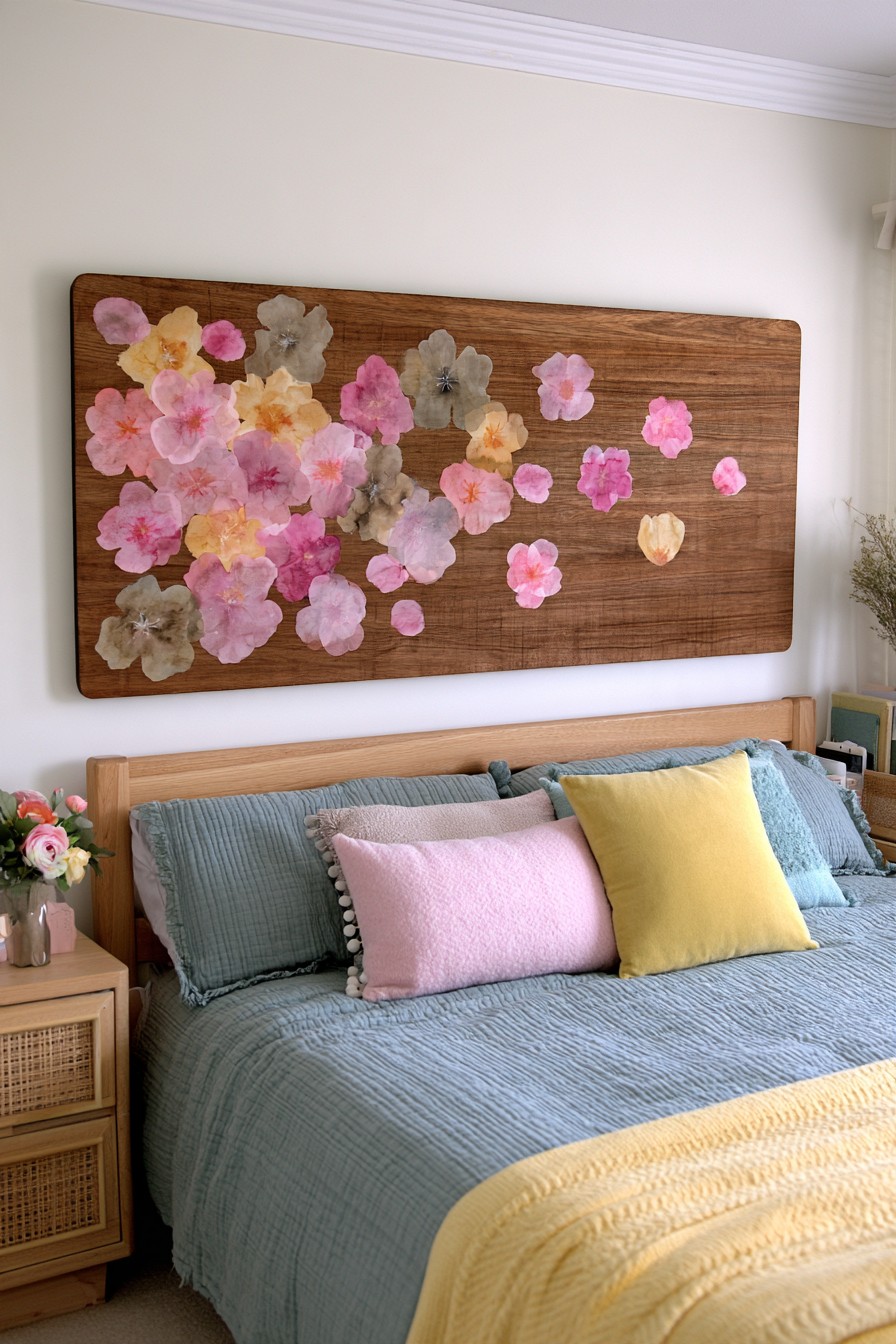
The wooden flower panel hangs separately above the bed's existing timber headboard, decorating the wall without replacing the furniture below it. Pink, cream, gray and soft yellow blooms gather toward the left, with exposed wood giving the rest of the arrangement breathing space. Create a similar layered floral effect with shallow decorative appliques or a suitable textured paint system, testing it on a sample first.
Borrow the flower colors and asymmetrical placement for a painted interpretation, beginning with a few large blooms and spacing smaller ones outward. Thin paint layers can change color and transparency, but they should not be presented as a method for reproducing the photographed raised petals. If adding separate ornaments, identify suitable materials and attachment before choosing the mount. Hang the completed panel independently with fixings appropriate for its total weight and the wall. Leave space above the existing headboard so the pieces remain distinct, and do not let the panel's placement interfere with the bed's normal use.
20. Color Blocked Wooden Armchair with Textured Spindles
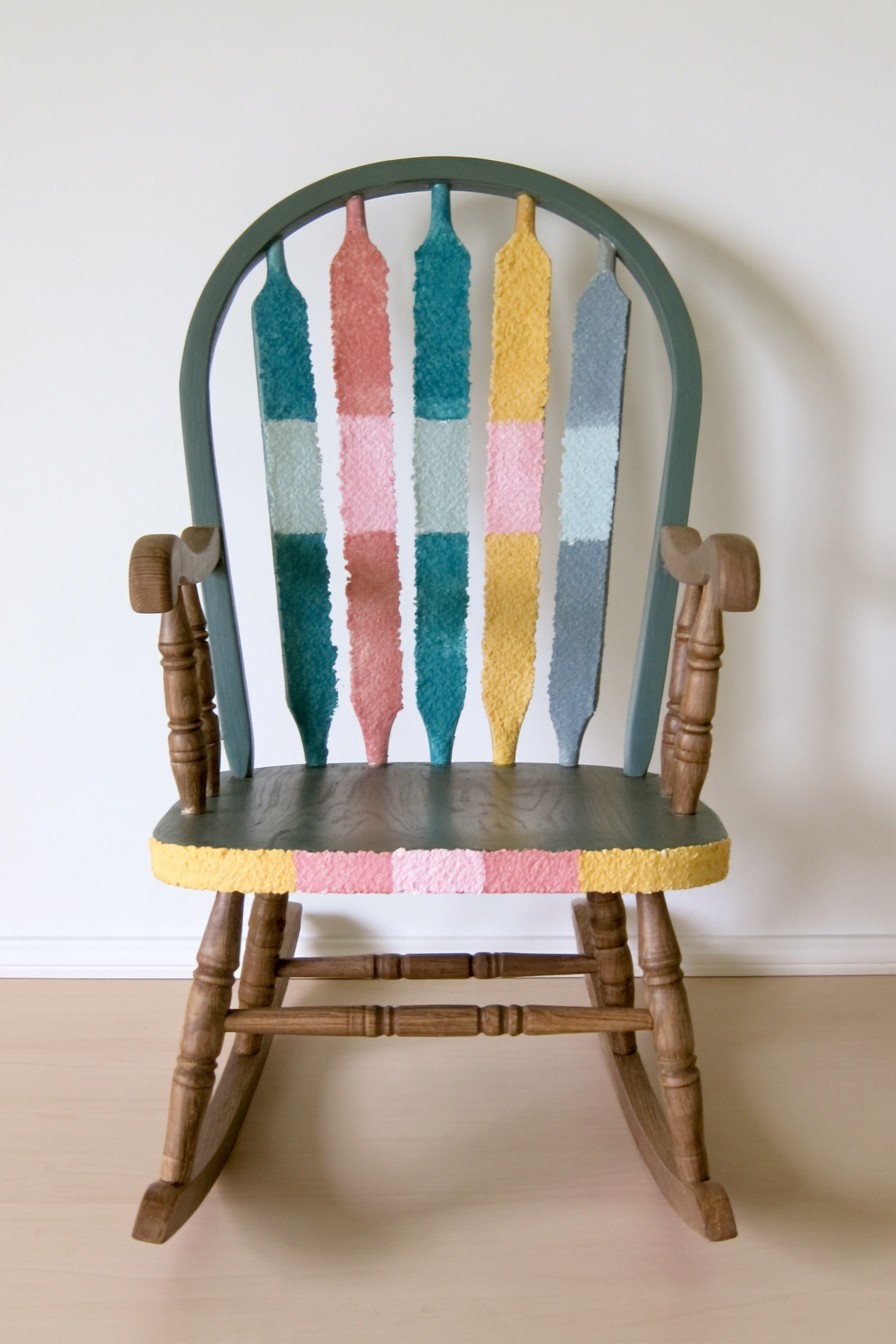
Natural timber arms and the lower frame contrast with a dark green upper outline and individually colored back spindles. Pink, teal, yellow and pale blue divide the back into clear sections, with a repeated band of lighter colors across the middle. The spindle surfaces have visible texture, so the design offers both a palette and a surface treatment to consider when adapting it.
A flat painted adaptation can follow the colored spindle sections without recreating the photograph's rough surface. Mark the bands from the same height reference, then use a small brush around profiles that tape cannot follow reliably. Retain natural timber where hands grip the arms, or finish those areas with a system suited to repeated contact. Check joints and the chair's existing support arrangement before decorating; color is not a structural repair. Keep the seat comfortable and avoid heavy buildup along its front edge. Test the palette against nearby wood furniture before committing to every spindle in the composition.
21. Multicolor Painted Plant Stand with Speckled Shelves
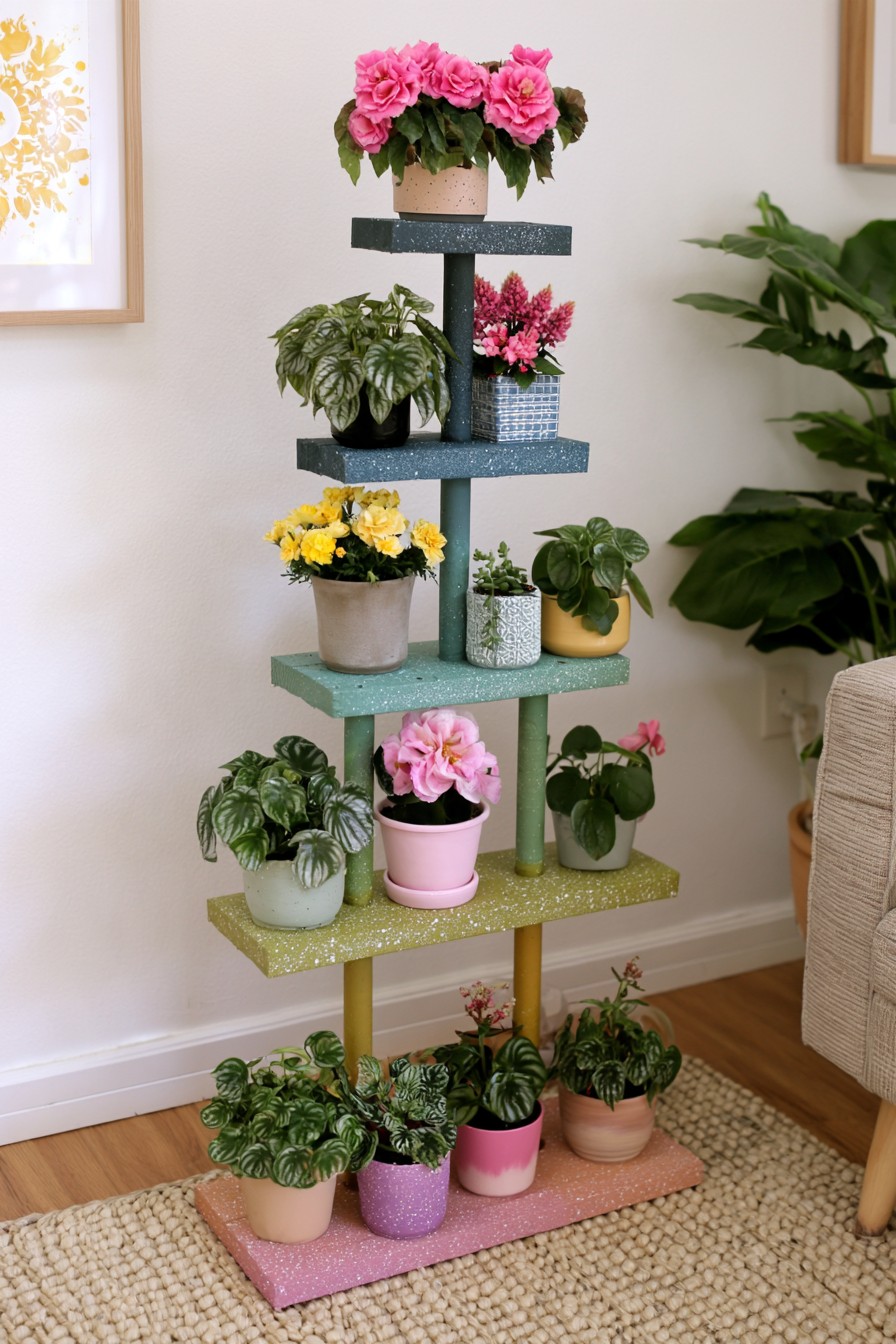
Each platform on this tiered plant stand receives a different shade, including deep teal, muted mint, olive yellow, and dusty pink. Small pale speckles soften the flat areas and give the finish a casual handmade texture.
Paint removable platforms separately when the stand's construction allows, keeping connection points clear for reassembly. A small sample helps set the density of speckles without covering the main shelf colors. Plan the layout with the pots, wet soil and plants together, placing heavier containers where the stand can support them appropriately. Use waterproof saucers and remove plants for watering where practical instead of expecting paint to contain spilled water. Dry pot bases before returning them and keep access for wiping each platform. Check the stand remains level and inspect any joints hidden by the arrangement.
22. Abstract Painted Wardrobe with a Layered Landscape Effect
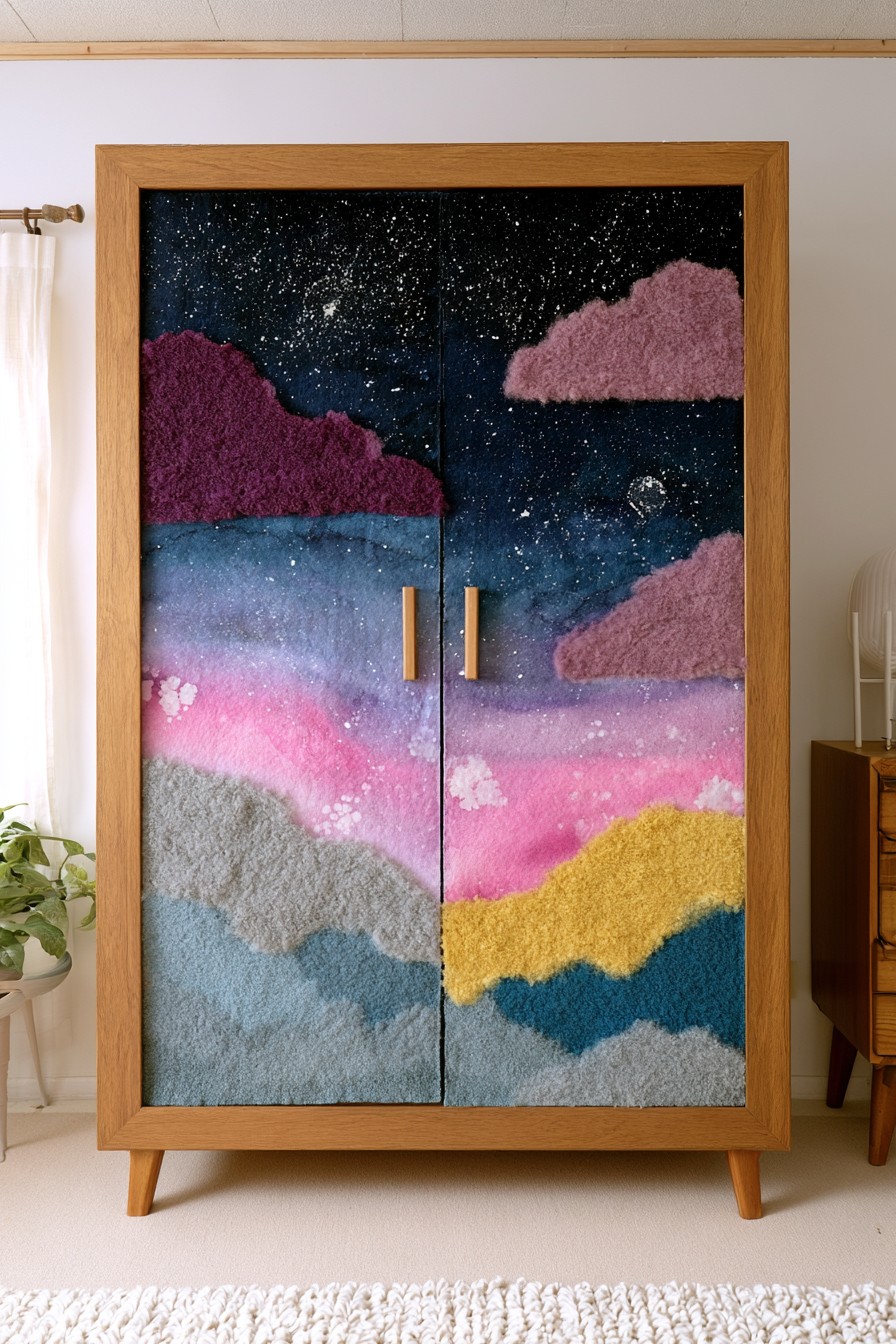
The two doors of this wardrobe function as a single canvas. Deep navy, pink, burgundy, mustard, muted blue, and gray form wide flowing layers, while lighter speckles add contrast across the darker upper portion. Natural wood around the doors provides a clean boundary for the artwork.
Draw the full landscape with both doors closed so the bands meet across the central seam. Open or remove doors before painting edges, preserving their clearance instead of bridging the gap with a continuous coating. Test softer stippled transitions and speckles before placing them on the main panels. For a surface that is easier to wipe clean, recreate the landscape with smooth color bands rather than a fibrous texture. Keep handles easy to grip and leave hinge access clear. Check door travel when the finish is ready, and retain any required restraint for the tall cabinet.
23. Painted Crate Shelving with Mix and Match Color Blocks
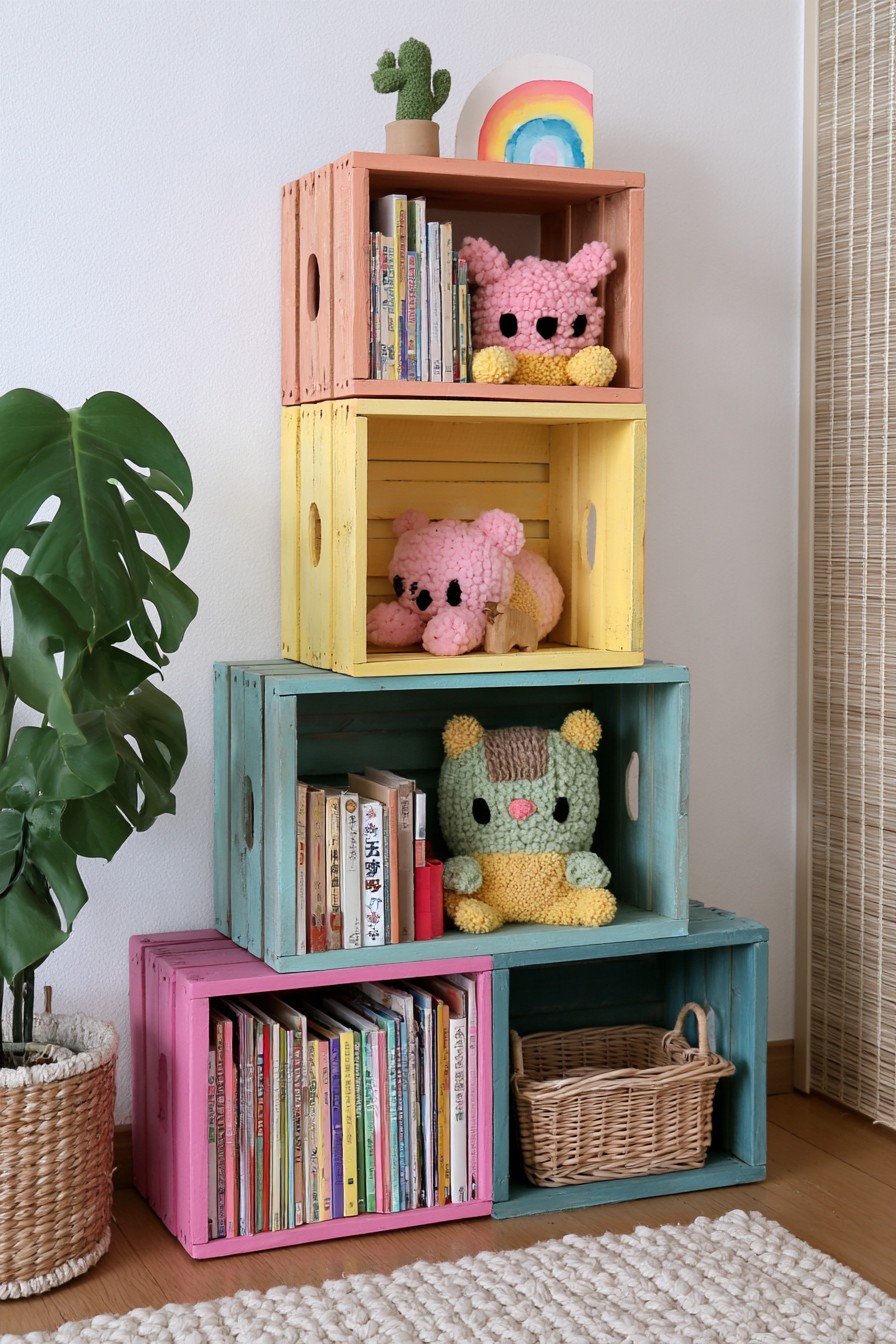
Separate wooden crates in coral, yellow, teal, pink, and blue green create a flexible shelving arrangement with more personality than a single uniform cabinet. Because each crate receives one main color, the individual boxes remain visually readable even when stacked together.
Paint each box before joining the layout so corners remain reachable, preparing the timber according to its source and existing finish. Unknown old paint should be assessed before abrasion, and bare porous wood may need the preparation specified by your paint system. Let the coatings become ready for assembly and loading rather than packing books against a newly dry surface. Connect the crates securely and plan the support and wall restraint for the chosen arrangement; wooden crate shelving ideas offers related layout guidance. Use color to separate the compartments visually, and choose shelf supports and fixings for the objects they will hold.
24. Dollhouse Style Painted Storage Cabinet with Pastel Details
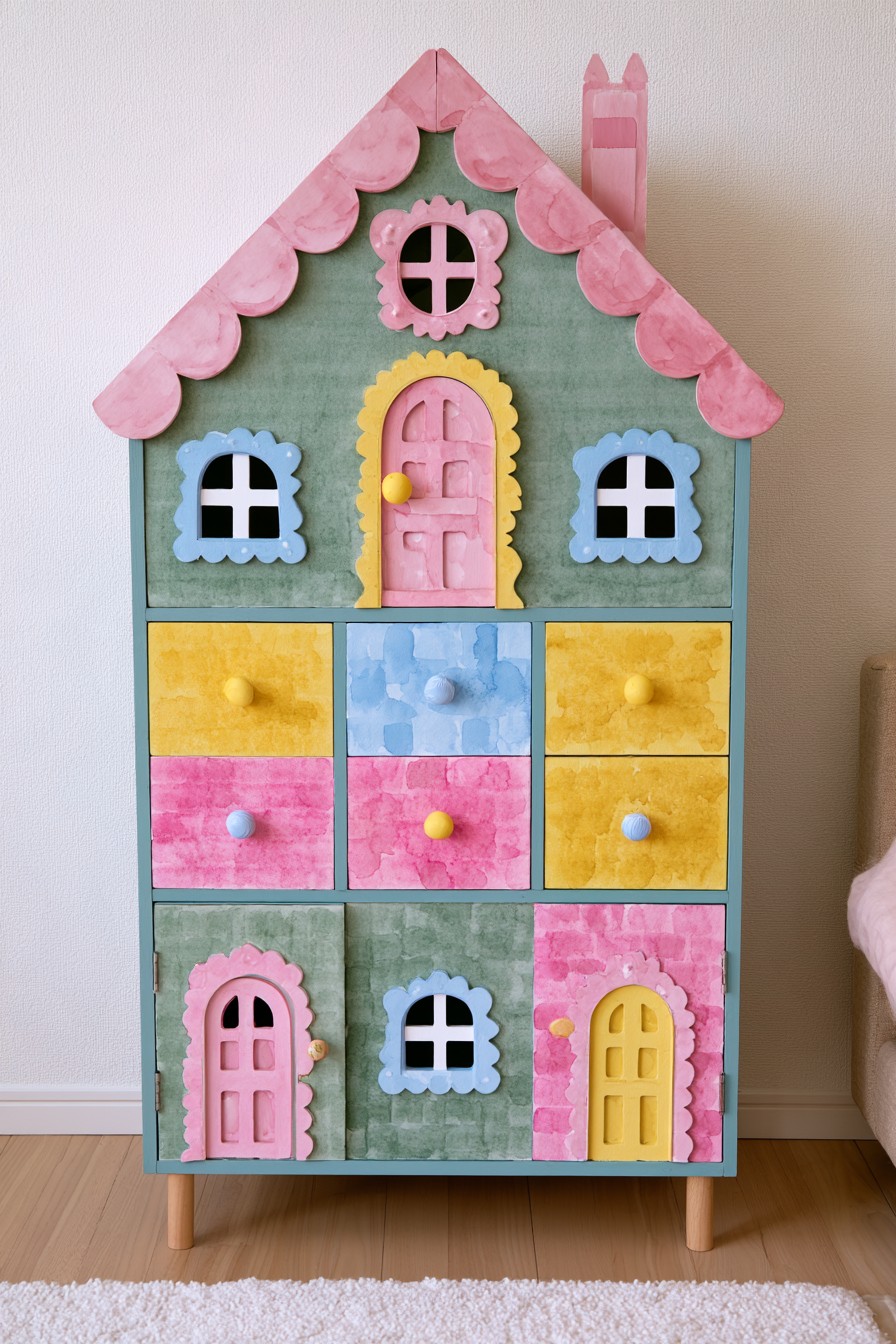
This storage cabinet borrows architectural details from a miniature house. Soft green provides the main color, while pink, yellow, and pale blue distinguish doors, drawers, trim, and decorative openings. Repetition of the same small palette prevents the many details from becoming disconnected.
Map the cabinet like a small building elevation, using one main color and a limited group of accents for windows, doors and drawers. Paint accessible components flat where they can be safely removed, noting their positions before disassembly. The sculptural roofline and window trim are existing design features to assess rather than effects obtainable from paint alone. Keep decorative layers thin around moving fronts and leave knobs and catches functional. This arrangement can suit playful room styling without making the furniture a toy. Follow its mounting or restraint instructions and choose a finish appropriate to how the storage will be handled.
25. Celestial Painted Nightstand with Moon and Star Details
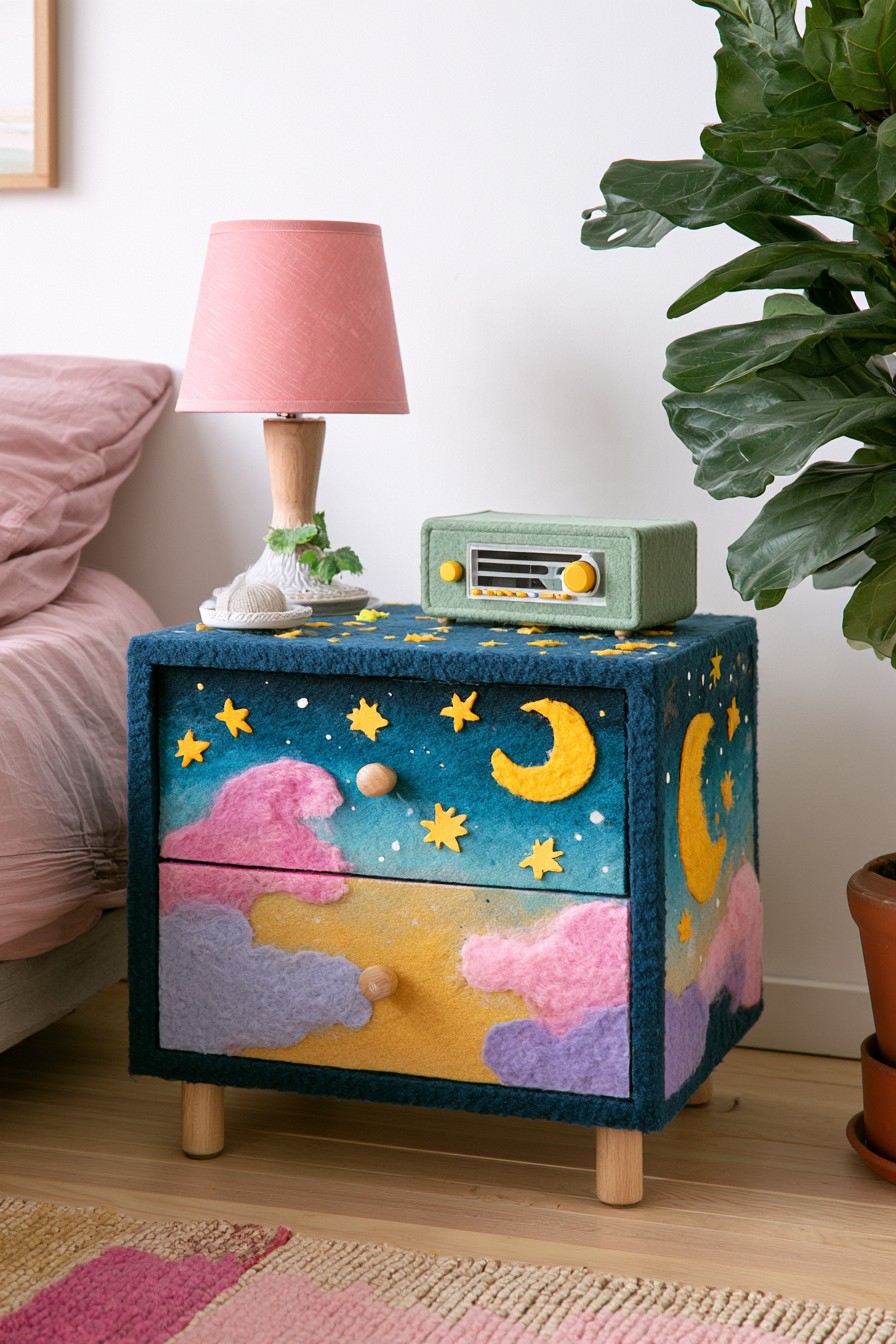
A dark blue base gives this nightstand its strongest visual cue, allowing crescent moons, stars, clouds, and pastel accents in mustard, pink, lavender, and gray to stand out clearly. Natural wooden legs and knobs break up the darker paint and keep the compact piece from feeling too heavy.
Place the moon and the larger cloud shapes before scattering small stars, leaving some dark blue visible to give the motifs contrast. Protect the natural legs and distinguish the colored tabletop from areas reserved for regular objects. The pictured clouds have a dimensional surface; paint can reinterpret their outline while separately added details need a compatible attachment and maintenance plan. Keep relief away from drawer gaps and the pull. A flatter top is easier to use for a lamp or book, and the finish must reach its stated use stage before those objects remain in place.
26. Painted Cube Storage Unit with Playful Character Panels
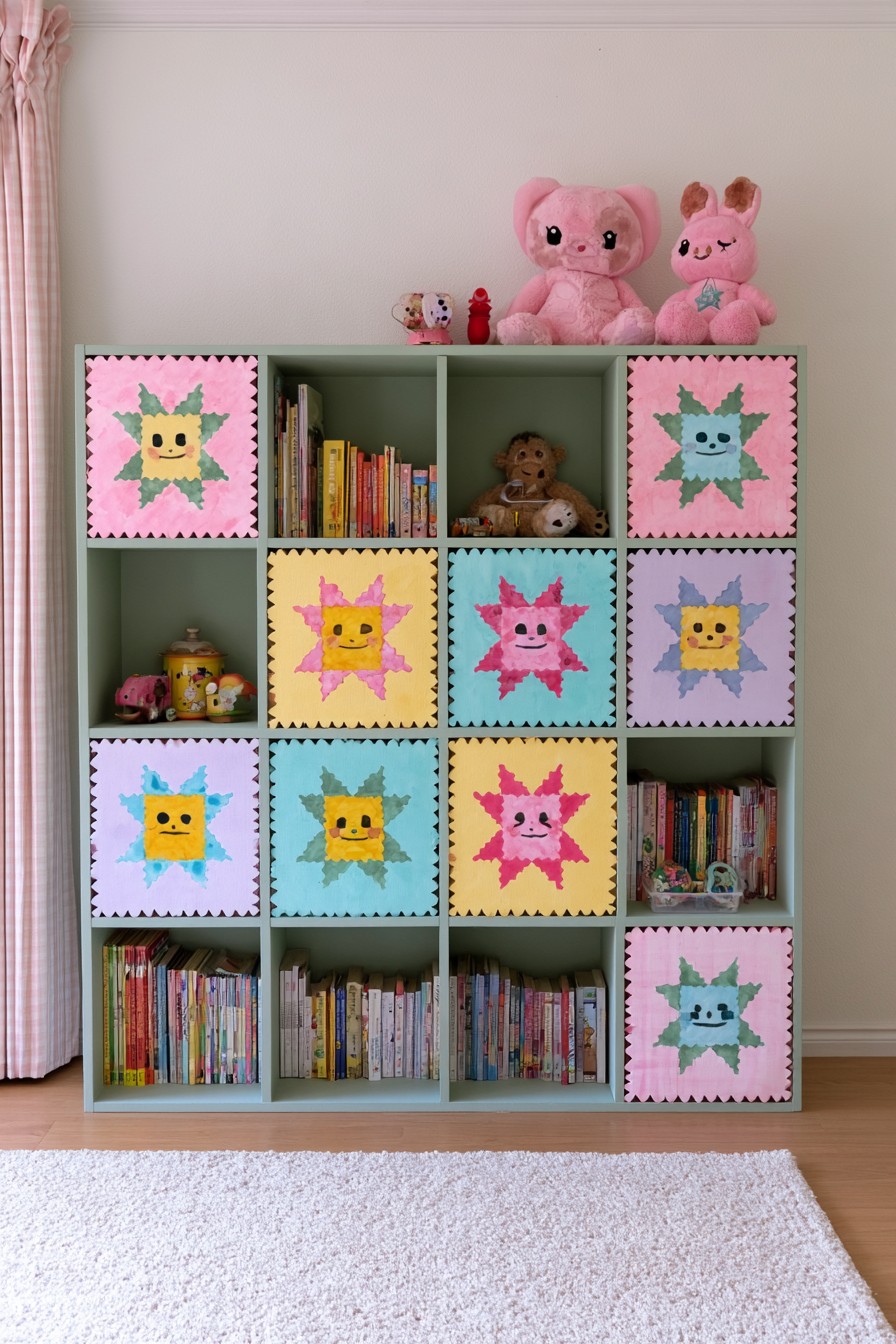
A muted sage frame gives this cube organizer a consistent foundation, while pink, yellow, lavender, and aqua panels introduce playful character motifs. Repeating the same basic form across several colors produces rhythm without making every compartment identical.
Plan the panel group with the organizer in its final orientation, balancing decorated fronts against open compartments. Prepare removable insert panels to make painting easier, then secure each one with backing and fasteners suited to the original furniture. Repeat a simple character outline and change its background or expression for variety. If adding textured material, confirm that edges and attachments suit the expected handling and do not cover catches. Recheck doors, inserts and access to the open cubes after finishing. Keep existing carrying connections and required wall restraint independent from the decorative work.
27. Painted Wardrobe with Playful Animal Art Panels
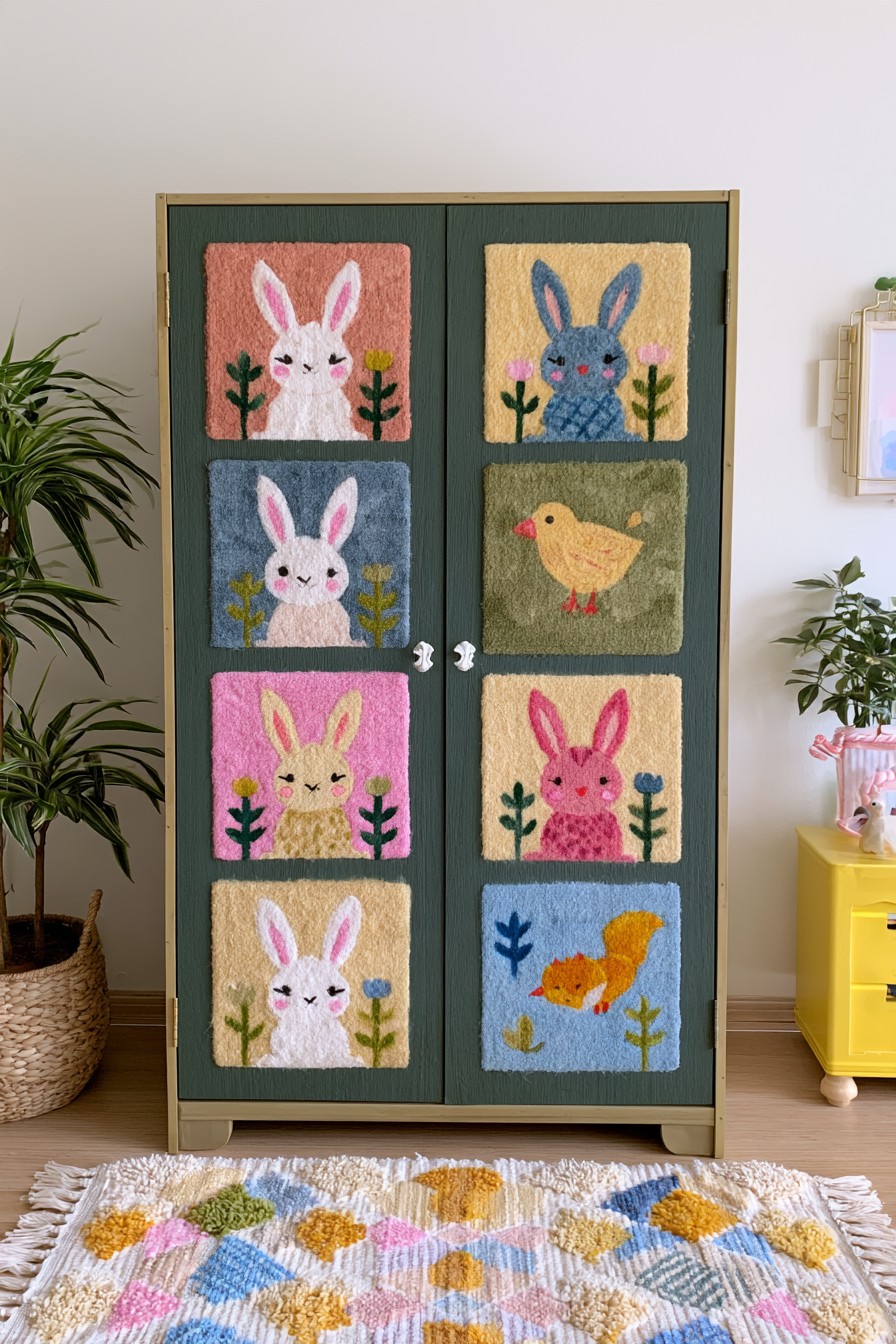
The forest green doors provide a calm backdrop for a gallery of pastel animal panels. Rabbits repeat across several squares, with a bird and a squirrel adding variety. Pink, blue, cream, yellow and olive backgrounds stand out against the darker body, while similar panel proportions make the front feel organized. The visible surface is textured rather than a uniformly smooth painted illustration.
Lay out the illustration positions across both closed doors before painting or making separate panels. Start each animal with a simple silhouette, then add facial marks and nearby plants. A smooth painted adaptation repeats the rabbit, bird and squirrel themes without assuming that the visible fibrous texture comes from ordinary brushwork. If using separately decorated panels, choose their attachment for the door surface and added thickness, preserving handles and the center gap. A consistent outer margin keeps the gallery organized. Retain the wardrobe's required restraint and avoid placing raised details where hands regularly grip the doors.
28. Pastel Rainbow Dresser with Textured Color Block Drawers
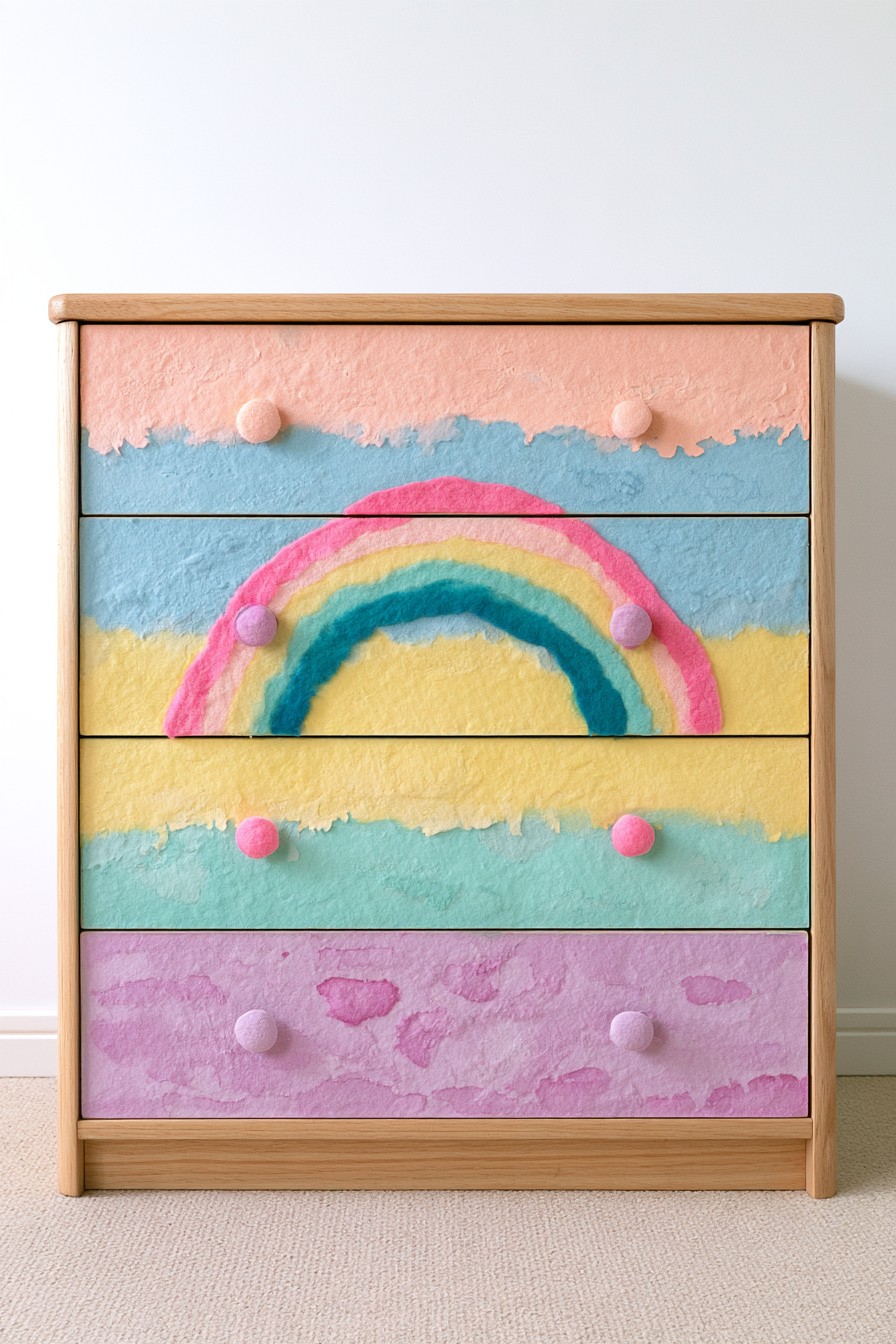
Peach, powder blue, pale yellow, mint, lavender, pink, and teal spread across the drawer fronts of this dresser, with a rainbow motif continuing through the center. Keeping the surrounding frame and top in natural wood gives the pastel composition a defined border.
Label the drawers before removal, then map the full rainbow with the fronts temporarily aligned in their proper order. Separate them for painting so color never bonds neighboring fronts together. A smooth interpretation can preserve the pastel bands and central curve while being easier to wipe than the pictured textured relief. Keep coating and ornament clear of runners, closing edges and handle attachment points. Let the selected system reach its stated readiness before reassembly and check drawer travel afterward. For other surface treatments with the same practical concerns, explore DIY drawer front ideas.
Make the Color Change Fit Your Room and Routine
Choose one role for the piece before adding every technique you like. Muted gradients can settle into a restful room, repeated stripes bring order to a set, and bold florals or animal panels create a playful focal point. Repeat one existing textile or wall color to connect the makeover to its surroundings. Keep a record of the chosen products and colors for later repairs, and use the finish manufacturer's cleaning guidance once the surface is ready.

Leave a Reply