
A chipped plate, an empty bottle, or a worn pair of jeans can offer the starting point for an artwork with its own texture and character. These 27 recycled art project ideas explore sculptural wall pieces, small tabletop objects, fabric compositions, and hanging decorations. Some preserve the original material almost untouched; others use cutting, stitching, layering, or repeated shapes to give it a different purpose.
Start with the illustrated paper landscape project below to practice preparing materials, arranging a composition, and attaching each layer neatly. Then browse the individual ideas for the materials you can reuse, a practical construction approach, and details that help the finished piece look intentional. You can adapt the same planning sequence throughout the collection, while changing the joining method to suit paper, fabric, ceramic, metal, or plastic.
Table of Contents
- Select Materials and Make a Small Recycled Artwork
- Choose the Material Before Choosing the Technique
- Make a Torn Paper Landscape Inside a Reused Lid
- Find a Direction for Your Recycled Artwork
- 1. Build a Breaking Wave from Blue and White China
- 2. Frame a Butterfly Made from Muted Fabric Scraps
- 3. Give a Black Feather Sculpture a Reclaimed Wood Backing
- 4. Suspend Old Keys Beneath a Wire Mesh Cloud
- 5. Knot Produce Nets into a Colorful Wall Hanging
- 6. Arrange Reflective Disc Pieces inside a Fan Shape
- 7. Preserve Worn Gloves as a Textile Wall Sculpture
- 8. Grow a Small Mushroom Scene from Paper Packaging
- 9. Group Three Tiny Landscapes in Reused Metal Lids
- 10. Piece Together a Decorative Patchwork Kite
- 11. Cut a Green Bottle into a Hanging Spiral
- 12. Shape a Soft Jellyfish from an Old Blue Shirt
- 13. Construct a Transparent Orb from Plastic Strips
- 14. Balance Three Reclaimed Wire Rings as a Mobile
- 15. Layer Reused Spoon Bowls into a White Lotus
- 16. Make a Folding Screen from Corrugated Cardboard Frames
- 17. Suspend a Photograph inside Nested Cardboard Squares
- 18. Sew Old Denim into Interlocking Sculptural Links
- 19. Create an Open Eye Sculpture with Cardboard and Cord
- 20. Stack Paper Cups into a Minimal Hourglass Column
- 21. Build a Bottle Cap Ferris Wheel for a Shelf
- 22. Hang a Pastel Balloon Made from Packaging Strips
- 23. Turn a Clear Bottle into a Retro Bead Display
- 24. Assemble a Miniature Gramophone from Everyday Packaging
- 25. Make a Suspended Saucer from Foil and Clear Packaging
- 26. Stack Blue Bottle Bases on a Visible Metal Spine
- 27. Arrange Damaged Record Sections into an Expanding Rhythm
- Help the Finished Artwork Last
Select Materials and Make a Small Recycled Artwork
Choose the Material Before Choosing the Technique
Wash suitable containers and let them dry completely. Keep only sound cardboard, clean textiles, and solid wood without loose splinters. Set aside anything moldy, contaminated, badly corroded, or coated with an unidentified flaking finish. With mixed materials, make a small sample joint first and let it cure before committing to the whole design.
- Paper and cardboard: Use a thin layer of PVA craft glue for porous paper joints. A paper decoupage medium such as Mod Podge Paper is another option for flat decorative layers. Excess moisture can warp card, so spread the adhesive evenly rather than soaking the surface.
- Fabric: Stitch seams, hanging loops, and stuffed forms. A flexible permanent fabric adhesive such as Fabric Fusion can attach small flat patches, but test for visible marks and follow its particular drying instructions.
- Plastic: Identify the plastic where possible. Bottle bodies and caps may require different adhesives. Ordinary craft glue is not a dependable choice for smooth plastic, and many general purpose glues exclude polyethylene and polypropylene. For suitable polyethylene or polypropylene pieces, an activator and cyanoacrylate system such as Loctite Plastics Bonding System is an option; follow its surface preparation sequence. Otherwise choose a product approved for the specific plastic, or use ties and mechanical connections.
- Ceramic and metal: For indoor ceramic mosaics, a mosaic PVA adhesive such as Weldbond can suit compatible porous backers. For small metal to wood or ceramic joints, a two component epoxy approved for both surfaces is another option. Mix only the amount you can use within its working time, following the product ratio, and support the joint until cured. Heavy pieces need a rigid backing and suitable hanging hardware. Decorative glue joints should not replace the fittings that carry a suspended sculpture.
For painted paper or card, apply acrylic craft paint in light coats. Plastic and metal may need a compatible primer and paint system; check the label before coating them. Keep cut plastic, wire ends, and ceramic edges smooth or enclosed. Eye protection and appropriate tools are essential when preparing hard materials. Do not heat bottles, discs, or records to make them easier to shape.
Make a Torn Paper Landscape Inside a Reused Lid
This small project turns a clean screw jar lid into a circular frame. Cream paper becomes the sky, a sage paper edge suggests distant hills, and a deeper blue layer brings the foreground closer. An ochre circle adds a quiet point of focus. The paper composition is assembled on a separate card disk, which keeps the glue work away from the metal and makes the final fit easier to check.
Materials: One clean shallow metal screw lid with an intact rounded rim, scrap cereal box card, cream, sage, blue, and ochre paper scraps, PVA paper glue, a flat brush, scissors, pencil, ruler, and double sided craft tape suitable for paper and clean metal. Reuse colored envelopes, gift wrap, or painted paper offcuts where available. Test printed scraps for bleeding before applying glue.
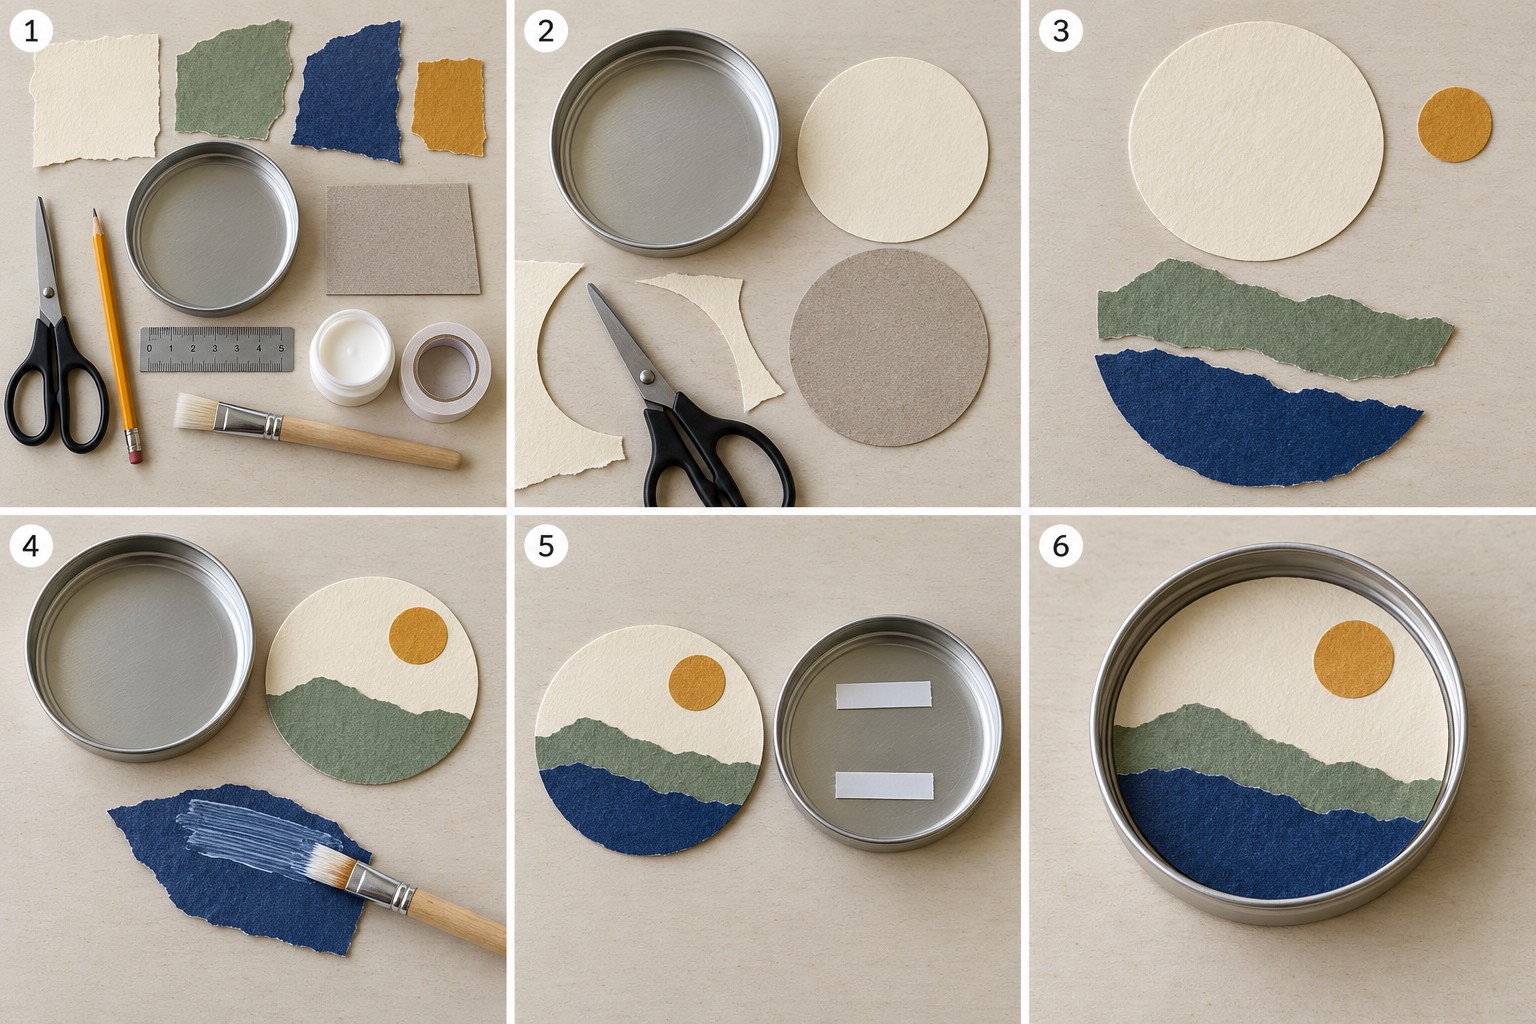
- Prepare the lid and supplies. Remove residue, wash the lid, and dry it thoroughly. Choose a lid with a clean interior and no rust or exposed sharp edges. Place the paper colors together before cutting so you can check that the two hill layers remain distinct.
- Cut the backing and sky. Measure the flat interior of the lid rather than its outside diameter. Cut a card disk and a matching cream paper circle slightly smaller than this space. Test the card inside the lid and trim it until it sits flat without buckling.
- Plan the landscape. Tear an irregular upper edge for the sage hill and another for the blue foreground. Cut a small ochre sun. Arrange everything on the cream circle without glue, leaving enough open sky above the hills. Keep the paper pieces slightly generous at the sides for final trimming.
- Attach the layers in order. Glue the cream circle to the card disk with a thin, even coat. Add the sun and sage hill, then brush glue onto the reverse of the blue piece and press it over the lower part of the sage layer. Smooth gently from the center outward without flattening the torn edges excessively.
- Let the collage dry and prepare the lid. Once the paper is dry, trim any overhang flush with the card circle. Check the fit again. Place two short pieces of double sided tape on the clean interior of the lid, keeping them within the area the disk will cover.
- Insert and display. Peel away the tape liners, align the sun at the upper right, and press the disk into place. Display the finished lid on a small plate stand or use it as one element in a larger composition. This paper artwork belongs in a dry indoor space.
If the paper wrinkles, use less glue on your next sample and smooth each layer before it begins to set. If the disk lifts around its edge, check whether it is too large or still damp before adding more adhesive. For a group of landscapes, repeat the same palette while varying the height of the hills.
Find a Direction for Your Recycled Artwork
The ideas below range from approachable paper and sewing projects to pieces that need experience with mosaic tools or hardware. Choose a material you already have, then let one quality lead the design: the print on broken china, the softness of denim, the translucency of a bottle, or the curve of a record. For a simpler activity to adapt for younger makers, explore these recycled art projects for kids.
1. Build a Breaking Wave from Blue and White China
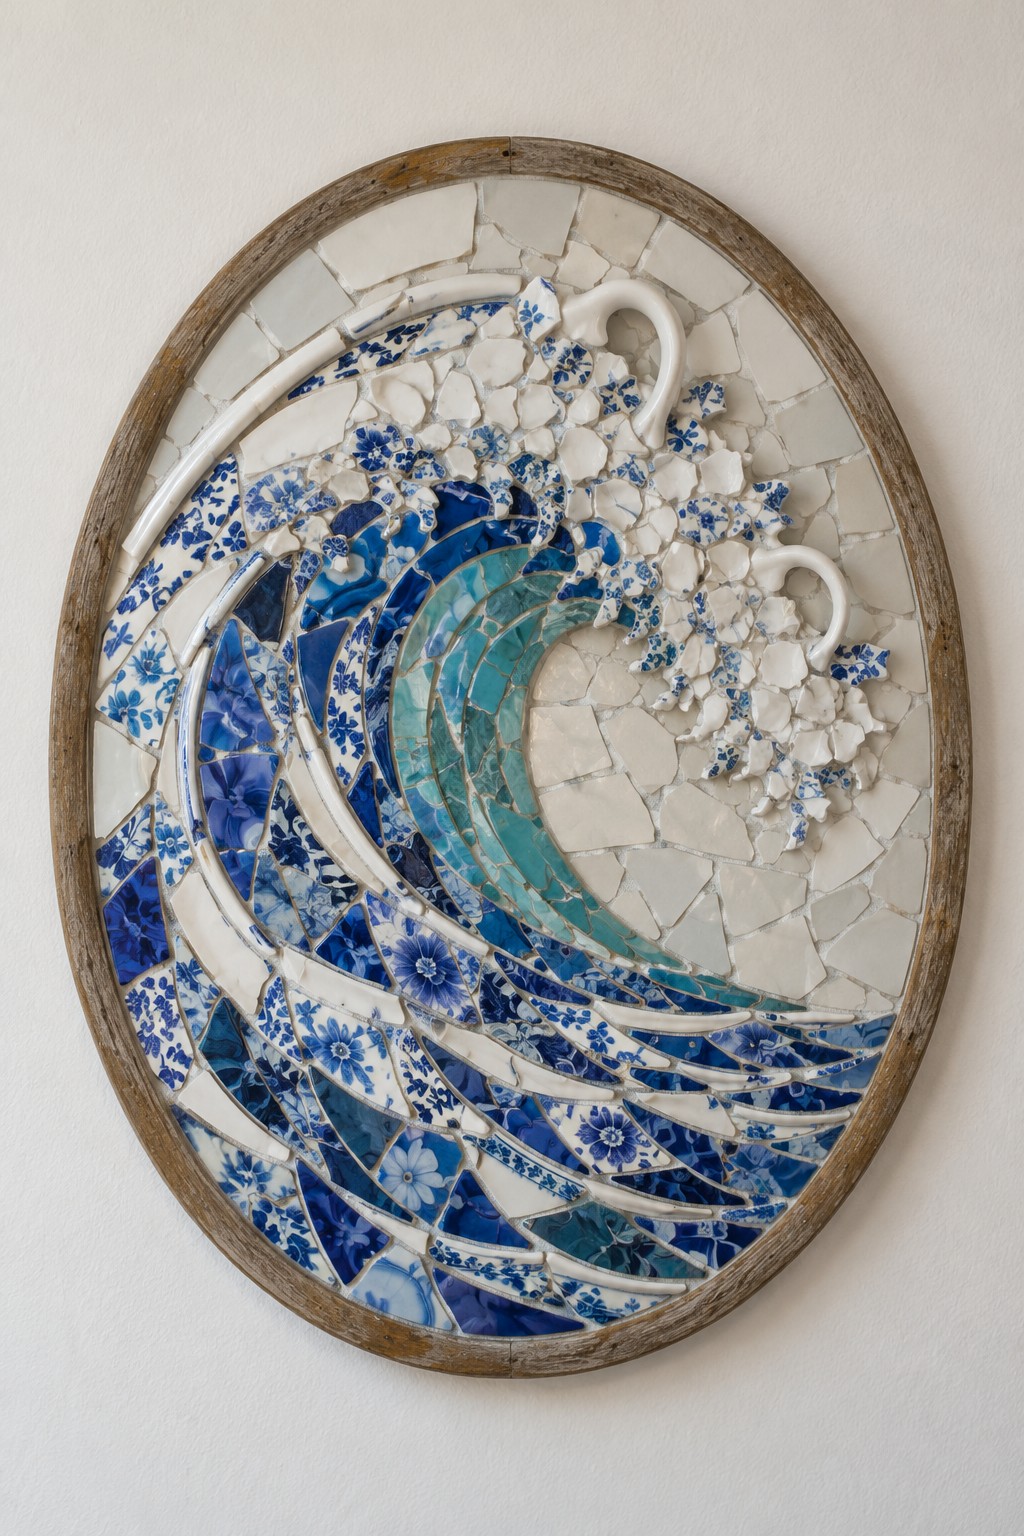
The patterns on damaged blue and white dishes become moving water when their fragments follow the curve of a wave. Gather prepared ceramic pieces, a rigid oval mosaic backer, a sound wooden surround, a mosaic PVA adhesive such as Weldbond where suitable for the ceramic and backing, and grout suitable for the joints. Begin with a drawn wave outline and arrange the blue bands before filling the pale background.
Use curved handle fragments near the crest to suggest spray, supporting their contact points with a suitable adhesive rather than balancing them on neighboring tiles. This raised composition is more demanding than a flat beginner mosaic. Have sharp edges professionally prepared if needed, allow the adhesive to cure before grouting, and weigh the completed piece before choosing wall fittings. Keep the surrounding wall simple so the broken floral patterns remain readable.
2. Frame a Butterfly Made from Muted Fabric Scraps
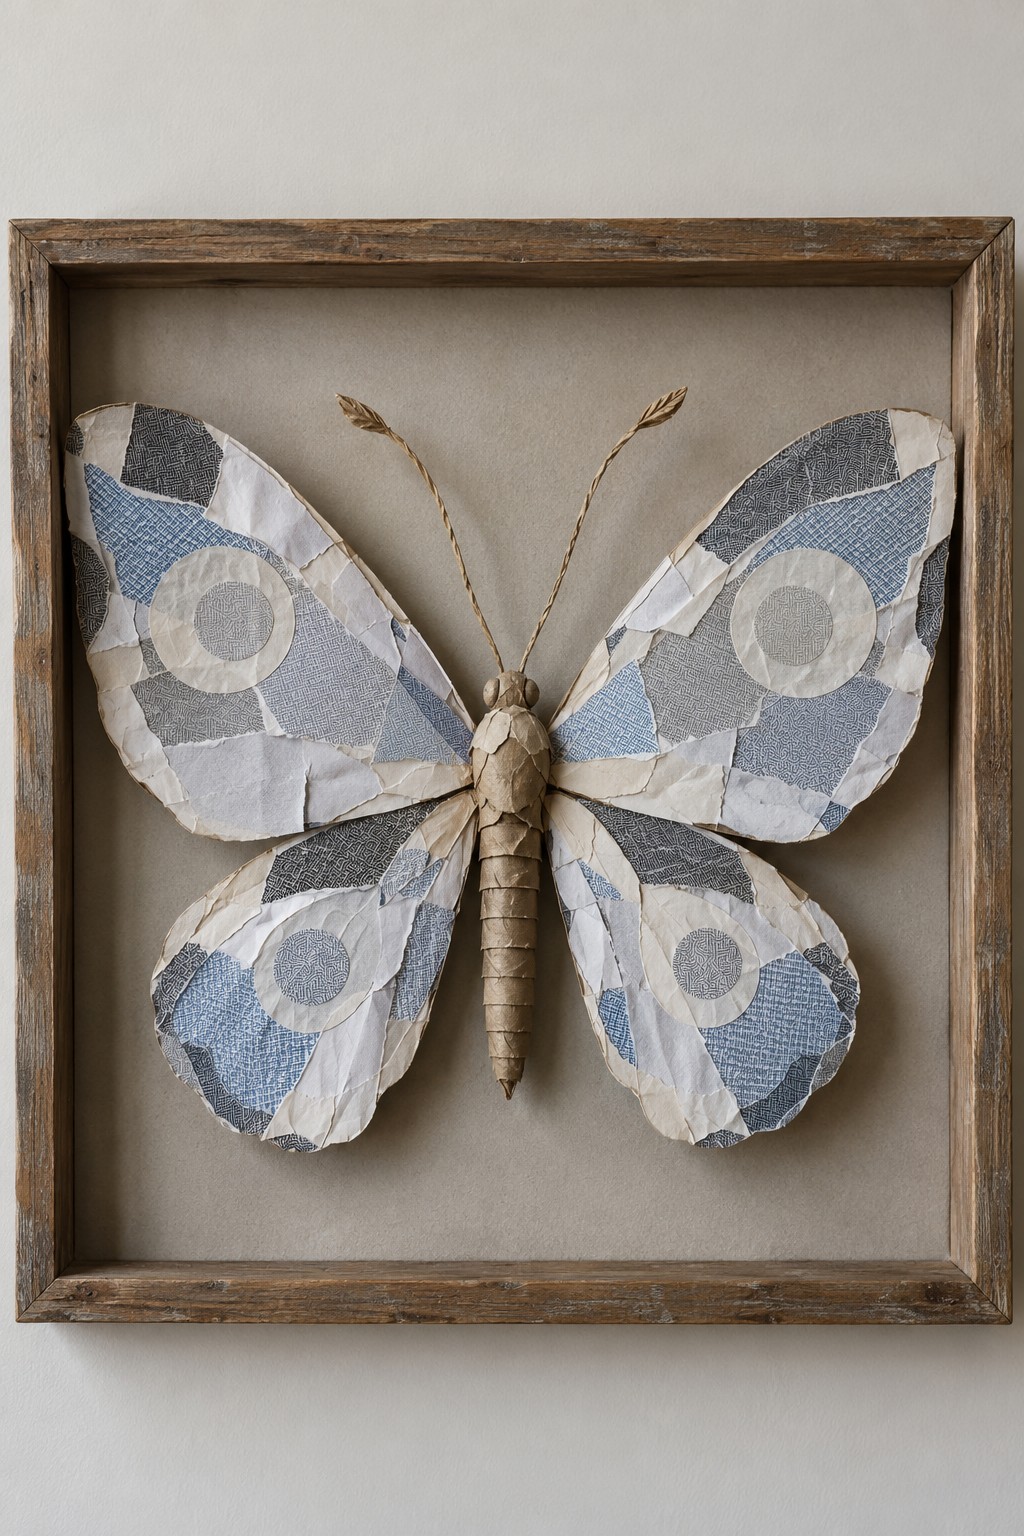
Small pieces of faded cotton can form a butterfly with a softer appearance than painted paper. Use clean blue, gray, and cream fabric, firm recycled card for the wing shapes, a short wrapped fabric body, thread, thin covered wire for the antennae, and a deep reused frame. Arrange the larger fabric patches first, then add smaller pale details across the wings.
Attach the fabric to the card with a thin application of fabric compatible craft adhesive, folding surplus fabric neatly onto the reverse. Secure the body and wing roots to a firm backing while leaving the outer wings slightly raised. Turn the antenna tips into closed loops. A generous plain border around the butterfly makes the textures easier to appreciate and keeps the frame from crowding the wings.
3. Give a Black Feather Sculpture a Reclaimed Wood Backing
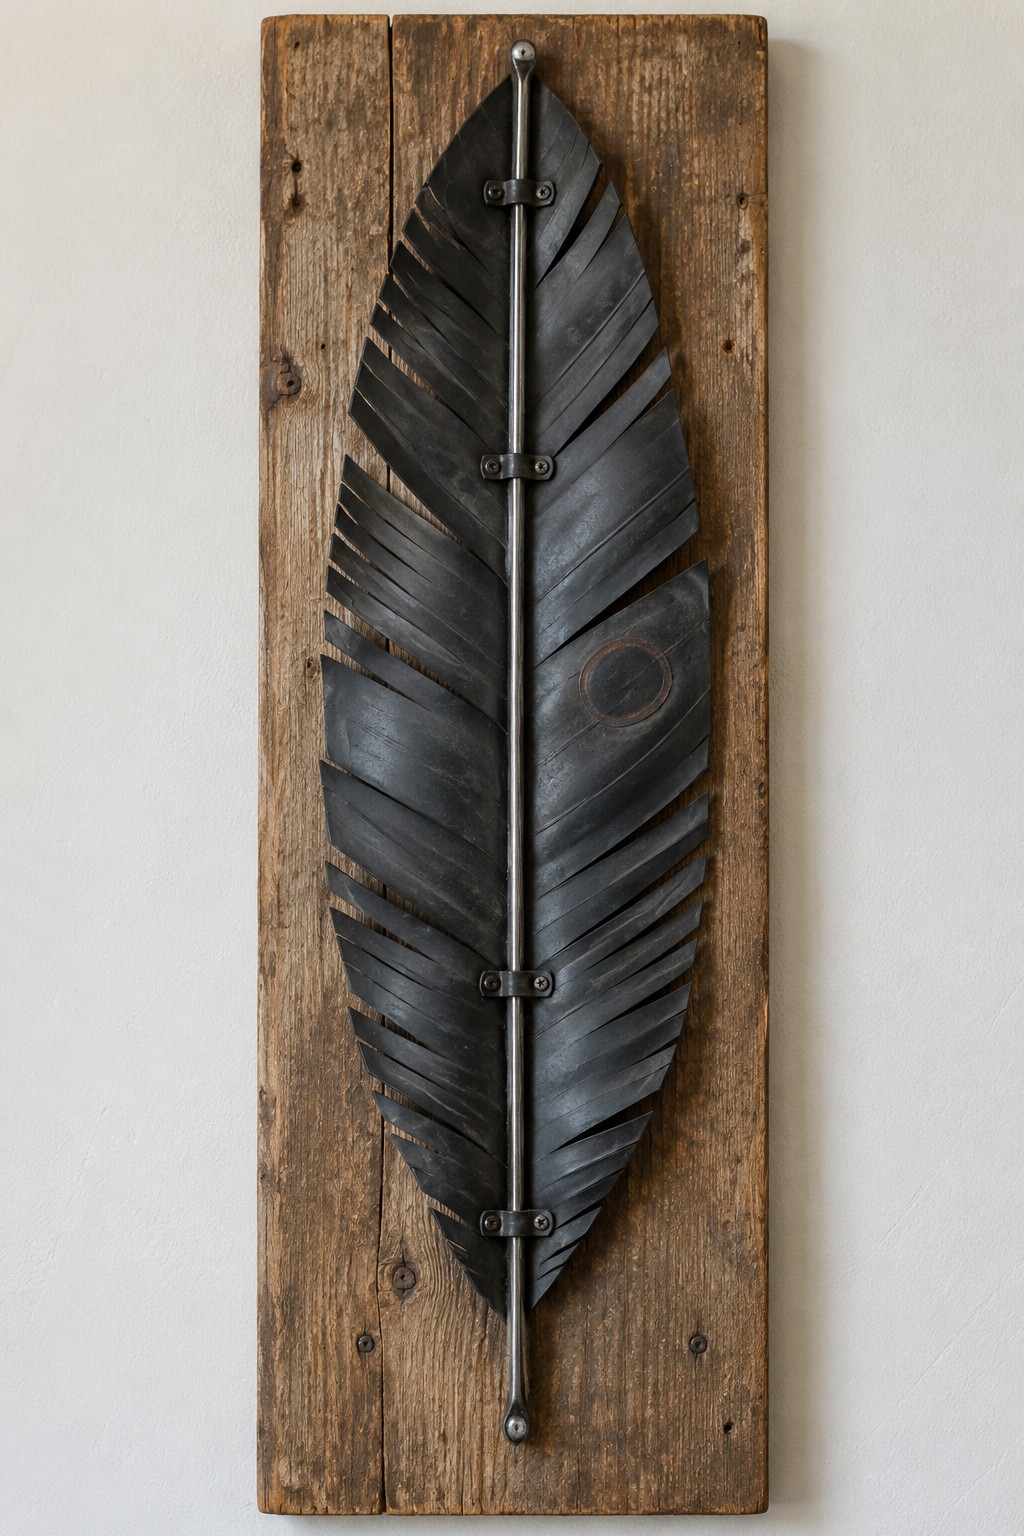
A dark feather shape gains definition from diagonal cuts and a straight metal spine. For a similar piece, use safely prepared sections of damaged vinyl records or suitable reclaimed black plastic, a sound wooden board, a narrow metal rod, and screw fixed retaining clips. Draw the full feather on paper first so the individual vanes taper toward both ends instead of spreading at random.
This is an advanced material preparation project. Records are brittle, so use properly finished components prepared by someone experienced with that material; avoid snapping them by hand or heating them at home. Arrange the pieces flat, secure them with a compatible adhesive, and fasten the spine clips into the board with appropriately sized screws. The aged wood and dark surface provide enough contrast without additional decoration.
4. Suspend Old Keys Beneath a Wire Mesh Cloud
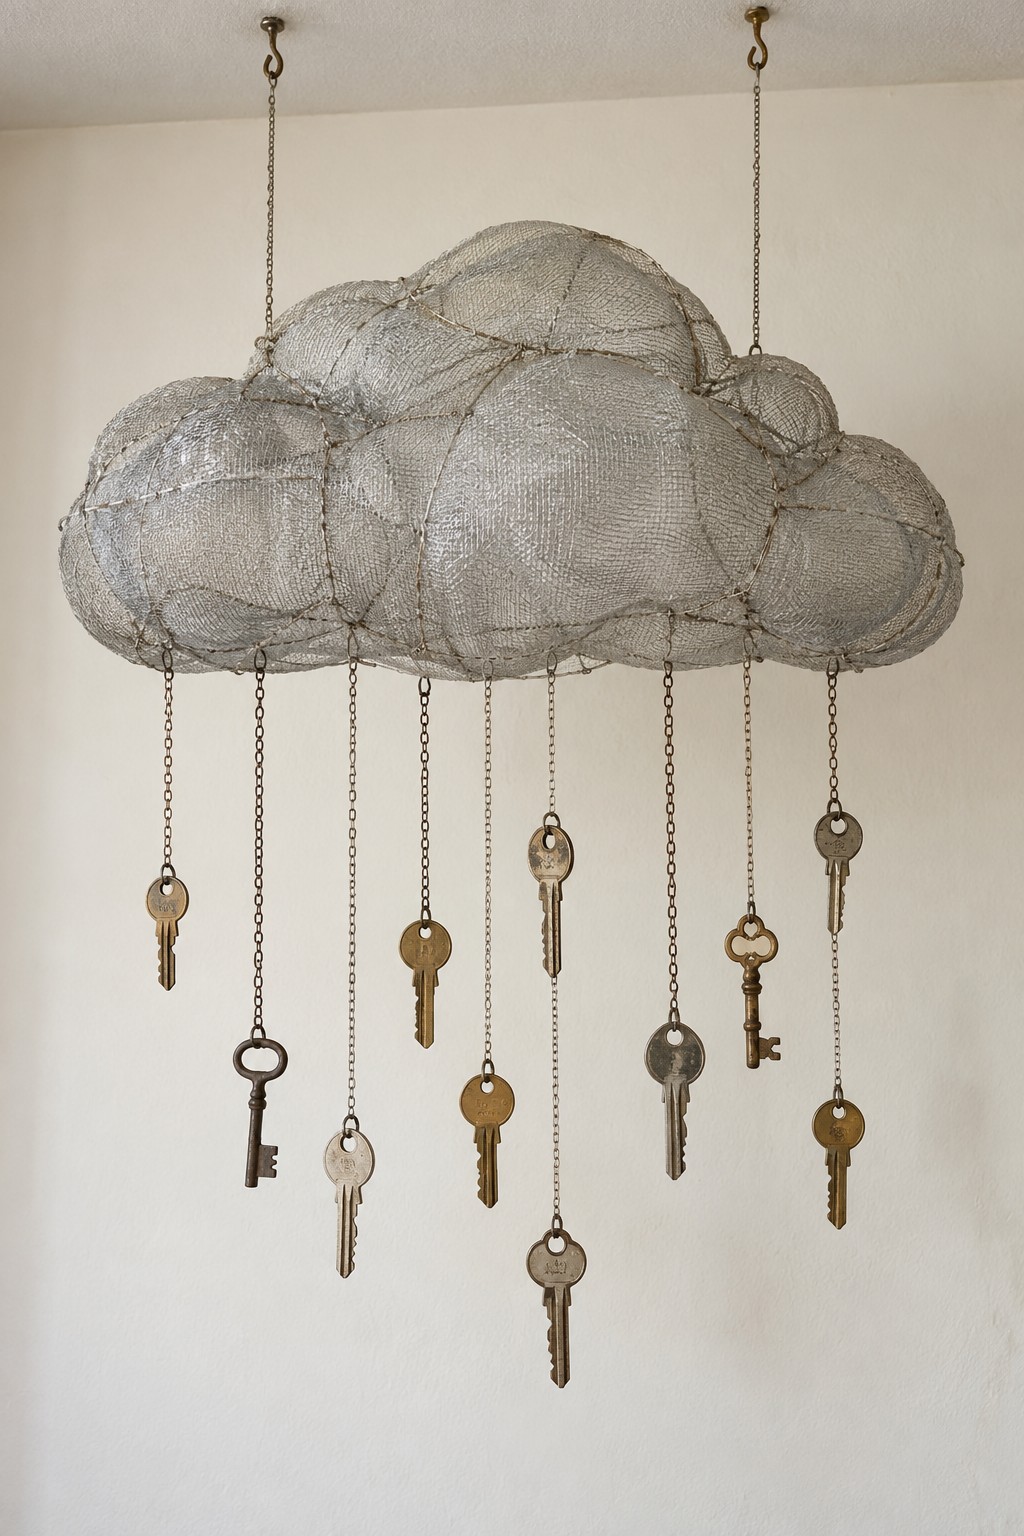
A mesh cloud gives a collection of retired keys an unexpected setting. Gather clean metal mesh, a sturdy wire framework, pliers, binding wire, short chains, closed connecting rings, and keys that are no longer needed. Form rounded cloud lobes over the framework and secure the mesh around them, folding every cut edge inward.
Attach the key chains to the supporting framework rather than the mesh alone, varying their lengths to create a loose falling rhythm. Two separate suspension chains help keep the cloud level. Use ceiling or wall fittings appropriate for the complete weight and the surface they enter. Treat this as a hanging sculpture, with clear space beneath it and no expectation that the keys will produce a tuned musical sound.
5. Knot Produce Nets into a Colorful Wall Hanging
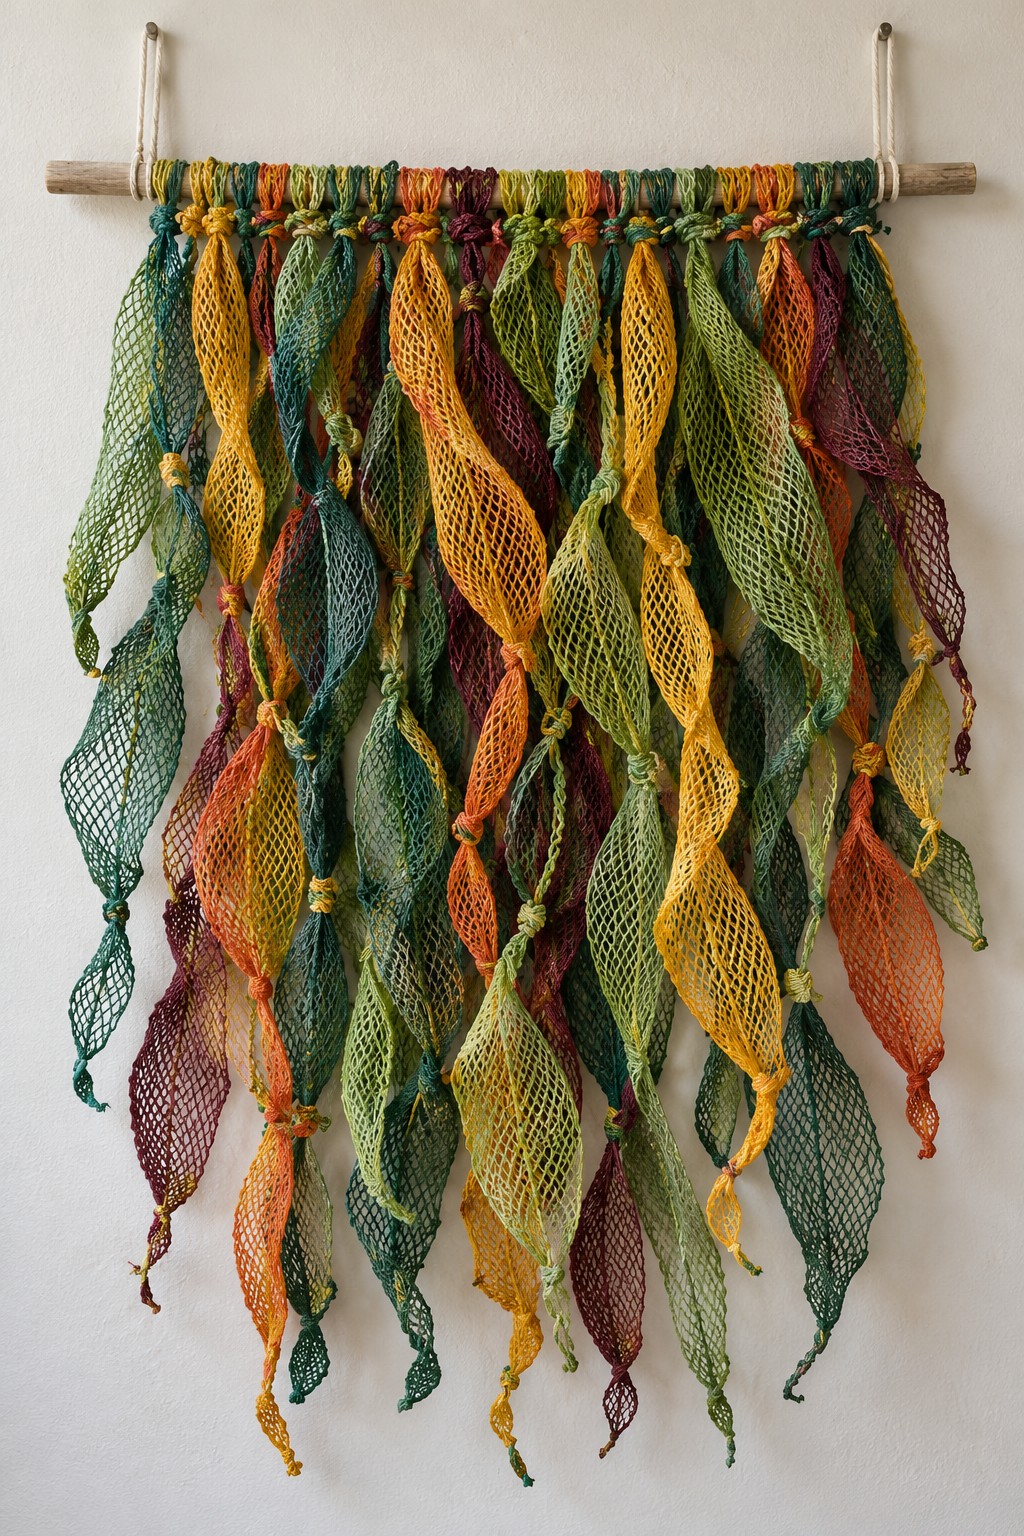
The open weave of produce bags creates a light textile effect without hiding their original character. Collect clean green, yellow, and orange mesh bags, a reused wooden dowel, scissors, and strong thread. Remove labels, metal clips, and damaged sections, then cut or open the bags into manageable lengths.
Loop the lengths around the dowel and tie loose knots at different heights. A few small securing stitches can hold the bunches without leaving bulky glue deposits. Alternate narrow trailing sections with fuller folds so the design has both density and open space. Hang it indoors away from heat and strong sunlight, and keep the loops beyond the reach of small children and pets.
6. Arrange Reflective Disc Pieces inside a Fan Shape
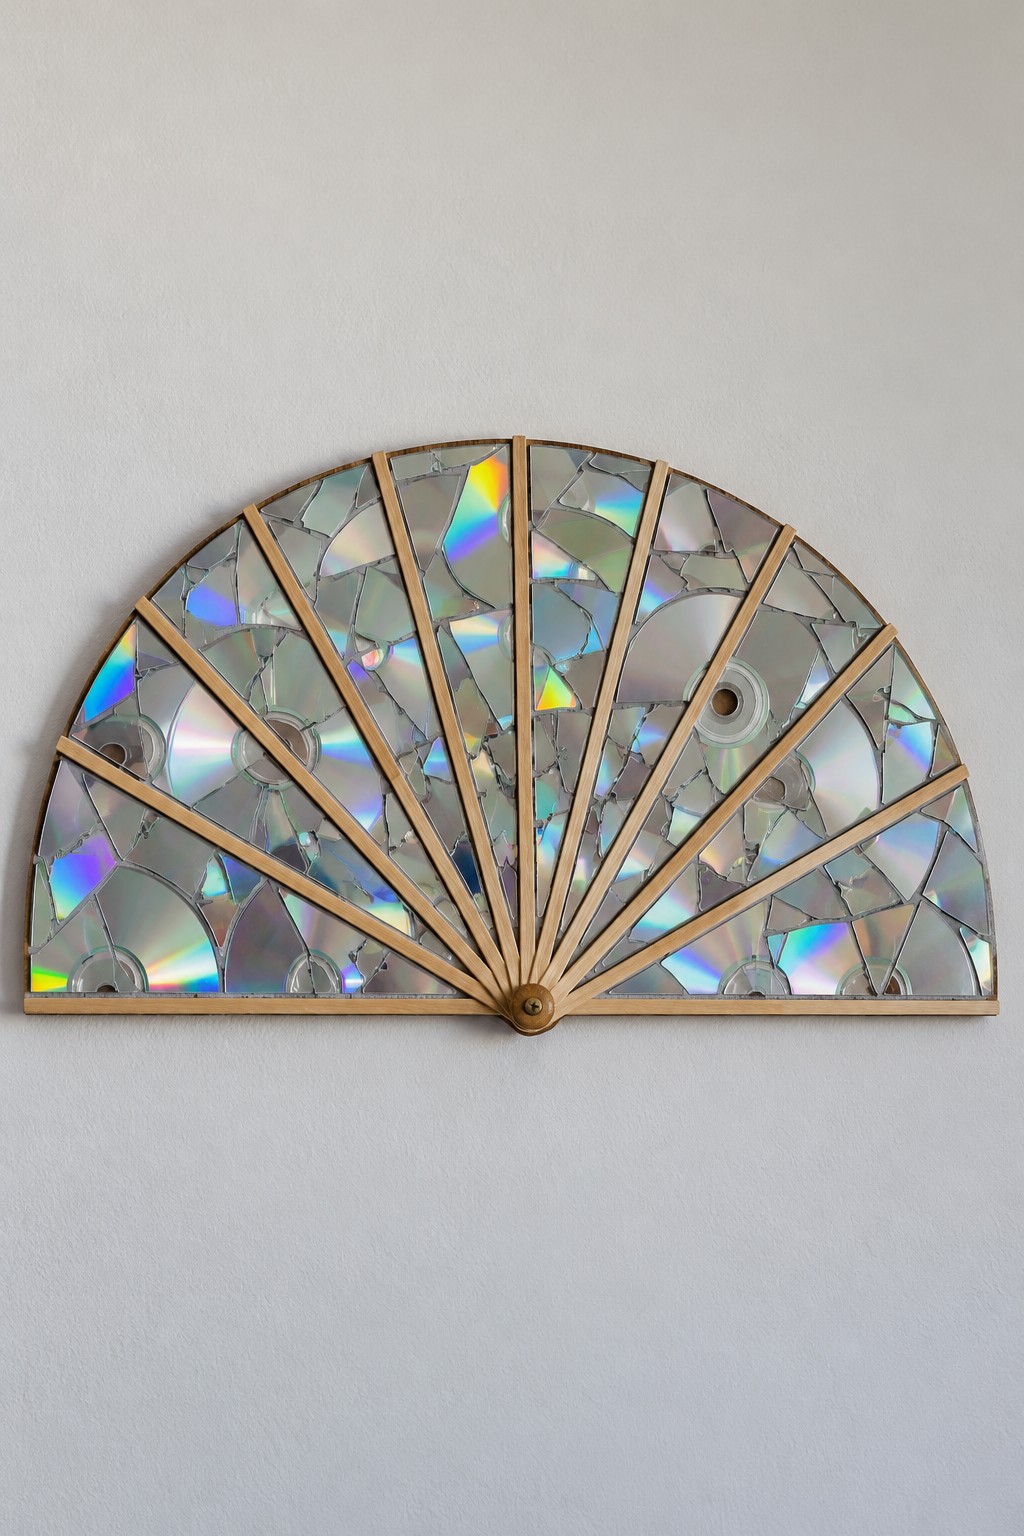
Reflective fragments catch changing light inside this fan shaped wall piece. You can build the design with a semicircular plywood backer, thin reclaimed wooden strips, safely prepared pieces of unwanted discs, and adhesives matched separately to the wood and reflective plastic. Lay out the radial ribs first, keeping their spacing balanced at the curved outer edge.
Fill each wedge with reflective pieces while leaving the wooden divisions visible. Disc material can crack or shed sharp layers, so do not force ordinary scissors through a brittle disc; prepared smooth pieces or reflective packaging offer a more approachable starting point. Test the adhesive for damage to the reflective coating and avoid abrasive grout on the delicate faces. Similar combinations of reflective surfaces and reclaimed borders appear in these upcycling ideas for old mirrors.
7. Preserve Worn Gloves as a Textile Wall Sculpture
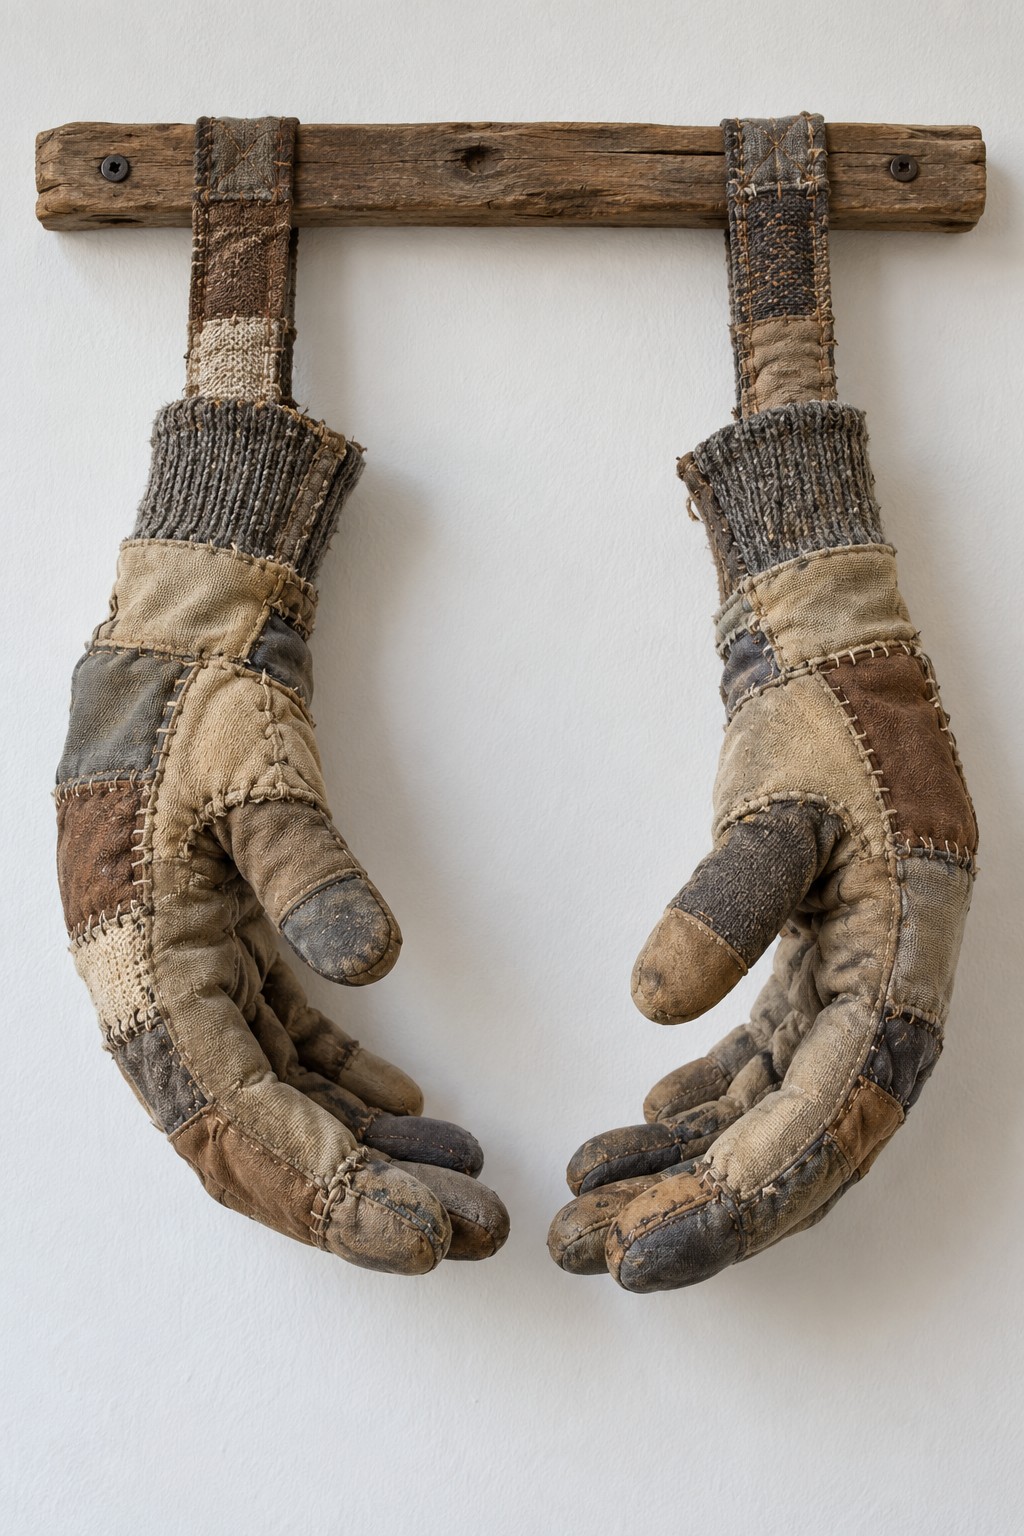
Patched gloves can become a tactile piece about work, repair, and the things we keep. Choose clean gloves with no chemical contamination, fabric offcuts, scrap stuffing, strong thread, two fabric straps, and a wooden rail. Mend weak areas first, using visible stitches that become part of the composition.
Fill the fingers lightly and shape their curve with a few hidden stitches between adjoining sections. Sew the straps securely through the cuffs and close them around the rail before mounting it. The hands can suggest a cupped gesture while remaining empty. Keep this piece decorative rather than using it to support a plant or other weight; its interest comes from the repaired fabric and expressive shape.
8. Grow a Small Mushroom Scene from Paper Packaging
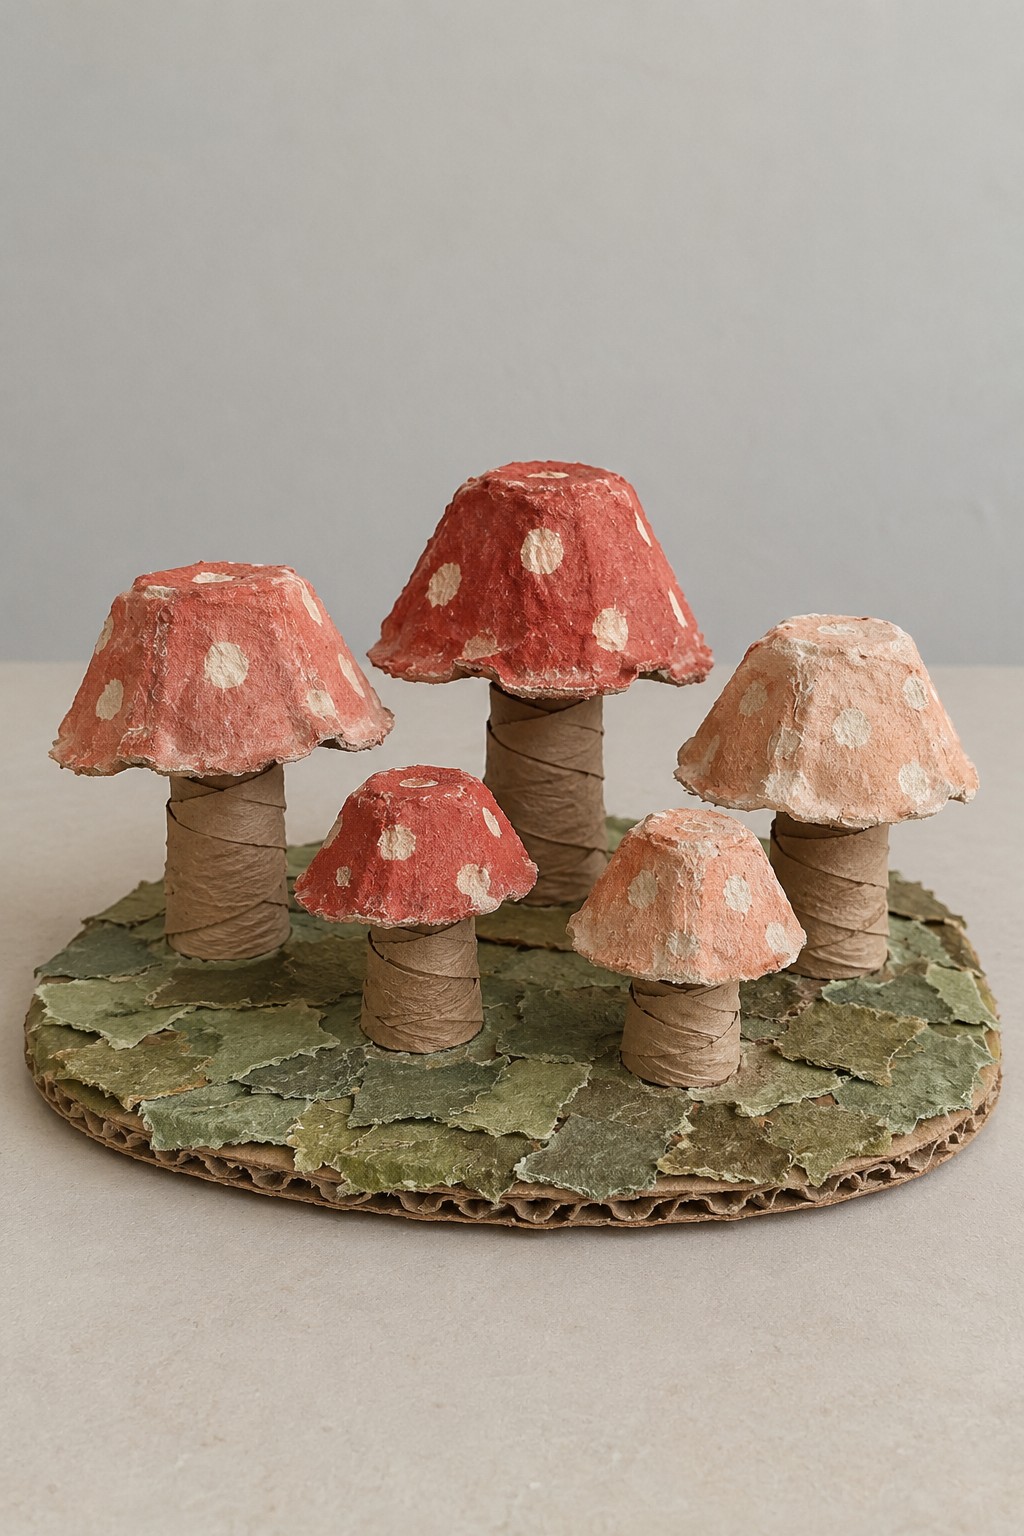
A small cluster of mushrooms makes useful art material out of molded paper packaging and cardboard tubes. Gather clean paper packing sections or egg carton cups, short tube pieces, a layered oval cardboard base, PVA craft glue, and coral, cream, brown, and muted green acrylic paint. Select cap shapes in different sizes before deciding the stem heights.
Cover open cap edges with small paper strips where necessary, then paint each component in thin coats. Glue the stems to broad contact areas on the base and attach a cap to each stem once those joints are firm. Torn green paper creates the uneven ground texture. Place the tallest mushroom toward the back and keep this lightweight scene on a dry shelf where it will not be crushed.
9. Group Three Tiny Landscapes in Reused Metal Lids
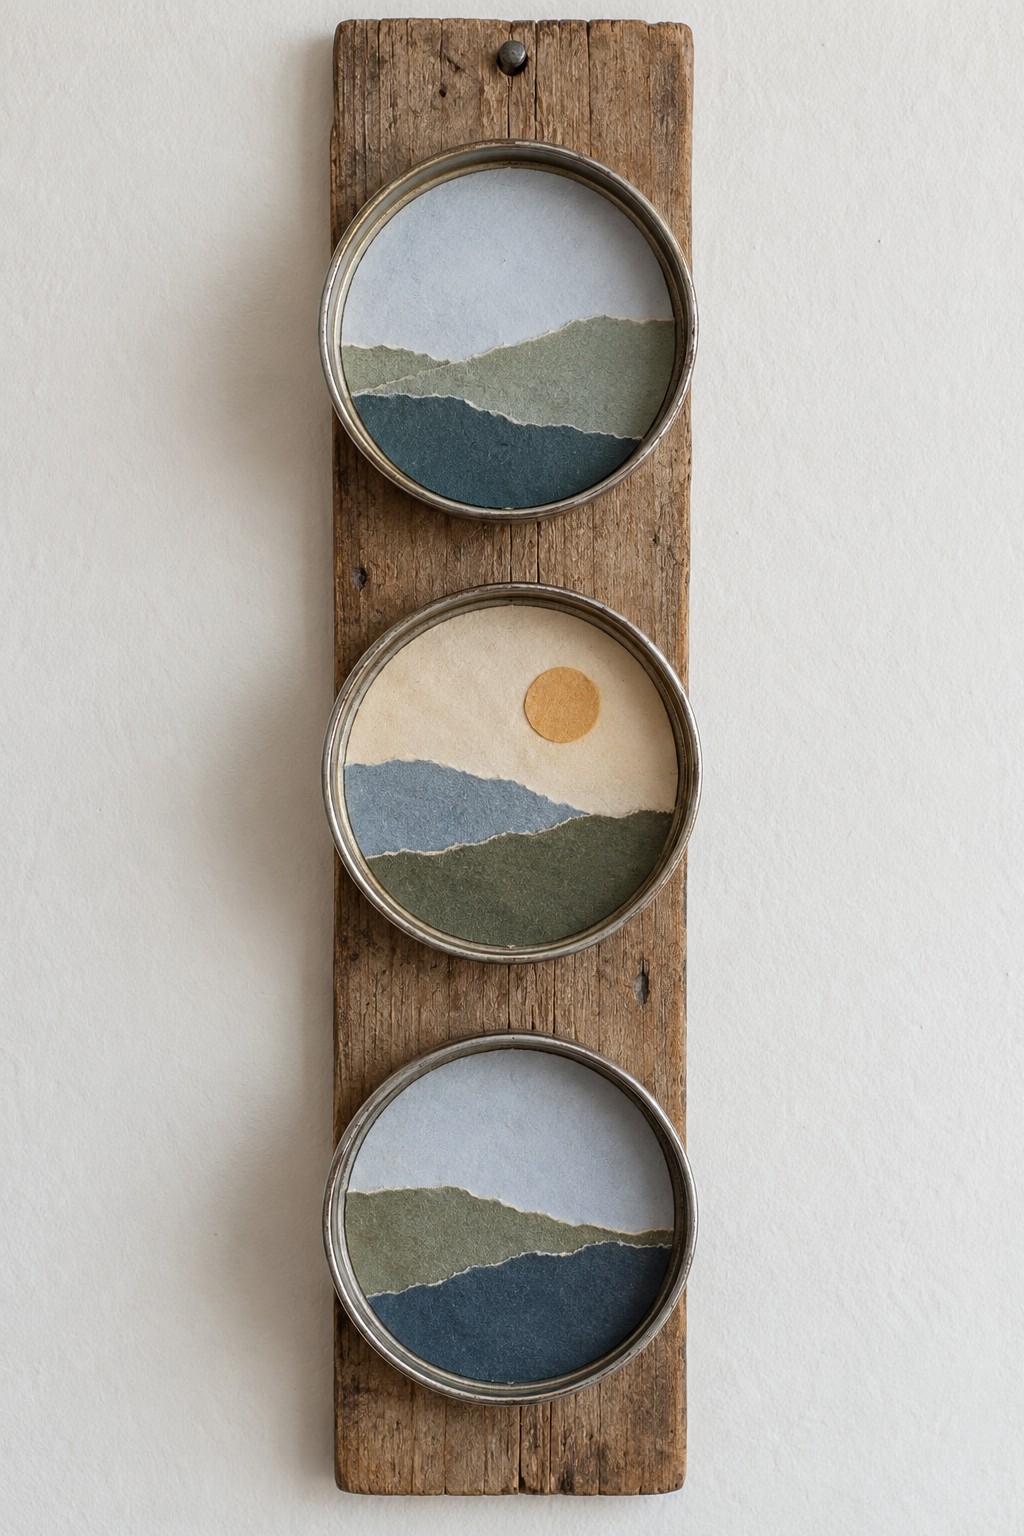
Three lid frames turn a small paper exercise into a narrow wall composition. Use clean screw lids, a sound reclaimed board, paper scraps in related tones, card disks, PVA glue, and small screws for fixing the lids to the board. Make each miniature with the opening tutorial, changing the hill lines and placing a sun in just one scene.
For a more dependable wall assembly, fasten the empty lids to the board with small screws through their centers before inserting the artwork. Prepare the holes with the lid supported and remove burrs; use thin foam mounting tape behind each card disk to clear the screw head. Keep the three rims evenly spaced and fit proper hanging hardware to the board itself.
10. Piece Together a Decorative Patchwork Kite
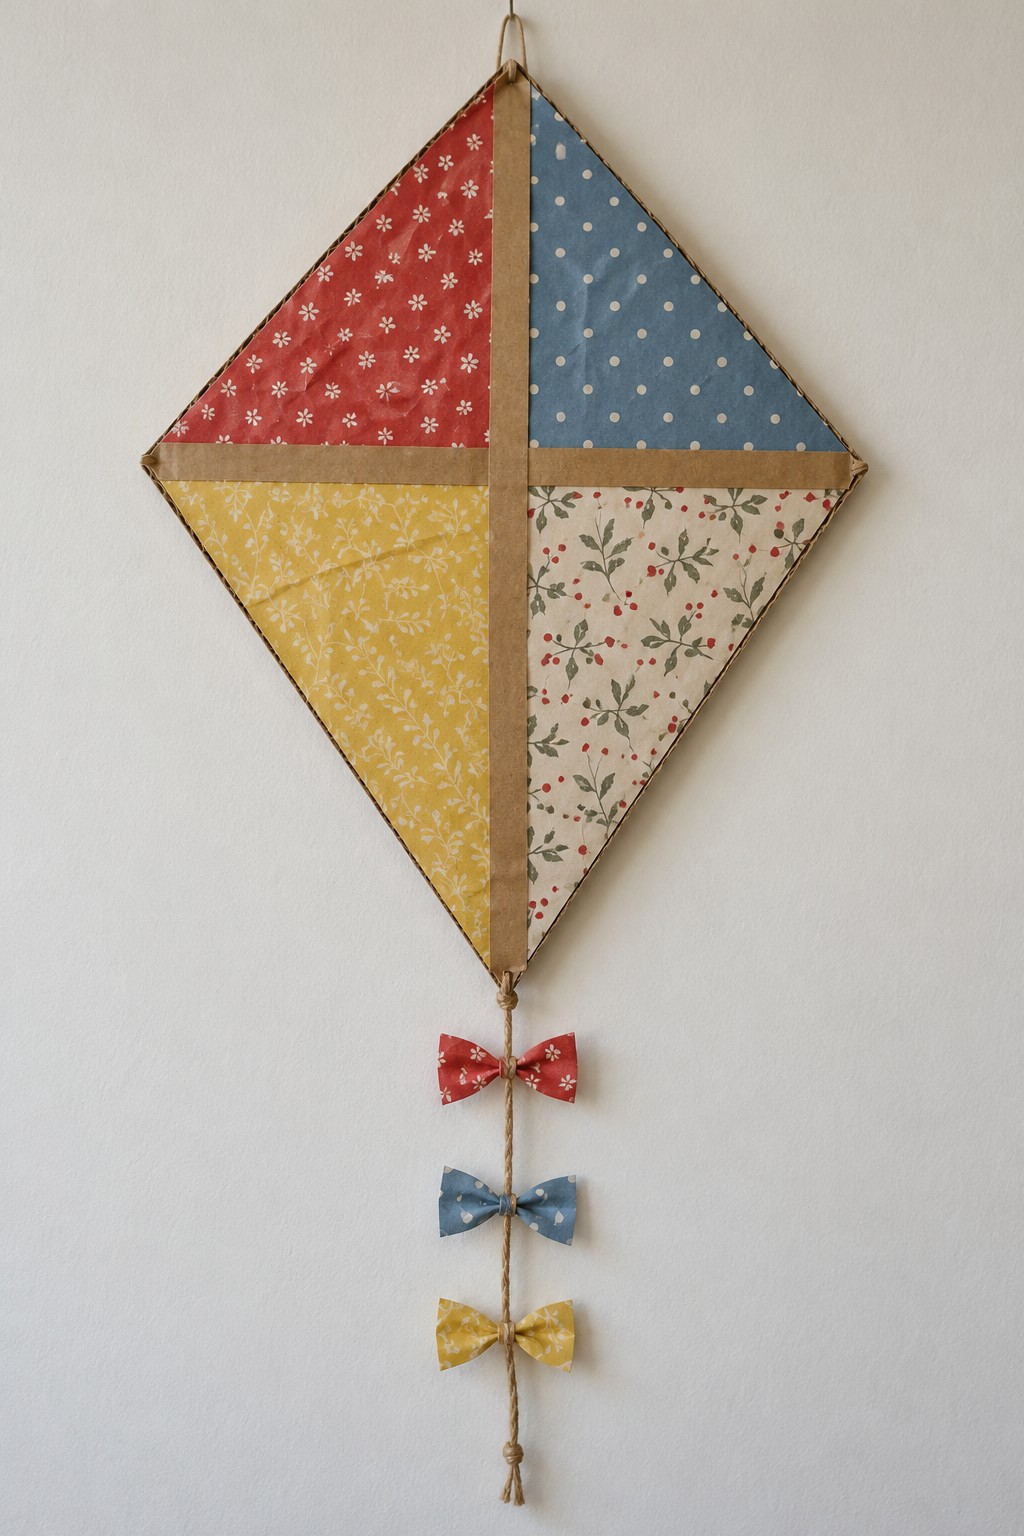
A decorative kite is a good way to use four fabric scraps that feel related without matching. Gather thin wooden strips, a light cardboard diamond, cotton remnants, narrow fabric tape, cord, and a needle and thread. Divide the diamond into four triangles and arrange the colors before attaching the fabric to its backing.
Cover the joins with narrow tape and secure the wooden cross on the reverse to keep the shape flat. Attach a cord tail with three small fabric bows and a separate hanging loop at the top. Use stitching at the suspension points so the weight does not depend on a small glued patch. This version is wall art; it is not constructed or balanced for flying.
11. Cut a Green Bottle into a Hanging Spiral
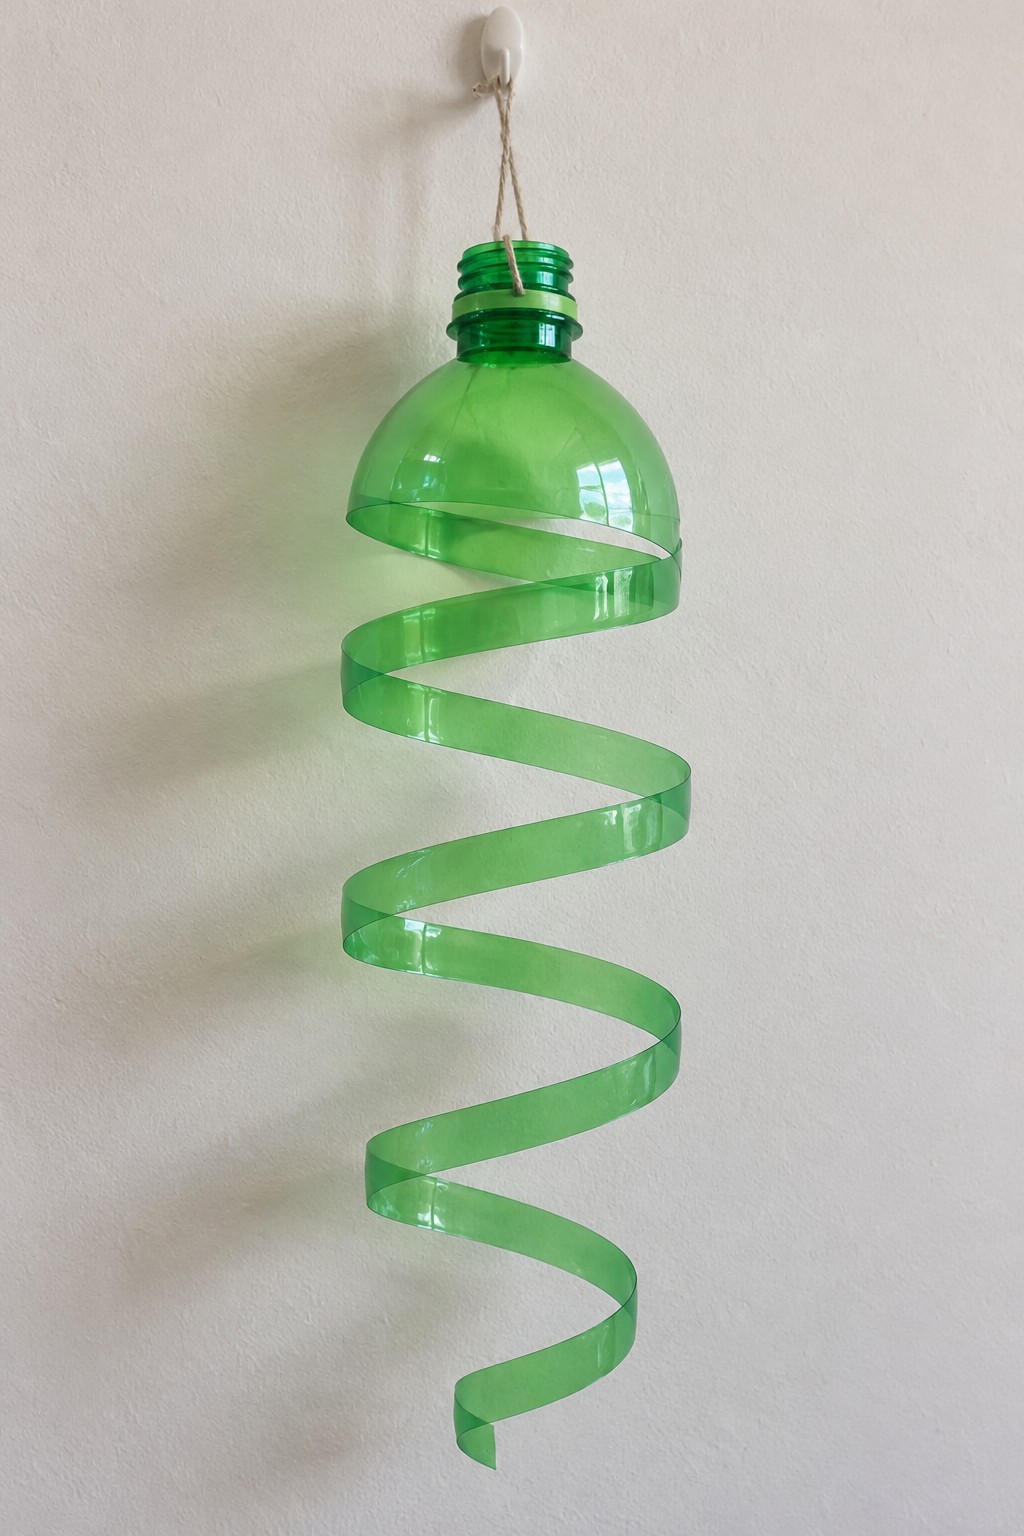
A single green bottle can become a long, light catching ribbon while its shoulder remains recognizable. Use a clean flexible PET bottle, washable marker, suitable scissors, and cord. Mark an even spiral around the bottle body, leaving the shoulder intact. An adult should make the initial opening and remove the base before following the marked line upward.
Round the end of the strip and remove rough spots without heating the plastic. Keep enough uncut material near the shoulder to prevent tearing, and attach the hanging cord through two reinforced holes on opposite sides of the neck area. Let the spiral hang freely without stretching it. A plain wall makes the changing width of its shadow part of the composition.
12. Shape a Soft Jellyfish from an Old Blue Shirt
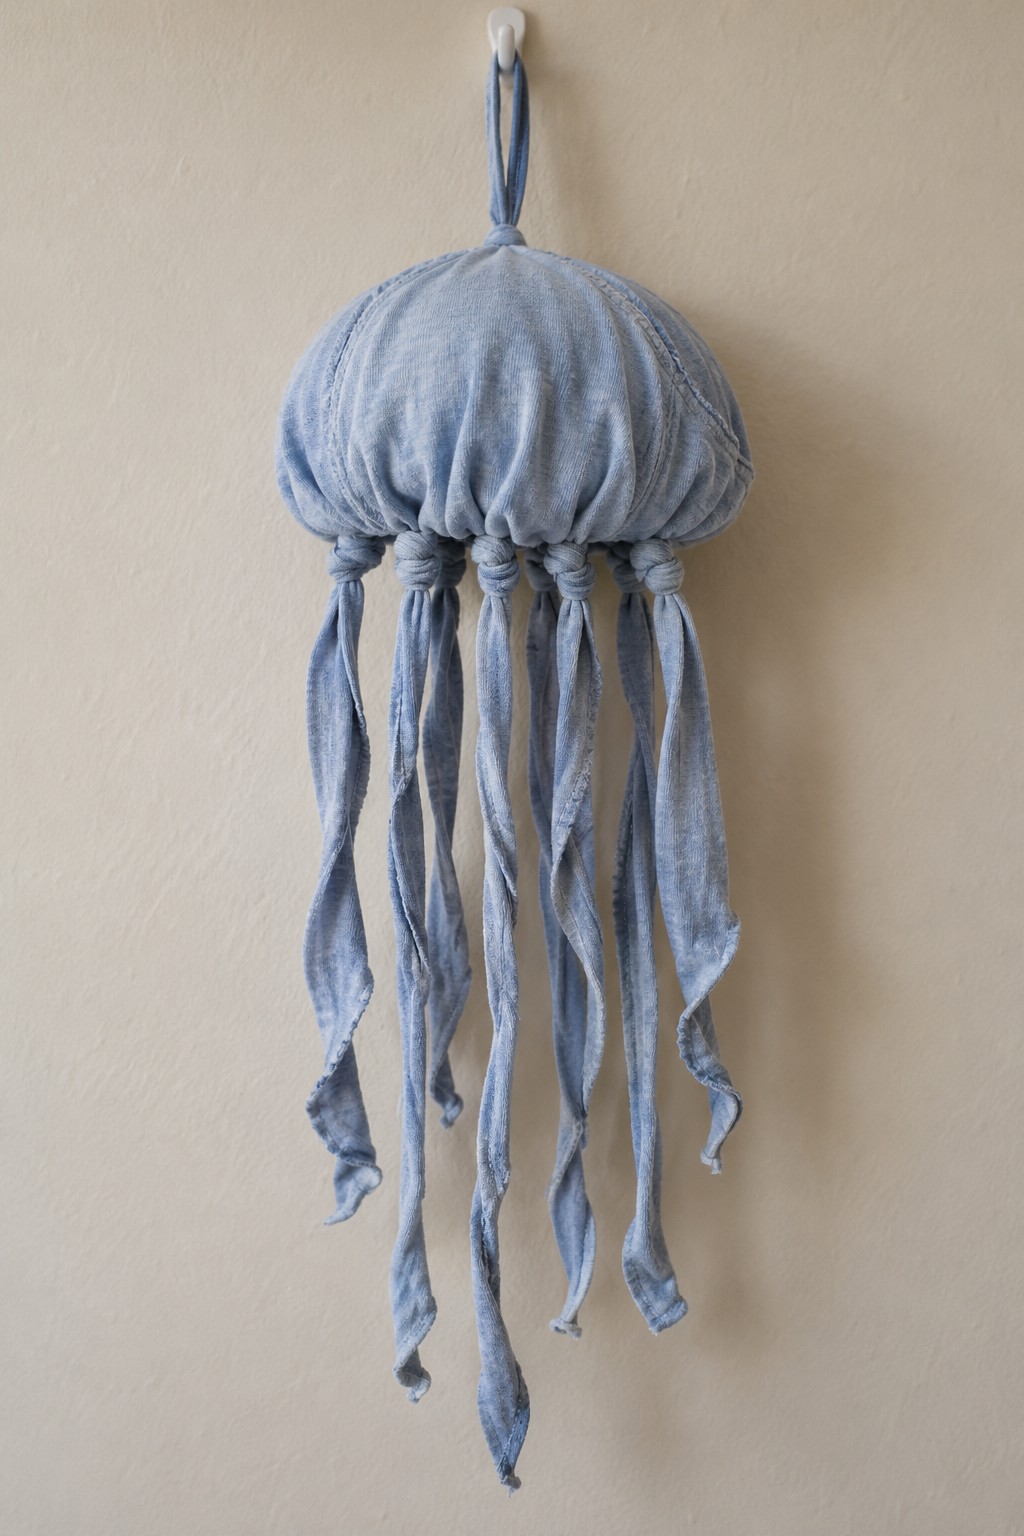
Faded blue shirt fabric can create a jellyfish with a rounded top and softly twisting tentacles. Gather washed fabric, a needle and thread, scrap stuffing, cord, and a small circular fabric backing. Sew a gathering stitch around a larger fabric circle, add a little stuffing, and draw it into a shallow dome over the backing.
Cut uneven strips from the remaining cloth, finish any excessively fraying edges, and stitch them securely around the underside. Knot a few strips loosely to vary the texture. Sew the hanging loop through a reinforced area at the top rather than through a single thin layer. This makes a gentle coastal accent for a dry wall; keep its long dangling parts away from a cot or play area.
13. Construct a Transparent Orb from Plastic Strips
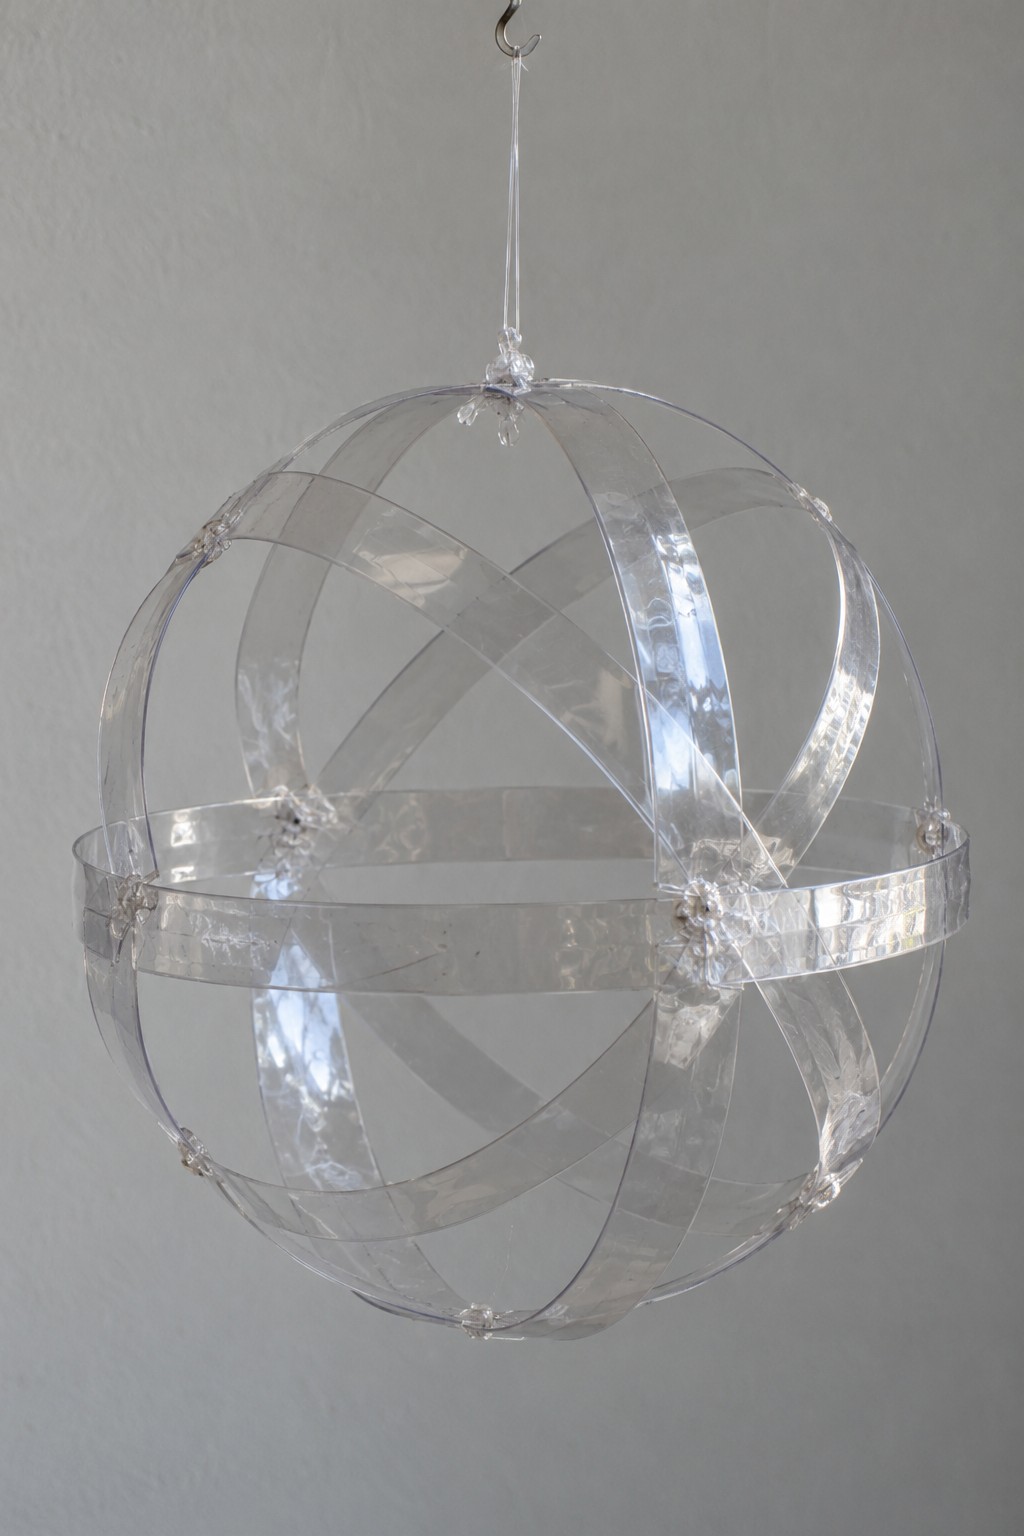
Clear packaging becomes sculptural when a few strips describe a sphere without filling it. Gather smooth flexible PET offcuts, a ruler, marker, scissors, a suitable hole punch, clear nylon thread, and a hanging cord. Cut several strips of matching width, round their corners, and form one equatorial ring before adding the crossing loops.
Overlap the strip ends and join them through paired holes with nylon ties or small suitable fasteners. Connect the crossings so the sphere keeps its shape, reinforcing the top suspension point across more than one strip. Physical joints are useful here because an unsuitable glue can cloud or weaken the plastic. Display the empty orb against a plain wall where its highlights and curved shadows remain visible.
14. Balance Three Reclaimed Wire Rings as a Mobile
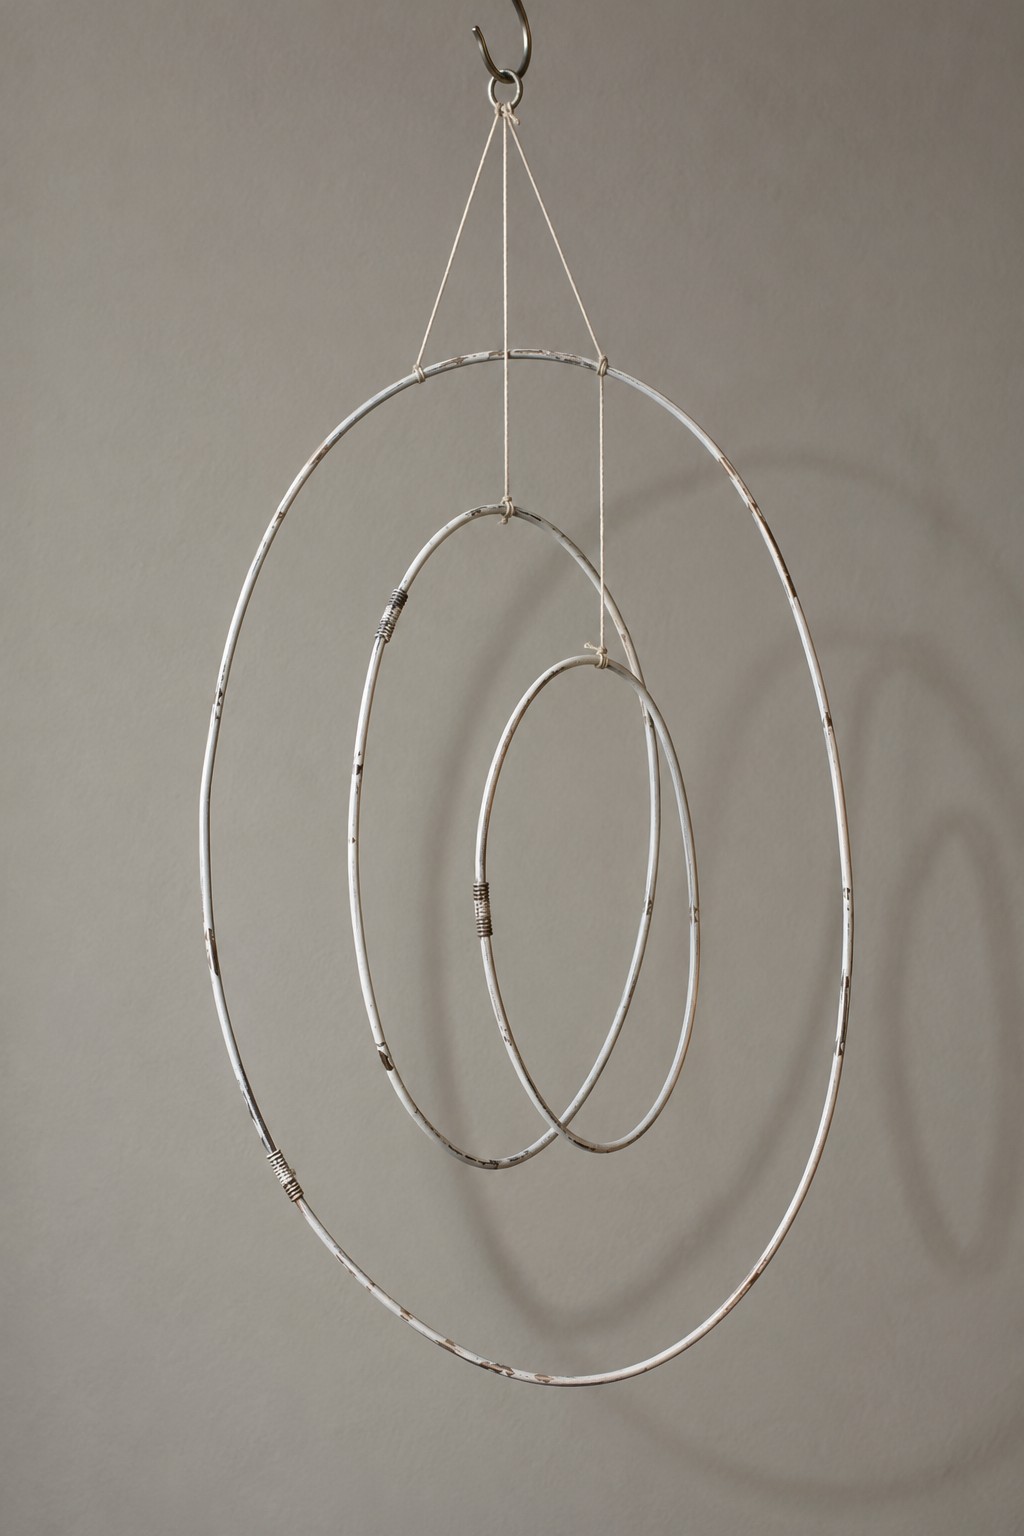
Three open circles create a quiet mobile with very little material. Reuse suitable metal hoops, or form soft metal wire around round templates in three sizes. You will also need pliers, crimp sleeves suitable for the wire, and strong thin cord. Close each ring securely and cover or smooth the joined ends so they cannot catch on the suspension threads.
Hang each ring on its own cord from a shared top connection, adjusting the lengths until the smallest ring sits comfortably within the others. Leave clearance so they can move without tangling. Test the balance at a low height before placing the mobile overhead. A side light adds overlapping circular shadows without needing paint, beads, or extra ornaments.
15. Layer Reused Spoon Bowls into a White Lotus
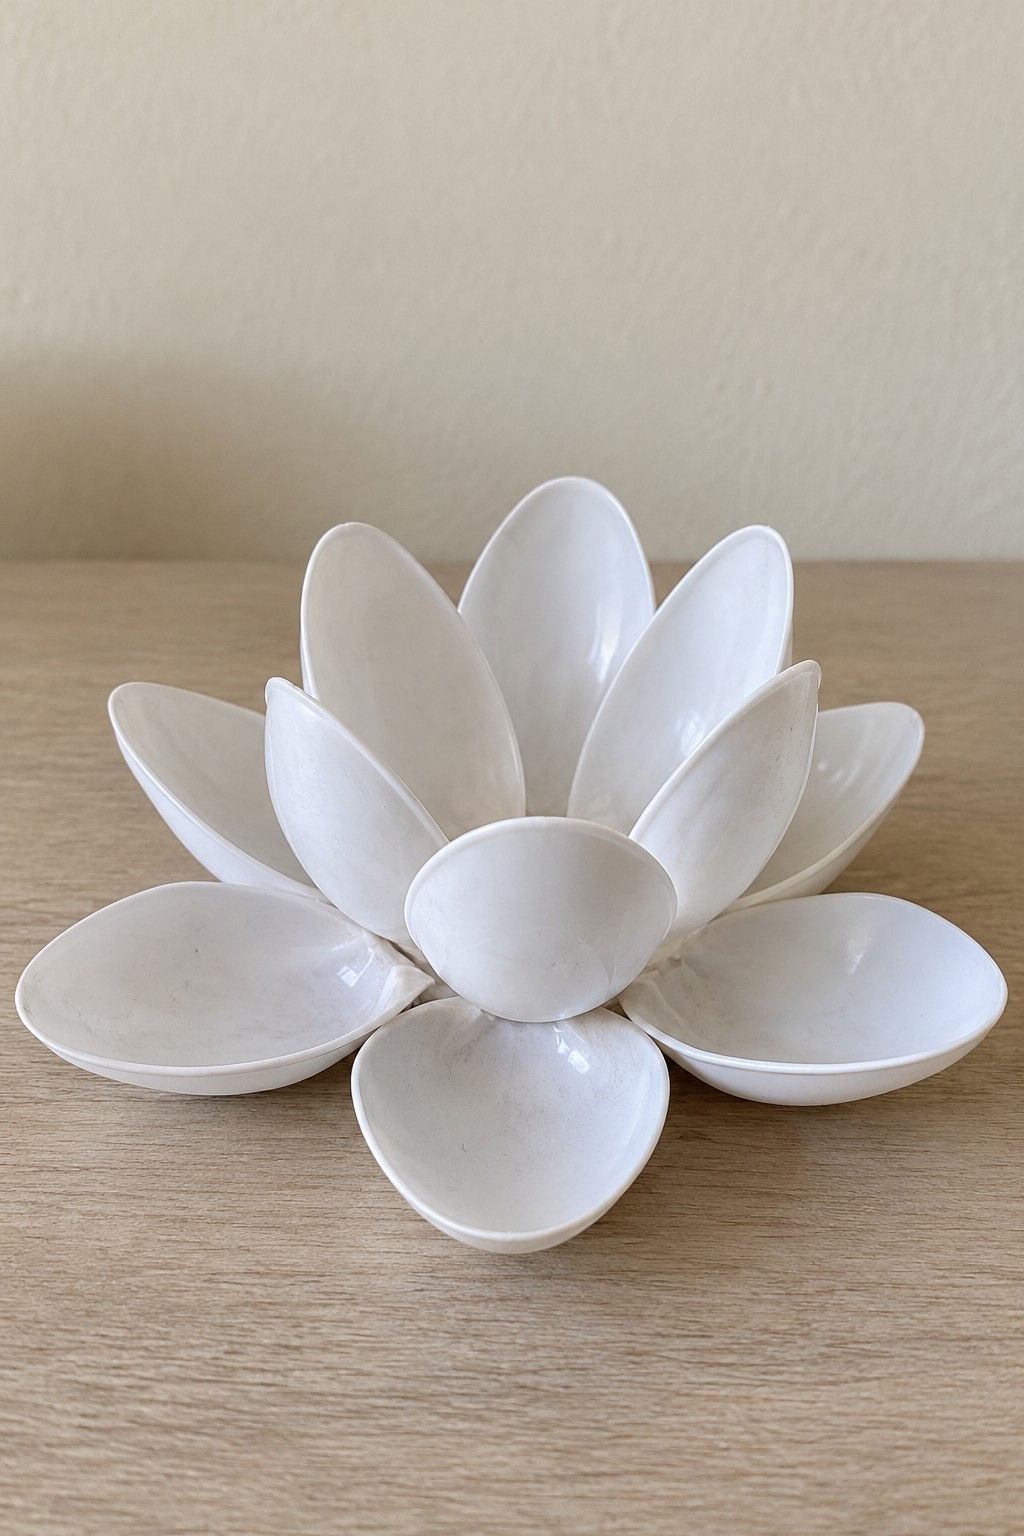
The cupped shape of white plastic spoons can suggest petals when repeated around a low center. Use clean saved spoons, a small rigid base, suitable cutting tools, and an adhesive specifically compatible with the spoon plastic. Prepare the handle ends safely and smooth the cuts before arranging anything. A paper circle marked into sections helps distribute the outer petals evenly.
Attach a low outer ring first, then build smaller rows at steeper angles, holding each row until its joints are secure. Many disposable utensils are difficult to glue, so test a spare piece rather than assuming hot glue or PVA will work. Keep the center empty and use the finished lotus purely as a sculpture, away from candles, hot objects, and food.
16. Make a Folding Screen from Corrugated Cardboard Frames
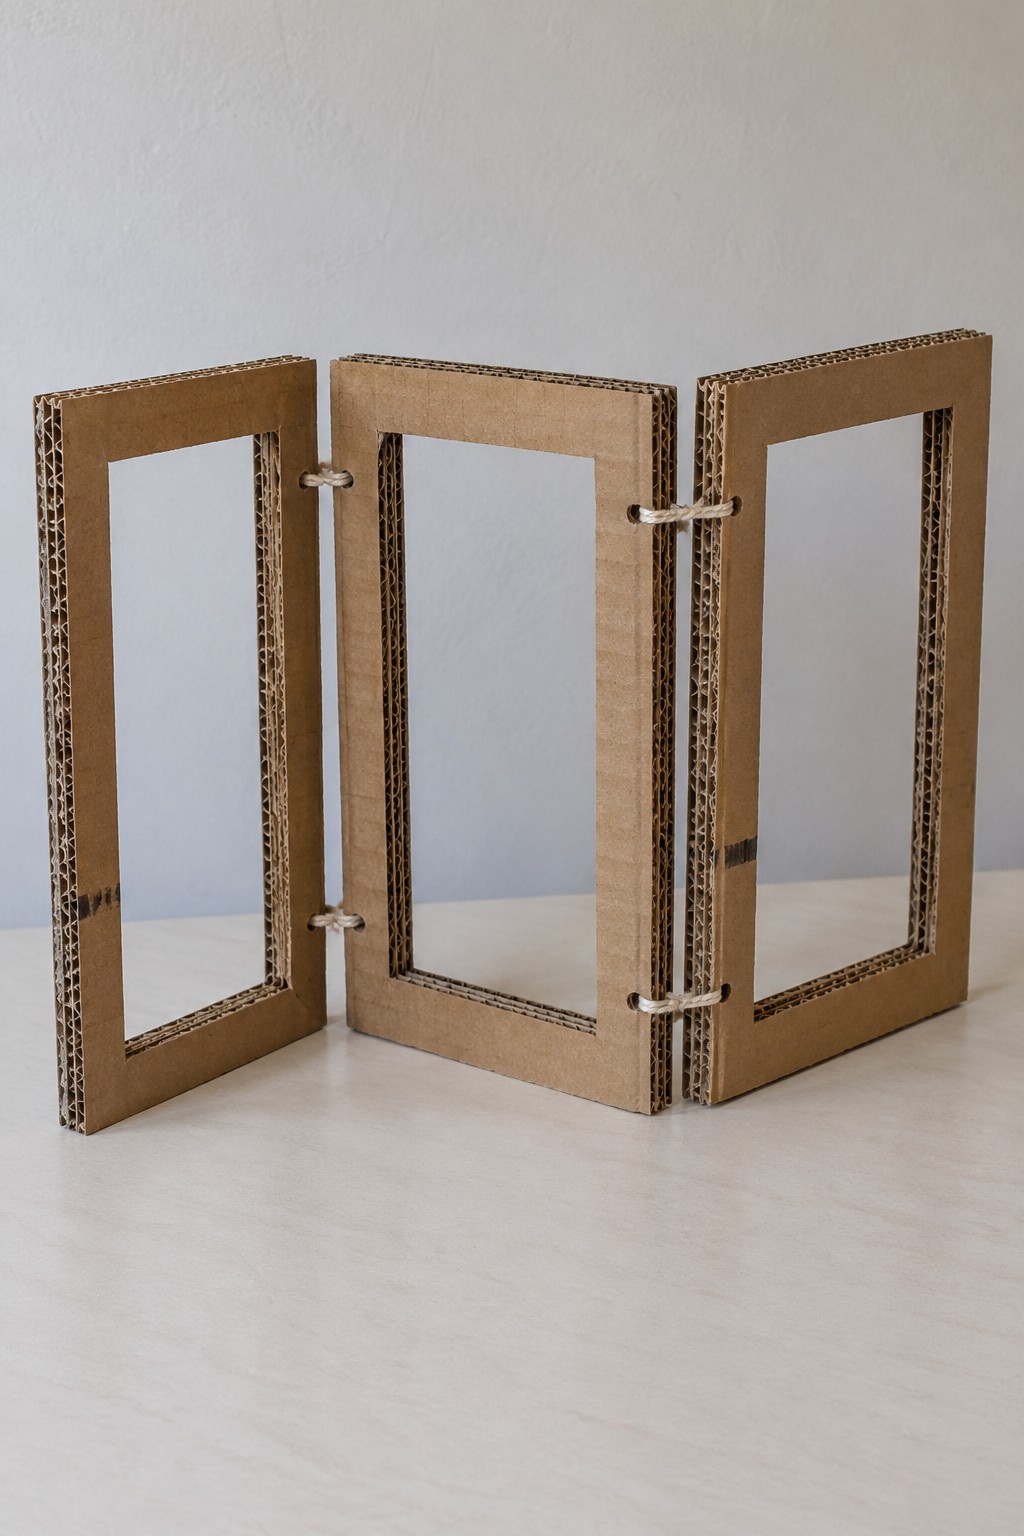
Open rectangular panels give corrugated cardboard an architectural quality. Use clean box card, a ruler, cutting mat, craft knife, PVA glue, and short lengths of cotton cord. Cut three matching frames with broad borders, then laminate additional matching layers, changing the flute direction between layers where practical. Let them dry flat under a light, evenly spread weight.
Reinforce the hinge areas before making paired holes and lacing adjacent frames together. Leave a small gap at each hinge so the panels fold without scraping. Arrange the screen in a shallow zigzag for stability. Keep the openings empty as a study in shape and shadow, or use the same construction for lightweight paper artwork; it is not a support for glass mirrors.
17. Suspend a Photograph inside Nested Cardboard Squares
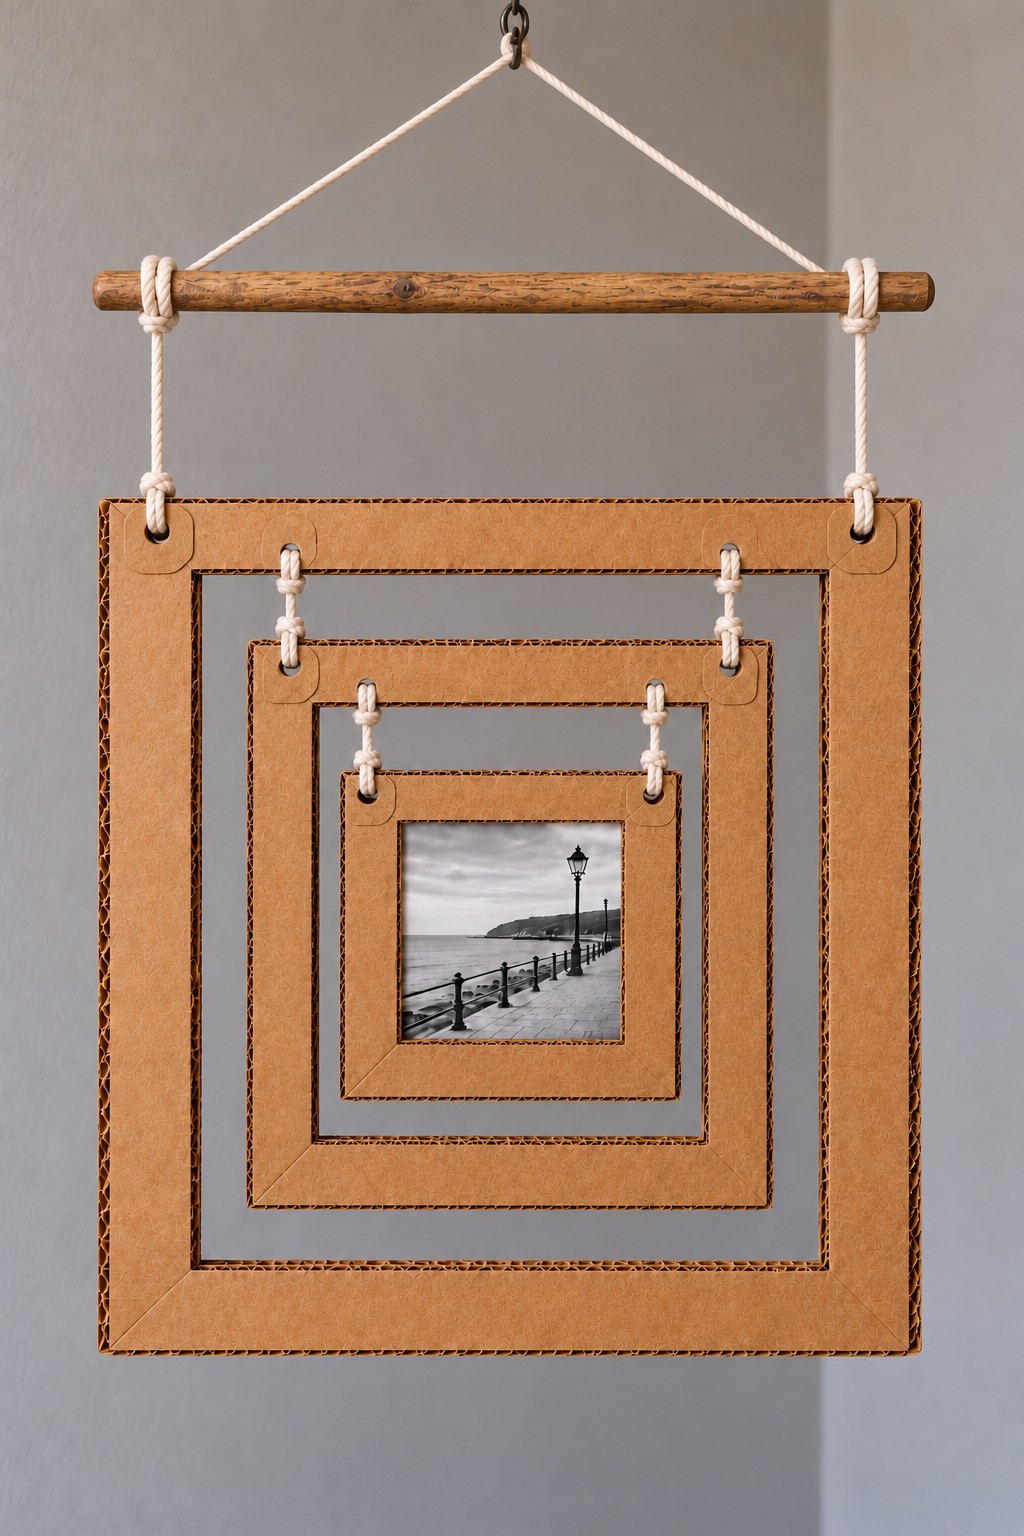
Nested squares create depth around one small photograph without using a heavy frame. Gather corrugated cardboard, a ruler, craft knife and mat, cotton cord, a straight reused dowel, and a printed copy of a photograph. Cut three progressively smaller square frames, keeping the borders broad enough to resist bending. Reinforce the hole locations with extra card on the reverse.
Suspend the largest frame from the dowel, then tie each smaller frame to the one outside it using equal cord lengths on both sides. Attach the photograph to a light backing within the innermost opening. Use a replaceable print rather than a valuable original, since packaging card is not an archival framing material. Leave the corrugated edges visible for a consistent handmade finish.
18. Sew Old Denim into Interlocking Sculptural Links
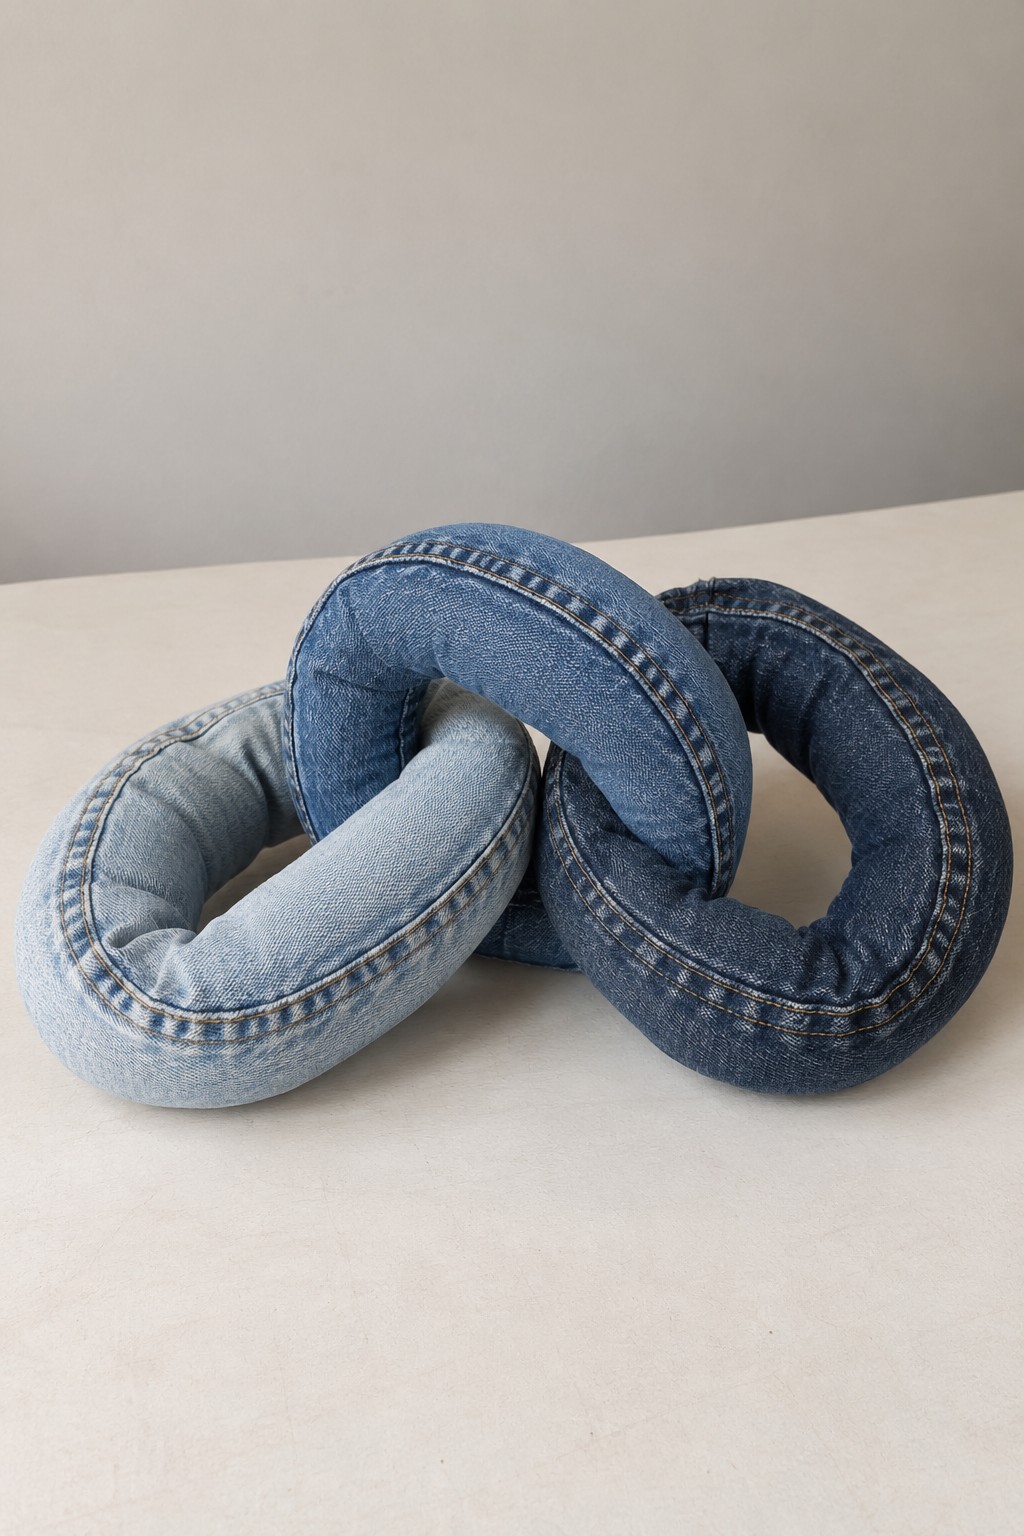
Different denim washes give a three link sculpture subtle changes in color. Use sections from damaged jeans, scrap stuffing, strong thread, a suitable needle, and scissors. Sew each long fabric strip into a tube, turn it right side out, and add enough filling to hold a rounded profile without making it rigid.
Close the first tube into a ring. Pass the second tube through that ring before joining its ends, then repeat for the third link. Secure each circular seam with small strong stitches and position the joins toward the underside. The finished chain sits well on a low shelf where its soft curves contrast with books or a hard surface. It is a decorative textile object rather than a handle or load carrying chain.
19. Create an Open Eye Sculpture with Cardboard and Cord
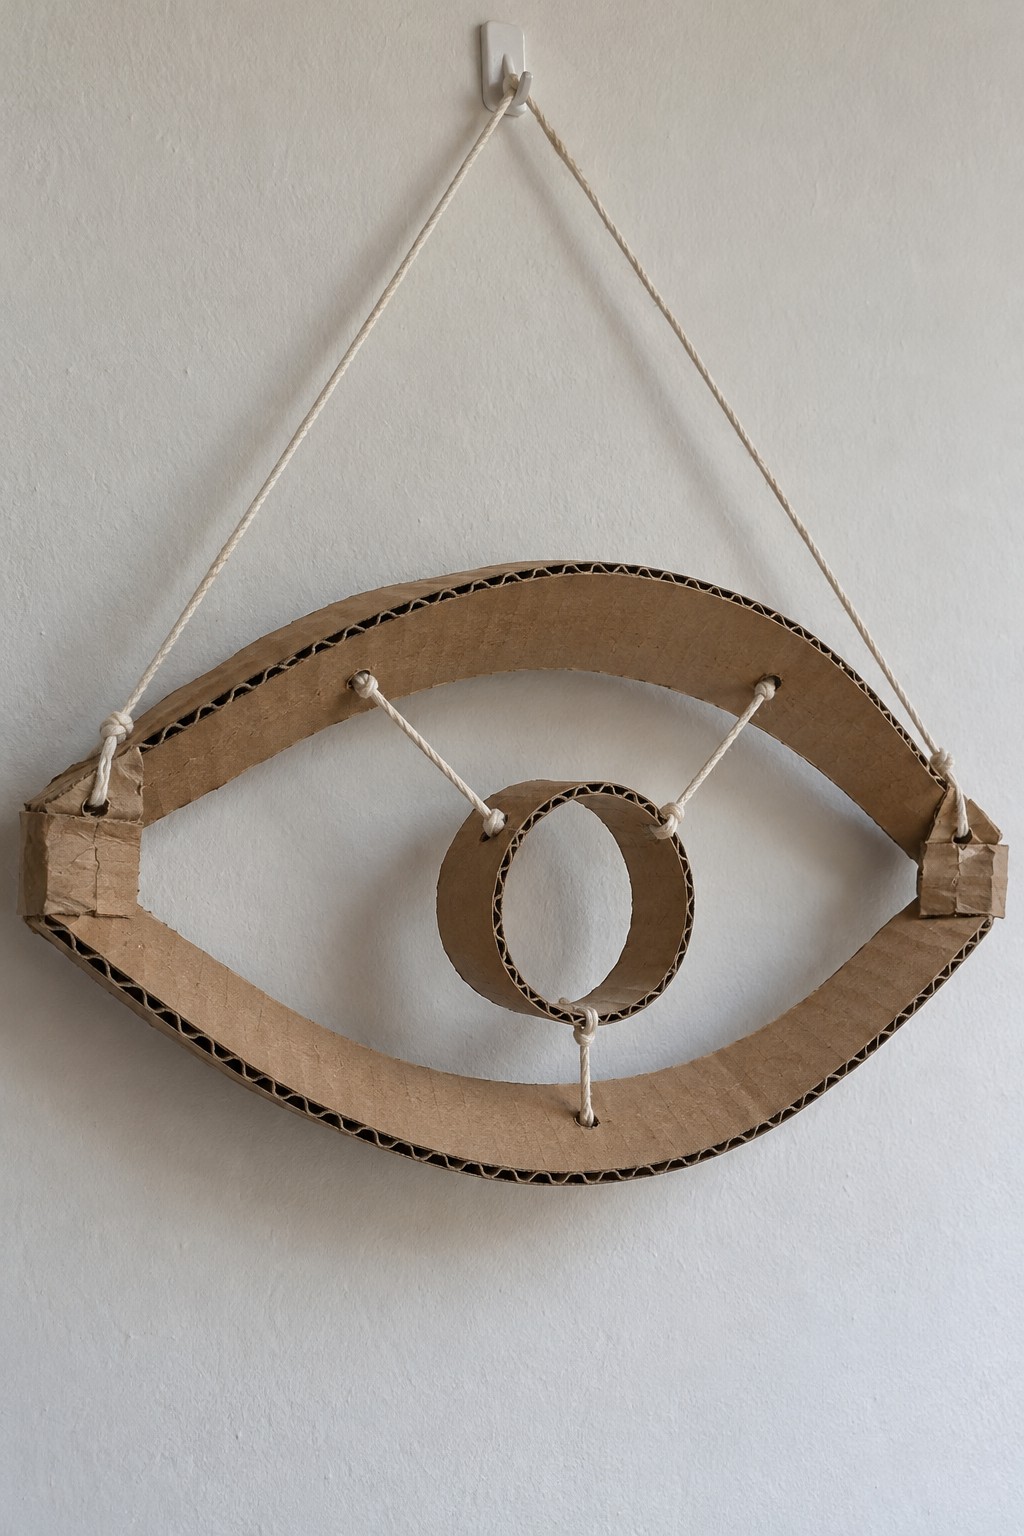
An almond shaped outline and a floating inner ring turn plain cardboard into a graphic wall piece. Gather corrugated packaging, PVA glue, cotton cord, a cutting mat, and suitable cutting tools. Draw a symmetrical eye template, then laminate several matching outlines so the broad upper and lower curves remain firm. Make a smaller oval ring for the center.
Add reinforcing card behind the cord holes before threading three short connections to hold the center ring in position. Adjust the tension gradually so the cardboard does not buckle. A separate hanging cord attaches at the outer corners. The spaces within the eye are part of the design, so preserve them instead of filling the center with extra decoration.
20. Stack Paper Cups into a Minimal Hourglass Column
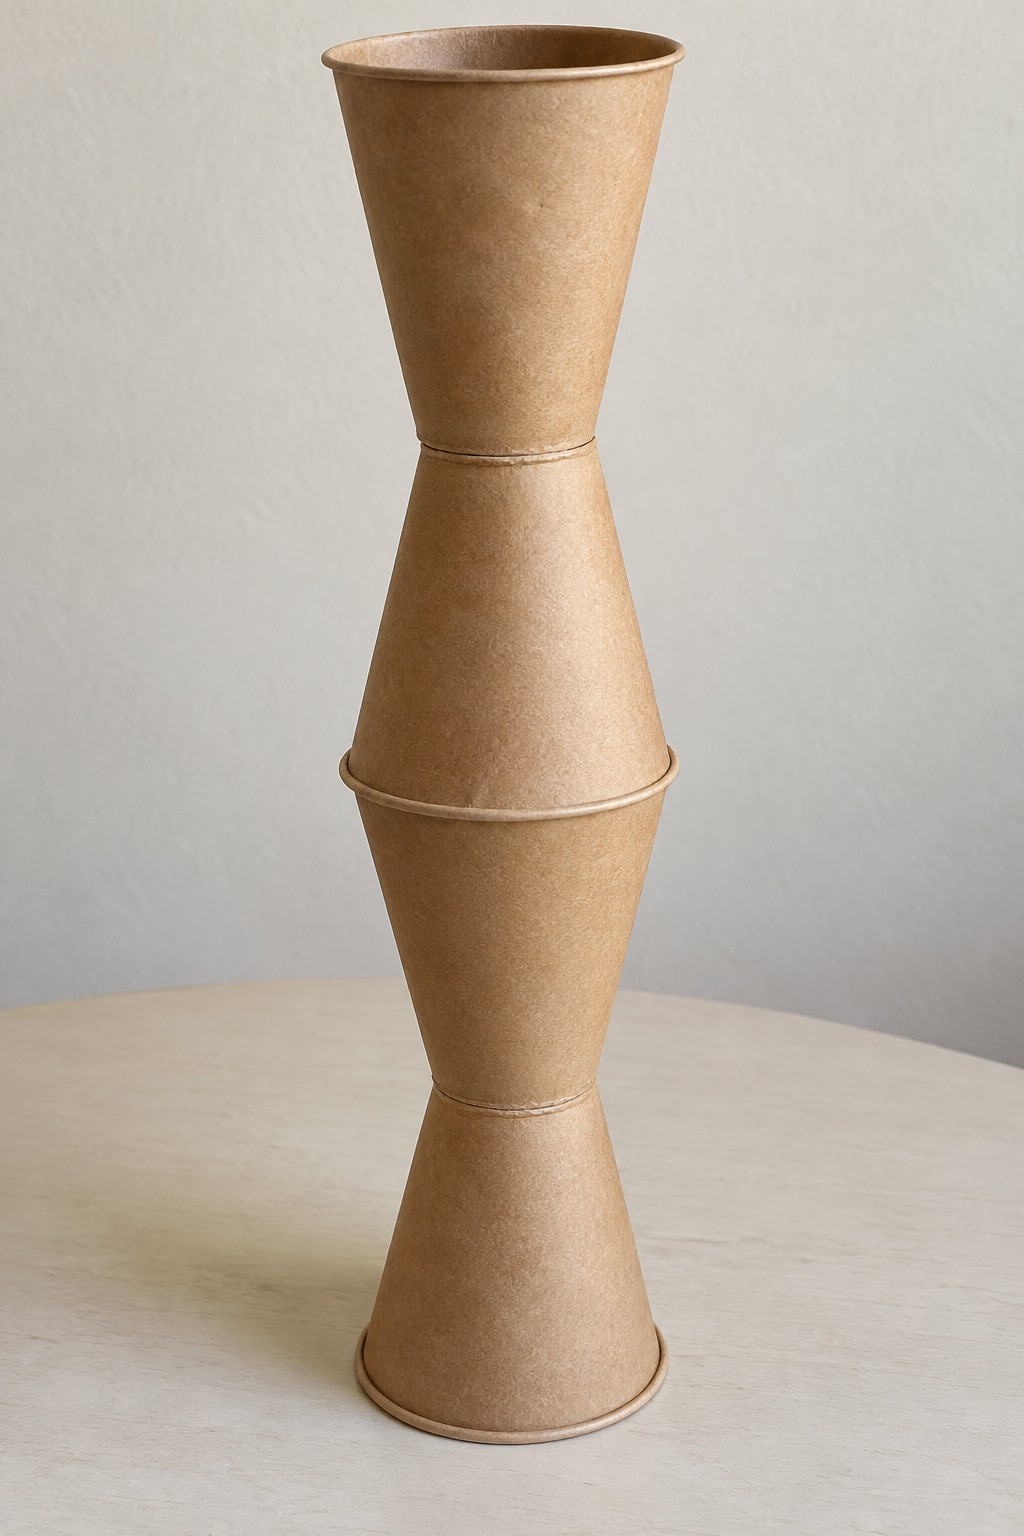
Four clean brown paper cups can make a restrained geometric sculpture through alternating curves. Choose cups of the same size with firm rims, plus thin recycled card and adhesive appropriate for the cup coating. Pair two cups at their narrow closed bases to form an hourglass unit, then repeat with the remaining two cups.
Join the two units at their touching wide rims, using a thin card disk inside that central seam to help maintain alignment. Hold the assembly upright while the adhesive sets and check that the bottom rim rests evenly on the table. Leave the kraft surface exposed to emphasize the silhouette. The open top may resemble a vase, but this lightweight artwork should remain empty and dry.
21. Build a Bottle Cap Ferris Wheel for a Shelf
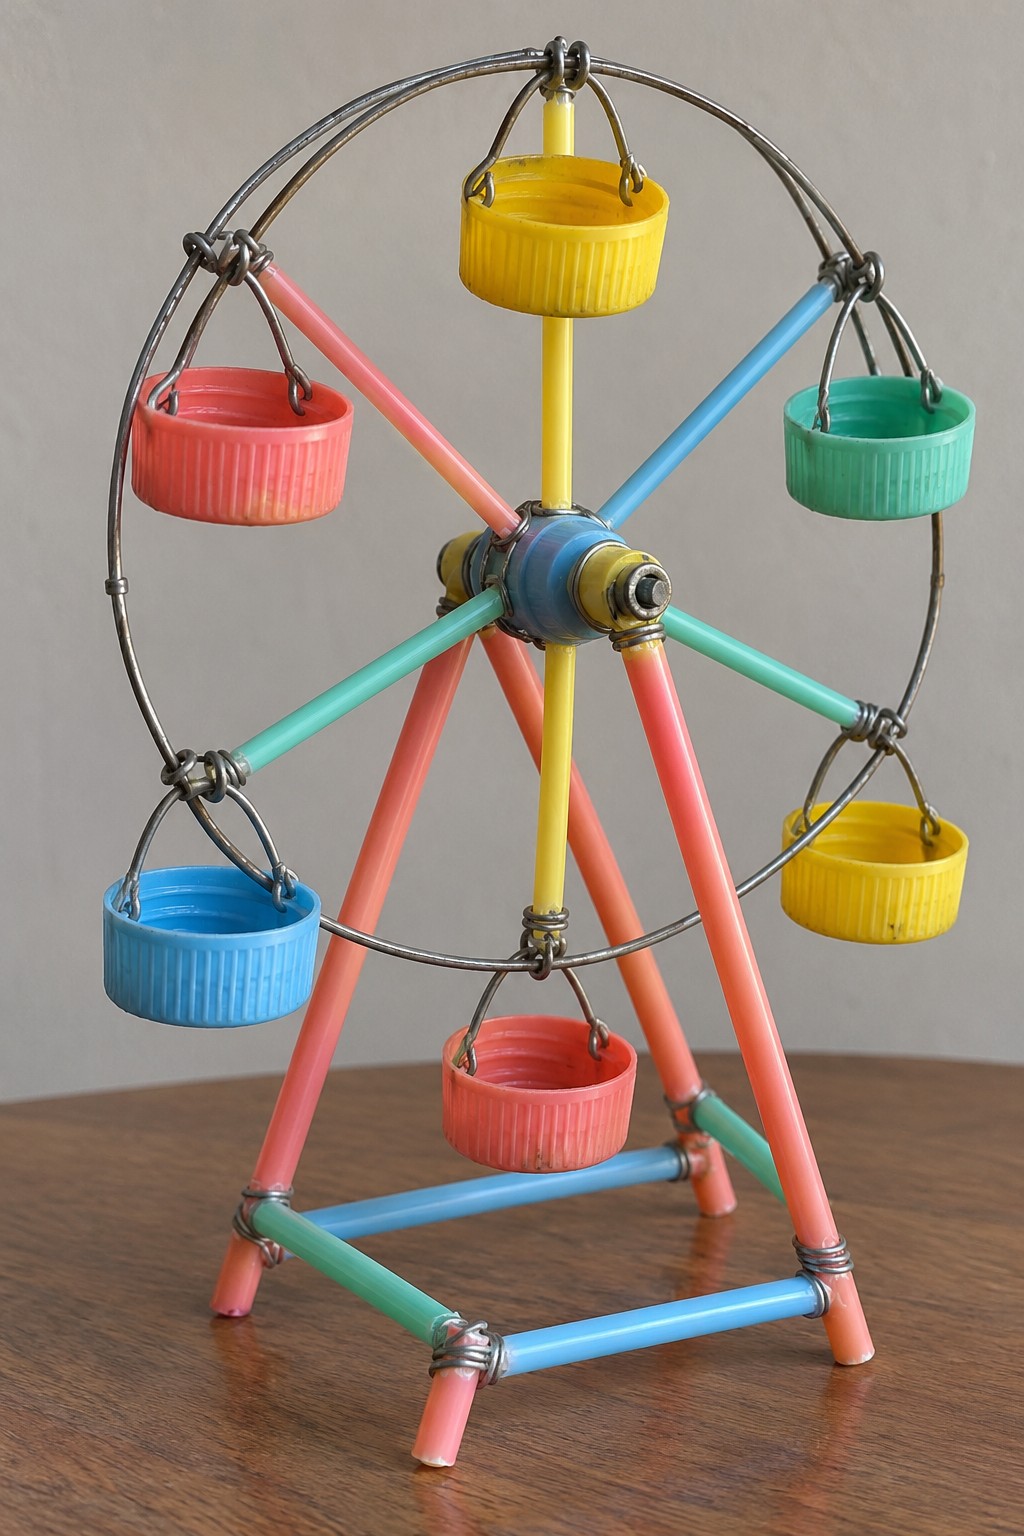
Bright bottle caps become tiny gondolas in a playful fairground sculpture. Gather six clean caps, a firm wire hoop, reused drinking straws, wooden skewers to stiffen the straws, a small central hub, soft binding wire, and pliers. Build a broad braced stand first, then arrange six evenly spaced spokes between the hub and rim.
Prepare paired holes in each cap and suspend it from a short wire handle, turning all wire ends inward. Secure the wheel at the hub so it stays balanced on the stand. A fixed display version is the most straightforward approach; a freely rotating axle requires additional clearance, retainers, and testing. Keep the finished model on a stable shelf and treat the small caps and exposed hardware as display components rather than toy parts.
22. Hang a Pastel Balloon Made from Packaging Strips
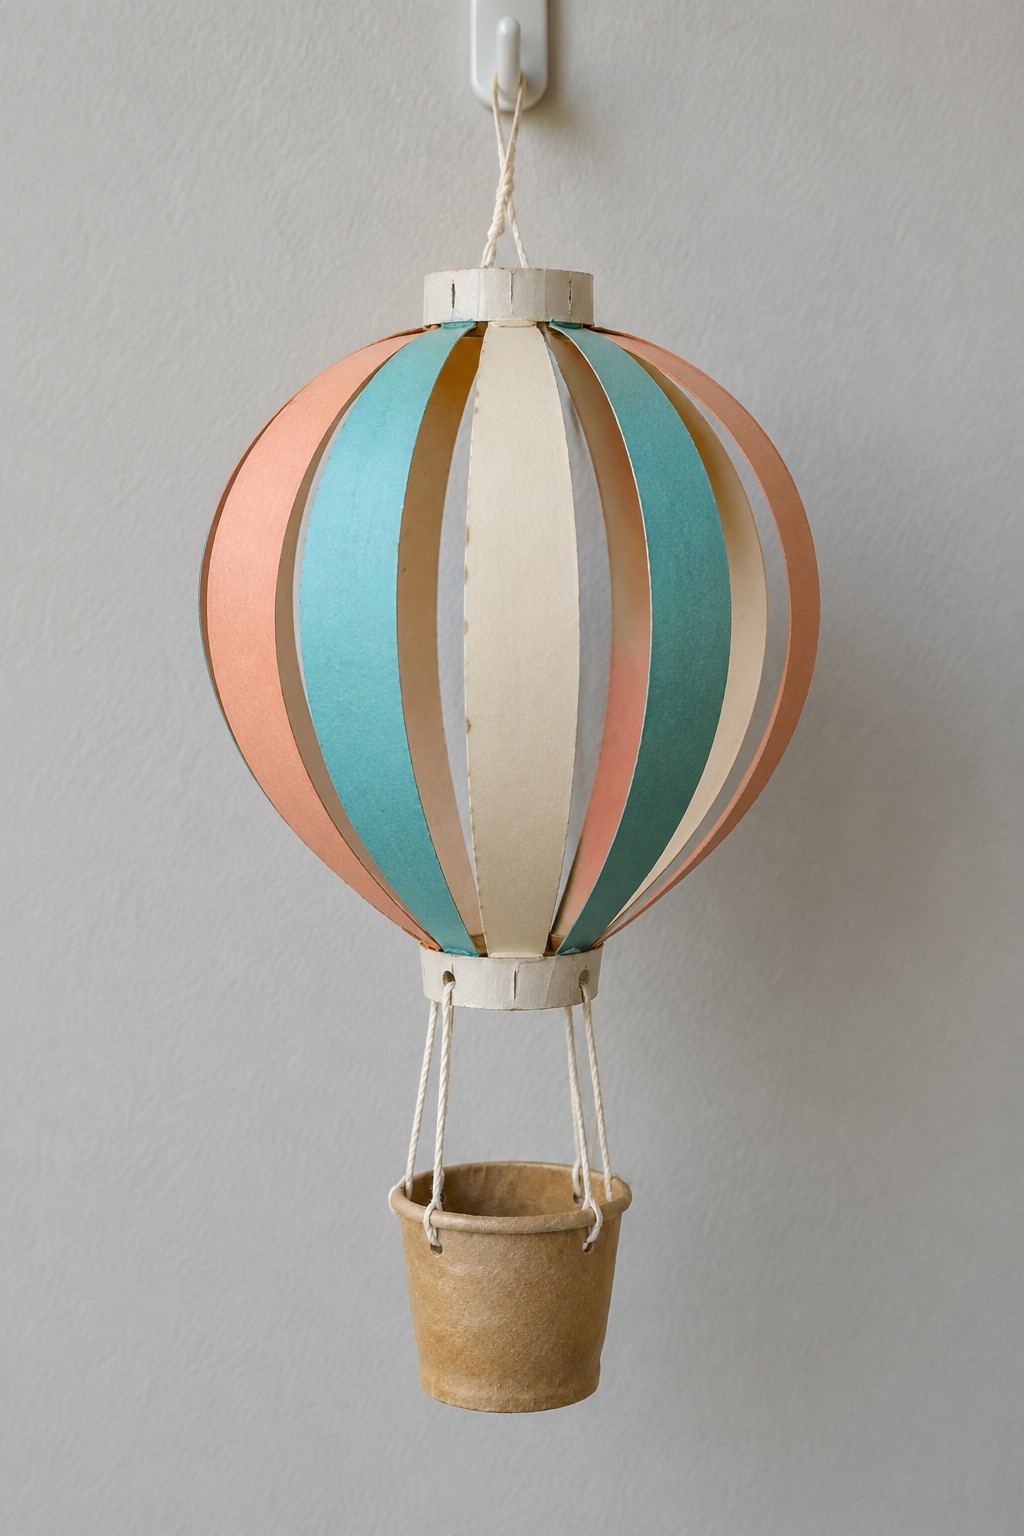
Curved strips of firm packaging card can form an airy balloon around an open center. Gather matching card strips, peach and blue acrylic paint, a small paper cup, cotton cord, PVA glue, and reinforced card collars for the top and bottom. Paint selected strips lightly, leaving others cream or natural, and let them dry before bending.
Space the strips evenly around the two collars, using matching lengths to keep the balloon symmetrical. Suspend the cup basket from three equal cords fixed through reinforced points on the lower collar. Run the upper hanging loop through a strong crosspiece inside the top collar rather than attaching it to one strip. Leave the basket empty so the delicate structure remains balanced.
23. Turn a Clear Bottle into a Retro Bead Display
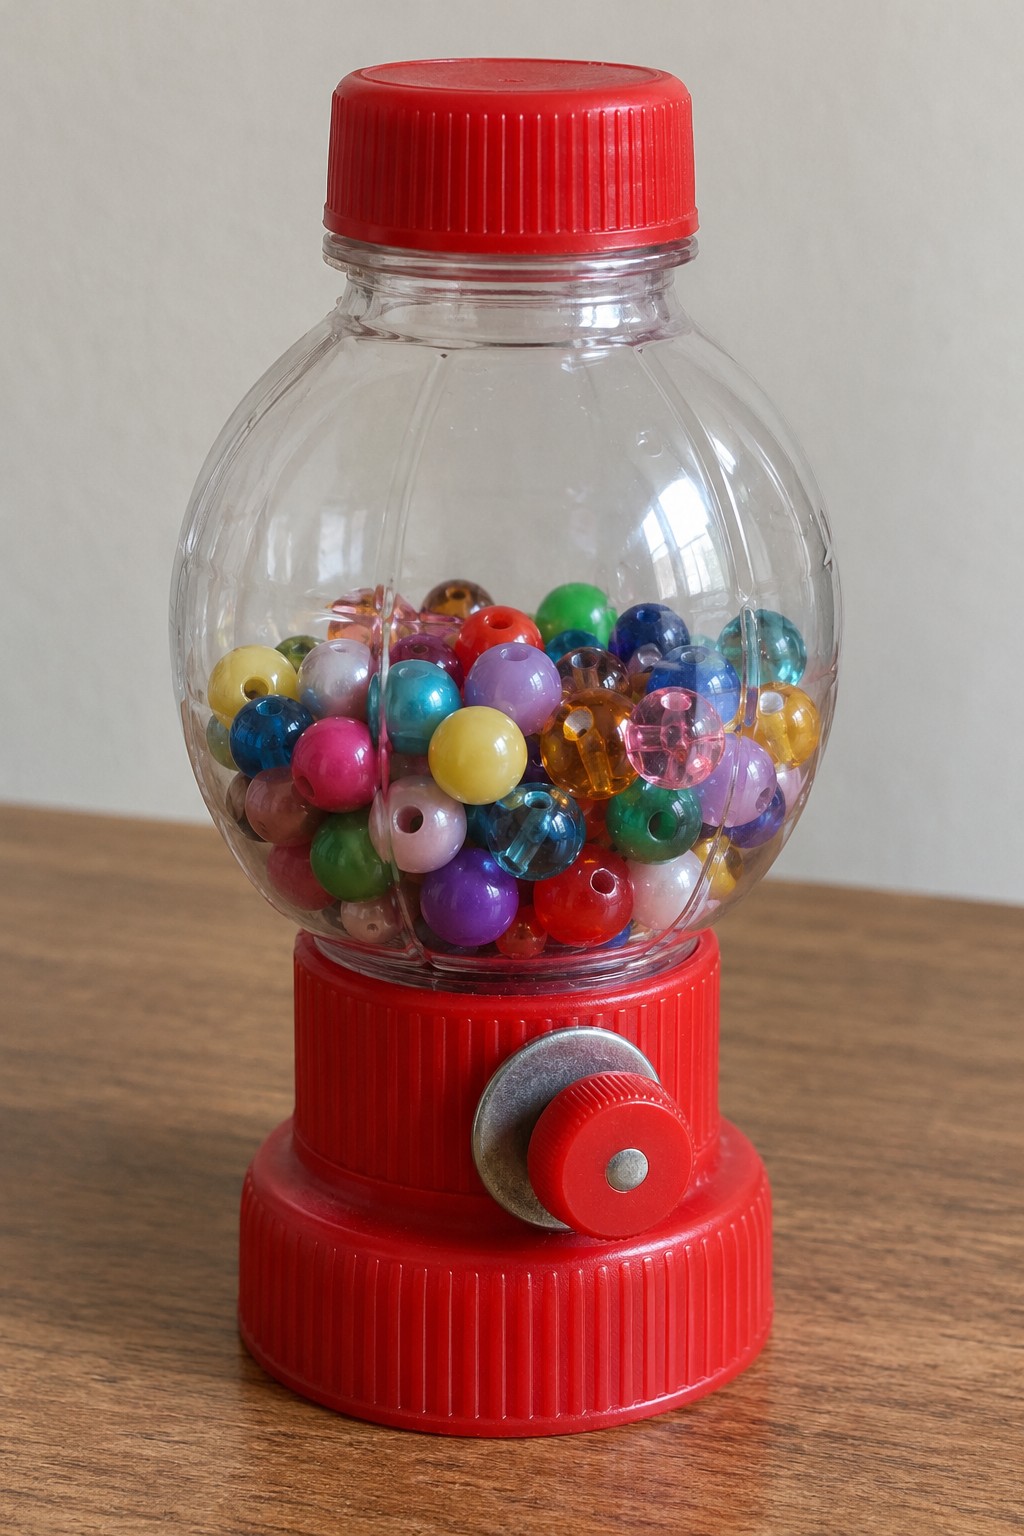
A clear rounded bottle and a group of red lids suggest a vintage gumball machine. Use a clean transparent container with its screw cap, larger salvaged lids for the base, colorful unwanted beads, and a small cap for the decorative front knob. Choose the parts by proportion: the broad bottom lid should keep the filled bottle from tipping.
Dry fit the base before bonding it with a plastic compatible adhesive, then attach the knob as a fixed detail. Fill the bottle with beads and close its top securely. The beads stay inside; there is no dispensing mechanism behind the knob. Keep it beyond young children's reach. If you prefer a practical container project, these upcycled storage ideas offer other ways to put reclaimed packaging to use.
24. Assemble a Miniature Gramophone from Everyday Packaging
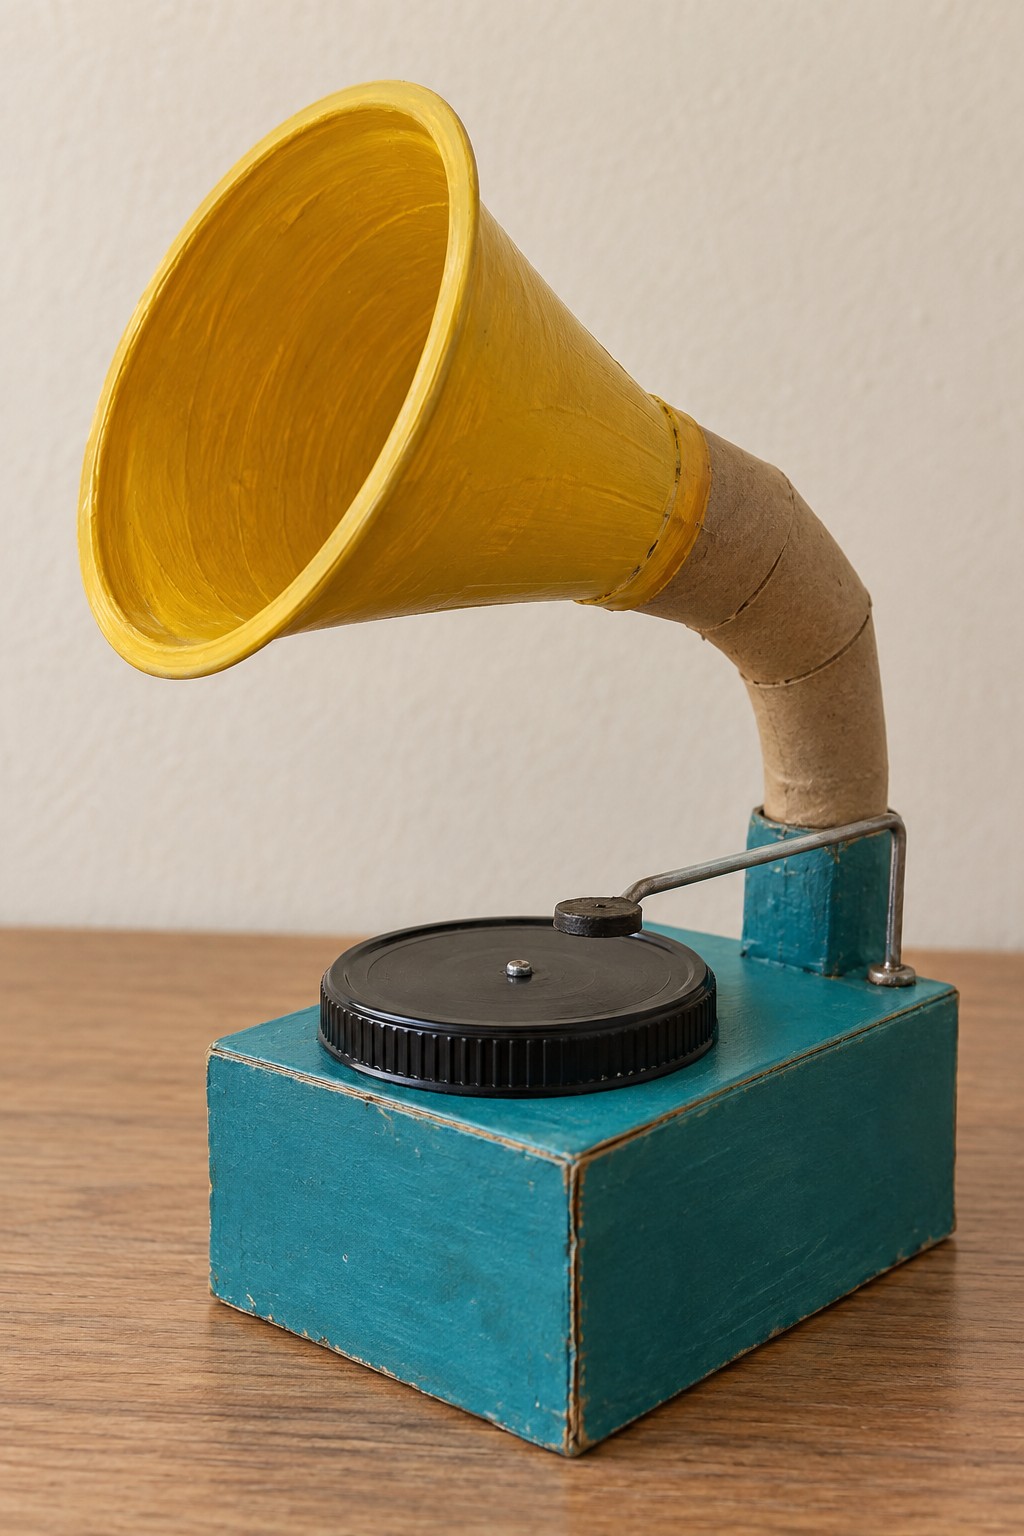
A yellow paper cup becomes the horn of a small gramophone sculpture, while a turquoise box gives it a bright base. Gather a sturdy small cardboard box, a paper cup, rolled kraft card, a black plastic lid, thin covered wire, PVA glue, and acrylic paint. Form the curved horn neck from short angled card sections and cover the seams with paper strips.
Paint the horn interior yellow and the box turquoise before assembly. Support the horn neck through a reinforced opening in the box, then attach the black lid and a bent wire tonearm with a small capped end. Keep the tonearm fixed to avoid loose pointed parts. This is a decorative model, so its success depends on the silhouette and recognizable details rather than working audio components.
25. Make a Suspended Saucer from Foil and Clear Packaging
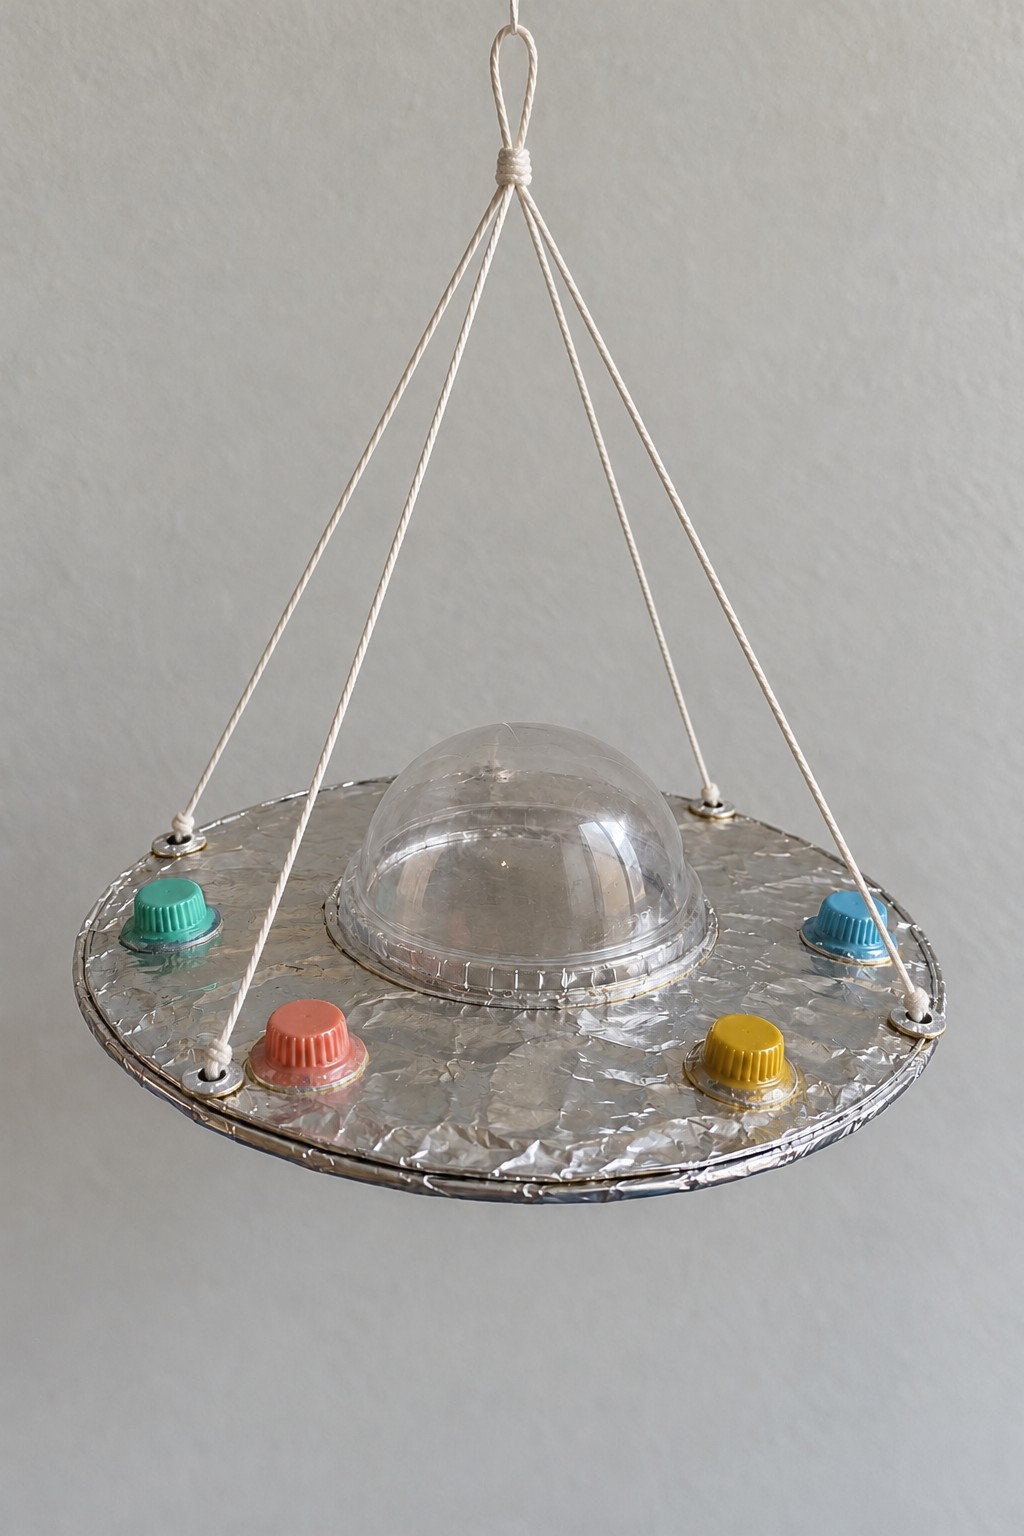
Clean foil and a clear packaging dome make a lightweight space themed sculpture. Use a rigid cardboard circle or sound disposable tray, reused foil, a transparent rounded lid, several colored bottle caps, cord, and suitable adhesives. Cover the disk neatly, turning the foil onto the underside so loose edges cannot catch or peel upward.
Attach the dome centrally and distribute the caps around it. Reinforce three evenly spaced suspension holes near the outer edge, then tie the cords to a common loop above the center. Adjust their lengths until the saucer hangs level. The clear dome and metallic surface provide enough visual interest without electrical lights. Keep this hanging piece away from heat and areas where someone could walk into it.
26. Stack Blue Bottle Bases on a Visible Metal Spine
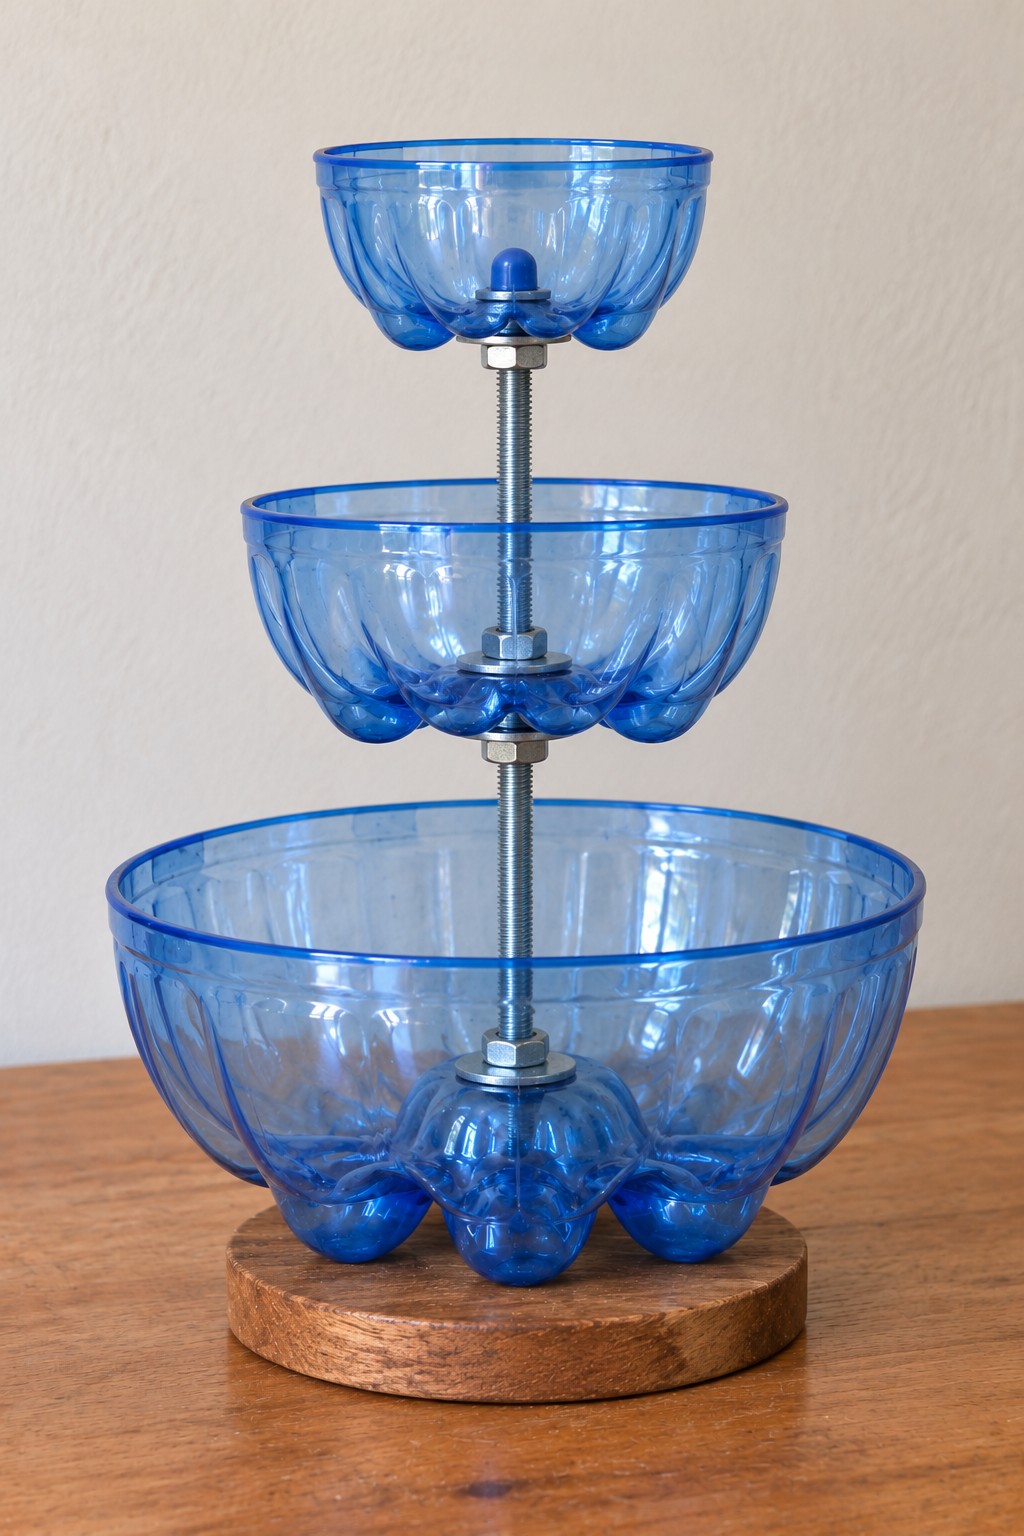
Three blue bottle bases become a stepped sculpture when the support is made part of the design. Gather PET bottle bottoms in three sizes, a small sound wooden base, a threaded metal rod, broad washers, nuts, a protective end cap, and suitable rim edging. Cut and finish each bowl separately, preserving the recognizable molded feet at its bottom.
An experienced adult should prepare the centered holes with the material firmly supported. Secure the rod through the wooden base with a recessed lower fixing, then support each bowl between washers and nuts, adding soft protective washers against the plastic. Tighten only enough to hold the position without crushing it. Cap the upper rod end and test the empty sculpture for wobble. Its drilled bowls are decorative and are not intended to hold water or serve food.
27. Arrange Damaged Record Sections into an Expanding Rhythm
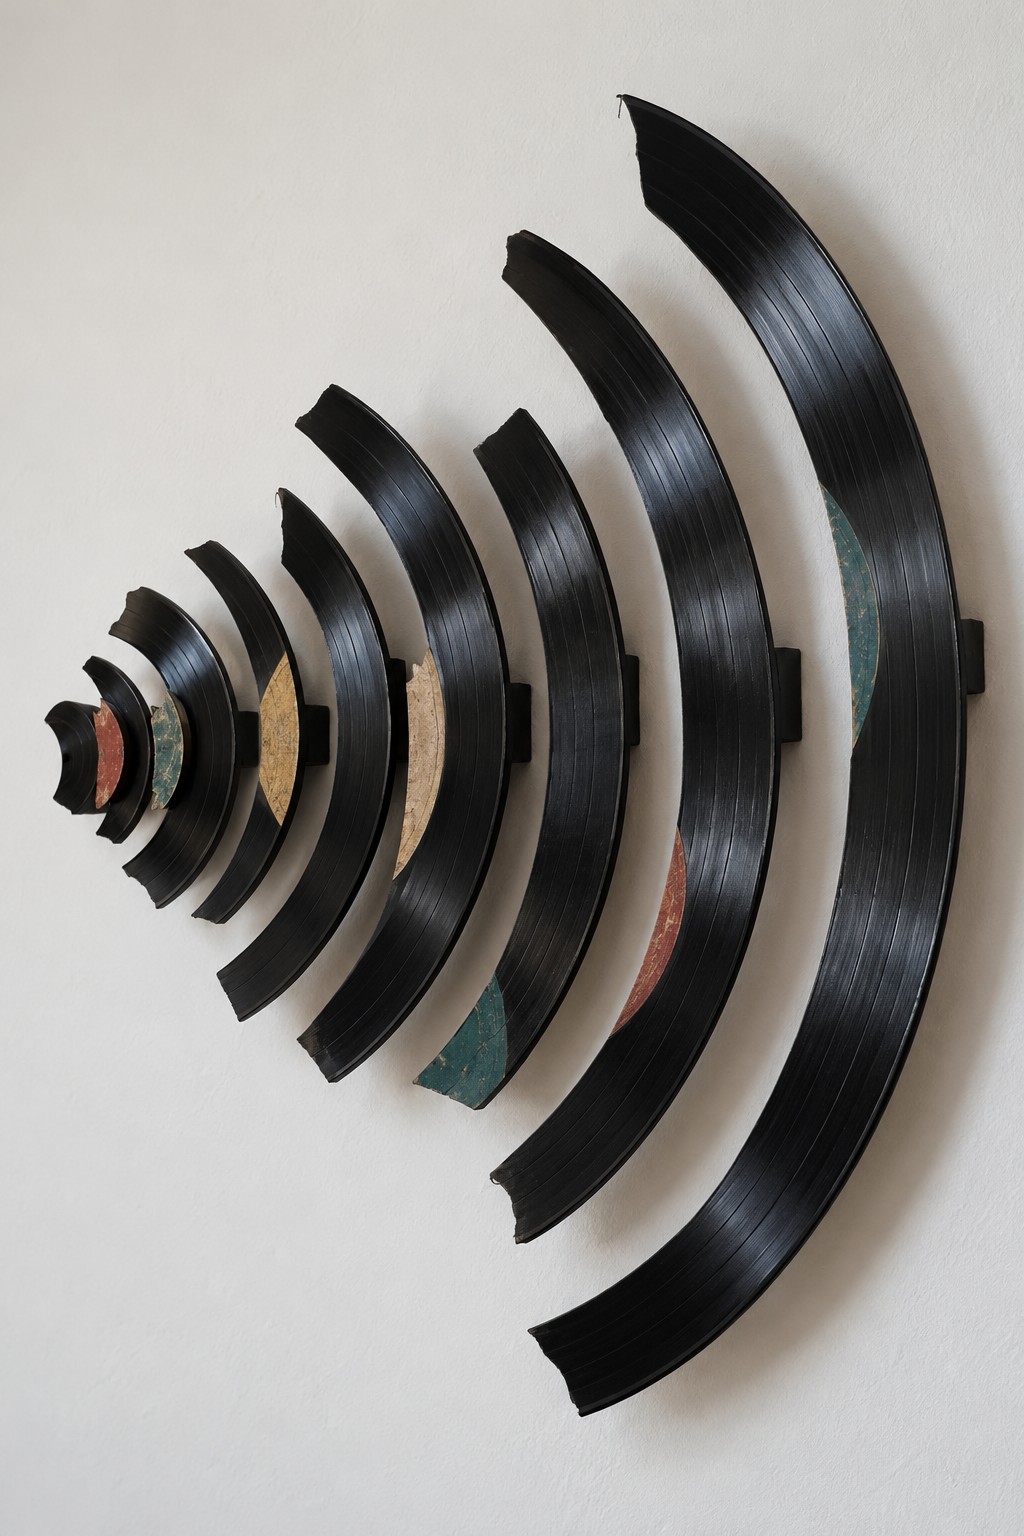
Repeated record curves suggest sound spreading across a wall. Use unwanted damaged vinyl records, safely prepared curved sections, a paper layout template, small mounting blocks, and a concealed supporting rail or suitable individual fittings. Arrange the arcs from small to large, keeping a consistent visual gap so the rhythm is clear.
Record material is brittle, and the long curved cuts call for experienced preparation rather than casual hand snapping. Keep the sections at the scale your actual records allow, finish every cut edge, and do not heat vinyl to bend it. Attach the sections securely to their spacers with a compatible system, then fix the supporting structure to the wall. Leave enough distance from passing hands to protect both the artwork and its edges.
Help the Finished Artwork Last
Choose the display location before adding a final finish. Paper, cardboard, and fabric pieces usually belong in dry rooms away from persistent humidity. Dust delicate surfaces with a soft brush, and inspect hanging cords, stitched loops, and glued components occasionally. A clear coating cannot compensate for a weak joint or make every reclaimed material suitable for outdoor use.
Before hanging a piece, weigh the completed assembly and match the fittings to both its weight and the wall or ceiling construction. Keep valuable materials reversible where practical, using ties, screws, or replaceable inserts. Start with a small version of the design you like, resolve its joints and balance, and only then consider making a larger piece.


Leave a Reply