
Table of Contents
- Prepare Natural Materials and Plan the Build
- Clean, Dry, and Sort the Materials
- Choose Tools for the Actual Material
- Match the Connection to the Job
- Choose a Project That Fits Your Space and Experience
- Give Each Material a Clear Decorative Role
- Plan Cleaning and Daily Use Before Assembly
- Natural Materials Become a Decorative Object
- Choose Your Project
- 22 Natural Material Designs to Explore
- 1. Rustic Bark Slice Branch Wall Art
- 2. Miniature Bark and Twig House Decor
- 3. Woven Twig and Pinecone Decorative Bowl
- 4. Bark, Twig, and Pinecone Mirror Frame
- 5. Hanging Twig Mobile with Stones and Pinecones
- 6. Painted Bark Mosaic with Twig Frame
- 7. Balanced Stone and Branch Table Sculpture
- 8. Twig Sunburst Wall Clock
- 9. Branch Photo Display Tree with Stone Base
- 10. Pinecone Topiary with Natural Stone and Bark Base
- 11. Tiered Wood Slice Plant Stand
- 12. Rustic Branch Ladder with Mini Bark Planters
- 13. Rustic Twig Cube Display with Jute-Wrapped Joints
- 14. Layered Pinecone Pendant Shade Design
- 15. Bark-Covered Desktop Organizer
- 16. Bundled Twig Pedestal with Wood Slice Top
- 17. Bark-Framed Twig Grid Wall Art
- 18. Wood Serving Tray with Branch Handles and Dried Flower Corners
- 19. Twig and Pinecone Radial Wall Decor
- 20. Two-Tier Twig Fruit Stand with Pinecone Accents
- 21. Hanging Pinecone Curtain Ornaments with Braided Cord
- 22. Bark and Twig Table Runner with Botanical Motifs
- Care for the Finished Materials
Prepare Natural Materials and Plan the Build
Decide first whether the piece will decorate a surface, hold everyday items, hang overhead, or support a planter. That decision determines its backing and connections. A pinecone glued to a panel is a decorative attachment; a branch beneath a shelf carries a load. Sketch the outline and position the main parts before buying hardware. Measure the actual branches, slices, and objects the finished piece will hold, because irregular natural material cannot be treated as uniform timber.
Clean, Dry, and Sort the Materials
Use legally gathered fallen material or prepared craft stock, leaving bark on living trees intact. Brush away loose dirt and examine each piece for decay, mold, insects, shedding surfaces, and splits. Reject damaged material for supporting parts. Clean stones separately and let them dry completely before bonding. Spread branches and bark where air can circulate, keeping them apart from finished household textiles while they are being assessed. For a thick wood slice, check that the timber is sufficiently dried and stable for the project before attaching decorations.
Fresh wood can shrink and develop cracks as it dries. Purchased dried slices are a more predictable starting point when flat platforms and firm joints matter, although even prepared rounds need inspection. Avoid a universal oven or microwave treatment for mixed gathered materials. Dry flowers in small, airy bundles for dimensional arrangements, or press them when the project needs flat motifs. Keep dried botanicals away from damp storage; apply paint or protective finishes only after the material and bonding surfaces are ready.
Choose Tools for the Actual Material
A ruler, pencil, square, and paper layout help transfer positions accurately. Pruning shears can trim slender twigs; a fine-tooth saw with a secured workpiece is better for thicker branch sections. Use a sanding block to smooth handled edges without removing all the natural texture. Projects with mechanical joints may also need a drill with bits matched to the wood and chosen connections, clamps, a driver, and a wrench for accessible threaded hardware. Eye protection belongs with cutting and drilling, and dust control is needed when sanding.
Small pliers and wire cutters help make retaining ties for mobiles and botanical accents. Scissors, a needle, and cord are useful for liners and fabric details. A glue gun may hold compatible lightweight embellishments, but its nozzle and adhesive can burn skin. Select a wood adhesive for closely fitted bare-wood joints and a material-compatible adhesive for stone-to-wood decoration. Read application, ventilation, protection, and curing instructions for the exact product; one glue is not interchangeable across every surface.
Match the Connection to the Job
Dry-fit the parts and mark their locations before applying adhesive. Remove dust at the joint, keep wood bonding areas free of finish where the product requires it, and hold the assembly in position for its specified curing period. An initial grip is not the same as full strength. Bare branch ends meet a platform on end grain, so a small glued contact alone is a poor basis for a loaded stand. Use a properly designed mechanical connection, with pilot holes and remaining wood thickness planned around the hardware.
Apply decorative adhesive to concealed contact areas and press each accent into its prepared position. Cord wraps can hide a joint and add texture, but they do not establish its load capacity. For wall pieces, attach hangers to the solid backing. For mobiles, use secure enclosures or retaining loops for heavier objects. Build a sample connection with spare material before committing to an arrangement; its purpose is to check fit and handling, not to assign a structural rating.
Choose a Project That Fits Your Space and Experience
Start with a need and a display location. A wall panel uses little shelf space, a catchall needs a stable tabletop, and a botanical holder needs access for changing its contents. Measure the available area, including door movement, nearby objects, and the space required to handle the piece. Choose materials whose shape supports that purpose: flat bark suits a panel, a forked branch suits a photo display, and flexible weaving stock suits a basket.
For a first project, choose a light ornament on an existing rigid backing or a small organizer with a ready-made core. Move toward raised stands, suspended objects, and working light fittings only when their supporting and installation requirements can be resolved. Compare the complete preparation effort, including cleaning, cutting, finishing, curing, and upkeep. Free gathered materials may still require more work and additional hardware than prepared craft stock.
Give Each Material a Clear Decorative Role
Choose one dominant texture and use the others to support it. A rough bark background can carry a fine twig pattern; smooth pebbles can punctuate it; dried flowers can supply a small color accent. Repeat a shape, direction, or color to connect the parts without covering every surface. Place the largest pieces first and leave enough empty space for the outline to remain readable.
Check the arrangement from its intended viewing distance before fixing it. A tabletop object should look coherent from several sides, while a wall piece needs a clean silhouette against its background. Paint can link natural textures to the room, but test it on spare material before committing. Keep handled surfaces smoother than purely decorative areas, and avoid fragile additions where people will grip or move the object.
Plan Cleaning and Daily Use Before Assembly
Make liners, flower containers, and other frequently cleaned parts removable. Keep bark and dried botanicals away from water contact, and use a separate watertight insert for fresh stems. Food displays need appropriate washable contact surfaces. Dry plant material belongs away from open flames and heat sources; a decorative shade requires a lighting-specific assessment before being used with a working fixture.
Before completing the piece, check how you will reach its fixings, dust its corners, and store it. Allow adhesive and finish to cure according to their instructions before adding contents or mounting it. Inspect stability on the actual display surface and examine hangers for the full finished weight. These checks help select a workable project, but they do not establish an unverified structure's load capacity.
Natural Materials Become a Decorative Object
Wood rounds and bark-covered branches form a tiered display using metal connectors and separate feet. Establish the supporting structure before arranging the natural textures. The same order works for panels, organizers and tabletop pieces, with joints and hardware chosen for each object.
22 Natural Material Designs to Explore
Choose a natural-material project around its purpose: compose a wall panel, organize small objects or make a supported display. Match the design to your tools and experience, then prepare the materials before planning their connections and finish.
1. Rustic Bark Slice Branch Wall Art
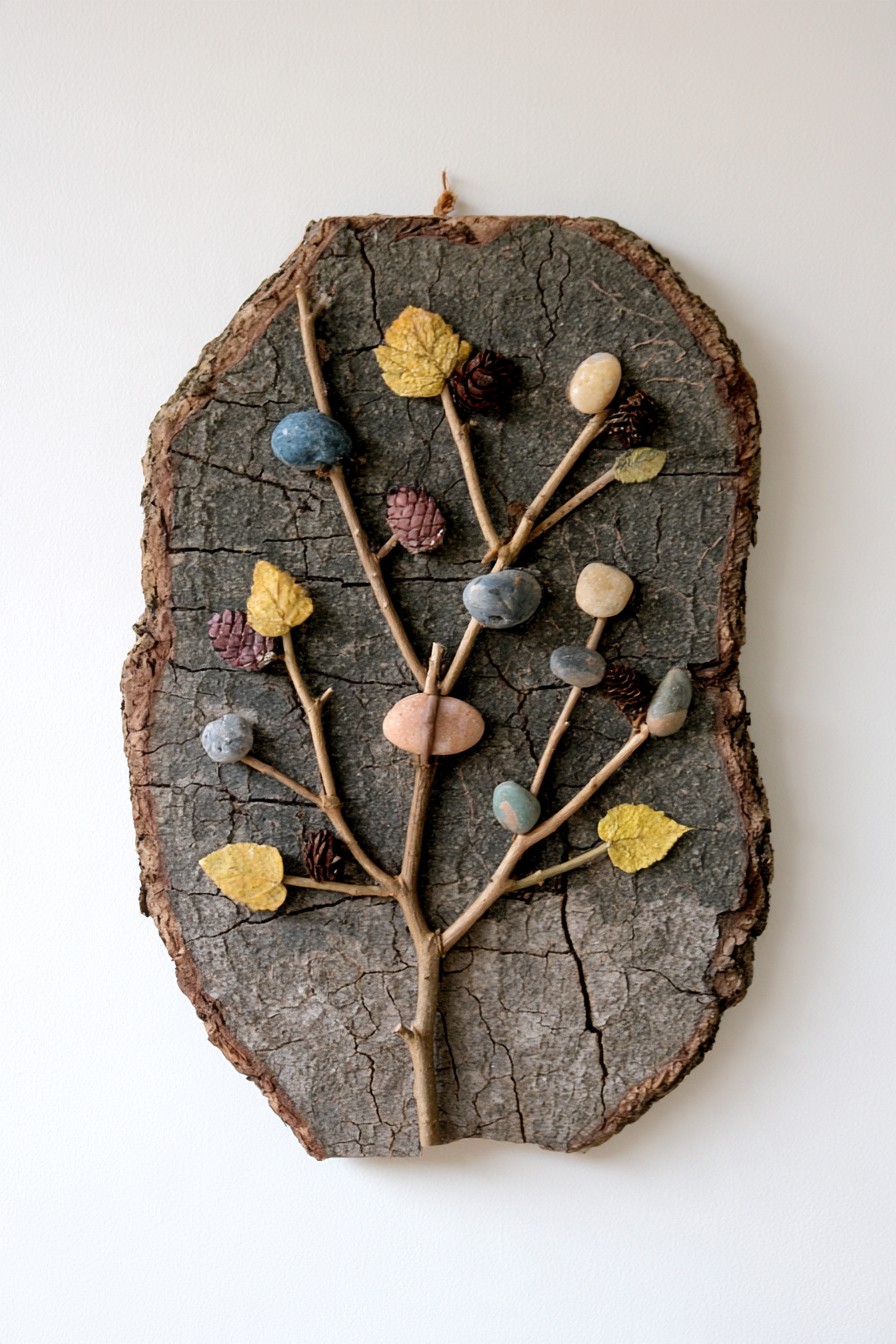
A branching twig spreads across a large, dark bark panel, with pale and colored pebbles positioned along its offshoots. Small yellow leaf shapes brighten the textured background without covering it. This works as a narrow wall accent because the branch establishes a single upward movement. The bark's irregular silhouette provides its own border, so an additional outer frame would change the character of the design.
Arrange the branch first, then place the smaller motifs where its forks create natural stopping points. Support the bark on a rigid panel cut slightly inside its outline, attaching the hanger to that backing. Bond stones directly to dependable contact areas with an adhesive intended for both materials. Colored leaf accents can be made from dried foliage or cut fiber shapes; choose the method that will hold up to dusting. Leave space to clean around each pebble.
2. Miniature Bark and Twig House Decor
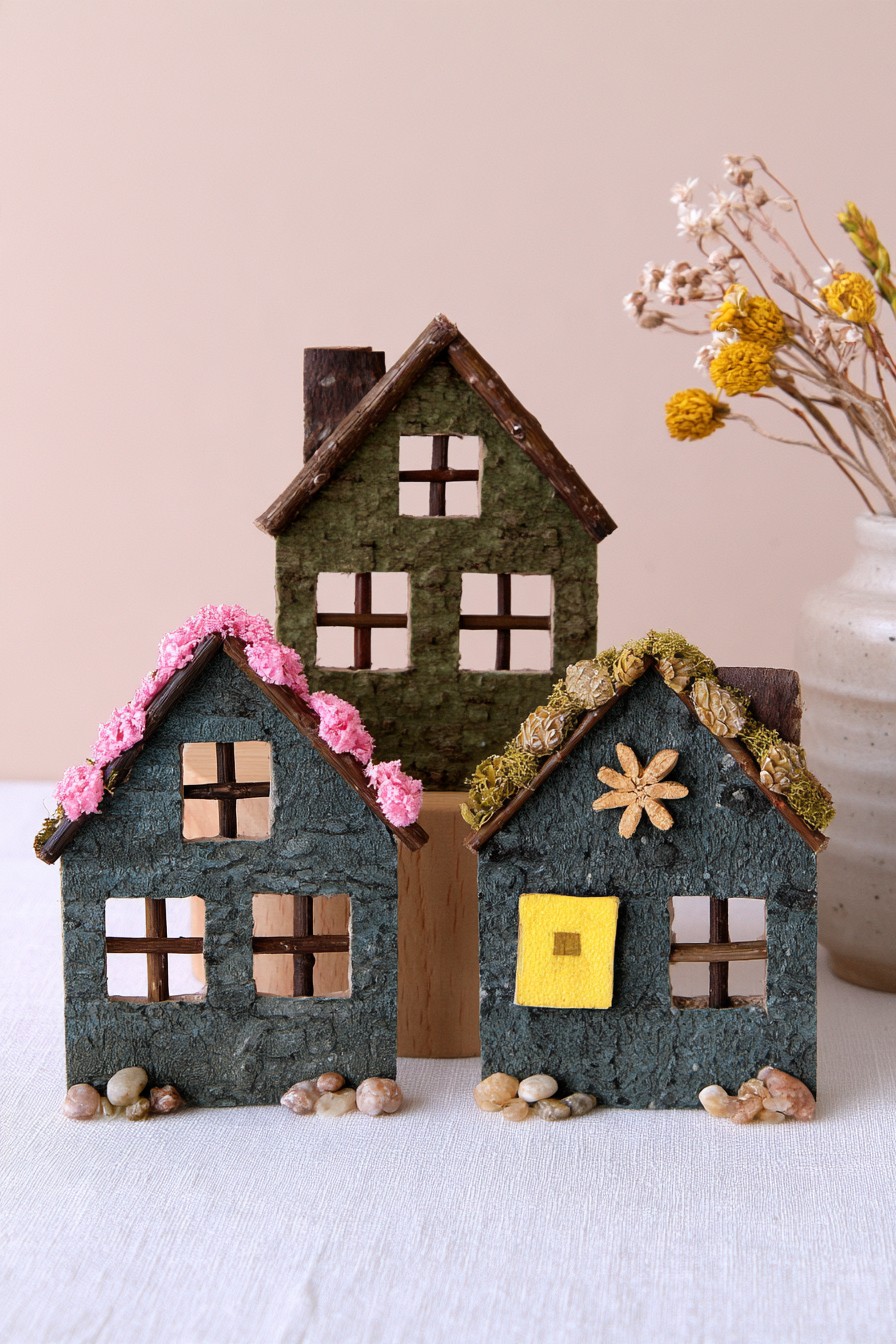
Three house silhouettes combine textured walls with contrasting roof edges and pale window panes. The taller house at the back gives the group depth, while pebbles along the lower edges connect the smaller houses visually. This is a shelf display with a clear architectural outline, not a collection of separate bark fragments. Pink, olive, and dark gray finishes let the same construction produce different personalities.
Cut the house cores from a firm sheet material before applying bark or another textured covering. Make the doors and window shapes separately so their edges remain readable against the rough surface. Add the roof trim after checking its alignment on both sides. Mount each house on a flat base if it will stand freely, keeping the heavier covering low. Paint a scrap first: a thin coat may retain texture, while a thick one can fill the small cracks.
3. Woven Twig and Pinecone Decorative Bowl
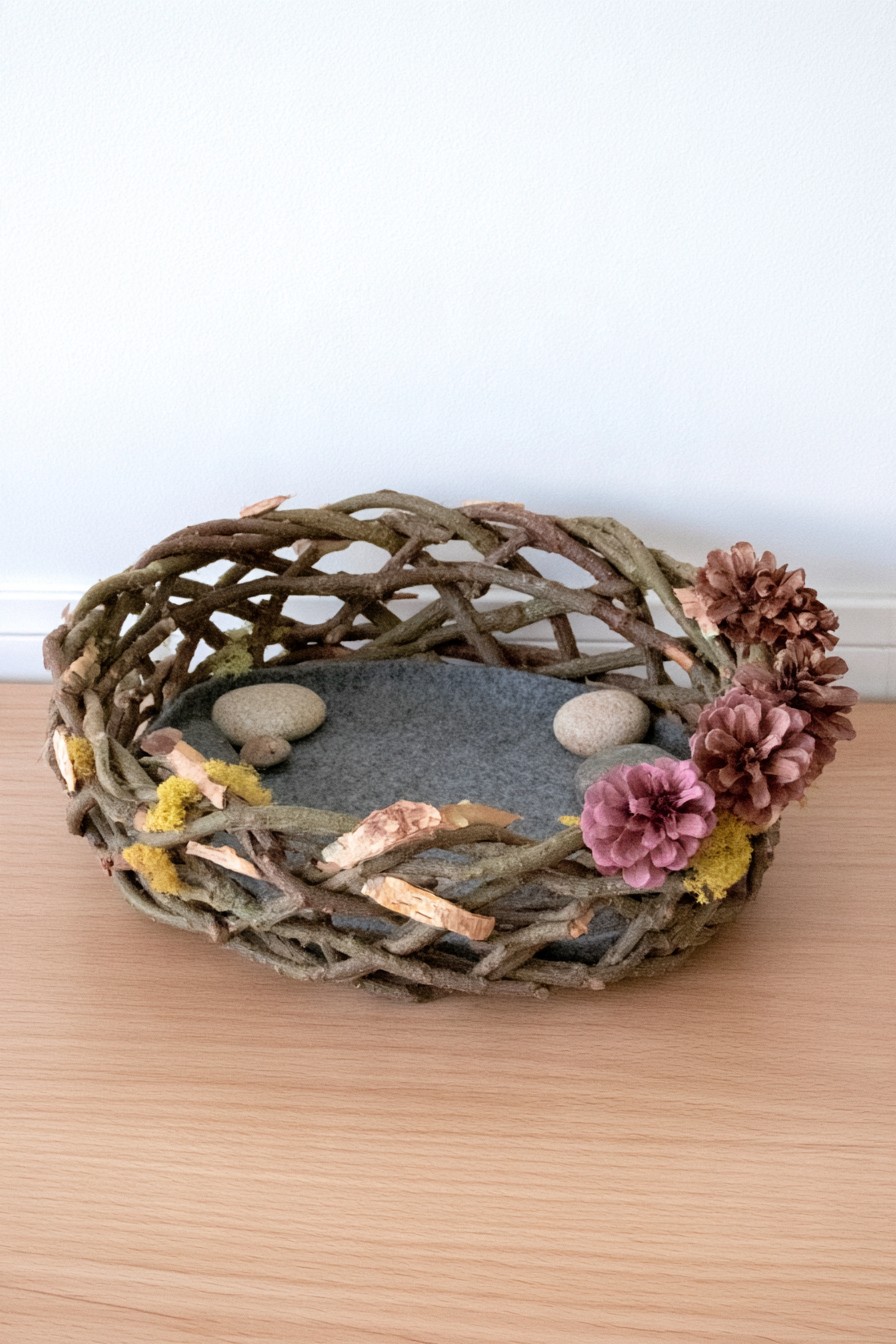
The twig bowl has an open, loosely crossing rim surrounding a gray insert. Pink pinecone clusters and small colored accents occupy one side, leaving much of the weave visible. It is well suited to a console as a decorative catchall with a soft base. The contrasting insert is important: it gives small objects a surface to rest on and separates them from the rough twig framework.
Choose flexible craft willow or similar prepared weaving material if you want to build the basket; brittle dry twigs may snap when bent. Establish the bottom and weave the sides around a form, tying selected intersections where necessary. Fit a removable felt liner after the basket holds its shape. Attach the clustered decoration to the outer rim, leaving the main opening unobstructed. Use it for lightweight accessories and keep it out of food service, since craft coatings and gathered material are not a documented food-contact surface.
4. Bark, Twig, and Pinecone Mirror Frame
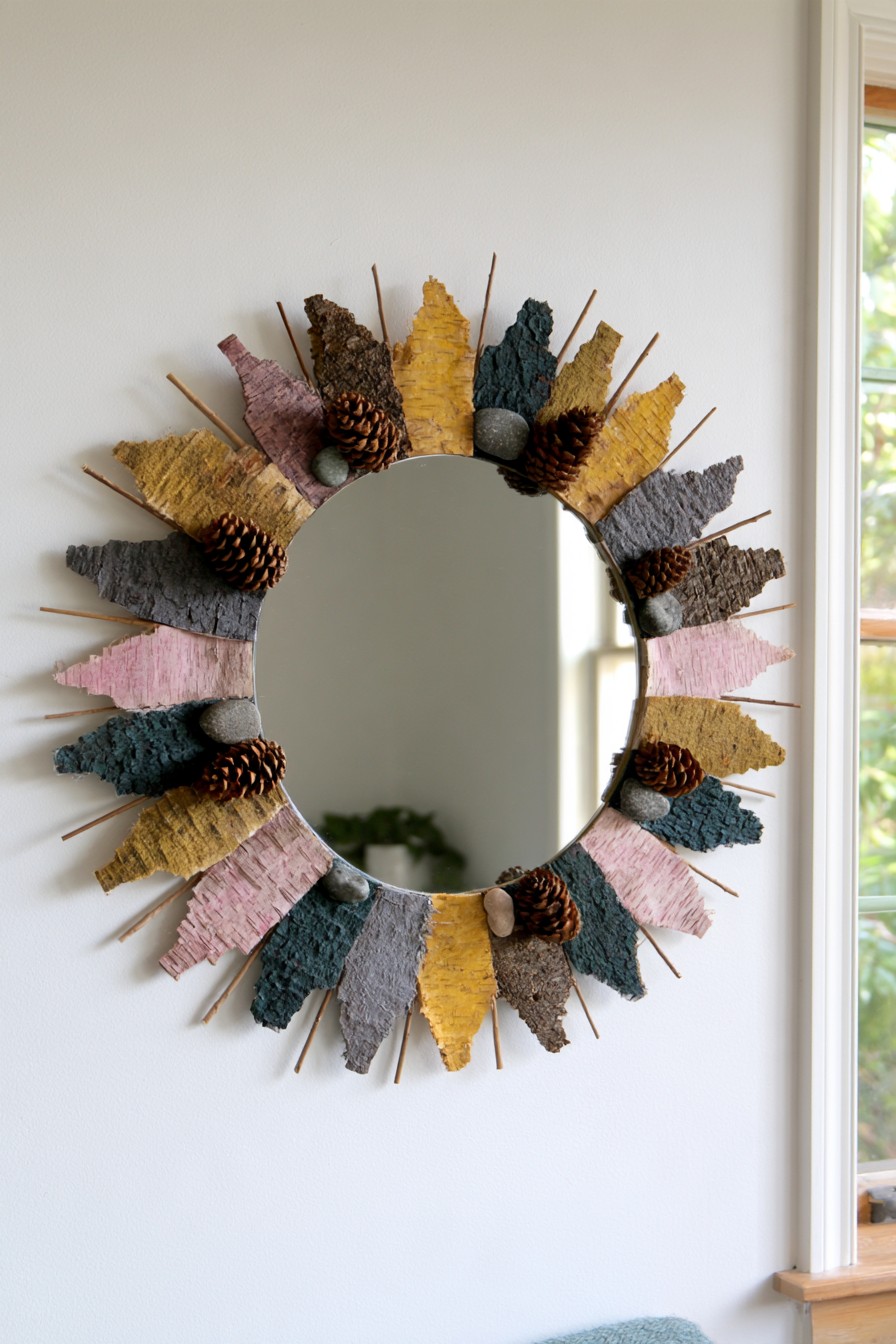
Short textured strips radiate around the round mirror, alternating muted pink, yellow, gray, and dark tones. Pinecones and small stones create occasional interruptions in the pattern. This is a more colorful interpretation of natural-material decor than the first bark panel, but the repeated radial direction keeps it orderly. It suits a wall where the reflection can remain clear and the textured edge can be appreciated at eye level.
Use an existing framed mirror or a backing system designed to support the glass. Lay out the longest radial pieces, then insert shorter ones between them. Prepare the colored strips from clean bark or fiber covered craft pieces, choosing materials that can be securely attached to the backing. Keep stones supported by the rigid frame, not a fragile outer strip. Choose a mirror-compatible mounting method, and keep adhesive and embellishments off the reflective area. Hang the complete assembly using hardware matched to its total weight.
5. Hanging Twig Mobile with Stones and Pinecones
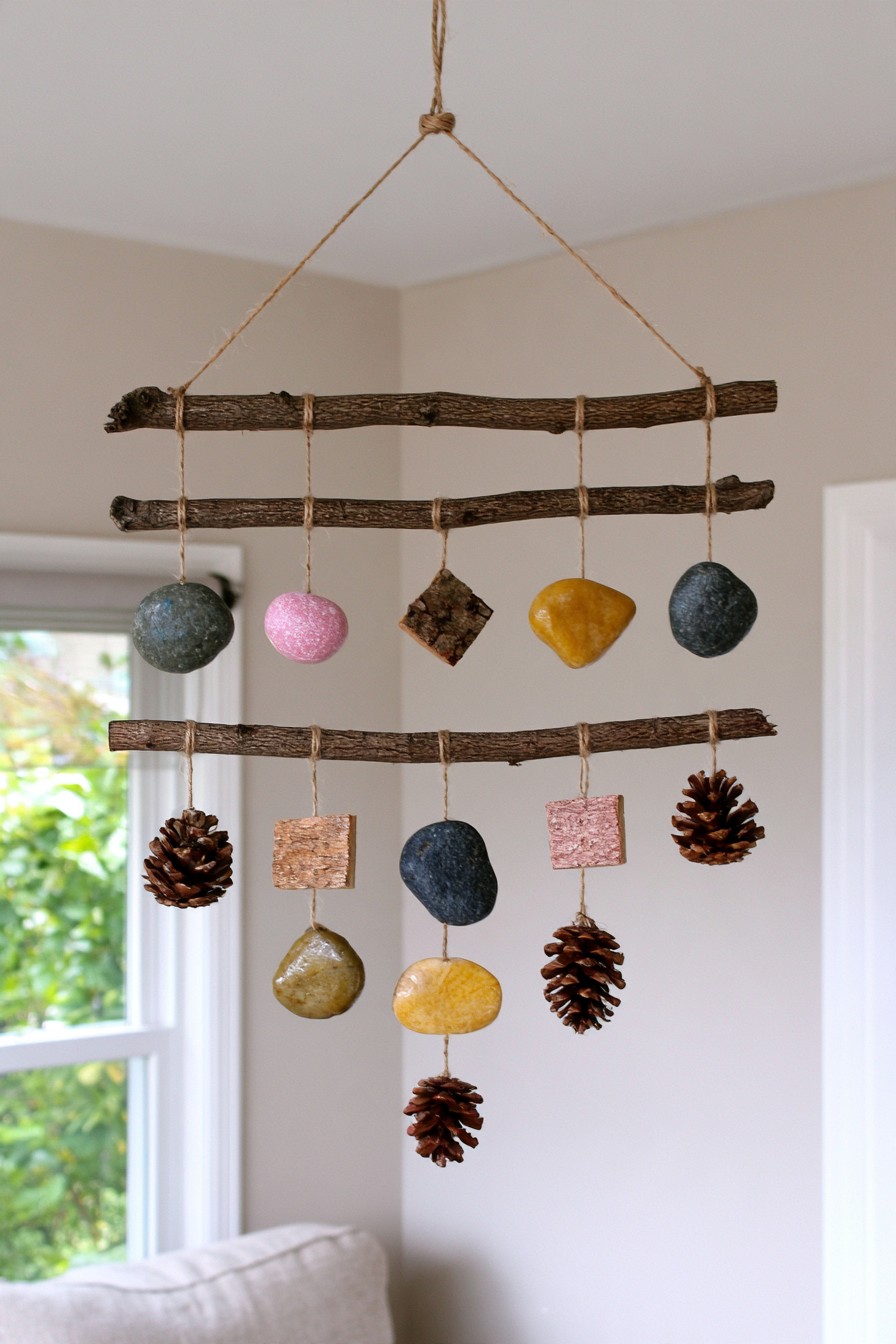
Three horizontal branches create a layered mobile, with colored round and angular pieces alternating among suspended pinecones. The different strand lengths draw the eye downward without making one dense cluster. It fits a corner with clear space beneath and around it, where slight movement will not cause the parts to strike furniture. The branch bars provide the rhythm; the hanging objects supply the changing shapes.
Make the lightweight strands first and connect them to sound branch sections with adjustable knots. Add heavier objects only after checking the balance. Felt or wooden shapes offer a lighter interpretation of the colored pieces than solid stones. If using stones, retain them in a secure wrap or purpose-made fitting instead of a glue spot. Check strand clearance at a controlled low height, then choose an overhead fixing for the finished weight. Keep this decorative mobile outside children's reach.
6. Painted Bark Mosaic with Twig Frame
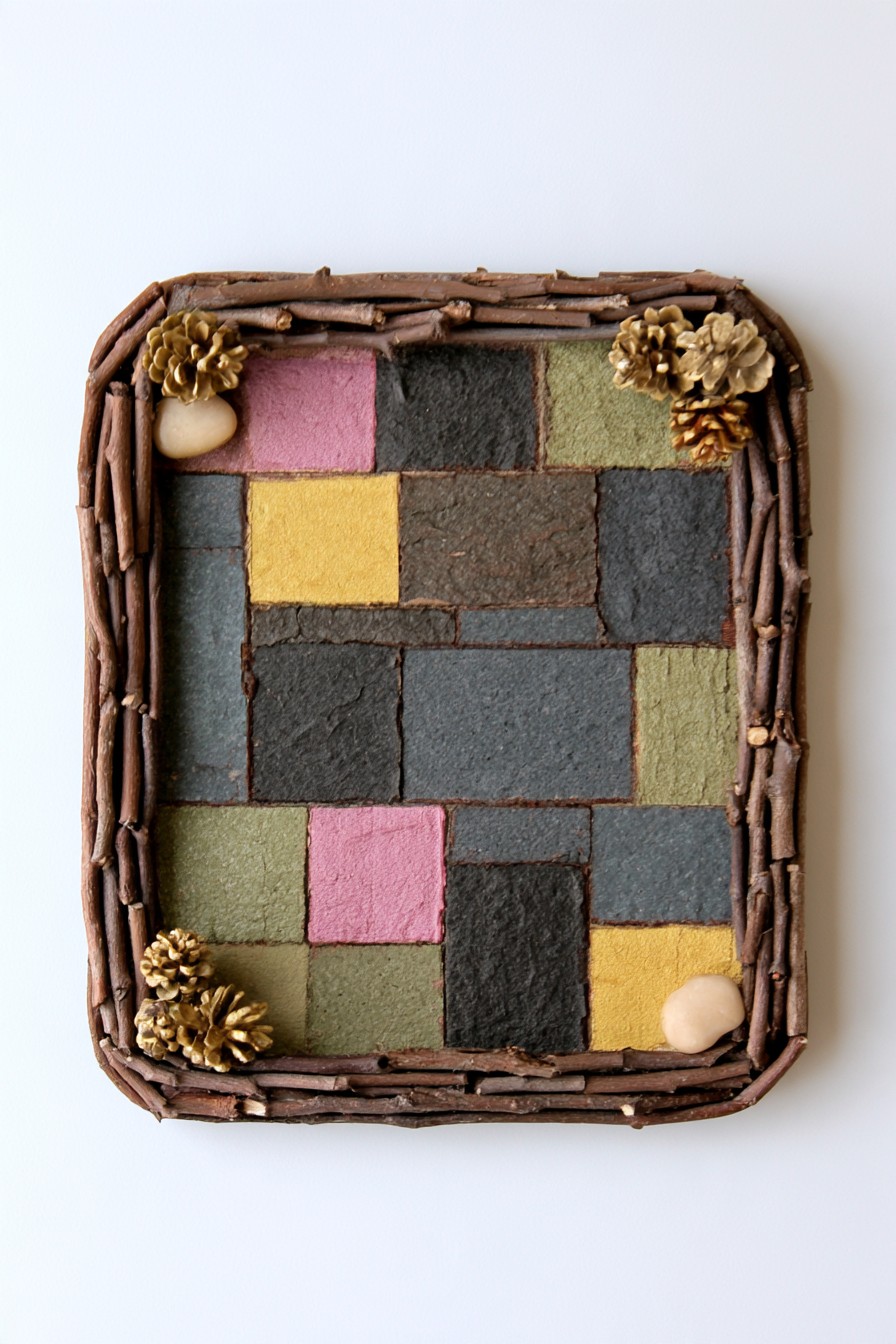
Rectangular bark sections form a patchwork panel inside a twig border. Muted pink, mustard, olive, and charcoal blocks vary in size, so the color pattern feels assembled rather than printed. Small corner clusters bring the geometry back toward a botanical theme. This is a useful choice when you want natural texture to relate to existing upholstery colors without covering an entire wall in rough material.
Draw the main rectangles on a backing board and dry-fit the covering pieces inside them. Use existing bark shapes where possible instead of forcing every edge into a perfect rectangle. Add paint in controlled layers, preserving enough surface relief to keep the blocks distinct. Fasten the twig border to the backing after the central composition is complete. Mount the corner decorations outside the central grid so they do not interrupt its readability. The wall hanger should connect to the board, with the border carrying only its own decoration.
7. Balanced Stone and Branch Table Sculpture

A curved branch forms a near-circle around a central stack of flat dark stones and rounded colored forms. Pinecones and greenery decorate the arc, while a thick wood slice anchors the whole composition. The open gap around the stack makes this a sculptural focal point rather than a tightly filled arrangement. It belongs on a protected surface where the contrast between the enclosed objects and the airy branch can remain visible.
Secure the branch to a dependable base connection before arranging the center. Select flat stone contacts and use a compatible adhesive, allowing each stage to cure without movement. The yellow disk appears above the lower stack; reproduce that effect only with a concealed support or securely joined lightweight form. Build the arrangement on a stable base with secure joints rather than balancing loose pieces. Colored felt-covered shapes are an option for reducing the top weight. Keep the completed piece away from edges and locations where a passing hand could catch the curved branch.
8. Twig Sunburst Wall Clock
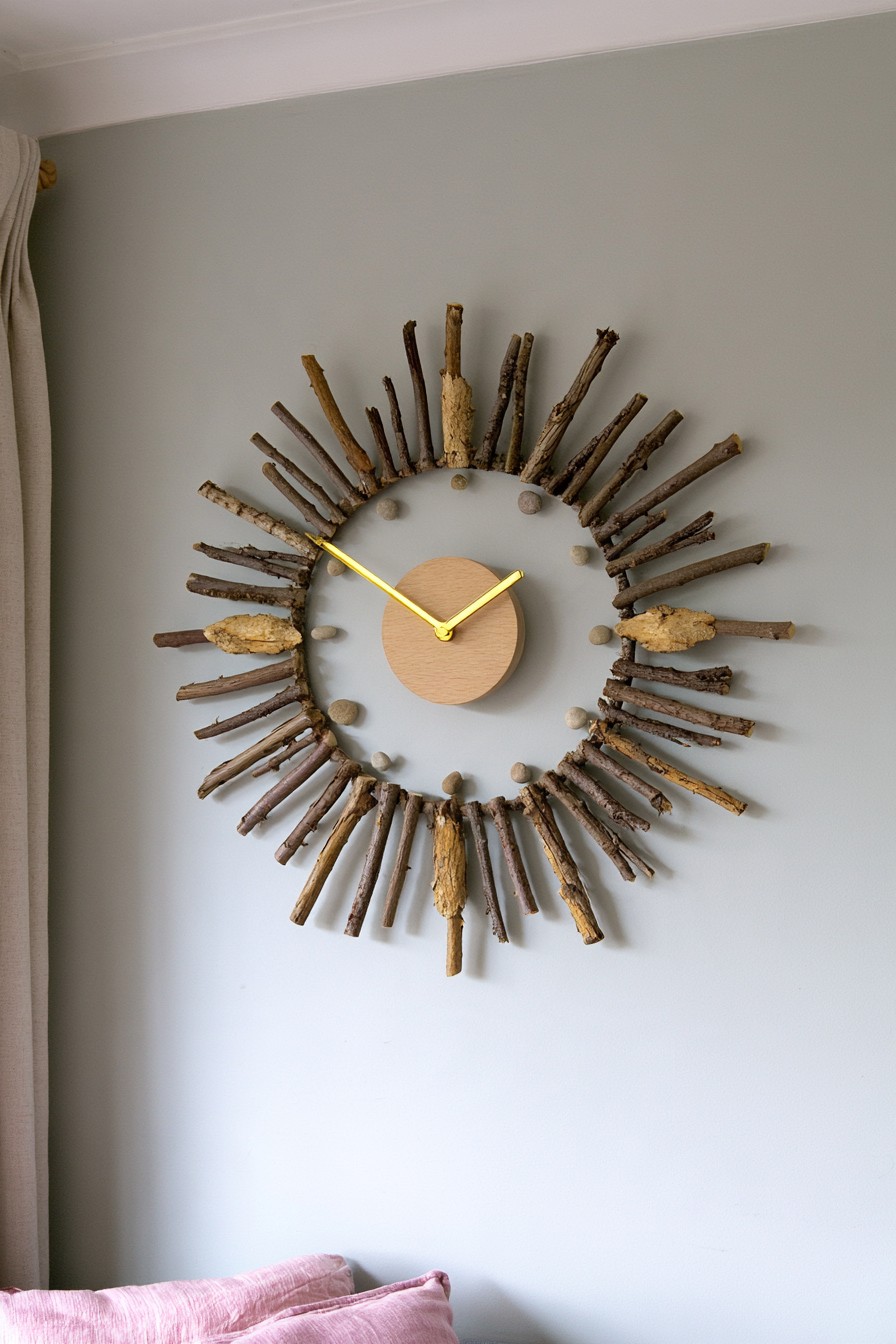
Uneven twig rays surround a small wooden clock face with bright hands. Longer branches create an irregular outer edge, while the simple center keeps the time display readable. The natural texture has a clear purpose here: it enlarges the clock's presence without enlarging its face. Place it where the hands stand out against the background and nearby wall decoration does not compete with the sunburst.
Choose a clock movement whose shaft length matches the actual face and mounting hardware. Drill the center opening according to that mechanism's instructions and check the hands before attaching rays. Lay the twigs around a hidden backing ring, varying their lengths deliberately. Keep all decorative parts outside the hands' sweep, including raised hour accents. Fit the rear hanger to the supporting panel and allow access to the battery compartment. This design has no visible pendulum, so assembly checks should focus on the movement, hand clearance, and secure wall attachment.
9. Branch Photo Display Tree with Stone Base
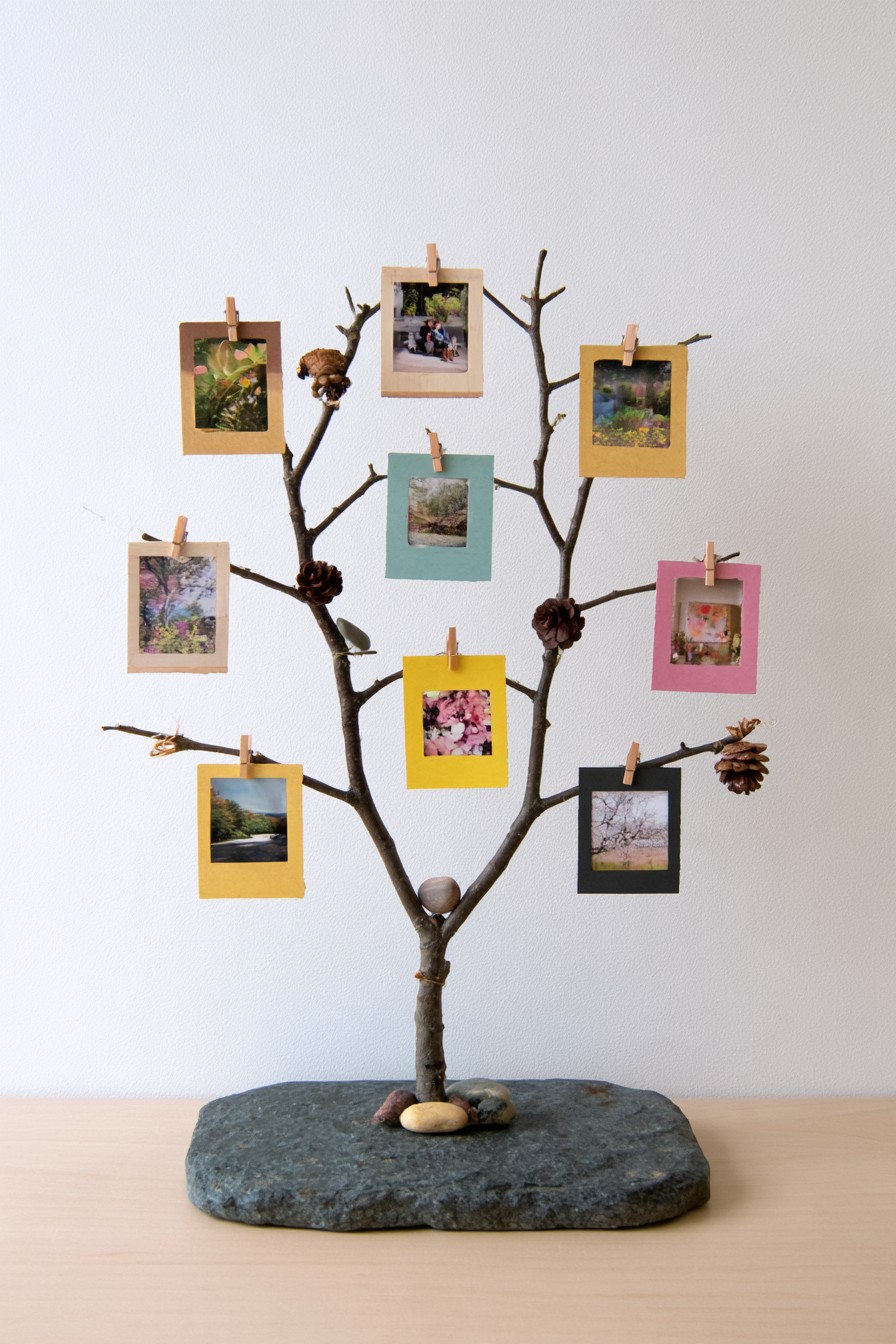
A forked branch carries small photos in colored card surrounds, each held by a miniature clip. The dark, flat stone base contrasts with the open tree shape, while a few pinecones occupy otherwise empty junctions. This arrangement makes changing photographs part of the decor. It is particularly useful on a desk or console where small prints can be seen closely without filling the wall.
Choose a sound branch with several firm offshoots and plan the clips before fixing its trunk. The stone base requires a connection designed for both the stone and the branch; a wood insert or discreet support fitting can simplify construction. An adhesive bond alone needs appropriate contact area and full curing. Place the larger cards nearer the trunk, then check the piece after the photographs are installed. Keep clip pressure on the card surround rather than delicate prints, and leave enough space to remove a photo without pulling neighboring branches.
10. Pinecone Topiary with Natural Stone and Bark Base
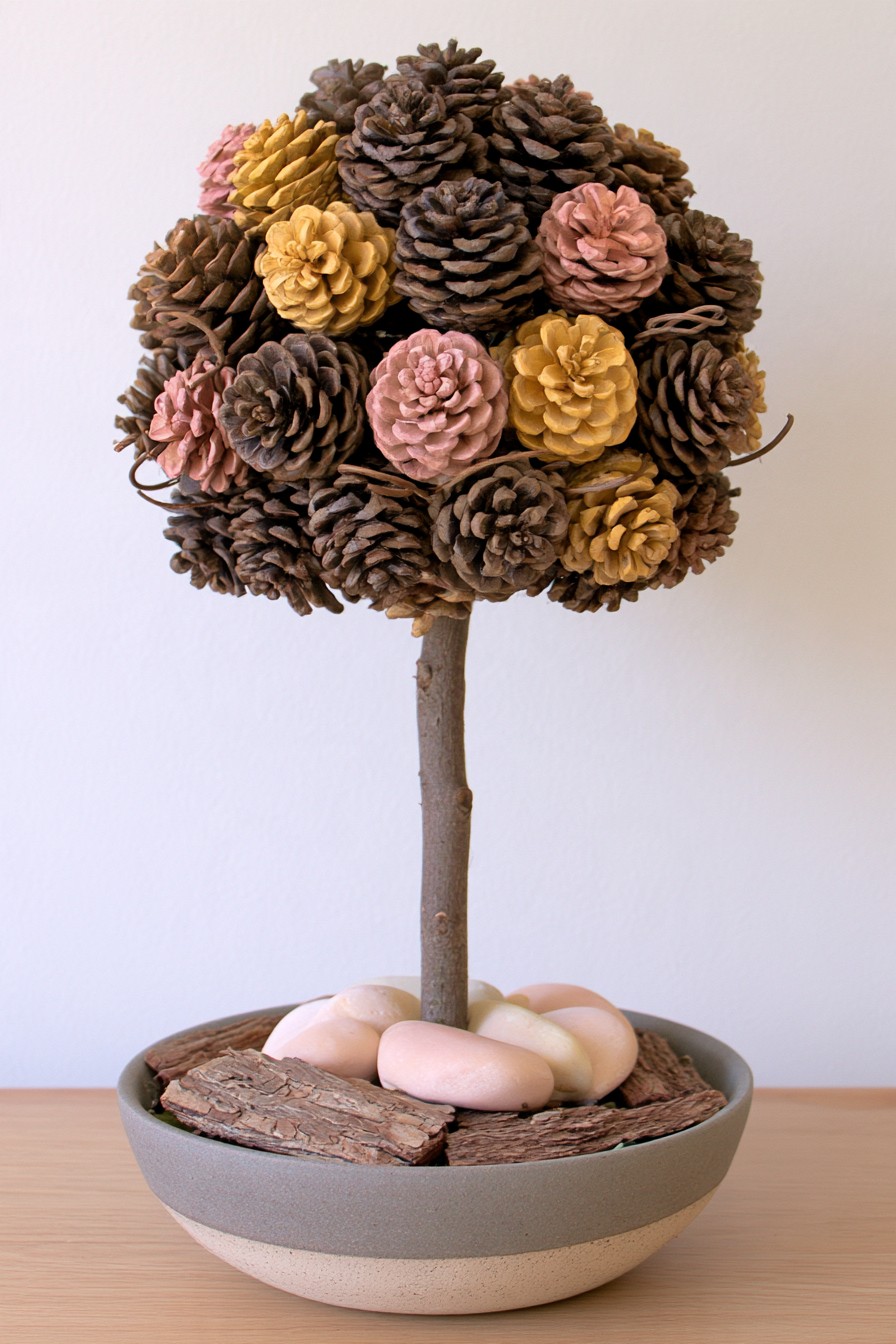
A dense spherical crown of brown, pink, and mustard pinecones rises on a single trunk above a shallow bowl. Pale stones and bark cover the lower arrangement, making the crown look fuller while the trunk remains visible. The repeated cone shapes provide texture, and the few painted examples create color without changing the recognizable topiary outline. It suits a stable sideboard with sufficient space around its rounded upper section.
Fit the trunk to a lightweight crown core before attaching the cones. Work around the sphere in sections, choosing smaller cones for gaps instead of continually adding weight. Fix the lower trunk into a firm internal support within the bowl; loose decorative stones are not a substitute for that attachment. Keep the painted cones distributed across the crown and allow their finish to dry before bonding. Compare the weight and footprint as assembly progresses so a heavy upper section does not overpower the base. If green texture is central to your arrangement, explore these moss craft ideas for additional decorative uses.
11. Tiered Wood Slice Plant Stand
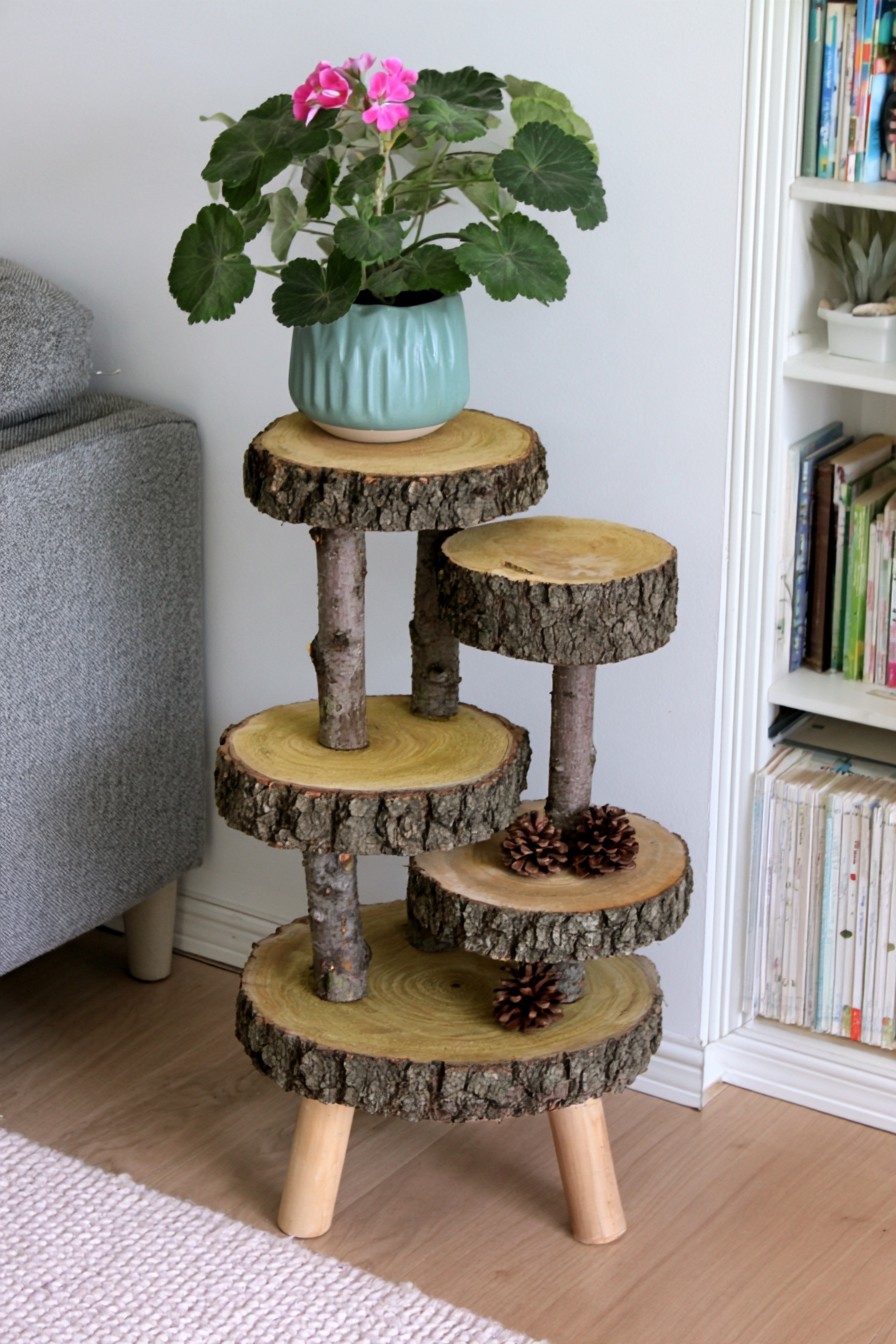
Several wood rounds step upward on bark-covered branch supports, with smooth wooden feet raising the largest base off the floor. The offset smaller platforms give the stand a sculptural outline even when only one holds a plant. This is the design most closely related to the video. It needs room not only for the upper pot, but also for reaching around the lower platforms during cleaning.
Plan the platform order before determining the hardware from the actual round thickness and support sizes. Reject slices with splits crossing proposed fastening points. Level the branch ends and check the contact faces before drilling. Connections beneath a platform should remain accessible during assembly; hiding them with bark or twine comes later. A watered planter may be much heavier than decorative pinecones, so use a supporting design appropriate to its full weight. Keep a watertight saucer on the shelf and remove the pot for watering.
12. Rustic Branch Ladder with Mini Bark Planters
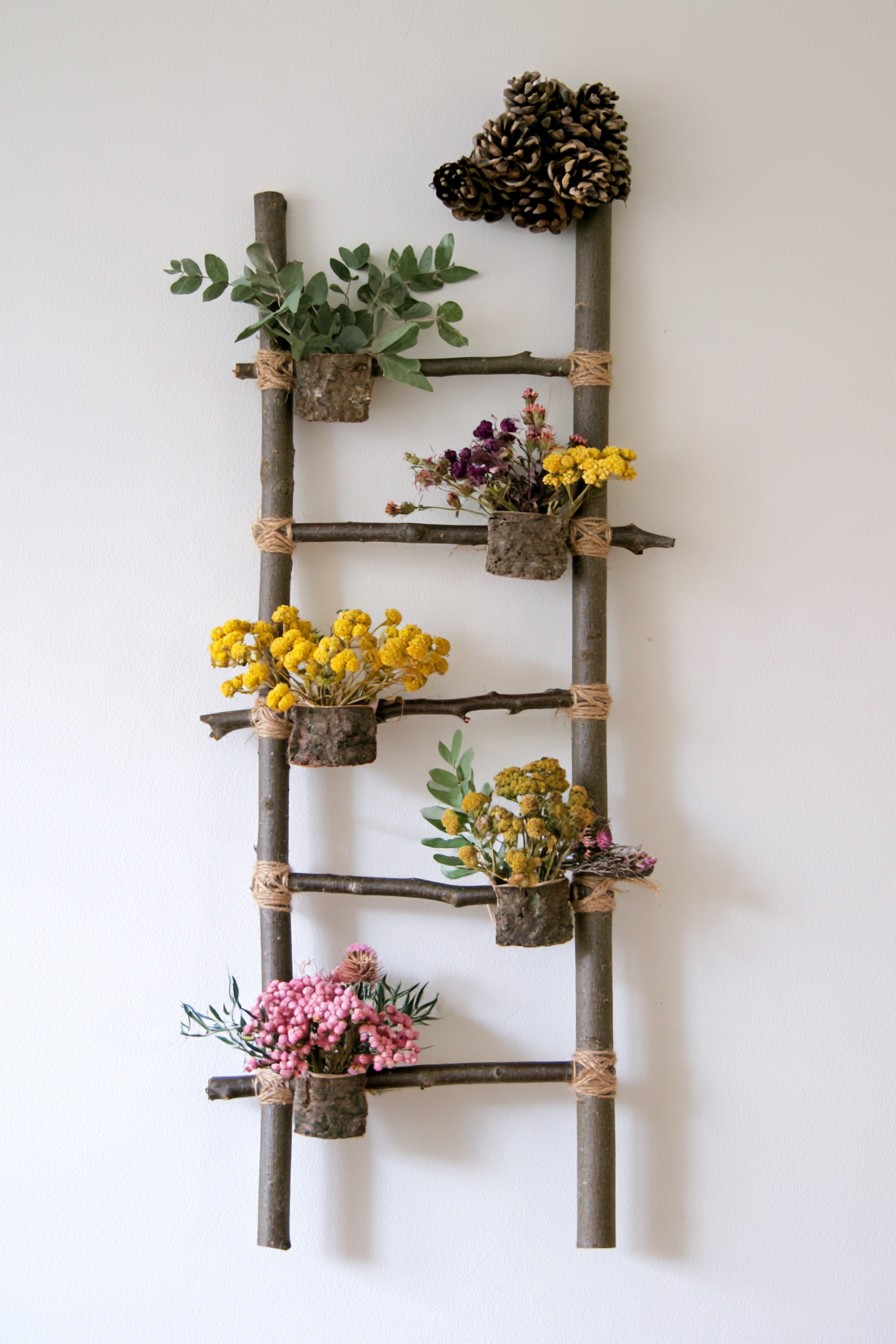
A slim branch ladder holds small bark-covered botanical containers at staggered positions. The horizontal rungs establish a repeated structure, while yellow and pink flowers bring each level to life. It makes good use of a narrow wall, with the decoration projecting only a short distance forward. The upper pinecone cluster finishes the composition without adding another container.
Join the rungs to the side rails with a method that keeps them from turning, then add jute wraps for the visible finish. Attach small containers through their own secure hanging points. Dried or artificial stems keep water away from the bark; fresh flowers need removable watertight inserts that can be lifted out for refilling. Treat these as floral holders unless an actual growing pot and drainage arrangement are provided. Fasten the display to the wall for its full weight and keep the containers narrow enough to avoid excessive leverage.
13. Rustic Twig Cube Display with Jute-Wrapped Joints
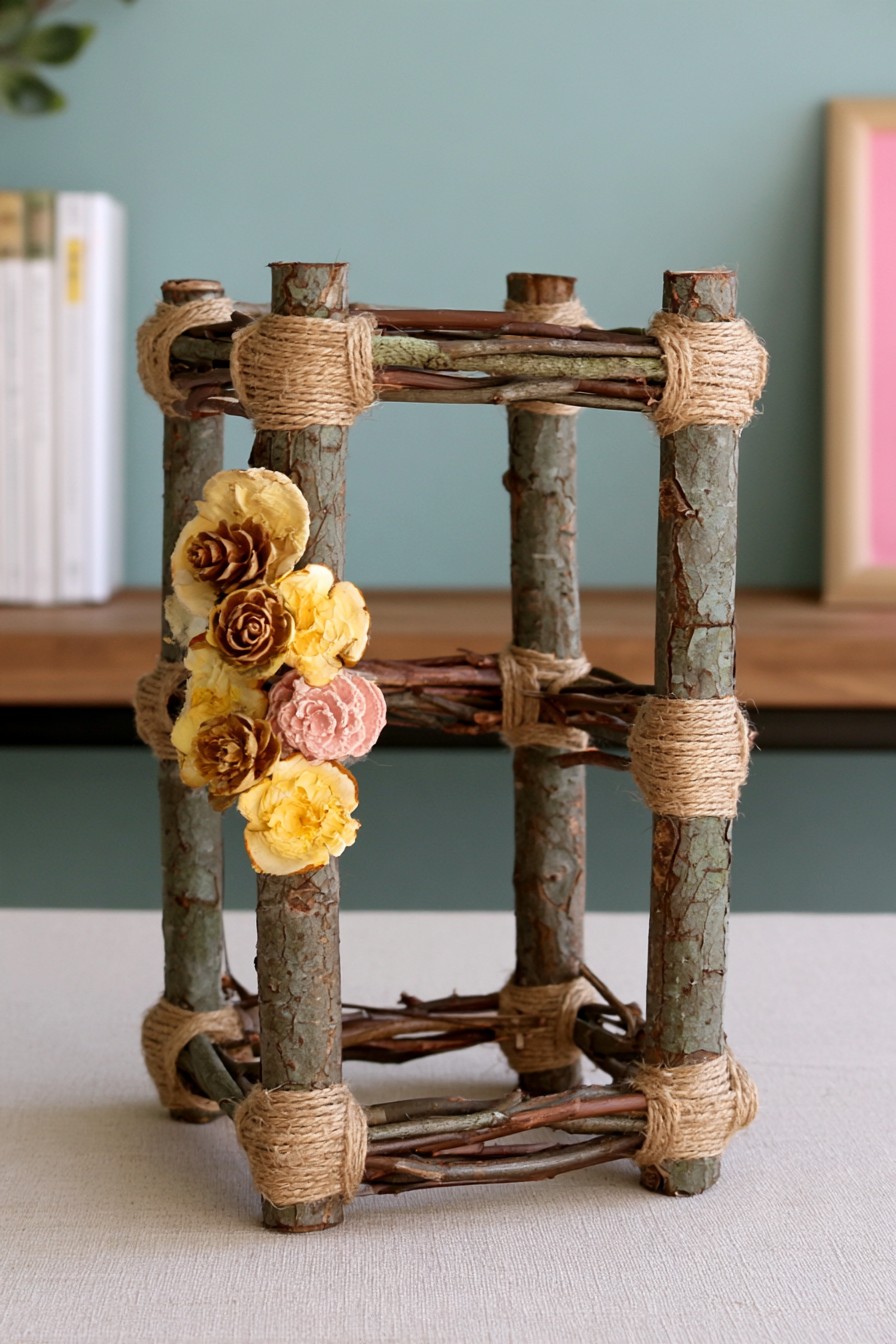
Four upright branches and layered horizontal rails form an open cube with thick jute bands at the corners. A cluster of yellow and brown botanical shapes softens one side, leaving the rest of the frame open. The interest comes from the contrast between strict geometry and irregular wood. It works as a freestanding decorative object on a shelf where its interior can remain visible.
Cut matching rail sets and assemble two side frames before connecting them into the cube. Work on a flat surface so the bottom contact points align. Make dependable structural joints at the corners before adding jute wraps, and size the frame for its intended use. Keep the botanical cluster removable for dusting. Use the cube as an ornament, not as a shelf or stool, unless its supporting design has been specified for that separate purpose.
14. Layered Pinecone Pendant Shade Design
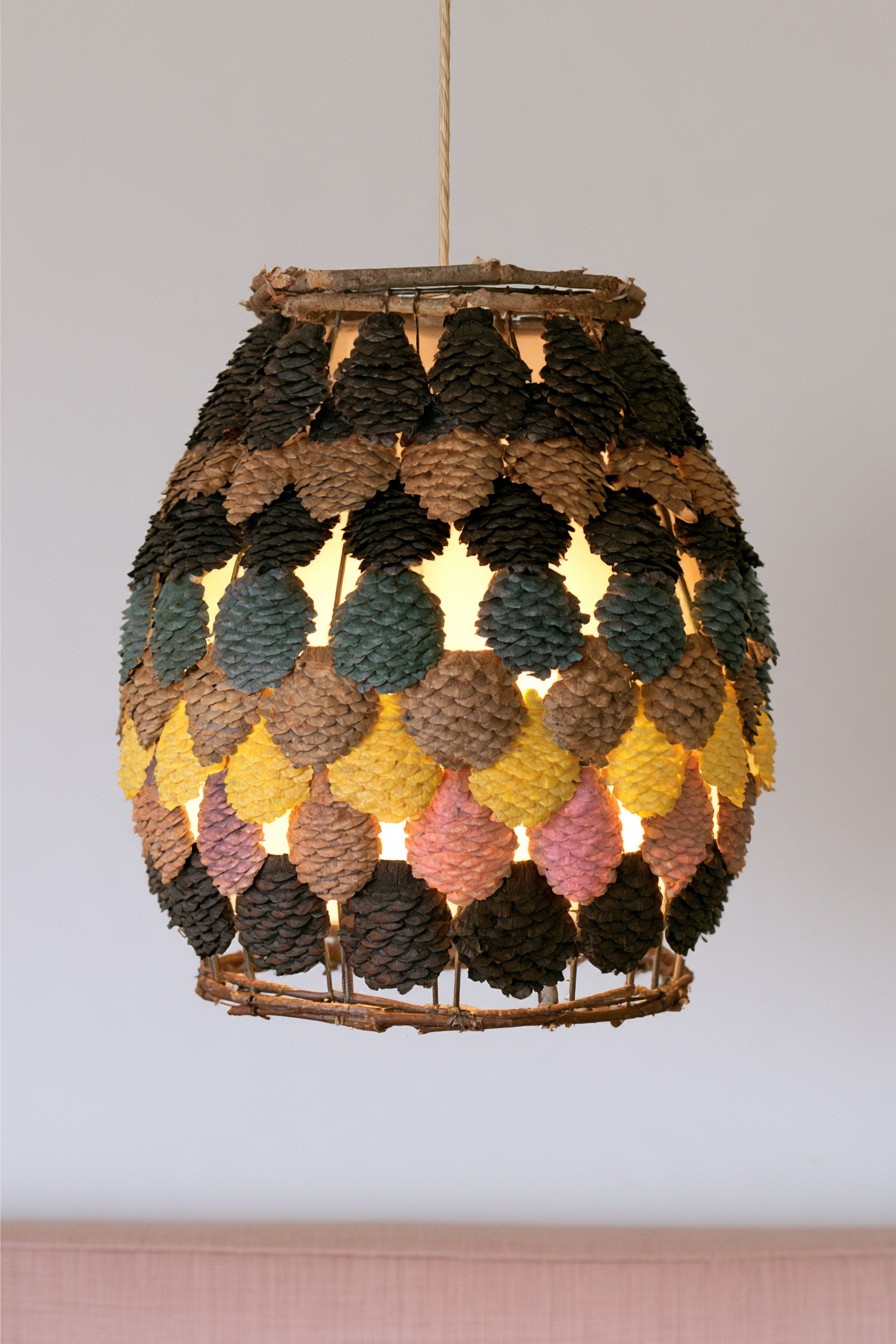
Rows of small cone-shaped pieces create a hanging oval form, with dark, mustard, pink, and gray sections alternating around the frame. Gaps reveal the interior and give the surface a layered, almost textile-like appearance. The pieces read as whole small pinecones, not individual scales, so the construction should be described accordingly. Its intricate surface can also be reproduced as a hanging sculpture without a working light inside.
Plan the cones on a rigid decorative frame, attaching them in staggered rows and checking their clearance as the outline curves inward. If the object will operate as a lampshade, use a manufacturer-approved assembly and material arrangement, with its specified spacing, ventilation, and weight limits. A low-heat bulb alone does not make dried pinecones and adhesive appropriate for a fixture. Have the lighting configuration assessed by a qualified professional. When those requirements cannot be established, keep the same surface treatment on a non-electrical sculpture.
15. Bark-Covered Desktop Organizer
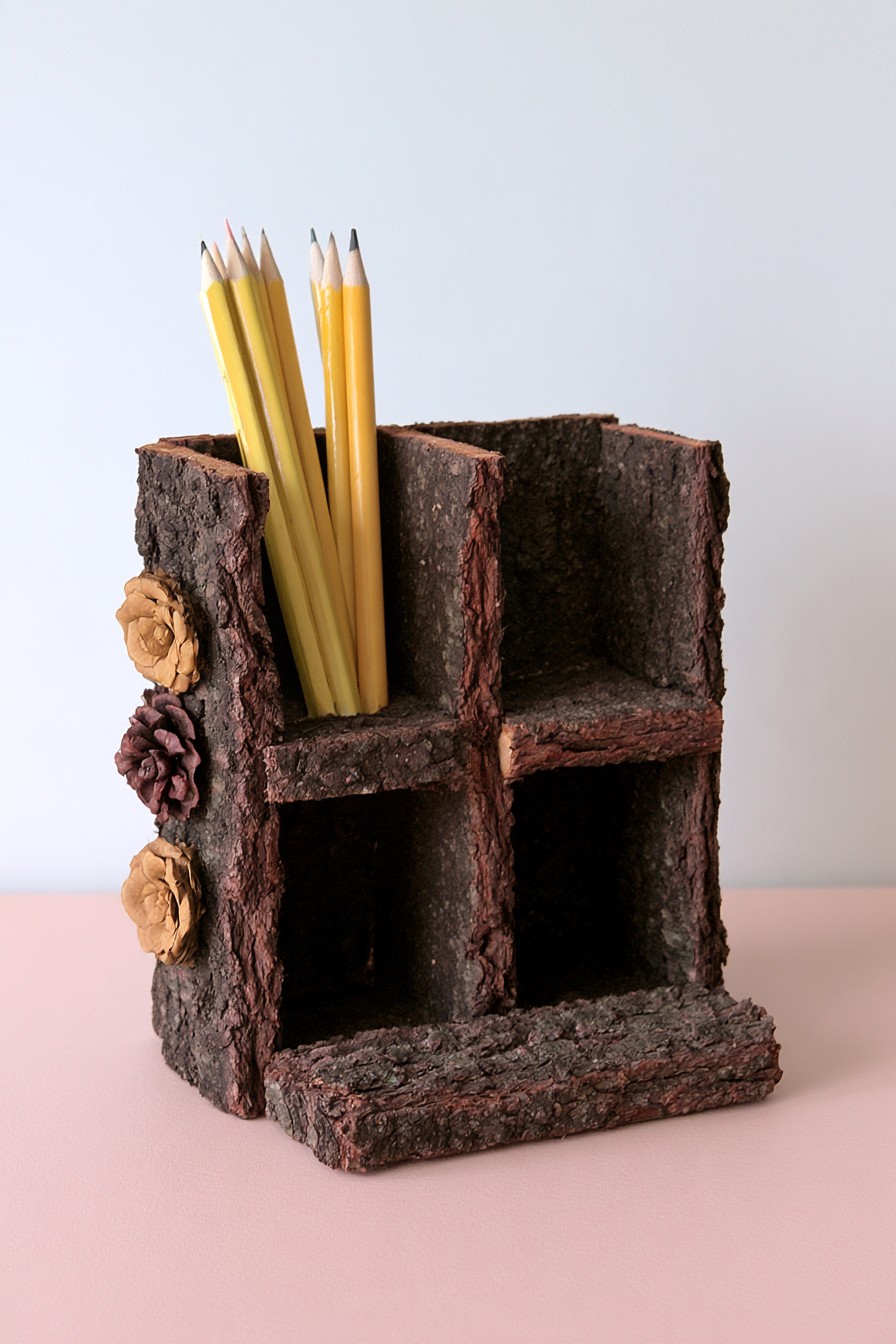
Rough bark covers a compact organizer with upper compartments for pencils and smaller openings below. The divided structure gives the texture a practical role: it dresses an object used every day. Small cone-like flowers run down one side, leaving the front openings clear. This design belongs on a desk where the compartments can be reached without repeatedly handling the brittle covering.
Construct or choose the rigid organizer first, matching compartment depth to the items you intend to store. Apply bark to the exterior faces and trim it clear of the openings. Keep the inside smooth and free of adhesive beads that could catch stationery. A prepared edge or thin lining can protect frequently touched areas. Attach the decorative flowers on a side that is rarely gripped. Brush loose flakes away before using the organizer and trial any clear protective coating on spare bark to check the change in color and sheen.
16. Bundled Twig Pedestal with Wood Slice Top
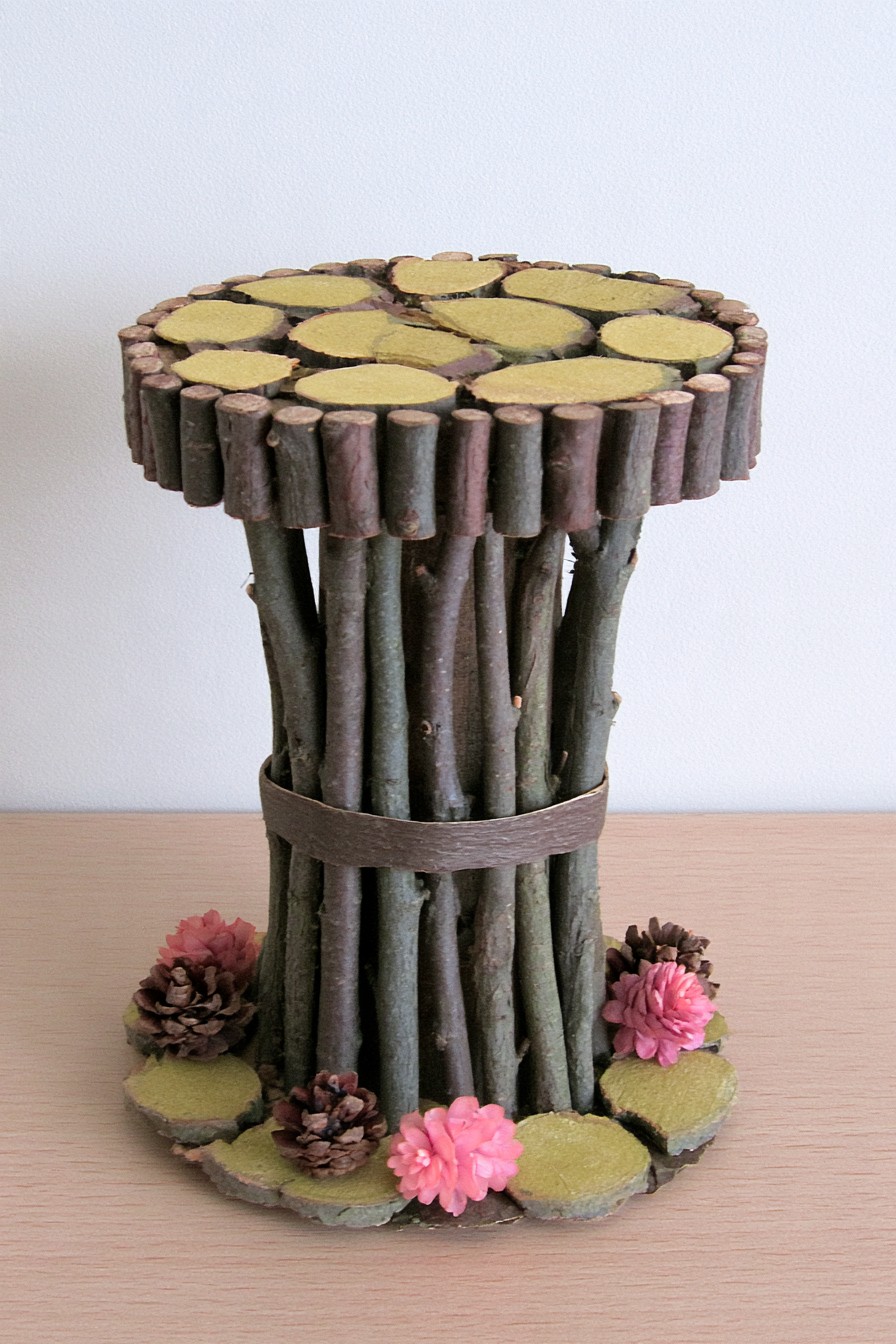
A vertical bundle of branches supports a circular top filled with small wood cross-sections. A dark band encircles the middle, and painted round accents and pinecones finish the lower edge. The design emphasizes repeated end grain above and long bark texture below. It makes a distinctive small pedestal, particularly for a lightweight display object that leaves the patterned top partly visible.
Build the platform on a rigid disk and secure it to a supporting core. The surrounding branch bundle can then provide the texture without being the sole structural system. Fit the branches to a consistent height and use concealed fastening appropriate to the core. A visible central band adds cohesion but should not be the only thing holding the assembly together. Maintain a broad, flat lower contact area and protect the furniture surface beneath it. Keep the chosen display weight within the actual supporting design, with heavier objects positioned centrally.
17. Bark-Framed Twig Grid Wall Art
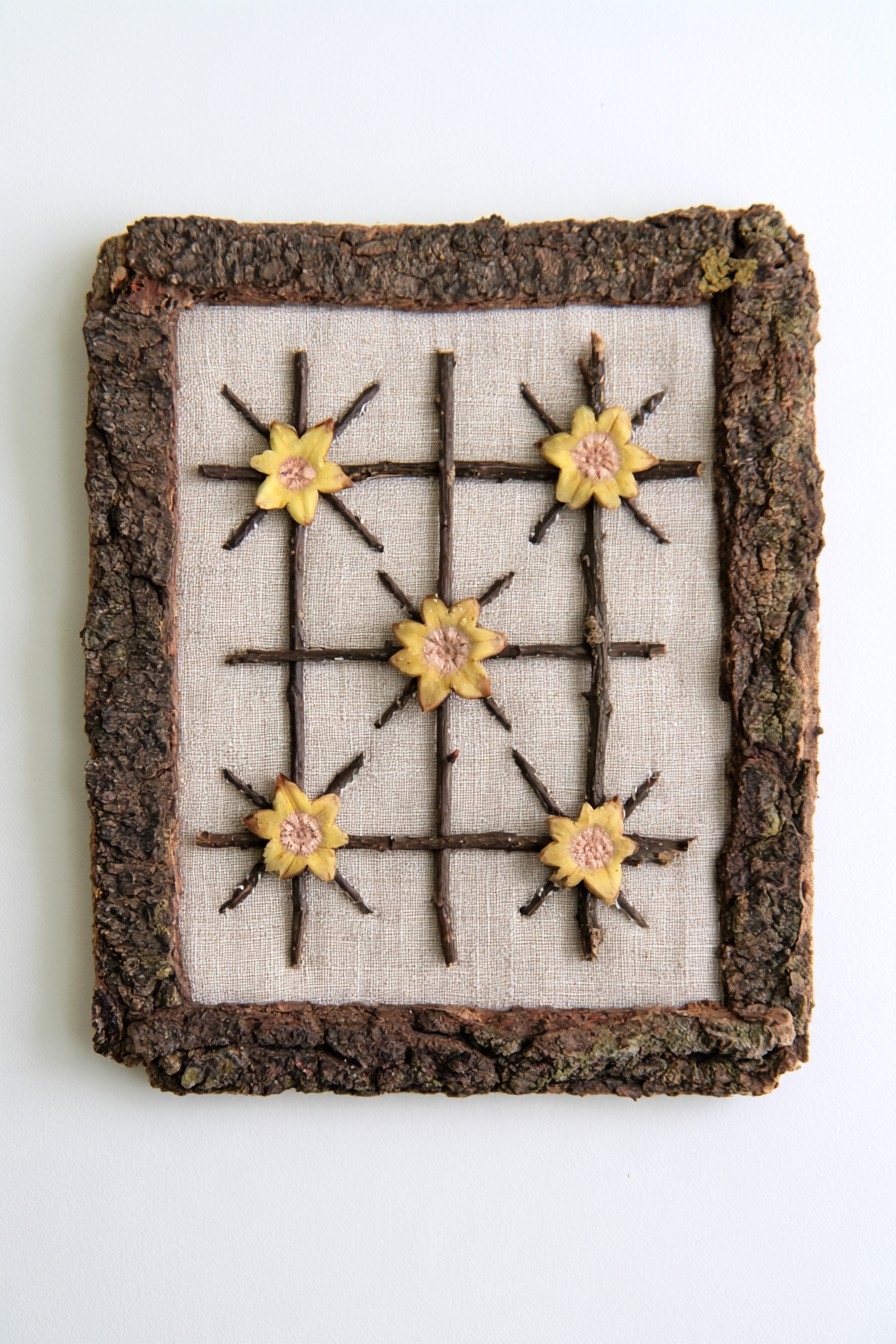
A simple twig grid sits against pale fabric inside a broad bark frame. Yellow flower motifs appear at selected intersections, giving the straight lines a gentle botanical emphasis. The fabric creates a clean background that makes the branches easier to read than they would be against more bark. It suits a wall where you want a quieter natural-material composition than the colorful mosaic.
Stretch the fabric over a rigid backing and secure it at the rear before adding the grid. Lay out the horizontal and vertical twigs together, adjusting their positions to keep the spaces balanced. Fasten them without pulling the fabric out of shape. Make the flower motifs separately from pressed botanicals or fiber pieces, then attach them at the selected junctions. Fit the bark border last so it conceals the backing edge. Leave the wall fixing connected to the panel and keep fabric openings free of protruding wire ends.
18. Wood Serving Tray with Branch Handles and Dried Flower Corners
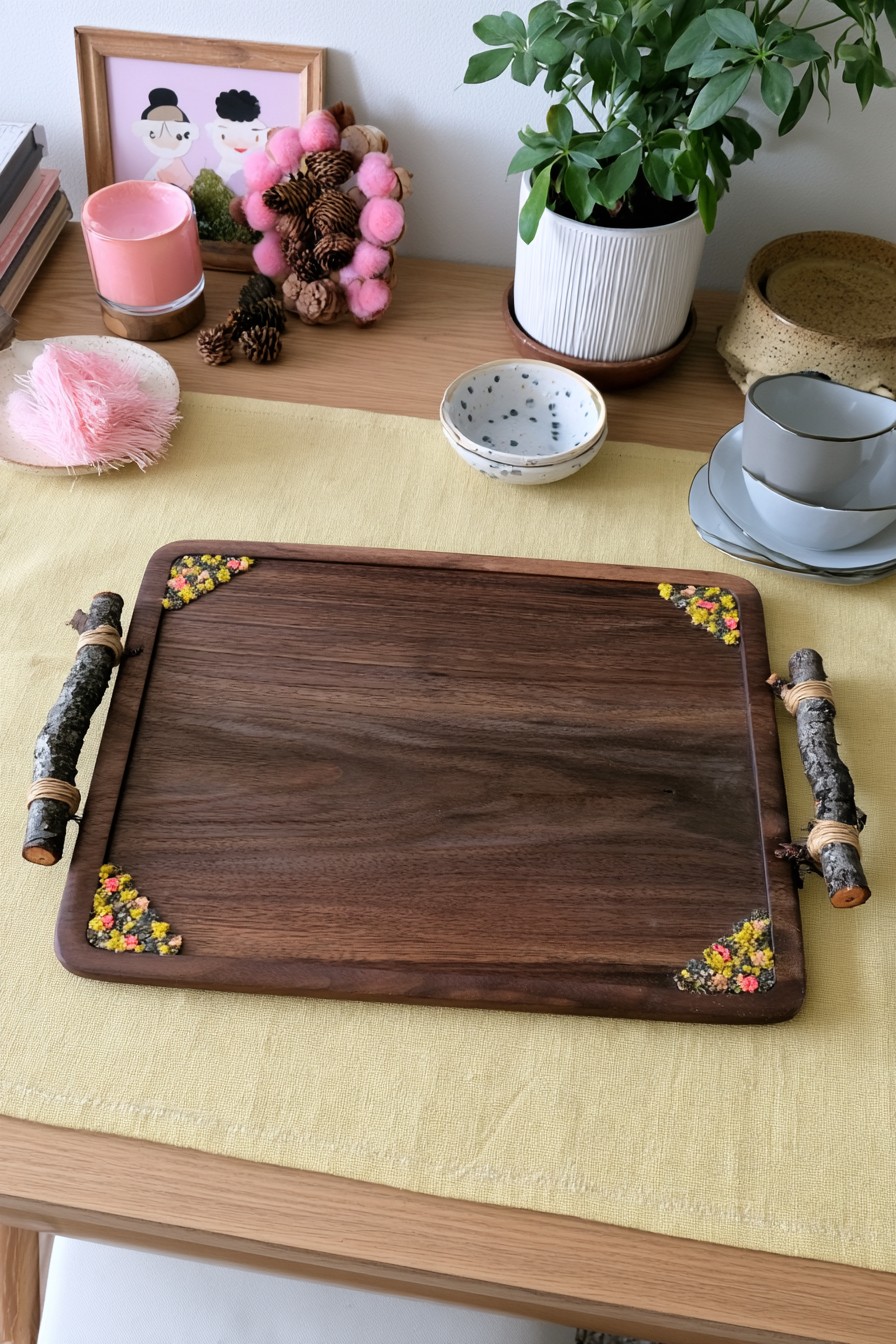
A dark rectangular tray has branch-style handles secured at either side and tiny floral details at its corners. The decoration stays outside the clear central surface, making the contrast between polished wood and rough handles the main feature. It fits a coffee table or serving area where dishes need a predictable flat base. The short handles distinguish it from decorative panels that are never lifted.
Start with a sturdy tray and plan the handle fastening around the tray's side or base thickness. Use mechanically secured handles suited to the intended loaded weight; a jute wrap can finish their appearance after the connection is complete. Keep botanical accents clear of the grip area and tableware positions. Choose coatings appropriate to the tray's intended use and avoid direct food contact with craft finishes or loose plant material. If the handle connection is unverified, use the tray as a stationary display and lift it by its supported base.
19. Twig and Pinecone Radial Wall Decor
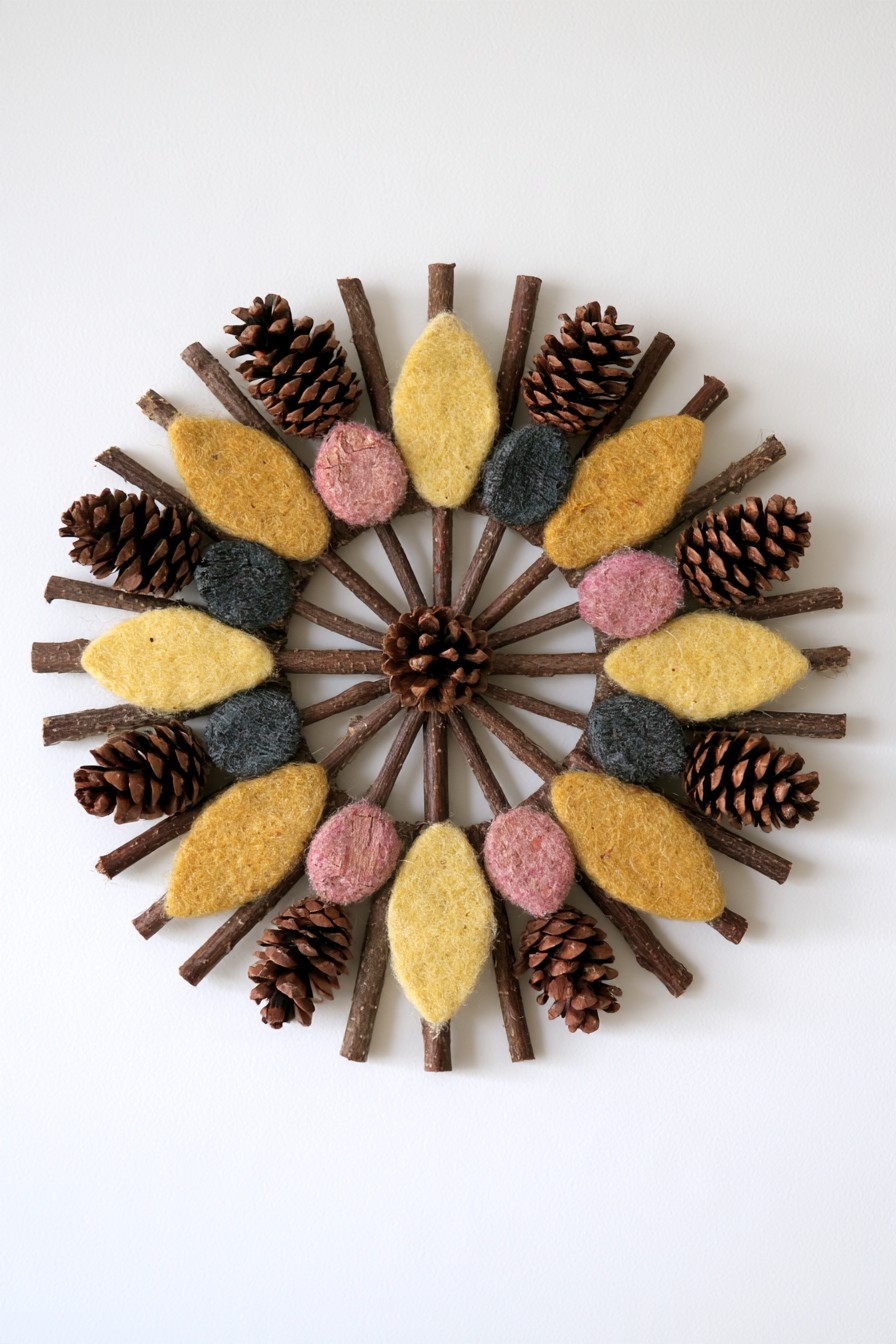
Twigs radiate around a central pinecone, with larger cones and yellow, charcoal, and pink fiber shapes placed between the spokes. The rounded leaf forms soften the sharper branch ends and make the piece feel fuller than the clock's sparse sunburst. It is a compact wall accent with a strong center, suited to a craft corner or a small grouping of handmade objects.
Draw the spoke positions on a hidden backing disk before attaching the twigs. Set the longer pieces first, then fill selected gaps to maintain a balanced circumference. Make the colored fiber motifs as separate lightweight accents and secure them without burying the twig pattern. Place pinecones at intervals where the backing or a firm branch connection can support them. Tuck the ends of any retaining wire behind the piece. Keep the hanger on the backing and check that the ornament lies clear of the wall without projecting sharp tips into a passage.
20. Two-Tier Twig Fruit Stand with Pinecone Accents
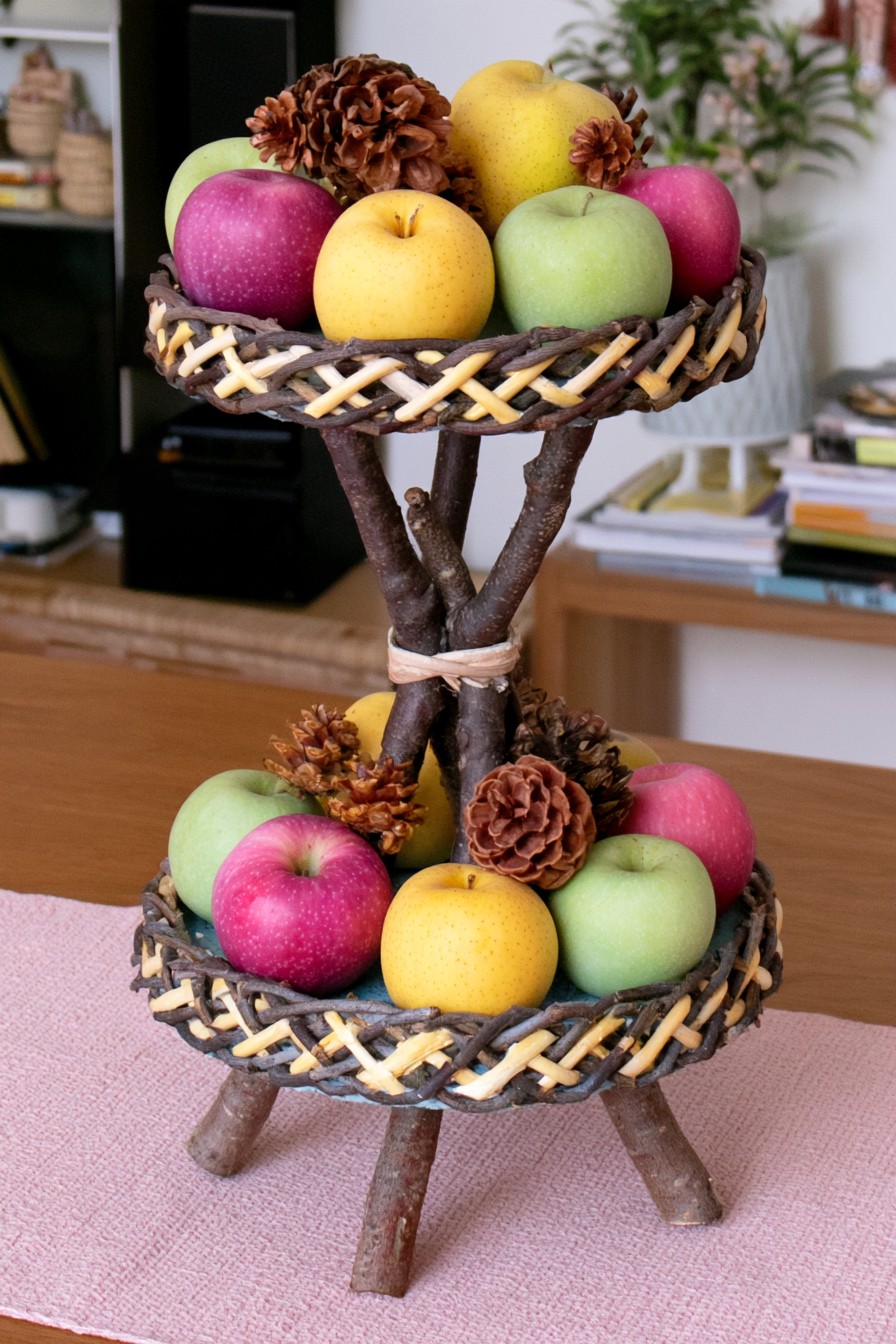
Two circular baskets rise around a central group of branches, with pale crisscross rim details and pinecone accents. The smaller upper level creates a clear hierarchy above the broader lower basket. Use lightweight imitation fruit for the lasting display, or place real produce in a separate suitable serving insert. The stand can serve as a seasonal centerpiece even when it is not used for food storage.
For a functional fruit stand, begin with a load-bearing two-tier structure and washable food-contact inserts. Add the twig rims and botanical details outside those surfaces. Keep the upper basket accessible for cleaning and retain enough headroom between levels to remove larger fruit. Connect the branch bundle to both tiers with structural fittings sized for the load, then add cord wrapping as decoration. Distribute heavier contents low and centrally. A decorative version with lightweight fruit forms offers the layered appearance without assigning a food-storage role to untreated materials.
21. Hanging Pinecone Curtain Ornaments with Braided Cord
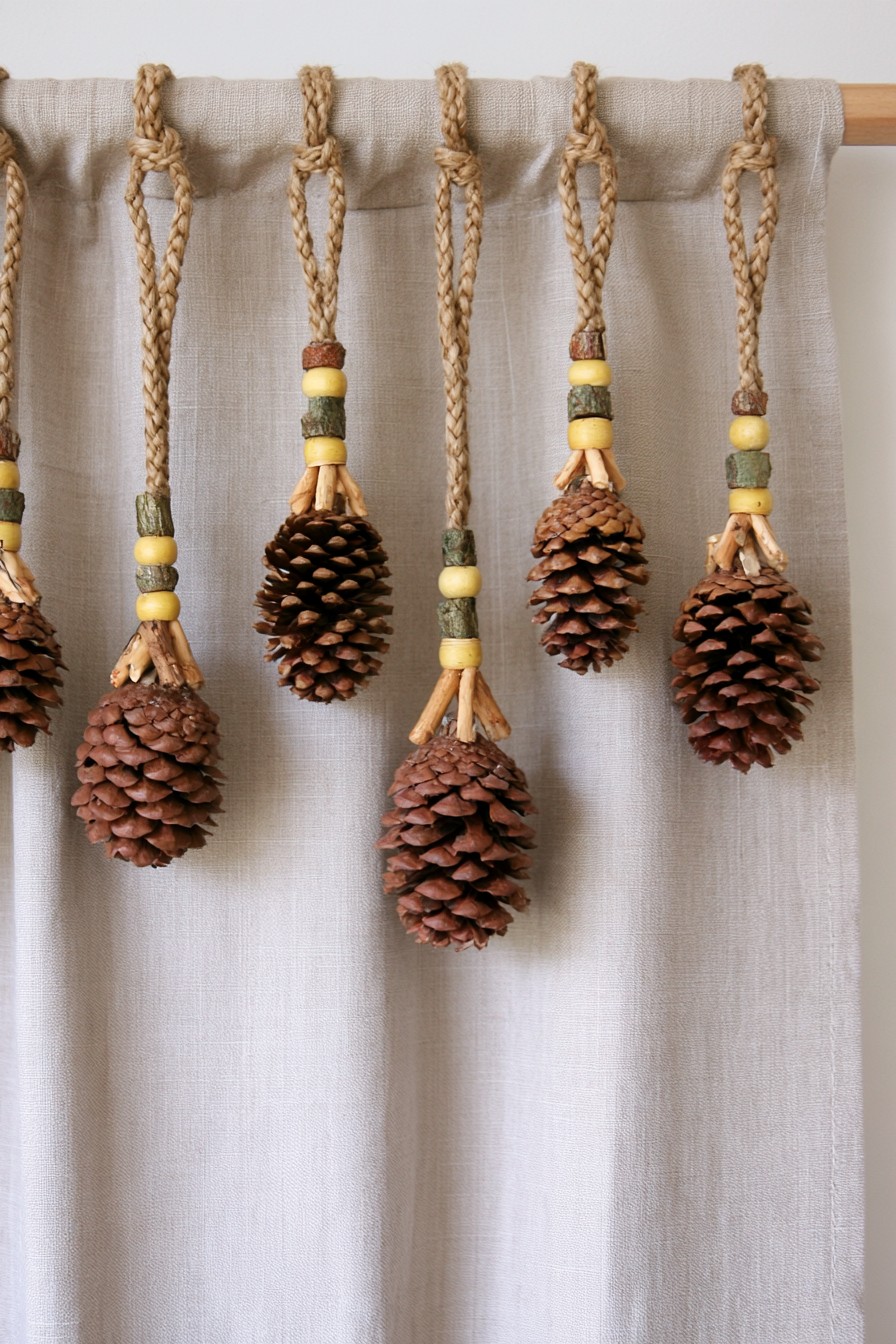
Braided cord loops hang from the curtain rod, ending in pinecones beneath stacked beads. Their varied lengths create a repeated vertical pattern against plain fabric. They read as hanging curtain ornaments rather than ties pulling the curtain aside. This distinction matters because the rough cones can remain suspended in front of the textile without needing to bear the force of a drawn-back panel.
Prepare each braid and bead sequence separately, checking the bead holes against the cord thickness. Fasten the pinecone through a secure retaining loop around its firm upper section and keep it from rubbing against delicate fabric. Compare the finished lengths while they hang, then adjust the arrangement on the rod. The cord loops require particular care in homes with young children: keep looped ornaments inaccessible or choose another location. Make the ornaments removable so the curtains can be cleaned and operated without catching the cones.
22. Bark and Twig Table Runner with Botanical Motifs
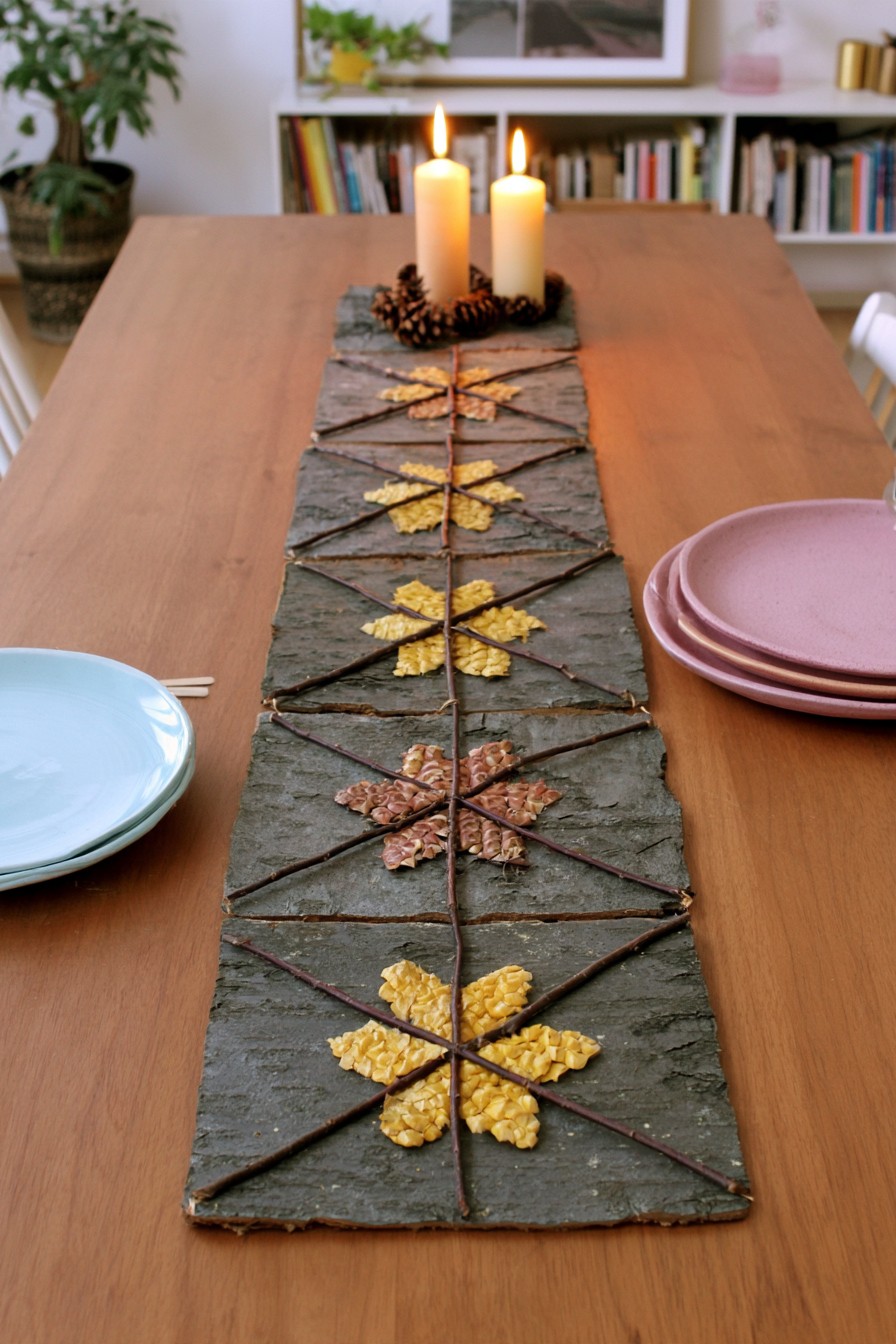
Flat dark panels line the center of the table, with crossed twigs and yellow or pink leaf motifs repeated along their length. The arrangement works like a low decorative runner, preserving sightlines across the table. Its appeal comes from repetition: each section carries a related pattern while the rough panel edges keep it handmade. The candles at the far end are part of the scene, not evidence that dry material is appropriate beside a flame.
Build the design on removable backing sections and add felt pads beneath them to protect the table. Position the twigs and flat motifs before bonding, maintaining similar spacing from one section to the next. Keep dishes on the bare tabletop or a separate stable surface, clear of raised decoration. For an illuminated version, use flameless candles in the display area. Dry bark, fibers, and botanicals should remain away from open flames and hot serving equipment. Store the sections flat so the raised twig details are not crushed.
Care for the Finished Materials
Use a soft brush to lift dust from bark, cones, and twig joints, supporting fragile accents as you clean. Remove liners, photographs, and water containers separately. Keep dried arrangements away from persistent dampness and inspect them for shedding or mold before returning them to display. Recheck handled and supporting connections periodically; replace a split branch or loose component instead of concealing the damage beneath more decoration.


Leave a Reply