
A cat room becomes useful when the route through it makes sense: an easy first step, a steady place to climb, a surface worth scratching, and somewhere quiet to curl up afterward. These 27 DIY cat room ideas combine wooden hideaways, padded shelves, fabric shelters, and compact climbing furniture. Some fit along one wall; others create a complete activity corner without taking over the room.
Start with the practical planning notes and the illustrated wooden sleeping cubby project below. Then use the individual ideas to choose materials, understand the basic assembly, and adapt the layout to your cat. A low sleeping bench can be a manageable first woodworking project, while tall towers, suspended bridges, and wall installations need more experience and fixings selected for their actual supports.
Table of Contents
- Plan the Room Around Your Cat’s Everyday Routes
- Choose Materials and Connections Before Cutting
- Build a Simple Wooden Cat Sleeping Cubby
- Materials and Tools
- Four Stages from Cut Panels to a Comfortable Den
- Turn a Low Resting Spot into a Climbing Layout
- 1. A Little Castle with Sleeping Towers and a Scratch Courtyard
- 2. Gingham and Pinstripe Dens with a Central Lookout
- 3. Botanical Wall Dens Linked by a Short Bridge
- 4. A Blush Sleeping Bench beneath Three Wooden Shelves
- 5. A Three Bed Bench with Sisal Climbing Columns
- 6. A Sage Cat Loft with a Pink Upper Lounge
- 7. An Open Timber Tower with a Fabric Hammock
- 8. A Compact Cat Corner with a Clear Diagonal Route
- 9. A Green Gingham Lookout with a Full Staircase
- 10. A Circular Nap Nook beside a Mint House
- 11. A Peach Patterned Cat Apartment with Six Compartments
- 12. Pastel Tunnel Boxes beneath Two Round Perches
- 13. A Raised Cottage with a Braced Timber Frame
- 14. A House Shaped Climbing Cabinet with Staggered Shelves
- 15. A Hexagonal Hideaway Framed by Two Climbing Ramps
- 16. A Striped Rooftop Tent above Two Round Dens
- 17. A Floral Canopy and Striped Tent at Floor Level
- 18. Twin Arched Dens with a Supported Connecting Walkway
- 19. A Low Sage Lounge with an Open Scratch Bay
- 20. A Lavender Lookout above a Tall Scratching Panel
- 21. A Storage Bench with a Hexagonal Bed and Four Perches
- 22. A Sage Sleeping Bench with an Asymmetric Hexagonal Hut
- 23. A Blue Gray Climbing Station with a Long Upper Bed
- 24. A Basket Perch Tower with a Braced Middle Lounge
- 25. A Terraced Cat Village with Steps at Both Ends
- 26. A Green Cat Courtyard with a Raised Gingham Bed
- 27. A Rounded Sage and Blue Tower with Wide Side Steps
- Let the Room Grow from the Places Your Cat Uses
Plan the Room Around Your Cat’s Everyday Routes
Watch where your cat already sleeps, scratches, and pauses to look around. Put the first climbing step close to an established route and leave enough clear floor for play. Choose shelf depth and entrance size from your cat’s body size, including room to turn around comfortably. Avoid setting a universal jump distance: age, mobility, confidence, and the landing surface all affect what is manageable.
Arrange a way down as carefully as the way up. Broad steps and low resting places are useful alternatives to high shelves. In a home with several cats, spread out resting spots and resources so one cat cannot block every route. Keep litter facilities away from food, give water its own position, and leave bowls outside the landing area of climbing furniture. Compact bowl arrangements can help visualize a corner, but the finished room should give these resources more separation.
Choose Materials and Connections Before Cutting
For wooden structures, start with sound plywood or solid timber suited to the intended span and load. Reject splintered boards, swollen panels, and reclaimed wood with an unknown treatment. Make a full size cardboard entrance template before cutting circular or arched openings. Round exposed edges and sand every cutout, including the underside where paws may reach.
- Cabinets and box steps: Use properly fitted panels, internal timber cleats, and suitable wood screws. Drill pilot holes and choose screw lengths that cannot emerge into a sleeping compartment. A continuous base helps keep joined modules aligned.
- Wood joints: A PVA wood adhesive can supplement close fitting timber joints. Apply a thin layer to clean mating surfaces, clamp as directed, and remove squeeze out. It does not replace the mechanical connections needed for climbing furniture. Follow the exact product’s curing instructions before fitting bedding or allowing access.
- Wall shelves: Select brackets and fasteners as a complete system for the shelf, wall construction, and expected use. Fix into sound studs or suitable masonry using the appropriate hardware. Adhesive hooks and decorative shelf fittings are unsuitable substitutes. Check for concealed services before drilling.
- Scratching surfaces: Use replaceable corrugated cardboard, securely fitted sisal fabric, or tightly wrapped sisal rope. Keep rope ends captured beneath a trim or end fitting rather than leaving loops or exposed staples.
- Soft surfaces: Choose washable covers and firm pads that stay in place. Secure removable pads with sewn sleeves or concealed fastenings. Avoid loose fringe, long ties, and fabric loops that can catch claws.
- Paint and finish: For painted exterior panels, use a compatible primer and furniture coating whose manufacturer confirms suitability for the intended pet furniture use. A water based label alone does not establish safety. Follow preparation, ventilation, and full curing requirements; keep chewing surfaces and scratching inserts free of decorative coatings.
Borrow color placement and surface preparation ideas from these furniture painting projects, then choose products appropriate to a cat’s surroundings. Paint removable panels before assembly where practical, keeping glue contact surfaces bare.
Build a Simple Wooden Cat Sleeping Cubby
A low wooden cubby gives the room a practical starting point: a sheltered bed with a wide entrance and a removable cushion. This version stays on the floor and uses five panels joined with internal timber cleats. You can borrow its box construction for the sleeping compartments in the ideas below, while treating raised furniture and wall routes as separate structural projects.
Materials and Tools
The following example makes a cubby approximately 50 cm wide, 40 cm high, and 40.9 cm deep. Check your cat’s resting and turning space before ordering the cuts. The dimensions are a starting example, not a load rating for a climbing platform.
- Two 18 mm plywood panels measuring 50 by 40 cm for the top and bottom
- Two 18 mm plywood side panels measuring 36.4 by 40 cm, fitted between the top and bottom
- One 9 mm plywood back panel measuring 50 by 40 cm, attached over the rear edges
- Four straight timber cleats measuring 25 by 25 mm in section and 36 cm long
- PVA wood glue, approximately 24 countersunk wood screws measuring 4 by 35 mm for the cleat connections, and eight smaller screws measuring 3 by 25 mm for the back
- A drill and suitable pilot and countersink bits, clamps, tape measure, pencil, square, sanding block, and eye protection
- A washable fitted cushion sized to the completed interior without blocking the entrance
Have the panels cut accurately or clamp them securely while cutting with appropriate tools. Measure the actual plywood thickness before finalizing the side height. Use sound material without an unknown coating. The collage shows the main assembly stages; tool positions and the parts layout are not a scaled cutting diagram.
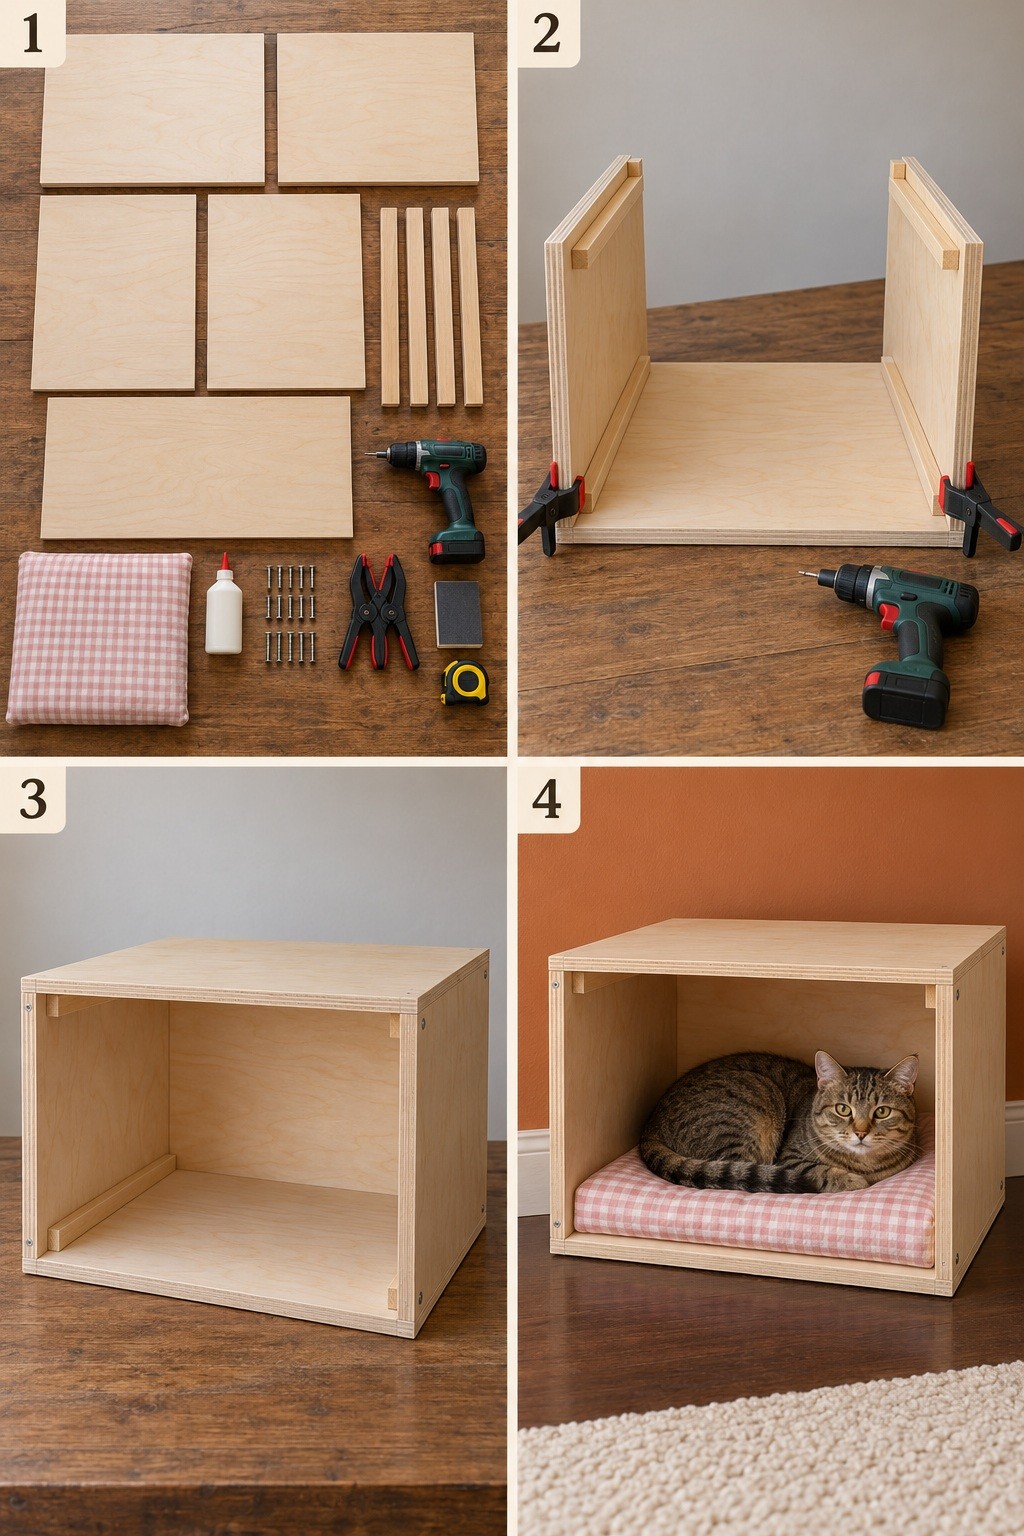
Four Stages from Cut Panels to a Comfortable Den
- Prepare and check the parts. Dry fit the panels before applying glue. The side panels sit on the bottom, and the top covers their upper edges. Round and sand exposed edges, remove dust, and mark the screw locations. Check that each fastener will enter solid timber without emerging into the interior. Panel one shows the parts and main supplies.
- Assemble the base and sides. Attach one cleat along the inside upper edge and one along the inside lower edge of each side panel, with their ends set back about 2 cm from the front and rear. Keep the cleats flush with the panel edges. Apply a thin layer of PVA wood glue, drill pilot holes, and screw through the side panels into the cleats. Stagger those screws away from the later top and bottom fixing positions. Stand the sides on the base, clamp them square, and fasten the base into the lower cleats from underneath. Panel two shows the resulting U shaped body before the top and back are fitted.
- Add the top and back. Glue the mating surfaces and screw through the top into the upper cleats, keeping the outer edges aligned. Check the opening for square by comparing its two diagonals. Fit the back over the rear edges, drill pilot holes centered in the plywood edges, and secure it with the smaller screws. Keep all heads flush without crushing the surface. Wipe away excess glue, maintain the product’s specified clamping time, and allow the adhesive to cure fully. Panel three shows the completed empty cubby.
- Inspect and add the cushion. Check for movement, splinters, exposed points, and glue residue. Place the cubby on a level floor with its entrance unobstructed, then fit the washable cushion. The fourth panel shows the finished sleeping area. Let your cat approach freely. This version remains unpainted; if adding a finish, select a product suitable for the intended use and complete its full curing process before adding bedding or allowing access.
Keep this first build as a floor level sleeping den. Stacking another box on it, raising it on posts, or attaching it to a wall changes the support requirements and needs a separate design. Remove the cushion regularly to vacuum the corners and inspect the joints.
Turn a Low Resting Spot into a Climbing Layout
For a furniture project, begin with the lowest module and work upward. Draw the outside dimensions, internal openings, support positions, and pad thickness before making a cut list. Assemble and square the base, then attach the sides and dividers to cleats with suitable screws. Add the top only after the lower structure is rigid. Attach box steps to the main frame so they cannot slide away during use.
Mark wall platforms with removable tape and locate structural fixing points before cutting shelves. Use brackets and fixings suitable for the wall, platform and forces from a jumping cat; secure tall furniture against tipping. Fit the gripping surface after installing the shelves. Have an experienced installer assess uncertain walls or long spans.
The ideas that follow are design approaches rather than interchangeable measured plans. You can use the cubby construction above, the same careful panel preparation, and washable bedding across the collection. Choose one arrangement that answers a real need, then add another feature only if it improves the route or resting space.
1. A Little Castle with Sleeping Towers and a Scratch Courtyard
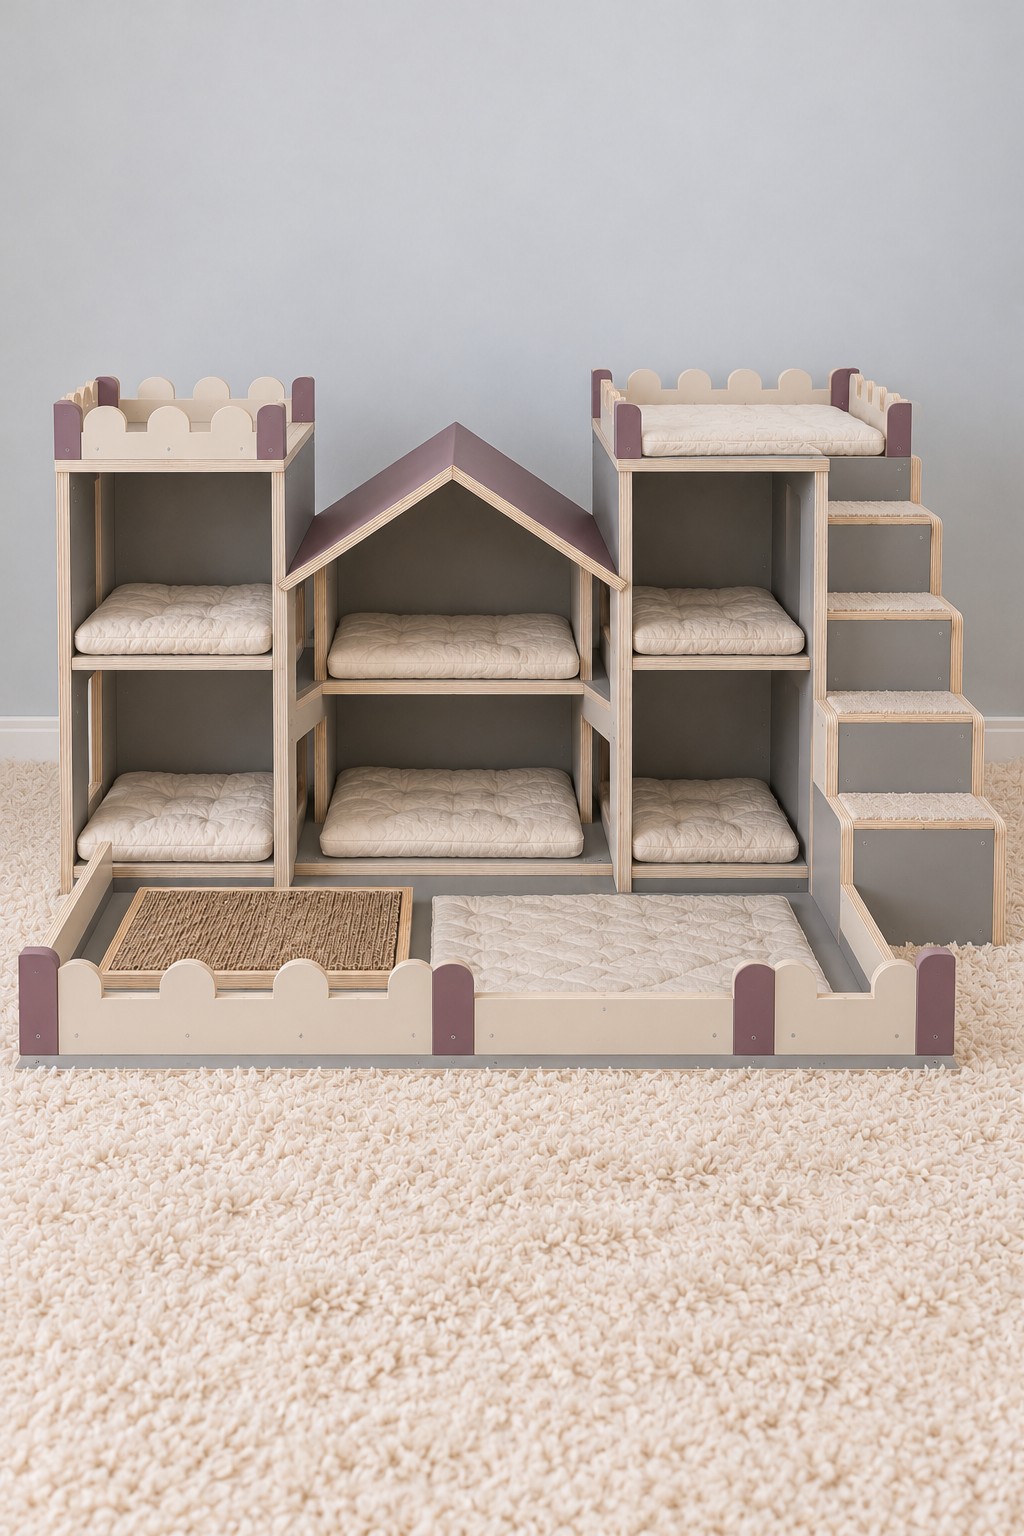
Cream panels, muted mauve trim, and a small central pitched roof turn a row of sleeping cubbies into a miniature castle. The two taller side units offer open resting decks, while the shallow front enclosure creates a distinct play and scratching area.
Build the cubbies from plywood with supported horizontal dividers, then join them to a shared base. Attach the staircase to the right tower before adding the decorative battlements. Use removable cushions, a fitted courtyard mat, and a cardboard scratch insert. Round every scallop and keep the front boundary low enough for an easy entrance. The decorative fence should never be relied on to stabilize the towers.
2. Gingham and Pinstripe Dens with a Central Lookout
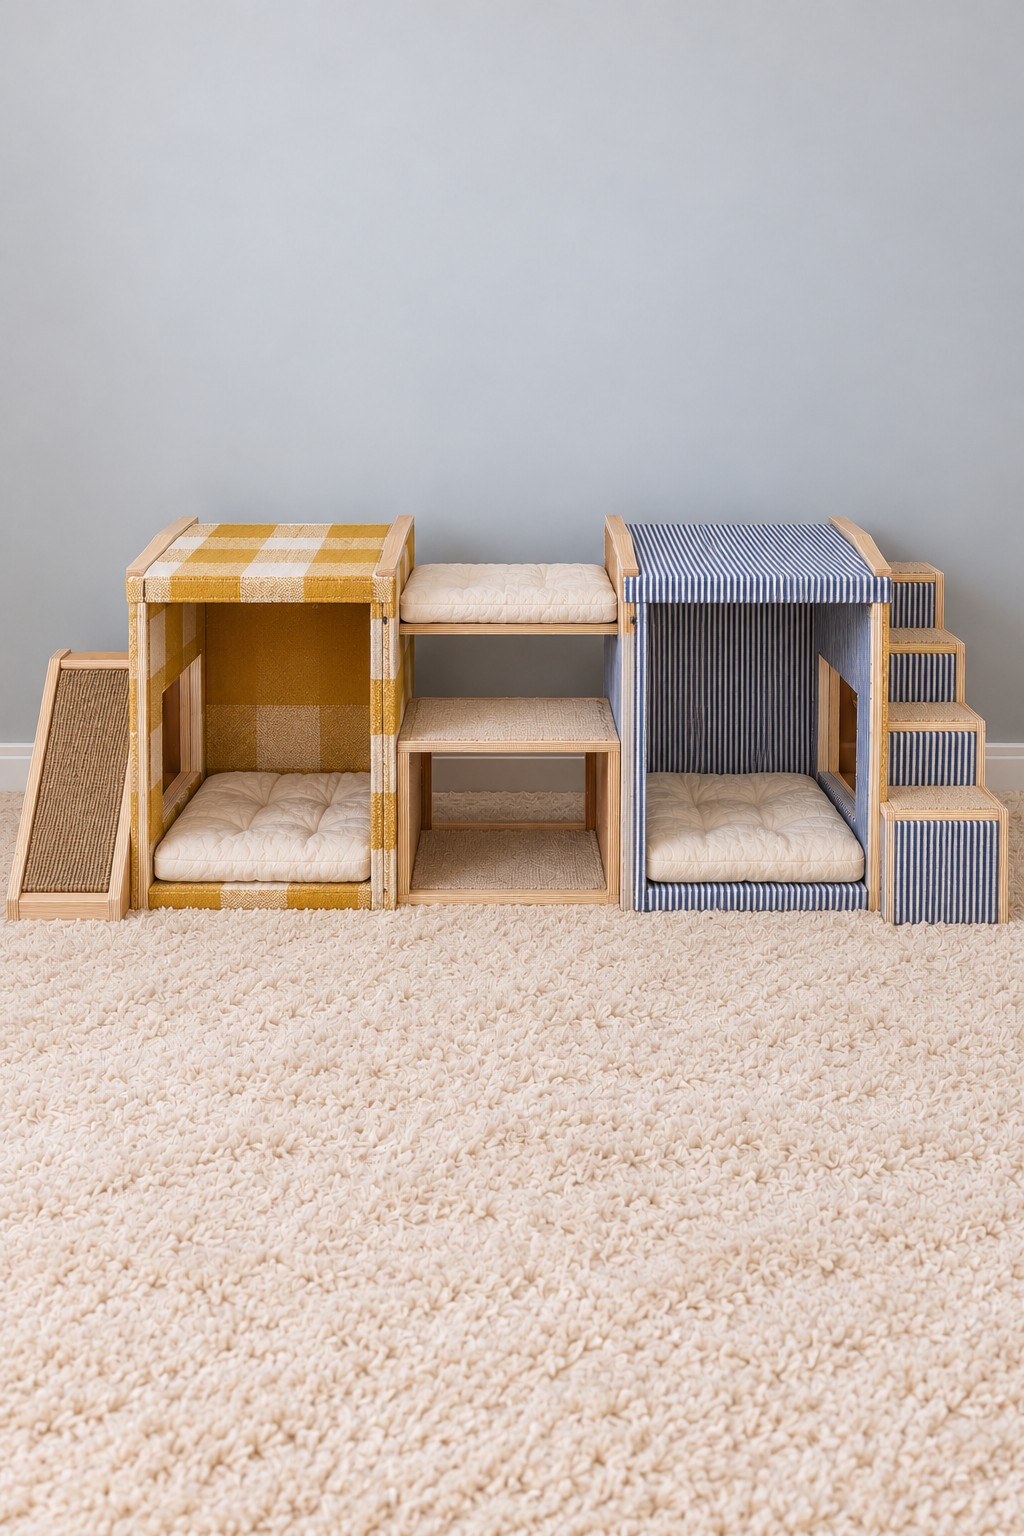
Mustard gingham and narrow blue stripes give two simple box dens different personalities. A small central platform links them visually, with a scratch ramp on one side and enclosed steps on the other. This is a useful direction when you want a playful corner with relatively low furniture.
Make the load carrying boxes and middle platform from timber or plywood first. Sew fitted cotton covers for the exterior faces, leaving each entrance completely open, and add firm washable pads. The fabric is a covering rather than a support. Screw the side steps to the frame and capture the scratch ramp at both ends so it cannot slip. Use a gripping surface on any roof intended for climbing.
3. Botanical Wall Dens Linked by a Short Bridge
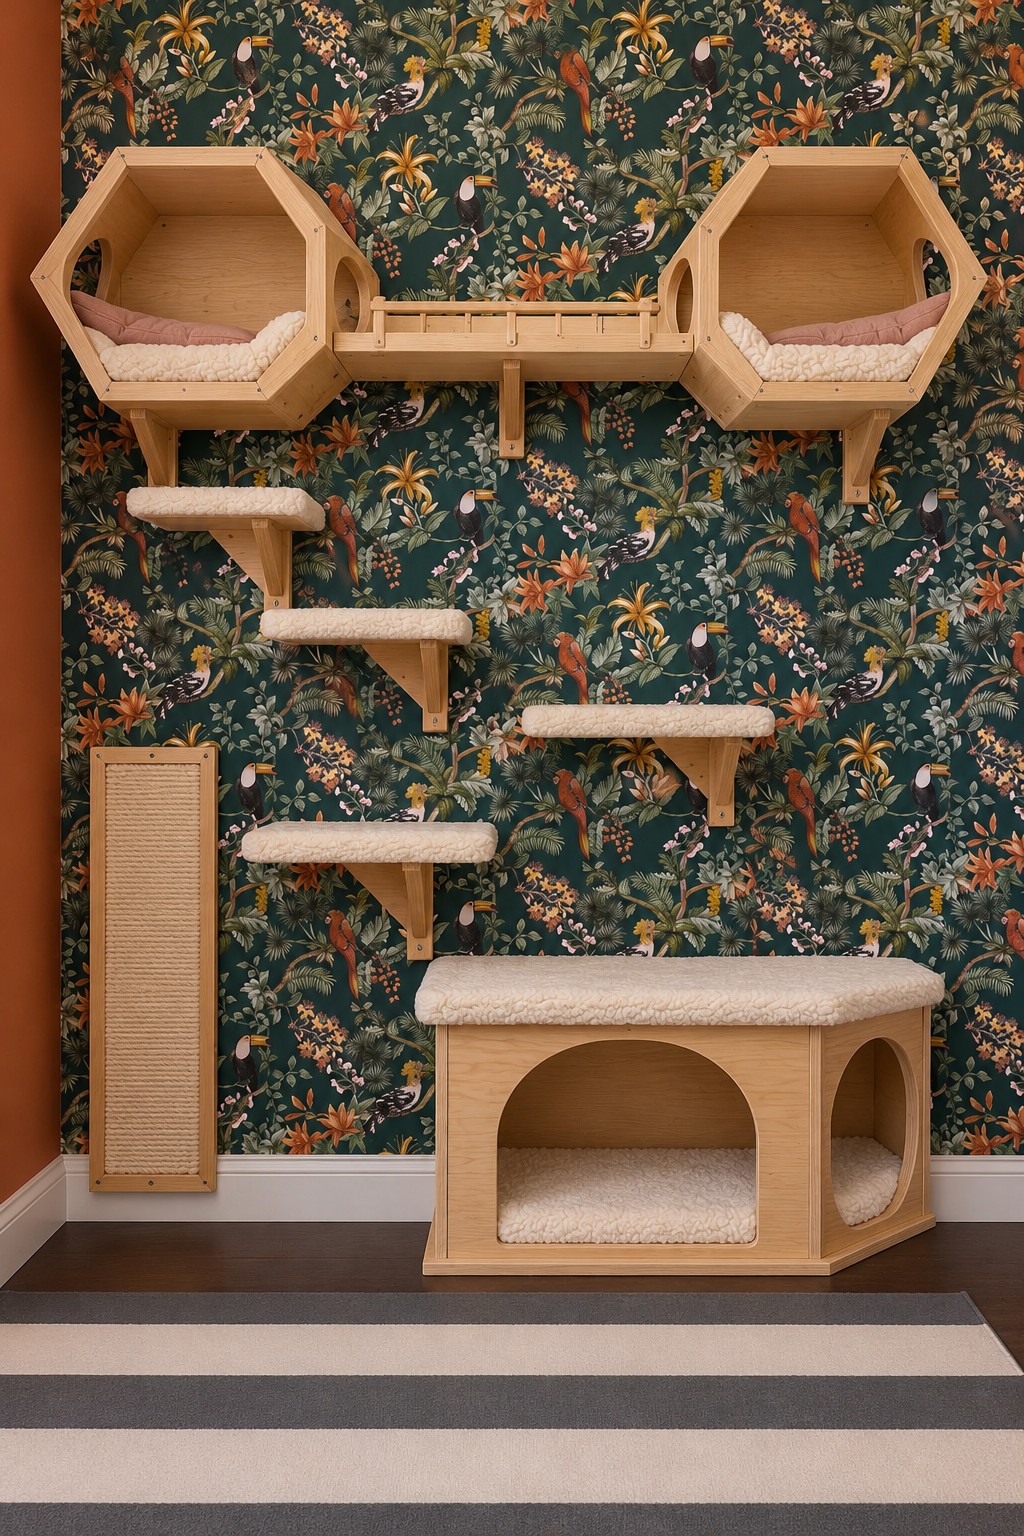
Two wooden hexagonal hideaways become the destinations of a wall climbing route. A short slatted bridge connects them, while padded shelves lead upward from a broad floor cubby. Dark botanical wallpaper makes the pale wood and cream surfaces stand out without needing extra objects in the climbing area.
Use plywood for the lower den and correctly cut timber panels for the hexagonal shells. Each upper den needs its own structural mounting; the bridge must not be its only support. A purpose designed cat bridge kit is the more practical starting point for the moving connection. Follow its fastening and spacing instructions, eliminate trapping gaps, and keep a firm landing at each end. Add a replaceable vertical scratch panel within easy reach from the floor.
4. A Blush Sleeping Bench beneath Three Wooden Shelves
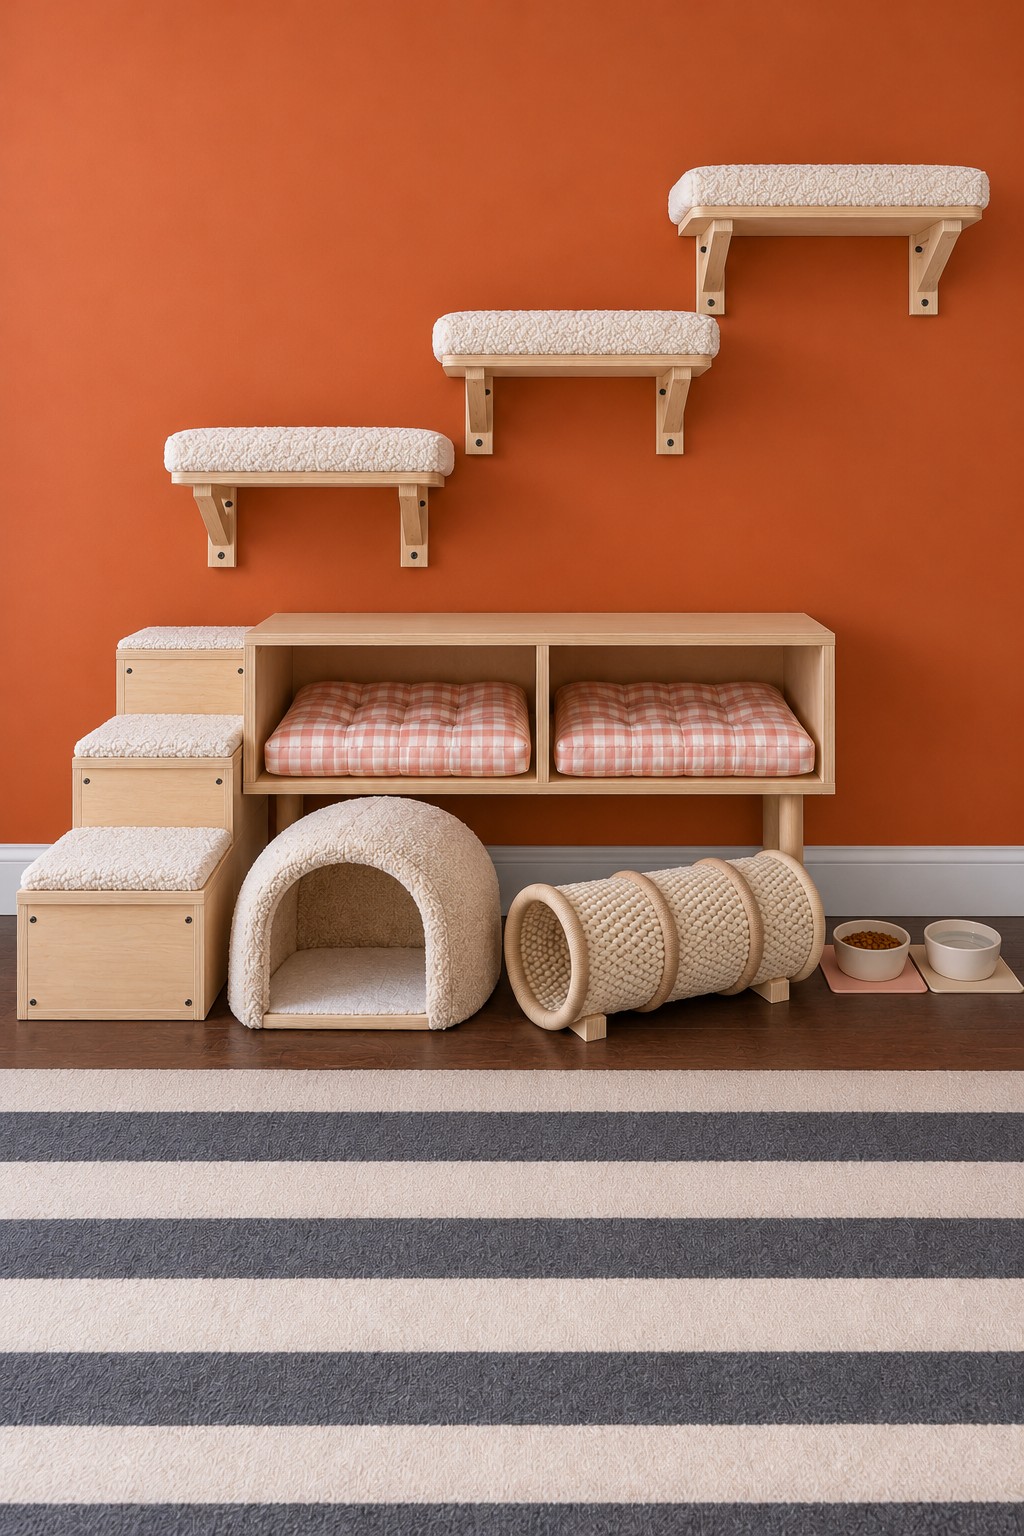
A two compartment bench creates the base of this corner, with three padded wall shelves rising diagonally above it. Blush gingham beds soften the straight timber lines. A separate fabric cave and woven tunnel keep some of the activity close to the floor.
Build the bench as one rigid carcass with a central divider and a supported top, then attach the short box stair along its left end. Cut matching wooden platforms and mount each on an appropriate pair of brackets. Fit securely retained cream pads after installation. The cave and tunnel can remain movable, allowing you to change the floor layout without disturbing the wall route. Keep them clear of the first step.
5. A Three Bed Bench with Sisal Climbing Columns
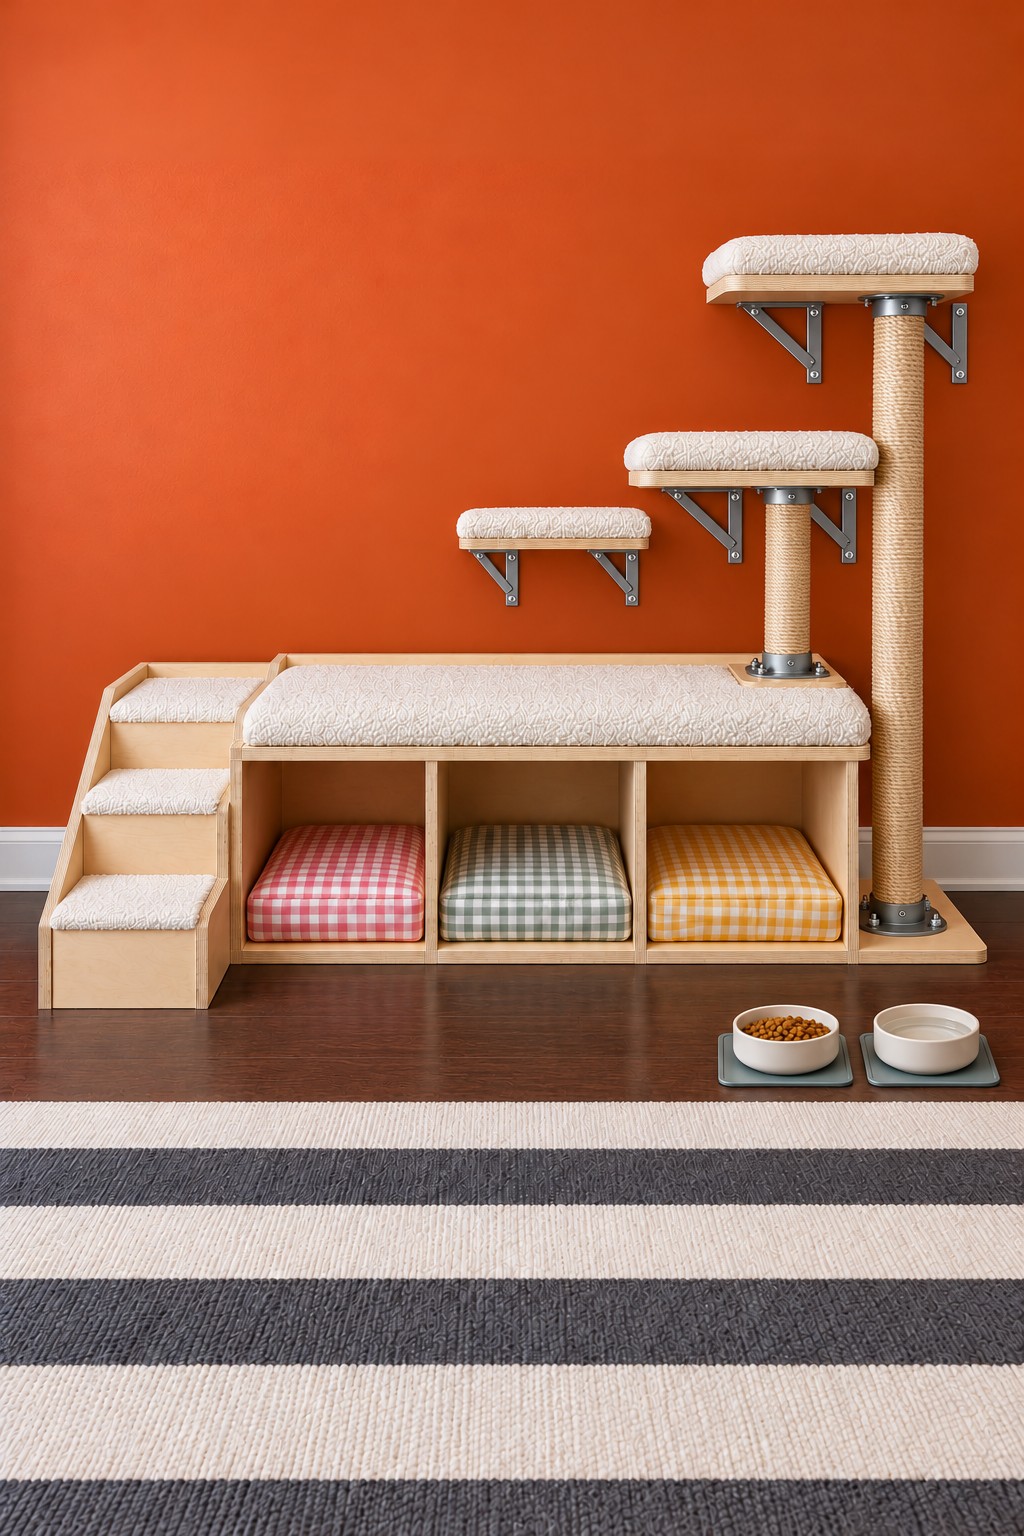
Three checked cushions in pink, green, and mustard make the lower sleeping bays easy to distinguish. Above them, small wall platforms and two sisal covered columns create a more active vertical arrangement. The steps at the left offer a gentler start than a jump from the floor.
Use plywood dividers to support the bench top, with fixed box steps at one end. Choose purpose made cat tree posts with compatible metal fittings, or have solid timber posts connected with properly designed bolted joints. The rope is a scratching skin, not a structural connector. Install the wall brackets independently and arrange the platforms so the cat has a usable landing beside each column. Make all three cushion covers removable.
6. A Sage Cat Loft with a Pink Upper Lounge
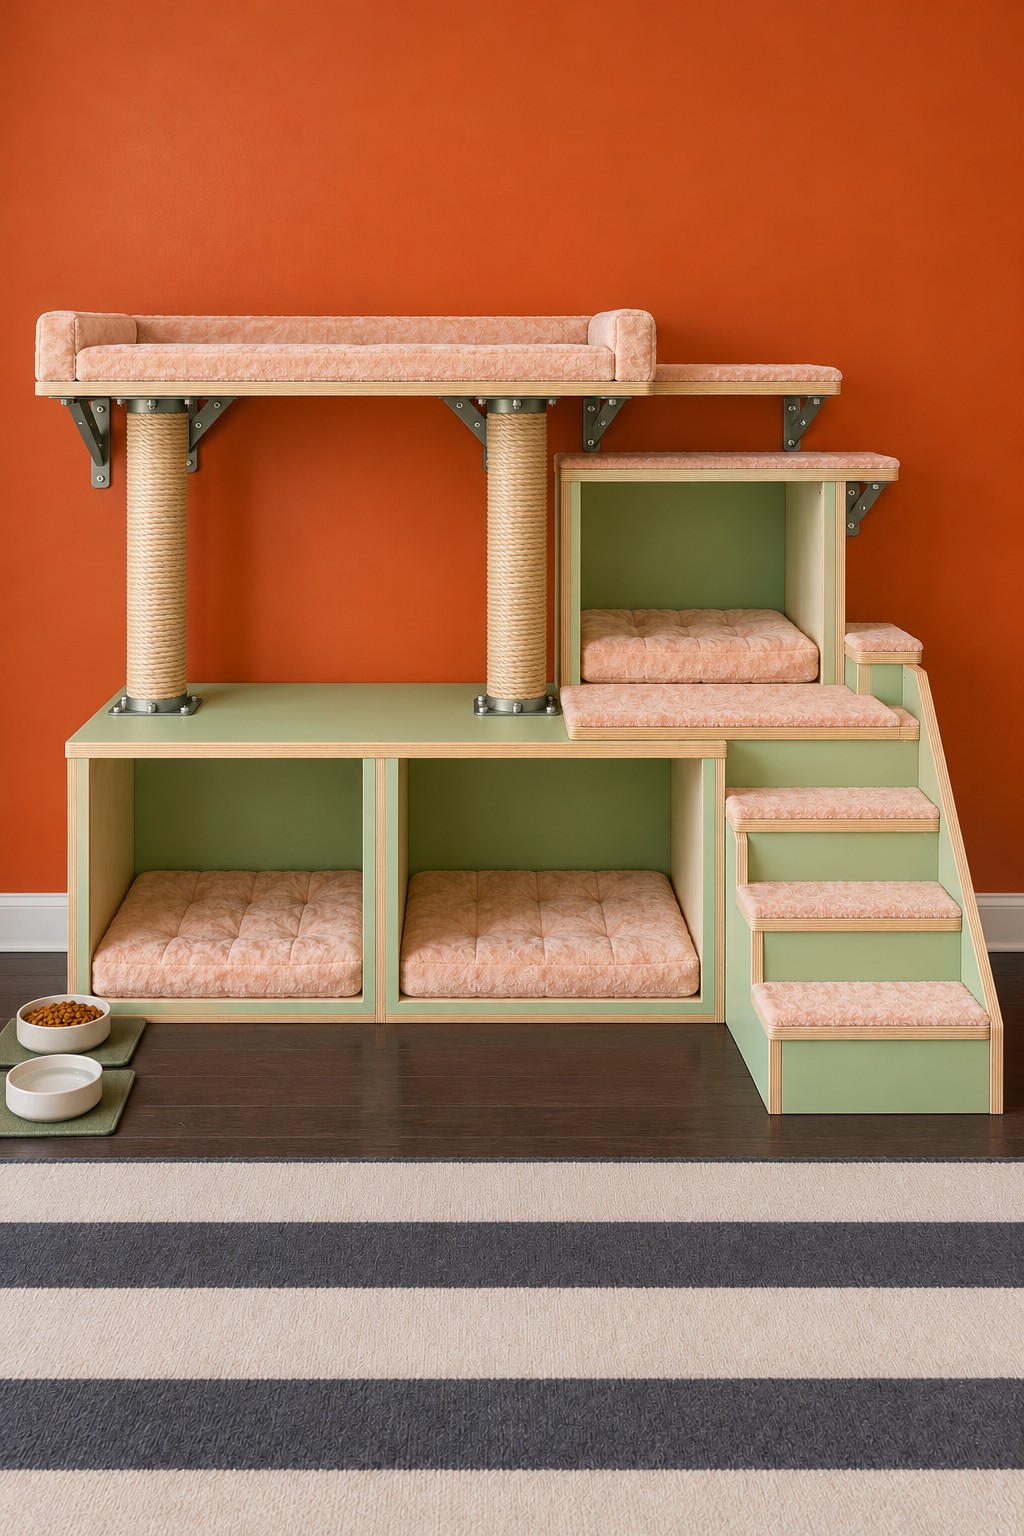
Sage cabinetry and pale pink upholstery give this climbing unit the feel of a small piece of living room furniture. Two lower dens sit beneath a raised lounge, with an extra cubby on the right and broad steps leading to it.
Assemble the base boxes and stair as connected plywood modules. Align the sisal posts above supported parts of the base rather than an unsupported patch of the top. Bolt the posts to suitable fittings and add the illustrated wall support for the long upper platform. The small raised den needs its own secure connection to the base. Use a firm fitted pad on the lounge and keep the step edges visible instead of covering them with thick, floppy cushions.
7. An Open Timber Tower with a Fabric Hammock
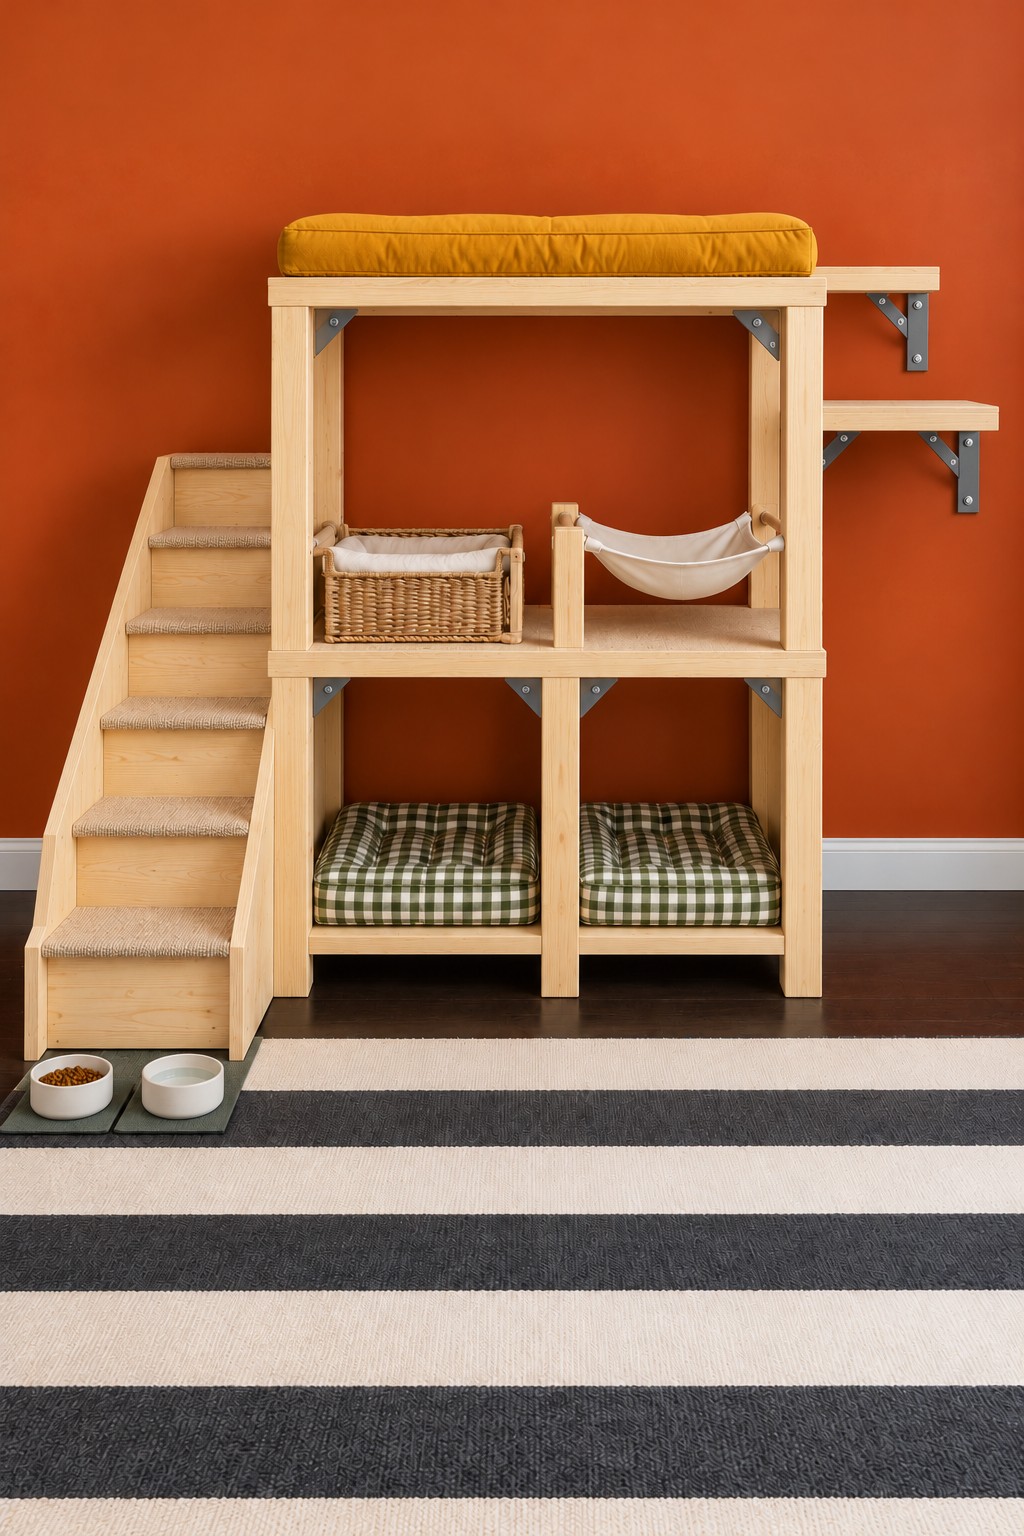
An open frame makes this taller arrangement feel lighter than a solid cabinet. A mustard bed occupies the upper deck, a woven basket and small hammock share the middle level, and green checked cushions fill the lower bays. A full stair runs along the left side.
Build the tower from substantial timber uprights and rails with appropriate bracing, then connect the staircase to the frame. Use a purpose made cat hammock or a securely sewn fabric sling with fittings rated for that use. Short enclosed attachments are preferable to trailing cords. The upper deck and side wall shelves need their own reliable connections. Restrain the tower against tipping, and leave enough space around the hammock for an uncomplicated exit.
8. A Compact Cat Corner with a Clear Diagonal Route
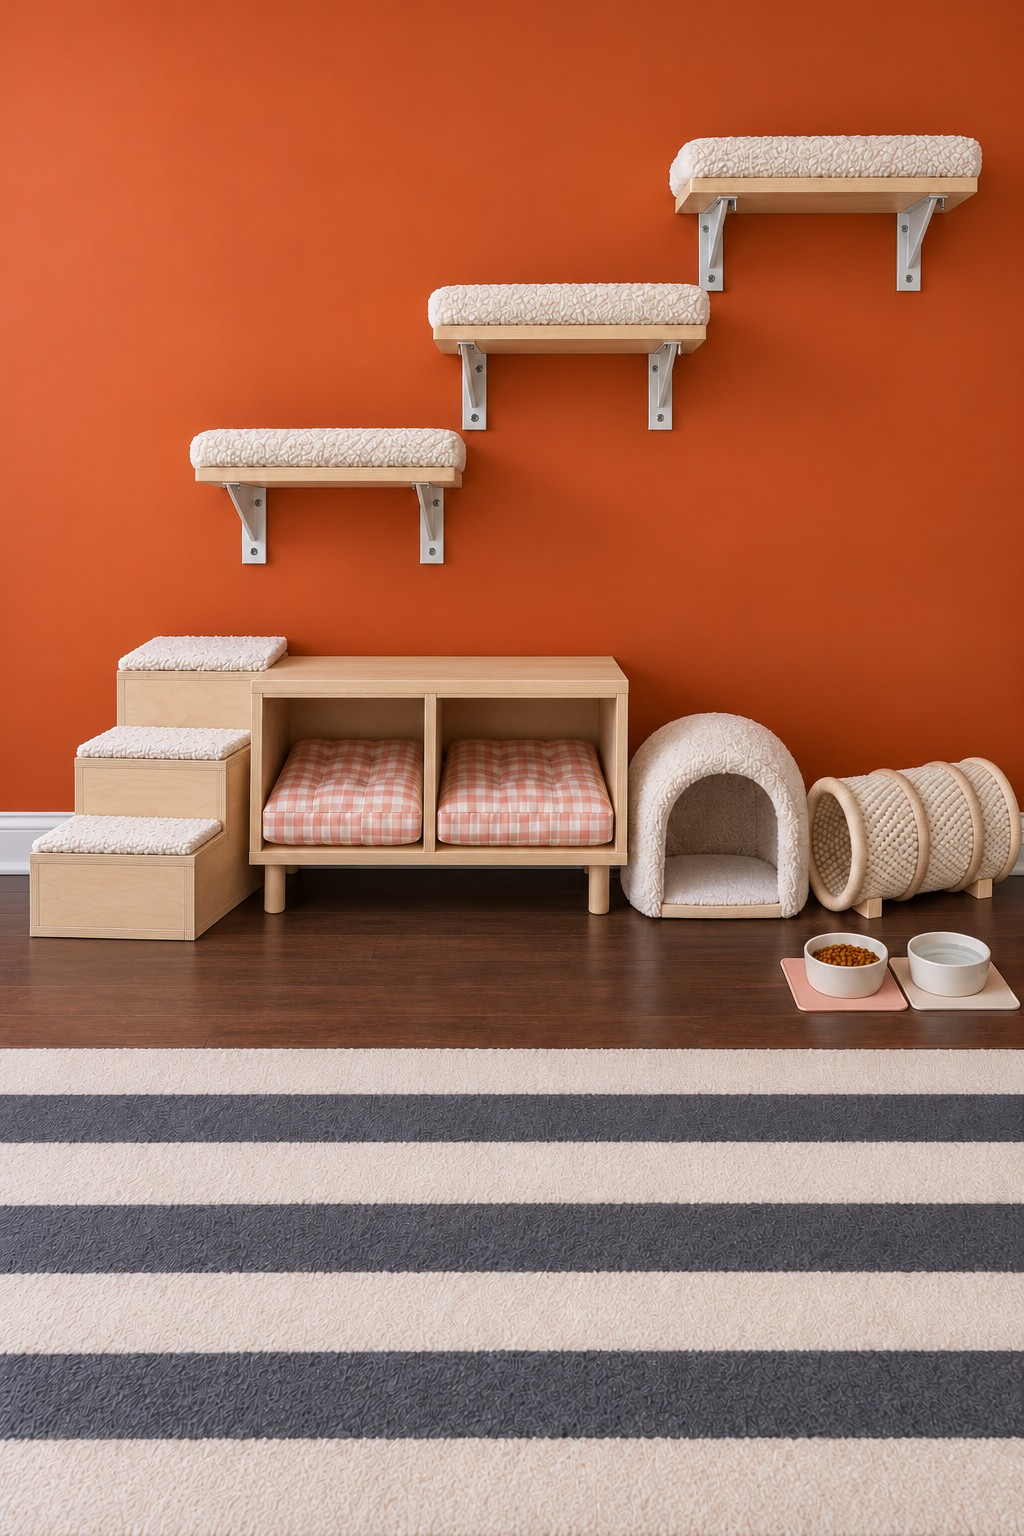
This smaller arrangement combines a low pink cushioned bench, three climbing shelves, a soft cave, and a short tunnel. It suits a room where the floor needs to remain open and the climbing area should stay visually contained.
Start with a sturdy two bay bench and a fixed three level stair on its left. Use matching padded boards above, offset so the cat can pause on each surface before moving onward. Choose the actual spacing after observing your cat’s comfortable movement at low height. Keep the cave and tunnel separate for cleaning and play changes. This version needs fewer built components than a full tower, but the wall fixings still require the same care.
9. A Green Gingham Lookout with a Full Staircase
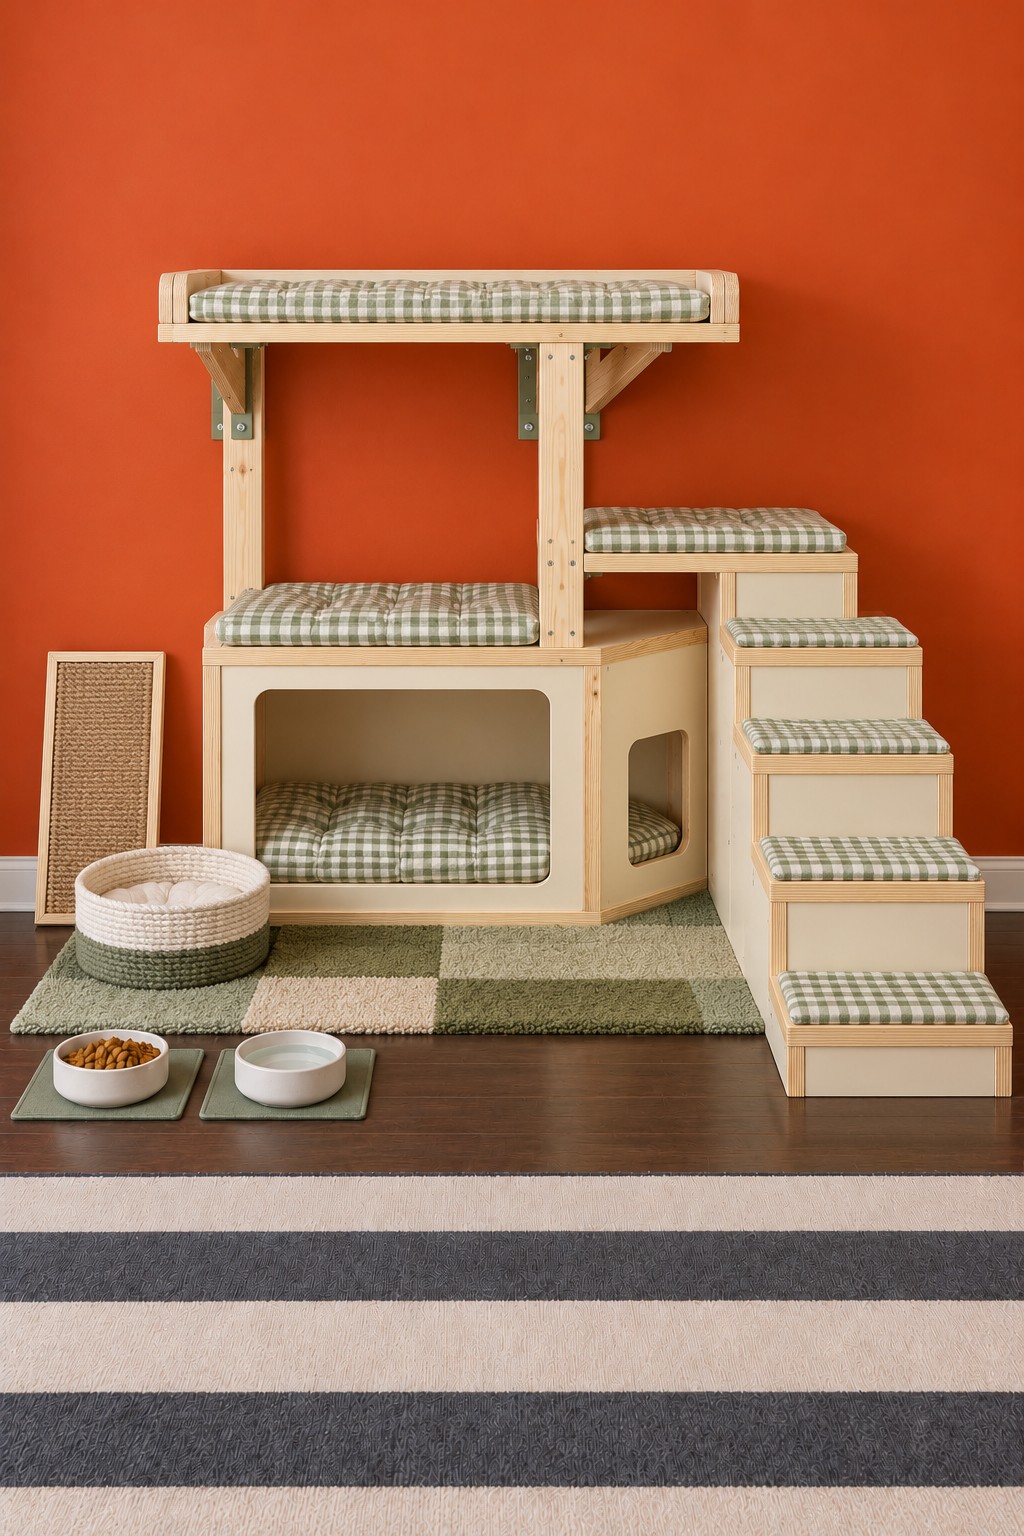
A roomy lower den anchors this natural wood structure. Above it, an intermediate landing and a raised bed provide two open places to rest, reached by a long staircase on the right. Repeating green gingham across the pads keeps the arrangement calm and cohesive.
Make the lower box with a large front opening and a second side opening, smoothing both edges carefully. Fix the upper uprights to the structural frame, then support the lookout with suitable corner braces. Construct the staircase as a rigid assembly and fasten it to the unit. Sew shallow fitted pads for the treads, avoiding bulky edges. Place the separate scratch board flat or secure it in its intended position rather than leaving a loose board leaning beside the route.
10. A Circular Nap Nook beside a Mint House
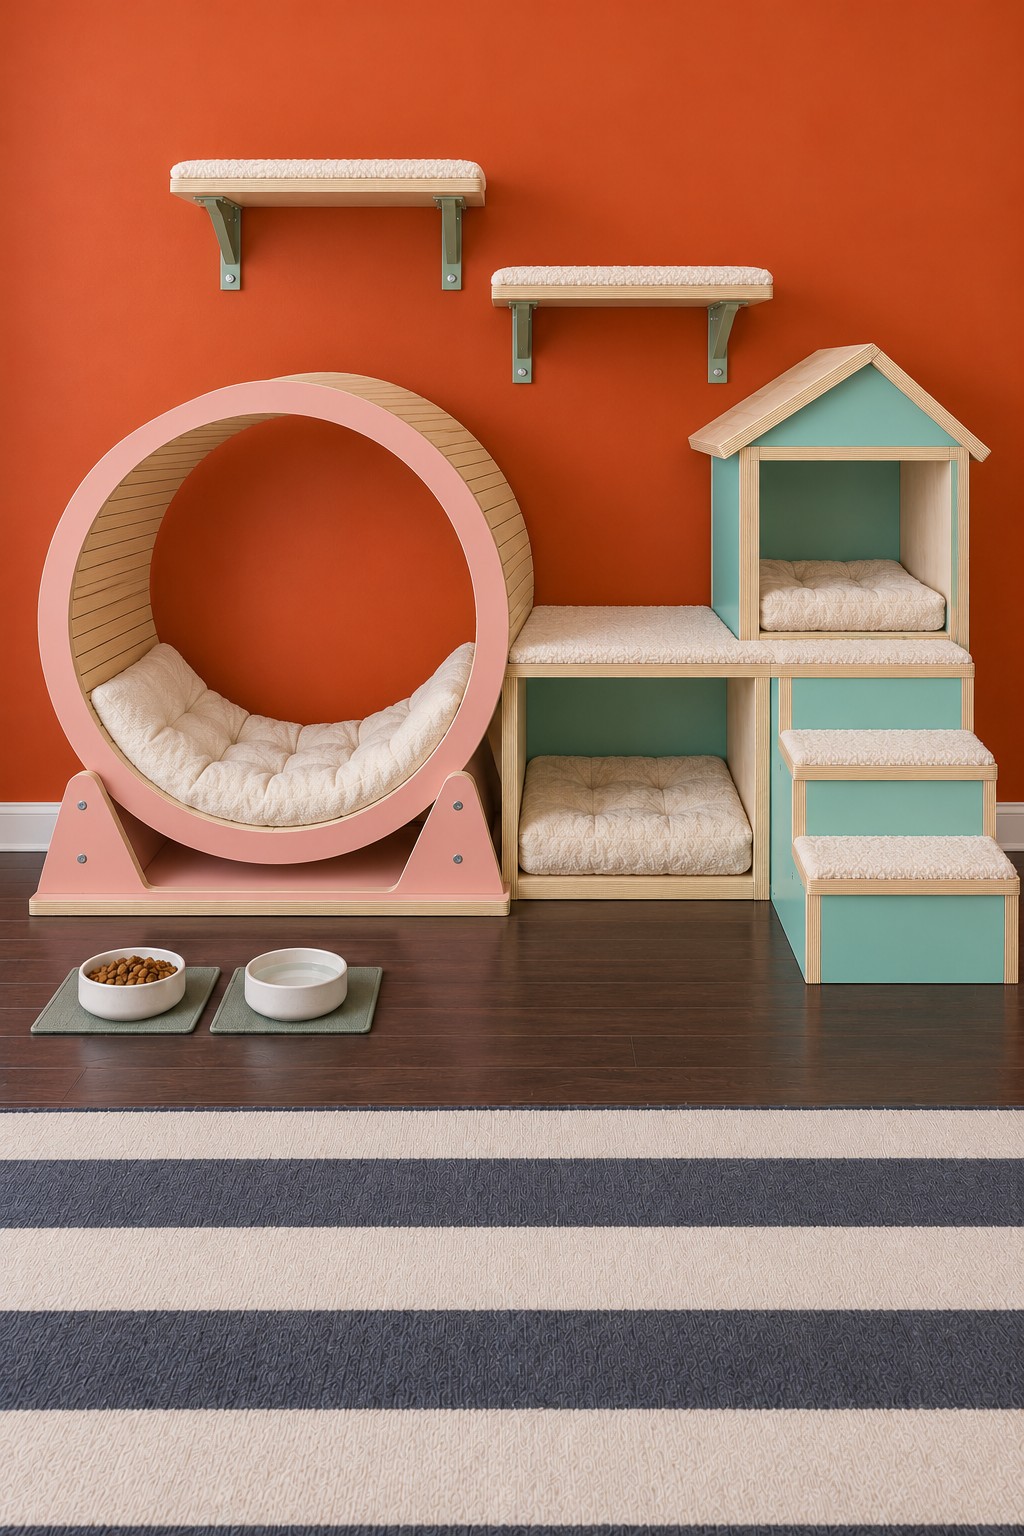
A large pink edged ring creates a sculptural sleeping nook alongside a mint house and padded steps. The curved cushion follows the bottom of the ring, giving the corner a softer shape than the surrounding square cubbies and wall shelves.
Treat the circular element as a stationary bed, not an exercise wheel. Its curved shell is an advanced woodworking component, so a ready made rigid ring or professionally fabricated form is a sensible starting point. Secure it to the shaped cradle and wide base so it cannot rotate. Build the adjoining mint boxes and steps separately, then connect them securely. Keep access to the house clear and mount the two upper shelves as independent structures.
11. A Peach Patterned Cat Apartment with Six Compartments
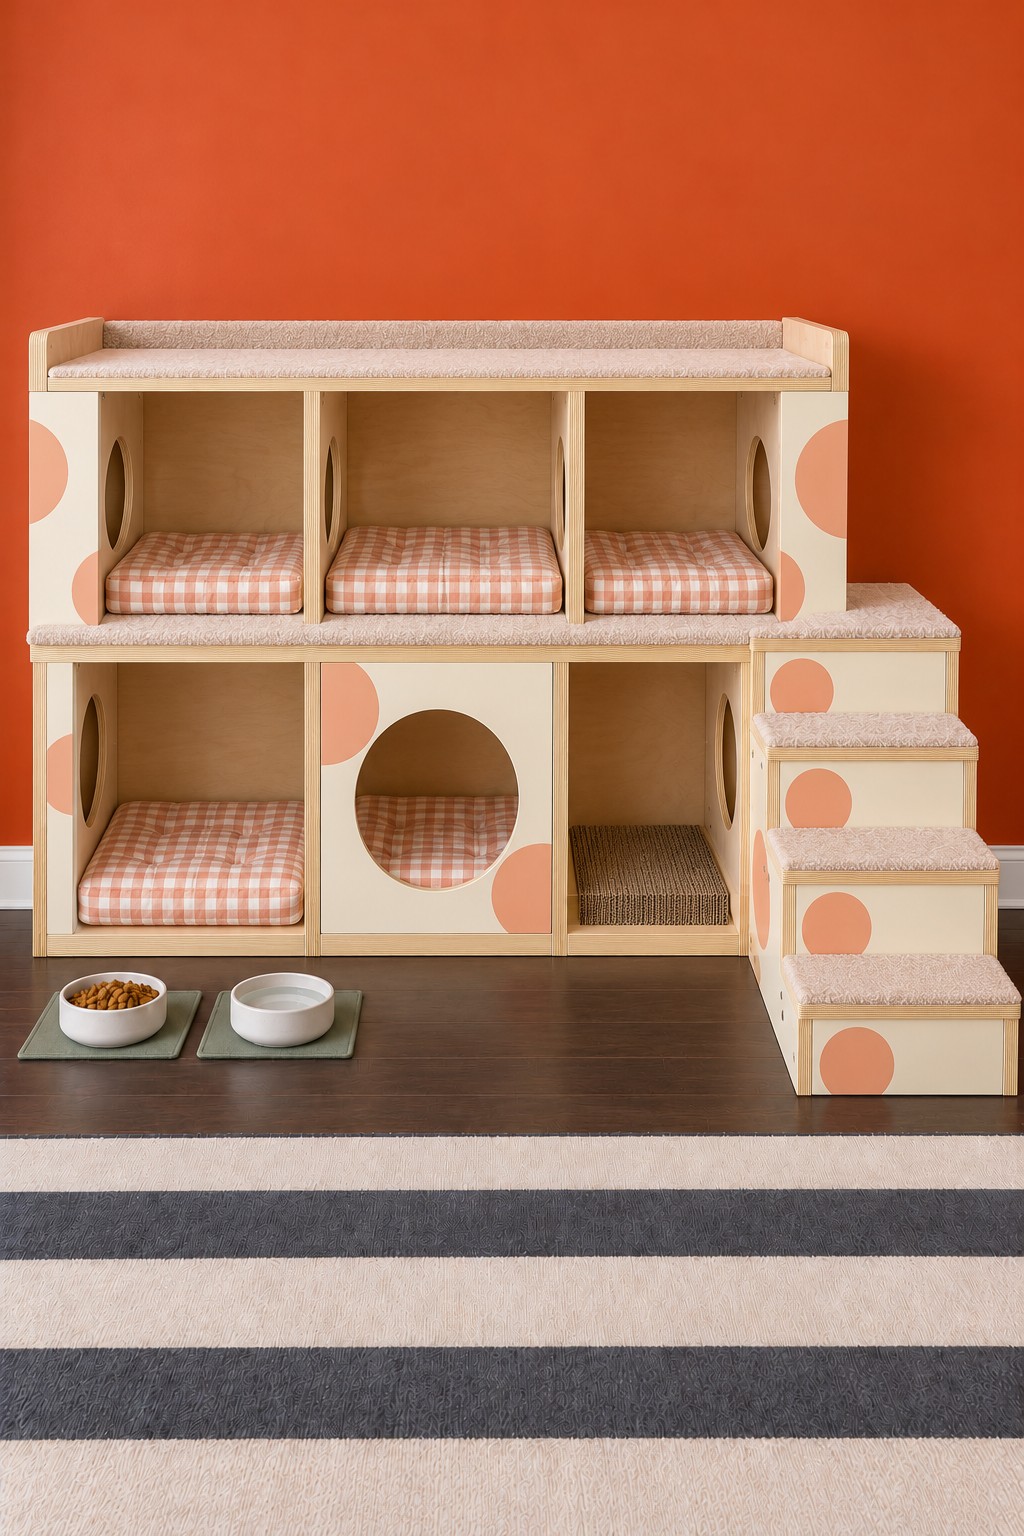
A broad two level cabinet offers several choices between open beds, a circular entrance, and a scratching compartment. Peach curves and circles decorate the cream fronts, while the side staircase reaches a long padded rooftop.
Use a plywood carcass with vertical dividers aligned to support the level above. Cut the circular doorway before assembly and check the usable space behind it with a full size template. Add internal cleats, suitable screws, and a securely attached stair module. Paint the decorative shapes on the exterior, allow the finish to cure, and then fit the gingham cushions. Keep the scratch insert removable. Several neighboring beds do not replace separate retreats elsewhere in a home with multiple cats.
12. Pastel Tunnel Boxes beneath Two Round Perches
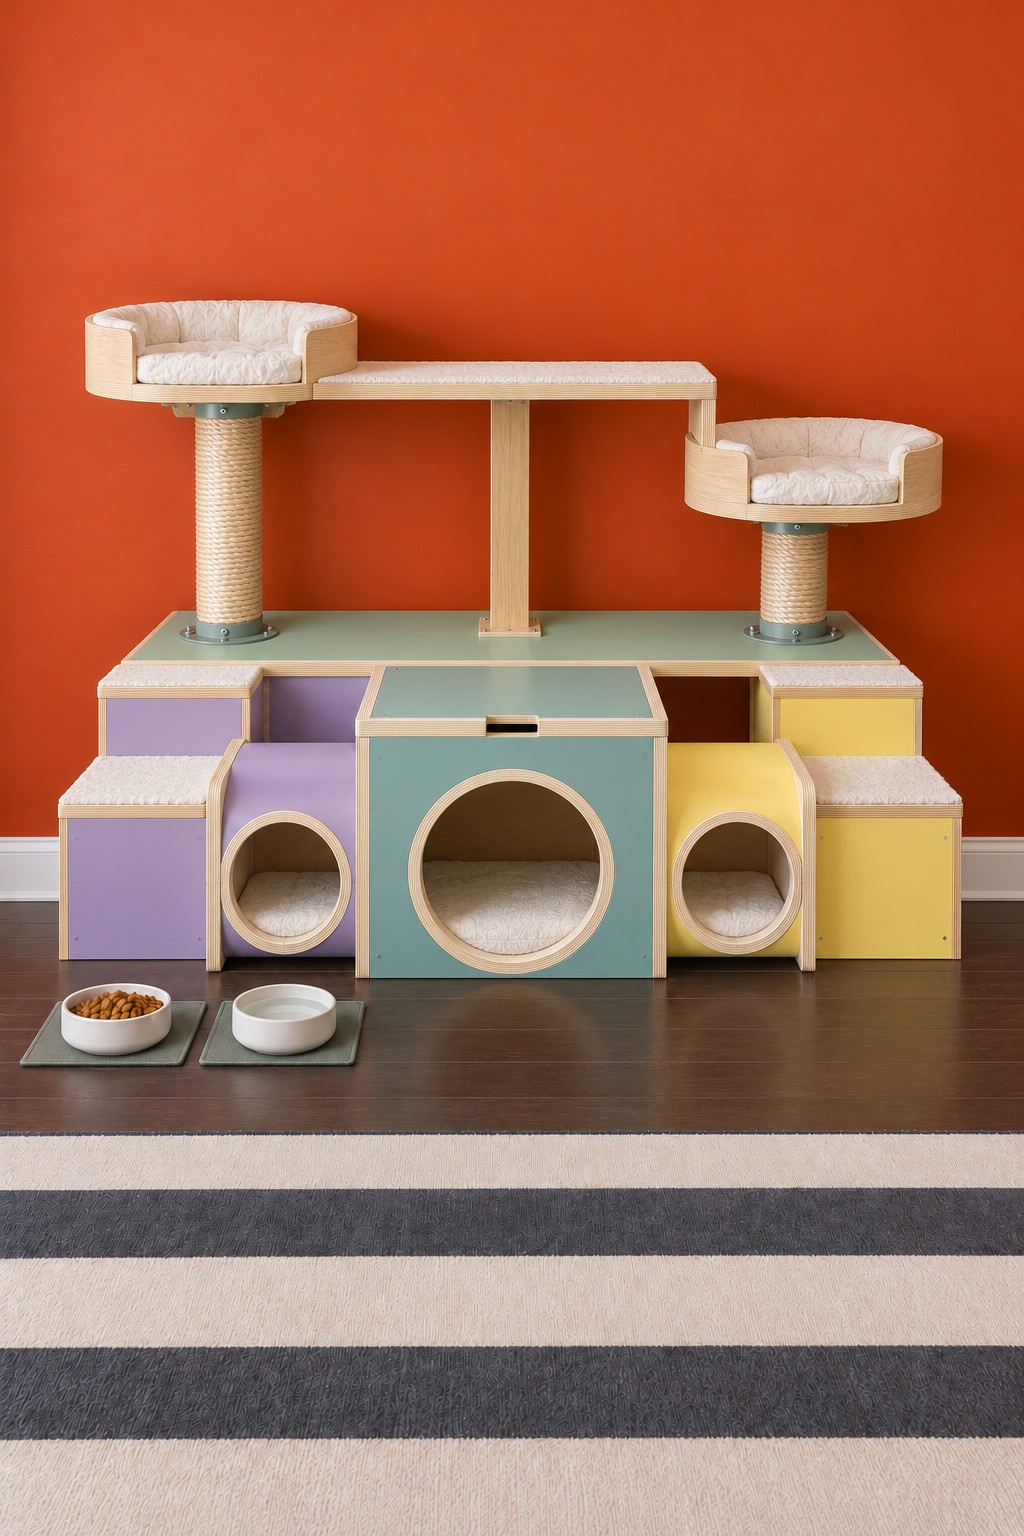
Lavender, aqua, and pale yellow modules form a cheerful base with three circular entrances. Above them, two round beds and a connecting platform create a second layer of resting space. The low blocks at the sides act as small approach steps.
Build the lower compartments from plywood and use rigid, smoothly finished tunnel liners where a cylindrical passage is needed. Keep each opening generous enough for the intended cat, with no squeezing point behind the front panel. Place the sisal posts over supported sections of the base and connect them with proper fittings. The central platform also needs its own support, as shown by the vertical timber beneath it. Fit the round pads securely inside the shallow perch rims.
13. A Raised Cottage with a Braced Timber Frame
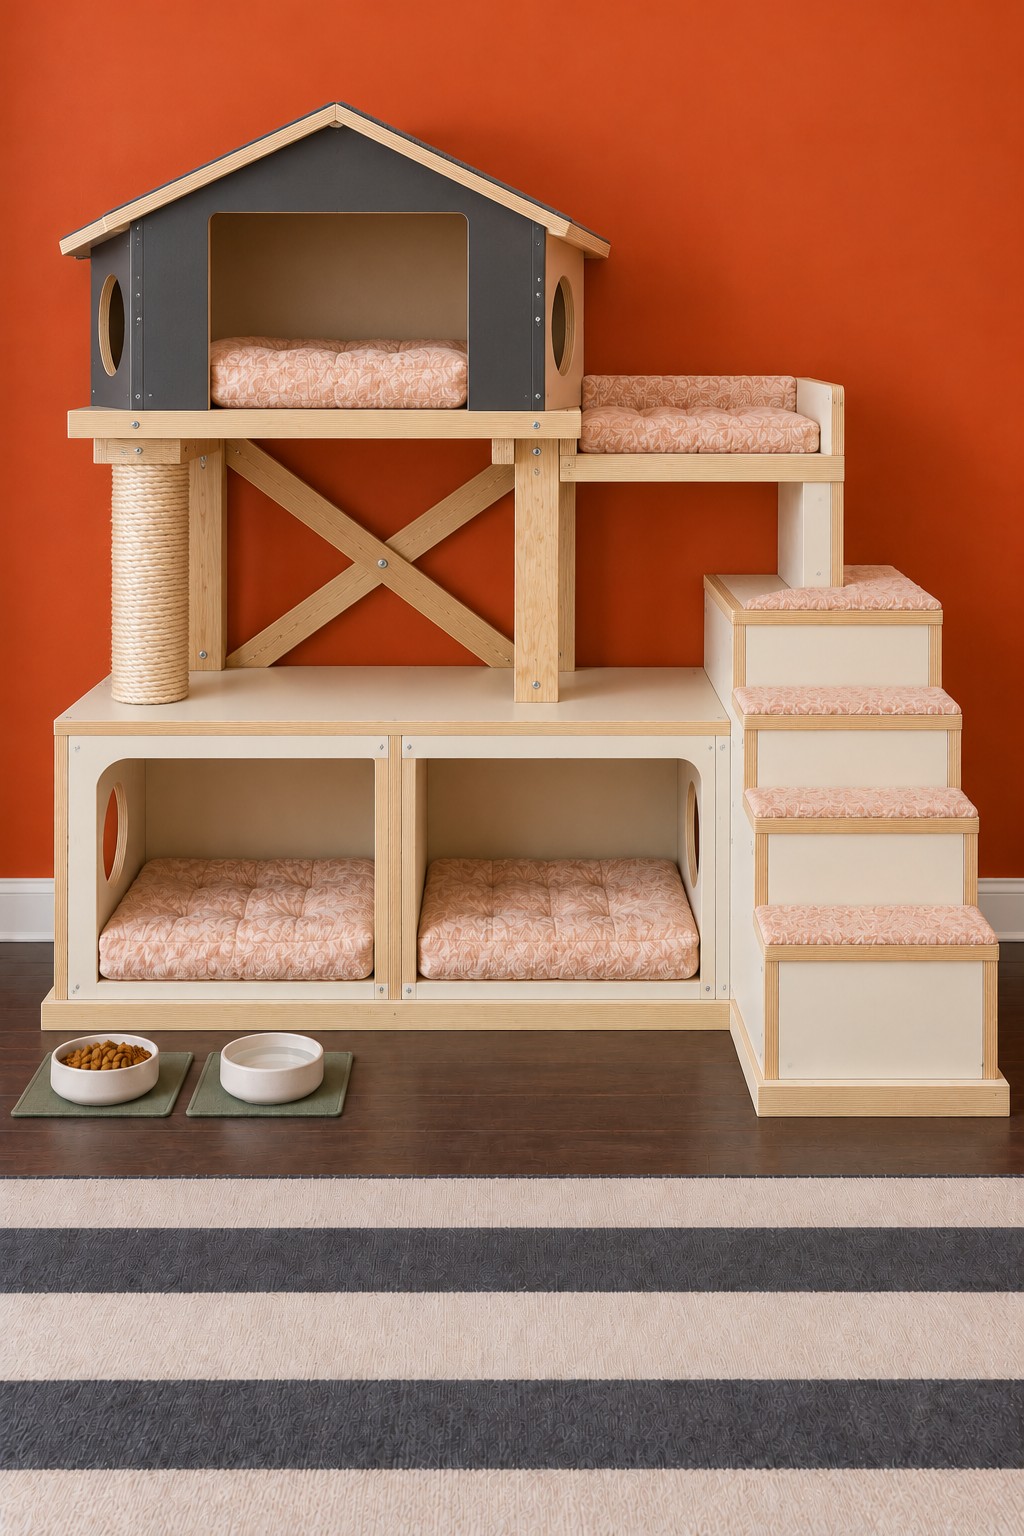
A dark gray cottage sits above two cream sleeping cubbies, with pink bedding tying the levels together. A sisal column and diagonal rear braces make the upper structure visually understandable, while the right staircase leads to a sheltered landing beside the house.
Assemble the lower cabinet and stair first. Build the cottage platform on fixed uprights and add diagonal bracing to resist sideways movement. Make the roof from joined plywood panels and leave the side openings smooth and unobstructed. The roof provides shelter; the flat adjoining platform is the intended landing. Screw the cottage down to its support and secure the whole tall unit against tipping before adding the washable bedding.
14. A House Shaped Climbing Cabinet with Staggered Shelves
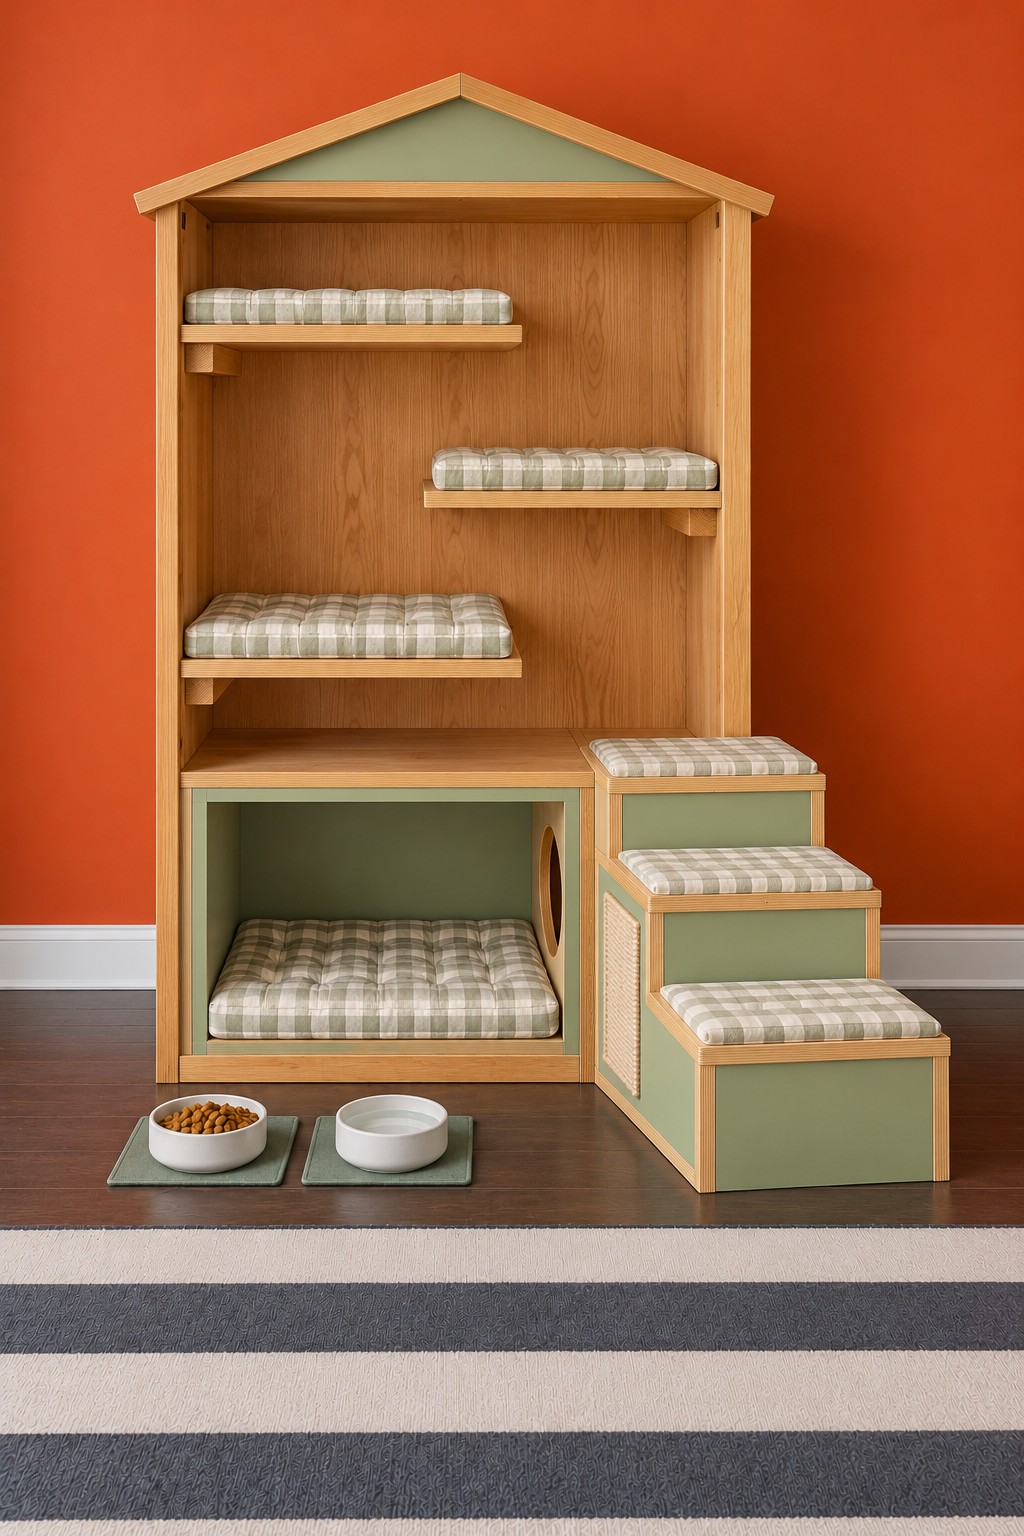
A tall timber back panel turns a modest footprint into a climbing cabinet. Three cushioned shelves sit at alternating heights above a sage sleeping cubby, and a small pitched top gives the unit the outline of a house.
Use a substantial structural back panel connected to the side frame and base. Shelf supports must fasten into that structure rather than a thin decorative backing. Assemble the lower den and right side steps as one stable foundation, then install the shelves with enough space for turning. Restrain the complete cabinet to the wall. Green checked pads can lift off for washing, but their retaining method should prevent them sliding when a cat lands.
15. A Hexagonal Hideaway Framed by Two Climbing Ramps
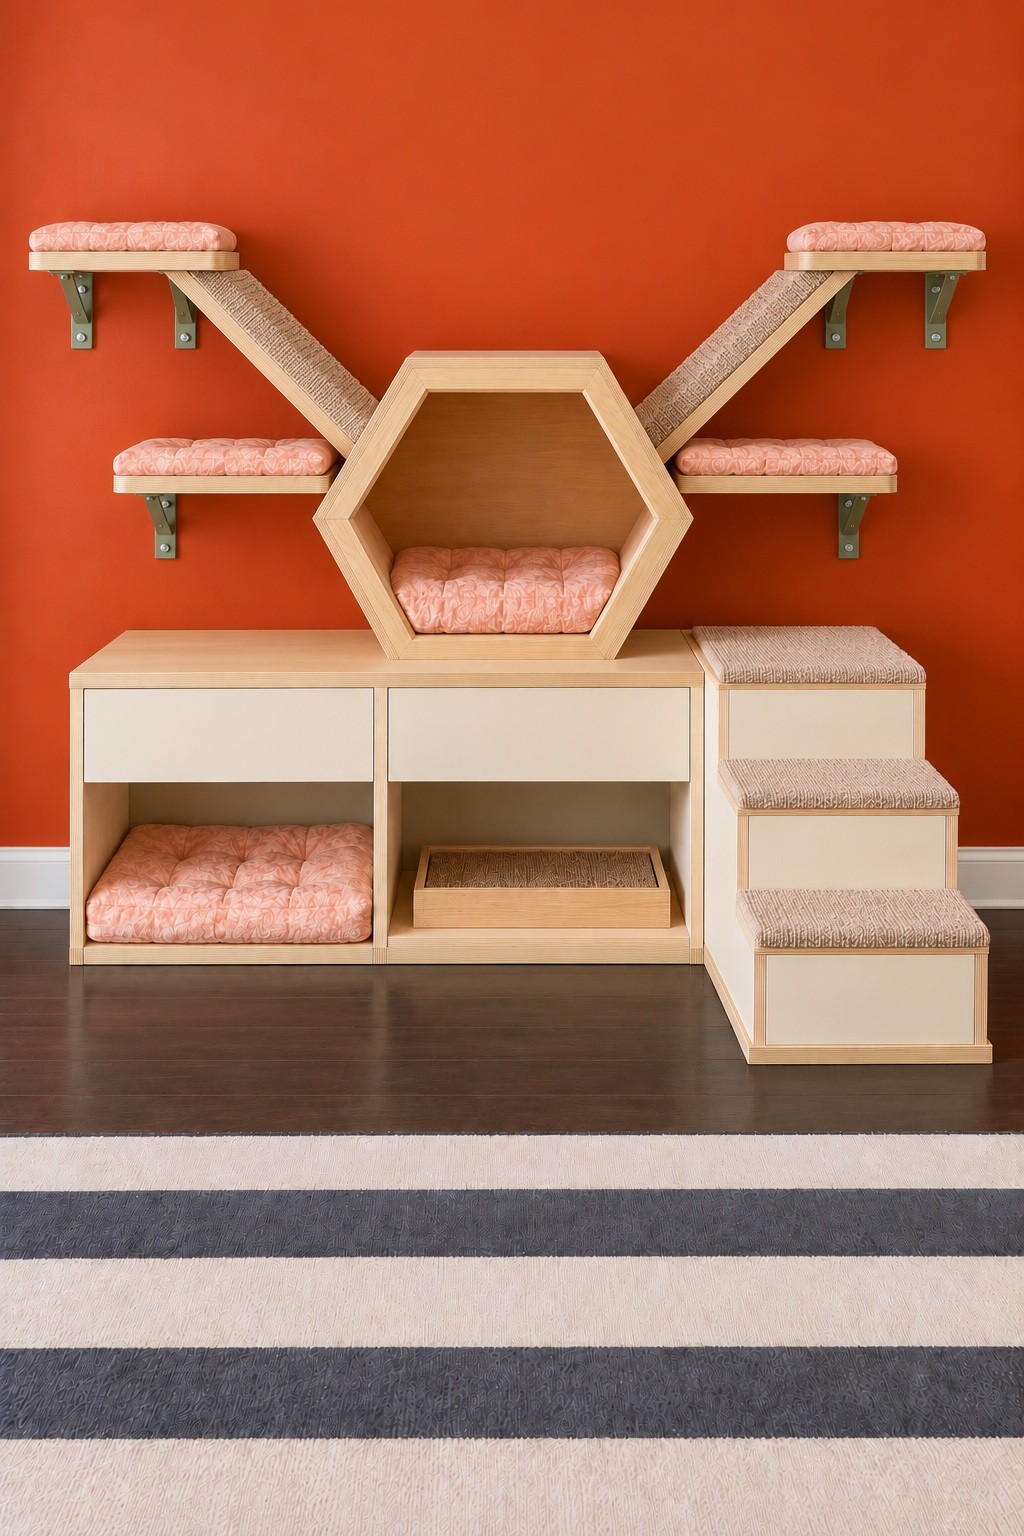
A central hexagonal bed sits firmly on a cream cabinet, while two carpeted ramps connect lower and upper wall platforms at either side. The long diagonal surfaces replace a series of tiny connections with a clearer climbing route. Pink cushions keep the cabinet beds and raised platforms visually related.
Construct the lower cabinet and side stair as a joined base, then fasten the hexagonal shell to its top. Install each wall platform with its own appropriate brackets. Make the ramps from rigid boards with securely fitted gripping material, fastening both ends to the landing structures. Check that the den does not obstruct the ramp entrances. Keep the cardboard tray in the lower open bay removable, filling it snugly with clean corrugated cardboard strips stood on edge and cut level with the rim.
16. A Striped Rooftop Tent above Two Round Dens
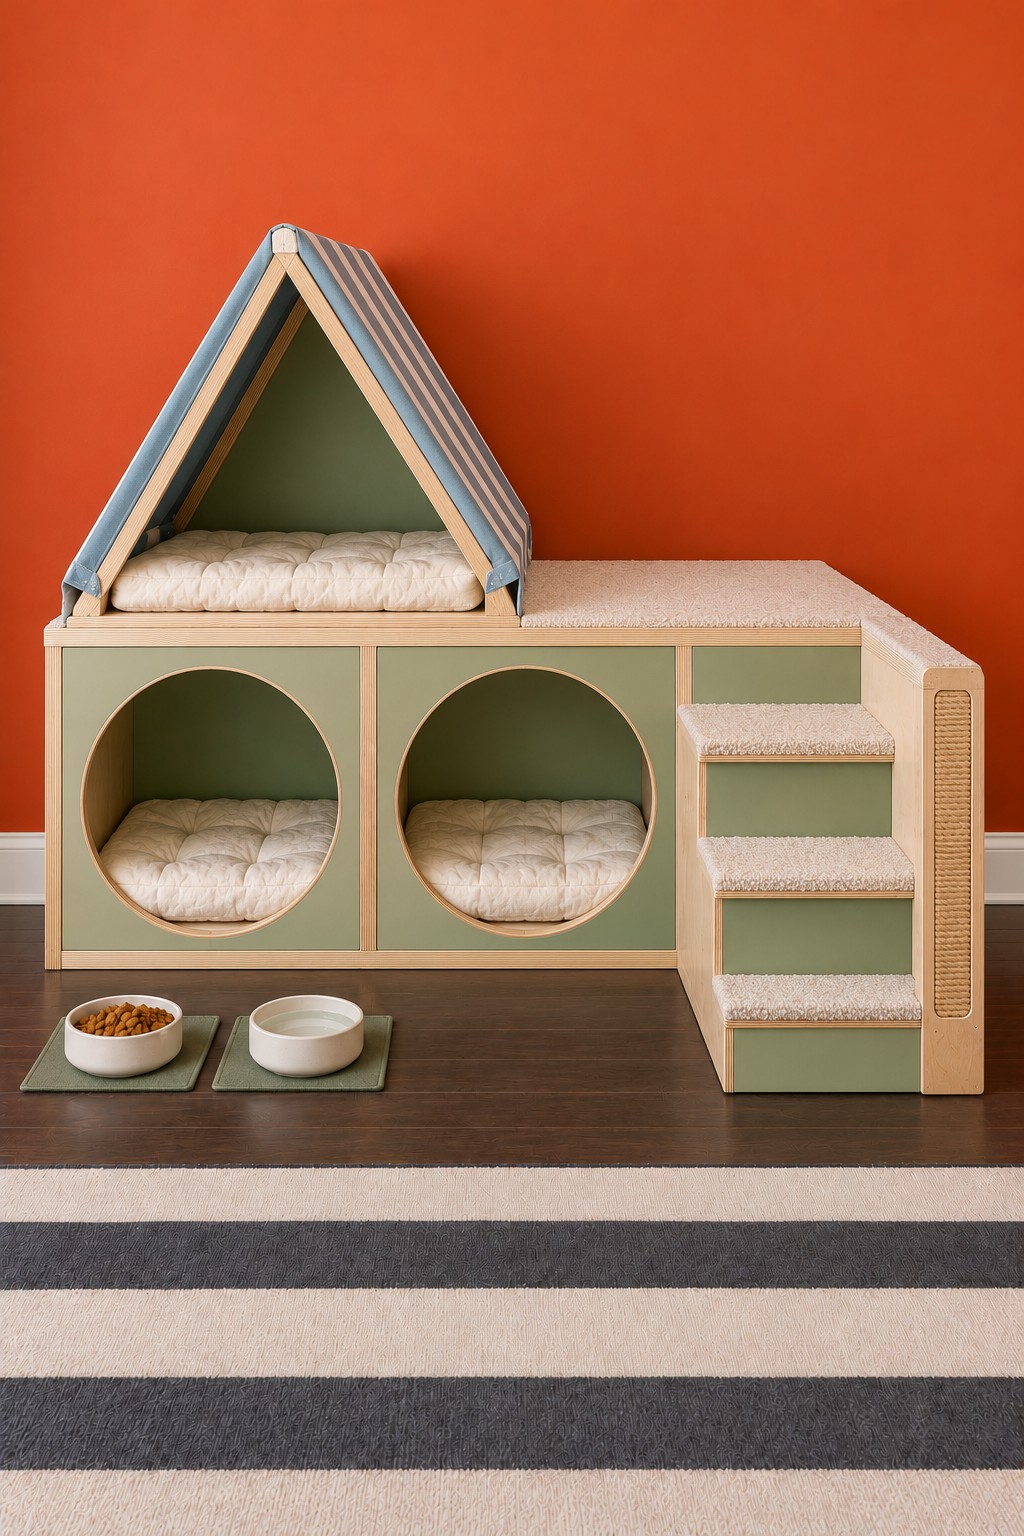
A blue striped fabric tent gives the upper deck a sheltered resting place, while two circular openings lead into the base. Sage panels and a narrow vertical scratch surface beside the stairs combine sleep, access, and scratching in one compact unit.
Cut the lower openings into plywood fronts before assembling the divided cabinet. Build a rigid triangular timber frame for the rooftop tent and fasten it to the deck. Sew a removable cover with a clean entrance and no loose ties, then add a separate cushion. The fabric roof is not a climbing platform. Attach the stair to the base and fit the scratching panel as a replaceable insert, keeping its edges covered by smooth trim.
17. A Floral Canopy and Striped Tent at Floor Level
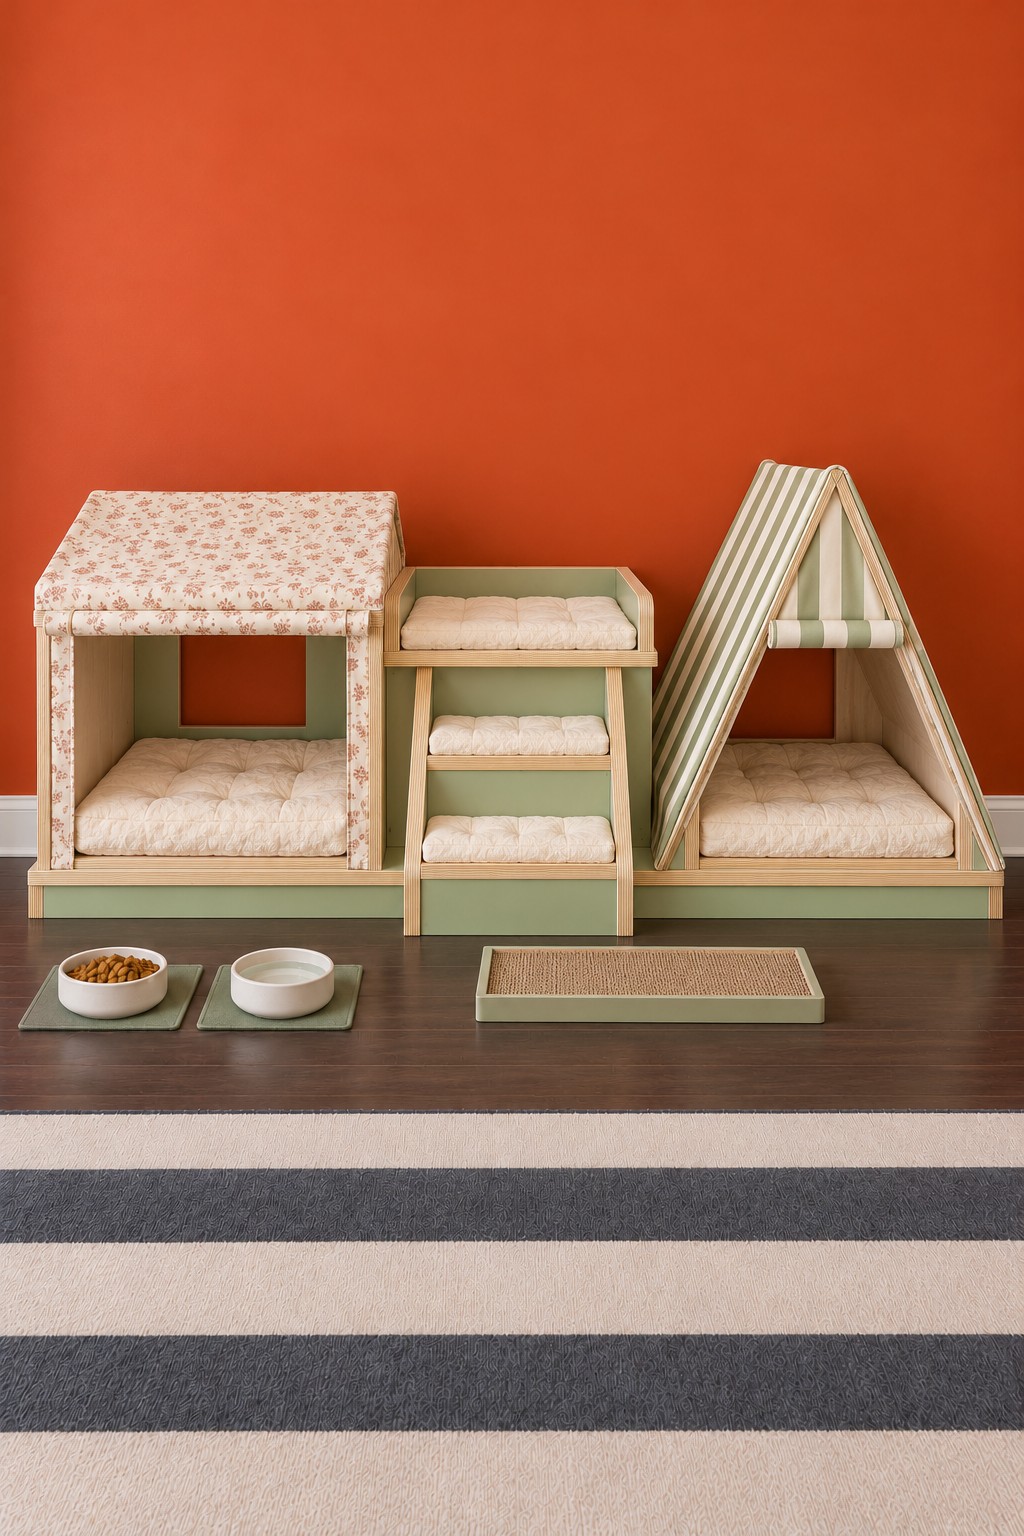
A floral canopy box and a green striped triangular shelter offer two very different sleeping moods without a tall tower. A short padded stair between them leads to a small lookout, and a separate scratch tray adds an activity surface in front.
Build a low common base with a simple four post canopy frame at one end and a fixed triangular frame at the other. Fit the floral and striped fabric as removable covers over the timber, leaving ventilation and entrances clear. Assemble the center steps from securely joined boxes and use thin retained pads. This is a good direction for a cat that prefers lower routes. Keep the detached scratcher outside the step landing area.
18. Twin Arched Dens with a Supported Connecting Walkway
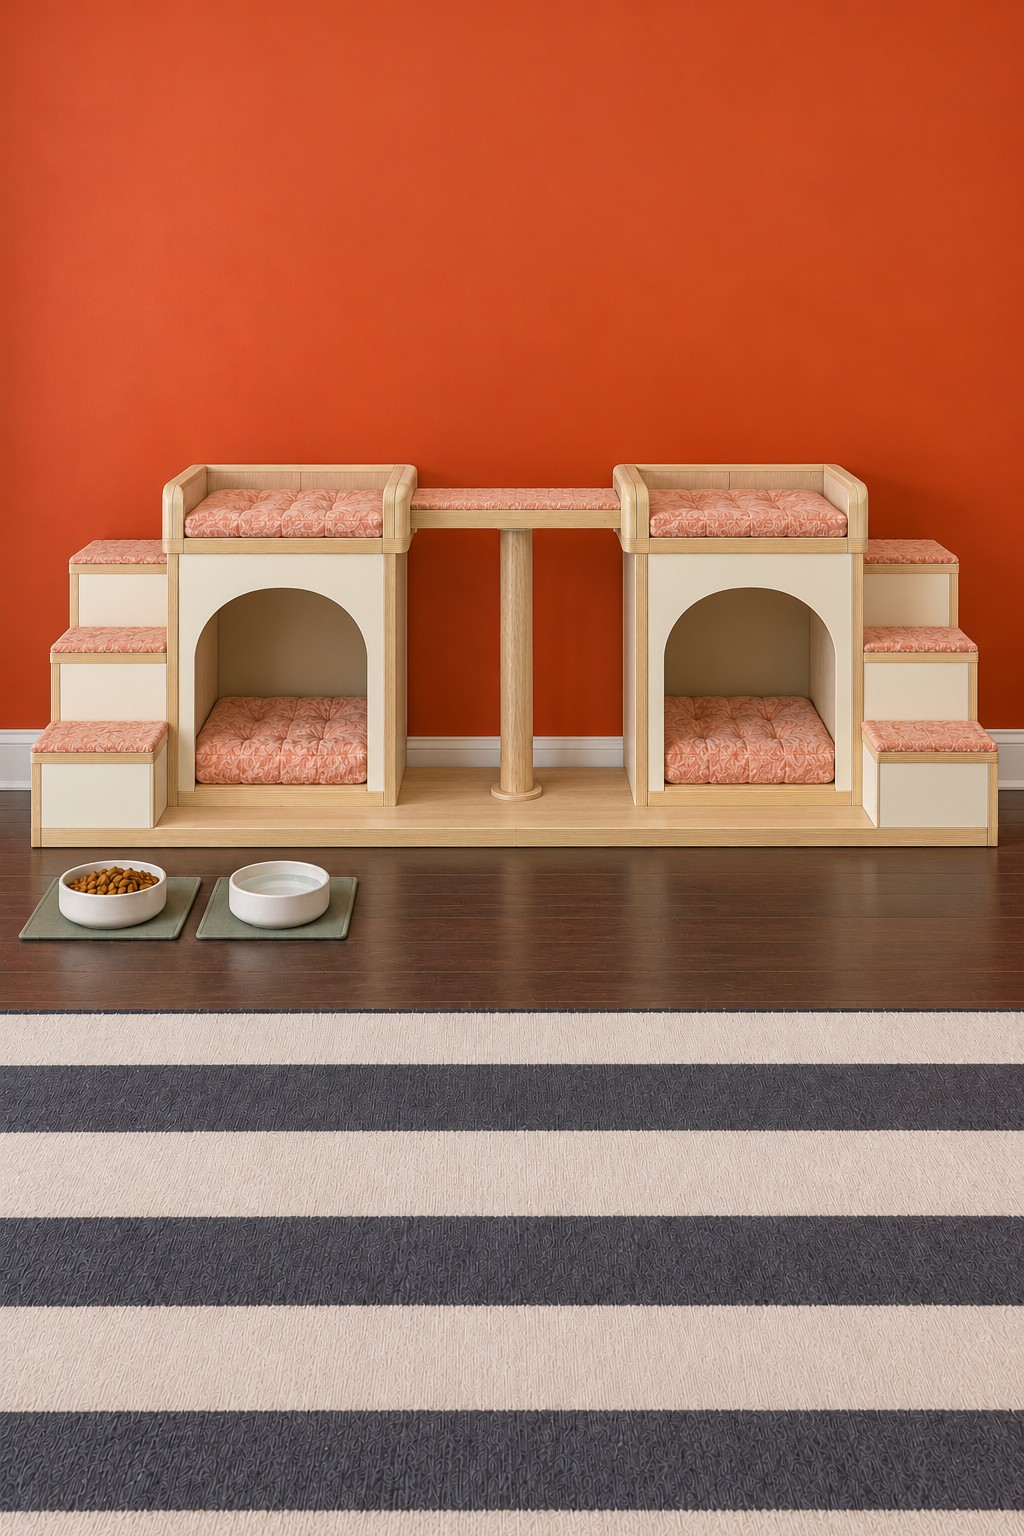
Two matching arched cubbies create a balanced arrangement, with staircases at both ends and a narrow elevated connection between the cushioned roofs. The central post makes the span’s support visible instead of leaving a long board apparently suspended.
Build the two den boxes to matching heights and join them to a continuous base. Install the center support and connecting board with appropriate mechanical joints before adding the roof beds. Make each stair part of the same frame so it cannot drift away. Use the connecting surface as a passage, reserving the wider roofs for resting. Two approaches help the arrangement feel less like a dead end, provided the surrounding floor also stays clear.
19. A Low Sage Lounge with an Open Scratch Bay
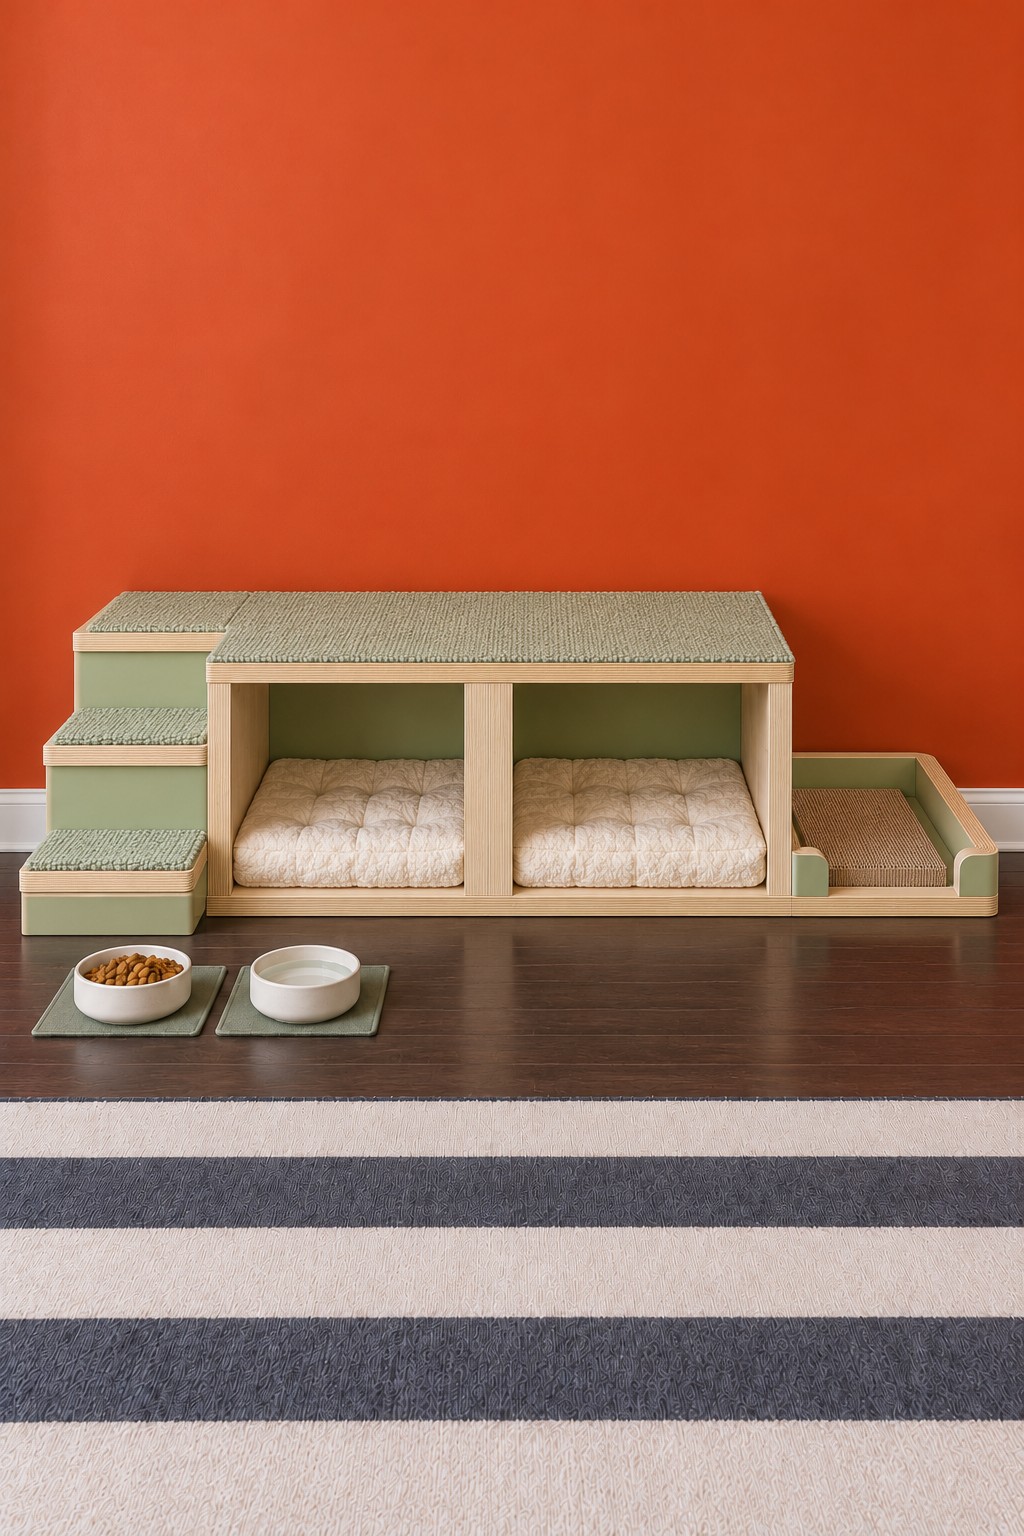
A low profile bench offers two cushioned hideaways, an easy stepped approach on the left, and a shallow tray area on the right. The broad flat top creates an accessible resting surface without the height of a climbing tower.
Make the bench from plywood with a central divider supporting the top. Join the stair and side tray to the main base, then fit the sage panels and removable pads. Use a firmly secured sisal mat or other suitable gripping material on the upper surface. The shallow side bay can hold a replaceable scratch insert. Keep its rim smooth and low. If adapting this for reduced mobility, size the steps to your cat’s comfortable movement rather than copying the proportions unchanged.
20. A Lavender Lookout above a Tall Scratching Panel
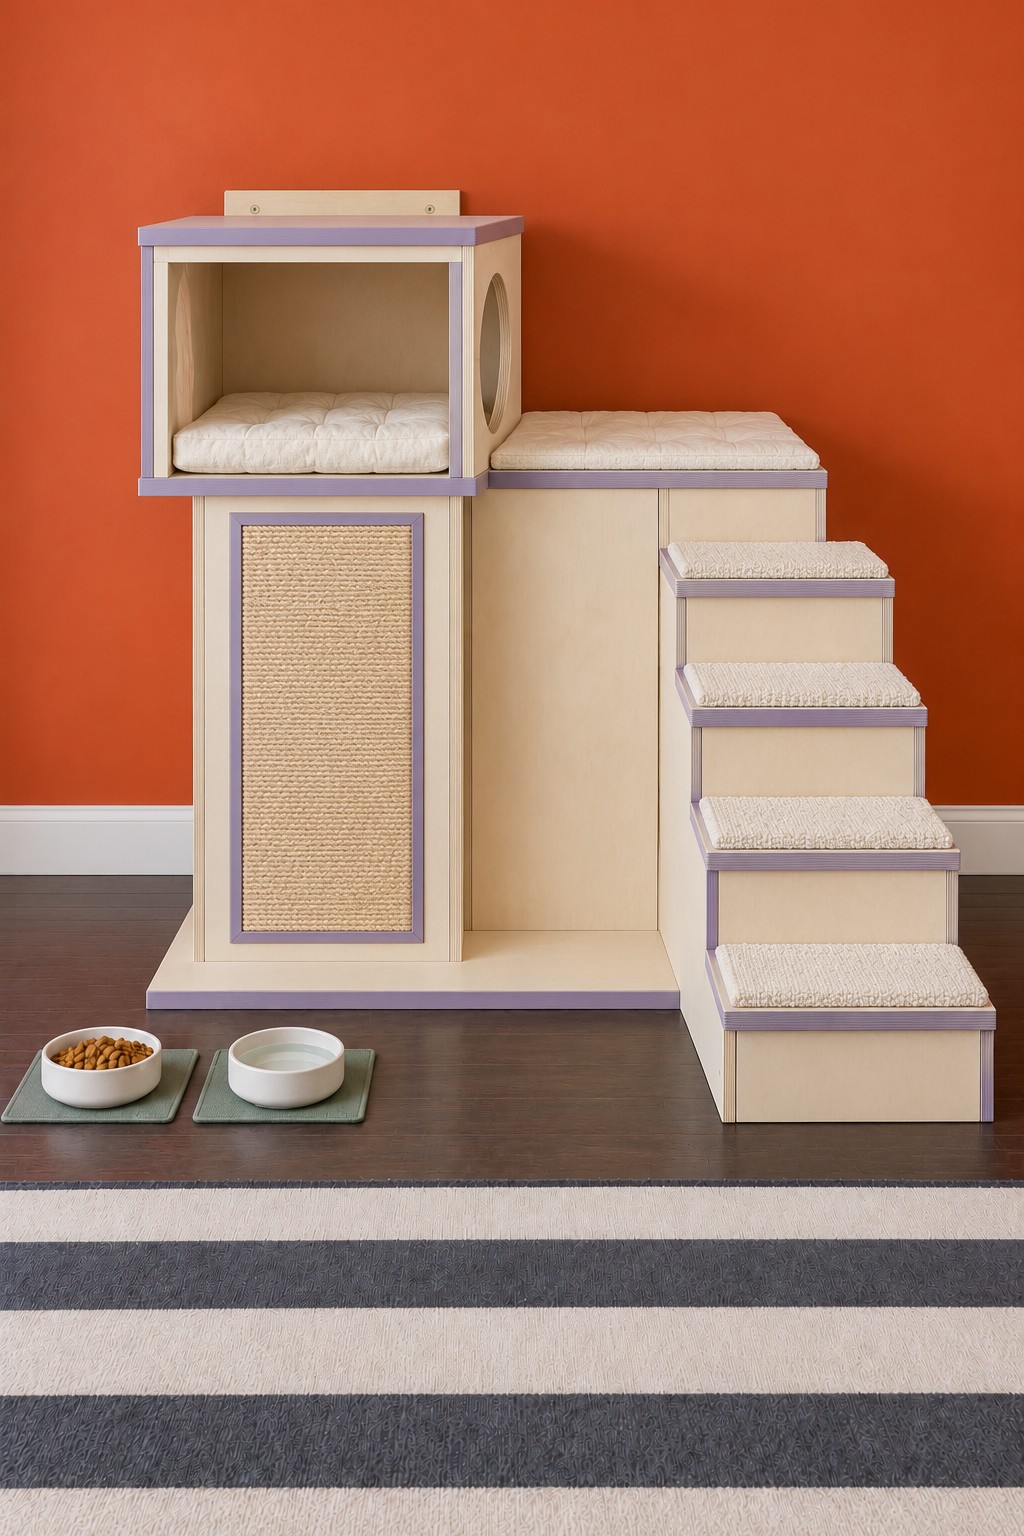
A raised box bed sits above a long vertical scratching panel, while the generous staircase offers another route to the upper landing. Lavender edging outlines the cream panels and makes the different levels easy to read.
Build the tall support as a structural cabinet or boxed column, then mount the upper den directly over it. The woven scratch panel should be a replaceable facing attached to this rigid support. Fix the adjacent stair and landing to the same base, and secure the upper structure against tipping. Smooth the circular side opening in the bed. Use a shallow pad at the top so bedding does not obstruct the entrance or spill onto the stair.
21. A Storage Bench with a Hexagonal Bed and Four Perches
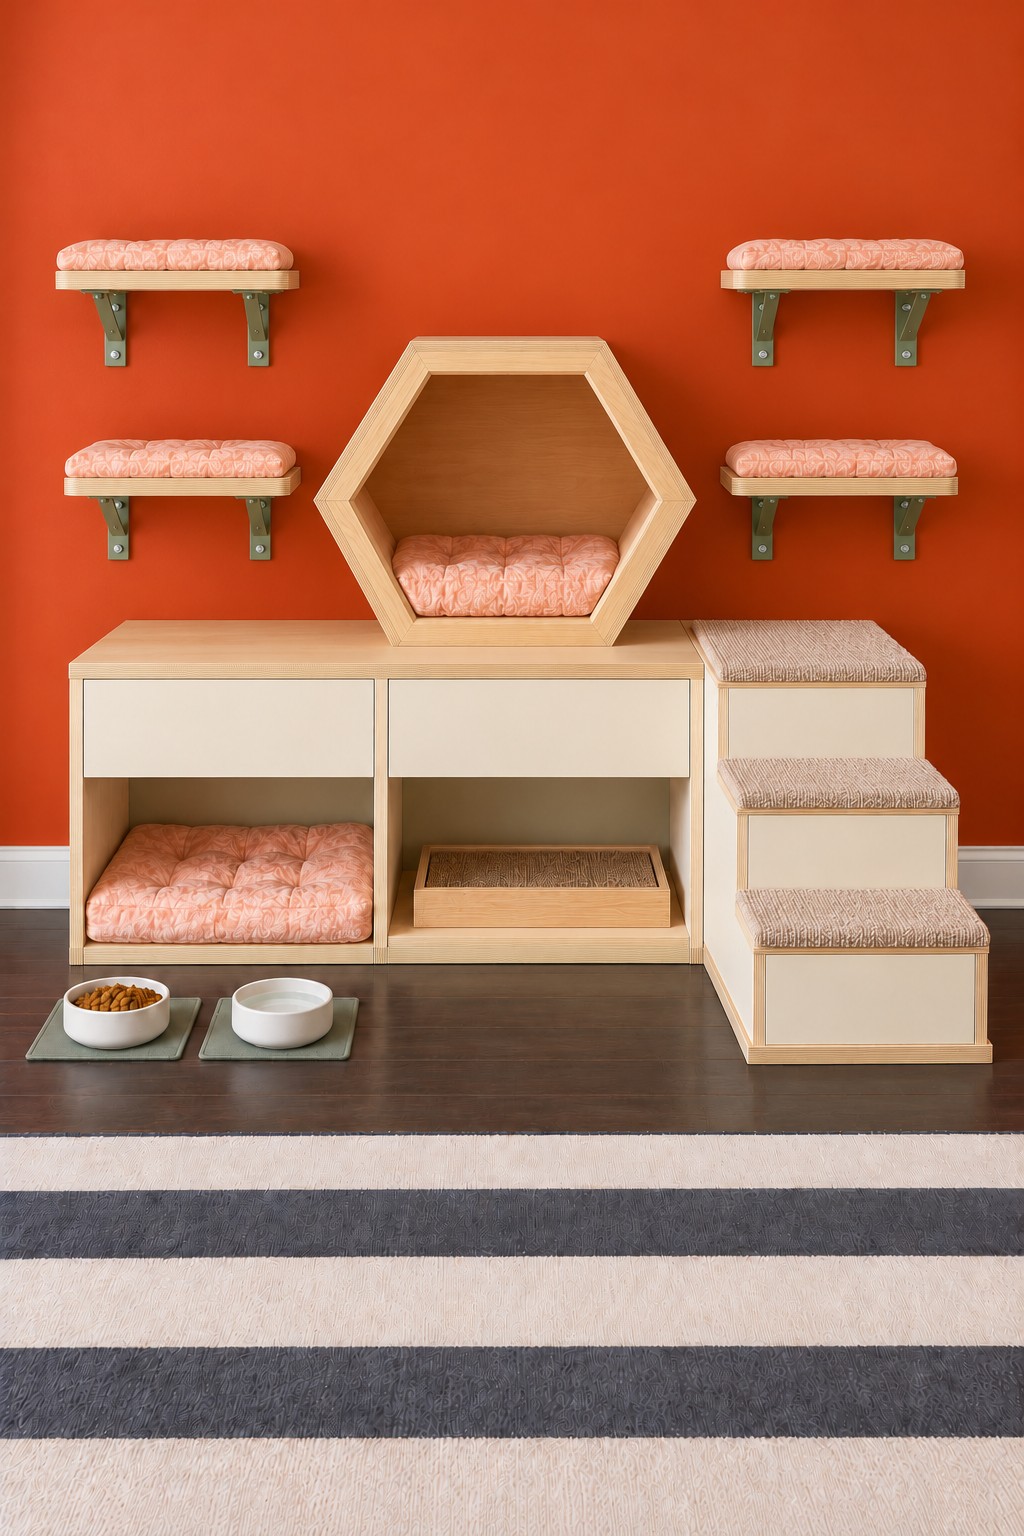
This version keeps the hexagonal bed as the focal point and uses four separate wall perches around it. Drawers store small supplies above two open lower bays, while the substantial staircase provides access from the right.
Start with a purpose built bench or a sound cabinet assessed for the intended use. Retain the structural rails when making openings, fasten the hexagonal bed down, and connect the side stair mechanically. Mount the surrounding perches independently rather than attaching them to the thin edges of the den. Keep grooming tools and loose toys inside the drawers. For a separate place to organize accessories, these upcycled storage ideas include a pet supply station that can sit away from the climbing route.
22. A Sage Sleeping Bench with an Asymmetric Hexagonal Hut
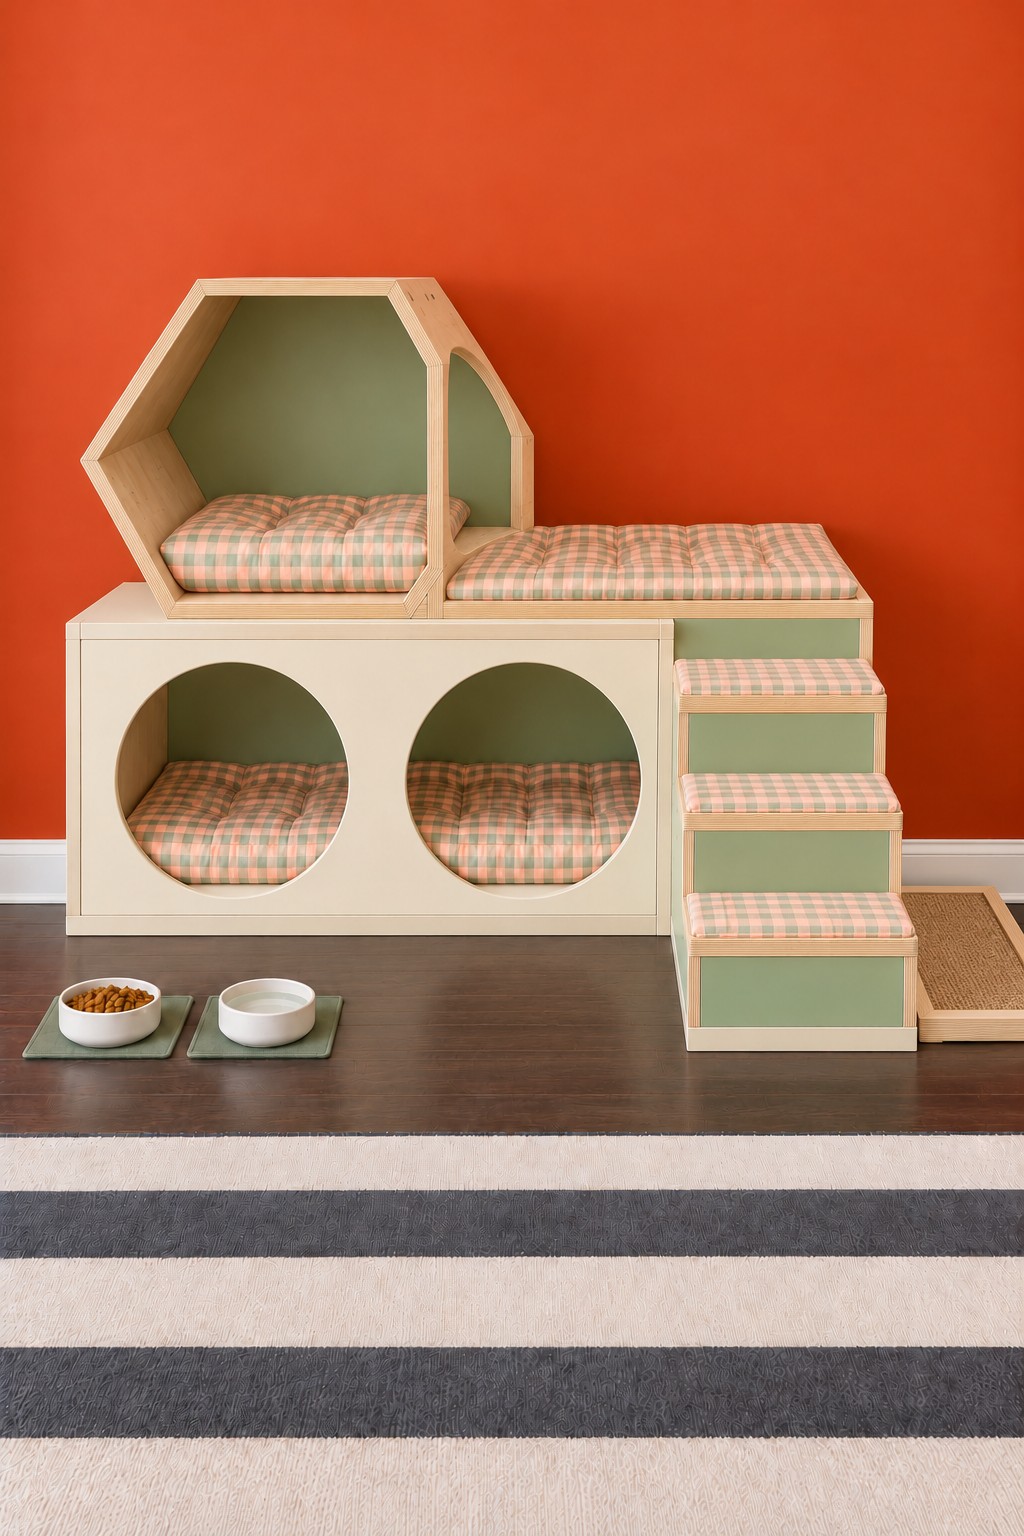
Two circular lower doorways sit beneath a long checked lounge and a hexagonal hut at one end. The open deck beside the hut gives the upper level a useful landing instead of filling every part with enclosed furniture.
Assemble the base with a center divider and carefully rounded doorways. Build the hut from accurately joined angled panels, reinforcing the joints internally and securing its flat bottom to the bench. Keep the timber edge of the side opening smooth. Attach the right staircase and finish it with retained checked pads. A slim scratch tray can sit alongside the base, but leave enough floor space to approach the first tread without stepping over it.
23. A Blue Gray Climbing Station with a Long Upper Bed
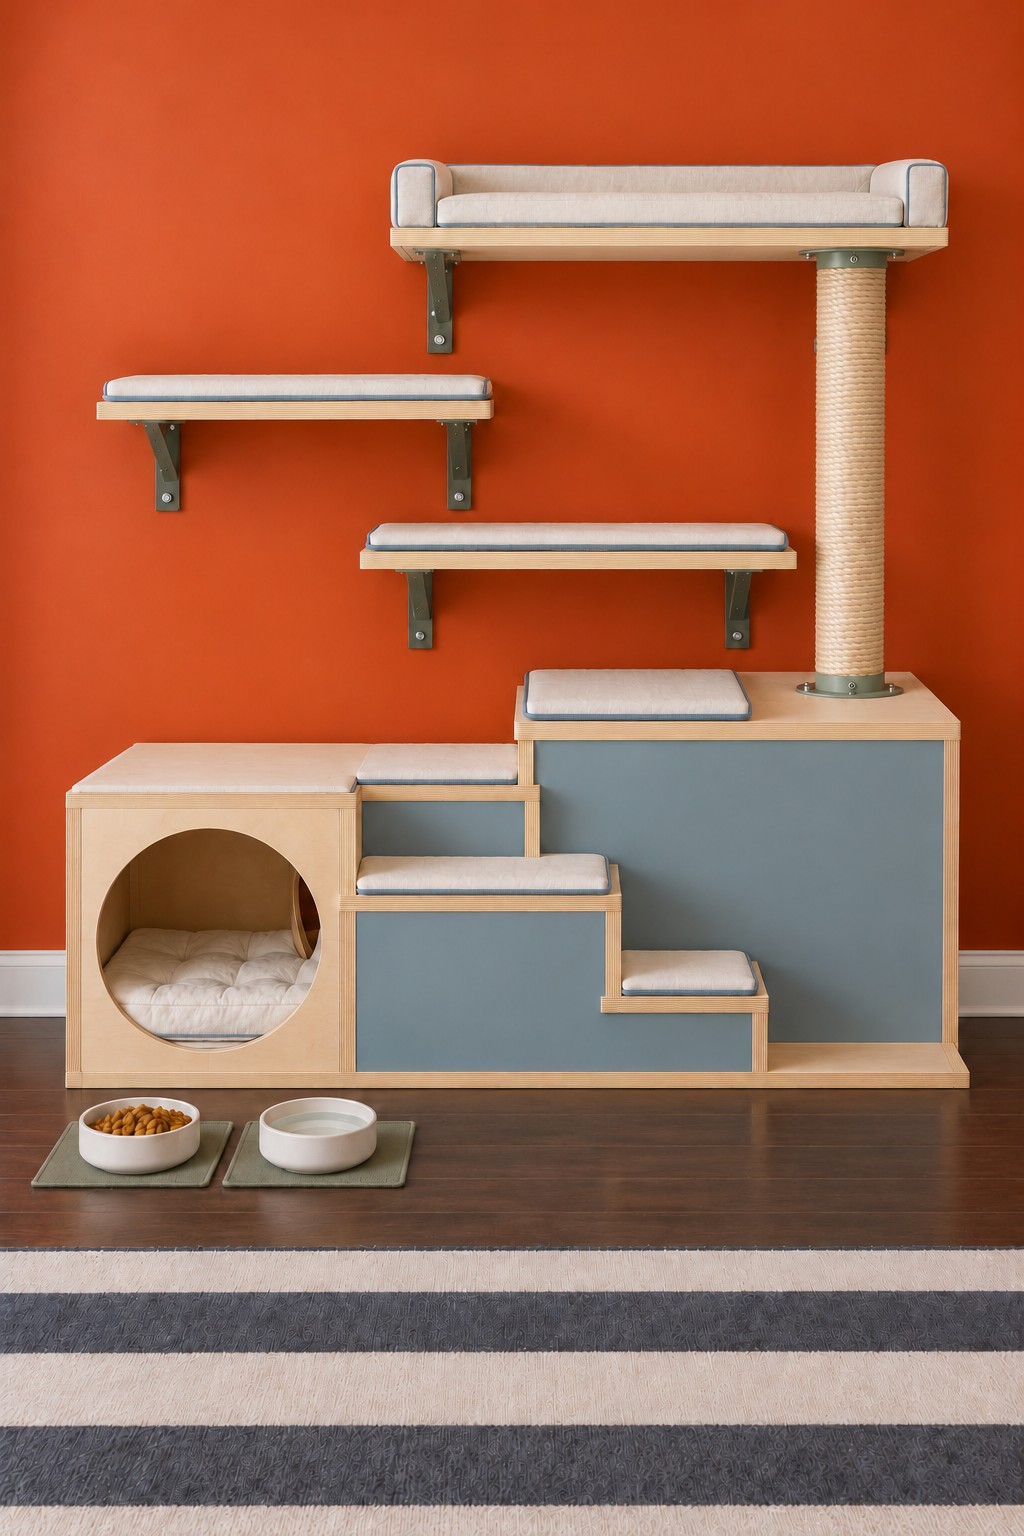
Blue gray panels and slim cream pads give this climbing station a restrained look. A circular lower den sits beside stepped platforms, and a tall sisal column supports one end of the long upper bed. Two staggered wall shelves connect the lower furniture to the higher resting area.
Build the lower den and stepped modules on a shared plinth, making each tread a genuine supported box surface. Check the route in both directions before setting the final heights. Fix the sisal column above a reinforced part of the base and connect it to the upper bed with compatible hardware. The wall end needs its own bracket support. Use fitted pads that leave the platform edges visible and make the upper bed deep enough for comfortable turning.
24. A Basket Perch Tower with a Braced Middle Lounge
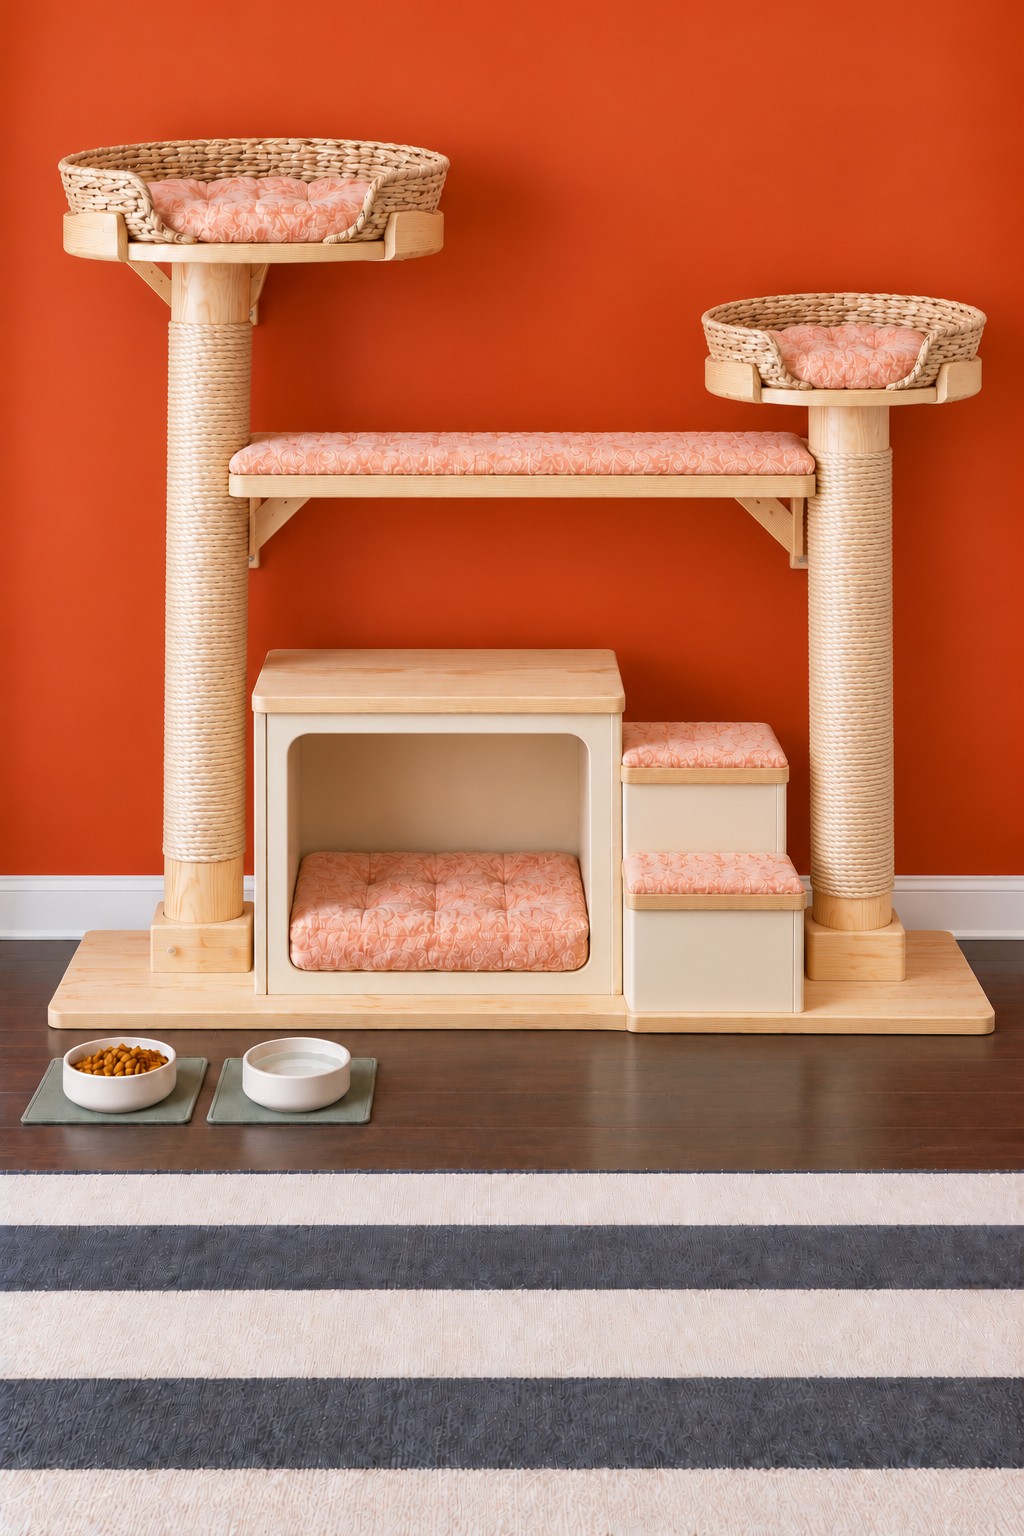
Two woven basket beds sit at different heights above a central padded lounge. Tall sisal columns, a lower sleeping cubby, and two short steps create a compact arrangement with several places to pause.
Use a broad base and properly connected timber posts or compatible cat tree components. The woven baskets should sit inside rigid supporting platforms with retaining edges; their wicker bottoms should not carry the load across an unsupported opening. Support the middle lounge with suitable brackets or timber braces and secure the baskets against shifting. Bolt the columns to their base connections, add restraint against tipping, and inspect the weaving regularly for broken strands.
25. A Terraced Cat Village with Steps at Both Ends
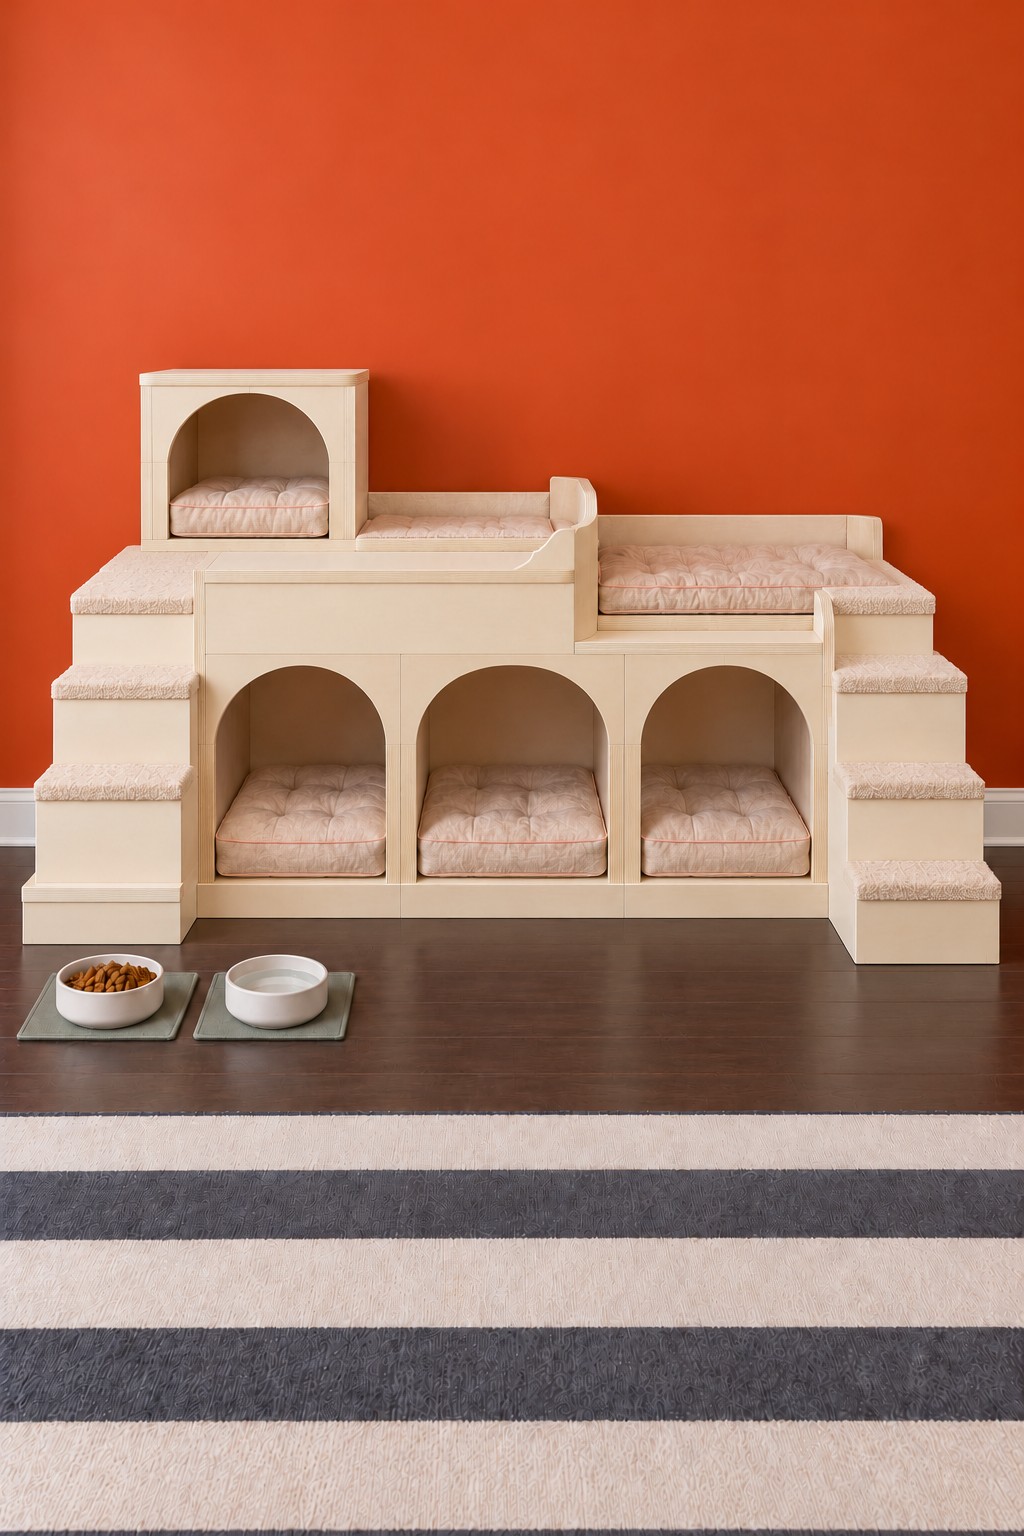
Three arched dens form the ground floor of this cream village. Above them, offset pink lounges and a small upper house create a stepped skyline. Access from both ends offers more routing choices than a single narrow staircase.
Lay out the lower dividers first so they carry the upper decks. Cut the arched fronts before assembly, sand the edges, and connect the boxes with internal cleats and suitable screws. Add the two stair modules to the common base, then fix the upper house in position. Keep each landing wide enough to pause or turn. Use separate washable cushions rather than one large cover that bridges several levels and obscures their edges.
26. A Green Cat Courtyard with a Raised Gingham Bed
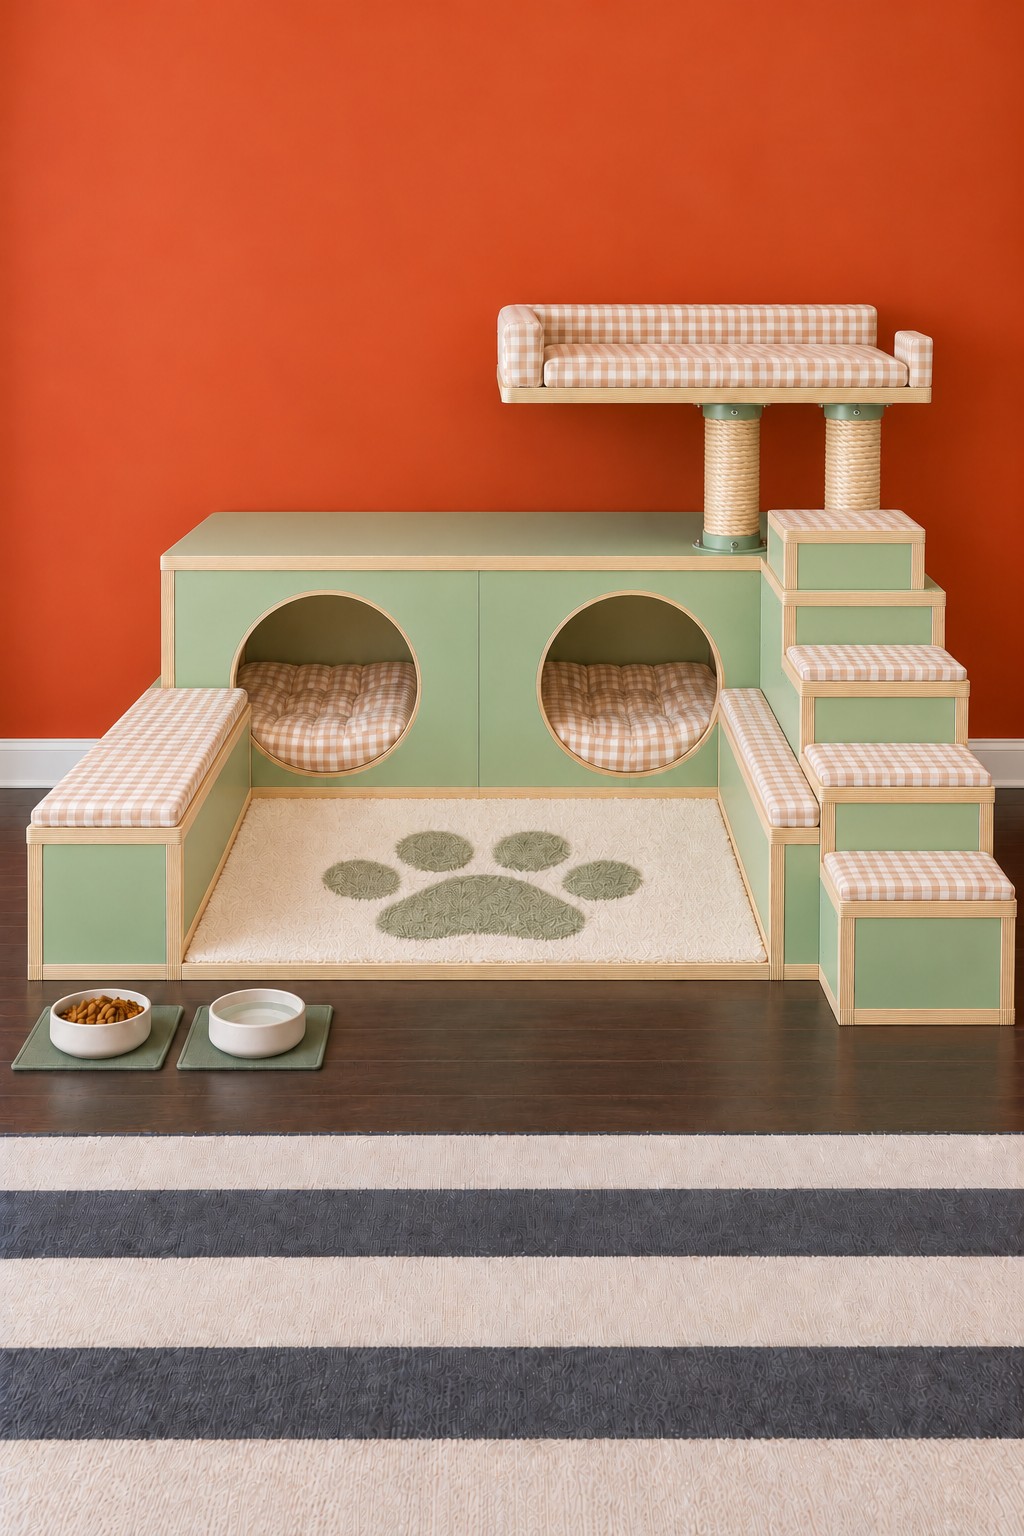
A central paw patterned mat gives this arrangement an open play area, framed by low padded side benches and two circular hideaways at the back. A staircase on the right reaches a higher gingham bed supported by two short scratching posts.
Build the rear den cabinet and side benches around a flat, easily cleaned base. Keep the front entrance open and use a washable, securely positioned mat for the paw motif. The upper posts need mechanical fittings over supported sections of the cabinet. Connect the staircase to the frame and give the raised bed a firm platform beneath its cushion. Leave the courtyard free of stored toys when it serves as a landing or turning area.
27. A Rounded Sage and Blue Tower with Wide Side Steps
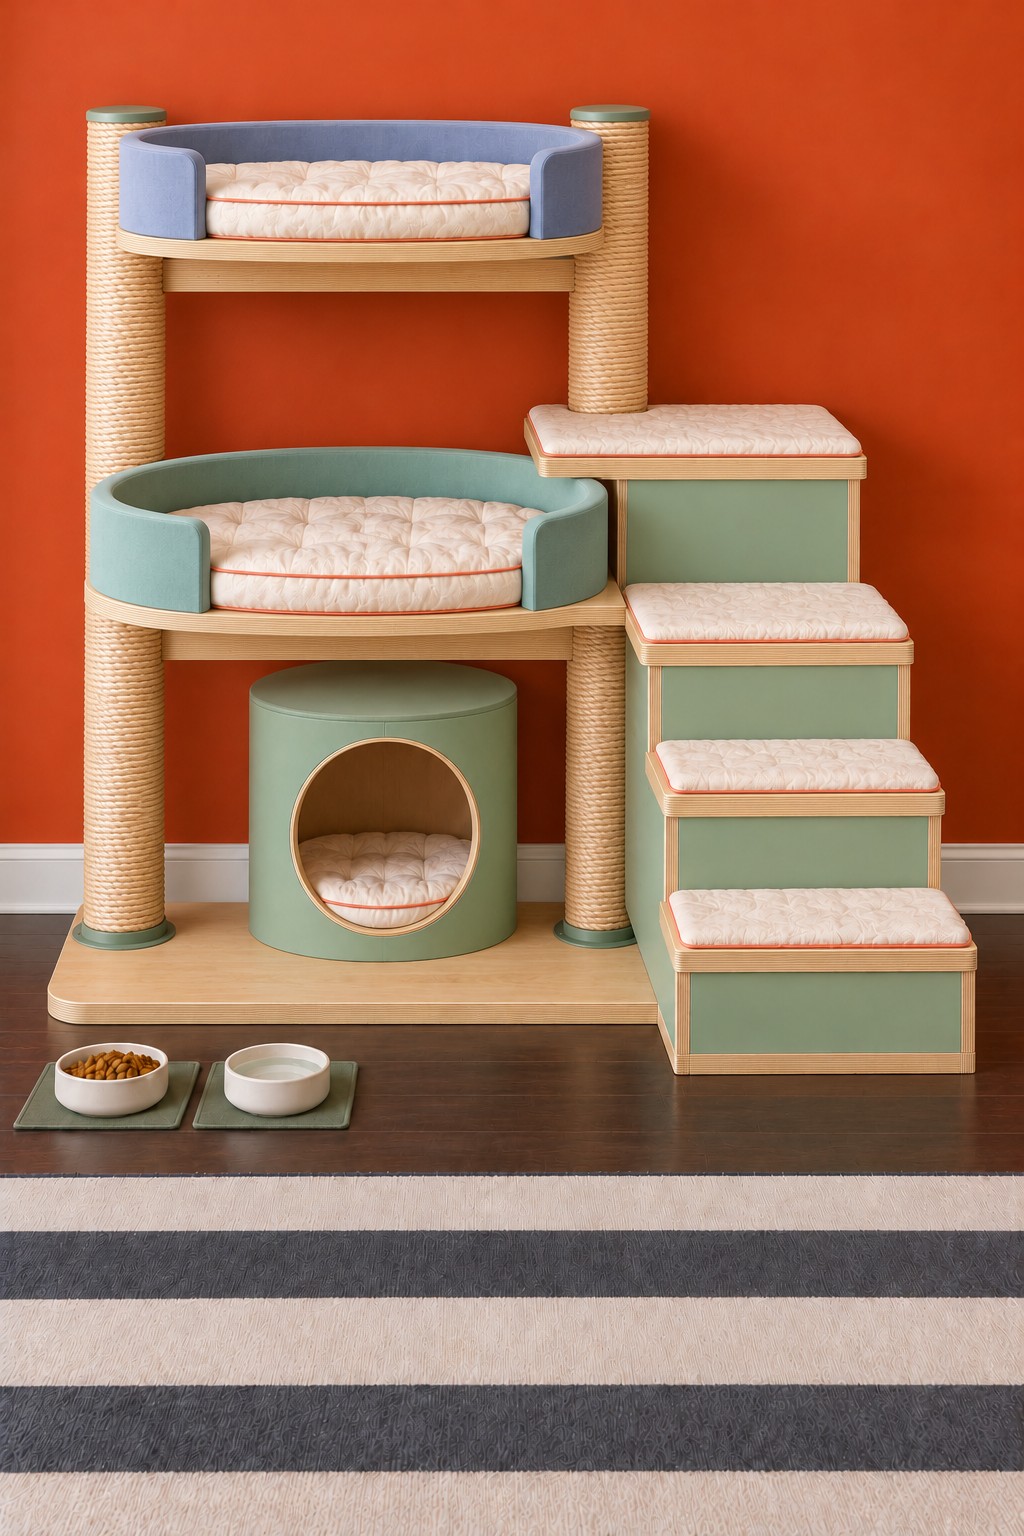
Curved bed fronts soften this taller tower, with sage on the lower lounge and muted blue around the top. A cylindrical hideaway fits below, while broad steps on the right lead through the different levels.
For the curved components, use ready made rigid shells or have plywood forms made by an experienced woodworker. Pair them with properly fitted sisal columns and a staircase attached to the same wide base. A cushion bolster provides comfort but should not be treated as a structural barrier. Keep the cylinder entrance smooth, secure the tall structure against tipping, and leave a clear transfer area between each stair landing and the adjacent bed.
Let the Room Grow from the Places Your Cat Uses
Finish one dependable resting spot and one scratching surface before expanding upward. Introduce new furniture without forcing your cat inside a den or onto a shelf. Keep familiar bedding nearby and observe which approach feels comfortable. An unused perch may need a better route, a different location, or less height rather than another decoration.
After the first sessions and during routine cleaning, inspect joints, wall fittings, rope ends, pads, and cardboard inserts. Tighten or replace worn components as their manufacturer directs, and remove any unstable section from use. A cat room stays useful when its parts are easy to reach, clean, repair, and adapt as your cat’s preferences change.



Leave a Reply