
Living moss, preserved moss and artificial greenery have different uses and care needs. Choose the material first, then compare 16 projects for mirrors, walls, storage and tabletop displays. A moss-border video introduces arranging textures in layers, with preparation, attachment and care notes for adapting the look.
Table of Contents
- Select Moss and a Suitable Display
- Find a Design for Your Space
- How to Plan and Make Moss Decor
- Preserved, Dried, Artificial, and Living Greenery
- Choose a Project by Contact, Moisture, and Complexity
- Prepare the Backing and Gather the Tools
- Build the Greenery as a Decorative Layer
- Preserve Function and Leave Access for Care
- Arrange a Moss Border in Layers
- 16 Moss Craft Designs and Their Practical Choices
- 1. Moss Covered Shelf Wall Accent
- 2. Framed Moss Forest Wall Hanging
- 3. Moss Framed Arch Mirror
- 4. Sculptural Moss and Branch Centerpiece
- 5. Moss Framed Wooden Wall Clock
- 6. Moss Wrapped Drawer Pulls
- 7. Moss Accented Table Lamp
- 8. Moss and Branch Curtain Topper
- 9. Moss Covered Desk Organizer
- 10. Moss Inlay Wooden Headboard
- 11. Moss Covered Kitchen Utensil Holder
- 12. Moss Crescent Hoop with Hanging Rings
- 13. Moss Panel on the Closed Staircase Side
- 14. Moss Wall Panel Beside a Birch Accented Railing
- 15. Arched Moss Tabletop Display
- 16. Moss Trimmed Woven Storage Basket
- Care According to the Material You Chose
Select Moss and a Suitable Display
Find a Design for Your Space
For low contact wall decoration, explore the framed forest and the arch mirror. For a tabletop feature, compare the branch sculpture with the wooden arch. The desk organizer introduces practical storage, while the drawer pulls and the basket need particular attention to handling.
How to Plan and Make Moss Decor
Preserved, Dried, Artificial, and Living Greenery
Preserved material has been treated to retain a decorative appearance; it is no longer growing and is not watered like a plant. Products sold as reindeer moss are often preserved lichen, with a branching texture different from flatter sheet moss. Dried moss is another material category and can be more fragile. Artificial greenery provides a manufactured alternative, but its cleaning and heat limitations still depend on the product. Check the product label for its material type and treatment before deciding how to attach and care for it.
Living moss requires its own growing conditions, moisture management, and container system. Gluing it onto a mirror, wooden handle, or fabric surface does not create a workable growing arrangement. For the dry decorative adaptations in this collection, choose prepared preserved material or a suitable artificial alternative. Check its supplier’s guidance for room conditions and handling. Preserved products can respond differently to ambient humidity, and an instruction for one supplier’s material should not become a universal rule for all moss crafts.
Choose a Project by Contact, Moisture, and Complexity
A framed panel or small arch offers a useful first project because the greenery can remain on a low contact surface. Desk organizers introduce cleaning and paper access, while handles and baskets need a plan for repeated handling. Consider how often the object will move, who will reach it, and whether the area encounters sunlight, splashes, steam, or heat. Choose the display location before making an object whose texture may be difficult to protect there.
Begin with a firm existing frame or box if your interest is botanical arranging. A raised sculpture, overhead branch, or working lamp needs supporting and installation decisions beyond moss placement. Compare the backing, adhesive, hardware, and future replacement work as well as the amount of greenery. A small removable insert can be easier to manage than permanently covering a large furniture surface. Measure the depth available so the moss does not project into a drawer path, curtain movement, or walking route.
Prepare the Backing and Gather the Tools
Use a ruler, pencil, paper layout, scissors, tweezers, and a protected work surface for the arranging stage. A small tray keeps loose fragments contained. Cut a rigid insert with tools appropriate to its material, securing the workpiece and using the required eye and dust protection. Complete sanding, painting, and structural assembly before attaching the greenery. Let finishes cure according to their instructions and remove loose dust from the bonding area.
Select an adhesive compatible with the actual backing and the preserved material’s treatment. Test a spare cluster and scrap backing first for discoloration, staining, or poor grip. A hot glue tool may suit some combinations, but its temperature, adhesive formulation, and burn precautions need consideration; white glue visible in a video is not enough to identify the correct product. Have a support or clamp available where the bond requires holding, and follow the adhesive’s ventilation and curing directions.
Build the Greenery as a Decorative Layer
Place the larger clusters without adhesive and decide where the background will remain visible. Use rounded pieces for depth, finer branching texture for transitions, and small bark accents for contrast. Check the composition upright or at its eventual viewing angle. A landscape band, tree silhouette, and irregular border need different arrangements even when they use the same colors. Work outward from those shapes instead of filling every gap automatically.
Trim loose backing material carefully without flattening the visible surface. Apply adhesive to the concealed underside or prepared support area, position the cluster, and press gently enough to make contact without crushing it. Work in small sections so the arrangement remains adjustable. Larger ornaments require dependable contact areas and their own secure attachment where necessary. Finish with small pieces only after the primary forms hold their position.
Preserve Function and Leave Access for Care
Moss does not support a shelf, strengthen a handrail, or establish a lamp’s material rating. Attach hangers to the rigid backing, keep furniture fasteners accessible, and leave grips and working surfaces clear in daily use adaptations. Where a design approaches a light source or a staircase, resolve the fixture or building requirements first. Check the requirements for the actual fixture or staircase before choosing the decoration.
Allow bonds to cure before lifting the object. Check for loose pieces and contact with nearby fabric, papers, or moving parts. Choose a removable layer where the underlying surface needs regular wiping. If fire performance or other installation ratings matter in the chosen location, check documentation for the complete materials and system you plan to use.
Arrange a Moss Border in Layers
The video uses an arched mirror with a wooden lower ledge. Greenery is trimmed, adhesive is applied along one side of the frame, and clusters are pressed into position. Dark branching texture forms a background for brighter rounded pieces, while small pink toned bark accents punctuate the border. Most of the mirror remains open. This gives a useful sequence for other designs: define the coverage area, establish the background texture, add the larger clusters, then refine the transitions.
Use the same layering order for a clock border, removable panel or tabletop arch. Fit its backing and attachments to the object, protect mirror glass during work and leave the existing hanger accessible. Arrange one small section before extending the moss across the full border.
Choose an adhesive compatible with the frame and preserved moss. Test a spare cluster for color and texture changes, then use a small amount at the contact points so glue does not flood the visible surface.
16 Moss Craft Designs and Their Practical Choices
The collection moves from protected wall surfaces to objects that are handled, moved, or used near fixtures. Each description begins with the visible arrangement, then explains an adaptation suited to its purpose. For your own version, match the material and attachment to the object’s use, keeping its working surfaces and supporting parts accessible.
1. Moss Covered Shelf Wall Accent
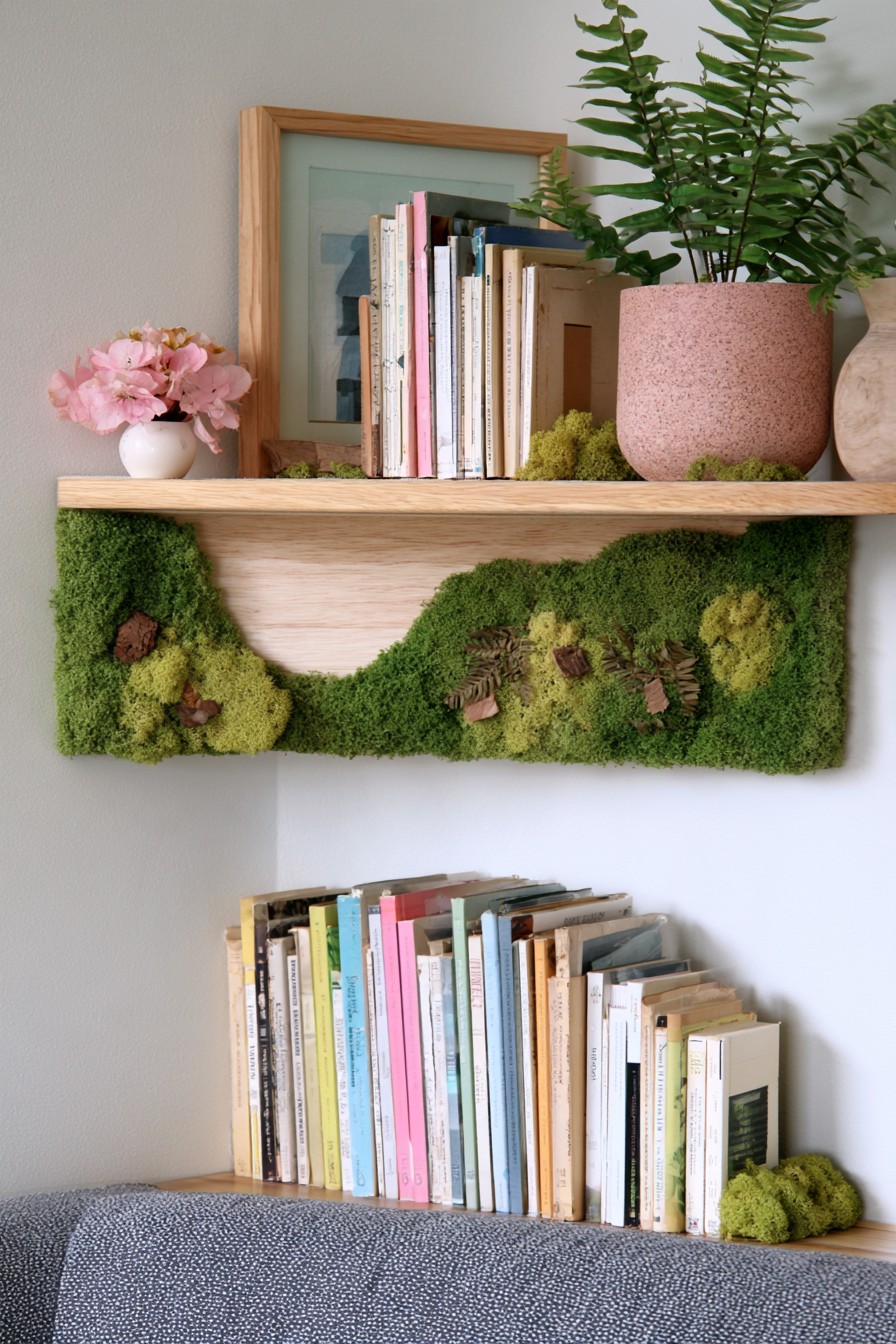
A green band follows the underside of a wooden shelf, dipping around an exposed central section of wood. Dark and lime toned clusters create a loose landscape, with small bark details interrupting the surface. The shelf above holds books and a plant, making the greenery an extension of the display rather than a second shelf. This idea suits a wall where the botanical texture can stay below the objects without crowding their resting surface.
Make the decorative shape on a separate rigid insert, using the exposed wooden area to define its upper outline. Attach the insert independently and keep access to the shelf brackets. Place broad dark sections first, then add brighter patches to establish the uneven lower edge. Choose preserved or artificial material for the dry adaptation and keep watering from the plant above away from it. A removable panel allows damaged clusters to be replaced without dismantling the shelf.
Compare wooden shelf and display ideas when planning the surrounding arrangement. Position the separate moss panel around the shelf’s existing support points and keep every structural fixing accessible. The greenery and its backing should not replace the shelf’s support system.
2. Framed Moss Forest Wall Hanging
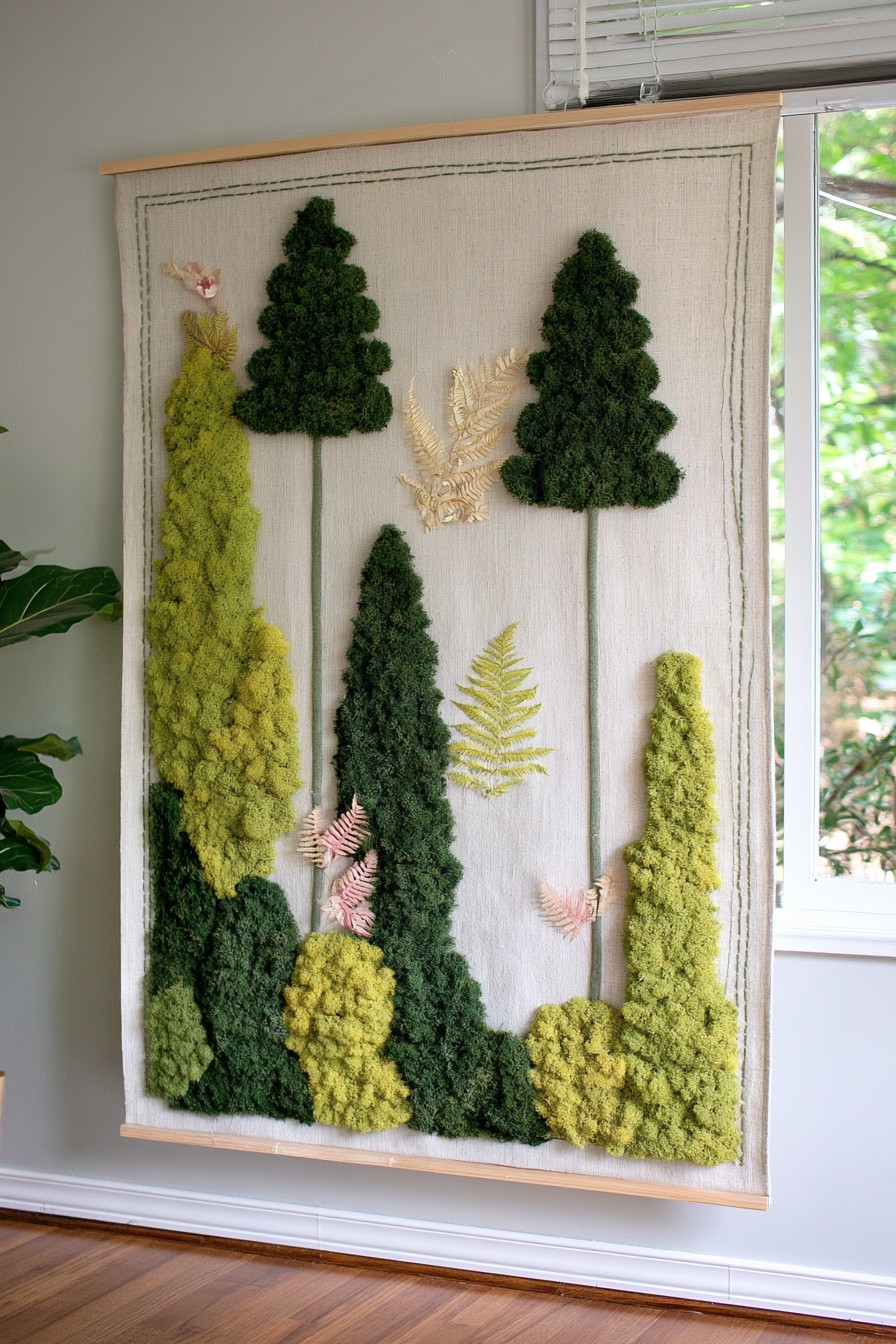
Dark tree shaped clusters rise on slender vertical lines against a pale fabric background. Bright greenery fills the lower edge and one side, with delicate fern like accents between the larger shapes. The background is essential to the forest effect: it separates the silhouettes and makes them read as individual trees. This is a framed composition for a room that needs green texture with a more deliberate pattern than an irregular moss border.
Stretch the fabric over a rigid backing before laying out the tree positions. Make the tall silhouettes as distinct groups, checking their spacing from the intended viewing distance. Attach stems or supporting lines first, then build their crowns and lower clusters. Choose preserved or artificial foliage for this dry decorative frame and follow the material's own care instructions. Keep the wall hanger attached to the solid panel and retain enough clear background that future additions do not erase the forest pattern.
Before placing dyed preserved material against the pale fabric, check the supplier’s color transfer guidance. Some treatments may release pigment with moisture or friction. Where advised, place a compatible separator beneath the green shapes to protect the textile while leaving its visible background clear.
For a larger botanical wall feature, compare these indoor vertical garden wall ideas. Choose a dry preserved arrangement or a living plant system according to the room and the care you can provide; a planted wall needs a growing setup separate from this glued decorative panel.
3. Moss Framed Arch Mirror
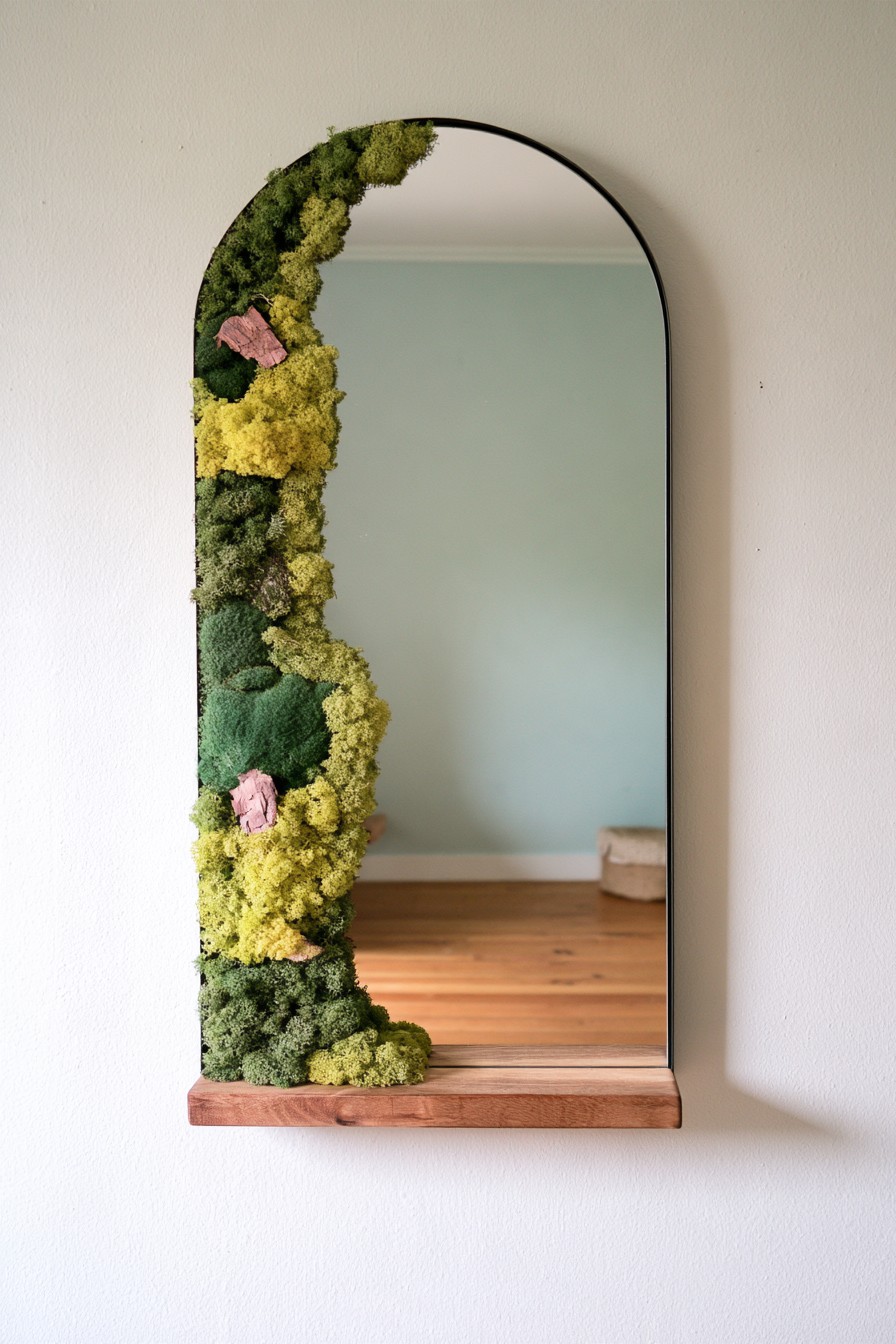
Green clusters run down the left side of an arched mirror, with dark areas, bright yellow green pockets, and small pink bark accents. The opposite side remains mostly bare, preserving the arch’s outline and a generous reflective area. It is the closest match to the video and a useful example of asymmetry: the border has visual weight without enclosing the entire mirror in greenery.
Work on an accessory strip or compatible frame surface that leaves the glass and original fixing points clear. Place the background texture along the curve, then build rounded clusters where they add depth. Keep the lowest section clear of the wooden ledge’s usable surface. Adhesive selection depends on the actual frame finish, not just its color. Finish the work flat or in a controlled position, allow the bonds to cure, and inspect the border for contact with the glass before hanging the mirror.
A sound existing mirror can supply the starting frame. Inspect the frame finish and mounting hardware before adding greenery, and keep the original support and reflective surface independent of the new botanical border.
4. Sculptural Moss and Branch Centerpiece
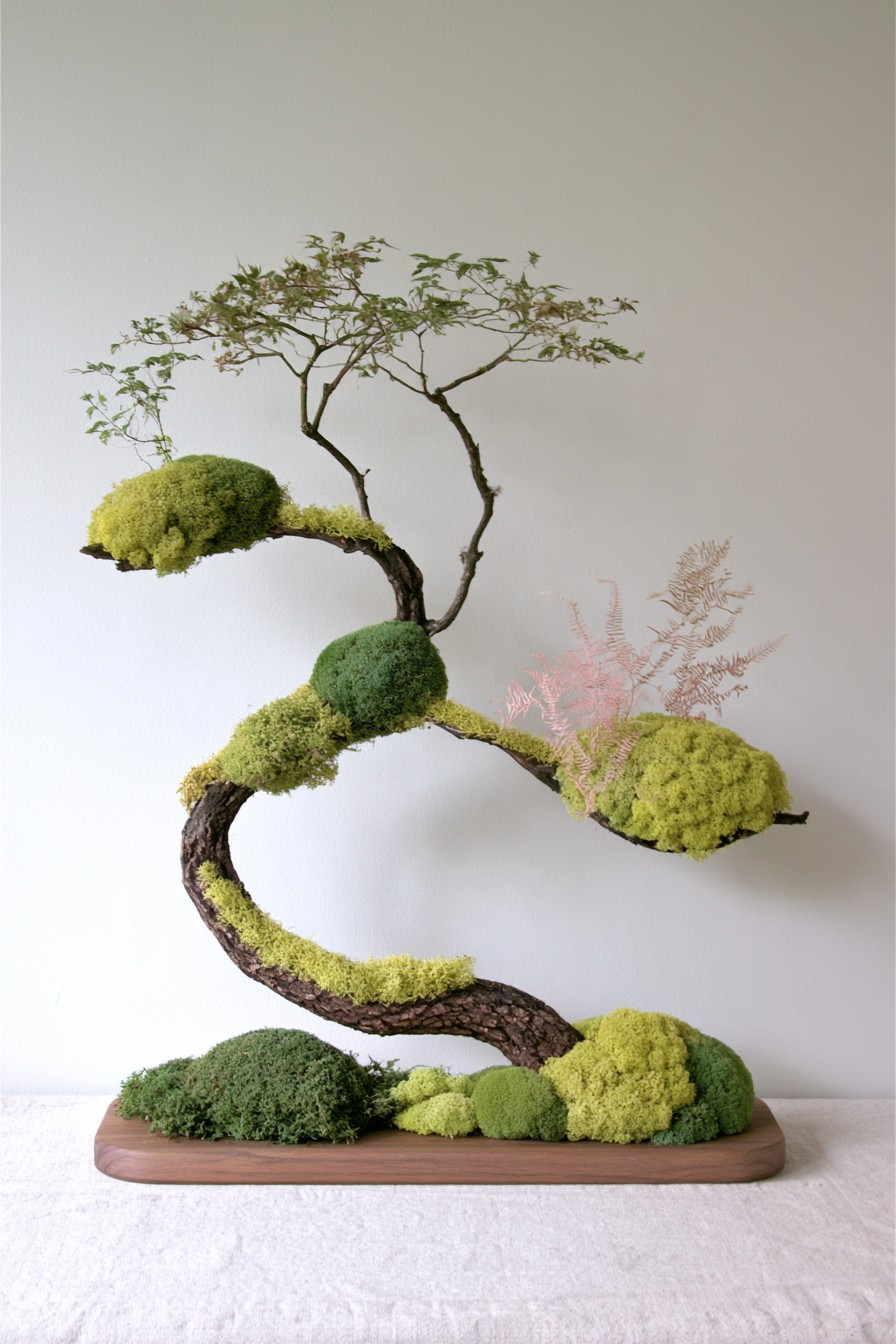
A twisting branch rises from a broad wooden base, carrying rounded green pads at several bends and fine botanical branches above. The exposed wood makes the arrangement look like a miniature landscape rather than a solid mound of greenery. Its height and open areas give it a sculptural presence on a console. The curved silhouette also creates leverage, making the base connection a central construction decision.
Secure a dry, sound branch to the base before adding the soft surface details. Build lighter clusters around the upper bends and keep heavier components near the bottom. Prepared preserved or artificial foliage can reproduce the green pads without requiring wet growing pockets. If using real living plants, they need a separate horticultural system rather than a glued decorative layer. Check the completed footprint on the intended furniture surface and leave clearance around the higher branches so they are not caught by passing objects.
5. Moss Framed Wooden Wall Clock
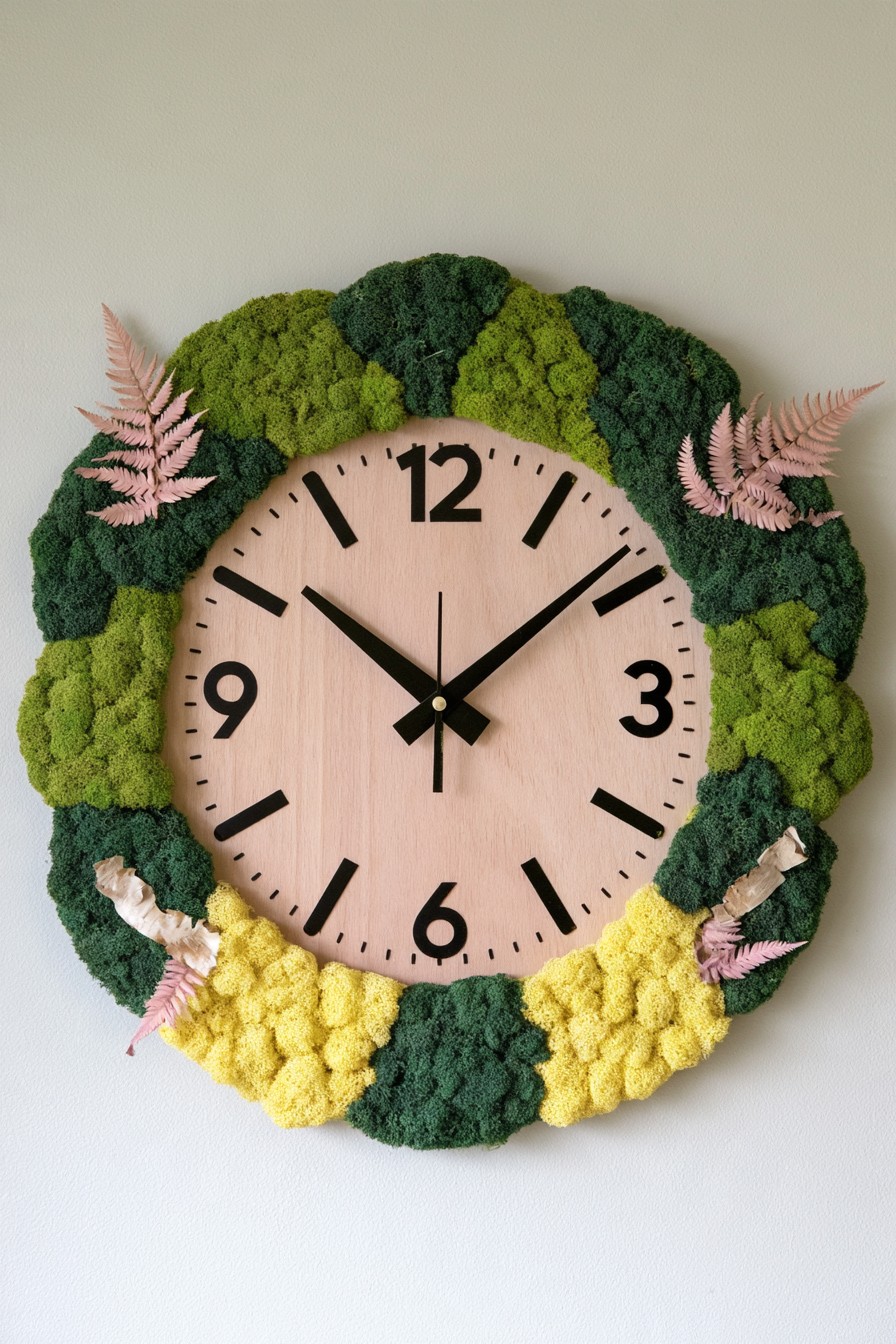
A round wooden face sits within a thick, uneven moss border, with pale fern like pieces extending to either side. Dark green defines the outer shape, while brighter patches make the lower edge feel fuller. The strong numbers and clear face keep the clock readable despite the decorative depth. It belongs where the perimeter can be appreciated without obscuring the hands or competing with other small wall details.
Create the moss on a backing ring around an existing clock, checking its clearance before bonding. Keep greenery away from the hand sweep, central spindle, and rear movement. Arrange the side foliage so it cannot droop onto the face. A removable border makes battery access and future repair easier. Choose the hanger for the weight of the complete assembly, and retain the clock’s original adjustment access. Small bark or leaf accents should reinforce the border’s composition without covering the hour markings.
6. Moss Wrapped Drawer Pulls
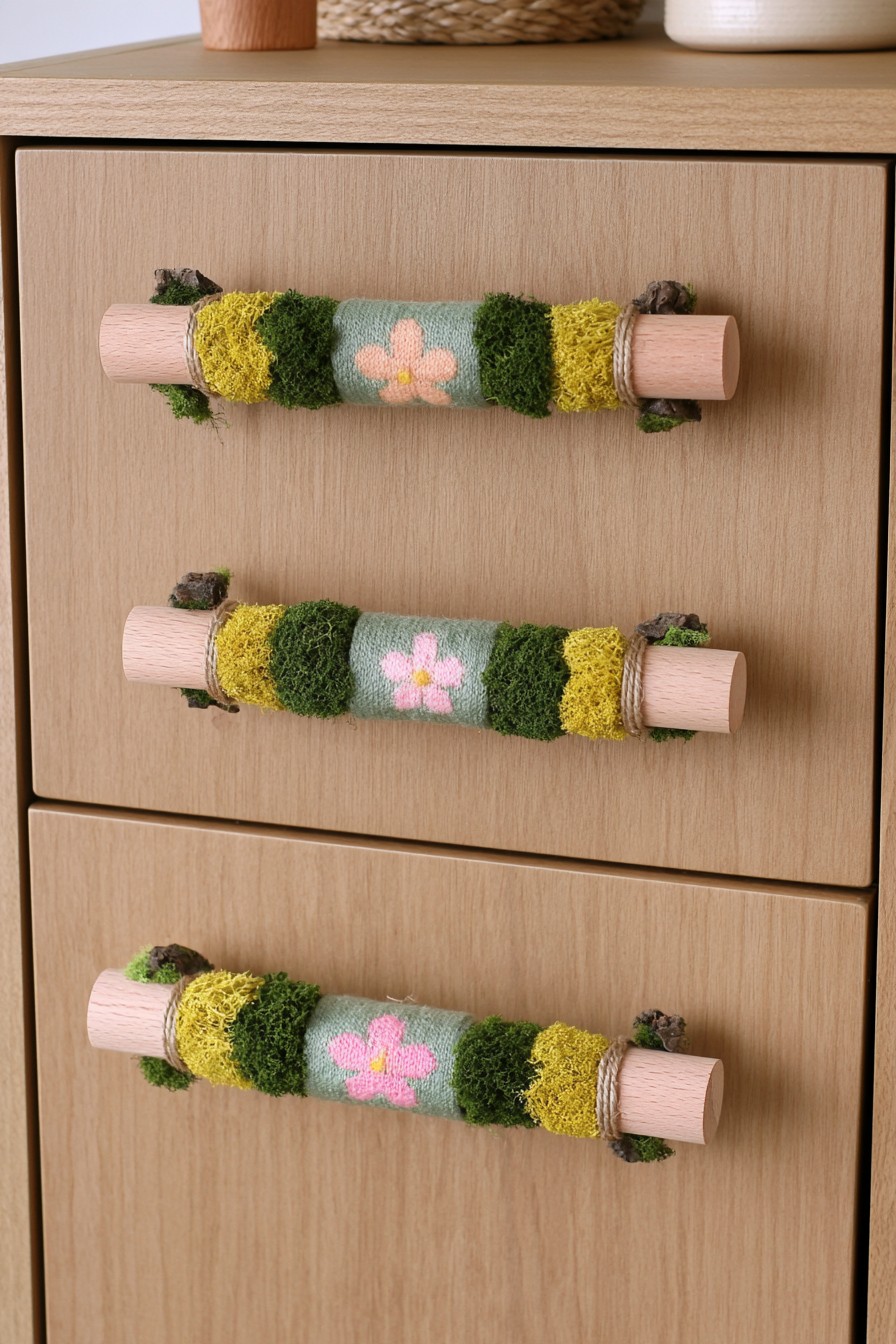
Three long pulls combine pale wooden ends with green textured bands and central blue green fabric decorated with small flowers. The repetition creates a coordinated furniture detail rather than three unrelated ornaments. The moss extends across much of each pull, so this treatment has different demands from a wall panel. Its appeal is strongest on an occasional use display cabinet where the surface receives limited handling.
For working drawers, leave a smooth central grip and position the greenery on low contact sections or separate decorative collars near the ends. Retain access to the fixing screws and check the full finger clearance behind each pull. The flowered fabric can provide the visual center without requiring fingers to press into moss. On a display only sample, broader coverage can reproduce the photographed texture, but repeated use will need a more durable handle treatment. Check that small fibers cannot catch at the drawer opening.
7. Moss Accented Table Lamp
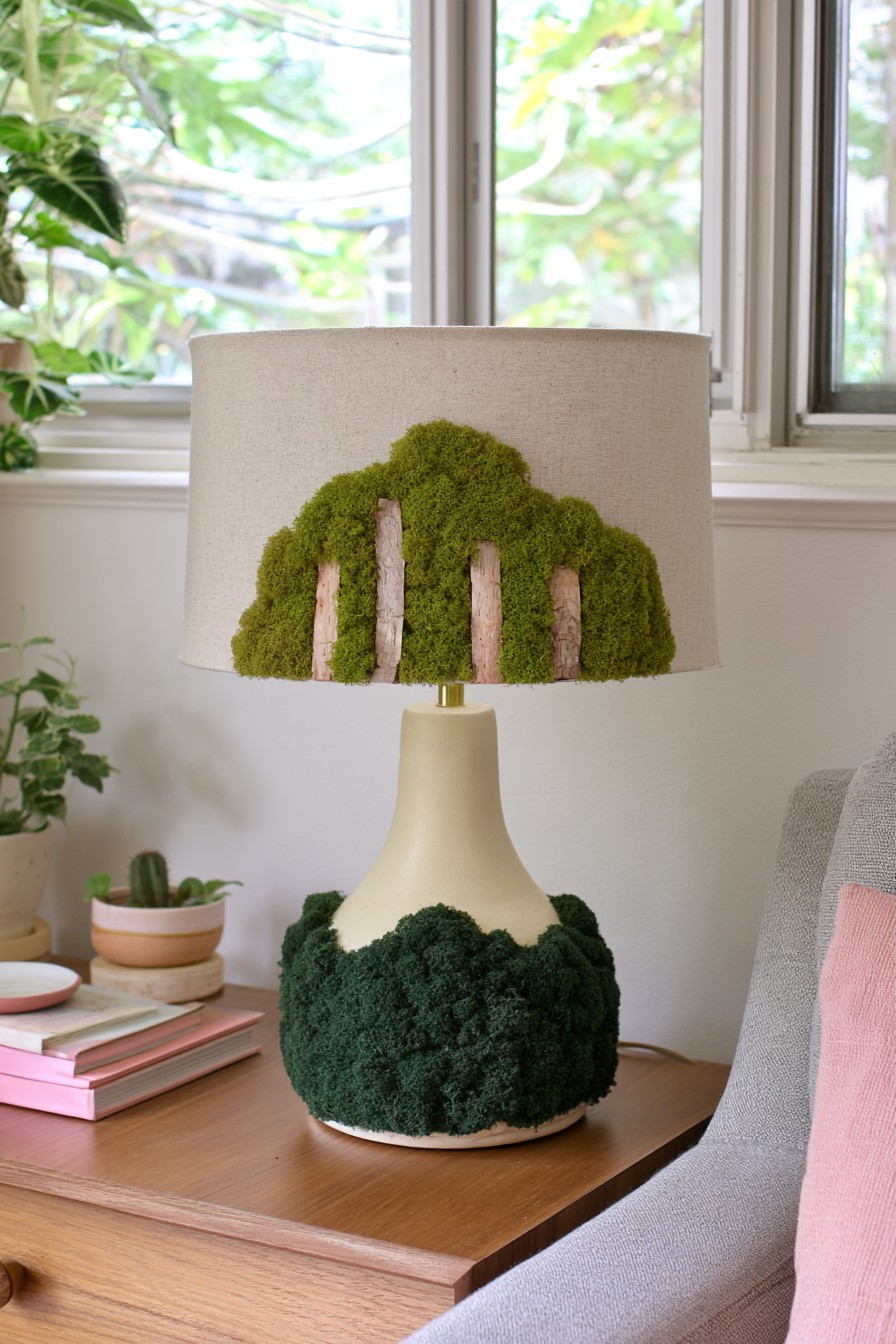
Dark green covers the lower lamp base, while a rounded woodland motif with pale trunk like lines sits on the shade. The plain upper shade balances the dense green areas, connecting the two parts visually. This is a more involved interpretation than simply setting a moss object beside a lamp: the decoration appears on the shade itself, so its proximity to a working light needs separate assessment.
Use a fixture and shade configuration approved for the selected materials and added decoration. Preserved greenery, adhesive, and fabric cannot be judged suitable from the photograph or from using a lower heat bulb alone. Keep vents, socket access, wiring, and required clearances unobstructed, with a qualified professional assessing any functional adaptation. To explore the same composition without altering lighting, make a non electrical display form or position a separate moss sculpture beside an unchanged lamp. Keep the lamp’s own operating instructions available for routine use.
8. Moss and Branch Curtain Topper
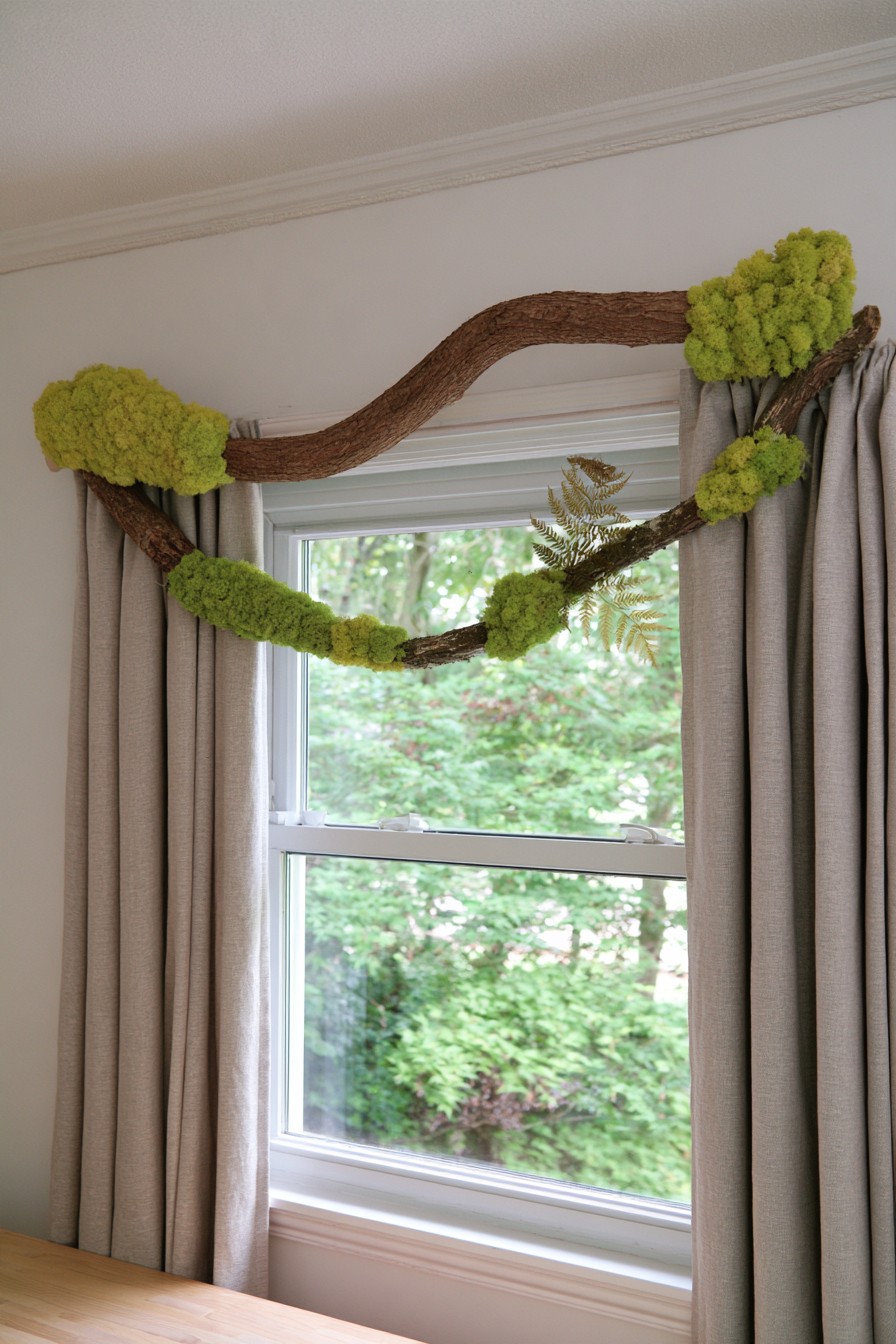
A long curved branch stretches above the curtains, with green clusters at its ends and along the lower arc. The wood remains visible between them, making the line feel suspended and organic rather than like a flat valance. It is a strong overhead accent for a window where the wall has enough room for both the branch outline and the curtain’s movement.
Choose a sound prepared branch and plan its supports before attaching any greenery. Independent wall brackets should carry the decoration; the curtain rod needs to perform its original supporting role without additional unverified weight. Check the whole arc against opening curtains and window access. Add preserved or artificial clusters where they do not obstruct fixings, then keep small projecting details secured. Direct sun at a window can affect the selected material’s color, so check the supplier’s placement instructions. Make the piece removable for cleaning the window and curtain hardware.
9. Moss Covered Desk Organizer
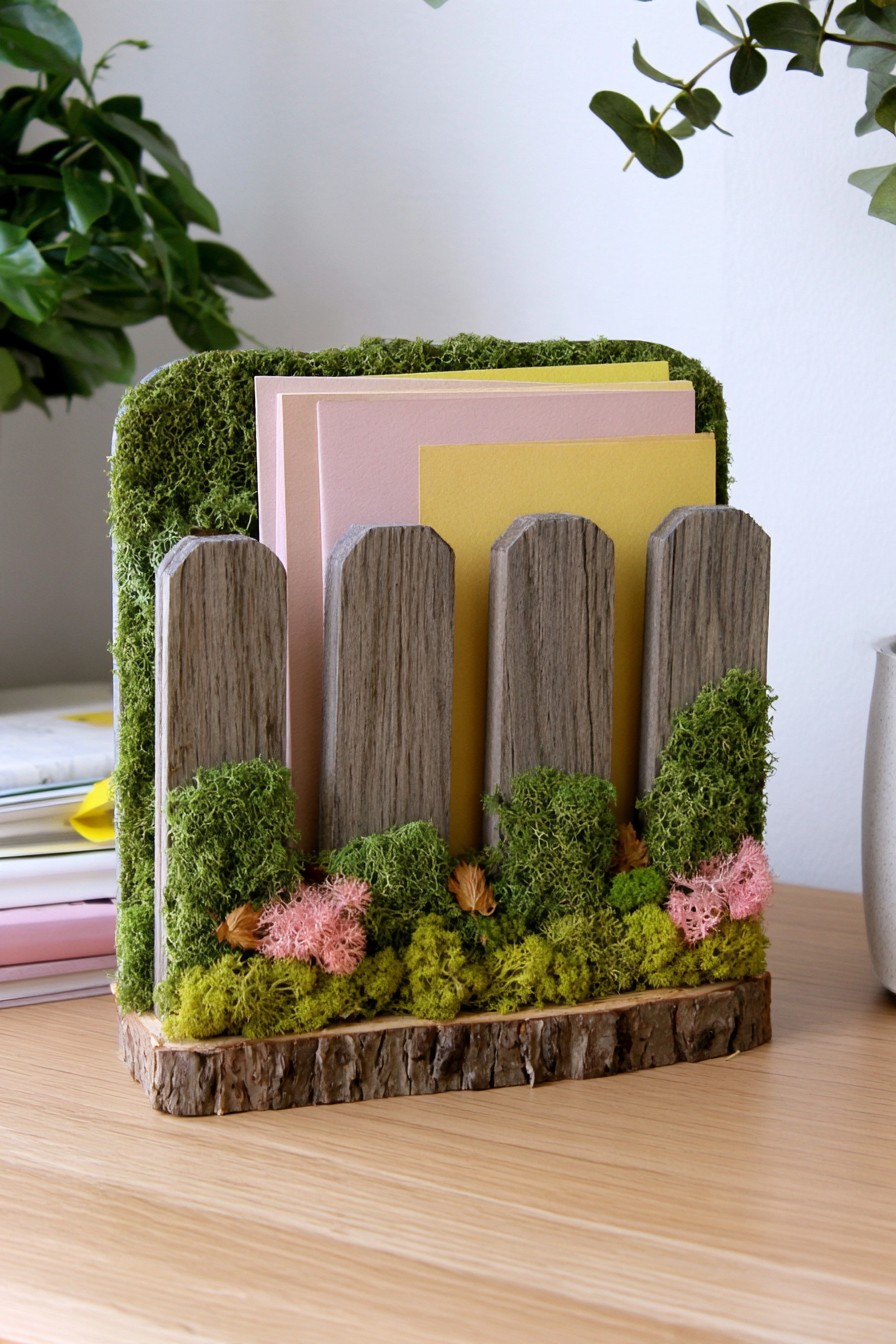
Upright wooden slats frame a stationery holder, with moss behind the papers and clustered greenery along the lower front. Pale pink botanical details punctuate the green, while a bark covered base defines its footprint. The taller rear coverage gives the holder depth, but the front slats keep its storage function recognizable. It is suited to cards and papers that can be lifted out without repeatedly brushing the decoration.
Build or choose the organizer core first and finish the inner surfaces smoothly. Apply greenery to exterior panels or removable inserts, leaving document slots and their upper edges free of loose fibers. Position the lower clusters below the usual grip area. Trial the arrangement with the actual paper sizes before bonding, especially at the rear where protruding material can catch sheets. Place protective pads beneath the base and make decorative inserts detachable if the organizer will move frequently between work surfaces.
Compare small wooden organizer ideas when selecting the core and compartments. Choose their depth and spacing for the papers you actually keep, then plan the moss layer around that usable structure.
10. Moss Inlay Wooden Headboard
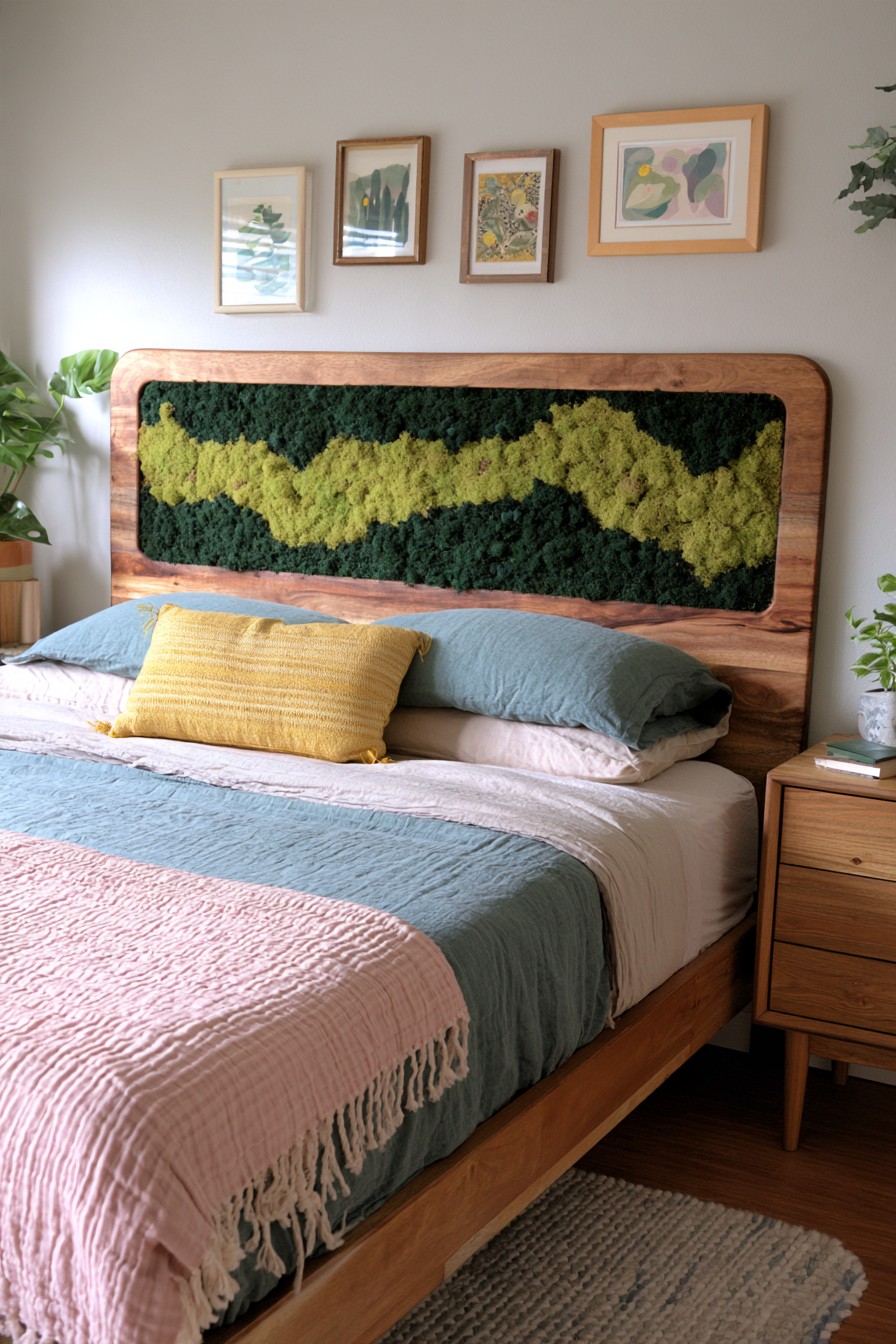
An elongated moss landscape sits within the wooden headboard, alternating dark upper and lower areas with a brighter winding center. Its wide horizontal shape relates to the bed and leaves the surrounding wood visible. The fabric and bedding repeat quieter green and neutral colors, so the panel supplies texture rather than another busy pattern. This idea works only where its depth can remain clear of routine contact.
Make the green section as a removable rigid insert in a recess that does not weaken the headboard’s structural parts. Position the material behind the surrounding wood edge and outside the area touched by pillows, hair, or bedding. Compare the insert depth with how people actually sit in bed before finalizing it. A textile or artificial texture interpretation may be easier to maintain where regular contact is unavoidable. Keep the headboard fixings accessible and inspect for loose fragments before returning the bed to use.
Check whether the chosen dyed material has a supplier warning about pigment transfer before placing it near light bedding. Retain physical separation from the textiles and use an appropriate backing where recommended. A recessed panel helps manage contact, but it does not remove a product specific transfer risk.
11. Moss Covered Kitchen Utensil Holder
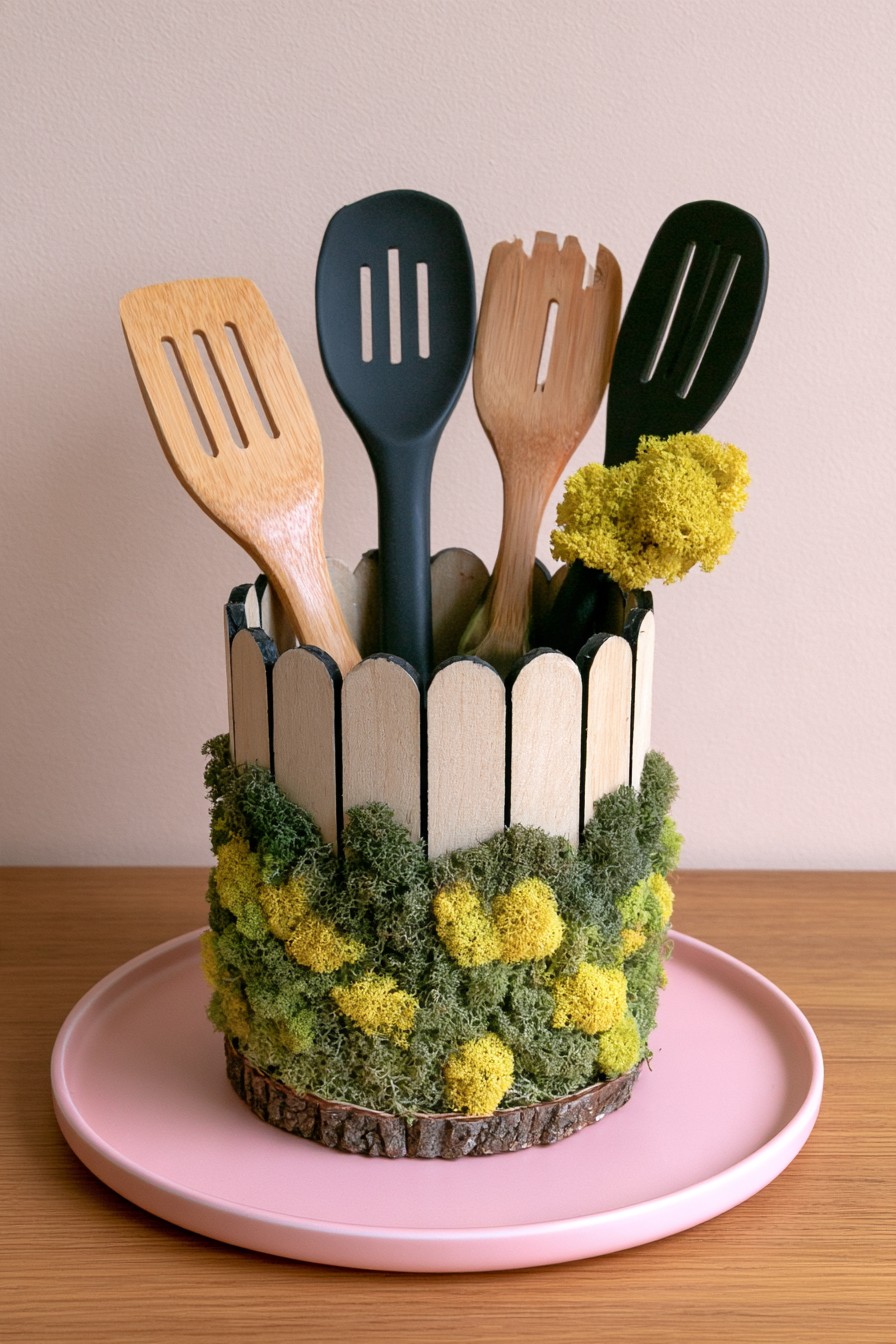
Pale slats form the upper outline of a cylindrical holder, with layered moss around its lower exterior and a bright cluster rising at one side. The cooking utensils remain visible above it, giving the object a useful kitchen identity. The wooden and green surfaces create contrast, but they also complicate cleaning compared with a plain washable utensil cup.
Build the craft around a separate removable container that can be washed independently. Keep moss, adhesive, and bark away from its rim and all utensil contact surfaces. The raised side cluster should sit clear of handles as they are inserted and lifted out. Store only clean, dry utensils and place the object away from the sink, cooking heat, steam, and food splashes. If that separation is not practical, use the same exterior as a dry decorative holder elsewhere instead of treating fragile greenery as a kitchen cleanable finish.
12. Moss Crescent Hoop with Hanging Rings
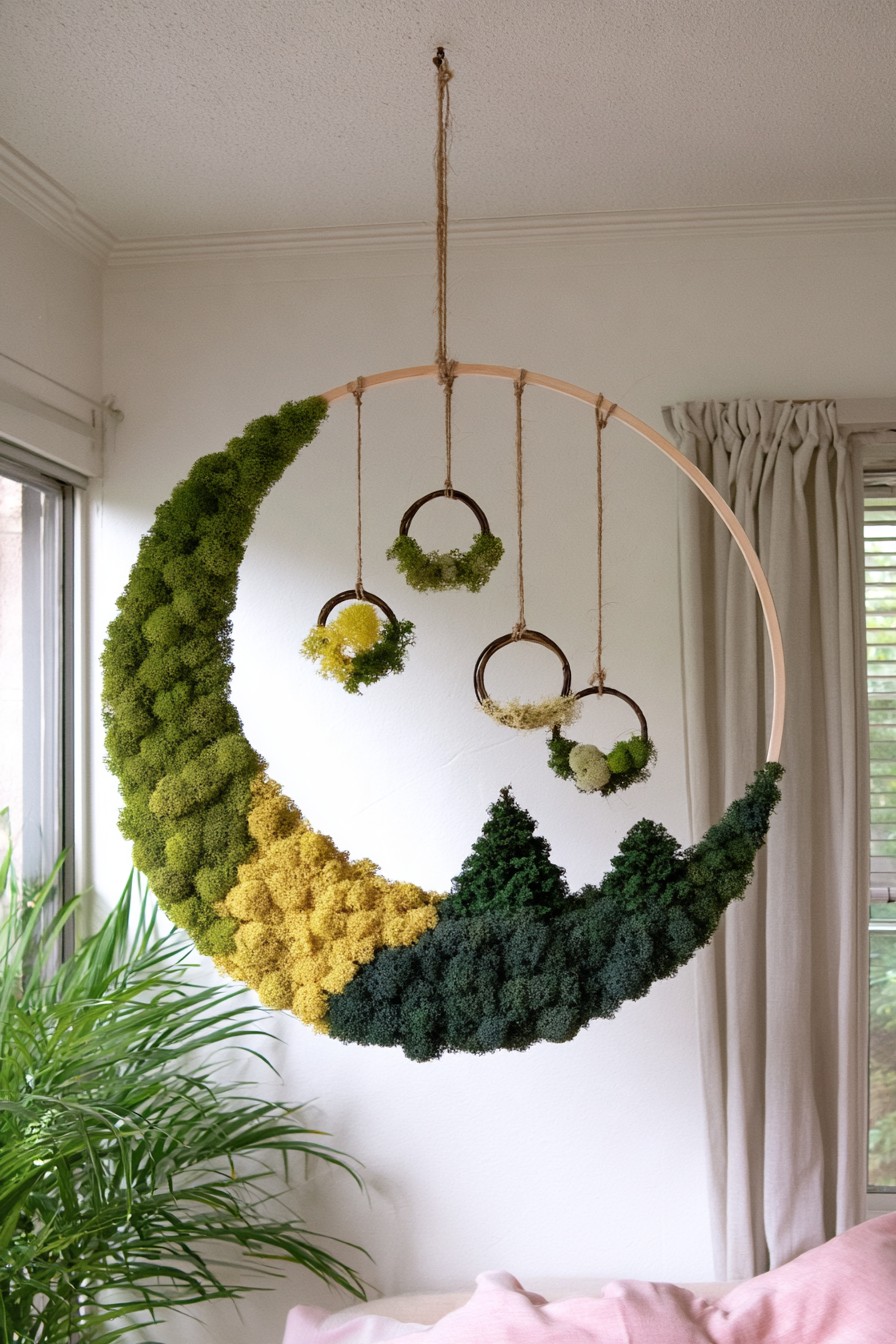
A large open hoop carries an uneven crescent of greenery along one side and the bottom. Small rings with their own moss clusters hang within the open center, adding a second layer of movement. The bare upper arc preserves the circular boundary, while the clustered lower edge creates the crescent effect. It suits an overhead location with generous clearance, not a frequently crossed route.
Use a firm hoop with a properly designed suspension point, then attach the larger decorative crescent to a supporting strip or frame section. Prepare the small hanging rings separately and compare their lengths before tying them inside the opening. Check clearance as they move so the pieces cannot catch or rub against one another. The overhead fixing and all supporting connections need to suit the finished weight. Keep the mobile out of reach of children and pets, and make it accessible for inspection without pulling on the moss.
13. Moss Panel on the Closed Staircase Side
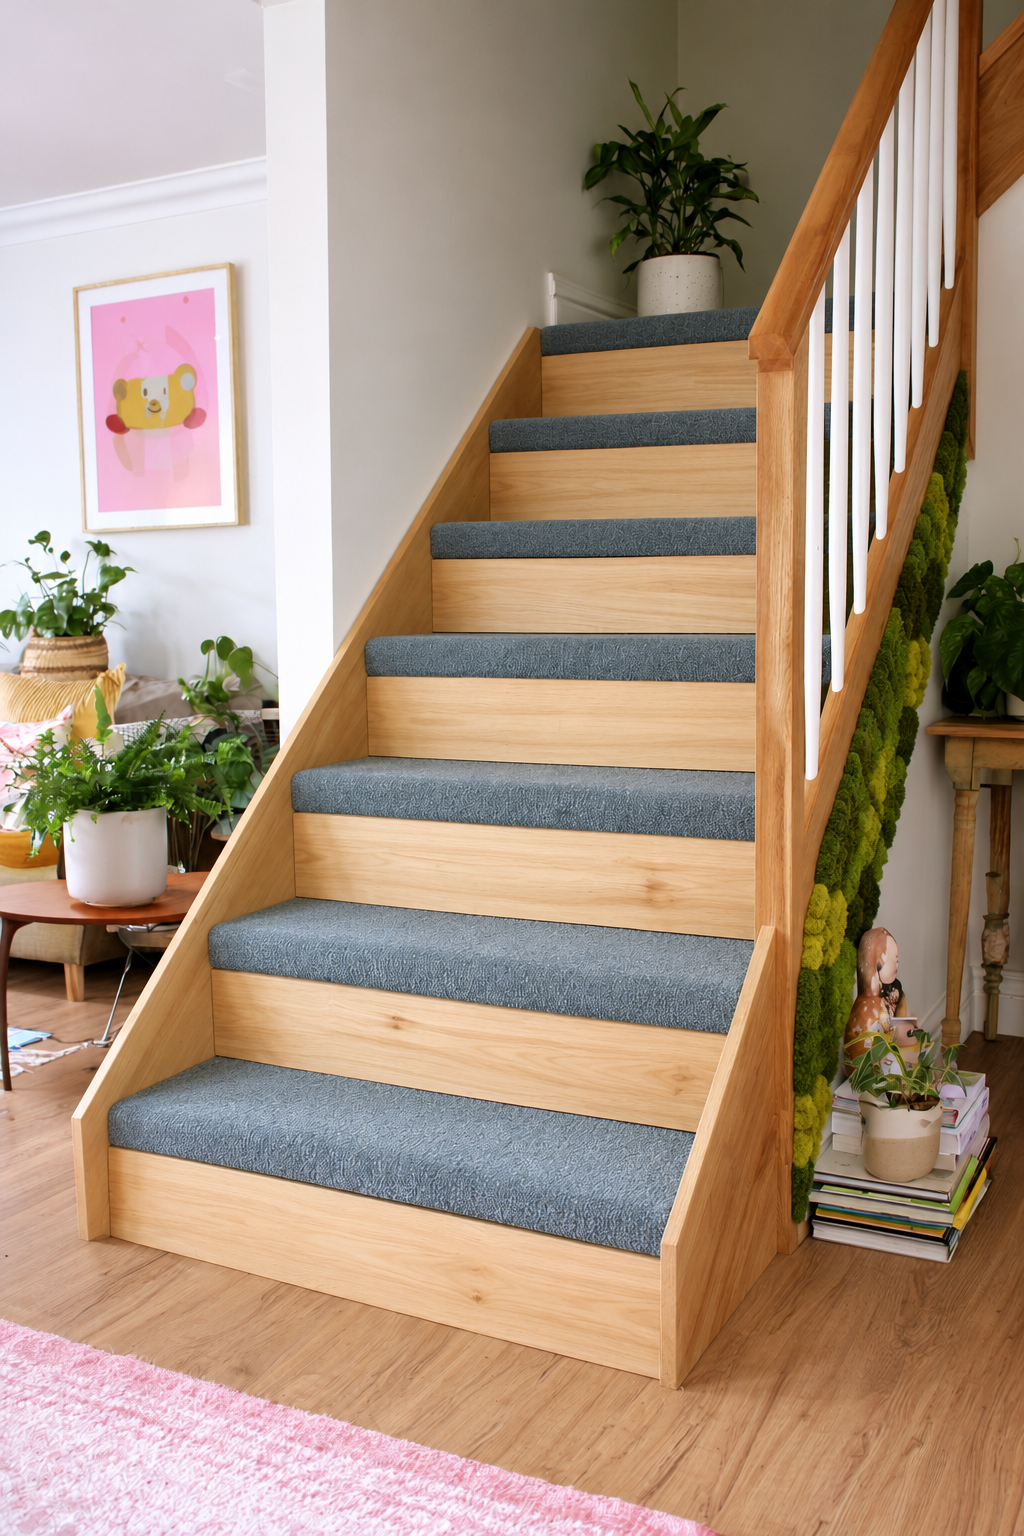
The blue gray steps and pale wooden risers stay clear, while a narrow green accent runs along the staircase’s closed exterior side panel. The moss follows the upward direction without extending onto the tread surfaces, step edges, or floor. This keeps the woodland detail connected to the staircase while preserving a distinct walking route. The uncovered timber rail also remains separate from the decoration.
Make the moss as a removable strip on a rigid backing sized for the closed side panel. Position the strip wholly outside the tread area and retain access to staircase fixings. Check the proposed depth against passing feet, furniture, and cleaning access before installation. Keep the panel low contact, secure loose pieces, and remove any shed fragments from the floor promptly. The decorative strip should not cover joints or change the staircase’s usable width.
14. Moss Wall Panel Beside a Birch Accented Railing
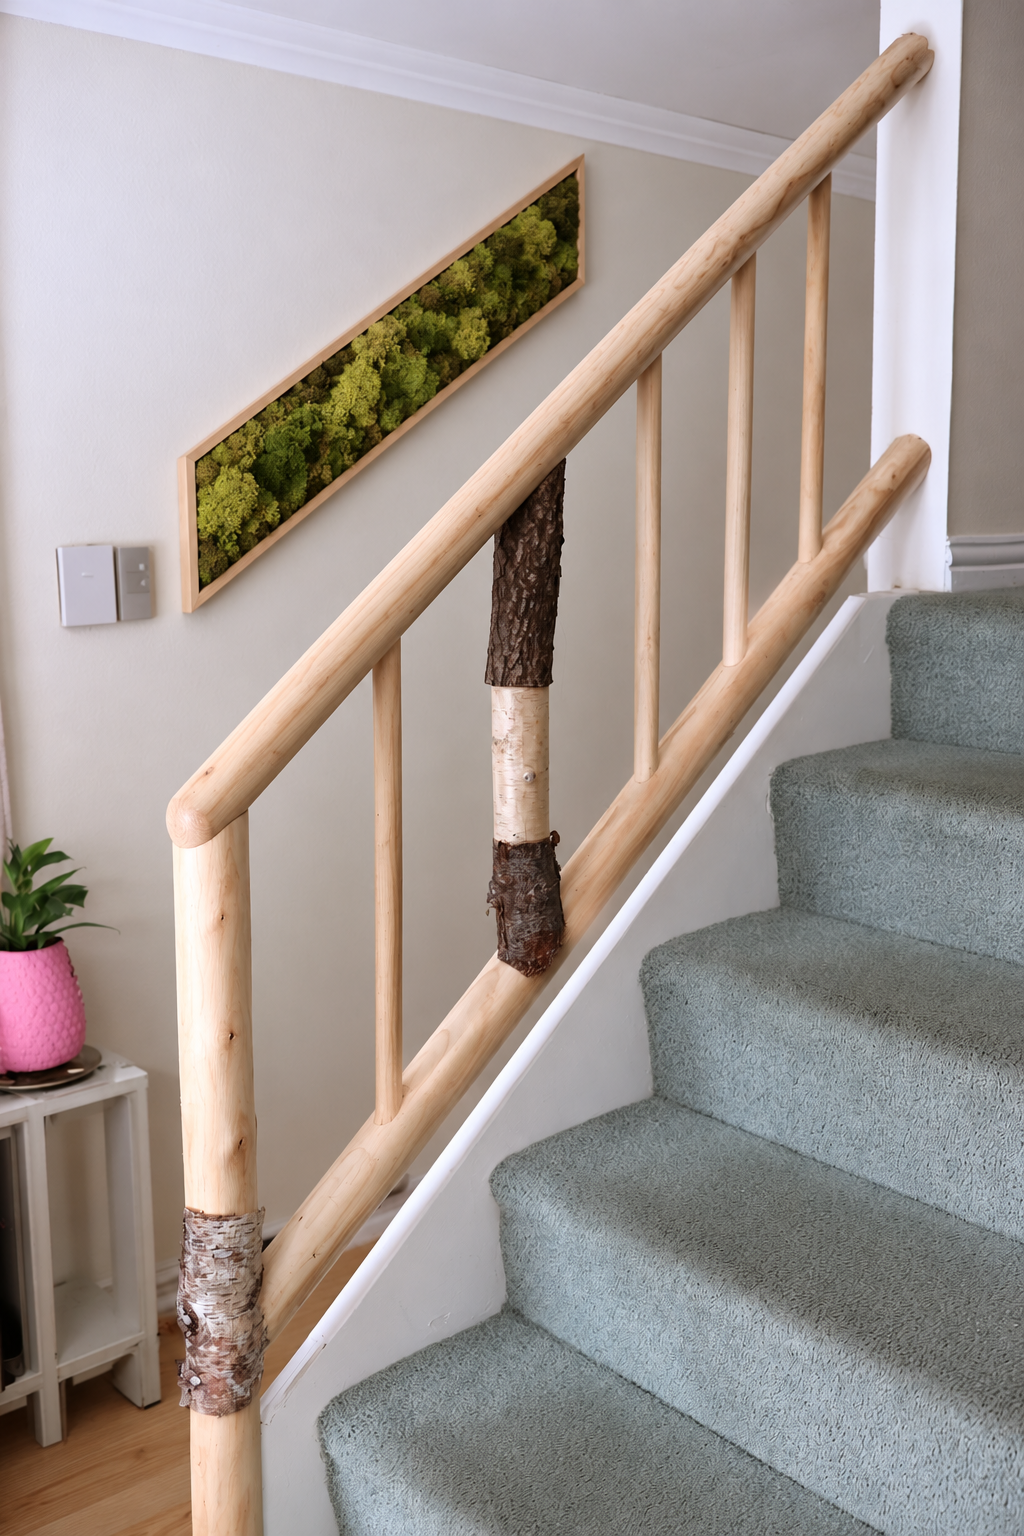
A slim framed moss panel follows the staircase angle on the adjacent wall, separate from the pale wooden upper handrail. Birch like bark accents remain on the uprights, connecting the green wall texture with the wood’s natural character. The continuous graspable rail is uncovered along its full length. This arrangement gives the greenery its own clear boundary instead of using a support surface as the decorative base.
Build the green strip on a removable framed backing and plan its wall position independently of the railing. Leave clearance from the rail, switch, brackets, and passage; check the placement against actual hand movement on the stairs. Attach the panel to suitable wall fixings without altering the railing connections. Keep its fibers contained inside the frame and inspect for loose material during cleaning. Product choice and surrounding conditions still determine how the preserved or artificial greenery should be maintained.
15. Arched Moss Tabletop Display
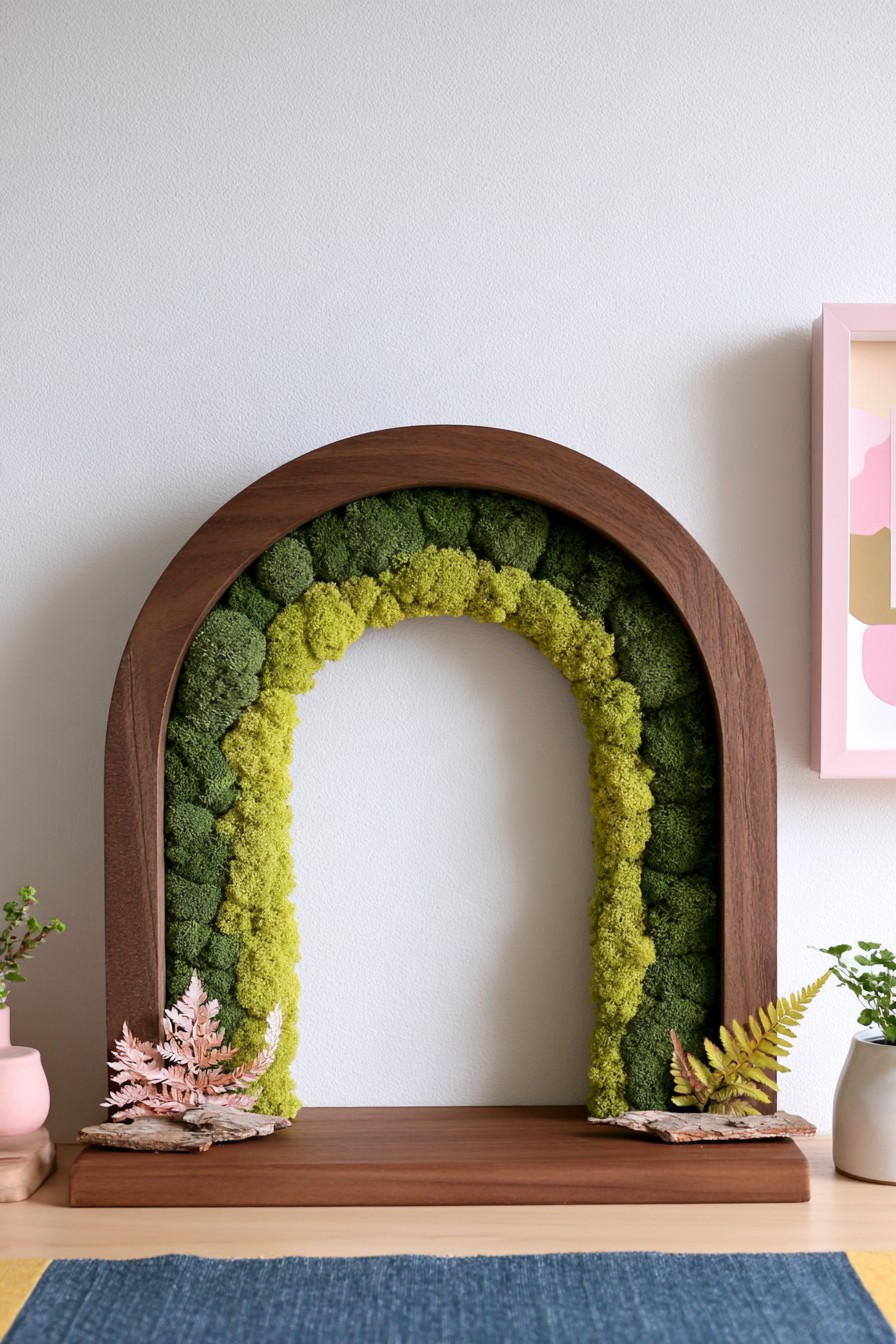
A dark wooden arch encloses rounded green clusters, with a brighter inner band emphasizing the opening. Small pale botanical pieces sit near the lower corners. The surrounding wood makes the object look architectural, while the clear center keeps its tabletop footprint visually light. It is a useful option for a shelf where a picture frame would feel too flat.
Assemble the arch on a broad, stable base before arranging its recessed greenery. Fit a separate backing strip inside the curve and compare the darker and brighter bands dry before bonding them. Keep the clusters behind the front edge where possible, reducing accidental contact. Finish the corner accents independently so they can be replaced if they become brittle. Check the empty opening and surrounding clearance on the actual shelf; projecting moss should not catch nearby books or objects. Lift the sculpture by its wooden base rather than the upper curve.
16. Moss Trimmed Woven Storage Basket
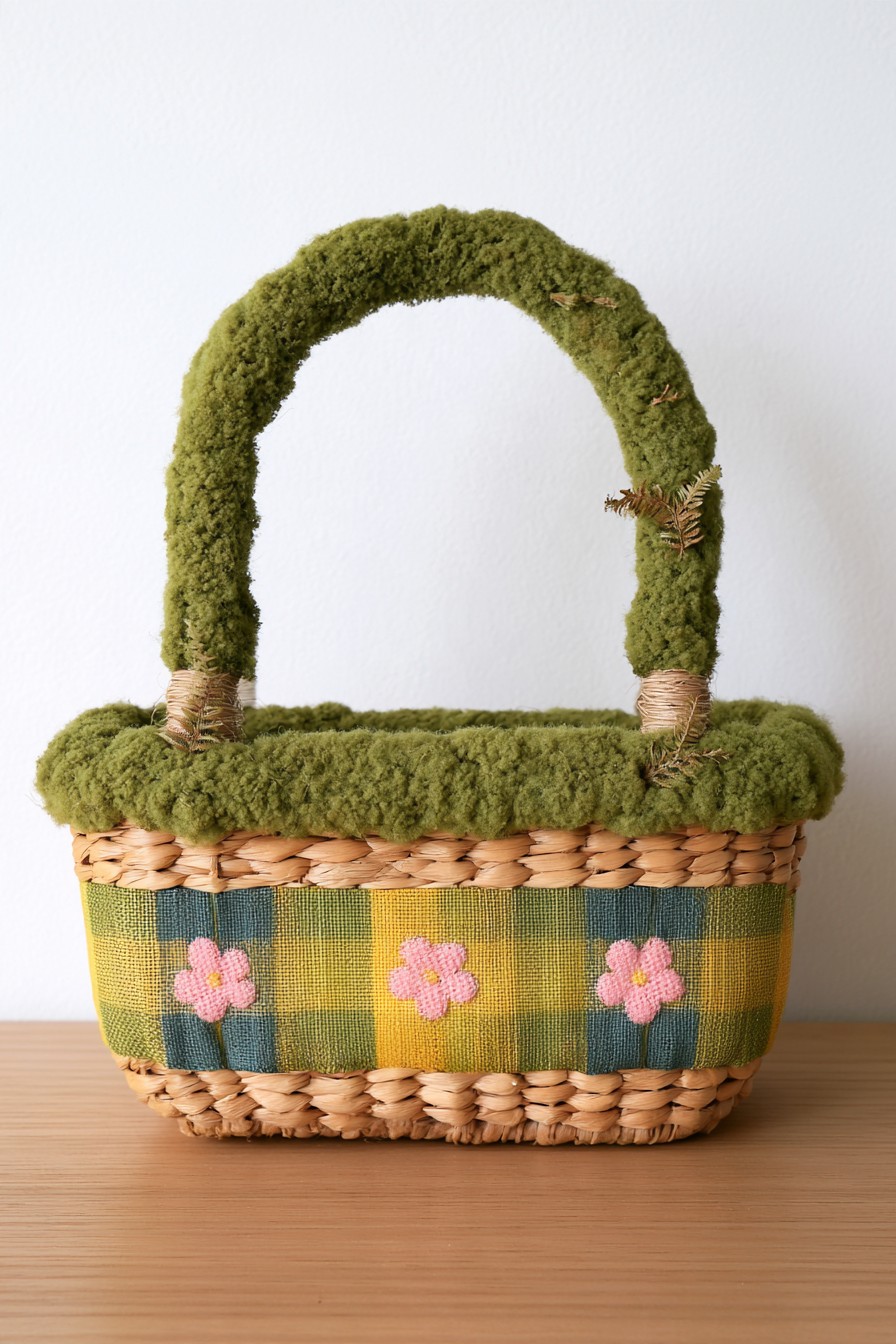
A woven basket combines a yellow and green checked fabric band with small pink flowers, a thick moss rim, and a moss covered handle. The soft green surfaces repeat the fabric colors, turning an ordinary storage shape into a woodland display. Its handle coverage is prominent, so the piece is best read as decorative storage rather than a basket intended for frequent carrying.
Use a removable liner for the contents and make the exterior band detachable where cleaning matters. For a carrying version, leave the handle grip and heavily touched rim sections uncovered, concentrating moss on a separate low contact strip. If reproducing the broad coverage for display, move the basket using its supported base and avoid lifting by the decorated handle. Keep damp items out of the interior and check that fibers cannot migrate onto stored textiles. The basket’s existing structure supports its contents; the greenery is solely a surface finish.
For pale liners and stored fabrics, check the selected material’s colorfastness advice. A separate compatible backing behind the trim can reduce direct contact when the supplier recommends it; keeping the contents dry also avoids one possible trigger for pigment movement. This is a product specific consideration, not a claim that all preserved moss stains.
Care According to the Material You Chose
Follow the supplier’s cleaning method for preserved material, using only gentle techniques it permits. Routine watering or misting is not part of preserved moss care. Keep the arrangement away from direct heating, splashes, and sustained dampness, and check its recommended ambient conditions before installation. Some preserved lichens become firmer in dry air; do not try to correct that by spraying a mixed material craft.
Inspect the backing and connections when taking a piece down for cleaning. Replace loose clusters on removable panels, and clear fragments from nearby furniture or floors. Artificial greenery and dried material have their own care requirements, so keep product information with the project. Low contact placements usually make the decorative effect easier to retain than grips, working surfaces, or constantly moved storage.

Leave a Reply