
An orchid tower brings flowers up to eye level while leaving tables free for everyday use. The most useful designs give each plant a secure place to sit and enough room to lift its pot out without bending a flower stem. This guide combines a practical wooden shelf project with 30 ways to arrange orchids on metal stands, crate frames, wall panels, and larger room features.
You will find a materials list, an illustrated assembly sequence, and specific construction suggestions beneath each idea. Start with the simple wall tower if you want to practice measuring and fitting brackets, then adapt its separate shelves and removable saucers to the design that suits your room. Some ideas use an existing stand or cabinet frame, which can save considerably more work than building every component from scratch.
Table of Contents
- Plan the Tower Around the Plants You Already Have
- Make a Simple Wooden Orchid Tower with Three Shelves
- Materials and Tools
- 1. Prepare the Parts and Mark the Shelf Positions
- 2. Fit Two Brackets Beneath Each Shelf
- 3. Protect the Wood and Let the Finish Cure
- 4. Mount the Tower and Add the Orchids
- Adapt the Connections to the Material
- 30 Orchid Tower Ideas to Adapt to Your Room
- 1. A Cream Metal Tower with Butter Yellow Pots
- 2. A Rope Wrapped Column with White Orchid Layers
- 3. A Blue Ceramic Base Beneath an Open Root Display
- 4. A Low Stone Bowl with Tall Flowering Spikes
- 5. A Dark Wood Stand with Ivory Pot Covers
- 6. A Staggered Pine Crate Tower
- 7. A Cork Faced Wall Panel with Black Baskets
- 8. Three Wooden Hoops Around White Orchids
- 9. A Sage Shutter Turned into a Vertical Orchid Rack
- 10. A Bamboo Tripod with Woven Orchid Baskets
- 11. An Oak Framed Grid with Four Slatted Holders
- 12. A Cream Open Shelf Tower with Cork Fronts
- 13. An Adjustable Pegboard Tower for Small Orchids
- 14. A Branch Tower with Black and Wood Baskets
- 15. A Curved Pine Panel with Three Balcony Shelves
- 16. Terracotta Texture Behind Round Wooden Shelves
- 17. A Cord Screen Around a Peach Orchid Column
- 18. Sage Hexagon Shelves with Three Flower Colors
- 19. A Black Mesh Cylinder with Cork Trimmed Baskets
- 20. A Copper Toned Pipe Frame with Round Pot Platforms
- 21. An Open Timber Lattice with Staggered Crate Pockets
- 22. A Suspended Column of Slatted Orchid Baskets
- 23. A Butter Yellow Chair Back with Cane Baskets
- 24. A Braced Timber Tree for Six Orchids
- 25. An Ivory Arch with Six Woven Pot Pockets
- 26. A Tall Open Frame with Six Alternating Baskets
- 27. A Timber Pyramid with Six Crate Planters
- 28. A Curved Cane Cabinet with Three Orchid Niches
- 29. A Stepped Cluster of Timber Columns
- 30. A Narrow Timber Spine with a Pink Color Progression
- Keep the Display Practical After the Flowers Fade
Plan the Tower Around the Plants You Already Have
Measure each orchid from the bottom of its pot to the highest flower, then check its leaf spread. A shelf that fits the pot may still leave the foliage squeezed against a side panel. Allow space above and in front of each plant so you can remove it for watering. Compact Phalaenopsis are easier to fit into closely spaced shelves than tall flowering specimens.
Choose a position with bright, filtered light and protection from harsh sun. Closed curtains can create a calm decorating backdrop, but they should not leave living orchids in darkness throughout the day. Open the curtains when appropriate or provide a suitable plant light. Keep the arrangement away from radiator heat and cold drafts.
Weigh a freshly watered, drained orchid together with its decorative holder and saucer before selecting brackets. Wall fixings must suit both the wall material and the complete loaded assembly. A tall floor tower also needs protection against tipping. Its visual proportions alone do not establish how much weight it can safely support.
Make a Simple Wooden Orchid Tower with Three Shelves
This version uses a straight backboard, three projecting shelves, and six metal brackets. It is a useful starting point for the cork panel, pegboard, and bracketed wall shelf ideas below. The suggested dimensions suit small plants; adjust the spacing before cutting if your orchids need more headroom. The collage shows the materials, a close view of the bracket connection, finishing, and the completed planted tower.
Materials and Tools
- One straight pine backboard approximately 120 cm long, 20 cm wide, and 18 mm thick.
- Three pine shelf boards approximately 20 cm square and 18 mm thick, cut square at the timber supplier if needed.
- Six steel shelf brackets, two for each shelf, with arms and published load limits suitable for the shelf depth and intended weight.
- Wood screws matched to the bracket holes and board thickness. For 18 mm timber, check that the screw tip will remain inside the wood after passing through the bracket.
- Wall screws and fixings selected for the actual wall. The four fixing positions shown are an example layout, not a universal fixing specification.
- Three shallow waterproof saucers and three compact orchids in individual pots with drainage openings.
- Sandpaper, a sanding block, a pencil, a square, a tape measure, a level, clamps, a drill with appropriate bits, and a screwdriver.
- A clear water based interior wood finish and a suitable brush, plus eye protection when drilling or sanding.
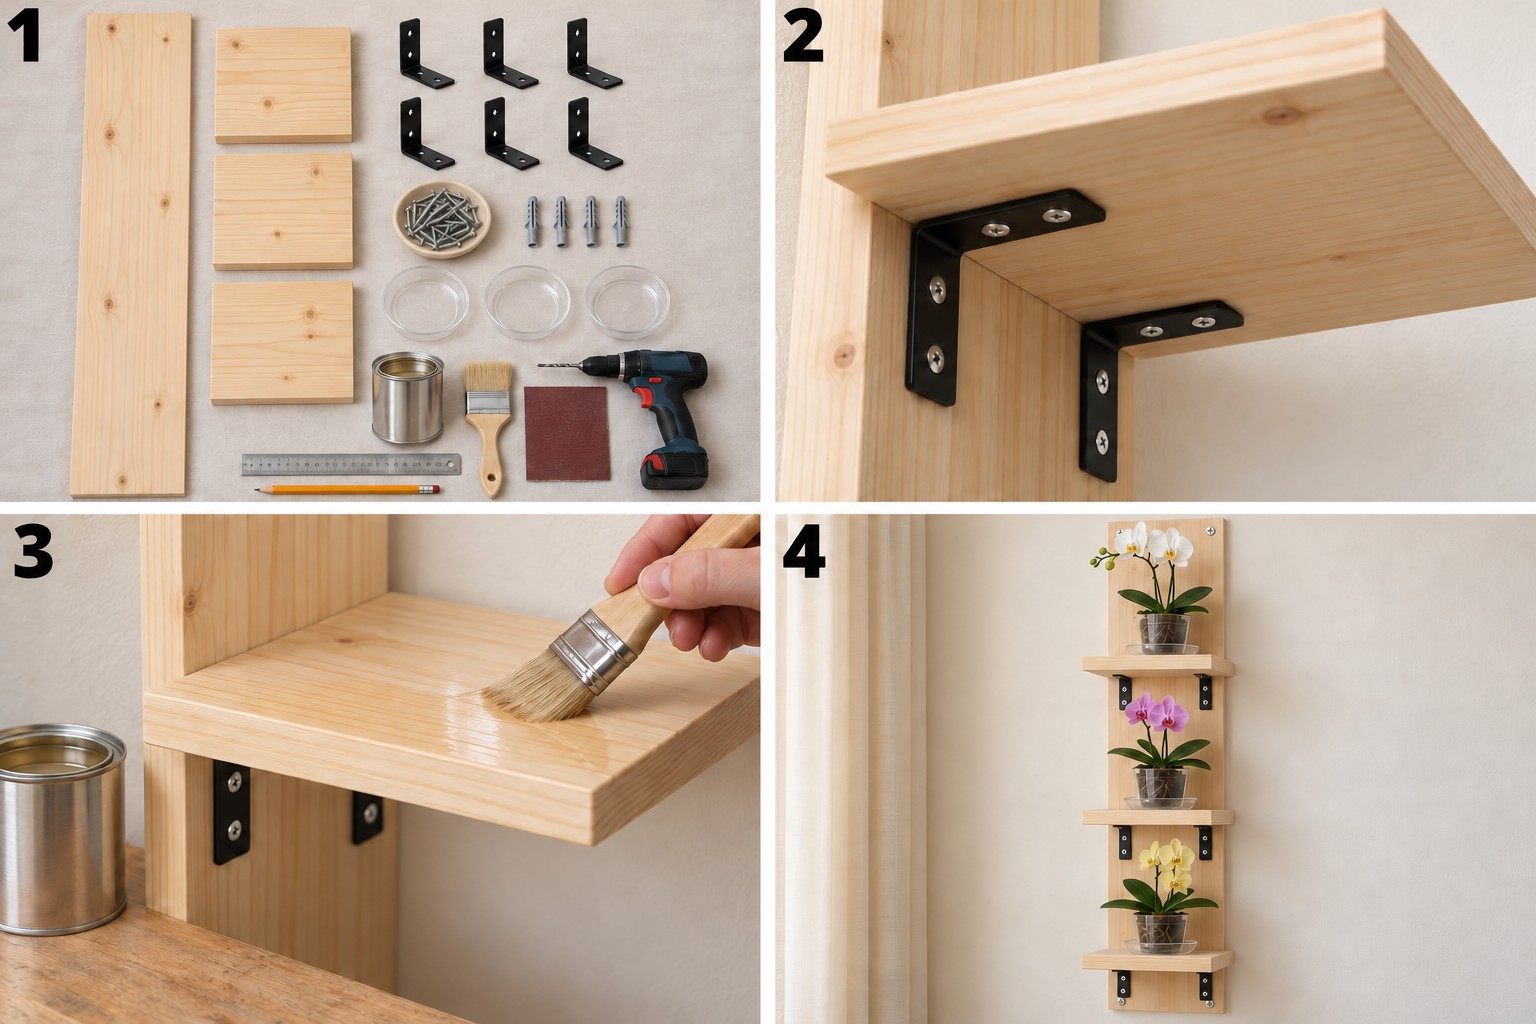
1. Prepare the Parts and Mark the Shelf Positions
Sand rough faces and soften sharp edges, then remove the dust. Lay the backboard flat and arrange the shelves against it before drilling. As a starting layout, mark shelf tops approximately 12, 50, and 88 cm above the lower end of the board. Check the available opening against the actual plants, including the space needed to lift them out. Mark the wall fixing positions clear of the shelf brackets.
2. Fit Two Brackets Beneath Each Shelf
Clamp the backboard securely. Use a square to position the first shelf at a right angle to it, then mark the bracket holes on both pieces. Drill pilot holes using the size recommended for the chosen screws, with a depth stop to prevent drilling through. Fasten both brackets to the backboard and the underside of the shelf. Repeat for the other two shelves, checking that their front edges remain parallel. Do not substitute hot glue for the metal connections.
3. Protect the Wood and Let the Finish Cure
Brush thin coats of clear finish onto exposed wood, including shelf edges and end grain, following the product instructions for sanding and recoating. Keep the bracket screws accessible. Wait for the stated full curing period before placing saucers and pots on the shelves. For a colored version, use a compatible wood primer and furniture paint system. A decorative finish helps with incidental splashes but does not replace a waterproof saucer.
4. Mount the Tower and Add the Orchids
Check the wall for concealed services before drilling. Secure the finished backboard level, using the fixing arrangement appropriate to the substrate and load. Have another person support it during installation. Inspect the connections before adding the plants. Put one saucer on each shelf, then place the drained pots into them. If a leaf or flower touches the shelf above, use a smaller plant or revise the shelf spacing instead of forcing the growth into the opening.
Adapt the Connections to the Material
For wooden crate frames, reinforce joints with screws through solid rails. An exterior grade wood glue such as Titebond III can supplement closely fitting bare wood joints: spread a thin layer, clamp the parts, and follow the label before loading them. Keep glue off roots and pots. Cork, cane webbing, and decorative rope should cover or soften a support, while timber, brackets, or purpose made metal components carry the weight. For metal stands, use the manufacturer's hardware and assembly method.
30 Orchid Tower Ideas to Adapt to Your Room
The following designs range from small stands to substantial floral features. Each idea explains the visible materials, a practical way to assemble or adapt the structure, and the detail that needs the most attention. Choose the scale first, then borrow the finish or flower palette that works with your furniture.
1. A Cream Metal Tower with Butter Yellow Pots
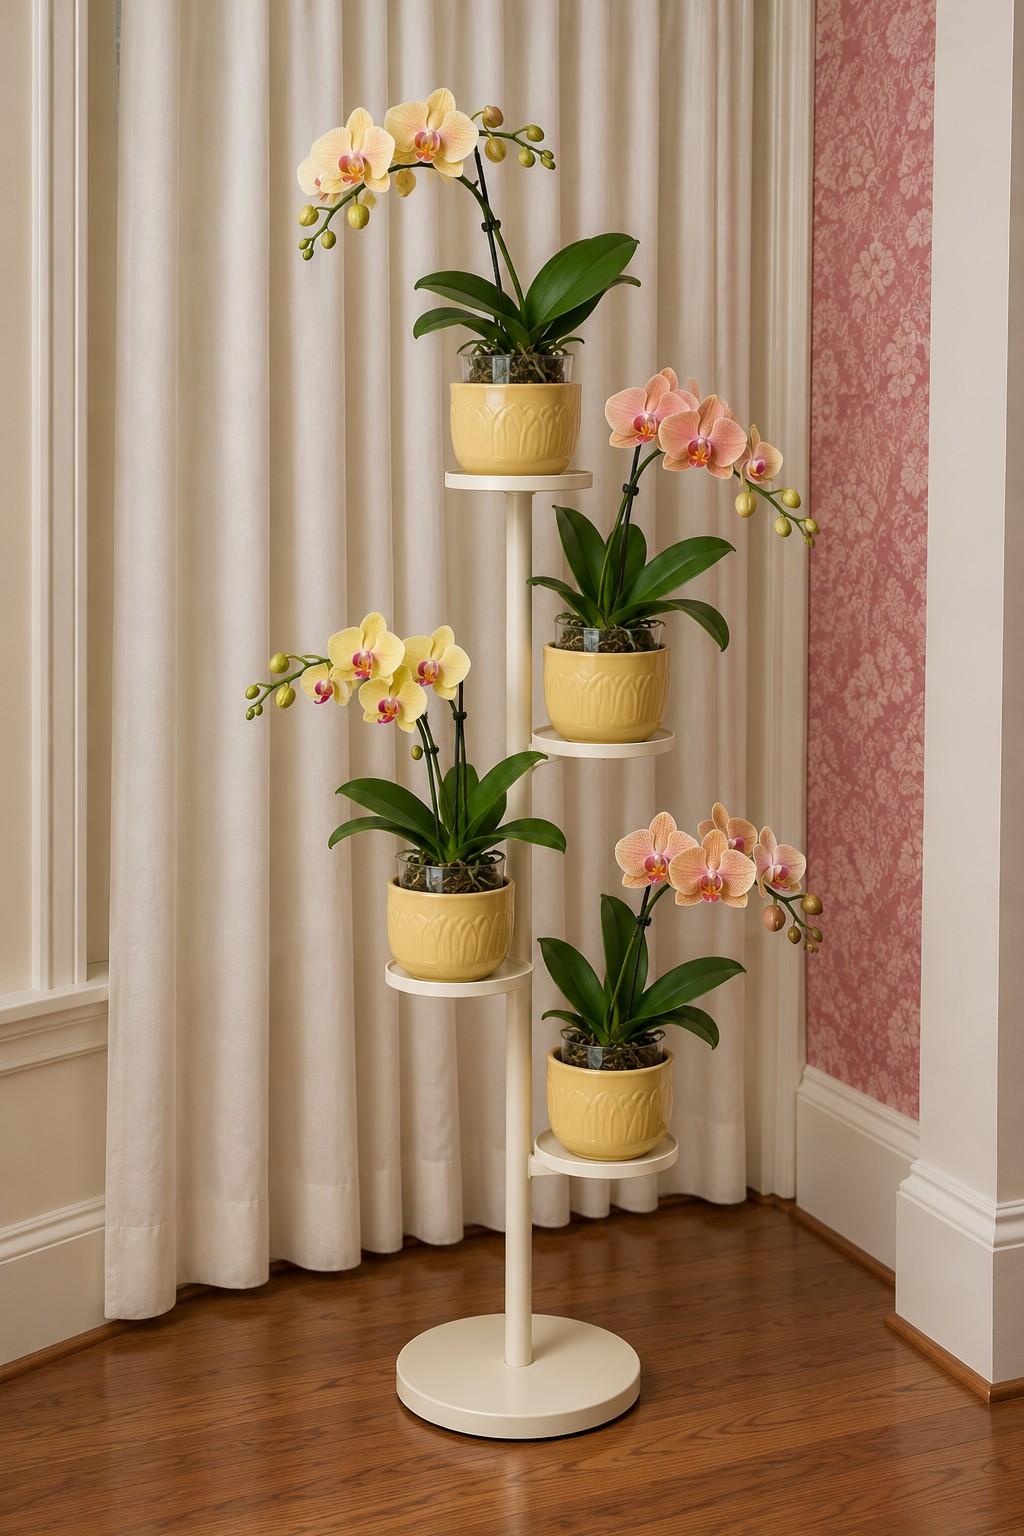
Four butter yellow pots brighten a slim cream stand without making the corner feel crowded. Alternating the holders around the central upright gives peach and yellow flowers separate outlines, while the round base keeps the arrangement visually simple.
Use an existing metal plant stand with securely attached trays, four matching outer pots, and individual nursery pots. Assemble the stand according to its instructions before checking that each outer pot sits fully inside its tray. If refreshing the metal, prepare it and apply a compatible metal primer and enamel before adding plants. The DIY work here is the finish and pot arrangement; avoid improvising projecting arms on a lightweight pole. Keep the heaviest pot on a lower holder.
2. A Rope Wrapped Column with White Orchid Layers
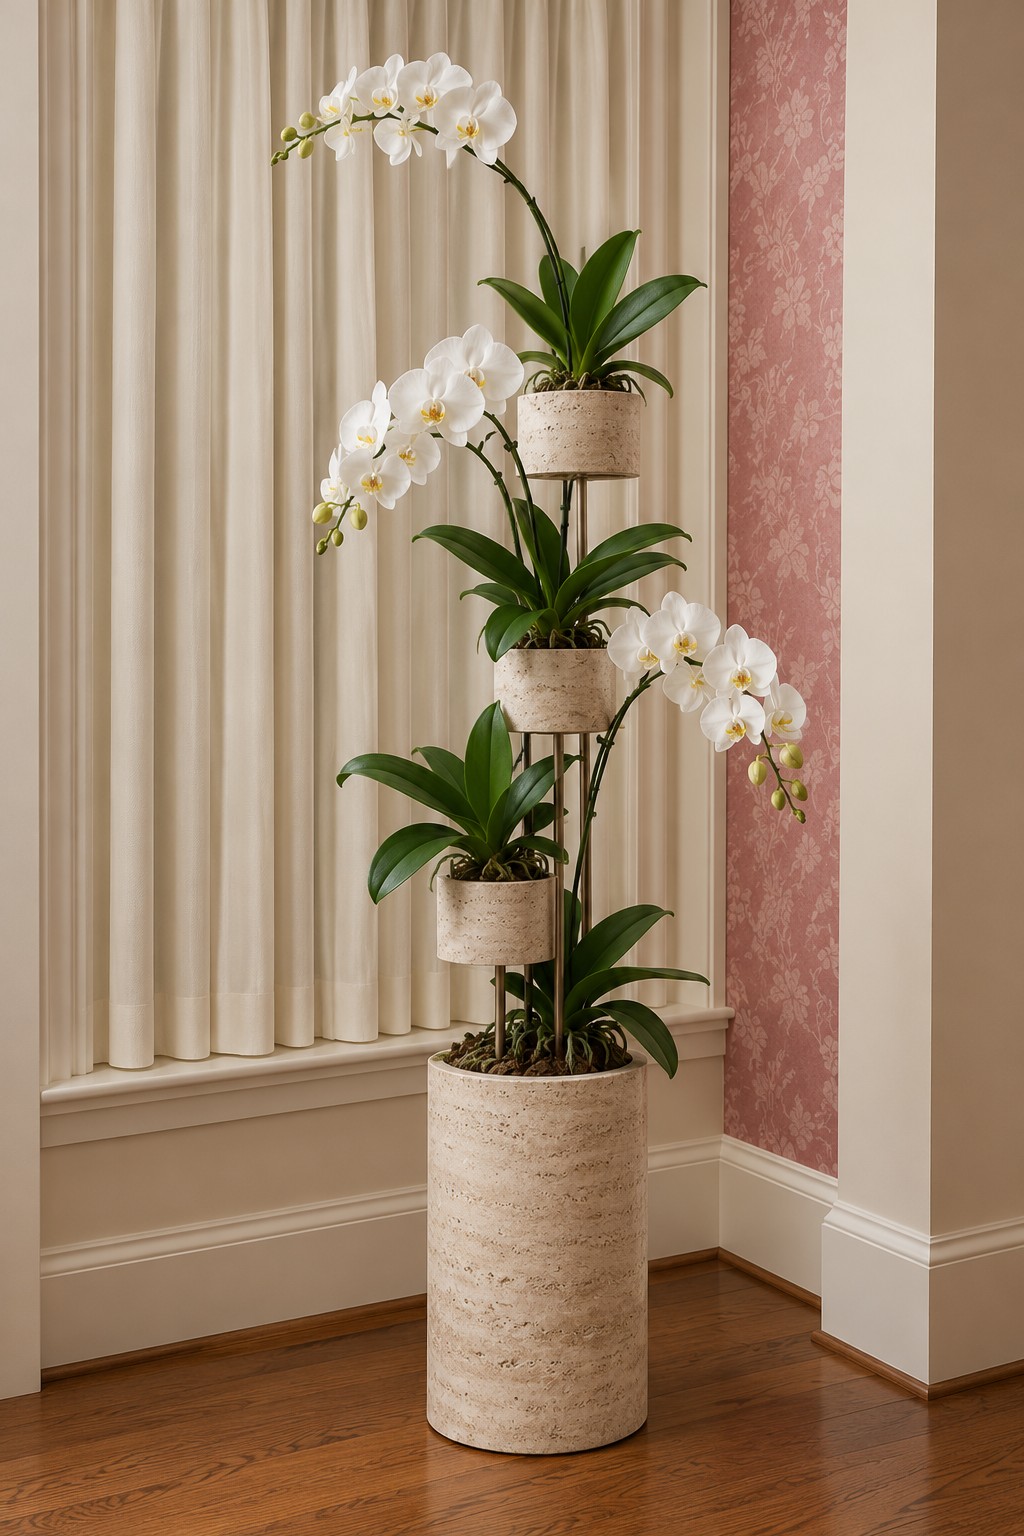
A textured cylindrical base conceals the lower structure, allowing several white orchids to read as one rising arrangement. Small wrapped holders repeat the texture above the base, creating continuity without adding more colors.
Begin with a stable stand whose upright and pot supports are mechanically connected to a rigid base. Fit a removable cylindrical cover around the lower section, then wrap that cover and the outer pot sleeves with cotton cord. A craft adhesive labeled for both surfaces can hold this decorative wrapping. Leave the plant containers removable and keep the cord above their saucers. Do not bury a loose pole in orchid bark or depend on a decorative basket to brace the tower.
3. A Blue Ceramic Base Beneath an Open Root Display
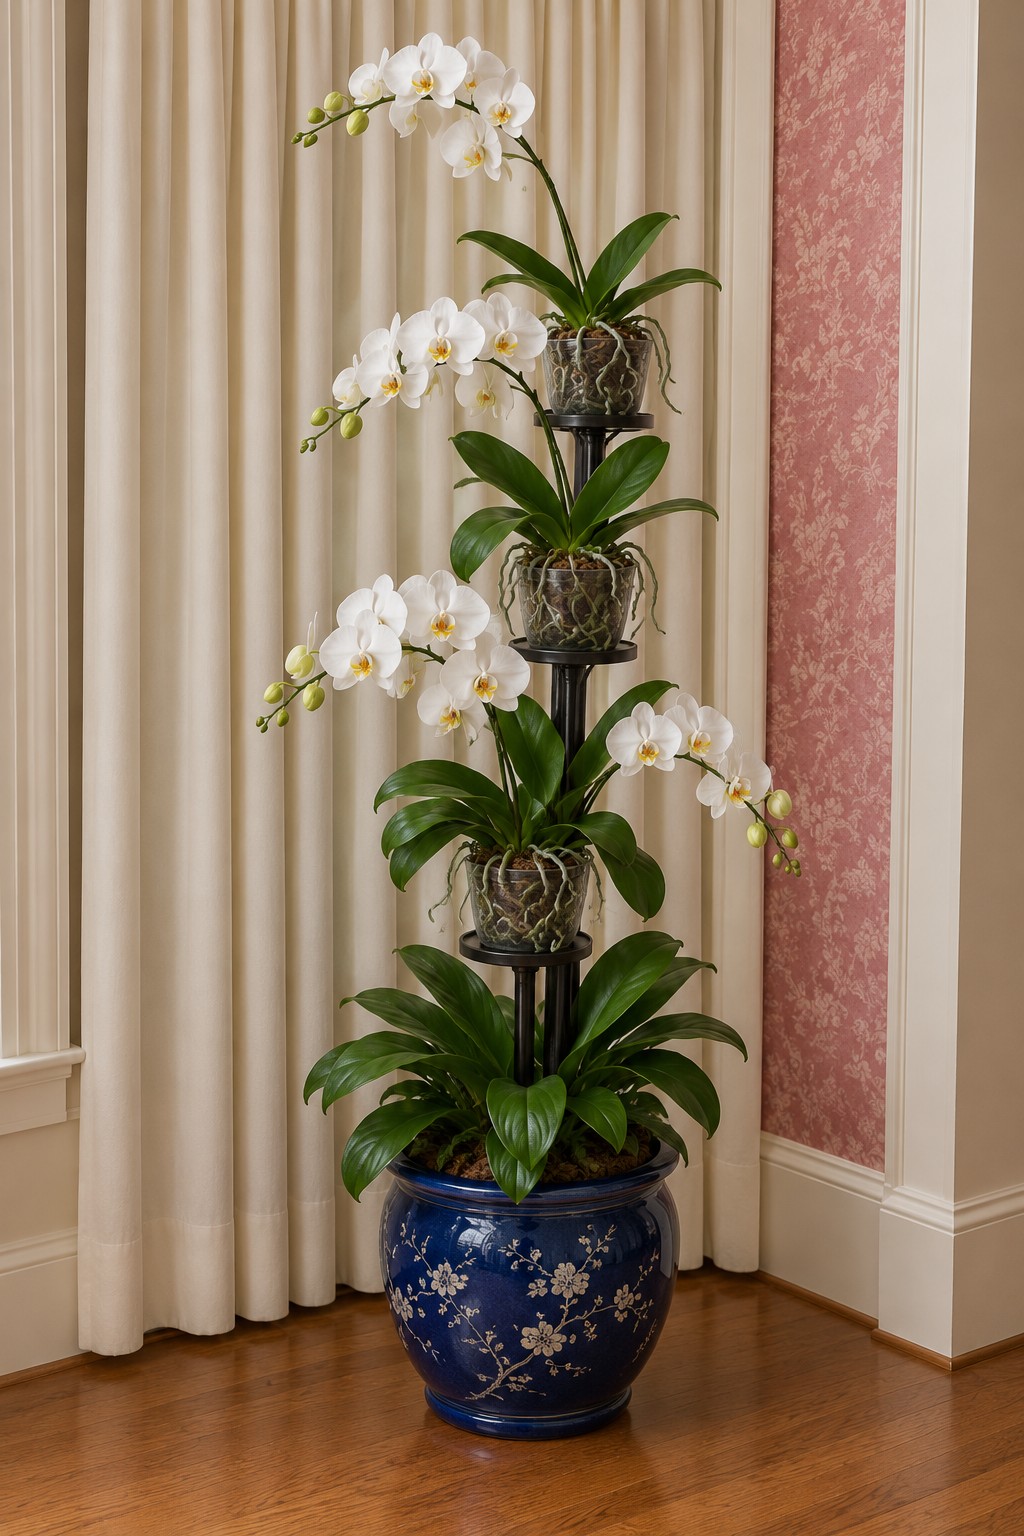
A blue patterned ceramic planter gives this white orchid display a traditional anchor. Above it, open baskets show the roots and break up the height with distinct clusters of leaves. The lower foliage helps connect the raised plants to the base.
Recreate the structure with a self supporting metal pot rack and a decorative ceramic shell that fits around its lower support. Keep the ceramic out of the structural load path. Use slotted orchid pots in the upper baskets and arrange a separate lower pot inside the large container on a removable waterproof tray. Leave visible aerial roots free rather than packing them into a tight decorative ball. This version needs generous access from the front for inspecting every plant.
4. A Low Stone Bowl with Tall Flowering Spikes
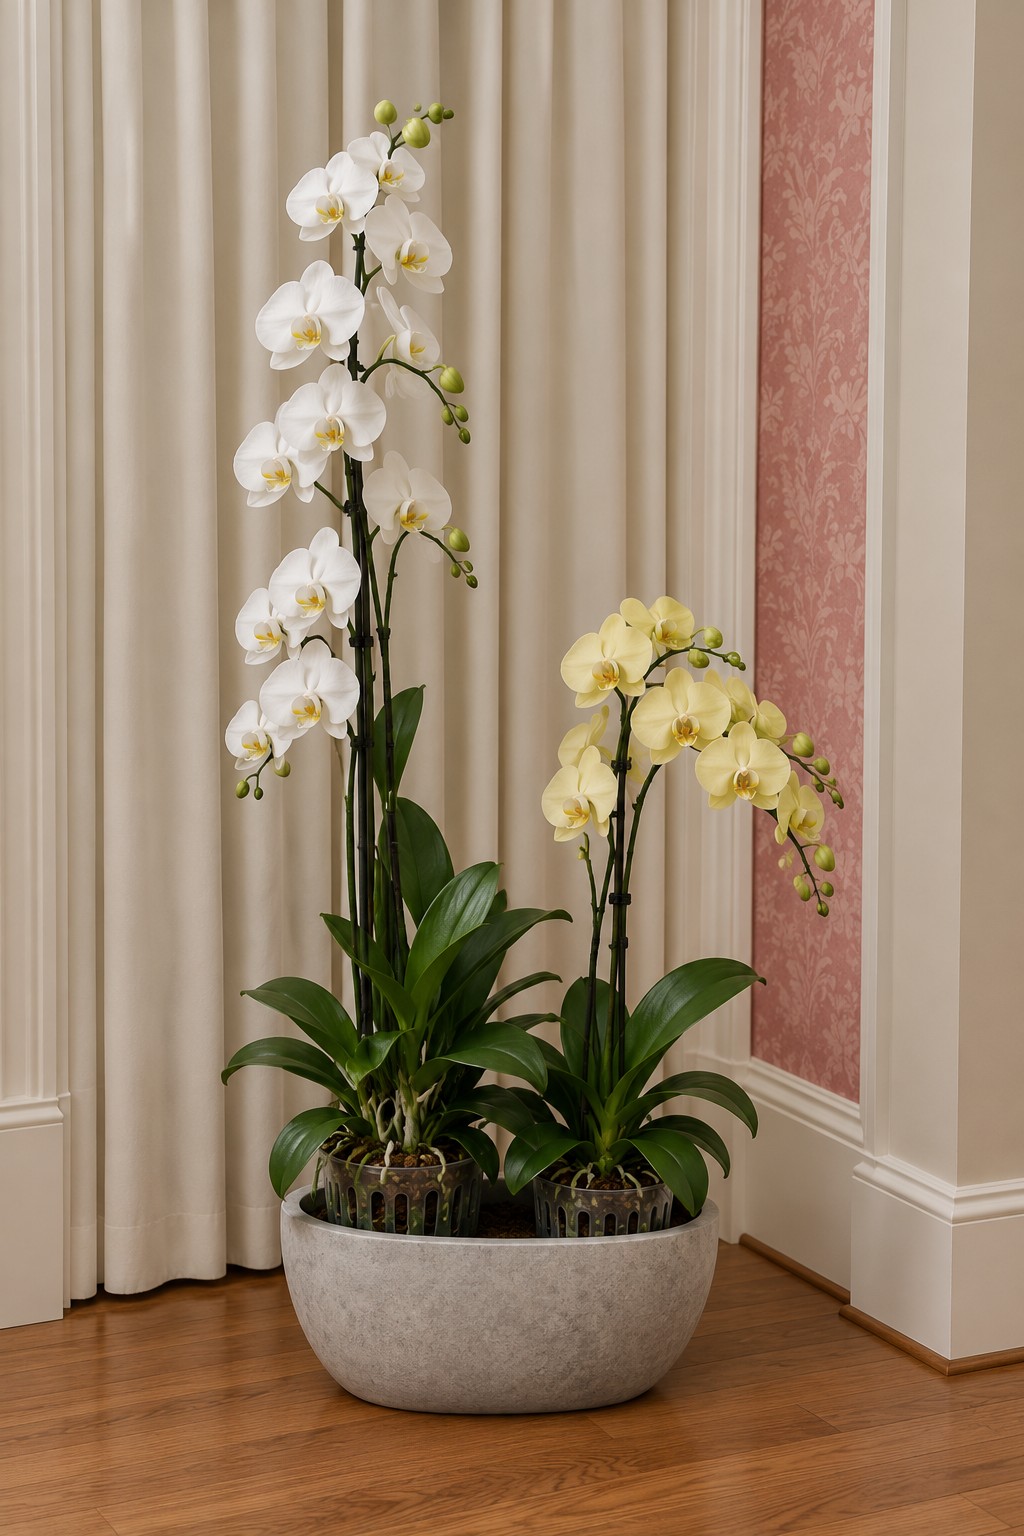
Here the height comes from the flowers rather than a stack of shelves. A low gray bowl gathers white and pale yellow orchids into a single floor arrangement, making this an alternative when you want a vertical floral accent without a tall piece of furniture.
Choose a broad decorative bowl, separate orchid pots, waterproof inserts, and discreet stakes with loose orchid clips. Arrange the pots inside the bowl without repotting everything into one mass of soil. Conceal gaps with removable pot sleeves if necessary, leaving the plant crowns visible. Support existing tall spikes at their natural angle. You cannot turn a short orchid into this shape by stretching or sharply bending its stem.
5. A Dark Wood Stand with Ivory Pot Covers
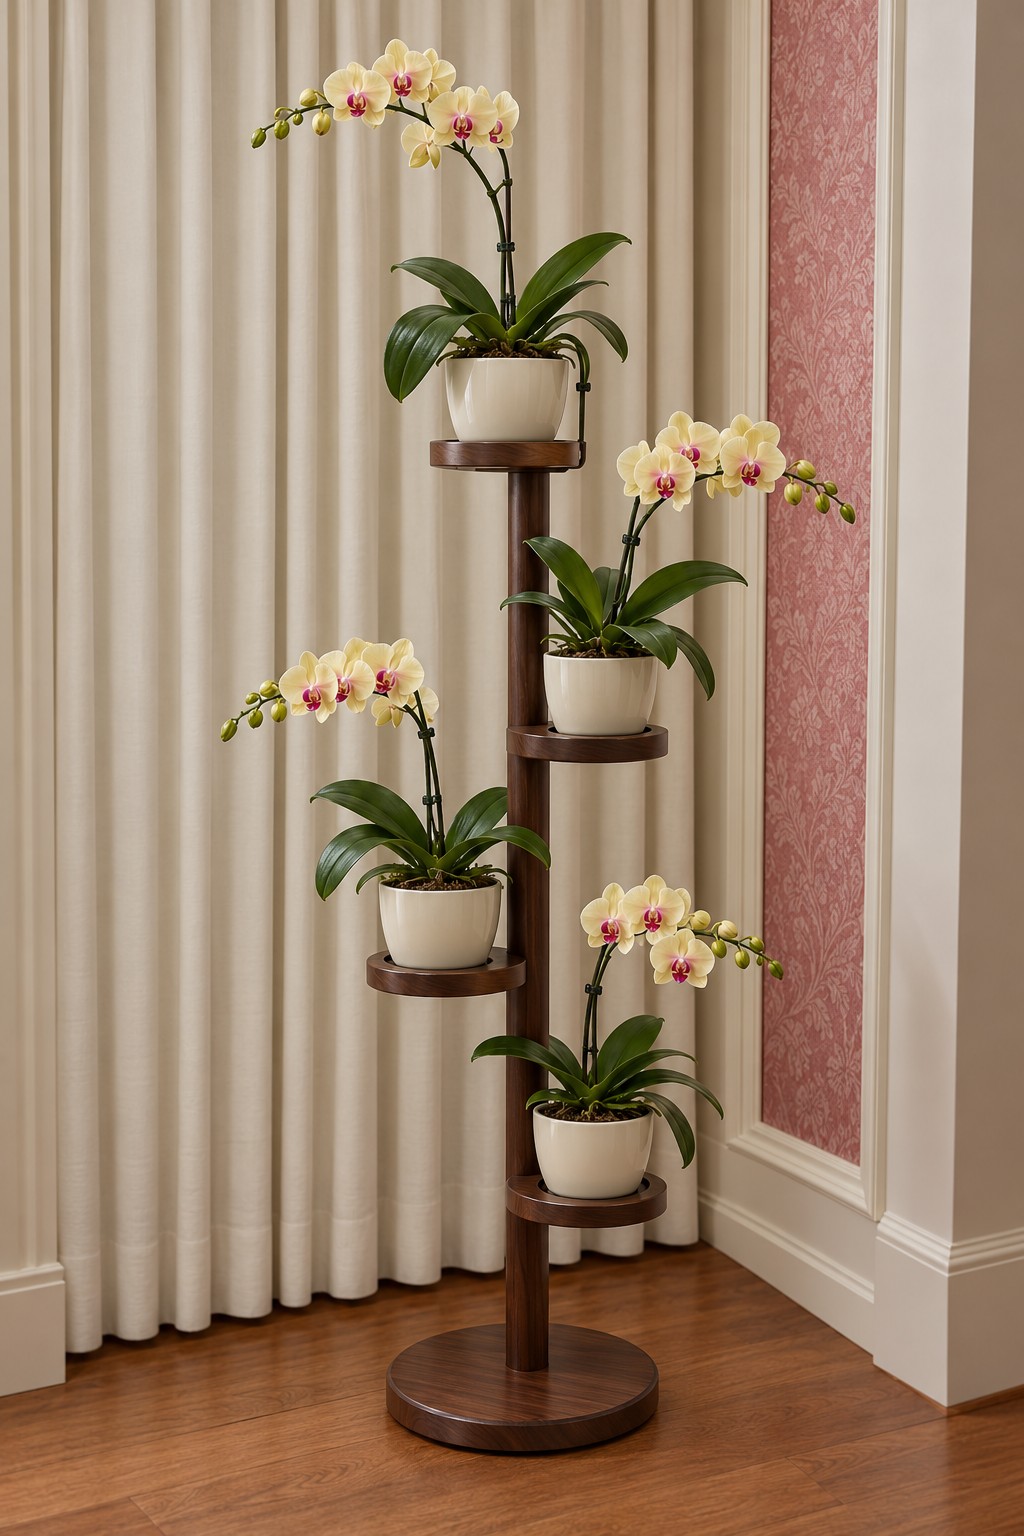
Ivory pots against dark brown wood create a restrained tower that can sit comfortably beside traditional furniture. The staggered circular shelves give each pale yellow orchid its own small stage, with open space between the flower sprays.
Adapt a sound wooden plant stand with securely fixed shelf arms. Clean it, check the joints, and refinish the timber with stain and a compatible protective topcoat if needed. Use matching lightweight pot covers rather than heavy ceramic containers on every level. If constructing a similar stand, each projecting shelf needs a proper bracket or reinforced joint at the upright; a screw driven into the end of a thin dowel is not an adequate substitute. Test the arrangement with empty pots before adding plants.
6. A Staggered Pine Crate Tower
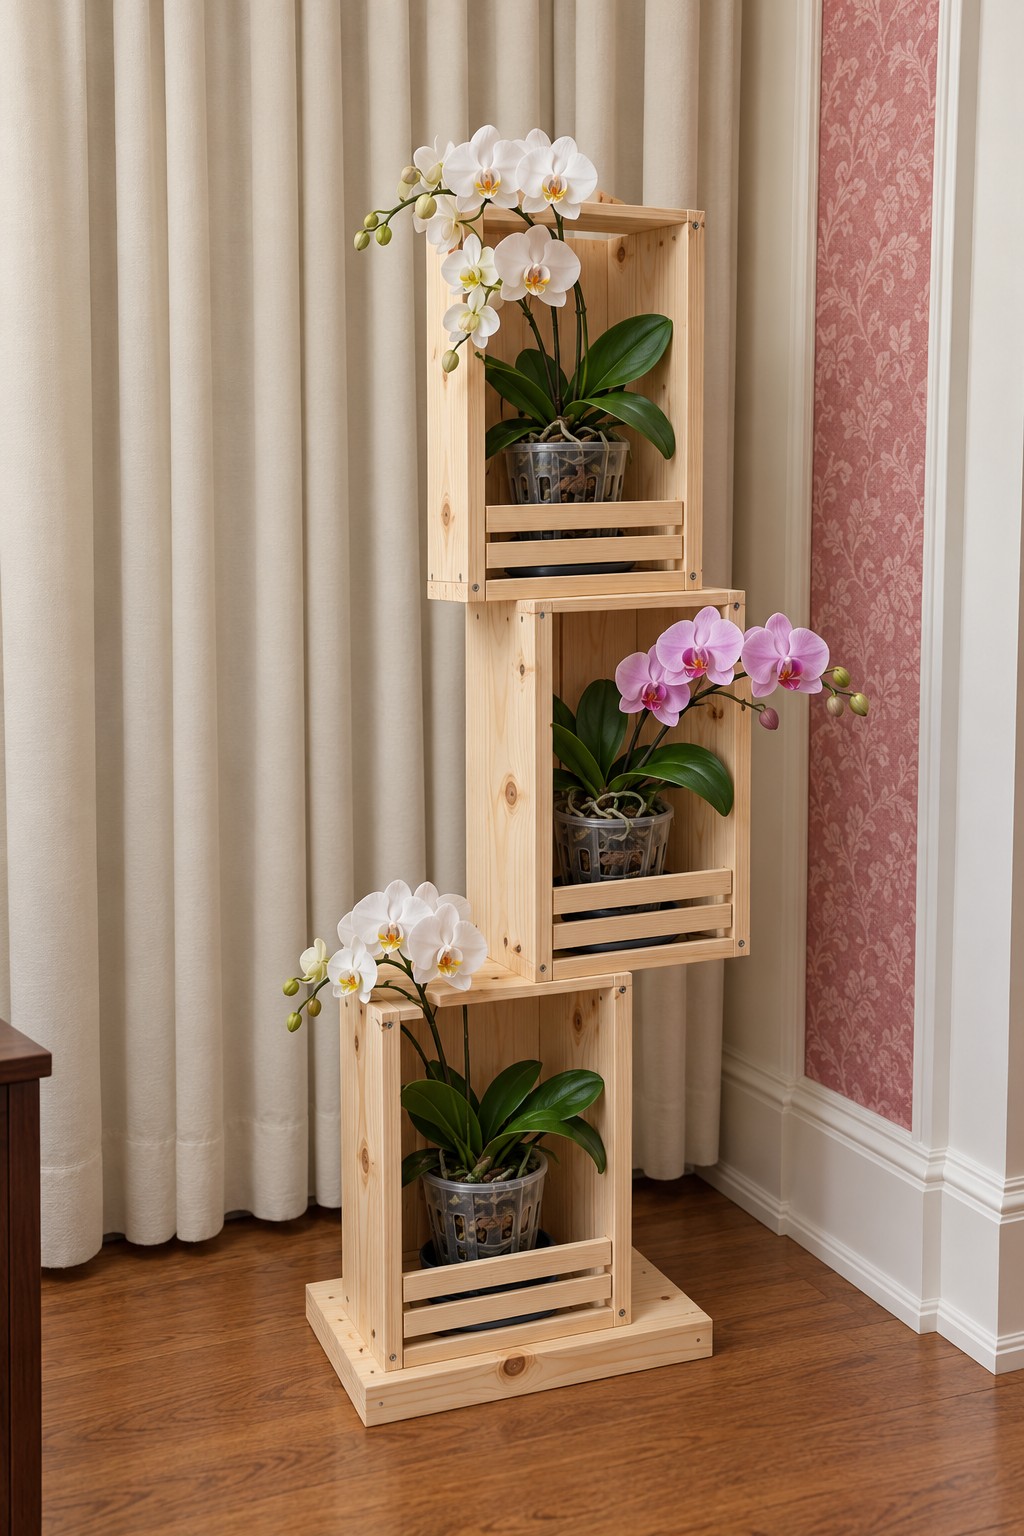
Open pine compartments give this tower a handmade character. The low slatted fronts conceal part of each pot while leaving the leaves and flowering spikes visible. White blooms at the top and bottom frame the pink orchid in the middle.
Use three sturdy wooden crates or purpose built open boxes, a broad baseboard, and a continuous rear support. Dry fit the staggered arrangement, then connect the boxes through their substantial corner rails into the support and adjoining structure. Add reinforcing cleats where needed, rather than fastening only through thin decorative slats. Seal the wood, place a separate tray in every compartment, and keep the front opening large enough to remove the pot. Restrain the completed tower against tipping.
7. A Cork Faced Wall Panel with Black Baskets
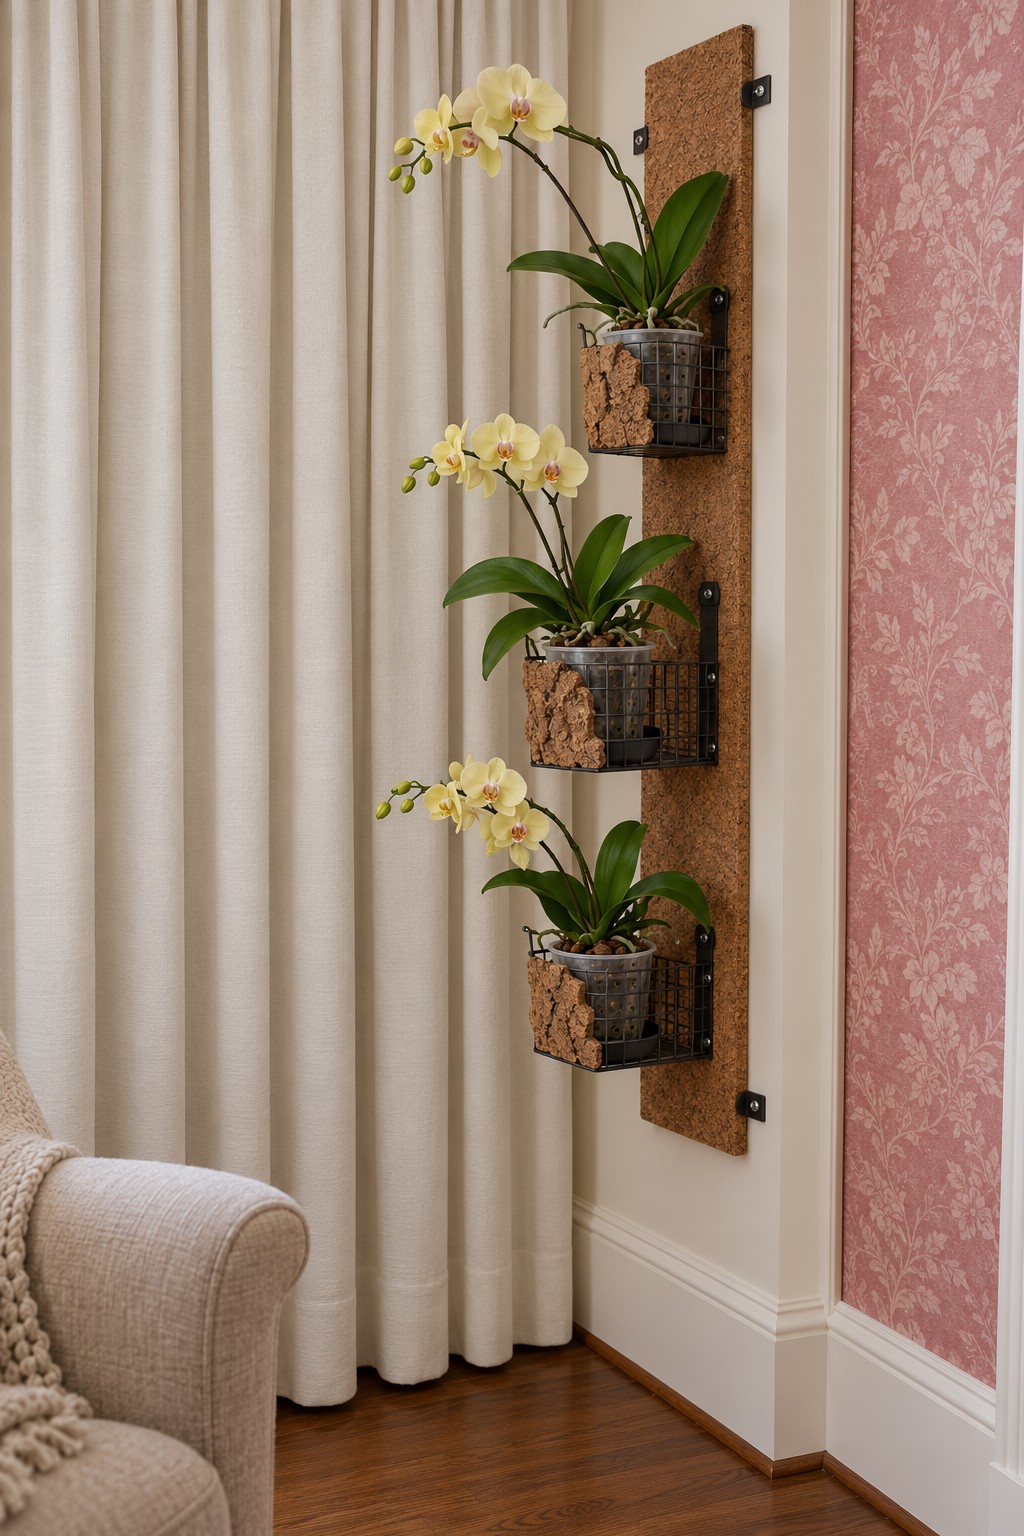
A warm cork surface softens the contrast between black wire baskets and pale yellow orchids. Because the panel sits above the floor, it leaves the space beside a chair available for cleaning and movement.
Cut a rigid plywood backboard and bond cork sheet to its face using an adhesive specified for cork and wood. Fit three basket brackets through the facing into the structural board, then mount the board with suitable wall fixings. Cork alone should not carry the baskets. Keep the black cages removable or give them sufficiently open tops for lifting out each plant. Small waterproof dishes inside the baskets protect the panel without covering the whole cork face in plastic.
8. Three Wooden Hoops Around White Orchids
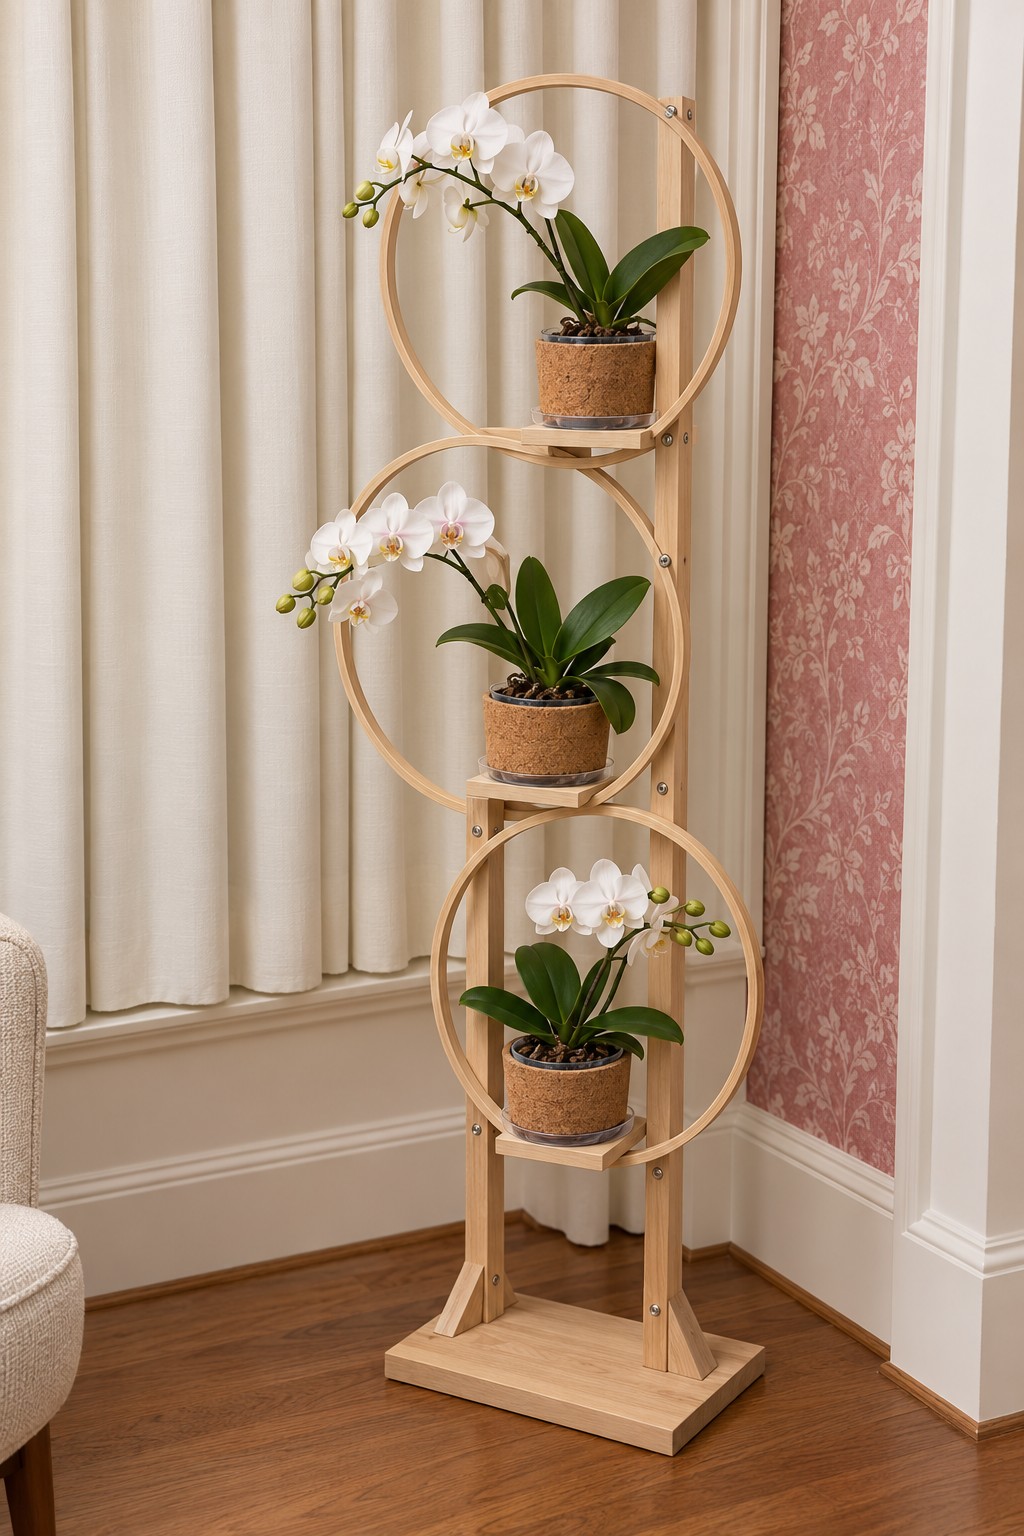
Large wooden circles frame three white orchids like individual portraits. The slim uprights and rectangular base keep the outline light, while small platforms provide level surfaces inside the hoops.
Use substantial decorative wooden rings, two structural uprights, three shelf platforms, and a braced base. Attach the platforms to the uprights with brackets or supported cleats, then secure the rings as decorative frames around them. Thin embroidery hoops should not carry loaded pots. Sand and seal the wood before adding woven pot sleeves. Position each flower spray within the open circle without tying it to the ring. Leave room behind the sleeves so they can be lifted out independently.
9. A Sage Shutter Turned into a Vertical Orchid Rack
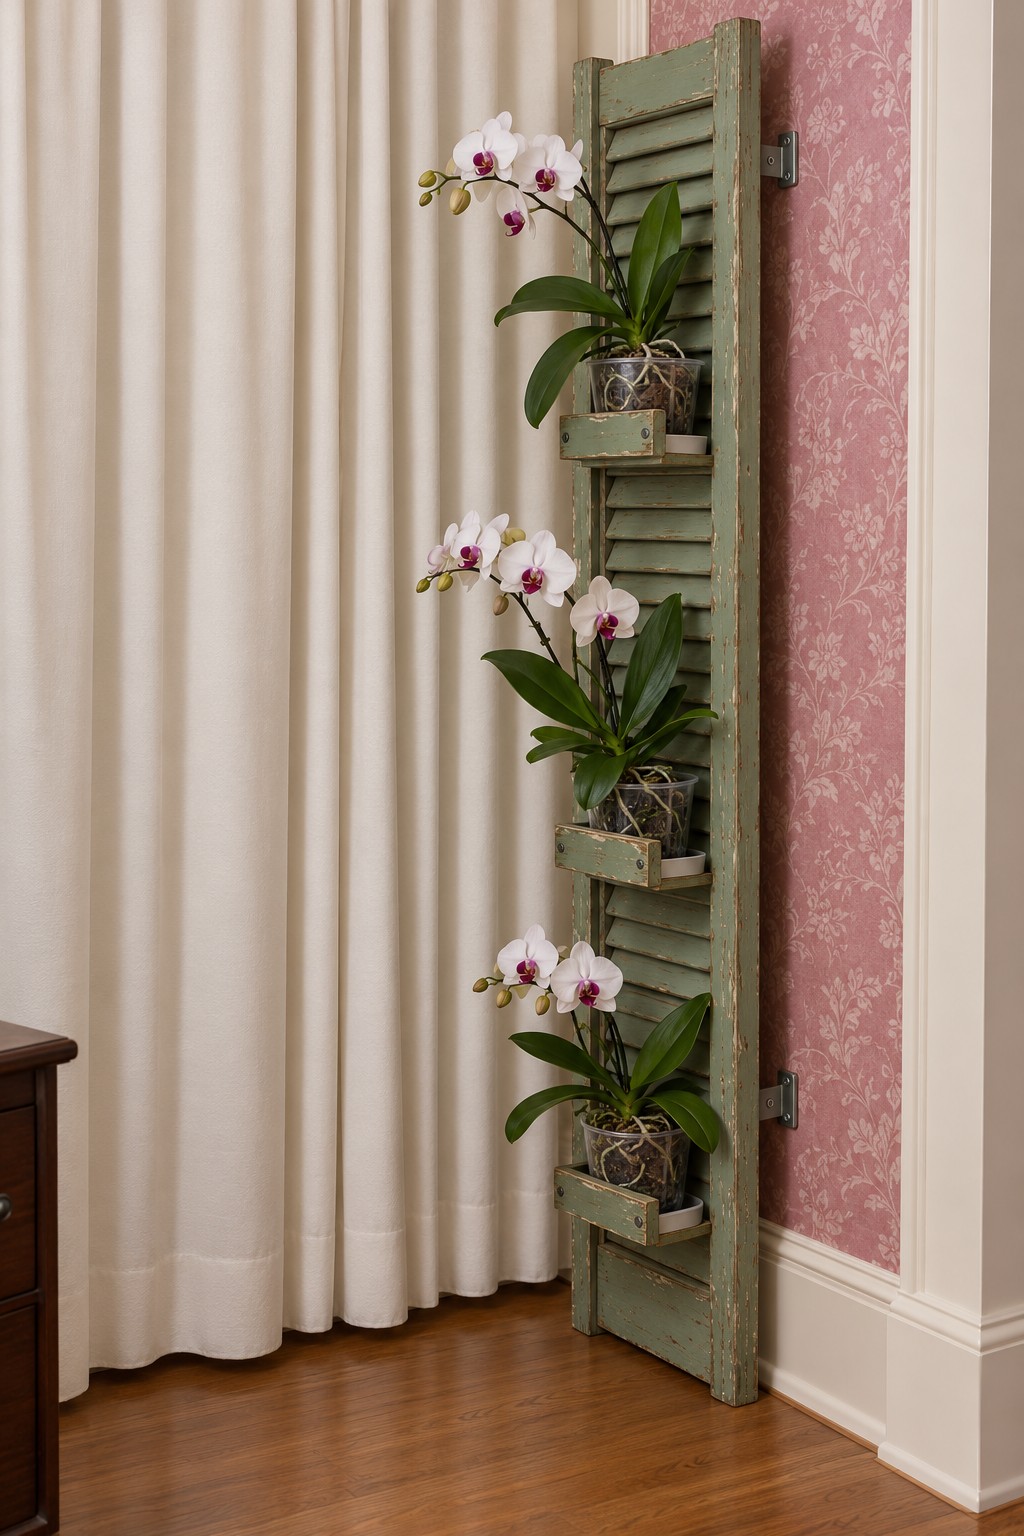
A muted sage shutter becomes a narrow backdrop for white orchids with dark pink centers. The repeated horizontal louvers add texture, making this a useful choice when the surrounding wall is otherwise plain.
Choose a sound shutter and inspect its frame before refinishing it. Attach small pot shelves or baskets through the solid side stiles, using a backing rail where necessary. Do not hang loaded pots from the louvers. Apply a suitable primer and furniture paint, let the coating cure, and secure the shutter to the wall. For more furniture pieces that can be given a new purpose, explore these upcycled storage ideas. Keep saucers separate from the painted holders so moisture is easy to spot.
10. A Bamboo Tripod with Woven Orchid Baskets
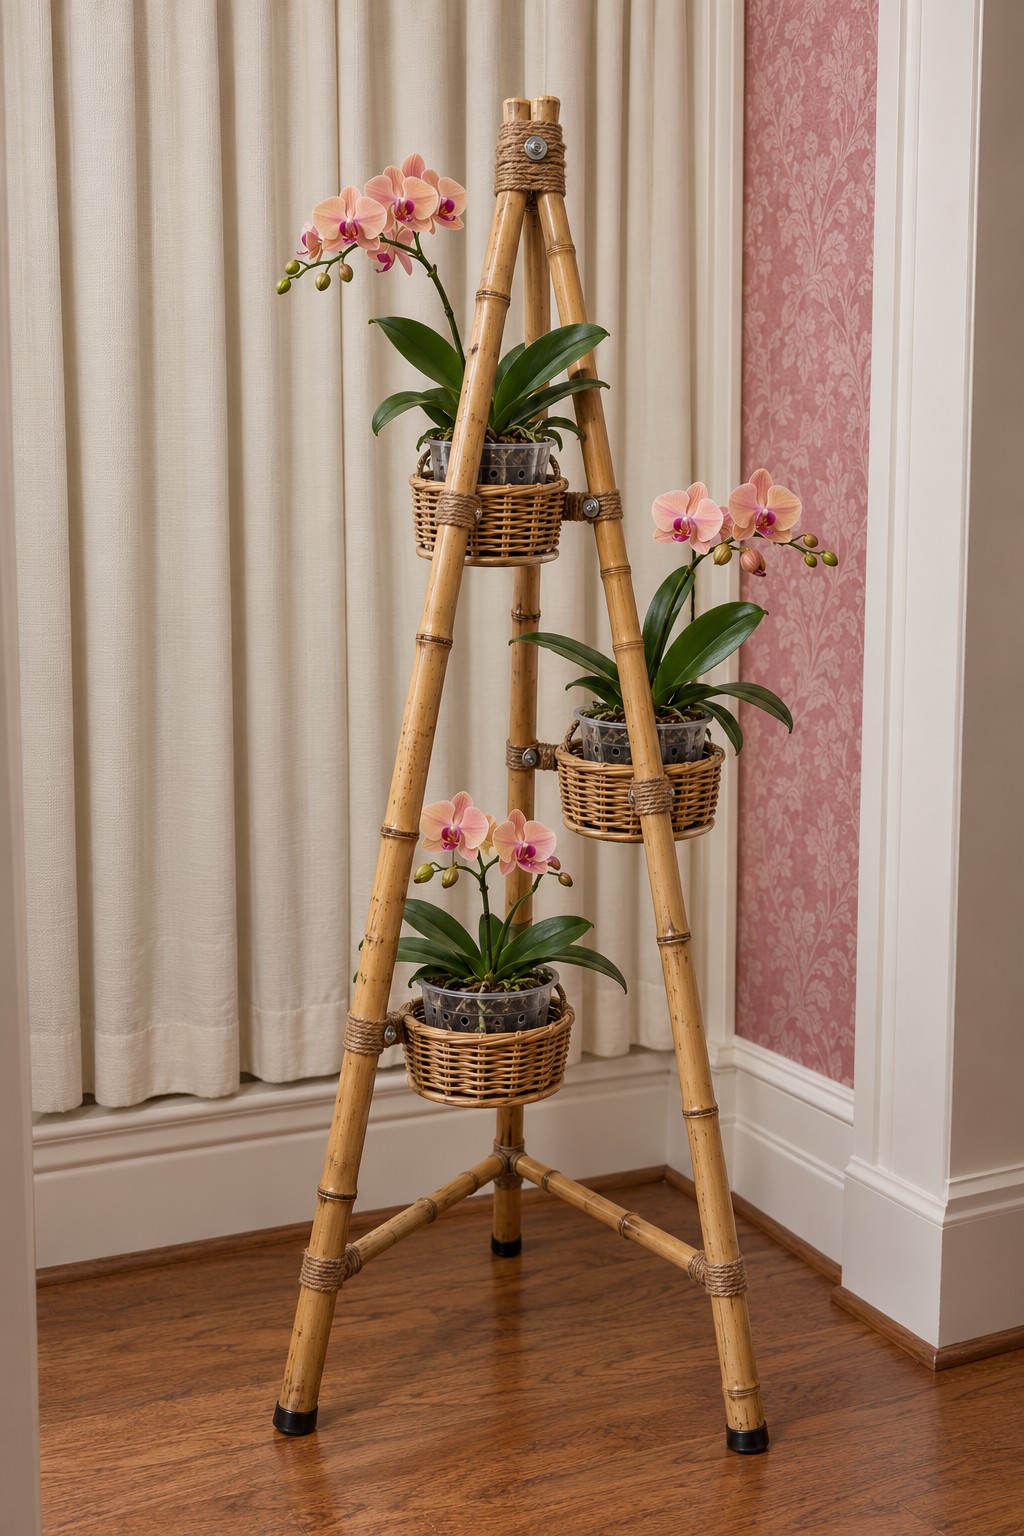
Three woven baskets step around a bamboo tripod, giving peach pink flowers a relaxed, airy setting. The open center keeps the structure from feeling bulky, and the triangular footprint gives the baskets room to face different directions.
Start with a purpose made bamboo plant tripod or build one with mechanically secured joints and spreader braces between the legs. Rope lashings can finish the joints visually, but should not be the only restraint holding a loaded stand together. Fit basket supports to the frame, add removable waterproof dishes, and set each nursery pot inside its basket. Keep the basket positions within the footprint of the legs and confirm that the feet sit firmly on the floor.
11. An Oak Framed Grid with Four Slatted Holders
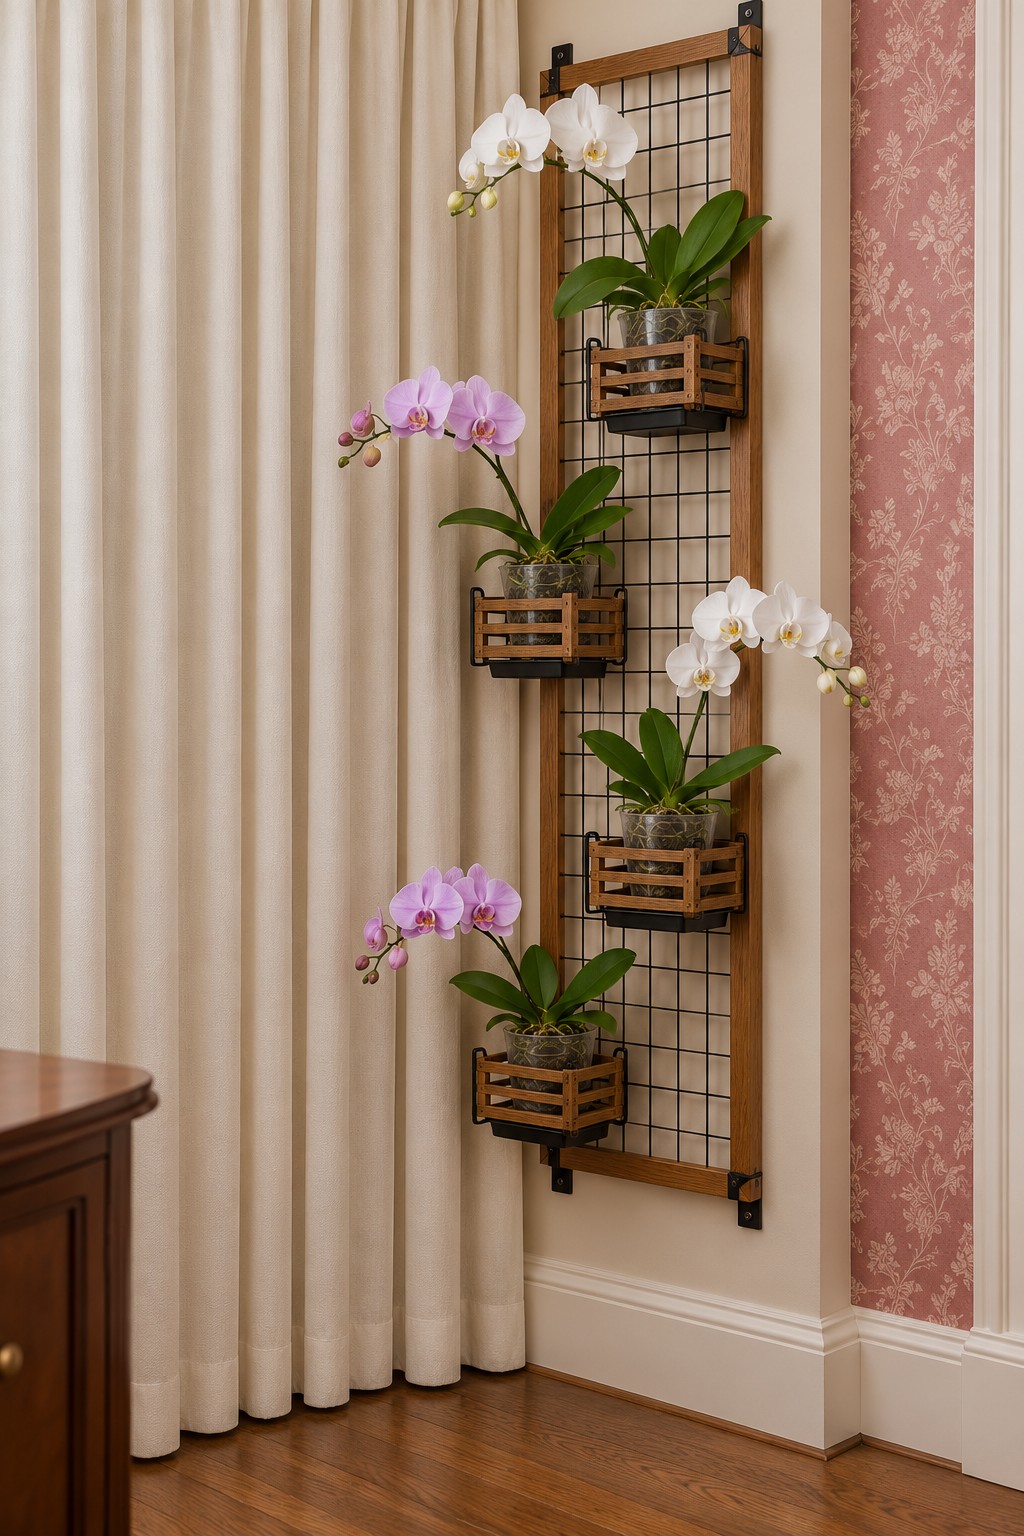
A black grid inside a timber frame creates a flexible vertical display for white and lavender orchids. Small slatted holders interrupt the straight mesh lines and bring the wood color forward around each pot.
Use a rigid welded panel captured securely in a timber frame, plus compatible basket hooks or brackets with retainers. Fix the frame to the wall at its structural rails. Space the four holders with the actual leaf spread in mind before tightening their attachments. A loose picture frame and lightweight craft mesh are unsuitable substitutes for a loaded planting rack. Leave enough clearance behind the grid for the hooks, and use small removable dishes in the holders to keep the wood dry.
12. A Cream Open Shelf Tower with Cork Fronts
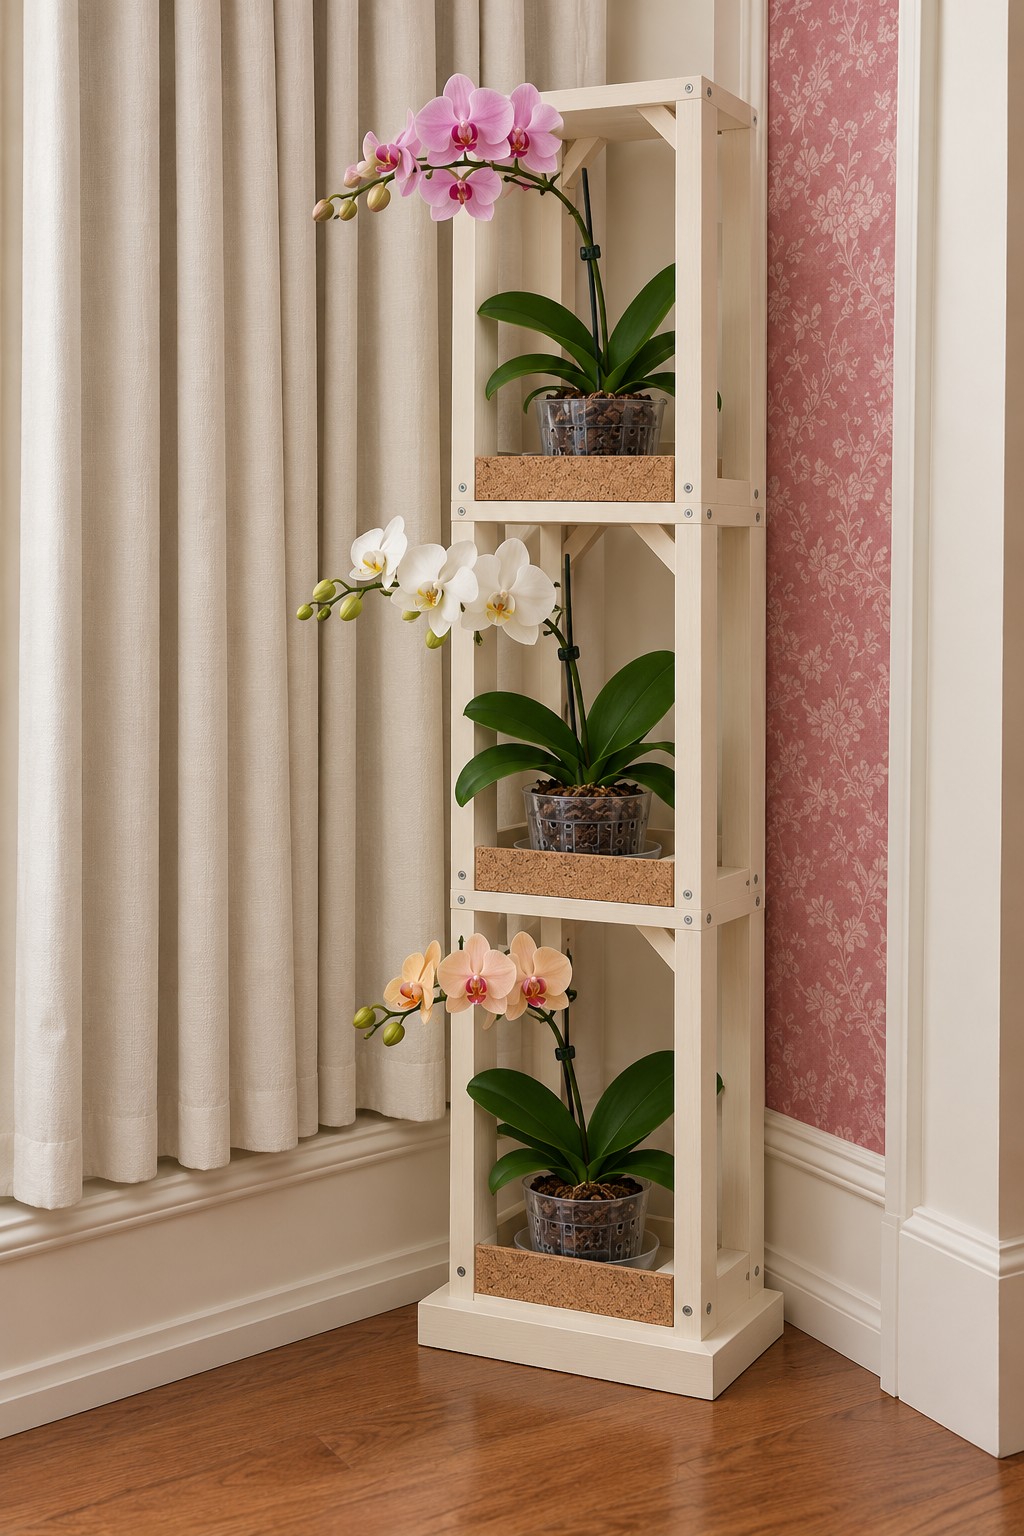
A cream frame and cork shelf fronts make this tower feel like a small piece of room furniture. Three open compartments give pink, white, and peach orchids separate positions, with triangular braces visible beneath the shelves.
Build or adapt a narrow open shelving unit with continuous uprights, securely attached shelves, and a stable plinth. Add short cork faced front strips to conceal the saucers without blocking access to the pots. Prime and paint the frame before bonding on the cork. Match the clear height of each compartment to its plant; the upper flower spray can extend above the frame. Fit a wall restraint and avoid treating the small cork fronts as handles when moving the unit.
13. An Adjustable Pegboard Tower for Small Orchids
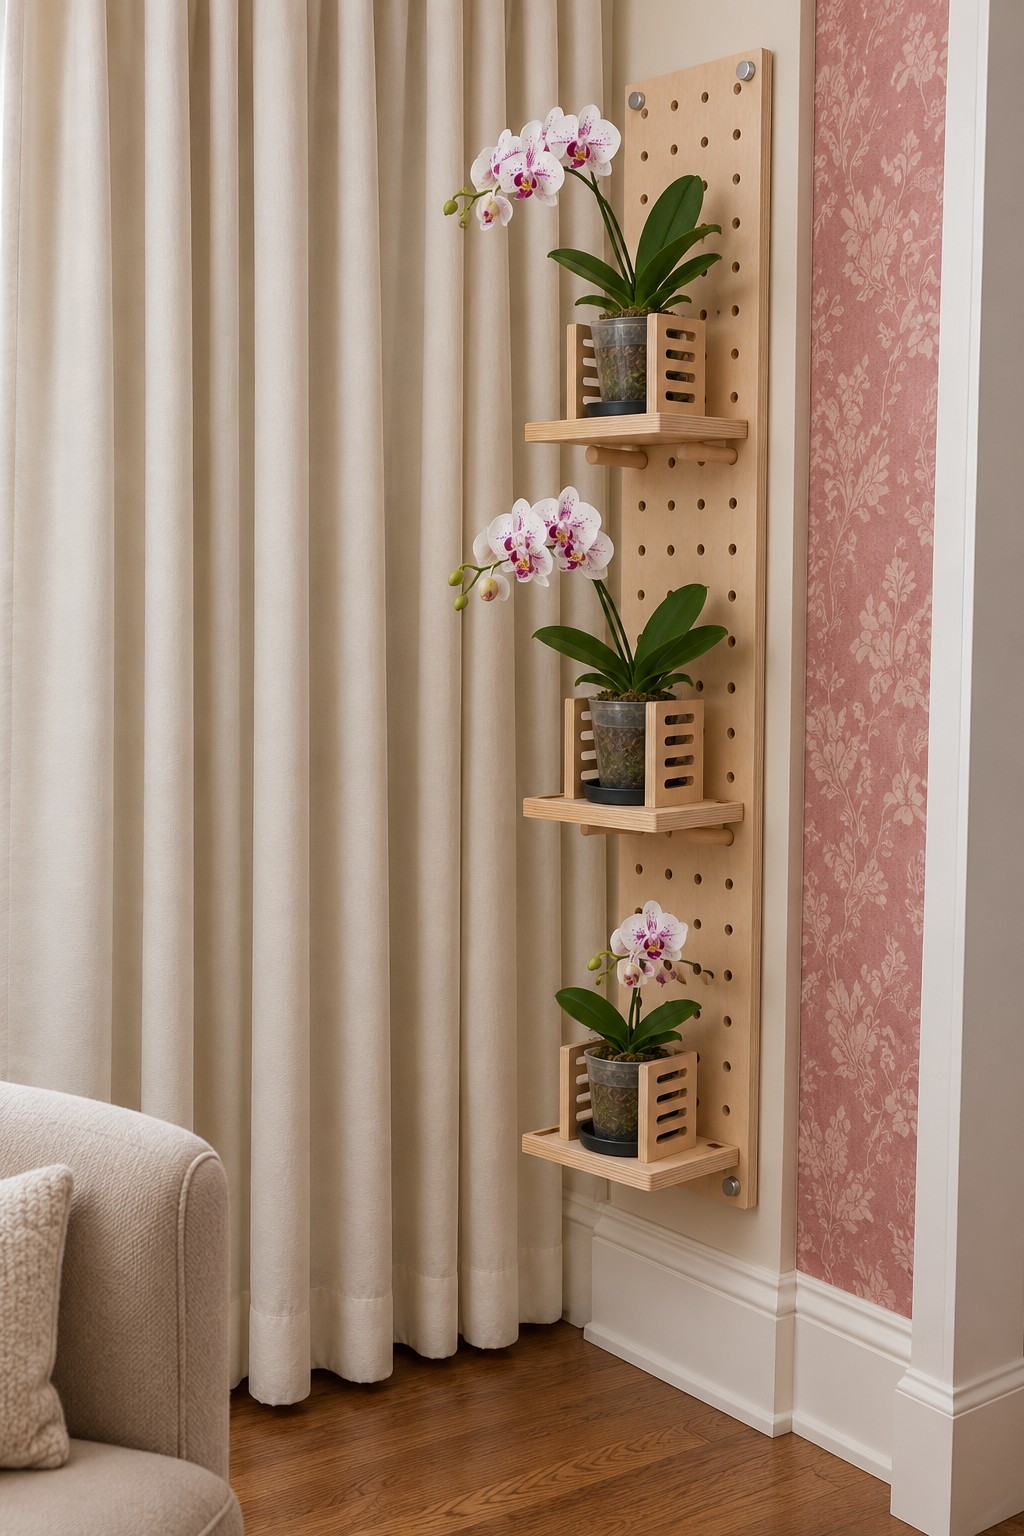
A narrow pegboard gives three small orchids an orderly arrangement while leaving room to change shelf heights later. Plain timber shelves and matching slatted pot covers keep the many holes from becoming visually busy.
Choose a load rated wooden pegboard system with locking shelf supports, or make a thick panel with properly fitted pegs and retained shelves. Mount it on spacers if the support design requires clearance behind the board. Fit each shelf to the manufacturer's loading guidance and check that it cannot be lifted or knocked loose accidentally. This is especially useful when replacing a compact plant with a taller one, since you can move a shelf instead of squeezing the new flowers into the old opening.
14. A Branch Tower with Black and Wood Baskets
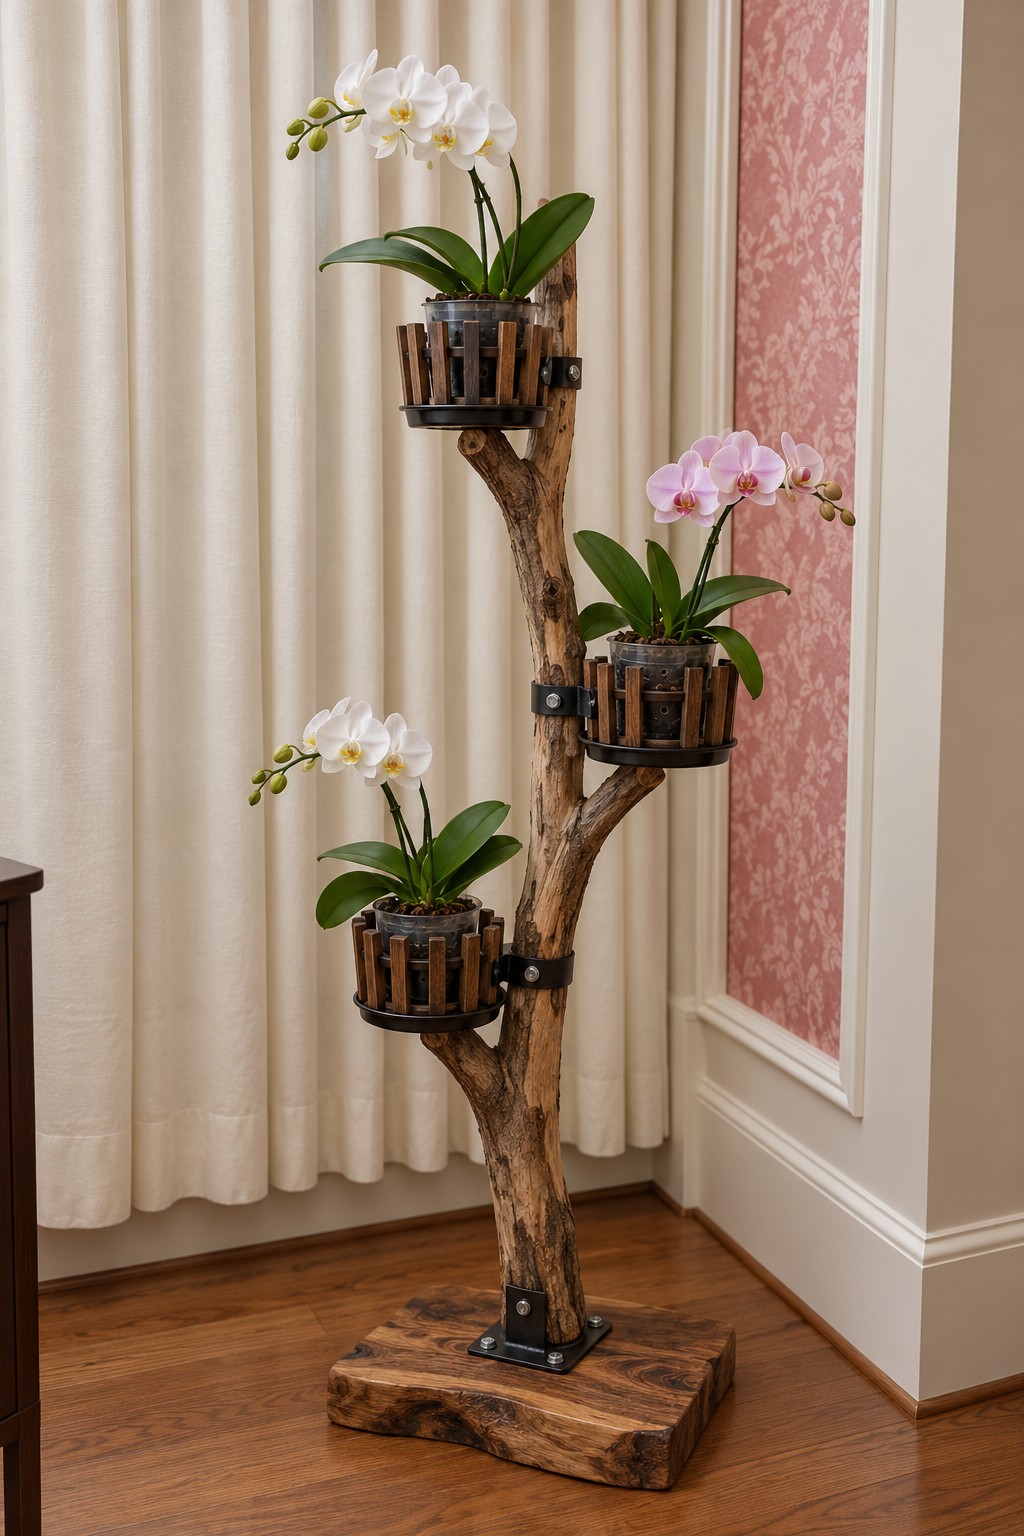
A branching piece of timber gives this stand an irregular outline that feels closer to a small indoor tree. Black basket bands define three planting positions, while the heavy looking wooden base echoes the trunk.
Select dry, sound wood without soft sections, active insects, or loose bark. Have its structural suitability checked if the branches are slender or cracked. Mechanically secure the trunk to a broad base and add pot brackets with connections suited to the timber. Reproduce the basket texture with slatted sleeves around supported pots, keeping the living roots separate from the wood. Place the largest plant low and keep the upper baskets close to the trunk to reduce leverage.
15. A Curved Pine Panel with Three Balcony Shelves
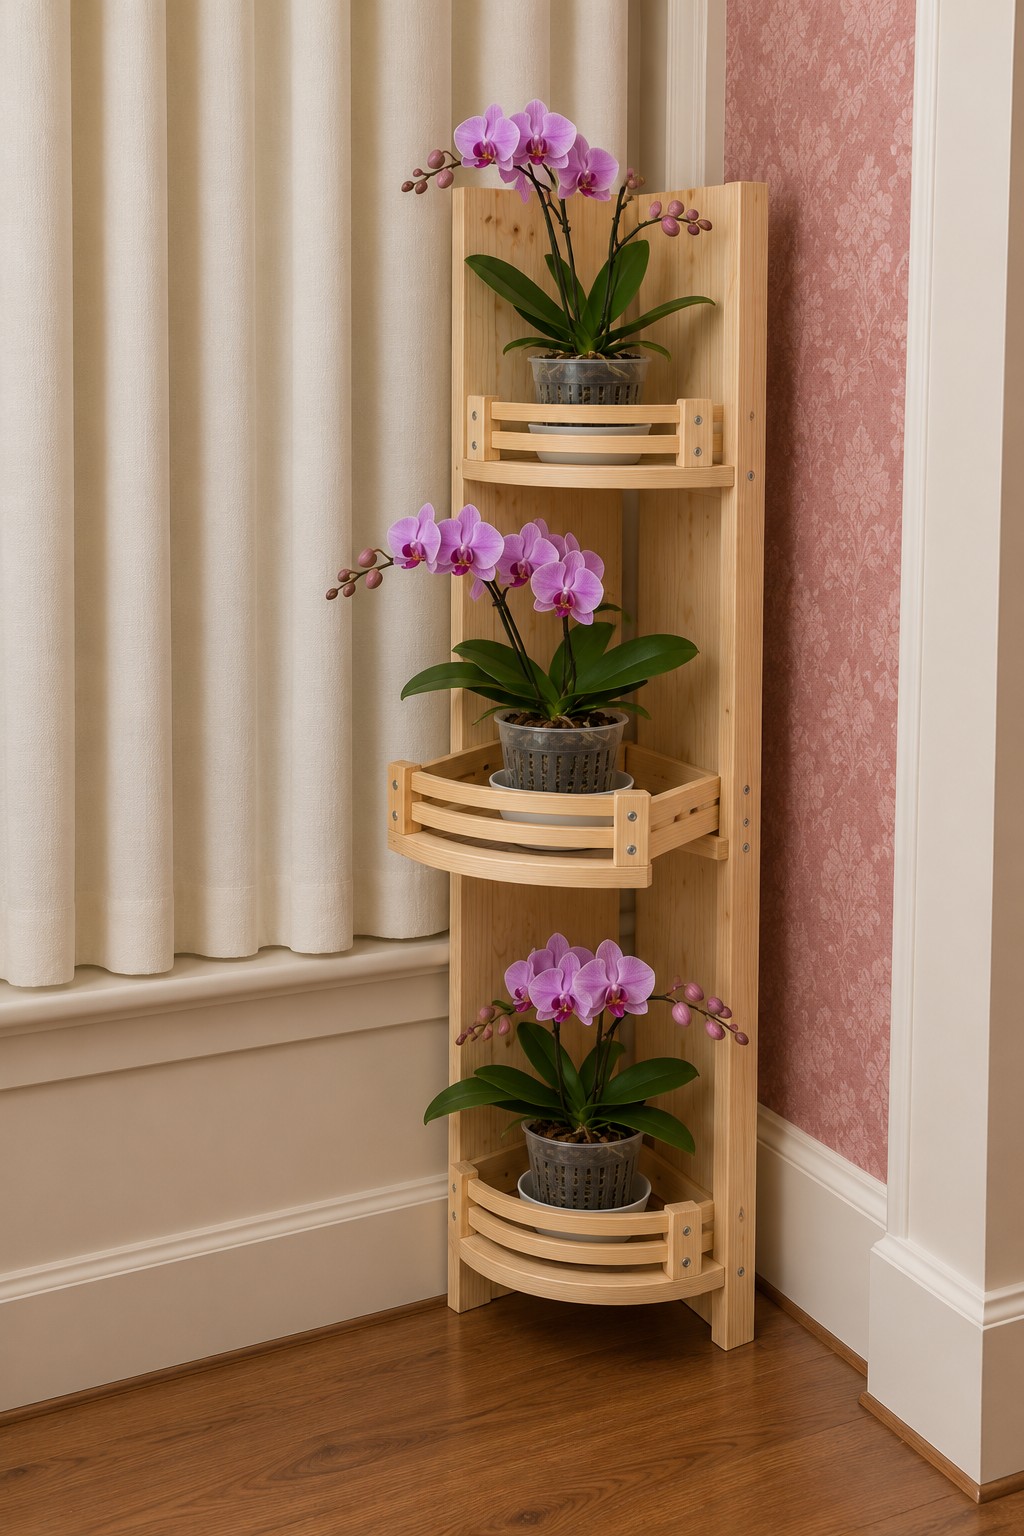
Rounded shelf fronts and a curved back panel give this compact tower the feel of three small balconies. Purple orchids stand out against the pale wood, with their stems reaching beyond the rails instead of being trapped inside a box.
Use a rigid shaped backboard with three supported shelf plates. Make the rounded front guards from suitable flexible plywood or buy curved wooden shelf units, rather than trying to bend ordinary dry timber sharply. Attach the guards to the shelf edges; the shelf plates and their brackets carry the pots. Finish all faces before installation, and secure the panel to the wall. Keep the guards low enough that you can remove a saucer without tilting it.
16. Terracotta Texture Behind Round Wooden Shelves
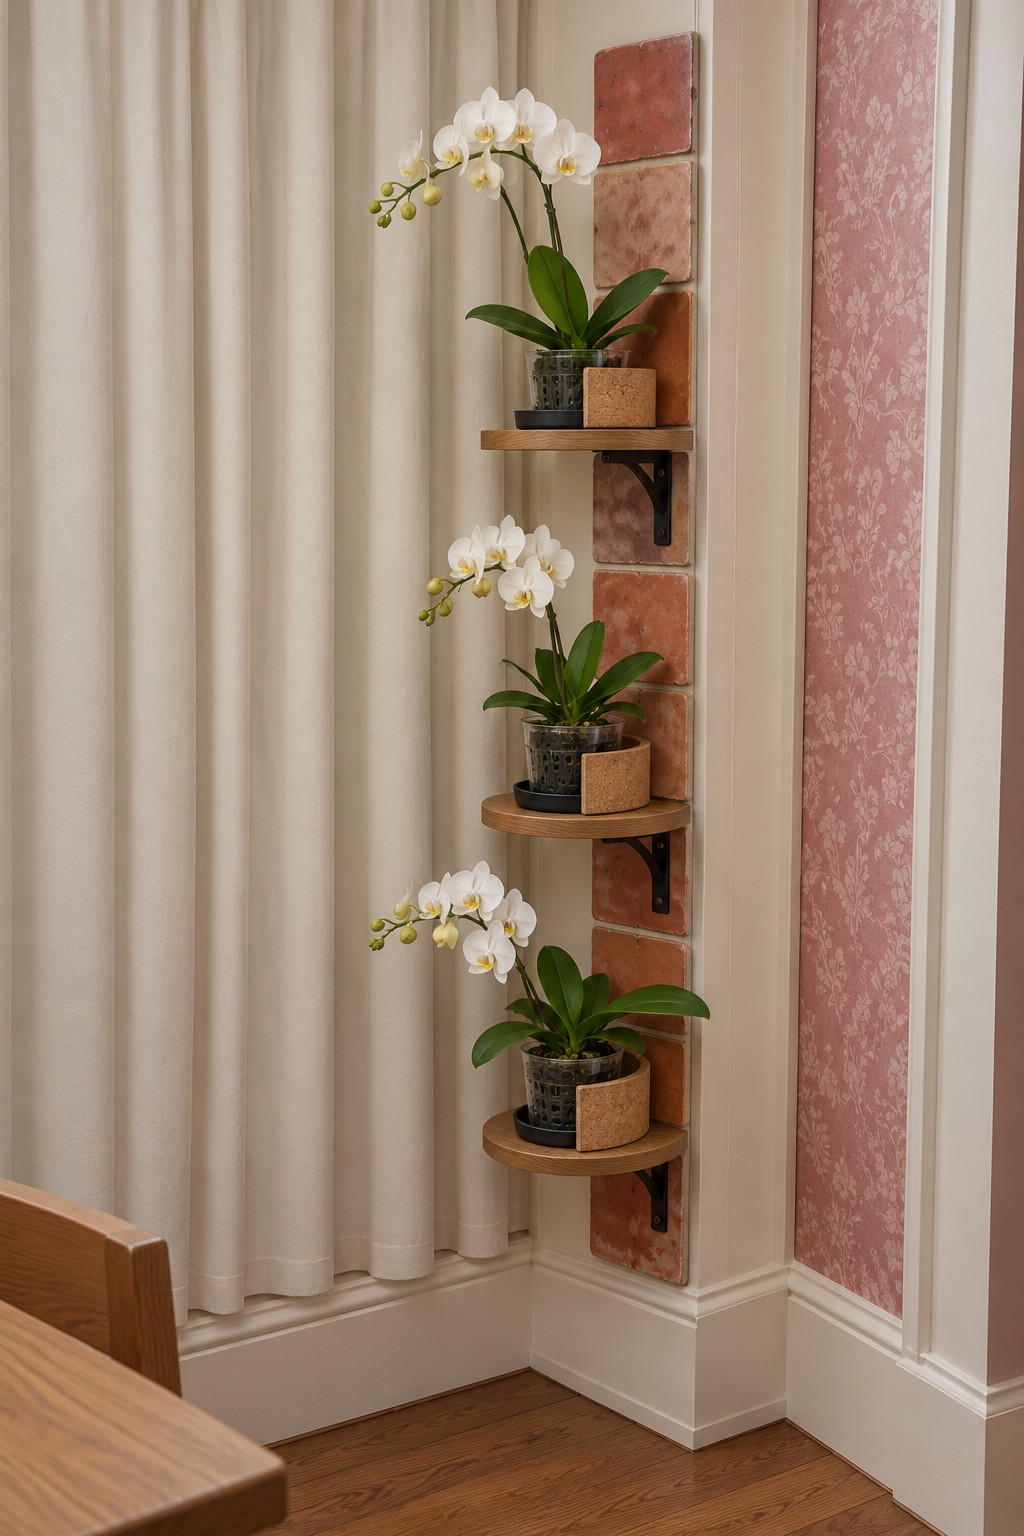
A terracotta colored backdrop warms this simple column of white orchids. Dark brackets beneath the rounded shelves make the support visible, while small cork toned pot wraps connect the plants to the textured panel.
Apply a lightweight terracotta effect paint or thin decorative facing to a rigid backboard. Attach the three shelves with brackets fixed into that board, keeping the finish out of the screw connections. Real tiles add substantial weight and need an installation designed for that extra load. Use cork only as a removable outer sleeve around each pot. Position the shelves so the white flower sprays have room to curve outward without brushing the curtain.
17. A Cord Screen Around a Peach Orchid Column
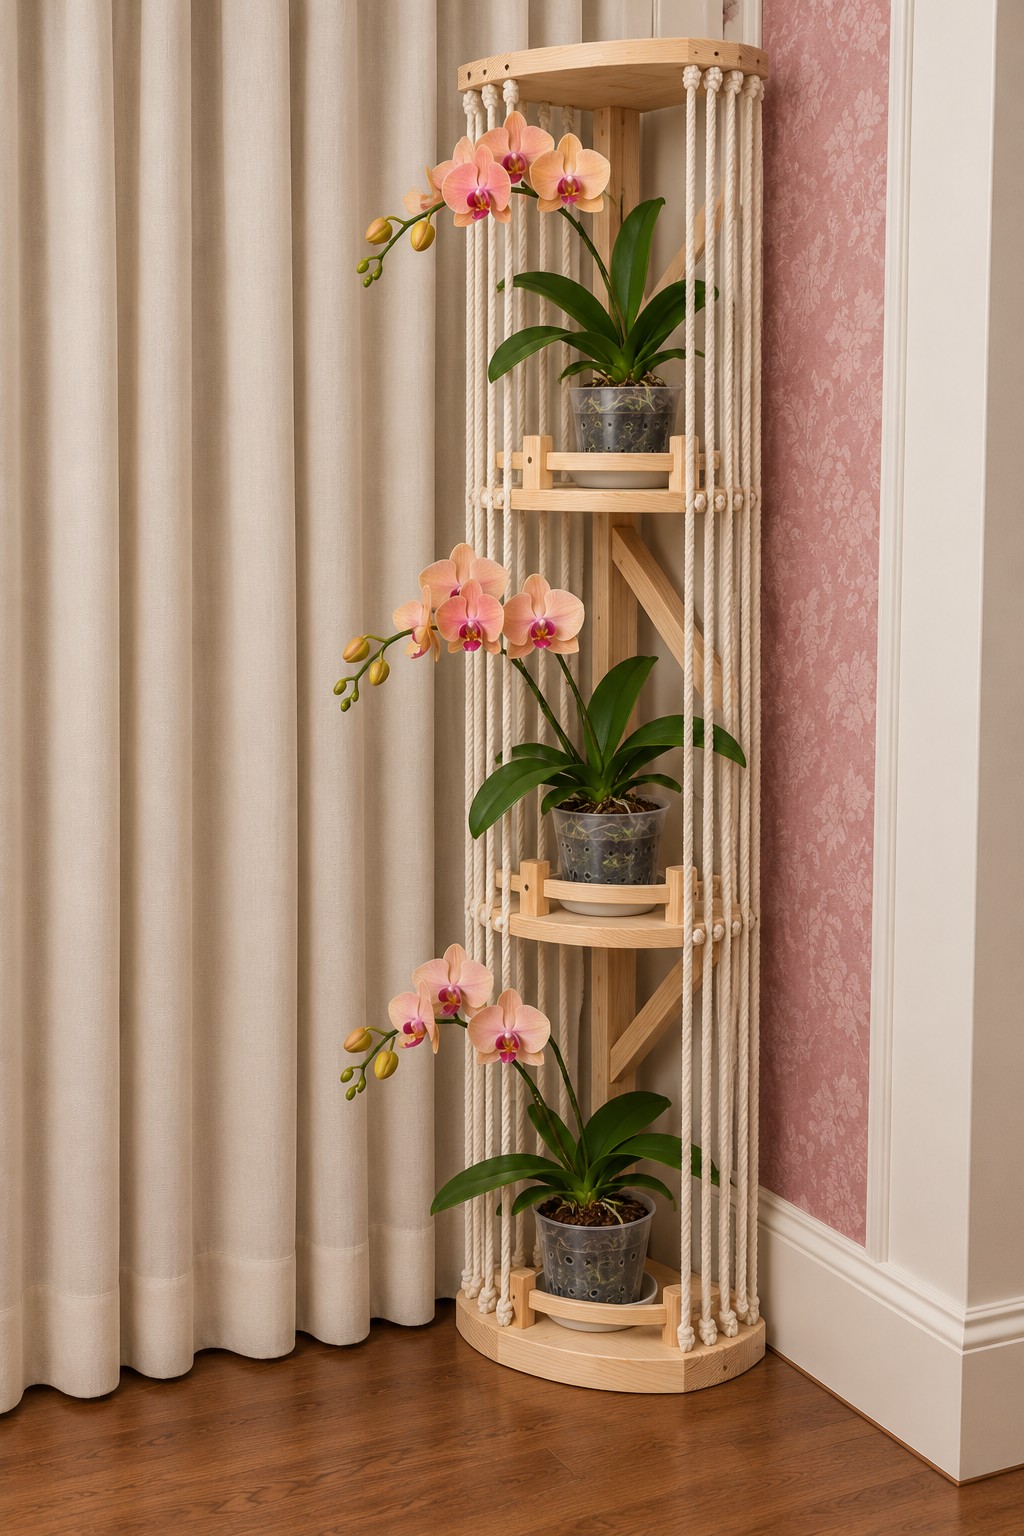
Vertical cords form a light screen around three peach orchids, giving the tower texture without enclosing it completely. Rounded shelves and a matching top create a softer outline than a rectangular cabinet.
Make the structure from rigid shelves joined to timber uprights, with braces beneath the loaded surfaces. Thread cotton cord between the upper and lower frame as a decorative screen, keeping an open front for plant access. The cords should not suspend the shelves. Seal the timber before threading them, and leave each orchid in a removable pot and saucer. Check the access opening with a full plant in hand; a gap that admits an empty pot may be too narrow for its leaves.
18. Sage Hexagon Shelves with Three Flower Colors
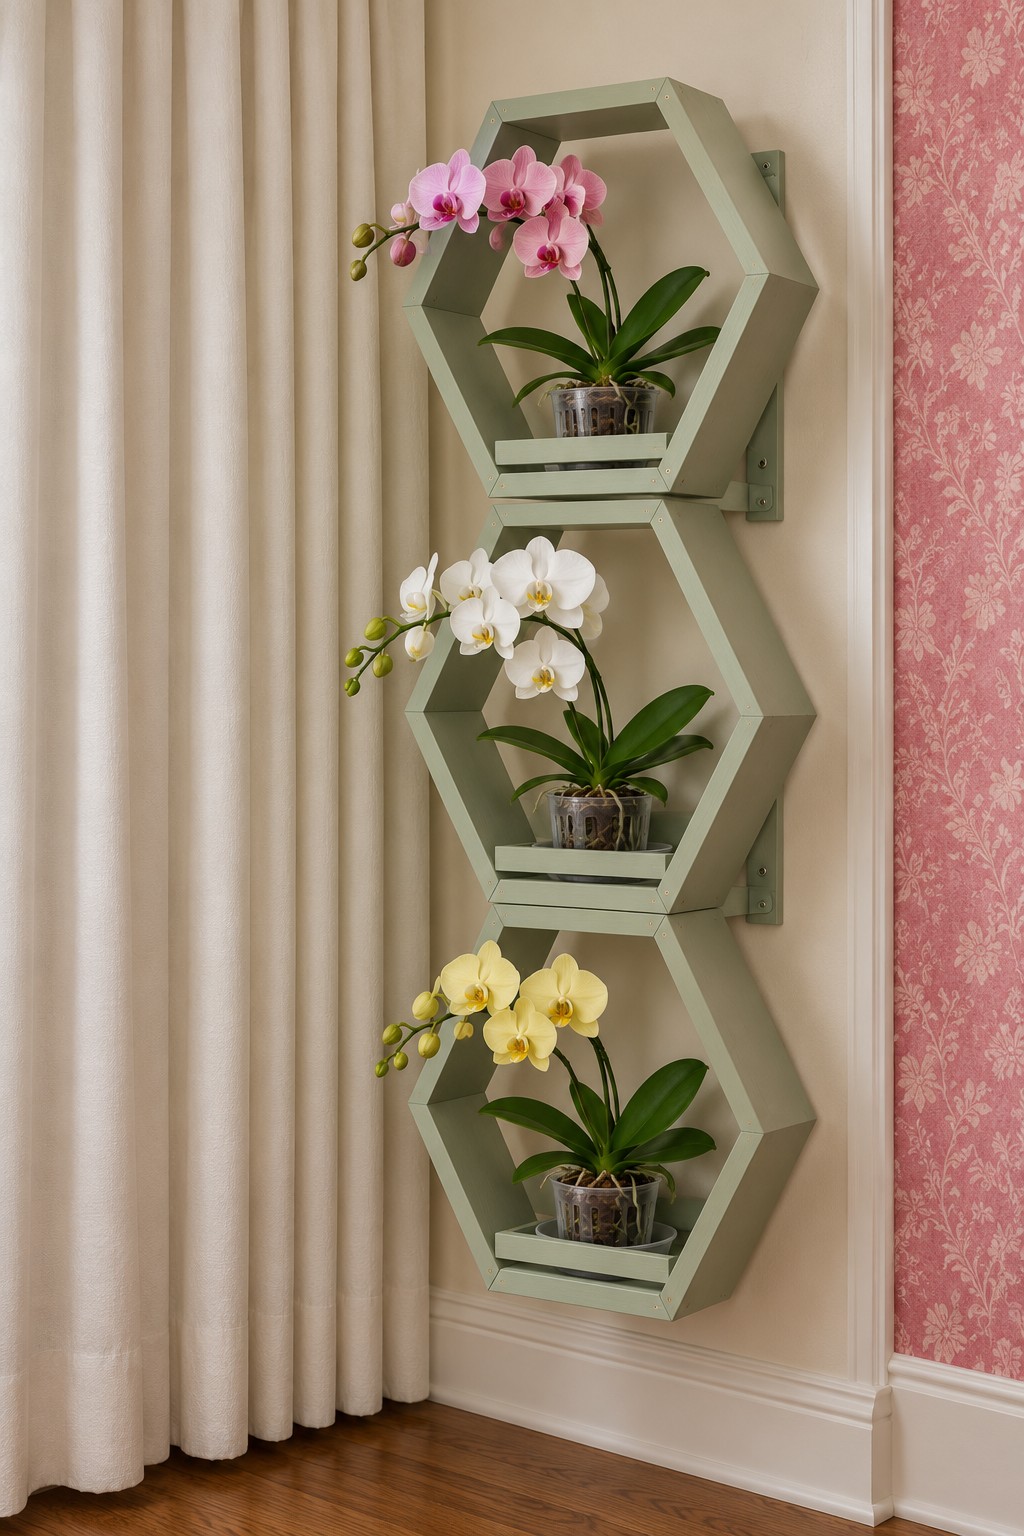
Stacked hexagons turn a narrow wall into a geometric display. Sage green frames connect the pink, white, and yellow flowers, while small front rails keep the pots visually contained.
Use sturdy ready made hexagonal shelves or construct the frames from accurately cut timber with reinforced corner joints. Mount each unit independently or fix all three to a structural backing system. Simply gluing their touching edges together does not create a secure wall rack. Paint the frames before installation and test the internal opening with the intended orchid. The corners should frame the flowers without forcing the stems to change direction. Add a compact saucer behind each front rail.
19. A Black Mesh Cylinder with Cork Trimmed Baskets
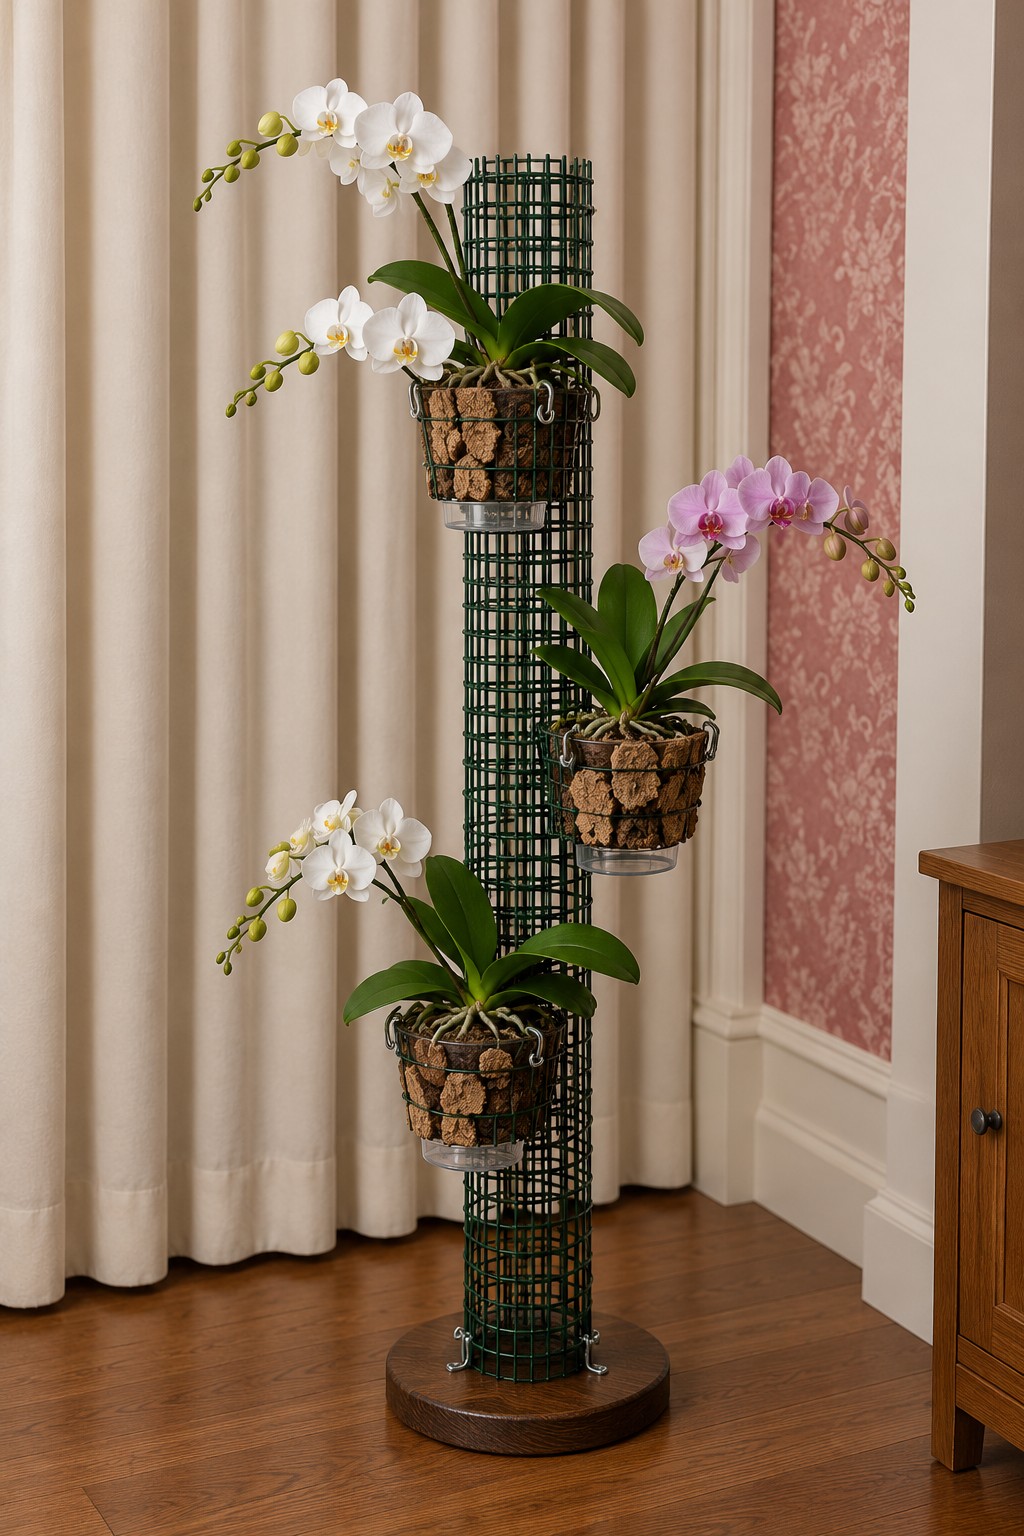
A dark mesh cylinder gives white and lavender orchids an industrial backdrop. Cork pieces soften the basket exteriors and introduce small patches of warm brown against the open black structure.
Build around a rigid central support and firmly attached circular base, then add welded mesh as a sleeve. Fix the basket arms to the structural support, rather than expecting the mesh skin to resist their leverage. Secure decorative cork pieces to the outside of each basket without obstructing its removable pot. Finish exposed mesh edges with protective trim. This design works best with lightweight containers and an open side or top that allows access to the basket connections.
20. A Copper Toned Pipe Frame with Round Pot Platforms
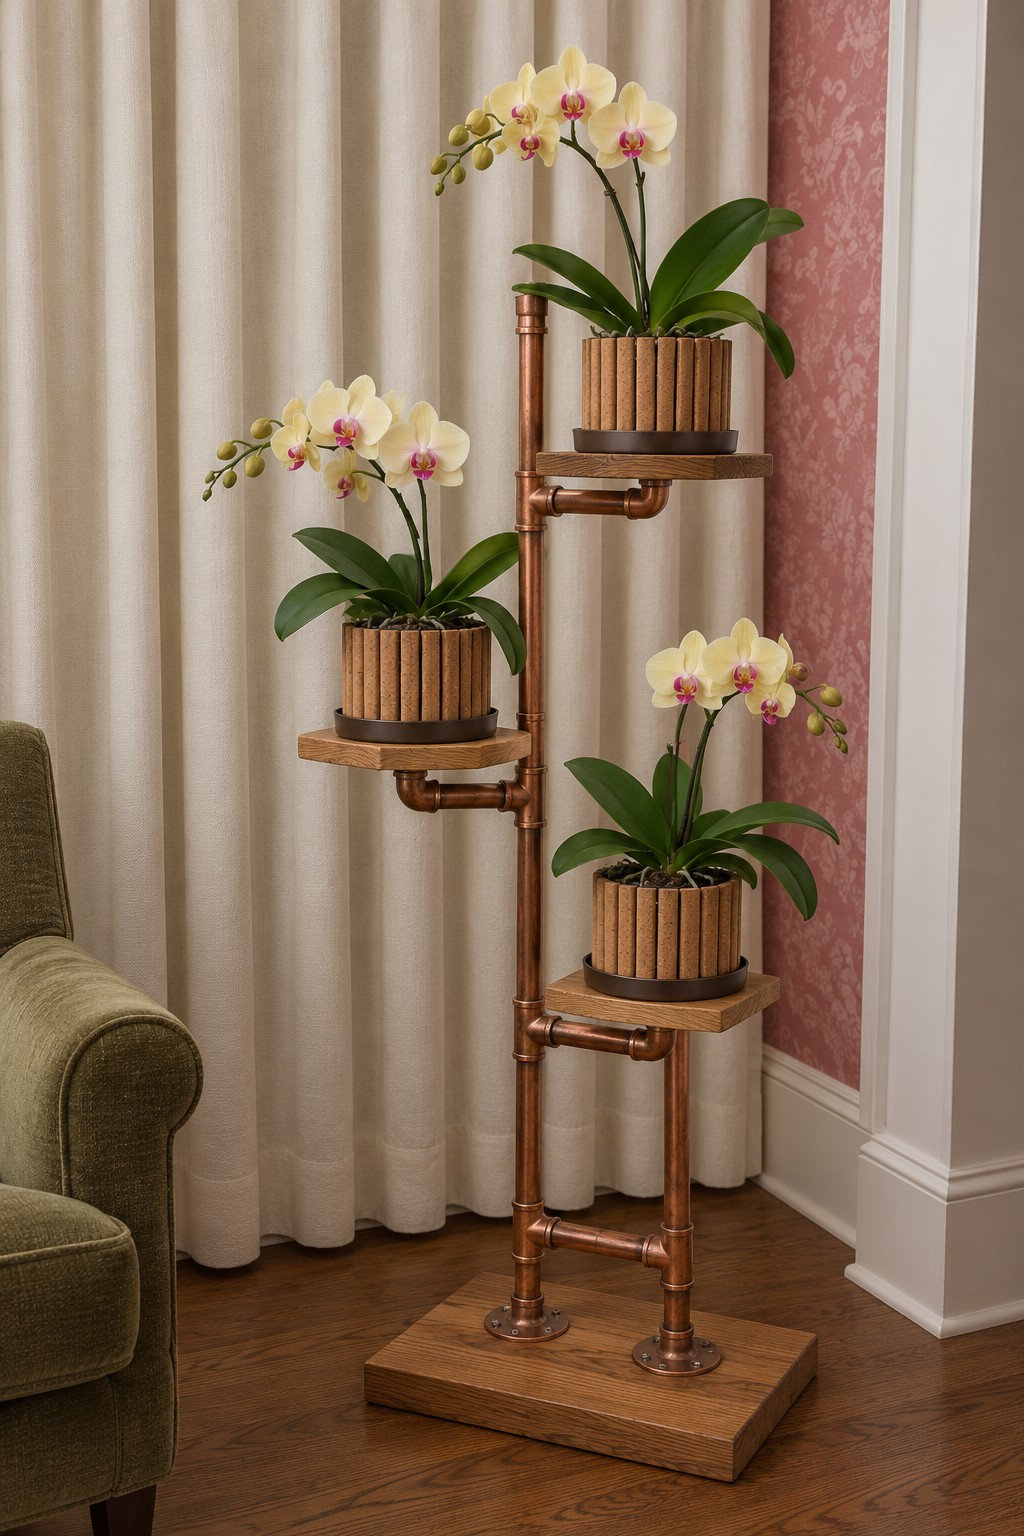
Warm metal uprights and round timber platforms give this tower a workshop inspired character. Ribbed wooden pot sleeves repeat the vertical lines of the pipes, while pale yellow orchids keep the display soft.
For a practical adaptation, use a compatible threaded steel pipe and fitting system with a copper colored finish. Fasten its flanges to a substantial timber base, then fit the shelf supports so they resist rotation. Use corrosion resistant screws appropriate to the flange holes. The metal color need not mean the structure is made from soft copper plumbing tube. Place the timber platforms centrally over their supports and keep each pot sleeve light, with a removable saucer inside.
21. An Open Timber Lattice with Staggered Crate Pockets
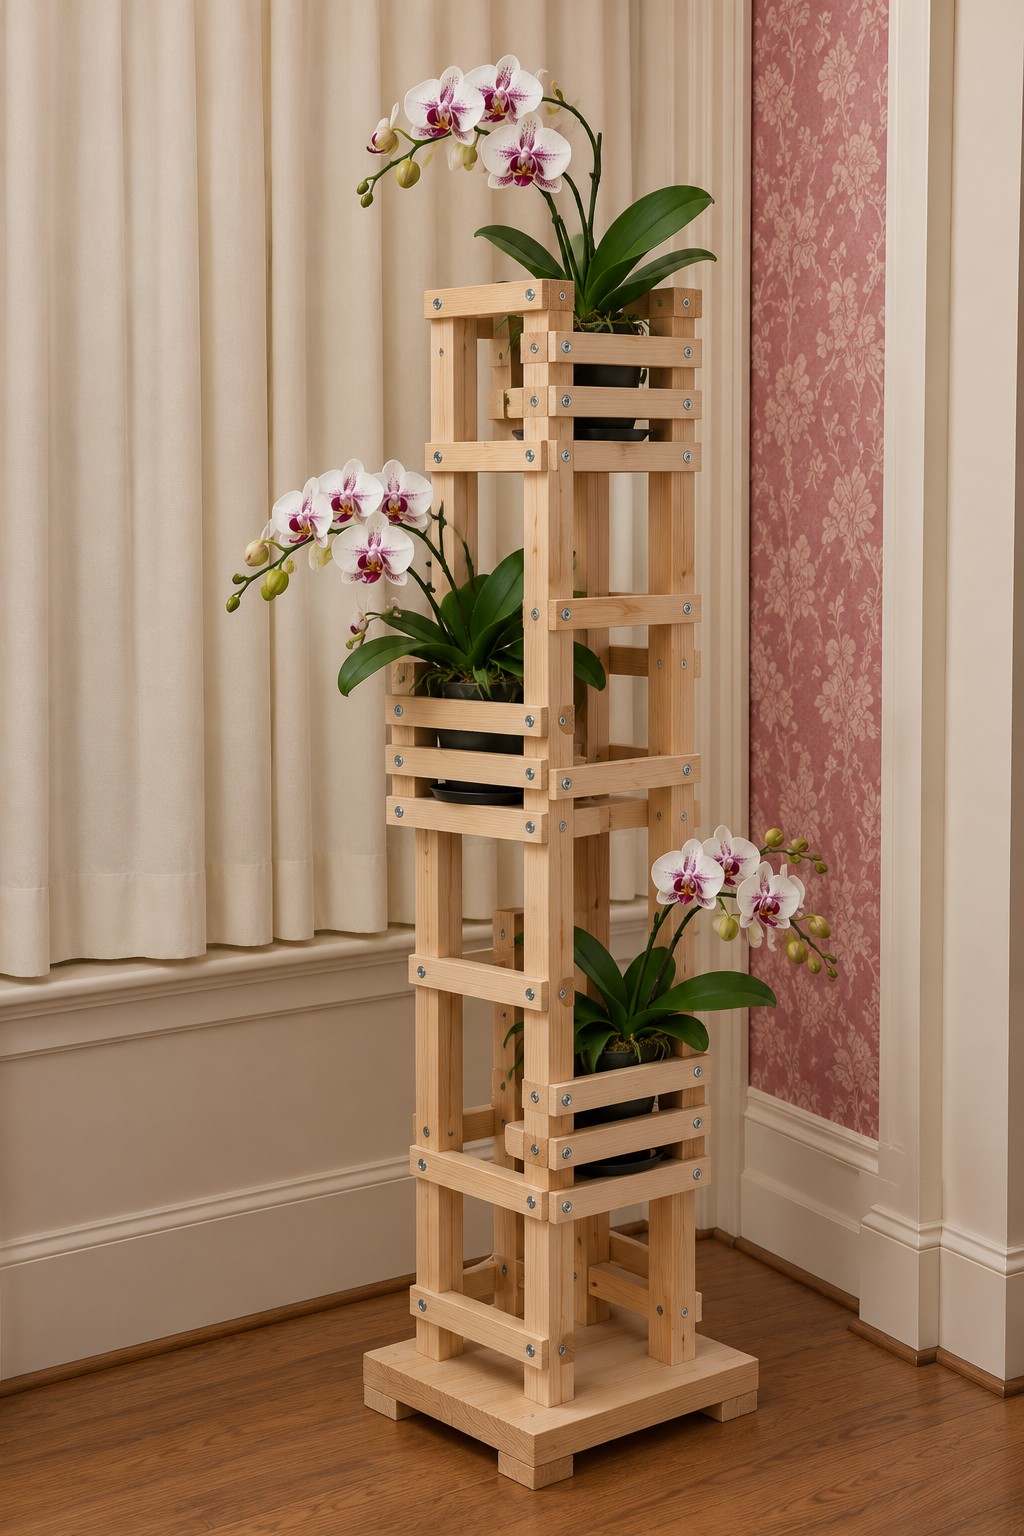
An open lattice tower offers more glimpses through the structure than a stack of enclosed boxes. Three crate pockets sit at different heights, allowing the patterned white and burgundy flowers to reach into the surrounding space.
Construct the continuous upright frame first, using cross rails and concealed diagonal bracing to limit side movement. Add small crate pockets onto supported platforms, fastening through their solid rails. The pockets should not be the only pieces tying the tower together. Keep the bottom frame broad, fit a wall restraint, and check that projecting pockets do not catch passing clothing. A clear finish preserves the pale timber and makes the slatted construction the main decorative detail.
22. A Suspended Column of Slatted Orchid Baskets
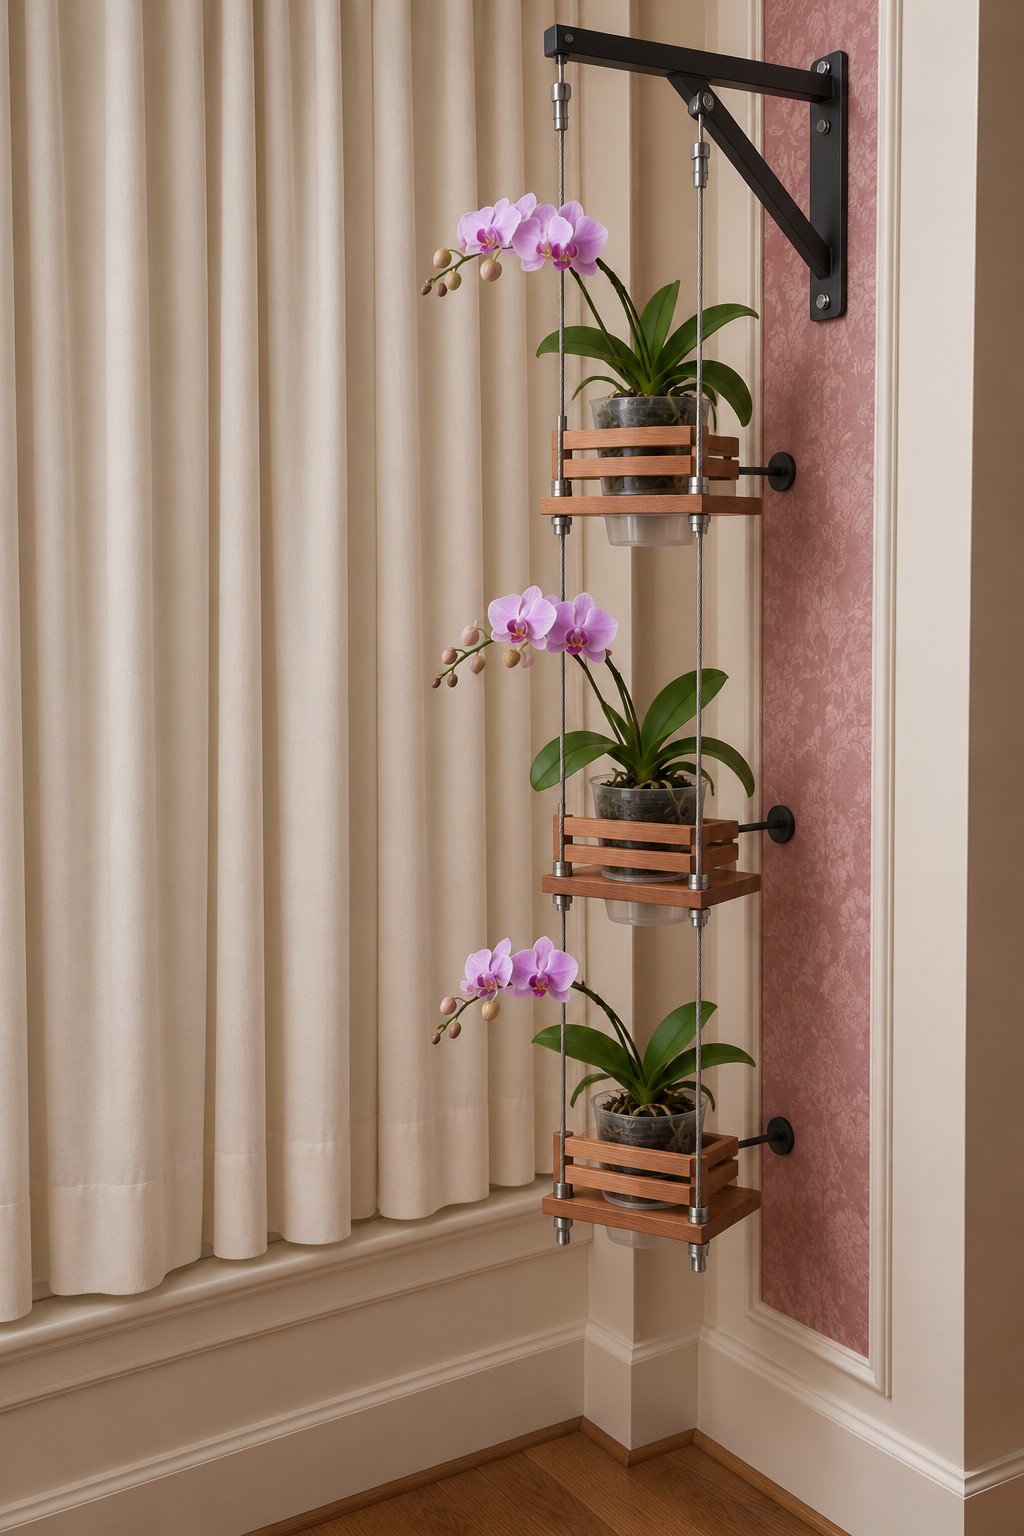
Three suspended baskets leave the floor completely clear. A black wall bracket establishes the upper support, while side spacers keep the baskets from swinging into the wall.
Use a load rated hanging bracket, compatible suspension hardware, and three baskets with rigid bases. The upper bracket must support the entire wet assembly, including every pot and basket below it. Prefer a purpose made multi tier hanging system with positively secured connections over improvised cord knots. Attach spacers to the basket frames as appropriate to limit movement. Make sure you can remove each orchid without lifting the whole column, and keep the display away from a doorway or a chair where it could be knocked.
23. A Butter Yellow Chair Back with Cane Baskets
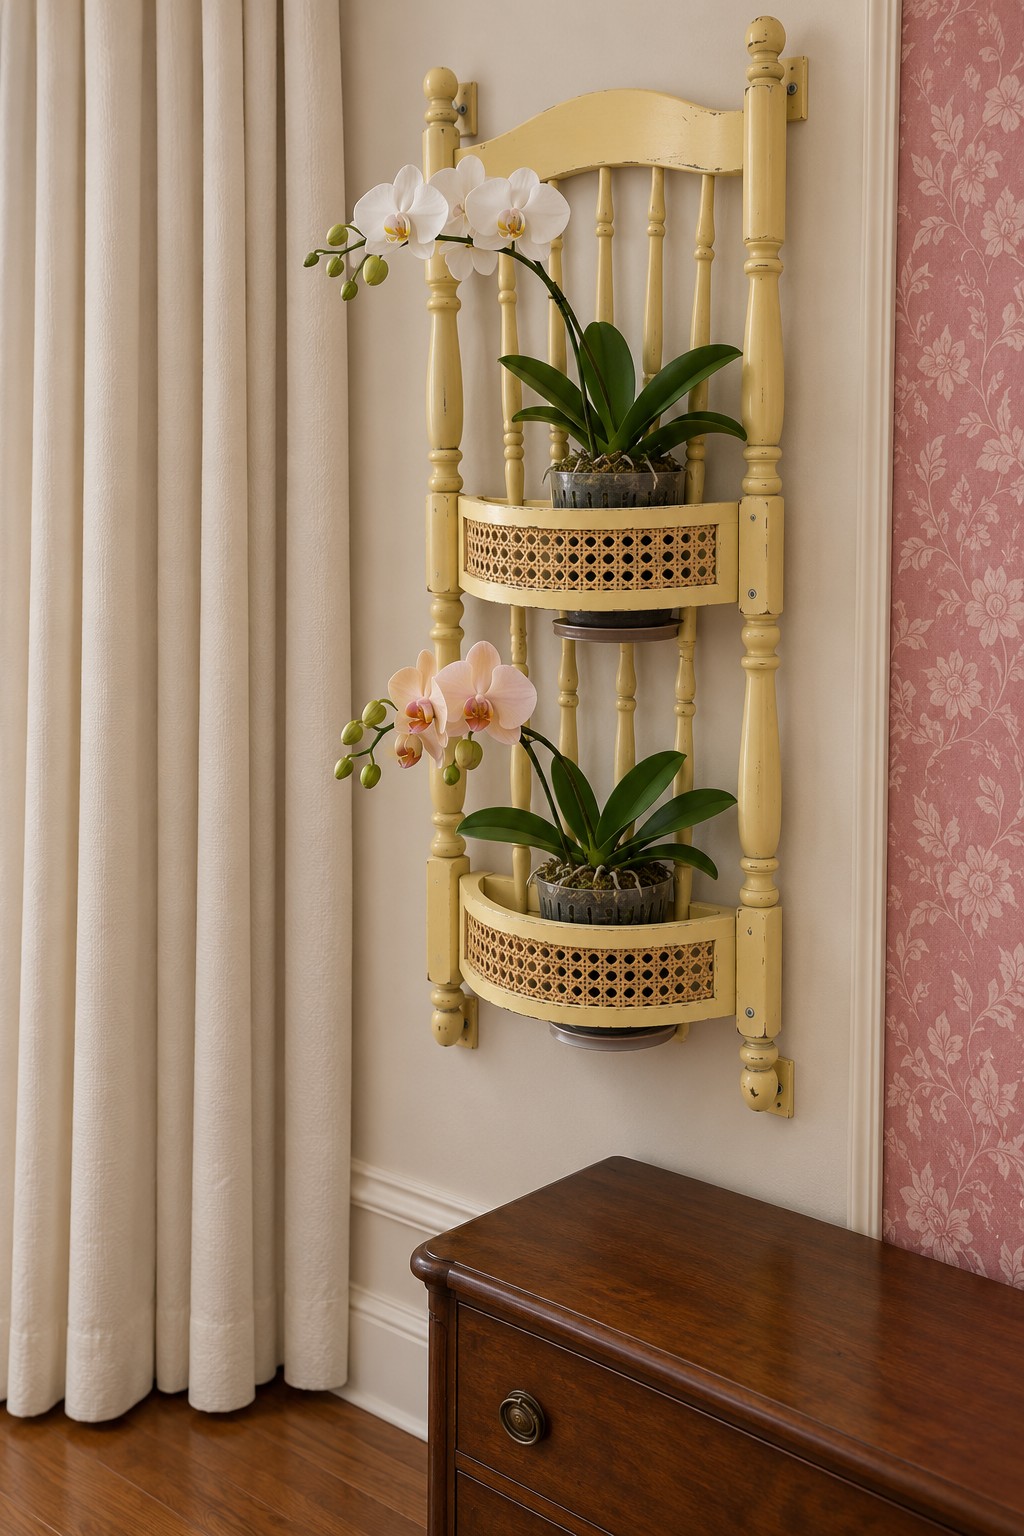
A decorative chair back becomes a compact wall tower with two cane front baskets. Butter yellow paint gives the turned posts a playful finish, while white and peach orchids echo the soft colors of the room.
Use a clean, structurally sound chair back or a newly made frame in the same style. Add two shallow timber shelf boxes fixed through the strong side posts, then attach cane webbing as a decorative front. Cane should not serve as the basket floor. Prepare and paint the frame with products suited to the existing surface, taking appropriate precautions with unknown old coatings. Mount the piece independently of the cabinet below, leaving room to lift out both pots.
24. A Braced Timber Tree for Six Orchids
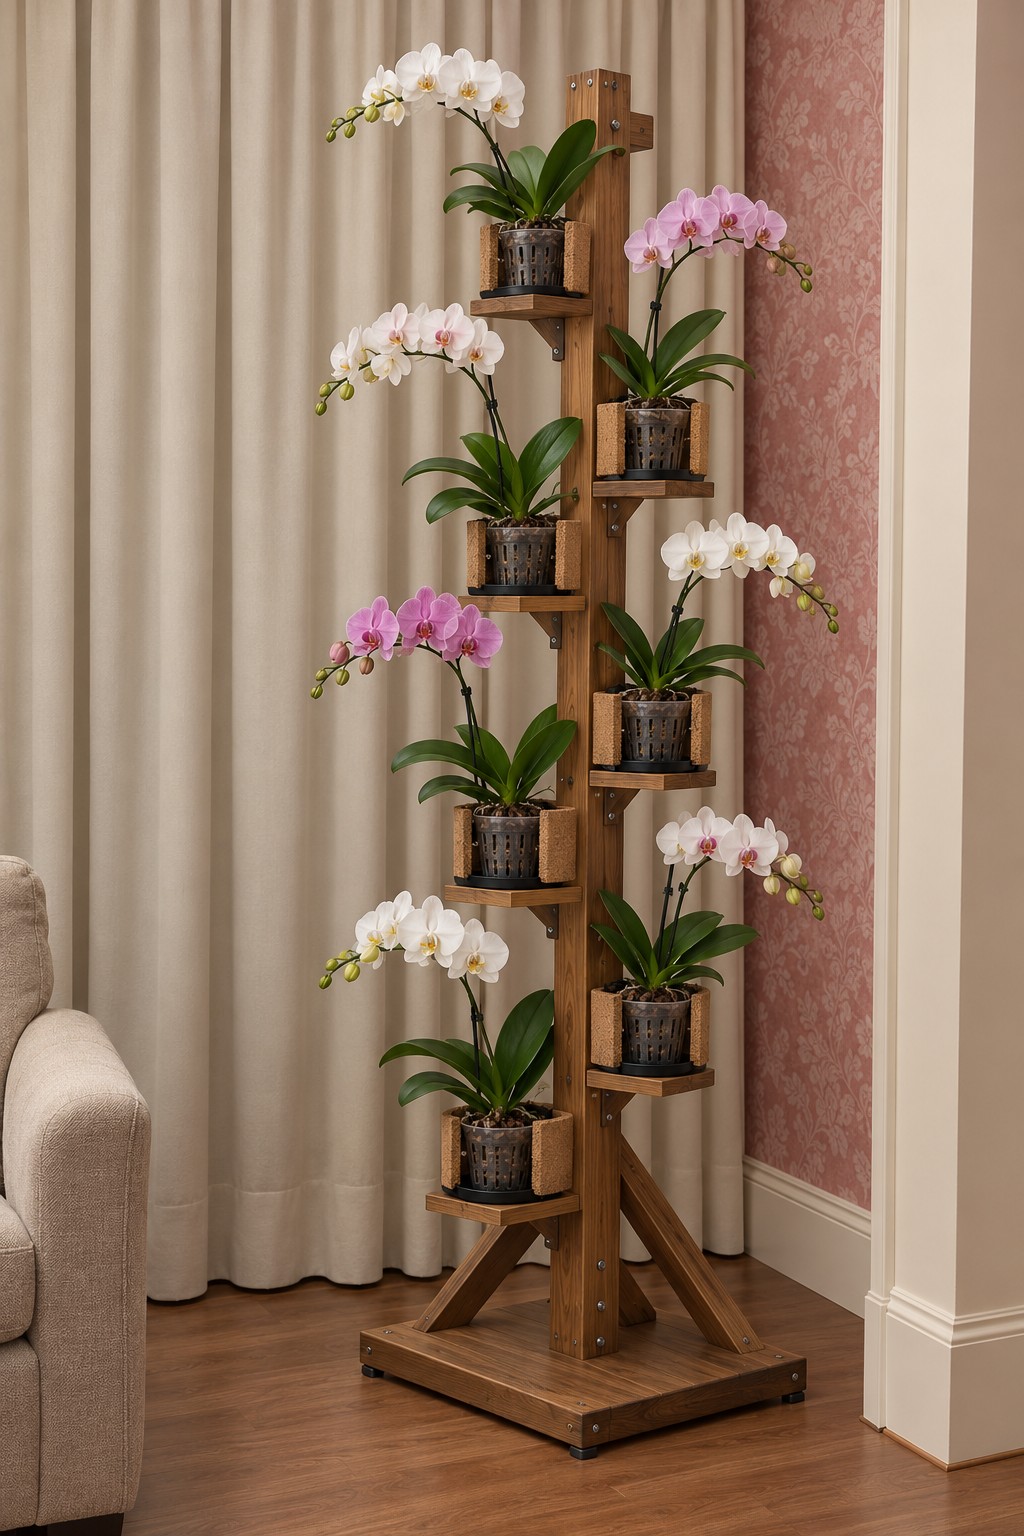
Six orchids alternate around a central timber upright, creating a fuller floral tree. The broad square base and diagonal braces are part of its visual character, grounding the repeated baskets above.
Use a substantial central post, supported shelf arms, and a base reinforced with diagonal braces. Secure each basket to a level platform rather than hanging it loosely from a single screw. Plan the plants in pairs around the upright to keep the display balanced, with the heaviest containers low. A tower of this height needs a suitable wall restraint as well as a stable base. Leave an accessible side so watering does not become a process of untangling adjacent flower stems.
25. An Ivory Arch with Six Woven Pot Pockets
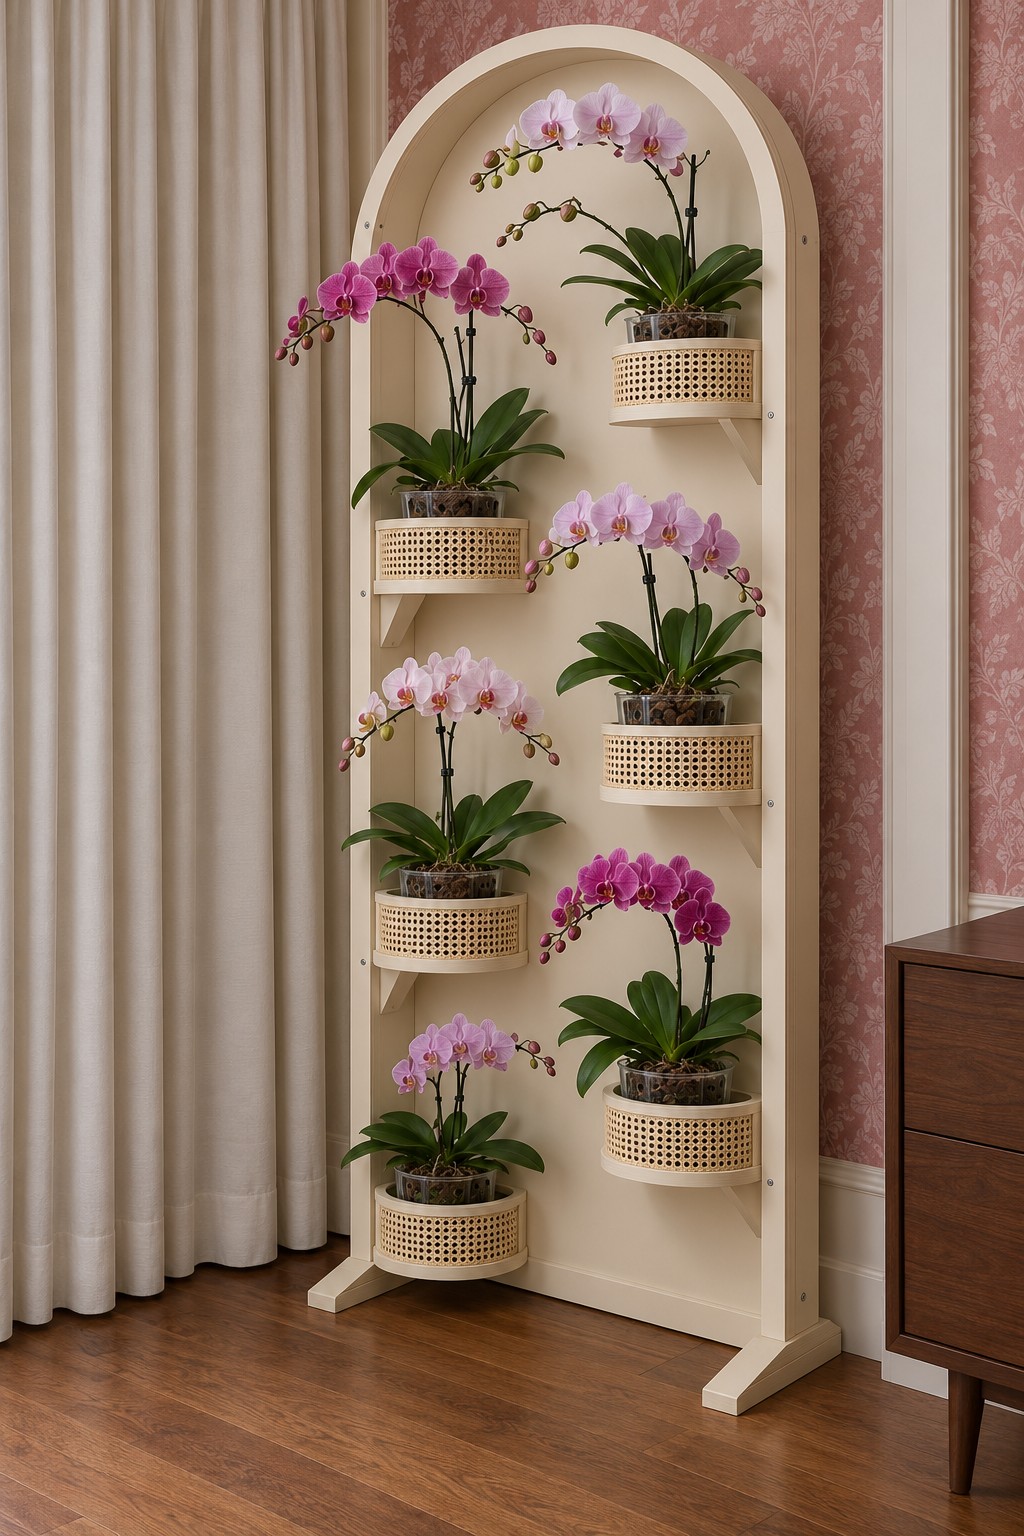
An ivory arch creates a calm backdrop for six pink and purple orchids. Alternating woven pockets give the panel a gentle rhythm, with enough space between them for the flowers to spread beyond their containers.
Build the arch from a rigid timber frame and a smooth panel, with deep feet and a wall restraint. Fix small shelf plates or brackets through the panel into the structural frame, then add woven fronts as removable pot covers. The woven material is decorative, not the primary support. Use warm ivory furniture paint and repeat one pink tone elsewhere in the room. These romantic bedroom decorating ideas offer related ways to combine cream, blush, and deeper floral accents.
26. A Tall Open Frame with Six Alternating Baskets
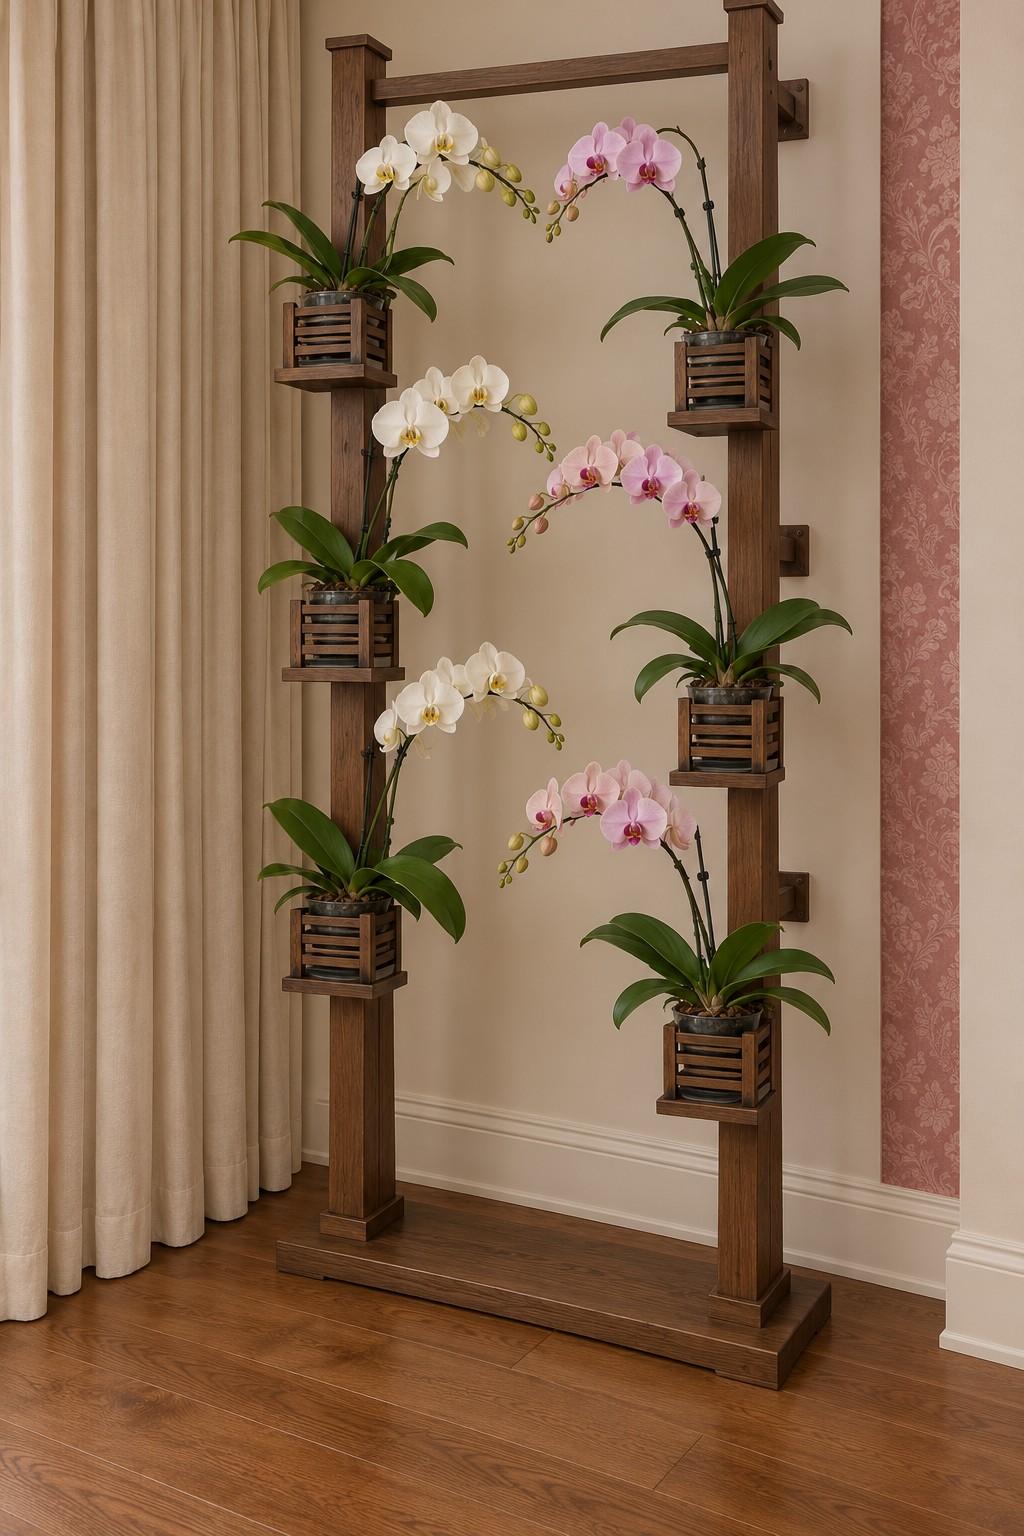
Two tall timber posts and a connecting top rail create a frame around the flowers rather than behind them. Three baskets on each side leave the middle open, allowing pale walls to remain visible through the display.
Make the outer frame with reinforced corner joints and a wide connected base. Secure it against racking and tipping before fitting the six basket supports to the posts. Alternate the flower sprays toward the center, but leave a clear gap between opposing leaves. This is a substantial furniture project, so scale the joinery and fixings to the completed wet load. Avoid positioning it across a circulation route; the open center is a visual feature, not a passageway.
27. A Timber Pyramid with Six Crate Planters
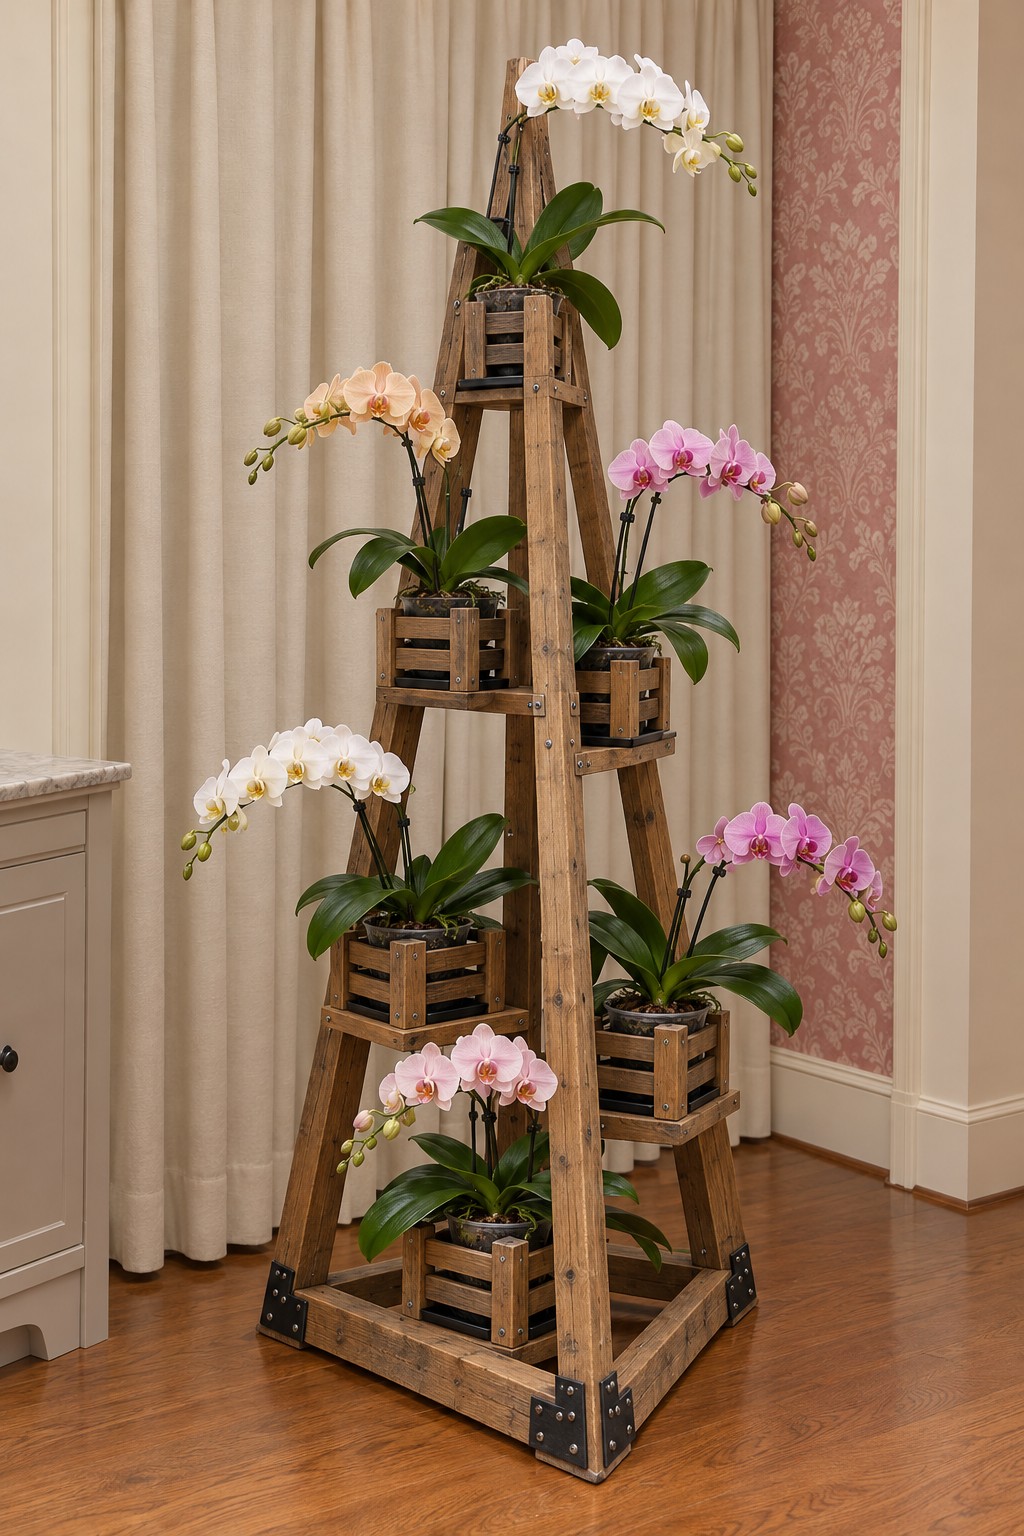
A tapering timber pyramid gives a large orchid collection a defined silhouette. Small crate holders step upward around the angled frame, while black corner plates add emphasis at the broad base.
Lay out the angled legs and crosspieces carefully before cutting, then assemble a square base and brace the frame against twisting. Mount each crate on a level support even though the legs are sloped. Decorative corner plates can supplement the joints only when their fasteners engage substantial timber. Place larger plants lower and retain access from more than one side. The top orchid should remain reachable without climbing the structure, and the tower should be restrained where it stands.
28. A Curved Cane Cabinet with Three Orchid Niches
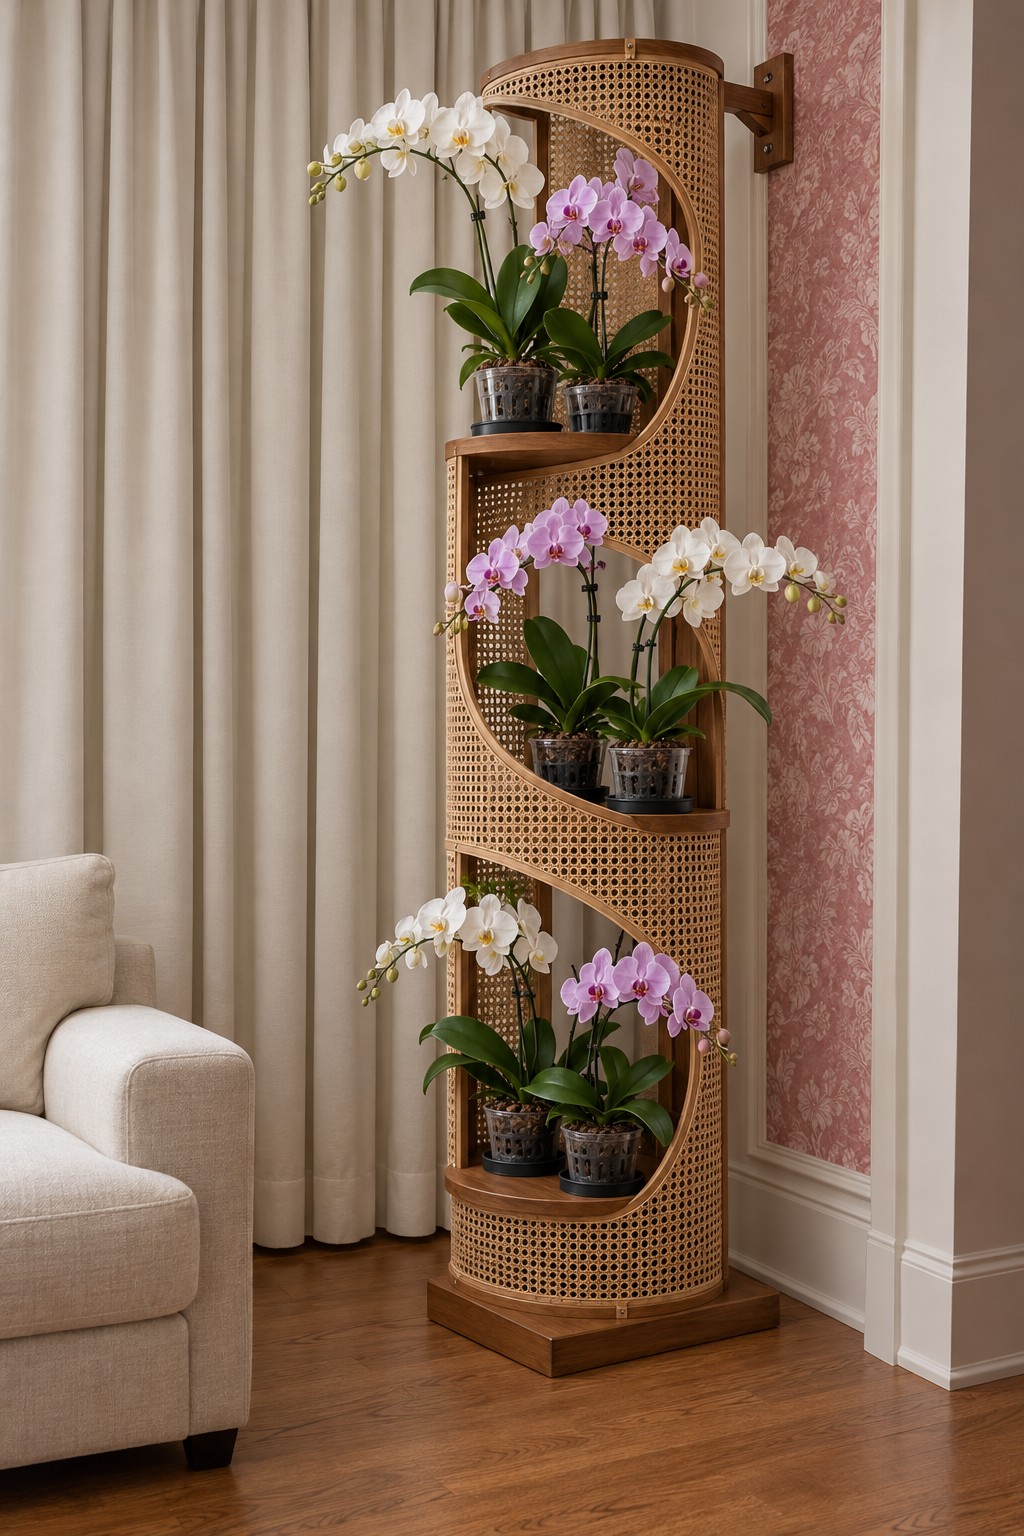
Three curved openings reveal paired orchids inside a cane faced column. The repeating white and purple flowers make the piece feel more like a small botanical cabinet than a conventional plant stand.
Begin with a rigid cabinet carcass containing three supported shelf trays. Form the curved front from suitable bending plywood and apply cane webbing to its decorative face. Large openings are essential for removing pots and allowing air movement. Seal the wooden shelves, use individual waterproof trays, and keep the cane clear of runoff. The curved joinery makes this a more advanced adaptation; modifying a sound existing cabinet may be more practical than building the whole shell.
29. A Stepped Cluster of Timber Columns
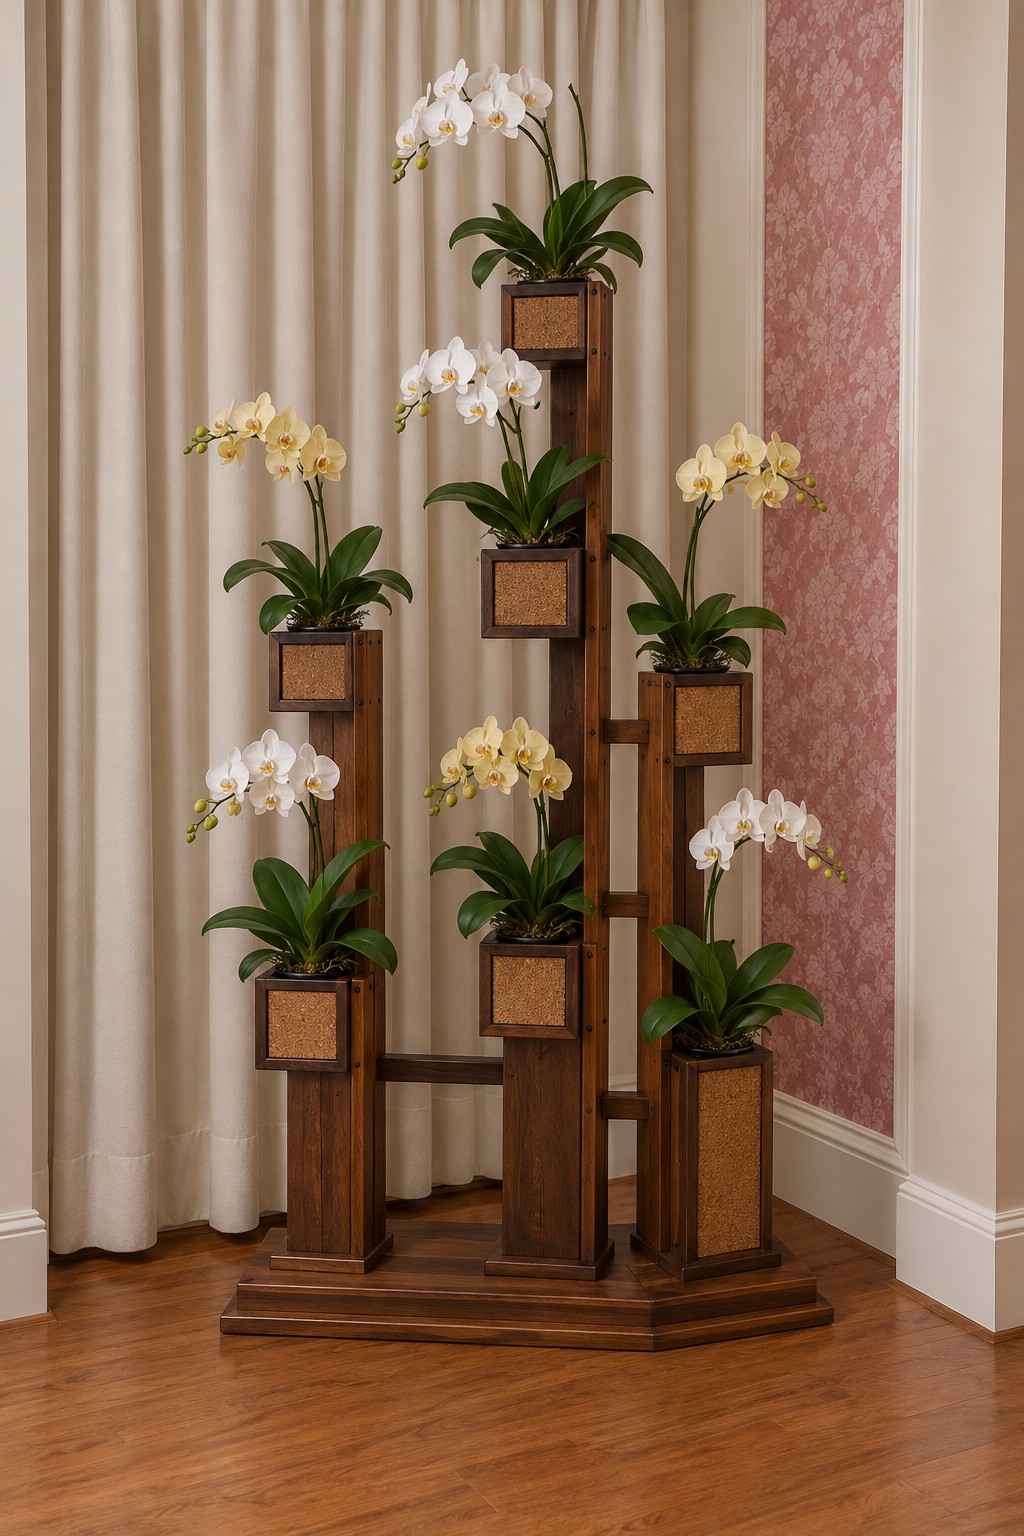
Several vertical timber columns distribute the orchids across a wider footprint. Square pot holders and a stepped base give the arrangement an architectural outline, with white and pale yellow blooms softening the repeated angles.
Build the base as one rigid connected assembly, then fasten each column securely to it with appropriate bracing. Add level pot platforms at staggered heights and wrap their fronts with timber or cork toned panels. Do not glue separate tall blocks together and assume the cluster is stable. Plan the positions with full size pot templates before assembly, leaving a clear route to every holder. This version suits an open room corner where its wider base will not obstruct movement.
30. A Narrow Timber Spine with a Pink Color Progression
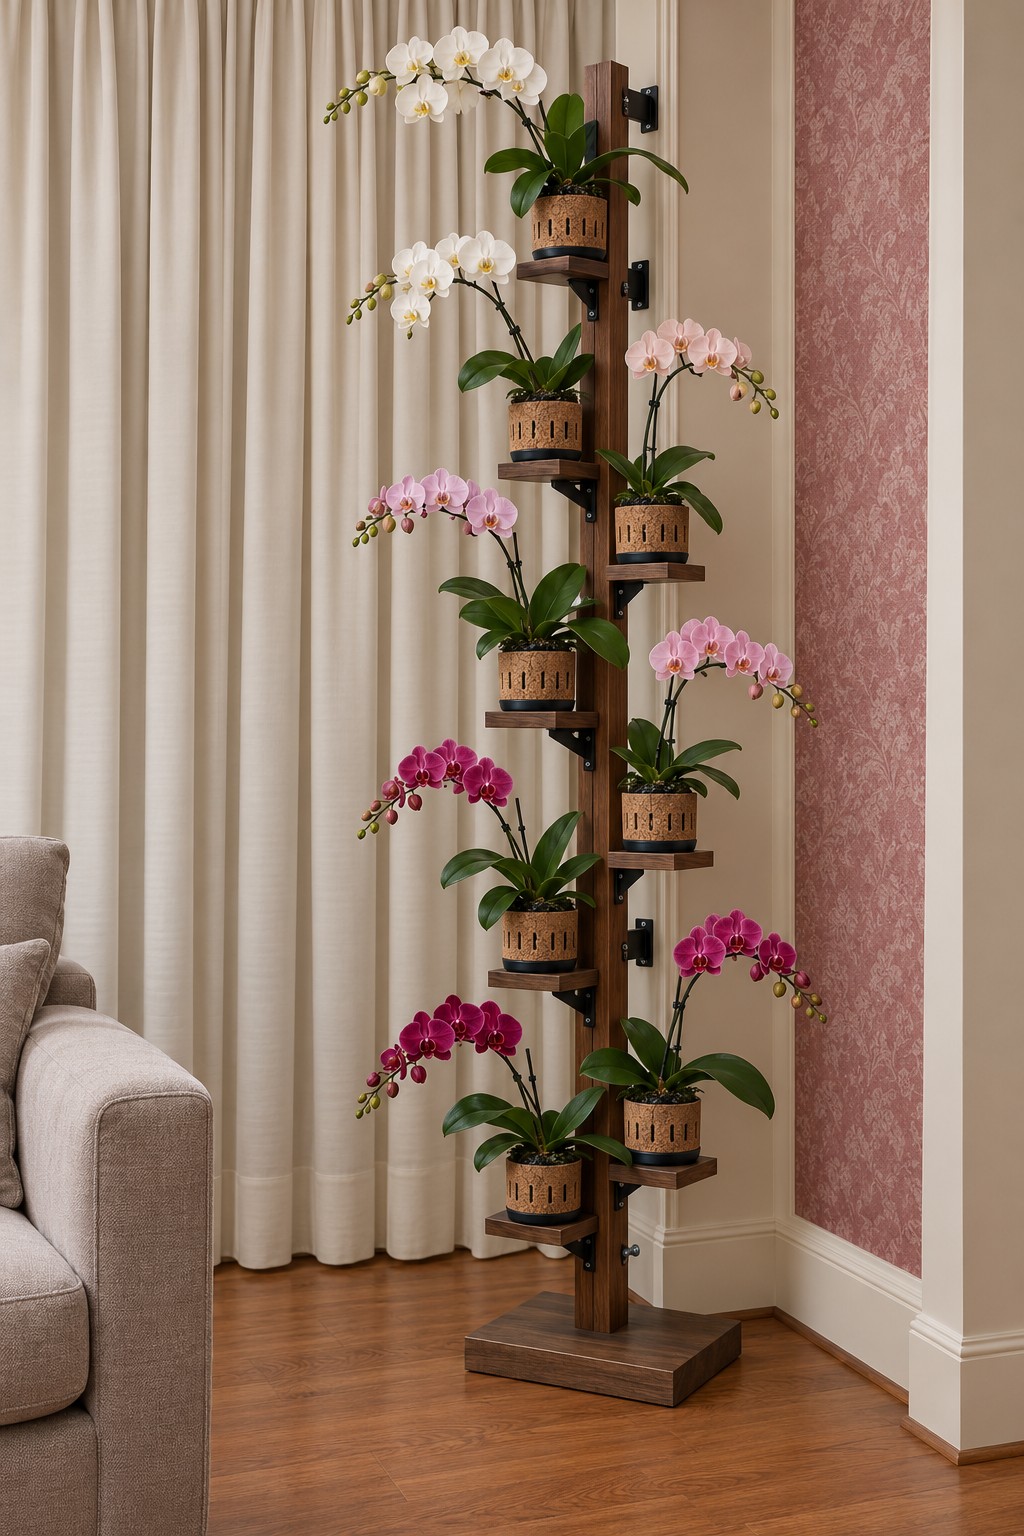
White orchids at the top shift through pale pink into deep magenta near the base. Eight alternating baskets give the narrow wooden spine a fuller appearance without needing a large cabinet around it.
Use a continuous structural upright on a rigid base, with supported basket arms arranged on both sides. Fix the tower to the wall using restraints suitable for its full height and load. Set out the basket positions around the actual plants so leaves do not overlap heavily or block access. Choose the flower colors while the plants are in bloom, and keep each orchid removable. When flowering ends, the orderly baskets and healthy foliage should still make a coherent display.
Keep the Display Practical After the Flowers Fade
Use an airy orchid potting mix suited to Phalaenopsis rather than ordinary garden soil. Check the mix and pot weight before watering instead of assuming every level dries at the same speed. Remove each pot, water it thoroughly with tepid water, and let it drain before returning it to its holder. Empty collected water and avoid leaving moisture in the crown where the leaves meet.
Inspect the fixings whenever you remove the plants, especially on suspended baskets and projecting shelves. Wipe away spills promptly and replace a damaged tray before it stains the wood. Turn or reposition an individual pot gently if its growth needs more room, keeping its flower spike loosely supported. A tower works best when the plants remain easy to care for and the structure stays attractive between flowering cycles.

Leave a Reply