
Acrylic sheets can turn an ordinary storage task into a small design feature. A clear compartment keeps desk supplies visible, a translucent organizer adds color to a work surface, and a simple panel can become a frame for several favorite photographs. This collection brings together 37 DIY acrylic sheet projects for desks, bathrooms, craft corners, and living spaces, with practical suggestions for materials, assembly, and everyday use.
Begin with the small photo frame tutorial below to understand how matching panels, clean edges, and removable fasteners work together. Then adapt those principles to the ideas that follow. Flat frames and decorative shapes are approachable with prepared parts; fitted boxes, curved dishes, and weight bearing stands need more careful fabrication. Ordering accurately cut components from an acrylic supplier lets you concentrate on assembly without having to create every curve yourself.
Table of Contents
- Choose Acrylic Sheets and Connections for Your Project
- Before You Shape Acrylic with Heat
- Make a Simple Acrylic Photo Frame in Eight Clear Steps
- Materials and Tools
- Prepare Clean Edges and Avoid Common Assembly Problems
- 37 Acrylic Sheet Project Ideas to Adapt for Your Home
- 1. Cloud Backing with a Clear Blue Mail Pocket
- 2. Coral Tulip Holder for Paper Coffee Filters
- 3. Sea Green Wave Jewelry Stand
- 4. Pastel Acrylic Butterfly Window Hanging
- 5. Pastel Daisy Acrylic Drink Coasters
- 6. Pink Scalloped Acrylic Vanity Tray
- 7. Olive Acrylic Propagation Stand with Glass Tubes
- 8. Lilac Cat Desk Organizer with Two Compartments
- 9. Oval Acrylic Botanical Frame in a Walnut Base
- 10. Layered Mountain Acrylic Key Rack
- 11. Magenta Wave Sides for a Two Level Display Shelf
- 12. Blue Whale Acrylic Phone Stand
- 13. Rainbow Acrylic Desktop File Sorter
- 14. Strawberry Acrylic Cotton Pad Dispenser
- 15. Amber Acrylic House for Tea Sachets
- 16. Sage Acrylic Cactus Ring Stand
- 17. Lilac Checkerboard Acrylic Keepsake Box
- 18. Cream Acrylic House Remote Organizer
- 19. Walnut Photo Tree with Clear Acrylic Frames
- 20. Mint Acrylic Shell Soap Dish with a Catch Tray
- 21. Blue Whale Headphone Stand with a Wooden Rest
- 22. Pink Scalloped Ribbon Spool Rack
- 23. Lilac Acrylic Makeup Brush Storage Rack
- 24. Clear Acrylic House Savings Bank with a Pink Roof
- 25. Blush Acrylic Bunny Scrunchie Stand
- 26. Sage Frog Sponge Holder with a Drip Tray
- 27. Yellow Duck Washi Tape Dispenser
- 28. Strawberry Acrylic Hairbrush and Comb Caddy
- 29. Penguin Acrylic Toothbrush Stand
- 30. Lilac Cloud Acrylic Crochet Hook Rack
- 31. Detective Cat Magnifying Glass Rest
- 32. Peach Acrylic Moth Earring Display
- 33. Turquoise Acrylic Cotton Swab Box with an Otter Backing
- 34. Three Acrylic Flower Photo Frames on a Wooden Base
- 35. Pastel Rainbow Acrylic Frame for Three Travel Photos
- 36. Smoked Acrylic Wall Gallery for Seven Photographs
- 37. Hinged Amber Acrylic Screen for Six Photographs
- Choose a First Project That Fits Your Tools
Choose Acrylic Sheets and Connections for Your Project
Buy material identified as PMMA acrylic rather than assuming that every clear plastic sheet behaves the same way. Clear acrylic suits photo covers and compartments, translucent colors create glowing edges, and opaque colors work well for character backings. For the small frame described here, two sheets of 3 mm acrylic are a useful starting point. That thickness is a project choice, not a universal specification for shelves, bookends, or tall stands.
Make a cardboard model before ordering shaped parts. Measure the actual objects the project will hold, including the space needed to lift them out. Give your supplier the overall dimensions, material thickness, hole locations, and intended connections. Curves, slots, matching pairs, and detailed silhouettes are easier to reproduce accurately when supplied from one checked drawing.
- For removable panels: use gold colored Phillips machine screws with nuts and protective washers, suitable spacers, or frame hardware designed for the measured material stack.
- For permanent acrylic boxes: use an acrylic cement specified for your sheet type and follow its preparation, ventilation, and curing instructions.
- For wooden bases: use a properly sized groove or a mechanical connection that supports the acrylic without forcing it into place.
- For decoration: choose compatible vinyl or paint, test it on a spare piece, and keep it away from joints that need clean bonding surfaces.
Where a design uses a cemented box, prepare square mating edges, try the complete assembly without cement, and support the pieces in alignment while the bond develops. Follow the selected product's application method rather than treating all clear adhesives as interchangeable. Let the joint reach its specified readiness before adding contents.
Before You Shape Acrylic with Heat
For a straight bend, use a purpose made acrylic strip heater to warm a narrow line. Broader curves can be formed with an infrared heater or a controlled airflow forming oven and a prepared mold. The required temperature depends on the acrylic grade: for example, the manufacturer’s forming guide gives material temperatures of 150 to 160 °C for extruded PLEXIGLAS XT and 160 to 175 °C for cast PLEXIGLAS GS. Other products can require different temperatures, so check your sheet supplier's technical guidance. These figures describe the material's forming temperature, not a universal setting for the heating tool.
Remove the protective film, work on a nonflammable surface, and wear suitable heat protective gloves. Test a spare piece first, heat evenly without touching the heating element, then bend the softened sheet against a prepared jig or mold and hold it until stable. Heating time varies with thickness and equipment; do not force a stiff sheet or continue heating until bubbles appear. Avoid open flames. The flat photo frame below does not require heat forming.
Make a Simple Acrylic Photo Frame in Eight Clear Steps
This small tabletop frame uses two clear panels to enclose one print, four brass colored Phillips machine screws with matching rear nuts to secure the corners, and a wooden slot base to keep it upright. Begin with undrilled panels and retain their protective film during drilling as directed by the sheet manufacturer. Remove the film and drilling debris before adding the photograph. The same panel sandwich approach can be adapted to the botanical frame and several photo projects later in the collection.
Materials and Tools
- Two undrilled clear acrylic panels, each 150 mm wide, 200 mm tall, and 3 mm thick, with matching rounded corners and finished edges.
- Four brass colored M3 machine screws with rounded pan heads and a Phillips cross recess, approximately 12 mm long, plus four matching M3 hex nuts. Use straight threaded machine screws rather than pointed wood screws.
- Eight small metal flat washers with an outer diameter of approximately 9 mm and holes sized for the M3 screws, plus eight thin, soft protective washers compatible with acrylic. The washers must bridge the drilled openings and sit flat.
- One photograph measuring 100 mm by 150 mm and four small photo corners.
- A prepared walnut base approximately 180 mm long, 70 mm deep, and 25 mm high, with a central slot approximately 10 mm deep. Have the slot fitted to the actual assembled panel thickness with a small insertion clearance.
- A drill, a 6 mm bit intended for acrylic, a solid sacrificial MDF backing board, padded clamps, removable marking tape, a ruler, and a pencil.
- Safety glasses, a manual Phillips screwdriver that matches the screw recess, a small spanner that fits the nuts, a soft clean cloth, and protective felt pads for the base.
Check the selected screw length against both panels, the print, all washers, and the nut before assembly. The thread must pass completely through the nut without an unnecessarily long exposed end. Confirm the hole size and drilling settings with the sheet and bit suppliers. If you do not have suitable equipment, have a fabrication shop carry out the drilling stage.
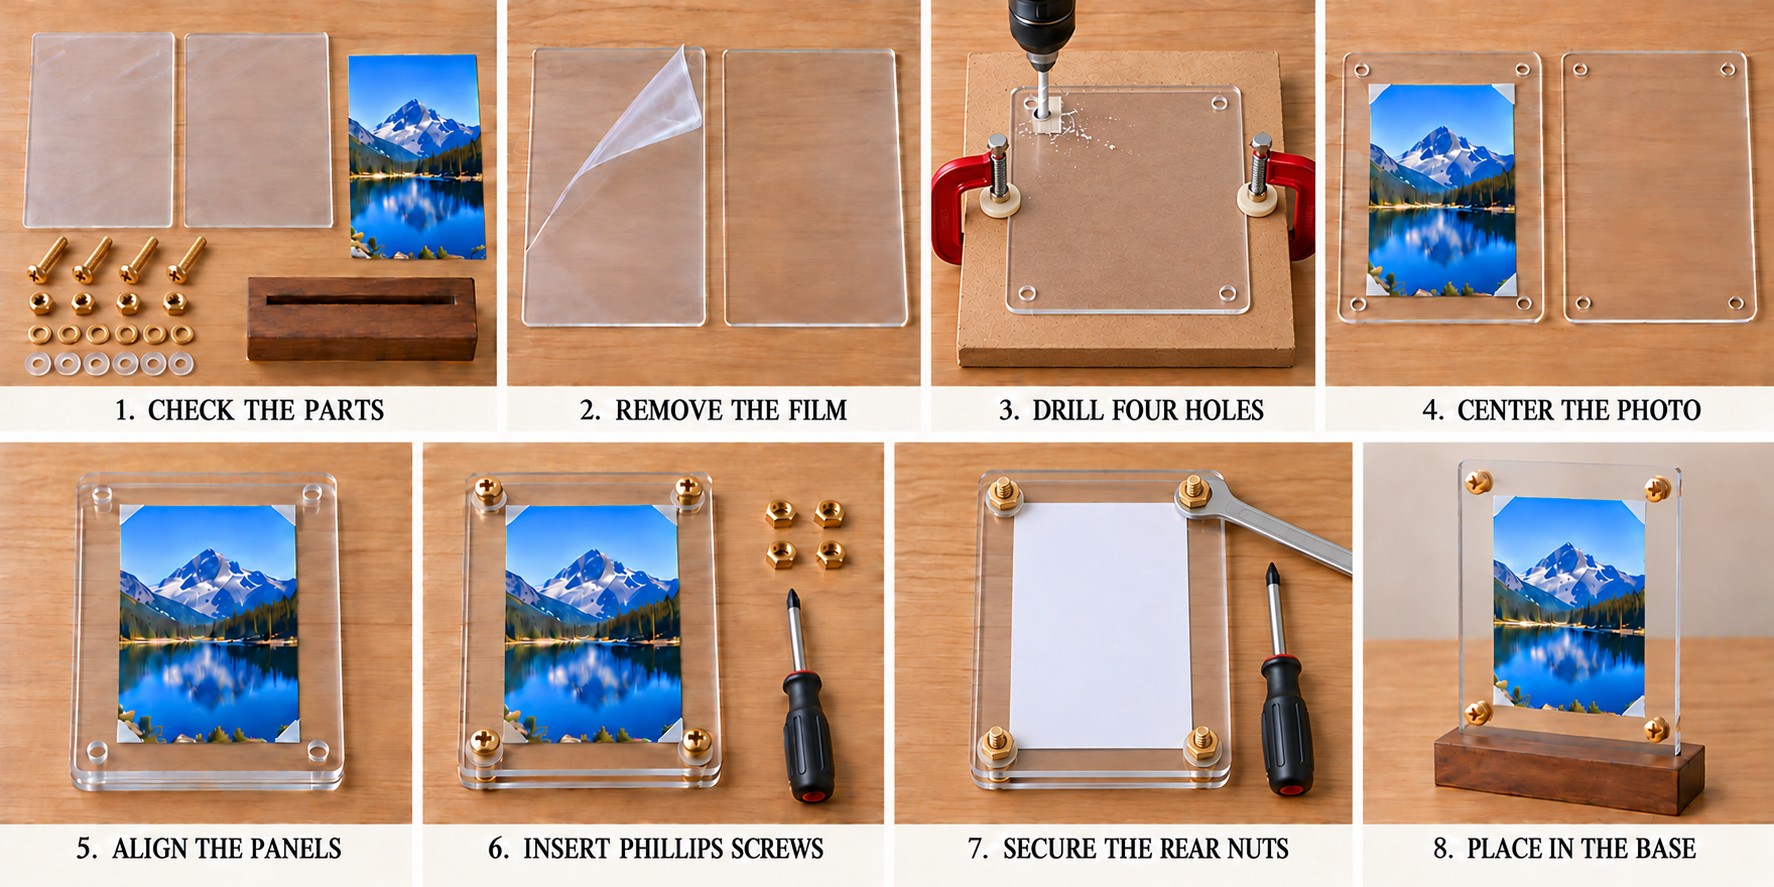
- Check the parts. Lay out two undrilled panels, the photograph, four yellow brass colored Phillips screws, four hex nuts, the washers, and the wooden base. The panels have no holes at this stage. Check their dimensions, matching corners, and edge condition before removing their protective film.
- Protect the faces and mark the holes. Keep the supplied masking film in place for drilling, following PLEXIGLAS’s drilling instructions. Handle the edges and rest the panels on a clean, soft surface. Mark the hole positions on removable tape over the film. The illustration shows early peeling; use the written fabrication sequence here and remove the film after drilling. If your panels arrive unmasked, ask the supplier how to protect their faces during machining.
- Drill four matching holes. Mark four positions, with each center 15 mm from its two adjoining edges. Align both panels on the sacrificial MDF board and secure them with padded clamps, keeping the drilling areas accessible. Wearing safety glasses, use the acrylic bit perpendicular to the surface, feed gently at entry and exit, and clear chips as required. Follow the equipment guidance when drilling the aligned stack. Make all four matching holes, ease any burrs as the supplier directs, remove the masking film and marking tape, and clean away every chip before bringing the photograph to the work area.
- Center the photo. Place the clean rear panel flat and center the print so there is approximately 25 mm of clear space on every side. Fix the small photo corners to the rear panel while keeping adhesive off the print itself. All four drilled holes should remain unobstructed outside the picture.
- Align the panels. Lower the front panel over the photograph without sliding it across the surface. Line up the four corner holes and check the print position. Lift the cover to remove any trapped dust rather than rubbing the acrylic layers together.
- Insert the Phillips screws. Place a metal flat washer and then a soft protective washer beneath each screw head, so the soft washer touches the acrylic. Pass one brass colored Phillips machine screw through each pair of aligned corner holes from the front. Keep the frame supported flat while fitting the rear hardware.
- Secure the rear nuts. On the back of each screw, add a soft washer against the acrylic, a metal flat washer, and a matching hex nut. Support the frame carefully on a clean padded surface while accessing the rear. Start the nuts by hand, hold each nut with the small spanner, and turn its front screw with the matching Phillips screwdriver. Bring opposite corners just snug. Do not compress the panels until they bend or force the hardware against the hole edges.
- Place in the base. Add felt beneath the walnut block and insert the lower acrylic edge into its fitted slot. The slot should support the panel without wedging it tightly. Confirm that both the lower screw heads and the rear nuts clear the wood, then check that the frame stands steadily on a level surface.
To change the print, lift the frame out of the base and support it on a clean padded surface. Hold each rear nut with the spanner while loosening its front Phillips screw. Keep the screws, nuts, and washers together so the same protective layers can be refitted. For a larger frame or thicker contents, revise the base and fastener length to suit the complete assembly.
Prepare Clean Edges and Avoid Common Assembly Problems
If you drill your own parts, wear eye protection, use a bit intended for acrylic, and clamp the sheet over a solid backing board. Feed gently as the bit enters and exits, clear chips, and follow the bit and sheet suppliers' speed guidance. Do not drill a small loose shape while holding it in your hand. Keep holes away from narrow tips and allow the clearance required by the fastening system.
Use a cutting method intended for acrylic and suited to your sheet thickness and support the material to reduce vibration. A scoring tool is not a way to cut every animal outline, thick panel, or internal slot. Ask a fabrication shop to make complex contours and matched slots if your equipment cannot produce them cleanly.
Ease exposed edges with an appropriate finishing method before assembly. Wet sanding on a block can help keep an edge even; polishing is a separate finishing step. Keep mating edges for cemented joints flat rather than rounding them for shine. Avoid improvised flame polishing or heating over a kitchen flame.
Clean finished pieces with mild soap, lukewarm water, and a soft cloth, then rinse and blot dry. Avoid abrasive pads, acetone, and ordinary window cleaners unless the acrylic manufacturer explicitly approves the product. Acrylic can scratch and can develop fine cracks after contact with incompatible chemicals. Keep these projects away from candles, hot cookware, and other strong heat sources.
37 Acrylic Sheet Project Ideas to Adapt for Your Home
Use the panel alignment, careful measuring, and connection planning from the frame tutorial as a starting point for these ideas. Each project below explains a practical material combination and an assembly approach. Choose removable screws where access matters, prepared box components where compartments matter, and a stable base wherever a tall decorative panel supports everyday objects.
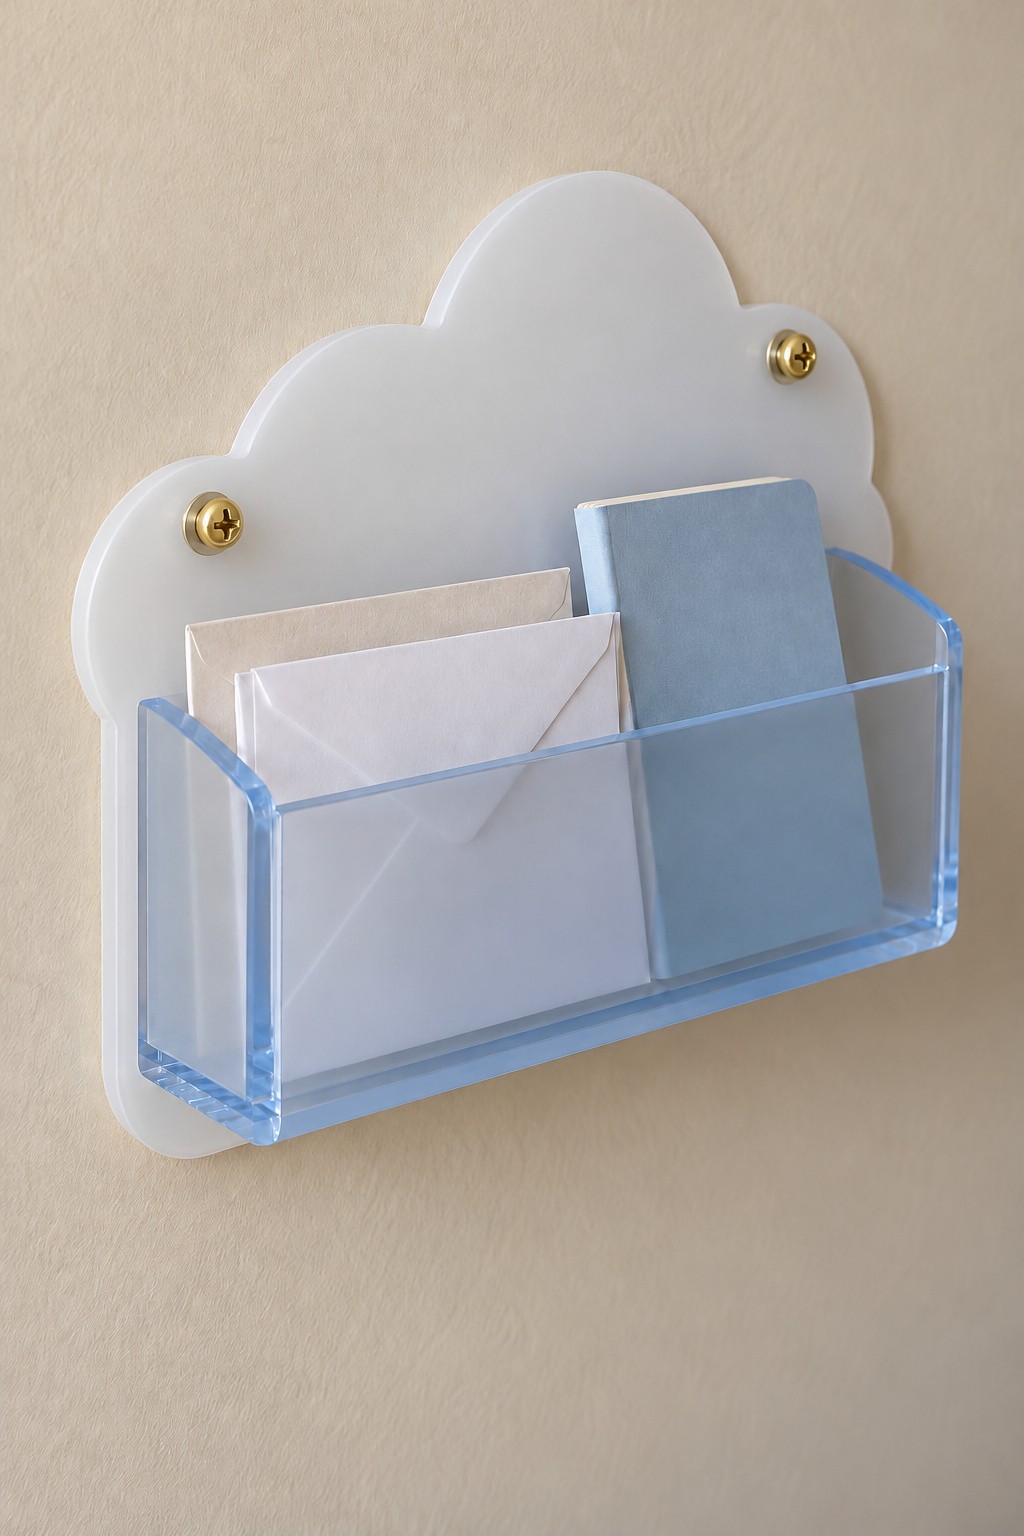
1. Cloud Backing with a Clear Blue Mail Pocket
A white acrylic cloud and a pale blue pocket create a compact place for envelopes and a small notebook near the entry. Prepare the cloud backing and a pocket made from a front, bottom, and two side pieces. Size the compartment around the mail you receive, with enough finger space above its front edge.
Assemble the pocket with compatible acrylic cement and let it cure before attaching the unit. Use the two upper mounting positions with gold colored Phillips machine screws, protective washers, and rear nuts securing suitable mounting brackets. Choose separate wall anchors for the wall construction and loaded organizer. Keep the front low enough to see short letters rather than making a deep pocket that hides them.
2. Coral Tulip Holder for Paper Coffee Filters
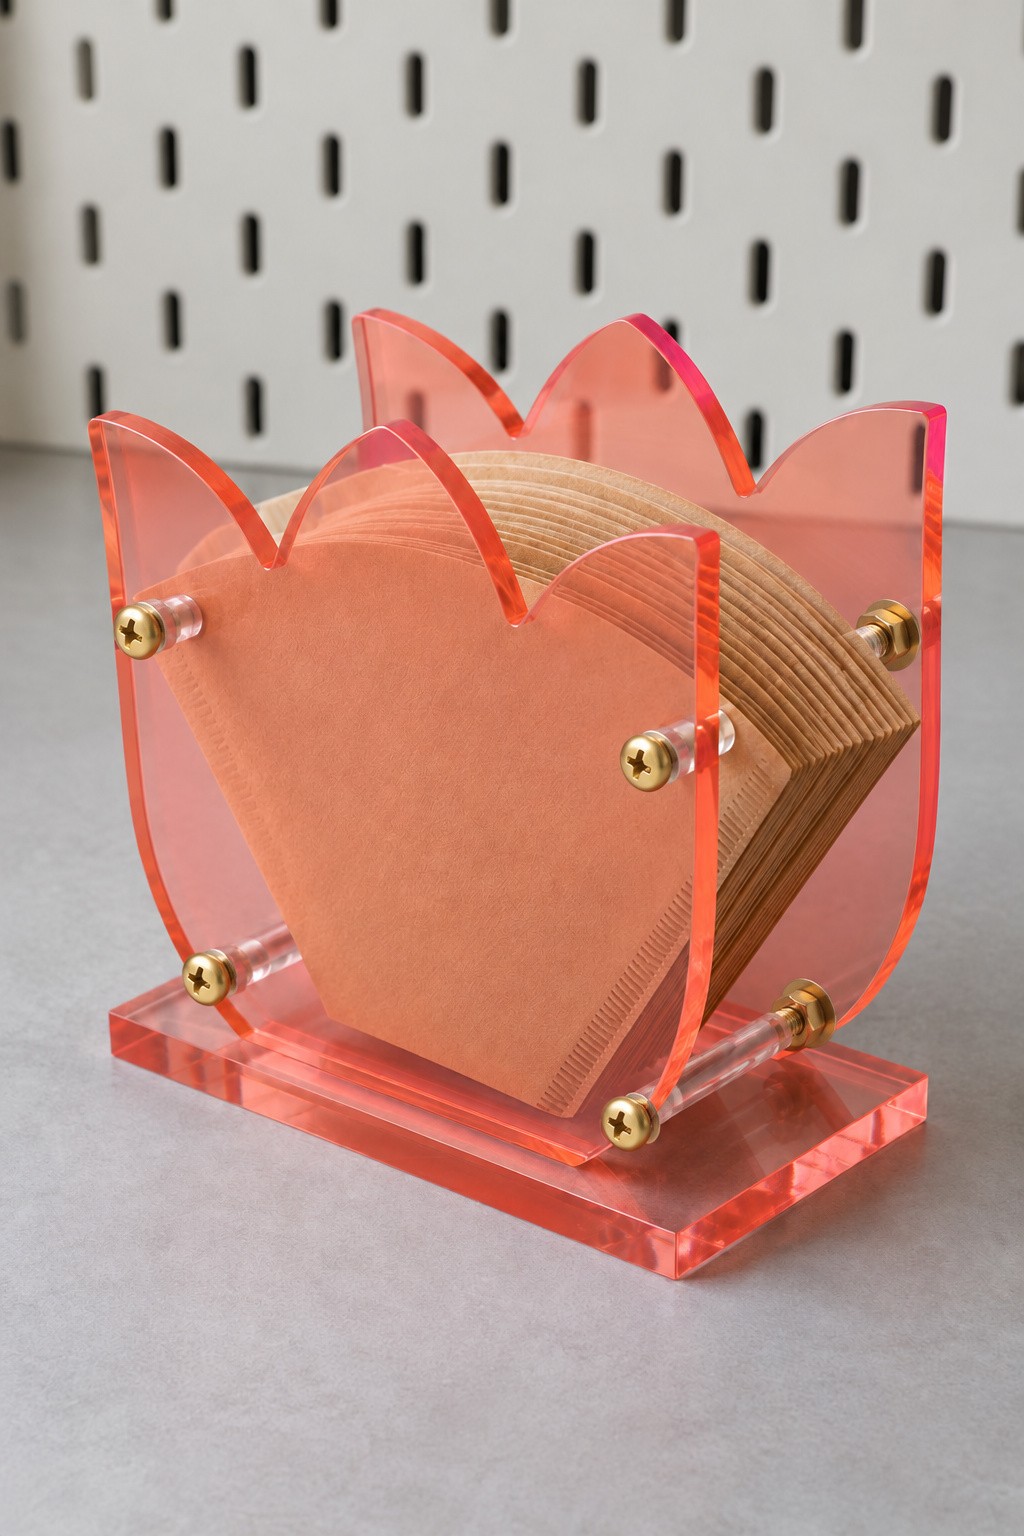
Two coral acrylic tulip silhouettes can hold a fan of paper coffee filters beside a brewing station. Use a matching flat base, clear spacer sleeves, and gold colored Phillips machine screws with rear hex nuts to keep the shaped panels parallel. Measure your actual filters before specifying the gap so the stack rests comfortably between the flowers.
Have the matching silhouettes and connection holes made from the same drawing. Assemble the spacers loosely, check the alignment, and then secure them without squeezing the acrylic. Position the lowest support below the filter stack so the papers cannot fall through. Keep the holder away from kettle steam and splashes to protect the filters.
3. Sea Green Wave Jewelry Stand
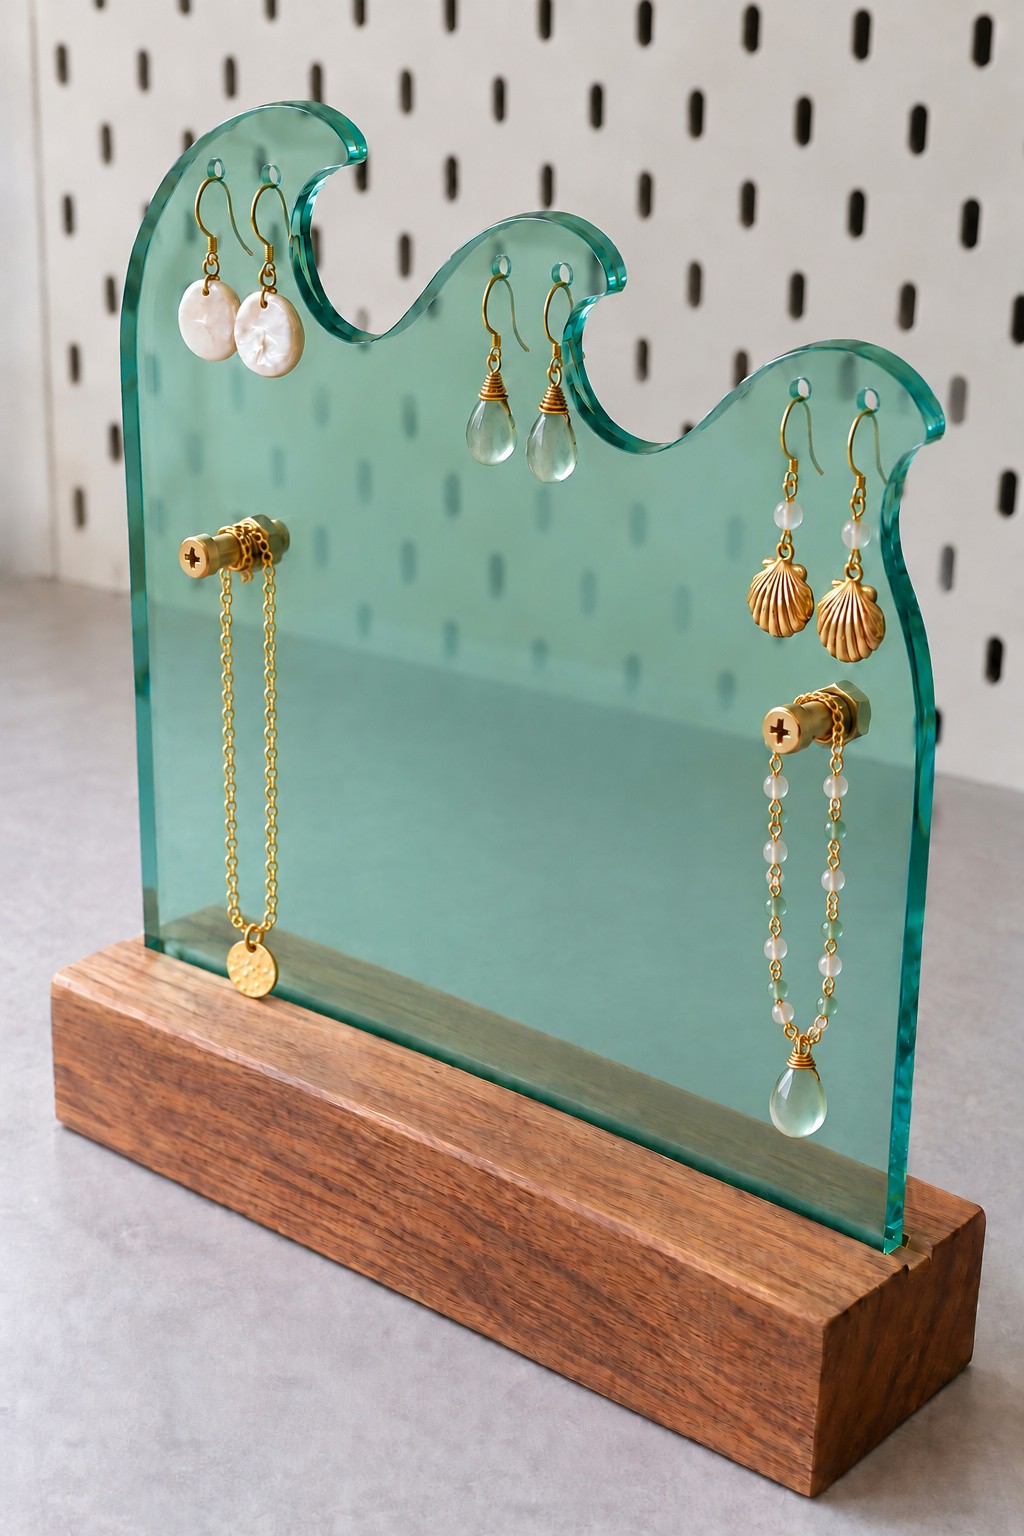
A sea green acrylic panel with a wave shaped top gives earrings their own visible hanging row. Small upper holes hold suitable earring hooks, while two brass spacer posts below support one necklace each. Let each closed necklace hang from its own post as a narrow vertical loop, with the pendant at the lowest point and no chain stretched between the posts. Set the panel into a fitted walnut block to balance the transparent color with a warmer material.
Plan hole spacing using the widest earrings and longest necklaces you intend to store. Order the holes with the outline and fix the posts using gold colored Phillips machine screws, protective washers, and matching rear hex nuts. Check the hardware clearance before seating the stand in its wooden base.
4. Pastel Acrylic Butterfly Window Hanging
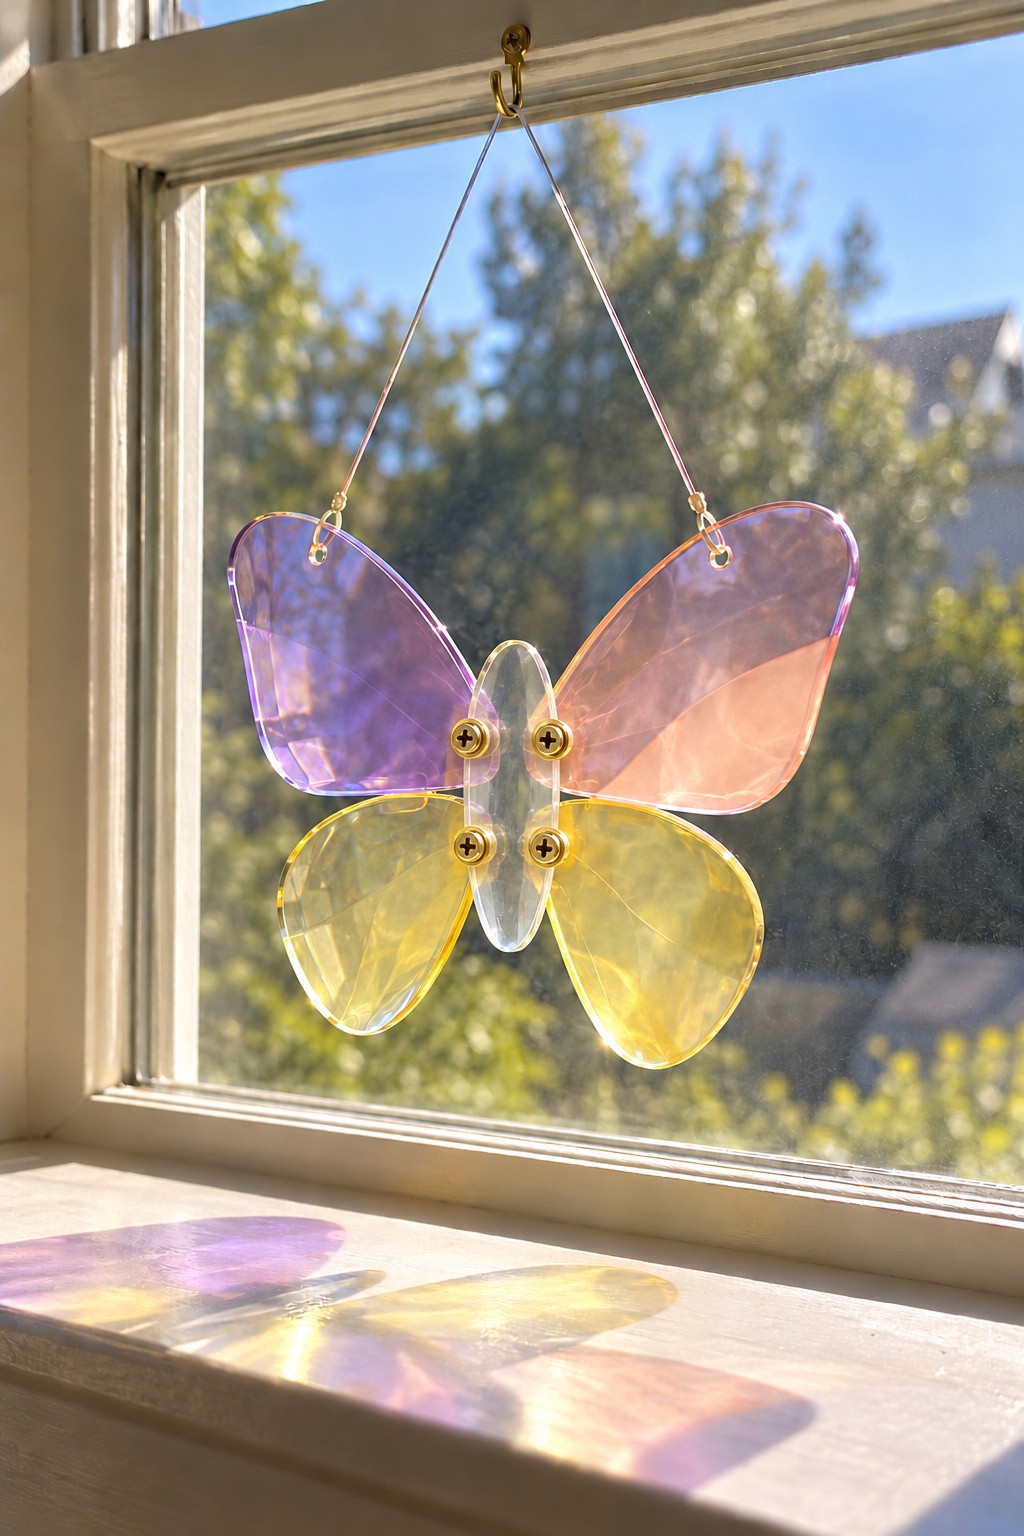
Four translucent wings in lilac, blush, and pale yellow make a butterfly that casts colored patches in sunlight. You can build the arrangement from separately cut acrylic wings whose inner roots overlap a clear central connector plate. Four gold colored Phillips machine screws pass through the overlapping layers, with protective washers and matching hex nuts behind. A two point hanging line helps keep the broad outline facing forward.
Use one full size paper template to check wing balance before ordering the parts. Keep connection holes within broad areas, not directly beside delicate tips. Suspend the finished piece from a secure fitting and make sure it clears the glass when the window moves. Keep cords and small fittings out of children's reach.
5. Pastel Daisy Acrylic Drink Coasters
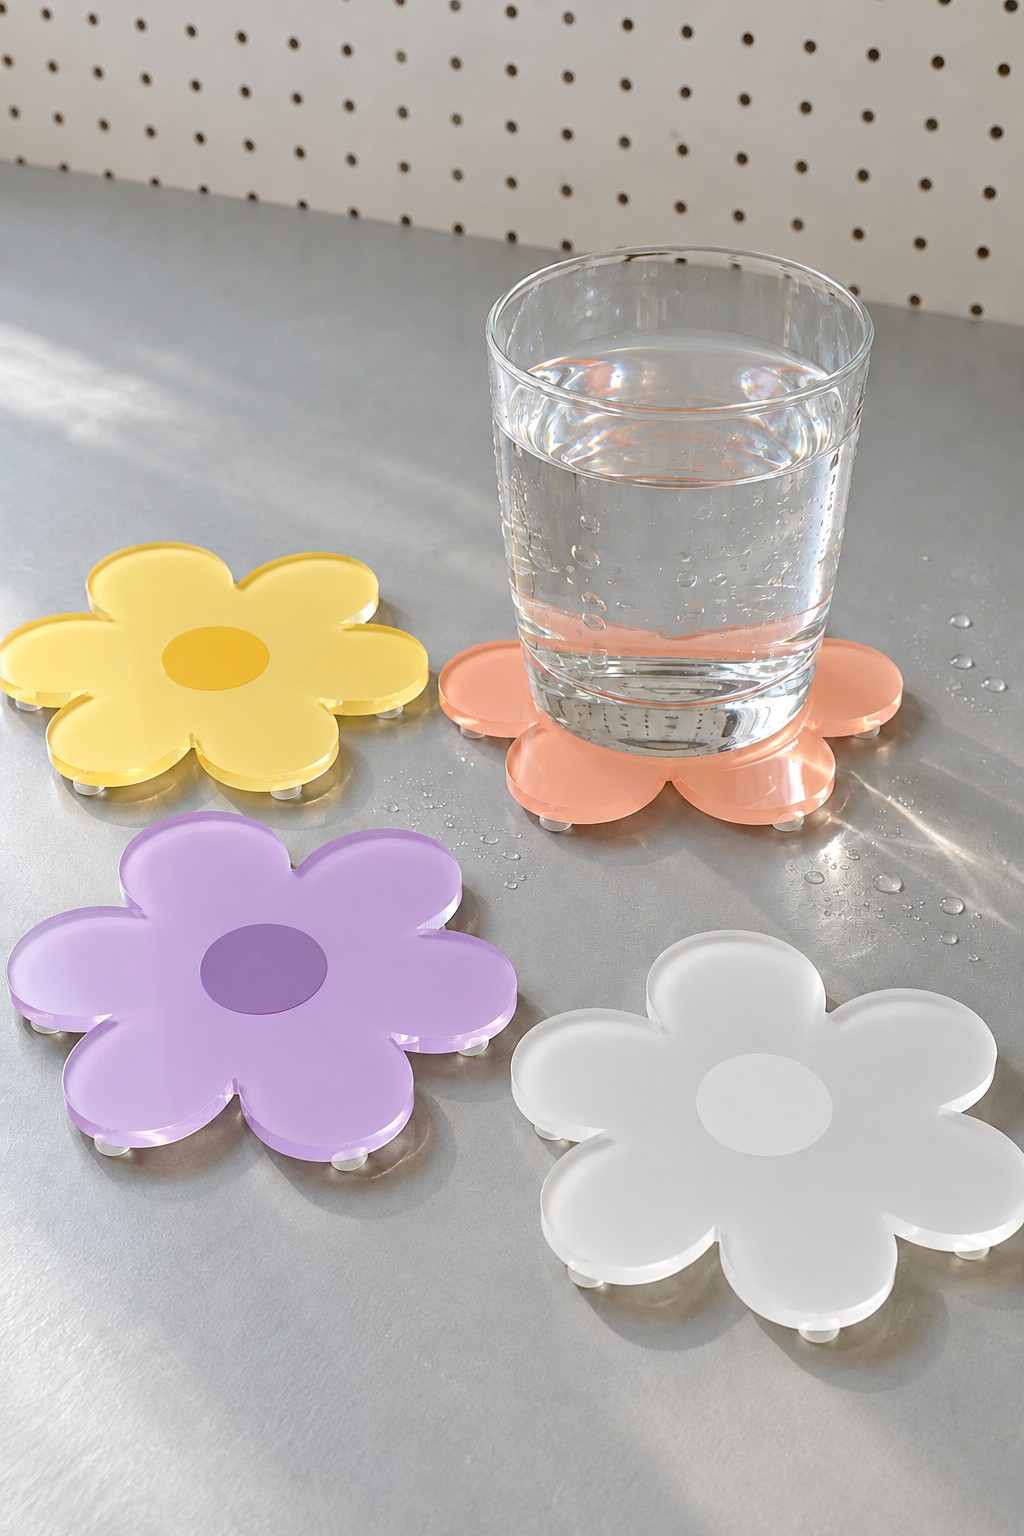
Flower shaped acrylic blanks become a cheerful coaster set with yellow, pink, lilac, and white petals. Create the smaller contrasting centers with flush inlays or compatible printed color. Keep the entire upper surface level, including the center, so a glass rests evenly without rocking on a raised disc.
Request smooth petal edges and add small grip pads beneath the coasters. Test each one with the actual tumblers you use, checking for rocking and sliding. These pieces suit cool drinks; do not assume a decorative acrylic coaster is a trivet for hot pans. Wipe away condensation after use to keep the surface underneath dry.
6. Pink Scalloped Acrylic Vanity Tray
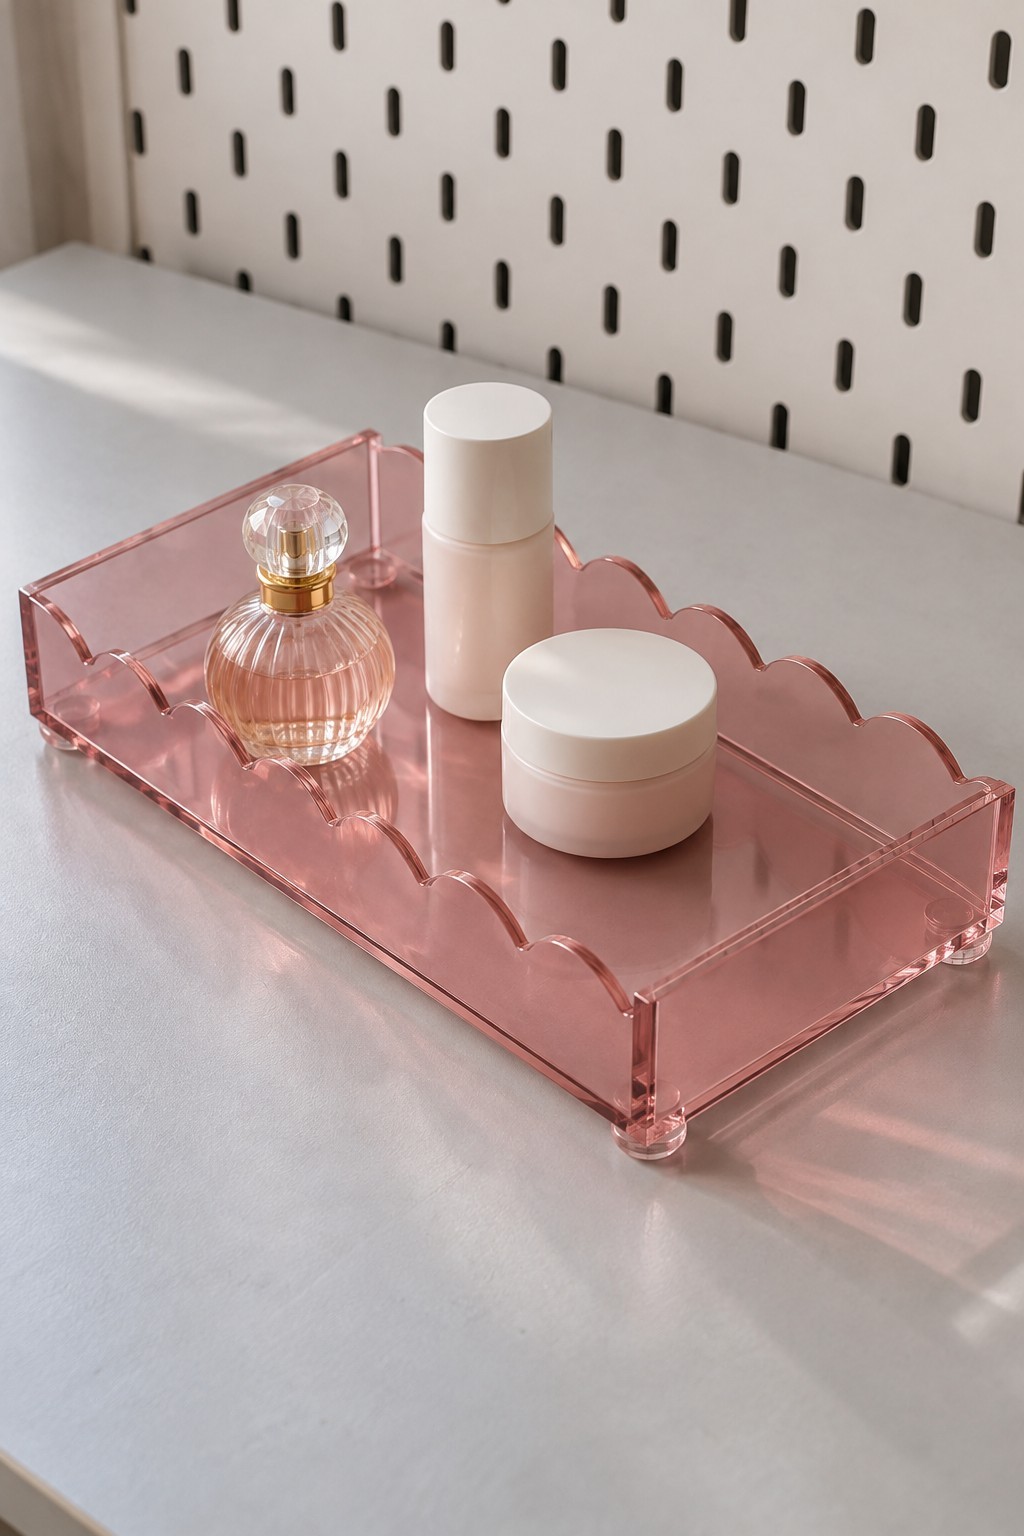
A blush acrylic tray gives perfume, a cream jar, and a small bottle a defined place on a dresser. Use a rectangular base, low straight front and side walls, and a taller scalloped back. The decorative edge works best behind the products, where it remains visible without obstructing your hand.
Try the bottles on a paper template before deciding the internal dimensions. Assemble the box with square, closely fitting joints, support it while curing, and add small protective feet. Keep liquids inside their original containers and wipe spills promptly. Lift the tray beneath its base rather than using a decorative wall as a handle.
7. Olive Acrylic Propagation Stand with Glass Tubes
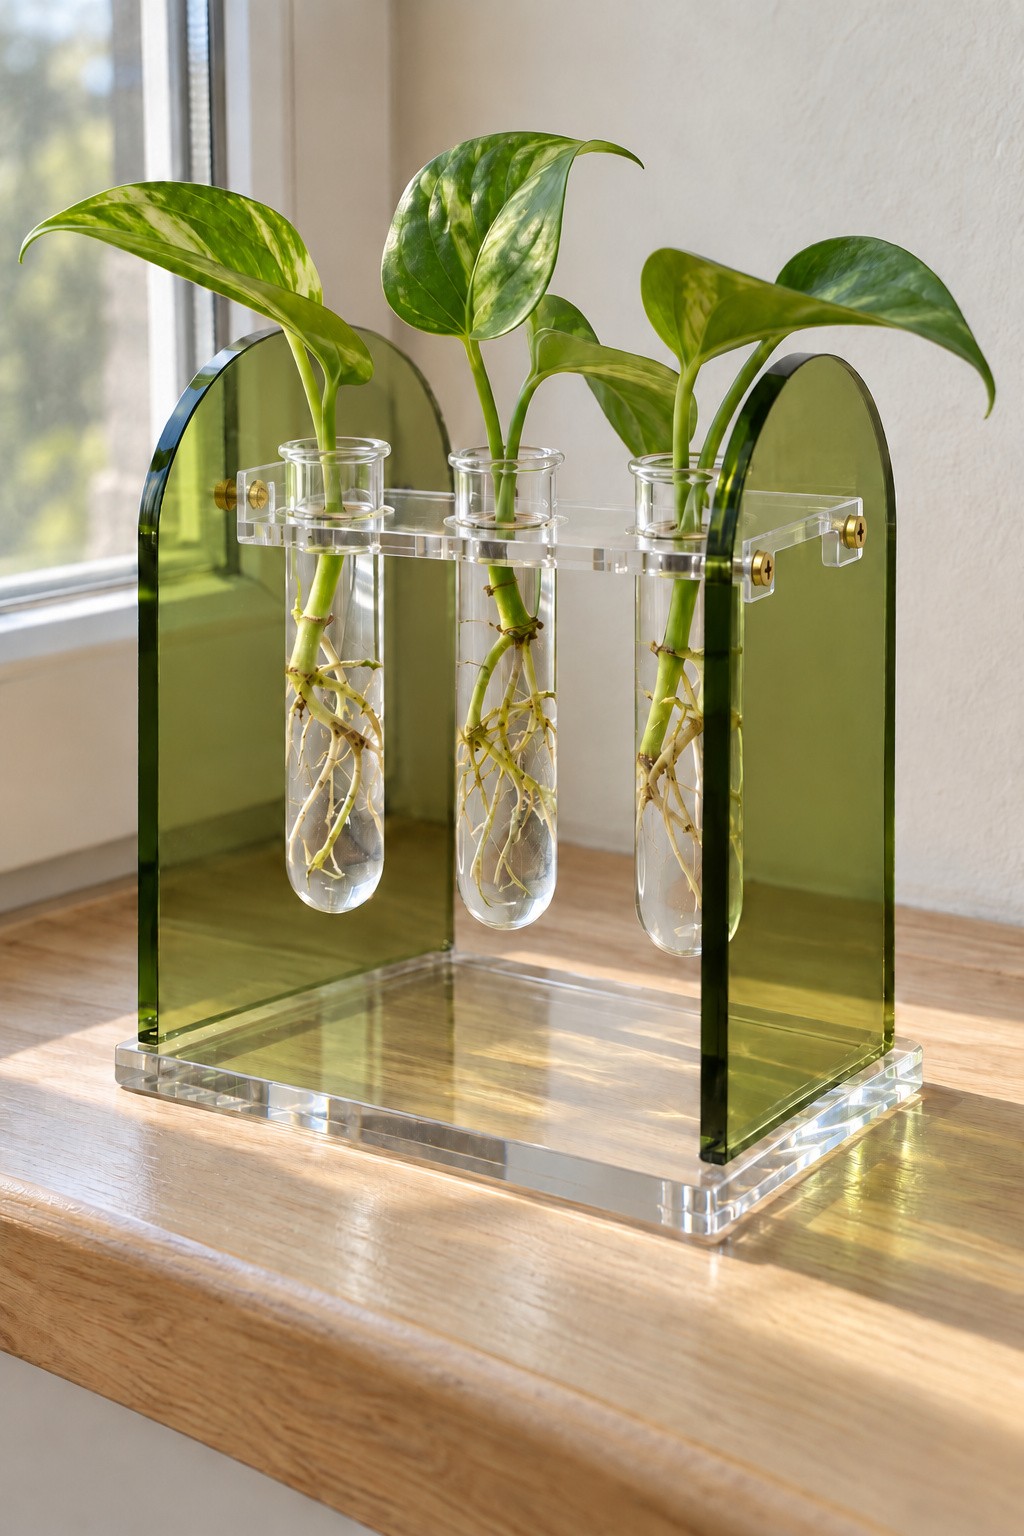
Two olive green arched supports and a clear base can frame three glass propagation tubes. Use a clear horizontal bridge with openings sized to the tube bodies so the wider glass rims rest securely above them. Small clear angle brackets support the bridge at the side panels; gold colored Phillips screws, protective washers, and rear nuts secure these joints without touching the glass. The glass holds the water, while the acrylic acts as the stand.
Measure the tube bodies and their wider rims to size the bridge openings, and allow clearance beneath the rounded ends. Position the left support and its fixing at the rear of the assembly so the front bridge edge stays clear. Assemble the base and supports first, then install the tube fittings and check the empty stand for stability. Fill and empty the tubes away from the acrylic frame. Choose cuttings suitable for water propagation and keep foliage clear of neighboring stems.
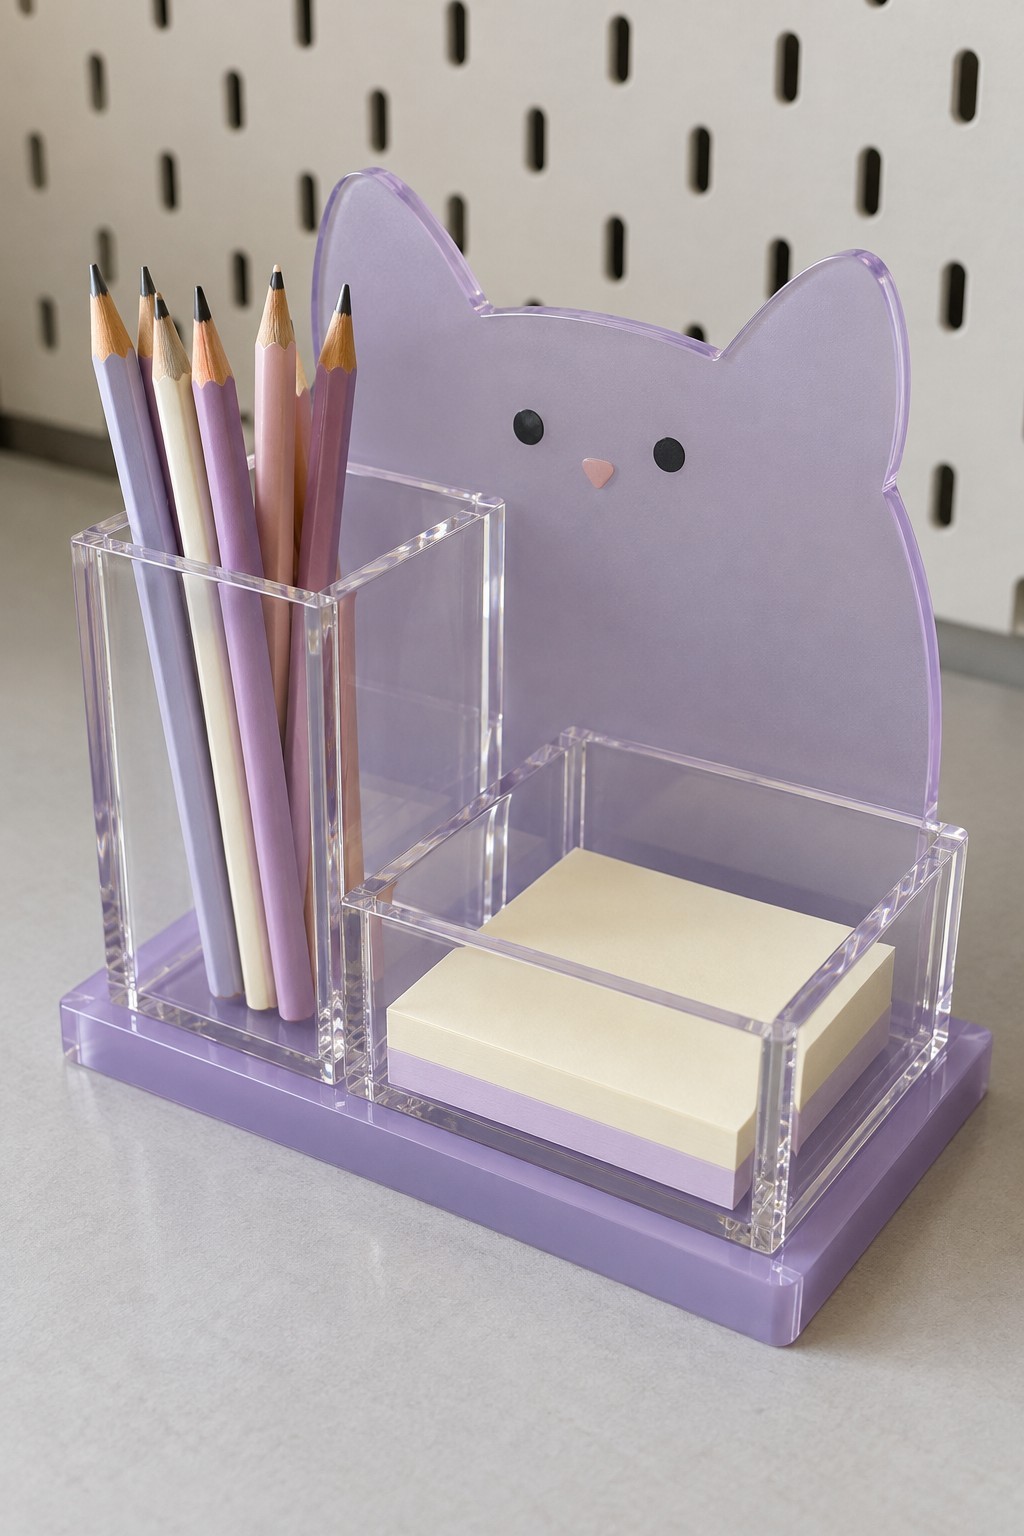
8. Lilac Cat Desk Organizer with Two Compartments
A lilac cat backing turns two clear compartments into a friendly desk organizer. You can combine a tall pencil cup, a lower square compartment for sticky notes, and a broad acrylic base. Add the simple face with compatible vinyl or paint after the structural pieces are prepared.
Fit the compartments around the pencils and note pads you already own, then try the layout before bonding. Keep the tall cup toward one side and leave the note compartment open above for easy access. Bond the boxes and backing securely to the base, allowing the joints to cure before filling them. Rounded ear tips make the silhouette easier to handle.
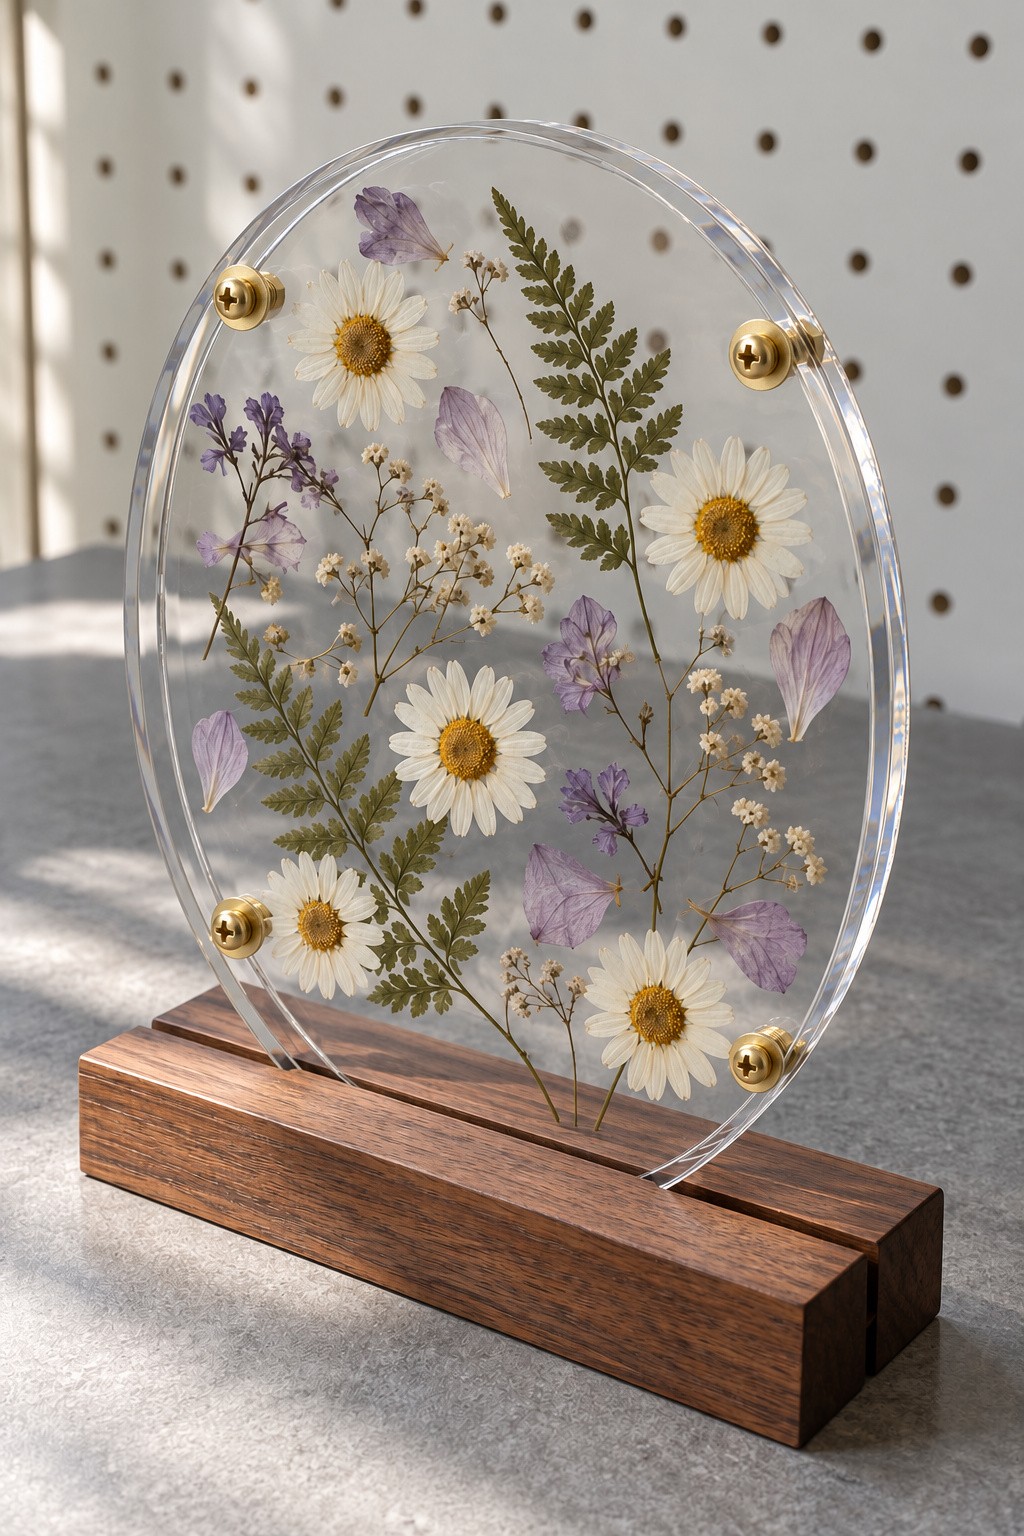
9. Oval Acrylic Botanical Frame in a Walnut Base
An oval transparent frame gives pressed daisies, small purple flowers, and a fern frond room to form a light botanical arrangement. Use two matching clear acrylic ovals, four gold colored Phillips machine screws with protective washers and matching rear hex nuts, and a fitted wooden base. This follows the sandwich method from the introductory frame, with a different outline and delicate contents.
Arrange fully dried specimens on the rear panel and leave space around the fasteners. If stems hold the panels apart, use matched spacers and revise the base slot instead of tightening until the flowers flatten. This type of display is not an airtight preservation system. Find complementary arrangements in these DIY leaf decoration ideas.
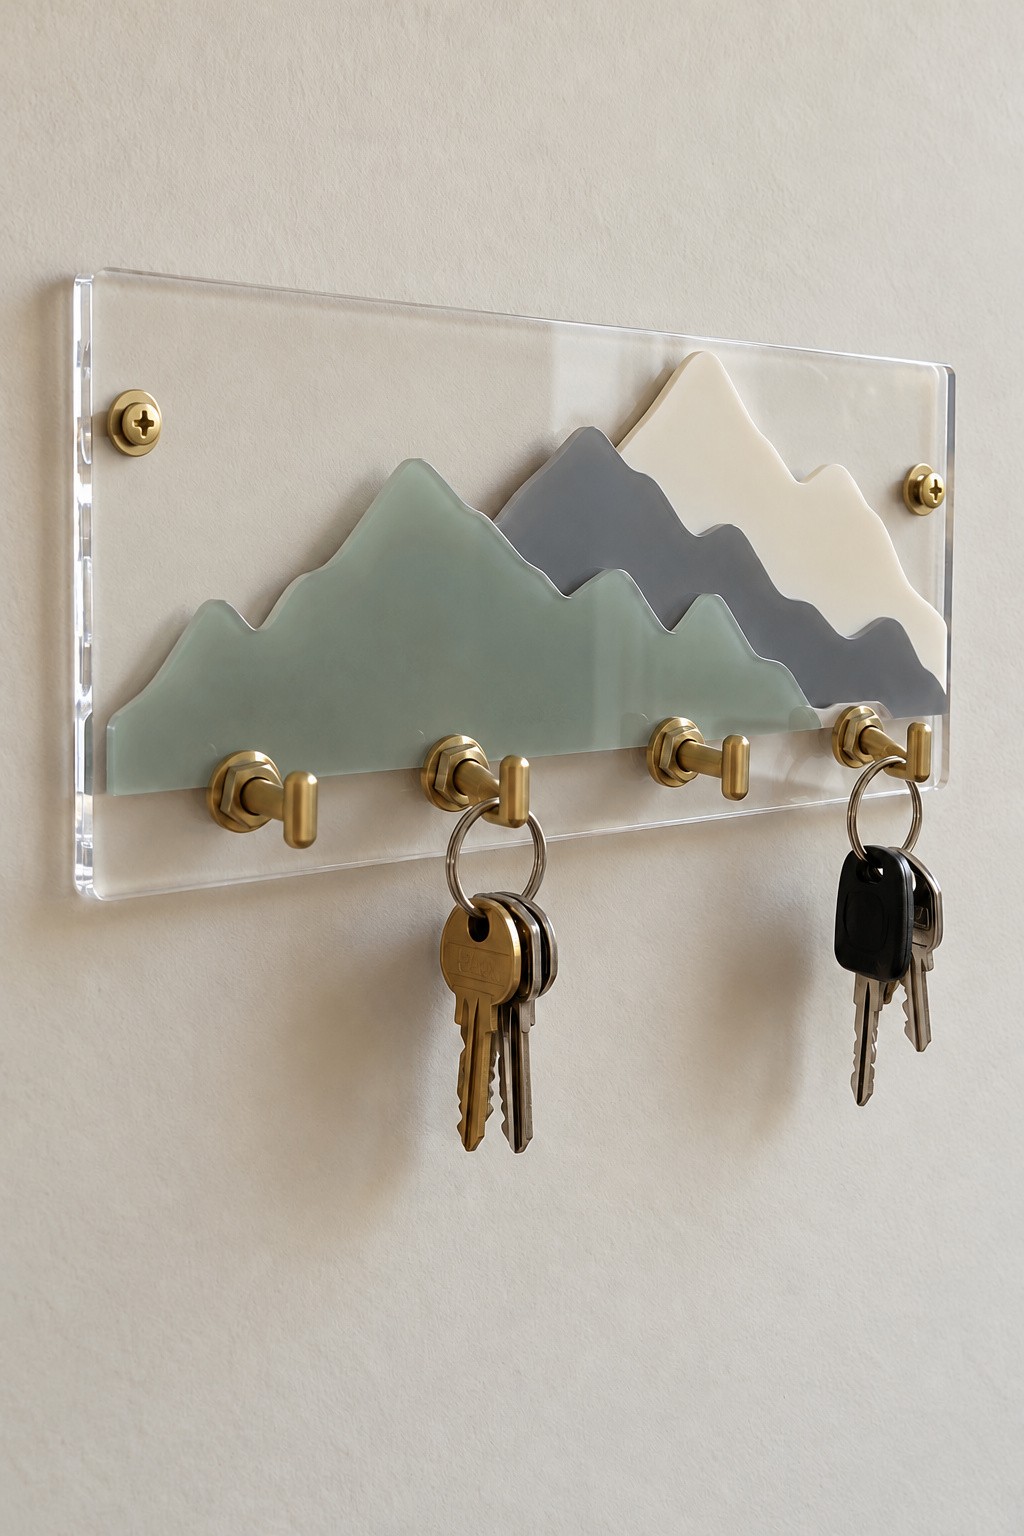
10. Layered Mountain Acrylic Key Rack
Muted green, gray, and cream mountain layers give a clear rectangular key rack a landscape motif. Start with a clear backing, thin colored mountain pieces, and brass hooks attached through the supported backing. The layered peaks provide decoration while the hardware carries the keys.
Arrange the mountain colors before fixing them with a compatible adhesive or thin decorative mounting system. Keep the hook row below the narrow peaks and check that key rings can lift off easily. Mount the complete rack with gold colored Phillips screws and protective washers through the upper holes, using rear nuts to secure the supporting bracket assemblies. Choose suitable wall anchors and allow room behind the panel for its hardware. Do not rely on the decorative mountain layers alone to secure the hooks.
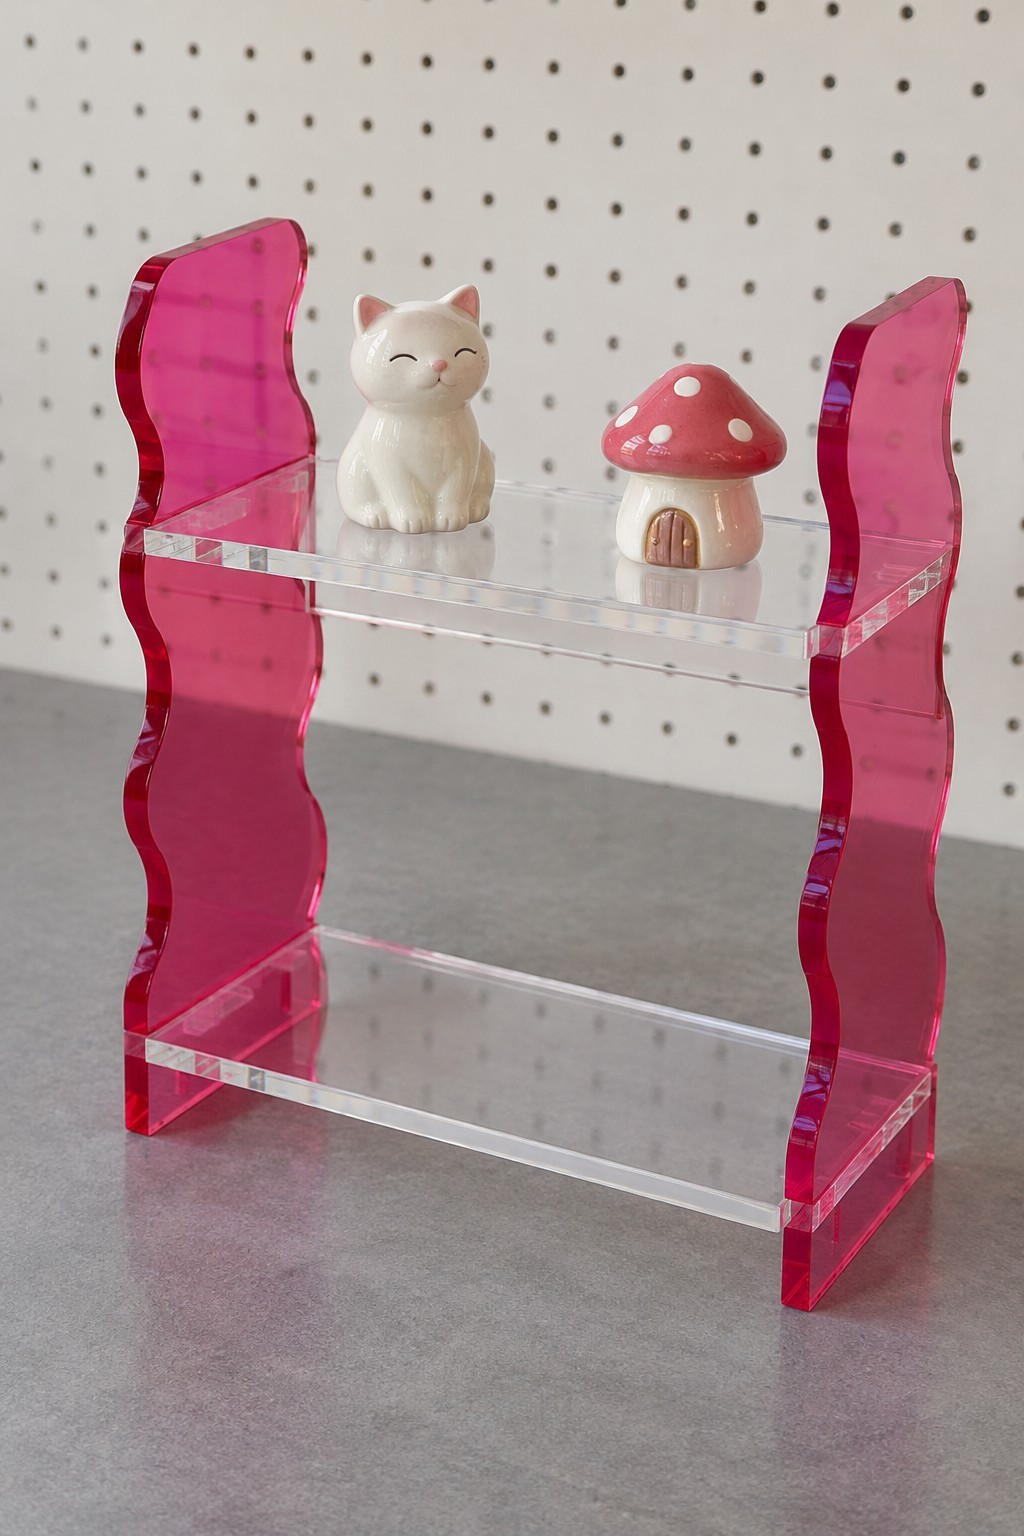
11. Magenta Wave Sides for a Two Level Display Shelf
Wavy magenta side panels add color to a small clear shelf for lightweight ornaments. You can make the structure from two identical shaped uprights and two clear shelves fitted into accurately machined slots or supported with suitable panel hardware. Matching slots matter more than the decorative curves.
Have the supplier check the slot fit against the actual shelf thickness. Assemble on a flat surface, confirm that both levels sit evenly, and add grip pads beneath the sides. Keep heavy jars and stacked books elsewhere unless the complete shelf has been designed for that load. A few small objects let the bright outline remain the main feature.
12. Blue Whale Acrylic Phone Stand
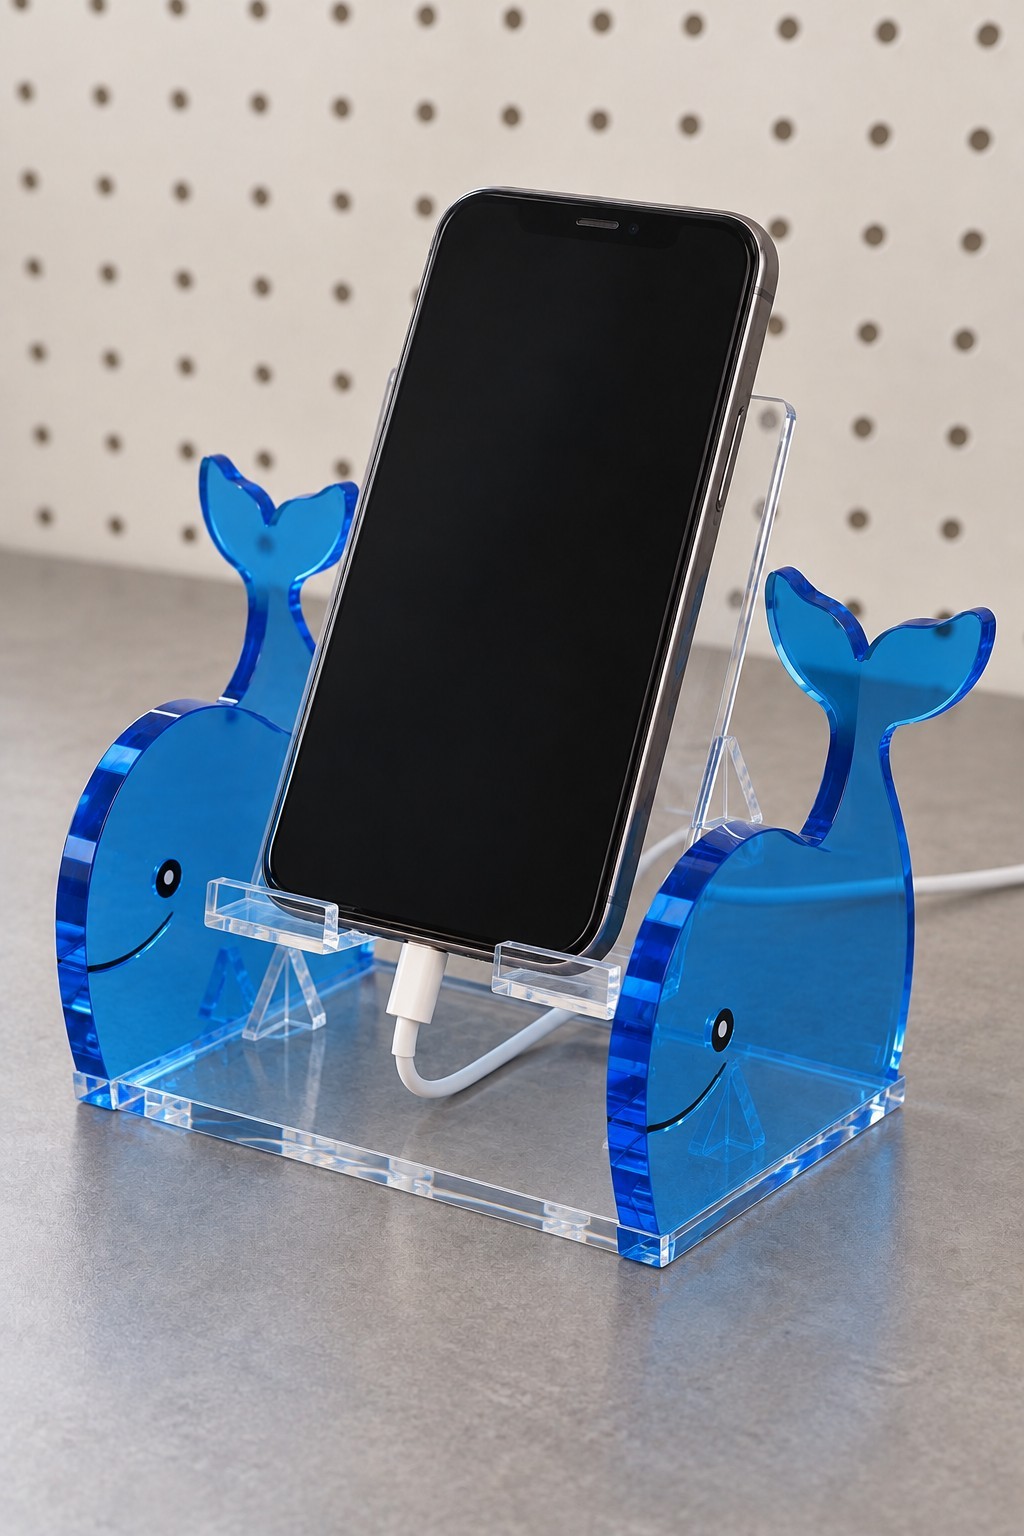
Two blue whale silhouettes can support a clear angled phone cradle on a rectangular base. The cradle needs a lower retaining ledge and a central opening for the charging connector. Size it with your phone inside its normal case so the fit reflects everyday use.
Order the angled support components or have a supplier form the cradle; a flat rectangle alone will not create the correct resting angle. Assemble the side plates around the clear support, leaving the charging lead free to move. Check stability while tapping the screen, and make sure the ledge supports the case without pressing its buttons or covering the speaker openings.
13. Rainbow Acrylic Desktop File Sorter
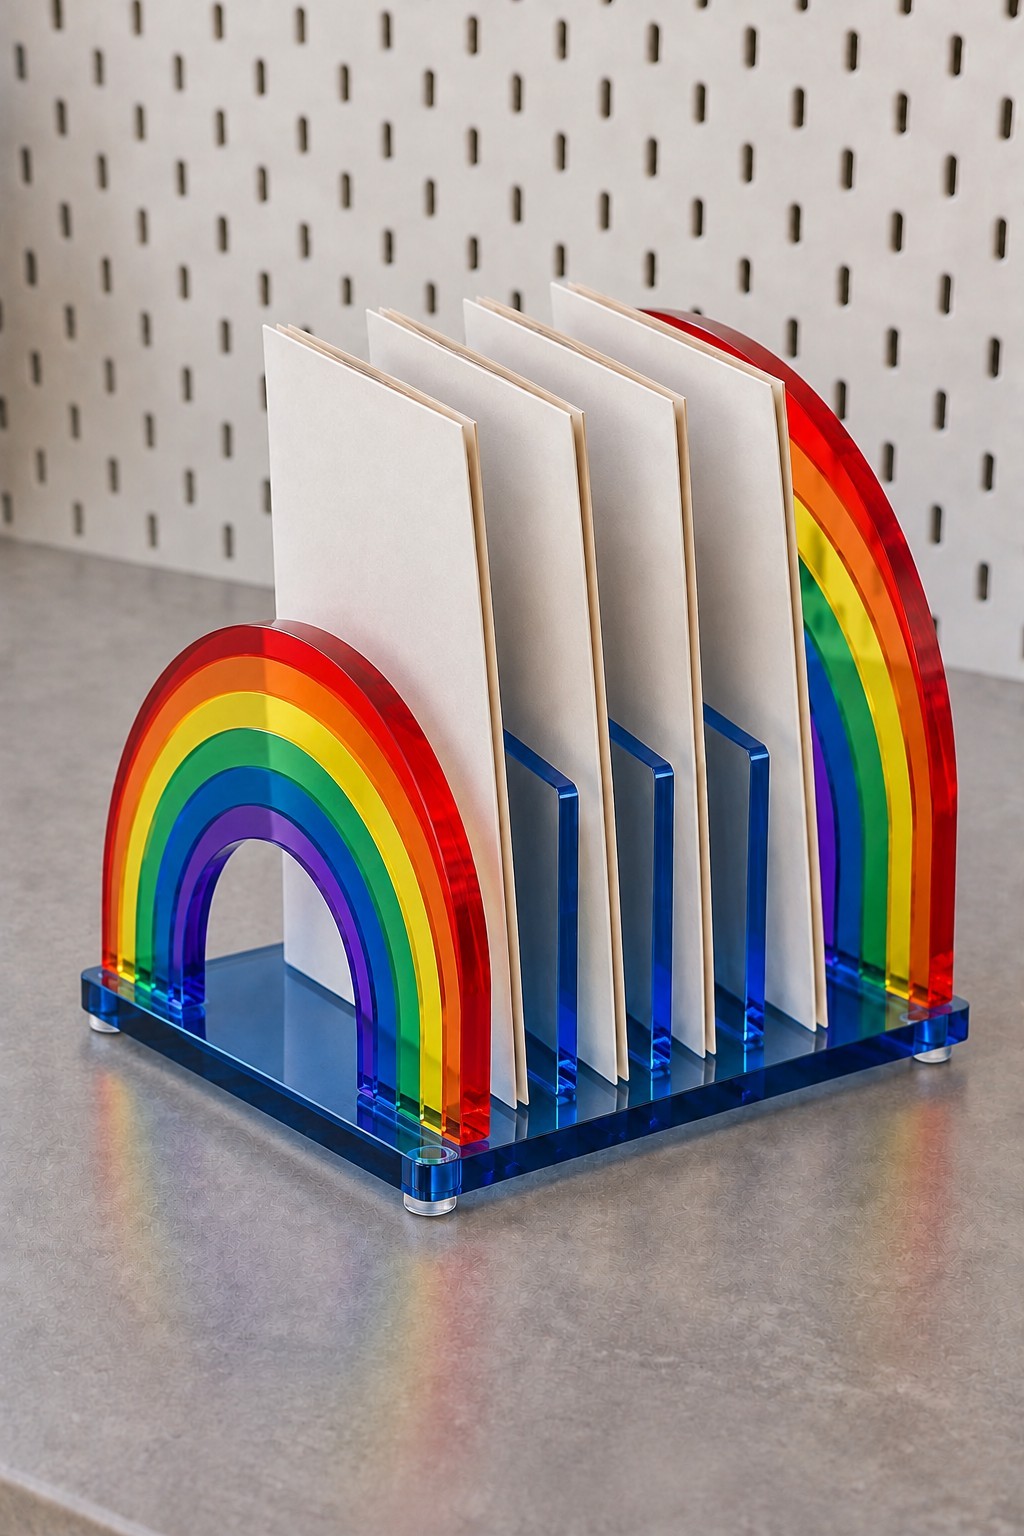
A rainbow file sorter combines bright arched ends with clear upright dividers on a blue base. You can create the colored bands from layered acrylic shapes or apply compatible colored film to a prepared arch. Clear dividers keep the structure visually light even when several notebooks are stored.
Choose compartment widths using your thickest folders and allow room to remove them without scraping their covers. Prepare matching slots or accurately bonded divider positions, then assemble the dividers square to the base. Use the rainbow ends as decorative boundaries while ensuring that the clear partitions and base form a stable structure. Reserve narrow channels for thin notebooks and loose papers.
14. Strawberry Acrylic Cotton Pad Dispenser
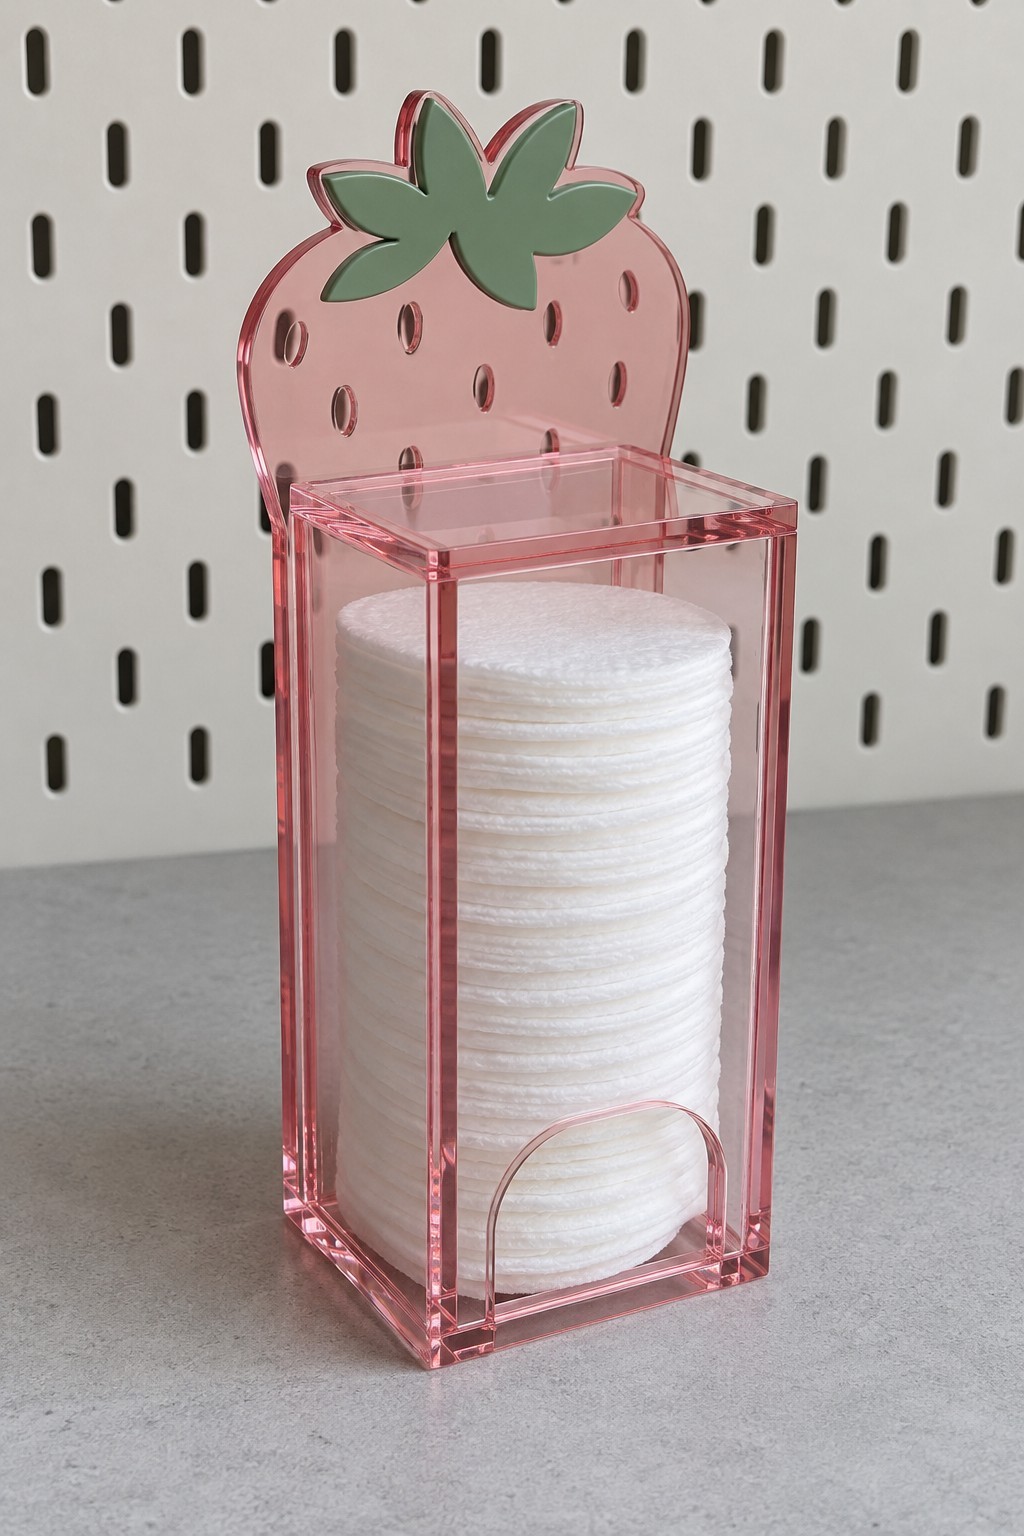
A pink strawberry backing makes a clear cotton pad column feel at home on a vanity. Use clear box panels, a fitted removable lid, and a lower finger opening shaped wide enough to retrieve one pad. The green leafy top can be a separate flat accent attached to the backing.
Measure the pad diameter before specifying the inside width and depth. Leave a little clearance so the stack settles without being compressed, then smooth the dispensing opening carefully. Assemble the box, check the lid movement, and attach it to the strawberry panel. Store only dry pads and keep the organizer clear of routine sink splashes.
15. Amber Acrylic House for Tea Sachets
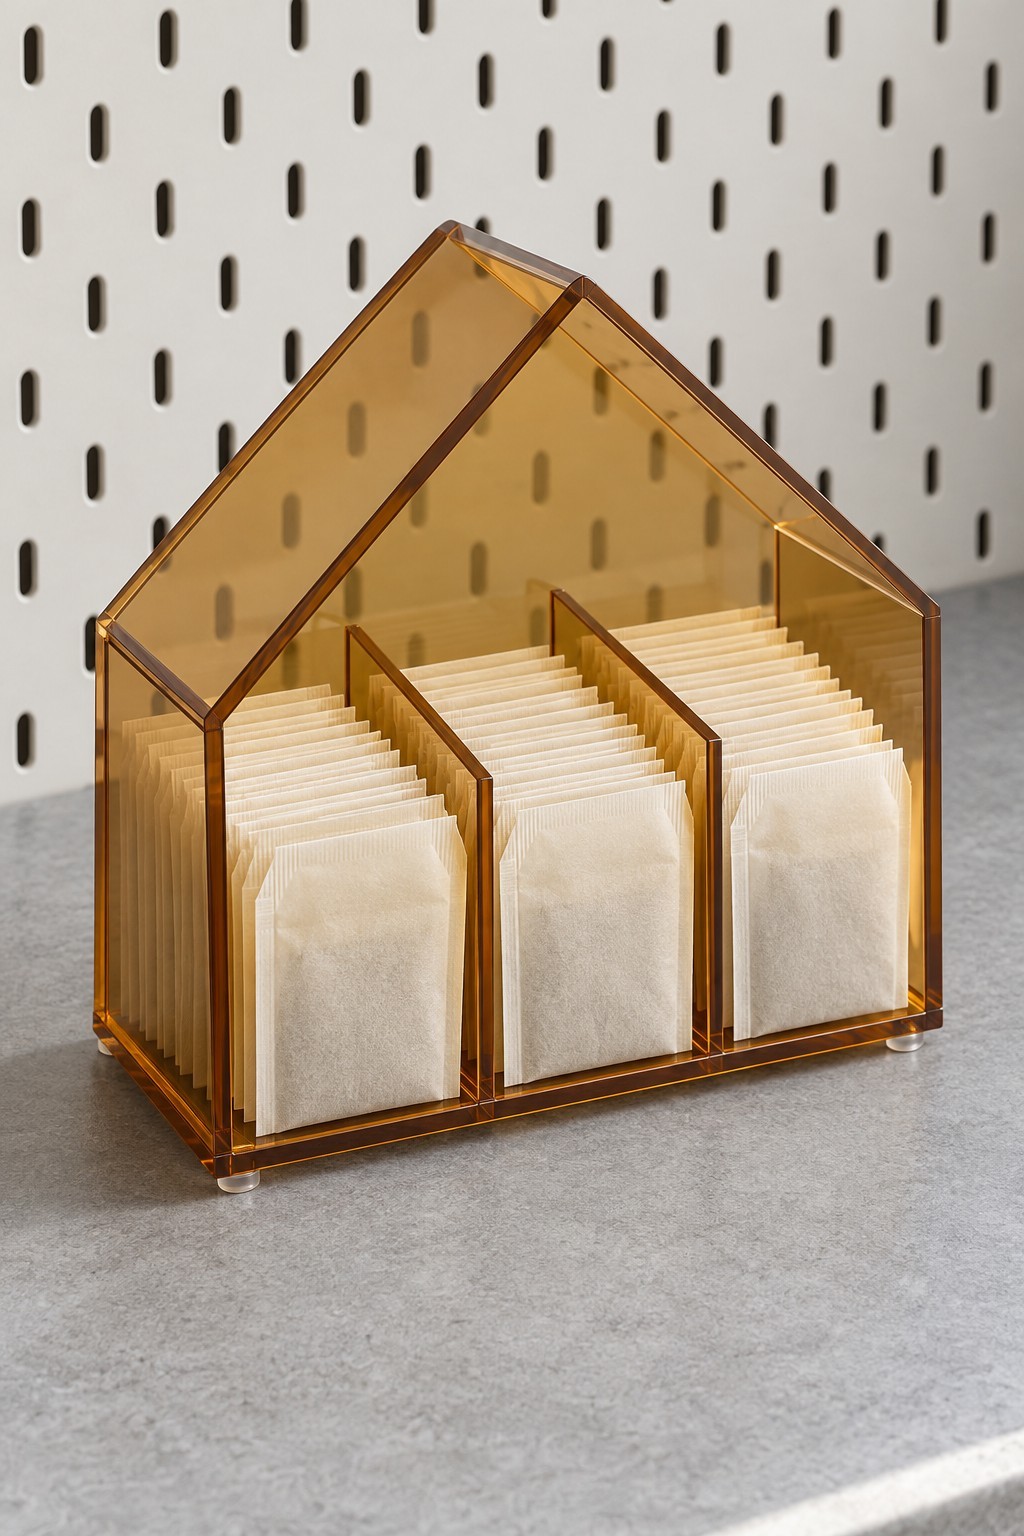
An amber house outline gives three rows of tea sachets a tidy place beside a mug station. Build it with a house shaped back, a base, short side walls, and two internal dividers. The open front makes the flavors easy to browse without lifting a lid.
Set the divider spacing around your preferred sachets and keep the front opening accessible. Use individually wrapped tea sachets for daily storage, rather than treating unverified craft materials as suitable for direct food contact. Assemble the compartments first and then add the roof outline as decoration. Position the finished holder away from steam so the packets remain dry.
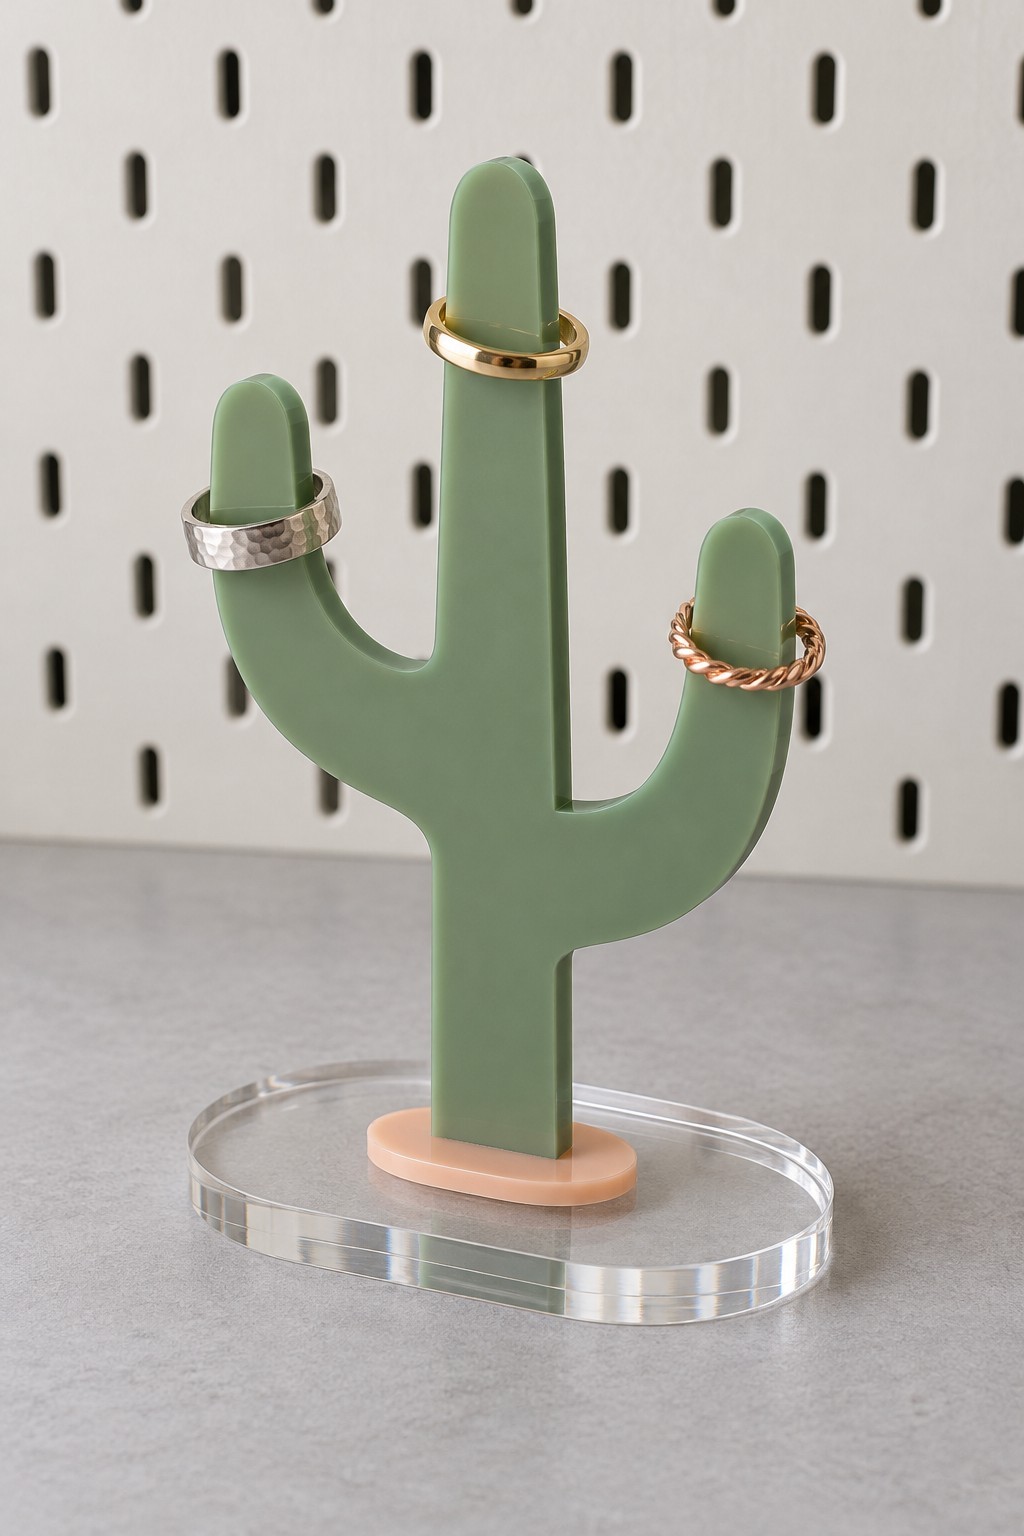
16. Sage Acrylic Cactus Ring Stand
A flat sage cactus can hold a few rings on its upward branches while standing on a small oval base. Use a prepared acrylic silhouette, a shallow pink mounting block, and a clear base large enough to keep the cactus upright. Rounded branch ends suit this function better than pointed details.
Check ring sizes against a paper template before ordering the cactus. Each branch must be narrow enough for a ring to pass over but broad enough to remain sturdy. Fit the stem into a prepared slot or supported socket, then secure the mounting block to the base. Keep the display to a light daily selection rather than crowding every branch.
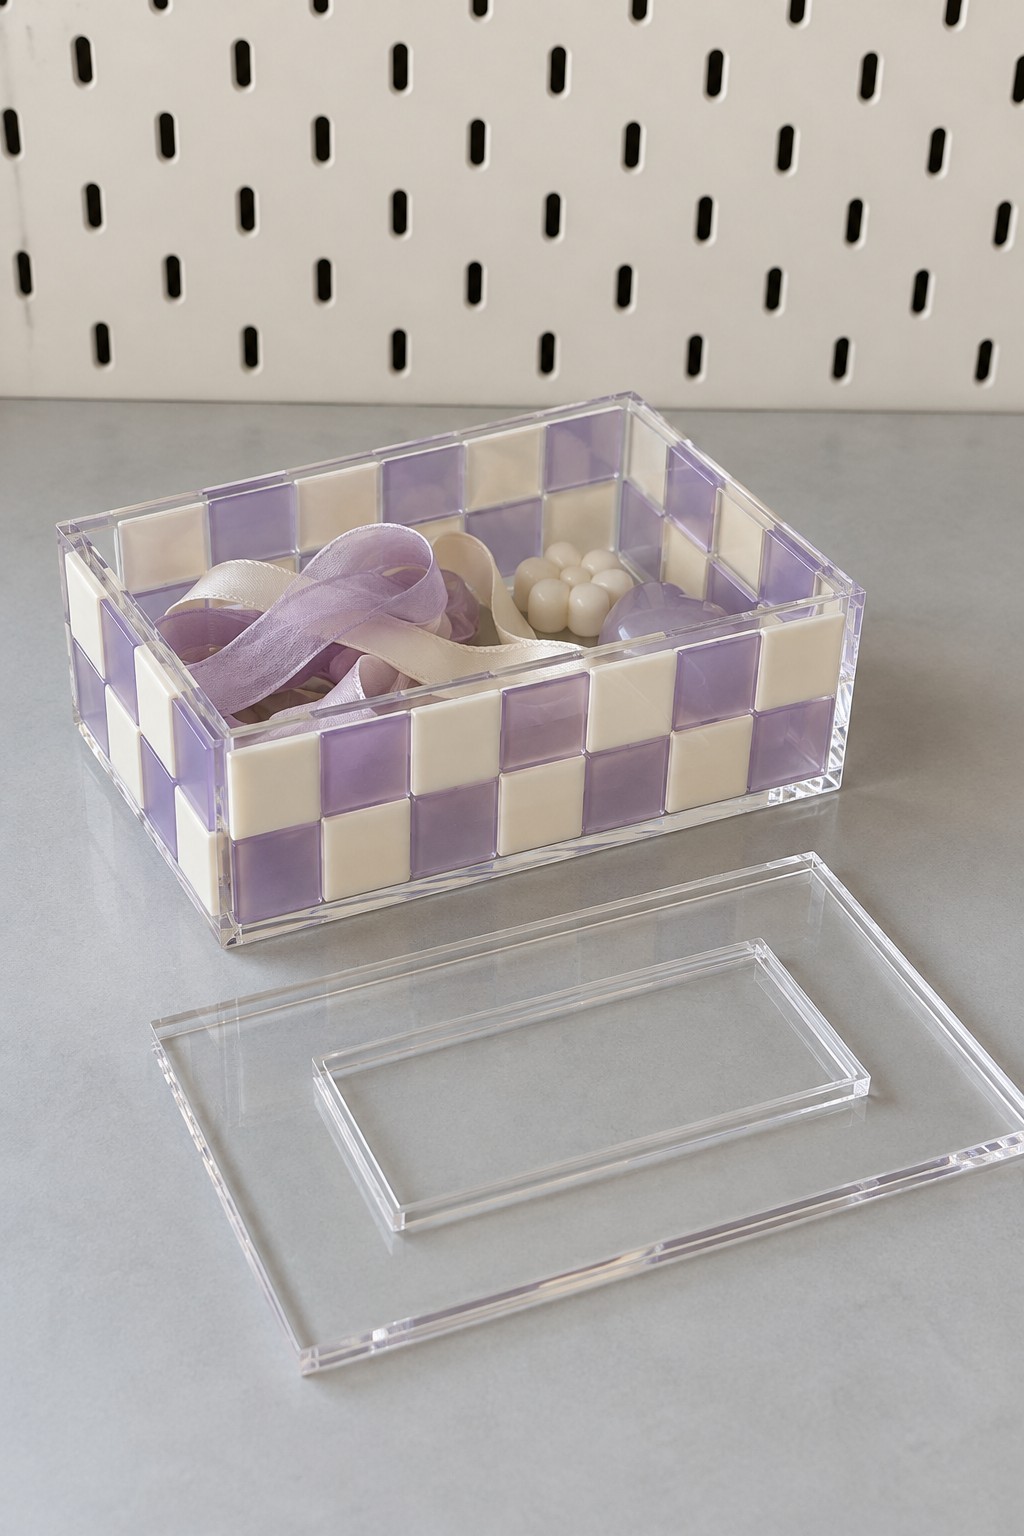
17. Lilac Checkerboard Acrylic Keepsake Box
A small clear box gains a soft geometric pattern from alternating lilac and cream squares. You can create this look with compatible vinyl applied to prepared side panels, keeping the top edge and bonding areas clean. A transparent removable lid leaves the contents visible.
Assemble and cure the box before applying decorative squares across its exterior. Align the pattern from one reference corner so the rows meet neatly around the sides. For a lid that stays centered, add a smaller locating panel underneath with enough clearance to lift freely. Use the box for dry accessories and keep the decoration away from surfaces that rub during opening.
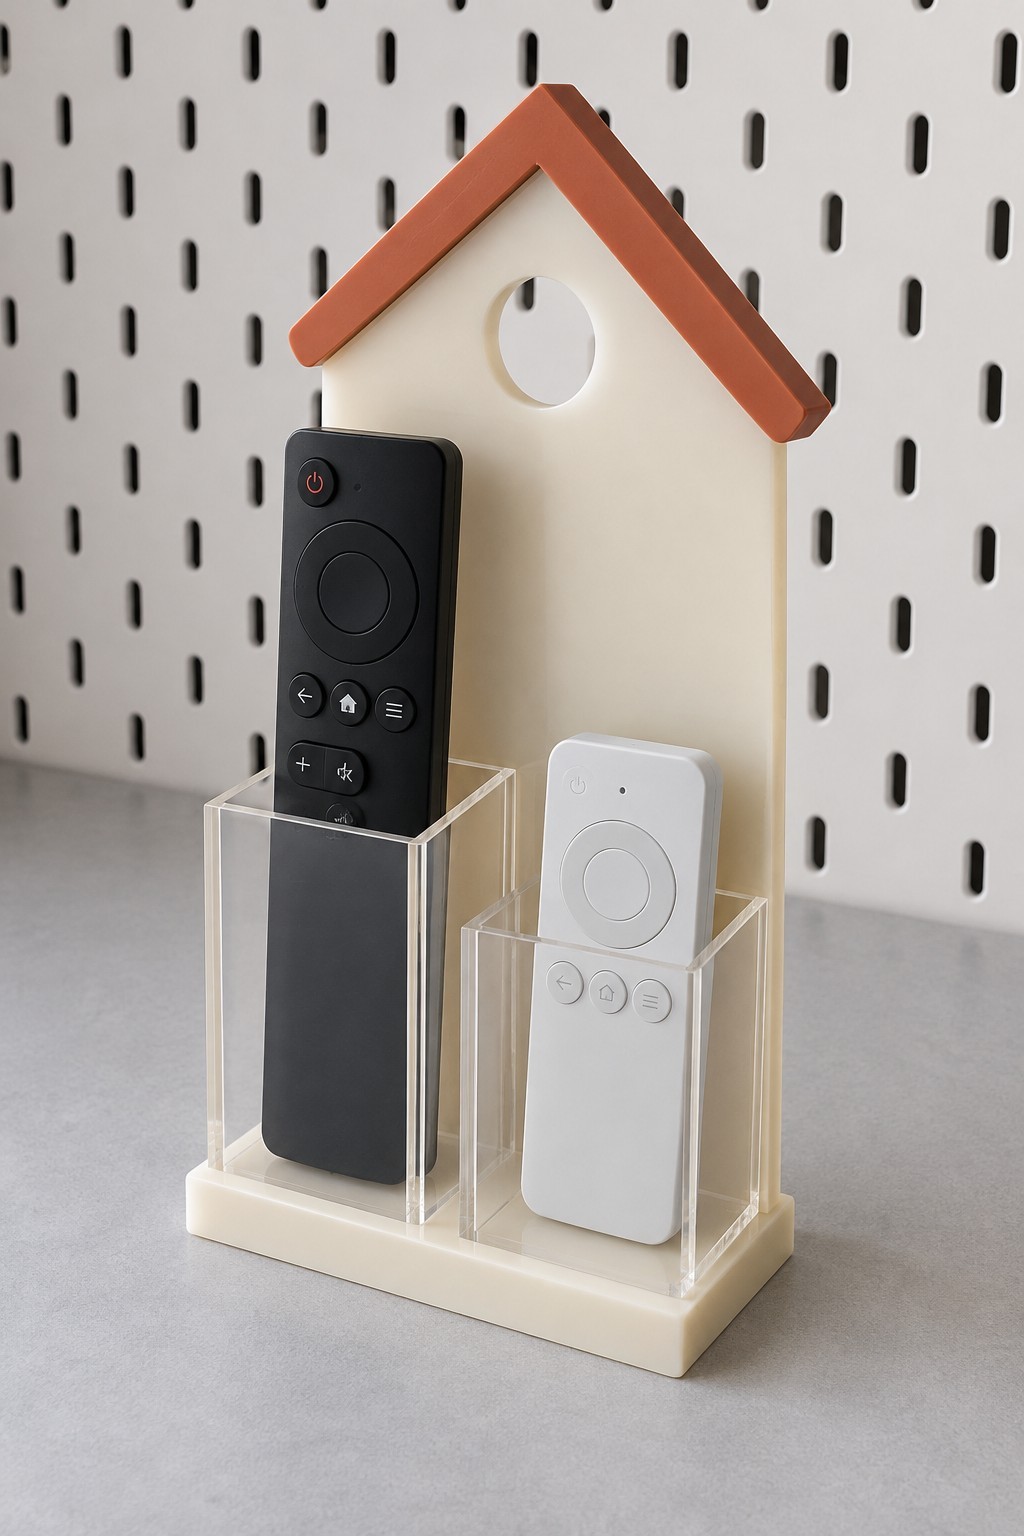
18. Cream Acrylic House Remote Organizer
A cream house backing with a terracotta roof can hold two clear remote compartments. Make the pockets at different heights to suit a tall television remote and a shorter device controller. A broad cream base brings the pockets and decorative backing into one compact unit.
Measure each remote with its protective case, then allow room for fingers at the sides. Assemble the pockets, attach them to the base, and position the house behind them before securing it. Keep decorative roof pieces above the storage opening so they do not interfere with removal. Fit the tallest remote before final assembly to check that the organizer will remain balanced.
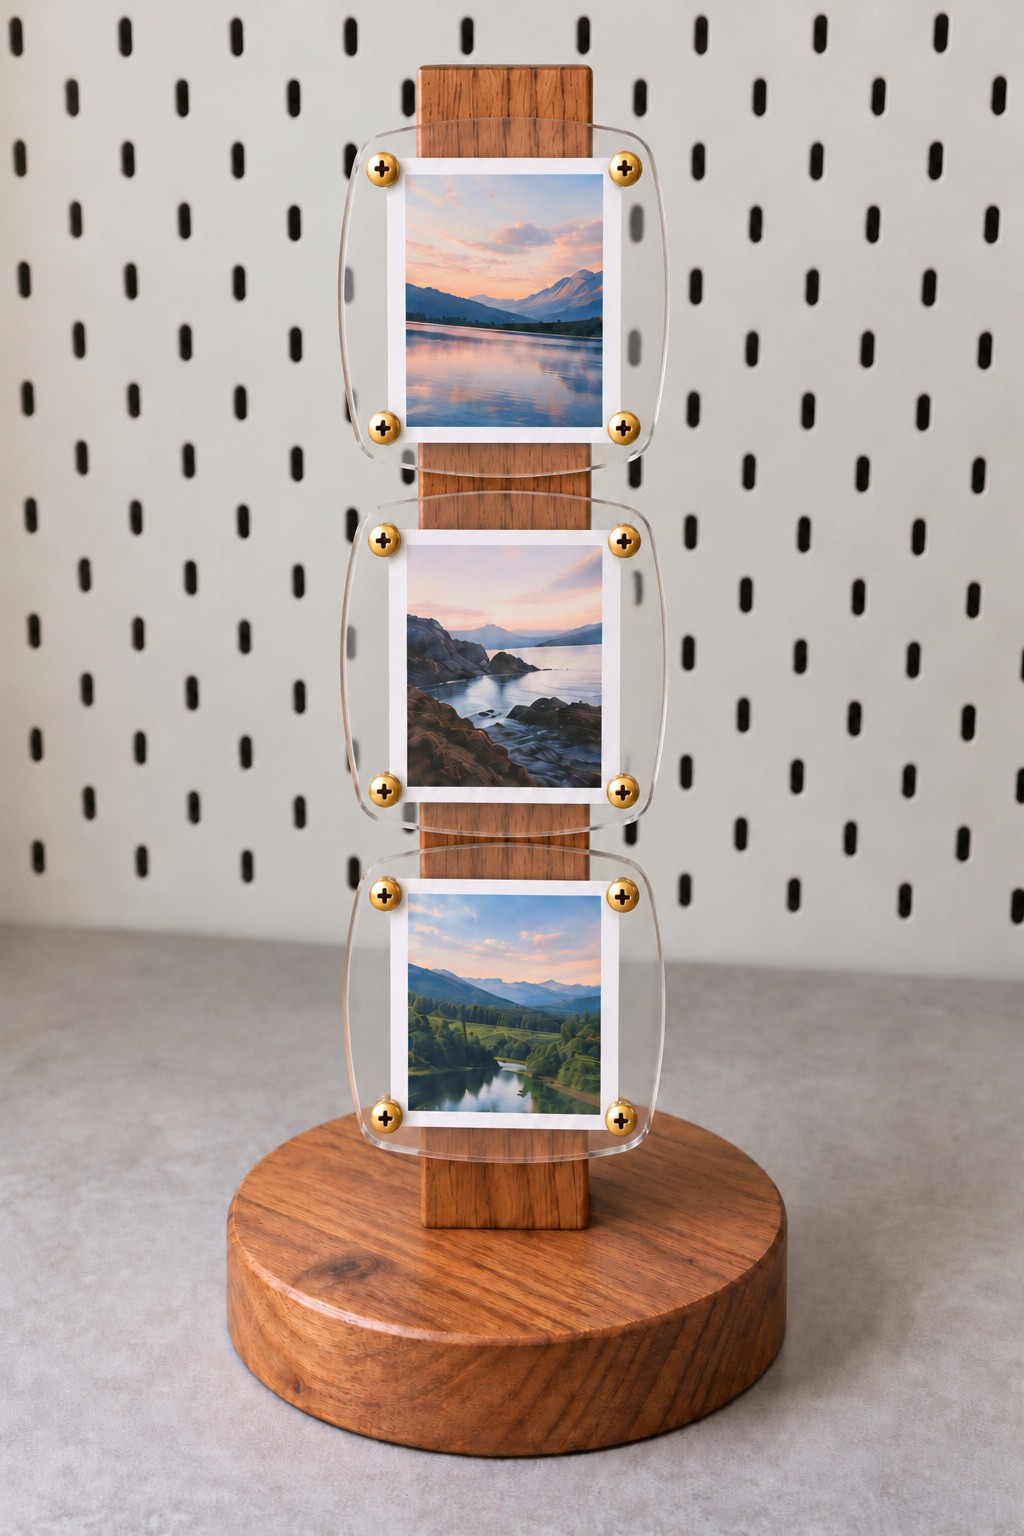
19. Walnut Photo Tree with Clear Acrylic Frames
A walnut post rising from a round wooden base creates a small photo tree with three clear frames arranged vertically. Use matching acrylic panel pairs for each print, with small gold colored Phillips screws, protective washers, and rear hex nuts at the corners. The frames sit in front of the walnut post, with their broad rear acrylic faces bonded to the flat front face of the wood behind them.
Arrange the three frames in a vertical column on the front of the post. Keep the post narrower than the frames so the rear corner nuts remain clear of the wood. Choose an adhesive explicitly approved for acrylic and the prepared wood surface, test it on spare material, and bond the central rear acrylic face flush against the post with a broad, flat contact area. Support the frames in alignment for the adhesive's specified curing period before adding the prints. Apply adhesive only to the exterior rear face, keeping it out of the photograph cavity, and leave the corner screws and rear nuts accessible for changing photographs.
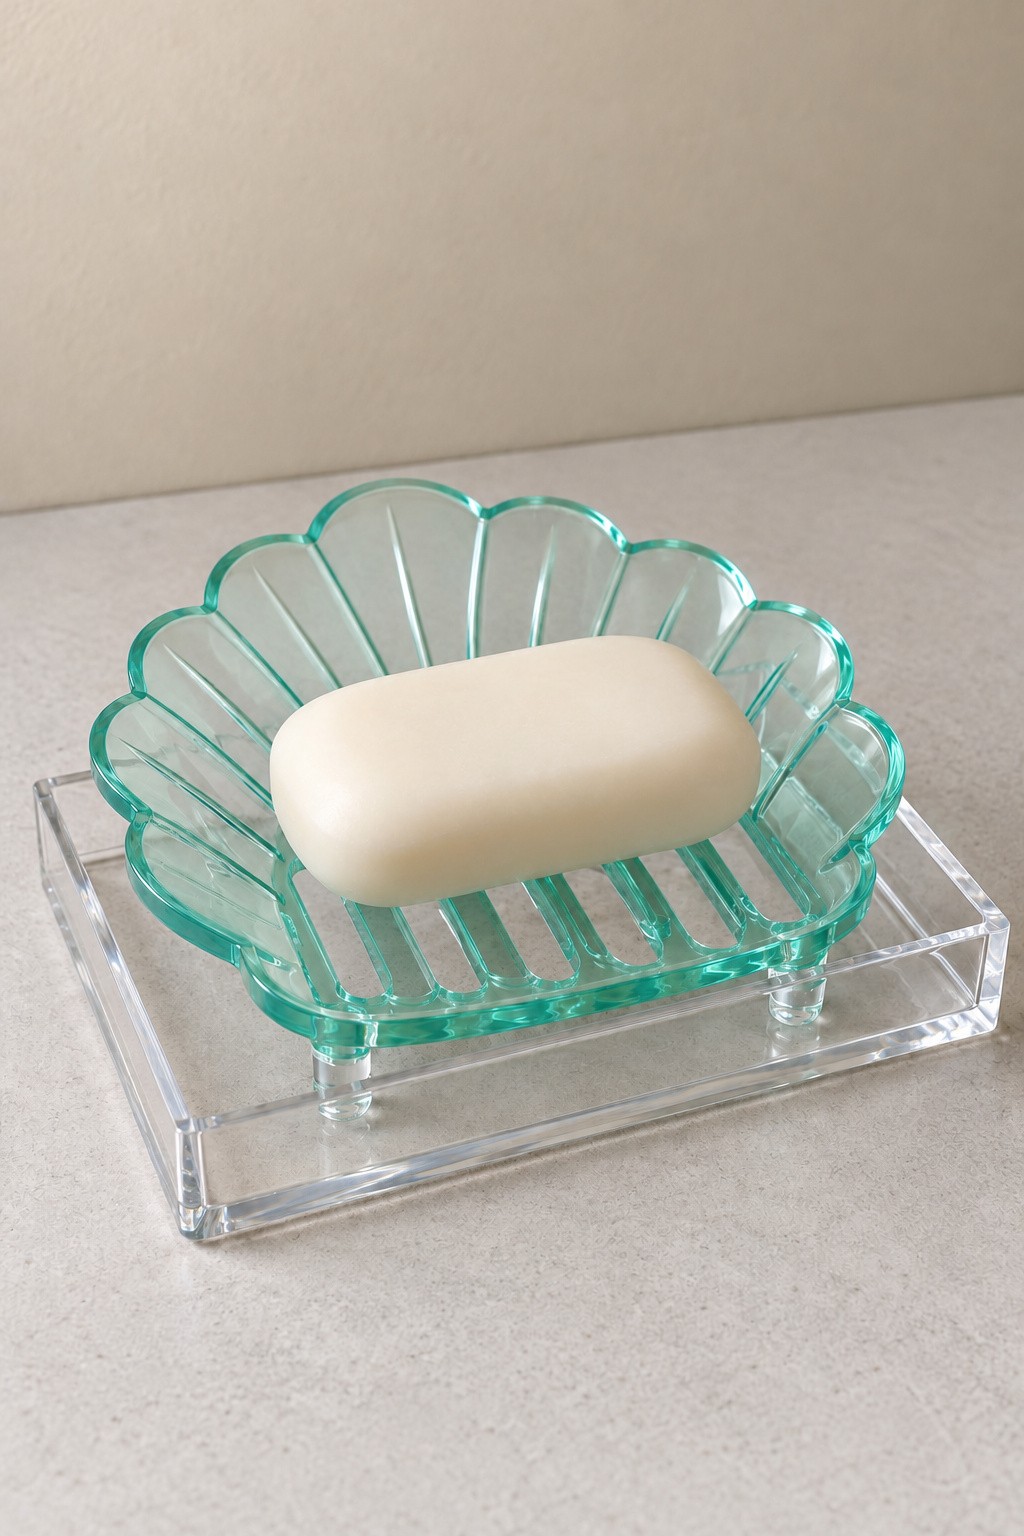
20. Mint Acrylic Shell Soap Dish with a Catch Tray
A mint shell insert raised above a clear catch tray separates a bar of soap from collected water. The shaped insert needs actual drainage openings, not just engraved lines. Because the curved shell and raised ribs require more than a flat silhouette, order a prepared insert or have those details professionally fabricated.
You can assemble the supporting tray from clear acrylic panels and add short feet beneath the removable shell. Check that water can pass through and that the insert lifts out for cleaning. Empty the lower tray regularly and smooth every contact edge. A removable upper piece is more useful here than a permanently sealed decorative assembly.
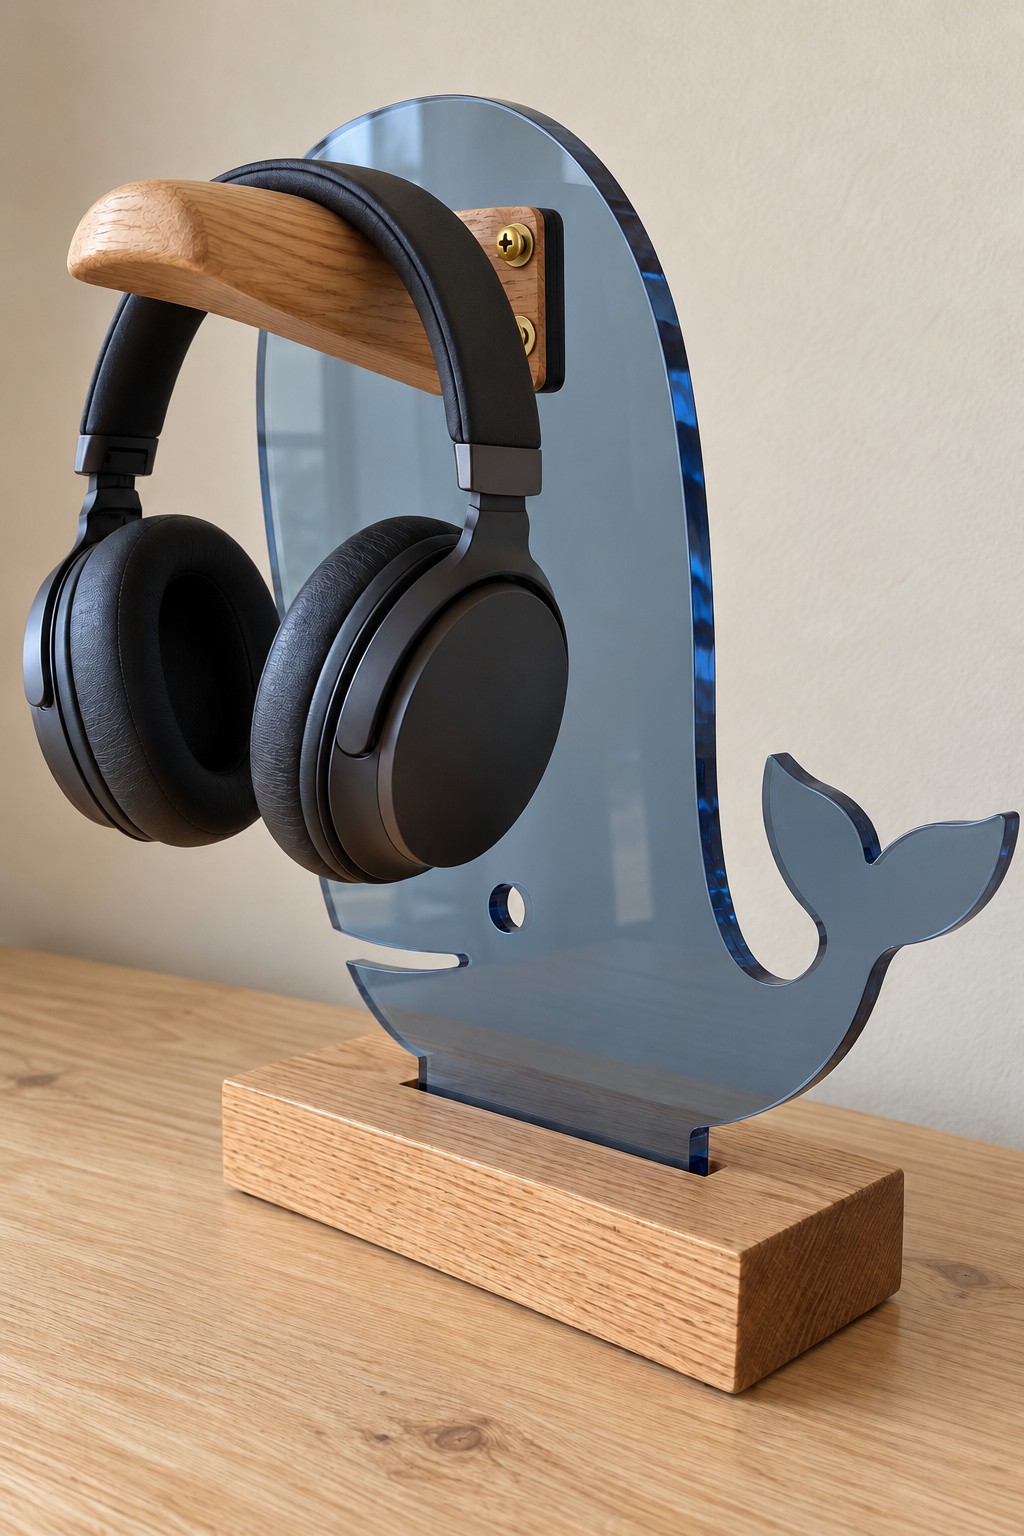
21. Blue Whale Headphone Stand with a Wooden Rest
A smoky blue whale silhouette gives a headphone stand a playful profile, while a rounded wooden crosspiece supports the headband. Use a slotted timber base, a sufficiently rigid acrylic upright, and two gold colored Phillips machine screws with protective washers and rear hex nuts to secure the projecting wooden rest. The rest should have a smooth, broad contact surface.
Plan the connection with a fabricator around your headphones' weight and headband width. Fit the upright securely, attach the rest, and check that the ear cups clear both the desk and the whale's tail. Keep the base centered beneath the hanging load. Thin decorative acrylic and an unsupported glued peg are poor substitutes for a properly designed connection.
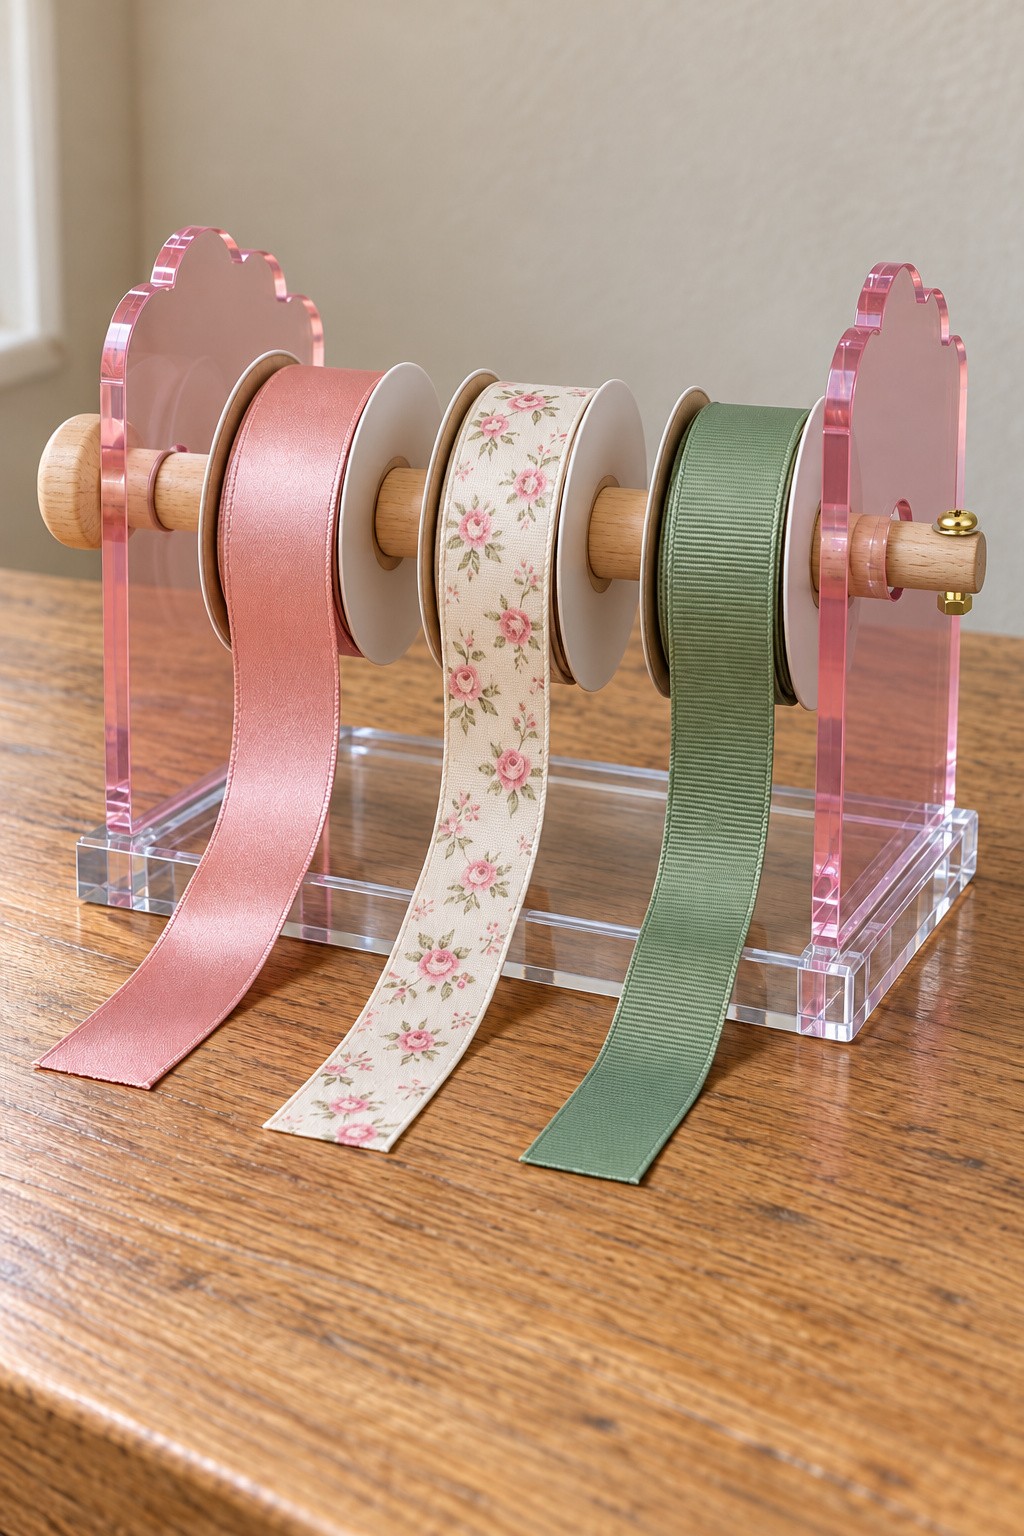
22. Pink Scalloped Ribbon Spool Rack
Pink scalloped end panels and a clear base turn ribbon spools into an orderly row. A removable wooden dowel passes through the spool centers and rests in aligned supports at the ends. You can add loose spacer discs where neighboring reels need separation.
Measure the largest spool diameter before deciding the dowel height so the ribbon can unwind without touching the base. Make the right end retainer removable for refilling. A small gold colored Phillips screw through a transverse hole near the dowel tip, secured with a nut underneath, can prevent the axle from sliding through the support. Align the acrylic end panels before securing them. Leave the ribbon tails loose at the front so colors can be selected without removing every spool.
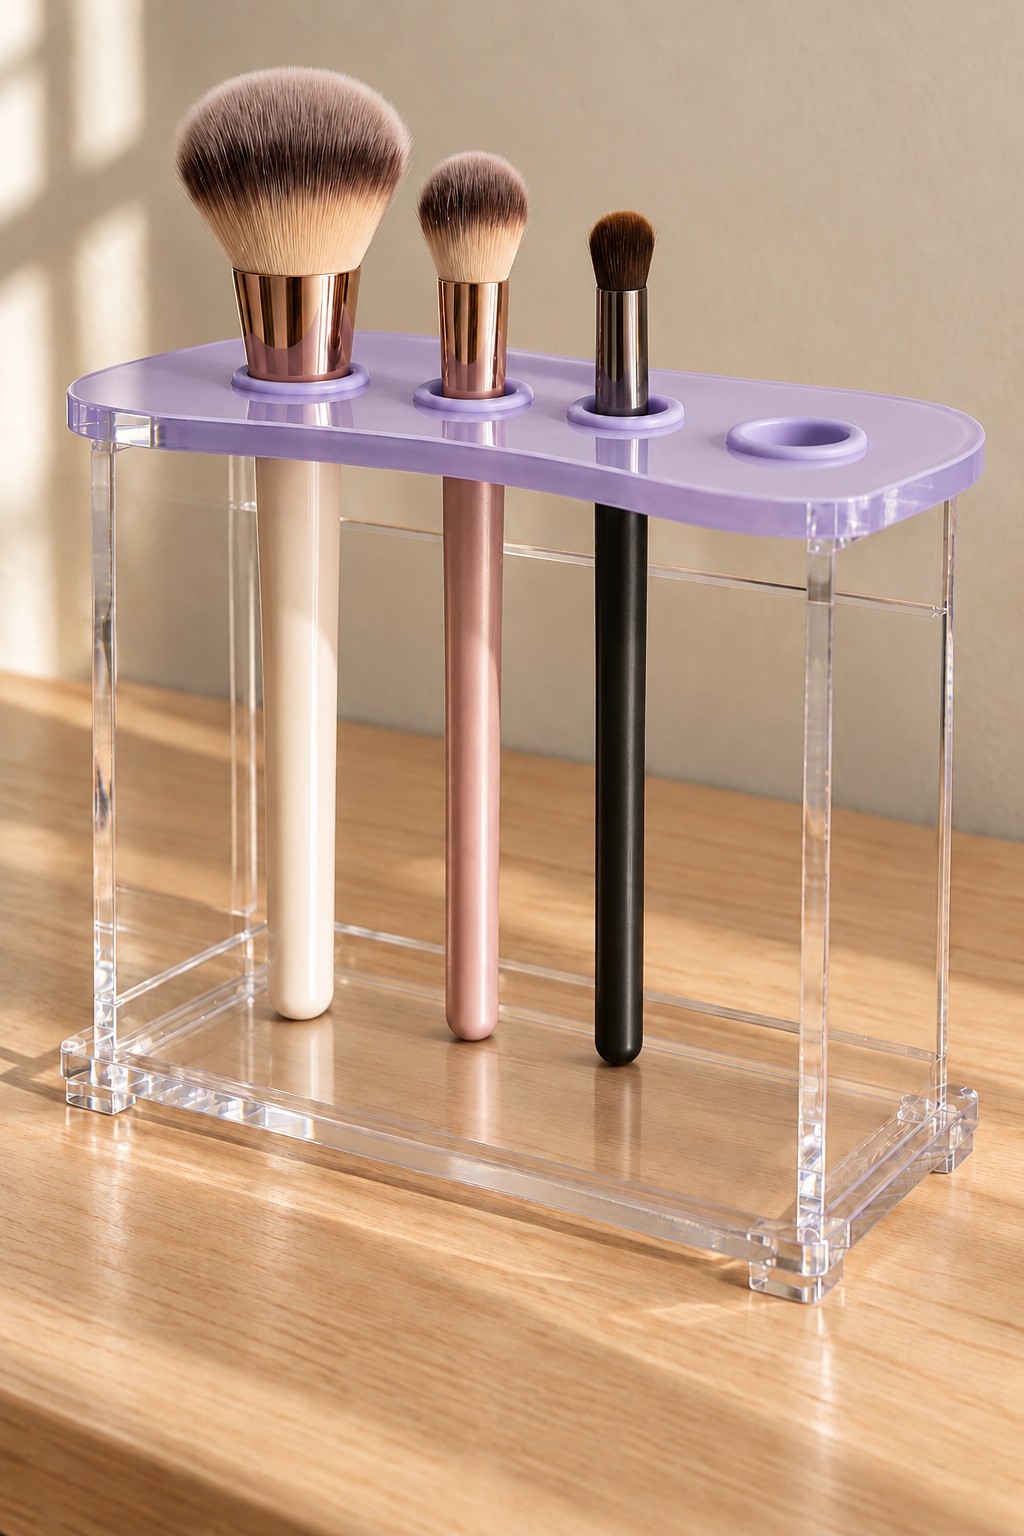
23. Lilac Acrylic Makeup Brush Storage Rack
A lilac top plate with circular openings can keep dry makeup brushes separated above a clear base. Clear side panels hold the top level, and the lower plate supports the brush handles. Match the hole sizes to the handle widths rather than assuming every brush fits the same opening.
Lay out the brushes on paper and leave enough space for the fluffy heads to sit apart. Order smooth holes, assemble the support structure square, and confirm that each handle reaches the base. This upright arrangement is for storing brushes after they have dried. Follow the brush maker's cleaning and drying advice rather than standing wet brushes in the rack.
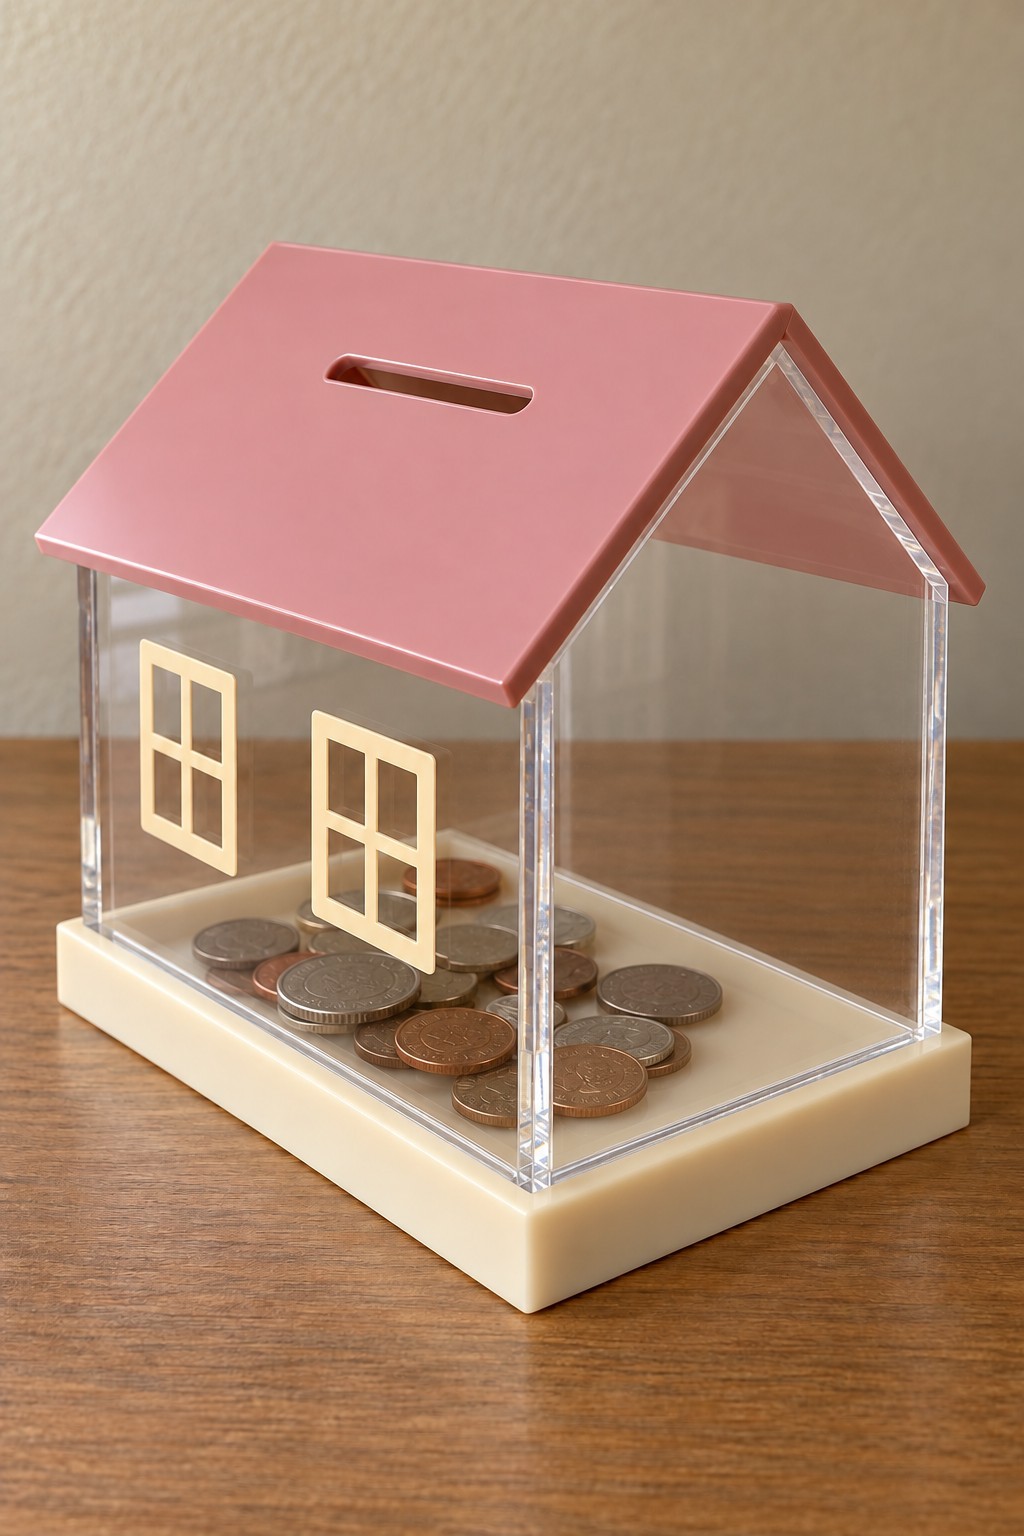
24. Clear Acrylic House Savings Bank with a Pink Roof
A transparent house bank makes saved coins visible beneath a pink roof. Use clear wall panels, a cream base, and two roof sections, with a smooth coin slot in one roof plane. Size the slot using the largest coin you intend to insert.
Plan access before bonding the walls. You can make one roof section removable with suitable fittings or fit an accessible base panel, rather than sealing the coins inside permanently. Assemble the shell square and keep decorative window shapes on the outside. Check the slot edges for sharpness and supervise use around young children because loose coins and small hardware are choking hazards.
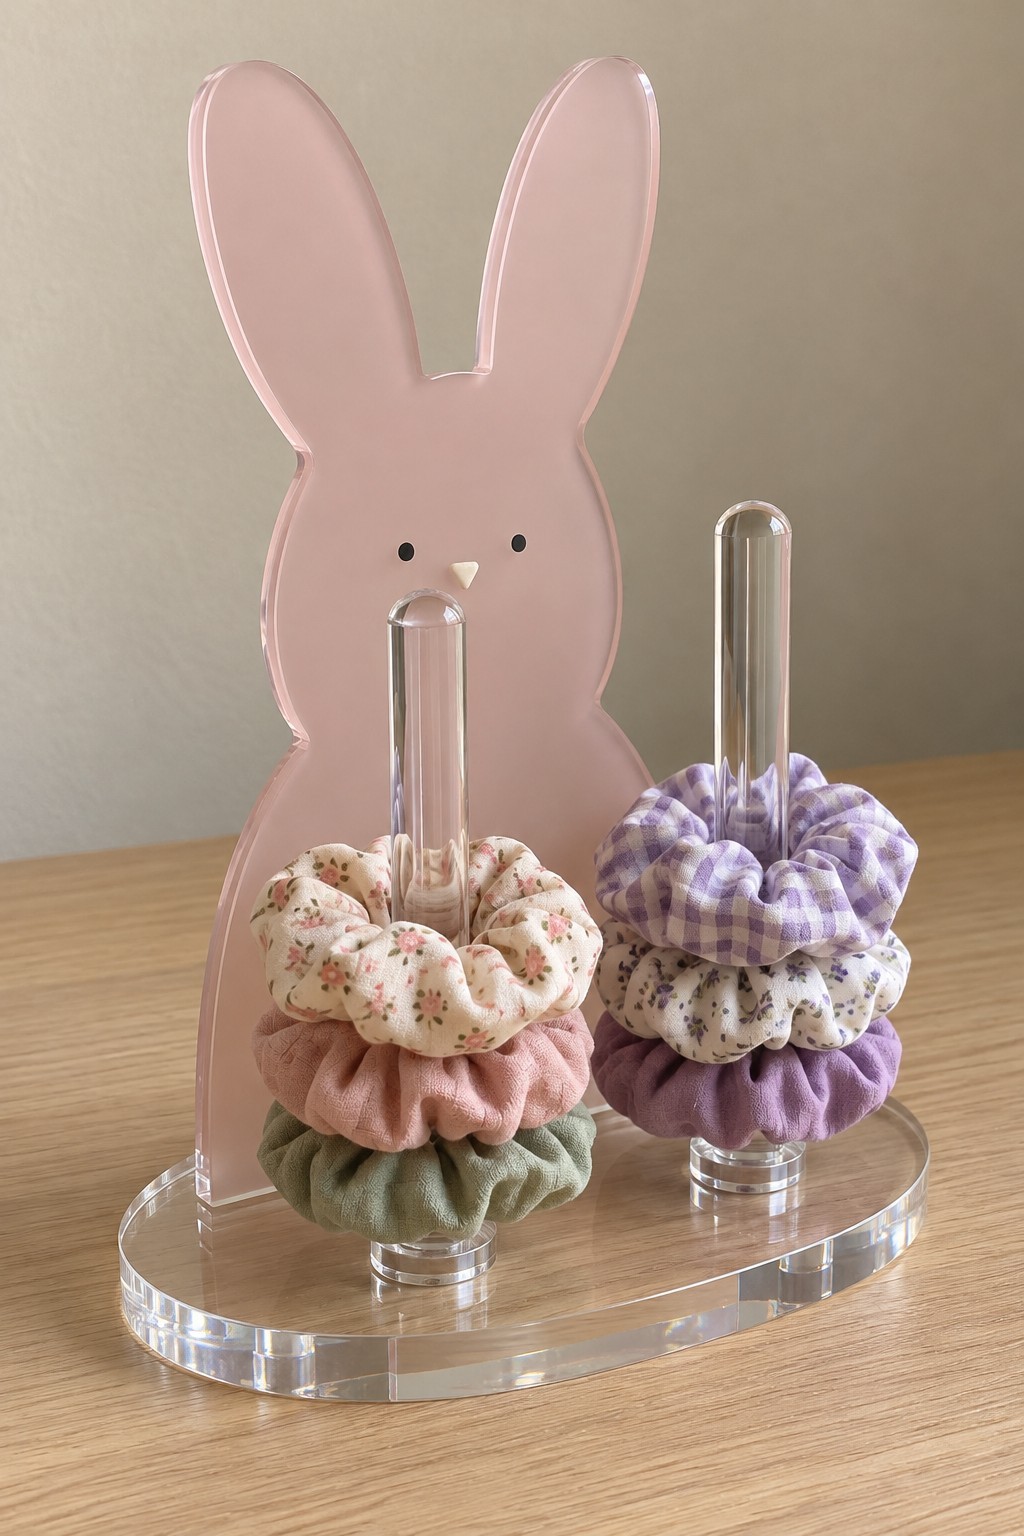
25. Blush Acrylic Bunny Scrunchie Stand
A blush bunny backing and two clear upright rods create a compact stand for fabric scrunchies. The oval base should be wide enough to support the full arrangement, with space between the rods for bulky gathered fabric. The bunny face can be a small compatible vinyl detail.
Use prepared acrylic rods with smooth rounded tops and accurately fitted mounting holes or sockets in the base. Secure the rods and backing before stacking the scrunchies. Set their heights around the number of accessories you actually use, keeping the upper pieces easy to lift off. Leave the long ears as decoration rather than using them as additional storage hooks.
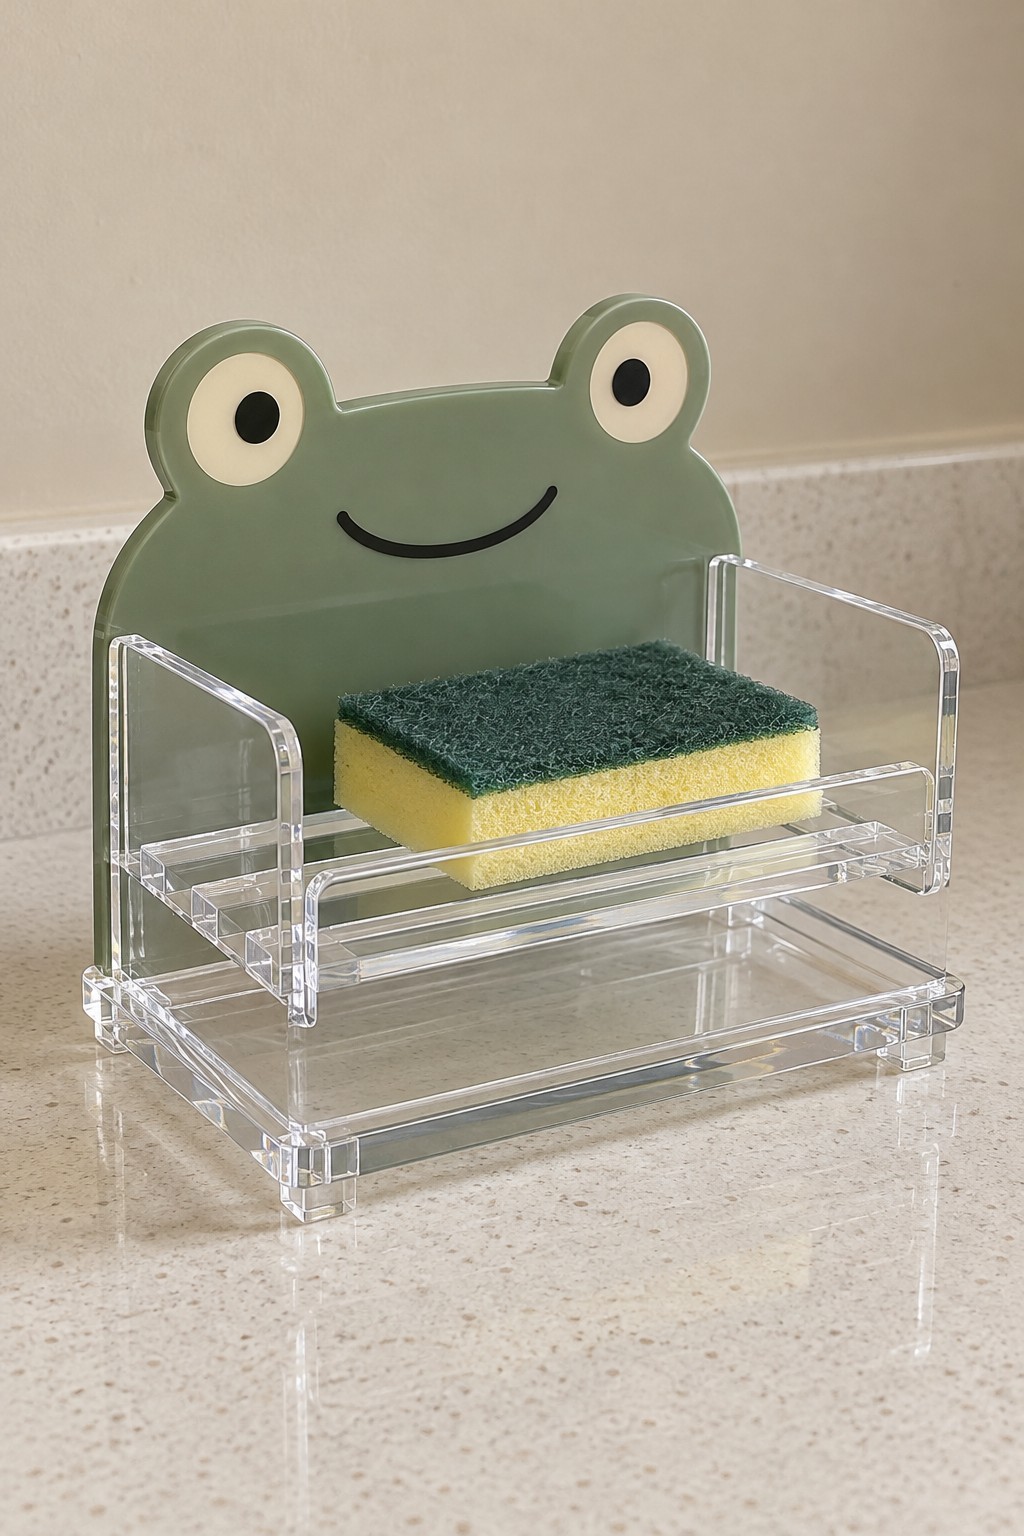
26. Sage Frog Sponge Holder with a Drip Tray
A sage frog backing brings character to a clear sponge rack above a removable drip tray. Use an open rail or slotted support for the sponge, a separate lower tray, and clear sides that hold the upper section above the collected water. The gap beneath the sponge is functional, not just decorative.
Size the upper rack around your sponge without enclosing it tightly. Prepare real drainage openings and make the lower tray easy to slide out for washing. Keep the facial decoration on the dry backing area and place the finished unit where it can drain and be cleaned regularly. Do not make the frog panel carry the wet sponge without a supported base.
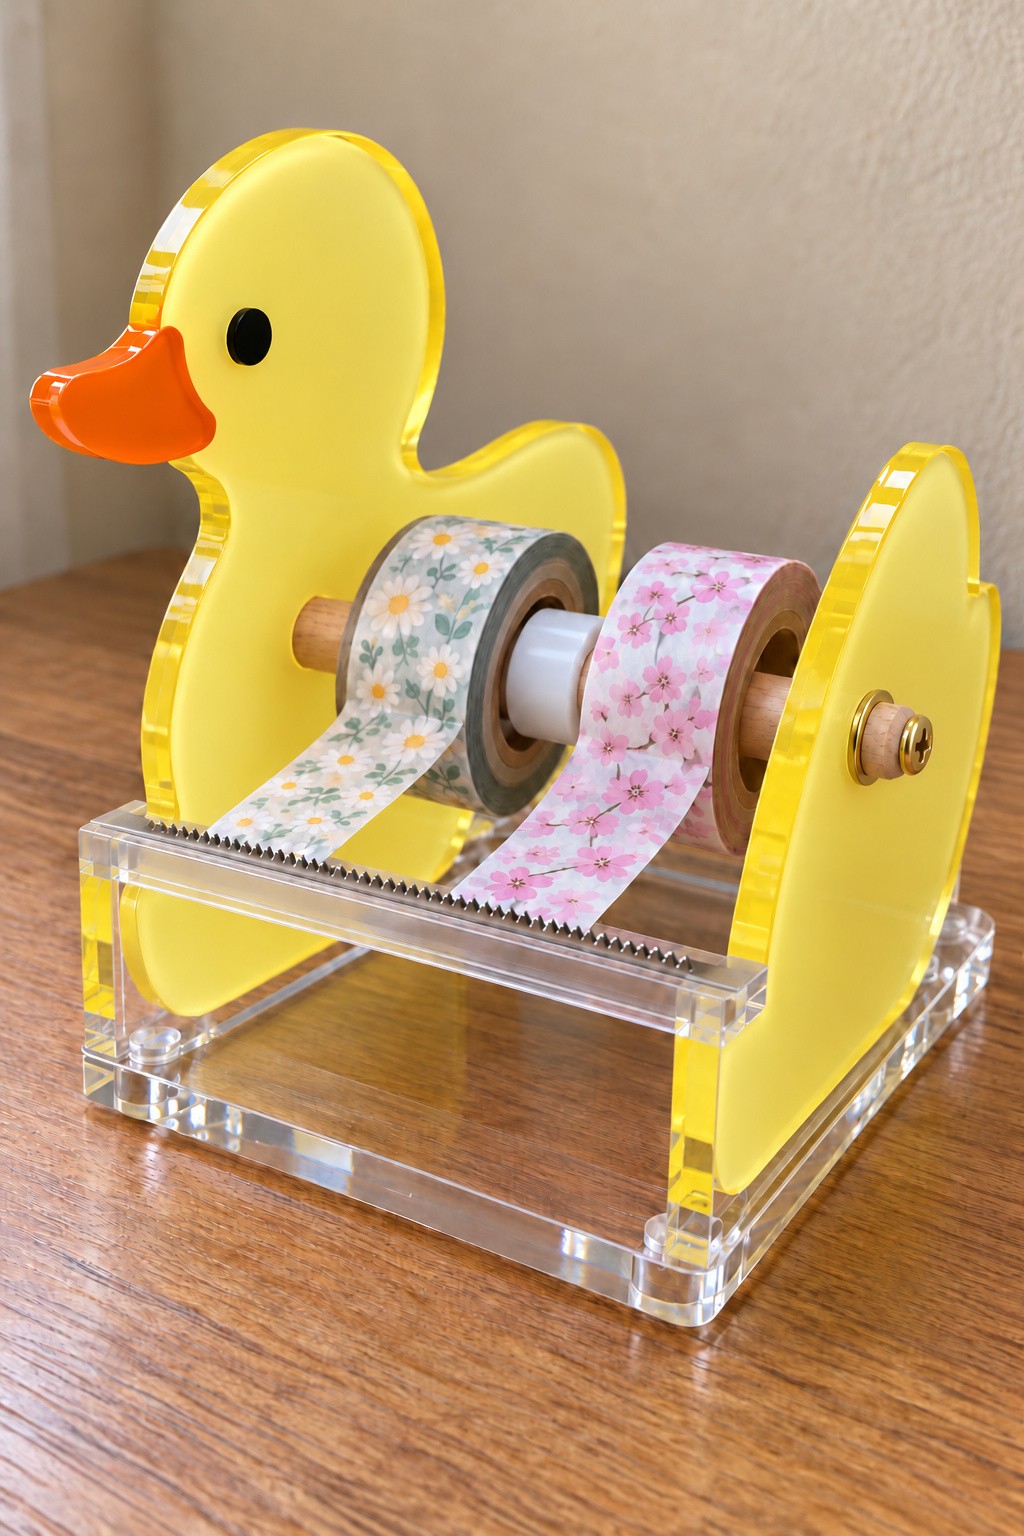
27. Yellow Duck Washi Tape Dispenser
Two yellow duck side panels can carry a horizontal dowel for washi tape rolls. A clear base and front crossbar keep the assembly aligned, while a bonded metal cutting strip sits along the front. Use a purpose made tape cutting component rather than shaping sharp teeth from brittle acrylic.
Measure the tape roll cores before choosing the dowel and leave room for the largest roll to rotate. Keep one end of the axle removable for loading. Choose a cutting strip with a flat backing that makes broad contact with the clear front support. Bond the backing flush to that surface with an adhesive explicitly approved for the chosen metal and PMMA acrylic, following its surface preparation and curing instructions. Keep the adhesive line thin and clear of the teeth and tape paths. This cutting assembly uses no screws or nuts. After the bond has fully cured, check that the strip is secure and that tape reaches it without rubbing the decorative beak. Place the finished dispenser securely before pulling or cutting tape.
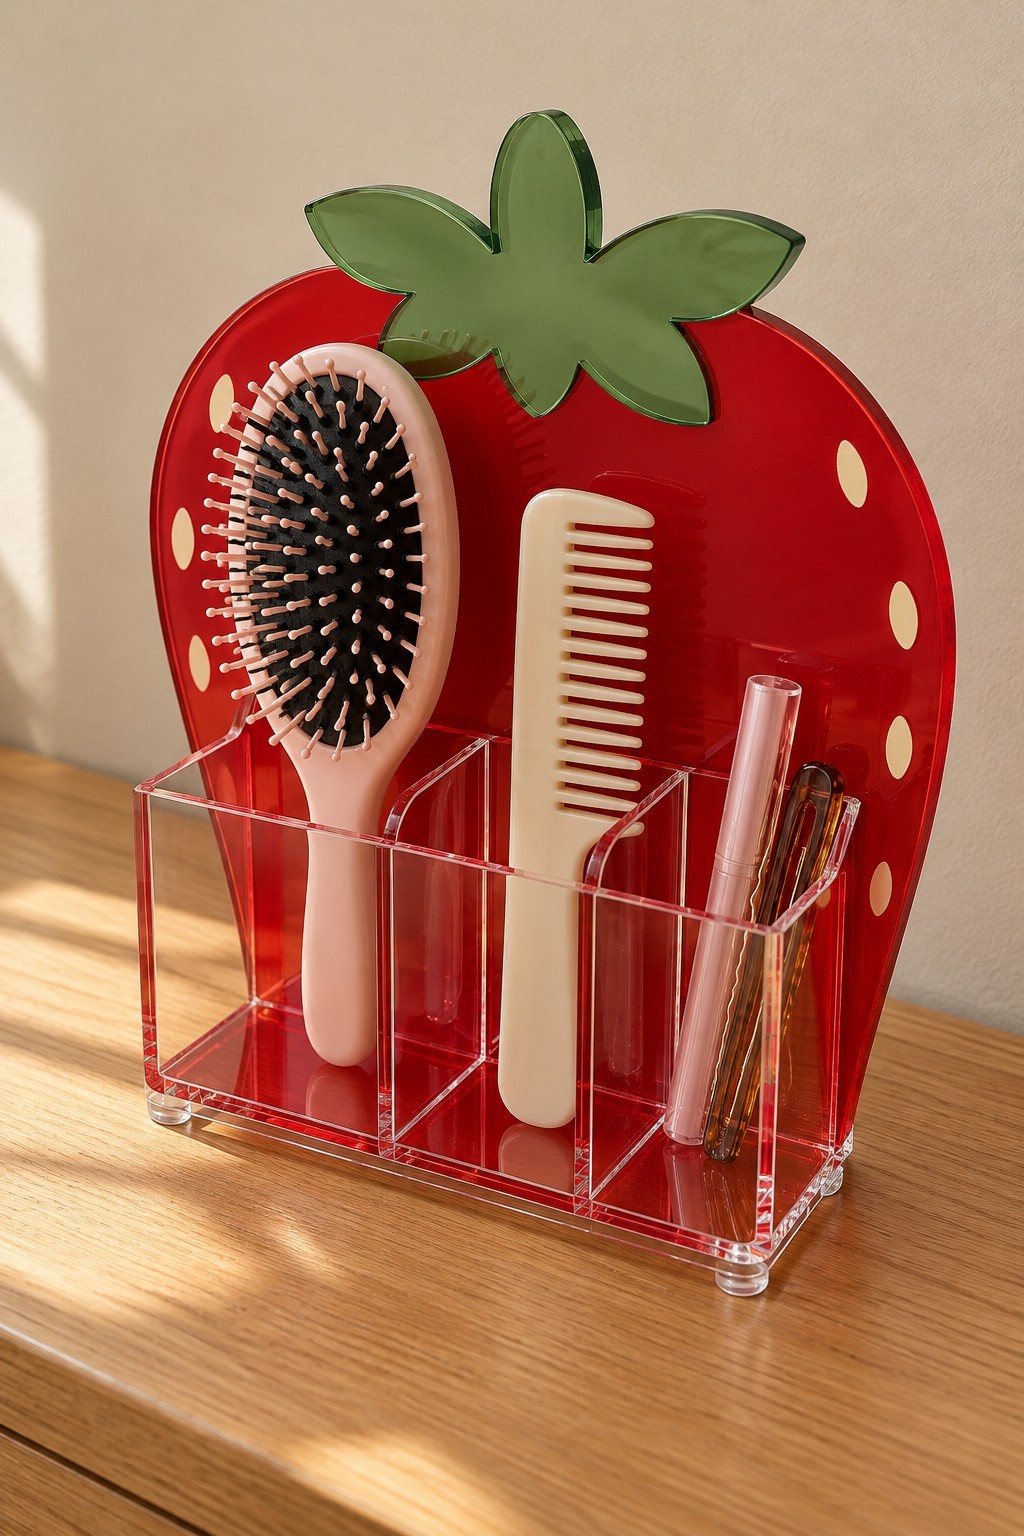
28. Strawberry Acrylic Hairbrush and Comb Caddy
A red strawberry backing with a green leafy top can frame three clear compartments for a hairbrush, comb, and clips. Use a broad base and divide the front box according to the tools' actual widths. The tall fruit outline adds color without needing to form the storage walls.
Try the hairbrush in the widest compartment before fixing the dividers. Leave enough clearance for the brush head and keep the shallower sections reachable. Assemble and cure the clear caddy, then attach the strawberry backing and decorative seeds. Store dry tools and clean out loose hair regularly so the transparent compartments remain easy to use.
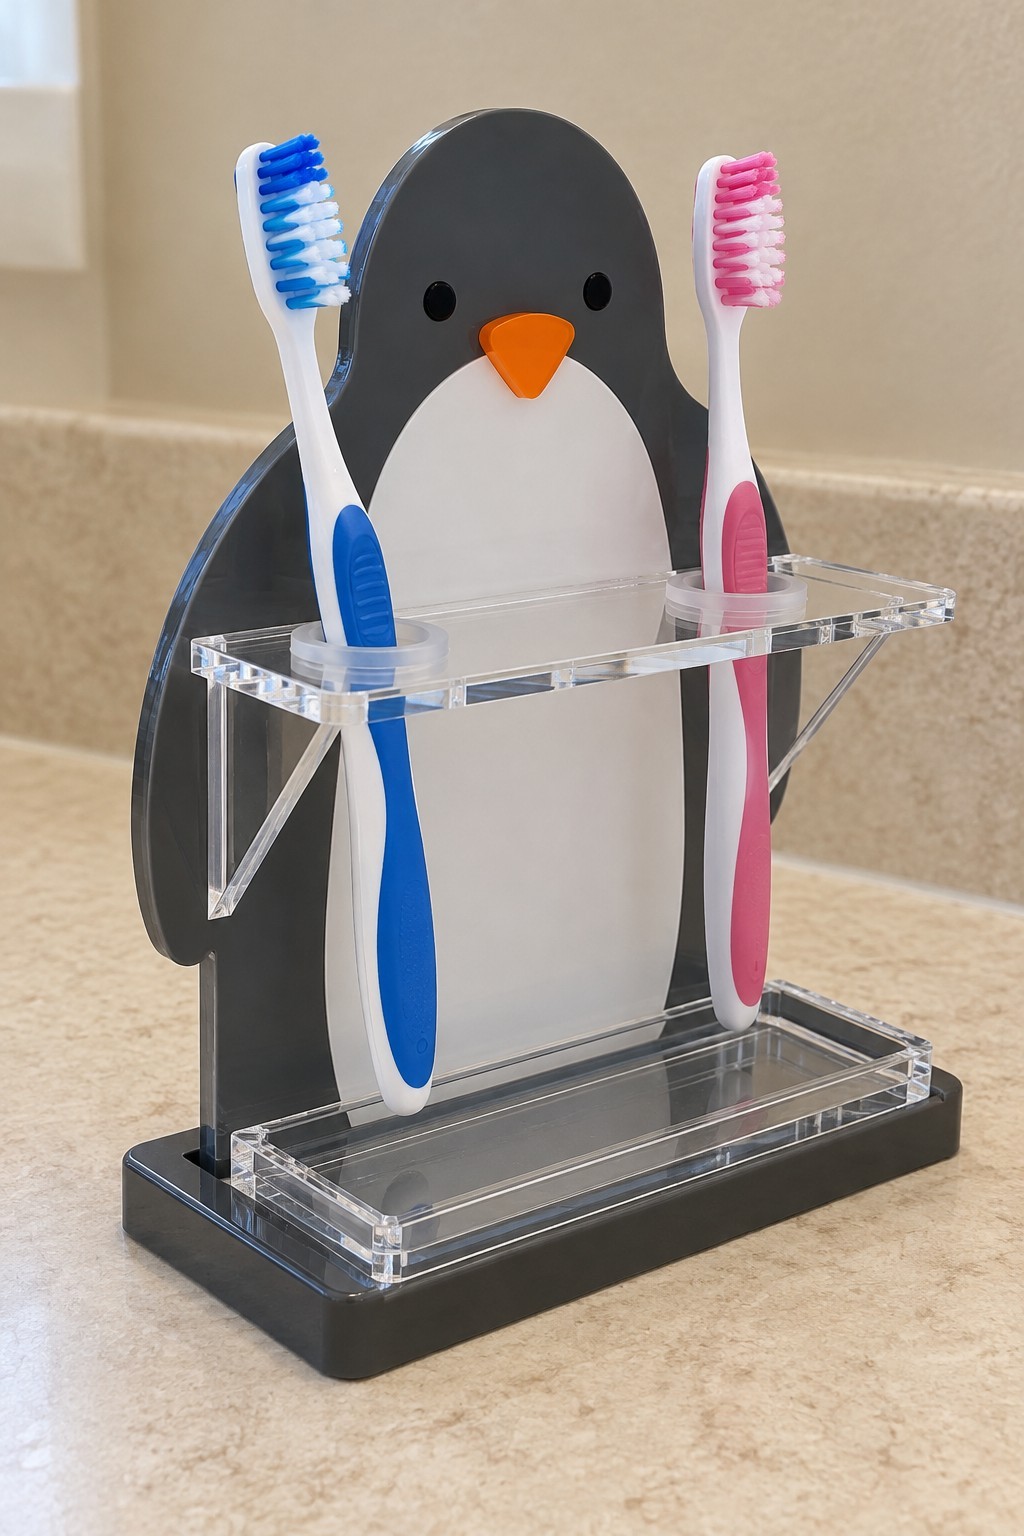
29. Penguin Acrylic Toothbrush Stand
A dark penguin backing, white belly, and orange beak give a clear toothbrush stand a simple character theme. Use a raised horizontal plate with openings sized for the handles, side supports, and a base with accessible drainage or a removable catch area.
Position the openings far enough apart that the brush heads do not touch. Keep the upper plate below the heads and make every surface reachable for cleaning. Assemble the structure before adding the face details, then test it with the actual toothbrushes. Empty and dry the catch area regularly rather than allowing water to remain beneath the handles.
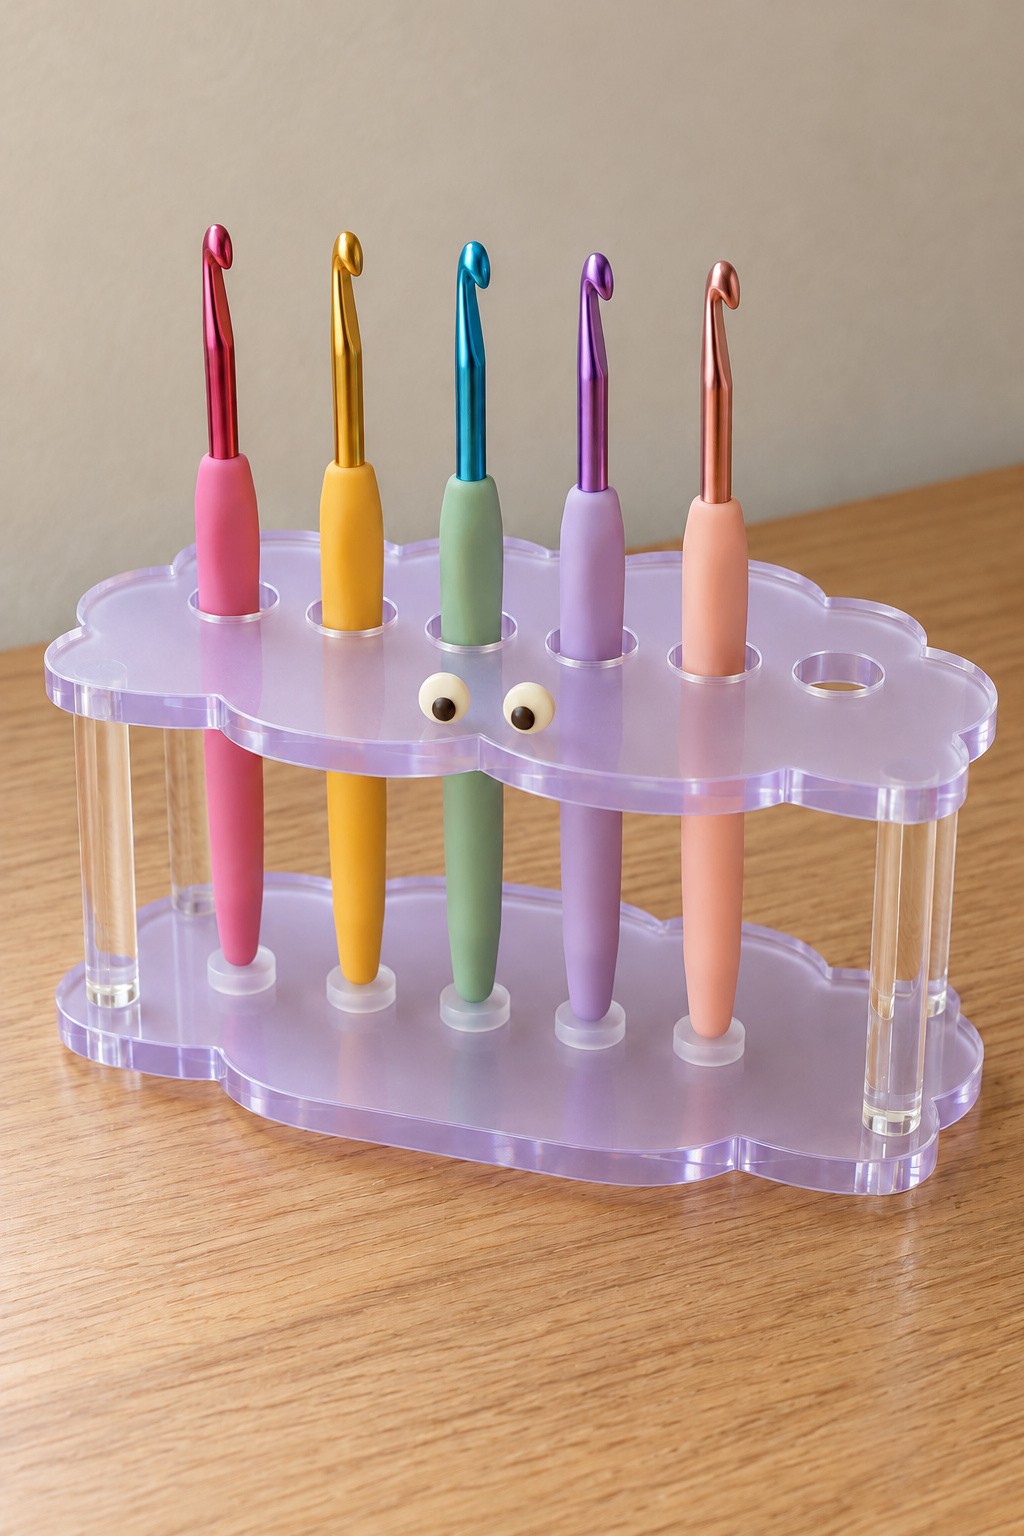
30. Lilac Cloud Acrylic Crochet Hook Rack
Two lilac cloud plates and clear vertical supports can organize a row of crochet hooks. The upper plate separates the handles while the lower plate steadies their ends. A pair of small eyes adds character without covering the useful storage openings.
Map each hole to your own hooks, including the thicker ergonomic handles. Order the top and bottom openings from one aligned drawing, then assemble the support posts between the plates. Keep the plates parallel and let the rounded ends of the ergonomic grips rest in the lower support cups. Each tool has one metal working hook above its grip, with no additional metal point projecting from the bottom. Put frequently used sizes in the most accessible positions instead of sorting only by handle color.
31. Detective Cat Magnifying Glass Rest
A detective cat acrylic backing can turn a walnut base into a dedicated rest for a magnifying glass. A raised clear shelf guides the handle through a smooth opening, while a lined recess in the wood supports its lower end. Wooden posts carry the shelf beside the cat silhouette.
Measure the handle and lens rim before placing the guide opening so the glass sits securely without being jammed in place. Fix the posts to the base, fit the shelf, and add the cat in its own prepared slot. Store the magnifying glass away from direct sunlight, where its lens could focus light onto nearby material.

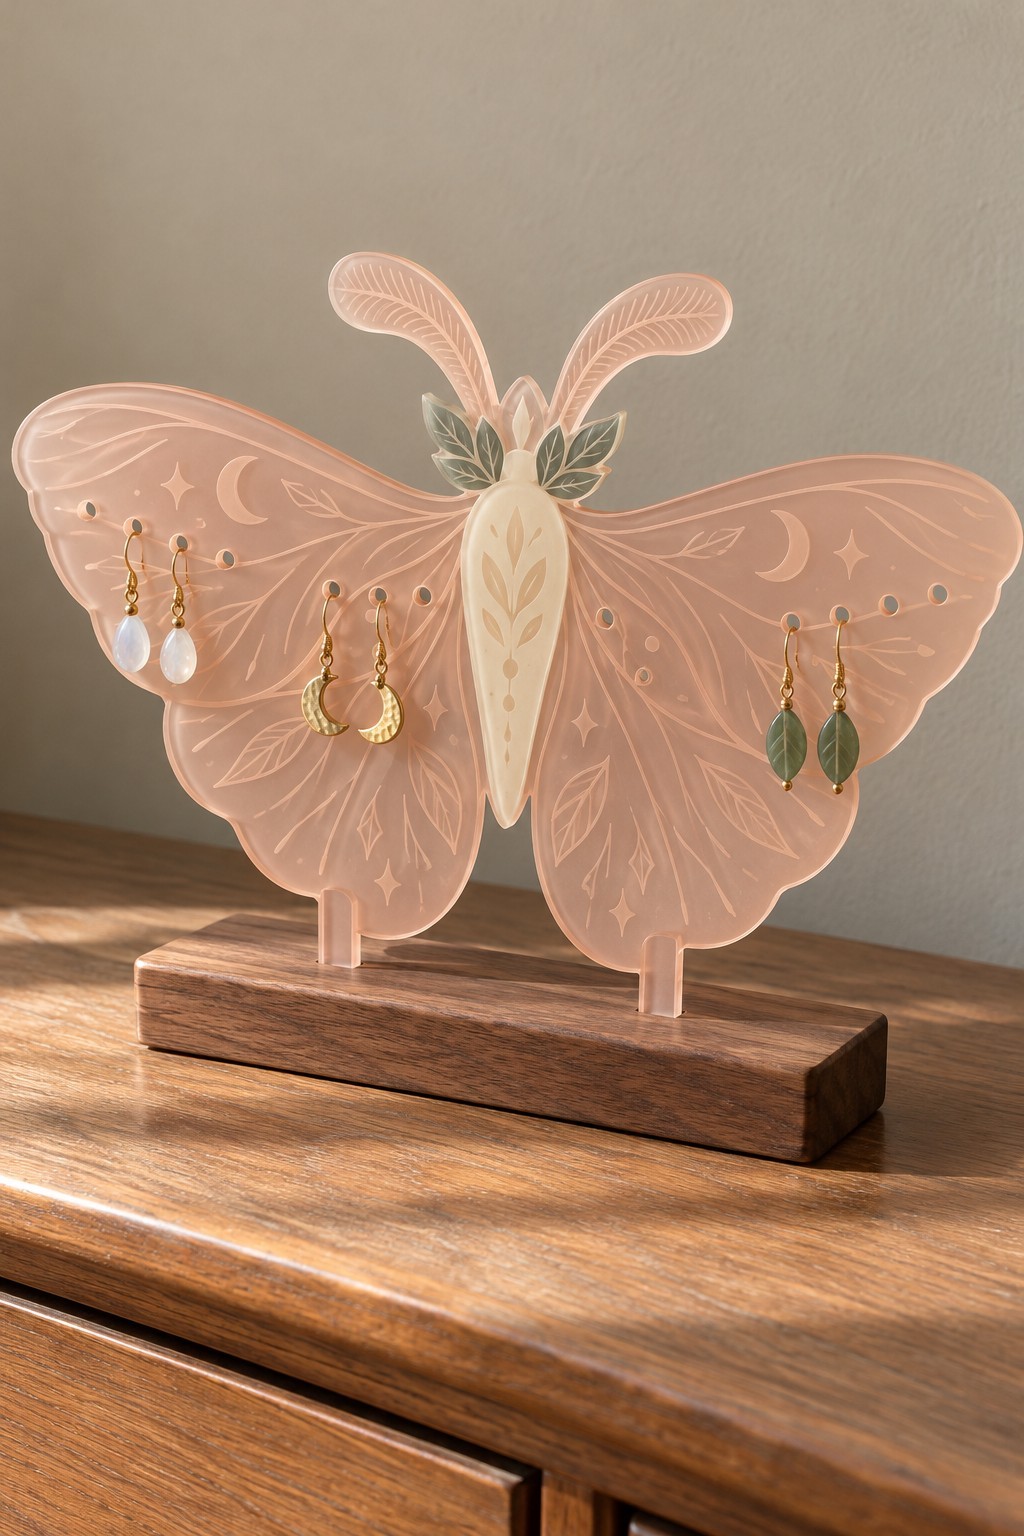
32. Peach Acrylic Moth Earring Display
A peach moth silhouette becomes an earring stand when small hanging holes are arranged across its broad wings. Fine engraved wing lines provide decoration without filling the surface with extra layers. A long walnut slot base gives the wide outline a stable foundation.
Plan the earring positions with paper shapes matching your longest pairs. Leave room beneath each hole so drops hang freely and keep the holes away from delicate wing tips. Order the engraving and holes with the outline, then ease any rough edges before fitting the base. Leave enough access behind the wings to fasten earrings without taking the entire stand apart.
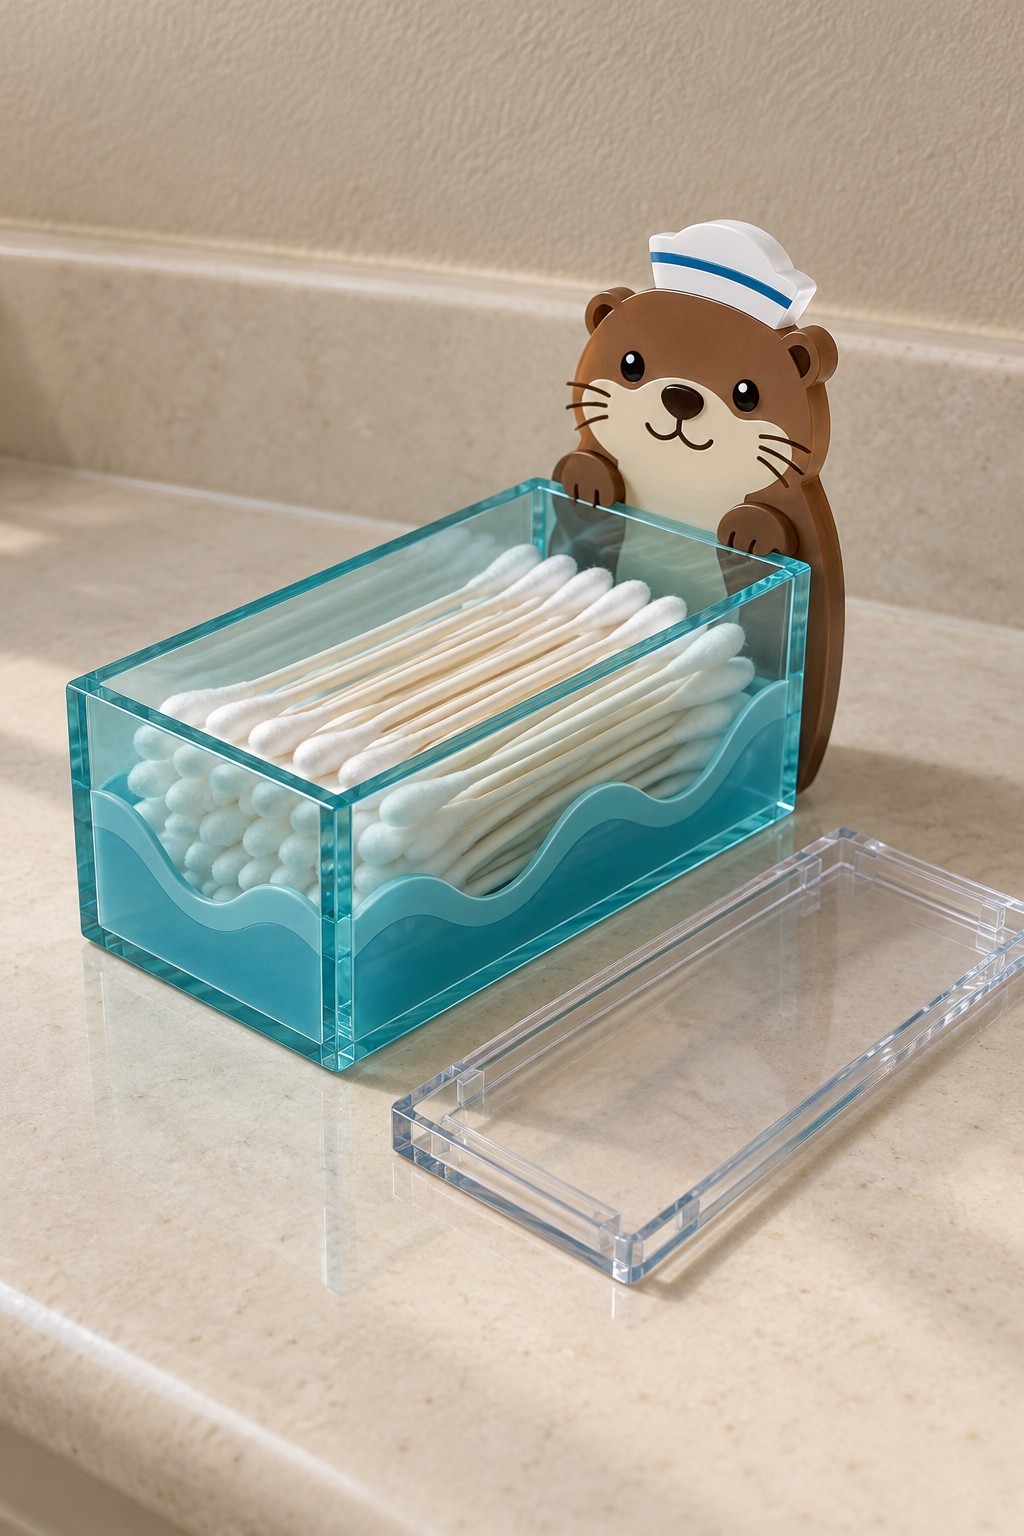
33. Turquoise Acrylic Cotton Swab Box with an Otter Backing
A turquoise box with a little sailor otter at the back creates a compact place for cotton swabs. Use a clear removable lid and a wave shaped front accent, keeping the interior smooth and unobstructed. The otter can be a printed or vinyl decorated acrylic silhouette attached behind the box.
Measure the swab length to determine the internal width and leave room to lift a small handful. Assemble and cure the box before adding the wave and character details. Fit the lid with a locating rim that allows easy removal rather than a tight friction fit. Keep the contents dry and use clean hands when refilling the container.
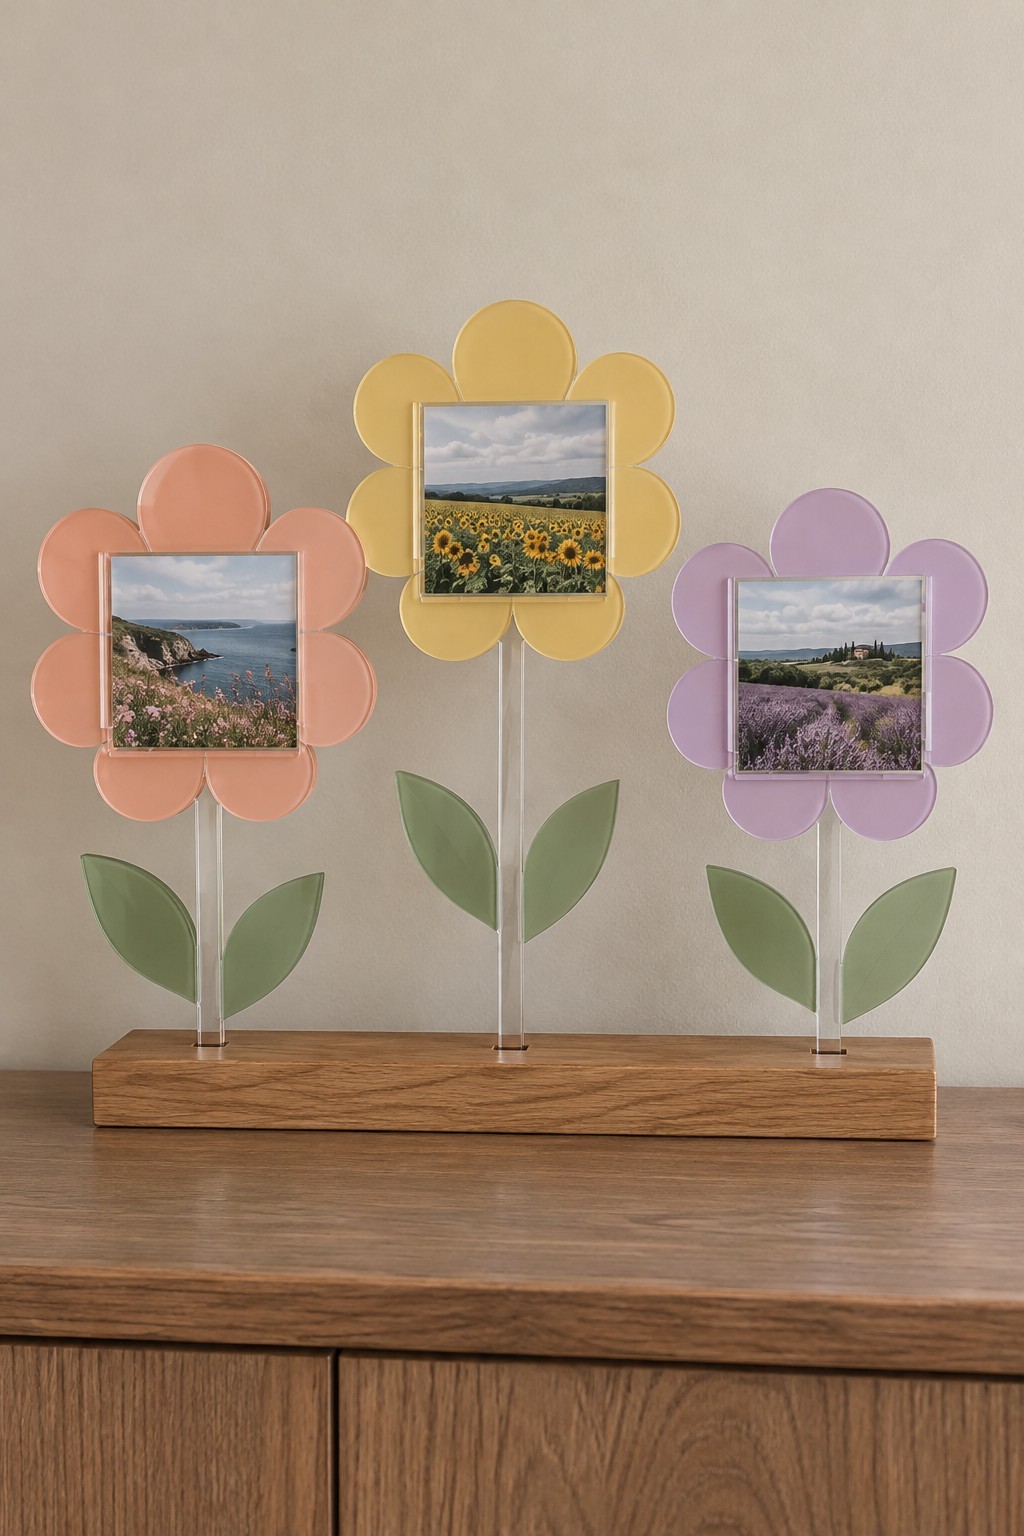
34. Three Acrylic Flower Photo Frames on a Wooden Base
Three pastel flowers can display small landscape prints above a narrow wooden base. Make each flower from a colored silhouette with a clear photo cover or prepared pocket at its center. Clear acrylic stems keep the flowers visually light, with green leaves attached as flat accents.
Choose the print size first and make the three photo openings consistent. Plan accessible side or top openings so pictures can be changed without removing the flowers. Fit the stems into accurately machined slots in the wood and stagger their heights before securing them. Keep the flowers close enough to read as a group while leaving the photographs unobstructed.
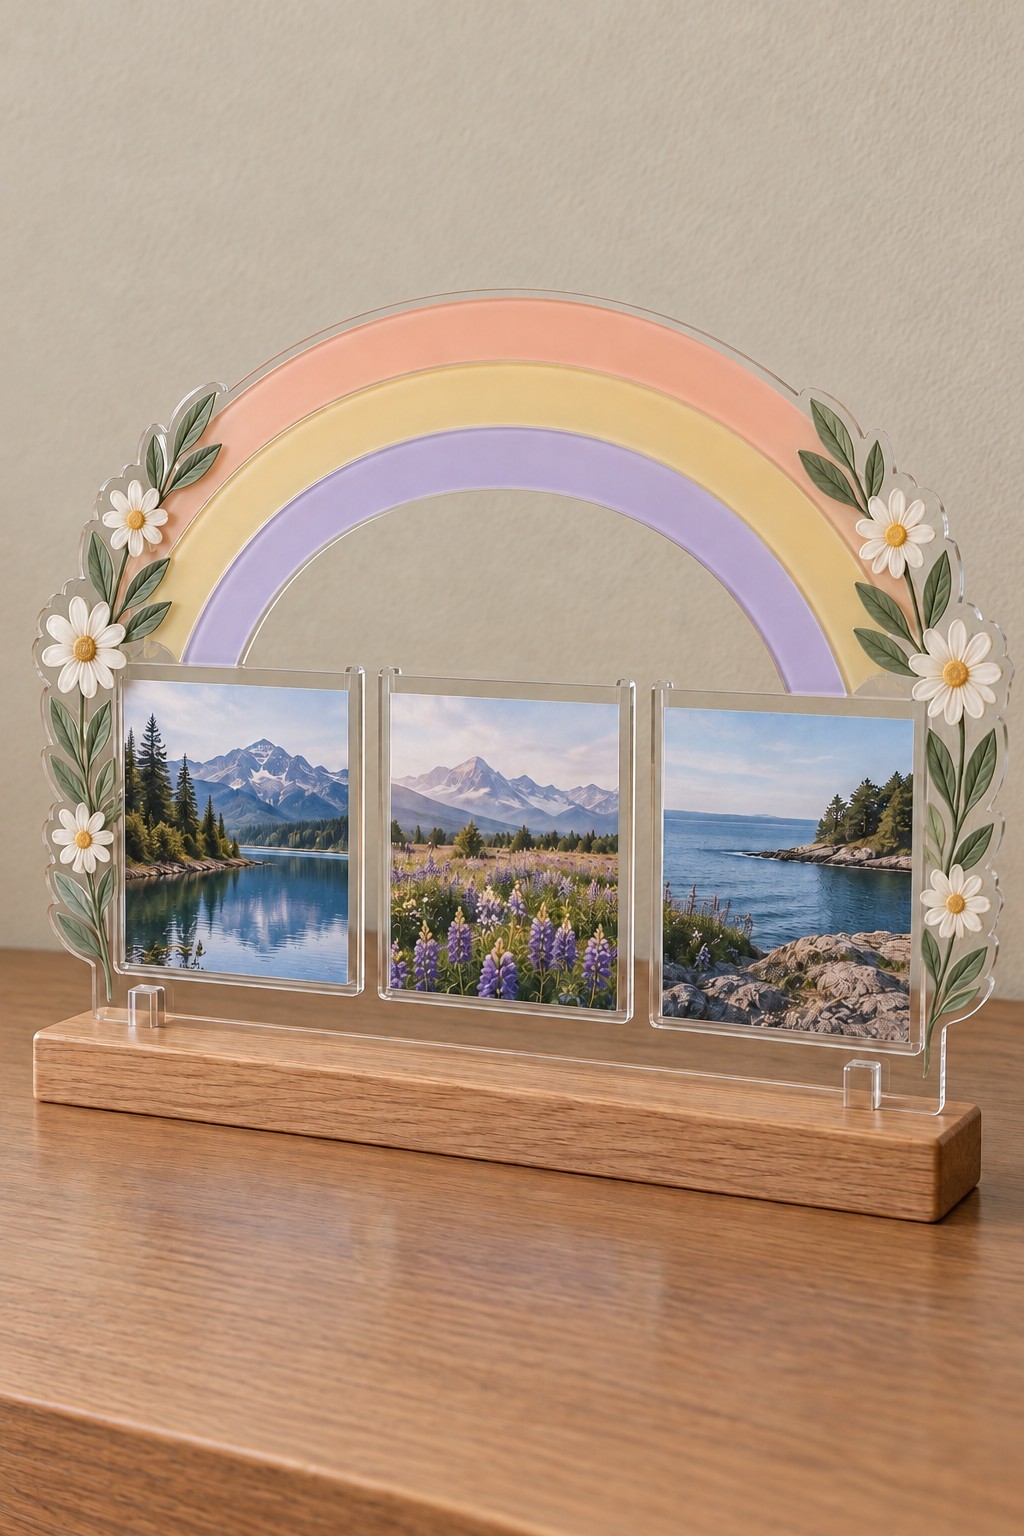
35. Pastel Rainbow Acrylic Frame for Three Travel Photos
A pastel rainbow behind three clear photo pockets combines a decorative arch with a compact travel display. Use a clear backing shaped around the rainbow, compatible colored accents, three matching photo covers, and a fitted wooden base. Small floral details can frame the sides without crossing the prints.
Arrange all three pictures on a paper template and confirm that their lower edges line up. Build the pockets with a small insertion gap suited to the print thickness, keeping the top or side accessible. Add the colored bands after checking the pocket positions. Seat the finished backing in the base and verify that the outer flowers have adequate support.
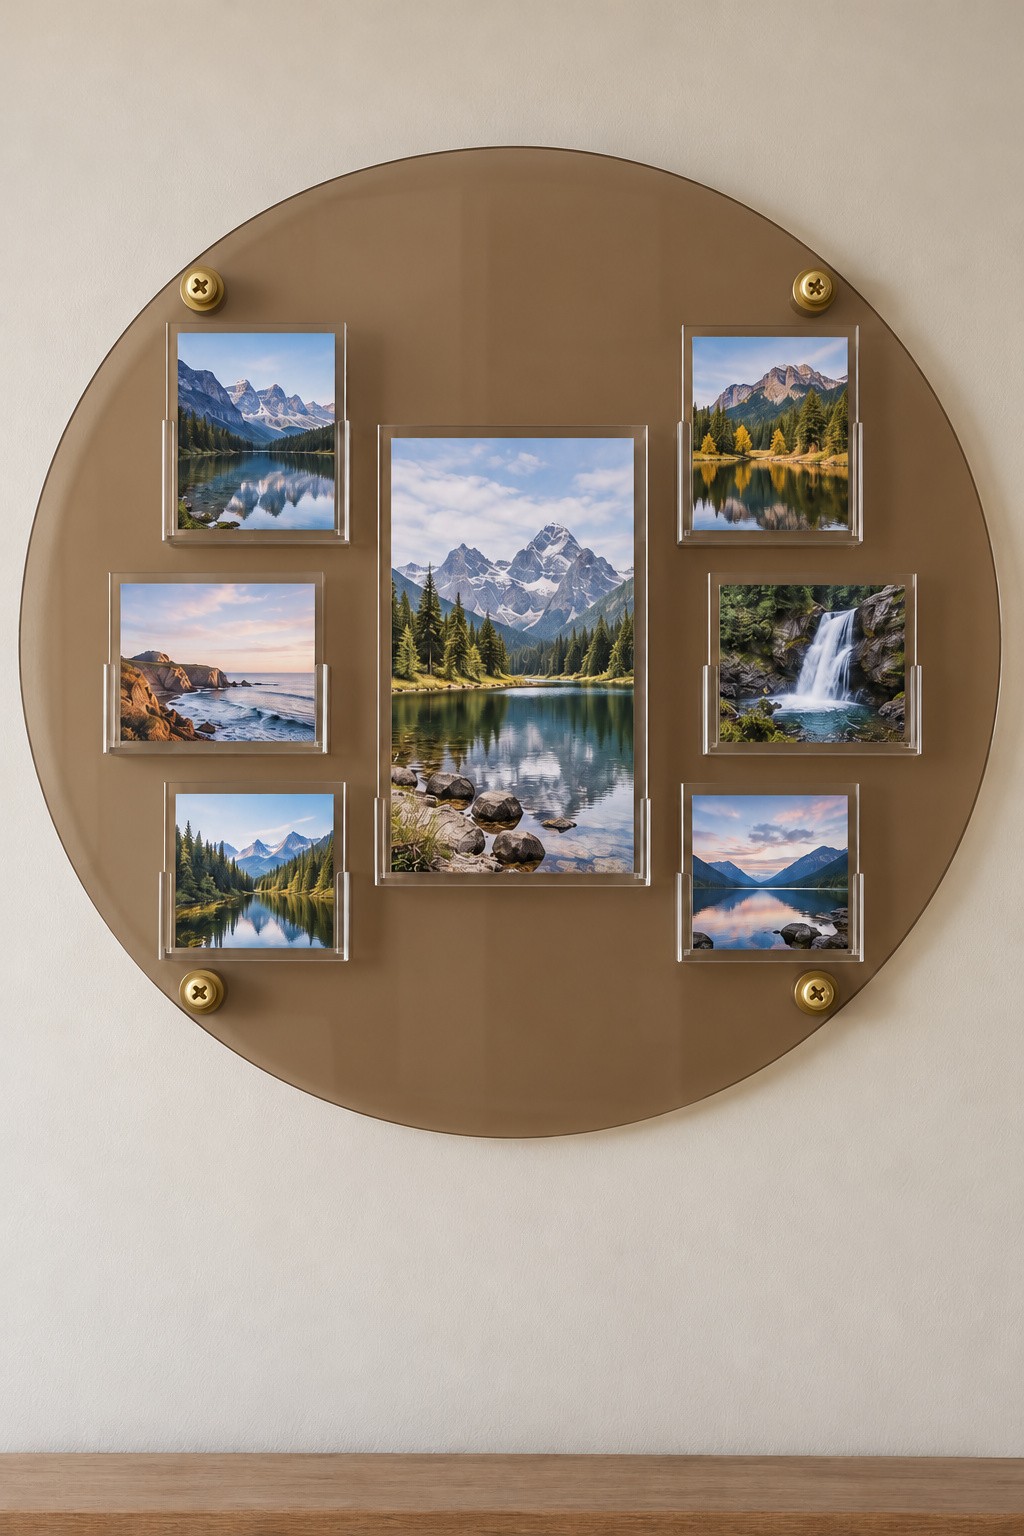
36. Smoked Acrylic Wall Gallery for Seven Photographs
A round smoked acrylic panel brings seven photographs together: one larger central portrait and three smaller prints on either side. You can use clear individual pockets on the front so the prints remain replaceable. The tinted circle gives the arrangement a shared background without adding separate wooden frames.
Lay out paper versions of all seven prints before ordering the circular backing and mounting holes. Align the small pictures around the central image, then attach the pockets without closing their insertion edges. Use gold colored Phillips screws with protective washers through the four mounting holes, rear hex nuts securing the bracket assemblies, and suitable wall anchors for the complete loaded panel. Keep the panel free of forced bending and confirm access to the mounting caps before filling every pocket.
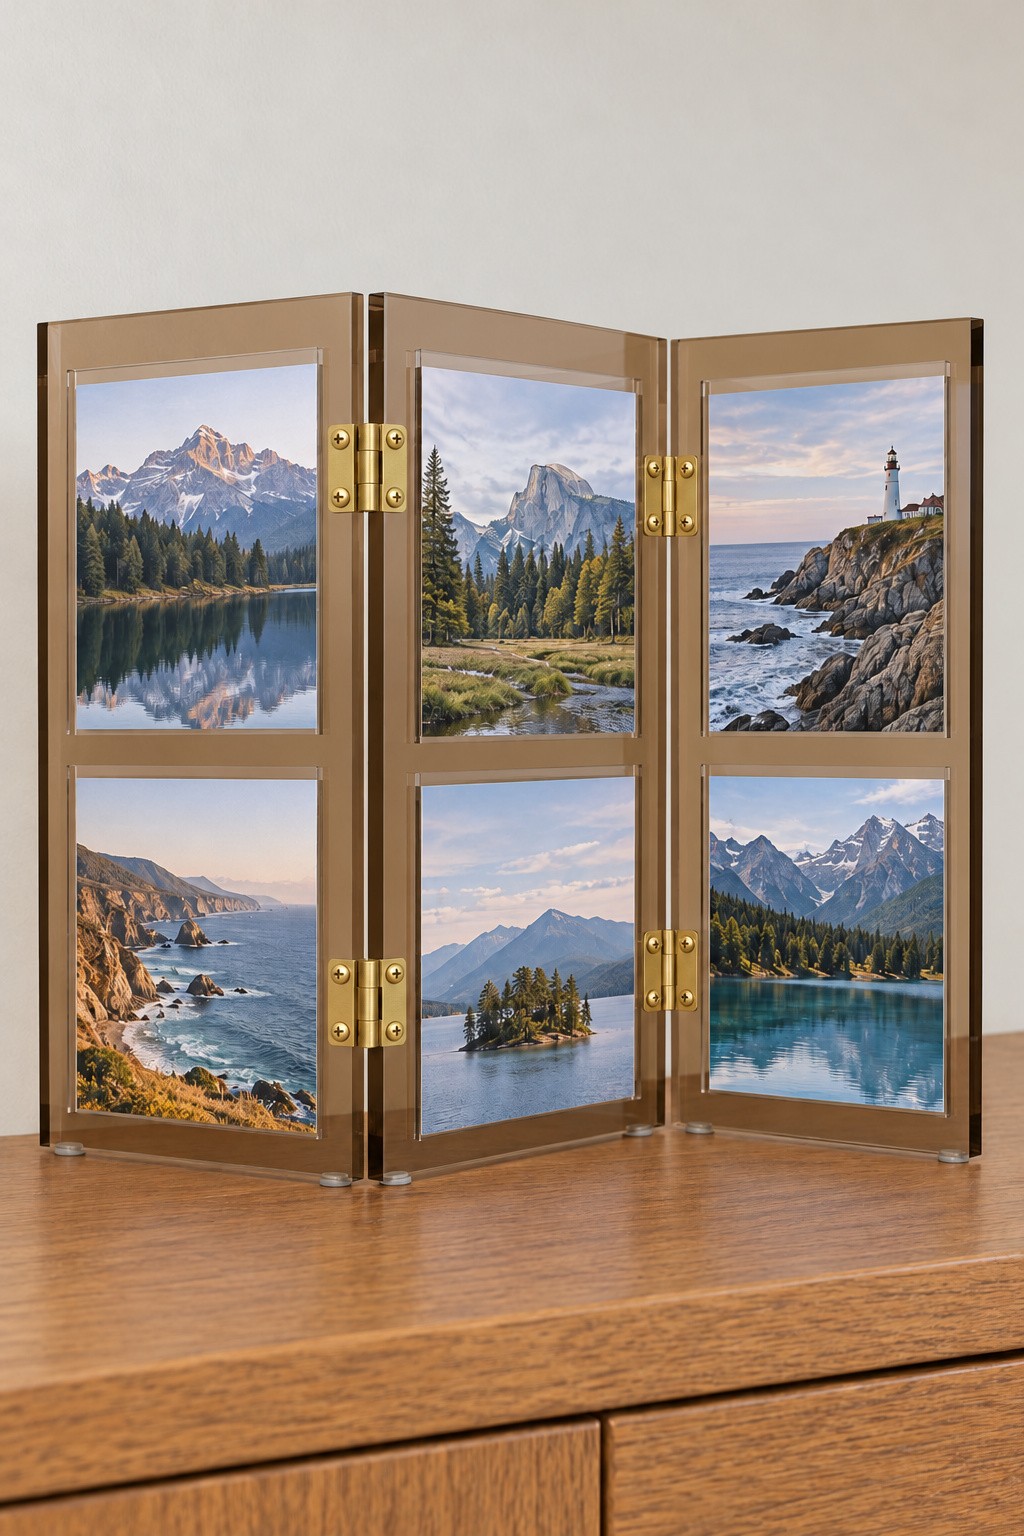
37. Hinged Amber Acrylic Screen for Six Photographs
Three amber acrylic panels can form a folding tabletop gallery with two photographs on each panel. Clear photo pockets keep the six prints visible, while small hinges allow the screen to stand in a shallow zigzag. This arrangement suits a dresser or console where a long flat frame would take more space.
Choose hinges specified for the panel thickness and have their holes positioned accurately. Use small gold colored Phillips machine screws with protective washers and matching rear hex nuts, keeping the moving hinge barrels clear of the acrylic edges. Fit the hinges before attaching photo pockets so the fittings remain accessible, then check the folding direction and clearance. Add small protective feet and open the screen until it stands steadily. Keep the panels partly angled during display rather than lining all three up in an unstable straight row.
Choose a First Project That Fits Your Tools
For a simple start, choose the photo frame, prepared flower coasters, or a flat ring stand. Move on to divided organizers once you can align panels and produce dependable joints. Curved soap dishes, suspended pieces, and stands with projecting supports are better approached with prepared components and advice from a fabricator.
Let the intended contents guide the dimensions, then add the decorative silhouette. A holder that releases one cotton pad easily, a ribbon rack that can be refilled, or a photo frame that opens without damage will remain useful long after the first display. That practical fit is what turns a colorful acrylic shape into a piece you will enjoy using at home.

Leave a Reply