
A handful of leaves can become a surprisingly detailed decoration: a fox portrait, a little forest, a sunburst mirror, or a softly lit botanical display. These DIY leaf projects to decorate your home explore 23 ways to work with natural shapes, autumn colors, and visible leaf veins. Most use real dried or pressed leaves, while a few translate the same shapes into cord, paper, clay, or colored glass for pieces that need a different material.
Start with the leaf preparation guide and illustrated making sequence below. You can use that basic method for the flat collages, then adapt the support and adhesive for the dimensional projects. Each idea explains what you need, how to build the main details, and which small decisions help the finished piece hold together. Choose a simple framed design for your first attempt, or gather a larger selection of leaves for a layered animal or seasonal display.
Table of Contents
- How to Prepare Leaves for Home Decorations
- Materials for a Simple Pressed Leaf Picture
- Make the Picture in Eight Clear Stages
- Small Checks That Prevent Common Problems
- 23 Leaf Decoration Ideas to Make Your Own
- 1. Build a Leaf Sunburst Around a Round Mirror
- 2. Cover a Fabric Storage Basket with Overlapping Leaves
- 3. Assemble a Folding Botanical Screen for a Battery Candle
- 4. Shape Pleated Paper Leaves into a Fan Wall Light
- 5. Press a Large Leaf into a Shallow Clay Dish
- 6. Suspend Skeleton Leaves Inside a Lighted Wooden Frame
- 7. Layer Pressed Leaves into an Embroidery Hoop Owl
- 8. Knot Three Macrame Leaves for a Curtain Tieback
- 9. String Colorful Cord Leaves Across a Doorway
- 10. Give a Miniature House an Overlapping Leaf Roof
- 11. Trace a Leafy Branch onto a Transparent Window Panel
- 12. Build Three Miniature Trees with Leaf Covered Cones
- 13. Arrange Ginkgo Leaf Butterflies Under a Glass Dome
- 14. Wrap a Cylindrical Holder in Vertical Leaves and Jute
- 15. Create a Fox Portrait with Pointed Leaf Fur
- 16. Fill a Wooden Lantern Frame with Pressed Botanicals
- 17. Add Playful Faces to Autumn Maple Leaves
- 18. Make a Wooden Turtle Plaque with Rounded Leaves
- 19. Clip Leaf Owls onto a Jute Garland
- 20. Dress Tiny Fairies in Layered Leaf Skirts
- 21. Build a Sunflower Plaque with Yellow Leaves and Seeds
- 22. Set Two Leaf Mice Beside an Acorn on a Wood Slice
- 23. Give Three Drawn Portraits Carefully Arranged Leaf Hair
- Choose a Leaf Project That Suits Its Place at Home
How to Prepare Leaves for Home Decorations
Thin, intact leaves are a useful starting point for flat artwork. Gather them when their surfaces are dry, with permission where needed, and avoid unfamiliar plants that may irritate your skin. Select several sizes rather than trying to cut every shape from one large leaf. Rounded leaves suit faces and bodies, pointed leaves suggest feathers and fur, and small narrow leaves fill awkward gaps.
Choose the preparation method for the object you want to make. Pressed leaves work well on card, wooden plaques, and framed pictures. Brittle specimens are less suitable for bending around baskets and containers, so test one against your intended curve before preparing the whole set. Ready preserved craft leaves can be useful for those curved surfaces. Purchased skeleton leaves are the simplest option for delicate transparent wings and suspended displays.
Materials for a Simple Pressed Leaf Picture
- Three intact leaves in contrasting colors, plus a few spares
- Clean white absorbent paper, such as blotting paper or plain uncoated paper
- Two pieces of corrugated cardboard larger than the leaves
- Heavy books or a plant press
- Thick white card or another firm, smooth backing
- A small brush, tweezers, a pencil, and paper scissors
- PVA craft glue suitable for paper and dried plant material
- A frame with enough depth and a spacer to keep the glazing off the leaves
Allow around 30 minutes for arranging and mounting a small picture once the leaves are ready. Pressing takes much longer: plan for about two to four weeks, with the actual drying time depending on the leaves and room conditions. Adhesive drying is a separate stage; follow the product label before handling or framing the work.
Make the Picture in Eight Clear Stages
Follow the eight numbered stages from loose materials to the finished framed picture. White absorbent sheets are used only for pressing; a separate sheet of thick white card supports the finished artwork. The collage follows one work area from above: the press stays on the left and the mounting card stays on the right. A drying interval separates stages three and four.
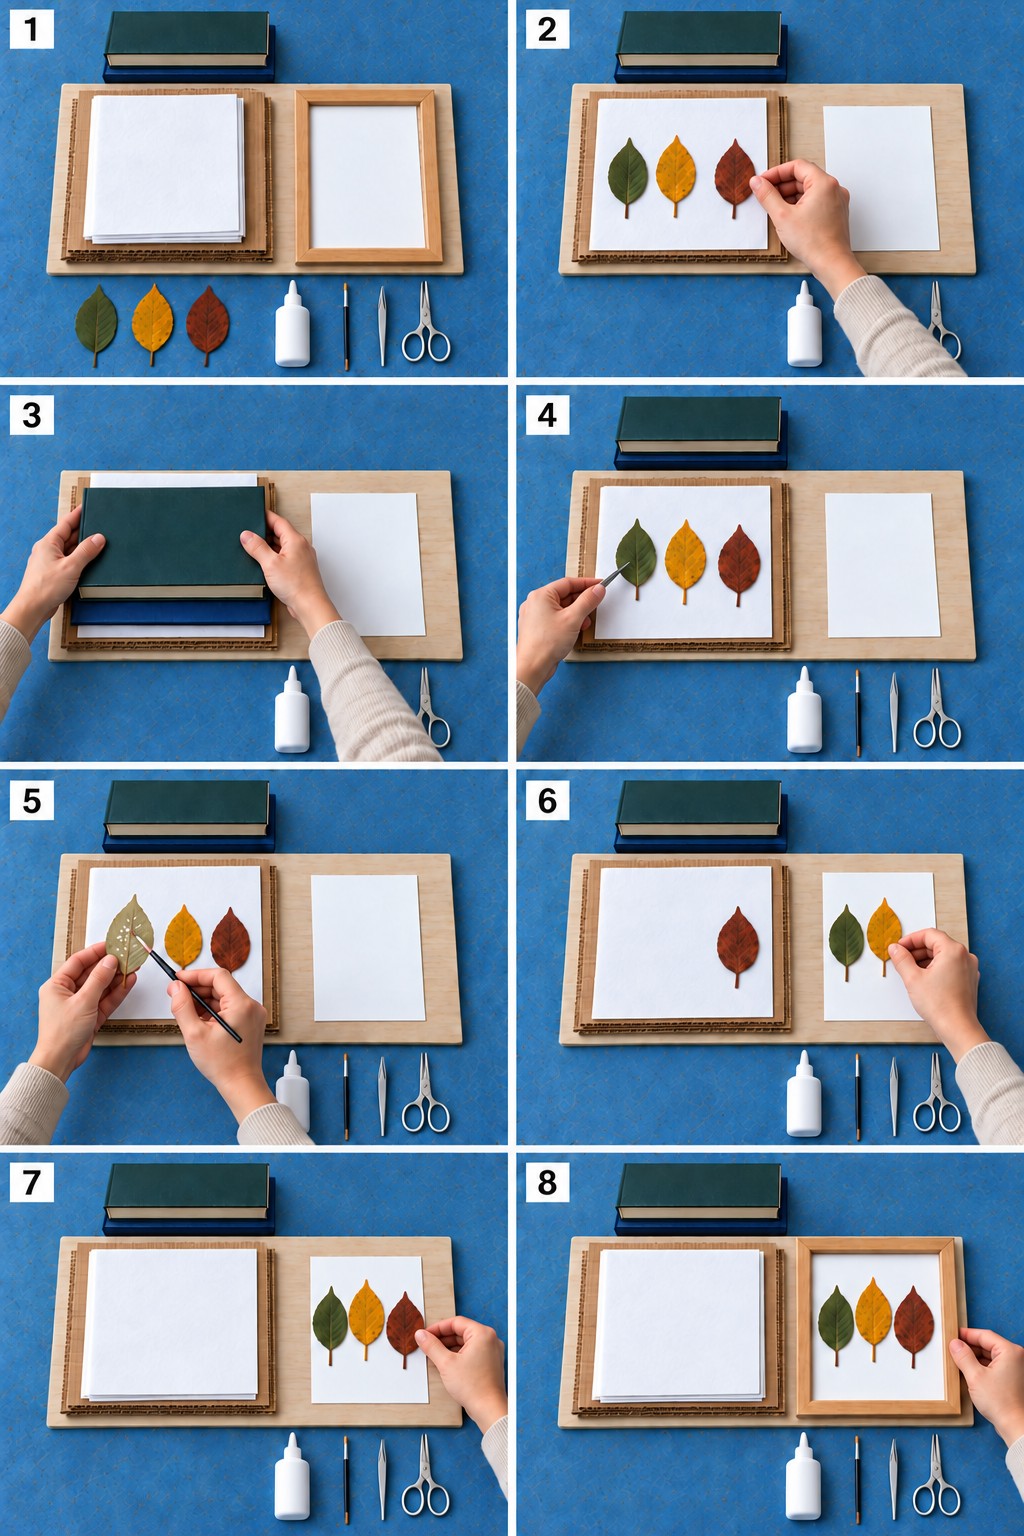
- Gather the separate materials. Set out the three loose leaves on your work surface beside the empty absorbent paper, cardboard, books, white mounting card, glue, brush, scissors, tweezers, and frame. The frame rests loosely over the blank card to check its fit; set it aside before starting the press. No leaves are attached yet. Brush loose dirt from the leaves and let any surface moisture dry before pressing. Reject leaves with mold or extensive damage.
- Place the leaves in the open press. Put a white absorbent sheet over the lower cardboard board. Lay the green and yellow leaves on it, then lower the brown leaf into the remaining space, as shown. Keep every leaf separate with its blade and stem lying flat. This paper is for drying, not the final picture backing.
- Cover, press, and wait. Cover all three leaves with more white absorbent paper and the second cardboard board. Lower the heavy books onto the closed sandwich. Leave it in a dry location, replacing absorbent paper if it becomes damp. Plan for about two to four weeks, continuing until the leaves are fully dry.
- Remove the dry leaves. Set the books aside and open the cardboard and paper layers. Lift each dried leaf carefully with tweezers or a supporting piece of paper. Place the unused white mounting card nearby. At this stage the card is still blank, and none of the leaves has been glued to it.
- Apply glue to the first leaf. Support the green leaf with its reverse facing upward, away from the blank card. Dab a small amount of PVA onto the reverse with the fine brush. Its underside may look paler than its front. Keep the yellow and brown leaves separate on the work surface, and avoid soaking the leaf or coating its fragile edges heavily.
- Attach the green leaf, then the yellow leaf. Turn the green leaf face upward and lower it onto the left side of the mounting card. Apply small glue dabs to the yellow leaf's reverse in the same way, then lower it into the center with its tip slightly higher. The sixth panel shows that second placement in progress. Leave room on the right for the brown leaf, which is still off the card.
- Add the final brown leaf. Apply glue to the brown leaf's reverse, turn it face upward, and lower it into the right hand space. Keep the green and yellow leaves in their established positions. Check the clear margins and spacing without dragging the attached leaves. All three leaves are now on the card for the first time. Let the picture dry flat according to the adhesive instructions.
- Frame the dried picture. Once the adhesive is dry and the leaves stay secure when the card is lifted, fit that same card into the light oak frame. Use a frame with enough depth and a spacer to keep its glazing clear of the raised veins. The last panel shows the completed picture. Display it indoors away from strong direct sunlight and damp walls.
Small Checks That Prevent Common Problems
Try your adhesive on a spare leaf first. It may darken the surface, leave a shiny mark, or react differently with a preserved specimen. More glue does not necessarily make a stronger collage: excess moisture can wrinkle paper and displace small pieces. For layered work, attach the background shapes first and let them settle before adding the smaller details.
Natural colors can change as leaves dry and age. A clear coating does not guarantee permanent color or make the work waterproof. Test any optional finish on a spare piece, and keep delicate decorations in dry indoor spaces. Use a soft brush for exposed surfaces and wipe only the surrounding frame or protective cover.
For illuminated projects, keep dry leaves and paper away from flames and hot bulbs. Choose a suitable complete LED light or enclosed battery light, preserve its ventilation, and keep its controls accessible. Decorative dishes and covered containers below are intended for dry display or storage unless the underlying product is specifically designed for another use.
23 Leaf Decoration Ideas to Make Your Own
With your leaves prepared, you can turn the same arranging and mounting skills into the projects below. Start by identifying the main shape, then choose leaves that already resemble its parts. The cord, paper, clay, and glass ideas use their own construction methods, so follow the material guidance in those sections rather than treating every project as a pressed leaf collage.
1. Build a Leaf Sunburst Around a Round Mirror
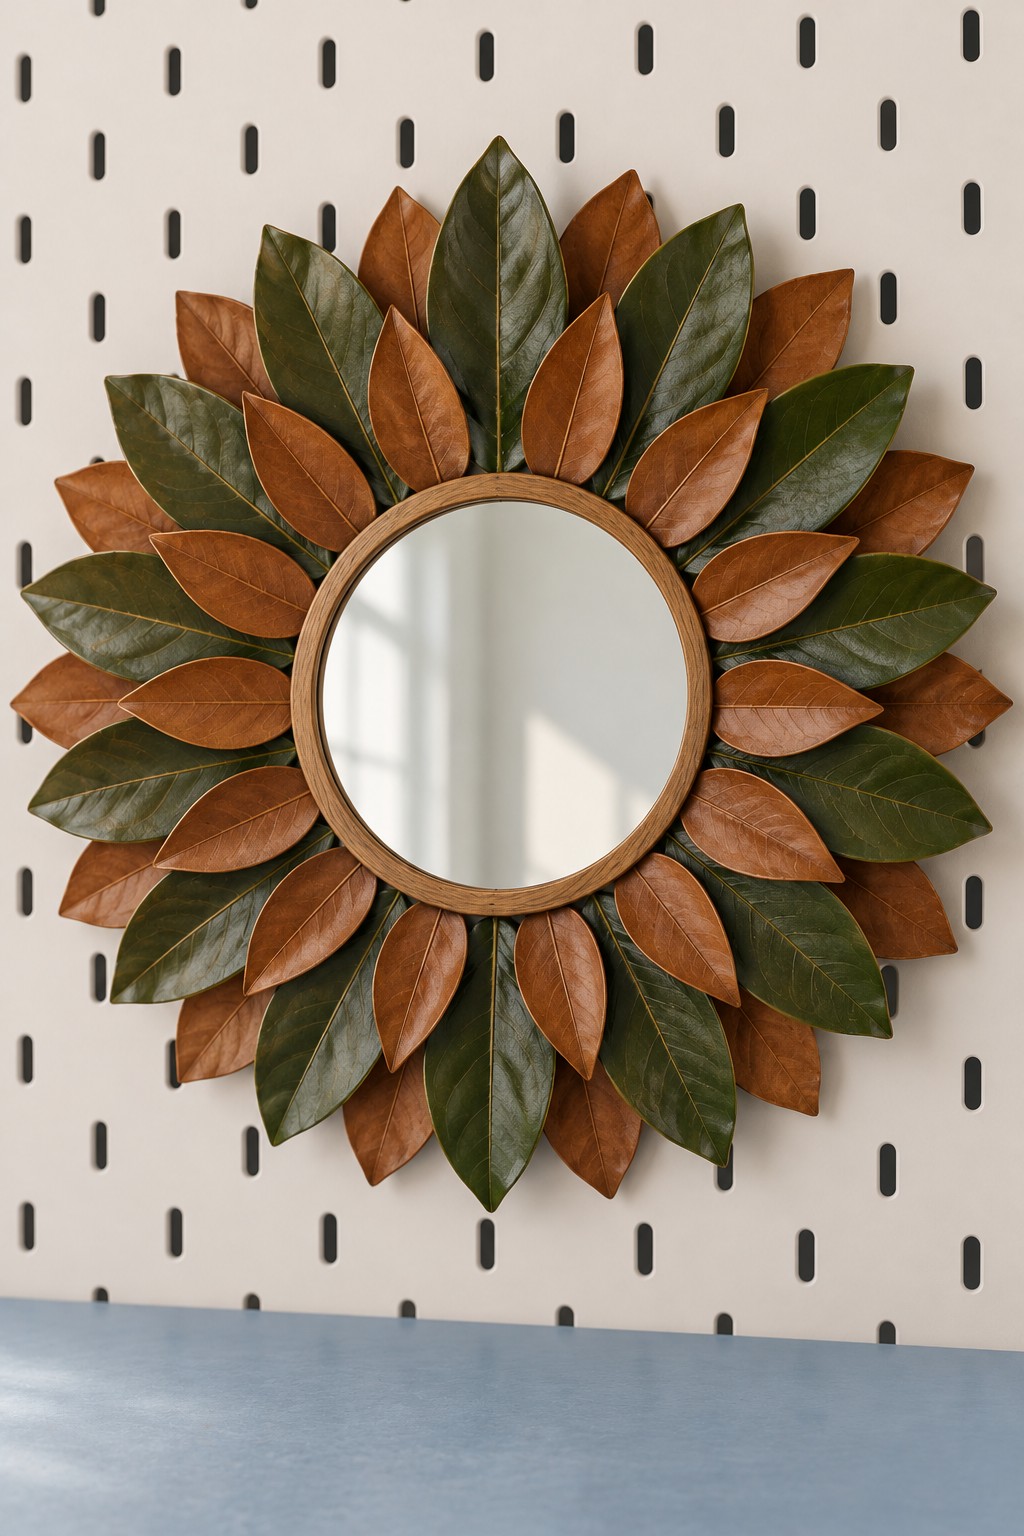
Alternating green and copper brown leaves gives a small round mirror the presence of a much larger wall decoration. You will need a securely framed mirror, a rigid circular backing, preserved leaves, and an adhesive suited to the backing. The backing should extend beyond the mirror so it can carry the leaf arrangement without relying on the glass.
Arrange a ring of outward pointing leaves, then add a second staggered layer to cover gaps. Keep their tips visible and hide the attachment areas beneath the mirror frame. Mount the mirror with fixings appropriate to its weight, independently of the leaves. This approach also pairs naturally with other ideas for updating old mirrors.
2. Cover a Fabric Storage Basket with Overlapping Leaves
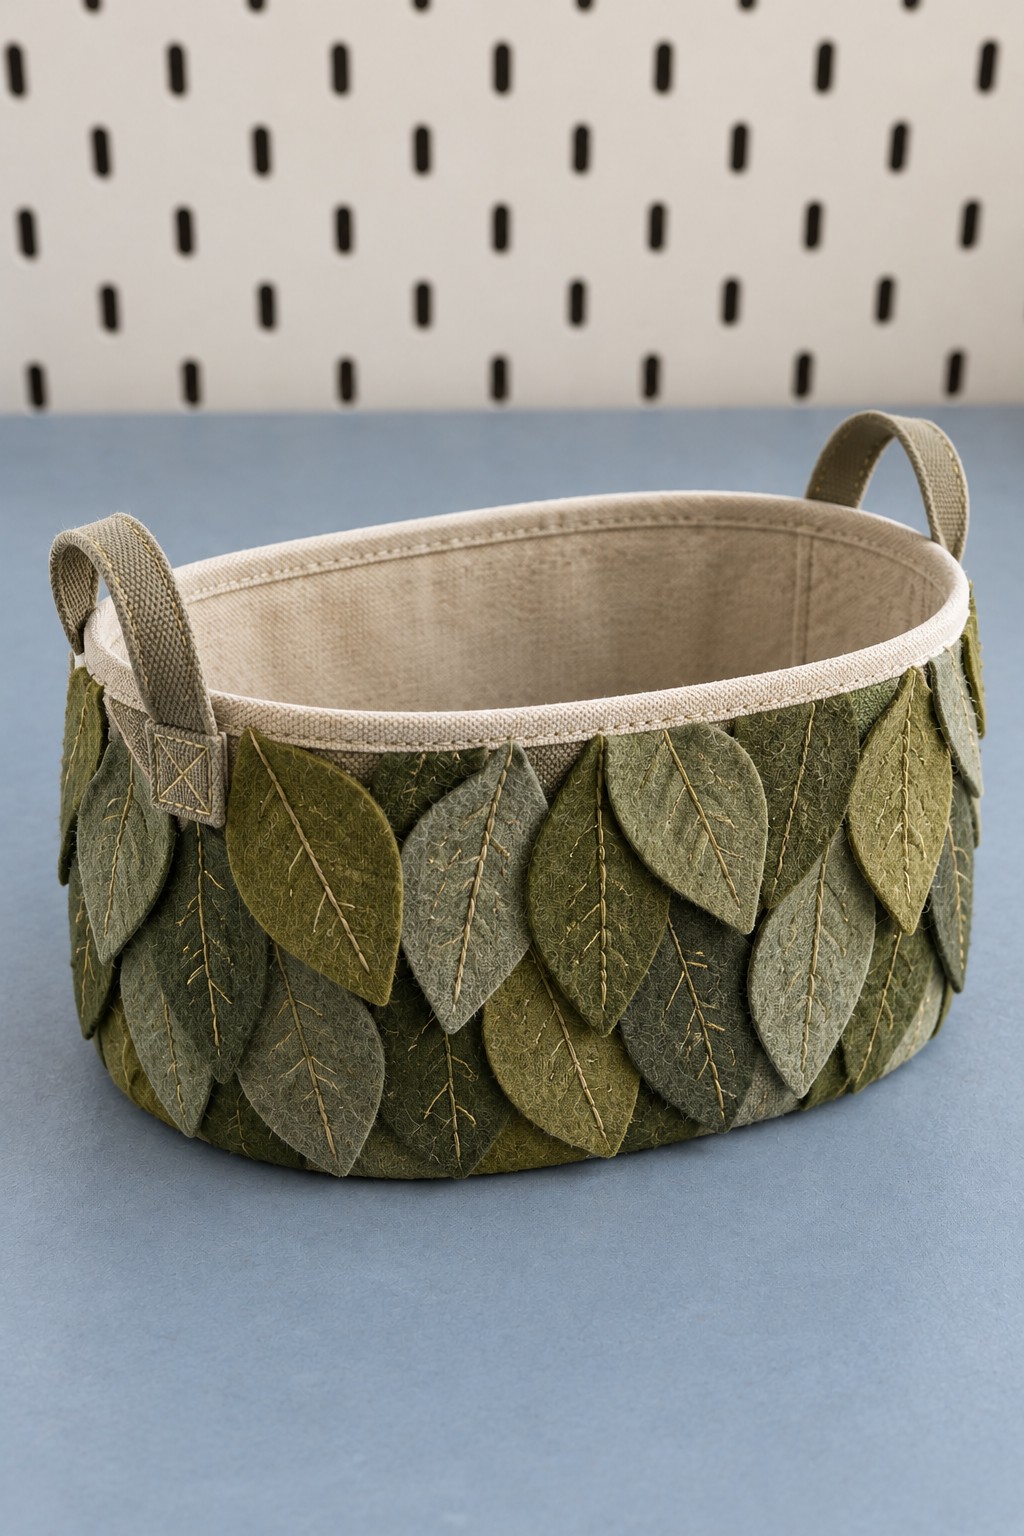
A low oval basket becomes a botanical storage piece when green leaves overlap around its outside. Begin with a firm fabric basket, preserved leaves that tolerate a gentle curve, and craft adhesive tested on both materials. Keep the existing lining and handles clear so the basket remains comfortable to use.
Work from the lower edge upward, setting the pointed tips downward and staggering the next row over the attachment points. Stop beneath the rim rather than folding fragile leaves over it. Store light items inside and lift the basket by its original handles. The decorated surface is best placed where it will receive little rubbing, such as a shelf holding spare scarves or folded cloths.
3. Assemble a Folding Botanical Screen for a Battery Candle
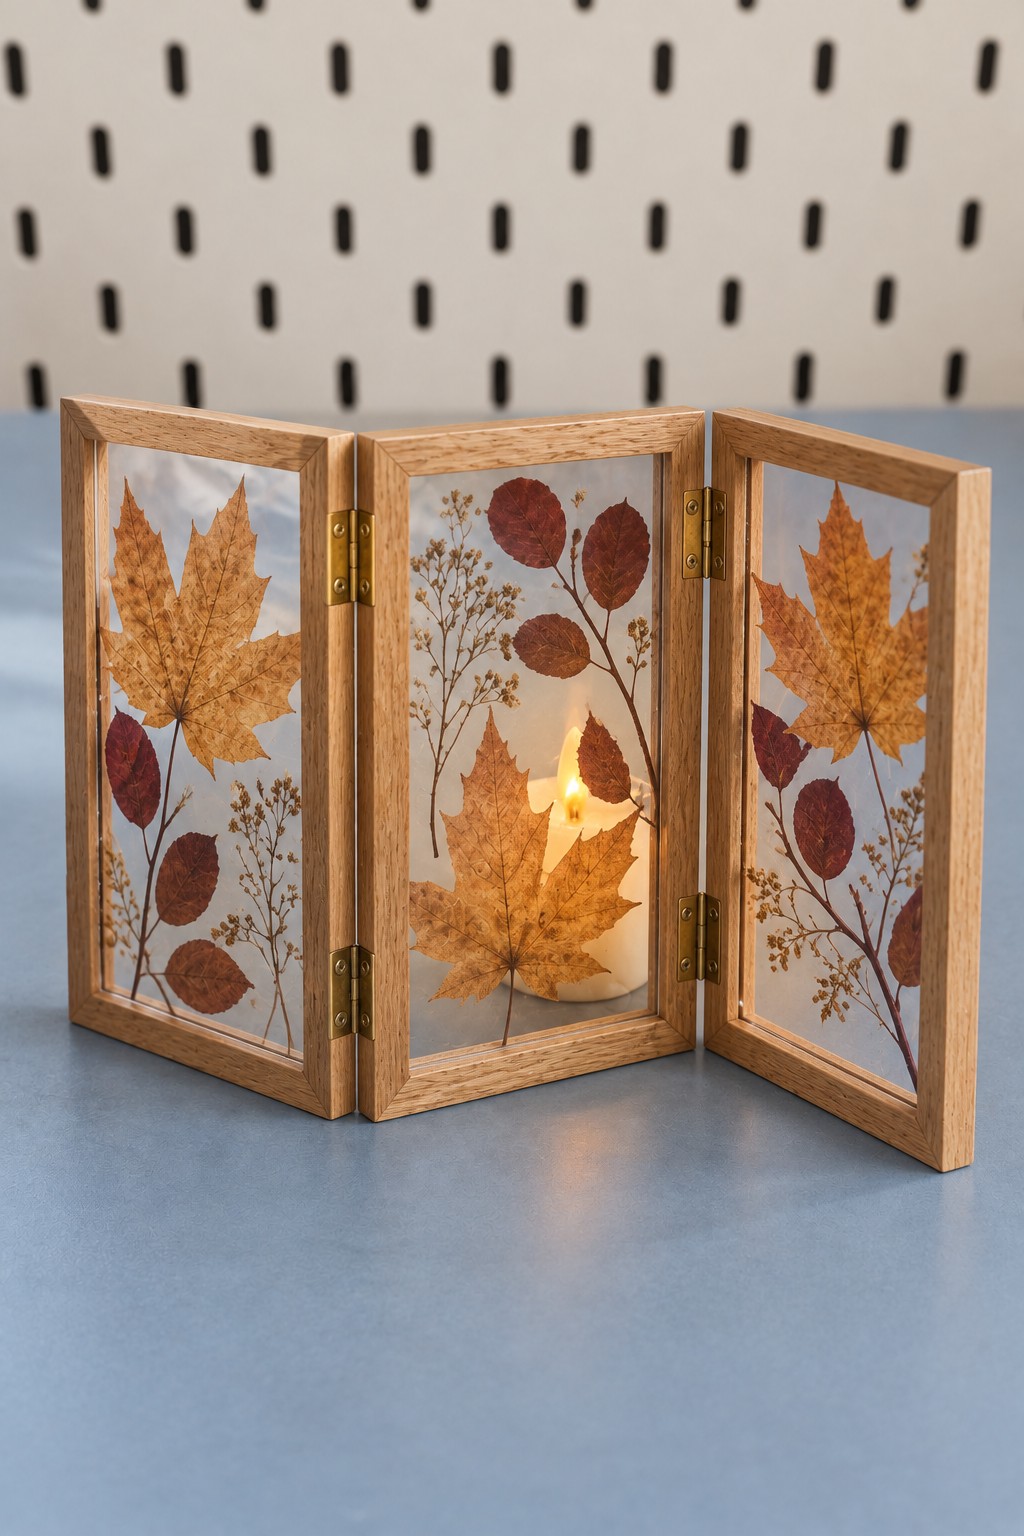
Three wooden frames can form a small tabletop screen with leaves suspended across transparent panels. Gather matching frames, suitable clear inserts, small hinges, pressed leaves, and an enclosed battery candle. Use a panel adhesive compatible with the inserts and test whether it dries visibly before committing to the arrangement.
Place the larger leaves first and tuck smaller stems or fern pieces into the remaining space. Secure them between compatible clear sheets or within the frame assembly, then hinge the frames so the outer panels support the center. Leave the light separate from the screen and accessible from behind. A flameless candle provides the warm central glow without putting an open flame beside dried plant material.
4. Shape Pleated Paper Leaves into a Fan Wall Light
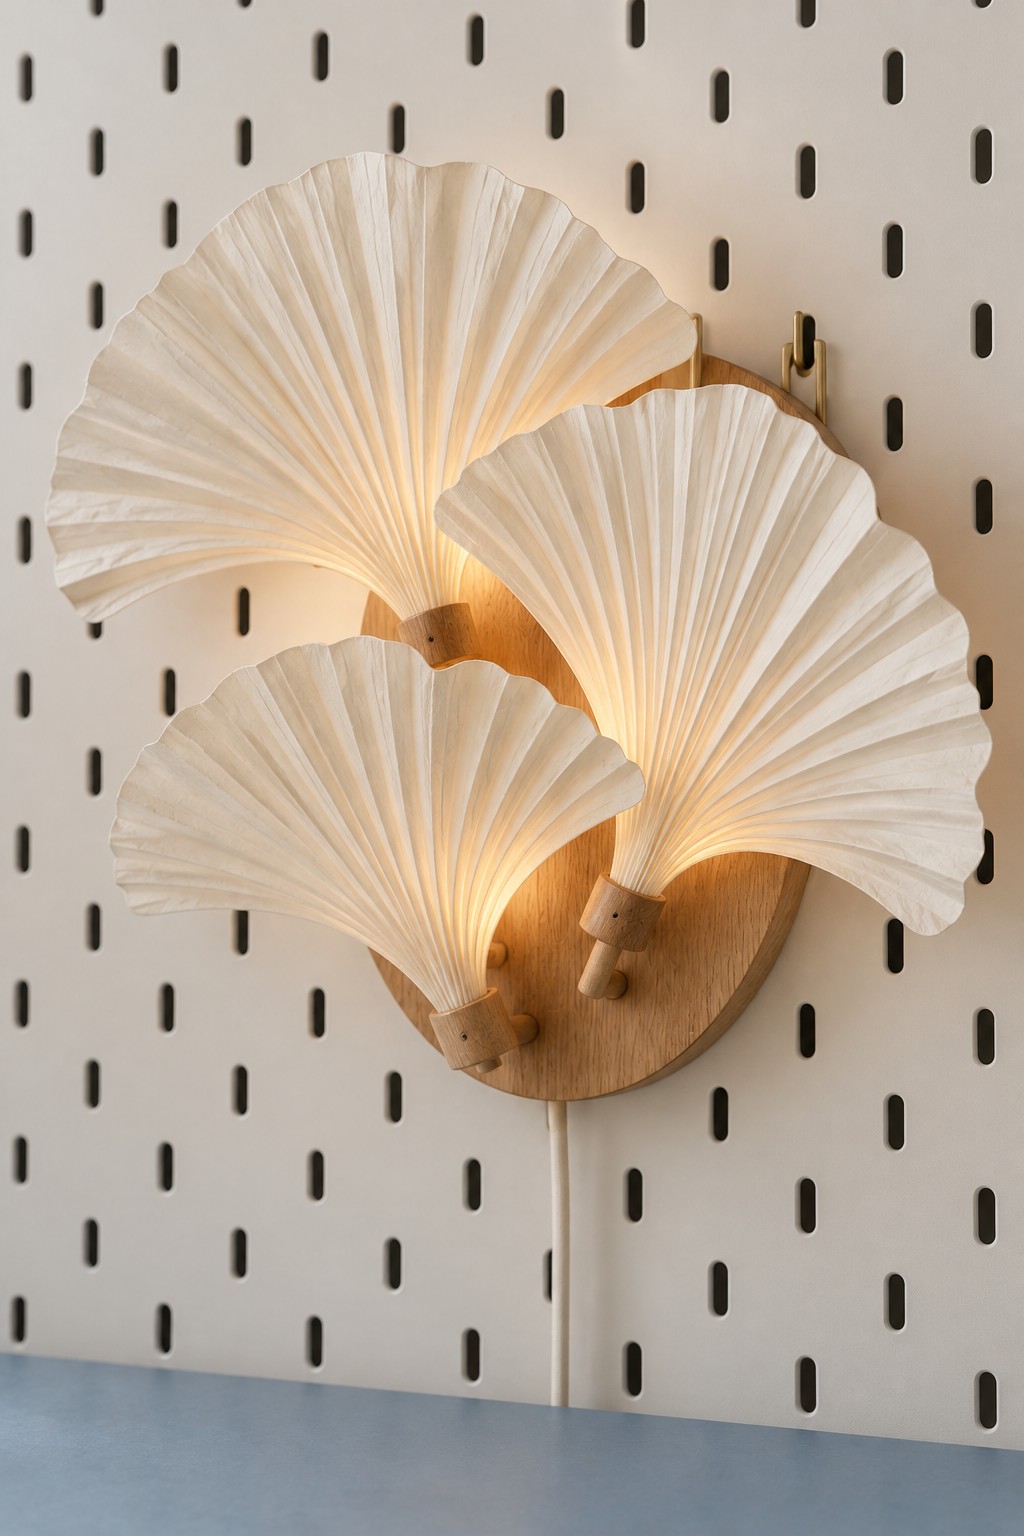
Broad ivory fans capture the shape of ginkgo leaves through paper folds rather than real foliage. For a decorative version, use sturdy cream paper, a folding tool, wooden dowels, and a round wooden plaque. Fold each paper piece into an accordion, gather one end, and spread the opposite edge into a broad fan. Make three sizes to create the overlapping arrangement.
Secure the gathered ends to short dowels and attach those supports to the plaque. To add light, use a complete low heat LED fixture designed for decorative shades and keep the paper outside its required clearance. Leave any mains wiring or fixture modification to a qualified electrician. You can also make the same arrangement as an unlit wall sculpture.
5. Press a Large Leaf into a Shallow Clay Dish
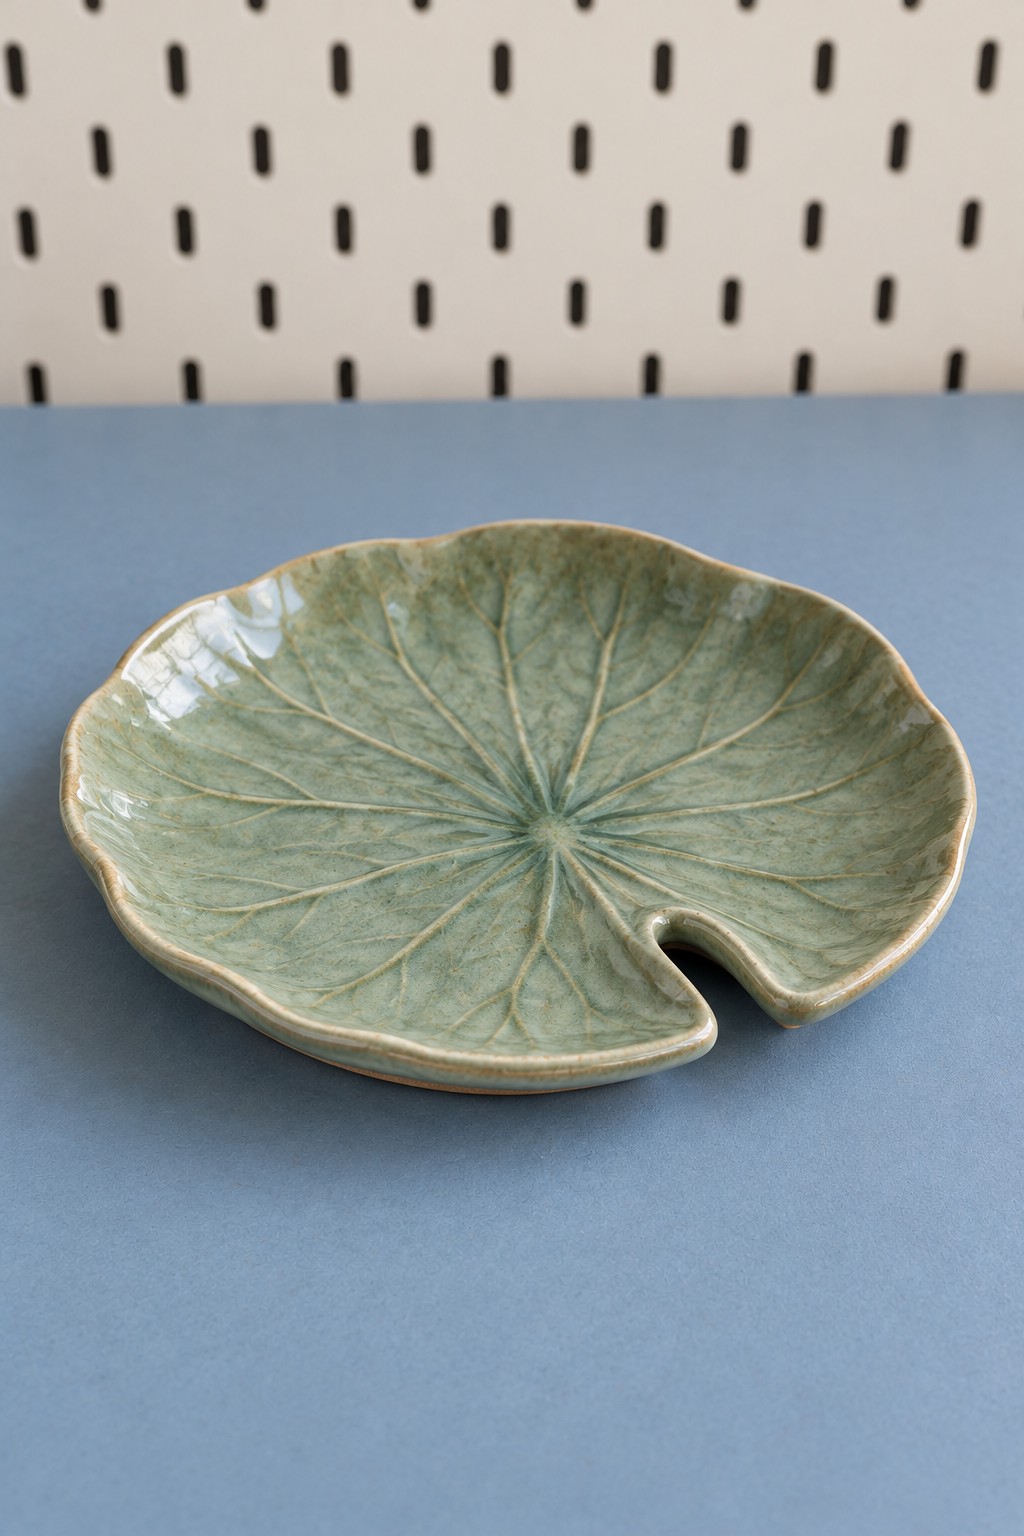
A broad leaf with radiating veins provides the pattern for this green decorative dish. Use a suitable real leaf, air drying craft clay, a roller, a smooth cutting tool, a shallow forming bowl, and acrylic paint. Roll the clay to an even thickness recommended by its manufacturer, then press the veined underside of the leaf gently into the surface.
Lift the leaf away, cut around the outline, and preserve the characteristic notch where the stem would meet the blade. Shape the clay in a shallow support and let it dry fully according to the product instructions. Add muted green paint and a compatible finish. Use the finished piece for dry jewelry or small keepsakes; ordinary craft clay and paint do not make a food safe or watertight dish.
6. Suspend Skeleton Leaves Inside a Lighted Wooden Frame
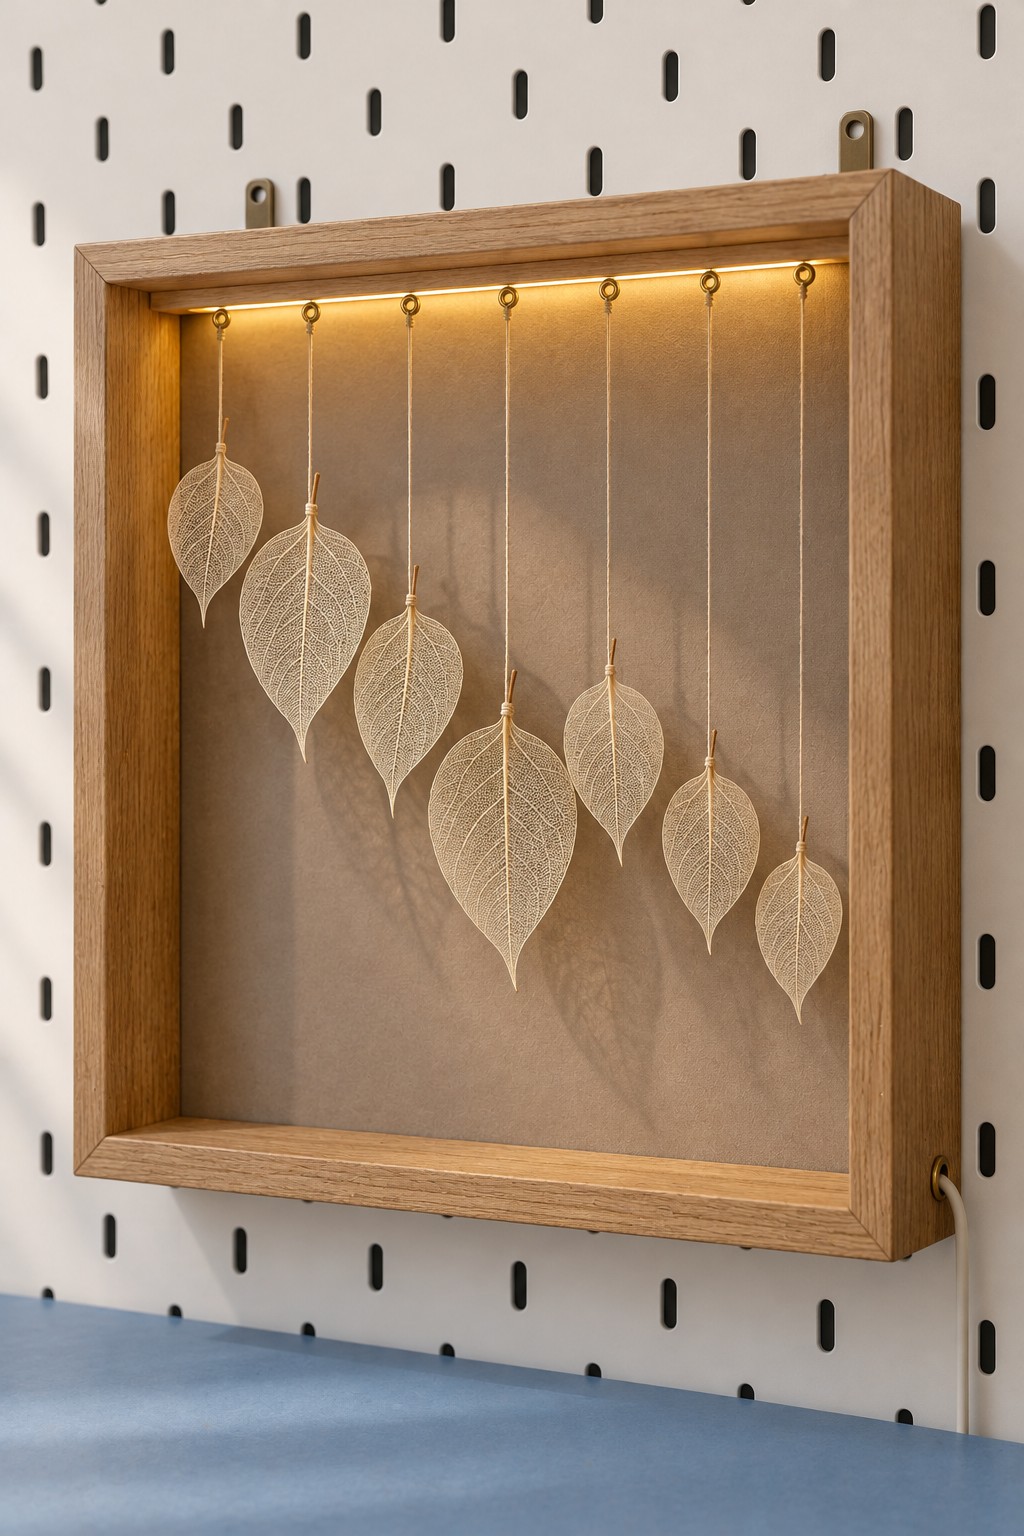
Fine skeleton leaves create a quiet display when they hang at different heights inside a deep wooden frame. Gather seven purchased skeleton leaves, fine thread, tiny screw eyes, a deep frame, and a complete enclosed LED strip suitable for the frame. The lighting should be installed according to its instructions, with its cable and power connection accessible.
Set the small eyes into the upper wooden rail and tie each thread securely around a leaf stem, without tightening it across the delicate veins. Arrange the lengths into a loose descending rhythm with clear space between specimens. A plain backing helps the shadows show. Keep the frame out of drafts and separate the foliage from the lighting components so it cannot swing into them.
7. Layer Pressed Leaves into an Embroidery Hoop Owl
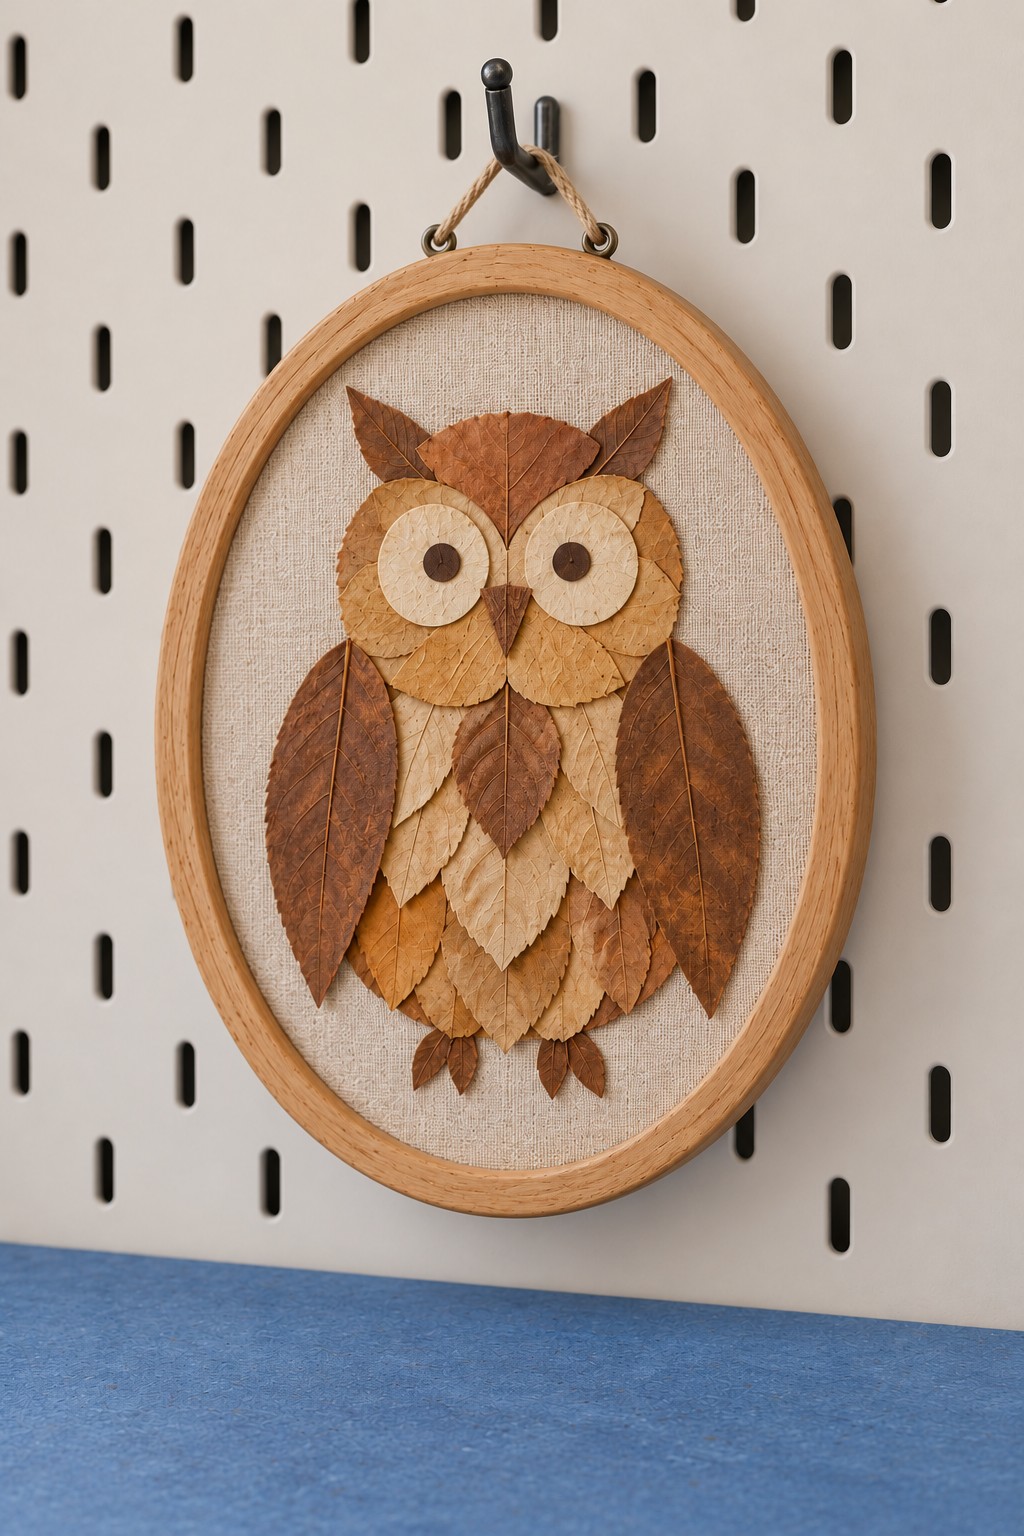
An oval hoop and a linen colored background provide a clear outline for a leaf owl. Prepare a hoop, firm fabric backed with card, pressed brown and cream leaves, craft glue, and pale card circles for the eyes. Sketch a faint central guide so the eyes and body stay aligned.
Build the lower feather rows first, overlapping upward with their tips pointing down. Add two larger side leaves for the wings, a small pointed beak, and leaf tips above the eyes for ear tufts. Place the circular eyes last so their spacing remains easy to judge. The fabric should stay taut, but the rigid backing carries the collage and prevents the glued layers from flexing when you hang it.
8. Knot Three Macrame Leaves for a Curtain Tieback
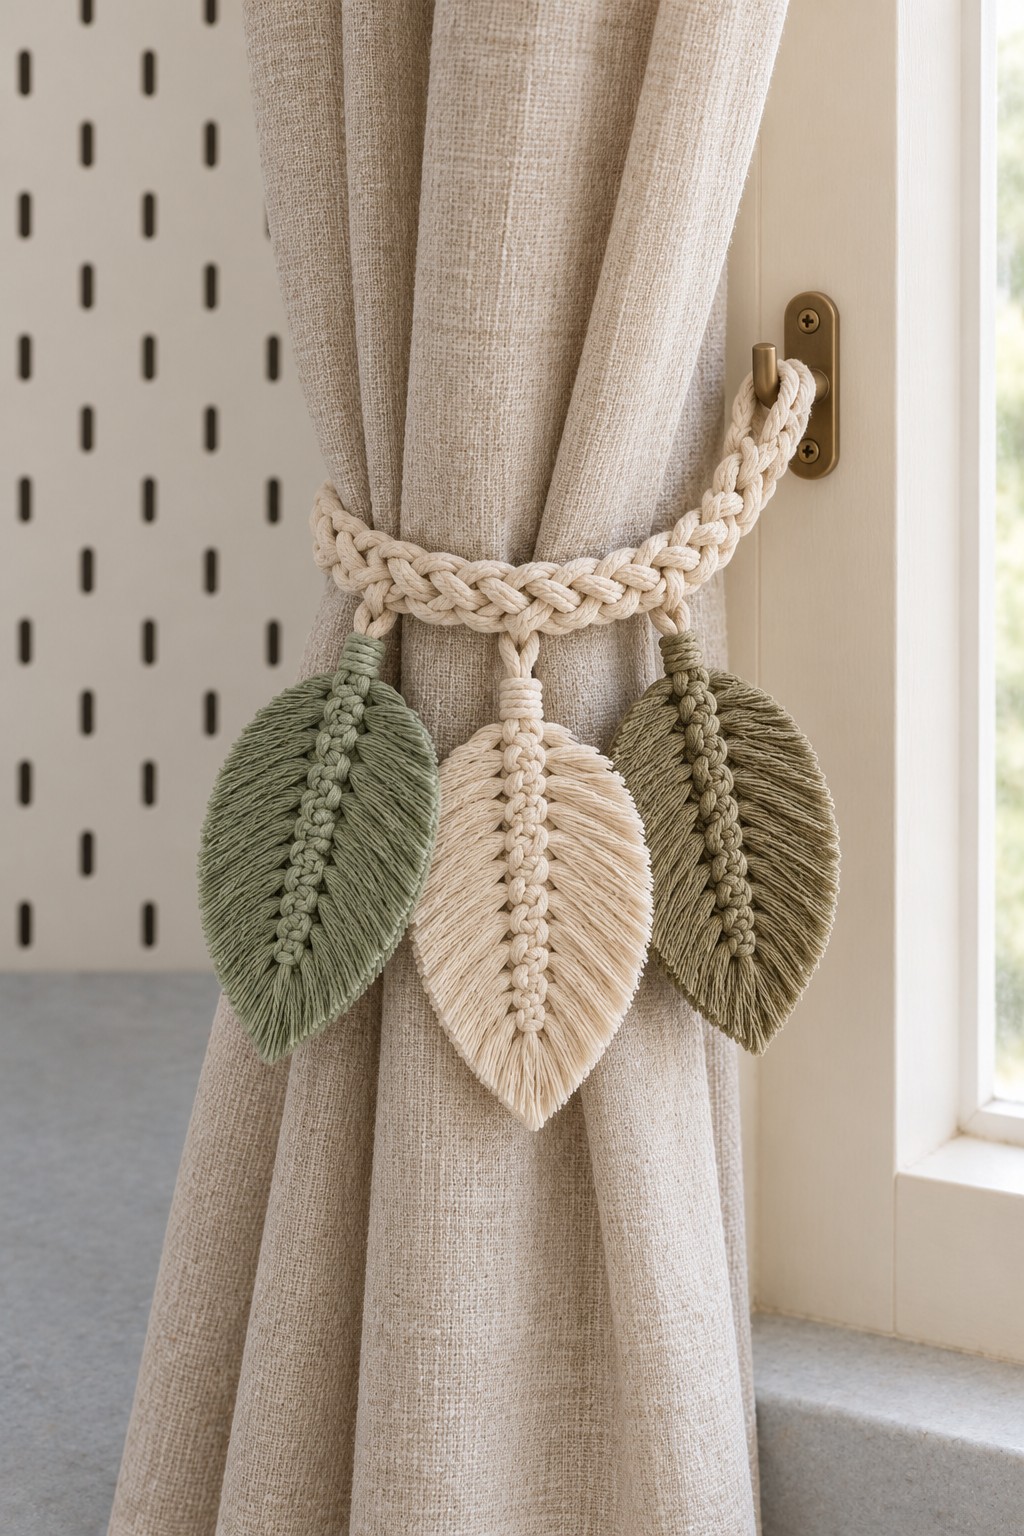
Soft cord is a practical way to bring leaf shapes onto a curtain that will be handled regularly. Use cream cord for the main tieback and sage, ivory, and olive cord for three hanging leaves. Make each leaf around a folded central cord. Fold two short cords in half, place their loops on opposite sides of the central stem, and pass each pair of loose ends through the opposite loop. Tighten the interlocking pair around the stem and repeat below it.
Comb the loose strands and trim them gradually into a tapered leaf shape, keeping the central knots intact. Attach the three stems to a braided or knotted tieback at slightly different heights. Fit the main loop around the curtain and secure it to a suitable wall hook. The thicker top braid should carry the curtain; the fringe leaves act as decoration and should not be pulled to open or close it.
9. String Colorful Cord Leaves Across a Doorway
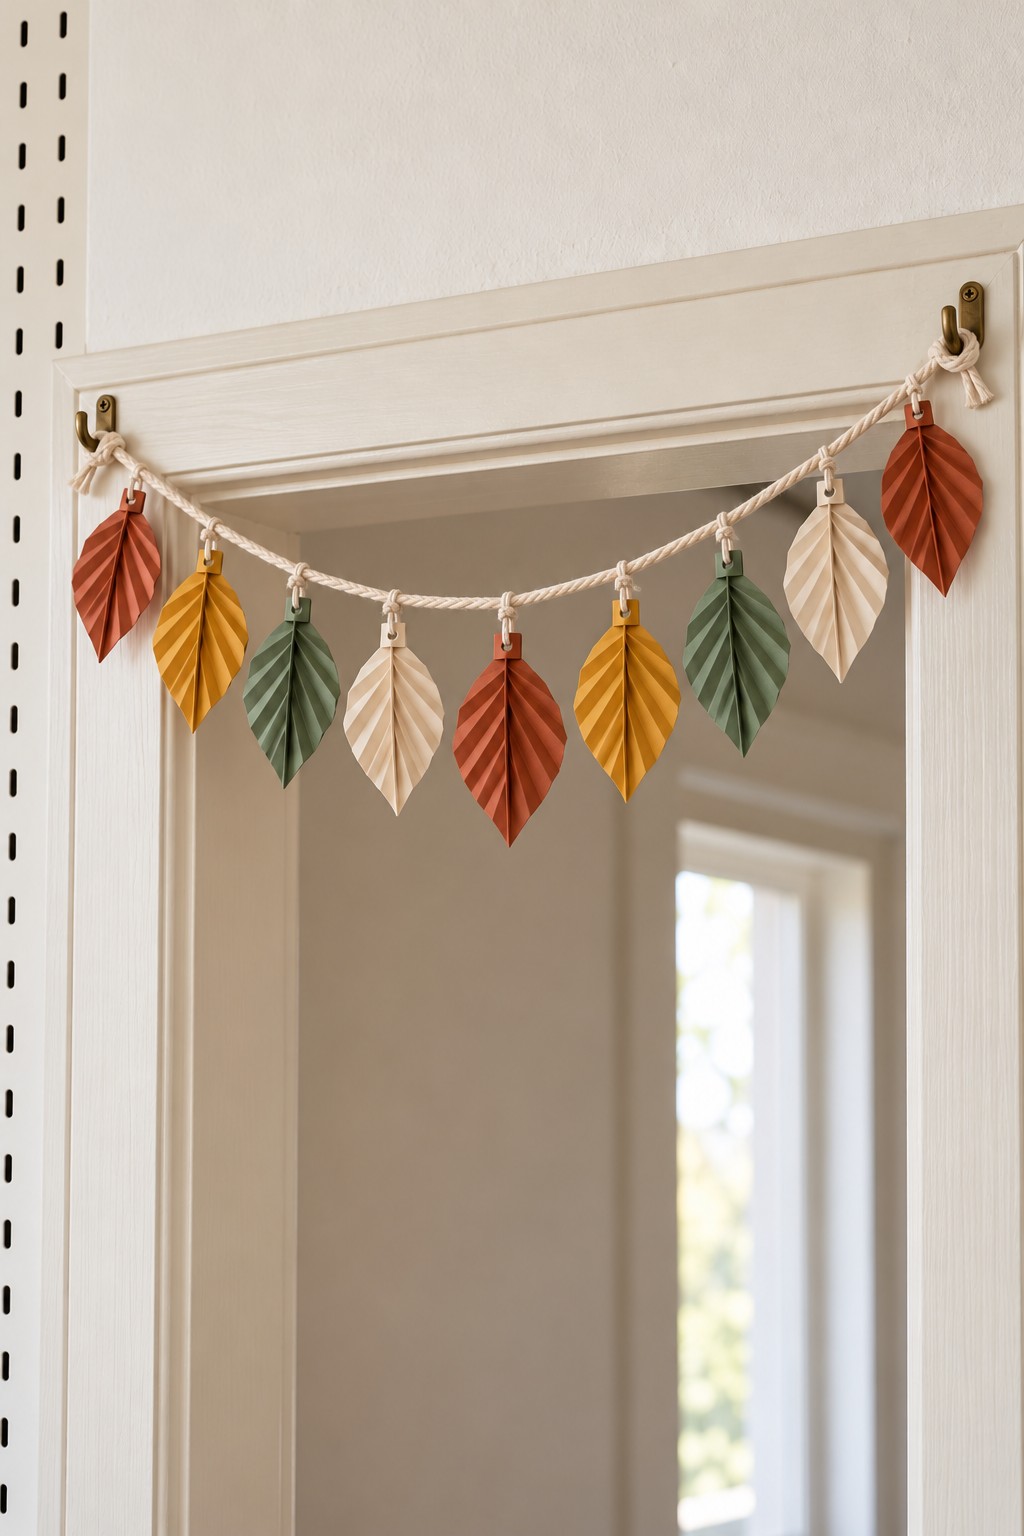
A repeated series of rust, mustard, cream, and sage leaves makes a cheerful garland above a doorway. Choose combable cotton cord in those colors, a strong hanging cord, scissors, and a comb. Form each leaf around a central stem using paired knots, then brush and trim the fringe into a consistent pointed outline.
Make a sample first to settle the finished size before cutting cord for the full set. Tie the leaf stems onto the main line at even intervals and secure both ends to appropriate hooks above the frame. Keep the center high enough for the door to move freely. The design works best with an intentional shallow curve rather than a deep loop that catches on passing people or moving doors.
10. Give a Miniature House an Overlapping Leaf Roof
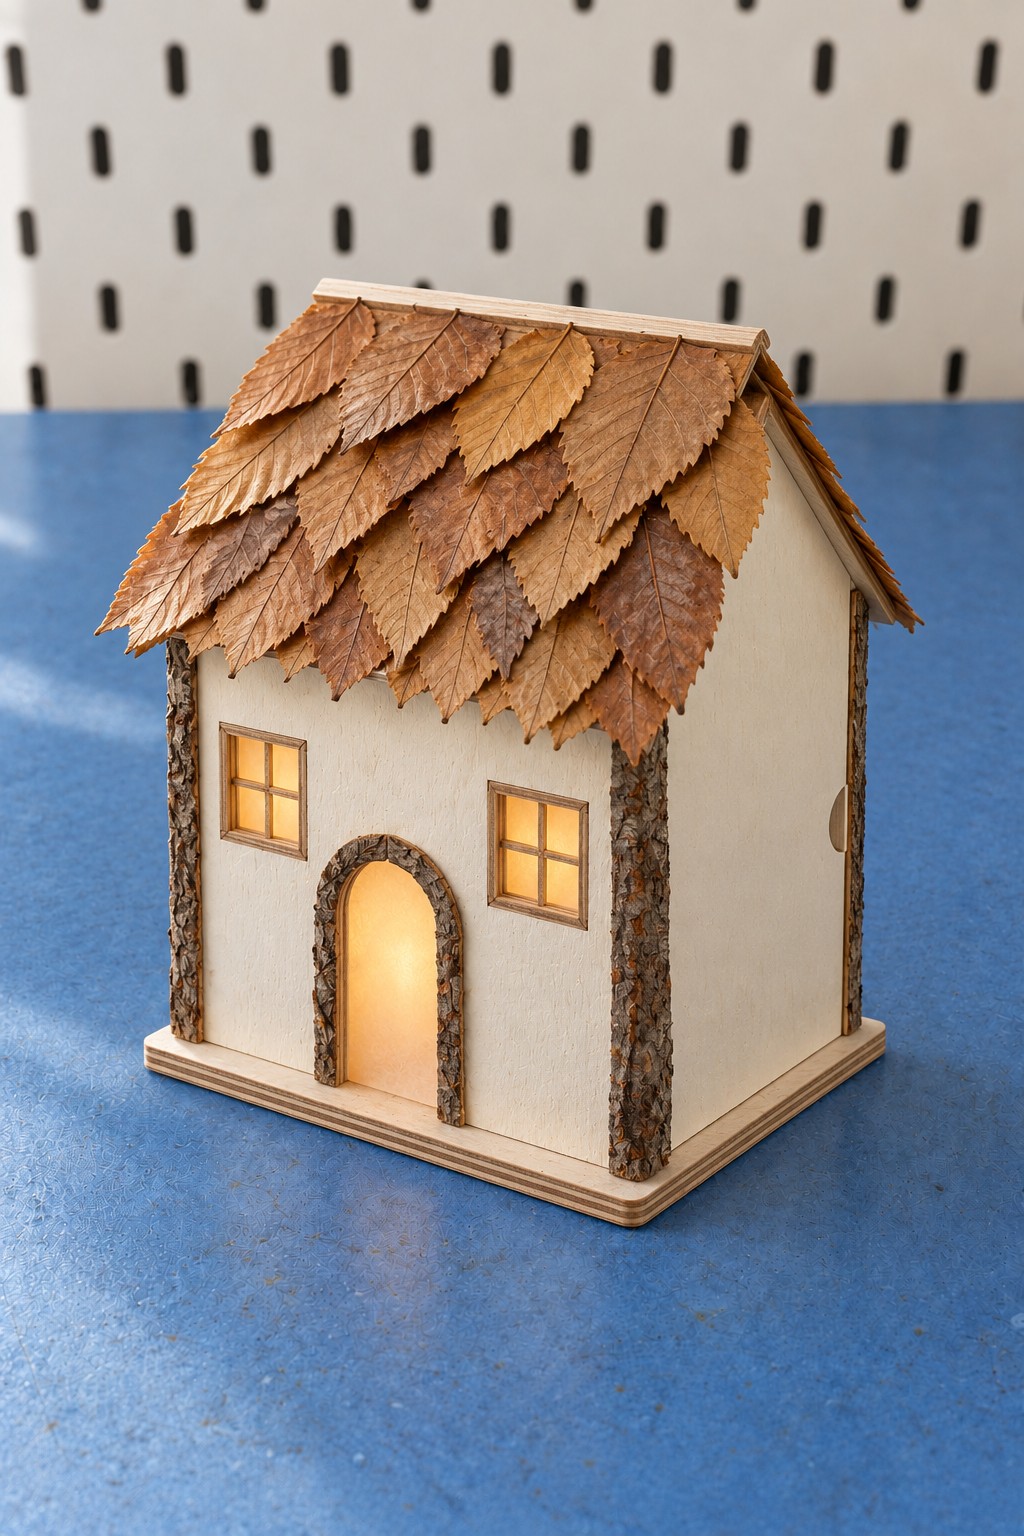
Small brown leaves can imitate roof shingles on a simple wooden craft house. Use an unfinished house with a removable or accessible base, pressed leaves, a little pale paint, short bark pieces for corner trim, and an enclosed battery LED light. Paint the walls before attaching the foliage so the roof remains clean.
Begin at the eaves and overlap successive leaf rows toward the ridge, leaving the tips visible like shingles. Finish the upper join with a narrow ridge strip instead of leaving loose stem ends exposed. Add the corner trim and place the light inside without blocking its controls. The leaf roof is an indoor decorative surface; it is not a weatherproof covering or a birdhouse roof for outdoor use.
11. Trace a Leafy Branch onto a Transparent Window Panel
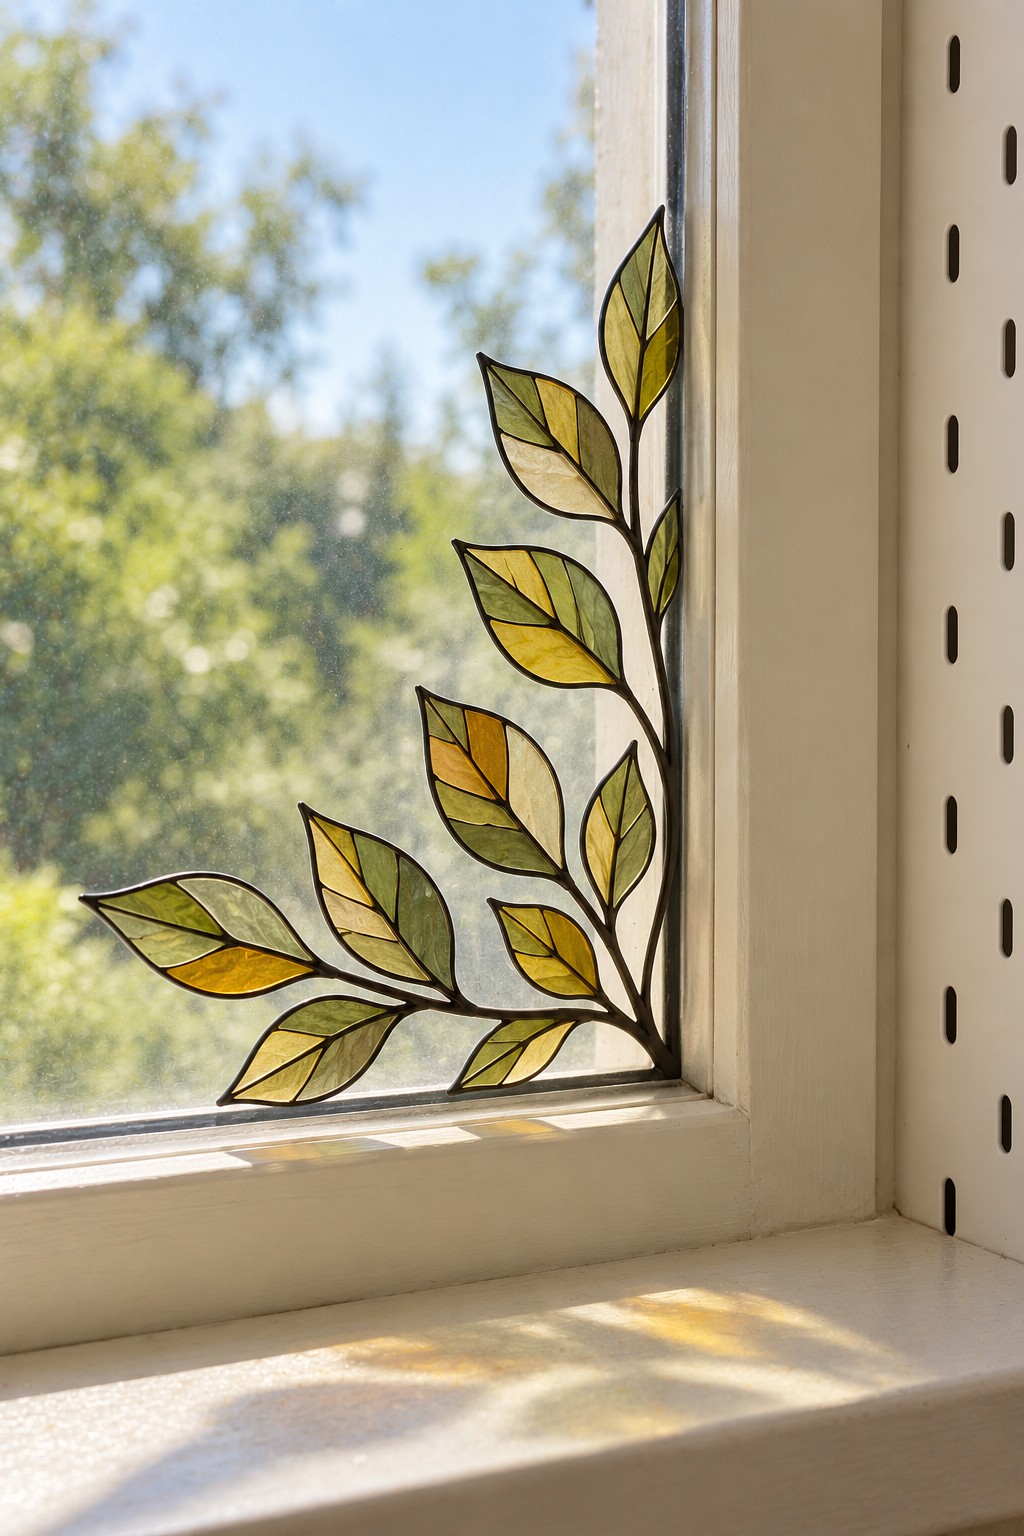
A branching pattern of green, amber, and cream leaves brings botanical shapes to a bright window corner. This version uses colored transparent sections and dark outlines rather than mounted dried leaves. For an approachable interpretation, gather a removable clear panel, transparent glass effect paints or colored craft film, and compatible dimensional outlining paint.
Draw a branch that fits the panel, divide each leaf into a few simple vein sections, and apply the colors inside the outlines. Let each material cure as directed before positioning the panel. Support it independently without obstructing the window opening. Traditional soldered stained glass requires different tools and skills; Decovive's stained glass window ideas and painting guide offers related decorative approaches.
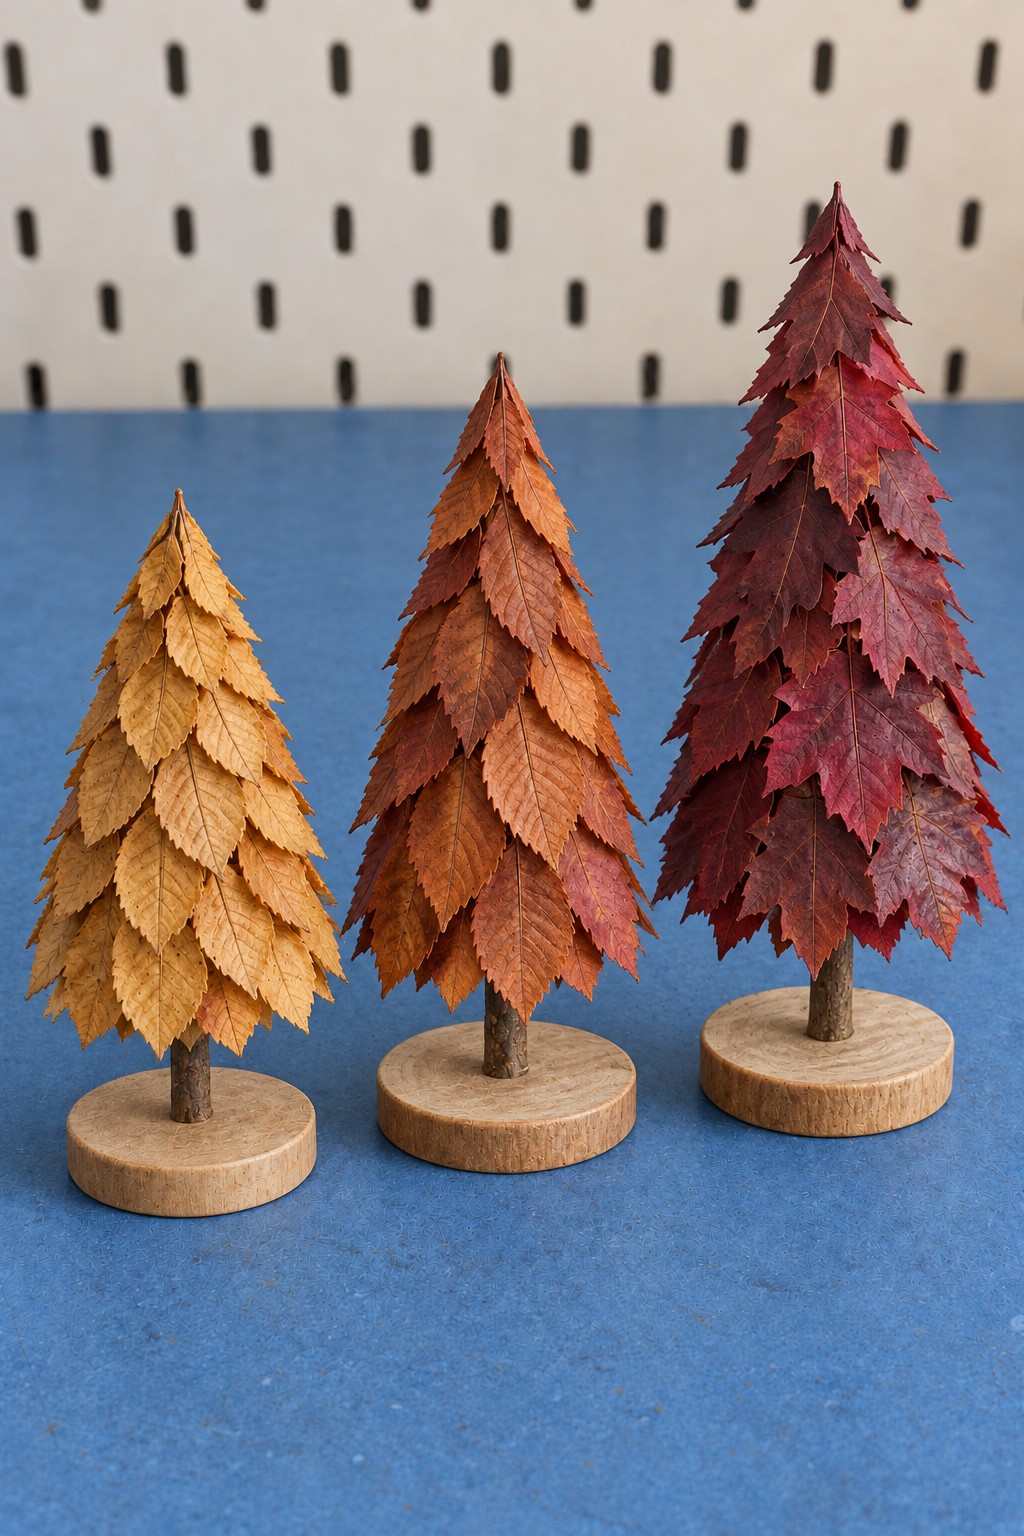
12. Build Three Miniature Trees with Leaf Covered Cones
A trio of yellow, copper, and burgundy trees turns spare leaves into a compact seasonal forest. Gather three card cones of different heights, small pressed leaves, short wooden dowels, wooden bases, and suitable adhesive. Fix each dowel securely into its base and support the cone centrally over it before adding the foliage.
Starting at the bottom, glue leaves in overlapping rings with their tips hanging down. Move upward in smaller circles, turning the cone to check the coverage from every side. Finish the top with a few narrow leaves rather than a large clump. Keep the bases wide enough for the finished trees to stand steadily, and use one main color per tree to make the different heights easy to read.
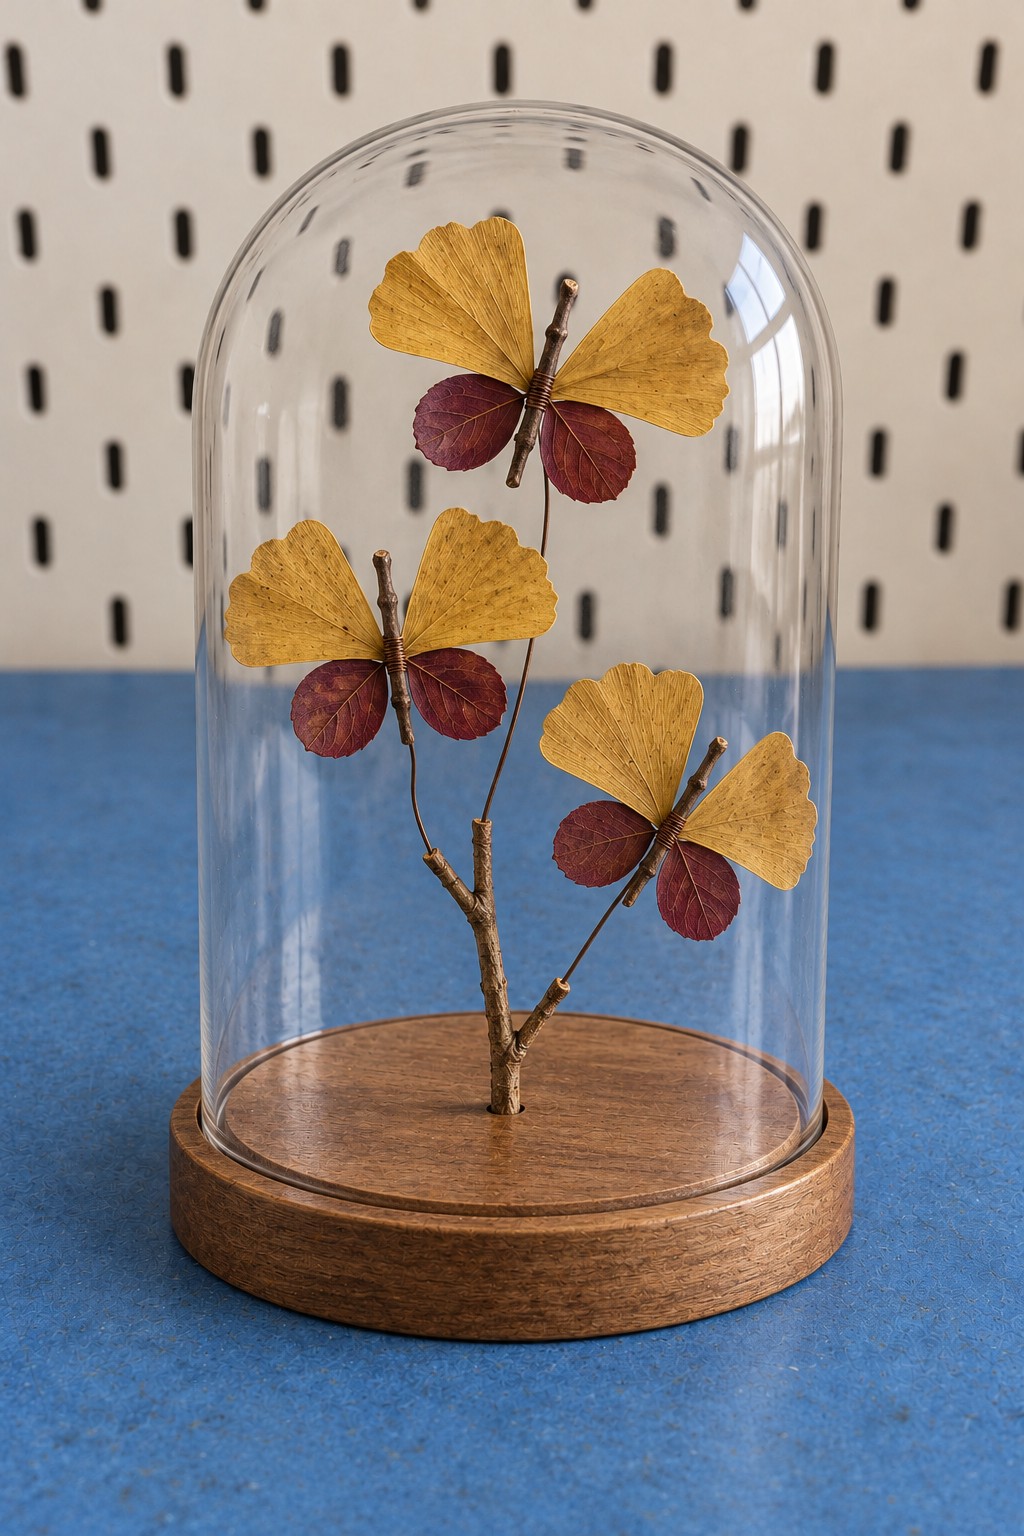
13. Arrange Ginkgo Leaf Butterflies Under a Glass Dome
Fan shaped yellow leaves suggest open butterfly wings with very little trimming. To build this display, use a glass cloche with a wooden base, a dry branching twig, ginkgo leaves, small burgundy leaves, fine wire, and a suitable craft adhesive. Cut unobtrusive backing shapes from thin card if the leaves need support.
Pair the yellow fans for the upper wings and smaller rounded pieces for the lower wings, then add a narrow body down the middle. Secure each supported butterfly to the twig with fine wire hidden behind its body. Fit the twig firmly into the base before lowering the dome over it. Allow all glue to dry first and leave enough clearance for the wings to avoid brushing against the glass.
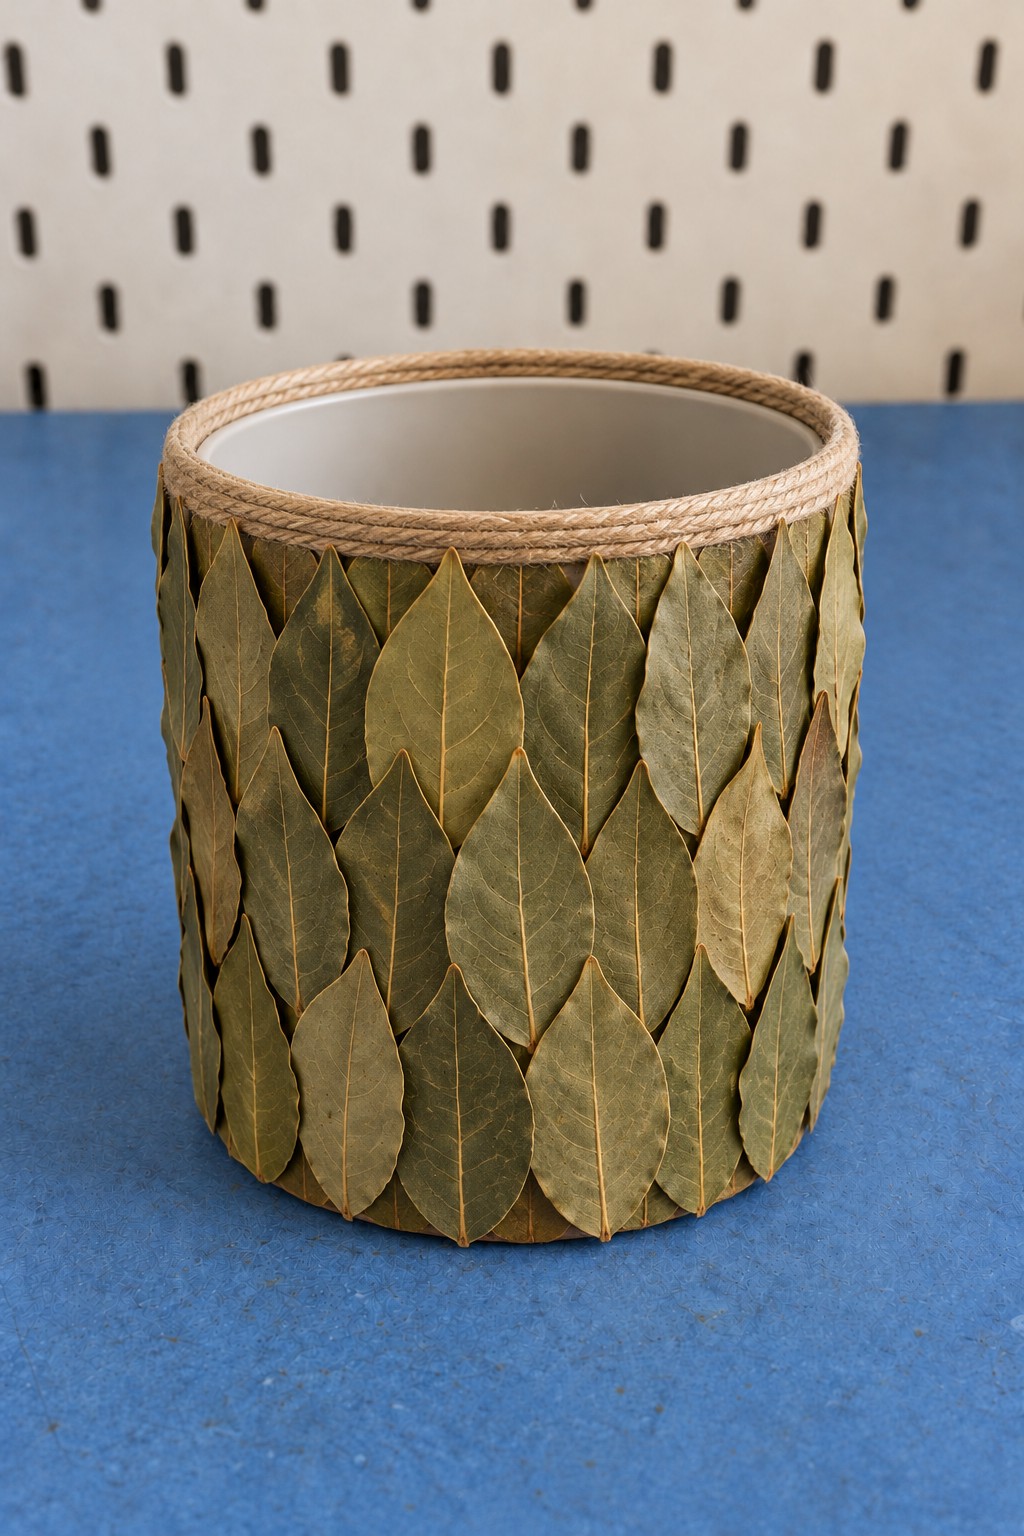
14. Wrap a Cylindrical Holder in Vertical Leaves and Jute
A plain cylindrical container becomes a textured desk holder when narrow leaves are arranged vertically around its exterior. Use a smooth container with a finished rim, pressed or preserved leaves suited to its curve, jute cord, and adhesive compatible with both the leaves and the surface. Keep the original interior completely uncovered.
Test the first leaf against the curve, then work around the holder with small overlapping joins. Alternate slightly different lengths to avoid a rigid stripe pattern. Finish the top edge with a neat band of jute, keeping all fibers below the opening. Use the holder for dry desk supplies or place a separate removable plant pot inside; never water directly against the leaf covered shell.
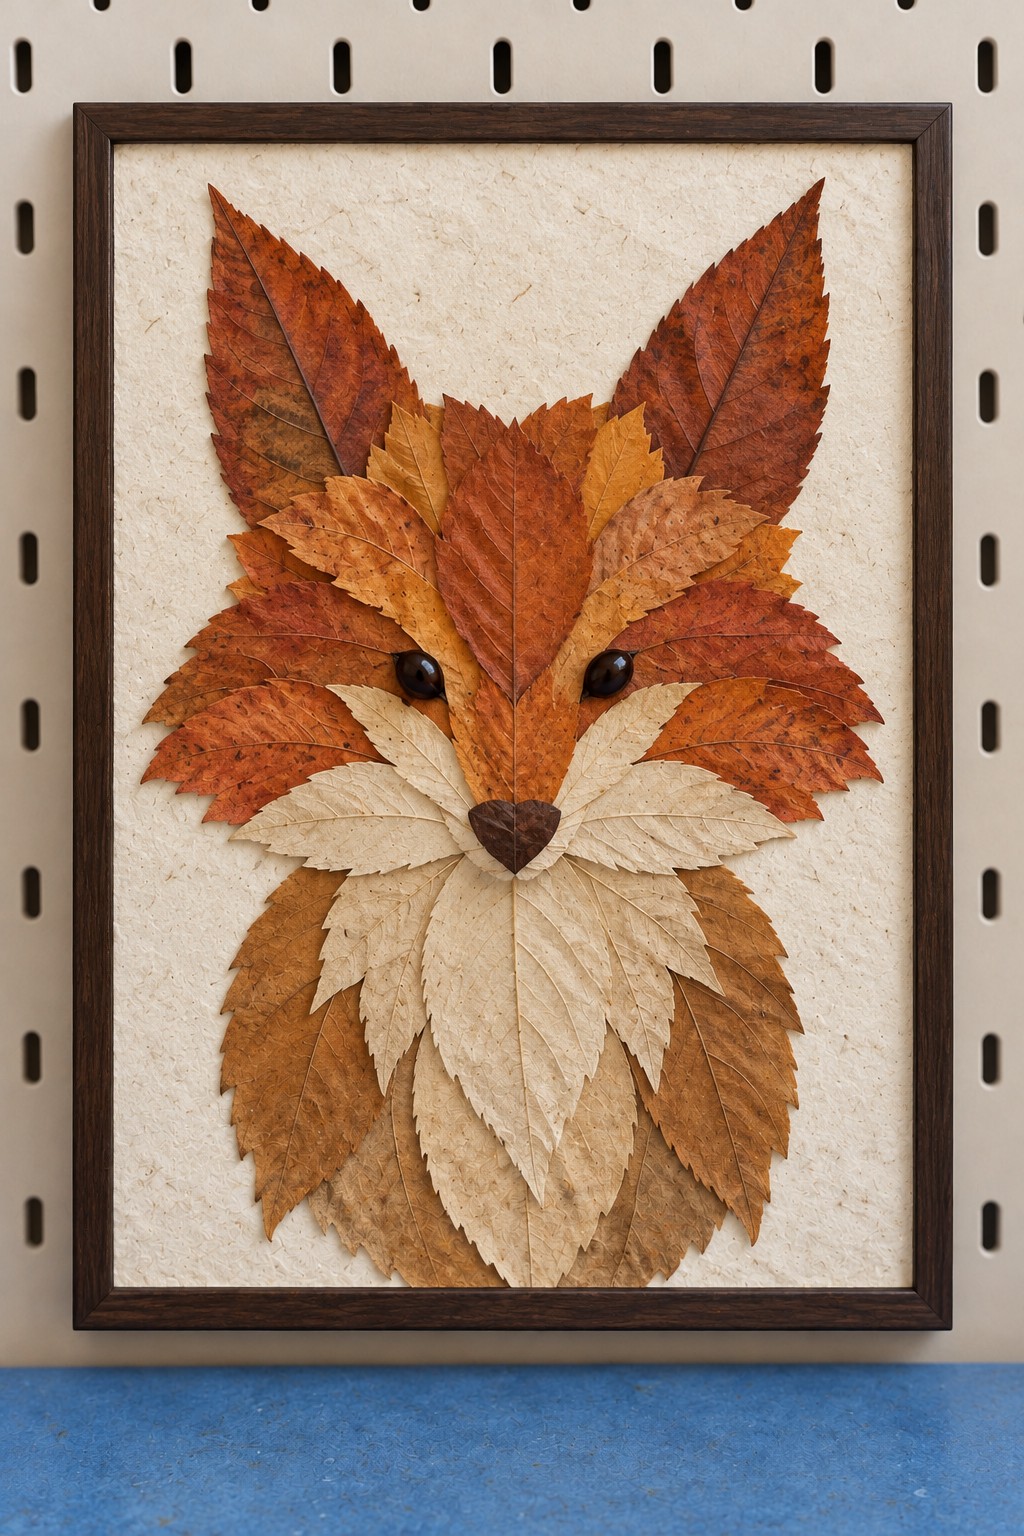
15. Create a Fox Portrait with Pointed Leaf Fur
Rust colored leaves, pale cream pieces, and a few dark facial details create a fox with a clear expression. Gather a firm light backing, a deep frame, narrow pointed leaves, wider leaves for the cheeks, craft glue, and small dark card pieces or beads for the features. Sketch the nose, eye line, and tall ears before beginning.
Attach the lower chest leaves first, then build the cheeks and forehead in upward overlapping rows. Direct the outer tips away from the nose to suggest fur growth. Add pale leaves around the muzzle and down the chest, keeping both eyes visible against the rust tones. Finish with a small dark nose and leave enough frame depth to protect the raised layers.
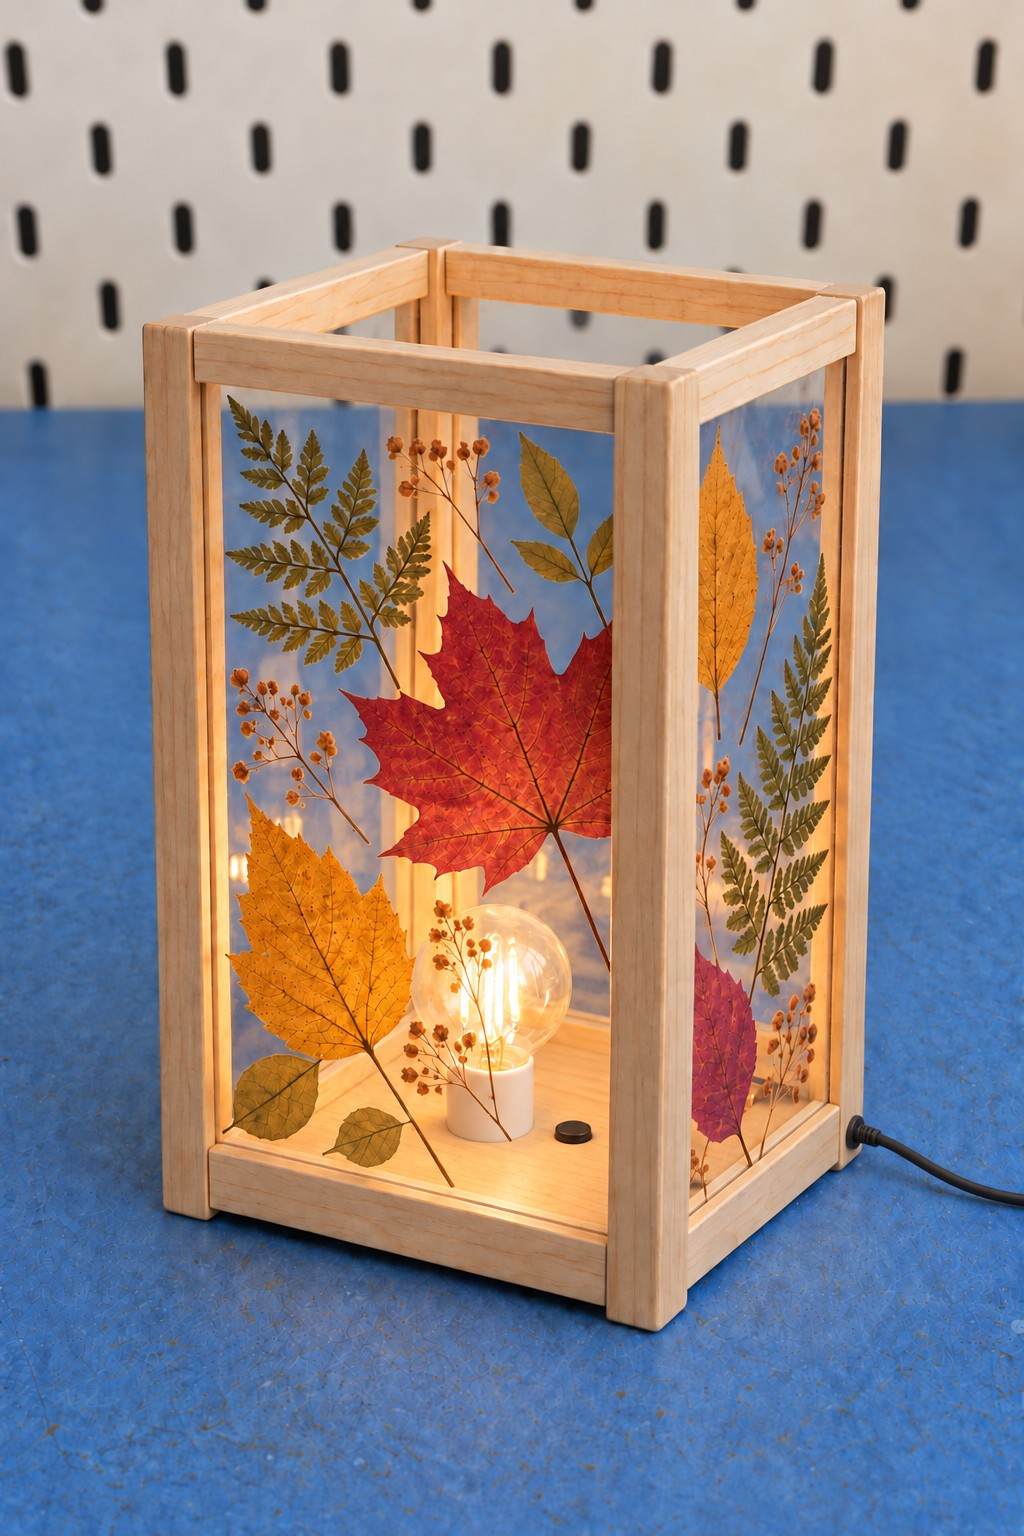
16. Fill a Wooden Lantern Frame with Pressed Botanicals
A wooden lantern with transparent sides gives large maple leaves and small fern fronds room to show their shapes. Start with a lantern or display frame specifically suitable for its complete LED light, transparent removable panels, fully dry leaves, and a compatible clear adhesive. Decorate the panels separately so glue does not reach the electrical parts.
Place one large leaf on a panel and balance it with finer stems rather than filling every gap. Let the decorated panels dry before refitting them. A warm LED provides the amber glow, but the original fixture clearances and ventilation must remain intact. Use a ready made lighting assembly and keep all wiring accessible; dried leaves should never be placed against a hot lamp or an exposed flame.
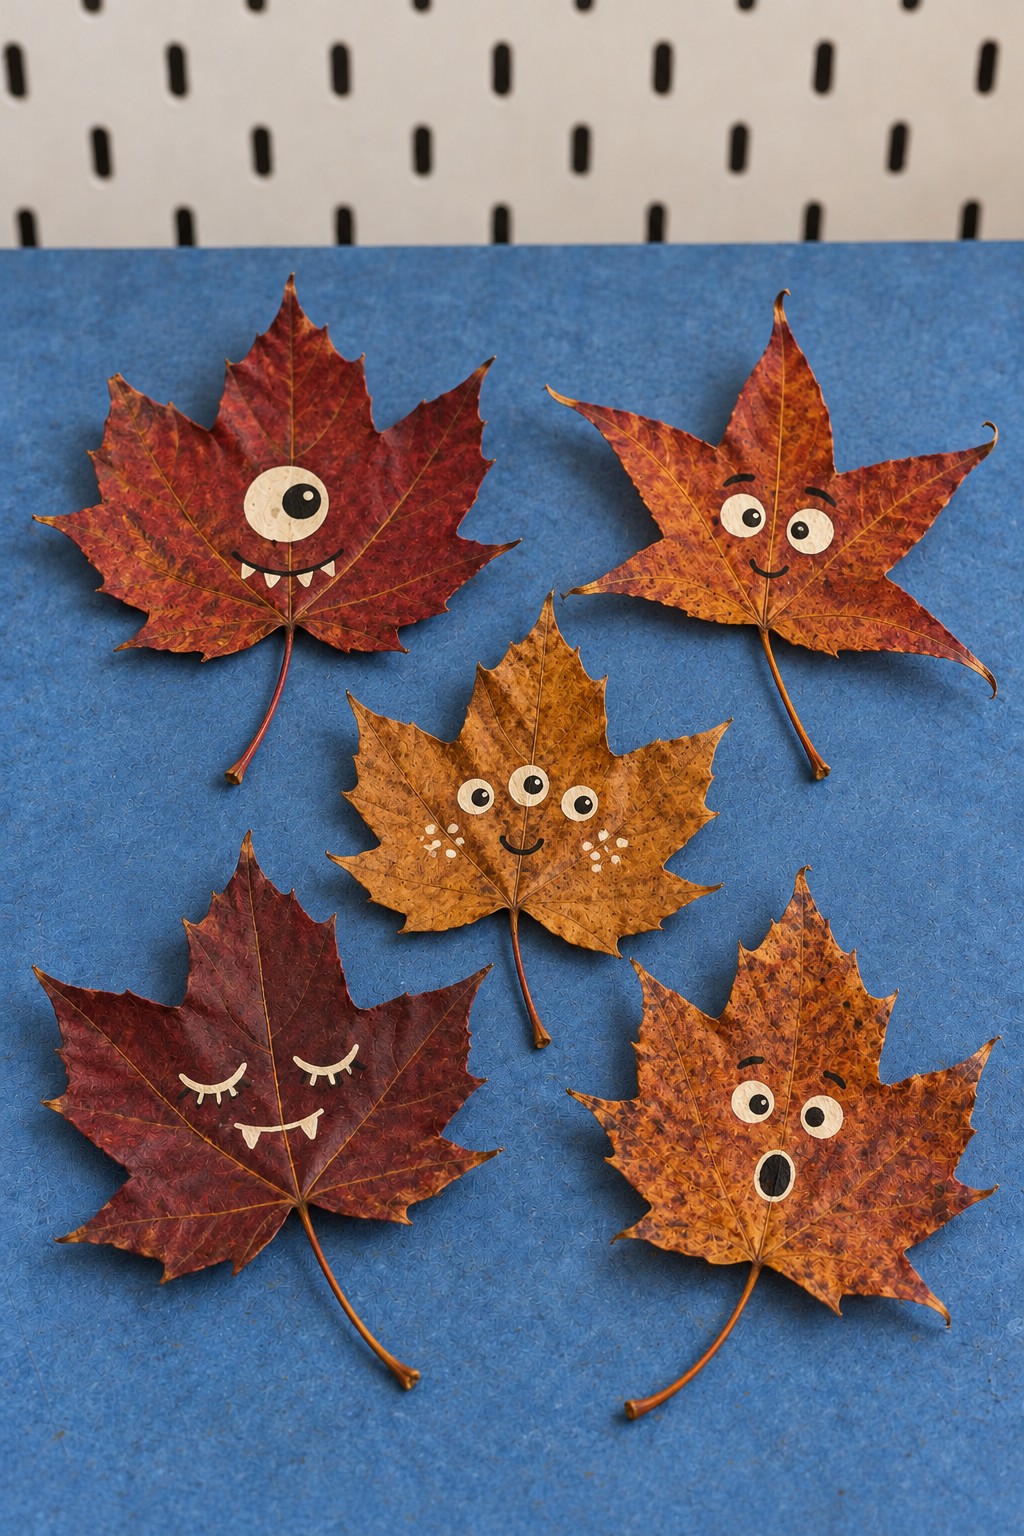
17. Add Playful Faces to Autumn Maple Leaves
Red and golden maple leaves make expressive little characters because their pointed lobes already suggest hair, ears, or a star shaped face. Prepare pressed leaves, pale card circles, a dark fine marker, tiny paper teeth, and craft glue. Work on a flat support and handle the stems gently so the leaf bodies stay intact.
Plan each expression before attaching the eyes. One large eye, three small eyes, sleepy lids, and an uneven smile create distinct personalities without adding many materials. Use small glue dots beneath the paper features. Mount the finished characters on a card panel or arrange them in a shallow display frame. These are delicate decorations, so keep tiny pieces out of reach of young children.
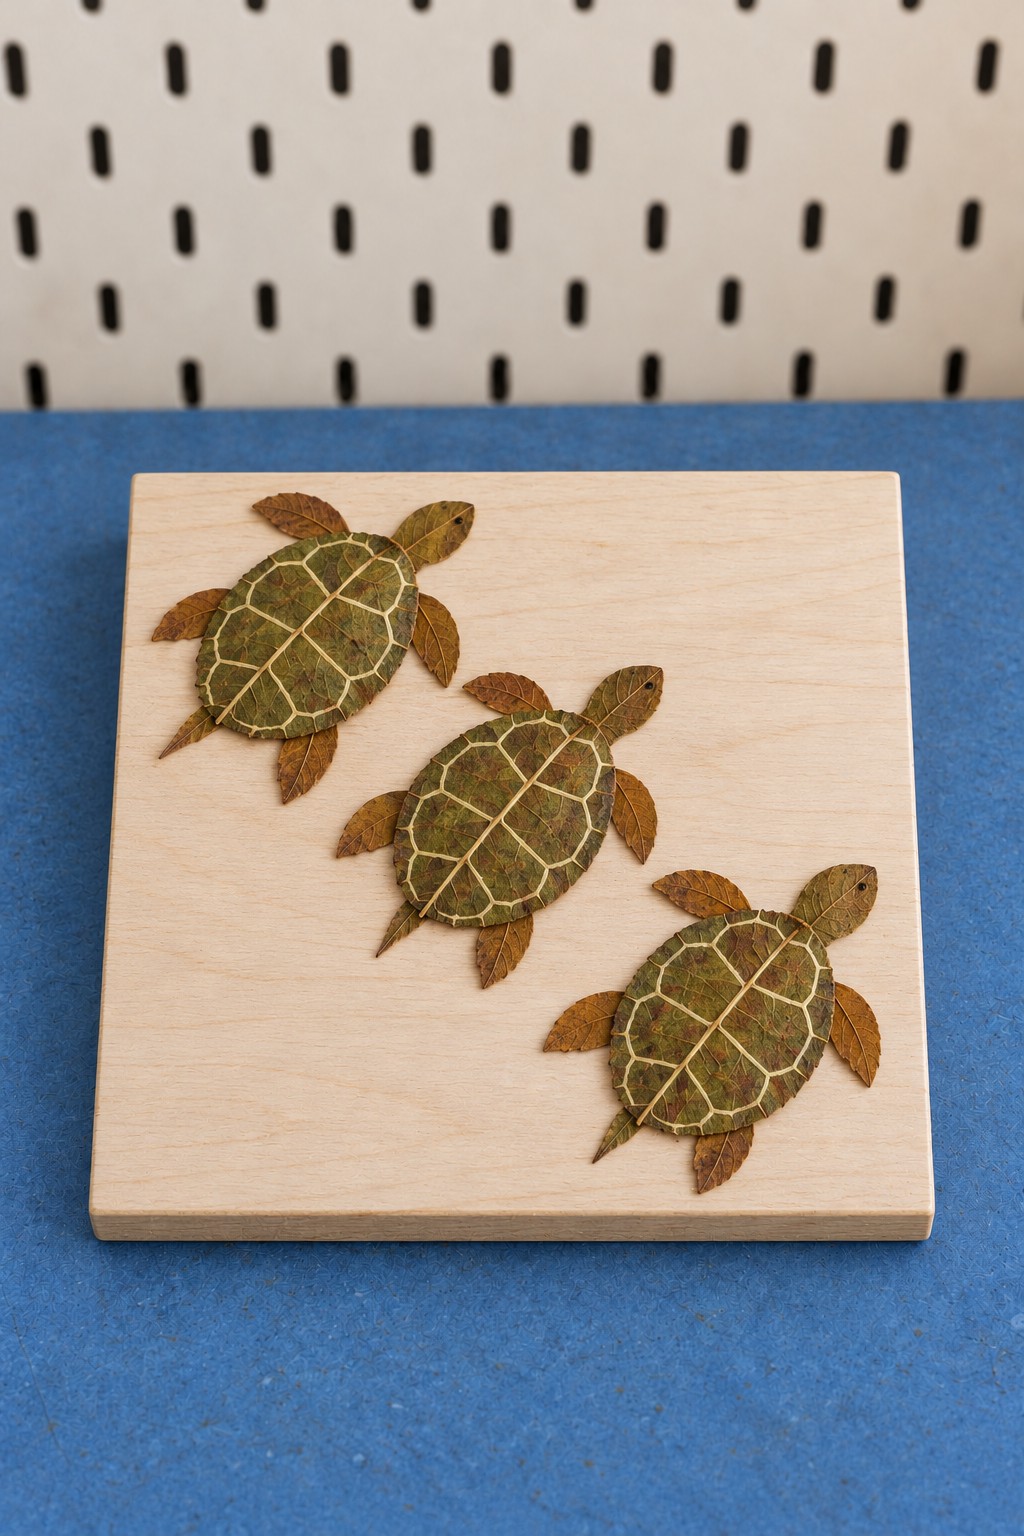
18. Make a Wooden Turtle Plaque with Rounded Leaves
Three small turtles can travel diagonally across a square wooden plaque. Use a smooth wood panel, rounded green leaves for shells, smaller leaf pieces for flippers and heads, a pale paint pen, and tested craft adhesive. Arrange the complete turtle shapes before drawing any shell details.
Glue the head, flippers, and pointed tail first, then lay the larger shell leaf over their inner ends to hide the joins. Add a few pale curved lines to suggest shell sections, using a light touch so the pen does not tear the surface. Keep the turtles a similar size and leave space between them. A simple unfinished wood background makes the small shapes easier to understand than a heavily patterned base.
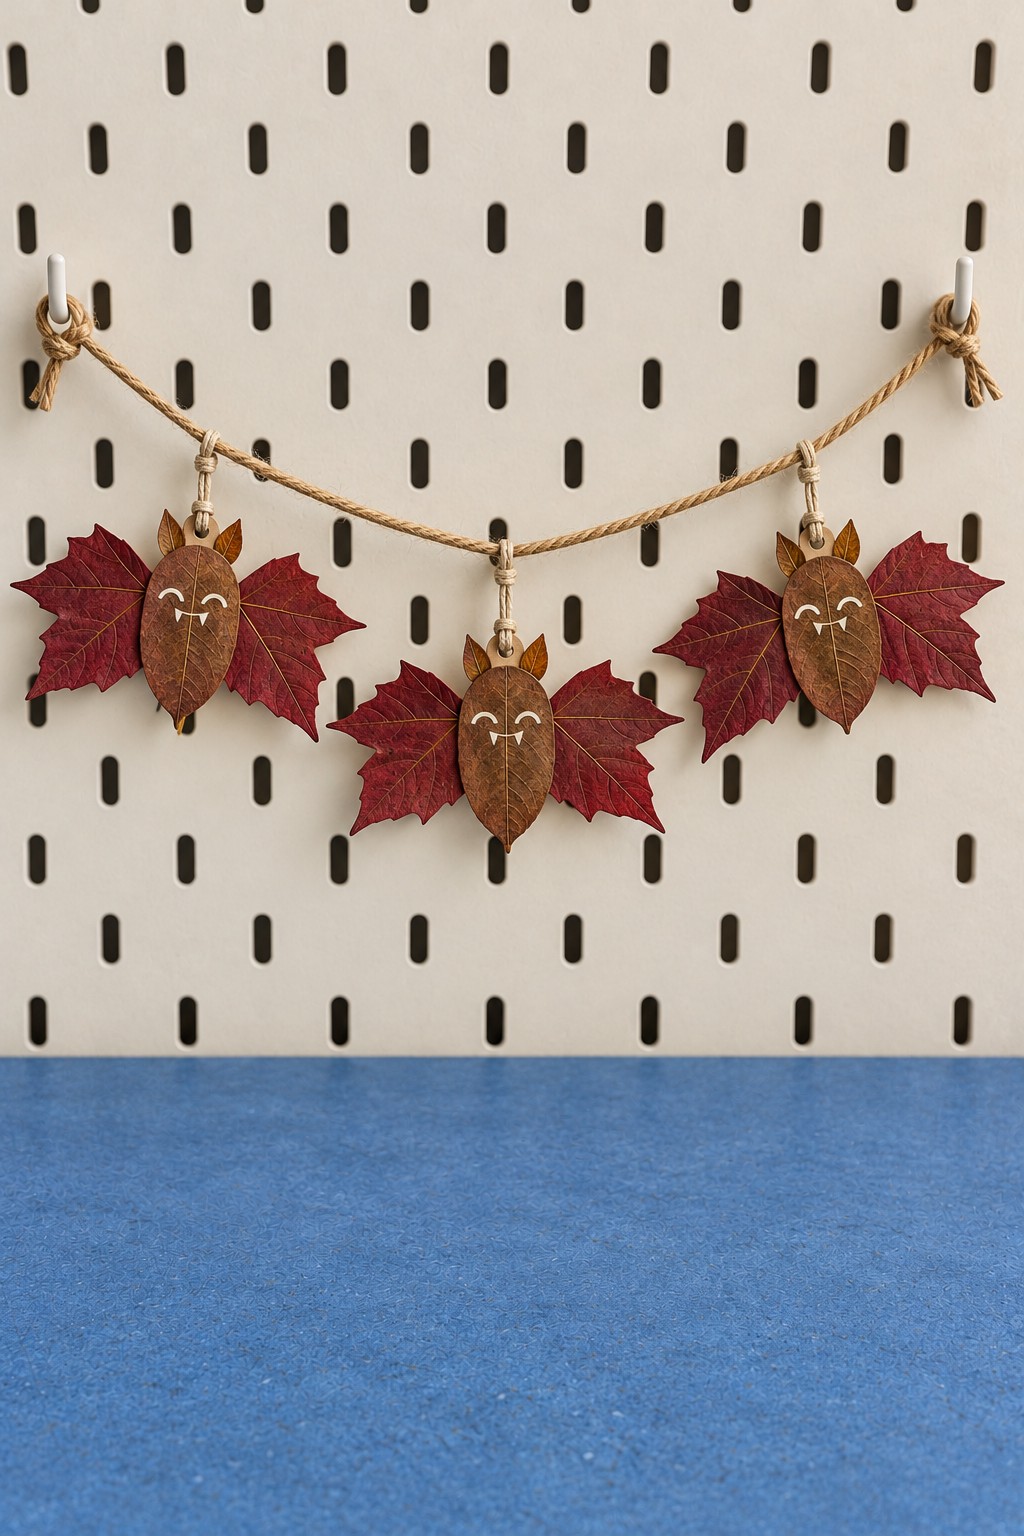
19. Clip Leaf Owls onto a Jute Garland
Wide red maple leaves form spreading wings for a row of little brown owls. Gather three large pressed maple leaves, three smaller oval leaves, tiny card eyes, short paper beaks, miniature wooden clips, and a length of jute. Reinforce the back of each large leaf with a discreet card shape if it feels fragile.
Place the oval leaf vertically over the maple leaf's center, then add the face to the upper part of that oval. Attach the clip to the backing rather than pinching directly onto the brittle leaf. Space the owls along the jute and hang the line with a shallow curve. This method lets you adjust the spacing without repeatedly pulling on the finished characters.
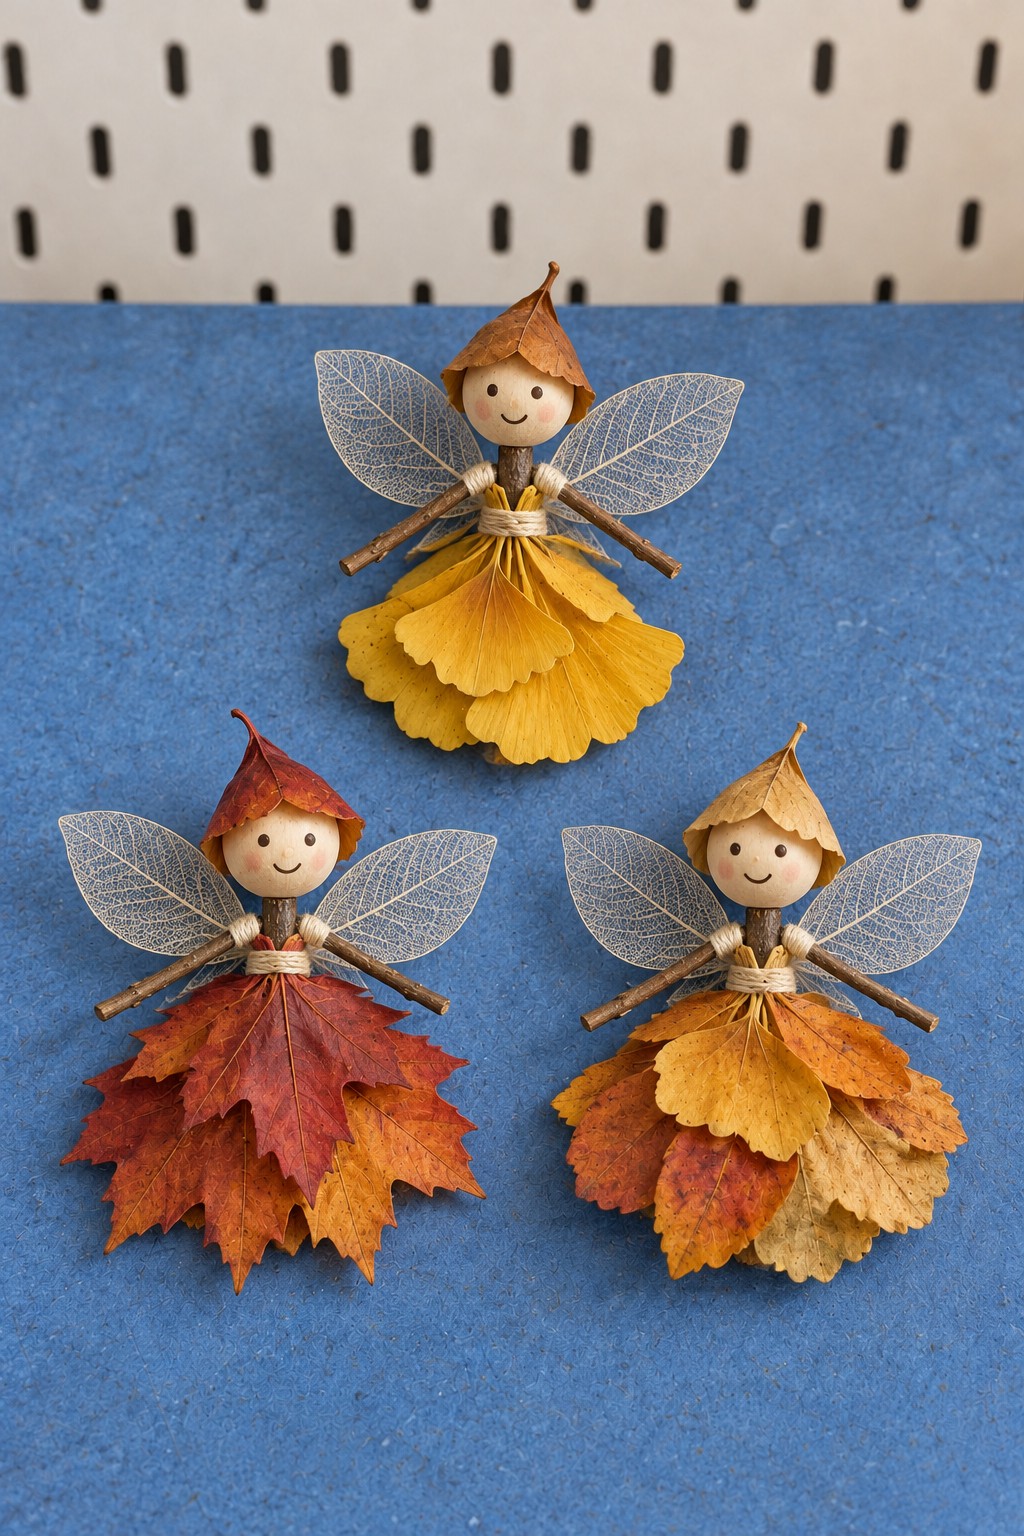
20. Dress Tiny Fairies in Layered Leaf Skirts
Leaf skirts, wooden bead faces, and translucent skeleton wings turn a few small materials into woodland fairy ornaments. Gather painted wooden beads, thin cord or wire for the body, small leaves in yellow and rust tones, purchased skeleton leaves, and suitable craft glue. Build the body on a continuous support so the leaves do not carry its weight.
Attach the skirt leaves around the waist in overlapping tiers, placing broad pieces at the lower edge and smaller ones above. Add two skeleton leaves behind the shoulders, then finish the head with a pointed leaf cap. Let every join set before moving the figure. Display the fairies in a protected tabletop arrangement or add hanging loops to their supporting bodies.
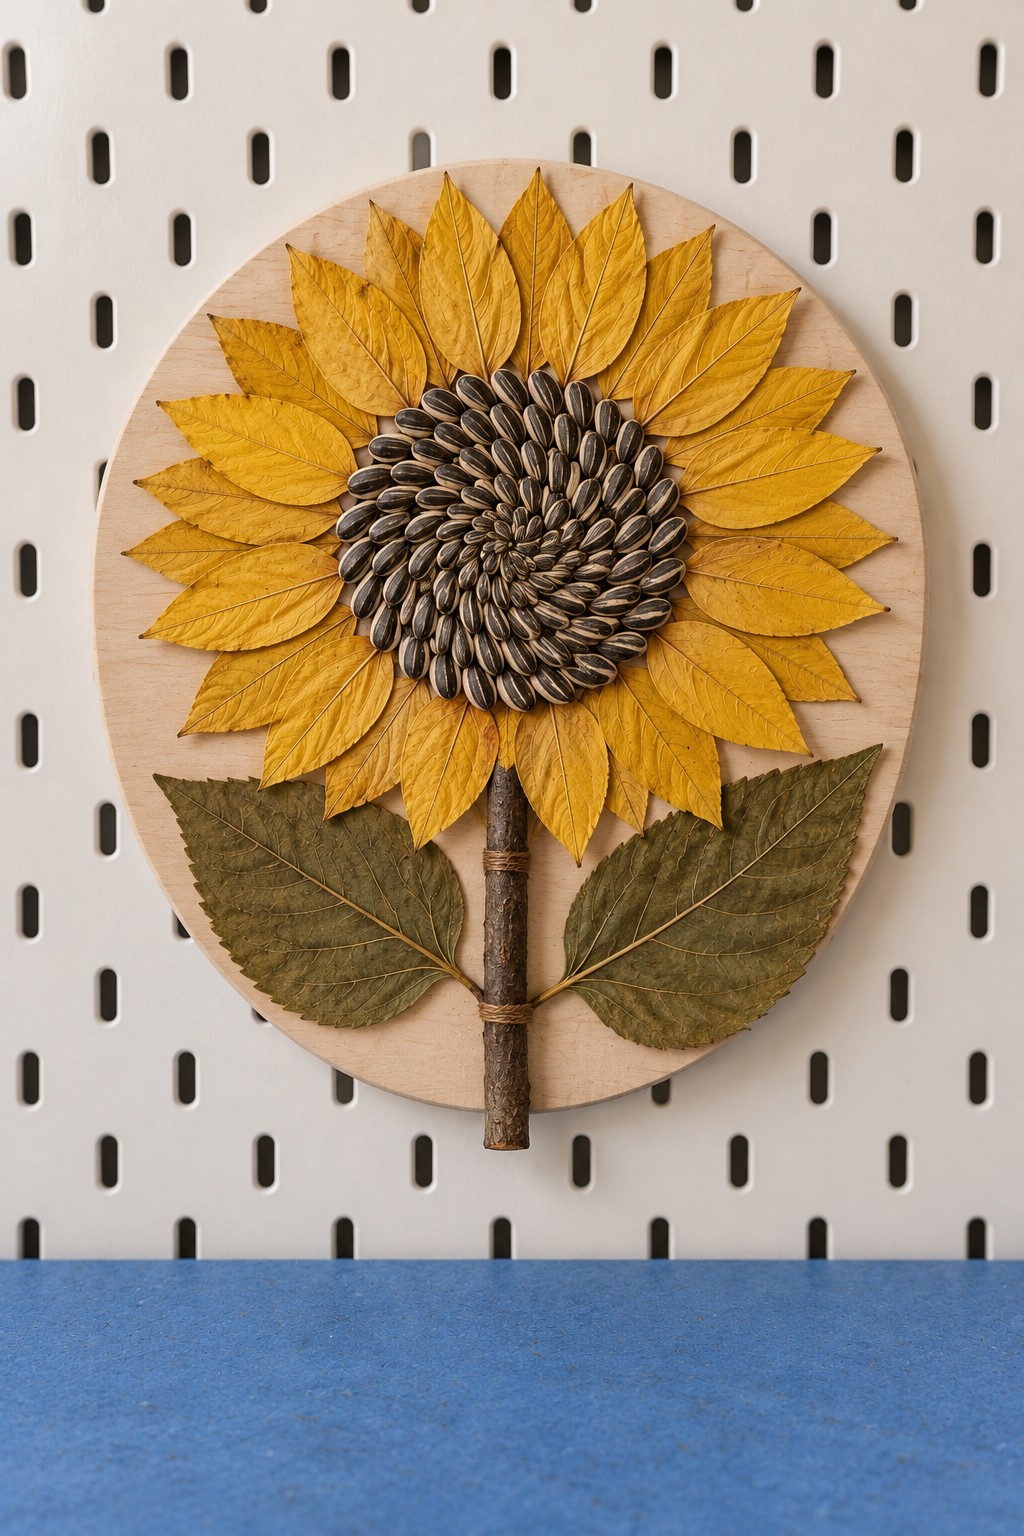
21. Build a Sunflower Plaque with Yellow Leaves and Seeds
Yellow leaves become sunflower petals around a densely textured center on a round wooden plaque. Use pointed golden leaves, sunflower seeds, two broader green leaves, a dry twig, a wood circle, and adhesive suited to the materials. Mark a central circle lightly so the seed area stays round.
Glue the twig stem and green leaves first, followed by overlapping yellow petal rings with their tips pointing outward. Fill the middle with seeds in close circular rows, hiding the inner ends of the petals. Work in short sections so the glue remains workable. Attach a secure hanger to the plaque and keep the finished piece indoors, away from damp conditions and places where loose seeds could be reached by pets.
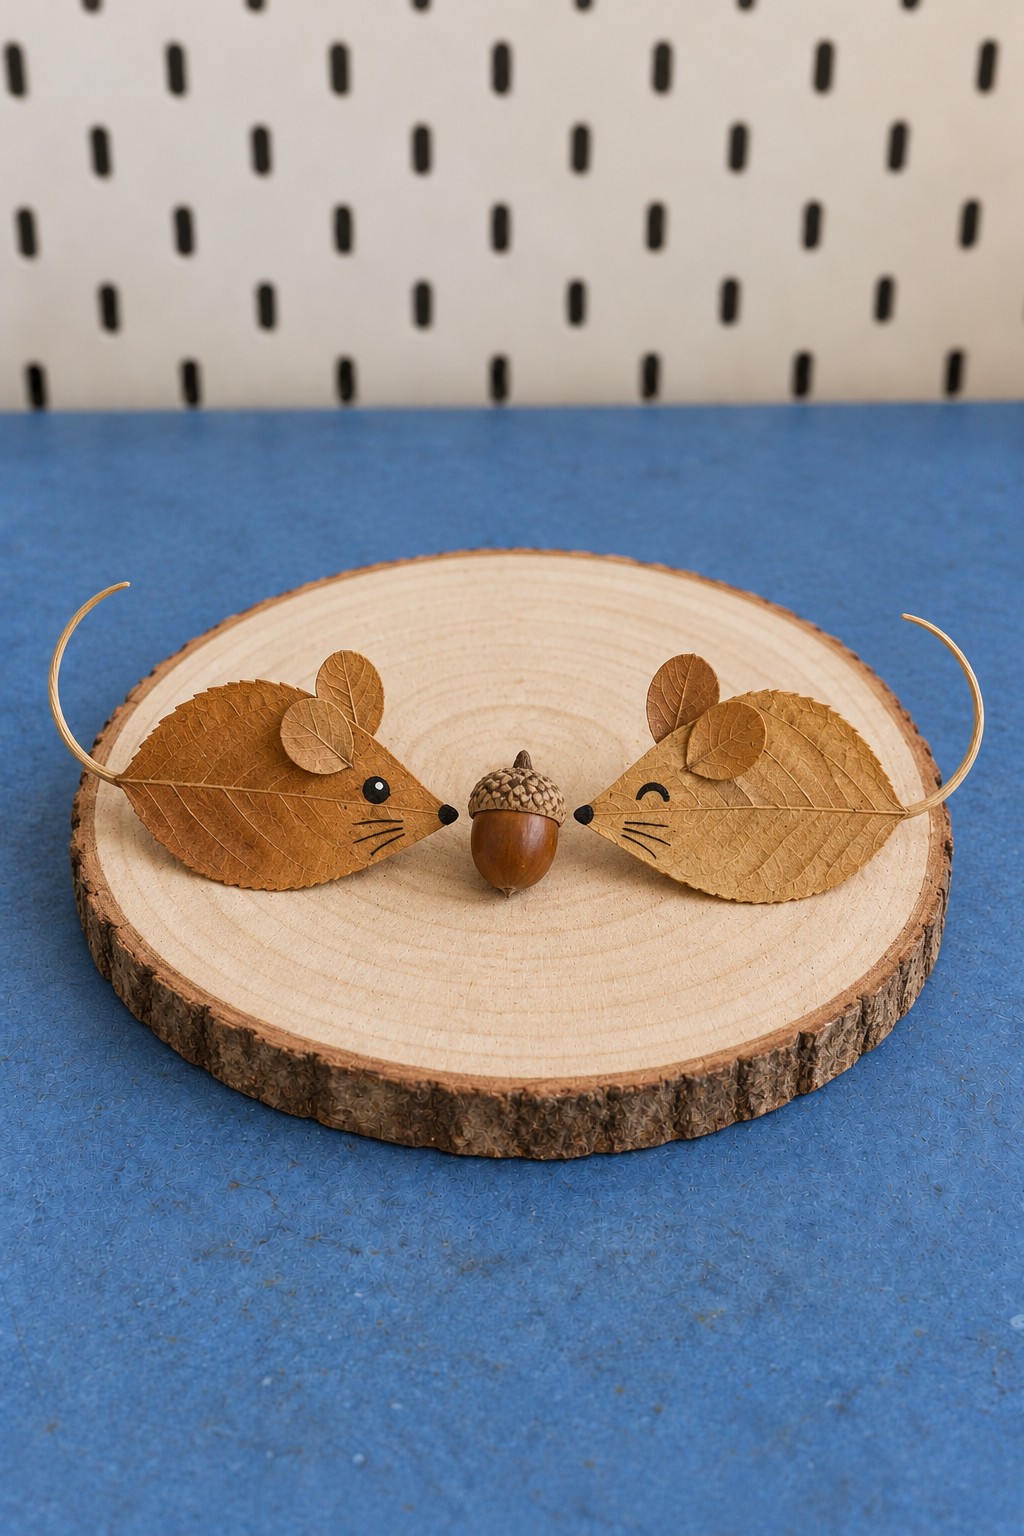
22. Set Two Leaf Mice Beside an Acorn on a Wood Slice
A bark edged wood slice provides a simple stage for two tiny mice facing an acorn. Choose two broad oval leaves for the bodies, smaller rounded pieces for ears, fine jute for tails, a dark marker, a dry acorn, and suitable glue. Select body leaves whose pointed ends can become the noses.
Arrange the mice facing inward, then attach each tail behind the wider end of its body. Add the ears above the head area and draw small eyes and whiskers with minimal pressure. Fix the acorn near the center so it stays in position when the plaque is moved. The broad wood base supports every delicate part, allowing the leaves to remain flat rather than forcing them into unsupported three dimensional bodies.
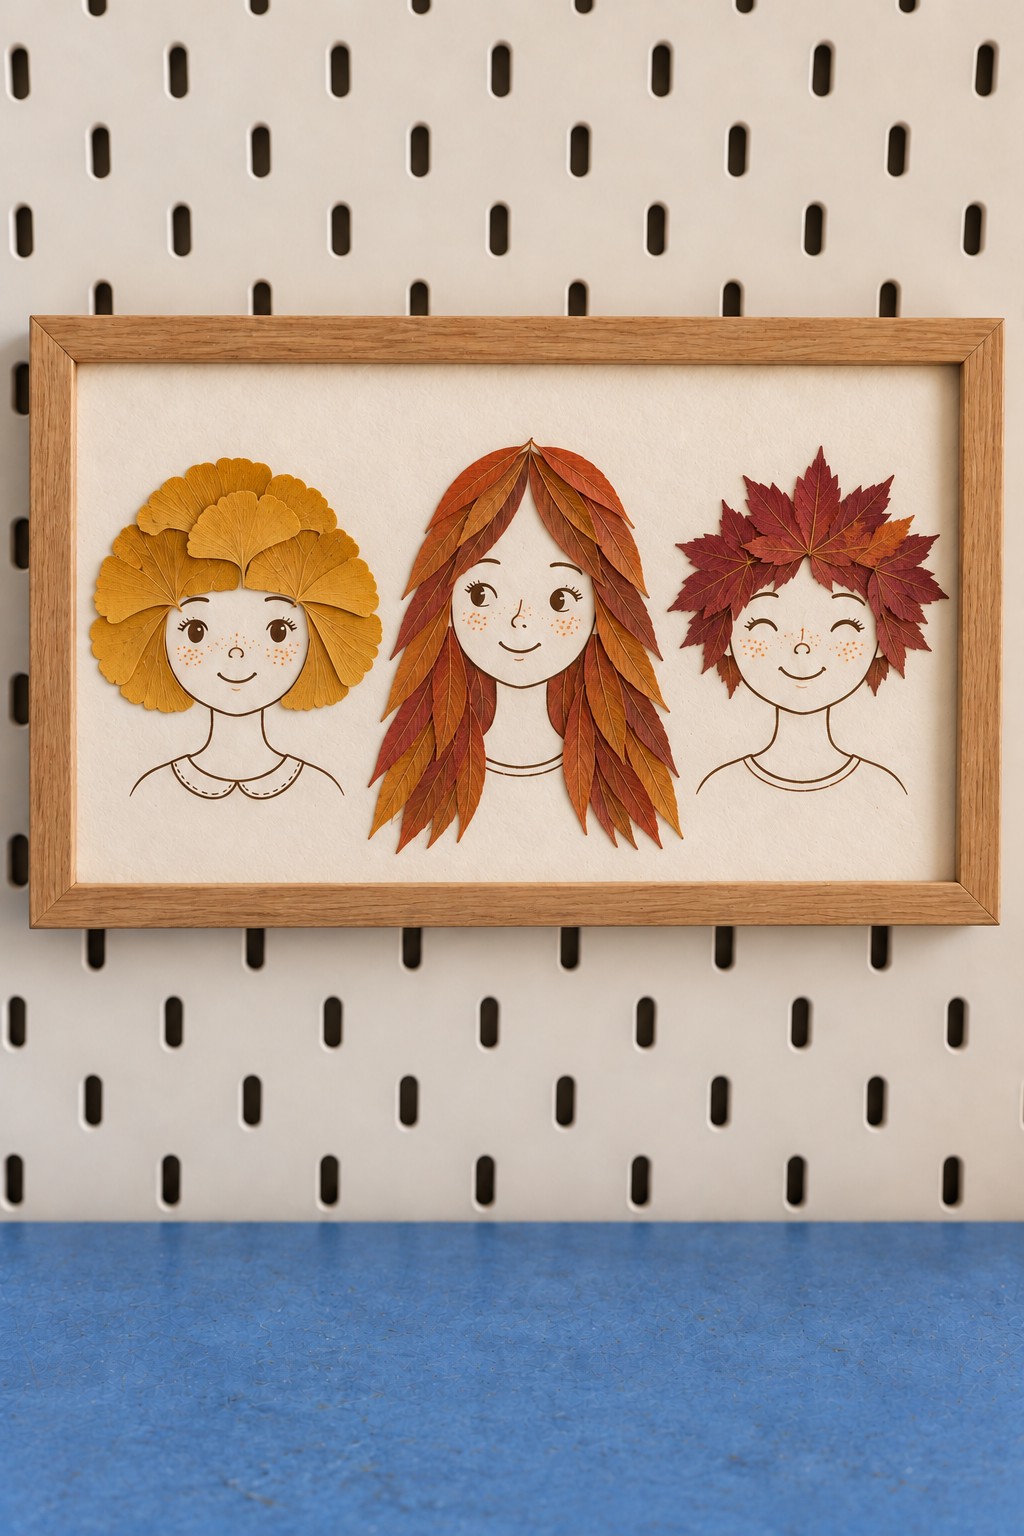
23. Give Three Drawn Portraits Carefully Arranged Leaf Hair
A horizontal frame can hold three simple faces with completely different leaf hairstyles. Prepare thick cream paper, a fine drawing pen, small yellow leaves, long rust colored leaves, pointed burgundy leaves, craft glue, and a deep frame. Draw the faces and shoulders first, leaving enough room above each head for its hairstyle.
Build a rounded yellow bob from short overlapping leaves, a longer center hairstyle from downward pointing copper leaves, and a spiky crown from small red maple pieces. Lay out each section before gluing, and keep the eyes, eyebrows, and mouth clear. Restricting each hairstyle to one main color keeps the arrangement orderly. If you enjoy using botanical shapes on household accessories, explore these felt flower decorations for the home for another material to work with.
Choose a Leaf Project That Suits Its Place at Home
For a first project, a flat turtle plaque or a small botanical picture makes it easy to practice placement and gluing. Layered owls, foxes, and miniature trees take more sorting, while lighted frames and lanterns need suitable lighting components as well as careful leaf work. Choose cord for pieces that will be handled often, and reserve fragile natural specimens for protected displays.
Before putting a finished decoration in place, check the backing, hanging hardware, exposed leaf edges, and any removable light. Keep a few spare leaves from the same batch for small repairs. A well chosen support and a clear arrangement will do more for the finished piece than adding extra details to every available space.

Leave a Reply