
These 20 whimsical clay decor ideas bring sculpted animals, flowers, bows and miniature landscapes into everyday rooms. Alongside the designs, you will find illustrated making stages, a guide to choosing clay and tools, and practical ways to shape, join and finish decorative pieces. Learn how to keep mirrors supported, photos changeable and flower inserts removable, then use the same basic techniques to develop a playful design that fits your space.
Table of Contents
- Decide What the Piece Needs to Do
- Select Clay, Tools and a Compatible Finish
- Build a Playful Design from Simple Shapes
- Bring the Making Techniques into These 20 Designs
- 1. Dragonfly Relief Art for a Creative Corner
- 2. Textured Landscape with Rolling Hills
- 3. Koi Pond Panel with Water Lilies
- 4. Cottage Door Relief with Climbing Roses
- 5. Bow and Daisy Mirror for a Vanity
- 6. Storybook Mirror with a Princess and Castle
- 7. Unicorn Mirror with a Rainbow Border
- 8. Expressive Monster Mirror with Colorful Characters
- 9. Heart Balloon Photo Display with a Broad Base
- 10. Oversized Bow Frame with Floral Corners
- 11. Cherry and Gingham Stand for a Small Print
- 12. Heart Shaped Frame with Roses and Ruffled Trim
- 13. Duck Pond Ornament with a Floral Surround
- 14. Bunny Light Surround for a Bedside Table
- 15. Teddy Bear Display with a Flower Edged Tray
- 16. Sleeping Cat Tray with a Floral Border
- 17. Floral Bear Pot for a Small Bouquet
- 18. Frog Flower Holder with a Cheerful Face
- 19. Swan Flower Holder with Soft Pink Blooms
- 20. Blushing Cat Pot with Delicate White Flowers
- Give the Finished Piece Room to Work
Decide What the Piece Needs to Do
A shallow relief panel starts with a flat composition, while a photo frame needs an accessible picture opening. Flower holders begin with the dimensions of a removable inner vessel. Choose the intended use before sculpting: decorative clay adds character, but glass, hanging hardware, stands and water containers need their own suitable support. Start with a few larger motifs if you prefer less intricate work.
Select Clay, Tools and a Compatible Finish
Air dry craft clay hardens as it dries; oven cured polymer clay requires its specified heat treatment; ceramic clay needs an appropriate firing process. They are not interchangeable. Choose the material before selecting how to join, paint or finish it. Our air dry clay decor ideas give related shaping, drying and display guidance for that material.
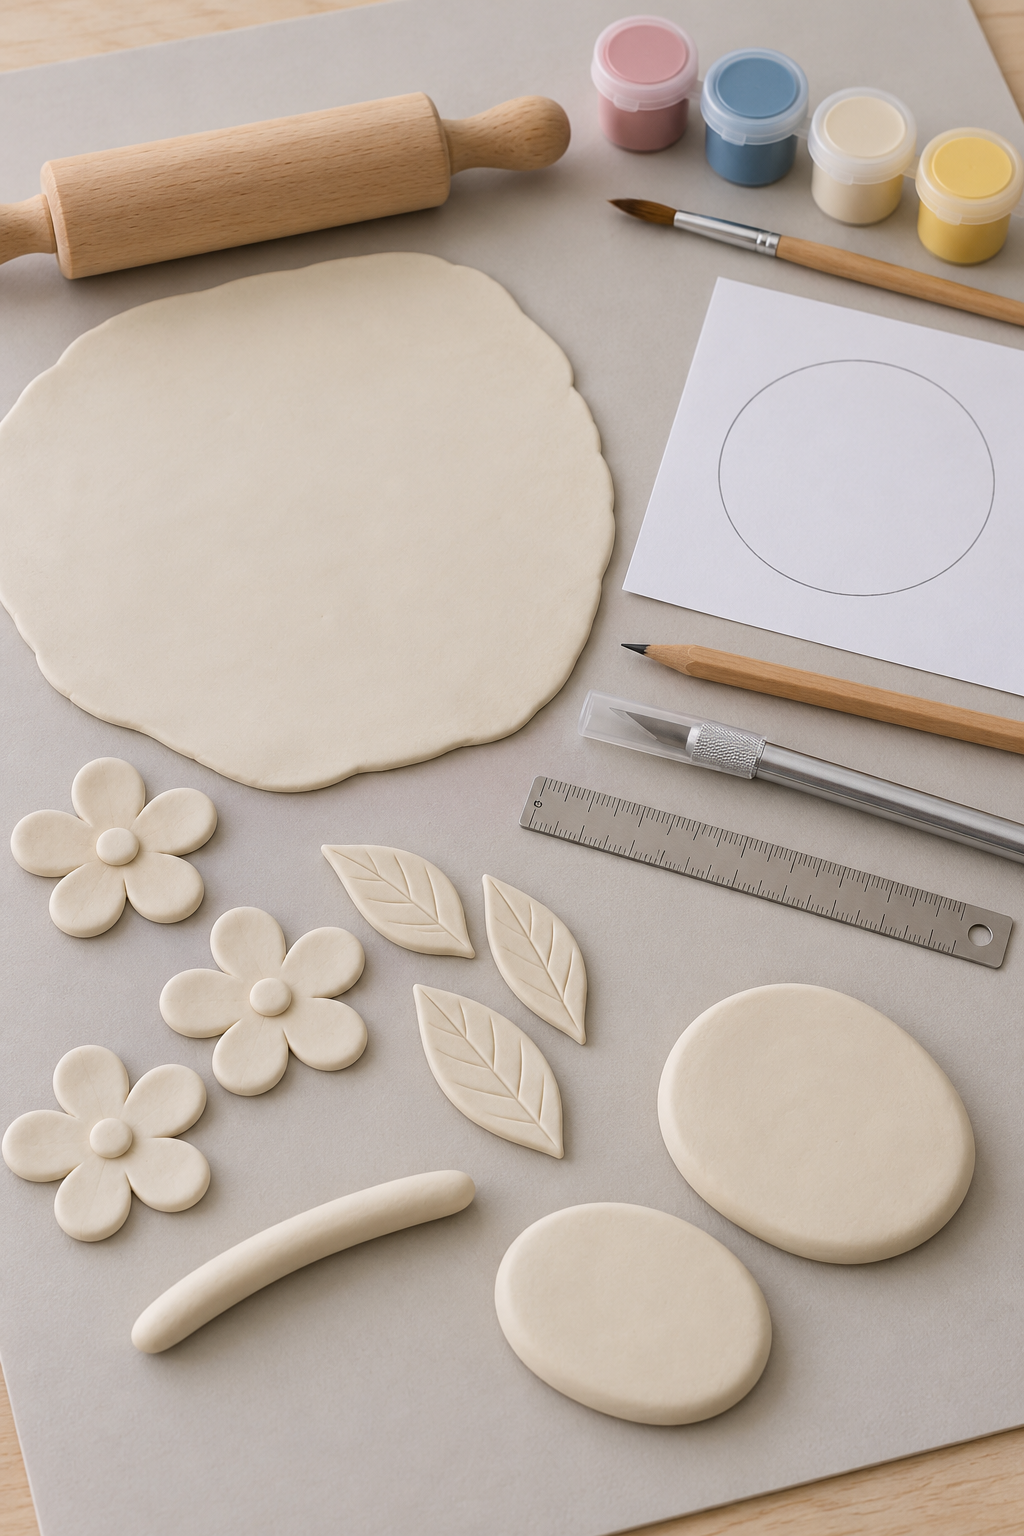
A protected work mat, roller, paper template, ruler and suitable clay cutting tool help form a base. A rounded modeling tool makes depressions; a fine tool adds veins, fur or folds; small brushes handle painted details. Select paint and adhesive for the actual clay and supporting surface, testing spare pieces first. Acrylic craft paint can be an option when the clay manufacturer approves it. Keep glazed decorative clay pieces away from standing water and food unless the complete clay and glaze system is specified for those uses.
Build a Playful Design from Simple Shapes
The making stages begin with a rolled base cut around a template, followed by a recessed center, rounded character parts and separate flower motifs. These operations offer a general method for the theme: sheets become backgrounds and borders, coils suggest ribbons or ripples, and rounded pieces form faces and petals. Sketch the main silhouette first, leaving the photo opening, mirror center or removable insert clear.
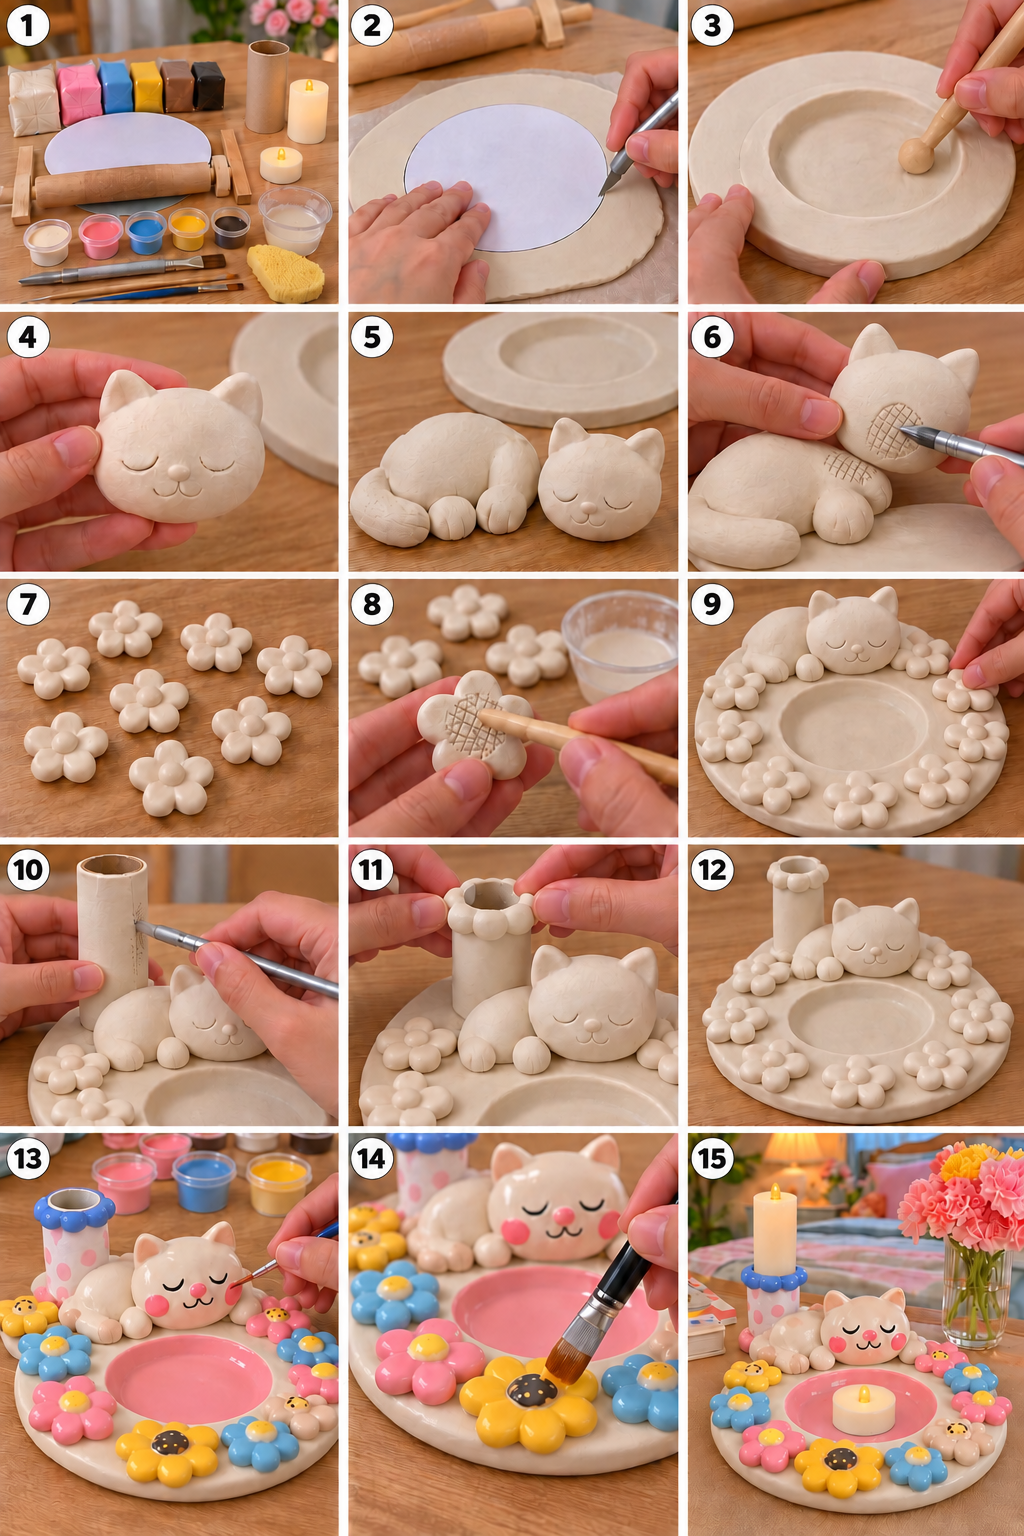
Prepare the larger forms before adding details. Flatten small rounded pieces for petals, taper leaves and mark their veins with light pressure. The illustrated crosshatching appears on rear contact areas, followed by a white joining liquid. Use the joining procedure and medium specified for your clay; do not transfer a water based clay method automatically to polymer clay. Separately hardened decorations need an adhesive compatible with both surfaces.
Support projecting parts during the material's drying or curing process. Air dry pieces must dry throughout before finishing; thickness and conditions affect the time. Polymer clay needs the package's temperature and duration, with an oven thermometer and ventilation as instructed. Keep incompatible stands, photographs, mirrors and electronic lights out of that process. Allow pieces to cool or dry fully before assembly, then wait for the adhesive and finish to reach their specified readiness for use.
Bring the Making Techniques into These 20 Designs
Use that order of planning, shaping, joining and finishing with the ideas below, changing the support and scale for each object. Pastel colors and rounded expressions can create a gentle storybook style; stronger contrasts and varied characters give a more animated effect. One repeated color helps connect a detailed piece with the room. For the light surrounds, plan only removable battery operated lights, keeping switches and battery compartments accessible.
1. Dragonfly Relief Art for a Creative Corner
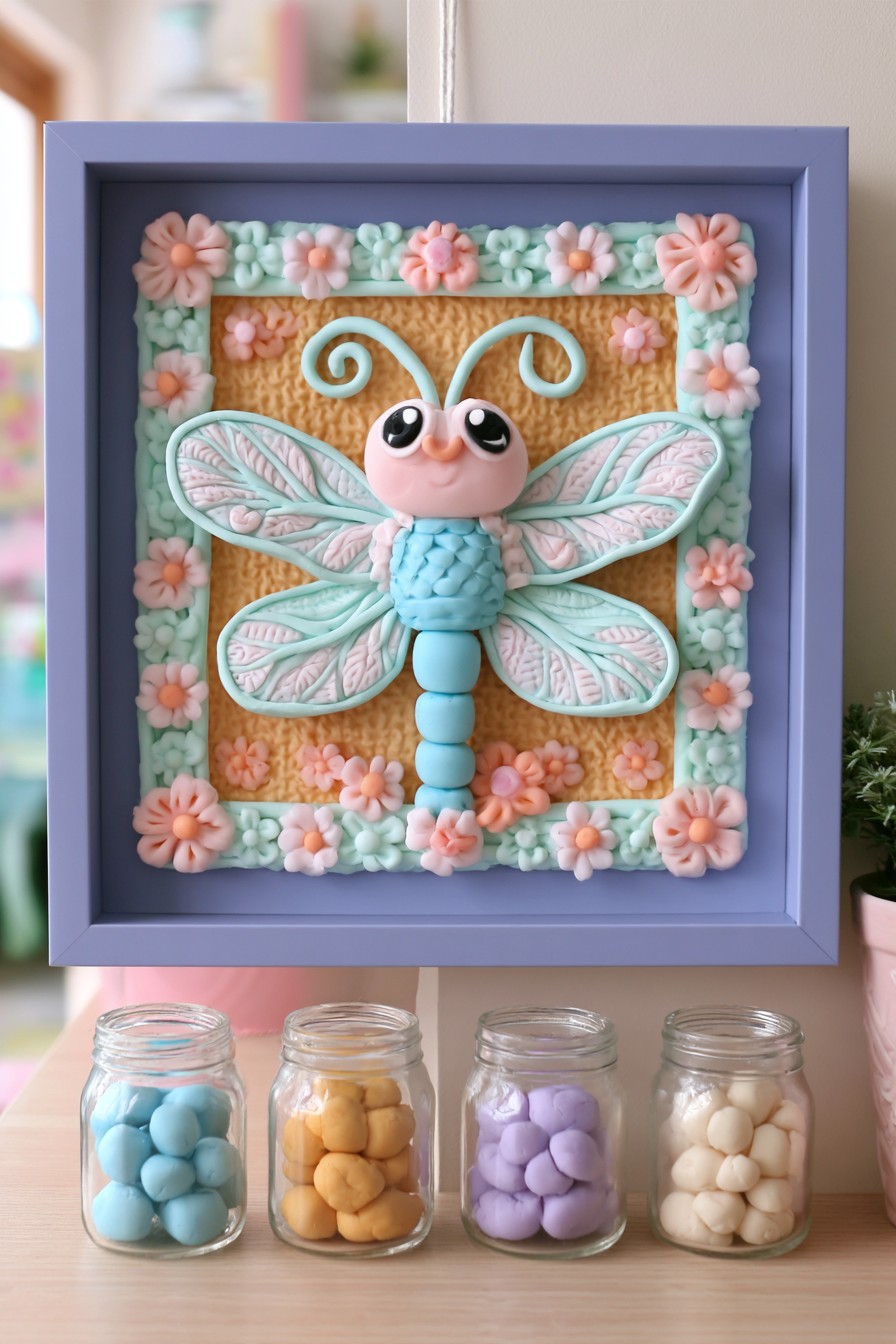
A dragonfly with patterned wings turns a small framed panel into a cheerful focal point above a craft desk. Its long body creates a vertical center, while the flower border fills the surrounding space without hiding the insect. Mint and blush give the figure a gentle character; a lavender frame separates the relief from a pale wall. For an adaptation, make broad wing shapes separately and impress their vein pattern before fitting them beside the segmented body.
Repeat just one of those colors in nearby storage containers rather than matching every accessory. For a practical version, keep the wings within the frame's protective outline and allow enough depth that their tips do not press against glazing. Use a backing and wall fixing selected for the finished panel's weight.
2. Textured Landscape with Rolling Hills
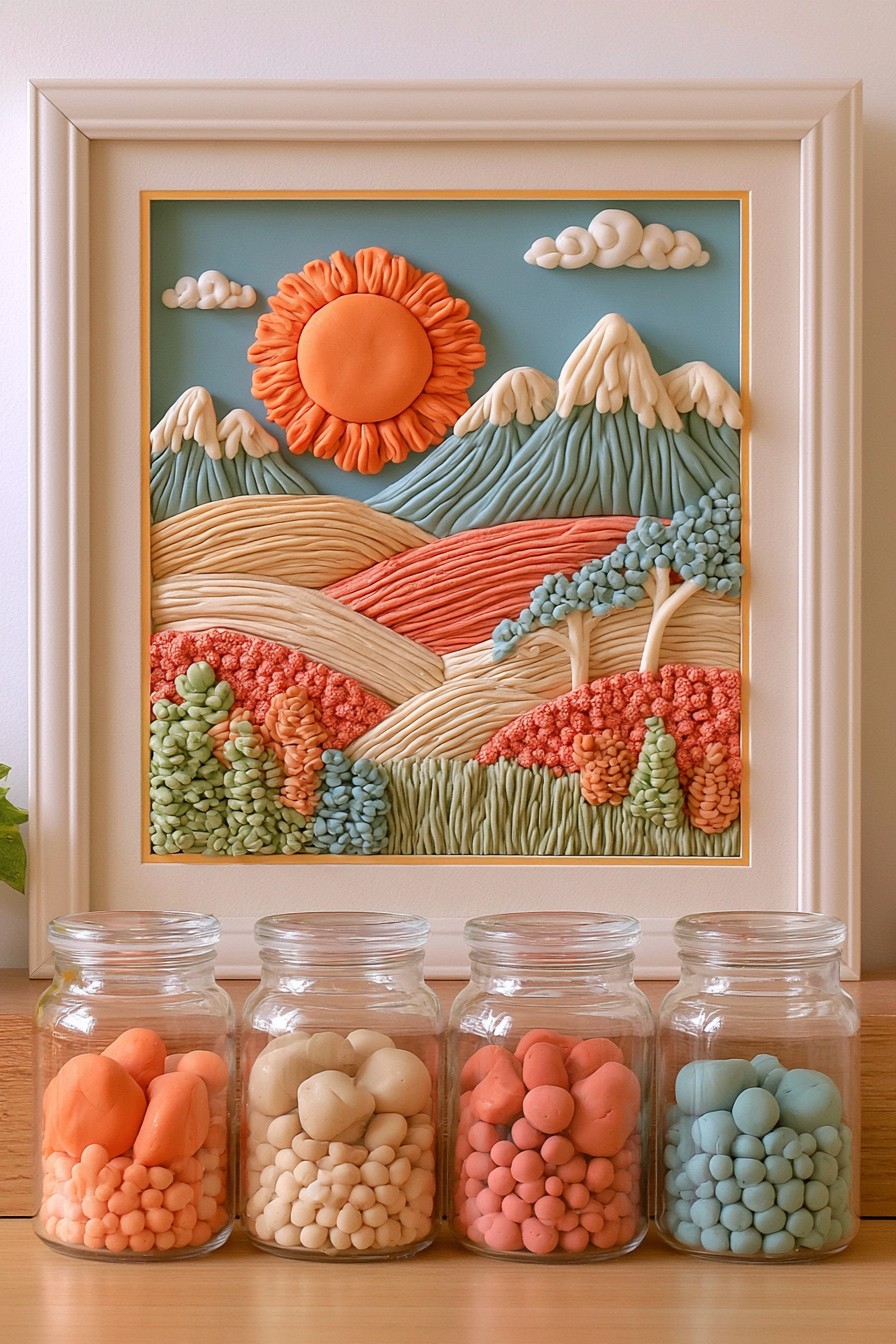
Curving bands of cream, peach, and muted green suggest fields and hills, while ridged surfaces give the landscape a tactile quality. The orange sun provides a clear point of emphasis above the quieter scenery. Small trees and clusters of flowers add scale, helping the composition feel like a miniature landscape rather than an abstract arrangement. Lay curved clay bands from the background forward, then add shallow grooves with a fine modeling tool before placing trees.
This type of relief suits a reading corner or a workspace furnished with pale wood. Keep nearby patterns simple so the fine surface lines remain noticeable. When planning a similar piece, leave accessible gaps between raised details for gentle dusting and choose a frame deep enough to accommodate the tallest elements.
3. Koi Pond Panel with Water Lilies
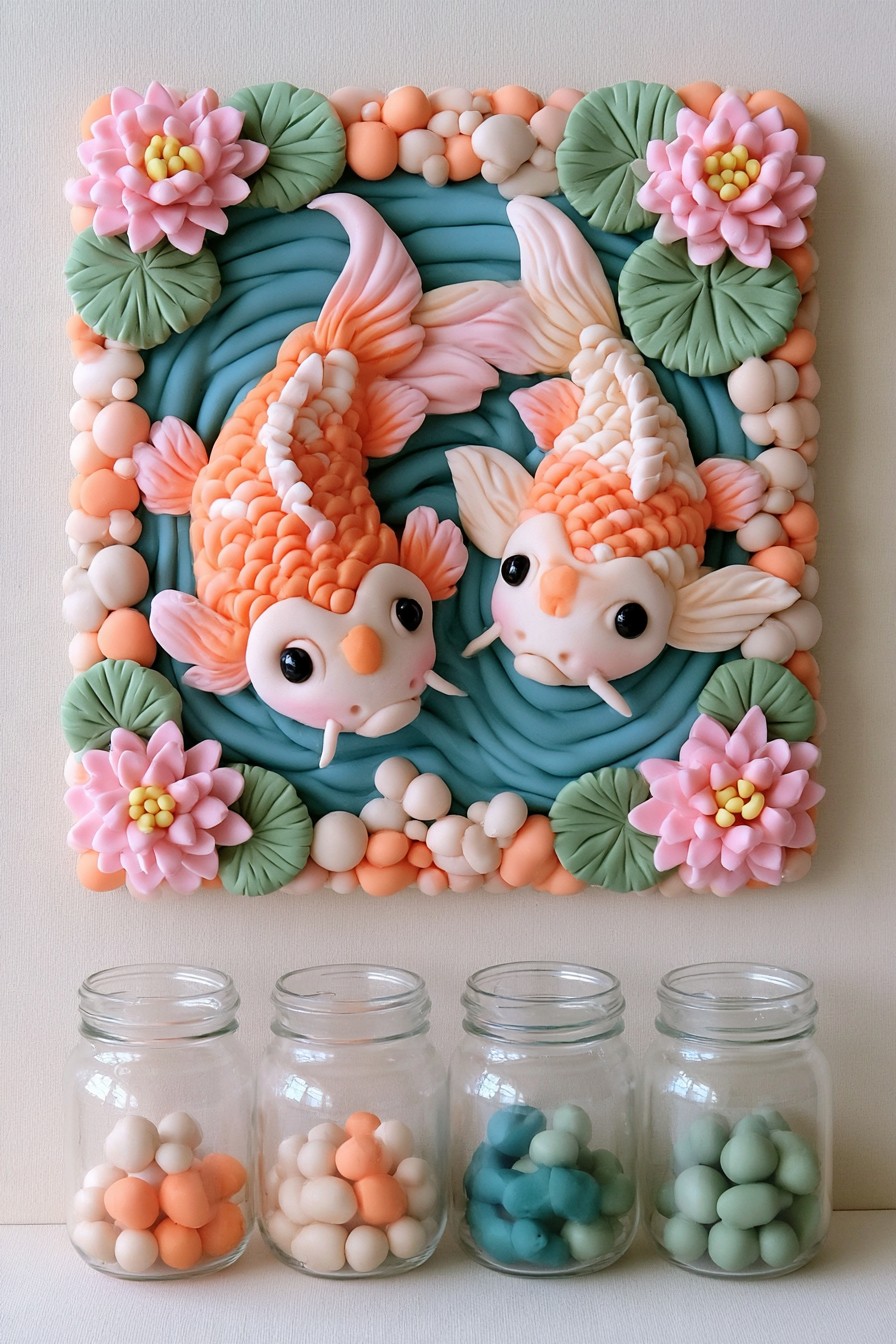
Two orange and white koi bring movement to a square panel through curved bodies, flowing tails, and rippling blue lines. Broad lily pads give the corners structure, while pink blossoms soften the boundary. The strongest contrast comes from the warm fish against the cool water, so the composition does not need additional bright decorations around it. Roll thin coils for ripples and shape the fish separately, preserving visible blue space around their tails before adding lily pads.
Display the panel above a narrow console or beside a reading chair where its details can be seen comfortably. A simple frame or exposed panel edge can work, depending on the relief's depth. If recreating the idea, simplify the pebble border first rather than reducing the open space between the fish.
4. Cottage Door Relief with Climbing Roses
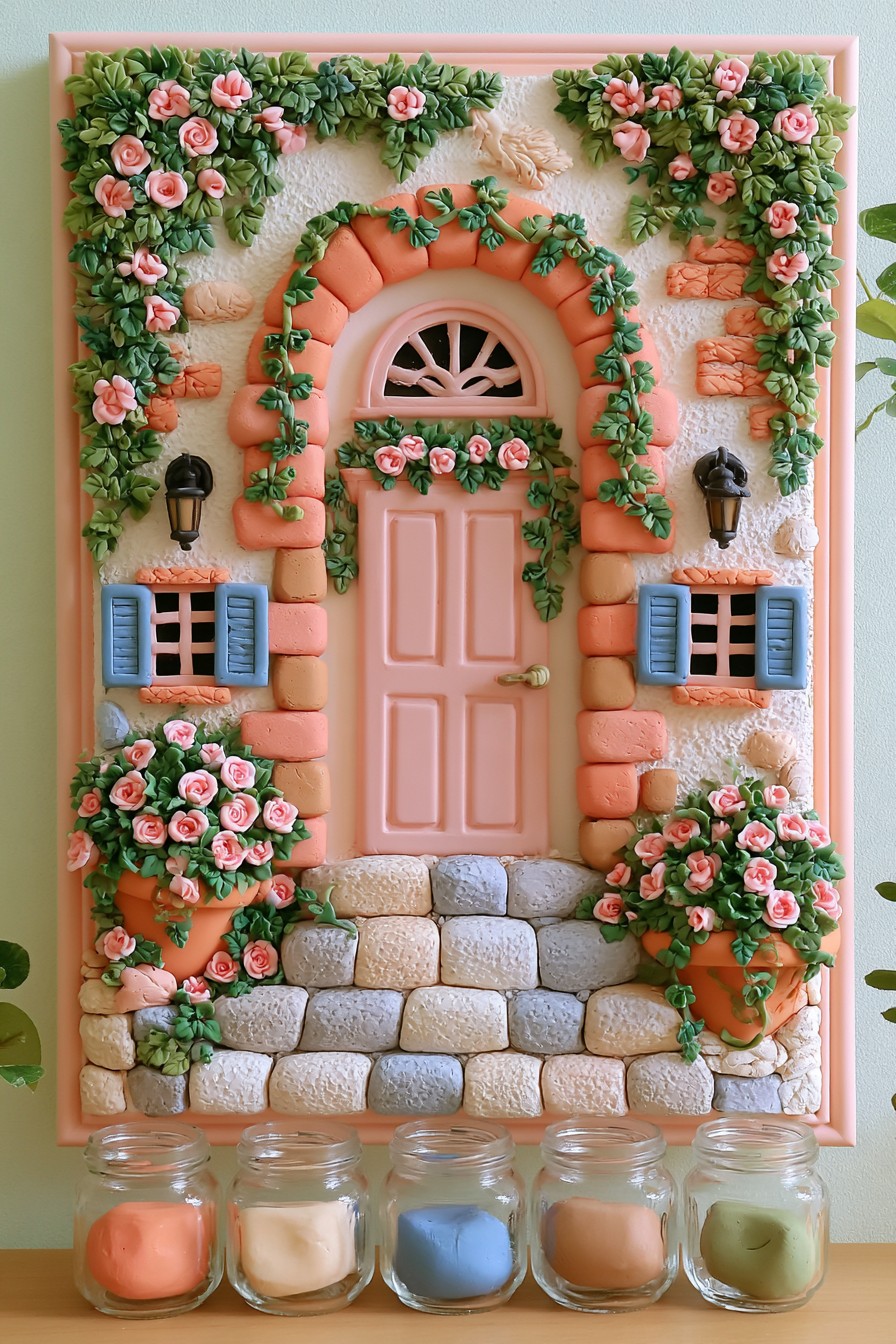
A pink arched door, blue shutters, and rounded stone steps create the impression of a tiny cottage entrance. Climbing roses connect the upper corners to the doorway, giving the scene a garden setting within a compact frame. Keeping the wall behind the flowers pale helps the architectural details remain readable. Cut the doorway and shutter silhouettes from a template, then build the stones and rose clusters as separate shallow details.
This design can bring a storybook accent to an entry console or a sewing room. Let it stand alone rather than surrounding it with several equally intricate objects. For an easier interpretation, focus on the doorway and a single rose vine. A deep frame can accommodate the projecting steps while reducing accidental contact with delicate stems.
5. Bow and Daisy Mirror for a Vanity
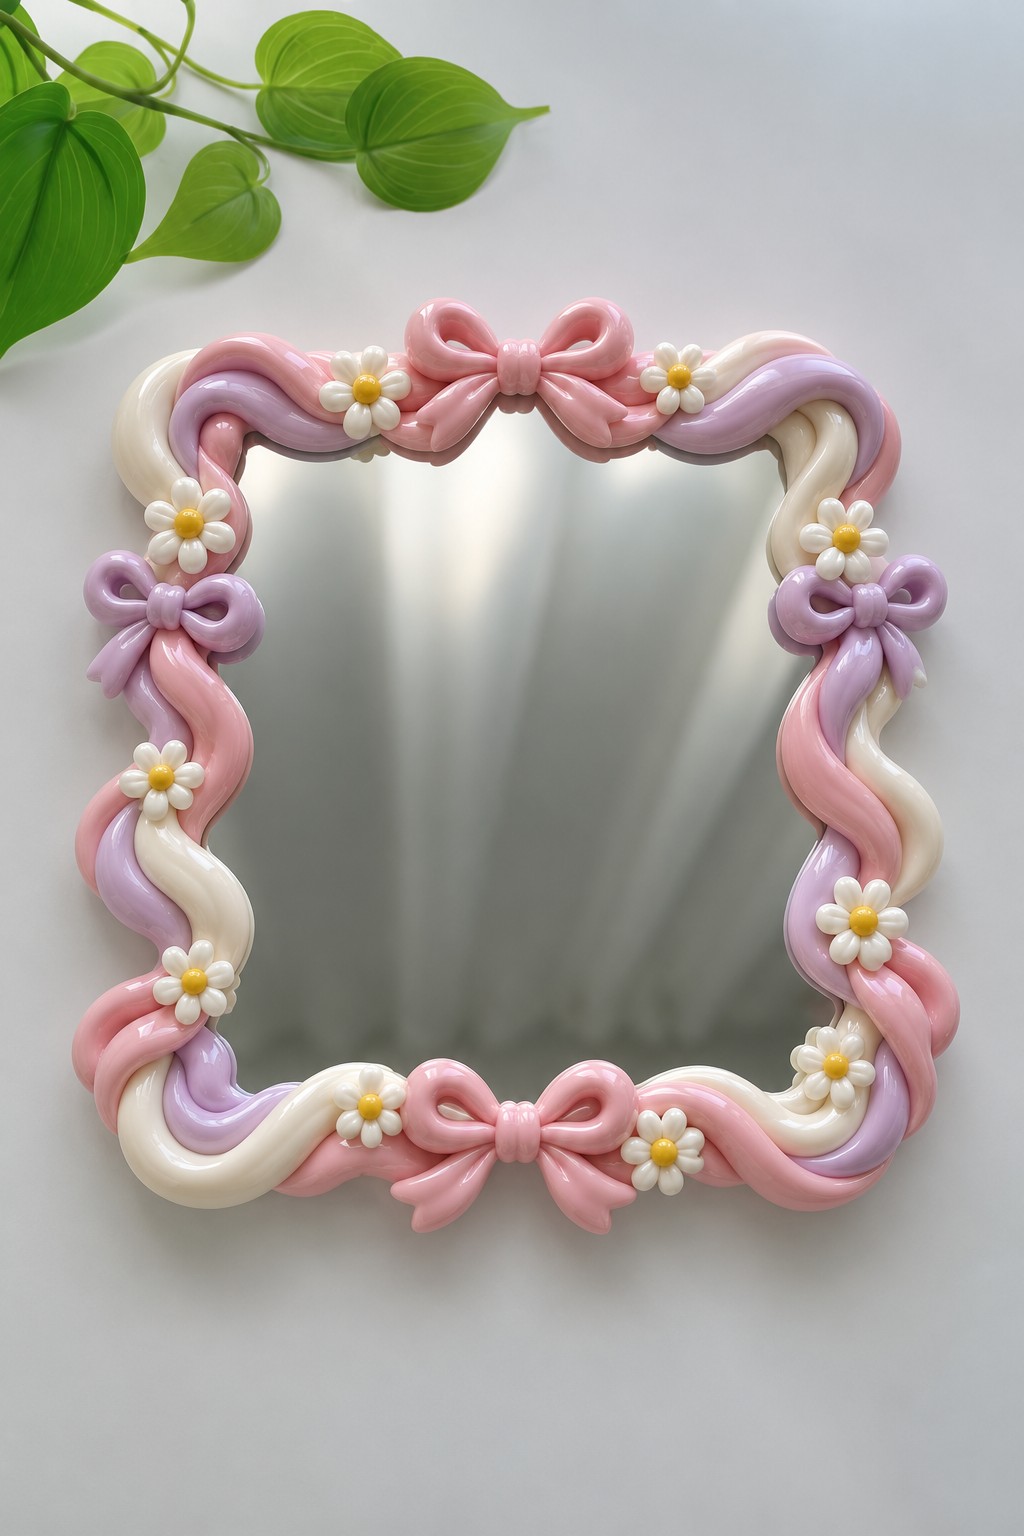
Looping pink ribbons soften the rectangular outline of a mirror, while small daisies punctuate the curves. Larger bows at the top and bottom establish a rhythm without filling the reflective center. The effect is playful but still suitable for a vanity used every day, especially when the surrounding storage is simple. Shape ribbon loops from broad flattened strips, keeping their folds substantial enough to withstand handling rather than pulling them very thin.
Before adding decorative pieces to an existing mirror, check how much usable reflective area the border will leave. Keep embellishments clear of its mounting hardware. The glass and backing should remain independently supported, with the ribbons attached as decoration. A plain tray beneath the mirror can repeat the pink palette without introducing another busy pattern.
6. Storybook Mirror with a Princess and Castle
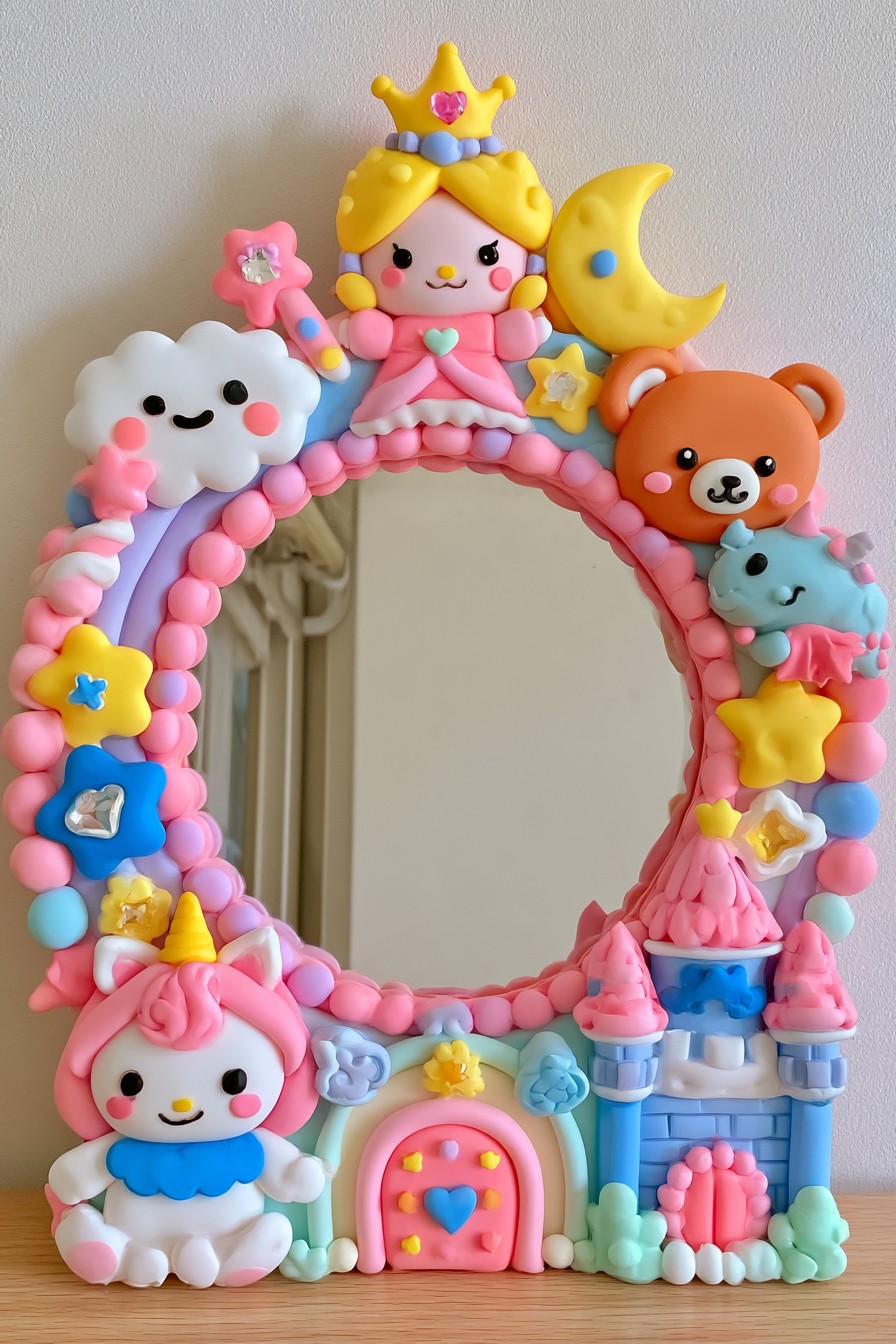
A crowned character above a round mirror establishes the story, while a castle, crescent moon, and small animal figures extend it around the edge. The circular pink border holds these different motifs together. Varying their sizes makes the arrangement more interesting than a ring of equally large decorations. Sketch the character positions around a paper circle first, then prepare the largest figure and castle before filling the remaining spaces.
Use the mirror as the main decorative feature in a dressing corner, with smaller accessories drawing from its pastel colors. Leave a generous reflective opening if it will be used for grooming. In a child's room, choose secure installation and a position away from active play; projecting figures should not become handles for pulling on the mirror.
7. Unicorn Mirror with a Rainbow Border
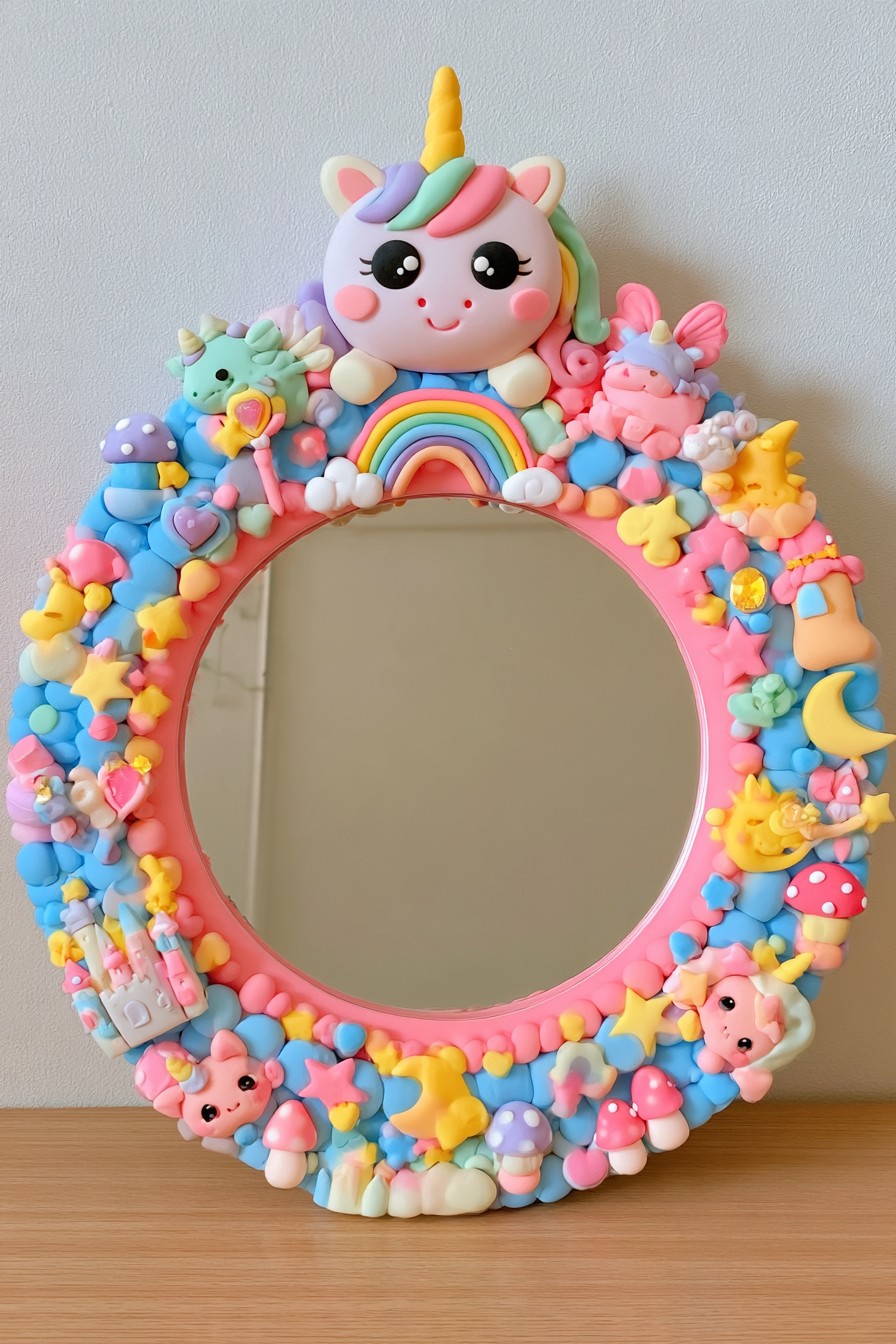
A large unicorn at the top gives this mirror an immediate focal point. Beneath it, a rainbow bridges the upper border, while tiny flowers, hearts, and creatures fill the sides. The contrast between one dominant figure and many smaller details keeps the theme recognizable even from across the room. Build the rainbow from curved coils and establish the unicorn first; smaller motifs can then fill selected areas instead of every gap.
For a calmer version, reduce the number of miniature motifs and repeat three main colors. This helps the mirror fit a room that already has patterned bedding or curtains. Position it with space around the outer decoration, and keep nearby furniture from touching the projecting pieces. A simple dresser allows the sculpted border to receive the attention.
8. Expressive Monster Mirror with Colorful Characters
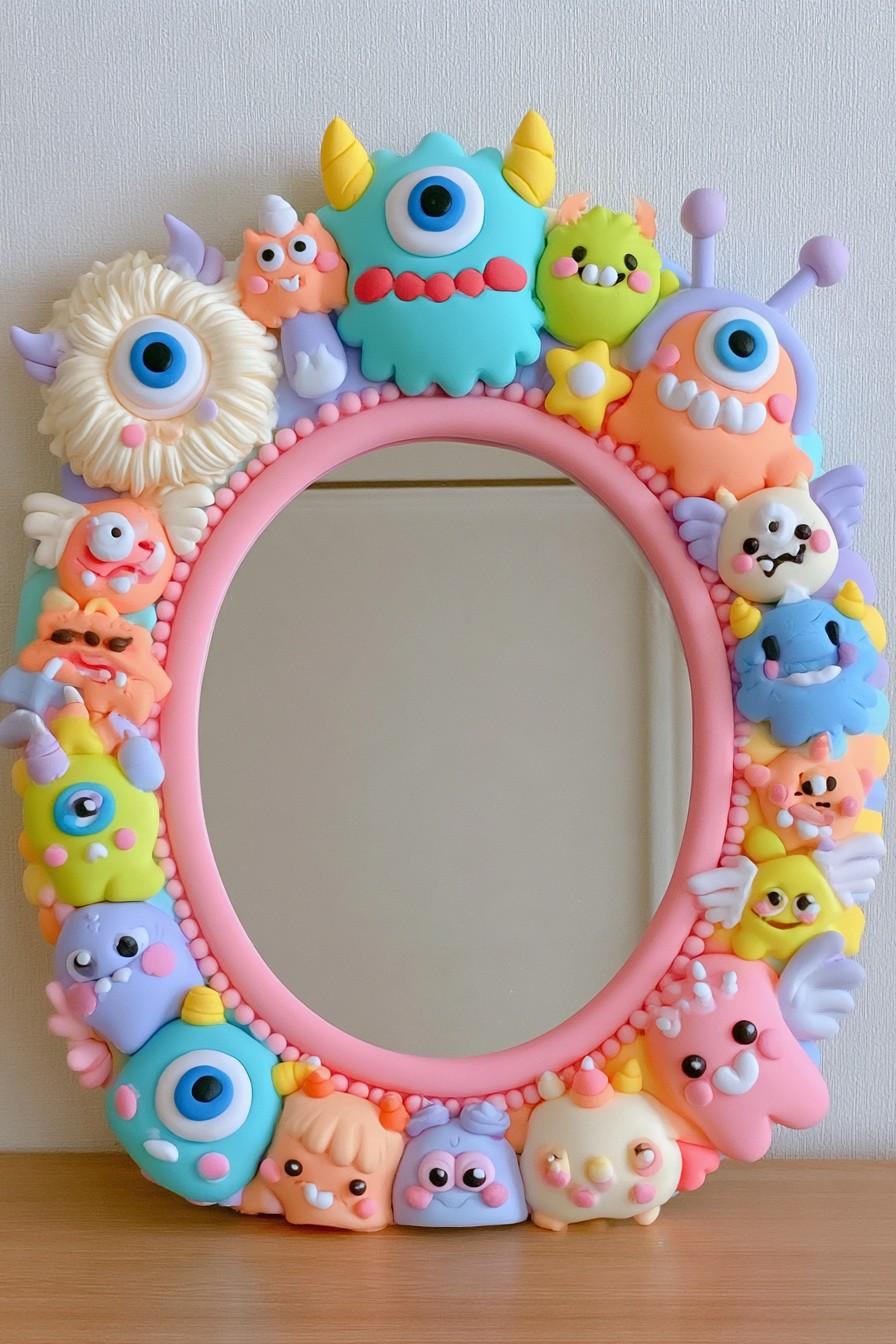
Different eyes, horns, and smiles give a group of small monsters individual personalities. A continuous pink ring provides a steady outline beneath the irregular figures, preventing the composition from looking disconnected. Bright blue, green, yellow, and coral work particularly well against a plain wall where each silhouette remains distinct. Begin with simple rounded bodies, then vary eye placement and facial marks so character differences come from expressions as well as color.
The idea suits a playful workspace or an older child's dressing area. Choose rounded forms instead of sharp projecting details when adapting the concept. Spread the larger characters around the border so one side does not look overloaded. Keep the central reflection unobstructed, and plan the support around the complete mirror rather than the decoration alone.
9. Heart Balloon Photo Display with a Broad Base
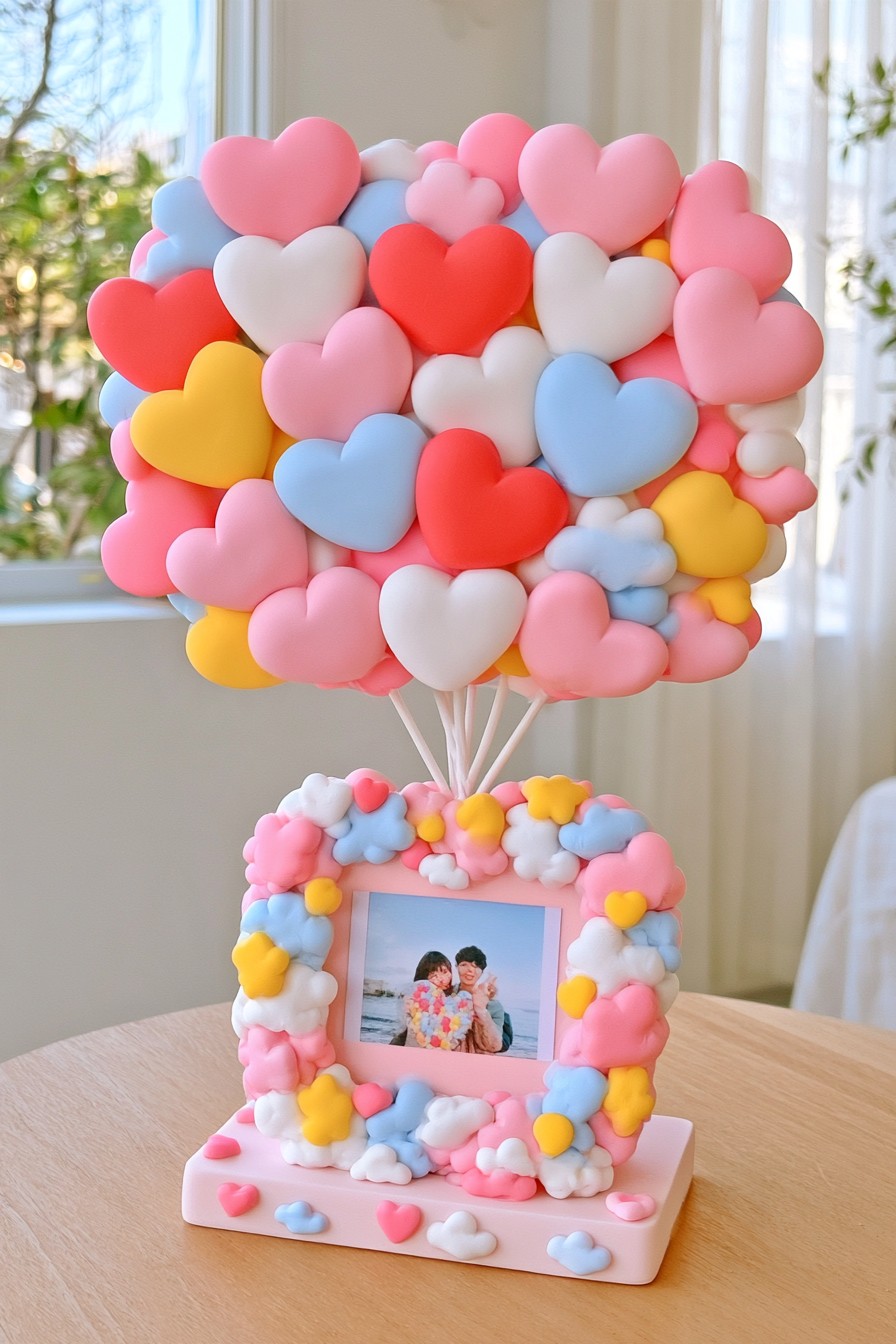
A cluster of heart balloons draws the eye upward from a small photo frame, giving a tabletop display the presence of a taller ornament. Thin supports preserve the impression of floating shapes, while the flower covered base connects the upper cluster to the photograph. Pink, blue, and yellow hearts create variety without needing a patterned background. Plan the supports before making the hearts, keeping their connection points clear and avoiding a tall cluster supported only by tiny clay joins.
Balance matters more here than the number of balloons. For a physical version, use fewer lightweight hearts and a broad base before considering a larger cluster. Check stability with the photograph installed. A recessed dresser position offers more protection than the edge of a desk, where the supports could be caught or bent.
10. Oversized Bow Frame with Floral Corners
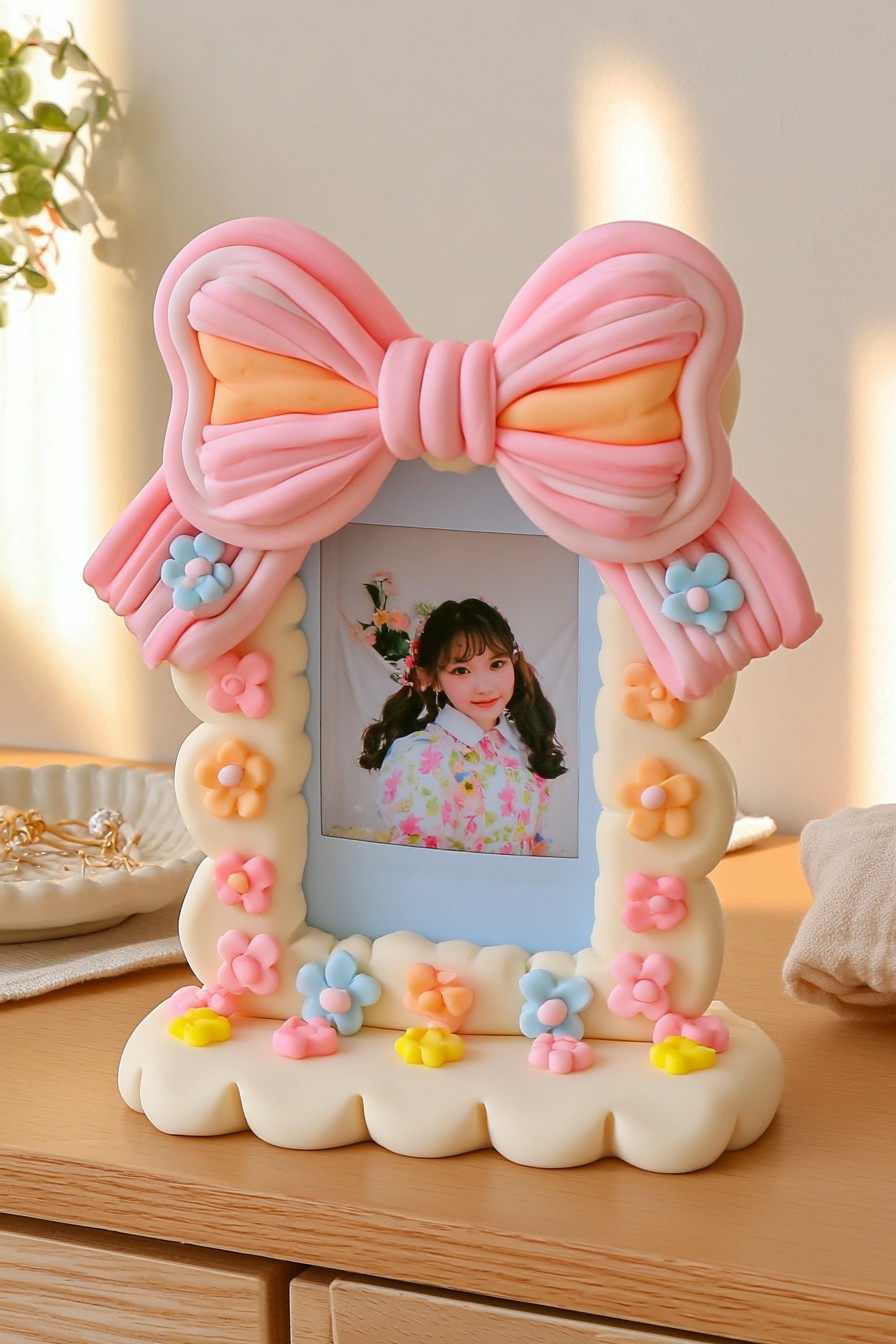
A broad pink bow turns the top of a cream frame into its main decorative feature. Fine ridges suggest folded ribbon, while flowers along the sides connect it to the scalloped base. Because the bow carries most of the visual emphasis, the photograph benefits from a simple opening and a quiet background. Shape the bow loops and tails separately, impressing their folds before assembly so the frame opening stays accessible during the work.
This works as a dresser accent or a personal gift concept. Plan a removable rear panel so the picture can be changed without disturbing the border. A separate easel or substantial stand is useful when a large bow adds weight above the frame. Keep surrounding ornaments lower so the ribbon shape remains visible.
11. Cherry and Gingham Stand for a Small Print
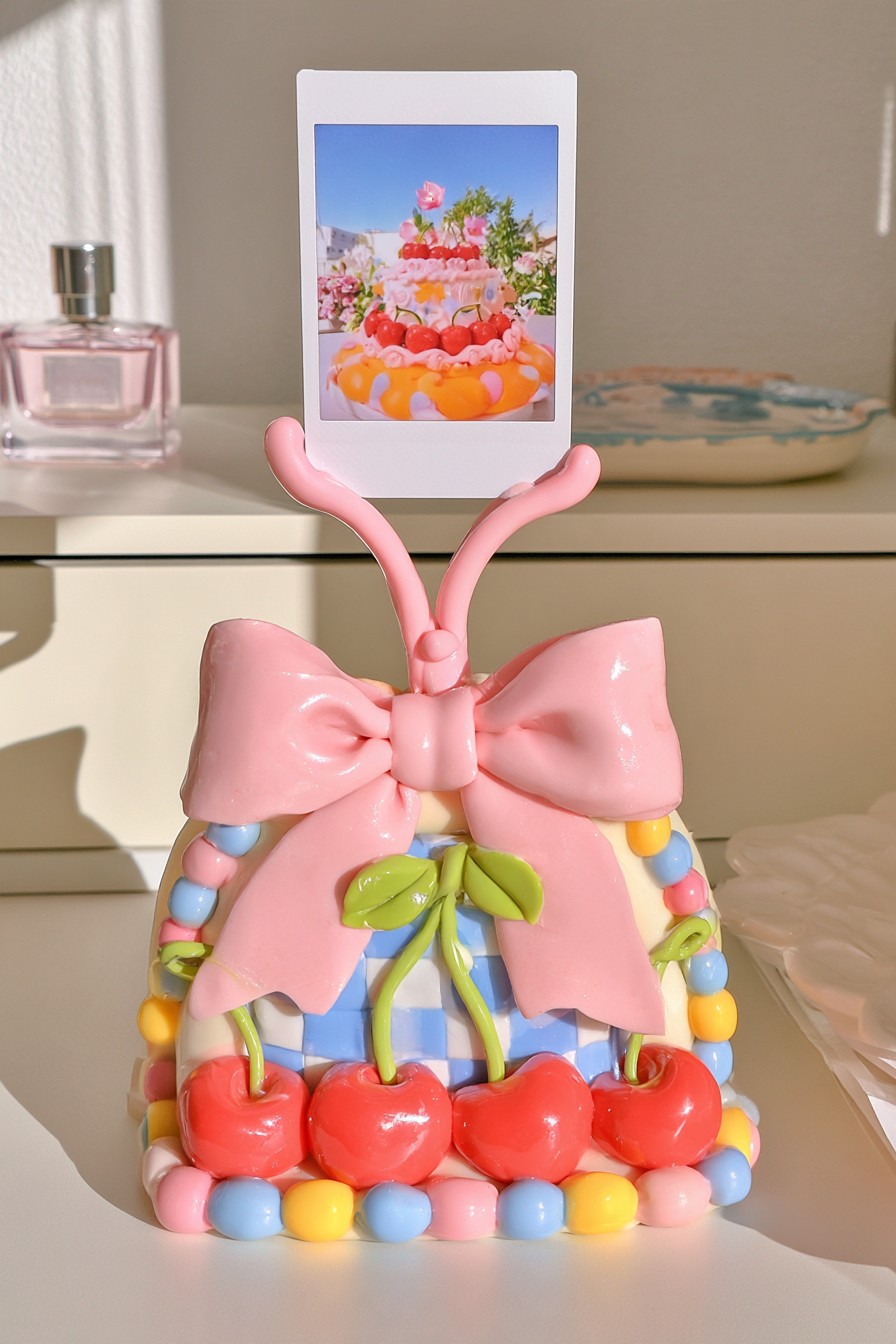
Red cherries sit against a blue and white checked surface, while yellow and other pastel colors belong to the rounded edge decorations. The pink bow softens the geometric pattern, and the print rises above the ornament rather than sitting inside a full frame. Keep these three parts distinct when planning an adaptation: the checked background, the sculpted border and the raised photo support.
Mark a small grid on a prepared surface and try the blue and white pattern on a sample before painting the base. Plan a removable clip or photo slot around the print size, securing its base before adding the decorative pieces. Position the support near the center and check the complete assembly with the print installed. Leave the cherries and bow clear of frequently moved desk objects.
12. Heart Shaped Frame with Roses and Ruffled Trim
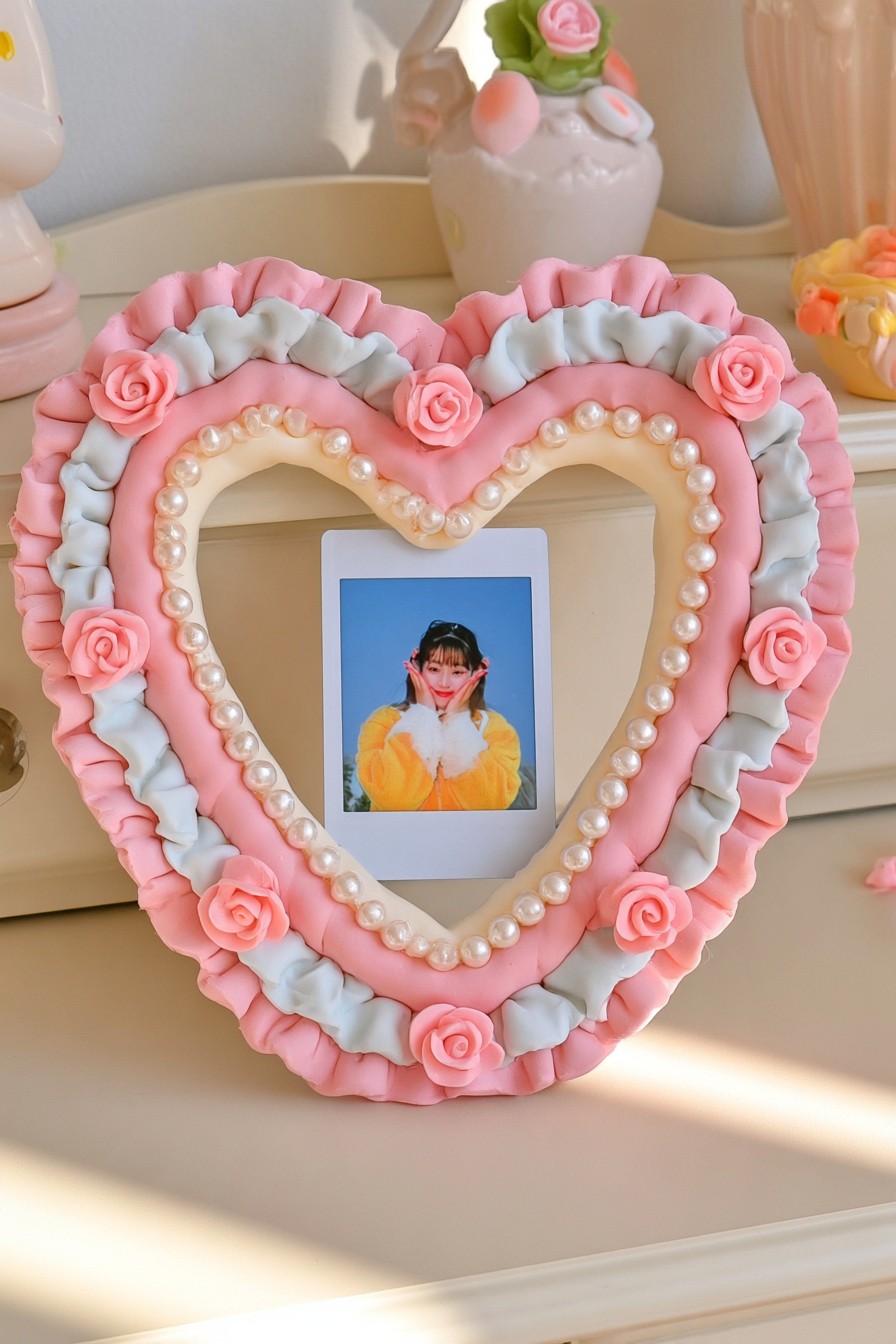
Pink roses, pale blue ruffles and pearl like dots form repeated borders around a heart opening. The pictured photograph remains a white edged rectangle inside that opening; the print itself has not been cut into a heart. To preserve this presentation, choose a print that fits visibly within the heart and plan a support that keeps it upright without attaching clay directly to the photograph.
A different version can place a larger photograph behind the opening, which masks part of the image. Test a paper template over the print first so the face and important details remain visible. Keep the backing removable for either option. Prepare roses and ruffled strips separately, then fit their rear contact surfaces around the border. The floral clay photo frame guide develops that layering and opening clearance in more detail.
13. Duck Pond Ornament with a Floral Surround
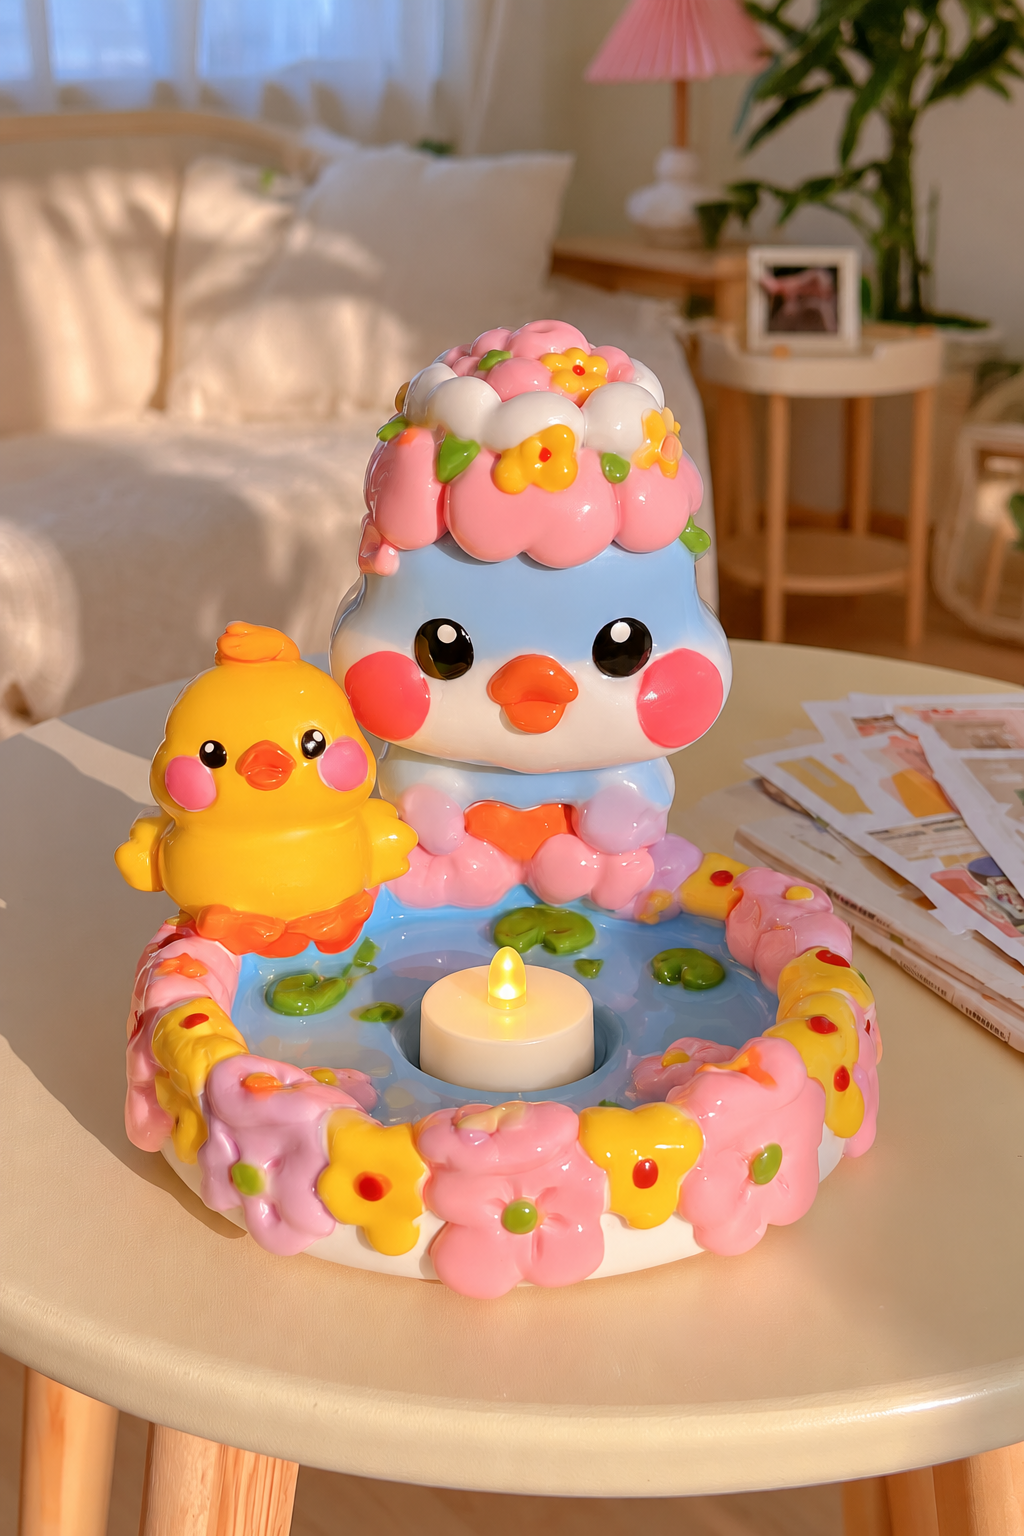
A blue duck and a yellow companion sit above a flower edged pond, with the decorative light kept at base level. The large duck's floral crown remains a sculpted feature rather than a support for an elevated candle. Repeating blue in the pond and larger duck connects the figures, while the pink and yellow flowers give the circular edge its rhythm.
Plan the shallow pond base first and arrange the ducks before filling the rim with flowers. Keep a clear space for a removable battery operated tealight so it can be lifted without bending nearby petals. No open flame belongs in this clay adaptation. Check balance with both figures and the light installed, and simplify the floral border if it crowds the light or makes the piece difficult to dust.
14. Bunny Light Surround for a Bedside Table
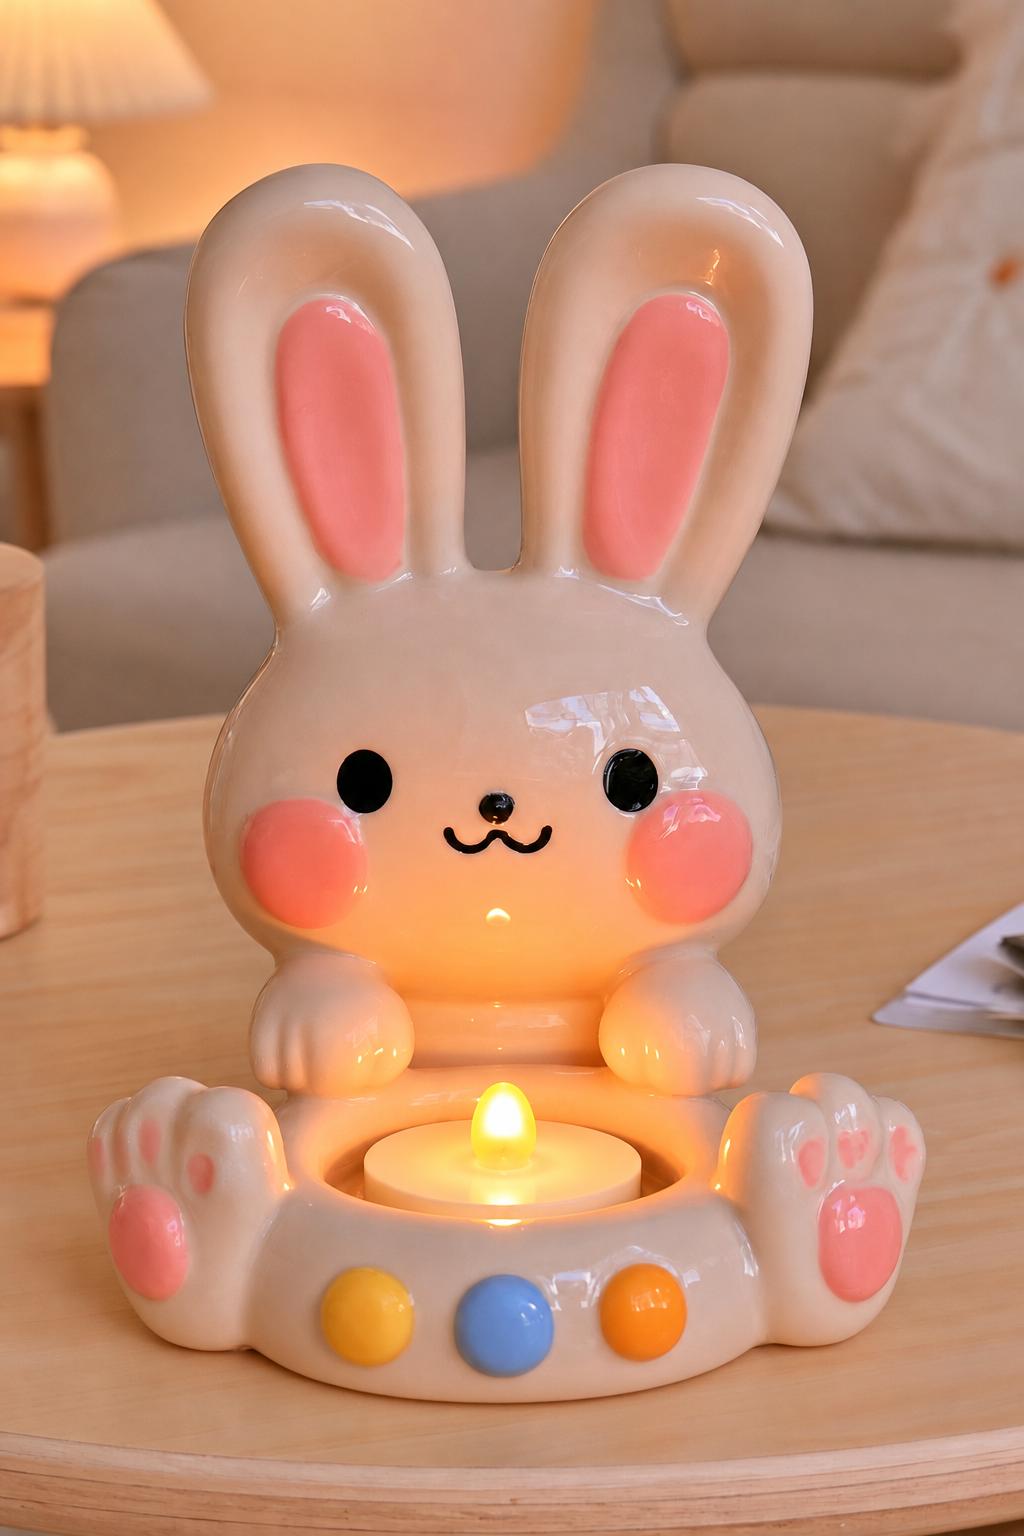
Tall ears, pink cheeks and a rounded body make this bunny recognizable around a small recessed light. The cream surface keeps the palette gentle, with pastel dots across the front and paw details at each side. For a similar design, establish a broad body and a level opening before adding the ears, cheeks and small decorative circles.
Measure the recess around the actual battery operated light, leaving room to lift it out without pressure on the paws. Use the product's instructions to keep its switch and battery compartment accessible; clay should not close around the electronic parts. Support the ears during the clay's specified hardening process. Once assembled, place the ornament toward the back of a bedside table, leaving useful space for items handled every day.
15. Teddy Bear Display with a Flower Edged Tray
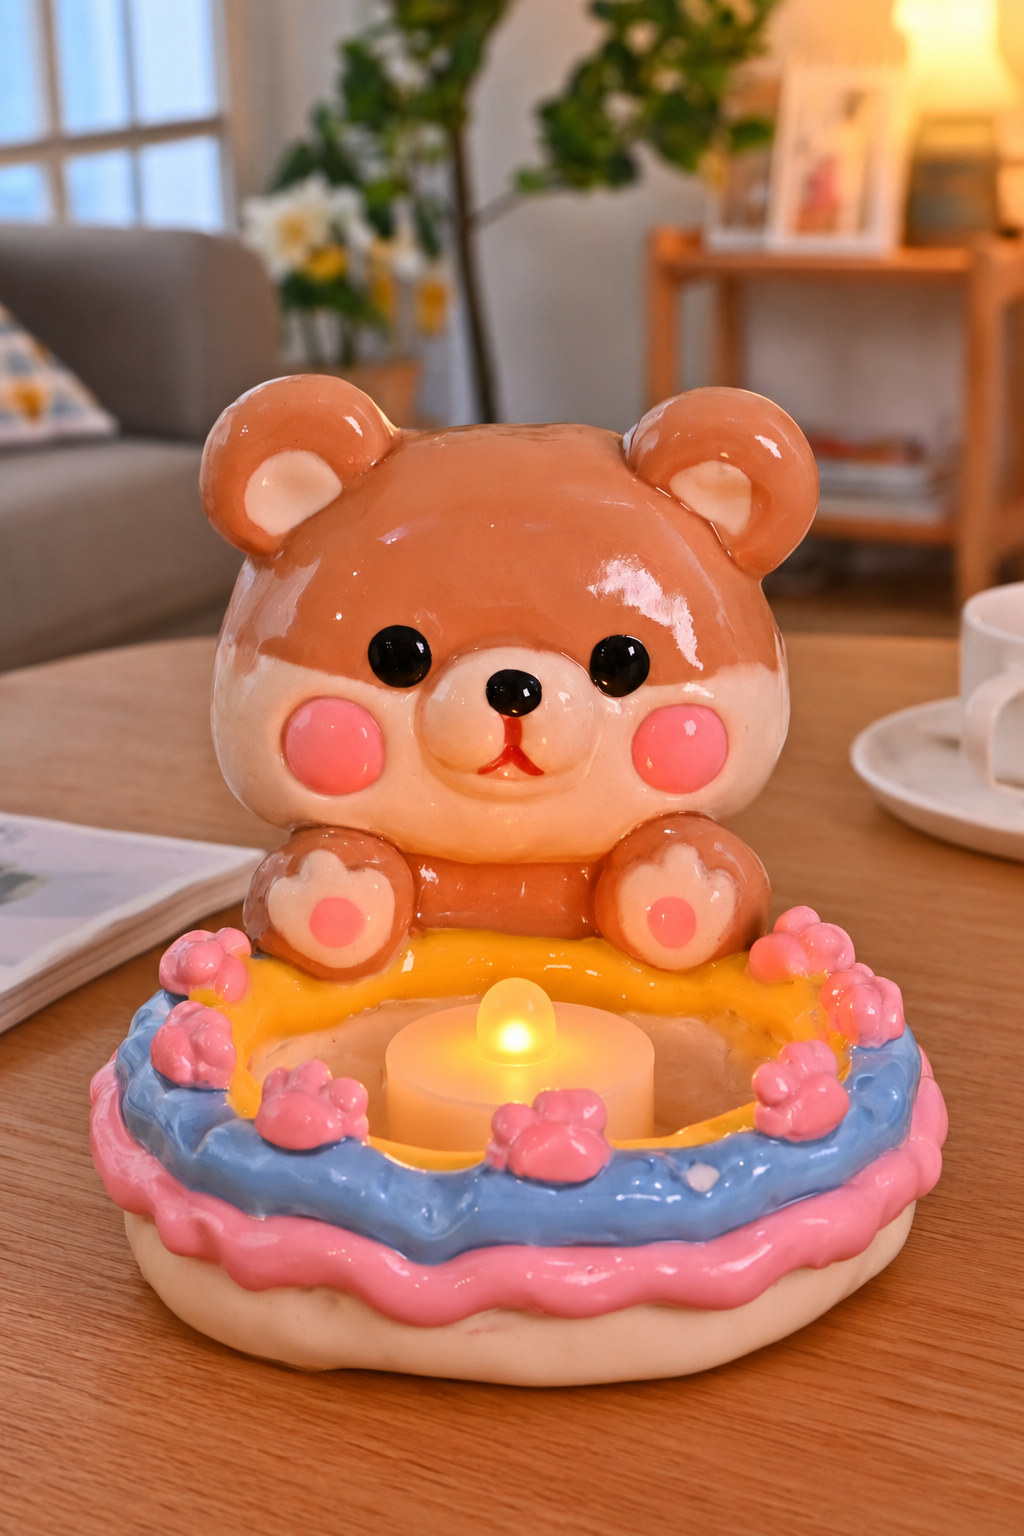
A seated teddy bear forms a backdrop to the shallow floral tray, with brown contrasting against a blue rim and pink flowers. The face remains visible above the display, while the open front offers access to a removable electric tealight. A broad base matters more than making the bear or decorative border especially tall.
Build the tray outline first, then fit the rounded bear body and limbs behind its center. Try the light in position before adding flowers, preserving a clear lifting area. Use only a battery operated light here, or keep the center for a dry, lightweight keepsake. Let the completed clay and its connections reach their required readiness before inserting the light. Place the display where surrounding books or containers do not press against the bear's ears.
16. Sleeping Cat Tray with a Floral Border
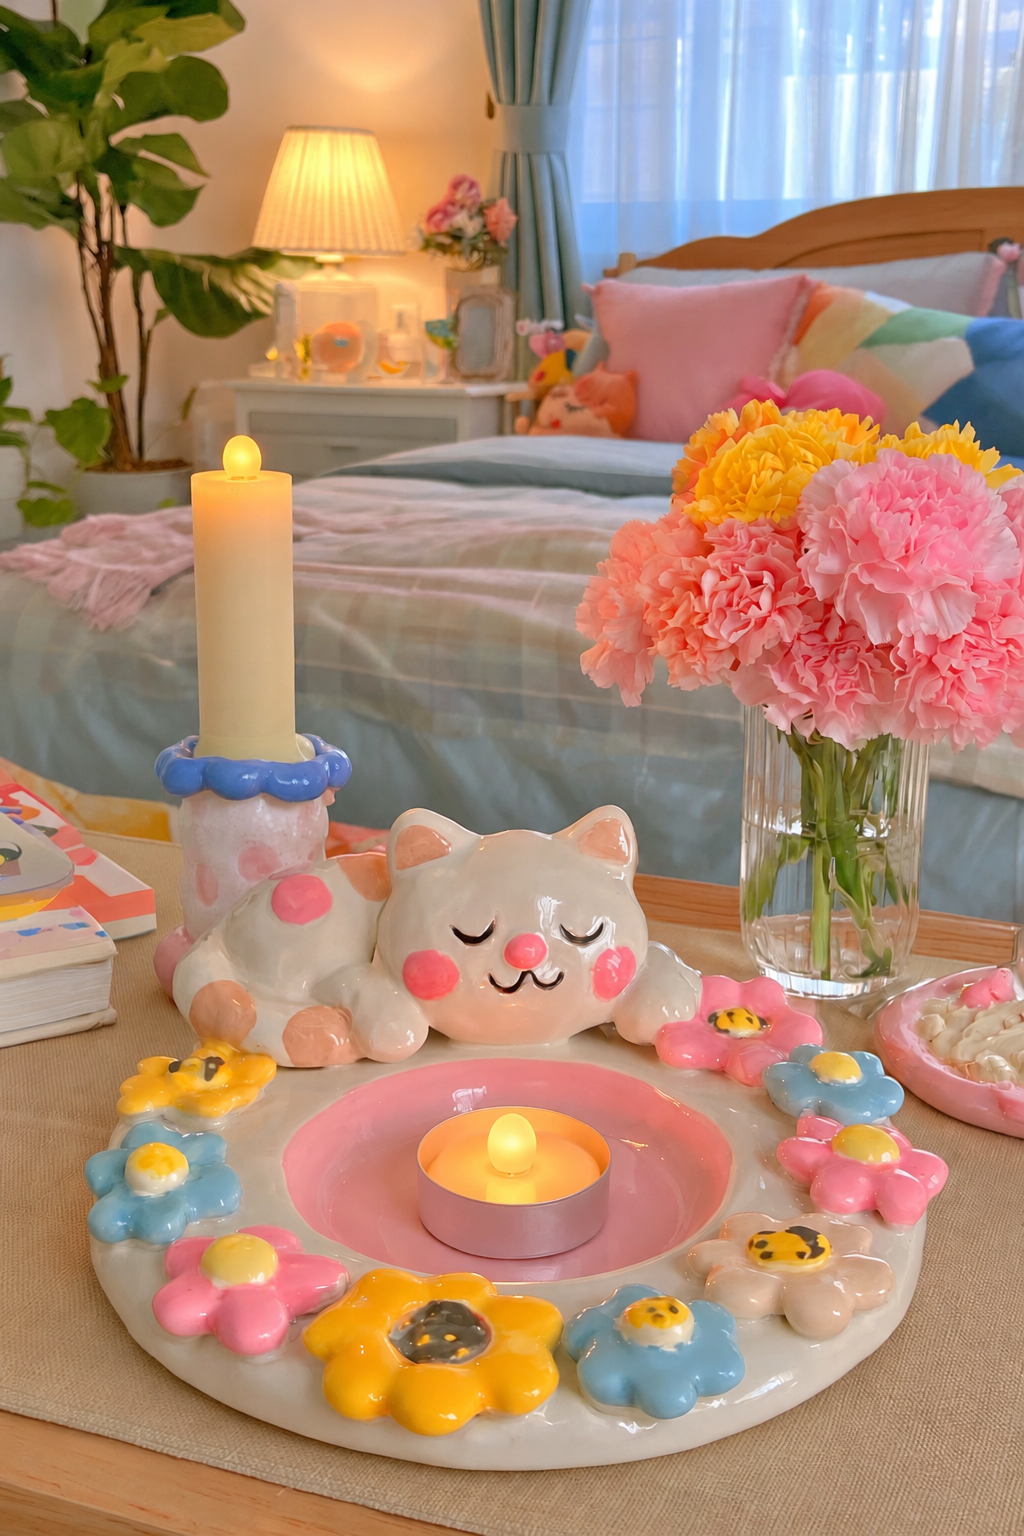
The resting cream cat sits beside a floral tray, with a taller light position at the rear. Pink and yellow blossoms circle the open center, and a blue border repeats the cooler tones in the flower details. The two light positions now use removable battery operated products, leaving the cat and its relaxed expression as the main decorative feature.
Use the illustrated base, separate character parts and flower making sequence as a starting point, then size both recesses to the lights you select. Electronics are fitted after the clay, paint and joining products reach their specified readiness. Check that the taller product remains upright and is not gripped so tightly that removal strains the clay collar. For a smaller display, omit the rear column and keep the cat with a dry keepsake tray.
17. Floral Bear Pot for a Small Bouquet
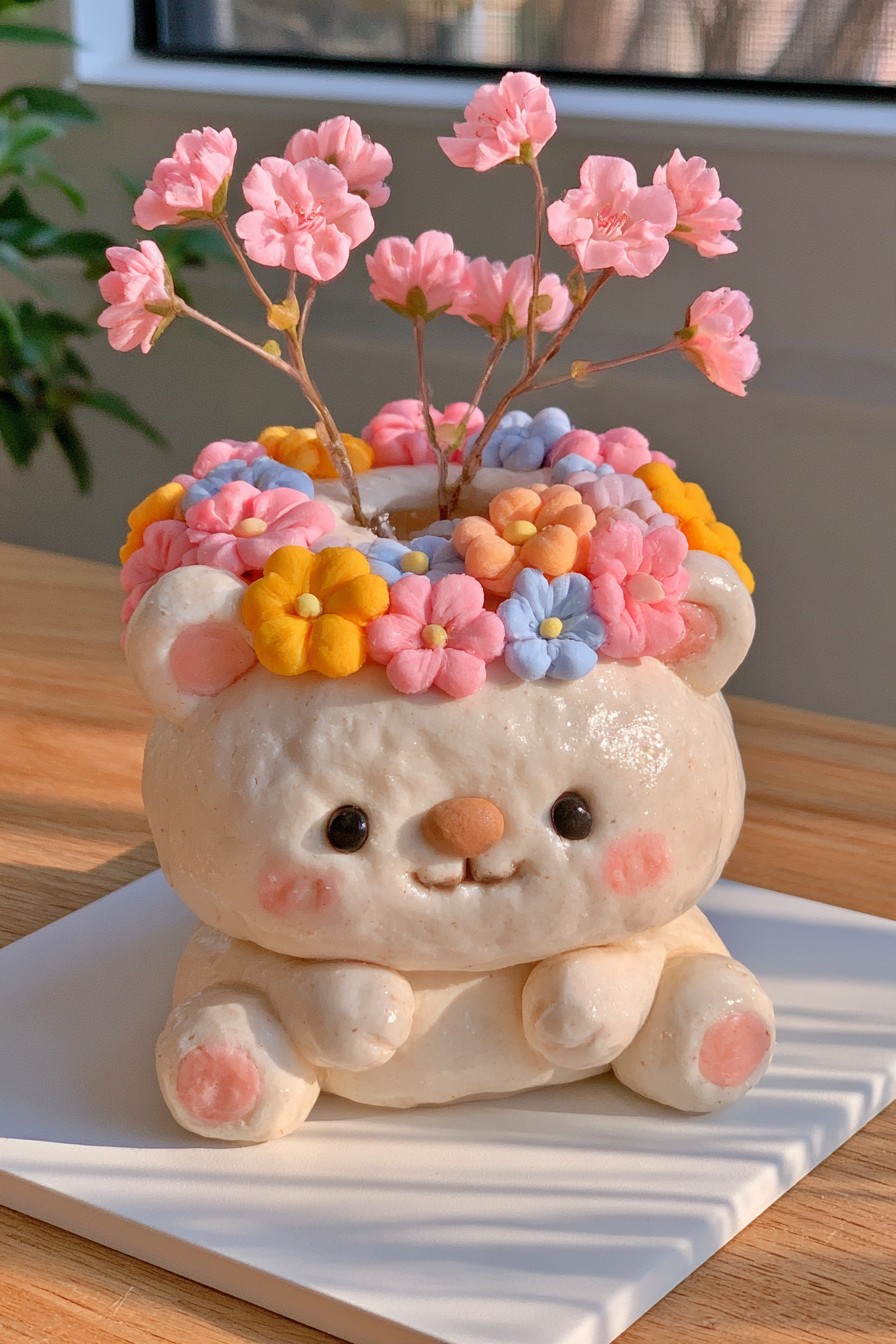
A bear face and small paws give a rounded flower container a character of its own. The sculpted blossoms around the rim form a dense band, while slender pink stems introduce height without concealing the expression. This combination works well when the bouquet remains lighter and more open than the decorative border. Shape the floral rim around a template for the insert opening, leaving enough clearance to remove the vessel without touching petals.
For fresh stems, plan the outer form around a removable water safe vessel. The insert should lift out without catching on the flowers at the rim. If adapting the shape for a living plant, use a suitable inner pot and remove it for watering. A simple shelf or dresser gives the colorful band room to stand out.
18. Frog Flower Holder with a Cheerful Face
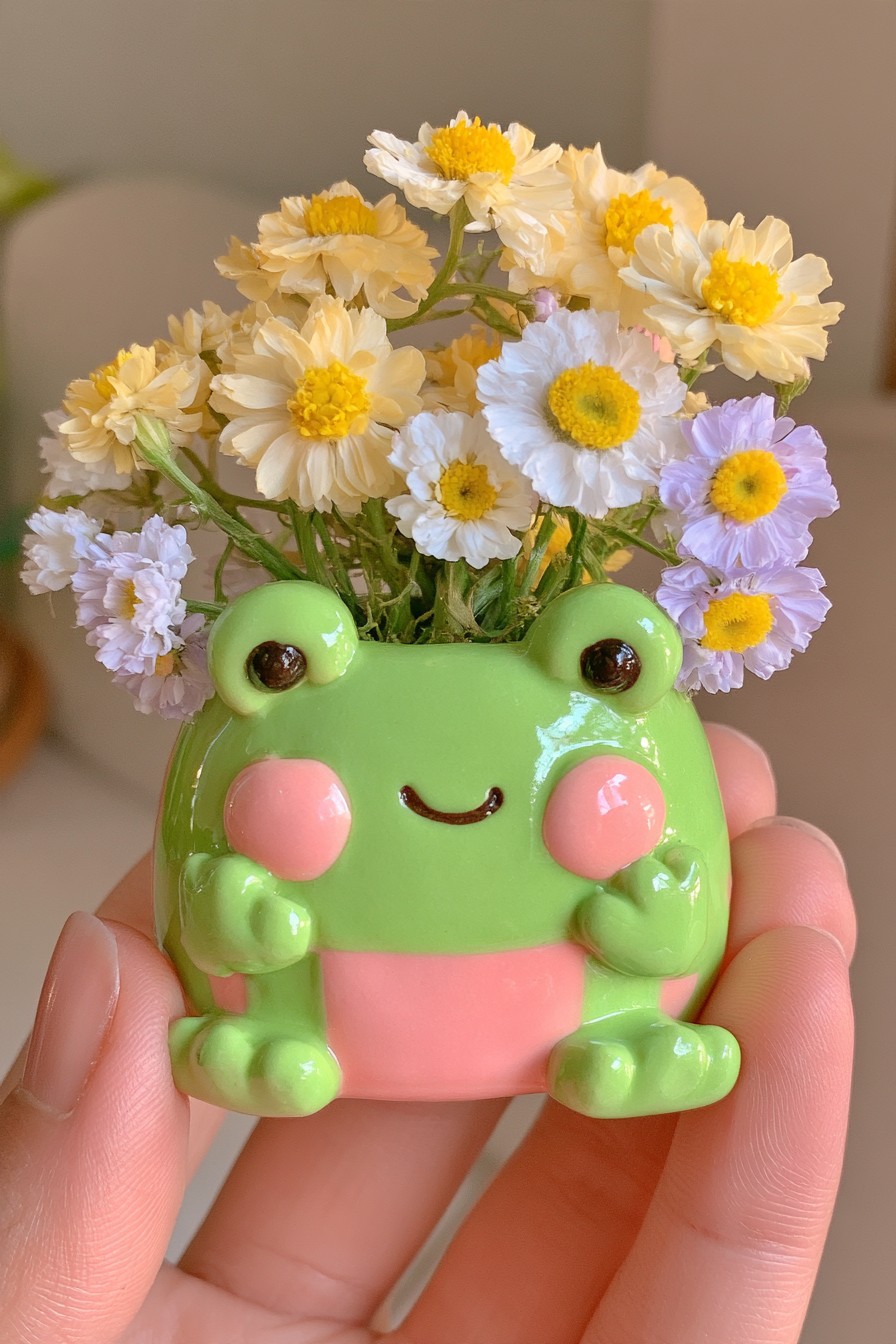
Raised eyes and a broad smile make a green frog container feel animated even with a simple body. Yellow and white flowers contrast with the green surface, while the small pink cheeks connect the face to softer floral tones. A compact bouquet keeps the character visible rather than hiding it under foliage. The raised eyes can be formed as separate rounded pieces; plan their contact areas before adding the smaller cheek and mouth details.
This idea can brighten a desk corner without requiring a large arrangement. Choose a small water safe insert for fresh flowers, or use dried stems for a display that needs no water. Leave working space around the container and keep it away from papers or electronics when handling the bouquet and its insert.
19. Swan Flower Holder with Soft Pink Blooms
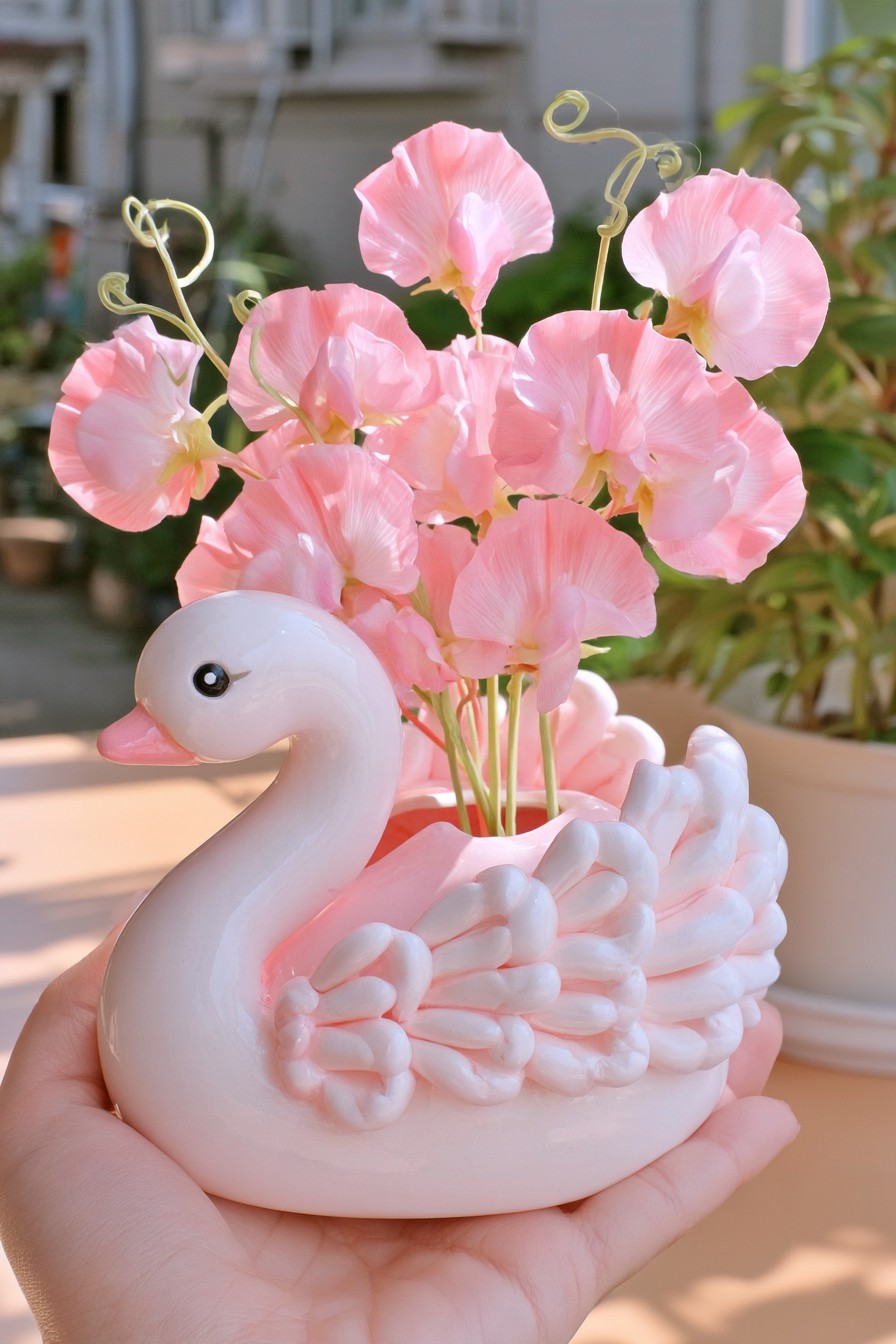
A curved swan neck outlines one side of an airy pink bouquet, while layered wings give the pale body texture. Leave gaps between stems so the neck and feather shapes remain visible instead of disappearing behind flowers. Shorter stems near the front and a few taller ones behind can support that outline. These flower arrangement ideas offer related choices for balancing stems and container shapes.
Plan the decorative body around a removable water safe insert before shaping the wings. Build broad feather forms first and add smaller overlapping details without narrowing the insert's removal path. Fresh flower water belongs in the separate vessel, not directly in an unverified clay body. Keep the neck clear of curtains and frequently moved items, and lift the piece by its supported body rather than the projecting neck.
20. Blushing Cat Pot with Delicate White Flowers
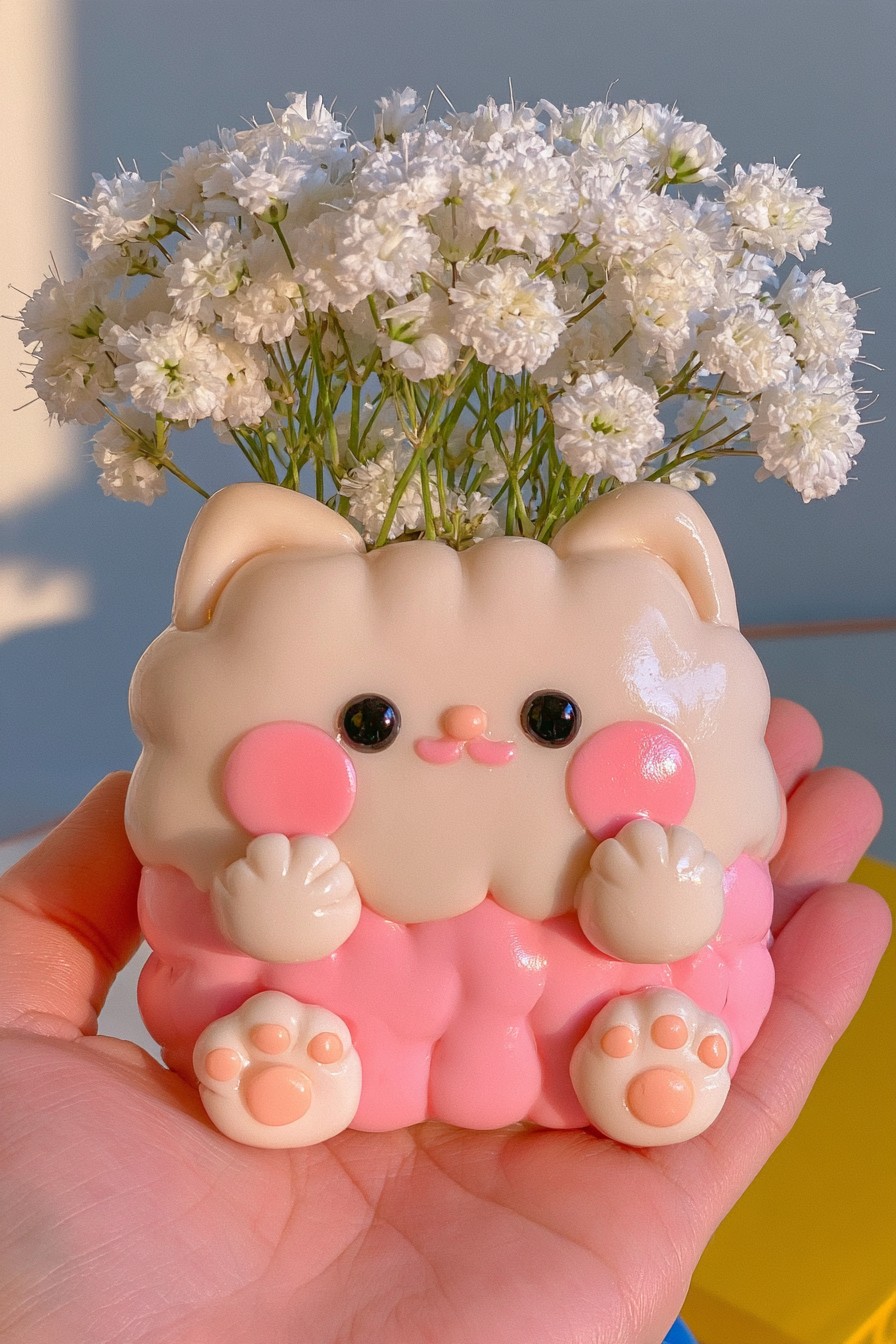
Rosy cheeks, rounded ears, and small paws give a cream cat pot a soft, friendly character. Fine white flowers add height while allowing the face to remain the main feature. Their open arrangement is a useful alternative to a dense bouquet, particularly when the container itself has several sculpted details. The cream face sits above a pink front with small raised paws. Shape the face and opening together so neither is hidden by stems.
Match the floral insert to the opening before planning the outer shape. It should be easy to remove for cleaning or water changes without touching the ears. A few coordinating pink accessories can connect the pot to a workspace, but leave enough empty surface around it that the small figure does not disappear among everyday supplies.
Give the Finished Piece Room to Work
Choose one detailed piece as the focal point, then repeat a color in simpler nearby accessories. Keep enough room to change a photograph, lift a floral insert or reach a light switch. A cured clay surface and a dry paint layer do not establish that every finish or adhesive is ready for handling; follow each product's instructions. Clean with a method suited to the complete assembly and support raised details when moving it.

Leave a Reply