
A handmade birthday card feels personal when its details belong to the person receiving it: a favorite animal, a shared song, a garden they love, or a message tucked somewhere unexpected. These 39 handmade birthday card ideas range from simple paper layers to little envelopes, stitched details, moving characters, and folded surprises. Each idea explains the materials to choose, a practical way to assemble the design, and the small construction details that help it work.
Start with the cherry card tutorial below to learn how to prepare a sturdy base, arrange paper pieces, and add gentle dimension. You can use those same foundations for many of the designs that follow. Cards with wheels, sliding inserts, or opening structures need their own moving parts, so their individual descriptions explain what changes. Choose your envelope before adding bulky decorations, and leave room inside for a birthday message that sounds like you.
Table of Contents
- Materials to Gather Before You Start
- Make a Cheerful Cherry Birthday Card in Six Steps
- Choose Adhesives and Folds That Suit the Design
- Handmade Birthday Card Ideas to Make Your Own
- 1. Denim Overalls with a Pocket Full of Birthday Wishes
- 2. A Floral Record Sleeve for a Music Lover
- 3. A Gold Stitched Cake Against Midnight Blue
- 4. An Orange Tabby Holding a Birthday Cake
- 5. An Accordion Dachshund Sending a Long Birthday Hug
- 6. Four Mini Envelopes with Four Personal Messages
- 7. Five Woven Candles in Candy Colors
- 8. A Little Dragon with a Folded Paper Wing
- 9. A Birthday Wish Vending Machine
- 10. A Birthday Snail with a Hidden Accordion Greeting
- 11. A Turning Wheel of Sunny Birthday Forecasts
- 12. A Three Tier Paper Cake That Opens with the Card
- 13. A Tiny Bakery Door with a Birthday Cake Inside
- 14. Rosette Ice Cream with Three Paper Scoops
- 15. A Parcel Lifted by Seven Pastel Balloons
- 16. Lavender Shutters Opening onto a Birthday Garden
- 17. A Garden Box That Opens into Birthday Messages
- 18. A Bouquet of Folded Heart Balloons
- 19. Butterflies Rising from a Painted Flower Meadow
- 20. A Teddy Bear Holding Three Birthday Stars
- 21. A Strawberry Cake Waterfall with a Pull Tab
- 22. A Panda with Arms Ready for a Birthday Hug
- 23. A Row of Pastel Envelopes Holding Little Good Things
- 24. A Matchbook of Paper Birthday Candles
- 25. A Ladybug Birthday Party on a Paper Theater Stage
- 26. A Cupcake with a Lift Up Frosting Message
- 27. A Lily with a Birthday Message at Its Center
- 28. A Tulip Bouquet That Unfolds Inside
- 29. A Sliding Bear Delivering a Birthday Cake
- 30. A Smiling Hippo with a Mouthful of Birthday Wishes
- 31. A Sage Envelope with a Pull Out Bunny Note
- 32. A Blueberry Cake with a Side Opening Greeting
- 33. A Gift Parcel That Rises When the Card Opens
- 34. An Unfolding Heart Note with a Slim Sleeve
- 35. A Pressed Petal Heart with Birthday Bunting
- 36. A Watercolor Heart Finished with Real Stitches
- 37. A Lift Up Gift Lid Revealing a Birthday Fox
- 38. Two Cherry Friends with a Tiny Party Hat
- 39. A Lavender Heart with Wooden Birthday Letters
- Give the Card a Personal Finish
Materials to Gather Before You Start
For the tutorial, make a finished card measuring 10 × 15 cm. These are suggested working measurements for your version, rather than a cutting template for every design in the collection.
- A cream card blank measuring 10 × 15 cm when closed, or a 20 × 15 cm piece of cardstock folded in half. Cardstock around 250 to 300 gsm is a useful starting point; check that your chosen sheet folds cleanly.
- A small piece of watercolor paper for two cherry shapes, each about 3 cm across, plus red and pink watercolor paint and a small brush. Red cardstock is a simpler alternative if you prefer to skip painting.
- Sage green paper for two stems approximately 5 to 6 cm long and 3 to 4 mm wide, and one leaf about 3 cm long.
- Blue and cream paper for a striped party hat about 2 cm tall, plus a tiny yellow paper circle for its tip.
- A black fineliner, white gel pen, pencil, ruler, scissors, and a blunt scoring tool or bone folder.
- A glue stick suitable for paper and four small adhesive foam squares about 1 mm thick. Use a paper craft adhesive that dries clear if a textured surface needs a stronger bond.
- A protective work surface, clean scrap paper for applying glue, and an envelope with enough space for the finished decoration.
Keep the base dry while you paint the separate pieces. Ordinary thin paper can buckle under watery paint; watercolor paper is more suitable for the cherries. For projects with tiny lettering, test the pen on an offcut first. If children are helping, let an adult handle craft knives, piercing tools, and small metal fasteners. Simple cutting and collage ideas in these crafts using everyday materials can help younger makers practice before trying a moving card.
Make a Cheerful Cherry Birthday Card in Six Steps
The illustrated sequence shows the materials, blank base, prepared pieces, background assembly, foam placement, and completed card. Read the steps alongside it so the hidden adhesive and order of assembly are clear.
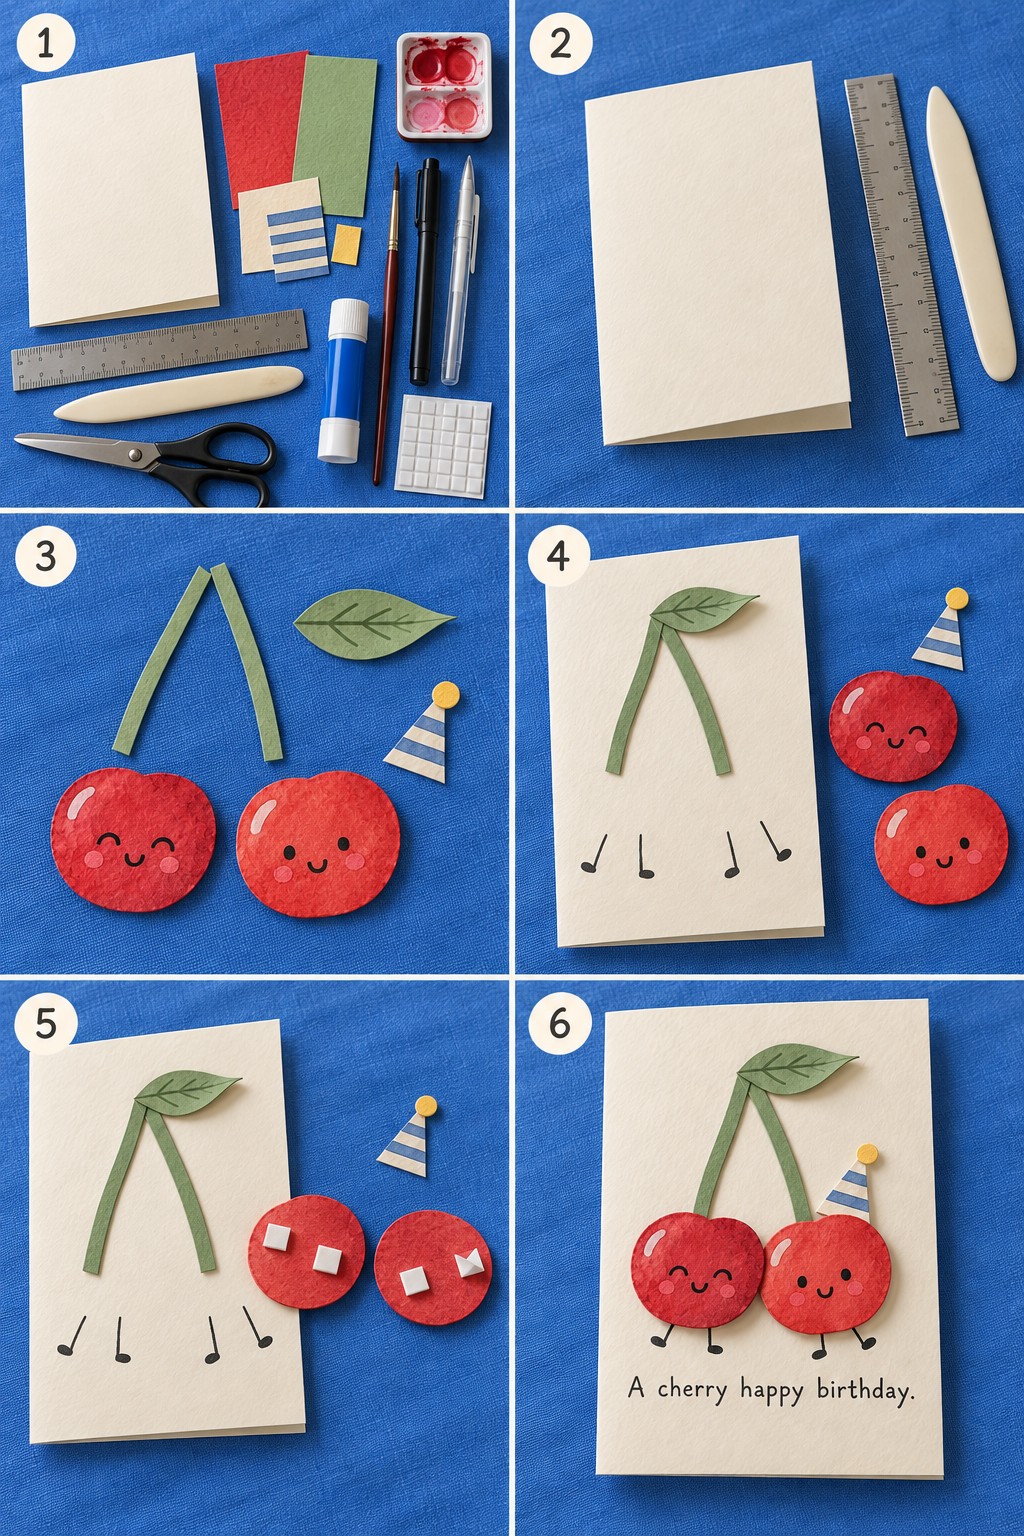
- Gather and size the pieces. Set out the cream blank, colored papers, paints, pens, glue, and thin foam squares. Plan for two cherries near the lower middle of the card, with their stems meeting above. Leave roughly 2 cm beneath the decoration for the greeting. If using a ready folded blank, keep its fold on the left.
- Prepare a clean fold. For a handmade base, mark the midpoint of the 20 cm edge and score a line down the sheet, creating two 10 × 15 cm panels. Use a blunt tool against a ruler without cutting through the cardstock. Bring the edges together and crease gently. A ready folded blank only needs its crease smoothed and its edges checked.
- Prepare the cherry decorations. Paint two small areas of watercolor paper red, allow them to dry fully, and cut two rounded cherry shapes. Add pink cheeks, black faces, and small white highlights after the paint dries. Cut the two green stems and leaf. Make the triangular hat from cream paper, glue on blue stripes, trim their ends to its outline, and add the yellow tip.
- Position the flat background details. Arrange every piece without glue first. Let the stems form a narrow inverted V, with each lower end hidden behind its cherry. Mark the cherry positions lightly, lift the fruit away, and glue down the stems. Attach the leaf at the upper junction, leaving its tip slightly free if you want a little curl. Draw two short legs below each planned cherry position. Keep their upper ends beneath the fruit so they look connected.
- Add the concealed supports. Turn both cherries face down. Place two small foam squares on the back of each, spaced apart and kept inside the outline. Avoid putting a pad directly over a stem end, which would create an uneven stack. Attach the hat behind the upper right edge of the right cherry with a small amount of paper glue. Let that join set before removing the foam liners.
- Assemble and personalize. Press the cherries onto their planned positions, covering the lower stem ends and the tops of the drawn legs. Add a greeting beneath them, then write your personal message inside. Check for loose edges, exposed adhesive, and enough envelope clearance. Press only over the foam supports so the raised paper stays gently dimensional.
Choose Adhesives and Folds That Suit the Design
Use a glue stick for broad, flat paper layers and a small amount of craft glue that dries clear for narrow details or textured cardstock. Spread liquid glue thinly instead of soaking the paper. Hold parts together as directed on the product label and allow the bond to set before moving them. For paper pockets, narrow double sided tape makes it easier to keep adhesive on the attachment tabs and out of the opening.
Foam squares create a shallow raised effect; they are not a substitute for a working hinge. Use scored paper tabs for opening doors, miniature envelopes, and folded structures. A sliding channel must remain free of glue, and a rotating disc needs space around its edge and a loose enough pivot to turn. Test a mechanism on scrap paper before decorating it, then check it again before closing the backing layer.
For painted and stitched cards, work on a separate front panel and attach it to the blank afterward. This keeps paint away from the inside message and conceals thread ends. For substantial rosettes, fabric details, or wooden letters, choose a roomy envelope or a shallow presentation box instead of forcing the card flat.
Handmade Birthday Card Ideas to Make Your Own
Use the preparation, layering, and finishing steps above as your starting point, then adapt the following designs to the recipient. Some rely on a simple paper surface; others add a pocket, wheel, or folded insert. The suggested methods describe practical ways to recreate each idea. For detailed moving designs, make a plain paper mockup first so you can check the opening action before using your favorite materials.
1. Denim Overalls with a Pocket Full of Birthday Wishes
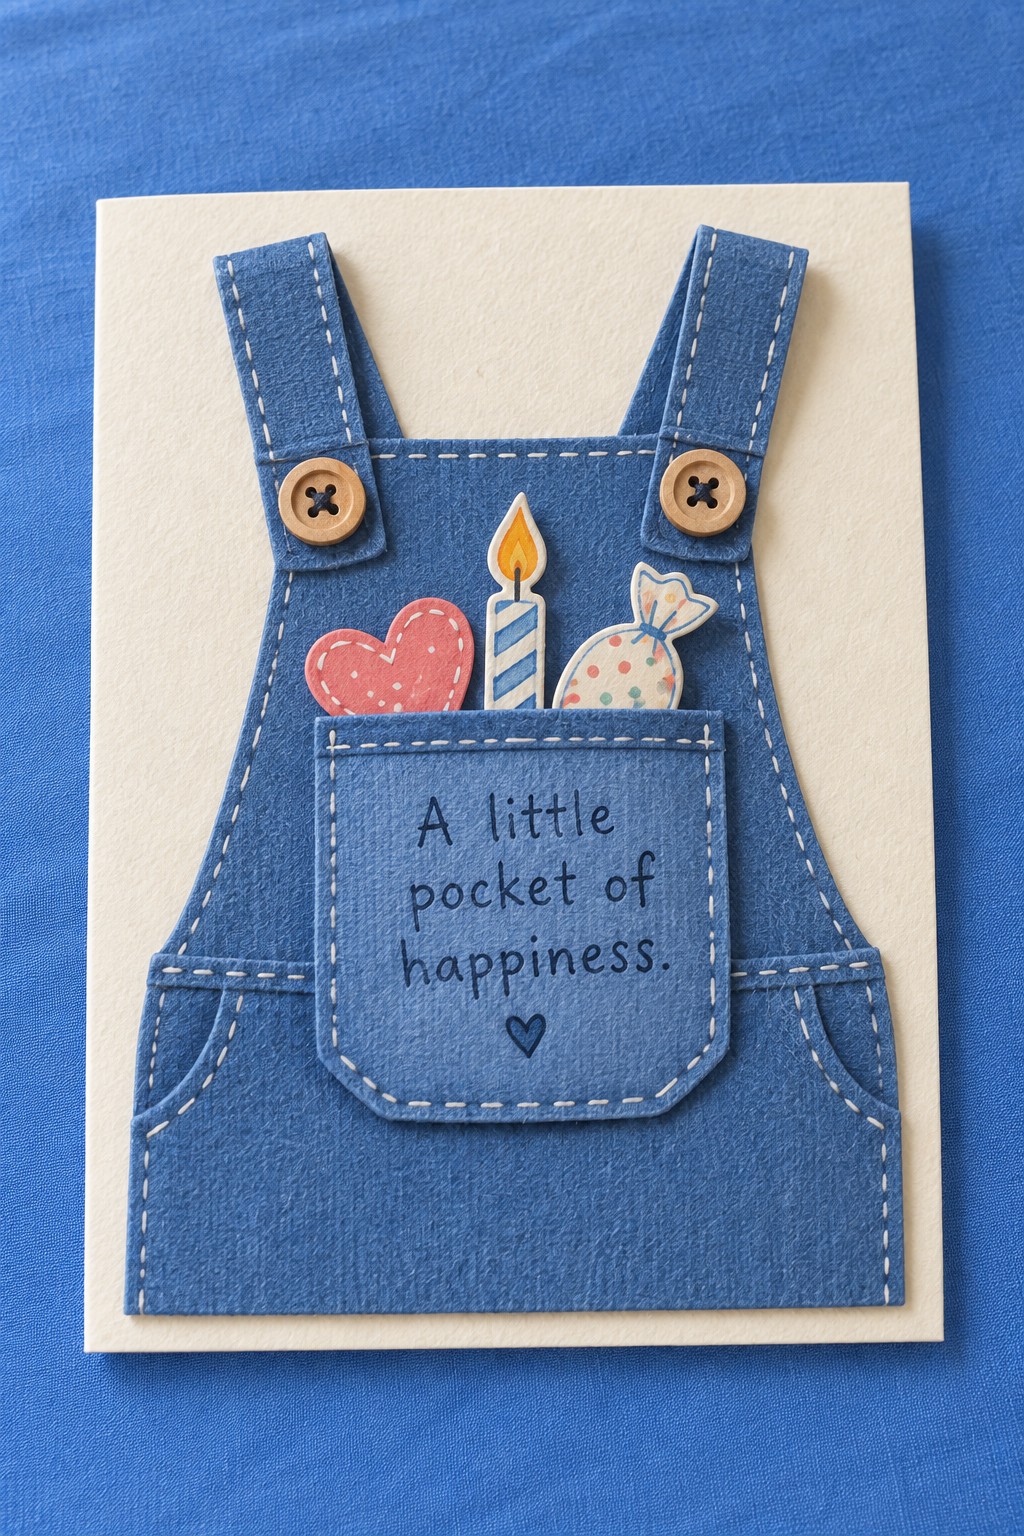
A tiny pair of overalls turns the front of a card into a place for a personal surprise. Use lightweight denim, a cream cardstock base, two small buttons, pale thread, and paper cutouts shaped like a heart, candle, and wrapped sweet. Cut the overall bib and straps as a flat silhouette, then prepare a separate pocket piece.
Stitch the pocket to the denim along its sides and bottom before attaching the fabric panel to the card. Leave its top open and keep glue away from that opening. Sew the buttons to the straps, then use a thin layer of fabric compatible craft glue to secure the denim to the cardstock. Tuck a short removable note behind the decorations. Lightweight fabric and flat buttons keep the finished card easier to handle.
2. A Floral Record Sleeve for a Music Lover
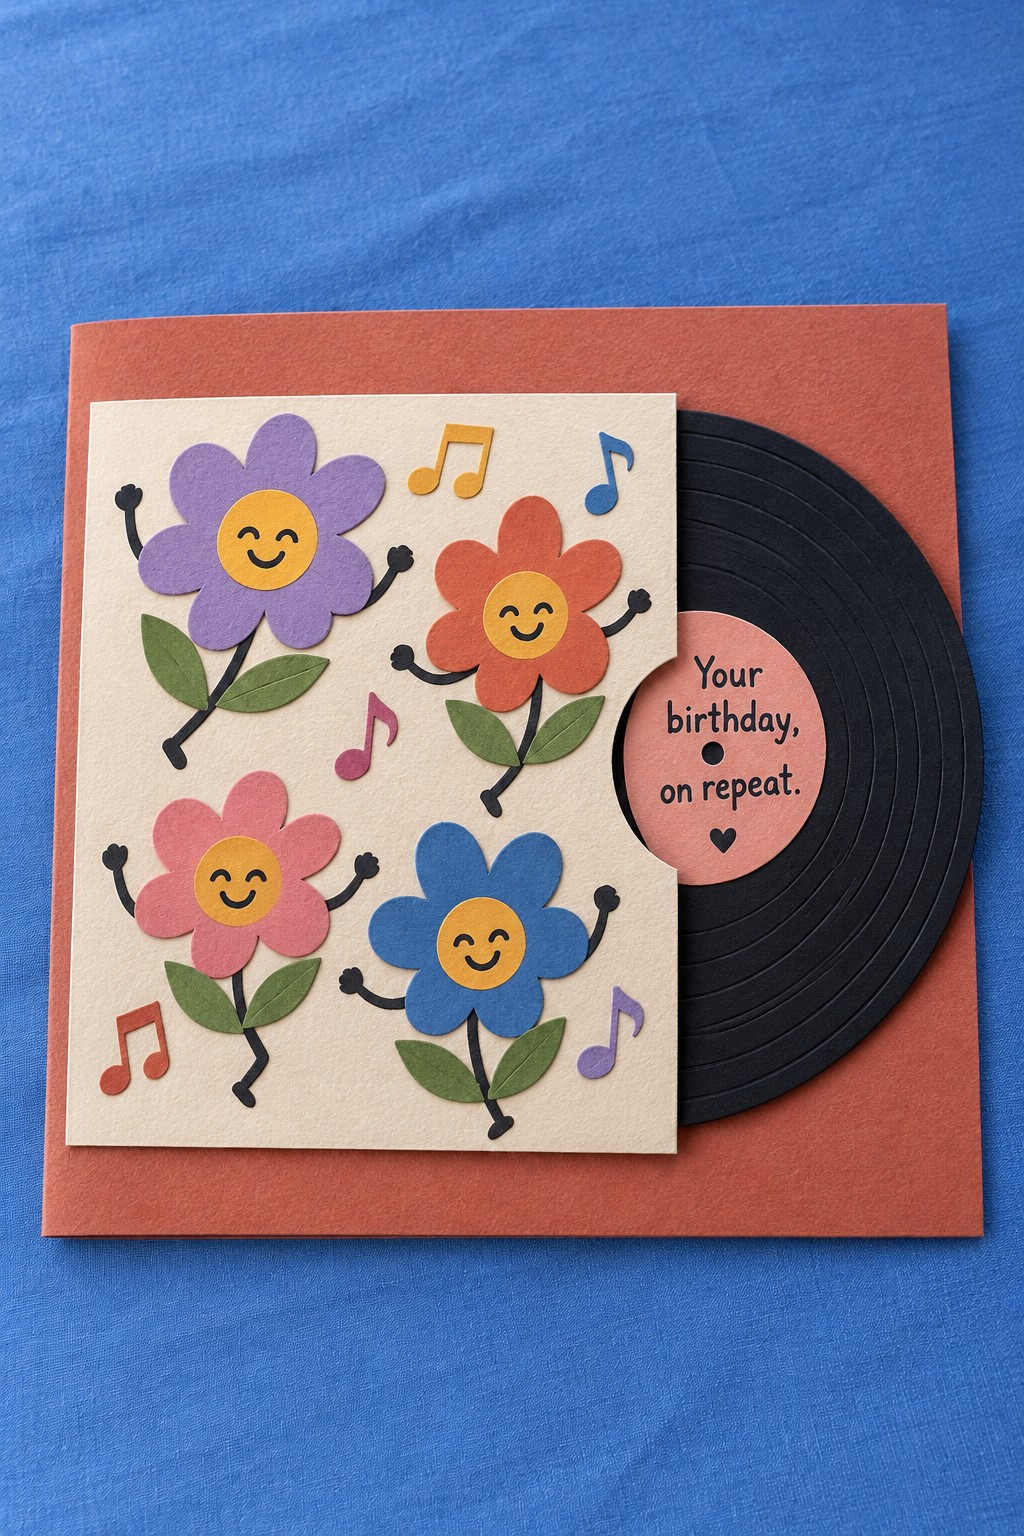
A paper record peeking out from a flower covered sleeve makes a thoughtful card for someone who always has a song playing. Gather coral cardstock, cream paper, a black cardstock circle, a pink label, colored paper scraps, and a fine black pen. Draw subtle concentric circles on the record and add a birthday message to the center label.
Decorate the cream sleeve with four cheerful flowers, leaves, and musical notes before fixing it to the card. Attach only its top, left, and bottom edges, leaving the right side open for the record. Size the pocket so the disc slides easily without disappearing completely. Write a favorite song title or a shared music memory on the reverse of the removable disc.
3. A Gold Stitched Cake Against Midnight Blue
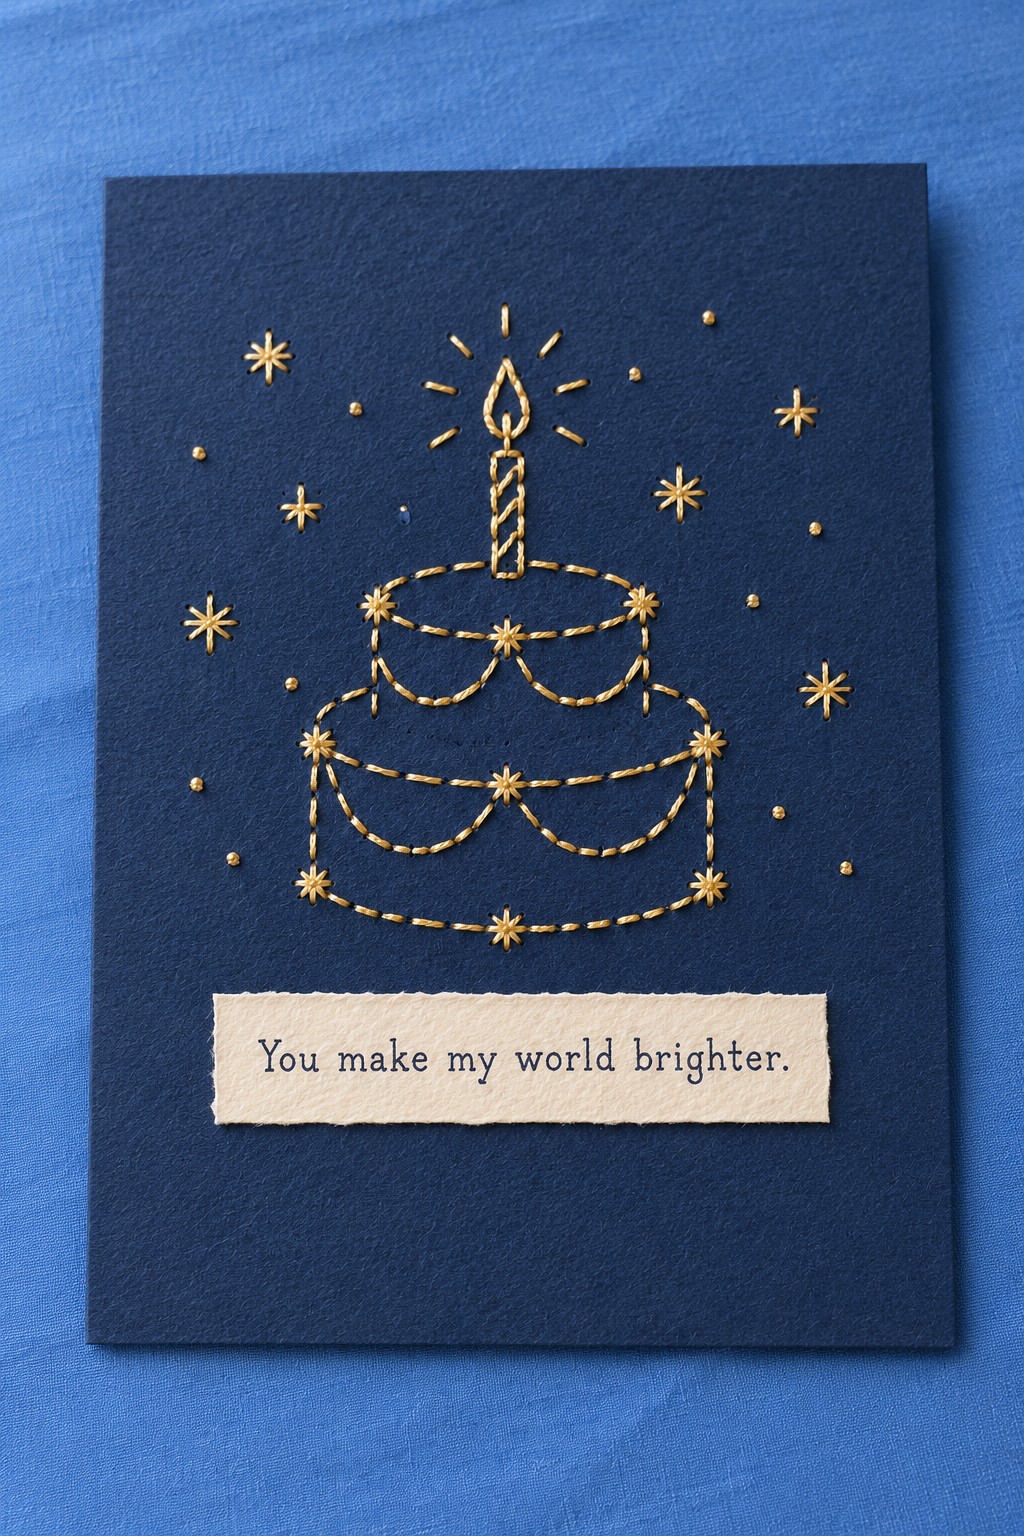
A fine gold cake outline gives navy cardstock a celebratory glow without covering it in decorations. Use a separate navy front panel, fine metallic embroidery thread, a small needle, a piercing tool, a soft piercing mat, and a cream greeting strip. Sketch the cake tiers, candle, and small surrounding stars on a paper guide.
Pierce evenly spaced holes through the guide and panel before sewing. Keep enough card between holes to prevent tearing, and use short lengths of thread so the metallic strand tangles less. Stitch gently rather than pulling the card tight. Secure thread ends with tape on the reverse, then mount the finished panel on a navy blank to hide the working side.
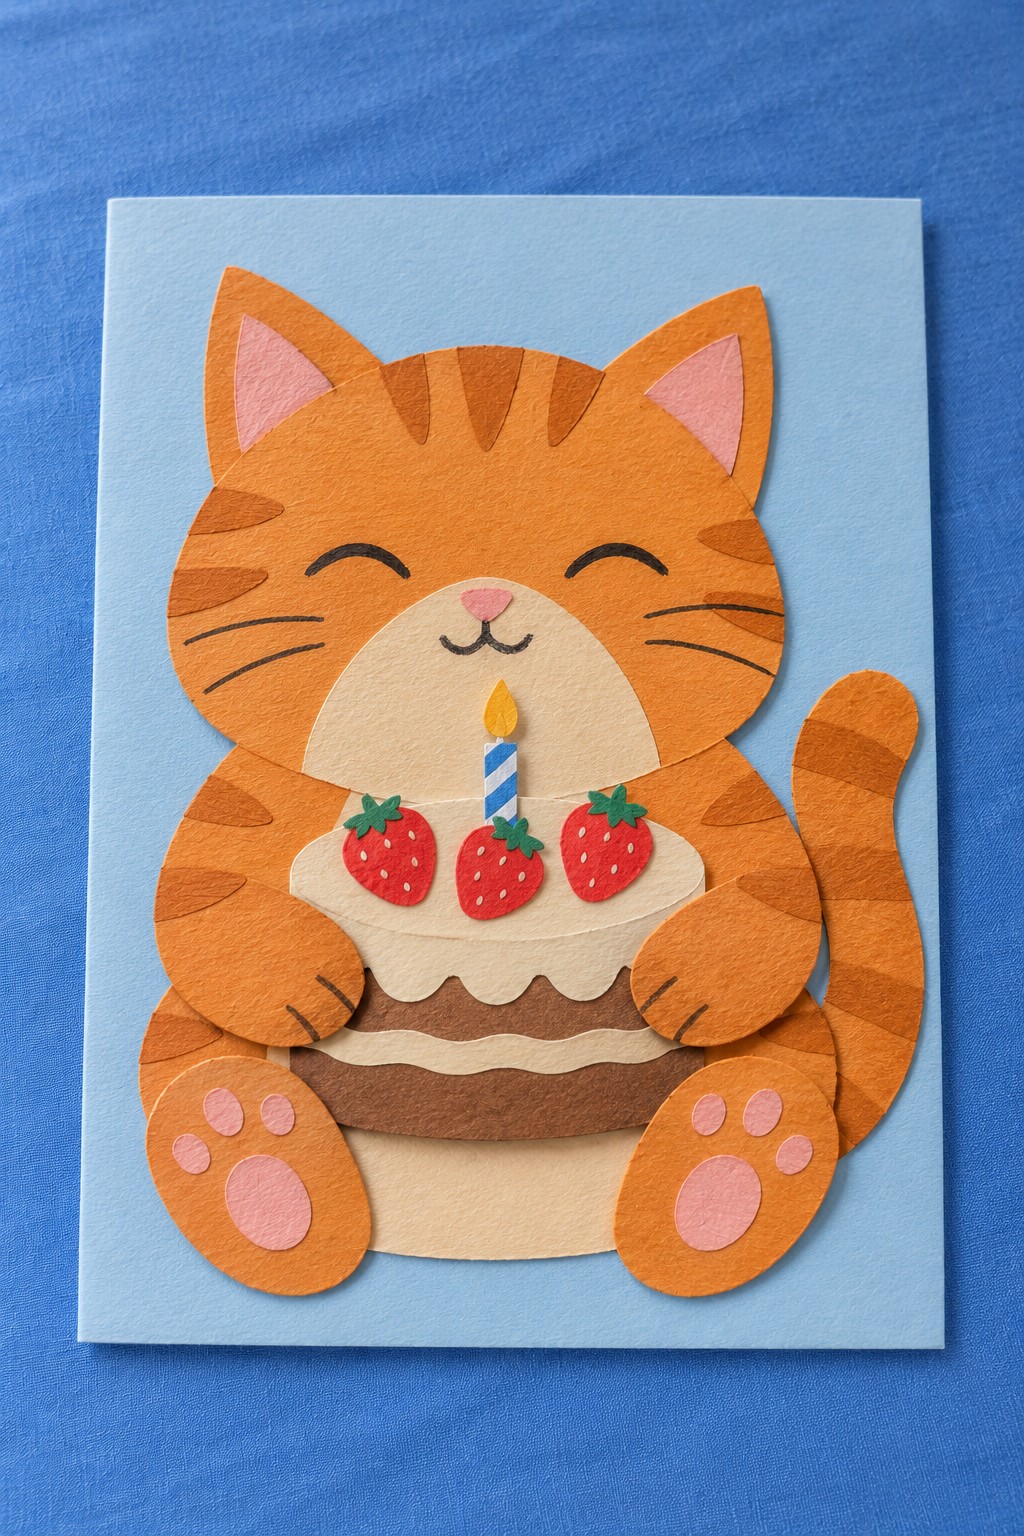
4. An Orange Tabby Holding a Birthday Cake
Give a cat lover a cheerful orange tabby with a strawberry topped cake held between its paws. Build the character from orange, cream, pink, and brown cardstock on a pale blue base. You will also need darker orange coloring pencils or markers for the stripes, plus tiny paper pieces for the candle and strawberries.
Attach the ears and tail behind the body first, then layer the cream muzzle and tummy. Position the cake in front of the tummy before adding the two paws over its upper sides. The feet sit at the bottom, with pink pads on top. Keep the cake and paws slightly raised with thin foam pads while attaching the larger body flat, so the layers remain stable.
5. An Accordion Dachshund Sending a Long Birthday Hug
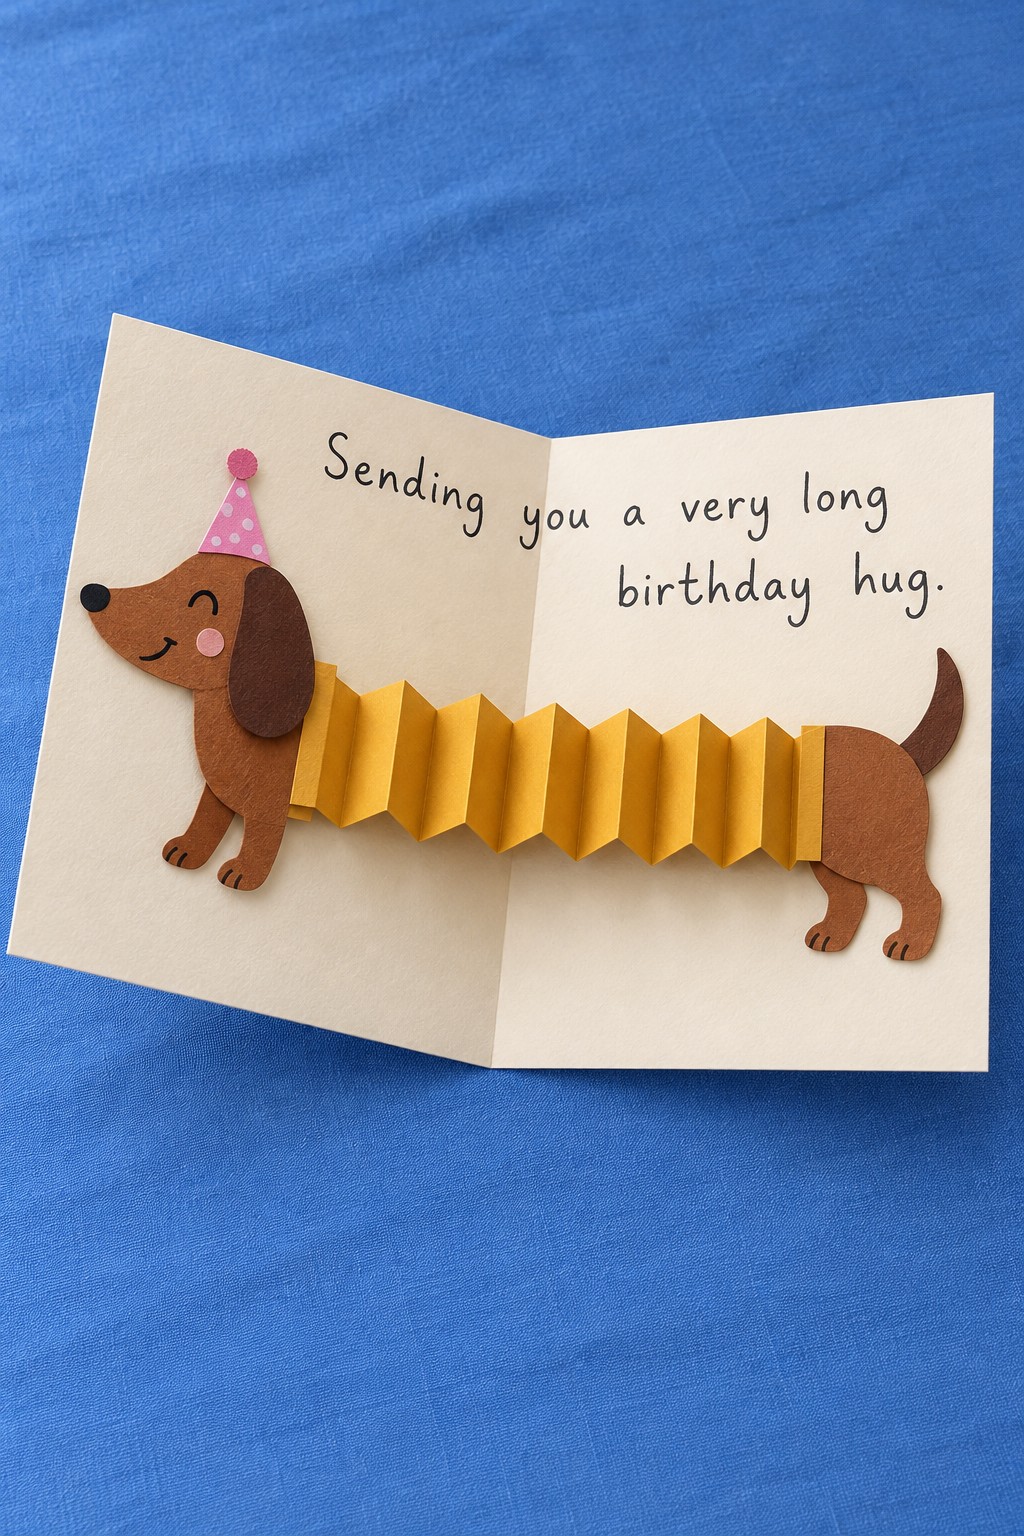
A long yellow accordion makes this dachshund stretch across the inside of an open card. Use a cream blank, lightweight yellow paper, brown cardstock for the head and hindquarters, and pink paper for the party hat. Cut an even width strip for the body and fold it back and forth into matching pleats, leaving a flat attachment tab at each end.
Glue the end tabs to opposite inside panels, then cover them with the dog sections so the accordion appears to grow from the body. Test the placement with removable tape before fixing it: the folds must compress inside the closed card without pulling on the head or tail. Write the long hug message above the dog, outside the path of the folding paper.
6. Four Mini Envelopes with Four Personal Messages
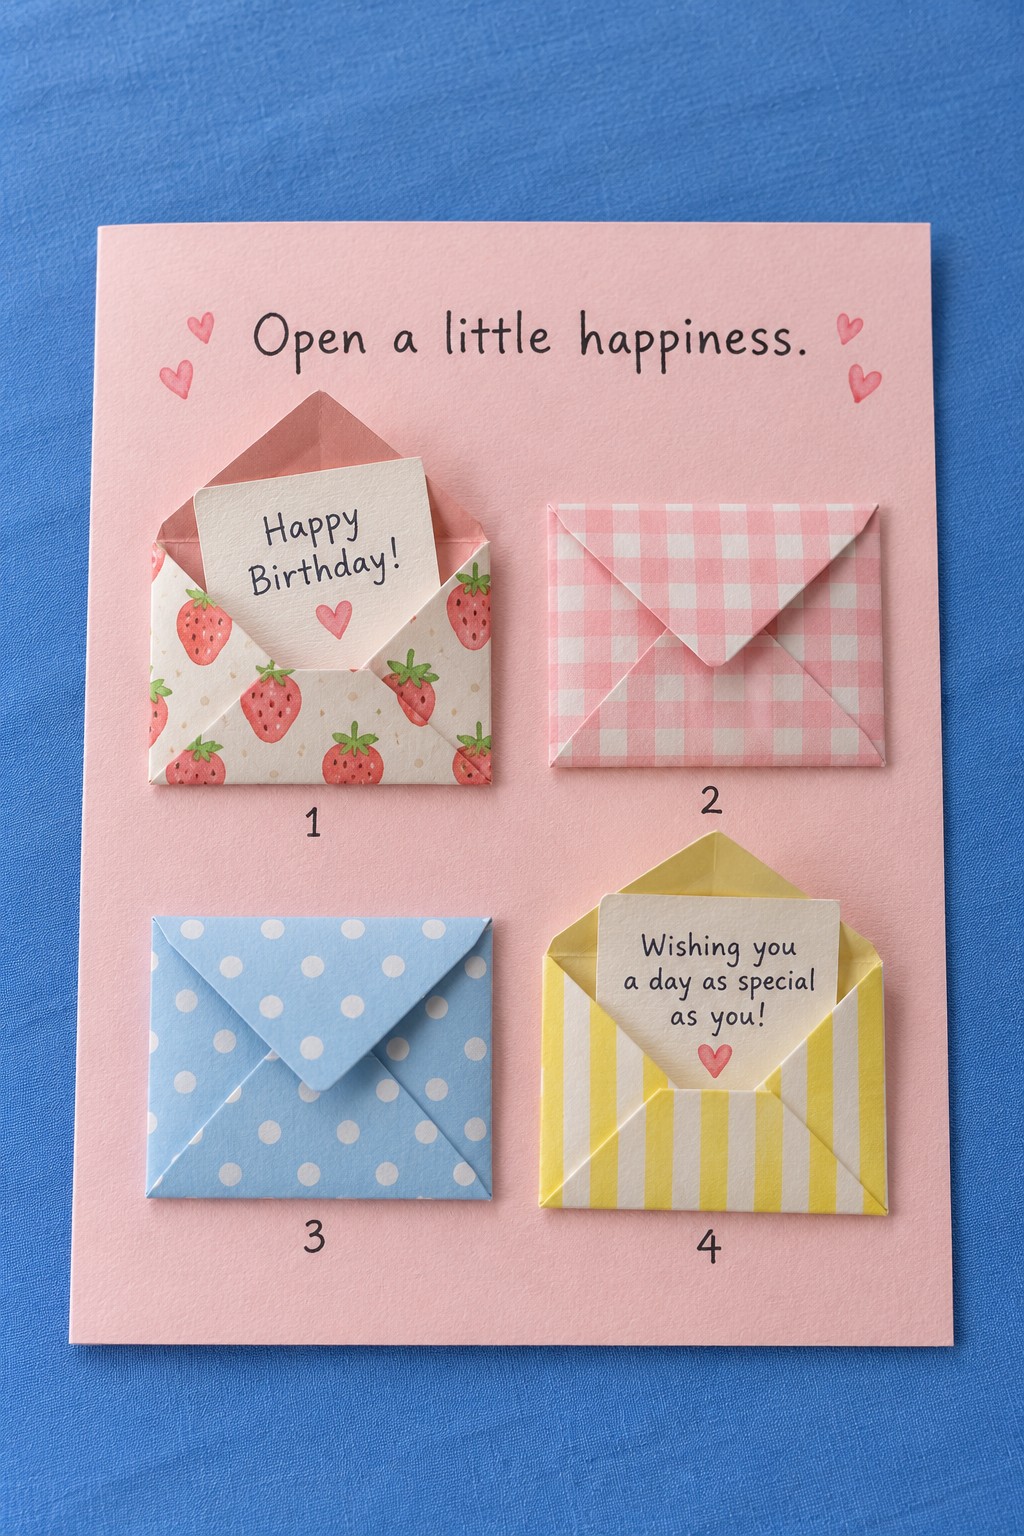
Four tiny envelopes let you give more than one birthday wish. Choose a pink cardstock base and four light patterned papers, such as strawberries, gingham, dots, and stripes. Fold matching miniature envelopes around small rectangular notes, allowing a little extra room so each note slides out comfortably.
Glue the side and bottom envelope flaps together, leaving the top flap free. Attach only the backs to the card in a balanced grid. Write a different thought in each note: a favorite memory, something you admire, a wish for the coming year, and an invitation to spend time together. Numbering the envelopes adds a gentle order without making the recipient solve a puzzle.
7. Five Woven Candles in Candy Colors
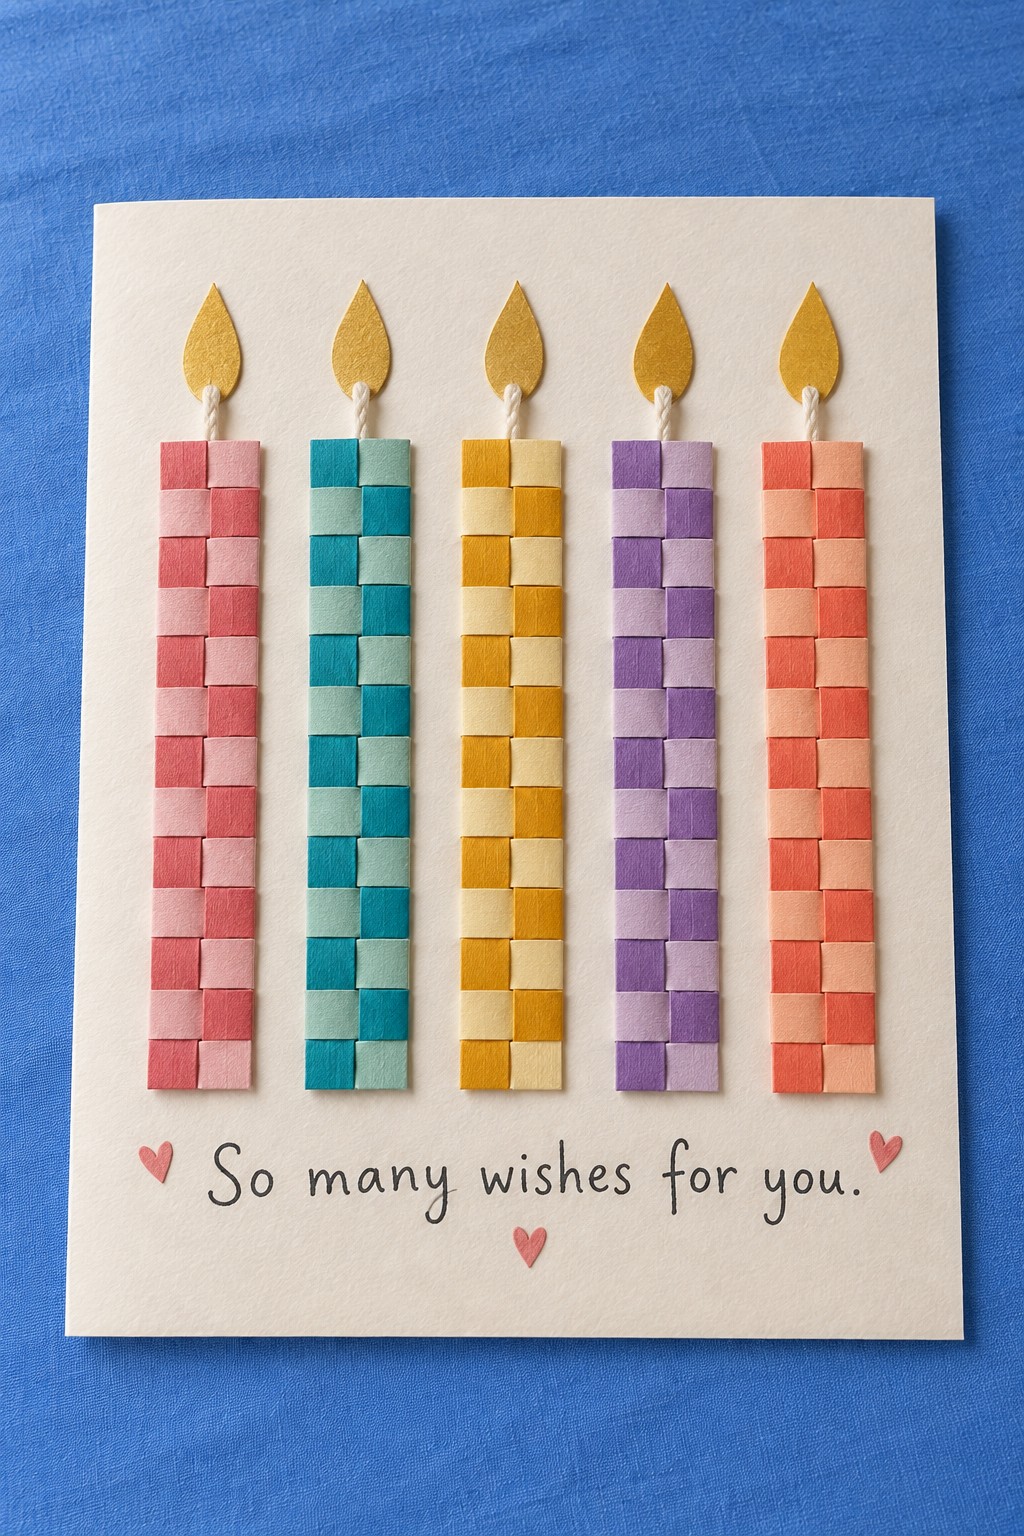
Checkerboard candles bring texture to a simple row of birthday wishes. Gather cream cardstock, colored paper in five coordinated pairs, thin white thread, yellow paper, scissors, and paper glue. For each candle, arrange two narrow vertical strips and weave short contrasting strips across them, alternating over and under to form the checks.
Work on a scrap backing strip, secure the loose ends, and trim the weaving into a neat candle rectangle. Make all five candles the same height before attaching them at an even baseline. Add a short thread wick behind each yellow paper flame and glue those ends securely. These are decorative paper candles, so the cheerful glow comes entirely from their colors.
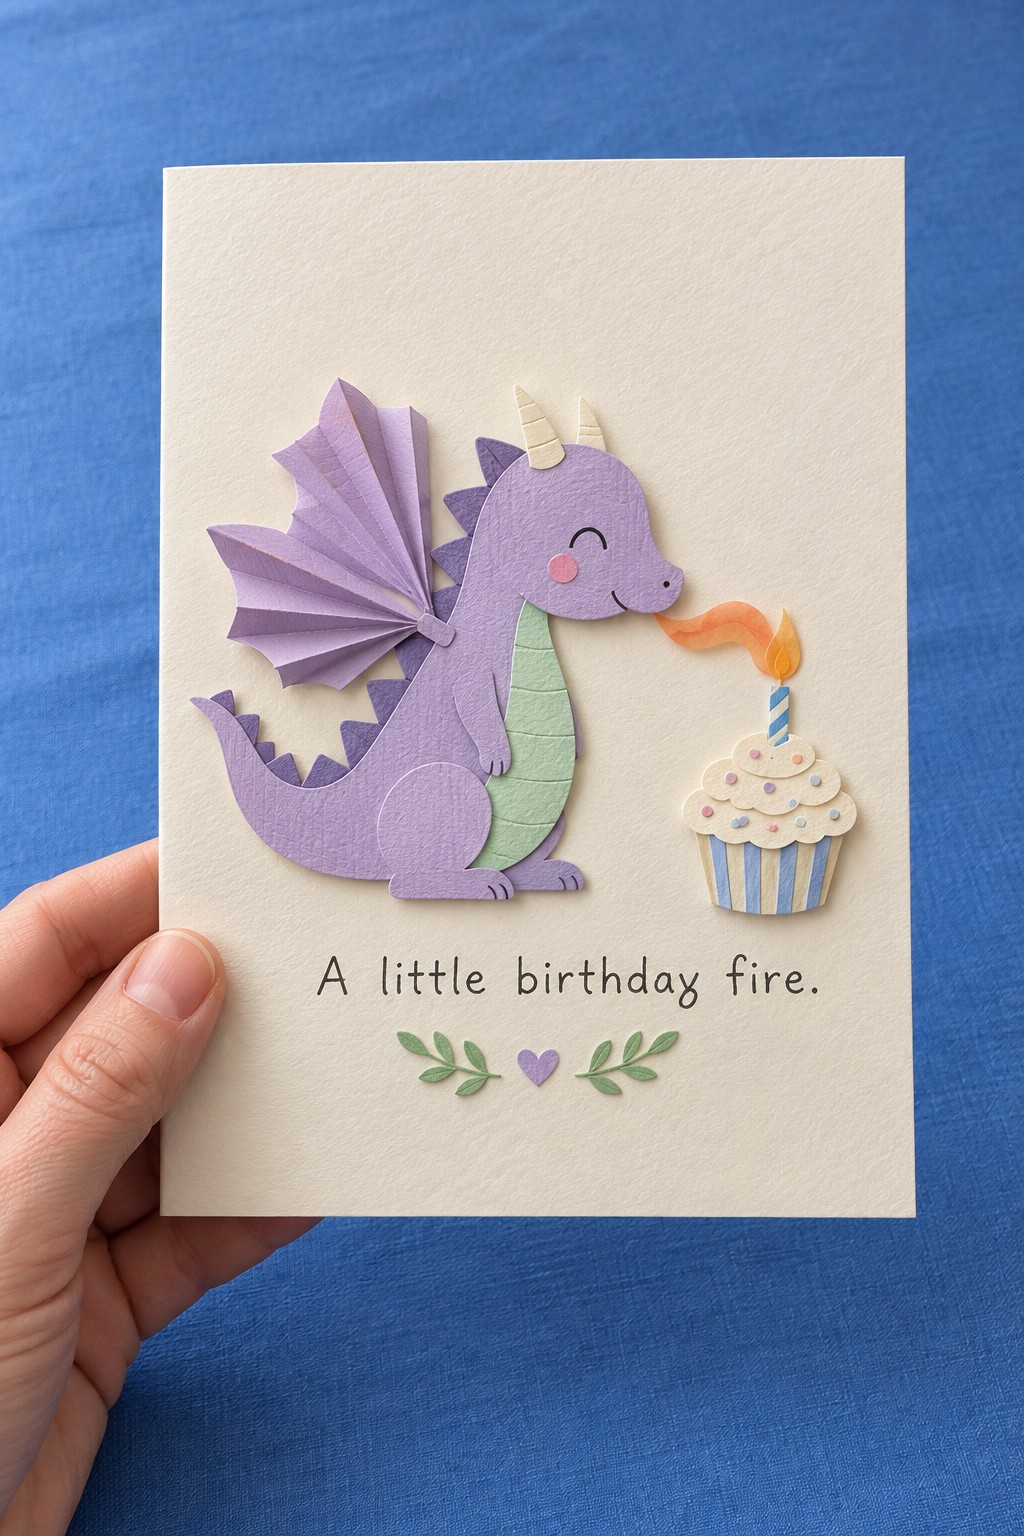
8. A Little Dragon with a Folded Paper Wing
A lavender dragon blowing a tiny paper flame toward a cupcake is a playful choice for a fantasy fan. Use purple and mint cardstock, lightweight lilac paper for the wing, orange paper for the flame, and small blue and cream scraps for the cupcake. Cut the dragon as a flat silhouette with a curved tail and friendly face.
Fold the wing paper into narrow pleats, pinch one end, and attach that end behind the shoulder with craft glue. Keep the outer pleats free so the wing fans outward. Add the mint tummy, small horns, cupcake, and flame in separate layers. Position the flame as a decorative paper shape with one end tucked behind the dragon’s muzzle, rather than leaving it unsupported.
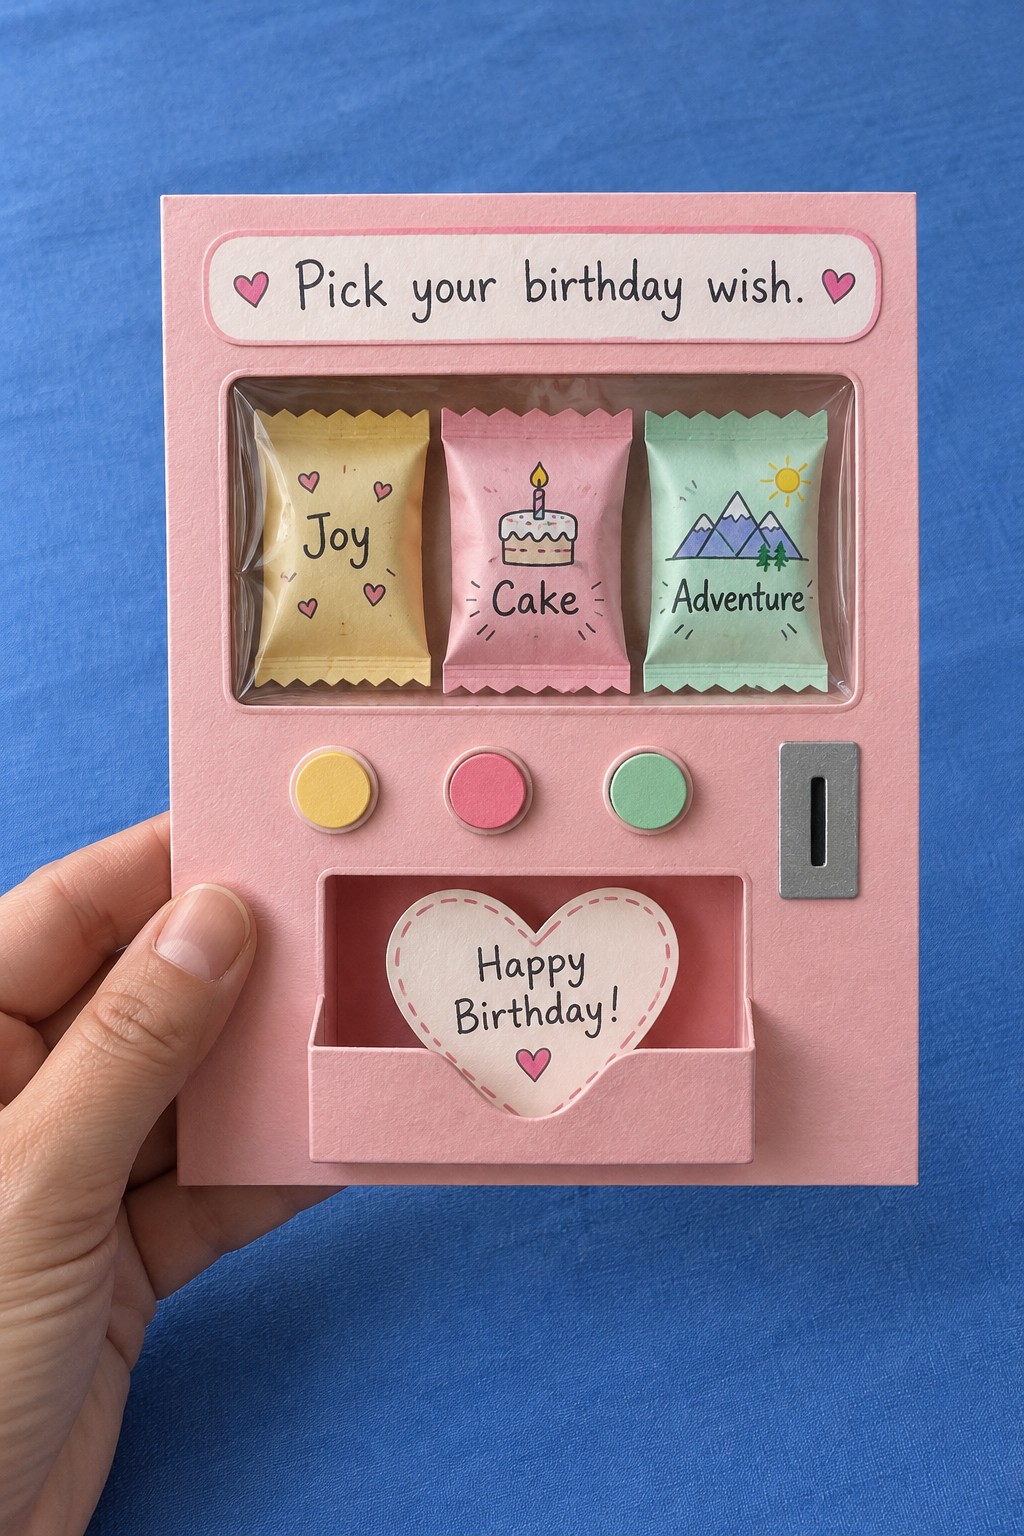
9. A Birthday Wish Vending Machine
A miniature vending machine can offer wishes instead of sweets. Build a pink cardstock frame over a recessed display panel, then add three small folded paper packets labeled with birthday themes such as joy, cake, and adventure. Colored cardstock circles make the buttons, and a narrow dark rectangle suggests the coin slot.
Use foam tape around the outer frame to create the shallow display, keeping the packet faces visible. Fold a separate lower pocket with side and bottom tabs and place a removable heart message inside. The buttons and coin slot can stay decorative; the useful interactive detail is the note the recipient can lift from the tray. Do not glue the heart to the pocket lining.
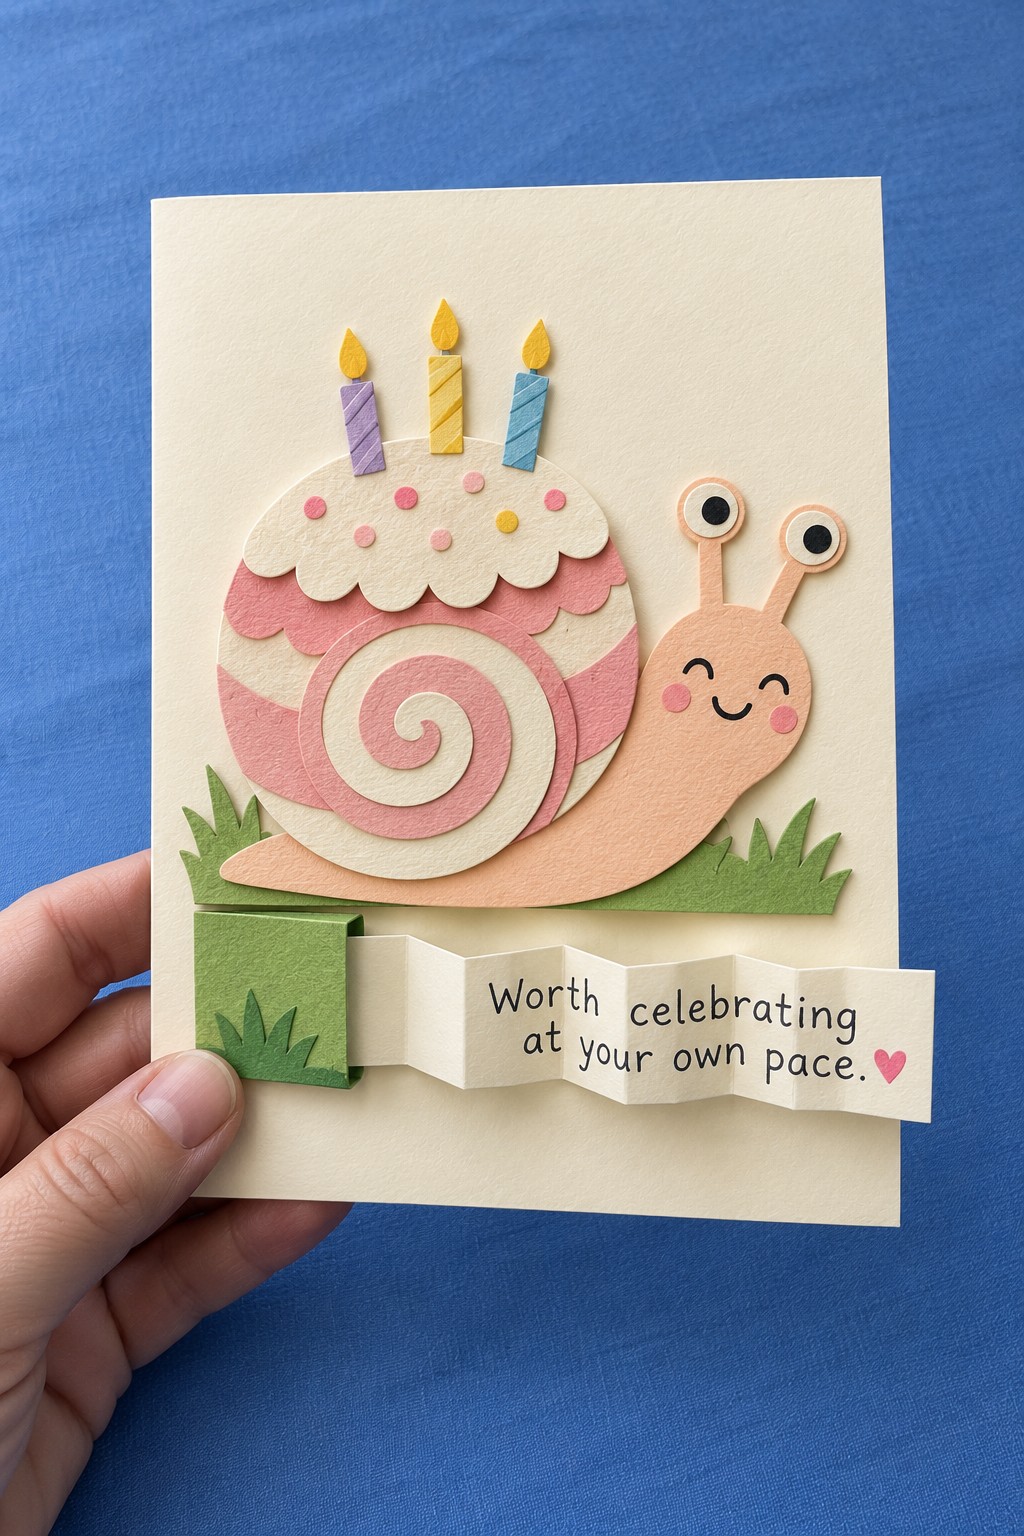
10. A Birthday Snail with a Hidden Accordion Greeting
A snail carrying a cake shell is a lovely way to celebrate someone at their own pace. Layer cream and pink cardstock for the spiral shell, frosting, body, and raised eyes. Add three small paper candles and simple green grass shapes along the bottom of a cream card.
Make the message from a narrow cream strip folded into equal accordion sections. Secure one end inside a small green pocket at the lower edge and leave the opposite end free to pull. The pocket attaches to the card along its back and side tabs, while the folded strip sits inside without being glued shut. Keep the writing within the individual panels so a crease does not run through every word.
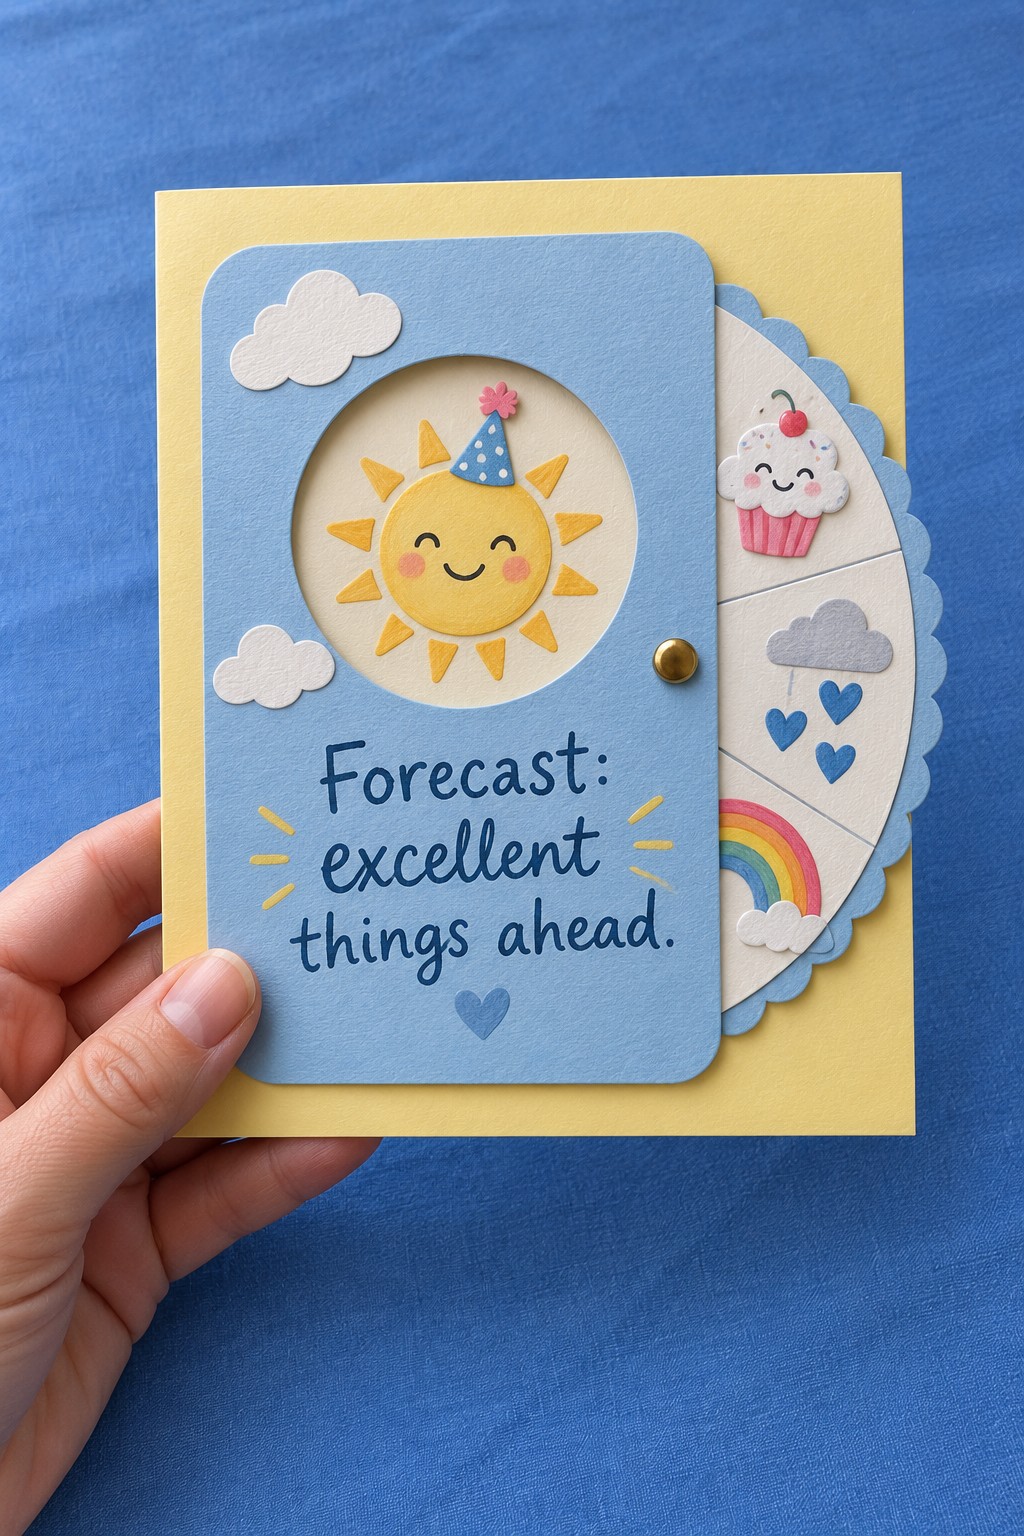
11. A Turning Wheel of Sunny Birthday Forecasts
Let the recipient turn through a little forecast of good things. Use a yellow base, a blue cover panel with a round window, a cardstock disc, a small paper fastener, and illustrated motifs such as sunshine, clouds, a rainbow, and birthday cake. Mark the pivot and window position on a plain paper model before drawing the final disc.
Arrange the motifs around the disc at the same distance from its center, so each appears within the window when rotated. Fasten the disc loosely beneath the blue panel, keep the rim accessible on the right, and use spacers outside its sweep. Cover the fastener legs behind a lining panel. For a related gift idea, explore this rotating photo wheel project.
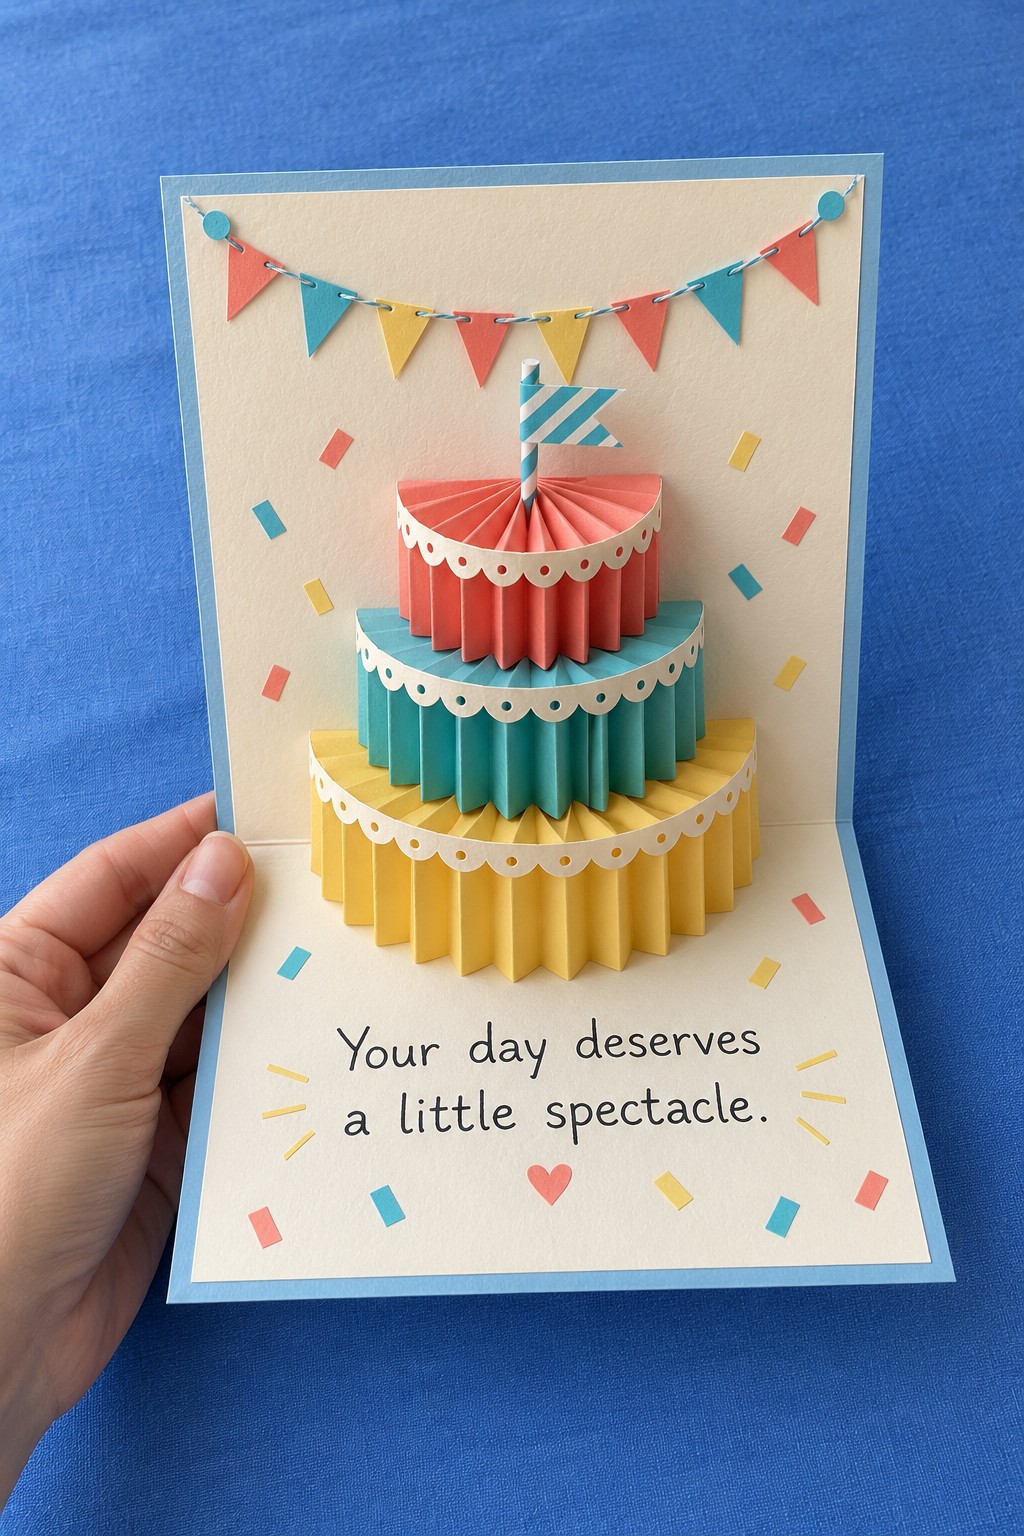
12. A Three Tier Paper Cake That Opens with the Card
Three colorful pleated tiers make an opening card feel like a small celebration. Choose a blue blank with a cream lining, lightweight yellow, turquoise, and coral paper, cream edging, and tiny bunting triangles. Make each tier from a separately folded paper strip, with the widest tier at the bottom and progressively smaller tiers above.
Attach the two end tabs of each accordion to opposite inside panels so the pleats compress toward the central fold as the card closes. Test each tier separately before adding the next. Use flexible paper trim, attached sparingly, for the frosting edges so it can collapse with the pleats. Keep the candle light and short enough to remain within the closed card outline.
13. A Tiny Bakery Door with a Birthday Cake Inside
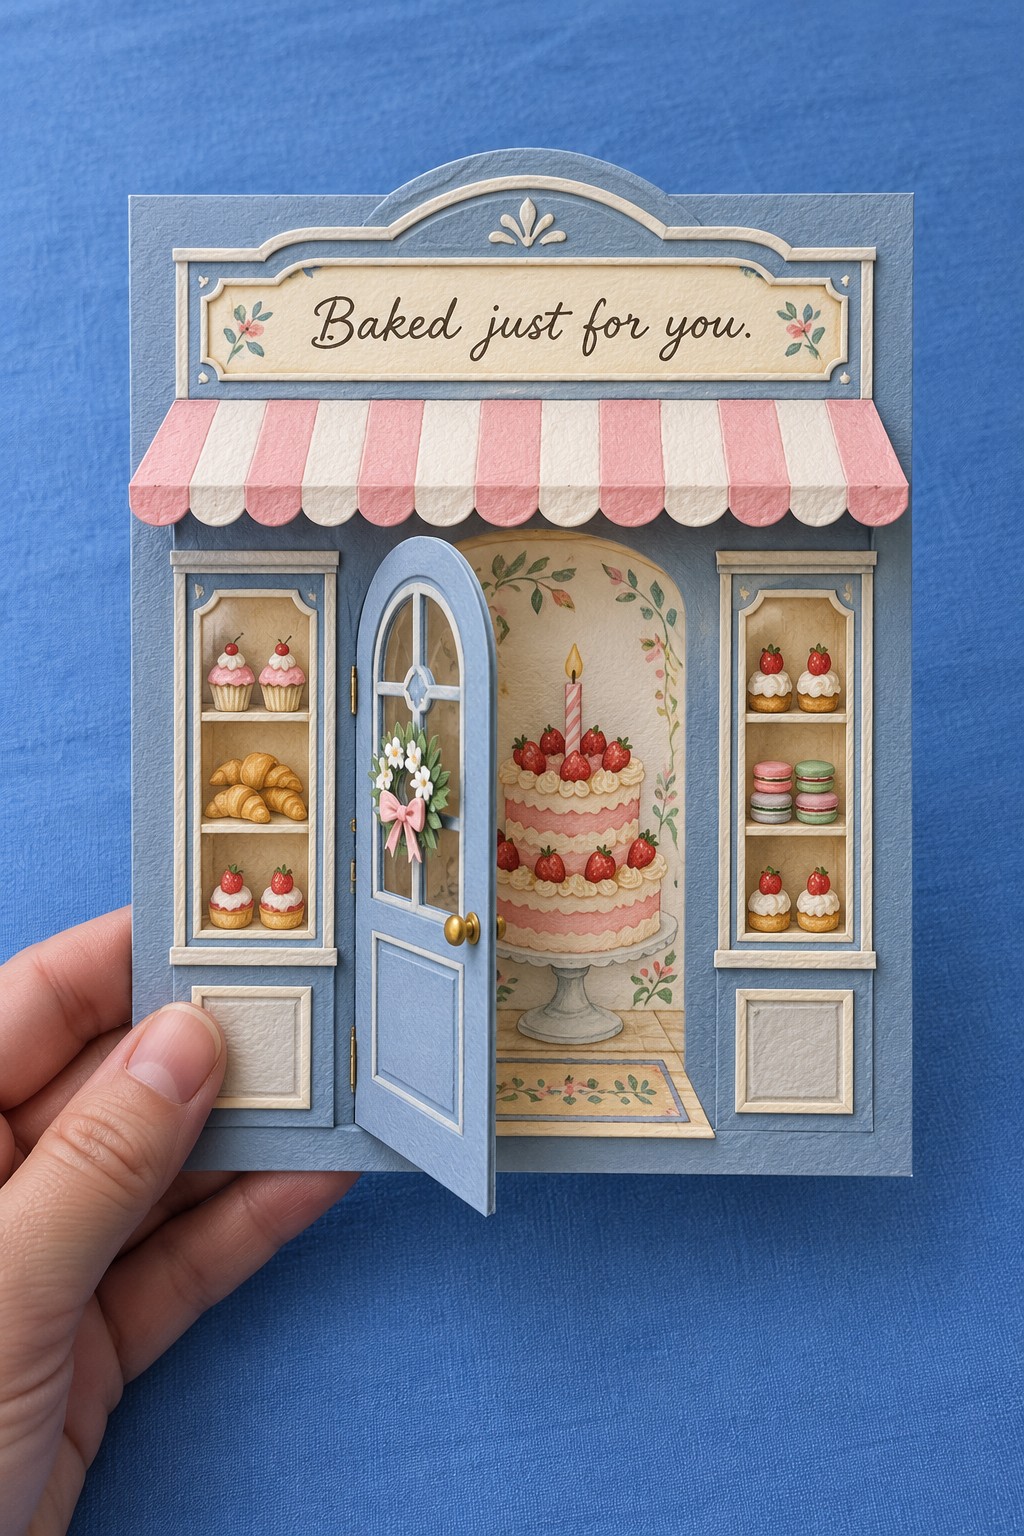
Turn a birthday greeting into an invitation to a tiny bakery. Prepare a blue cardstock shopfront, cream trim, a pink striped paper awning, and an illustrated cake scene for the backing. Small pastry illustrations in the side windows add detail without requiring every item to be built as a separate object.
Cut around the top, right, and bottom edges of the door, leaving the left edge as an intact scored hinge. Glue the cake scene behind the opening, then mount the shopfront using adhesive outside the doorway. Fold the awning along its upper edge and secure that tab above the windows. Let the door swing freely, and use a small paper or flat bead handle that will not drag against the frame.
14. Rosette Ice Cream with Three Paper Scoops
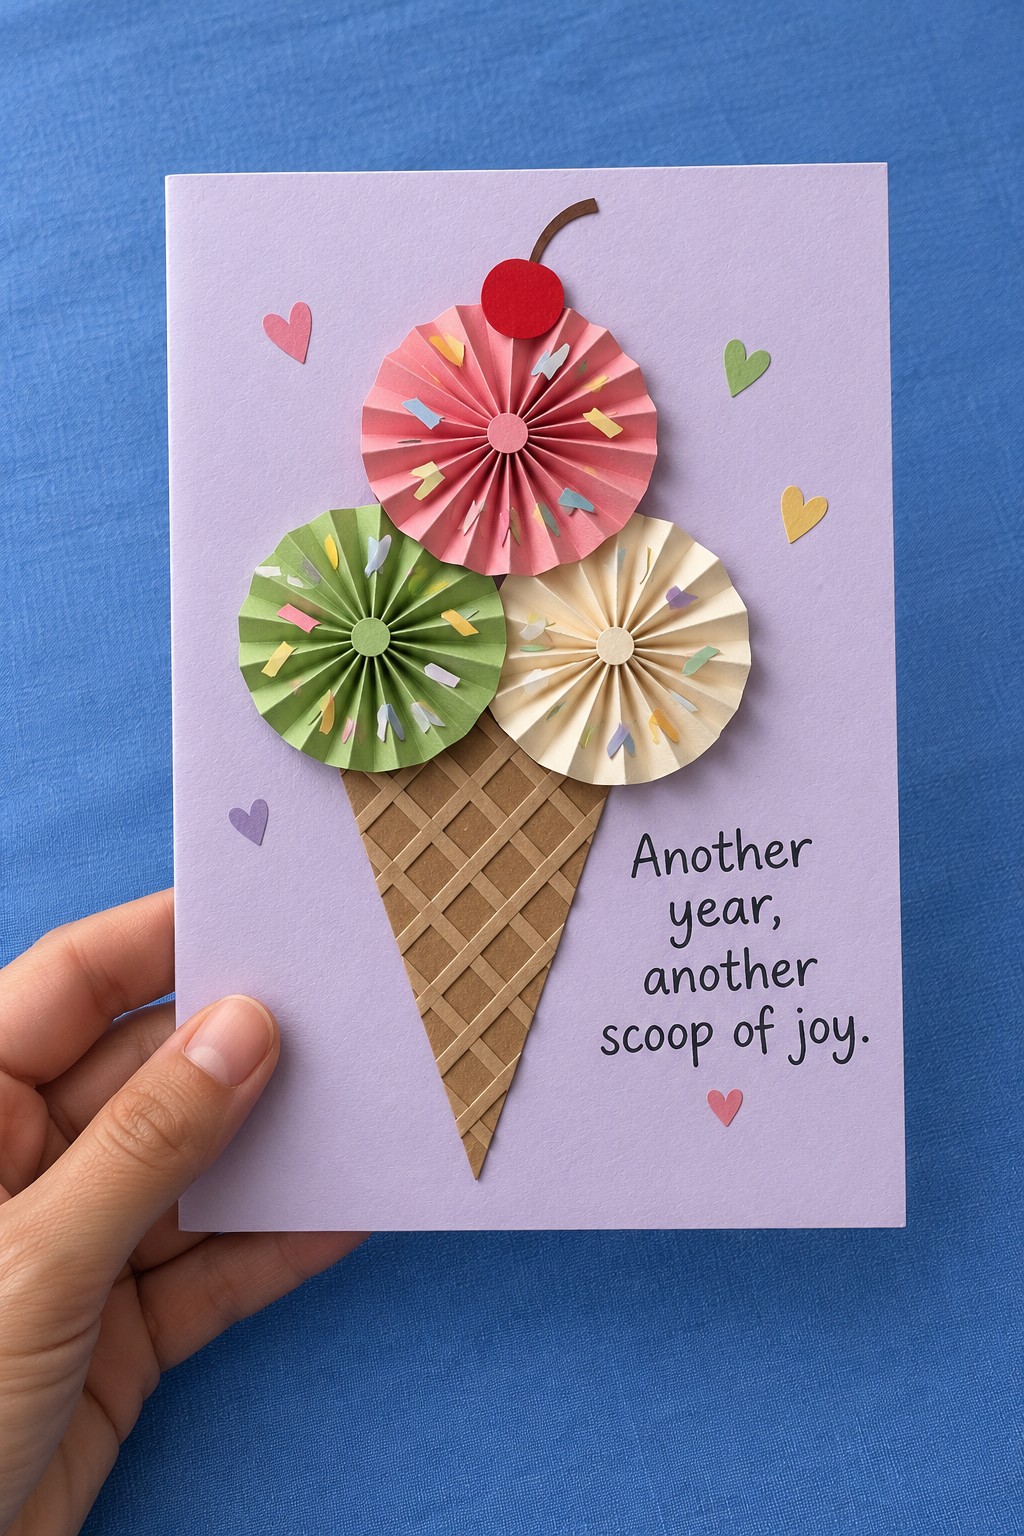
Three accordion rosettes turn an ice cream cone into a bright birthday centerpiece. Use lightweight pink, green, and cream paper, kraft cardstock, thin tan strips, a red cherry cutout, and a lavender blank. Score and fold each colored strip into narrow pleats, join its ends, and press the ring inward into a flat rosette.
Glue each rosette onto a small paper circle behind its center and hold it until secure. Make the waffle cone from a triangle with crossed tan strips, then arrange the scoops above it with slight overlap. Attach each scoop through its backing circle instead of gluing down the whole pleated surface. A small cherry finishes the top scoop; a roomy envelope protects the folds.
15. A Parcel Lifted by Seven Pastel Balloons
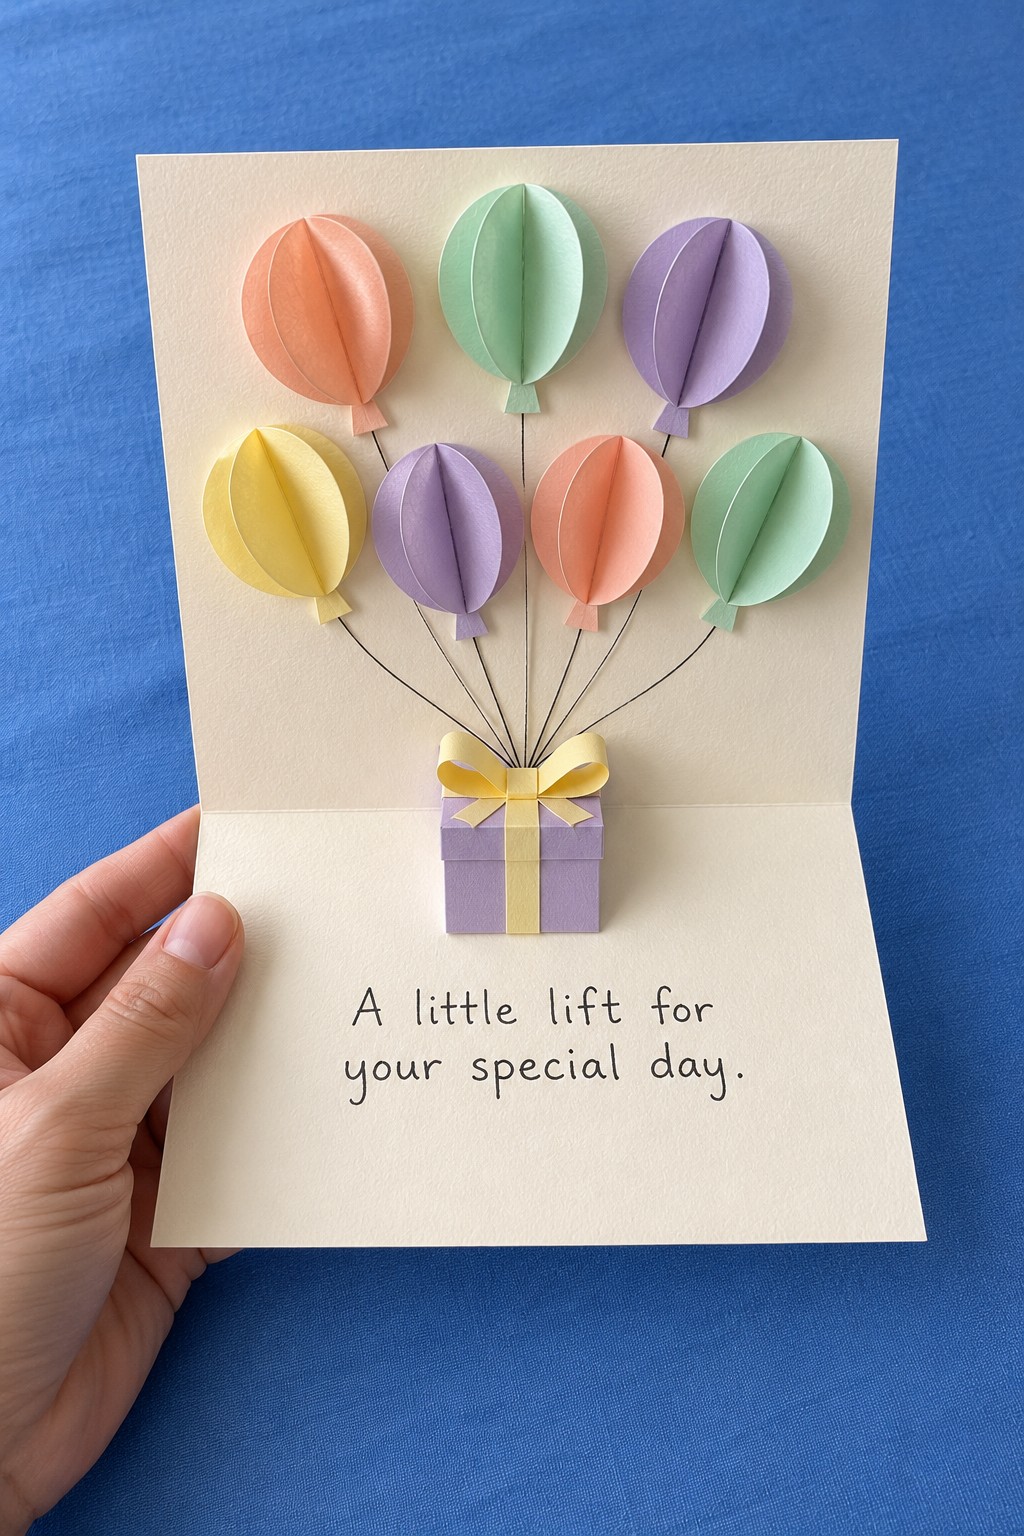
A cluster of pastel balloons gives a small paper gift a wonderfully light feeling. Use peach, mint, lavender, and yellow paper, cream cardstock, a black fineliner, and a small purple gift rectangle. Cut three matching oval shapes for each balloon and fold every oval lengthwise through its center.
Glue the folded ovals together along their adjacent half faces, then attach the two outer half faces to the card to create a shallow dimensional balloon. Arrange seven balloons in two loose rows. Draw strings down to a common point and conceal their ends beneath the gift and yellow bow. Keep the lowest balloons far enough above the parcel to leave the strings readable.
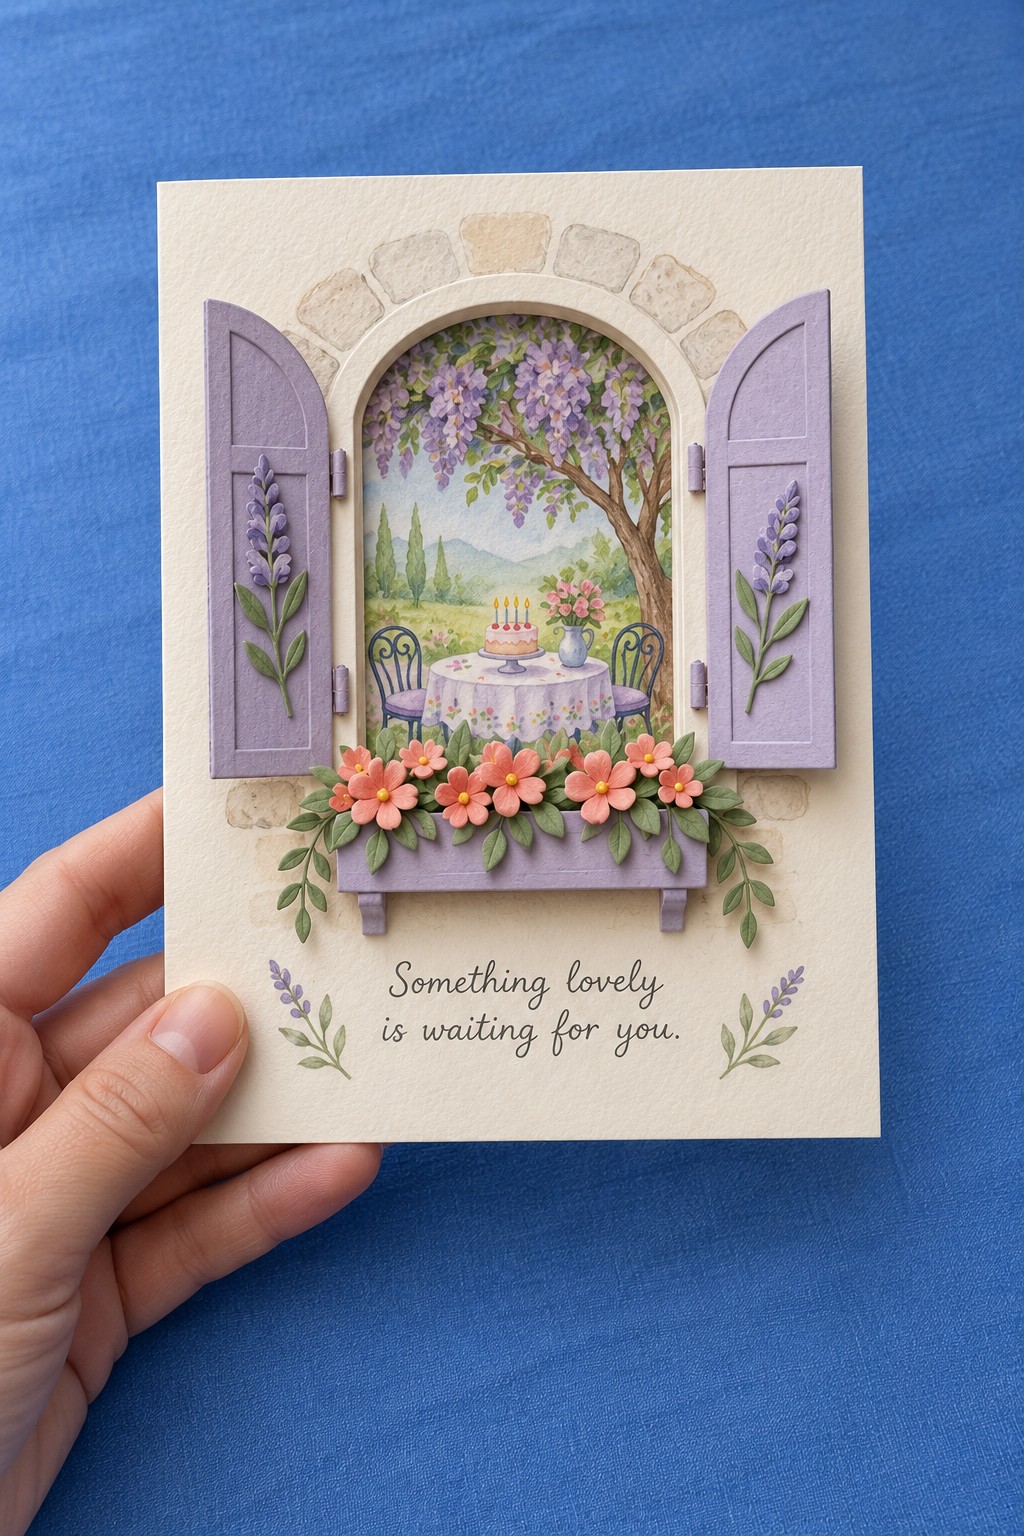
16. Lavender Shutters Opening onto a Birthday Garden
Lavender shutters make a garden scene feel like a view waiting to be discovered. Gather cream and lilac cardstock, a small painted or printed garden illustration, tiny flower cutouts, green leaves, and paper glue. Place the garden scene behind an arched opening and build the pale stone surround from thin paper shapes.
Cut each shutter separately with a narrow hinge tab along its outer edge. Score the tabs and secure them behind the window surround so both shutters can swing outward. Attach the flower box below the opening and keep its upper decorations out of the shutter path. Use flat floral details on the shutters themselves so they can close without crushing the garden scene.
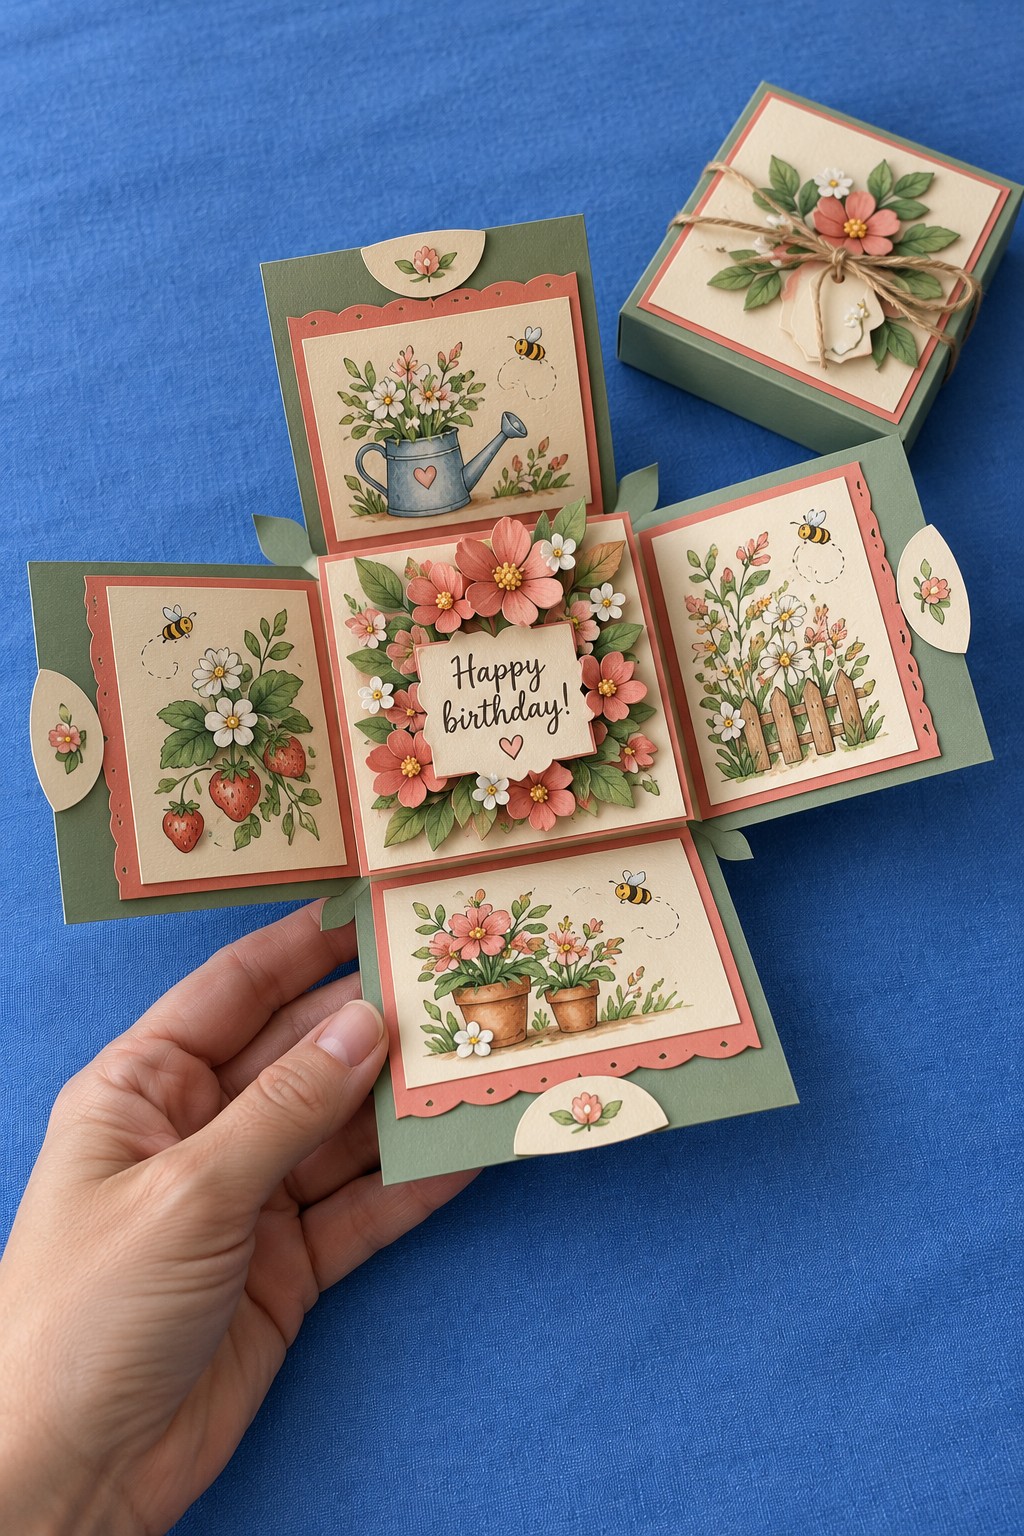
17. A Garden Box That Opens into Birthday Messages
A small garden themed box can unfold into several little places for a message. Use sturdy green cardstock, coral matting, cream illustrated panels, paper flowers, and a separate lid. Score a square sheet into a three by three grid of equal squares, then remove the four corner squares to leave a cross shaped base.
The center square forms the bottom and the four surrounding squares fold upward as the sides. Decorate the inside faces before assembly, keeping flowers clear of the folds. Make a separate shallow lid with an internal size slightly larger than the folded box, adjusting the allowance for the thickness of your cardstock. When the lid is lifted, the unjoined side panels can open around the central greeting.
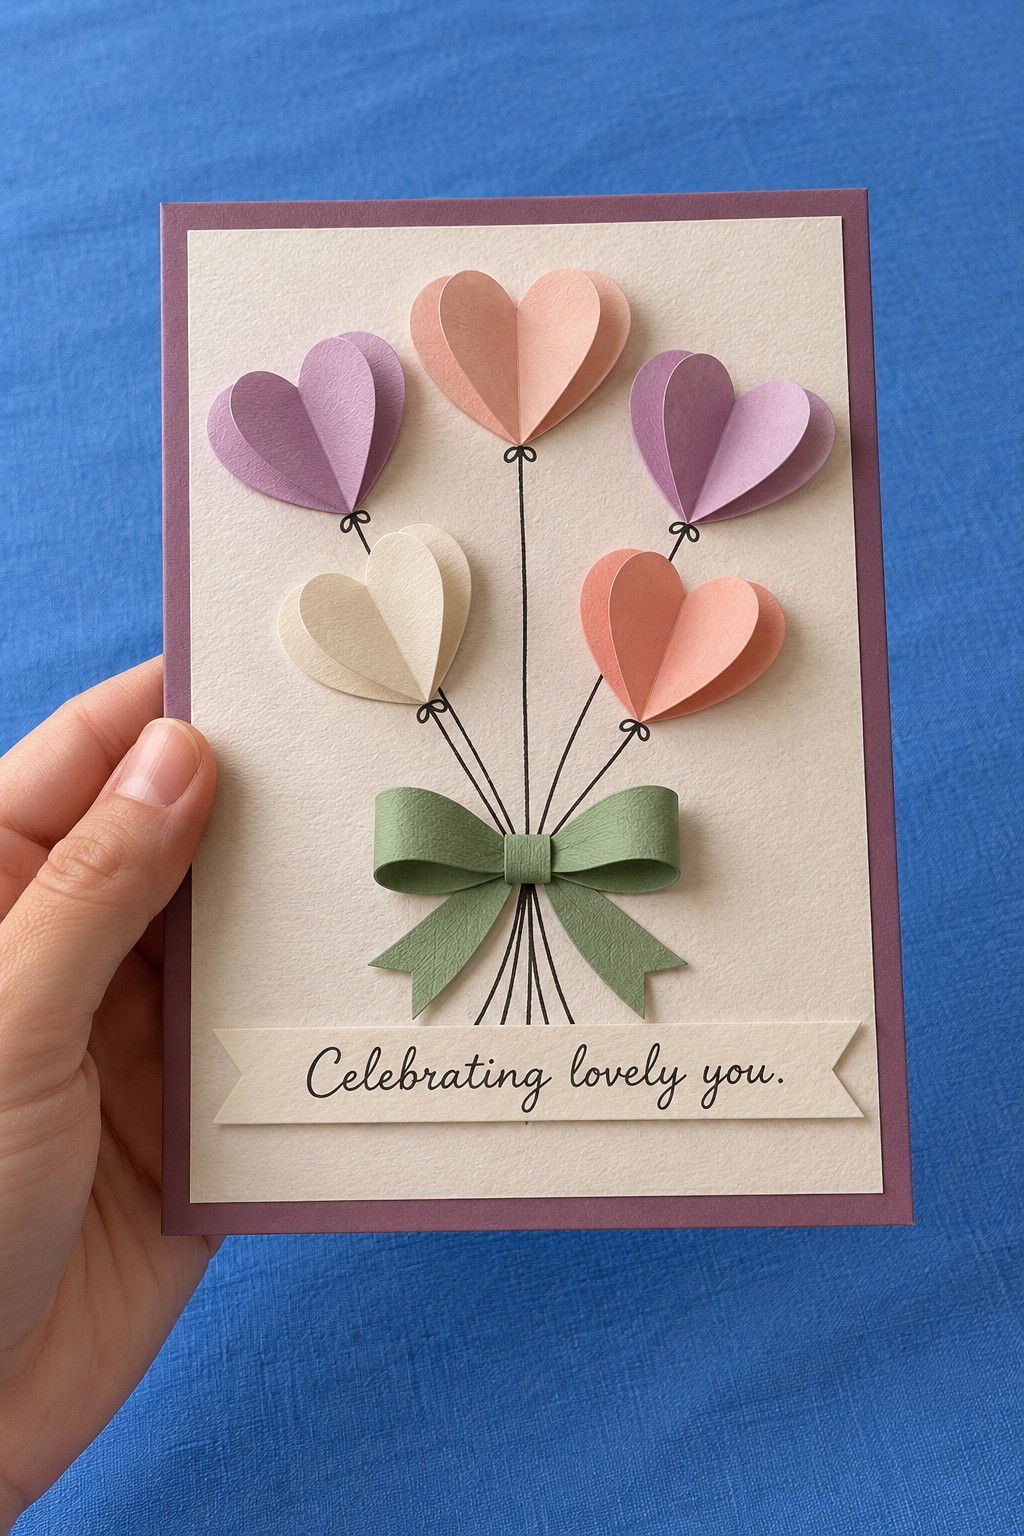
18. A Bouquet of Folded Heart Balloons
Heart balloons make a warm birthday greeting for a partner, parent, or close friend. Choose a burgundy card base, a cream front panel, pastel paper, a fine black pen, and green paper or ribbon for the bow. For each balloon, cut two matching hearts, fold them down the center, and glue one half of each together.
Attach the remaining outer halves to the cream panel so the joined section stands slightly forward. Arrange five hearts with enough space for their individual shapes to show. Draw slender strings toward the lower center and cover their meeting point with the green bow. Add the greeting on a separate cream strip so it stays crisp against the textured bouquet.
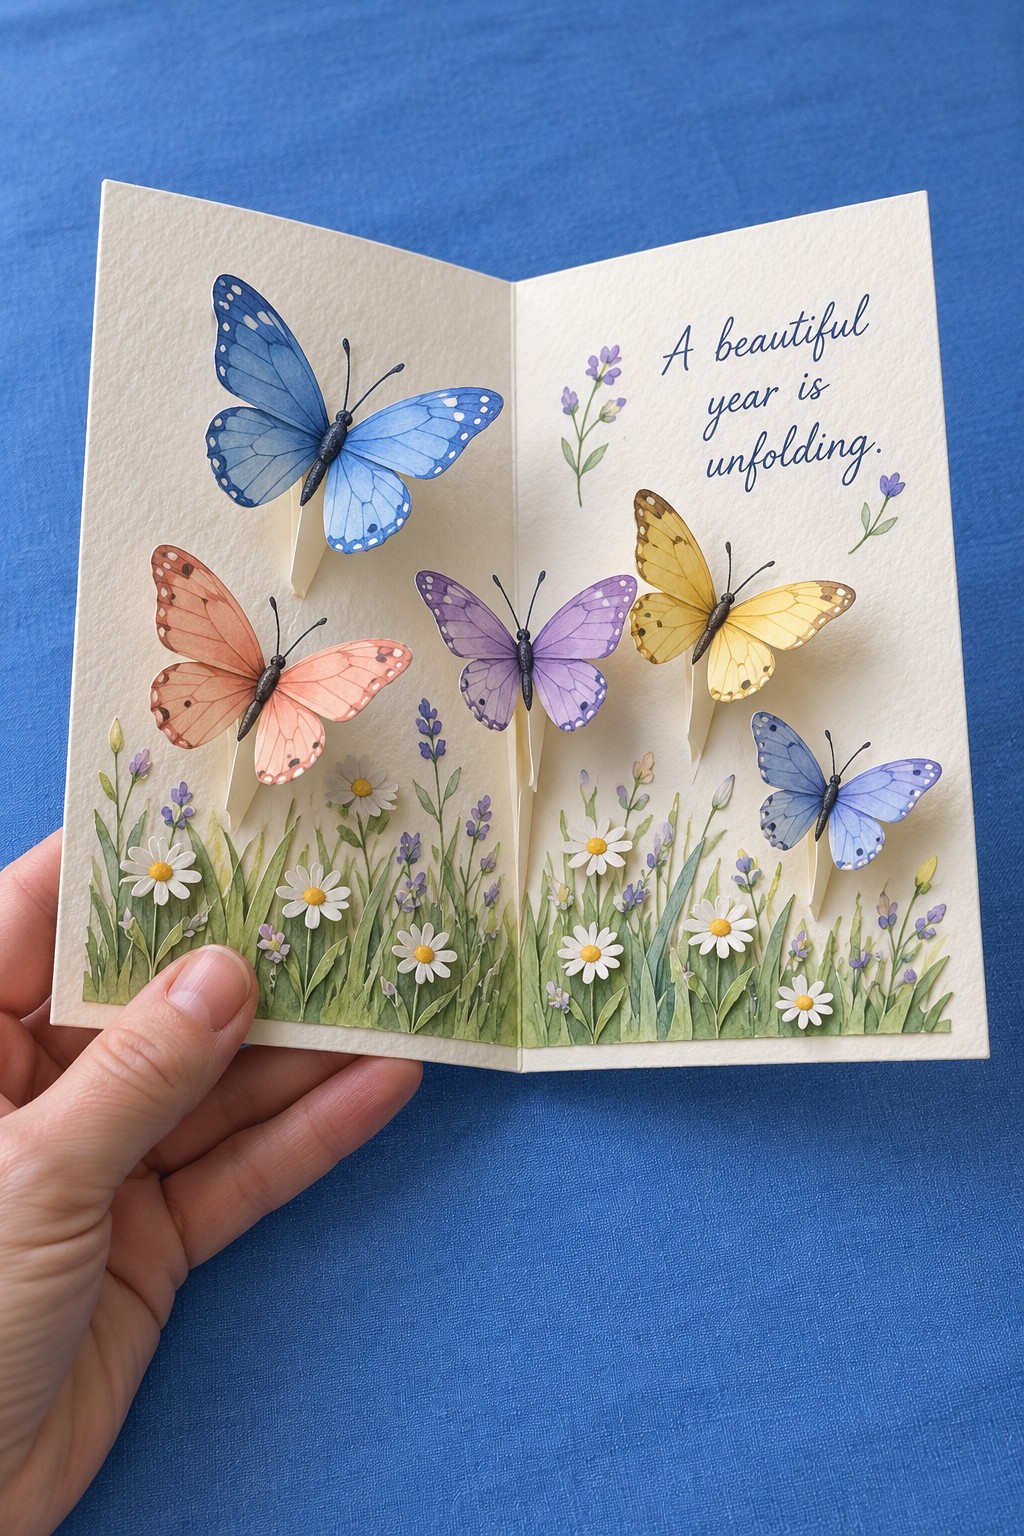
19. Butterflies Rising from a Painted Flower Meadow
Painted wildflowers and lifted paper wings create a card that feels like a small spring garden. Use a cream blank, watercolor paper for the meadow panel, watercolor paints, a fine brush, and lightweight paper butterflies in blue, pink, purple, and yellow. Paint the meadow separately and allow it to dry before mounting it inside the card.
Fold each butterfly gently along either side of its narrow body. Glue only the body to the panel, leaving the wings free. Keep butterflies away from the central crease and check that their wings settle inside the card when it closes. A short greeting in the open space above the flowers balances the decoration without crowding the scene.
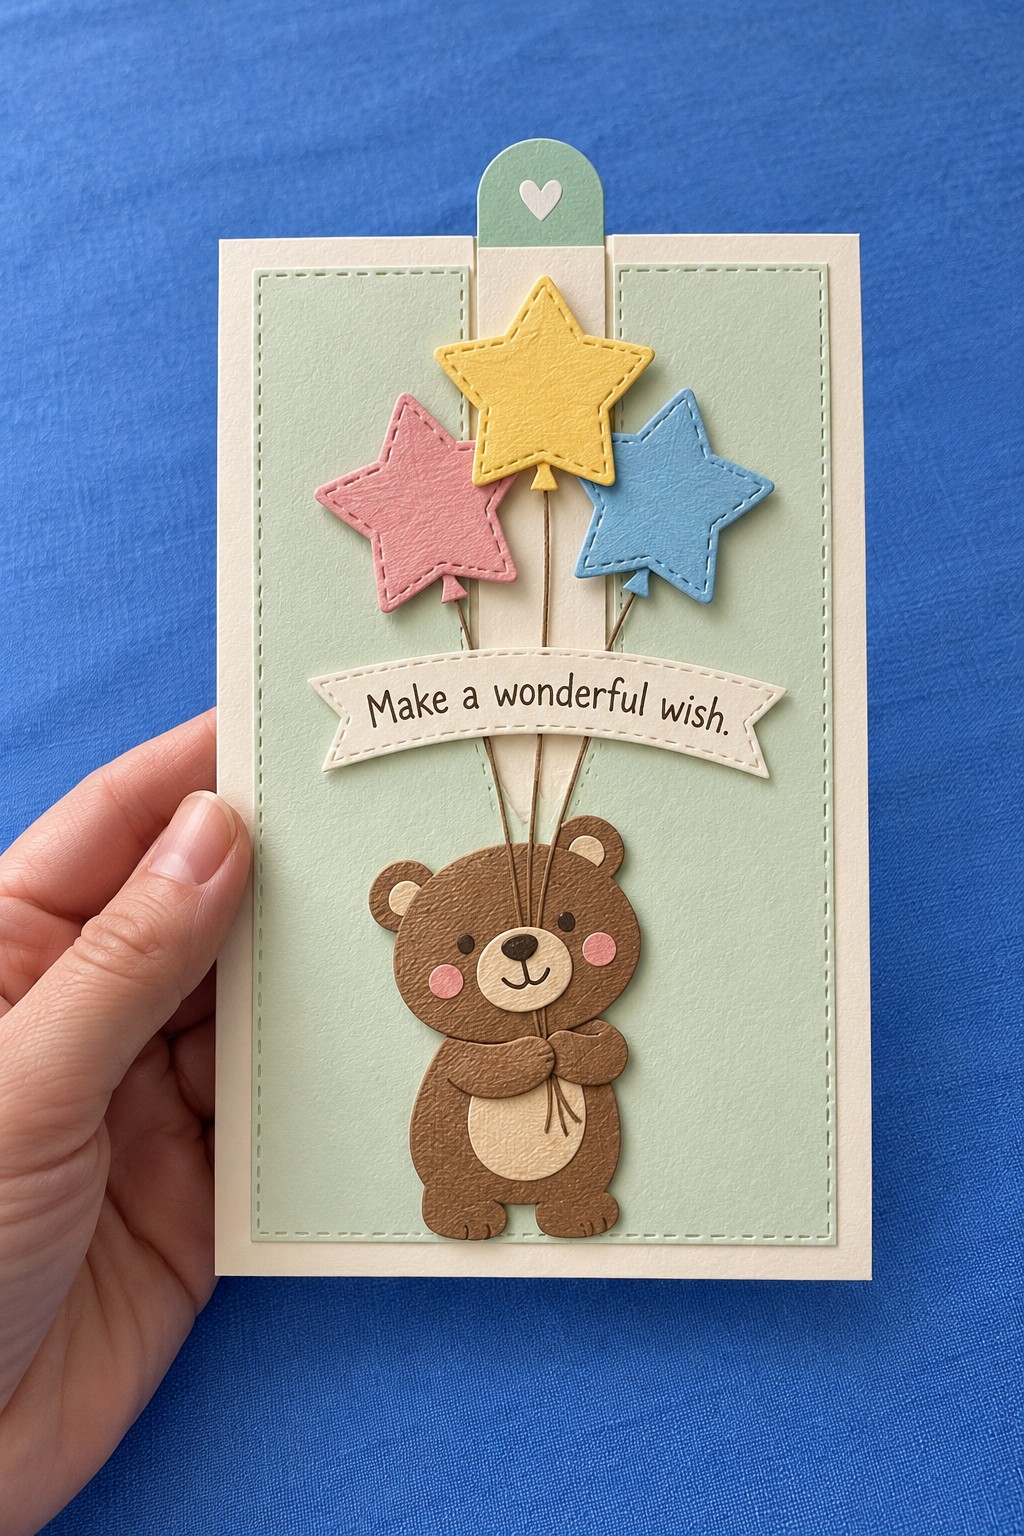
20. A Teddy Bear Holding Three Birthday Stars
A little bear holding star balloons is a gentle design for a child or anyone who loves soft colors. Use sage and cream cardstock, brown paper for the bear, yellow, pink, and blue paper for the stars, and a fine pen for the strings and stitched outlines. Layer the bear’s muzzle, tummy, ears, and paws before placing it at the bottom.
Arrange three stars above the bear and draw their strings toward its paws. Place a narrow wish banner across the strings without hiding the stars. The rounded tab at the top can belong to a removable message insert: build a shallow sleeve behind the sage panel and leave its top open. Keep the decorated bear panel fixed while the plain note slides out.
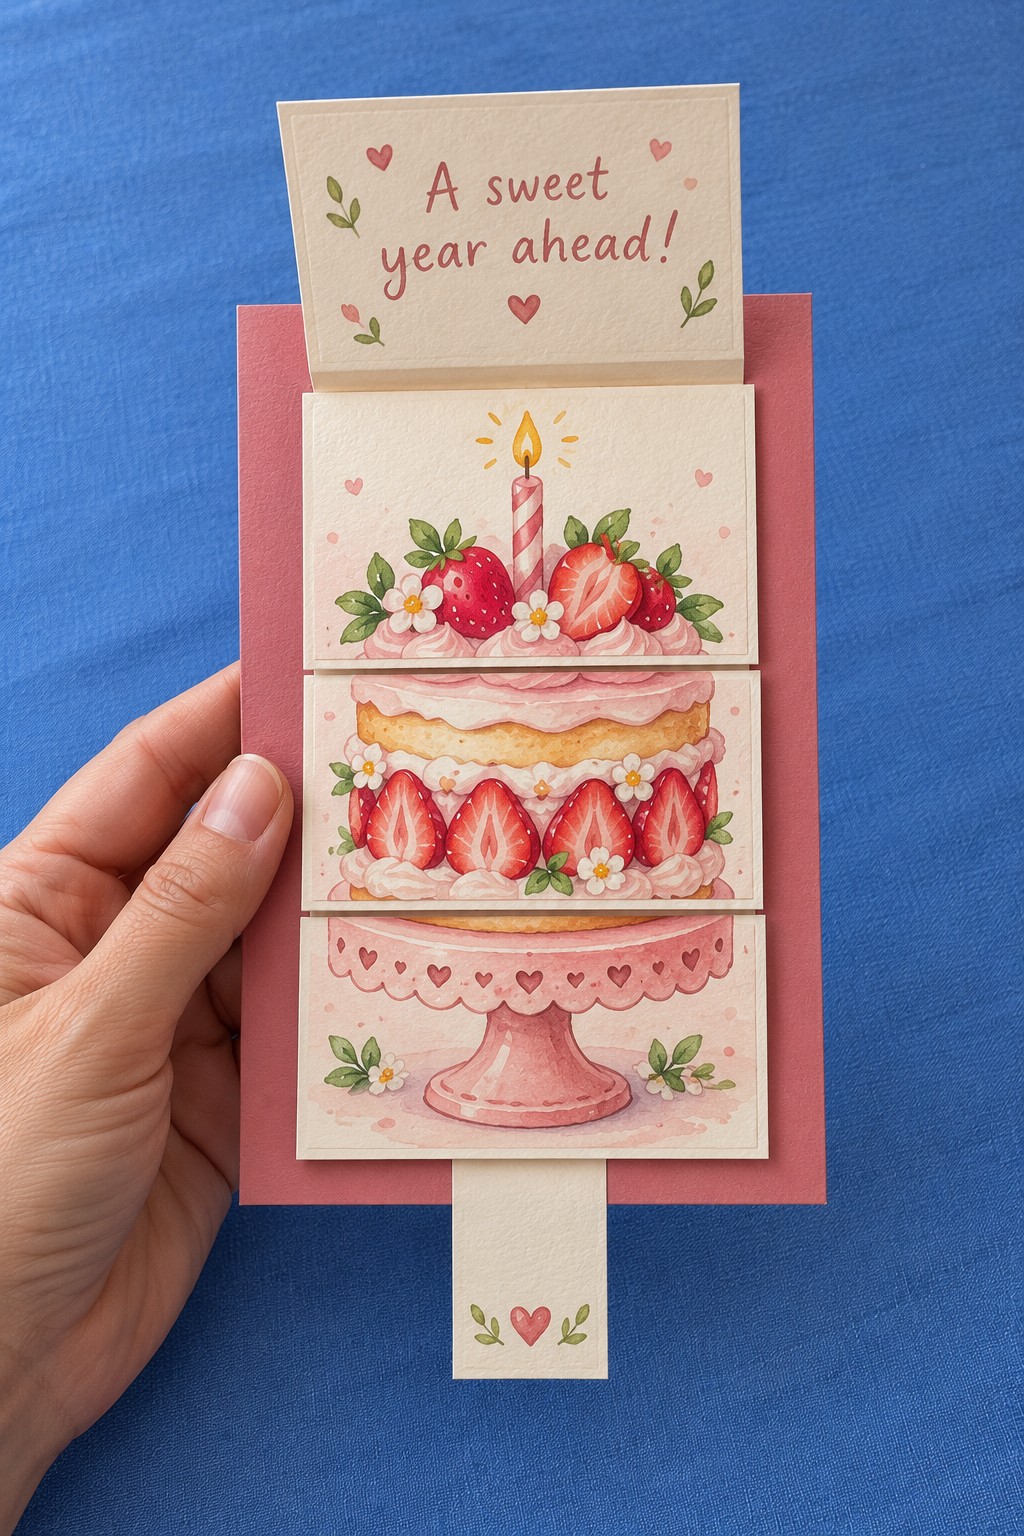
21. A Strawberry Cake Waterfall with a Pull Tab
A strawberry cake illustration becomes more surprising when its stacked sections turn like pages. Use pink and cream cardstock, a cake illustration divided across matching panels, a long cardstock strip, a narrow retaining band, and strong paper tape. Score the strip at evenly spaced intervals that match the intended overlap of the cake panels.
Attach each cake panel only along the upper attachment area of its corresponding scored section. Fold the long end behind the stack and pass it beneath the retaining band. Fix the band at its outer ends and secure the front end of the mechanism to it, leaving the rear strip free to travel. Pulling the lower tab should flip the panels in order. Keep the illustration aligned when the stack returns to its resting position.
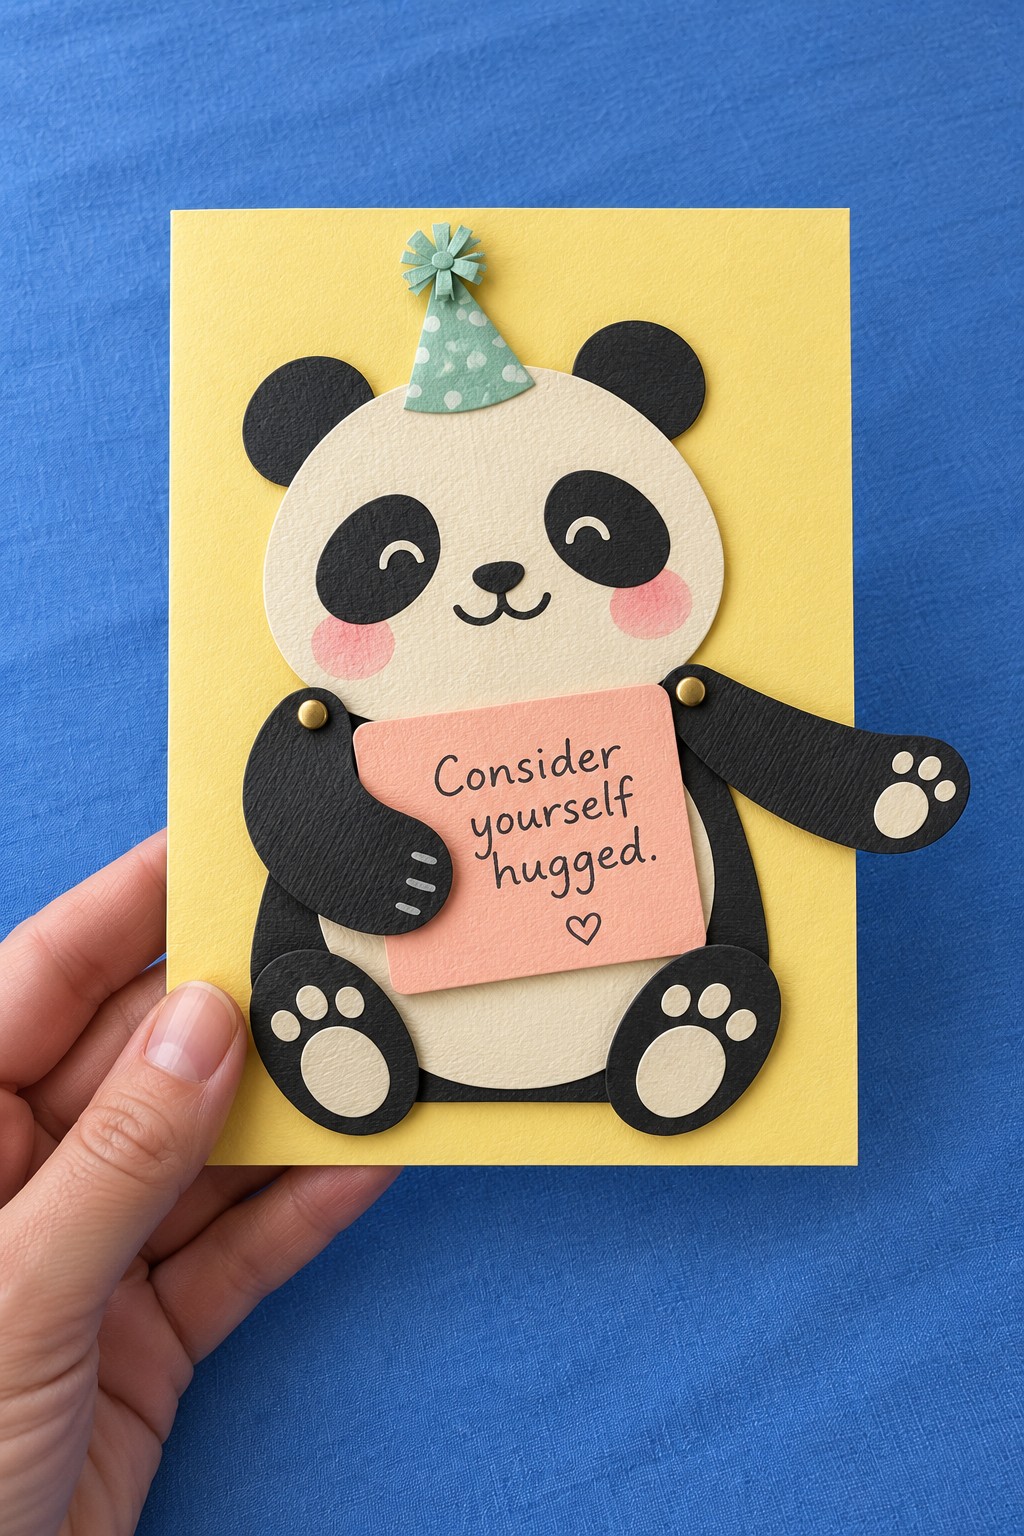
22. A Panda with Arms Ready for a Birthday Hug
A panda holding a little note can offer a hug when its arms swing inward. Use black and cream cardstock, pink cheek circles, a mint party hat, a yellow card base, and two small paper fasteners. Build the head and body as fixed layers, keeping the two arms separate.
Pierce matching holes through the upper arms and shoulder positions, then join them with fasteners loose enough to pivot. Cover the metal legs behind a lining layer. Place the coral message panel over the tummy and test both arm positions before securing the body to the blank. Leave the hands free so the recipient can move them around the note without bending the cardstock.
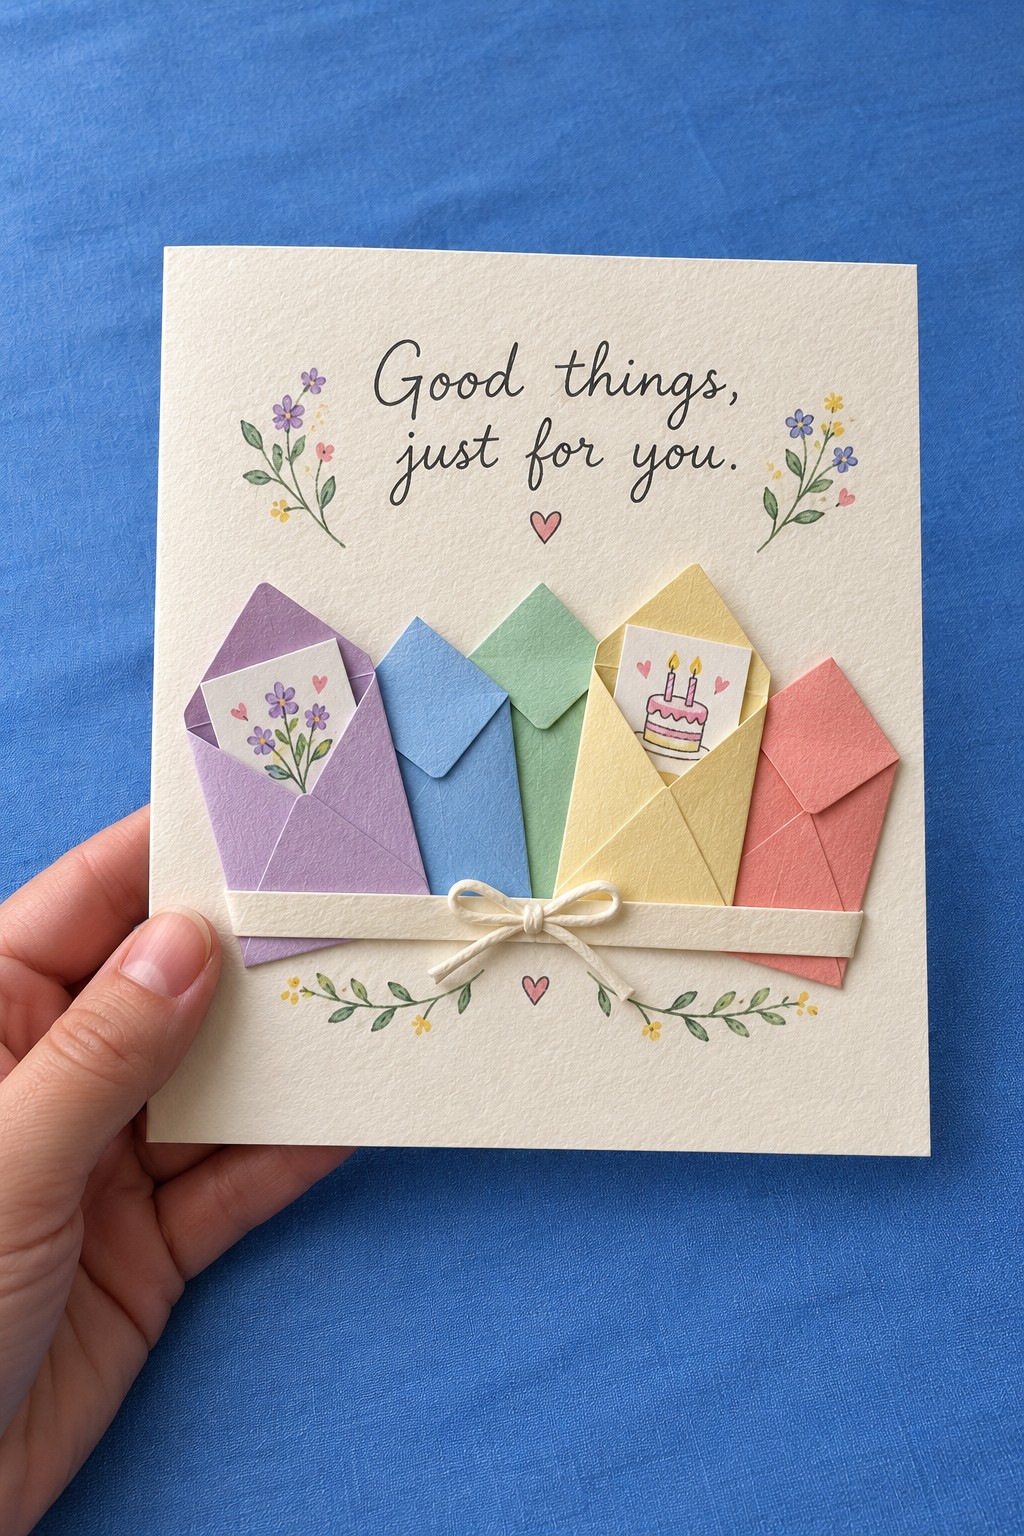
23. A Row of Pastel Envelopes Holding Little Good Things
Five slim envelopes make room for a collection of small birthday kindnesses. Use lilac, blue, mint, pale yellow, and coral paper, a cream blank, and a narrow ribbon. Fold the envelopes to a matching size and assemble their lower and side flaps with a small amount of paper glue.
Arrange them in a gently overlapping row, keeping each opening reachable. Add notes with a flower, a cake, a compliment, or a simple promise of time together. Glue the ribbon across the lower envelope fronts and tie or attach a small bow near the center. The ribbon should decorate the row without pressing across the openings or trapping the notes inside.
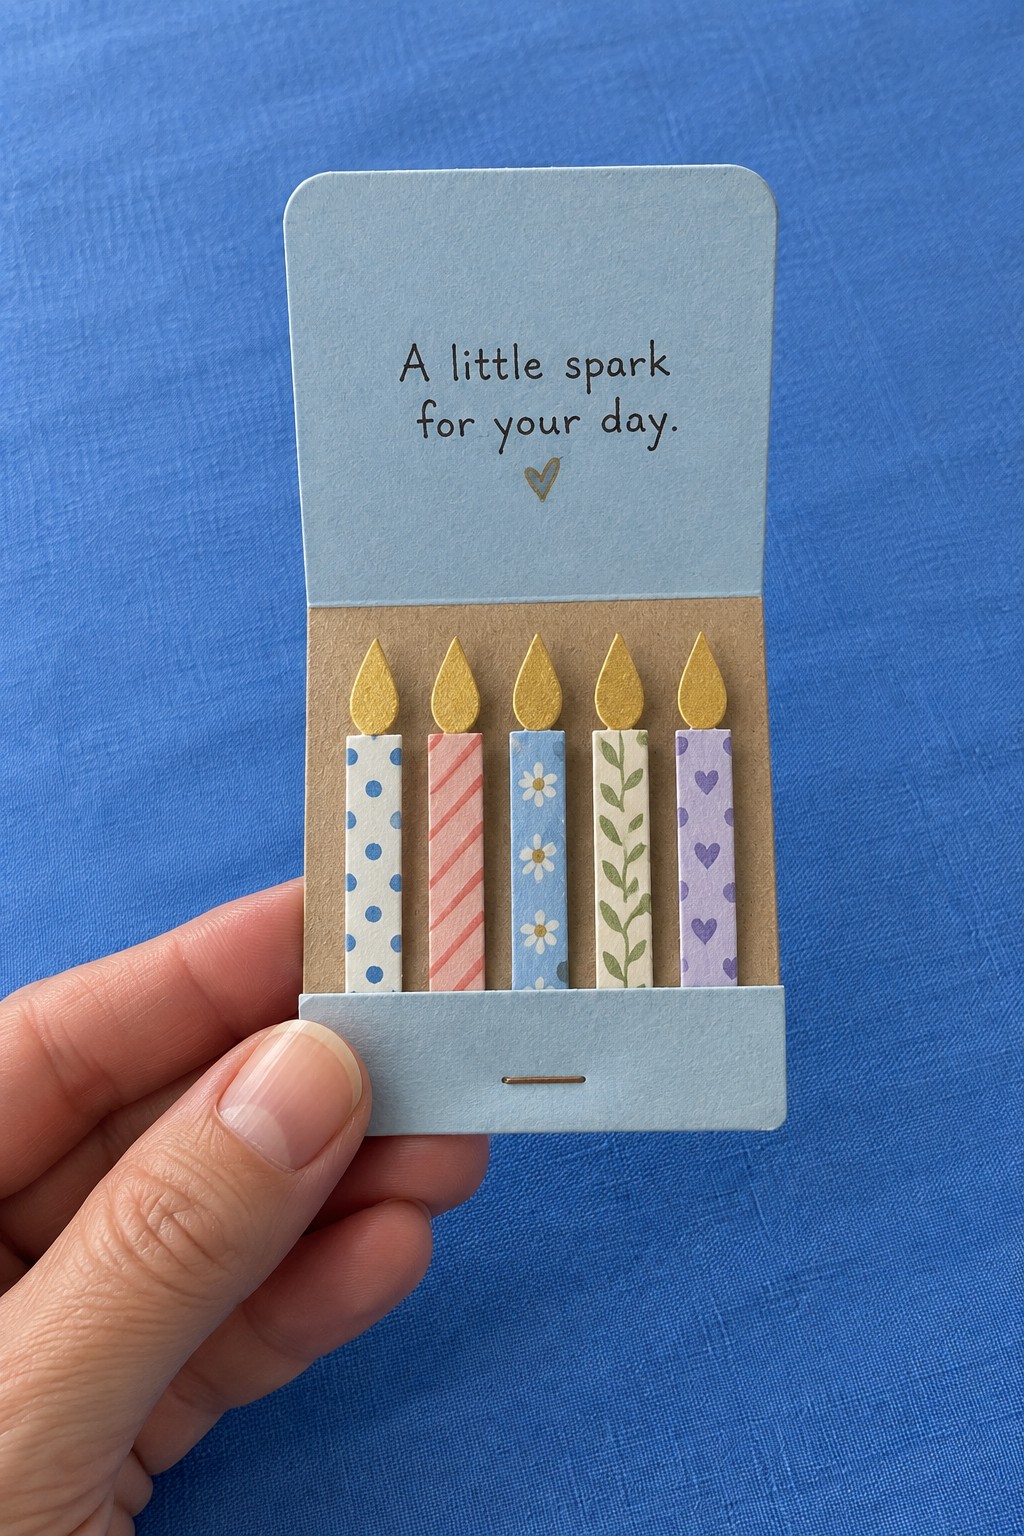
24. A Matchbook of Paper Birthday Candles
A matchbook shape turns a row of paper candles into a compact birthday surprise. Use blue cardstock for the wrap, kraft or cream card for the inside backing, five patterned paper strips, and yellow paper flames. Score the wrap to create a large top cover and a short lower retaining flap.
Attach the candle strips to the inner backing and cover their lower ends with the small flap. Fix the flap near its bottom edge so the front cover can tuck beneath its upper lip. Use a narrow line of strong tape or a carefully covered staple for the fastening. All flames and candles remain paper decorations, making the card a playful keepsake rather than a holder for real matches.
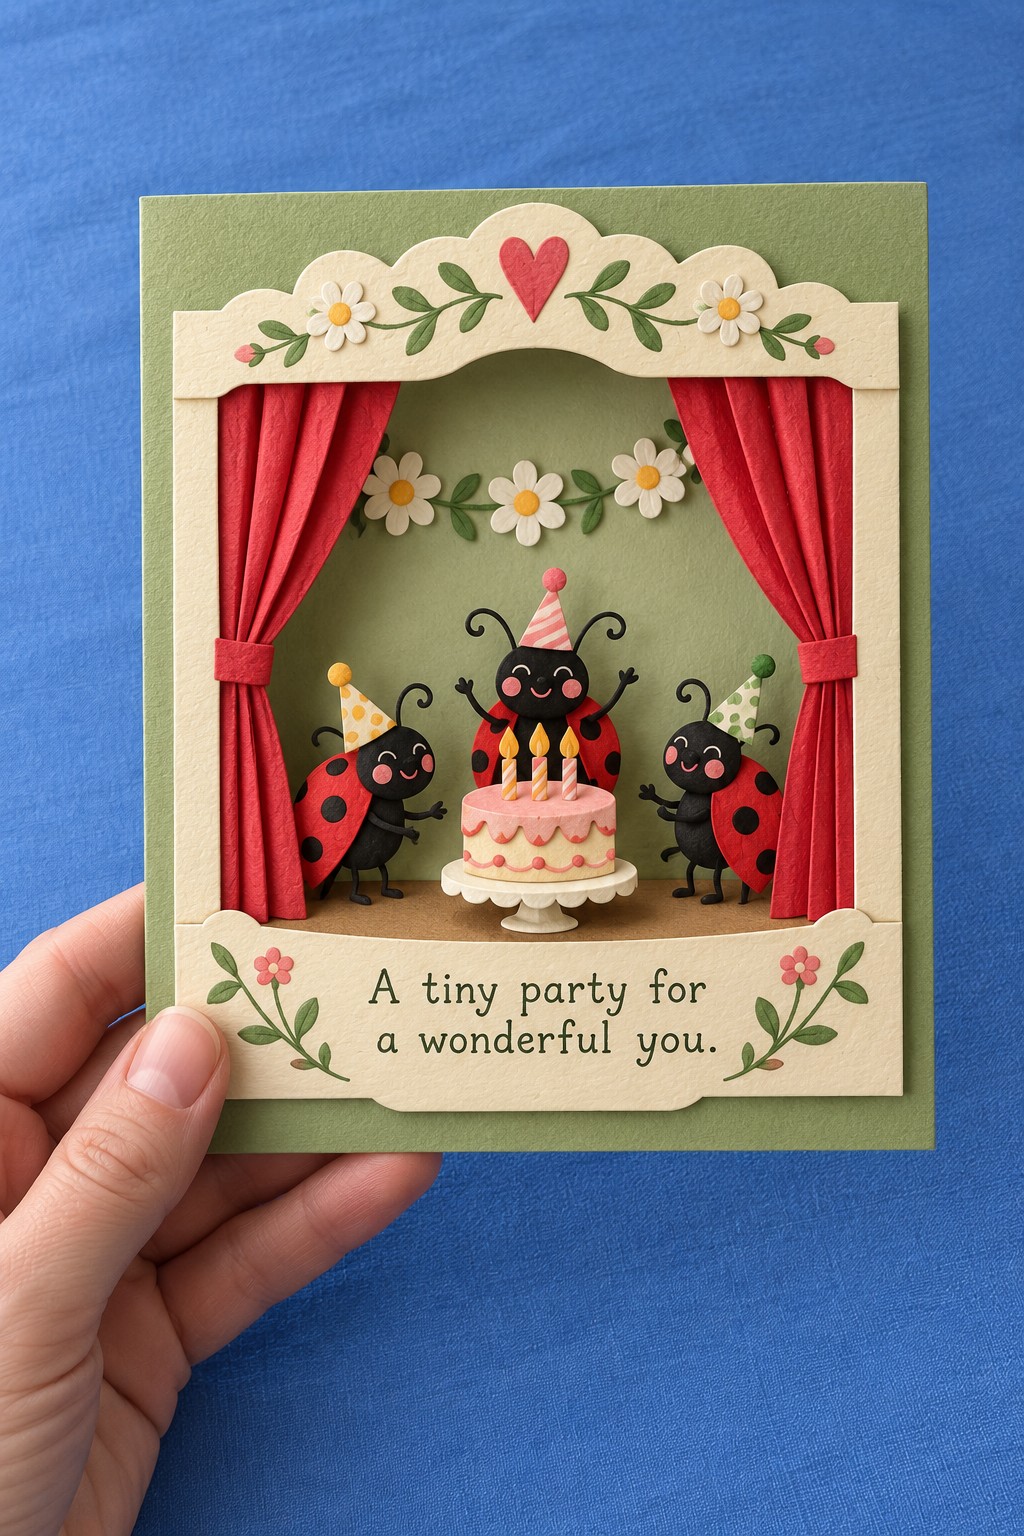
25. A Ladybug Birthday Party on a Paper Theater Stage
Give a small cast of ladybugs a birthday stage. You will need a green blank, a cream frame, red lightweight paper for curtains, black and red cardstock for the characters, and tiny flower shapes. Mount a simple green backdrop behind the frame and arrange the cake and ladybugs before adding the curtains.
Pleat the red paper vertically and secure it along the top and outer sides, leaving the inner folds visible. Add narrow paper tiebacks to hold the curtains open. Build the cream decorative trim separately and mount it above the stage. This version works as a fixed theater scene; keep the curtains in their open position and let the layered characters provide the depth.
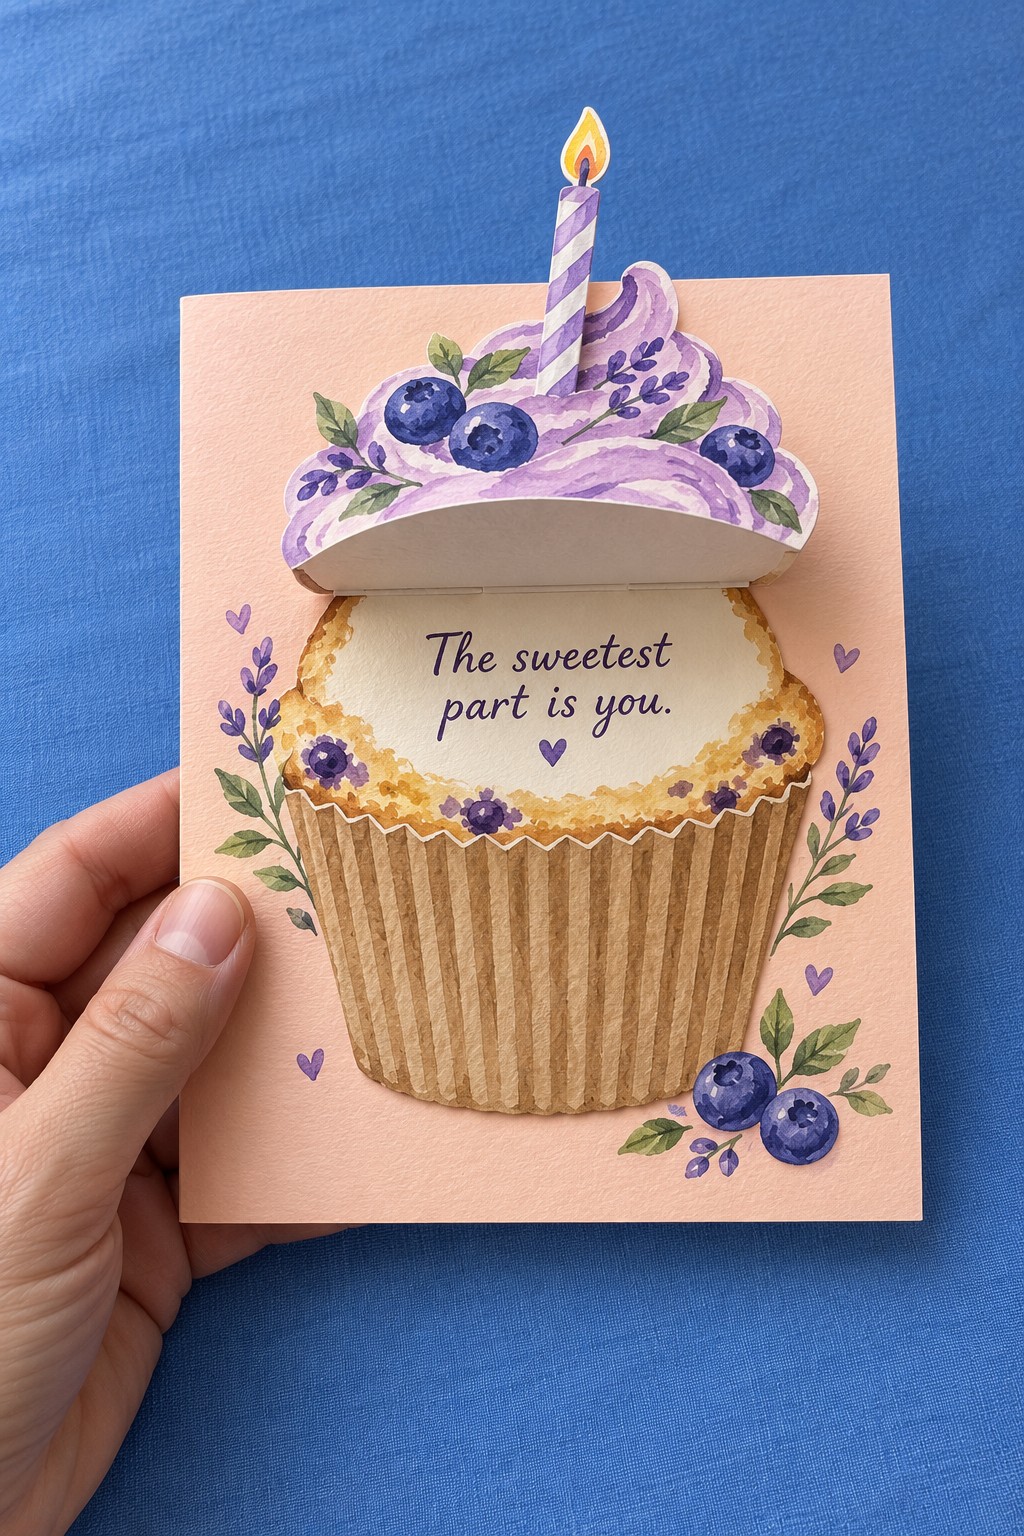
26. A Cupcake with a Lift Up Frosting Message
A cupcake can hide a sweet message beneath its frosting. Use a pink blank, a ridged kraft paper cupcake case, a cream message area, and a painted purple frosting cutout with blueberries and a paper candle. Paint and dry the decorative pieces before assembling them.
Glue the cupcake case flat to the card and position the message immediately above its top edge. Give the frosting a scored paper hinge behind its upper edge, attaching only that hinge to the backing. The frosting can then lift away to reveal the words. Keep the candle attached to the frosting piece so both move together, and check that the lifted flap does not catch on the surrounding floral decoration.
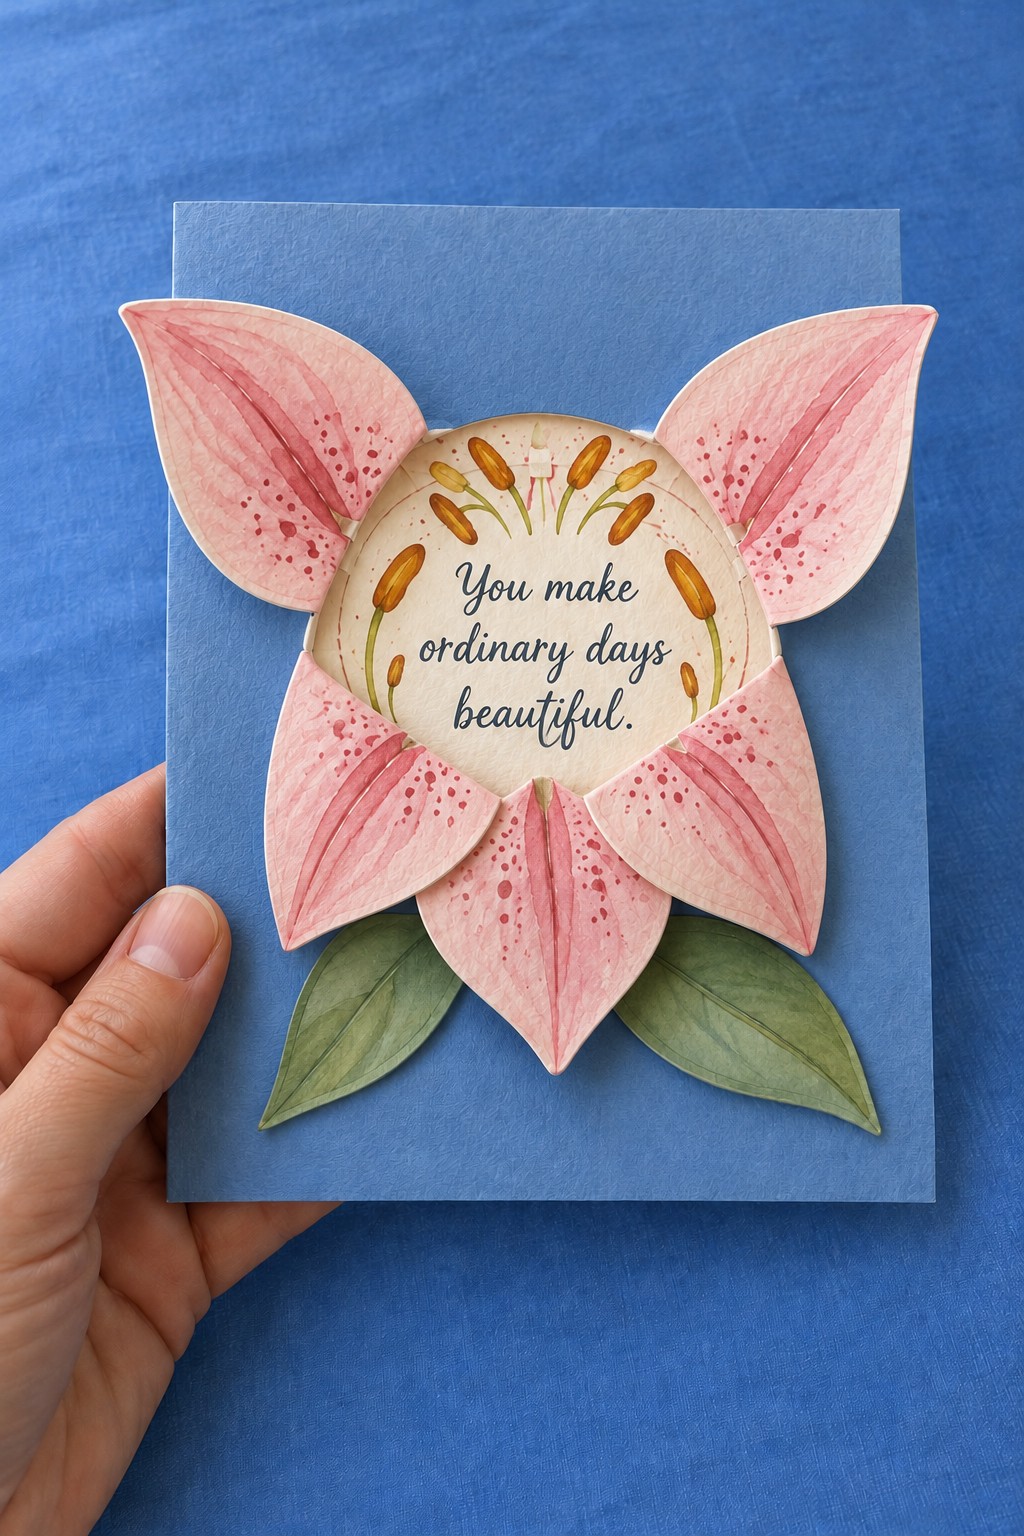
27. A Lily with a Birthday Message at Its Center
A large pink lily offers a more botanical birthday card with plenty of space for a short personal line. Use a blue base, watercolor paper, pink and green paint, a cream message circle, and a blunt shaping tool. Paint the petals with darker speckles near their bases and make two long green leaves.
Once dry, cut the petals and curve their outer edges very gently. Arrange them around a central paper disc, gluing their lower ends while leaving the tips free. Place the greeting circle over those attachment points and add slender paper stamens around its upper edge. Keep the message readable and use a shallow box if the petals project too far for an envelope.
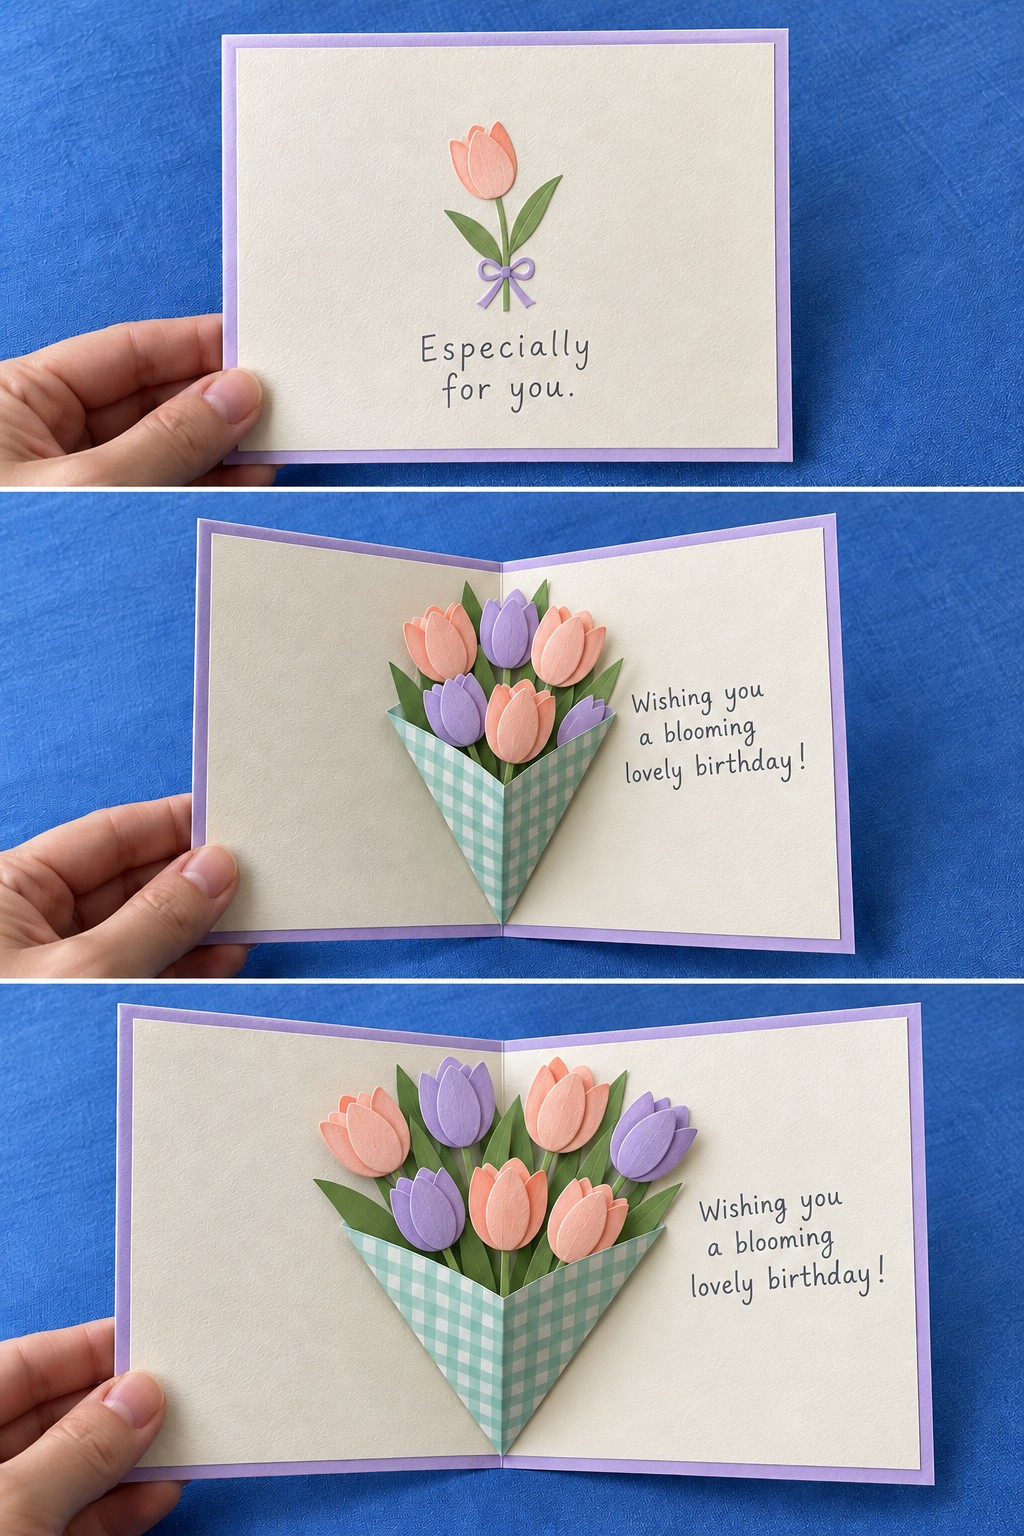
28. A Tulip Bouquet That Unfolds Inside
A small tulip on the cover gives only a hint of the bouquet inside. Gather a lavender blank, cream lining, pastel paper for the flowers, green stems and leaves, and mint gingham paper for the wrapper. Make the tulips with overlapping folded petal shapes, keeping them light enough to flatten gently.
Build the bouquet around a central folded paper support aligned with the card crease. Attach its outer tabs to the two inside panels so the support expands as the card opens. Fix the stems to the support and fold the gingham wrapper around their lower ends, allowing its central fold to move. Test the plain support first, then add flowers gradually while checking that every tulip stays within the closed card.
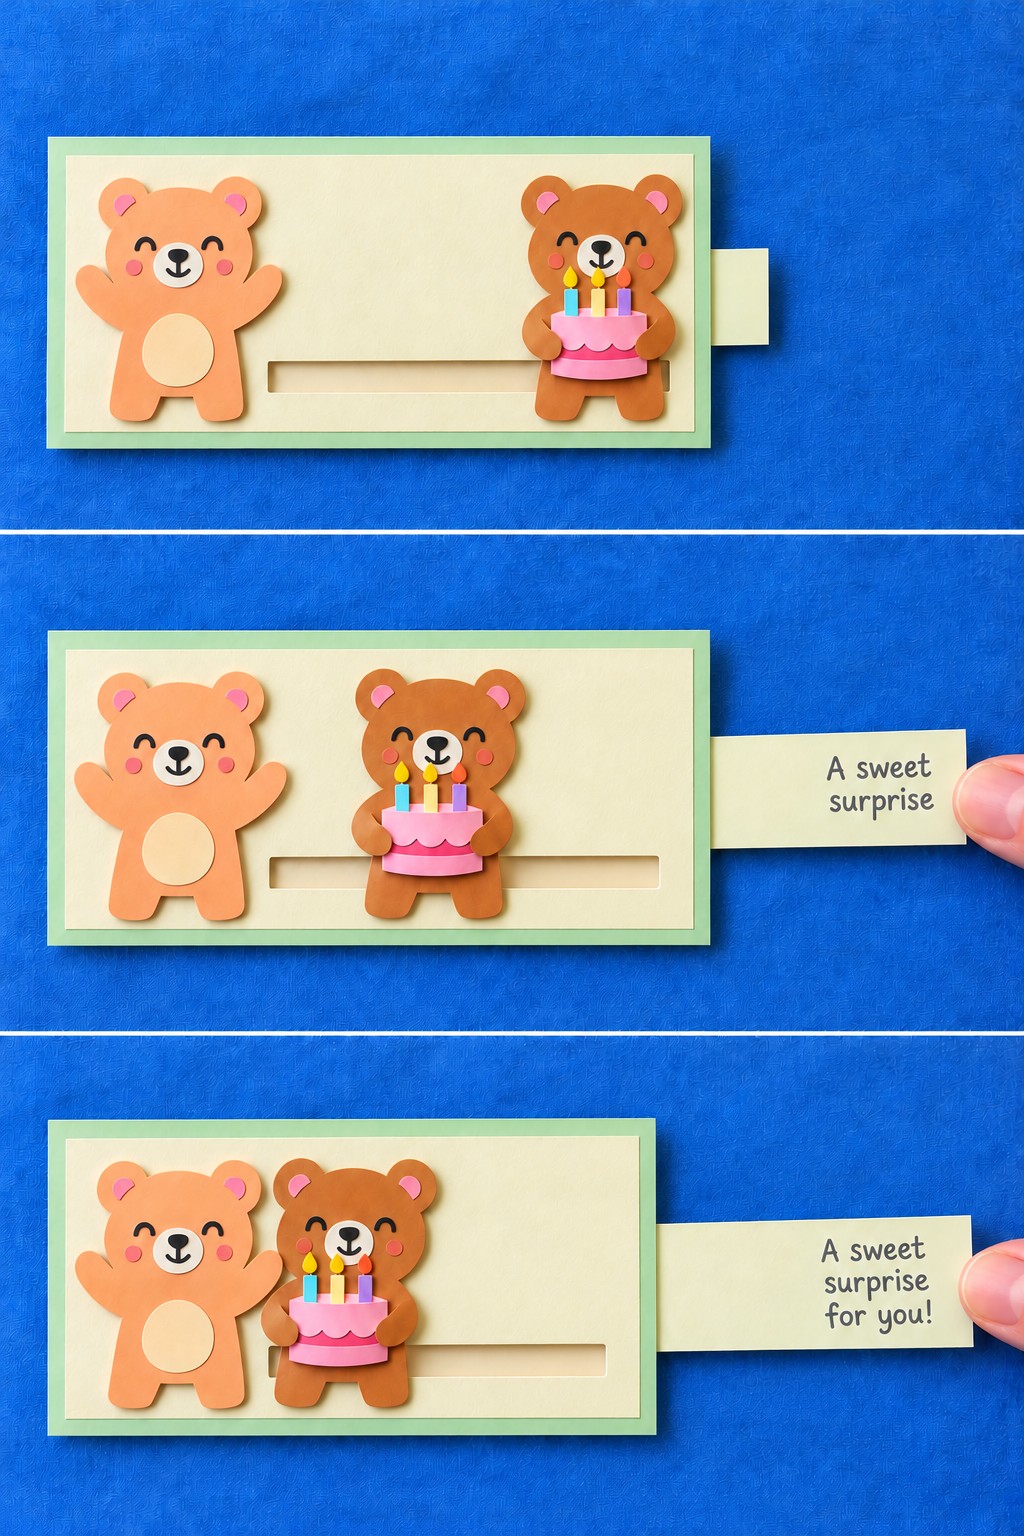
29. A Sliding Bear Delivering a Birthday Cake
A cake carrying bear moving toward its friend makes the greeting feel like an arrival. Use a mint base, a cream panel with a horizontal slot, two paper bears, a cake cutout, a firm card support, a smooth plastic loop, and strong tape. Keep the left bear fixed; the cake bear travels across the slot.
The opposite directions need a loop mechanism: wrap a smooth plastic strip loosely around a hidden horizontal support and join the strip to itself. Attach the right pull tab to the rear run of the loop. Attach the moving bear, through the slot, to the front run, so pulling right moves the bear left. Add spacers outside the loop path and travel stops before sealing the backing. A plain card strip directly joined to the bear would move it in the wrong direction.
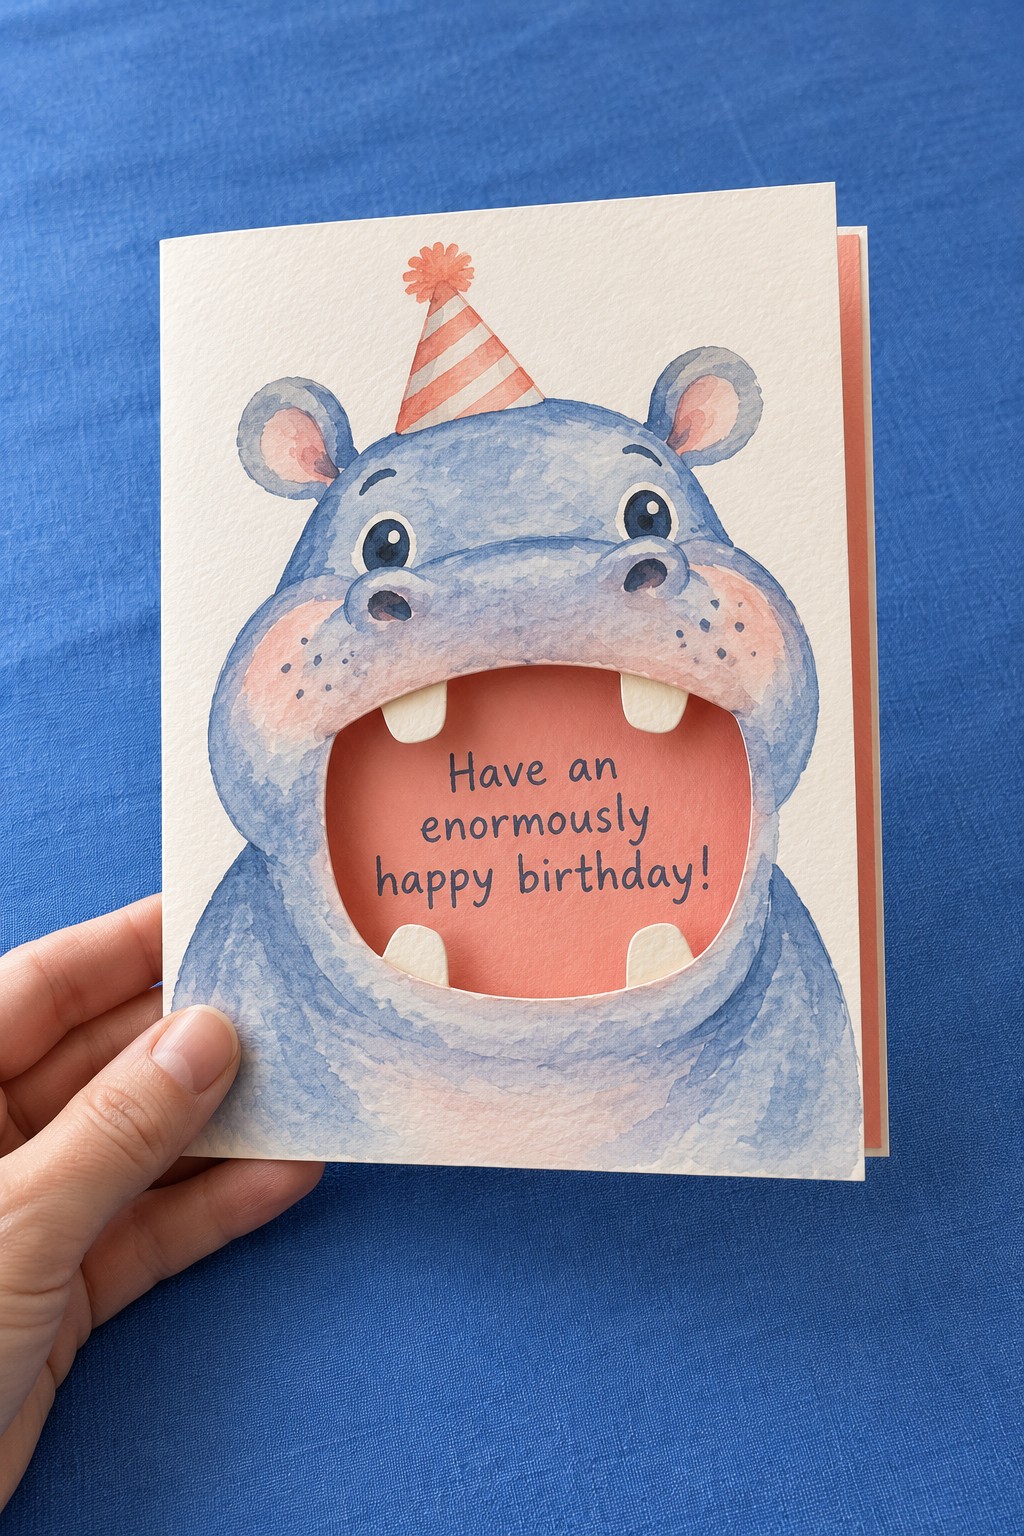
30. A Smiling Hippo with a Mouthful of Birthday Wishes
An enormous hippo smile gives a short birthday message a funny place to live. Use a cream blank, watercolor paper, blue and pink paints, coral paper for the mouth, and small cream tooth shapes. Paint the head and ears as one main piece, then cut an opening for the mouth once the paint has dried.
Place the coral message panel behind the opening and attach the hippo around it. Tuck the tooth shapes between those layers so they overlap the mouth edge without covering the writing. Add the striped party hat above the head. Keep the mouth as a framed message window; the expression carries the joke without requiring a jaw mechanism.
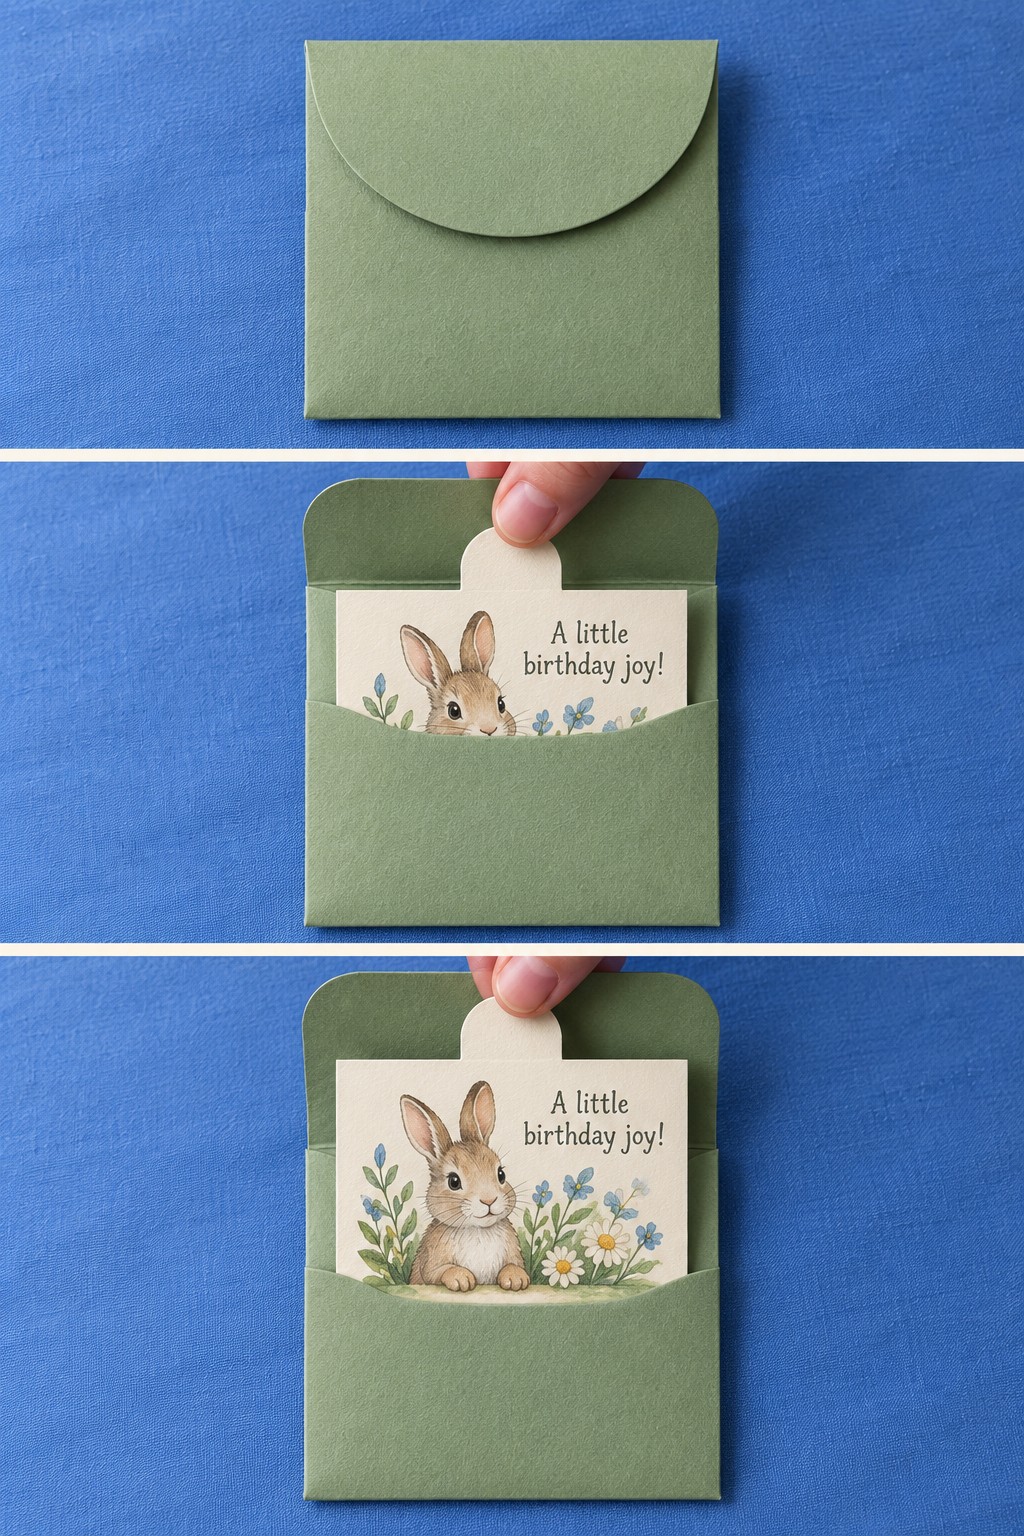
31. A Sage Envelope with a Pull Out Bunny Note
A sage envelope and a tiny bunny make a gentle birthday greeting that feels like a little letter. Use green cardstock for the envelope, cream card for the insert, a bunny illustration, and small flower and leaf details. Cut the insert first and build the envelope around it, allowing a few millimeters of clearance at each side.
Fold and glue the side and bottom envelope tabs, then score a rounded top flap so it opens easily. Add a rounded lifting tab to the note or cut it as part of the insert. Keep the bunny artwork flat so it slides past the envelope edge. Put the main birthday message on the reverse for a surprise that appears after the note is fully removed.
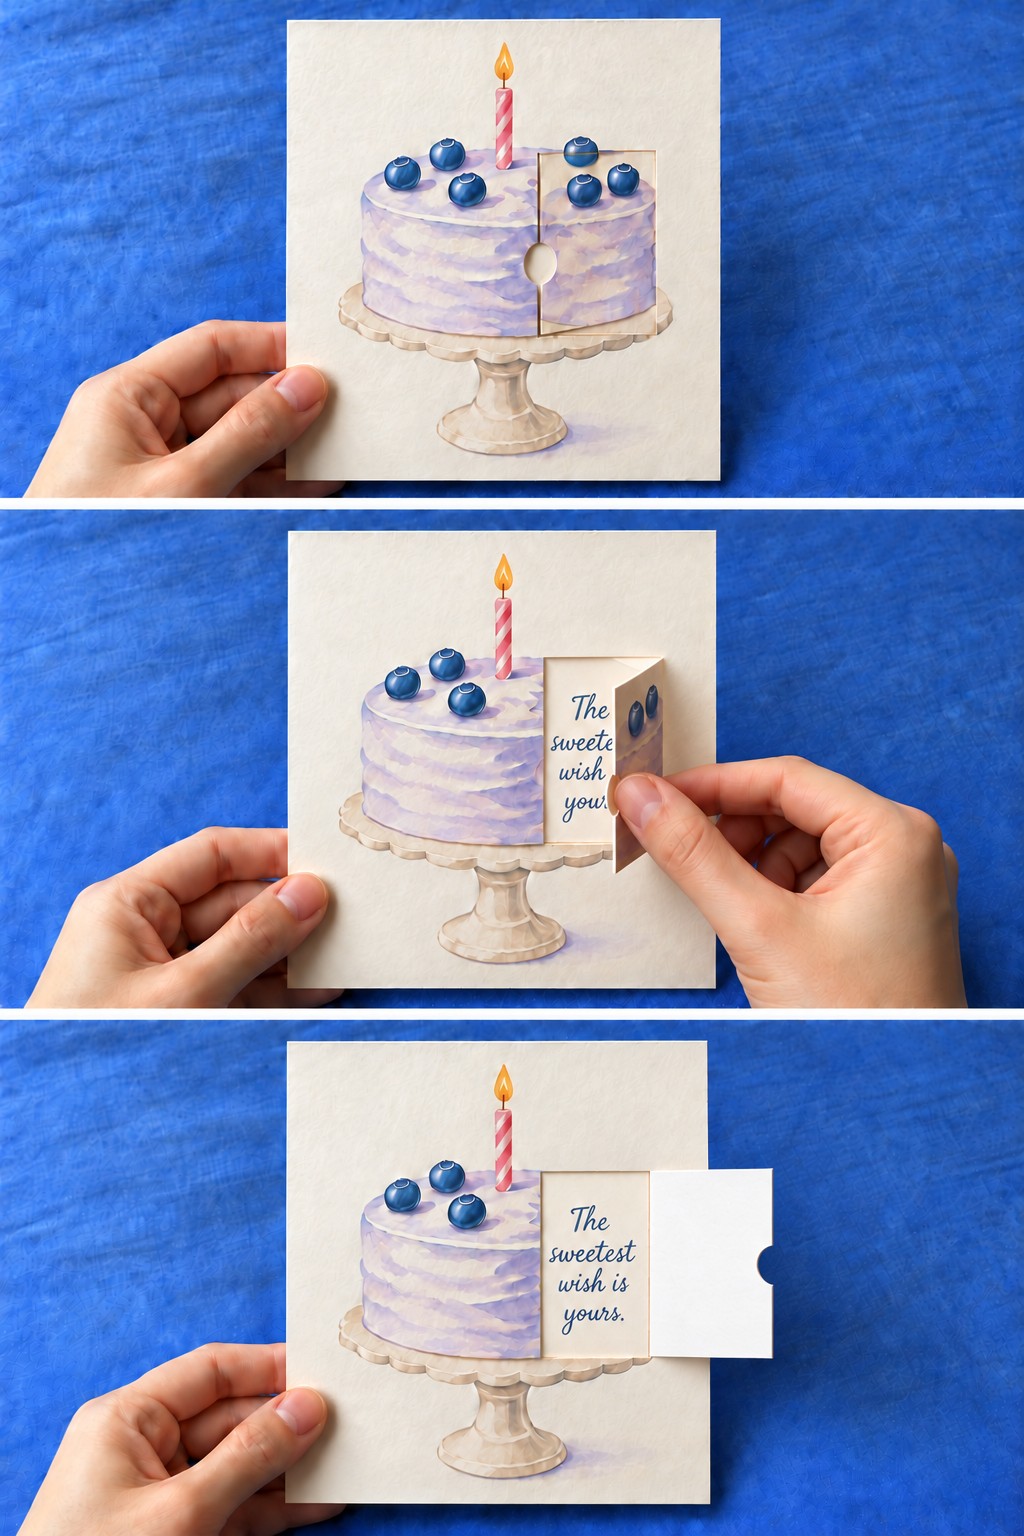
32. A Blueberry Cake with a Side Opening Greeting
A little opening panel can turn a painted blueberry cake into a secret message card. Prepare a cream base, a watercolor cake panel, a second matching cake detail for the flap, and a narrow paper hinge. Paint the cake with pale purple frosting, blueberries, a candle, and a pedestal before cutting the moving section.
Place the message beneath the right hand cake section and attach that section along a scored vertical hinge at its left edge. When closed, the flap illustration should line up with the fixed cake beside it. Leave the other three edges free and add a small finger notch at the outer edge. Use a paper mockup to check the hinge before cutting a finished illustration.
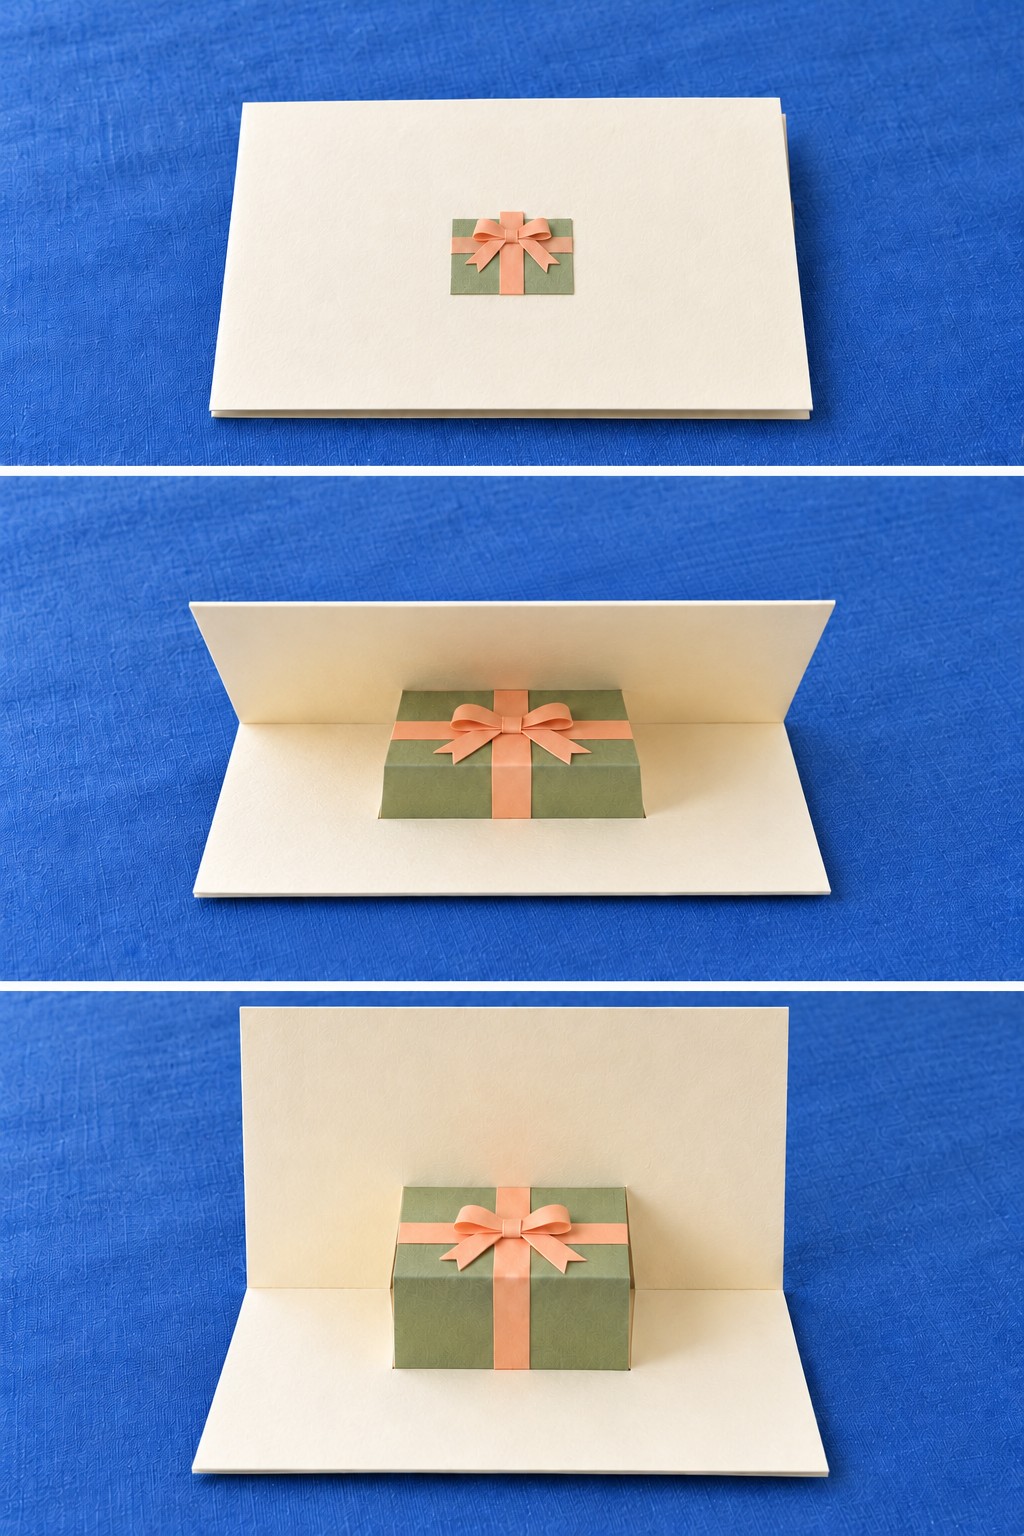
33. A Gift Parcel That Rises When the Card Opens
A green parcel with a peach bow makes a simple cover motif and a larger surprise inside. Use a cream card blank, green cardstock, peach paper strips, and strong paper tape. Build the inner parcel as a collapsible rectangular step with scored corners and two attachment tabs, rather than a sealed rigid box.
With the card held at a right angle, position one tab on the lower inside panel and the other against the upper panel. The two visible parcel faces and the card surfaces should form a folding parallelogram in side view. Test that structure before adding decoration. Glue the ribbon separately on each face and keep the bow shallow so it can compress when the card closes.
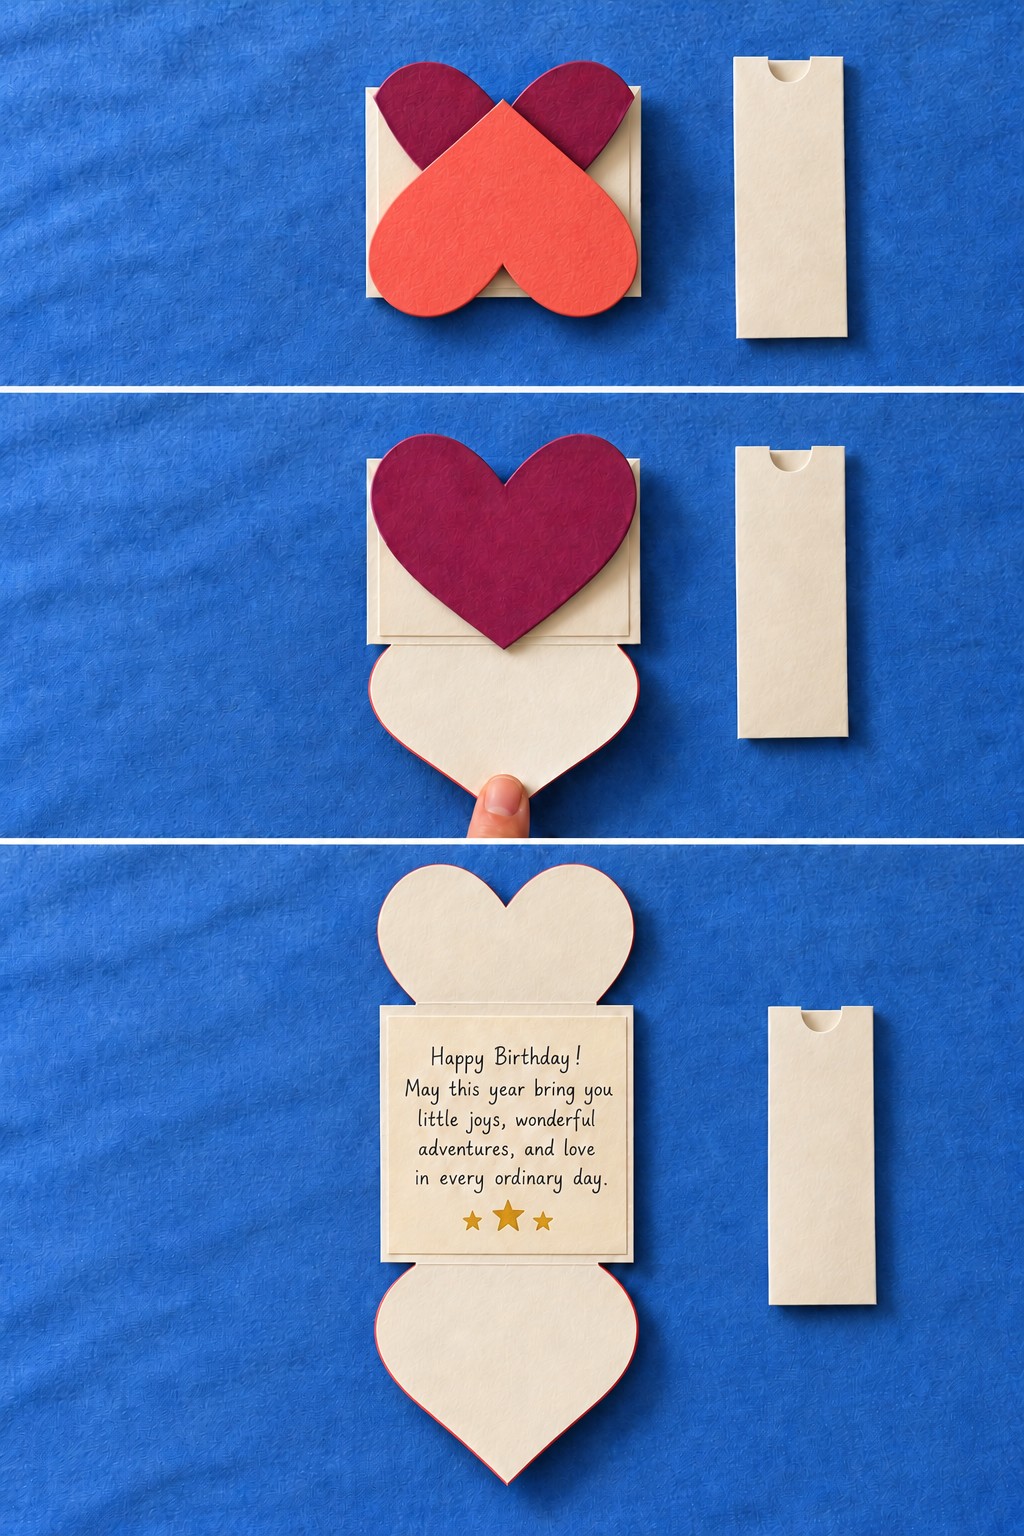
34. An Unfolding Heart Note with a Slim Sleeve
A folded heart turns a birthday note into a small keepsake that can be opened slowly. Use cream cardstock for the message section, burgundy and coral paper for the outside heart shapes, and cream card for a protective sleeve. Start with a central writing rectangle and connected upper and lower flaps, then shape their free ends into rounded heart curves.
Score the flap joins and fold them inward so the colored outer faces overlap neatly. Keep the writing inside the central rectangle and away from the fold lines. Make a sleeve just wide enough to accept the folded piece without pressure, with a small notch for easier removal. Decorate only after the folded shape slides in and out smoothly.
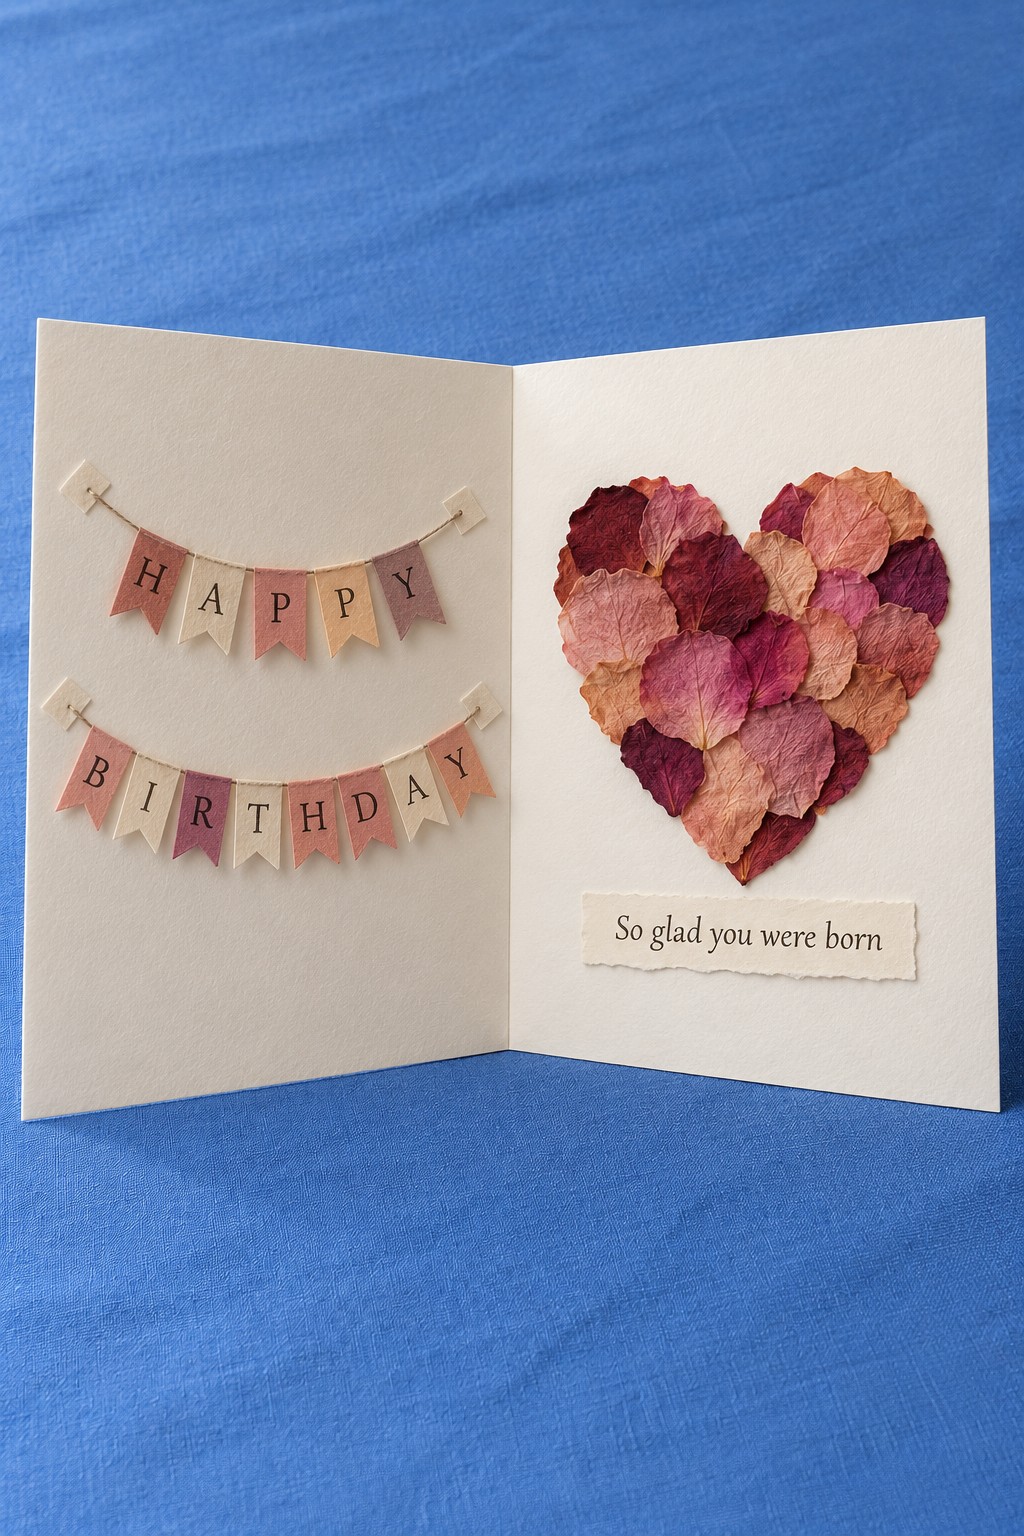
35. A Pressed Petal Heart with Birthday Bunting
A heart made from pressed petals gives a birthday card a soft, natural texture. Choose fully dry, flat petals in pink, burgundy, and peach, a sturdy cream blank, thin thread, small paper bunting flags, and a modest amount of craft glue. Draw a faint heart guide on a separate front panel before arranging the petals.
Work from the outside edge inward, overlapping the petals lightly and applying tiny amounts of glue underneath rather than brushing over their delicate faces. Let the panel dry before mounting it on the right side. Attach the two bunting strings on the left with their ends covered by small paper tabs. Keep the petals clear of the fold and protect the finished card from moisture and direct sunlight.
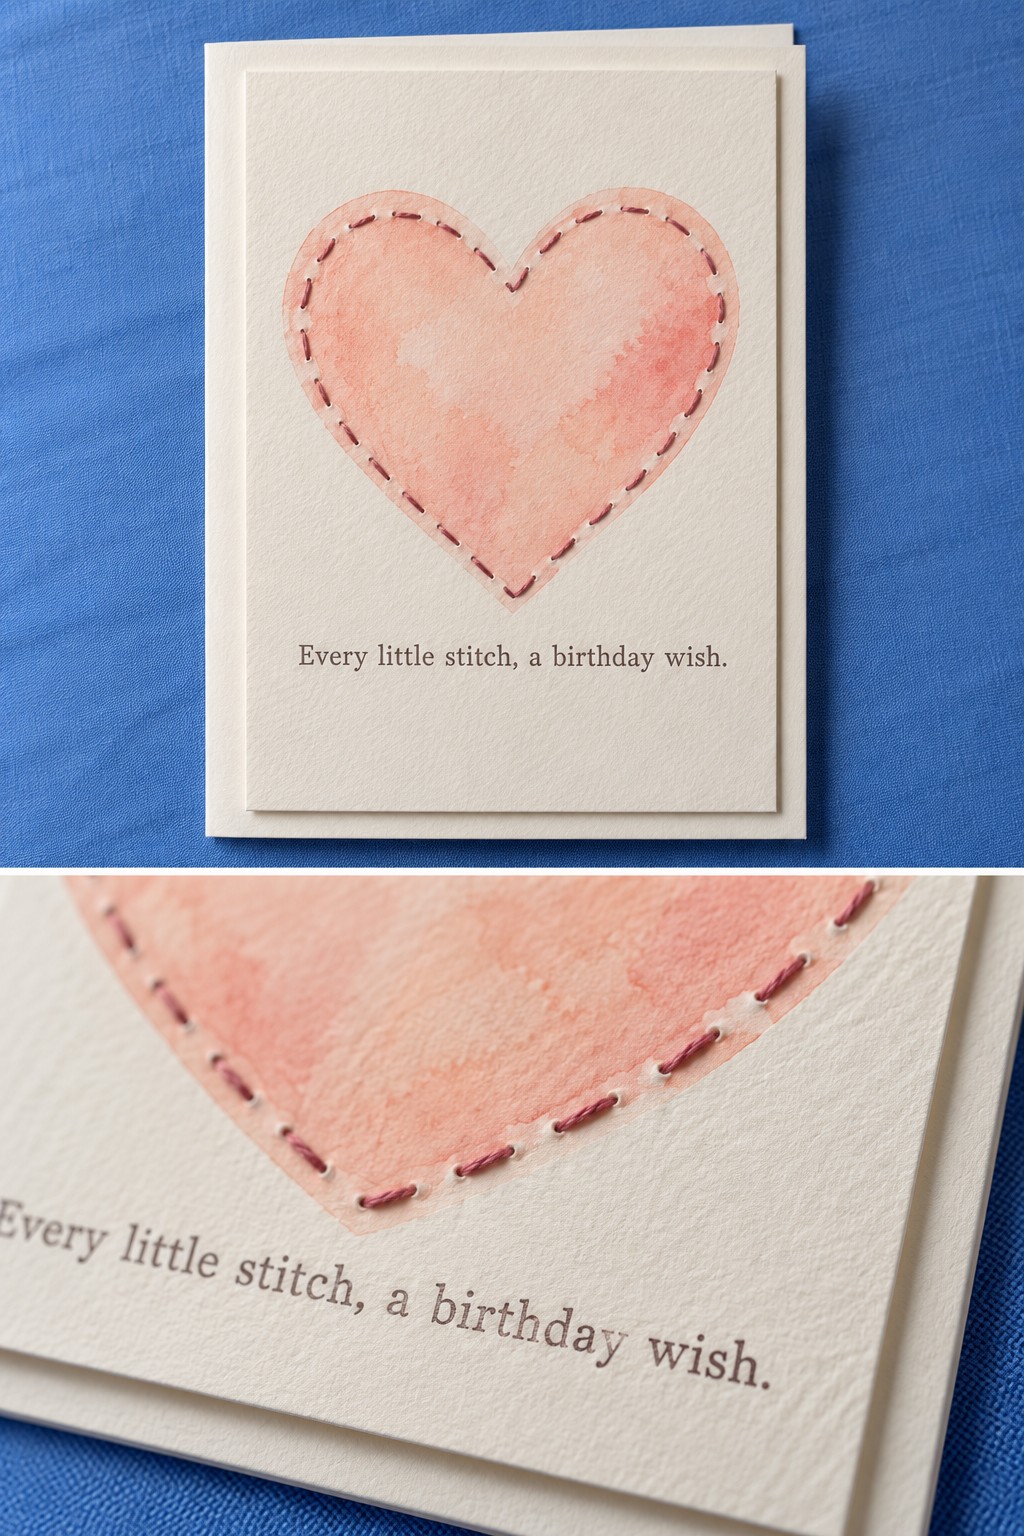
36. A Watercolor Heart Finished with Real Stitches
A pink watercolor heart becomes more tactile with a simple line of real stitching. Use a separate watercolor paper panel, pale pink paint, embroidery thread, a small needle, a piercing tool, and a cream card blank. Paint the heart and allow the panel to dry completely before working the stitch holes.
Pierce holes around the heart outline with consistent spacing and a safe margin from the paper edge. Sew a relaxed running stitch, keeping the tension light enough that the panel stays flat. Tape the thread ends to the reverse and attach the finished panel to the card. Add a short greeting below the heart, leaving enough empty space for the stitching to remain the main detail.
37. A Lift Up Gift Lid Revealing a Birthday Fox
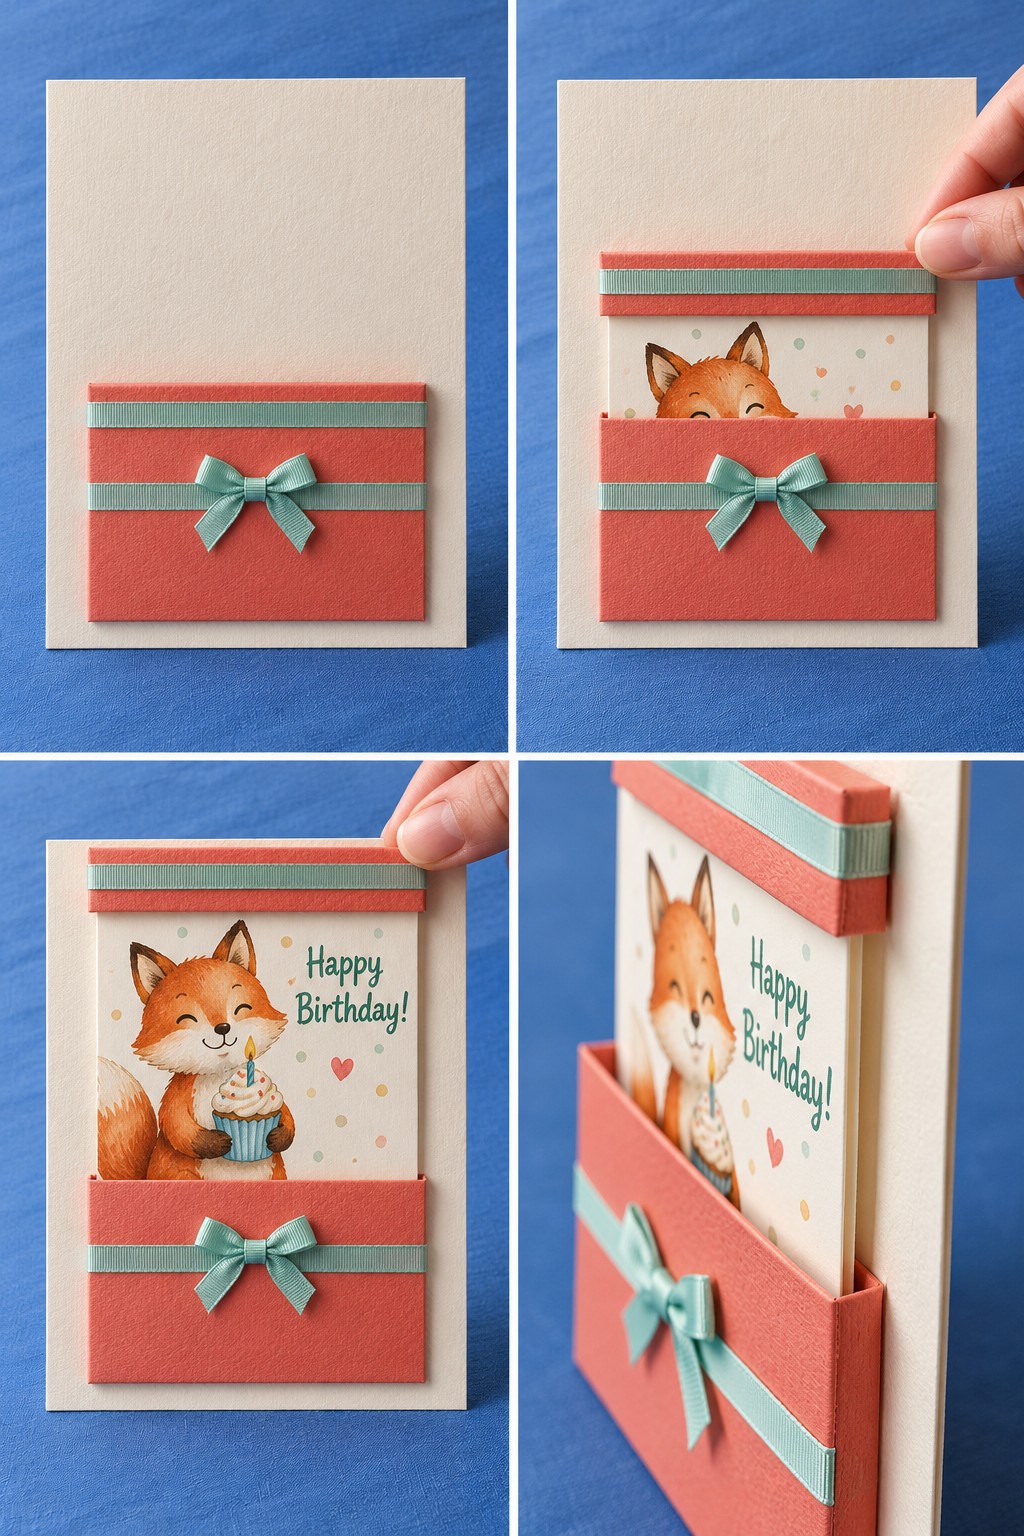
A fox rising from a gift box gives the recipient a cheerful reveal. Use a cream blank, coral cardstock, mint ribbon, and a cream insert decorated with a fox and birthday message. Build the lower gift box as a shallow pocket with folded side and bottom tabs, keeping the top open.
Attach the narrow gift lid to the upper edge of the insert, so lifting the lid lifts the fox panel with it. Wrap the mint ribbon around the lid before fixing it to the insert, and attach the lower bow only to the pocket front. Leave clearance between the insert and pocket walls. A discreet stop tab can keep the panel from coming out entirely, or you can leave it removable for a longer note on the reverse.
38. Two Cherry Friends with a Tiny Party Hat
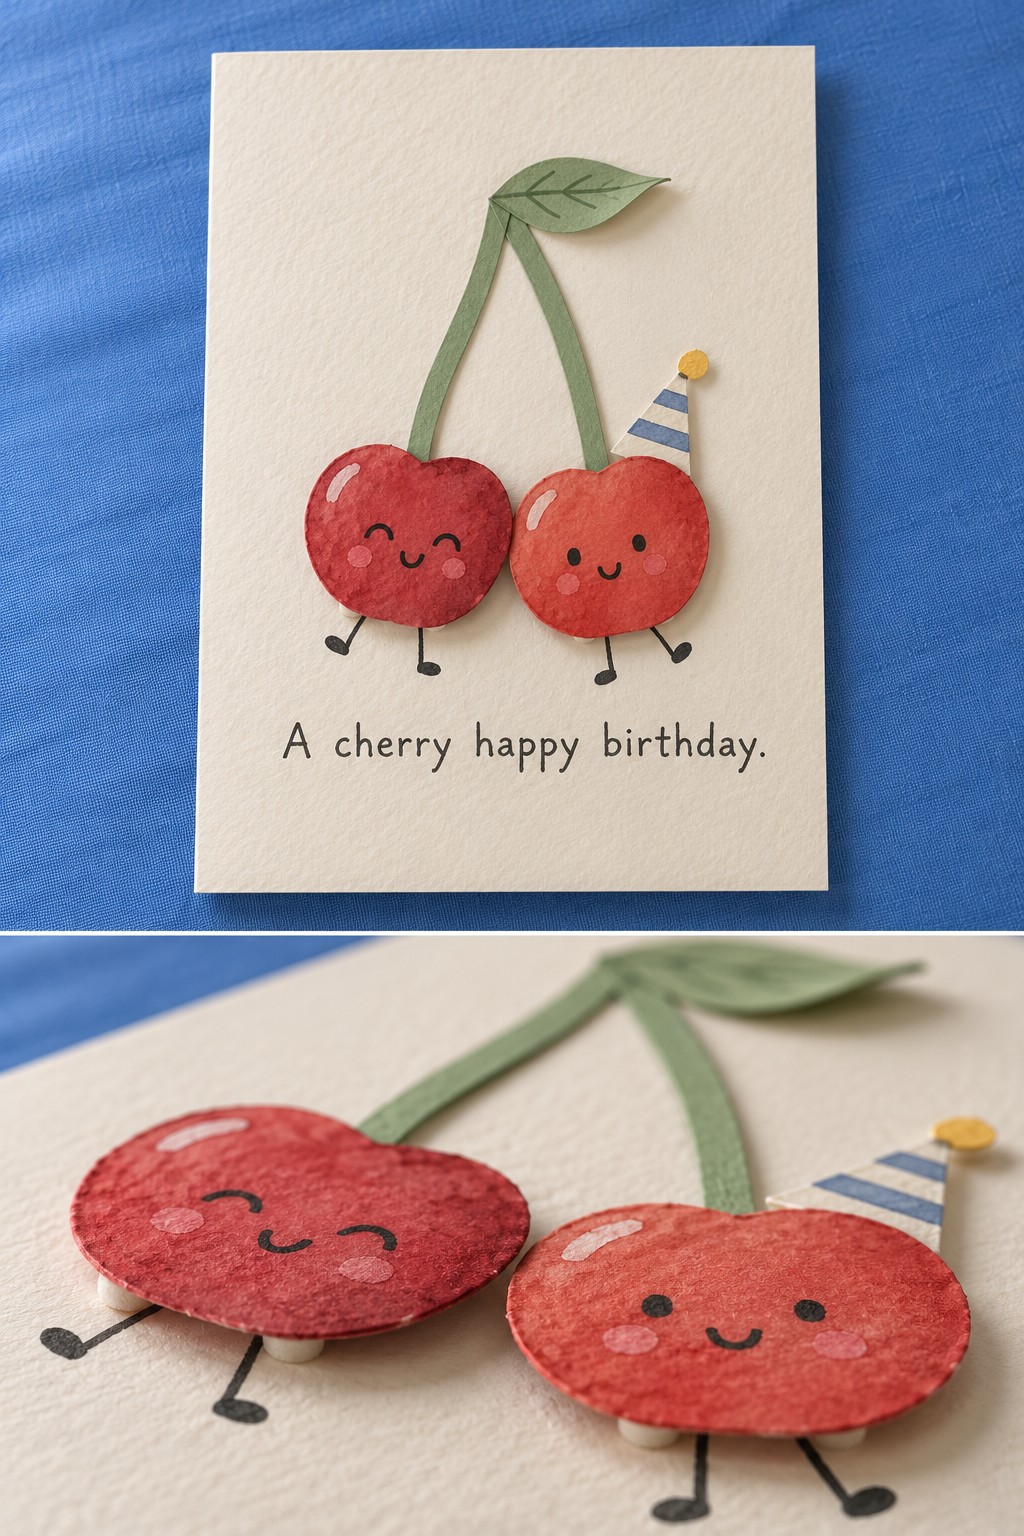
Two smiling cherries make a lighthearted card for a friend who appreciates a little wordplay. This is the finished design used in the opening tutorial: red painted paper fruit, sage stems and a leaf, black drawn legs, and a small striped party hat. The cream background leaves the faces and greeting easy to read.
Keep the stems flat and use just a shallow layer of foam behind the cherries. Their lower edges should cover the tops of the drawn legs, while the hat tucks behind the right cherry. Personalize the inside with a shared memory or a line about being a good pair. If posting the card, check that the raised fruit cannot catch on the envelope opening.
39. A Lavender Heart with Wooden Birthday Letters
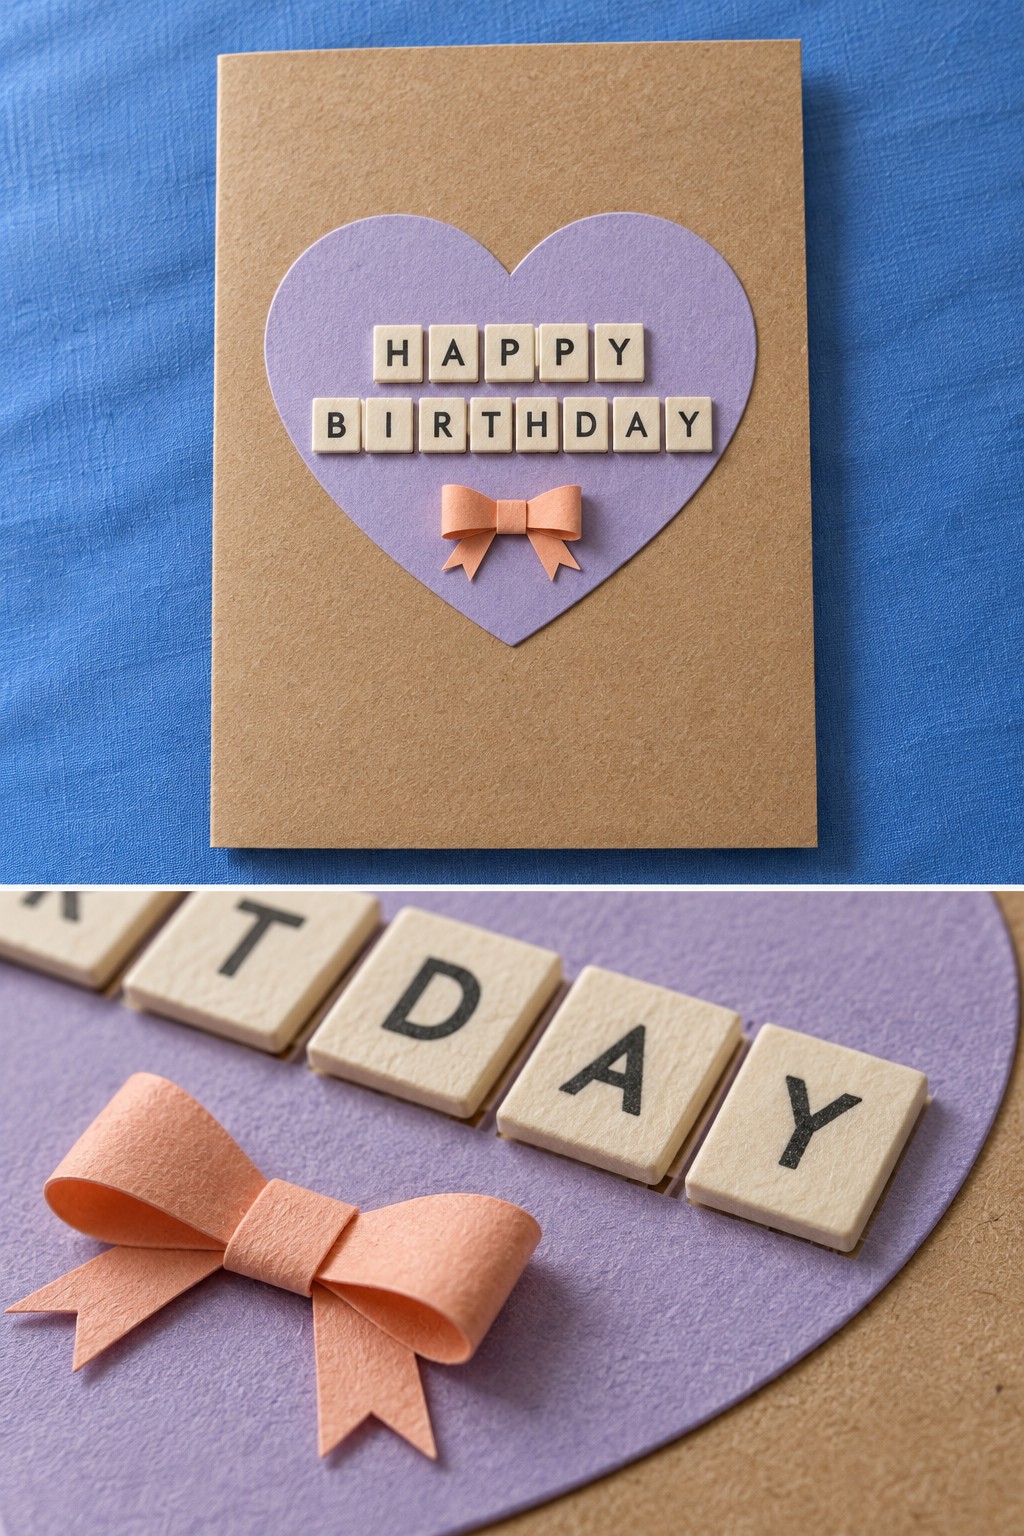
Wooden letter tiles give a simple heart card the feeling of a small keepsake. Gather a kraft blank, lavender cardstock, lightweight alphabet tiles, peach paper, and a craft adhesive labeled for wood and paper. Cut one large heart and arrange the letters into two centered rows before applying any glue.
Check the complete spelling and spacing while the tiles are still loose. Glue each tile to the heart, allow the adhesive to set, then mount the decorated heart onto the kraft base. Form a small paper bow by curving two loops and wrapping a narrow strip around their center. Place it below the lettering. The extra thickness makes a padded envelope or shallow gift box useful for delivery.
Give the Card a Personal Finish
Before you seal the envelope, open the card and try every pocket, flap, wheel, and slider. Pull gently from the intended tab, check that loose pieces stay attached, and make sure nothing catches on a neighboring decoration. Remove visible glue strands and erase planning marks only when the ink and adhesive are dry.
Inside, choose one specific thing to say. Mention a moment you still remember, a quality you admire, or something you hope to do together in the year ahead. A clear, personal sentence often means more than filling the whole page with general wishes. If you want to pair the card with a larger memory gift, this photo scroll gift with moving memories offers another way to bring shared moments into the celebration.
Finish by checking the envelope fit without forcing the card inside. Raised flowers, wooden letters, and substantial folded decorations need more room than a flat greeting. Protect delicate details with a loose sheet of tissue or a suitable box, then write the recipient’s name clearly. The result should be enjoyable to open, easy to handle, and unmistakably made with that person in mind.

Leave a Reply