
Turn cardboard boxes, paper plates, clean socks, and leftover paper into playful animals, moving cards, miniature scenes, and simple games. These 19 kids craft ideas pair a visual making sequence with a finished example, helping you choose a project and understand how its parts fit together. You will find material suggestions, practical assembly details, and ways to adapt the designs to what you already have. Start with a simple paper project, then try a supported cardboard model when your child is ready for more construction.
Prepare your craft space: Gather a glue stick, washable craft glue intended for children, washable paints, brushes, pencils, blunt scissors, scrap cardstock, and a protective table covering. Choose supplies suitable for your child's age and follow their labels. Use clean, dry packaging with staples and sharp edges removed. An adult should cut thick cardboard, make slots, punch difficult holes, and handle needles. Keep small loose pieces and cords away from children who may put them in their mouths. Supervise throughout, wash hands afterward, and put tools away before snack time.
Use the making sequences as a guide: Read each collage from the upper left across, then continue on the lower row. Some sequences start with prepared parts, so the written directions explain the earlier cutting and painting too. Lay out the pieces before attaching them, use broad tabs for upright parts, and allow paint and glue to dry according to their labels. You can adapt the colors and decorations in the finished examples while keeping the same supports and connections. Drying time is additional to hands on making time.
For more activities built around familiar shapes, explore our alphabet activities for preschoolers. Save the seasonal variations for later with these Halloween crafts for preschoolers.
Table of Contents
- 1. Hanging Sock Bat with Felt Wings
- 2. Paper Plate Hippo with an Opening Mouth
- 3. Flowering Cardboard Cactus in a Paper Pot
- 4. Egg Carton Chameleon with a Curled Tail
- 5. Cardboard Whale Feeding Game
- 6. Folded Paper Tulip Card
- 7. Cardboard Airplane Hangar and Paper Runway
- 8. Rainbow Paper Shooting Star
- 9. Cardboard Rain Boots in a Paper Puddle
- 10. Twisted Paper Bird Nest with Speckled Eggs
- 11. Paper Bowl Octopus with Eight Curled Arms
- 12. Standing Cardboard Elephant with an Accordion Trunk
- 13. Yarn Constellation Picture with Paper Stars
- 14. Shoebox Aquarium Television
- 15. Printed Grape Bunches with Leaf Impressions
- 16. Cardboard Suitcase with an Accordion Beach Scene
- 17. Cardboard Cheese Maze with a Rolling Ball
- 18. Wooden Spoon Scarecrow on a Cardboard Stand
- 19. Cardboard Monster Face with Lifting Eyelids
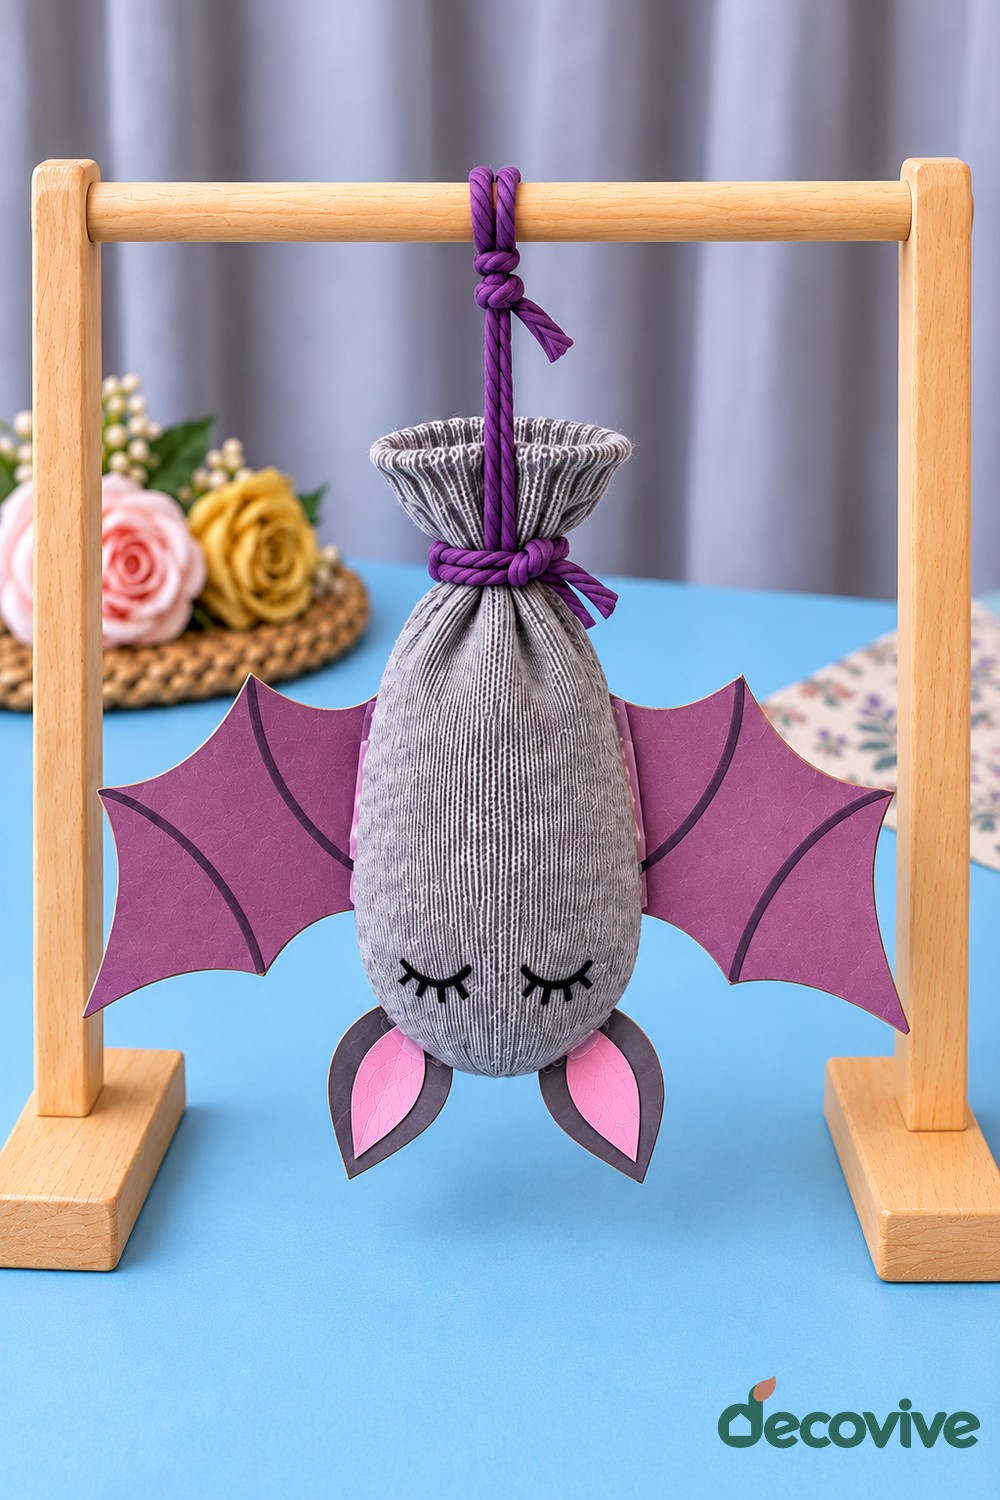
1. Hanging Sock Bat with Felt Wings
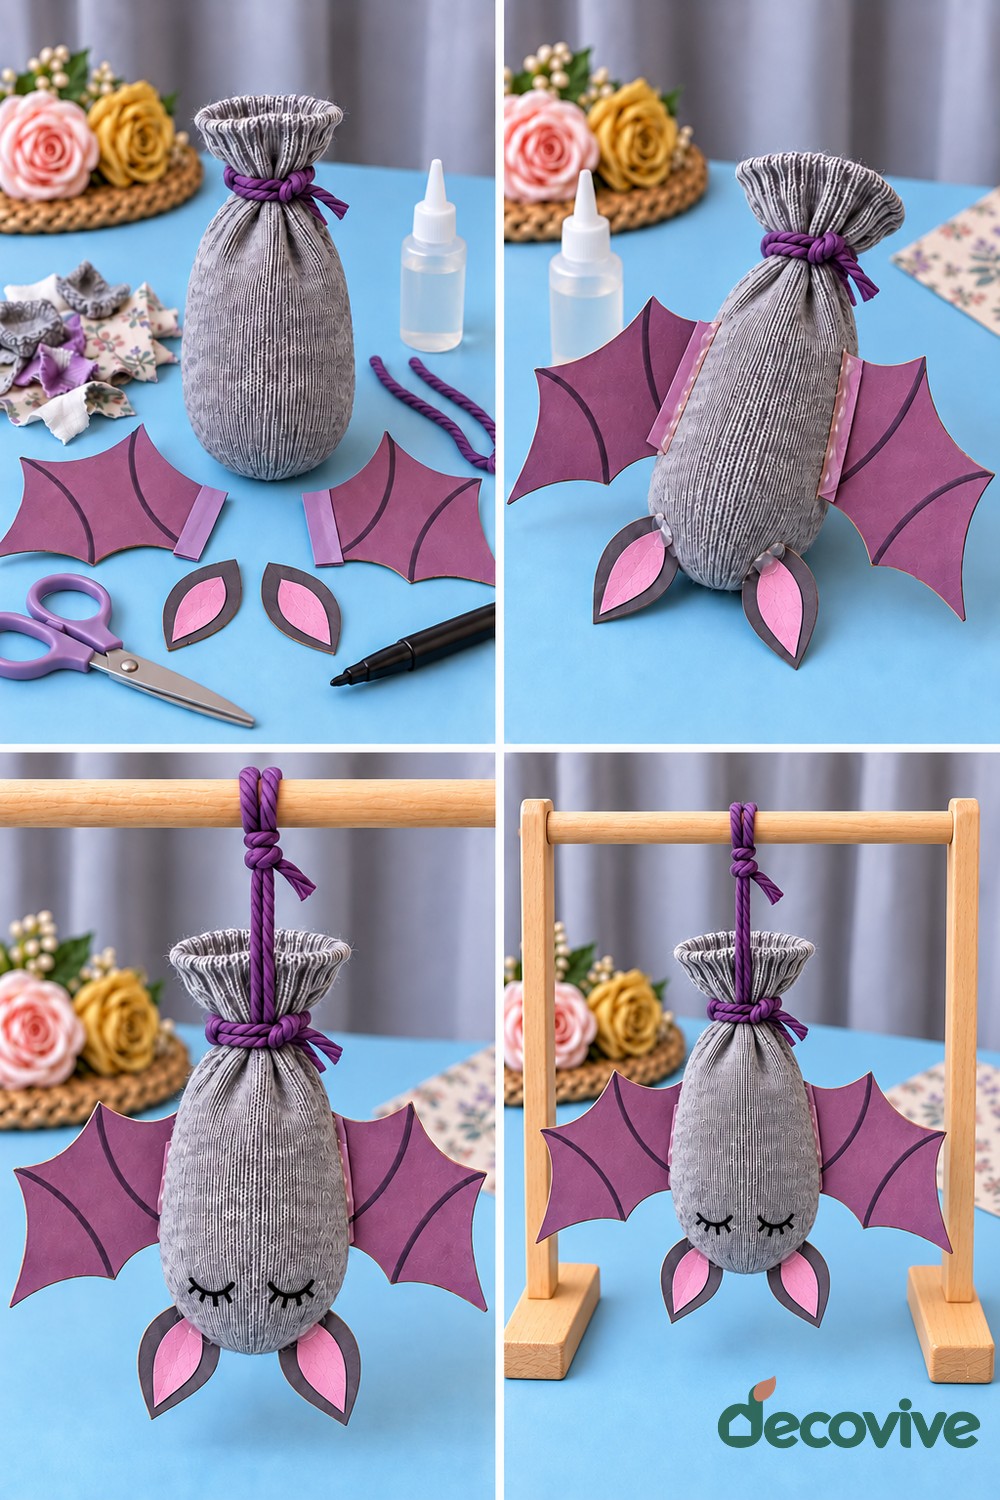
Materials: One clean gray sock, soft stuffing, purple yarn, gray and pink felt, purple felt for two wings, black embroidery thread, a needle and thread, scissors, and fabric glue.
How to make it: Fill the toe of the sock to make a softly rounded body, keeping the heel and cuff above it. Tie the opening firmly with purple yarn. Cut two matching wings with a wide inner edge and draw or stitch their curved vein lines before attaching them to opposite sides of the body. Stitch through both the felt and sock rather than relying on a tiny dot of glue. Add layered ears at the lower end and embroider the closed eyes so the bat reads correctly when hanging upside down.
Finishing and practical tips: An adult should handle the needle and check the hanging loop. Suspend the bat from a stable display stand out of reach of younger children, never over a cot. You can vary the wing color while keeping both wings the same size.
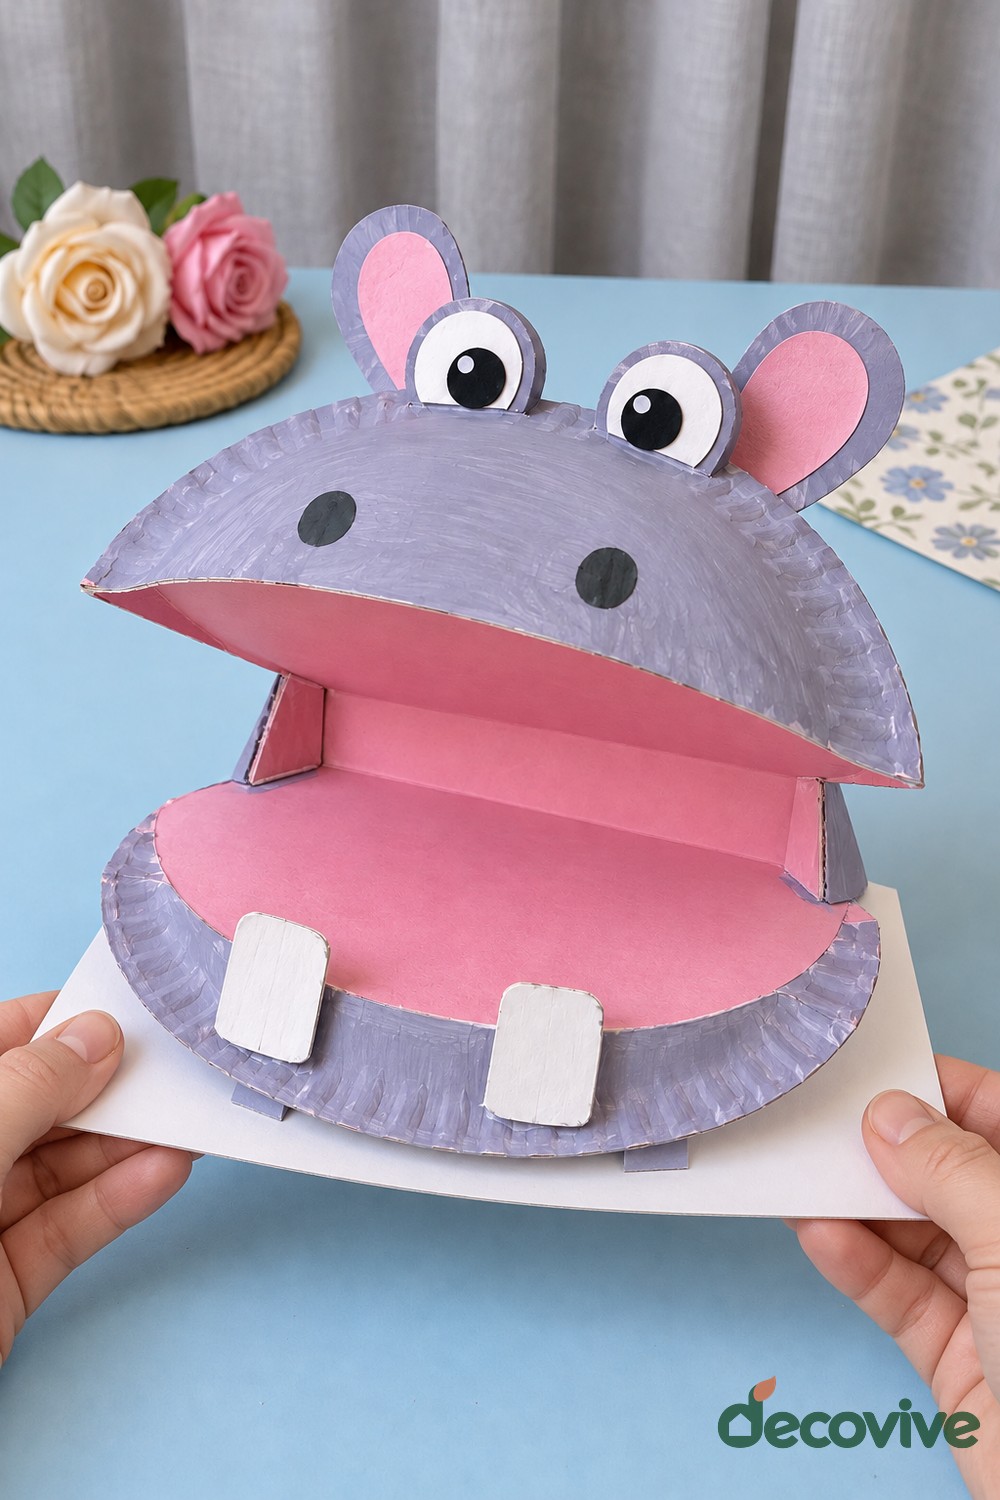
2. Paper Plate Hippo with an Opening Mouth
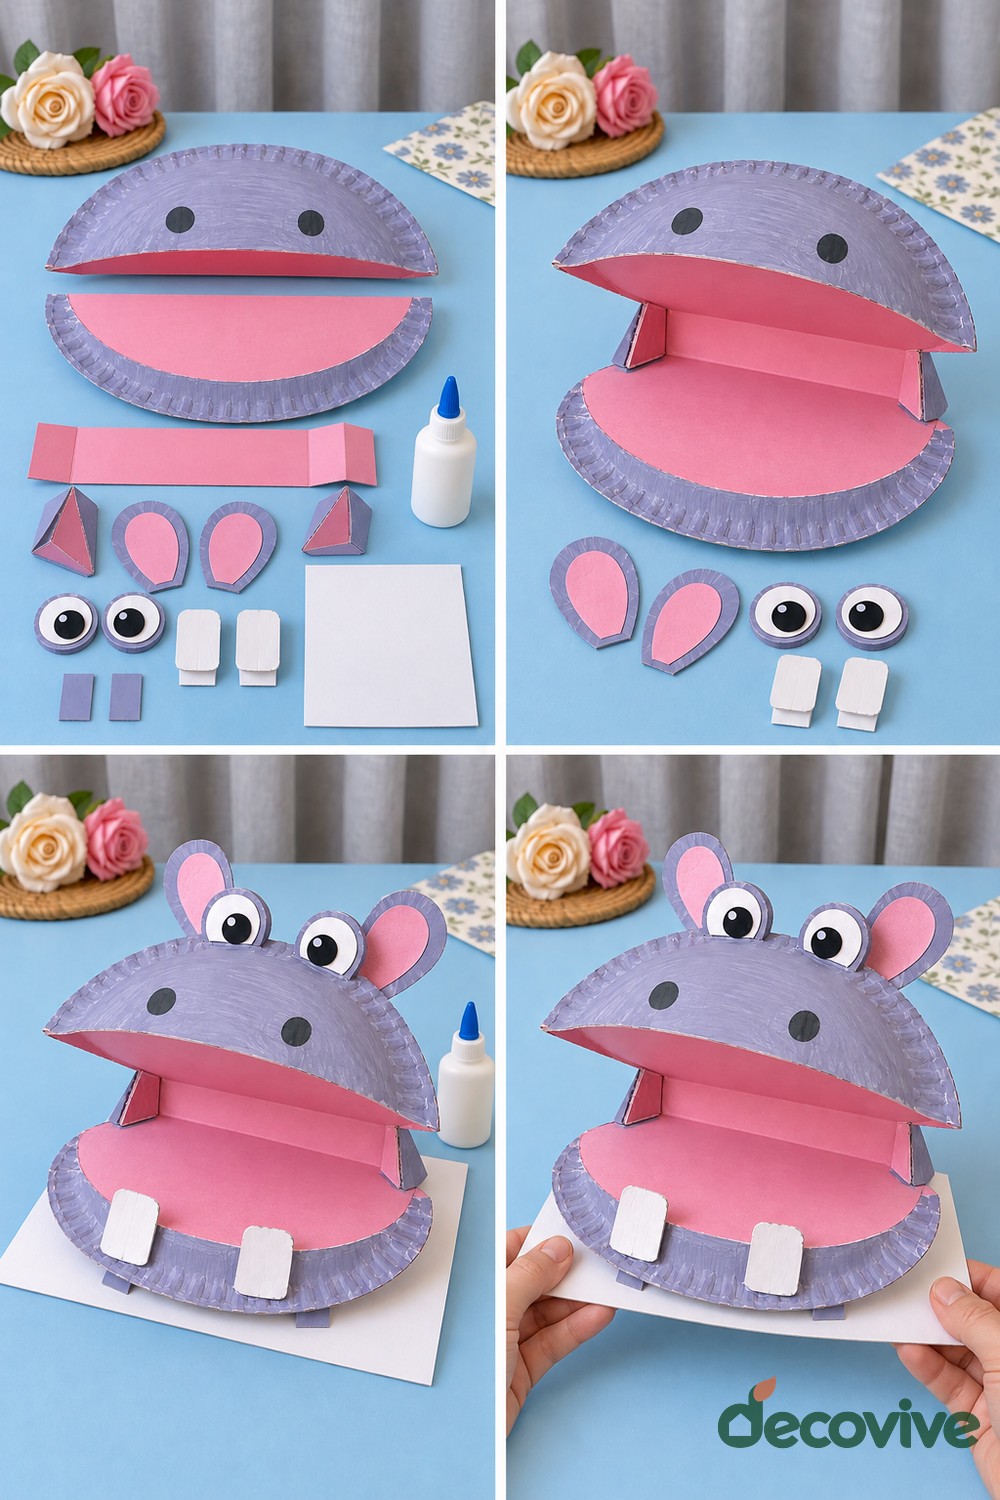
Materials: Two paper plates, gray and pink washable paint, gray and pink cardstock, white cardstock for two teeth and eyes, black paper, a narrow cardboard hinge, scissors, and craft glue.
How to make it: Paint the outer surfaces gray and let them dry. Trim the plates into matching upper and lower mouth shapes, then cover the inside surfaces with pink paper or paint. Join their back edges with a folded cardboard hinge, leaving enough room for the upper mouth to lift. Glue the ears and eyes behind the upper plate and add two nostrils to its front. Fold a small attachment tab on each white tooth and glue the tabs to the lower lip.
Finishing and practical tips: Keep the hinge free of extra glue and open it gently after drying. This is a paper puppet for careful handling rather than a durable biting toy. Children can change the expression by moving the eye shapes before attaching them.
3. Flowering Cardboard Cactus in a Paper Pot
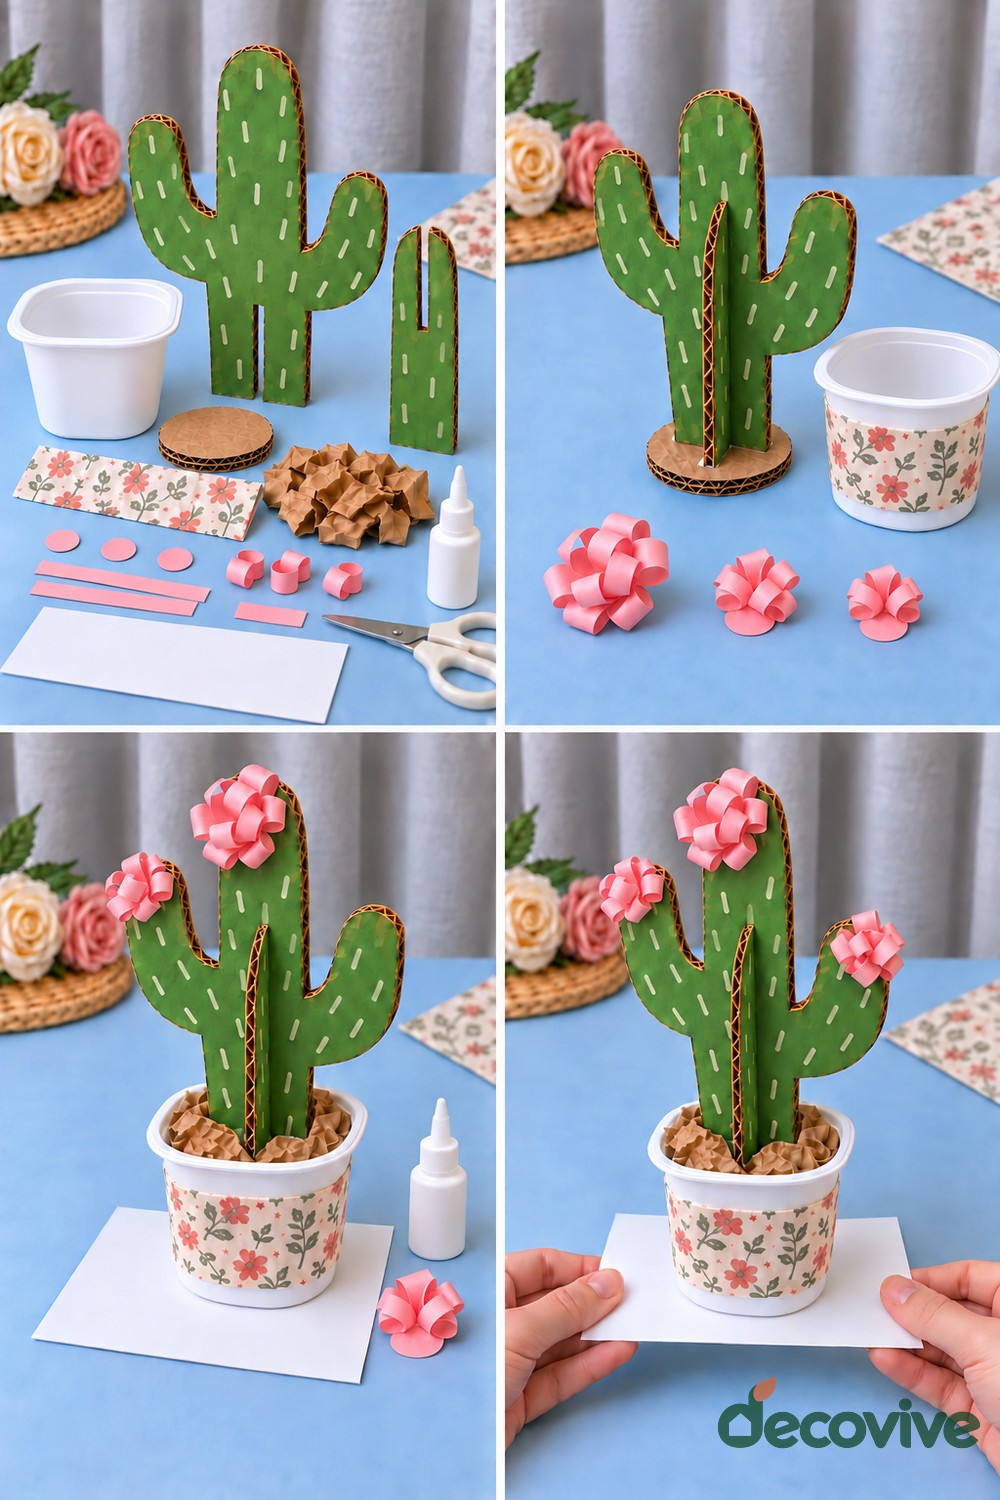
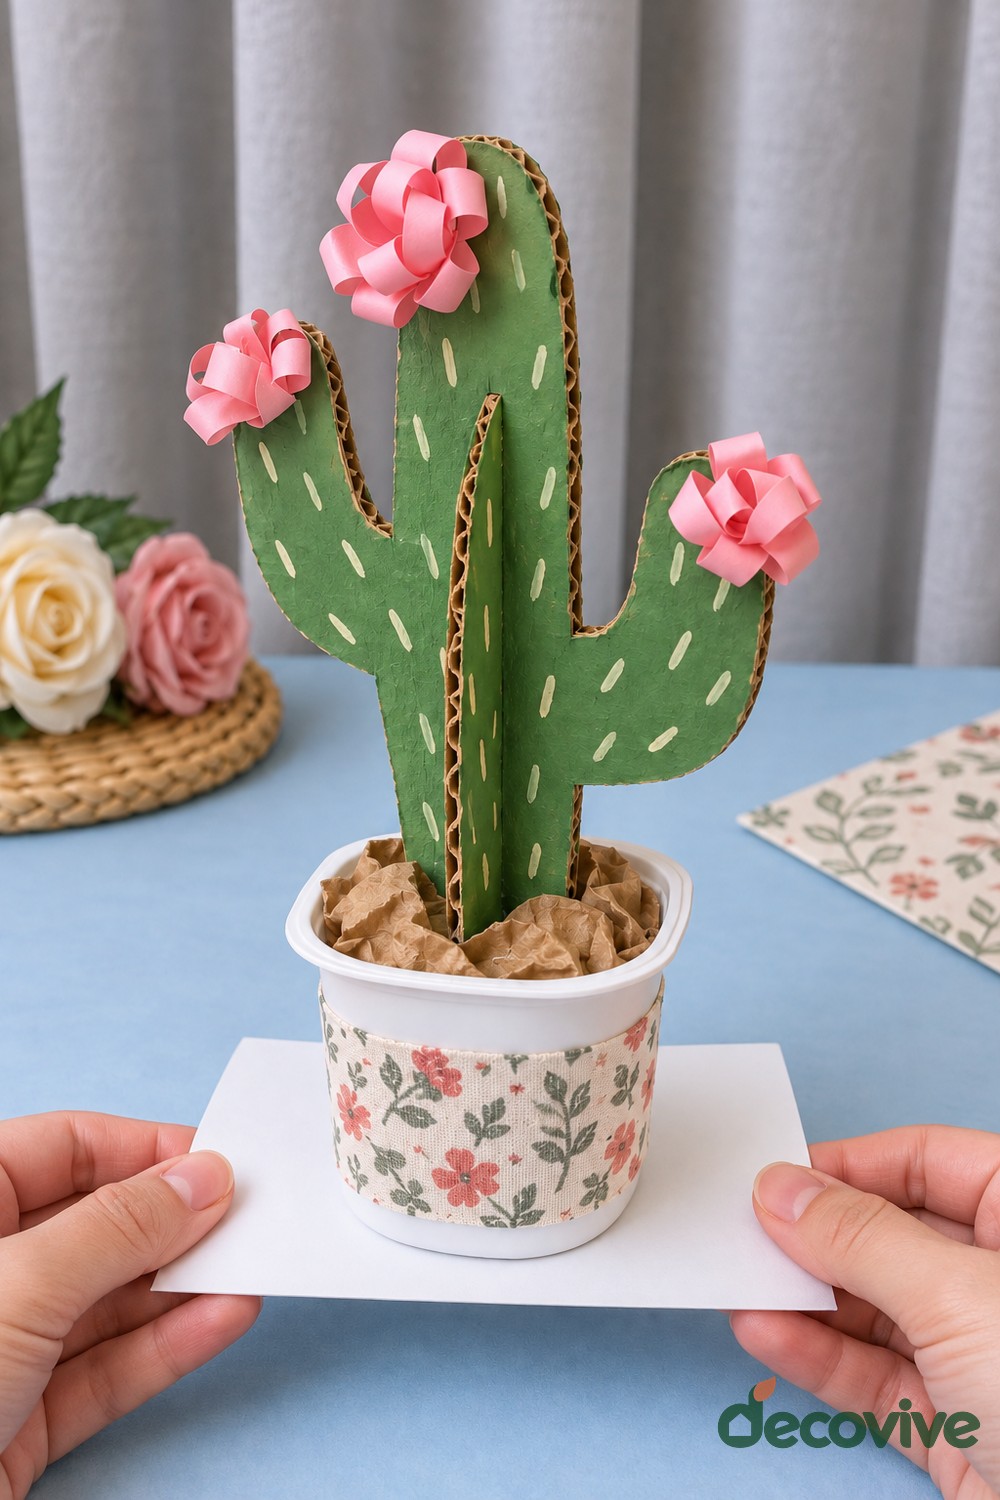
Materials: Corrugated cardboard, green washable paint, pink paper, a clean paper container, a cardboard insert for the pot, crumpled brown paper, craft glue, scissors, and a pale paint marker.
How to make it: Draw two cactus silhouettes with matching heights and arms. Cut a slot down from the top of one and up from the bottom of the other so they slide together at right angles. An adult should cut thick cardboard and adjust the slots until the cactus stands straight. Paint the pieces green, including their exposed edges, then add short pale marks instead of real spines. Fold pink paper strips into small blossoms and glue them to the arm tips.
Finishing and practical tips: Anchor the cactus in snug slots in a cardboard insert inside the pot and cover the insert with crumpled paper. The filler alone will not secure a tall cactus. Keep this decoration dry and lift it by its container rather than its flowers.
4. Egg Carton Chameleon with a Curled Tail
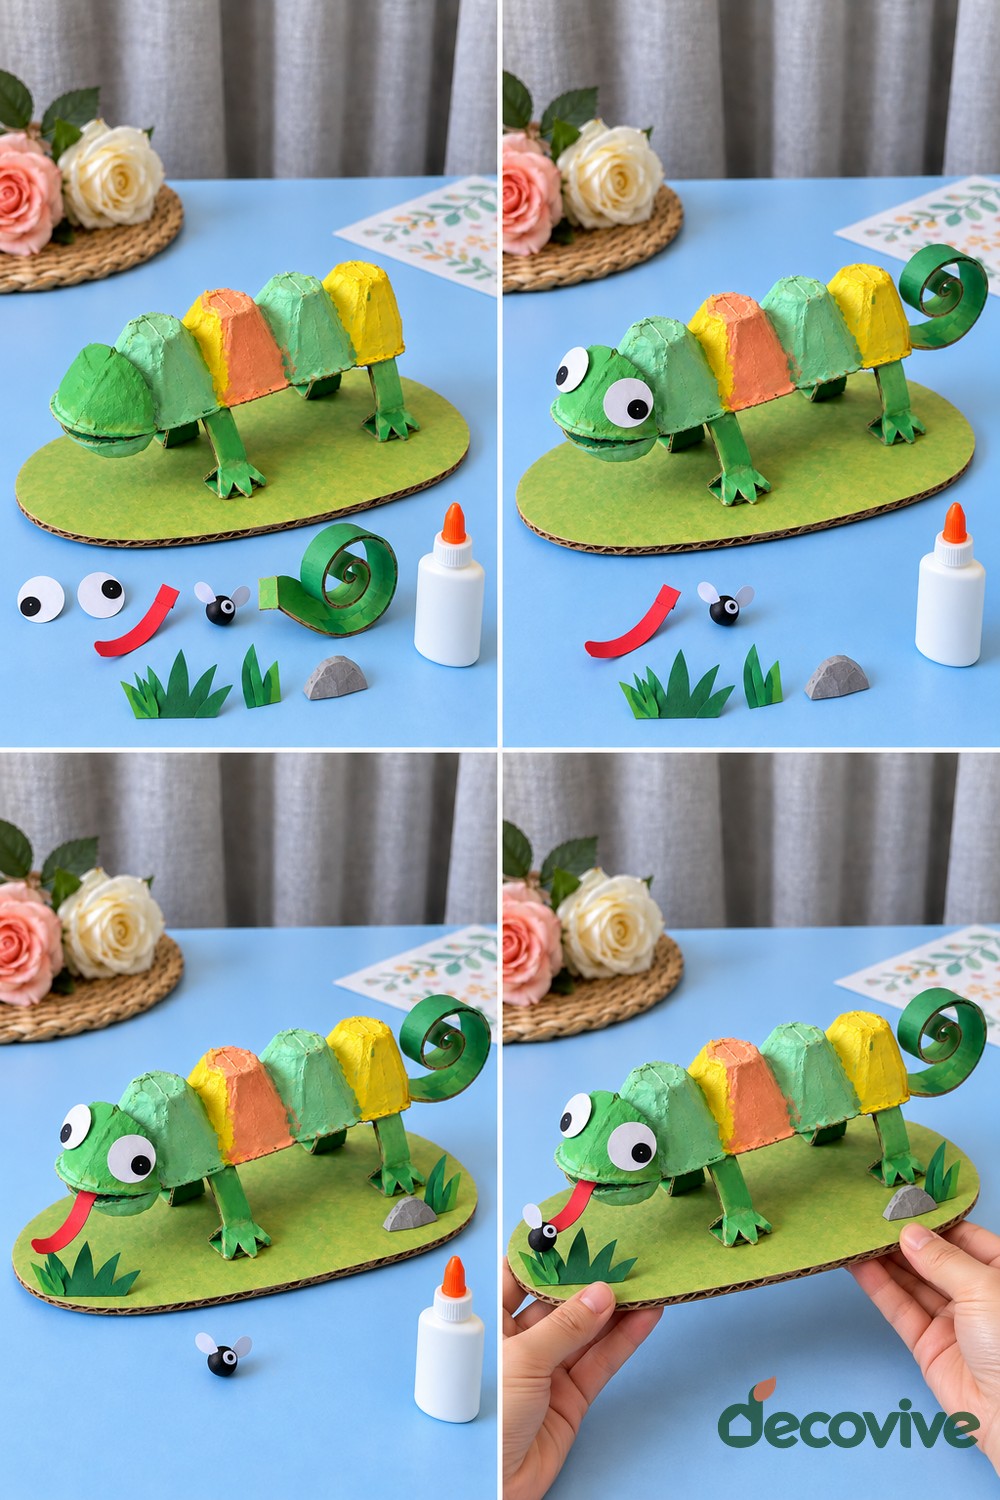
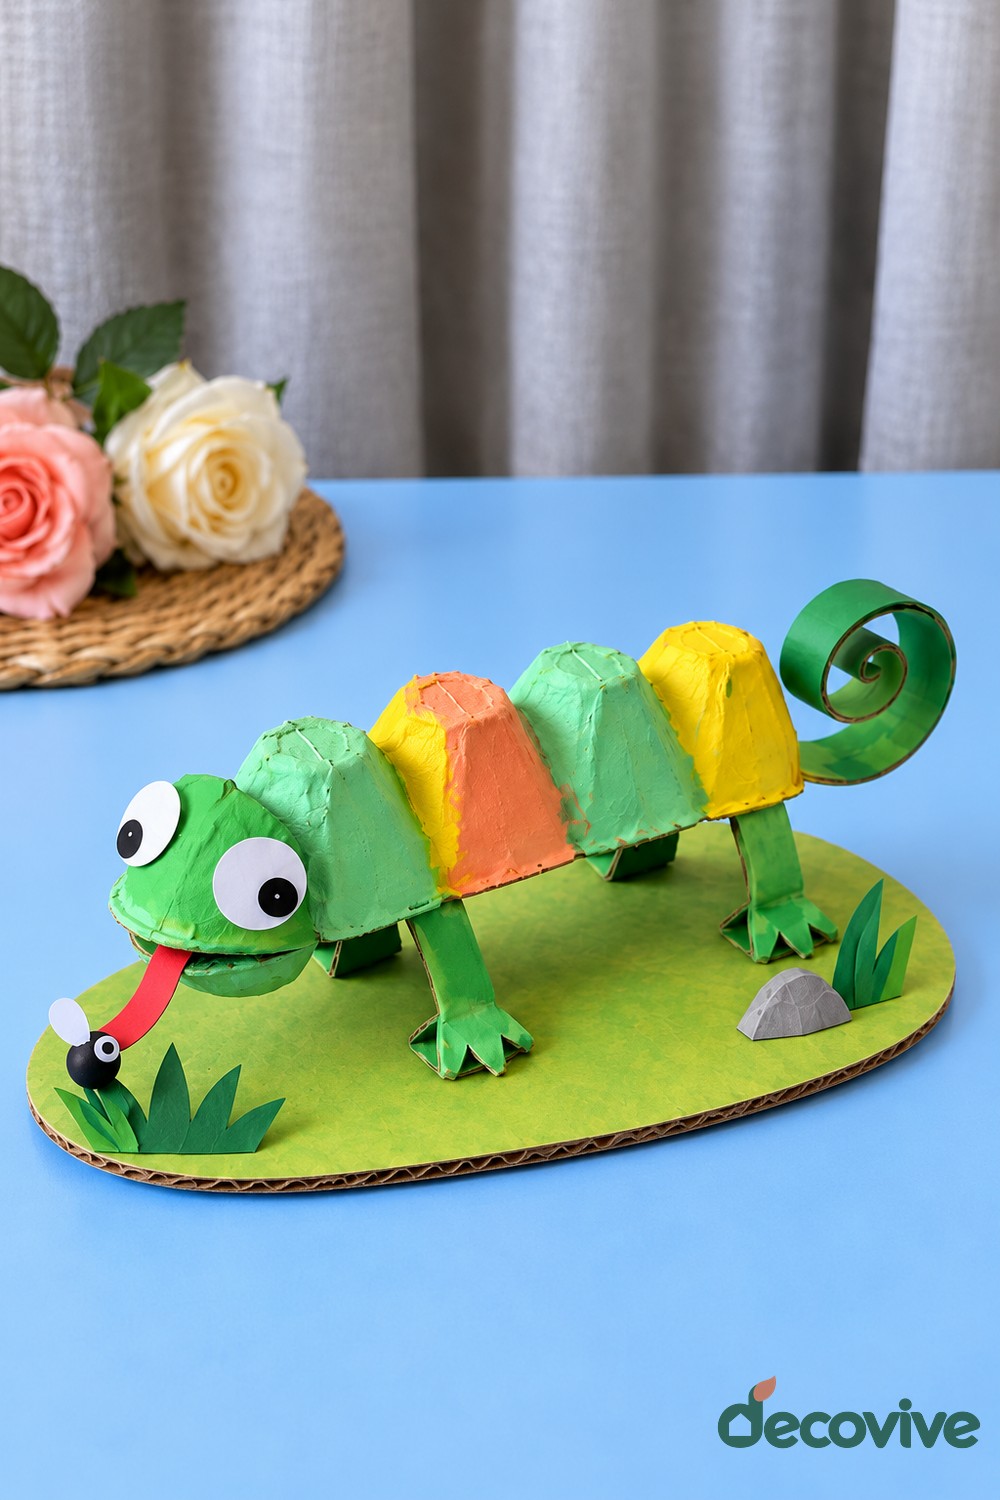
Materials: A clean dry paper egg carton, an oval corrugated cardboard base, green cardstock, a narrow cardboard strip for the tail, red and white paper, a small black paper piece, washable paints, scissors, and craft glue.
How to make it: Have an adult trim a connected row of carton cups, shaping the first cup into the head and leaving a narrow mouth opening. Paint the head green and the raised back sections in alternating cheerful colors. Fold four cardboard legs with broad attachment tabs at the top and small feet at the bottom. Glue them underneath the body and onto the oval base. Curl the tail strip around a pencil, release it, and glue its flat attachment tab firmly behind the last cup.
Finishing and practical tips: Add paper eyes and a red paper tongue, with a tiny paper fly attached at its tip. Support the tongue while its glue dries. The grass and rock can help create a miniature habitat, but the legs and tail should remain clearly visible.
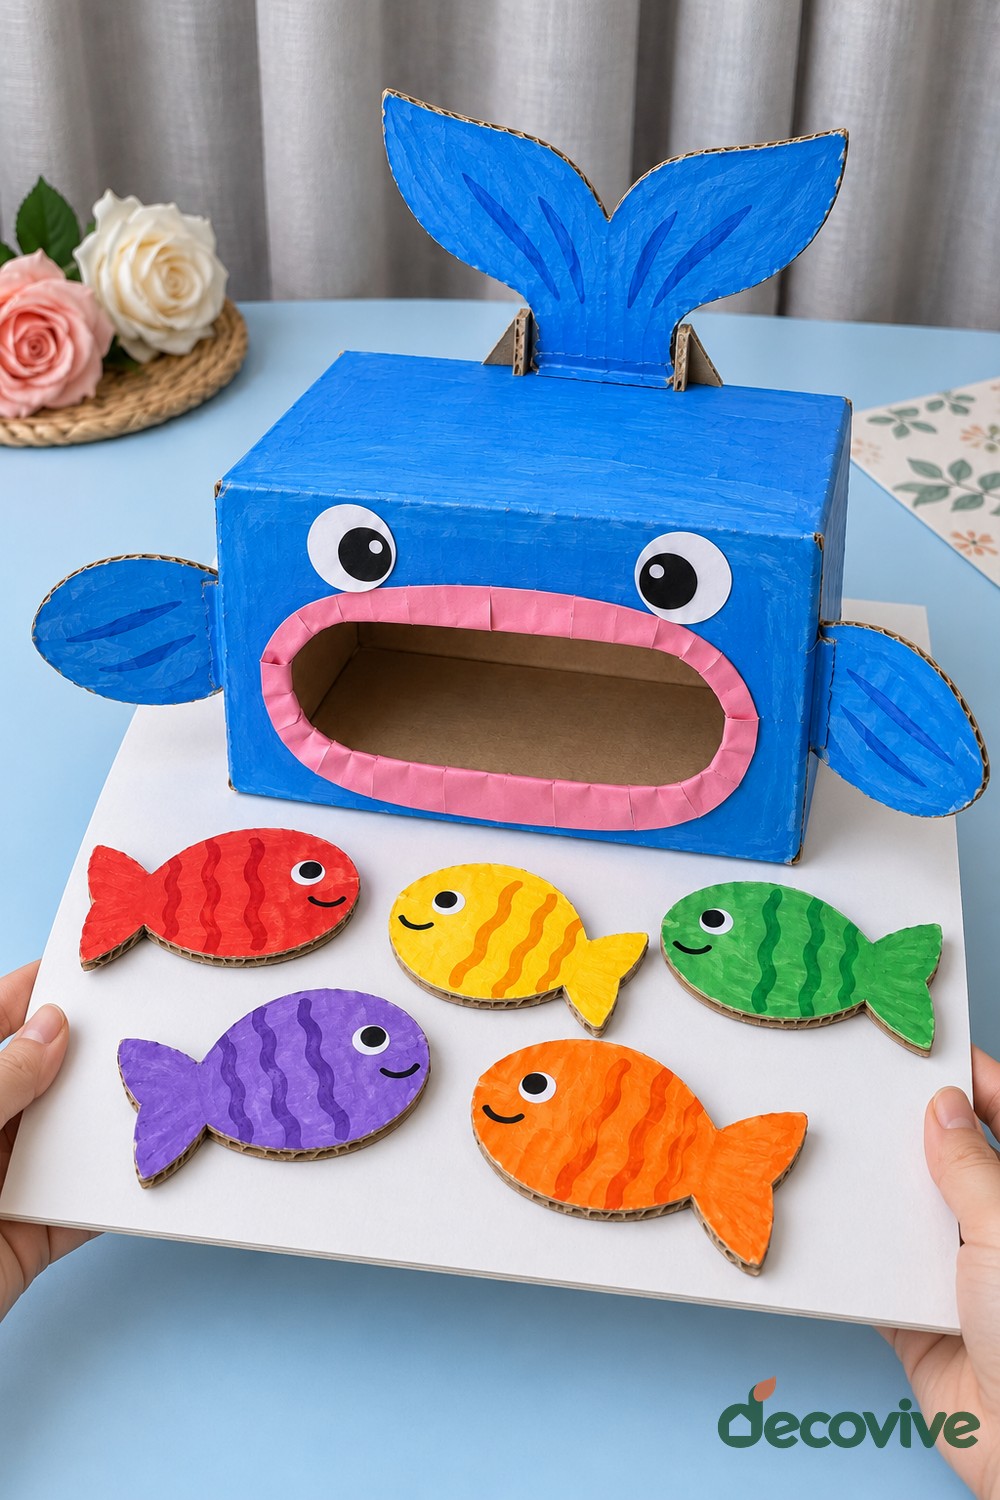
5. Cardboard Whale Feeding Game
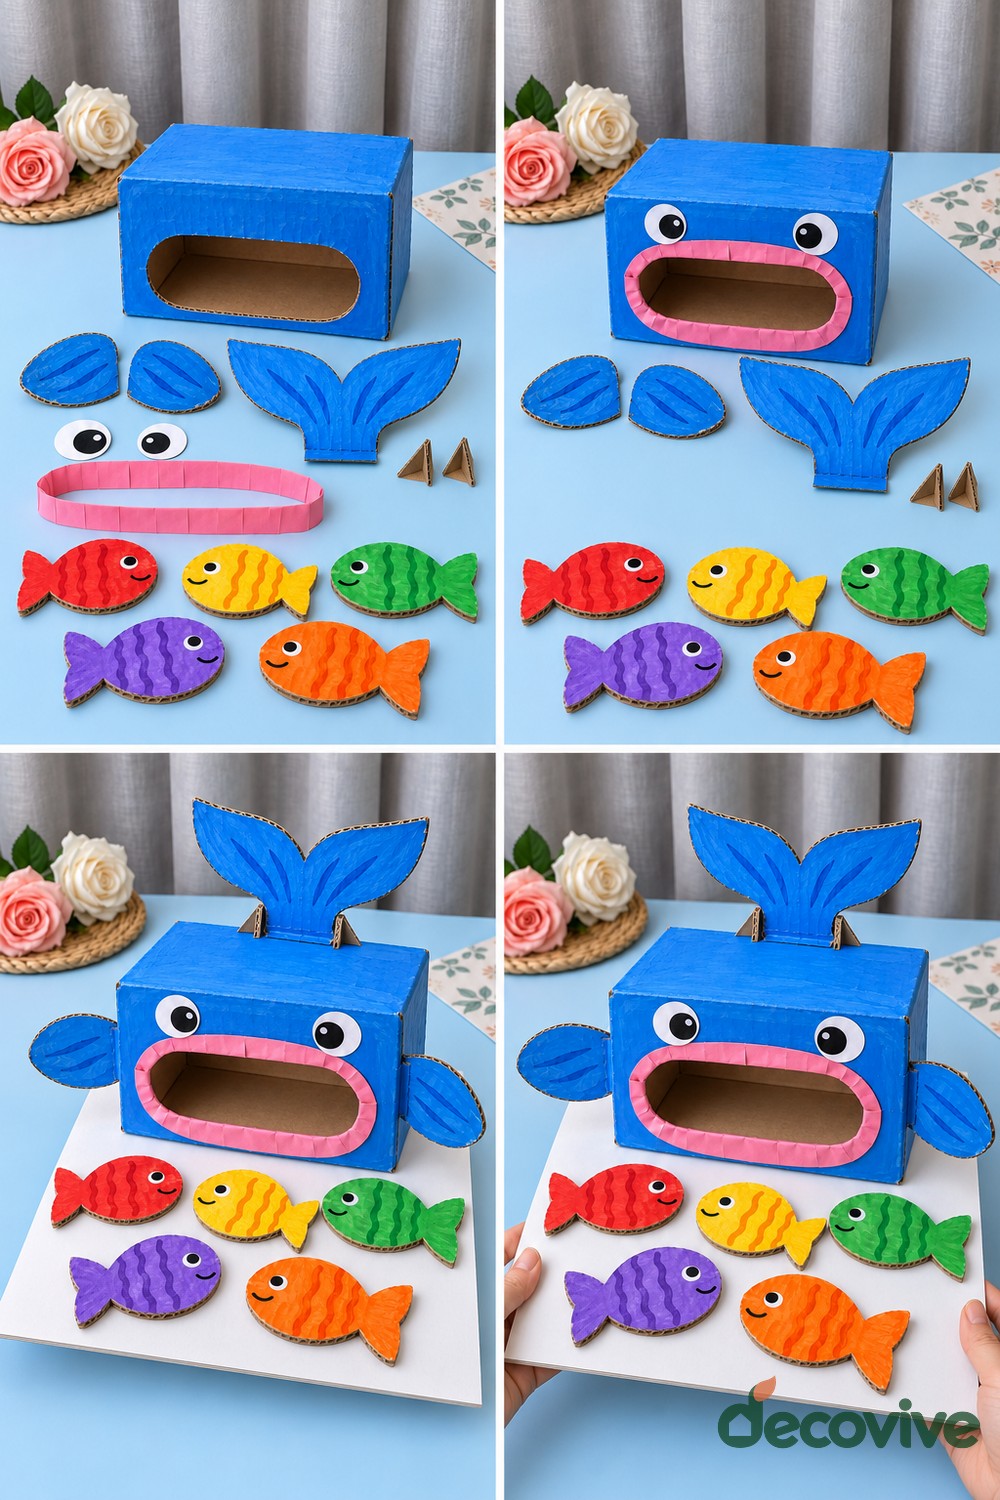
Materials: A small cardboard box, blue paint, blue cardstock for fins and tail, pink paper for the mouth rim, white and black paper eyes, cardboard fish shapes, washable paints, scissors, and craft glue.
How to make it: An adult can cut a wide rounded mouth in the front of the box and cover any rough edges with a smooth paper rim. Paint the box blue, then glue broad side fins to opposite walls. Make a slot in the top for the tail and secure its lower tabs inside the box so it stays upright. Add the eyes above the mouth. Cut several chunky cardboard fish, decorate them in different colors, and let their paint dry before playing.
Finishing and practical tips: Keep the fish large and flat, particularly around children who still put objects in their mouths. Leave the back or lid accessible so the fish can be collected without crushing the whale. Invite children to feed it a named color or count how many fish fit inside.
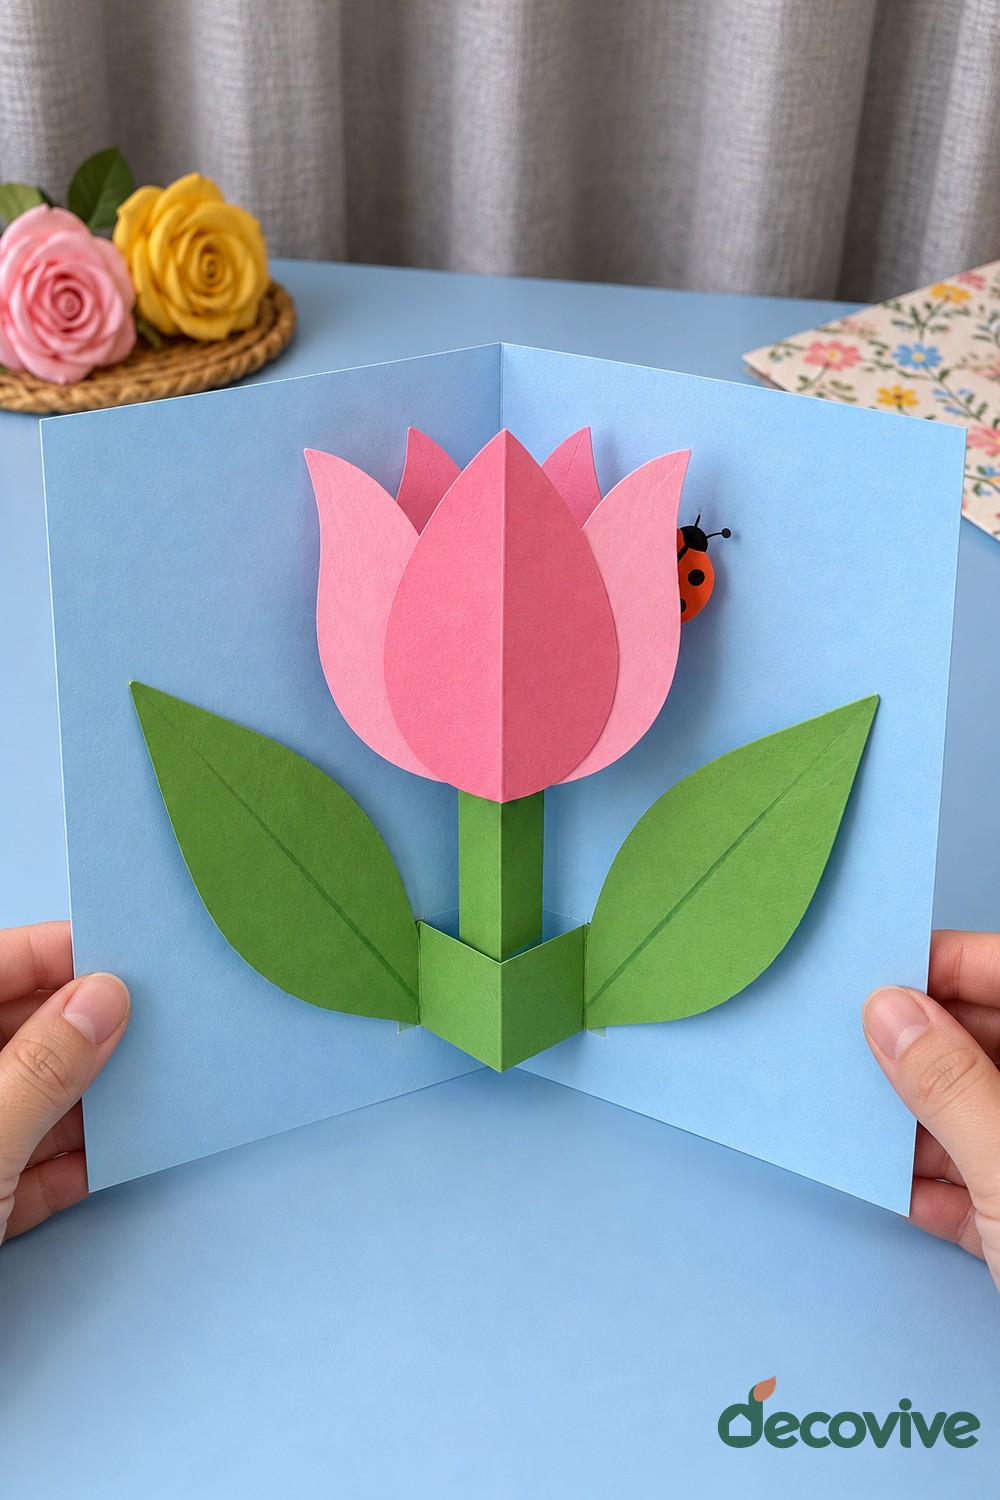
6. Folded Paper Tulip Card
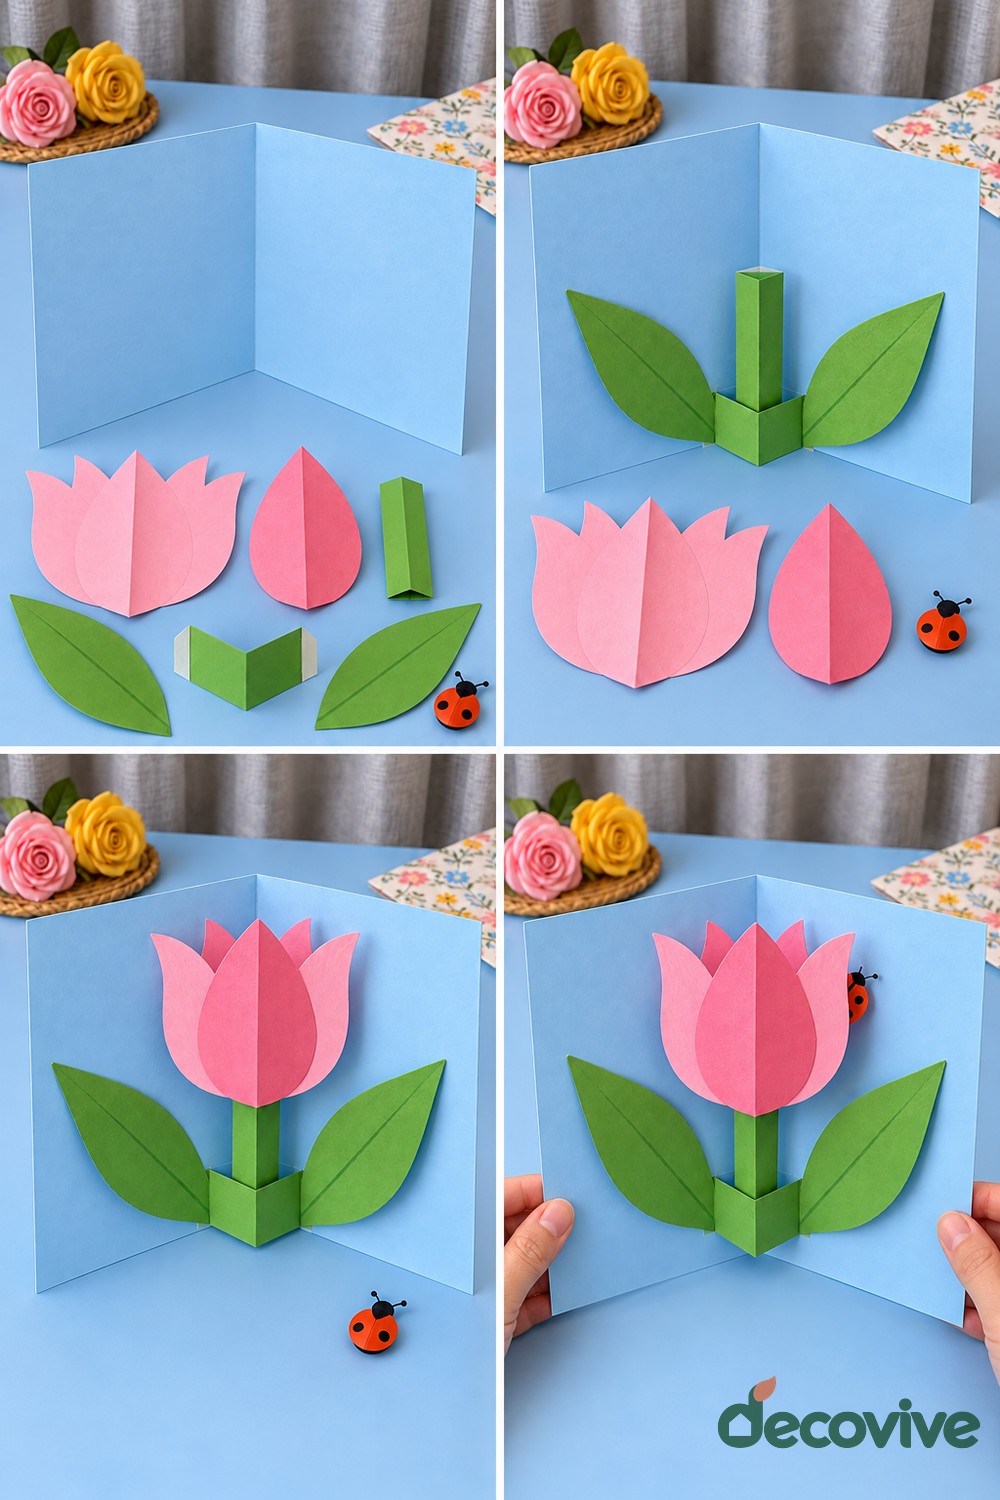
Materials: One pale blue folded card, pink paper, green paper, scissors, a pencil, and a glue stick.
How to make it: Fold the blue card in half and crease it firmly. Cut several matching pink petal shapes, each with a pointed top and rounded lower edge. Fold the petals lengthwise, then glue their outer halves together to form a layered flower that can flatten when the card closes. Fix only the two outside faces to the card near its central fold. Add a green stem beneath the blossom and two leaves angled outward, keeping their attachment points clear of the moving paper layers.
Finishing and practical tips: Close the card gently before the glue sets to check that no petals catch or extend beyond the edges. Reopen it for drying. You can use the same construction for a birthday greeting or a spring display, changing the petal color without adding heavy decorations.
7. Cardboard Airplane Hangar and Paper Runway
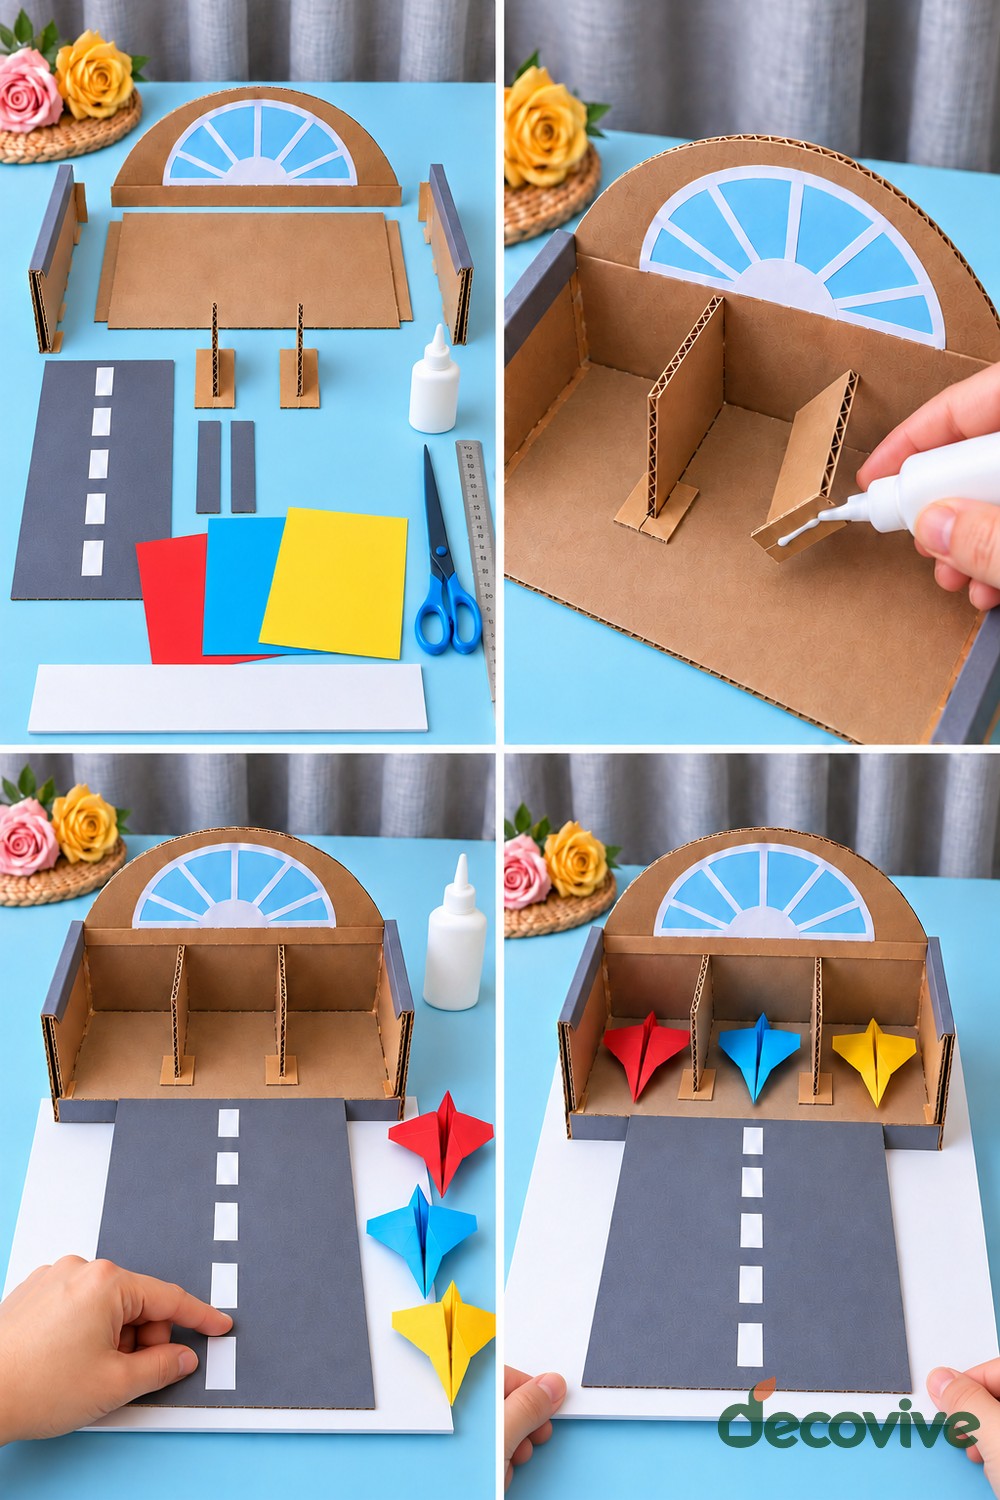
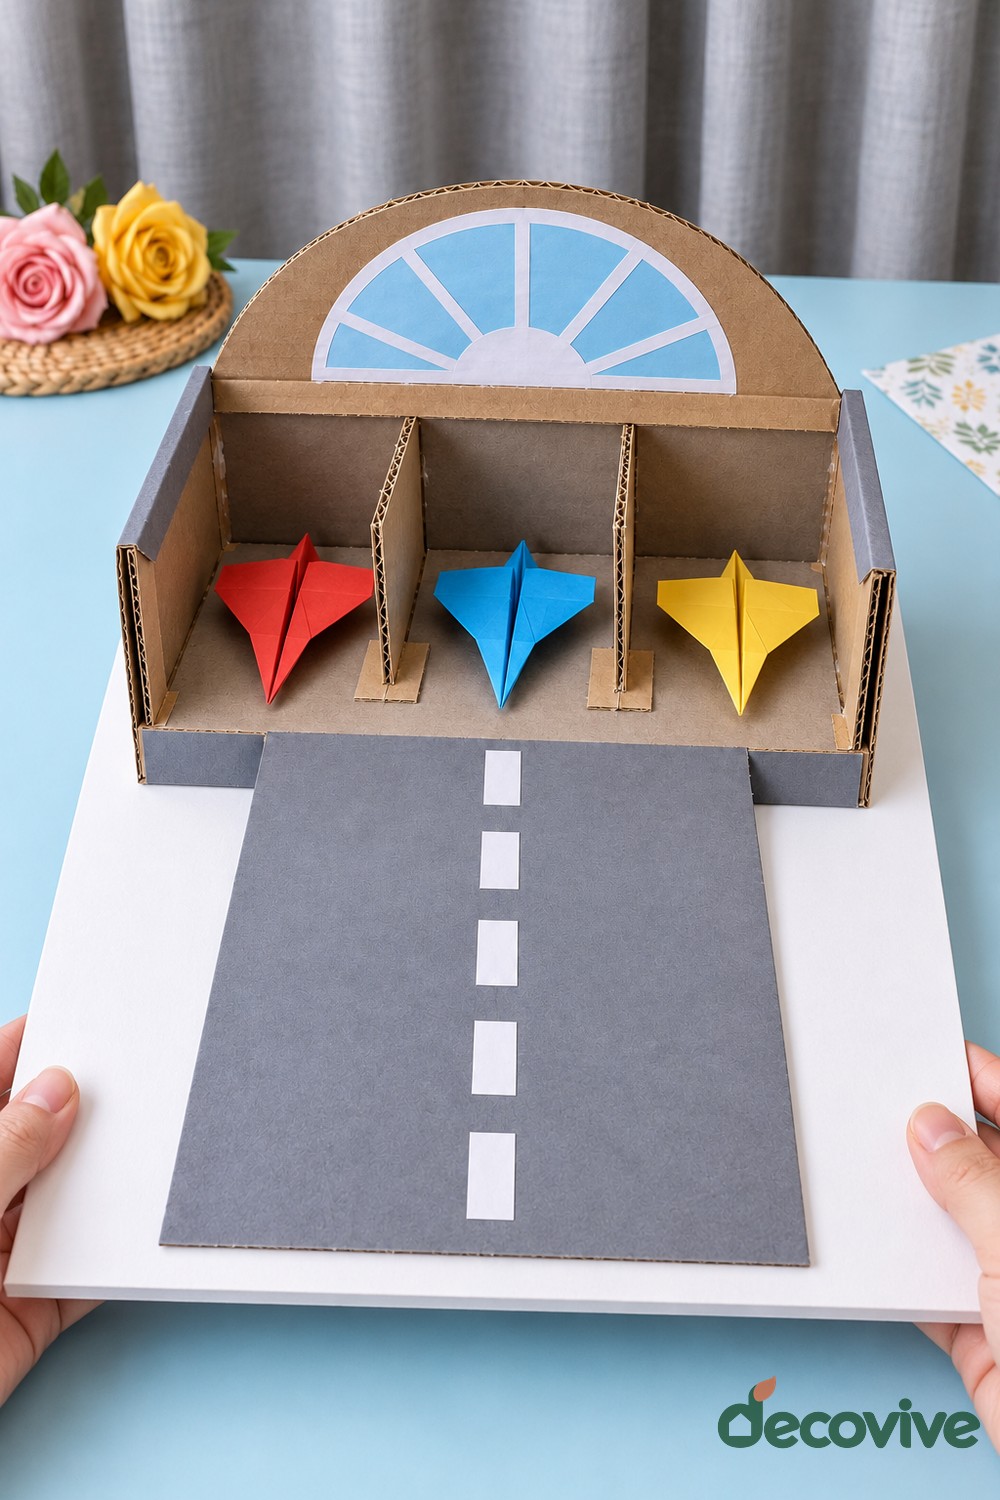
Materials: A shallow cardboard box, extra corrugated cardboard for dividers and a rounded sign, gray and white paper, blue paper for the window, three full sheets of colored paper for airplanes, scissors, and craft glue.
How to make it: Place the box on its side with the opening facing forward. Fit two upright dividers inside to create three parking bays, securing each divider with folded tabs along its base and back. Add a rounded cardboard header with a pale blue paper window above the bays. Cover a long cardboard runway with gray paper and add a line of short white rectangles down its center. Fold three airplanes from full sheets of paper, then check their wingspans against the bay widths.
Finishing and practical tips: Make the bays wider than the finished planes before gluing the dividers permanently. Keep the runway level with the hangar floor so the planes can slide in easily. Launch paper planes only into a clear space and away from faces; the hangar also works as a quiet tabletop sorting activity.
8. Rainbow Paper Shooting Star
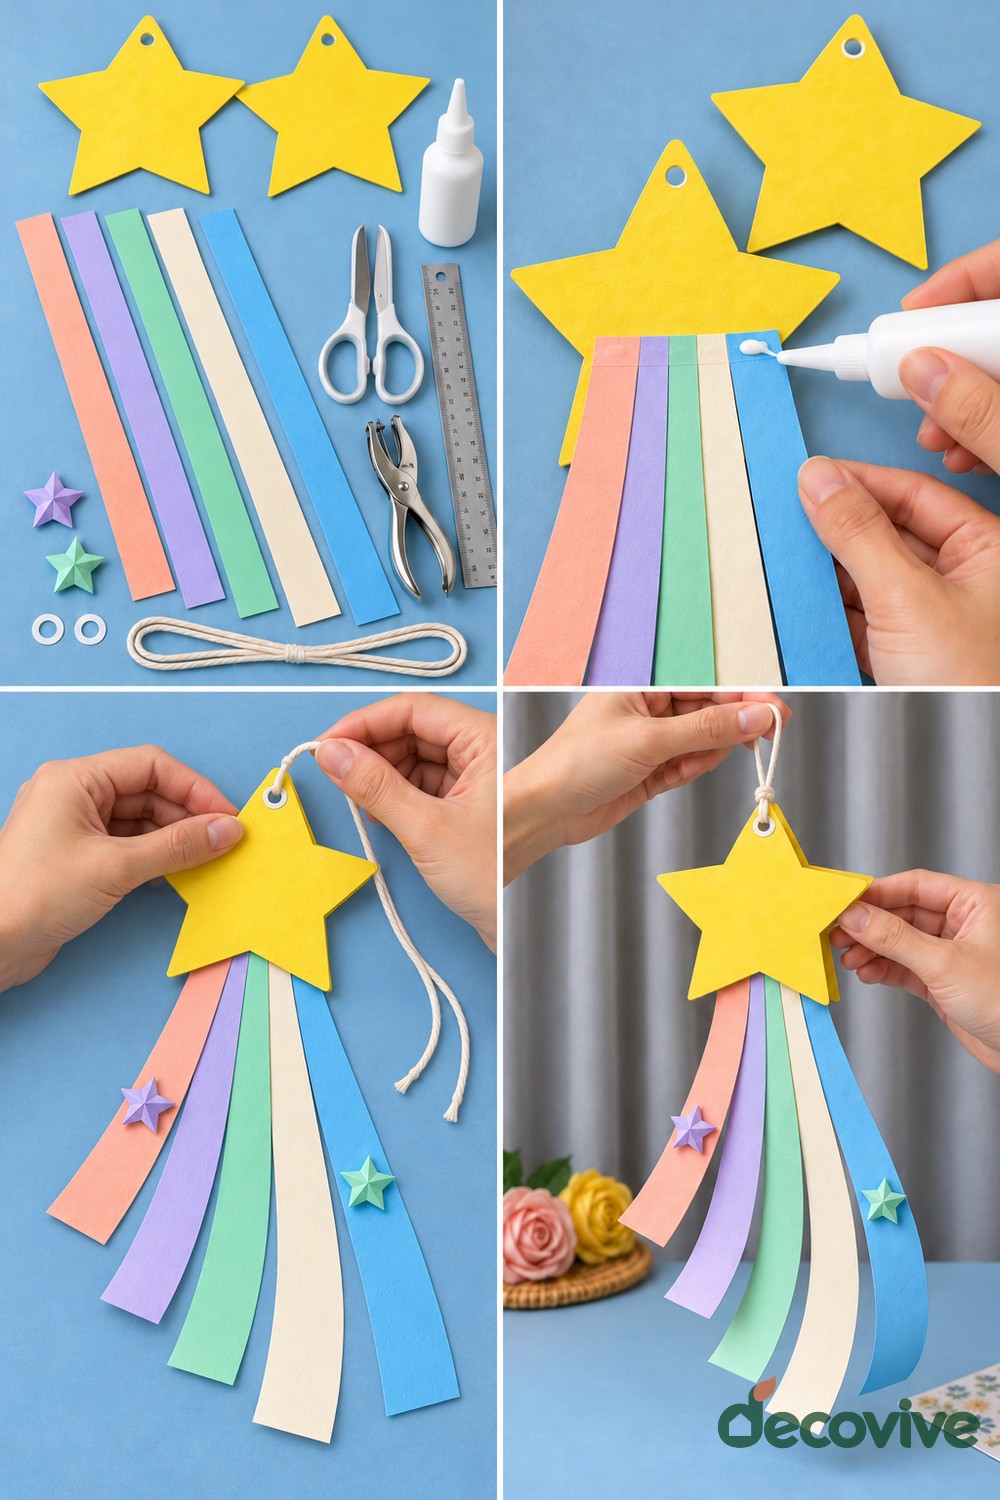
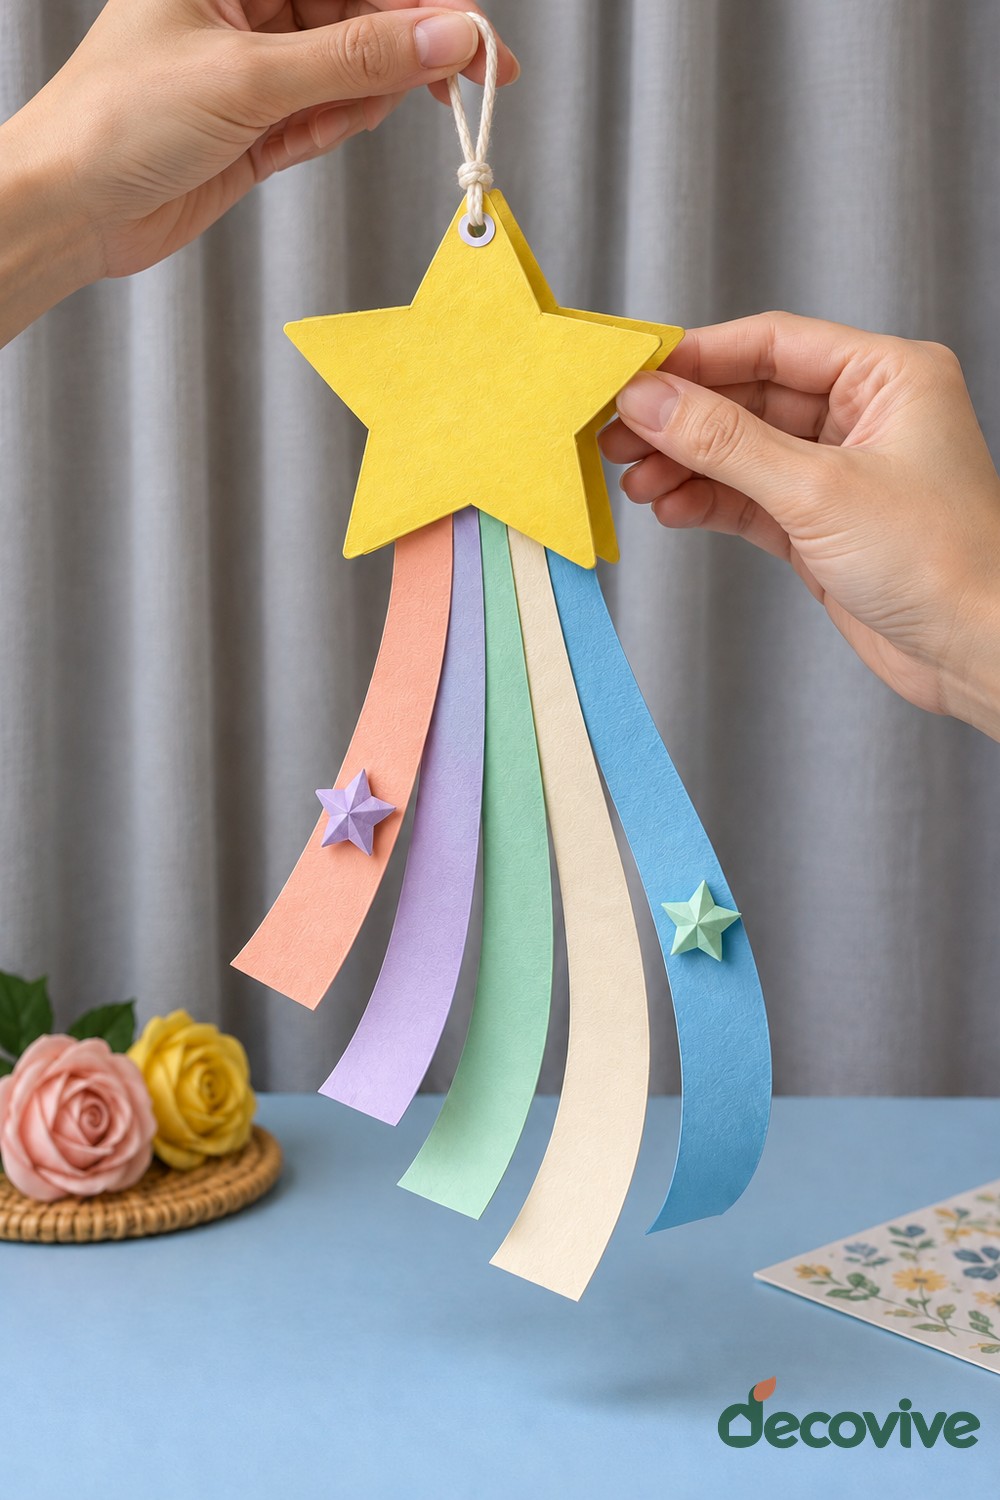
Materials: Yellow cardstock, several long pastel paper strips, a short length of yarn, a hole punch, scissors, a glue stick, and optional small paper stars.
How to make it: Cut one large yellow star and arrange the pastel strips behind its lower points. Overlap their top ends across a broad area so each strip has enough surface for glue. Attach the strips to the back, then cover the join with a second small piece of yellow cardstock if it needs reinforcement. Curl the lower ends gently around a pencil and release them without creasing. Punch a hole near the top point, leaving a generous border of card above it, and thread a short hanging loop through.
Finishing and practical tips: Use lightweight paper decorations so the tails still hang freely. Display the star away from fans, heaters, and places where children could catch the loop around themselves. A shorter version can be taped to a bedroom noticeboard instead of suspended.
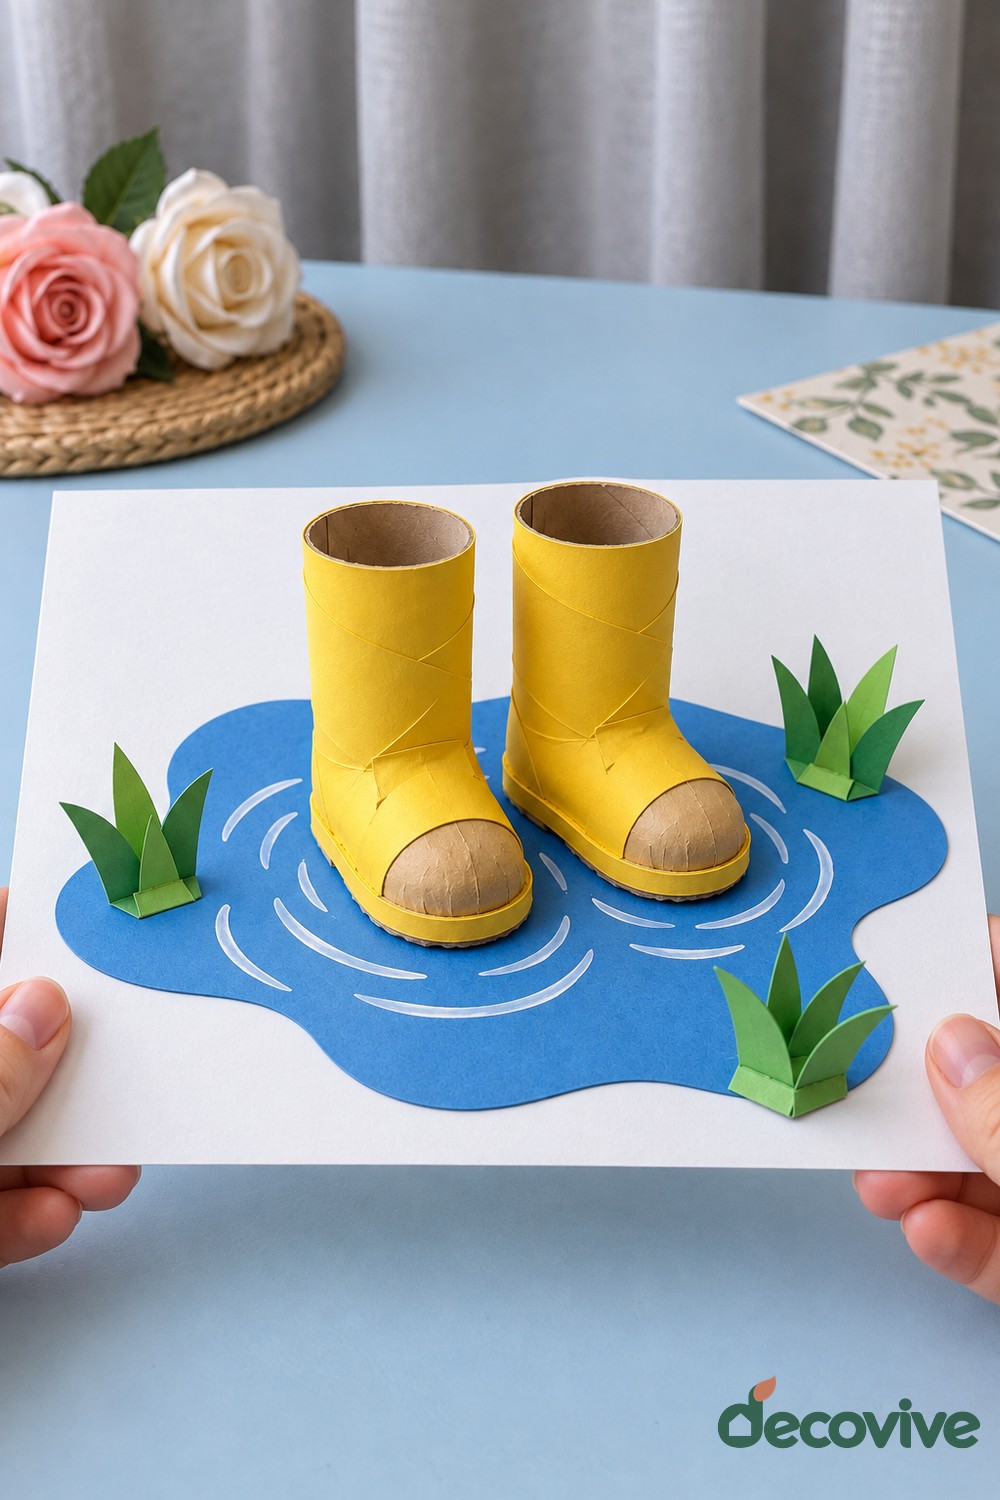
9. Cardboard Rain Boots in a Paper Puddle
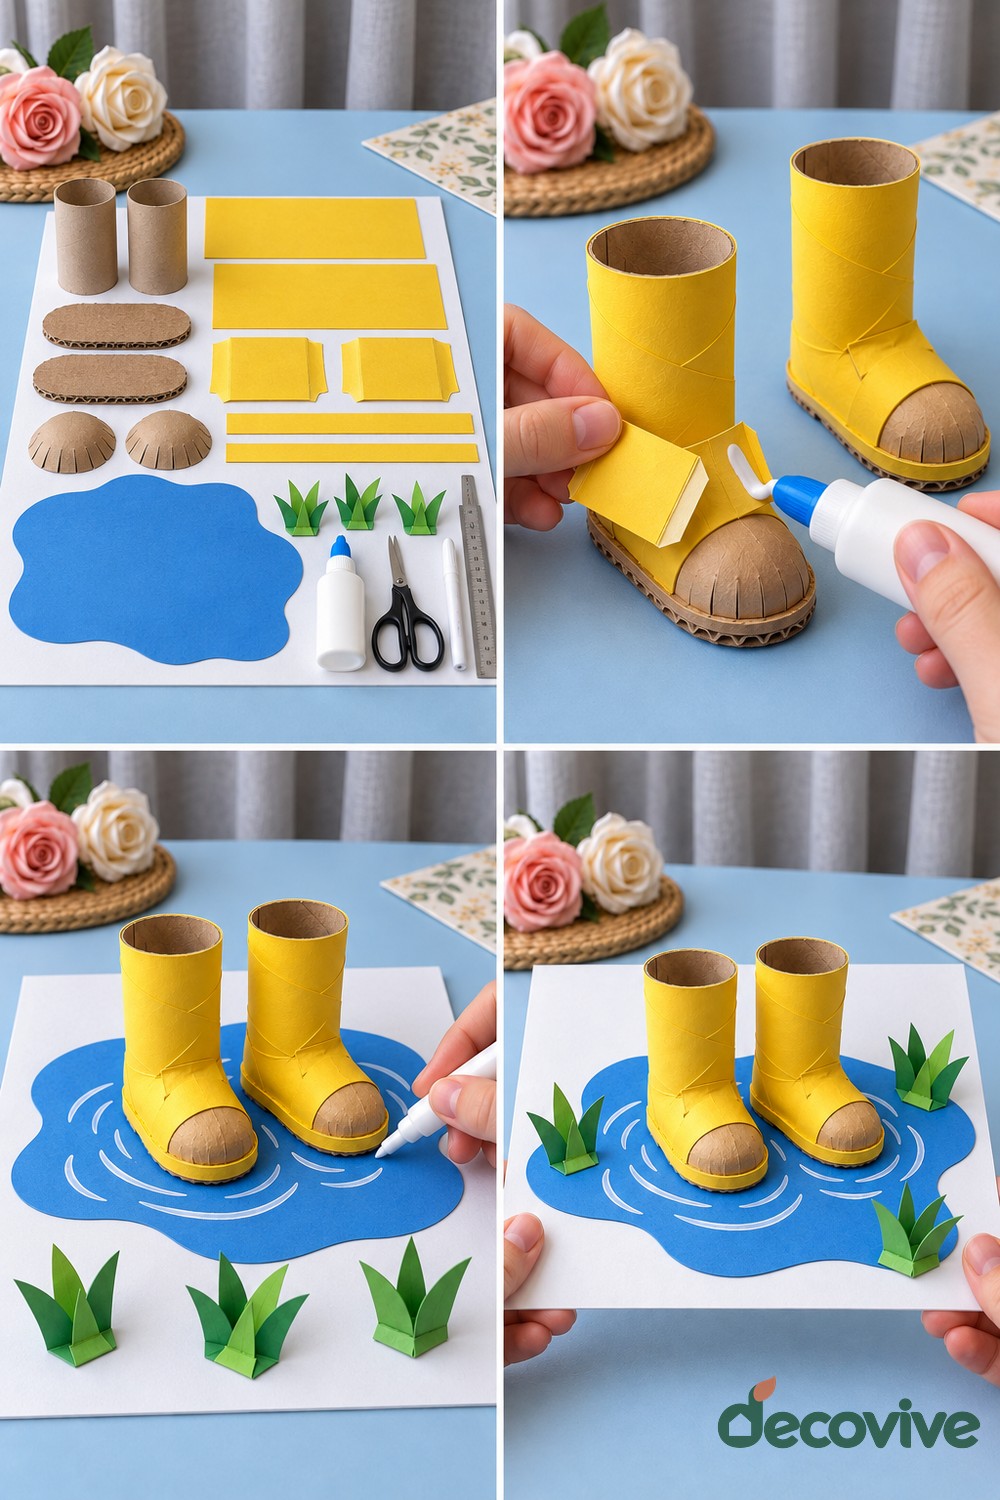
Materials: Two clean cardboard tubes, corrugated cardboard for rounded toes and soles, yellow paper or paint, blue cardstock for a puddle, green paper, white paint or a pencil, scissors, and craft glue.
How to make it: Trim the tubes to matching heights. Build a rounded toe in front of each tube using curved cardboard over a flat sole, then wrap or paint both parts yellow. Keep the tube opening visible at the top so the boots retain their hollow shape. An adult can help cut the toe supports and smooth any sharp corners. Glue both soles onto a blue puddle shape, leaving a small gap between the boots, and add pale ripple marks around their bases.
Finishing and practical tips: Fold small tabs beneath the grass clumps and glue them to the puddle. These are miniature display boots rather than wearable items, and the puddle is dry paper rather than water. Wait until all joins are firm before moving the scene by its base.
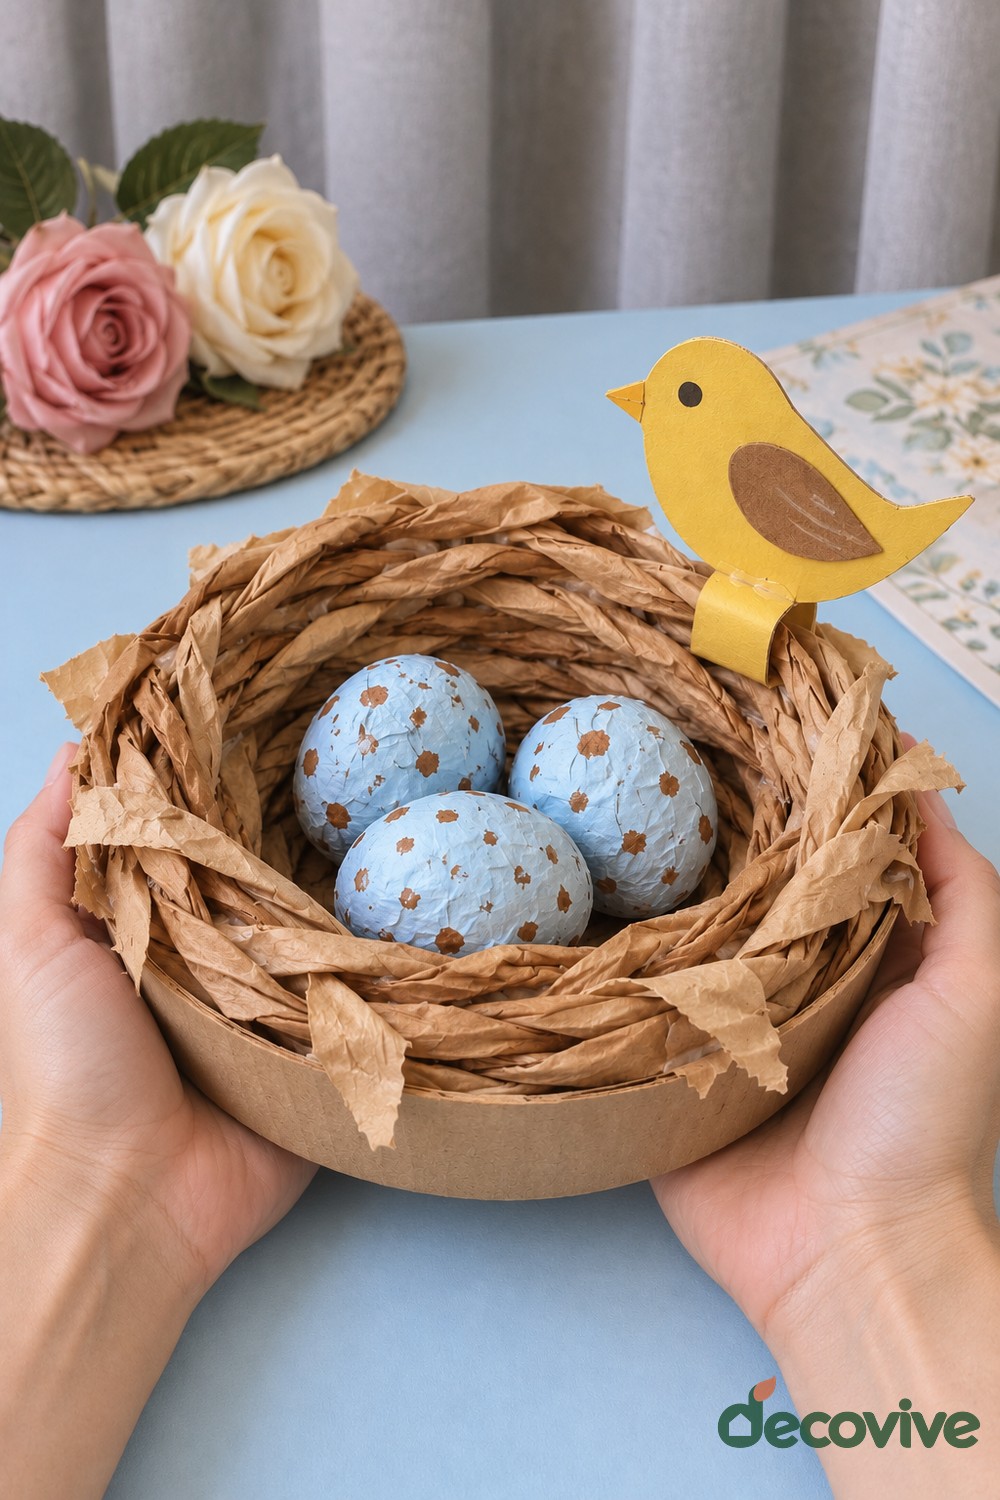
10. Twisted Paper Bird Nest with Speckled Eggs
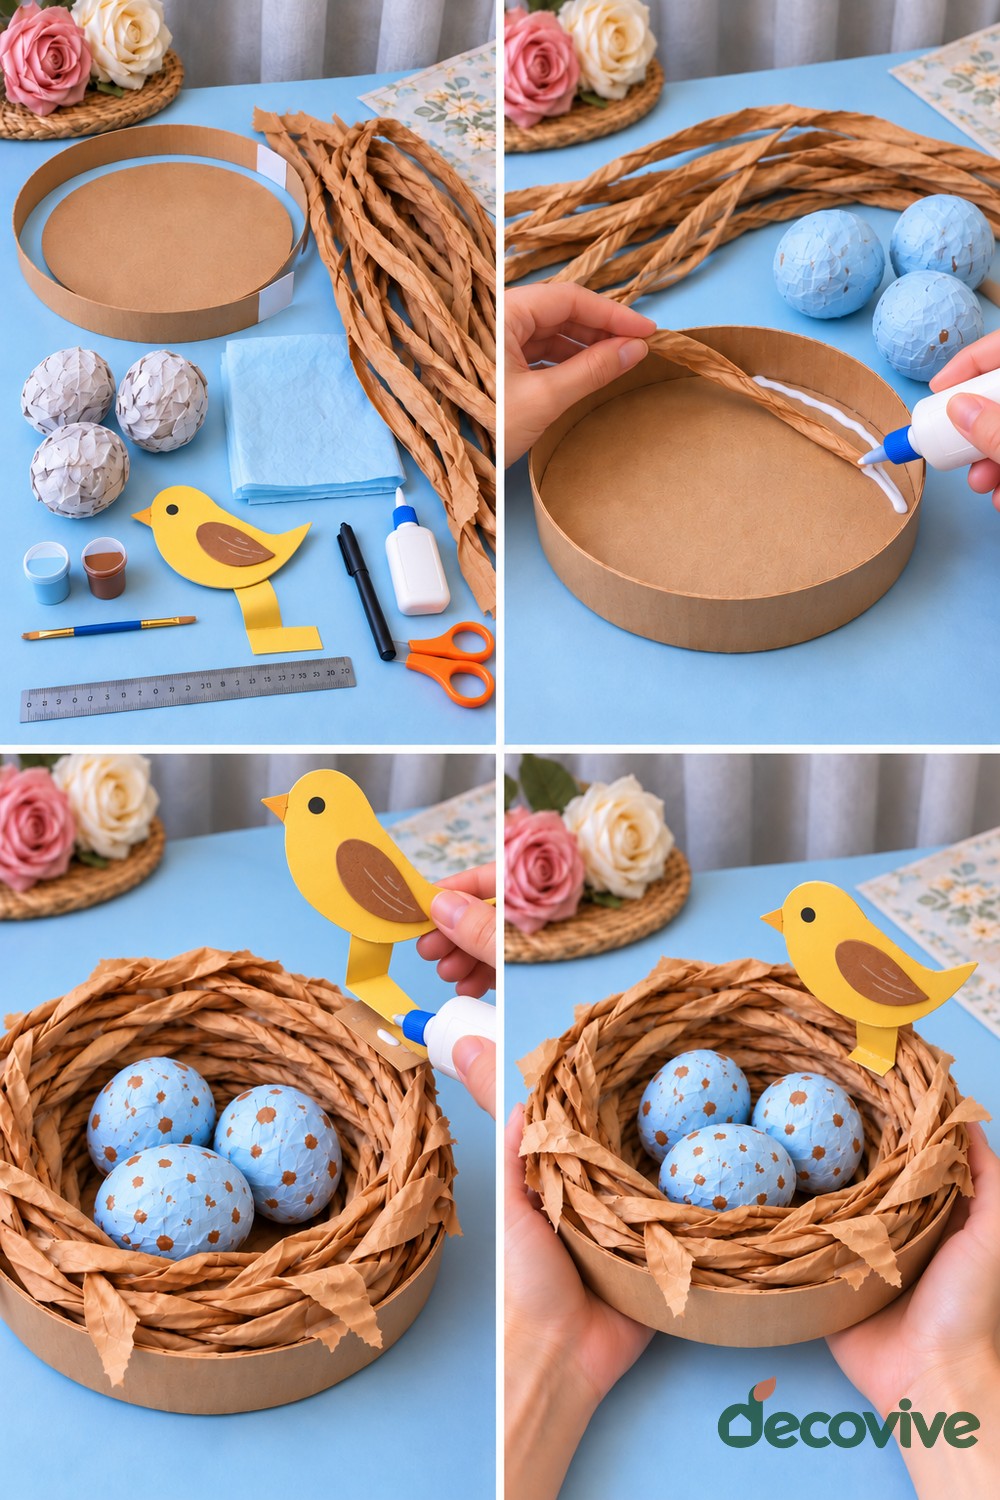
Materials: A shallow round cardboard tray, brown packing paper, blue paper for three eggs, a small sponge, brown washable paint, yellow cardstock for a bird, scissors, and craft glue.
How to make it: Tear the packing paper into long strips and twist each strip loosely into a textured cord. Glue the cords around the tray rim in overlapping circles, adding shorter pieces across the inside to soften the base. Keep the tray underneath as the structural support. Crumple blue paper into three oval eggs and wrap each with a smoother outer layer. Use a sponge to dab on a few brown speckles and let the paint dry before arranging the eggs.
Finishing and practical tips: Glue a flat yellow paper bird to the nest rim with a folded tab behind its feet. Keep the eggs secured if younger children may handle the display. This is an indoor craft nest, so avoid placing glue, paint, or paper outdoors as nesting material for real birds.
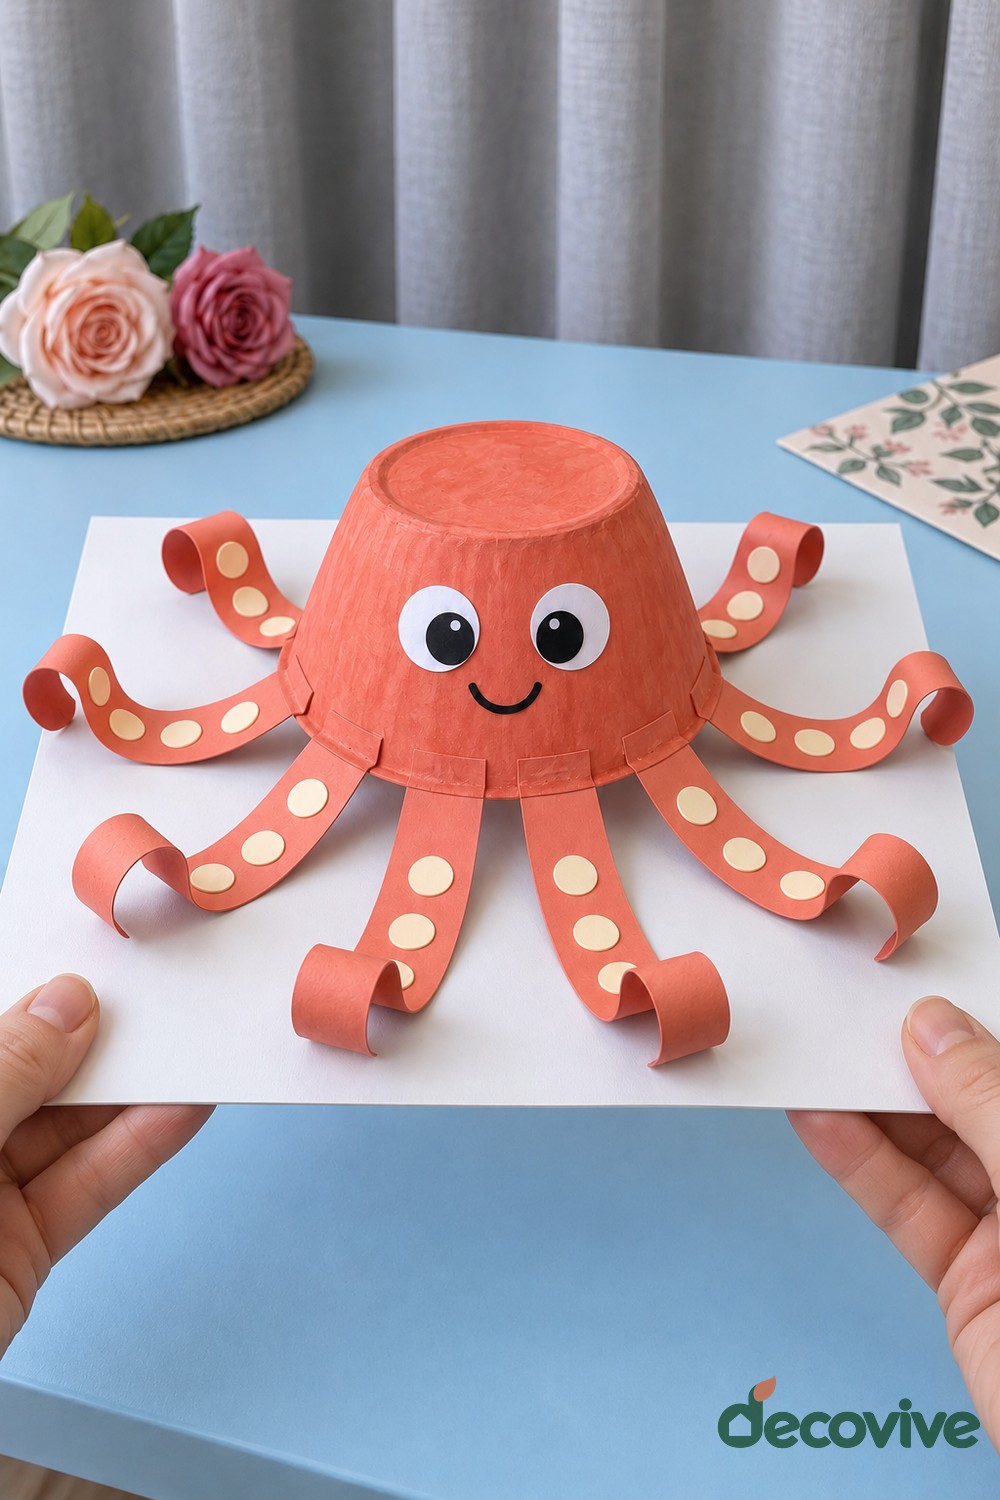
11. Paper Bowl Octopus with Eight Curled Arms
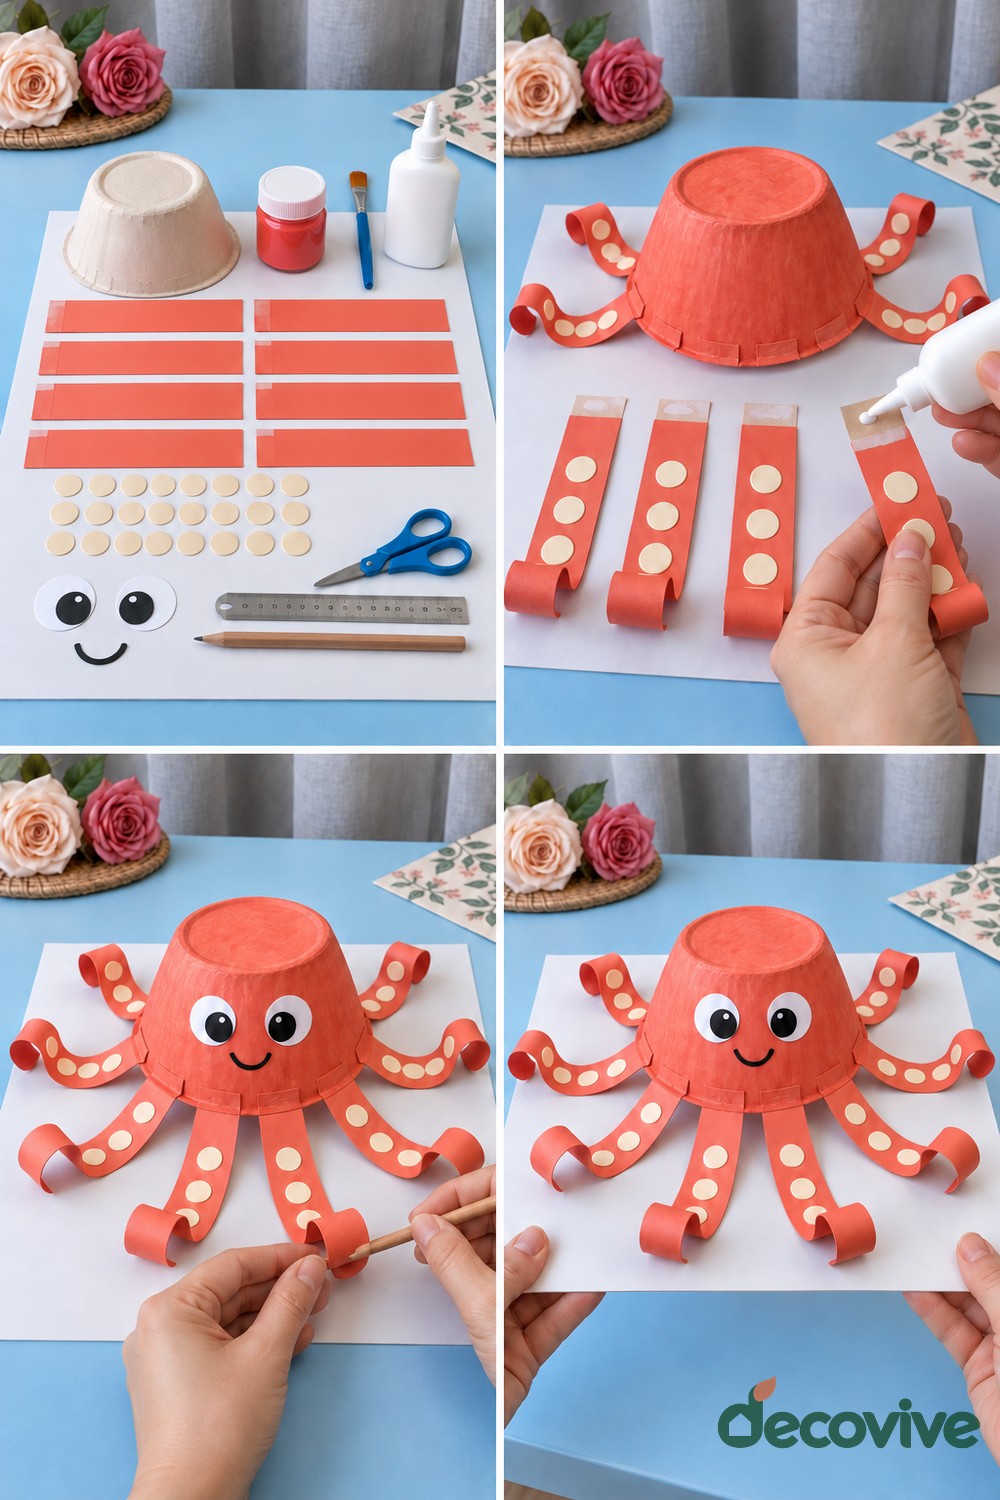
Materials: One paper bowl, orange washable paint, eight orange paper strips, pale paper circles, two paper eyes, black paper for a smile, a pencil, scissors, and craft glue.
How to make it: Turn the bowl upside down, paint it orange, and allow it to dry. Cut eight equal paper strips and add pale circles along them as simple suckers. Leave a plain tab at one end of every strip for attachment. Arrange all eight tabs evenly around the bowl rim before gluing, checking that four will not accidentally overlap the other four. Glue the tabs securely along the lower rim and curl the free ends around a pencil.
Finishing and practical tips: Add two eyes and a small curved smile to the front. Count the arms together once more before the glue dries. If thin strips tear while curling, use slightly heavier paper and make a wider curl. Carry the finished octopus by the bowl rather than pulling its arms.
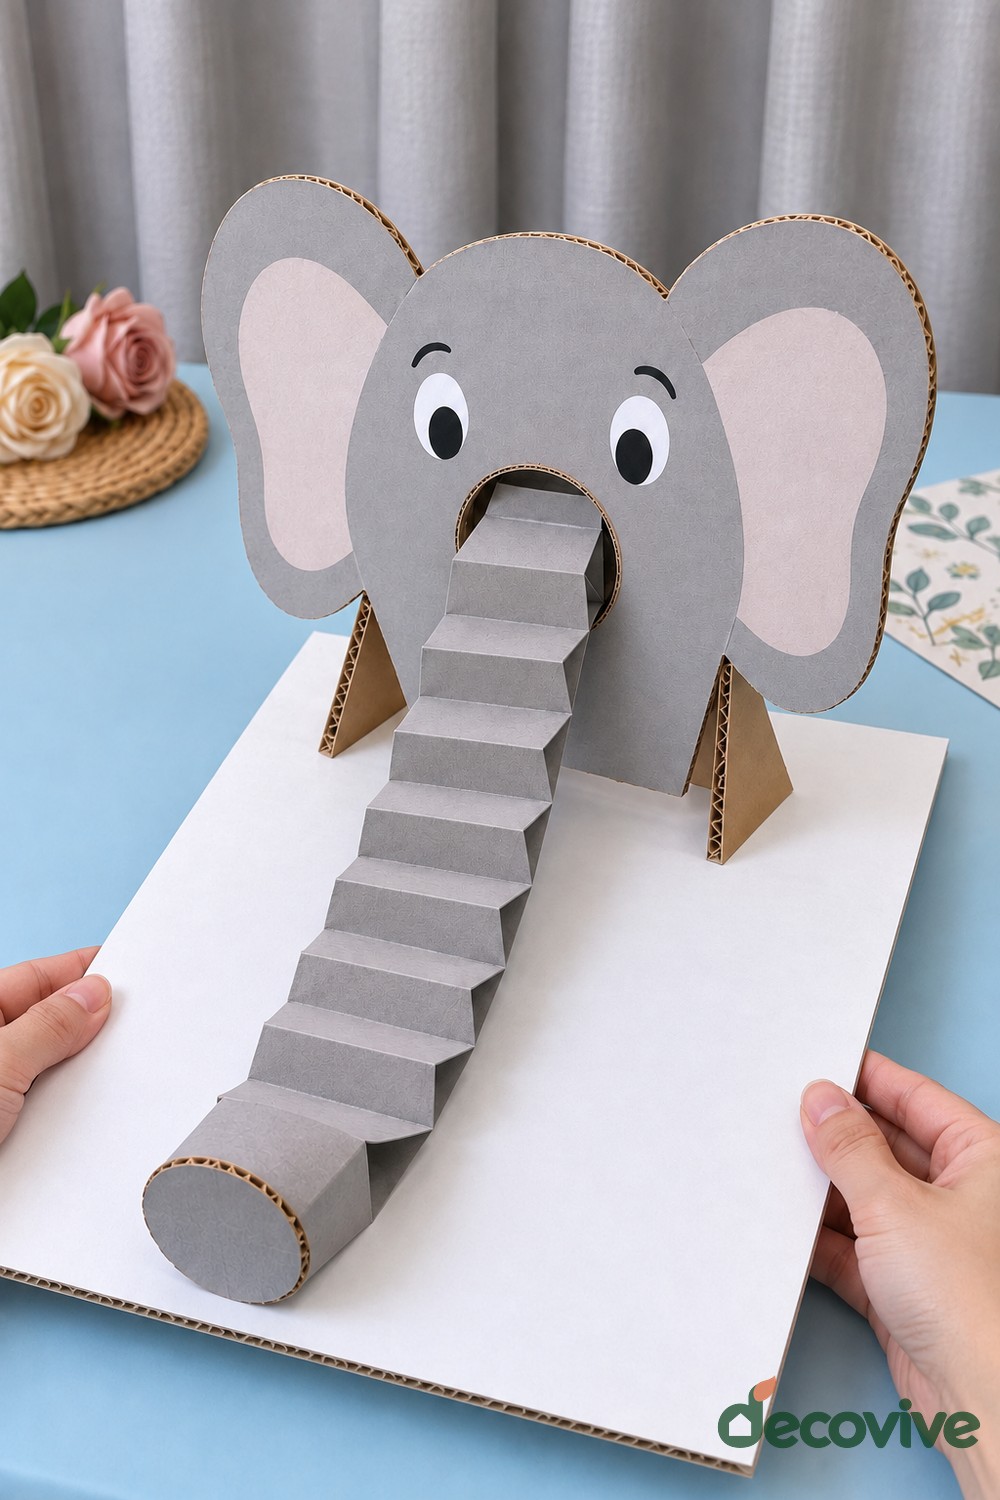
12. Standing Cardboard Elephant with an Accordion Trunk
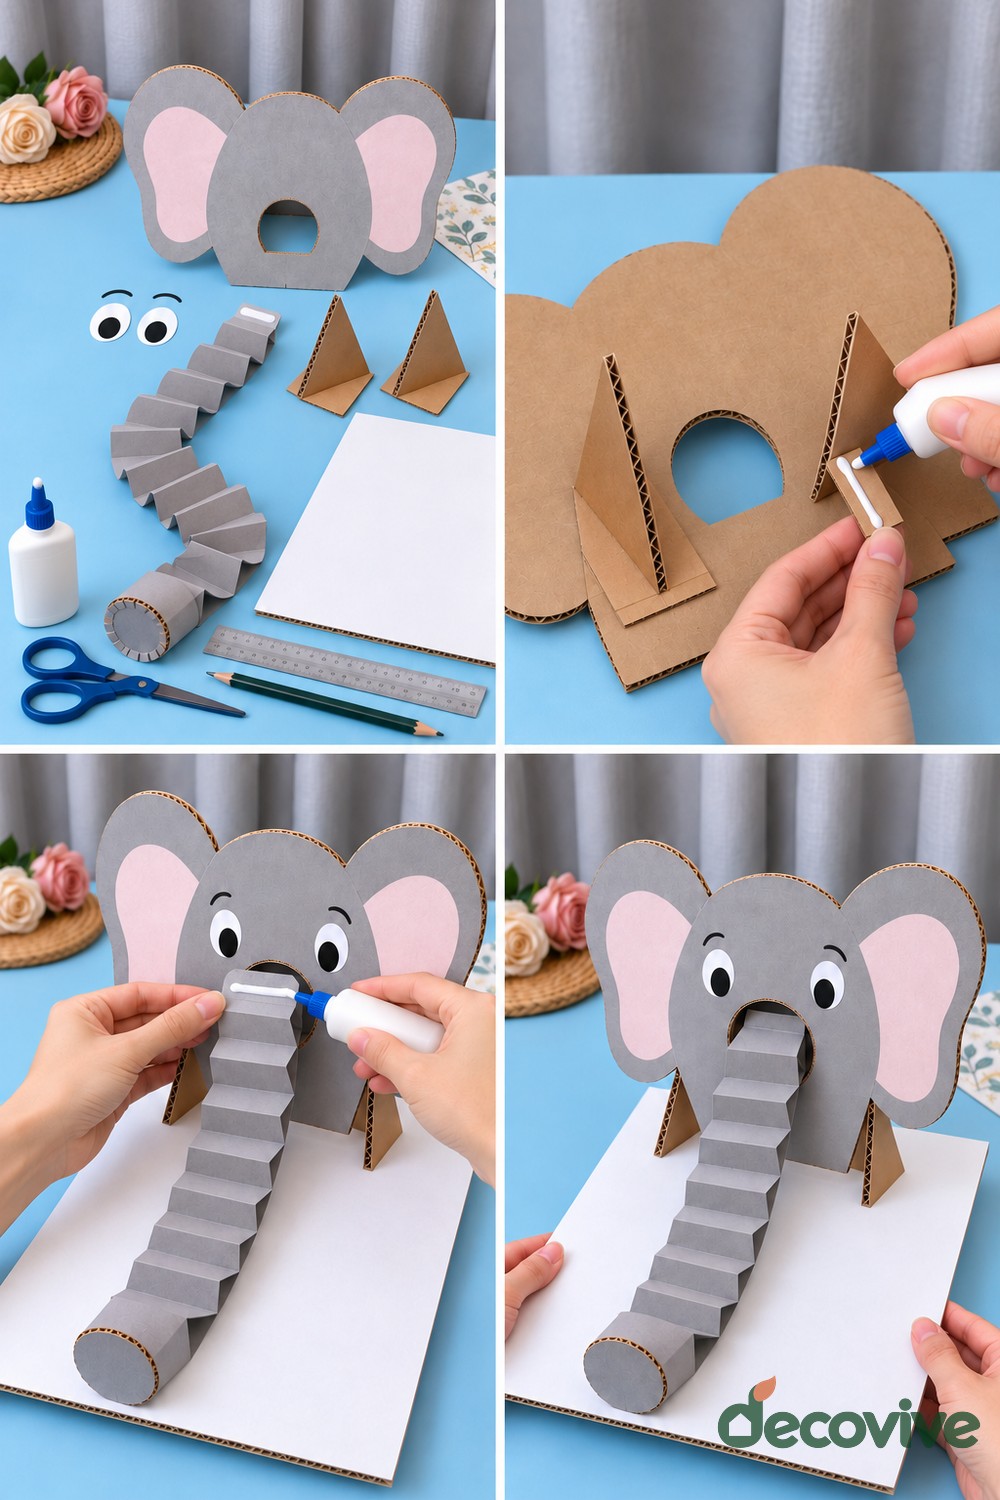
Materials: Corrugated cardboard, gray and pink paper or washable paint, a long gray paper strip, white and black paper eyes, two triangular cardboard supports, scissors, and craft glue.
How to make it: Cut a broad elephant head with two large ears and an opening where the trunk will attach. An adult should handle the thick cardboard cutting. Cover the front in gray and add pink inner ears and expressive eyes. Fold the long gray strip back and forth into an accordion, keeping the folds even. Push its upper tab through the face opening and glue it flat against the back of the head. Curl the free end slightly to give the trunk a rounded tip.
Finishing and practical tips: Glue one triangular brace behind each side of the head, leaving the braces wide enough to prevent tipping. Position the elephant upright while the supports dry. The trunk should move gently without carrying the weight of the whole craft; children can explore its folds without stretching them flat.
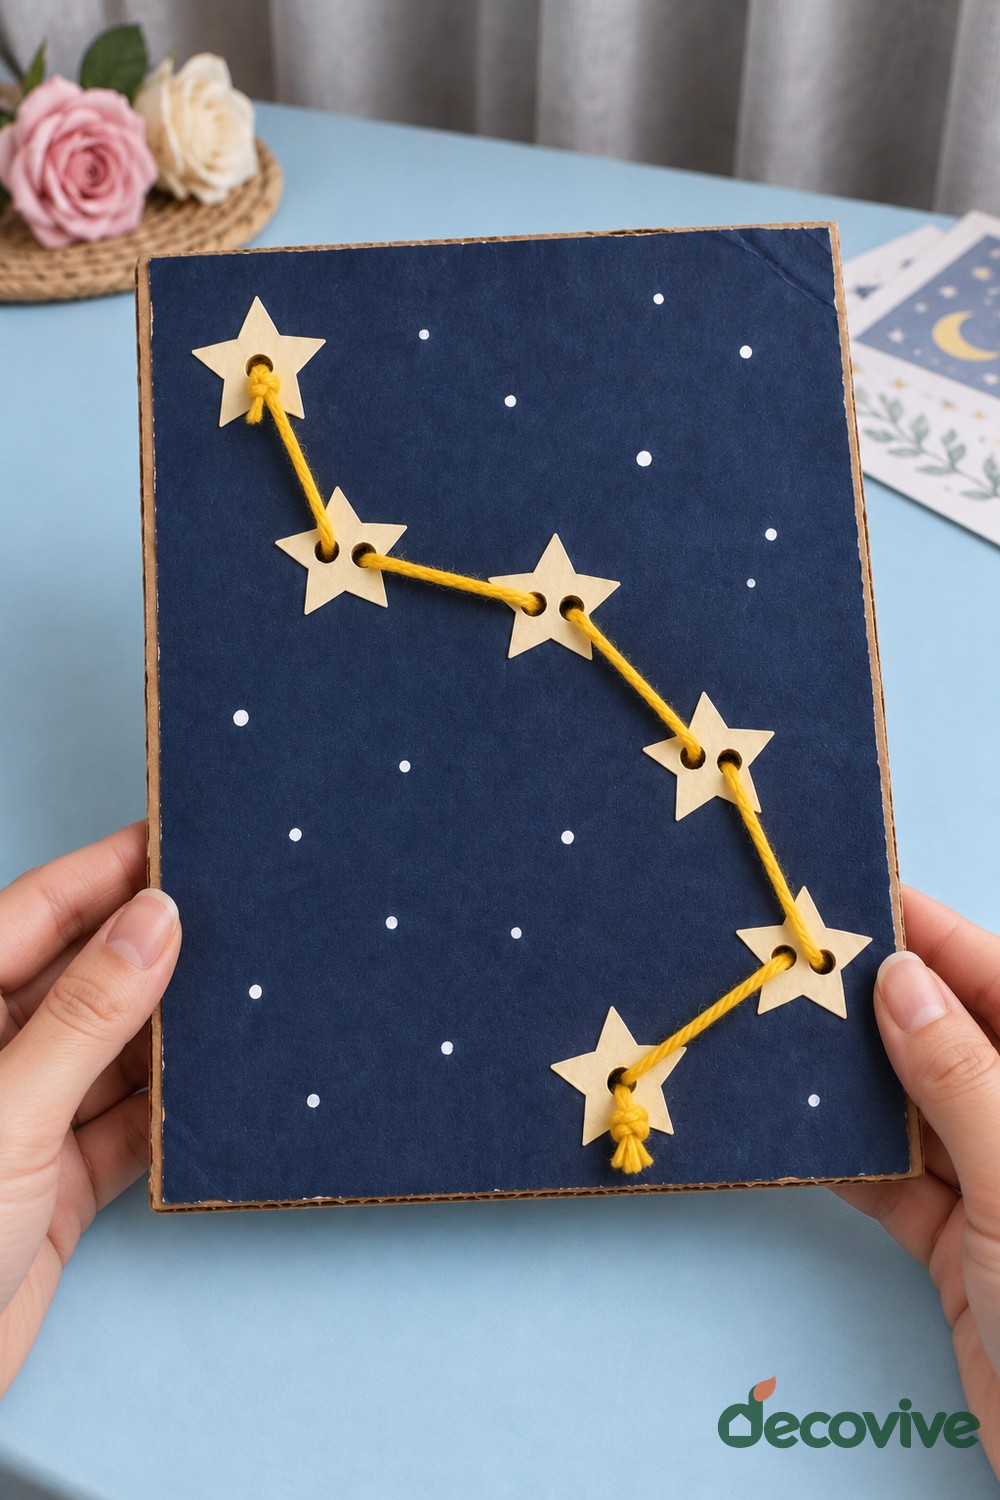
13. Yarn Constellation Picture with Paper Stars
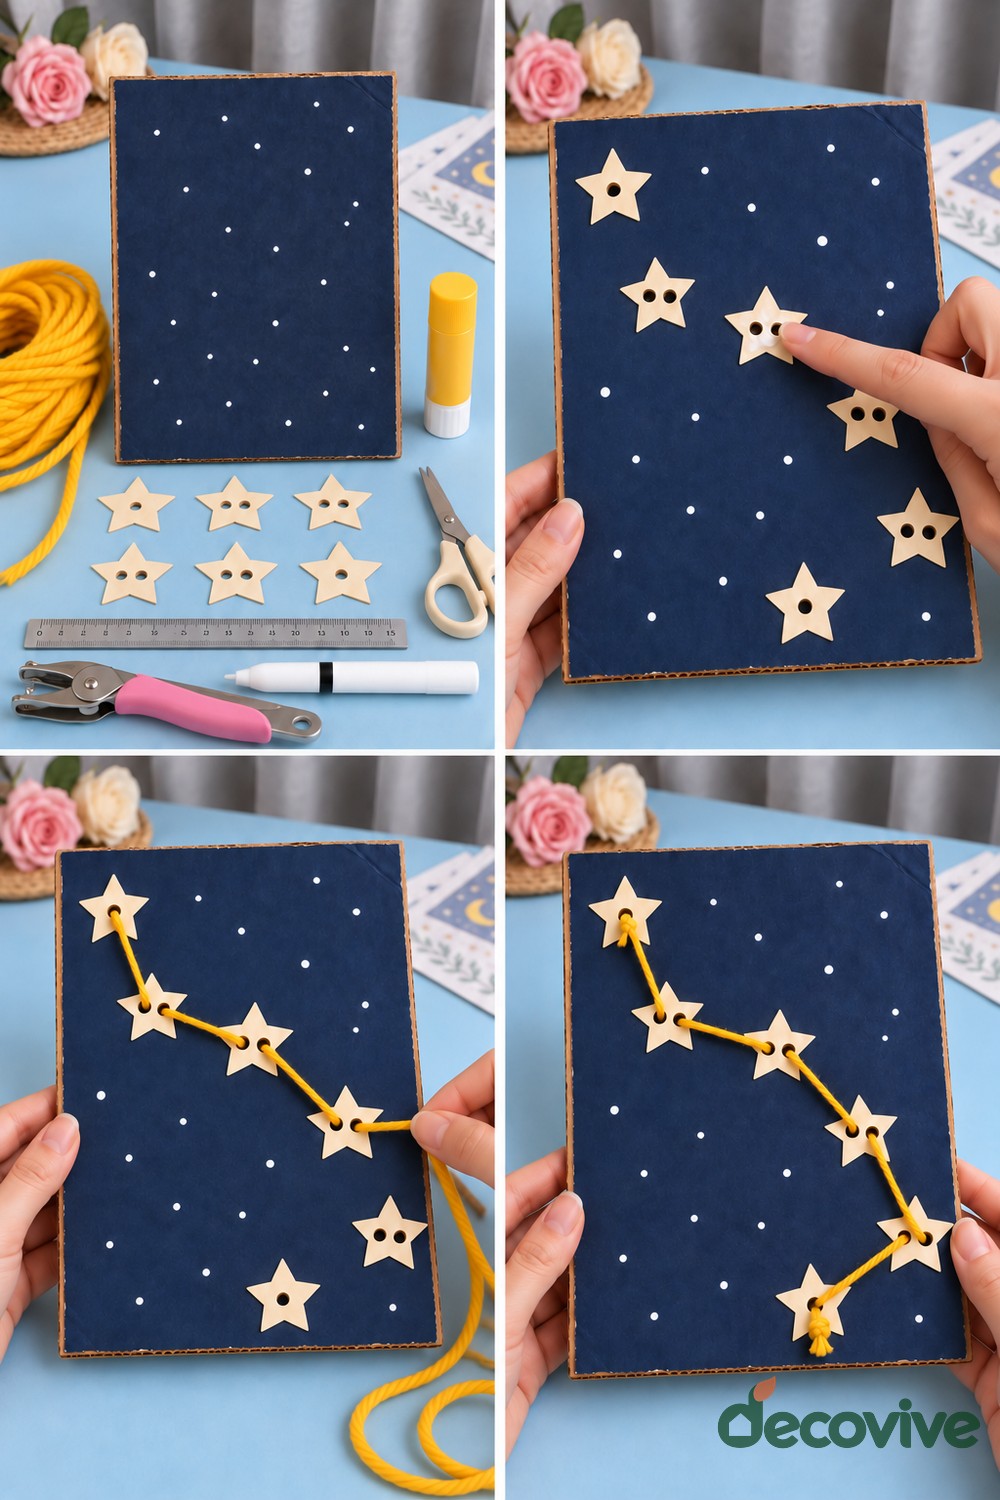
Materials: Dark blue cardstock, a cardboard backing, yellow paper stars, yellow yarn, a white paint marker or pencil, scissors, and craft glue.
How to make it: Mount the dark blue sheet onto a firm cardboard backing so the finished picture stays flat. Add scattered white dots, leaving a clear route for the main constellation. Arrange several yellow stars in a loose zigzag and decide where the yarn will begin and end. Glue short yarn sections between the chosen positions, pressing the ends into small patches of glue. Fix the stars over the joins to hide the loose ends and hold the line in place.
Finishing and practical tips: Treat the pattern as an imaginary constellation unless you deliberately copy an accurate sky chart. Keep the yarn short and attached to the card rather than leaving hanging loops. Children can invent a name and story for their constellation, then create another with fewer stars and a different route.
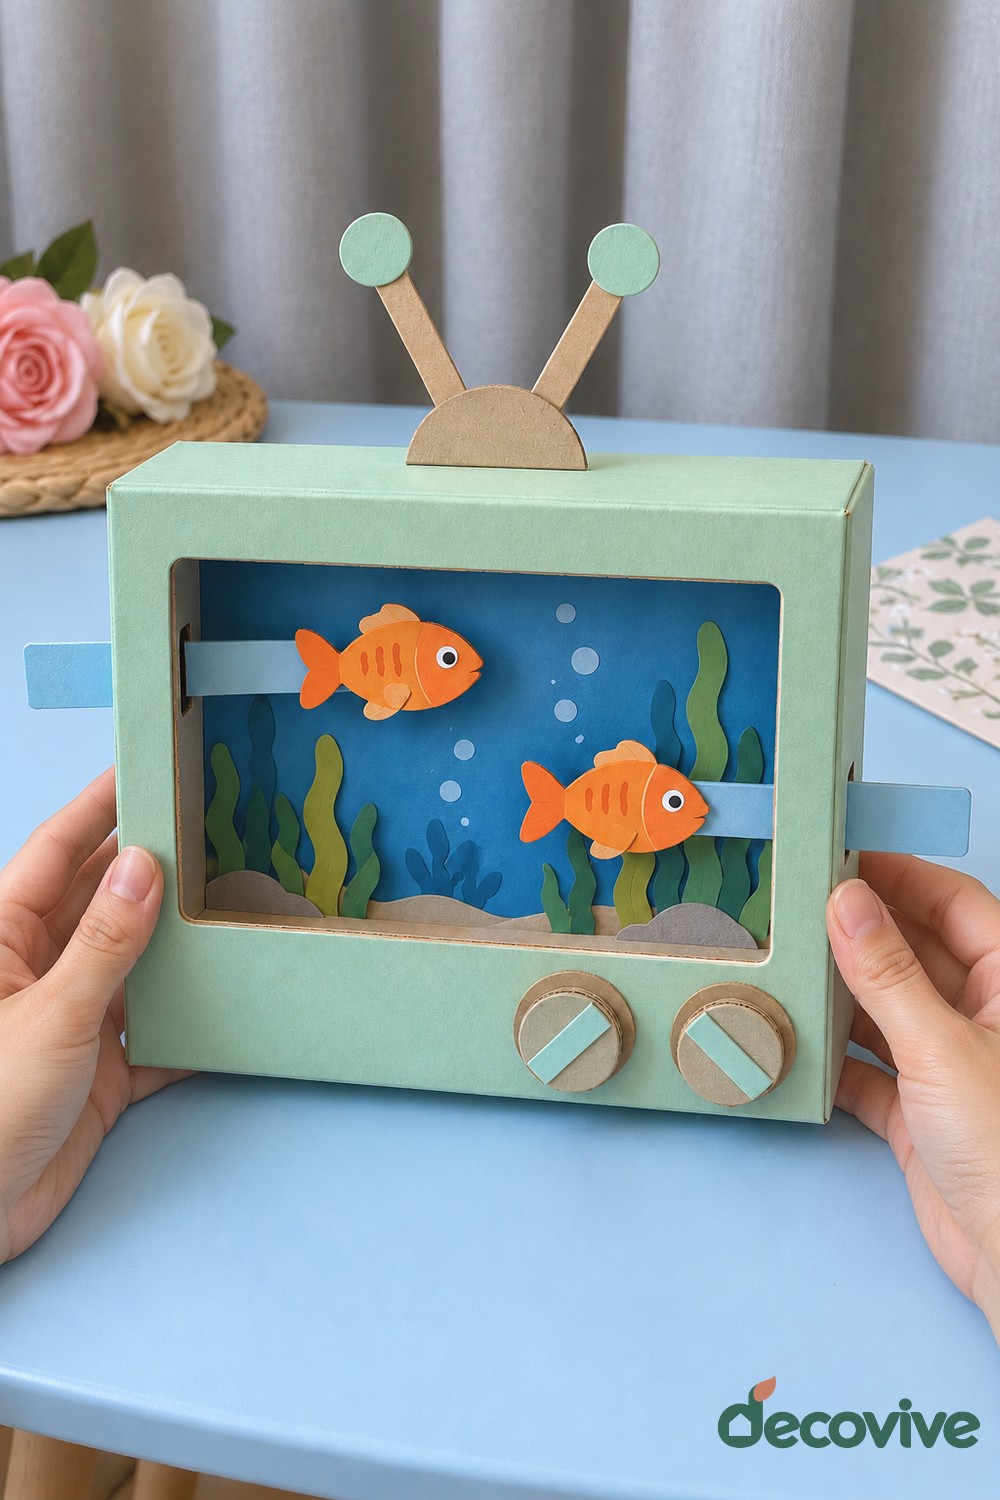
14. Shoebox Aquarium Television
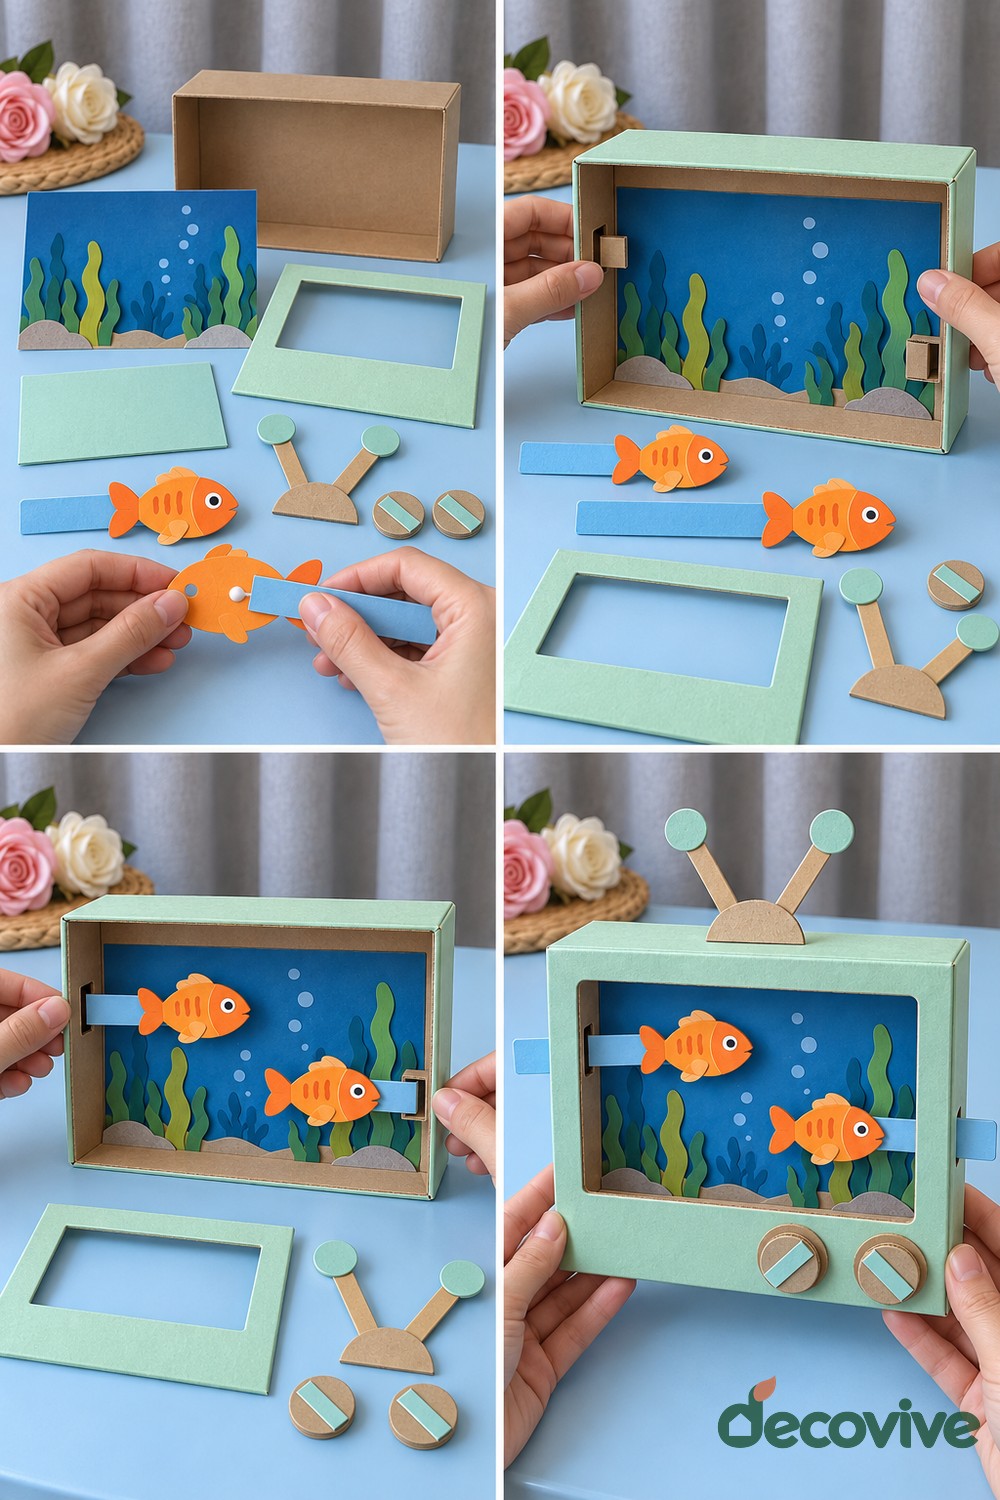
Materials: A shallow cardboard box, a cardboard front frame, pale green paper or paint, blue paper, green seaweed shapes, two orange paper fish, short paper suspension strips, craft sticks, cardboard circles, scissors, and craft glue.
How to make it: Cover the inside back of the box with blue paper and add green seaweed along its lower edge. Make two orange fish with contrasting fins and simple drawn eyes. Attach each fish to the upper inside of the box with a short folded paper strip, keeping the strip hidden behind the fish where possible. Fit a pale green cardboard frame over the opening, leaving enough depth that the fish do not rub against it. Glue layered cardboard circles to the front as pretend controls.
Finishing and practical tips: Attach two short craft sticks behind the top edge with broad glued contact areas and add paper circles at their tips. The antenna and controls are decorative. Keep this aquarium completely dry and use paper details rather than loose sand or real water.
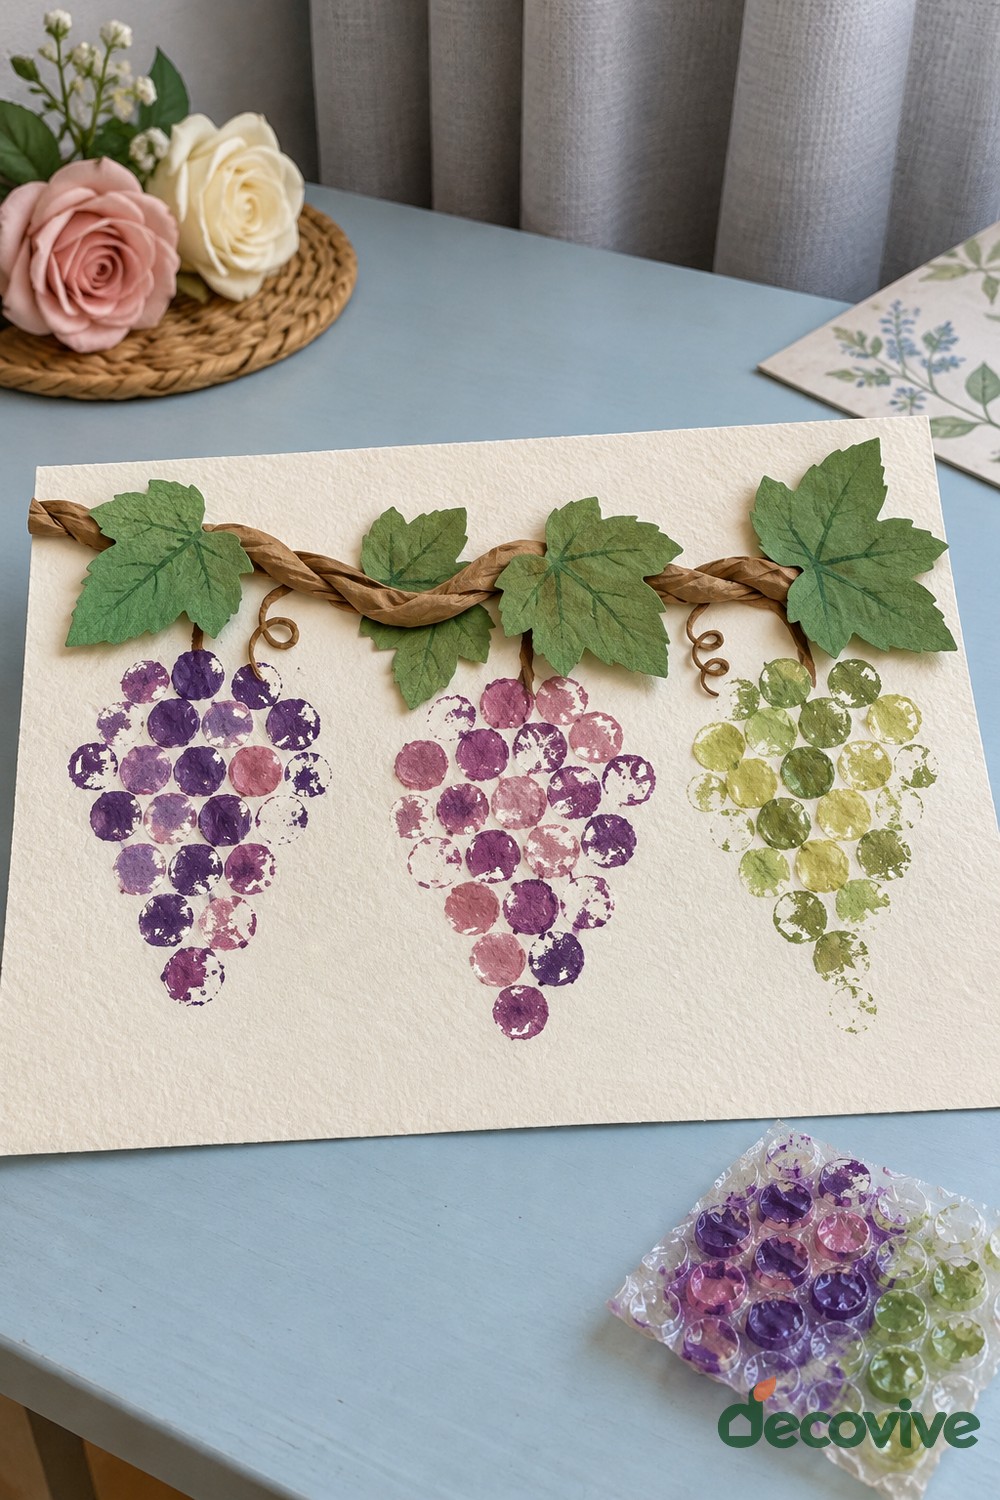
15. Printed Grape Bunches with Leaf Impressions
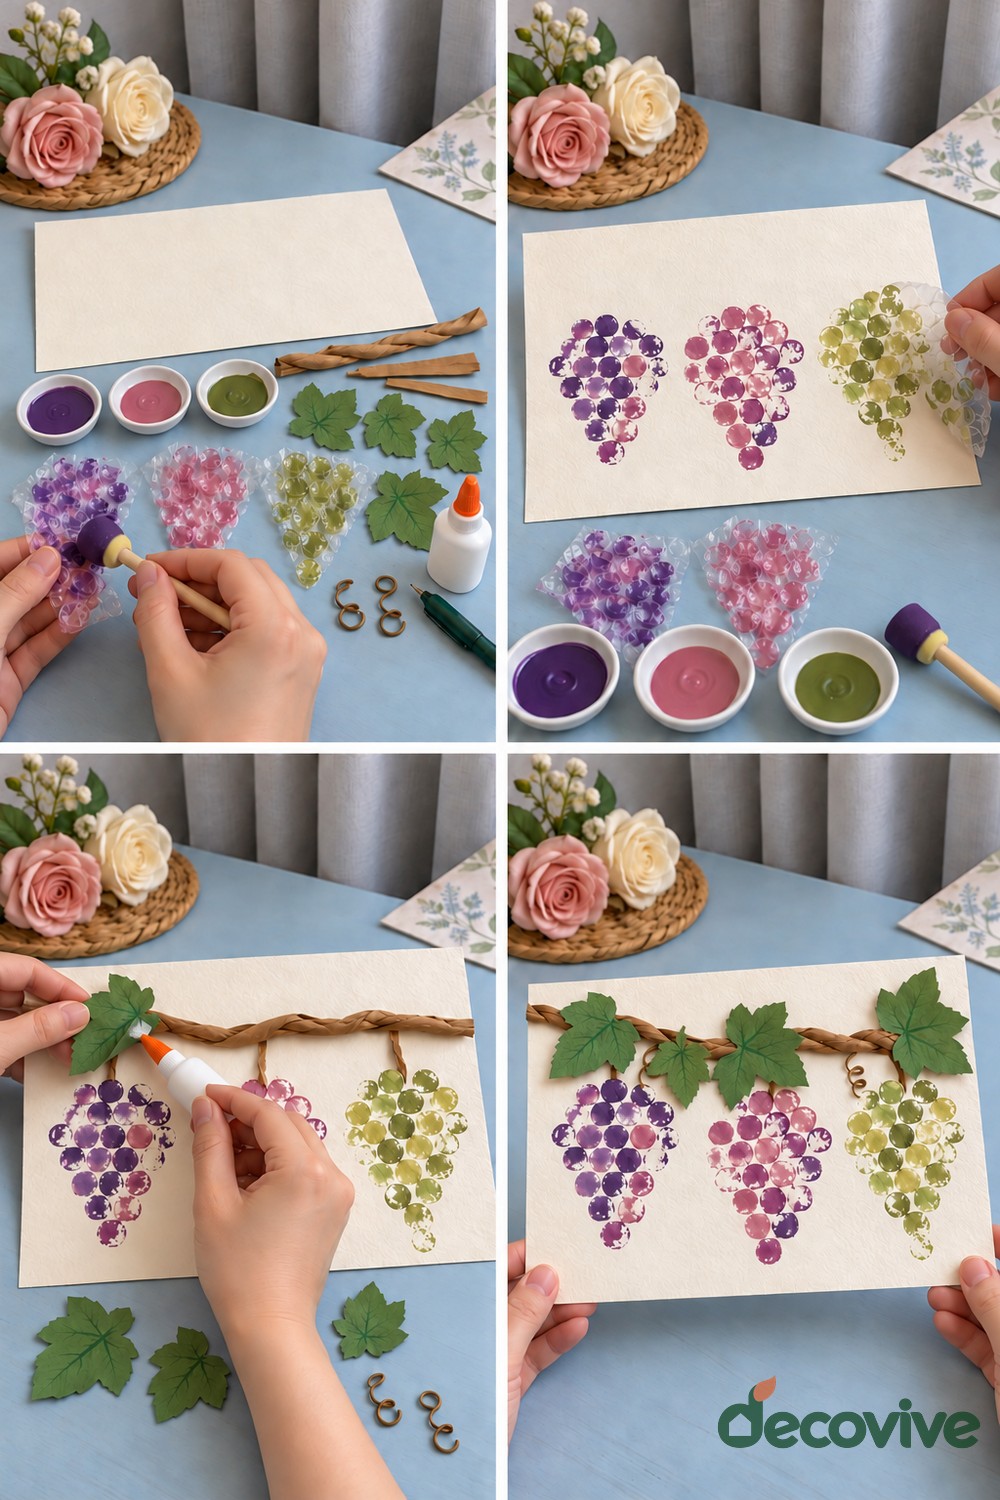
Materials: Cream paper, purple and pale green washable paint, a small piece of bubble packaging, fresh clean leaves, brown packing paper, a brush, and craft glue.
How to make it: Brush a thin layer of paint over the raised bubbles, then press the packaging onto the cream sheet to make groups of round grape marks. Build each bunch wider at the top and narrower toward the bottom, lifting the stamp between impressions instead of dragging it. Use a different clean area of packaging for the pale green grapes. For the foliage, coat the veined underside of a leaf lightly with green paint, press it onto the paper, and peel it away carefully.
Finishing and practical tips: Let the printing dry before gluing twisted brown paper along the upper edge as a vine. You can change the cluster sizes while keeping space between them. An adult should choose safe leaves and collect the packaging after use; wash hands and clear the paint before snacks.
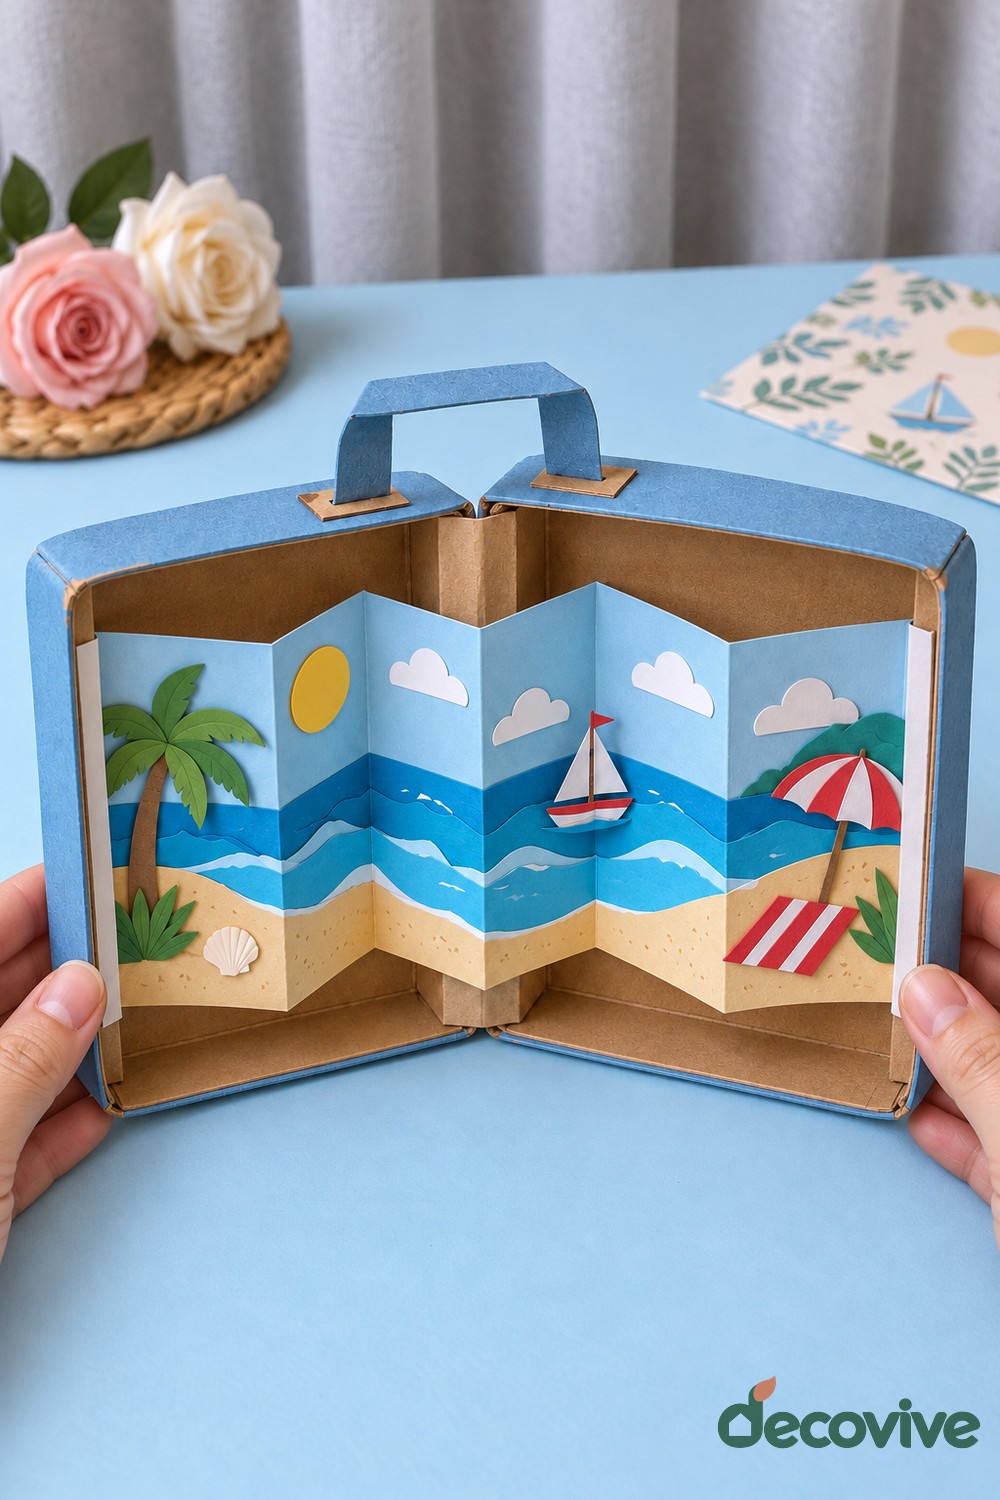
16. Cardboard Suitcase with an Accordion Beach Scene
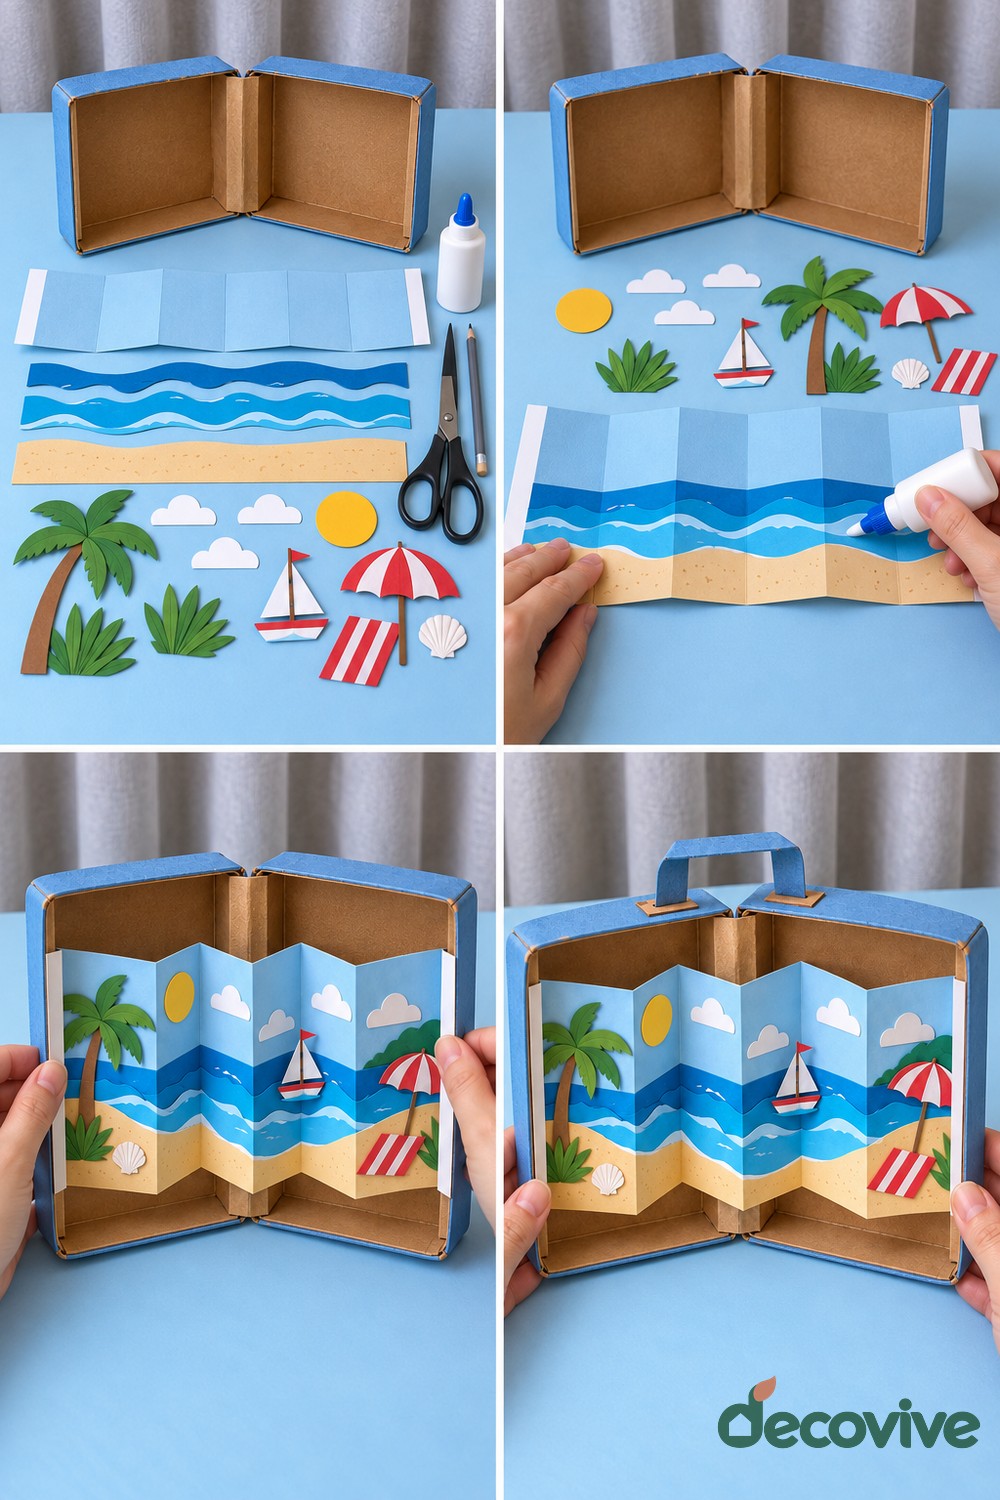
Materials: A shallow cardboard box adapted into two hinged halves, blue covering paper, one long pale blue cardstock strip, blue and tan paper, colored paper for beach details, extra cardboard for a handle, scissors, and craft glue.
How to make it: Cover the outer box edges in blue and reinforce the central hinge with a flexible paper strip. Make a long landscape panel that fits inside the open suitcase, adding continuous blue waves and a tan beach along its lower edge. Fold the panel into even accordion sections before adding delicate details. Place a palm tree on the left, a sailboat near the middle, and an umbrella and towel on the right. Glue the broad end tabs of the accordion to the inner sides of the box.
Finishing and practical tips: Keep the middle folds free so the scene can expand. Check the fit by closing the suitcase gently before securing the tabs. Reinforce the handle attachments with cardboard patches, but lift the finished display underneath rather than trusting a paper handle to carry its weight.
17. Cardboard Cheese Maze with a Rolling Ball
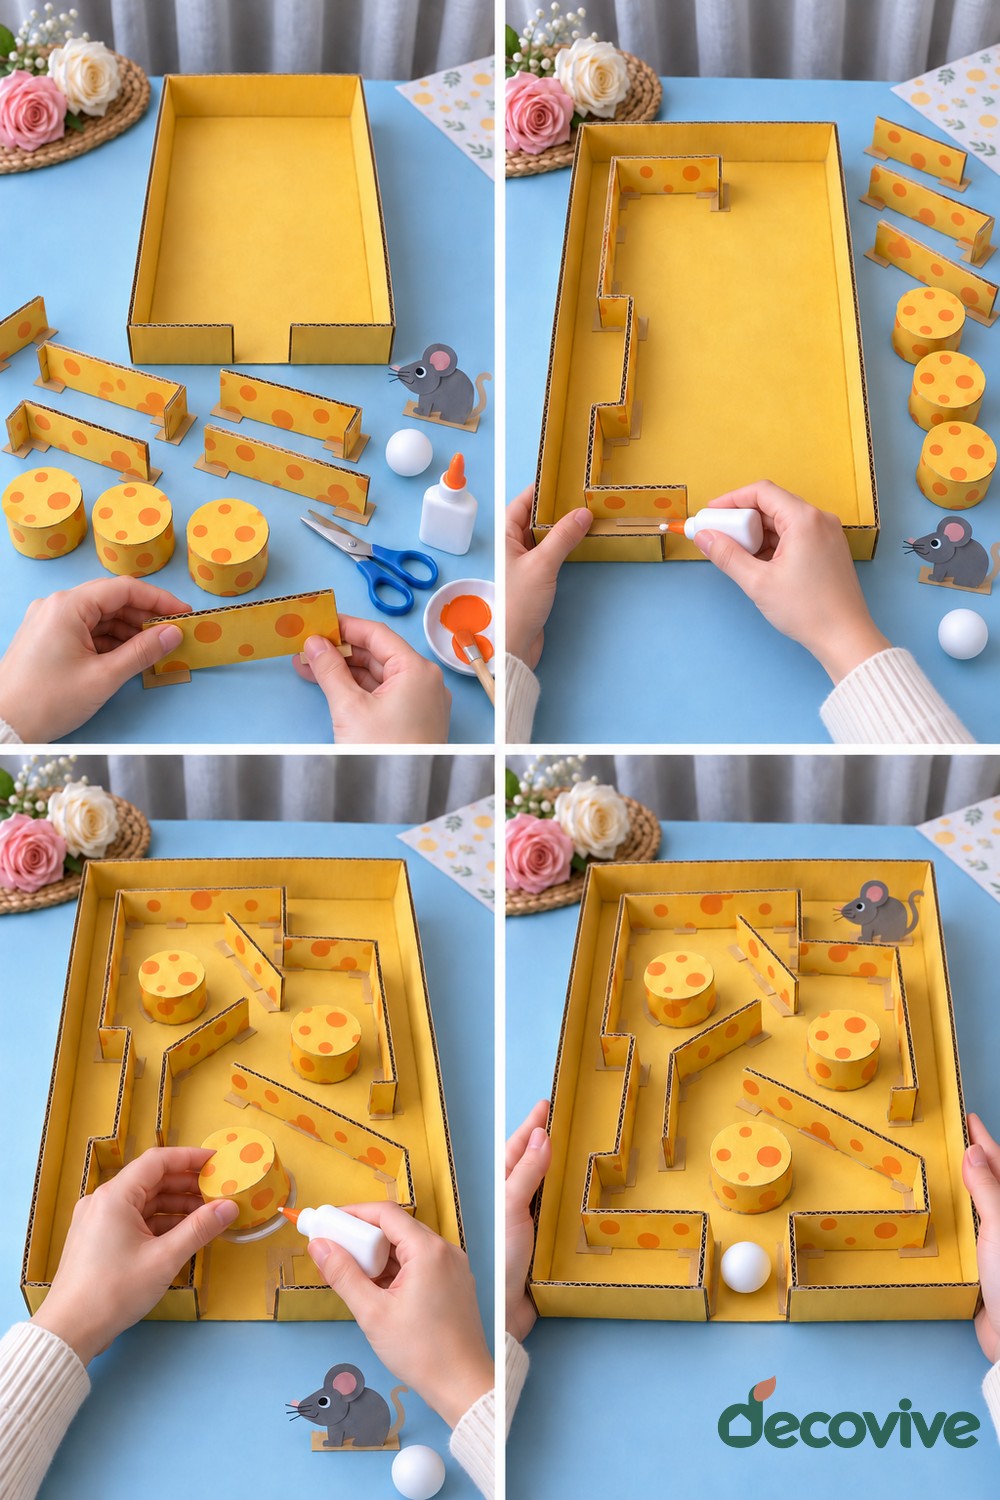
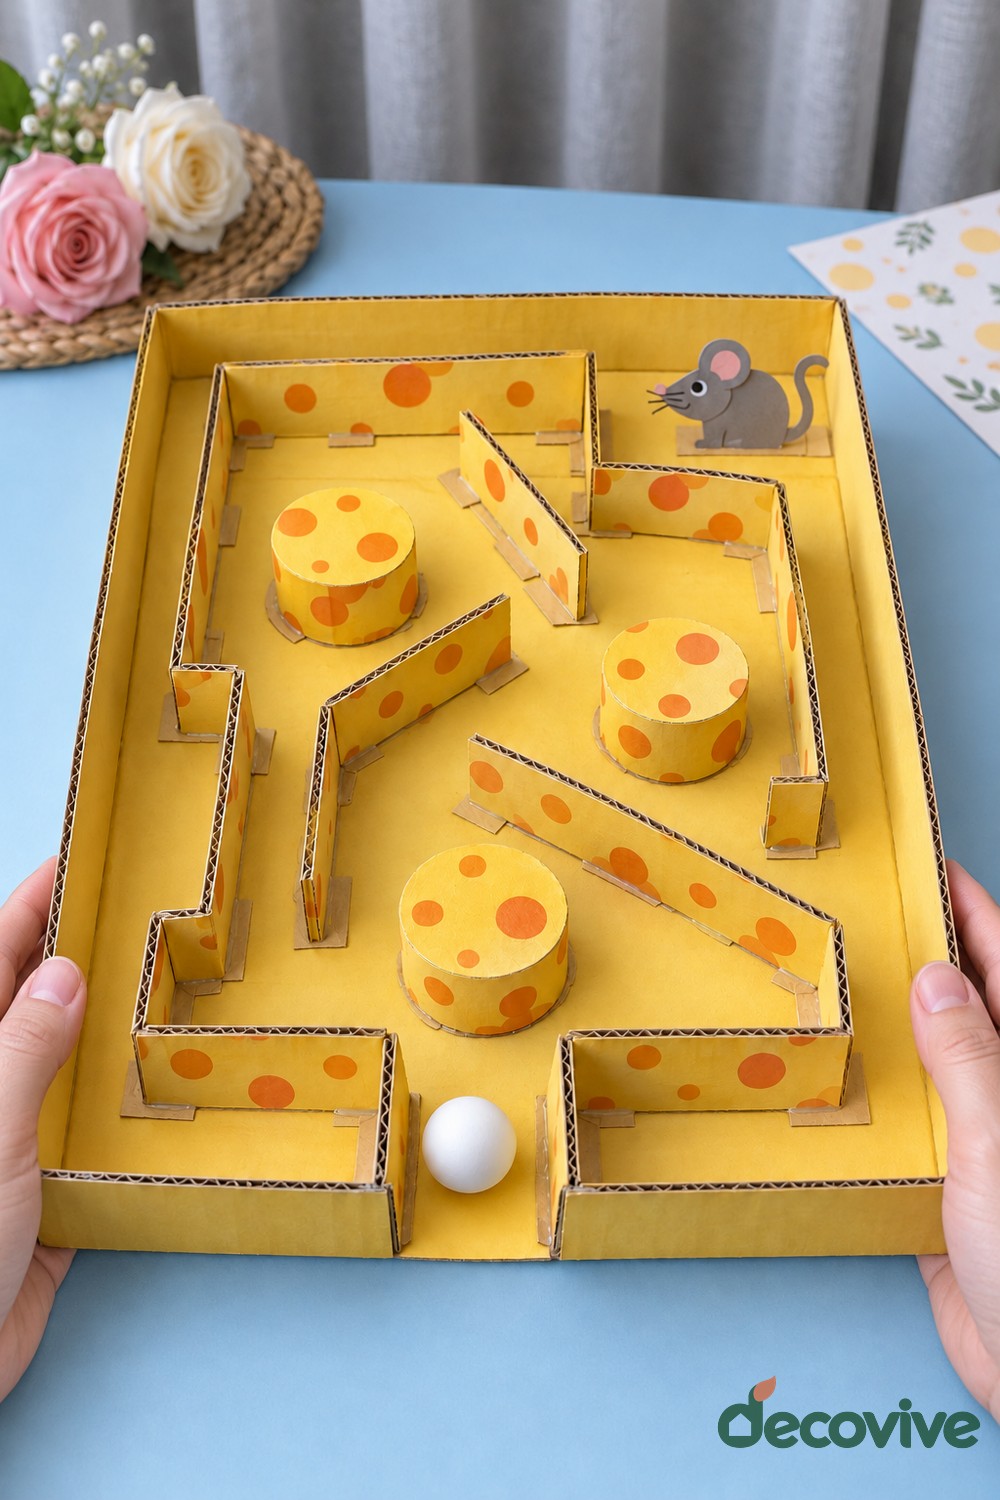
Materials: A shallow box lid, corrugated cardboard strips, cardboard discs and curved strips for three cheese obstacles, yellow and orange paint or paper, a table tennis ball, a paper mouse, scissors, and craft glue.
How to make it: Plan a continuous route from one corner of the lid to the mouse at the far end. Cut low cardboard walls with broad folded tabs, then glue the tabs flat against the base. Form the cheese obstacles from stacked discs or short cardboard cylinders and decorate them with orange spots. Place them where they create turns without blocking the route. Roll the actual ball through each opening before fixing the last wall, allowing extra clearance so it does not jam.
Finishing and practical tips: Let the joins dry fully before tilting the maze. Keep the rim intact to help contain the ball, and store the ball separately after play. Small or loose components are unsuitable for children who mouth objects. You can make an easier route by reducing the number of walls.
18. Wooden Spoon Scarecrow on a Cardboard Stand
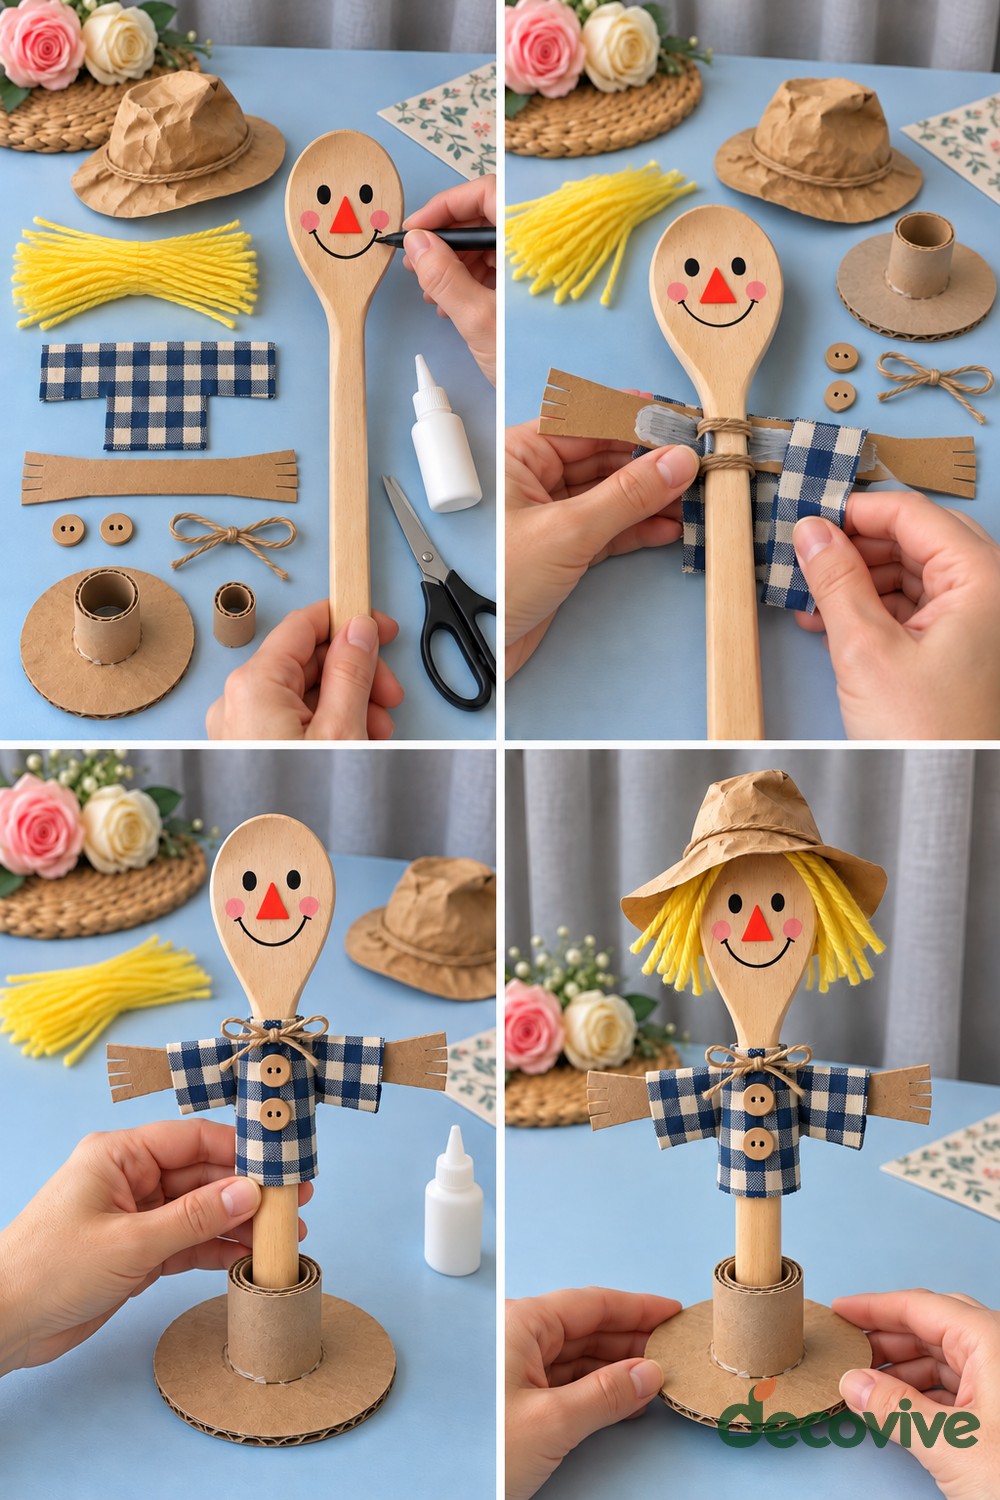
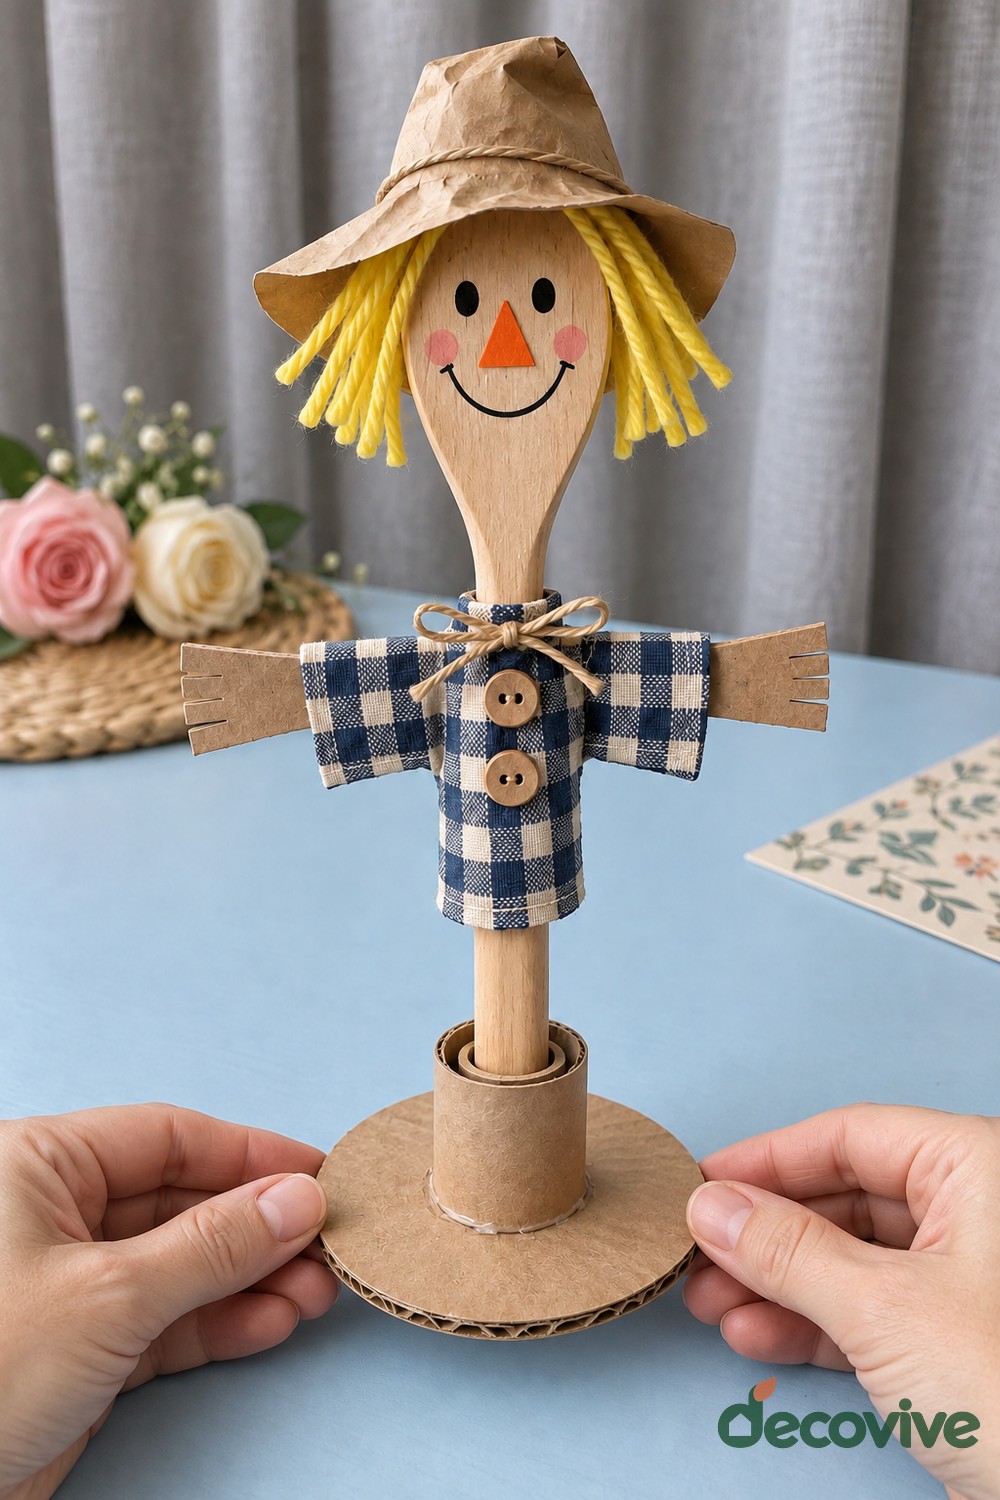
Materials: One wooden craft spoon, yellow yarn, a small checked fabric square, brown packing paper for a hat, two large buttons, a cardboard tube, a circular cardboard base, markers, scissors, and craft glue.
How to make it: Draw the face on the spoon bowl, then glue short yellow yarn strands around its upper back edge as hair. Form a small paper hat with a folded brim and secure it over the hair. Wrap the checked fabric around the handle below the face, leaving the sides extended as sleeves, and glue the fabric overlap at the back. Add the buttons to the shirt. Fix the cardboard tube upright on the circular base using folded tabs or a broad glued cardboard collar.
Finishing and practical tips: Insert the spoon handle into the tube and stabilize it with tightly packed paper. An adult should check the stand before display. Use large paper circles instead of buttons for younger children, and keep the yarn hair short. The spoon becomes a craft item and should not return to food preparation.
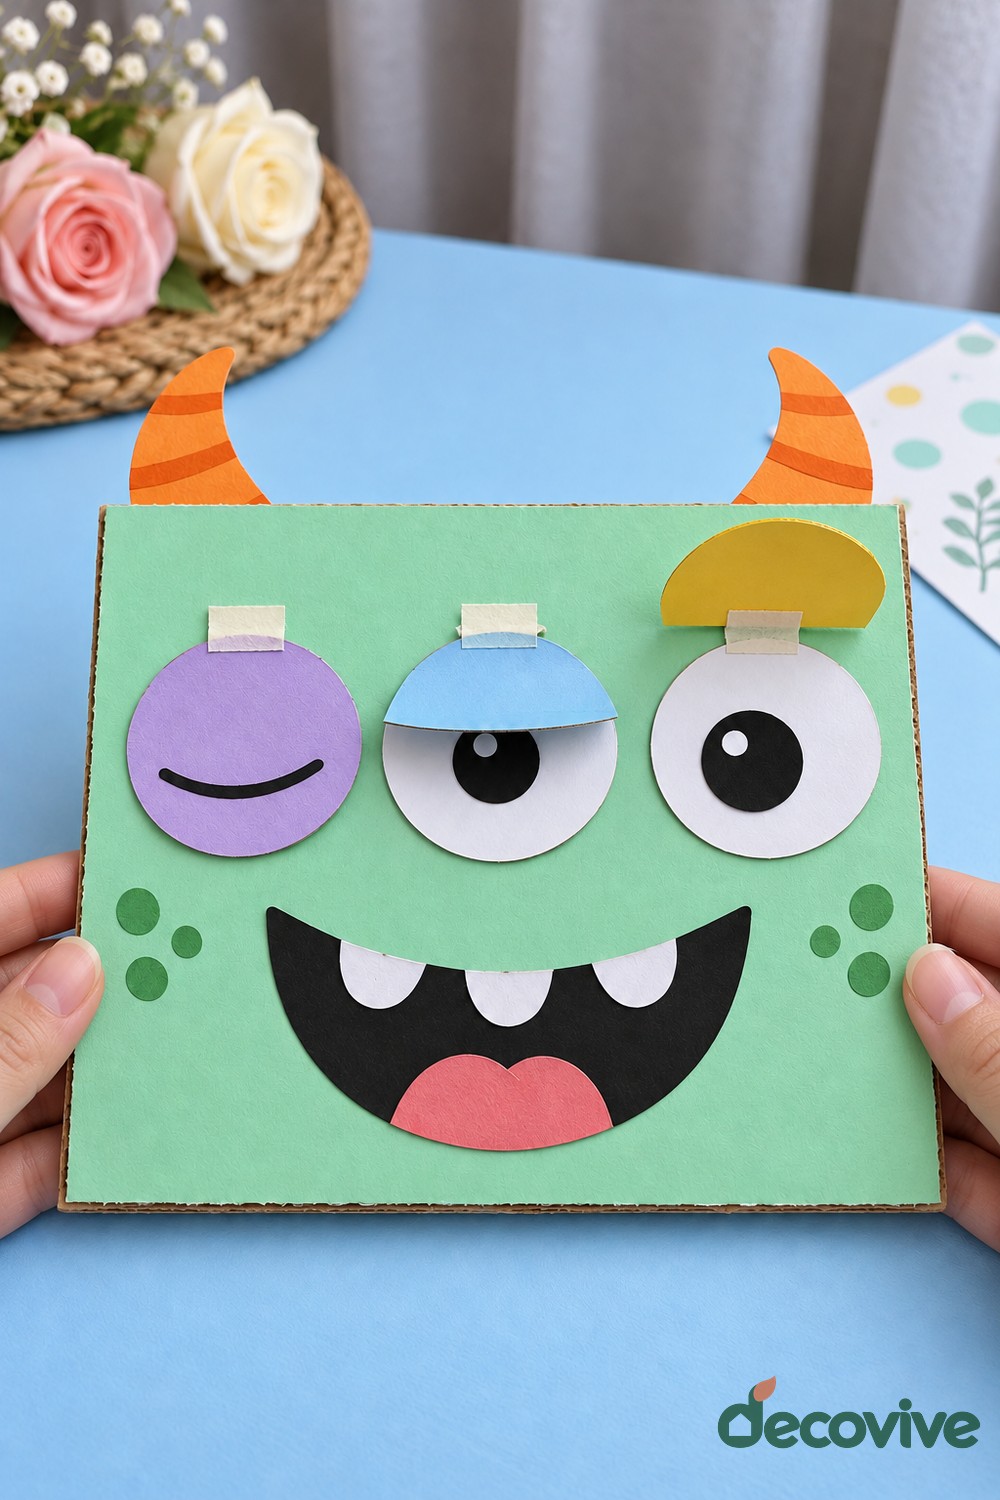
19. Cardboard Monster Face with Lifting Eyelids
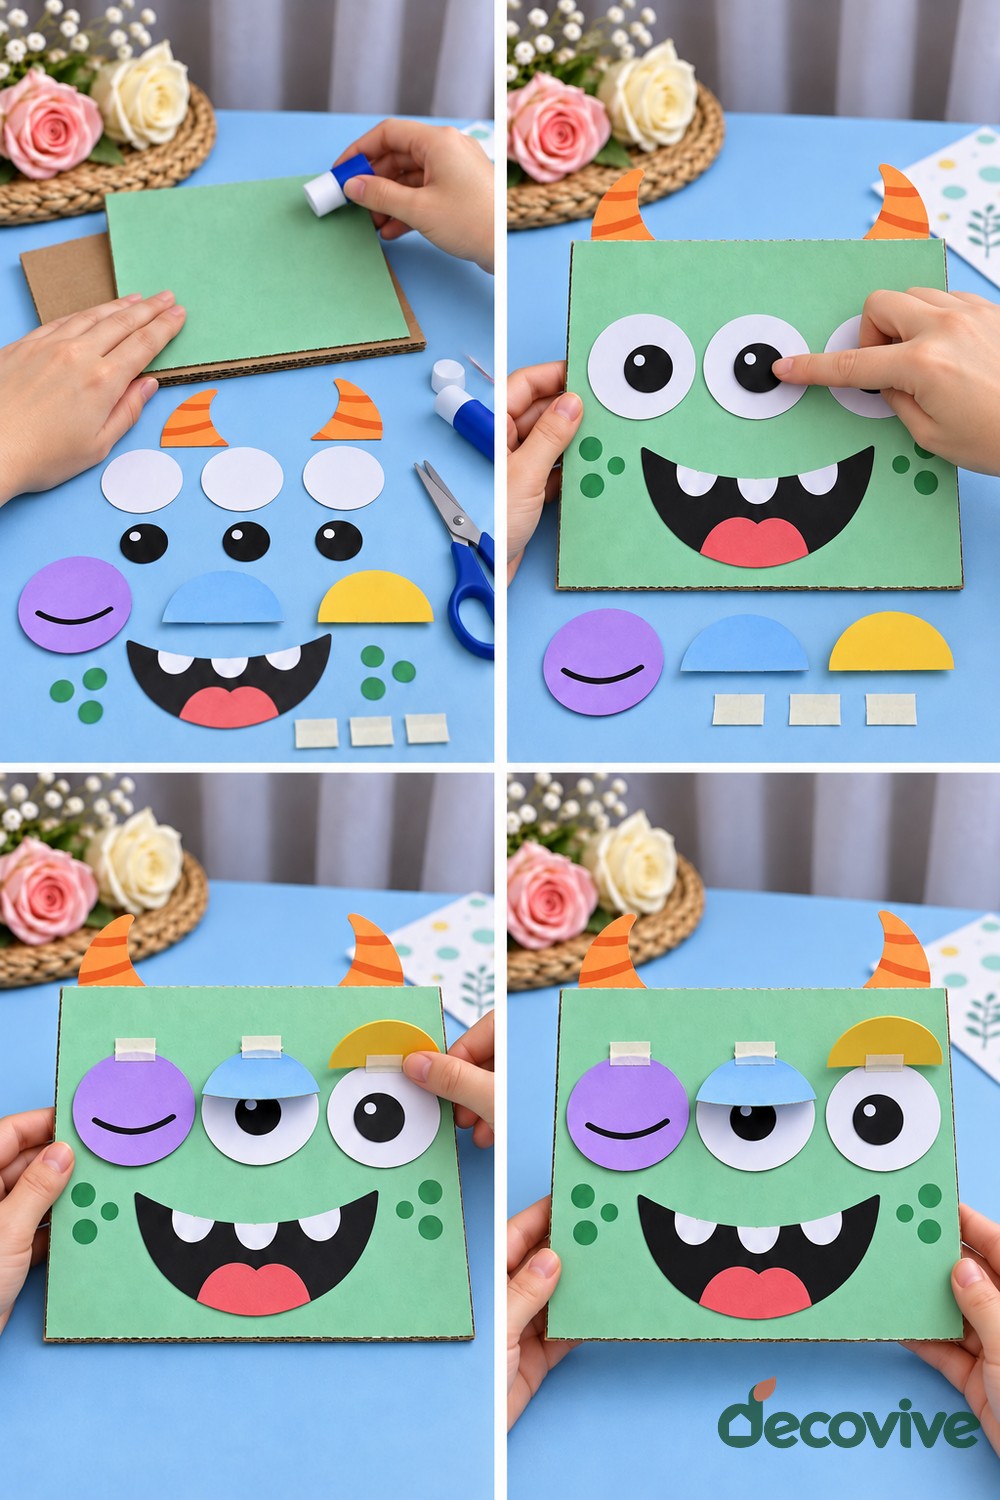
Materials: A flat cardboard square, green paper, three large paper eyes, colored semicircles for eyelids, short strips for hinges, orange paper horns, black and pink paper for a mouth, white paper teeth, scissors, and a glue stick.
How to make it: Cover the cardboard in green, then arrange three large eyes across the upper half. Glue the white eye circles and black pupils flat. Make each eyelid from a colored semicircle and attach only its top edge with a small folded paper hinge. Leave the curved edge loose so it can lift to reveal the eye beneath. Add a broad black mouth, rounded white teeth, a pink tongue, orange horns, and small green cheek spots.
Finishing and practical tips: Check each eyelid separately before adding the neighboring one; a hinge trapped under another piece will not open. The small tabs above the lids give fingers a place to lift without tearing the curved edge. Let children choose different eyelid positions to create sleepy, surprised, or silly expressions.


Leave a Reply