
Copper jewelry begins with a few simple decisions: the shape of the metal, the way each part connects, and where a bead adds color or movement. This collection brings together 31 copper jewelry projects with wire, beads, and hammered details, from delicate botanical pieces to woven bracelets and sculptural Gothic pendants. You will find a practical starting project, a clear materials list, and individual ideas you can adapt to your tools and experience.
Start with the hammered pendant below to practice smoothing edges, creating texture, punching attachment holes, and making a secure bead drop. Then use those skills to explore the inspiration designs. Each idea explains a possible construction approach, suitable materials, and the detail that needs extra care. The more elaborate pieces involve metal piercing, stone setting, hinges, or soldering, so they are best approached after the basic connections feel comfortable.
Table of Contents
- Choose Copper, Wire, and Beads That Work Together
- Make a Hammered Copper Pendant with a Teal Bead
- Materials and Tools
- 1. Check the Components Before Assembly
- 2. Smooth the Oval Edge
- 3. Add the Hammered Surface
- 4. Punch the Two Attachment Holes
- 5. Make the Wrapped Bead Drop
- 6. Connect, Close, and Check
- Turn the Basic Techniques into Your Own Copper Jewelry
- 1. Three Hammered Copper Petals with a Teal Drop
- 2. Copper Branch Brooch with Amber Colored Beads
- 3. Open Spiral Earrings with Dark Red Beads
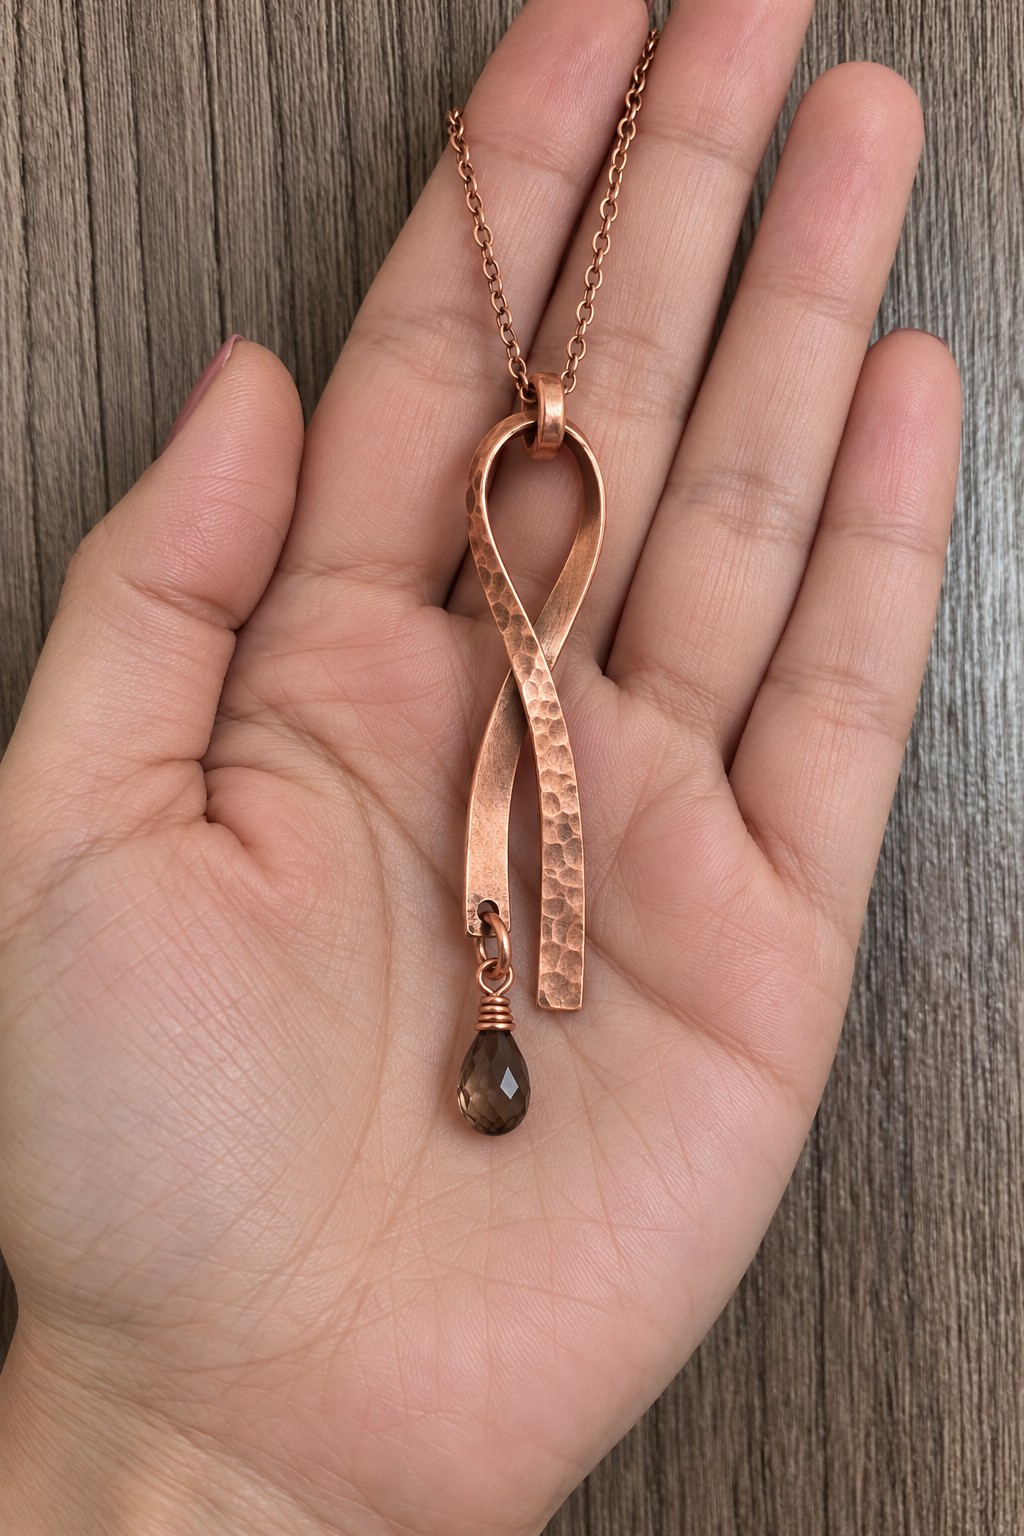
- 4. Folded Ribbon Pendant with a Smoky Drop
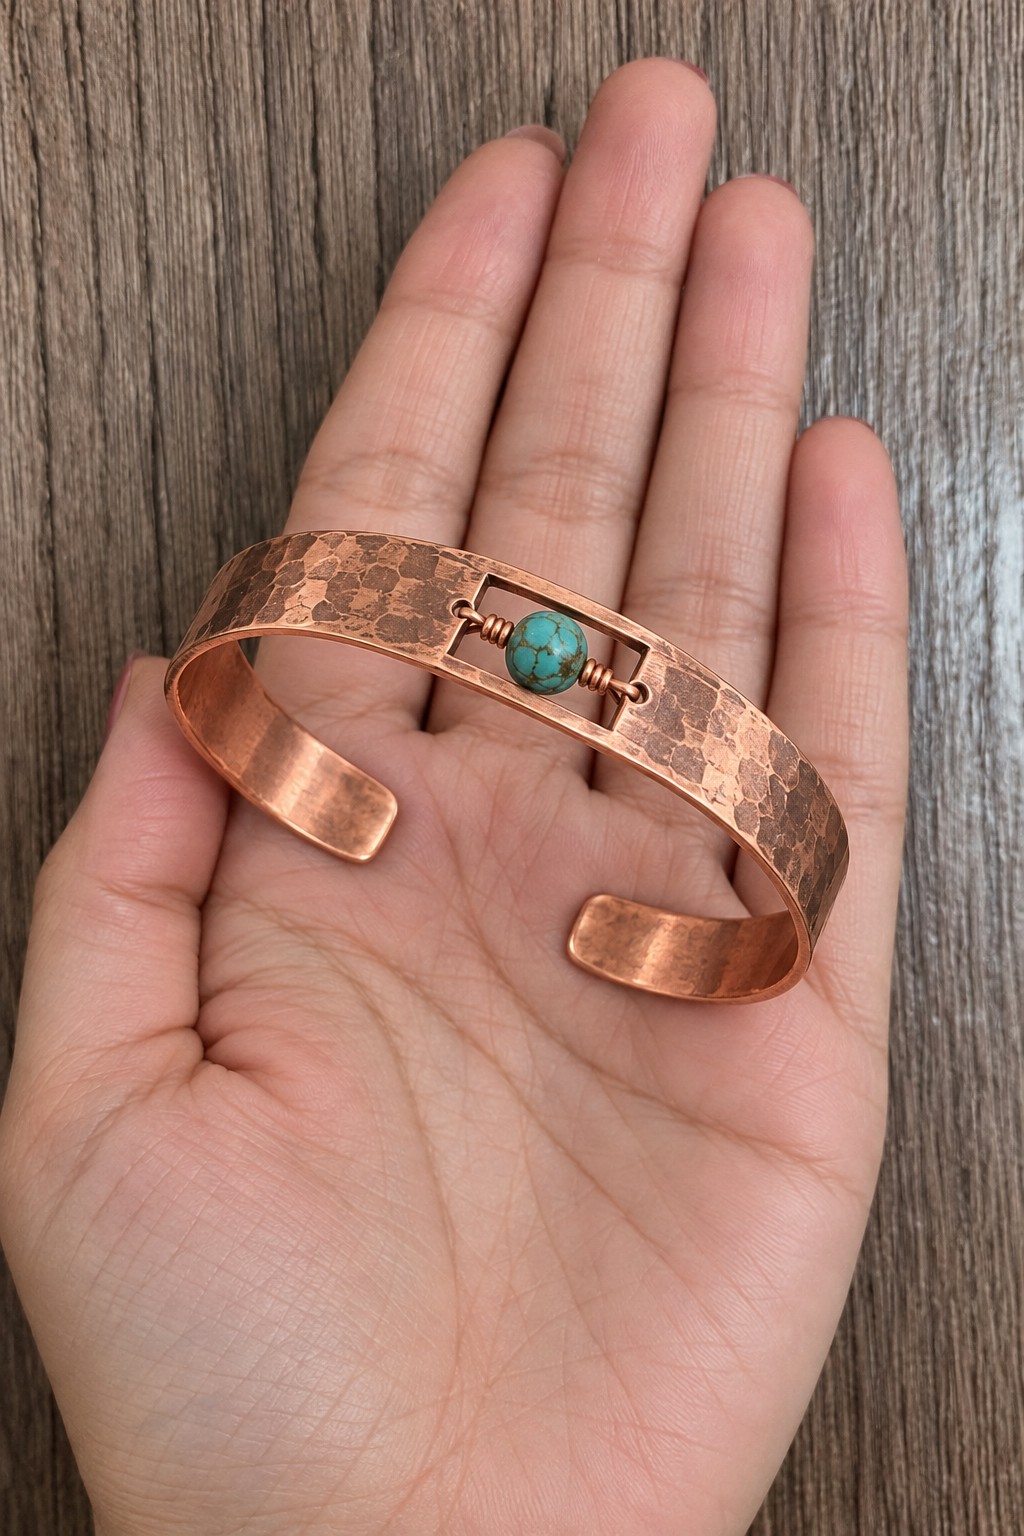
- 5. Hammered Cuff with a Turquoise Colored Window
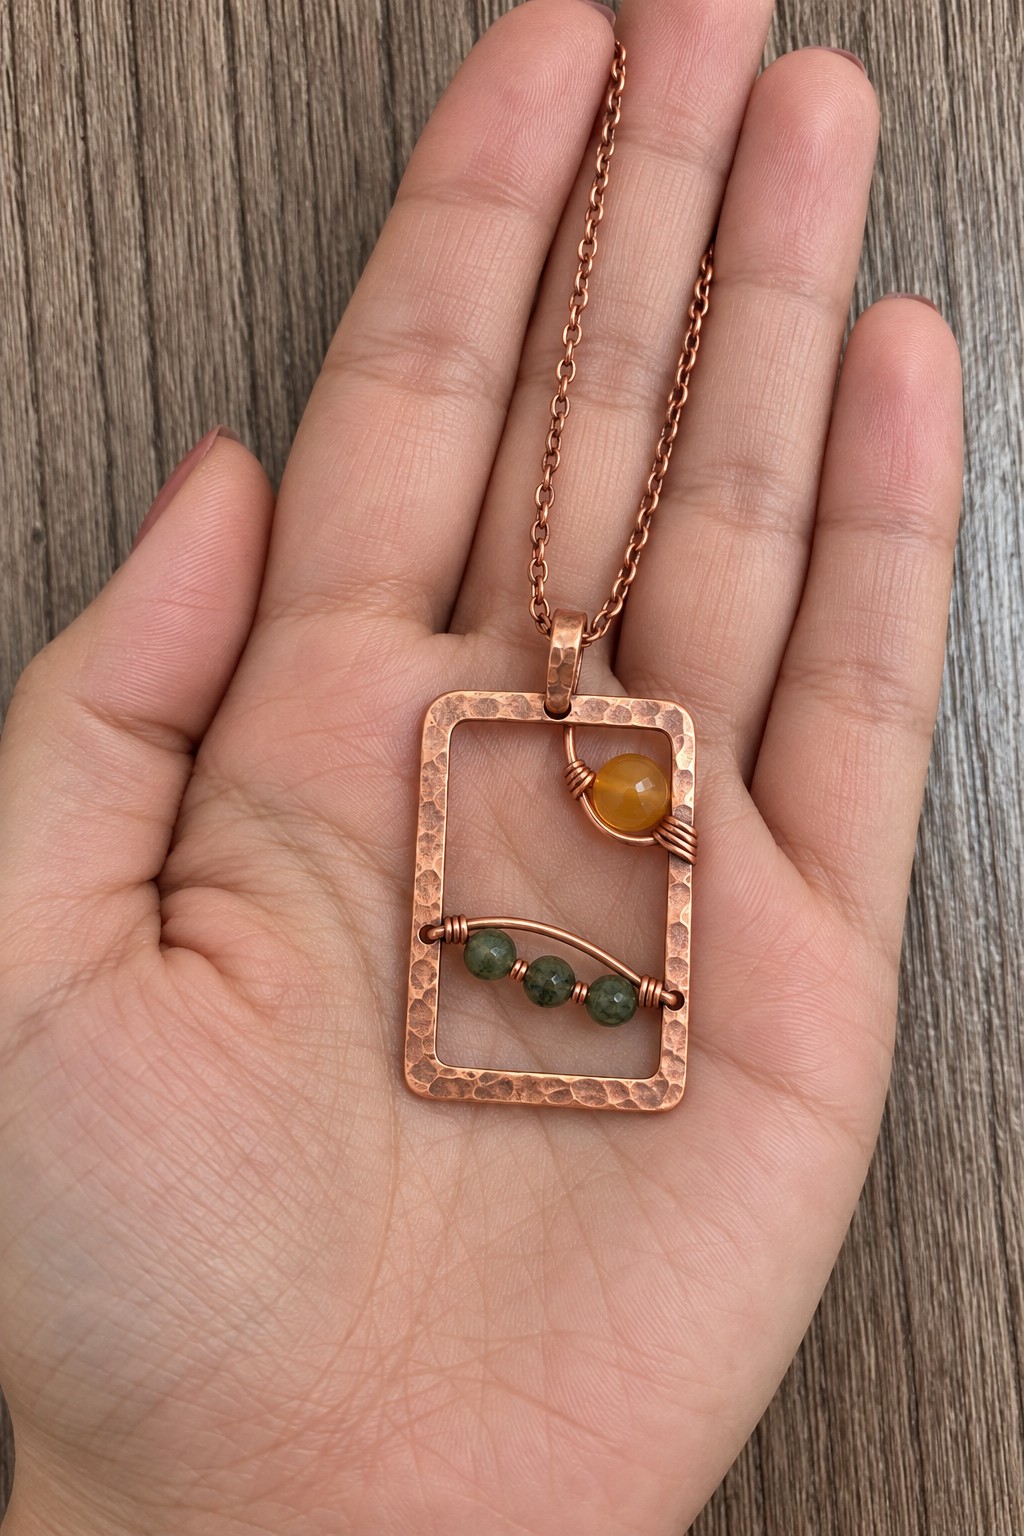
- 6. Landscape Frame Pendant with a Golden Sun
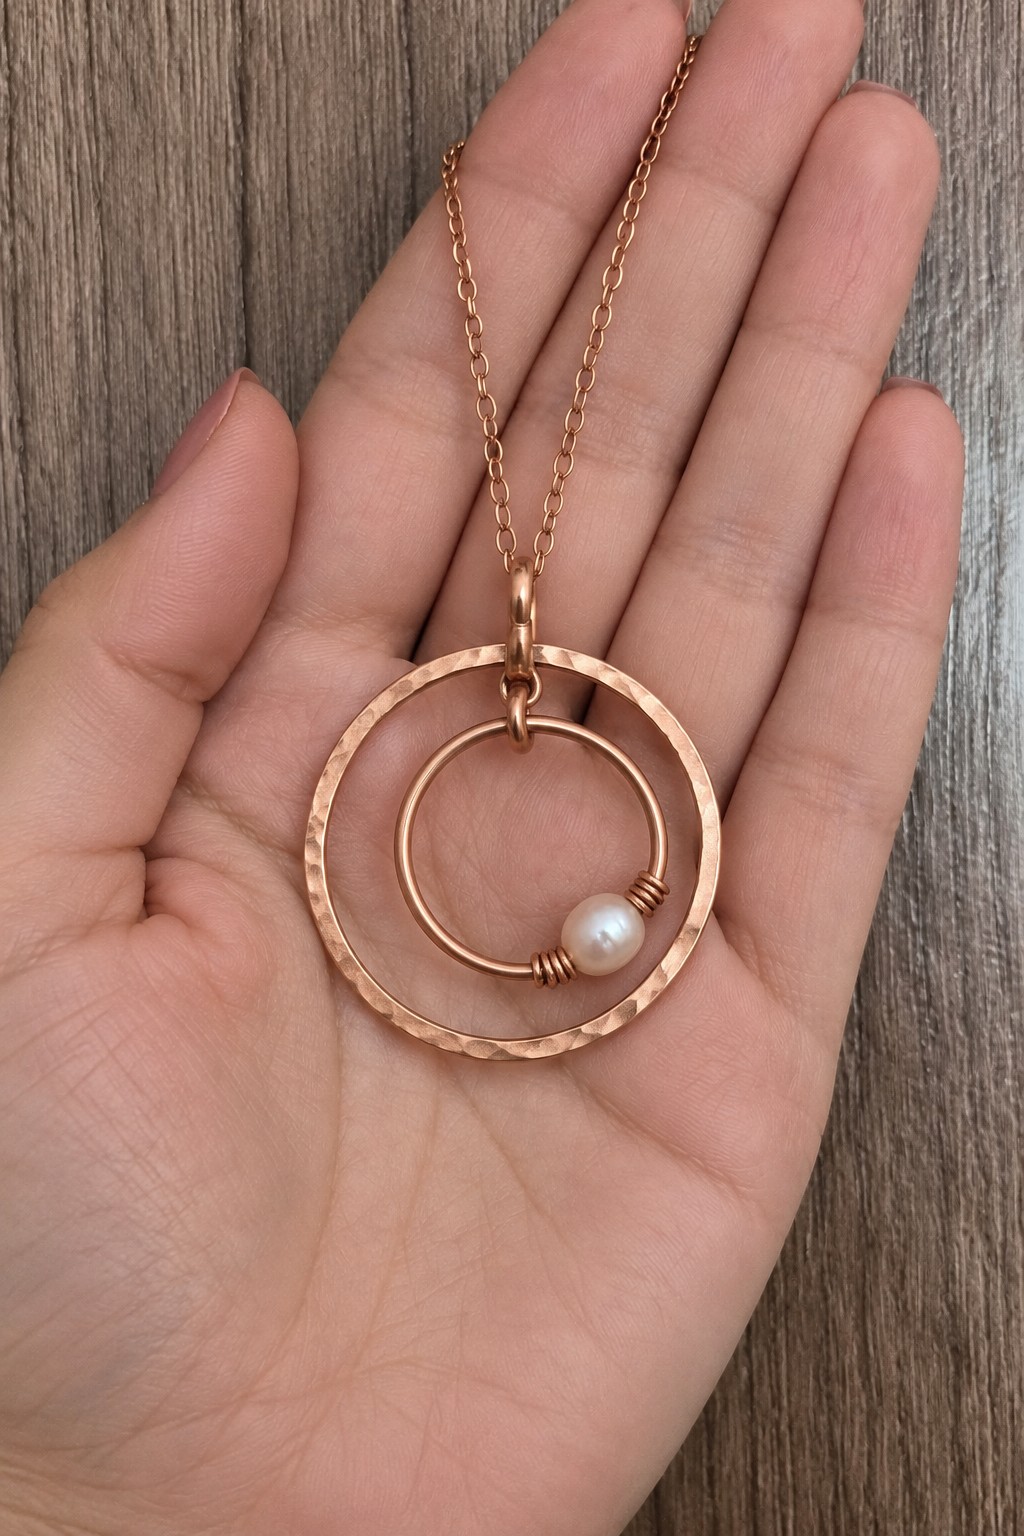
- 7. Nested Circle Pendant with a Pearl Accent
- 8. Copper Fan Earrings with Five Bead Drops
- 9. Pomegranate Pendant with Rows of Red Seeds
- 10. Kite Earrings with Beaded Bow Tails
- 11. Miniature Abacus Pendant with Sliding Beads
- 12. Secret Garden Pendant with an Opening Gate
- 13. Stairway Pendant with a Pale Bead at the Top
- 14. Copper Envelope Pendant with a Tiny Letter
- 15. Bead Loom Pendant with a Small Copper Boat
- 16. Lantern Earrings with Golden Bead Lights
- 17. Snail Ring with a Spiral Shell and Tiny Flowers
- 18. Split Leaf Earrings with Burgundy Bead Veins
- 19. Woven Copper Collar with an Open Spiral Drop
- 20. Curved Copper Leaf Earrings with Green Beads
- 21. Braided Copper Cuff with a Black Focal Bead
- 22. Graduated Spiral Necklace with Three Smoky Drops
- 23. Woven Copper Ring with a Deep Blue Bead
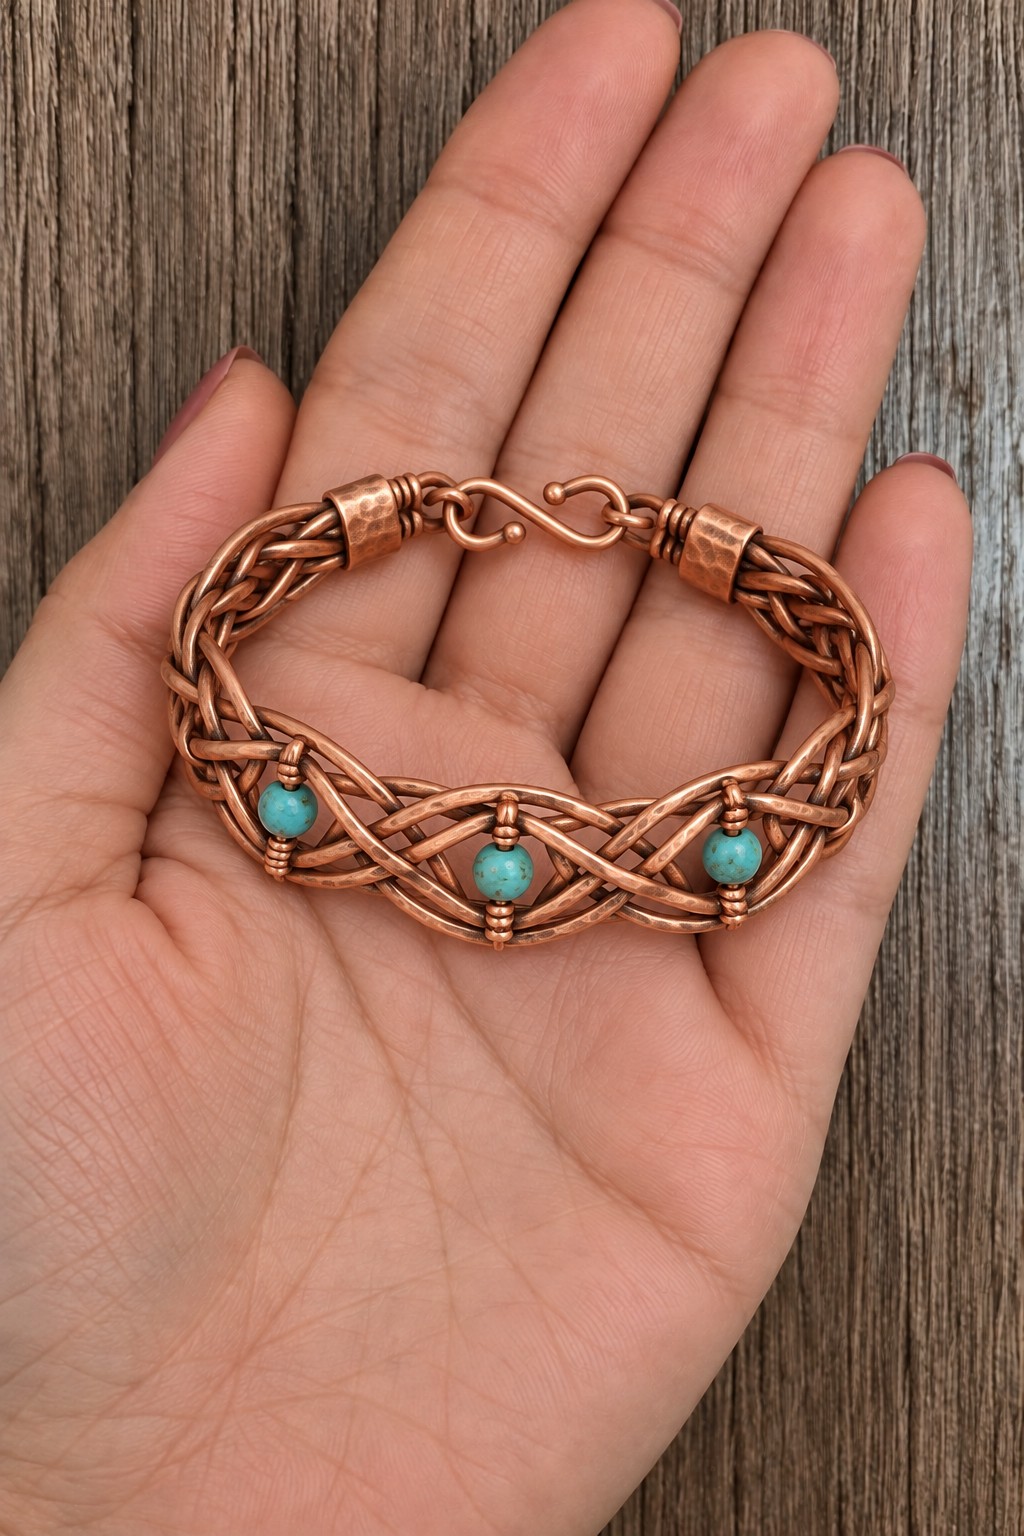
- 24. Interlaced Copper Bracelet with Turquoise Colored Beads
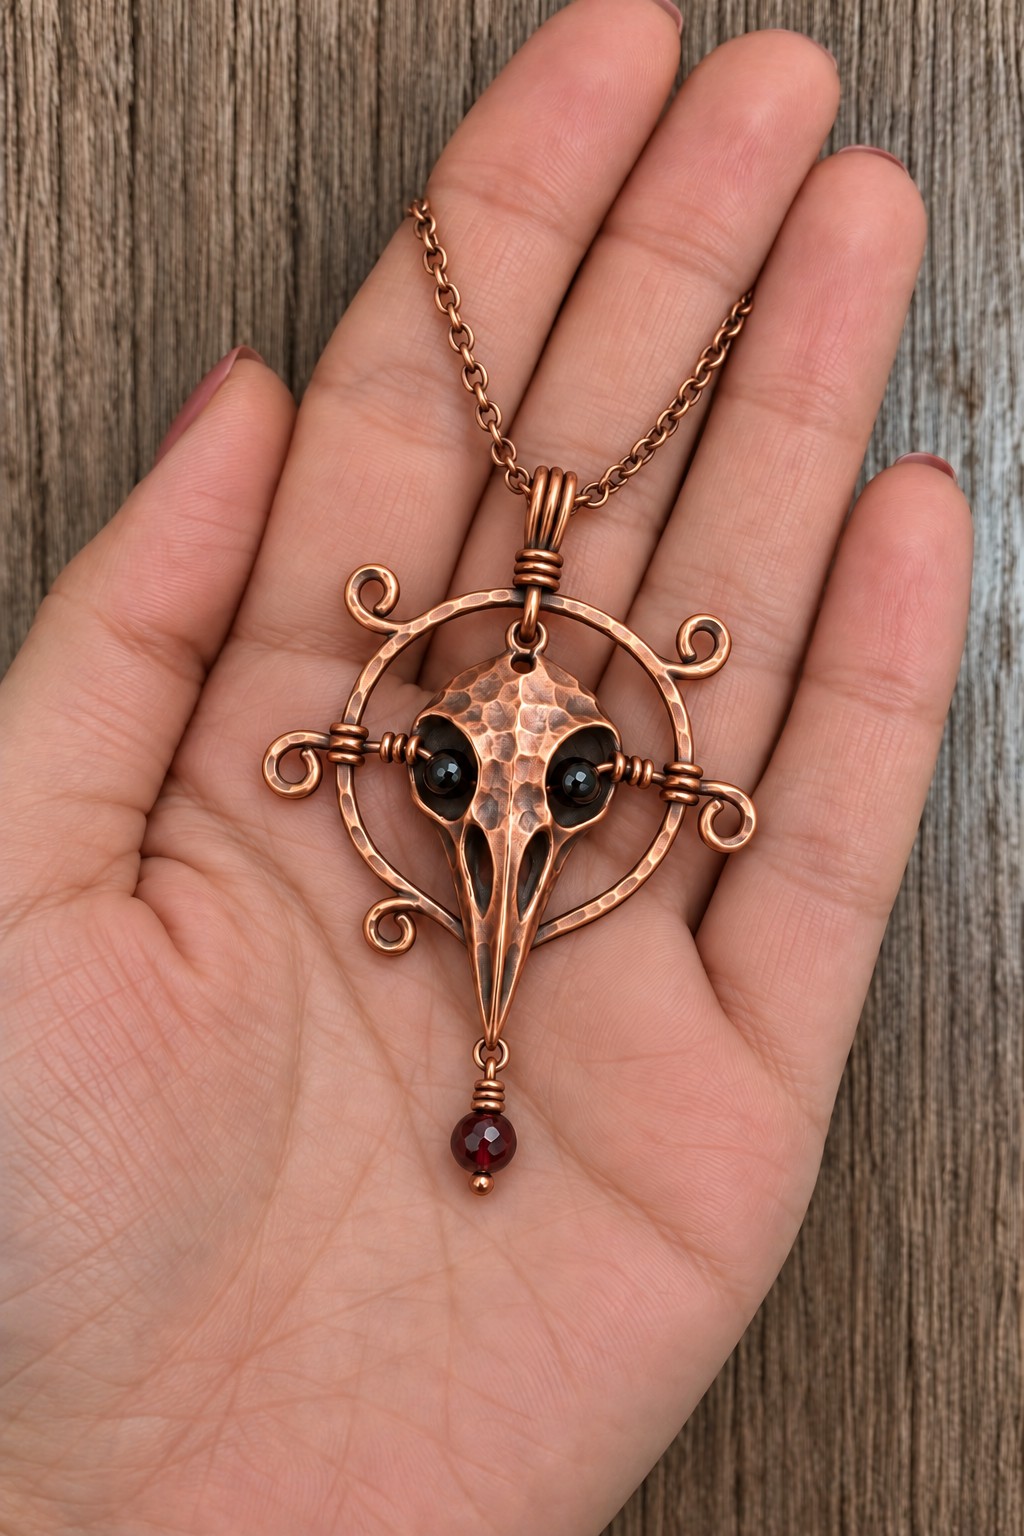
- 25. Raven Skull Pendant in a Scrollwork Circle
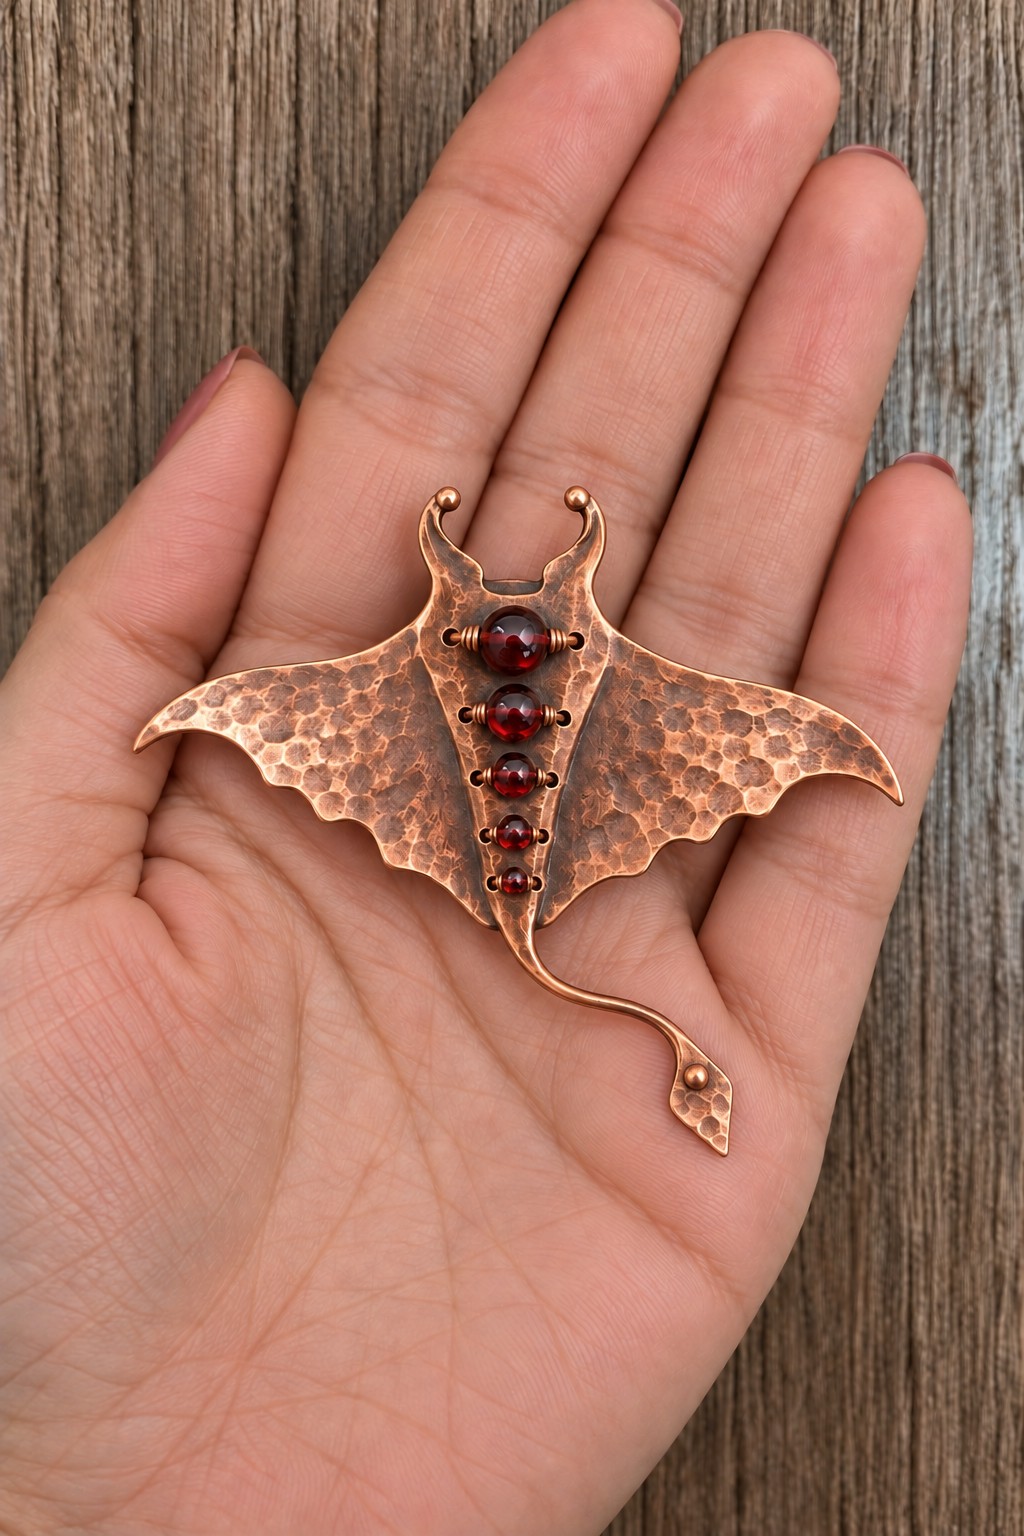
- 26. Hammered Manta Brooch with a Red Bead Spine
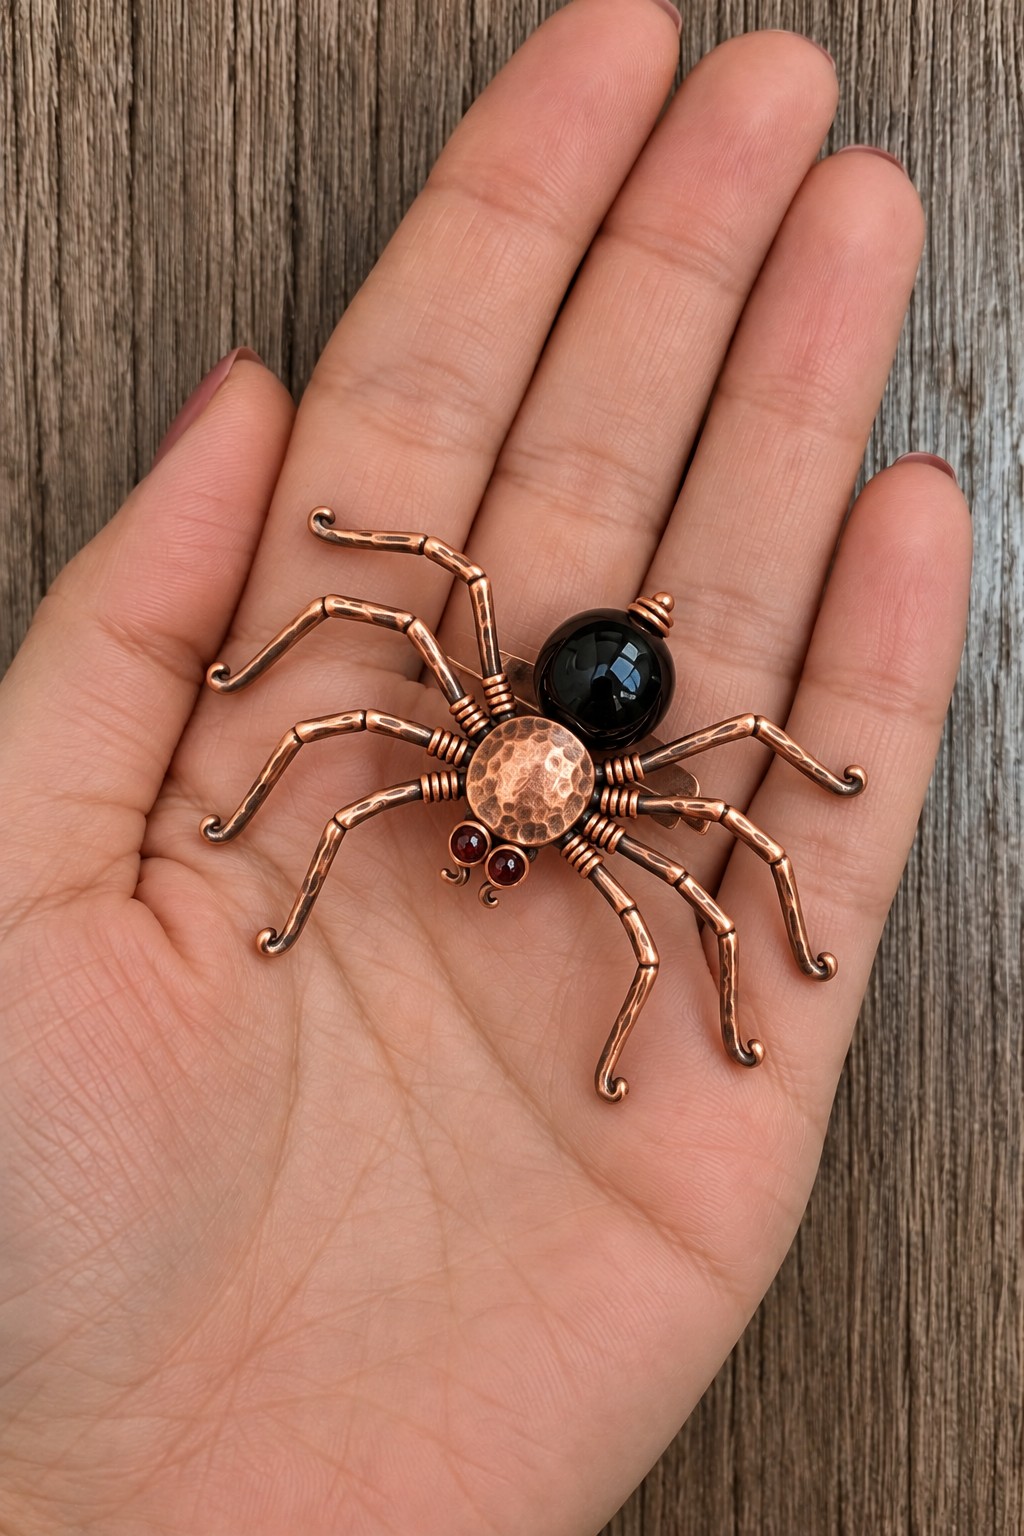
- 27. Copper Spider Brooch with a Dark Bead Abdomen
- 28. Horned Copper Mask Earrings with Smoky Drops
- 29. Ouroboros Pendant with a Purple Bead Center
- 30. Woven Serpent Pendant Around a Black Cabochon
- 31. Gothic Window Earrings with Burgundy Bead Rows
- Choose the Right Connection for Each Design
- Finish the Copper Without Losing Its Texture
- Check Comfort, Movement, and Everyday Wear
Choose Copper, Wire, and Beads That Work Together
For small flat pendants and earrings, copper sheet around 0.5 to 0.7 mm thick is a useful starting range. Bracelet bodies need a different balance of thickness, width, and stiffness, so choose a blank intended for a cuff rather than enlarging a thin earring pattern. Buy solid copper when you plan to file or texture the surface. Copper colored plating can wear through, while coated craft wire may lose its finish under a hammer.
Wire has different jobs within a piece. A soft copper wire around 0.8 to 1.2 mm can form small frames, stems, and decorative curves. Finer wire around 0.3 to 0.5 mm works for binding and weaving. These are starting choices, not interchangeable specifications: larger structures need more support, and every bead hole must accept the selected wire without force. Match the wire temper to the task, using soft wire for intricate shaping and firmer wire where a connection must retain its form.
Choose drilled glass beads when you want predictable holes and repeatable sizes. Natural stones, pearls, and dyed beads need care appropriate to their material and treatment. A dark bead can give the appearance of a polished gemstone without requiring an expensive stone. Select beads by size, weight, and hole direction before building the surrounding metalwork.
Make a Hammered Copper Pendant with a Teal Bead
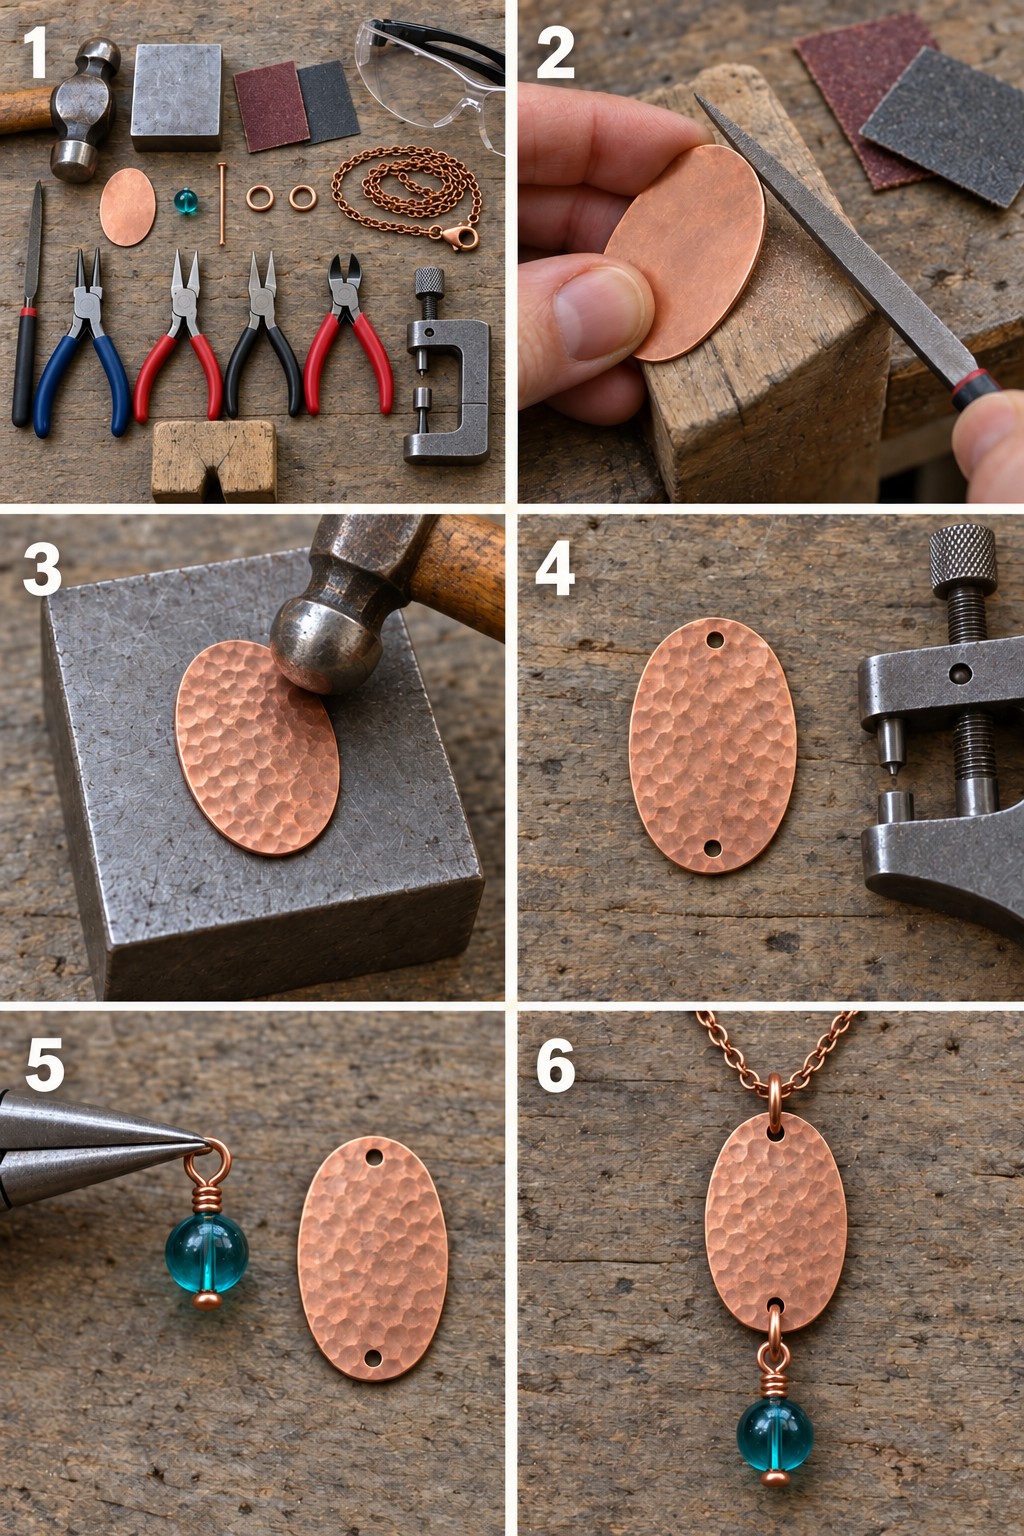
This small pendant combines the three central techniques in the collection: textured copper, a wrapped wire connection, and a freely moving bead. It uses a ready cut oval blank, so you can concentrate on finishing and assembly. The suggested dimensions are a starting pattern; check them against your actual findings before making the holes. No solder or adhesive is needed.
Materials and Tools
- One solid copper oval blank, approximately 30 mm tall, 20 mm wide, and 0.6 mm thick, without holes
- One round teal glass bead, approximately 8 mm across, drilled through its center
- One soft copper headpin, approximately 50 mm long and 0.6 mm thick, with a head wider than the bead hole
- Two sturdy copper jump rings, approximately 7 mm outside diameter with 0.8 to 1 mm wire thickness
- One finished necklace chain with a clasp, in your preferred length
- A fine needle file, 400 and 800 grit abrasive paper, and a secured wooden bench peg
- A small ball peen hammer and a stable steel bench block
- A screw operated jewelry hole punch with a bit around 1.5 mm, rated for the thickness of your copper
- Round nose pliers, two pairs of smooth jaw gripping pliers, and flush cutters
- Safety glasses, plus a ruler and marker for checking hole placement
Set the block on a stable bench and secure the bench peg before working. Wear eye protection while cutting, punching, or hammering. Keep beads and finished chain away from the hammering area. The illustrated sequence shows the same pendant from the prepared blank to the finished necklace, with closer views of the small connections.
1. Check the Components Before Assembly
Pass the headpin through the bead to confirm the fit. The head must stop the bead from slipping off. Check that each jump ring can pass through a 1.5 mm hole and still clear the copper edge. Use a scrap of similar thickness to test the hole punch and ring clearance. If a ring binds, choose a larger ring before changing the pendant pattern.
2. Smooth the Oval Edge
Support the blank against the bench peg and file away burrs with controlled strokes. Ease the front and back edges so neither feels sharp. Follow with the abrasive papers, using the finer grade after the deeper file marks disappear. Check the entire perimeter, including both narrow ends, before texturing.
3. Add the Hammered Surface
Place the blank flat on the steel block and make light, overlapping impressions with the rounded end of the hammer. Practice the pressure on scrap first. Work across the face gradually rather than repeatedly striking one spot. Stop before the oval becomes thin or noticeably distorted, and inspect the back and edge again.
4. Punch the Two Attachment Holes
Mark one hole near each end of the long centerline, with each center approximately 3 mm from the edge. Punch the holes according to your tool instructions. Remove the small burr around each opening with a suitable fine file or abrasive, without enlarging it unnecessarily. Both holes should remain surrounded by solid copper, with enough clearance for the rings to pivot.
5. Make the Wrapped Bead Drop
Slide the bead onto the headpin and leave a short neck above it. Bend the wire to a right angle, form a small eye around the round nose pliers, and bring the tail around the straight stem. Make two or three close wraps beneath the eye. Trim the excess and press the cut end snugly against the wrap. Leave enough room for the bead to sit comfortably without squeezing it.
6. Connect, Close, and Check
Using two pairs of pliers, twist a jump ring open sideways. Pass it through the lower hole and the wrapped bead eye, then twist it closed until its ends meet flush. Fit the second ring through the upper hole and around the necklace chain. Do not pull either ring outward into an oval. Lift the necklace and check that the pendant faces forward and the bead swings without rubbing the copper edge.
Run a scrap of soft fabric over the perimeter and connections to find catching points, then give each connection a gentle pull. File or tuck any rough area before wearing. This attachment sequence also works for many of the small drops in the ideas below. For more ways to combine meaningful beads and charms, explore these charm bracelet ideas with practical fit and connection tips.
Turn the Basic Techniques into Your Own Copper Jewelry
The following ideas show how the same materials can become very different pieces. Use the construction notes as design routes rather than exact cutting templates. Make a paper pattern first, check the weight and scale against the wearer, and build a sample connection before committing to a complex design. Select your own bead materials and use the suggested connections to build a version that suits your tools and skill level.
1. Three Hammered Copper Petals with a Teal Drop
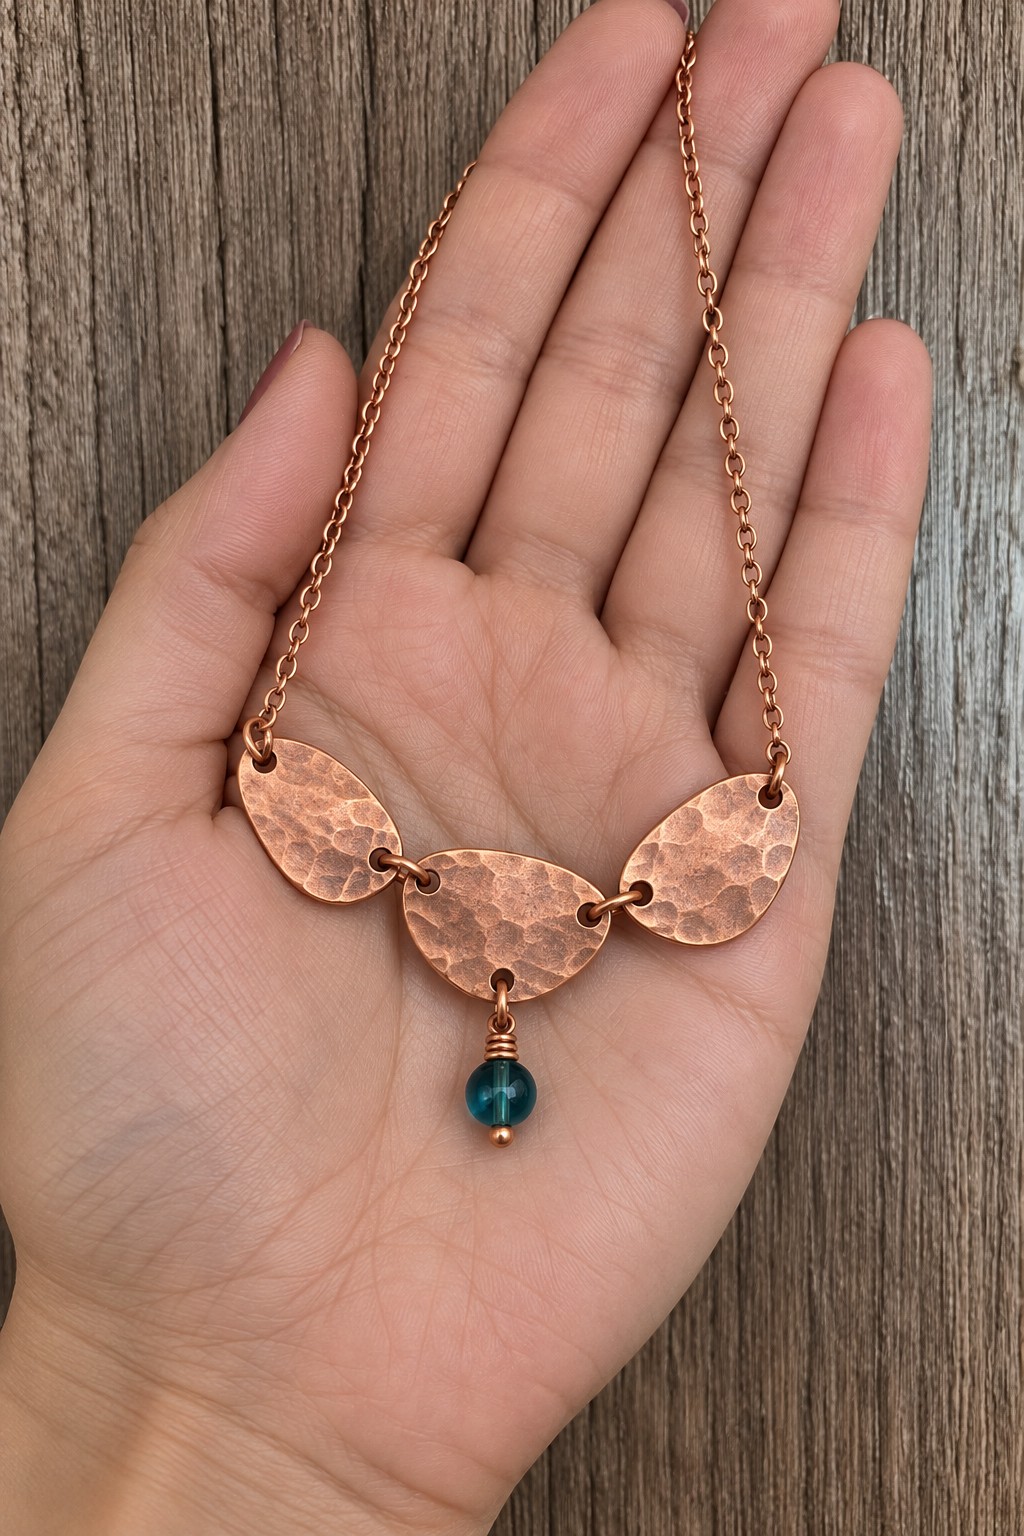
Three rounded copper plates create a soft collar shape, while a single teal bead gives the center a little movement. Use thin copper sheet, small jump rings, a chain, and a drilled glass bead on a headpin. Let the middle plate sit slightly lower so the necklace follows a gentle curve across the neckline.
Cut and finish the three plates before marking the side connections. Join neighboring plates through separate holes, leaving the rings free to turn. Add the bead through a dedicated hole at the bottom of the middle plate. Test the necklace on a curved surface before attaching the chain: rings that are too tight can make the plates overlap or tip forward.
2. Copper Branch Brooch with Amber Colored Beads
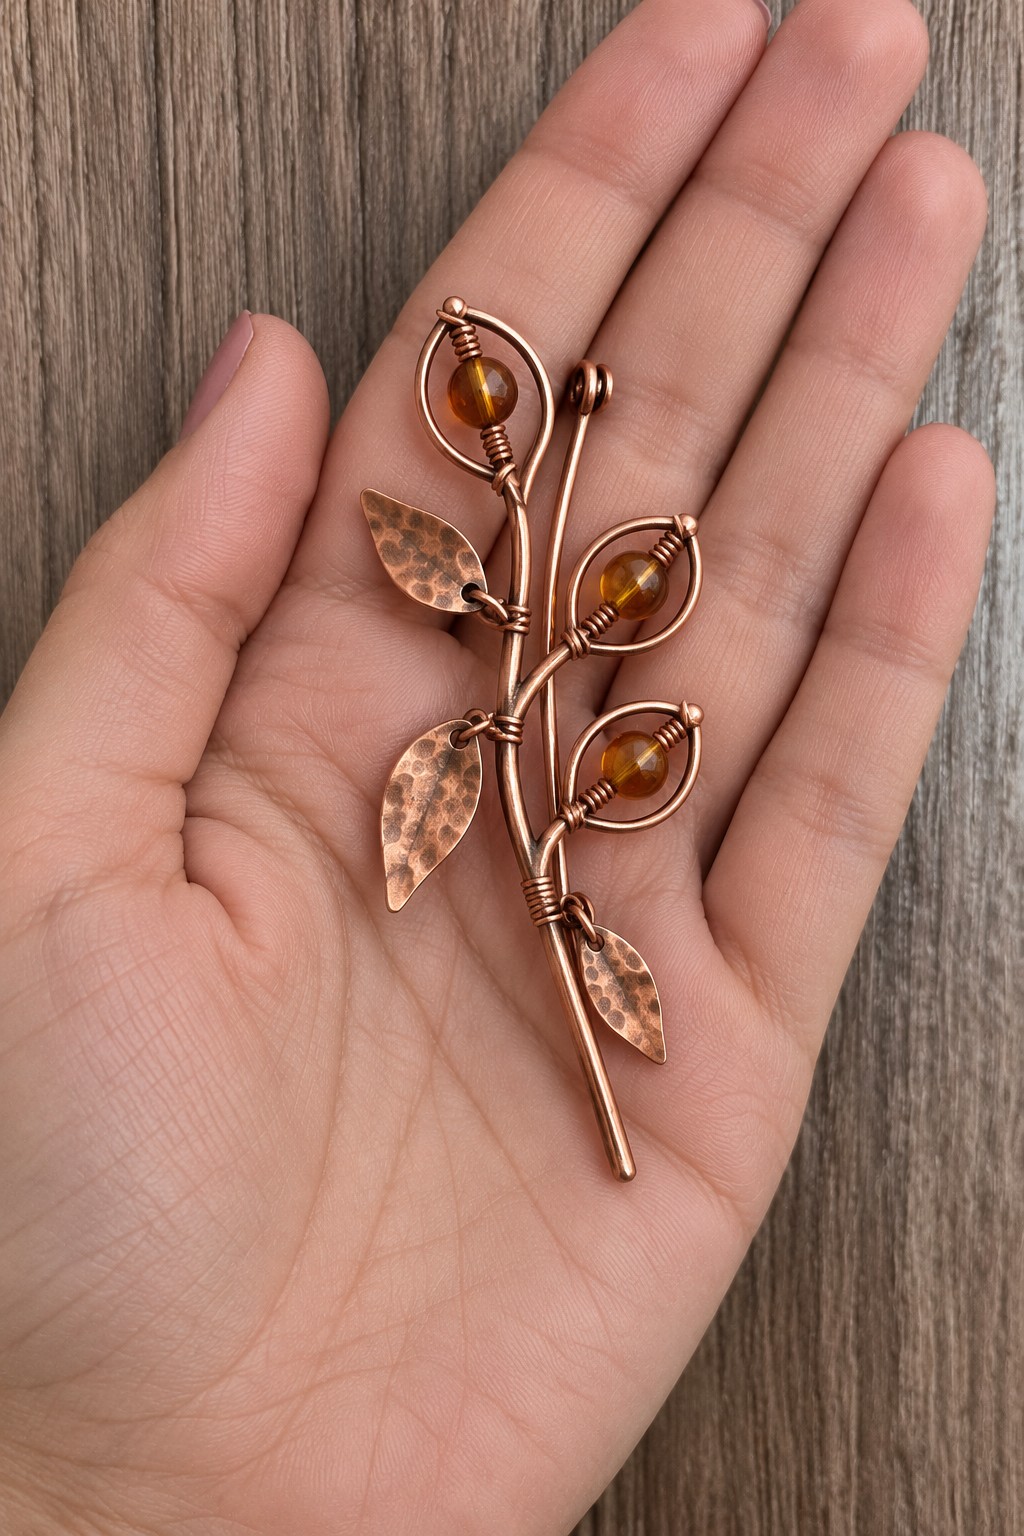
A slender branch combines three hammered leaves with open wire shapes holding warm amber colored beads. Gather copper sheet for the leaves, a firmer wire for the stem, finer binding wire, drilled beads, and a ready made brooch fastening. The contrast between solid leaves and open spaces keeps the botanical outline easy to read.
Shape the stem and individual branch loops first. Mount each bead on a fine wire that is secured at both ends, then bind the branches to the main stem. Attach the metal leaves through small holes near their bases. Build the decorative front onto a backing that can hold a mechanically fixed brooch pin, and check that the pin opens without catching any branch. Keep the stem tip smooth and rounded.
3. Open Spiral Earrings with Dark Red Beads
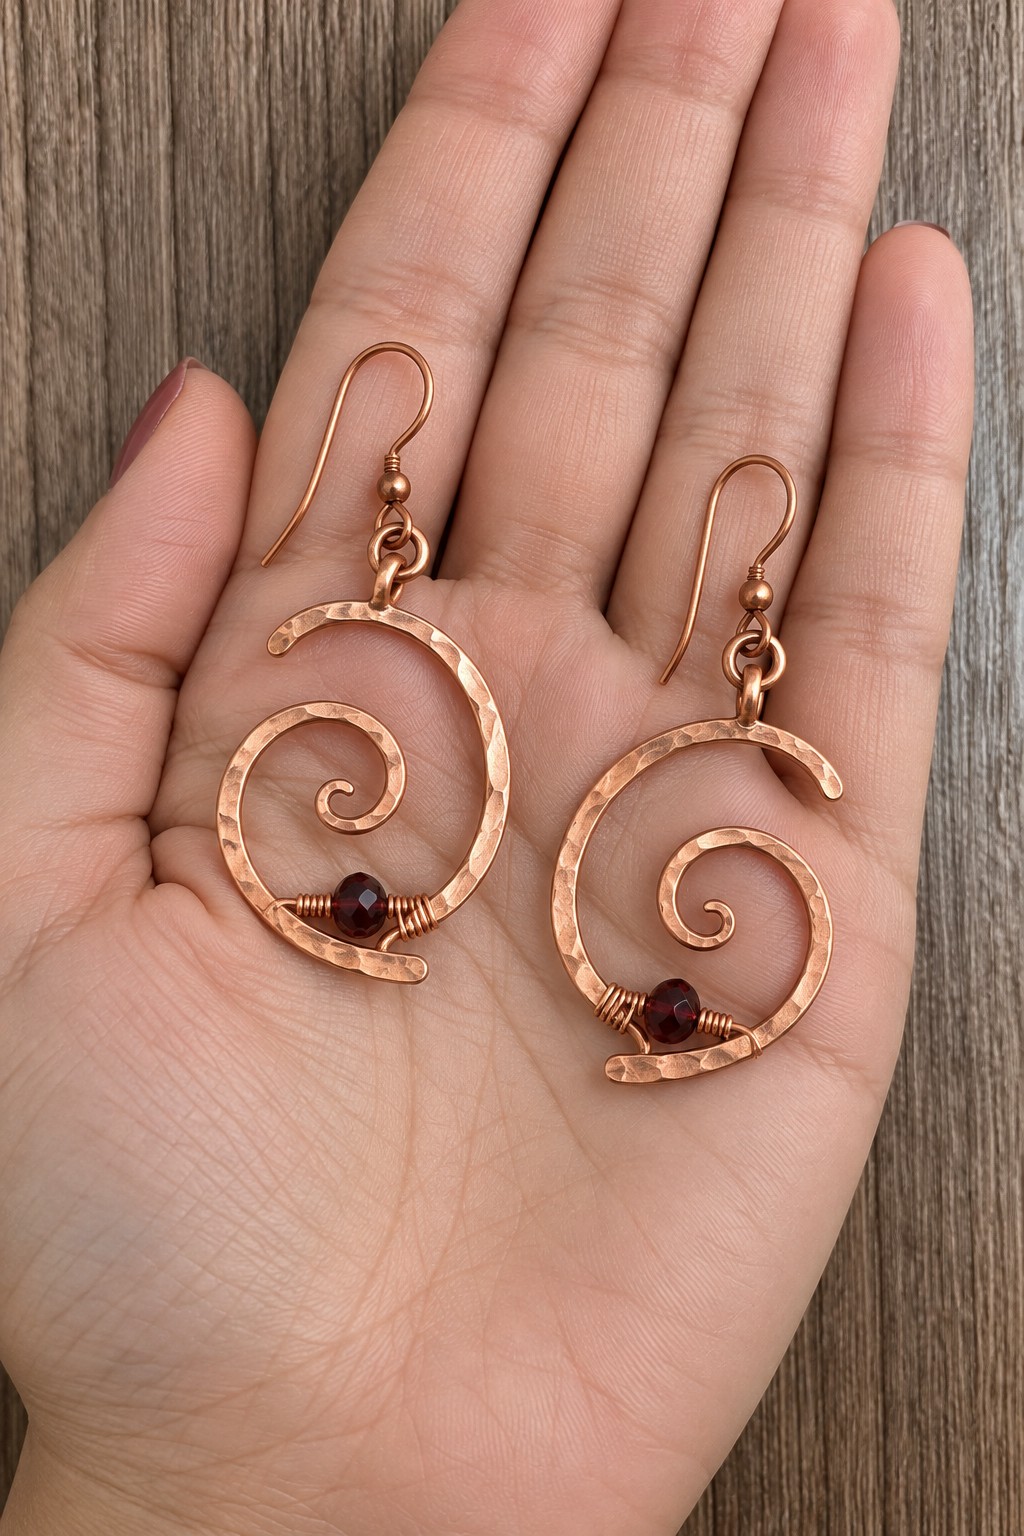
Broad copper spirals and tiny red beads make an expressive pair without a complicated silhouette. Start with solid copper wire thick enough to retain the open curve, finer wrapping wire, two matching beads, and suitable ear hooks. A paper spiral pattern helps keep the two earrings similar in width and drop.
Form the spirals gradually, leaving a clean gap between neighboring turns. Lightly flatten the main curves on a steel block before introducing the beads. Secure each bead near the lower arc with fine wire passing through its hole and wrapping around the frame on both sides. Give the upper connection a closed attachment eye rather than depending on an open decorative curl to hold the ear hook.
4. Folded Ribbon Pendant with a Smoky Drop
A narrow strip of copper becomes a flowing ribbon with two uneven tails and a smoky colored drop. Use a soft copper strip with carefully rounded ends, a necklace bail, one drilled teardrop bead, and matching connecting rings. Keep the strip narrow enough to curve easily without creating a heavy pendant.
Texture and finish the strip while it is flat, then shape the upper loop around a smooth mandrel. Ease the crossing into place rather than pinching a sharp crease. Punch the lower attachment hole in one tail and connect the bead with a wrapped eye. Check the gap at the crossover so it does not grip fabric, and keep the longer tail clear of the moving bead.
5. Hammered Cuff with a Turquoise Colored Window
A small rectangular opening makes one turquoise colored bead the focal point of this otherwise simple cuff. Choose a copper cuff blank with enough width for a window, a drilled bead, and wire suitable for a supported bead axle. The opening should leave strong borders above and below the bead.
This design requires piercing an interior cutout with a jeweler's saw. Round the window corners, finish every inner edge, texture the metal, and form the cuff before adding the bead. Fix the bead wire through small side holes or around the window uprights, keeping the ends away from the wrist. Fit the cuff once and avoid repeatedly bending it open and closed, which can fatigue the metal.
6. Landscape Frame Pendant with a Golden Sun
An open rectangular frame becomes a miniature landscape with a golden bead near the top and three green beads on a curved wire below. Use a pierced copper sheet frame or a securely joined frame, fine binding wire, and drilled beads. The empty center is part of the design, so resist filling every space.
Finish the frame before fitting the wire details. Anchor the golden bead to the upper corner with a short curved support. Shape the lower wire into a gentle hill, add the green beads, and fasten both ends to the side rails. Keep the bindings compact and position them so they cannot slide into the corners. A centered bail helps the scene hang upright.
7. Nested Circle Pendant with a Pearl Accent
Two circles create a light, balanced pendant, with a pale bead following the lower curve of the inner ring. Use an outer copper ring with a broader hammered surface, a smaller wire circle, one drilled pearl or glass pearl, and a bail that can support both elements. Let the difference in diameter provide room for the inner circle to move.
Shape and finish the circles before adding the bead. For a simple adaptation, thread the bead onto the inner wire before closing and binding its joint near the bail. Alternatively, mount it on a short wire bridge between two finished wire ends. Check that the bead cannot strike the outer ring during normal movement and that the concealed upper joint remains secure.
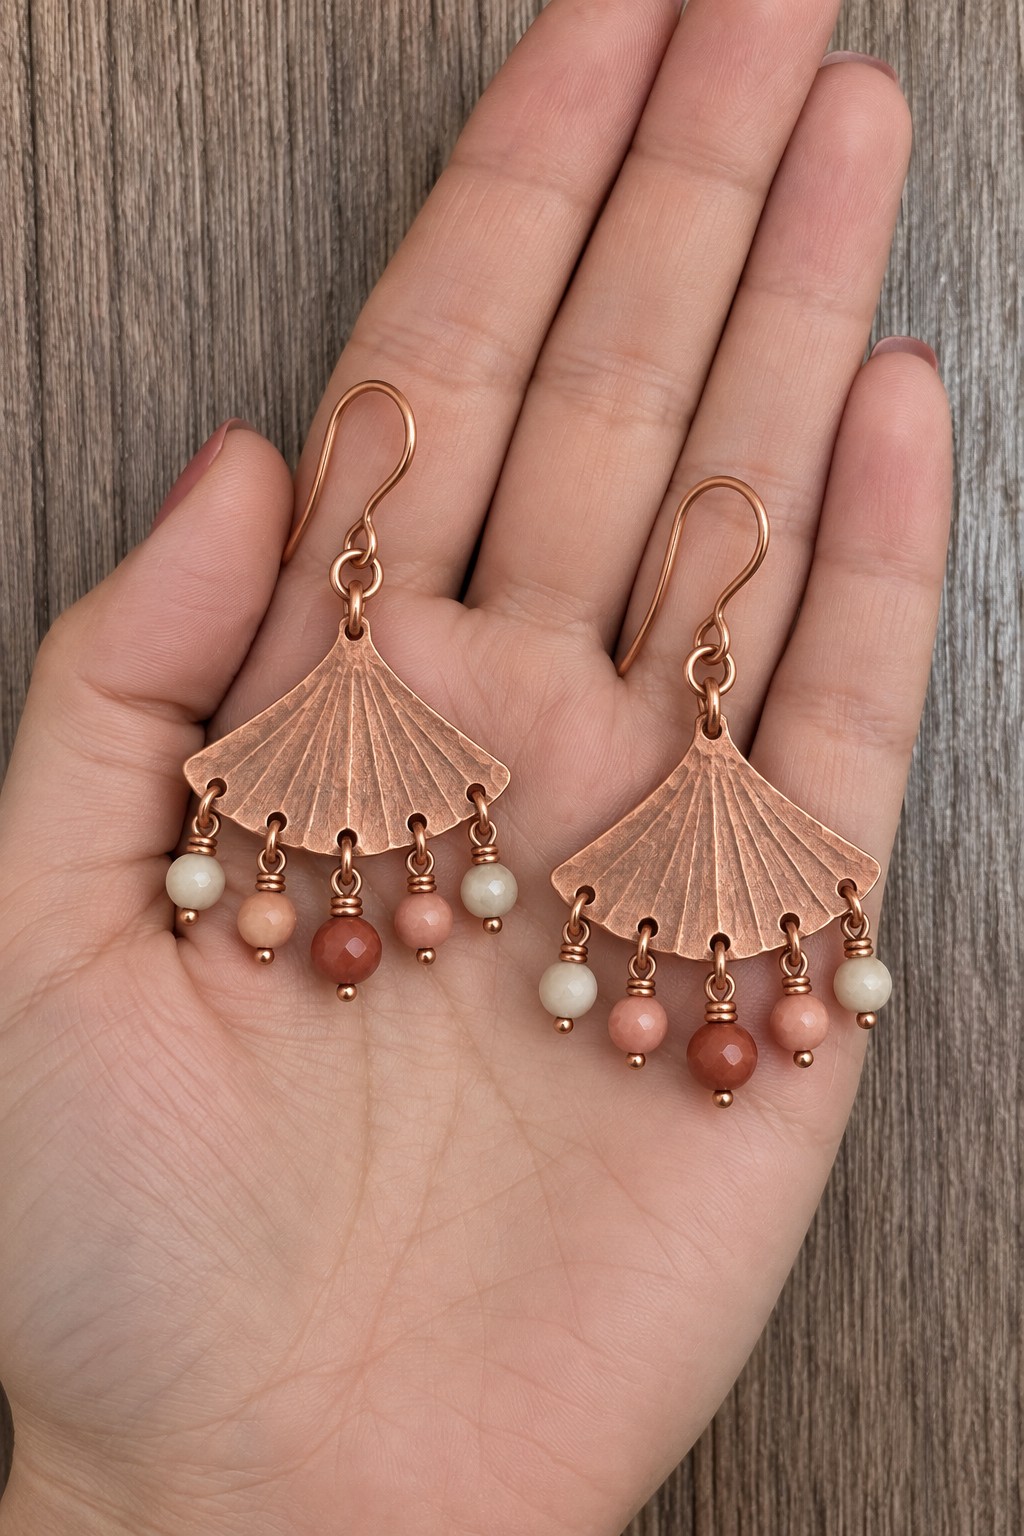
8. Copper Fan Earrings with Five Bead Drops
Radiating lines give these fan earrings a shell like texture, while five small drops soften the lower edge. Prepare matching copper fan blanks, a fine texturing tool, ten lightweight drilled beads in cream and muted coral tones, headpins, jump rings, and ear hooks. Place the largest or deepest colored bead in the center for a gradual rhythm.
Make both paper patterns together and mark the lower holes at equal intervals. Texture the radiating lines, finish the scalloped edge, then punch and deburr the holes. Assemble each bead on its own headpin and connect the drops separately. Leave enough space between them to swing, and compare the finished weight of both earrings before wearing.
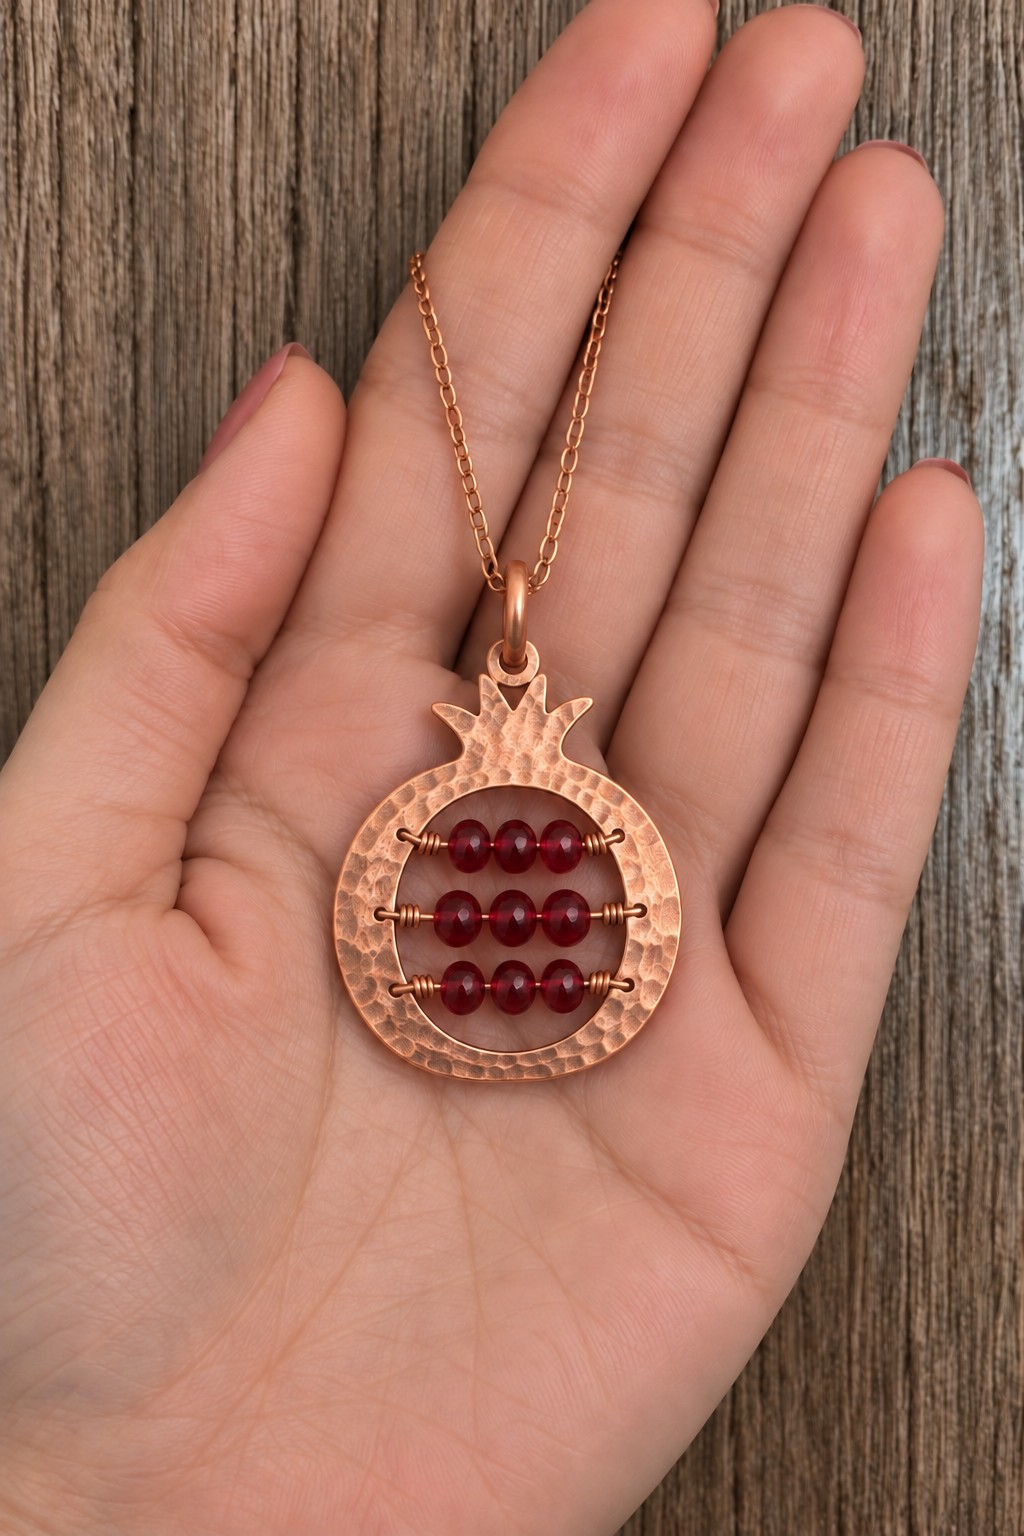
9. Pomegranate Pendant with Rows of Red Seeds
A round copper outline with a small crown suggests a pomegranate, and three rows of red beads become its seeds. Use copper sheet for the fruit outline, drilled round beads, and three lengths of wire that can span the interior. The crown and open center make this a metal piercing project rather than a simple wire loop exercise.
Draw the complete shape with generous metal around each row's fixing points. Pierce and finish the opening, then add the surface texture. Thread the beads onto the horizontal wires and secure the ends through paired side holes or firmly wrapped anchors. Keep the rows separate and leave a little clearance around the beads. Round every crown tip so the pendant will not scratch or catch clothing.
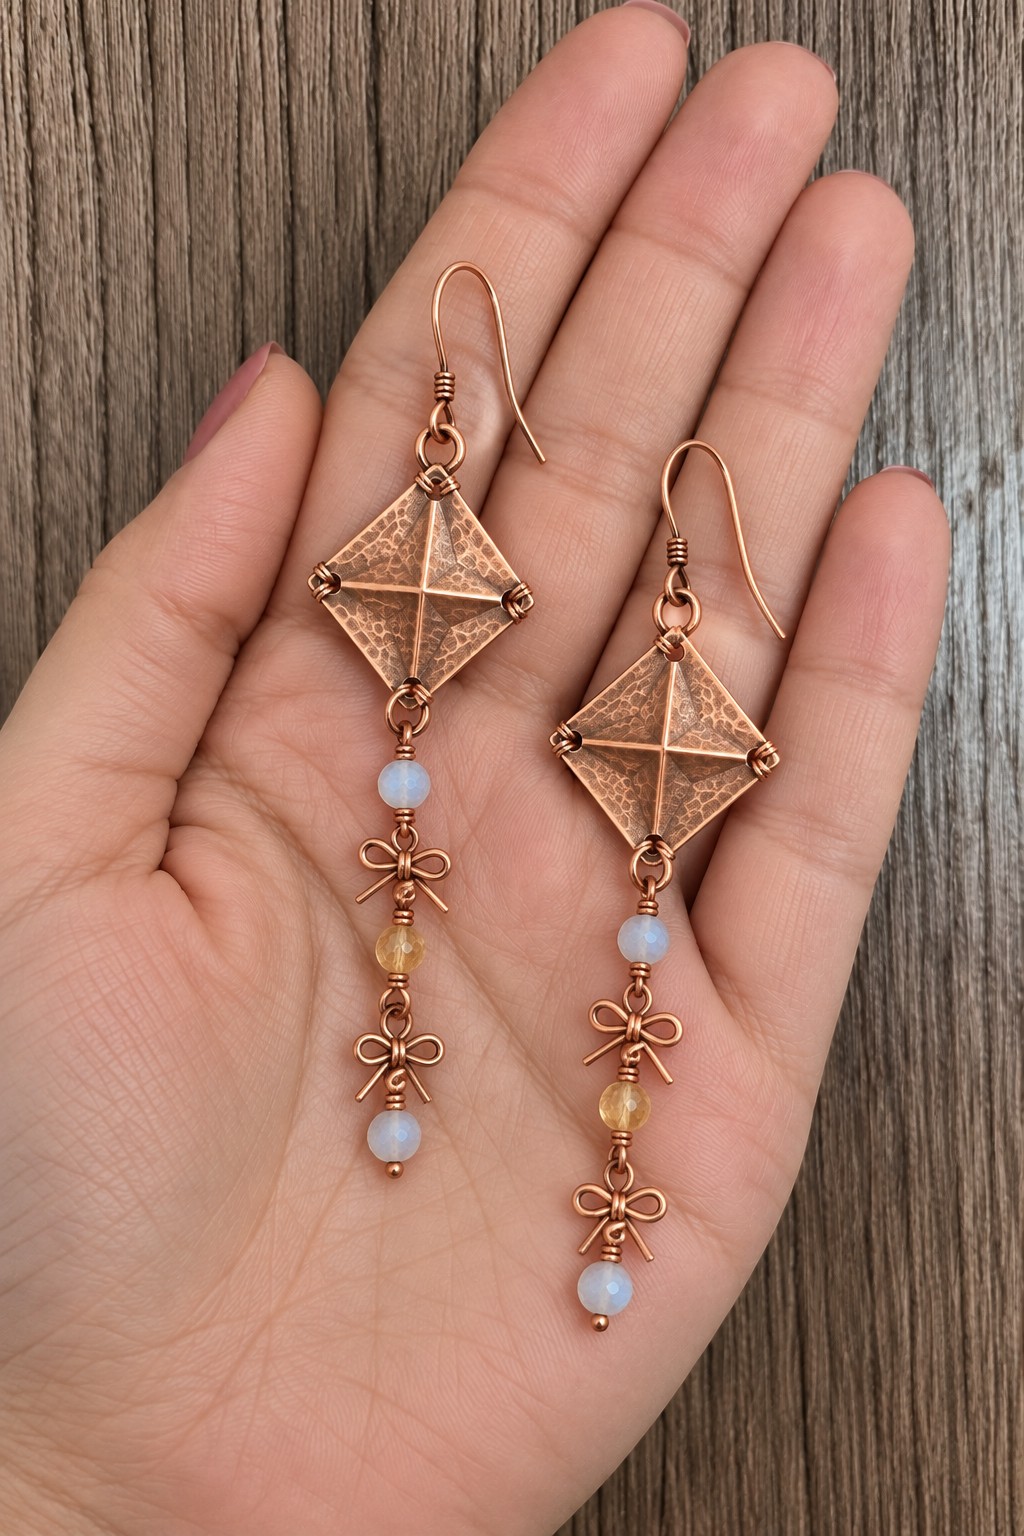
10. Kite Earrings with Beaded Bow Tails
Small hammered diamonds become kites when crossed wire ribs and long decorative tails are added. Gather lightweight copper sheet, fine wire for the ribs and tiny bows, pale blue and honey colored beads, headpins or eye pins, and ear hooks. A narrow, flexible tail keeps the motif playful without turning it into a rigid ornament.
Cut matching diamonds, round the four corners, and add attachment holes before assembling. Secure the crossed ribs at their ends through small holes. Build each tail as short connected bead sections, adding tightly formed bow details with all wire ends tucked in. Keep the two tails similar in length and test them against hair and fabric for snagging.
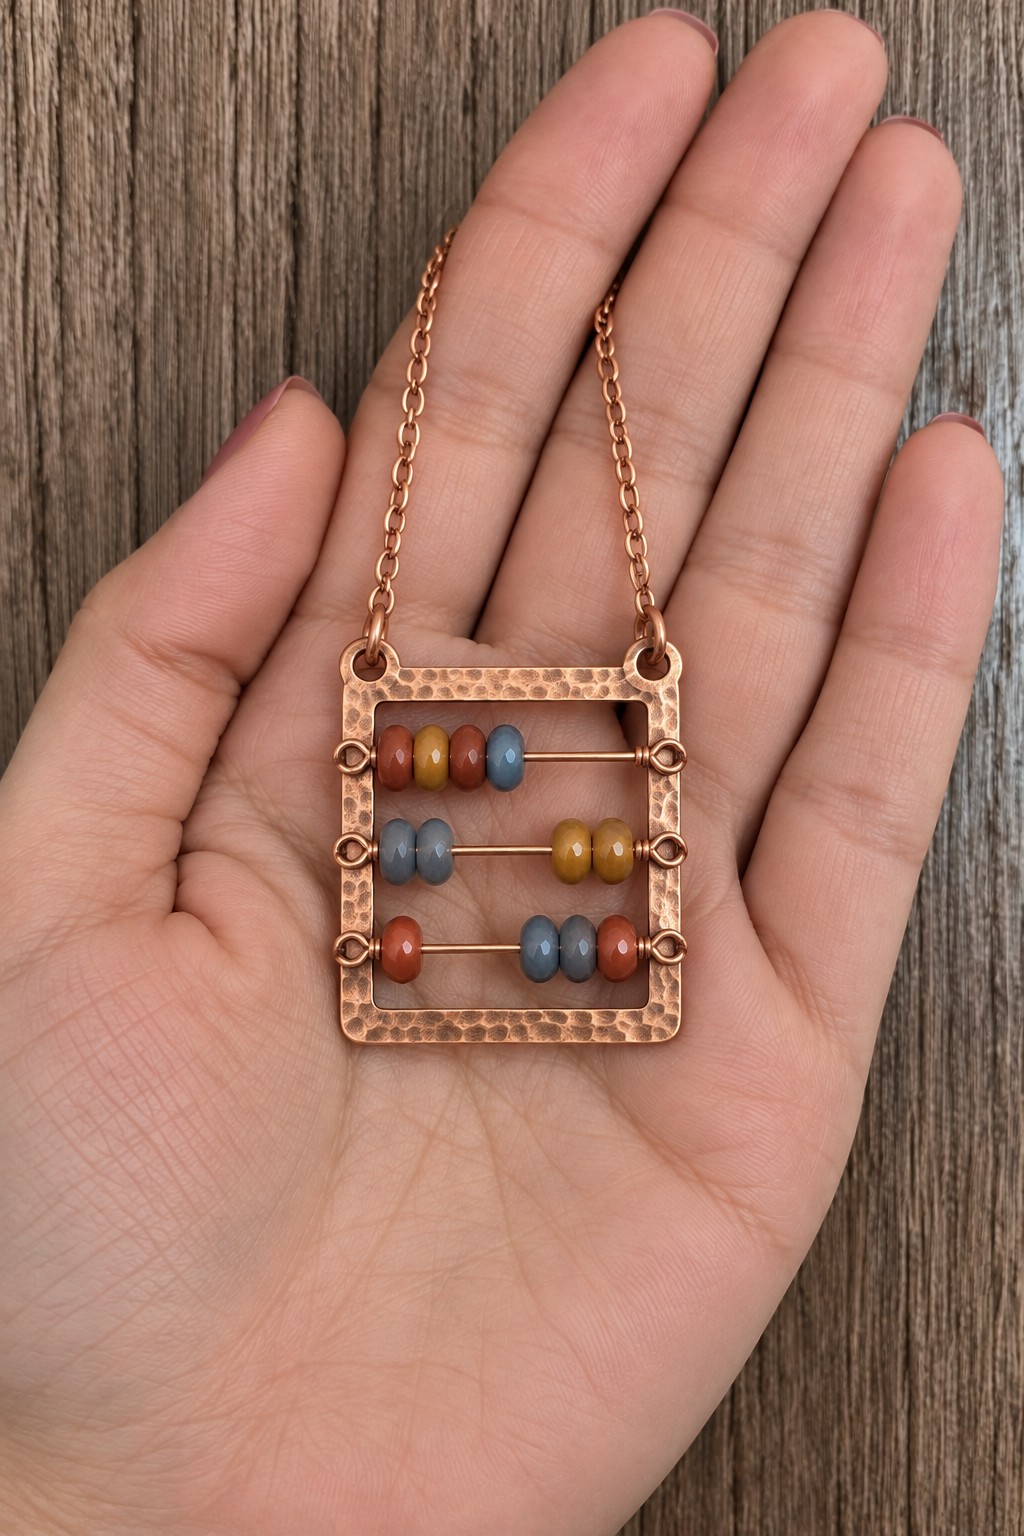
11. Miniature Abacus Pendant with Sliding Beads
A little abacus gives a copper necklace a cheerful geometric character. Use a rigid rectangular frame, three straight wire rods, and small beads in muted blue, red, and yellow. Select beads with holes that slide freely on the rods, and leave an unfilled section on each row if you want the beads to move.
Create paired holes along the two side rails and pass the rods through them. Secure each rod mechanically so neither end can pull out, using a riveted end or a firm external wrap appropriate to the frame. Avoid making the rods so tight that the side rails bow inward. This is a decorative pendant; a tiny moving element should remain secure even when gently shaken.
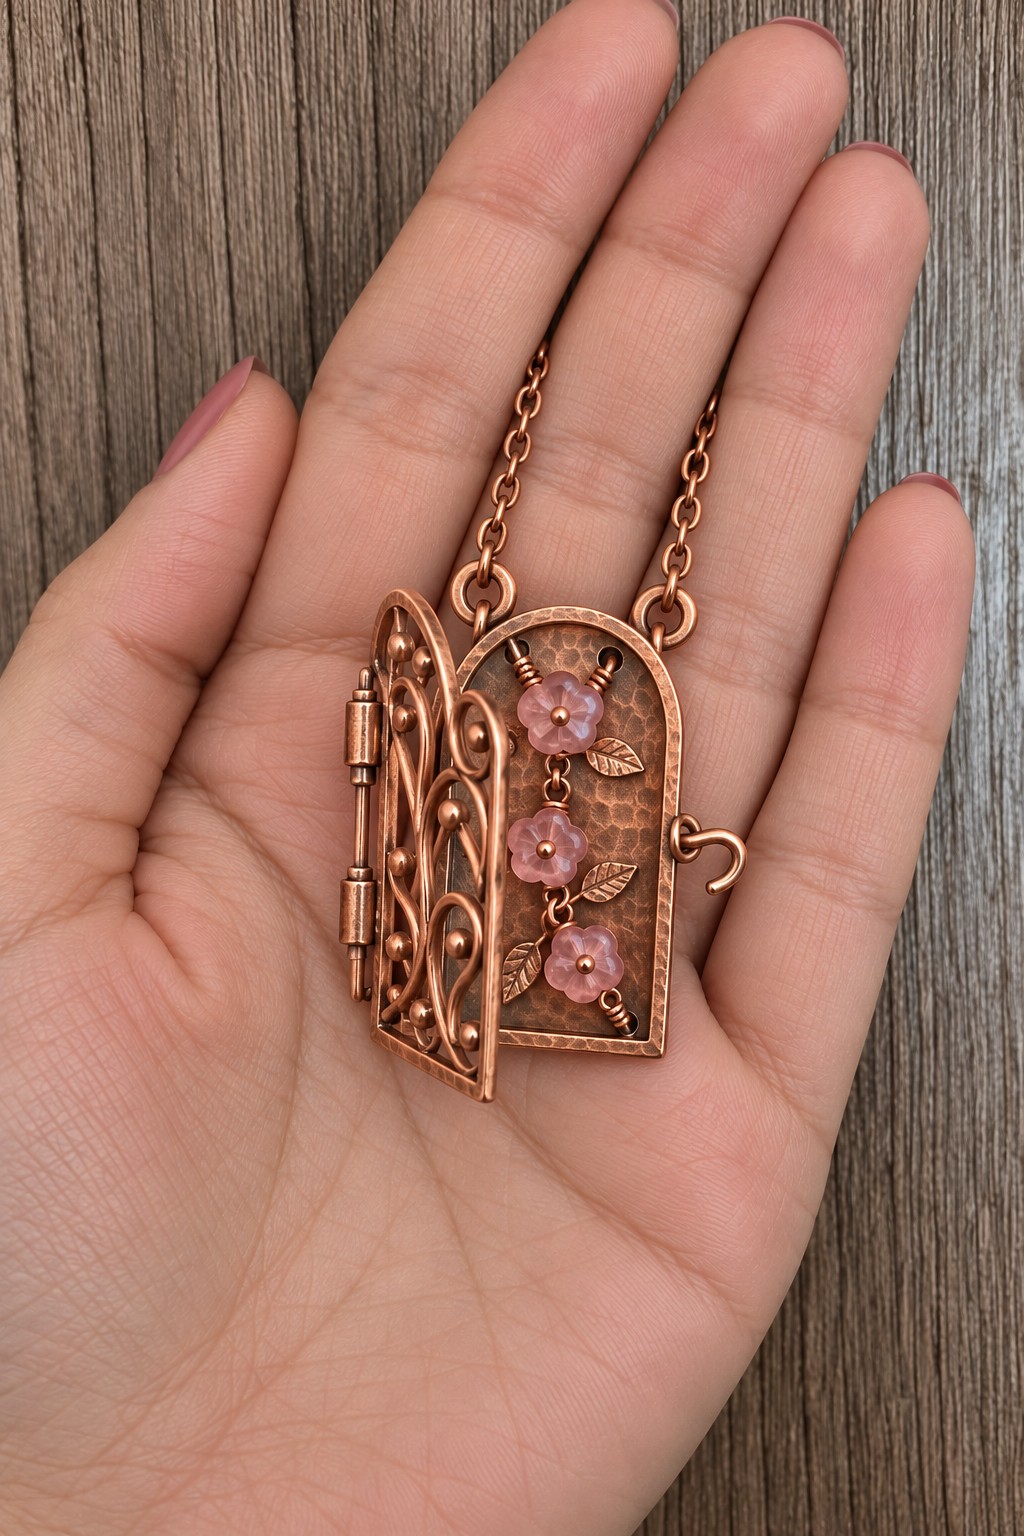
12. Secret Garden Pendant with an Opening Gate
An opening scrollwork gate reveals three pink flowers against a hammered copper backing. This is an advanced miniature construction using an arched backing plate, a separate framed gate, fine copper scrolls, flower beads, small leaf elements, a hinge, and a side catch. The depth between the gate and flowers is as important as the front outline.
Build and test the bare metal gate, hinge, and catch before attaching the flowers. A small purchased jewelry hinge can simplify the mechanism; a fabricated tube hinge needs accurately aligned barrels and a retained pin. Complete any soldering before adding beads. Mount the flowers through drilled holes or on secured wire stems, then close the gate slowly to check that nothing presses against the petals.
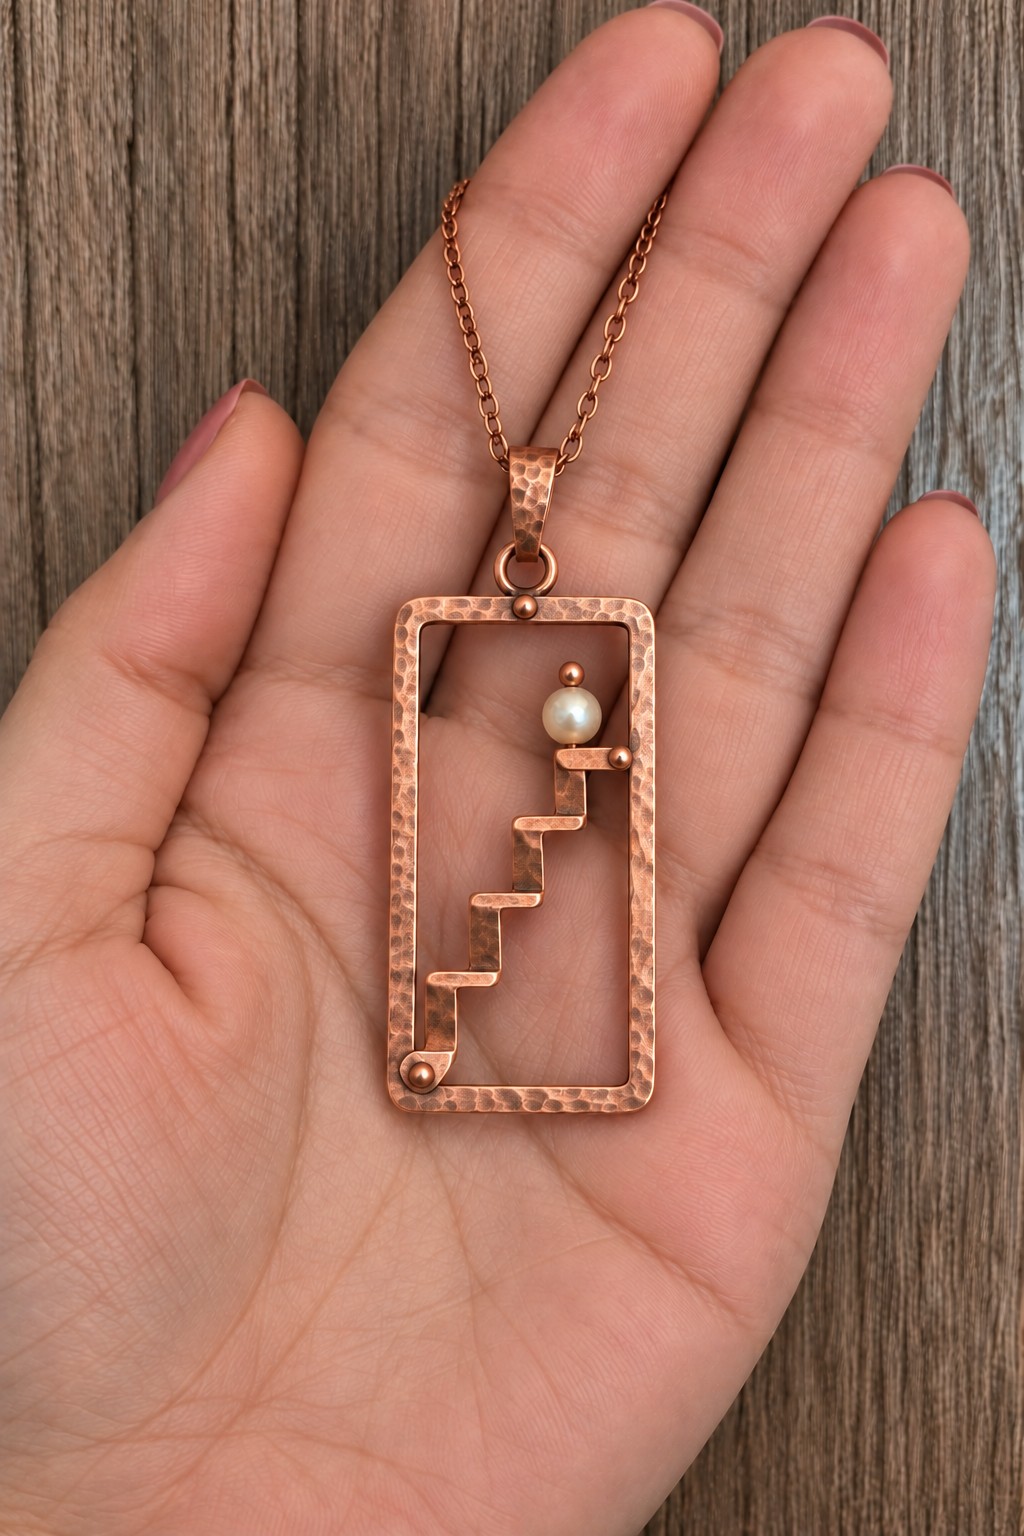
13. Stairway Pendant with a Pale Bead at the Top
A small staircase inside an open frame gives this pendant a quietly architectural feel. Use a pierced rectangular copper frame, a narrow copper strip for the steps, a pale drilled bead, and a bail. Keep the staircase broad enough to read clearly while preserving open space around it.
Mark equal step intervals on the strip and bend it with flat nose pliers to alternate short horizontal treads and vertical risers. A practical version fixes the lower end to a small tab at the bottom of the frame and secures the upper end to the side rail. Mount the bead on a retained vertical pin at the top step. Check the right angle bends carefully for roughness, cracks, or thinning.
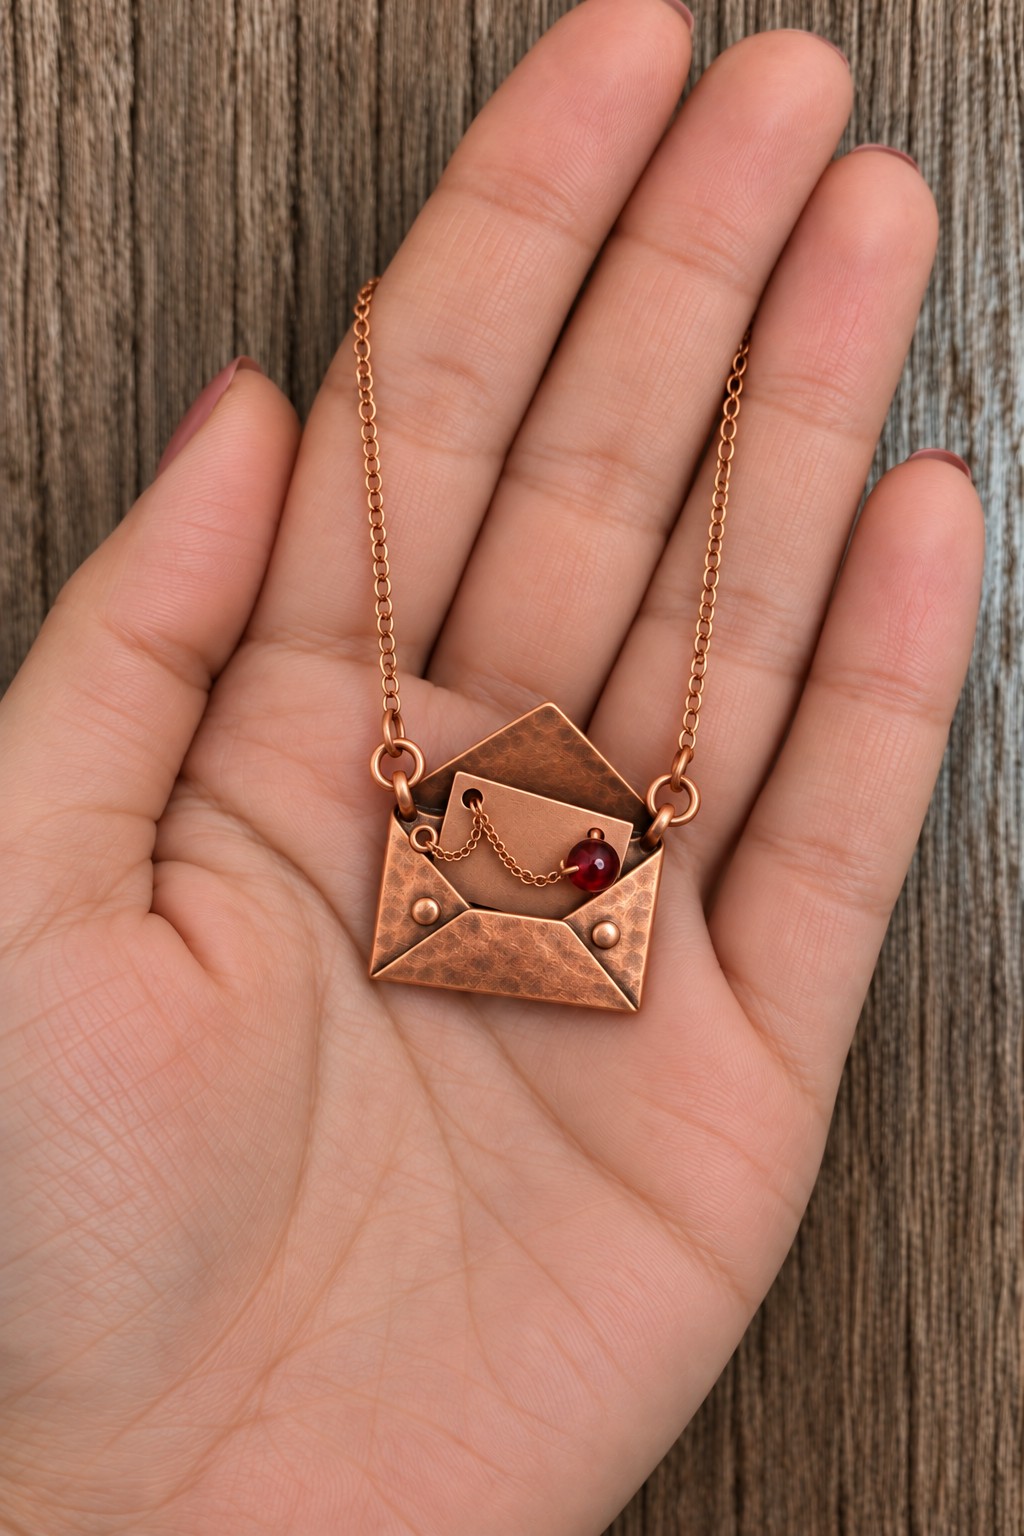
14. Copper Envelope Pendant with a Tiny Letter
Folded copper panels create an open envelope holding a tiny metal letter and a red bead detail. Use thin soft sheet, small copper rivets, a short fine chain, a drilled red bead, and two upper necklace attachments. A paper envelope mockup is especially useful for checking how the folds overlap.
Cut and finish the blank, then fold the side and bottom panels around a spacer that leaves room for the letter. Secure the overlaps with appropriate rivets without flattening the pocket closed. Round the letter's corners and tether it with the short chain so it cannot disappear during wear. Keep the envelope mouth smooth, and do not force a sharp fold into metal that has already become stiff from repeated bending.
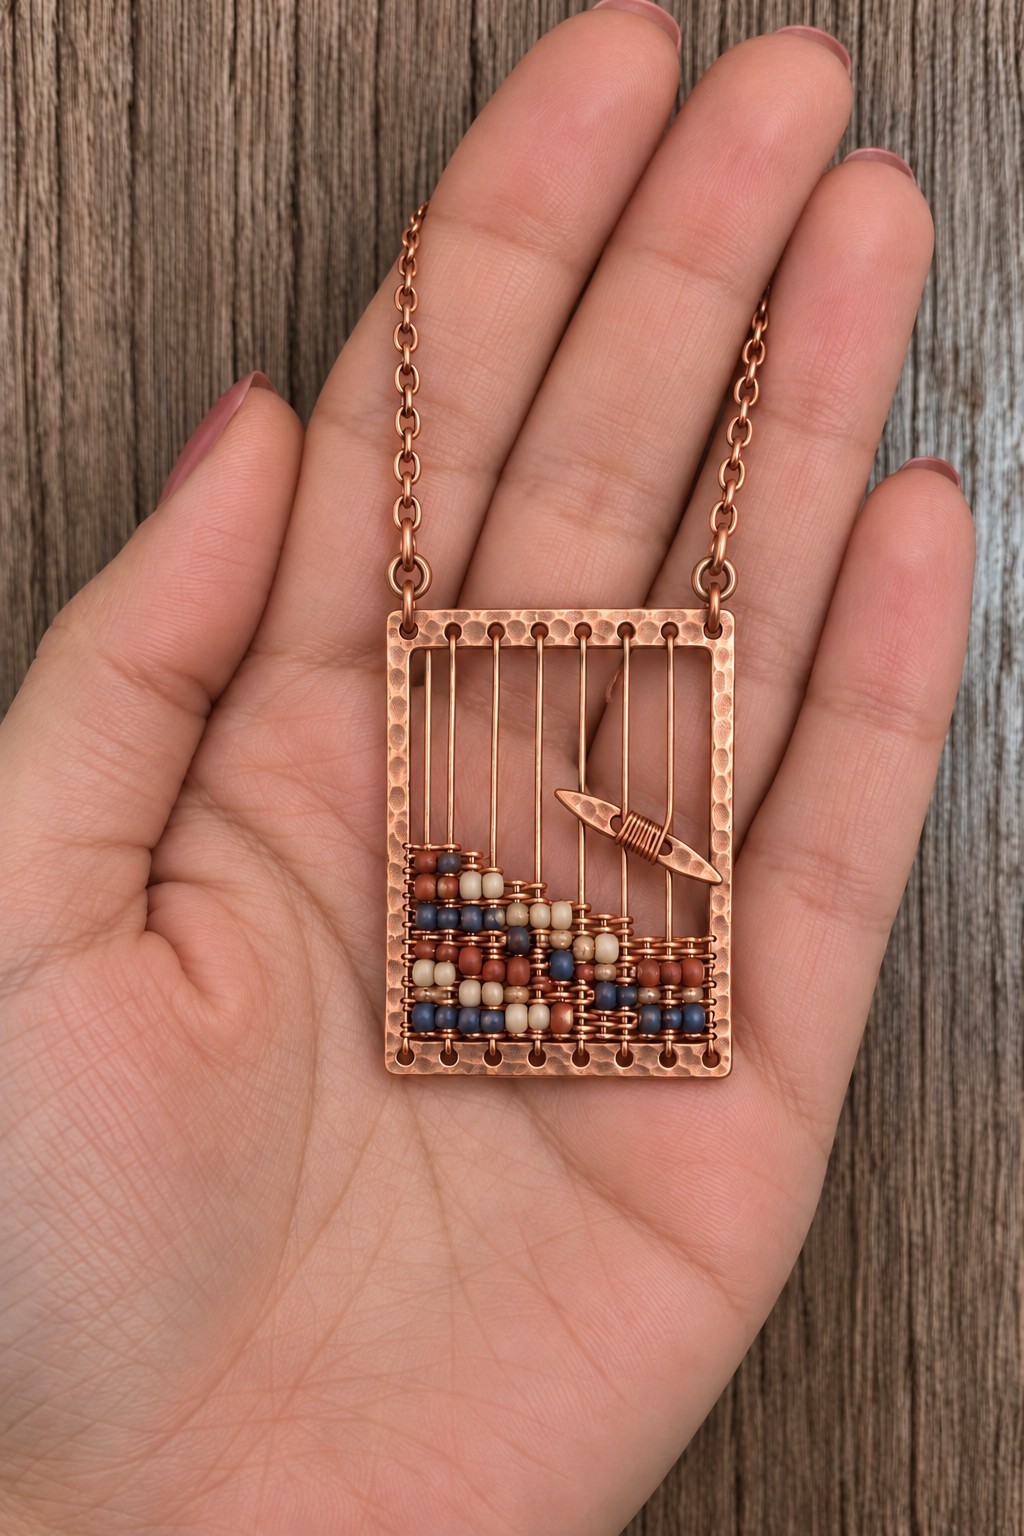
15. Bead Loom Pendant with a Small Copper Boat
Vertical wires, low rows of colorful beads, and a tiny copper boat turn this frame into a miniature waterscape. Prepare a rigid copper rectangle with matching holes along its upper and lower rails, fine wire, small seed beads, and a lightweight boat cut from sheet. Choose beads with consistent holes so the wires stay straight.
Plan the bead pattern on squared paper, then assemble each vertical strand from bottom to top. Secure the ends behind the rails and tuck them away from skin. Place the boat above the bead field with two discrete wire connections so it stays level. Pull the strands just taut enough to align them; excessive tension can bend the frame or cause the upper rail to twist.
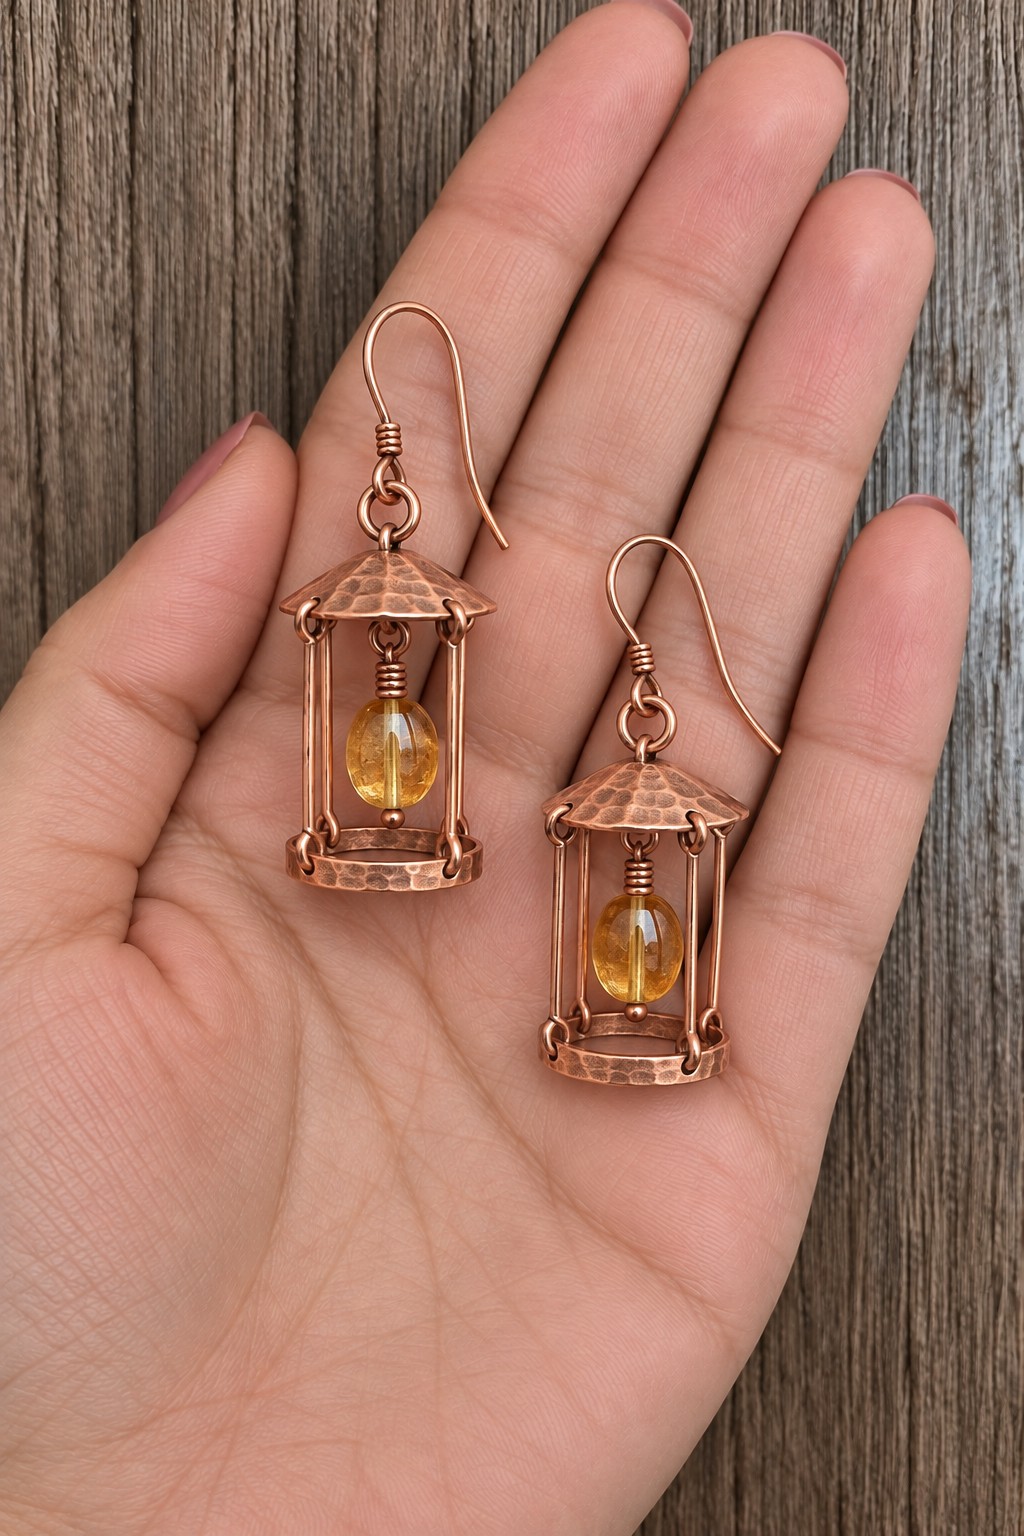
16. Lantern Earrings with Golden Bead Lights
A warm golden bead suspended inside a copper lantern creates the impression of a tiny light. Use two matching shallow copper roofs, two small bases, straight wire supports, drilled oval beads, and ear hooks. This design depends on equal support lengths so the bases remain level beneath the roofs.
Shape and finish the roof and base components before adding the beads. Connect them with evenly spaced wire posts through corresponding holes, using closed ends or secure wraps. Suspend each bead from an independent inner loop beneath the roof. The bead must clear both the posts and the base. Complete soldered joints, if used, before assembly, and keep the finished lanterns small enough for comfortable earrings.
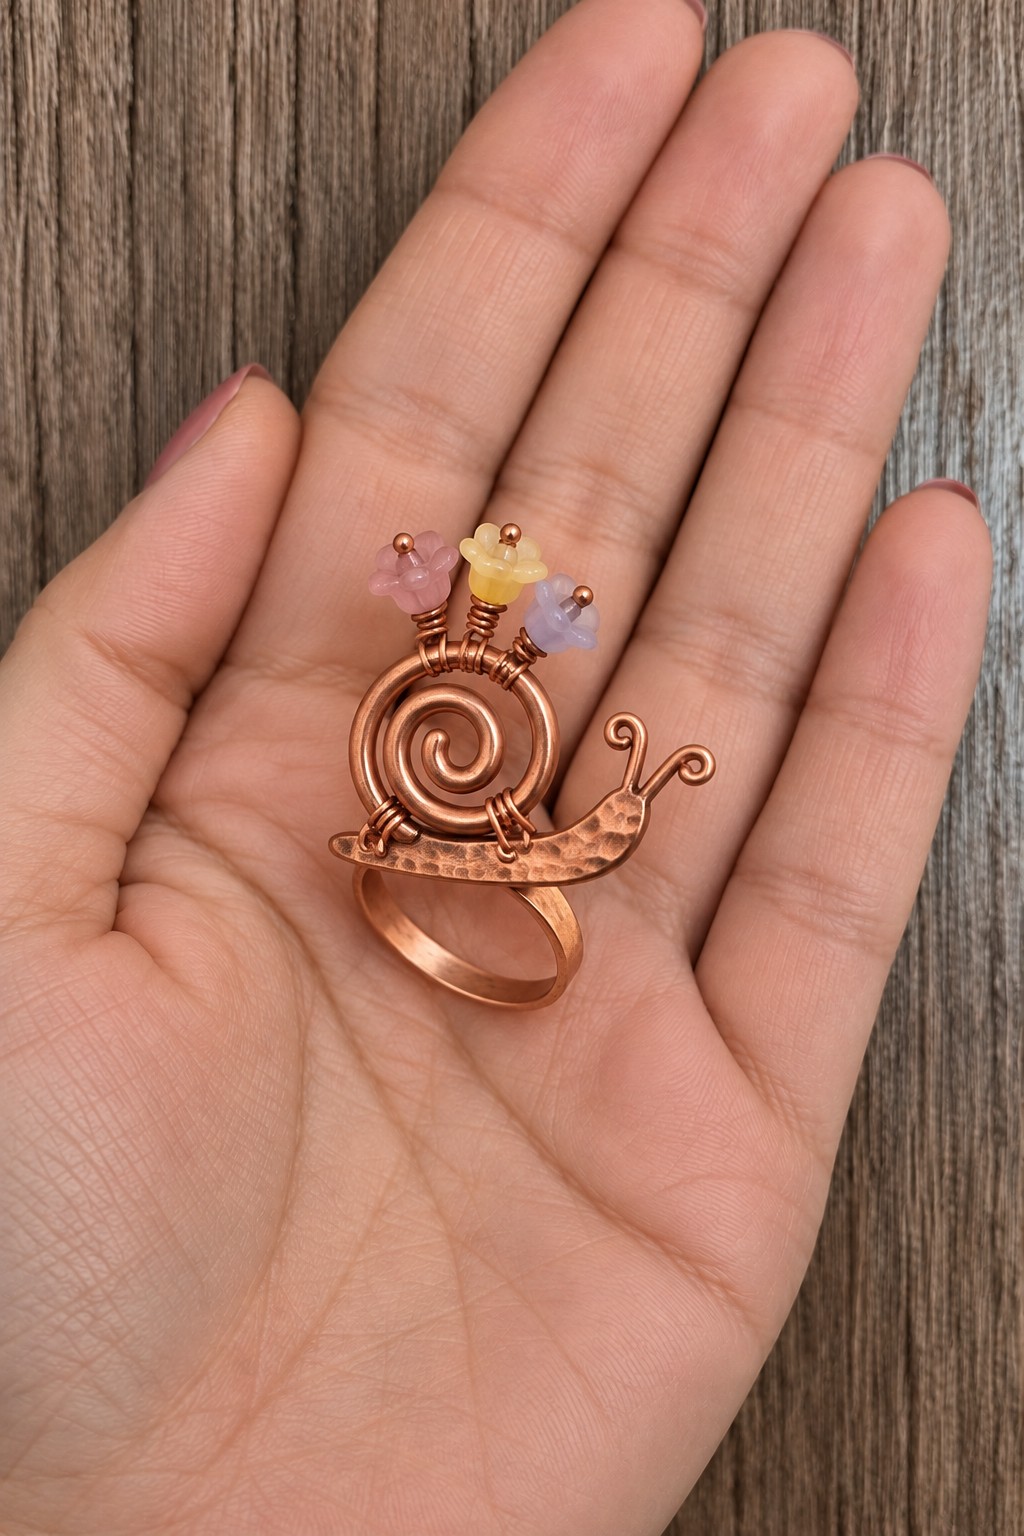
17. Snail Ring with a Spiral Shell and Tiny Flowers
A broad spiral shell, curled feelers, and pastel flowers give this snail ring a whimsical profile. Use a comfortable copper ring shank, a small snail body cut from sheet, thicker wire for the spiral, and tiny drilled flower beads on fine stems. Keep the shell relatively low so it does not become a catching point.
Form and finish the ring shank to the intended size first. Fit the snail body to the shank using a suitable metal connection, then secure the spiral shell through small holes or prepared mounting points. Add the flower stems after any heat work. Curl and smooth the antenna tips, and tuck the flower wire ends beneath the decorative front rather than against the finger.
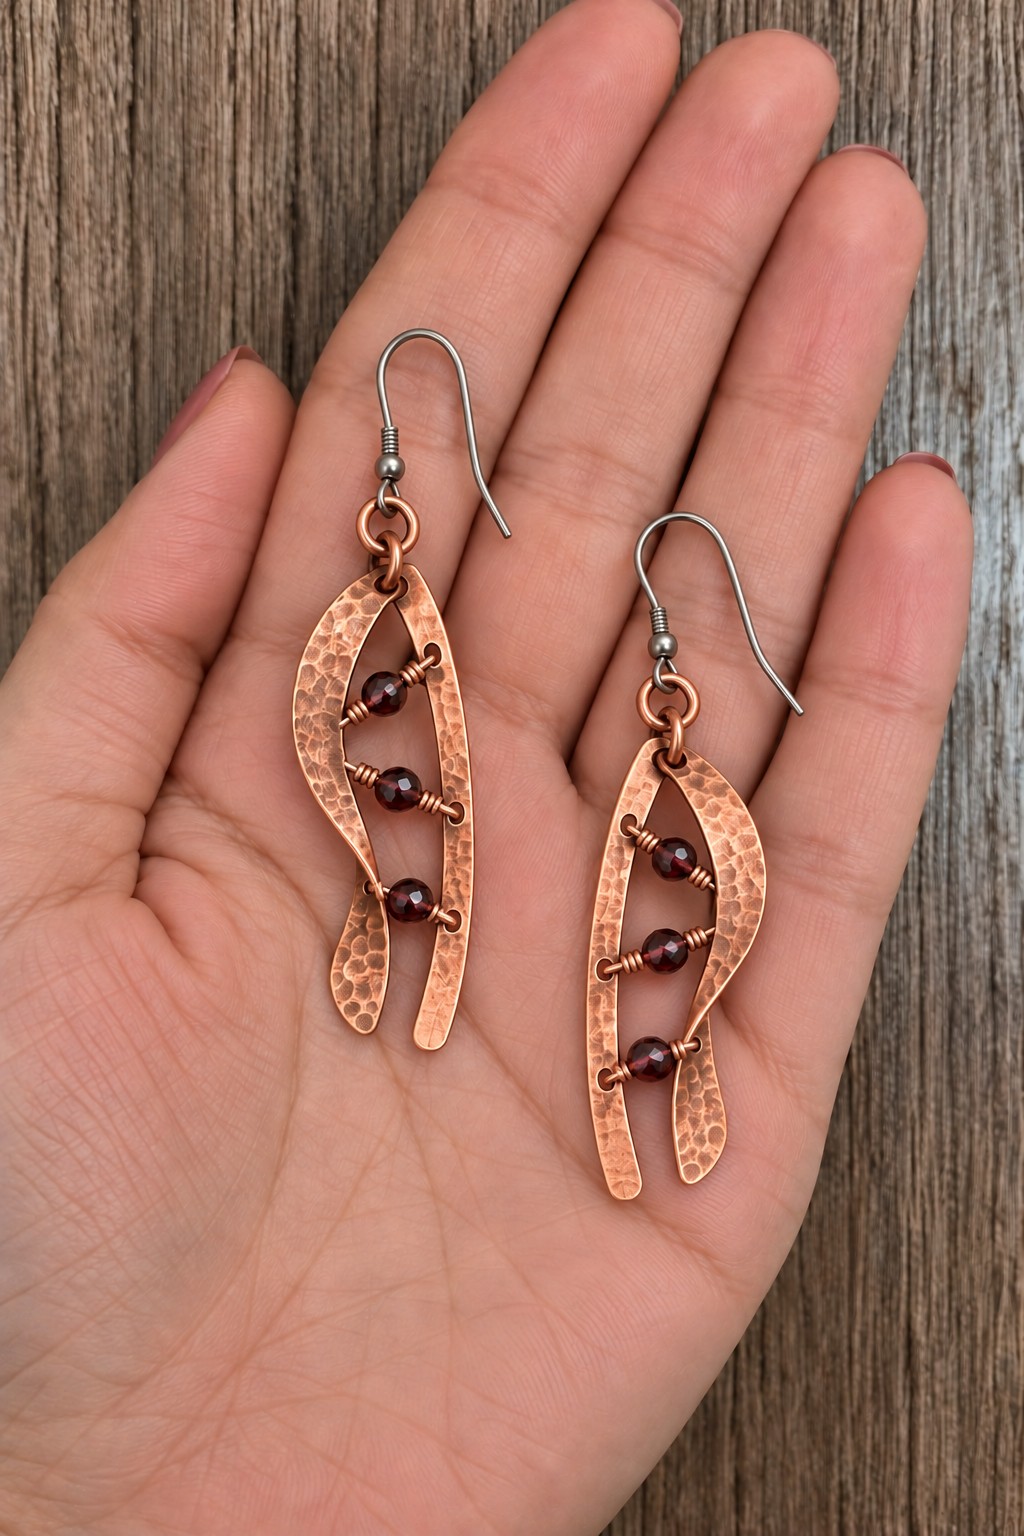
18. Split Leaf Earrings with Burgundy Bead Veins
Long copper leaves open along one side to reveal three burgundy beads. Use thin sheet for the curved leaf silhouettes, small drilled beads, fine wrapping wire, and ear hooks. A broad upper section tapering into a rounded lower tip keeps the leaf recognizable without requiring sharp points.
Saw or cut the outer profiles and pierce the interior opening, leaving enough metal near the top attachment. Finish the inner edges as carefully as the outside. Add the hammered texture, then secure each bead on a short wire bridge within the opening. Follow the curve of the leaf while keeping the three beads separated. Compare both finished leaves against the same template before fitting the hooks.
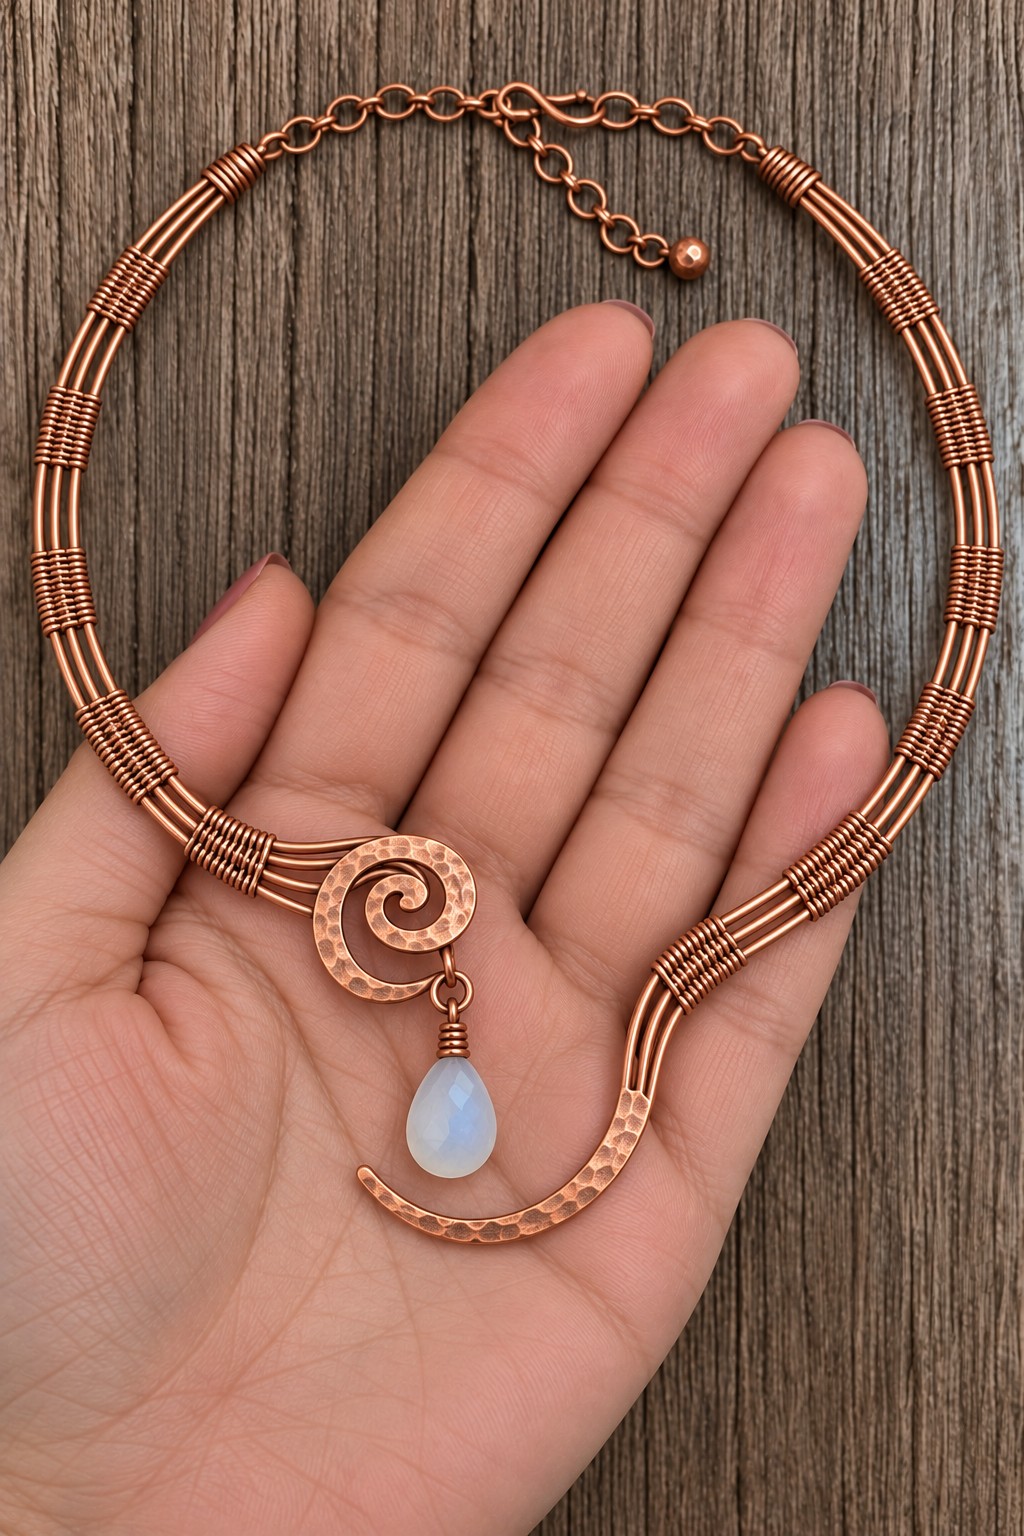
19. Woven Copper Collar with an Open Spiral Drop
Bound parallel wires lead into an open asymmetric spiral, with a pale blue drop suspended near its center. Gather several matching lengths of copper wire, fine binding wire, a clasp with an extension chain, and a drilled drop bead. This collar needs more planning than a pendant because its shape must follow the neckline comfortably.
Shape the main wires together around a smooth oval form, allowing extra length for the front curves and rear fittings. Add compact binding bands at regular intervals without squeezing the strands out of alignment. Form the lower spiral and finish all metalwork before connecting the bead. Fit the rear clasp securely and test the collar while seated as well as standing; the front should not press against the throat.
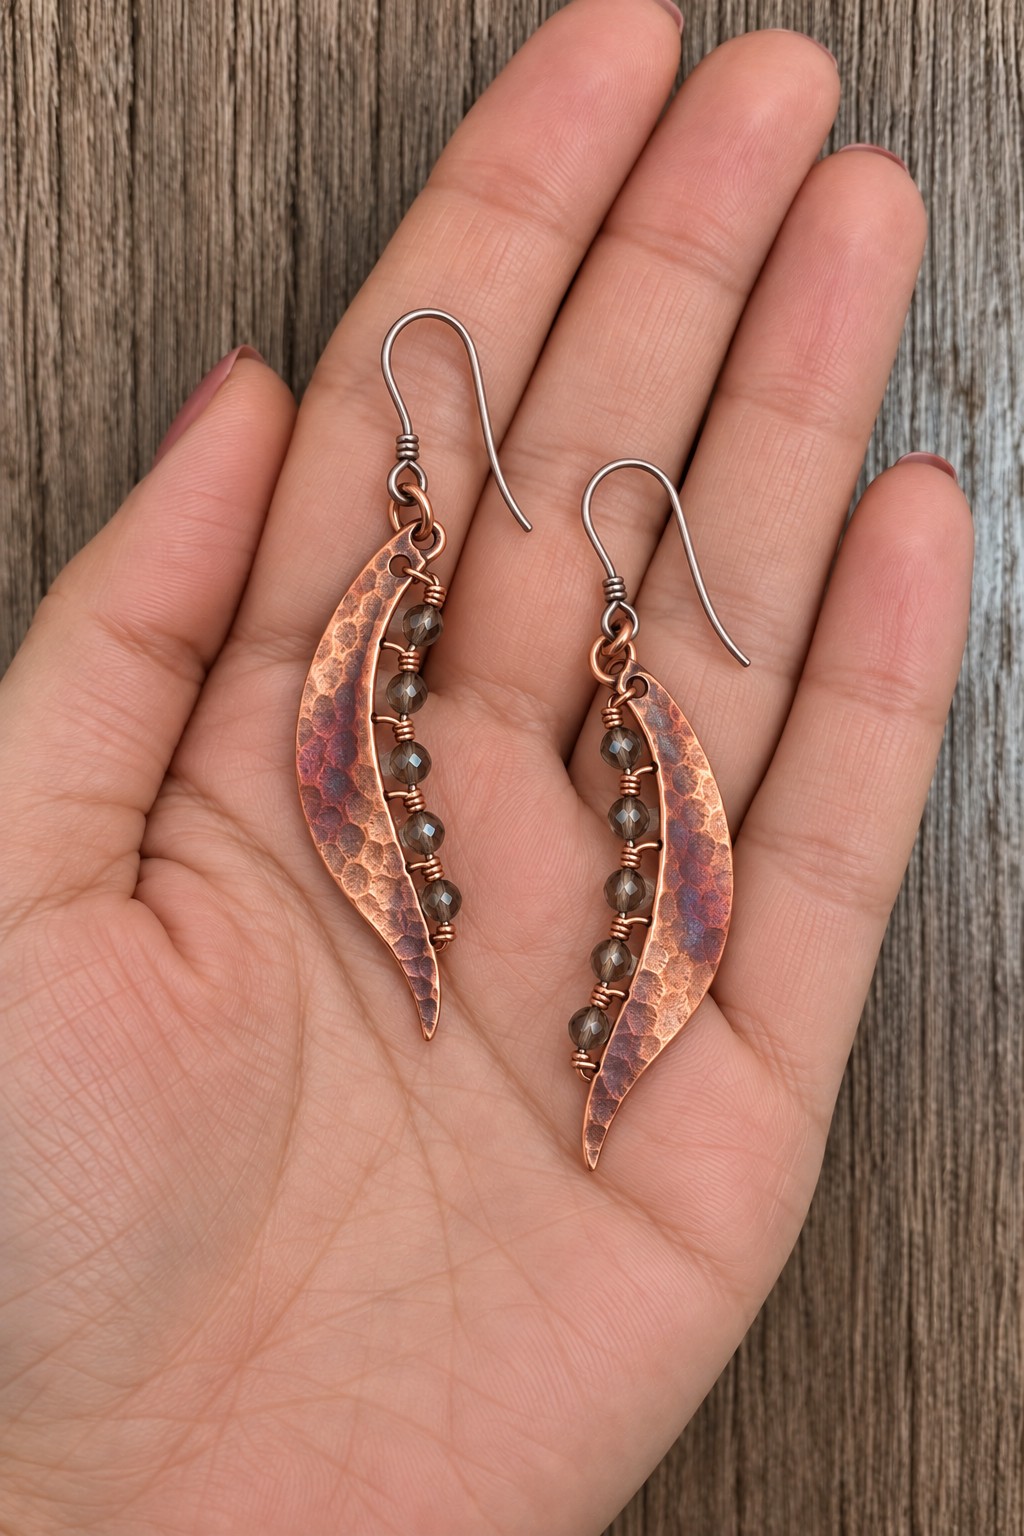
20. Curved Copper Leaf Earrings with Green Beads
A narrow line of dark green beads follows the inner edge of each long, curved copper leaf. Use lightweight copper blanks, several small drilled beads, fine wire, and ear hooks suited to the wearer. The bead line adds texture without filling the entire open center.
Prepare matching curved profiles and smooth the pointed ends into wearable rounded tips. Texture the broad copper surfaces before adding a wire strand along the inner edge. Thread the beads onto that strand and secure its ends at the top and bottom, with additional discreet ties where needed to prevent bowing. Keep the beads clear of the cut edge and ensure the two earrings hang in complementary directions.
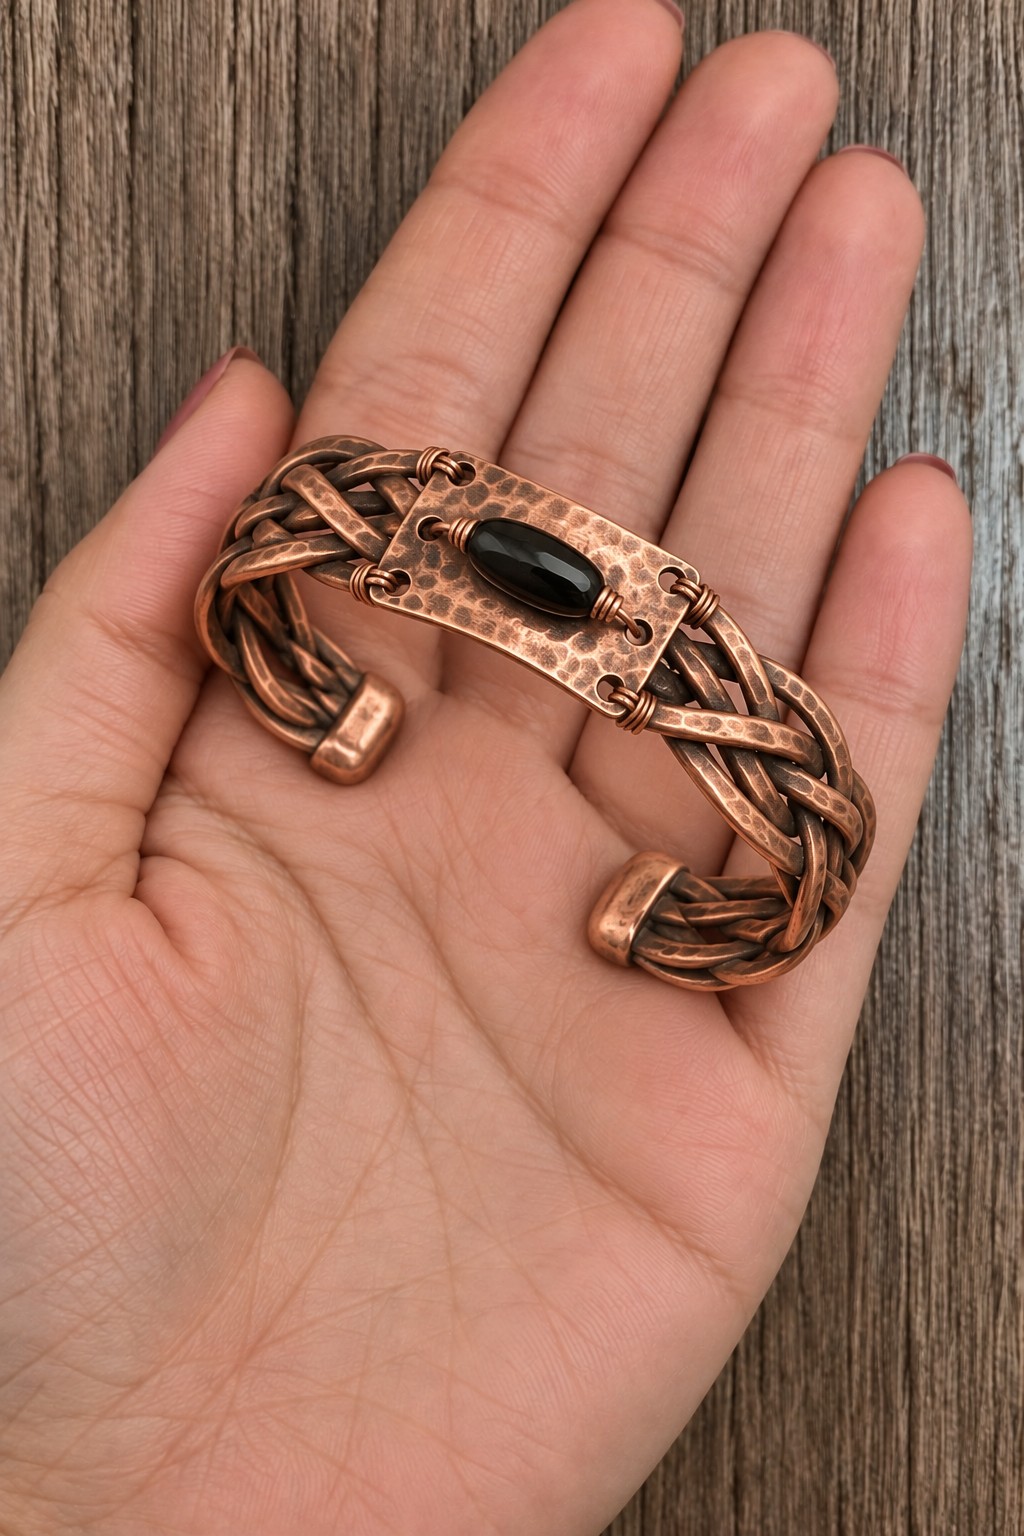
21. Braided Copper Cuff with a Black Focal Bead
An open copper braid gives this cuff depth, while a hammered central plate carries an elongated black bead. Use smooth copper wires or narrow strips for the braid, a cuff form, sheet for the plate, and a drilled oval bead or a securely set cabochon. Decide which focal material you will use before laying out the attachment holes.
Make the braid flat, keeping the crossings even, then curve it to the wrist shape. Finish the ends beneath rounded metal caps or carefully secured wraps. Attach the central plate to several structural strands so it cannot rotate. A drilled bead can be fixed through paired plate holes; an undrilled stone needs a fitted setting. Check that no braid crossing or plate corner presses against the skin.
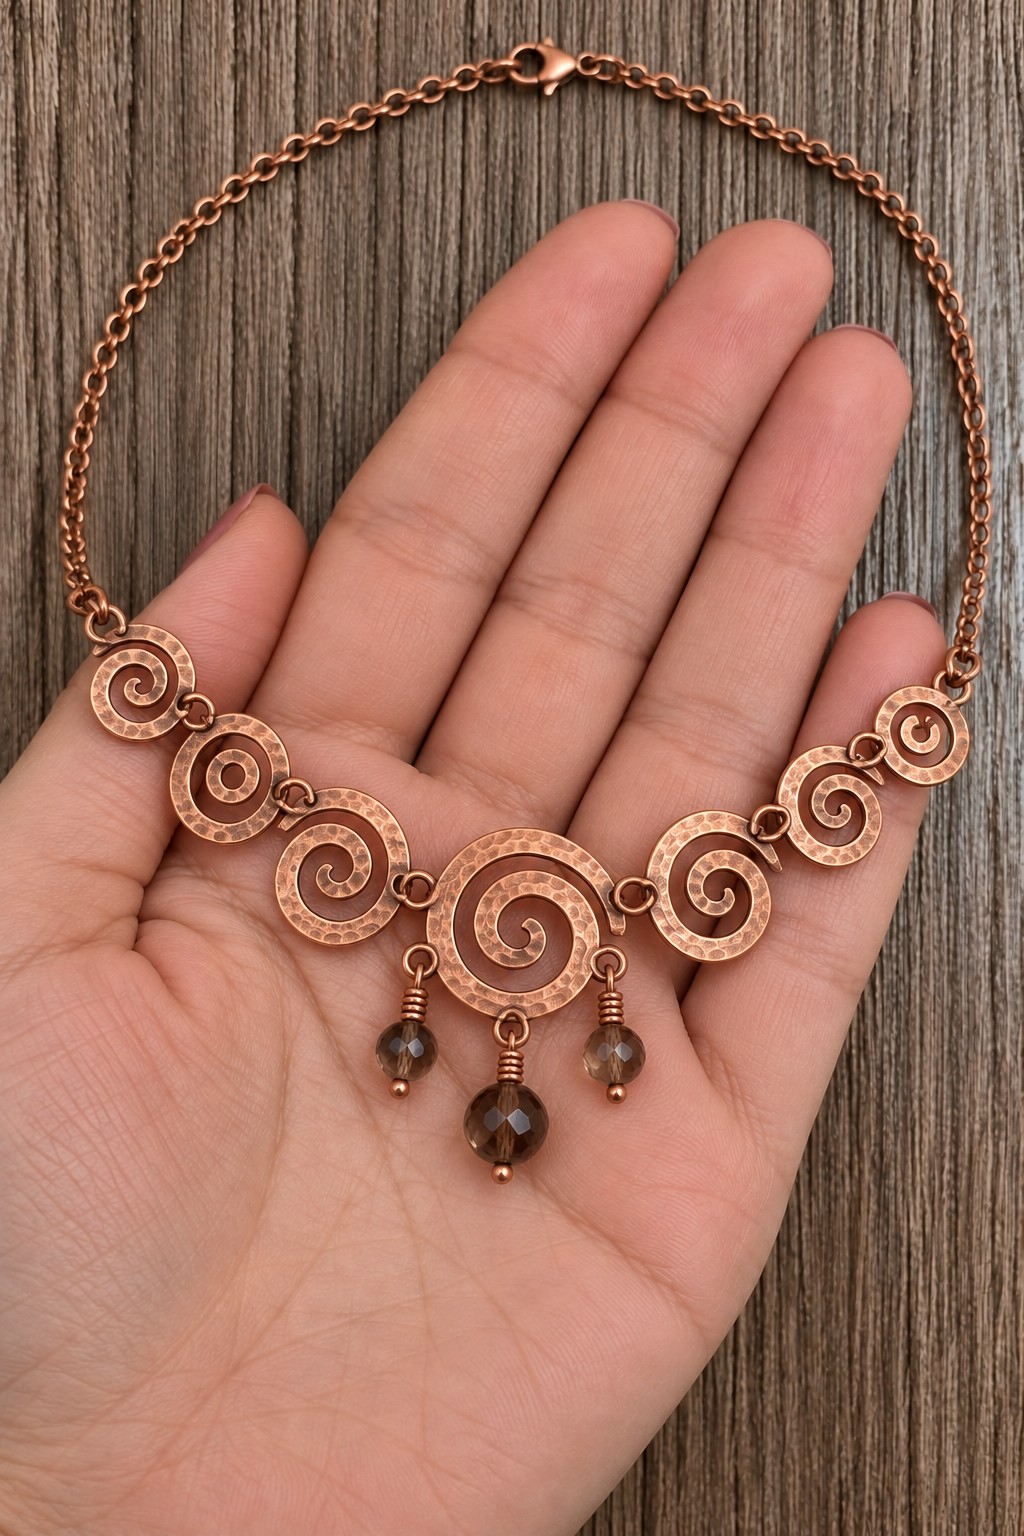
22. Graduated Spiral Necklace with Three Smoky Drops
Seven copper spirals grow toward a larger central curl, producing a necklace with a clear visual rhythm. Use sturdy copper wire, connecting rings, chain, and three smoky colored drilled beads. Lay the full arrangement on paper before making the spirals so the change in size feels gradual.
Form and lightly flatten the spirals separately, then connect them through secure attachment eyes. Leave enough movement between adjacent pieces for the necklace to curve. Add the longest bead drop at the center and two shorter drops beside it, using independently closed connections. Check that the outer spirals transition into the chain without twisting and that the three drops cannot catch inside neighboring curls.
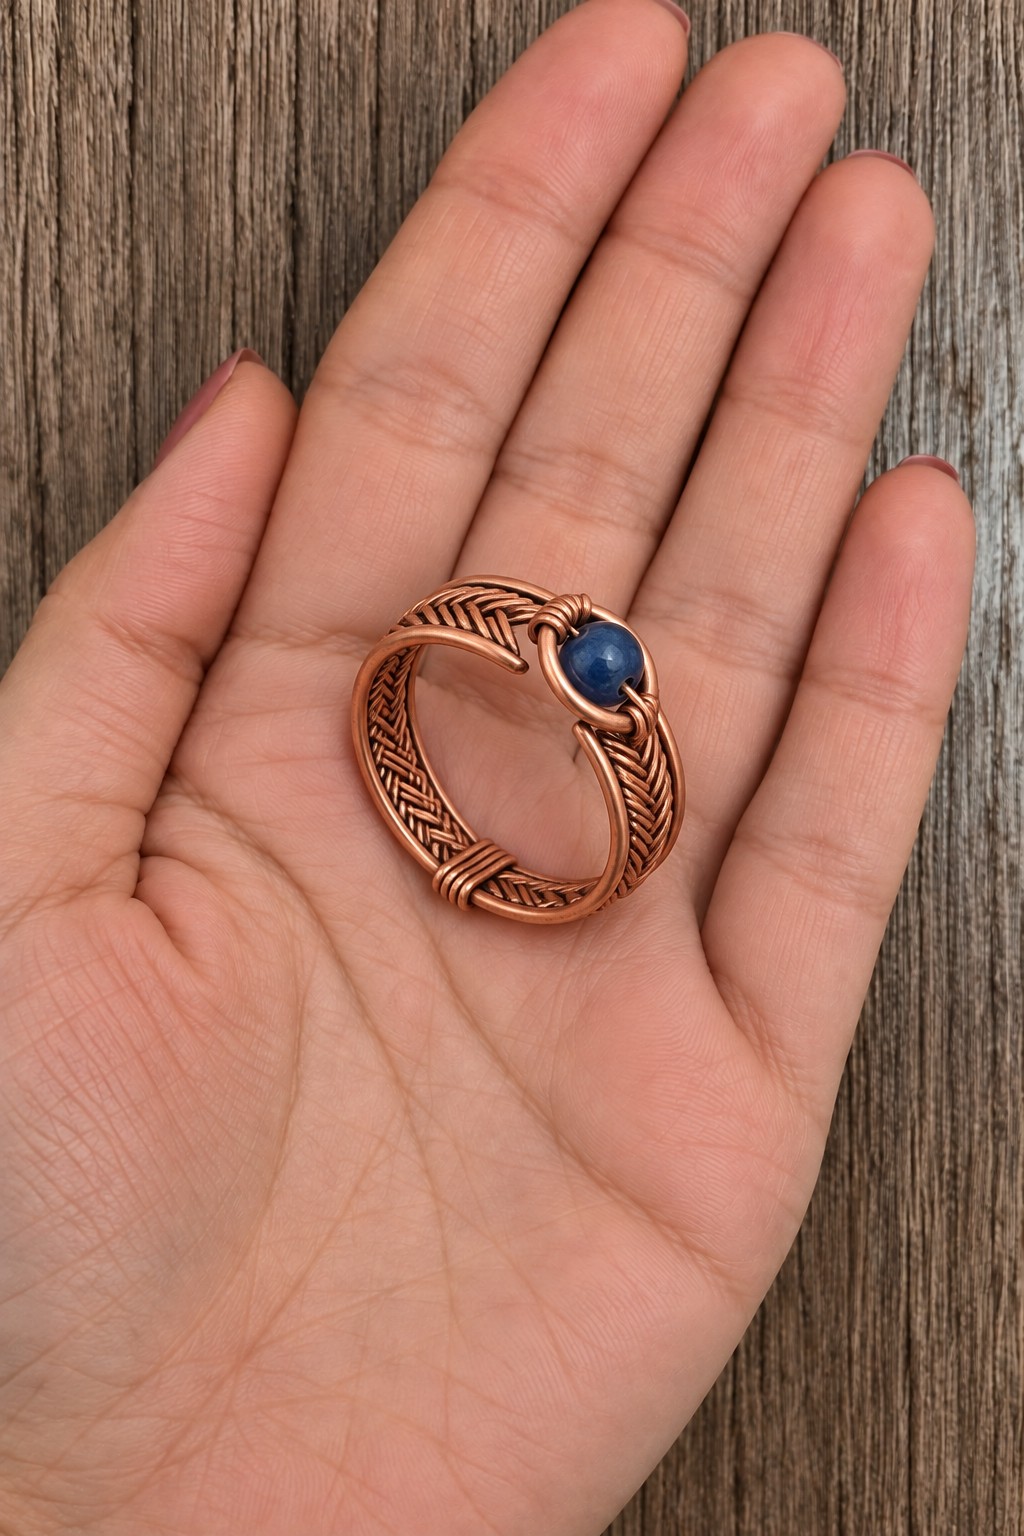
23. Woven Copper Ring with a Deep Blue Bead
A deep blue bead sits between woven copper shoulders, giving this ring a compact focal point. Use parallel structural wires, fine soft weaving wire, a drilled round bead, and a ring mandrel. Make a short weaving sample first to judge the finished width and the amount of wire the pattern consumes.
Weave the band while it is flat, keeping each turn close without crossing the previous wrap. Form it around the mandrel, allowing for the thickness of the finished weave. Pass a structural wire through the bead and secure it into both shoulders, then shape the surrounding wires to keep the bead centered. Finish every wire tail on the outside of the band and check the inner surface for pressure points.
24. Interlaced Copper Bracelet with Turquoise Colored Beads
Three turquoise colored beads sit within an open lattice of copper curves. Use matching structural wires, finer binding wire, drilled beads, and a sturdy hook clasp. The open construction lets the bead color show through while the crossing wires create a braided appearance.
Plan three evenly spaced bead positions and make the lattice flat before curving it around a bracelet form. Thread each bead onto a retained internal wire and bind its support into the neighboring crossings. Finish the bracelet ends with compact wraps that also hold the clasp fittings. Keep the hook opening small enough to retain its matching eye, and check the fit with enough ease for the bracelet to move without turning excessively.
25. Raven Skull Pendant in a Scrollwork Circle
A long stylized beak, dark eye details, and a circular scrollwork surround give this pendant its Gothic character. Gather copper sheet for the skull, thicker wire for the outer circle and curls, dark drilled beads for the eyes, and one red bead drop. The skull needs careful piercing and shallow shaping to achieve its sculptural surface.
Build the skull and frame as separate components, then connect them at several points so the face cannot swing into the outer curls. Mount the eye beads on short retained wires rather than relying on surface adhesive. Hang the red bead from a smooth lower attachment. Round the beak tip and every scroll end, and keep the pendant size comfortable for the intended chain.
26. Hammered Manta Brooch with a Red Bead Spine
Broad hammered wings, curled head fins, and five graduated red beads create a dramatic manta silhouette. Use copper sheet for the body, a narrow strip or wire for the tail, drilled beads, and a ready made locking brooch pin. Keep the wings light enough that the brooch does not pull the garment forward.
Cut and finish the body, round the fin tips, and texture the wings before adding the spine. Secure each bead with its own short wire bridge or a supported central wire arrangement. Attach the curved tail mechanically or complete a suitable soldered joint before installing beads. Mount the brooch fastening on the back with enough support to prevent rotation, and test the catch on a piece of the intended fabric.
27. Copper Spider Brooch with a Dark Bead Abdomen
Eight bent wire legs surround a hammered round body and a glossy dark abdomen bead. Use four lengths of sturdy wire to create paired legs, a small copper body plate, a large drilled bead, two tiny red eye beads, and a brooch fastening. Pairing the legs helps you keep exactly four on each side.
Shape the leg bends against a full size drawing, then secure the four wire lengths beneath the central body with a backing plate or closely fitted bindings. Retain the abdomen on a wire that runs through its hole and anchors into the body structure. Add the eyes last. Curl the leg tips inward, check for snagging, and place the rear pin so it does not interfere with any leg joint.
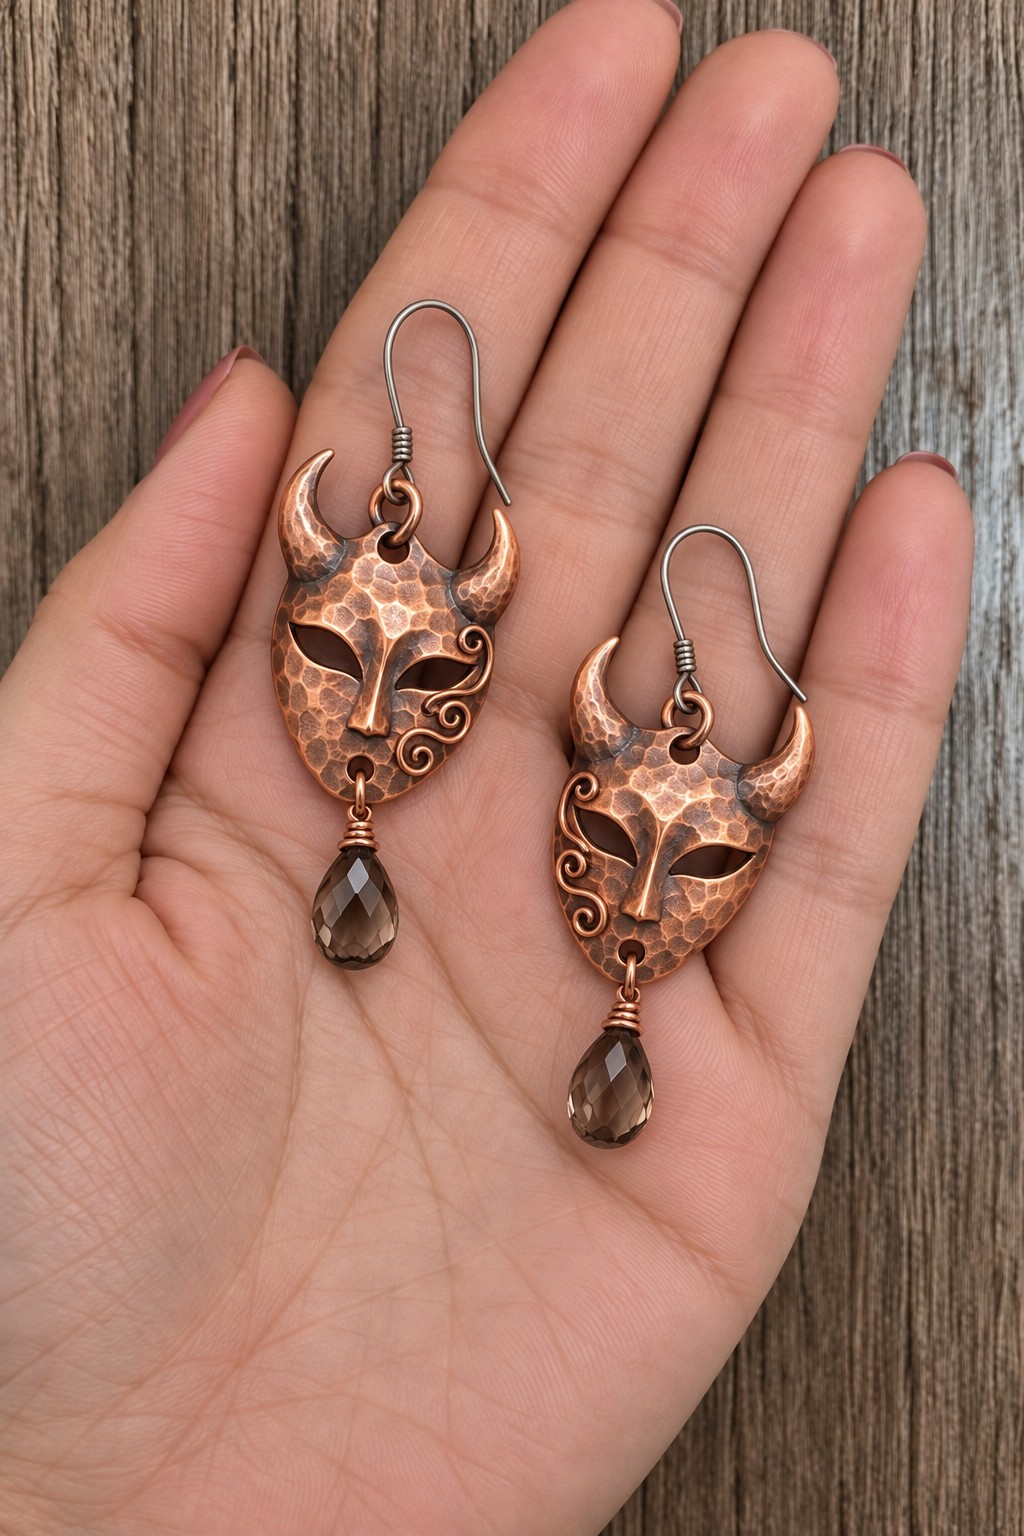
28. Horned Copper Mask Earrings with Smoky Drops
Curved horns, pierced eyes, and small spiral ornaments create expressive copper masks. Use lightweight sheet, fine wire for the scrolls, two drilled smoky colored drops, and ear hooks. The masks should remain small and thin enough to wear comfortably despite their detailed shape.
Draw one mask pattern and reverse it for the second earring if you want a mirrored pair. Pierce the eye openings, smooth all inner edges, and texture the surface before adding the wire ornaments. Secure the scrolls through small holes or prepared metal joints. Round the horn tips, suspend each lower bead from a closed connection, and compare both earrings for weight and balance.
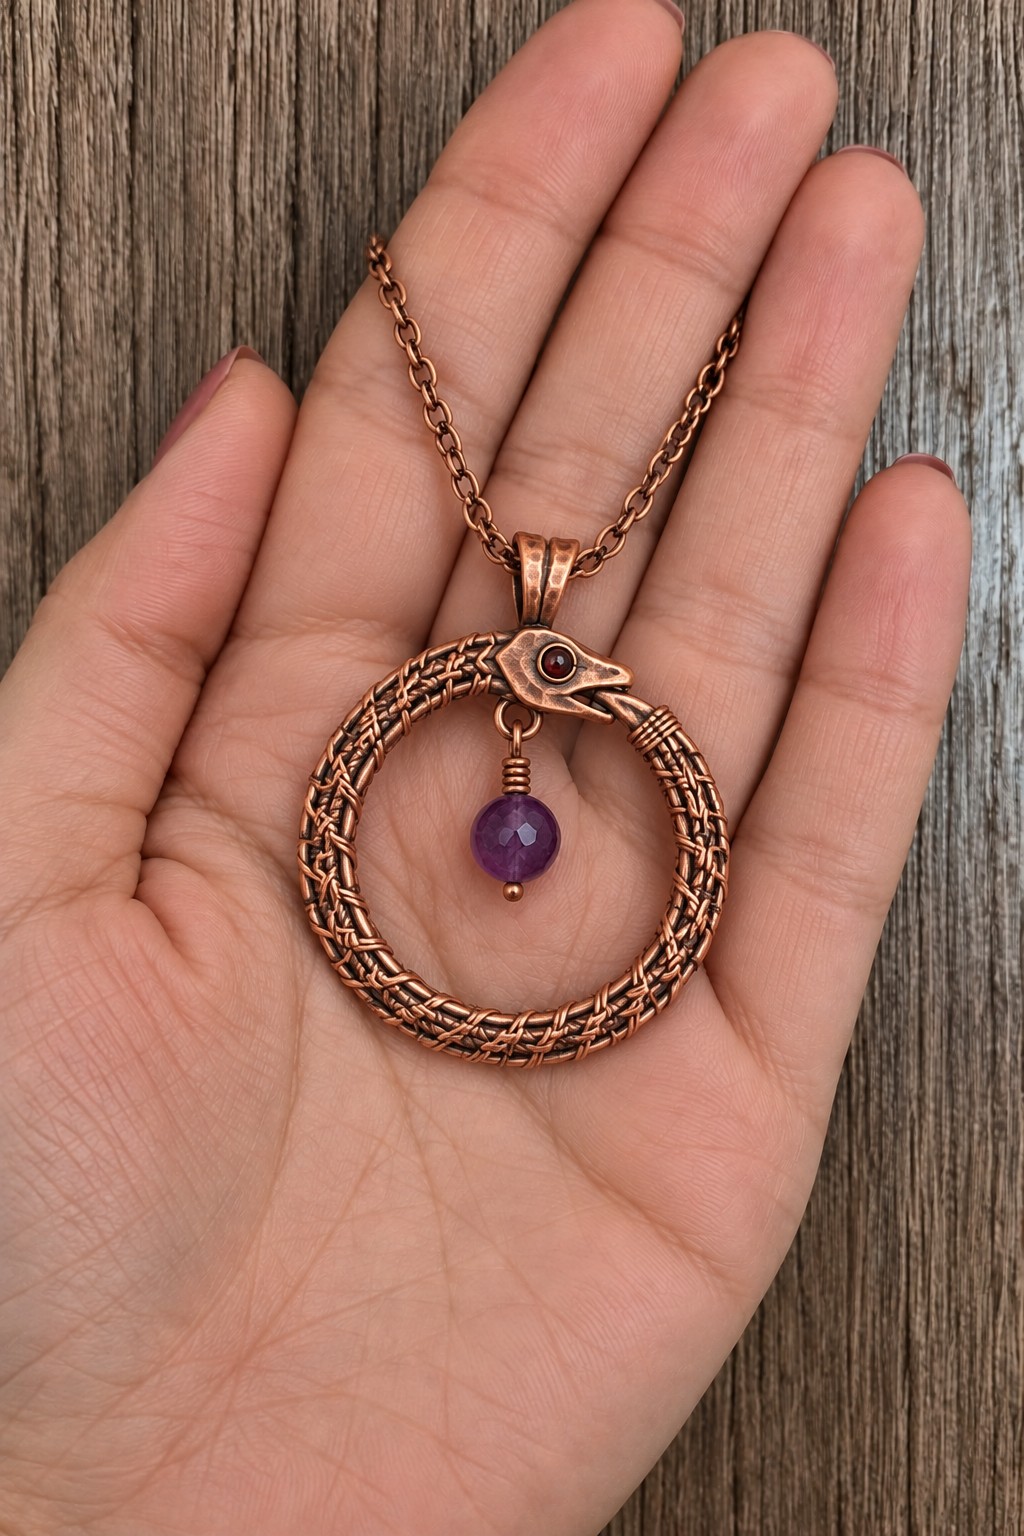
29. Ouroboros Pendant with a Purple Bead Center
A woven snake curves into a circle, with its head meeting the tail and a purple bead suspended inside. Use structural copper wires, fine weaving wire, a small formed head component, a drilled purple bead, and a strong bail. The woven body adds scale like texture without requiring individual metal scales.
Weave the body along a straight or gently curved wire foundation, then form it around a round mandrel. Secure the head and tail junction so the circle stays closed under the pendant's weight. Position the bail at the top and suspend the bead from a separate inner attachment. Keep the bead clear of the woven body and tuck every weaving end where it cannot scratch the wearer.
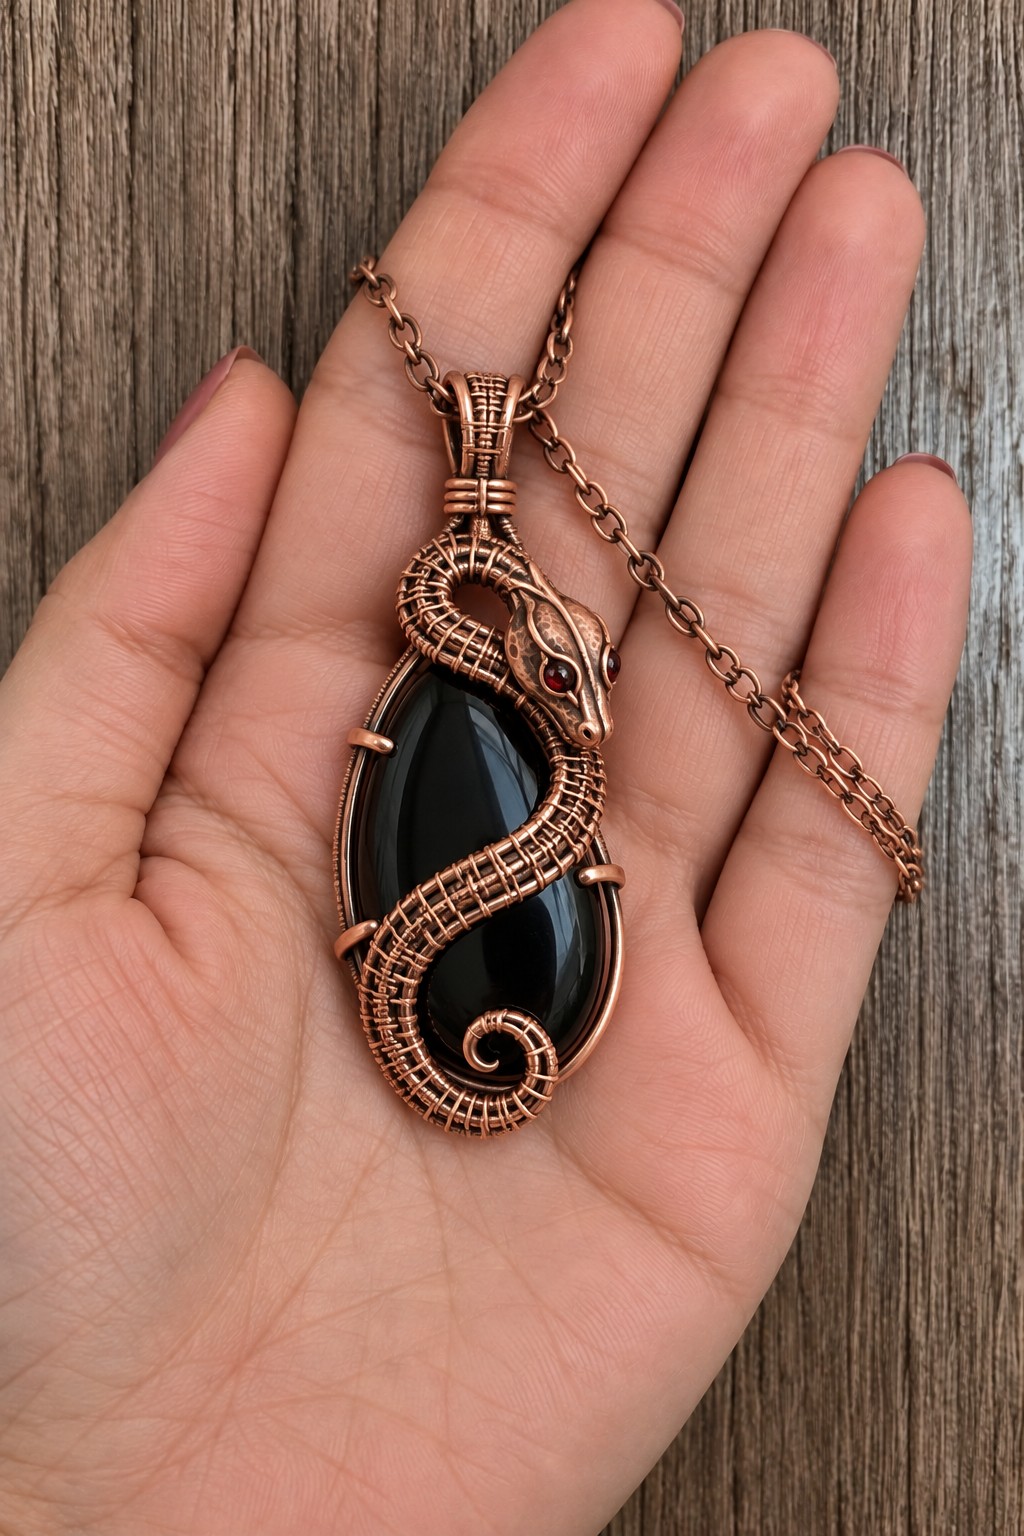
30. Woven Serpent Pendant Around a Black Cabochon
A sweeping copper serpent follows the front of an elongated black cabochon. Use a stone with a smooth intact edge, structural wire for a complete retaining frame, finer wire for the woven body, and a formed snake head. This is an advanced setting project because the decorative snake and the stone retention must work together.
Build the supporting frame around the back and sides first, including a secure bail and several retaining contacts that overlap the stone's edge. Confirm that the stone cannot slip out in either direction before adding the woven serpent across the front. The decorative body can reinforce the composition, but it should not be the only restraint. Finish the head and any tiny eye detail without applying heat near the stone.
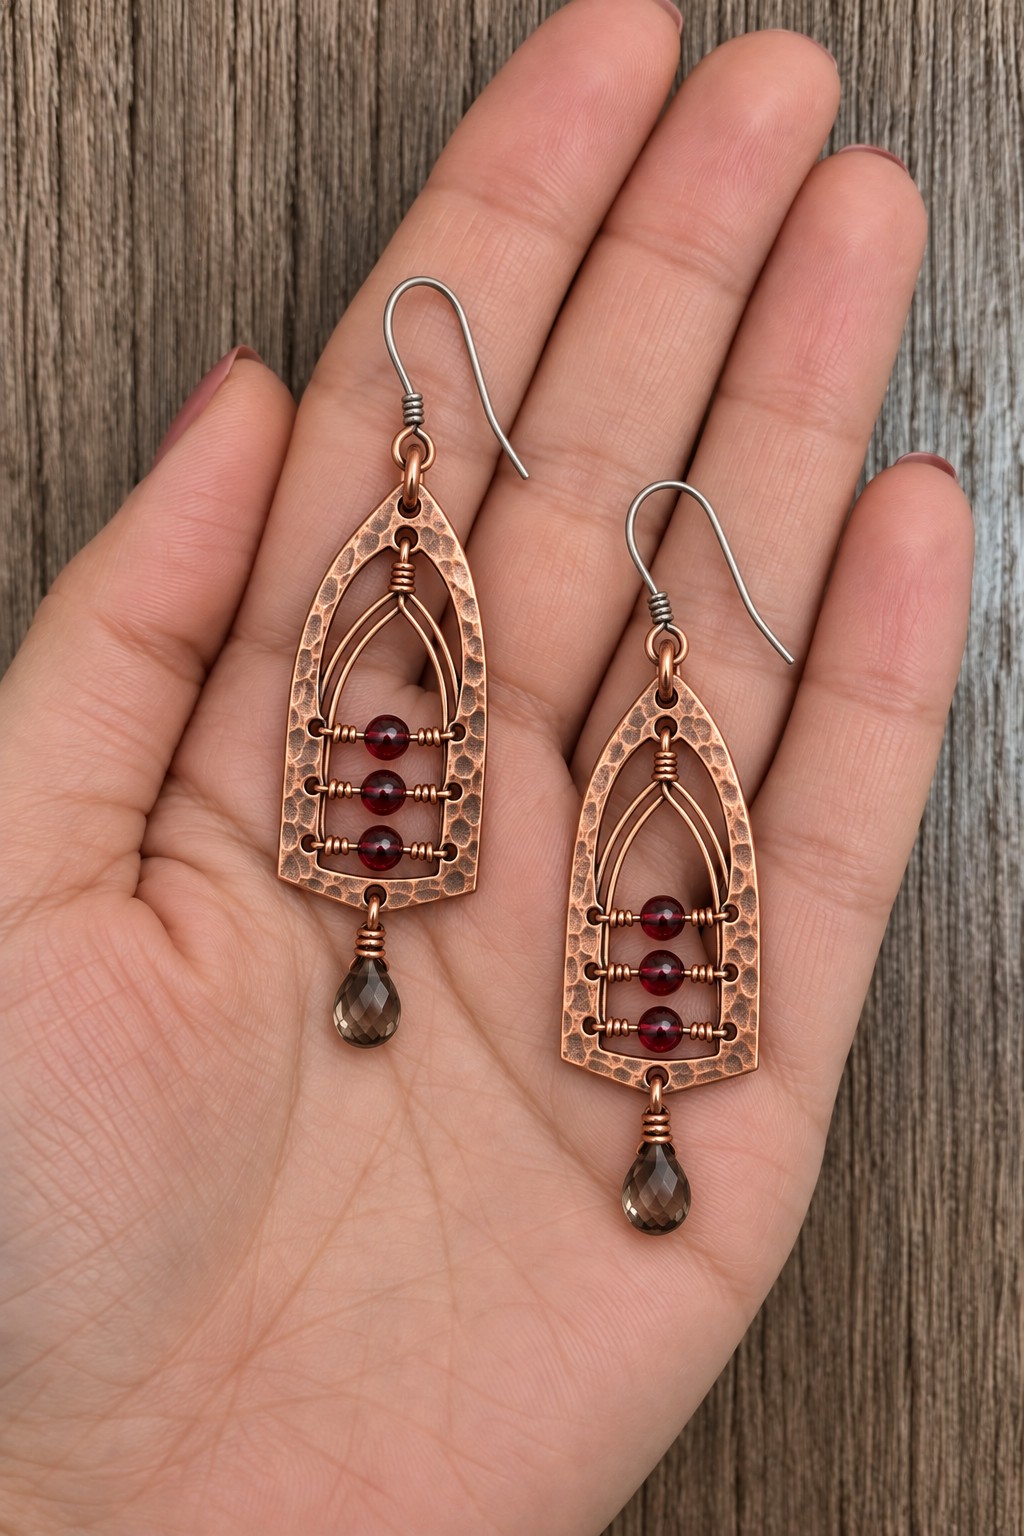
31. Gothic Window Earrings with Burgundy Bead Rows
Pointed copper arches frame three burgundy beads, with smoky drops beneath each window. Use thin copper sheet for the outer frames, finer wire for the inner tracery, small drilled red beads, two drilled drops, and matching ear hooks. Preserve a generous open center so the architecture remains visible.
Pierce and finish two matching outer arches, then make the fine inner arches against the same paper pattern. Bind the tracery to the frame at the top and lower sides. Secure each bead on a short horizontal support, keeping the rows level and clear of the neighboring wires. Add the bottom drops after checking all joints, and soften the upper points so the earrings do not catch in hair.
Choose the Right Connection for Each Design
A jump ring is useful where two finished parts need to move. A wrapped wire eye works well above a bead because the wrapped tail helps keep the eye closed. Binding wire can fasten small decorative elements to a frame, but an unsupported fine wire should not carry the full weight of a heavy pendant. Match the connection to the load and test it before adding the next component.
Rivets are useful for stacked metal plates, brooch fittings, and some hinge attachments. Match the hole diameter, rivet length, and setting tool to the complete thickness of the layers. A loose rivet can let the parts rotate; an overdriven rivet can distort a thin plate. Practice on a sample stack of the same materials before working on the finished front.
For designs with fixed sculptural joints, jewelry soldering is a separate skill. It requires a suitable solder and flux for the metals, a proper heat resistant work area, ventilation, and controlled heating. Finish this work before adding beads, stones, coatings, or moving components that could be damaged. If you are beginning, choose a version assembled with holes, wire wraps, jump rings, and rivets, or use professionally made components for the intricate joints.
Glue is not needed for the starting pendant or the basic wire connections in this collection. If a chosen decorative component specifically calls for adhesive, use a jewelry epoxy rated for both materials, follow its mixing and curing instructions, and test the bond on spare materials. Do not substitute adhesive for a secure bail, a loaded hinge, or the retaining frame around a heavy stone.
Finish the Copper Without Losing Its Texture
Decide whether you want bright copper, a soft satin surface, or darker recesses. For a satin finish, use fine abrasive paper consistently and avoid removing so much material that the hammered texture becomes shallow. A polishing cloth can brighten the raised areas while leaving a quieter finish in the recesses.
For darker contrast, a commercial copper patina product can be used on compatible bare metal. Follow its own dilution, protective equipment, ventilation, rinsing, and disposal instructions. Different formulations are not interchangeable. Work on a sample first and apply the finish before adding sensitive beads or stones. Do not mix patina solutions with household cleaners.
If you choose a protective wax or coating, use a product intended for the metal and suitable for the finished item's contact with skin. Follow its drying or curing directions and leave hinge barrels, clasps, and moving connections free to operate. Coatings wear with use, particularly on rings and cuffs, so include their care requirements when giving a piece as a gift.
Check Comfort, Movement, and Everyday Wear
- Feel both faces and every edge, including the inside of pierced openings.
- Check that jump ring ends meet and wrapped wire tails lie flat.
- Use ear hooks made from a material the wearer already tolerates, such as appropriately specified titanium or niobium, rather than choosing only by color.
- Check paired earrings for comparable length, weight, and movement.
- Make sure bead drops clear the frame and stones remain secure from the front and back.
- Open and close clasps, hinges, and brooch catches several times before wearing.
- Keep cuffs fitted to the wearer instead of repeatedly flexing the opening.
Wipe finished pieces with a soft dry cloth after wearing and store them separately so projecting wires cannot tangle. Keep jewelry away from prolonged moisture and choose cleaning products according to the beads, stones, patina, and coating, not just the copper. A divided box or small lined drawer can make the pieces easier to find; these upcycled storage ideas offer starting points you can adapt with soft compartments for jewelry.
For a first project, choose the oval pendant, a small spiral, or a simple bead frame. Once your edges feel smooth and your connections stay secure, move toward layered leaves, woven bands, and sculptural motifs. Changing a bead color, an open space, or the direction of a curve is often enough to give the same copper technique a distinctly personal result.



Leave a Reply