
Find 24 handmade cupcake stand ideas, from woven tiers and woodland displays to floral plates, open wire frames and colorful yarn pedestals. The illustrated making stages introduce ways to support, connect and decorate a stand, with guidance on materials, tools and serving surfaces. Each idea explains what kind of display it suits and which details affect stability, cupcake fit and cleanup, helping you adapt the look to your own dessert table.
Table of Contents
- Plan Around the Cupcakes and the Table
- What to Gather and How the Making Stages Work
- Use the Assembly Principles in These 24 Stand Ideas
- 1. Rustic Woodland Tree Slice Cupcake Stand
- 2. Scalloped Painted Wood Cupcake Stand
- 3. Hand Painted Terracotta Pot Cupcake Stand
- 4. Stacked Wooden Crates for a Cupcake Display
- 5. Woven Rattan Tiered Cupcake Stand
- 6. Colorful Upcycled Tin Cupcake Stand
- 7. Whitewashed Farmhouse Cupcake Stand
- 8. Floral Garden Ladder Cupcake Stand
- 9. Blush Pink Scalloped Cupcake Tower
- 10. Enchanted Forest Stump Cupcake Stand
- 11. Elegant Damask Tiered Cupcake Stand
- 12. Natural Wood Floating Tier Cupcake Stand
- 13. Black and Gold Art Deco Cupcake Stand
- 14. Blue Floral Vintage Cupcake Stand
- 15. Pastel Birthday Wire Cupcake Stand
- 16. Romantic Blush Pyramid Cupcake Stand
- 17. Sage Green Garden Party Cupcake Stand
- 18. Black Metal Industrial Cupcake Stand
- 19. Vintage Floral Plate Cupcake Stand
- 20. Floral Plate Cupcake Stand with Pink and Blue Details
- 21. Pastel Mixed Plate Cupcake Stand
- 22. Ribbed Yarn Cupcake Pedestal
- 23. Pastel Textured Yarn Cupcake Pedestal
- 24. Rainbow Yarn Pedestals at Different Heights
- Serving, Cleanup and Reuse
Plan Around the Cupcakes and the Table
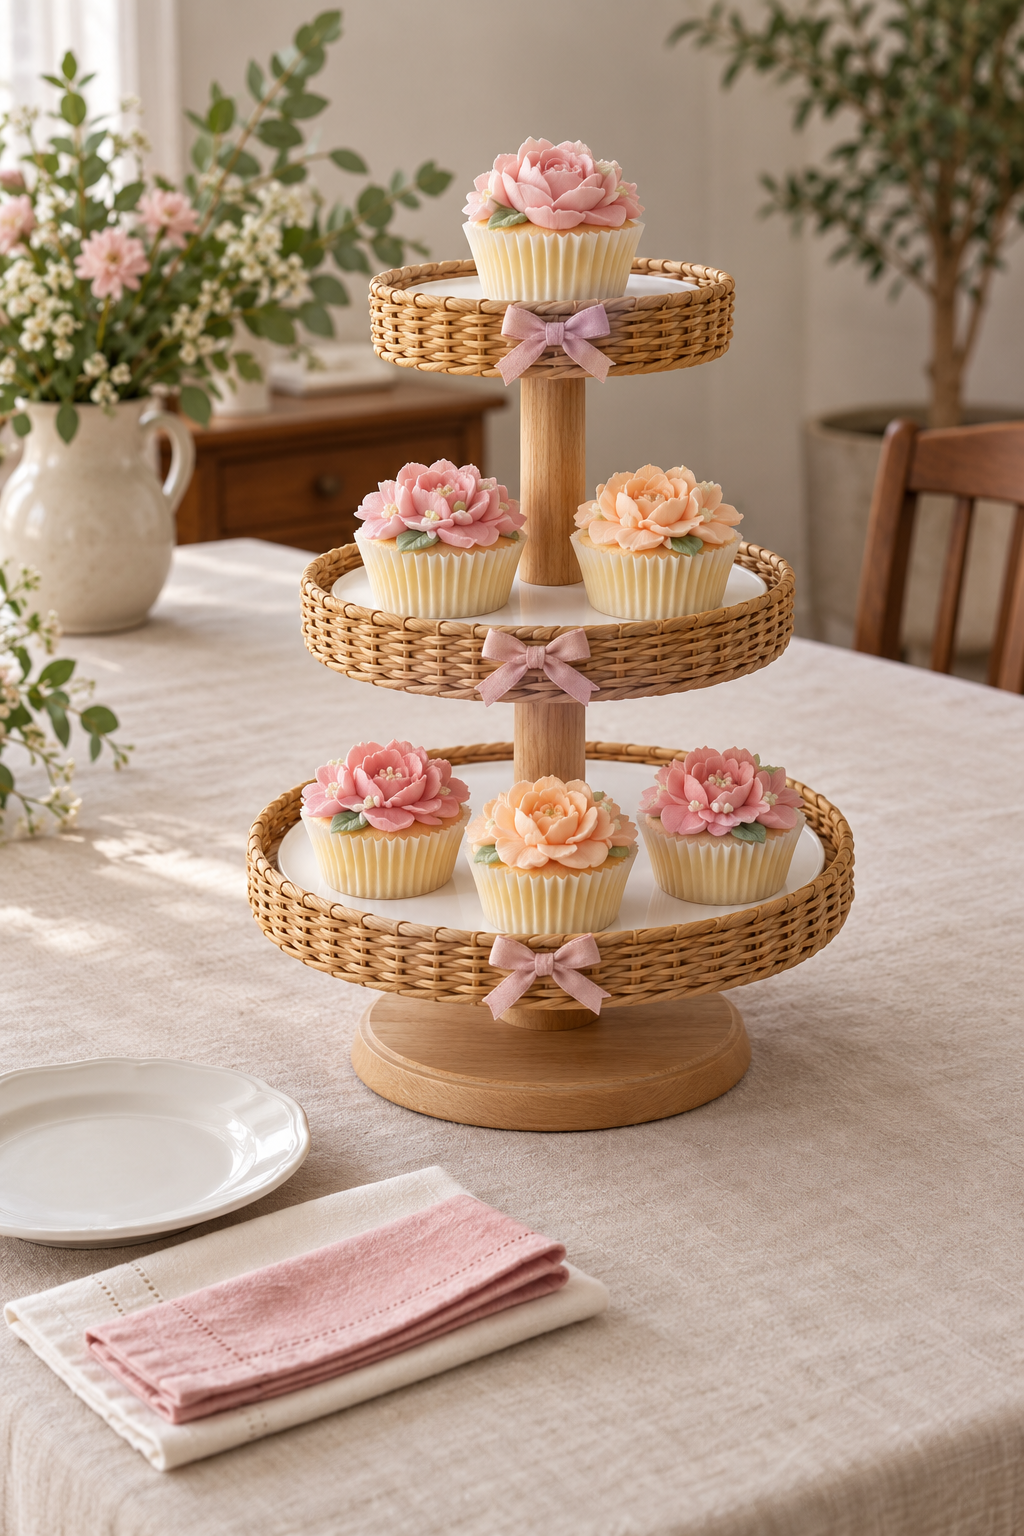
Start with the cakes you will serve, including their cases, frosting and toppers. Tier gaps need room to lift a cake, not only room for it to stand underneath. Use a paper layout to compare platform size with the available table space, leaving room for plates and guests' hands. A tiered stand suits several desserts, while the pedestals in 22 to 24 emphasize selected cupcakes beside the main serving arrangement.
Choose materials by their task. Rigid platforms and suitable supports carry the display; woven rims, yarn, flowers and painted patterns supply decoration. Use verified food serving surfaces, or separate removable food suitable dishes and inserts above craft materials. Cupcake cases catch crumbs but do not certify an unknown painted or antique surface for serving. Consider how the stand will be assembled, cleaned and stored before deciding on a permanent or removable connection.
What to Gather and How the Making Stages Work
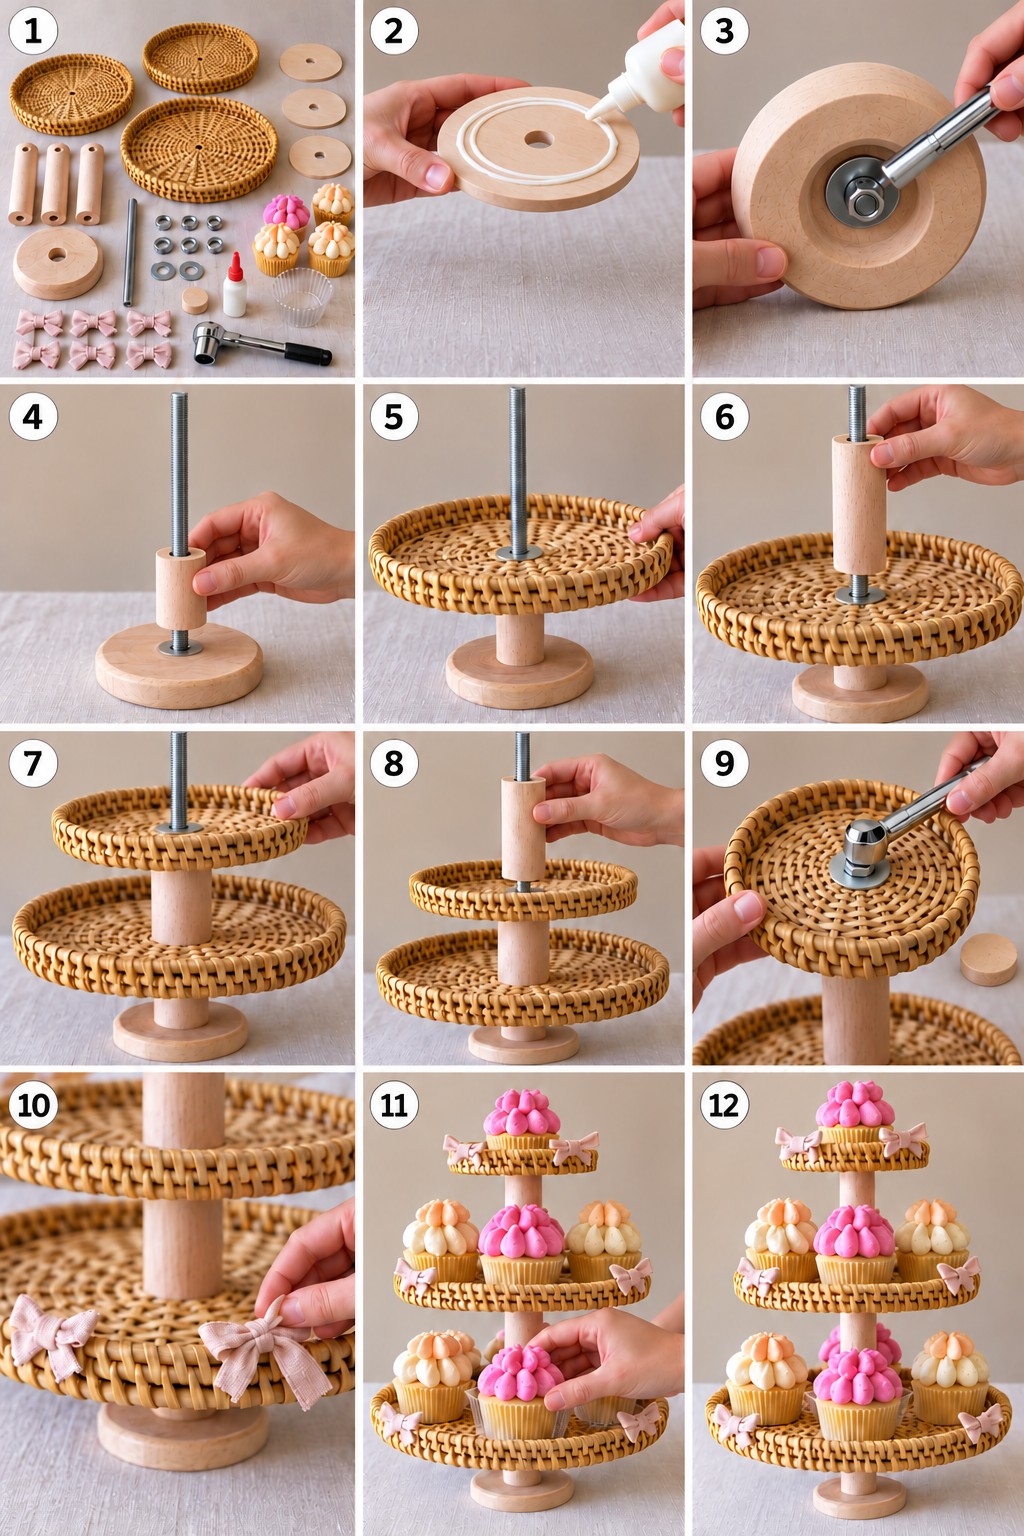
The illustrated assembly uses woven trays, wooden reinforcing disks, hollow timber spacers, a broad wooden base and a threaded center rod with nuts and washers. A socket wrench tightens the fittings, and adhesive is applied to a wooden contact surface. For a similar approach, select compatible components and holes first. A ruler, marking tool, level and suitable holding tools help with alignment; cutting or drilling equipment is needed only when preparing your own blanks. Predrilled parts simplify that preparation.
Lay out the base and platforms before fixing anything. Confirm the center alignment and dry fit the rod, supports and reinforcement so the trays sit level. Prepare bonding faces for the materials you use, apply a compatible adhesive where needed and follow its pressure and full cure instructions. A glue made for wood is not automatically appropriate for metal, glazed plates or fabric. Select adhesive for the actual contact materials, and use appropriate mechanical fittings wherever the structure needs them.
Assemble from the broad base upward, alternating supports and trays while checking alignment. Reinforcing disks help distribute force at flexible woven centers; nuts and washers must work with the chosen assembly without crushing the weave or splitting timber. Add the final fitting and keep exposed hardware from the cakes. The sequence shows bows added after the structure is assembled. Use that order for other themes too: build the carrying system, check it, then attach trim where it does not obstruct serving or conceal connections that need inspection.
Use joining methods suited to each material: compatible tier hardware for prepared serving plates, connections that keep stacked crates from shifting, and a rigid pedestal beneath yarn covers. Predrilled serving plates avoid making holes in ceramic, while a purpose-made frame provides a starting point for wire designs.
Use the Assembly Principles in These 24 Stand Ideas
Borrow the making sequence's order, then change the platform, support and trim to suit your chosen design. Try the stand on the actual serving surface with the planned load before the event, checking both full and partly emptied arrangements. Allow adhesives and finishes to reach their prescribed use stage. The following ideas connect the visual theme with a practical adaptation, so you can choose a display that suits your cakes rather than copying every decorative piece.
1. Rustic Woodland Tree Slice Cupcake Stand
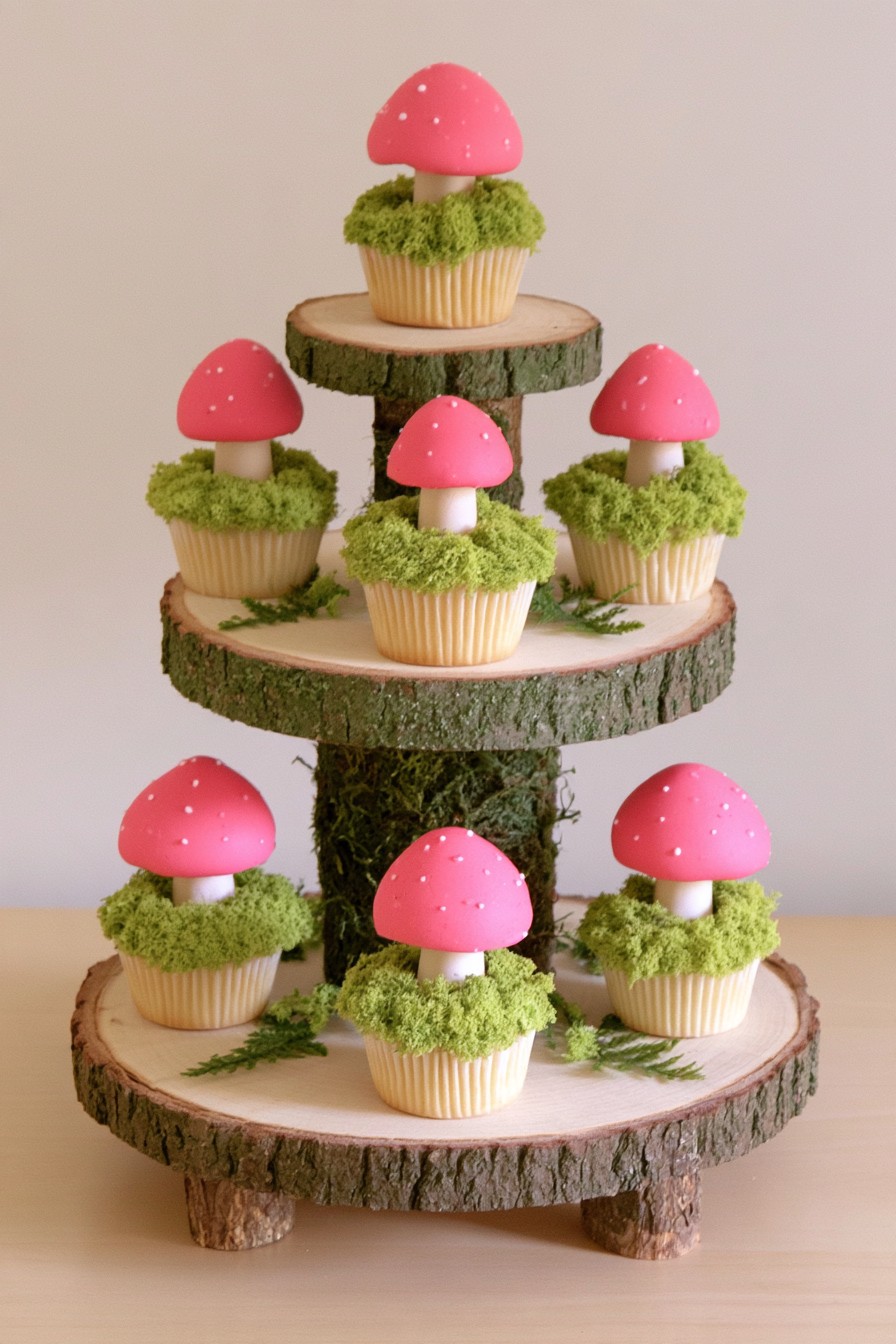
Bark edged wood rounds and mushroom themed cupcakes turn this tiered display into a small woodland scene. The broad lower round gives the arrangement visual grounding, while smaller upper levels keep the tallest treats visible. It suits a nature themed table where the stand becomes part of the story rather than simply holding the desserts.
Choose sound, level rounds and plan their support connections before adding decorative moss or mushrooms. Keep those accents clear of the serving areas and provide separate food suitable surfaces where needed. Check the gap using a fully decorated cupcake, including its topper. Connect the theme to the surrounding table with these woodland birthday table ideas, while leaving enough space around the stand for guests to reach the lower tier.
2. Scalloped Painted Wood Cupcake Stand
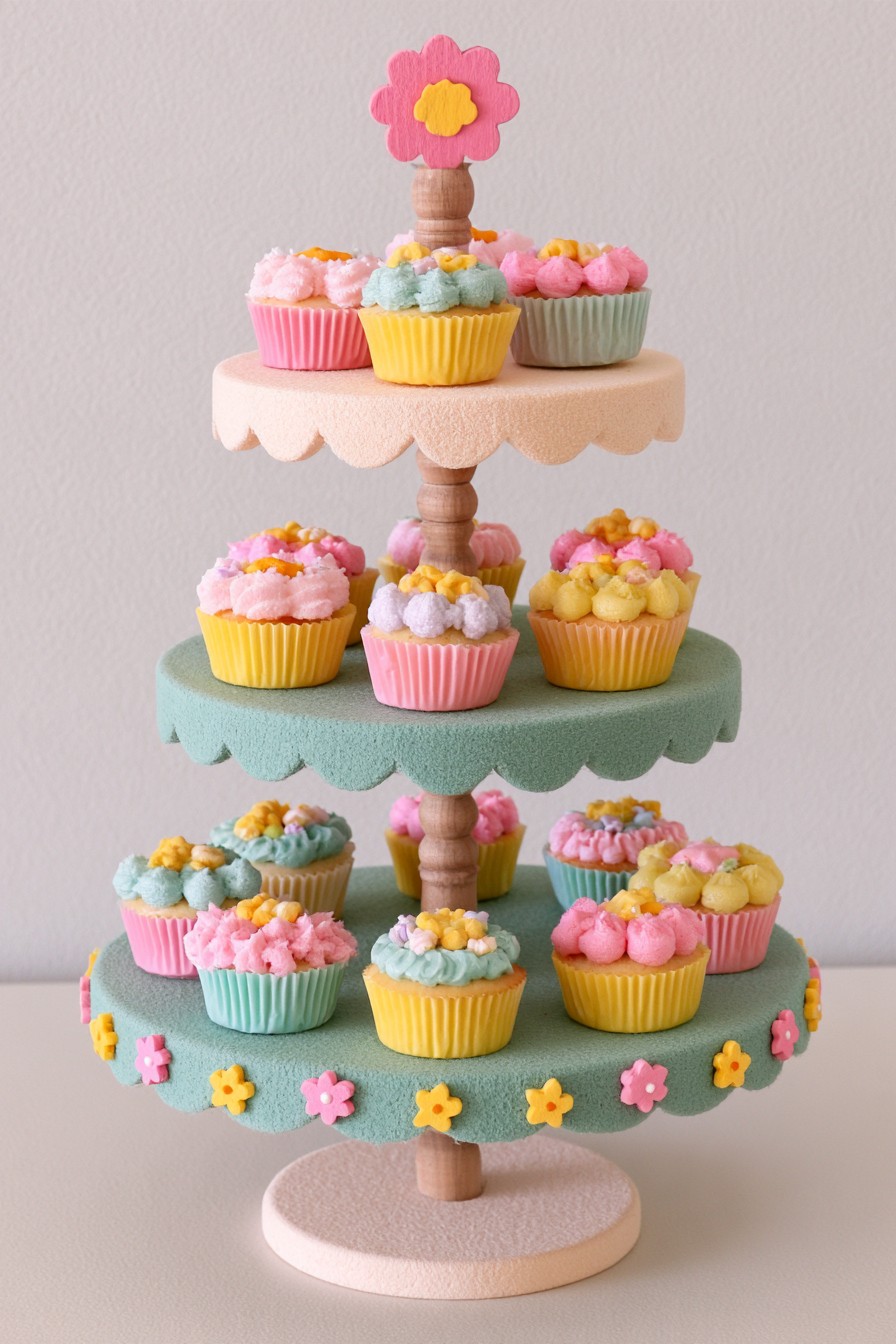
Mint and blush scalloped tiers bring the party palette into the stand itself. Small floral details sit around the edges, leaving the center areas readable even with colorful frosting above them. A pale central post connects the levels, making this a good option when the display needs to feel decorative without adding another large table backdrop.
Plan the scallops on templates before cutting or choose prepared platforms with smooth edges. Check that the post and base support the intended arrangement, then paint with a system suitable for the platform material. Let the finish reach its stated readiness before assembling or loading. Keep any separately attached flowers out of the paths used to lift cupcakes, and add removable food serving inserts above decorative coatings. Leave the uppermost topper low enough for easy placement and removal.
3. Hand Painted Terracotta Pot Cupcake Stand
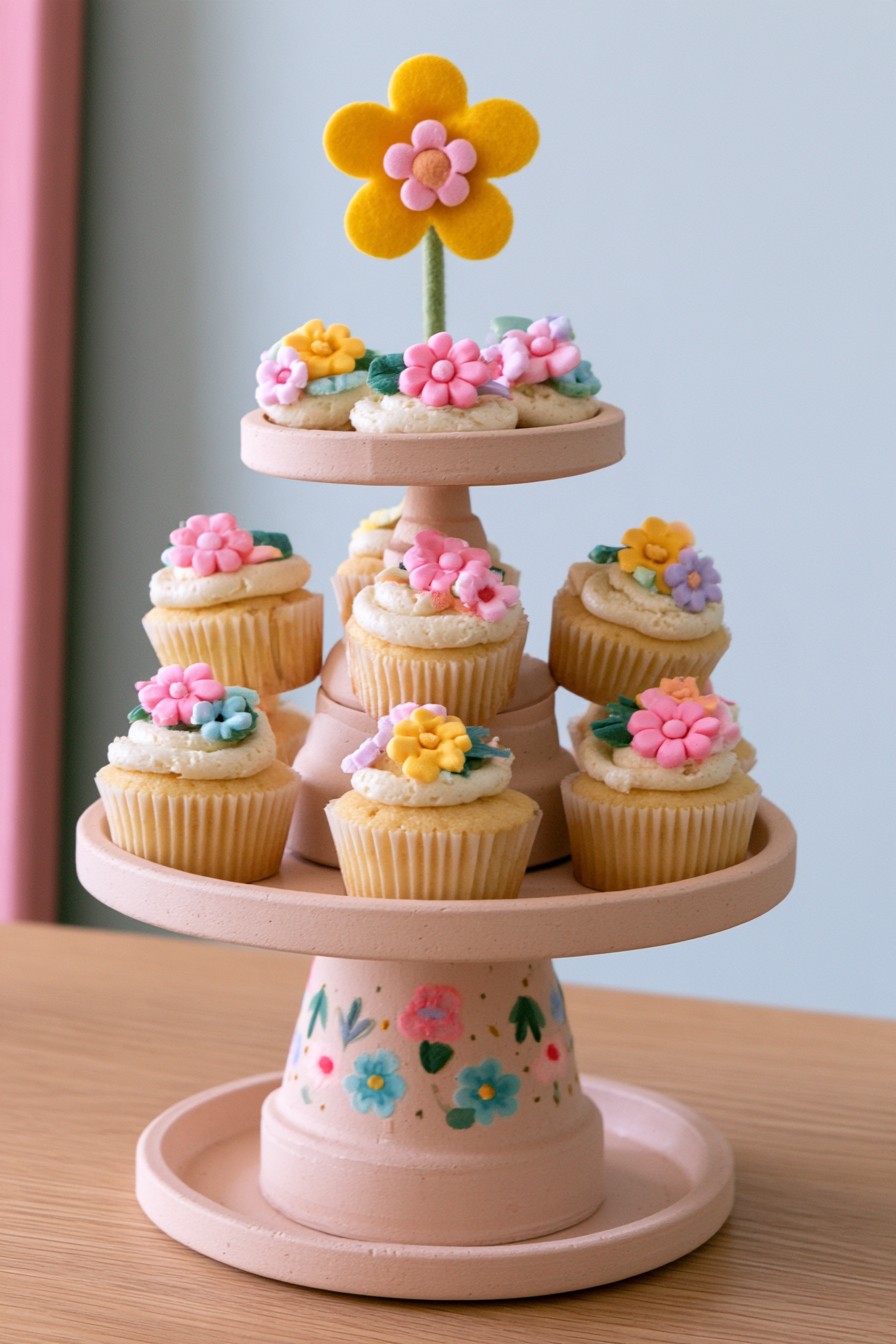
An upside down flowerpot gives the lower section a garden character, with floral decoration repeated on the tier rims. The large yellow flower above the display reinforces the theme without needing a crowded table arrangement. This concept suits a modest selection of cakes displayed near other botanical details.
Use a sound pot and level platforms, and plan the connection between them rather than relying on a loose stack. A reused plant pot can be cleaned for decorative use, but cleaning does not turn it into a food serving surface. Keep cakes on separate food suitable dishes or inserts. Choose the top flower as a clearly decorative piece and secure it away from frosting and lifting space. Try removing cakes from different sides to check the assembly's balance as serving progresses.
4. Stacked Wooden Crates for a Cupcake Display
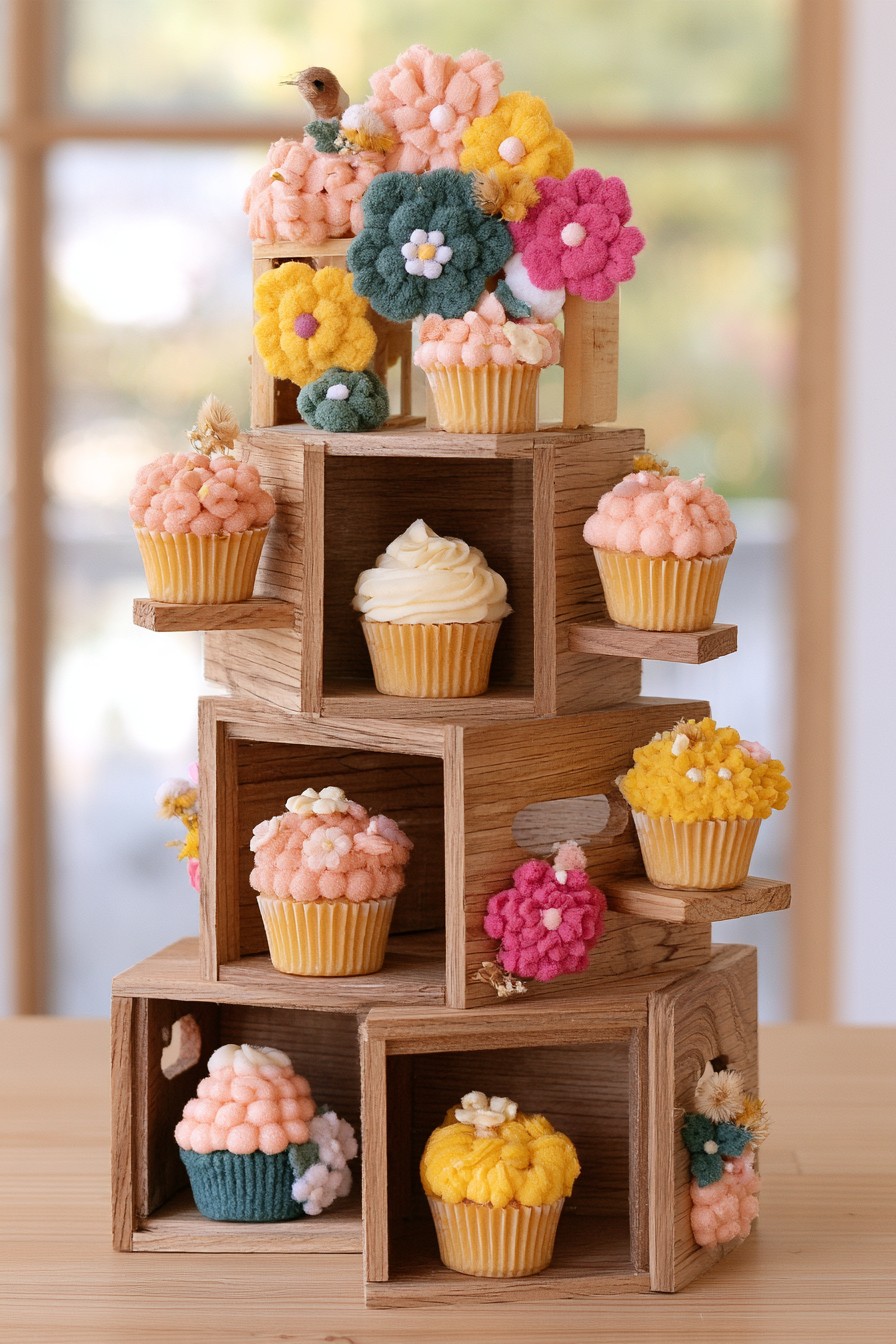
Open crates create a stepped display with small compartments and upper surfaces for featured cupcakes. Their openings give individual treats a little setting, while the timber texture works with floral frosting and a casual dessert table. This arrangement has a different access pattern from a spindle stand because guests reach into some spaces rather than around a central post.
Choose crate orientation around the cakes and room needed to lift them, then connect the boxes so they cannot shift independently. These wooden crate display layouts offer related arrangement ideas. Check timber condition and old finishes before any abrasion. Fit separate food serving surfaces where treats sit, and keep decorative flowers outside the access openings. Leave the heaviest elements low and confirm that an upper box remains stable when a nearby dessert is removed.
5. Woven Rattan Tiered Cupcake Stand
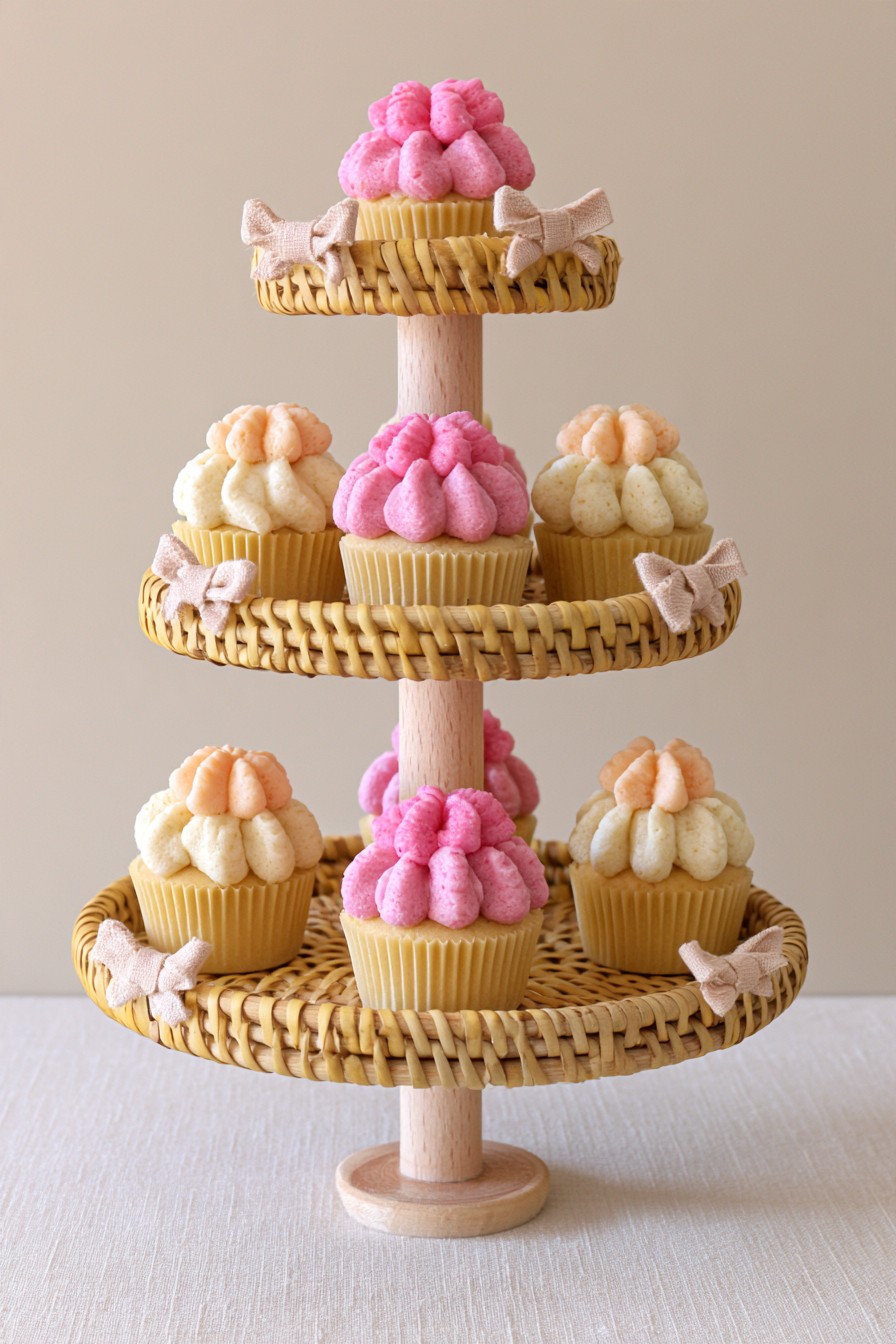
Three woven trays give the stand a soft natural texture, with small pink bows repeating the cupcake colors. The narrower upper levels let the lower cakes remain visible, and the woven rims help define each serving area. This is a useful theme when you want a handmade look alongside linen or other natural table materials.
The making stages provide an assembly example, but flexible weaving still needs appropriate reinforcement and connections. Plan rigid support at each tray center and a level food serving insert for the cakes. Check that the insert fits without pressing the rim out of shape and remains removable for cleaning. Keep bows below the serving surface and off the central connections. After the event, remove food inserts and clean each material as directed rather than soaking the entire wooden and woven assembly.
6. Colorful Upcycled Tin Cupcake Stand
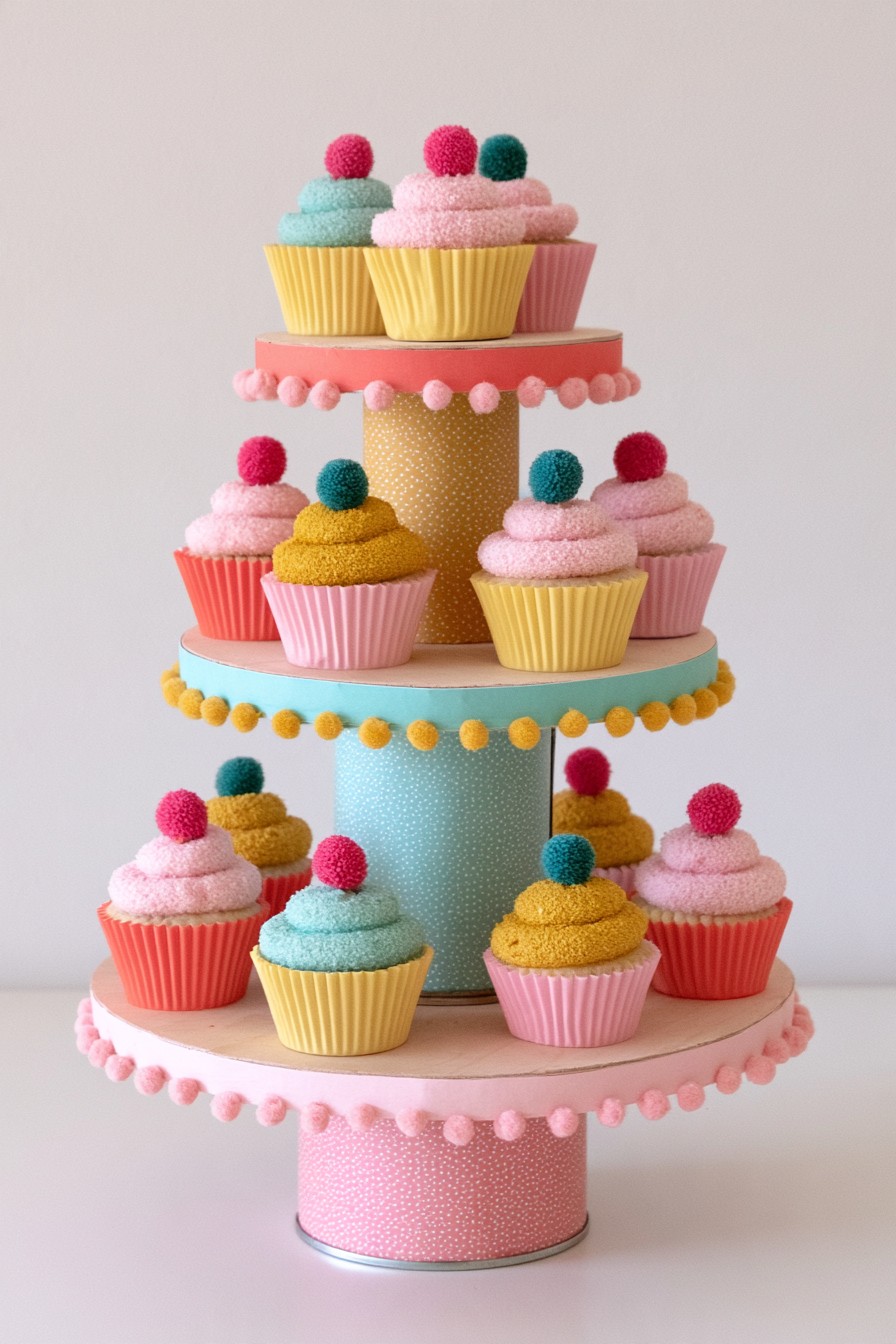
Pastel platforms, patterned cylindrical risers and small pompom trim create a bright reused-material display. Echo the cupcake cases in the colors. Clean metal tins can provide an adaptation for the risers when their connections and flat ends support the tiers securely.
For that adaptation, inspect the tins for sharp rims, corrosion and suitability as supports, then select rigid platforms and compatible connections. Covering a rough edge with decorative fabric is not a substitute for addressing it properly. Keep pompom trim below food serving inserts and clear of guests' hands. Plan how to wipe the platforms without wetting the decorative covering. Choose support height around the frosting and assess the stand with cupcakes removed from one side, not only with a balanced full display.
7. Whitewashed Farmhouse Cupcake Stand
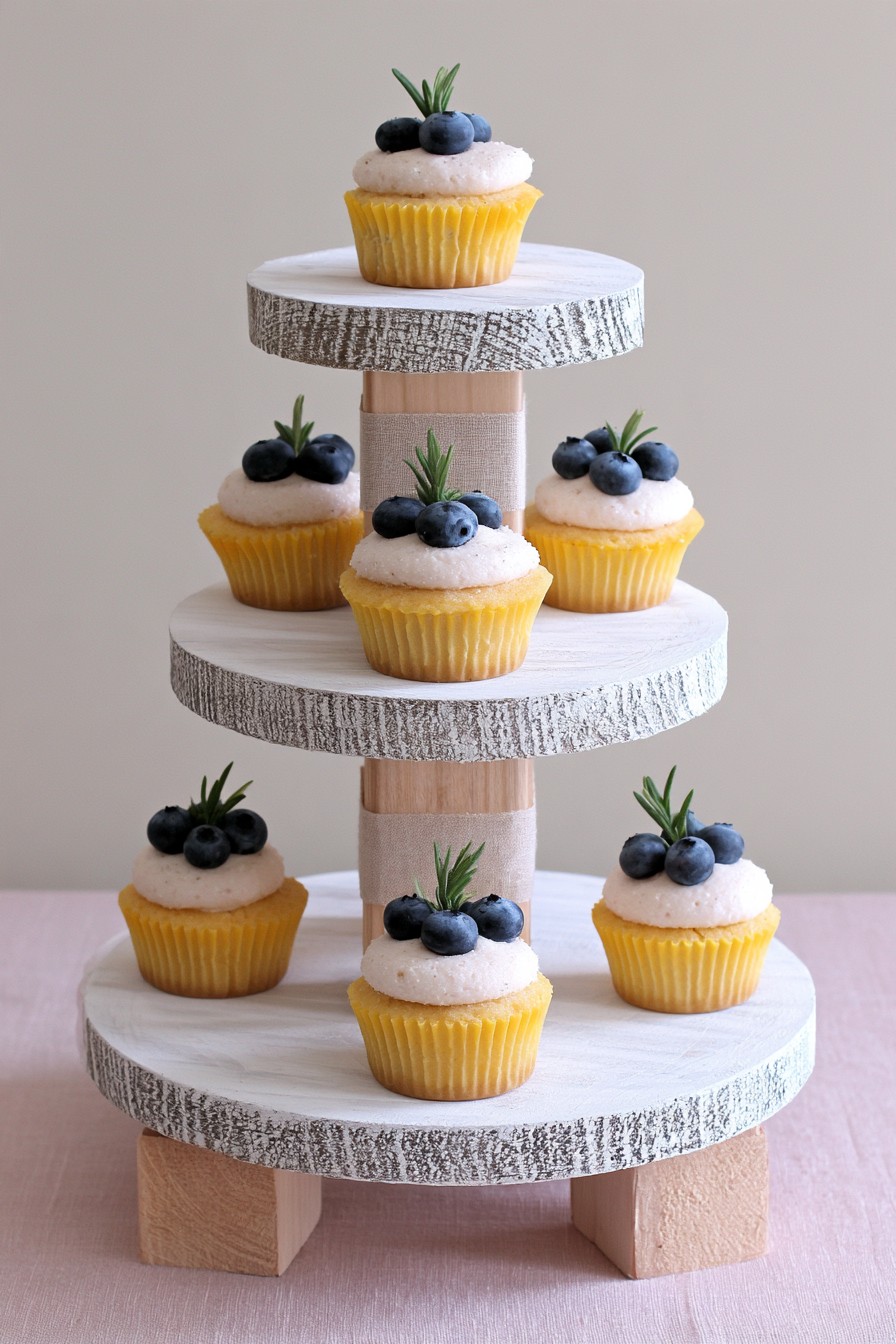
Pale wood rounds make the stand feel lighter than a dark bark covered woodland design. The restrained platforms let fruit topped cupcakes supply most of the color, while the visible timber grain keeps the display warm. Short feet lift the broad base, giving the lower tier a defined edge on the table.
Check the base contacts sit evenly before planning the upper structure. Use sound rounds and supports with appropriate connections, keeping the pale finish off any mating surfaces where your assembly requires bare material. Follow the coating's preparation and use guidance instead of assuming a whitewashed look is itself protective. Separate food suitable inserts can make cleanup easier and avoid direct contact with decorative paint. Keep the fruit arrangement within the cupcake cases or serving dishes, and leave enough room for a guest to take a cake without gripping the stand.
8. Floral Garden Ladder Cupcake Stand
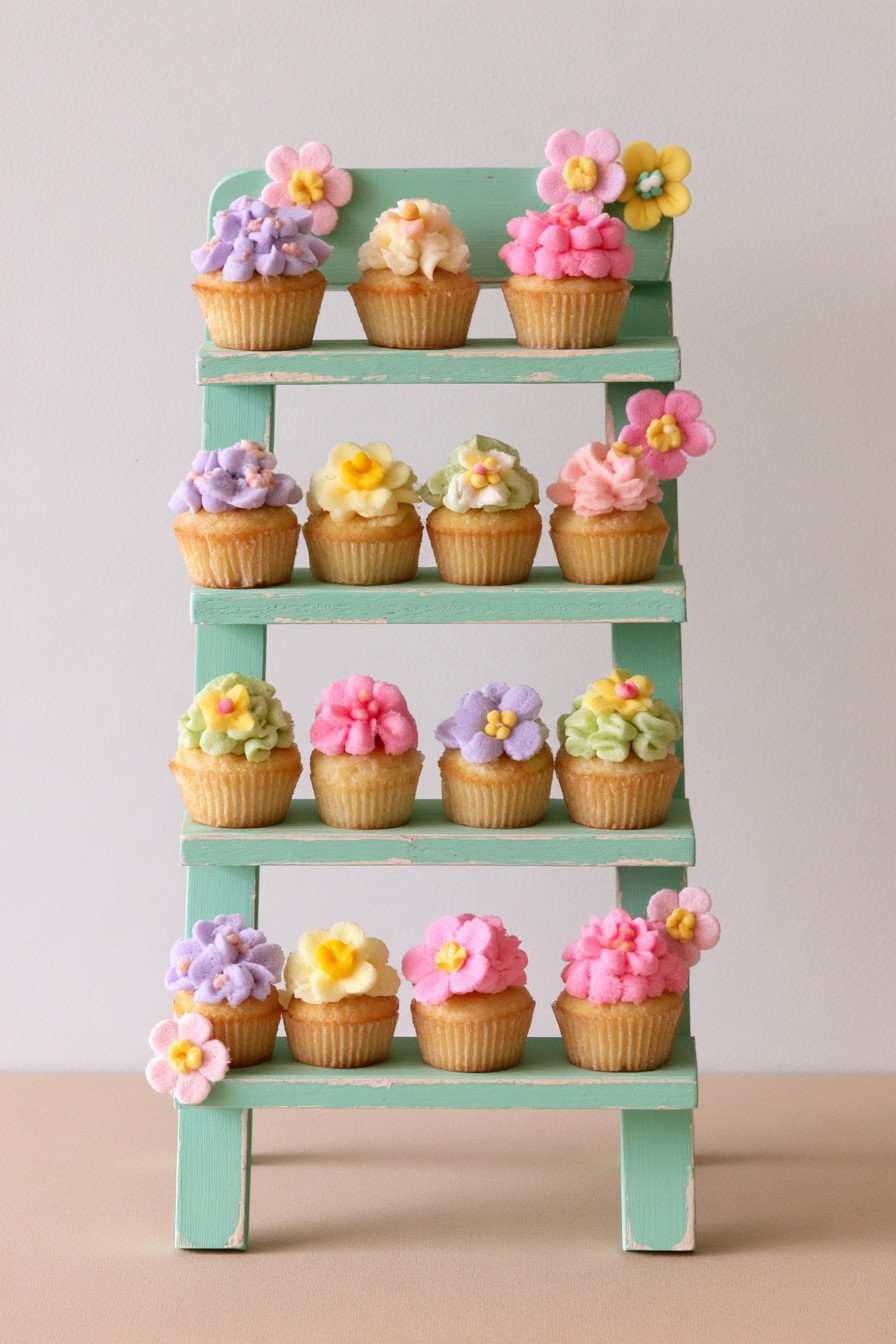
The mint ladder display places cupcakes in horizontal rows, making several frosting colors easy to compare. Its height can suit a table with limited depth, while flowers along the uprights soften the straight frame. It is particularly useful when you want a clear front view rather than access from every side.
Choose shelf depth using the actual cupcake case and leave clearance above the tallest topper. Join the side frame and shelves to a stable base, using connections designed for the full serving load. Check support and restraint for the chosen construction before decorating. Keep flowers from narrowing the routes into each shelf, and position the display so guests do not need to reach over the top row. Use food serving inserts that can be removed without disturbing the frame or pulling off the floral trim.
9. Blush Pink Scalloped Cupcake Tower
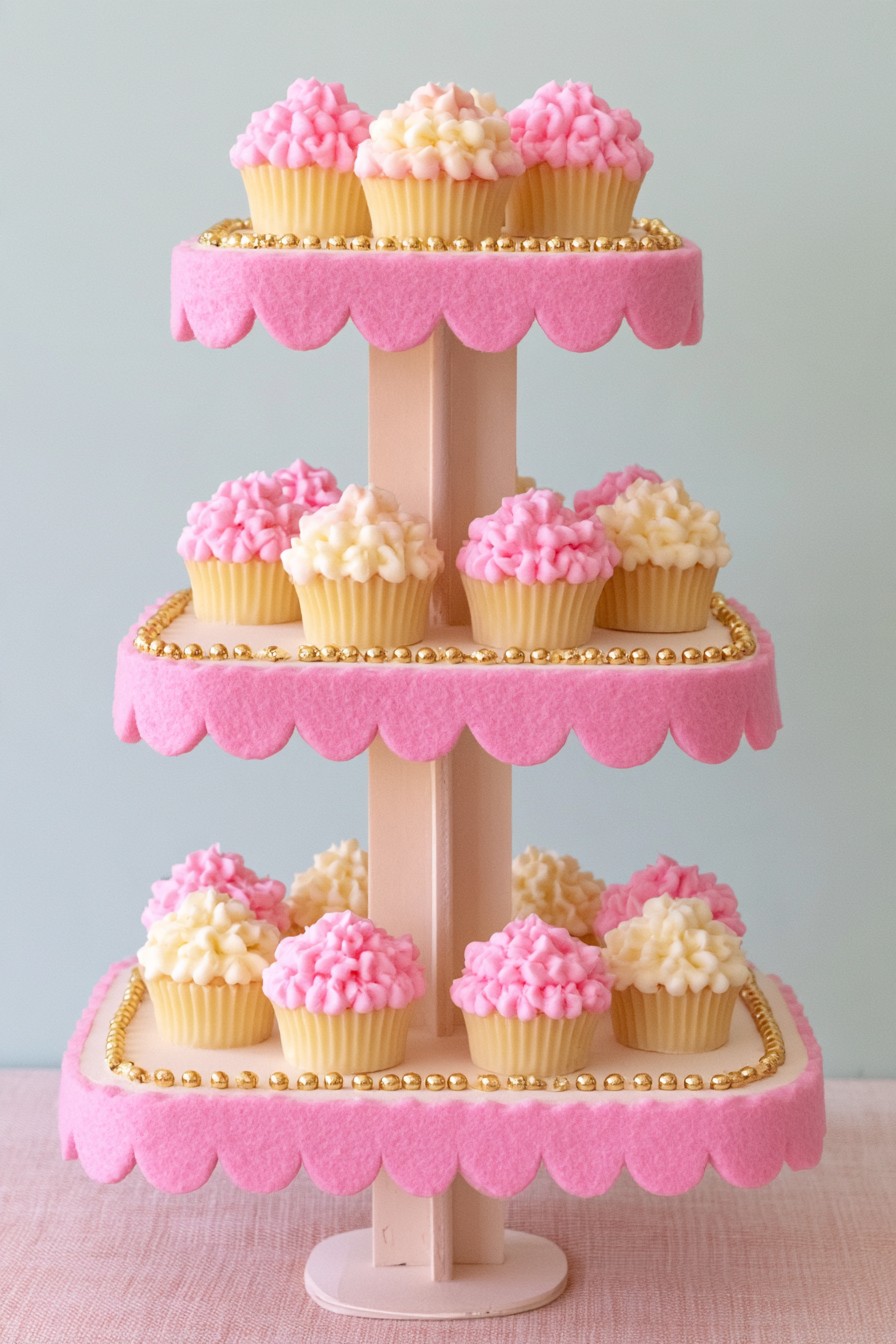
The blush pink tower uses round levels with scalloped edging and a restrained gold accent. Each layer becomes smaller toward the top, allowing the decorated rims to remain part of the display. Pink and cream frosting echo the stand's color without requiring every cake to look identical.
Use circular templates or prepared platforms to keep the tier shapes coordinated, then plan the post alignment and base footprint. A decorative craft board platform may need reinforcement; choose its construction for the intended use rather than its painted appearance. Attach trim only after checking the main assembly, leaving cupcake cases free to lift past the scallops. Add suitable removable serving inserts and allow adhesive and coatings to reach their stated use stage. A smooth interior serving area can preserve the detailed edge while keeping crumbs easy to remove.
10. Enchanted Forest Stump Cupcake Stand
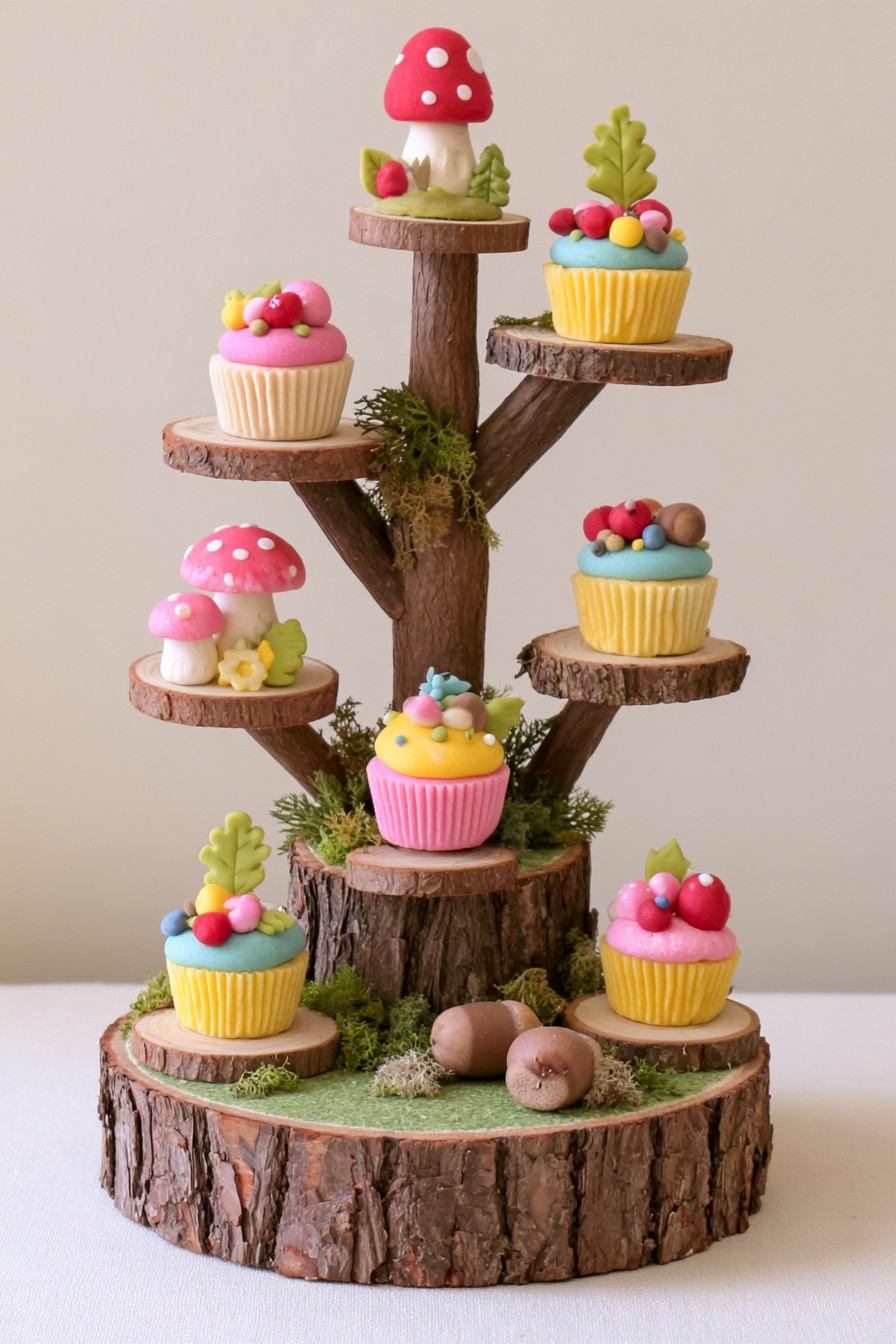
Individual platforms branch from a central trunk, giving each cupcake its own place in an enchanted woodland display. The staggered arrangement works well for a small selection with varied toppers, because the cakes can be seen from different directions. Moss like decoration and mushroom forms fill the spaces around the base rather than replacing serving surfaces.
Plan the branch positions with the cakes in place before selecting the connection method. Each projecting platform creates a different balance problem from a centered tier, so the base and joints need appropriate design for that arrangement. Keep the platforms level and provide separate food suitable dishes on cut timber. Check access to the rear cakes as well as those at the front. Removing an outer treat should not require leaning on another branch; place the stand where guests can comfortably approach the serving points.
11. Elegant Damask Tiered Cupcake Stand
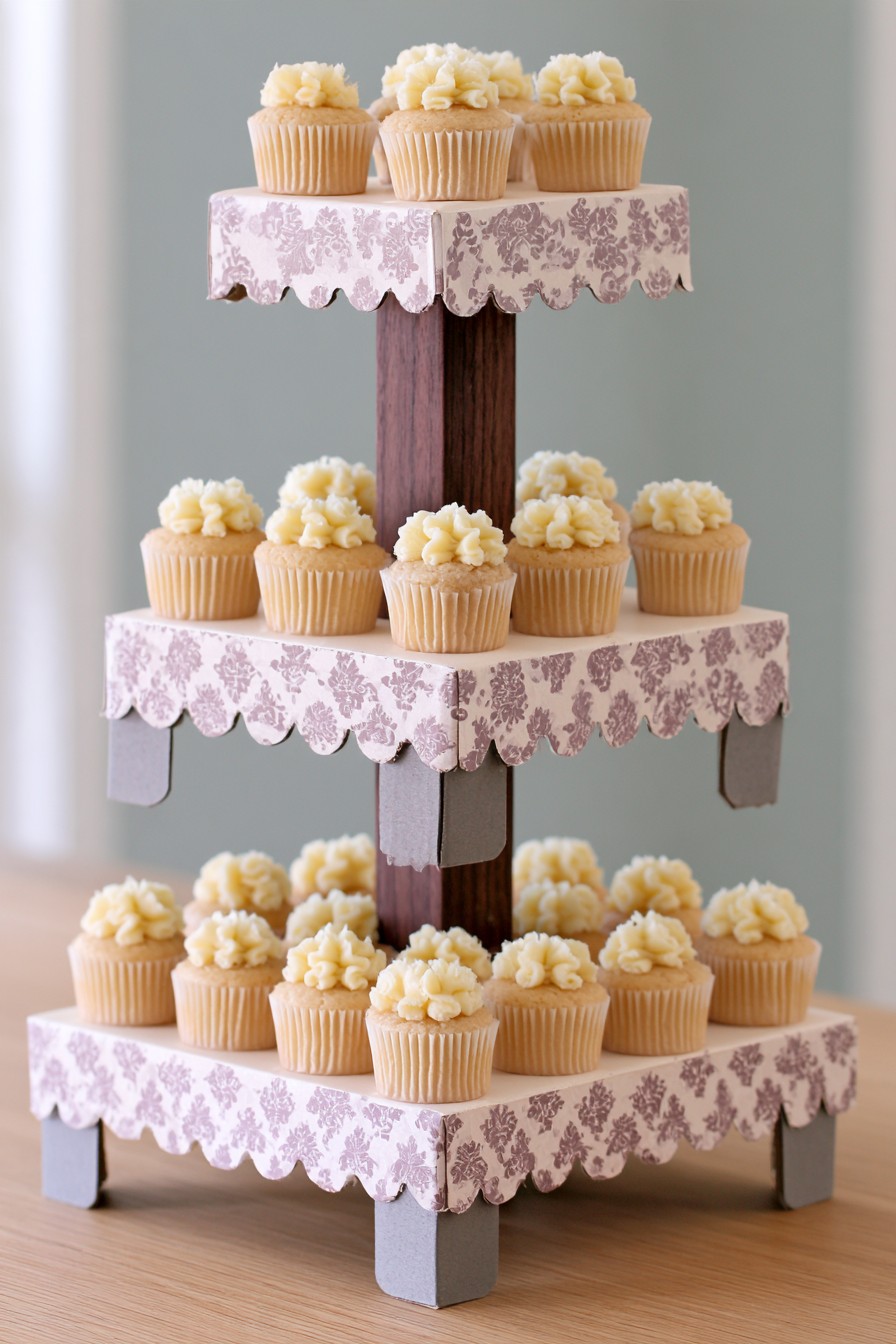
A muted patterned edge gives these tiers a textile influenced look, with a darker central post framing the pale cupcakes. Scalloped borders carry most of the decoration, so the food itself can stay simple. This suits a quieter dessert palette where pattern matters more than a large number of bright colors.
Choose a rigid platform structure first, then decide whether the damask effect will come from paint, printed covering or another suitable decorative treatment. Keep any covering beneath a separate food serving insert and finish the edge so it cannot catch a cupcake case. Inspect the post connections before adding trim that could hide them. For reuse, select inserts and edge details that can be cleaned or replaced individually, and leave enough space between cakes to keep the patterned border visible.
12. Natural Wood Floating Tier Cupcake Stand
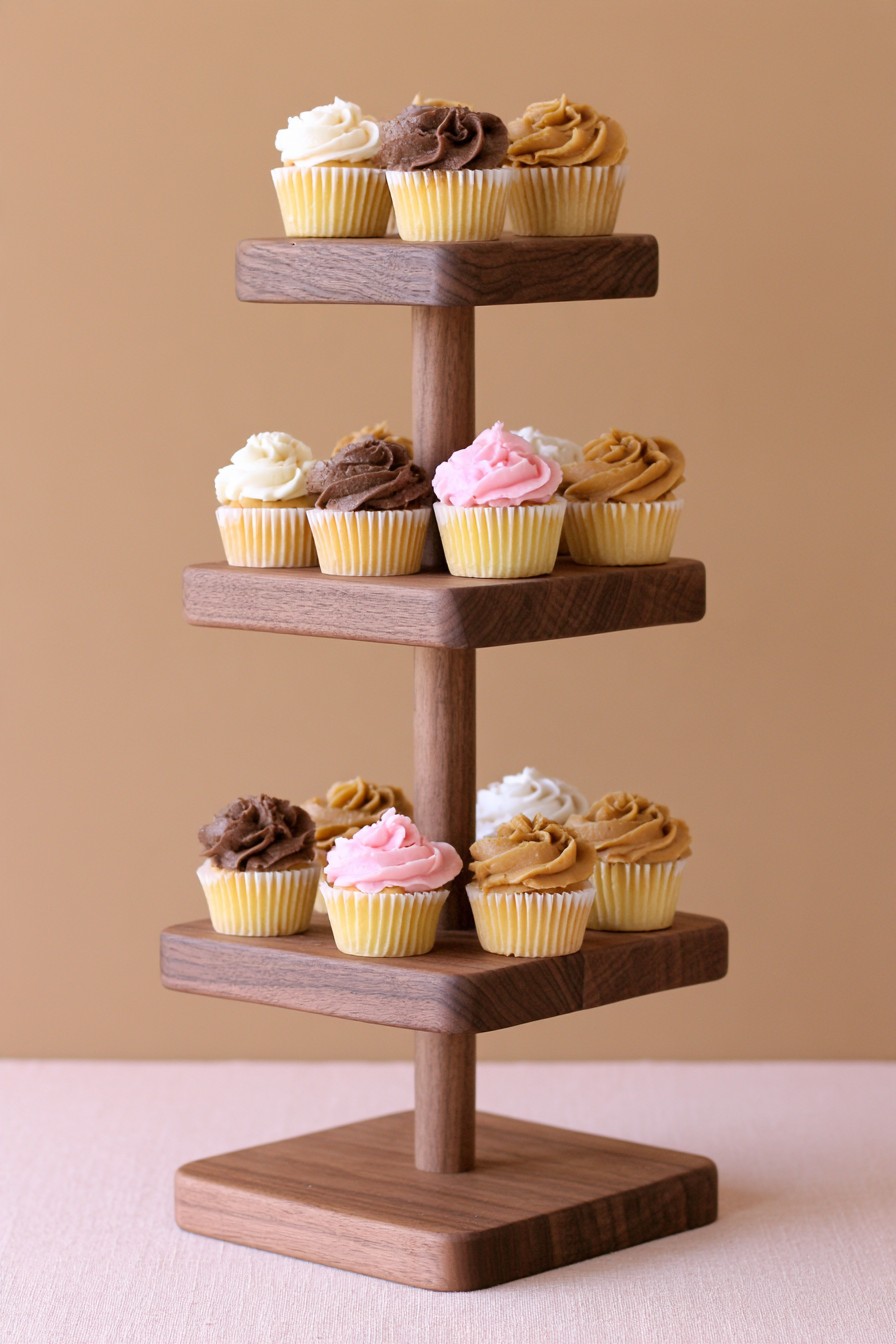
Plain timber tiers and generous open gaps give the display a spare architectural silhouette. The wood grain remains visible around the cakes, and the broad square base contrasts with the narrower column. This style can suit richly decorated cupcakes because the stand does not compete with their frosting colors.
Measure the finished cakes before choosing support lengths and platform depth. Use a suitable rigid assembly for the shelf connections, not just a visually aligned stack. Sand newly prepared edges as the timber and finish allow, then provide food serving surfaces wherever cake or frosting could touch the decorative treatment. Keep the base level and the loading arrangement suited to the construction. Leave a clear reach to the upper tier and carry the unloaded stand from an appropriate structural section rather than assuming the top is a handle.
13. Black and Gold Art Deco Cupcake Stand
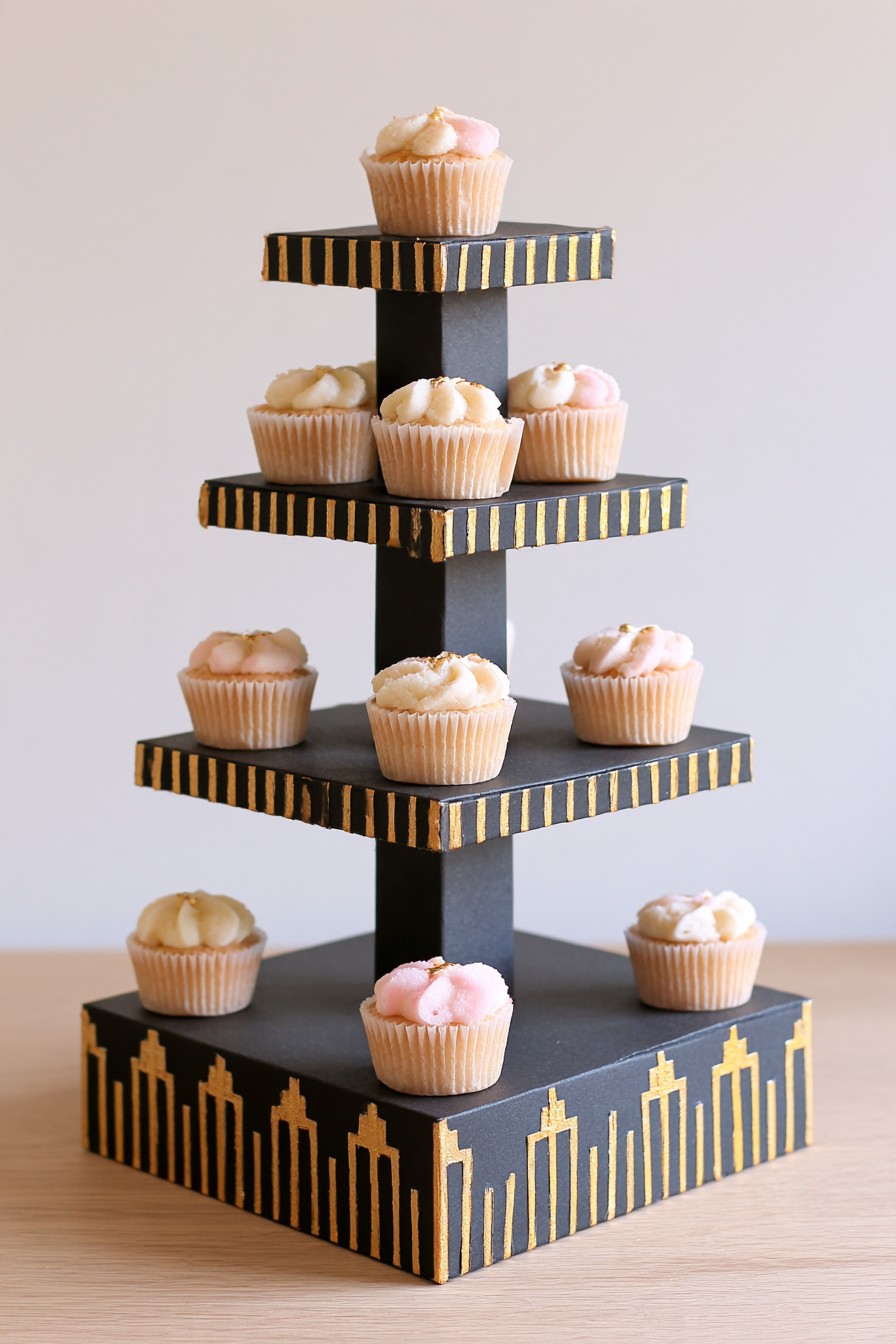
Dark round platforms and repeated gold lines give this stand an Art Deco character. The lower box shaped base carries a larger geometric border, while the narrow central column keeps the upper levels visually open. Pale cupcakes provide contrast, so a relatively simple frosting design can work without extra table decoration.
Plan the color bands and trim after selecting a rigid carrying assembly. Use measurements to space the gold accents around each rim, protecting the serving zones during painting. The photograph supplies an appearance rather than a material specification or load rating. Keep decorative coatings below removable food serving inserts and let them reach their stated use stage before loading. A broad dark base can anchor the scene visually, but its support and platform connections still need to suit the actual construction and cakes.
14. Blue Floral Vintage Cupcake Stand
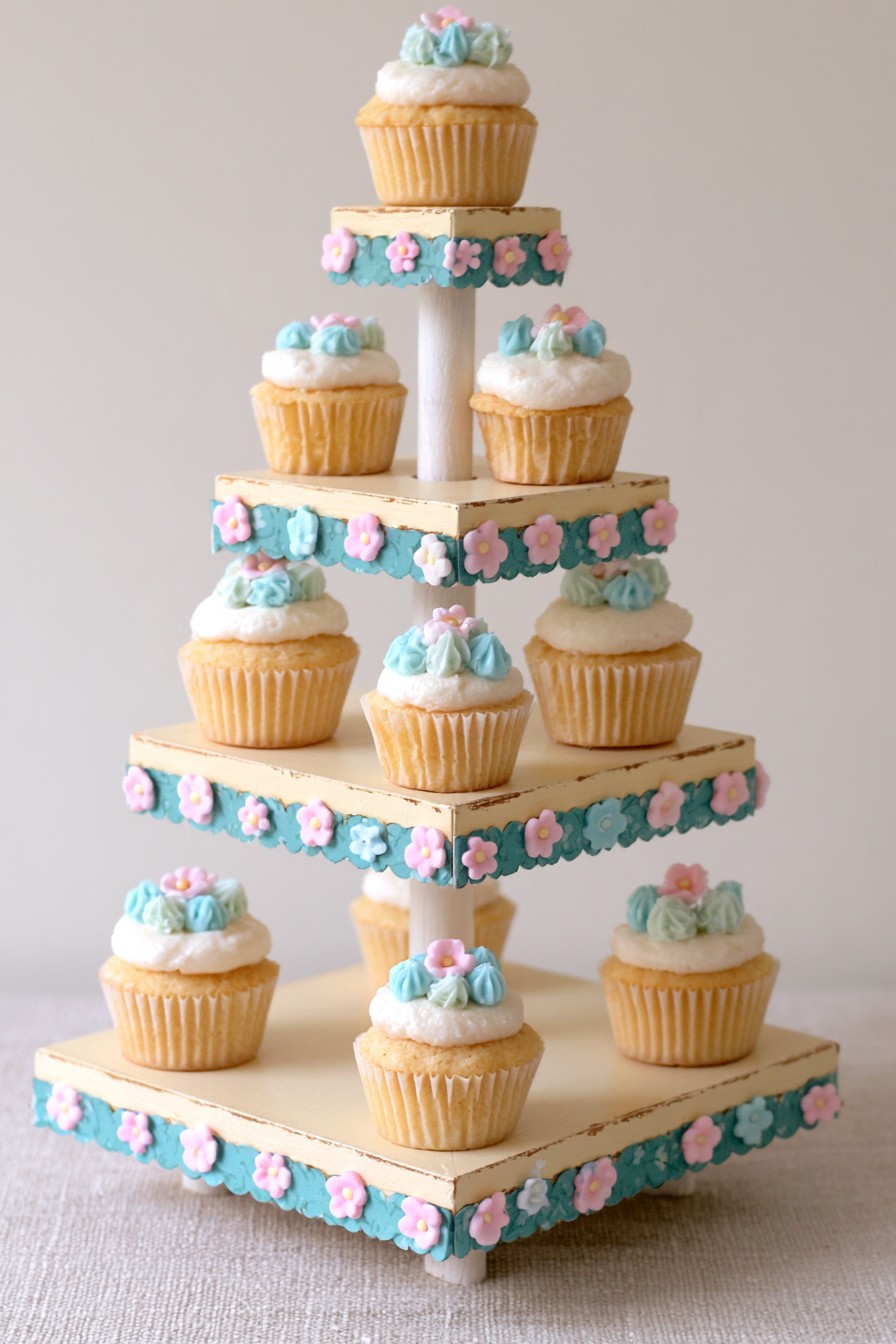
Cream tiers with blue floral bands and small pink blooms echo a tea table palette. The flowers run around the outer edges, letting the cupcake frosting remain the central focus. Different platform sizes allow the decorated borders to be seen without requiring every cake to be placed right against the rim.
Choose the carrying structure first, then plan the edging as a separate layer. Ready trim or individually prepared floral pieces can adapt the look, but their material and attachment are not established by the picture. Position them below the serving surface and away from the lifting route. Use suitable removable serving inserts and confirm clearance with the tallest finished cake. Keep the centers and fixing access clear when attaching decoration, so future inspection or disassembly does not require pulling through the flowers.
15. Pastel Birthday Wire Cupcake Stand
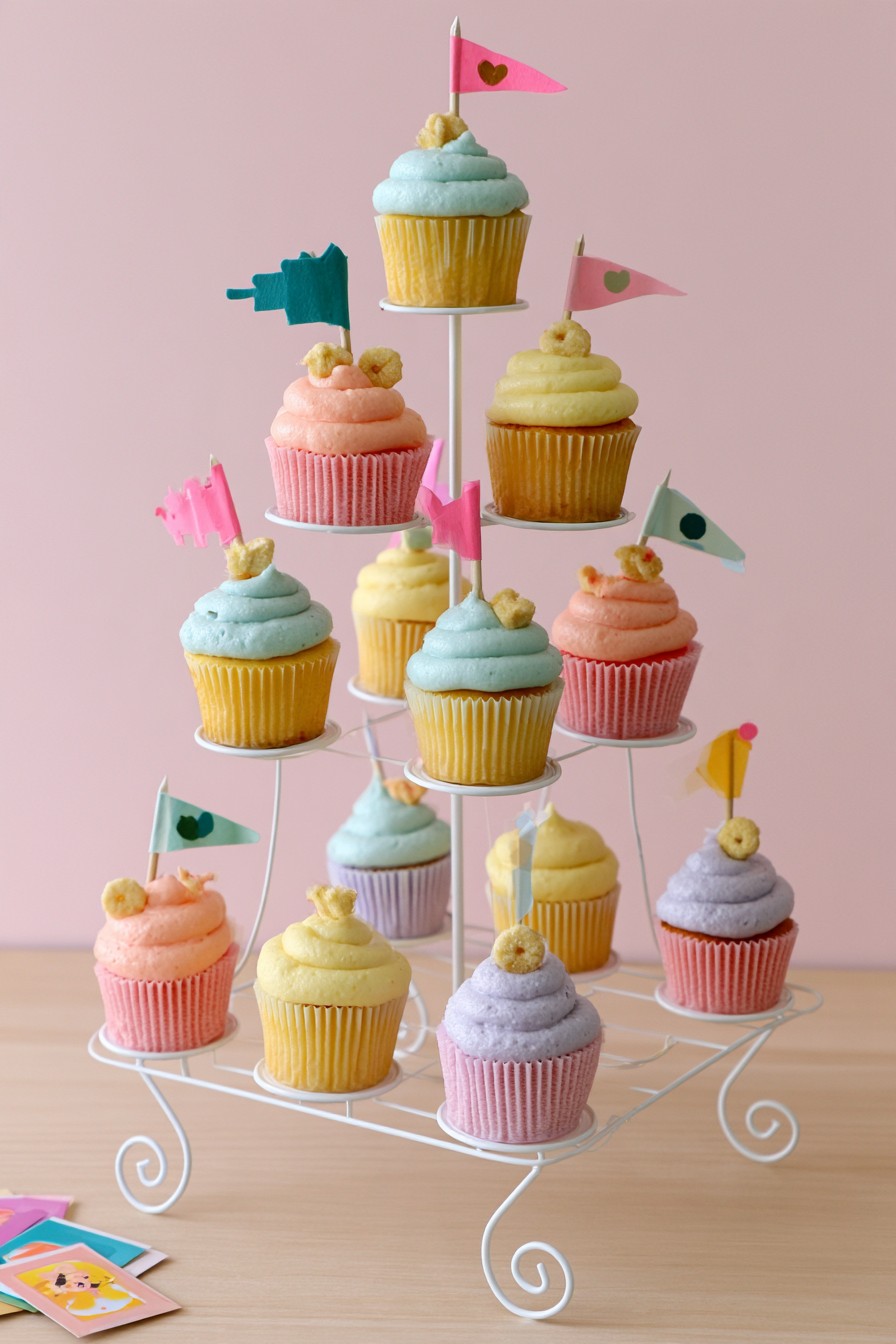
The open frame gives each cupcake its own circular holder, making pastel frosting and little flags visible from several directions. The holders are staggered vertically, so guests can choose a cake without reaching across a broad tray. This layout works best when the intended cupcake cases suit the actual holder construction.
Check the supporting surface with the cake case you will use: it should sit level, avoid rocking and not pass through an open bottom. An open ring and a small platform beneath the case provide different support, so diameter alone is not enough. Choose a frame designed for serving and inspect its assembly instructions rather than copying a capacity from the photograph. Keep flags from catching the wire, distribute cakes sensibly and check the arrangement as outer positions are emptied.
16. Romantic Blush Pyramid Cupcake Stand
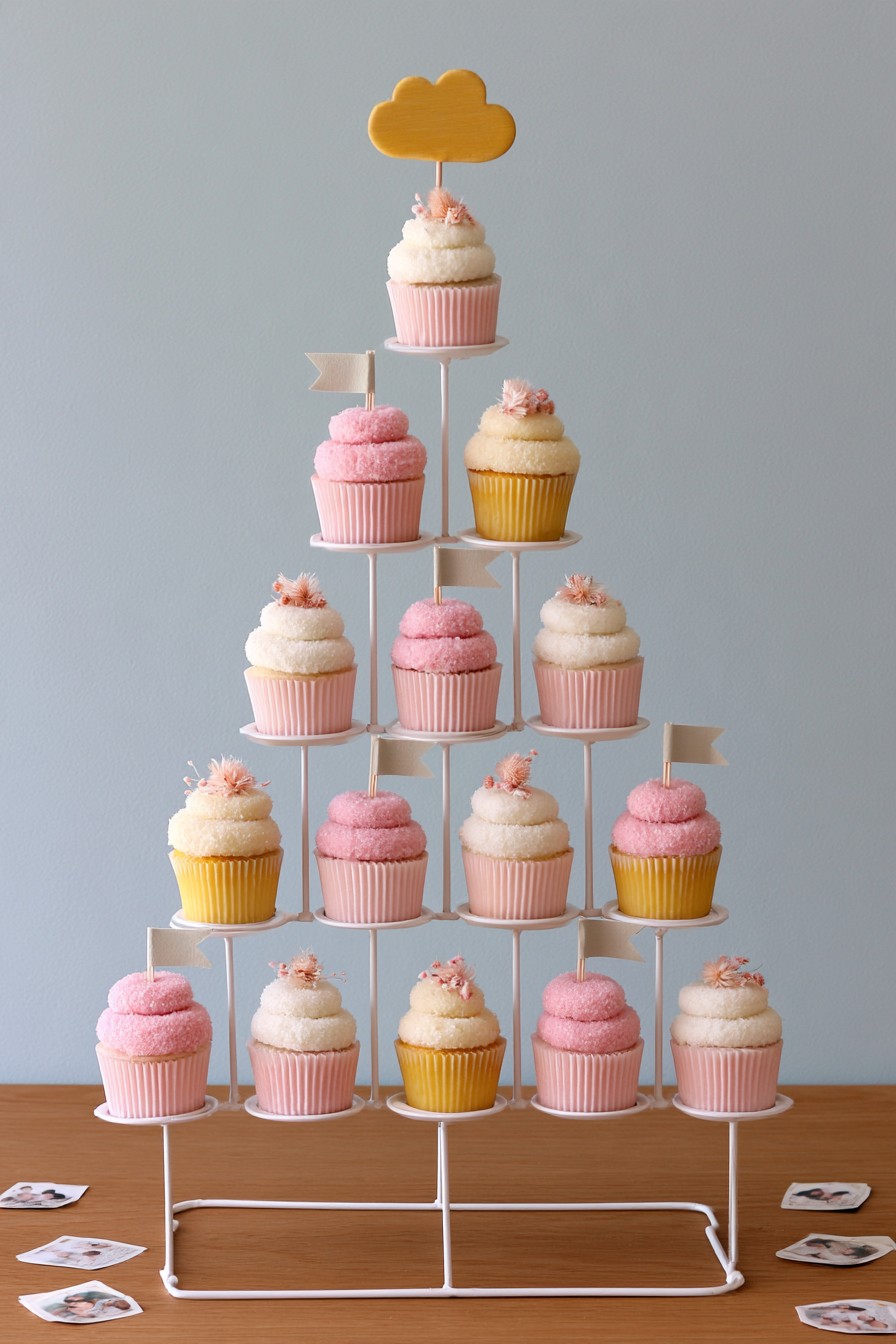
The pyramid arranges individual cupcakes in narrowing rows, creating a clear upward rhythm in blush, cream and pale yellow. A small topper finishes the display without a full decorative backdrop. This is a useful option when you want guests to see each cake separately rather than choosing from closely packed tier trays.
Assess every holder's level and supporting surface with the planned cupcake cases. Keep the frame on a flat serving table, complete its specified assembly and place cakes in an arrangement suited to its design. Check that taking a treat does not require gripping a support or reaching through another row. A tall topper needs clearance from guests' hands as well as the cake above it. Keep extra cupcakes on a separate tray for replenishment instead of adding more positions than the frame is designed to provide.
17. Sage Green Garden Party Cupcake Stand
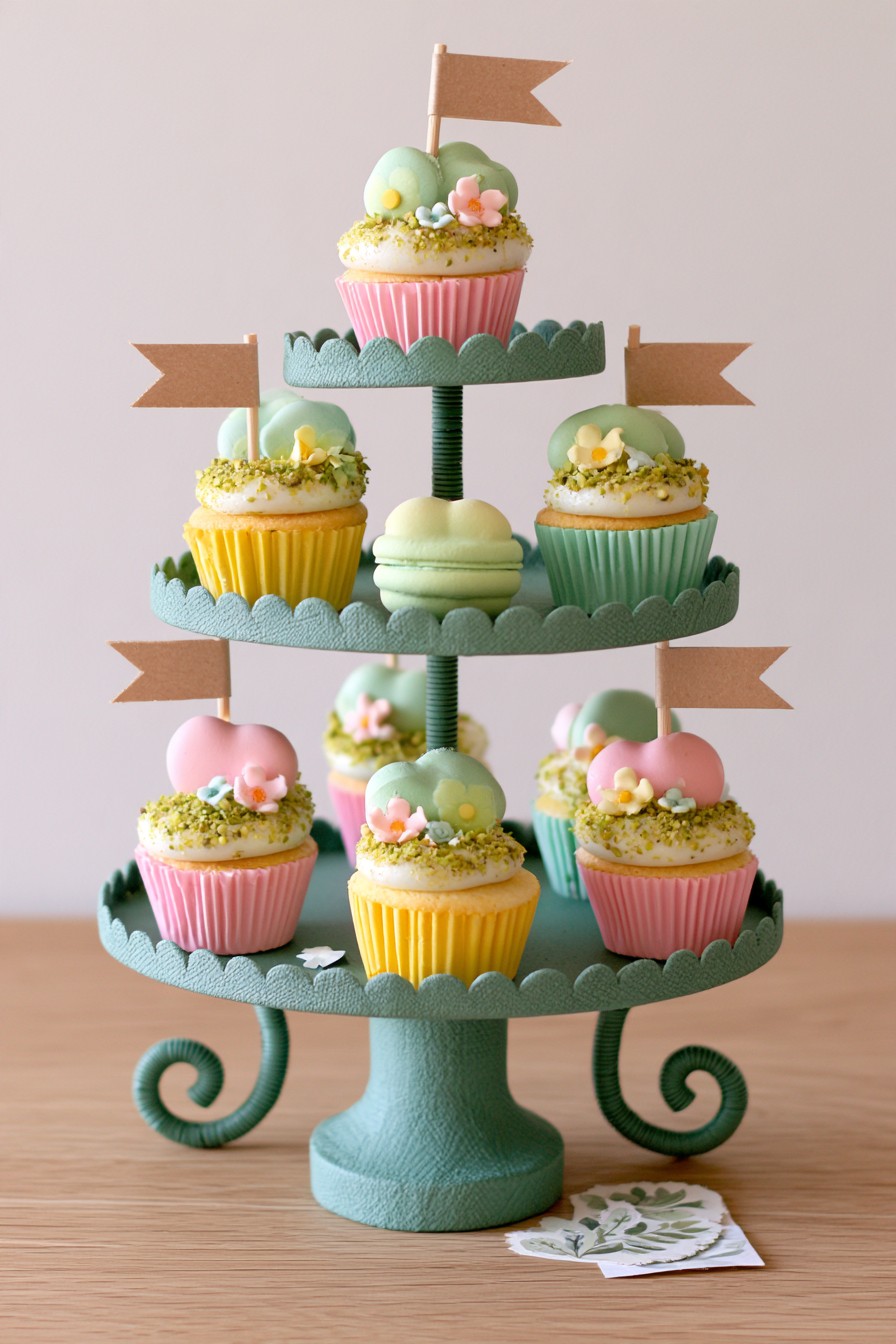
Sage scalloped tiers bring a soft garden palette to the table. A broad central base supports the visible arrangement; the curled extensions beside it complete the decorative outline. They should not be described as load carrying feet on the evidence of the photograph. Small flags echo the color scheme without occupying much room between the cakes.
Select the rigid platforms and central carrying assembly before shaping or adding curled ornament. Keep those extensions clear of the areas where hands reach for the lowest cakes. Check the base sits evenly, and judge stability through the actual structure rather than the visual spread of the curls. Removable food serving inserts separate desserts from decorative paint. Leave flag sticks and rim trim outside the lifting paths, and preserve access to connections for checking them before each use.
18. Black Metal Industrial Cupcake Stand
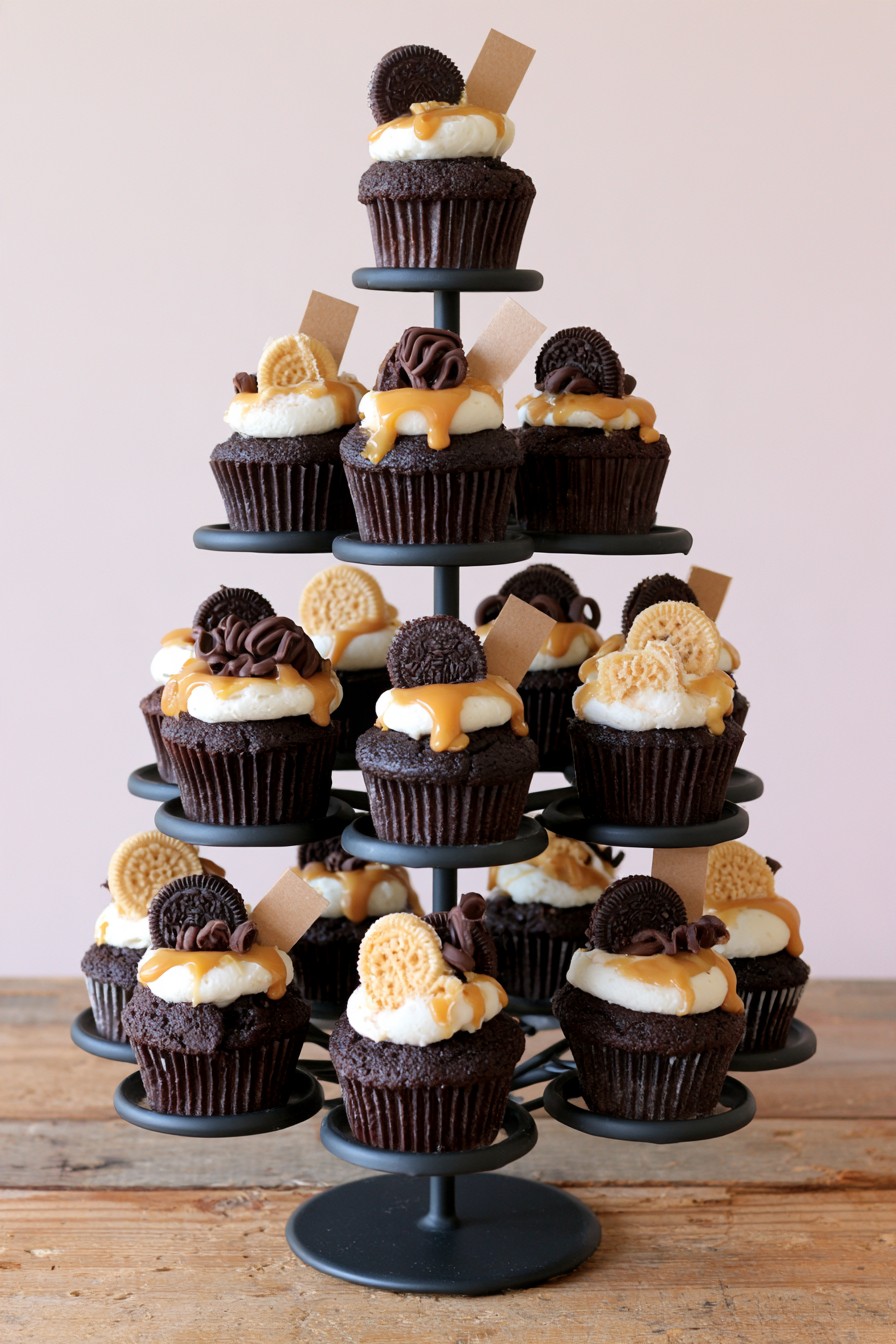
The dark upright frame and separate circular holders give chocolate and cream cupcakes a clear outline. Several rows create height without wide continuous trays, letting the frosting stay visible from the side. A plain dark base keeps the attention on the desserts rather than additional floral trim or color bands.
Use a purpose made serving frame or a suitably designed metal assembly, with the maker's connections and care guidance followed. Ordinary craft wire should not be assumed to provide the same support. Inspect each holder with the actual cupcake case and check the platform or ring beneath it. Position the stand where guests can reach upper cakes without leaning over the whole arrangement. Keep decorations and extra servings from adding unplanned loads, and inspect for sway or loose fittings as the display is partly emptied.
19. Vintage Floral Plate Cupcake Stand
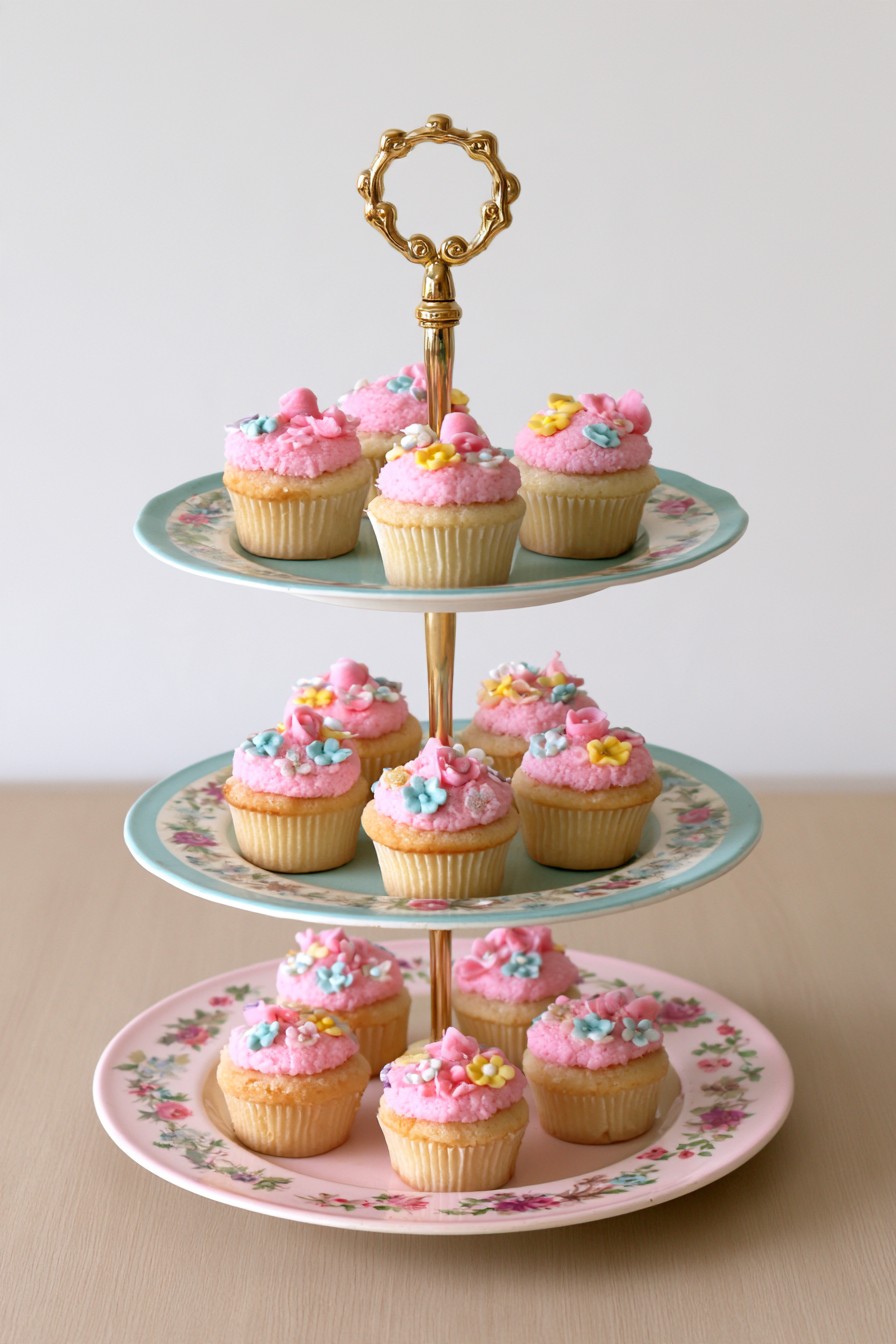
Floral plates in related pastel colors make a traditional tiered centerpiece, with the decorative borders left visible around the cupcakes. A slender center fitting and top handle connect the levels without obscuring the patterns. Similar looking modern plates can capture the style when antique pieces have uncertain suitability for serving.
Check food use and physical condition separately. A plate can be intact yet have an old glaze or decoration that releases lead; choose pieces whose food suitability can be established through reliable product information. Washing does not resolve that uncertainty. Keep doubtful decorative plates out of food service and select a different plate for the stand. Use compatible tier fittings, inspect prepared holes and avoid stressing the ceramic during assembly. Do not assume the top handle can lift a loaded stand unless the system expressly allows it.
20. Floral Plate Cupcake Stand with Pink and Blue Details
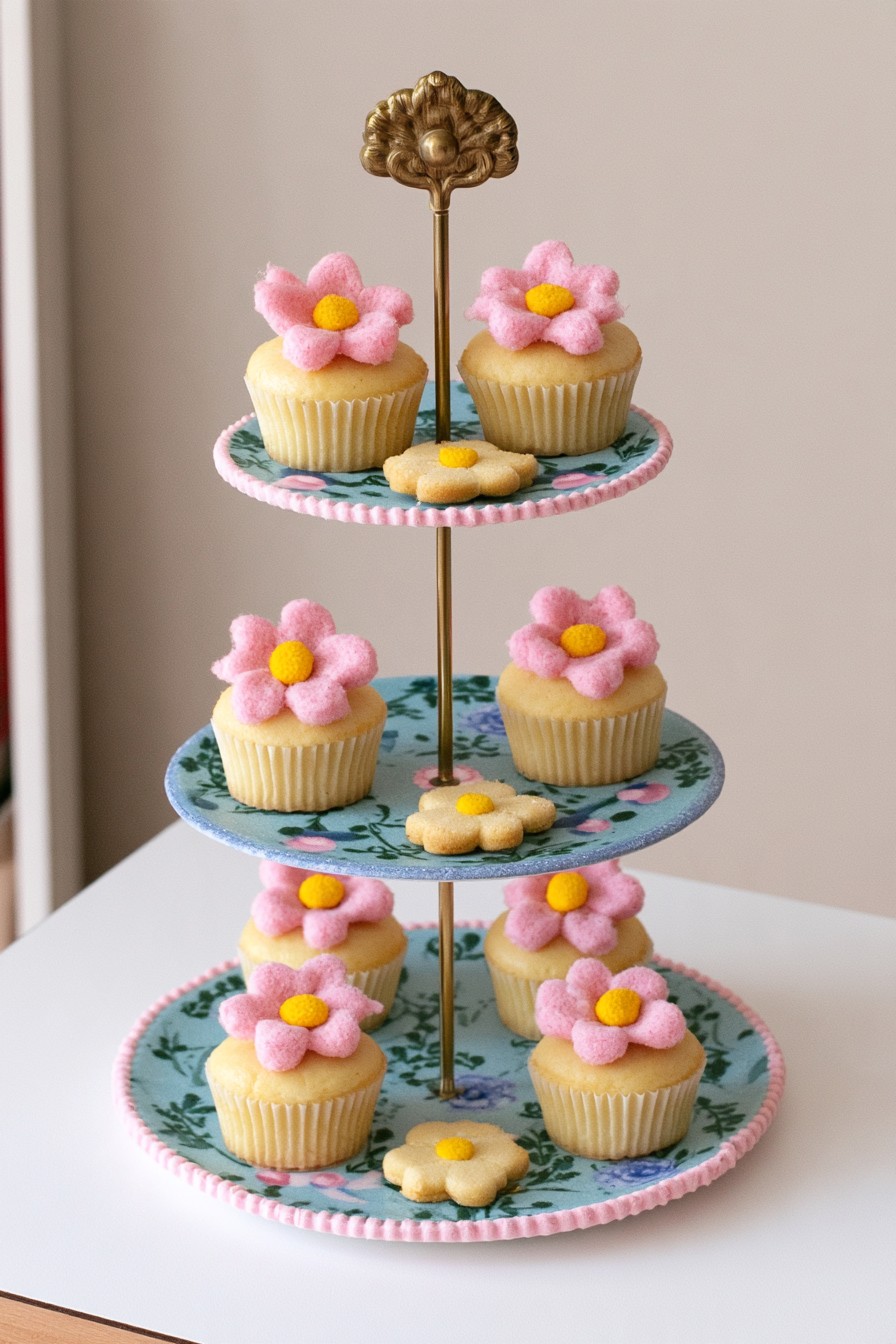
Blue and pink floral decoration makes the plates part of the dessert presentation. The slim warm toned fitting leaves their borders visible, and the smaller upper dishes make cakes on the lower plate easier to reach.
Choose intact plates verified for serving and compatible with the same tier hardware. Prepared holes and appropriately seated fittings make assembly more manageable than improvising joins between dishes. Follow the system's tightening guidance so ceramic is not compressed excessively. If customizing plates yourself, use a decoration system expressly suitable for the intended contact and cleaning conditions rather than treating craft paint as a food finish. Leave gaps between cupcakes to show the patterned border, and dismantle for cleaning only as the fittings allow.
21. Pastel Mixed Plate Cupcake Stand
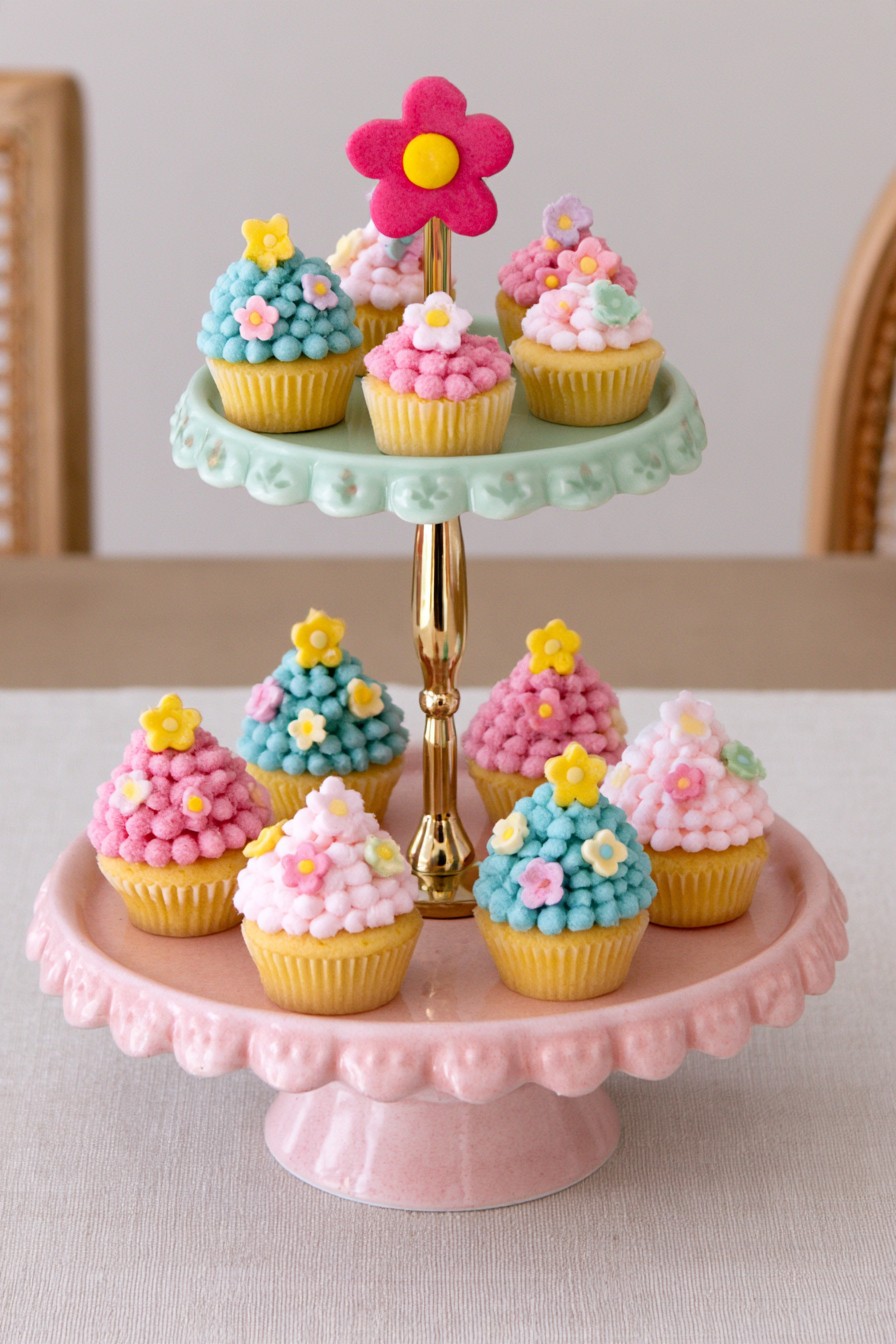
A mint upper dish and blush lower dish create a pastel composition with different scalloped outlines. The warmer metal center fitting connects the colors, while a large flower above the cupcakes finishes the theme. This idea offers a way to combine suitable existing serving pieces without requiring their shapes to match exactly.
Confirm both dishes are appropriate for food and for the planned tier assembly before considering color. Use plates that fit the same tier fittings, checking the condition of each dish and the assembled stand before serving. Select connections that keep the dishes aligned and supported instead of simply balancing one on another. Check how the assembled stand sits on the actual table, then leave the decorative flower clear of food and serving access. Keep some frosting colors repeated across both levels so the different dishes feel coordinated without filling every available space.
22. Ribbed Yarn Cupcake Pedestal
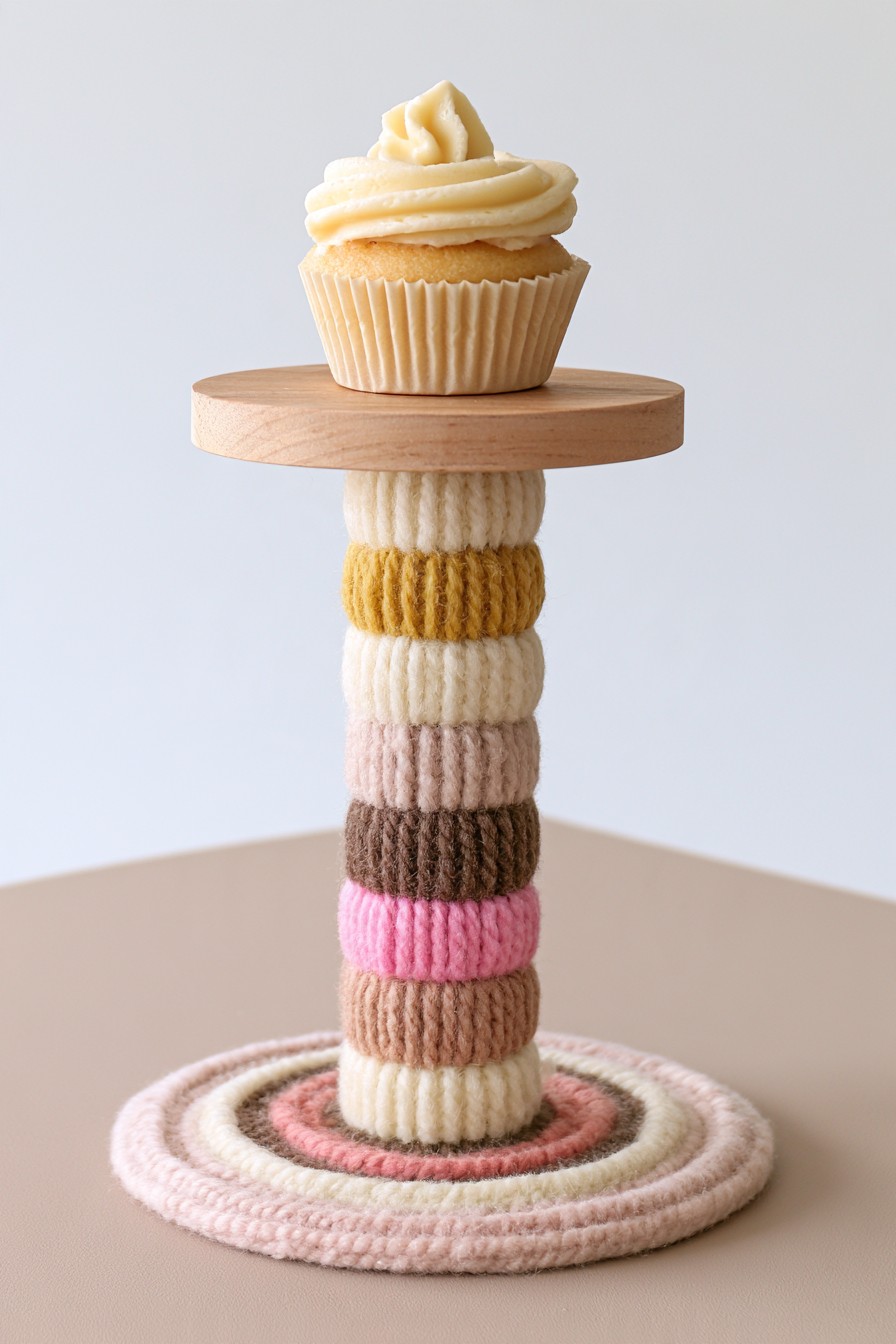
The ribbed column, short color bands and coiled base give one cupcake a textured setting. Cream, mustard, brown and pink relate to a bohemian table palette while the plain timber top keeps the cake visible. This is a focal pedestal for a selected treat, rather than a stand for a large batch.
Prepare a sound rigid base, column and platform first. To recreate the ribbed texture, add a removable knitted sleeve, a crocheted cover, or neatly wrapped bands around the rigid column. Measure the column before preparing a cover and keep its top clear of loose fibers. Add a separate food serving disk beneath the cake. Plan how the cover can be removed or cleaned, and place the pedestal beside the main dessert tray where it remains easy to reach.
23. Pastel Textured Yarn Cupcake Pedestal
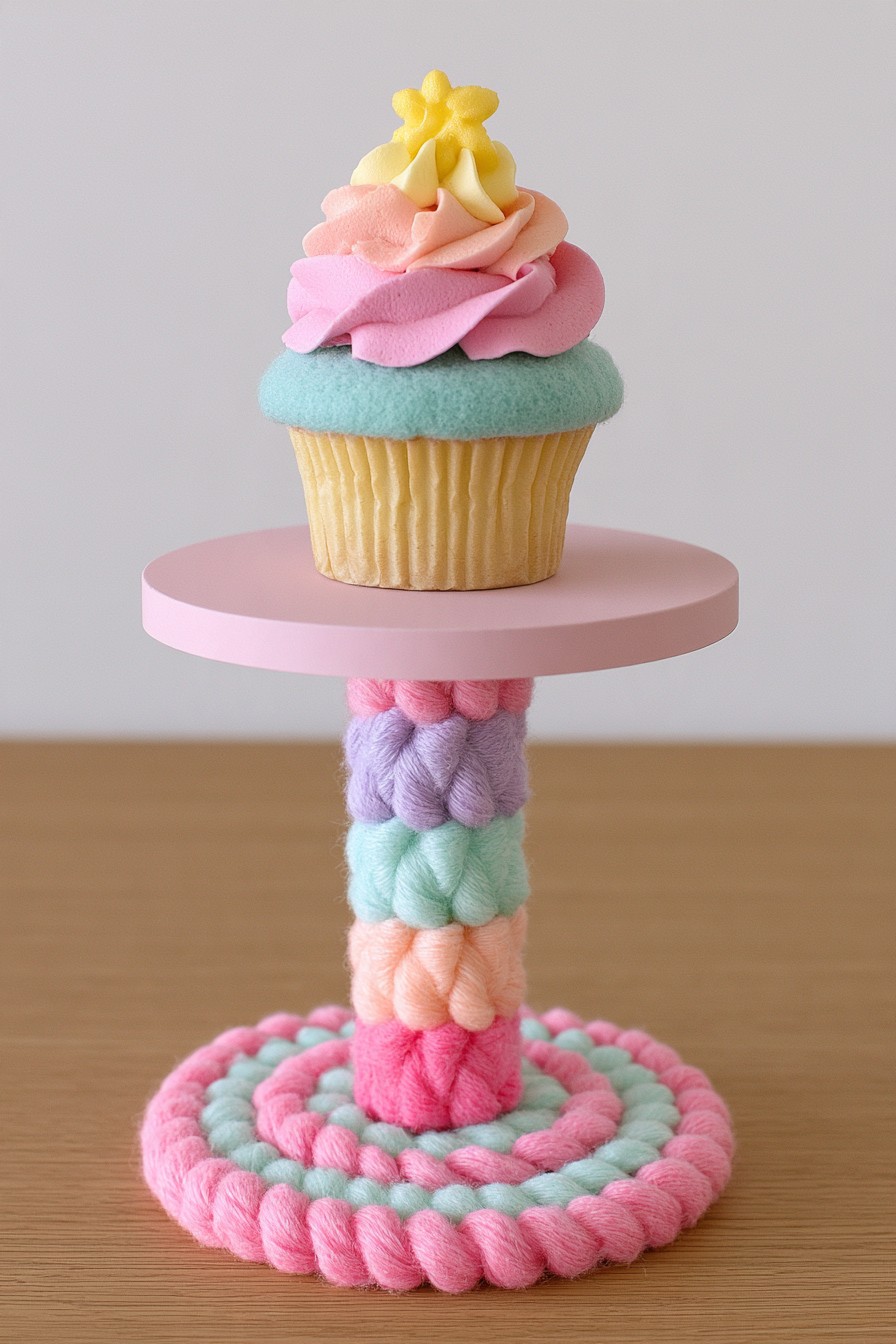
Chunky pastel loops give this pedestal more volume than a simple thin yarn wrapping. Pink, lavender, mint and peach continue into the textured base, while the smooth pink platform frames a single flower topped cupcake. It suits a small featured dessert or a color accent beside a larger serving arrangement.
Choose a rigid carrying body and plan its balance before adding textile ornament. Separately prepared braided bands or looped motifs can suggest the pictured texture without assuming an unseen stitch pattern. Keep their attachment below the serving area and avoid covering connections that need access. A removable food serving disk protects the decorative top from direct cake or frosting contact. Allow enough clear space to lift the cupcake without pulling on the loops, and choose textile care compatible with the adhesive or removable fastening you use.
24. Rainbow Yarn Pedestals at Different Heights
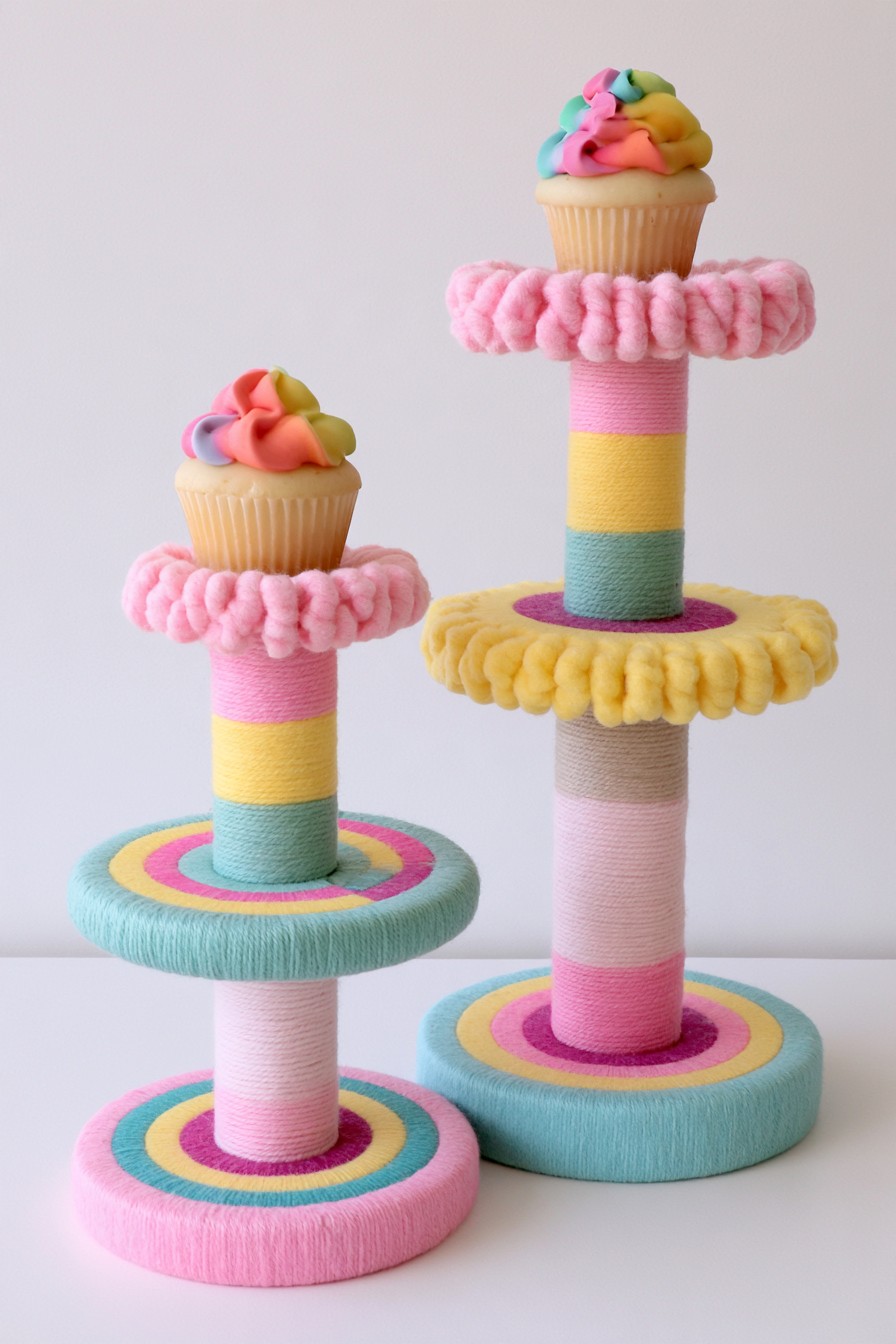
Two pedestals at different heights turn a pair of cupcakes into focal points. Repeated pink, yellow and turquoise bands connect the columns, while large looped rims and concentric base colors add a playful rhythm. The intermediate platforms are part of the sculptural outline rather than an invitation to crowd every level with extra cakes.
Build or select suitable rigid bodies for the full height of each piece before adding wrapping and looped trim. Assess each pedestal individually; matching colors do not guarantee matching stability. Keep the cupcake positions on separate food serving disks, with loose textile away from frosting. Space the pair so guests can reach either top without moving the other stand. This arrangement can frame the main dessert selection or highlight two special flavors, leaving the larger batch on an accessible shared tray.
Serving, Cleanup and Reuse
Place the completed stand before filling it and keep a clear route for plates, napkins and replenishment. Desserts with fillings or frosting that require refrigeration should remain properly chilled until serving and be brought out in manageable batches; a decorative stand does not provide cold storage. Remove decorative toppers before eating, and keep food and decorative flower pieces distinct.
After serving, remove the food inserts and clean them according to their material instructions. Wipe or clean the decorative body only as its finishes and construction permit. Dry parts before storage, keep textiles from staying damp and inspect supports, fittings and glued joints before the next event. Saving the assembly information with the stand makes future setup easier without treating a successful previous display as a permanent guarantee of condition.

Leave a Reply