
A vertical garden can grow leafy plants, frame a climbing vine, or simply display flowers above the furniture. These 31 indoor wall ideas explain those differences and help you choose a manageable layout. Explore plant suggestions, decorative alternatives, and practical care details before deciding how much wall space to use.
Table of Contents
- Choose Your Wall Display and Growing Conditions
- Read the light before choosing plants
- Compare the five main systems
- Use two containers for ordinary potted plants
- Plan pot sizes and a realistic care routine
- Make humidity measurable
- Separate living, preserved, and artificial moss
- 31 Plant Wall and Flower Display Ideas
- 1. Modular Black Wall Planters With Contrasting Foliage
- What you see
- Why it works
- How to recreate it
- You will need
- 2. Wooden Pocket Planters With Fine Trailing Edges
- What you see
- Why it works
- How to recreate it
- You will need
- 3. Repeated Planter Grid With Cascading Columns
- What you see
- Why it works
- How to recreate it
- You will need
- 4. Woven Basket Holders for a Textured Plant Wall
- What you see
- Why it works
- How to recreate it
- You will need
- 5. Staggered Corner Shelves for Seasonal Flower Displays
- What you see
- Why it works
- How to recreate it
- You will need
- 6. Sculptural Corner Shelves With Fresh and Dried Stems
- What you see
- Why it works
- How to recreate it
- You will need
- 7. Curved Shelf With Yarn Covered Vases and Craft Flowers
- What you see
- Why it works
- How to recreate it
- You will need
- 8. Rustic Corner Shelves With Airy Flower Arrangements
- What you see
- Why it works
- How to recreate it
- You will need
- 9. Slatted Wood Shelves With Pots and Flower Vases
- What you see
- Why it works
- How to recreate it
- You will need
- 10. Honeycomb Planters With a Central Trailing Vine
- What you see
- Why it works
- How to recreate it
- You will need
- 11. Arched Timber Panels With a Reachable Lower Planter
- What you see
- Why it works
- How to recreate it
- You will need
- 12. Diamond Lattice for Guided Climbing Stems
- What you see
- Why it works
- How to recreate it
- You will need
- 13. Mixed Timber and Grid Wall With a Lower Planting Trough
- What you see
- Why it works
- How to recreate it
- You will need
- 14. Arched Trellises With Vines Along Their Edges
- What you see
- Why it works
- How to recreate it
- You will need
- 15. Tall Narrow Trellises for Leafy Vertical Columns
- What you see
- Why it works
- How to recreate it
- You will need
- 16. Framed Green Panel That Contains the Plant Collection
- What you see
- Why it works
- How to recreate it
- You will need
- 17. Sculpted Green Niches With Recessed Planting
- What you see
- Why it works
- How to recreate it
- You will need
- 18. Terracotta and Blush Pots Against a Green Backdrop
- What you see
- Why it works
- How to recreate it
- You will need
- 19. Pastel Backplates That Organize a Green Feature Wall
- What you see
- Why it works
- How to recreate it
- You will need
- 20. Layered Cork Textures With Small Planting Niches
- What you see
- Why it works
- How to recreate it
- You will need
- 21. Woven Panel With Color Blocked Plant Zones
- What you see
- Why it works
- How to recreate it
- You will need
- 22. Pegboard Shelves That Move as Plants Grow
- What you see
- Why it works
- How to recreate it
- You will need
- 23. Hanging Rail Pots With Adjustable Spacing
- What you see
- Why it works
- How to recreate it
- You will need
- 24. Framed Burlap Display With Dark Basket Holders
- What you see
- Why it works
- How to recreate it
- You will need
- 25. Branch Framework With Moss Wrapped Plant Holders
- What you see
- Why it works
- How to recreate it
- You will need
- 26. Wire Mesh Panel for a Changing Plant Collection
- What you see
- Why it works
- How to recreate it
- You will need
- 27. Open Box Shelves That Frame Each Plant
- What you see
- Why it works
- How to recreate it
- You will need
- 28. Tension Cable Grid for Trained Climbing Greenery
- What you see
- Why it works
- How to recreate it
- You will need
- 29. Fabric Pocket Grid for Compact Removable Pots
- What you see
- Why it works
- How to recreate it
- You will need
- 30. Ceramic Tube Holders With a Plan for Root Growth
- What you see
- Why it works
- How to recreate it
- You will need
- 31. Separate Felt Pockets for an Editable Plant Group
- What you see
- Why it works
- How to recreate it
- You will need
- Keep the Collection Easy to Maintain
- Before You Install
Choose Your Wall Display and Growing Conditions
The collection includes living plant arrangements, climbing supports, and flower display alternatives. Ideas 5 through 8 use cut, dried, or handmade flowers; they provide floral decoration without growing plants on the wall. Idea 9 combines pots and vases. The named plants in each idea are suggestions for recreating the arrangement, not confirmed species identifications.
Read the light before choosing plants
Check the wall in the morning, at midday, and later in the afternoon, with accent lighting switched off. Record the hours when sunlight actually reaches each planting position. Upper and lower holders can receive different amounts of light.
- Direct sun: A beam falls onto the leaves. Its duration and intensity matter; gentle morning exposure differs from hot afternoon sun.
- Bright indirect light: Abundant daylight reaches the plant without a strong direct beam on its leaves. This suits many of the suggested foliage plants.
- Low light: Daylight is limited for much of the day. Tolerant plants grow more slowly, and a flower or craft display may be a better choice for very dim positions.
For a setup relying on growing lights, a useful general starting point is 12 to 14 total light hours daily for foliage houseplants and 14 to 16 for many flowering houseplants. This is a lighting schedule, not a demand for that many hours of direct sun. Light intensity, distance, coverage, species, and seasonal daylight still determine the result. Use the light manufacturer's settings for the chosen crop or plant. Decorative panel lights serve a different purpose.
Compare the five main systems
| System | Best use | Care access | What the setup involves |
|---|---|---|---|
| Shelves and open boxes | A corner or a modest plant collection | Individual pots and vases lift out. | Existing shelves or a new shelf arrangement, sized around the containers. |
| Removable wall pots | A narrow wall with distinct plant positions | Each pot needs an unobstructed removal route. | Matched holders and separately maintained growing pots. |
| Trellises and cable frames | A climbing vine with room to develop | Root pots remain accessible; stems need tie checks and shaping. | A plant support and a plan for the direction of growth. |
| Green backed panels | A defined decorative feature | The pot collection and backing have separate care routines. | A framed or sculpted panel with a clearly identified covering. |
| Felt and fabric pockets | Compact plants or a growing beginner collection | The entire pot insert must slide out. | Decorative outer pockets, or a specialist direct planting system with its own instructions. |
Use two containers for ordinary potted plants
A nursery pot with drainage holes holds the roots and potting mix. A watertight outer pot, also called a cachepot, catches drainage and fits the decorative holder. Water removable pots away from the display, let them drain, and empty the outer container before replacing them. Keep roots above standing water. Trained vines need a reachable root pot and a way to remove collected runoff without pulling stems from their ties.
Plan pot sizes and a realistic care routine
Pot diameters below are examples for young or modest sized plants, measured across the top in inches. Keep an established plant in the size its root system needs; the decorative opening is not a reason to squeeze it into a smaller pot. Measure pot height, rim width, and removal clearance as well.
| Plant | Useful role | Example pot diameter | Watering and checks |
|---|---|---|---|
| Golden pothos, Epipremnum aureum | Broad trails or trained climbing stems | 4 to 6 inches for a young plant | A 7 to 14 day watering interval can be a rough planning reference; water when the upper mix has dried, and check sooner in small warm pots. |
| Heartleaf philodendron, Philodendron hederaceum | Leafy lattice routes and narrow columns | 4 to 6 inches initially | Check every 2 to 3 days while learning the position; water after the upper mix dries. |
| Ripple peperomia, Peperomia caperata | Compact, textured rosettes | 3 to 4 inches for a small specimen | Inspect twice weekly initially; allow the upper mix to dry before watering. Keep the check shallow enough for the actual small pot. |
| String of turtles, Peperomia prostrata | Fine trailing edges | 3 to 4 inches for a small plant | Review moisture twice weekly at first and follow the plant supplier's drying guidance. |
| Boston fern, Nephrolepis exaltata 'Bostoniensis' | Arching fronds in a wider holder | 6 to 8 inches for a modest specimen; larger ferns need more | Check at least 2 or 3 times weekly, and daily if the pot dries quickly. Water when the surface becomes slightly dry. |
| Spider plant, Chlorophytum comosum | Arching leaves and hanging offsets | 4 to 6 inches for a young plant | Inspect every 2 to 3 days initially and allow some drying between waterings. |
| African violet, Streptocarpus ionanthus hybrids (formerly Saintpaulia) | Compact living flower accents | About 3 to 4 inches for many standard plants; miniatures differ | Check every 2 days at first and water when the surface feels dry, before the plant wilts. |
Check frequency and watering frequency are different. The inspection intervals are suggested monitoring routines, not claims that a plant needs water on those days. Record actual watering dates for 2 weeks. If a pot is still moist at its expected watering date, wait and check again. Small containers, warmth, brighter light, and active growth can shorten the interval; cool dim conditions can lengthen it.
Make humidity measurable
For a Boston fern, use 40 to 50 percent relative humidity as a practical indoor starting range and measure it near the fronds with a hygrometer. A humidifier provides more controllable adjustment than occasional misting. A pebble tray below an accessible pot can add local evaporation: keep the pot base above the water and check whether the reading near the plant improves. Its effect is local, so it may be insufficient for a high wall position.
Many common foliage houseplants also grow well around 40 to 50 percent humidity; common hoyas often benefit from 40 to 60 percent. Individual species can need different conditions. These figures guide plant placement, not an instruction to create damp wall surfaces.
Separate living, preserved, and artificial moss
Living moss: Confirm the species and use a purpose designed growing assembly with uniform irrigation, drainage, light, and air movement. There is no reliable universal humidity target for a decorative indoor moss wall. Controlled research tested several species at 60 to 100 percent humidity, yet survival remained limited; those numbers are experimental conditions, not recommended home settings. Request a species specific humidity range and irrigation cycle from the grower, measure near the moss, and use the specified watering system. A humidifier alone cannot replace substrate moisture management.
Preserved moss: This is nonliving decorative material. Keep it unwatered and unmisted. Some products specify approximately 40 to 60 percent indoor humidity, but the particular supplier's range controls. Artificial moss: It needs no growing conditions; use its stated cleaning method. For an ordinary home feature, a decorative backing with separately potted live plants keeps the two care tasks easier to manage.
Choose one system around your maintenance habits before ordering a full panel. Custom supports, larger frames, growing lights, and automated irrigation increase the project's scope; the simplest display that meets your design goal often leaves more time for plant care.
31 Plant Wall and Flower Display Ideas
Each arrangement below explains its appearance, its design purpose, a way to adapt it, and the materials to gather. Flower suggestions refer to cut, dried, or crafted stems where the idea is a display. Plant suggestions refer to rooted specimens with their own containers and care.
1. Modular Black Wall Planters With Contrasting Foliage
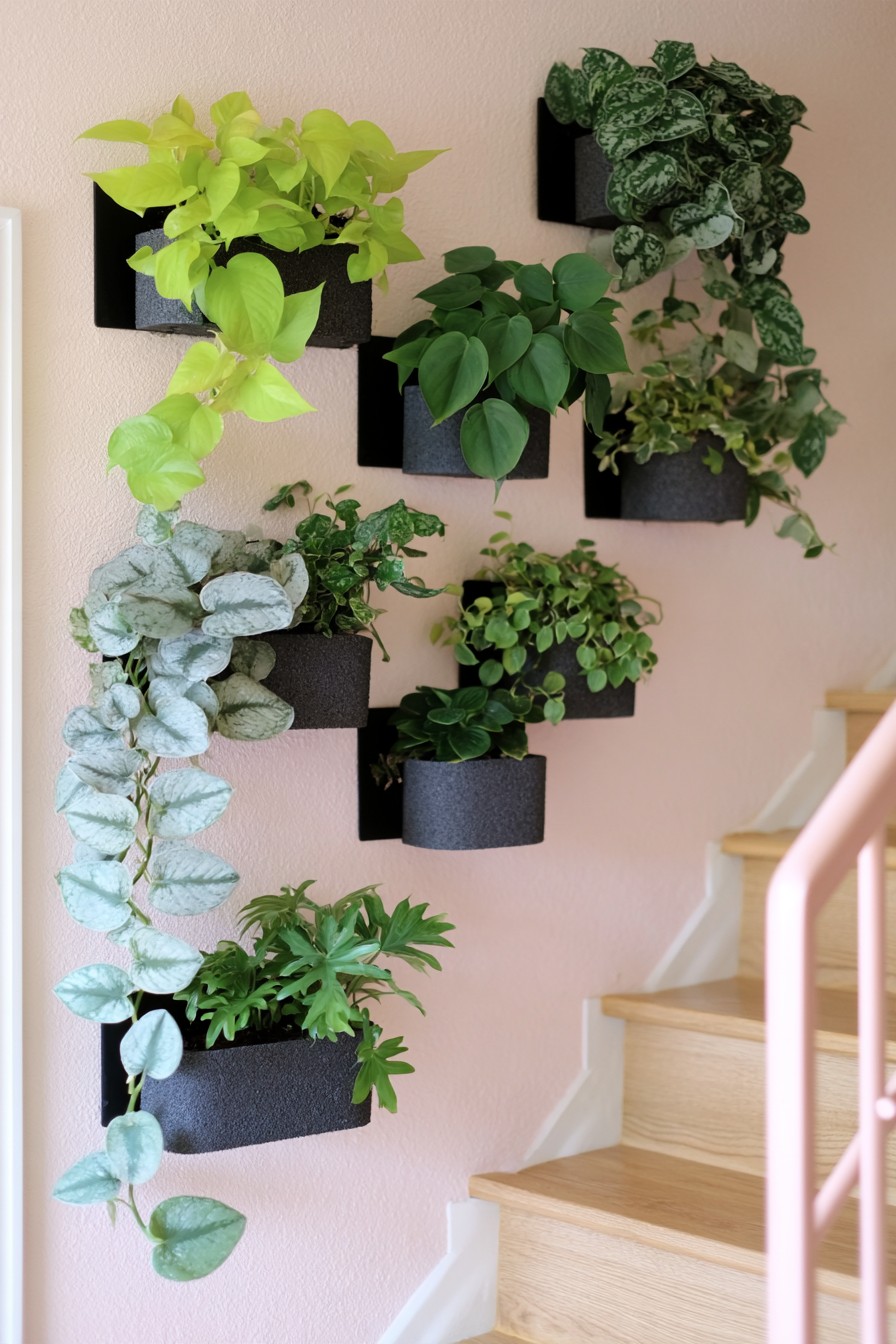
What you see
Staggered black containers combine lime leaves, deep green rosettes, and silvery patterns in a compact wall grouping. Some foliage stays close to its holder while other stems spill beyond the rim.
Why it works
The contrast comes from both color and leaf texture. Keeping the containers consistent lets a crinkled leaf, smooth trailing stem, or pale marking supply the variation, making this useful beside a plain wall finish.
How to recreate it
Arrange golden pothos near a dark green ripple peperomia, then add a silver marked Scindapsus pictus where its light requirements can be met. Make a paper outline of each mature canopy before setting the spacing. Position the brightest leaves beside darker neighbors instead of collecting all light foliage at one end. Check each pot separately: textured peperomia and vigorous pothos can dry at different rates.
You will need
Matching black holders, individual growing pots sized to their root balls, removable outer pots, paper canopy templates, and a tape measure. Young plants in approximately 4 inch pots provide a useful layout example; larger specimens need their existing pot size and extra leaf clearance.
2. Wooden Pocket Planters With Fine Trailing Edges
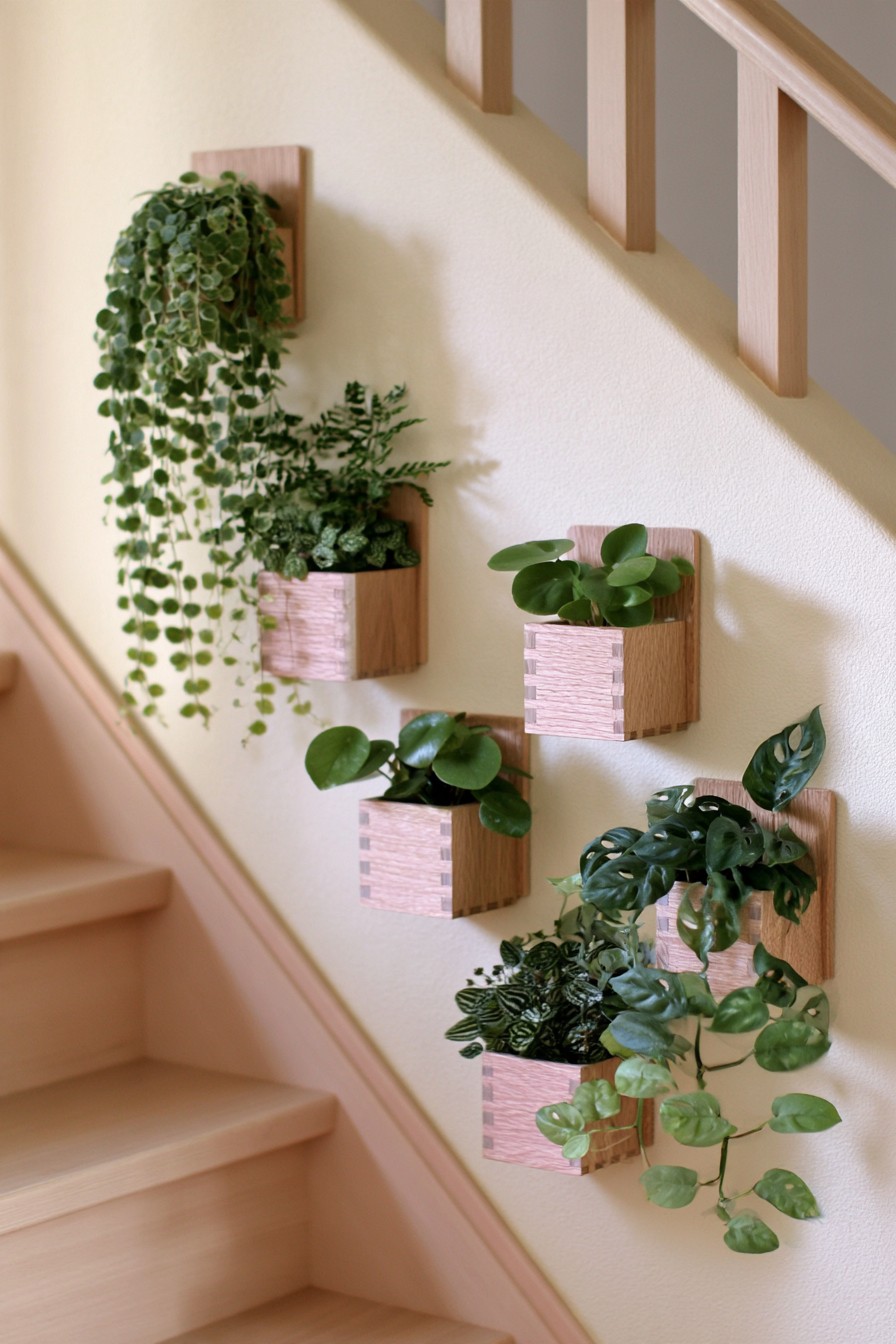
What you see
Small wooden pockets with pink fronts hold rounded foliage and fine trailing stems. Exposed timber between the plants gives the wall a light, handmade appearance.
Why it works
Delicate foliage makes the pocket outlines readable. This works especially well when a dense vine wall would overwhelm a narrow strip of wall or compete with nearby patterned furnishings.
How to recreate it
Pair string of turtles, Peperomia prostrata, with a small ripple peperomia in bright indirect light. Place the trailer at an outside edge and the rosette nearer the center. Lift the actual inner pot through the opening before committing to the pocket size; allow for the foliage as well as the container. Turn a removable rosette pot occasionally if growth becomes strongly one sided.
You will need
Wooden outer holders, pink paint or finished fronts, small nursery containers, matching cachepots, and a ruler for checking the opening. A 3 or 4 inch pot can suit a young compact specimen, provided its roots already fit that size.
3. Repeated Planter Grid With Cascading Columns
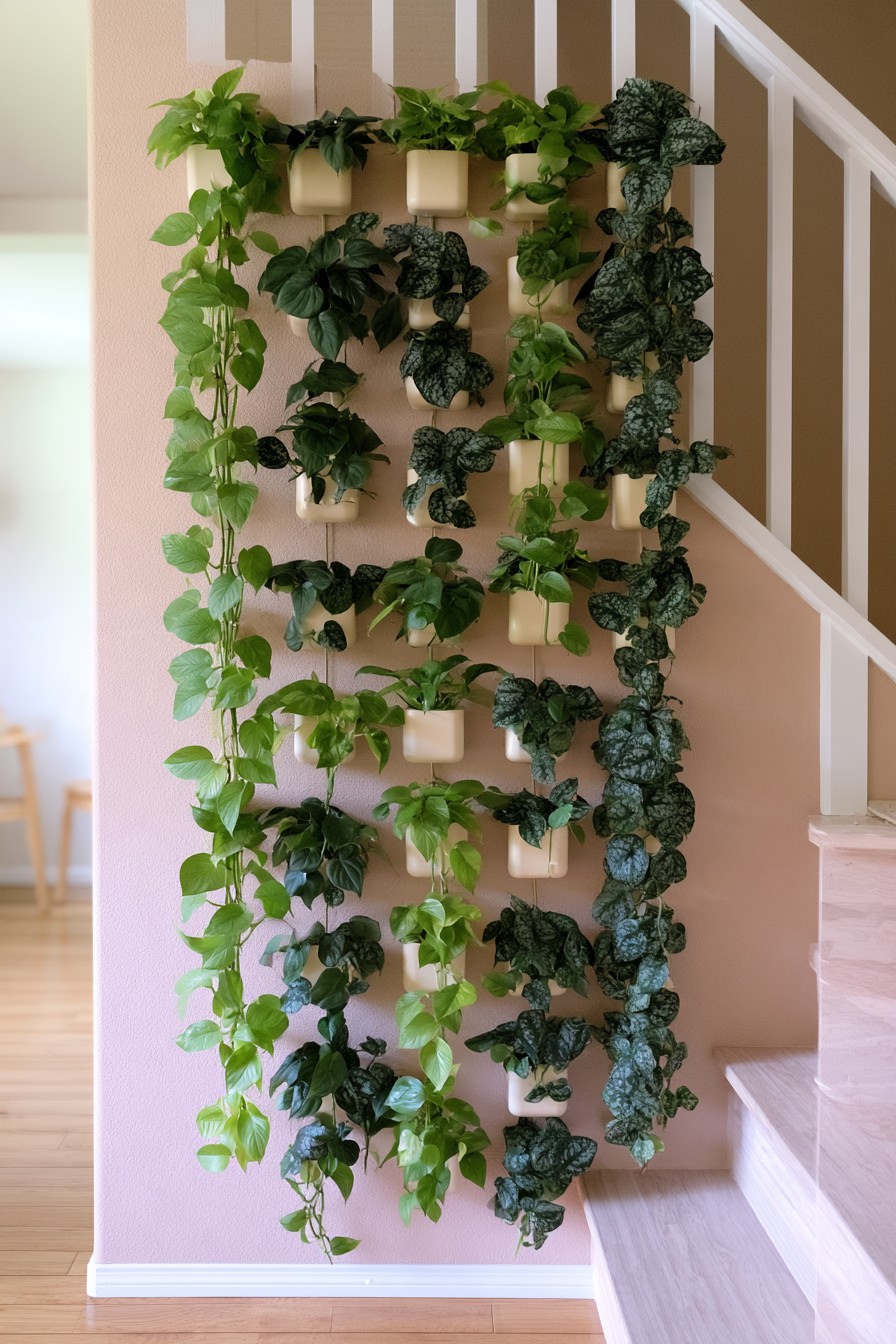
What you see
Rows of cream pots form long curtains of lime, deep green, and pale patterned foliage. The containers become less prominent as the stems overlap vertically.
Why it works
Repeating a leaf tone down each column gives a dense collection a readable rhythm. The downward growth supplies the structure, so this approach can create height without training every vine onto a support.
How to recreate it
Use rooted pothos cultivars for broad cascades and Scindapsus pictus for a silvery column in bright indirect light. Set the upper pots slightly to one side of the ones below so leaves leave an inspection gap. Trim selected pothos stems just above a node when they hide a lower container, then redirect neighboring trails into the open space. Rotate accessible pots to prevent one column leaning heavily toward the light.
You will need
Repeated light colored holders, correctly sized inner pots, clean pruning scissors, plant labels, and a plan marking each column's leaf tone. Begin with established 4 to 6 inch pots if those match the plants' root systems; dense coverage develops through growth.
4. Woven Basket Holders for a Textured Plant Wall
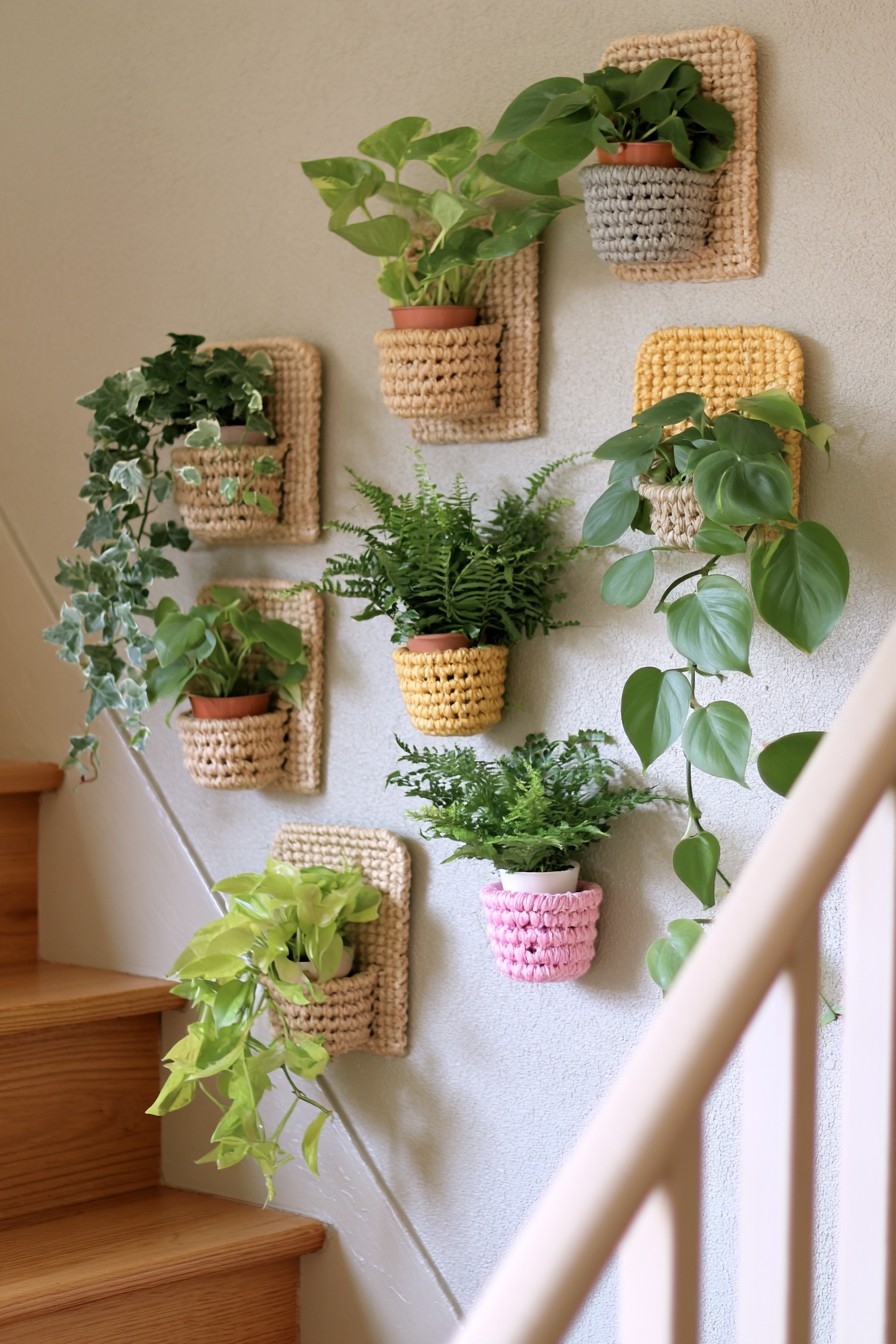
What you see
Chunky woven holders mix natural colors with small pink, yellow, and gray accents. Fine fronds and trailing leaves soften their rounded outlines.
Why it works
The fibers add interest before a plant becomes large. A coordinated weave can connect the display to linen, rugs, and other soft furnishings while the foliage provides movement.
How to recreate it
Choose ripple peperomia for a compact center and a small Boston fern cultivar for a wider holder with room for fronds. Use the fern humidity guidance in the care section and keep its checks separate from the peperomia. Test the pot removal movement while the plant is still on a table. For additional shapes made from household objects, explore our unusual hanging planter ideas and compare their inner container arrangements.
You will need
Woven outer baskets, fitted cachepots, separate draining plant pots, a measuring tape, and the selected plants. Fibers form the decorative surround; the inner growing containers provide the root space.
5. Staggered Corner Shelves for Seasonal Flower Displays
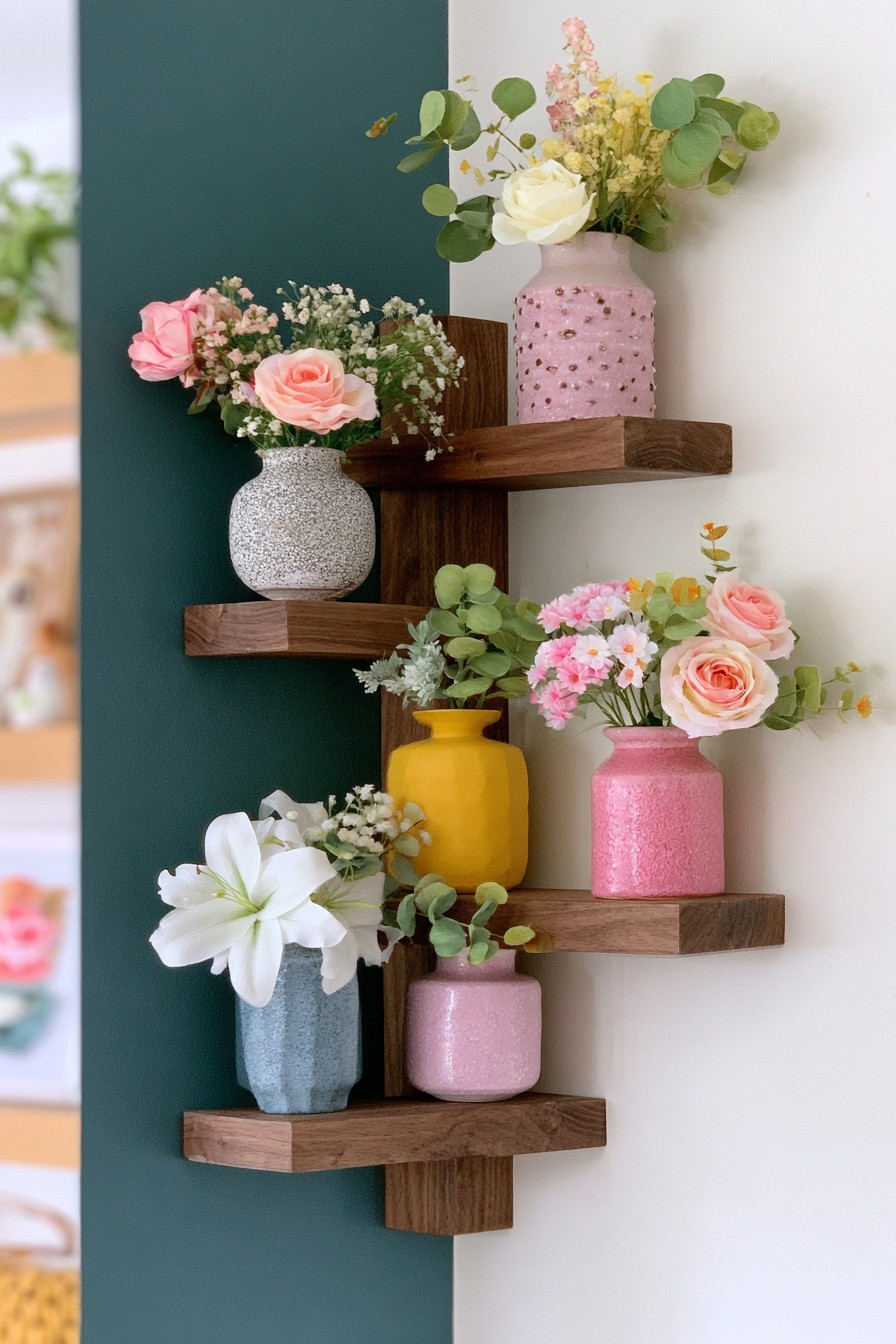
What you see
Dark staggered corner shelves carry colorful vases with pale, pink, and yellow bouquets. Each shelf holds a separate flower arrangement.
Why it works
A permanent shelf arrangement can change character with the season. This offers fresh color without committing the corner to a collection of rooted plants or a permanent growing light setup.
How to recreate it
In spring, choose cut tulips and narcissus in separate vases; in summer, use zinnias or cosmos; in autumn, try chrysanthemums and asters. These are seasonal alternatives for the display, with local availability determining the final choice. Repeat one vase color across several levels and vary bouquet height within the shelf gaps. Check water levels daily, remove fading stems, and clean vases when refreshing arrangements.
You will need
Corner shelves, narrow watertight vases, seasonal cut stems, clean flower snips, and flower food used according to its label. Measure vase height plus the space needed to lift the bouquet clear of the next shelf.
6. Sculptural Corner Shelves With Fresh and Dried Stems
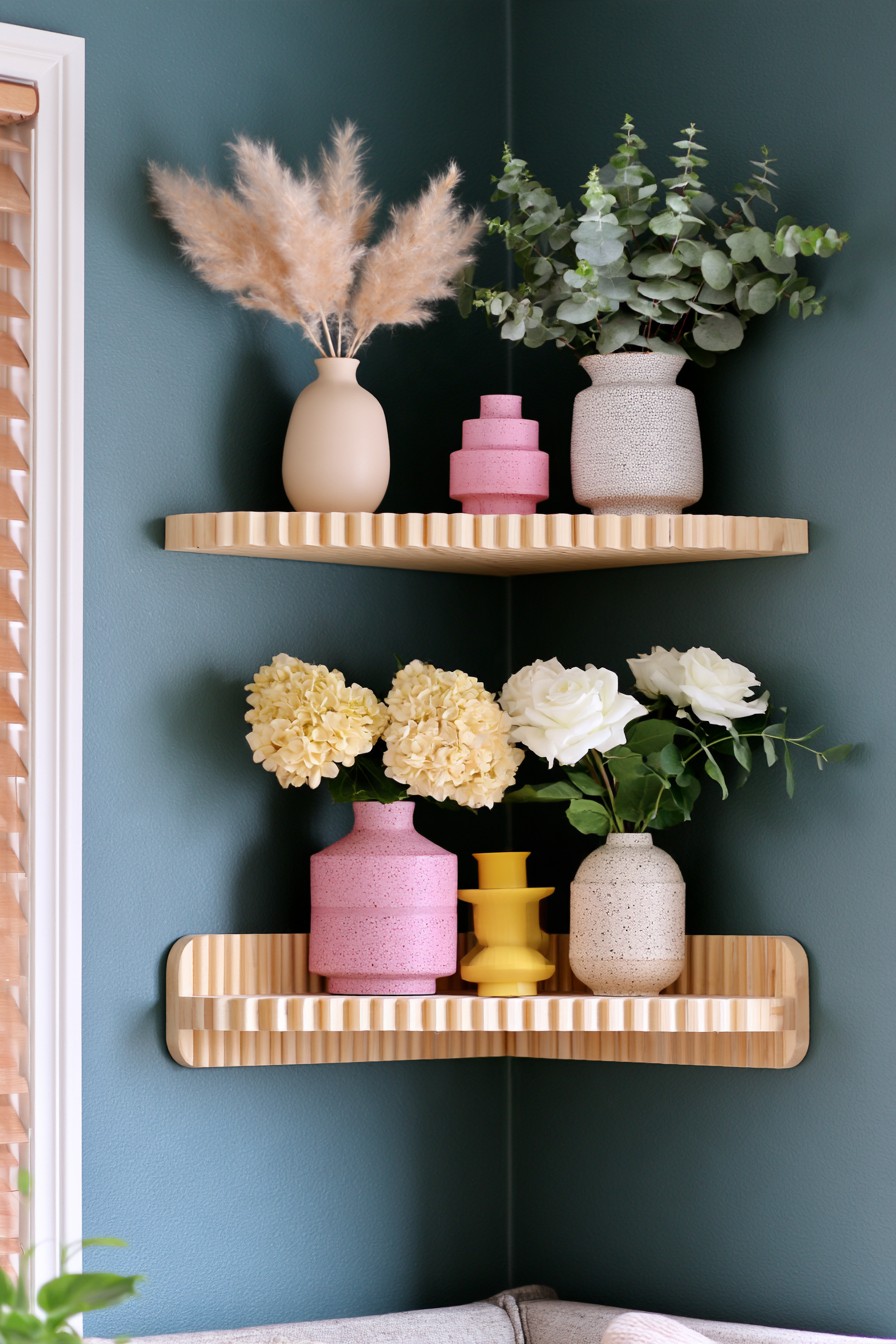
What you see
Two curved, ribbed shelves combine airy grasses and leafy branches above fuller pale flowers. A small pink sculptural accent ties the vessel colors together.
Why it works
Fresh and dried materials contribute different kinds of volume. Soft grasses make the upper grouping feel light, while fuller flowers create a visual base that keeps the corner from looking top heavy.
How to recreate it
Use fresh roses or hydrangeas on the lower shelf and dried lavender, eucalyptus, or pampas in separate dry vessels above. Eucalyptus can also be used fresh, but choose one condition for each vessel. Keep dried stems clear of vase water and trim them to expose some ribbed shelf edge. Check fresh flowers daily; gently dust dry arrangements when needed and replace brittle stems that shed excessively.
You will need
Curved shelves, separate wet and dry vases, fresh flowers, prepared dried stems, snips, and a soft dusting brush. Choose short stems for a small corner so the arrangements remain easy to lift and refresh.
7. Curved Shelf With Yarn Covered Vases and Craft Flowers
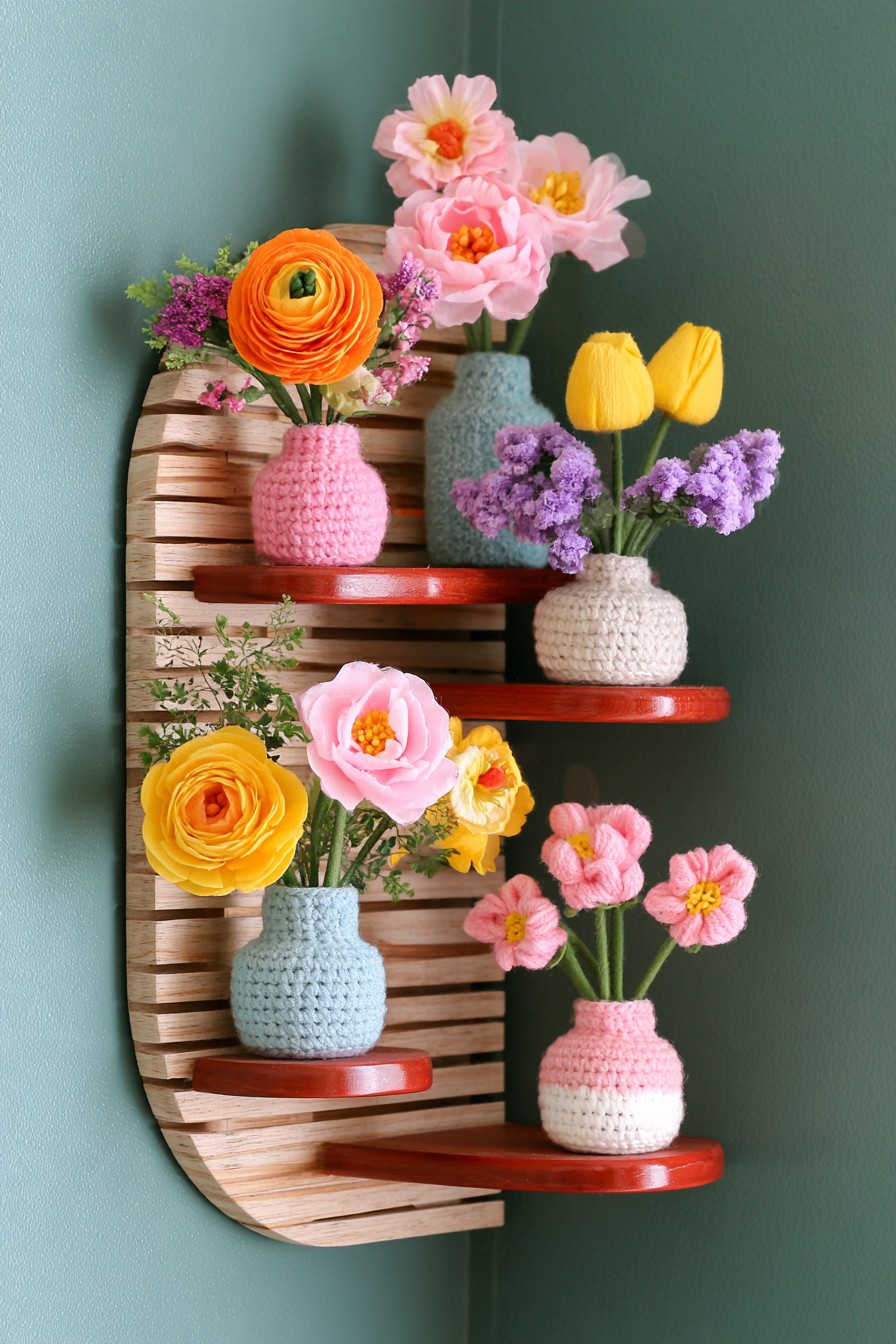
What you see
A curved slatted backing supports small shelves with yarn covered vases and sculpted flowers in pink, orange, yellow, and purple. The effect is deliberately handmade.
Why it works
Craft flowers provide a lasting floral display in a corner where light or regular bouquet replacement would be inconvenient. Soft sleeves repeat the texture of the petals and connect the individual platforms.
How to recreate it
Make or buy recognizable cosmos and tulip shaped craft stems, then vary their heights across the platforms. Add a larger rose inspired bloom as a focal point if the group needs one. Keep the flowers dry and leave the next shelf clear. A removable glass insert allows an occasional fresh bouquet, but it should be cared for separately from the yarn cover. This is a flower display, with no rooted plant watering schedule.
You will need
Dry craft flowers, vase sleeves, stable inner vessels, small shelf platforms, and a soft brush for dust. Use fitted sleeves that slide off for cleaning without pulling the flower arrangement apart.
8. Rustic Corner Shelves With Airy Flower Arrangements
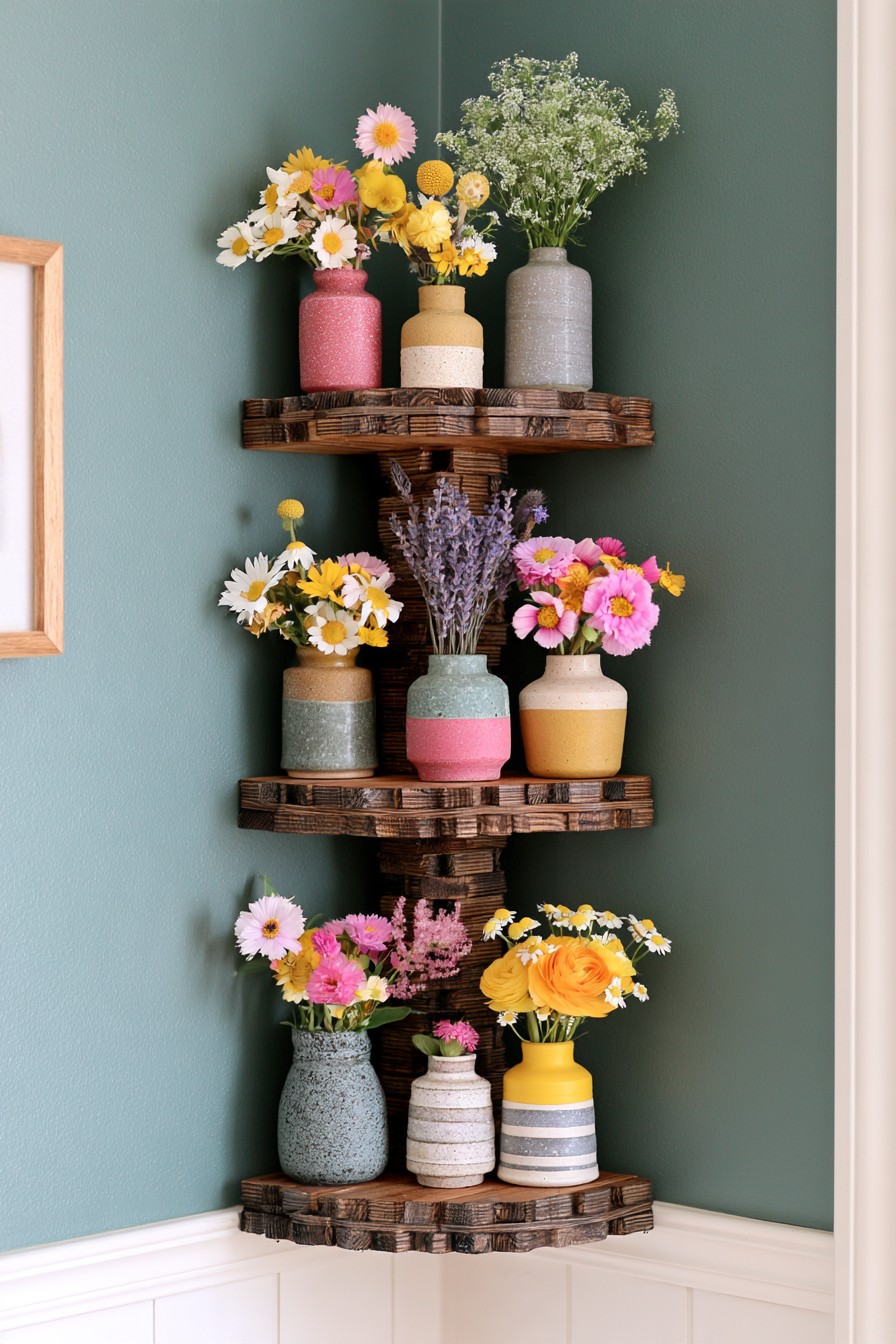
What you see
Rough timber corner shelves hold small vessels and loose, meadow style bouquets. Open spaces between stems expose the irregular shelf edges.
Why it works
Weathered surfaces and simple flower shapes create a relaxed rustic character. The timber becomes part of the decoration, so a few airy stems can be more effective than a tightly packed formal bouquet.
How to recreate it
Pair sound reclaimed wood with clear glass bottles or small ceramic vases. Cut daisies and cosmos give light, open flowers; yarrow can add a finer textured filler. Use commercially sourced stems and check their vase care instructions. Group a taller bottle beside a shorter vessel, then keep some timber visible at the front. Change fresh flower water as needed after daily checks, or substitute dried lavender for a quieter, lasting arrangement.
You will need
Prepared reclaimed timber shelves, narrow glass bottles, a few small vases, cut flowers or dried stems, and flower snips. Select vessels with bases that sit entirely on the shelf.
9. Slatted Wood Shelves With Pots and Flower Vases
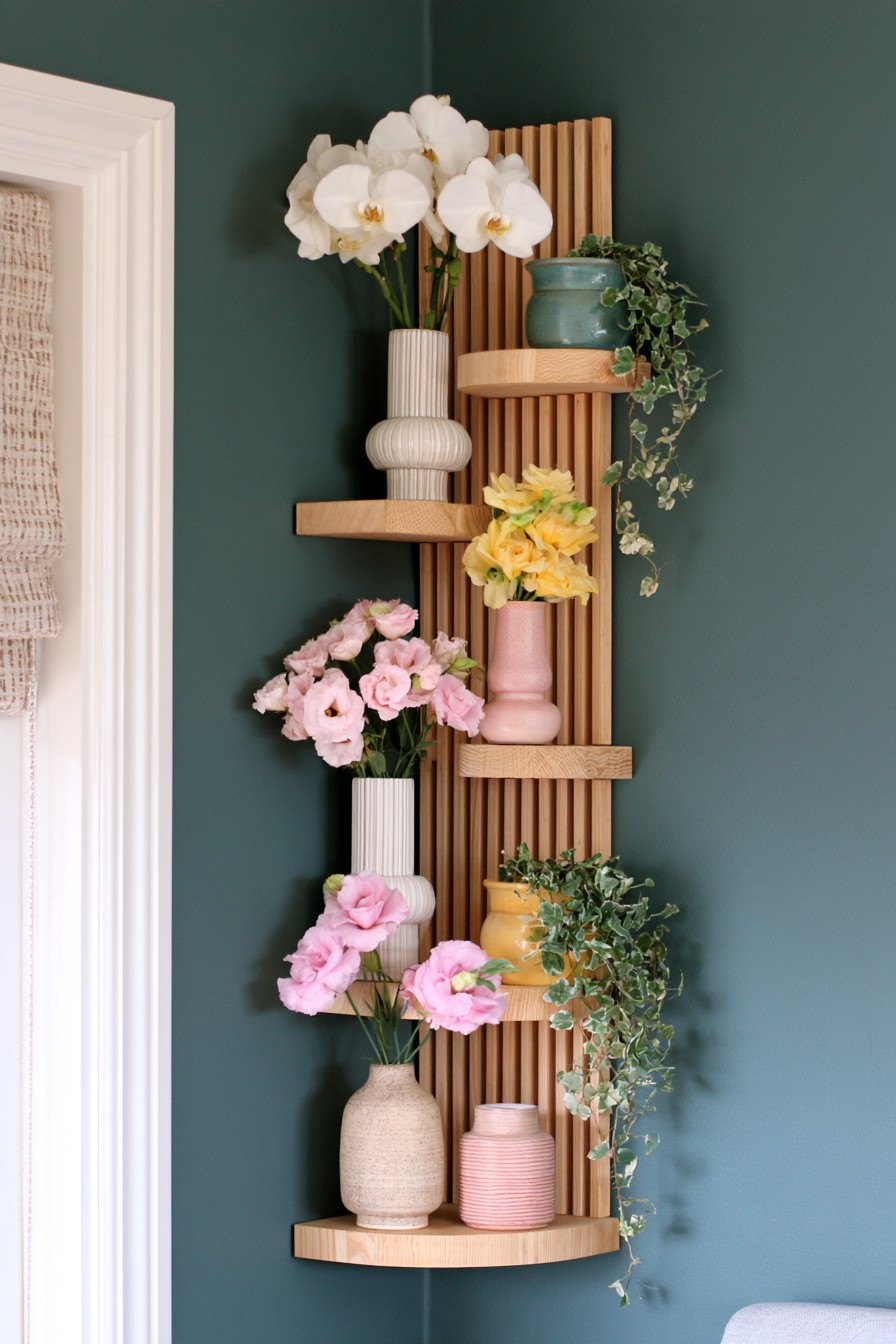
What you see
Slender timber slats support a mixture of tall flower arrangements and small trailing plants near a doorway. Upright stems and hanging foliage share the vertical outline.
Why it works
The combination provides two independent ways to refresh the wall. A living trailer supplies continuity while a vase arrangement can change for an occasion without disturbing the plant.
How to recreate it
Give string of turtles an outer shelf with a clear downward route. For a rooted flowering alternative, use a compact Phalaenopsis orchid in its own orchid pot and appropriate bark mix; cut orchid stems are a separate temporary option. Choose a shelf tall enough for the flower spike to grow freely. Place vases where their water can be changed without moving the trailer, and label the rooted and cut arrangements in your care plan.
You will need
A slatted shelf panel, separate flower vases and plant cachepots, a draining orchid container if selected, bark mix for the orchid, and enough clearance for stems. Use the actual plant's pot diameter to set shelf depth.
10. Honeycomb Planters With a Central Trailing Vine
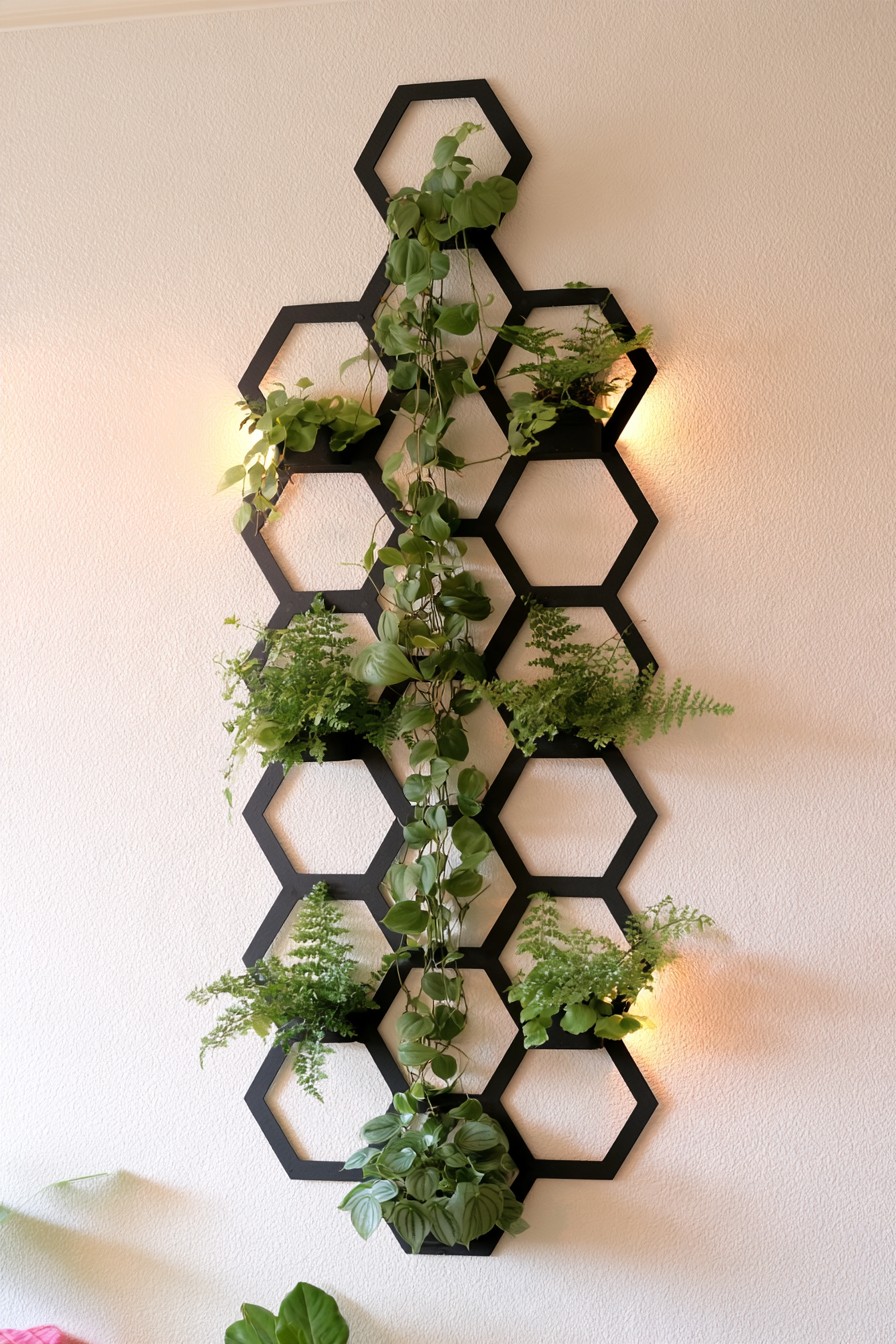
What you see
An open honeycomb frame surrounds a strong central cascade of greenery. Smaller foliage groups occupy some of the side cells while others remain open.
Why it works
The empty hexagons stop the display becoming a solid mass. A central trail draws the eye down through the frame, making this useful above a low console or beside a plain furniture grouping.
How to recreate it
Set golden pothos in an upper position so it trails naturally downward, and use ripple peperomia for a compact side accent. Keep several cells free for future growth. An upward version needs a rooted vine near the bottom and loose ties directing its stems along the frame. Smooth metal provides a route for training; the plant still needs help holding that route. Check integrated accent lights separately from the growing light.
You will need
A honeycomb display frame, compatible pot holders, two or more appropriately sized plant containers, and soft ties for an upward trained adaptation. A 4 inch compact plant and a larger established trailer can create contrasting scales without filling every cell.
11. Arched Timber Panels With a Reachable Lower Planter
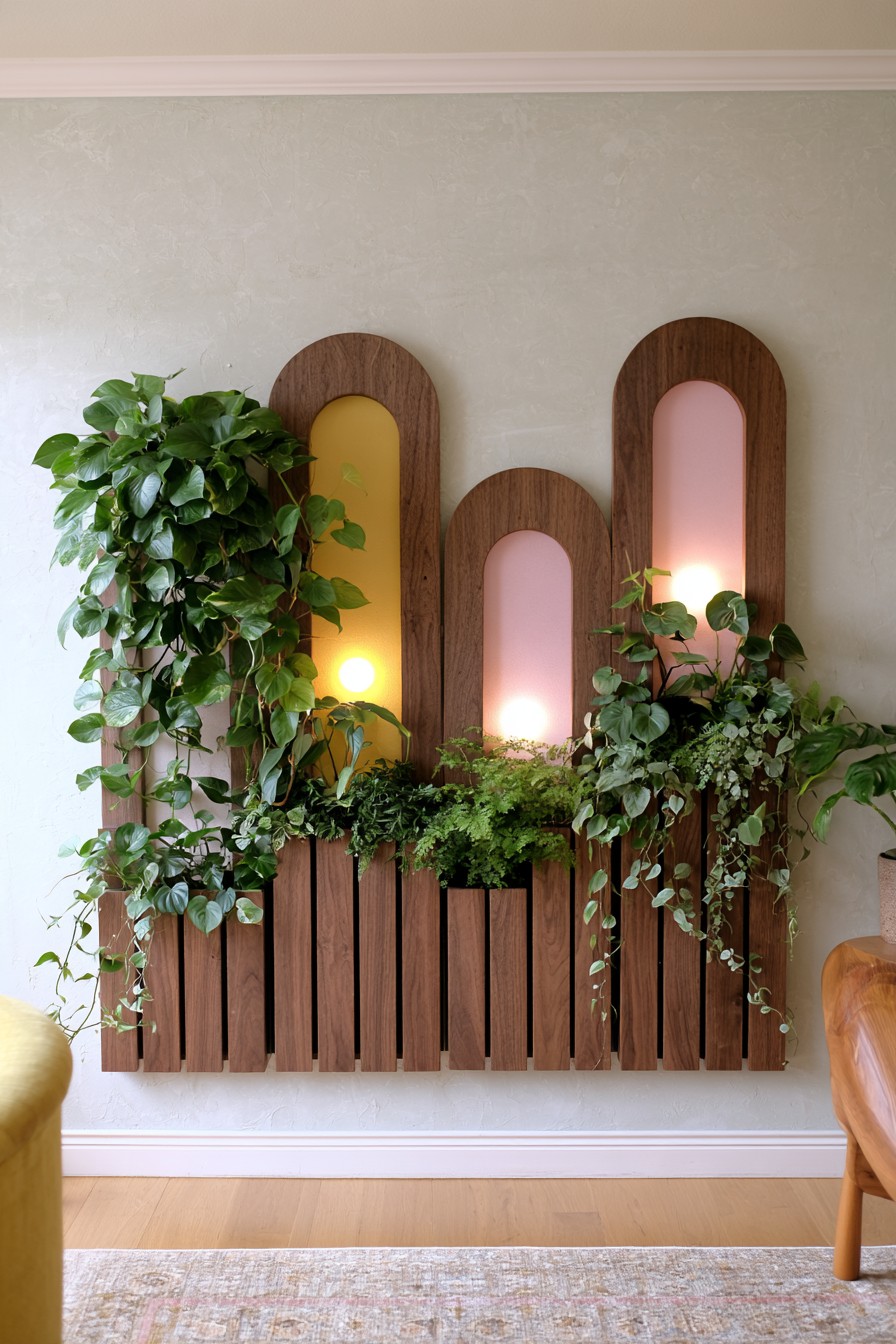
What you see
Rounded timber panels rise above a lower slatted planting area. Pink and yellow centers remain visible behind the leaves, with small lights emphasizing the curved outlines.
Why it works
The plants share the scale of a furniture feature. A lower root zone can support upward foliage while keeping most care at a convenient height, and the colorful centers give the wall structure before the vines mature.
How to recreate it
Keep the plants in separate containers within the lower recess. Consider heartleaf philodendron for a trained vertical line and a compact Boston fern cultivar for an arching lower silhouette. Preserve some visible color around their canopies. Plan the philodendron's route on a separate support so the fern can be removed independently. The decorative glow highlights the panels; add plant lighting only if the measured daylight is inadequate.
You will need
Curved timber backplates, a lower pot recess with removable containers, a vine support, plant ties, and optional independently specified lighting. Measure the fern's expected spread and the space needed to lift each pot out.
12. Diamond Lattice for Guided Climbing Stems
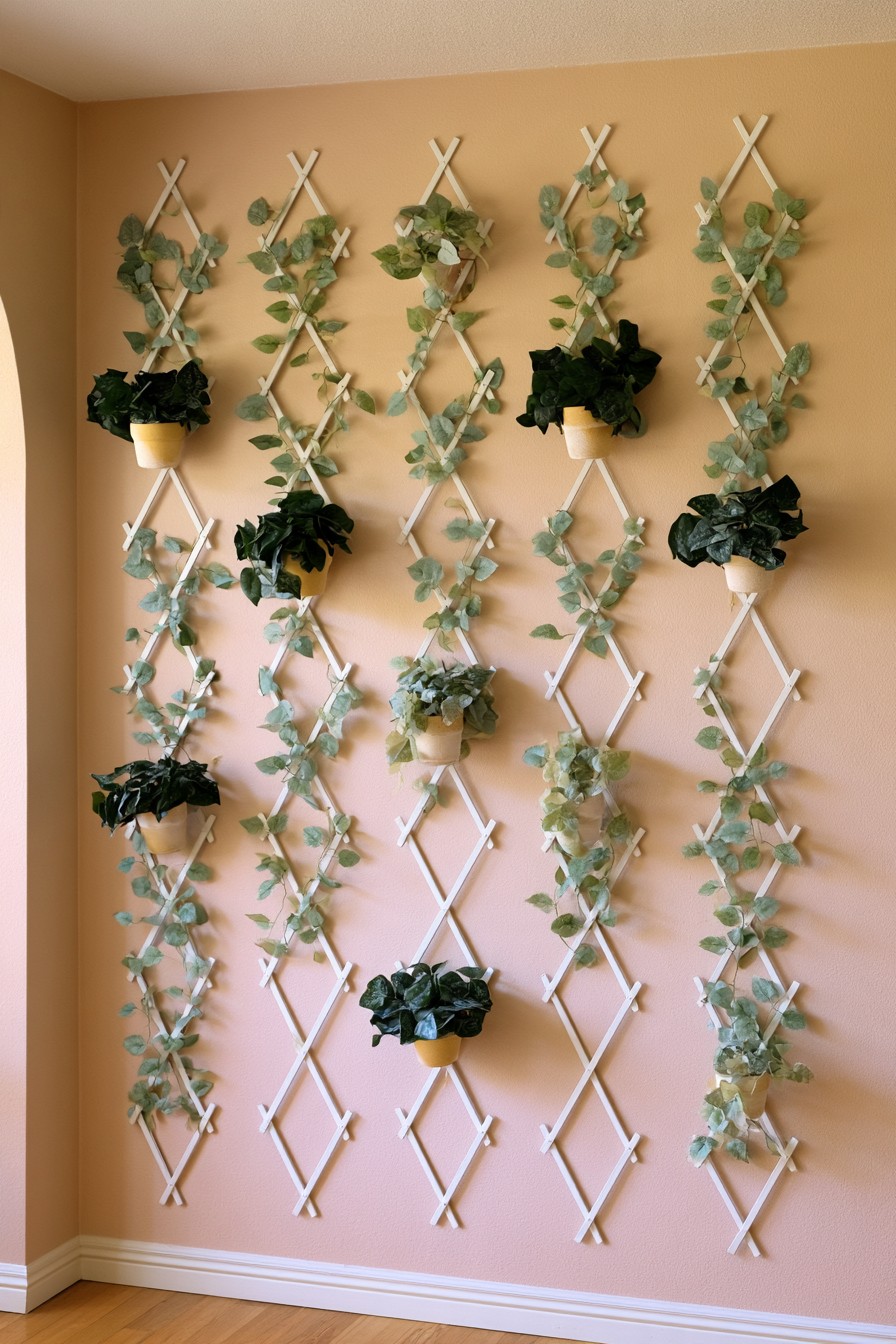
What you see
Pale lattice forms repeated diamonds with leafy stems following selected diagonals. Small pots supply extra foliage without covering the entire pattern.
Why it works
Visible crossings give a climbing vine a clear route. This is particularly useful when you want to control the direction of growth and keep the wall's geometric structure visible.
How to recreate it
Guide heartleaf philodendron or golden pothos from an accessible root pot. Choose flexible young stems, lay them against the intended diagonal, and secure them with soft loops at a few crossings. Leave space inside each loop for thickening and keep leaf stalks free. Inspect ties every 2 weeks during active growth, loosening any that press into a stem. Redirect a shoot while it is flexible instead of forcing a woody section around a sharp bend.
You will need
A lattice panel, a rooted climbing plant, reusable soft ties, clean snips, and a pot that remains reachable for watering. A dry lattice shapes stems; it supplies neither potting mix nor the rooting conditions of a moist moss pole.
13. Mixed Timber and Grid Wall With a Lower Planting Trough
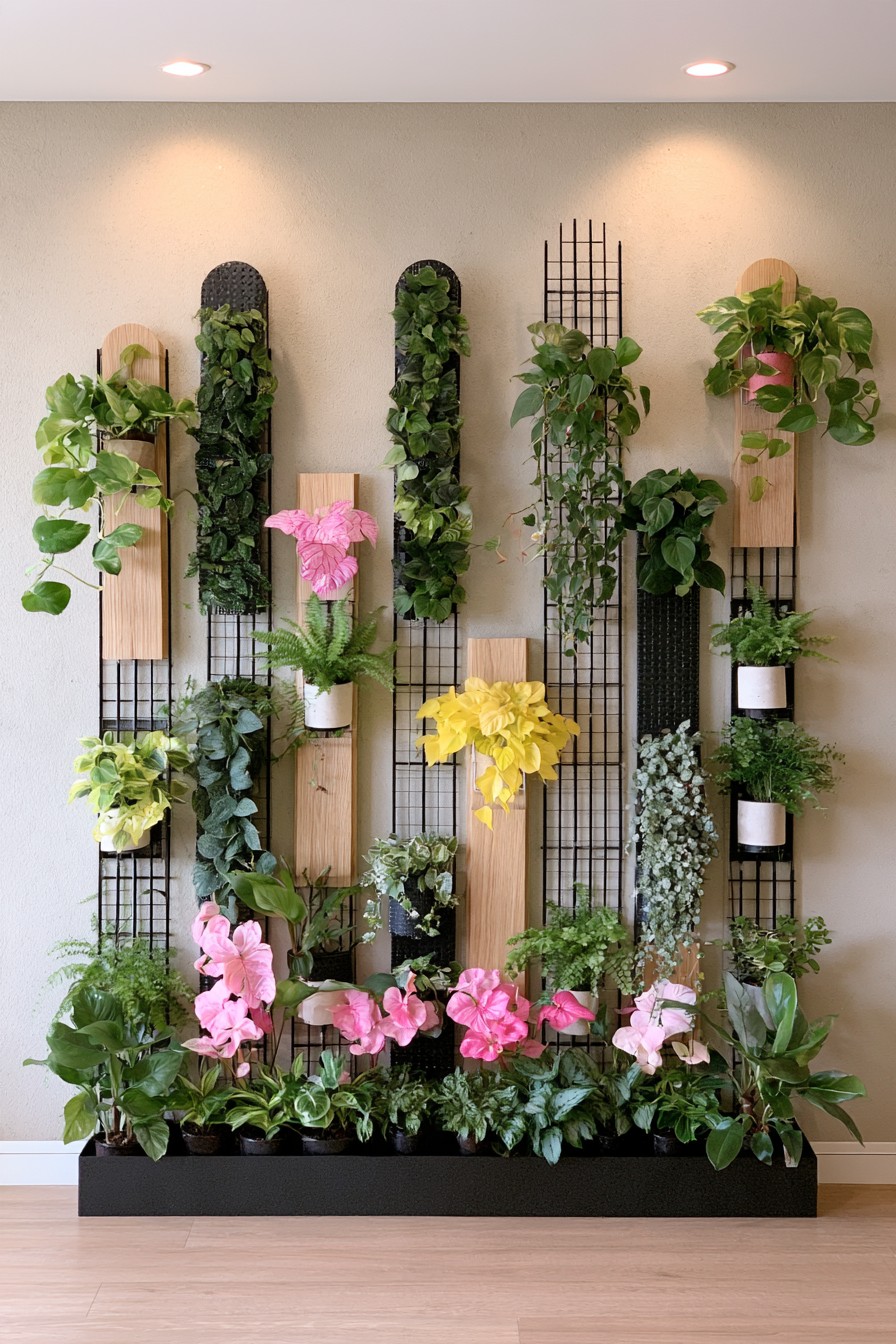
What you see
Alternating timber surfaces and black grids rise above a continuous low trough. Broad leaves, trailing stems, and flowering accents occupy different levels.
Why it works
Solid and open backgrounds separate plant silhouettes. The trough visually joins the collection while allowing larger root containers to sit at a more accessible level.
How to recreate it
Keep a Boston fern and ripple peperomia in individual pots within the trough so their different watering triggers remain visible. Direct a heartleaf philodendron onto one grid and leave its neighboring timber panel open behind broader foliage. Arrange the pots before training any stems; later moves become harder once several vines overlap. A flower vase can supply temporary pink color independently of the rooted collection.
You will need
Timber backplates, grid sections, a long decorative trough, separate draining pots and outer containers, plant labels, and soft ties. Match trough depth to the complete containers and their removal movement.
14. Arched Trellises With Vines Along Their Edges
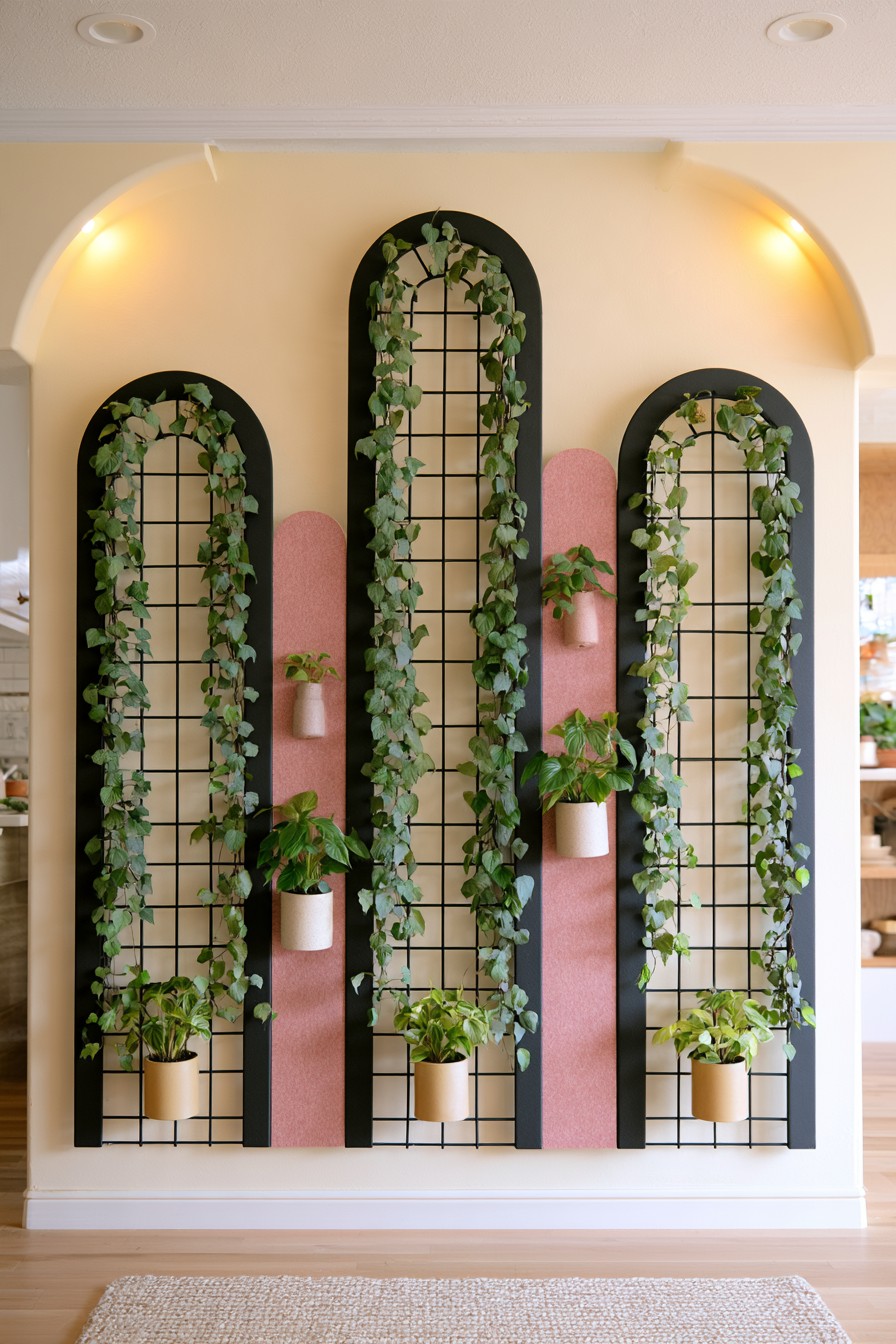
What you see
Tall black arches carry vines mainly along their borders, leaving the centers open. Smaller pot accents sit between the curved frames.
Why it works
An outlined arch gives a flowering vine room to show both its leaves and eventual flower clusters. The open middle makes it easier to see new shoots and inspect the short flowering spurs.
How to recreate it
Try Hoya carnosa or Hoya pubicalyx in bright indirect light and guide young growth around the arch with loose ties. A humidity range of 40 to 60 percent supports many common hoyas. Flowering also depends on maturity and steady care, so allow time. Keep established flower spurs, called peduncles, after blossoms fall because they can flower again. When buds develop, maintain consistent placement and care. A decorative uplight alone supplies no assurance of enough growing light.
You will need
An arched trellis, a rooted hoya in its existing appropriately sized pot, soft supports, a humidity meter, and optional plant lighting chosen for the site. Use an airy potting mix and avoid moving a small root ball into an oversized container.
15. Tall Narrow Trellises for Leafy Vertical Columns
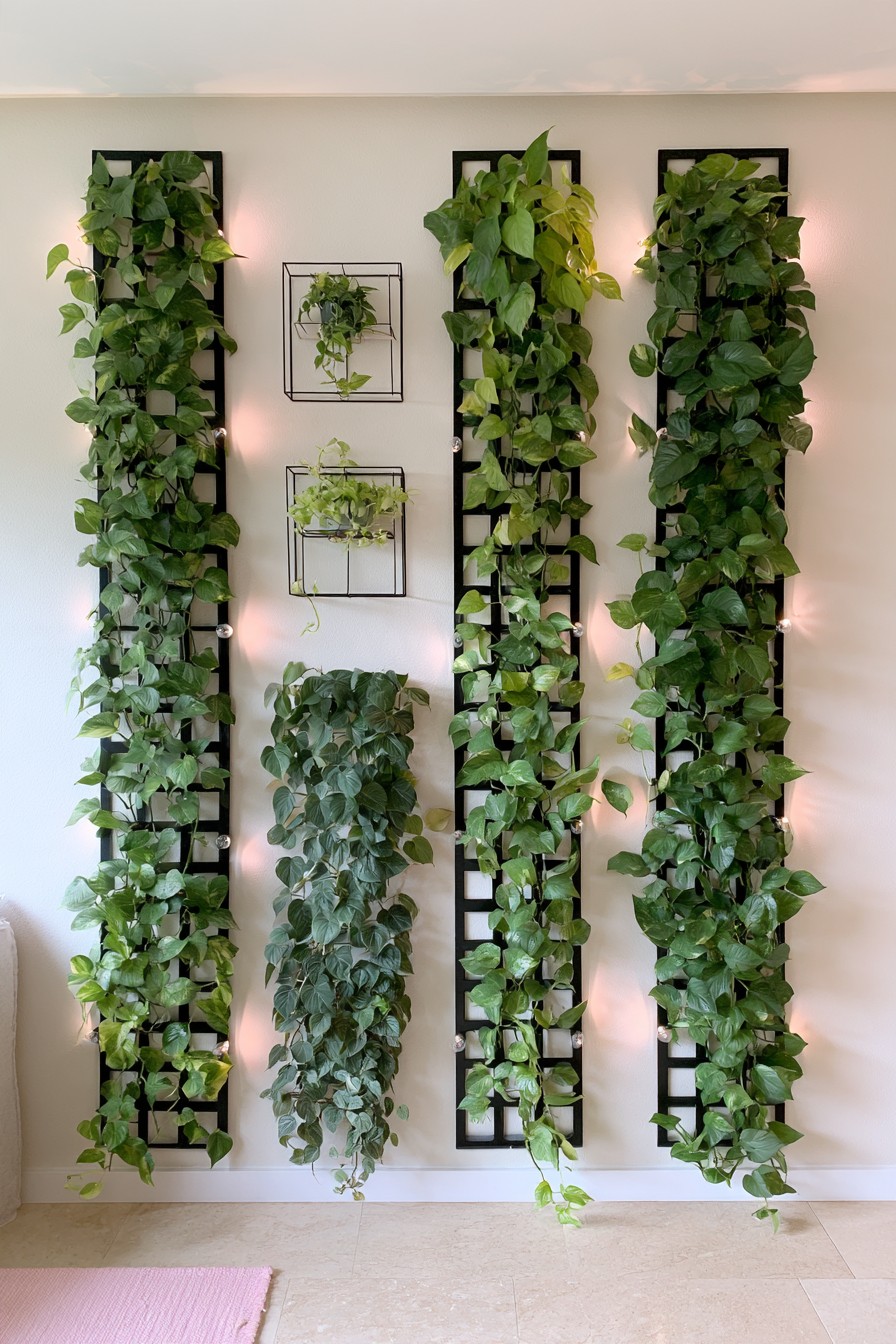
What you see
Long narrow trellises form separate leafy columns, with visible wall between them. The plants fill vertical strips instead of tracing open arches.
Why it works
Concentrating foliage in narrow bands leaves more wall exposed and suits a slim wall section or corridor. The gaps prevent several vines merging into one bulky mass.
How to recreate it
Use climbing heartleaf philodendron for a filled column, or golden pothos if you prefer varied leaf color. Map the full mature projection from the wall before choosing a corridor position. Place pots where doors can still open fully and daily movement feels easy. Route stems vertically and trim side shoots that expand across the gaps. Smaller neighboring holders can contain spider plants, whose offsets hang downward and supply a different movement.
You will need
Narrow trellis panels, accessible root pots, soft stem ties, a tape measure, and pruning scissors. Measure the plant canopy as well as the frame; a slim support can still carry a wide plant.
16. Framed Green Panel That Contains the Plant Collection
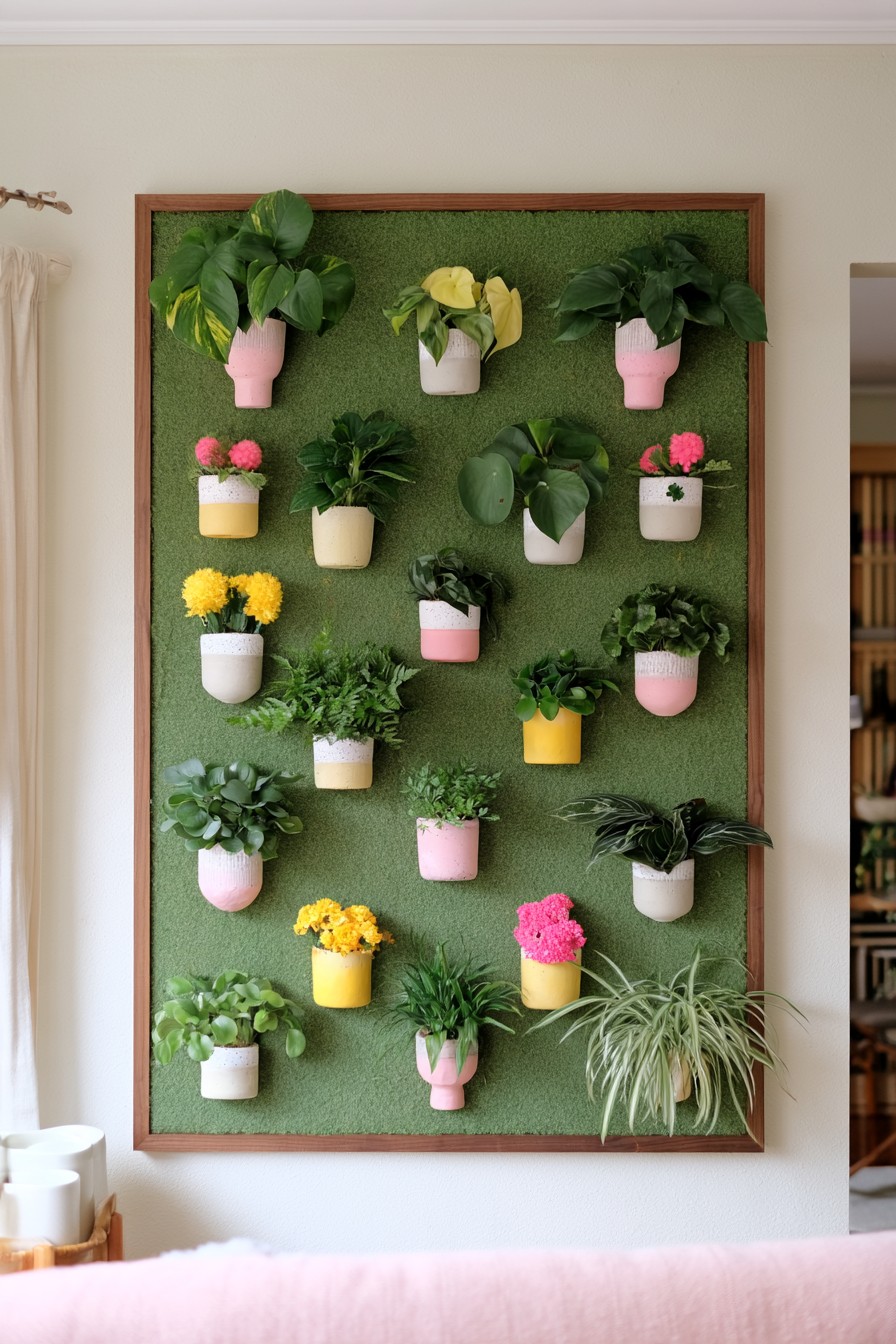
What you see
A timber frame encloses a green backing with scattered colorful holders. The pots form a bounded collection instead of an uninterrupted carpet of plants.
Why it works
The clear border can turn related plants into a focused collection. A fern themed version makes fine, arching, and broader frond shapes the main difference, with quieter pot colors keeping attention on the foliage.
How to recreate it
Adapt the arrangement with a compact Boston fern cultivar, a rabbit's foot fern, and a young bird's nest fern only where their individual root space and light needs fit. These are suggested substitutions for a fern collection. Group by frond shape, and leave each canopy room to expand beyond its pot. Label the plants because related appearance does not give them identical watering needs. Keep the rabbit's foot fern's surface rhizomes exposed.
You will need
A framed panel, a clearly identified decorative green backing, individual pot holders, nursery pots selected for the plants' roots, and labels. Choose compact cultivars and check mature dimensions; a full sized fern soon overwhelms a tiny holder.
17. Sculpted Green Niches With Recessed Planting
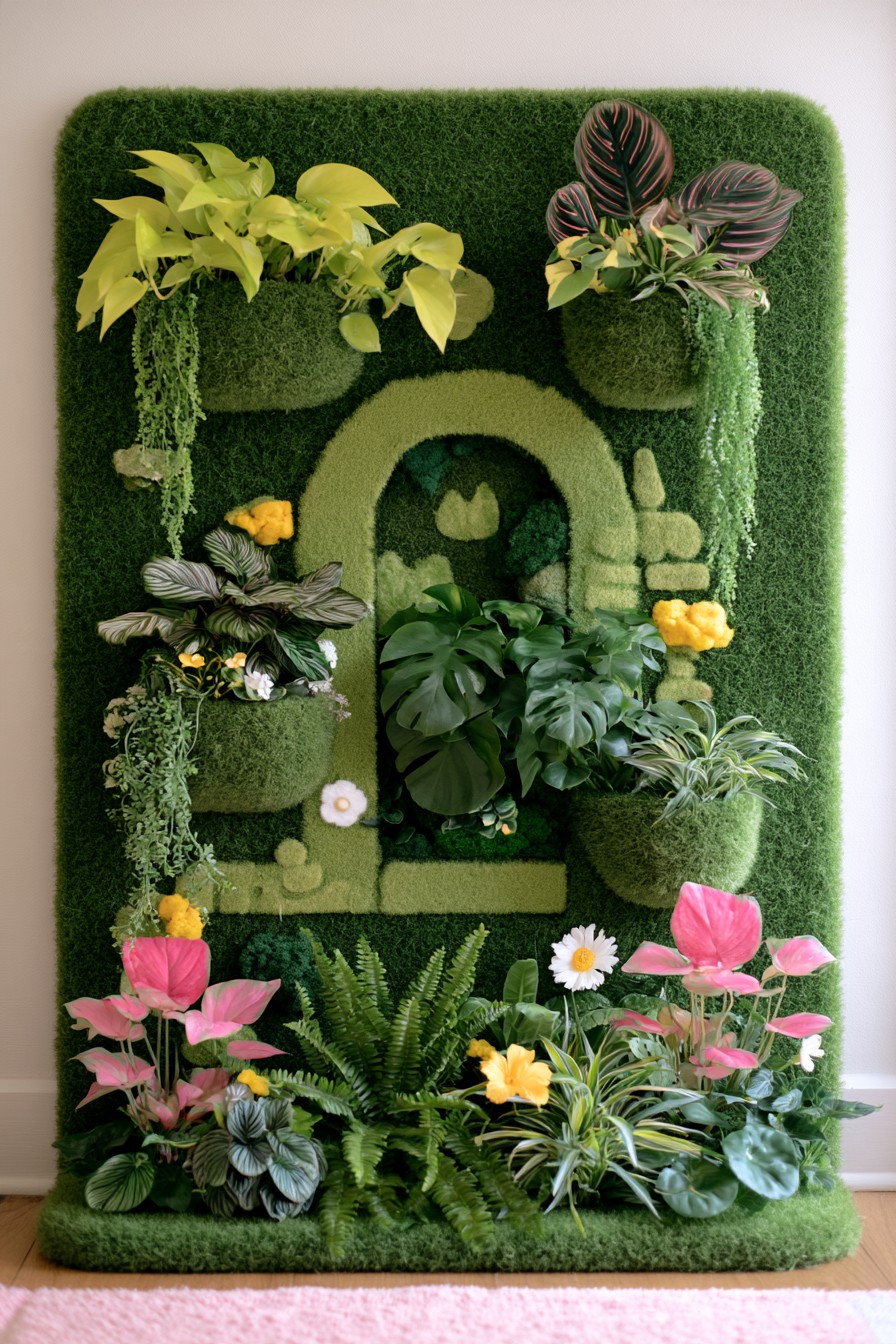
What you see
Rounded projecting pockets surround an arched recess, with broader foliage near the center and finer cascades at the edges. The green covering gives the whole feature a sculptural outline.
Why it works
Depth separates foreground and background plants. A large leaf shape reads clearly inside the recess, while a lighter trailer makes the projecting pockets feel less solid.
How to recreate it
Use a compact ripple peperomia in a shallow position and a young heartleaf philodendron where a trail has room. A small prayer plant, Maranta leuconeura, is another broad leaf option only if its particular conditions and pot space can be maintained. Draw the removal path for every container before arranging the foliage. Assign the deepest recess to the widest root pot, and move a plant to another container when its roots or canopy outgrow the niche.
You will need
A purpose designed sculpted panel or fitted niche assembly, removable plant pots, liners or outer pots that fit the recesses, and a measuring tape. Identify the green material before choosing its cleaning or growing care.
18. Terracotta and Blush Pots Against a Green Backdrop
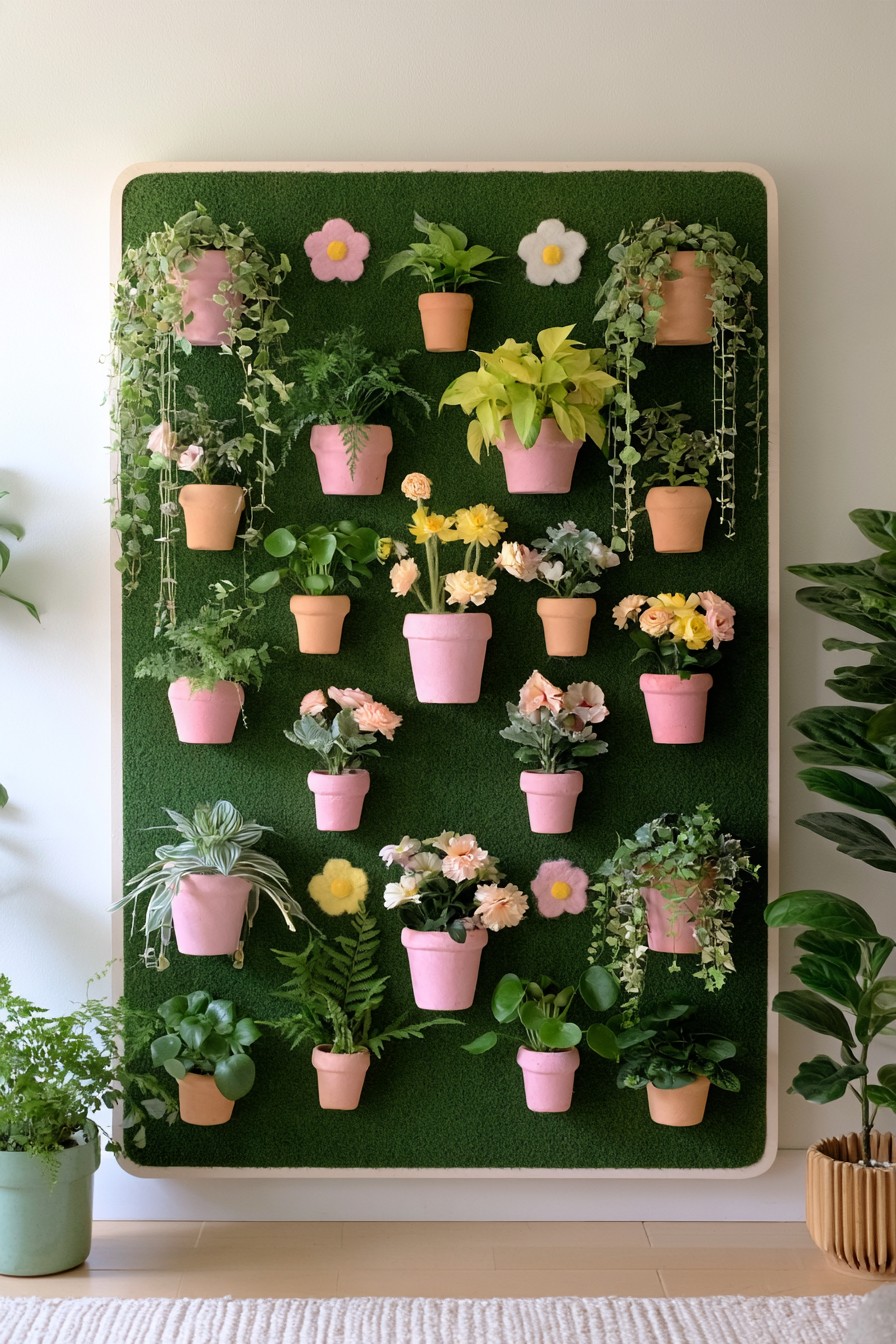
What you see
Terracotta and blush pink vessels sit against a deep green surface, with longer foliage framing the sides and flowers adding small warm accents.
Why it works
The earthy clay balances the softness of pink. Repeating those two finishes creates a warm palette without asking every plant to provide the same leaf color or flower.
How to recreate it
Use golden pothos near an outside edge and a compact African violet in a well lit central position. Keep blush tones on selected pots or decorative flower accents so they remain visible between leaves. Rooted blooms and cut flower inserts can both suit the palette, with separate care plans. Compare pot moisture individually: unglazed terracotta generally dries faster than glazed containers. Match the green backing's care to its actual material.
You will need
Terracotta vessels, blush cachepots or finished outer holders, independent growing containers, and plants with enough light for their intended growth or bloom. Use 4 inch young foliage pots or an African violet's existing pot as measuring examples, not compulsory sizes.
19. Pastel Backplates That Organize a Green Feature Wall
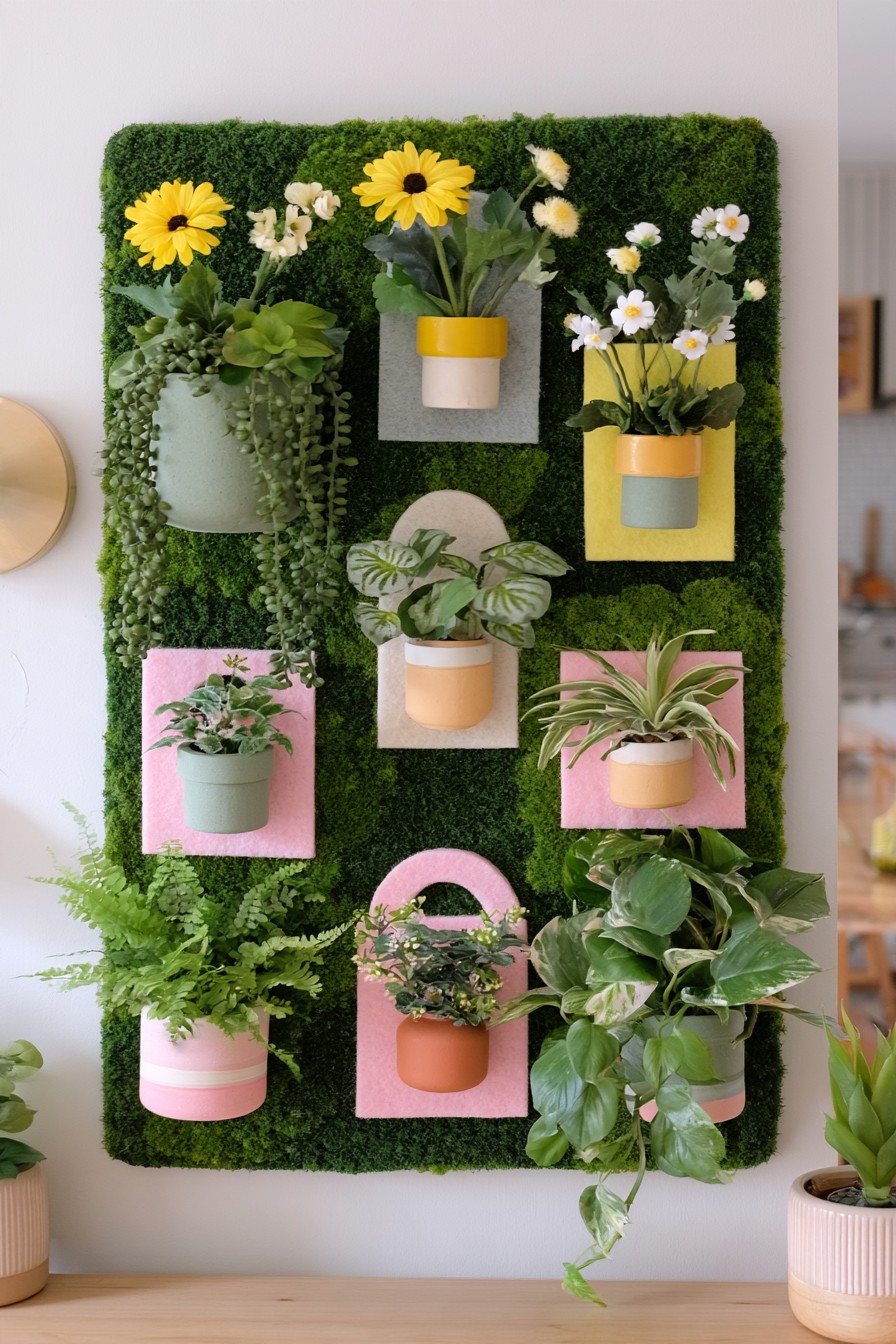
What you see
Pastel squares and arches sit behind individual pots on a green panel. The colored shapes organize flowers, small rosettes, and longer leaves into separate zones.
Why it works
The geometry can be adapted to the room's purpose. In an office, quiet repeated shapes create a readable backdrop; in a child's room, fewer larger shapes can make the arrangement easier to recognize.
How to recreate it
For an office, combine compact ripple peperomia with a trailing spider plant positioned away from the work surface. For a child's room, keep the same simple geometry but choose a fully secured display outside reach and check every species for the household. Map each module's location using its holder's specified mounting points, then arrange the backplates around those points. Preserve enough space above each pot for it to lift free. Use handmade flowers where living blooms lack the necessary light.
You will need
Pastel backplates, a framed green surface, compatible removable pot holders, compact plant containers, and a paper layout. Background color identifies zones; the actual pot holder carries and locates the container.
20. Layered Cork Textures With Small Planting Niches
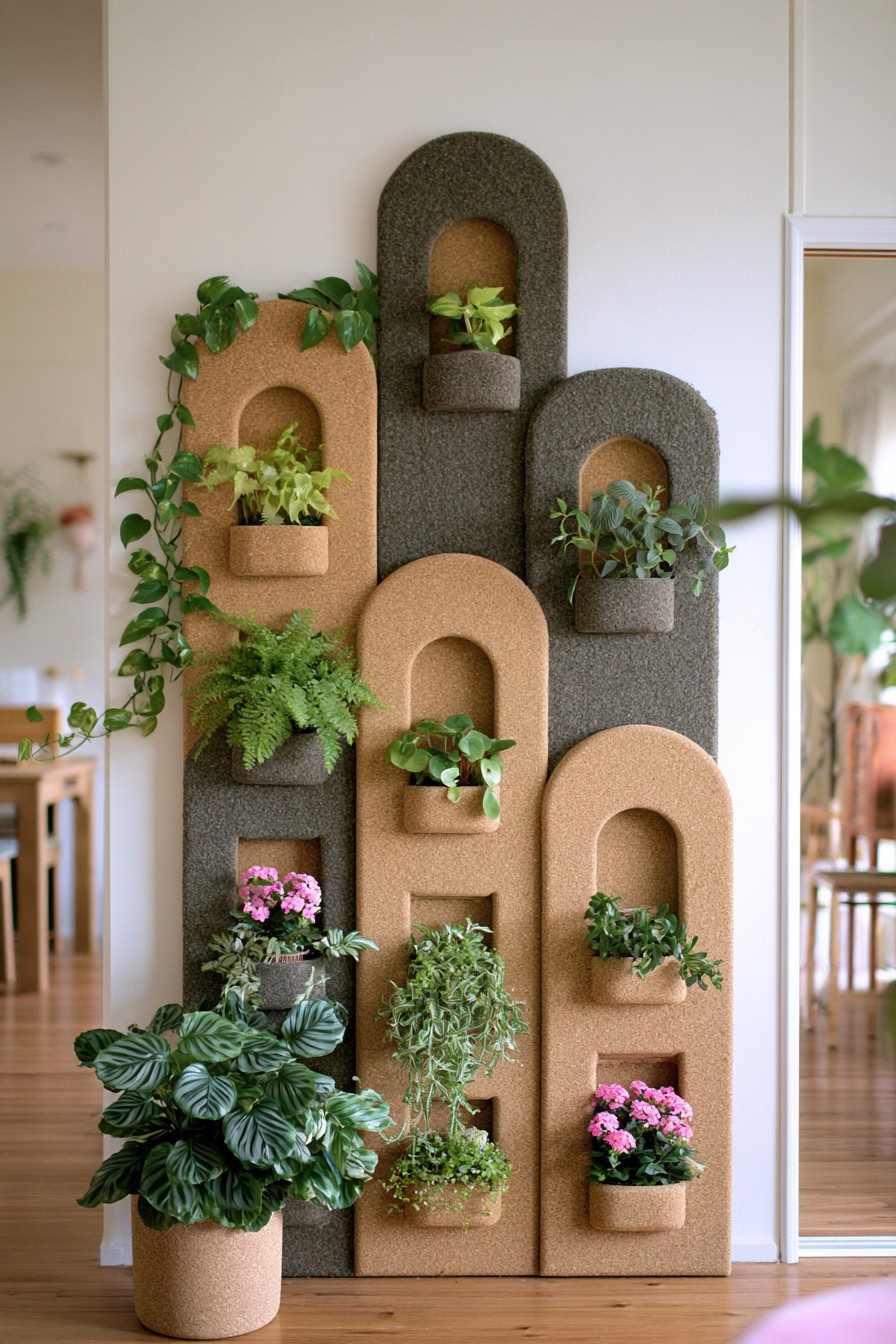
What you see
Tan and charcoal arched panels overlap at different heights, with small planting recesses and a few trailing stems. Their textured surfaces remain a large part of the composition.
Why it works
Material contrast creates depth without demanding dense foliage. This can suit an earthy interior where timber, woven textiles, or warm neutral furniture already provide the room's character.
How to recreate it
Place ripple peperomia in a short central recess and string of turtles near an outside curve where it can hang clear. Leave a visible band of cork around each opening. Check the usable recess with the complete pot in hand, including its rim and the space needed to remove it. Keep vigorous vines in larger separate containers if their root volume exceeds the small niches. Preserve several empty areas so the overlap between the arches stays clear.
You will need
Layered arch panels with a specified support system, small removable holders, fitted growing containers, and plants selected for the recess volume. Actual cork, imitation cork, and other textured coverings have different care instructions.
21. Woven Panel With Color Blocked Plant Zones
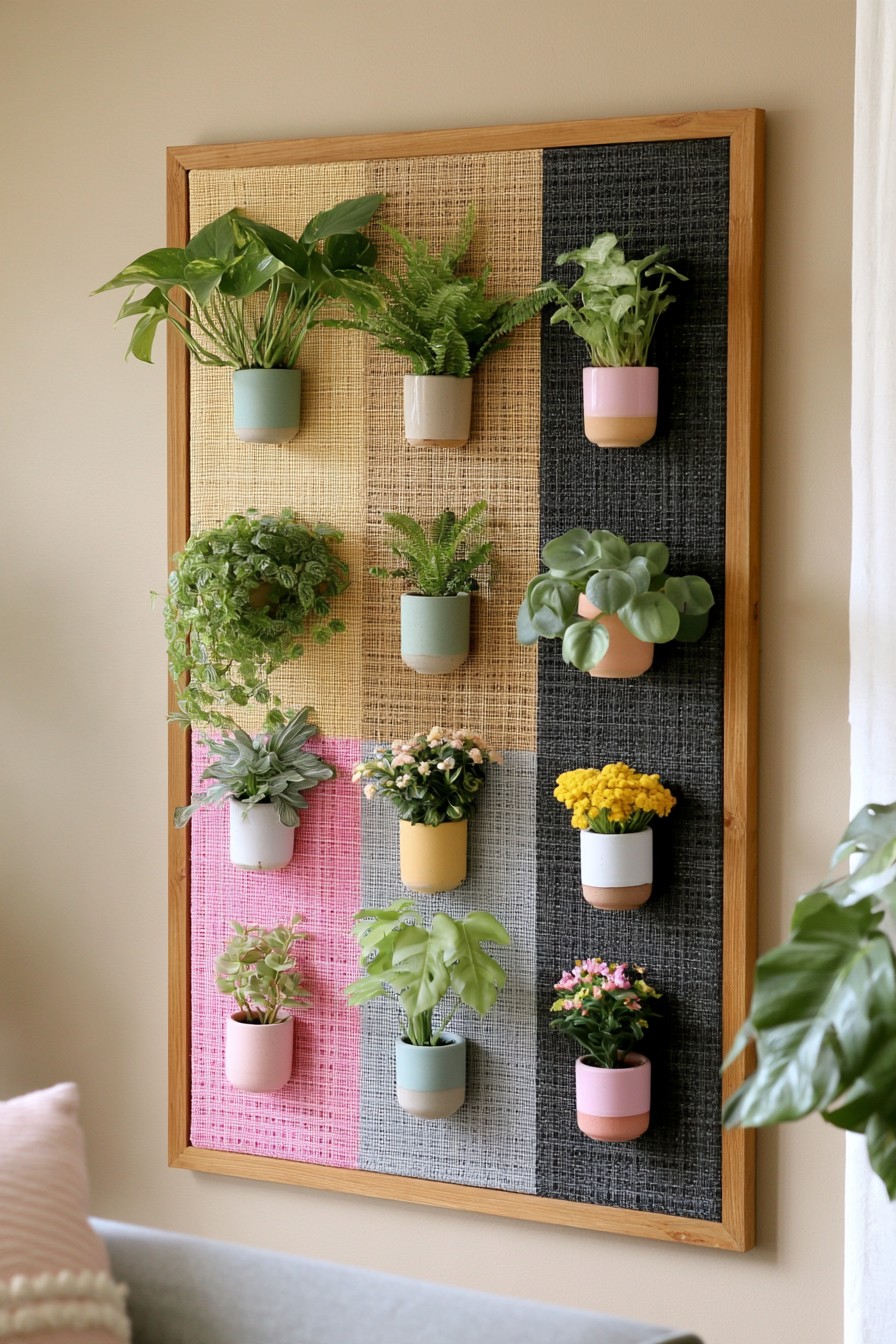
What you see
A timber border encloses cream, black, and pink woven zones. Small pots are spaced across the color blocks, leaving sections of weave exposed.
Why it works
The background contributes the pattern even when the plant collection is modest. A dark zone emphasizes pale foliage, while cream weave gives plain green leaves a softer setting.
How to recreate it
Choose a silver marked Scindapsus pictus for the dark area and a ripple peperomia for a lighter block. Arrange their pots according to canopy size, not simply one plant per color square. A smaller framed panel beside a chair can use the same contrast with fewer pots. Mark the container centers on paper, then confirm that every pot lifts out without catching on a neighboring leaf.
You will need
A woven decorative panel, a surrounding timber frame, compatible pot supports, separate growing containers, and contrasting foliage plants. Keep a sample of the background near the plant while planning so the leaf and backing colors can be compared.
22. Pegboard Shelves That Move as Plants Grow
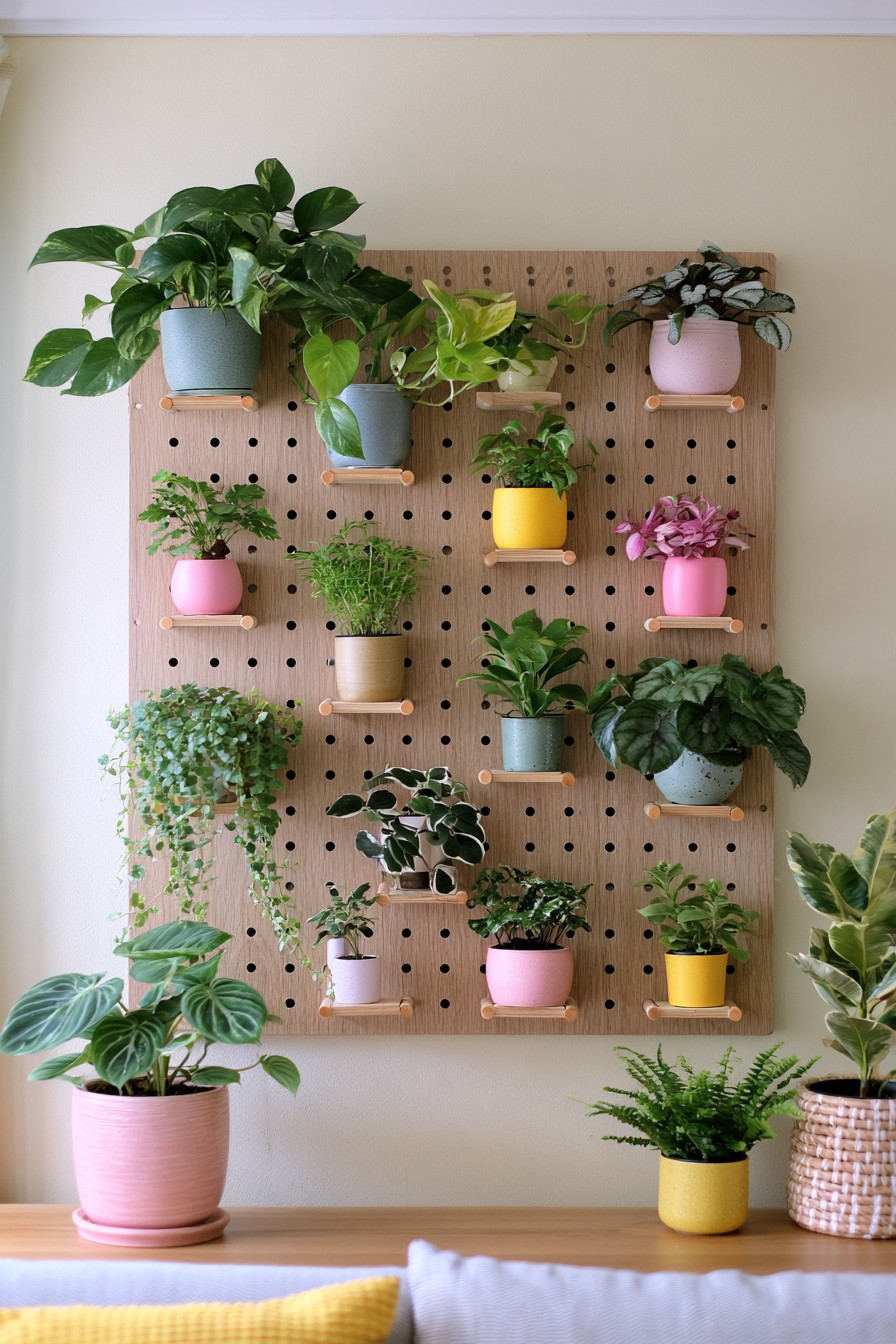
What you see
A perforated timber board holds small shelves at different levels, carrying a varied collection of potted foliage and flowers. The grid of holes stays visible between them.
Why it works
Adjustable shelf positions let the display respond to growth. A pot can gain canopy clearance or move to a better lit part of the board without rebuilding the entire arrangement.
How to recreate it
Use ripple peperomia on a compact ledge and golden pothos where its longer stems can fall beyond the board. When a canopy begins touching the shelf above, remove the pot and shelf, reposition the compatible brackets, and test the new lift out clearance before returning it. A spider plant may eventually need a wider lower position. Review shelf spacing monthly during active growth and move plants according to their light needs as well as their size.
You will need
A purpose designed pegboard shelving system, its matching shelves and retaining parts, plant containers, a ruler, and labels recording each position. Pegboard is useful for flexible placement; the complete system's installation requirements are collected below.
23. Hanging Rail Pots With Adjustable Spacing
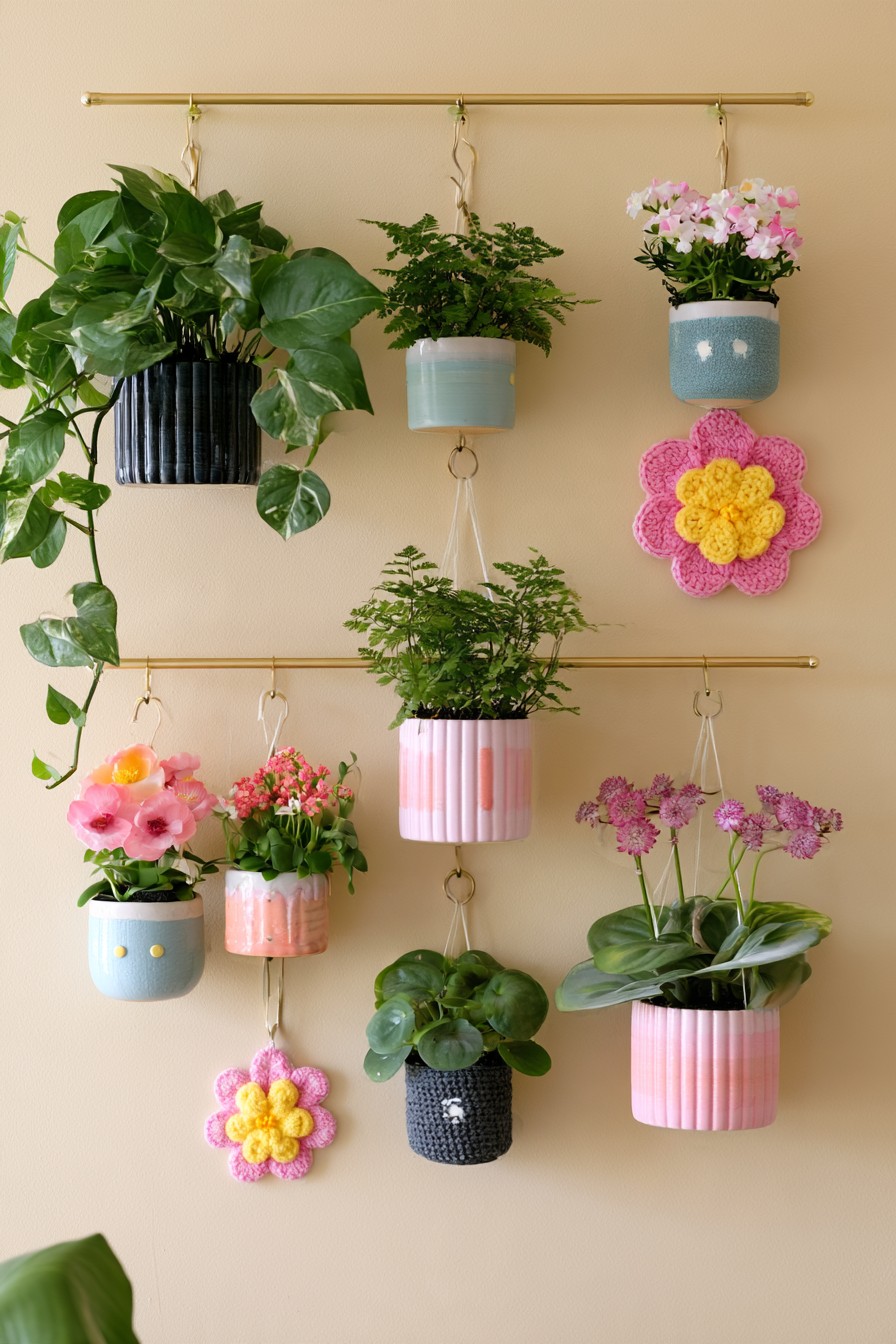
What you see
Two horizontal rails carry pots at varied suspension lengths, with some vertically linked groups and decorative flowers between them. Plenty of plain wall remains visible.
Why it works
Open spacing can turn this arrangement into a practical kitchen herb display. Individual pots keep different herbs independently accessible for watering and harvesting.
How to recreate it
Adapt the rails for basil, mint, and parsley, with one species per pot. A young herb can begin in a container about 6 inches across if the root ball fits, with future room for mint growth and adequate depth for parsley. Place the display where herbs receive strong light; a plant light timer of 12 to 16 hours daily is an option when daylight is insufficient. Check moisture daily while learning the location. Harvest reachable stems and leave enough spacing to handle each pot without tangling its neighbor. For a separate tray crop, see our microgreen container ideas; microgreens use a different growing and harvesting routine.
You will need
A rail system with its matched pot hangers, independent herb pots and catch containers, basil, mint, parsley, labels, and optional growing lights. Select a system whose carriers fit the actual pot diameter before buying the containers.
24. Framed Burlap Display With Dark Basket Holders
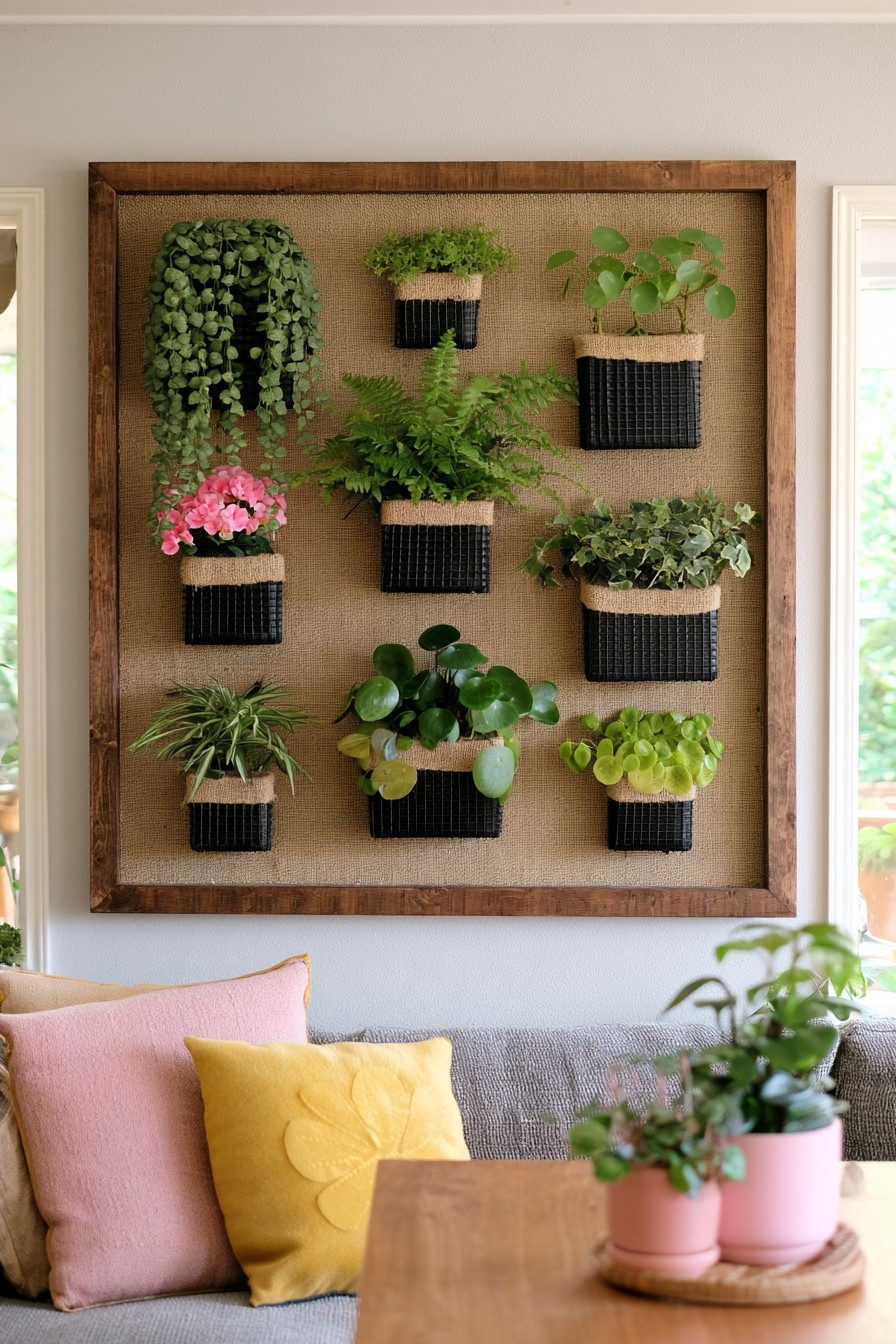
What you see
Dark basket holders stand against a coarse natural fabric inside a timber frame. Rounded foliage, delicate fronds, and a single cascade provide different silhouettes above the seating.
Why it works
Black baskets provide a clear boundary around each plant. Their texture connects the wall to upholstered furniture while the visible burlap keeps the arrangement from reading as a dense green panel.
How to recreate it
Try ripple peperomia in a smaller central holder and a compact Boston fern cultivar where its spread fits. Use one pothos near an outer edge if a longer trail is wanted. Keep the baskets separated by enough exposed fabric to preserve the outline of each plant. Choose the removal route from beside the furniture when setting the layout; the practical service position helps determine where the frame belongs.
You will need
A timber frame, burlap as a decorative backing, matched basket holders, individual plant pots, and a layout showing canopy widths. The textile supplies texture and the pots remain separate growing units.
25. Branch Framework With Moss Wrapped Plant Holders
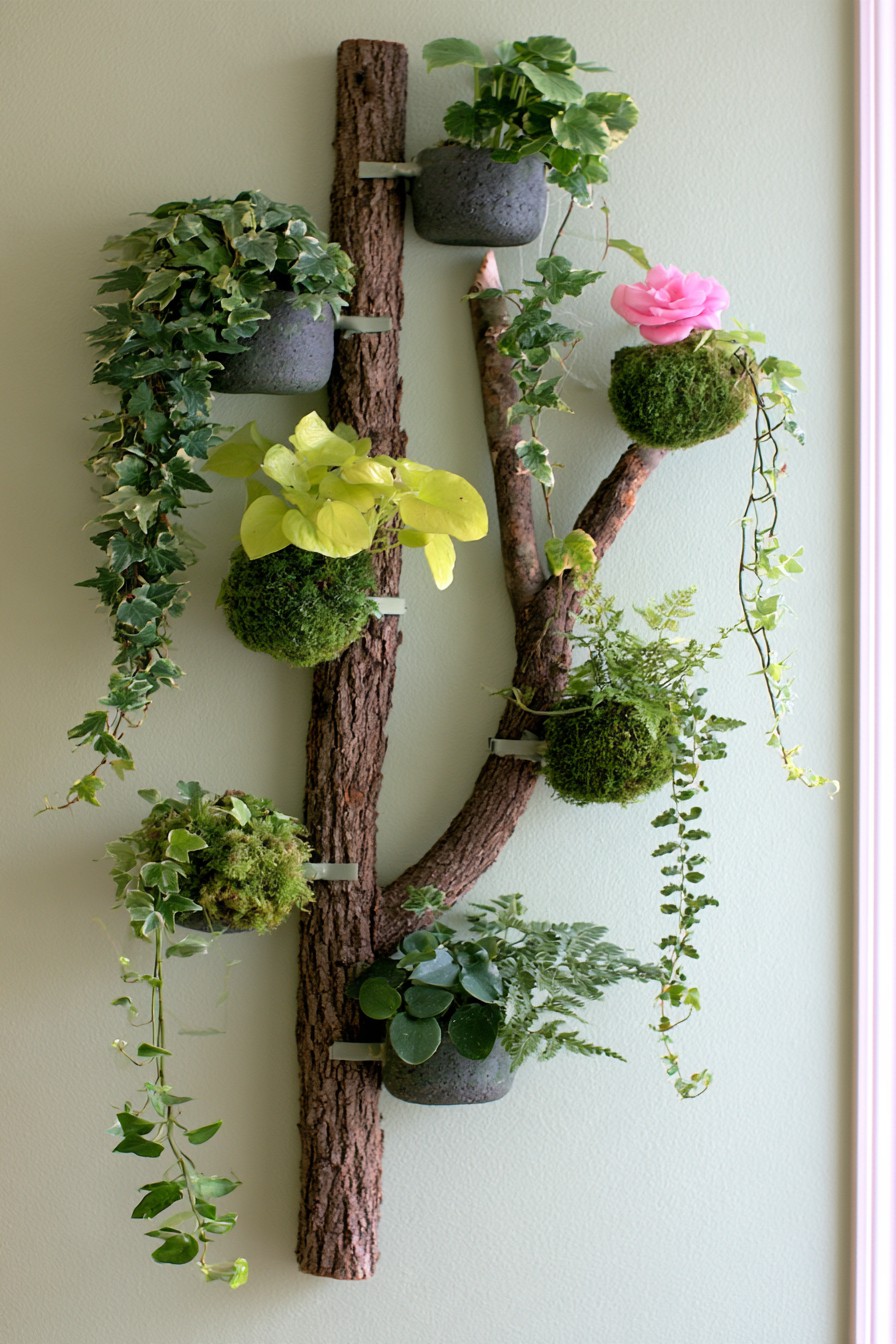
What you see
Irregular upright branches carry small containers and green wrapped holders. Cascading foliage follows the timber's natural turns, leaving some bark exposed.
Why it works
The branching outline creates an organic alternative to repeated squares. A restrained leaf trail can connect the individual holders without hiding the timber that gives the display its character.
How to recreate it
Pair string of turtles in an upper holder with a compact rabbit's foot fern in a wider lower position. Arrange both in removable pots within the decorative surrounds and keep the fern's surface rhizomes uncovered. Treat an exposed root ball or kokedama as a separate growing method with its own care routine. For a single plant on a timber backing, explore our large staghorn fern mounting ideas; that approach uses a dedicated fern mount with different root support and watering access.
You will need
A prepared branch display assembly, compatible container cradles, separate nursery pots, outer holders, and the chosen plants. Identify whether green wraps are live, preserved, or artificial before choosing care.
26. Wire Mesh Panel for a Changing Plant Collection
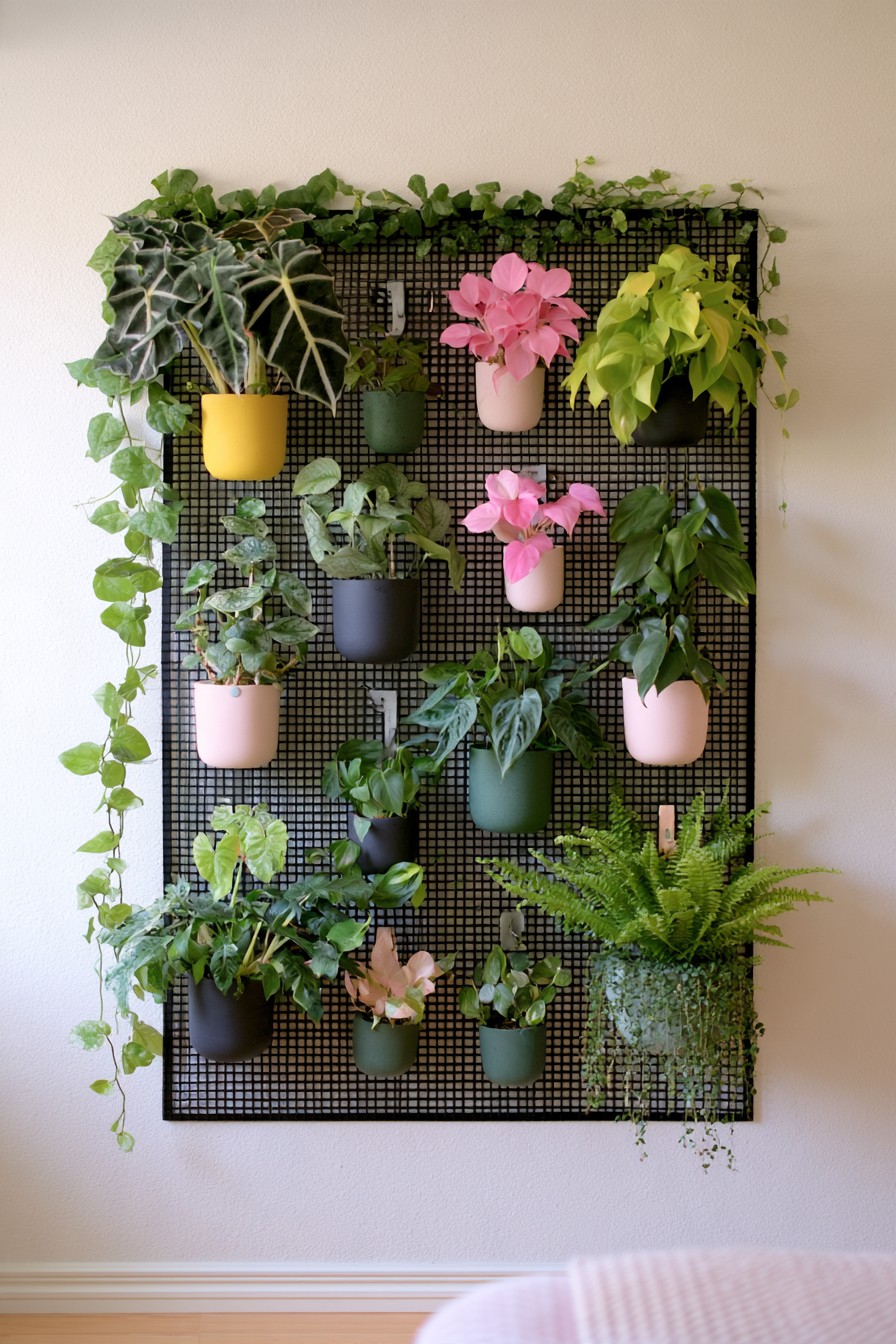
What you see
A black wire grid supports colorful pots at many positions, with compact leaves, fine trails, and flowering accents. The open mesh leaves the background wall visible.
Why it works
Removable holders make this useful for a rotating collection. A permanent foliage group can stay in place while a flowering or seasonal accent changes without rebuilding the wall.
How to recreate it
Keep ripple peperomia and golden pothos as the continuing collection, then reserve an accessible position for a flowering African violet or a temporary cut flower vase. Change that accent when it fades or the room's seasonal palette changes. Leave the core plants in their established light positions. Inspect a new rooted plant before adding it, and keep its care label with its pot so a change of display does not obscure its needs.
You will need
A compatible mesh panel and removable carriers, pots for the continuing foliage, one interchangeable accent container, labels, and a simple position record. Allow room for each carrier's removal movement.
27. Open Box Shelves That Frame Each Plant
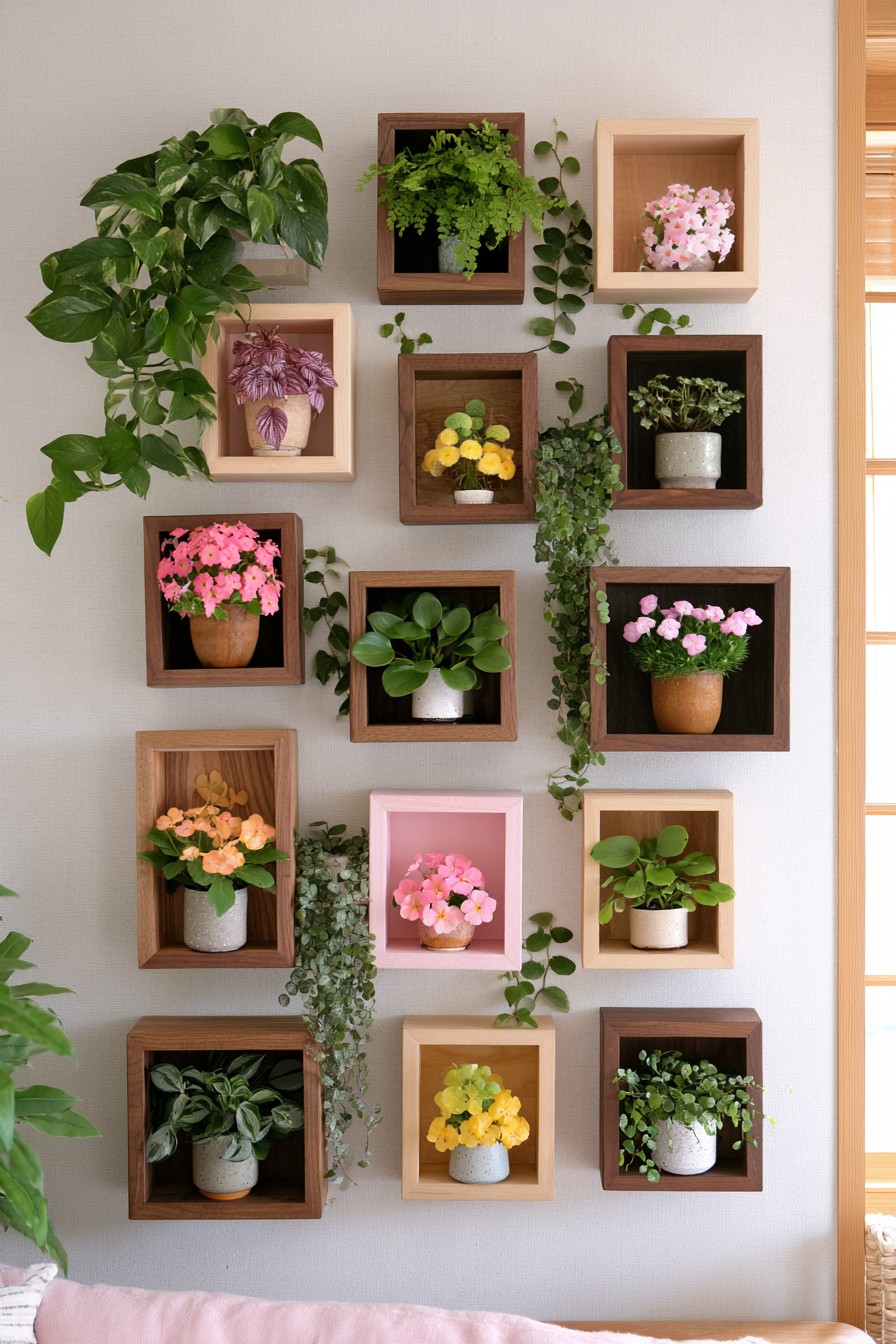
What you see
Separate open timber boxes frame individual plants, with wall spaces visible between the modules. Differences in wood tone contribute to the grouping.
Why it works
Each box gives a small plant its own boundary. This suits a collection where a textured rosette deserves attention just as much as a long cascade.
How to recreate it
Use ripple peperomia in a box with generous overhead clearance and string of turtles at a module's outside edge. Choose shelf depth from the pot's full diameter and the canopy's natural spread. Offset a trailing plant from the box below so it does not cover that opening. Leave the top of a rosette clear; a plant that has to be compressed against a panel needs a different position.
You will need
Open box shelves, individually fitted plant pots, a measuring tape, and a paper plan of the modules. Mix wood tones within a limited palette so the containers provide variation without competing with the leaves.
28. Tension Cable Grid for Trained Climbing Greenery
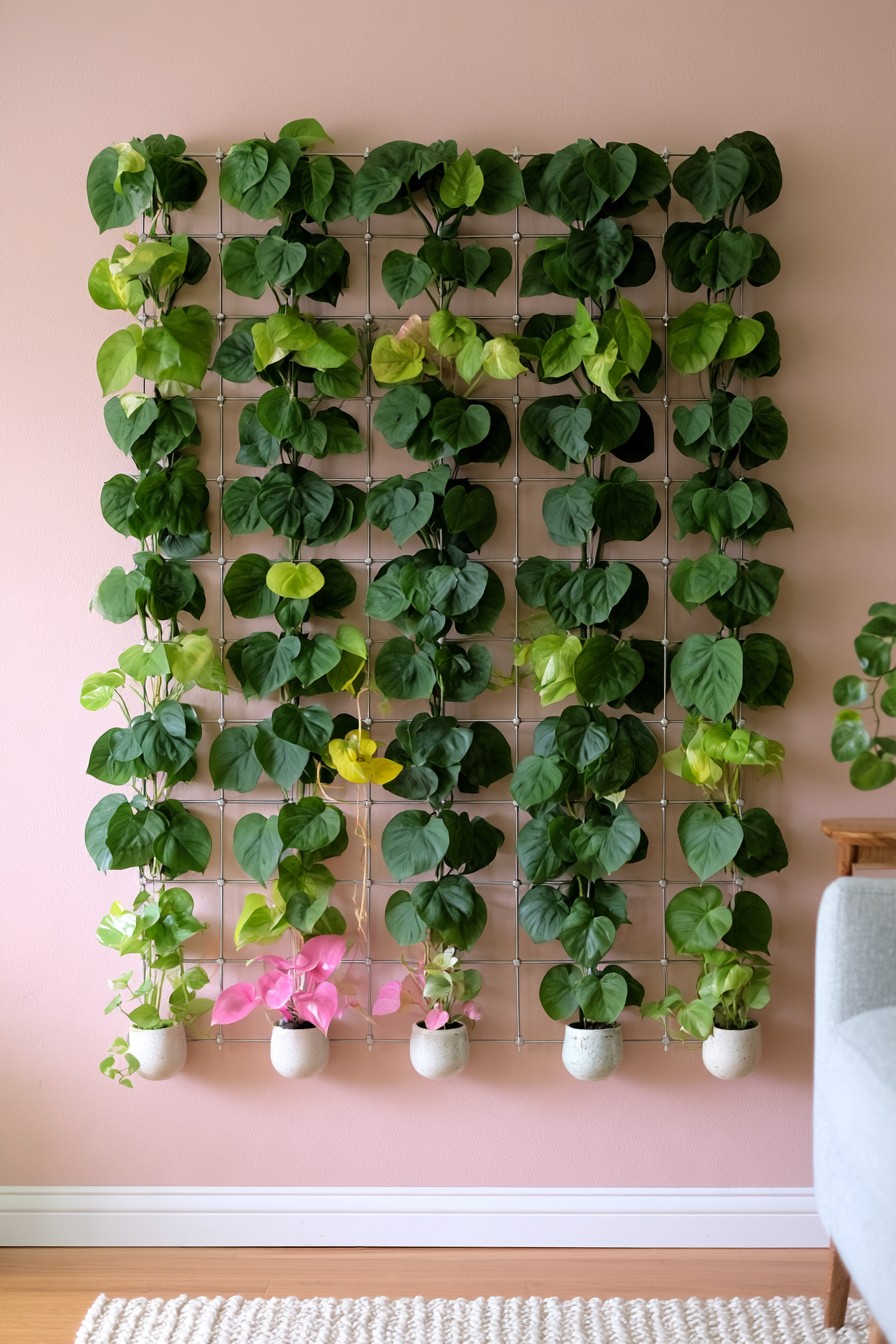
What you see
Thin intersecting cables support a dense pattern of green climbing stems. The support recedes visually, making the leaves appear to form their own vertical lines.
Why it works
A cable route offers a light looking structure. For a renter, a frame containing the cable grid can reduce separate wall fixing points compared with anchoring each cable directly into the wall.
How to recreate it
Choose a manufactured frame with its internal cables already supported, or a freestanding trellis version when wall attachment is unavailable. This adapts the cable effect and uses the frame's specified fixing points; it is not a promise of a damage free wall. Keep golden pothos or heartleaf philodendron rooted in accessible lower pots and guide flexible stems onto the grid with loose ties. A small cable frame can be repositioned more readily before foliage becomes intertwined. Our indoor hanging planter ideas offer other ways to organize plants in a compact room.
You will need
A cable frame or freestanding plant trellis, accessible root pots, soft plant ties, and the installation components specified for that frame. Choose the frame's complete mounting method before planning the cable layout.
29. Fabric Pocket Grid for Compact Removable Pots
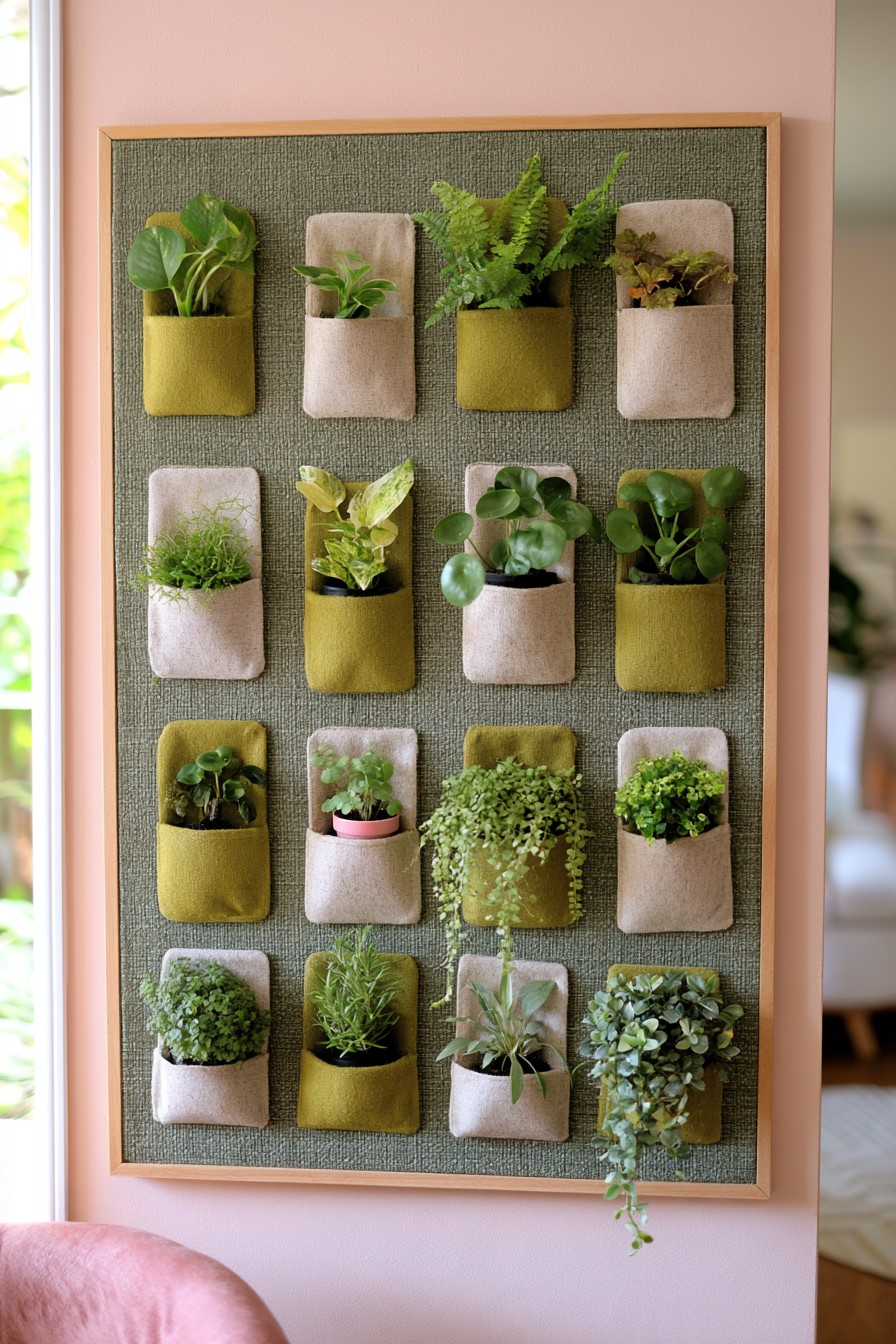
What you see
Rows of cream and olive fabric pockets form a regular grid within a narrow frame. Each small plant occupies an easily recognized position.
Why it works
The repetition brings order to a slim wall section. Fixed rows make it easier to compare growth and notice an empty or struggling position without the display appearing scattered.
How to recreate it
Use compact ripple peperomia and string of turtles where their young root systems fit the inserts. Place the trailer on the bottom row so it leaves the pocket above visible. Put a nursery pot with holes in its base inside a removable watertight outer pot, then slide that complete insert into the pocket. Check that it lifts out easily without stretching the seam. This layout treats fabric as an outer holder; direct planting requires a purpose designed pocket system with its own irrigation and drainage.
You will need
A framed fabric pocket panel, small draining nursery pots, fitted outer pots, plant labels, and a ruler. Young plants in 3 or 4 inch pots are possible examples only when pocket depth, root volume, and removal clearance all agree.
30. Ceramic Tube Holders With a Plan for Root Growth
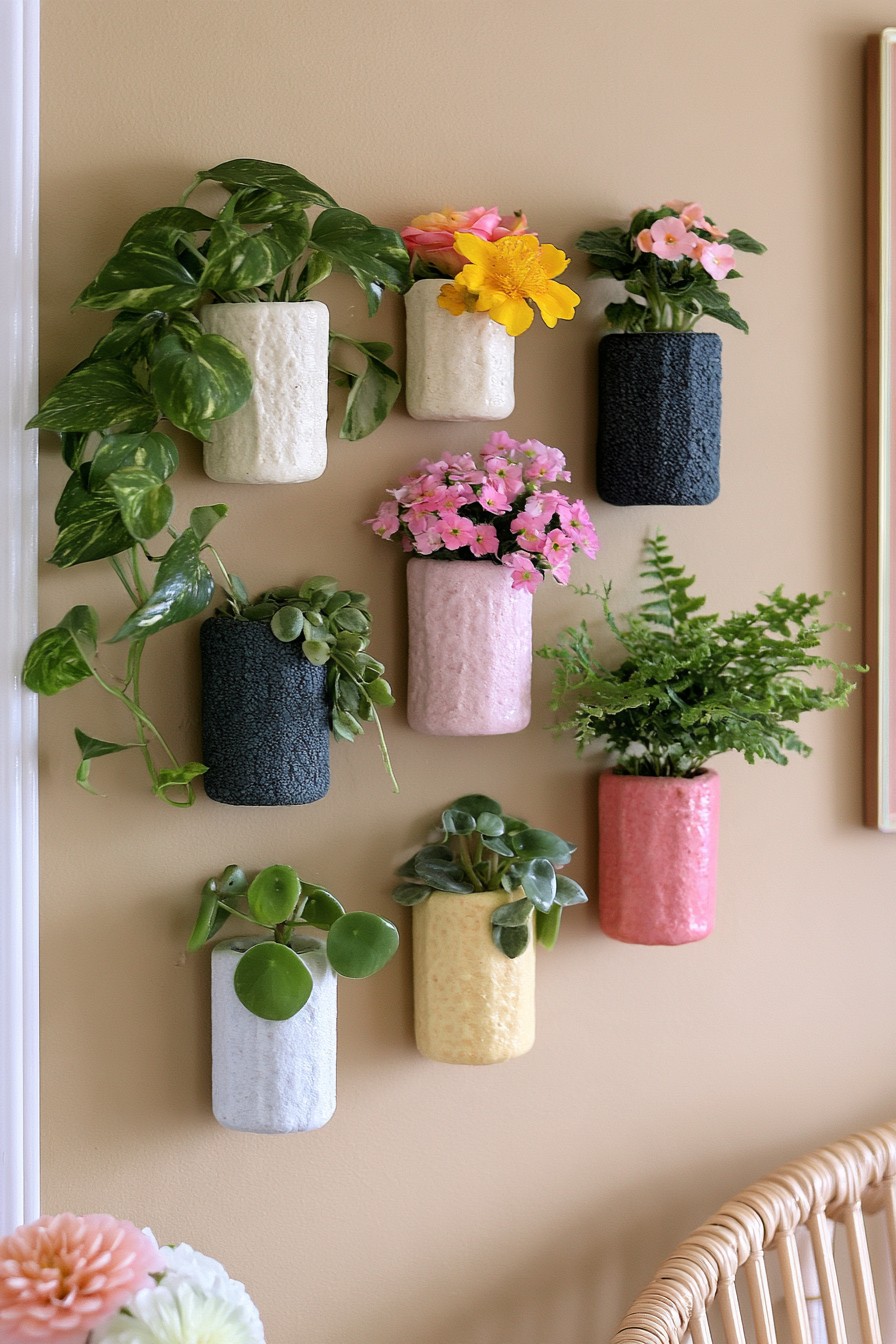
What you see
Pastel cylindrical holders repeat across the wall, each carrying a small foliage group or a flower accent. Their projecting rims make individual containers easy to distinguish.
Why it works
The narrow shapes produce a lighter arrangement than a solid panel. Separating the cylinders also lets small leaves and occasional flowers read as individual accents.
How to recreate it
Try a young ripple peperomia or string of turtles only where the cylinder accepts its complete draining pot. Measure the opening and any internal taper, then test removal before adding the plant. A tall shell can still provide very little root space. Move an outgrown plant to a larger container, and use cut cosmos or handmade stems in cylinders that cannot accommodate a growing pot. Flower tubes and rooted plant holders can share colors while following different care routines.
You will need
Cylindrical outer holders, removable plant containers or separate vase inserts, a ruler for measuring the inside opening, and small plants or cut stems. A 3 inch insert is useful only for a plant whose roots fit it.
31. Separate Felt Pockets for an Editable Plant Group
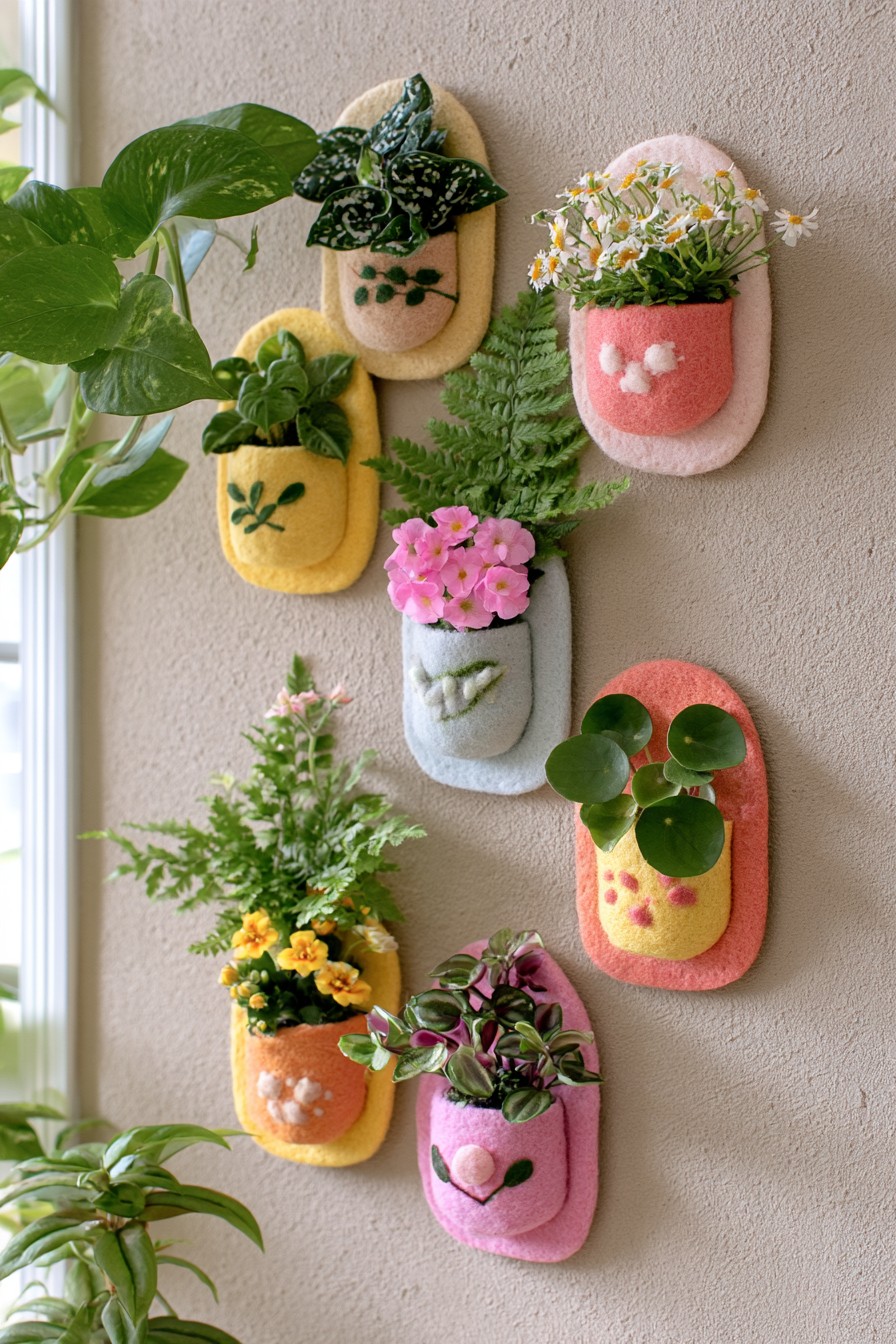
What you see
Separate rounded felt holders in pink, yellow, cream, and blue form a loose wall group. Stitched details add character between the flowers and foliage.
Why it works
Independent pockets let a beginner expand gradually. Unlike the fixed grid in idea 29, the spacing can change as the collection and the gardener's care routine develop.
How to recreate it
Begin with two or three individually removable pockets: a ripple peperomia, a small string of turtles, and optionally an African violet where light supports bloom. Record their moisture checks for 2 weeks before adding more. If a pocket is awkward to lift or one plant repeatedly shades another, change the spacing while the grouping is still small. Keep each growing pot inside a fitted catch container. Handmade flower inserts can fill a dim position without adding another watering task.
You will need
Two or three felt outer holders, fitted nursery pots and cachepots, compact plants, labels, and a short care log. Additional pockets can be added once the existing plants remain accessible and their growing conditions are understood.
Keep the Collection Easy to Maintain
- Keep a short care record: Note watering dates and meaningful changes in light or drying speed. A position record is especially useful for rotating pots and adjustable shelves.
- Inspect leaves during care: Check undersides, new shoots, and pot rims for pests. Isolate a new or affected removable plant while checking the problem.
- Clear dust by plant type: Support smooth broad leaves while gently wiping them. Delicate fern fronds and hairy African violet leaves need a gentler method appropriate to the plant.
- Shape growth deliberately: Redirect shoots before they entangle another pot. Review trained stems every 2 weeks in active growth and preserve hoya flowering spurs.
- Make room for roots: Check for crowded roots and unusually fast drying. Move an outgrown specimen to a larger holder, shelf, or floor pot instead of forcing it into the original layout.
- Refresh flowers separately: Check fresh vase water daily, remove fading stems, and clean the vessel when replacing the bouquet. Dust dried or craft flowers by a method that protects their material.
Before You Install
Finish these checks before positioning the collection permanently. They apply across the ideas, whether the feature is a small shelf, a pocket panel, or a complete plant wall.
- Protect the wall and decorative materials: Plan removable catch containers and inspectable gaps behind pots. Keep wood, cork, burlap, yarn, and felt separate from wet potting mix and collected runoff. After a spill, remove the inserts and let affected materials dry fully before reassembly. A decorative fabric or moss covering is not a waterproof barrier.
- Calculate the complete load: Include the frame, filled pots, wet growing mix, collected water, and mature foliage. Choose the complete mounting system for that load and the wall construction, using its specified brackets, anchors, and fixings. An appearance of sturdy timber or metal supplies no load rating.
- Check the particular system: Pegboards need matching brackets and retaining parts; woven strands and decorative moss cannot carry pot supports. Linked rail pots may transfer the lower container's load through the upper unit. Branch joints need assessment for hidden weakness. Tension cables exert forces beyond the plants' weight, so their anchor design needs competent assessment.
- Confirm panel attachment: For geometric backplates and sculpted panels, connect pot brackets to the load carrying board or frame using the system's specified fixings. Decorative covering alone cannot hold them. Secure tall panels; leaning them against a wall does not complete the installation.
- Plan safe service access: Place displays beside stairs where care can be carried out from a level landing or another stable position. Keep fronds and trails clear of handrails, steps, doors, and walking routes. Above furniture, plan a removal route that needs neither standing on upholstery nor leaning across the seating.
- Check rental and household constraints: Confirm permission and the agreed fixing method before drilling in a rented home. Fewer holes still need properly specified attachment. Where wall work is unavailable, use an approved freestanding system. In children's rooms, keep pots, hanging lines, and small decorations outside reach and check the chosen plants for the household.
- Allow growth and pot removal: Test the complete insert before installation and mark its upward lifting clearance. Maintain access to the highest container, any lighting equipment, and concealed surfaces. A display that needs unsafe stretching for routine care belongs in a different position.
Before buying the final components, choose the display type, confirm the available light, measure the actual containers, and plan how each one will be watered and removed. Those decisions turn a decorative wall idea into a collection you can keep looking good as it grows.

Leave a Reply