
Choose a woodworking project by the job it needs to do: hold books, display plants, provide a seat or help a pet reach a favorite spot. The 21 designs below cover those different uses. Two assembly collages introduce a curved wall shelf and modular boxes; the preparation sections explain which measurements, joints and mounting decisions to settle before cutting.
Table of Contents
- Choose the Preparation Your Project Needs
- Tools, Materials, and Assembly Order
- Plan a Wall Installation for the Entire Load
- Collage 1: Assemble a Curved Wall Shelf
- Collage 2: Build Separate Storage Modules
- 21 Woodworking Designs to Plan Around Real Use
- 1. Wall Mounted Slatted Wood Cabinet with Rounded Corners
- 2. Sculptural Plywood Stool with Interlocking Curved Legs
- 3. Woven Rope Bench with a Solid Wood Frame
- 4. Floating Wooden Nightstand with Drawer and Open Shelf
- 5. Arched Wooden Trellis for Climbing Houseplants
- 6. Curved Plywood Side Table with Sculptural Supports
- 7. Modular Wooden Wall Cubes for Flexible Storage
- 8. Rounded Wood Mirror with a Coordinating Floating Shelf
- 9. Arched Wall Shelf for Books and Decorative Objects
- 10. Tiered Wooden Plant Stand with Offset Platforms
- 11. Rolling Wooden Storage Cart with Three Open Levels
- 12. Low Wooden Lounge Seat with a Thick Cushion
- 13. Tall Arched Display with Staggered Shelves
- 14. Sculptural Wooden Floor Lamp with an Arched Frame
- 15. Geometric Wood Display with Colored Back Panels
- 16. Wall Mounted Plywood Desk with an Upper Shelf
- 17. Wooden Plate Racks with Simple Peg Supports
- 18. Multifunctional Wall Organizer with Pegboard and Drawer
- 19. Folding Wooden Breakfast Tray with Raised Sides
- 20. Tiered Wooden Rack for Books and Small Artwork
- 21. Wooden Cat Ramp with Raised Climbing Steps
- Complete the Plan Before the Build
Choose the Preparation Your Project Needs
Straight panel assemblies such as wall cubes differ from the repeated curved pieces in the stool and the side table. Seating in 2, 3, and 12 needs a design for human use, not just a surface that carries a pot. Folding parts in 19, electrical components in 14, and suspended furniture need additional planning. Plan the load bearing joints and supports for the intended use, with experienced design help for seating and suspended pieces.
Choose dimensions from the intended contents and user. Include material thickness, usable internal space, joining allowances, and moving clearances in the plan. The bedside cabinet should relate to the bed, the desk to the chair and user, and racks to actual books or plates. Neither collage provides universal cutting dimensions for the 21 designs.
Tools, Materials, and Assembly Order
Prepare a tape measure, square, pencil, clamps, drill and appropriate bits, a screwdriver or driver, and sanding tools. Select a saw for the actual cut: straight board sizing and curved template cutting need different setups. Follow tool instructions and use appropriate protection and dust control. Clamping must support the work without obstructing the cutting path.
Check panels for flatness, damaged edges, and sound fastening areas. Choose solid wood, plywood, or another board according to span, joints, exposure, and finish requirements, not appearance alone. Store material appropriately for the intended environment and consider moisture movement in the joints; no single waiting period suits every timber. A curved silhouette may be cut from a sheet or formed by another process, so avoid assuming bending from its appearance.
Mark and cut, prepare the contact faces, then dry assemble before bonding or fastening. A square check and a trial fit can reveal gaps while correction is still possible. Choose joints for their task: a shelf connection, box corner, seat frame, and wall fixing carry different forces. Adhesive compatibility, clamping time, and full cure are separate decisions. Follow the selected product’s instructions, and never assume glue alone completes every structural joint.
Plan a Wall Installation for the Entire Load
Identify the wall structure and intended loaded weight before choosing a fixing system. Include the furniture, contents, and forces from pulling a drawer or using a work surface. Depth and leverage matter as well as weight. Check the connection from shelf to frame and from frame to wall separately. Select the wall fixings as part of a complete mounting arrangement rated for the loaded cabinet and suited to the wall structure.
Check for concealed services before drilling and follow the mounting system’s instructions for its substrate, positions, and fasteners. Suspended units need connections that carry their weight. A tall unit resting on the floor instead needs its supporting base and, where required, a separate connection to reduce tipping. Those two jobs are not interchangeable. Get a suitable mounting design or qualified help when the wall or joint capacity is uncertain.
Collage 1: Assemble a Curved Wall Shelf
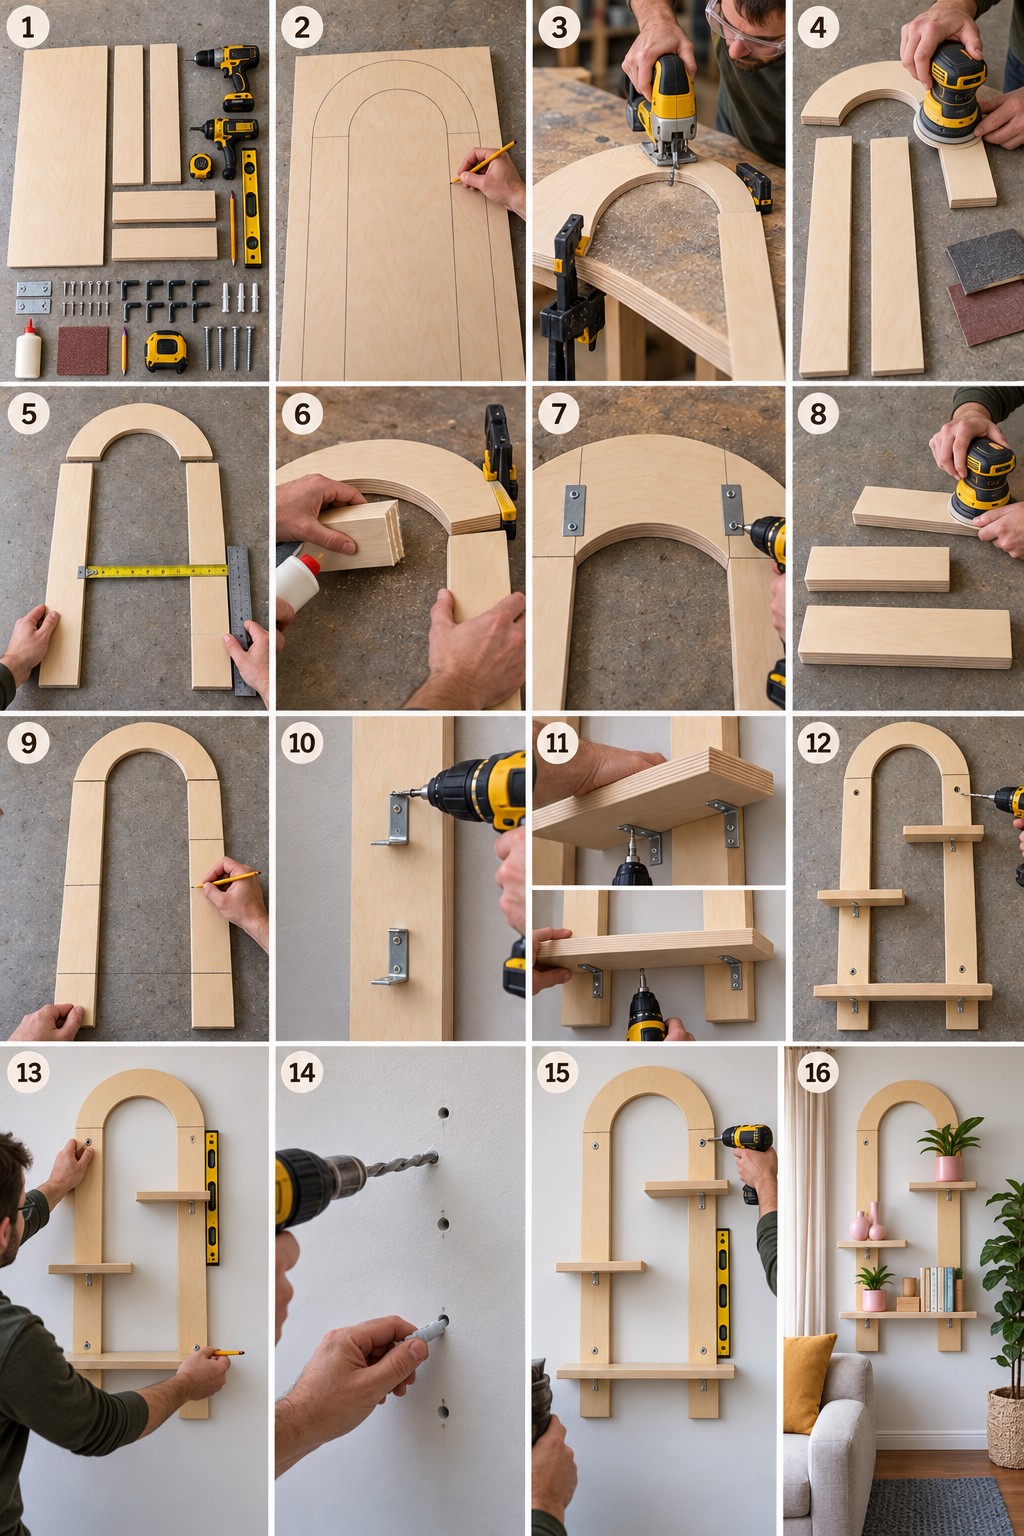
The first collage shows an arch marked on board, cut, and smoothed, with two vertical lengths and separate shelf platforms. The curved top and uprights are arranged together, bonded at their meeting faces, and joined with plates. Shelf positions are marked, metal brackets are fixed to the uprights, and the platforms are attached from below. The assembled frame is positioned with a level before wall fixing.
The useful lesson is to separate the frame joints, shelf supports, and wall mounting. Dry fit the arch and uprights first, then plan each platform connection before finishing the assembly. Choose plate and bracket fasteners for the actual material and thickness. The depicted wall plugs and screw positions are an example, not a universal prescription. Shelf depth, loaded weight, and your wall must determine the installation before the unit is filled.
Collage 2: Build Separate Storage Modules
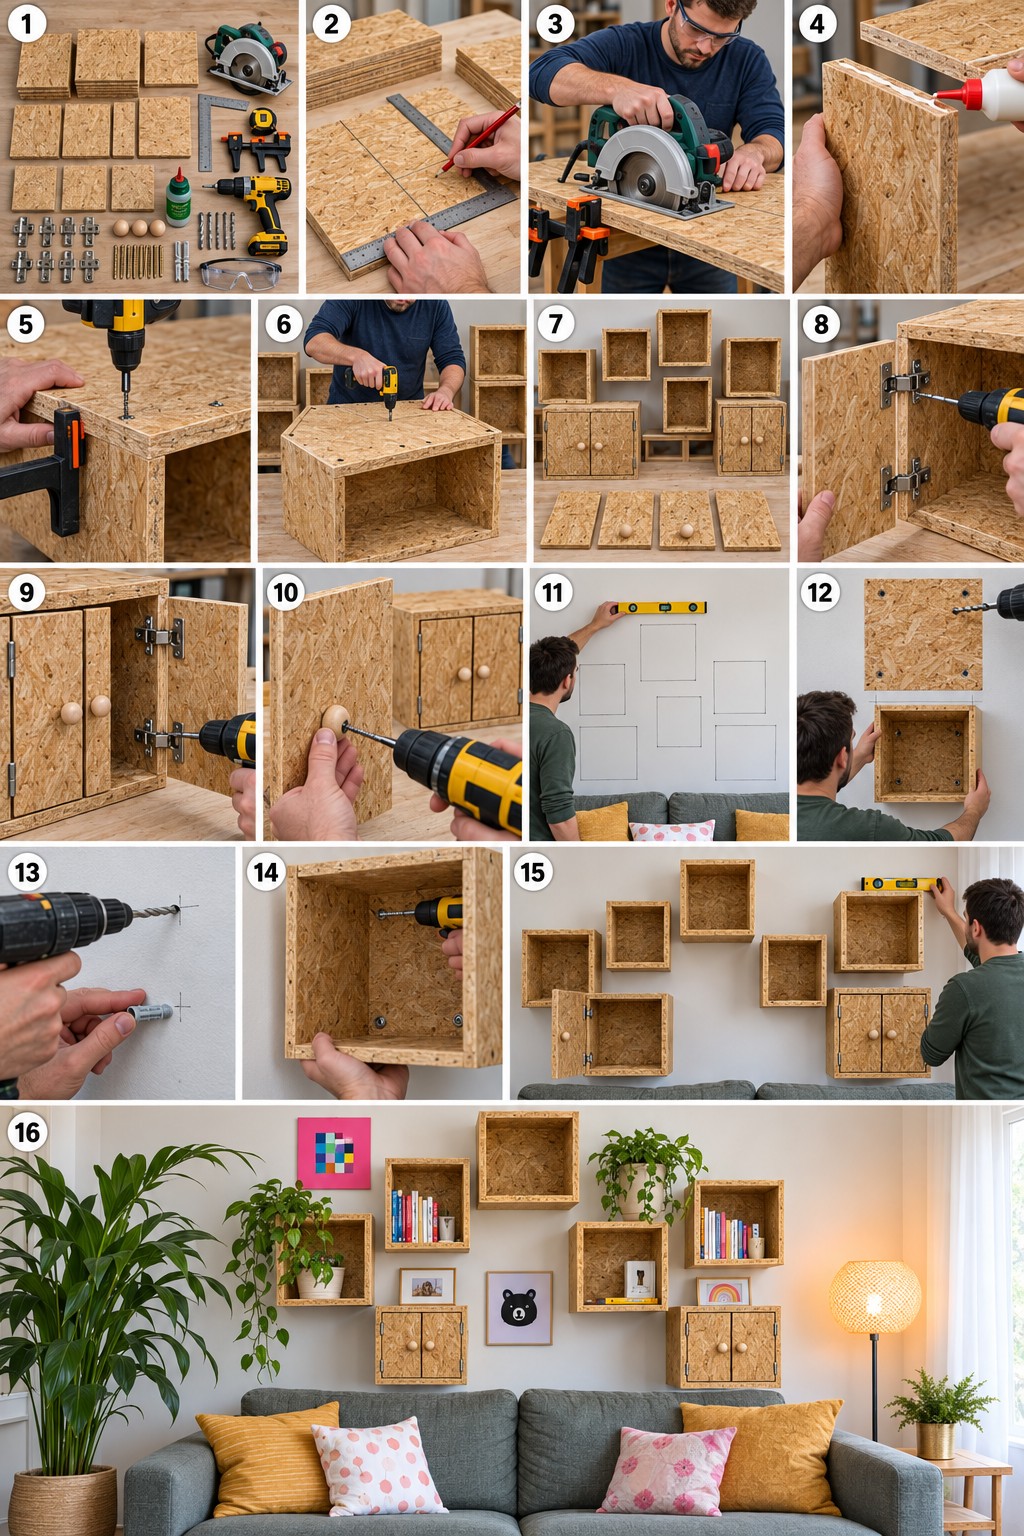
The second collage uses visibly textured board to make rectangular boxes. It shows marking and straight cuts, adhesive on an edge before the neighboring panel is placed, clamping and screw assembly, and back panels added to the boxes. Selected modules receive hinges, doors, and knobs. The layout is marked on the wall, then individual modules are positioned and fixed.
This approach suits repeated straight components rather than a curved frame. Plan module sizes around the contents, allowing for board thickness, hinge space, and the door opening. Check each box for square before completing the joints. Its back panel must transfer the intended load into the rest of the box, not merely close the opening. Mount each module according to an appropriate wall system, and assess additional boxes individually when expanding the arrangement.
21 Woodworking Designs to Plan Around Real Use
The following ideas offer project directions rather than complete measured plans. Use the collages to understand preparation and assembly choices, then develop the connections and dimensions required by the particular object.
1. Wall Mounted Slatted Wood Cabinet with Rounded Corners
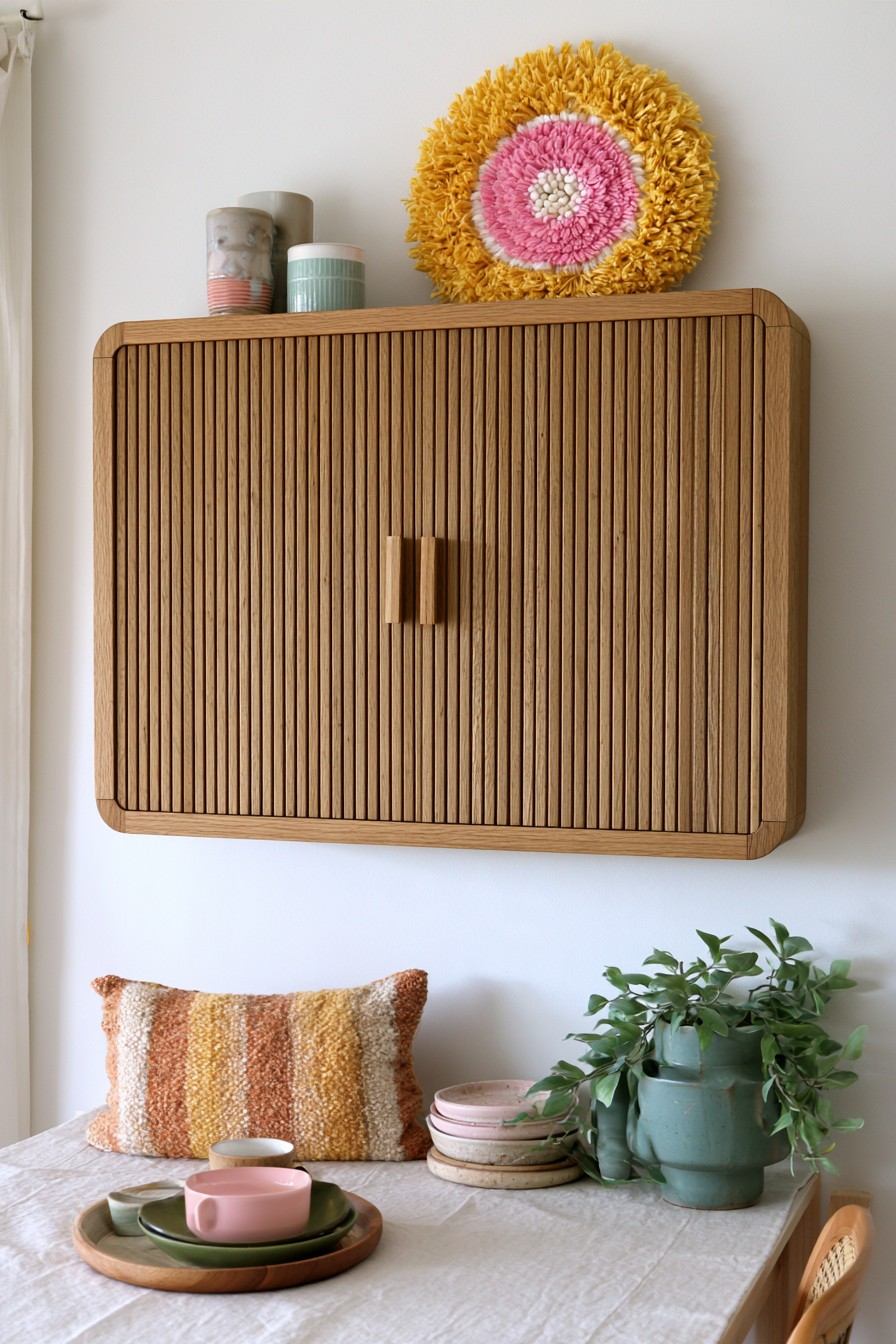
Rounded corners and closely spaced slats give this suspended cabinet a quieter front than a collection of exposed shelves. Closed storage suits items you want out of view. The wood color and vertical rhythm let a substantial box remain visually restrained.
Plan the loaded cabinet and its wall connection before designing the slatted doors. Choose panel material for its span, edge condition, and hinge attachment, and allow the doors to move independently. Keep hardware accessible beneath the decorative front. These drawer front makeover ideas can inform surface personalization; they are not a structural cabinet plan. Test the final front’s movement separately from the system supporting the cabinet.
2. Sculptural Plywood Stool with Interlocking Curved Legs
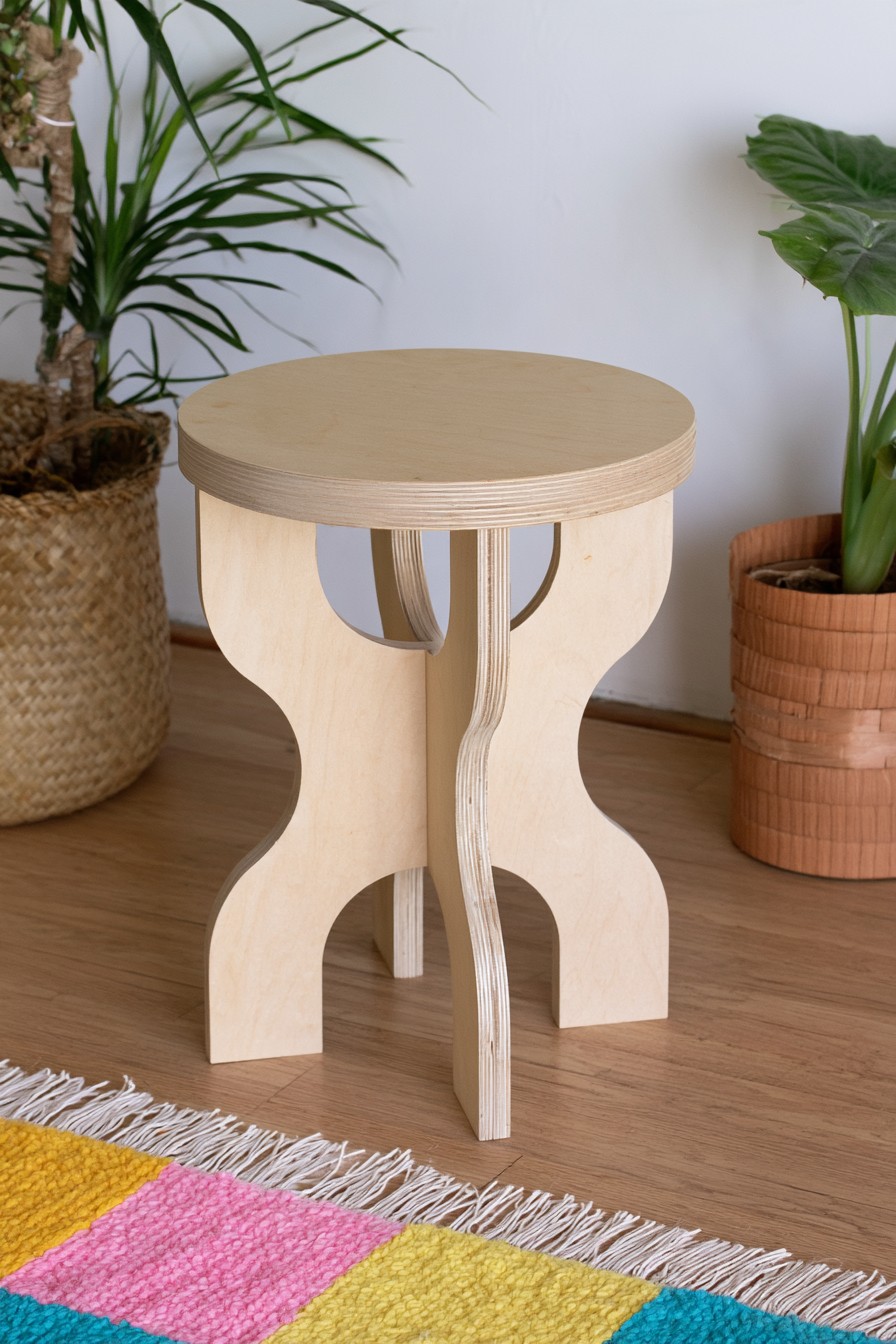
Curved plywood sections interlock beneath a round top, making the base the main sculptural feature. Visible layered edges reinforce the material’s character. The compact footprint could inform an occasional side surface, but seating use is a separate design requirement.
Use a template to keep repeated curves consistent and trial the slots before final assembly. Their fit controls sideways movement, while the top’s connection to the base needs its own fastening design. Assess the complete structure for its intended load rather than assuming a stool shape establishes sitting capacity. Smooth edges and transitions for handling. A plant stand version can borrow the silhouette without being presented as a validated human seat.
3. Woven Rope Bench with a Solid Wood Frame
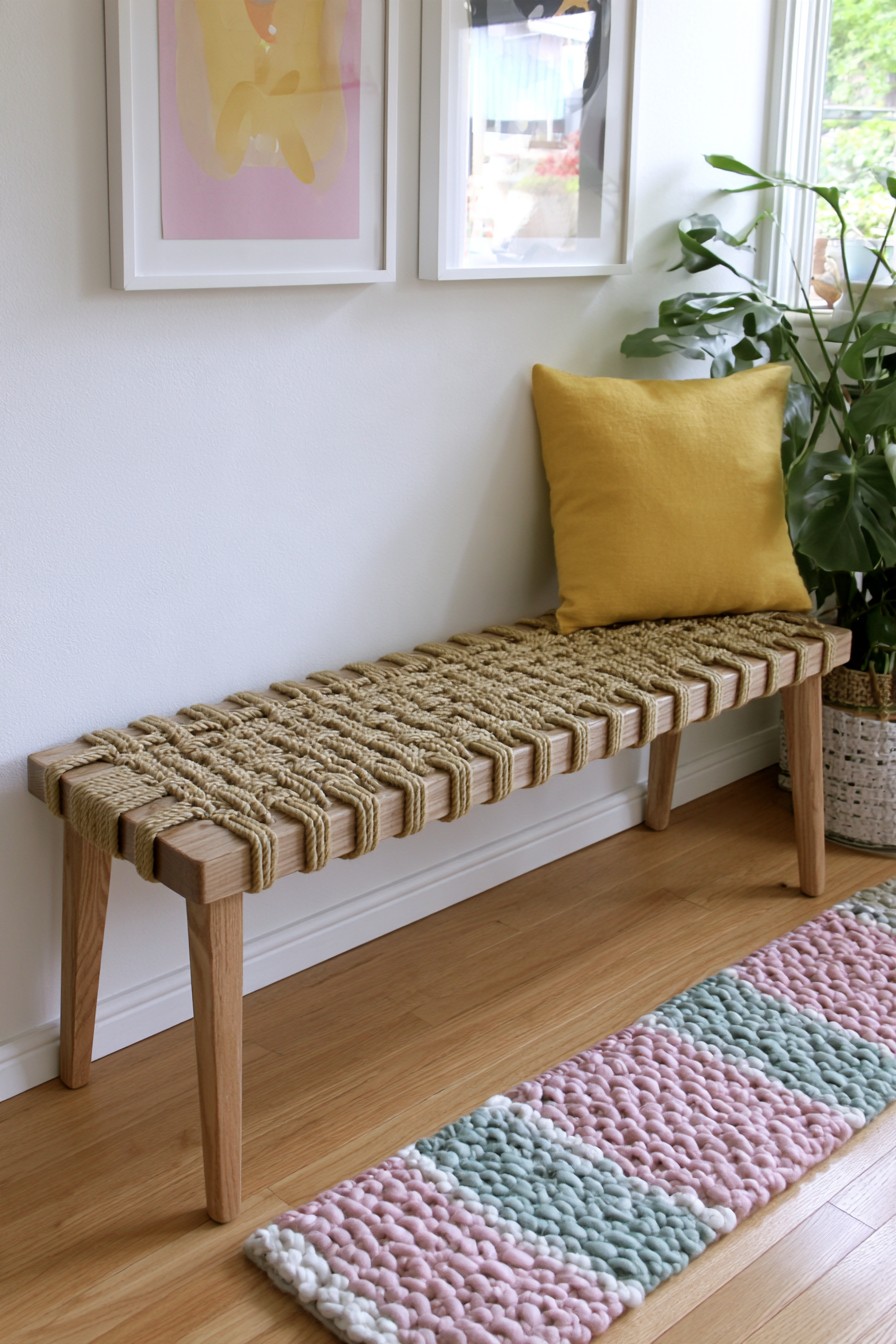
A rectangular timber frame surrounds an evenly spaced rope seat, creating a light bench with tactile contrast. Straight rails provide the shape while the woven surface softens its appearance. It suits a small entry or bedroom seating direction when designed for that use.
Build and brace the bench frame before tensioning the rope. Anchor the first and last lengths securely, maintain even tension without distorting the rails and leave the joints accessible beneath the weaving. Choose rope and a complete frame design intended for human seating, with a way to replace the woven surface.
4. Floating Wooden Nightstand with Drawer and Open Shelf
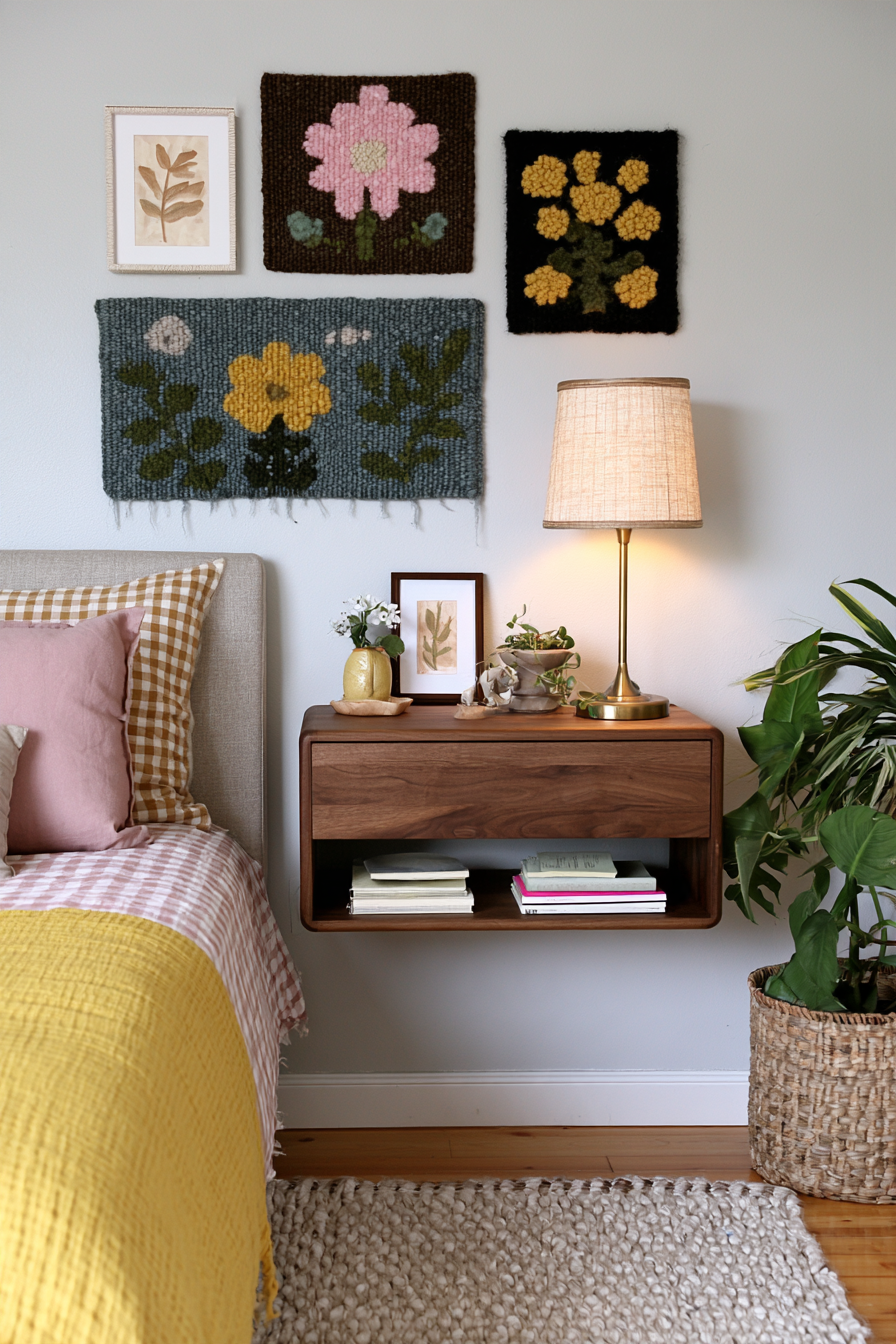
A wall mounted nightstand combines a closed drawer with an open lower shelf, leaving floor space underneath. The rounded box keeps the silhouette compact. Its two storage areas can separate concealed personal items from frequently reached books.
Choose installation height from the mattress and the user’s reach, checking drawer access from the bed. Plan the carcass, runner clearances, and front thickness together. The wall connection must carry the unit, its contents, and use forces, not simply stop it tipping. Keep mounting access available behind or inside the cabinet. Fit the drawer after confirming the box is square, then test full movement before filling the shelf and top with everyday objects.
5. Arched Wooden Trellis for Climbing Houseplants
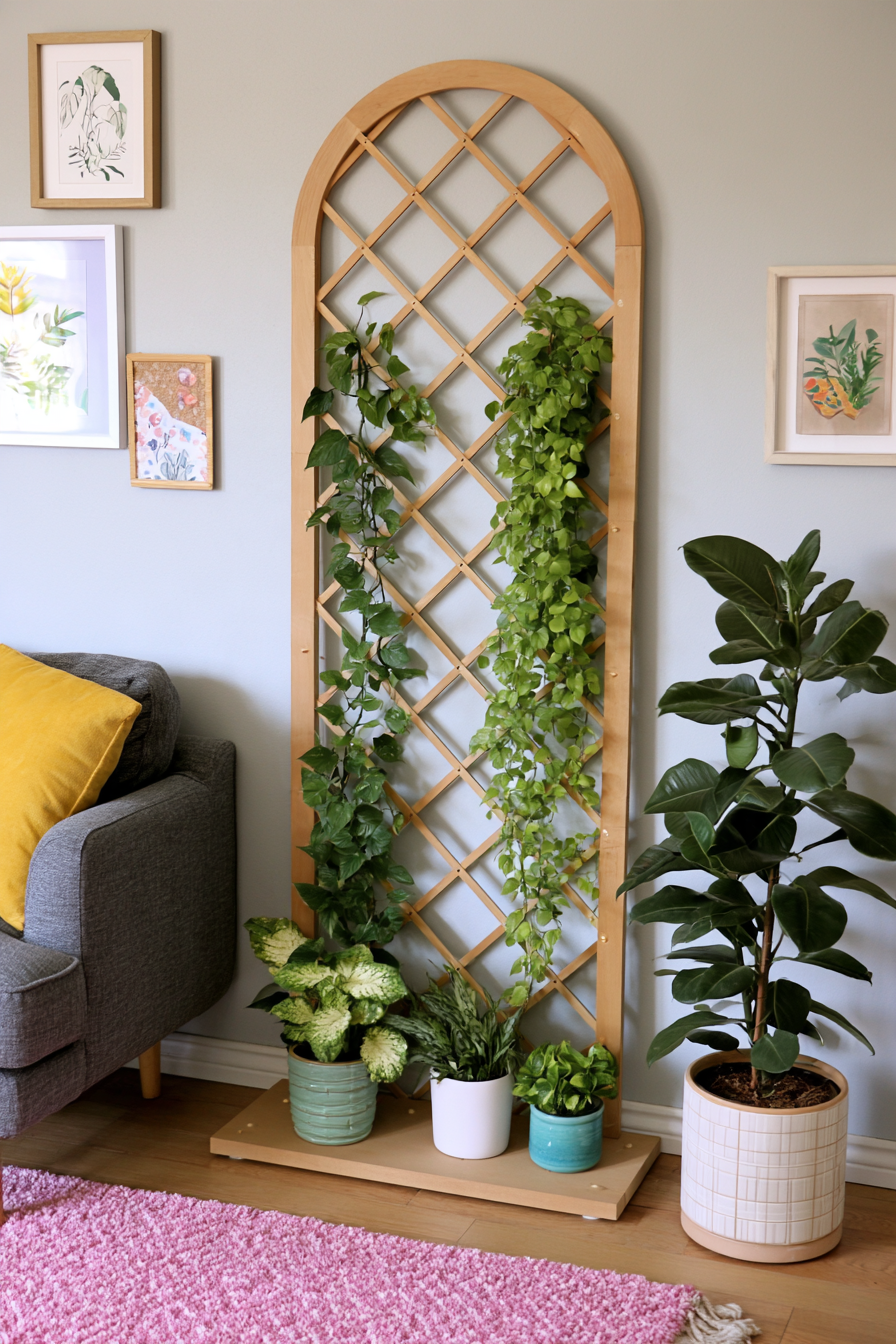
An arched timber trellis gives climbing houseplants a defined upright framework above a broad lower base. Diamond openings provide points for guiding growth. The tall outline can organize foliage without requiring a full wall installation.
Keep the frame stable as plants develop and choose a support or anti tipping arrangement for the intended placement. Guide stems with a method appropriate to the plant, leaving room to reach and prune them. Use removable pots and saucers so water does not collect against the base. A finish cannot replace spill control. Inspect the surface after watering and reassess the arrangement if growing foliage or a heavier pot changes the balance.
6. Curved Plywood Side Table with Sculptural Supports
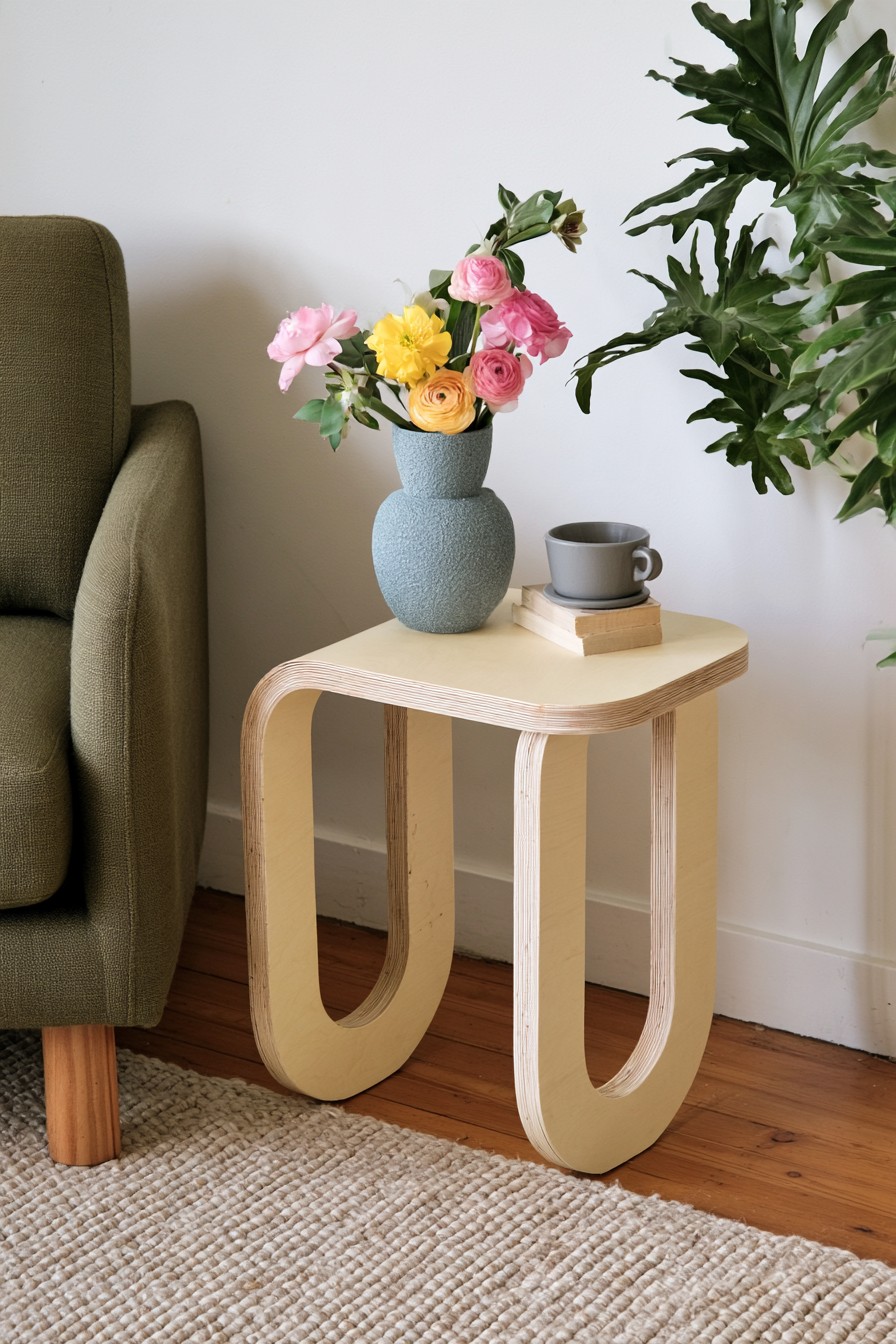
Two curved plywood supports hold a simple side table top, with exposed layers creating much of the decorative interest. The open loops reduce visual bulk beside a chair. A small practical surface remains the focus rather than added ornament.
Choose material and support dimensions for the span and intended tabletop contents. Choose between a curve cut from a suitable blank and a bent laminated element, then plan the material thickness and joints for that method. Trial the supports for consistent alignment and plan their connection to the top. Check stability with intended objects near usable edges instead of assuming a centered vase proves balance. Smooth and protect exposed edges under a finish system suited to normal handling.
7. Modular Wooden Wall Cubes for Flexible Storage
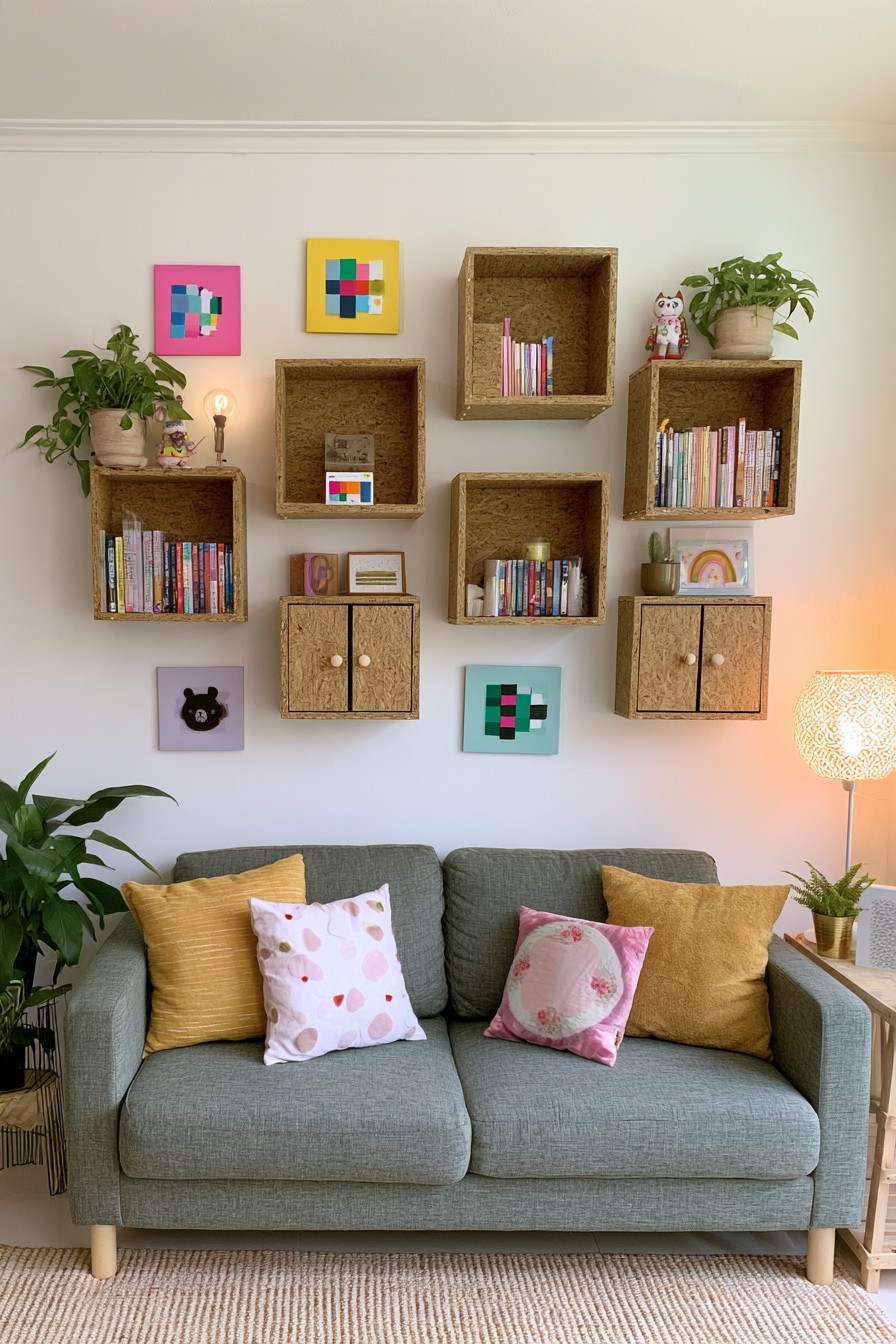
Separate wall boxes create an adaptable composition with open displays and selected closed compartments. Different heights accommodate books and small objects, while visible wall space keeps the group from reading as one dense cabinet.
Use the second collage’s straight panel approach as an assembly reference, planning inside dimensions and door travel before cutting. Box corners, backs, and wall attachments have distinct load roles. A larger cube is not automatically stronger than a smaller one. Plan each mount for its actual contents and depth. Leave enough access around closed modules for handles and hinges, and evaluate new boxes independently if the composition expands later.
8. Rounded Wood Mirror with a Coordinating Floating Shelf
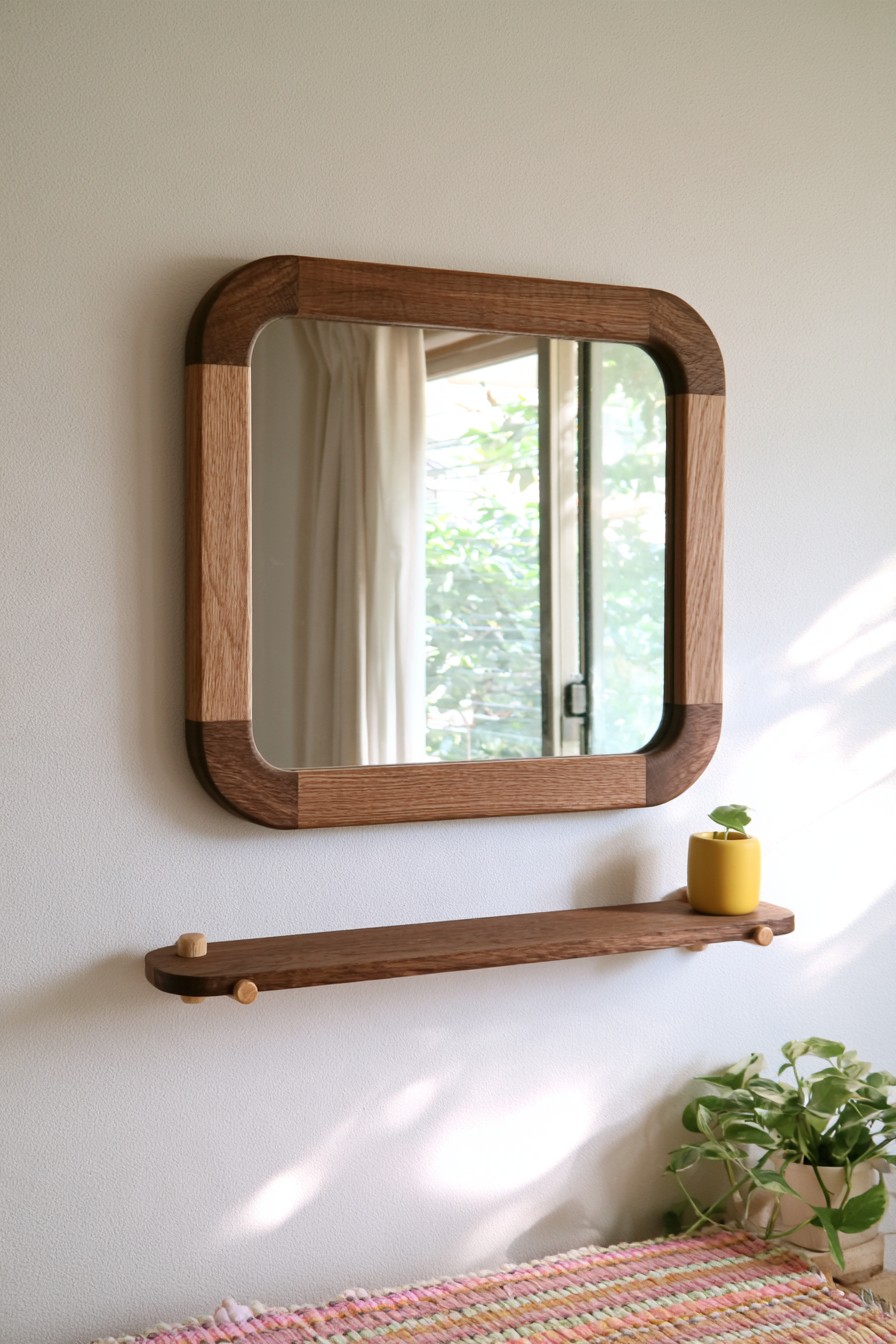
A rounded wooden mirror sits above a shallow matching shelf, linking a reflective surface with a small everyday landing place. Different wood tones define the frame without requiring painted ornament. The separated shelf keeps its purpose visible.
Retain the glass within a frame construction appropriate to its size and weight, with no pressure from an uncertain improvised edge joint. Plan the mirror mount and shelf support individually. Measure shelf depth from the items you want to place there and keep it clear of the room’s approach. A small pot needs a saucer and access for removal; keys or compact containers need less depth. Matching finish does not mean both objects can share one fixing arrangement.
9. Arched Wall Shelf for Books and Decorative Objects
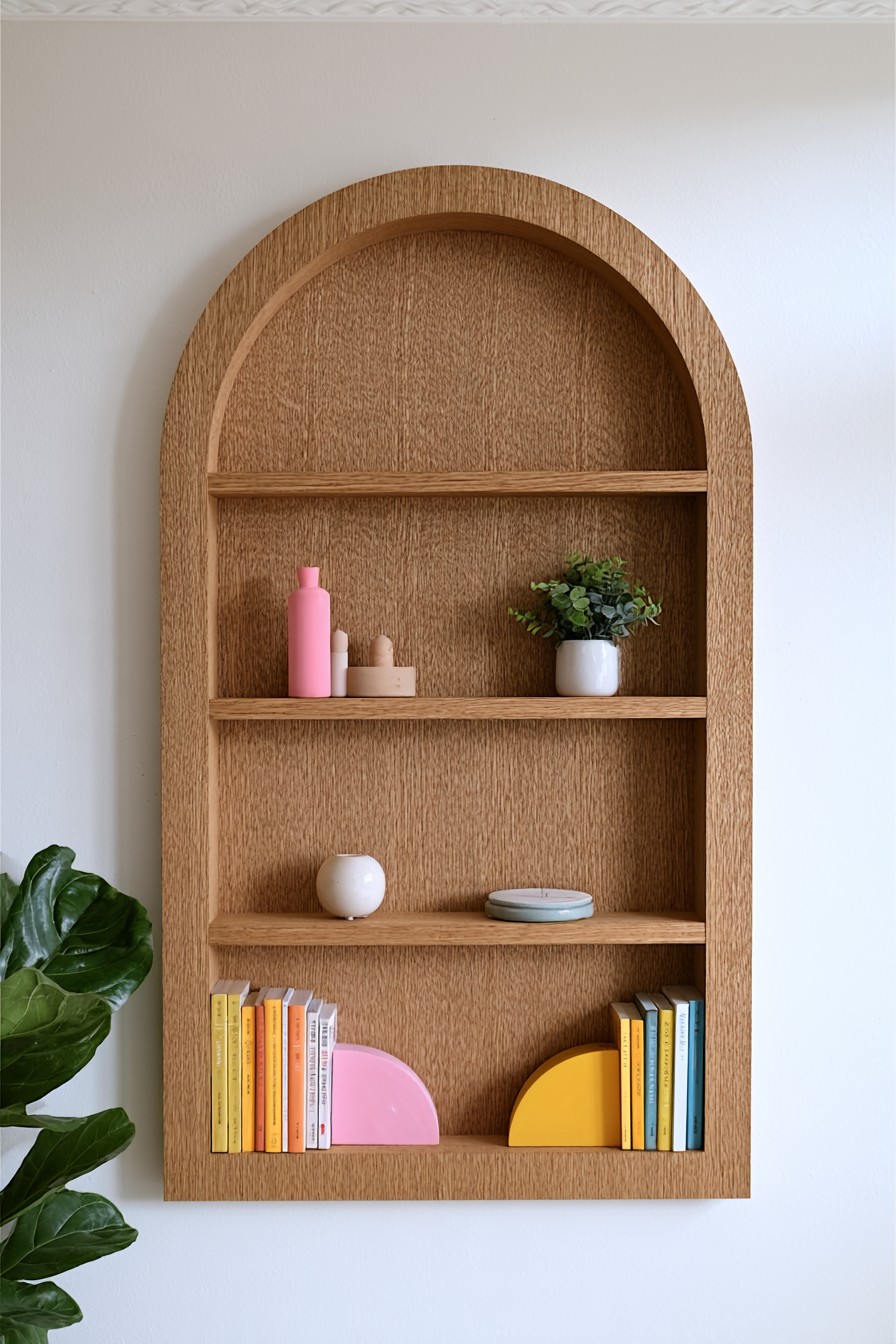
An arched surround frames several horizontal shelves, with a deeper lower area holding books. The broad background unifies useful storage and decorative objects. Its shape adds an architectural outline to a plain wall.
Determine shelf depth and spacing from the books or containers you actually own, allowing for the frame thickness. Connect shelves to a supporting structure, then assess that structure’s wall attachment for the complete loaded weight. Greater projection increases demands on the mounting, not just usable storage. Keep heavy or frequently used items where you can reach them comfortably. The arch may be prepared from shaped board or other joinery; its finished outline is not a cutting template.
10. Tiered Wooden Plant Stand with Offset Platforms
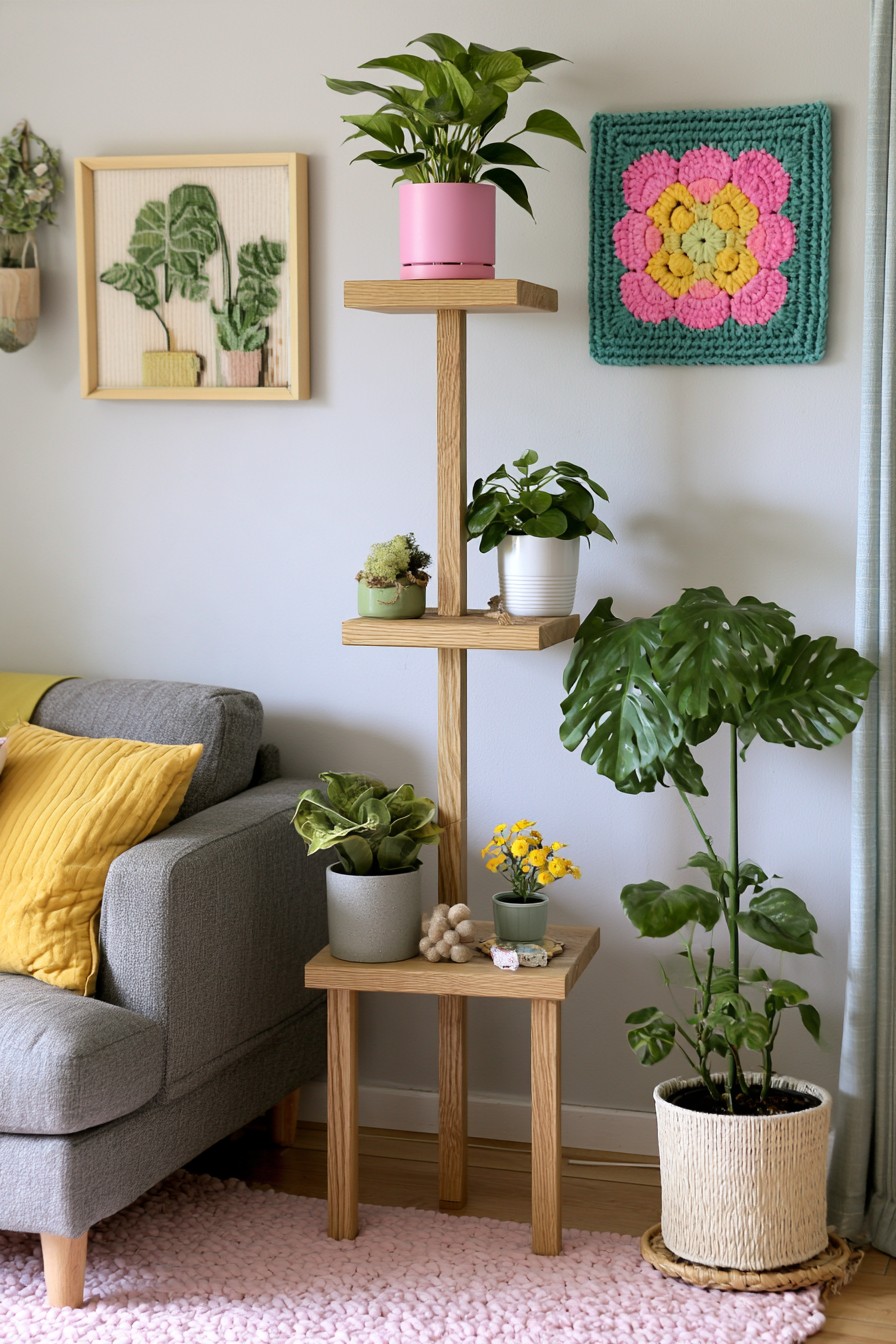
Offset platforms arrange several plants at different heights around a narrow upright. The lower table like base gives the stand a clearer footprint. Each plant receives more growing space than it would in a tightly grouped row.
Plan platform connections and balance for the pots at their watered weight, considering their positions as well as size. Remove pots for watering when practical and use appropriate saucers. Dry the platforms after spills; a protective finish does not make standing water harmless. Keep upper pots within maintenance reach and reassess the setup as plants grow. A light looking container may still become heavy with soil and water, so placement should follow the stand’s design rather than appearance alone.
11. Rolling Wooden Storage Cart with Three Open Levels
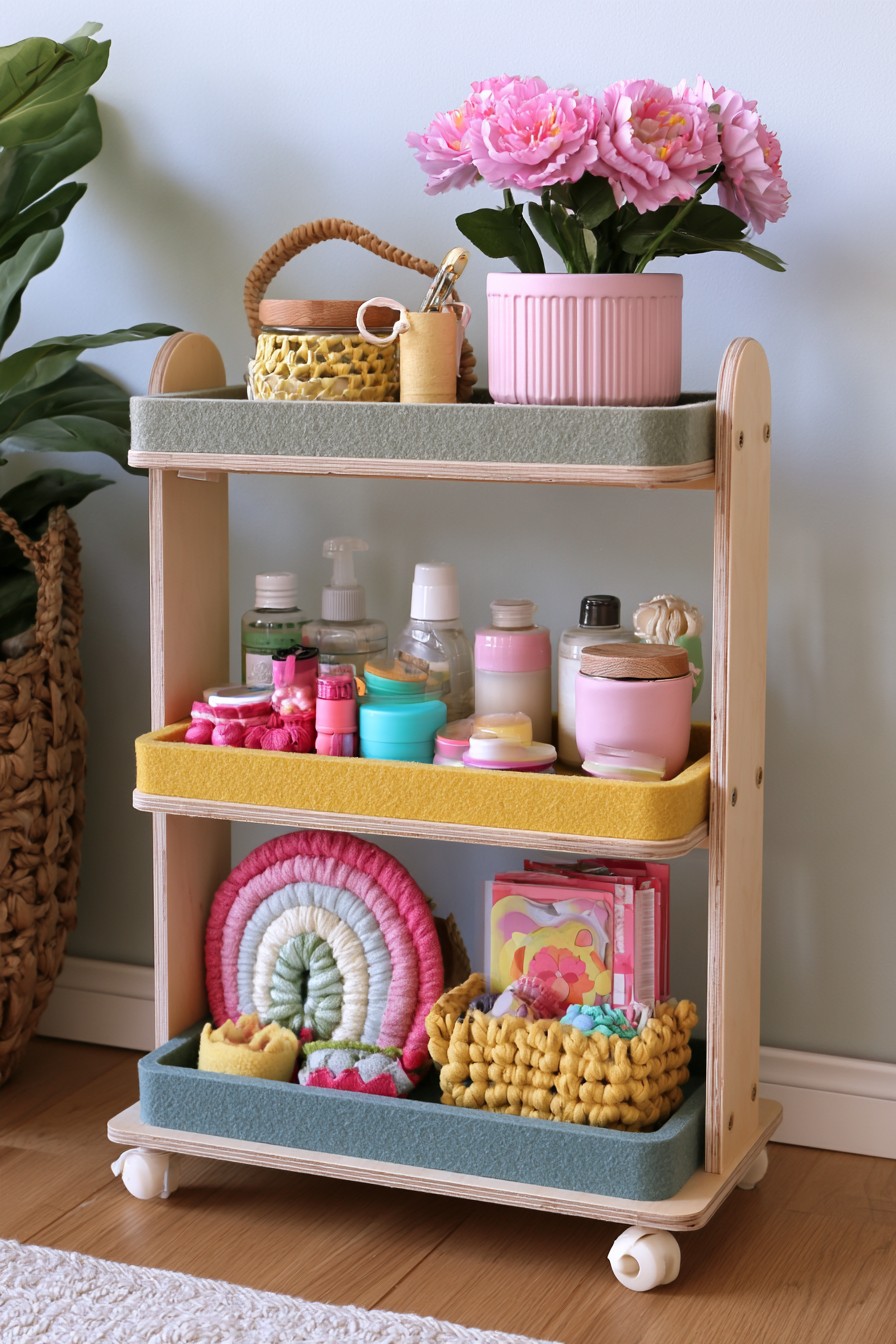
Three open levels and raised tray edges give this cart visible, portable storage. Different supplies can occupy separate tiers without disappearing into deep drawers. The rounded side frame connects the shelves into one compact moving unit.
Choose casters for the expected load, floor, and fastening arrangement, with appropriate locking when the cart is used stationary. Measure overall width including projecting handles or wheels, then check the actual doors and thresholds it will cross. Keep heavier supplies low and small objects in supported containers. Trial reaching the upper tray with the cart stopped so it does not roll or tip during access. The back and shelf joints still need to resist the forces of moving loaded storage.
12. Low Wooden Lounge Seat with a Thick Cushion
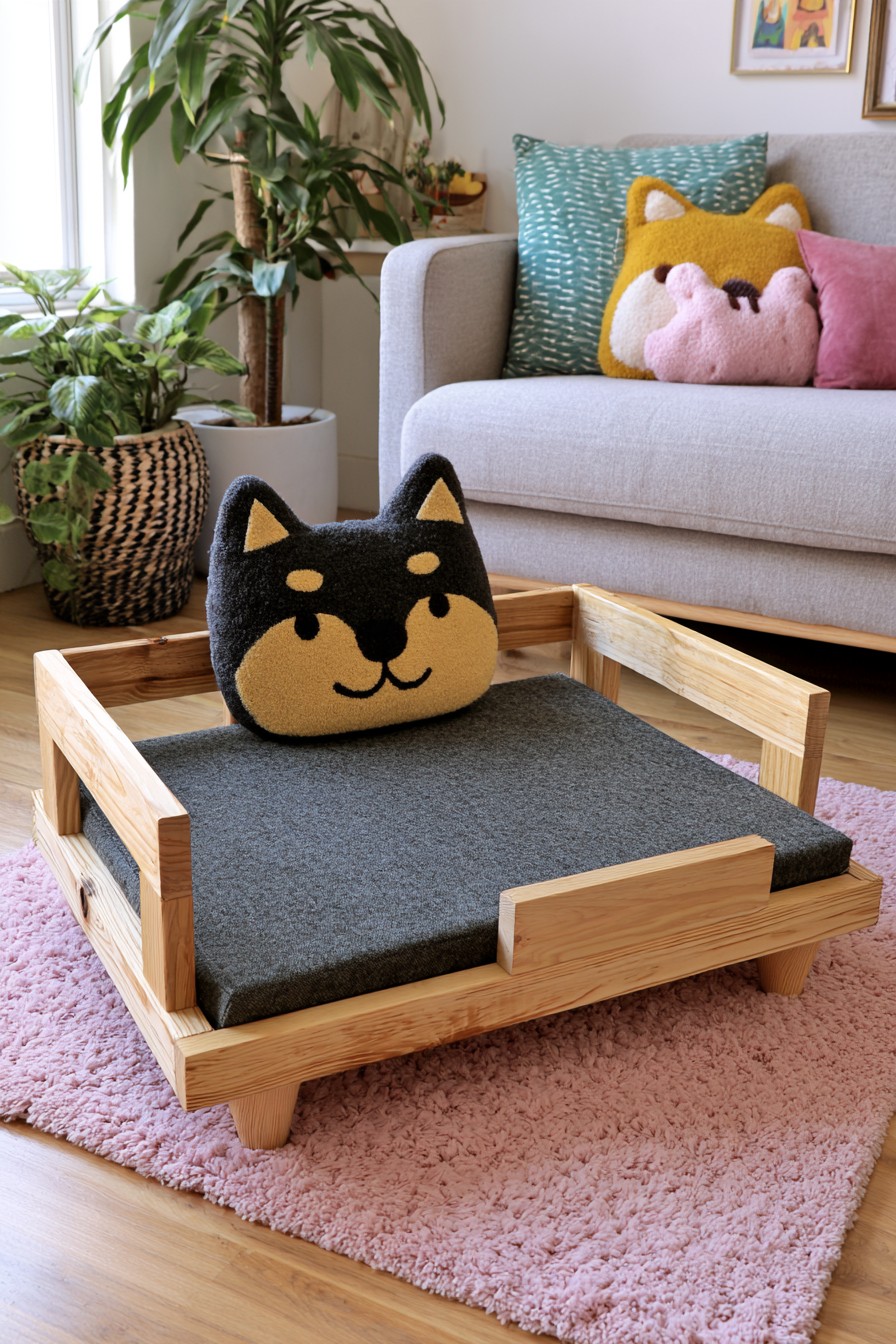
A low timber frame surrounds a thick flat cushion, with open sides keeping the support visible. Its reduced height gives the piece an informal lounge character. A decorative back pillow can personalize it without changing the seat’s basic structure.
Design the rails, corners, and base for intended seating use and repeated movement. Seat cushioning needs support and comfort appropriate to that task; a decorative pillow is not a substitute for it. Keep the cushion removable so joints can be inspected. These handmade pillow and cover ideas can supply a decorative back accent, not a seat construction plan. Check whether the low height suits the people who will use it.
13. Tall Arched Display with Staggered Shelves
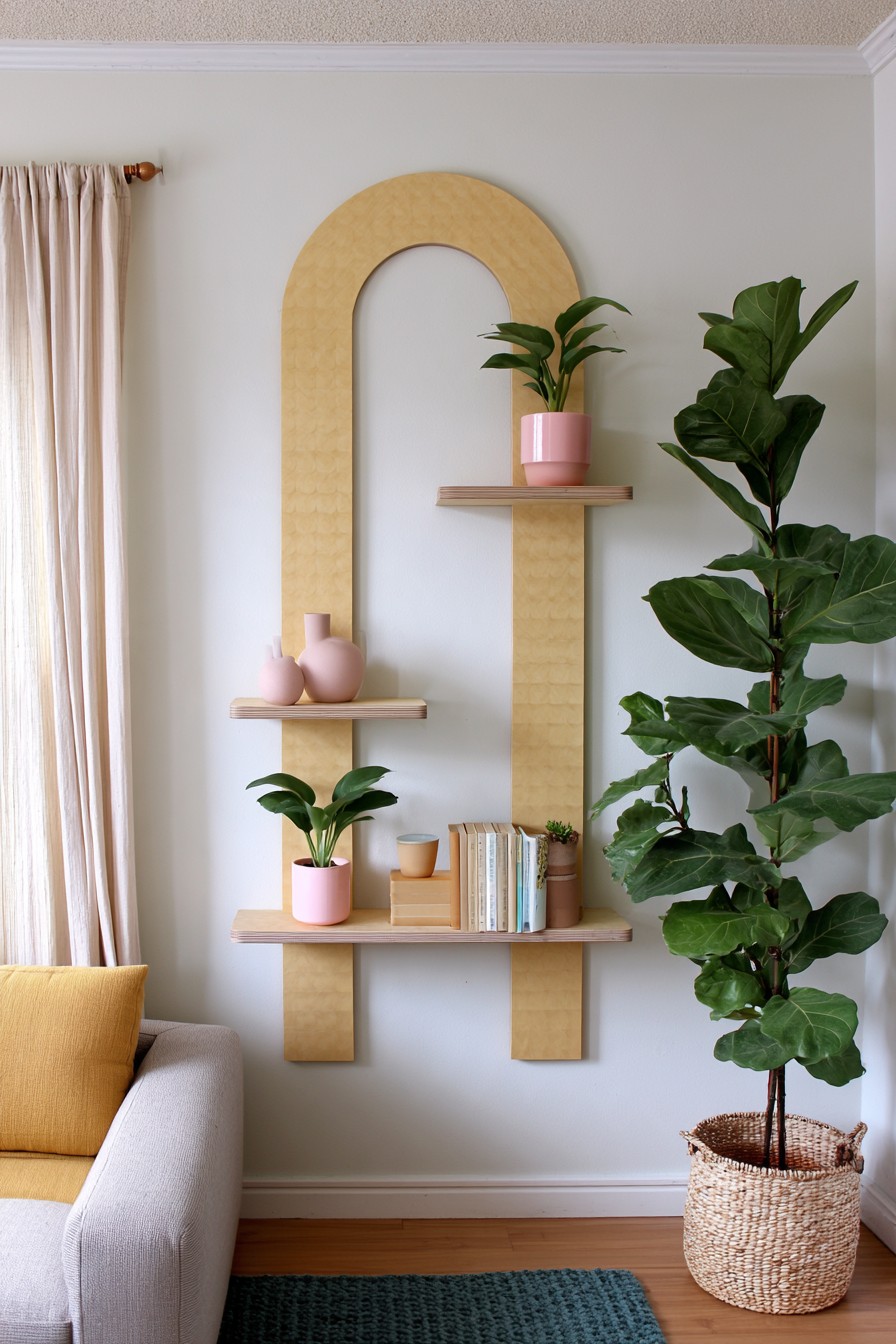
A tall arch carries three staggered shelf positions while remaining suspended above the floor. Plants, books, and ceramics occupy different height openings. The narrow outline uses a wall area that a broad cabinet might fill too heavily.
Follow the first collage’s distinction between frame joints, shelf brackets, and wall fixings. Because this piece does not stand on the ground, its mount must carry the complete loaded display, not only prevent tipping. Include pots at their watered weight and assess shelf projection. Use saucers, remove plants for watering where practical, and retain access to every bracket and fastening. The displayed staggered arrangement should follow maintenance reach as well as visual balance.
14. Sculptural Wooden Floor Lamp with an Arched Frame
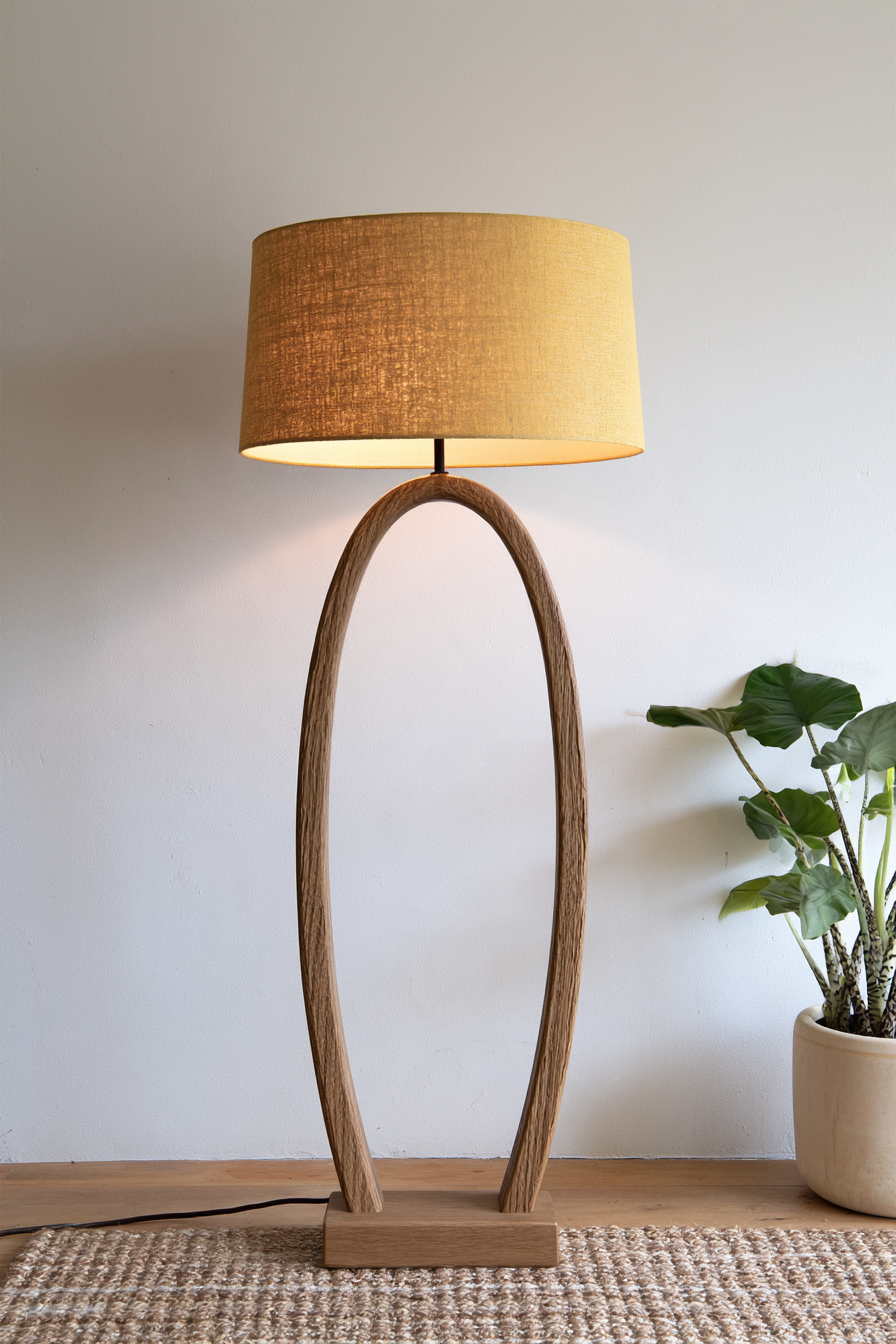
An elongated wooden arch supports a shade above a wider base, giving the lamp a sculptural outline. The open center keeps the piece lighter visually than a solid column. The wood structure and lighting assembly contribute separate requirements.
Choose a construction plan that addresses the curved member’s connection to the base and overall stability. Resolve the shade and electrical mounting with appropriately rated components, including cable routing and strain relief. Use qualified electrical help when you lack the necessary competence. Keep timber clear of heat producing parts and preserve access for inspection. Choose a cut or laminated arch according to the design, and have any electrical fittings installed with their required wiring access and operating clearances.
15. Geometric Wood Display with Colored Back Panels
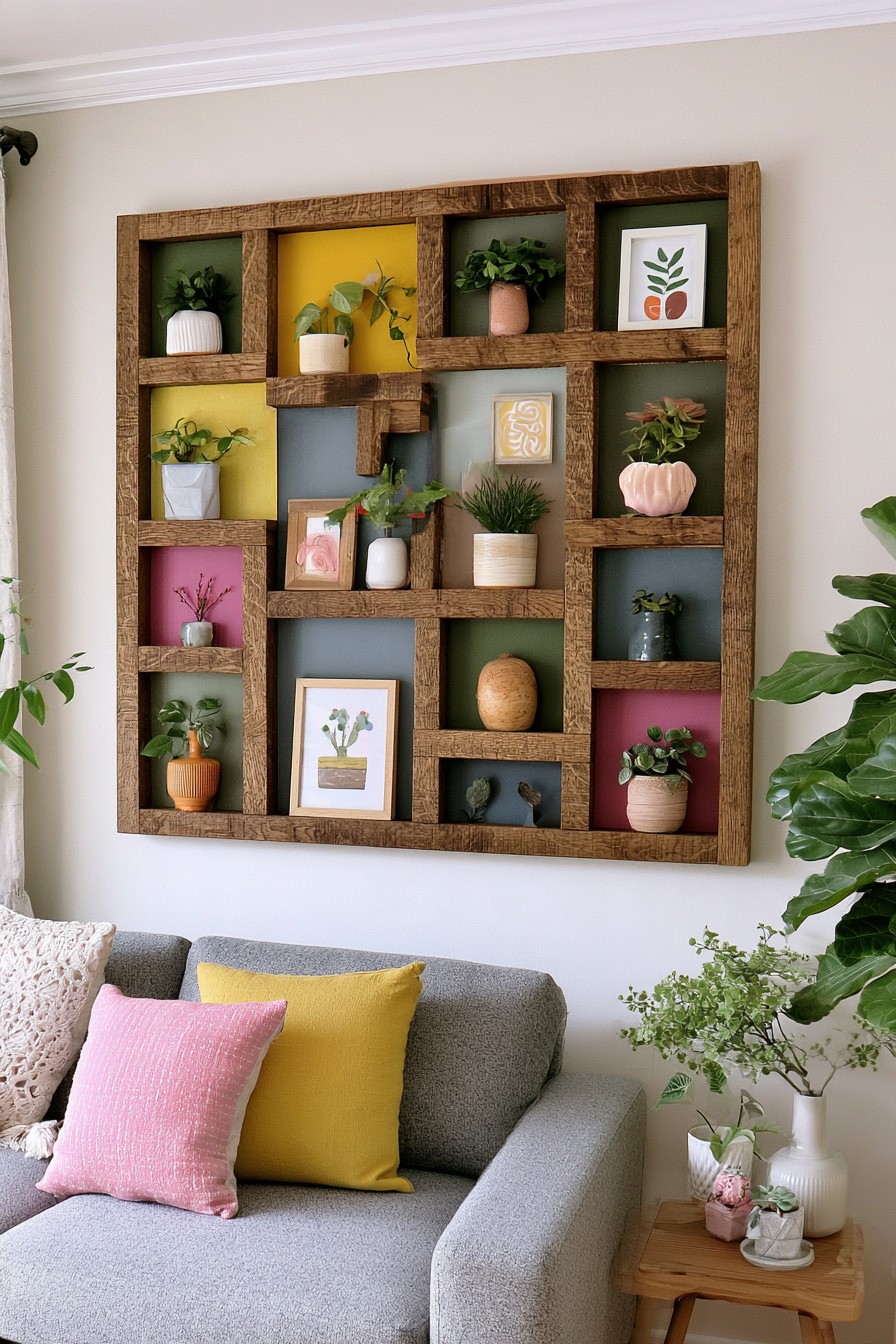
An irregular timber grid gives small plants and decorative objects their own compartments, with colored back sections adding contrast. Some spaces stay open, preventing the display from becoming visually overloaded. The geometry organizes objects of different proportions.
Plan compartments from real contents, including room to lift pots out without catching foliage. The back sections must be assessed for their actual role; a decorative colored insert is not automatically a structural back. Connect the grid and mounting for the complete loaded arrangement. Use saucers and keep plant removal possible for watering and drying the wood. Simplify the grid if many narrow compartments would make fastening, cleaning, or maintenance access difficult.
16. Wall Mounted Plywood Desk with an Upper Shelf
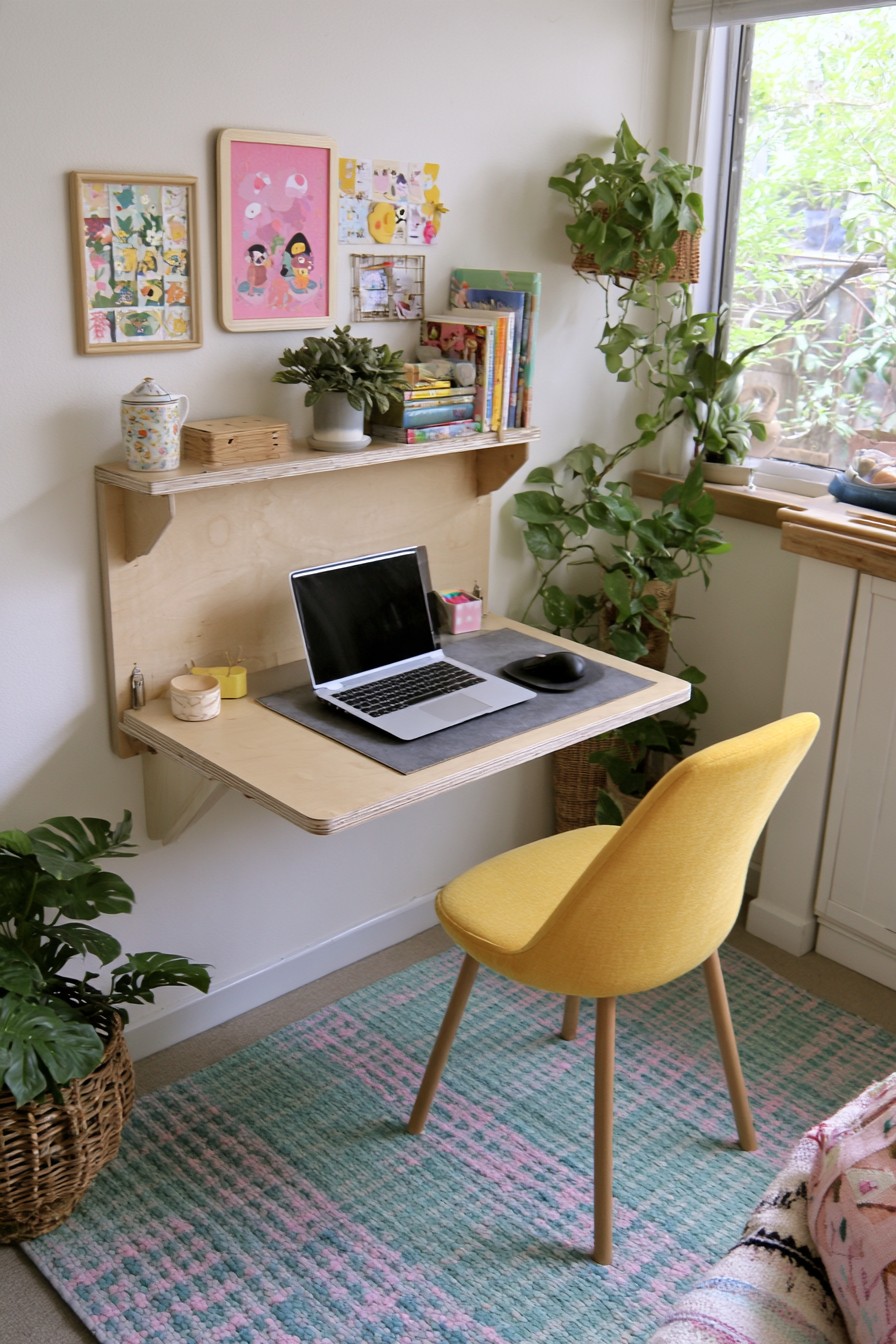
A broad wall mounted work surface sits below an upper shelf, making a compact desk with clear floor space. The simple plywood forms keep the workstation visually restrained. Moving books upward leaves more of the lower surface for working.
Set height from the actual chair and user, checking knee room, reaching distance, and usable depth. Include panel thickness and support projection in those measurements. Plan the desk mount for its own weight, equipment, and pressure during work, rather than assuming a laptop’s weight is the only load. Keep the upper shelf reachable without making it another obstacle. Material selection should account for span, edge condition, fastening regions, and moisture exposure from nearby plants.
17. Wooden Plate Racks with Simple Peg Supports
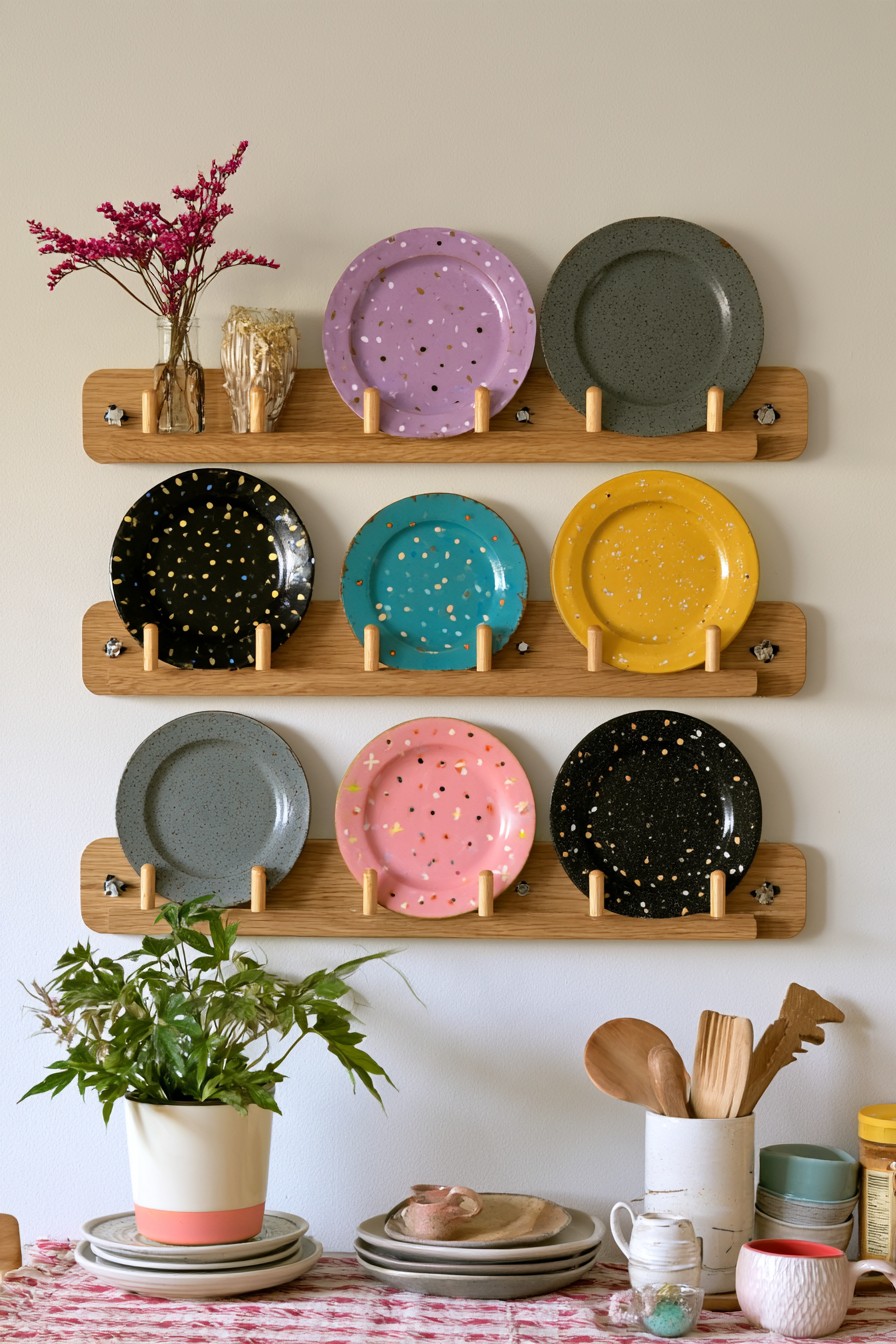
Slim timber rails and pairs of pegs display plates upright, turning dish patterns into wall decoration. The repeated rows offer an alternative to storing every piece inside a cupboard. The open structure lets each plate remain visually distinct.
Trial the rack with the real plates before setting peg spacing. Each plate needs a reliable lower support and enough room to be lifted out without touching its neighbor. Consider rim thickness and weight as well as diameter. Smooth contact areas to reduce scratching, and connect the rack to the wall for the total dishes and timber. A peg that separates plates is not necessarily the component carrying their weight; establish those roles in the design.
18. Multifunctional Wall Organizer with Pegboard and Drawer
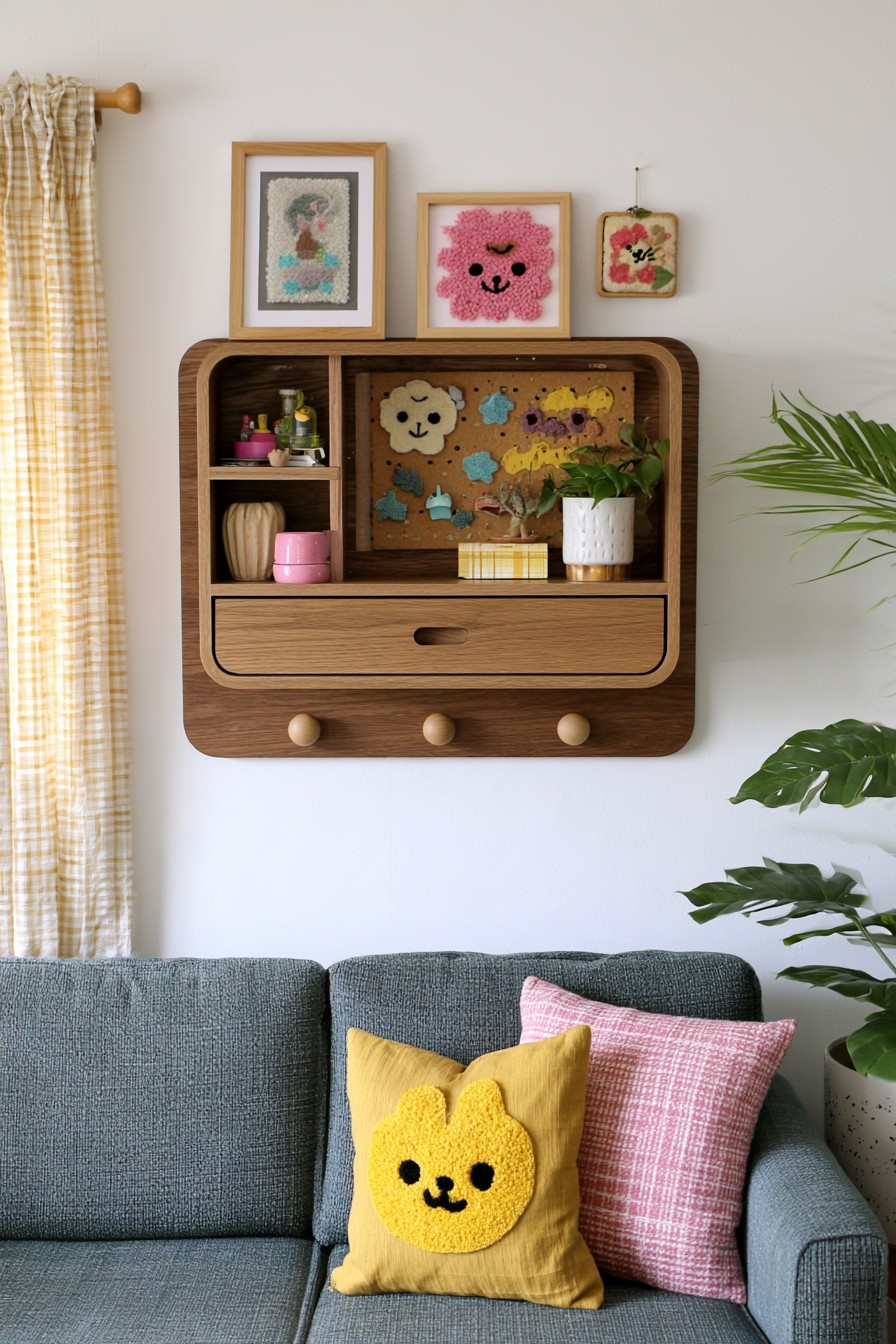
A rounded wall organizer combines open cubbies, a pegboard area, a lower drawer, and small hanging pegs. Different storage methods fit within one frame, leaving each function visible. The arrangement can suit a craft corner or compact entry.
Choose the contents first, then size the drawer, cubbies, and peg spacing around them. Allow the drawer to travel without catching hanging accessories. The unit’s wall fixing must support both stored objects and use forces when the drawer is pulled. Plan the pegboard fittings for their intended items rather than treating all hooks alike. Keep the rear mounting accessible and test each function on the assembled unit before filling every compartment.
19. Folding Wooden Breakfast Tray with Raised Sides
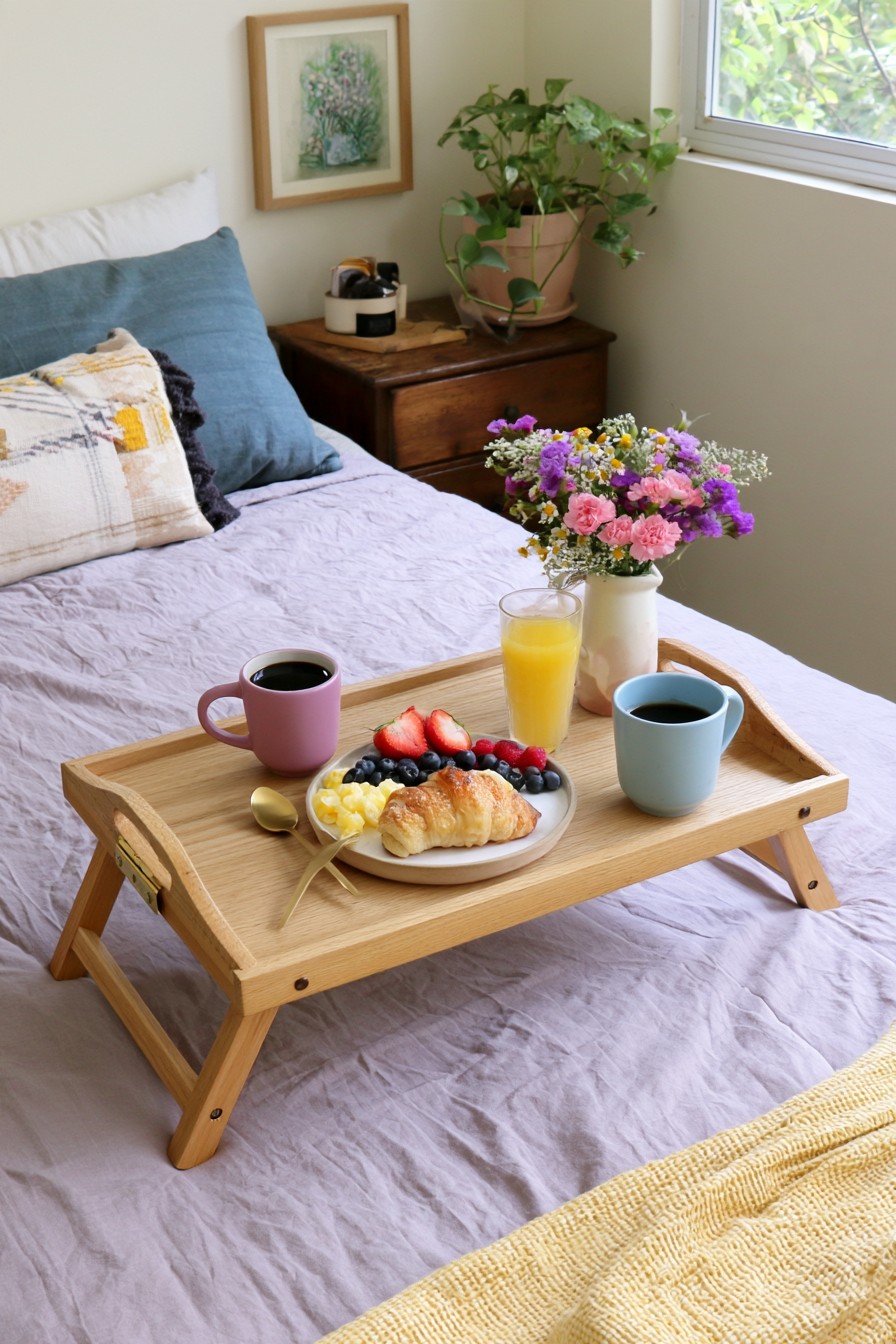
A raised rim surrounds a wooden tray with folding legs, allowing a temporary surface above bedding or another suitable resting area. The simple shape can serve refreshments or hold a lightweight book. Folding changes the storage footprint without altering the top’s purpose.
Design how the legs are retained in their fully open position, using an appropriate stop or locking arrangement specified for the selected mechanism. Fit the locking mechanism specified for the folding assembly and test its engagement before use. Check hinge movement and finger clearance before use. A rim reduces sliding but does not guarantee spill protection. For direct food contact, choose a finish explicitly suitable for the intended use and follow its curing instructions; decorative furniture coatings are not interchangeable with that requirement.
20. Tiered Wooden Rack for Books and Small Artwork
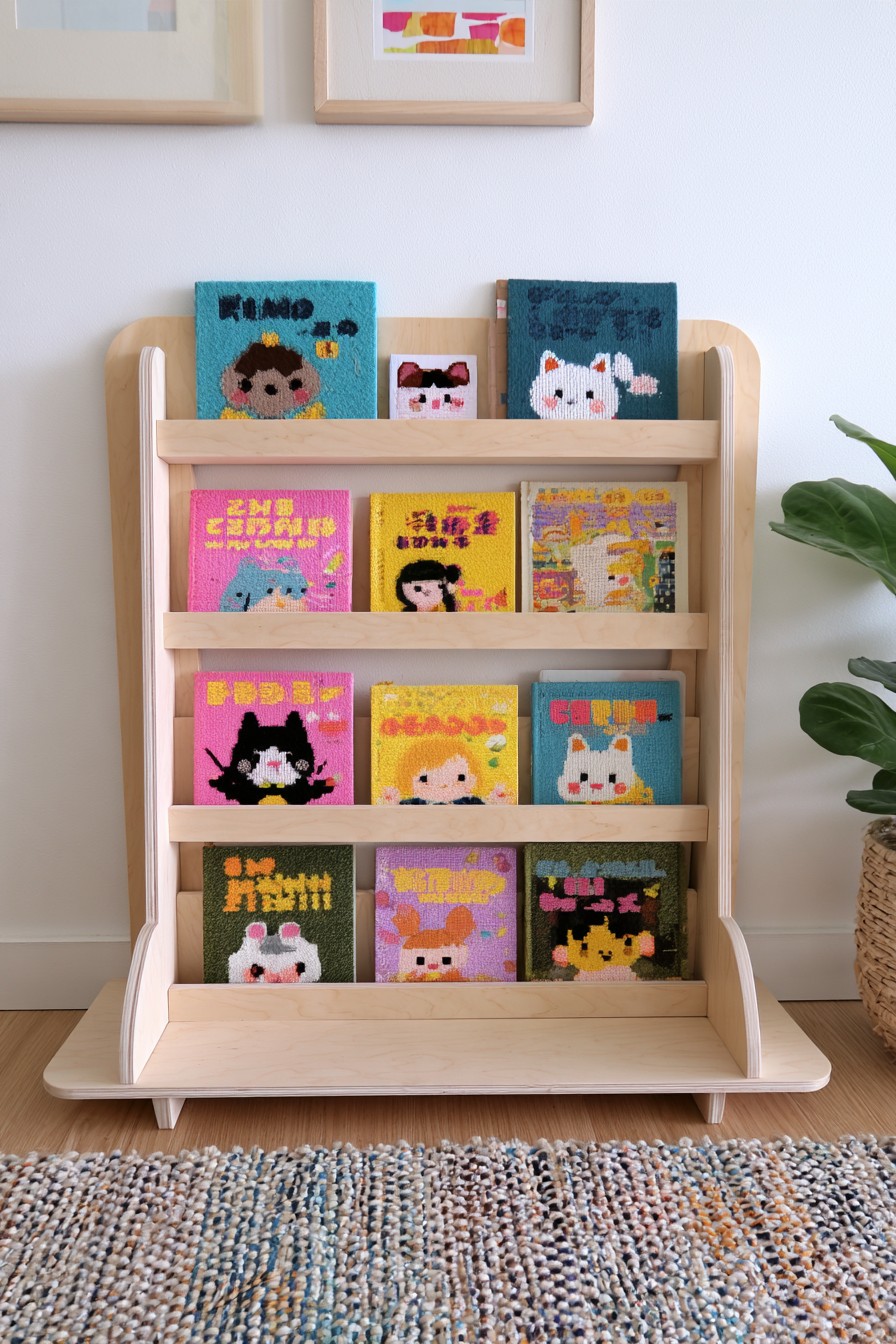
Several tiers display books and small artwork from the front, with retaining rails along their lower edges. The broad base and repeated pale frame create a simple reading display. Covers remain visible instead of being reduced to a row of spines.
Measure the actual books’ height, thickness, and weight before planning shelf spacing. Leave room to lift one out without dislodging another, and keep retaining rails high enough for their job without hiding important cover details. Assess the rack’s base and any required anti tipping connection for the intended setting. This is a different mounting task from suspending a shelf’s entire weight. Smooth accessible edges and choose the overall height for the people who will use it.
21. Wooden Cat Ramp with Raised Climbing Steps
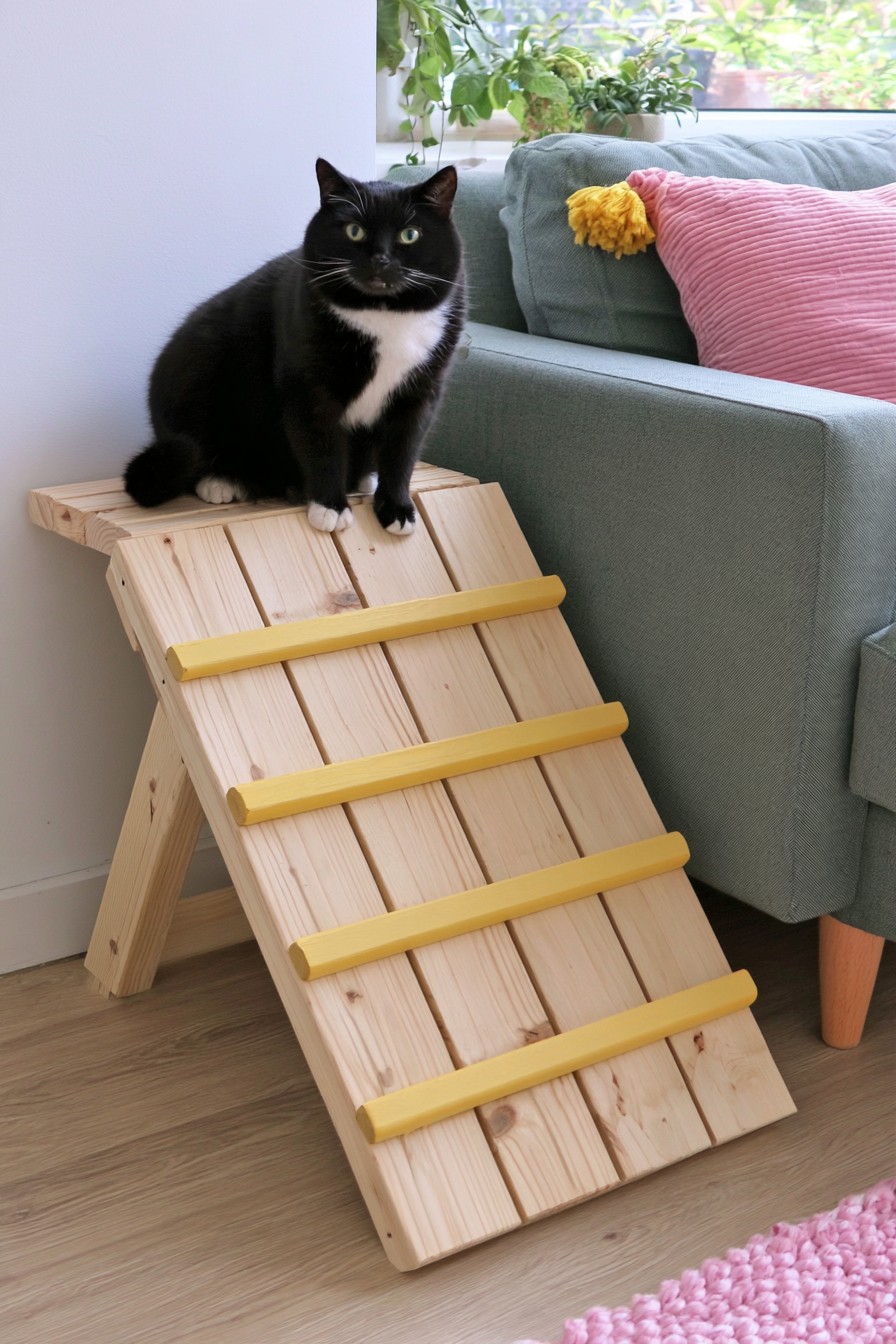
A sloping timber surface with raised crosspieces leads to a small upper platform beside a sofa. The battens provide defined steps along the approach. The design addresses pet access rather than human seating or a decorative plant display.
Plan the upper platform’s relation to the target furniture so it provides a usable transition, with no unstable gap. Select the slope and surface for the particular pet instead of offering one angle for every cat. Keep the base stable and use an appropriate nonslip, cleanable surface where needed. Arrange attachments so they can be inspected and the tread area cleaned. If a pet shows pain or significant movement difficulty, seek veterinary advice alongside any change to furniture access.
Complete the Plan Before the Build
Choose the project’s purpose, measure the real contents or user, and draw the parts with their thickness and joints included. Identify what supports each load and which connections must stay accessible. Confirm material and finish requirements before cutting, then dry assemble to check fit. These decisions are more useful than copying proportions from a photograph.
After assembly and the required curing, check function within the construction plan’s limits. Keep inspection and maintenance practical: remove pots to dry shelves, take cushions off to reach seat joints, and check moving hardware. A decorative appearance should remain connected to the object’s everyday use, with supports designed for the work they actually perform.

Leave a Reply