
A drawer makeover has to look good while still sliding freely. Compare 25 treatments in paint, rope, cane, fabric and shallow relief, with guidance on thickness, handle clearance and attachment. The two making collages show textile-covered drawers and replacement panels. Cabinet-door examples include suggestions for fitting their motifs to smaller drawer fronts.
Table of Contents
- Choose the Scope of Your Makeover
- Check the Surface and Working Parts First
- Plan Attachments, Clearance, and Handles Together
- Collage 1: Personalize Existing Drawers with Textile Faces
- Collage 2: Renew Drawer and Door Fronts Separately
- 25 Front Designs to Adapt to Your Furniture
- 1. Rope Framed Drawer Fronts with Woven Texture
- 2. Scalloped Drawer Fronts with Layered Color
- 3. Fabric Inset Drawer Fronts with Scalloped Trim
- 4. Embroidered Drawer Fronts with Soft Textile Details
- 5. Lace Panel Drawer Fronts for a Soft Vintage Finish
- 6. Woven Cane Drawer Fronts with Botanical Wood Details
- 7. Gothic Drawer Fronts with Architectural Appliqués
- 8. Distressed Gothic Drawer Fronts with Arched Detailing
- 9. Gothic Drawer Fronts with Velvet Panels and Ring Pulls
- 10. Gothic Arch Drawer Fronts with a Crackled Painted Finish
- 11. Embroidered Floral Drawer Fronts with Crescent Moon Details
- 12. Rustic Gothic Drawer Fronts with Cutout Arch Details
- 13. Vertical Slat Drawer Fronts with Natural Wood Texture
- 14. Mixed Wood and Fabric Drawer Fronts with Brass Label Pulls
- 15. Arched Botanical Cabinet Panels Adapted to Drawers
- 16. Framed Floral Drawer Fronts with Mixed Color Blocks
- 17. Velvet Drawer Fronts with Carved Frames and Antique Hardware
- 18. Painted Butterfly Drawer Fronts with Brass Bar Pulls
- 19. Pink Gothic Drawer Fronts with Bold Cutout Motifs
- 20. Tufted Textile Drawer Fronts with Geometric Flower Motifs
- 21. Crocheted Drawer Fronts with Floral Appliqués and Vintage Pulls
- 22. Celestial Drawer Fronts with Moon Phase and Star Motifs
- 23. Painted Star Cabinet Panels Adapted to Drawer Fronts
- 24. Starburst Cabinet Relief Adapted to Drawers
- 25. Gothic Arch Cabinet Fronts Adapted for Drawer Makeovers
- Finish with One Complete Working Front
Choose the Scope of Your Makeover
Painted motifs in 18, 22, and 23 change the profile very little. Textile inserts need a backing and cleaning plan. Slats and relief pieces add thickness and weight. Cutting or replacing fronts, as explored in 12, requires a separate assessment of the material and its connections. Measure each drawer front and check its movement before sizing decorative panels or choosing their attachments.
Decide how many drawers you will update, whether existing handles can stay, and what repairs or cutting are needed. Test one complete front before repeating the treatment. Use the actual furniture’s gaps and mechanism requirements instead of a universal clearance measurement.
Check the Surface and Working Parts First
Identify solid wood, thin veneer, a painted finish, or laminate before preparing it. Inspect lifting edges, loose coverings, and peeling paint. Clean away grease and residue using a method compatible with the surface, then follow the chosen finish system’s preparation and primer instructions. Thin veneer can be damaged by aggressive sanding. If an older coating may contain hazardous material, establish an appropriate handling method before sanding or cutting it.
Fix existing alignment or rubbing issues before adding decoration. Label removed drawers and hardware so they return to the right positions. Gather measuring and marking tools, a screwdriver, the selected panel materials, and any cutting or fastening tools the method requires. Secure workpieces and follow tool instructions, with appropriate eye protection and dust control for cutting and sanding.
Plan Attachments, Clearance, and Handles Together
Choose adhesive for both surfaces being joined, including any existing finish. Test compatibility on a small area and follow the specified pressure, application, and full curing requirements. Apply it to the hidden contact area before placing the piece; keep visible edges free of excess. For textile on painted laminate, choose an adhesive specifically compatible with the fabric and the prepared laminate surface.
For a removable textile adaptation, fit the fabric to a rigid backing and plan accessible mechanical fasteners for that backing. One option, where the construction permits it, is screws from the rear of the original front into an appropriate panel, selected so they cannot emerge through its face. Confirm substrate thickness and connections first. A permanently glued insert is not removable. Fabric fixed to a backing may also need separate detachable construction if it is to be cleaned off the panel.
Mock up one front with the intended thickness, then open and close the drawer completely. Check the surrounding carcass, neighboring fronts, and the handle’s full movement. Measure total thickness for handle screws, follow the hardware instructions, and provide a firm seating point instead of crushing a soft textile layer. Leave access to every fastening needed for future removal.
Collage 1: Personalize Existing Drawers with Textile Faces
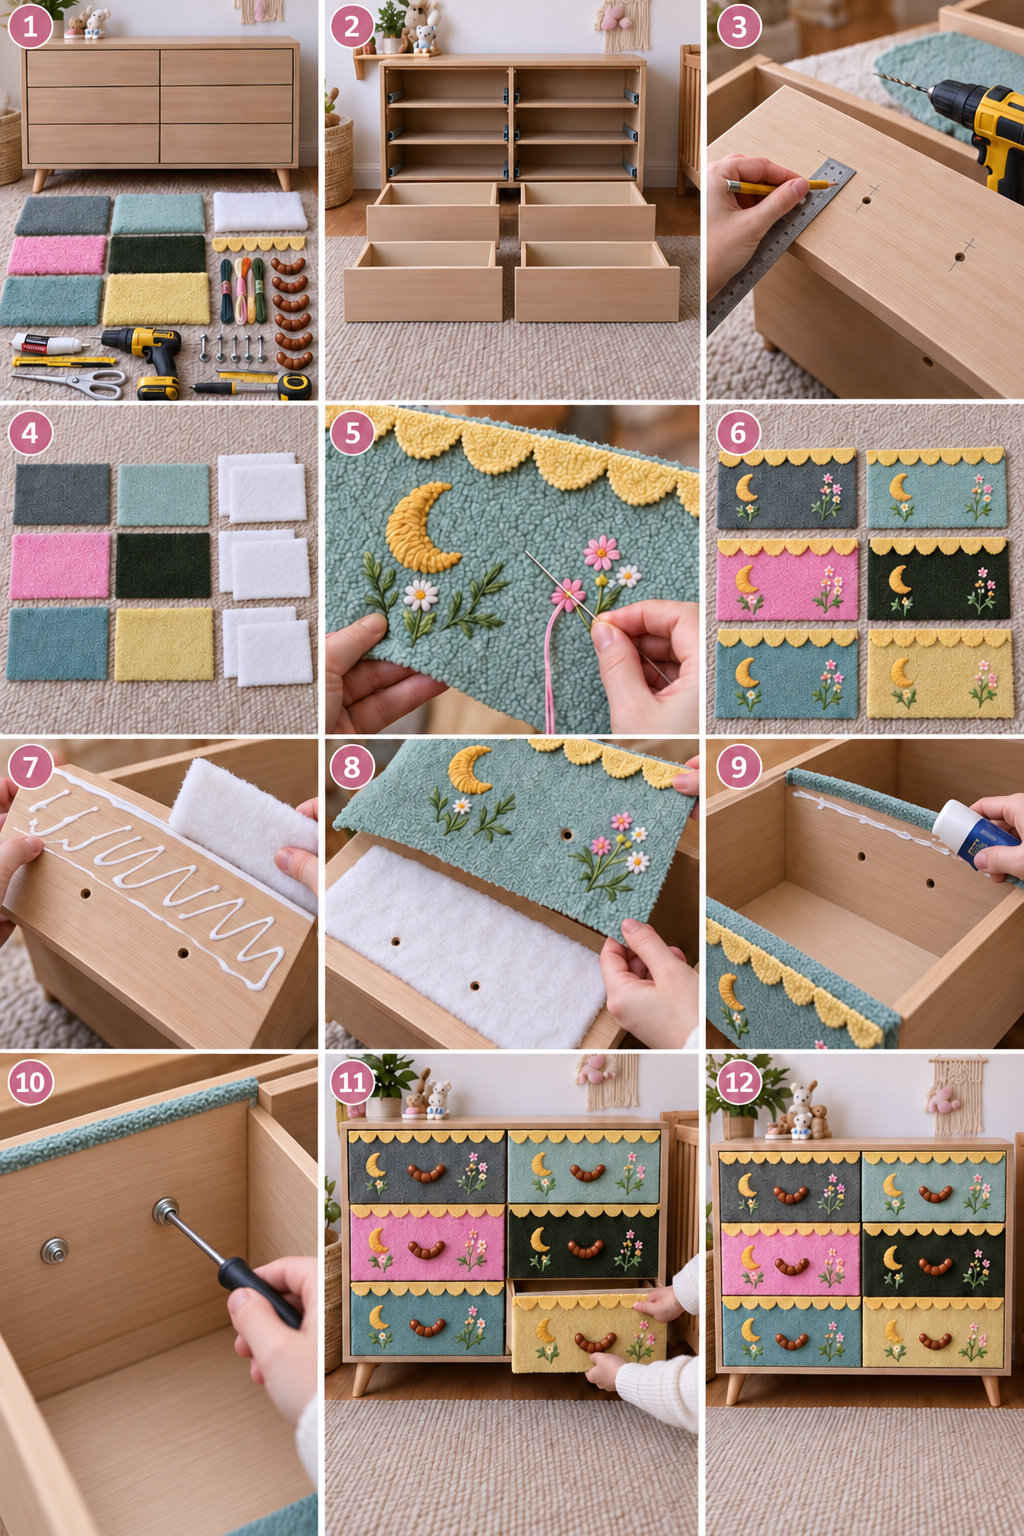
The first collage shows drawers removed from a dresser, handle positions marked, and colored textile pieces prepared separately. Embroidered flowers and crescent details are added before mounting. A pale underlayer and the decorative face are placed on the drawer front, fabric is secured around the edges, and handles are installed from the rear. The later panels show the drawers returned and operated.
Borrow the order: measure and plan hardware, complete the needlework off the furniture, fit one front, then check operation before making the remaining set. The glue attached version shown should not be described as removable. Use a separately fastened backing if that is your priority. Choose adhesive for the actual surfaces and size screws around the dresser's material, thickness, and working load.
Collage 2: Renew Drawer and Door Fronts Separately
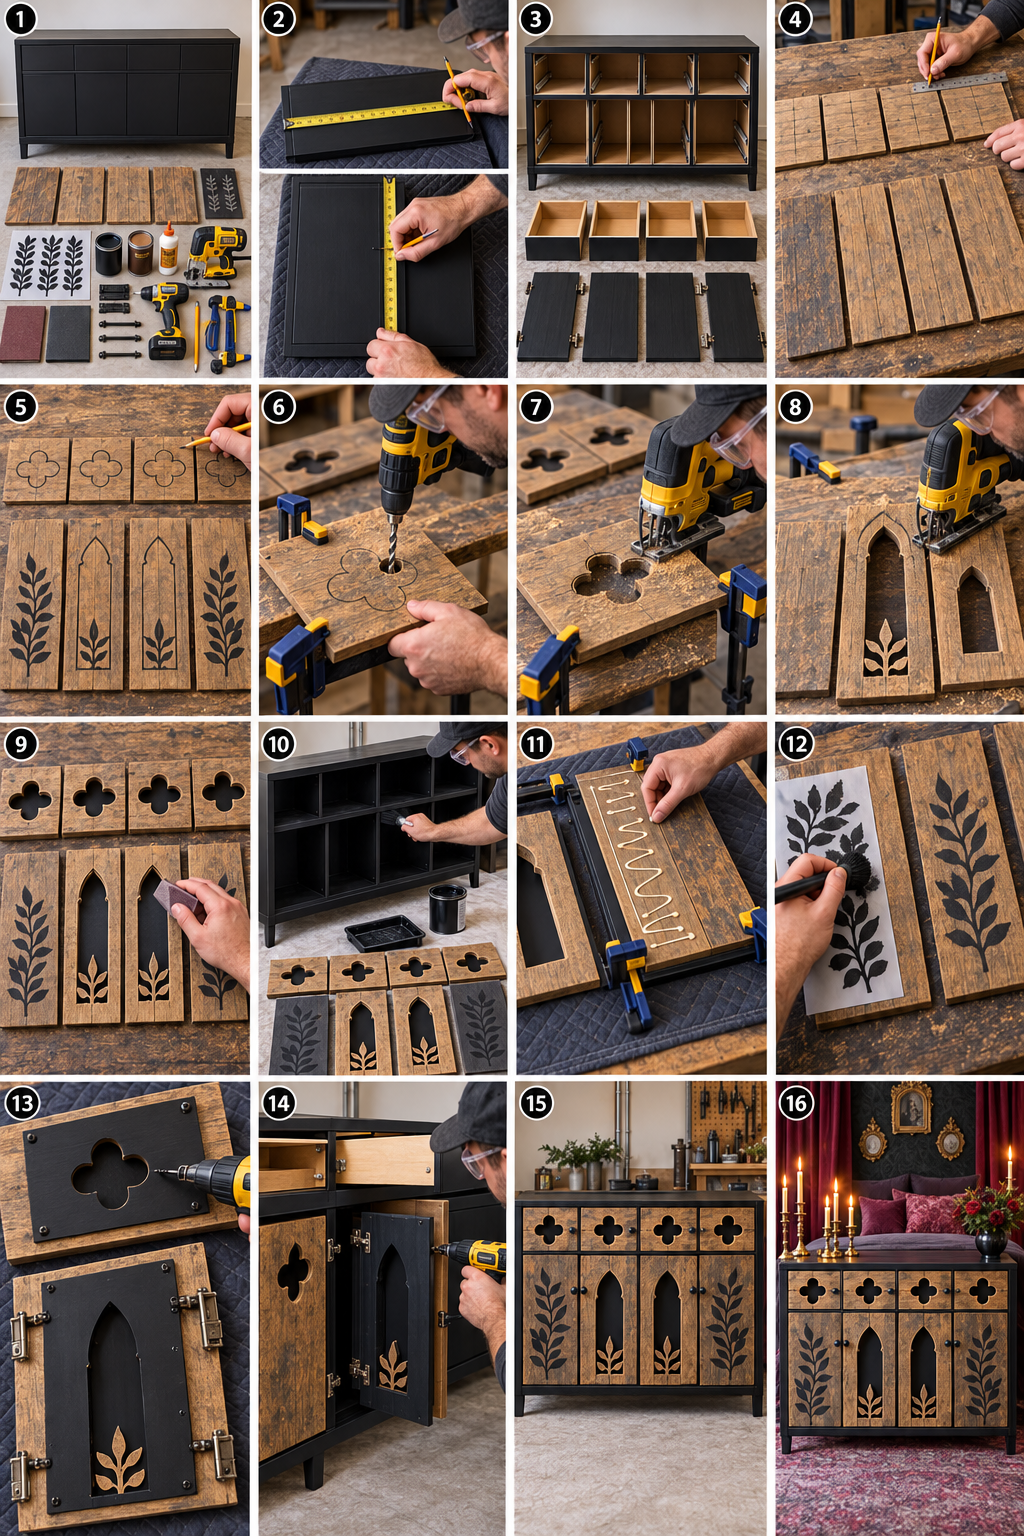
The second collage shows an existing cabinet measured and opened, with upper drawers and lower doors removed. New rustic looking panels are marked with quatrefoils, pointed arches, and leaf motifs. Drilling and cutting create the openings, edges are prepared, dark backing pieces are fitted, and the drawer hardware and door hinges are reinstalled. The final scene combines both kinds of front.
Assess replacement panel material, thickness, fixing positions and moving parts before cutting. A shallow decorative overlay or painted dark motif offers the same Gothic geometry when replacing the front is impractical. Plan drawer fittings and door hinges separately so each opens cleanly.
25 Front Designs to Adapt to Your Furniture
Use each idea to select an appearance, then adapt the pattern to the actual drawer or door it will occupy. A continuous visual rhythm should still stop at every moving front’s boundary.
1. Rope Framed Drawer Fronts with Woven Texture
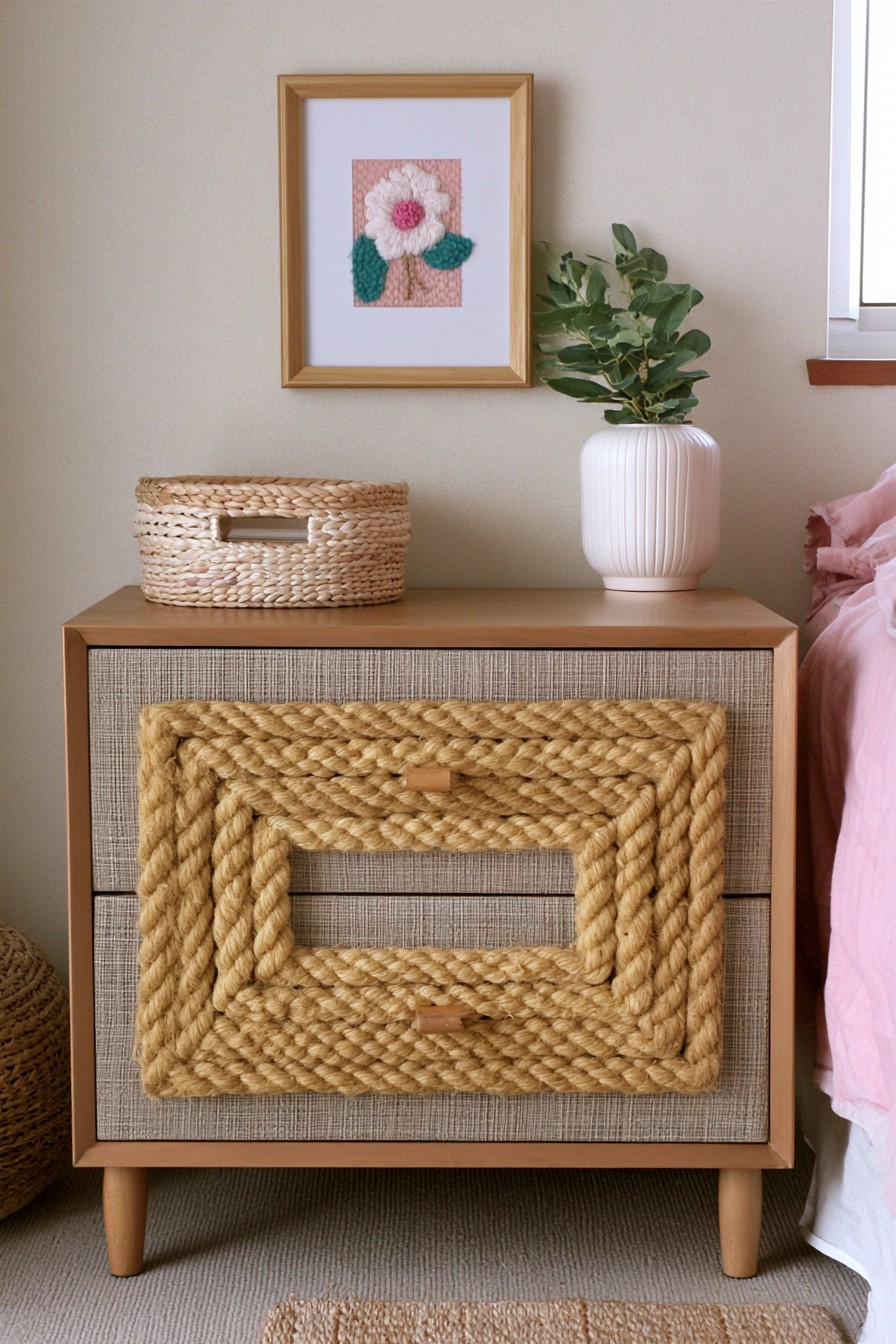
A thick rope border surrounds a textured inset, giving this small unit a warm, woven character. The border creates depth while a plain frame keeps the shape orderly. Small wooden pulls remain visually quieter than the rope.
Choose rope thickness by the front’s available profile, not just its appearance. Mock up the corners so joined ends lie neatly without bulky overlaps. Keep fibers within each moving front and clear of its gaps. Select a backing and attachment suitable for the inset and original finish, then test opening before repeating the frame. Leave a clear handle area so the user pulls the hardware rather than catching fingers in the raised border.
2. Scalloped Drawer Fronts with Layered Color
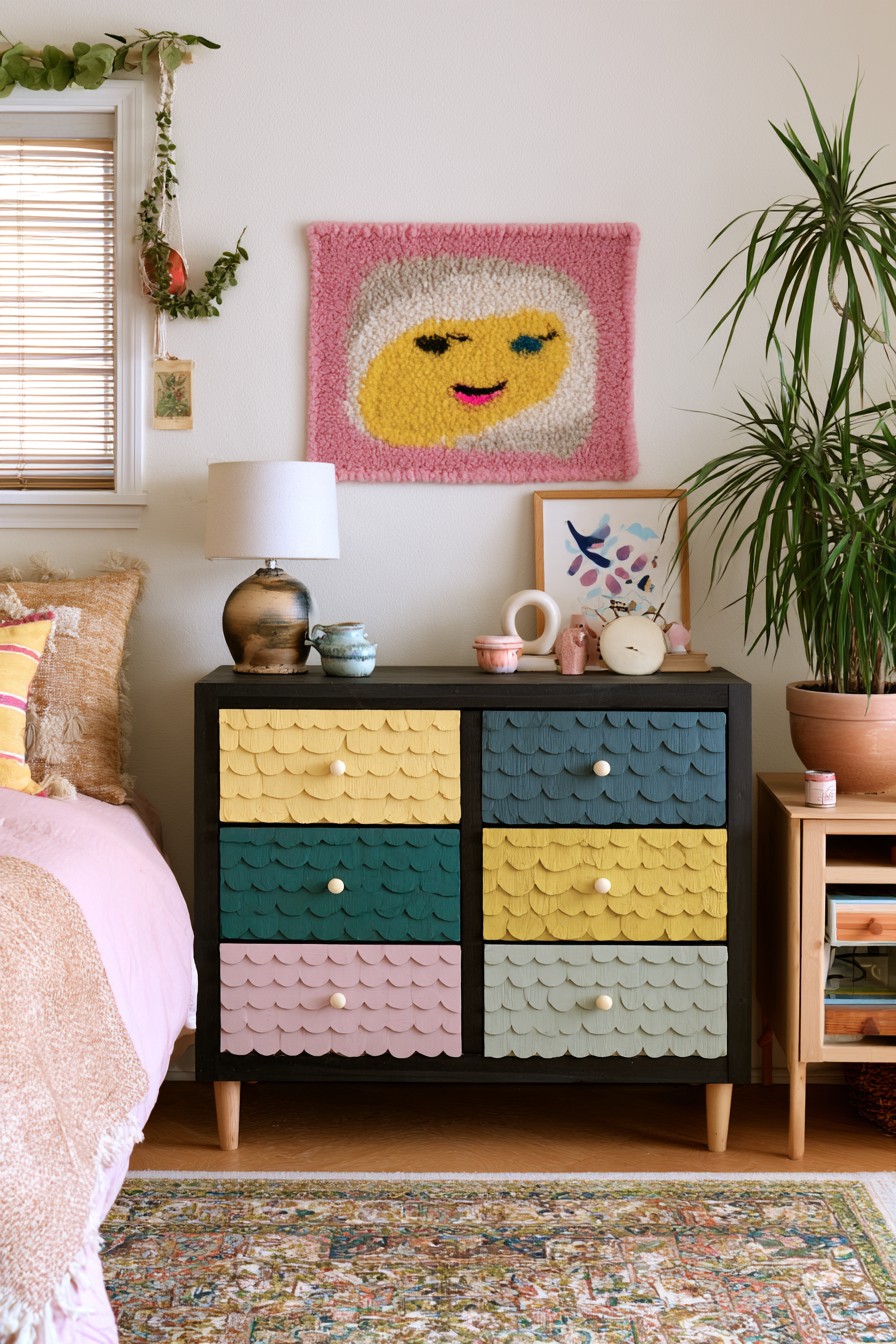
Rows of overlapping scallops give six colored fronts a repeated texture. Mustard, teal, muted blue, and pink stand out against the dark dresser body. The small knobs let the pattern remain the primary feature.
Try one complete front with temporary placement to establish row spacing and the final projection. Open and close that drawer fully, checking the adjacent fronts and cabinet before fixing all the layers. Keep each row inside its own front, even where the pattern appears continuous. To make the scallops, cut thin decorative panels and choose their edge finish and adhesive for the drawer's substrate. Repeat a template once the test front fits.
3. Fabric Inset Drawer Fronts with Scalloped Trim
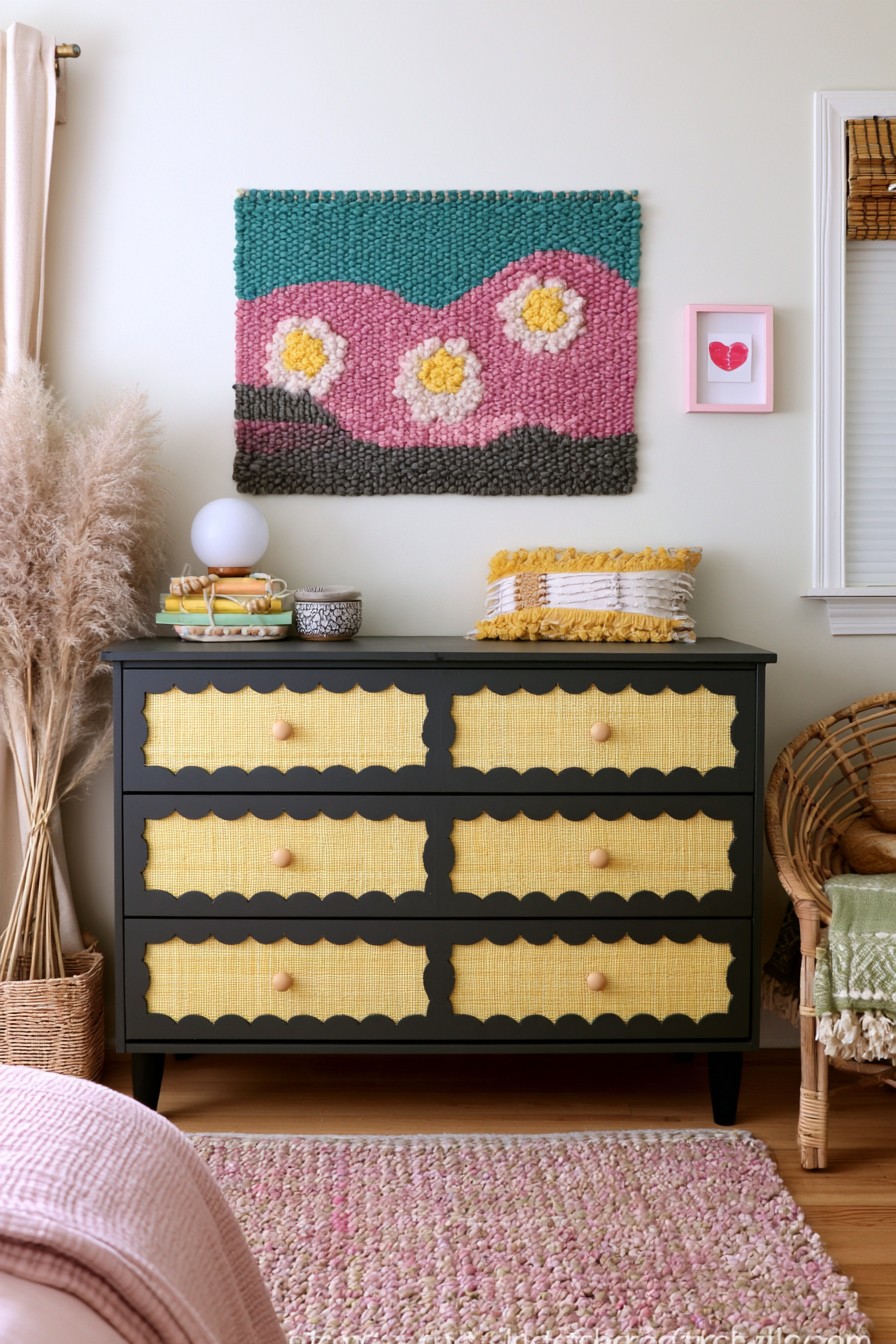
Yellow textile insets brighten a black dresser, with scalloped trim defining each long panel. The dark frame separates the fabric from the drawer gaps. Repeated small knobs keep the arrangement practical and visually consistent.
Stretch fabric over a suitable thin backing, completing the edge finish off the furniture. If removal matters, use the accessible mechanical backing attachment described above rather than permanently gluing the panel. Plan how the textile itself can be separated if it needs cleaning. Measure the added thickness when choosing knob screws and provide firm support around the fastening. Keep scallops away from moving edges so their softness does not hide contact when the drawer closes.
4. Embroidered Drawer Fronts with Soft Textile Details
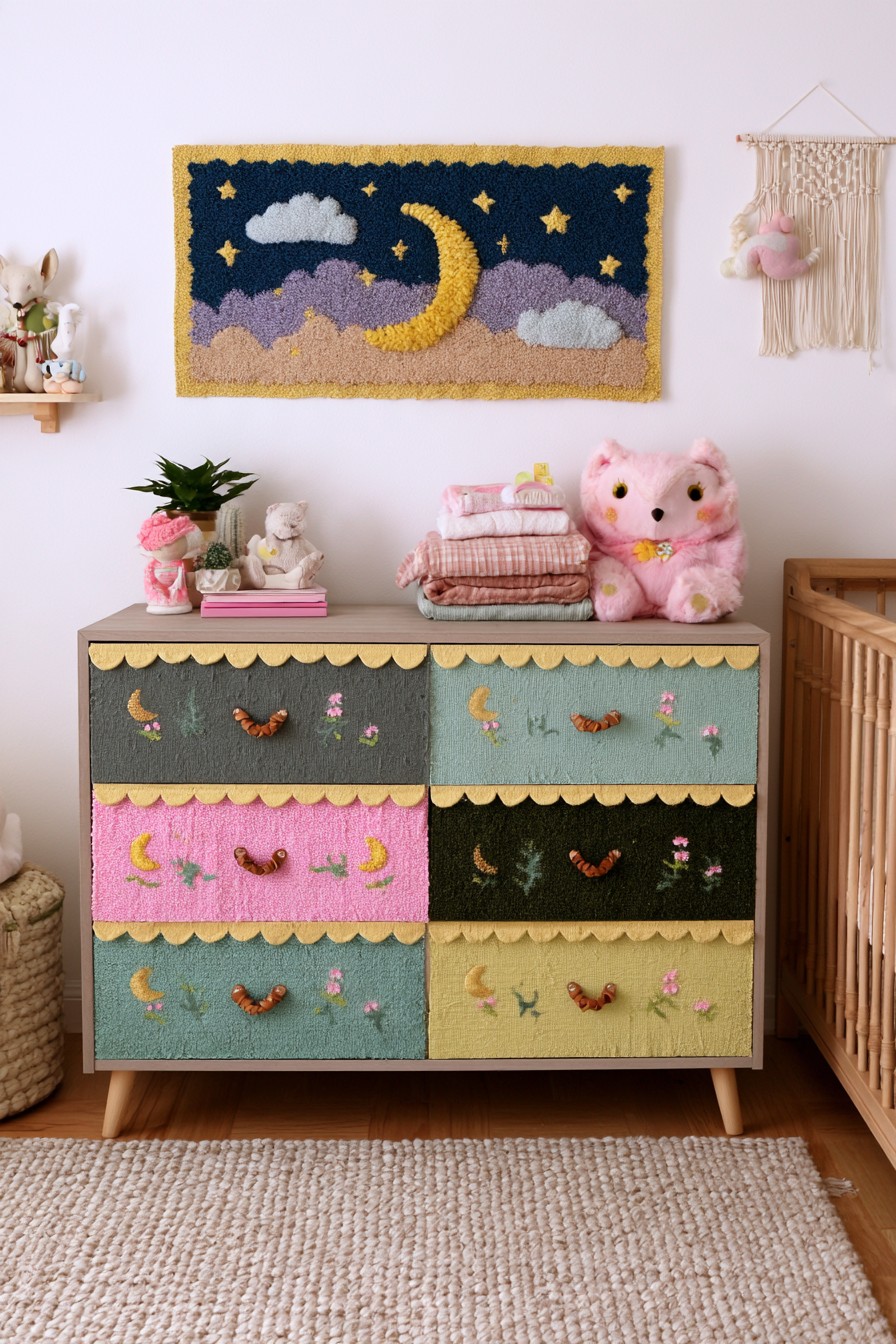
Six pastel textile fronts carry small flowers and crescent motifs, with a yellow scalloped edge linking the rows. Brown curved handles contrast with the soft surfaces. The decoration gives each drawer its own detail while the repeated layout keeps the dresser coherent.
Use the first collage’s sequence to complete embroidery before fitting the faces. Place the motifs outside the handle’s grip and attachment areas so frequent contact does not wear raised stitches. Check one finished front’s thickness and operation before preparing all six. A glued textile face is a permanent treatment unless the mounting is changed. For a child’s room, also follow the furniture’s anchoring and hardware instructions; soft decorative materials do not establish safe use.
5. Lace Panel Drawer Fronts for a Soft Vintage Finish
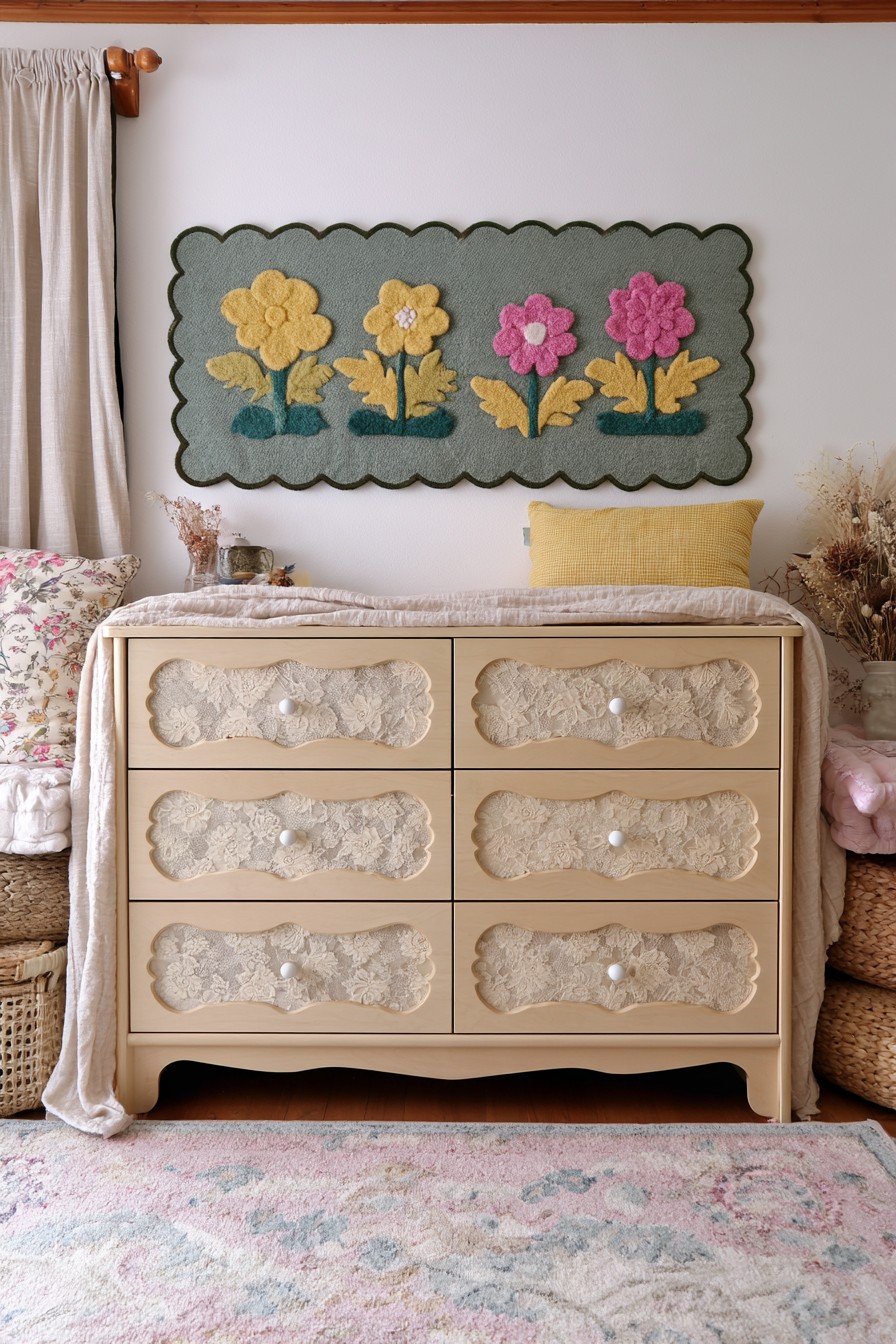
Pale lace insets occupy shaped panels within a light timber dresser. Much of the original wood remains visible, so the contrast comes mainly from the textile pattern. Round knobs reinforce the restrained vintage character.
Support delicate lace on a smooth backing instead of leaving it stretched across an unsupported area. Choose a fastening you can access if the insert is to be replaced, and keep projecting fibers clear of neighboring fronts. A backing that can be removed is not automatically a washable fabric assembly. Match the textile’s cleaning requirements to how it is fixed. Use the timber’s condition to guide preparation rather than sanding the entire piece merely to add the decorative insets.
6. Woven Cane Drawer Fronts with Botanical Wood Details
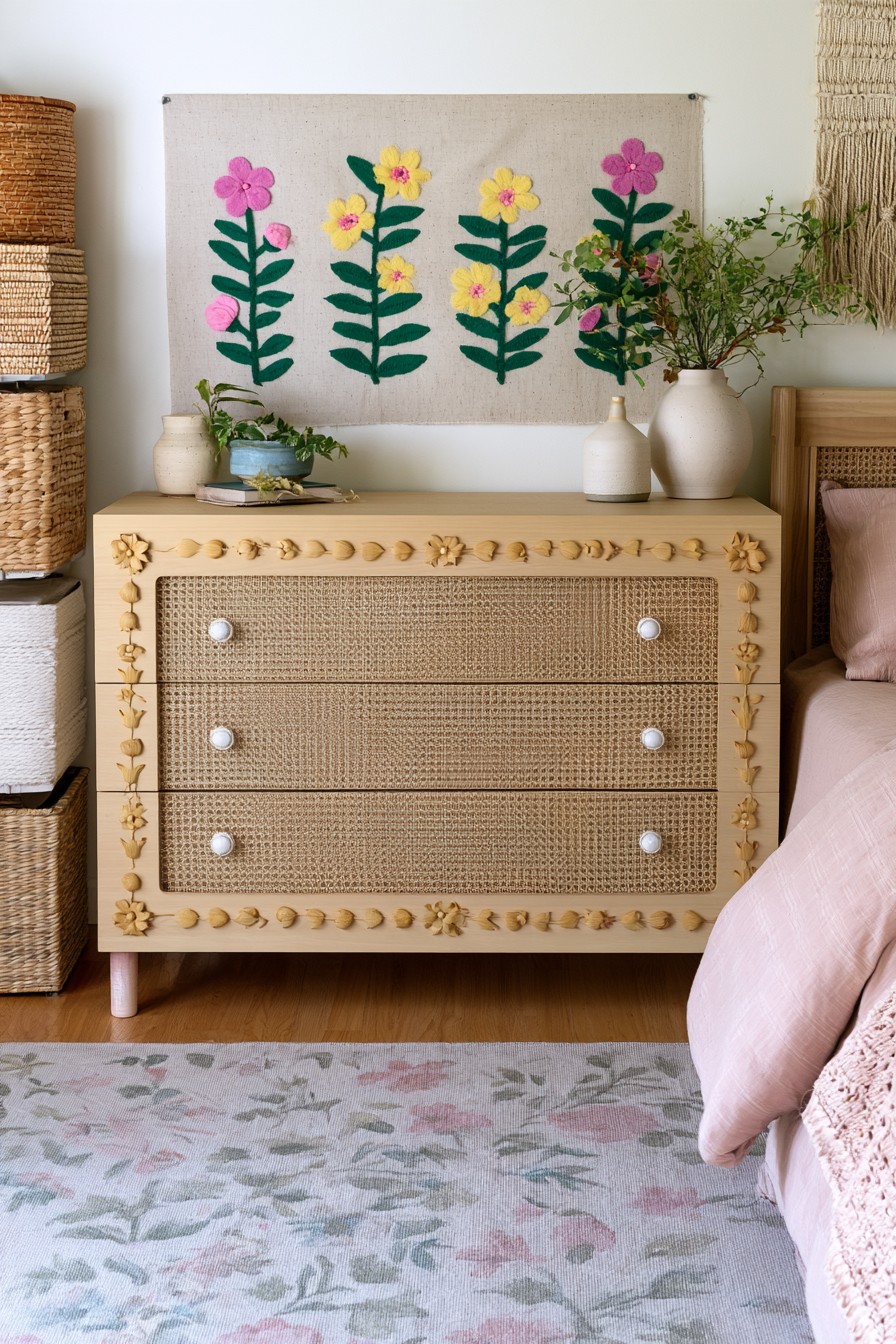
Woven cane fills broad horizontal fronts, while small botanical forms decorate the pale outer frame. The narrow drawer divisions leave the weave as the main texture. Light knobs sit quietly against it.
For an overlay adaptation, provide a suitable backing so stored contents cannot push against the cane. Follow the selected cane product’s preparation and attachment instructions rather than treating every weave identically. Keep its perimeter controlled, with no loose edges at the gaps. Arrange the botanical pieces on a template first, then attach them to compatible contact surfaces. Test handles and drawers after the backing is added; open texture does not remove the need to check thickness and connections.
7. Gothic Drawer Fronts with Architectural Appliqués
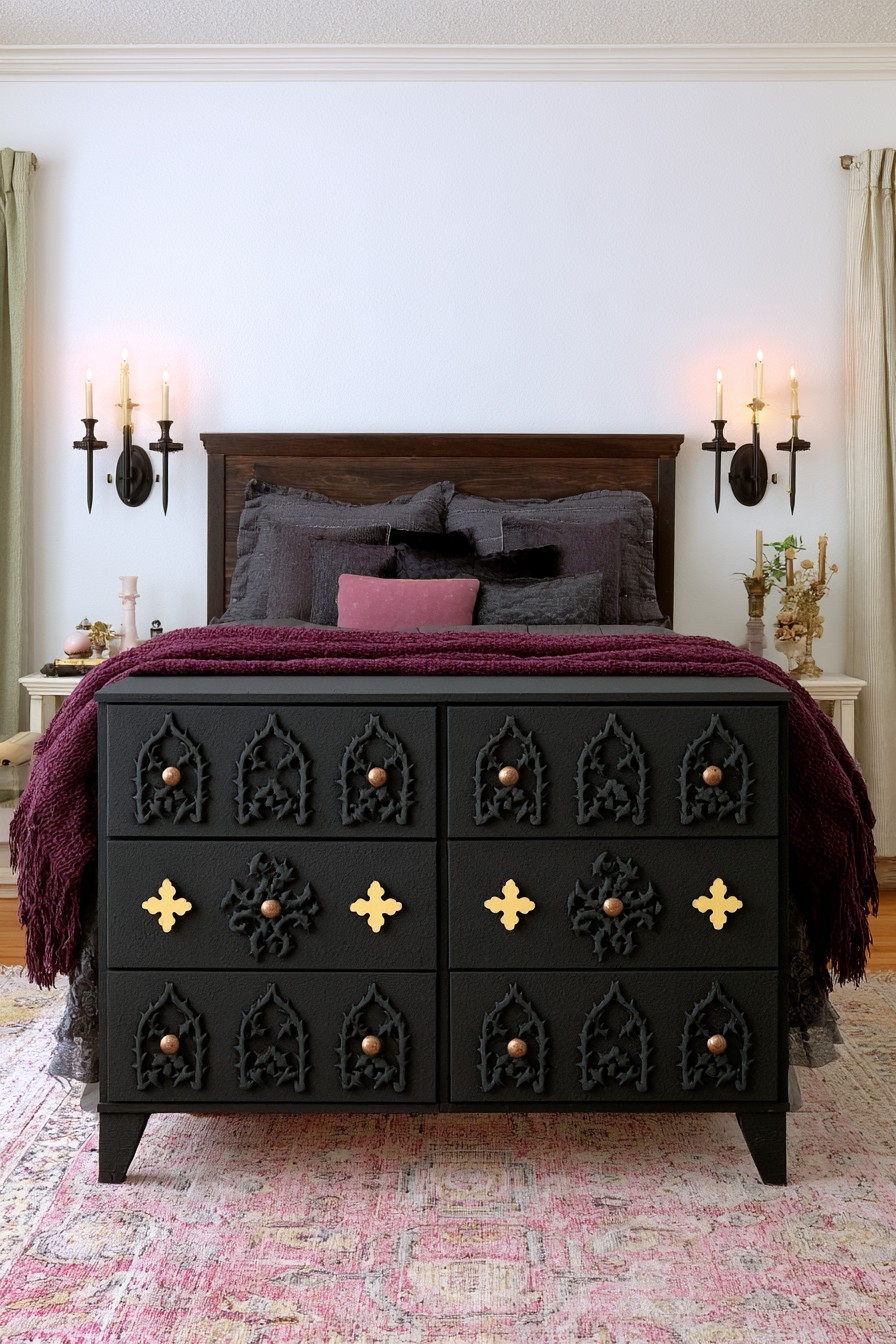
Pointed arch shapes repeat across black fronts, with small contrasting ornaments and warm round knobs. Shared color integrates the raised outlines with the cabinet. The symmetry gives an architectural effect without requiring every area to carry different ornament.
Plan each appliqué inside its own front and test spacing around the handle. Shallow separate pieces can recreate the appearance without cutting the original face. Trial their placement, then apply the chosen adhesive to hidden contact areas according to its instructions. Keep joins and excess glue from showing at the outline. If the design continues across several drawers, use a common reference line for alignment while preserving independent movement at every gap.
8. Distressed Gothic Drawer Fronts with Arched Detailing
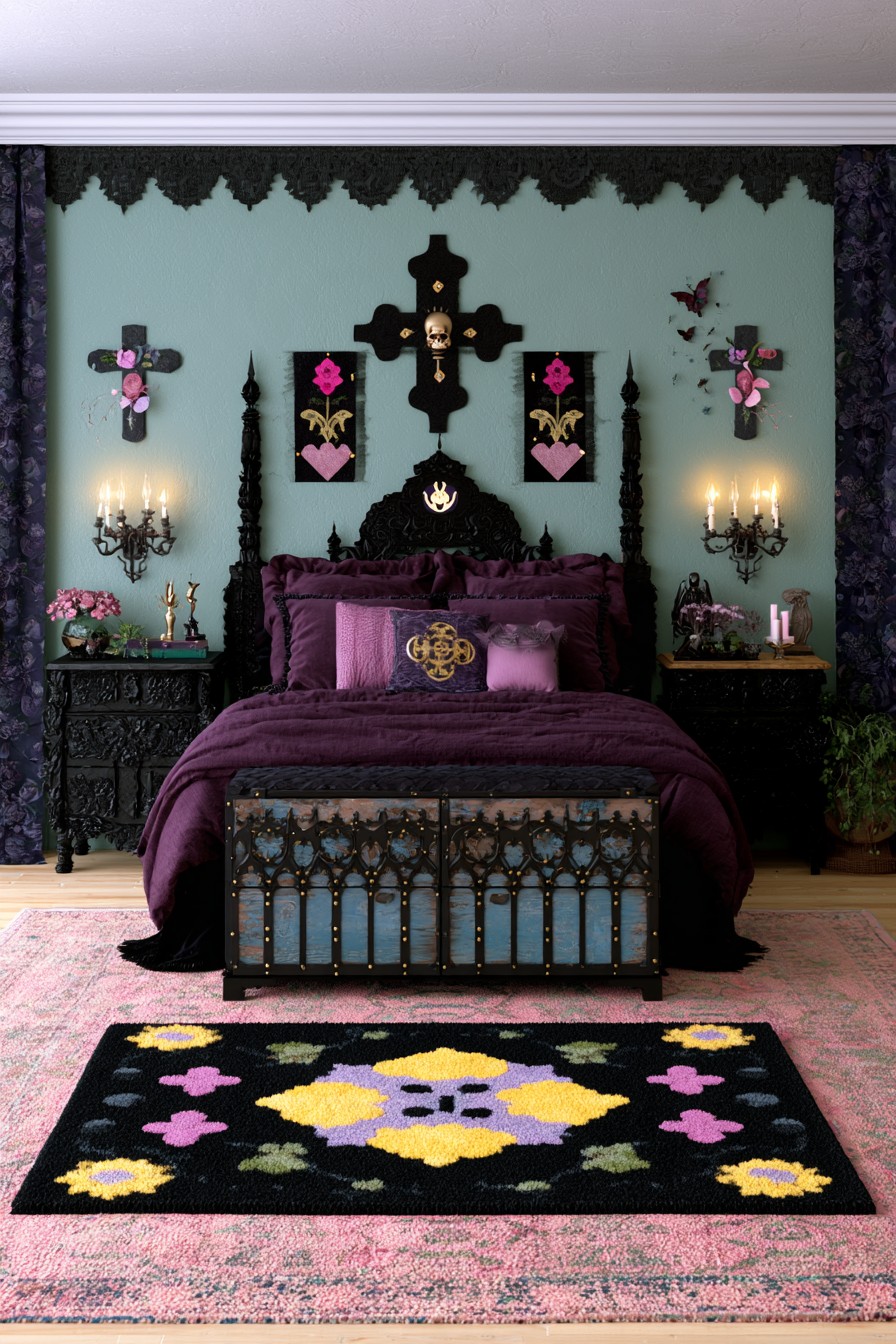
Muted blue appears behind dark pointed arch patterns on a low storage piece. The lighter ground makes the repeating shapes clearer than an all black treatment. Small raised details add texture around the outer edges.
Borrow the color contrast for a drawer without assuming the pictured overlays are a specific material or attachment method. Fit a shallow motif to the actual front and leave the grip area clear. If using an aged finish, test it on a sample first and keep the effect deliberate around edges rather than damaging sound material. Check the original surface preparation requirements, then complete a single front’s movement test before extending the pattern across the unit.
9. Gothic Drawer Fronts with Velvet Panels and Ring Pulls
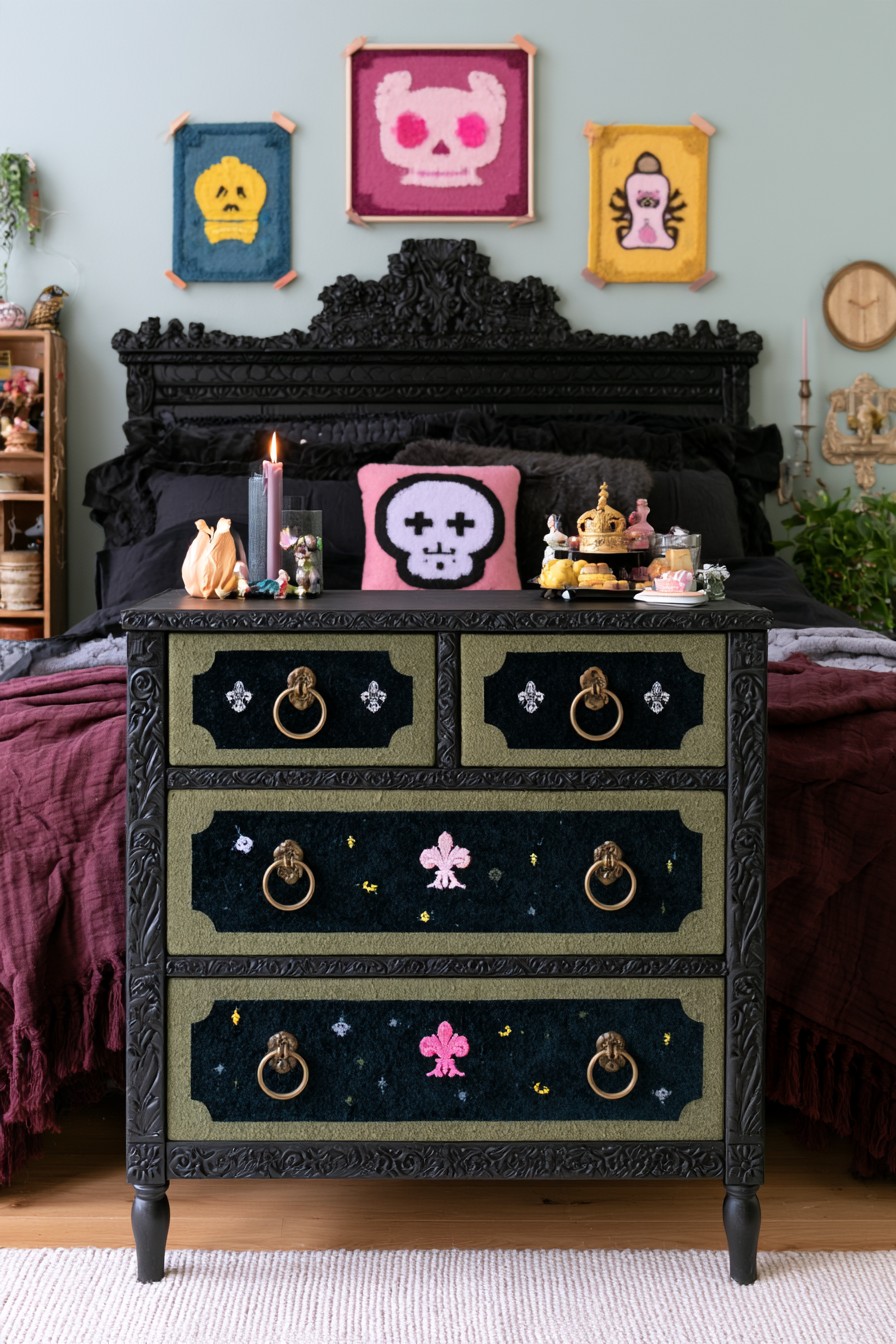
Dark inset panels sit within muted olive borders, with ring pulls and small ornamental details providing contrast. The framed structure makes this a more tailored Gothic option than a large uninterrupted black face. Texture within the insets suggests a softer decorative surface.
For a velvet adaptation, mount the textile on individual backing pieces and choose accessible fasteners for later removal. Keep the ring pull supported by the firm front, not solely by compressed fabric. Measure the combined thickness for compatible hardware screws and check the ring’s swing against raised borders. Follow the textile’s care guidance; taking off a panel does not make it machine washable. Keep embroidery away from the ring’s repeated movement.
10. Gothic Arch Drawer Fronts with a Crackled Painted Finish
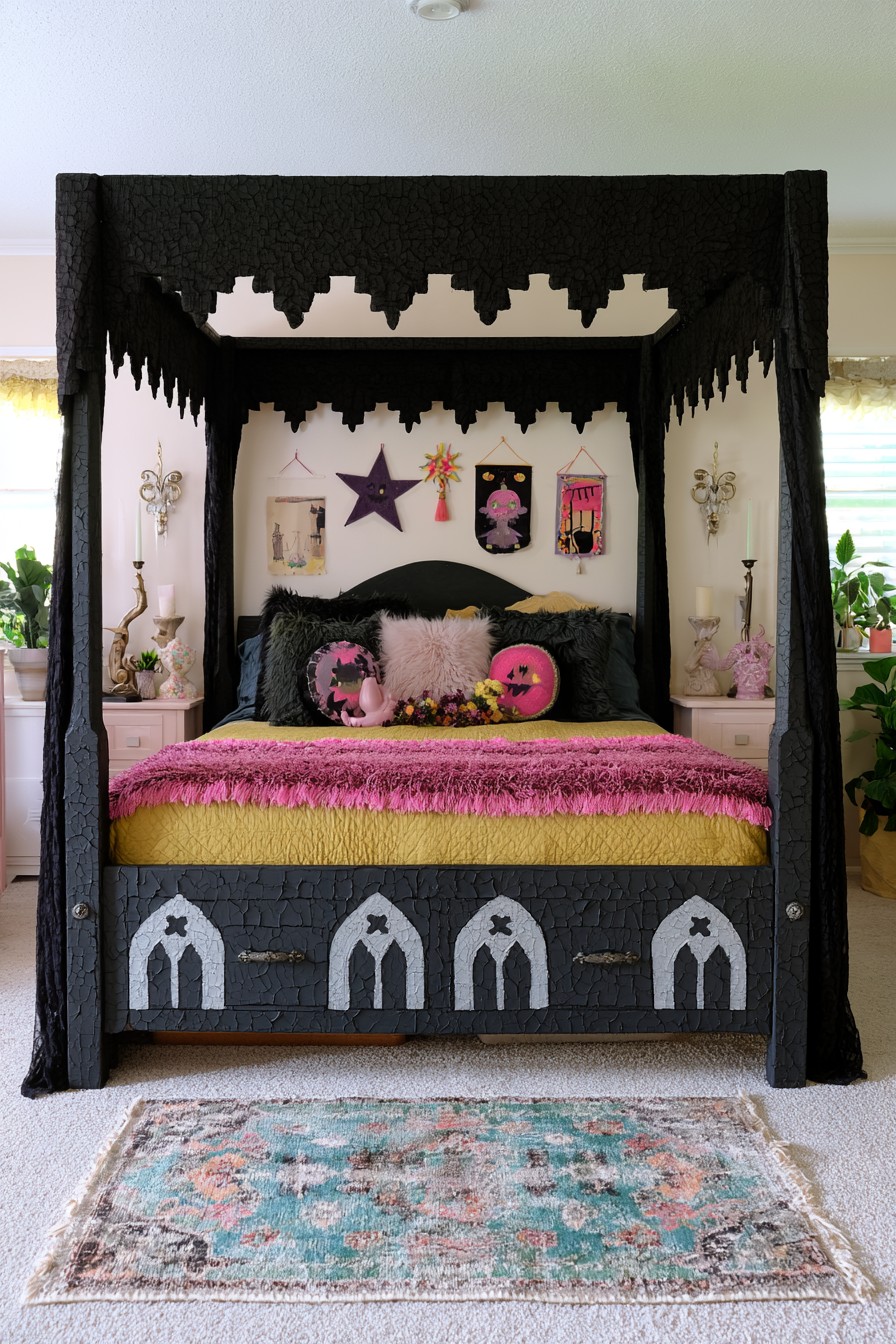
Pale pointed arches stand out from a dark low front, while a weathered looking finish gives the background more visual variation. The strong light and dark contrast carries the Gothic theme without needing several colors.
Use separate thin motifs or a painted interpretation if you want this appearance on a drawer. For a crackle finish, use a compatible product system and test the complete application on a sample first. For that optional finish, test a compatible system on a sample and follow its sequence and curing instructions. Leave space for hardware between the motifs and check the completed profile against adjacent fronts. Repeating the outline proportion matters more than reproducing an uncertain surface technique exactly.
11. Embroidered Floral Drawer Fronts with Crescent Moon Details
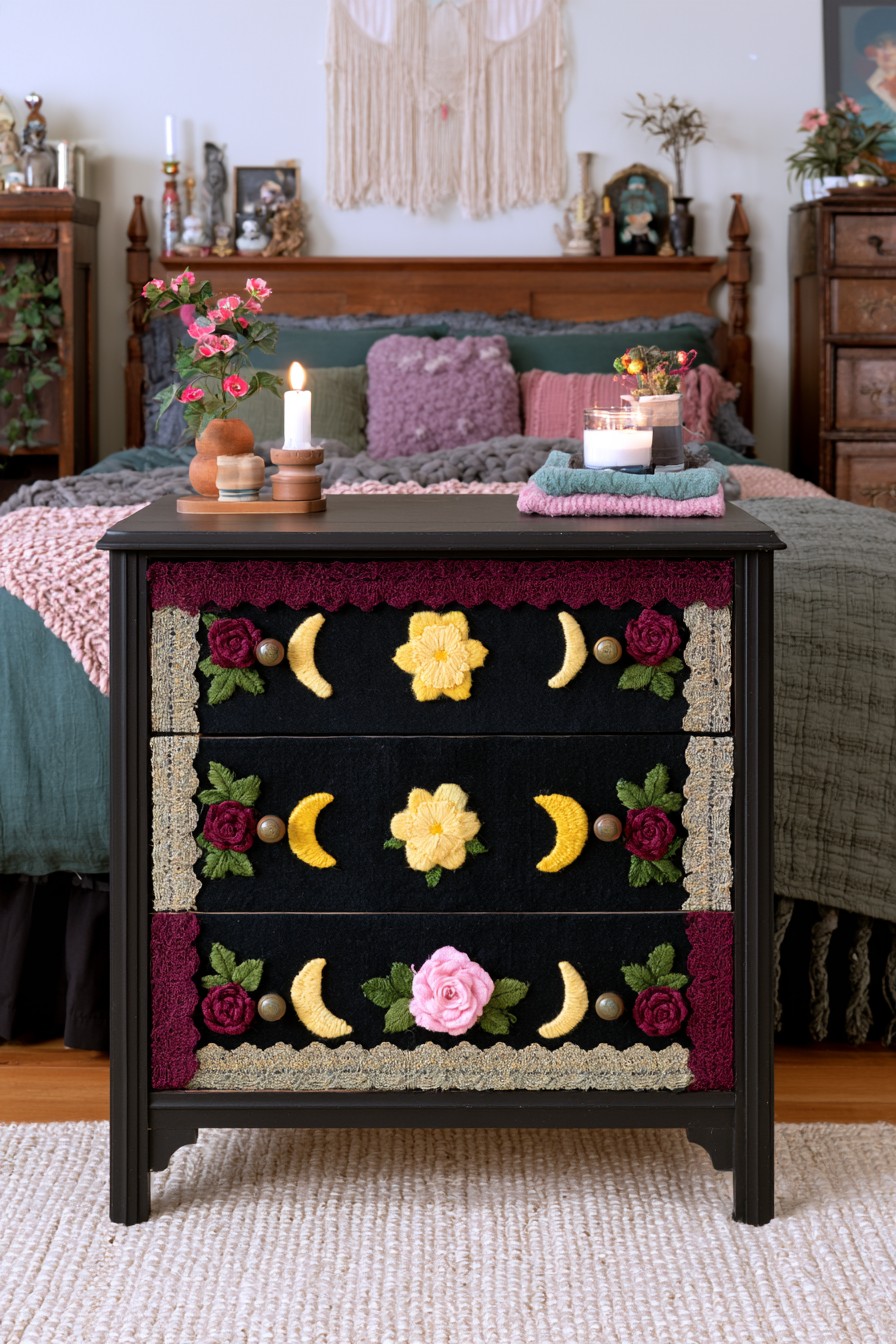
Flowers and crescent shapes decorate dark fronts bordered by pale lace like trim. The bright petals and leaves remain distinct against the background. Repeated organic motifs soften the straight lines of the dresser.
Complete an embroidered textile panel separately before mounting it, leaving firm handle locations and clear drawer edges. Secure the trim flat so strands do not enter the moving gaps. Plan an accessible backing attachment if future replacement is important; direct gluing would change that maintenance option. Position the densest stitching away from the user’s grip. Use one trial panel to check fit, then repeat its finished size while varying selected motifs for a coordinated handmade appearance.
12. Rustic Gothic Drawer Fronts with Cutout Arch Details
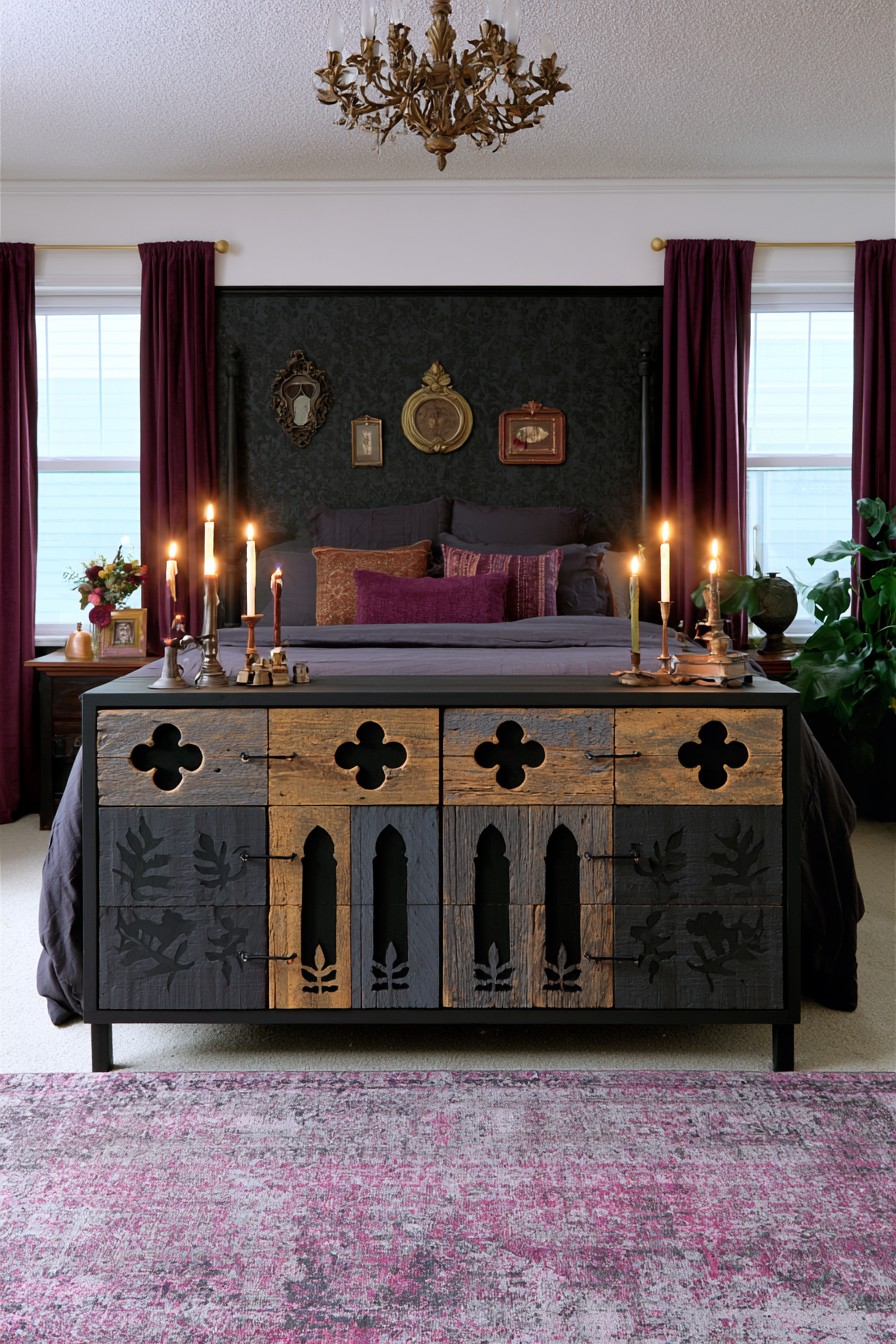
Quatrefoil shapes occupy the small upper fronts, while taller pointed arches and leaf details appear on the lower cabinet sections. Dark areas behind the openings make the rustic geometry legible. The cabinet combines drawer and door proportions rather than repeating one uniform front.
Choose whether to use contrasting surface panels or actual openings before preparing the dark shapes; openings need a suitable backing and edge treatment. Cutting an existing front requires assessment of its material, thickness, and connection points. A separate cut overlay or dark painted motif can offer a less extensive adaptation. Resize the tall arch for a horizontal drawer and keep its edges within that front. Plan backing and hardware before any irreversible cut.
13. Vertical Slat Drawer Fronts with Natural Wood Texture
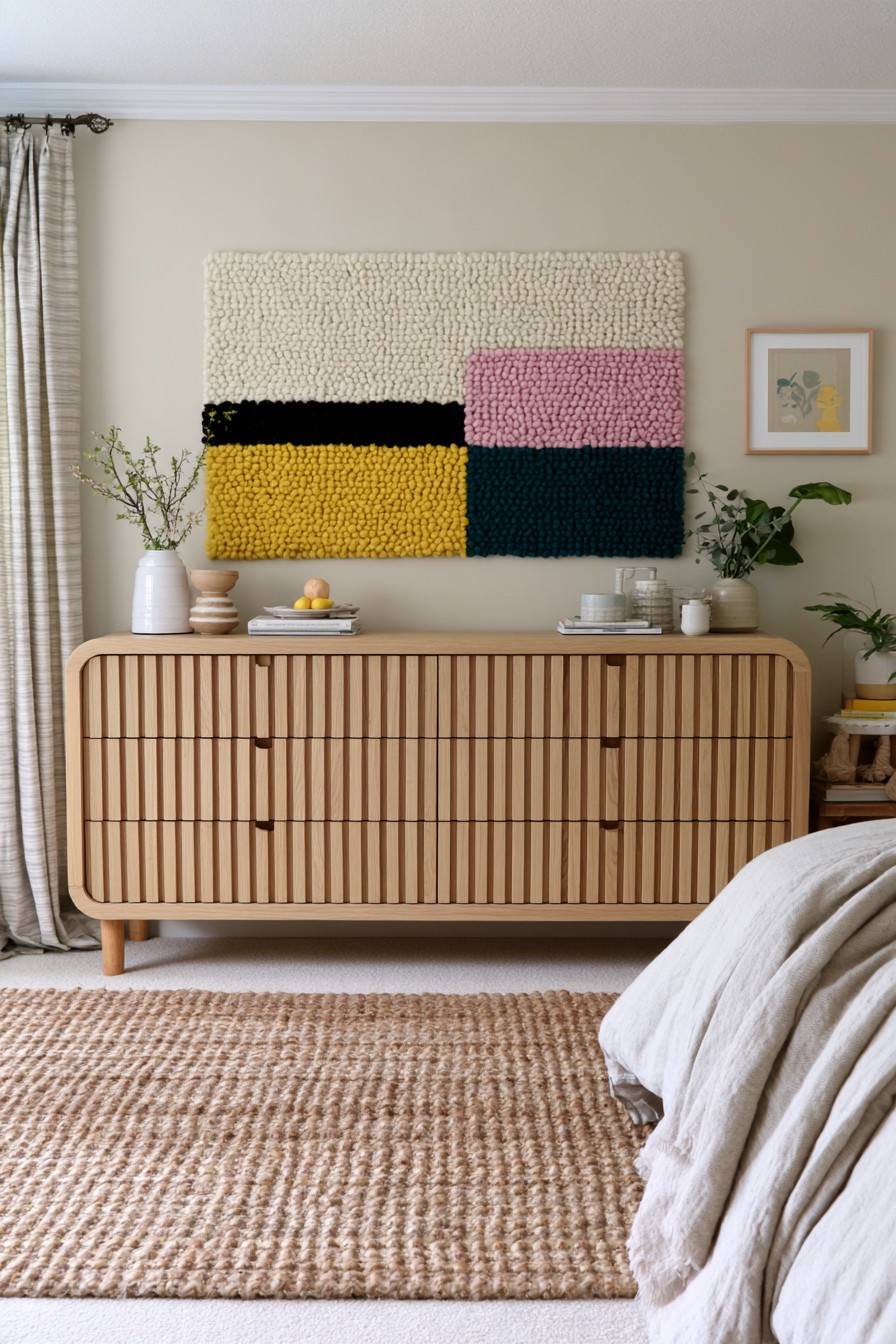
Narrow vertical slats form a continuous rhythm across a rounded sideboard, with understated pulls and natural wood color. Fine shadow lines supply the texture without a separate decorative image. The repeated spacing is the main feature to borrow.
Use a spacing guide and trial one front, checking how the slats meet its edges. Every strip must end at each moving drawer or door boundary; visual alignment must not physically connect neighboring pieces. Test the added projection during full opening and closing. Use these slatted wood cabinet ideas to compare spacing and color, then design attachments and opening clearances for this drawer. Keep handle access and future adjustment points available beneath the linear appearance.
14. Mixed Wood and Fabric Drawer Fronts with Brass Label Pulls
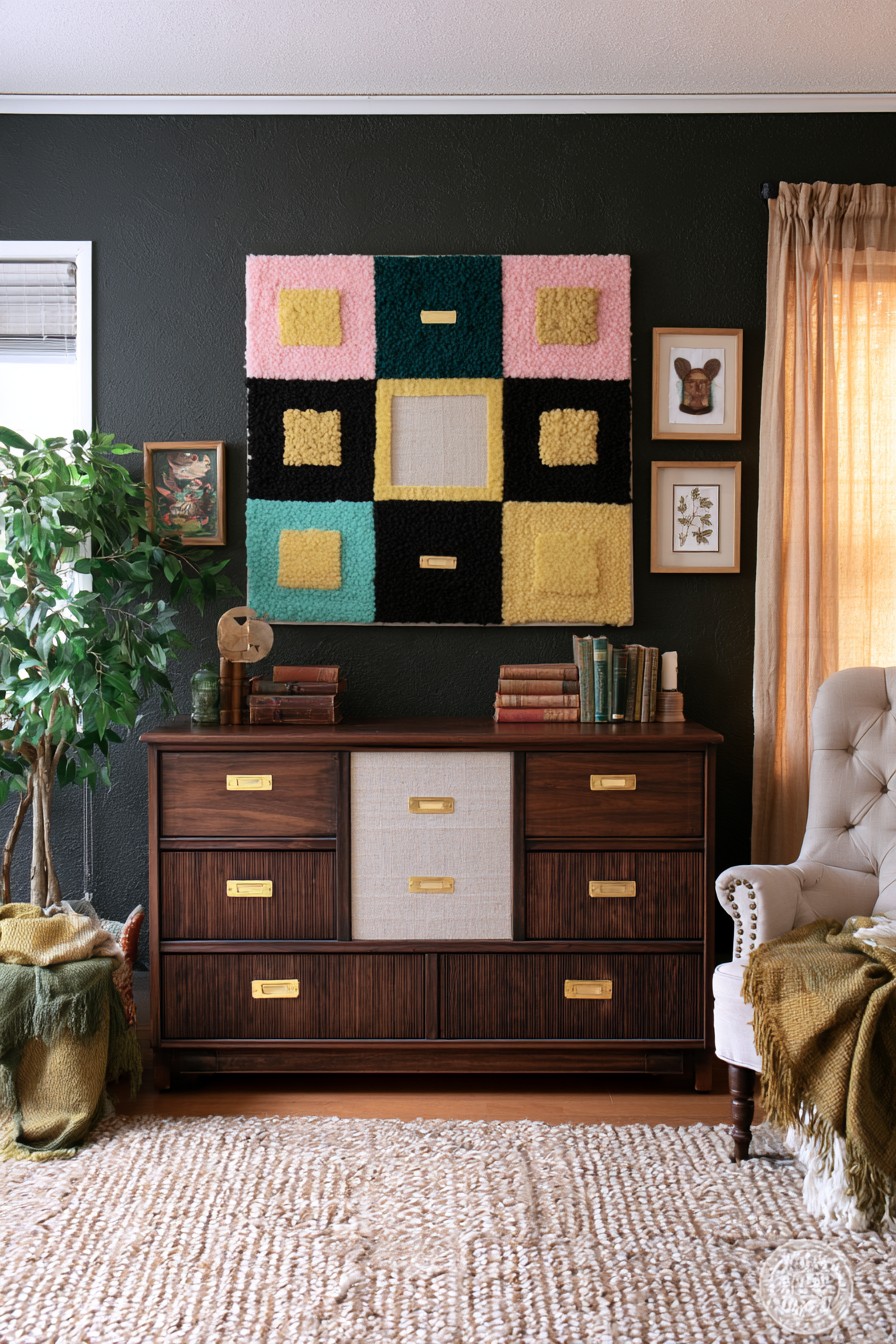
Dark timber, grooved sections, and a pale central inset vary across a wide dresser. Brass label pulls repeat on every drawer and visually connect the different surfaces. They can also help identify contents in household or craft storage.
Choose the repeated hardware first so each treatment preserves the same usable grip location. Keep a textile inset supported separately, with removal access if it is intended to be replaced. Check that grooved or added surfaces leave the label pull sitting on a firm base. Limit the number of finish systems if their preparation or cleaning requirements would conflict. A trial label and front layout can show whether the visual variety still reads as one furniture piece.
15. Arched Botanical Cabinet Panels Adapted to Drawers
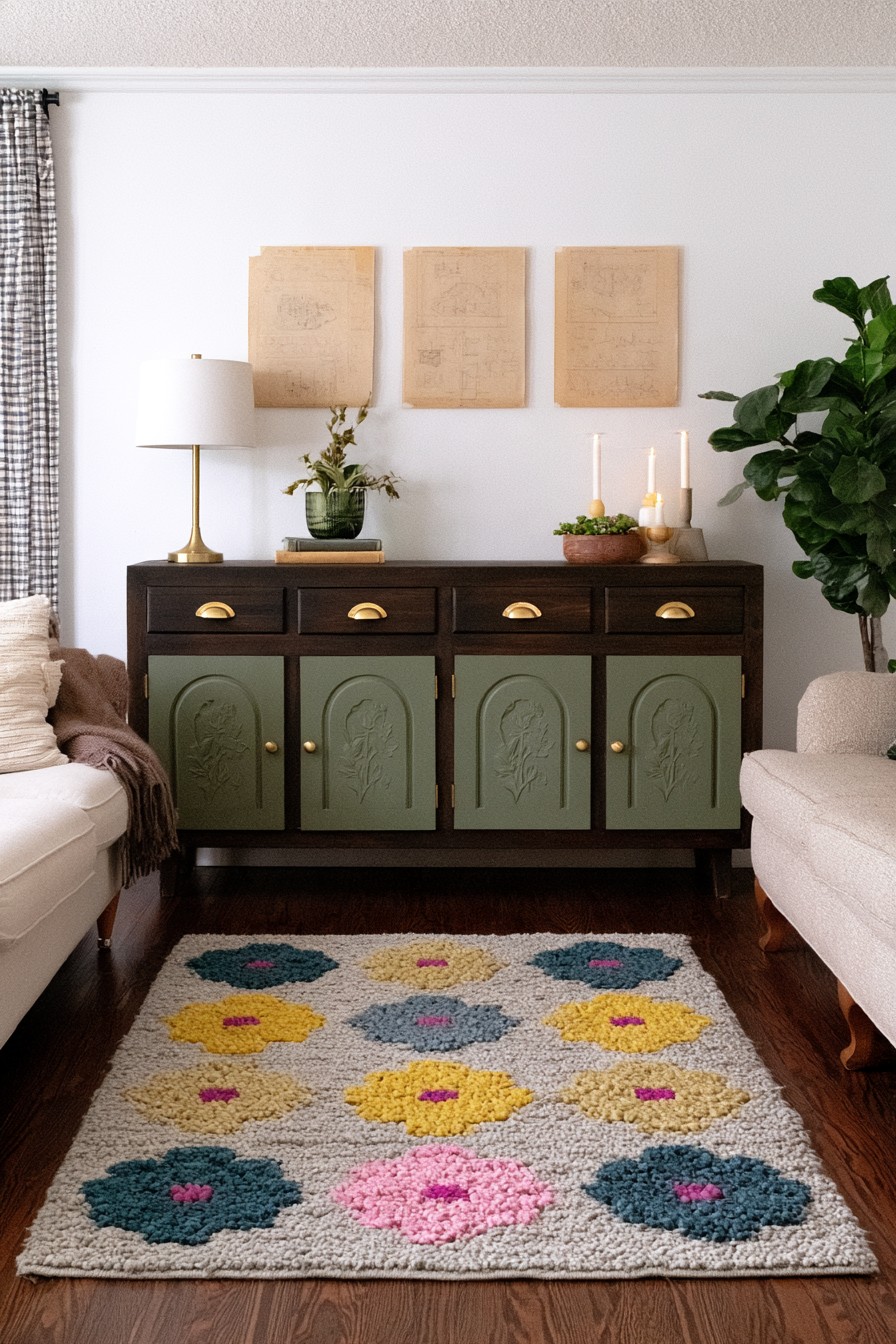
Arched botanical relief appears on the lower cabinet doors, while a row of smaller drawers remains above. Sage panels contrast with the dark surrounding timber. The photograph’s strongest floral treatment is therefore on doors, not on those upper drawers.
For a drawer adaptation, shorten the arch and scale the botanical arrangement to a horizontal front. Leave the handle zone clear and keep every piece inside the drawer’s boundaries. Dry fit the parts before choosing their compatible attachment, with adhesive applied to hidden contact faces. Shallow relief is easier to accommodate than deep projecting ornament, but still needs a movement test. Let the door design guide the motif, not the dimensions of the drawer version.
16. Framed Floral Drawer Fronts with Mixed Color Blocks
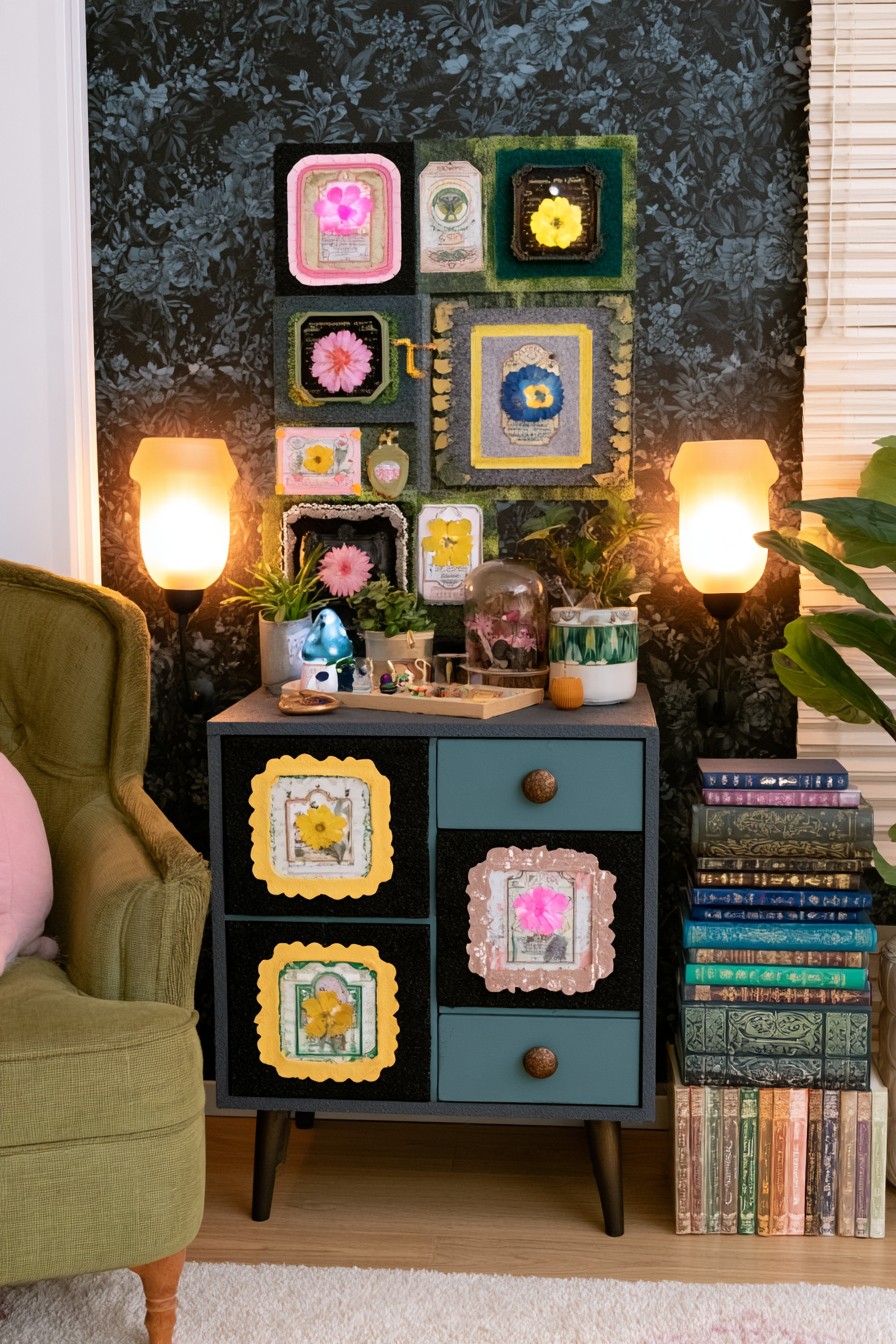
Small framed floral images sit among black, yellow, pink, and teal sections on a compact storage piece. Warm round knobs connect the differing colored fronts. The limited scale lets several expressive details coexist without occupying a large wall of furniture.
Plan the frames as individual surface accents, with shallow profiles and room for each handle. Choose a printed insert, painted panel, or other protected floral treatment according to the drawer's surface and cleaning needs. Position samples together before attaching them, then check opening at each decorated front. Keep any framed edge clear of contact areas. A few repeated frame shapes can unify the scheme without requiring every drawer to carry the same picture.
17. Velvet Drawer Fronts with Carved Frames and Antique Hardware
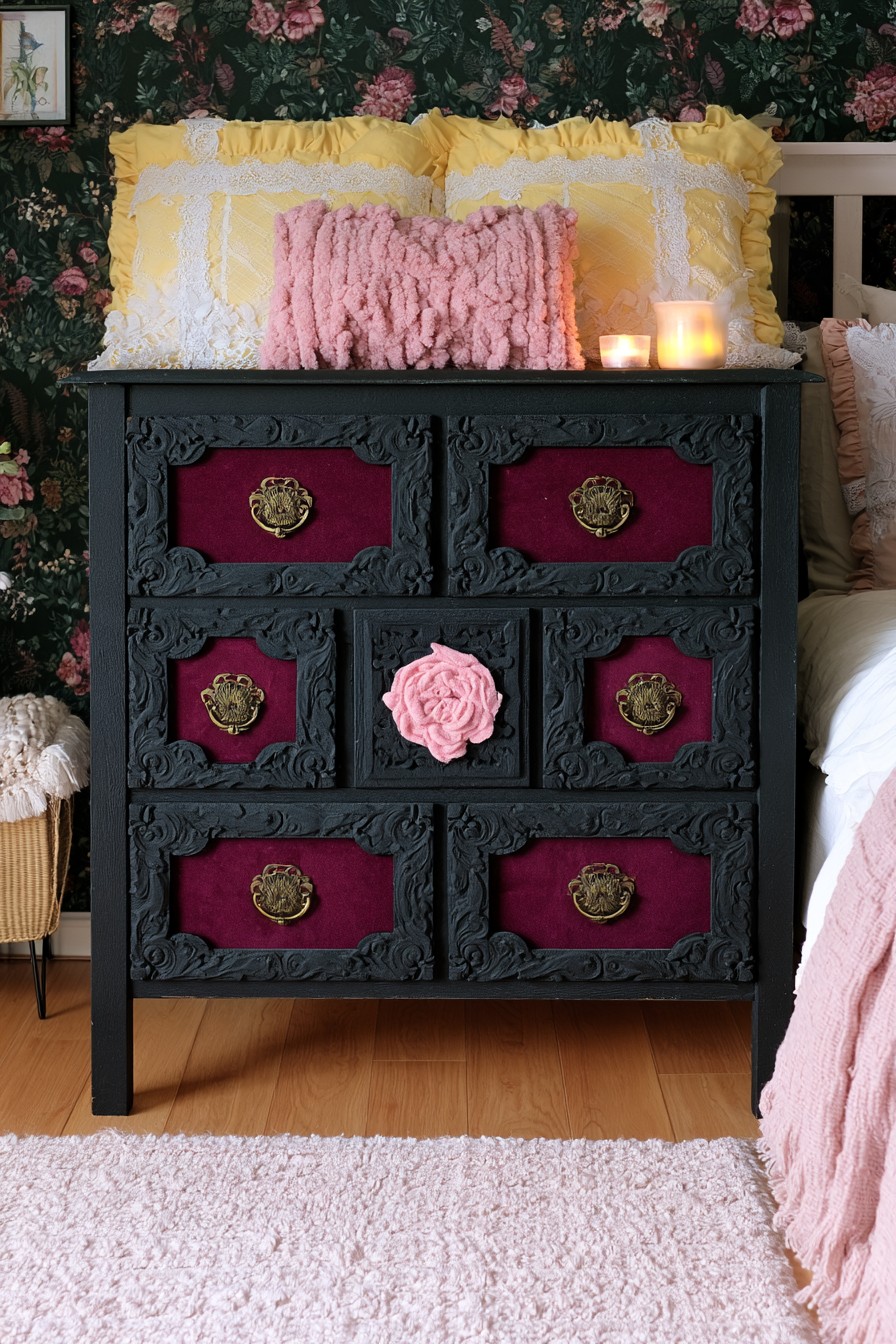
Burgundy velvet looking insets sit within ornate black frames, with brass hardware and one pink floral accent. The strong dark border gives the soft center a precise outline. This treatment makes the chest a room focal point.
Stretch a velvet adaptation around a rigid backing and arrange its fastening so the panel can be released from an accessible side. Clarify whether the fabric also detaches; a permanently fixed textile may only be replaceable, not washable. Plan the hardware’s firm seating point and measure total thickness for screws. Avoid crushing pile beneath a pull that needs to remain secure. Use the material where its cleaning requirements suit the room’s actual handling and spill exposure.
18. Painted Butterfly Drawer Fronts with Brass Bar Pulls
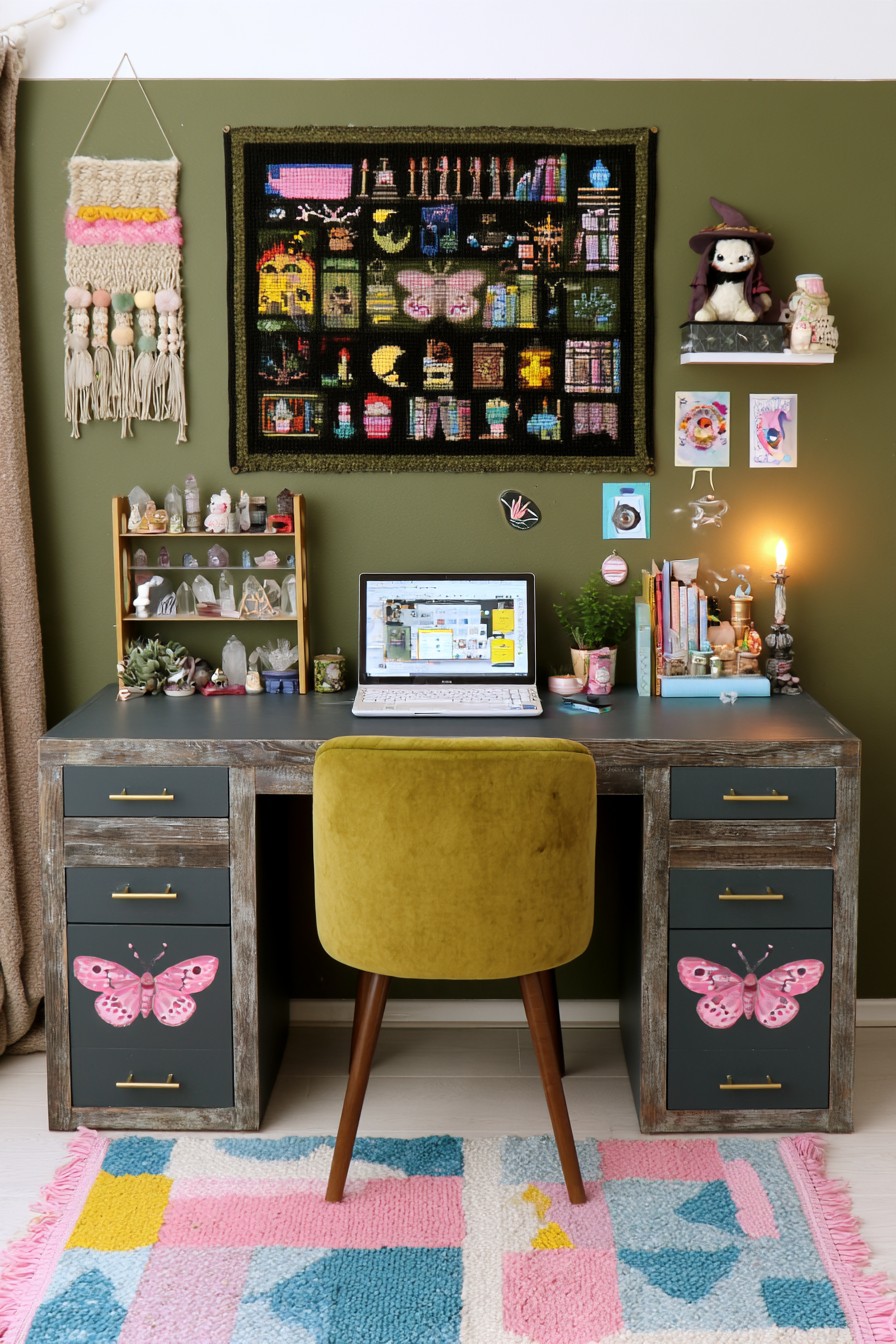
Pink butterflies occupy dark lower fronts beneath simpler small drawers. Their organic outlines contrast with straight brass bar pulls. Paint can provide this prominent decoration without a thick layer of new material.
Mark the handle position and complete outline before painting, using a stencil or transfer method suited to the design. Prepare the actual surface under the selected paint system’s instructions. Test wing colors and coverage on a sample, then allow the specified curing time before normal handling. Add a clear finish only if the system calls for a compatible one. Keep frequently touched areas easy to clean; painted imagery does not need raised ornament to become a distinctive front.
19. Pink Gothic Drawer Fronts with Bold Cutout Motifs
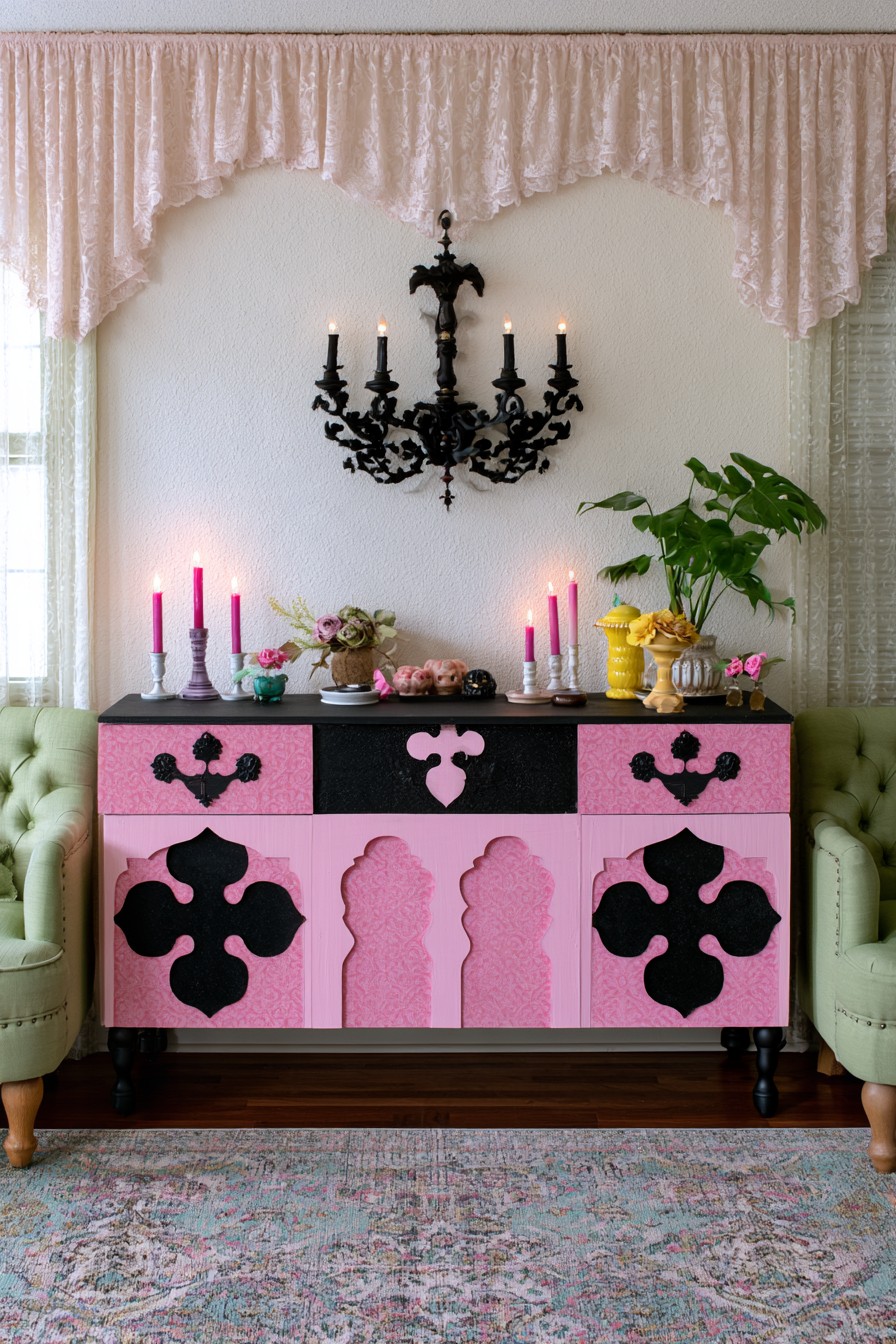
Pink fronts contrast with large black Gothic motifs, while smaller shapes occupy the upper row. The dark symbols create an architectural theme without an entirely dark cabinet. Symmetry makes the different sizes feel organized.
Cut a separate thin applique to create the contrast, or paint the shape directly where added thickness would interfere with the drawer. Try the full arrangement first, including hardware positions and gaps. Prepare separate shapes before fitting if that helps produce clean edges. Select the attachment for both the motif material and existing front, applying adhesive to its hidden contact face. Keep the lower pattern within each moving section rather than bridging them.
20. Tufted Textile Drawer Fronts with Geometric Flower Motifs
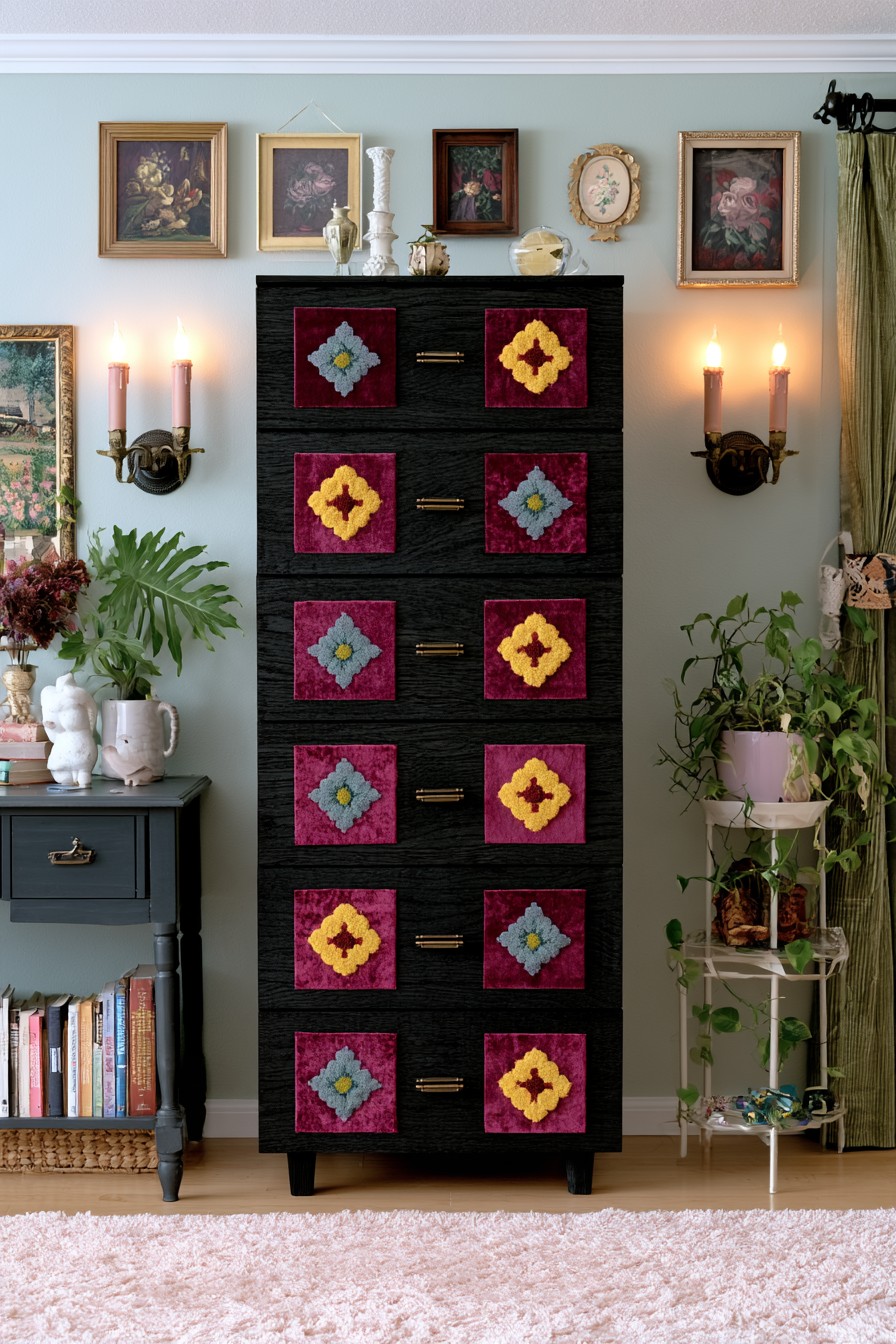
Colored flower motifs sit within repeated burgundy squares on a tall dark chest. Slim pulls occupy spaces between the textile areas, keeping the grip visually separate. The vertical repetition gives many small drawers a shared handmade theme.
Prepare a single backed textile panel and trial its thickness before making the full set. Open and close the decorated drawer, checking adjacent panels and the pull’s movement. Use accessible mechanical backing attachments where removal is intended, and state whether the textile can detach from that backing for care. Select the yarn or tufted fabric using its fiber description and cleaning instructions, then test it on a small panel. Repeating the backing dimensions can preserve order even when selected flower colors change.
21. Crocheted Drawer Fronts with Floral Appliqués and Vintage Pulls
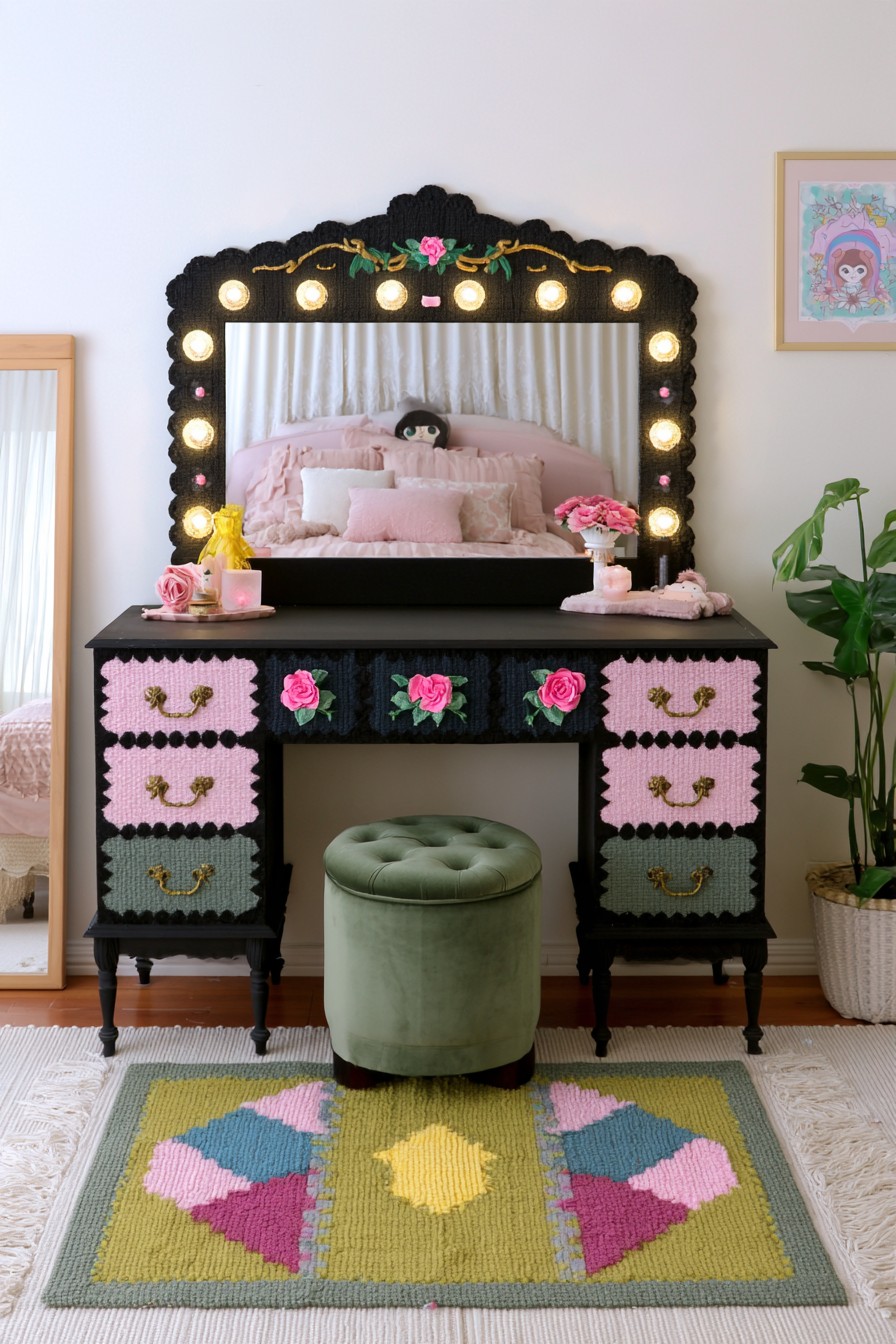
Pink and sage crochet looking panels decorate a dark vanity, with scalloped edging and rose motifs across selected fronts. Brass handles provide defined grip positions. The repeated soft surfaces contrast with the solid furniture frame.
Support a crochet adaptation on suitable backing and keep the hardware anchored to the firm front with compatible screws. Plan reachable panel fasteners rather than calling a permanently glued piece removable. For general textile fitting and care distinctions, explore crochet decor with removable covers. Bathroom moisture makes this different from a dry bedroom display: keep splashes away, remove damp panels, and choose a cleanable finish instead if regular drying and textile care are impractical.
22. Celestial Drawer Fronts with Moon Phase and Star Motifs
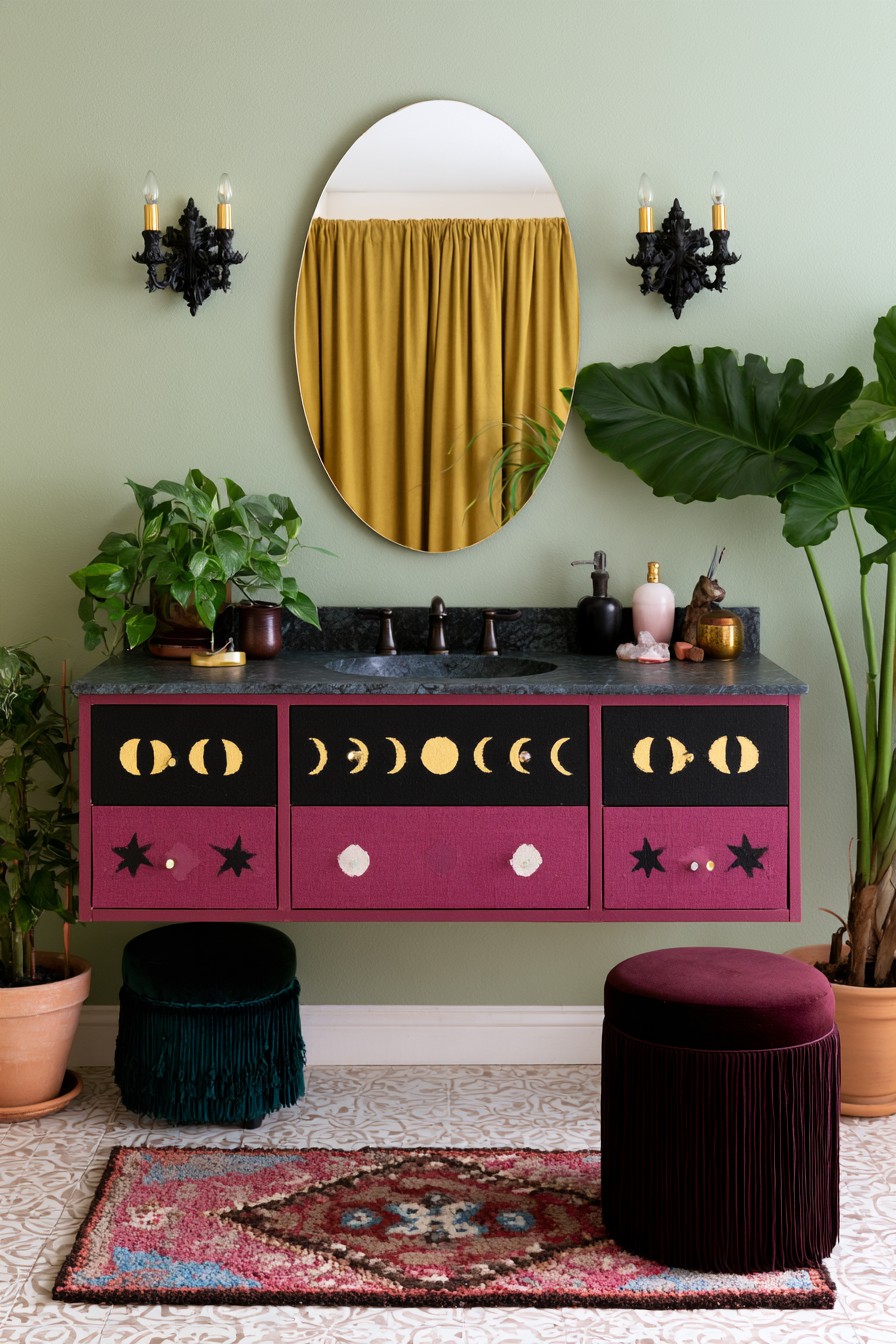
Moon phases repeat across dark upper fronts, with berry colored lower sections and smaller star accents. The progression gives several drawers a shared visual sequence. Metallic motifs supply contrast while the larger areas remain plain.
Mark a common reference line and each front’s center before transferring the symbols. Keep the sequence aligned visually while painting each drawer as a separate component. Surface preparation and metallic coverage should follow the chosen product system, with a small test before committing to the unit. In a bathroom, also select the finish for the actual exposure and cleaning requirements. The low profile paint approach offers a clearer maintenance option than adding delicate textile where splashes are frequent.
23. Painted Star Cabinet Panels Adapted to Drawer Fronts
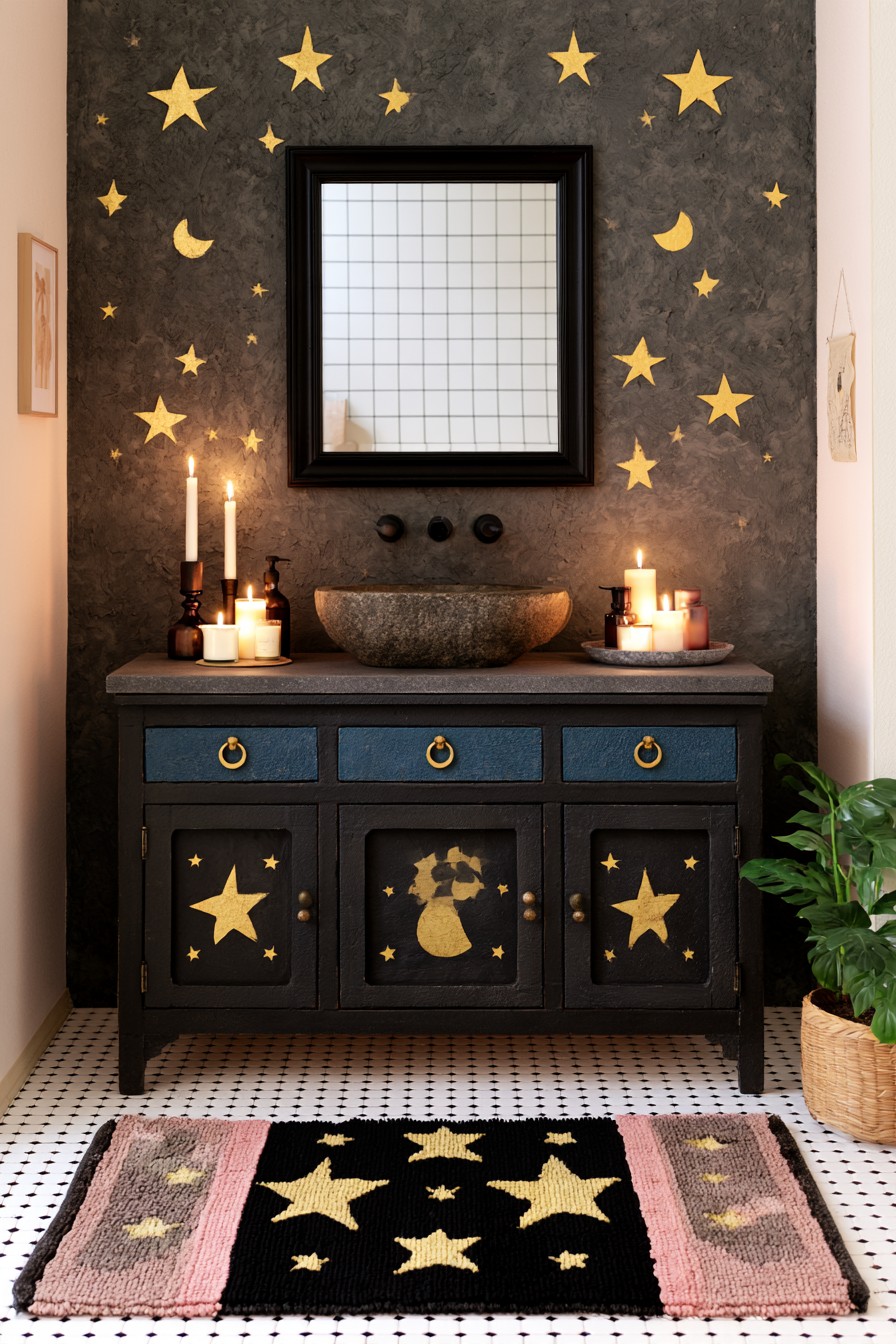
Gold stars and a crescent decorate the lower cabinet doors, with small blue drawers above. To use the same scheme on drawer fronts, scale the symbols to fit each smaller panel and keep them clear of handles and edges.
To adapt the idea, resize the painted symbols to the drawer’s horizontal shape and arrange them around its hardware. Keep the stencil and any raised alternative inside the front boundaries. A painted treatment changes thickness very little, making it easier to trial than layered ornament. Test the selected finish on the existing surface and allow proper curing before use. Repeating one small star can connect the upper drawers to the original door theme.
24. Starburst Cabinet Relief Adapted to Drawers
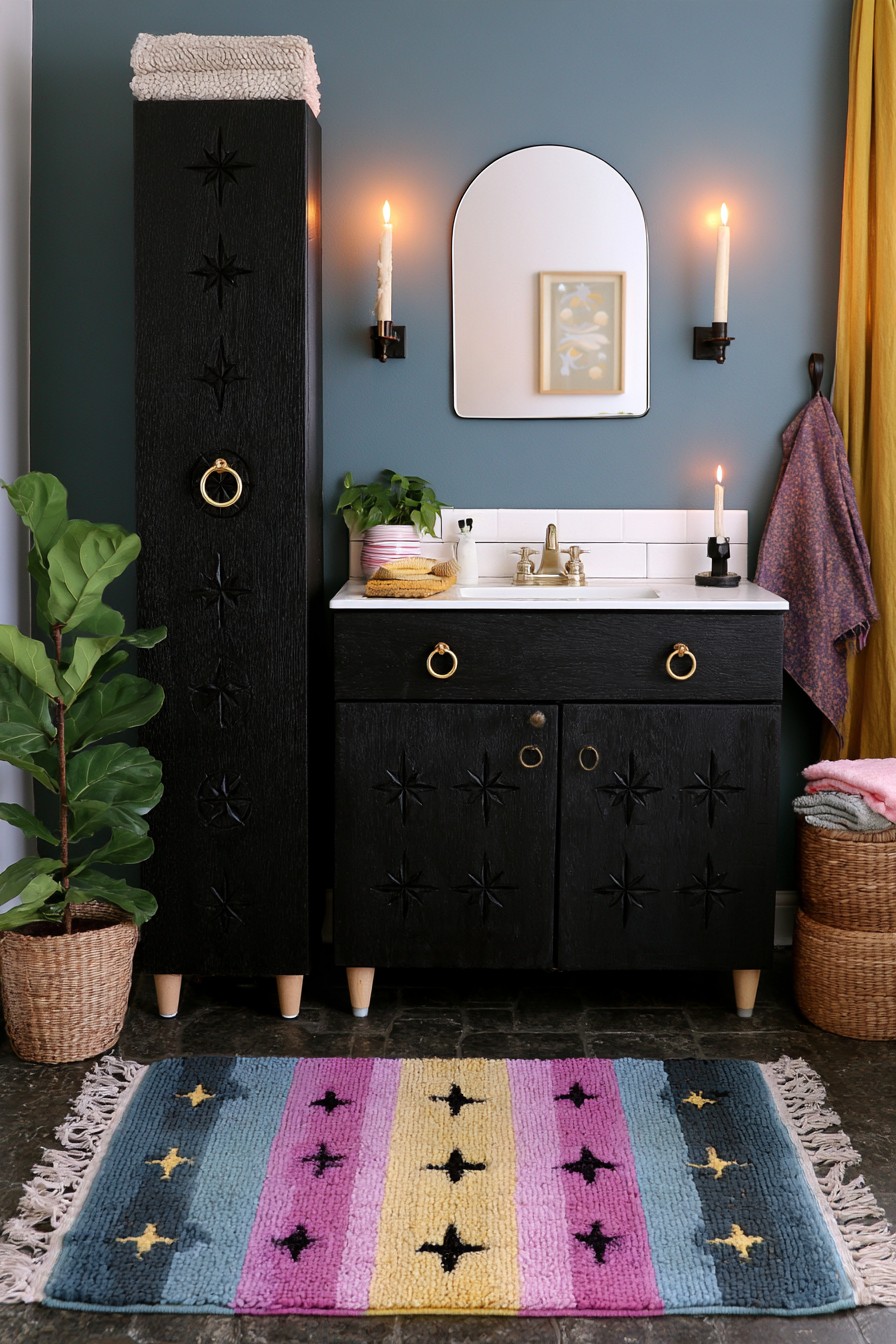
Dark starburst relief appears on a tall cabinet door and the lower doors of a sink unit. Ring pulls supply contrast against the largely monochrome surfaces. Shadows reveal the raised forms, giving the design texture without a second paint color.
For drawers, choose smaller, shallow motifs that suit the front width and leave the ring’s complete swing clear. Trial placement before bonding, and select an attachment compatible with the relief and original finish. Measure the added profile where other fronts or doors move nearby. In a bathroom, choose the decorative material, primer, and coating as a complete system suited to the expected moisture exposure. Preserve cleaning access around relief edges and hardware.
25. Gothic Arch Cabinet Fronts Adapted for Drawer Makeovers
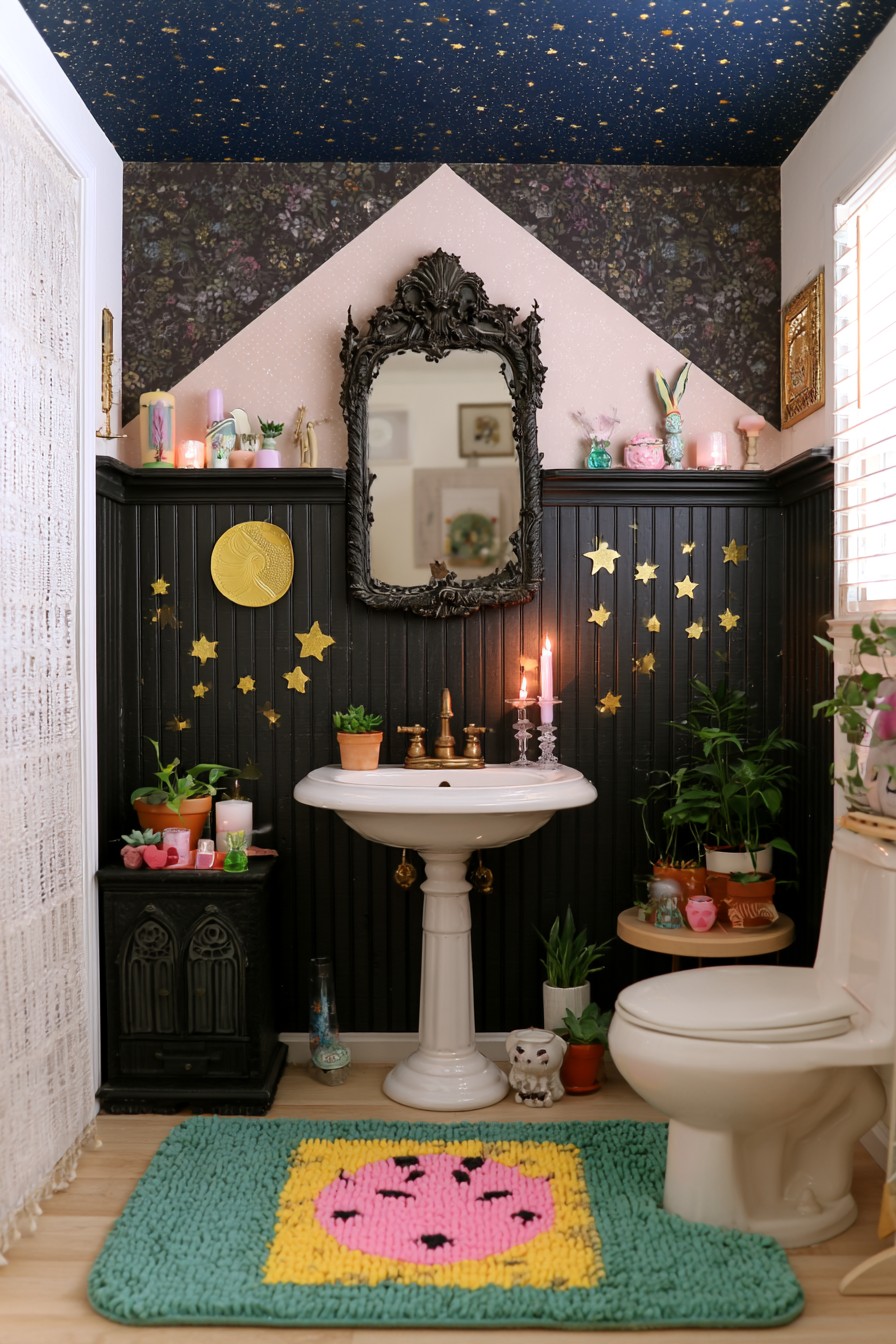
Pointed arch details decorate small lower cabinet doors beside a pedestal sink. The matte dark finish lets shadows define the relief, with other Gothic accents continuing around the room. This is cabinet door inspiration rather than a pictured drawer installation.
For a wide drawer, reduce the arch height and use a shallow overlay or painted outline fitted to the front. Keep its attachment clear of slides and opening gaps. This carries the Gothic shape into the drawer’s proportions while retaining its working hardware.
Finish with One Complete Working Front
Before repeating the design, confirm that one finished drawer opens and closes, the handle operates comfortably, and the attachment can be inspected or removed as planned. Check the final weight and profile against the furniture and mechanism instructions. Let adhesives and finishes reach their required cure before regular use; a surface that feels dry may not be ready for handling.
Clean painted finishes, velvet, lace, crochet, and tufted panels according to their actual materials. A removable panel is not automatically machine washable. Recheck loose trim, fasteners, or rubbing after use. The strongest makeover is a design you can operate and maintain, with every moving front still functioning independently.


Leave a Reply