
Your garden already offers a framework for Halloween decorating: flower beds, winding paths, gates, and places to gather. These 18 ideas show how to give each area a seasonal role. Use the selection guide to choose a scene, then compare its main pieces and layout with the space you have.
Table of Contents
- Find an Idea for Your Outdoor Space
- 1. Pumpkin Headed Skeleton in a Flower Bed Graveyard
- 2. Two Scarecrow Characters in a Pumpkin Patch
- 3. Weathered Grave Markers on a Curved Lawn
- 4. White Ghosts Among Colorful Flower Borders
- 5. Vine Covered Gate with a Pumpkin Approach
- 6. Oversized Witch Hats in Rounded Planting Beds
- 7. Mini Cemetery Behind a White Picket Border
- 8. Pumpkin Path Leading from the Patio
- 9. Backyard Lounge with Cemetery Themed Borders
- 10. Gothic Garden Gate with Painted Pumpkins
- 11. Outdoor Dining with Spiderweb Accents
- 12. Gothic Basin Display with Autumn Flowers
- 13. Front Entrance with Ghosts and Pumpkin Steps
- 14. Skeleton Guardians Along a Curving Walk
- 15. Red and Black Porch Drapery
- 16. Witch Hatted Pumpkin and Skull Posts
- 17. Pumpkin Topped Ghosts Along Green Borders
- 18. Branching Hanger with Bells and Pumpkin Ornaments
- Keep the Garden Usable Through the Season
Find an Idea for Your Outdoor Space
- Small flower beds: Choose the layered character scene in idea 1 or the low fenced miniature cemetery in idea 7.
- Existing garden paths: Compare the pumpkin route in idea 8, paired skeleton guardians in idea 14, and repeating ghost posts in idea 17.
- Seating and dining areas: Keep the lawn open with the border arrangement in idea 9, or coordinate a usable dining table with nearby flower bed accents in idea 11.
- House entrances: Link garden and doorway with the ghosts in idea 13 or the red and black porch backdrop in idea 15.
The ideas below include the main decorative pieces and a short placement plan. Adapt them to existing planting and furniture; large props, suspended ornaments, and illuminated products need the supports and exposure conditions specified for their use.
1. Pumpkin Headed Skeleton in a Flower Bed Graveyard
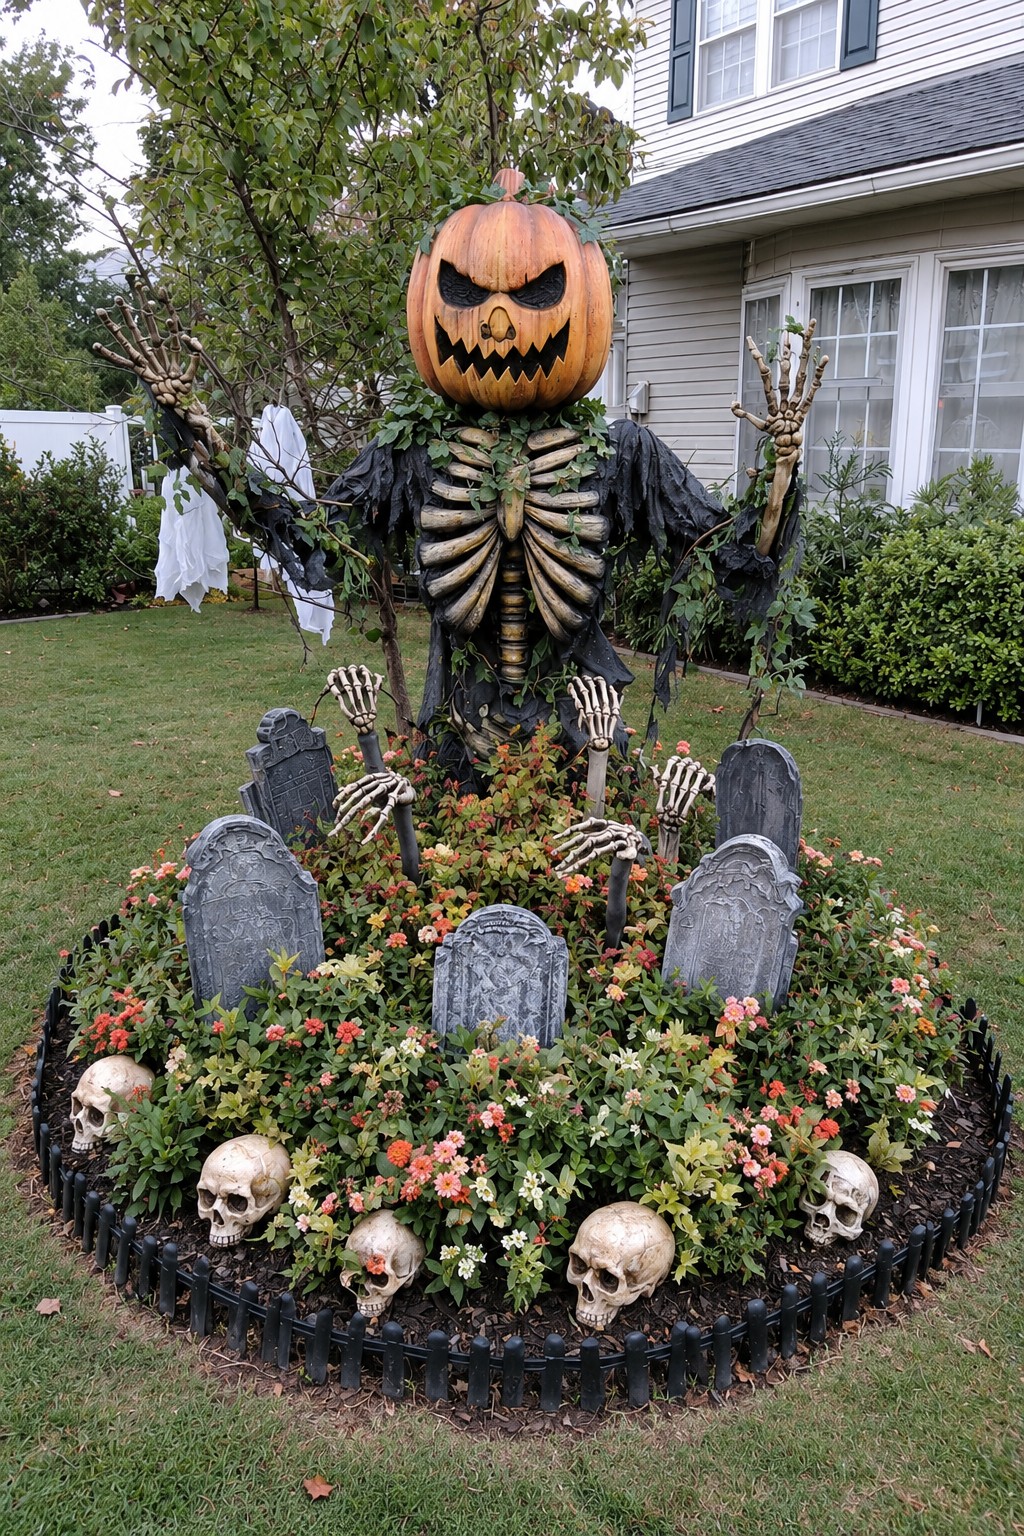
Plan the main skeleton's position first, toward the rear of the bed where its head and raised hands can rise above the planting. Place lower grave markers in front, then finish the near edge with a few small skull accessories. This simple sequence creates readable layers without allowing the smaller pieces to compete with the character.
Use a ready made exterior figure with the support system specified for it. In a compact bed, one character and two low markers can provide the same hierarchy. Keep flowering plants visible between the props, allowing the orange head, pale bones, and softer botanical textures to remain separate parts of the scene.
Main pieces: An exterior skeleton character with a lightweight pumpkin head, its specified supports, low grave markers, and small skull props.
2. Two Scarecrow Characters in a Pumpkin Patch
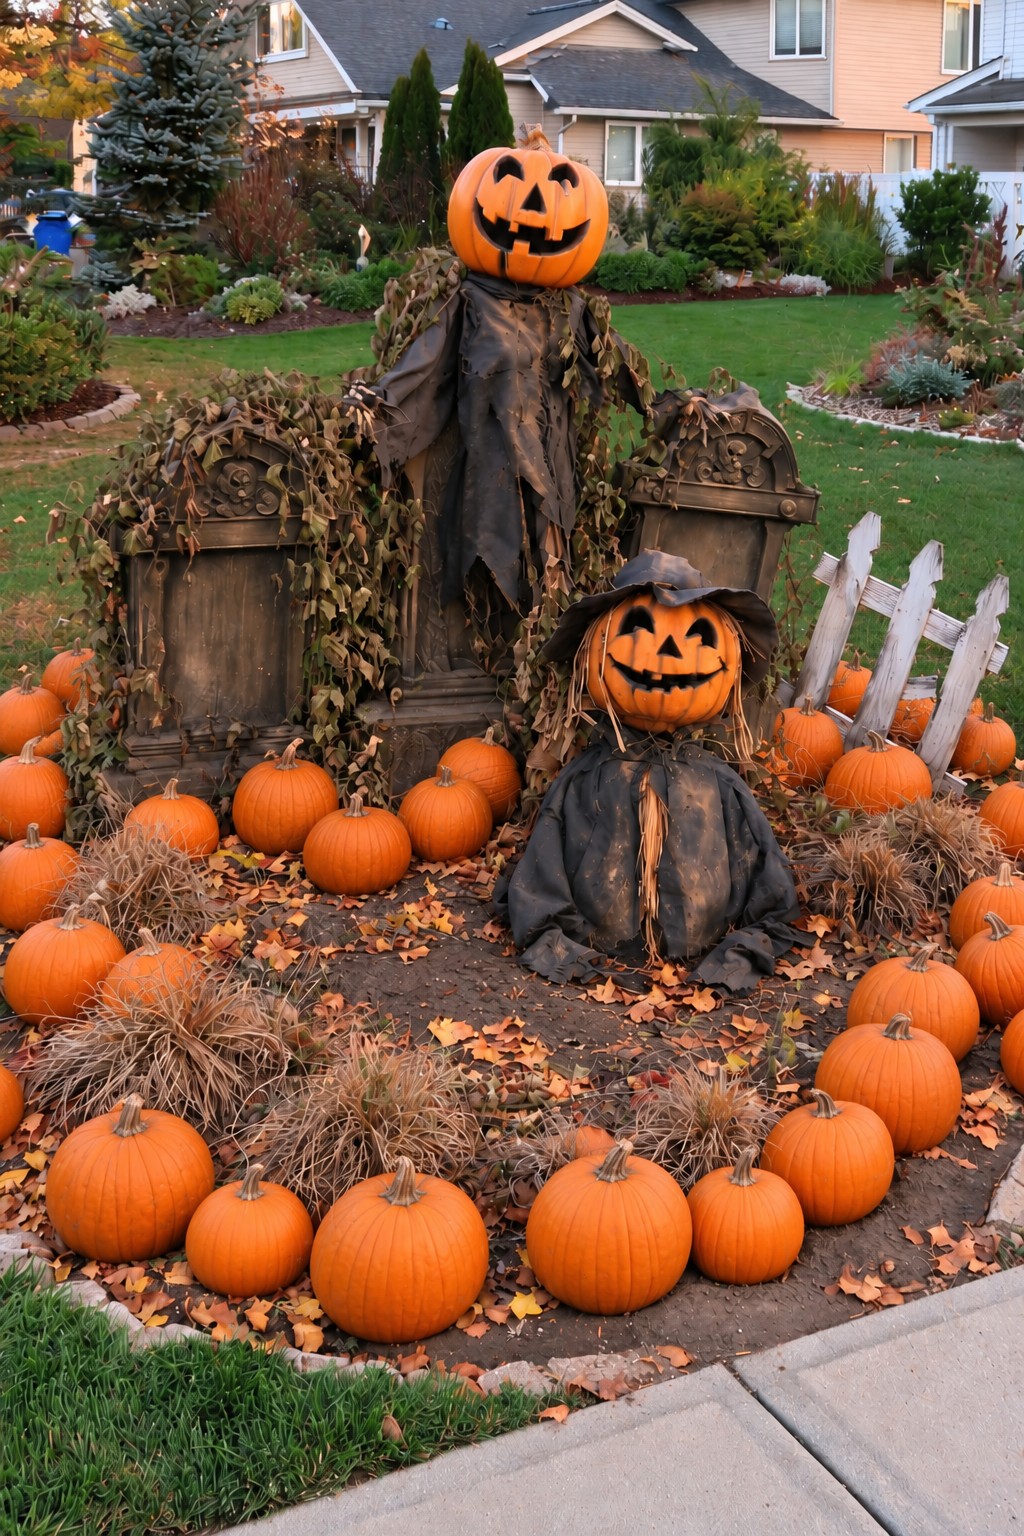
A standing scarecrow behind a smaller seated companion creates a story through posture and height. Their aged brown costumes blend with dry looking vines, while the orange faces remain easy to pick out. This pairing suits a bed where you want a friendly character scene with a little haunted texture.
Set the two characters in place before arranging plain pumpkins around them. Leave breaks in the pumpkin patch so mulch and planting still show, and add a short pale fence accent at one side if the composition needs a boundary. Choose separately supported figures; loose pumpkins at their feet are decorative, not a structural base.
Main pieces: Two exterior scarecrow figures in different poses, plain pumpkins, brown costume details, and an optional short fence accent.
3. Weathered Grave Markers on a Curved Lawn
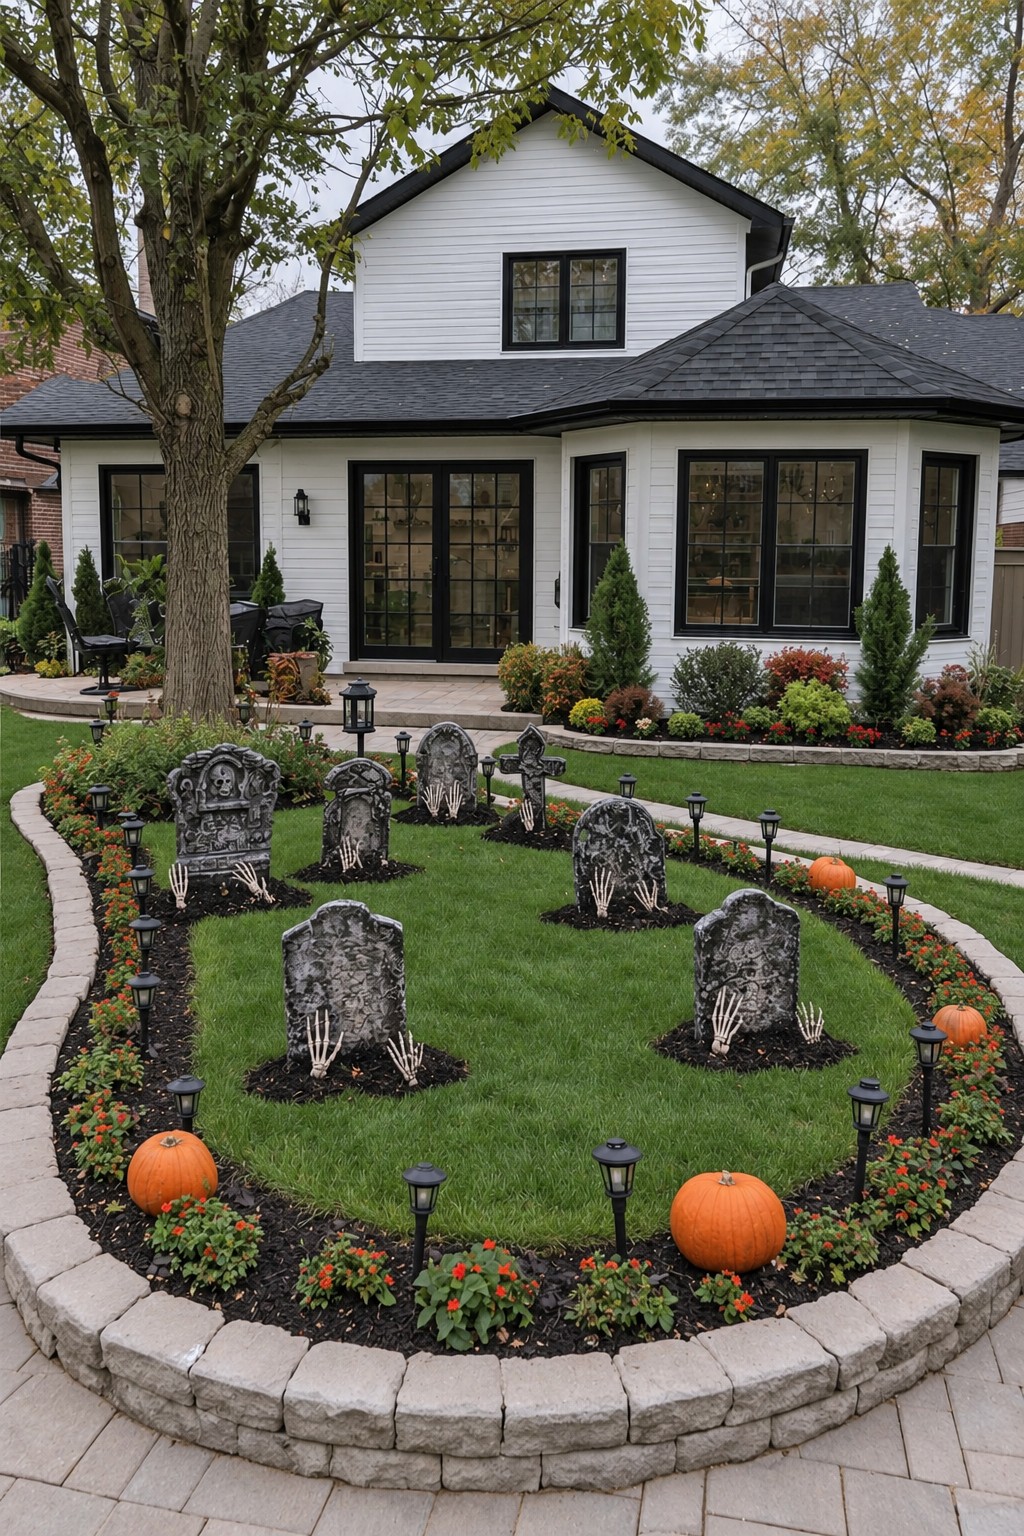
Open grass is part of this design. Weathered markers occupy separate pockets within a curved lawn, leaving green intervals that make their irregular outlines easier to see. The effect feels like a cemetery placed in an existing garden, rather than a dense theatrical bed with one dominant character.
Lay out the markers before adding accessories, stepping back to check the empty spaces between them. Use taller stones farther away and reserve skeletal hands for selected bases. A few pumpkins along the planted edge can connect the display with autumn flowers without filling the lawn. On a smaller plot, decorate one arc of the border and leave the rest open.
Main pieces: Grave marker props in varied heights, a few faux skeletal hands, and pumpkins for the planted border.
4. White Ghosts Among Colorful Flower Borders
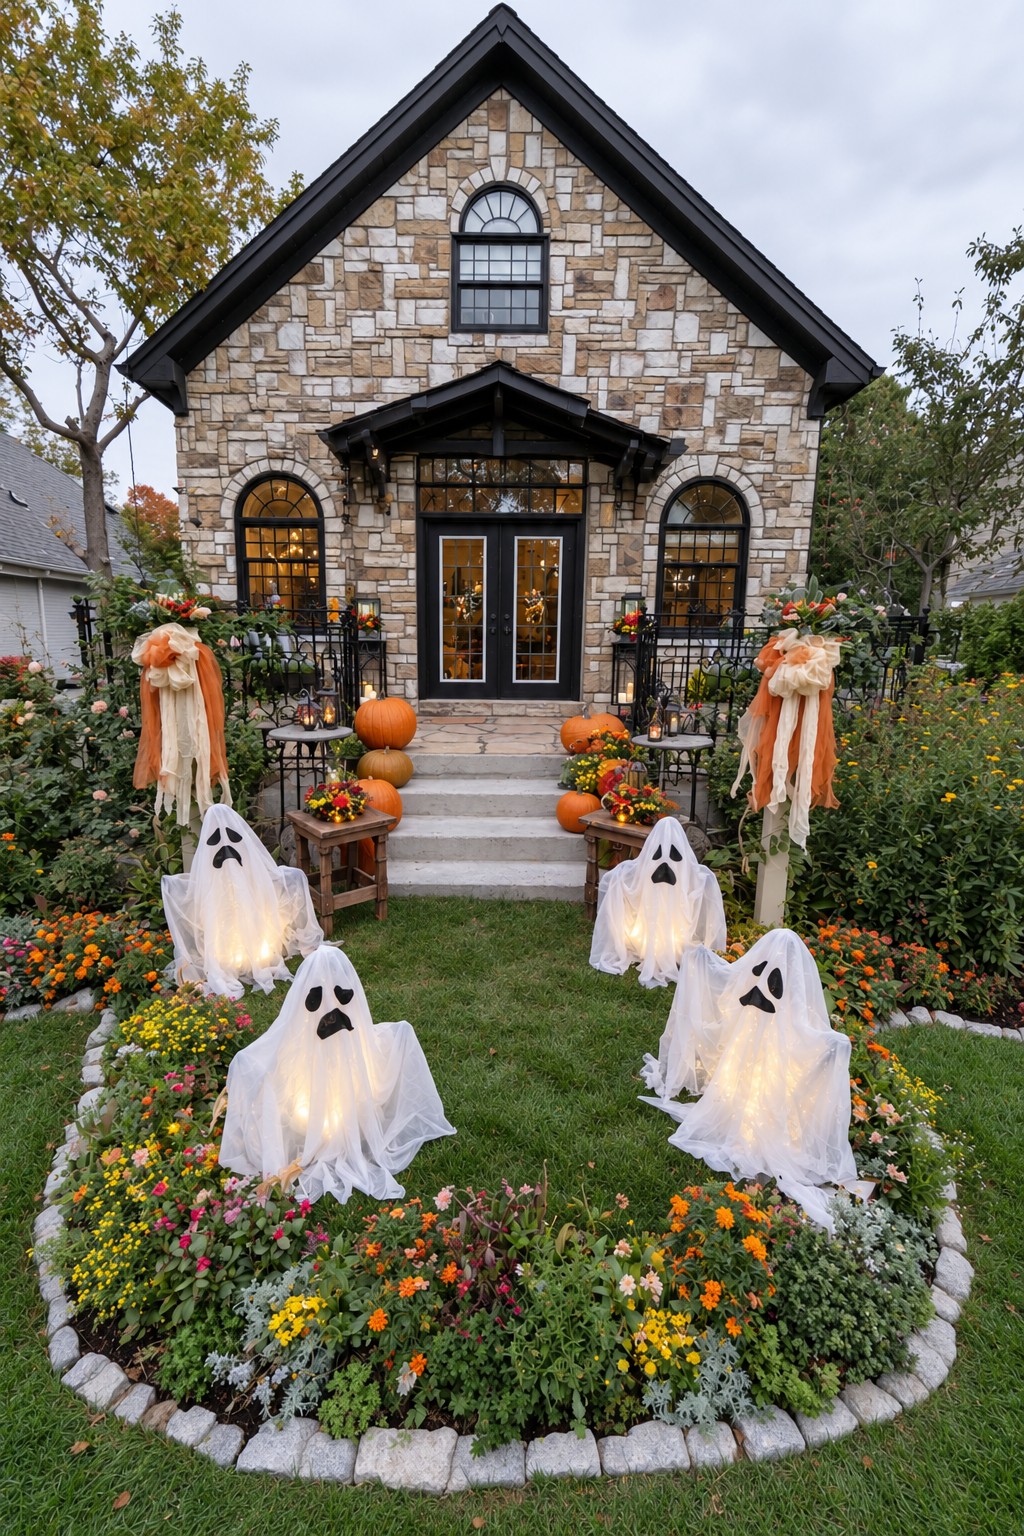
A group of pale ghosts makes an existing flower border feel like a stage. The white bodies stand out against green lawn, while yellow, orange, and red flowers keep the setting lively. Different faces and slight variations in height make the group feel animated without requiring additional large characters.
Begin with two ready made exterior ghosts placed inside the garden's existing outline, then add more only if their silhouettes remain distinct. Use each decoration's intended support and removable costume accessories. If you want the glowing version, select complete illuminated outdoor figures instead of putting separate lights inside ordinary fabric. A few pumpkins near the garden edge can link the scene to the entrance.
Main pieces: Finished exterior ghost figures, their matching supports, detachable fabric details, and a few pumpkin accents.
5. Vine Covered Gate with a Pumpkin Approach
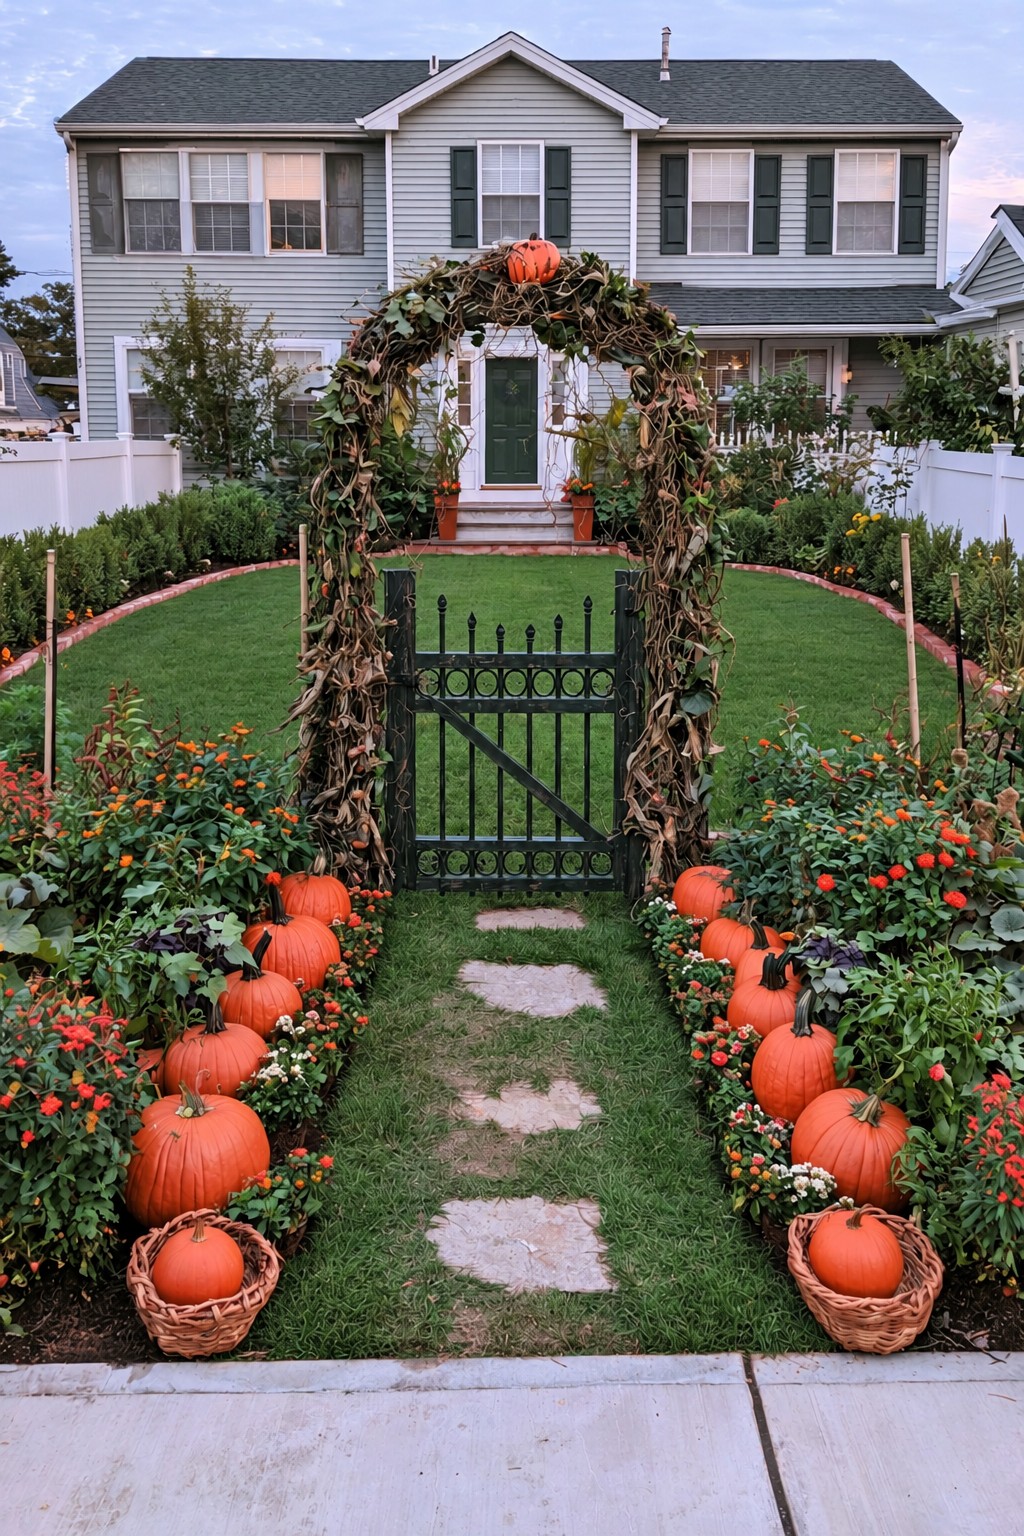
Twisted vine textures and simple pumpkin groups create a garden entrance that stays close to autumn decorating. Green leaves keep the arch connected to its planting, while the mostly plain pumpkins add seasonal color without turning every piece into a character. Choose this approach when you prefer botanical texture to elaborate Halloween faces.
Arrange the ground level pumpkin groups first, outside the stepping stones, then add vine garland to the fixed arch. A small lightweight pumpkin can finish the top on a compatible independent attachment; keep foliage away from the gate's moving parts. Woven baskets at the near corners give the arrangement a softer, collected appearance.
Main pieces: Vine garland, plain pumpkins, optional woven baskets, and a lightweight pumpkin ornament for the fixed arch.
6. Oversized Witch Hats in Rounded Planting Beds
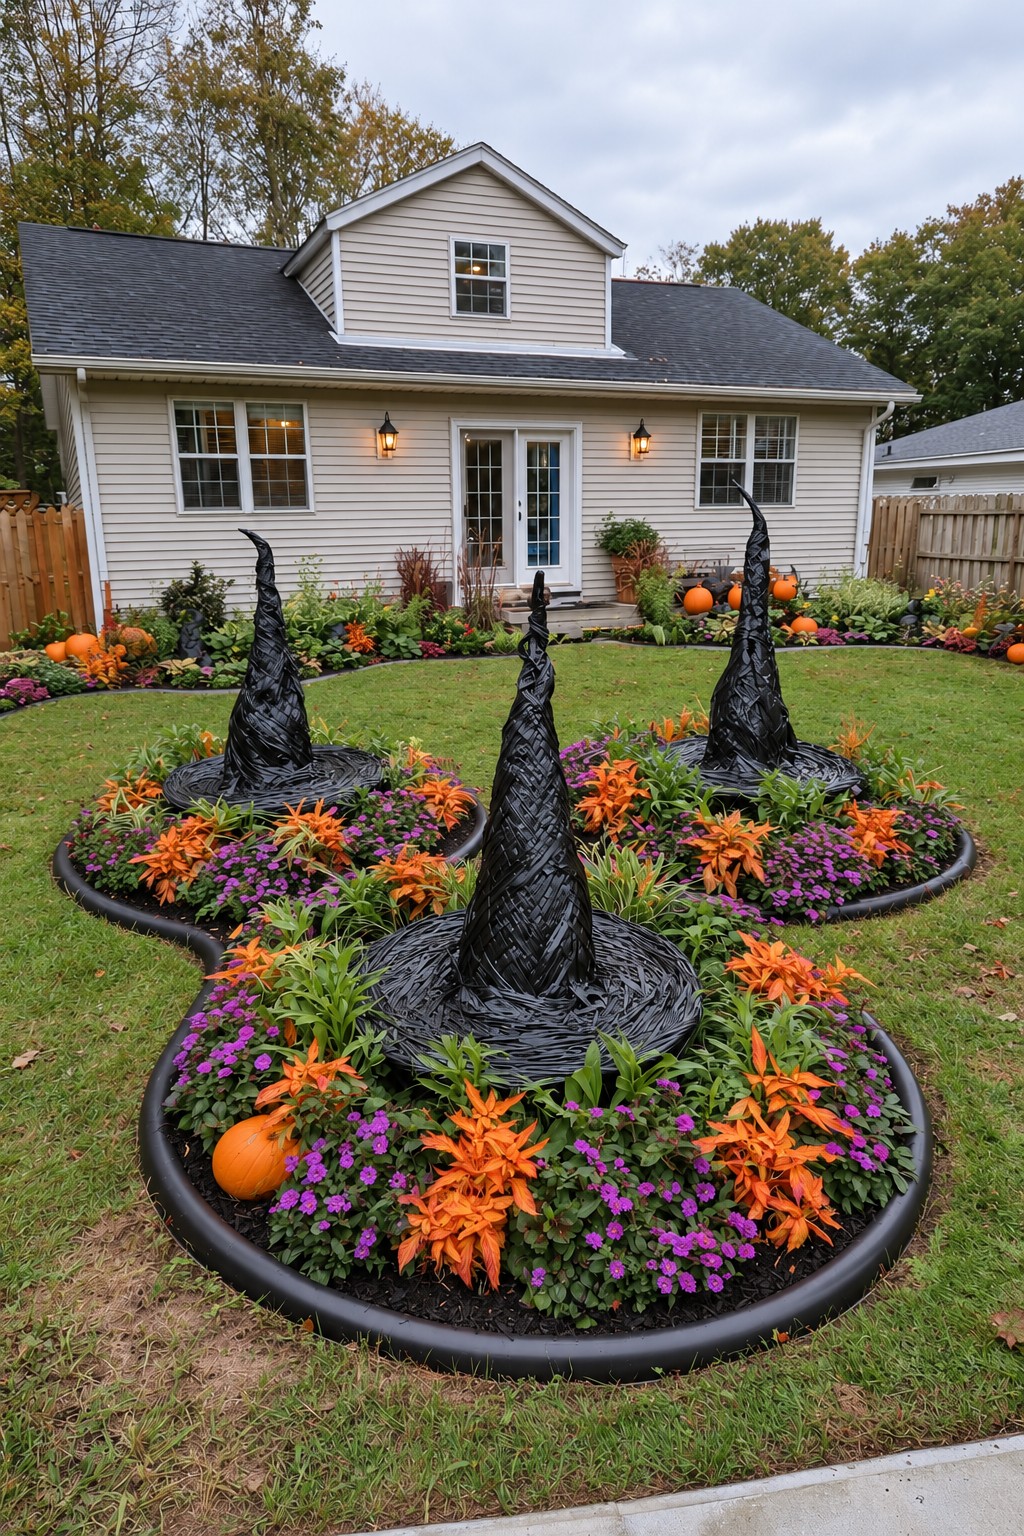
Try the compact version in an existing broad planter: one exterior decorative witch hat, supported above the plants, with a few purple and orange accents around its brim. You can capture the crooked silhouette without making new circular beds. Choose a hat sized to the planter so the foliage remains visible.
Across a larger garden, repeat the motif in existing beds at different distances, using the nearest hat as the main feature. Textured black surfaces contrast with low colorful planting, while varied heights prevent the groups from feeling identical. Use a lightweight exterior prop and compatible display support, placing its base independently of delicate stems rather than resting the brim on them.
Main pieces: An exterior decorative witch hat, a broad existing planter or bed, a compatible support, and a few colorful botanical accents.
7. Mini Cemetery Behind a White Picket Border
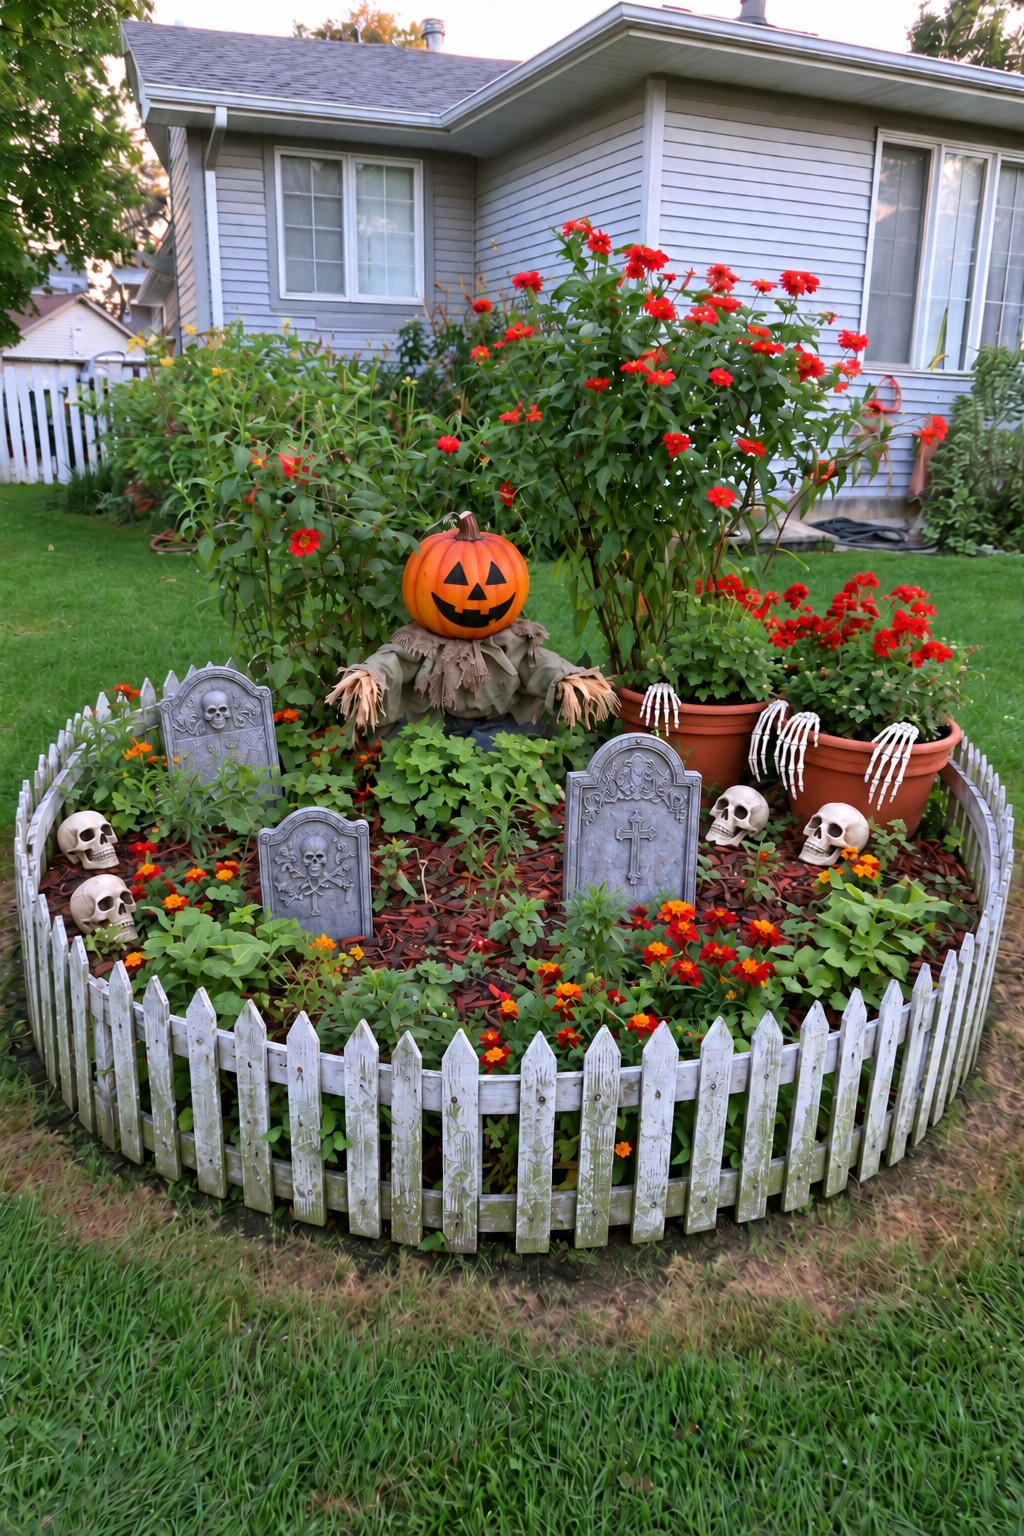
A low white border gives a small Halloween scene a clear beginning and end. Its pale pickets separate the miniature cemetery from the surrounding lawn, making a few markers and one cheerful scarecrow feel like a complete display. This is a useful choice when the available flower bed is small.
Decide the enclosure's footprint before positioning the character and markers. Keep the border low enough to reveal the flowers, and include a removable section for access. A terracotta pot with a skeletal hand at its rim adds a small visual joke without another full figure. Explore more Halloween gate and fence decorating ideas to coordinate the entrance with the surrounding border.
Main pieces: A low decorative picket border, a small scarecrow, compact grave markers, and optional skull or skeletal hand accessories.
8. Pumpkin Path Leading from the Patio
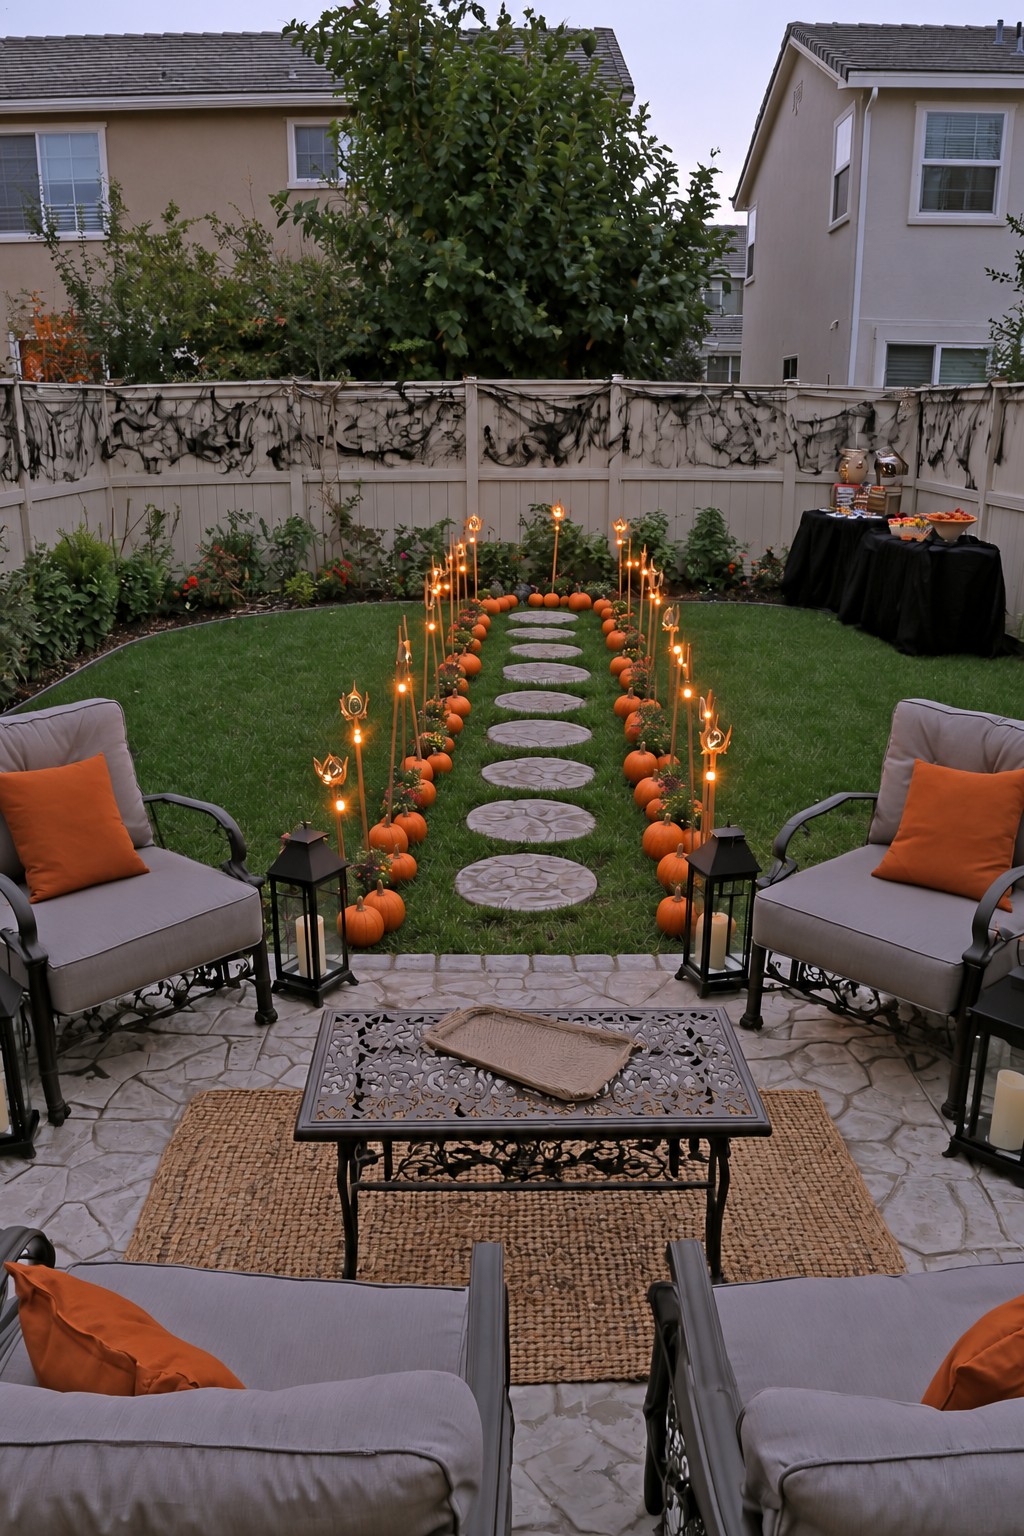
Pumpkin rows lead from the seated patio toward a separate serving table, making the route part of the party arrangement. The repeated low shapes pull attention along the stepping stones, while taller accents create a second rhythm beside them. Here the decorating emphasis is movement between relaxing and refreshments.
Begin with the destination table and the usable path, then place small pumpkins just outside its edges. Reduce the number where the route curves or narrows. A compact patio can use two short groups at the path entrance and another by the table. If adding illuminated stakes, choose finished exterior products with cables routed outside the route and projecting details away from passing clothes.
Main pieces: Small pumpkins, an existing garden path, a separate serving table, and optional finished exterior decorative stakes.
9. Backyard Lounge with Cemetery Themed Borders
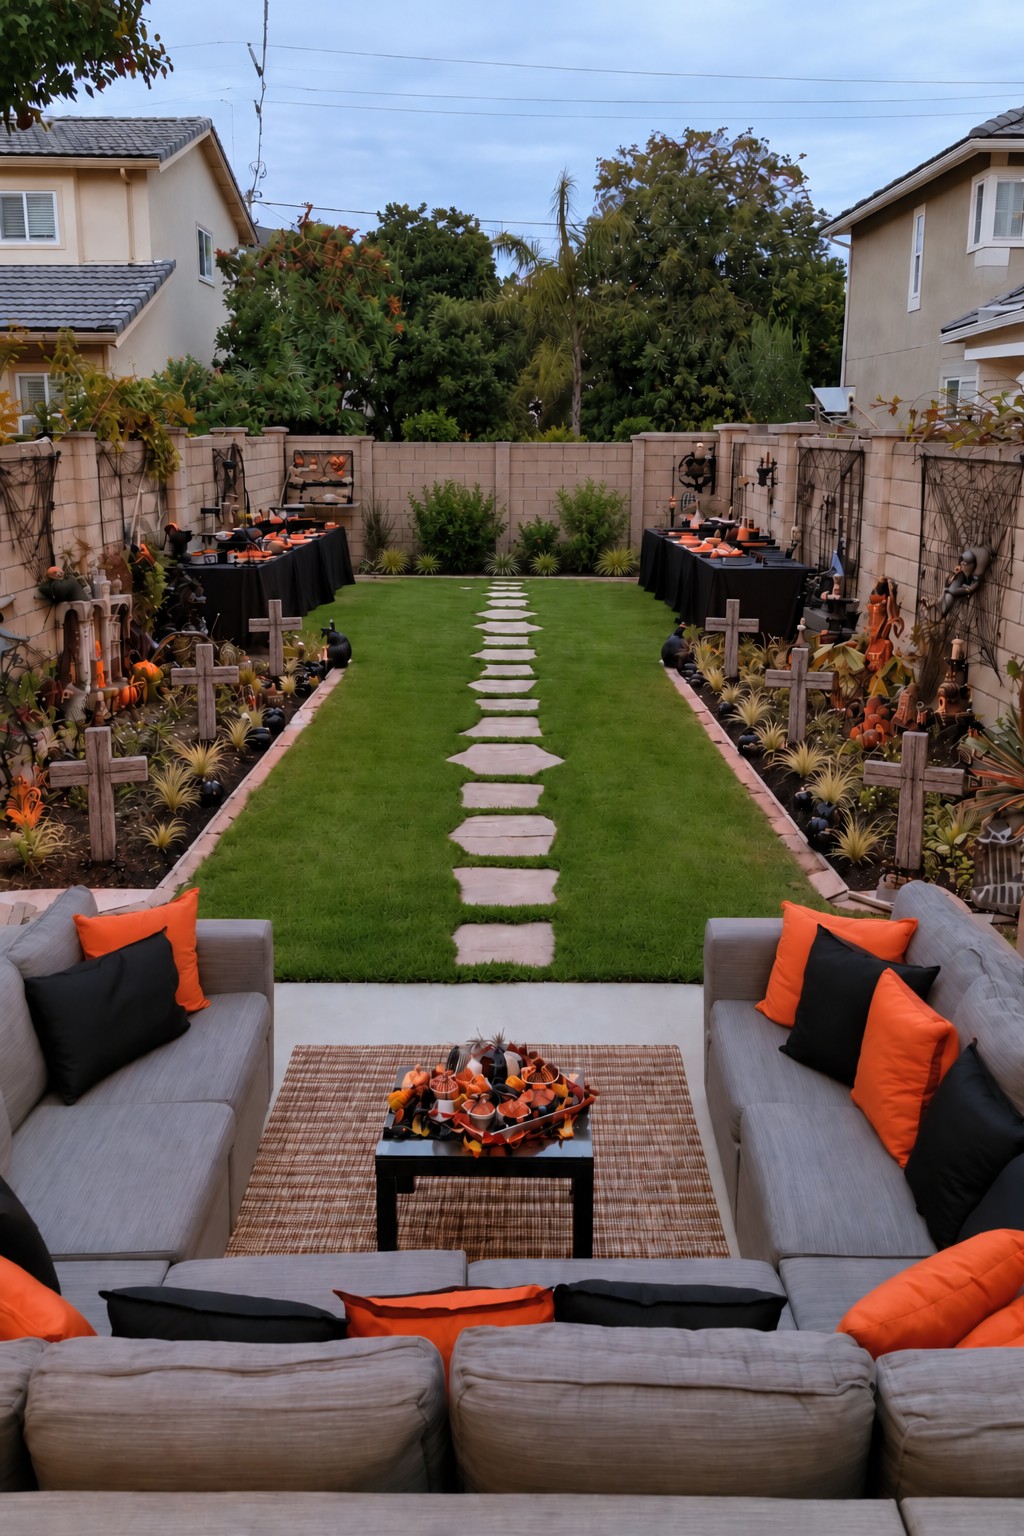
Keep the center of the garden open and place the cemetery details around its perimeter. Unlike the pumpkin route in idea 8, this layout treats decoration as a frame around the lounge and lawn. Low wooden markers and dark seasonal props make the edges atmospheric while leaving the middle available for movement and gathering.
Choose two or three border groups visible from the seats, then add a small coordinated centerpiece to the lounge table. Serving stations can sit against the back or side fence, with enough room to approach them. One table is enough for a smaller gathering; the garden does not need matching food stations on both sides to feel balanced.
Main pieces: Low graveyard props for the side beds, a small lounge centerpiece, and an optional perimeter serving table.
10. Gothic Garden Gate with Painted Pumpkins
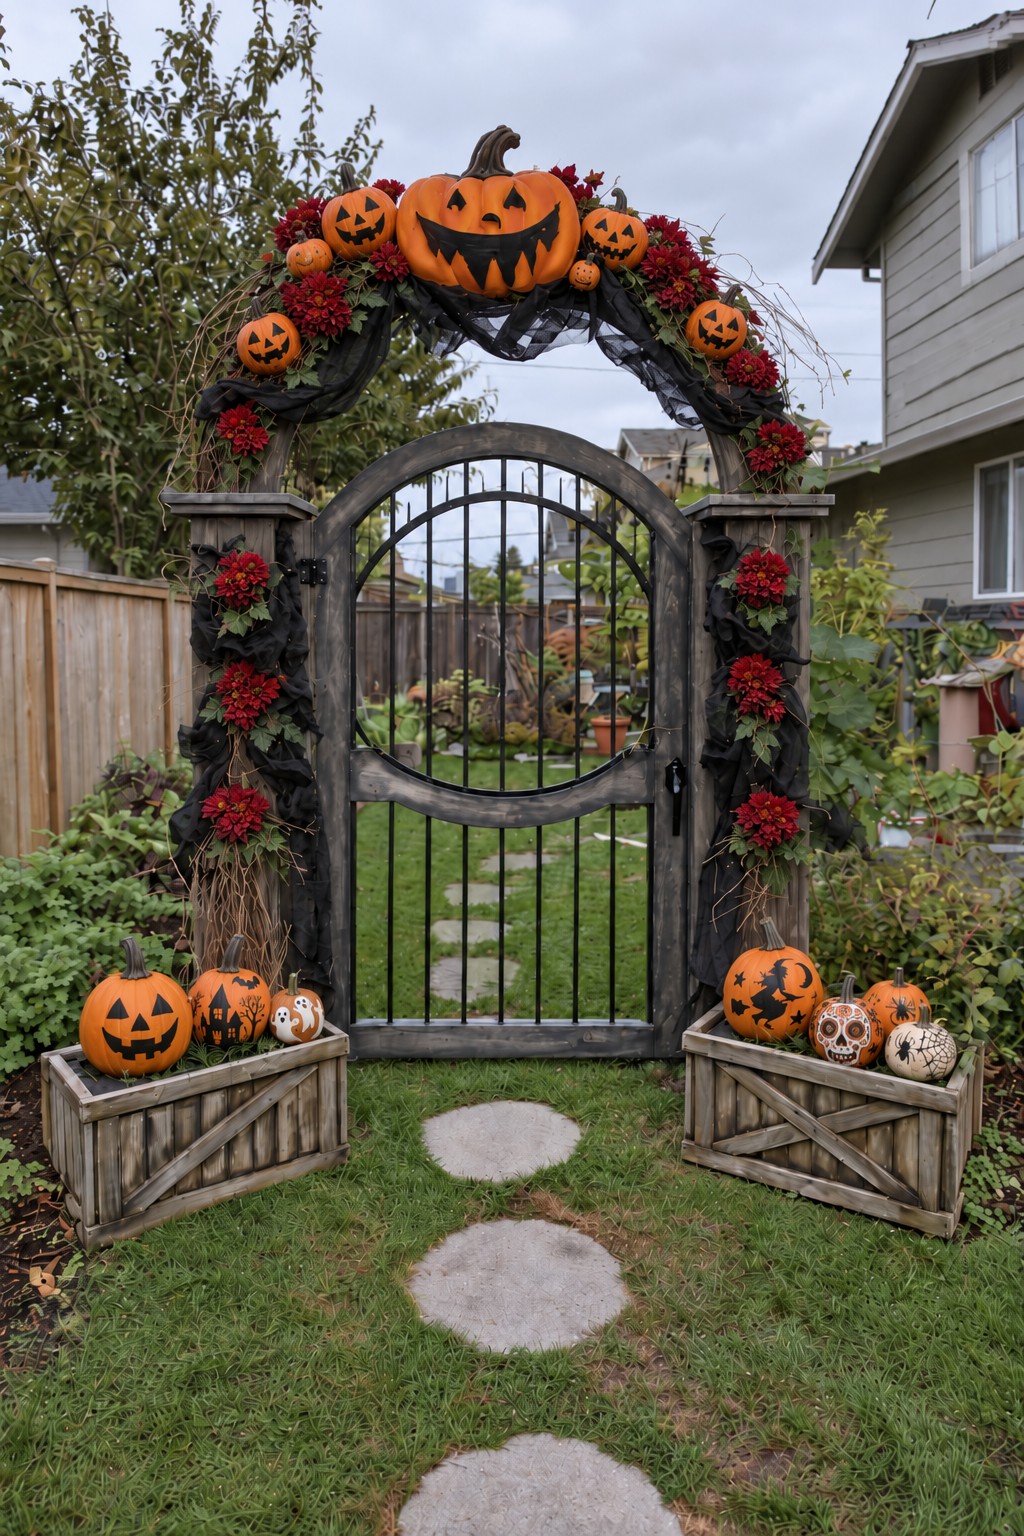
Black fabric, red flower clusters, and expressive pumpkins make this gate a theatrical Halloween entrance. The circular opening stays visually important beneath the larger face at the top. It offers a more character focused alternative to the vine covered gate, with painted designs supplying interest at close range.
Choose one main painted motif, such as a witch silhouette, then use quieter ghost or web details as companions. A decorated skull and haunted house pattern can provide variety without making every pumpkin equally busy. Arrange the smaller designs in side crates where visitors can see them, and use lightweight heads with appropriate fixed arch supports above the opening.
Main pieces: Painted pumpkins, lightweight upper pumpkin heads, red floral clusters, black fabric accents, and side display crates.
11. Outdoor Dining with Spiderweb Accents
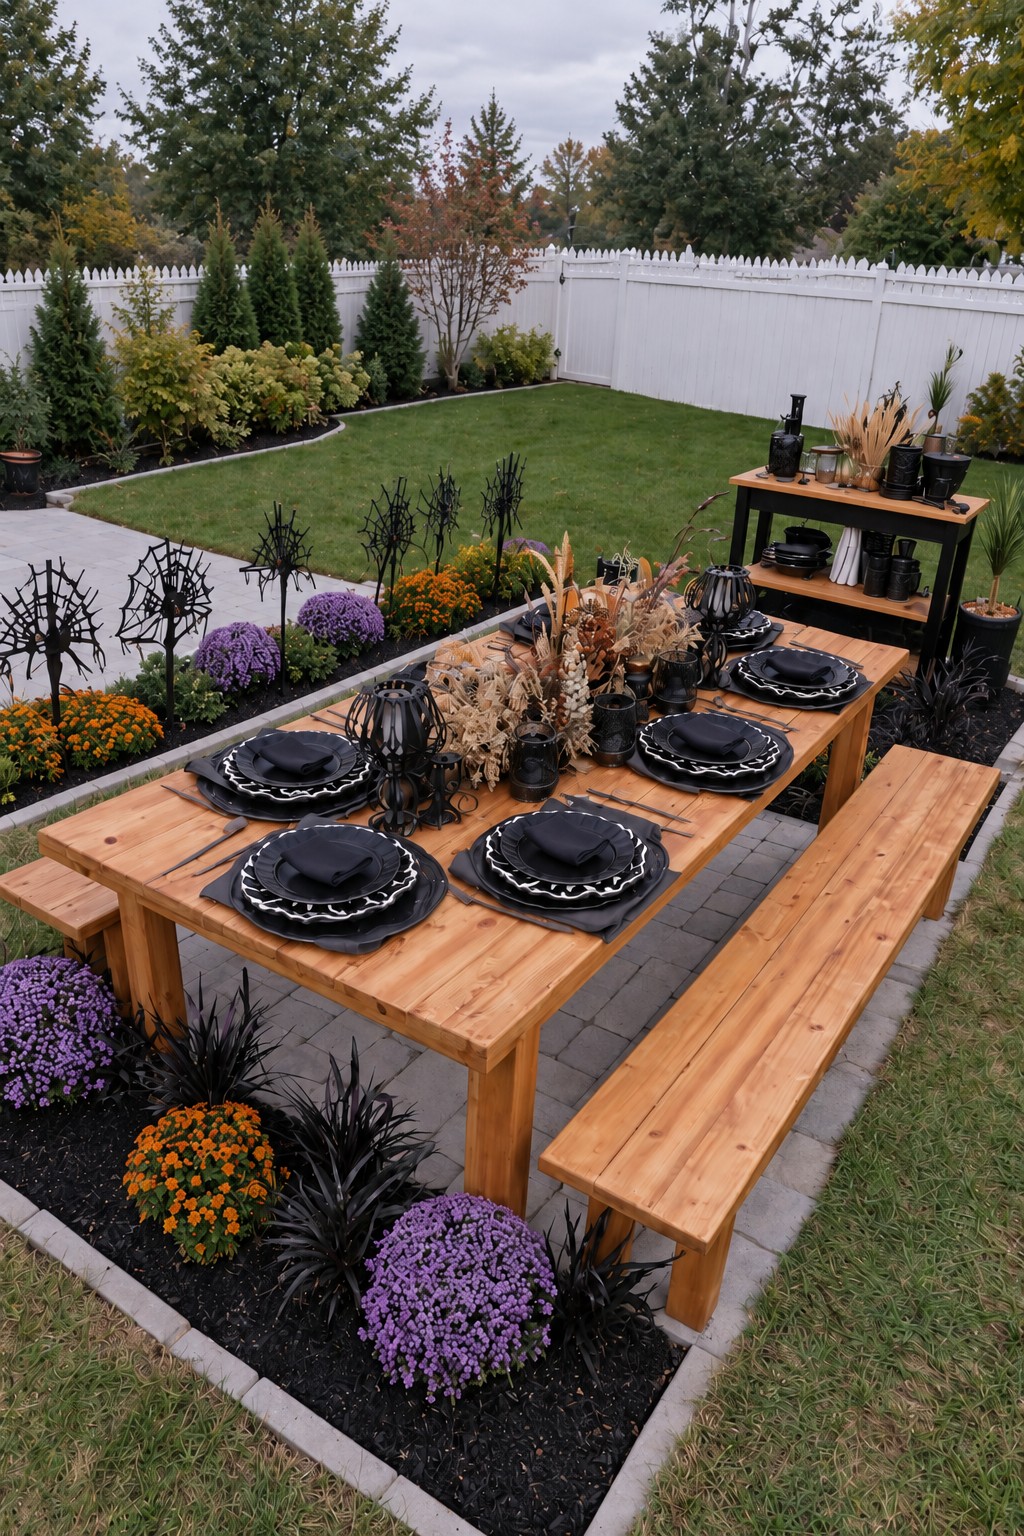
The table and garden carry different parts of this theme. Black plates and cups create Halloween contrast on the warm timber, while a natural textured centerpiece adds autumn character. Rigid spiderweb ornaments belong in the flower border, where their open outlines stand apart from the rounded flower groups.
For a small table, use a few black serving pieces and one low, removable tray of decorative stems. Leave space for dishes and conversation instead of copying a full length arrangement. Put the web ornaments behind the adjacent flowers, with their supports contained in the bed. For complementary colors and place settings, explore these Halloween table styling ideas.
Main pieces: Food safe black tableware, a low centerpiece tray, decorative stems, and rigid spiderweb ornaments for the border.
12. Gothic Basin Display with Autumn Flowers
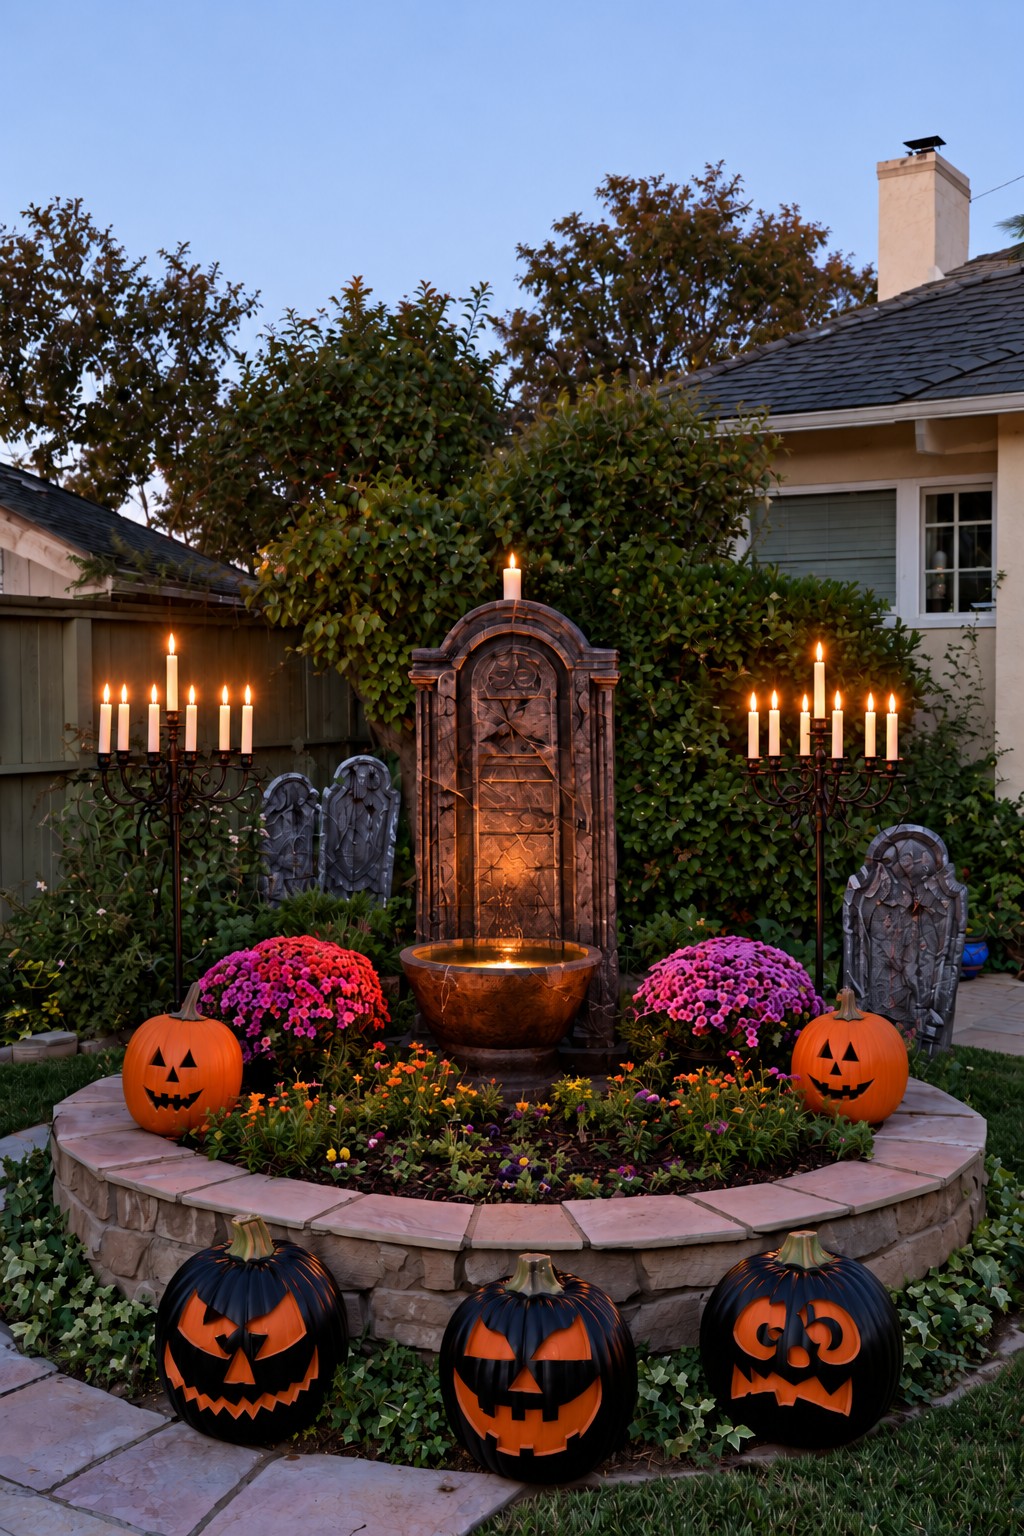
An arched Gothic feature rises behind a shallow basin, creating a composed centerpiece within the raised bed. The basin's warm metallic appearance contrasts with gray markers and lively autumn flowers. It can function entirely as a decorative object; the scene does not depend on a running fountain.
Place the tall feature first, then center the basin below it and keep neighboring flowers lower. On a smaller site, a supported Gothic panel behind a broad decorative bowl can suggest the same relationship. If you choose an actual water feature, use a complete system intended for that location; its water and electrical installation are separate from the seasonal styling.
Main pieces: A supported Gothic feature, a decorative basin, autumn flowering pots or planting, and optional pumpkin accents.
13. Front Entrance with Ghosts and Pumpkin Steps
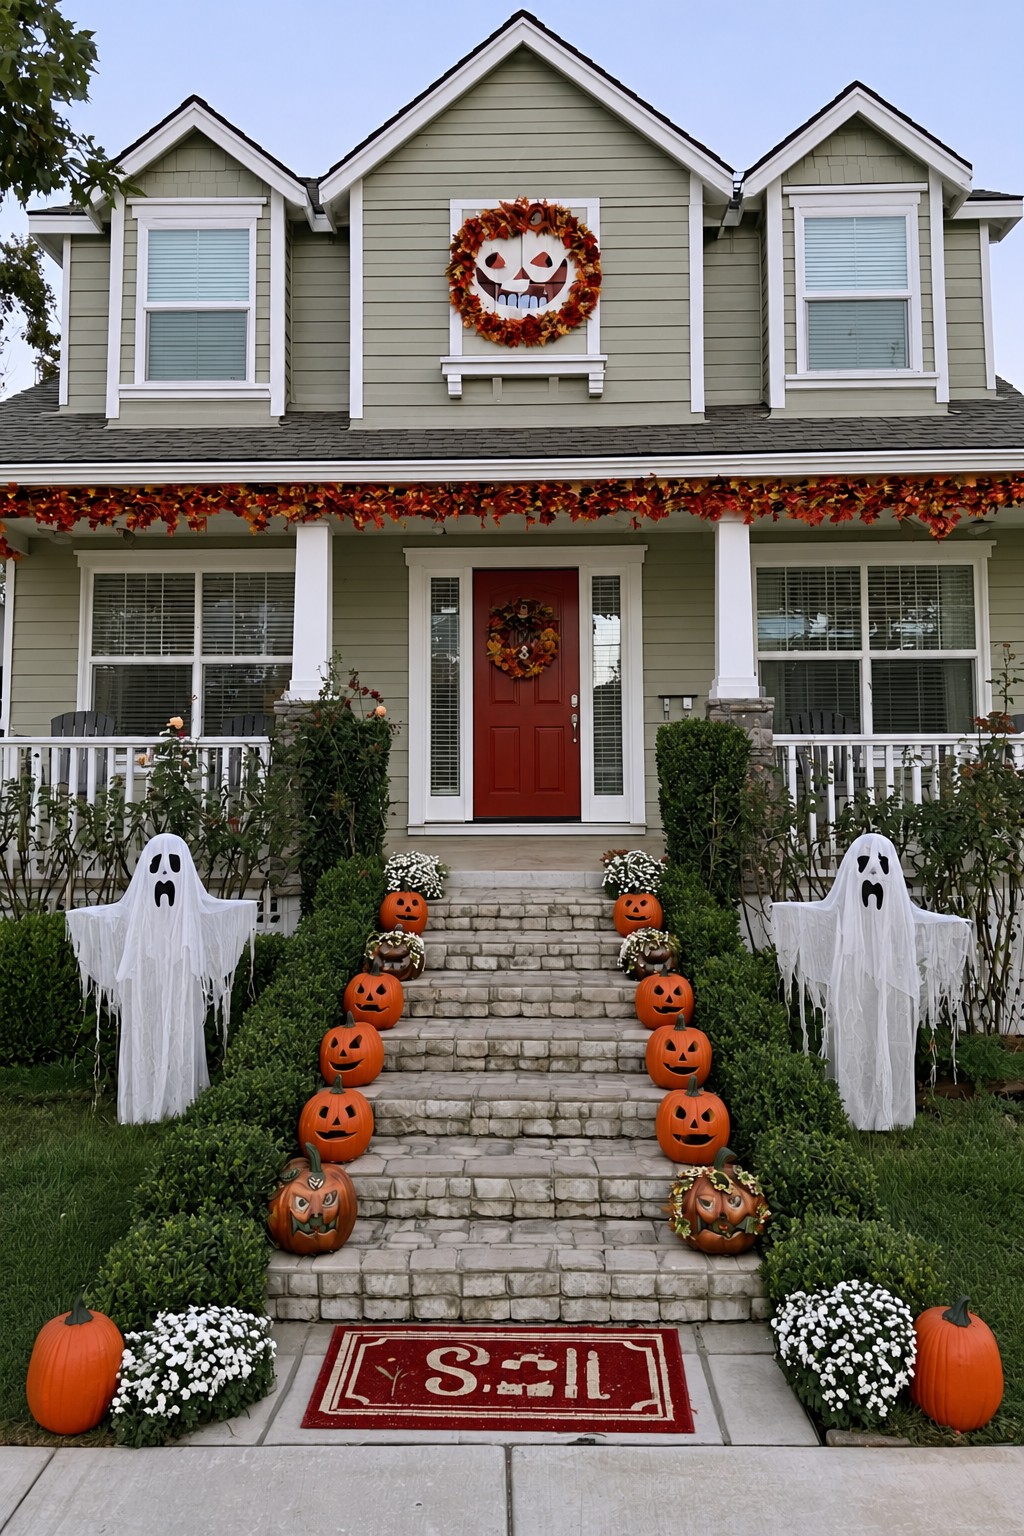
Two tall ghosts frame the front garden while pumpkins connect the lower approach with the doorway. The staircase provides the visual axis, but your home adaptation can place the pumpkin groups in the beds beside it. A wreath and autumn garland carry the same theme upward without needing decoration on every tread.
Start with the pair of ghosts, then choose a few pumpkin sizes that remain visible against the planting. Repeat one face or orange accent near the door to link the levels. For a compact entrance, two lower pumpkin groups and a wreath can replace the long repeated arrangement. Continue the garden theme at the front door with these Halloween porch decorating ideas.
Main pieces: Two supported exterior ghosts, a few pumpkins, a door wreath, and an autumn garland.
14. Skeleton Guardians Along a Curving Walk
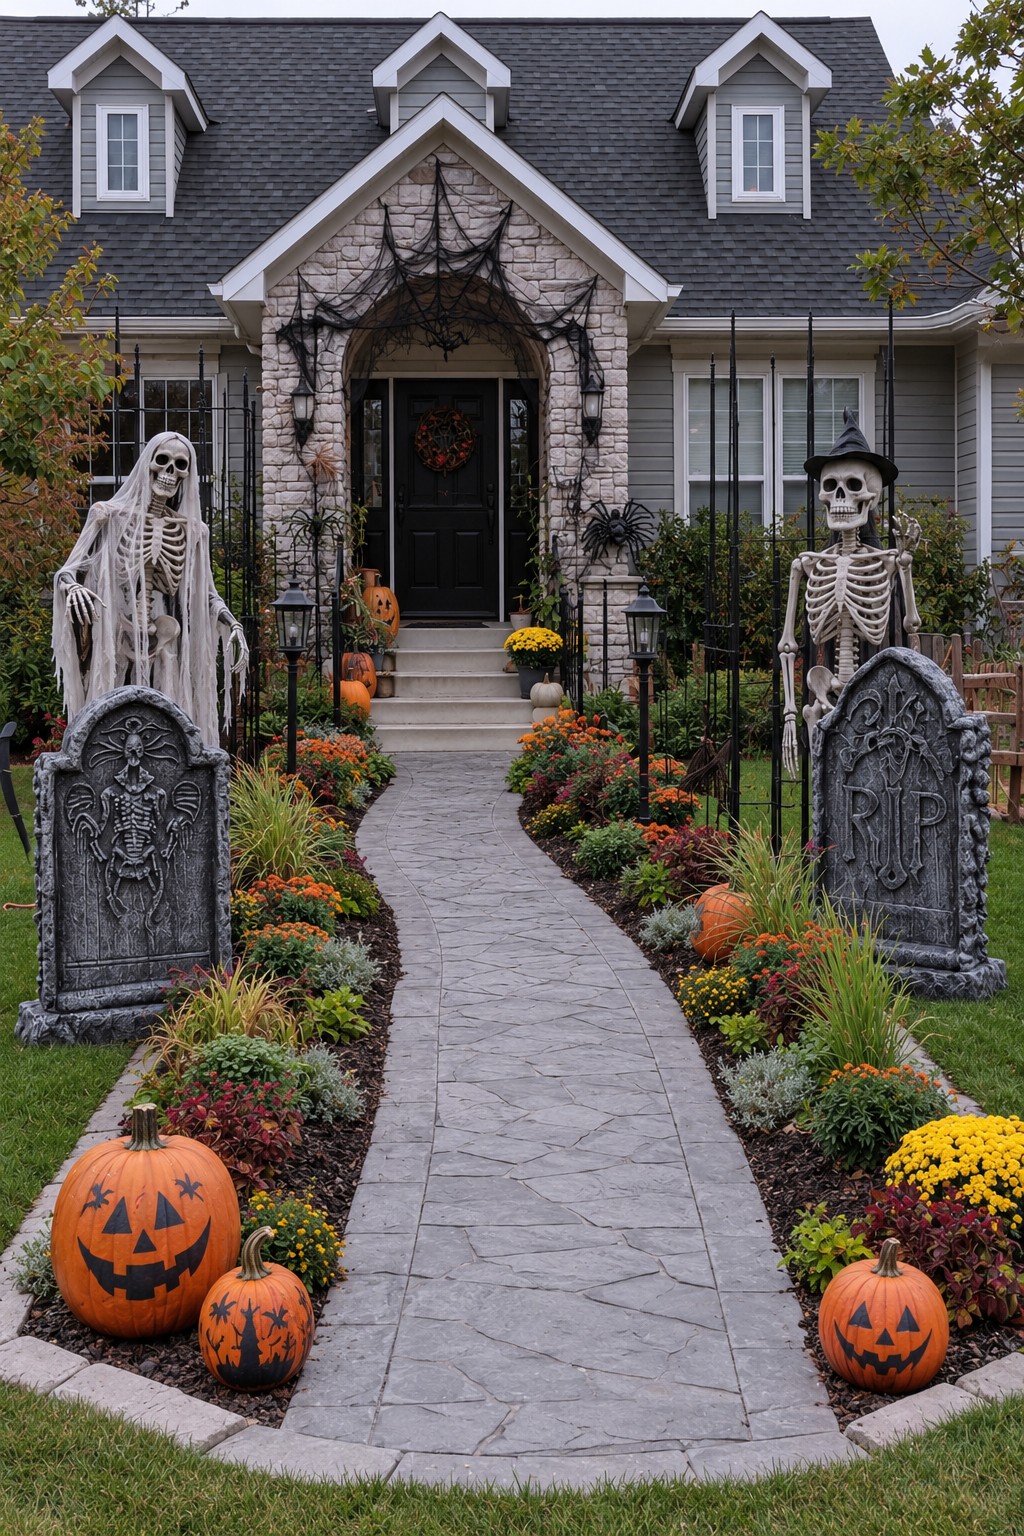
A pair of skeletons beside an existing curved walk turns the approach into a short character scene. Pale gauze distinguishes one guardian, while a dark pointed hat gives the other a sharper silhouette. Large markers below them emphasize the entrance to the route, with smaller orange accents drawing attention farther along it.
Position the two main figures in the planted sides where both are visible from the start of the walk. Add fewer details toward the door so the path's curve remains readable. An openwork web panel near the entrance can continue the theme without stretching loose netting through living plants; keep the web decoration on its own contained support.
Main pieces: Two exterior skeleton figures with supports, contrasting costume details, large marker props, and an optional openwork web panel.
15. Red and Black Porch Drapery
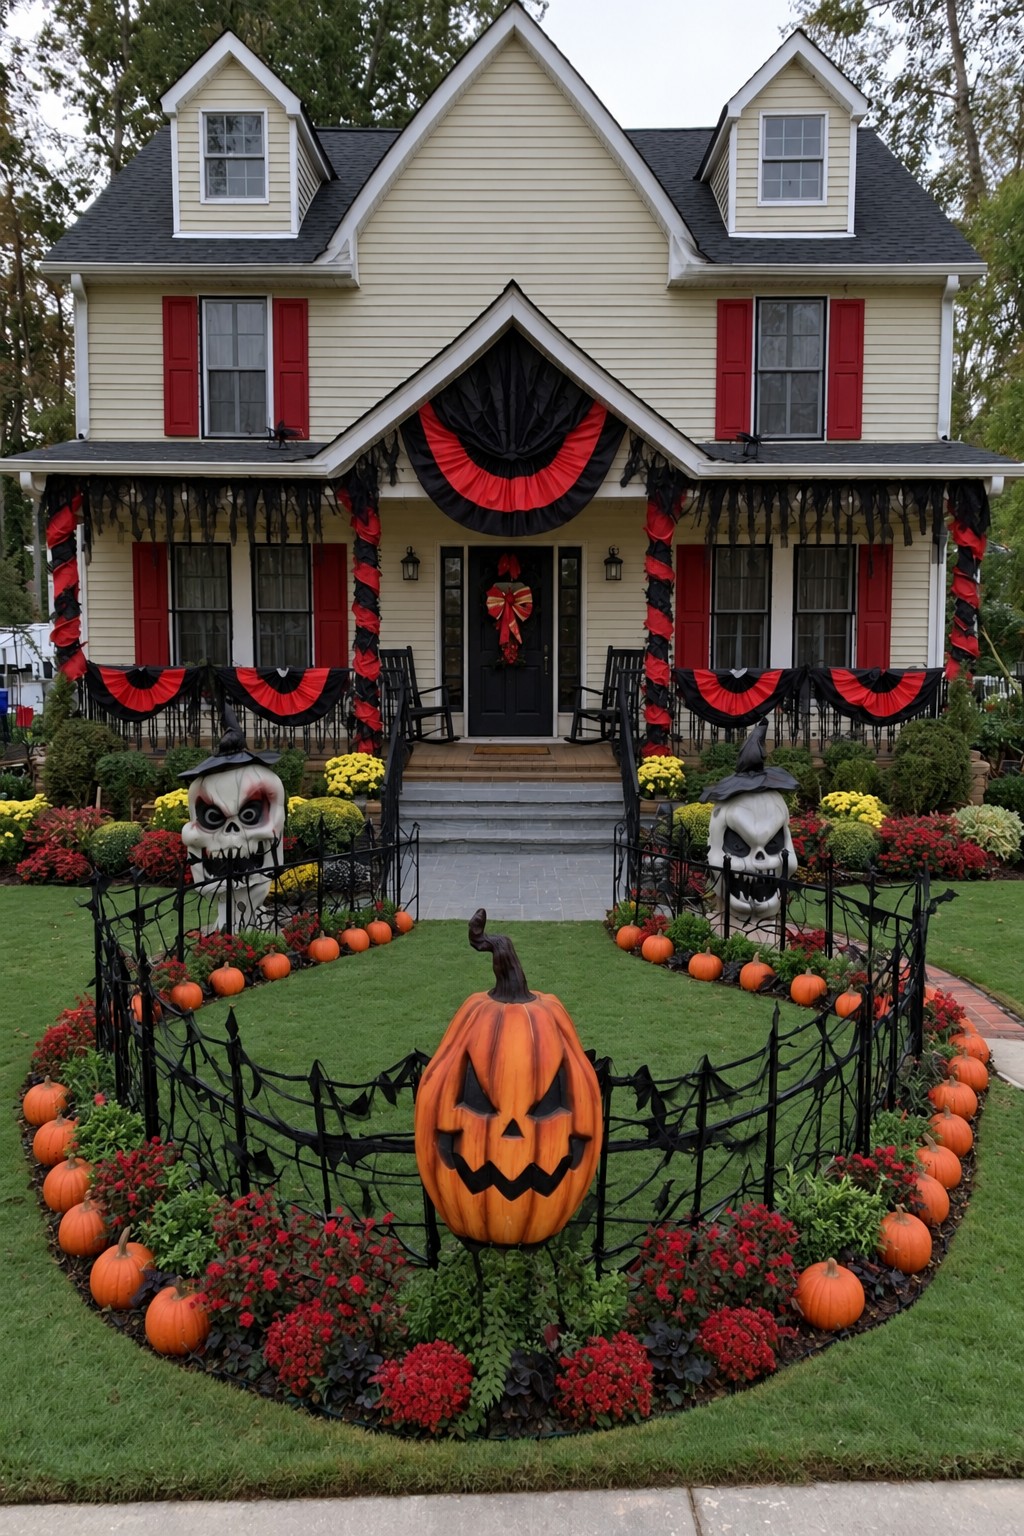
Red and black swags make the porch a bold background for a fenced garden scene. A central pumpkin character gives the lower enclosure its focus, while smaller pumpkins repeat the orange along the curved edge. The two levels feel connected because the house and garden each have one clear decorative role.
Choose the porch's main fabric accent first, then align the garden opening with the approach to the door. A smaller version needs only one supported swag and a pumpkin group in an existing bed. Indoor decorative fabric is for a brief dry, sheltered display; for longer exposure, choose textiles specifically intended for that setting and mounting.
Main pieces: Red and black fabric swags, a decorative garden border, a main pumpkin figure, and smaller pumpkins.
16. Witch Hatted Pumpkin and Skull Posts
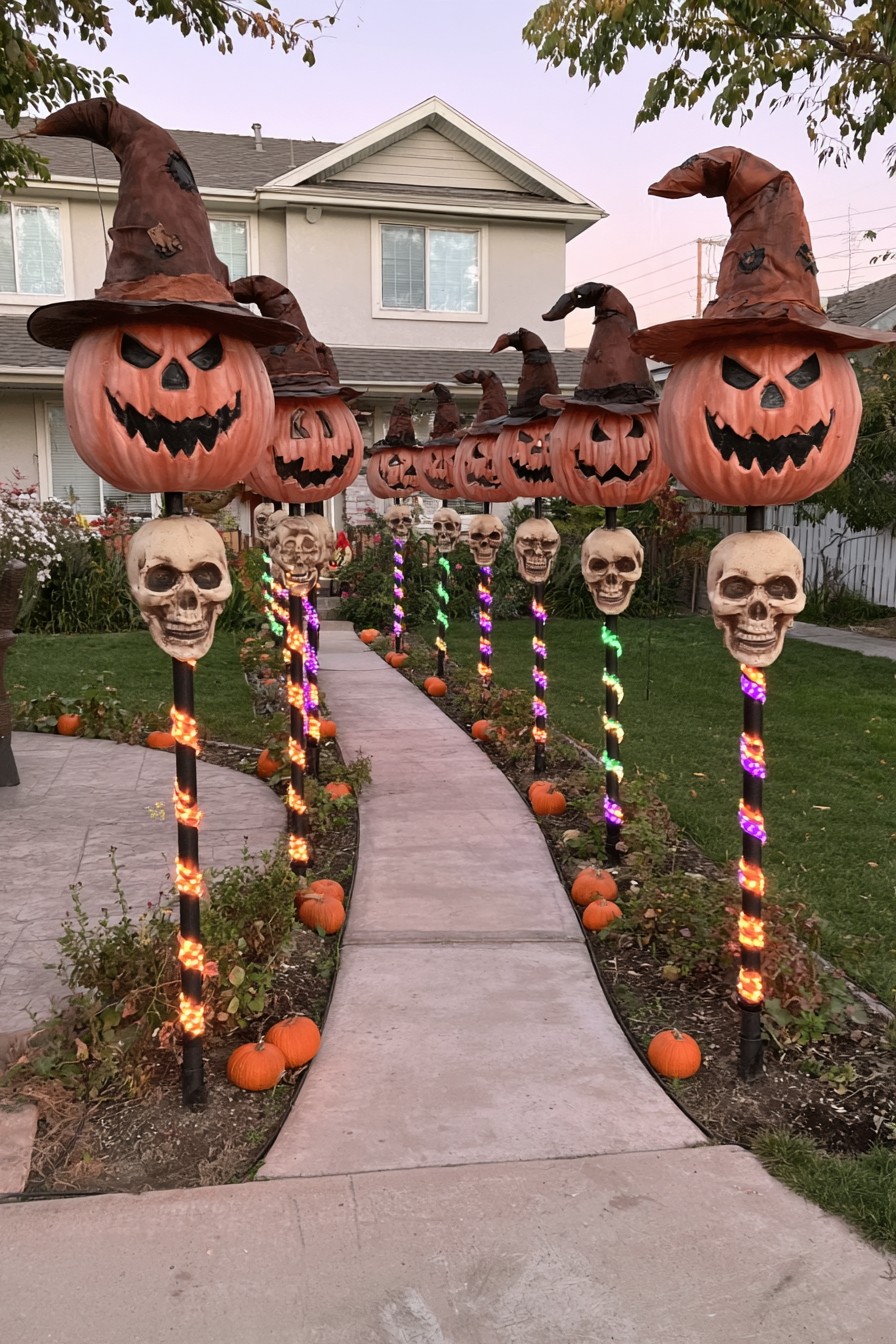
Brown witch hats above orange pumpkin faces and pale skulls create a layered procession. The patched, crooked hats give each post a weathered character, while the lower skulls provide a second recognizable shape. This idea suits a border where tall figures can repeat without hiding the garden beyond.
Look for complete exterior character posts, or choose lightweight heads and removable accessories designed to fit a compatible display system. Establish the spacing with two posts before planning a longer row, measuring the hat brims as well as the supports. For the illuminated look, select finished products rated for the exposure instead of improvising lighting inside the costume pieces.
Main pieces: Exterior character posts or compatible display supports, lightweight pumpkin heads, skull accessories, and removable brown witch hats.
17. Pumpkin Topped Ghosts Along Green Borders
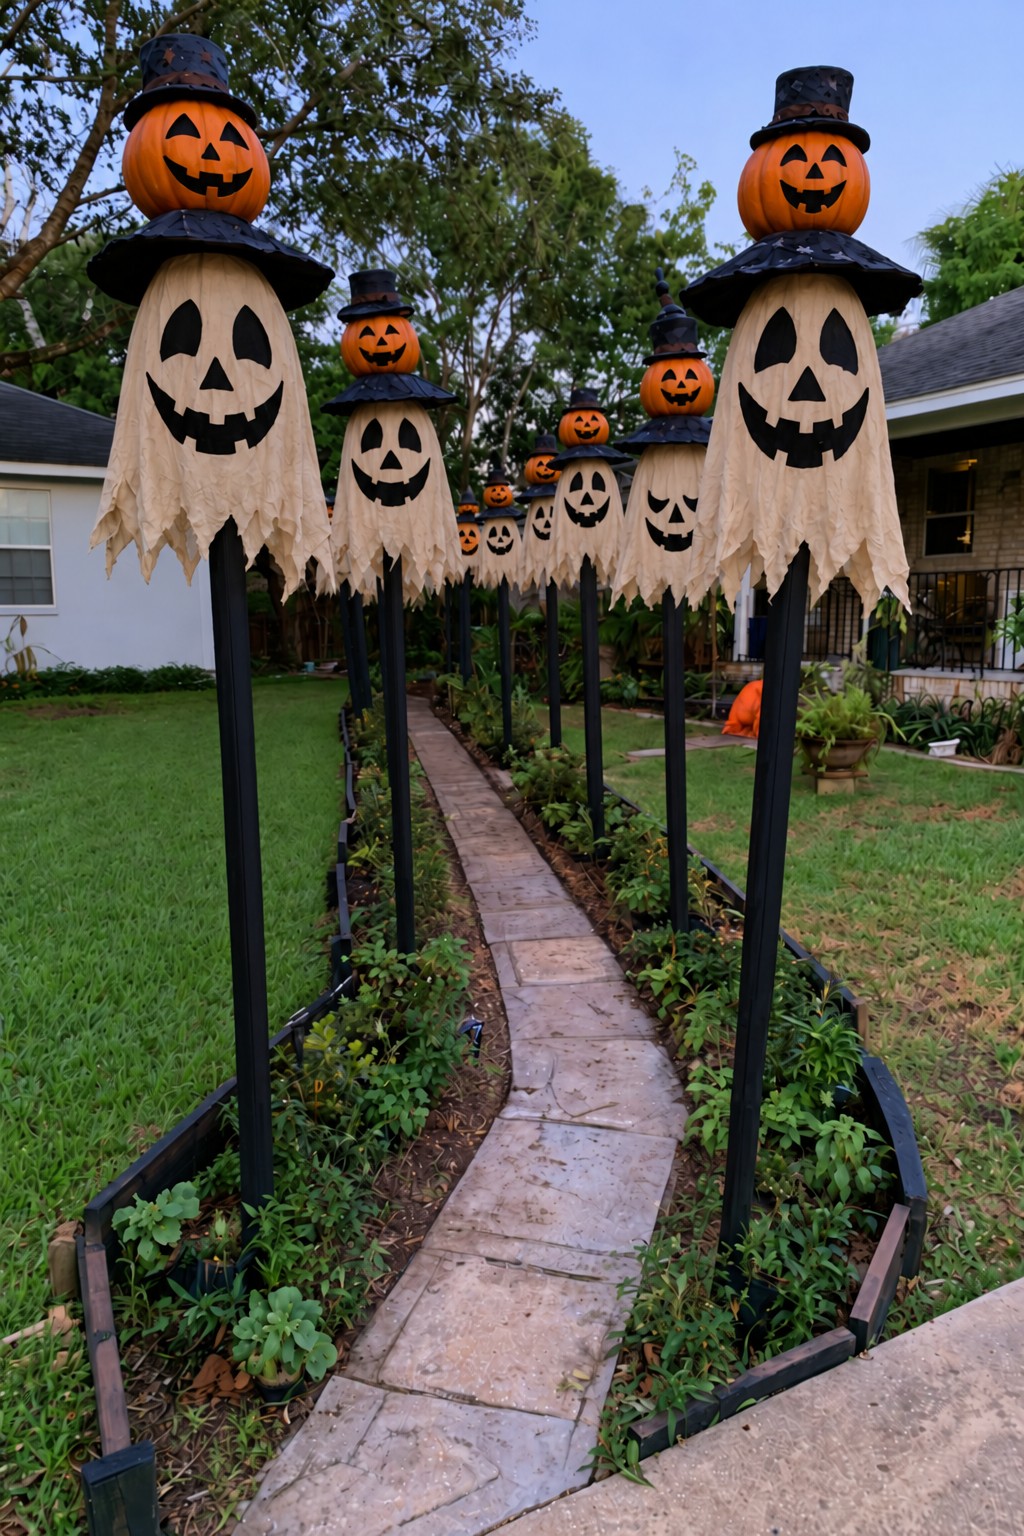
Ivory ghost bodies, broad black collars, and small pumpkin heads form a repeating silhouette above a narrow planted route. The green border provides a quiet base, making the stacked faces easy to follow. This version relies on pale fabric and clear spacing, rather than the skulls and weathered hats of the previous idea.
Use finished exterior ghost posts or a display system compatible with lightweight heads and detachable fabric bodies. For a short path, a pair near each end can suggest the rhythm with fewer pieces. Position the posts far enough back that the full collars and moving fabric stay within the beds, not just the narrow pole bases.
Main pieces: Finished exterior ghost posts or compatible supports, lightweight pumpkin heads, black collars, small hats, and removable pale costume bodies.
18. Branching Hanger with Bells and Pumpkin Ornaments
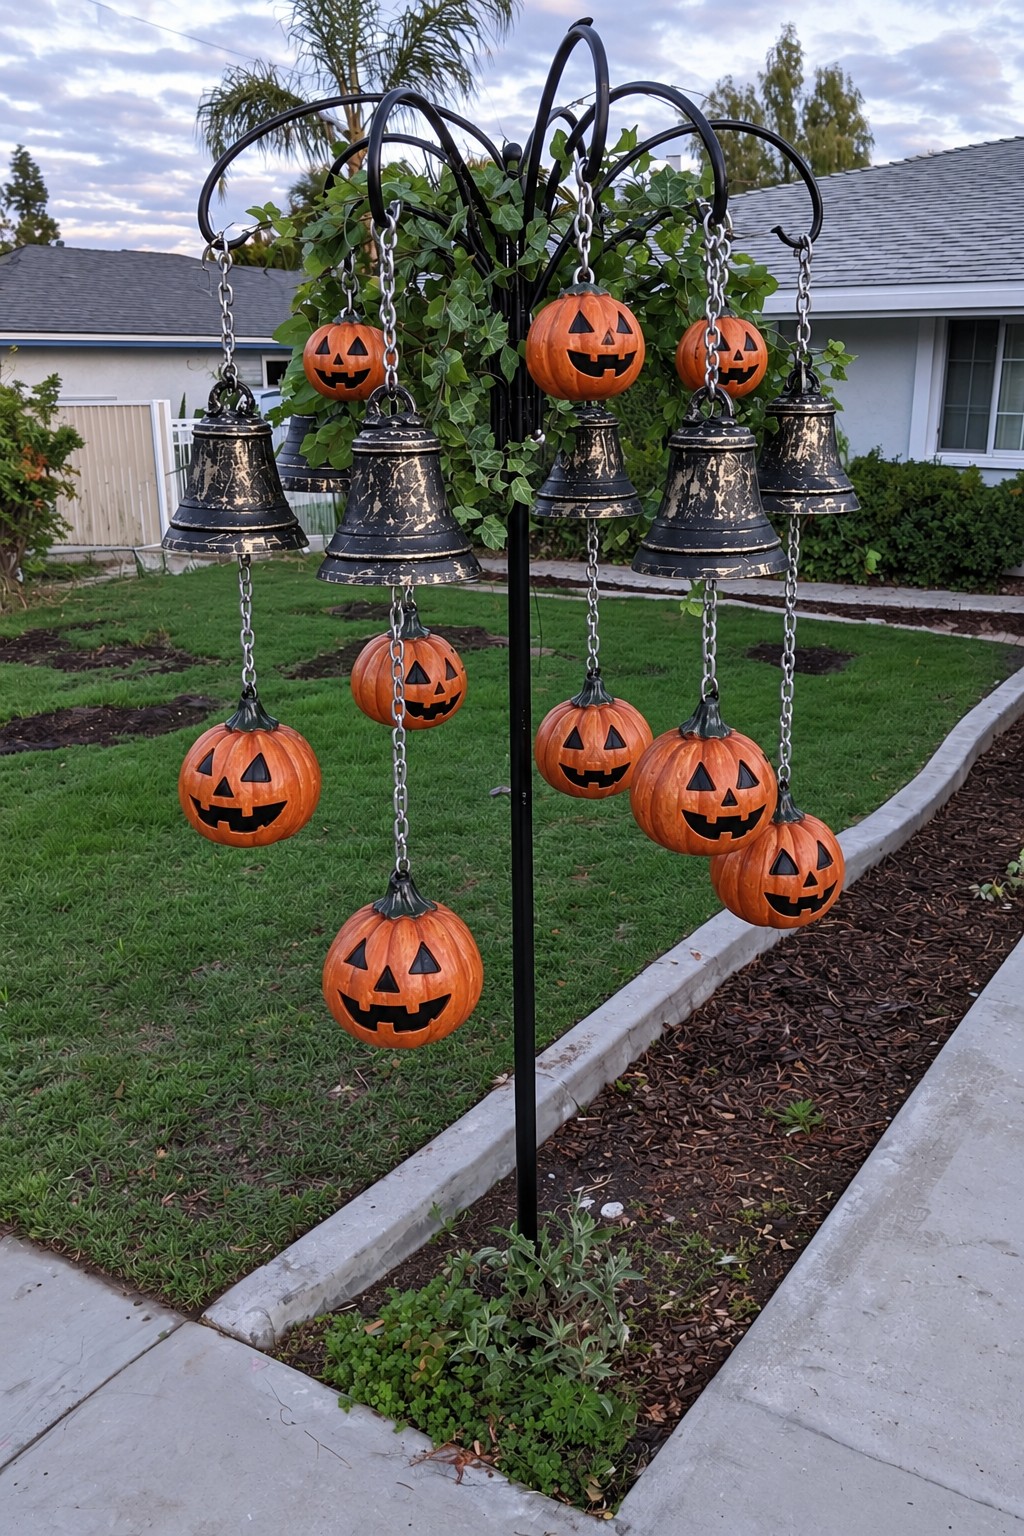
Bell shaped pieces occupy the upper hanging tier, with additional pumpkins dangling lower on extended chains. Some upper pieces also have a small pumpkin above the bell, making the composition feel layered rather than uniform. Dark curved arms hold the arrangement together, and the orange faces punctuate its vertical outline.
For a small garden, choose a stand with fewer arms and only a few lightweight ornaments. Select a frame intended for the complete load and outdoor movement, including the chains; decorative hollow bells can provide the appearance without the weight of solid metal chimes. Set the hanger within a side bed, with the full swinging reach of its lowest ornaments away from the path.
Main pieces: An exterior display stand rated for its load, lightweight bell shaped props, lightweight pumpkin ornaments, compatible chains, and removable connectors.
Keep the Garden Usable Through the Season
- Access and maintenance: Keep paths, steps, handrails, and full gate and door openings clear. Allow room to water, mow, and reach planted areas without moving a heavy display. Removable fence sections and contained prop groups make routine care easier.
- Props and weather: Follow the maker's instructions for anchoring, supports, and exterior exposure. Check connections after wind or rain and take down pieces when conditions exceed their intended use. A fabric costume or lightweight head is not weather resistant simply because its stand is.
- Lighting: Keep normal route lighting available, with decorative lights serving as accents. Use complete products intended for the actual exposure, keep cables outside walking routes, and follow required clearances from plants and textiles. Choose exterior rated flameless candle accents for seasonal displays; water feature and permanent electrical work need appropriate professional assessment.
- Fresh pumpkins: Check regularly for soft spots, mold, leaks, and collapse, including underneath pumpkins touching the ground. Remove deteriorating ones promptly so neighboring plants, surfaces, and reusable props stay clean.
- Drying and storage: Bring delicate paper details indoors before damp weather. Dry fabric, clean compatible reusable surfaces according to their care instructions, and disconnect lighting as directed before packing. Remove detachable heads, collars, chains, and accessories where the design permits, then label groups by their display location.
Begin with one area you already use: a small bed, the route to a serving table, or the garden beside your front door. Choose its main character or repeated shape before adding supporting pieces. A clear layout and a manageable number of props will make the scene easier to enjoy, maintain, and put away when Halloween ends.

Leave a Reply