
These 18 backyard play spaces combine colorful targets, painted balance rounds, miniature roads, sand boxes, art surfaces, and large lawn games. Each description follows the arrangement shown, then explains the adult preparation and a simple way to use it with children. Four related videos add visual inspiration for the road, sandbox, fence-side games, and ring toss. Choose a setup that fits the garden and the players, allowing for supervision, equipment preparation, and cleanup.
Table of Contents
- Prepare the Backyard Play Space
- Match the Game to the Skill and Space
- Plan the Adult’s Preparation
- 1. Bucket and Hoop Splash Targets
- 2. A Painted Stepping Trail for Balance Practice
- 3. A Garden Music Wall with Reused Kitchenware
- 4. A Pretend Market Beside a Sand Play Area
- 5. A Carnival Corner with Two Toss Challenges
- 6. An Outdoor Art Studio with Reusable Painting Surfaces
- 7. A Mini Road for Scooters and Ride-On Toys
- Video Inspiration: Shaping a Miniature Garden Road
- 8. A Shaded Sandbox for Construction and Treasure Games
- Video Inspiration: Organizing a Sandbox and Shade
- 9. A Vertical Beanbag Game with Changeable Scores
- 10. Giant Picture Tiles for a Lawn Memory Game
- 11. A Three-Color Beanbag Target Board
- 12. Chalkboard, Tic-Tac-Toe, and Hopscotch Along a Side Path
- Video Inspiration: Coordinating Hopscotch and Fence Games
- 13. A Giant Chess Board for Family Strategy Games
- 14. A Soft Tic-Tac-Toe Grid You Can Pack Away
- 15. A Soccer Scoring Corner with a Ball-Stick Target
- 16. Fabric Catch Pockets for Soft-Ball Tossing
- 17. Oversized Cup Targets for a Portable Lawn Game
- 18. A Low Ring Toss Board with Colored Pegs
- Video Inspiration: A Compact Colored-Peg Ring Game
- Finish with a Setup You Can Repeat
Prepare the Backyard Play Space
Match the Game to the Skill and Space
For aiming and taking turns, compare two carnival targets, changeable scores, catch pockets, and ring toss. For making and exploring, look at sound patterns, outdoor art, and sand construction. For remembering or planning moves, begin with picture pairs, chess practice, or portable tic-tac-toe. The miniature road needs controlled turning and stopping; the side-path games must also preserve household access.
Plan the Adult’s Preparation
Check the space, the children’s handling and rule-following skills, and the equipment’s age and use instructions. Adults handle cutting, mounting, support design, protective finishes, and the initial inspection. Children can choose colors, arrange permitted props, and take part in an appropriate paint activity. The descriptions explain preparation priorities; they do not provide measured structural plans.
Keep the active lane, waiting position, and collection route clear. Establish a stop signal before play, and pause launching, tossing, or kicking while pieces are retrieved. Select materials for children who may mouth objects, checking small detachable parts as well as overall size. Arrange storage so the equipment does not remain across normal garden routes after a session.
1. Bucket and Hoop Splash Targets
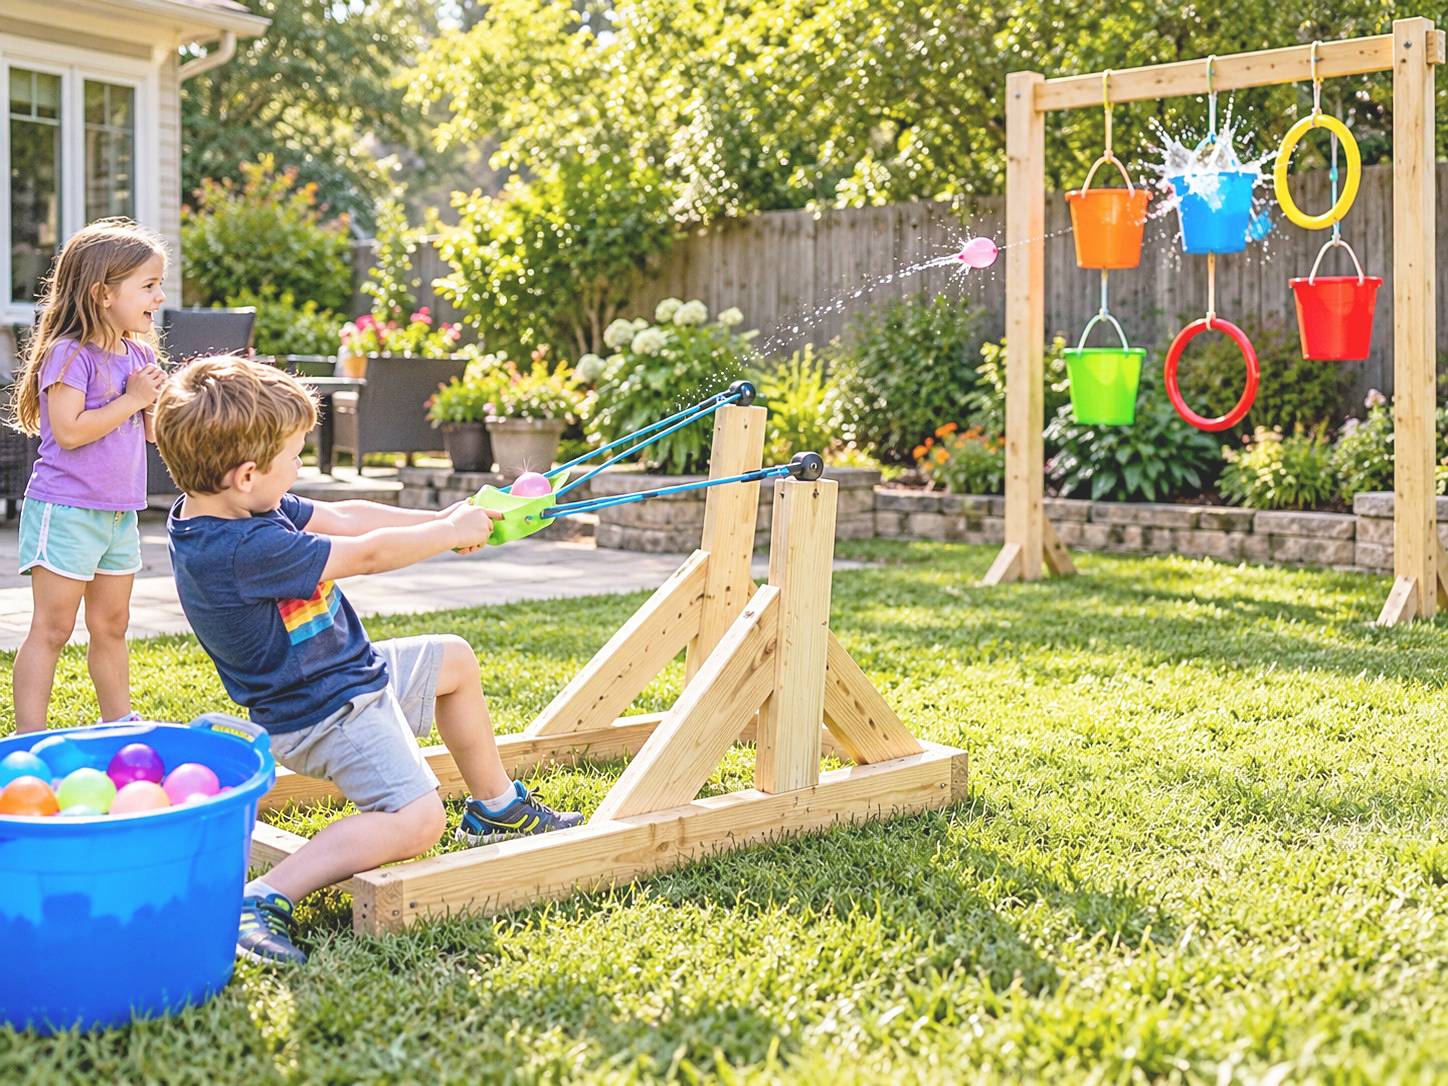
A timber launcher stands opposite a tall rack of orange, blue, green, and red buckets, with yellow and red hoops suspended between them. The blue elastic lines connect the launching area to its upright supports, while a container of colorful balloon-like projectiles sits beside the player. The arrangement creates a clear starting point and a colorful destination across an open stretch of lawn.
Adult preparation. Establish a stable target rack and assess the launcher and its supports as a complete mechanism before use. Select equipment and compatible projectiles intended for the participants, following its age, clearance, and operating instructions; the visible timber and bands are not enough to determine a working specification. Set the launch direction away from people and windows, place supplies beside the starting point, and supervise one player at a time. Balloon filling and removal of broken fragments belong to the adult; uninflated or broken balloons must stay away from young children.
Name one target for the round, give the player a limited set of attempts using the selected equipment as instructed, then stop before collecting projectiles. The adult controls the reset and keeps waiting children behind the active station. Empty water containers and remove all loose pieces afterward so the lawn returns to ordinary use.
2. A Painted Stepping Trail for Balance Practice
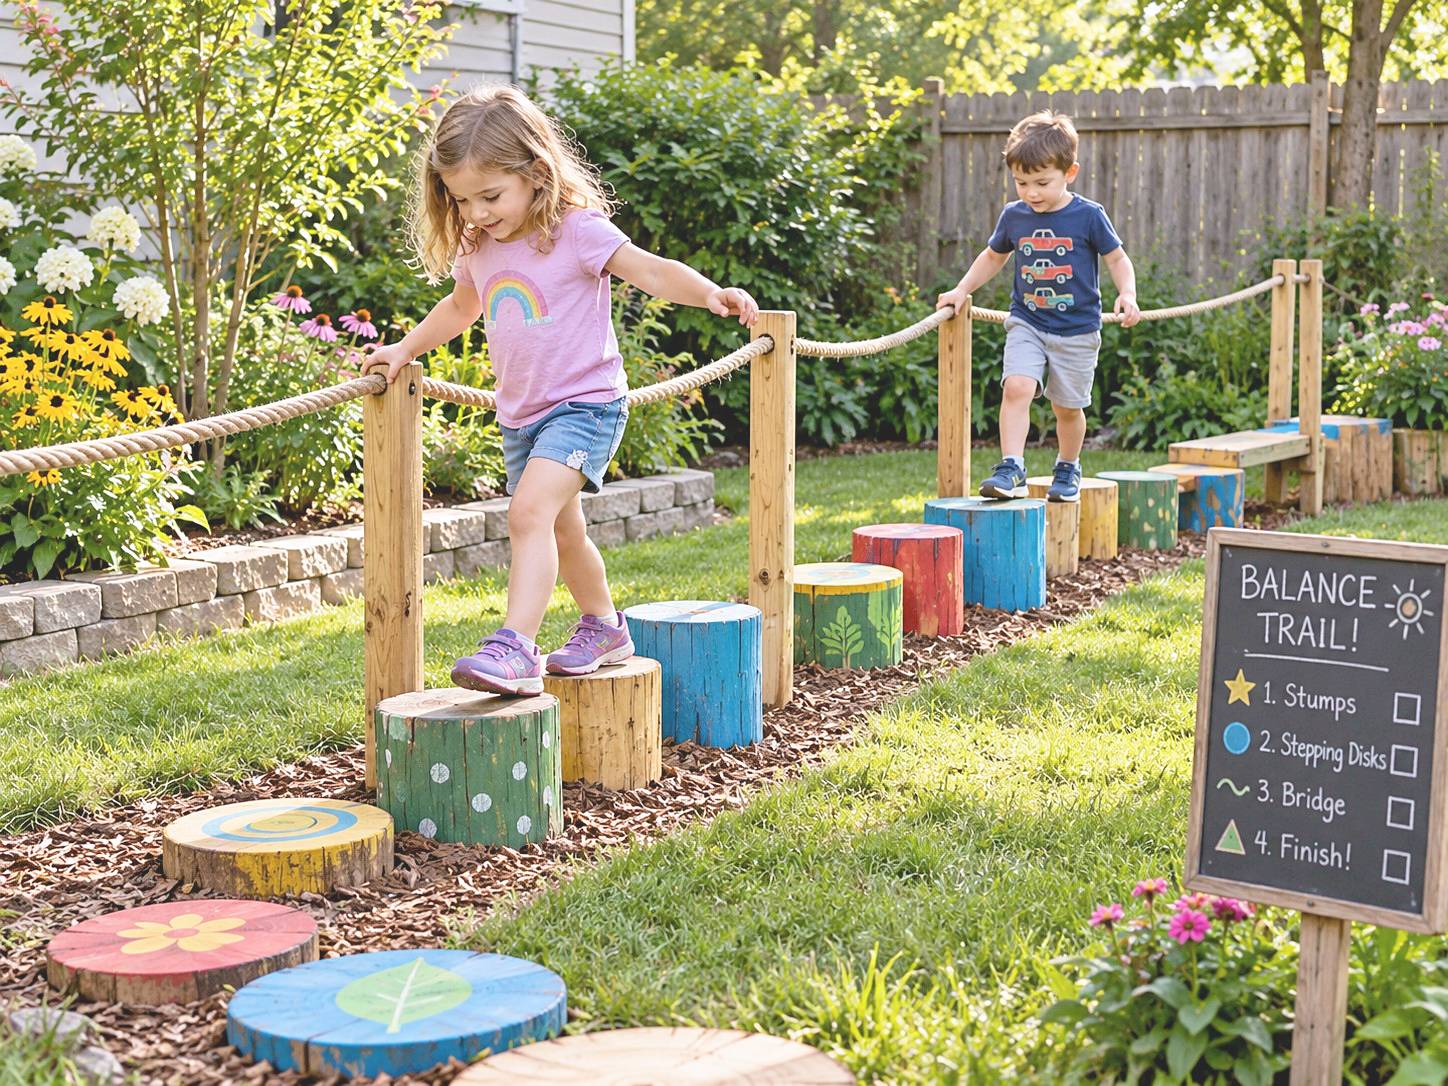
A row of painted timber rounds curves along the flower border, changing height as it reaches the rear of the garden. Flowers, leaves, and dots decorate the tops and sides, while ropes run between timber posts beside the route. The repeated circular forms make each step visually distinct, and the planting keeps the course along a boundary instead of across the main lawn.
Adult preparation. Plan the rounds, posts, connections, and any hand support as one designed play installation. Each stepping surface needs secure support and spacing that suits the intended users. Specify protective surfacing for the raised route’s fall height and use area; the visible grass and thin bark layer do not establish that protection. Any rope component needs an appropriate equipment design without loose ends or entangling loops. Adults handle installation, smoothing contact surfaces, painting, and checks for movement.
Begin with one child stepping slowly along a short section while an adult remains close. Wait until the section is clear before the next turn. Change the challenge by calling a painted color or asking for a pause on a leaf motif, keeping the same equipment height. Inspect surfaces and connections before the next session, especially after wet weather.
3. A Garden Music Wall with Reused Kitchenware
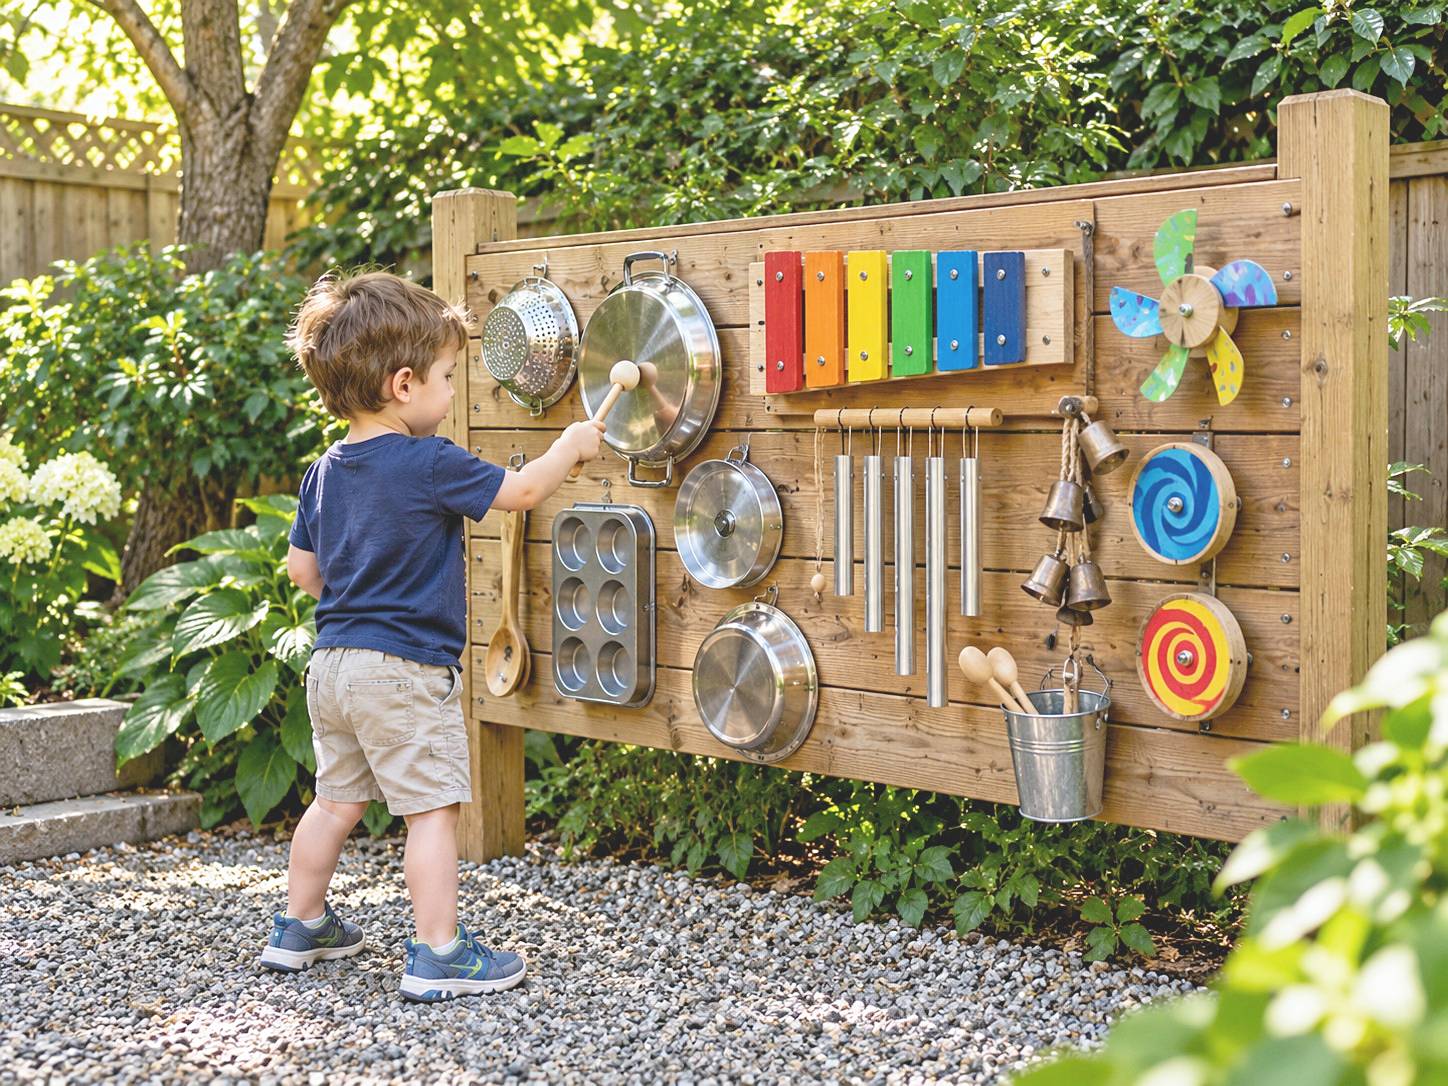
A broad timber panel holds pan lids, a colander, a muffin tray, metal tubes, bells, and a row of colored bars. Their contrasting shapes make the wall interesting before a sound is played. Placing percussion surfaces at several reachable positions lets children explore short taps, hollow sounds, and ringing tones without carrying instruments around the garden.
Adult preparation. Secure the panel to appropriate supports, then arrange clean kitchenware with smooth edges and dependable mounts for repeated tapping. Leave space between pieces for controlled mallet movement. Prepare age-appropriate mallets and a reachable holder, keeping long cords and detachable small fittings out of the working area. Homemade colored bars can produce different sounds without being tuned to musical notes, so treat them as a sound panel unless a tuned instrument is supplied.
Invite a child to tap two surfaces and compare which rings longer. The adult can then demonstrate a short rhythm for the child to copy before another player takes a turn. Keep tapping gentle, check metal edges and mounts for wear, and inspect mallets for damage. Store the tools after play and position the station where its sound will not repeatedly disturb a nearby resting area.
4. A Pretend Market Beside a Sand Play Area
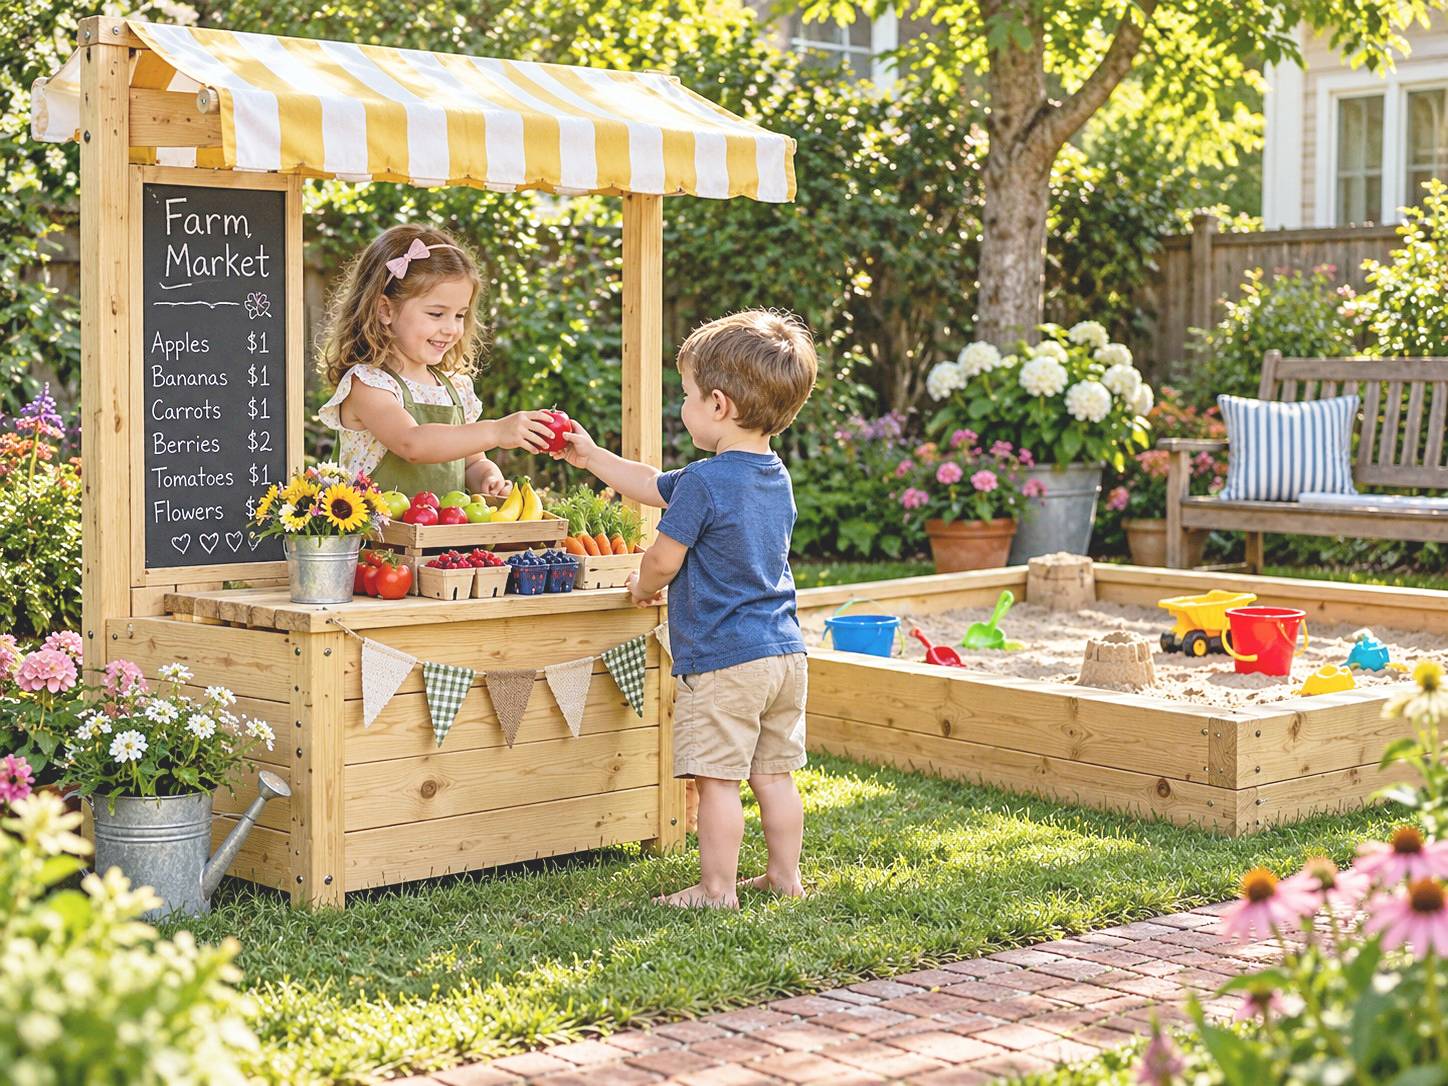
A yellow-and-white striped canopy covers a timber market counter filled with play produce. A dark menu board, shallow crates, and a small serving area organize the shop, while a separate timber sand box sits alongside it. The counter gives children a place to exchange items and talk, and the neighboring sand area supplies a different activity within the same garden corner.
Adult preparation. Set up a stable stall with smooth counter edges, secure joints, and an appropriately supported canopy. Arrange a few washable containers and age-appropriate produce props where children can reach them. Inspect small detachable parts, especially for players who mouth objects. Prepare the sand box separately with clean play sand, drainage, and a manageable fitted cover. Children can help choose a picture menu and group the produce by color or type.
Start with one customer requesting an item and one shopkeeper placing it in a basket, then change roles. Keep actual food breaks away from the sand and wash hands afterward. At cleanup, gather shop props and sand toys, check the sand for debris, and let wet sand dry thoroughly before covering it. Store accessories together so both activities are straightforward to reset.
5. A Carnival Corner with Two Toss Challenges
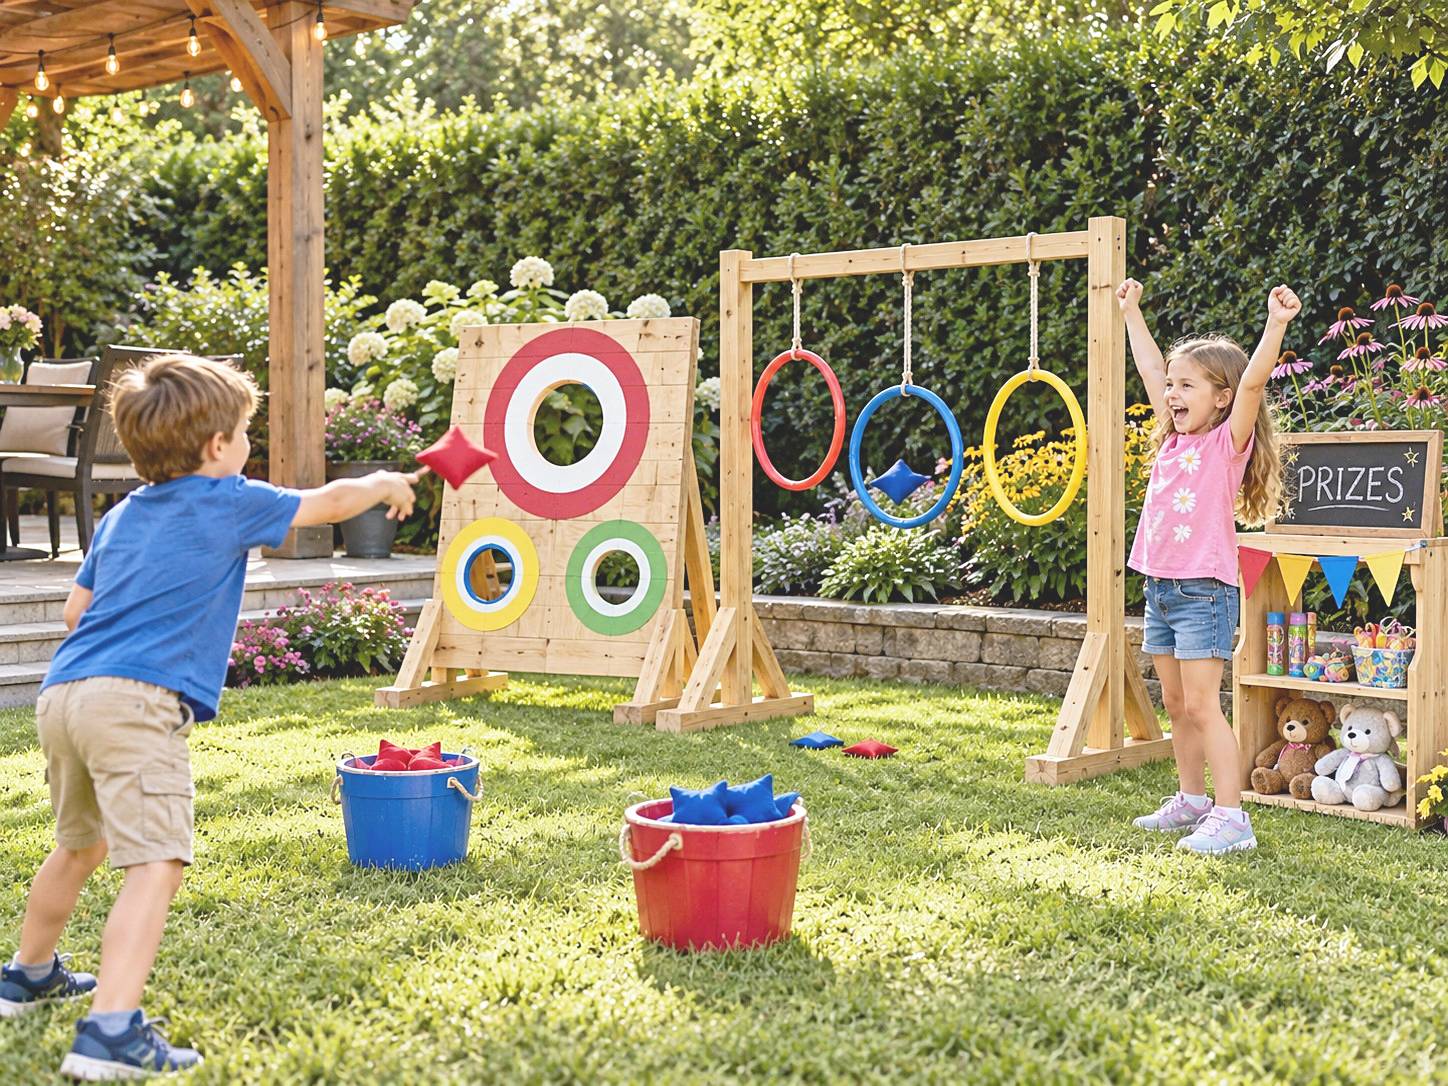
A painted board with three circular openings stands beside a timber frame carrying red, blue, and yellow hoops. Beanbag buckets mark the starting areas, and a small prize display completes the carnival setting. The two targets offer different aiming experiences: one receives bags through cut openings, while the other gives players a suspended ring to aim through.
Adult preparation. Prepare or select a supported board and a properly anchored hoop frame. Smooth the board openings, secure the short hoop attachments, and place intact soft beanbags in separate baskets. Mark two distinct lanes and position the prize display outside them. Children can choose a name for each challenge or help record completed attempts; adults handle cutting, mounting, and moving the stands.
Give each player three attempts at the board followed by three at the hoops. Count successful passes across both stations, then stop all throwing before retrieving bags. Begin with a generous opening and add a called color once the basic sequence is understood. Keep rewards appropriate to the children, inspect the equipment after use, and put bags and removable targets away instead of leaving hanging hoops available for climbing.
6. An Outdoor Art Studio with Reusable Painting Surfaces
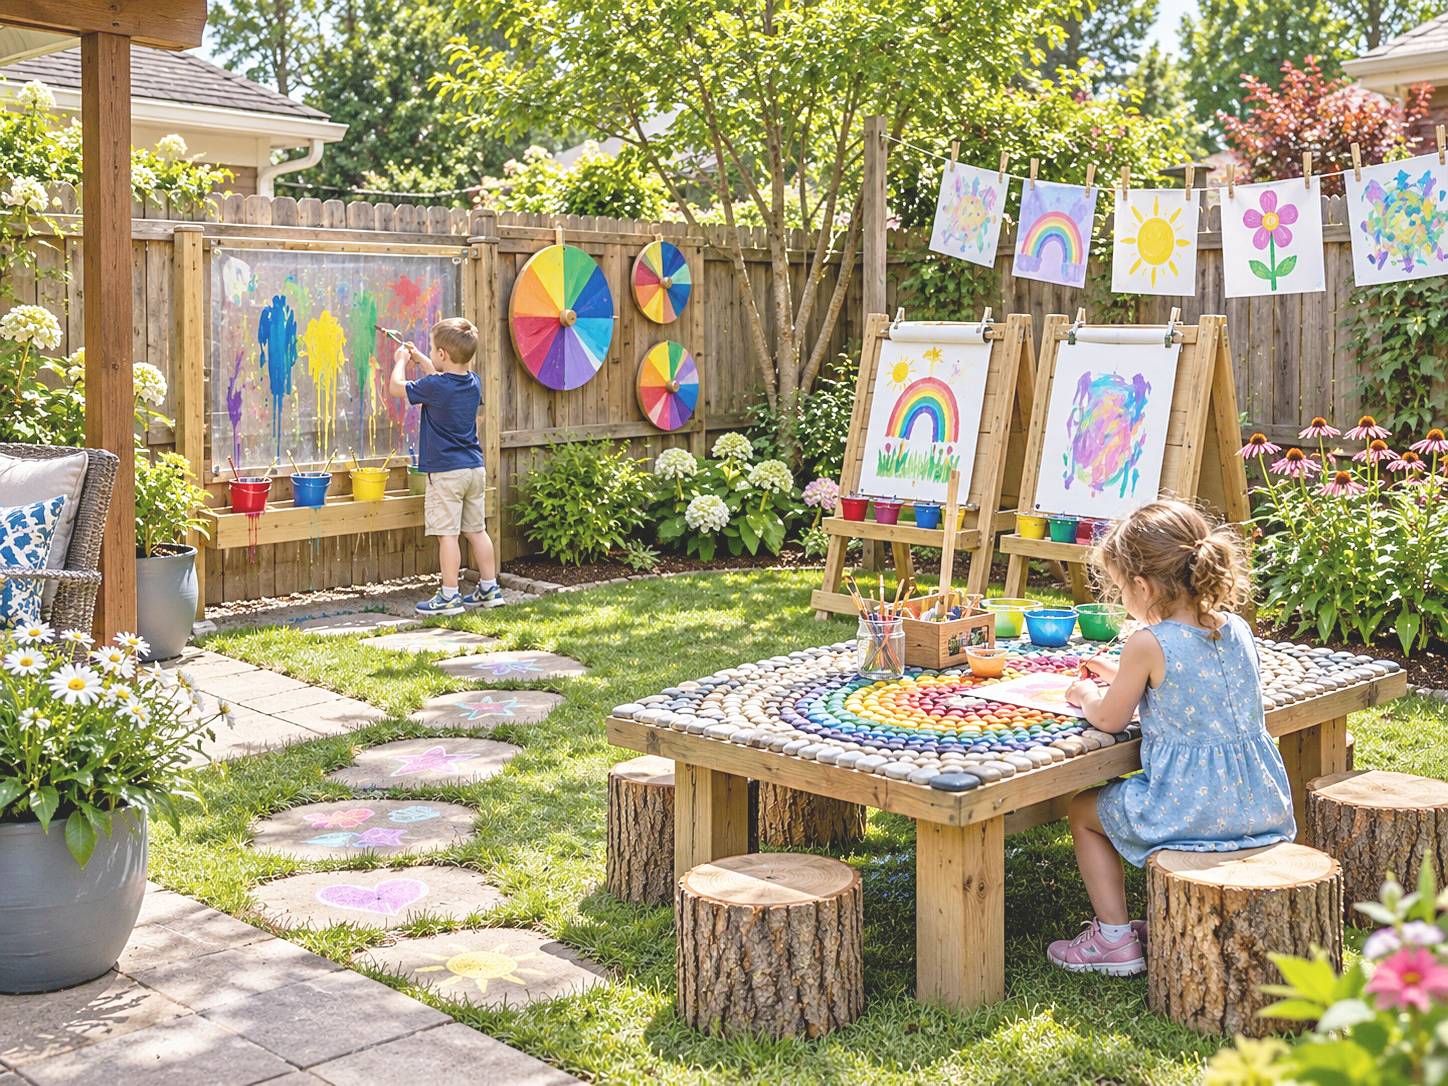
A transparent painting panel, paper easels, and a low worktable form an outdoor studio with several kinds of creative space. Paint cups line the panel area, colorful pictures hang near the boundary, and timber stools surround the table. The arrangement separates large standing brushwork from smaller seated projects while keeping finished work visible.
Adult preparation. Install a supported impact-resistant sheet with protected edges, stable easels, and a secure table. Ordinary glass is unsuitable for the painting panel. Keep paint-cup holders within comfortable reach and provide a display rail away from the movement route. Use frame-protection coatings as an adult preparation task, separate from the art materials children handle. Select paints for their labeled age and use, and check cleanup instructions; “non-toxic” does not mean edible. Test whether the chosen paint washes from the panel.
Children can paint at one assigned surface or make prints at the table, then move finished paper to the display. The adult manages tool sharing and cleaning water. A smooth table is the simpler working option if decorative texture would be hard to clean or inspect. Bring paper and supplies indoors, dispose of paint waste as directed, and dry the reusable surfaces before packing.
7. A Mini Road for Scooters and Ride-On Toys
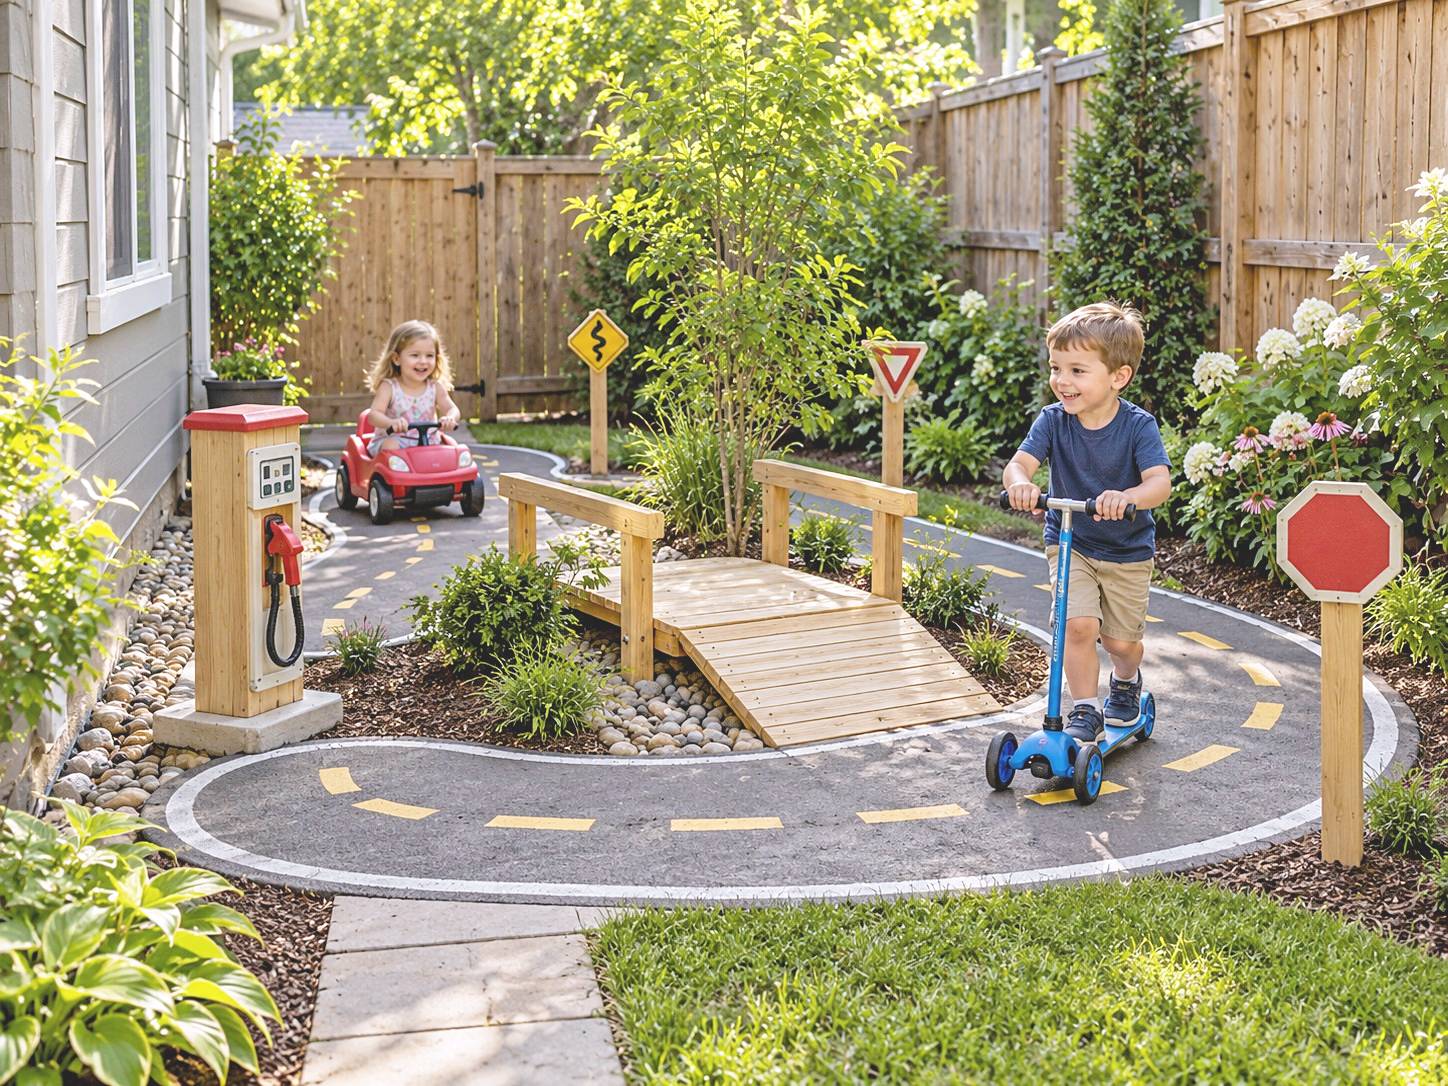
A miniature road winds around a planted island between the house and fence. Yellow lane marks, a red stop sign, a give-way sign, and a pretend fuel point turn the loop into a neighborhood game. A timber bridge adds a raised crossing within the circuit, while the broad front curve provides space to approach a stop and change direction.
Adult preparation. Plan turning room, stopping distance, and a waiting area before applying markings. Prepare a firm riding surface and place signs and the pretend fuel hose beyond the wheel path. If the bridge is included, its supports, width, slopes, approaches, and wet-use surface must be designed for the selected wheeled activity. Choose vehicles for the child’s age, height, and control skills. Provide a properly fitted helmet for scooter or bicycle use, even though the scooter rider in this scene is shown without one.
Start with one rider travelling to a stop marker and returning before the next turn. An adult supervises from a position with clear sightlines, keeping walkers out of the riding lane. Check debris and slippery areas before reuse. Remove riding helmets before children move to climbing or similar playground equipment, and store loose hoses and accessories afterward.
Video Inspiration: Shaping a Miniature Garden Road
The sequence develops an outlined winding route around existing planting, adds a dark road surface and yellow lane marks, and finishes with a timber bridge, traffic signs, and a pretend fuel point. The final loop uses the planted center as an island, with recognizable places to stop and change direction.
For this arrangement, the adult plans the route and waiting area together, prepares a surface appropriate to the selected wheels, and positions the signs beyond the riding line. The bridge needs a designed support and approach for that use, with turning and stopping space checked before children ride. The clip is visual inspiration; preparation also includes selecting the vehicle, fitting riding helmets, and checking the completed circuit.
8. A Shaded Sandbox for Construction and Treasure Games
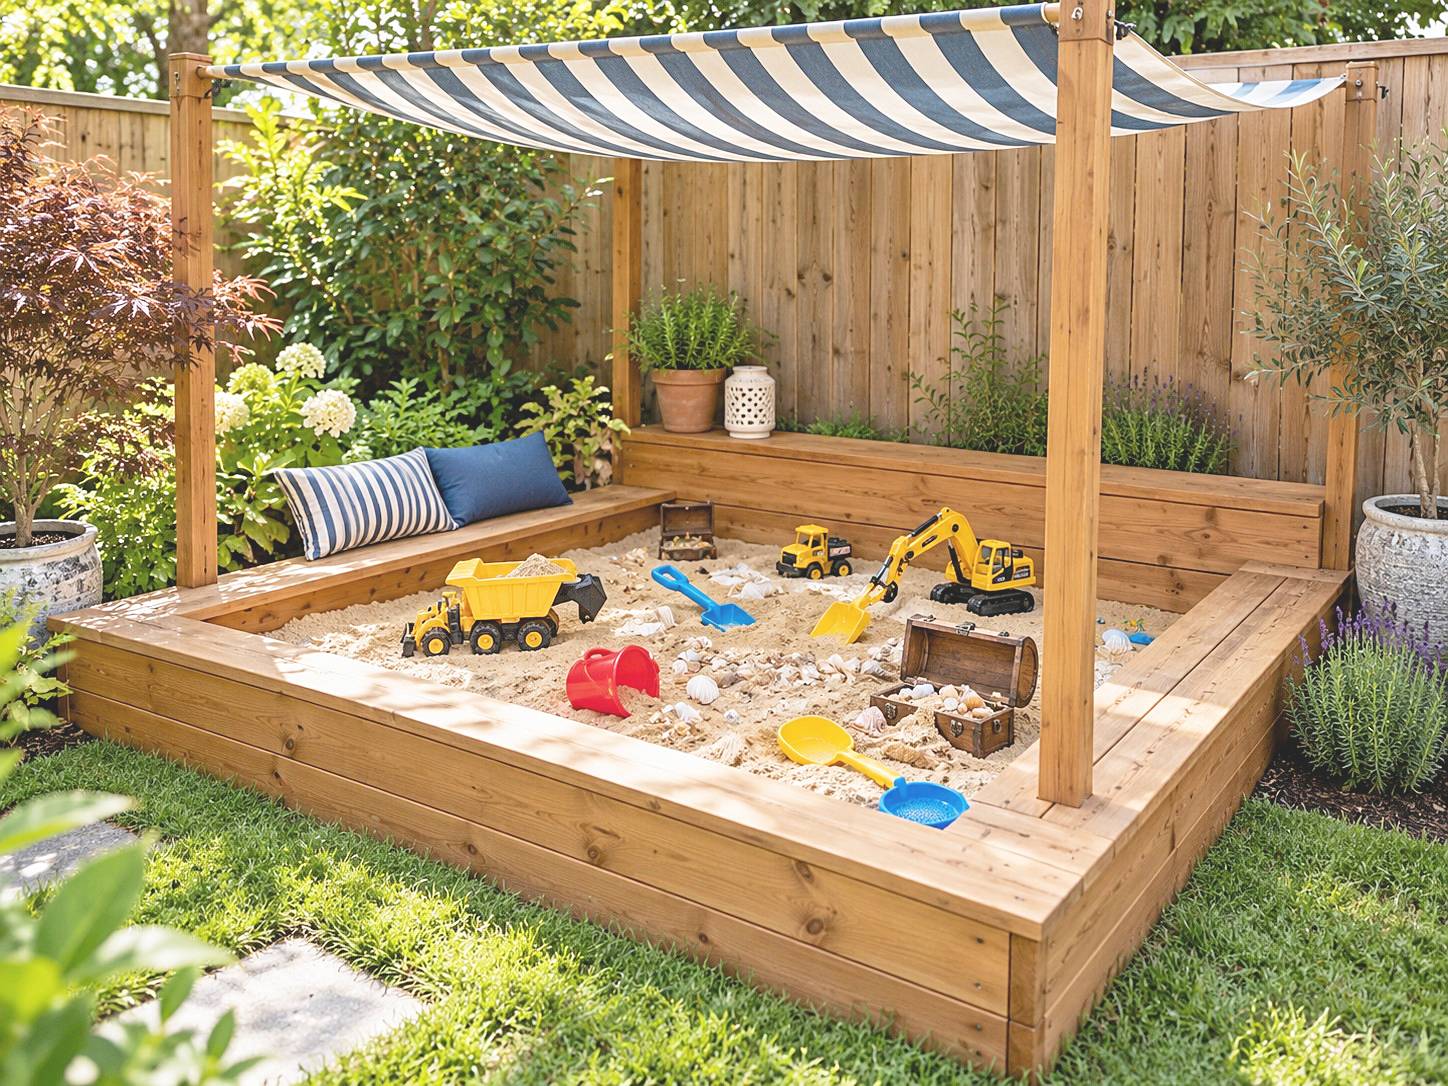
A timber sandbox has broad edges and a rear sitting area beneath a blue-and-white striped canopy. Toy construction vehicles, scoops, and buckets occupy the sand, while the bench keeps a supervising adult close. The canopy frames the worksite above, leaving the digging surface open and the tools easy to see.
Adult preparation. Build or select a sandbox with a draining base, smooth edges, and sitting areas designed for their loads. Install the shade system according to its mounting and weather instructions, checking actual coverage at playtime. Add play sand intended for children, age-appropriate digging tools, a fitted cover, and a nearby tool container. For a treasure round, count three large washable objects before hiding them, checking detachable components as well as size. Advice on planning a sand and digging station helps organize tools and maintenance access.
Begin with moving sand into a chosen area using a scoop or truck. A separate treasure search adds matching and counting; count every hidden object back out afterward. Collect toys, inspect the sand for debris, and allow wet sand to dry thoroughly before replacing the cover. Keep the cover and canopy cords out of children’s reach during play.
Video Inspiration: Organizing a Sandbox and Shade
A lawn outline becomes a timber sandbox with a broad rear sitting edge. The sequence adds a dark base layer, canopy posts, striped fabric, sand, and construction toys. The completed arrangement places the supervising seat beside the digging area, with the overhead covering giving the corner a defined upper outline.
The adult prepares a draining base, a sound box, and sitting edges capable of their intended load before adding sand. Canopy support and fixing follow the chosen shade system’s instructions, with coverage checked at playtime. The dark layer’s drainage is not established by appearance. Plan the cover and toy storage alongside the box so inspection, drying, and cleanup remain accessible once the sand is in place.
9. A Vertical Beanbag Game with Changeable Scores
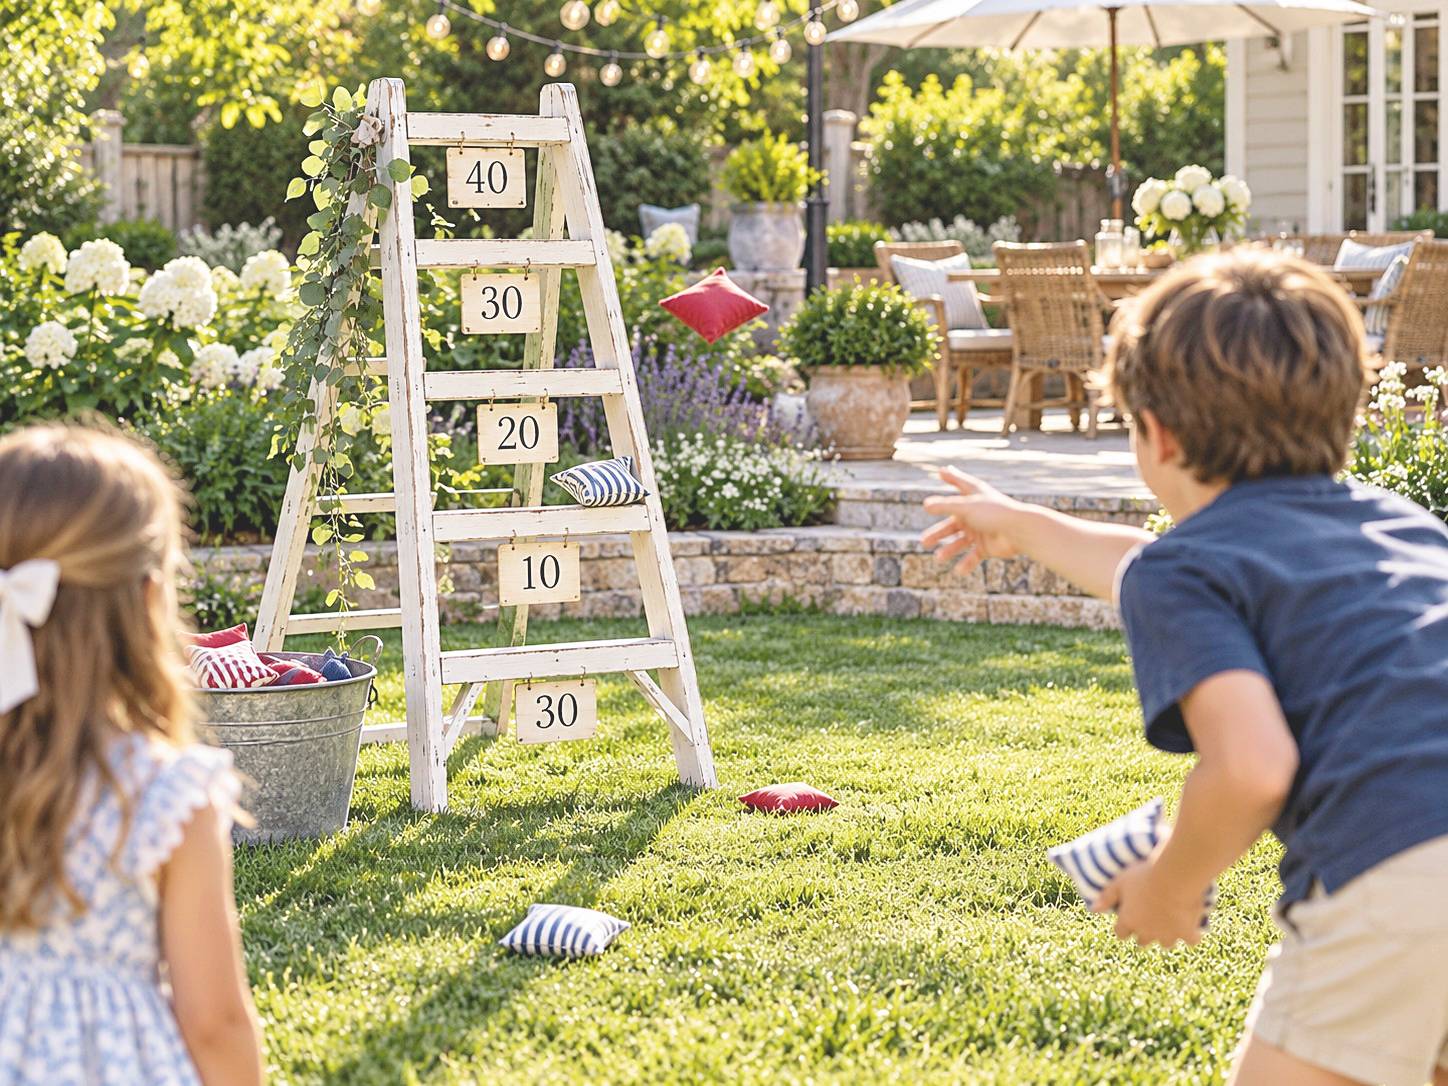
A narrow white ladder-shaped target stands on the lawn with score cards at several heights. The cards make each level easy to distinguish, while open spaces between them give tossed beanbags separate destinations. Its upright format uses less ground area than several side-by-side targets and keeps the scores visible from the throwing point.
Adult preparation. Prepare a frame specifically for the target game, including suitable supports, smooth edges, and secure score-card attachments. Keep its ladder-like shape separate from its use: a household access ladder is not a substitute, and the target is not for climbing. Place an intact beanbag basket at a marked throwing position and keep the lane and retrieval area clear. Adults check the stand and change cards; children can help choose colors or values.
Use three throws per player and begin with one point for reaching any designated opening. Stop for collection after the turn. Once children can follow the aiming rule, give the levels different scores and add the results together. Change values based on the difficulty observed instead of assuming the highest opening is always hardest. Gather bags afterward and store the stand away from unsupervised climbing.
10. Giant Picture Tiles for a Lawn Memory Game
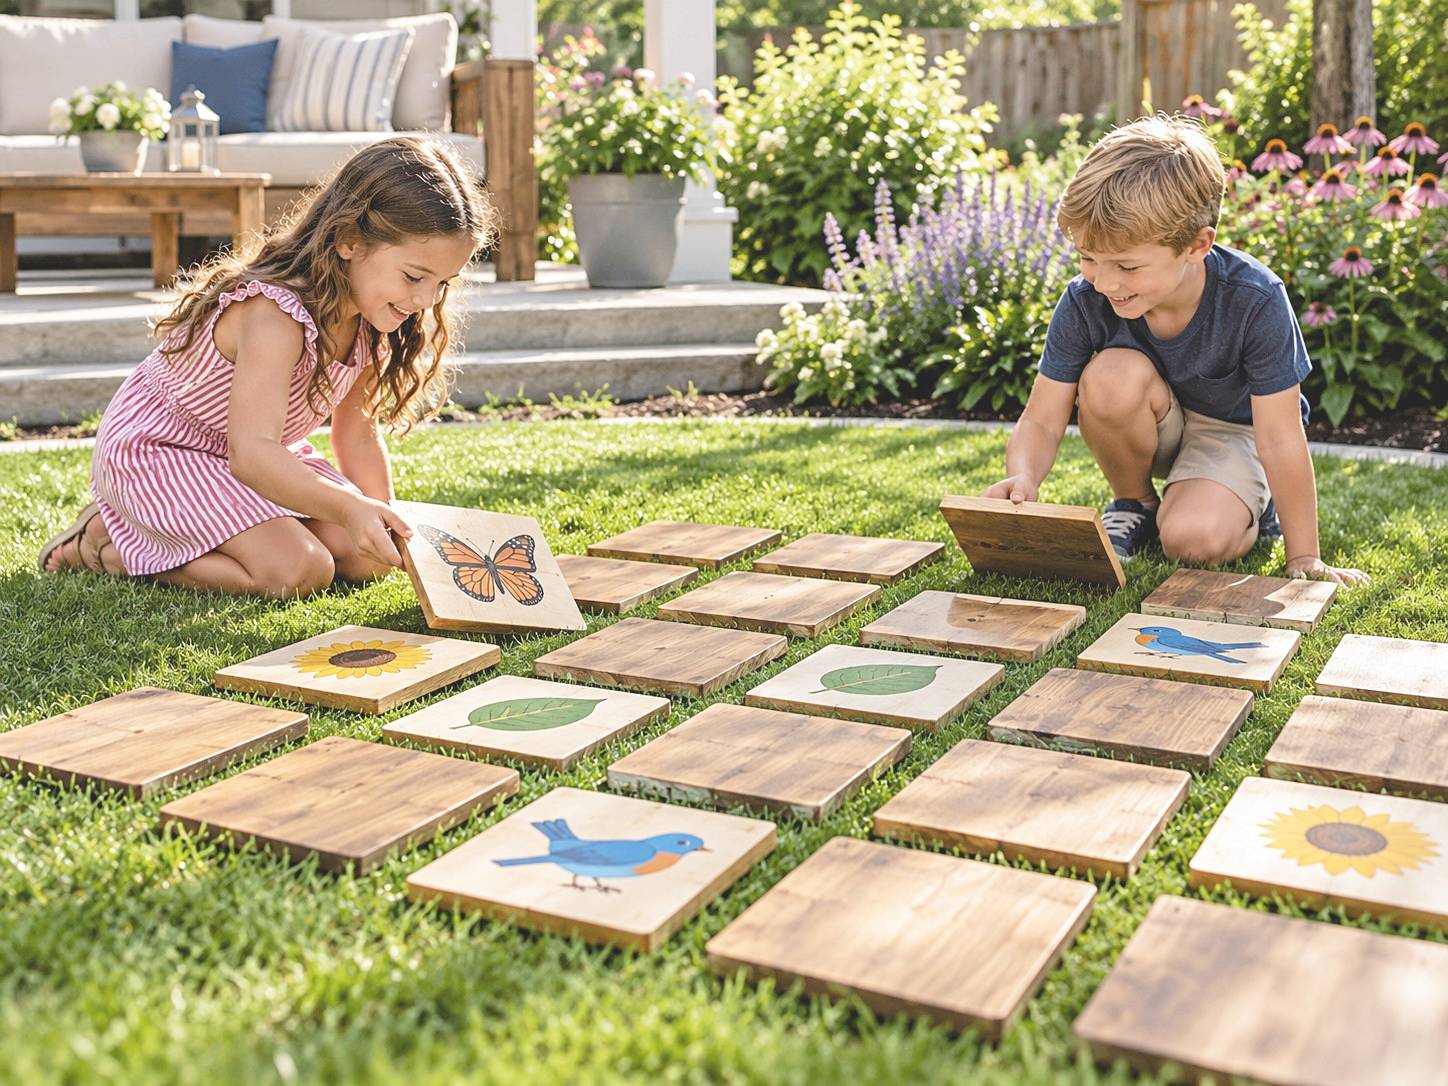
Square timber picture tiles lie across the lawn, with butterfly, leaf, and other garden motifs visible among face-down pieces. Their generous size makes the pictures easy to compare, and the lawn grid gives children room to kneel and turn them. The natural wood appearance connects the game to the garden, but matching backs are important to keep memory part of the activity.
Adult preparation. For a starter set, prepare four pairs using eight lightweight panels with rounded corners and smooth faces. Paint or apply matching pictures, then cover every back with the same opaque finish to conceal distinctive wood grain during the game. Use compatible finishes and allow them to cure as directed. Children can choose the picture pairs or join an appropriate painting activity after panel preparation. Check for loose decorations or small detachable parts.
Place the eight cards face down. Each player reveals two, removes a matching pair, or returns a mismatch before the next turn. Leave space to reach the pieces without stepping on them. Use fewer pairs for an easier round, then restore the full set. Wipe and dry panels, check for warping, and pack all pairs into one box.
11. A Three-Color Beanbag Target Board
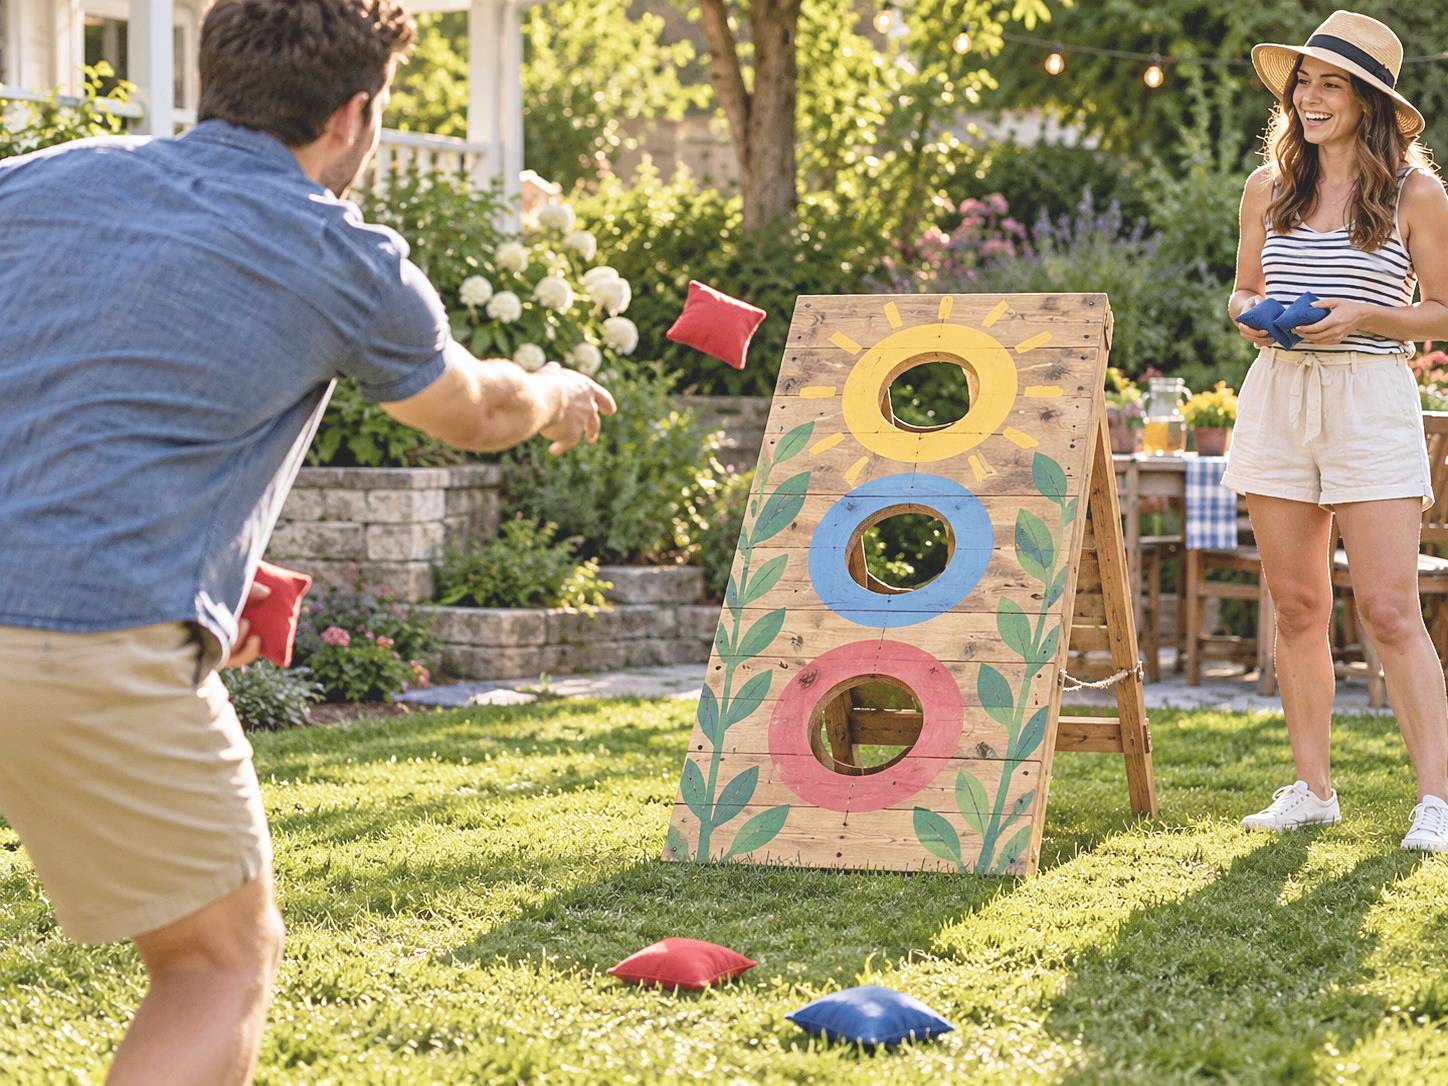
A sloping timber target board has yellow, blue, and red circular openings, with a sun motif around the upper hole and painted leaves below. Colored beanbags repeat the target palette on the lawn. The board combines a garden decoration with a clearly defined throwing game, using three openings instead of a large collection of separate targets.
Adult preparation. Select or prepare the panel, cut and smooth each opening, and resolve the rear support and anchoring before use. Apply an exterior-compatible finish and let it cure according to its instructions. Put intact, age-appropriate beanbags in a basket at the starting point, with space behind the board for retrieval. Adults handle cutting, folding supports, and moving the stand; children can name the colors or help prepare a simple score record.
Call one color and give the player a gentle attempt at that opening. Continue for three calls, change players, and collect after throwing stops. Let children choose a color for the first round; later, add points for responding correctly to the called target. Inspect edges and stand movement before reuse, and store bags with the board so loose pieces do not remain across the lawn.
12. Chalkboard, Tic-Tac-Toe, and Hopscotch Along a Side Path
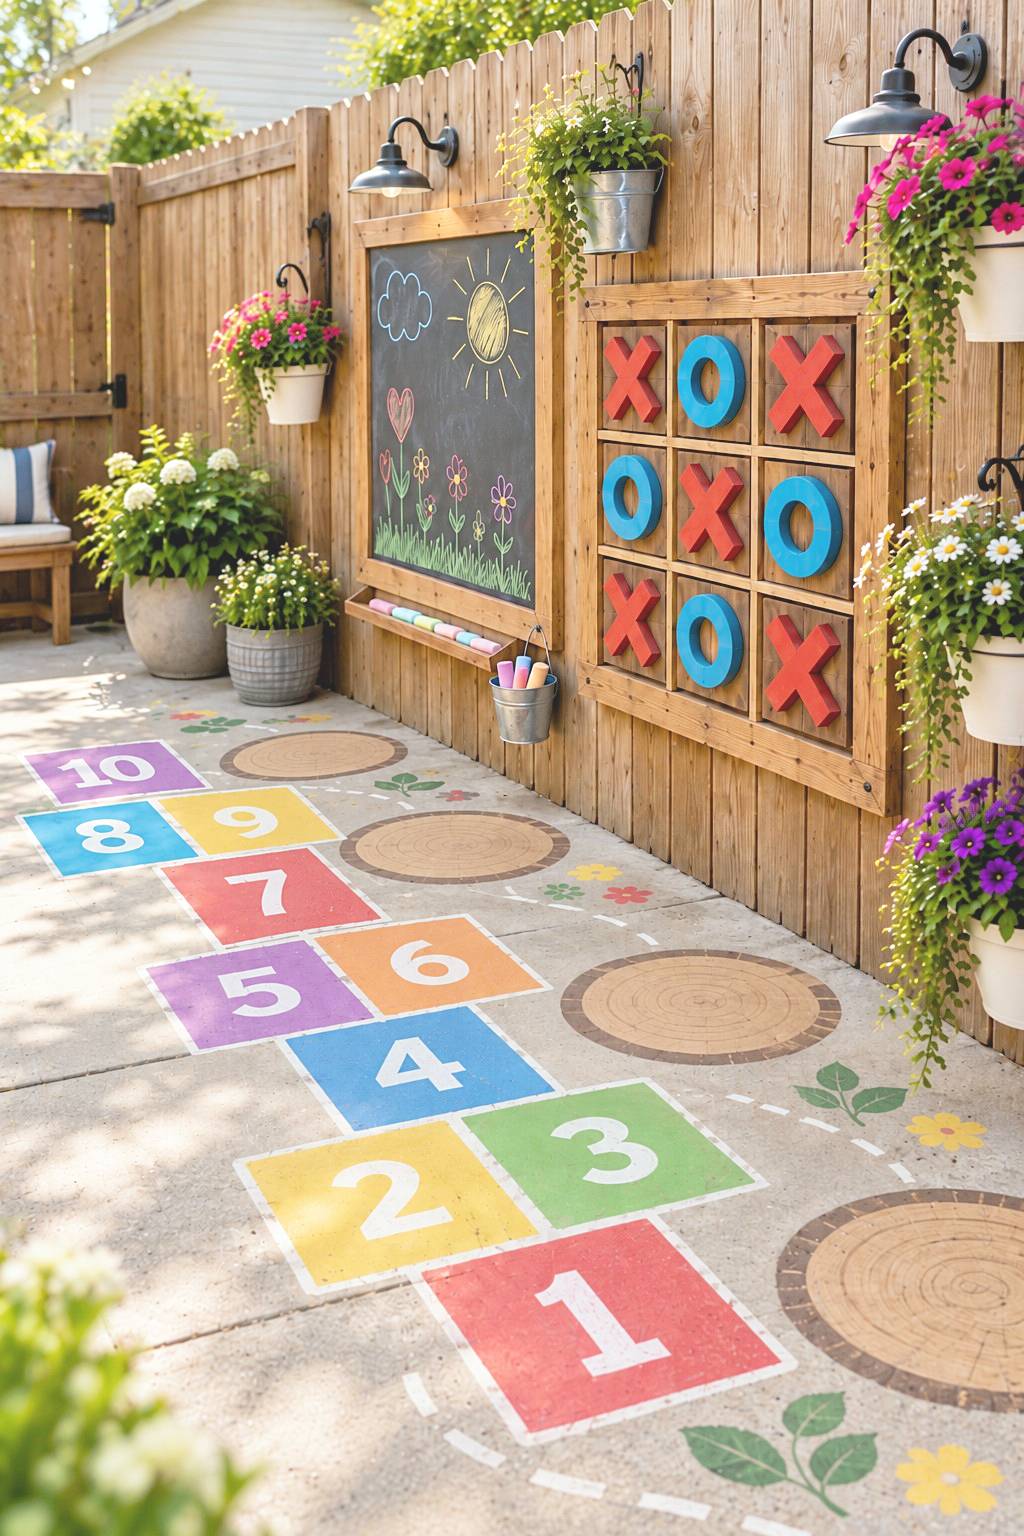
A fence-mounted chalkboard and a wooden tic-tac-toe panel sit beside a colorful hopscotch route. Painted circular wood-grain motifs and small flowers fill the neighboring paving, bringing several play surfaces into one narrow passage. Wall activities stay shallow, while the numbered ground pattern makes movement part of the same setting.
Adult preparation. Secure the chalkboard and symbol panel to appropriate fence framing, with smooth reachable edges and a usable chalk ledge. Plan the hopscotch pattern on the paving in chalk first, leaving the household’s daily route usable. Choose a permanent coating for the actual floor material and wet outdoor foot traffic if the trial layout works. Large X and O pieces still need appropriate fixings or storage, without unsuitable small magnets or loose fittings. Children can choose drawings or call destinations using alphabet hopscotch and movement games.
Use drawing, tic-tac-toe, and hopping on separate turns when the passage is too narrow for simultaneous play. Walking or pointing is another way to follow the number or letter sequence. An adult pauses games when someone needs to pass, then gathers chalk and removable markers. Inspect wall connections and keep ground accessories off the main route.
Video Inspiration: Coordinating Hopscotch and Fence Games
Tape outlines develop into colored numbered blocks beside circular ground motifs. A fence chalkboard and X-and-O panel complete the scene, with planting kept around the edges. The sequence combines movement on the paving with drawing and a board game on the boundary.
The adult lays out the full number sequence and working walkway before painting, checks coating compatibility with the paving, and secures the wall games to appropriate framing. Confirm the X-and-O set and leave chalk and removable markers within reach but outside the passage. The video supplies visual inspiration for the arrangement; floor preparation, curing, wall connections, and household access still need to be planned for the real space.
13. A Giant Chess Board for Family Strategy Games
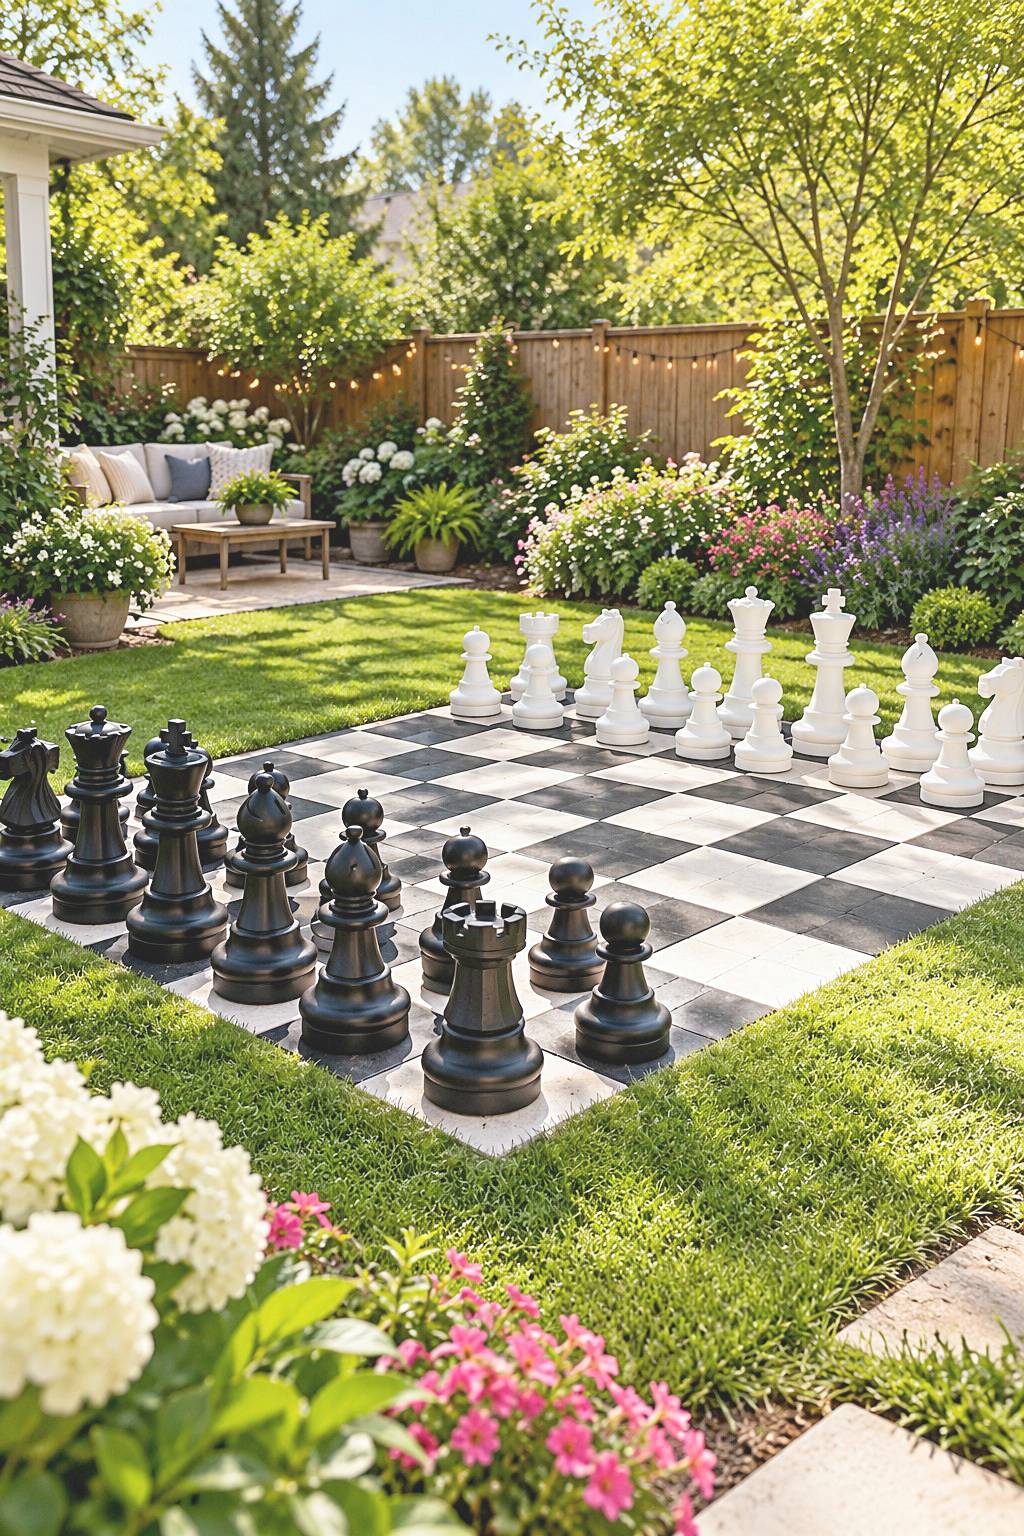
A black-and-white chess board forms a square playing area in the lawn, with large black and white pieces arranged at opposite sides. Flower borders and nearby seating give the game a quieter setting than the throwing stations. The broad pattern lets family members follow a move together while leaving the surrounding garden open.
Adult preparation. Prepare a level board surface with 64 equal squares in an eight-by-eight layout, scaled to the selected outdoor chess pieces. Position a light square at each player’s near right corner and provide space around the board for carrying pieces. Choose a manageable 32-piece set, 16 per side, following its age, handling, wind, and storage instructions. Adults handle surface work and placement; children can sort the two colors and identify matching pieces.
Begin with a few pieces and one movement rule, such as a rook’s straight lines. Each player discusses and completes a move before the other side starts. A short puzzle can follow once movement is familiar. Keep the area away from riding routes and steps, check the surface before play after rain, and return the large pieces to storage afterward.
14. A Soft Tic-Tac-Toe Grid You Can Pack Away
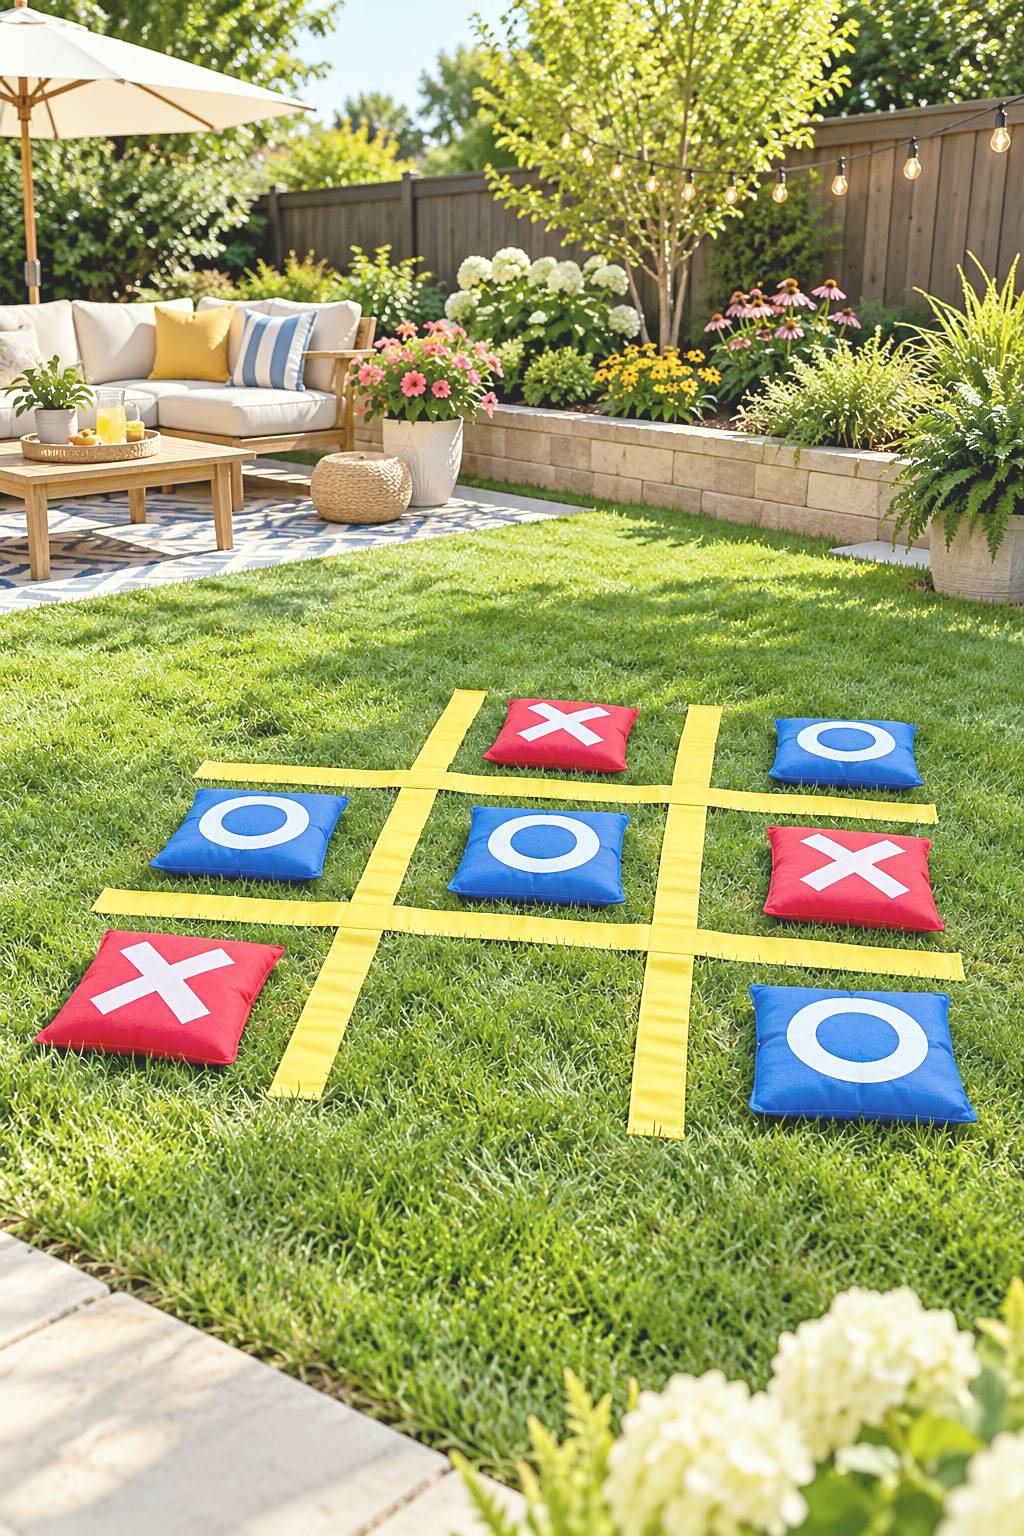
Yellow strips divide a patch of lawn into nine spaces, with red X and blue O cushions sitting inside the grid. The soft markers bring the board game to garden scale without a fixed timber installation. Empty squares make it easy to see where the next move can go, while the whole layout can be gathered when the lawn is needed.
Adult preparation. Arrange four flat strips as two horizontal and two vertical lines. Sew or select five padded markers for the first player and four for the second, with secure seams and no detachable trim. Inspect filling containment and material suitability for the children using them. Adults prepare the fabric pieces and check that the strips lie flat; children can help position the grid on dry, reasonably level grass. Keep rigid stakes and raised fasteners out of the playing area.
Players alternate placing one marker in an empty square, aiming for three in a row. Stop when someone completes a row or all spaces are filled. A later tossing round needs a clear rule for pieces touching a line. Inspect seams, dry damp fabric fully, and pack the strips and nine markers together.
15. A Soccer Scoring Corner with a Ball-Stick Target
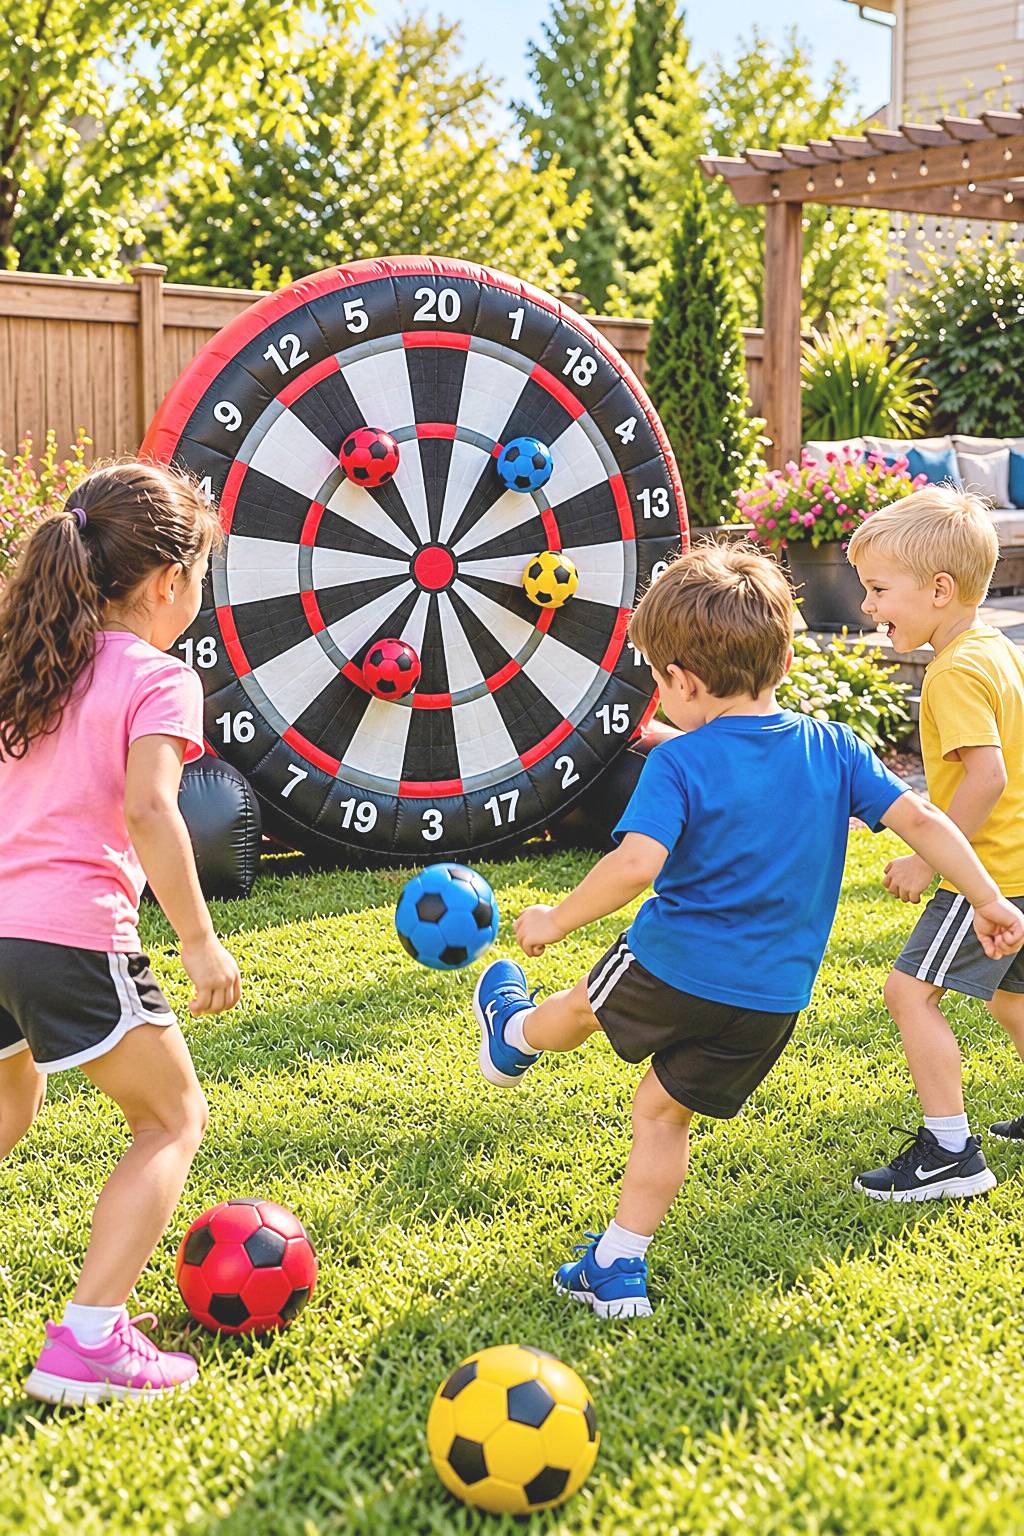
A large circular soccer target uses dartboard-style rings, colored scoring areas, and numbers to make kicks easy to follow. Several bright balls sit around the player, with others attached to the target face. The oversized circle is the main feature, giving the activity one visible destination against the garden’s flower border and timber backdrop.
Adult preparation. Install a purpose-built target with its specified base, anchoring, and inflation or airflow arrangement where required. Select the maker’s compatible soft hook-and-loop balls so they attach to the face as intended. Mark the kicking line, a waiting position behind it, and a retrieval approach. Adults handle setup and keep waiting children out of the active lane and target area; the close grouping around the kicking child should not be repeated during active attempts. A removable score sheet is the family’s DIY addition.
Begin with three controlled kicks toward one named zone. Stop all kicks before collecting balls, then change players. A closer starting line makes the first round manageable; two called zones add a later decision. Check equipment condition and follow its age, weather, clearance, and packing instructions each time the game is used.
16. Fabric Catch Pockets for Soft-Ball Tossing
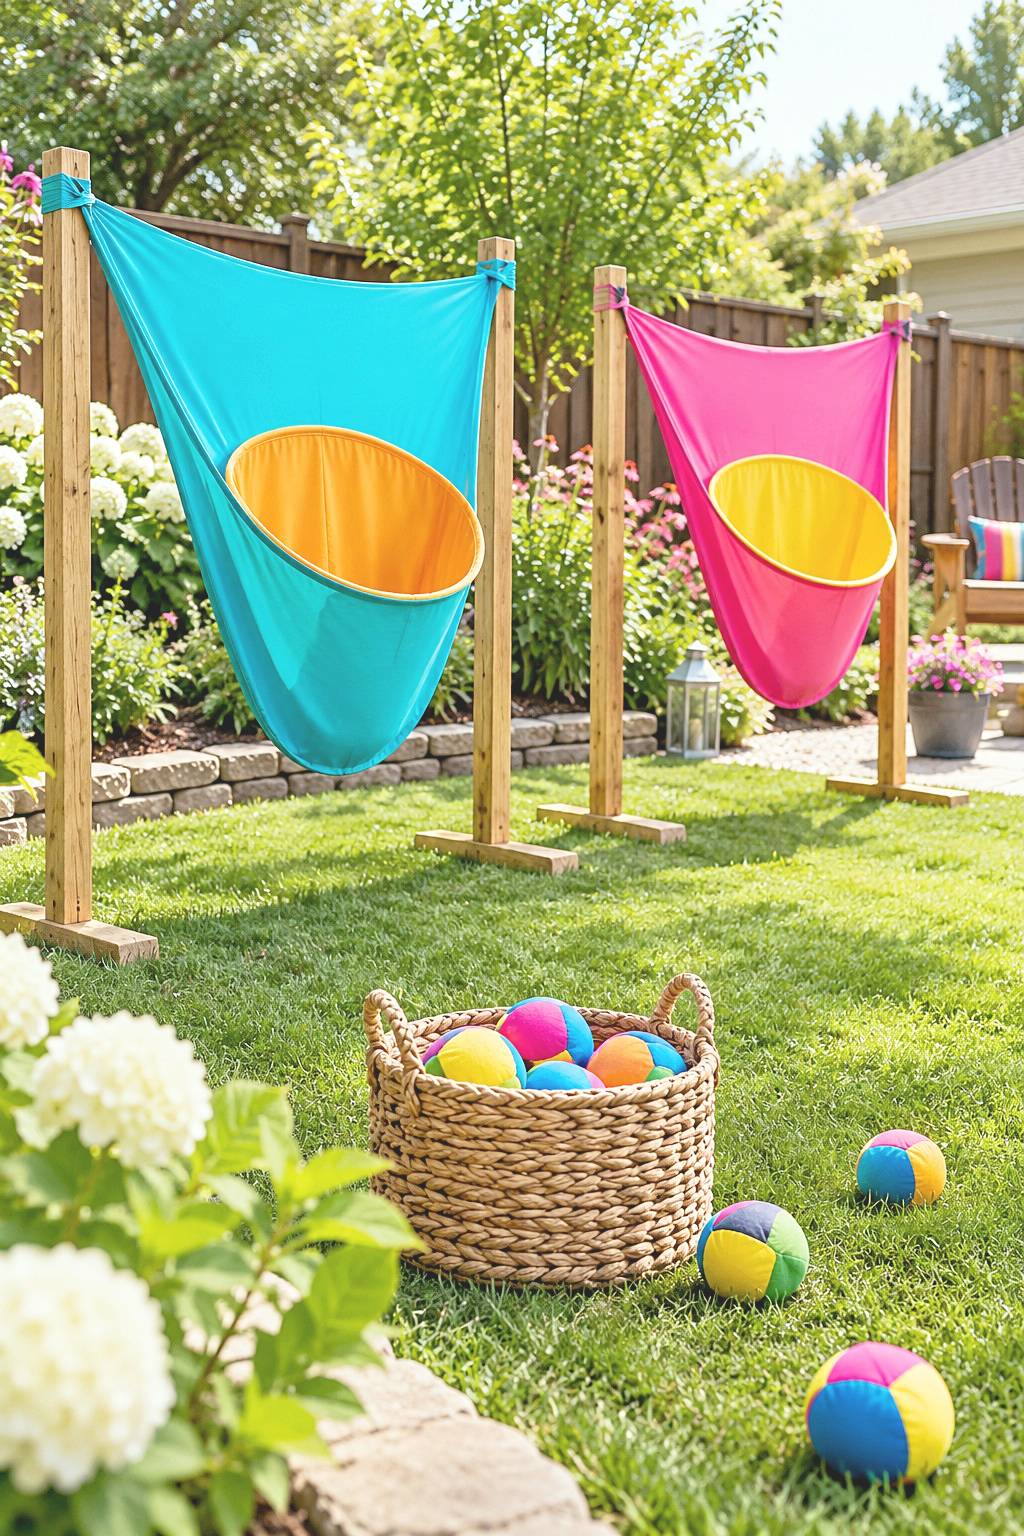
Turquoise and pink fabric targets hang inside timber frames, each with a large yellow-rimmed opening and a deep pocket below. A basket of colorful soft balls waits nearby on the lawn. The fabric contains successful throws, so players can finish a short round before gathering balls instead of chasing every attempt across the garden.
Adult preparation. Assemble or select frames designed to support the target fabric and its contents. Prepare reinforced openings, secure attachment points, and intact soft balls appropriate to the participants. Keep ties and fastening details clear of hands and movement space. Adults check frame support and stitching, while children can help choose which pocket to fill first. Inspect detachable parts and filling even when balls look large; the fabric pockets are for catching balls, not supporting children.
Take turns aiming until three balls have reached one nominated pocket, then stop together for collection. Alternating named pockets adds a color-following challenge without changing the frame height. Inspect seams and attachment points after use, count balls into the basket, clean fabric according to its care instructions, and dry it fully before storing the station.
17. Oversized Cup Targets for a Portable Lawn Game
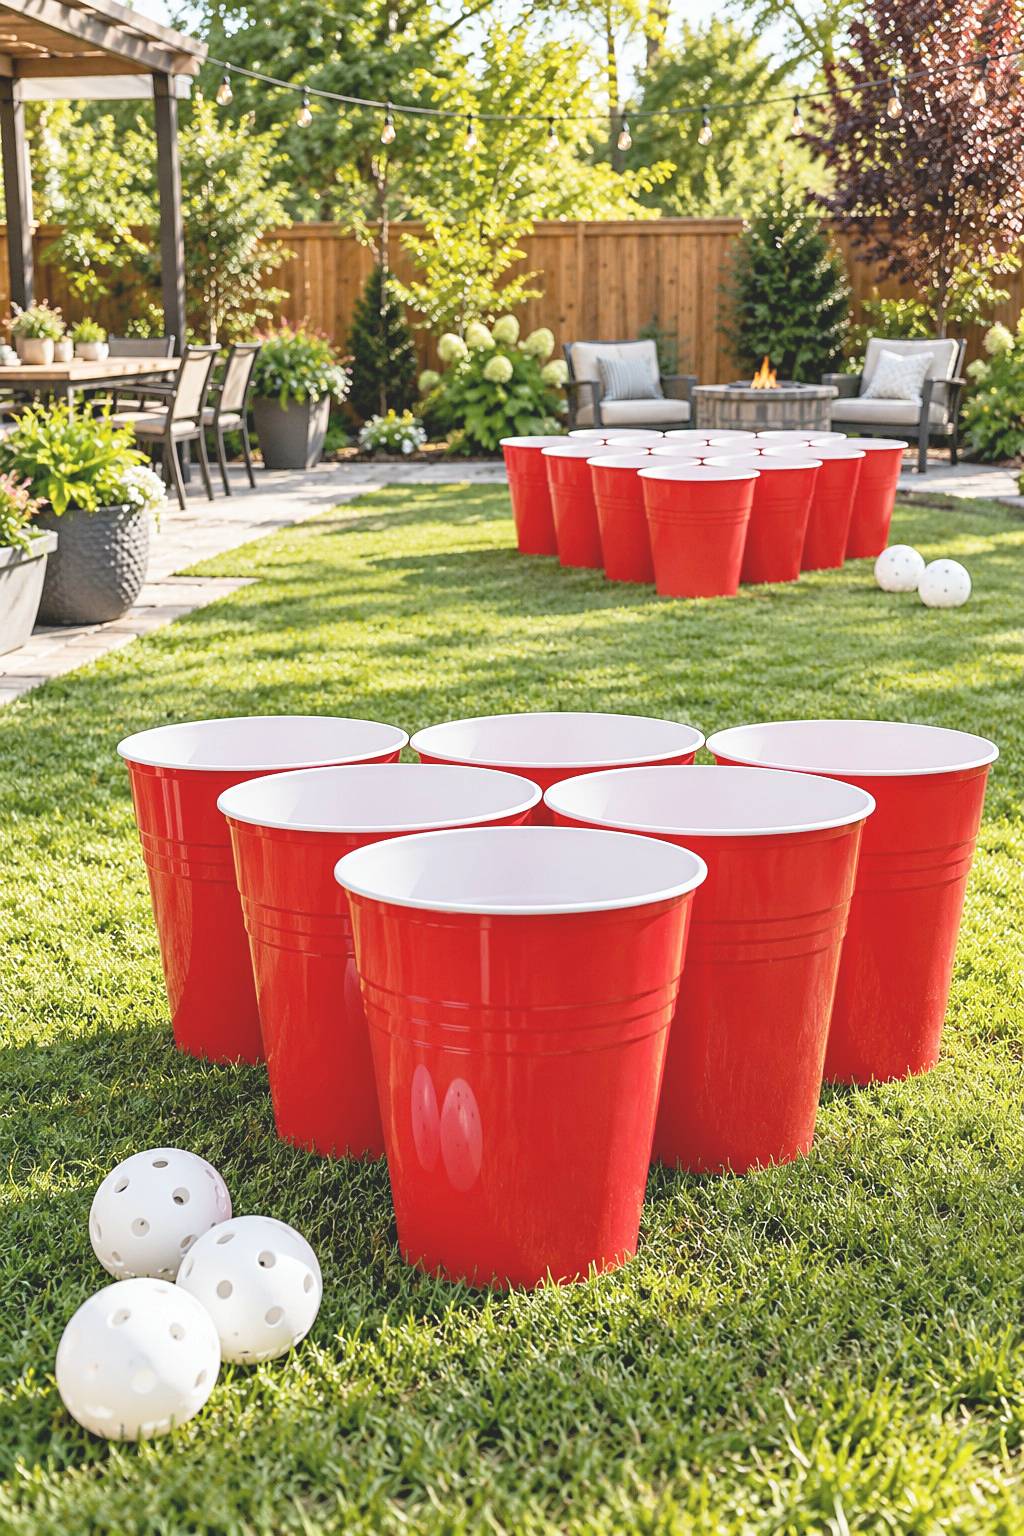
Large red cup-shaped containers form two triangular groups across the lawn, with light balls ready beside the nearer cluster. Repeated shapes create a bold target pattern that is easy to see from the starting point. The separate groups allow the game to be rearranged, moved, or packed away without adding a permanent structure.
Adult preparation. Choose smooth-edged containers with stable bases and lightweight balls appropriate to the children. Prepare one six-cup triangle for the first round, then establish a single throwing direction and a clear waiting point. Adults inspect containers for cracks or rainwater and decide where each group can operate. Children can help set the triangle, but opposing groups must not throw toward one another at the same time. Keep any extra cluster inactive until its separate round begins.
Give each player three gentle attempts to land a ball inside a cup, then stop for collection. A tighter cluster simplifies the aim; a row or curve changes the challenge using the same containers. Pause if wind affects stability. Empty, clean, and dry the targets, count them into storage, and stack them only as their design permits.
18. A Low Ring Toss Board with Colored Pegs
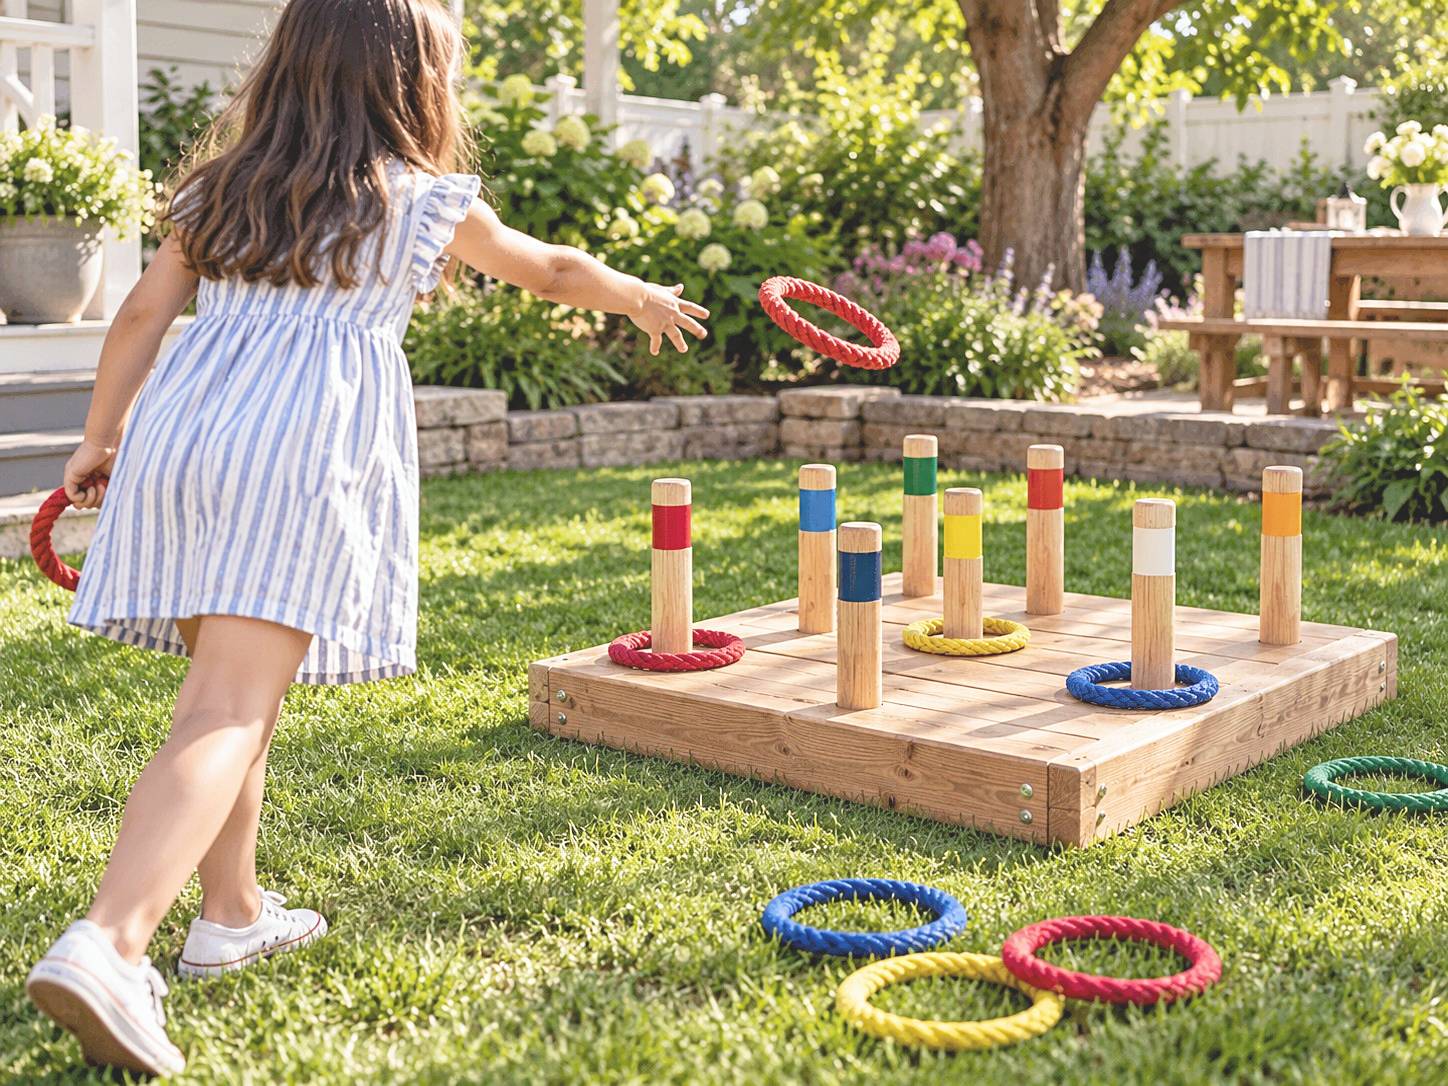
A low square timber base carries rows of upright pegs with red, blue, yellow, and green bands. Colored rings on the lawn and around the pegs repeat those bands, making each destination easy to identify. The board keeps the targets in one compact footprint while giving players a different challenge from passing a ball through an opening.
Adult preparation. Prepare or select a board designed for the game, with secure peg attachments, rounded tops, smooth contact edges, and rings appropriate to the players. Adults handle timber work, finishing, and moving the base. Check ring joins for loose ends or fraying and inspect any small detachable components. Position the board in its own throwing area, with a ring basket at the starting point and a storage space that keeps pegs outside running routes.
Use three rings per turn and count those that settle around a peg. Stop tossing before collection and change players. Begin by accepting any peg, then call a particular color once the aiming action is familiar. Inspect peg connections and ring joins before the next session, and put the board away instead of leaving its upright projections on the lawn.
Video Inspiration: A Compact Colored-Peg Ring Game
An adult joins a square timber outline, adds the board surface, marks peg positions, and installs the uprights. Colored bands are painted before rings are placed and tossed. The finished base gathers the pegs into one portable target, while repeated colors distinguish their positions.
The adult’s preparation includes a game-appropriate base design, secure peg connections, smooth rounded contact surfaces, and rings suitable for the children. Determine peg spacing and the working footprint before assembly, keeping the completed board out of running routes. Use the video for visual inspiration; the actual timber, connections, finish curing, and inspection routine need their own specifications before play.
Finish with a Setup You Can Repeat
Choose one game for the space available, prepare only its starting equipment, and try the simplest round before adding difficulty. Notice whether children understand the turn change, reach the materials comfortably, and can leave the activity when someone needs access. Change a target, cue, or sequence when that helps; extra height, power, and speed are not necessary to keep play interesting.
Use the game’s own reset routine: count picture pairs, gather fabric markers, inspect ring joins, dry cup targets, or check sand before fitting its cover. Put supplies in labeled storage handled appropriately by an adult, with rigid stands and peg boards outside movement routes. Repeat the equipment checks after weather or storage, rather than treating a familiar setup as ready automatically.

Leave a Reply