
A useful nail polish storage system makes every shade easy to find, gives glass bottles a stable place to stand, and fits the way you actually do your nails. This guide combines a simple DIY divider project with 29 storage ideas, from compact boxes and removable trays to decorative cabinets and repurposed household pieces. You will find material suggestions, practical assembly methods, and details that matter once the organizer is in use, including shelf clearance, lid support, bottle spacing, and access for cleaning.
Begin with the six compartment tray below to learn how to measure, cut, and fit a removable insert. You can adapt that method to the divided boxes, drawers, and carrying caddies later in the guide. The other designs introduce different approaches, such as supported shelves, lift out cups, and decorative fronts. Choose the structure that suits your collection first, then use color, shape, and swatches to make it your own.
Table of Contents
- Plan the Storage Around Your Bottles
- Make a Removable Six Compartment Nail Polish Tray
- Materials and Tools
- Adapt the Method Without Losing the Fit
- 29 Nail Polish Storage Ideas to Adapt to Your Space
- 1. An Artist Palette with Individual Bottle Wells
- 2. A Tambour Cabinet That Closes Over Your Collection
- 3. A Recessed Cabinet Rack with Color Markers
- 4. A Scalloped Swatch Door and Yellow Shelf Cabinet
- 5. A Book Style Chest with Separate Bottle Compartments
- 6. Leaf Front Bins on a Modular Pegboard
- 7. A Miniature Grand Piano with a Swatch Drawer
- 8. A Flower Tray with Removable Petal Pods
- 9. A Vending Machine Inspired Cabinet with a Divided Drawer
- 10. Honeycomb Shelves with Lift Out Bottle Caddies
- 11. A Patchwork Case with Removable Bottle Trays
- 12. A Green Box with Soft Sleeves Inside a Wooden Grid
- 13. A Peacock Organizer with a Fan of Color Swatches
- 14. An Octopus Tray with Eight Bottle Stations
- 15. A Koi Pond Tray with Removable Lily Pads
- 16. Color Family Blocks That Lift Out of a Shallow Tray
- 17. Scalloped Steps with a Detachable Front Tray
- 18. A Shell Shaped Box with a Pearl Finish
- 19. A Jukebox Cabinet with a Separate Color Card
- 20. A Theater Cabinet with a Stage Curtain and Swatch Drawer
- 21. A Crown Tray with Jewel Colored Bottle Cups
- 22. A Geometric Drawer Tower for a Narrow Surface
- 23. A Vertical Stand with Three Supported Color Platforms
- 24. A Reclaimed Crate with Removable Tin Can Cups
- 25. Tinted Bottle Base Cups in a Wooden Tray
- 26. A Shutter Cabinet with Three Protected Rows
- 27. A Handled Wooden Caddy with a Removable Grid
- 28. A Record Inspired Stand with Two Guarded Tiers
- 29. A Retired Guitar Body Turned into a Color Cabinet
- Care Habits That Make the Organizer Worth Using
Plan the Storage Around Your Bottles
Gather the bottles you want to store and measure the widest base and tallest closed cap. Allow enough space to pick up each bottle without knocking its neighbors. For a shelf, check both the usable depth behind its front rail and the room needed to lift a bottle over that rail. For a drawer, measure the clearance above the tallest bottle before making the insert.
A closed box suits a small collection that you prefer to put away. A shallow cabinet makes colors easier to scan, while removable modules let you bring a few shades to your manicure surface. Keep the finished organizer in a cool indoor location away from direct sunlight and sources of heat. An attractive display beside a sunny window is a poor everyday storage position.
Make a Removable Six Compartment Nail Polish Tray
This starter project uses a ready made wooden tray and three slotted plywood strips. One long divider crosses two shorter dividers to create three columns and two rows. The tray supports the bottles; the insert separates them. No glue or screws are needed for the removable grid.
The dimensions below are an example build, not measurements inferred from the inspiration designs. Use a tray with an internal space of 240 × 160 mm and an internal wall height of about 55 mm. Measure your own tray in several places and trim the divider ends gradually for a fit that slides in without force.
Materials and Tools
- One sound wooden tray with a flat, securely attached base.
- One birch plywood strip, labeled A, approximately 240 × 50 × 3 mm.
- Two birch plywood strips, labeled B and C, approximately 160 × 50 × 3 mm each.
- A ruler, pencil, small square, fine tooth backsaw, narrow flat needle file, and fine sandpaper.
- A clamp, sacrificial wood block, and eye protection for cutting.
- Six closed nail polish bottles for the final fit check.
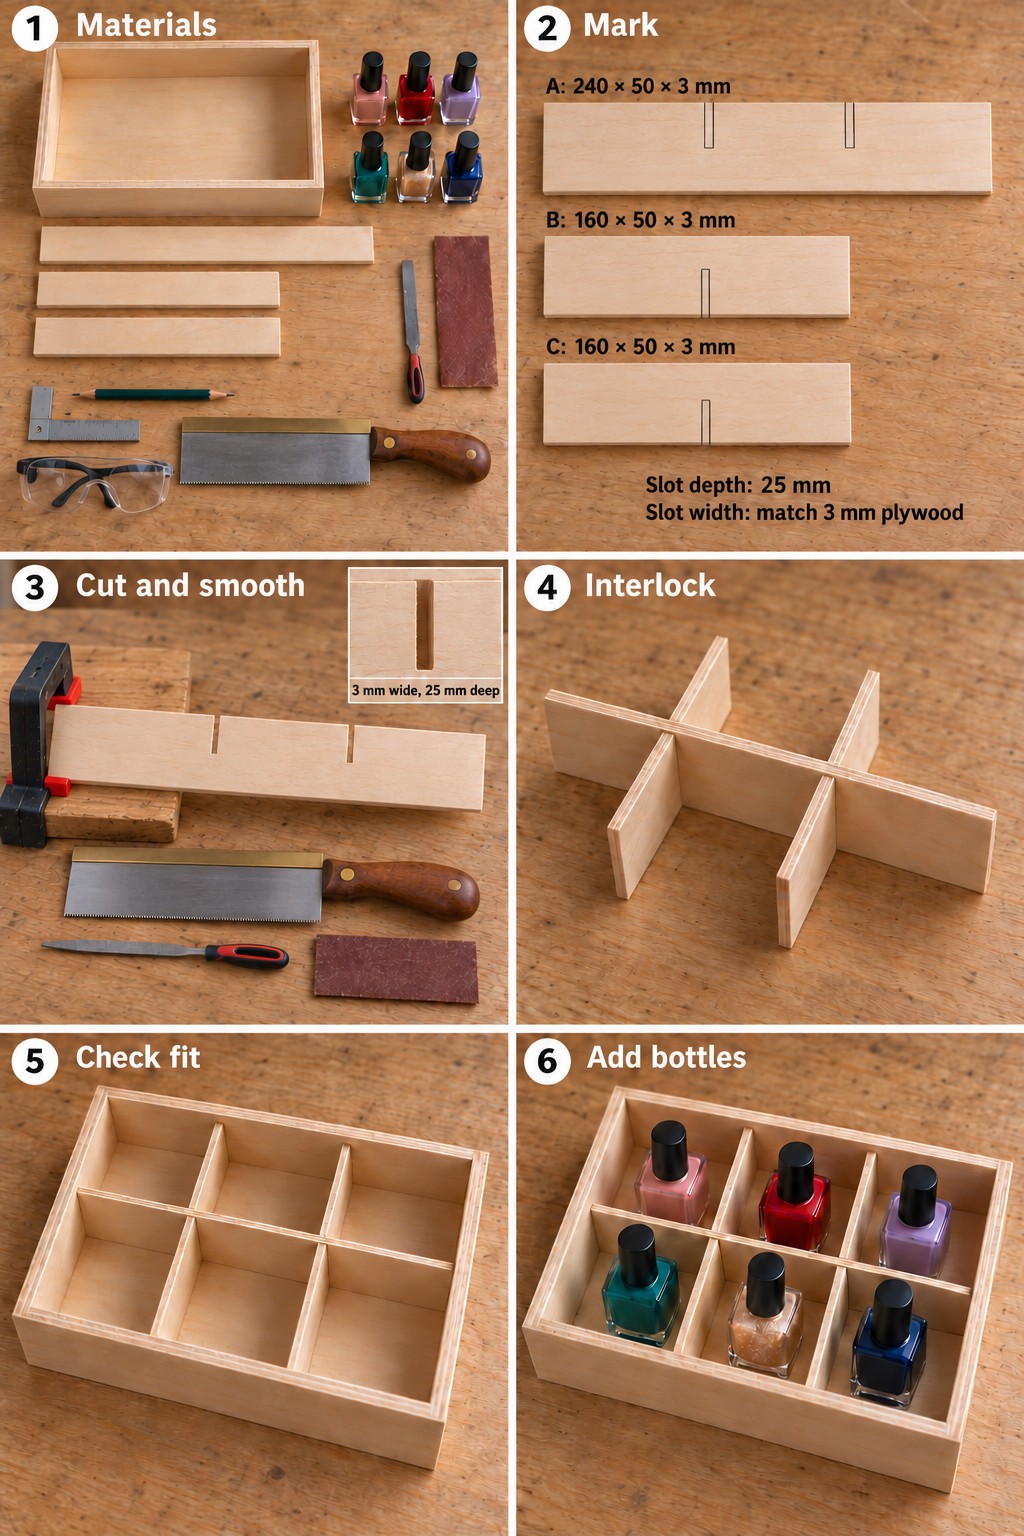
Follow the six stages to prepare the dividers, cut the slots, and fit the finished insert. Check the written dimensions against your own tray before cutting.
- Check the pieces. Confirm that the tray sits flat and that all three strips have the same height and thickness. The longer strip runs from left to right. The two shorter strips run from front to back. Keep the polish bottles away from the cutting area.
- Mark the crossing slots. On the long strip, mark slot centerlines 80 mm and 160 mm from the same end. Each slot starts at the top edge and extends 25 mm down. On each short strip, mark one centered slot 80 mm from an end, starting at the bottom edge and extending 25 mm up. Mark the slot width to match the actual plywood thickness, nominally 3 mm. If your tray dimensions differ, place the long strip slots at one third and two thirds of its length and the short strip slots halfway along their lengths.
- Cut and smooth the slots. Clamp one strip against a sacrificial block with the cut accessible. Use a fine tooth backsaw to make closely spaced parallel cuts within the marked slot, stopping at the 25 mm depth line each time. Keep every cut inside the slot boundaries. Remove the remaining thin waste with a narrow flat needle file that fits the opening, and square the bottom without deepening it. The cutting panel shows the completed slots with the tools set aside so their shape remains visible. Sand sharp edges and remove dust. Check a slot with a spare piece of the same plywood before cutting the others.
- Interlock the grid. Keep the long strip upright with its slots facing upward. Lower the two short strips onto it with their slots facing downward. All top edges and all bottom edges should align. Widen a tight slot a little at a time rather than forcing the joint and splitting the plywood. A loose or cracked strip should be remade.
- Fit the empty insert. Lower the complete grid into the tray. Its bottom edges must rest on the tray floor, with no rocking or bowed walls. Remove and lightly sand an end if the insert binds. The assembled tray should have exactly six open compartments.
- Add the bottles. Place one closed bottle upright in each compartment and check that every base sits flat. Lift bottles out individually to confirm access. Support the tray from beneath when moving it, and lift the empty insert out when you need to clean the base.
Adapt the Method Without Losing the Fit
A deeper box can use taller dividers, provided the lid still closes without touching the caps. More columns require additional crossing strips and a fresh spacing calculation. For a larger collection, make several small inserts instead of one oversized grid that becomes awkward to lift. A square cell is convenient, but a wider compartment may be more useful for unusually shaped bottles.
For a permanent wooden assembly elsewhere in this guide, use PVA wood glue on clean, bare wood contact faces, spread it evenly, and clamp as directed. Allow the joint to develop its specified strength before loading it. For most standard Titebond wood glues, an unstressed joint is clamped for 30 to 60 minutes and should not be stressed for at least 24 hours. Product instructions take precedence. Paint belongs on the finished structure, not between surfaces that need a wood glue bond.
Use a compatible wood primer and thin coats of acrylic craft paint for decorative color, followed by a compatible clear finish if required. Let each product cure as instructed. Keep coatings away from drawer runners and close fitting slots. A decorative clear coat should not be assumed resistant to nail polish remover.
29 Nail Polish Storage Ideas to Adapt to Your Space
The following ideas apply those measuring and fitting principles to very different shapes. Each includes a suggested route for recreating the design, with materials chosen for its working parts. Start with an existing box or organizer where possible. Decorative cabinets with curved doors, shaped lids, or moving parts need more woodworking experience than the simple tray project.
1. An Artist Palette with Individual Bottle Wells
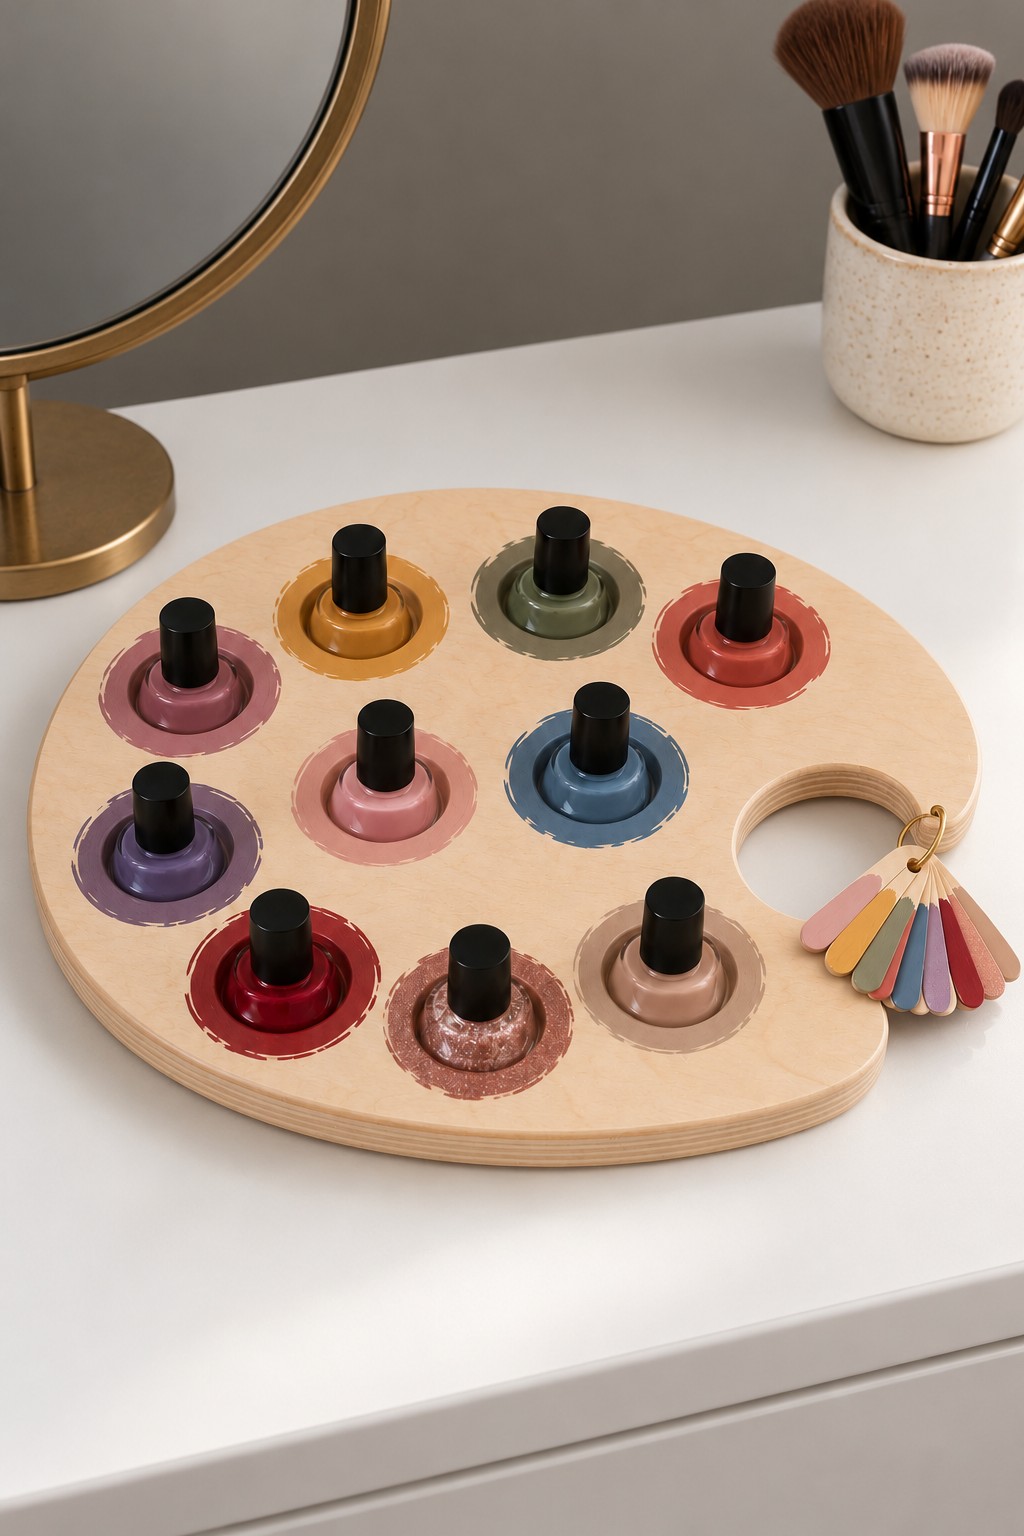
Turn your everyday colors into a compact palette by making shallow wells in a thick plywood blank. Use a paper template for the outer curve and thumb opening, then have the shape cut with a suitable saw. A drill press with a depth stop and a correctly sized Forstner bit can form flat bottomed recesses; clamp the blank securely and leave a continuous solid base beneath every well.
Sand the edges, paint a different color around each recess, and add a small ring of labeled swatches through the thumb opening. Size the wells around your own bottles rather than expecting round and square brands to fit identically. The recesses locate bottles but do not lock them in place, so keep the palette level and support it from underneath.
2. A Tambour Cabinet That Closes Over Your Collection
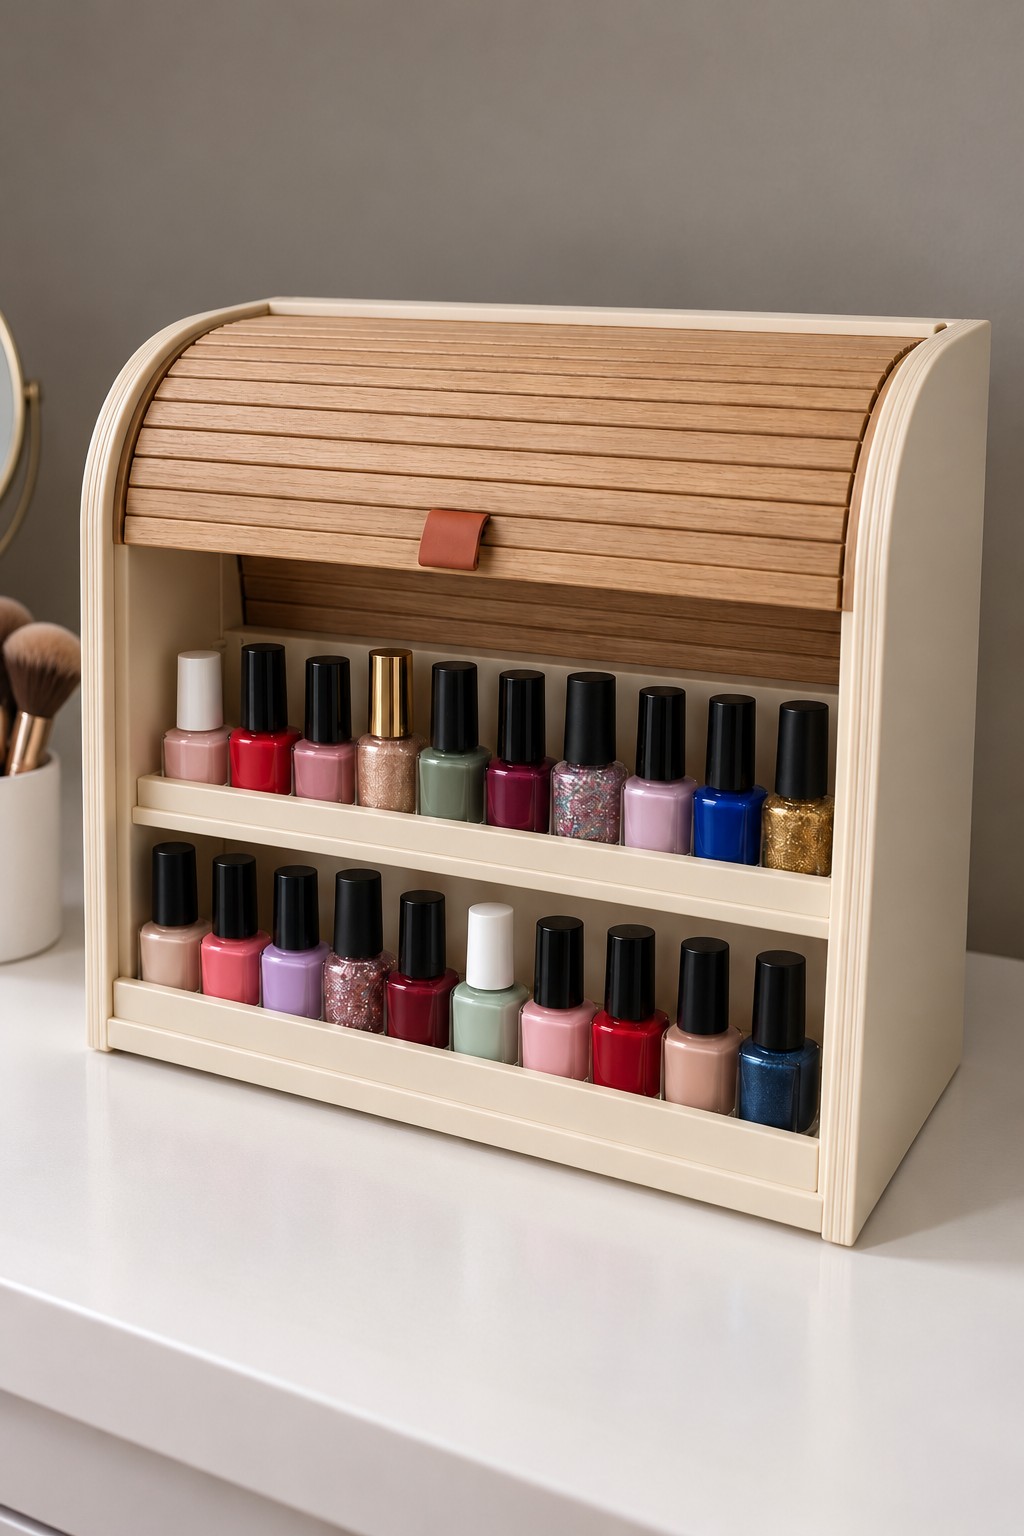
A small cabinet with a sliding tambour front keeps the collection accessible while giving you the option to close it away. The practical starting point is an existing tambour cabinet or wooden bread box that is tall enough for two rows. Check the full travel of the slatted door before choosing the shelf position. Its curved track needs empty space behind and above the bottles.
Add a plywood shelf supported on wooden cleats secured to the side panels, and fit a low front lip. Leave the moving slats and tracks free of thick paint or glue. A cream exterior and natural wood door give the piece its quiet contrast. Measure the usable interior with the door fully closed, since the visible opening does not show all the space the mechanism needs.
3. A Recessed Cabinet Rack with Color Markers
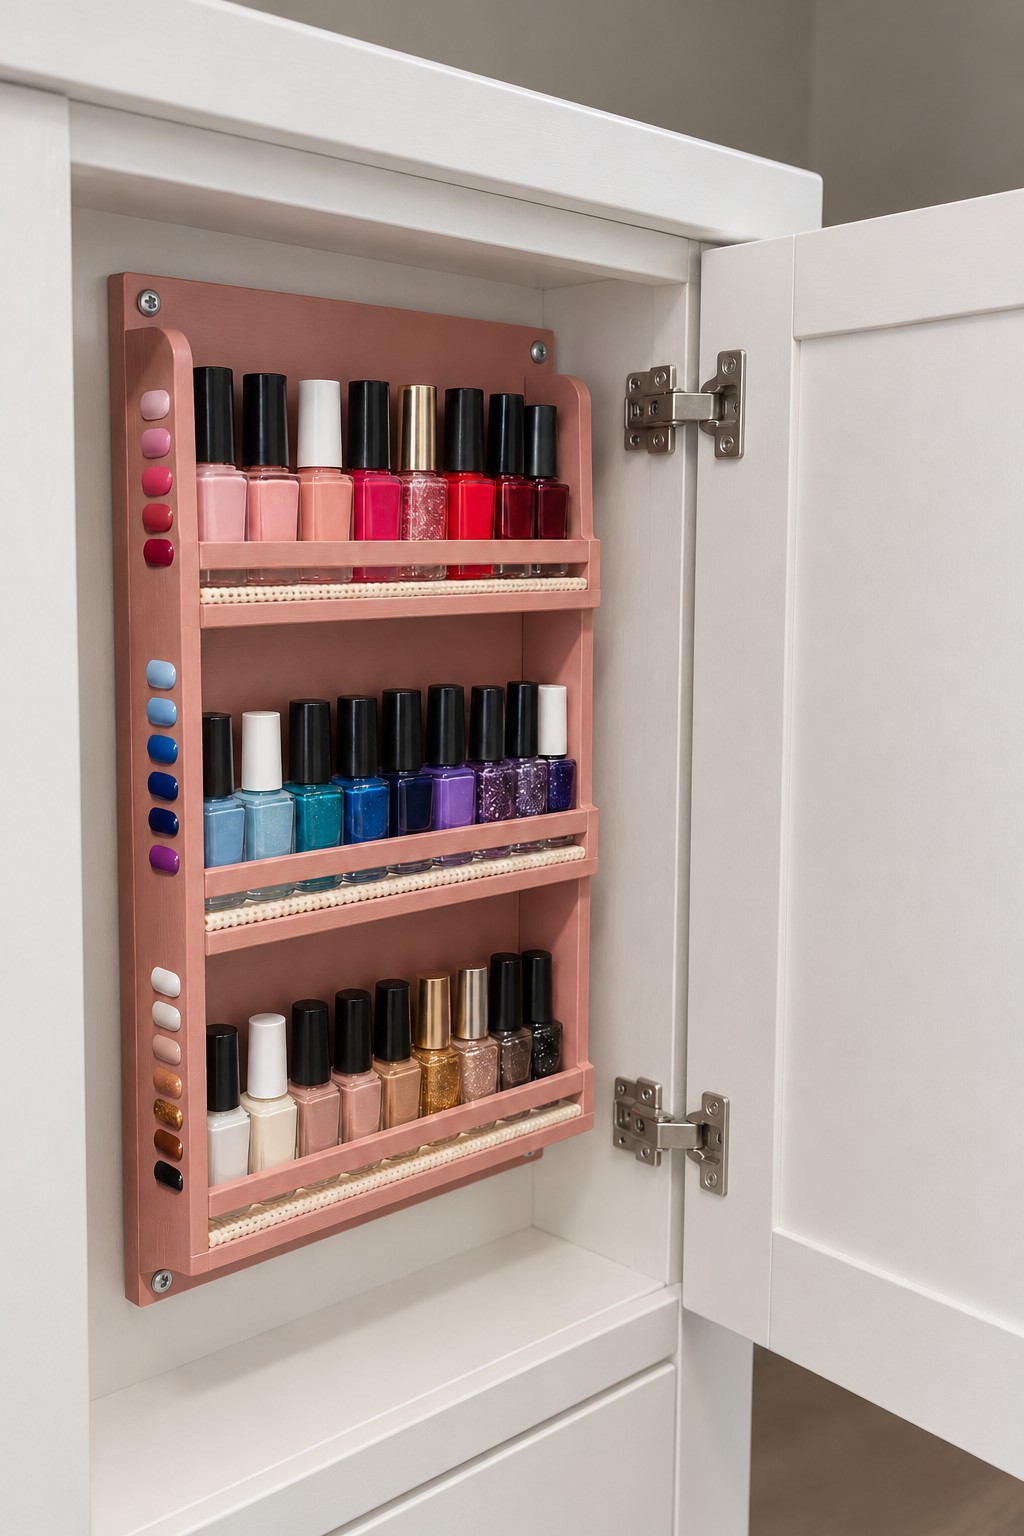
Use the protected interior of a cupboard for a shallow pink rack with three clearly separated rows. Build a plywood backing with narrow timber shelves, supported at their ends and secured to the structure. Add slim front retaining rails before painting. Small swatches down one side make neighboring color families easier to identify.
Fix the rack into sound cabinet structure with screws suitable for its thickness and the loaded weight. A thin cupboard back alone may need reinforcement. This arrangement sits inside the cabinet cavity, so measure the door hinges, existing shelves, and closing clearance before fitting it. Keep the tallest bottles on the row with the most headroom and leave enough room to lift them over the front rails.
4. A Scalloped Swatch Door and Yellow Shelf Cabinet
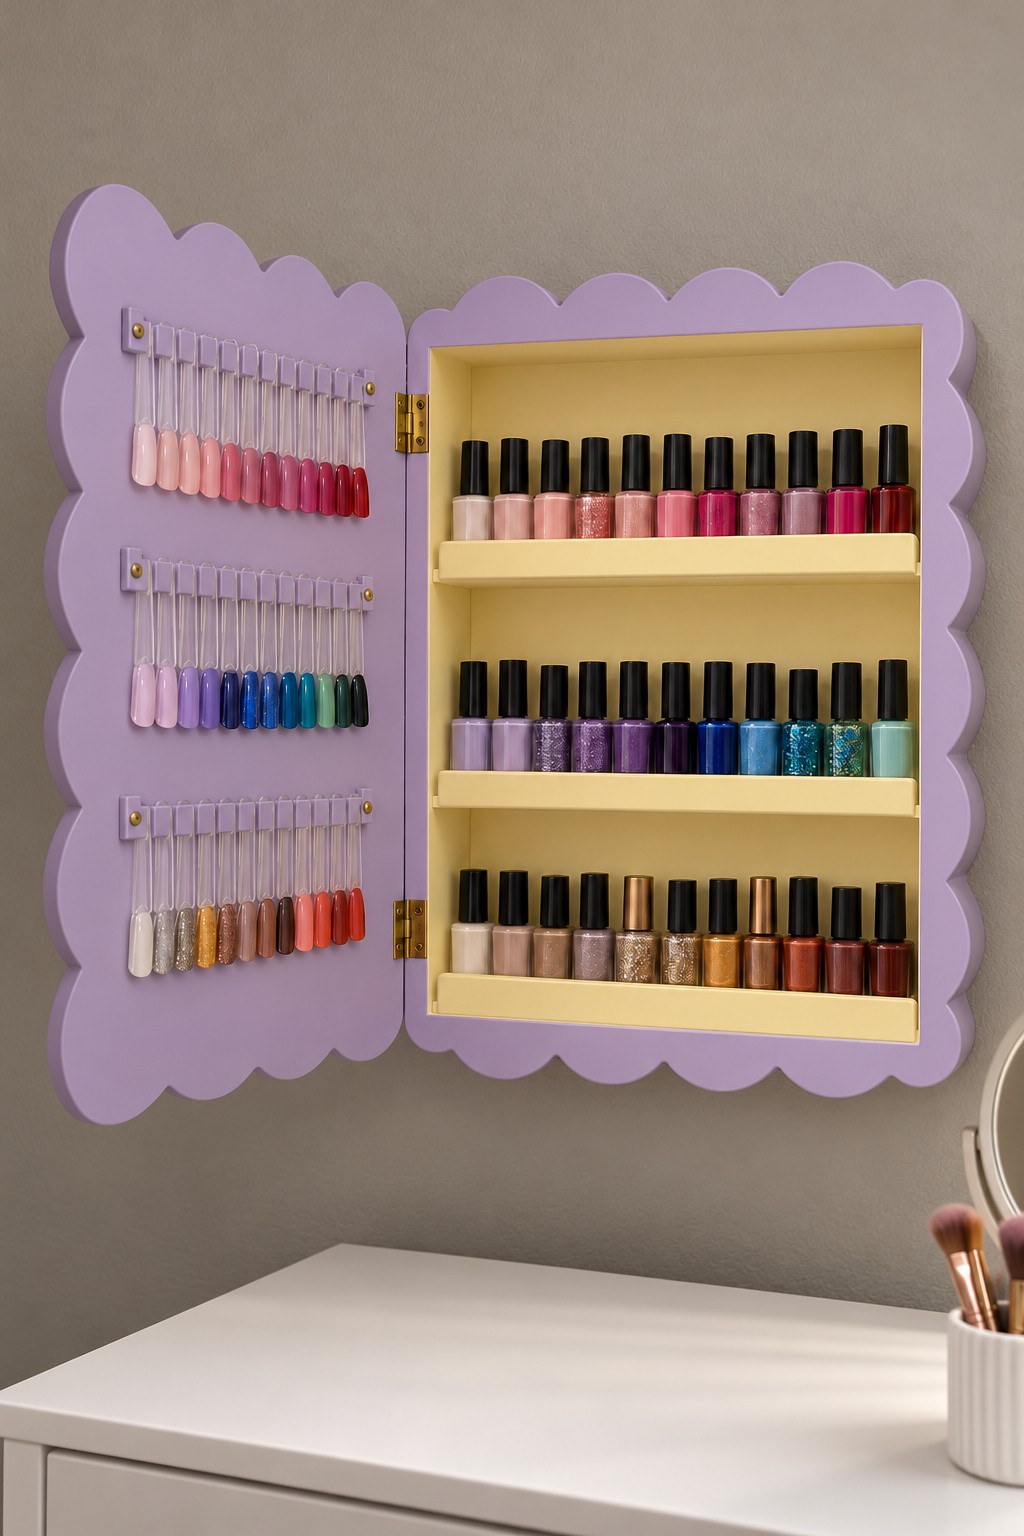
Combine a lavender scalloped surround with a yellow interior to give a shallow wall cabinet a cheerful frame. Make the rectangular cabinet first from plywood, then add the shaped border as decoration. Support the shelves on cleats and fit their front lips before attaching the hinged door. Thin craft plywood works for decorative scallops, while the cabinet itself needs a stronger structural shell.
Inside the door, small hooks or rods can carry lightweight swatch sticks. Check that the hanging sticks clear the shelf fronts when the door closes. Secure the cabinet through its structural mounting points using hardware suited to your wall and loaded collection. Keep the swatch display light so it does not strain the hinges or pull the open cabinet out of balance.
5. A Book Style Chest with Separate Bottle Compartments
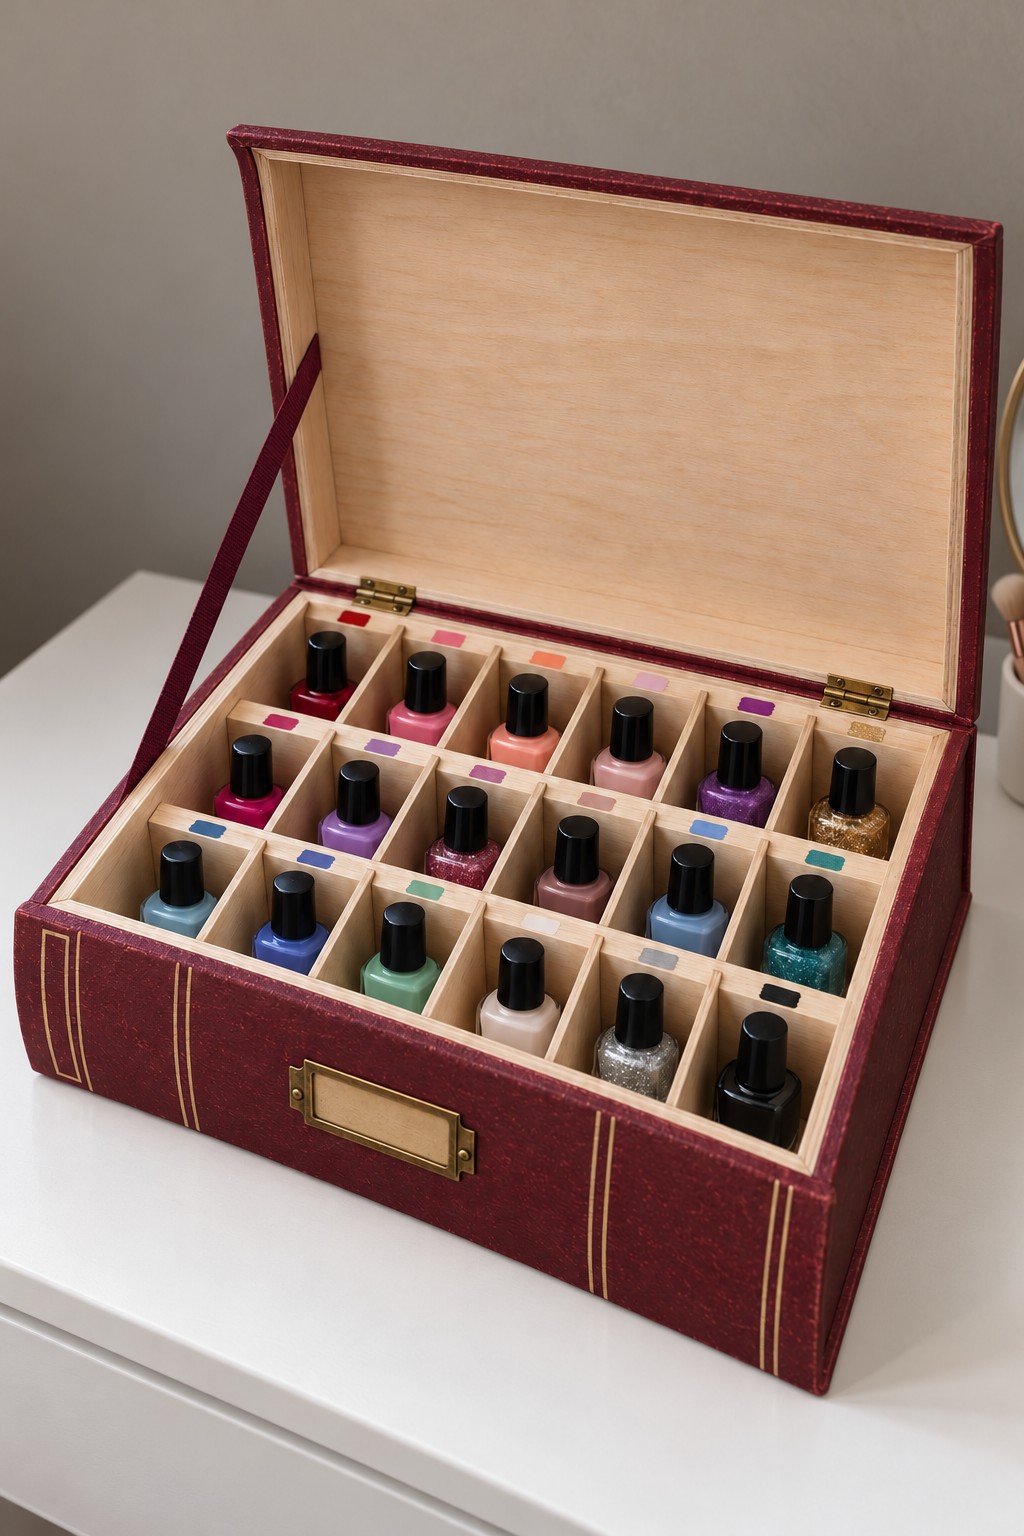
A burgundy chest with gold spine details gives polish the appearance of a treasured volume. Start with a rigid wooden book box deep enough to close over your tallest cap. Fit a removable plywood grid using the crossing slot method from the starter project, adjusting each cell around the bottle base. Add small color tabs along the rear edge of the compartments for quick browsing.
Use acrylic paint and narrow masking tape for the book cover decoration. Attach the lid restraint to solid parts of the lid and body so it limits opening without tearing away. Keep bottles upright when storing the box; this design should not be shelved vertically like an actual book.
6. Leaf Front Bins on a Modular Pegboard
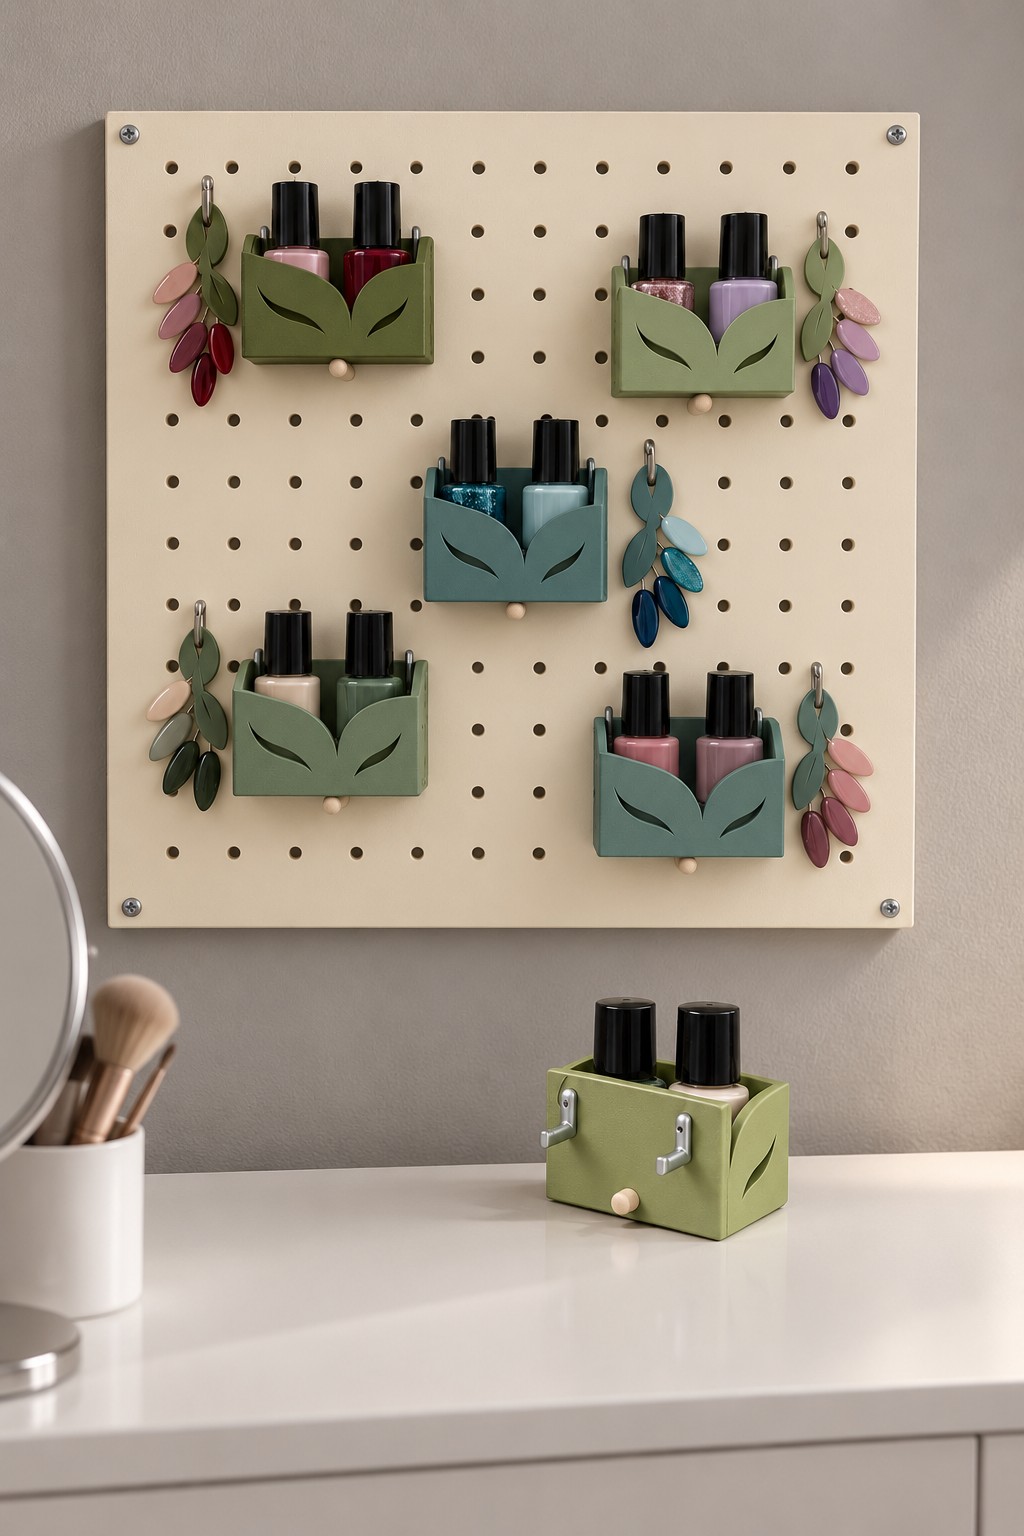
A pegboard lets you move small color groups without rebuilding the entire organizer. Use a rigid pegboard panel, compatible locking hooks, and small wooden bins with flat bottoms. Cut leaf shapes from thin craft plywood and attach them to the bin fronts with wood glue before painting in sage and teal. The decoration sits outside the bottle compartment so it does not reduce usable space.
Choose bin fittings that engage the pegboard securely and resist lifting off when you remove a bottle. Install spacers behind the board to provide the hook clearance specified by its hardware. Secure the panel for the combined weight of the bins and bottles. Hang swatch rings beside each group, and leave a little open board space so rearranging remains easy.
7. A Miniature Grand Piano with a Swatch Drawer
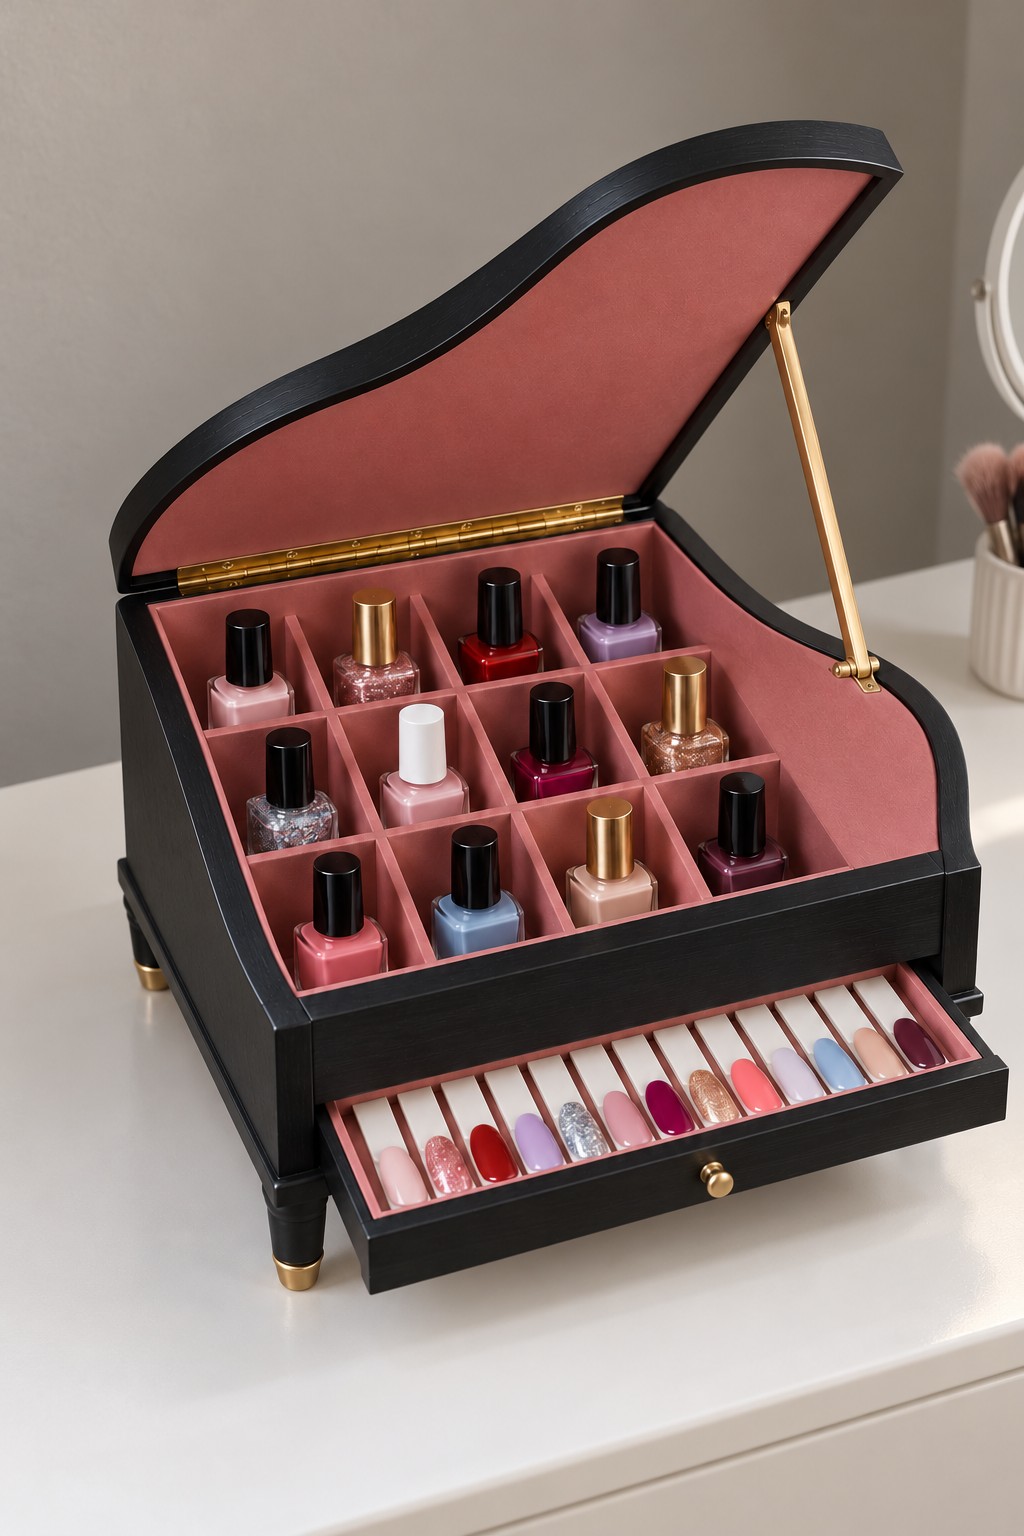
Use a piano shaped wooden box as the shell for this musical organizer. Its upper compartment holds a fitted grid, while a shallow drawer below becomes a keyboard inspired swatch index. Make the insert from thin plywood, paint it dusty pink, and keep the divider tops below the closing lid. A continuous hinge and a proper locking lid stay are more dependable than a loose decorative prop.
Arrange the swatches in the lower drawer so they remain clear of its runners and opening edge. Paint the keyboard pattern beneath them instead of adding raised keys that waste space. The curved lid is the demanding part of a new build, so adapting a suitable existing box is the simpler route. Check that the open lid cannot tip the loaded organizer backward.
8. A Flower Tray with Removable Petal Pods
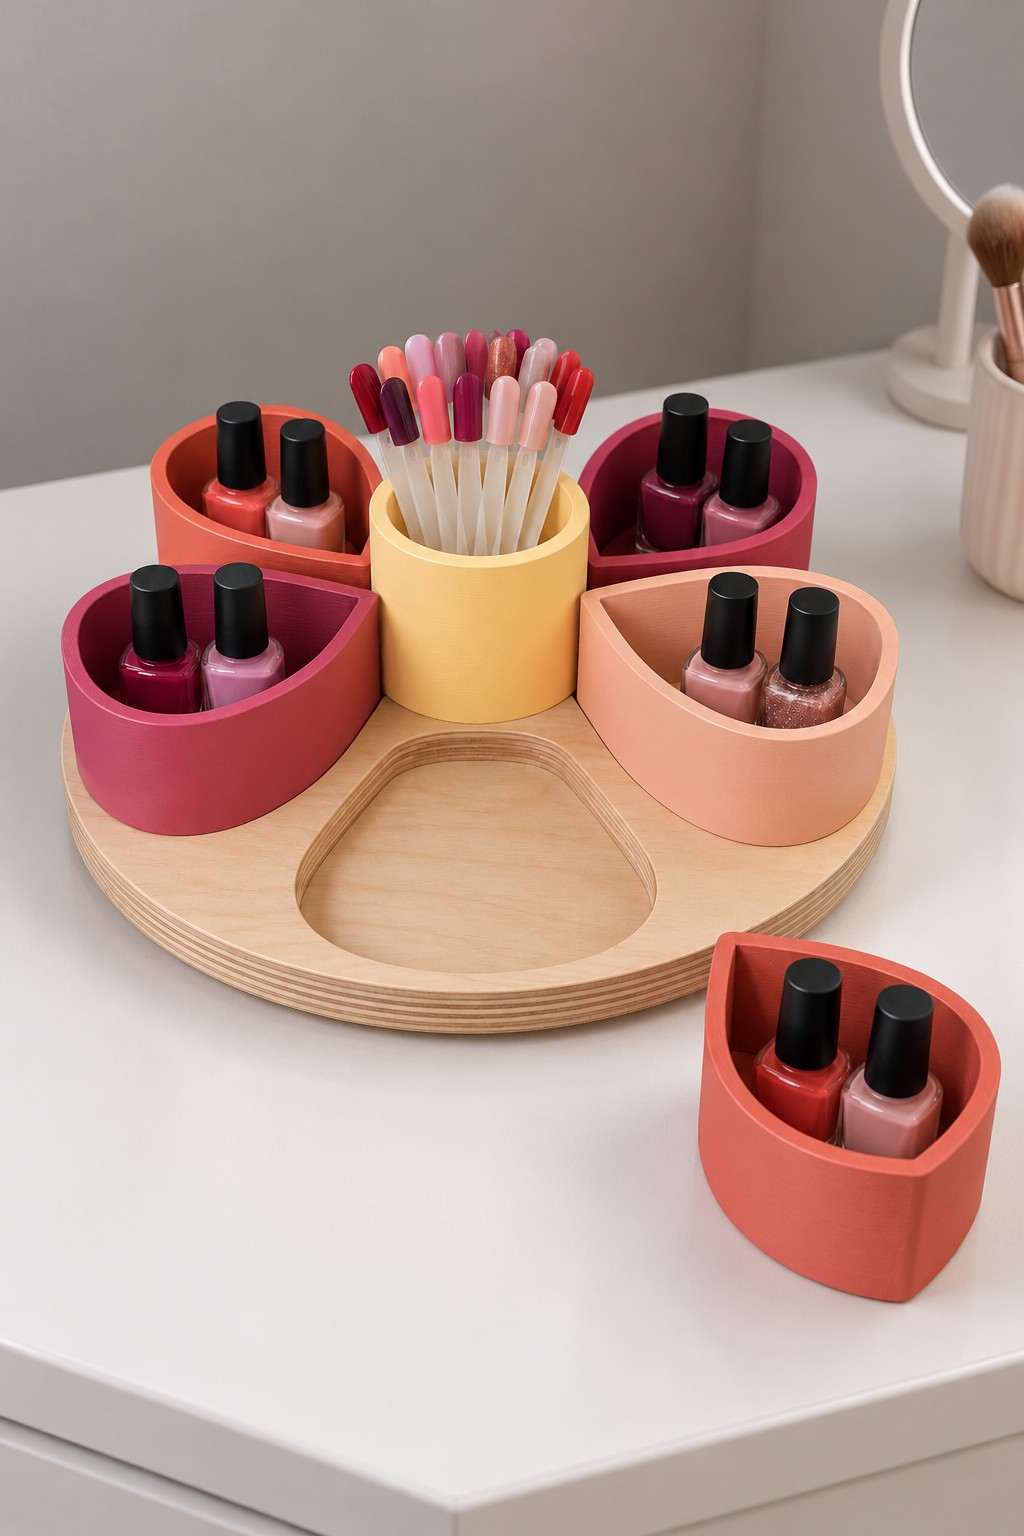
Group a few coordinating shades in each petal pod, then lift out only the colors you need. Build the round base from plywood and form the locating layer from a second sheet with petal shaped openings. Glue the two layers together on bare contact faces. Each removable pod needs its own solid bottom and enough clearance to lift free after painting.
The curved pods can be made by laminating matching plywood outlines over a base, then sanding the edges smooth. Paint them coral, peach, and berry, and use a ready made wooden cup at the center for swatch sticks. Test the fit before adding finish. The outer recesses locate the pods; they should not grip so tightly that lifting one causes the whole base to rise.
9. A Vending Machine Inspired Cabinet with a Divided Drawer
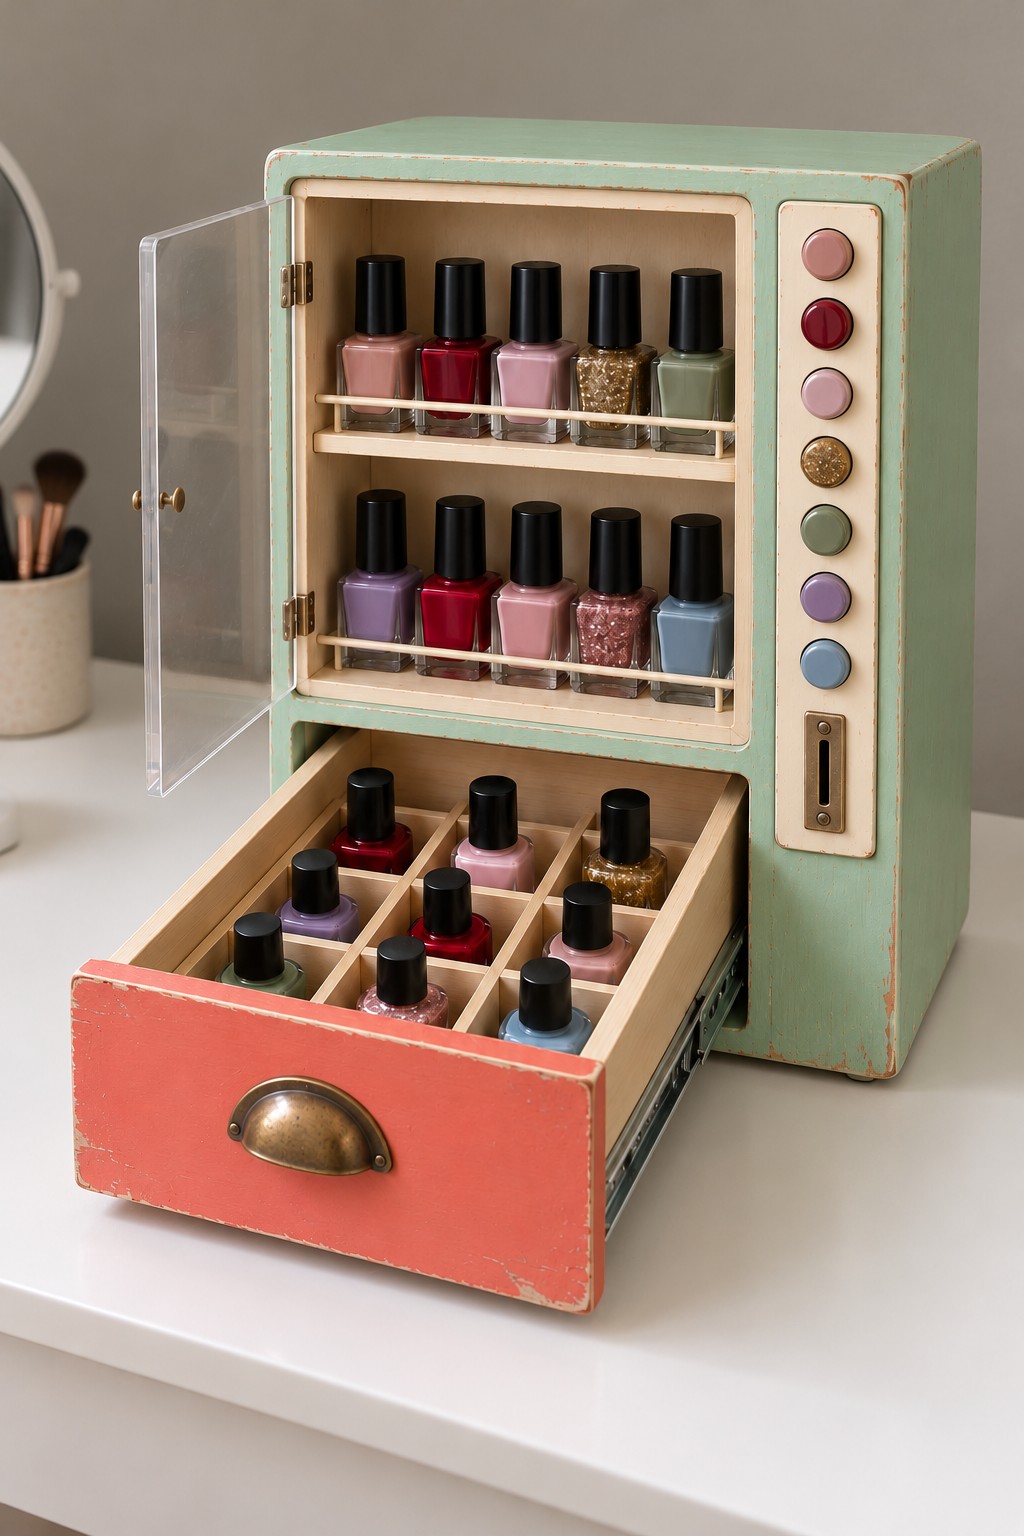
A mint cabinet, coral drawer, and column of colored buttons turn ordinary storage into a playful miniature vending machine. Adapt a small wooden cabinet with an existing drawer, then add two shallow interior shelves and retaining rails. For the transparent door, use a framed acrylic panel with hinges attached to the wooden frame rather than improvised screws through brittle corners.
The side buttons and slot are decorative details, not a dispensing mechanism. Make them from painted wooden discs and trim. Fit a removable grid inside the drawer and check that all caps clear the cabinet above it. Retain the drawer stops and use an appropriate anti tip fixing if opening the loaded drawer affects stability. Keep the most frequently used shades on the upper shelves.
10. Honeycomb Shelves with Lift Out Bottle Caddies
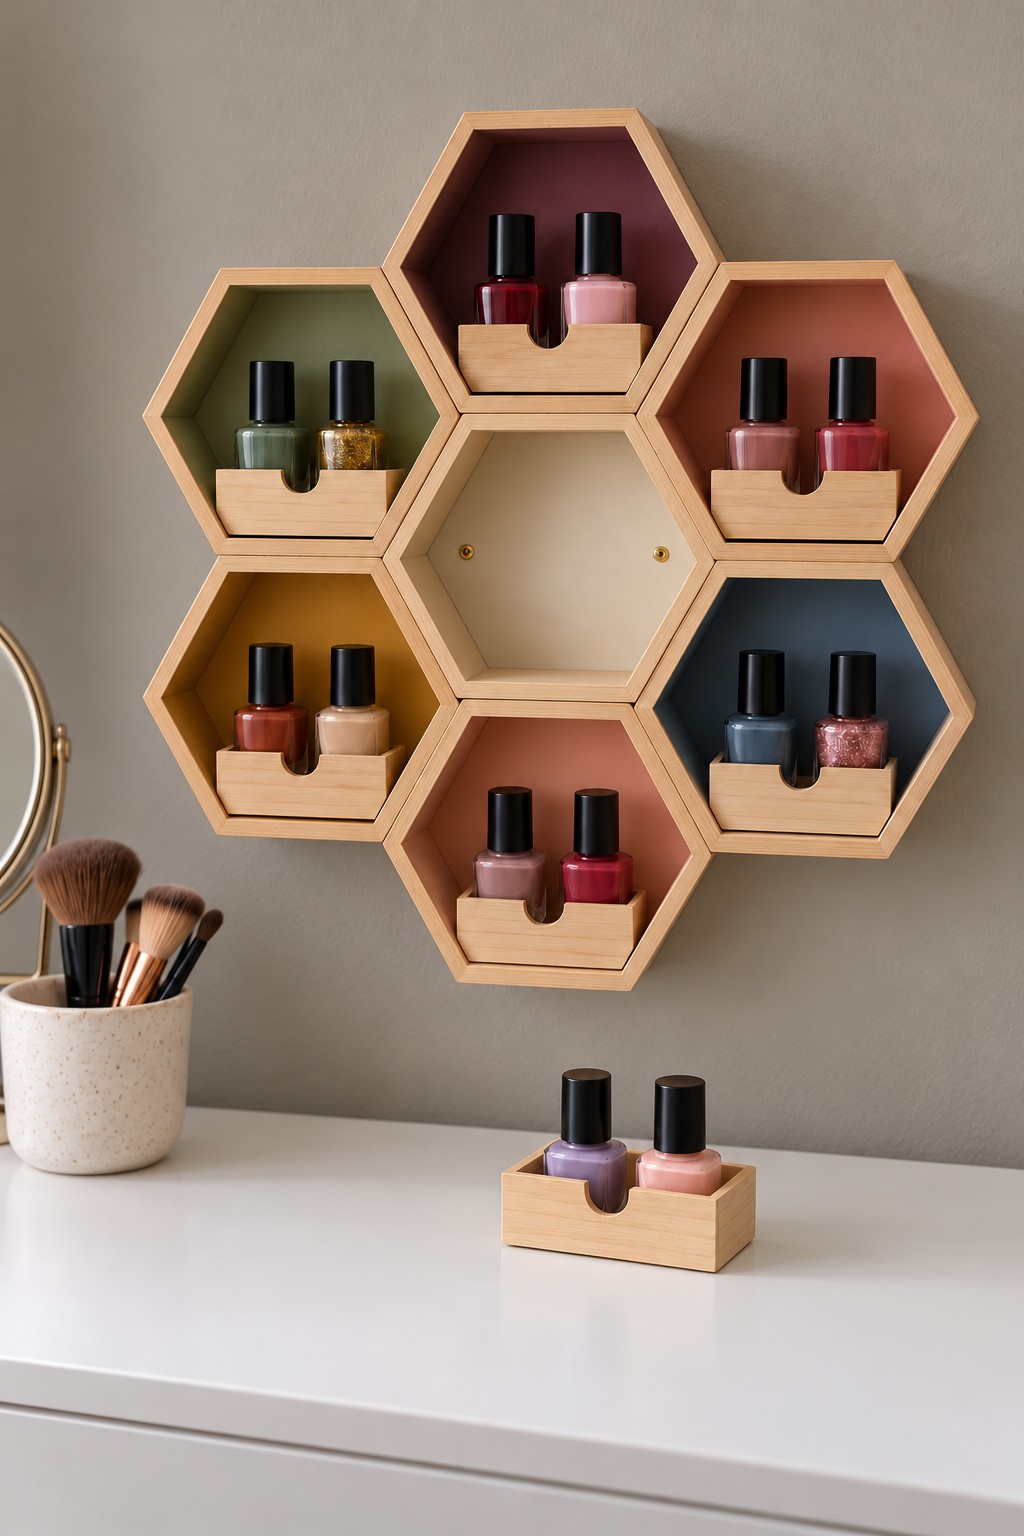
Hexagonal cubbies make useful little homes for pairs of colors. Use ready made wooden hexagon shelves to avoid the accuracy needed for repeated angled joints. Paint the back panels in muted green, burgundy, peach, and blue, leaving the frame edges natural. Make small rectangular bottle caddies with flat bases and low sides sized to sit on the lower horizontal face of each hexagon.
Keep the caddies removable so a pair of shades can travel to your manicure table. Fix each shelf with suitable hardware or attach the complete arrangement to a structural backing designed for wall mounting. Do not rely on decorative contact between neighboring hexagons to carry the load. An empty central cubby gives your hand room to reach the surrounding modules and keeps the display from feeling crowded.
11. A Patchwork Case with Removable Bottle Trays
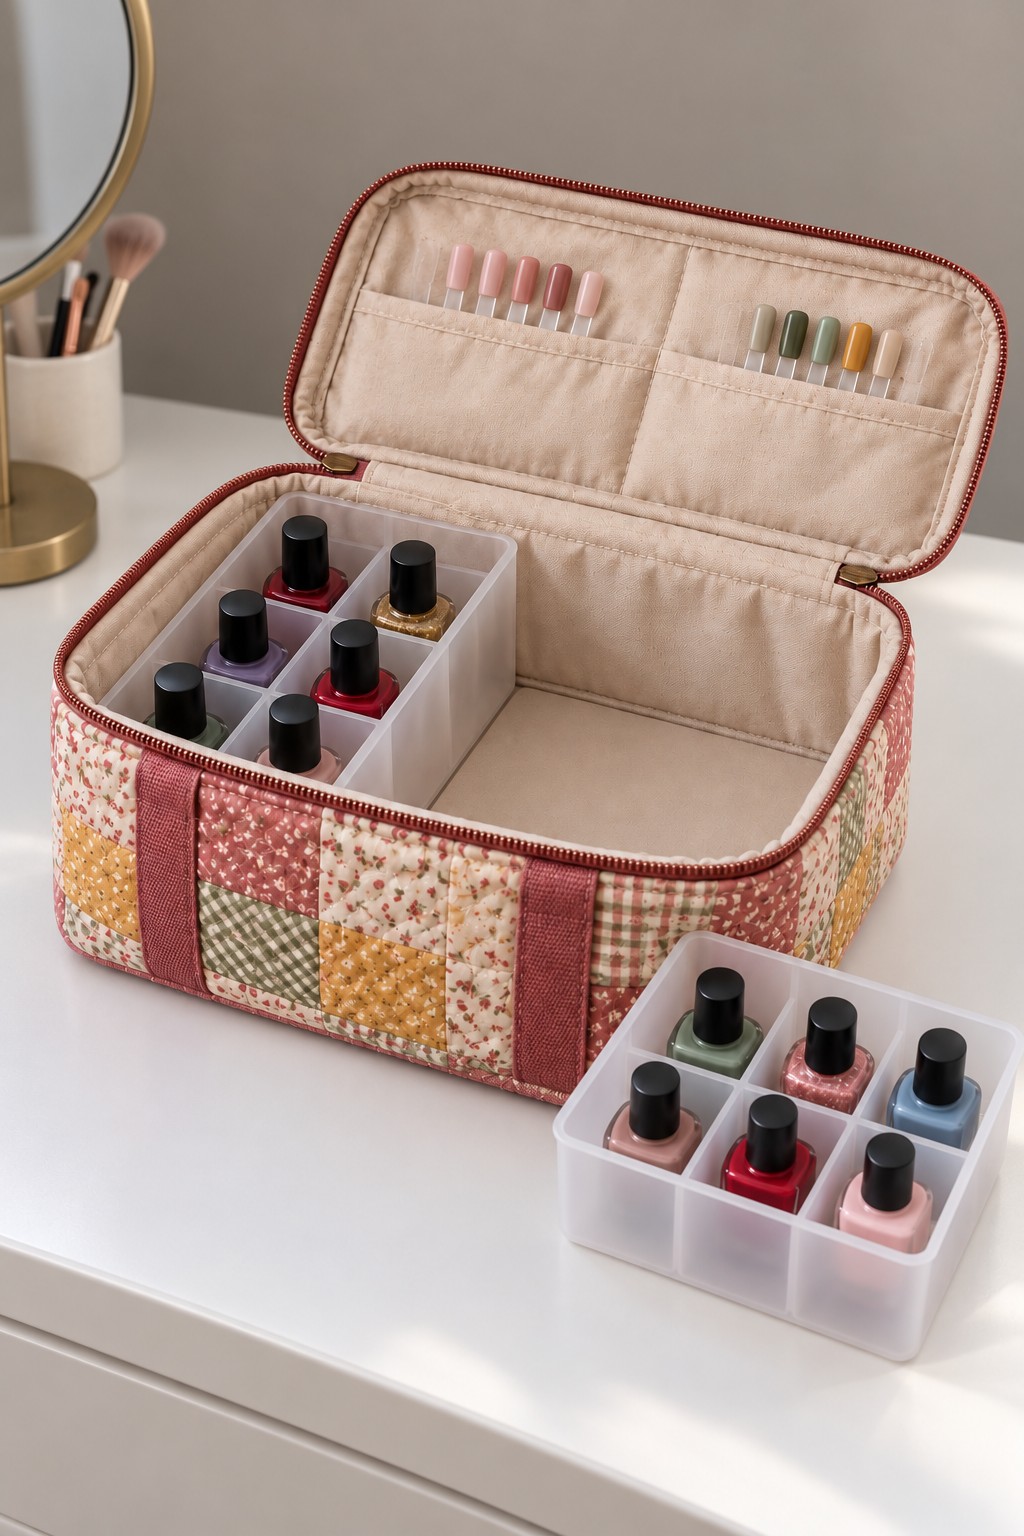
A structured cosmetic case can bring your collection together without a woodworking project. Choose one with a firm base and fit removable compartment trays inside. Use shallow plastic organizers that already match your bottle sizes, or make washable sleeves around a rigid removable insert. Keep fabric seams and padding from narrowing the cells too much.
Sew narrow pockets into a separate lid lining for swatch sticks, then attach the lining without obstructing the zipper. The pockets should hold light swatches, while bottles stay below. Check that the closed lid does not press against caps. A home storage insert is not automatically protective enough for travel, so add suitable retention and cushioning if the case will be carried, and inspect its handle and closure first.
12. A Green Box with Soft Sleeves Inside a Wooden Grid
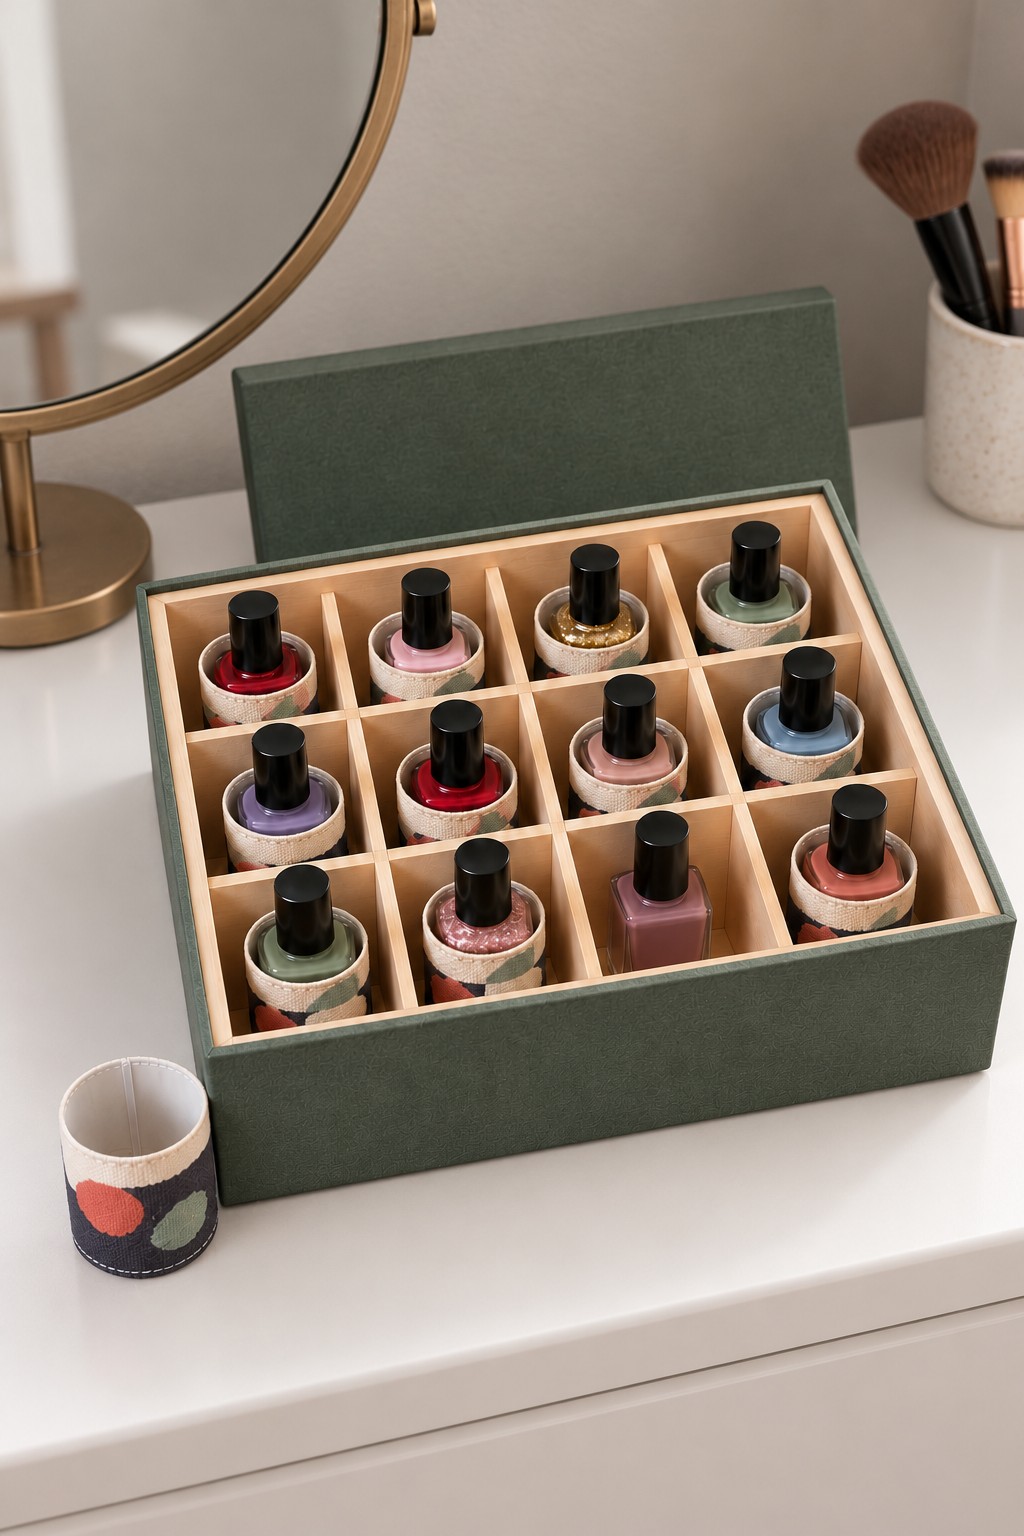
A simple green box gains a more tailored interior with a wooden grid and individual fabric sleeves. Fit the grid first, then make short sleeves from washable fabric with lightly padded sides. Keep each sleeve base flat and thin so the bottles remain upright. Test a finished sleeve in a compartment before sewing the full set, as padding quickly uses up the available width.
A small contrasting fabric tab makes each sleeve easier to remove for cleaning. Keep the box lid detachable or hinged according to its original construction, and confirm that it closes without compressing the caps. Use a washable removable liner beneath the grid if desired. Fabric softens contact between bottles and dividers, but it should be replaced or cleaned promptly if polish leaks onto it.
13. A Peacock Organizer with a Fan of Color Swatches
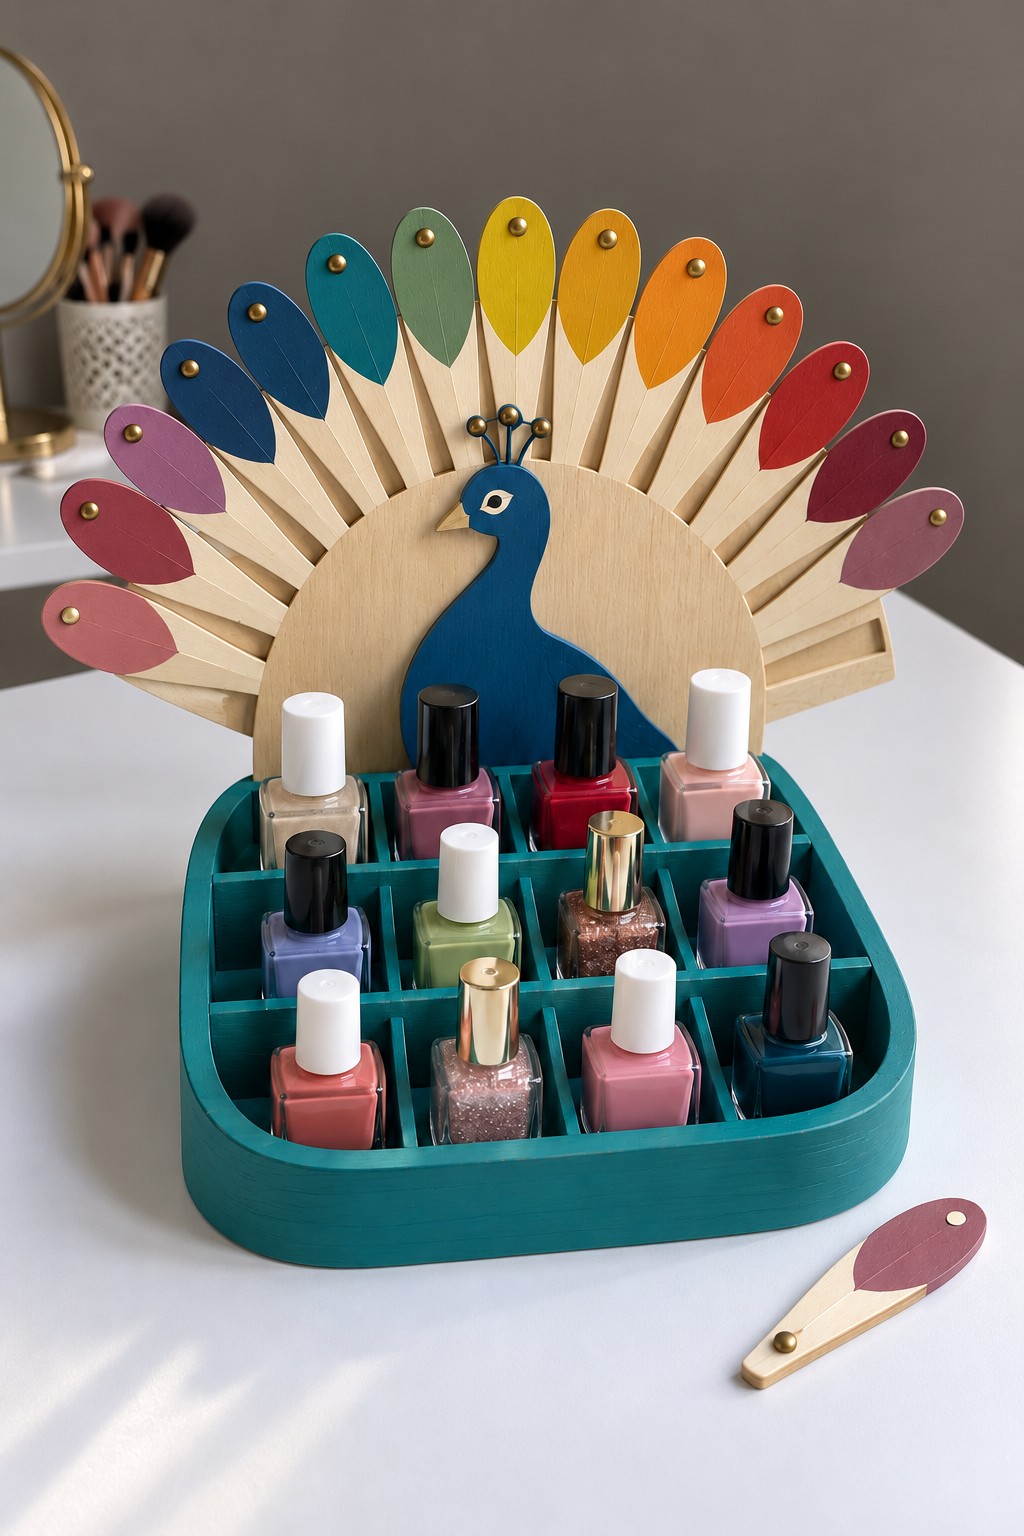
Make the color index part of the silhouette with a peacock backing and a fan of wooden swatch paddles. Start with a rounded wooden tray and fit a small compartment grid. Attach a plywood peacock shape to a rear support that is firmly joined to the tray, then paint the body teal. The fan can use smooth wooden paddles resting in individual slots behind the bird.
Make those paddles removable so you can compare shades away from the organizer. Label their backs to match the bottle compartments, and let painted samples dry fully before returning them. Keep the rear fan low and light enough that it does not tip the base. The decorative bird should frame the bottles without blocking your grip on the rear row.
14. An Octopus Tray with Eight Bottle Stations
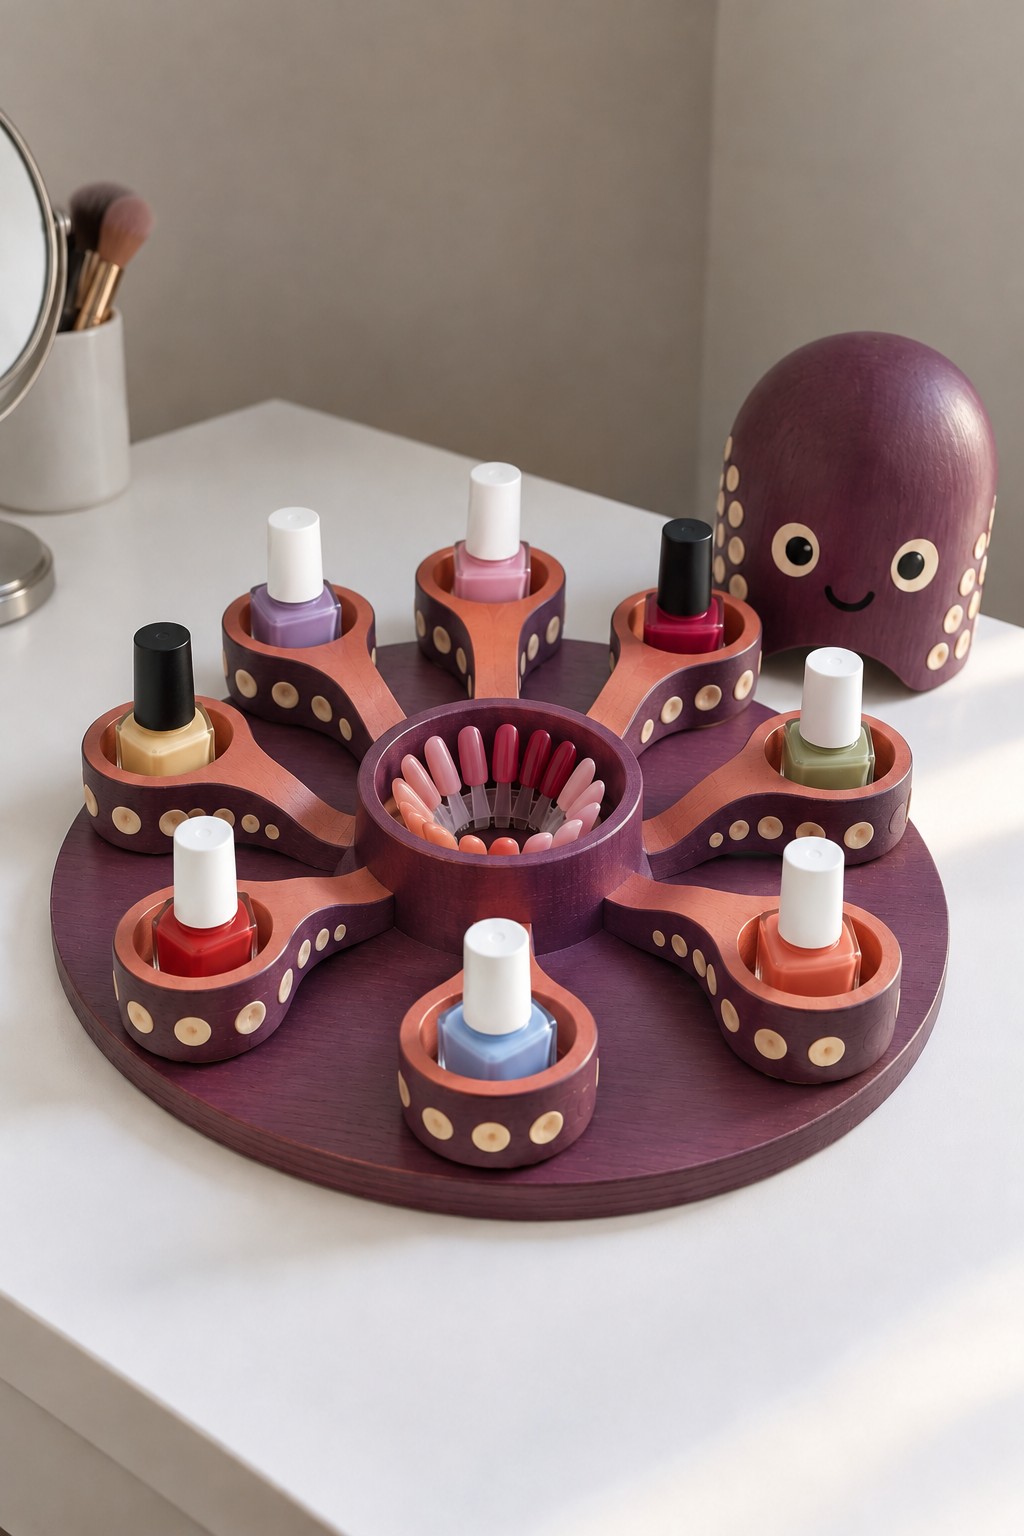
An octopus layout gives a small selection of shades distinct stations around a central swatch holder. Use a broad plywood base, eight short wooden cups, and curved arm shapes cut from craft plywood. Attach the cups to the flat base with wood glue on bare contact surfaces, then use the curved shapes as decoration around them. Build the head from a lightweight wooden or papier mache form fixed to a rear support.
Paint the structure plum and terracotta, with small cream dots for the suckers. A circular insert in the center can hold lightweight swatch sticks. Keep the cup floors level and the rims low enough to expose the bottle bodies. The head and arms are decorative; the continuous flat base should carry the weight of the glass bottles.
15. A Koi Pond Tray with Removable Lily Pads
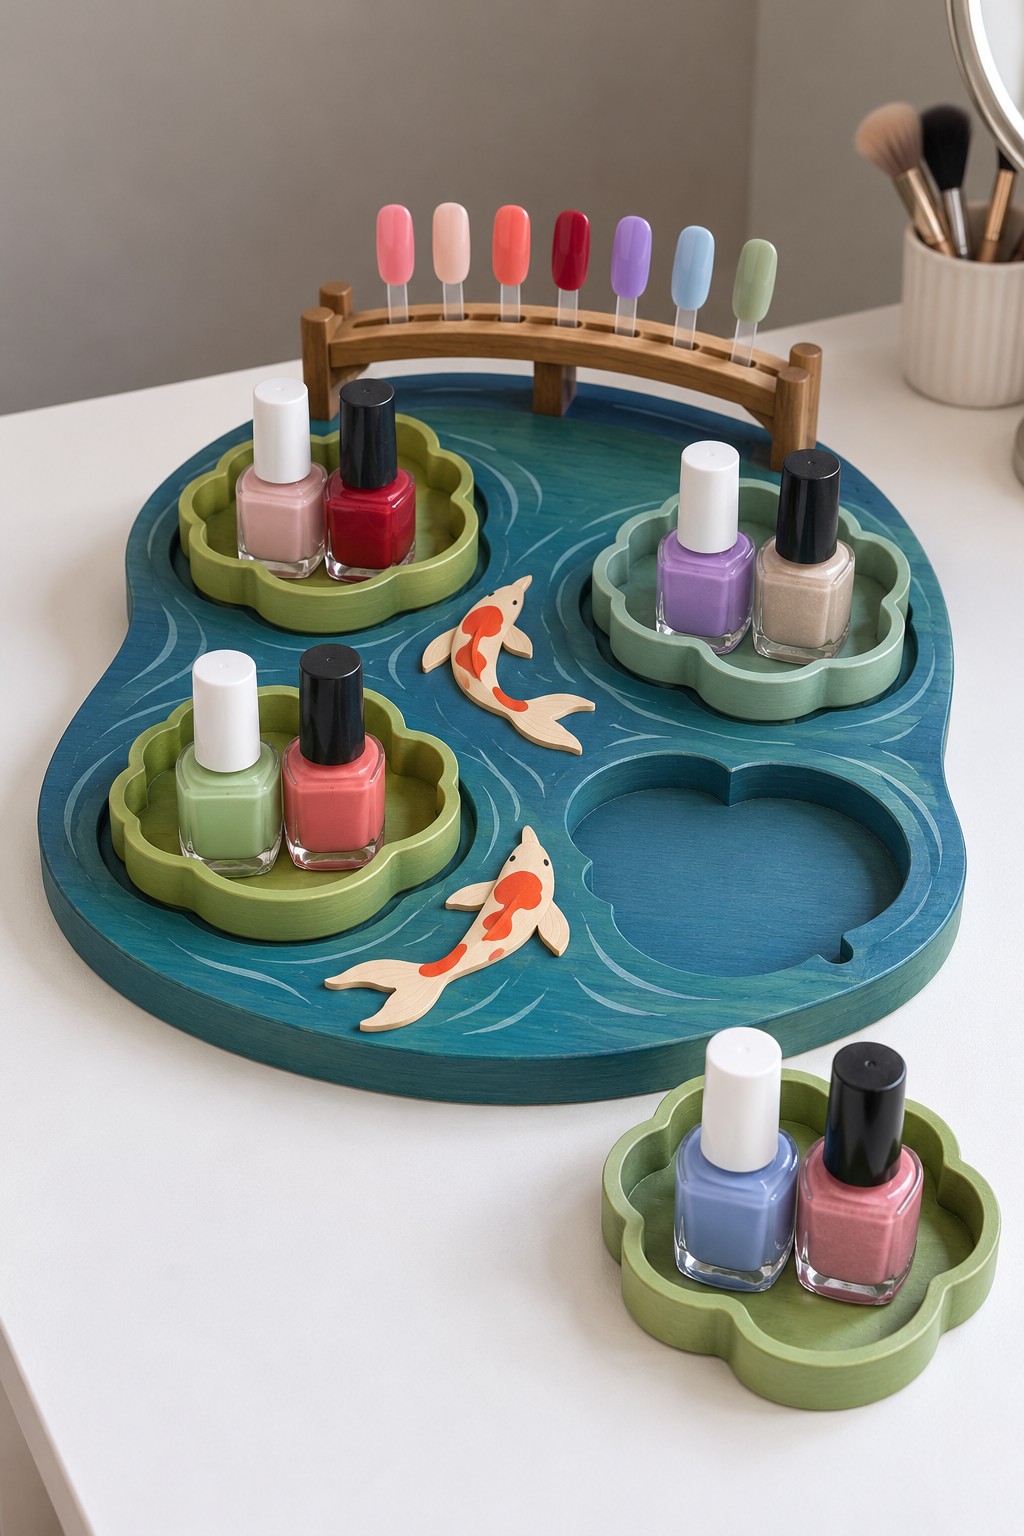
Create a pond scene with a painted wooden base and separate lily pad trays. Cut the outer base from plywood, then add a second layer with shallow locating openings for the pads. Each lily pad needs a flat bottom and a raised rim, which you can build from stacked plywood shapes. Sand the scalloped edges before painting them in several greens.
Paint the koi and water lines with acrylic craft paint, and use a compatible clear coating after the artwork dries. The pond is a painted surface, not a water filled container. A small wooden bridge at the back can hold swatches in predrilled slots. Keep its supports outside the paths used to lift the pads, and make each removable tray large enough for its bottles to stand without leaning.
16. Color Family Blocks That Lift Out of a Shallow Tray
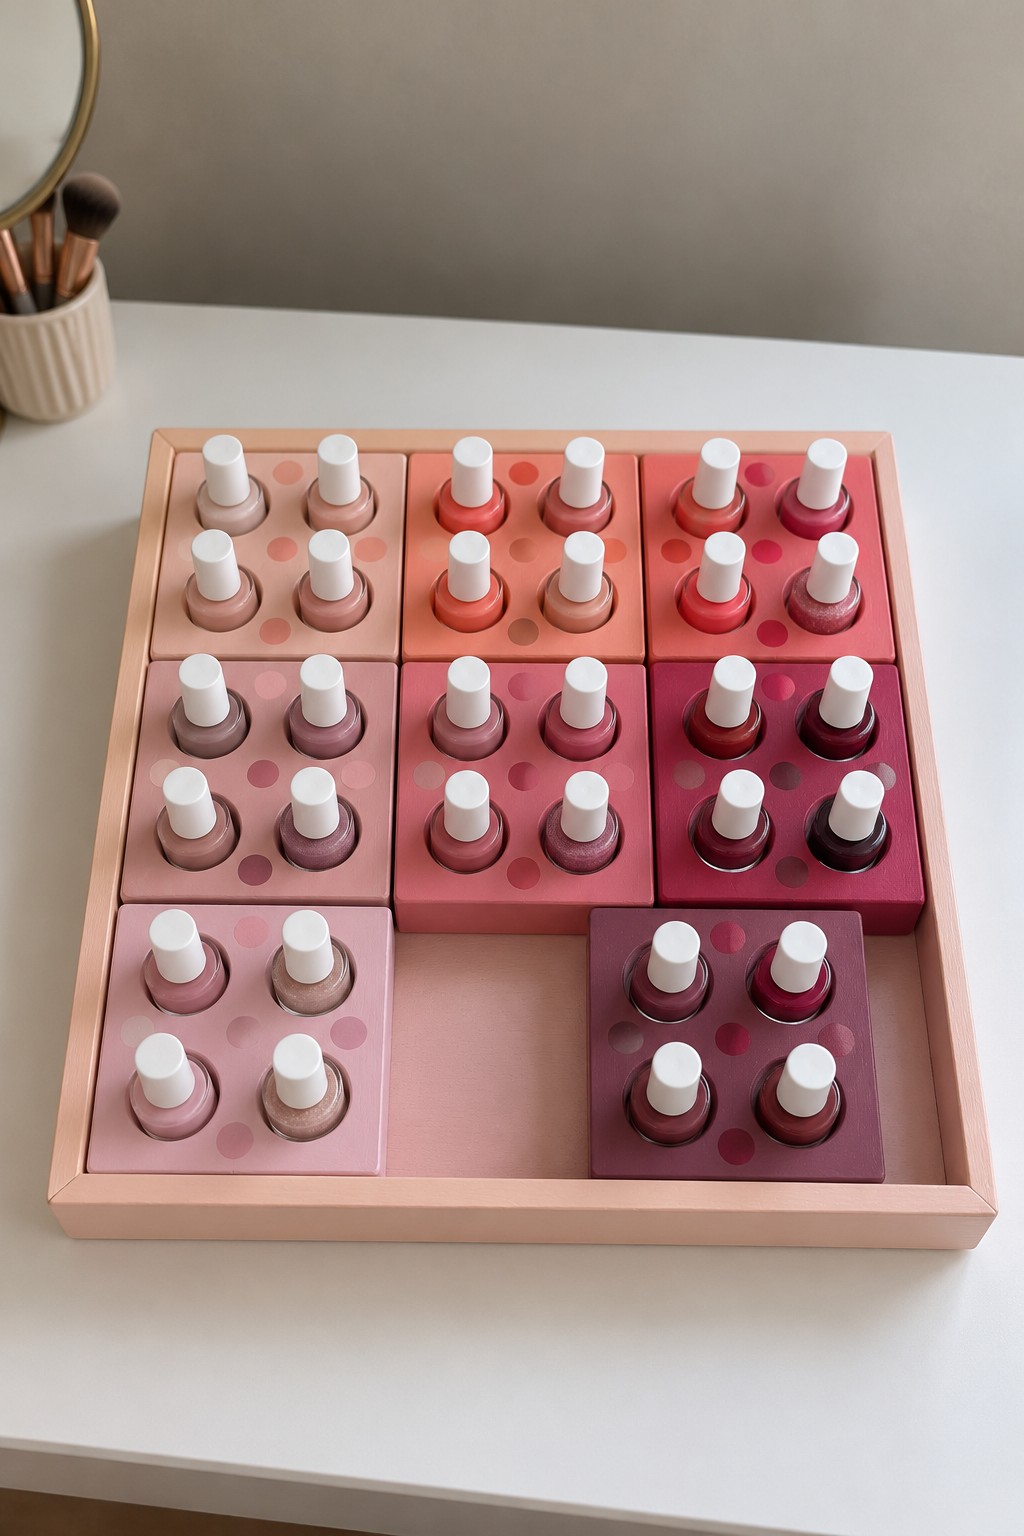
Organize a larger selection into small color families with removable blocks inside a shallow tray. Use solid wood or laminated plywood blocks thick enough for shallow bottle recesses while retaining a strong base. Mark the bottle centers using a template, then clamp each block and drill with a depth stop. Sand every recess before testing it with the intended bottles.
Paint the blocks in related blush, coral, and berry tones. Leave a finger gap or one open position in the outer tray so modules are easier to remove. Each block can hold a small group for one manicure, while the rest remain organized. Check the full bottle base shape before choosing the hole size, especially where square glass bottles need more room than their round caps suggest.
17. Scalloped Steps with a Detachable Front Tray
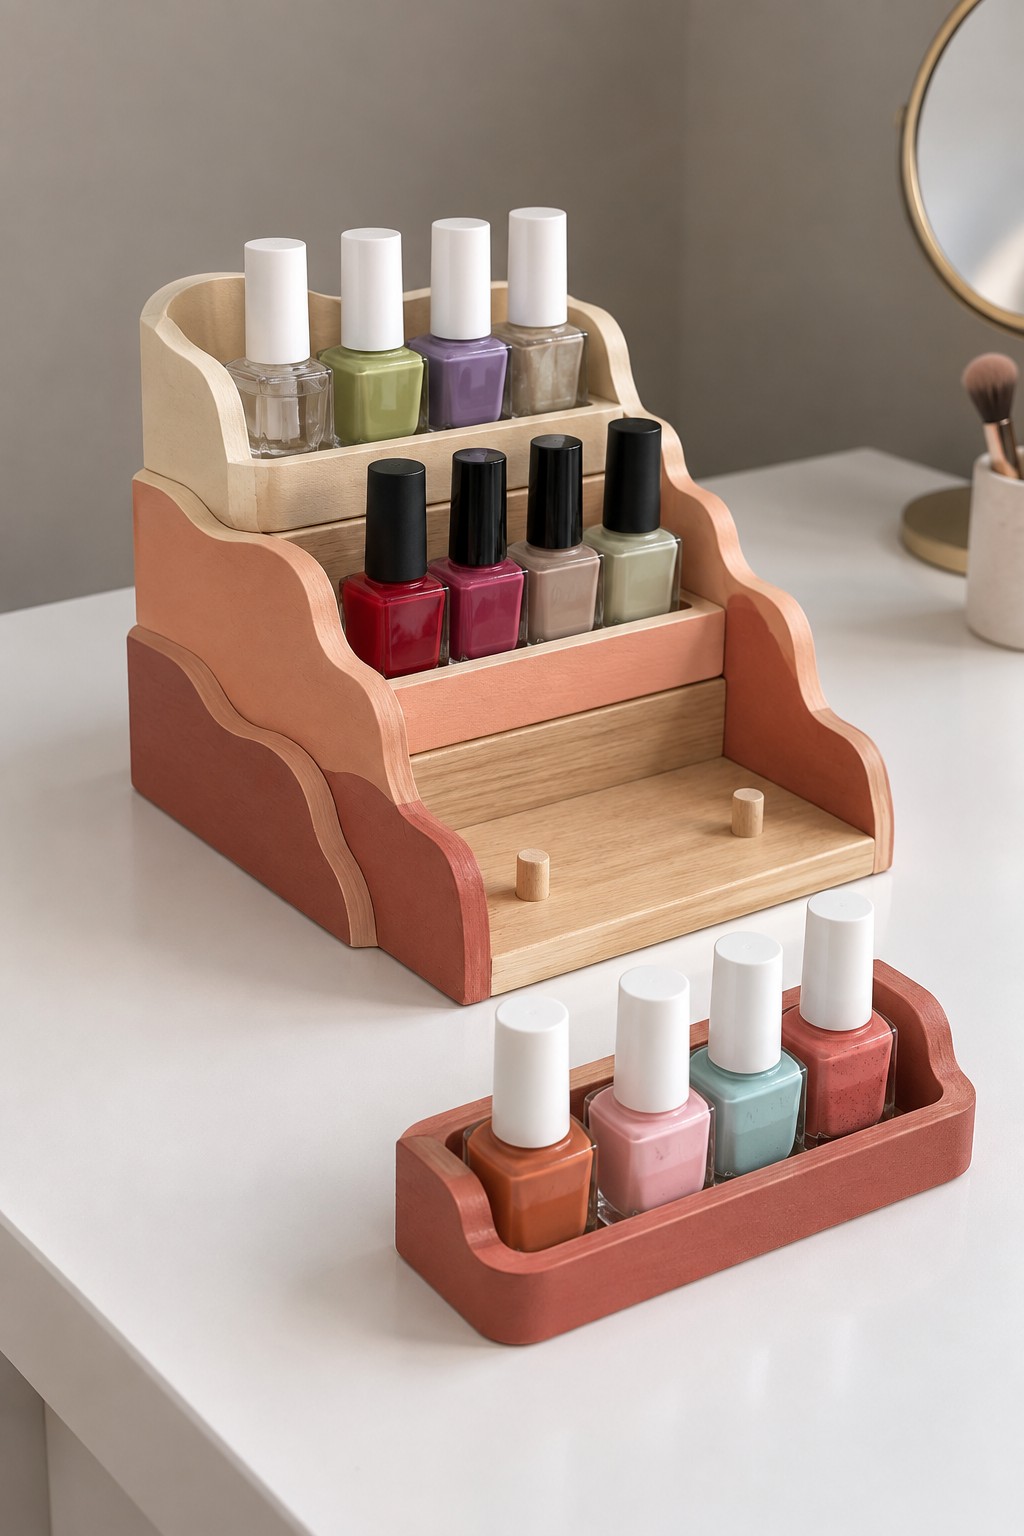
A stepped stand raises the back row so shorter bottles do not disappear behind taller ones. Build the side profiles from plywood and connect them with horizontal platforms supported on cleats. Add low retaining edges, then paint the sides in cream and terracotta while leaving selected wood surfaces natural. Choose the rise of each step around the bottle heights you own.
Make the lowest bottle tray separately so it can be lifted away. Small locating pegs in the platform can engage matching holes beneath the tray, provided they are short enough for easy removal and cannot penetrate its floor. Drill the matching positions with a paper template before finishing. Allow space behind each row for your fingers, and lift the detachable tray from its sides rather than pulling on bottle caps.
18. A Shell Shaped Box with a Pearl Finish
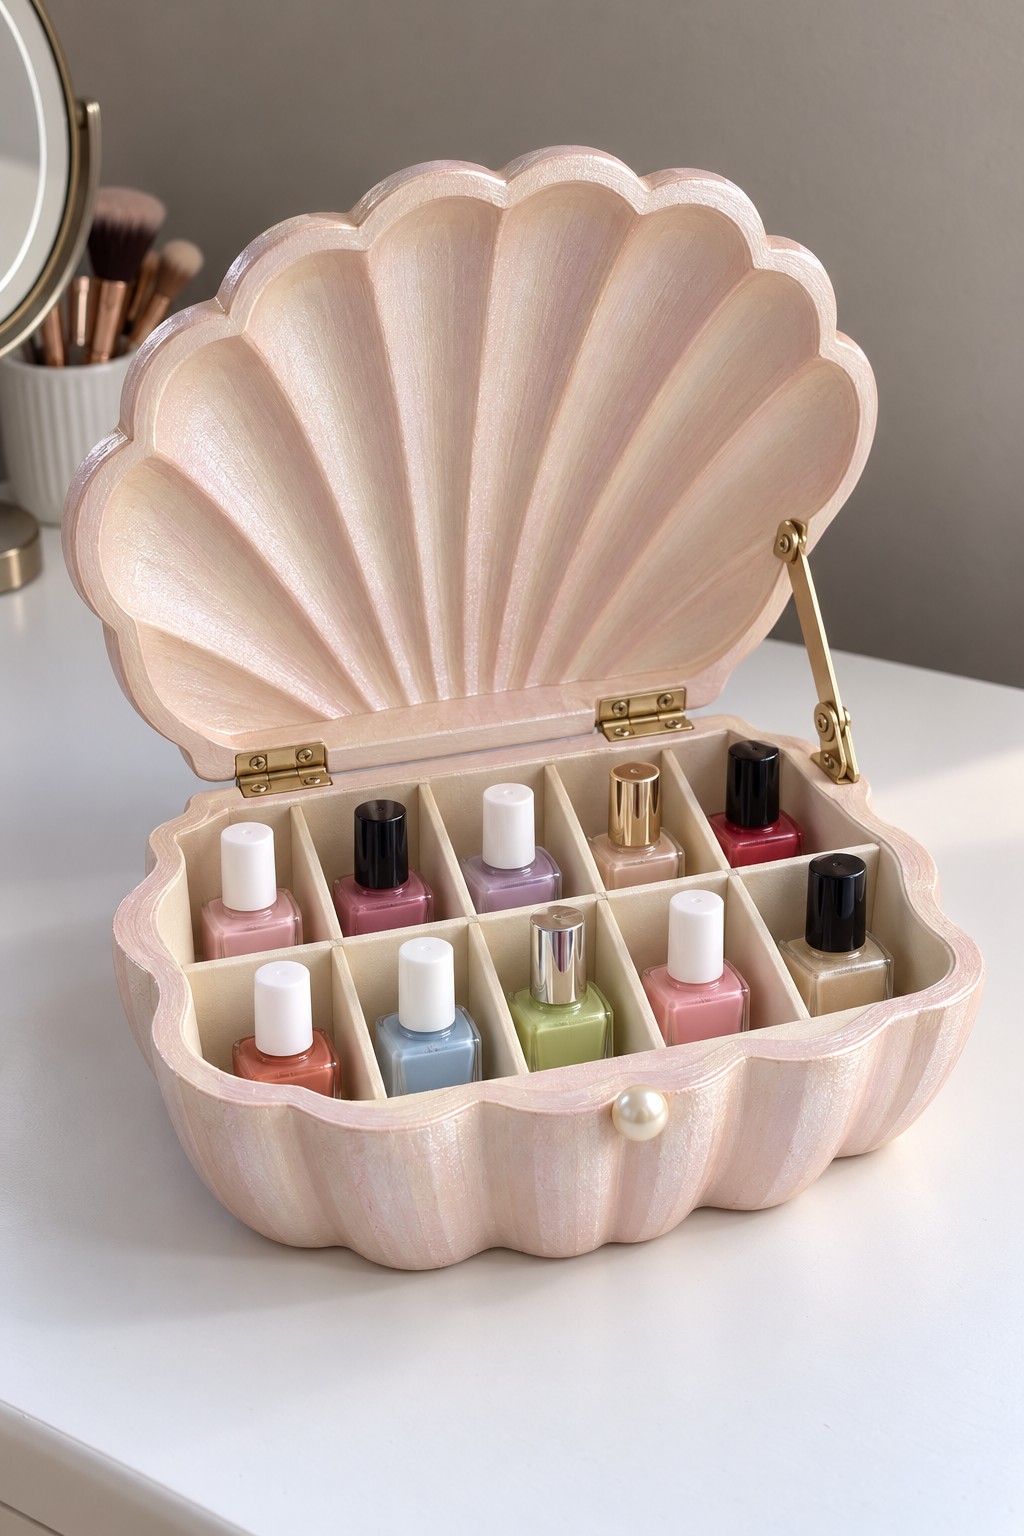
A shell shaped box makes a compact collection feel like part of the dressing table decor. Adapt a sound wooden or molded storage box with working hinges, then cut a removable divider insert to fit its interior. Use a paper template to map the curved sides before cutting plywood, leaving enough clearance for the insert to lift out without scraping the finish.
For a wooden shell, pale blush acrylic paint with a compatible pearlescent topcoat can emphasize the raised ridges. A molded plastic shell needs a finish specifically compatible with that plastic. Retain or fit a proper lid stay and check that it holds the lid securely while you reach inside. Keep the tallest caps away from any lower parts of the shell when the lid closes.
19. A Jukebox Cabinet with a Separate Color Card
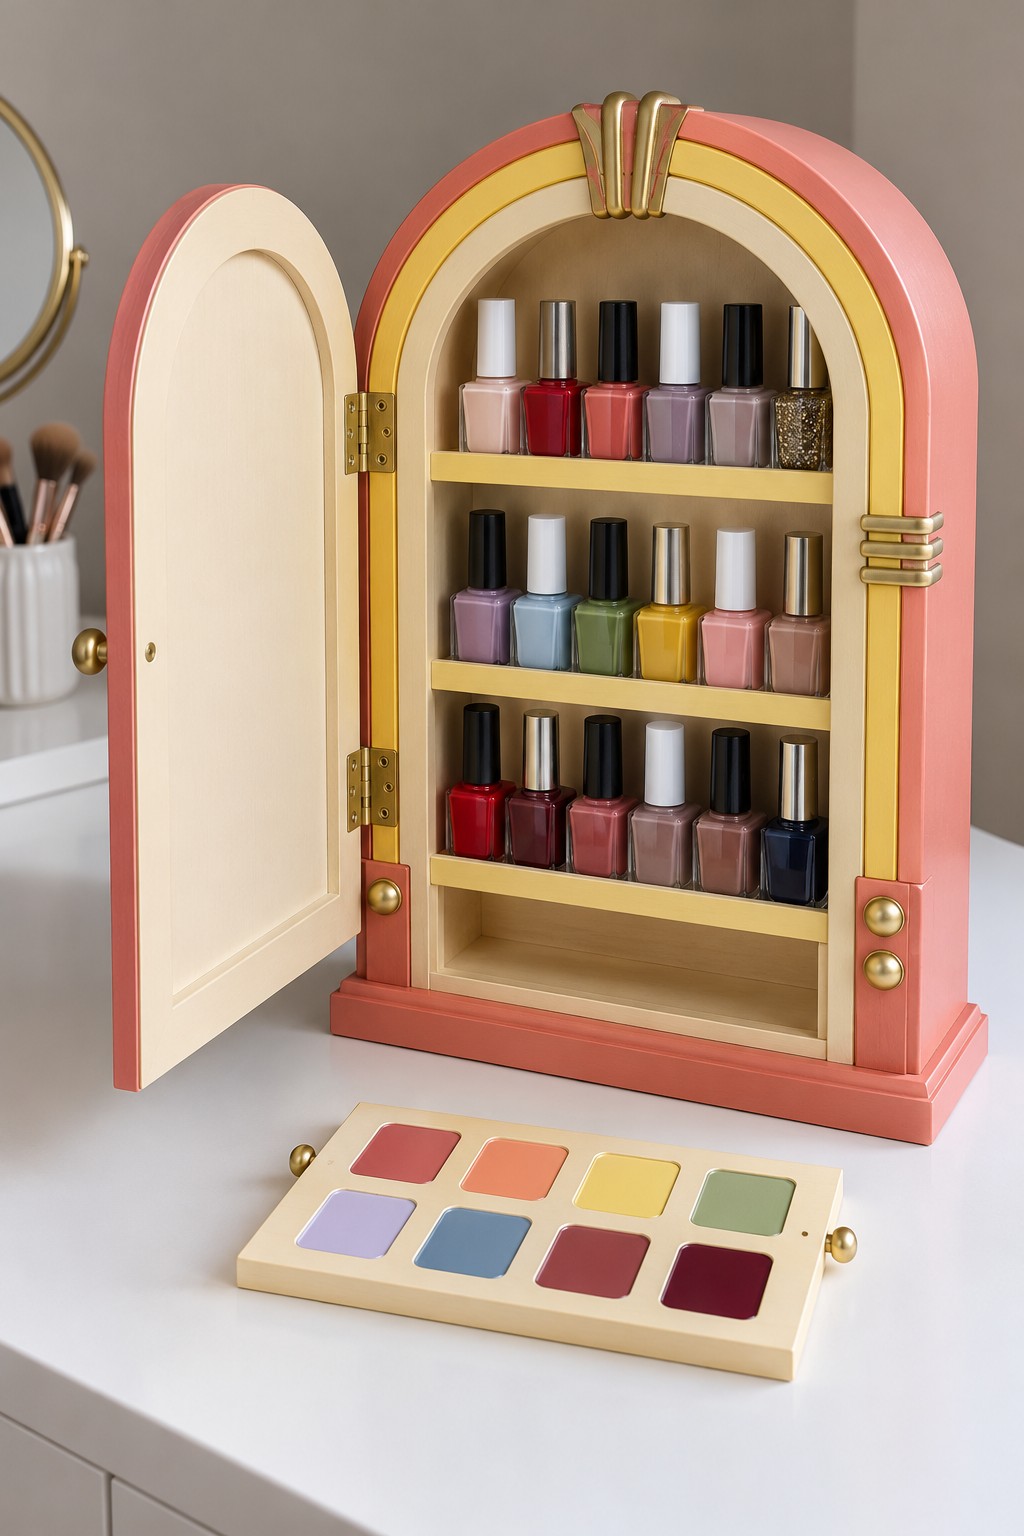
An arched cabinet brings a jukebox silhouette to three practical rows of polish. Start with a small arched wooden cabinet, or make a rectangular shelf carcass and add an arched decorative surround. Use plywood shelves supported at their ends, low front lips, and a hinged door that clears every bottle. Apply coral, butter yellow, and restrained gold details with acrylic paint.
The separate color card is useful for comparing shades without moving the entire collection. Fit painted sample tiles or coated swatches to a rigid board and label them to match the shelves. Keep the curved trim decorative rather than asking it to support the cabinet. If building the arch from scratch, plan the door thickness and hinge movement before cutting the curved pieces.
20. A Theater Cabinet with a Stage Curtain and Swatch Drawer
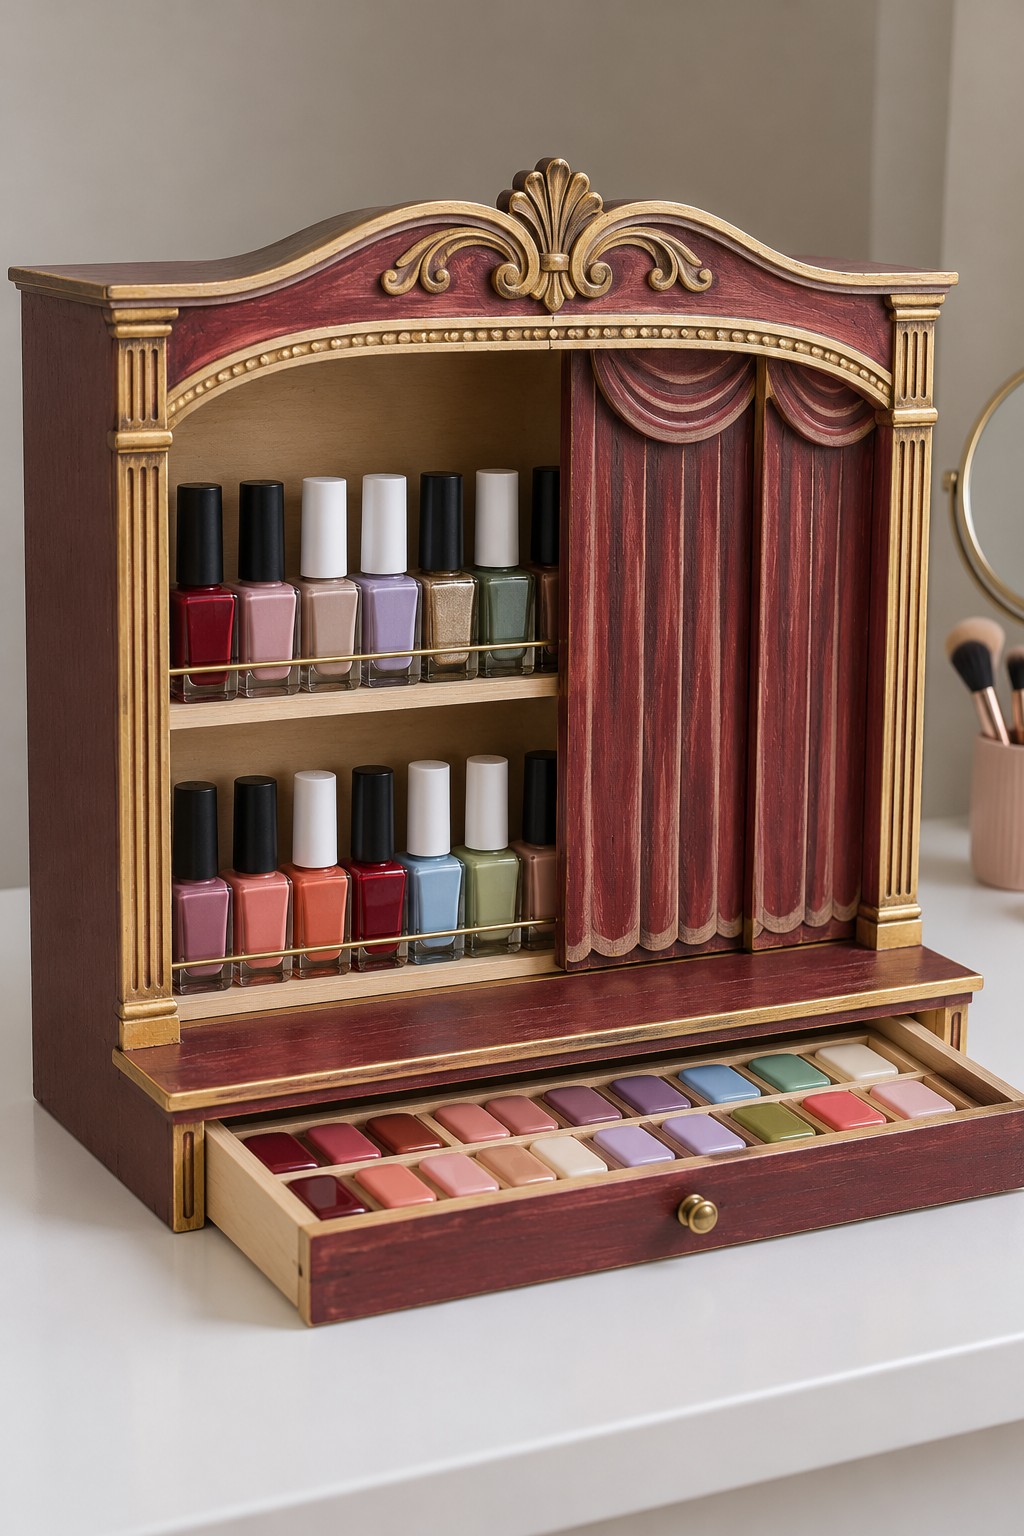
Turn a small wooden cabinet into a miniature theater by adding a decorative cornice, side columns, and a burgundy curtain. Build or adapt the storage shell first, using two supported shelves with retaining rails. Keep the ornate trim lightweight and attach it to the front frame. Gold acrylic details can pick out the raised decoration after the burgundy base coat has cured.
Hang the curtain from a slim rod or track mounted above the shelf opening. Its hem and folds must clear the bottles and drawer, with no loose fabric dragging across wet caps. Use the lower drawer for a flat swatch chart rather than loose bottles. Leave enough space at one side for the curtain to gather so opening it actually exposes the stored colors.
21. A Crown Tray with Jewel Colored Bottle Cups
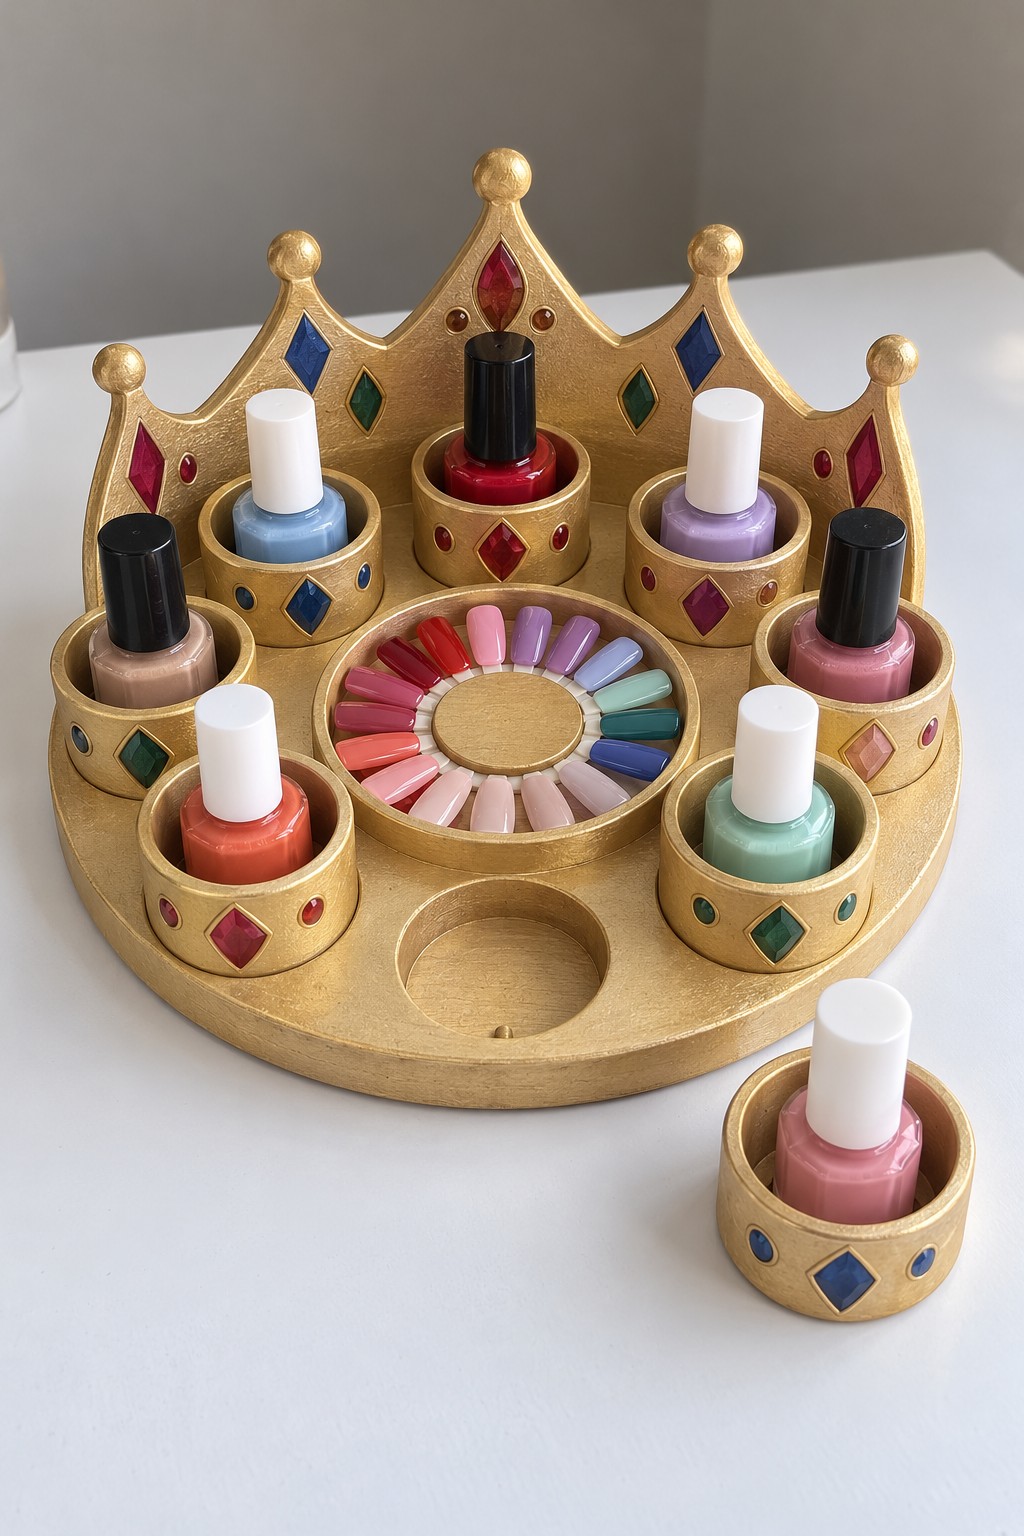
A crown shaped backing and small gold cups create a playful station for a favorite set of colors. Make the base and crown from plywood, then use short wooden cups with solid bottoms for the bottles. Add a locating layer to the base so each cup sits in its own shallow recess. The cups should lift out independently, as the front module does here.
Paint the pieces gold and add flat decorative gems to their outer faces with an adhesive suitable for both surfaces. Keep gems away from gripping edges and bottle openings. Fit a lightweight circular swatch display in the center and leave it clear of the surrounding cups. The crown must be firmly attached to the base, with rounded points that will not snag a sleeve as you reach across.
22. A Geometric Drawer Tower for a Narrow Surface
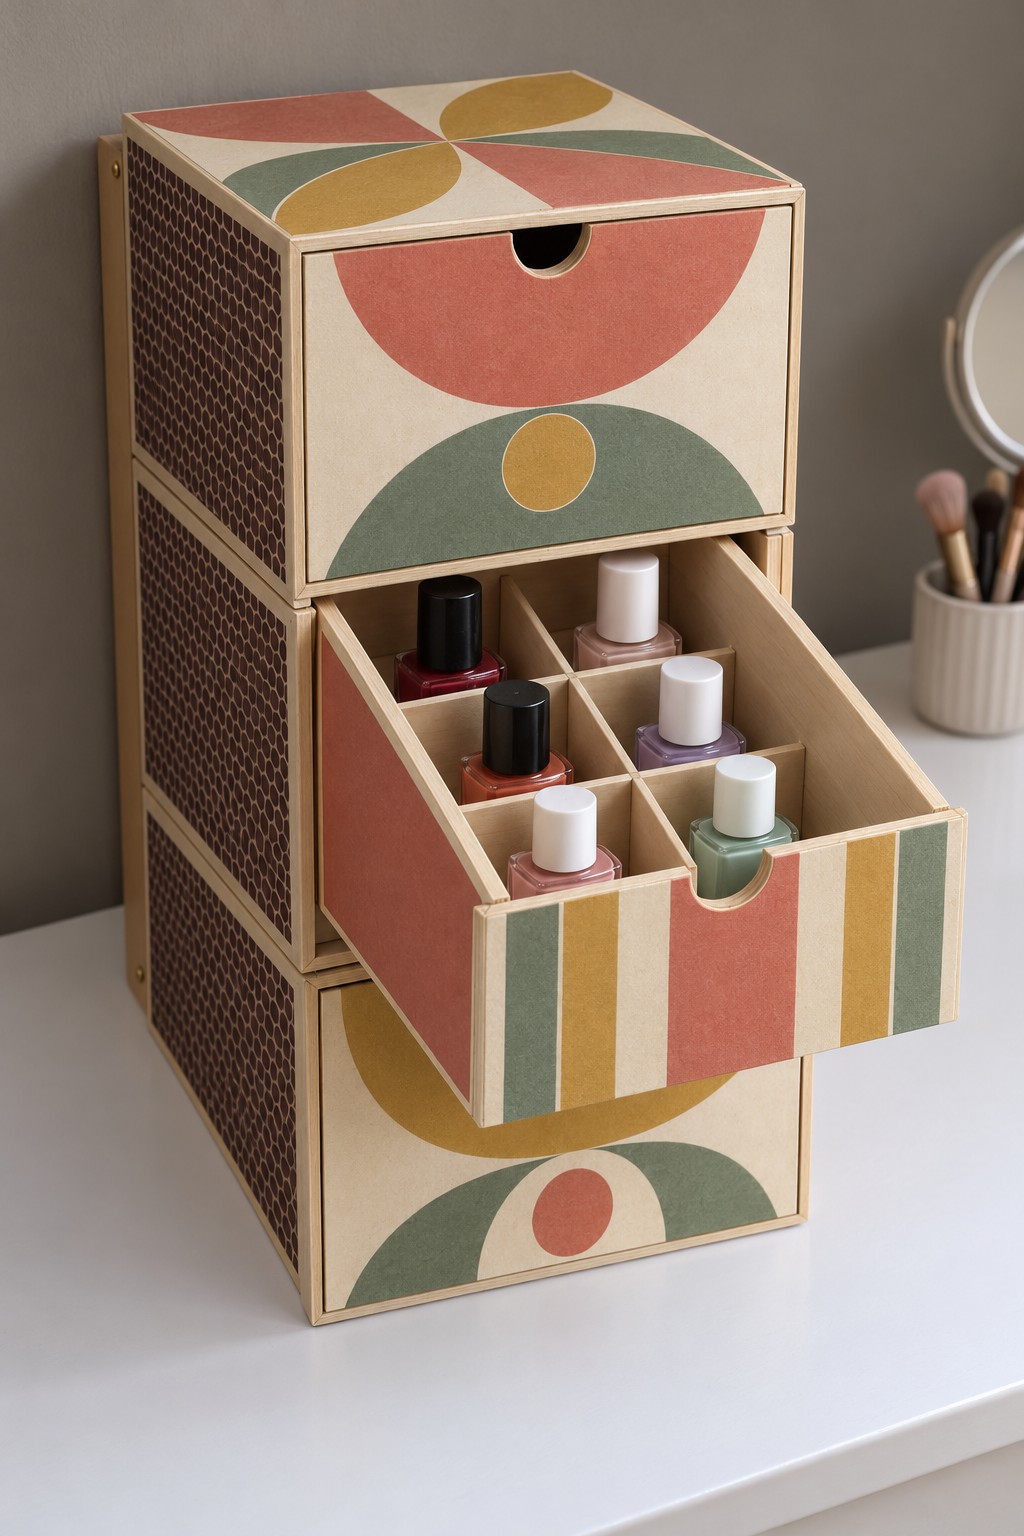
A narrow drawer tower suits a dressing table where width is limited. Adapt a sound wooden drawer unit and add removable grids to the drawers that are deep enough for upright bottles. Test the tallest bottle with each drawer completely closed before making the inserts. Thin dividers preserve more usable space than heavily padded compartments.
Use masking tape and paper templates to paint semicircles, stripes, and dots in coral, mustard, and sage. Keep paint off the drawer runners and edges that already fit closely. A tall unit can become unstable when a loaded drawer extends, so fit an appropriate anti tip restraint and open one drawer at a time. Arrange frequently used colors in the most comfortable drawer rather than overloading the top.
23. A Vertical Stand with Three Supported Color Platforms
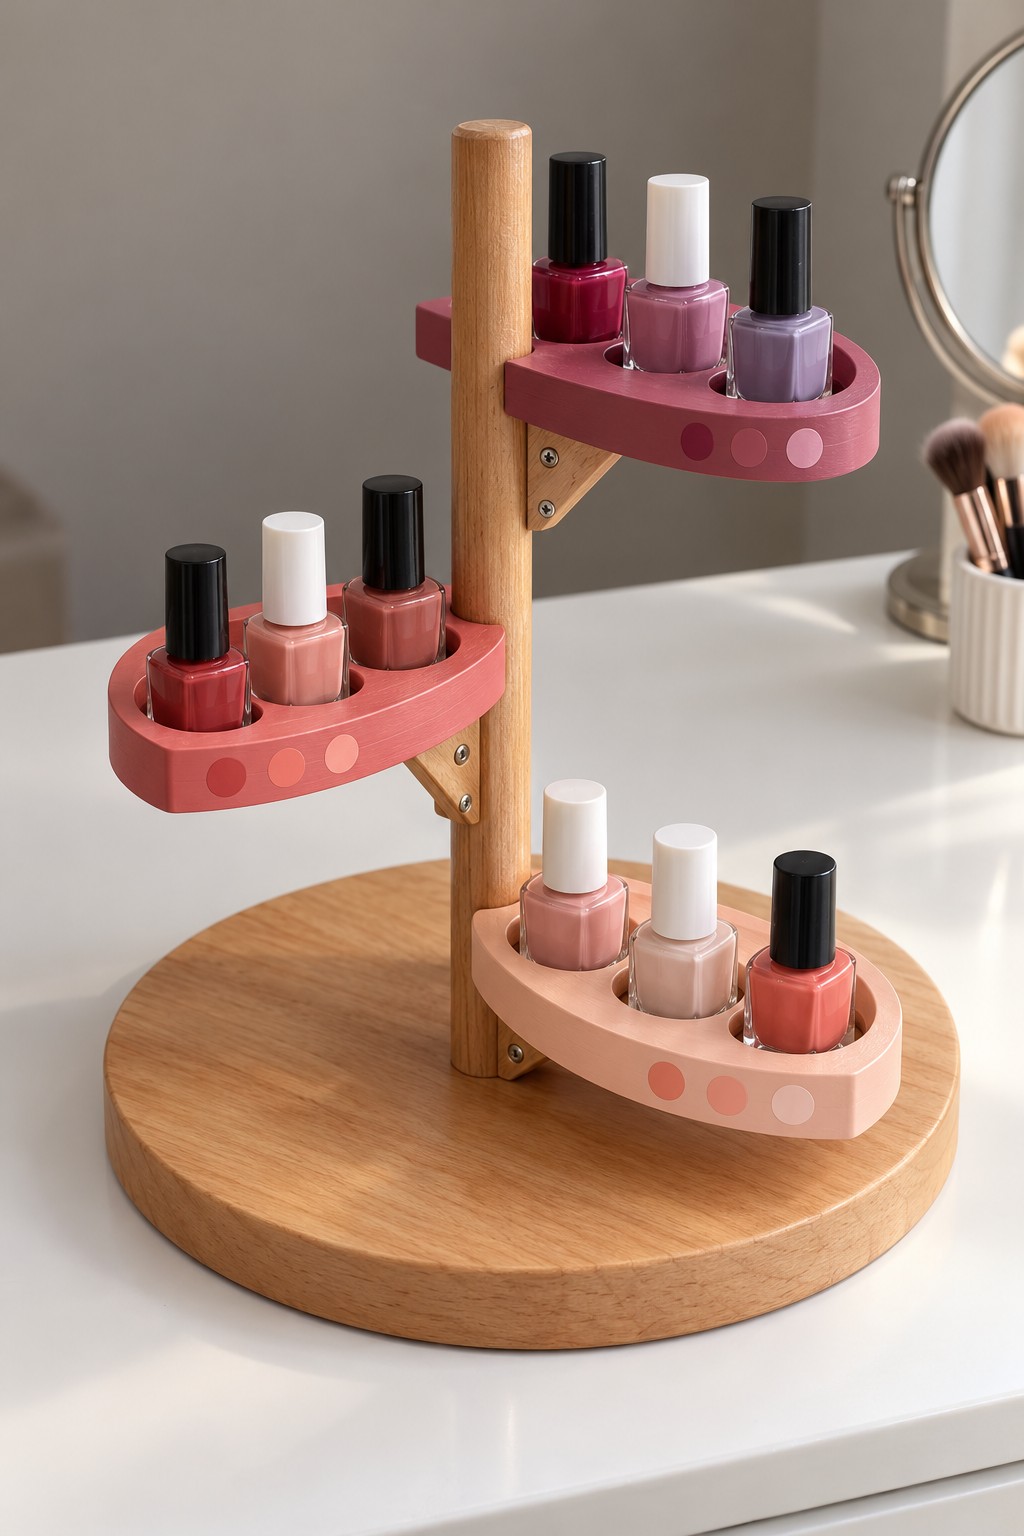
Three small platforms arranged around a central post provide a compact display for selected shades. Use a broad, heavy wooden base, a hardwood post, and plywood platforms with rounded fronts. Secure the post mechanically to the base, then support each platform on a small triangular wooden bracket fixed to the post. The brackets matter because the shelves project away from the center.
Add a front lip and paint each platform a different pink, with small color dots along the edge. Predrill fasteners and choose their lengths so no points emerge into the bottle spaces. These are fixed supported shelves unless you deliberately build a suitable pivot mechanism; their staggered positions alone do not make them swivel. Check stability with an uneven load before placing the stand in regular use.
24. A Reclaimed Crate with Removable Tin Can Cups
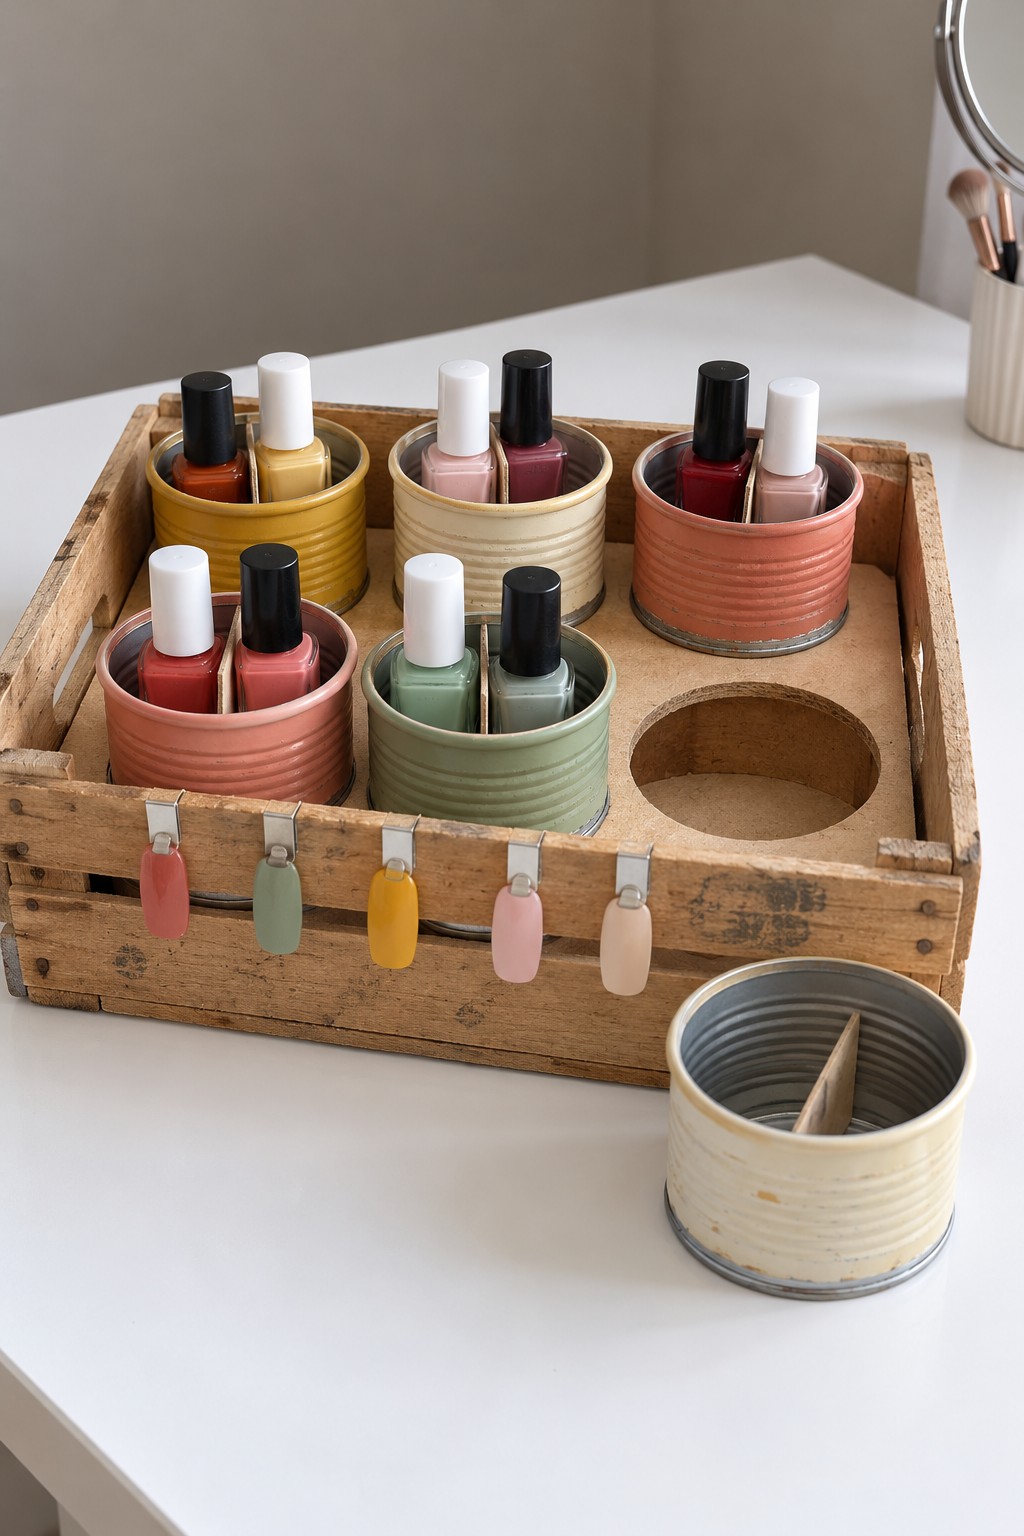
Give a clean wooden crate a fitted insert that holds a set of short tin cans upright. Select cans with smooth, intact rims and no rust, then wash and dry them thoroughly. Measure each can below its rim before cutting the holes in a plywood insert. Support the insert on cleats inside the crate and keep a solid crate floor beneath the cups.
Prime the can exteriors with a product suitable for metal, then apply compatible paint in muted coral, cream, mustard, and green. Leave the cups removable for cleaning and avoid cans with exposed sharp edges. Small clips on the crate front can hold matching swatches. For other ways to turn existing containers into organized storage, browse these wine rack repurposing ideas and borrow the principle of fitting separate containers into a supporting frame.
25. Tinted Bottle Base Cups in a Wooden Tray
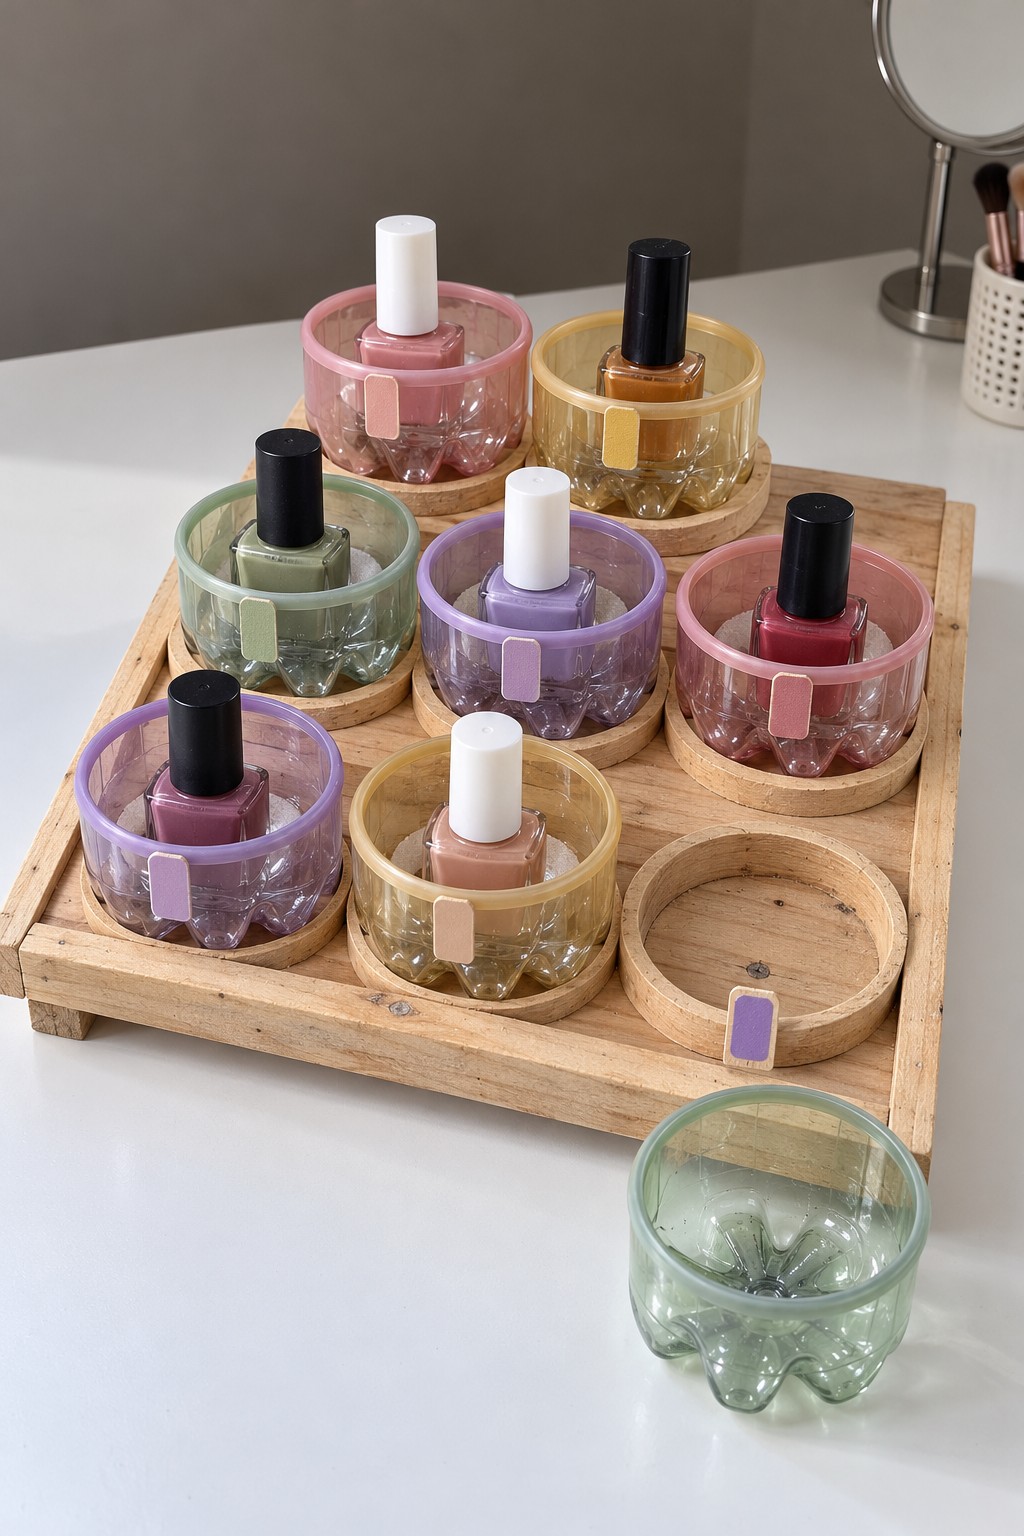
The petal shaped feet of clear plastic drink bottles can become small individual bottle cups. Use clean, intact bottles of similar diameter and mark a consistent cutting height. Have an adult cut the plastic carefully, then trim every rim smooth and fit a secure protective edging suitable for the plastic. Reject any cup that remains sharp, cracked, or too flexible to handle comfortably.
Set the cups into a wooden tray with shallow circular locating recesses. Their own molded bases should rest securely on the solid tray floor. Add small exterior color tabs, or use a compatible decorative coating after testing it on spare plastic. Keep the cups removable and away from nail polish remover. Ordinary wood glue is unsuitable for fastening smooth plastic, so the fitted wooden recesses provide the useful restraint here.
26. A Shutter Cabinet with Three Protected Rows
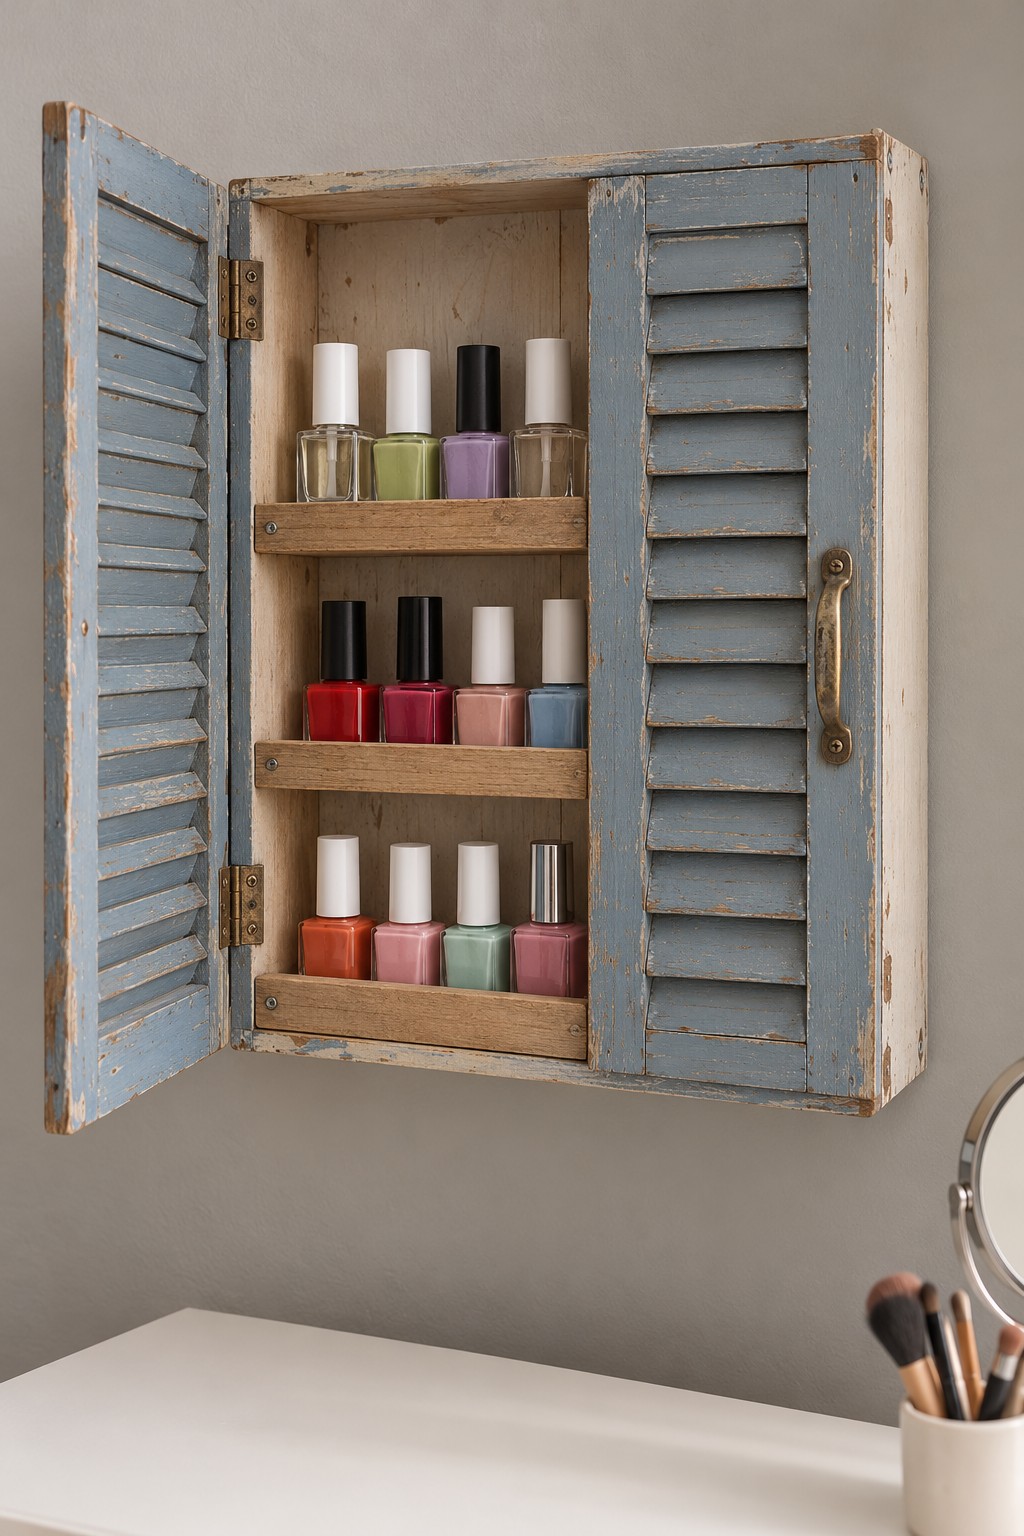
Small shutter doors can frame a shallow cabinet that closes over three rows of polish. Build a sound wooden box to match the shutters, add supported shelves and front lips, and attach the doors with hinges fixed into solid timber. Keep the bottle depth within the cabinet so the shutters close freely. A removable bottom liner makes dust and small spills easier to manage.
To recreate the faded blue finish, use a known modern paint system and lightly distress selected edges after drying. Do not sand an unidentified old coating without checking whether it needs special handling. Install the cabinet with suitable fixings through its structural mounting points, not through the shutter slats. The reclaimed look should come from the finish while the cabinet joints and mounting remain sound.
27. A Handled Wooden Caddy with a Removable Grid
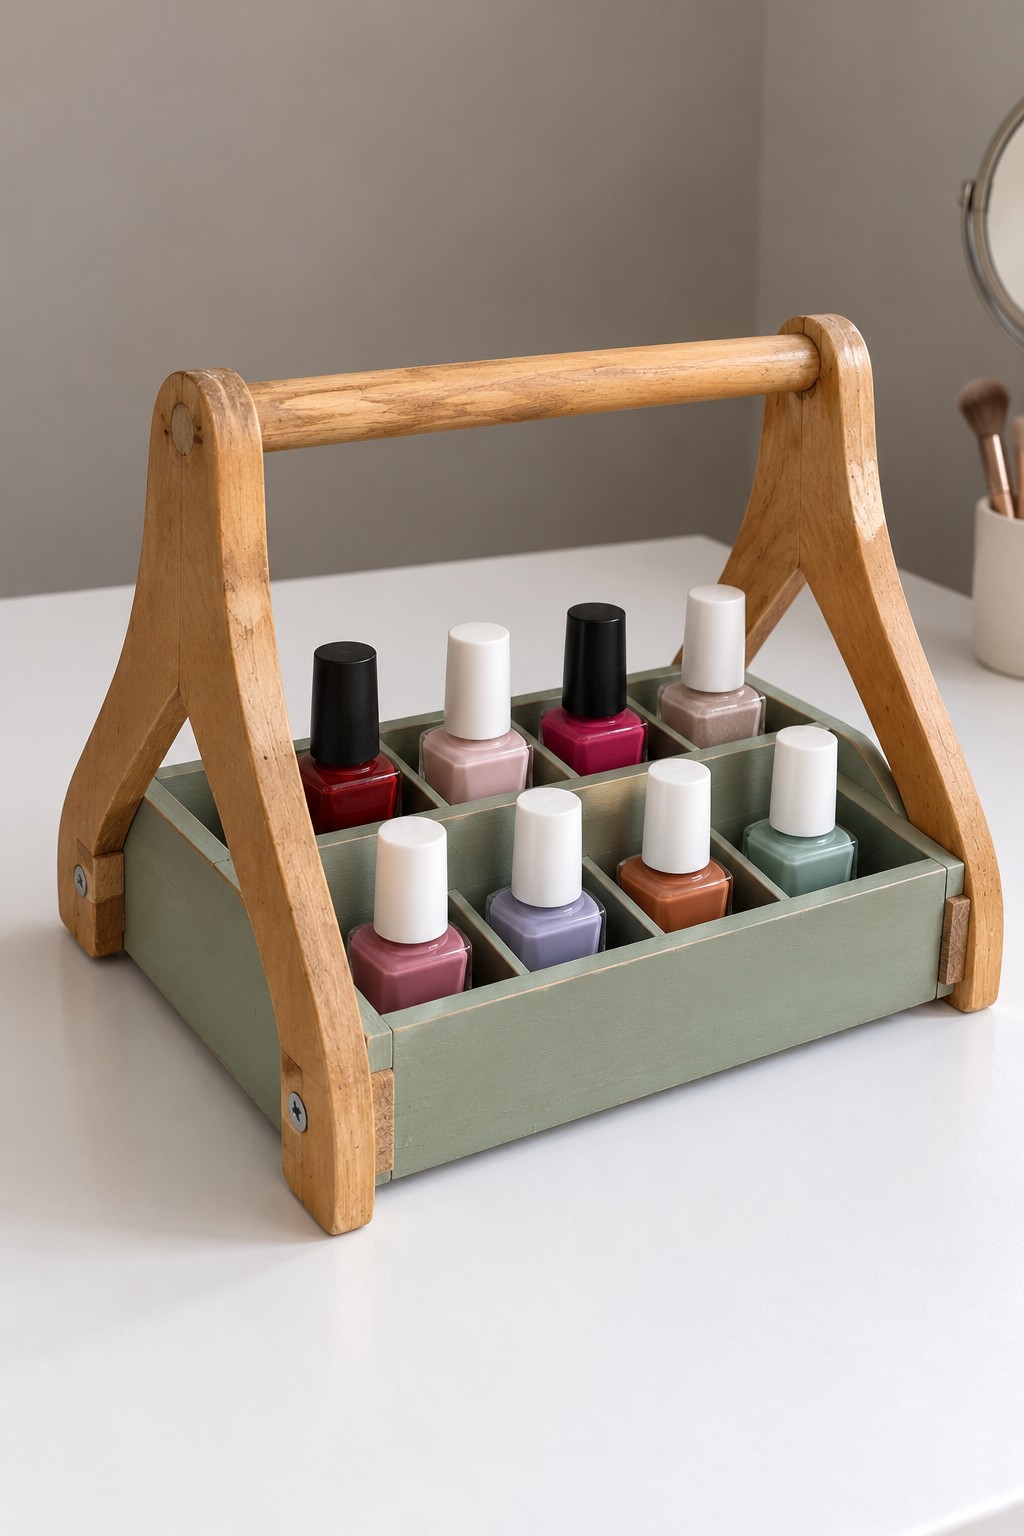
A handled caddy is useful when your polish lives on a shelf but your manicure happens at a table. Make a rectangular wooden tray with a securely attached base, then fit a removable plywood grid. Add shaped hardwood side supports and a dowel handle with mechanically secured ends. The handle needs a continuous connection through the sides to the tray, not just a glue joint against painted surfaces.
Paint the tray sage green and keep the handle natural for contrast. Leave enough clearance beneath the handle to lift the tallest bottle without tilting it into a neighboring cap. Check all connections with a modest trial load before regular use, and support the base whenever you are unsure of a reclaimed caddy's strength. The removable grid makes cleaning much easier than permanently enclosed cells.
28. A Record Inspired Stand with Two Guarded Tiers
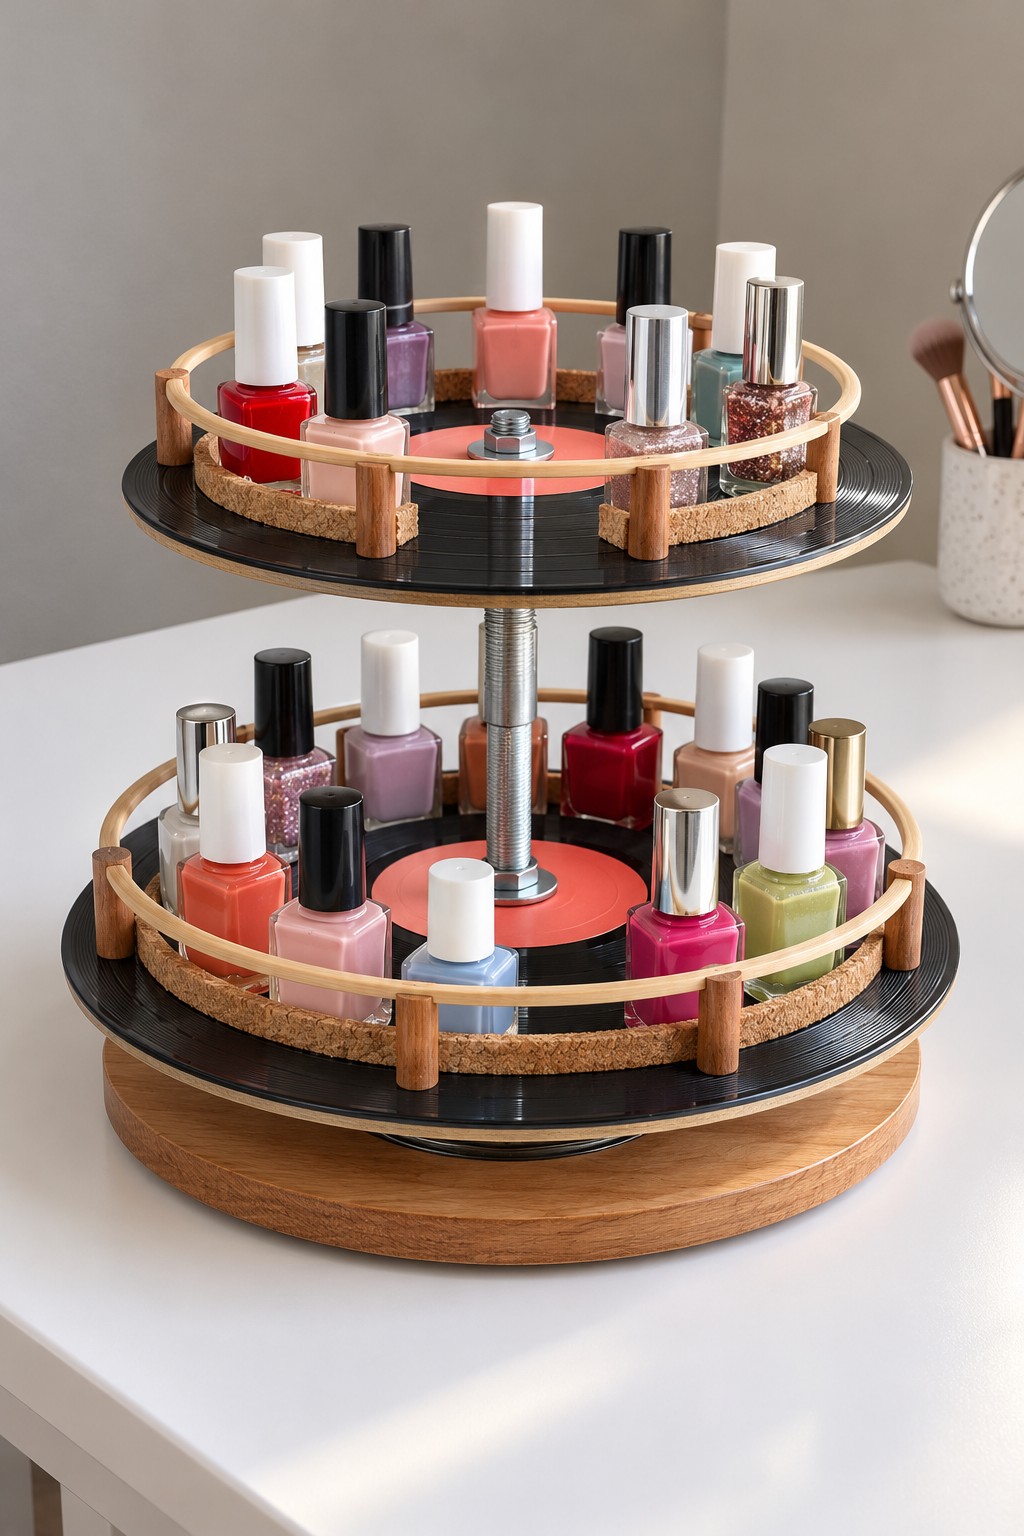
Black record surfaces, a wooden base, and circular guard rails give this stand its musical character. Use rigid plywood discs as the structural shelves and add unwanted records as decorative surface layers. Support both tiers with a suitable central rod, spacers, washers, and locking nuts. Plan the vertical gap around the tallest bottle on the lower tier before cutting the spacers.
Short wooden posts can hold a light circular rail around each shelf. Add cork pads beneath the bottles, keeping them level and away from the central fittings. Vinyl records alone should not be expected to carry a loaded shelf. A stand only rotates if you fit a suitable turntable bearing beneath the supported base; otherwise, use it as a fixed display and leave access around both tiers.
29. A Retired Guitar Body Turned into a Color Cabinet
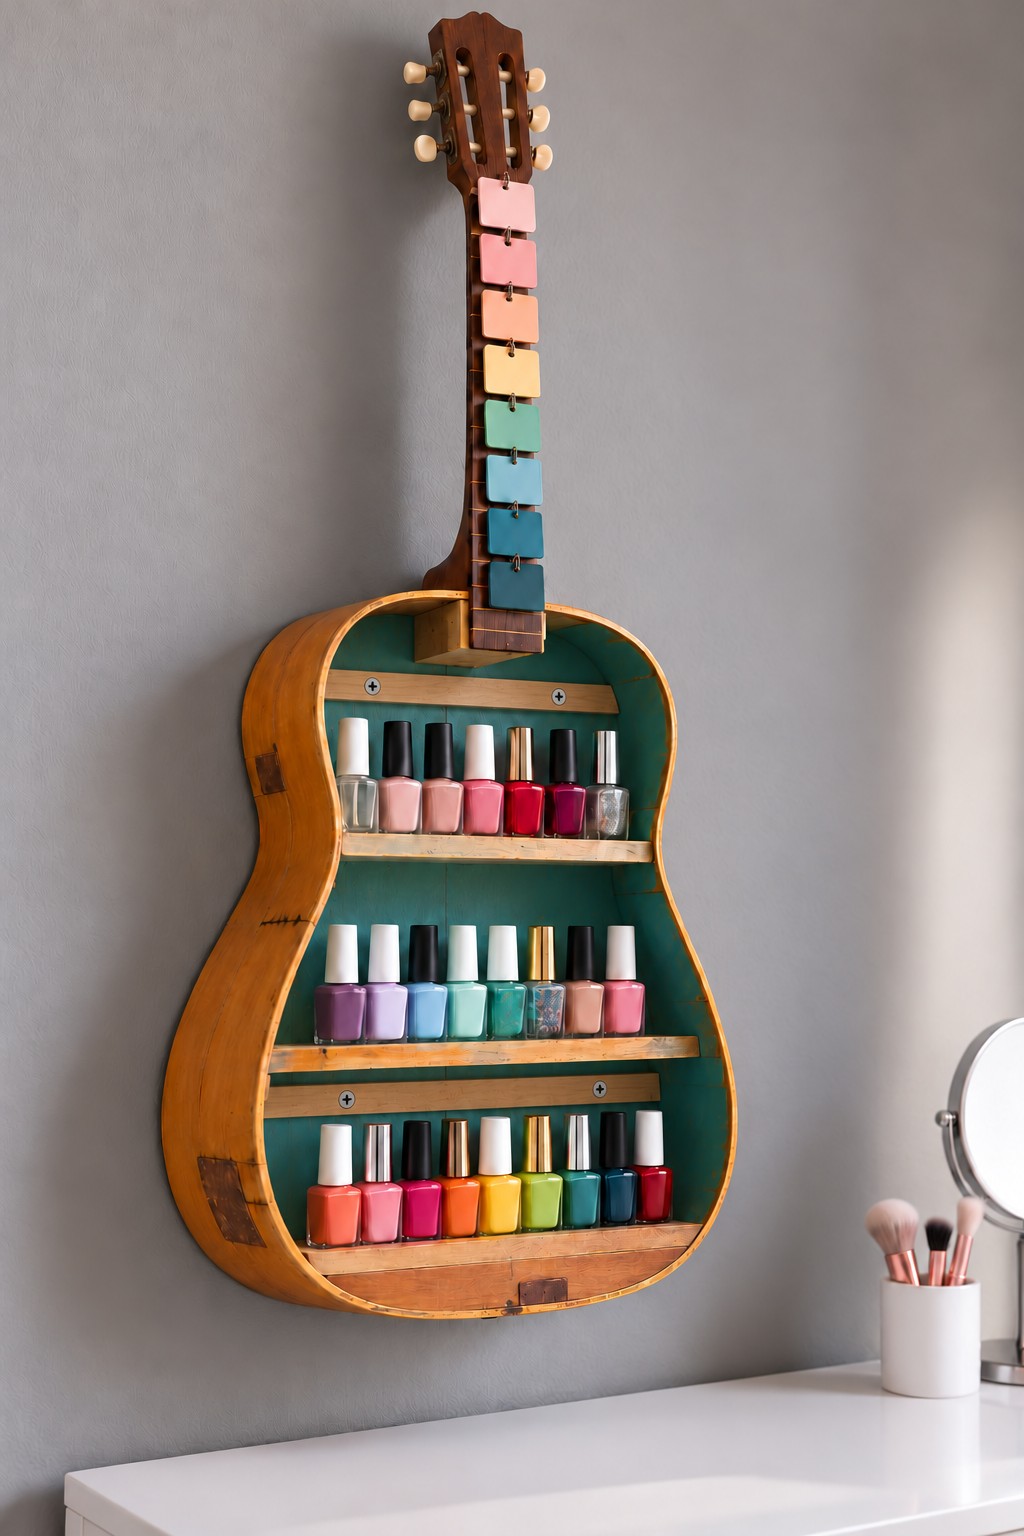
A retired acoustic guitar can become a striking wall cabinet, but this is an advanced adaptation. Choose an instrument that is beyond practical repair, remove its strings and loose hardware, and have the front opening prepared with suitable woodworking tools. Preserve the body outline, then add a reinforced internal backing and shelf supports. The thin curved shell should not carry the bottle load on its own.
Fit three level shelves with low retaining edges and paint the interior teal. Small labeled swatches along the neck turn its length into a color index. Use wall mounting hardware connected to the reinforced body structure and rated for the total loaded weight; do not hang the cabinet from a decorative point on the headstock. Round every exposed cut edge before finishing and loading the shelves.
Care Habits That Make the Organizer Worth Using
Return bottles upright, clean residue from the neck as the manufacturer directs, and close caps firmly after use. Keep the collection out of direct sunlight and away from heat, flames, and ignition sources. A decorative cabinet does not replace the storage instructions on the product label. Keep polish and remover inaccessible to children and pets.
For ordinary nail lacquer that has thickened, use only a compatible nail polish thinner if the brand permits it, following the stated amount. Do not substitute remover or add water. Gel polish is a different system: follow its own instructions, keep it in its original container, and do not assume a lacquer thinner is suitable. Keep gel bottles away from the working area of curing lamps.
Lift out trays and cups periodically, remove dust, and clean the organizer with a method appropriate for its material and finish. Test cleaning products on an inconspicuous area. Nail polish remover can damage decorative coatings and some plastics, so do not use it as a general organizer cleaner.
Label swatches with the brand and shade name, then check that each still matches the bottle in its assigned space. Follow the product's shelf life or period after opening guidance rather than keeping everything for one universal number of years. Remove leaking, damaged, or unusable products from the collection and follow local disposal guidance. Leave a little spare room so putting bottles away stays as easy as choosing them.


Leave a Reply