
An empty wine bottle can become a flower vase, a framed wall accent, a keepsake display or the base for a small decorative light. This collection brings together 30 ways to work with the original bottle shape, using materials such as cotton fabric, jute rope, wood, cane webbing, ribbon and lightweight craft embellishments. You will find a clear starting method, a visual guide, practical material choices and individual instructions for adapting the technique to each design.
Begin with the simple wrapped vase below if you are new to decorating glass. You can then use the same cleaning, measuring and careful finishing process for the fabric, painted and textured versions. The wooden stands and lighting ideas require additional supports or purpose made components, which are explained alongside those projects. Choose a finish that suits where the piece will live, and keep flower vases separate from dry electrical displays.
Table of Contents
- Materials to Gather Before You Start
- How to Make a Simple Wrapped Wine Bottle Flower Vase
- Details That Help Wine Bottle Crafts Last
- Choose Your Wine Bottle Decor Inspiration
- 1. Coastal Rope Wine Bottle Table Lamp
- 2. Pressed Daisy Bottle Bookends
- 3. Wooden Frame Wall Bottle Vases
- 4. Cane Wrapped Amber Bottle Vase
- 5. Message in a Bottle Keepsake
- 6. Painted Cottage Village Flower Vase
- 7. Raised Rose Bottle Vase
- 8. Macrame Hanging Bottle Vase
- 9. Beaded Floral Sleeve Bottle Vase
- 10. Miniature Picket Fence Bottle Vase
- 11. Patchwork Fabric Bottle Vase
- 12. Curtain Style Blue Bottle Vase
- 13. Fairy Staircase Bottle Vase
- 14. Crescent Moon Bottle Stand
- 15. Copper Branch Photo Holder Bottle
- 16. Antique Gold Butterfly Bottle
- 17. Pressed Petal Screen Bottle Vase
- 18. Miniature Balcony Bottle Display
- 19. Celestial Blue Bottle Light
- 20. Wooden Spool Frame Bottle Vase
- 21. Floral Fan Backdrop Bottle Vase
- 22. Envelope Pocket Bottle Stand
- 23. Corset Laced Bottle Vase
- 24. Ballet Slipper Bottle Vase
- 25. Pink Checkerboard Bottle Vase
- 26. Carousel Frame Bottle Vase
- 27. Moon Phase Bottle Light Shadow Box
- 28. Satin Ballet Wrap Bottle Vase
- 29. Sunburst Wood Bottle Stand
- 30. Basket Handled Bottle Vase
- Make the Design Fit Your Home
Materials to Gather Before You Start
- Intact empty wine bottles with smooth rims and no chips or cracks
- Mild dish soap, warm water, a bottle brush and a lint free cloth
- A tape measure, scissors, a pencil and a protected work surface
- Jute cord, cotton fabric, ribbon, cane webbing or other trim suited to your chosen design
- A craft adhesive or decoupage medium explicitly compatible with glass and the added material
- Glass suitable paint and brushes for the painted versions
- Cork pads, wood, screws and padded retaining hardware for supported displays
- Fresh cut flowers and water for vases, or fully dried stems for dry arrangements
- A purpose made bottle lamp kit or battery LED bottle stopper for lighting projects
You do not need every item for every idea. Select the project first, measure the actual bottle and buy only the materials that its construction requires. Bottle bodies vary in width and taper, so a sleeve or wooden opening that fits one bottle may not fit another.
How to Make a Simple Wrapped Wine Bottle Flower Vase
This starter project uses one intact clear bottle, natural jute twine, a glass compatible adhesive and a few white cut flowers. The six panels follow the same sequence as the instructions below. It provides a foundation for the wrapped and embellished vases later in the collection, rather than a universal construction method for the lamps or wooden frames.
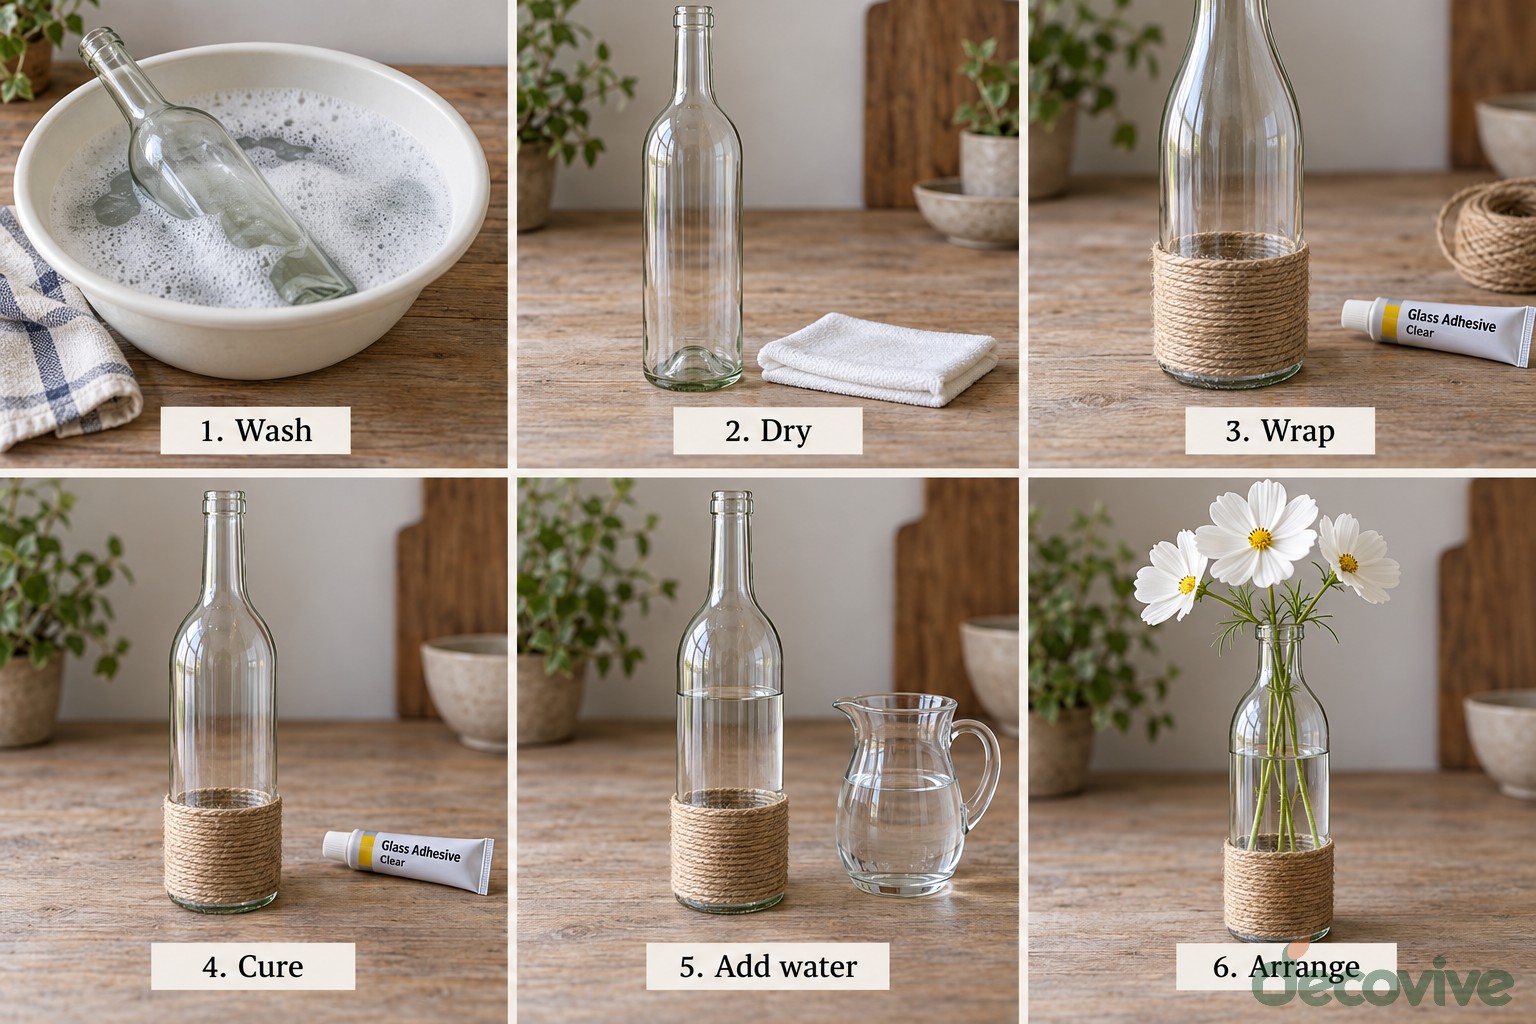
- Wash the bottle. Remove the cork and soak off the paper label with warm soapy water. Remove adhesive residue with a cleaner compatible with the glass, following its label. Wash the inside with a bottle brush and rinse thoroughly. Do not start with chipped or cracked glass.
- Dry every surface. Let the bottle drain and dry inside and out. Wipe the area to be decorated with a clean lint free cloth. A surface that looks clean can still carry oil or residue that interferes with adhesion.
- Wrap the lower body. Measure the height of the twine band and mark its upper boundary temporarily. Apply small amounts of the chosen adhesive as directed and wind the cord in close, even rows. Keep the bottom flat and tuck the final end neatly at the back.
- Let the adhesive cure. Leave the empty bottle upright and undisturbed for the full time specified on the product. Dry to the touch does not always mean ready for use. Remove any temporary guide after the wrap is secure.
- Add water carefully. Use a small jug or funnel to put water inside without soaking the twine. Start with enough water to cover the cut stem ends while keeping the bottle stable.
- Arrange a few flowers. Remove leaves that would sit below the waterline and trim the stems to suit the bottle height. Add the flowers loosely rather than forcing a large bunch into the narrow mouth. Check the water regularly and replace it when needed.
Details That Help Wine Bottle Crafts Last
Choose adhesives and finishes for the actual materials involved. A clear finish does not automatically make fabric, paper or rope waterproof. Keep those surfaces dry and remove decorative sleeves before washing whenever possible. Follow the paint maker instructions for coat thickness, ventilation and curing. Do not oven cure an unknown bottle unless both the coating instructions and the glass suitability support that method.
Keep flower water inside the original glass vessel. For fresh flowers, leave the rim and interior free of decorative coatings. For dry displays, make sure the bottle and all inserted materials are completely dry. These projects are decorative objects; do not return a painted or glued bottle to food or drink storage.
For a hanging vase, support the base as well as restraining the neck, and choose wall fixings for the complete filled weight. For a wooden stand, plan how the bottle will come out for cleaning before assembling the frame. For lights, use the supplied insulated wiring and components exactly as directed. Keep batteries, switches and connections accessible, and use no water or open flame inside a bottle light.
Choose Your Wine Bottle Decor Inspiration
The ideas below show how the preparation method can lead to very different finishes. Try a removable fabric sleeve for an easy refresh, a small wooden holder for a more structured display, or a dry LED design for a shelf accent. Each project includes the materials and construction details that make that particular arrangement work, so you can adapt its colors and flower choice while preserving its essential support and balance.
1. Coastal Rope Wine Bottle Table Lamp
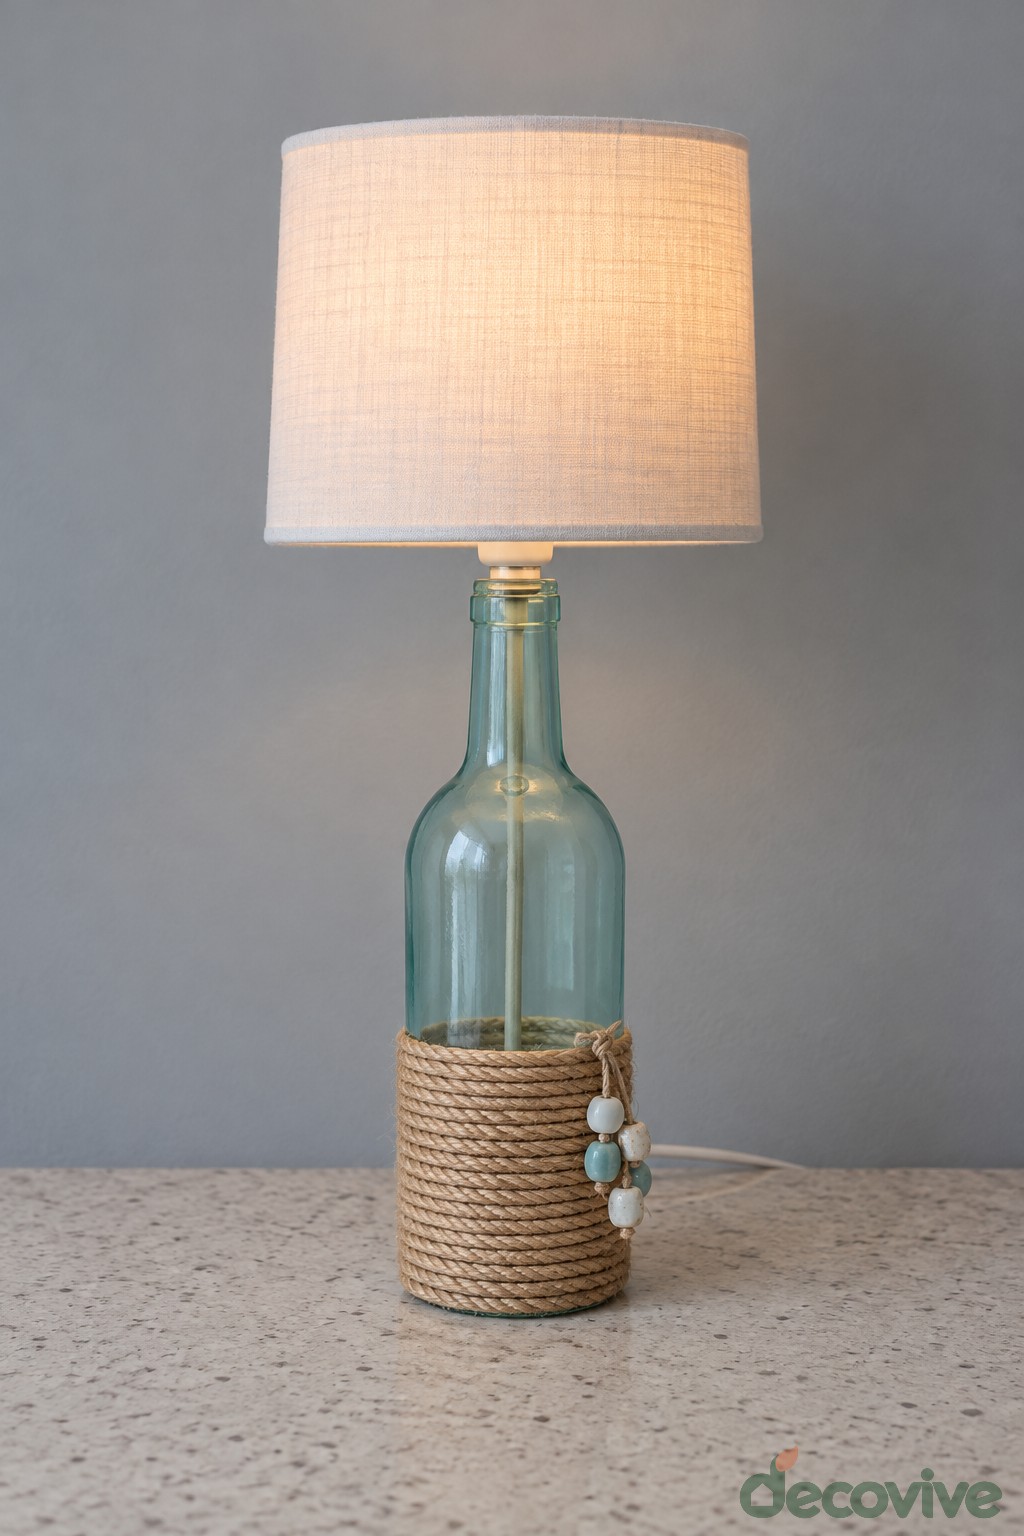
A pale green bottle, a broad rope band and a linen shade make a relaxed accent for a console or bedside table. The small hanging beads add detail without hiding the glass.
Use a purpose made bottle lamp conversion kit, a compatible shade and an LED bulb within the kit rating. Secure the socket with its supplied bottle adapter. For a version that needs no drilling, choose a kit whose insulated cord exits at the socket and runs down behind the bottle. The upright fitting inside the glass is support, not bare electrical wire. Follow the kit instructions rather than assembling exposed electrical parts.
Wrap the lower body with rope using a glass compatible adhesive, then attach the decorative beads separately. Keep rope clear of the socket, leave the switch accessible and check that the bottle stays stable under the shade. This lamp is a dry decorative project and must never contain water.
2. Pressed Daisy Bottle Bookends
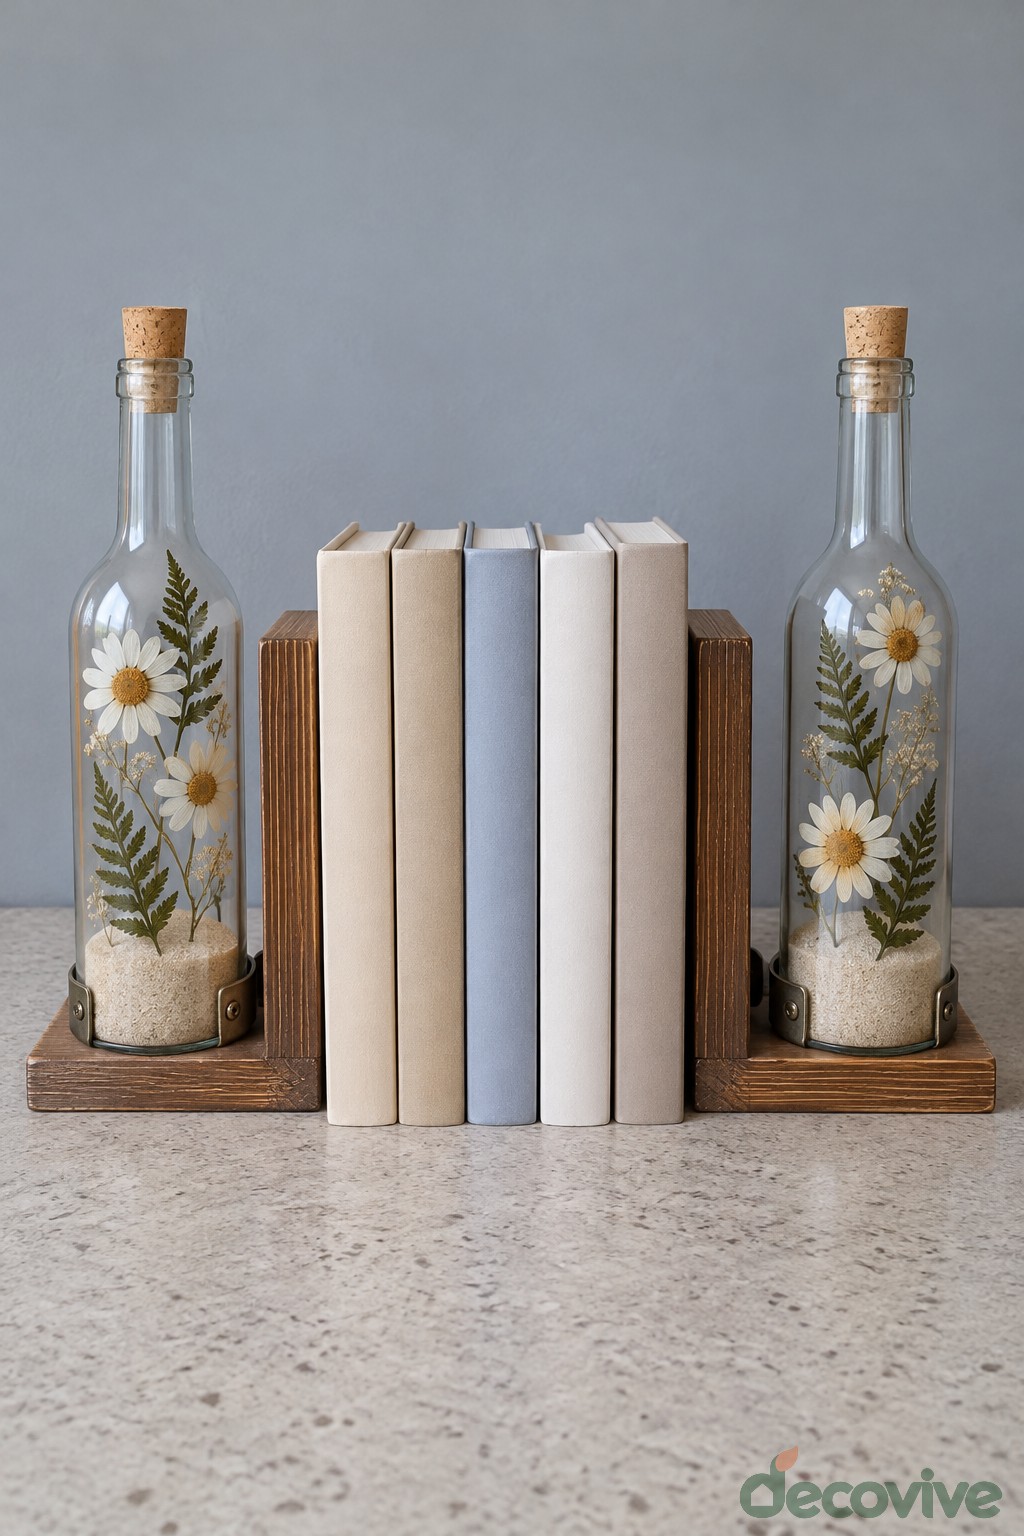
Clear bottles filled with pale sand and decorated with daisies create a gentle botanical border for a small group of books. Dark wooden brackets give the arrangement its structure.
Make two wooden L shaped supports with screwed joints and smooth edges. Fix a padded retaining bracket to each base, then secure the bottles without tightening metal directly onto glass. Add dry sand through a funnel and close each bottle with a cork. Apply pressed flowers to the outside using a suitable clear decoupage medium.
The wooden uprights should carry the sideways pressure from the books. Treat the bottles as decoration and ballast, rather than expecting fragile glass to restrain heavy volumes. Add nonslip pads underneath and keep this pair on a level shelf.
3. Wooden Frame Wall Bottle Vases
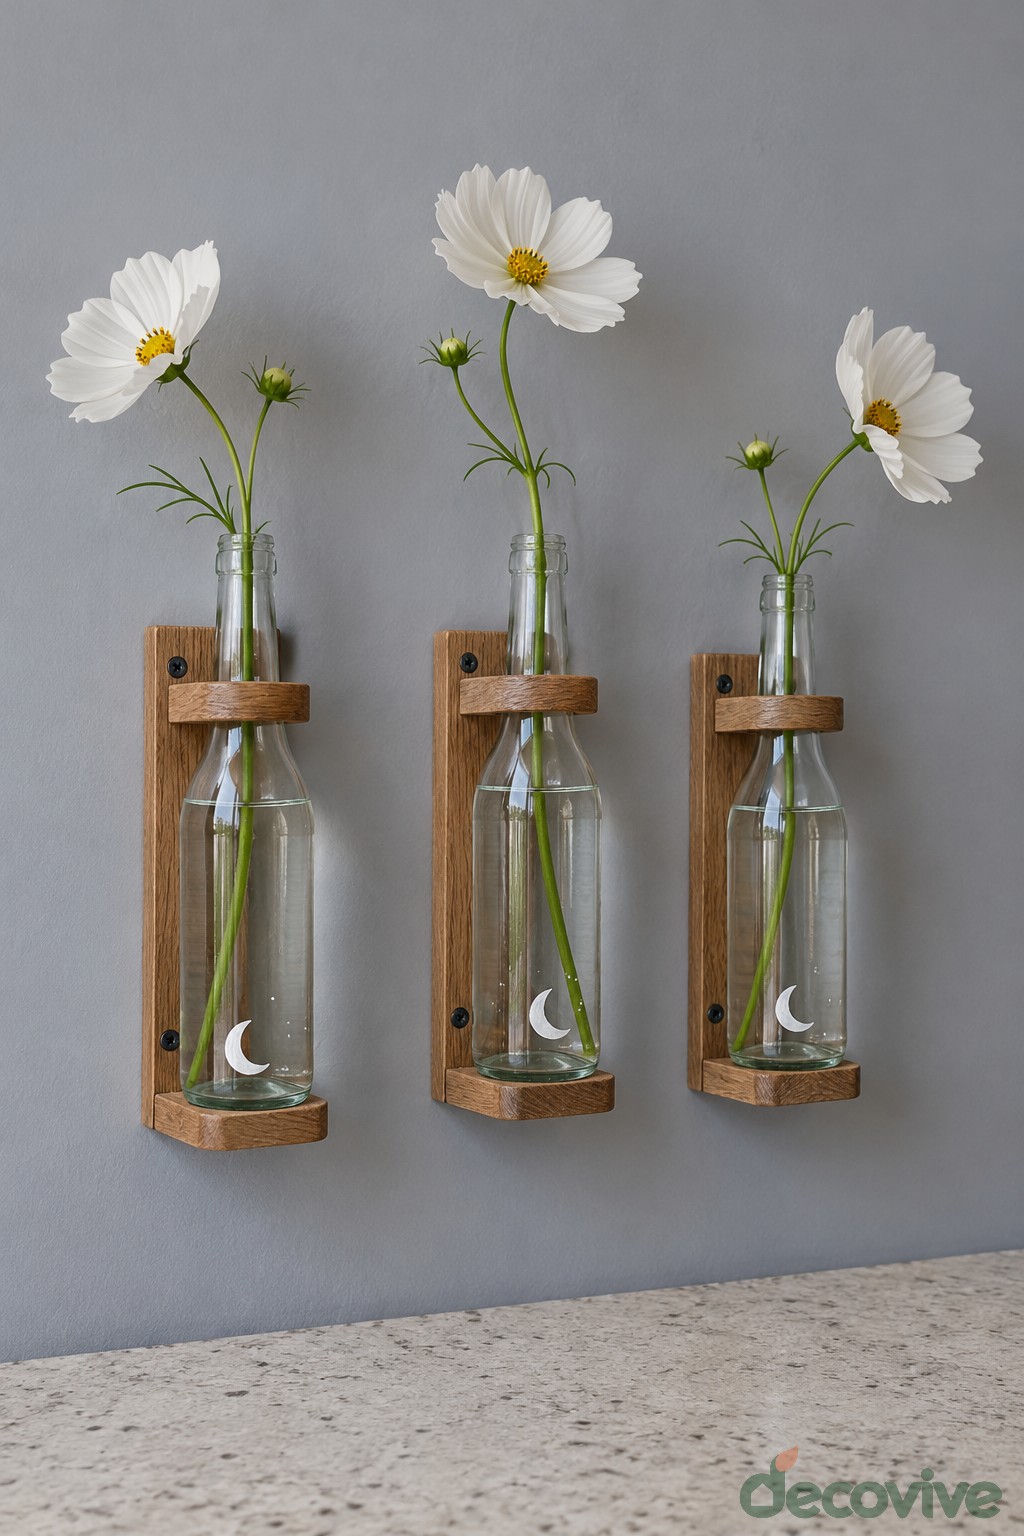
Three clear bottles set inside slim wooden frames turn individual white cosmos stems into a small wall arrangement. Their different heights create rhythm while the repeated wood finish keeps the grouping calm.
Build each open frame around the actual bottle measurements. Provide a small bottom ledge with a cork pad and a removable neck restraint. Fasten the frames to suitable wall fixings, allowing room above each mouth to remove flowers and lift out the bottle.
Mount the frames before filling the bottles. Add a modest amount of water, remove foliage below the waterline and use a few lightweight stems. The bottom ledge carries the bottle weight; a decorative neck band alone should not be the only support.
4. Cane Wrapped Amber Bottle Vase
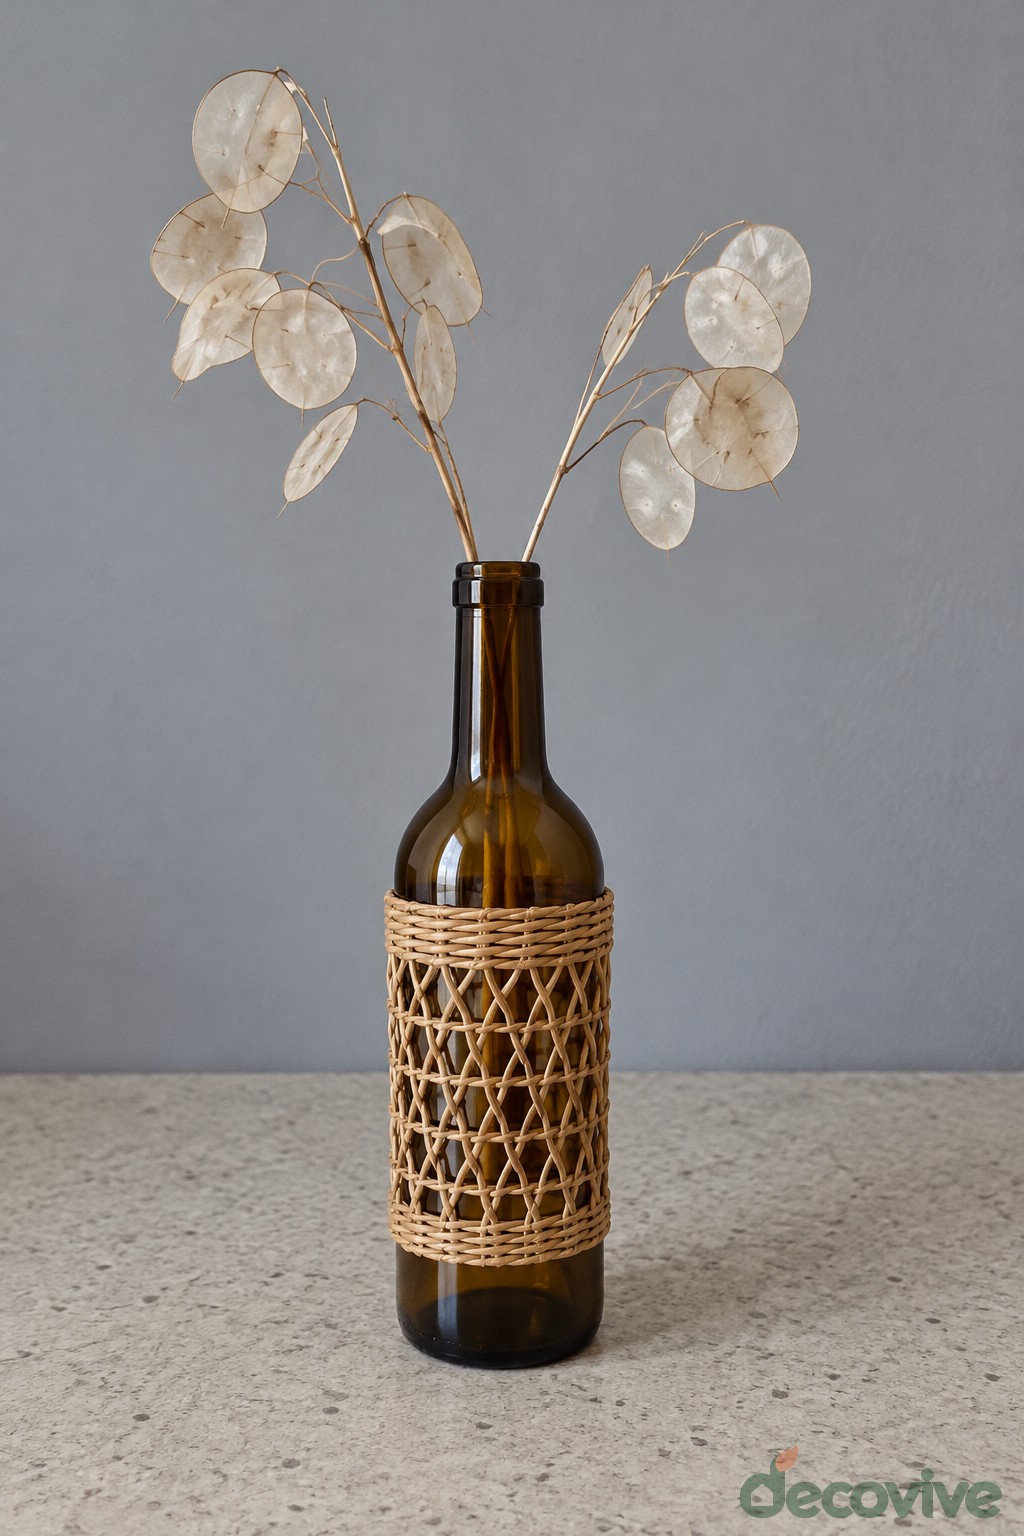
An amber bottle with a woven cane sleeve pairs naturally with dried honesty stems. The translucent seed heads balance the rich glass without needing a large arrangement.
Measure the straight lower body and cut a strip of flexible cane webbing to fit. Prepare the cane according to the supplier instructions, then wrap it around the bottle and join the overlapping edges neatly at the back. A small amount of compatible adhesive can hold the sleeve in position.
Let dampened cane dry fully before displaying the vase. Use completely dried stems for this version and keep the sleeve away from standing water. Leave the shoulder uncovered so the original bottle silhouette remains visible.
5. Message in a Bottle Keepsake
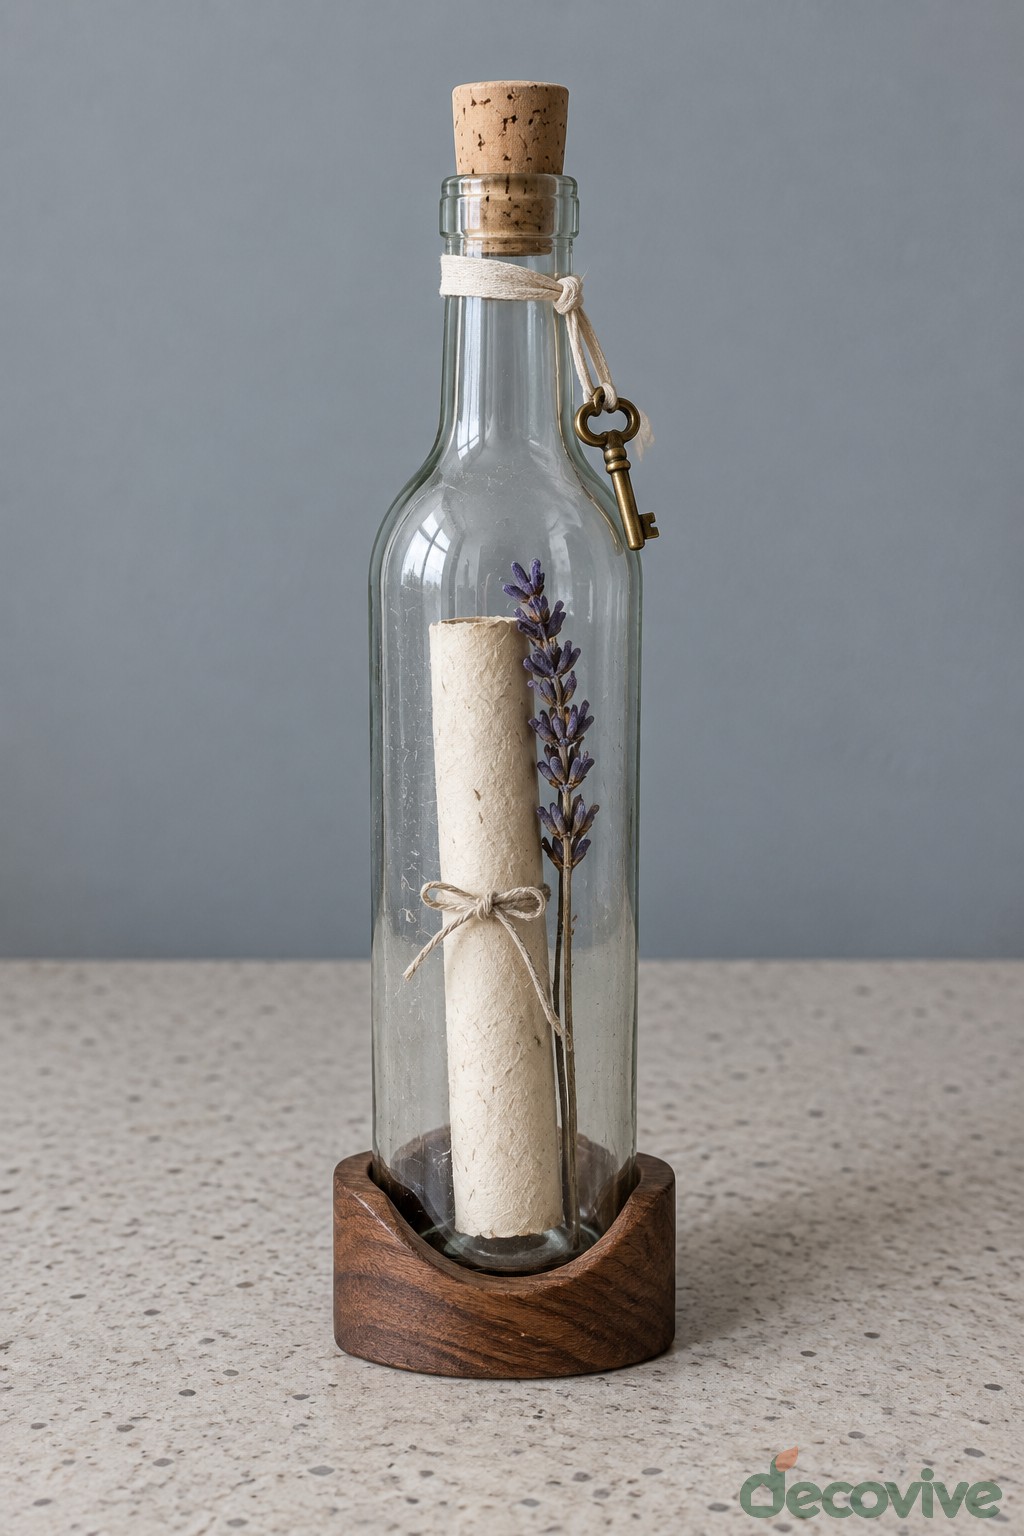
A rolled paper note and a small key charm turn a clear bottle into a personal shelf ornament. A shaped wooden cradle makes the narrow vessel feel deliberate and finished.
Roll a handwritten message loosely enough to remove later and tie it with fine cotton thread. Insert it into a completely dry bottle, add a cork and tie a small key charm around the neck. Set the bottle in a shallow wooden recess lined with cork.
Avoid permanently gluing the cork if the message is meant to be read. A short length of thread left accessible beneath the stopper helps retrieve the roll. Keep the paper away from damp windowsills and use a broad enough base to prevent tipping.
6. Painted Cottage Village Flower Vase
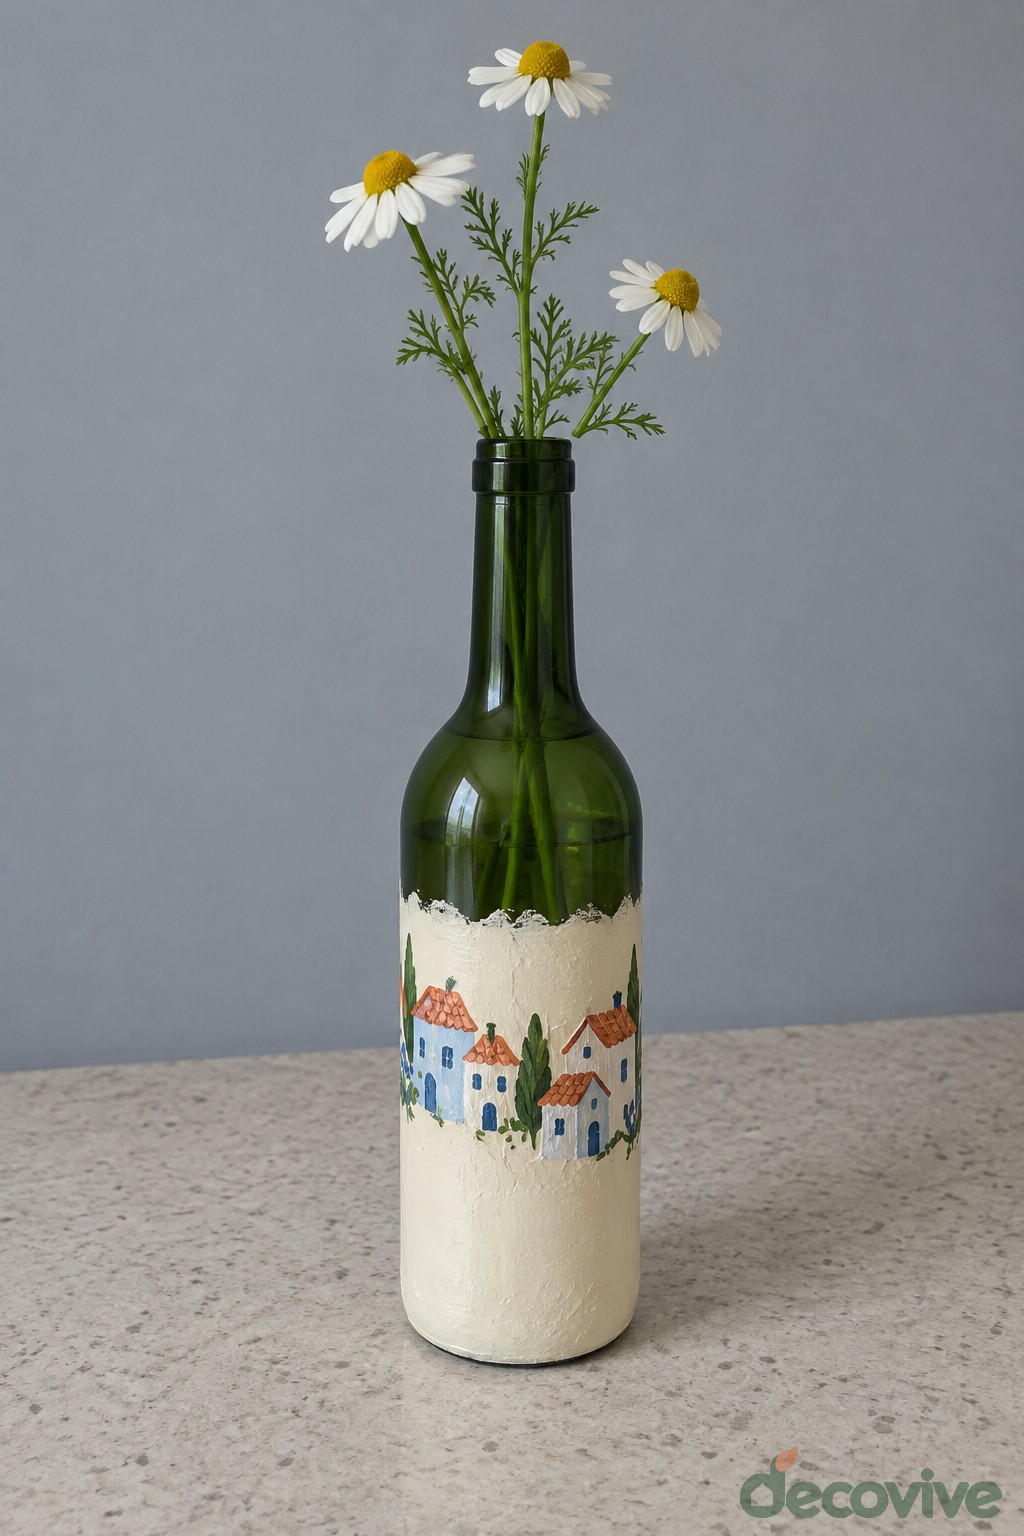
A cream lower section becomes a miniature row of colorful houses, while the green shoulder and neck remain exposed. A few fresh daisies echo the friendly scale of the painted village.
Clean and dry the bottle, then mask the upper boundary of the cream area. Apply thin coats of a paint system suitable for glass. Once the base is ready for overpainting, add small roof shapes, windows and doors with a fine brush. Follow the product instructions for drying and curing.
Keep paint outside the bottle and away from the rim. Add water only after the finish has cured, then arrange a few daisies with their lower leaves removed. Wipe the painted exterior gently instead of soaking it.
7. Raised Rose Bottle Vase
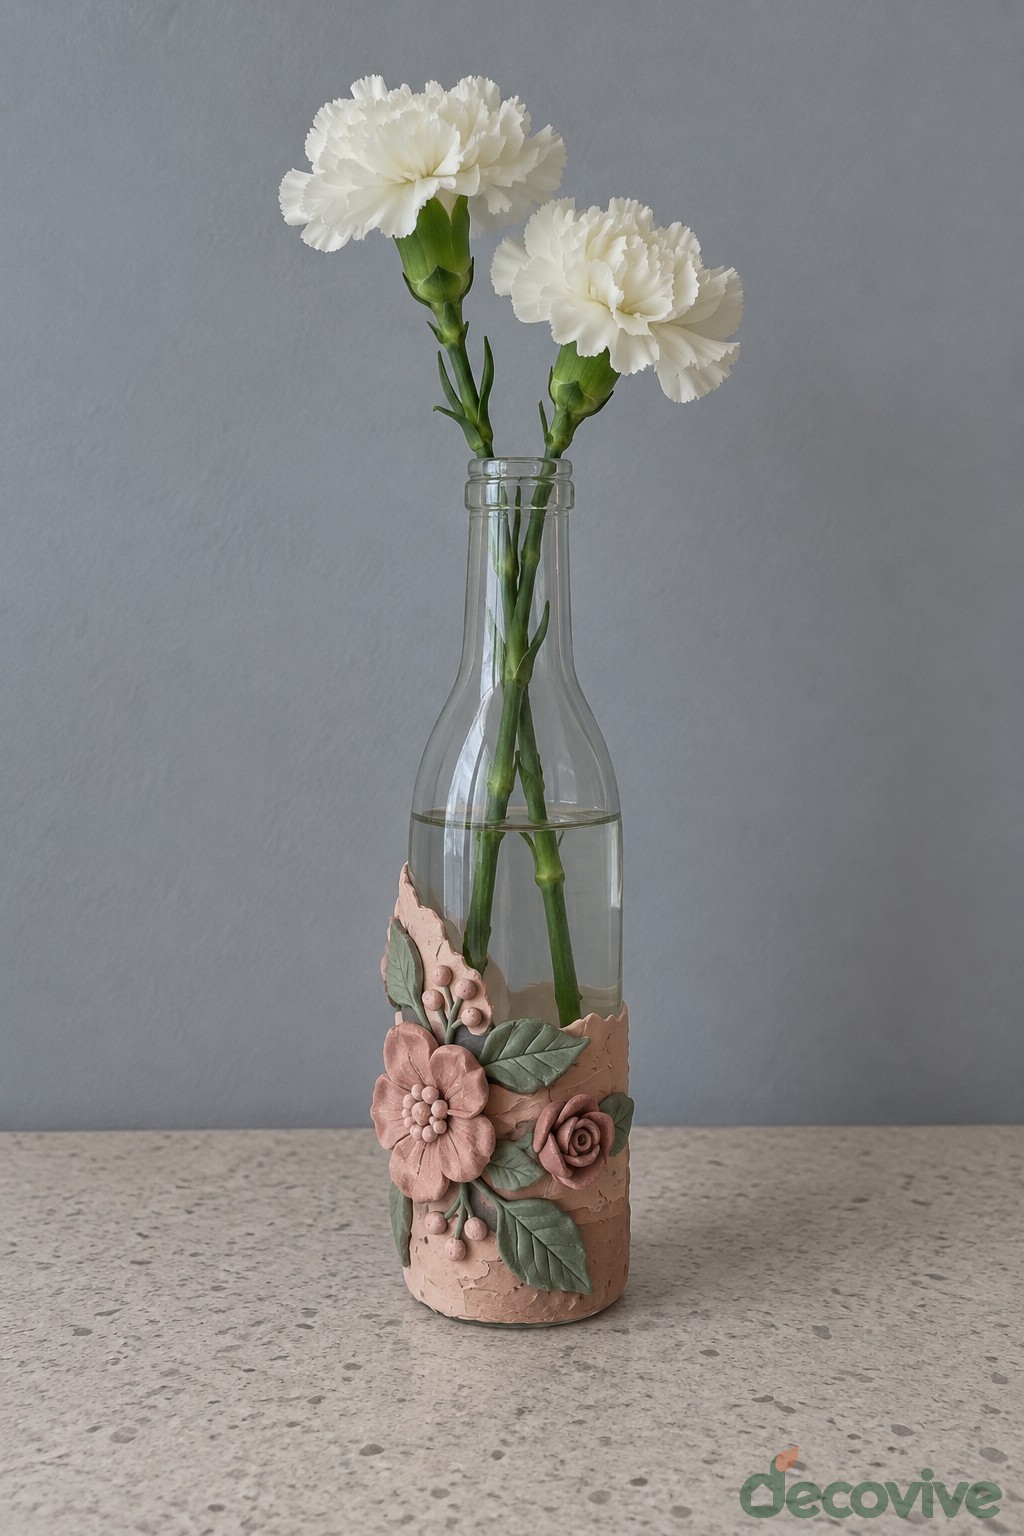
A cluster of dusty pink roses gives the lower half of this clear vase a sculptural focal point. The open glass above keeps the decoration light beside white carnations.
Use lightweight ready made floral appliques or shape small roses and leaves from a craft material intended for decorative relief. Let the pieces cure before attaching them to clean glass with an adhesive suitable for both surfaces. Keep the relief on the lower body and allow each attachment to set without movement.
Do not depend on decorative petals as handles when lifting the vase. Hold the plain neck and support the base. Add water carefully through a small funnel so the raised finish stays dry, then use a narrow group of cut carnations.
8. Macrame Hanging Bottle Vase
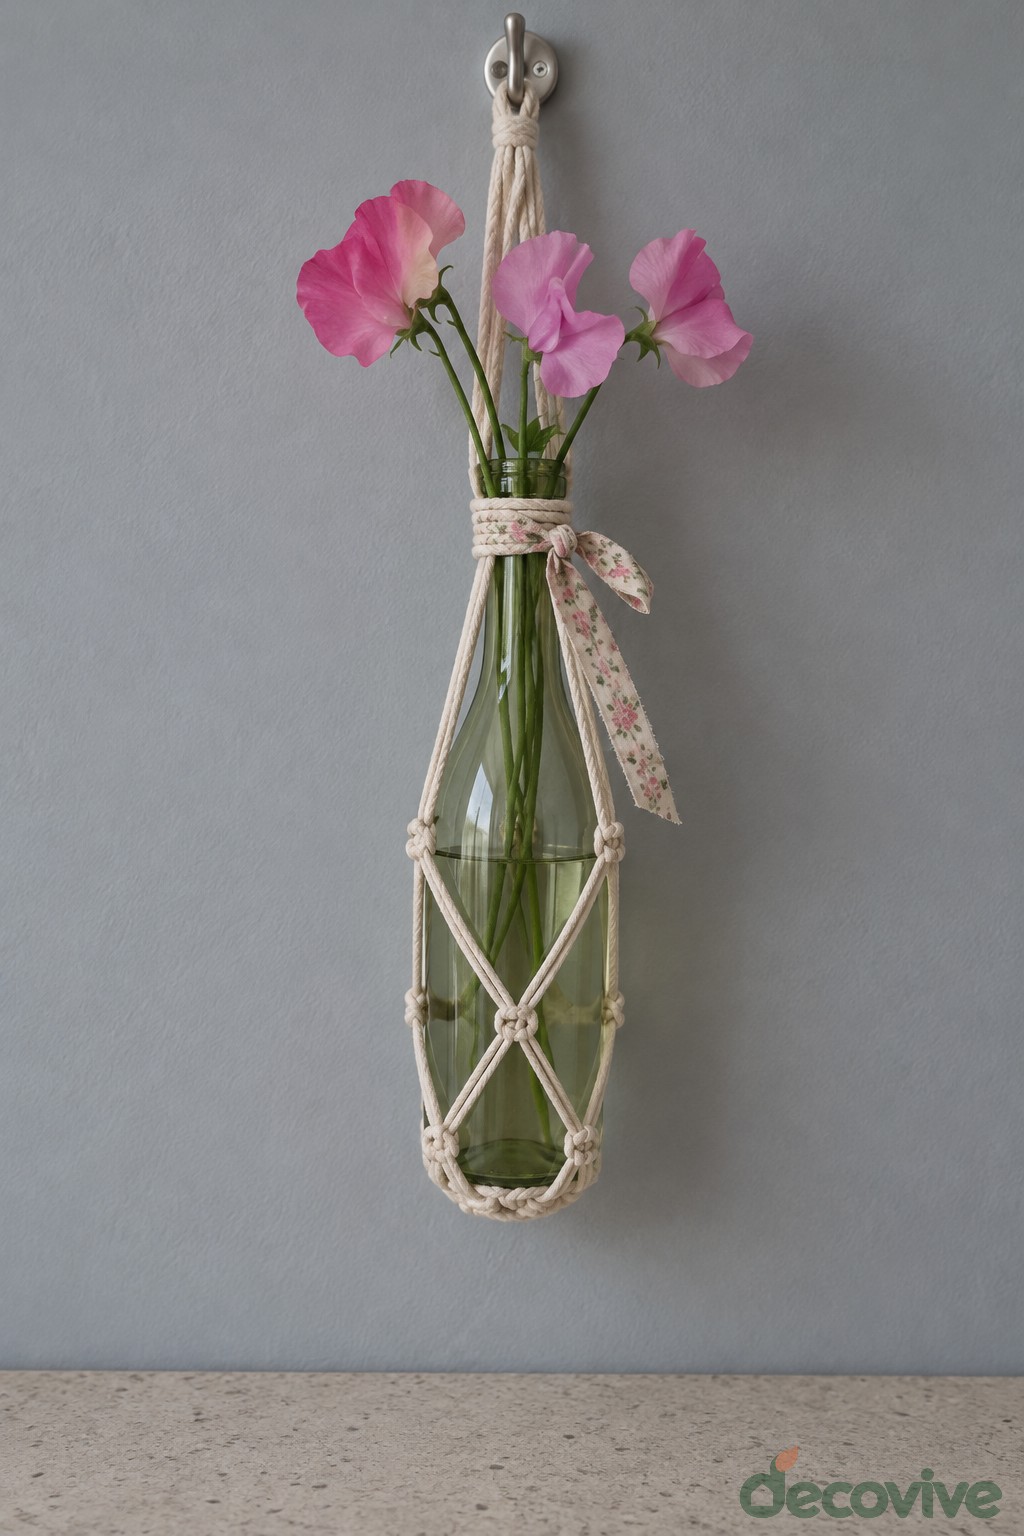
A cream knotted sling and a small floral bow soften a green bottle filled with pink sweet peas. This is a compact way to bring flowers to an otherwise empty section of wall.
Tie a macrame cradle with a closed supporting knot beneath the bottle base, evenly spaced side knots and a secure hanging loop. Test the fit over a padded surface. Install a wall hook and fixings rated for the combined weight of the bottle, cord, water and flowers.
The base must rest inside the cord cradle rather than hanging from ribbon around the neck. Add the ribbon only as decoration. Keep the arrangement away from doors and busy walkways, and lift the whole bottle out for water changes.
9. Beaded Floral Sleeve Bottle Vase
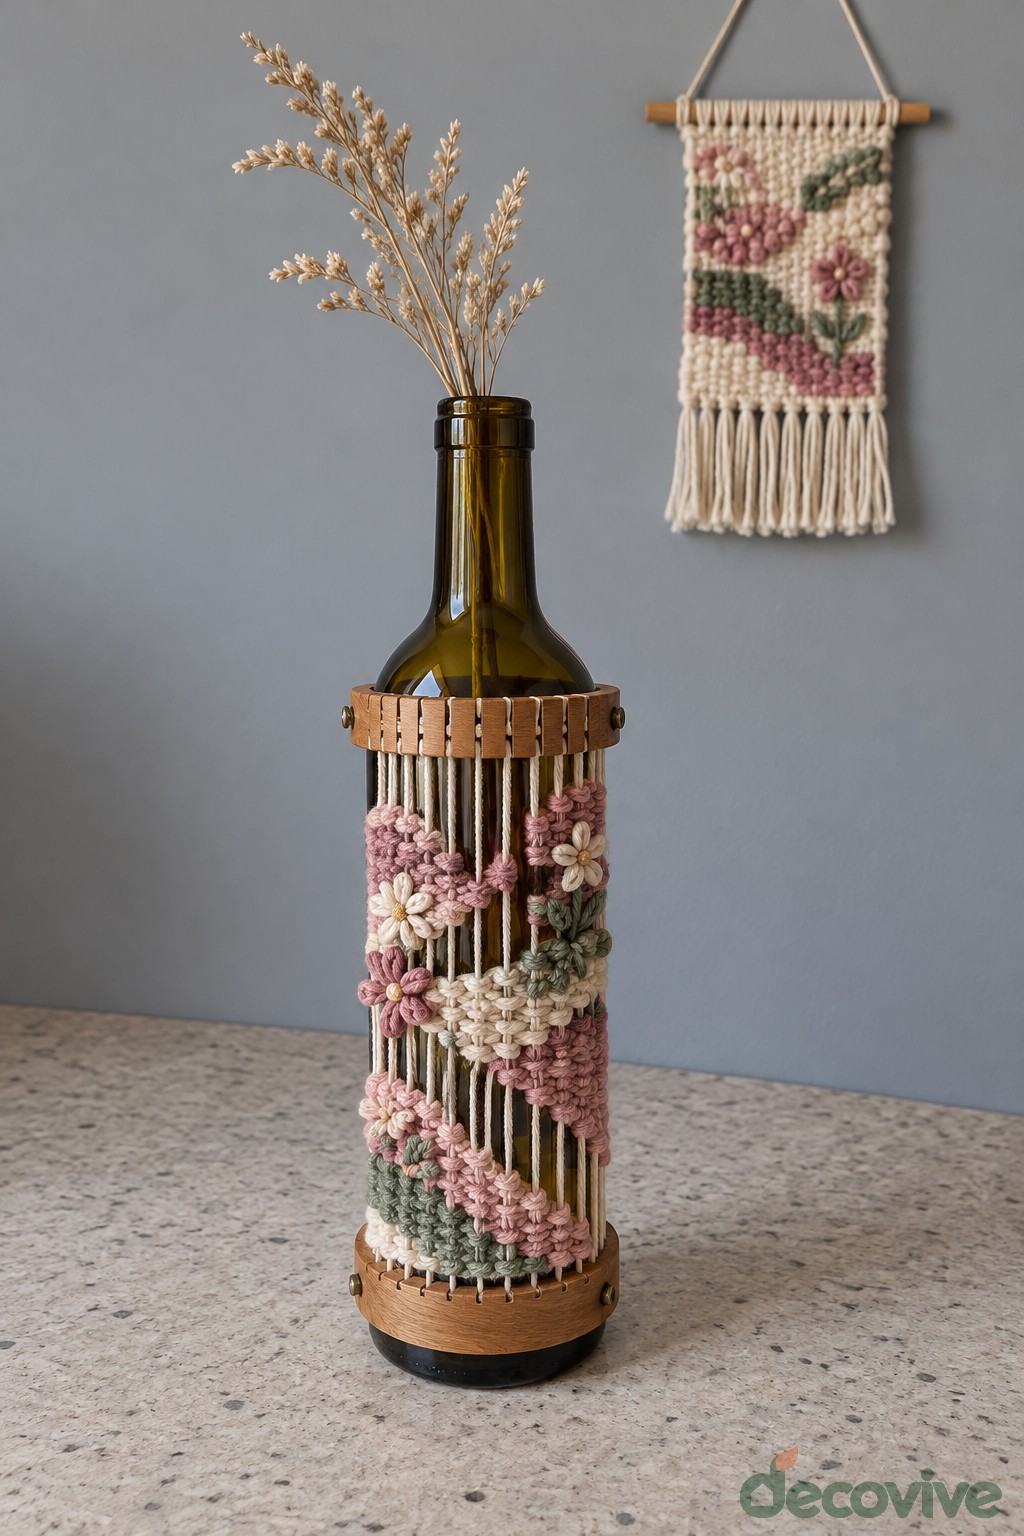
Pink bead strands and tiny roses form an ornamental sleeve around an amber bottle. Dried stems above give the detailed lower section room to stand out.
Build a removable wrap on a flexible mesh backing. Sew or tie bead strands onto the mesh and attach lightweight flower embellishments between them. Finish the upper and lower edges with narrow trim, then close the sleeve at the back around the bottle.
Use beads that are light enough for the backing and secure every strand end. Leave the neck uncovered for easy handling. Dried flowers suit this textile treatment because they avoid splashing the beads and trim during routine water changes.
10. Miniature Picket Fence Bottle Vase
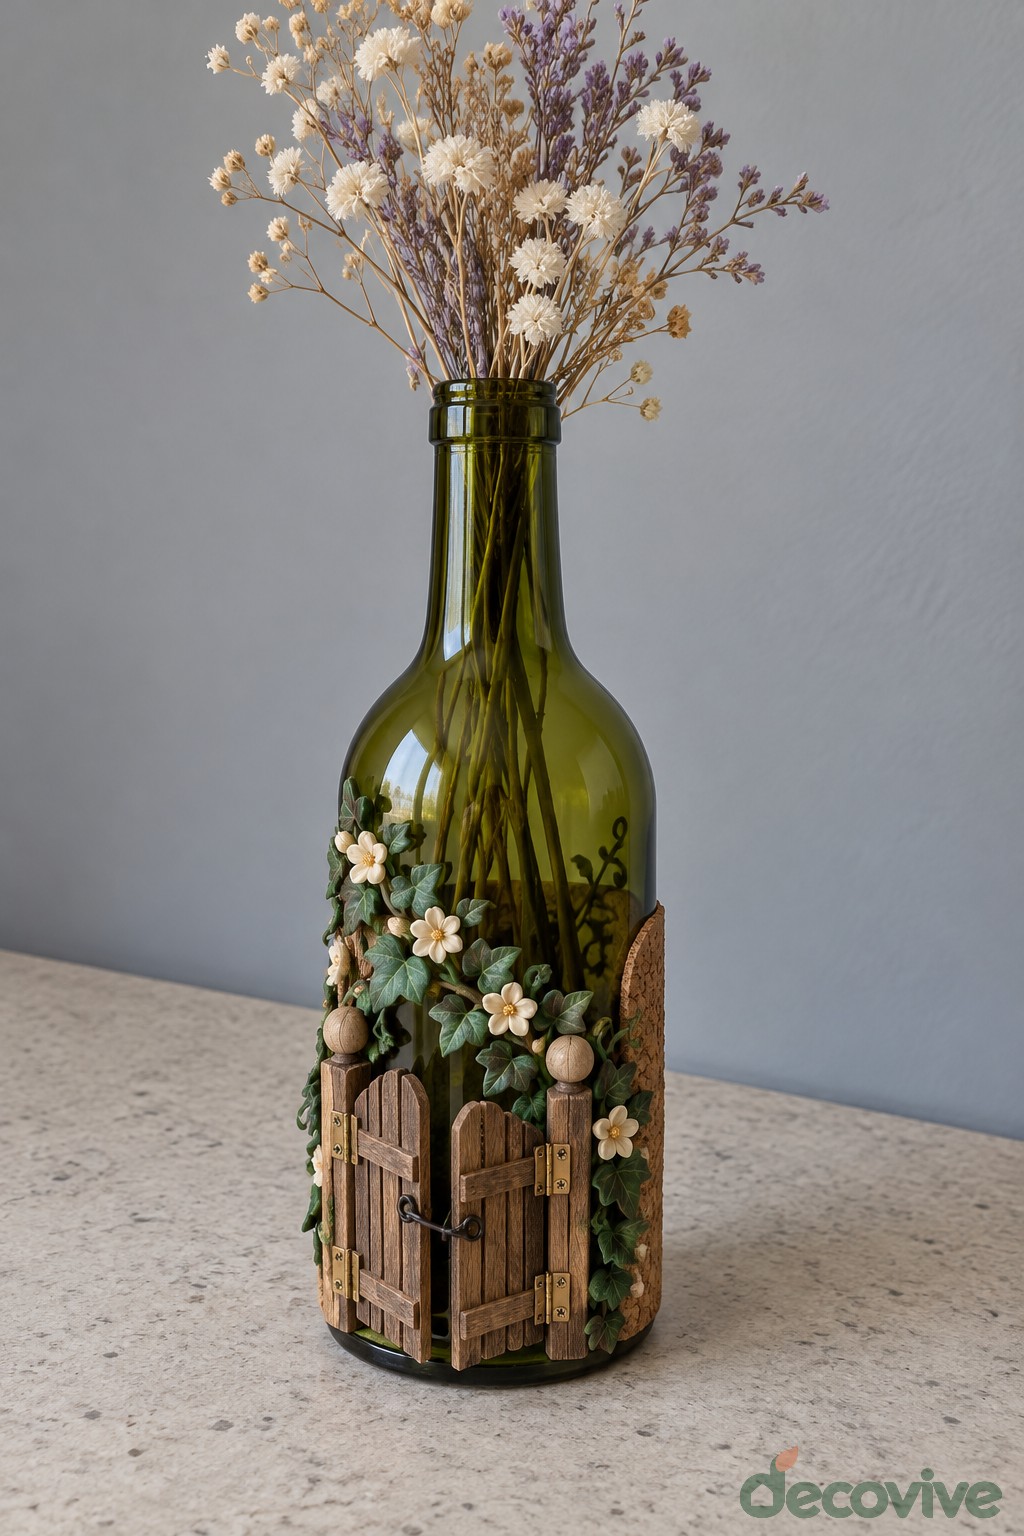
A low fence and tiny climbing blossoms make the bottle base resemble a little cottage garden. The broad green shoulder remains visible beneath an airy dried bouquet.
Trim craft wood slats to several modest heights, sand the ends and arrange them on a flexible backing. Wrap the assembled fence around the lower bottle body and attach it with a compatible adhesive. Add fine decorative vines and small artificial blossoms along the fence line.
Keep the fence level with the bottom edge so the bottle still sits flat. Use the miniature flowers as exterior trim and dried stems inside. Avoid building heavy scenery on one side, which could make the finished vase unbalanced.
11. Patchwork Fabric Bottle Vase
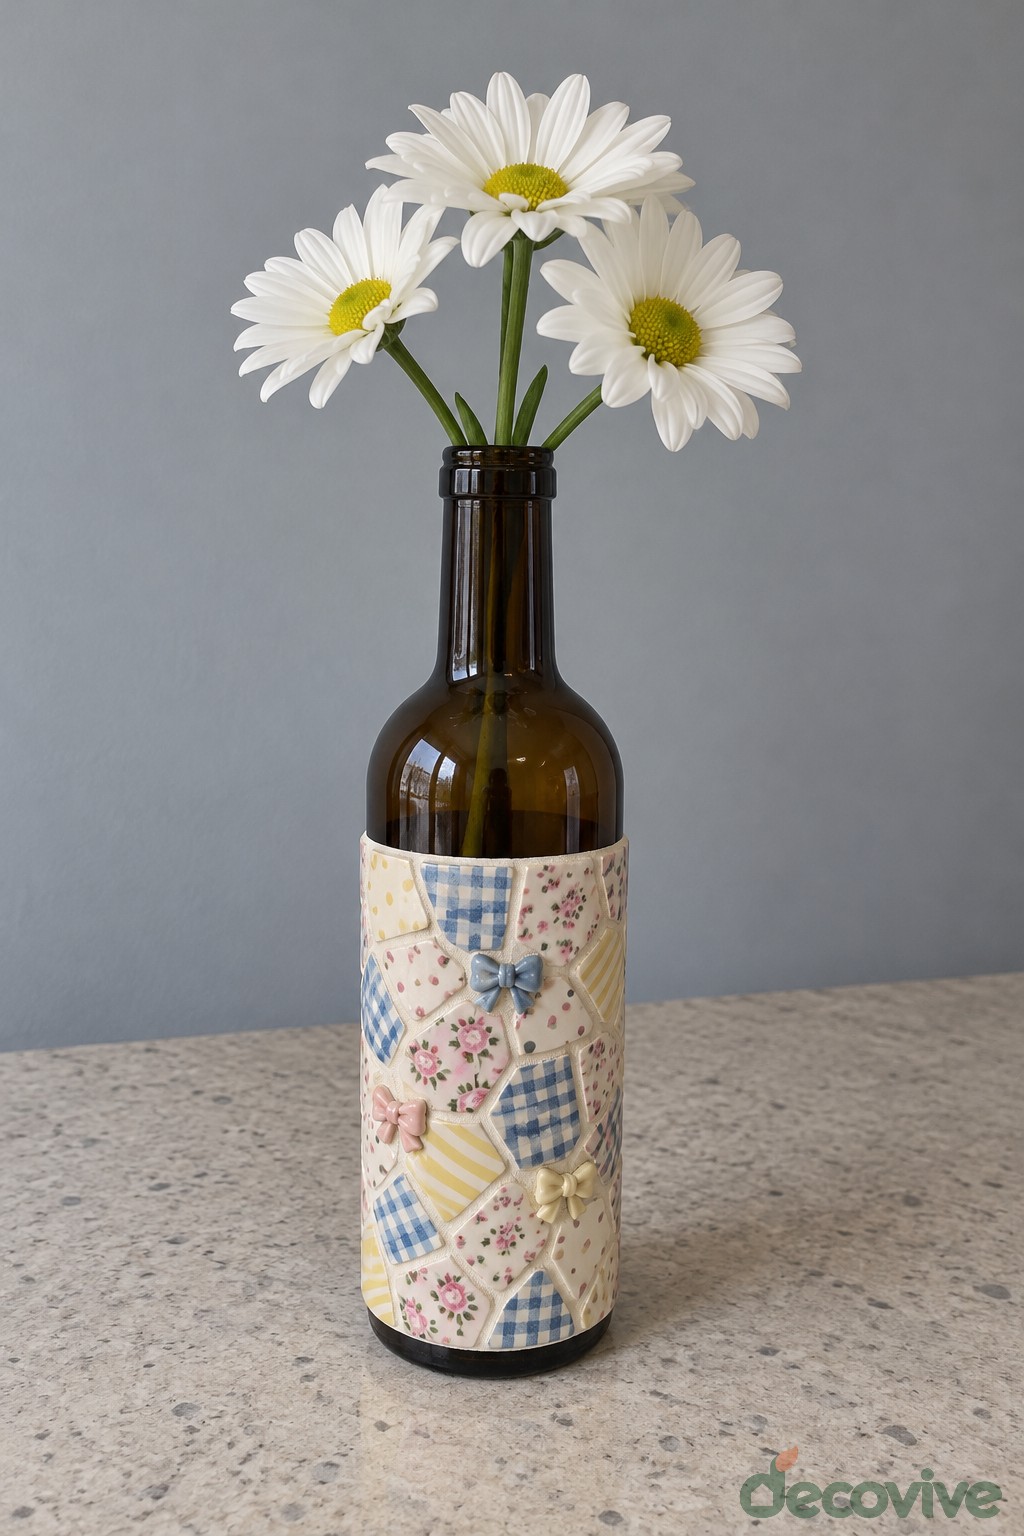
Small pastel fabric shapes create a quilt inspired surface below a simple arrangement of white daisies. The dark bottle neck provides a clean visual break above the pattern.
Cut thin cotton scraps into small squares and irregular patches. Apply them to the lower body with a decoupage medium intended for the materials, smoothing each piece from the center outwards. Overlap edges sparingly so the surface does not become bulky.
Let every layer cure as directed before handling. Keep the mouth and inside uncoated, and add water without wetting the fabric. If you enjoy this surface treatment, explore more color combinations in our jar painting ideas.
12. Curtain Style Blue Bottle Vase
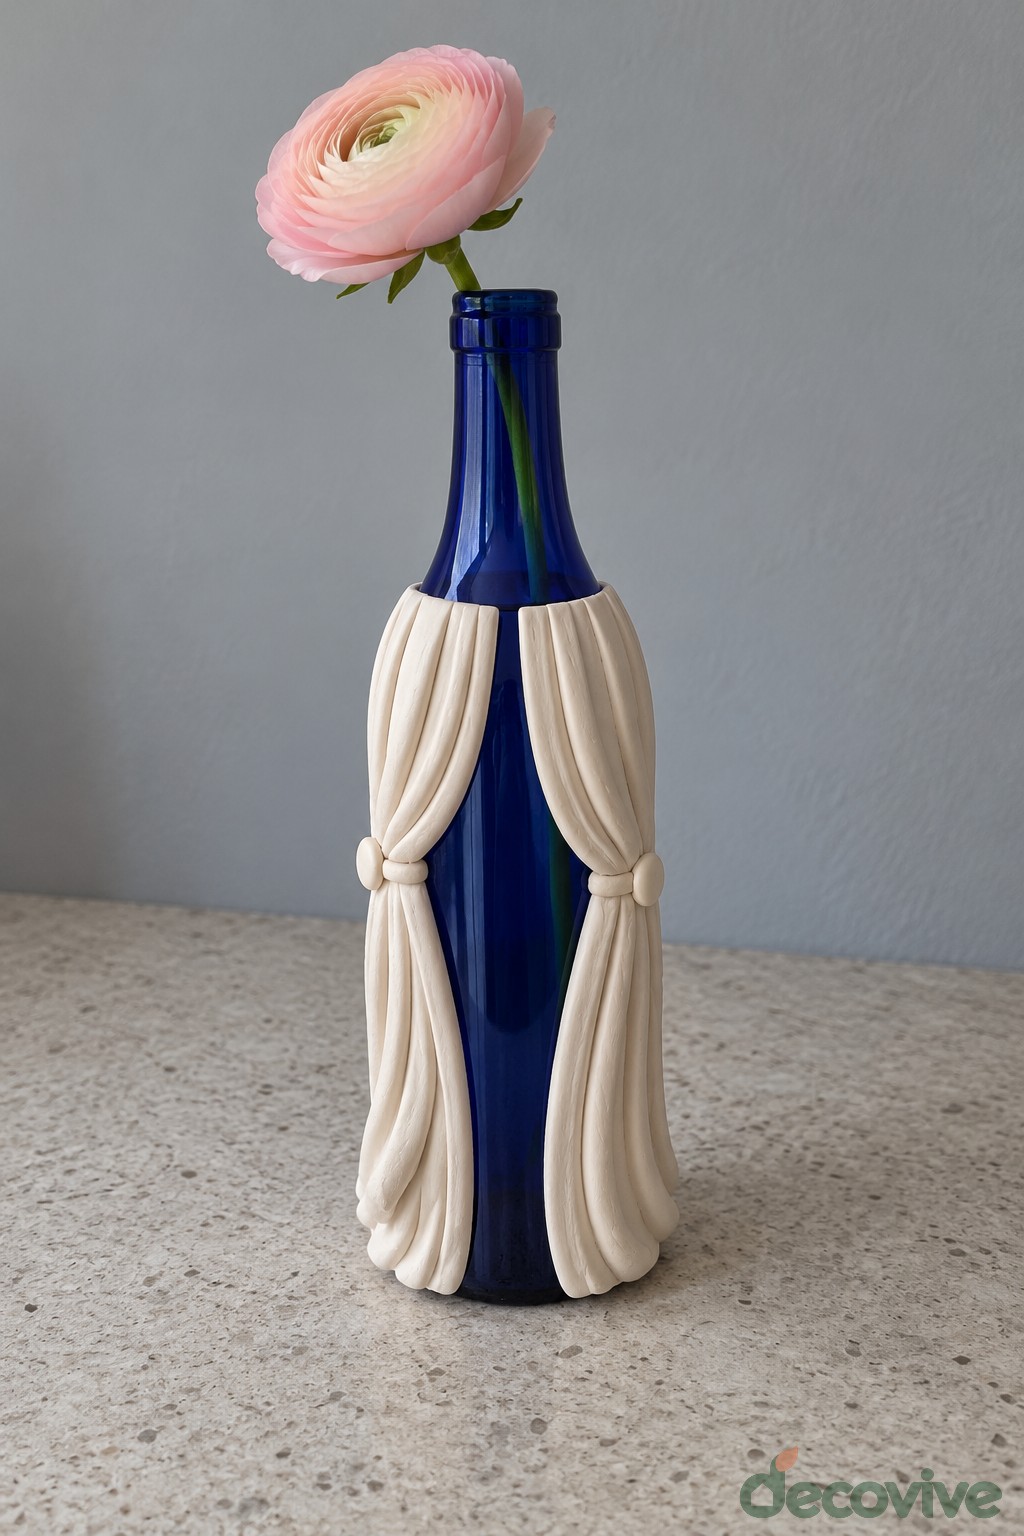
Cream fabric pulled into two small side ties frames the cobalt glass like a pair of miniature curtains. One pink ranunculus keeps the composition graceful and uncluttered.
Make two narrow fabric panels with finished edges. Attach their top edges to a removable band positioned below the bottle shoulder, then gather each panel with a short matching tie. Shape the folds so the blue center remains open.
Keep fabric above the tabletop and clear of the bottle mouth. A removable wrap makes this vase easier to clean than fabric glued across the full body. Use a single stem with enough length to sit naturally in the narrow neck.
13. Fairy Staircase Bottle Vase
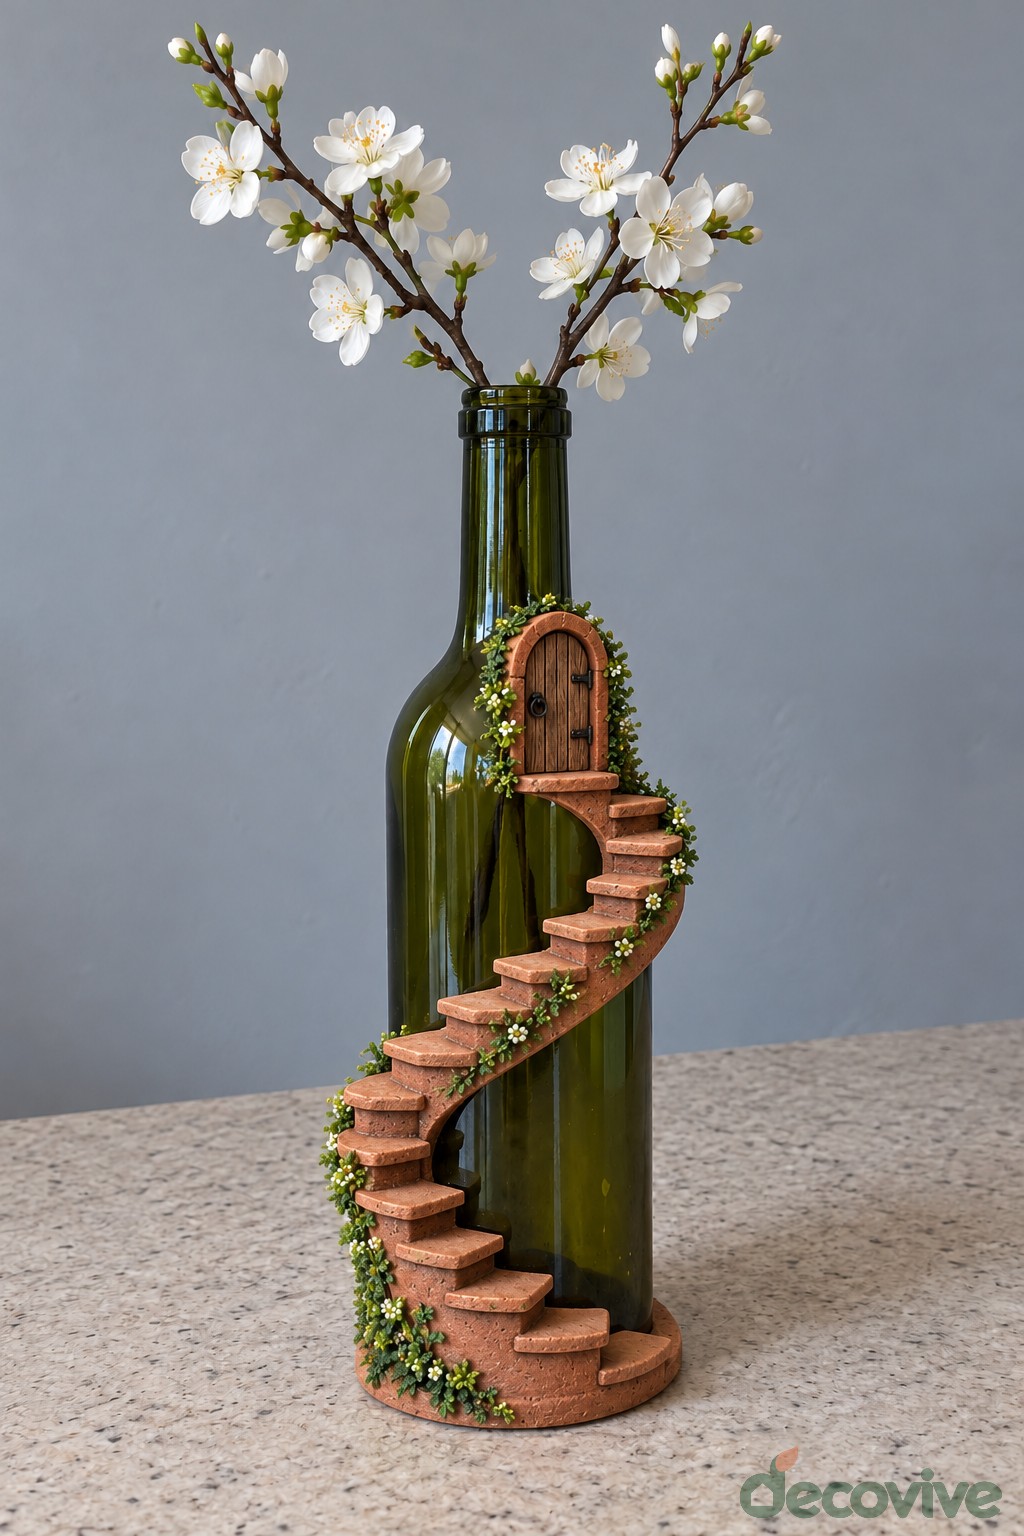
A tiny curving staircase winds around a green bottle toward an arched miniature door. Pale blossom branches above extend the storybook character without changing the bottle shape.
Build the stair ornament separately from lightweight craft pieces around a curved backing matched to the bottle. Support its bottom on a small level base and fix the door and faux moss to the backing. Once the assembly is secure, attach it to the exterior with a compatible adhesive.
These are decorative miniature steps, not a structural spiral cut into the glass. Keep the bottle intact and ensure the ornament does not project beneath its base. Use lightweight blossom stems and hold the plain upper section when moving the vase.
14. Crescent Moon Bottle Stand
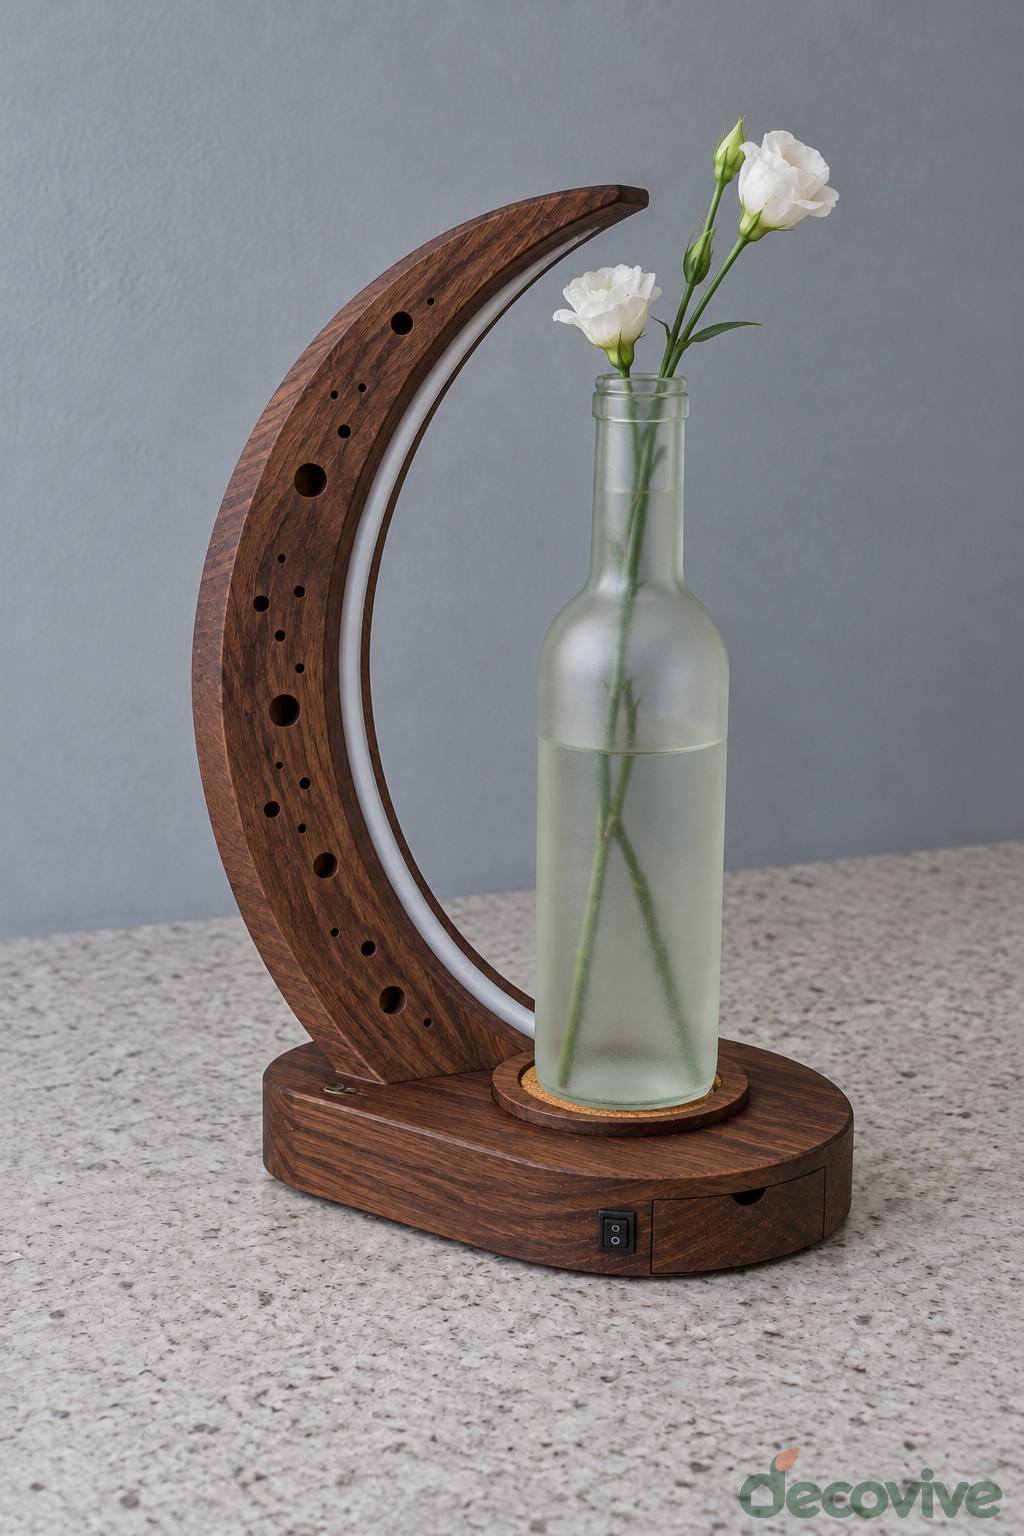
A dark wooden crescent curves around a pale bottle holding a few white flowers. Small drilled details on the crescent create a celestial character while the vase remains simple.
Cut the crescent from an adequately thick wood blank using a suitable template and tools, or use a prepared craft shape. Screw it securely to a broad round base. Make a shallow bottle recess with a cork pad and leave sufficient clearance for the bottle shoulder.
Do not cut a close fitting hole that traps the vase inside the crescent. The bottle should lift out for cleaning. Position its weight over the base rather than beyond the curved edge, and use short, light flowers to preserve balance.
15. Copper Branch Photo Holder Bottle
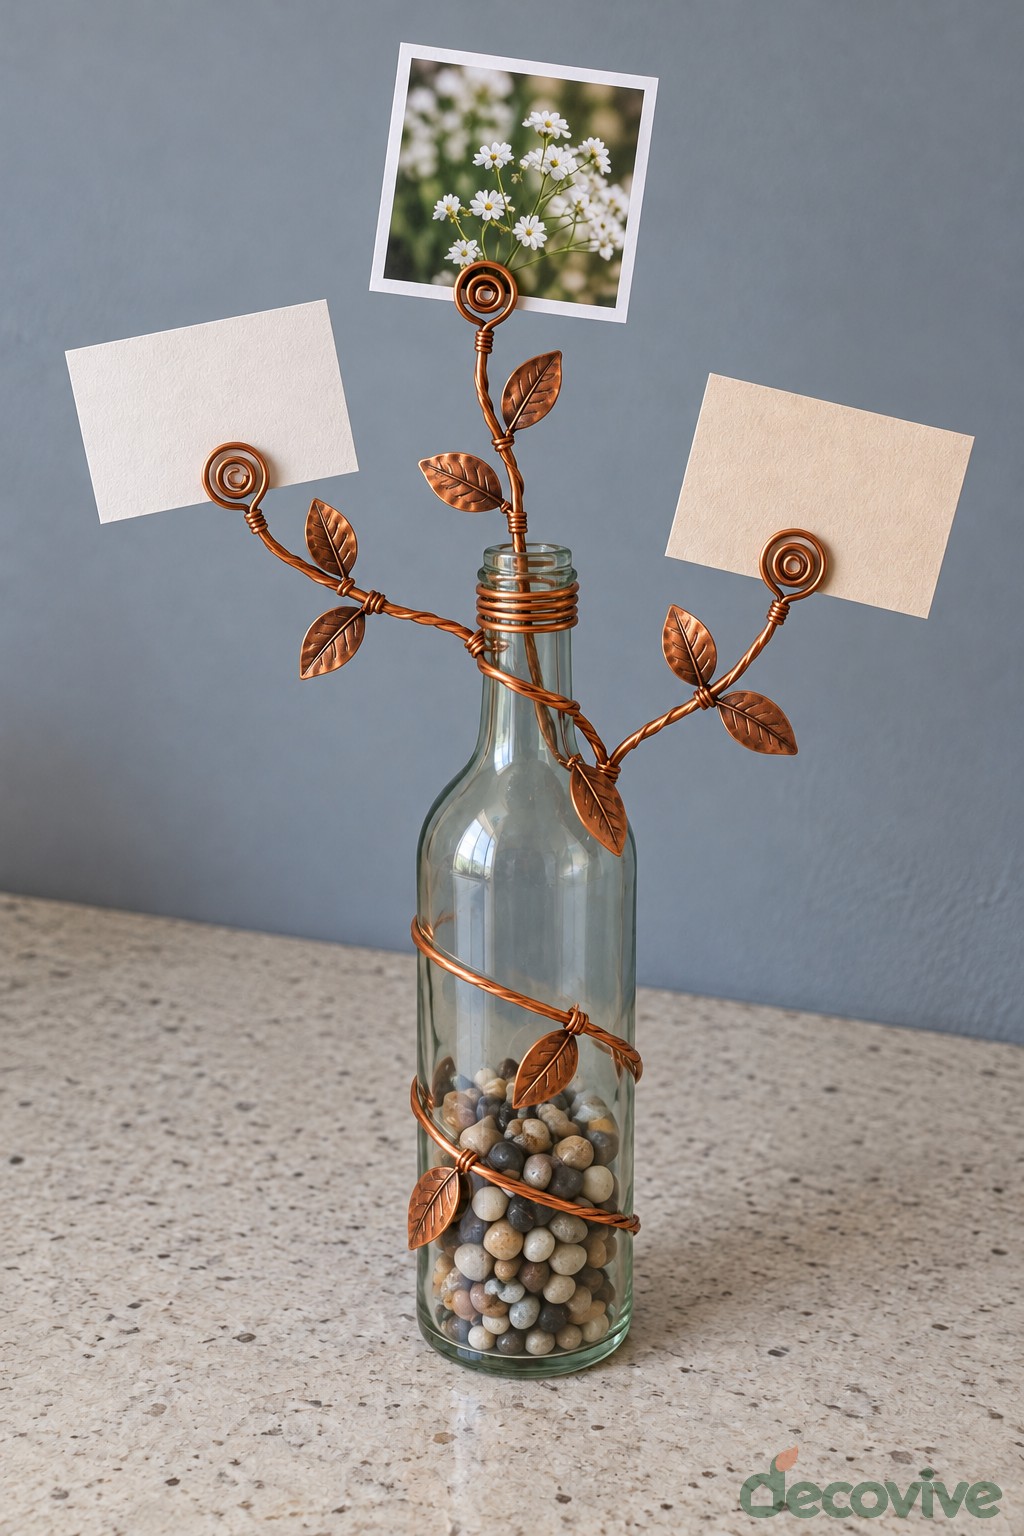
Copper colored branches hold small cards and a photograph above a pebble filled clear bottle. The little leaf details turn a practical display into an ornamental desk accent.
Form display branches from smooth craft wire, rolling the tips into flat spirals that grip paper without sharp exposed ends. Bind the stems together and secure the bundle in a fitted stopper. Add clean dry pebbles to the bottle for ballast and cover any trimmed wire ends.
Space the branches so the cards do not all pull the arrangement to one side. Use small lightweight photographs and notes, and keep the bottle on a stable desk. The wire is decorative and carries no electrical supply.
16. Antique Gold Butterfly Bottle
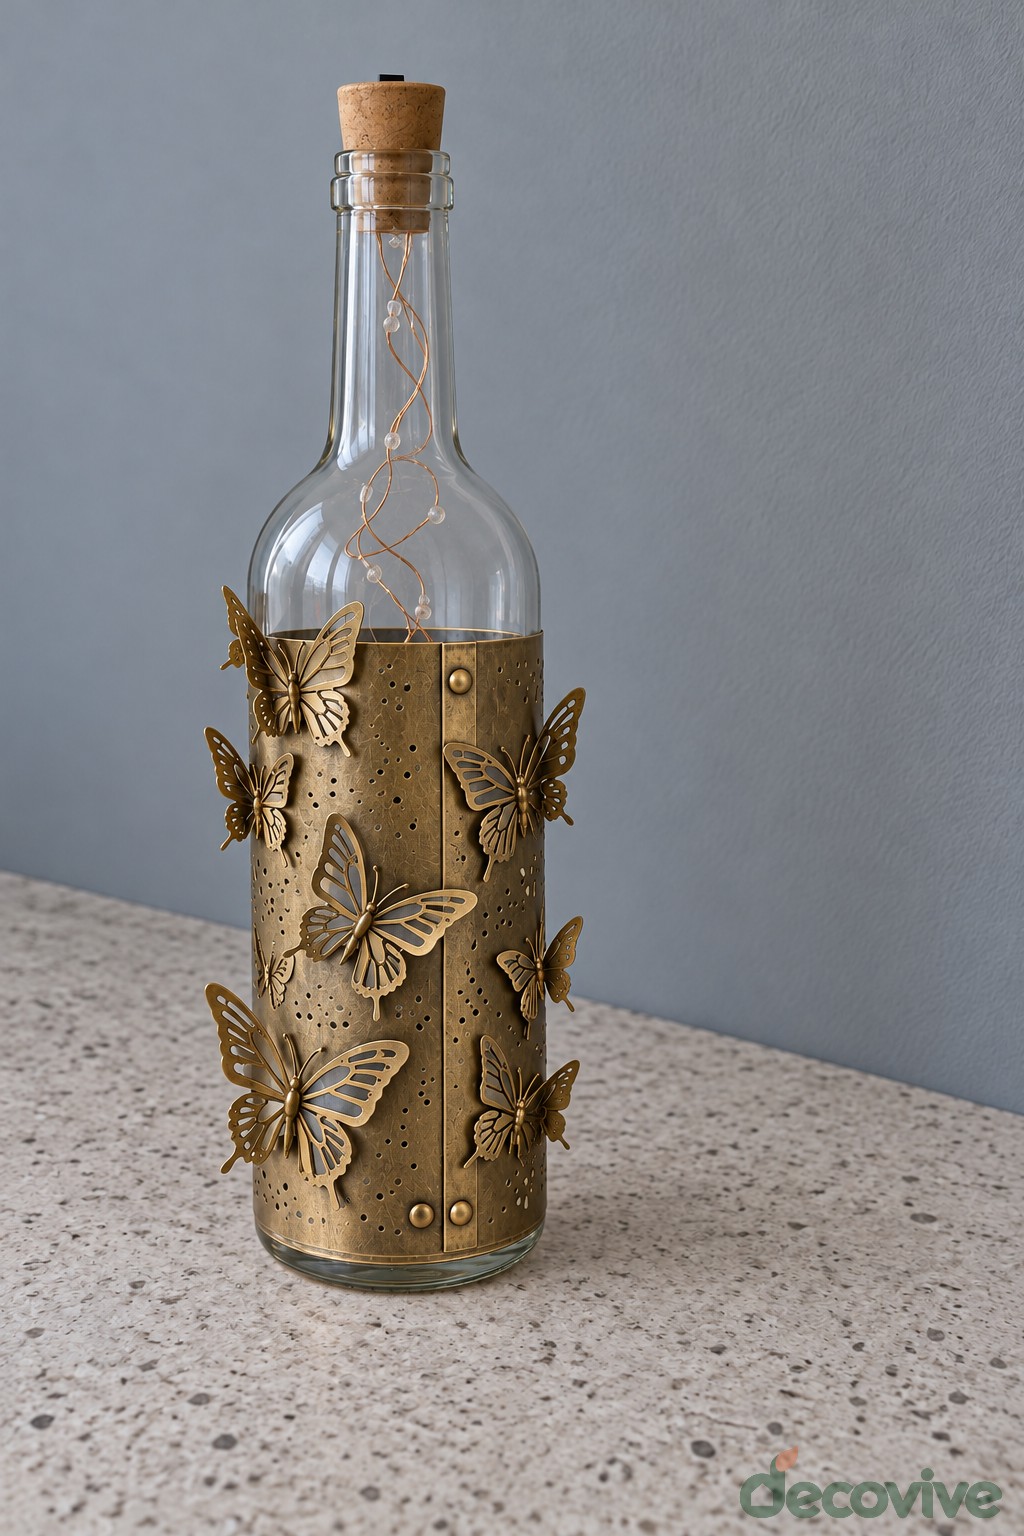
A textured bronze gold sleeve and raised butterflies give this corked bottle an aged ornamental finish. The plain glass shoulder stops the metallic surface from becoming too heavy.
Apply a thin decorative texture layer suitable for glass, or build the surface on a removable sleeve. Attach lightweight butterfly appliques, then use compatible metallic paint over the lower section. Add darker paint sparingly in the recesses and wipe raised areas for contrast.
Let each material dry and cure before adding the next. Protect the clear shoulder while painting and leave the cork removable. This version works as a dry shelf ornament; it does not need water or a floral arrangement.
17. Pressed Petal Screen Bottle Vase
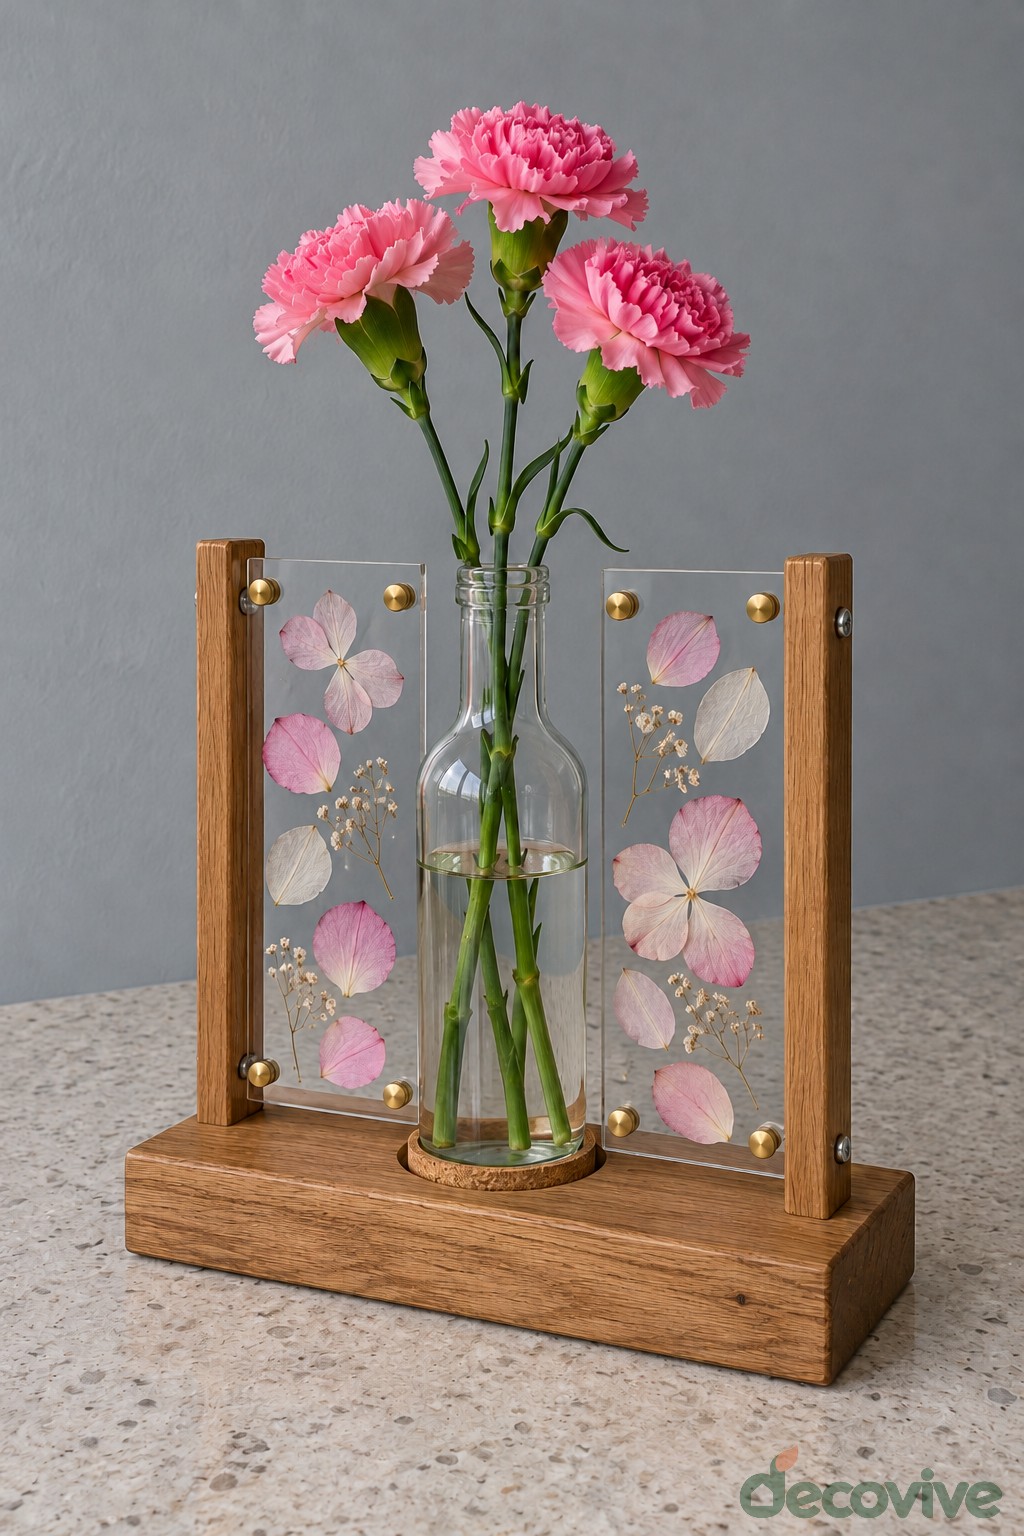
Two transparent panels filled with soft pink and cream petals frame a central carnation vase. A wooden base and brass colored fasteners give the delicate petals a defined outline.
Sandwich thoroughly dried petals between pairs of clear acrylic sheets. Have holes prepared for suitable stand off fasteners, keeping the holes away from the edges. Fix the panels to wooden side posts screwed into a broad base, and provide a separate cork lined position for the bottle.
The acrylic screens are decorative and should not hold the bottle upright. Leave enough space around the glass to lift it out without catching the flowers. Keep all wet stems inside the bottle and the pressed petals enclosed in the dry panels.
18. Miniature Balcony Bottle Display
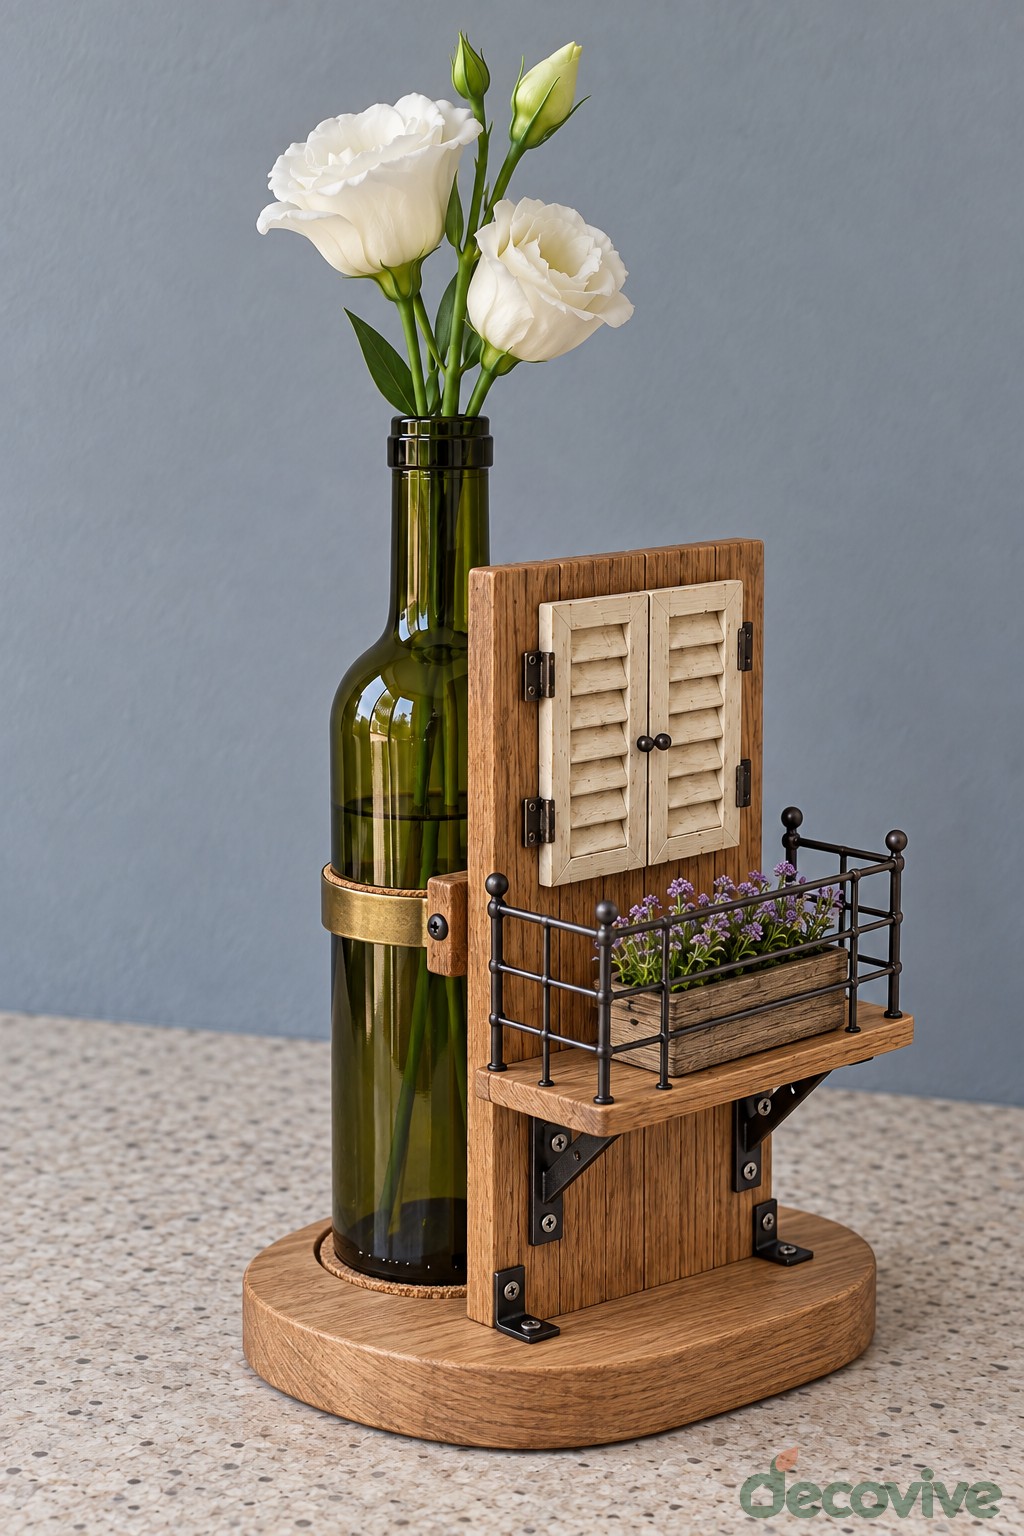
A tiny shuttered window and a projecting balcony create an architectural scene beside a green flower bottle. White blooms rise above the miniature building details.
Build the shutters and balcony as a separate model attached to a vertical wooden support. Screw that support into a broad base, add the railing and finish the small balcony floor before introducing the bottle. Retain the bottle with a padded strap fixed to the support.
The balcony must be supported by the wooden model, not glued to the curved glass as a cantilever. Keep the bottle removable for cleaning and avoid heavy miniature accessories on the outer railing. A few cut flowers provide enough height without hiding the shutters.
19. Celestial Blue Bottle Light
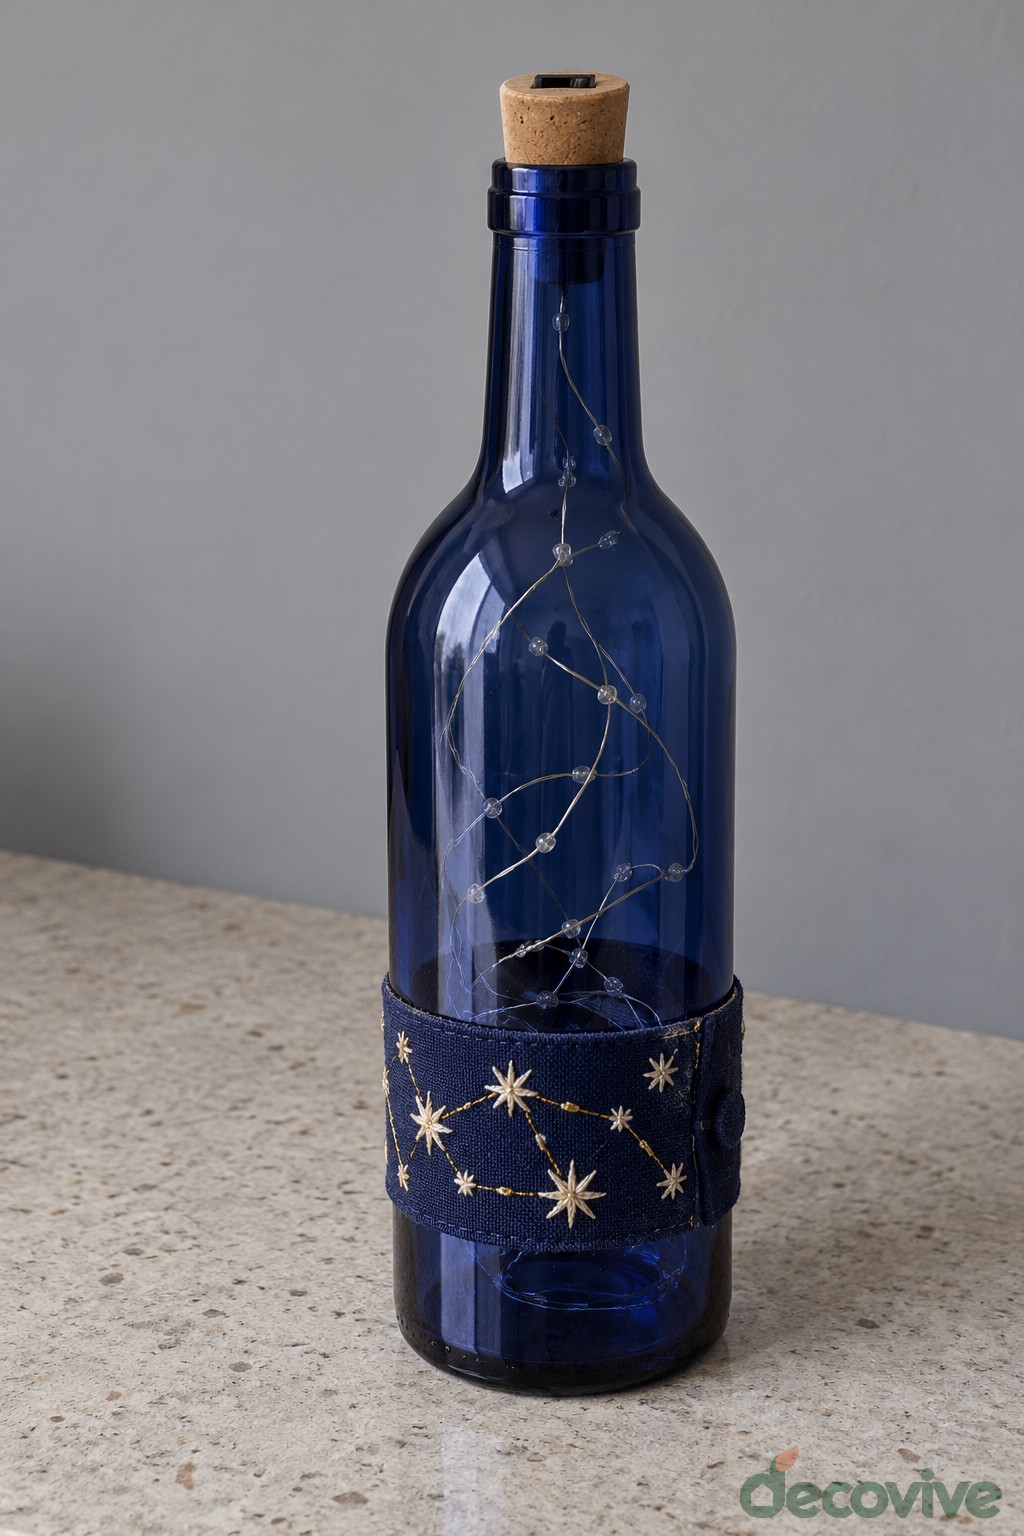
A deep blue bottle with small stars and a fine interior light strand makes a quiet celestial accent. The lower decorative band adds a second layer of night sky detail.
Apply small gold star motifs to the clean exterior using glass suitable paint or adhesive decorations. Use a purpose made battery bottle light stopper with a thin insulated LED strand. Feed only the strand through the mouth and keep its battery compartment accessible above the neck.
The string is visible but unlit in this styling. Use only the supplied battery system and keep the bottle completely dry. Never combine water, fresh flowers or a flame with the light strand, and replace batteries according to the product instructions.
20. Wooden Spool Frame Bottle Vase
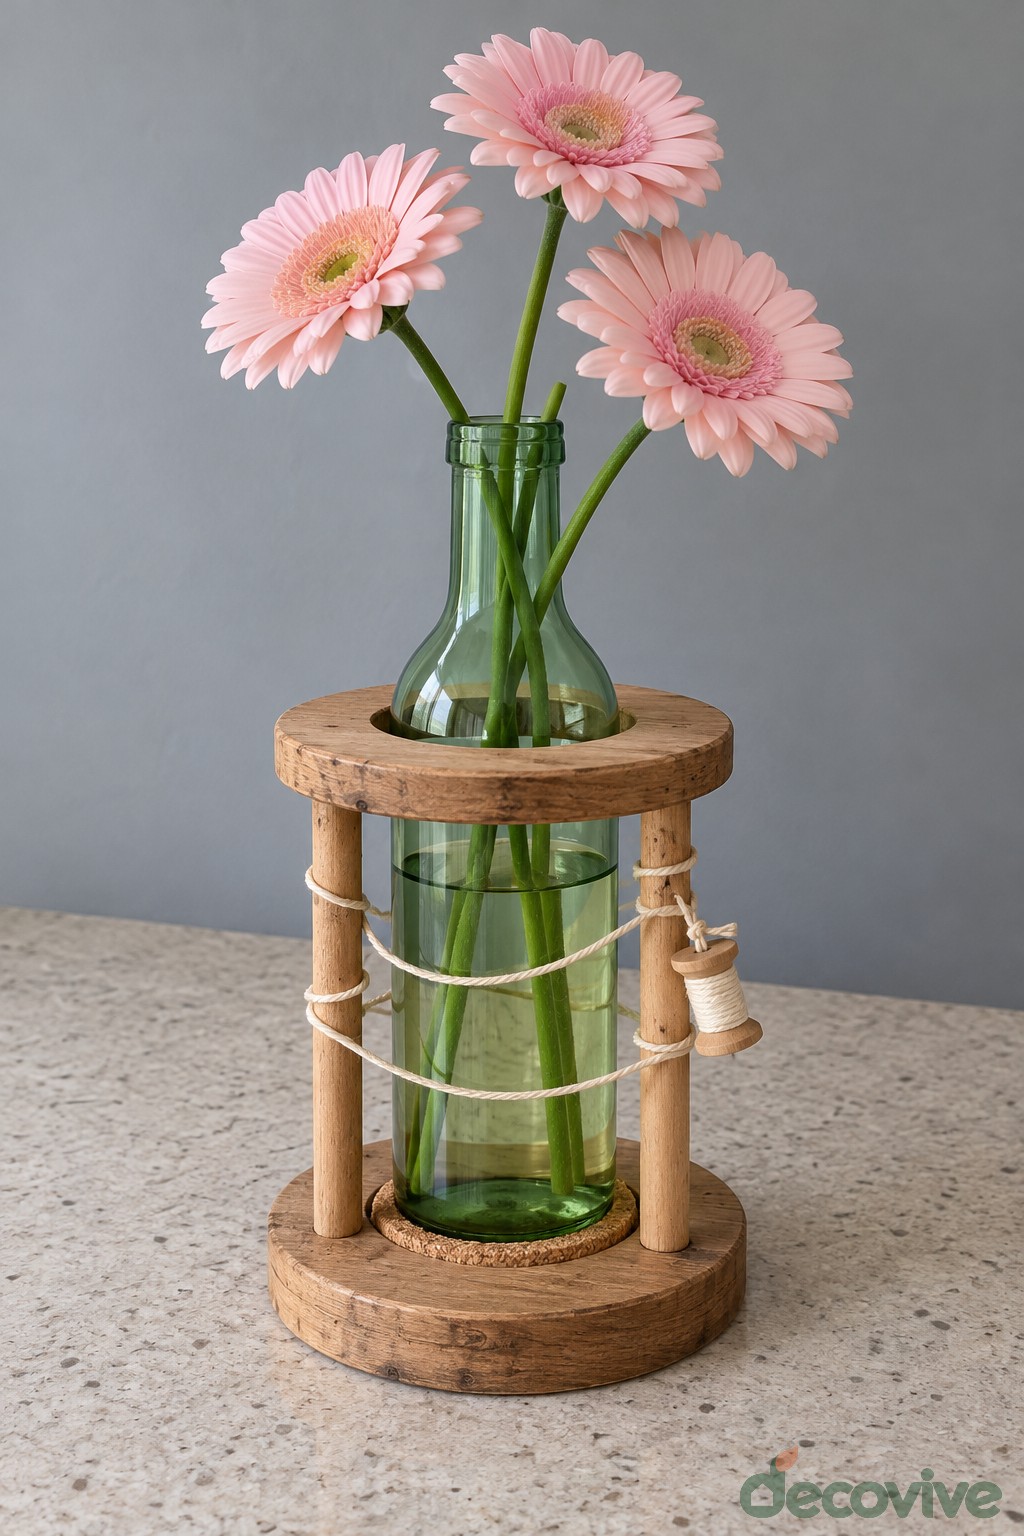
A green vase sits inside a circular wooden frame with upright dowels, cord and a tiny spool detail. Three pink gerberas add a soft contrast to the workshop inspired structure.
Make a broad round base and an upper ring, connecting them with securely fixed wooden dowels. Size the upper opening to clear the bottle body and provide a way to remove the top assembly, or build the frame so the bottle can slide out between the uprights. Add a cork pad beneath the glass.
Tie the decorative cord to the dowels, keeping the small spool outside the bottle opening. Do not permanently enclose the vase before planning water changes. Leave space above the ring for the gerbera stems to spread without pressing against the wood.
21. Floral Fan Backdrop Bottle Vase
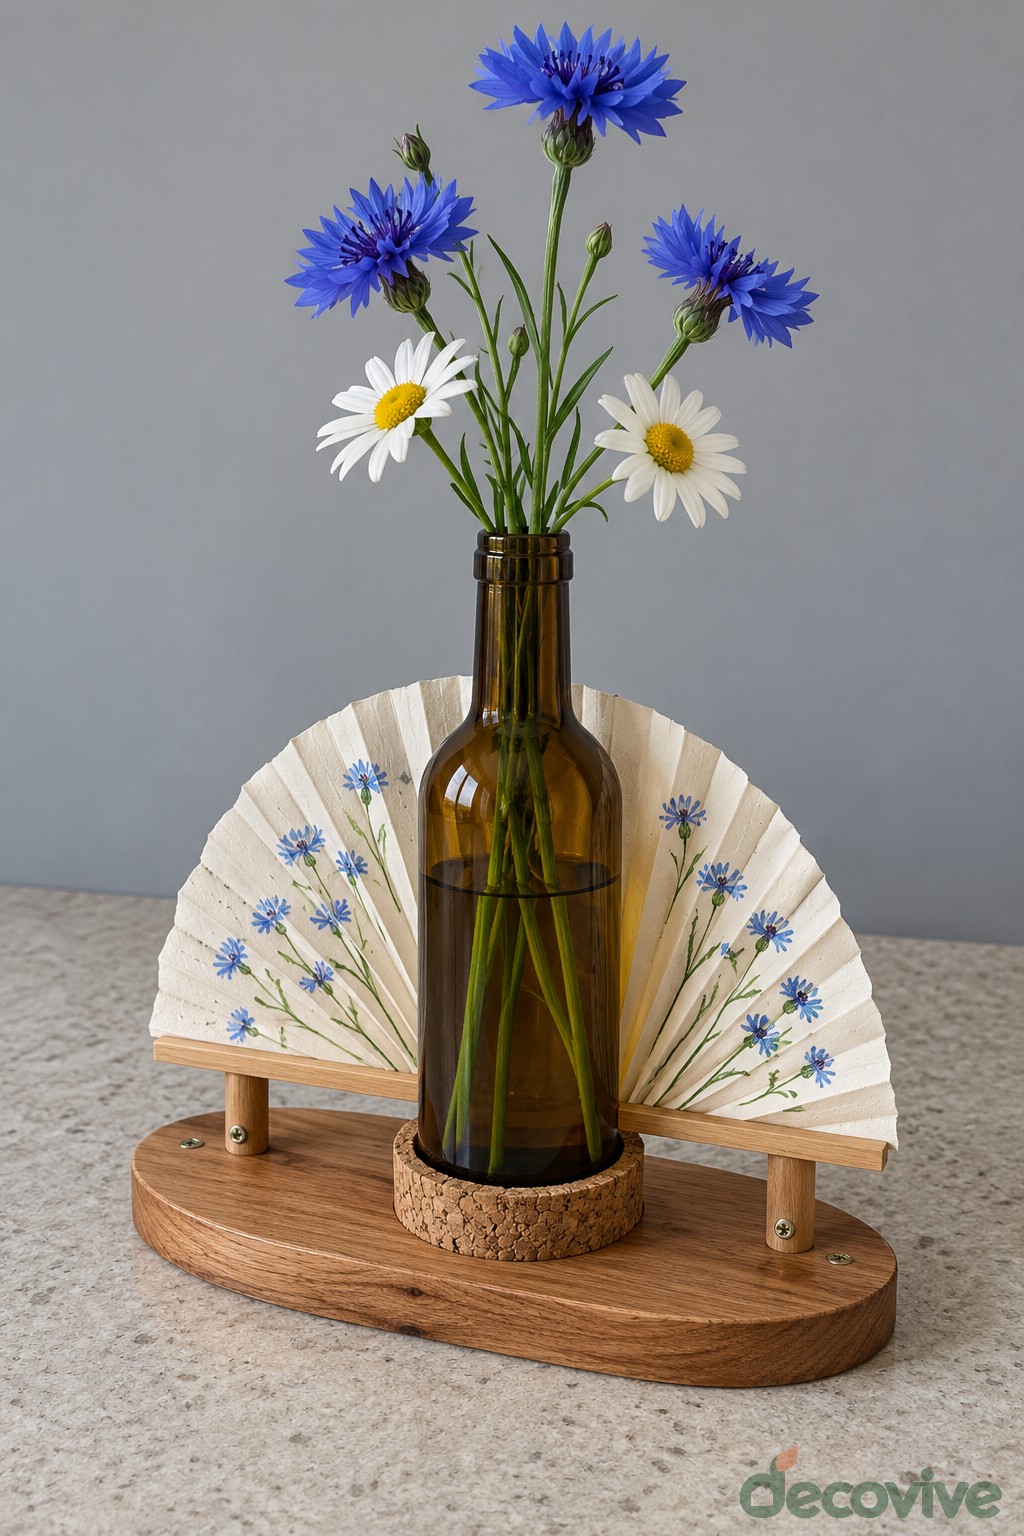
A pale folding fan rises behind an amber bottle of blue cornflowers and white daisies. The oval wooden base gives this light arrangement a clear footprint on a shelf or table.
Fix a small support behind the vase position and attach an opened decorative fan to it. Use a wooden fan frame with a paper or fabric covering and keep the attachment hidden at the back. Add a shallow cork lined bottle recess to the front of the base.
The fan should stand independently rather than resting against wet glass. Leave clearance so you can remove the bottle without bending the fan ribs. Keep the flower arrangement narrow enough that the painted fan remains visible on both sides.
22. Envelope Pocket Bottle Stand
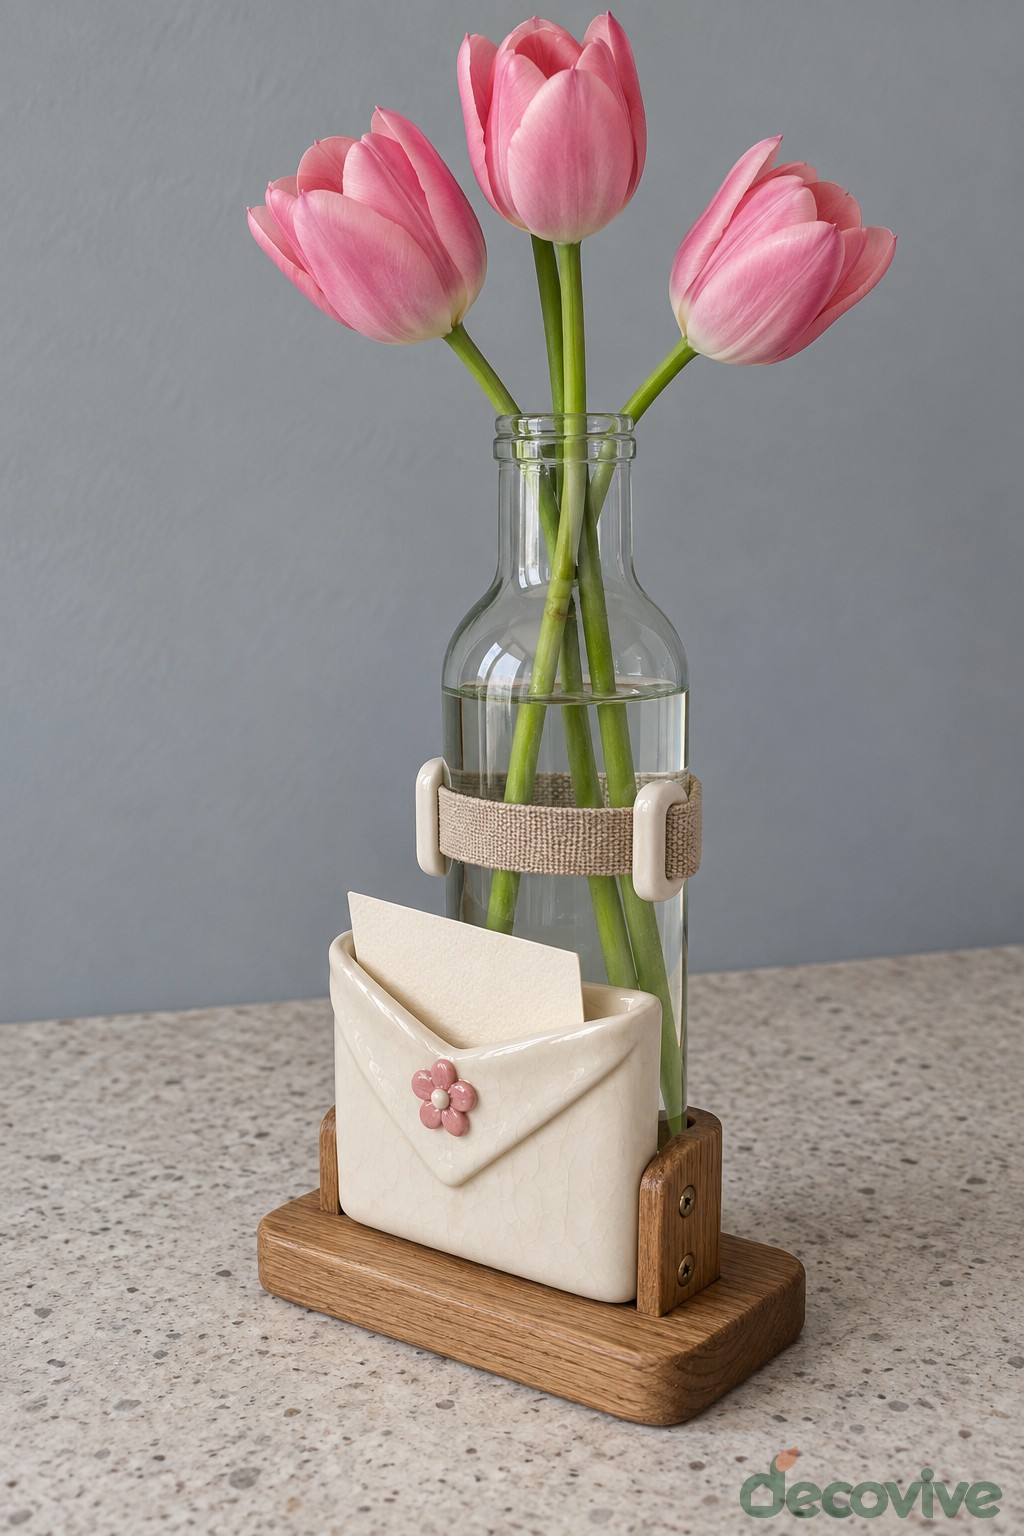
A little envelope ornament at the front of a wooden stand turns a tulip vase into a place for a personal greeting. Cream trim connects the pocket to the bottle restraint.
Build a low wooden base and a short upright with a removable padded bottle strap. Attach a lightweight envelope shaped pocket to the upright or a small front board. Use folded card for an occasional display or a more durable craft material for repeated use.
Treat the envelope as a small note holder and keep its opening clear of the water vessel. Lift the bottle out before filling it, then replace it in the stand and arrange three tulips. Do not soak the surrounding card or trim.
23. Corset Laced Bottle Vase
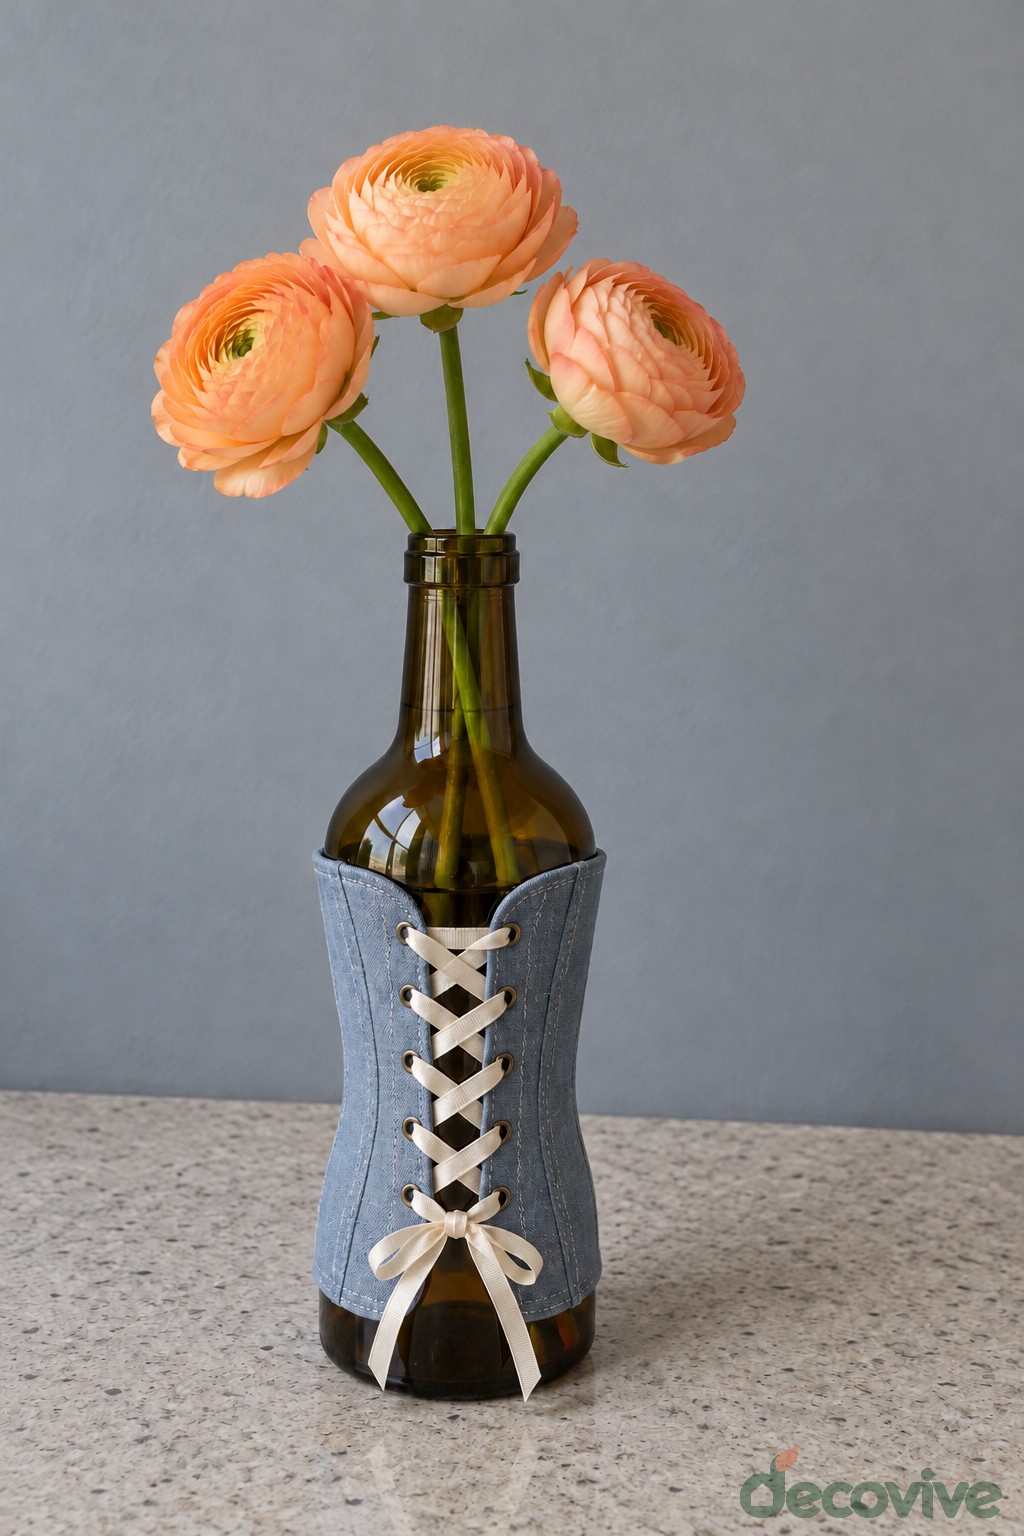
A pale blue fabric wrap laced with cream ribbon gives an amber bottle a tailored look. Orange ranunculus flowers add warmth above the simple dark neck.
Measure a removable sleeve for the lower body and reinforce its two front edges. Add evenly spaced eyelets to the fabric, lace them with narrow ribbon and fit the sleeve around the bottle. Stitch the eyelet strips firmly so pulling the ribbon does not tear the material.
Tie the lacing loosely enough to remove the wrap. The ribbon decorates the bottle and should never serve as a carrying handle. Keep the fabric away from spilled water and turn the sleeve seam toward the back for a neat finish.
24. Ballet Slipper Bottle Vase
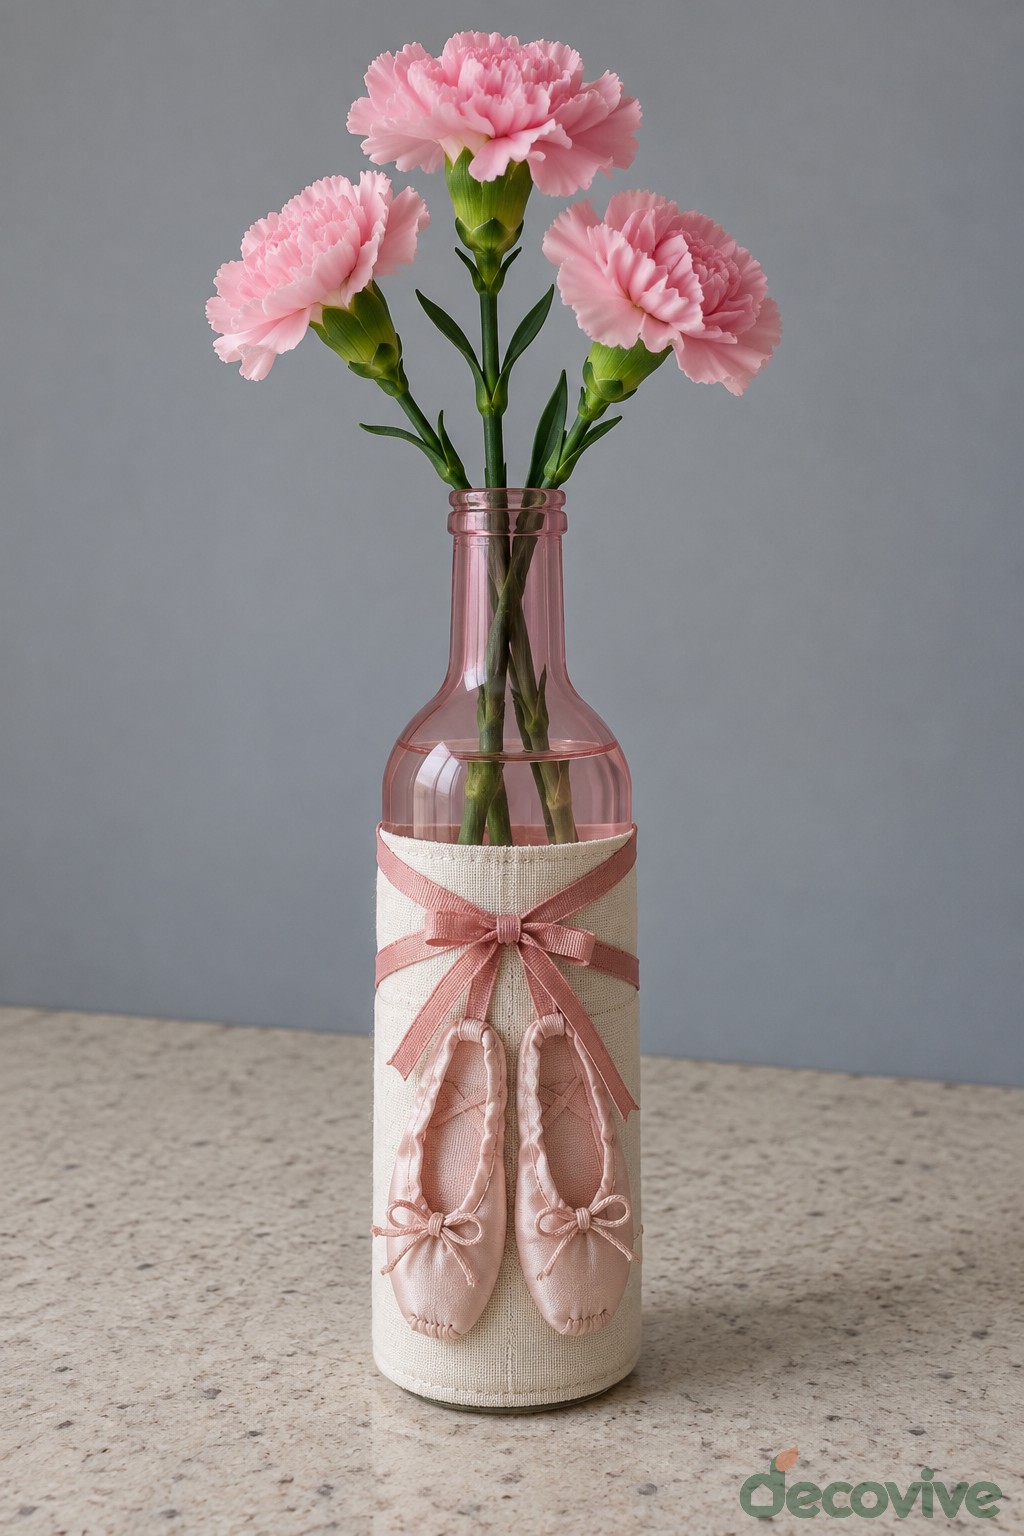
Pink miniature slippers and crossed satin ribbon decorate a pale sleeve below a pink glass neck. A few carnations complete the ballet inspired arrangement.
Start with a removable fabric or card sleeve sized to the lower bottle body. Attach small decorative slippers to the sleeve, then arrange crossed ribbon above them and finish with a bow. Use a ready colored bottle so the neck retains a clean translucent finish.
Keep the slippers light and fully attached so they cannot pull the sleeve downward. Lift the glass out for cleaning and add water before replacing the wrap. Let the carnation heads sit above the neck without crowding the ribbon.
25. Pink Checkerboard Bottle Vase
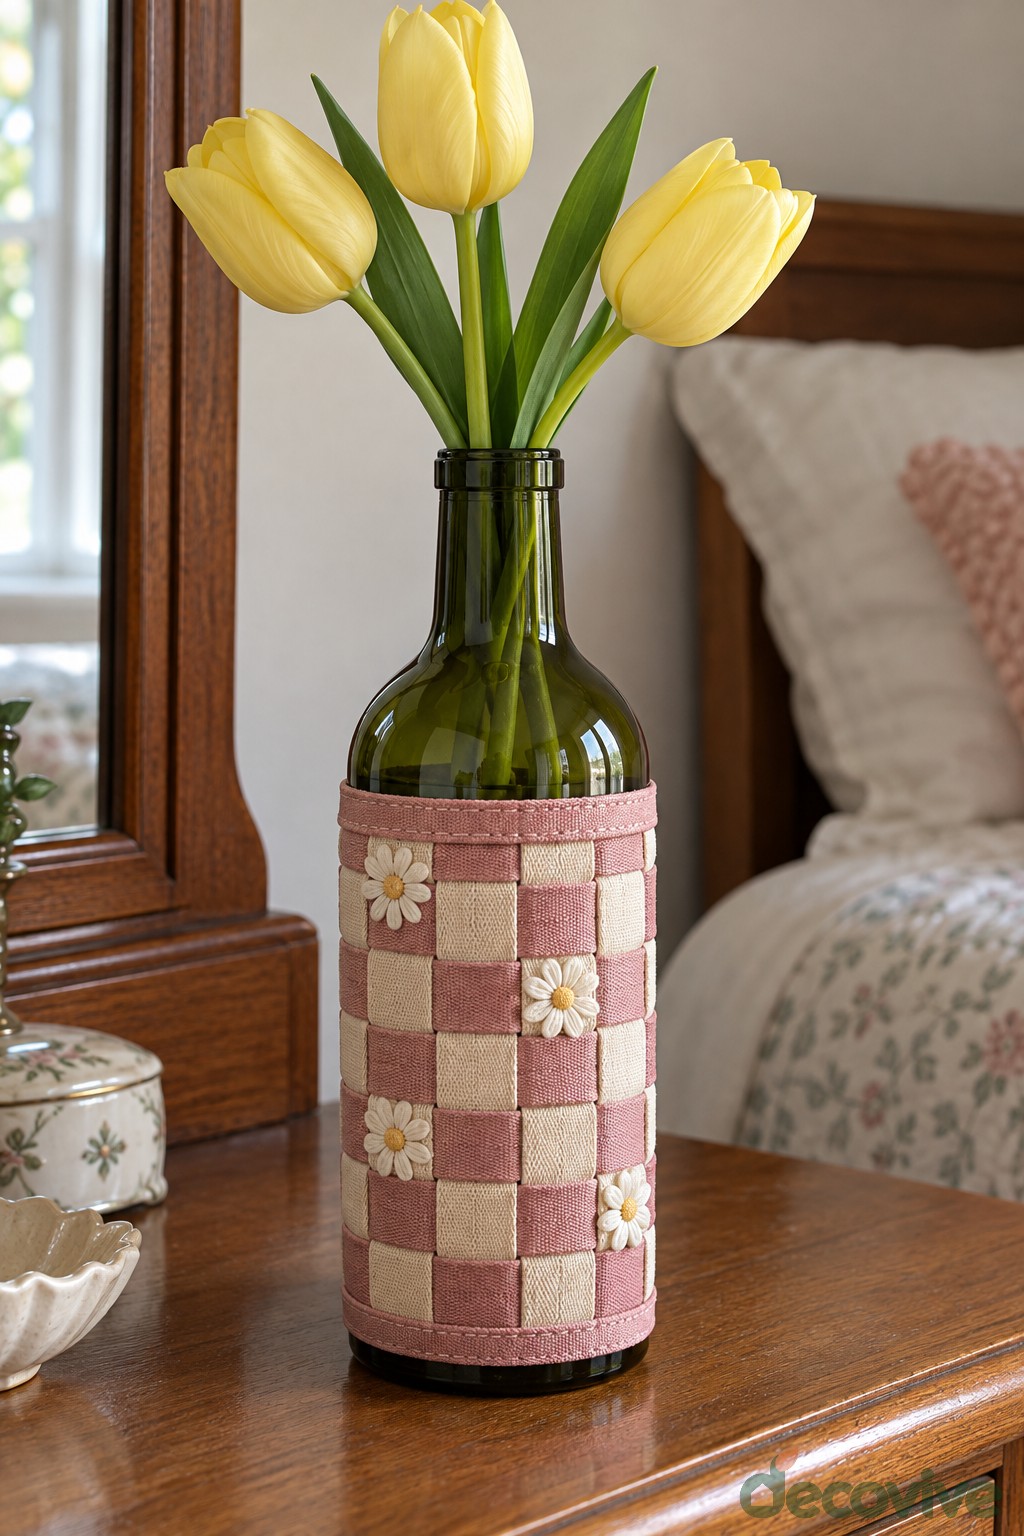
Muted rose and cream squares create a soft checkerboard sleeve around a green bottle of yellow tulips. Small floral accents break up the grid and give it a handmade textile character.
Mark a simple grid on a removable backing and apply thin cotton squares with a compatible decoupage medium. Keep the rows aligned around the bottle and finish the rear seam neatly. Add a few tiny floral details after the patchwork surface has set.
Leave the shoulder and neck uncovered so the dark green glass frames the pale pattern. Keep the exterior dry and use only a few tulips. The cheerful palette works well beside other small handmade pieces, including our felt flower decorations.
26. Carousel Frame Bottle Vase
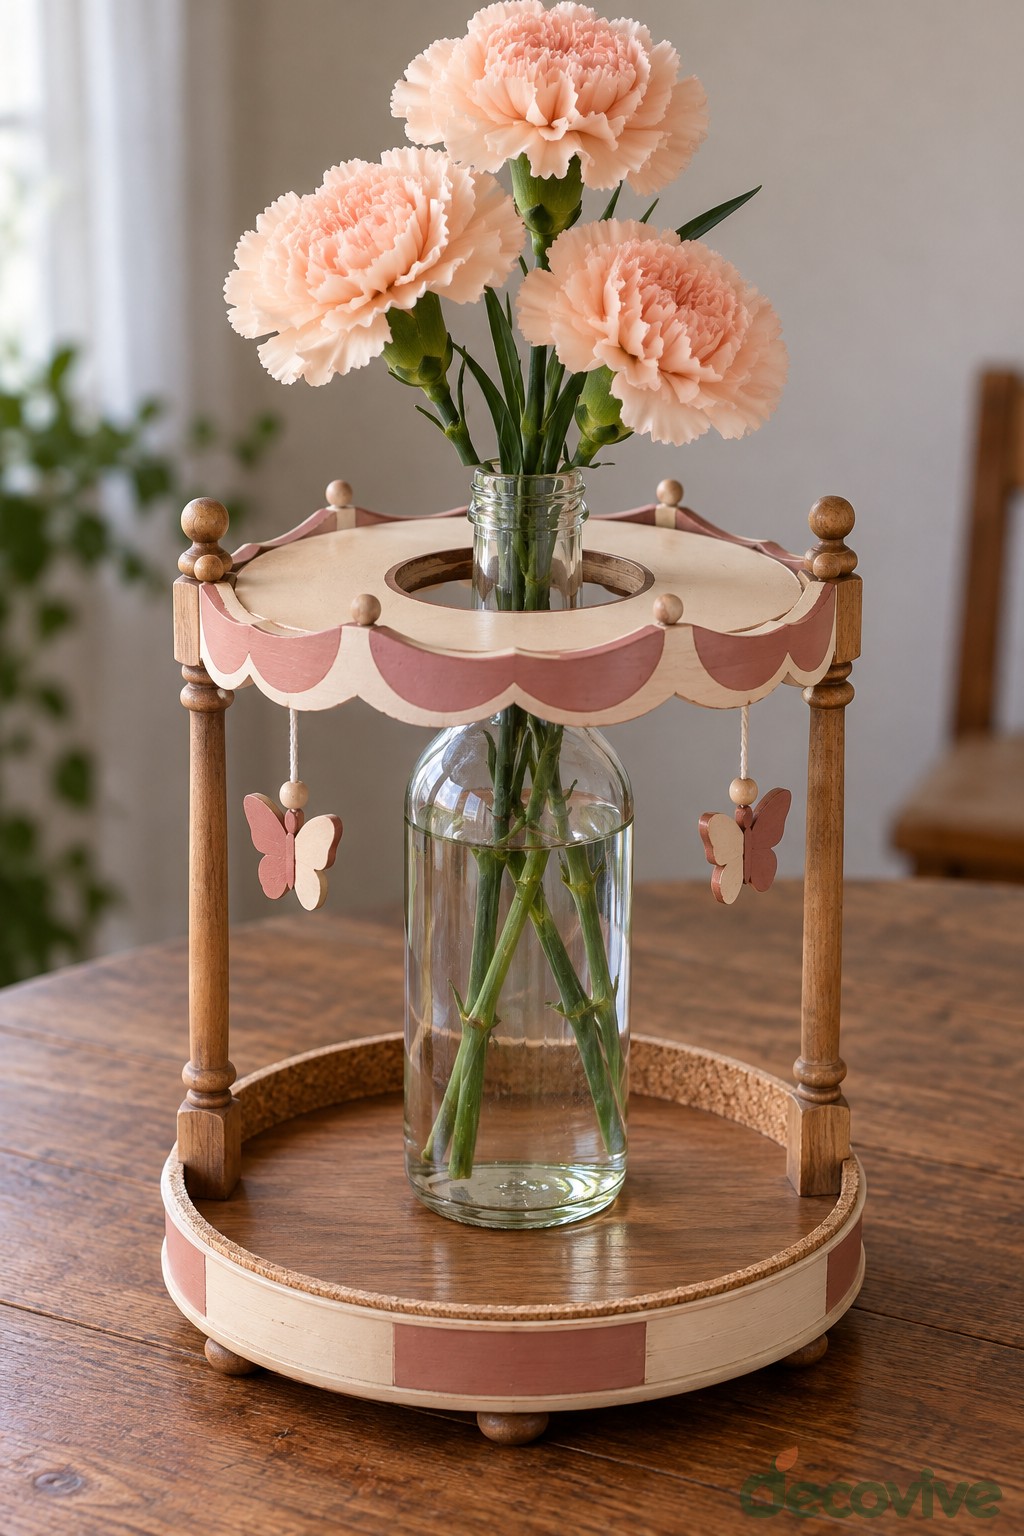
A pink circular platform, slender posts and a scalloped upper ring surround a clear vase of peach carnations. Small hanging butterflies give the frame a carousel inspired finish.
Assemble a solid round base and a matching open upper ring joined by upright dowels. Add scalloped trim around the upper ring and attach lightweight butterfly ornaments with short thread loops. Provide a removable upper section or a side opening large enough to take the bottle out.
The bottle mouth stays open above the ring and the flower stems go directly into the glass. Keep hanging details away from the water and ensure no thread can catch the bouquet when it is removed. Let painted wooden parts cure before assembly.
27. Moon Phase Bottle Light Shadow Box
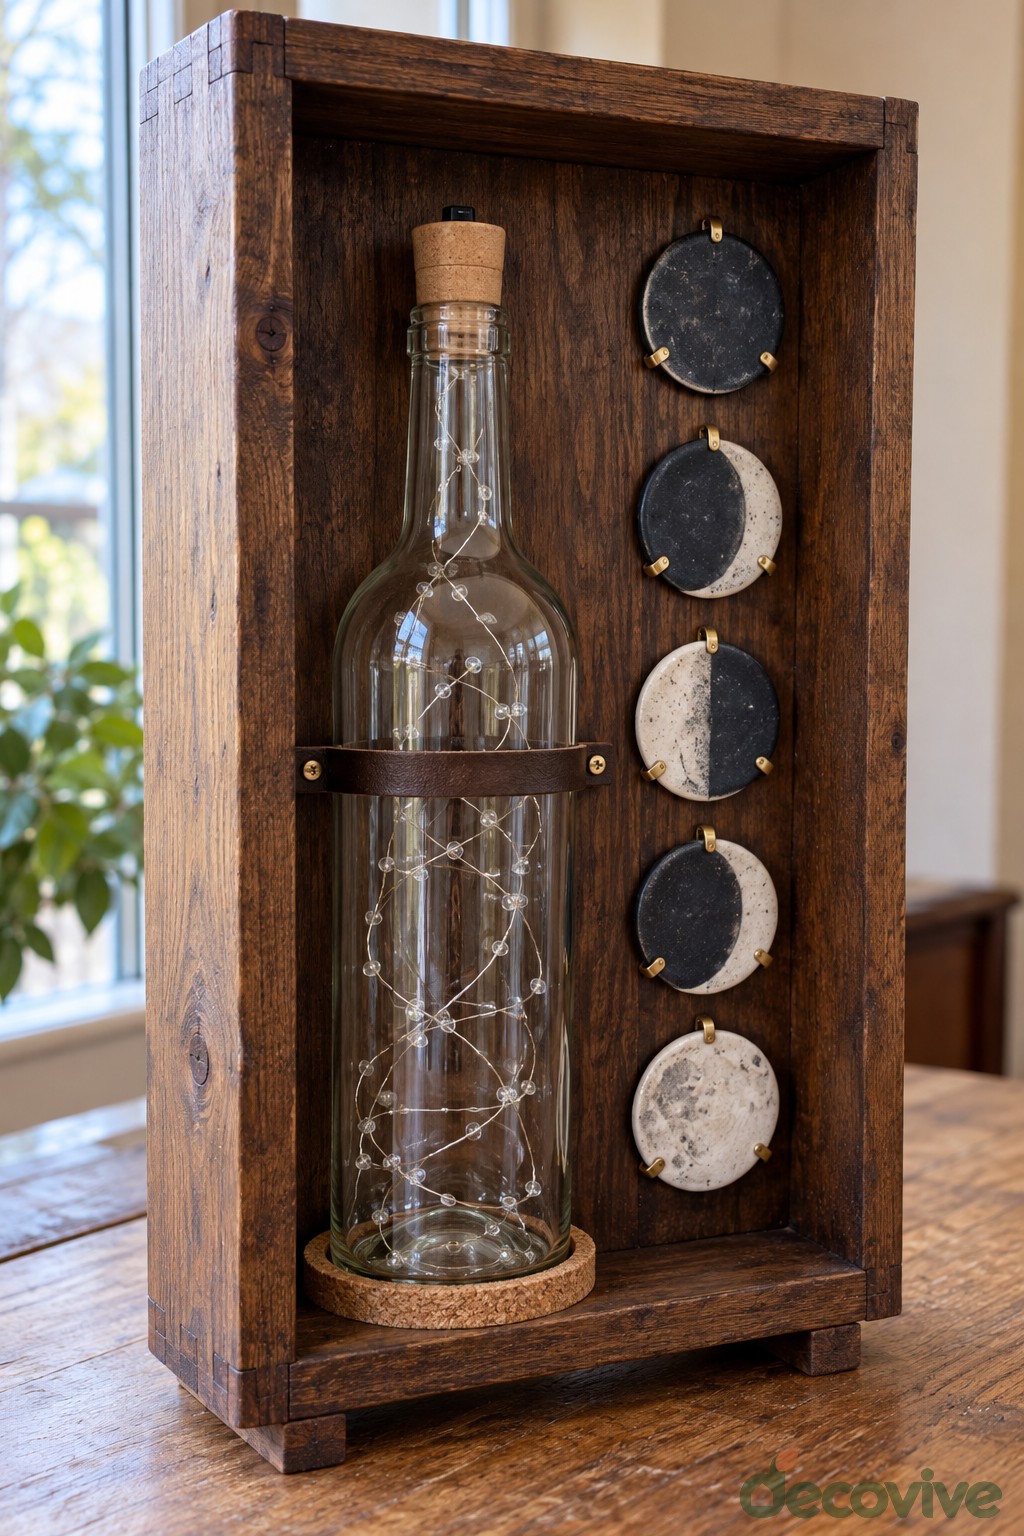
A clear bottle and a vertical row of moon phase discs fill a dark wooden shadow box. The dry interior LED strand adds a lighting option while the moon sequence supplies texture even with the lights off.
Build or choose a deep stable box with a small lower shelf. Place the bottle on a cork pad and secure it with a removable padded strap screwed to the wooden back. Mount painted moon phase discs separately beside it. Fit a purpose made battery bottle light stopper and feed its insulated strand into the dry glass.
Keep the battery compartment and switch reachable without dismantling the box. The strand is unlit in this display. Use secure wall hardware if hanging the box, or give a freestanding version a sufficiently deep base. Do not add water to this lighting project.
28. Satin Ballet Wrap Bottle Vase
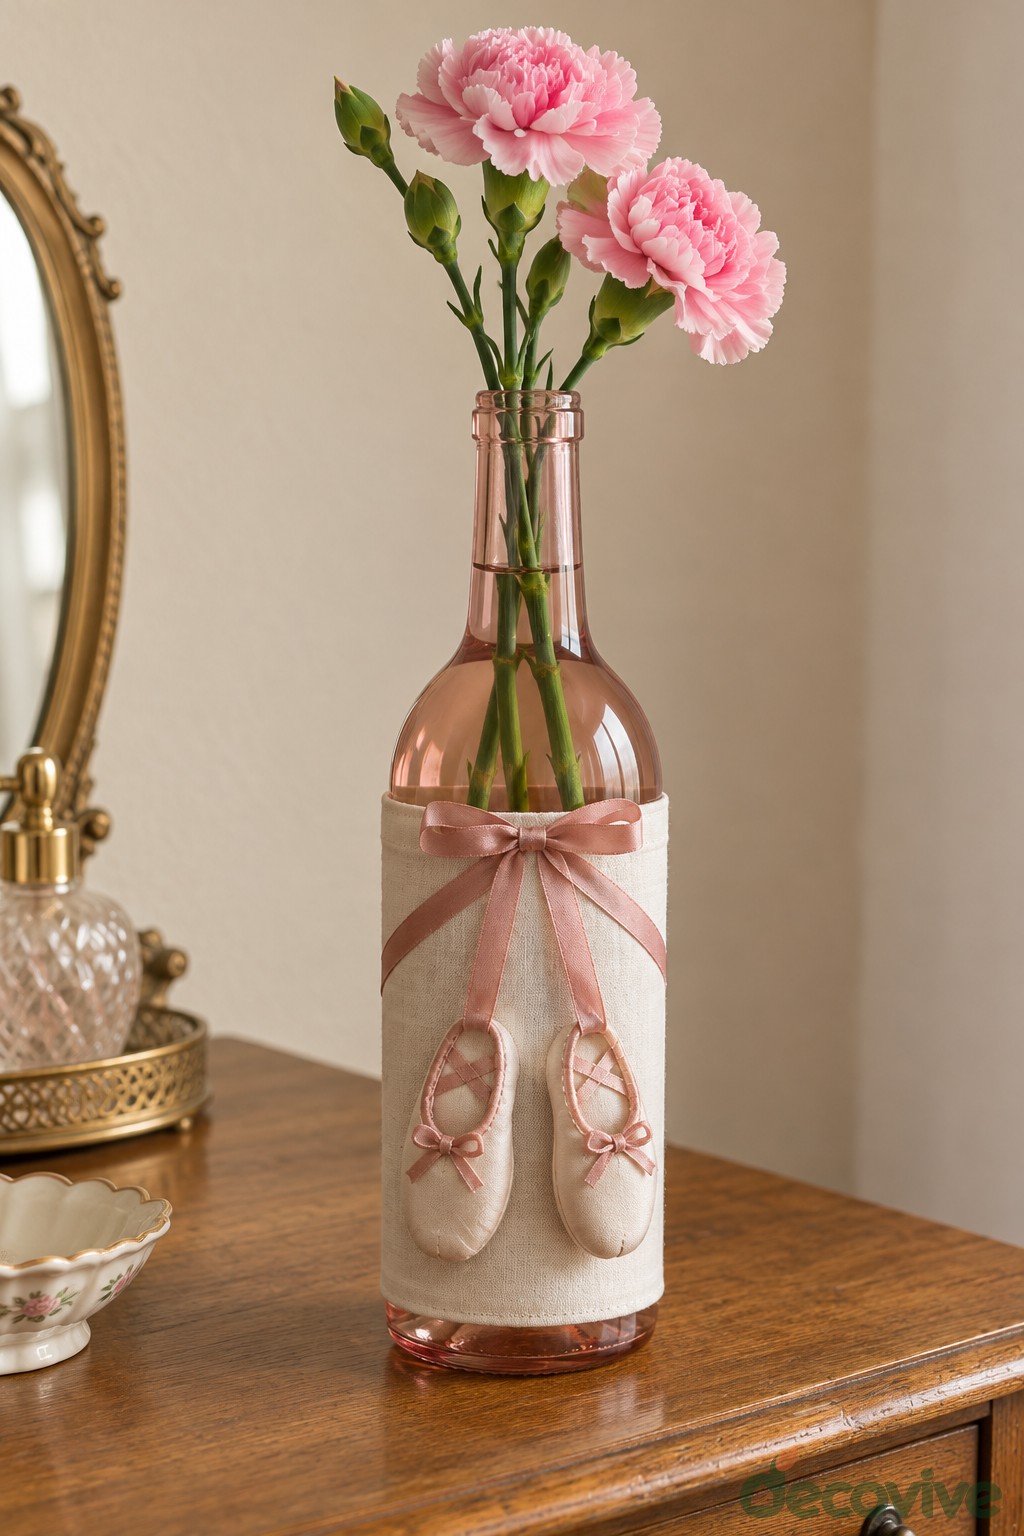
A pale wrap, pink slippers and a satin bow create a softer dressing table version of the ballet theme. Pink carnations repeat the ribbon color above the rose tinted bottle neck.
Make a simple removable sleeve with a smooth pale exterior. Sew or securely attach two small decorative slippers to its front, crossing their ribbons above them before tying a neat bow. Slide the sleeve over the lower bottle body and keep the upper glass clear.
This version suits a dresser or vanity where the ribbon can stay clean and dry. Fill the glass before fitting the sleeve, then add a few cut carnations. Remove the entire fabric section when cleaning rather than scrubbing around the miniature slippers.
29. Sunburst Wood Bottle Stand
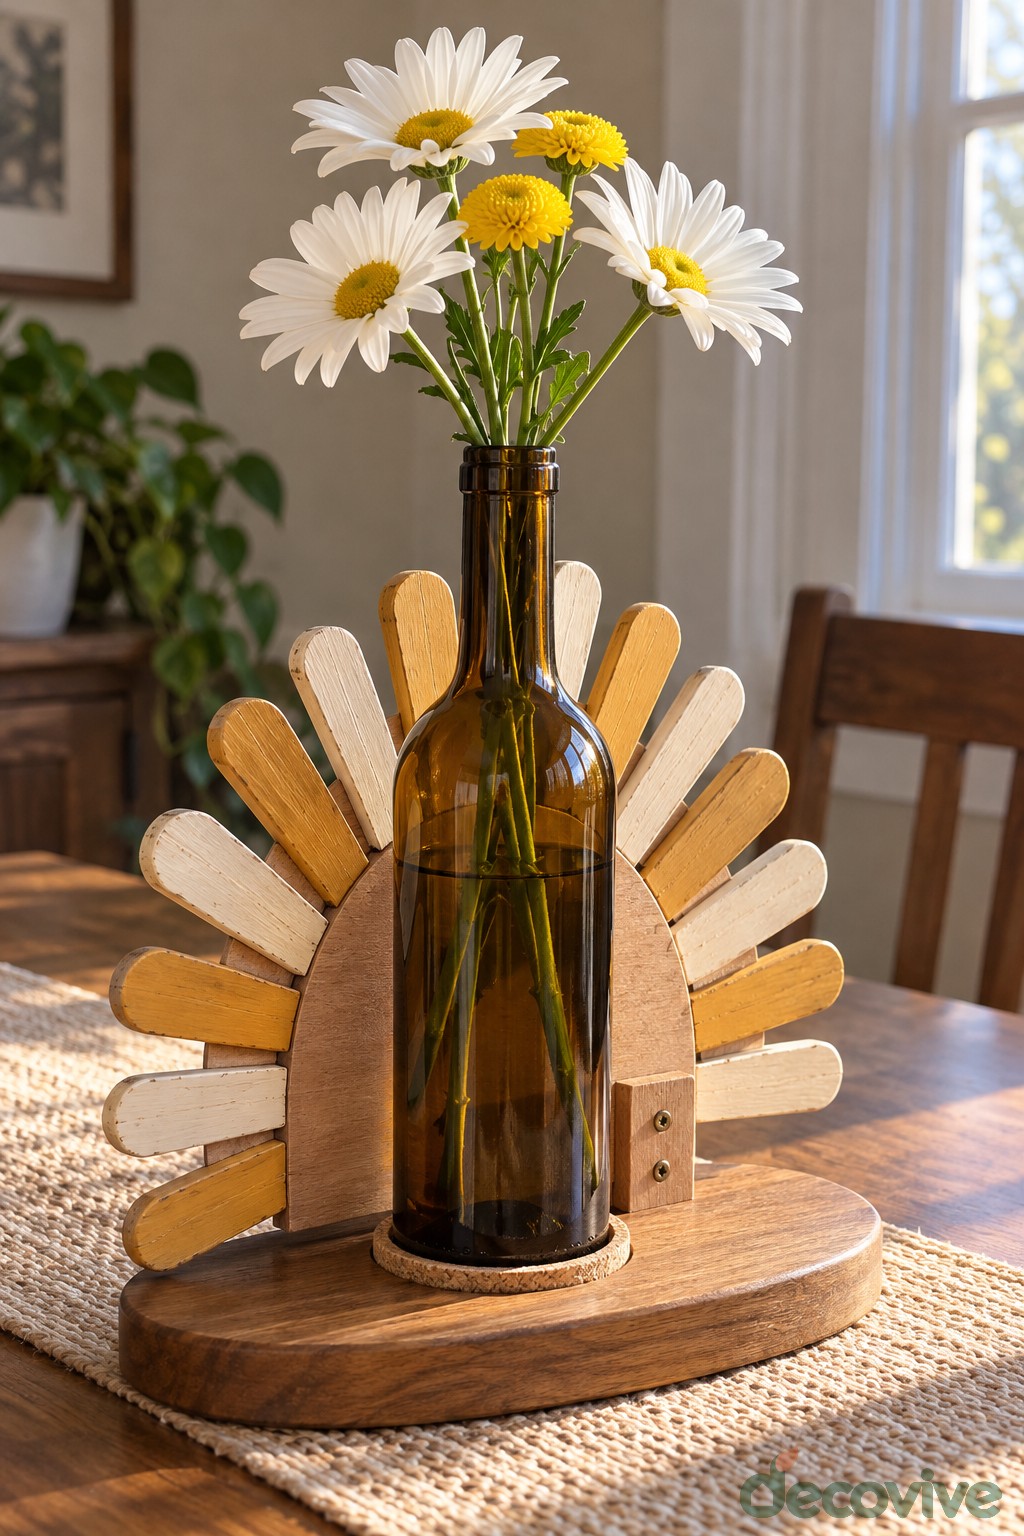
Rounded wooden rays fan out behind an amber bottle of white daisies. Warm yellow accents echo the flower centers and bring a sunny focal point to a dining table.
Arrange smooth craft slats of alternating lengths on a rigid semicircular backing. Round and sand every exposed tip, paint selected slats yellow and fasten the backing to a broad wooden base. Add a cork lined bottle position in front of the rays.
The backing must support the rays independently of the bottle. Leave enough clearance for lifting the vase out and keep the tallest rays below the main flower heads. A compact bunch of daisies lets both the woodwork and the amber glass remain visible.
30. Basket Handled Bottle Vase
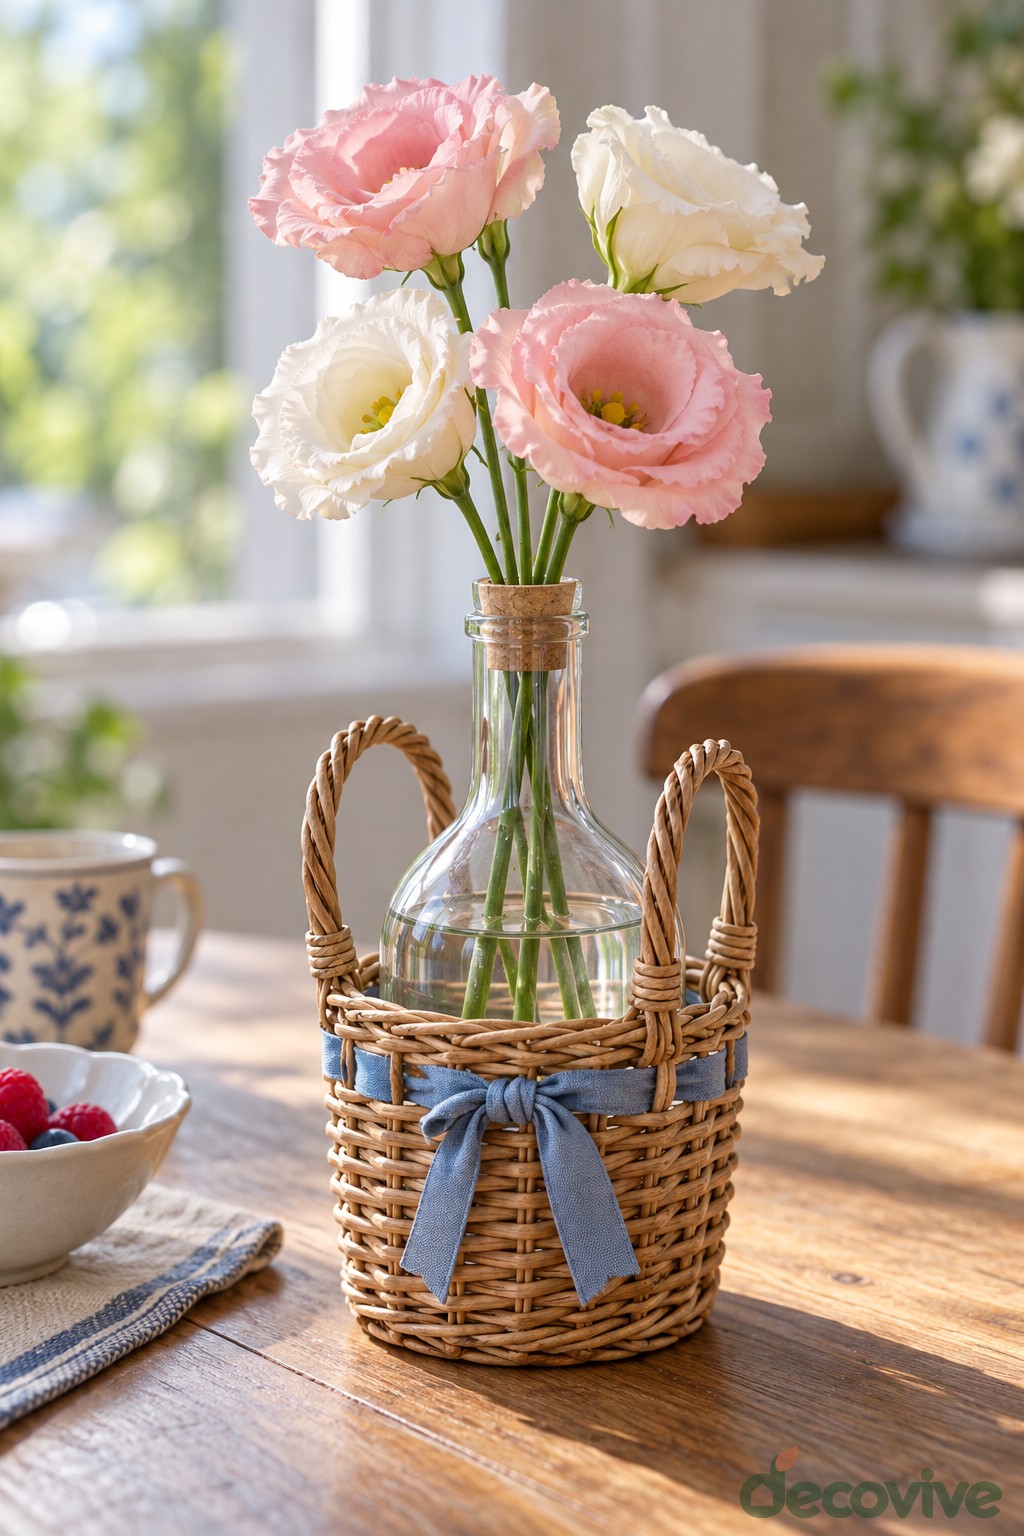
A small woven basket with side handles surrounds the lower part of a clear flower bottle. Blue ribbon and a loose arrangement of pink and cream blooms create a welcoming table centerpiece.
Choose a basket with a flat base and an opening wide enough to remove the bottle. Add a thin cork pad inside, place the clean bottle centrally and tie ribbon around the basket exterior. Use a single bow so the woven texture stays visible.
Fill the bottle outside the basket and dry its exterior before putting it back. The handles belong to the basket and should not be used to lift a full glass vase unless the basket is designed for that load. Remove the bottle for every water change.
Make the Design Fit Your Home
Repeat one material or color across two or three bottles if you want a coordinated display. A shared cream ribbon, matching wooden bases or a small group of similar flowers can connect different shapes without covering every surface. Leave space between pieces so their details remain visible and choose a stable position away from the edge of a shelf.
For your first project, a removable wrap or a simple twine band gives you a useful vase with very little construction. Once you are comfortable preparing glass and choosing compatible finishes, you can move on to the framed designs. Careful measuring, accessible water vessels and secure supports matter more than adding extra decoration.

Leave a Reply