
Old pants can become useful storage, soft furnishings, small accessories, and decorative pieces long after they stop fitting your wardrobe. These 28 upcycling ideas make use of details that are already there: roomy cargo pockets, sturdy denim seams, soft corduroy ribs, waistbands, and reusable zippers. You will find projects for full fabric panels as well as smaller scraps, with practical guidance on choosing materials, assembling each design, and making the finished piece work in everyday life.
Match the project to the fabric: firm denim gives organizers and containers more body, while softer cotton trousers suit cushions and lined pouches. Make a paper template around the intended contents, add seam allowances, and try unfamiliar techniques on scraps before cutting your main panels.
Table of Contents
- Prepare Old Pants Before Cutting
- Gather Basic Sewing Materials
- How to Sew a Lined Fabric Tray from Old Pants
- Materials for This Tray
- 1. Cut Two Matching Rectangles
- 2. Align and Baste Both Layers
- 3. Sew the Perimeter and Leave a Turning Gap
- 4. Trim, Turn, Press, and Topstitch
- 5. Fold and Sew the First Corner
- 6. Repeat the Same Corner Seam and Check the Shape
- 1. Cargo Pants Reading Cushion with Storage Pockets
- 2. Cargo Pants Hanging Laundry Bag
- 3. Corduroy Pants Pleated Lampshade Cover
- 4. Denim Jeans Wall Organizer with a Deep Lower Pocket
- 5. Trouser Fabric Bedside Rail Caddy
- 6. Canvas Pants Garden Tool Roll
- 7. Denim Covered Cat Steps with a Wooden Frame
- 8. Jeans Craft Organizer with a Wide Hanging Strap
- 9. Denim Covered Drawer Dividers for Sewing Supplies
- 10. Linen Trouser Bread Basket with a Washable Liner
- 11. Cargo Pocket Phone Charging Organizer
- 12. Patchwork Denim Flower Cushion
- 13. Suit Trouser Fabric Accordion File Holder
- 14. Denim Checkerboard That Rolls Up for Storage
- 15. Cargo Fabric Valet Tray with Folded Corners
- 16. Corduroy Mushroom Jewelry Stand
- 17. Pleated Trouser Fabric Wall Pocket for Mail
- 18. Mixed Trouser Fabric Wall Hanging
- 19. Denim Drawstring Play Mat for Small Toys
- 20. Canvas Pants Bicycle Frame Bag
- 21. River Pattern Denim Table Runner
- 22. Corduroy Pocket Magazine Rack on a Wooden Stand
- 23. Denim Crown Sleeve for a Glass Vase
- 24. Fold Flat Denim Basket with Cream Lining
- 25. Denim Petal Coaster for a Drinking Glass
- 26. Cat Ear Denim Corner Bookmark
- 27. Envelope Coin Purse from Denim Scraps
- 28. Pink Jeans Tulip Key Pouch
- Choose a Project That Makes the Most of Your Fabric
Prepare Old Pants Before Cutting
Wash and dry the trousers according to their care label, then check for thinning areas, damaged seams, stains, and loose hardware. Avoid worn sections wherever straps, hooks, or corners will carry weight. Open long seams with a seam ripper to recover broad panels, and keep usable pockets, belt loops, waistbands, and zippers together for later projects.
Press the fabric at a temperature suitable for its fiber content. Keep corduroy pile running in the same direction on matching pieces, and avoid pulling stretch denim out of shape while measuring. For structured projects, support stretchy material with compatible interfacing or choose a firmer section of fabric instead. Test dark fabric with a damp white cloth before pairing it with a pale lining.
Gather Basic Sewing Materials
- Clean old pants and suitable fabric for linings
- Fabric scissors, a seam ripper, a ruler, paper, and a removable fabric marker
- Matching thread, sewing clips, hand needles, and a sewing machine if available
- A machine needle suited to the fabric and thread, including a denim needle for substantial denim
- Interfacing, batting, or removable rigid inserts where the project needs support
- Project specific notions such as zippers, snaps, cord, rings, or mounting hardware
Sew a test seam through the same number of layers you plan to use. Adjust the needle, stitch length, and thread tension until the stitches form cleanly without puckering or skipped stitches. Trim bulky seam allowances in stages and sew slowly over thick intersections. Do not force fabric through a machine that cannot handle the layered thickness.
How to Sew a Lined Fabric Tray from Old Pants
This six step tutorial follows the same olive outer fabric and cream lining from flat rectangles to a finished tray. The two layers are held together with temporary basting rather than clips. The fabric stays flat through cutting, basting, sewing, turning, and topstitching. Only the final corner seams create the raised sides. This version uses no interfacing, snaps, or separate handles.
Materials for This Tray
- One firm olive cotton trouser panel, large enough to cut a 28 × 24 cm rectangle
- One cream cotton lining panel, also 28 × 24 cm
- Fabric scissors, a ruler, and a washable fabric marker
- A hand sewing needle and thread suitable for the fabric
- Contrasting thread for temporary basting, shown in red in the collage
- An iron and a suitable pressing surface for flattening the turned fabric
Choose sound fabric without stretch for the clearest result. The 28 × 24 cm measurements include a 1 cm seam allowance. After sewing and turning, the flat lined rectangle measures approximately 26 × 22 cm. Small differences can occur with fabric thickness and pressing.
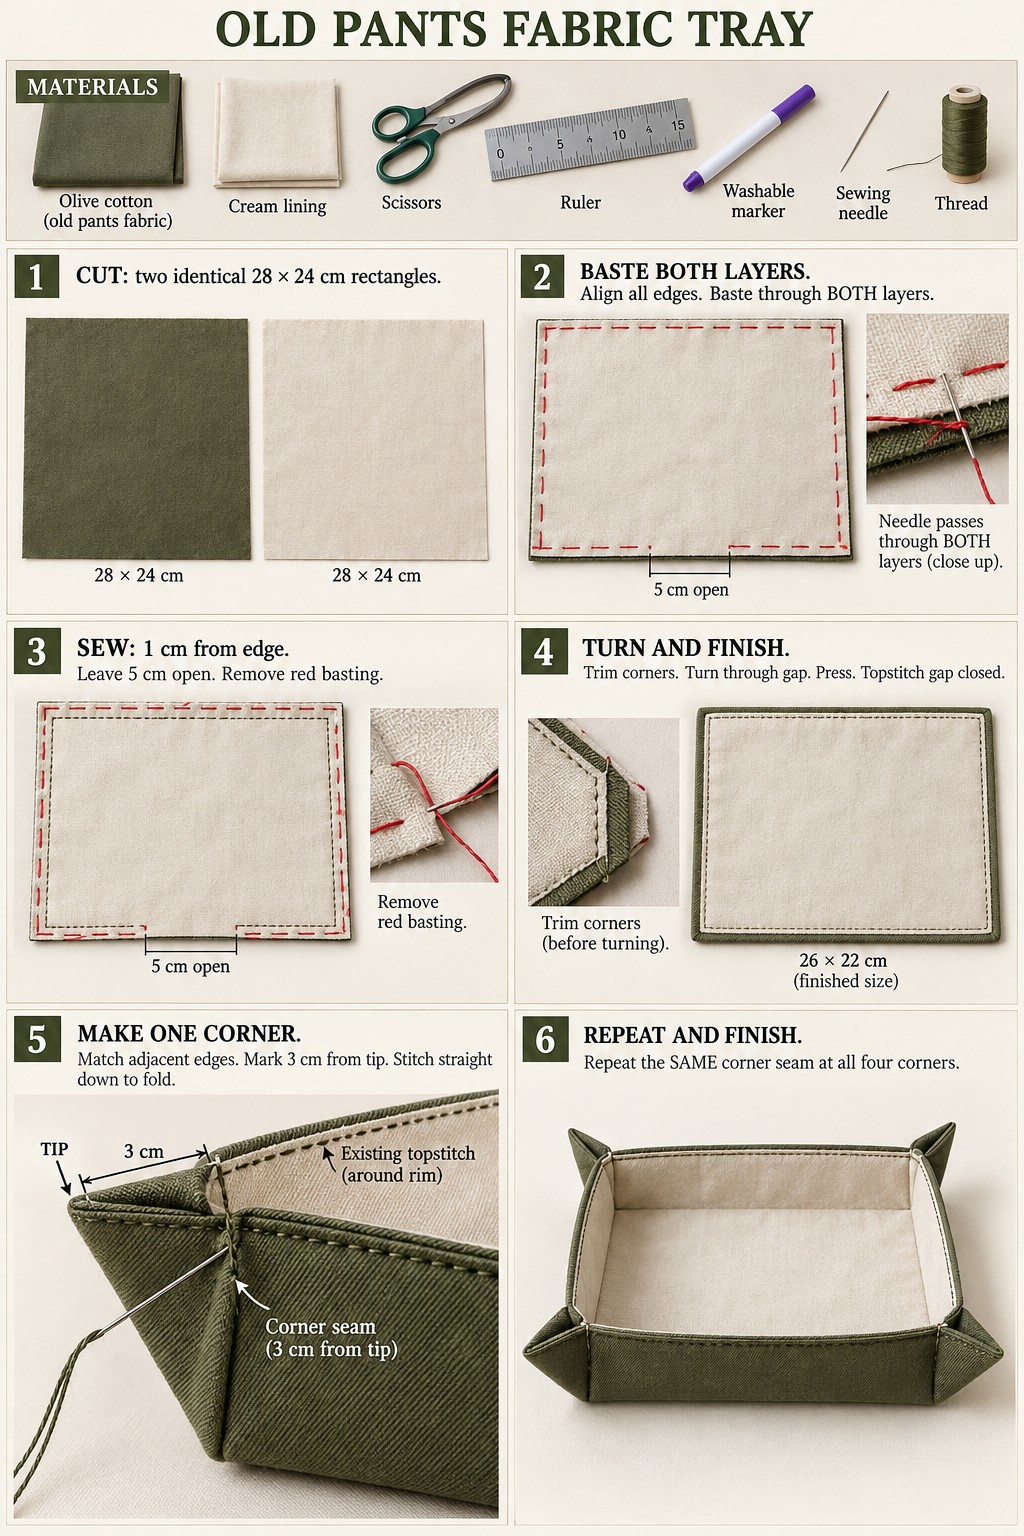 Follow the same two fabric layers throughout. The red stitches are temporary basting; the darker stitches form the permanent seams.
1. Cut Two Matching Rectangles
Cut one 28 × 24 cm rectangle from the olive trouser fabric and one identical rectangle from the cream lining. Keep the corners square and the edges straight. Place the pieces side by side to check that they match before continuing. Remove any loose threads.
2. Align and Baste Both Layers
Lay the olive rectangle with its right side facing upward. Place the cream lining directly on top with its right side facing downward, so the right sides touch. Align all four edges and corners. With contrasting thread, make long, loose running stitches about 5 mm inside the raw edge. Each stitch must pass through both layers, keeping them aligned. Leave a 5 cm section unbasted at the middle of one long edge for the turning opening.
3. Sew the Perimeter and Leave a Turning Gap
Mark a seam line 1 cm inside the raw edges. Sew along this line through both layers, leaving the same 5 cm opening unsewn. Use small backstitches for a firm hand sewn seam, securing the thread at both ends of the opening. Keep this permanent seam farther from the raw edge than the temporary basting. Once the permanent stitching is complete, remove all the contrasting basting thread without disturbing the seam.
4. Trim, Turn, Press, and Topstitch
Trim a small triangle from each corner allowance without cutting into the permanent stitching. Turn the entire rectangle through the 5 cm opening. Ease the corners outward gently with a blunt tool, then smooth and press the piece at a temperature suitable for both fabrics. Fold the opening allowances inward so they align with the sewn edge. Topstitch close to the finished edge around the full rectangle, catching both folded edges of the opening to close it. The piece must still be completely flat at this stage.
5. Fold and Sew the First Corner
Place the flat rectangle with the cream lining facing upward. At one corner, bring the two adjacent finished edges together so they match, with the cream sides facing each other inside the fold. The original corner tip now forms a doubled triangular flap projecting outward. Measure 3 cm from that tip along the matched finished edges and mark the position. From that mark, draw a straight line down to the diagonal fold, perpendicular to the matched edges.
Sew along this marked line through the folded layers with small secure backstitches. This new corner seam is separate from the existing topstitching around the rim. Do not stitch the two upper edges together along their length. Keep the triangular flap outside the tray, as shown in the close view, and secure the thread at both ends.
6. Repeat the Same Corner Seam and Check the Shape
Repeat exactly the same fold, 3 cm marking, and straight seam at the other three corners. Keep the cream lining inside, the olive fabric outside, and all four triangular flaps pointing outward. The four matching seams raise the sides and form the tray. Set it on a level surface and check that the base rests flat. If one side pulls higher than the others, compare the corner measurements and correct that seam before use.
The finished tray is suitable for lightweight everyday items such as keys, a watch, or small sewing notions. Firm fabric helps the sides stand up, but the tray is still soft. This same method is used for the olive valet tray inspiration below. Other projects, particularly zipper pouches and hanging organizers, need their own templates and assembly sequences.
1. Cargo Pants Reading Cushion with Storage Pockets
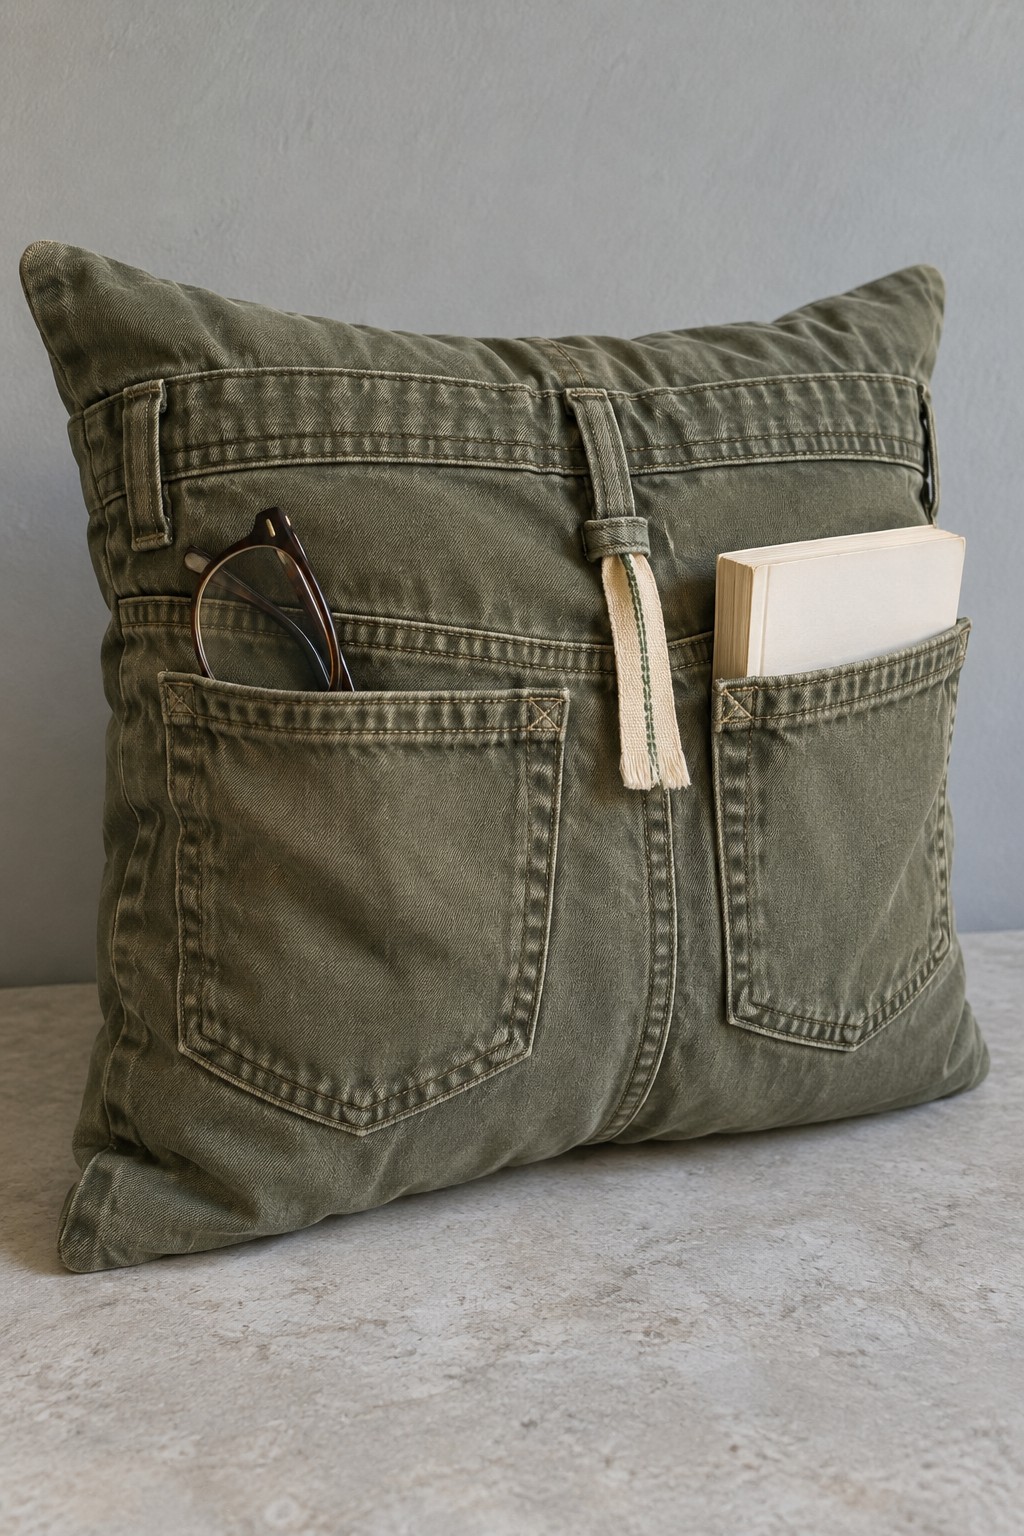
Give a reading corner a cushion that also keeps small essentials within reach. Olive cargo fabric provides a relaxed texture, while existing trouser pockets become useful places for glasses, a slim notebook, and a pen.
Use sound cargo panels, a cushion insert, a backing fabric, and a zipper or envelope closure. Arrange the pockets on the front panel and stitch them down before joining the cover. Keep the openings upright and reinforce the pocket corners. Sew the back to fit your insert, finish the inner edges, and insert the cushion through the planned opening.
Leave enough empty space around the pockets for comfortable leaning, and remove hard objects before using the cushion as support.
2. Cargo Pants Hanging Laundry Bag
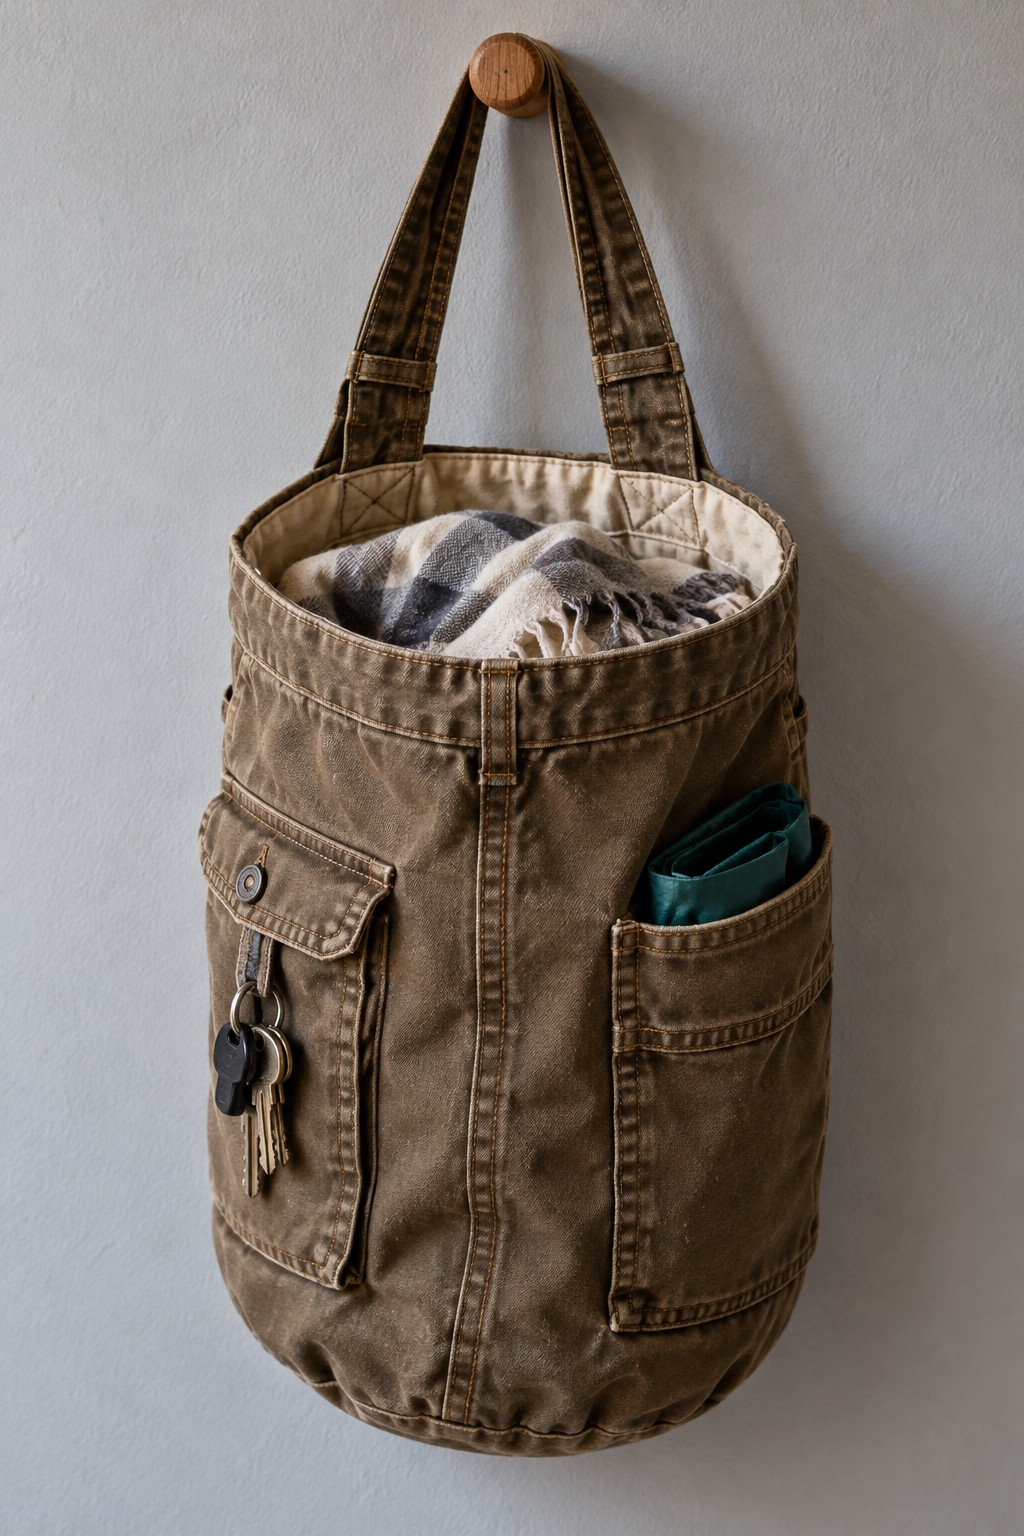
A cylindrical hanging bag makes a practical home for lightweight laundry or spare cloths. The original cargo pocket adds separate storage for small accessories, while the tall body uses the long uninterrupted sections of the legs.
Gather trouser panels, washable lining, a circular base template, and strong fabric straps. Join the panels into a tube, sew in the circular bottom, and add a lining of the same shape. Enclose the strap ends between the upper edges and reinforce their attachment with a stitched rectangle and diagonal cross.
Keep the load modest and use a hook fixed into a suitable support. This fabric design is best for dry items; damp laundry needs ventilation and prompt washing.
3. Corduroy Pants Pleated Lampshade Cover
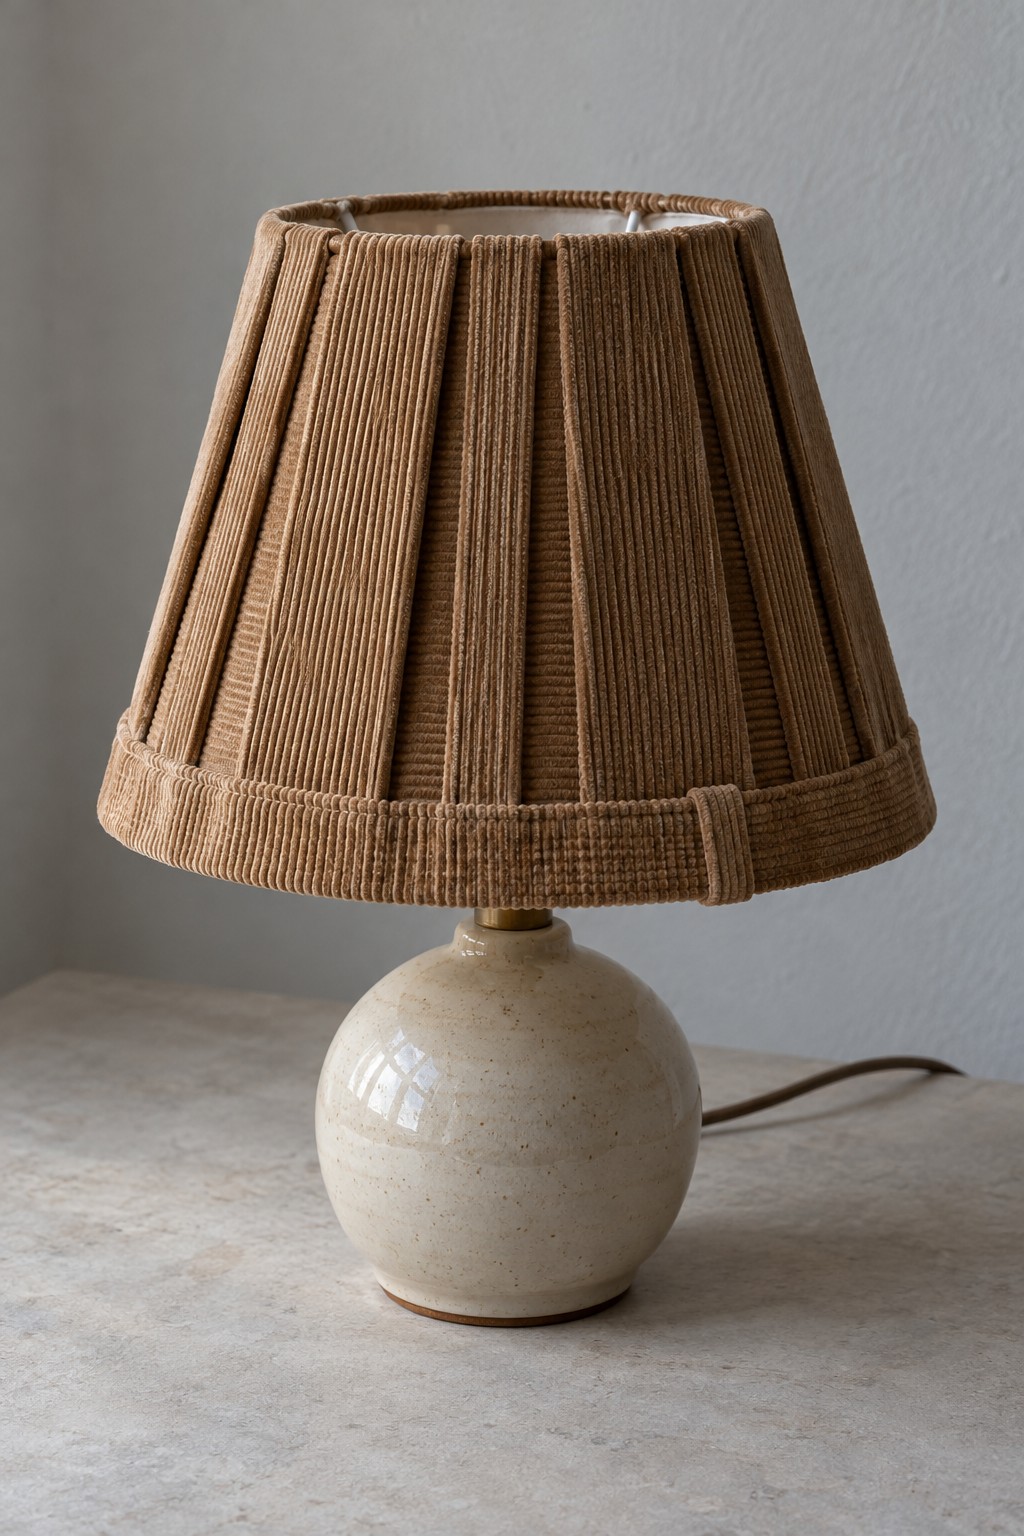
Brown corduroy gives a plain lamp a warm, ribbed surface. Narrow vertical sections echo traditional pleats, with a neat fabric band finishing the lower edge.
Use clean corduroy, a sound lampshade frame, and purpose made lampshade materials compatible with that frame and fabric. Make a paper pattern, test how the pleats change the required width, and follow the shade material supplier’s assembly instructions. Keep the cover securely supported and away from the bulb and electrical fittings.
This is a shade project, not a wiring project. Ordinary trouser fabric is not automatically suitable for a lamp. Use only a compatible bulb within the fixture rating and maintain the clearances required by the lamp and shade manufacturers.
4. Denim Jeans Wall Organizer with a Deep Lower Pocket
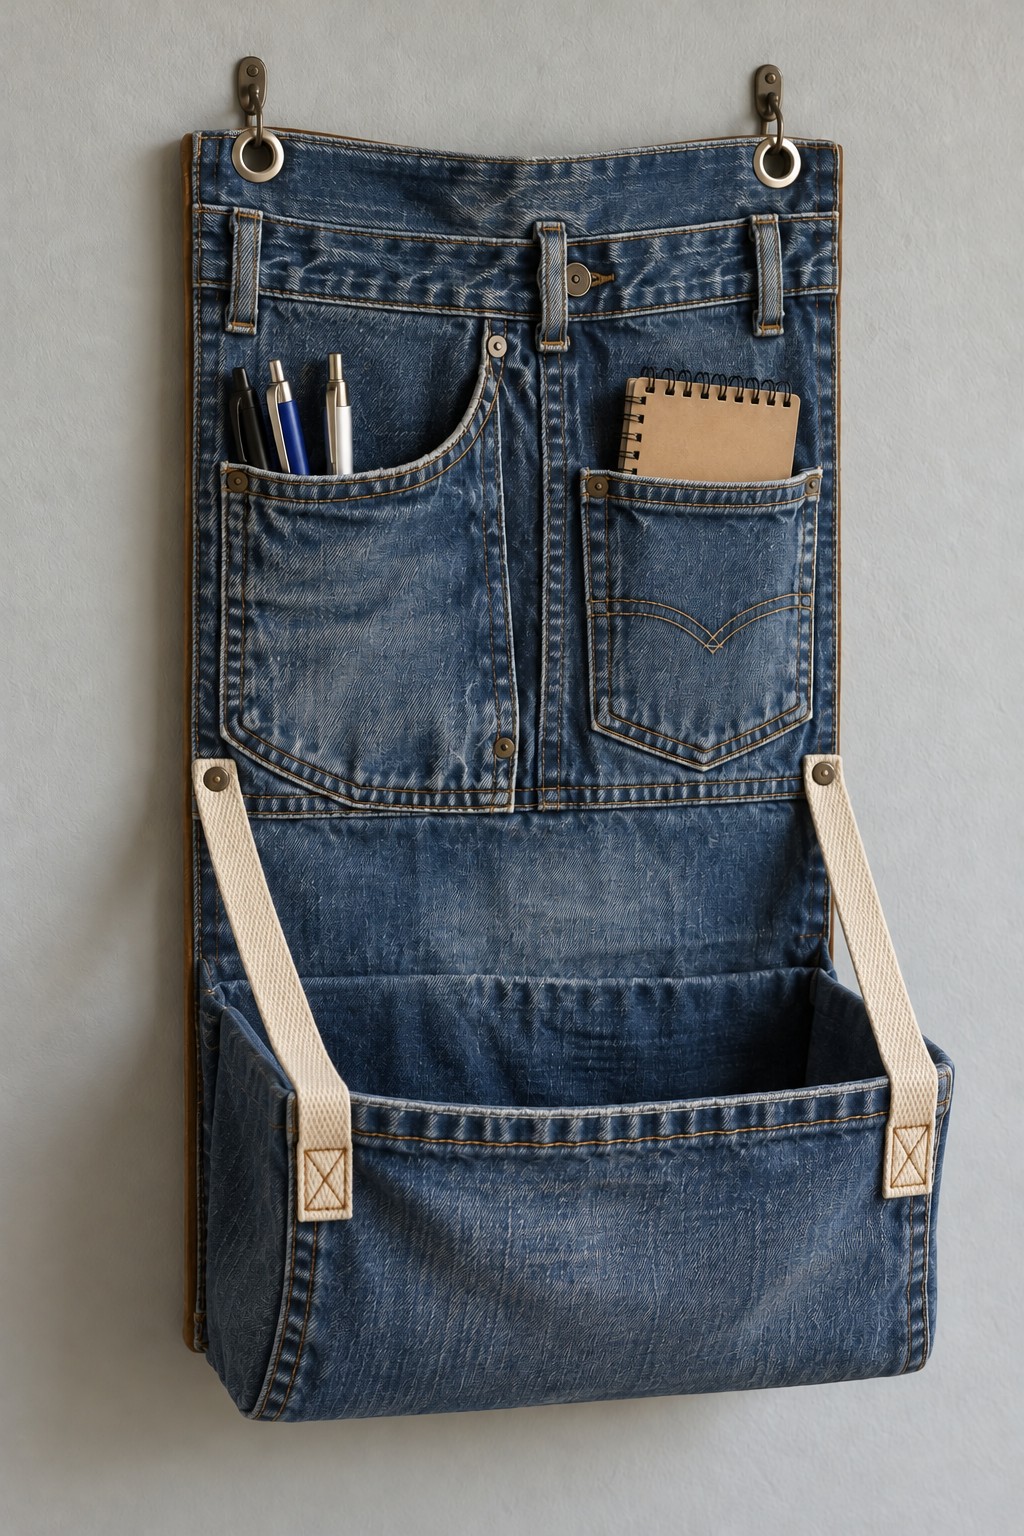
The back of a pair of jeans can become a compact stationery station. Two original pockets hold narrow supplies, while a deeper lower compartment collects larger items.
Use the jeans seat section, additional denim, lining, interfacing, and two reinforced hanging points. Stabilize the main panel, finish the top and side edges, and sew a separate wide pocket across its lower half. Box the lower pocket corners if you want depth, then secure the upper corners with short reinforced stitches.
Mount both hanging points level and keep heavy objects out of unsupported fabric sections. The diagonal tabs can help support the lower pocket when their ends are stitched into reinforced areas.
5. Trouser Fabric Bedside Rail Caddy
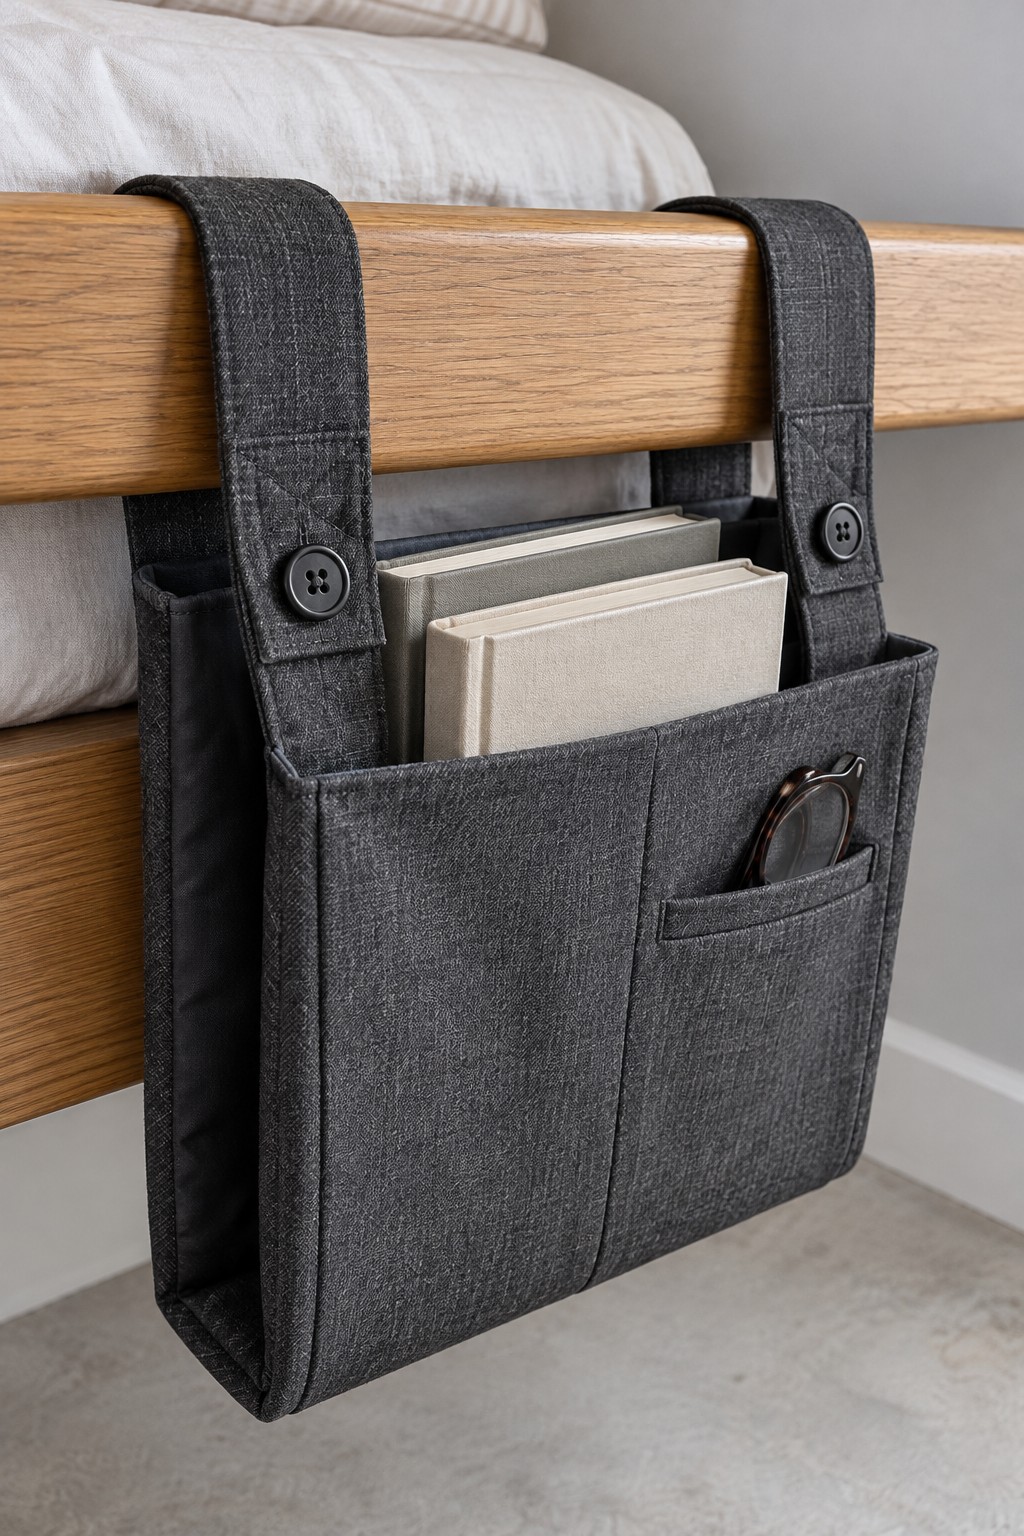
A bedside caddy keeps a book, glasses, and a tablet close to the mattress without filling a small nightstand. Dark gray trouser fabric creates a quiet, tailored finish.
Use sturdy outer fabric, soft lining, interfacing, and two broad straps with suitable closures. Measure the rail and the objects before drawing the pattern. Assemble the divided front pockets, attach them to a backed main panel, and reinforce the strap ends before completing the lining.
Check that the rail can support the contents and that closures remain secure when the pockets are filled. Position the caddy where it will not interfere with the bed mechanism.
6. Canvas Pants Garden Tool Roll
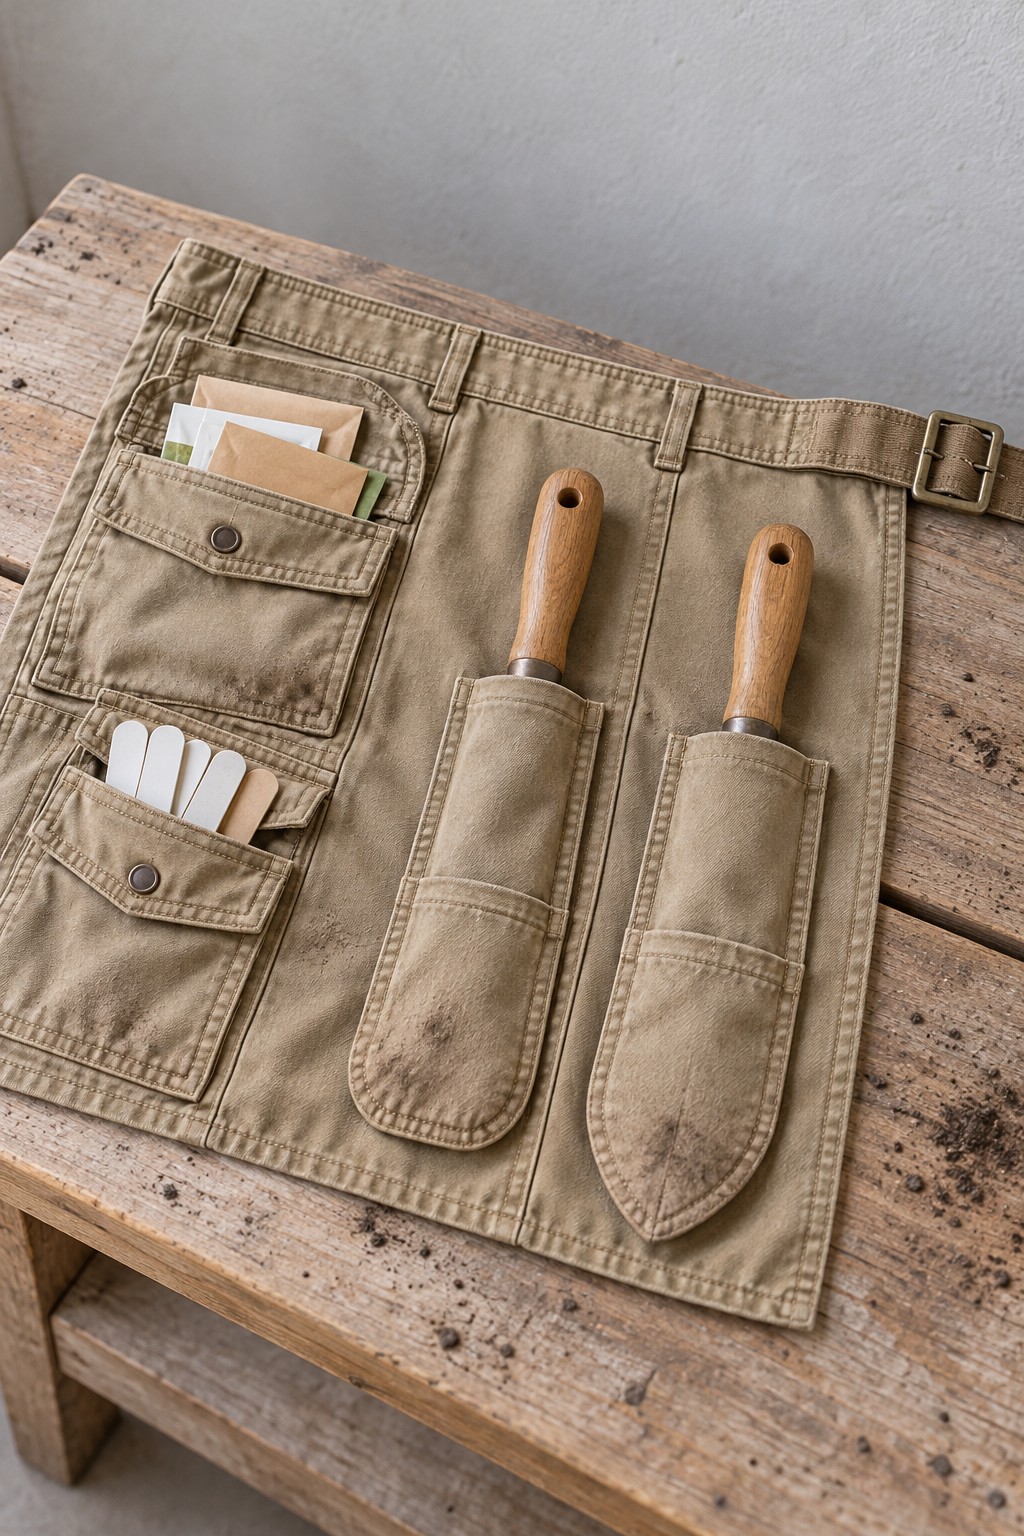
Firm beige work trousers suit a garden tool roll because their close weave gives the pockets useful body. Different pocket widths separate seed packets, labels, and small hand tools.
Gather canvas trouser panels, backing fabric, ties, and thread suited to the fabric weight. Finish the upper edge of a long pocket strip, place it across the lower part of the backing, and stitch vertical divisions sized around your own tools. Bind or turn the perimeter, then add ties at one side.
Clean and dry tools before storage. Use fitted guards for sharp points and do not rely on ordinary fabric alone to contain exposed blades.
7. Denim Covered Cat Steps with a Wooden Frame
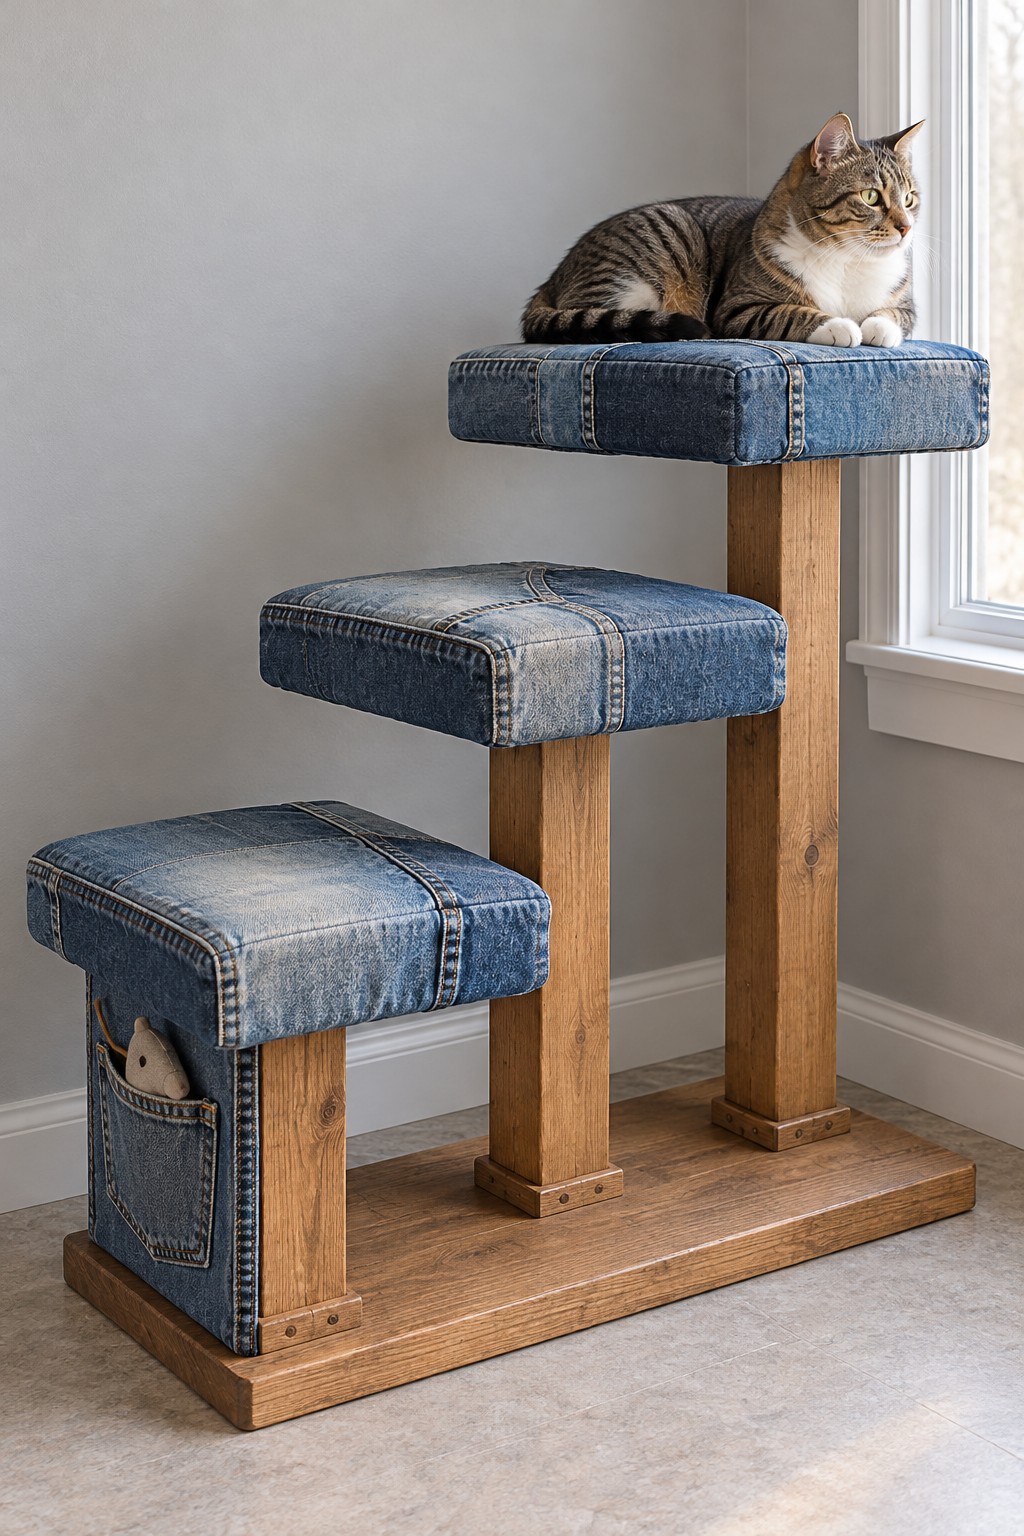
Old jeans make removable covers for padded platforms on a set of cat steps. The contrast between faded denim and simple timber keeps the design practical and uncluttered.
Use a stable, properly constructed step frame, firm upholstery padding, denim, and secure removable cover closures. Make a separate fitted cover for each platform, keeping thick seams away from the main stepping surface. Attach the covers underneath so the cat cannot easily pull them loose.
The timber structure carries the animal’s weight. Platform dimensions, bracing, and anchoring must suit the intended cat. Check for tipping, rocking, loose threads, and exposed fasteners before allowing use.
8. Jeans Craft Organizer with a Wide Hanging Strap
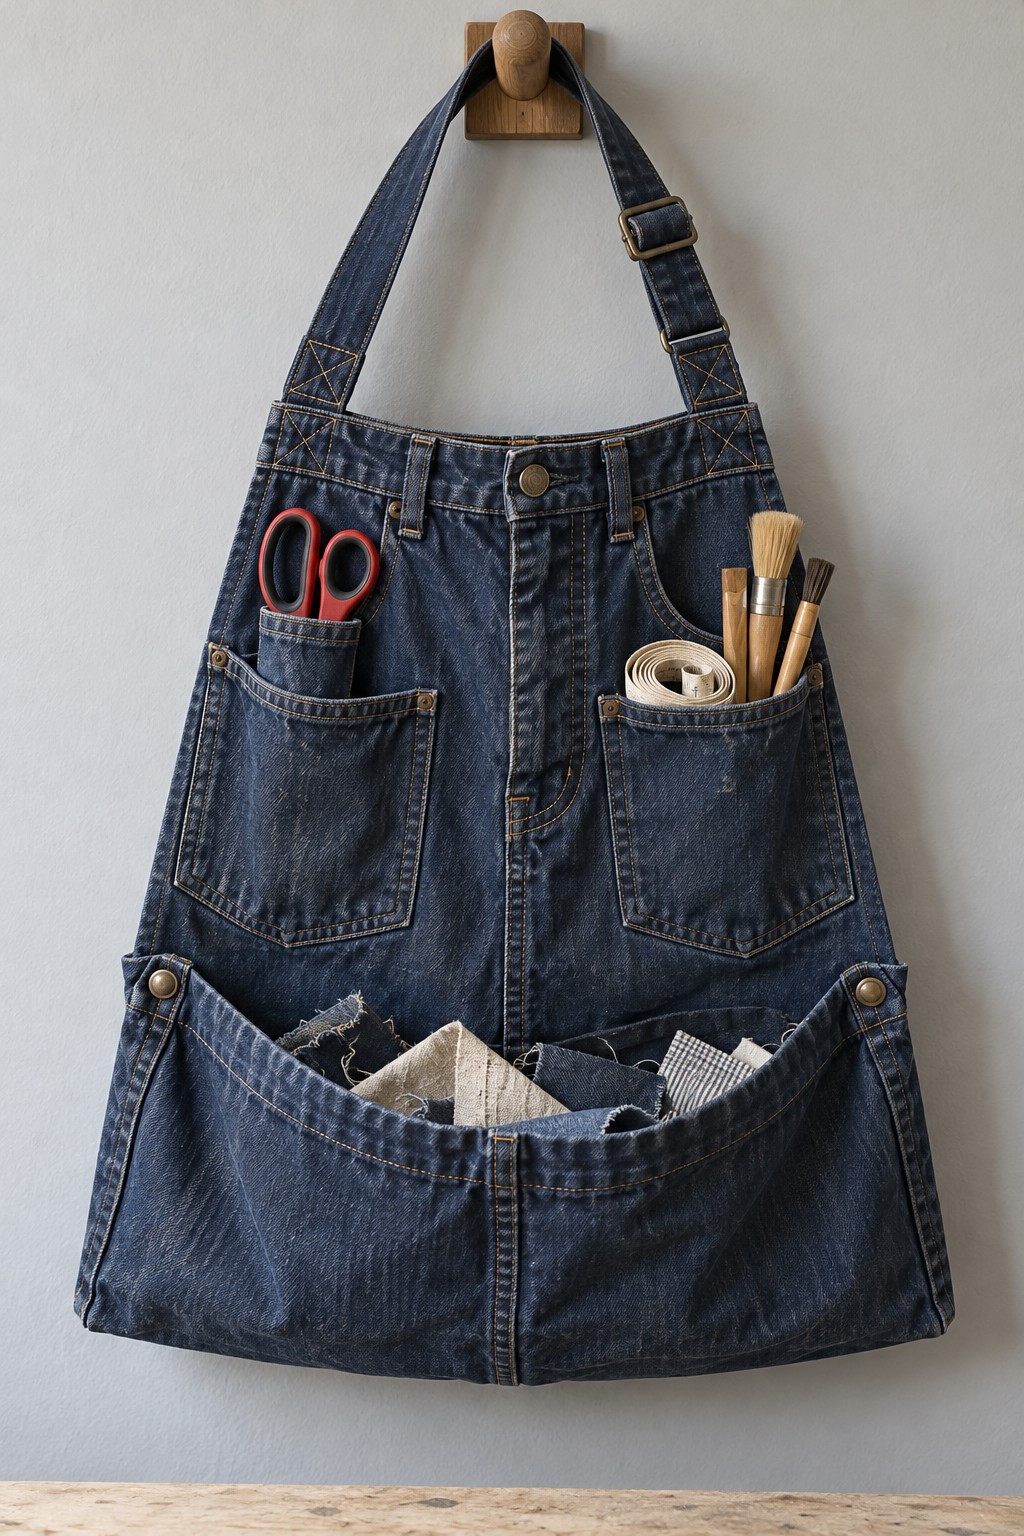
A wide strap and several retained jeans pockets turn this organizer into a handy sewing or craft companion. The lower pouch catches bulkier supplies while the upper pockets separate narrow tools.
Use denim seat and leg sections, lining, and a broad reinforced strap. Plan pocket positions with the tools laid flat, then stitch them to the front before adding the backing. Form the bottom compartment from a wider panel with boxed corners, and anchor the strap into strong fabric rather than worn waistband edges.
Keep pointed tools in protective sleeves and arrange the organizer so its contents cannot fall out when lifted. For more small sewing ideas, try the hand sewn felt cat card holder.
9. Denim Covered Drawer Dividers for Sewing Supplies
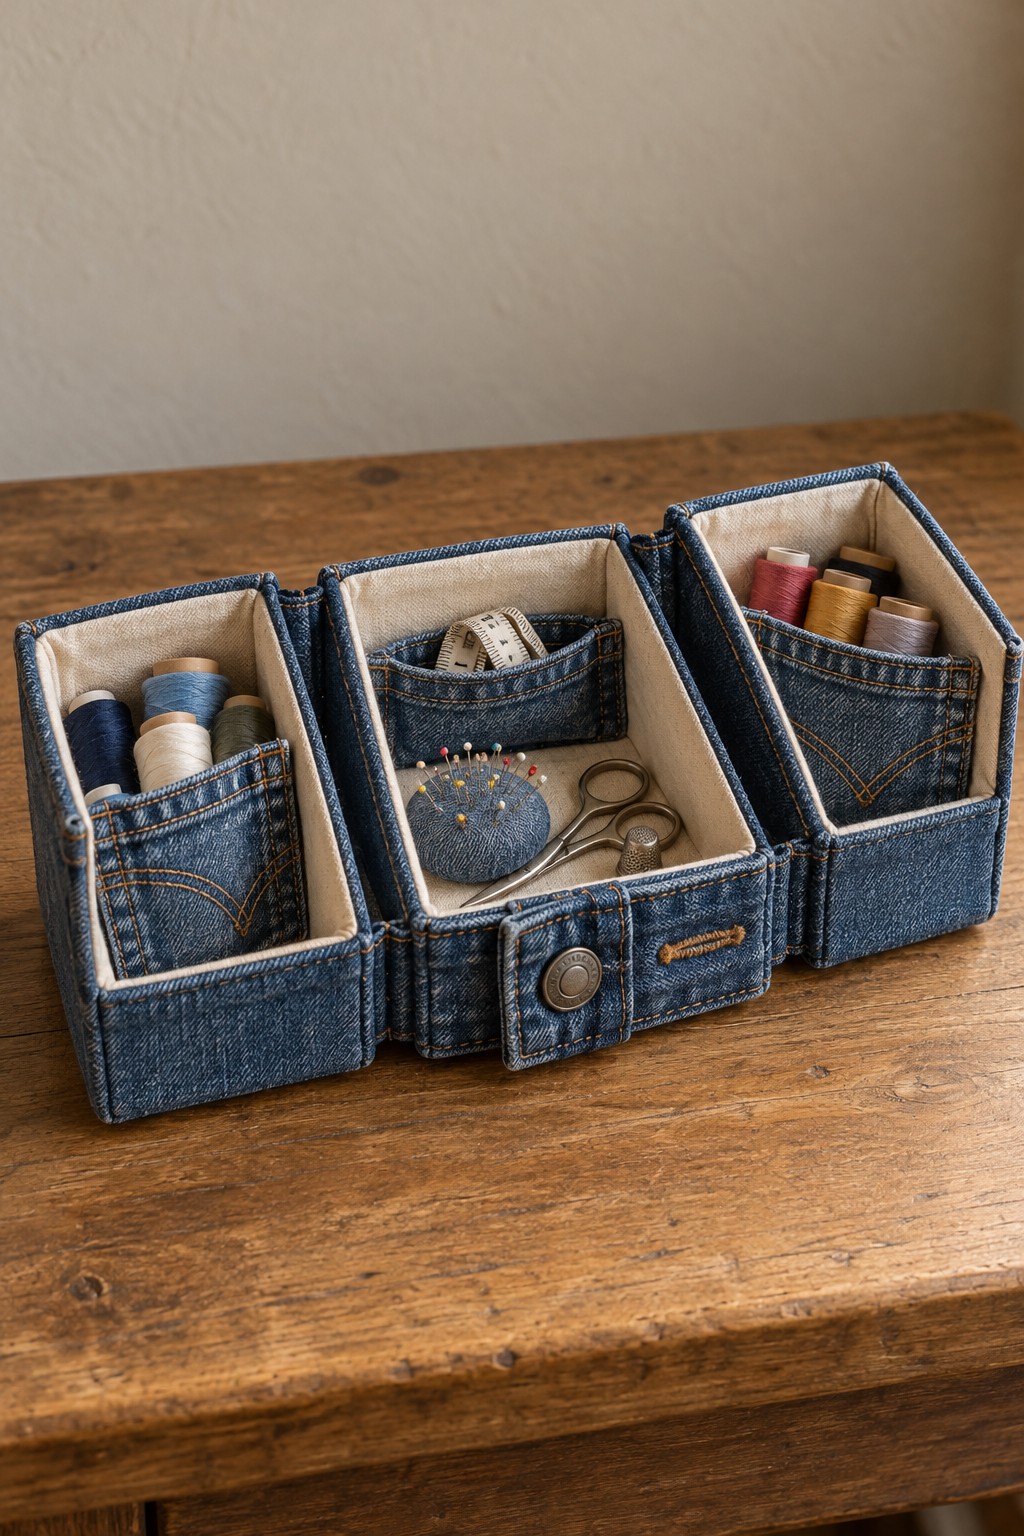
A group of small denim covered compartments brings order to thread, measuring tapes, and other sewing supplies. Different heights make each section easier to reach.
Use cleaned denim, rigid box inserts, lining, and an adhesive appropriate for the insert material if wrapping rather than sewing. Measure the drawer first and test a paper layout. Wrap each insert with denim, fold the edges inward neatly, and line the interior so raw edges and adhesive are concealed.
Keep sharp needles in a closed needle case. If you use cardboard cores, treat the organizer as a dry storage item and spot clean the fabric rather than soaking it.
10. Linen Trouser Bread Basket with a Washable Liner
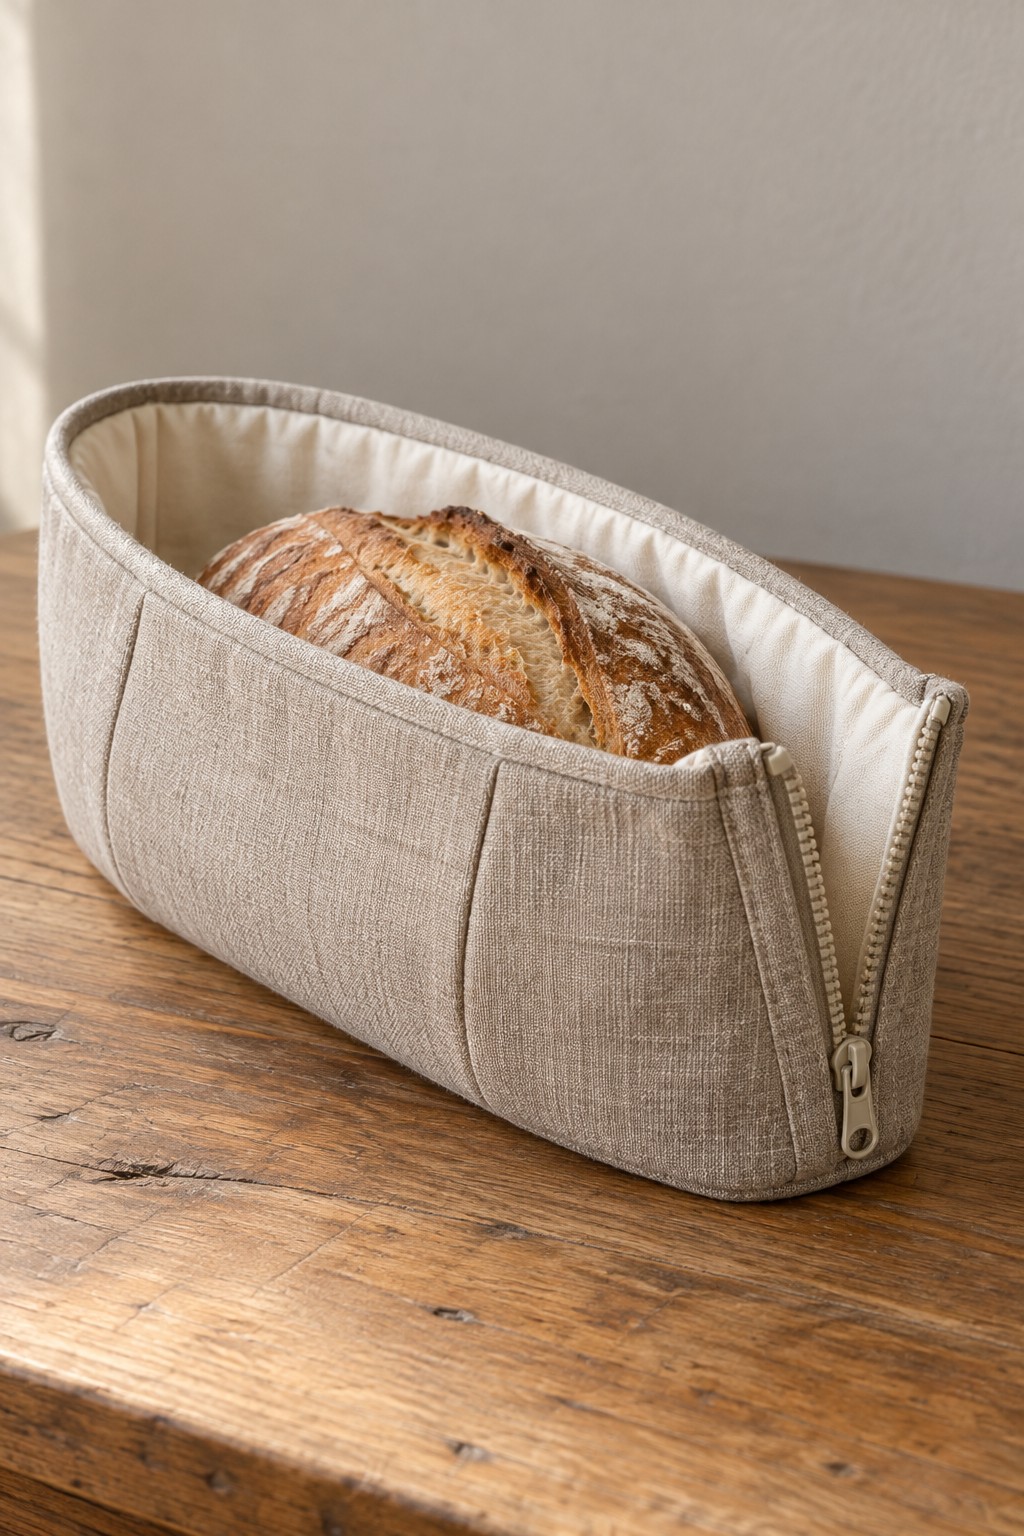
Soft beige trouser fabric creates an oval bread basket with a relaxed table setting style. A cream inner liner separates the loaf from the outer fabric and makes cleanup easier.
Use clean linen or cotton trousers, a removable washable lining suitable for food contact, a supporting layer, and an optional side zipper. Draft an oval base and a matching side band, then assemble the outer basket and liner separately. If adding a zipper for opening or cleaning access, cover its inner edge so it cannot scrape the contents.
Let bread cool before placing it inside. Do not use unknown dyed trouser fabric directly against food, and remove the liner for washing after use.
11. Cargo Pocket Phone Charging Organizer
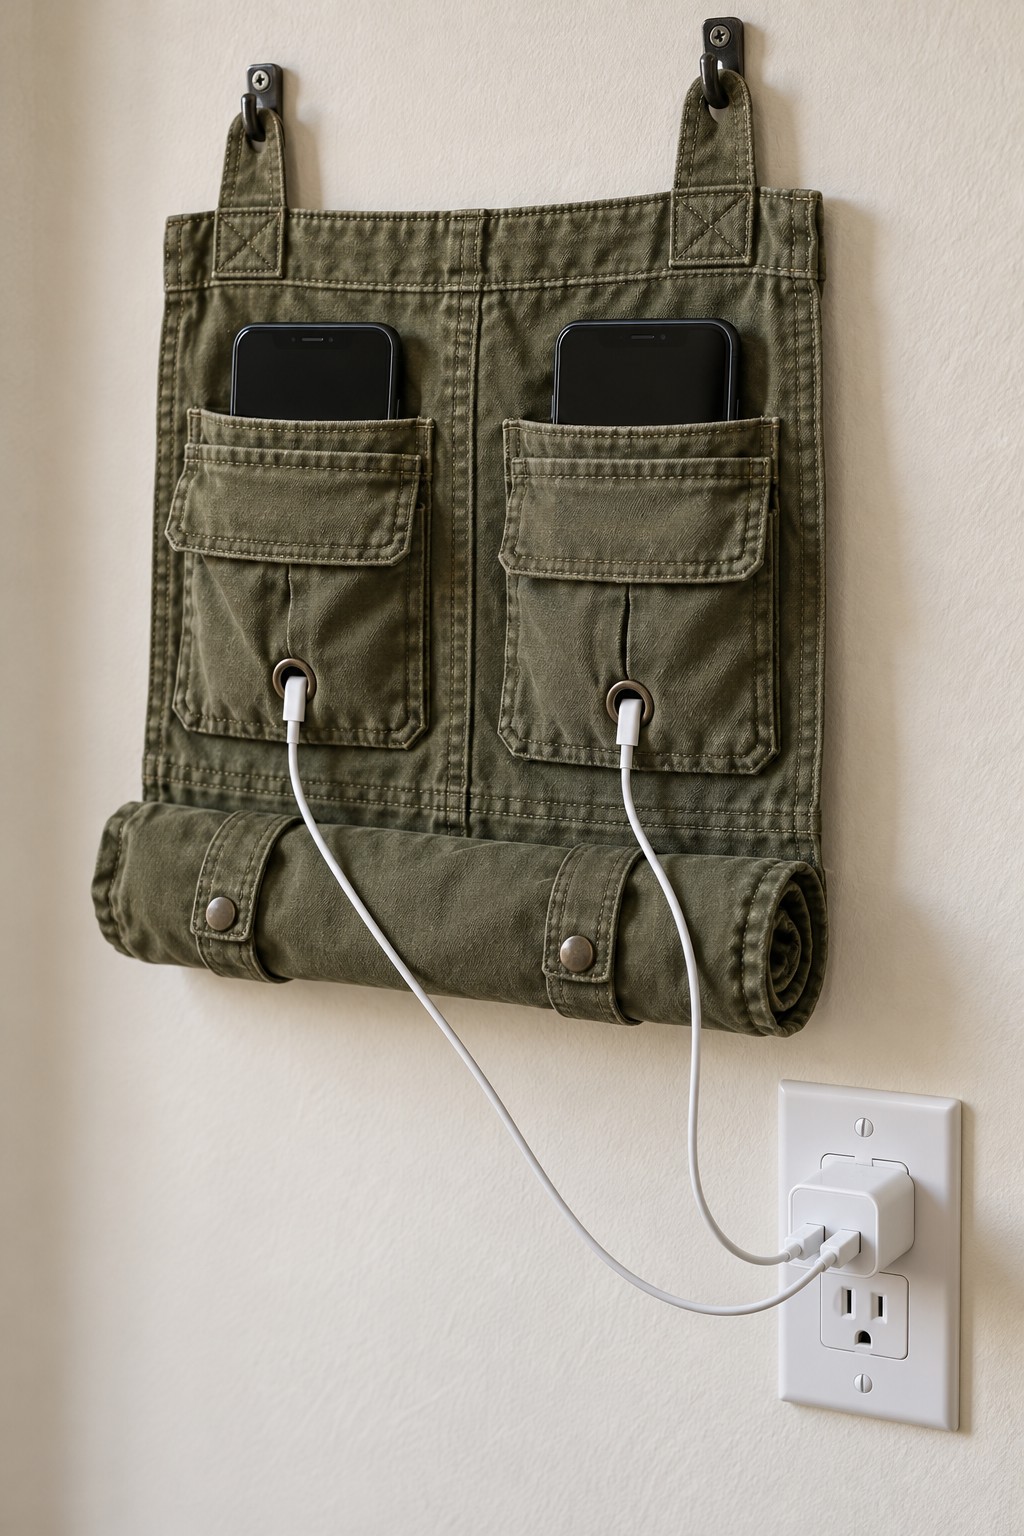
Two cargo pockets make a useful wall station for phones beside an existing outlet. Small openings at the pocket bottoms allow the charging leads to reach the devices without looping over the top.
Use a backed cargo panel, reinforced hanging tabs, suitable eyelets or sewn buttonholes, and existing charging cables. Make the cable openings in flat fabric before completing the backing. Size them for the cable connector, then finish every opening so no sharp edge rubs the lead.
Keep the mains adapter outside the fabric and leave ventilation around the devices. Avoid tight rolled cable storage during charging, inspect the leads regularly, and route them without tension or pinching.
12. Patchwork Denim Flower Cushion
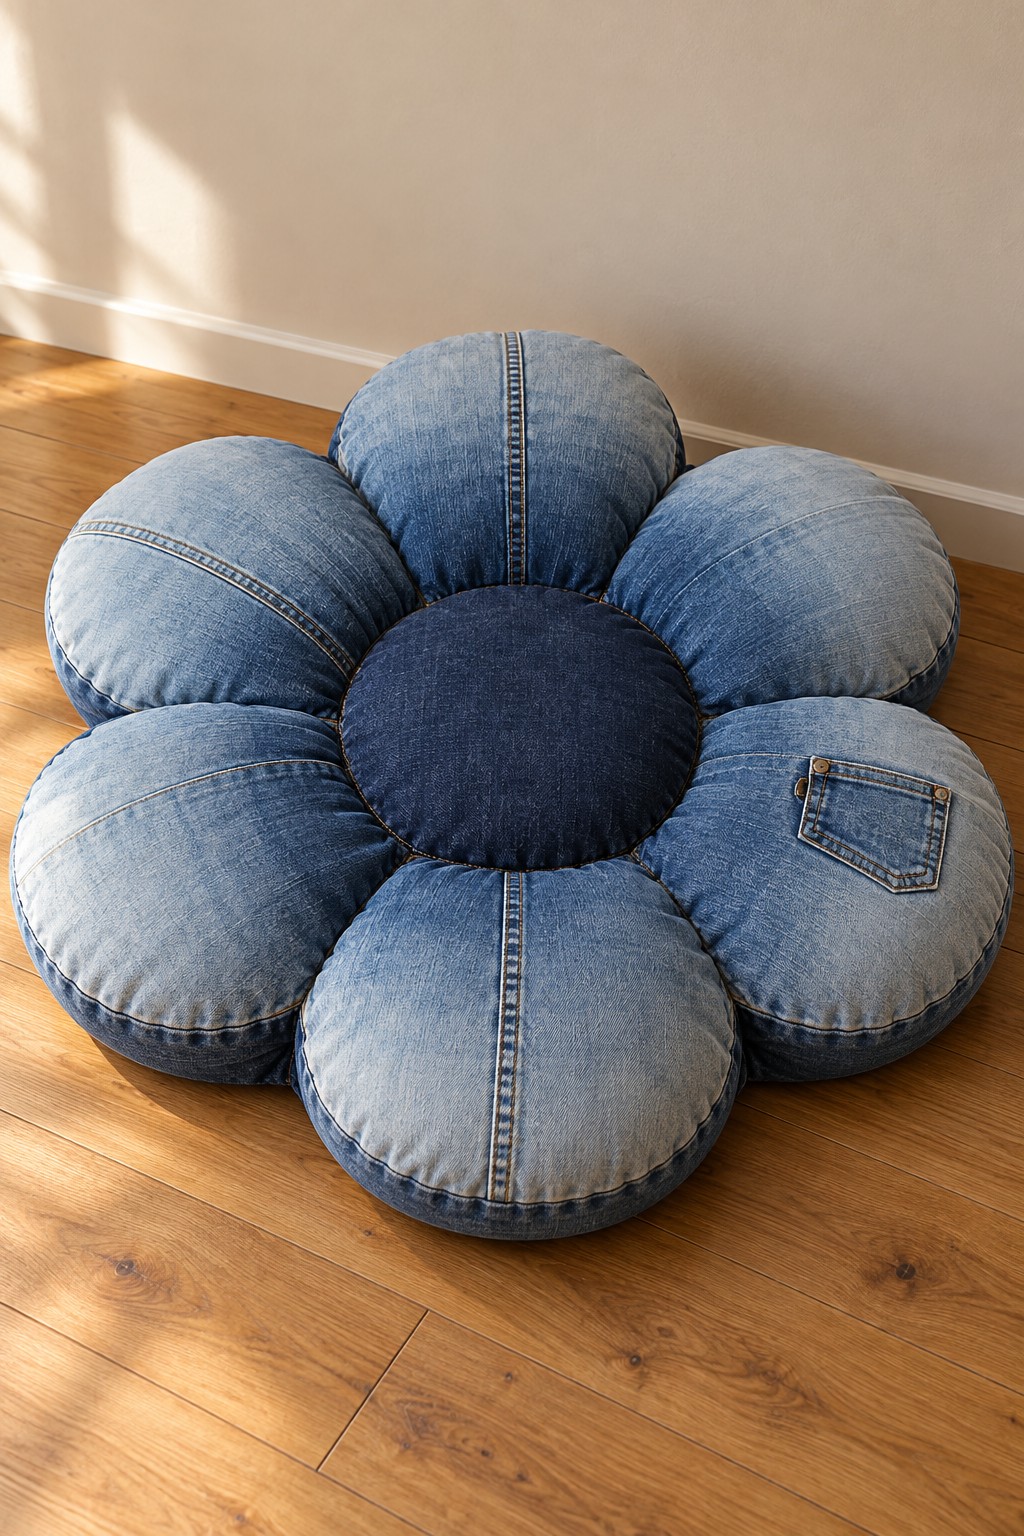
A flower cushion uses small sections of faded jeans to create soft rounded petals around a darker center. Different washes give the shape definition without extra trim.
Gather denim scraps, backing fabric, washable stuffing, and a circular center template. Sew matching petal pairs, leaving a turning opening in each. Turn, lightly fill, and close them before arranging the petals around a reinforced center backing. Secure each petal firmly, then cover the joins with a padded center circle.
Keep the filling soft enough for the seams to rest smoothly. Embroidered or sewn fabric details are easier to maintain than loose decorations.
13. Suit Trouser Fabric Accordion File Holder
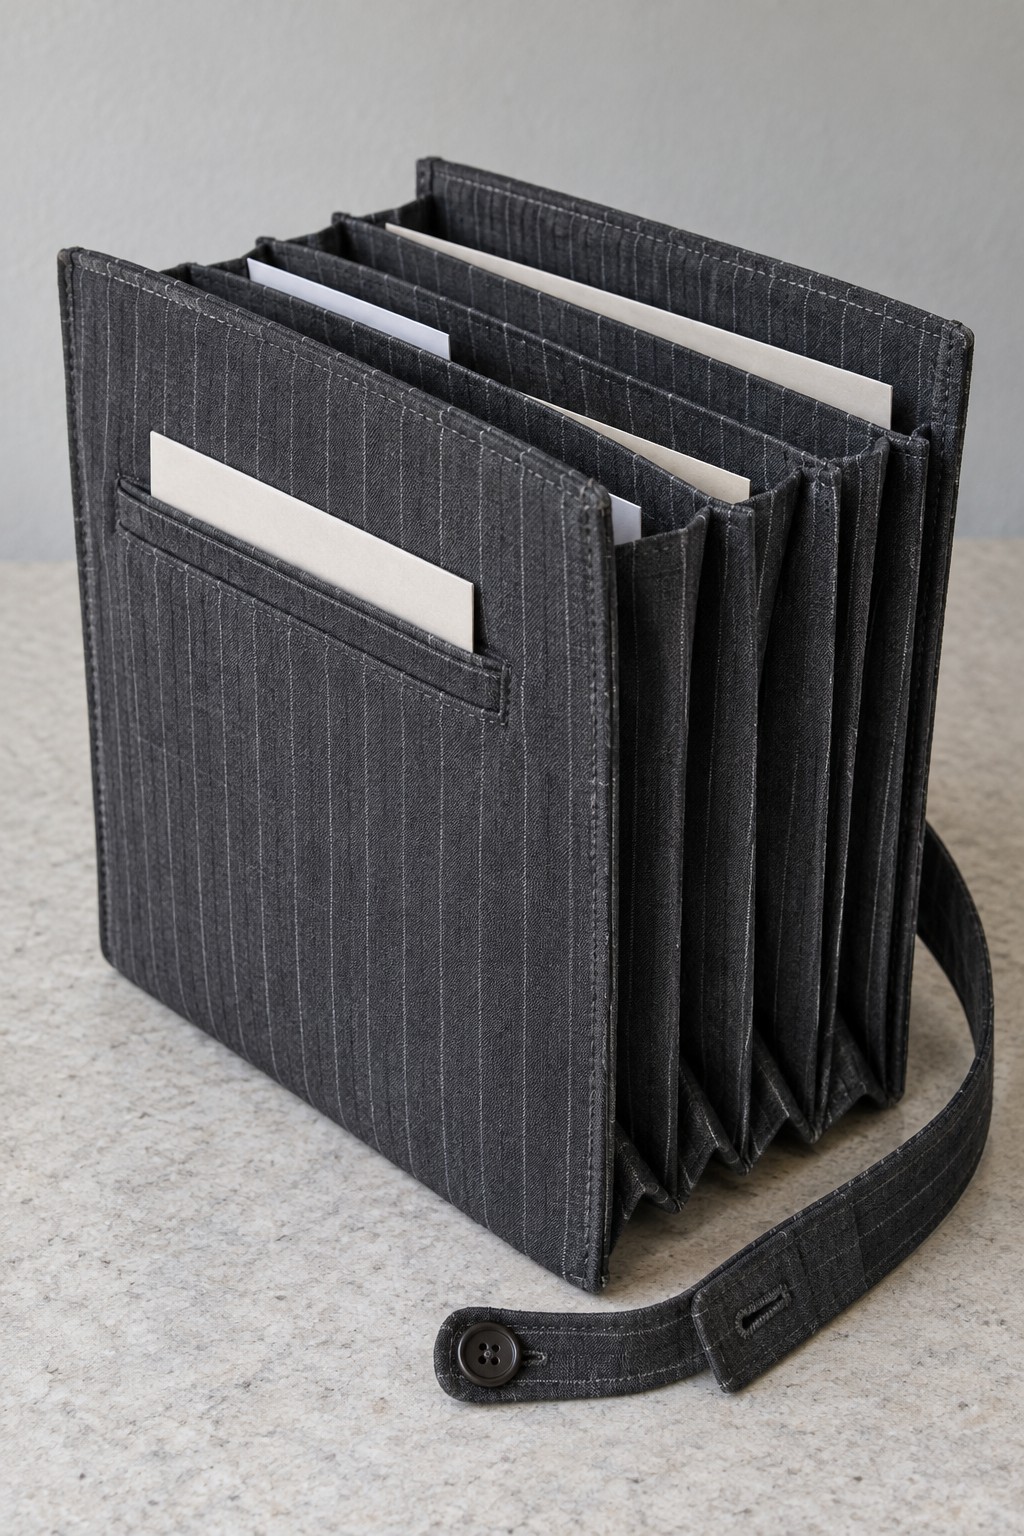
Pinstriped suit trousers lend a tailored finish to a freestanding document organizer. Fabric covered boards support the shape, while expanding side sections separate papers.
Use clean suiting, rigid covers, divider boards, sturdy gusset material, and binding. Work from the size of your folders, allowing space for the fabric wrap. Cover the boards first, then connect them with evenly folded gussets using a construction method suitable for the board and fabric combination.
Test the organizer with a few papers before adding a larger stack. Attach a carry strap to a reinforced base or outer frame, since thin divider fabric should not carry the load.
14. Denim Checkerboard That Rolls Up for Storage
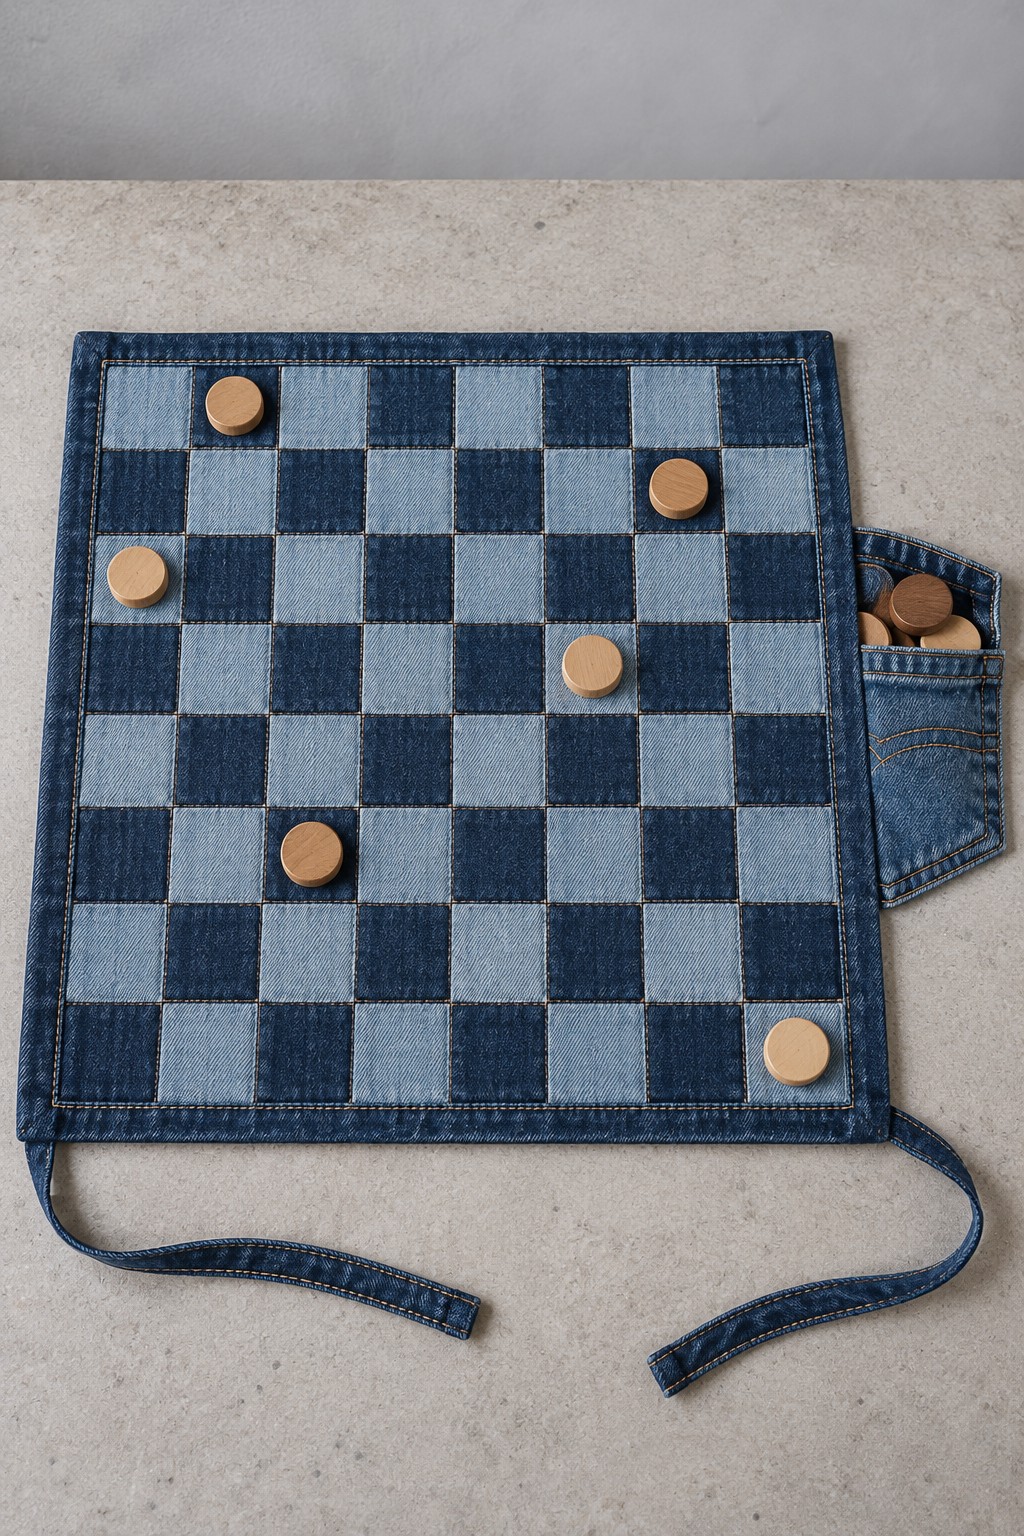
Two contrasting denim washes turn trouser scraps into a portable game board. A small side pocket holds the counters, and fabric ties keep the rolled board together.
Use light and dark denim, backing fabric, binding, ties, and game pieces. For an eight by eight checkerboard, prepare 64 equal squares and alternate the colors in every row. Sew the rows carefully, press the joins, add a stable backing, and bind the perimeter. Attach a closable counter pocket outside the playing area.
Check the square count and alignment before joining the backing. Choose pieces sized for the intended players and store small counters away from young children.
15. Cargo Fabric Valet Tray with Folded Corners
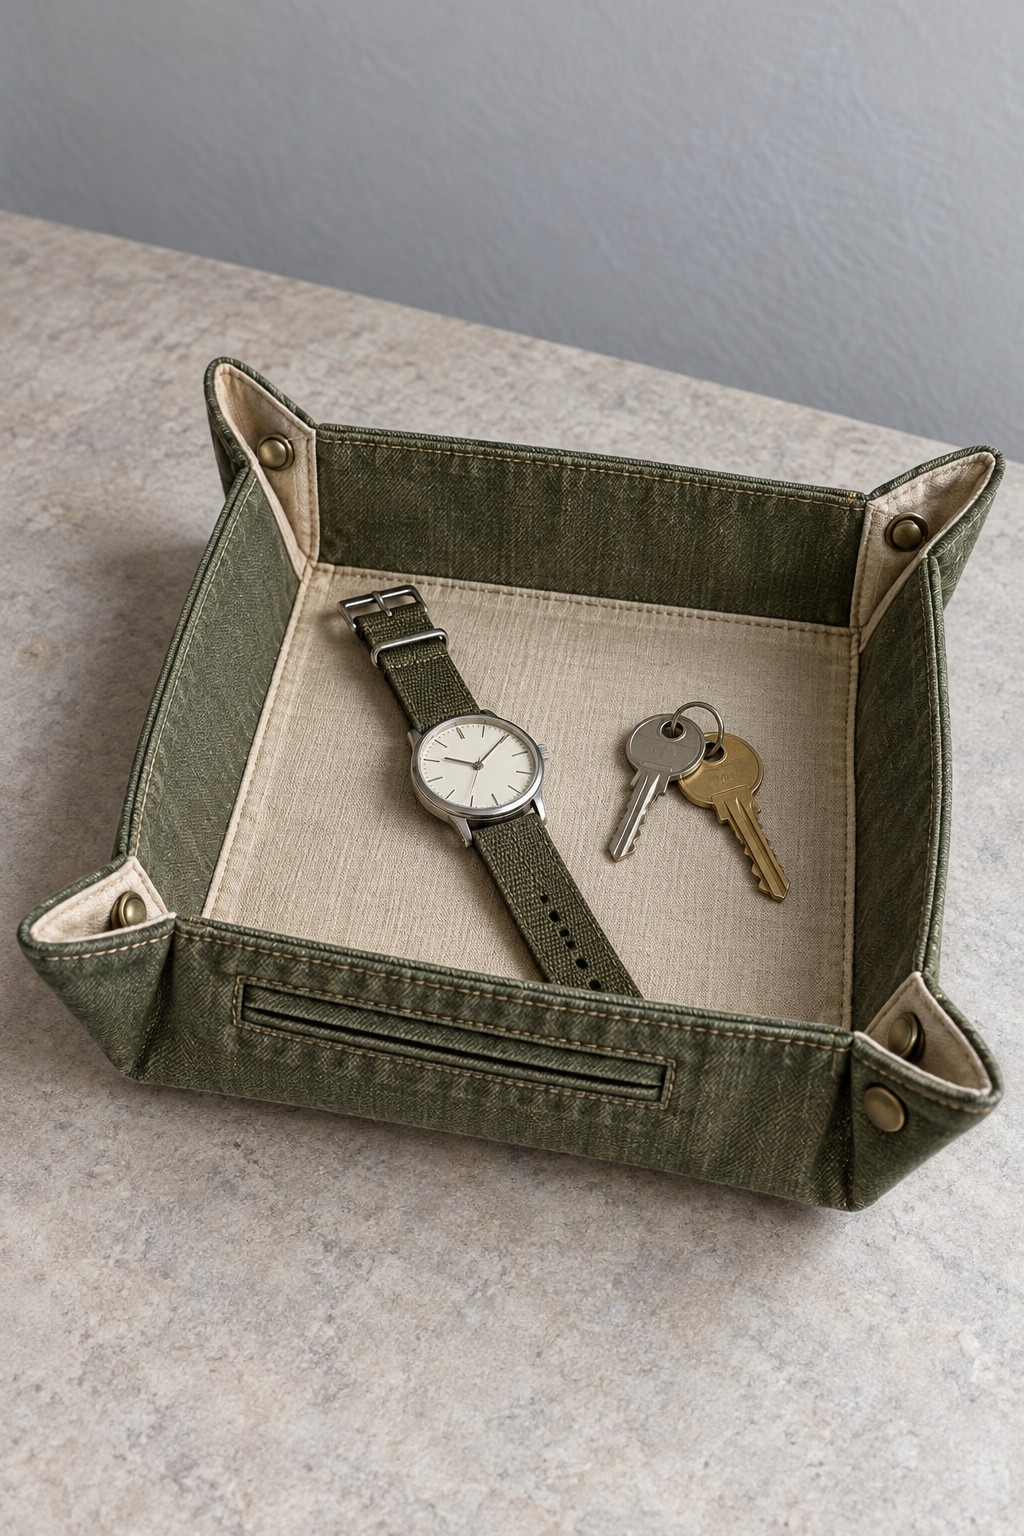
A shallow valet tray gives keys and a watch a defined place beside the door. Olive trouser fabric and a pale lining create a simple combination that works well with existing cargo seams.
Use a firm outer panel and lining. Follow the six step tutorial above to cut and baste the layers, sew and turn the rectangle, topstitch it flat, and sew the same folded corner at all four corners. A reused waistband strip can decorate the outer edge if you attach it before shaping the tray.
Keep the corners equal so the tray rests flat. If adapting the design with snaps, reinforce their placement and test them on scraps before installing them in the finished piece.
16. Corduroy Mushroom Jewelry Stand
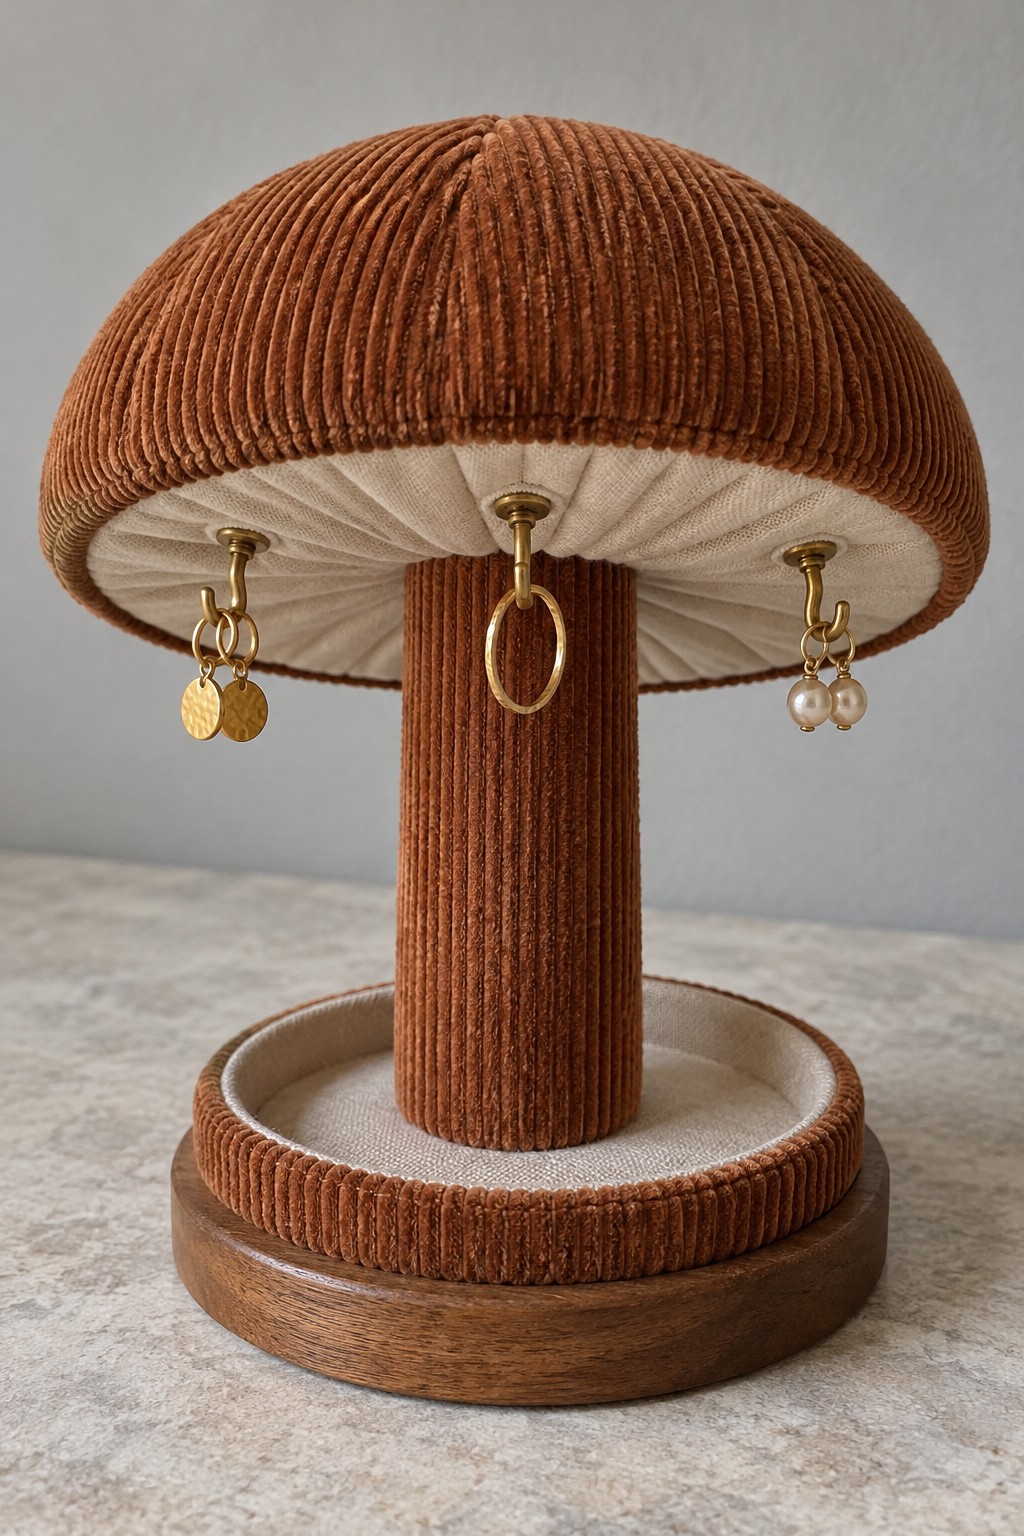
Rust colored corduroy forms a mushroom shaped jewelry stand with a soft cap and a fabric wrapped stem. Small hooks below the cap hold earrings and rings above a shallow base dish.
Use corduroy scraps, a sturdy wooden base and stem, a rigid cap core, padding, lining, and short hooks. Join the structural pieces securely first. Cover the stem and cap with fabric, then fit the hooks into the rigid core through prepared openings, keeping their ends fully enclosed.
This mushroom is a jewelry display, not a lamp. Space the hooks so delicate pieces hang freely, and keep the load light enough for the stand to remain stable.
17. Pleated Trouser Fabric Wall Pocket for Mail
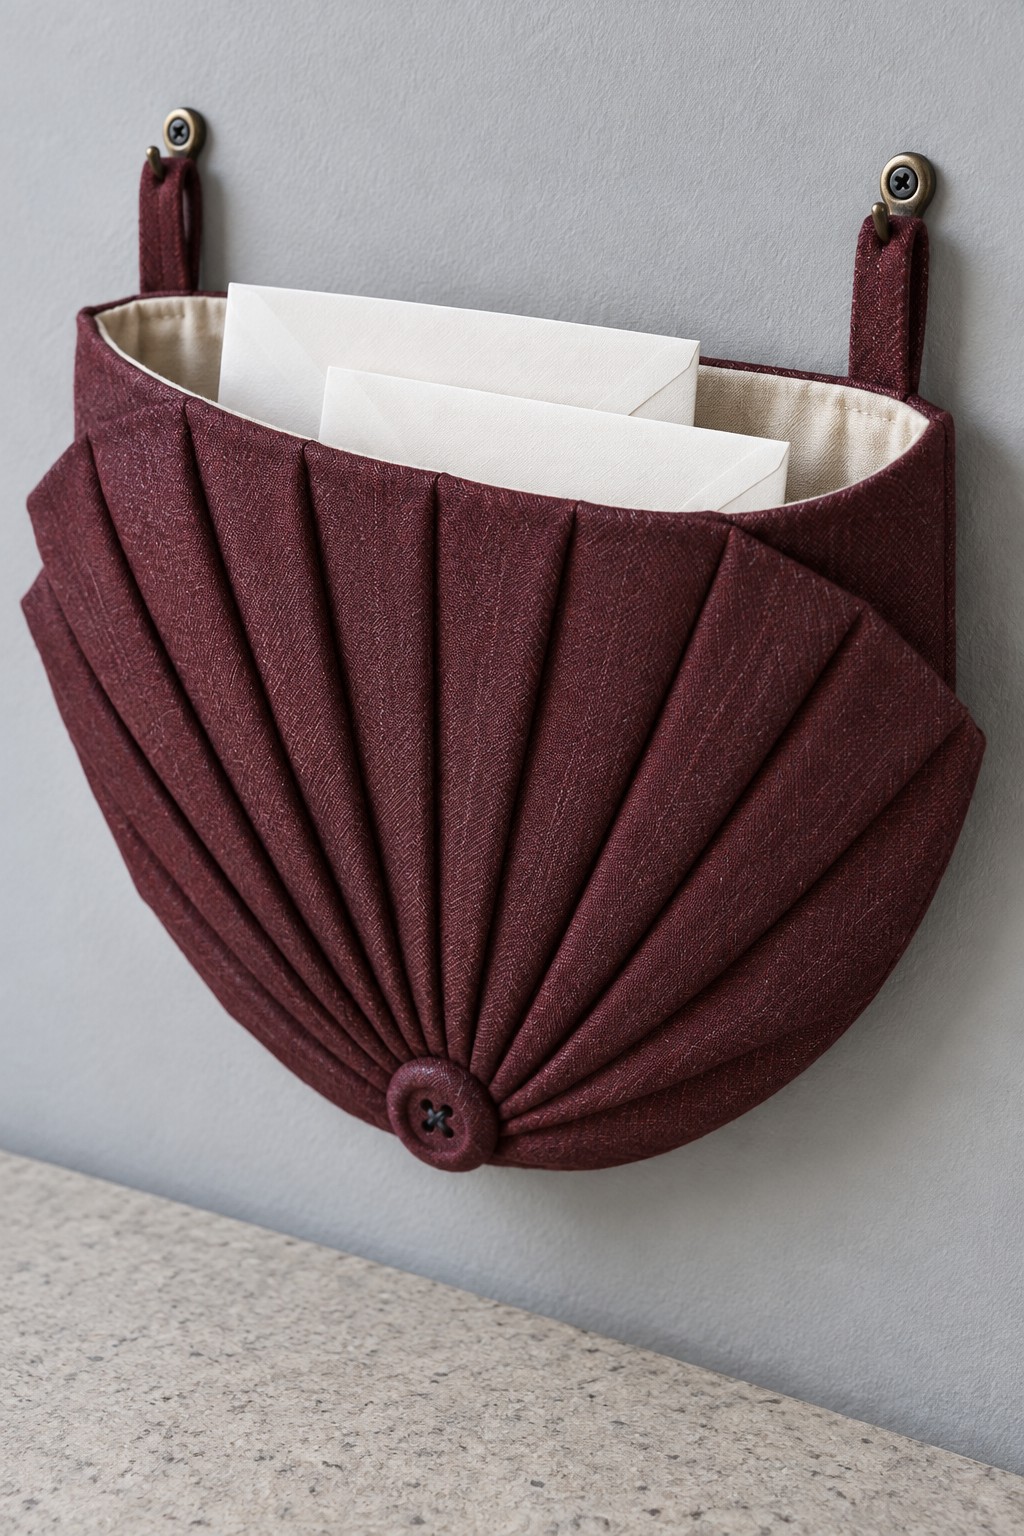
Burgundy fabric folded into a fan makes an attractive pocket for letters. A pale inner compartment keeps the mail separated from the decorative pleated front.
Gather trouser fabric, a stiffened backing, lining, a fabric covered button, and two hanging tabs. Form and baste the front pleats before attaching them to a curved lower edge. Sew the lined pocket behind the pleated panel, leaving the top open, and anchor both hanging tabs into reinforced upper corners.
Use the central button as decoration rather than the only structural fastener. Keep the pocket shallow enough that shorter envelopes remain easy to retrieve.
18. Mixed Trouser Fabric Wall Hanging
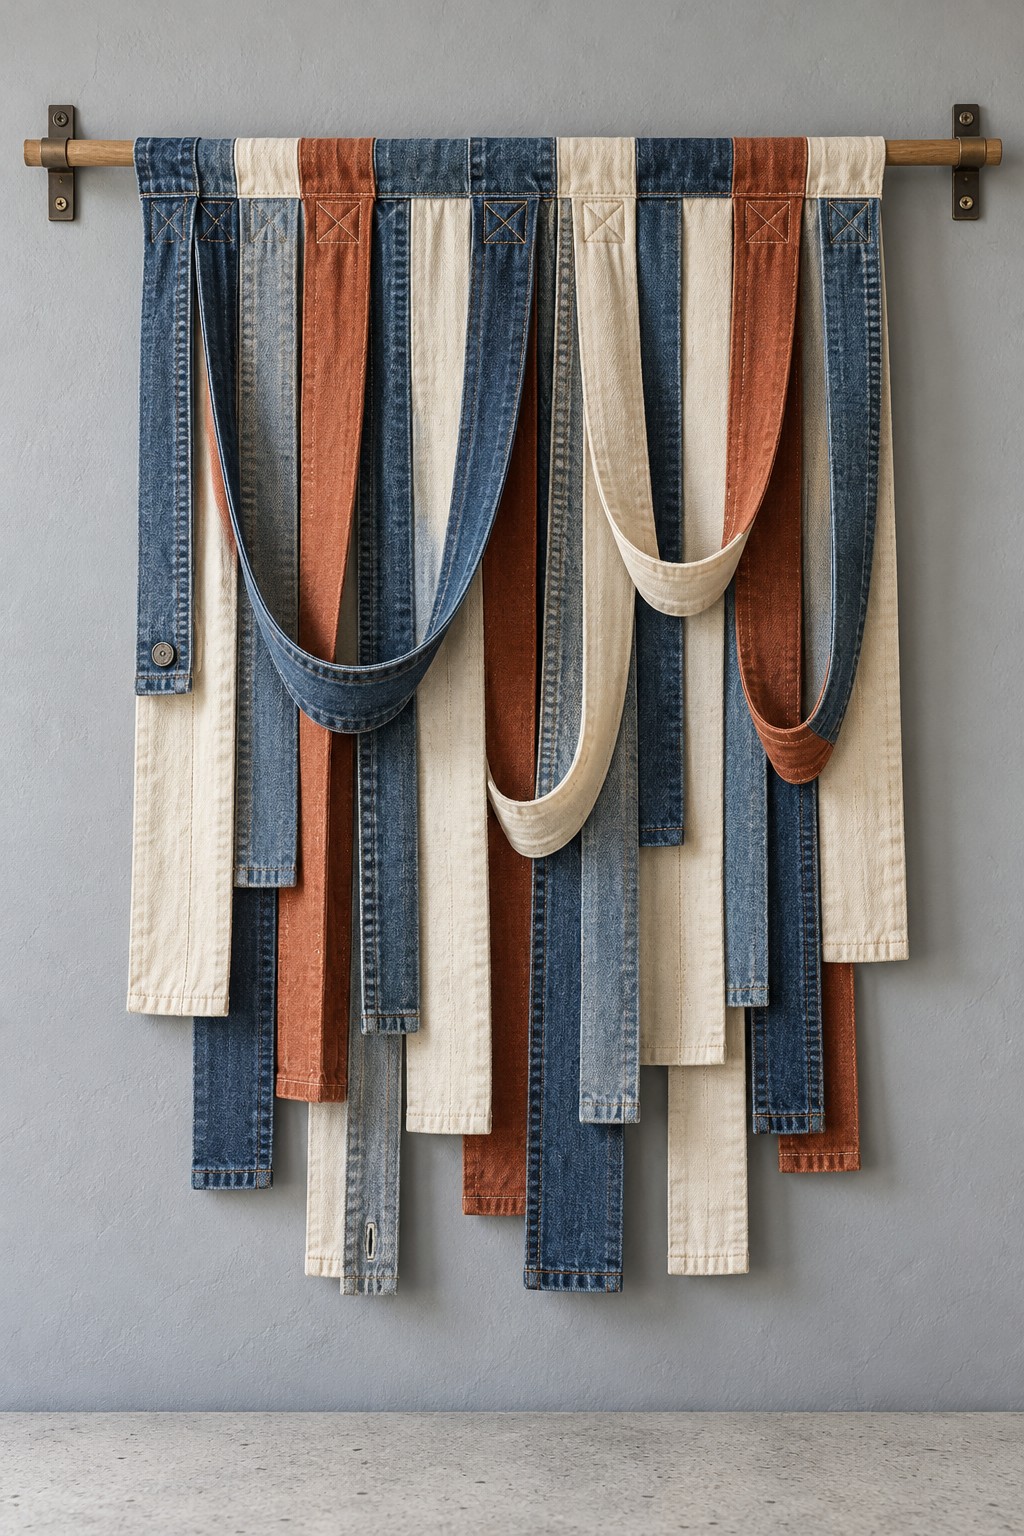
Long trouser offcuts become a textured wall hanging with straight tails and soft draped loops. Denim, cream cotton, and rust corduroy add variety through their weave and weight.
Use narrow fabric strips, a wooden rod, wall brackets, and matching thread. Finish fraying edges with narrow hems or folded seams, then make sewn loops at the top of each strip. Arrange the longer strips first and attach the draped bands between selected anchor points.
Balance the fabric across the rod and fix the brackets securely. Keep the hanging clear of heaters and use short, firmly attached loops in spaces accessible to children or pets.
19. Denim Drawstring Play Mat for Small Toys
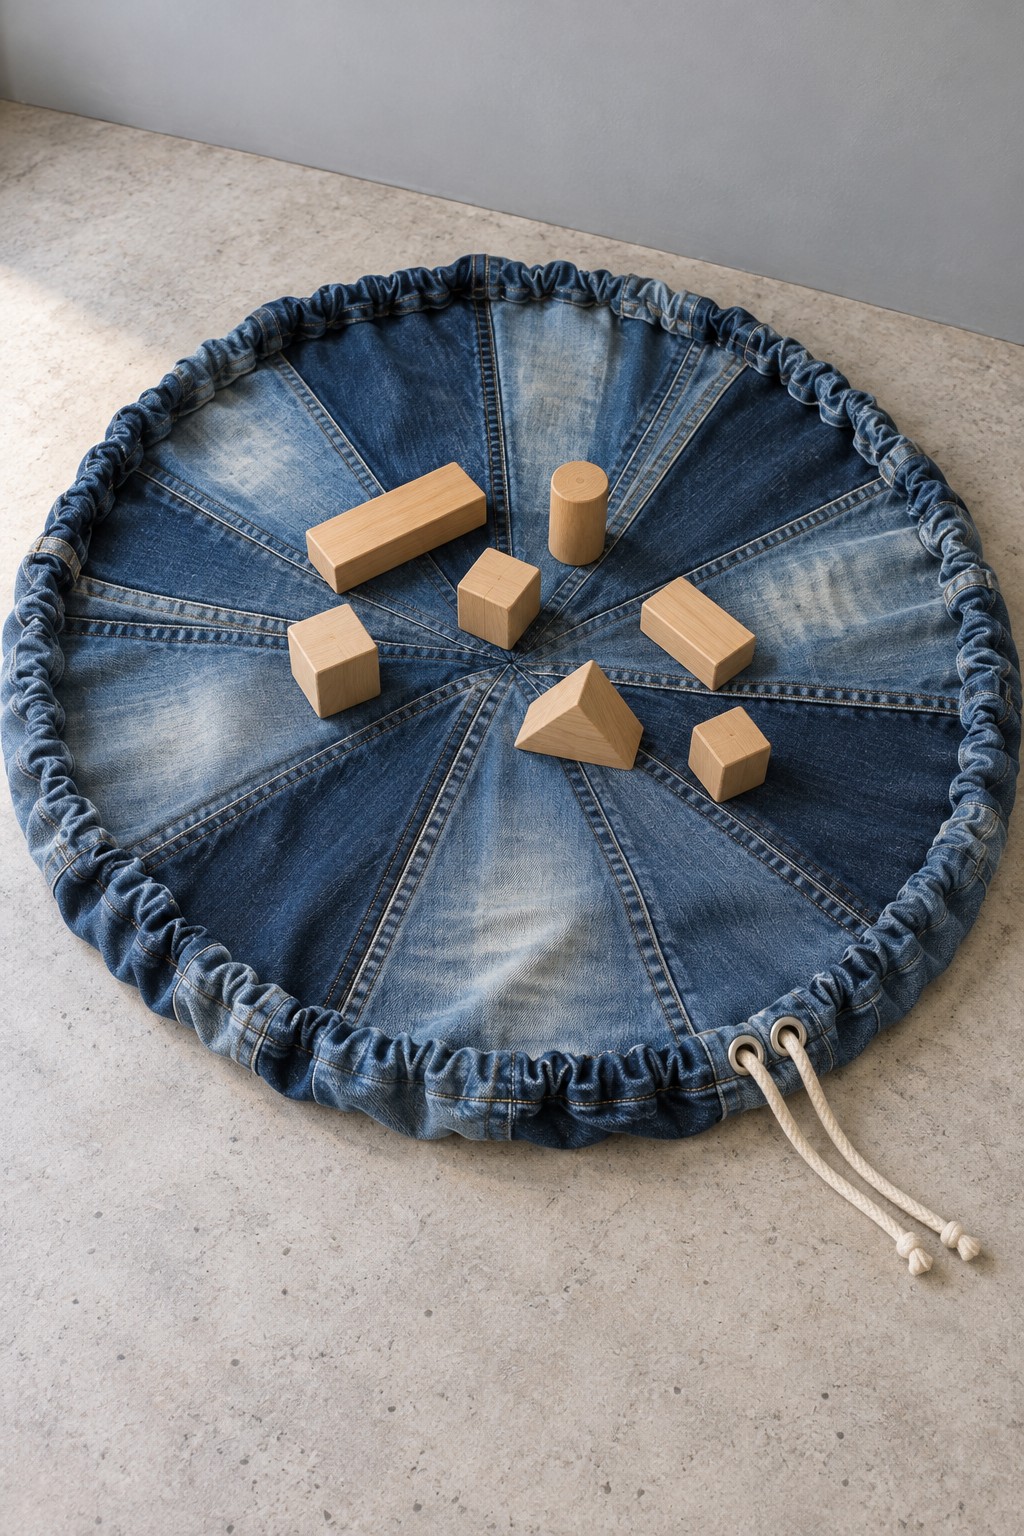
A round denim mat creates a defined surface for a small collection of blocks. Its edge channel allows an adult to gather the toys into a loose storage bundle.
Use denim wedges, smooth backing, binding for a cord channel, and a sturdy drawstring. Join the wedges into a flat circle, add the backing, and sew the channel around the edge without catching the cord path in the seam. Reinforce the cord exits and test the gathering action with lightweight contents.
Treat the drawstring as an adult operated storage feature. Keep loose cords inaccessible during play, and do not use this design as an infant sleep mat, a child’s bag, or a way to carry heavy toys.
20. Canvas Pants Bicycle Frame Bag
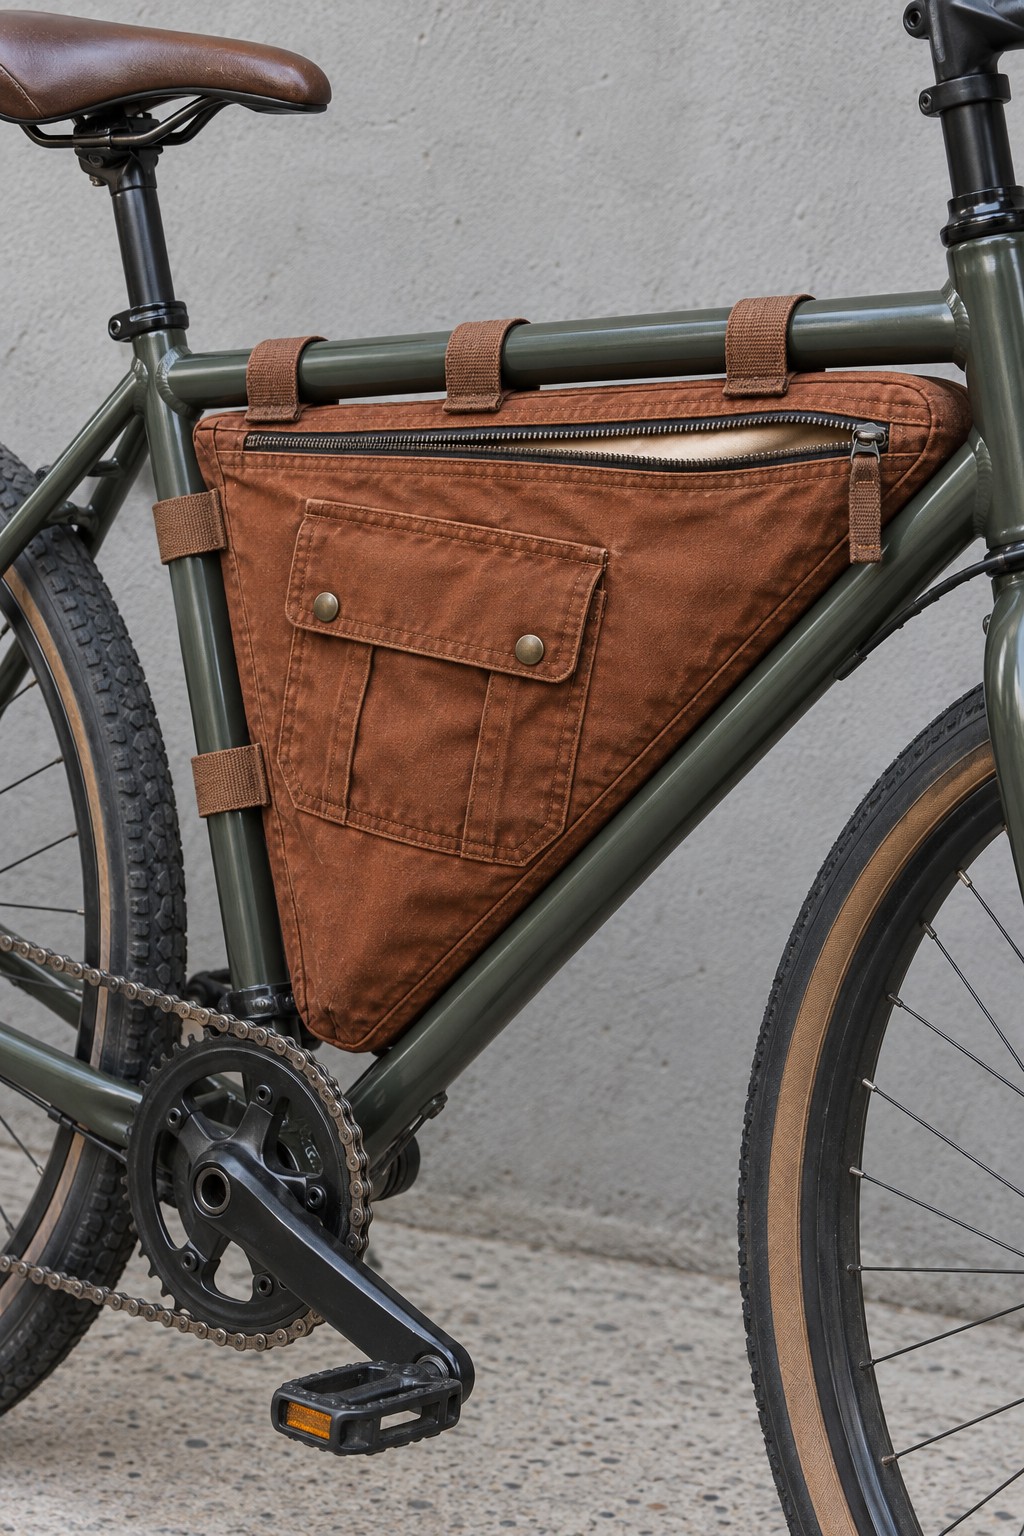
Firm brown work trousers can form a compact triangular bag that fits inside a bicycle frame. An original pocket adds accessible storage on the outer face.
Use tightly woven trouser fabric, lining, a zipper, stabilizing panels, and reinforced straps. Trace a paper template inside your own frame, allowing clearance around cables and fittings. Add the zipper to the upper or side seam before joining the gusset and two main panels, then anchor the straps into reinforced seams.
Check steering, pedaling, braking, and cable movement with the bicycle stationary before riding. Keep the bag clear of moving parts and do not assume ordinary trouser fabric is waterproof.
21. River Pattern Denim Table Runner
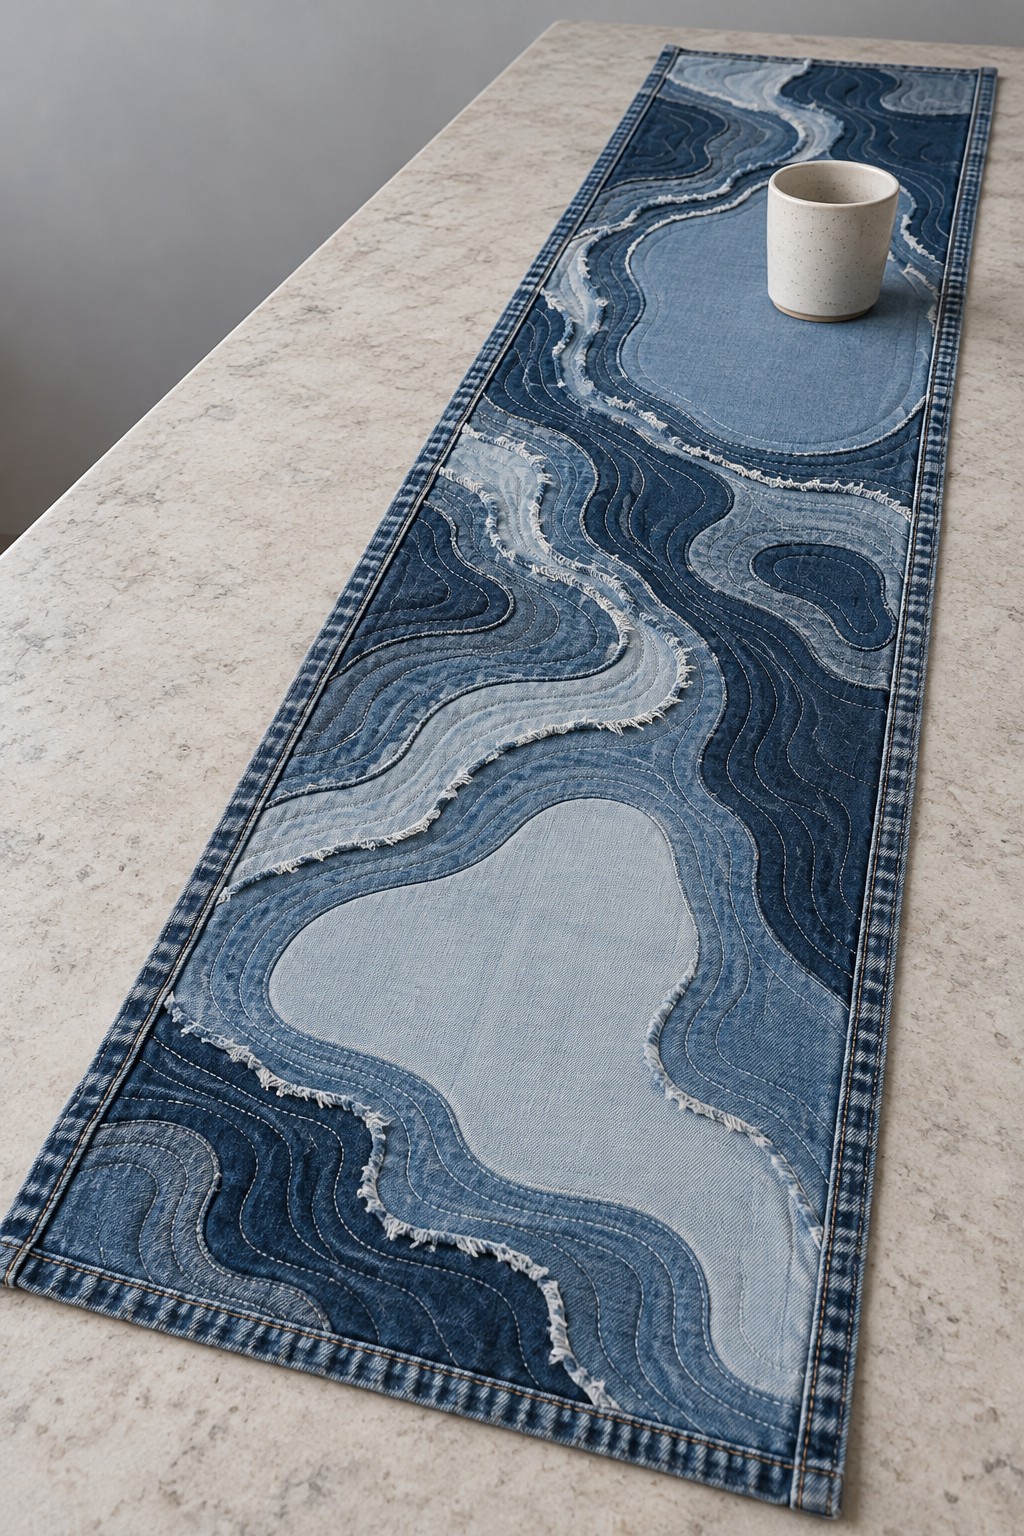
Flowing patches of light and dark denim create a river effect along a narrow table runner. Curved stitching follows the fabric edges and adds texture without separate decorations.
Use jeans in several washes, a continuous backing, thread, and binding. Cut a paper plan for the main curves, then arrange and secure the denim shapes on the backing. Stitch each applied edge, add extra quilting where needed, and finish the perimeter with a flat binding.
Test for color transfer before placing dark denim on a pale table. This runner is decorative and should not be treated as a heat resistant mat for hot cookware.
22. Corduroy Pocket Magazine Rack on a Wooden Stand
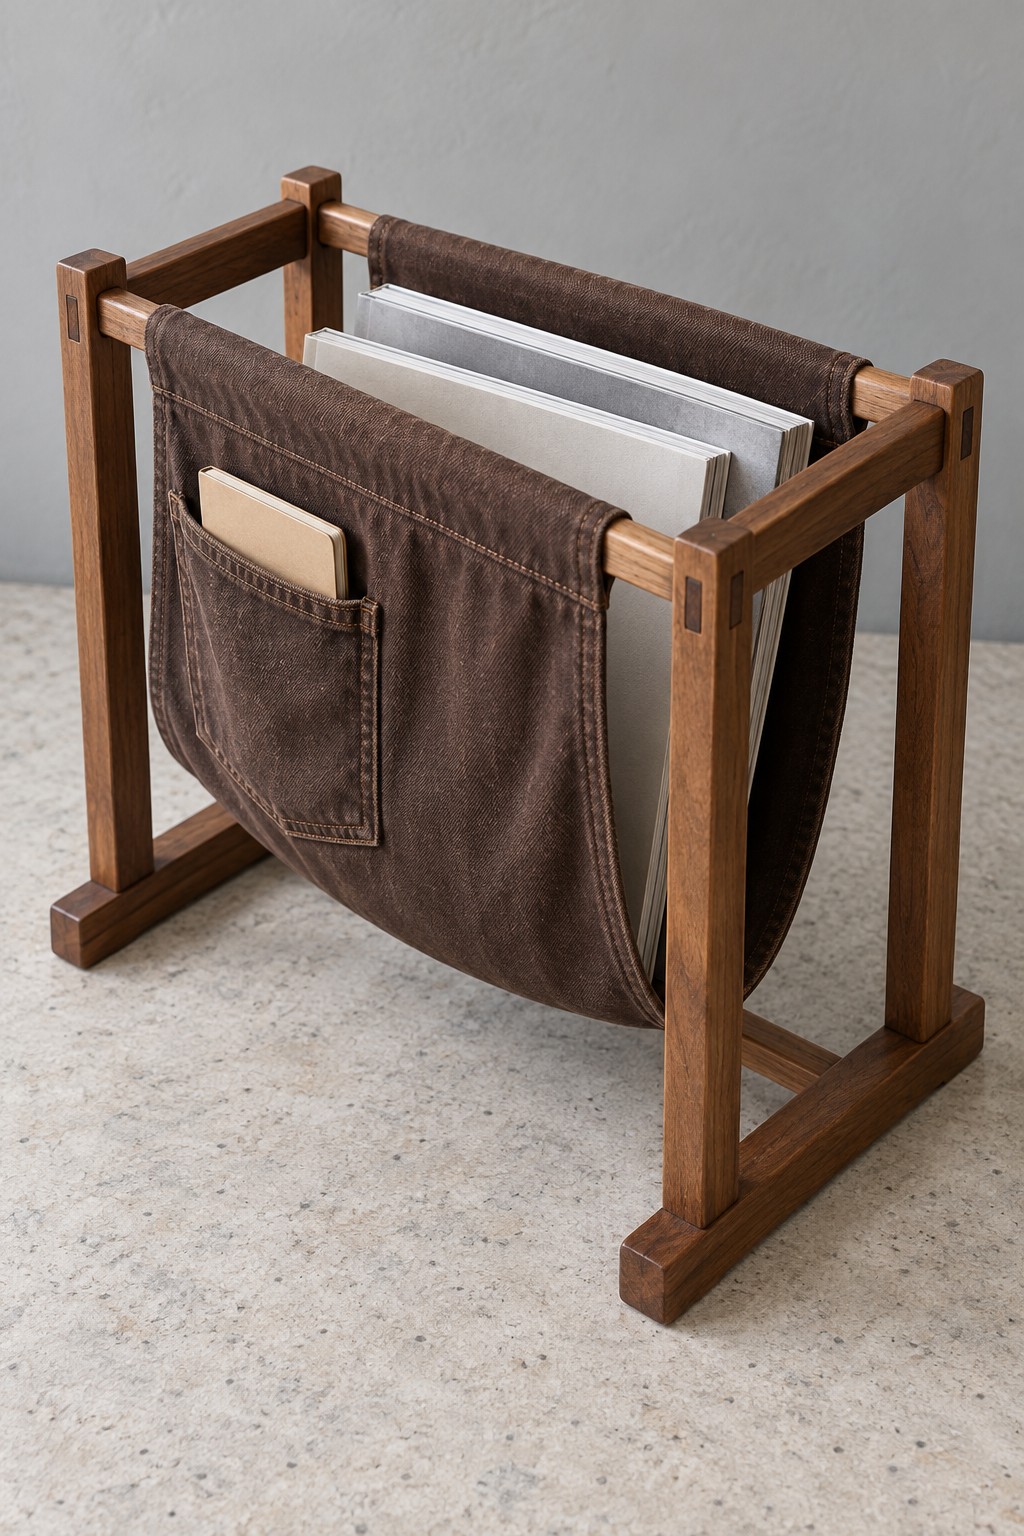
Brown corduroy turns a simple wooden magazine rack into a soft sided storage piece. The outer pocket gives a reading notebook its own place.
Use a stable rack frame, corduroy panels, strong lining, and appropriate attachment loops or removable fasteners. Measure the sling with the intended magazines in place, allowing extra fabric for attachment around the rails. Stitch the outer pocket first, then join the corduroy to its backing and reinforce the upper attachments.
The frame should support the sling evenly without sharp edges rubbing the fabric. Keep the base clear of the floor and avoid overloading the pockets.
23. Denim Crown Sleeve for a Glass Vase
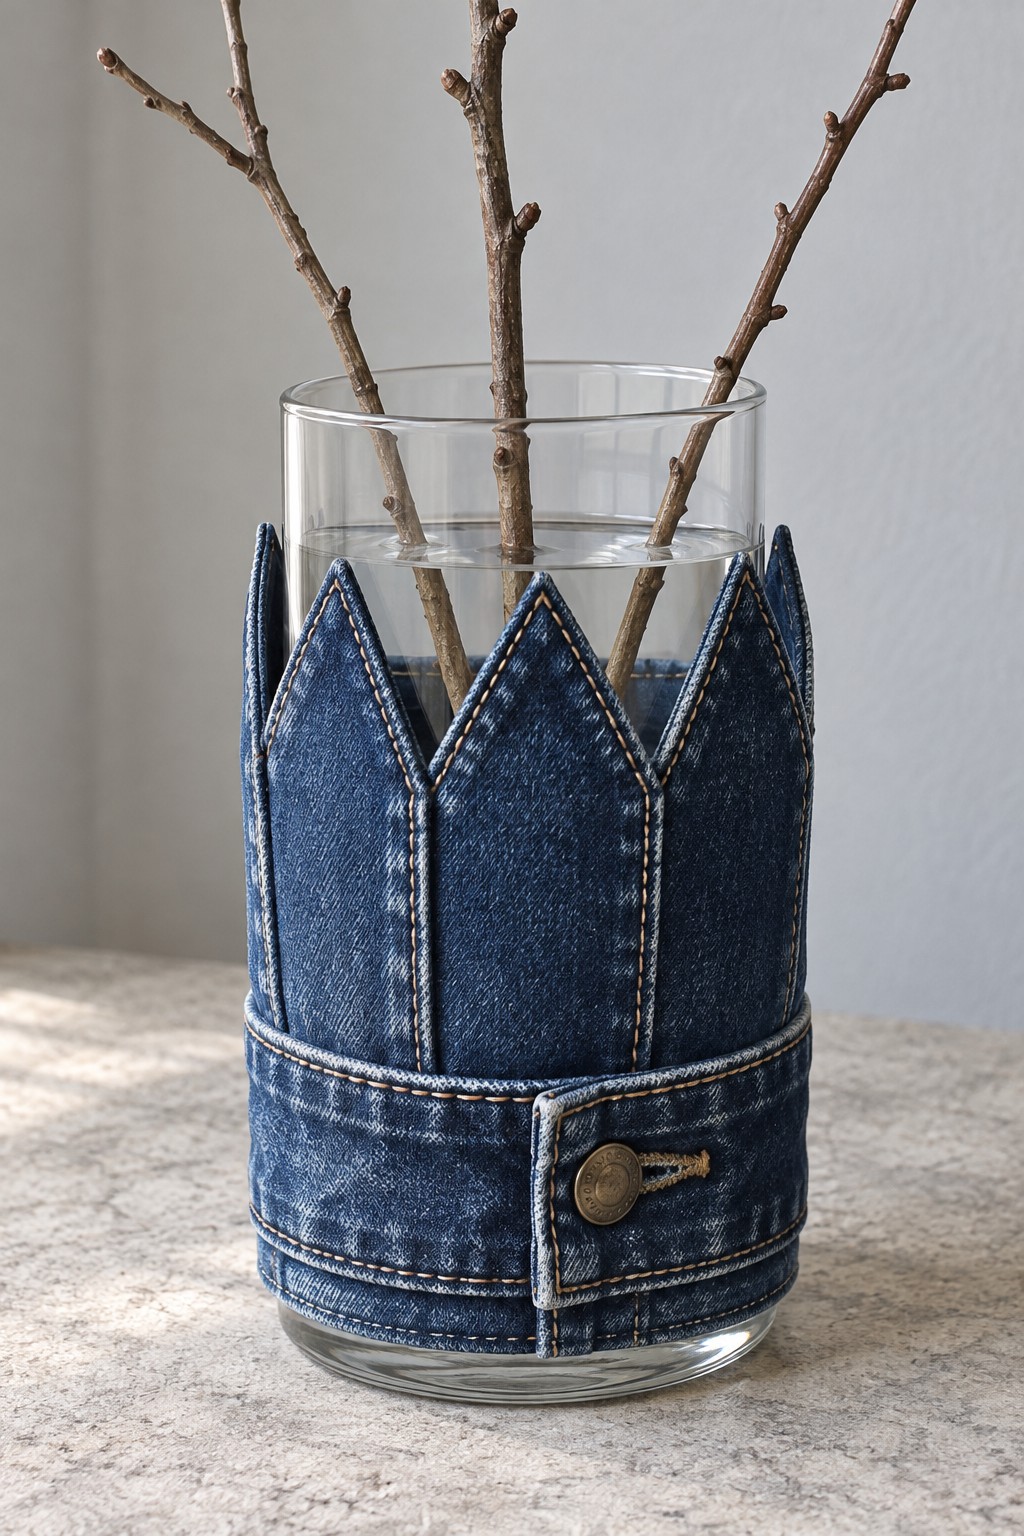
A pointed denim sleeve gives a plain glass cylinder a bold crown outline. A reused waistband wraps the lower section and adds recognizable jeans detailing.
Use denim, a glass vase, lining or interfacing, and the waistband. Measure the vase circumference and height, then draft the pointed upper edge with extra seam allowance. Sew and turn the pointed section carefully, close the sleeve around the vase, and secure the waistband without stressing the glass.
The glass container holds the water. Remove the fabric before filling, emptying, or washing the vase, and let the glass dry before replacing the sleeve.
24. Fold Flat Denim Basket with Cream Lining
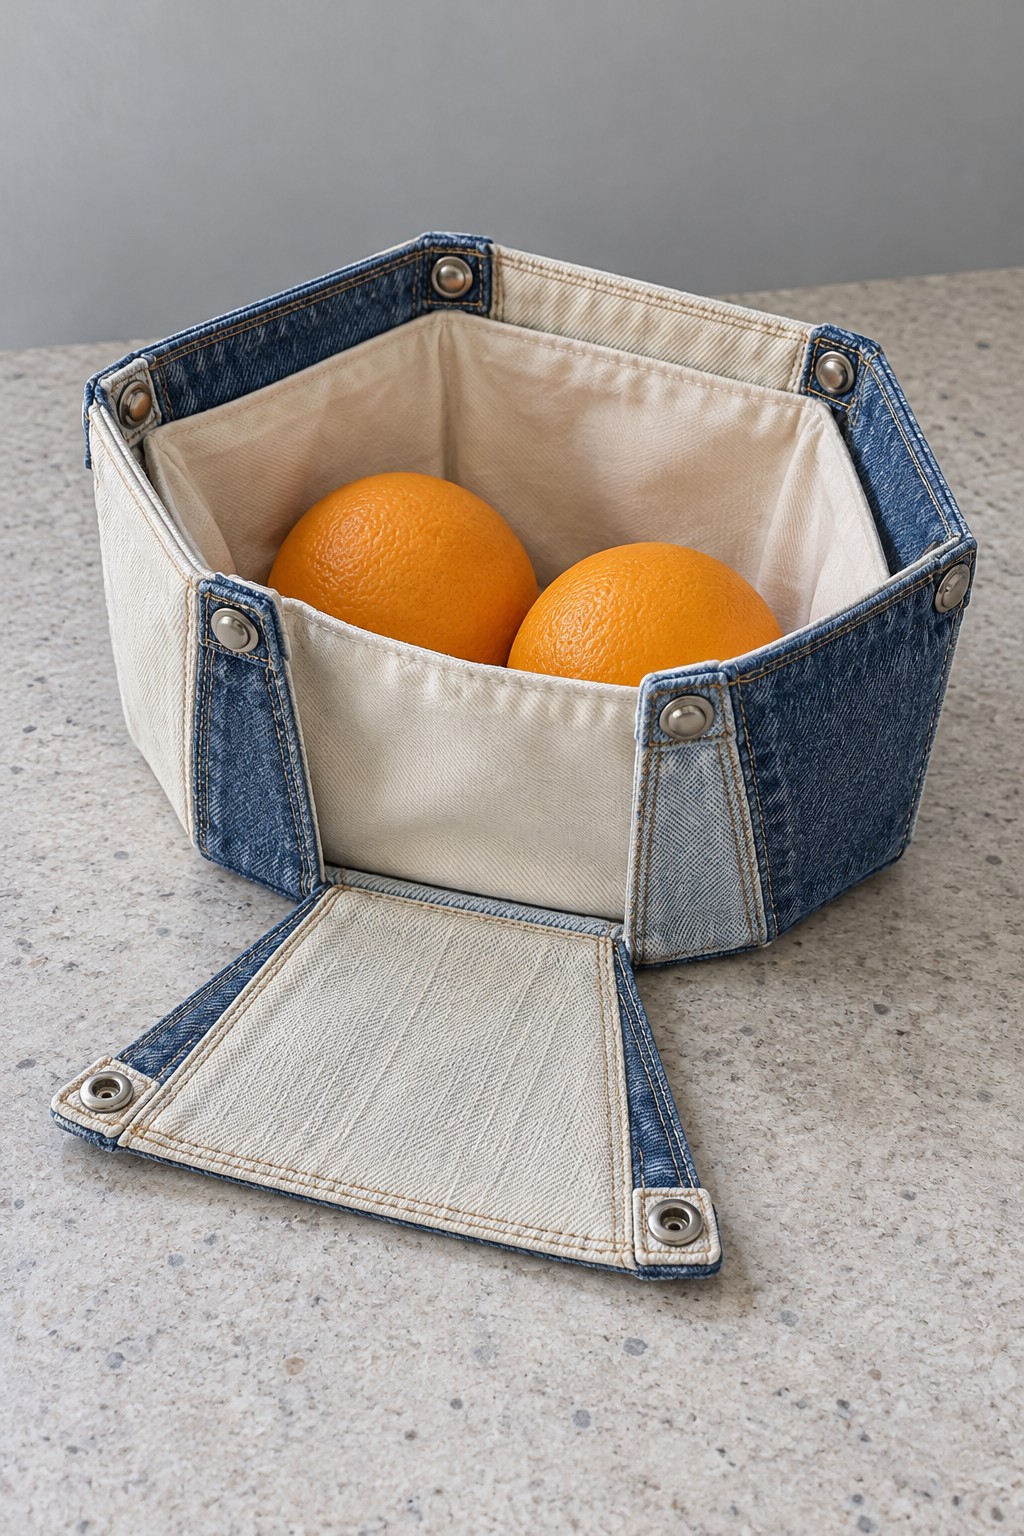
A basket with detachable corner fasteners folds open for cleaning and storage. Denim outer panels frame a cream interior, with a flat base supporting the contents.
Use denim, washable lining, removable stiffeners if needed, and reinforced snaps. Draw a cross shaped pattern with a central base and four surrounding walls. Sew the lined shape flat, finish all edges, and install compatible snaps at the wall corners so adjacent sides connect when raised.
Test the snap positions with a paper mockup before cutting. Use the basket for dry packaged goods or whole uncut fruit with a suitable washable liner, and keep rigid inserts out of the wash.
25. Denim Petal Coaster for a Drinking Glass
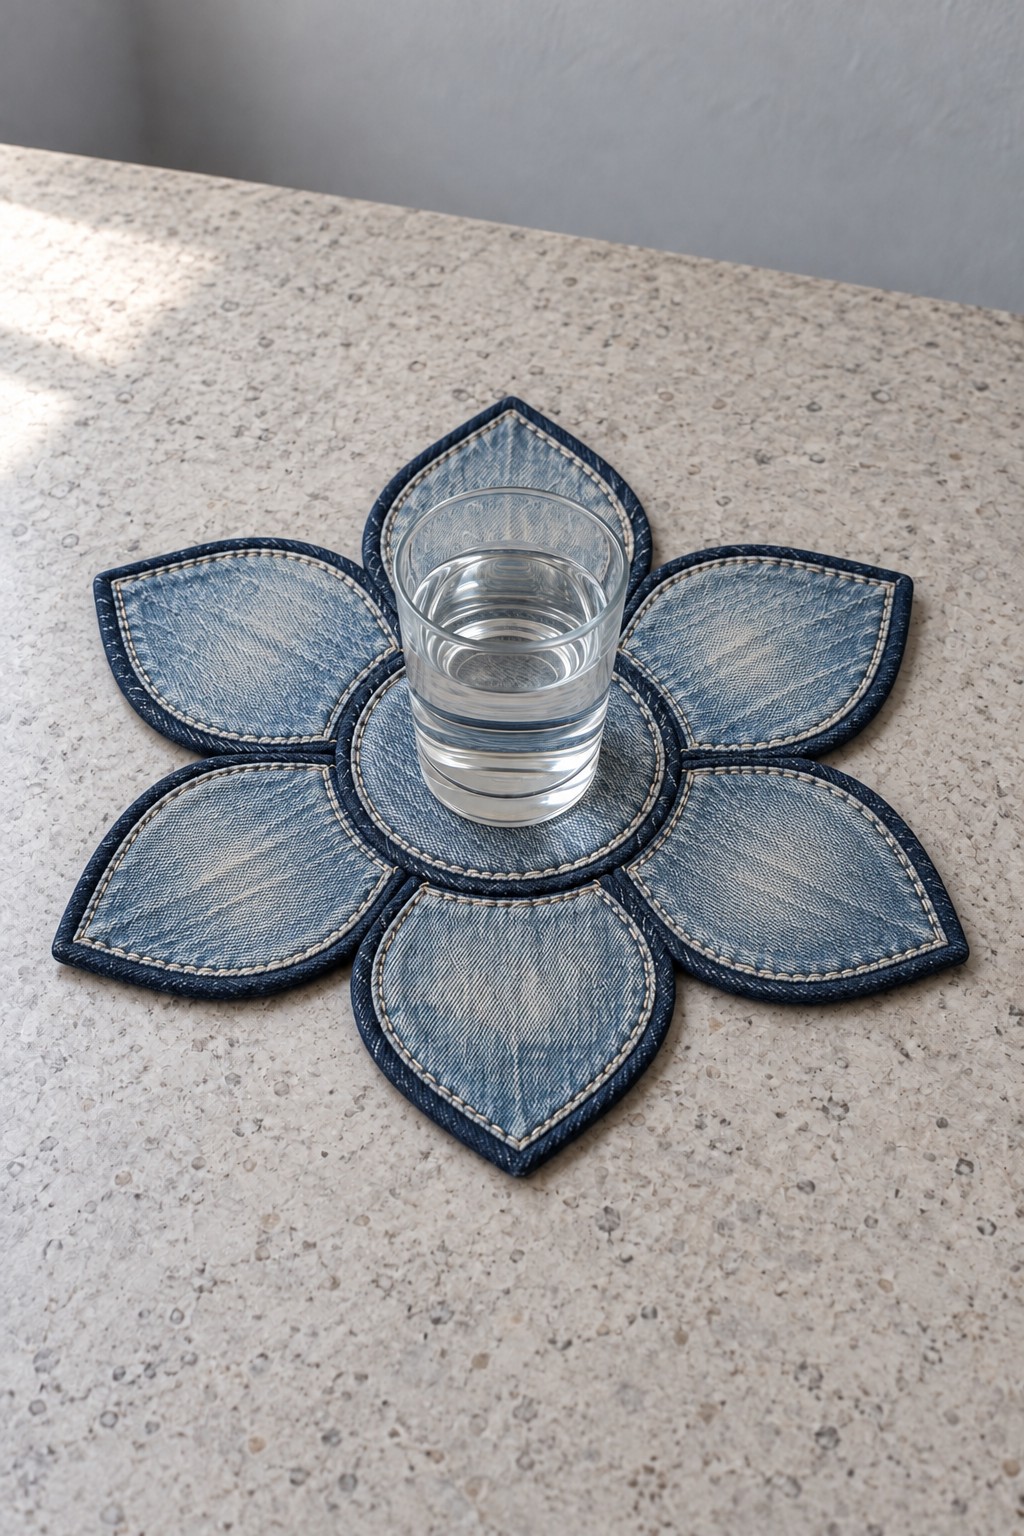
Six outlined denim petals form a small flower mat for a drinking glass. Two fabric layers and simple topstitching give each petal a clear shape.
Use denim scraps, absorbent backing, thread, and a six petal paper pattern with a broad center. Assemble a flat central area and attach the petals so their thick seams stay away from the glass base. Stitch the layers securely and trim or enclose the edges neatly.
Test the coaster on a flat surface before use. If a glass rocks on raised seams, flatten the joins or enlarge the center. Use it for condensation rather than hot pans.
26. Cat Ear Denim Corner Bookmark
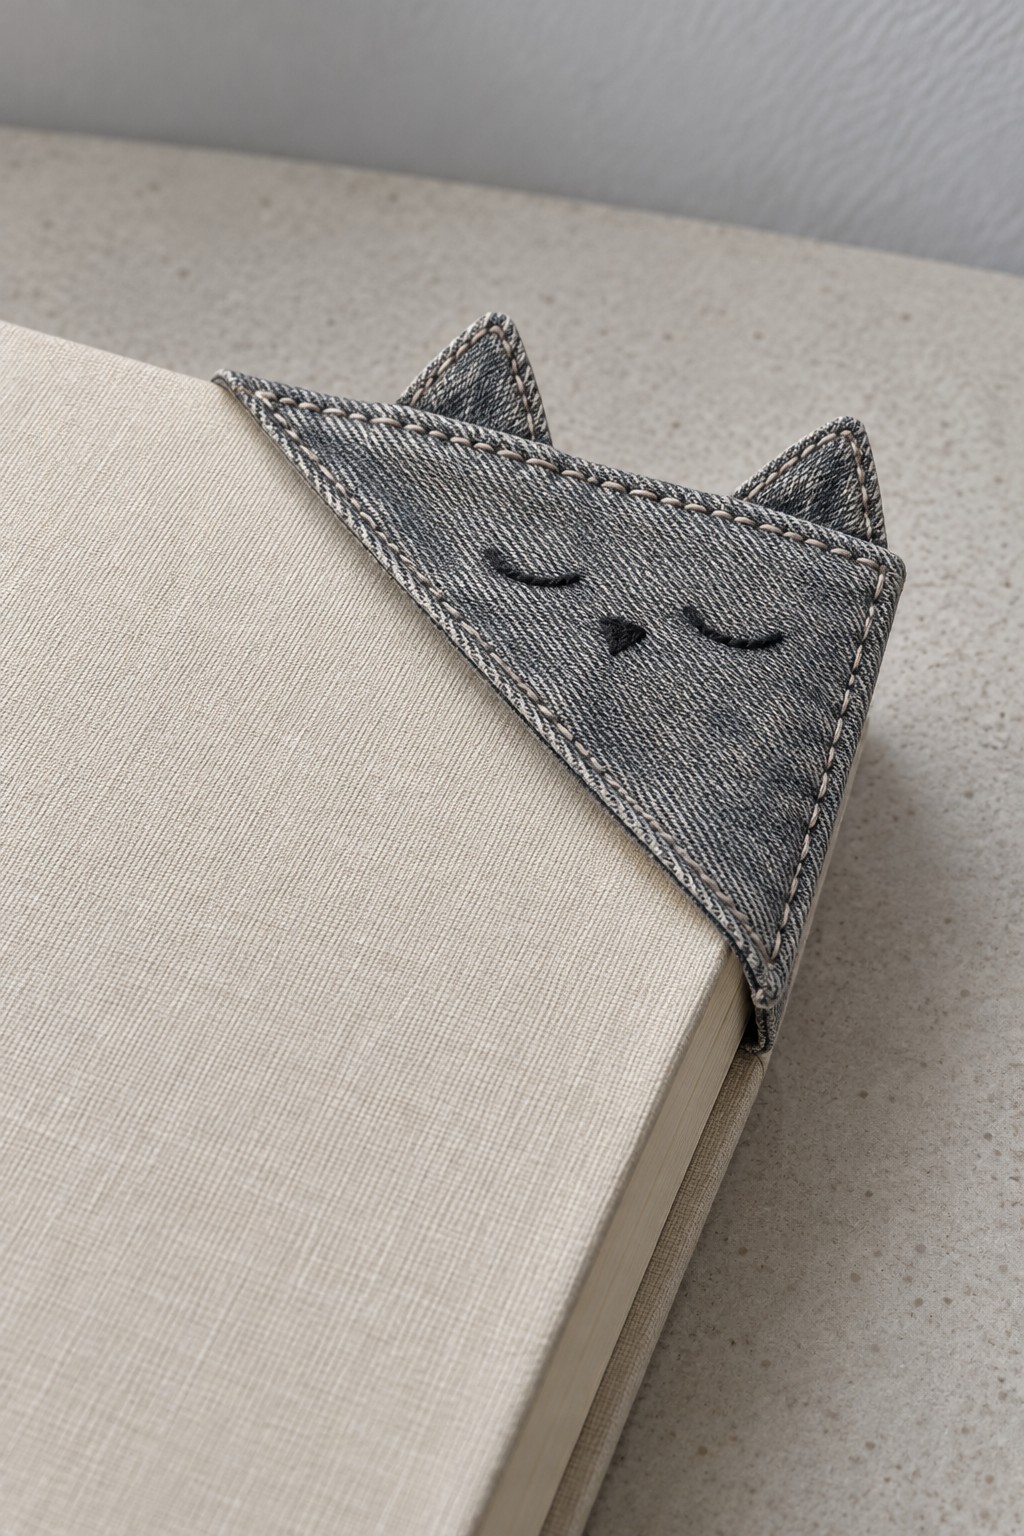
A triangular bookmark slips over a page corner, with two small ears and embroidered sleepy features giving it a cat character. Lightweight denim keeps the shape compact.
Use thin trouser scraps, a smooth lining, embroidery thread, and a paper triangle. Embroider the face and secure the ears before assembling the front. Join the front and back along the two outer sides, leaving the diagonal edge open to receive the page corner.
Avoid bulky seams, metal parts, and glue residue against the paper. Test the opening on a spare page so it slides on without bending the corner.
27. Envelope Coin Purse from Denim Scraps
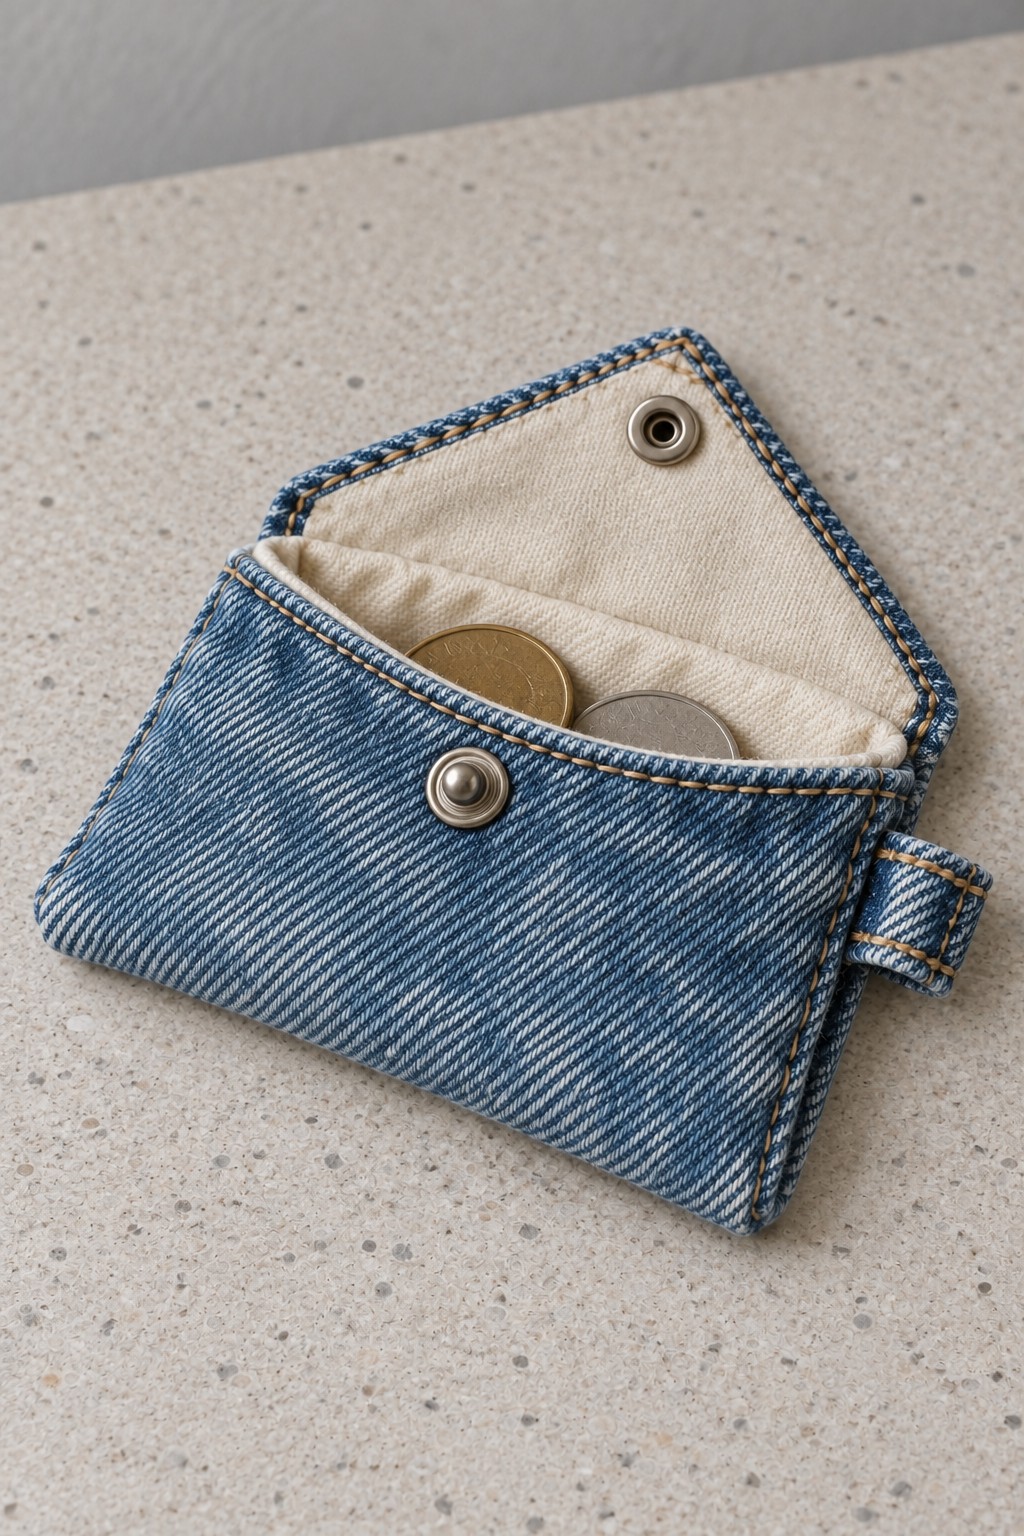
A denim envelope purse uses a broad triangular flap and a small snap to keep coins together. A side loop makes the pouch easy to find inside a larger bag.
Use denim, lining, interfacing if needed, a snap, and a short folded fabric loop. Make a paper pattern around the desired contents, including a flap long enough to overlap the front. Assemble the lined body, enclose the loop in a side seam, then reinforce and install the snap after checking its alignment.
Keep the inner seams closed so coins cannot lodge between the lining and outer fabric. A very small purse is easier to sew from lighter denim than from thick original jeans seams.
28. Pink Jeans Tulip Key Pouch
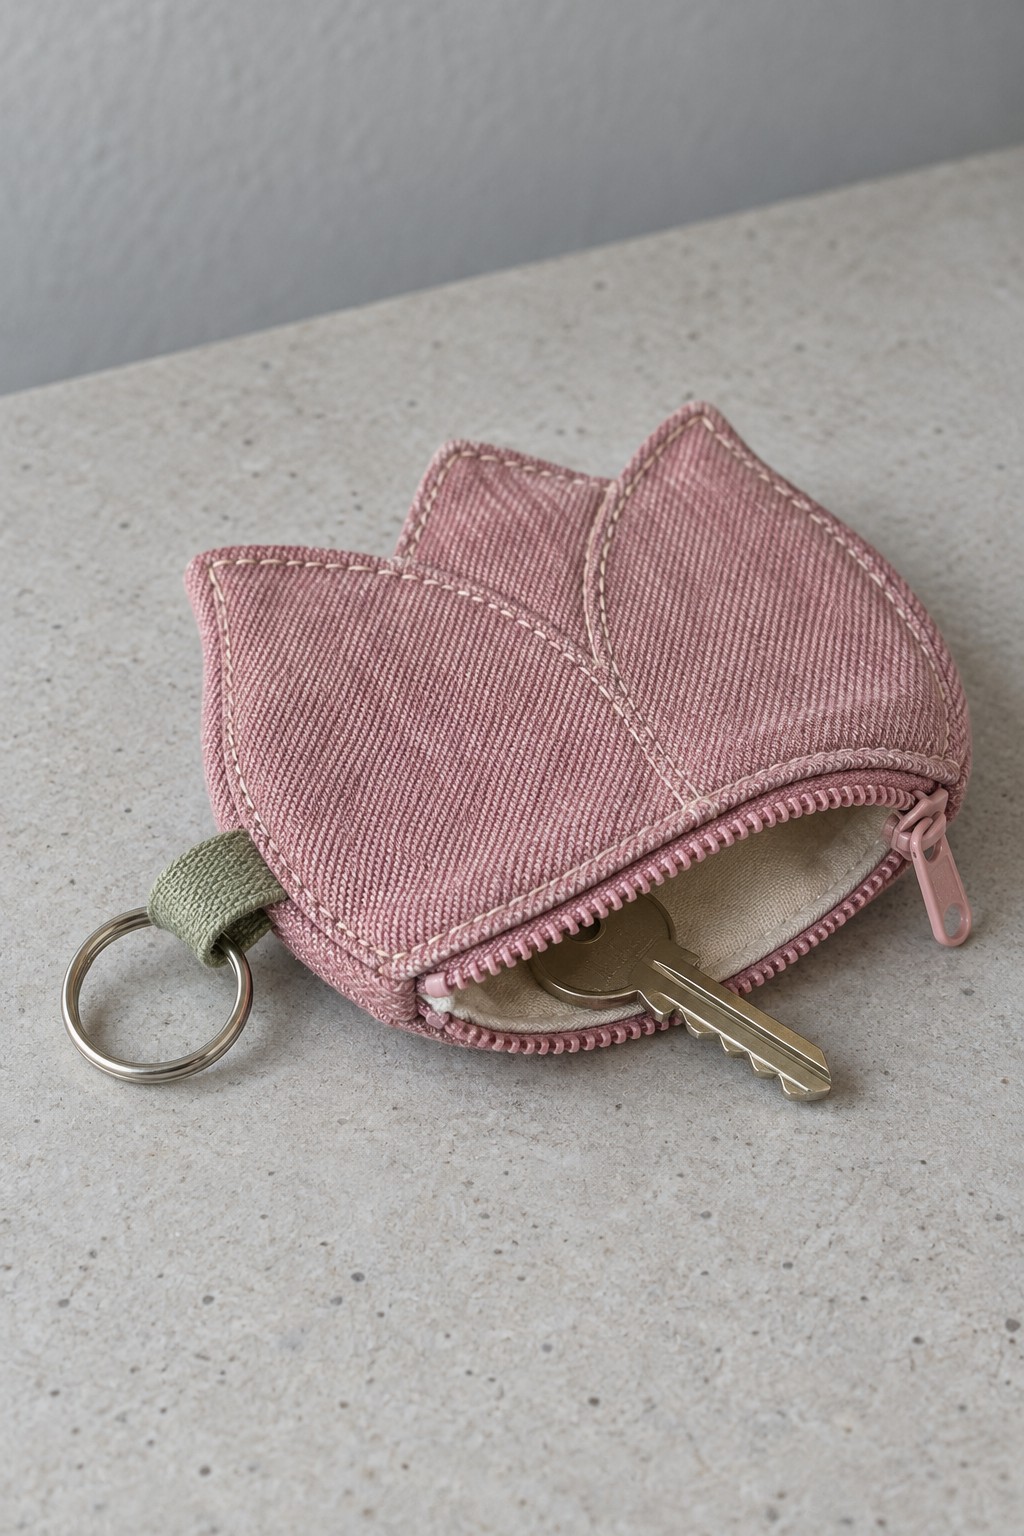
Dusty pink jeans become a tulip shaped pouch with three softly pointed petals. A side zipper opens into a pale lined compartment, while a sage tab carries a split ring.
Use pink denim, lining, a short zipper, a strong fabric tab, and a key ring. Draft the flower head around the actual key, leaving room for the zipper and seam allowances. Add the subtle petal stitching while the panels are flat. Sew the zipper into one curved edge, attach the tab in the opposite seam, and complete the lining without blocking the zipper.
Round the petal notches slightly and clip the allowances carefully so the top turns cleanly. Reinforce the ring tab and ensure the key enters and leaves without catching the lining.
Choose a Project That Makes the Most of Your Fabric
Start with a small flat project if you are new to sewing, such as a bookmark, coaster, or lined tray. Save larger intact panels for organizers and cushions, and reserve the strongest sections for handles and hanging tabs. A successful upcycling project gives the fabric a useful role while respecting its thickness, stretch, and condition.
Keep care practical: make liners removable where possible, inspect weight bearing seams, and wash a sample before committing to a cleaning method. For more ways to combine reused materials with handmade details, explore these shabby chic craft ideas.



Leave a Reply