
A paper bag can become a chatty monster; a folded doily can turn into a friendly ghost. These 30 Halloween crafts for preschoolers offer painting, tearing, wrapping, and collage activities. Each includes a short supply list, manageable instructions, and preparation notes to help adults choose a suitable project for their group.
Table of Contents
- Set Up a Preschool Halloween Craft Session
- Before You Set Up the Craft Table
- 1. Paper Plate Pumpkins with Mix-and-Match Faces
- Materials
- How to Make It
- 2. Cotton Ball Ghost Collage
- Materials
- How to Make It
- 3. Egg Carton Spiders with Bendable Legs
- Materials
- How to Make It
- 4. Cardboard Tube Monsters with Paper Wings
- Materials
- How to Make It
- 5. Craft Stick Haunted House
- Materials
- How to Make It
- 6. Tissue Paper Cauldron with Pretend Bubbles
- Materials
- How to Make It
- 7. White Yarn Mummy
- Materials
- How to Make It
- 8. Paper Bag Monster Puppet
- Materials
- How to Make It
- 9. Coffee Filter Spider Web Painting
- Materials
- How to Make It
- 10. Pasta Skeleton Collage
- Materials
- How to Make It
- 11. Sponge-Printed Ghosts on Black Paper
- Materials
- How to Make It
- 12. Upright Cardboard Tube Jack-o’-Lanterns
- Materials
- How to Make It
- 13. Cupcake Liner Witches with Yarn Hair
- Materials
- How to Make It
- 14. Stacked Paper Loop Halloween Characters
- Materials
- How to Make It
- 15. Paper Plate Spider Web Lacing
- Materials
- How to Make It
- 16. Pumpkin Seed Owl with Layered Feathers
- Materials
- How to Make It
- 17. Cotton Swab Skeleton Hand Collage
- Materials
- How to Make It
- 18. Pumpkin Lacing Card with a Paper Smile
- Materials
- How to Make It
- 19. Clothespin Bat for a Classroom Display
- Materials
- How to Make It
- 20. Bubble Wrap Pumpkin Prints
- Materials
- How to Make It
- 21. Tissue Paper Pumpkin Window Suncatcher
- Materials
- How to Make It
- 22. Upside-Down Paper Bowl Black Cat
- Materials
- How to Make It
- 23. Torn Paper Frankenstein’s Monster Portrait
- Materials
- How to Make It
- 24. Paper Doily Ghost with a Hanging Loop
- Materials
- How to Make It
- 25. Sponge-Painted Moon with Paper Bats
- Materials
- How to Make It
- 26. Felt Monster Face with Mismatched Features
- Materials
- How to Make It
- 27. Paper Fringe Witch Broom
- Materials
- How to Make It
- 28. Pom-Pom Pumpkin Wreath
- Materials
- How to Make It
- 29. Standing Accordion Paper Ghost
- Materials
- How to Make It
- 30. Paper Plate Eyeball with Yarn Veins
- Materials
- How to Make It
Set Up a Preschool Halloween Craft Session
Before You Set Up the Craft Table
Choose one activity at a time and prepare its parts before inviting children to the table. Use age-appropriate art supplies, washable paint, and child-appropriate glue; follow the product labels. Adults should handle thick-card cutting, hole punching, wire trimming, and any difficult assembly. Supervise throughout and let children make their own choices about colors and expressions.
Small loose items such as googly eyes, pom-poms, pasta, and seeds are unsuitable for children who still mouth objects. Offer large paper alternatives instead. Keep yarn lengths manageable and store them away after use.
For a session without paint-drying breaks, try the torn paper portrait, paper bag puppet, or doily ghost. Plan painted projects in two stages, with drying time before assembly. Keep lacing and small-piece collage activities for children who are ready for those materials.
1. Paper Plate Pumpkins with Mix-and-Match Faces
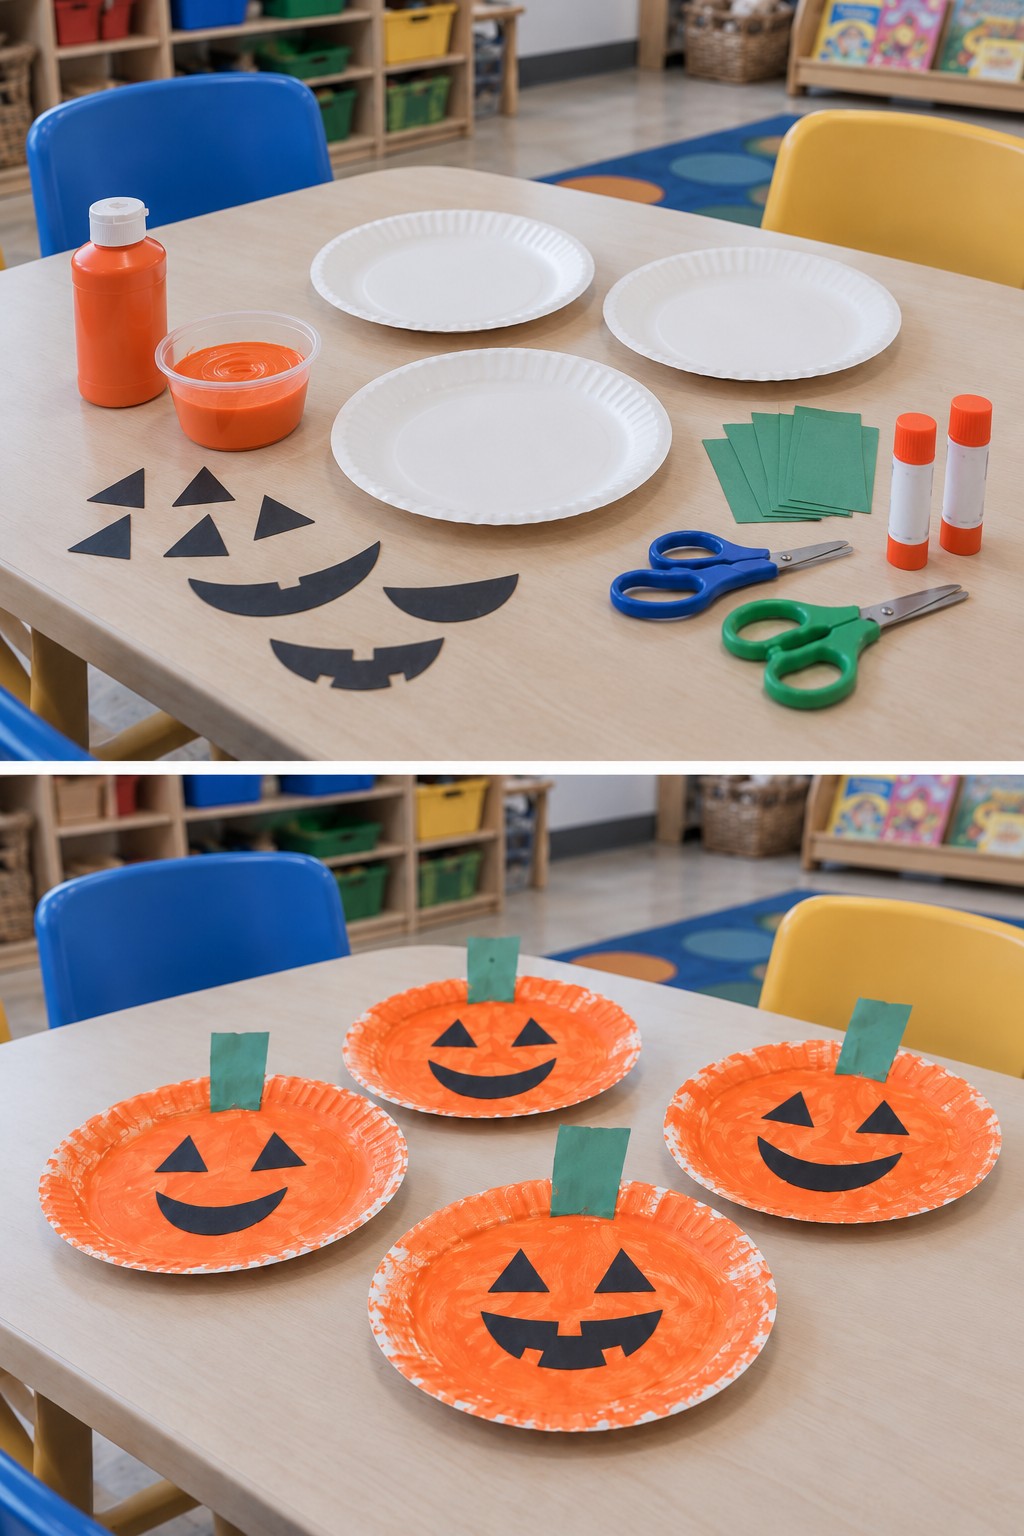
A crooked smile or an extra-wide mouth can give each pumpkin a different expression. Offer several paper features rather than one face that everyone must copy.
Materials
- Paper plate
- orange washable paint and brush
- black and green paper
- glue stick
- blunt-tip scissors
How to Make It
- Paint the front of the plate orange and set it aside to dry.
- An adult can prepare black eyes and mouths plus a green stem. Children who are ready for scissors can cut larger shapes with help.
- Arrange the face on the dry plate, glue the pieces down, and attach the stem behind the top edge.
Helpful note: Compare the expressions together: which pumpkin looks surprised, sleepy, or cheerful?
2. Cotton Ball Ghost Collage
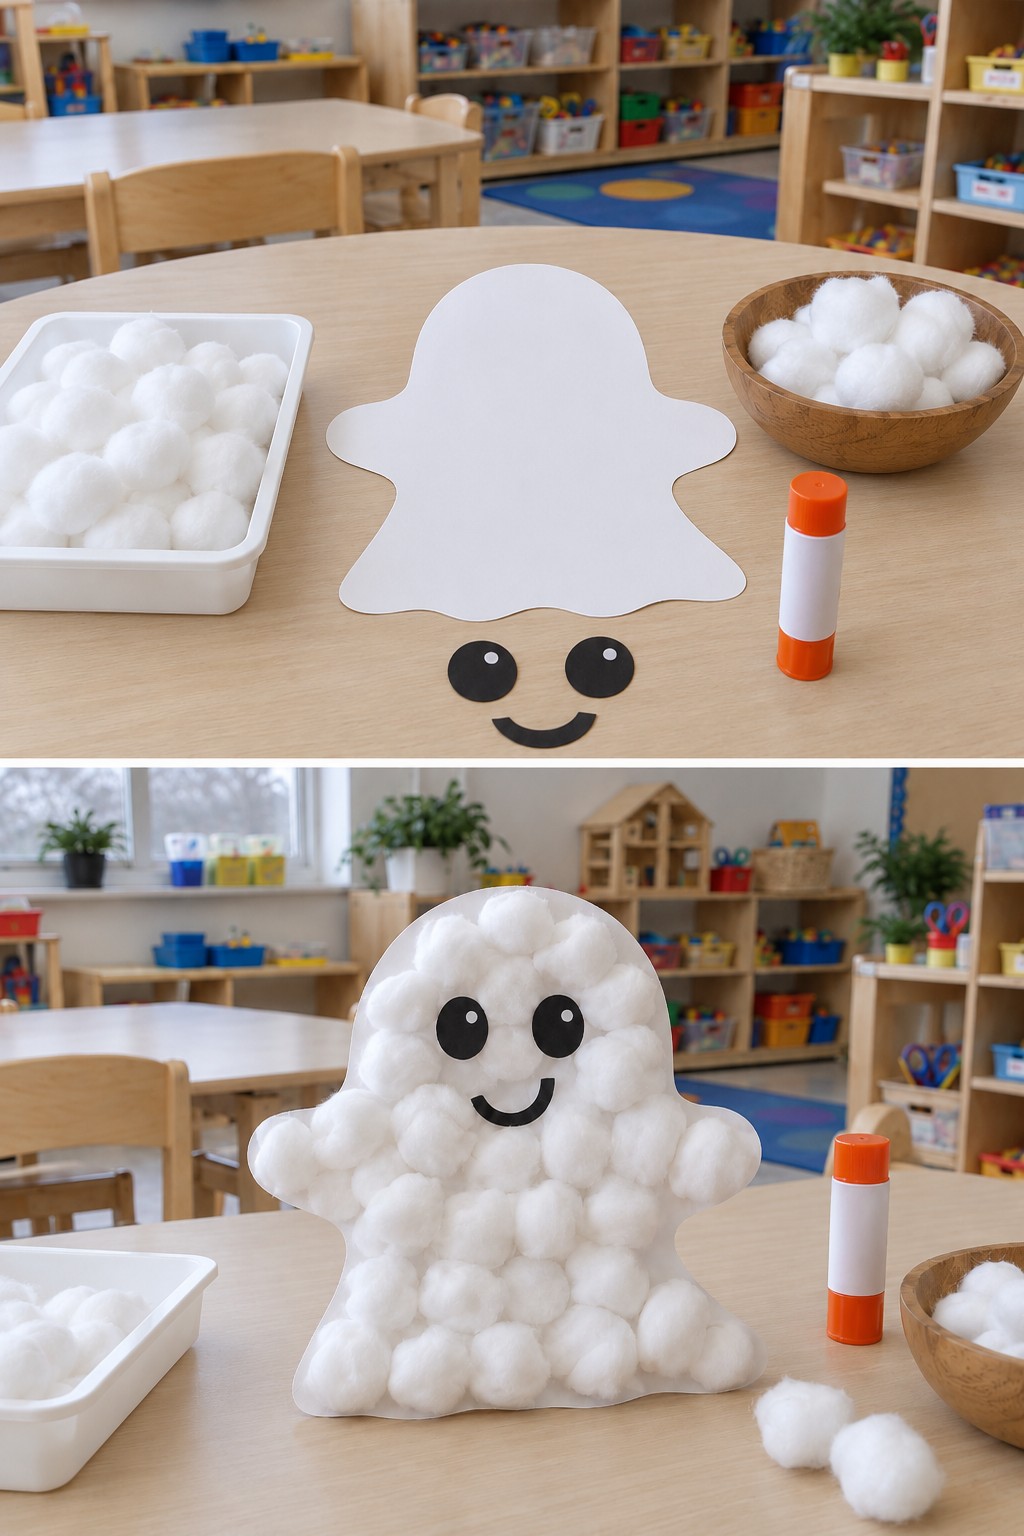
This ghost is built by pressing soft cotton onto a flat paper shape. A sturdy base keeps the cotton from bending the finished decoration.
Materials
- White cardstock
- cotton balls
- black paper eyes and mouth
- child-appropriate PVA craft glue
- scissors for adult preparation
How to Make It
- An adult cuts a broad ghost outline from cardstock and prepares the face pieces.
- Apply small dots of glue and press cotton balls onto the shape, leaving room for the face.
- Glue on the eyes and mouth. Keep the ghost flat until dry, then display it against a backing or on a board.
Helpful note: Use a little glue at a time so cotton does not stick to fingers instead of the card.
3. Egg Carton Spiders with Bendable Legs
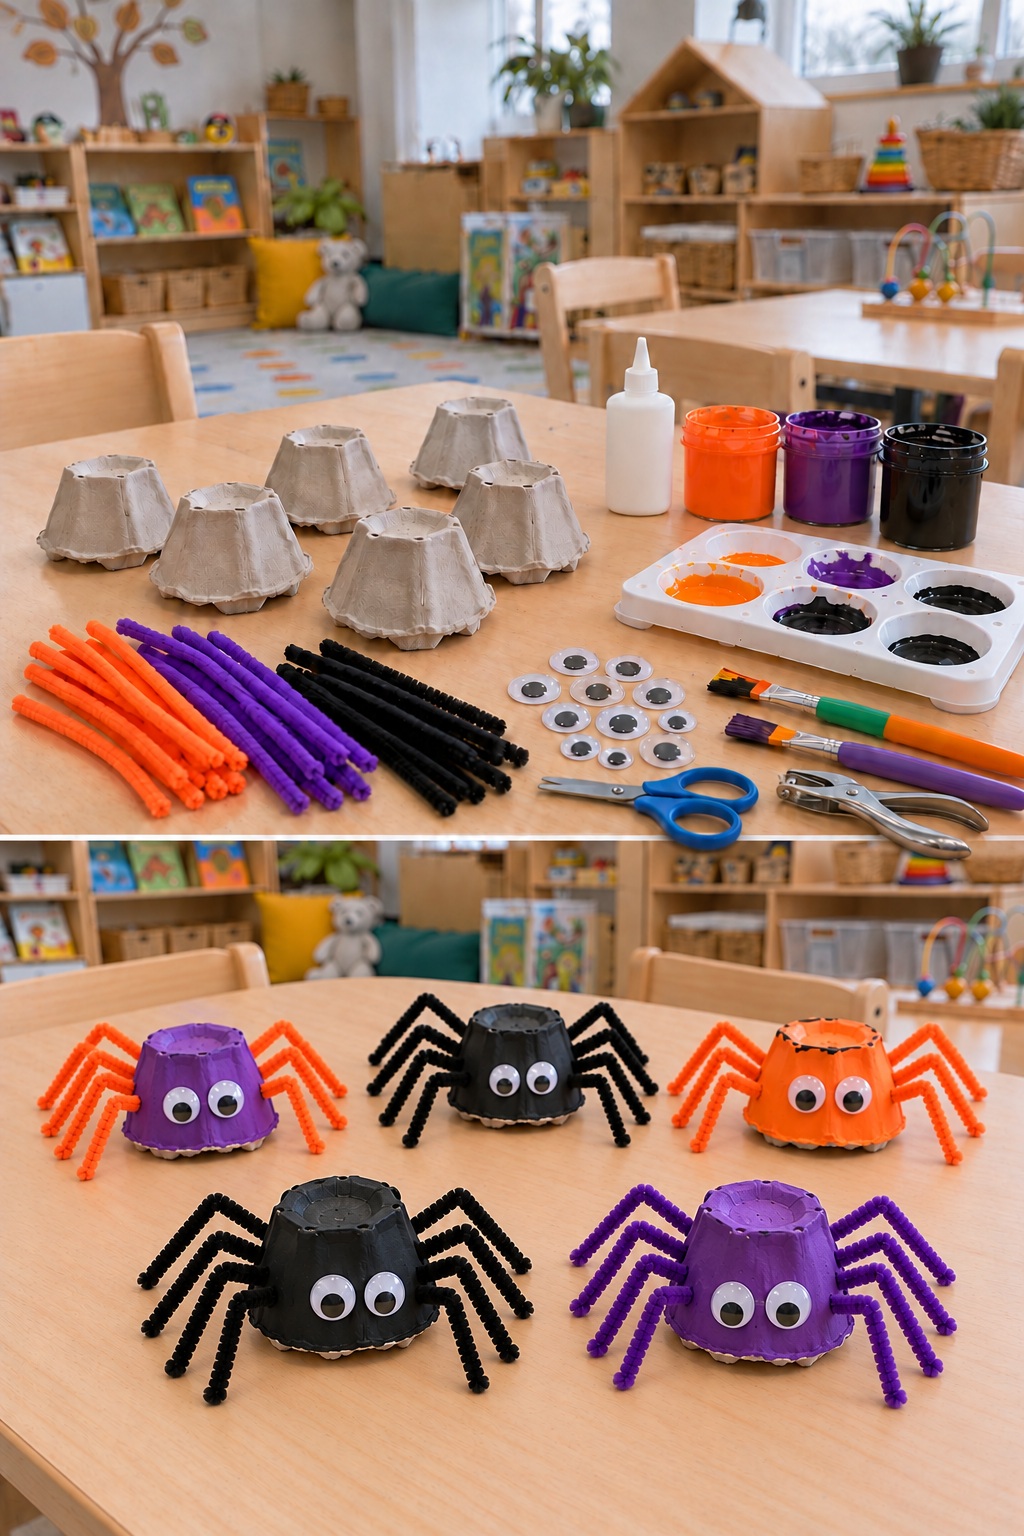
An upside-down carton cup gives the spider a raised body. Children can choose the paint color while an adult prepares the wire legs and attachment holes.
Materials
- Clean, dry cardboard carton cups
- washable paint and brush
- four pipe cleaners per spider
- paper or googly eyes
- PVA craft glue
- adult scissors and hole punch suitable for thin carton card
How to Make It
- An adult separates the cups, trims rough edges, and makes four small holes along each side, above the rim. Paint the outside and let it dry before fitting the legs.
- An adult cuts four pipe cleaners in half to make eight leg pieces. Insert one piece into each hole, then fold its inner end flat against the inside of the cup. Apply a small dot of PVA glue inside if needed and let it set. Fold exposed outer wire tips inward.
- Glue on the eyes. Bend each leg once so four legs extend from the left side and four from the right, with separate feet touching the table. Spread the legs enough to count all eight.
Helpful note: Count all eight legs before displaying the spider. Use paper legs instead if the wire pieces are unsuitable for the group.
4. Cardboard Tube Monsters with Paper Wings
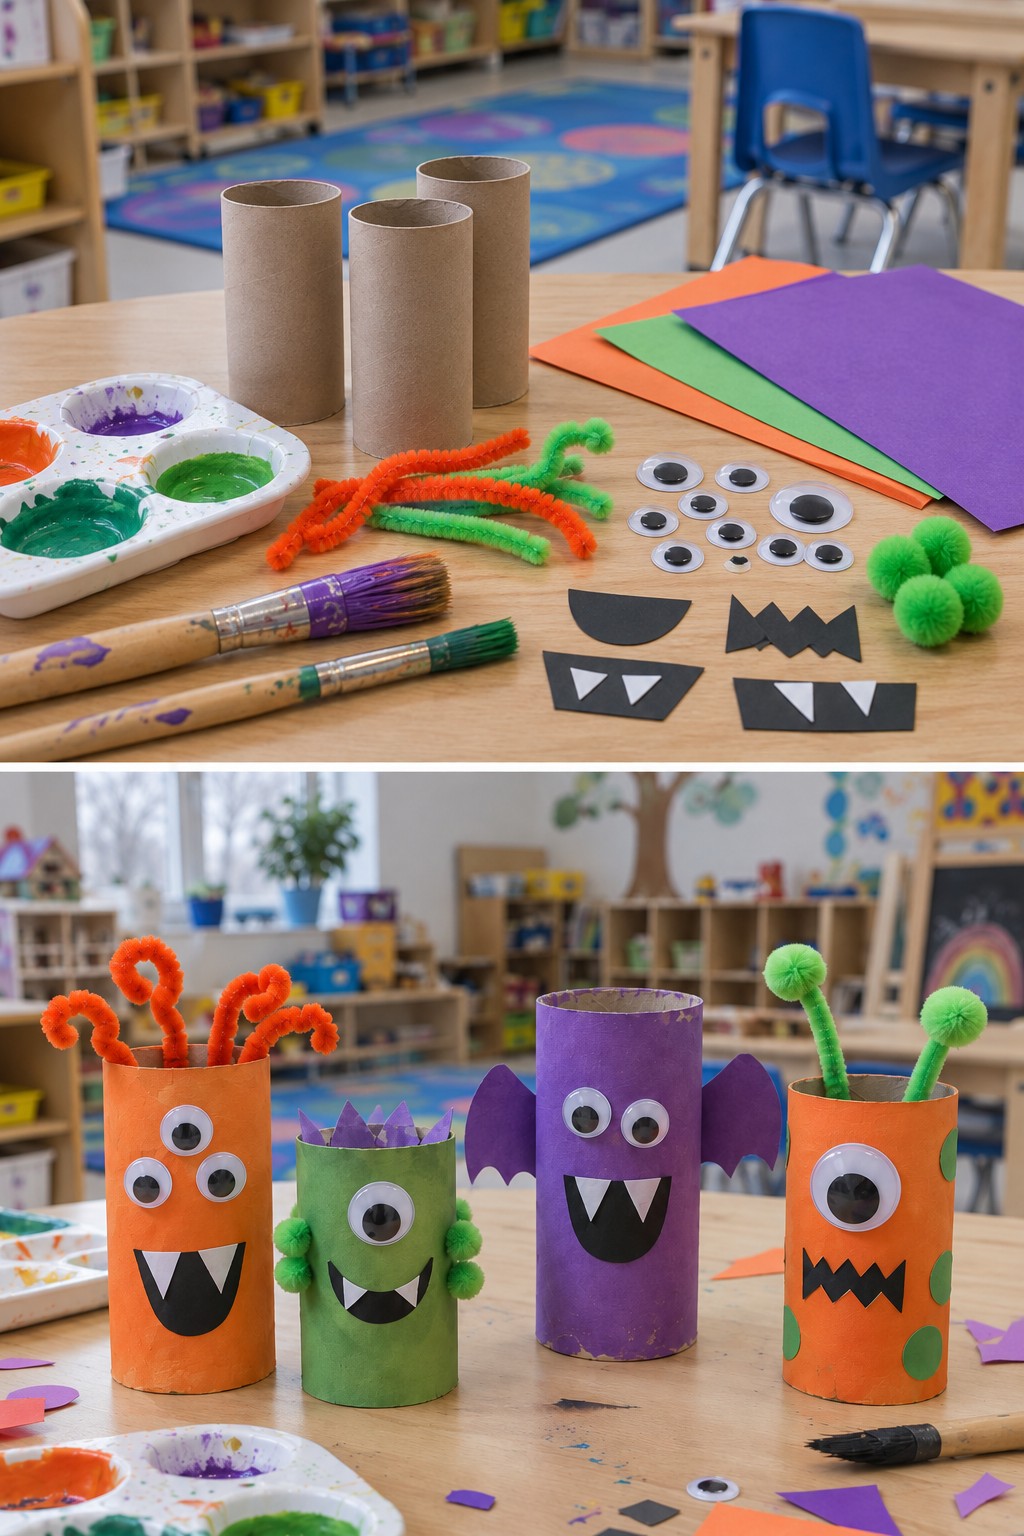
A tall tube can become a winged monster, while a shorter one might have one enormous eye. There is room to invent a character instead of reproducing a fixed design.
Materials
- Clean cardboard tubes
- washable paint and brushes
- colored paper
- paper or googly eyes
- optional pom-poms and prepared pipe cleaners
- PVA craft glue
- blunt-tip scissors
How to Make It
- Paint the outside of each tube and let it dry on a protected surface.
- Choose a mouth, eyes, teeth, and optional wings from prepared paper pieces. Glue flat features onto the tube first.
- Attach any pom-poms with PVA glue. An adult can secure prepared antennae inside the rim with tape, keeping wire ends covered.
Helpful note: Skip the loose decorations for children who mouth objects; large paper features still make expressive monsters.
For another use of the same tubes, explore recycled cardboard crafts for kids and let children invent a new classroom character.
5. Craft Stick Haunted House
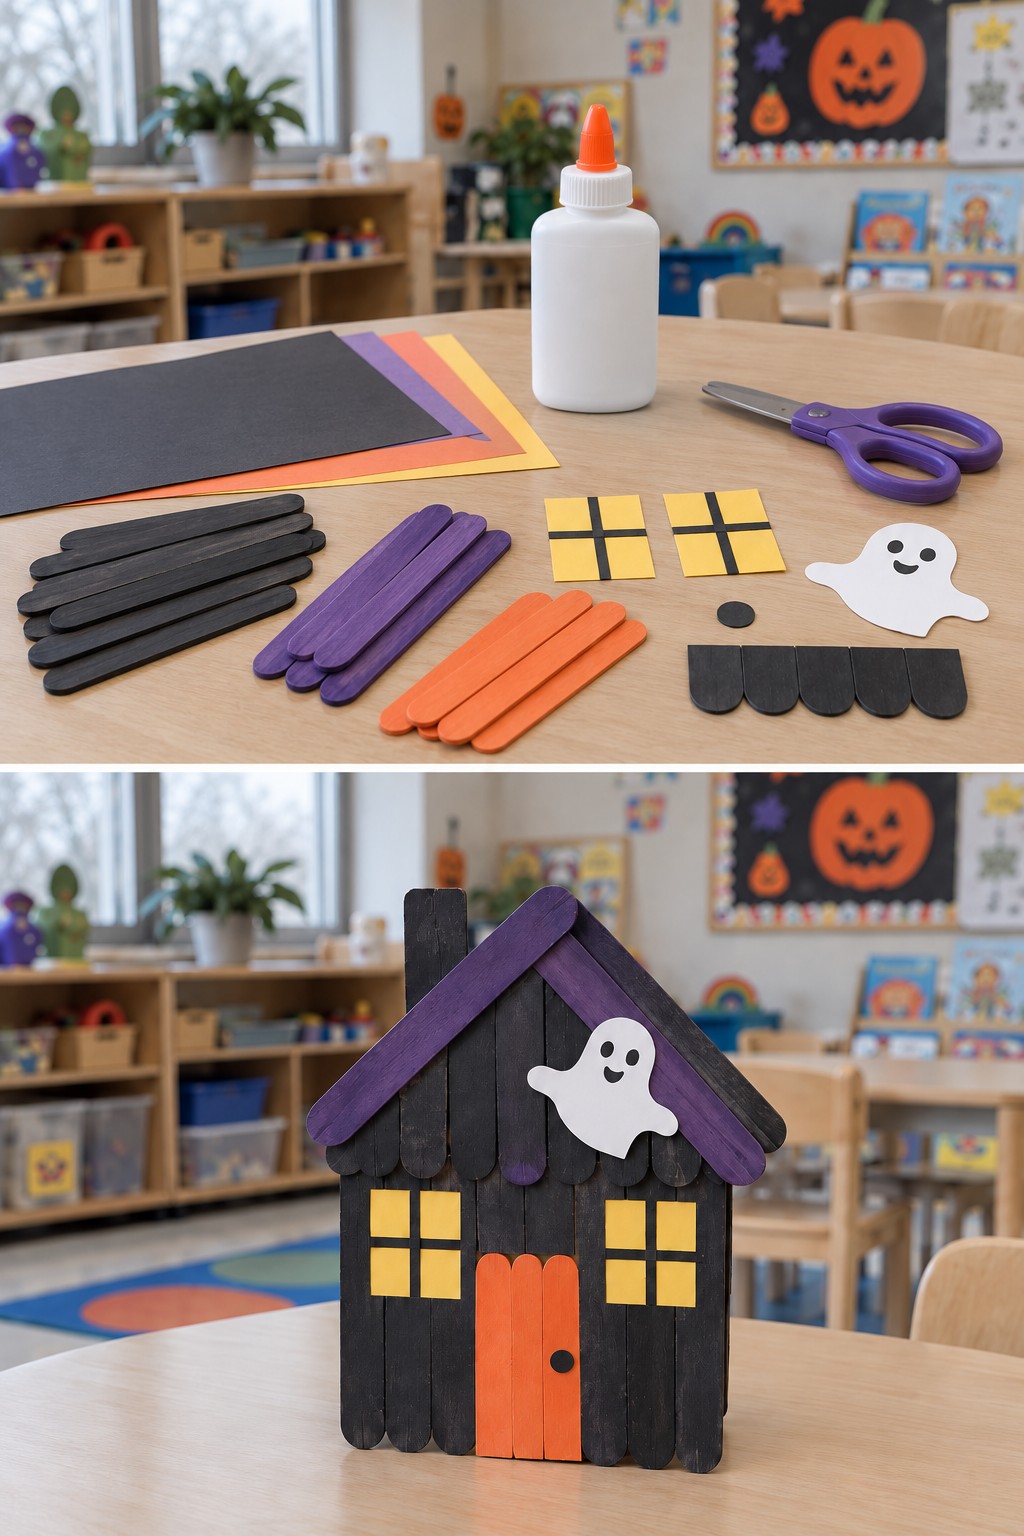
Black walls, purple roof edges, and an orange door make a small Halloween house. A backing helps the painted sticks stay together once the glue dries.
Materials
- Wooden craft sticks
- cardboard backing
- black, purple and orange washable paint
- brush
- yellow, black and white paper
- PVA craft glue
- adult scissors
How to Make It
- Paint the wall sticks black, the door sticks orange, and roof sticks purple. Leave them to dry.
- An adult prepares a house-shaped cardboard backing. Glue the wall sticks side by side onto it and add two sloping roof edges; adults handle any stick trimming.
- Add the orange door, yellow paper windows, and a white ghost. Dry the house flat before displaying it.
Helpful note: Hang the flat house on a display board, or have an adult add a folded cardboard support behind it for a tabletop version.
6. Tissue Paper Cauldron with Pretend Bubbles
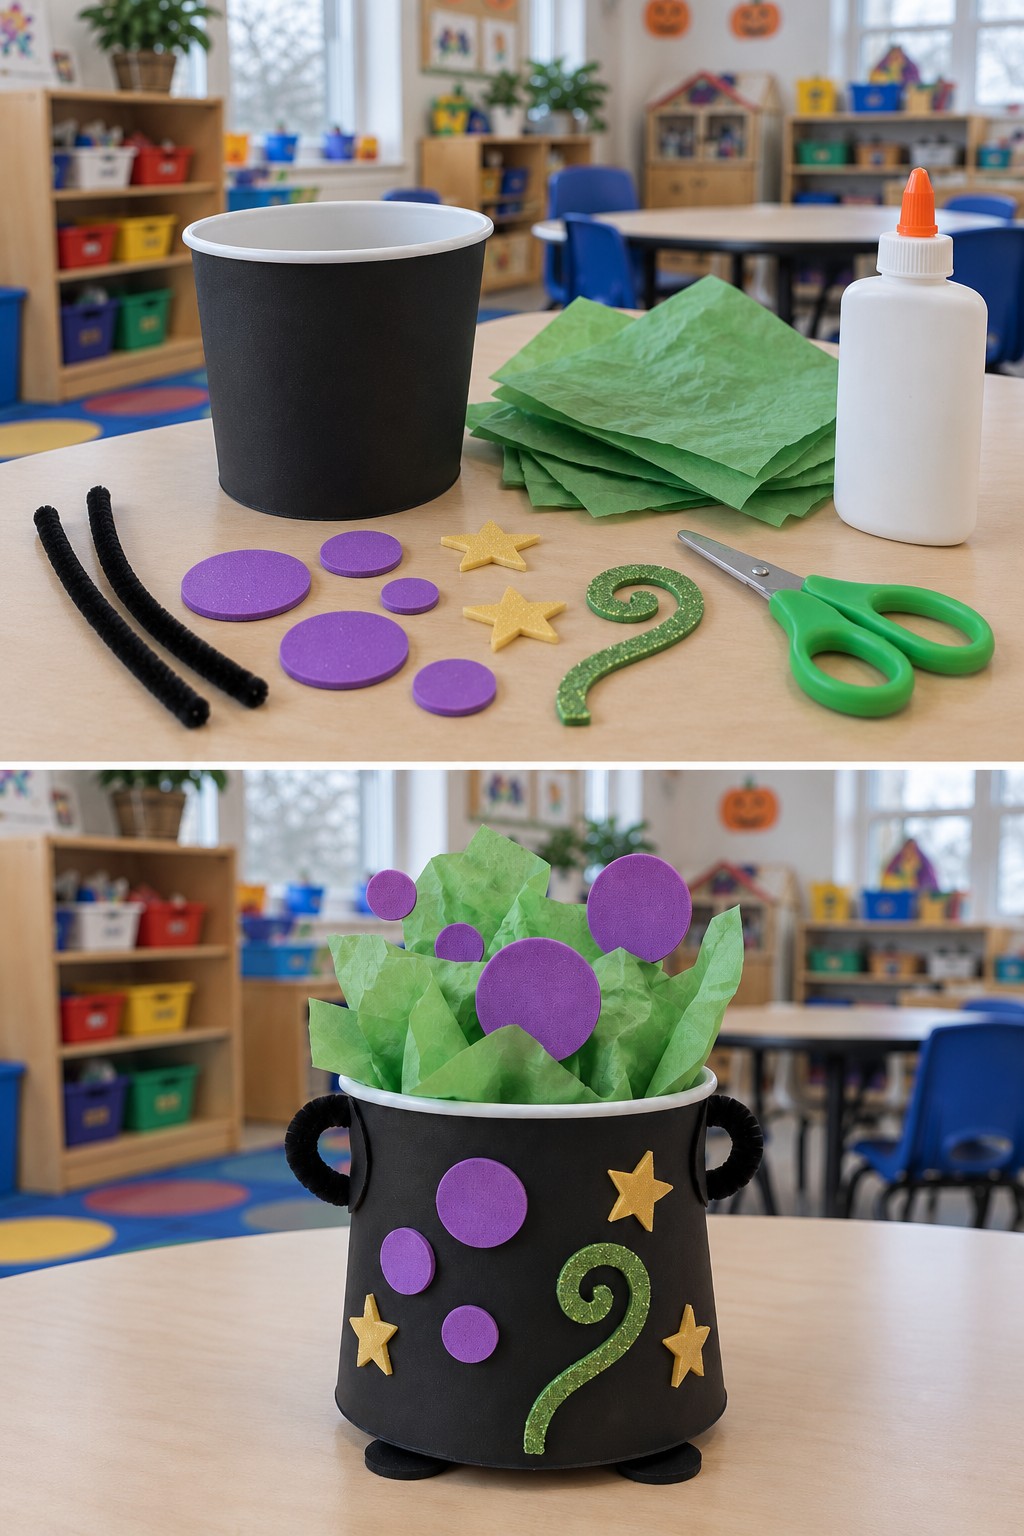
Crumpled green tissue becomes a pretend potion, with purple paper circles peeking out from the top. This is a dry collage project rather than a bubbling science experiment.
Materials
- Black paper craft cup
- green tissue paper
- purple, green and yellow paper or foam shapes
- prepared black pipe cleaners
- PVA craft glue
- adult scissors and hole punch
How to Make It
- An adult makes two holes near opposite sides of the rim, fits the handle loops, and folds wire ends safely inside.
- Glue stars, purple circles, and a green swirl onto the outside of the cup.
- Loosely crumple the tissue and glue it inside the cup so it rises above the rim. Attach purple circles to the tissue folds and let the glue dry.
Helpful note: Use folded paper handles if the group is not ready to work around wire components.
7. White Yarn Mummy
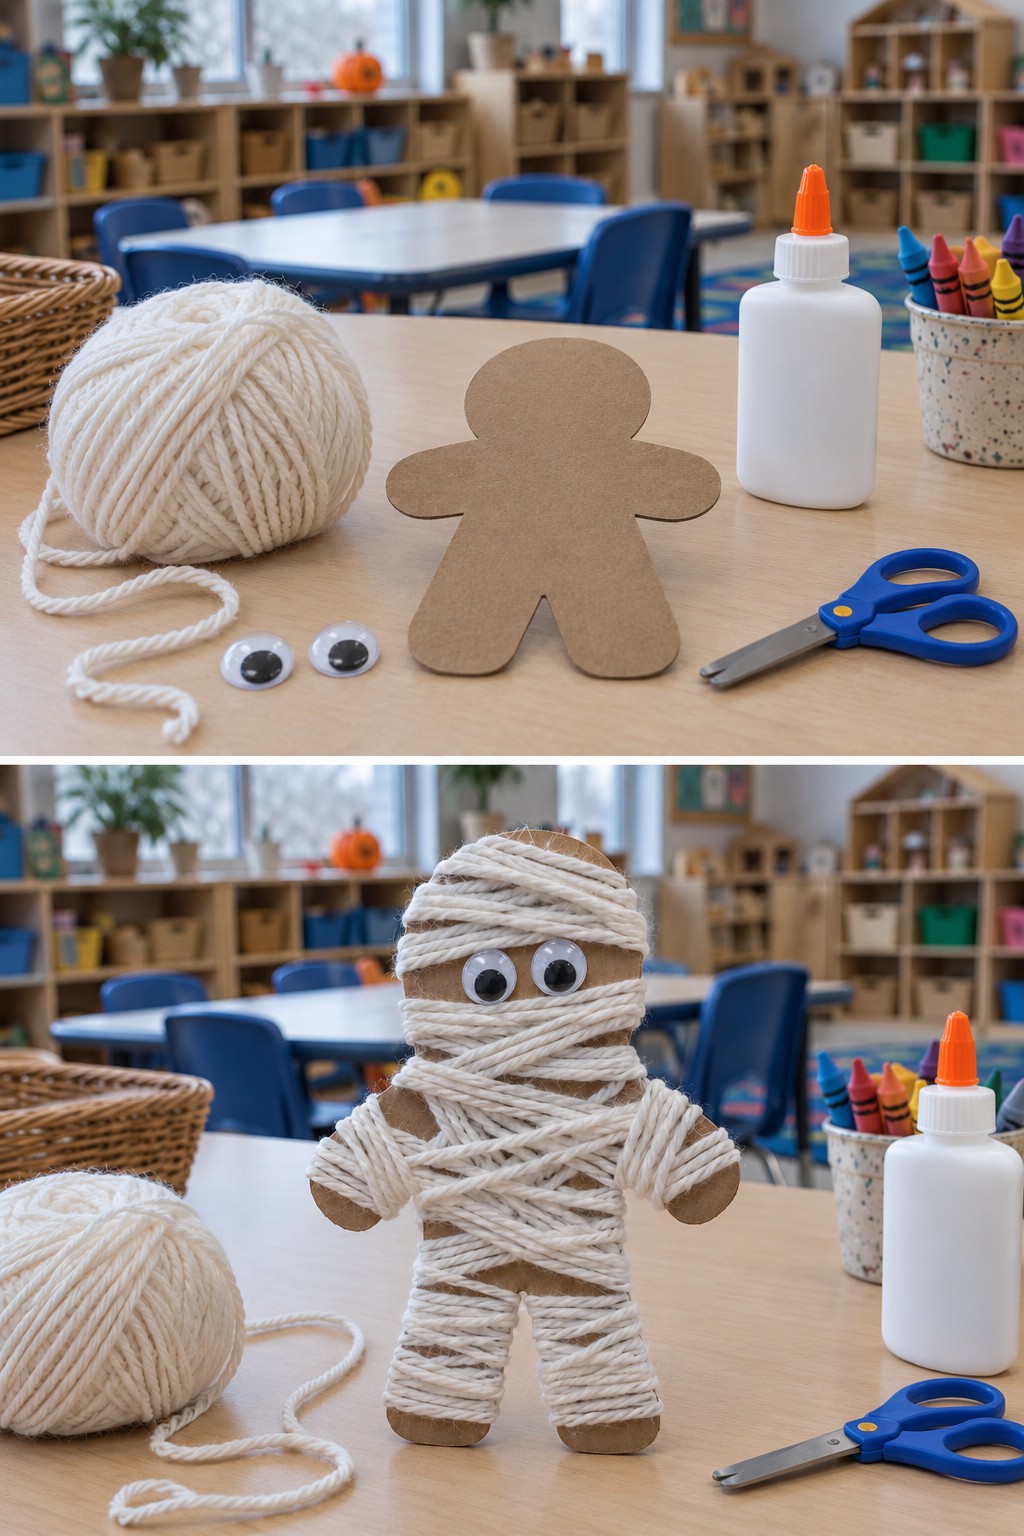
Loose, overlapping wraps create the bandaged look. Broad arms and legs are easier to wrap than a detailed outline with narrow fingers.
Materials
- Cardboard person shape
- short lengths of white yarn
- paper or googly eyes
- PVA craft glue
- tape
- scissors for adult preparation
How to Make It
- An adult cuts the figure and tapes one yarn end to its back.
- Wrap the yarn around the body, then across the arms, legs, and head. Secure each new short length on the back rather than using one unwieldy strand.
- Leave a gap for the eyes, glue them to the cardboard, and tape the final yarn end behind the figure.
Helpful note: Work flat on the table; the finished mummy can lean against a display rather than balance on its narrow feet.
8. Paper Bag Monster Puppet
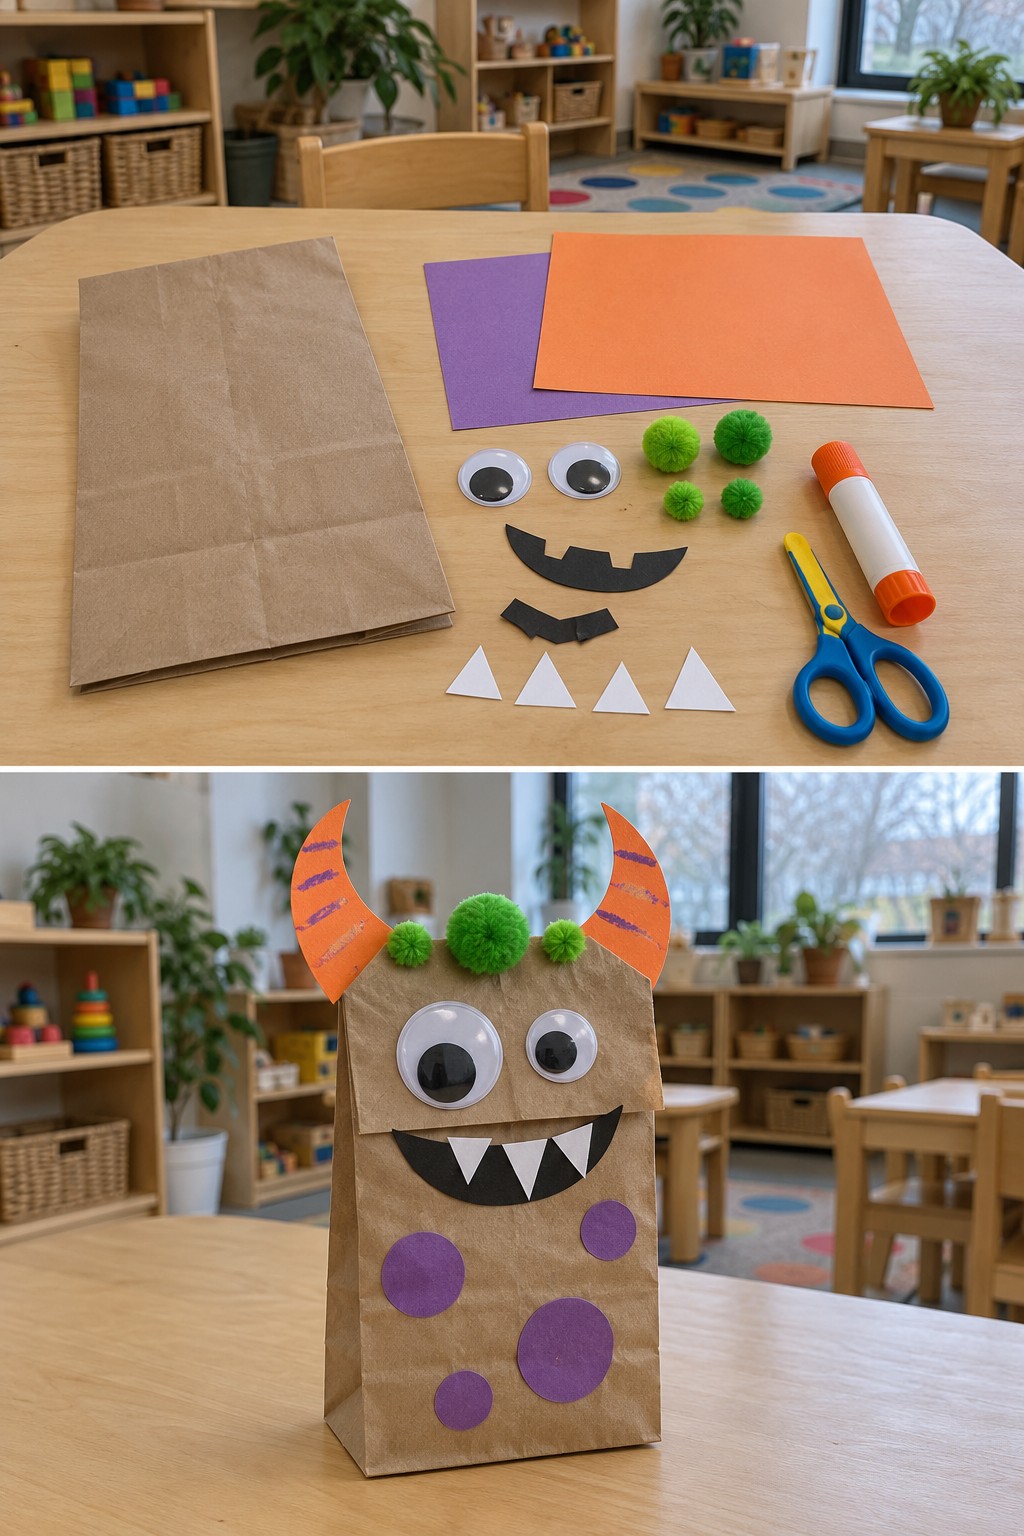
The folded bottom of a lunch bag becomes the puppet’s face. Keeping that flap free lets the finished monster open its mouth during pretend play.
Materials
- Paper lunch bag
- orange, purple, black and white paper
- glue stick
- washable marker
- optional googly eyes and pom-poms with PVA glue
- blunt-tip scissors
How to Make It
- Lay the bag flat with its folded bottom flap facing upward. Prepare horns, eyes, spots, a mouth, and teeth.
- Glue the face to the flap and add horns behind its upper edge. Keep glue and paper clear of the flap’s moving crease.
- Decorate the bag body separately. Once dry, slide a hand into the bag and test that the flap still moves.
Helpful note: Invite each child to give the puppet a name and a short greeting before a group puppet conversation.
Continue the story with sock puppet characters for storytelling. Adults can prepare the fabric characters while children choose colors, names, and voices.
9. Coffee Filter Spider Web Painting
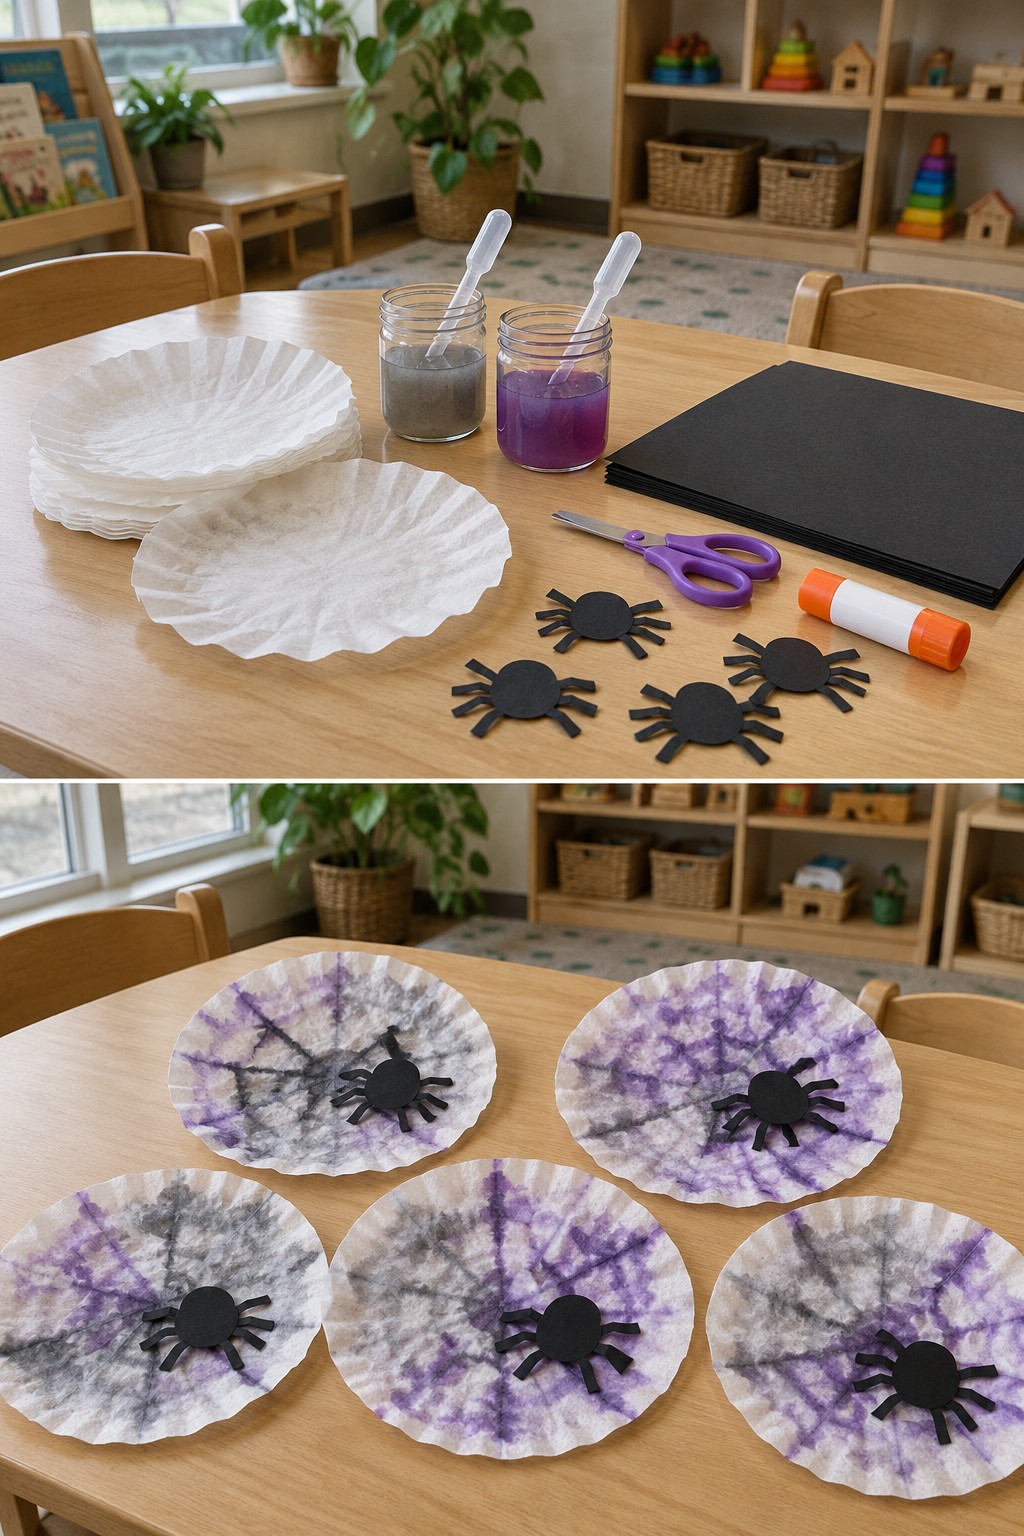
Purple and gray washes create a mottled background, but the web needs its own lines. Adding those lines after drying makes the construction clear.
Materials
- White coffee filter
- purple and gray washable watercolor
- child-safe dropper or brush
- tray
- dark washable marker
- black paper spider
- glue stick
- adult scissors
How to Make It
- Place the filter on a tray and add a few drops of diluted color. Let the colors spread without soaking the paper.
- When completely dry, draw lines outward from one point and connect them with curved cross-lines. An adult can guide this part.
- Prepare a paper spider with eight legs and glue it onto the dry filter.
Helpful note: Replace glass paint jars with shallow unbreakable containers at the children’s table.
10. Pasta Skeleton Collage
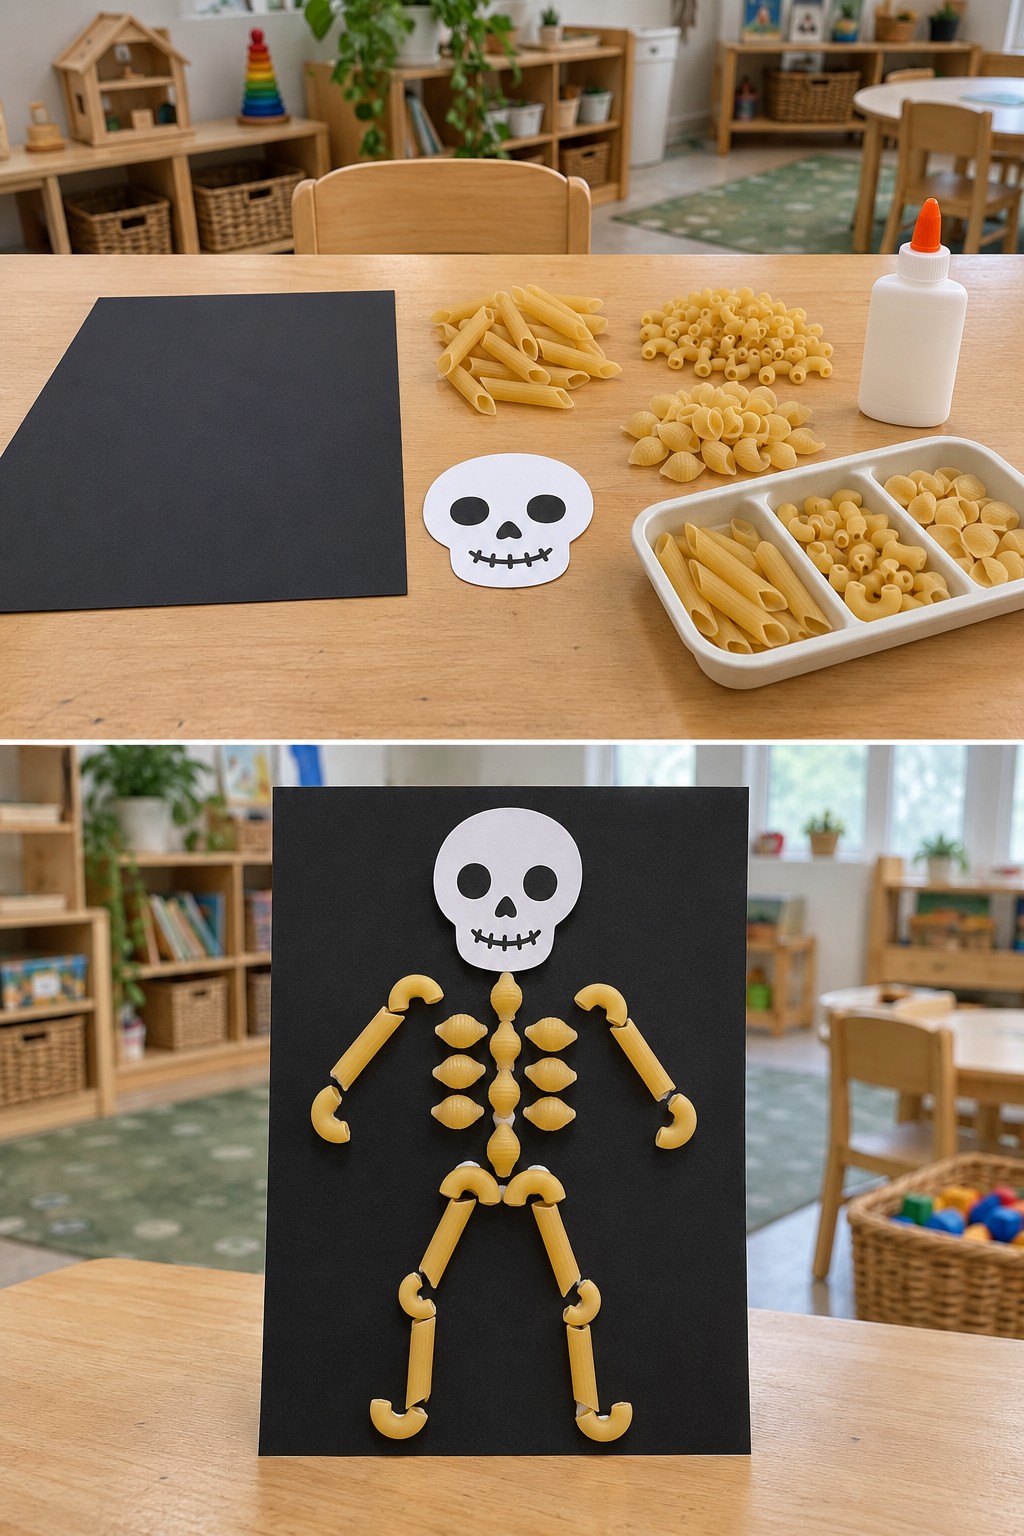
Pasta pieces can suggest a spine, ribs, arms, and legs. Treat the result as a playful Halloween figure, with children choosing how to arrange the shapes.
Materials
- Black cardstock
- paper skull
- assorted dry pasta
- child-appropriate PVA craft glue
How to Make It
- Place the skull near the top and arrange a central row of pasta beneath it for the body.
- Lay out matching arms and legs on either side, then add smaller pieces around the torso.
- Glue each piece in place and dry the collage flat before moving it.
Helpful note: Check food allergies and classroom rules first. For children who mouth objects, use large paper bone shapes instead of pasta.
11. Sponge-Printed Ghosts on Black Paper
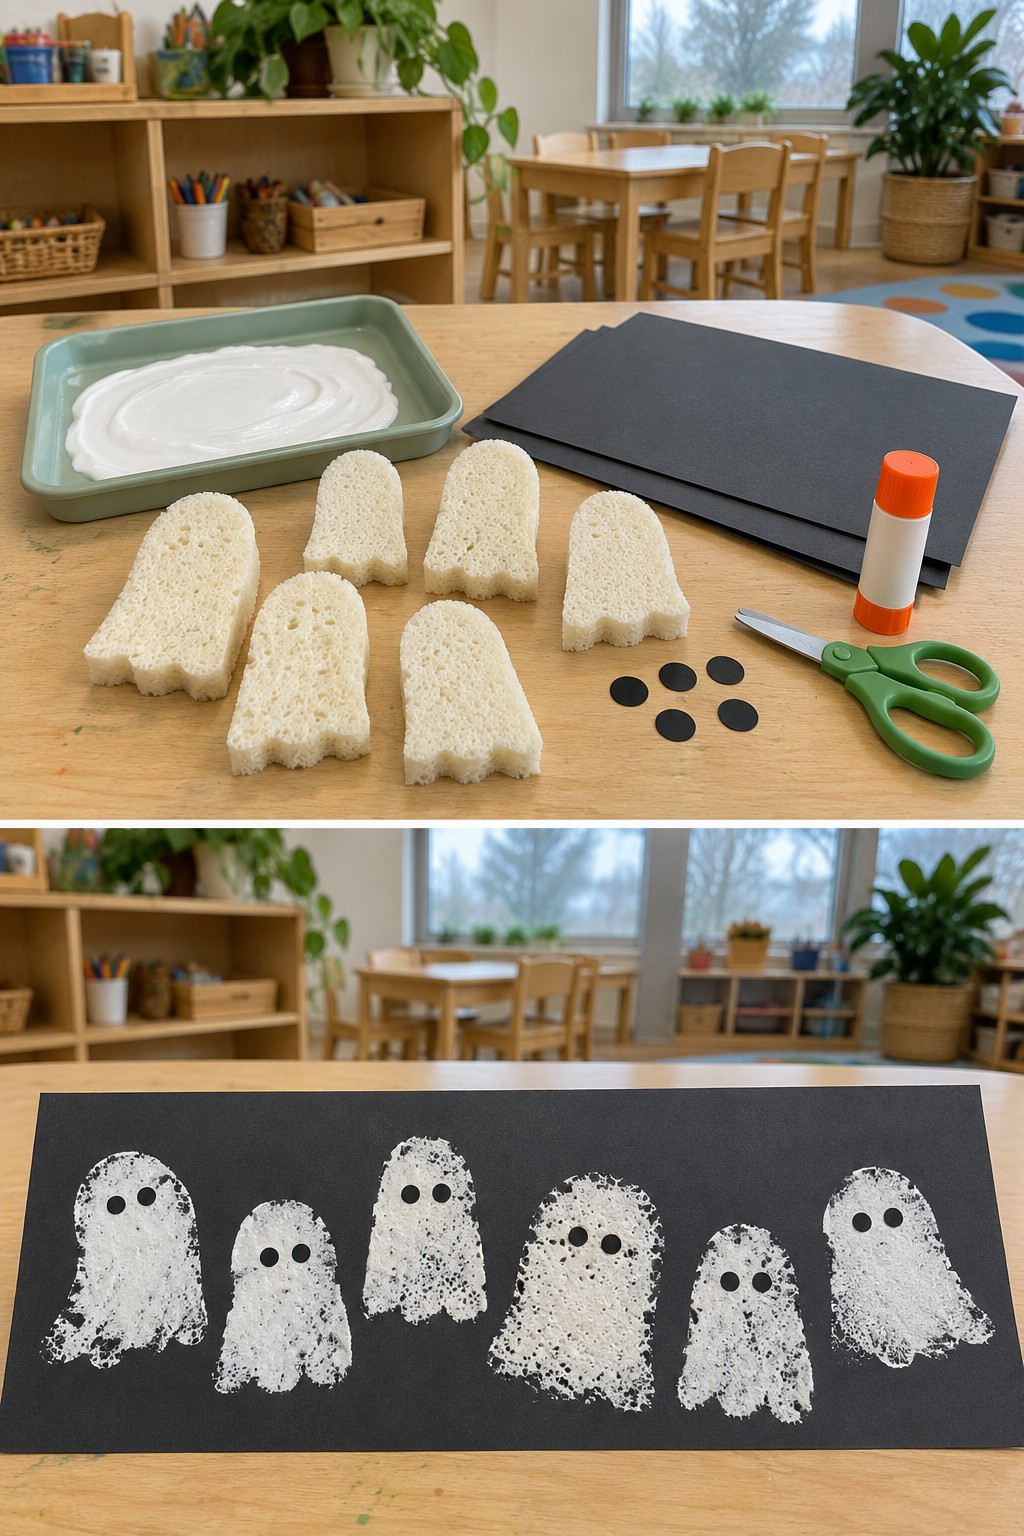
A lightly loaded sponge leaves speckled edges that suit a ghost. Each print can be a different shape even when the same sponge is used.
Materials
- Black cardstock
- white washable paint
- shallow paint tray
- adult-prepared ghost-shaped sponge
- black paper eyes
- glue stick
How to Make It
- An adult cuts a clean sponge into a broad ghost shape. Spread a thin layer of paint in the tray.
- Press the sponge into the paint, then onto the cardstock. Lift straight upward and repeat with space between the prints.
- Let the paint dry before gluing two paper eyes onto each ghost.
Helpful note: Try one practice print first. Too much paint hides the sponge texture and blurs the outline.
12. Upright Cardboard Tube Jack-o’-Lanterns
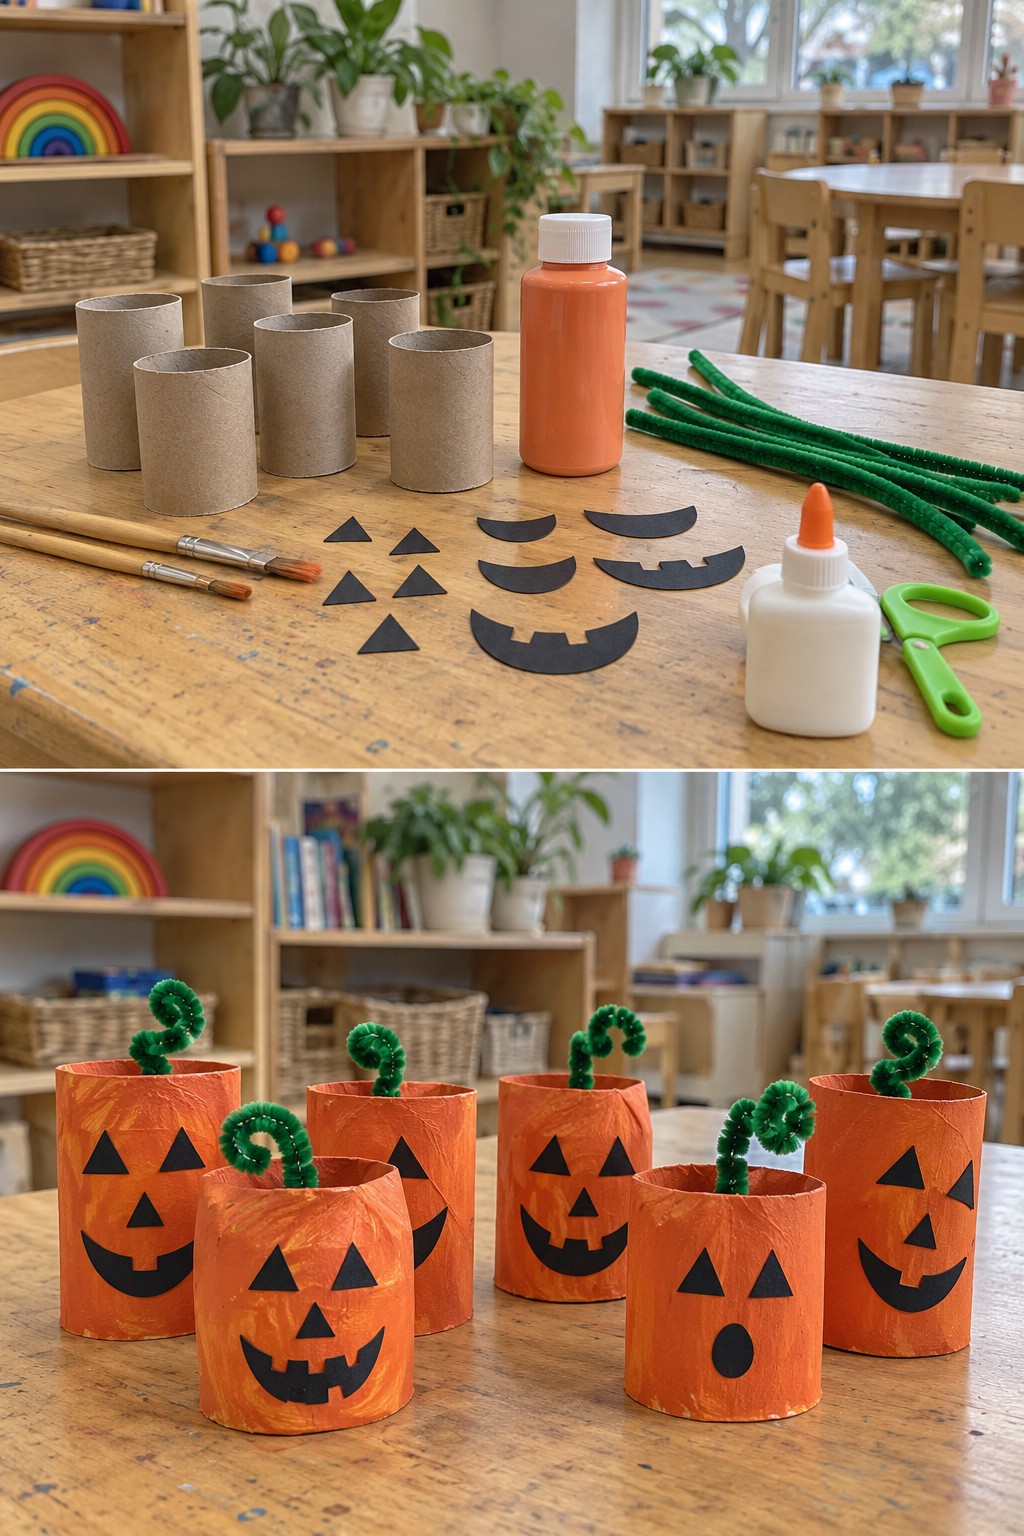
These pumpkins stand on their tube bases, so they work as small tabletop characters. The curled green stem distinguishes them from the flat paper plate pumpkins.
Materials
- Clean cardboard tube
- orange washable paint and brush
- black paper
- prepared green pipe cleaner or paper stem
- PVA craft glue
- tape
- adult scissors
How to Make It
- Paint the tube orange and allow it to dry.
- Glue black eyes, a nose, and a mouth onto the outside, keeping the bottom edge clear so the tube stands evenly.
- An adult curls a prepared pipe cleaner and tapes its lower end inside the top opening, covering the wire tip. A folded paper stem is another option.
Helpful note: A squat tube is easier to keep upright than a very tall one.
13. Cupcake Liner Witches with Yarn Hair
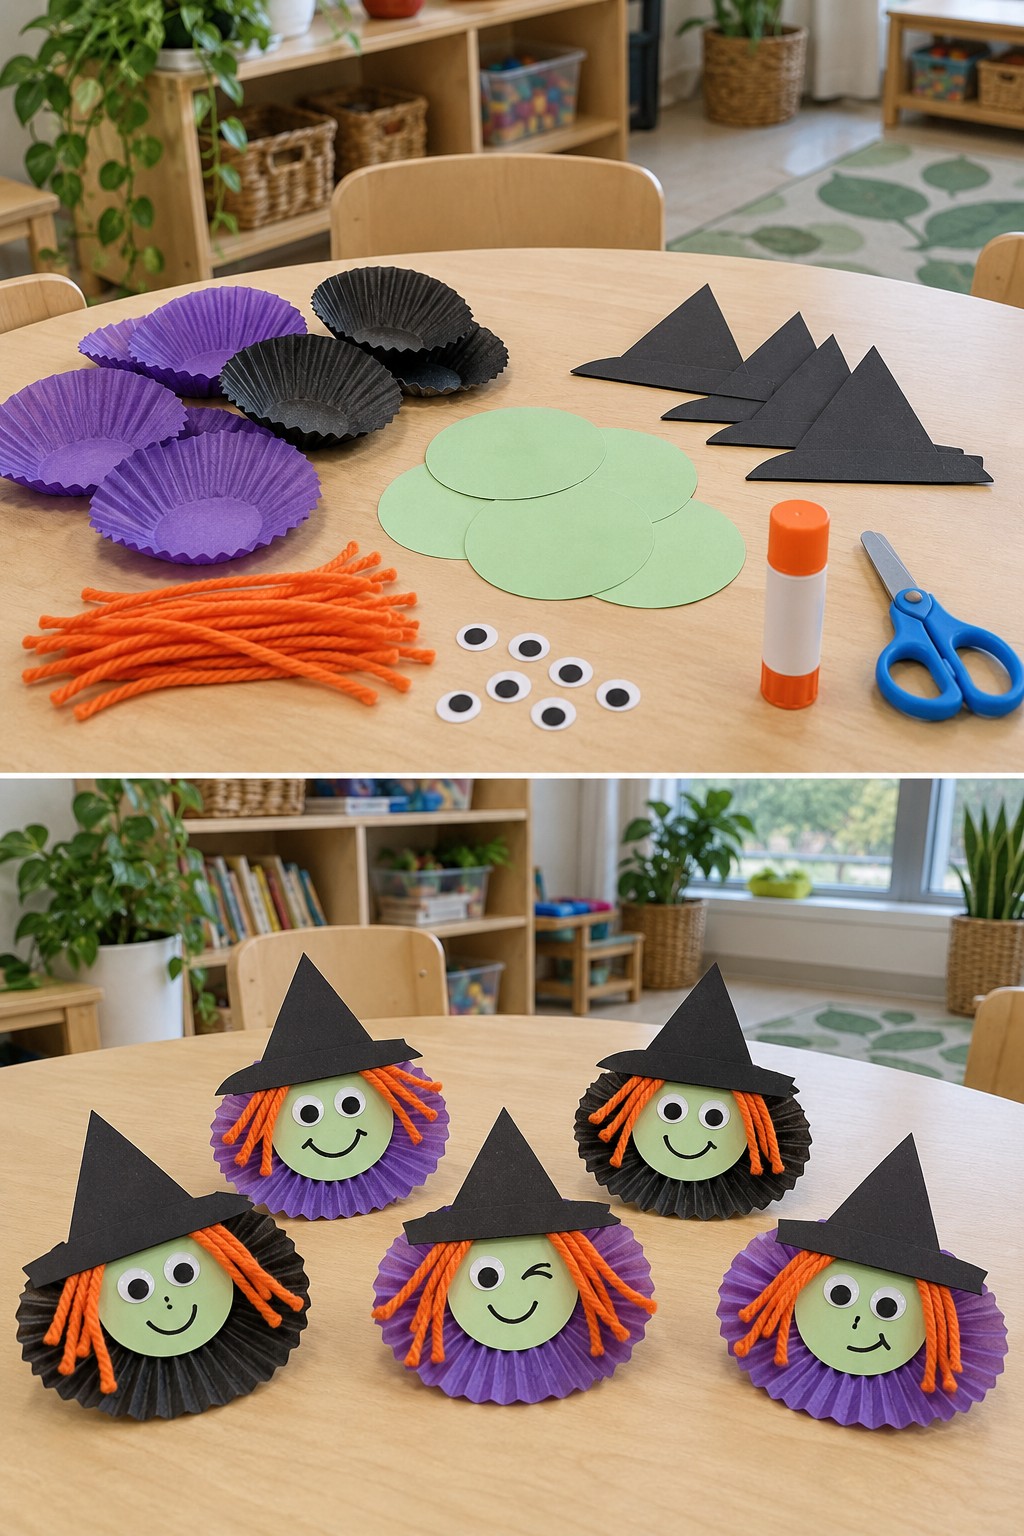
The pleated liner frames a small green face, while orange yarn adds a fringe beneath the hat. Prepare the face pieces before putting out the glue.
Materials
- Purple or black cupcake liner
- green and black paper
- short orange yarn pieces
- paper or googly eyes
- washable marker
- glue stick
- PVA craft glue
- adult scissors
How to Make It
- Flatten the liner gently and glue a green paper circle over its center.
- Attach short yarn pieces along the sides with PVA glue. Add eyes and draw a mouth.
- Glue a black paper hat over the upper edge, covering the ends of the yarn hair. Leave flat to dry.
Helpful note: Ask children to choose a friendly expression; the hair does not need to be symmetrical.
14. Stacked Paper Loop Halloween Characters
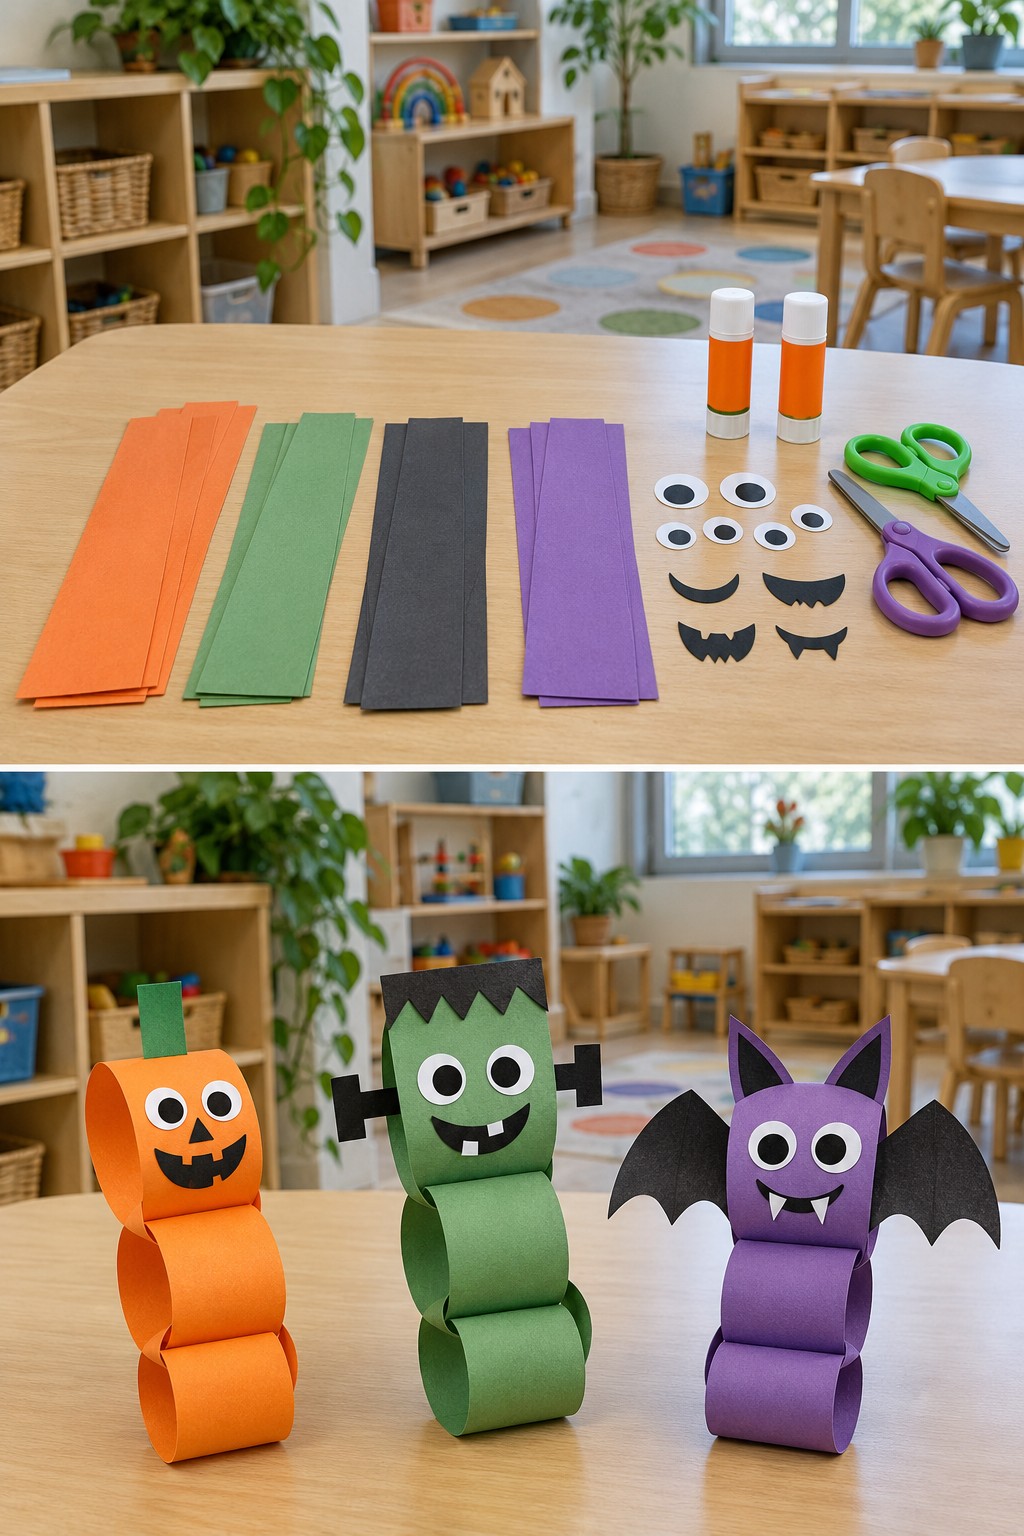
Joined paper loops make a rounded body for a pumpkin, monster, or bat. Unlike a linked paper chain, these loops are glued together at their touching surfaces.
Materials
- Orange, green or purple paper strips
- black and white paper features
- glue stick
- optional card backing and tape
- blunt-tip scissors
How to Make It
- Curve three broad strips into separate loops. Overlap and glue the ends, then hold each seam until it stays closed.
- Lay the loops on their sides with the openings facing left and right. Glue touching surfaces together in a vertical stack and let the joints dry.
- Add a face to the front of the upper loop and attach a stem, wings, or bolts. Flatten the lower loop slightly or add a card support behind the stack if it tips.
Helpful note: Children can decorate the loops while they are flat; an adult can help hold the joints during final assembly.
15. Paper Plate Spider Web Lacing
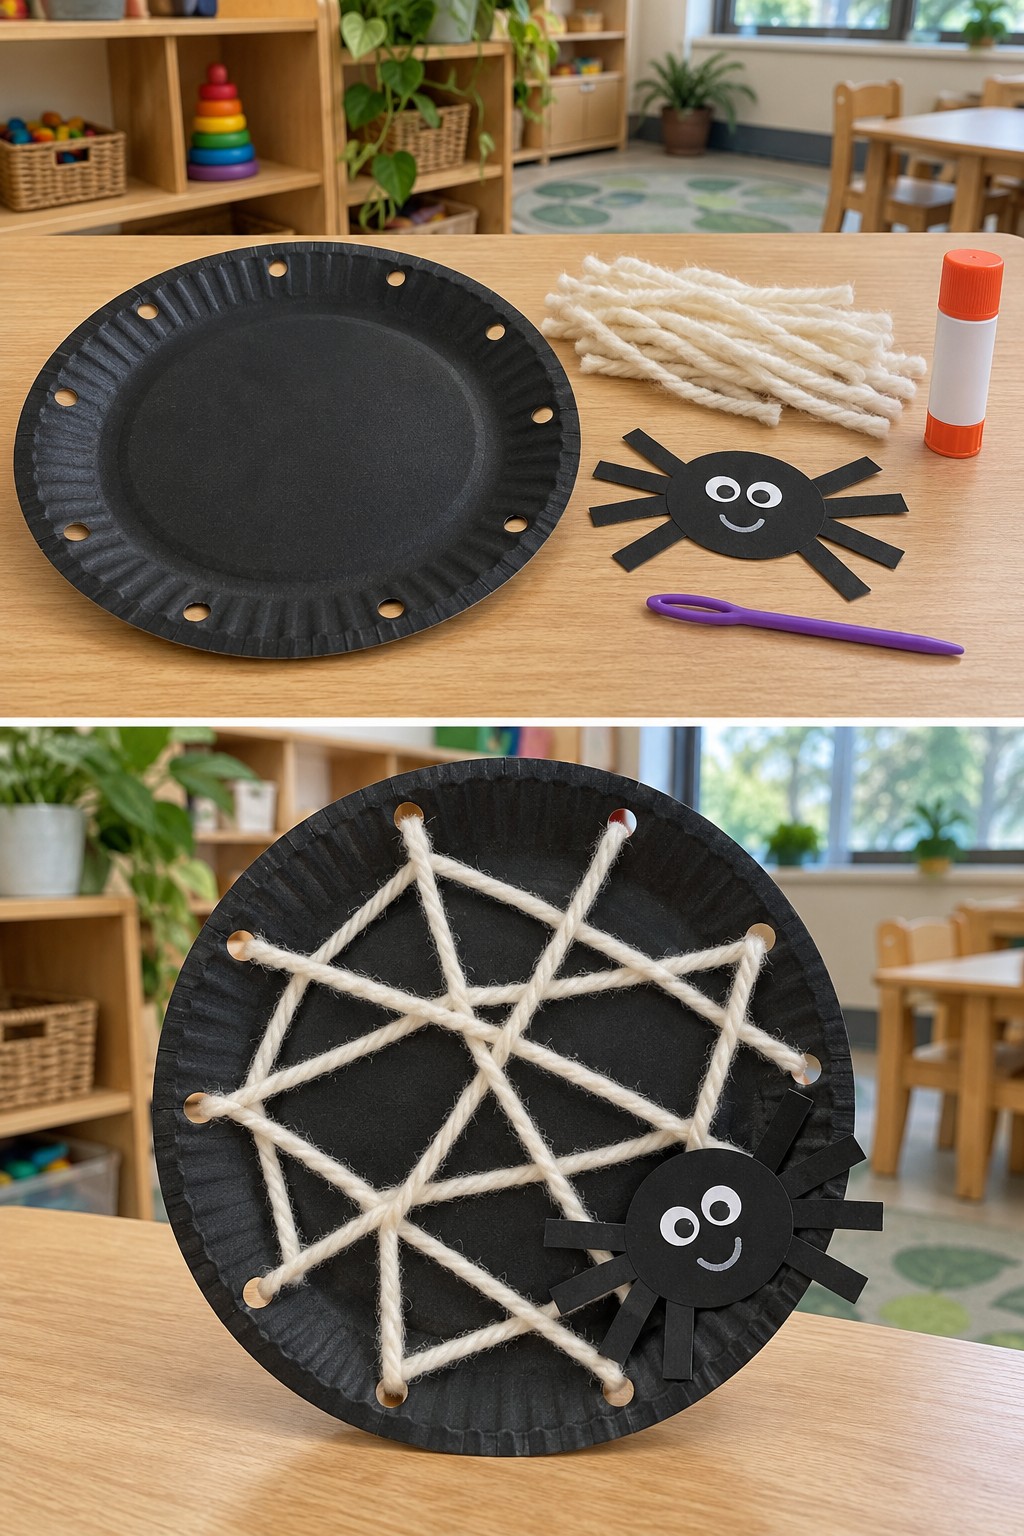
Crossing yarn between holes produces an irregular web. The aim is to explore different routes across the plate rather than follow a perfect pattern.
Materials
- Black paper plate
- short length of white yarn
- paper spider
- PVA craft glue
- adult hole punch
- tape or blunt plastic lacing needle
- scissors for adult preparation
How to Make It
- An adult punches holes around the rim and secures a yarn end behind the plate.
- Thread the yarn through one hole and across to another, using a taped tip or a blunt plastic needle. Continue crossing the plate until a web forms.
- Secure the final end behind the rim and glue an eight-legged paper spider onto the plate.
Helpful note: Begin with fewer holes and a shorter strand for a child trying lacing for the first time.
16. Pumpkin Seed Owl with Layered Feathers
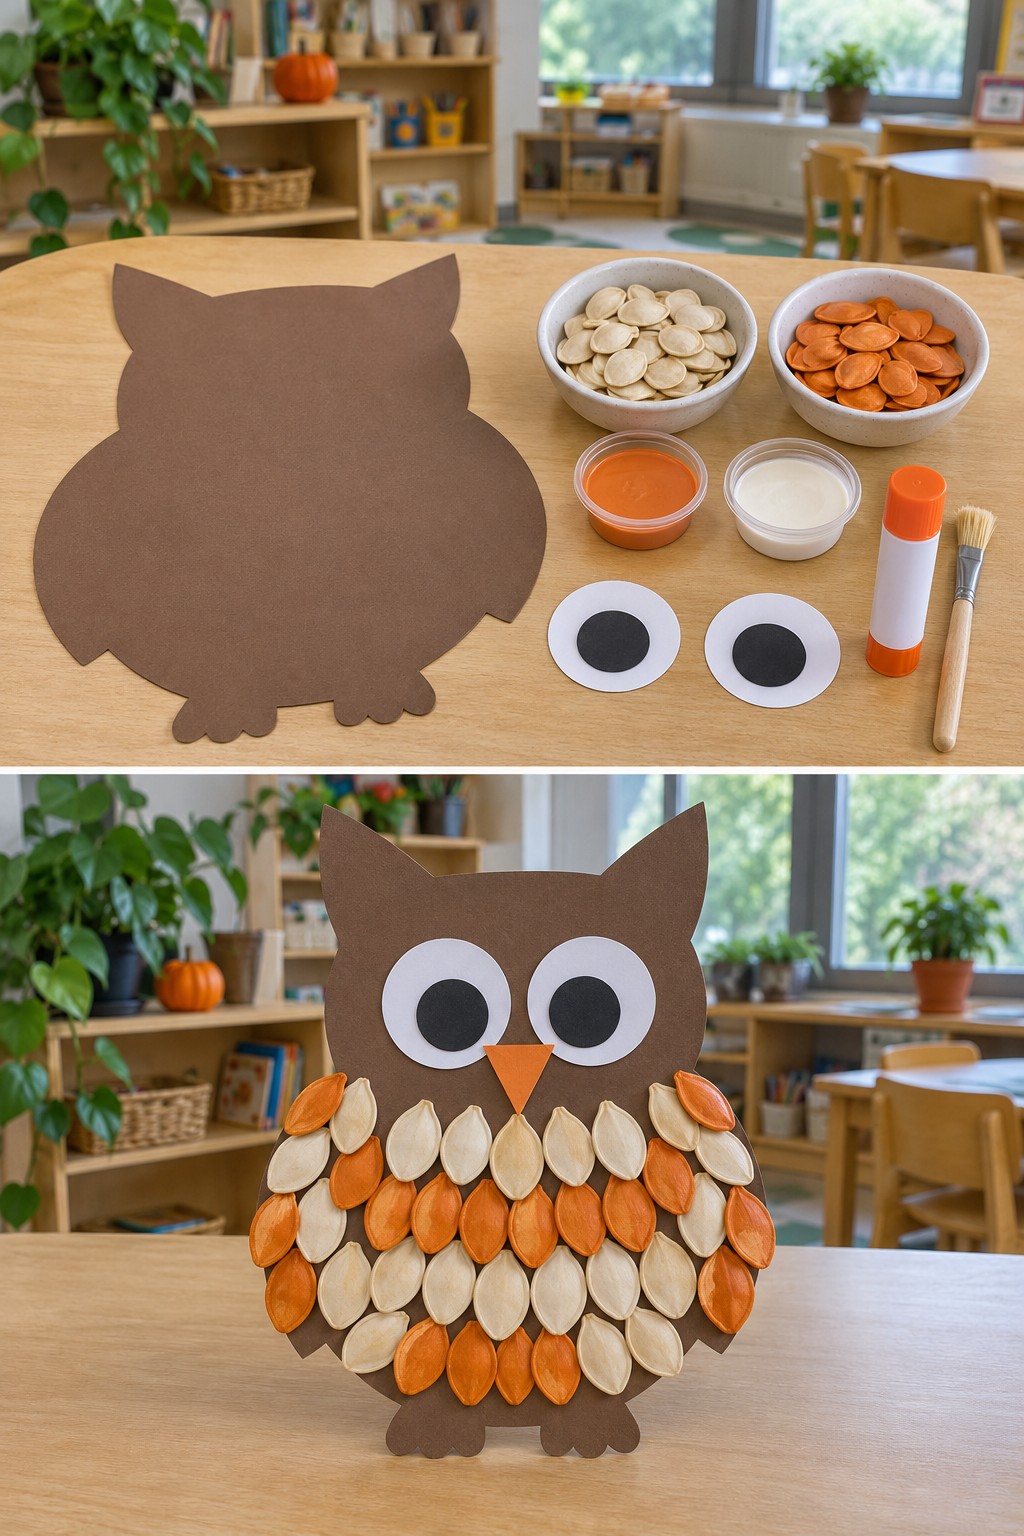
Rows of natural and orange seeds form the owl’s belly. The overlapping texture makes this a more detailed autumn project for children who can handle small pieces appropriately.
Materials
- Brown cardstock owl shape
- clean, dry pumpkin seeds
- orange washable paint and brush
- white, black and orange paper
- PVA craft glue
- adult scissors
How to Make It
- Paint some seeds orange and let them dry fully. An adult prepares the owl outline, eyes, and beak.
- Start at the lower body and glue on a row of seeds. Add the next row slightly above it, overlapping the first.
- Continue toward the chest, then attach the large paper eyes and triangular beak. Leave flat until dry.
Helpful note: For children who mouth materials, substitute large torn paper feathers. Check seed allergies and school rules before using food materials.
17. Cotton Swab Skeleton Hand Collage
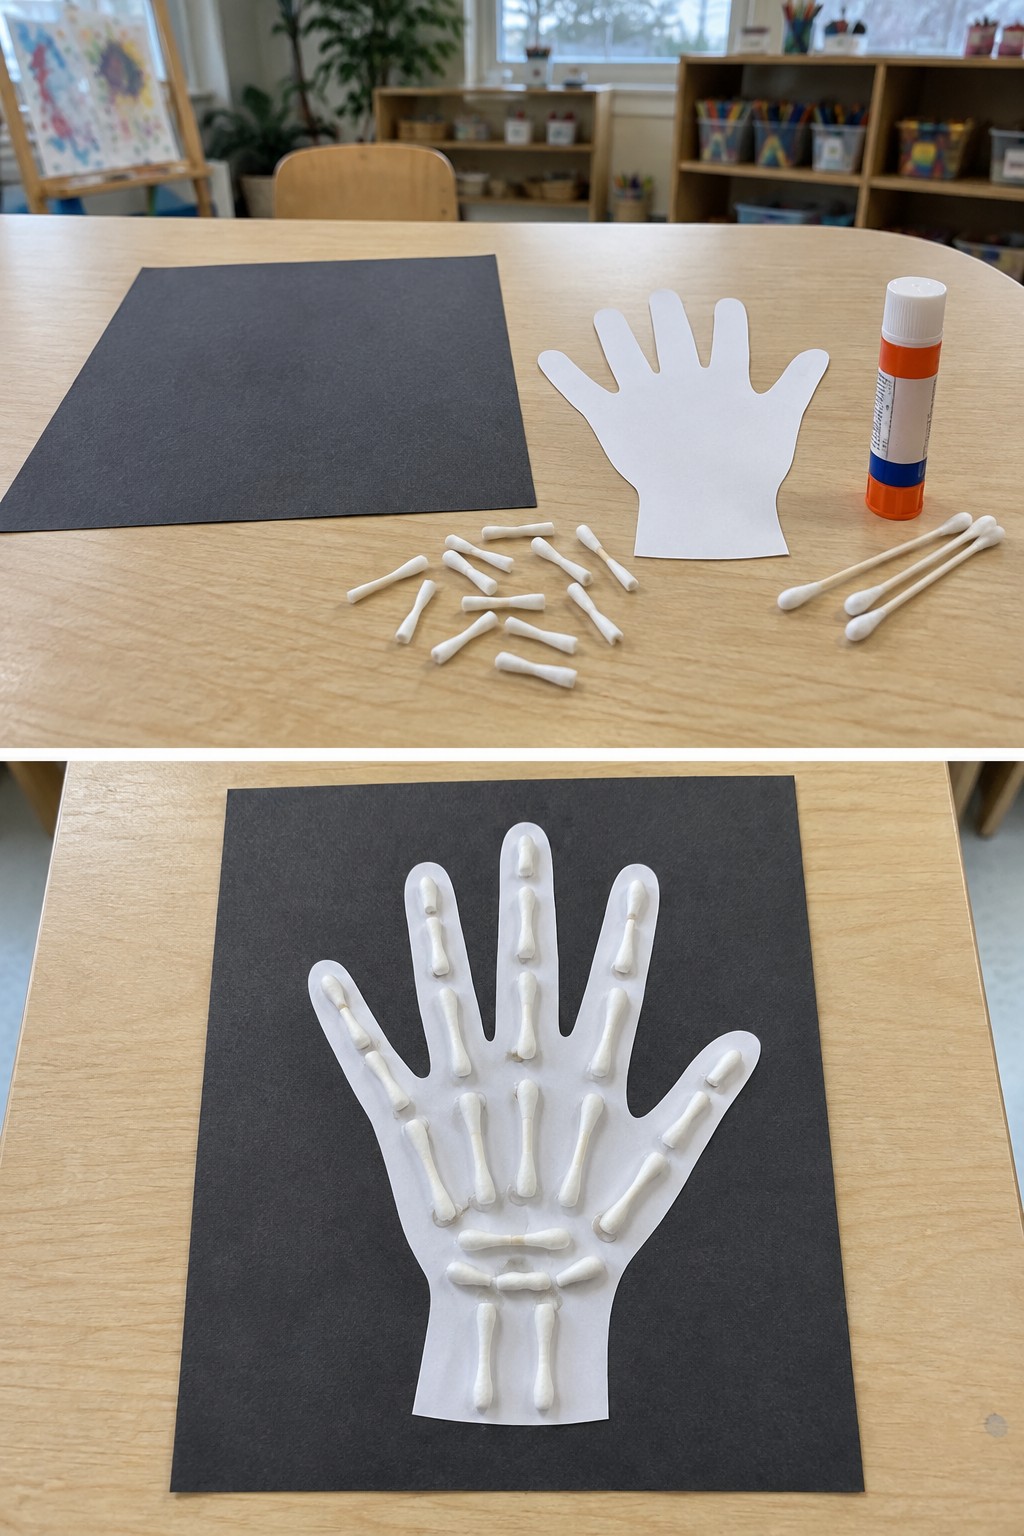
A white hand silhouette gives children a clear place to arrange the short swab pieces. This is a stylized craft rather than an accurate anatomy diagram.
Materials
- Black cardstock
- white paper hand cutout
- cotton swabs with paper stems
- PVA craft glue
- adult scissors
How to Make It
- An adult cuts a broad hand shape and prepares short cotton swab sections, discarding sharp or crushed pieces.
- Glue the white hand onto the black cardstock. Arrange the swab sections along the fingers and through the palm.
- Lift and glue each piece, then keep the artwork flat while it dries.
Helpful note: Let children point to their own fingers before arranging the collage, without requiring an exact number of bones.
18. Pumpkin Lacing Card with a Paper Smile
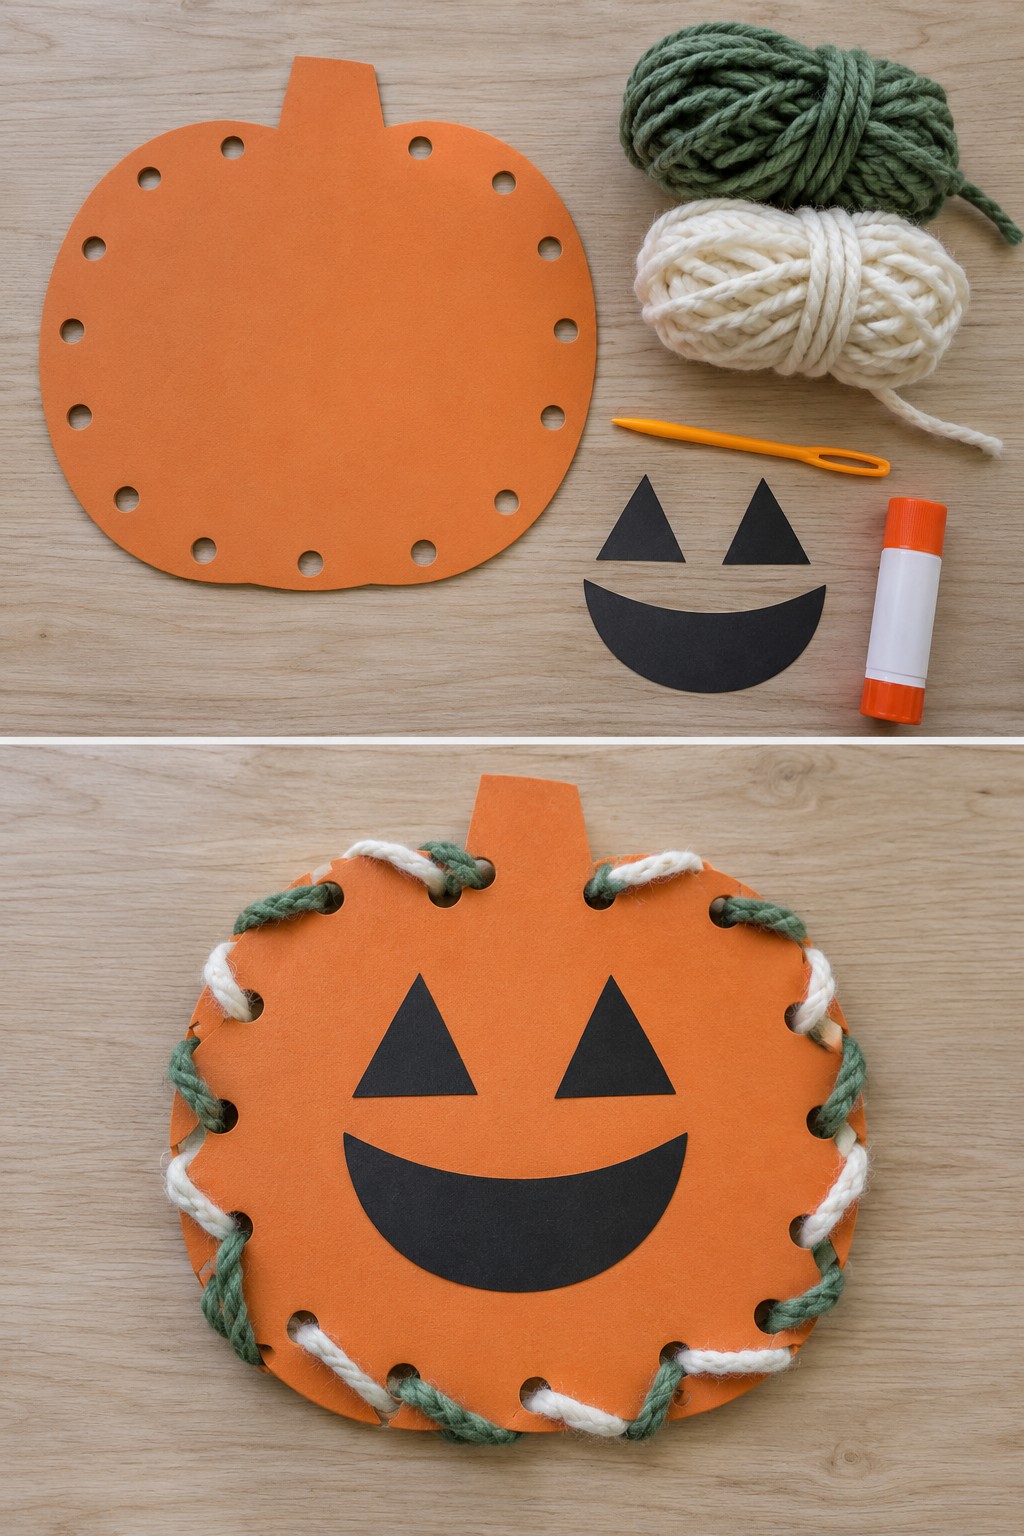
A flat pumpkin card is easier to hold than a loose sheet of paper. Green and white yarn can provide alternating accents around its edge.
Materials
- Sturdy orange card or craft foam
- green and white yarn
- black paper face
- adult hole punch and scissors
- glue stick
- tape or blunt plastic lacing needle
How to Make It
- An adult cuts a broad pumpkin with a stem and punches widely spaced holes around the edge.
- Secure one yarn end at the back. Thread it in and out through the holes; use a second short length for another section if desired.
- Fasten all loose ends behind the card and glue on the black eyes and mouth.
Helpful note: A taped yarn tip can be easier to manage than a needle. Keep the strands on the table and put them away after the activity.
19. Clothespin Bat for a Classroom Display
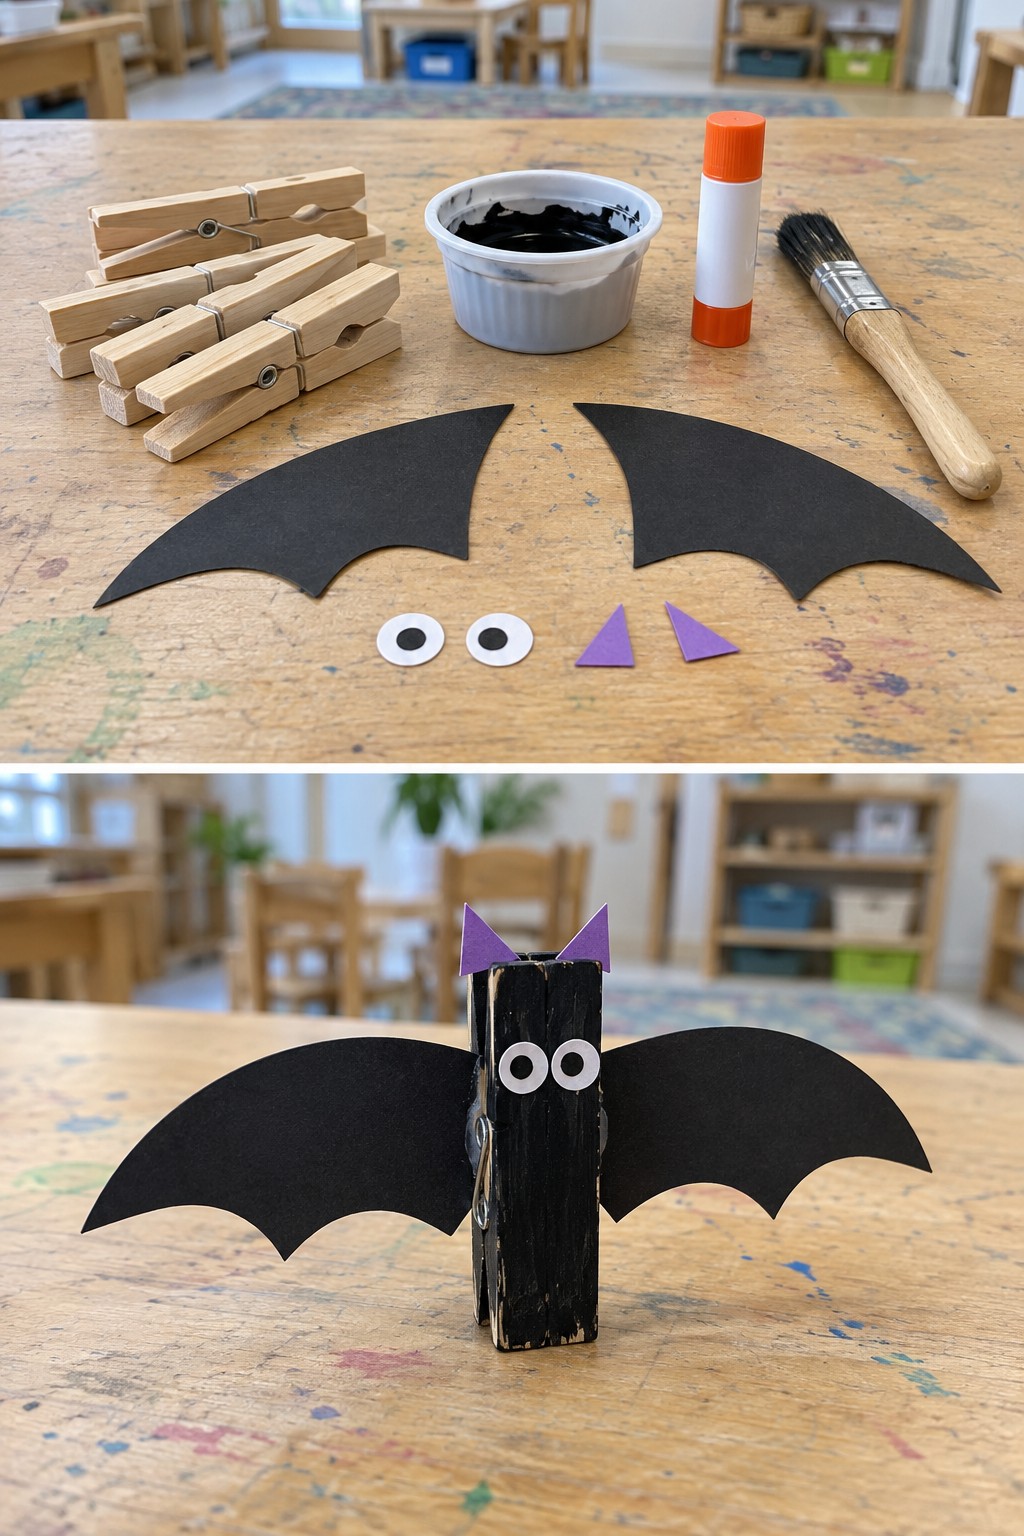
A wooden clip gives this bat a useful body for attaching to a card display. Position the wings so the clip can still open after decorating.
Materials
- Wooden clothespin
- black washable paint and brush
- black paper wings
- purple paper ears
- paper or googly eyes
- PVA craft glue
- adult scissors
How to Make It
- Paint the clip black and dry it fully, checking that the moving parts are not glued or painted shut.
- An adult prepares the wings and ears. Glue them to the rear of the upper section without covering the spring or gripping ends.
- Add the eyes and let the glue set. An adult can clip the bat to a card display or a shelf label.
Helpful note: Let an adult operate a tight clip to avoid pinched fingers. Display it clipped rather than relying on it to stand.
20. Bubble Wrap Pumpkin Prints
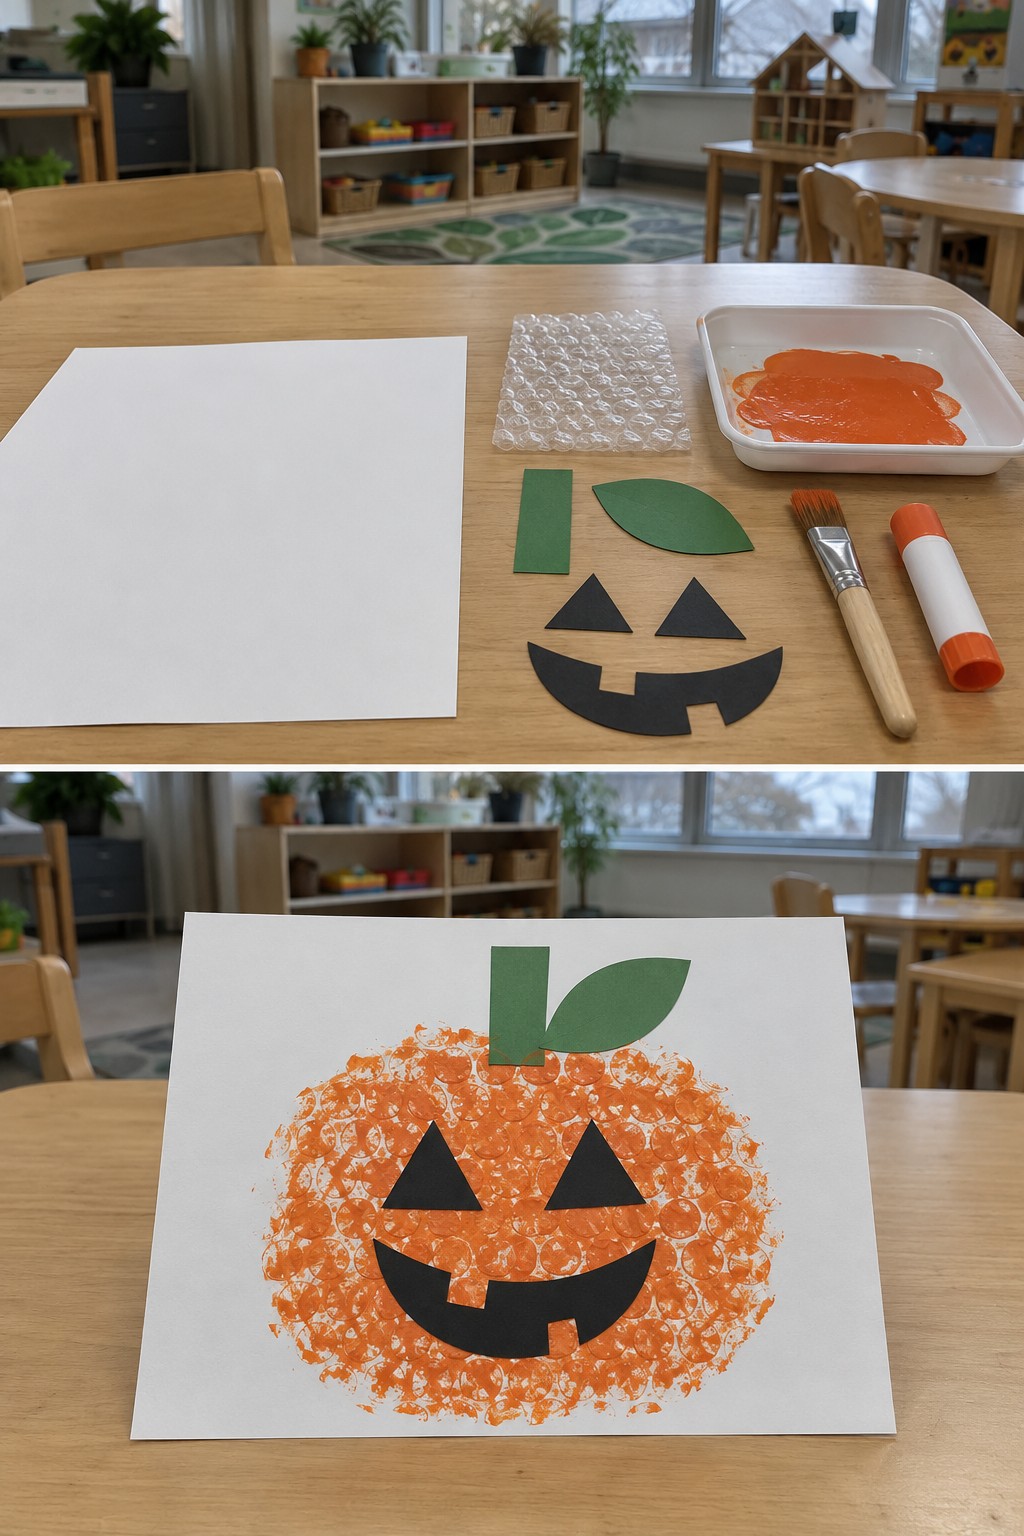
Bubble wrap leaves a pattern of little circles. Repeated impressions build a broad pumpkin shape without filling it with a brush.
Materials
- White cardstock
- small clean bubble wrap piece
- orange washable paint
- tray and brush
- green stem and leaf
- black paper face
- glue stick
How to Make It
- Brush a light coat of orange paint onto the raised bubbles.
- Press the painted side onto the card, lift it, and repeat nearby until the prints form a rounded pumpkin.
- Allow the paint to dry, then glue on the stem, leaf, eyes, and mouth.
Helpful note: Keep one unpainted edge available as a handhold so children can lift the plastic without smearing the print.
21. Tissue Paper Pumpkin Window Suncatcher
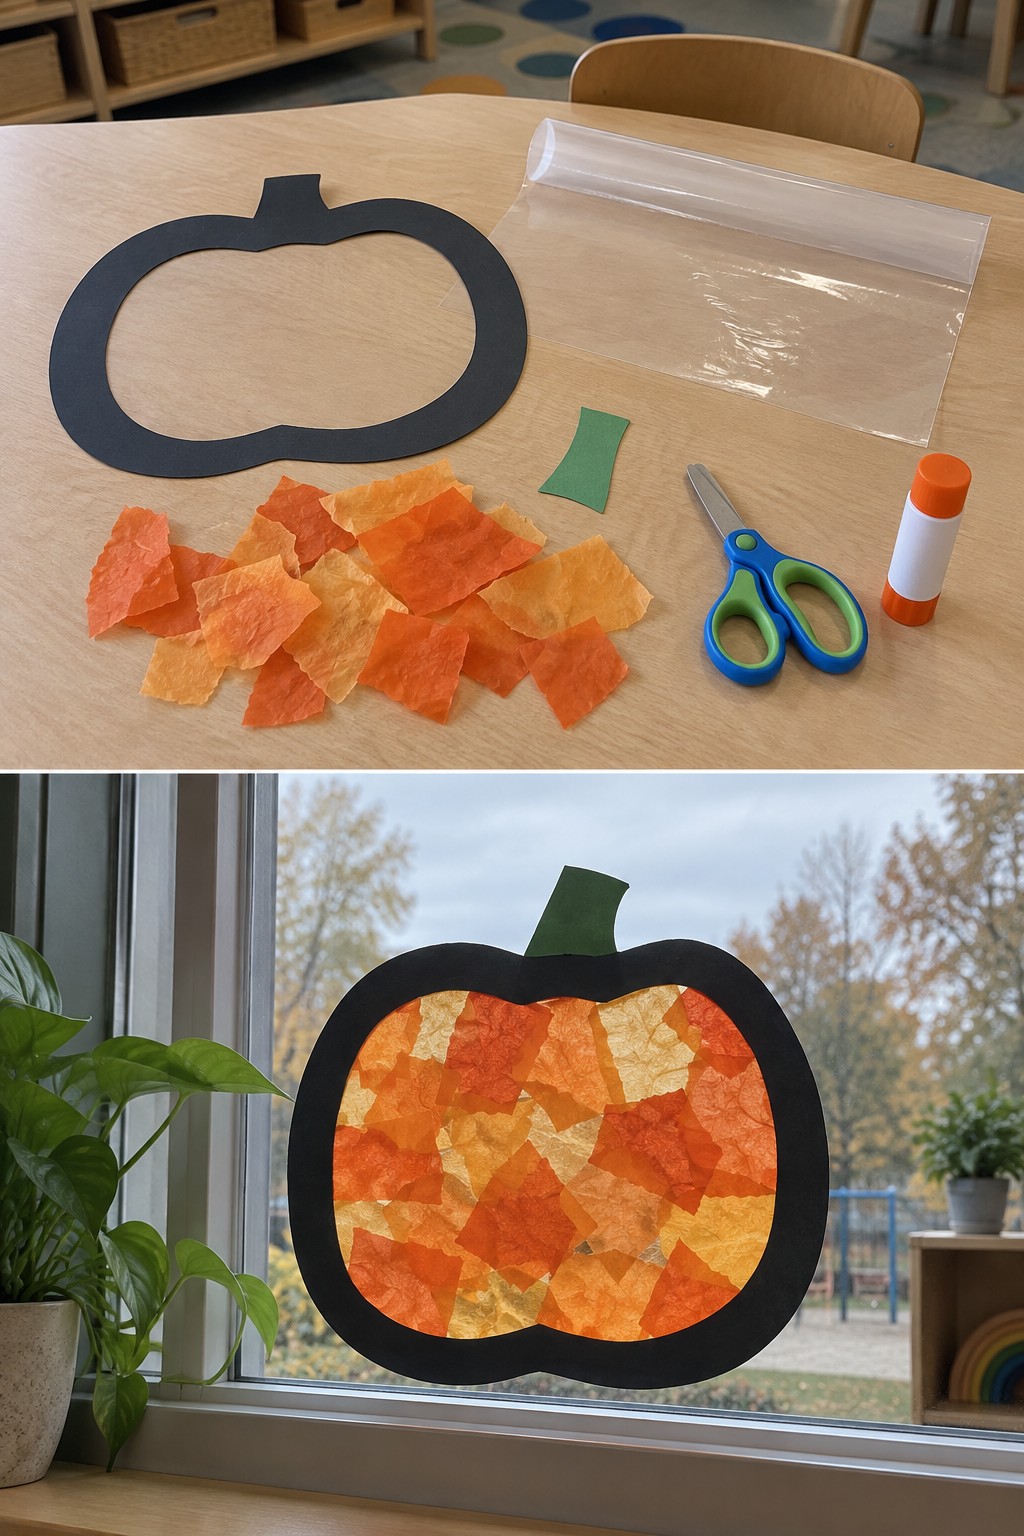
Thin tissue lets daylight pass through the pumpkin. A black frame gives the overlapping orange and yellow pieces a clear outline.
Materials
- Black cardstock pumpkin frame
- clear self-adhesive contact paper
- orange and yellow tissue
- green paper stem
- adult scissors
- suitable window mounting tape
How to Make It
- An adult cuts the open pumpkin frame. Lay contact paper sticky-side up and press the frame onto it.
- Tear tissue into small patches and press them inside the opening, keeping overlap light enough for daylight to show through.
- Cover with a second contact-paper layer, trim around the outer frame, and attach the stem. An adult mounts it on the window.
Helpful note: Choose a window area away from children’s reach if they tend to peel decorations apart.
22. Upside-Down Paper Bowl Black Cat
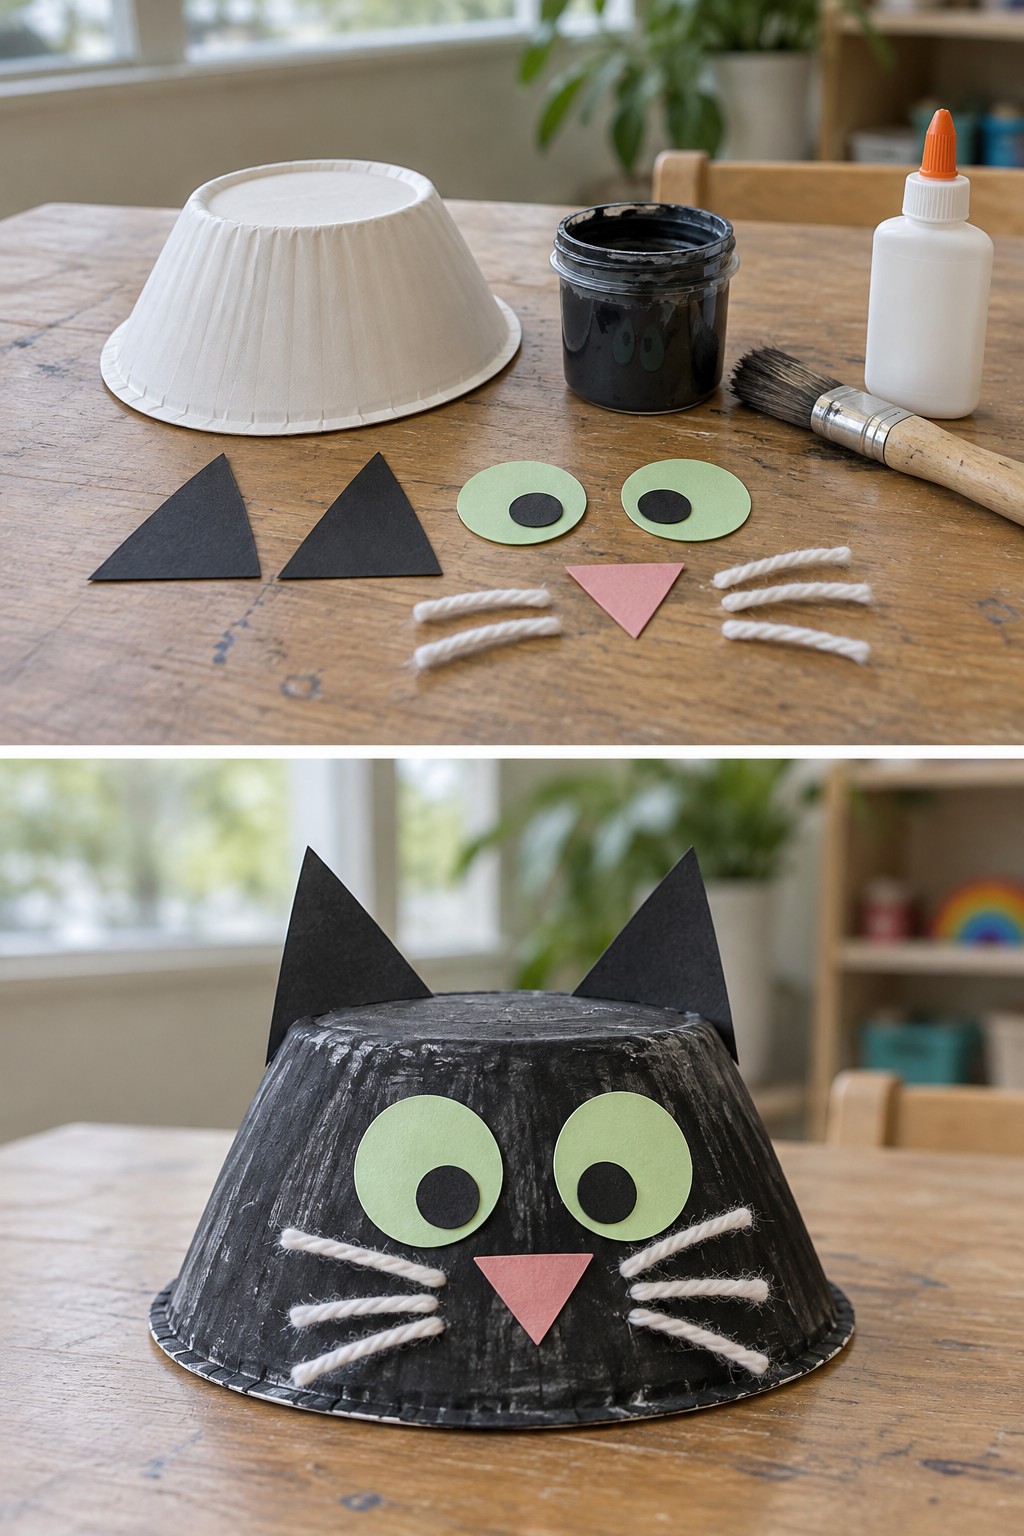
The bowl’s curved sides form a rounded cat face. Six short yarn whiskers and two paper ears provide most of the character.
Materials
- Paper bowl
- black washable paint and brush
- black, green and pink paper
- six short white yarn pieces
- PVA craft glue
- adult scissors
How to Make It
- Turn the bowl upside down, paint the outside black, and let it dry.
- Glue two black ears near the upper edge. Add green eyes with black pupils and a pink triangular nose.
- Glue three short whiskers on each side of the nose. Keep the bowl still until the yarn is secure.
Helpful note: Fold a small tab at the base of each ear to give it a larger gluing surface.
23. Torn Paper Frankenstein’s Monster Portrait
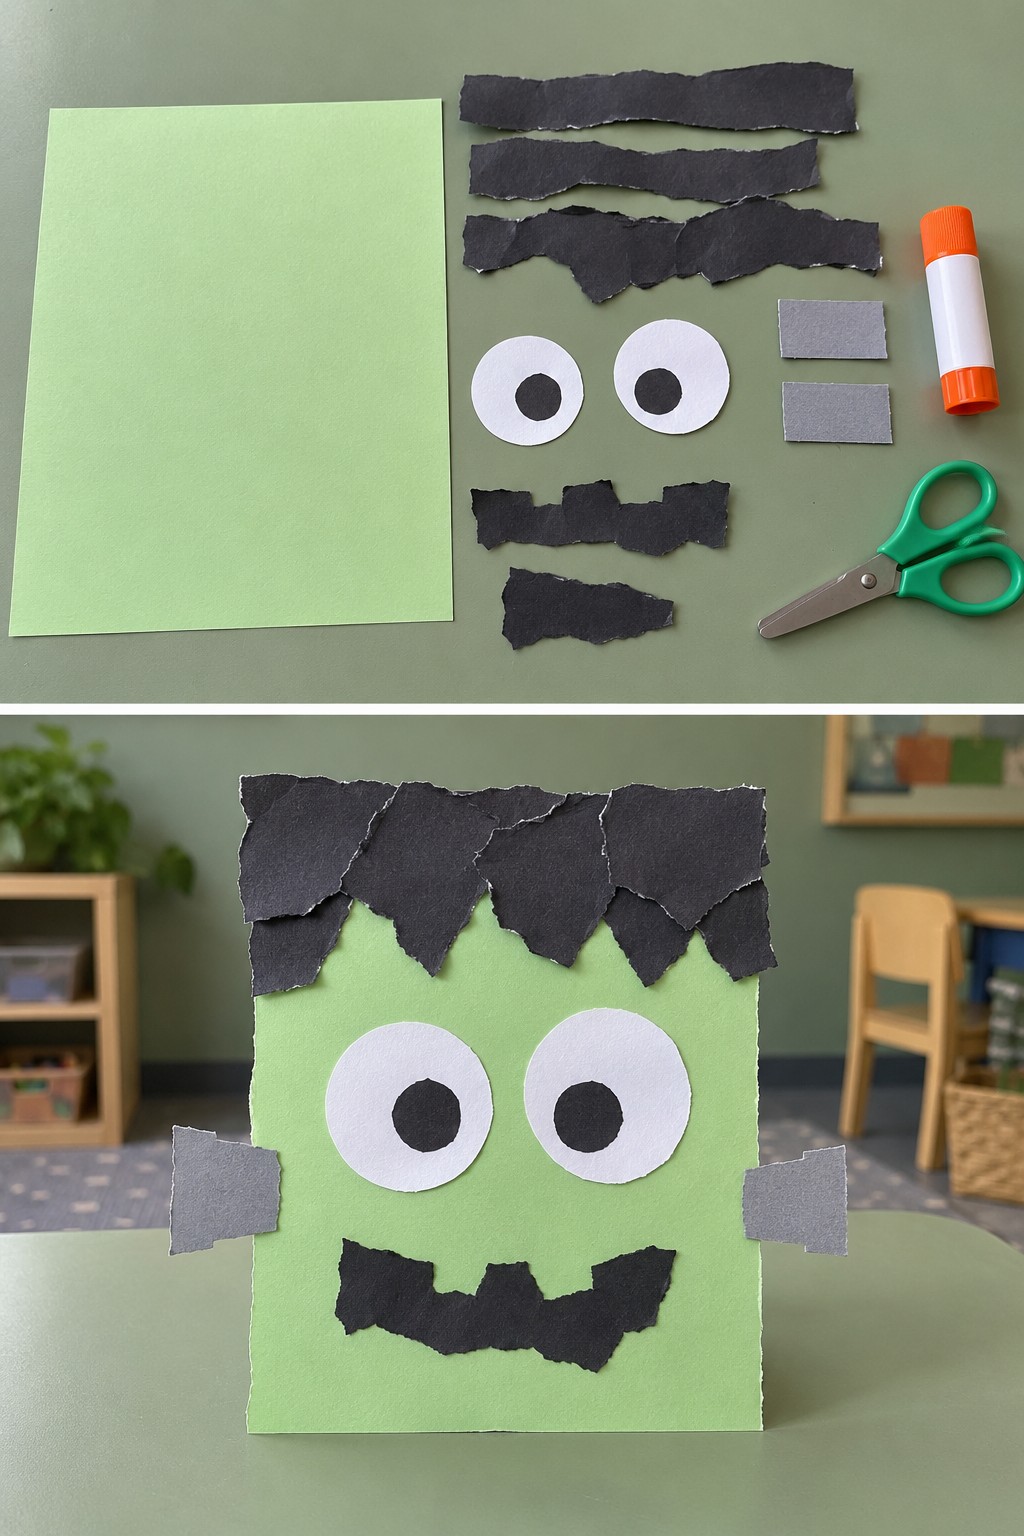
Uneven black paper edges make a jagged hairstyle. Tearing lets children shape the hair without needing precise scissor work.
Materials
- Green cardstock
- black, white and gray paper
- glue stick
- blunt-tip scissors for supported cutting
How to Make It
- Tear black paper into hair pieces and arrange them across the top of the green card.
- Glue on two large white eyes with black pupils. Add a torn black mouth beneath them.
- Attach gray paper bolts at the sides and press all glued edges flat.
Helpful note: Children can decide whether the monster looks puzzled or happy by moving the eyes and mouth before gluing.
24. Paper Doily Ghost with a Hanging Loop
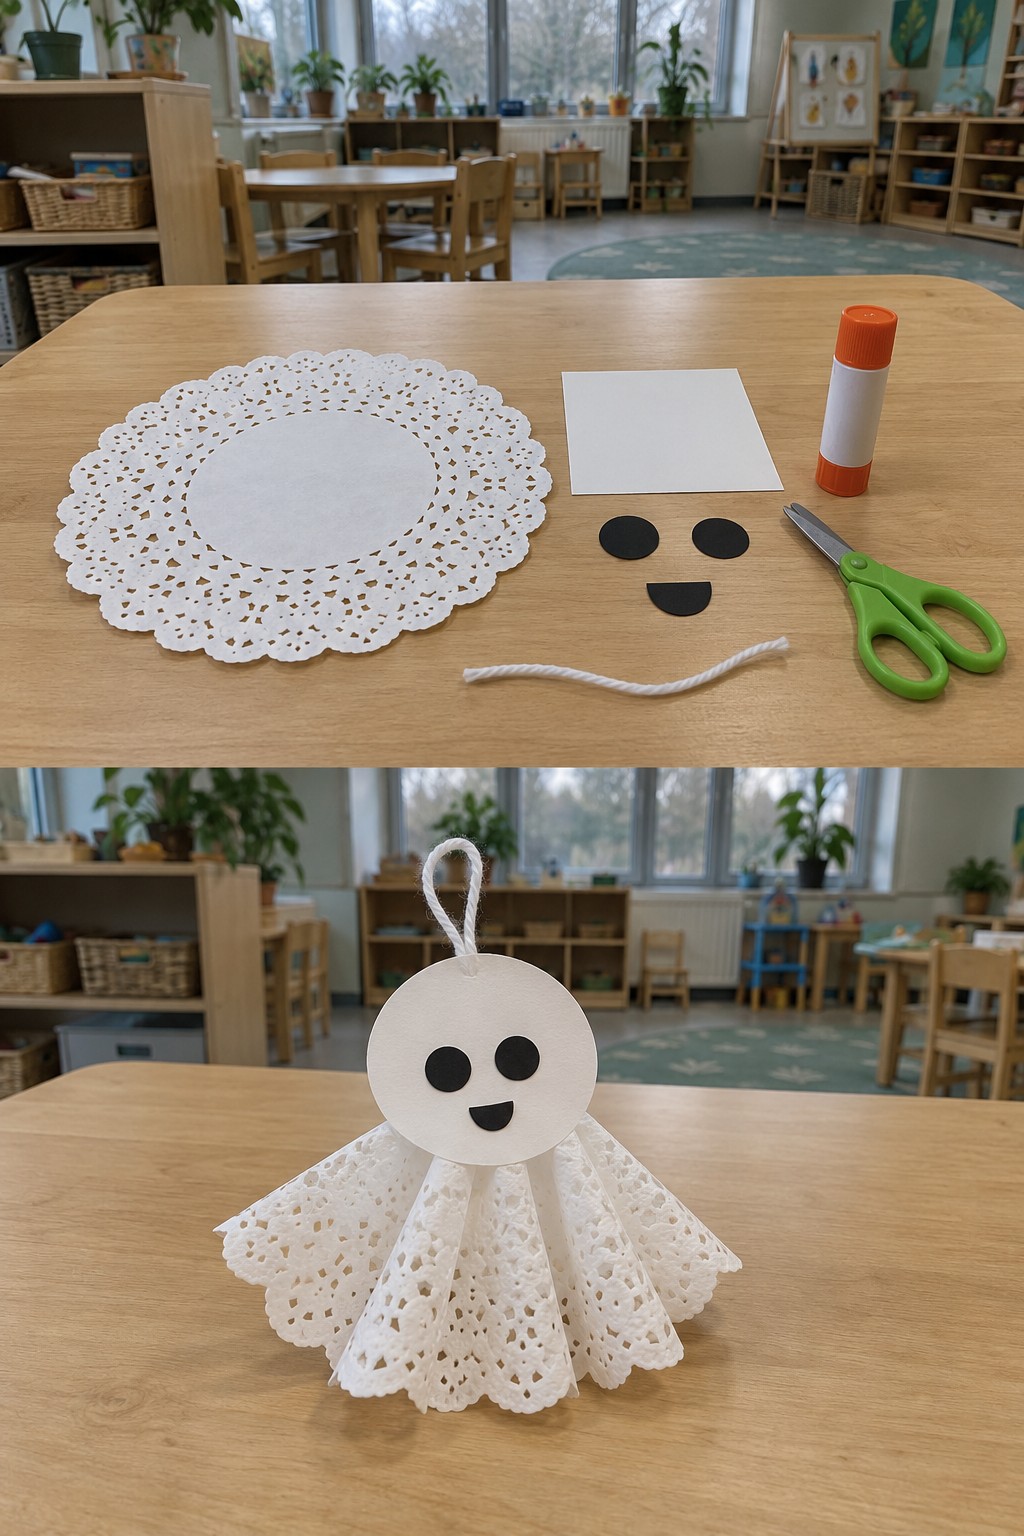
A folded doily gives this ghost a lacy skirt. Its round paper head also covers the gathered upper edge of the body.
Materials
- White paper doily
- white cardstock head
- black paper eyes and mouth
- short white yarn
- glue stick
- tape
- adult scissors
How to Make It
- Fold the doily into loose pleats and bring the upper edges together, leaving the lower edge spread out.
- Glue the gathered section behind a round cardstock head, then add the black face pieces.
- An adult tapes a short yarn loop behind the head. Let the joints dry before hanging the ghost on a display.
Helpful note: Handle the gathered paper gently; tight folding can tear the lace-like cutouts.
25. Sponge-Painted Moon with Paper Bats
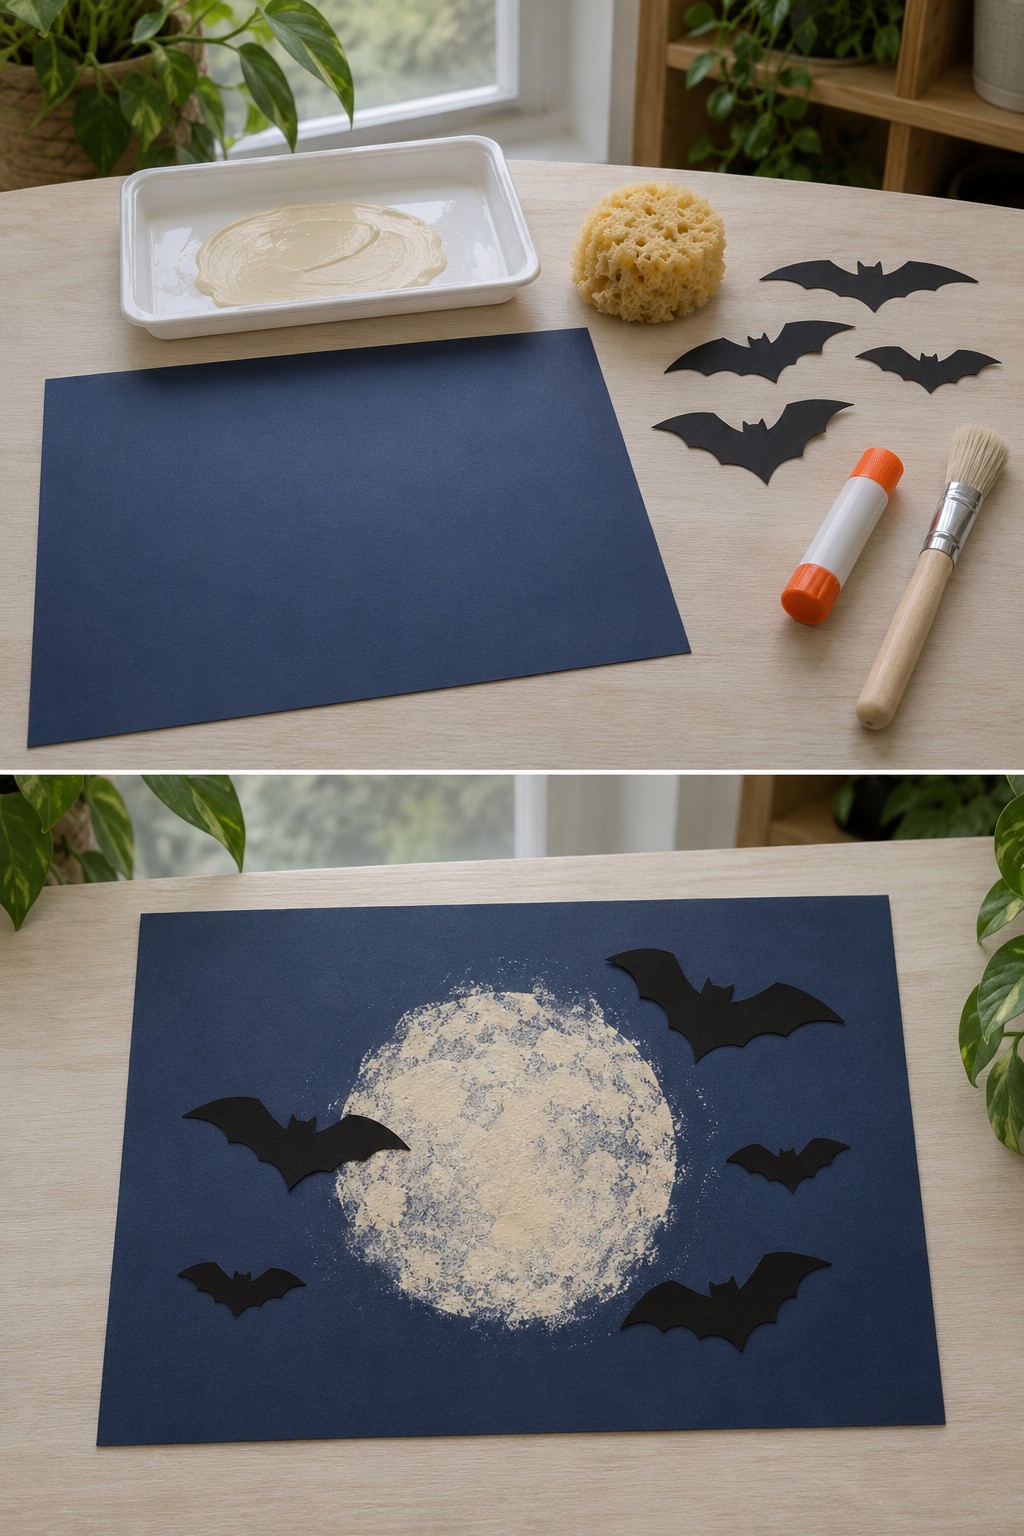
A pale mottled circle becomes a moon against navy cardstock. Black bat silhouettes can overlap the edge or sit around it to create a night scene.
Materials
- Navy cardstock
- sponge
- pale cream washable paint
- shallow tray
- prepared black paper bats
- glue stick
How to Make It
- Lightly dab the sponge in paint and test it on scrap paper.
- Build a circular moon with repeated dabs, leaving some darker areas for texture. Let the paint dry.
- Arrange paper bats around or partly across the moon, then glue them down.
Helpful note: An adult can lightly mark a circular guide if the child wants help keeping the moon round.
26. Felt Monster Face with Mismatched Features
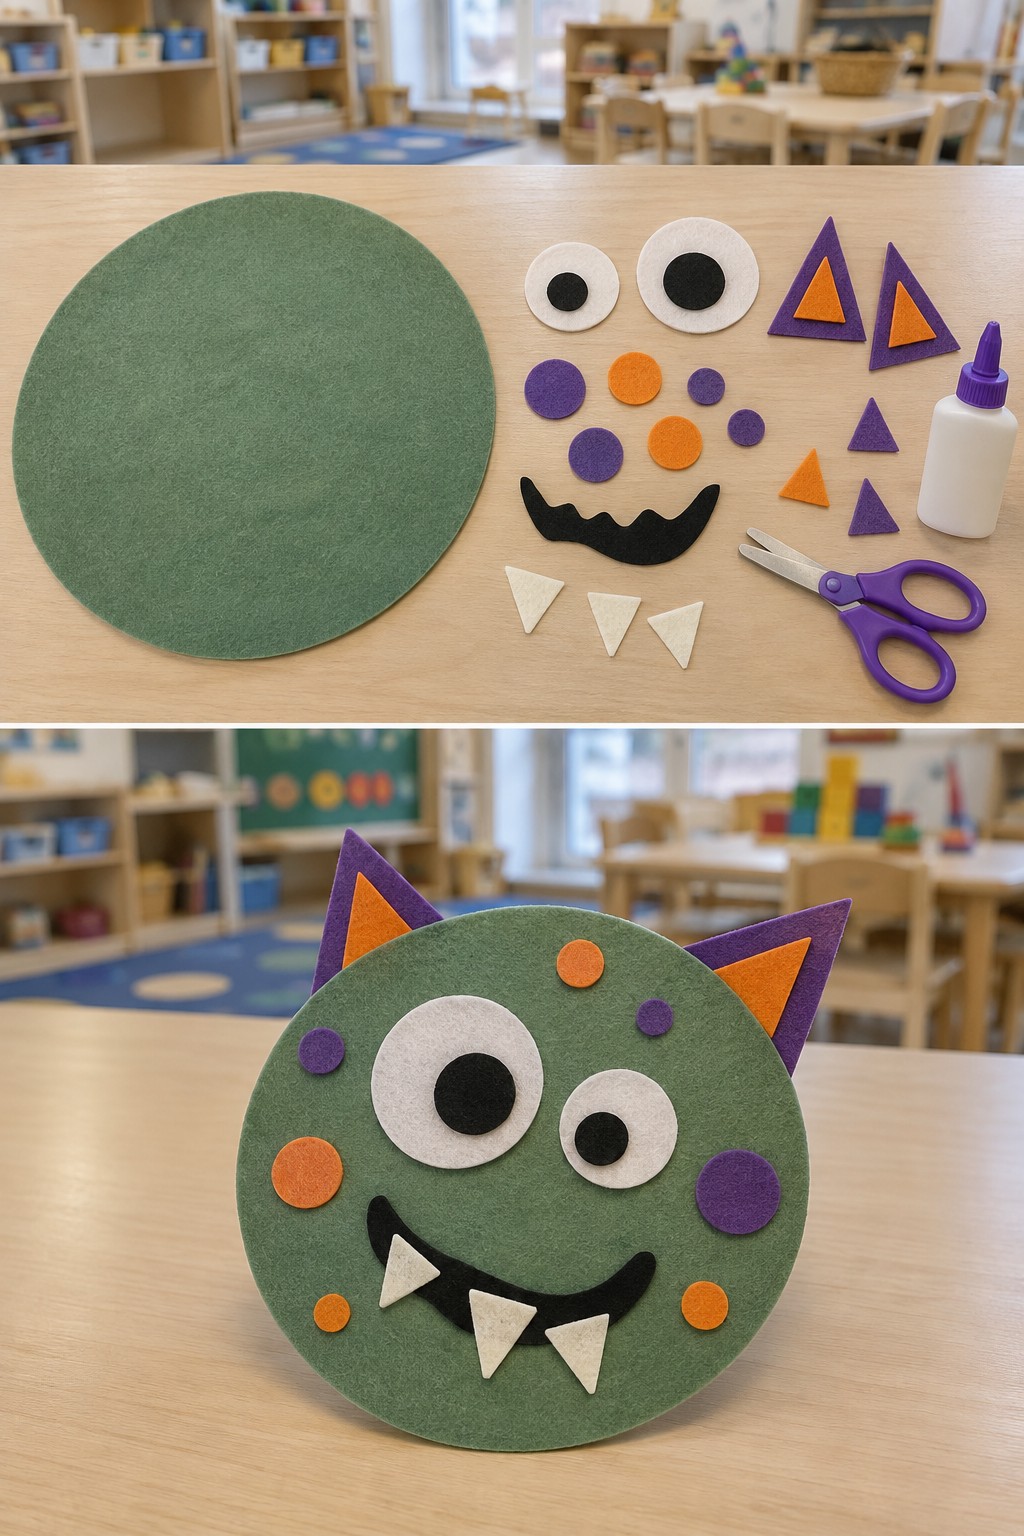
Felt pieces can be moved around before the design is fixed. Oversized eyes and an uneven grin give the monster personality without complicated construction.
Materials
- Large green felt circle
- white, black, purple and orange felt pieces
- felt-suitable child-appropriate craft glue
- adult scissors
- optional card backing
How to Make It
- An adult cuts the face, eyes, mouth, teeth, ears, and spots from felt.
- Arrange the pieces on the green circle and try several expressions before choosing one.
- Glue the features with a product suitable for felt and allow the stated drying time. Add card backing if a firm display piece is needed.
Helpful note: Blunt-tip children’s scissors may struggle with felt, so adults should prepare these pieces.
27. Paper Fringe Witch Broom
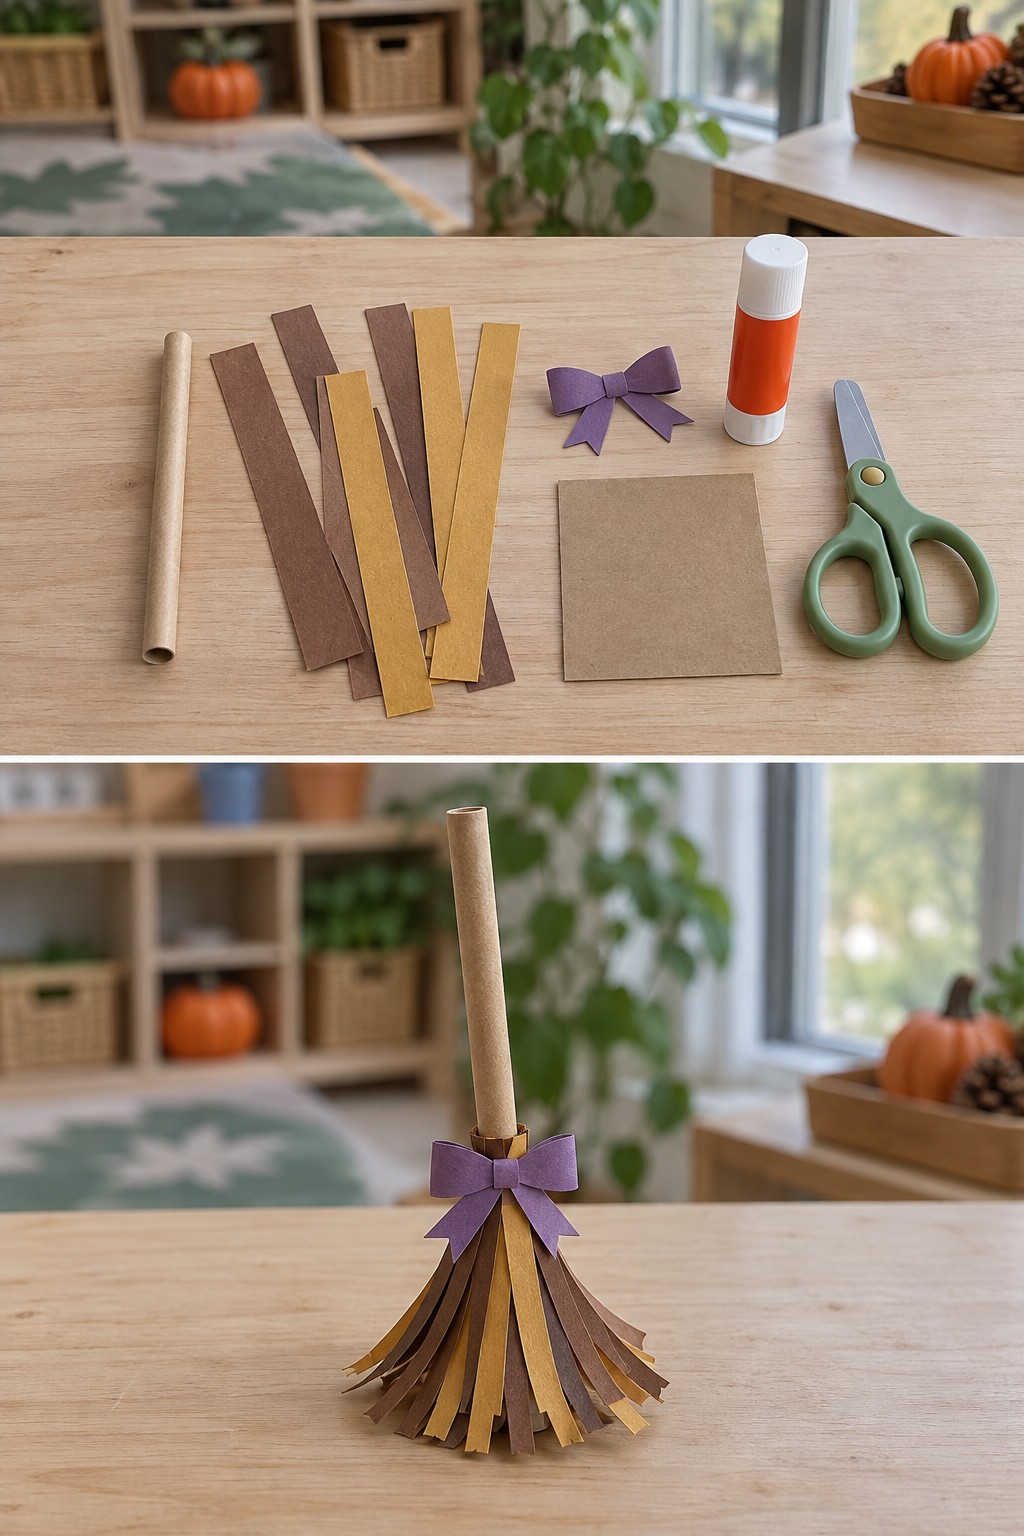
Brown and tan strips make a loose broom fringe around a rolled card handle. A continuous paper band holds the strips more reliably than gluing each one separately.
Materials
- Card rectangle for a rolled handle or sturdy paper straw
- brown and tan paper
- purple paper bow
- glue stick
- tape
- blunt-tip scissors
How to Make It
- An adult rolls the card into a narrow tube and tapes the seam, or provides a paper straw.
- Cut fringe into a brown paper rectangle while keeping one long edge uncut. Add tan strips, then wrap the intact band around the lower end of the handle.
- Glue and tape the band in place. Attach the purple bow over the join and gently spread the fringe.
Helpful note: Keep this as a small display prop; thin paper handles will not withstand sweeping or vigorous play.
28. Pom-Pom Pumpkin Wreath
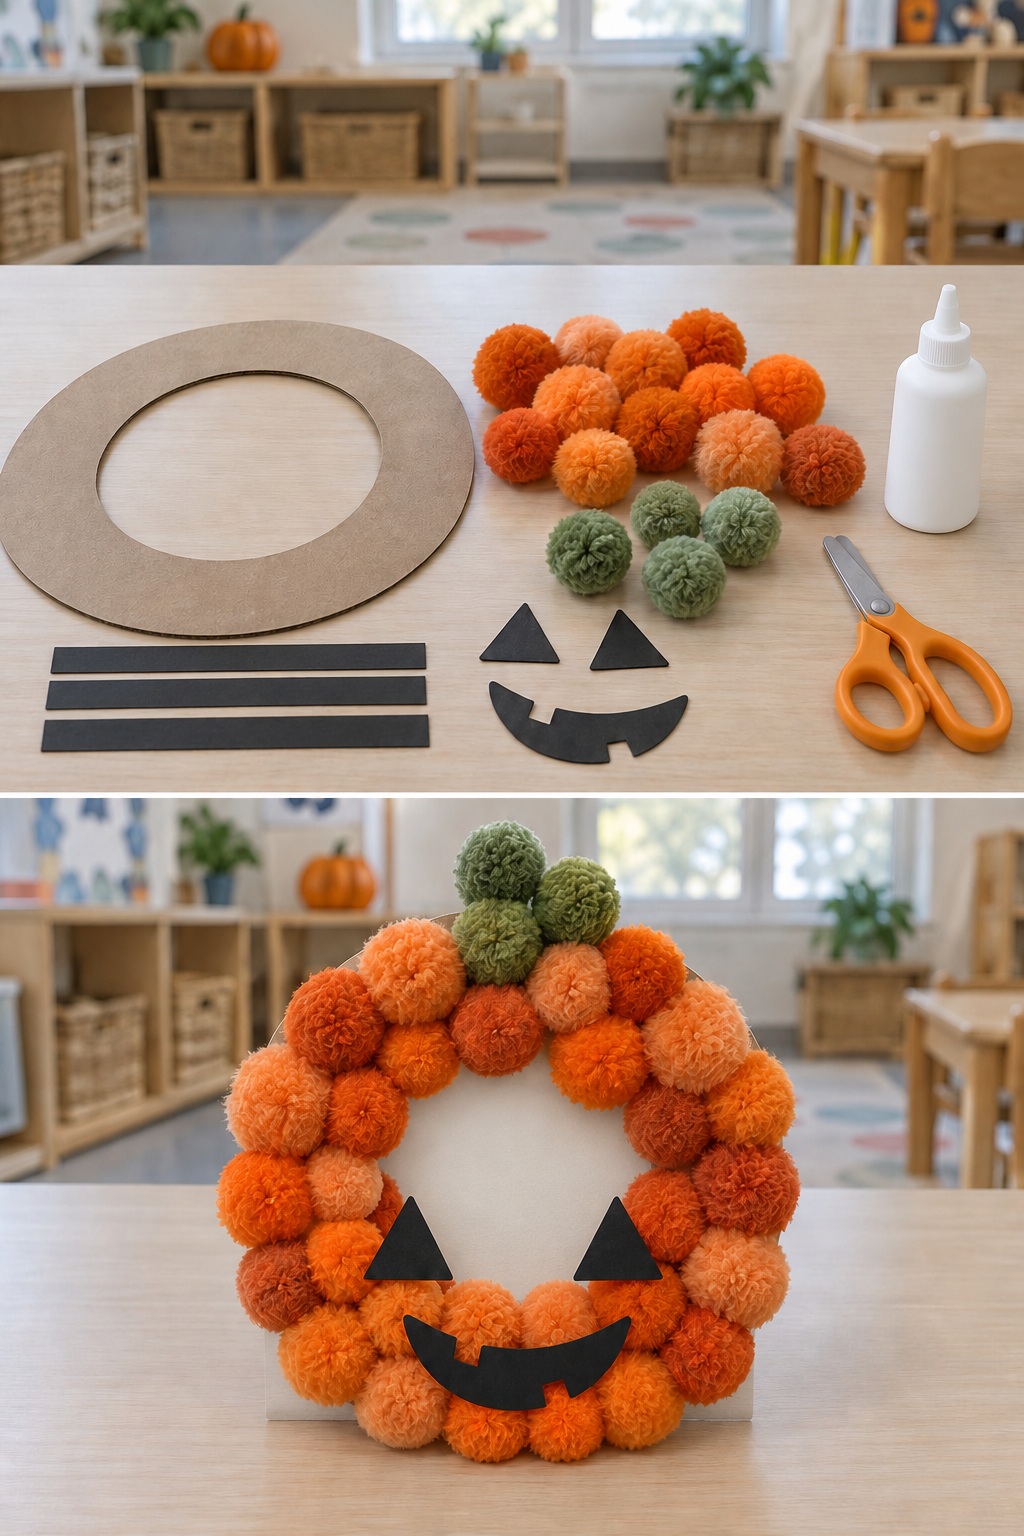
Shades of orange cover a cardboard ring, with green pom-poms at the top. The paper face needs a secure attachment across the open center.
Materials
- Adult-prepared cardboard ring with a broad border
- large orange and green pom-poms
- black card face shapes
- three narrow black cardstock support strips, each longer than the center opening
- child-appropriate PVA craft glue
- adult scissors
How to Make It
- An adult glues three narrow black cardstock bridges across the back of the ring: one behind each eye position and one behind the mouth. Both ends of every strip must overlap and bond to the cardboard border. Let these joints dry.
- Working flat, add PVA glue to the base of each orange pom-pom and press it onto the ring. Add green pom-poms at the top and let the glue set fully before turning or lifting the wreath.
- Apply glue to the backs of the black face pieces and fix them over their support strips. Keep the strips behind the features and orange border so the front looks tidy. Dry flat, check the joins, and display the wreath leaning against a board.
Helpful note: A glue stick may not hold bulky pom-poms securely. Use the liquid craft glue shown with the supplies, following its label, and keep this wreath as a display piece.
29. Standing Accordion Paper Ghost
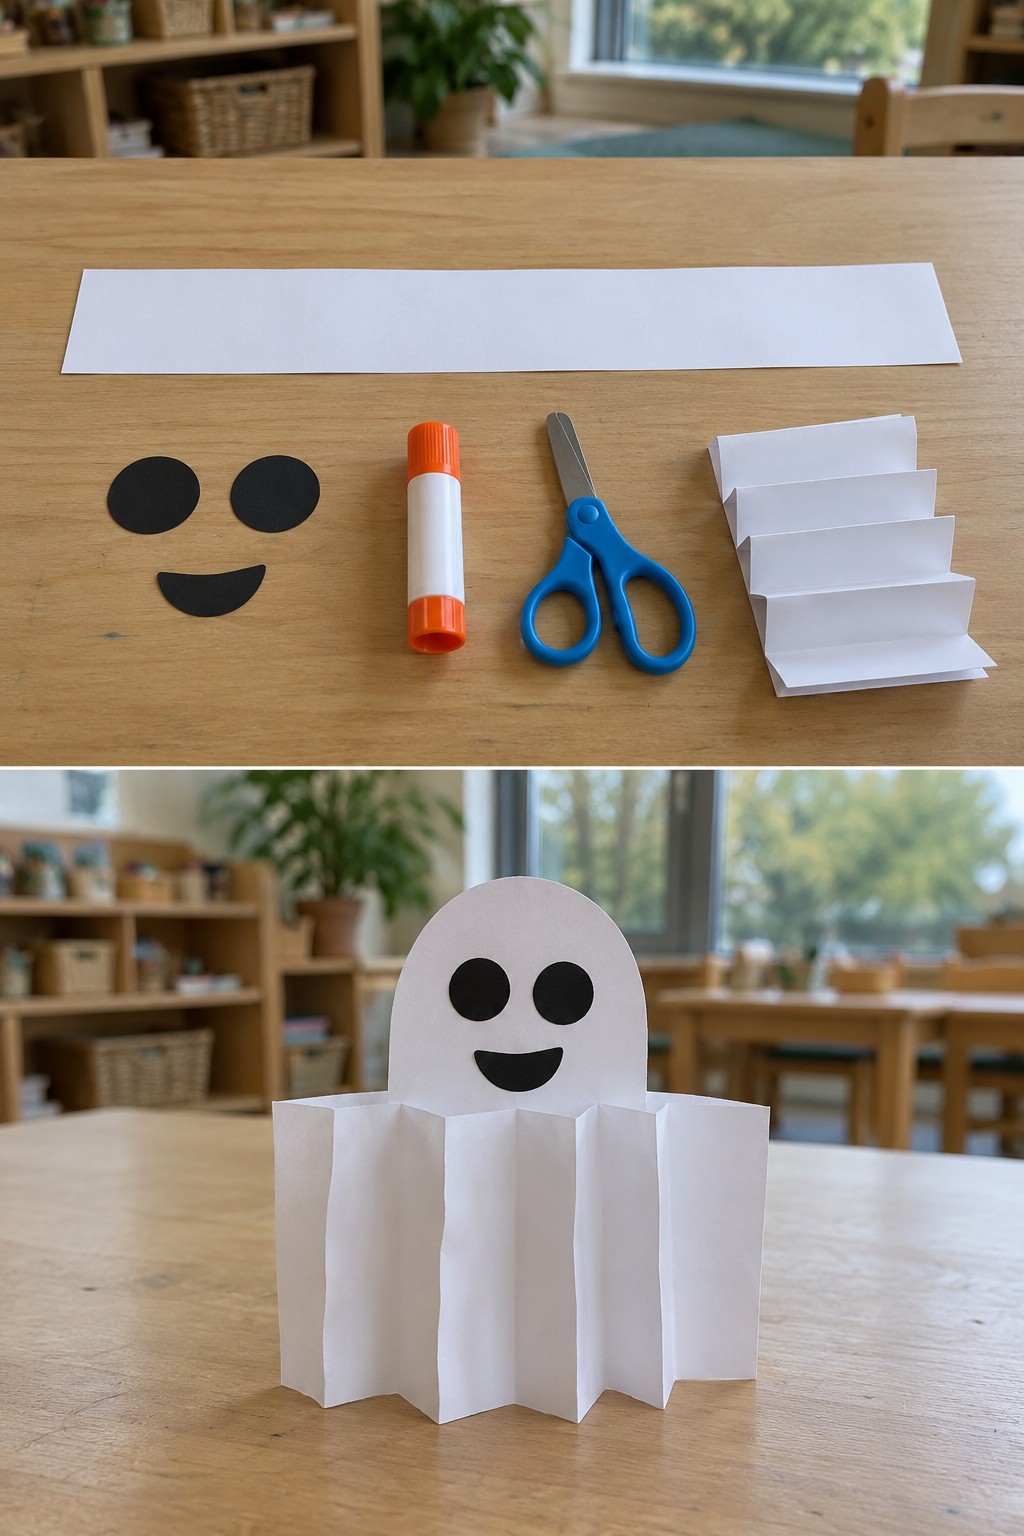
The accordion body stands because its folds run vertically once opened. A separate rounded head is fixed behind the center pleats.
Materials
- Wide white paper rectangle
- white cardstock head
- black paper eyes and mouth
- glue stick
- adult scissors
How to Make It
- Place the rectangle with its long edge horizontal. Fold narrow sections back and forth from one short side to the other.
- Stand the folded paper on its straight lower edge and open the pleats slightly so they form a zigzag footprint.
- Decorate the separate head and glue its lower section behind a center pleat. Keep the body upright while checking that the head does not make it tip.
Helpful note: The body is not a spring stacked beneath the head. Keep the creases vertical and use a wider base if it falls over.
30. Paper Plate Eyeball with Yarn Veins
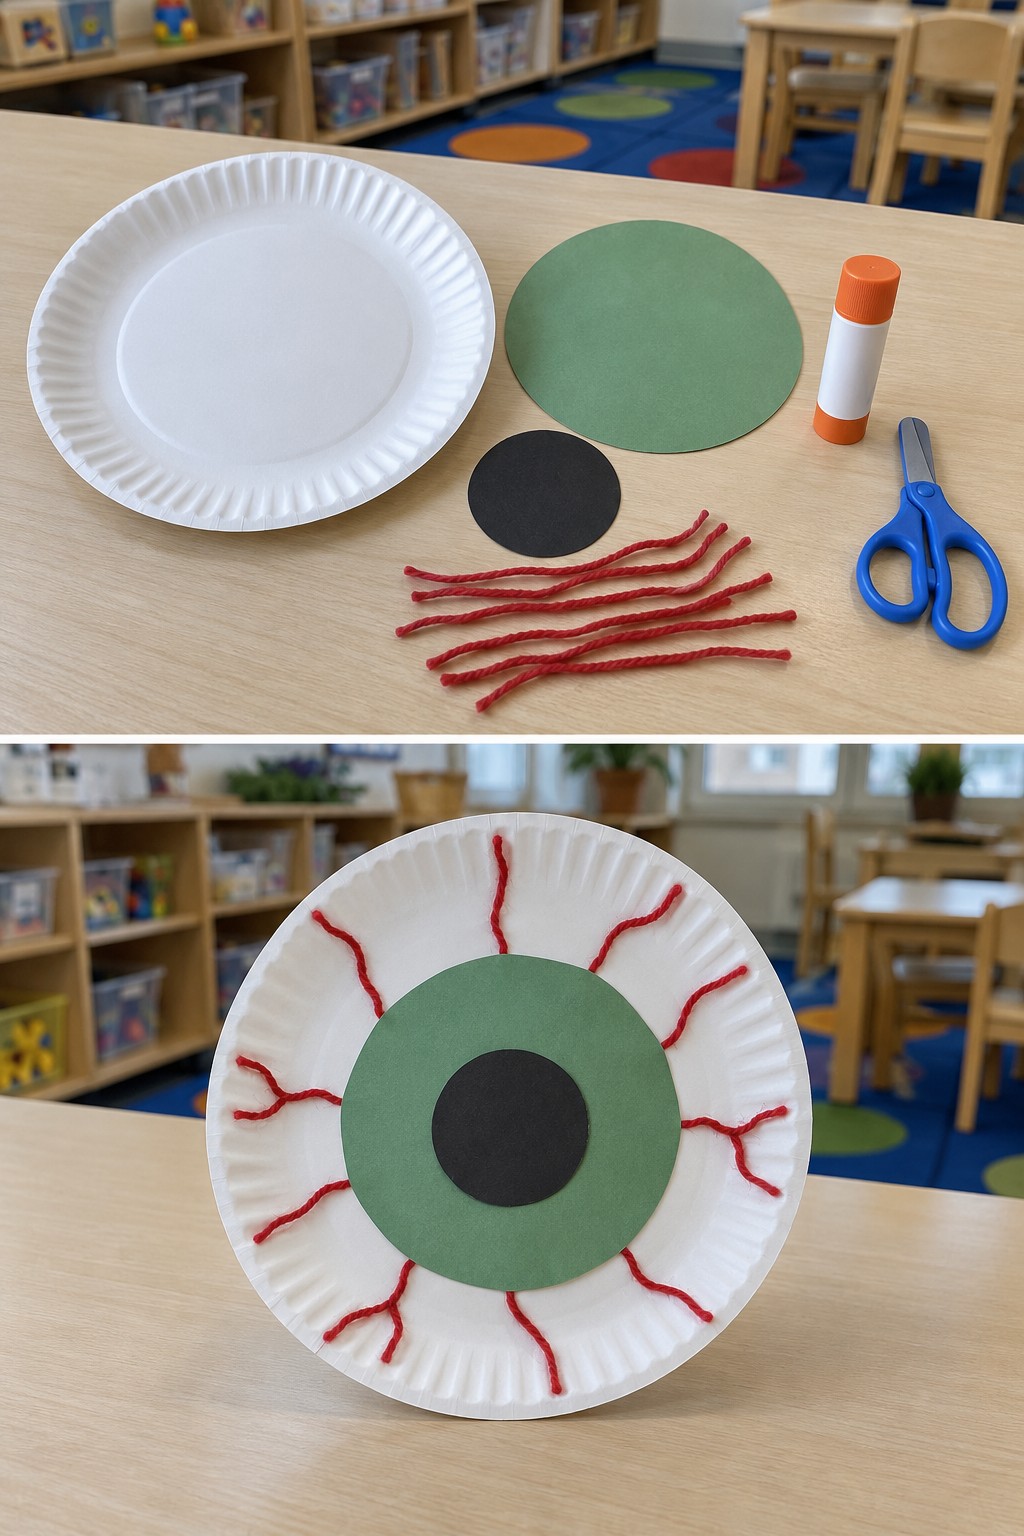
A large green iris and black pupil make the center of this oversized eyeball. Short red strands add the Halloween detail without requiring careful drawing.
Materials
- White paper plate
- green paper circle
- smaller black paper circle
- short red yarn pieces
- glue stick
- PVA craft glue
- adult scissors
How to Make It
- Glue the green iris into the middle of the plate and add the black pupil on top.
- Arrange short red strands across the surrounding white area, leaving the center circles uncovered.
- Add small dots of PVA glue beneath the yarn and dry the plate flat.
Helpful note: Let the vein paths vary. A few separated lines are easier to glue than a crowded layer of yarn.

Leave a Reply