
Make a shallow cardboard hockey rink, then try one of 35 toys for storytelling, matching and tabletop games. The rink tutorial covers its parts, measurements, folded tabs and assembly. The gallery explains the different supports, moving joints and playing pieces needed for each later design.
After the tutorial, explore 35 DIY cardboard toy ideas for storytelling, matching, aiming, and miniature adventures. Each idea explains how the starting methods could be adapted, which materials would suit the new shape, and what to check before play. Ramps, upright scenery, and moving parts need additional supports or fitted connections, which are described with the relevant design. Adjust the suggested sizes to your own cardboard and playing pieces. For more activities using saved packaging, explore these recycling projects for kids.
Table of Contents
- Start with a DIY Cardboard Hockey Rink
- Choose cardboard and supplies that suit the toy
- Make the connections before adding the decoration
- Make the starter hockey rink
- Adapt the starter construction to your next toy
- 1. Camping Story Television with Sliding Characters
- 2. Rocket Workshop with a Removable Spacecraft
- 3. Open Storybook with a Secret Passage
- 4. Three Lane Monster Bowling
- 5. Crocodile Dentist Practice Set
- 6. Tabletop Excavator with a Paper-Rock Scoop
- 7. Six Cabin Ferris Wheel for Tiny Passengers
- 8. Mountain Lodge Sled Run with a Zigzag Staircase
- 9. Ocean Animal Matching Pond with Cardboard Tongs
- 10. Penguin Fish Slide with a Catch Tray
- 11. Expression Robot with Layered Face Discs
- 12. Moon Base in a Folding Mission Box
- 13. Octopus Weaving Board with Broad Paper Ribbons
- 14. Miniature Skatepark with a Quarter Pipe
- 15. Friendly Halloween Target Board
- 16. Desktop Basketball Court with a Raised Hoop
- 17. Two Level Parking Garage with a Side Ramp
- 18. Cloud Hoop Runway for a Hand Guided Plane
- 19. Mountain Road Circuit with Two Tunnel Entrances
- 20. Winding Ball Run on Stepped Supports
- 21. Mini Football Pitch with Box Goals
- 22. Curved Mini Golf Green with a Yellow Hump
- 23. Little Sled Hill with a Stairway Back Up
- 24. Color Match Toss Board with Three Catch Pockets
- 25. Cardboard Hockey Rink with Two Open Goals
- 26. Woodland Tube Characters for Storytelling
- 27. Standing Sea Creatures on Short Tube Bases
- 28. Crescent Moon Crown and Paper Tube Wand
- 29. Solar System Board with Recessed Planet Seats
- 30. Ocean Disc Drop Board with Five Channels
- 31. Layered Lion Mane for Dress Up Stories
- 32. Space Target with Three Crater Portals
- 33. Mini Pool Table with Tube Pockets
- 34. Chunky Spinning Tops with Color Wedges
- 35. Long Shuffleboard Tray with Colored Scoring Zones
- Keep the finished toys ready for another play session
Start with a DIY Cardboard Hockey Rink
The rink uses a doubled base, curved card walls with hidden glue flanges and four panels for each open goal. Prepare the parts below, then read each assembly collage from left to right across its two rows.
Choose cardboard and supplies that suit the toy
Use clean, dry corrugated cardboard about 3 mm thick for the starter rink. For the later designs, board approximately 3 to 5 mm thick can suit bases, upright panels, and supports. Thin cereal box card works better for curved walls, folded tabs, roofs, and decorative details. Save sound cardboard tubes for figures and spacers. Reject packaging that smells strongly, has greasy patches, or previously held chemicals, and remove staples and loose tape. A pencil, ruler, cutting mat, blunt scissors, paper tape, brushes, and washable coloring materials cover many of the finishing tasks. An adult will also need suitable cutting tools for thick board and enclosed openings.
For broad cardboard joins, choose a white PVA craft glue labeled for paper and card. Brush on a thin layer, press the surfaces together, and hold them in position until the bond has set according to the product instructions. A glue stick is useful for flat paper decoration. Keep structural glue on bare card rather than a painted surface whenever possible. Use washable paint intended for children for the general color work, or cover the board with colored paper. Apply paint sparingly and let each layer dry before assembly so the cardboard does not become soaked.
Make the connections before adding the decoration
Laminate two base sheets with their corrugations running in different directions, then dry them flat under an even weight with a protective sheet above and below. Upright scenery needs folded tabs or triangular braces attached to both the panel and its base. A decorative strip along the front cannot replace a structural support behind it. For slots, test the fit on a scrap of the same cardboard before cutting the final part. For ramps, check that joins are smooth, the track has enough width for the chosen piece, and the supports reach the underside without bending it.
Adults should prepare thick cuts, holes, and any hot glue work. Choose supplies labeled for the child's age, supervise making and play, and keep small balls, loose discs, and detachable parts away from children under three and anyone who mouths objects. Older children can help measure, decorate, and assemble suitable prepared pieces. Smooth exposed edges, allow adhesives to set fully, and inspect the toy before each use. Cardboard structures are for gentle indoor play and do not support a child's weight. Retire wet, crushed, or peeling parts.
Make the starter hockey rink
Suggested materials and sizes: Two matching pieces of corrugated cardboard about 3 mm thick for a 40 × 28 cm base with rounded corners, plus an extra sheet of the same board to cut eight goal panels, two matching stick outlines, and two puck circles about 4 cm across. Add two flexible cream card strips about 69 × 4.2 cm, light blue paper for the floor, coral paper for the markings, and navy paper for one puck. Also gather white PVA craft glue, a glue stick, a flat brush, paper tape, a metal ruler, a pencil, scissors, and a cutting mat. An adult should prepare the thick cuts and scoring. Check the actual cardboard thickness before fitting the goal panels.
Each cream strip includes a 3 cm visible wall and a 1.2 cm lower flange that folds inward onto the base. The blue paper floor goes on after the walls, covering these flanges. For each open goal, prepare a back, a roof, and two sides. Adjust their dimensions to leave a clear mouth approximately 8 cm wide and 5 cm high, with about 4 cm of depth. Keep both fronts and both bottoms open.
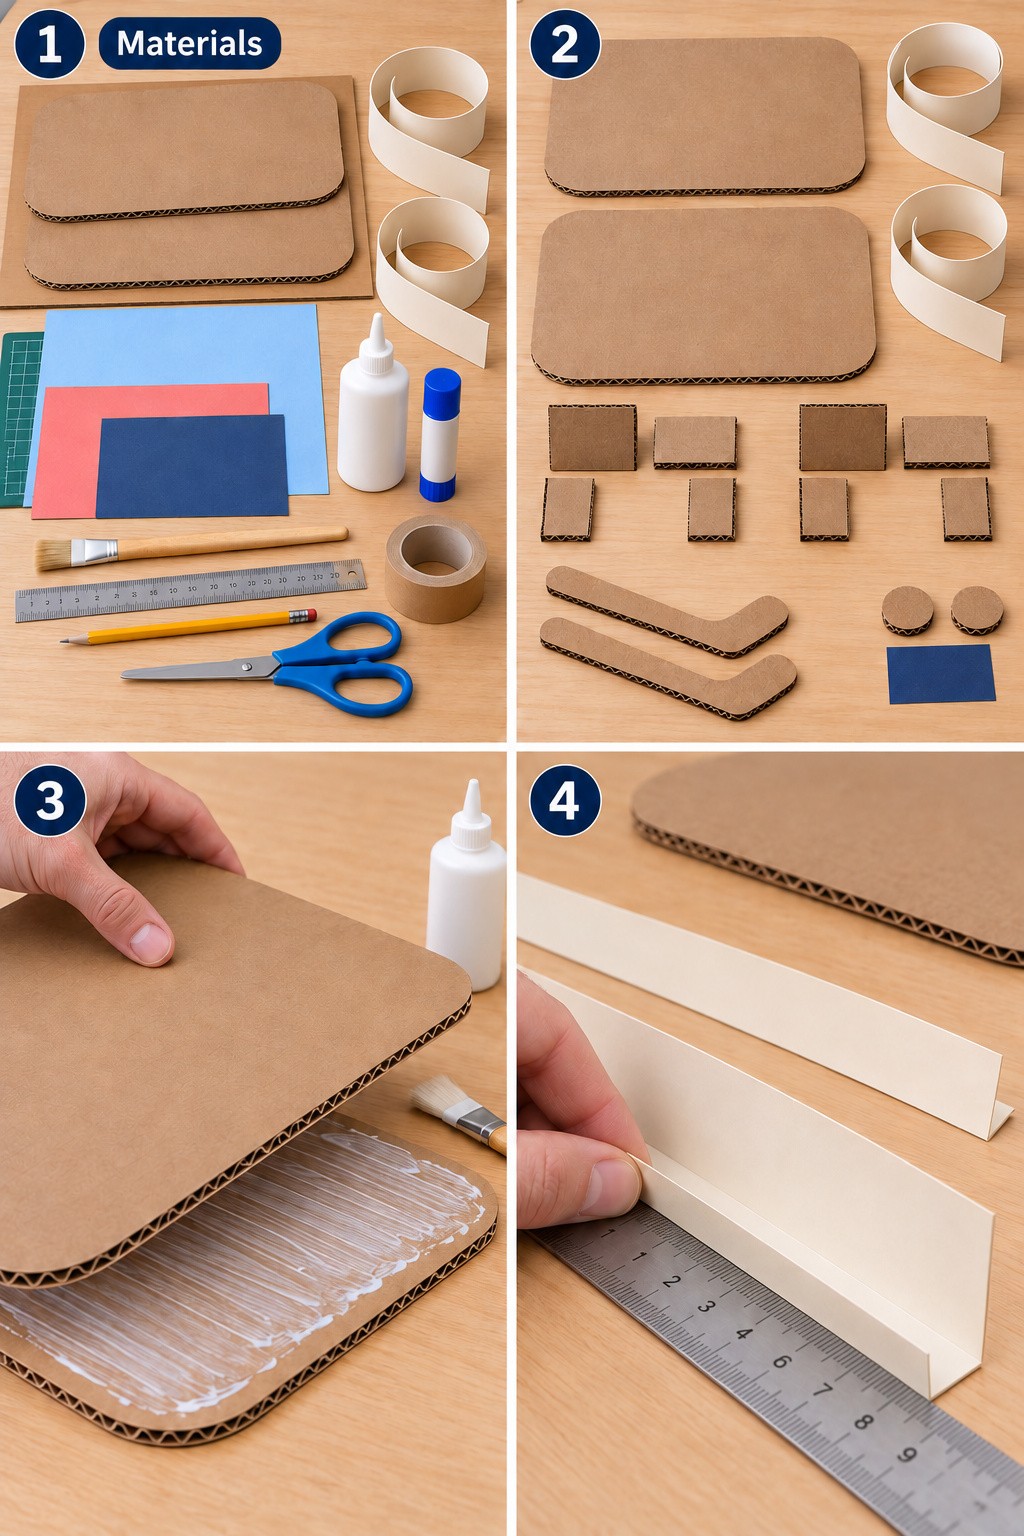
- Lay out the complete materials. Keep the corrugated board separate from the thinner flexible cream card. The same white PVA bottle, glue stick, paper colors, brush, and tools are used throughout. Reserve the small scraps for the goal joins and playing pieces.
- Cut and match the parts. Use one base outline as a template for the second. Prepare two long cream strips, two identical four panel goal sets, two matching stick outlines, and two puck circles. Stack matching pieces to check that their edges align before using any glue.
- Laminate the base. Brush a thin, even PVA layer over one base sheet. Align the second directly above it, with the corrugations crossing where possible. Press flat under an even weight with protective paper until set. Do not attach a wall to a damp or bending base.
- Score and fold the wall flange. On each cream strip, mark a line 1.2 cm from its lower edge. Score gently with a blunt creasing tool or ruler edge, avoiding a cut through the card. Fold the narrow section to a right angle. It will sit flat on the base while the remaining 3 cm forms the upright wall.
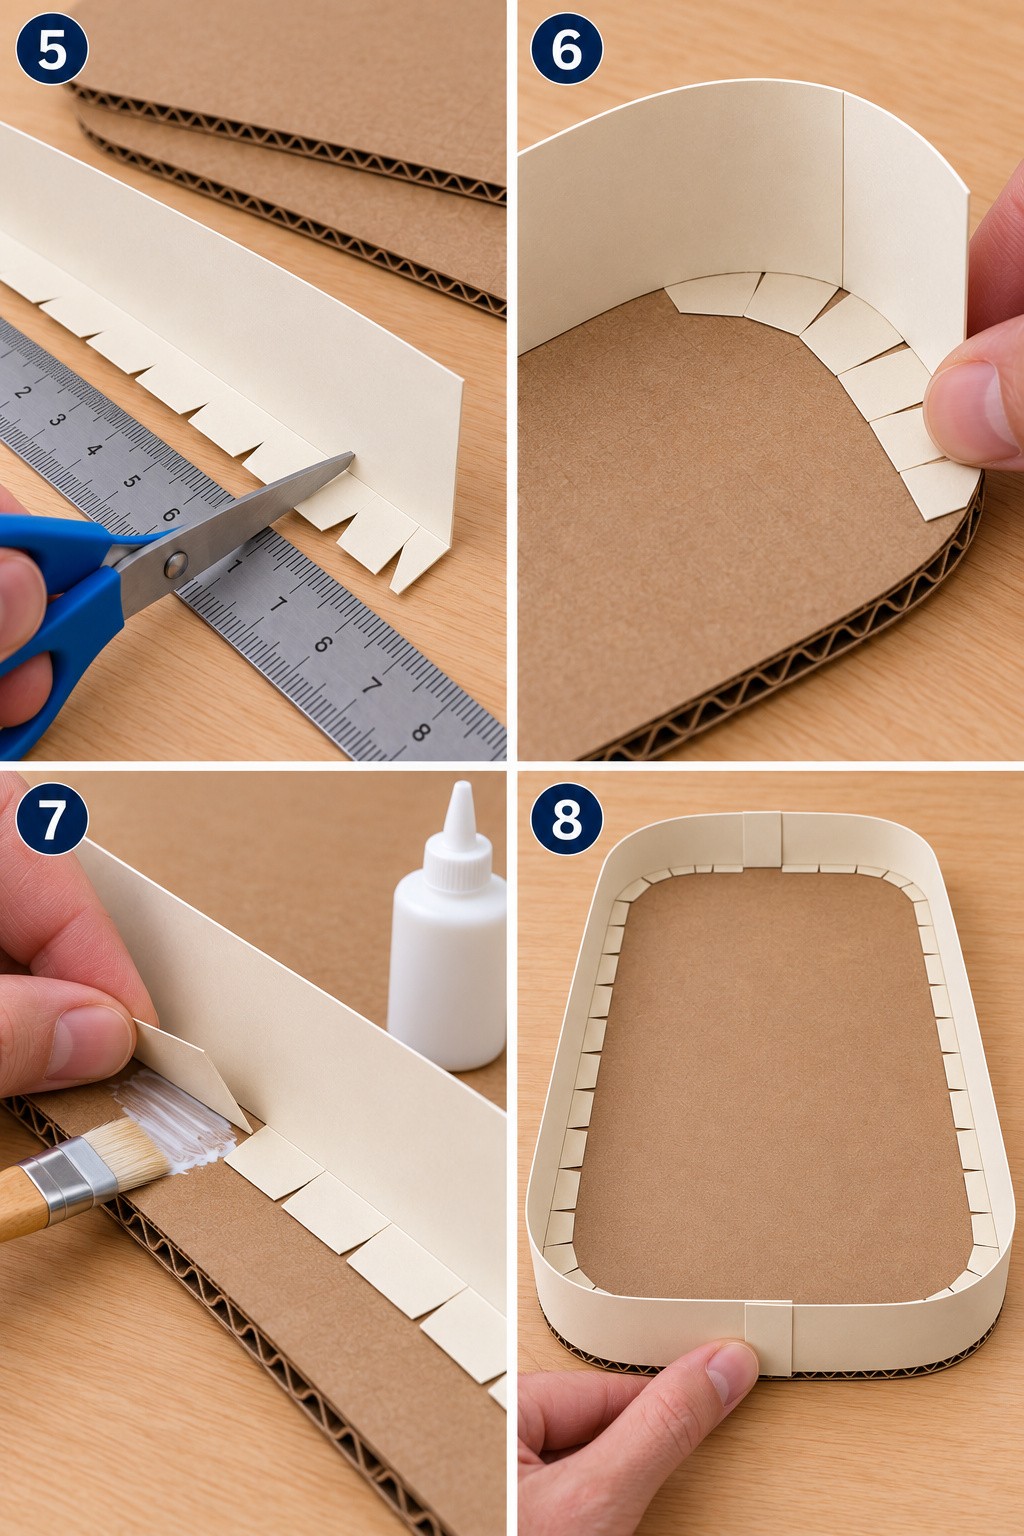
- Release the flange around the corners. Hold a strip against the bare base and mark where the rounded corners begin and end. Cut small relief notches in the narrow flange only, stopping at the fold line. Leave the 3 cm wall face continuous. The little tabs can then spread or overlap slightly as the wall curves.
- Fit the curve before gluing. Bend the strip gently around the base corner. Its upright face should follow the outside edge while every lower tab lies flat on top of the board. Trim any crowded flange tips. If the wall buckles, add or adjust a relief cut rather than forcing the thickened area flat.
- Glue the hidden connection. Lift a short section and brush PVA beneath its inward flange. Press the flange onto the base, keeping the wall upright. Work a little at a time around the first half of the perimeter. Support the wall while drying, then fit the second strip in the same way.
- Join both strip ends. Let the strip ends overlap by roughly 2 to 3 cm at the centers of the short ends, adjusting to the actual perimeter. Glue the overlapping wall faces together and press them flat. Trim one lower flange locally if two layers bunch up. Position these joins behind the future goals.
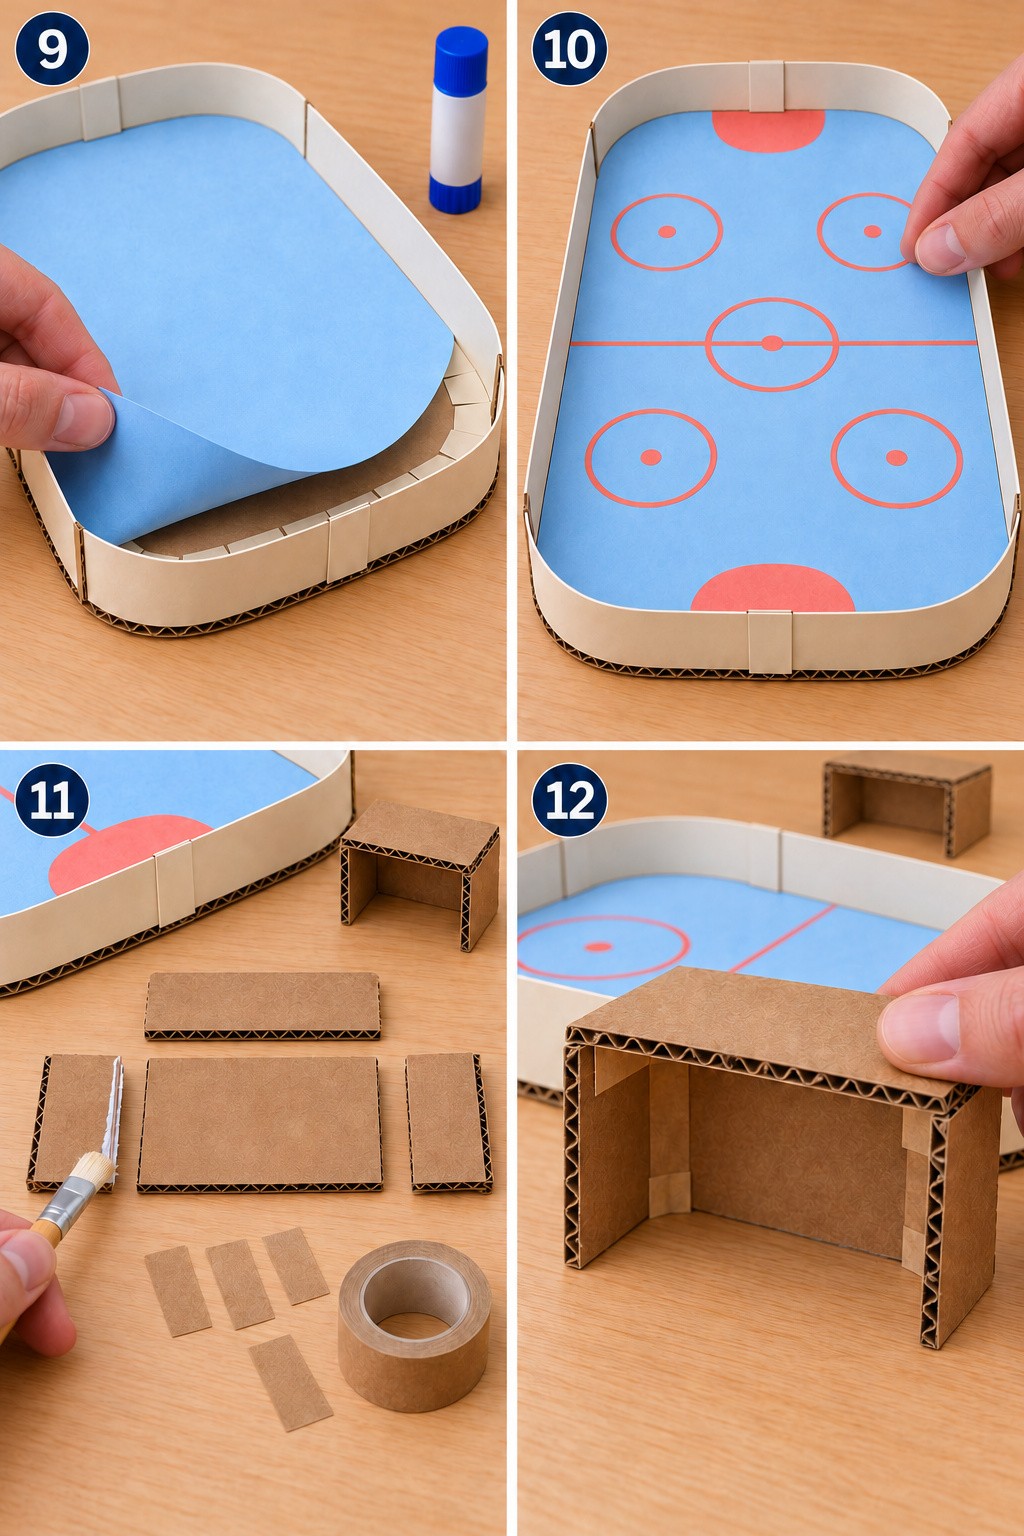
- Cover the flanges with the blue floor. After the wall joins set, fit a light blue paper shape inside the perimeter. Trim it slightly if necessary so it lies flat without climbing the walls. Use a glue stick to secure it over the base and the inward tabs, pressing outward from the center to remove wrinkles.
- Apply the rink markings. Add one coral center line, one central circle, four smaller circles, and two goal areas. Keep the positions the same in every later stage. Use thin paper and very little glue so a puck can slide over the markings without catching.
- Arrange one goal panel set. Place its back, roof, and two sides on the table in their assembly positions. Check their fit against the second matching set. Brush a small amount of PVA onto the joining edges and a narrow band on the inside where a reinforcing paper strip will sit. Keep the entrance clear. Cut small paper tape pieces ready to reinforce the inside corners.
- Join the goal corners. Connect the two sides to the back, then attach the roof across their upper edges. Keep the joins square and reinforce the inside corners with the prepared paper tape. Leave the entire front and bottom open. Make the second goal with the same parts and orientation, then let both set.
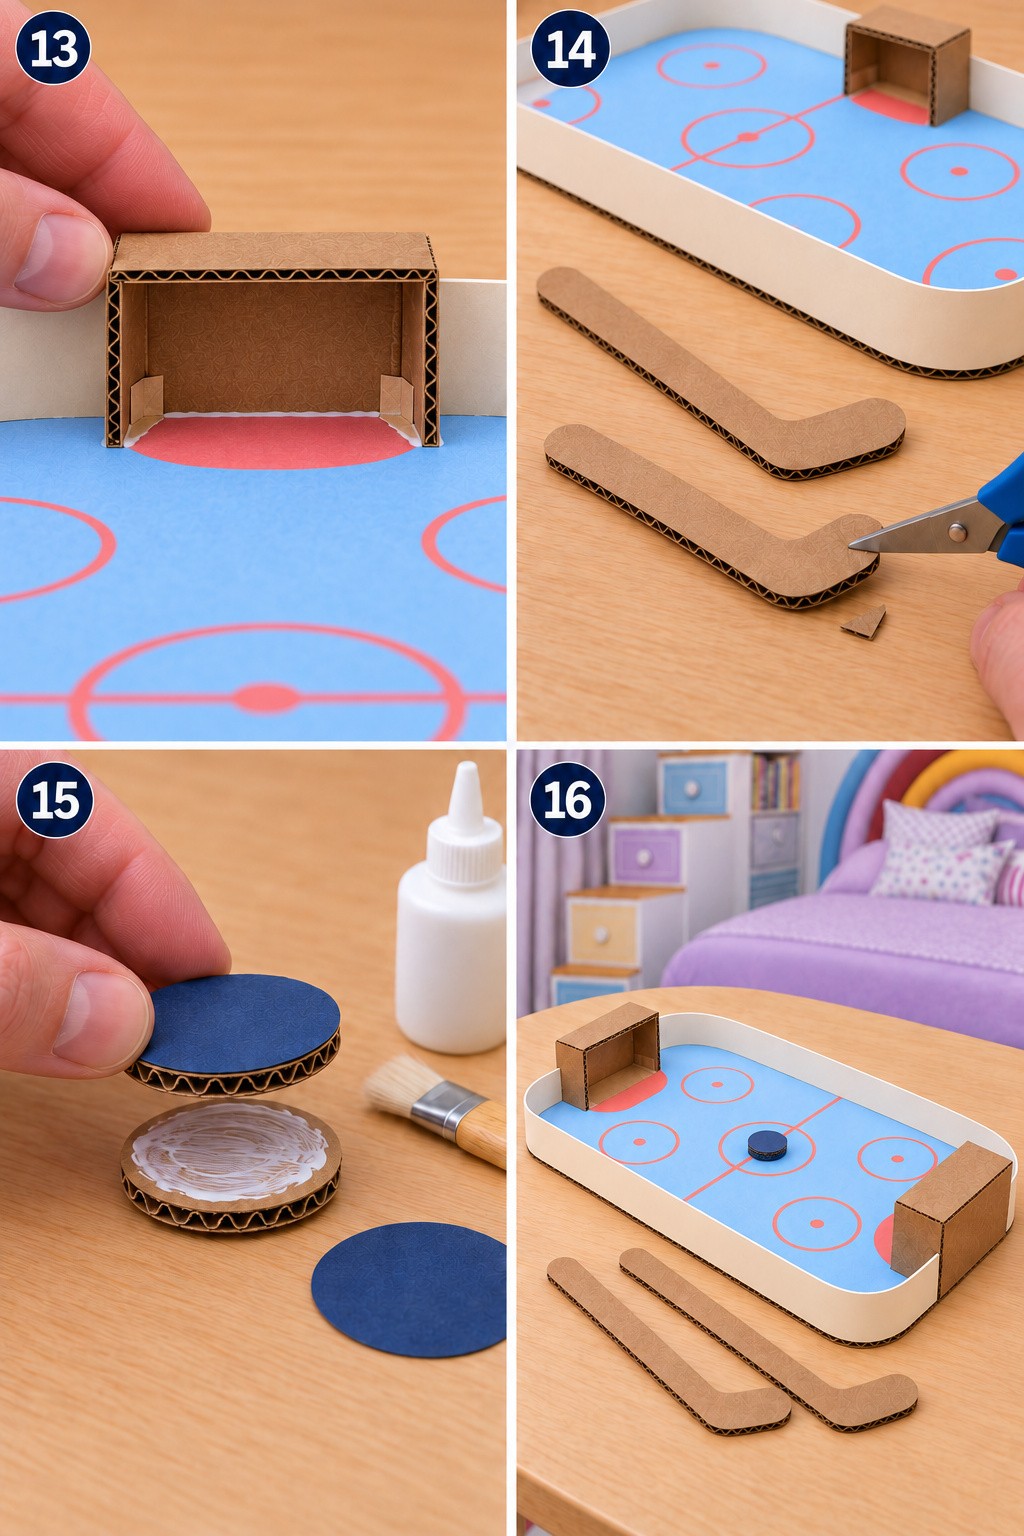
- Install the two goals. Put one at each short end, with both openings facing the center. Secure their lower back and side edges to the rink with PVA and small paper tape tabs placed inside the goal corners. Keep the front edge completely clear: the blue rink itself forms the goal floor, without an extra threshold.
- Finish the two sticks. Compare the two cut outlines and trim any uneven corner with scissors. Gently flatten a rough edge by rubbing it with a scrap of smooth card, avoiding loose dust. Both sticks remain single pieces of the same corrugated board, with the handle and head connected in one outline.
- Make the single puck. Glue the two equal cardboard circles into one aligned stack, approximately 6 mm thick if using 3 mm board. Cover both flat faces with navy paper, trimming the paper flush. Keep the rim smooth and allow it to dry completely. There should be one finished puck.
- Check the completed game. Slide the puck across the floor, along both side walls, and into each goal. Fix a lifting paper edge or raised glue spot before playing. Place the two sticks beside the rink and begin with gentle passes. Store the puck inside the rink afterward.
Adapt the starter construction to your next toy
Choose the next project by the cardboard you have and the activity your child enjoys. Each design below has its own assembly notes, from supported ramps to moving face discs.
1. Camping Story Television with Sliding Characters
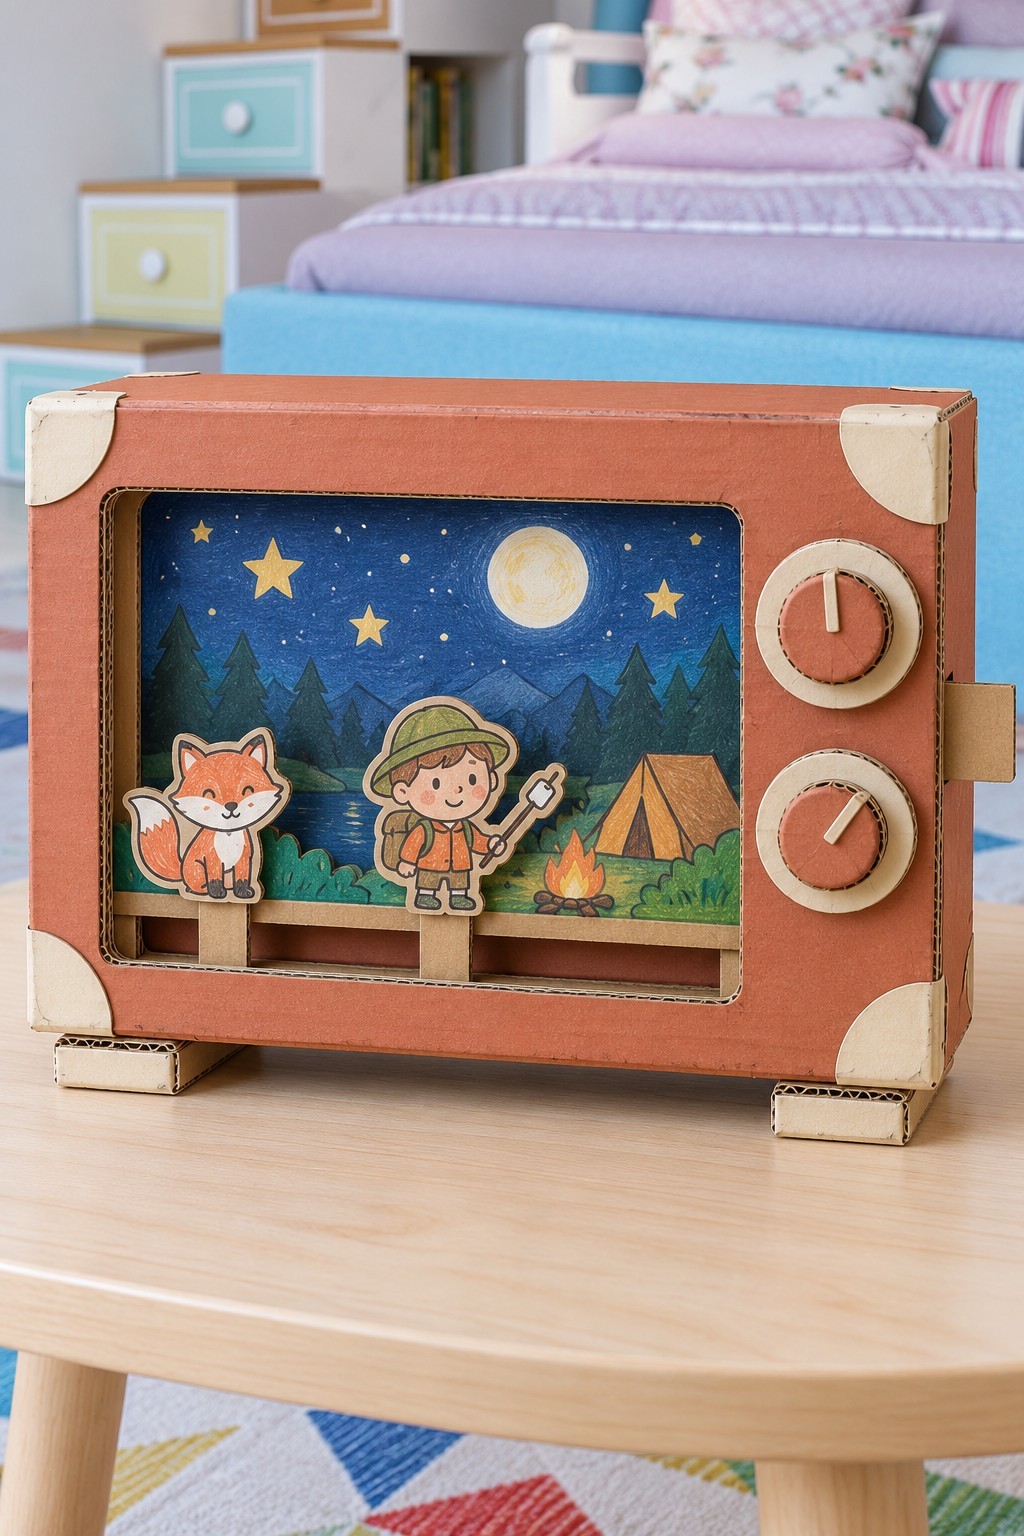
A pretend television gives a short camping story its own little stage. You could use a shallow cardboard box, corrugated scraps, thin card, colored paper, PVA glue, and washable paint. You can use a navy background for the night sky, then layer trees, mountains, a tent, and a small paper campfire across the back. These are scenery pieces, so the fire needs no light or heat.
Build a shallow box with a reinforced screen opening and broad folded feet. Leave a gap behind the lower screen rail for flat character handles to slide through. Layer the landscape against the back, keeping the moving figures clear of trees and tents.
Build the two side dials from layered circles and glue on narrow pointers. Children can slide the characters into the scene and invent the next part of the adventure. Keep the back accessible for changing the landscape.
2. Rocket Workshop with a Removable Spacecraft
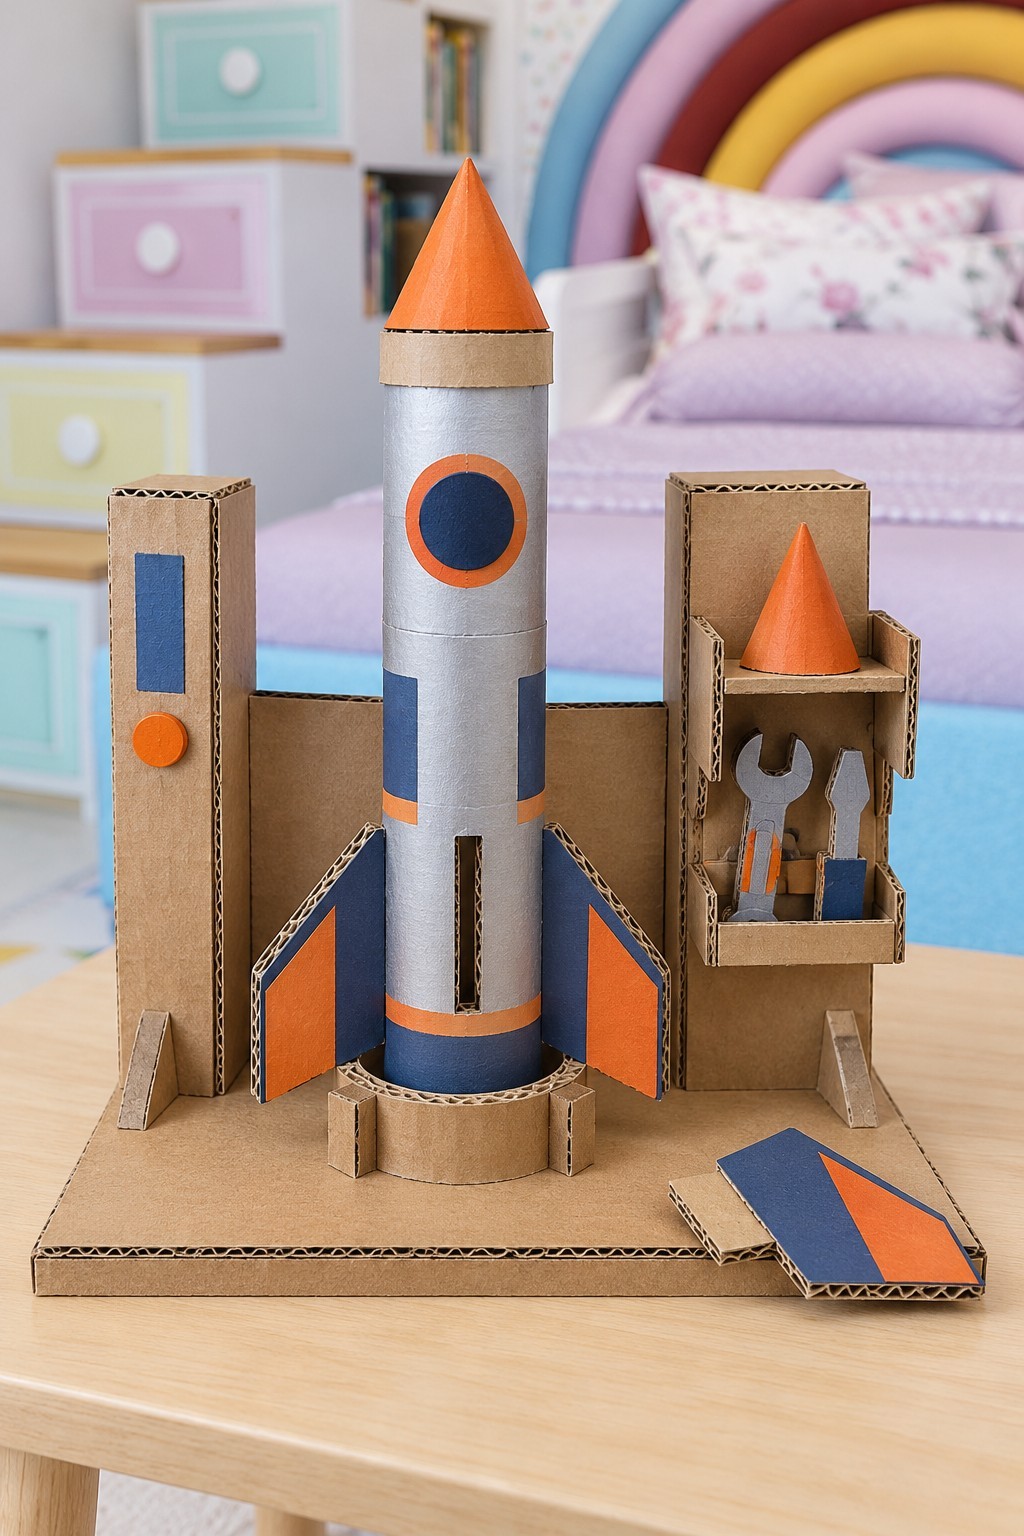
Give a cardboard rocket a place to be prepared for its next pretend mission. The main supplies are a sturdy tube, thin card for the orange cone, corrugated board for the base and fins, and silver, blue, and orange paper or paint. A base around 35 cm square is a useful starting size for a tabletop version.
Brace two box towers on the base and add folded shelves for the pretend tools. Fit three evenly spaced tabbed fins to the rocket tube, then overlap and glue its paper cone. A short collar on the launch pad holds the rocket upright while allowing it to lift out.
Cut the pretend tools from laminated card and round their ends. The loose fin shaped piece can become a spare workshop component. Keep the rocket a hand moved model rather than adding anything that launches it.
3. Open Storybook with a Secret Passage
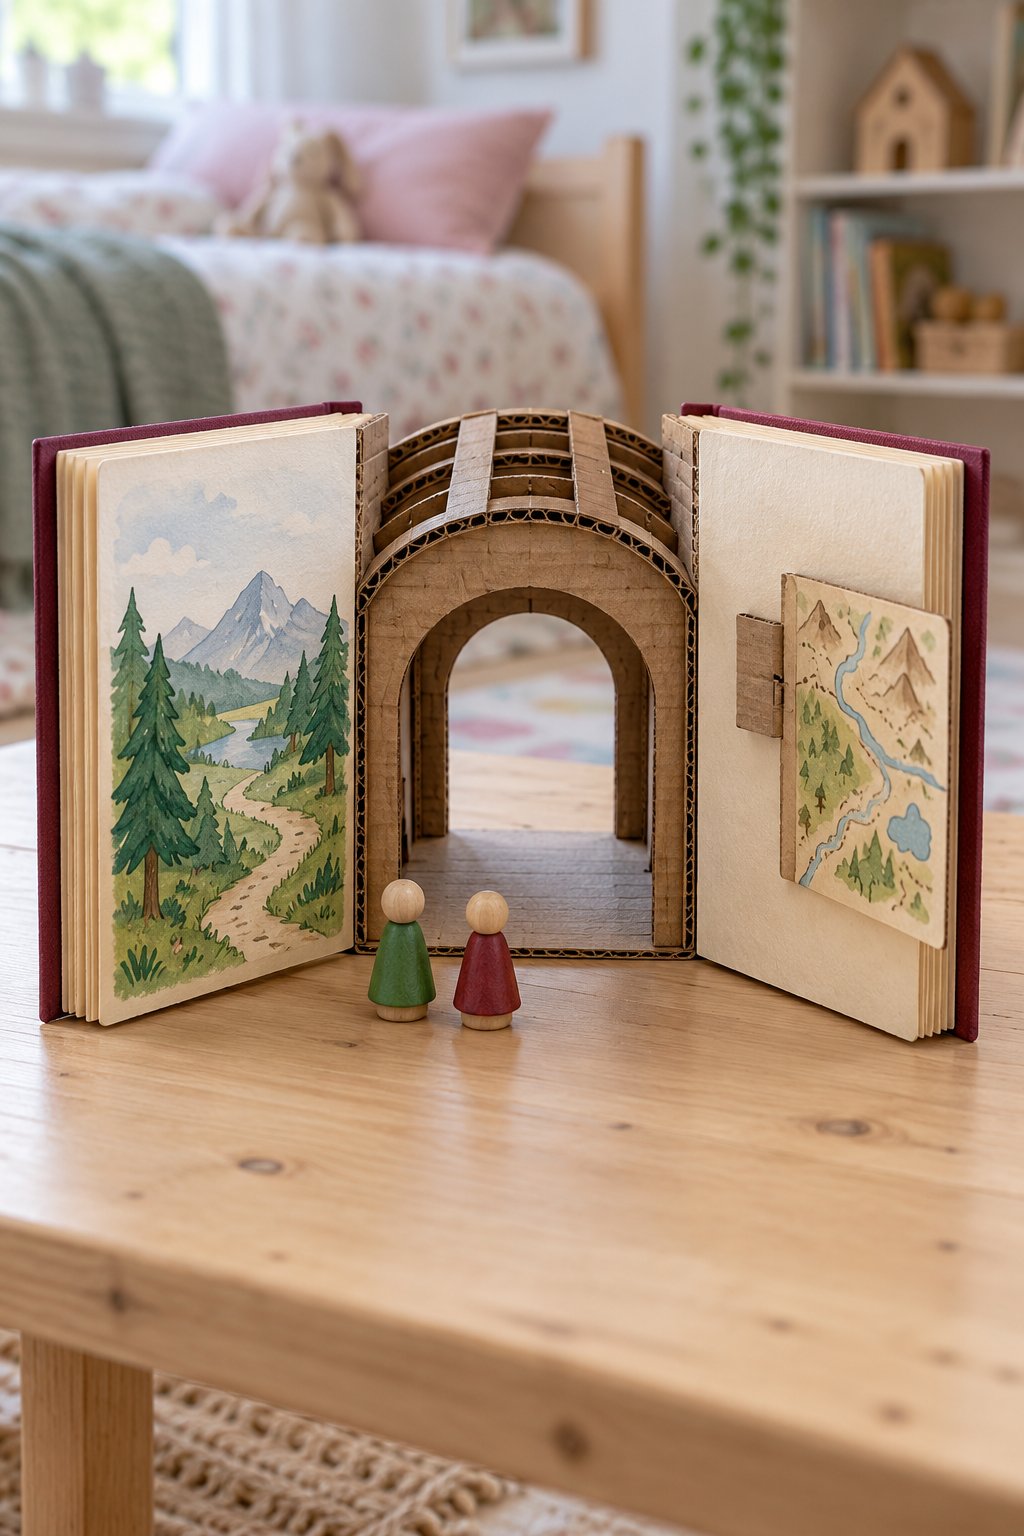
An open book can become the entrance to an imaginary landscape. You can use strong corrugated panels for the two covers, thinner card strips for the layered page edges, and a rectangular box structure for the passage behind the arch. Cream, burgundy, green, and pale blue paint create the aged book and forest details.
Cut matching front and rear arches for a toy-sized passage and connect them with roof ribs. Attach the decorated book covers with broad paper-tape hinges. Layer thin card along the outer edges to suggest pages and add a hinged map inside one cover.
Scale the opening for toy figures and use a broad footprint so the covers cannot pull it over. Children can move characters through the passage while telling a story. Avoid treating a cardboard roof as something to crawl beneath or climb on.
4. Three Lane Monster Bowling
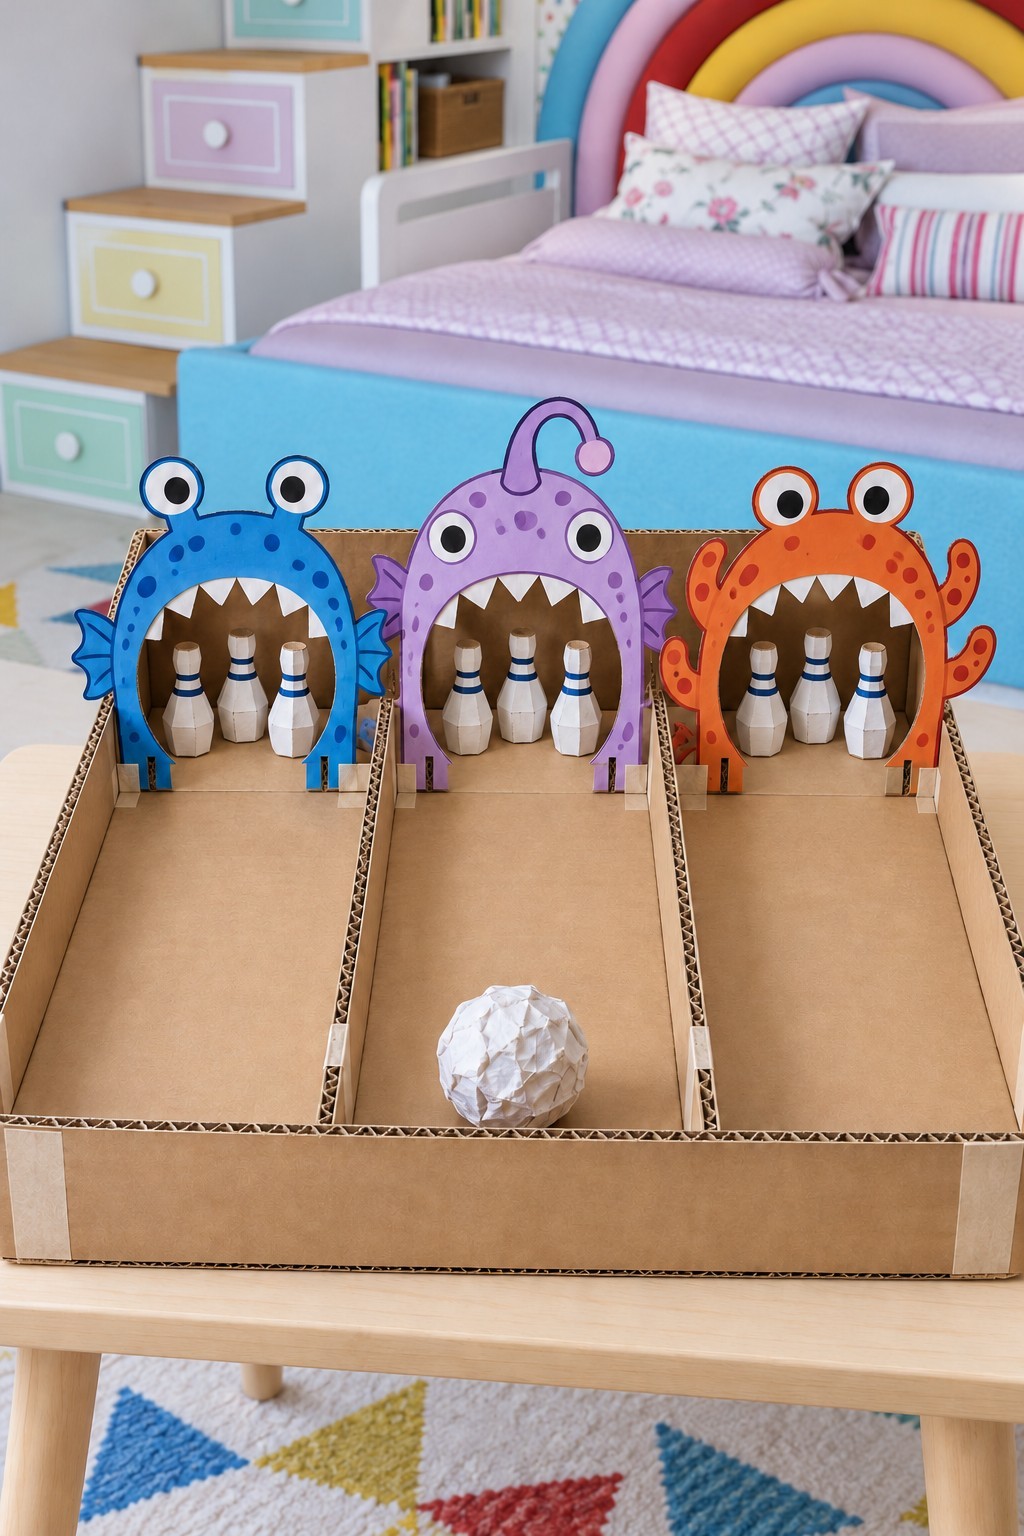
Three colorful monsters make an easy target game with a clear beginning and end. Useful materials include a shallow box or two laminated base sheets, cardboard strips for the lane dividers, three monster panels, thin white card, blue paper, and a loosely crumpled paper ball. You can plan the lane width around the finished ball before attaching anything.
Attach the lane dividers through folded lower tabs. Set each monster mouth flush with the lane floor and leave space behind it for three broad-bottomed paper pins. Make the mouth wider than the ball so a gentle roll can pass through.
Leave room behind the monsters to reset the pins. Children can roll toward a named color or count the fallen pins after each turn. Keep the ball light enough that it does not crush the cardboard fronts.
5. Crocodile Dentist Practice Set
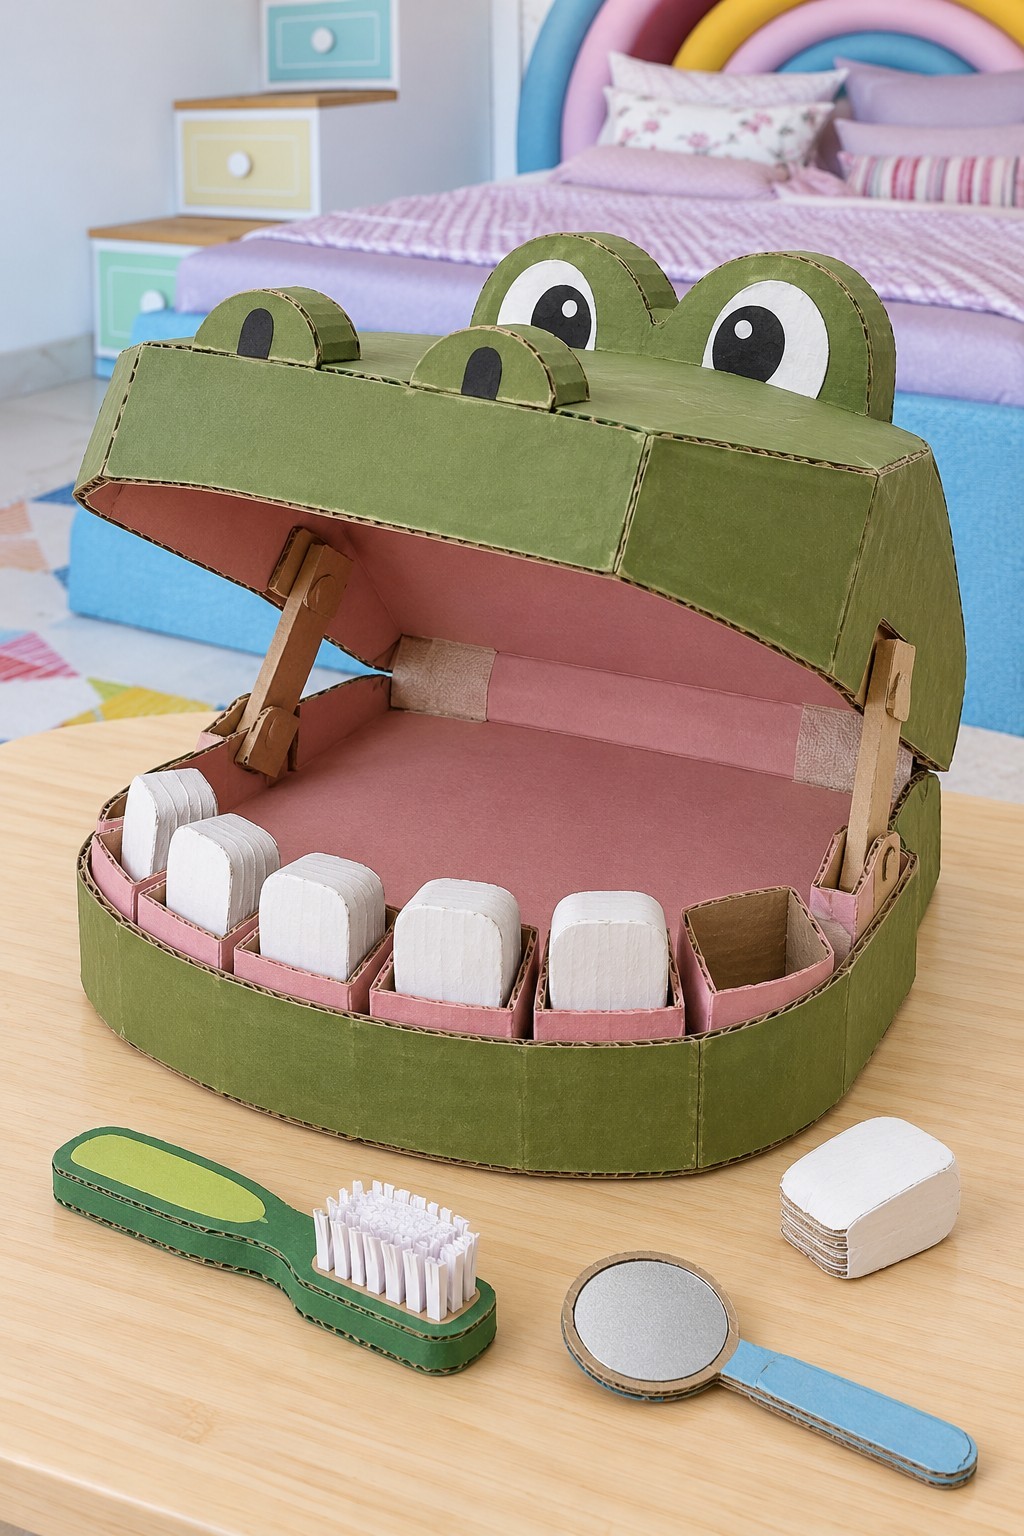
This large crocodile mouth turns a familiar care routine into pretend play. You could use corrugated board for two rounded jaws, green and pink paper, white card for chunky teeth, paper tape, and scraps for a toothbrush and inspection mirror. The teeth could use several glued layers with rounded corners, keeping the pieces easy to hold.
Curve a thin-card strip around the lower jaw, using relief cuts in its folded flange. Fit layered teeth into small card pockets. A broad rear tape hinge and two attached side props hold the upper jaw open; pink paper covers the interior joins.
For the toothbrush, fold short paper strips into a soft fringe and glue them to a flat handle. Use silver colored paper for the pretend mirror. These tools stay with the toy and should never go into a child's mouth. Practice gentle brushing on the cardboard teeth.
6. Tabletop Excavator with a Paper-Rock Scoop
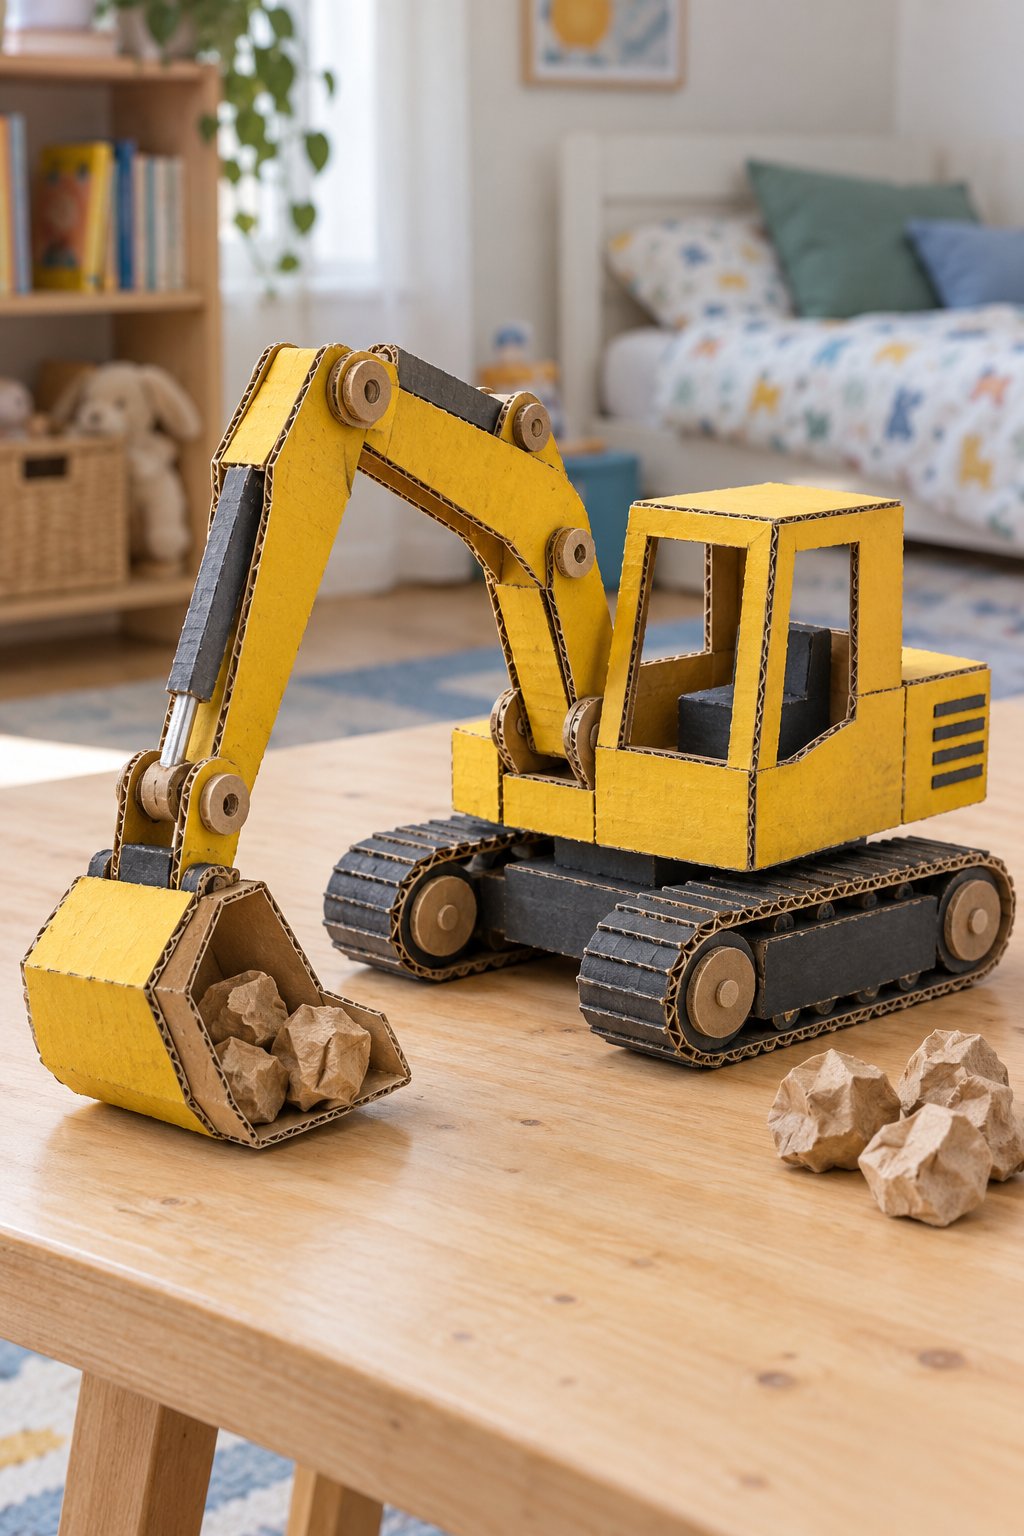
Build a small yellow excavator for scooping paper rocks on a tabletop. Use corrugated board for the cab, broad track bases, arm and bucket, with paper tubes for axles and yellow and charcoal paper or paint. Crumpled packing paper keeps the bucket contents light.
Build a small box cab and reinforce the arm ends and bucket corners. For a moving arm, an adult can fit rolled-card axles with retaining collars, keeping glue clear of turning surfaces. Brace the base against sideways tipping before testing the scoop with paper rocks.
Test the arm slowly while supporting it by hand and keep fingers clear of the joints. Lower the scoop before adding paper rocks, then check that lifting them does not tip the base. Store the model with the bucket resting on the table.
7. Six Cabin Ferris Wheel for Tiny Passengers
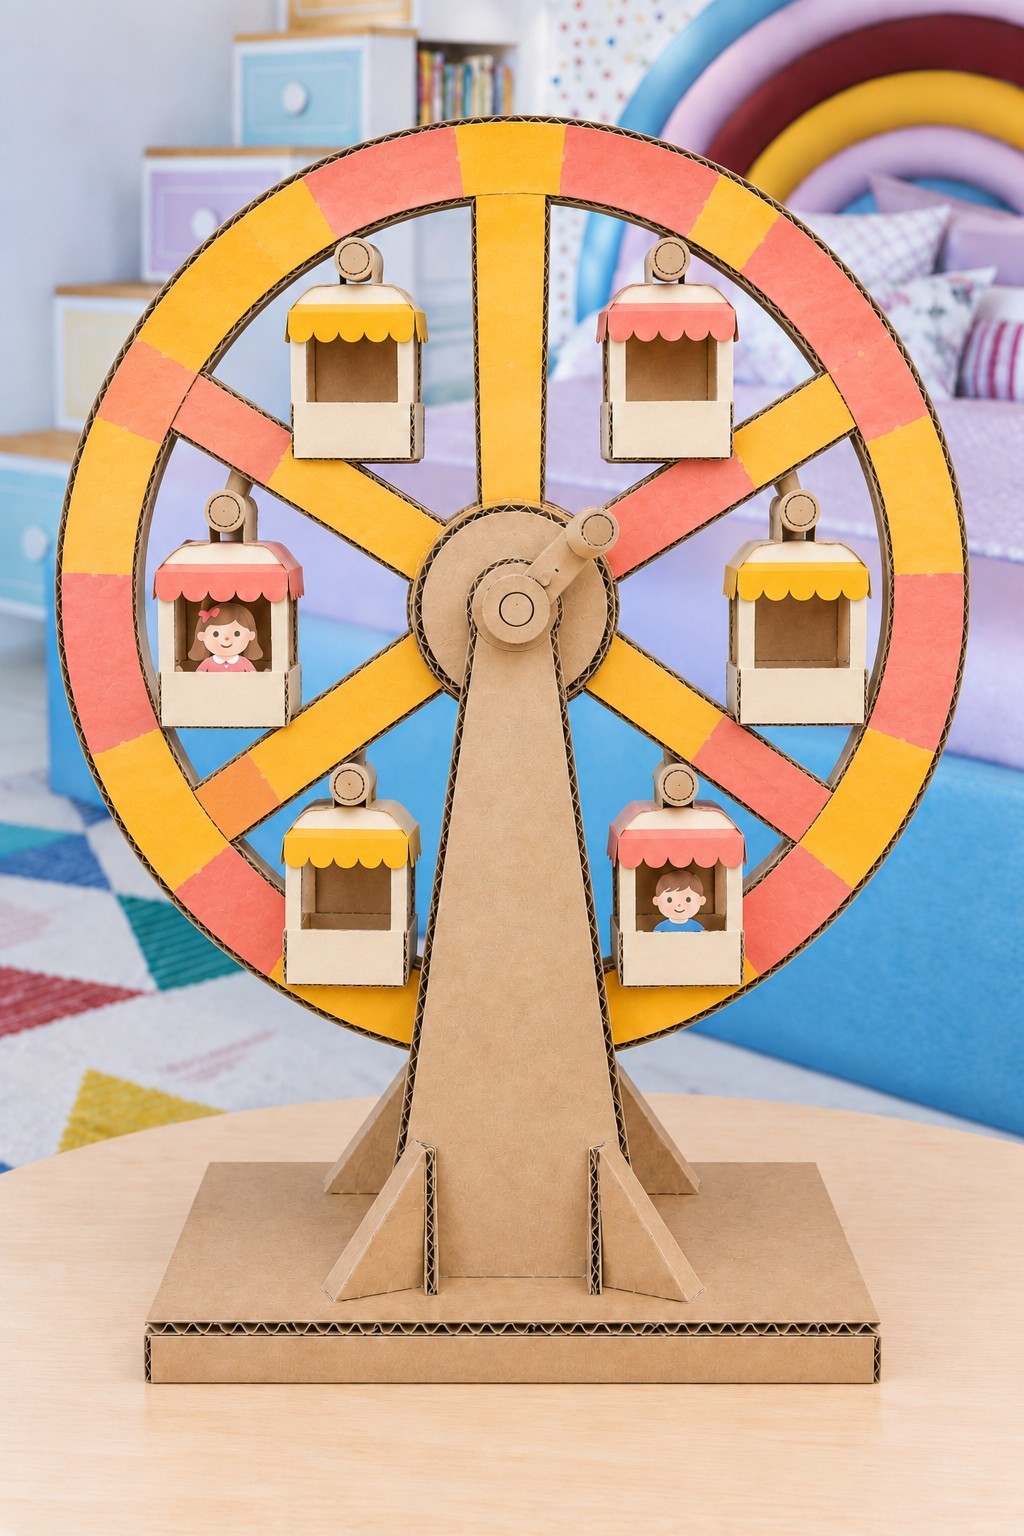
A miniature fairground wheel is a more involved project for an adult and an interested older maker. You could set aside corrugated board, thin folding card, paper tubes, PVA, and yellow and coral coloring materials. Draw the wheel as one continuous rim and spoke shape, then laminate a matching second layer to keep the narrow sections rigid.
Laminate the wheel’s rim and spokes, then mount it between two braced uprights on a broad base. Fold six matching cabins and place each hanger above its roof center. Fit the main rolled-card axle inside a wider sleeve, leaving clearance for cabins to swing past the stand.
Test the empty wheel first and turn it gently by hand. If cabins catch on the spokes or stand, increase the clearance before adding paper passengers. Match their sizes so one heavy cabin does not dominate the wheel.
8. Mountain Lodge Sled Run with a Zigzag Staircase
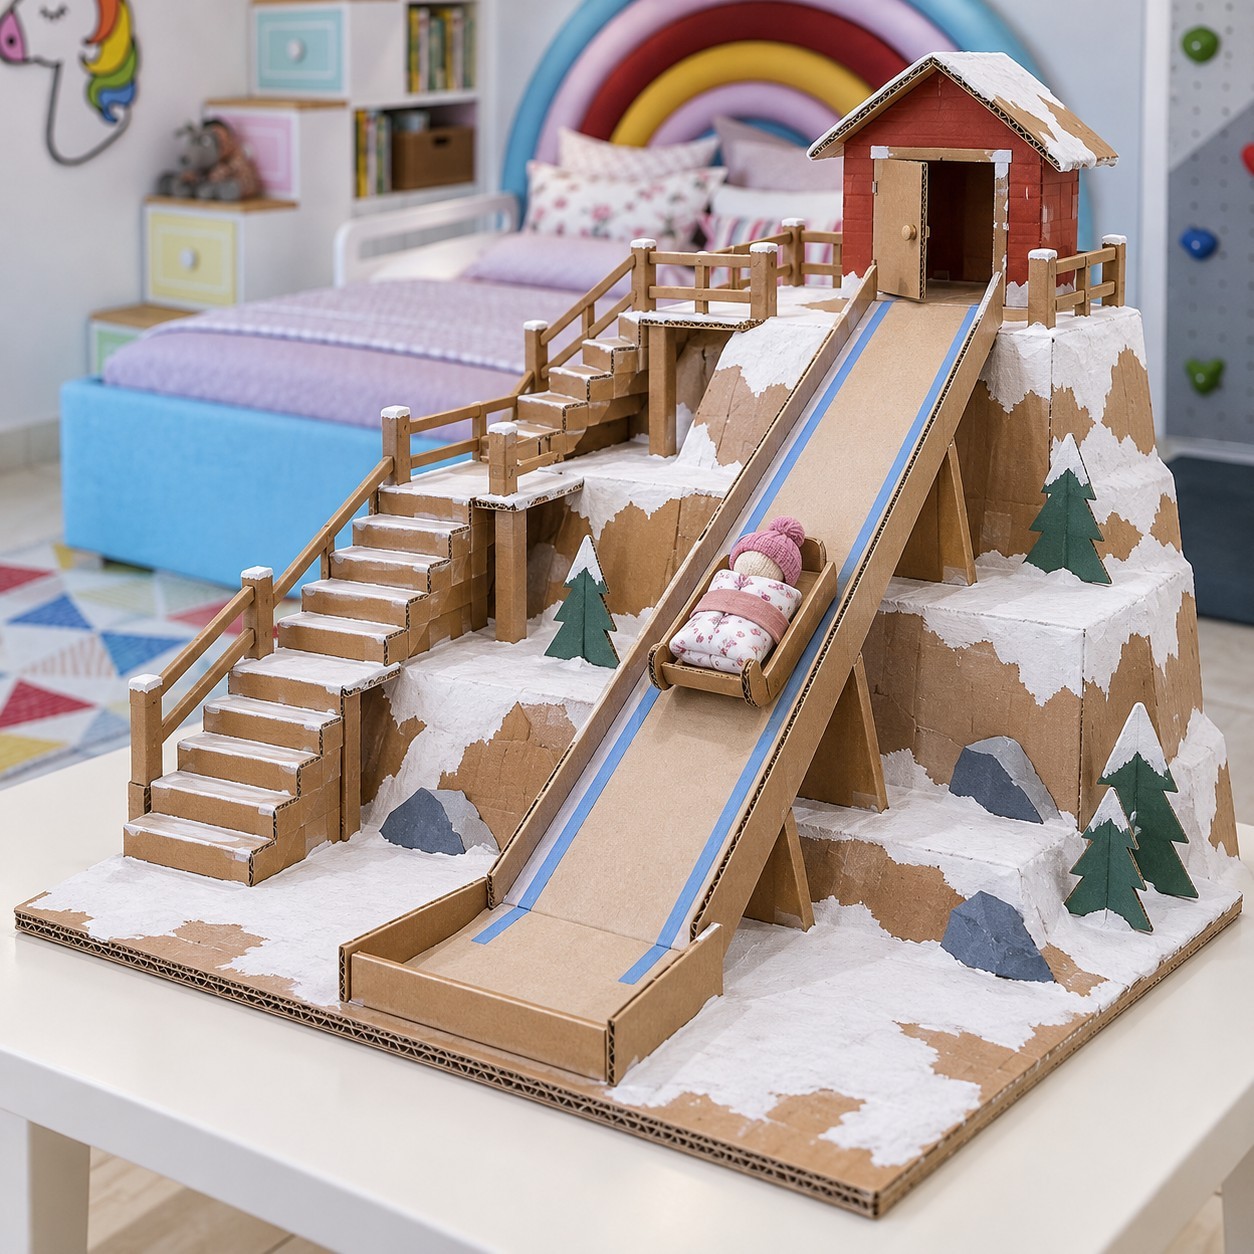
A stepped mountain gives a simple sled journey a whole setting. You can use stacked cardboard boxes for the mountain core, corrugated panels for the track, thin card for the lodge, paper tubes for railing posts, and white and brown paint. A small existing doll can ride in the sled, or you can make a lightweight card passenger.
Stack and join boxes for the mountain core. Carry the slope on triangular ribs, attach low side rails and support folded stair units on an inclined panel. Keep the lodge light and leave a smooth transition from the slope to the runout.
Paint the snow as a thin surface detail after the structure dries. Test the sled from a low release point first. This is a miniature landscape for toys, and its stairs and slope are not intended for a child to stand on.
9. Ocean Animal Matching Pond with Cardboard Tongs
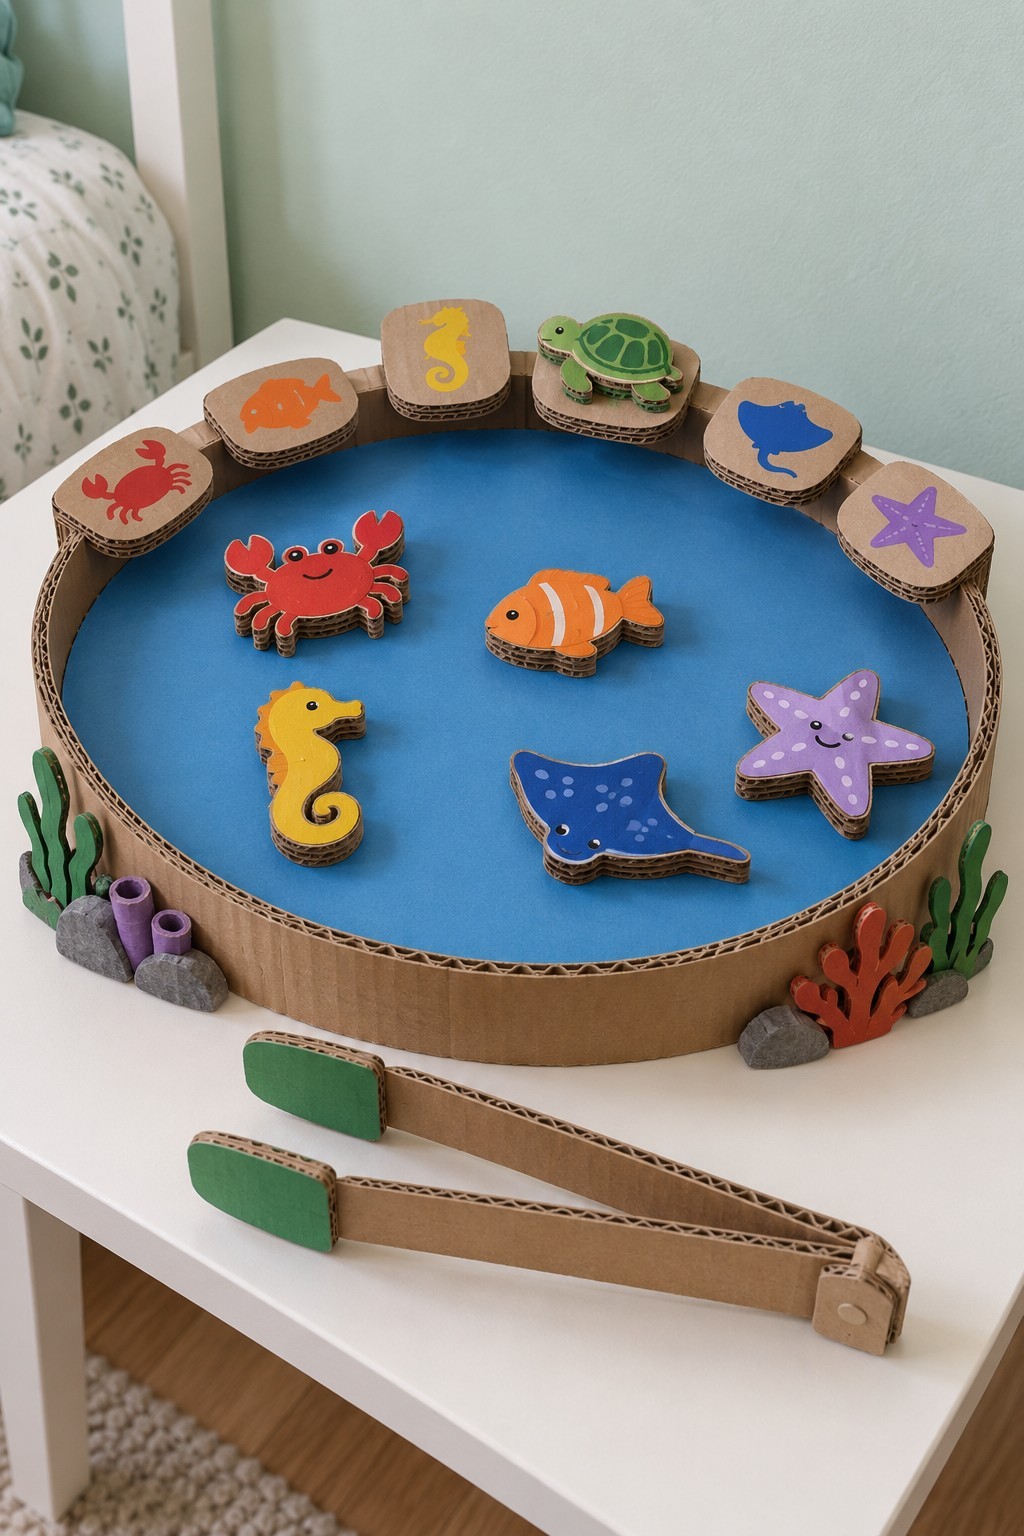
A round blue pond makes matching pieces easy to see and collect. You could start with a double layer cardboard circle, a flexible rim strip, six picture tiles, and six chunky creature shapes: a crab, fish, seahorse, turtle, ray, and starfish. You could add PVA, washable paint, and thin card for the tongs.
Curve a flanged rim around a laminated circular base. Layer the six creature silhouettes so they are easy to grip and mount the matching picture tiles on tabs at the rear. Join two broad card arms with a flexible folded strip to make the tongs.
Children can lift a creature and place it on its matching picture. Start with two pairs and add more when wanted. For another activity built around finding a match, explore these preschool alphabet activities. Keep the loose pieces out of reach of children who mouth toys.
10. Penguin Fish Slide with a Catch Tray
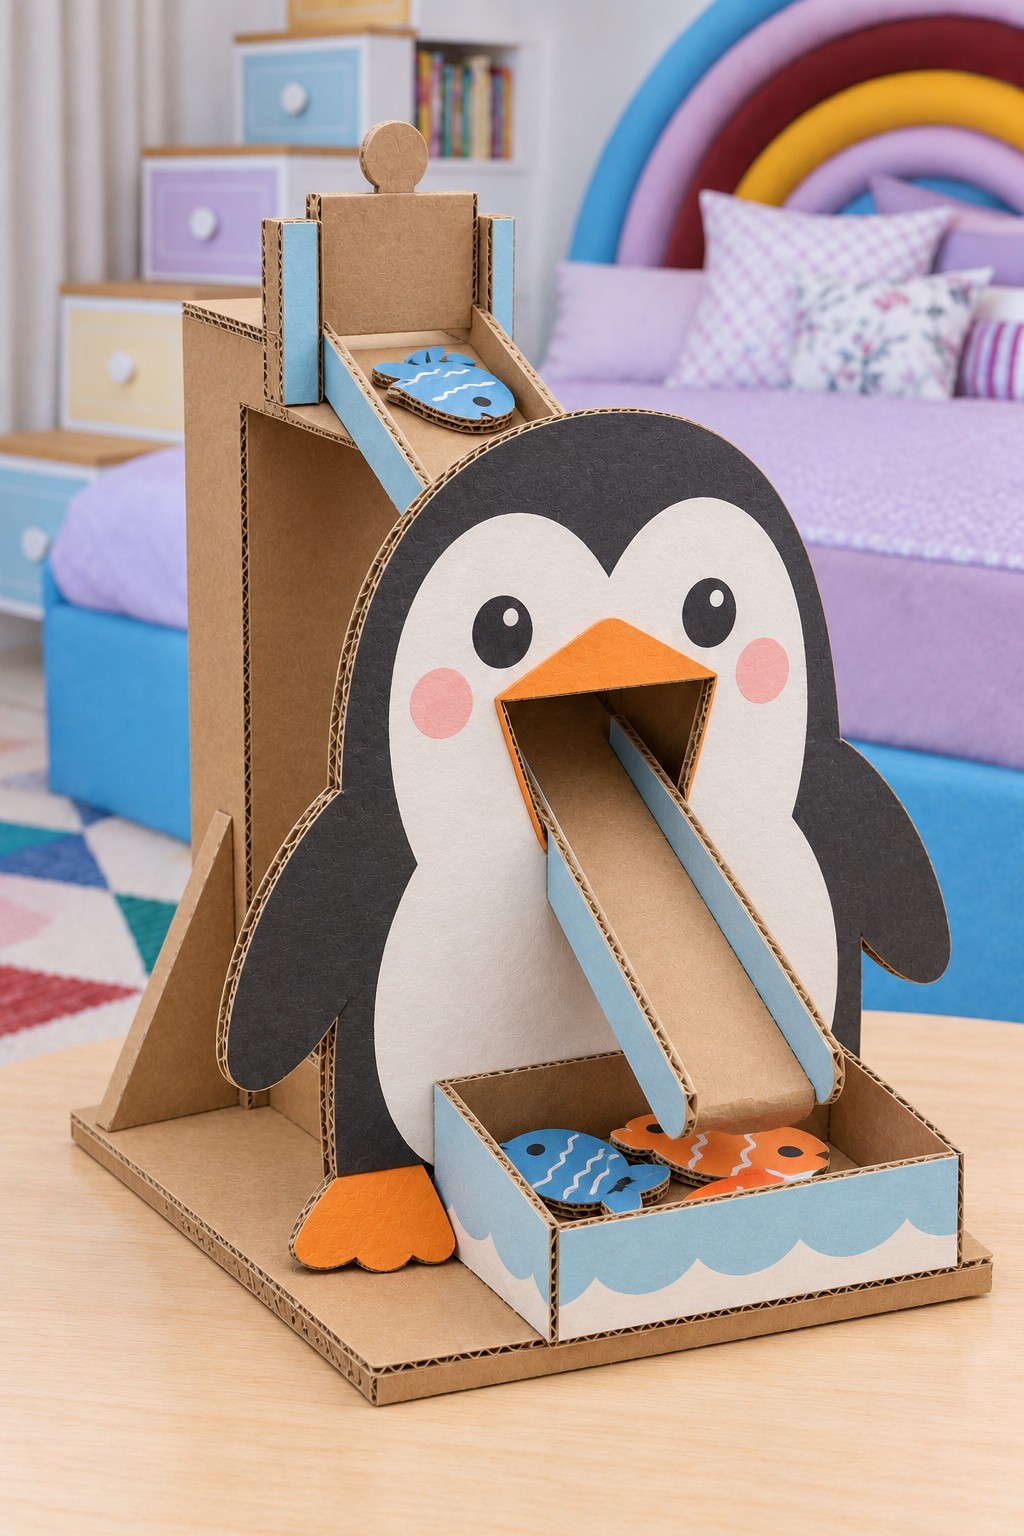
The penguin's open beak becomes a tunnel in a miniature fish delivery route. You can use a large corrugated silhouette, a sturdy rear support box, a smooth cardboard ramp, thin side rails, and laminated fish shapes. Black, white, orange, and blue paper can cover the surfaces without adding much wet paint.
Support one continuous ramp on a rear box and triangular braces, passing it through the beak into a shallow catch tray. The penguin panel frames the route; the supports carry its weight. Leave the opening wide enough for both rails and fish pieces.
Keep the fish narrower than the clear track width and remove rough paper edges that might catch. A gentle push can start a flat fish if it does not slide on its own. Count each delivery or ask for a particular color before resetting the pieces.
11. Expression Robot with Layered Face Discs
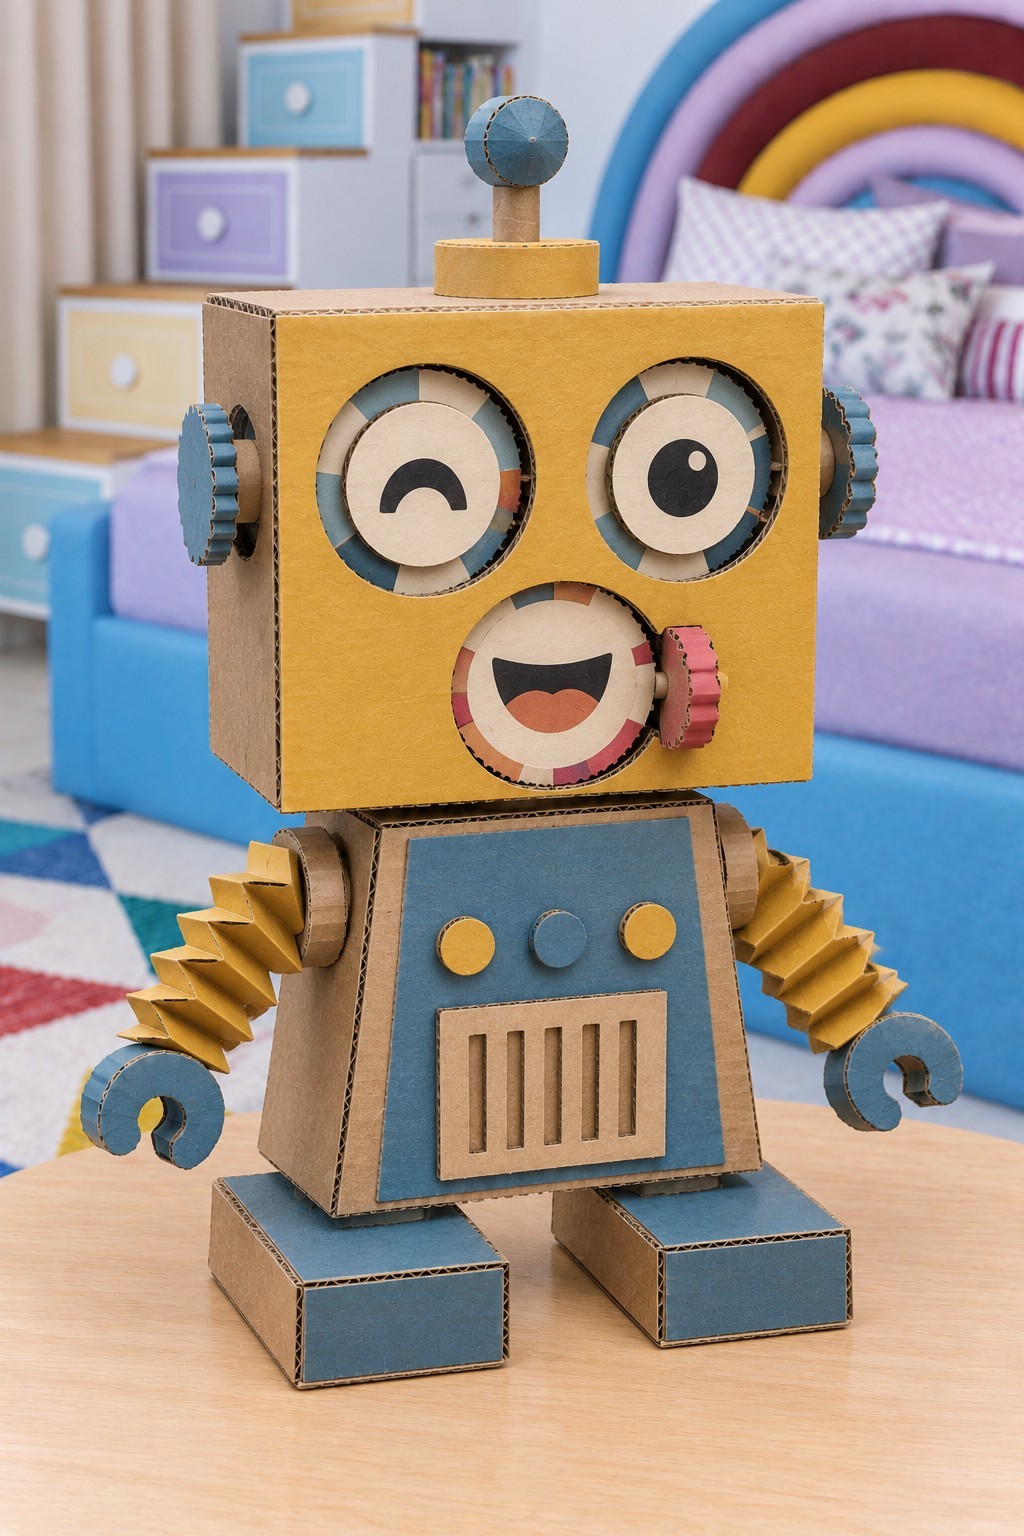
A box robot becomes a character when its face can be arranged in different ways. You could use two small boxes for the head and body, corrugated scraps for the feet and hands, yellow folding card for the arms, and circles of cream and blue card. Keep the head light and the feet wide enough to support it.
Join lightweight head and body boxes to broad feet. Mount layered face discs on short card axles inside loose sleeves, with retaining collars and rear access. Fold yellow accordion arms and attach them through broad shoulder tabs.
Add a layered chest grille and a paper ball antenna. Rotate or rearrange the face pieces to invent a surprised, sleepy, or cheerful robot. Test every loose component and keep the small parts with supervised older makers.
12. Moon Base in a Folding Mission Box
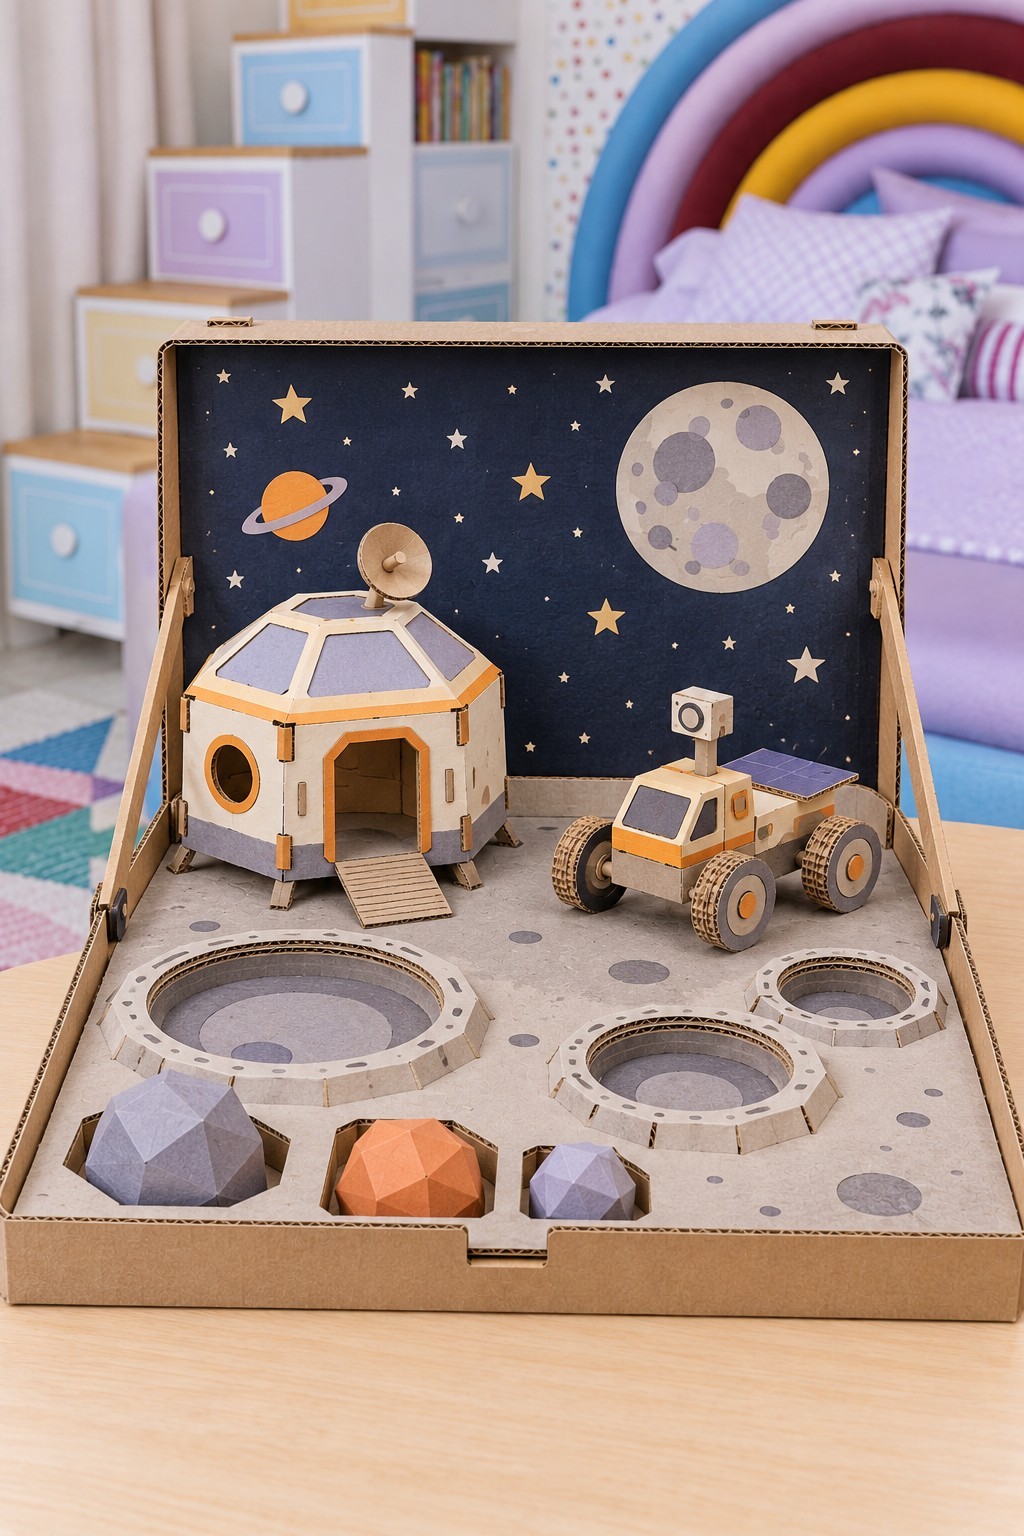
A folding mission box stores a small lunar landscape in one place. You can use a shallow box with an attached lid, several floor layers, thin card for the habitat, layered circles for rover wheels, and gray, cream, orange, and navy paper. The backdrop provides the space setting while the floor remains open for moving the rover.
Add a layered gray floor to a shallow lidded box. Cut crater openings through the upper layers only, leaving the backing solid. Fold the habitat and fit its short ramp level with the floor. Layer small circles for the rover wheels.
Keep the rocks removable so children can collect and sort them during a pretend expedition. Before making the lid closable, check that the building and rover fit beneath it without pressure.
13. Octopus Weaving Board with Broad Paper Ribbons
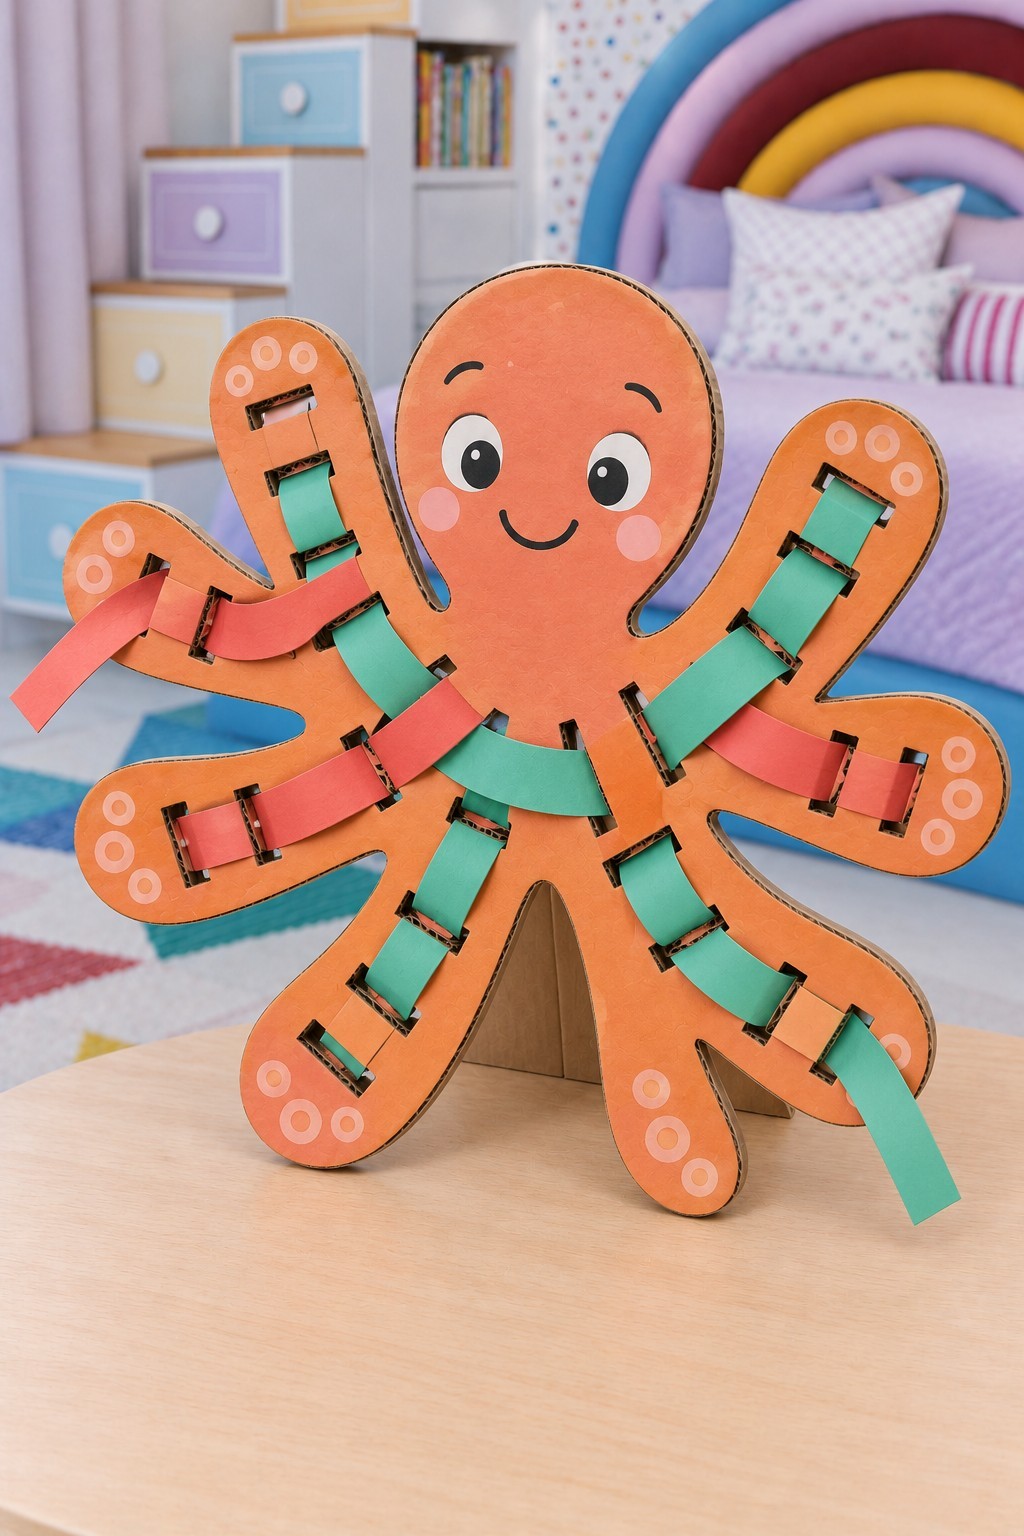
Broad paper ribbons make this octopus an approachable introduction to weaving. You could start with a corrugated board silhouette with eight arms, orange paper or paint, red and green thin card, and two folded rear feet. An adult should cut the outline and slots, keeping a generous border around every opening so the arms remain strong.
An adult can cut eight broad arms and slots slightly wider than the paper ribbons. Leave generous card around each opening and add folded rear feet. Try a ribbon through the unfinished slots before decorating, smoothing any edge that catches.
Children can pass a strip over one section and under the next, following the slots along an arm. Short strips are easier to manage than long trailing pieces. Keep the weaving loose enough to slide and replace ribbons when their ends become soft or split.
14. Miniature Skatepark with a Quarter Pipe
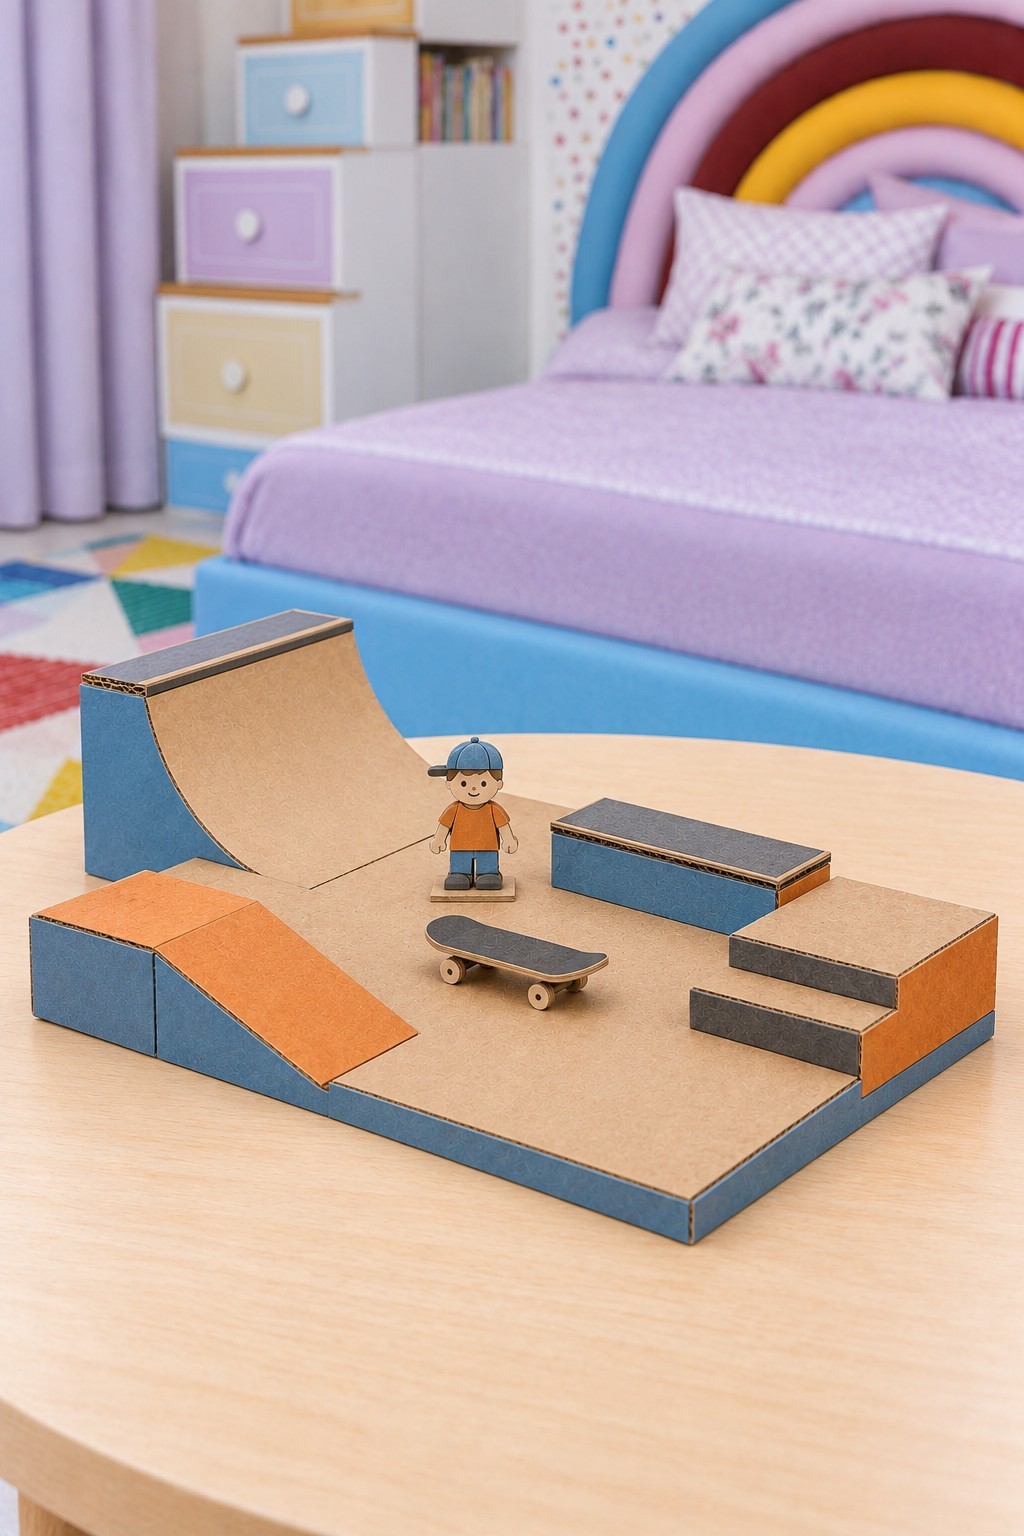
A miniature skatepark is a good project for practicing several cardboard shapes on one base. Useful materials include strong board for the platform, thinner card for the curved ramp surface, small boxes for the steps and ledge, and blue, orange, and charcoal paper. You could choose a toy fingerboard first so every obstacle suits its wheelbase.
Attach folded box steps and a low ledge to a stiff base. Support the quarter pipe with two matching curved side profiles and cross ribs, then cover it in flexible card. Keep its lower edge flush with the floor and leave room for the fingerboard’s approach.
Add a lightweight cardboard skater on a flat foot. Children can move the figure through a story or use the fingerboard separately. Check for raised paper seams that stop the wheels. The whole park stays at tabletop scale and is not designed for standing on.
15. Friendly Halloween Target Board
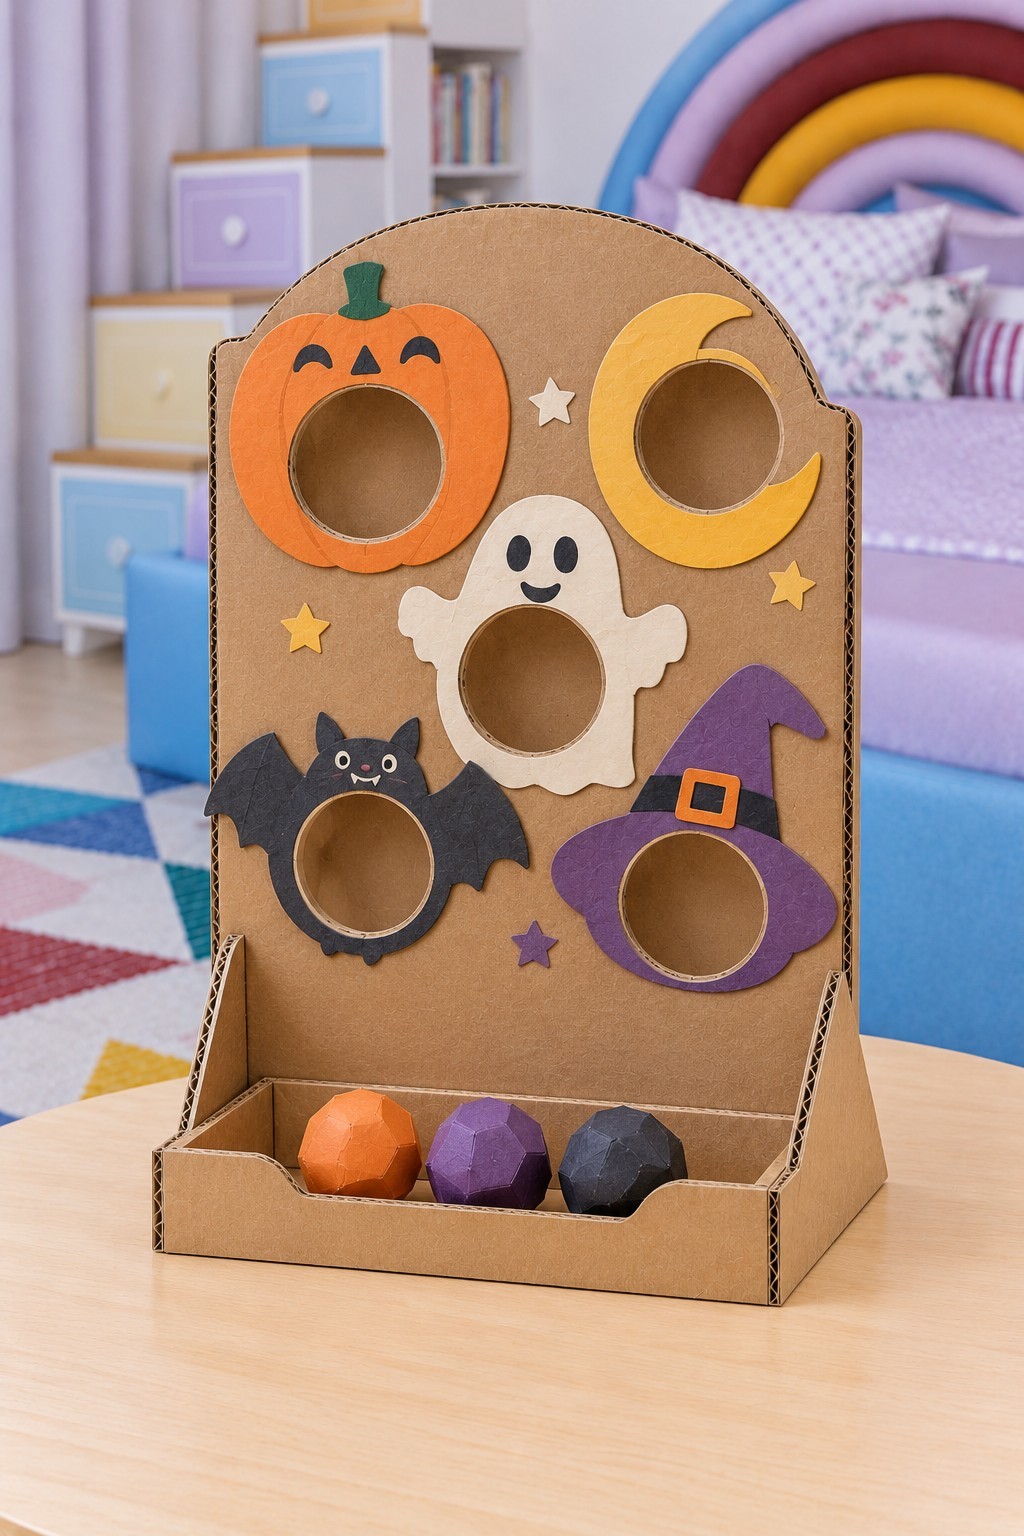
A pumpkin, crescent moon, ghost, bat, and witch hat turn five holes into a seasonal aiming game. You can use a tall corrugated panel, two triangular side supports, a shallow tray, colored paper, and three light paper balls. Draw the openings before cutting the decorative shapes so their centers stay aligned.
Brace the target panel with triangular sides and secure it to a shallow ball-storage tray. Cut the openings wider than the balls and align the character shapes around them. Line rough hole edges with thin paper without narrowing the targets.
The front tray holds the balls between turns; balls passing through the targets are collected from behind. Begin close to the board and move back only if the game feels too easy. Keep the area clear of breakable objects and use gentle underarm throws.
16. Desktop Basketball Court with a Raised Hoop
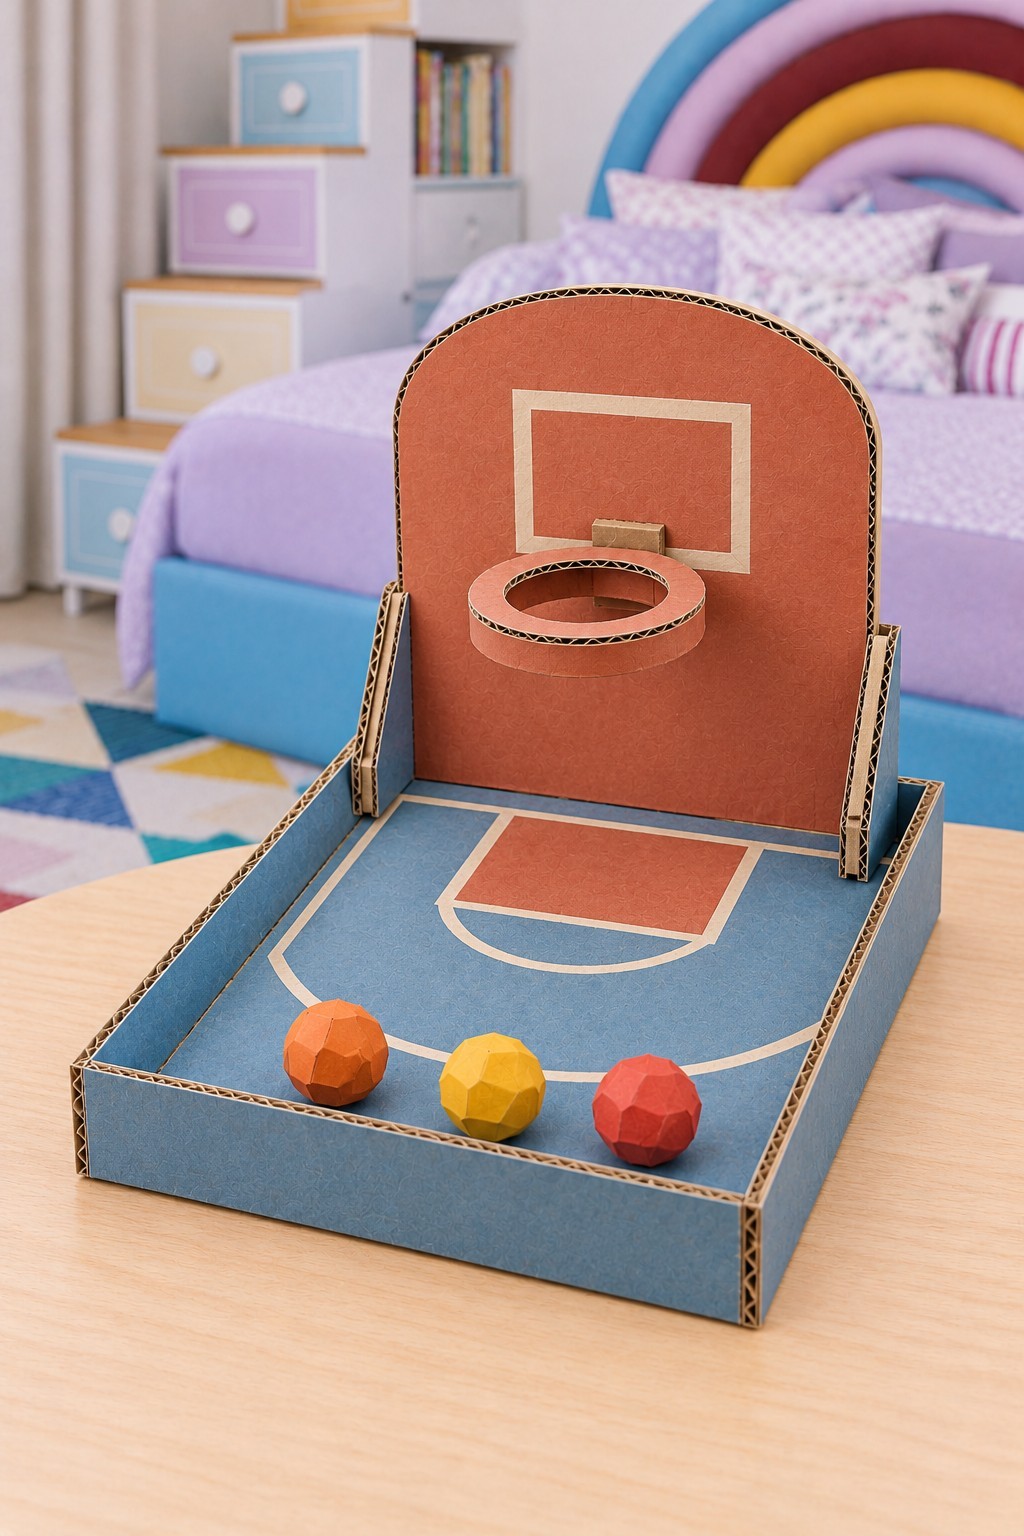
A raised hoop adds a different challenge from throwing through a flat board. You could use a double layer base, an upright backboard, two triangular braces, several cardboard rings, thin paper for the court markings, and light paper balls. A hoop opening around 9 cm suits a paper ball approximately 5 cm across as a starting combination.
Brace the backboard to a laminated base. Stack matching rings for the hoop and give them a broad rear tab with a folded bracket underneath. Fix that tab to a reinforced patch on the backboard, then add smooth paper court markings.
Drop a ball through the hoop to check its clearance before playing from farther away. Invite children to try gentle throws and collect the balls from the shallow tray. The rim is a target for paper balls and should not be pulled or used to support anything heavier.
17. Two Level Parking Garage with a Side Ramp
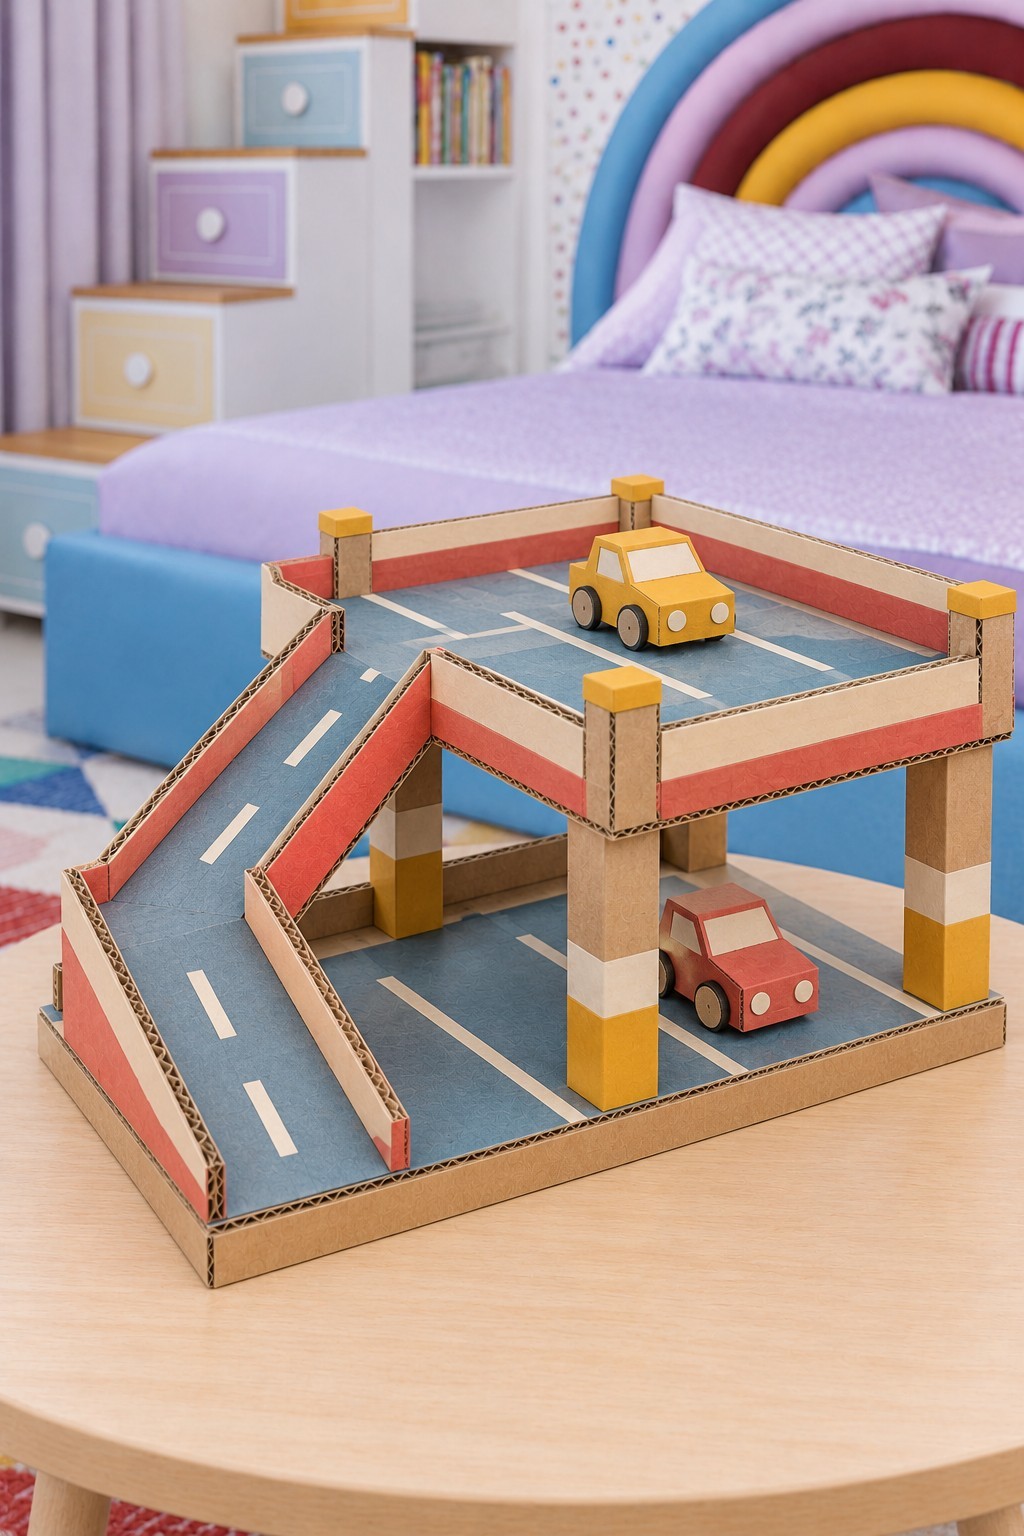
Two parking levels give a pair of toy cars a place to arrive, turn, and rest. You can use two laminated platforms, four hollow cardboard columns, a long ramp panel, low rail strips, and blue, cream, coral, and yellow paper. Measure your cars before choosing the column height and parking bay width.
Connect two stiff decks with four hollow box columns and broad attachment tabs. Add a beam beneath the upper deck if it bends. Support the side ramp underneath and make its transition through the upper guardrail smooth enough for the chosen cars.
Finish with low guards and painted parking lines. Test the route with one car before adding more. Children can sort the cars between levels or take turns using the ramp. Lift the garage by its base, never by the upper railing.
18. Cloud Hoop Runway for a Hand Guided Plane
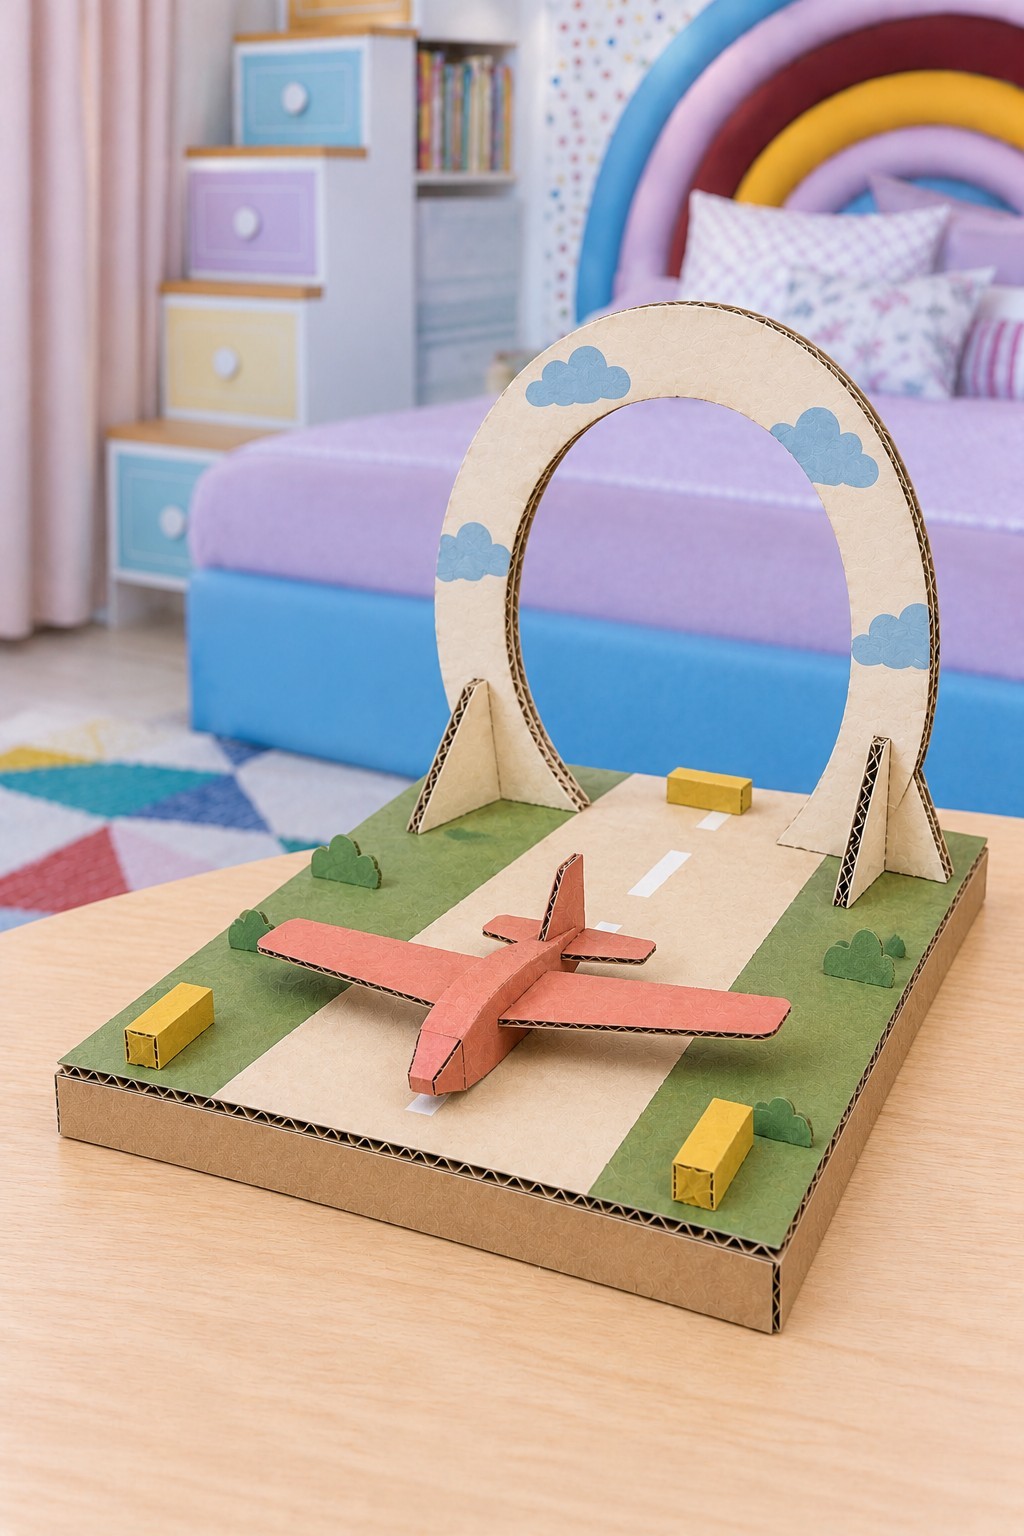
A runway and cloud hoop create a small flying adventure without needing a launching mechanism. You could start with a stiff base, a double layer cardboard ring, triangular braces, a flat airplane silhouette, and green, cream, blue, coral, and yellow paper. You could make the ring opening wider than the plane's wingspan so it can pass through without bending.
Laminate the cloud ring and plane body, then secure the ring with broad tabs and triangular braces. Add thin-paper clouds and a slotted tail fin. Check that the plane’s wings clear the opening comfortably before fixing the ring in place.
Children can guide the airplane by hand along the runway, lift it through the clouds, and bring it back for landing. Round the nose and wing tips. Keep the model as a hand held story prop rather than throwing the rigid cardboard plane across the room.
19. Mountain Road Circuit with Two Tunnel Entrances
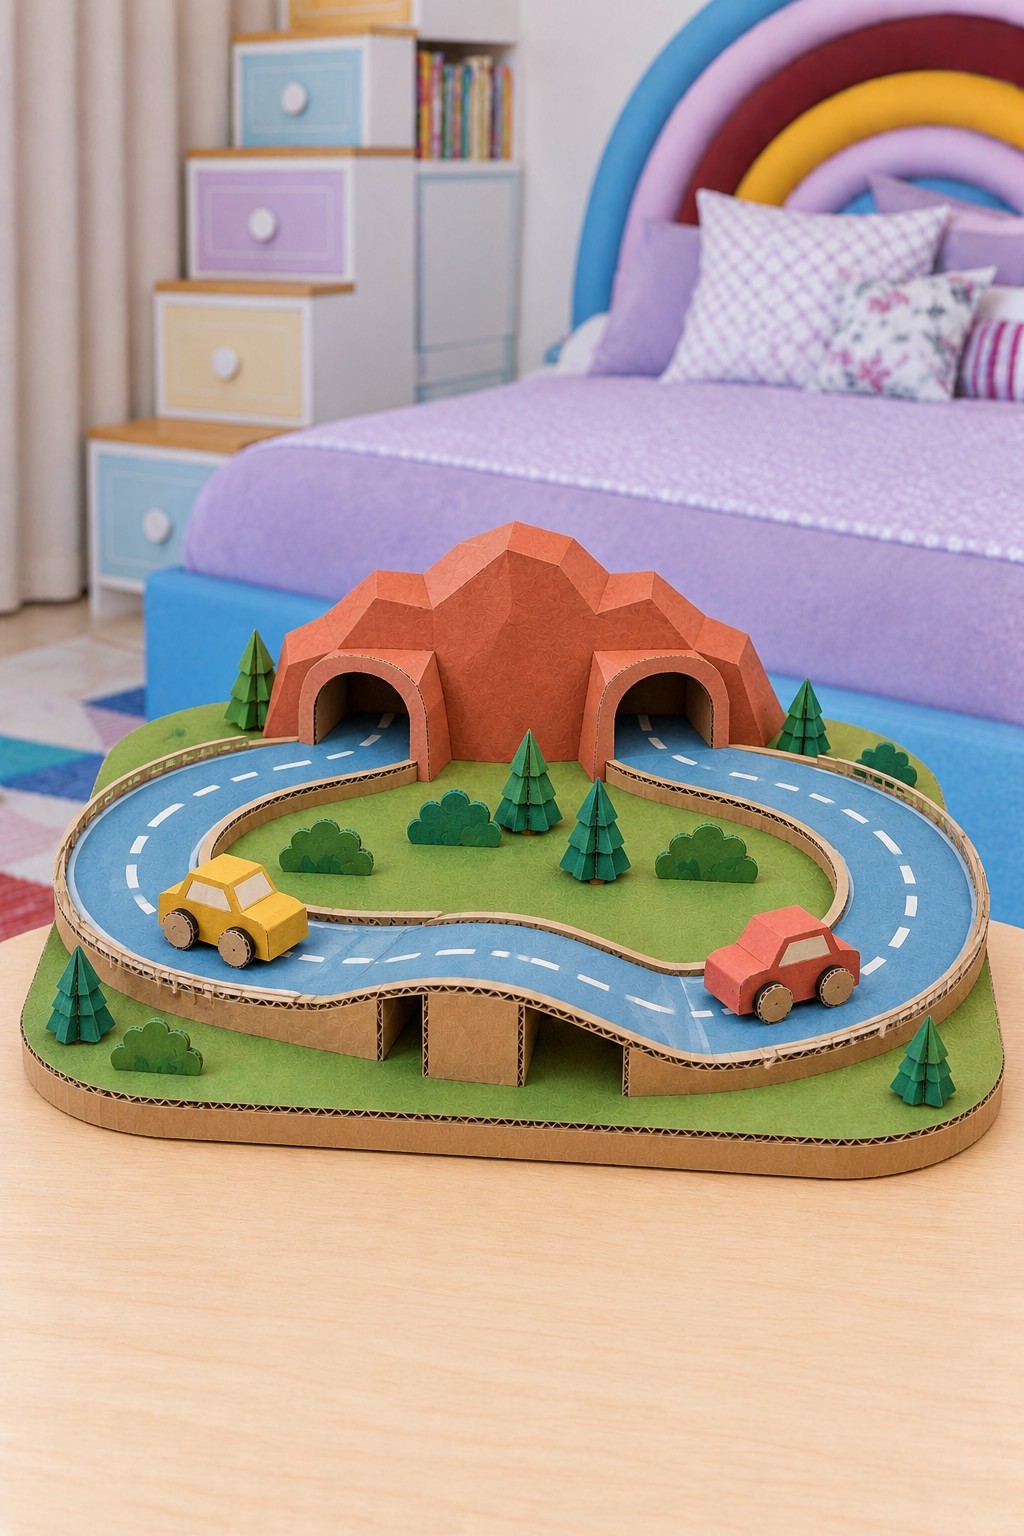
A road disappearing into a mountain gives a simple car circuit a reason to keep going. You can use a laminated oval base, cardboard road panels, box shaped supports, thin card for the mountain shell, and small toy cars. Build around the cars you intend to use, allowing extra space above their roofs and beside their wheels.
Carry the road on short box supports and keep its surface continuous through both tunnels. Form the mountain as a removable shell, leaving the hidden road accessible from behind. Low edges help guide cars without blocking their roofs or wheels.
Paint the dashed center line after the track fits together. Fold small trees and bushes on tabs, attaching them outside the driving area. Keep the mountain removable for repairs, and avoid placing tall scenery where it blocks the tunnel entrances.
20. Winding Ball Run on Stepped Supports
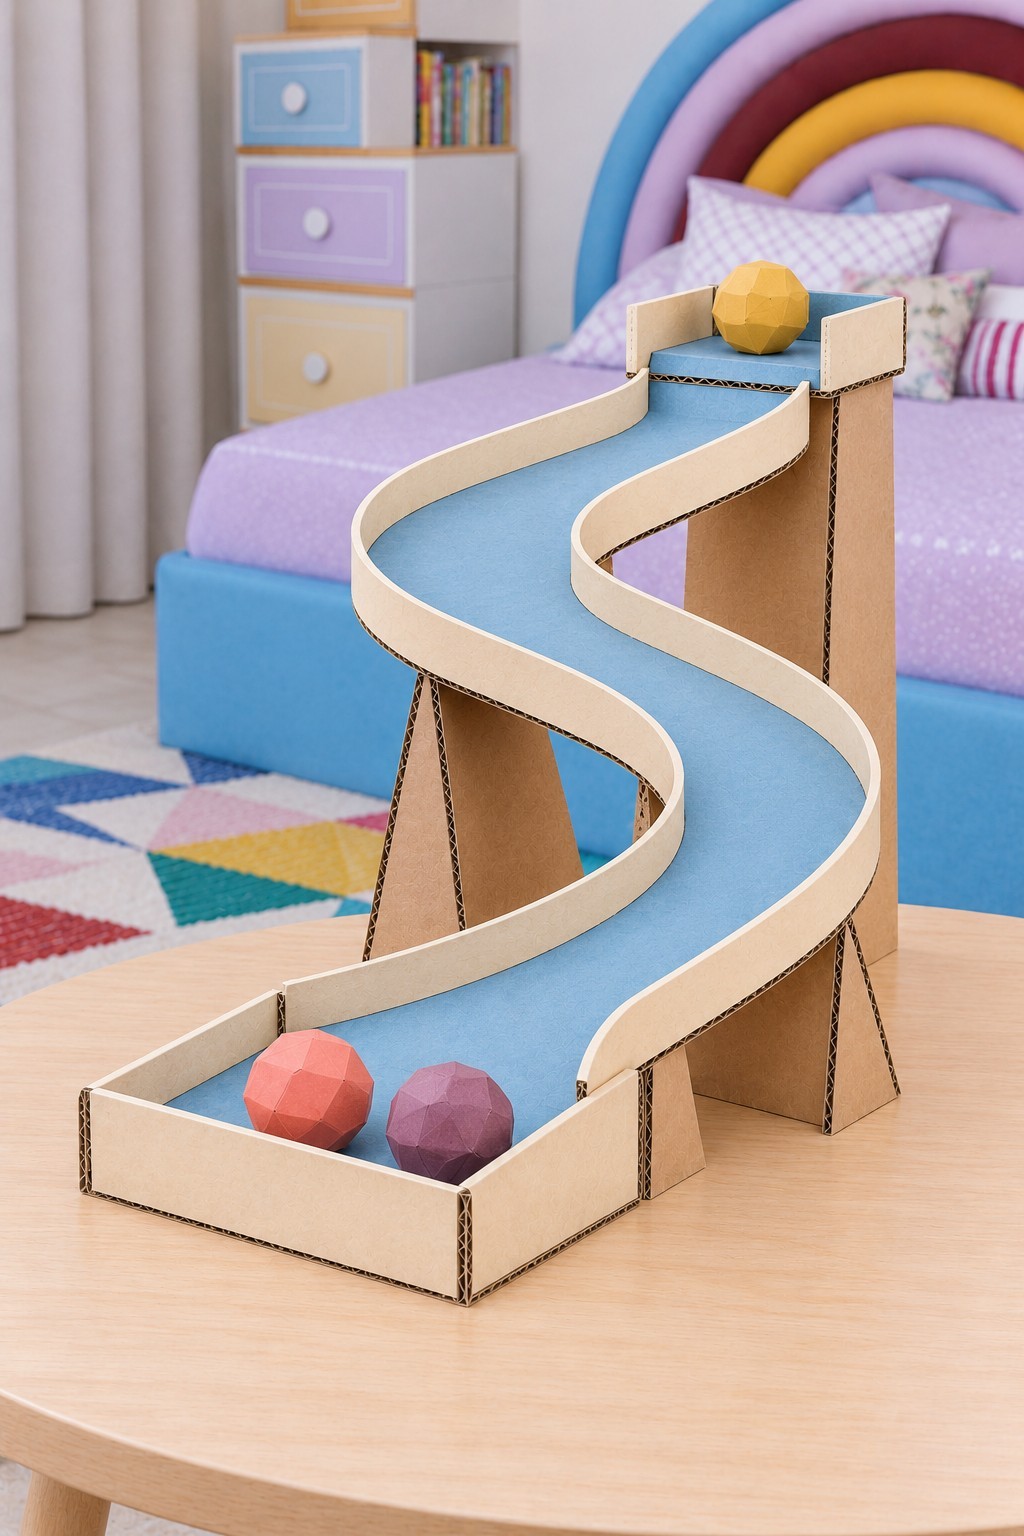
A winding track needs a gradual descent as well as an attractive outline. You could use a stiff base, corrugated support panels, thin flexible card for the track and rails, and three light paper balls. Build the track in manageable sections if a long piece cannot follow the changing curve without creasing.
Carry the track on supports that decrease gradually in height. Join shorter curved sections where a long strip would crease, laying seams flush in the direction of travel. Flexible side strips follow the bends and end at a shallow collection tray.
Use a broad base beneath the supports to prevent rocking. Begin the ball at different points to locate any flat section where it stops. Slightly rounded paper balls travel more predictably than sharply faceted ones. Adjust the slope gently rather than making the track steep enough to launch balls over its rails.
21. Mini Football Pitch with Box Goals
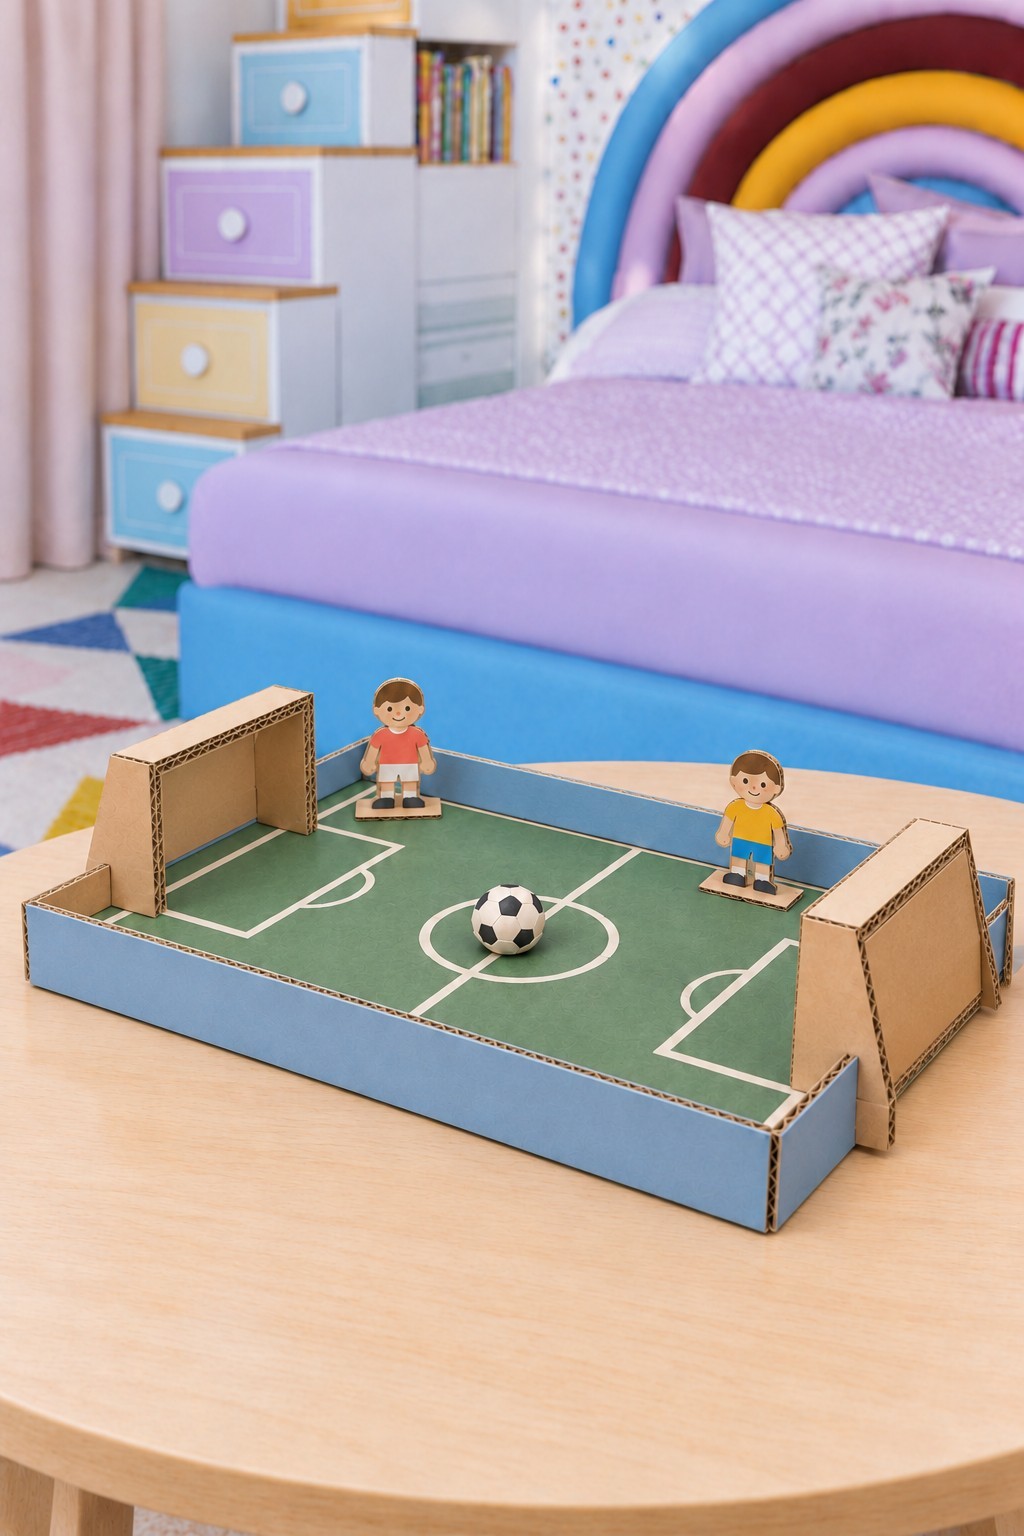
A shallow box is enough to begin a miniature football match. You can cover its floor with green paper, then add narrow white paper strips for the center line, touchlines, and goal areas. You will also need two small cardboard goal boxes, two layered player figures, and one light ball sized to fit easily through either goal.
Cover a shallow tray in green paper and add thin white markings. Place open goal boxes at opposite ends, flush with the pitch floor. Fit layered player silhouettes to broad feet and check the ball’s clearance through each goal.
Begin with passing the ball gently between two people, then add the goals when everyone is comfortable controlling it. A slightly smaller ball makes aiming harder, while a wider goal makes the first rounds more forgiving. Store the figures and ball inside the pitch when play ends.
22. Curved Mini Golf Green with a Yellow Hump
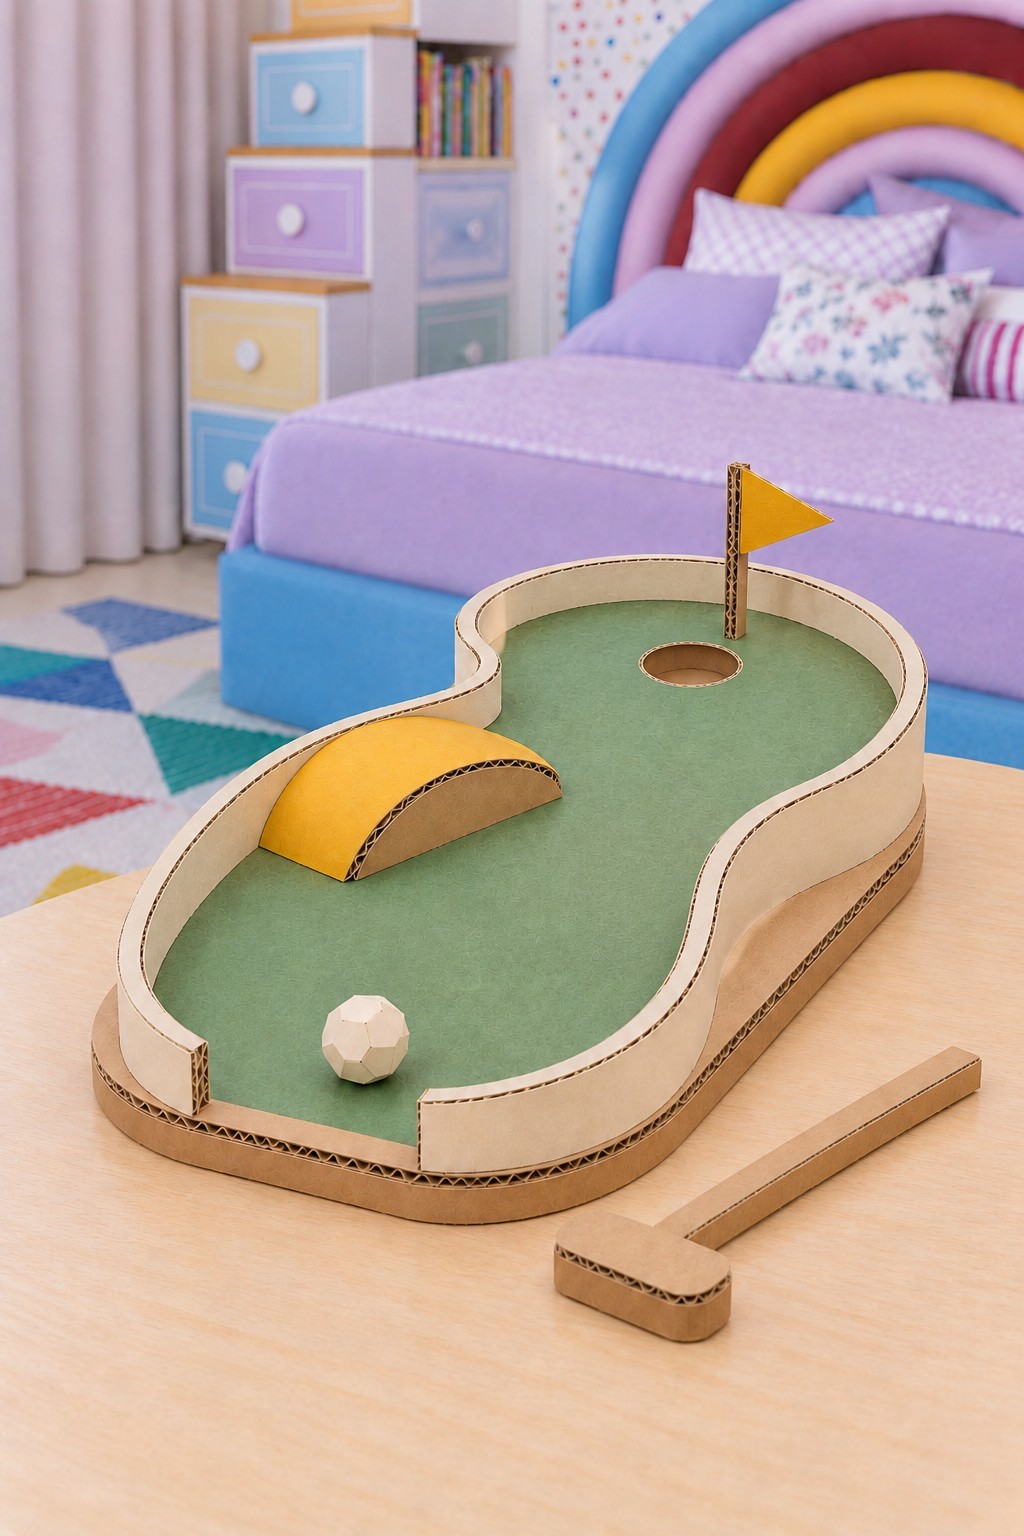
The raised yellow hump gives this little golf green a choice of routes. A player can try going over it or guide the ball around its side. You could use a stiff cardboard base, green paper, flexible cream card for the boundary, thin card for the hump, and scraps for a putter and flag.
Outline the green with a flexible flanged strip. Add a shallow layer beneath the putting surface for the cup, with a smooth card collar inside it. Build the yellow hump from matching curved sides and a flexible top, leaving an alternative route around it.
Laminate the putter head and fit it to a broad cardboard handle. Use a gentle push rather than a swing. Make the flag removable for storage, and keep its upright away from the edge where a hand could catch it during a turn.
23. Little Sled Hill with a Stairway Back Up
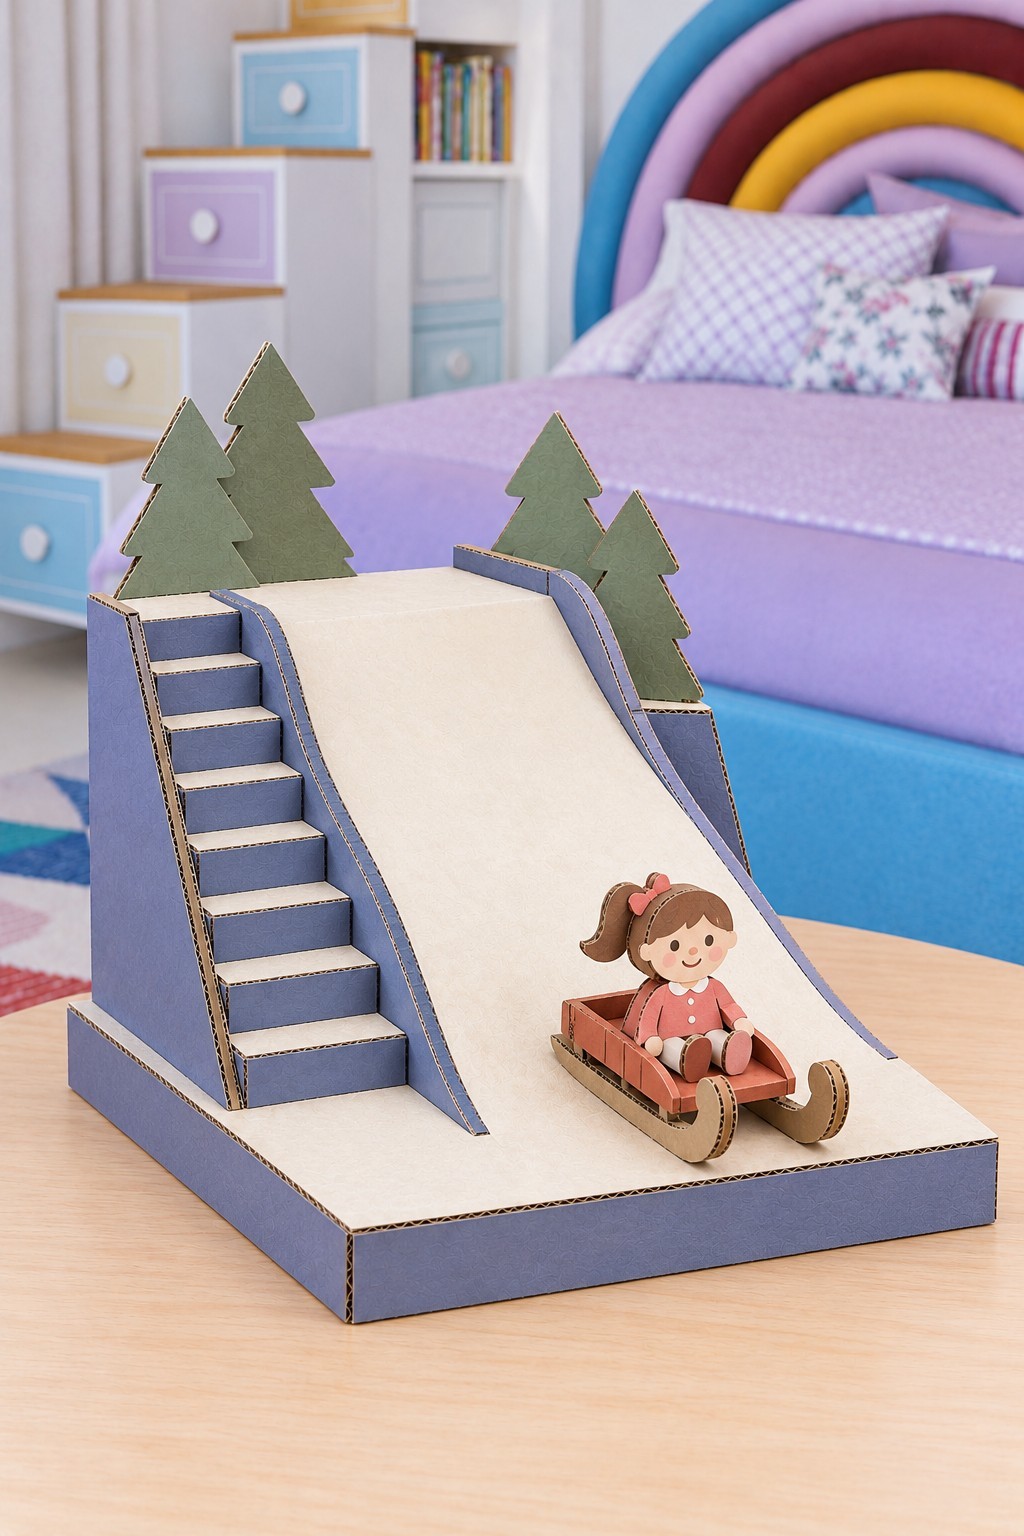
This smaller sled hill focuses on one smooth descent and an easy route back to the top for its paper passenger. You could start with matching side supports, a flexible card slope, a broad base, folded boxes for the stairs, and a small red cardboard sled. Green tree silhouettes can finish the upper corners without crowding the track.
Connect matching hill profiles with crosspieces and cover them with a flexible slope. Fit low side rails and curve the bottom gently onto the level runout. Fold the stair blocks separately and keep the sled seat low between two matching runners.
The sled needs two matching runners and a low seat for a lightweight passenger. Test it empty before adding the figure. If it stops at the bottom curve, smooth the join rather than making the hill taller. All the stairs and sled parts remain miniature.
24. Color Match Toss Board with Three Catch Pockets
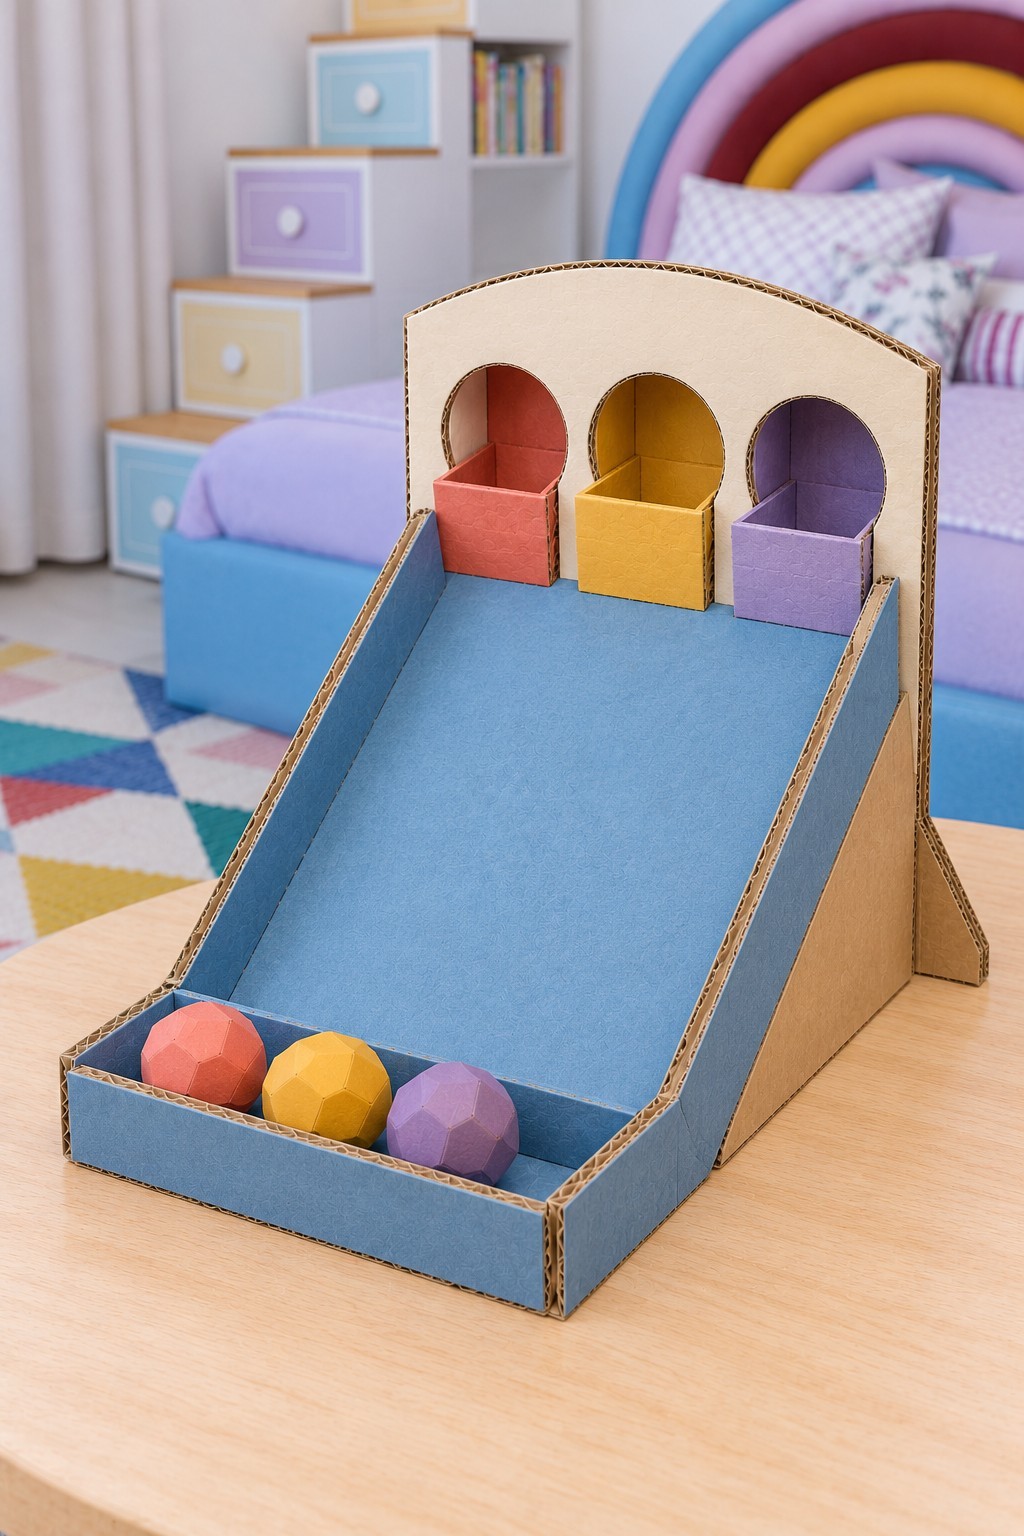
Three open pockets invite children to aim for a matching color. You can use a sloped cardboard panel, triangular supports, a tall backboard, three folded pocket boxes, and red, yellow, and purple paper. You could make three paper balls, checking that each fits freely inside every pocket before decorating.
Reinforce the backs and bottoms of three open catch pockets where they meet the upper panel. Brace the blue slope below and lead it into a shallow tray. Keep pocket tops open for tosses and smooth the return slope for missed balls.
Play by tossing gently into the open pockets from a short distance. The raised pocket fronts make this a catching game rather than a track for rolling balls uphill. Begin with any pocket, then ask players to choose a color before each throw.
25. Cardboard Hockey Rink with Two Open Goals
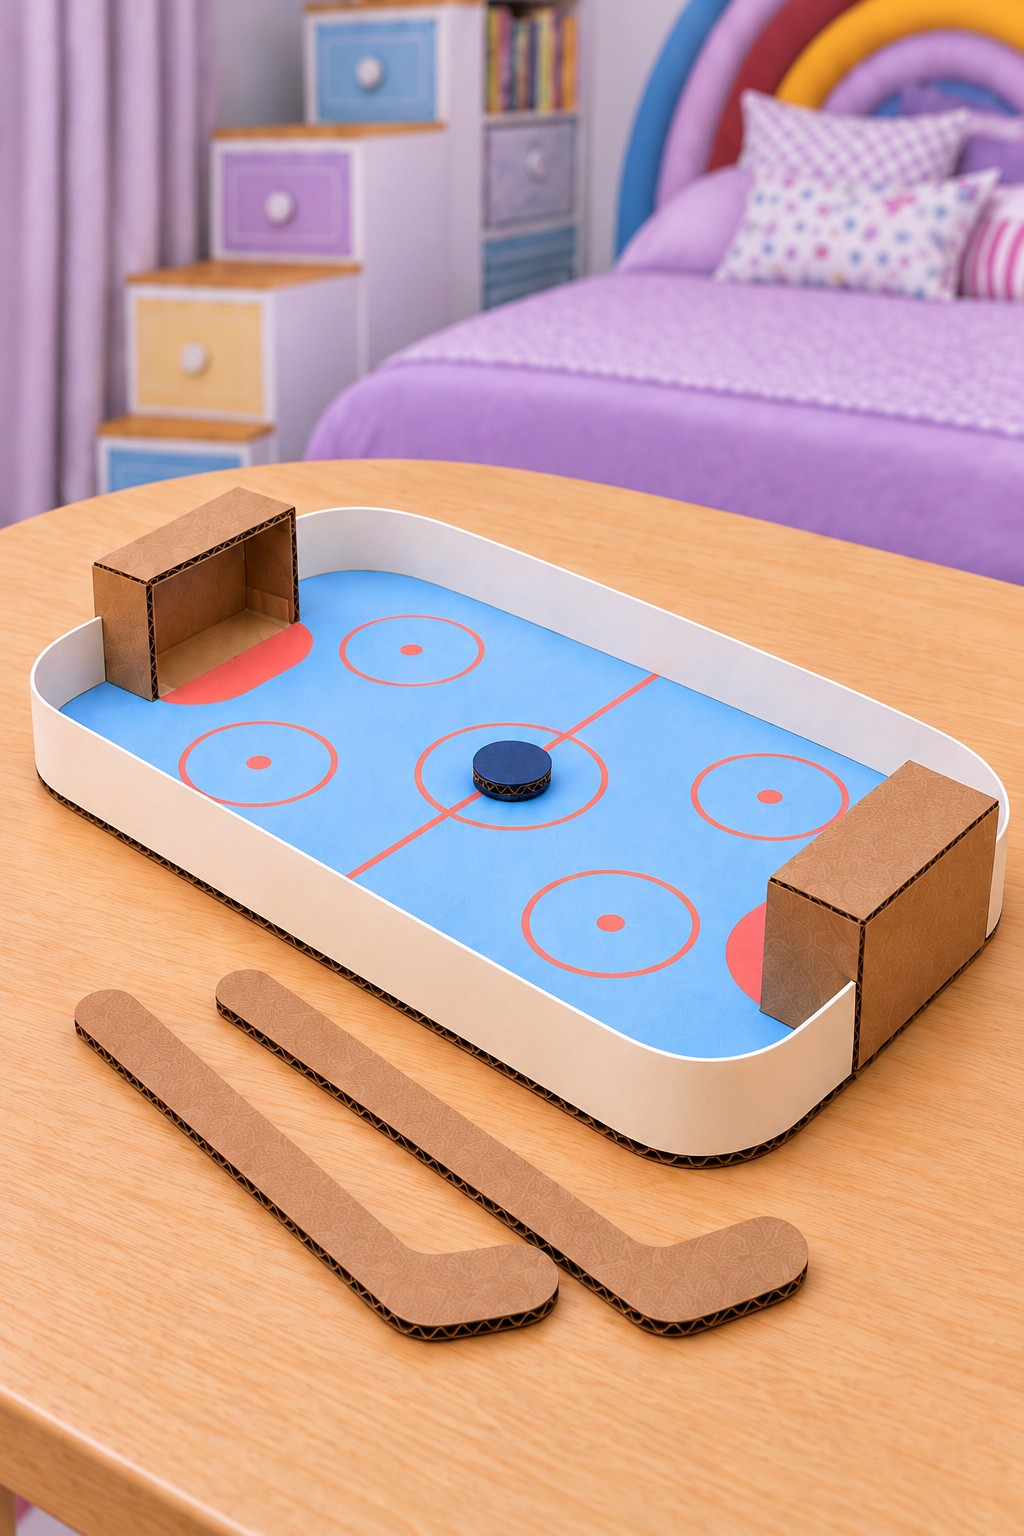
A hockey rink is a useful first game build because the walls, flat base, and folded goals use techniques that appear throughout this collection. You could choose two matching cardboard base sheets, flexible cream card, light blue paper, coral paper for the markings, navy paper, and extra board for two sticks and a puck.
Follow the complete rink assembly above. For a different challenge, widen both goals equally or use a larger lightweight puck. Keep the two ends symmetrical, the goal entrances level and the floor seams smooth.
After the glue dries, pass the puck across the empty rink and into both goals. Repair any catching seams before keeping score. This is a sliding tabletop game, so it needs a smooth floor and gentle strokes; no air cushion or motor is required.
26. Woodland Tube Characters for Storytelling
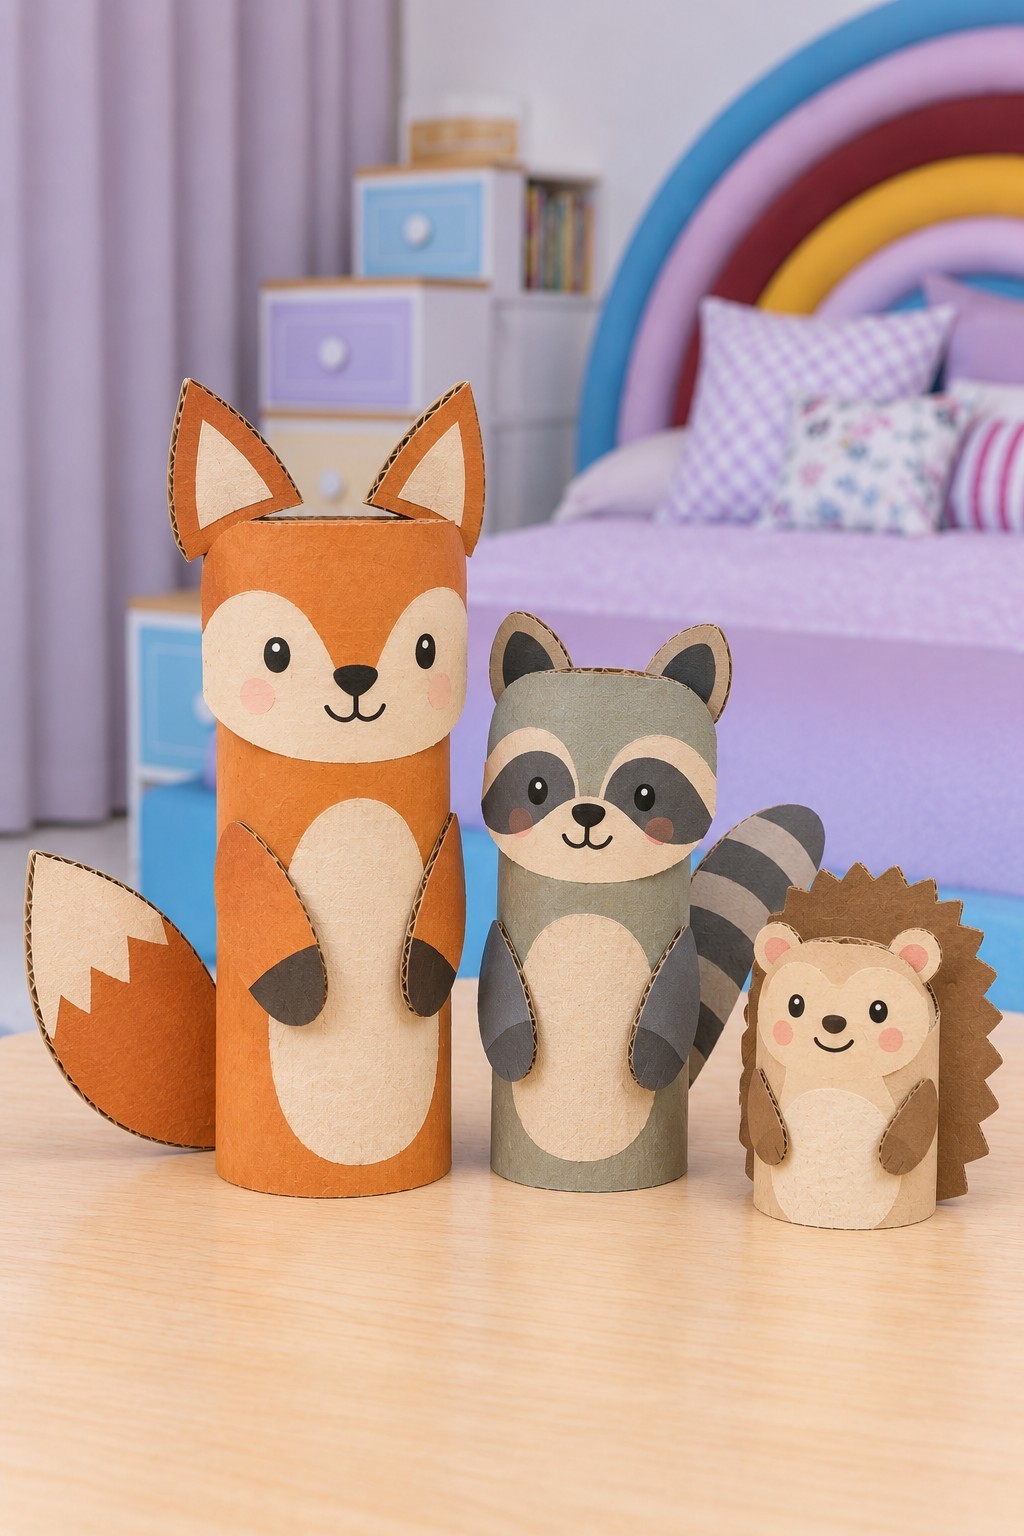
A fox, raccoon, and hedgehog show how differently three ordinary tubes can look. You could choose clean craft tubes in three heights, thin card for the ears and tails, and orange, gray, brown, and cream paper. You can cover the tubes with colored paper before adding the facial pieces, keeping the lower edges level so each animal stands.
Cover each tube before adding the animals’ broad paper details. Give ears and tails generous glue overlaps behind the body. A pale-tipped tail identifies the fox, a dark mask and striped tail the raccoon, and a rounded spiky backing the hedgehog.
Draw the small features rather than adding beads or loose eyes. Children can arrange a woodland meeting or move the characters through a simple cardboard landscape. These figures also pair well with the paper and packaging projects in our easy kids crafts collection.
27. Standing Sea Creatures on Short Tube Bases
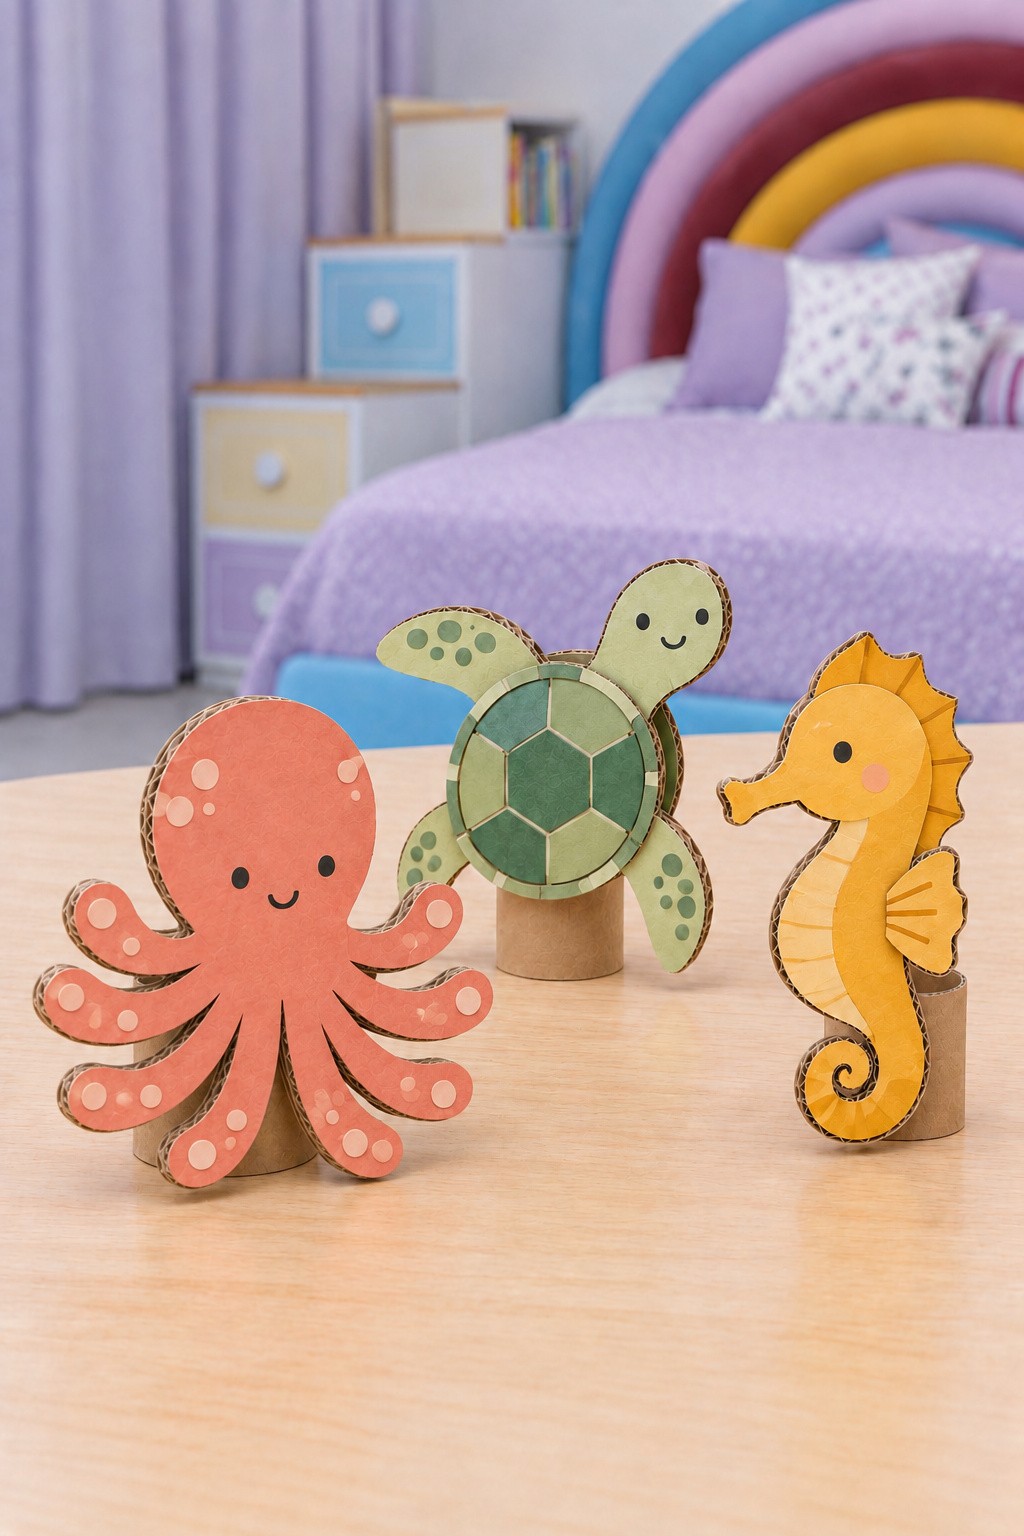
Short cardboard tubes turn flat sea creatures into a freestanding cast for a tabletop story. You could start with sturdy silhouettes for an octopus, turtle, and seahorse, three clean tube sections, PVA, and pink, green, and yellow paper. Double the narrow seahorse shape so its curved tail does not bend during handling.
Double narrow silhouettes before adding paper details. Fit each figure to a short tube through a broad vertical glue area, reinforced behind with thin card. Keep the octopus’s eight arms separate and the seahorse’s curved tail supported.
Check that every tube sits flat and that the figures balance without leaning against one another. Invite children to move them through an imaginary reef. Keep the play area dry, since the tubes and layered edges soften quickly if wet.
28. Crescent Moon Crown and Paper Tube Wand
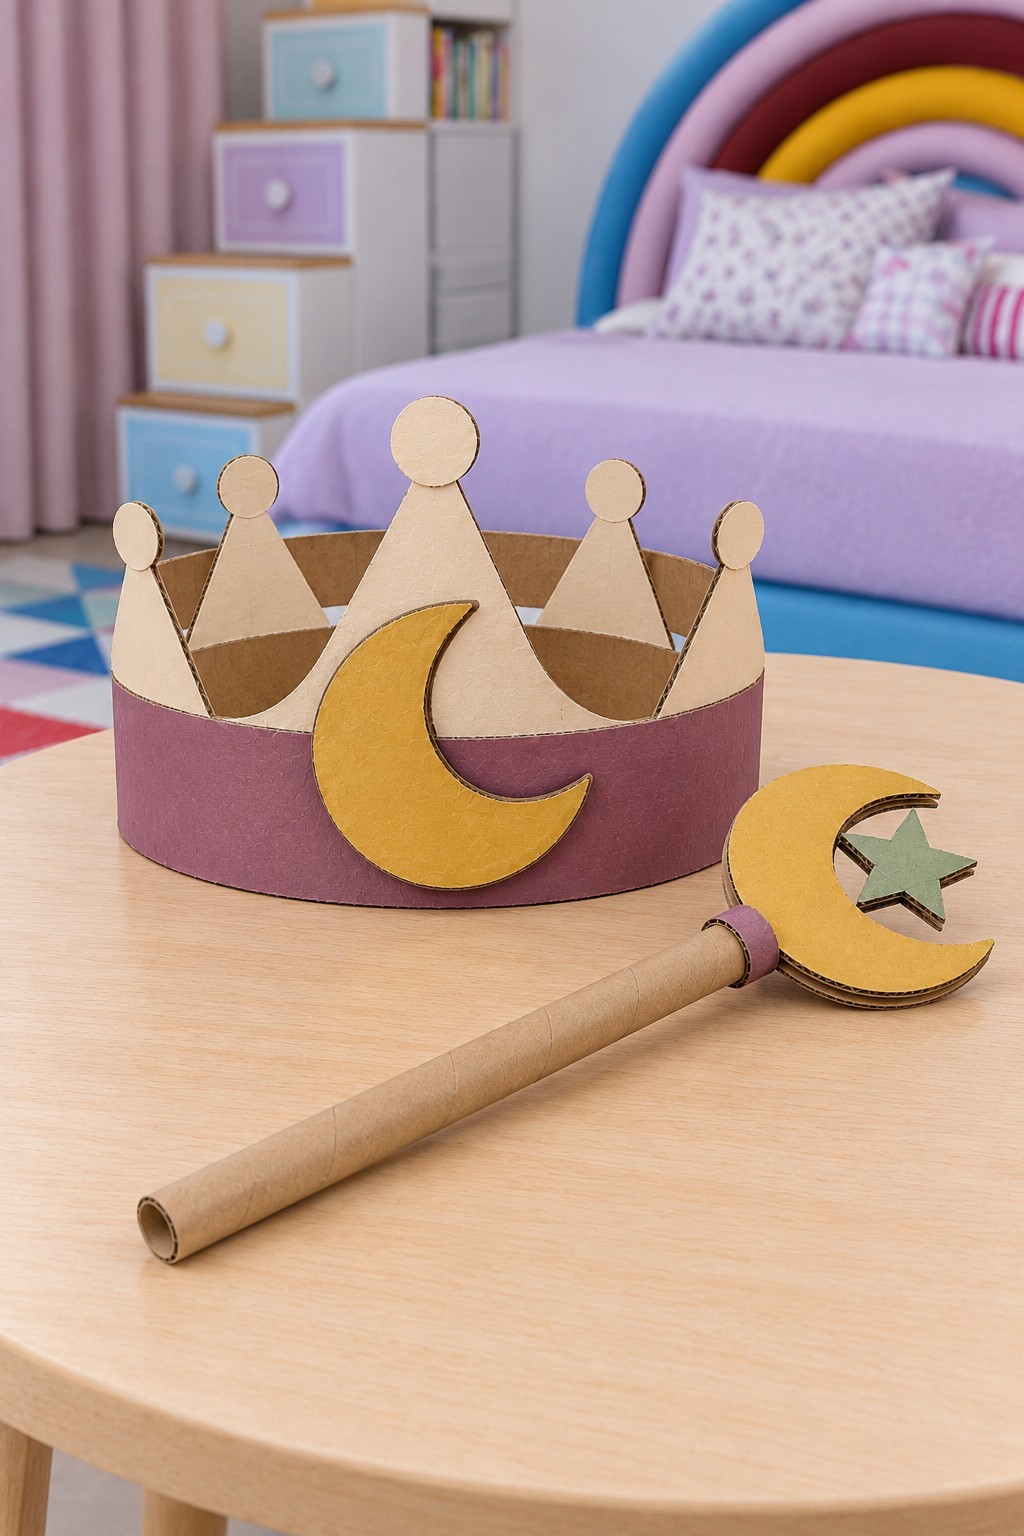
A moon crown and matching wand make a light costume set for a story corner. You can use flexible thin card for the headband, stronger card for the crown points and crescents, a short paper tube, and purple, gold, and green paper. You could make the moon decorations broad and round their tips before covering them.
Overlap a smooth headband and attach the crown points behind it through broad tabs. Sandwich a joining tab between two moon shapes and insert it into the wand’s paper tube. Support the small star with a broad bridge instead of one fragile tip.
Keep the set light and avoid cords around the neck. The wand is for gentle hand held play, with no swinging toward faces. Remove the crown if it slips over the eyes, and supervise while the costume pieces are worn.
29. Solar System Board with Recessed Planet Seats
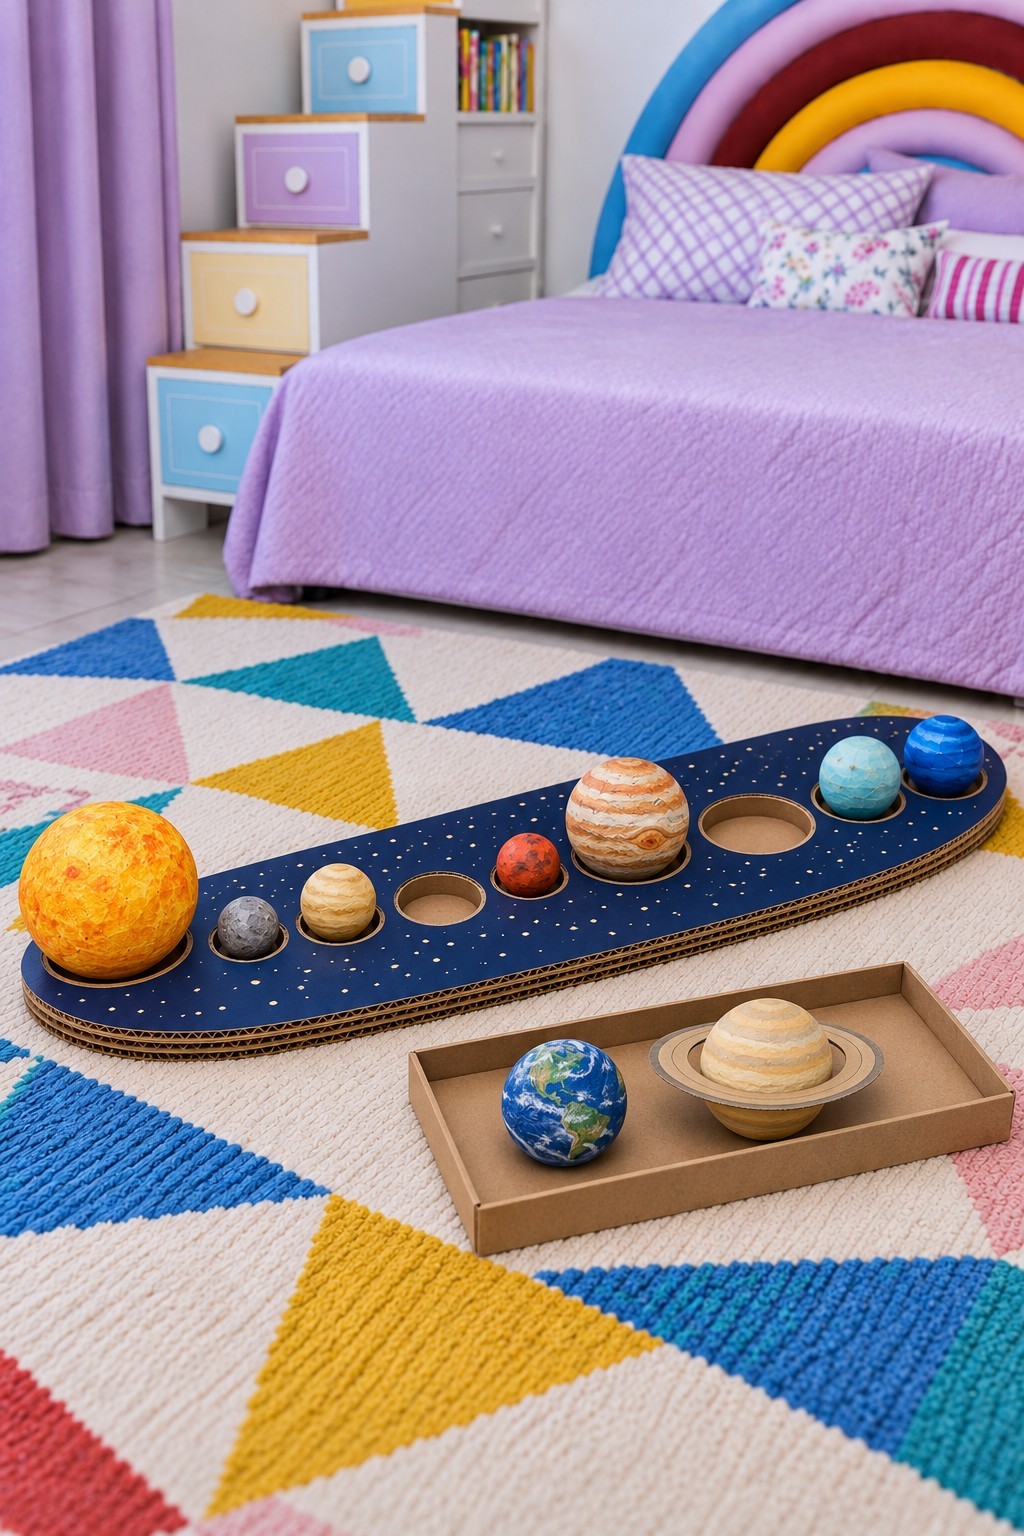
Recessed seats help round planet models stay in place while they are arranged. You can use several matching cardboard base layers, navy paper, plain paper for the spherical models, PVA, and washable paint. You could include the Sun and all eight planets, making nine positions in total. Keep a small tray for whichever models are being examined.
Cut planet seats through the upper cardboard layers, leaving a solid backing. Shape the models from compact paper balls covered in narrow paper strips and a little PVA. Add a slotted ring around Saturn and smooth the recess rims so every model lifts out.
Arrange Mercury, Venus, Earth, Mars, Jupiter, Saturn, Uranus, and Neptune outward from the Sun. The Sun is a star, and the model sizes and spacing are simplified for play rather than presented to scale. Use the seats for learning the order, not for demonstrating actual planetary distances.
30. Ocean Disc Drop Board with Five Channels
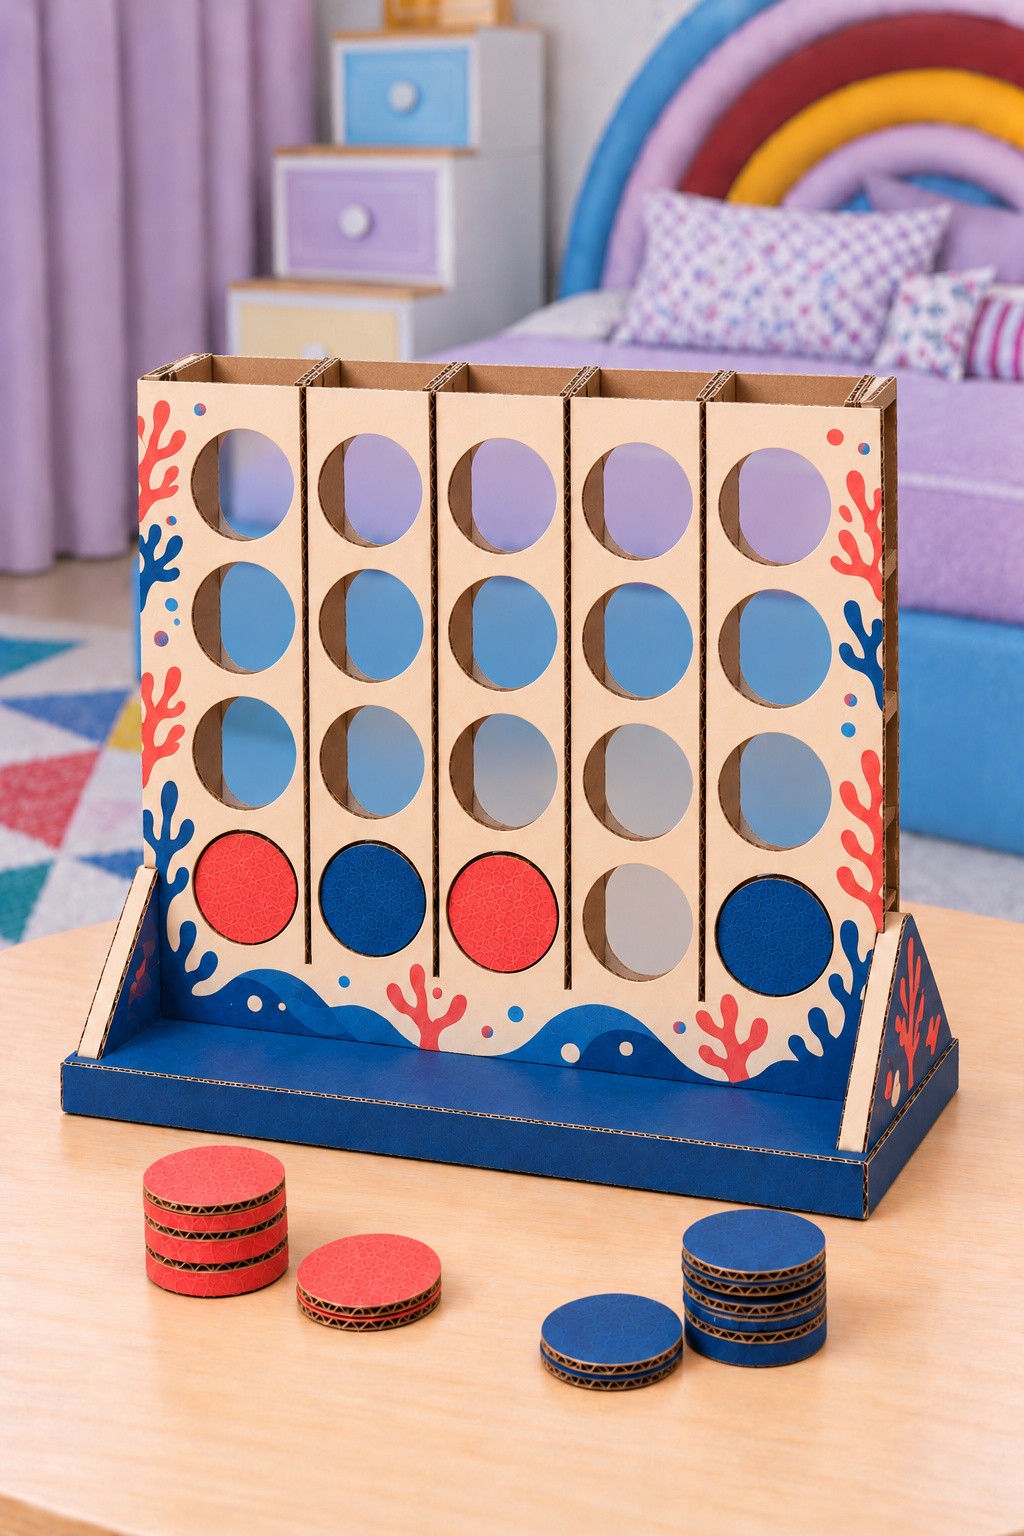
This custom strategy game depends on a detail that is easy to miss: the discs must be larger than the viewing holes. You could start with matching front and back panels, six vertical spacer strips, a bottom stop, two triangular feet, a base tray, and red and blue laminated discs. Cut five columns of four windows in both panels.
Fit six vertical spacers between matching front and rear panels to create five channels. One suggested layout uses 60 mm discs, 44 mm viewing holes and 60 mm row centers. Leave loading slots above, a closed stop below and clearance for the finished disc thickness.
Test one disc in every channel before adding paint. For a simple game, take turns dropping a color and try to make a line of three. Recover the discs by carefully inverting the empty game over its tray with adult help.
31. Layered Lion Mane for Dress Up Stories
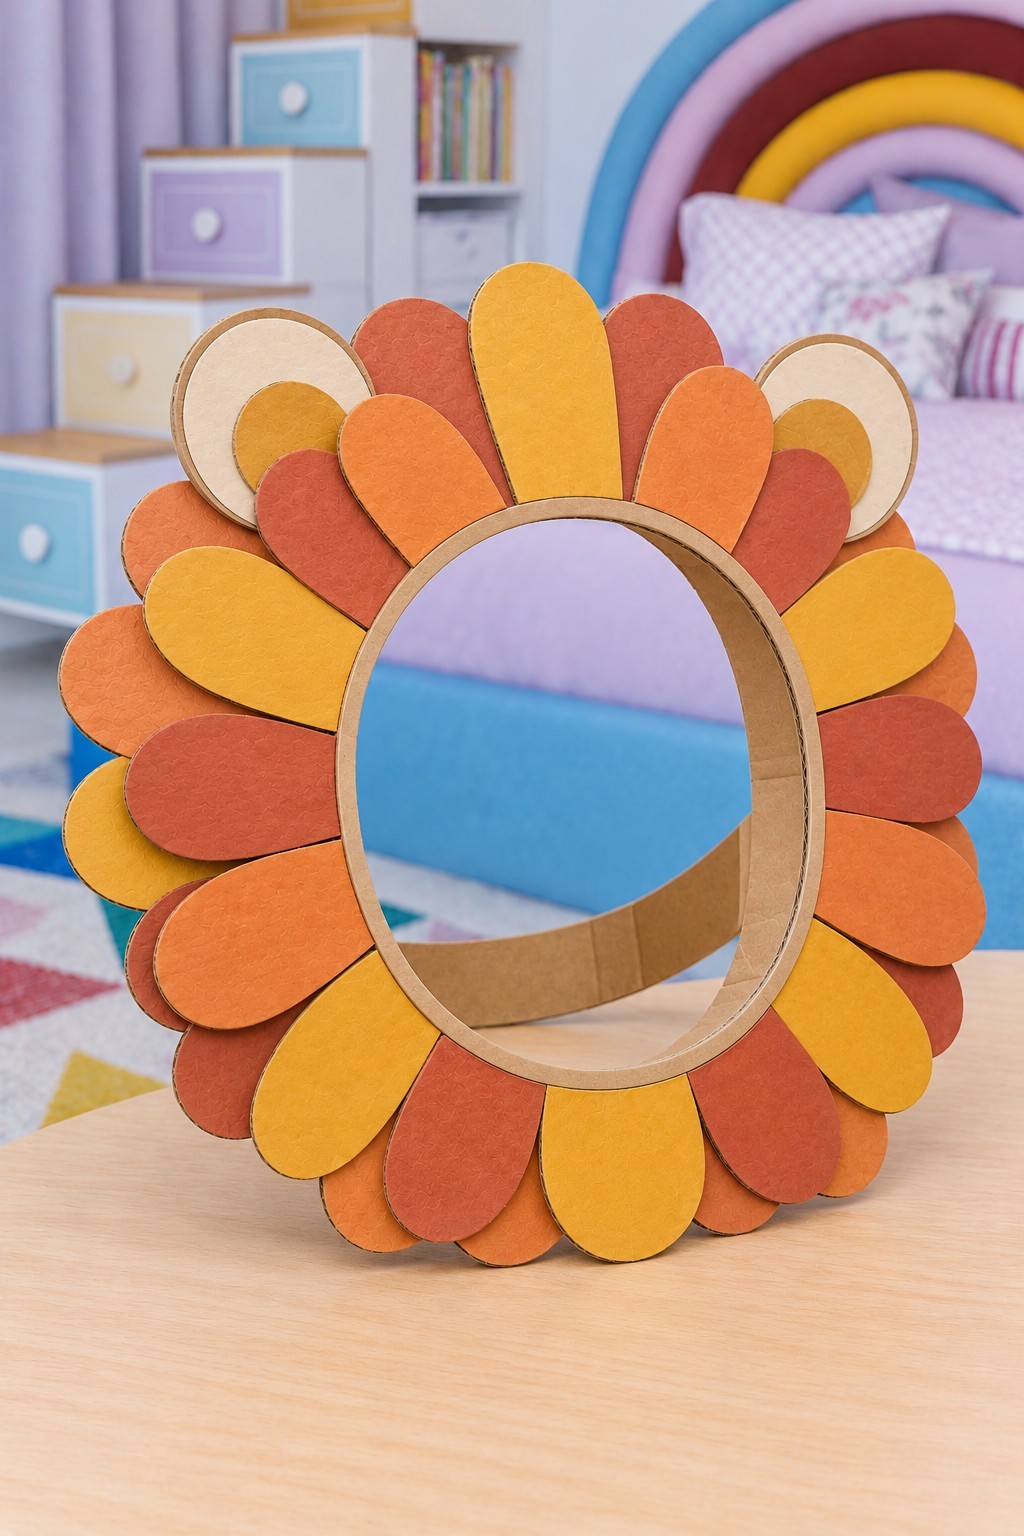
Rounded layers give a lion mane plenty of texture without needing yarn or fur. You could use light cardboard for the face ring, thin card for the mane shapes, a flexible rear band, and gold, orange, cream, and terracotta paper. You could start with an opening that leaves the wearer's face and vision clear.
Overlap rounded mane pieces behind a lightweight face ring, alternating gold, orange and terracotta. Use thin card for the decorative layers to keep their weight down. Add two ears and a smooth loose rear band, leaving vision and the face opening clear.
Cover any rough inner edge with a strip of paper and let all adhesive dry before trying it on. Keep the ring lightweight and remove it if it slips or presses against the face. It also works as a hand held character frame during a seated story session.
32. Space Target with Three Crater Portals
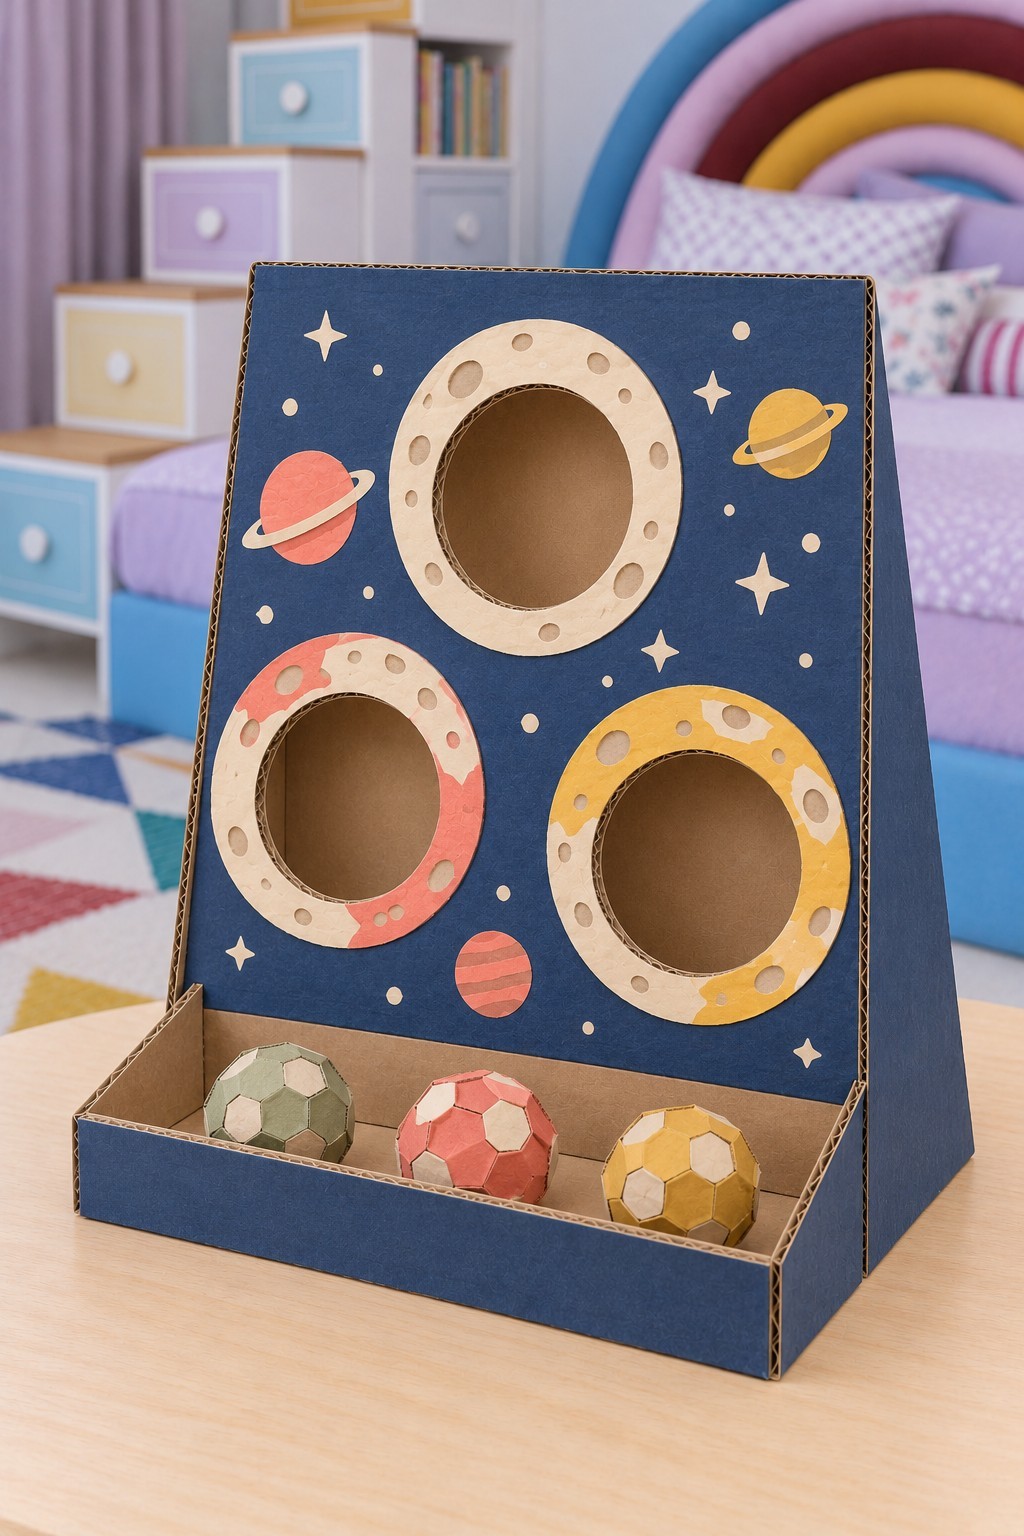
Three large crater rings give this space game a clear, uncluttered target area. You can use a doubled upright panel, two triangular supports, a tray base, three ring shapes, and thin navy, cream, coral, and yellow paper. You could make three light paper balls, with each ball comfortably smaller than the narrowest target opening.
Brace a doubled target panel to its tray with triangular sides. Align three crater rings exactly with the openings beneath. Keep paper stars and planets flat against the panel so they cannot obstruct the ball paths.
The front tray stores the balls, while a clear space behind the board receives successful throws. Start with a close, gentle toss and let players choose which portal to try. Change the throwing distance before making the holes smaller, since replacing an entire target panel takes more work.
33. Mini Pool Table with Tube Pockets
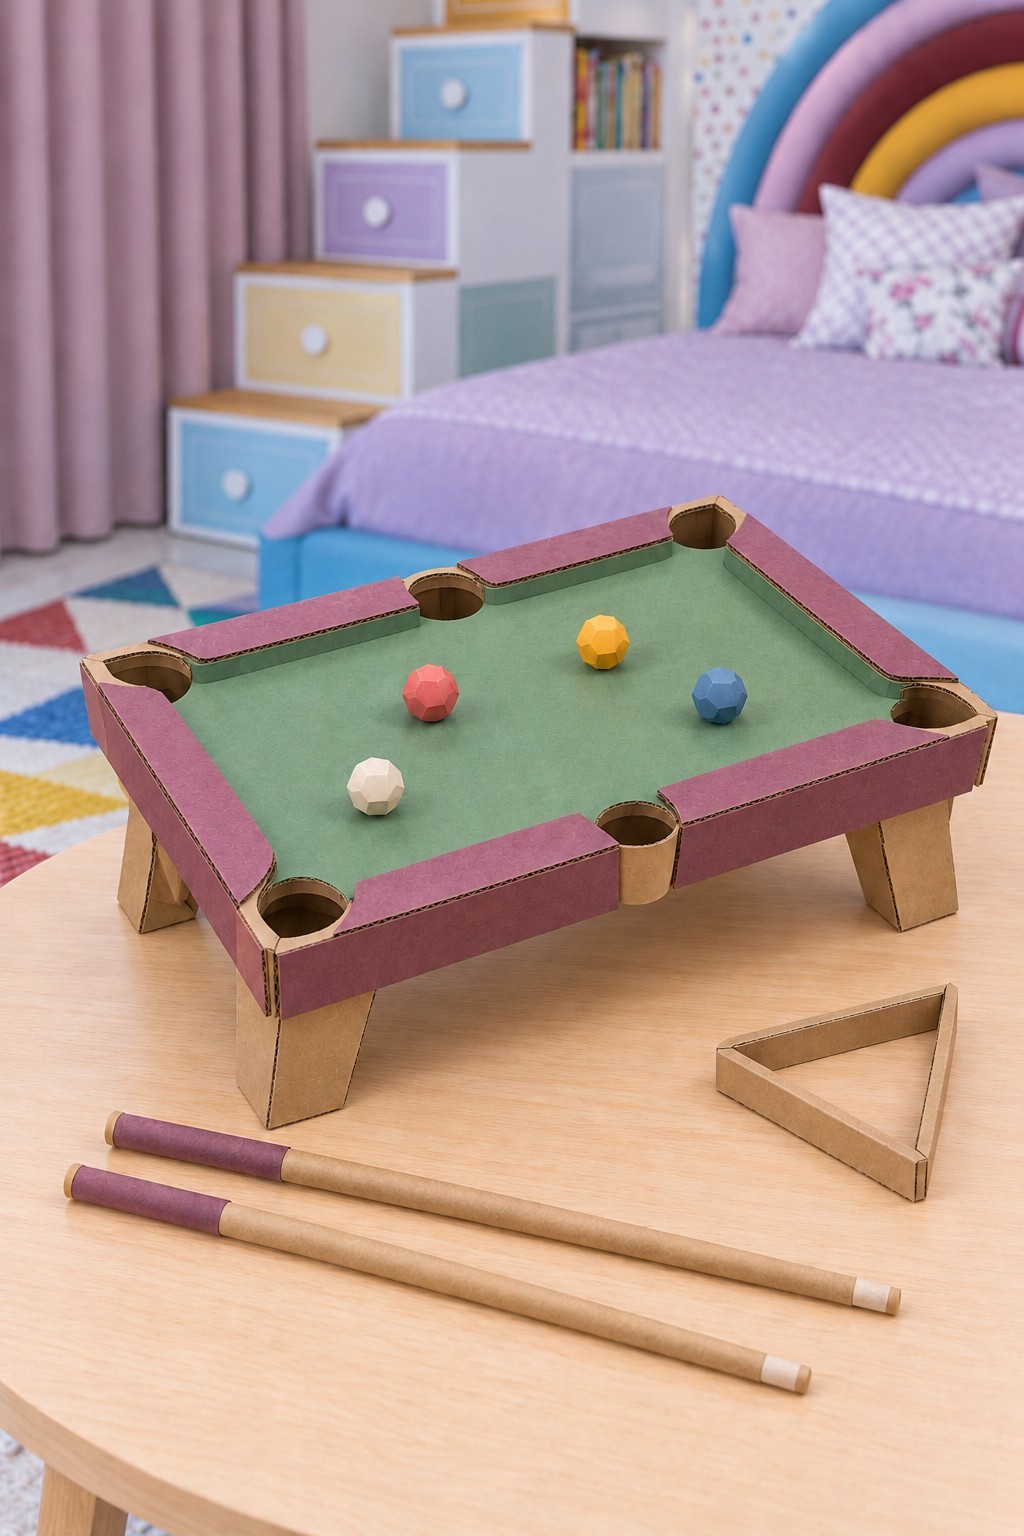
A little pool table calls for a level playing surface and pocket openings that actually lead somewhere. You could use a laminated cardboard top, a shallow support frame, four folded box legs, short cardboard tube sections for six pockets, and green and plum paper. You can use light paper balls and tightly rolled paper tubes as cues.
Carry the laminated top on an underside frame connected to four folded box legs. Add low rails between six pocket openings. Fit short tube collars beneath the holes and close each with a cardboard disc to collect the paper balls.
Check the table on a level surface before playing. Round paper balls work better than sharply folded ones. Use the cues for short pushes, and make the triangle rack from broad folded card strips that can be lifted off easily.
34. Chunky Spinning Tops with Color Wedges
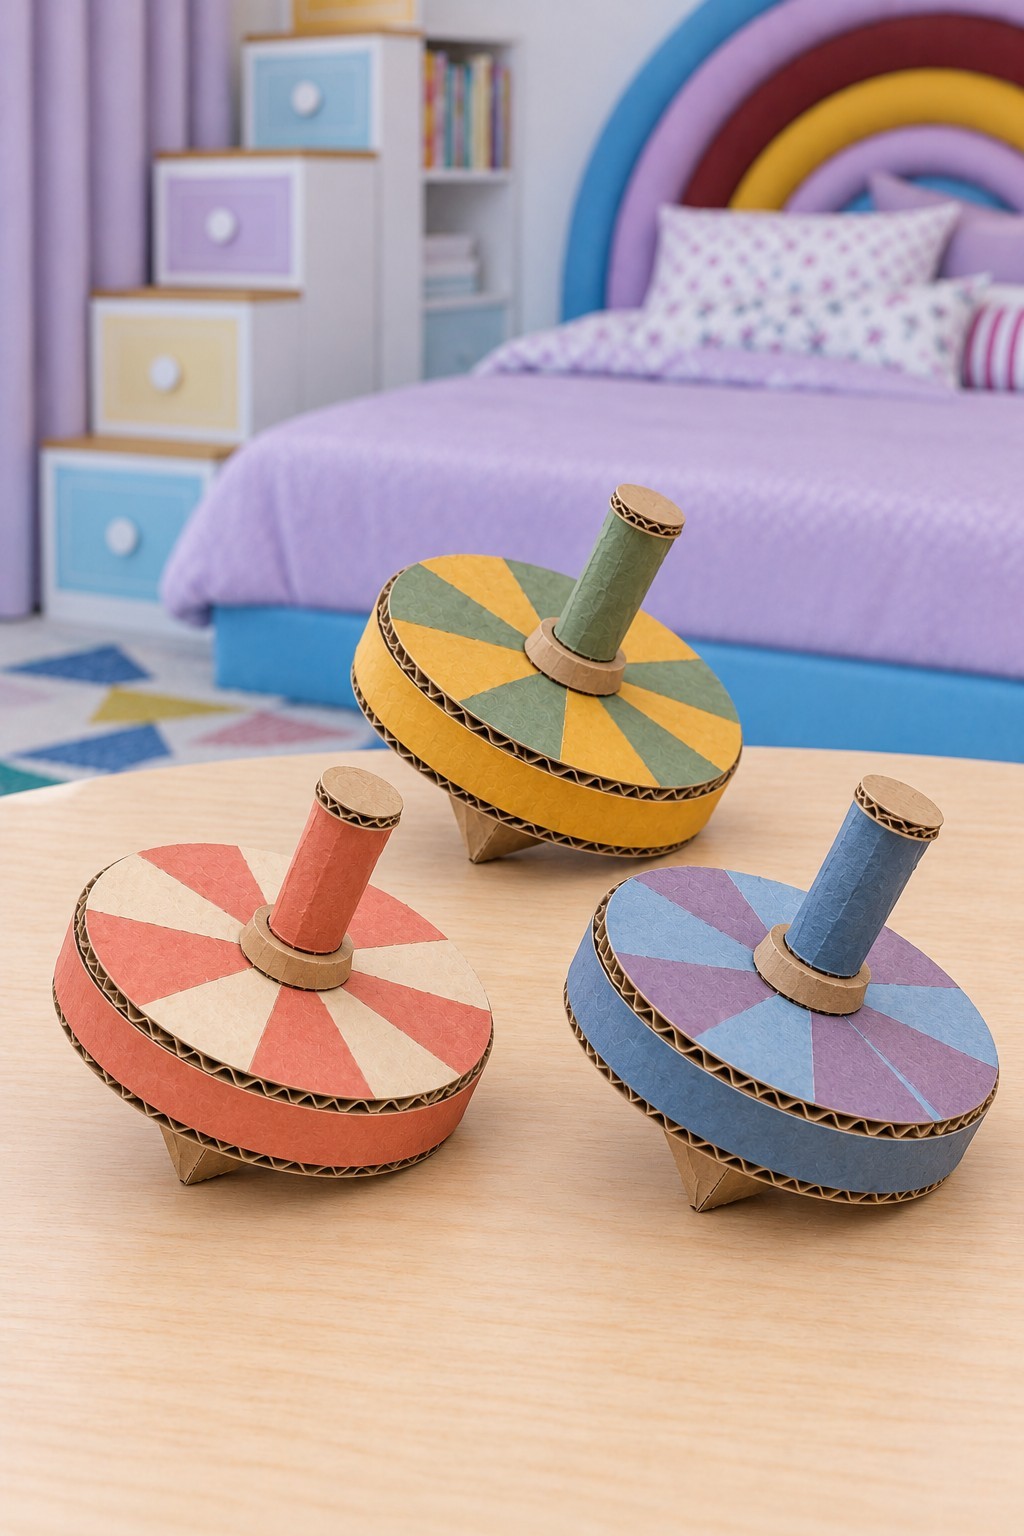
Balanced circles matter more than decoration when making a spinning top. Useful materials include corrugated circles, thin card for a shallow body band and lower cone, short paper tubes, PVA, and colored paper. You can use one carefully drawn master circle to make matching layers, and mark its center before cutting.
Align the centers of the layered body, tube handle and lower cone on one axis. Reinforce the handle connection with a collar and distribute the colored paper wedges evenly. Balance the undecorated top before adding further layers.
Try a gentle spin inside a clear tray. If the top immediately falls to the same side, check whether the handle leans or the cone is off center. Adjust the balance before adding another heavy layer of decoration. Keep the tops away from table edges while playing.
35. Long Shuffleboard Tray with Colored Scoring Zones
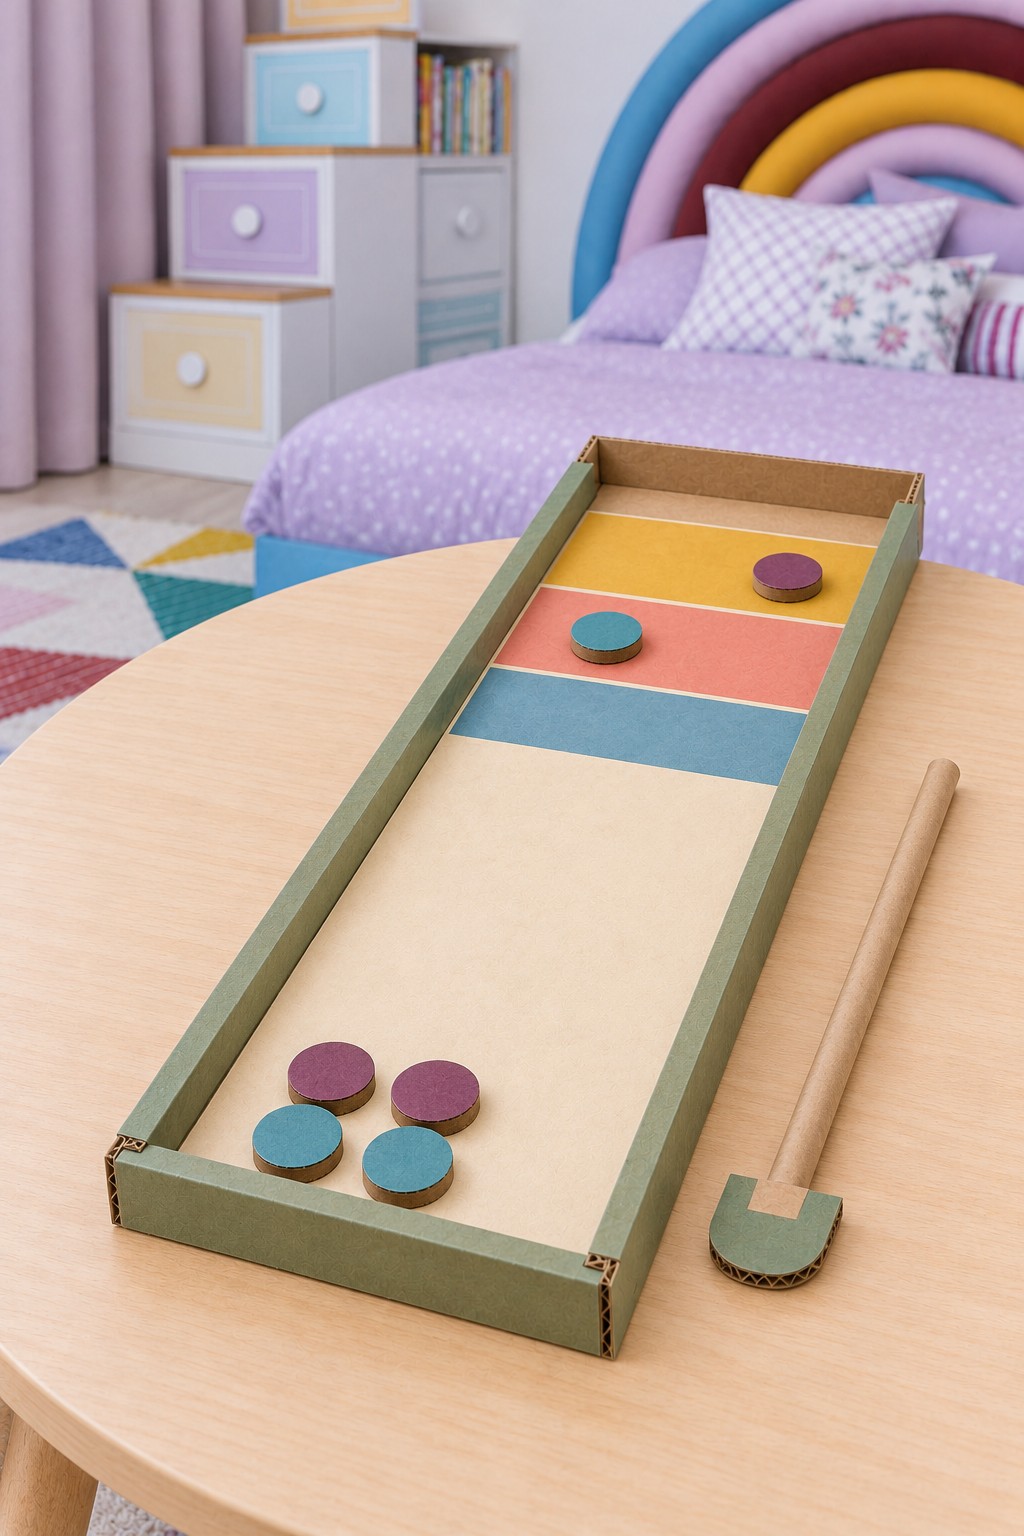
A long narrow tray makes a satisfying target game from a modest amount of cardboard. You can use a doubled base around 60 × 18 cm as a starting point, straight side rails, thin colored paper, six laminated discs, and a rolled paper handle with a broad pusher head. Keep all six discs the same thickness.
Make a long doubled base with straight side rails and smooth colored scoring bands at the far end. Layer six matching discs and cover both faces with paper. Attach a broad pusher head to a rolled-paper handle through a reinforced tab.
Take turns sliding one disc toward the colored bands. Agree beforehand how to score a disc touching a boundary, and leave spare discs at the near end. Begin with short pushes, then move the starting position farther back when players want more challenge.
Keep the finished toys ready for another play session
Store loose pieces in a labeled shallow box and keep tall models where they will not be crushed. Check the underside of ramps, the corners of goal boxes, and the edges of moving discs before the next game. A lifting paper edge can be glued back down, but a softened structural panel is better replaced. Keep paints and glues with the craft supplies rather than inside the play set. If the collection starts taking over a shelf, these upcycled storage ideas can help you give the finished toys and spare cardboard a practical home.


Leave a Reply