
A gift can start telling its story before the wrapping comes off. A paper teacup suggests a quiet tea break, a tiny garden caddy makes seed packets feel considered, and a fabric envelope turns a set of handmade coasters into something worth keeping together. These DIY gift ideas with handmade packaging pair small presents with containers that suit their shape, purpose, and recipient. Some projects begin with folded cardstock, while others use stitching, covered boxes, or simple wooden parts.
Begin with the measured gift box tutorial below to learn how scoring, corner tabs, and a slightly larger lid work together. The accompanying collage follows the same cream base and coral lid from materials to the finished parcel. You can adapt those paper construction principles to several of the designs that follow; the sewn and wooden projects use their own joining methods. Each inspiration includes suitable materials, a practical assembly approach, and details to check before filling it. Choose the gift first, then build the packaging around its actual size rather than squeezing it into a decorative shape.
Table of Contents
- Prepare the Gift and Make Its Box
- Choose Materials That Suit the Gift
- Make a Small Cardstock Box with a Removable Lid
- See Exactly How a Corner Tab Closes
- 1. Strawberry Balloon Sweet Basket
- 2. Friendly Ghost Balloon Candy Cup
- 3. Daisy Parasol Treat Pot
- 4. Toadstool Chocolate Box
- 5. Blue Parachute Sweet Hamper
- 6. Coral Paper Tote with a Scrunchie Pocket
- 7. Crepe Peony Chocolate Bouquet
- 8. Oversized Teacup for Tea and Biscuits
- 9. Pearl Shell Box with Coral Lining
- 10. Thread Wrapped Sewing Gift Canister
- 11. Orange Slice Candy Box
- 12. Mini Market Stall Biscuit Hamper
- 13. Felt Flower Hair Clips in a Drawer Box
- 14. Linen Book Box for a Botanical Gift Set
- 15. Quilted Coasters in a Denim Envelope
- 16. Honeycomb Box with a Jar and Wooden Dipper
- 17. Polka Dot Boot Box for Cozy Socks
- 18. Artist Palette Paint and Brush Tray
- 19. Wooden Garden Caddy with Seed Packets
- 20. Starry Crescent Moon Sweet Holder
- 21. Woven Heart Treat Handbag
- 22. Pineapple Jar for Colorful Hair Ties
- 23. Layer Cake Slice Chocolate Box
- 24. Faceted Lavender Jewelry Box
- 25. Baby Clothes Tray with a Sock Clothesline
- 26. Oval Hoop Stationery Pocket
- 27. Arched Mailbox for a Tea Selection
- 28. Blue Cottage Box with a Removable Roof
- 29. Grand Piano Chocolate Box
- 30. Mini Wardrobe Jewelry Cabinet
- 31. Felt Taco Pouch for a Charging Cable
- 32. Egg Carton Sewing Kit
- 33. Kite Shaped Box with a Ribbon Tail
- 34. Blue Backpack Gift Bag for a Reusable Care Set
- Check the Fit Before Giving
Prepare the Gift and Make Its Box
Choose Materials That Suit the Gift
For small folded boxes, start with cardstock around 250 to 300 gsm and test a crease on an offcut. Larger shaped containers benefit from a separate rigid base, such as 1 to 2 mm greyboard covered with decorative paper. Thick board needs separate panels and joining strips; it does not fold like thin card. Use a ruler, pencil, scissors, bone folder, and a cutting mat for any knife work. Adults should handle craft knives, drilling, and hot tools.
Apply a thin layer of PVA craft glue where paper tabs overlap, then hold the joint square while it sets. Strong double sided paper tape is useful when a wet adhesive would wrinkle a small detail. Use an adhesive specifically labeled for felt when forming felt decorations, and stitch parts that will bend or carry weight. Permanent felt glue is not necessarily washable. Wooden joints need wood glue and suitable mechanical fasteners where the design requires them. Follow the chosen product's instructions rather than assuming that every adhesive has the same drying time.
Keep sweets in their individual wrappers and use liners or bags intended for food contact around homemade biscuits. Craft paper, paint, tissue, and glue are decorative materials, not food packaging by default. Preserve ingredient and allergen information with edible gifts. Glass jars need extra support beneath them, and heavy gifts should travel in a protective outer box. Balloons, small ornaments, cords, and clips belong to the presentation; keep them away from young children and remove decorative packaging before handing over baby items.
Make a Small Cardstock Box with a Removable Lid
The cutting measurements below describe the flat card before folding. The finished measurements describe the assembled parts. This sample makes a light gift box for wrapped chocolates or a small accessory, with a cream base and a shallower coral lid.
Cream base: cut a 20 × 20 cm square and score 4 cm inward from every edge. After folding these borders upward, the central floor measures approximately 12 × 12 cm and the walls are 4 cm high.
Coral lid: cut an 18.2 × 18.2 cm square and score 3 cm inward from every edge. After folding these borders, the central top measures approximately 12.2 × 12.2 cm and the sides are 3 cm deep.
The lid starts with a smaller sheet because its sides are shallower. Its finished top is slightly larger than the base floor, which provides room to fit over the assembled box. Compare the finished 12.2 cm lid with the finished 12 cm base when checking the fit. Card thickness and folding accuracy affect the actual clearance, so check both parts before fixing the lid's final corners.
Materials for one box: one 20 × 20 cm square of cream cardstock, one 18.2 × 18.2 cm square of coral cardstock, approximately 1.2 m of ivory ribbon about 15 mm wide, a small sheet of white tissue, and six individually wrapped chocolates. Gather a small bottle of PVA craft glue, ruler, pencil, scissors, and bone folder. Cut the squares from two sheets of A4 cardstock if that is what you have available.
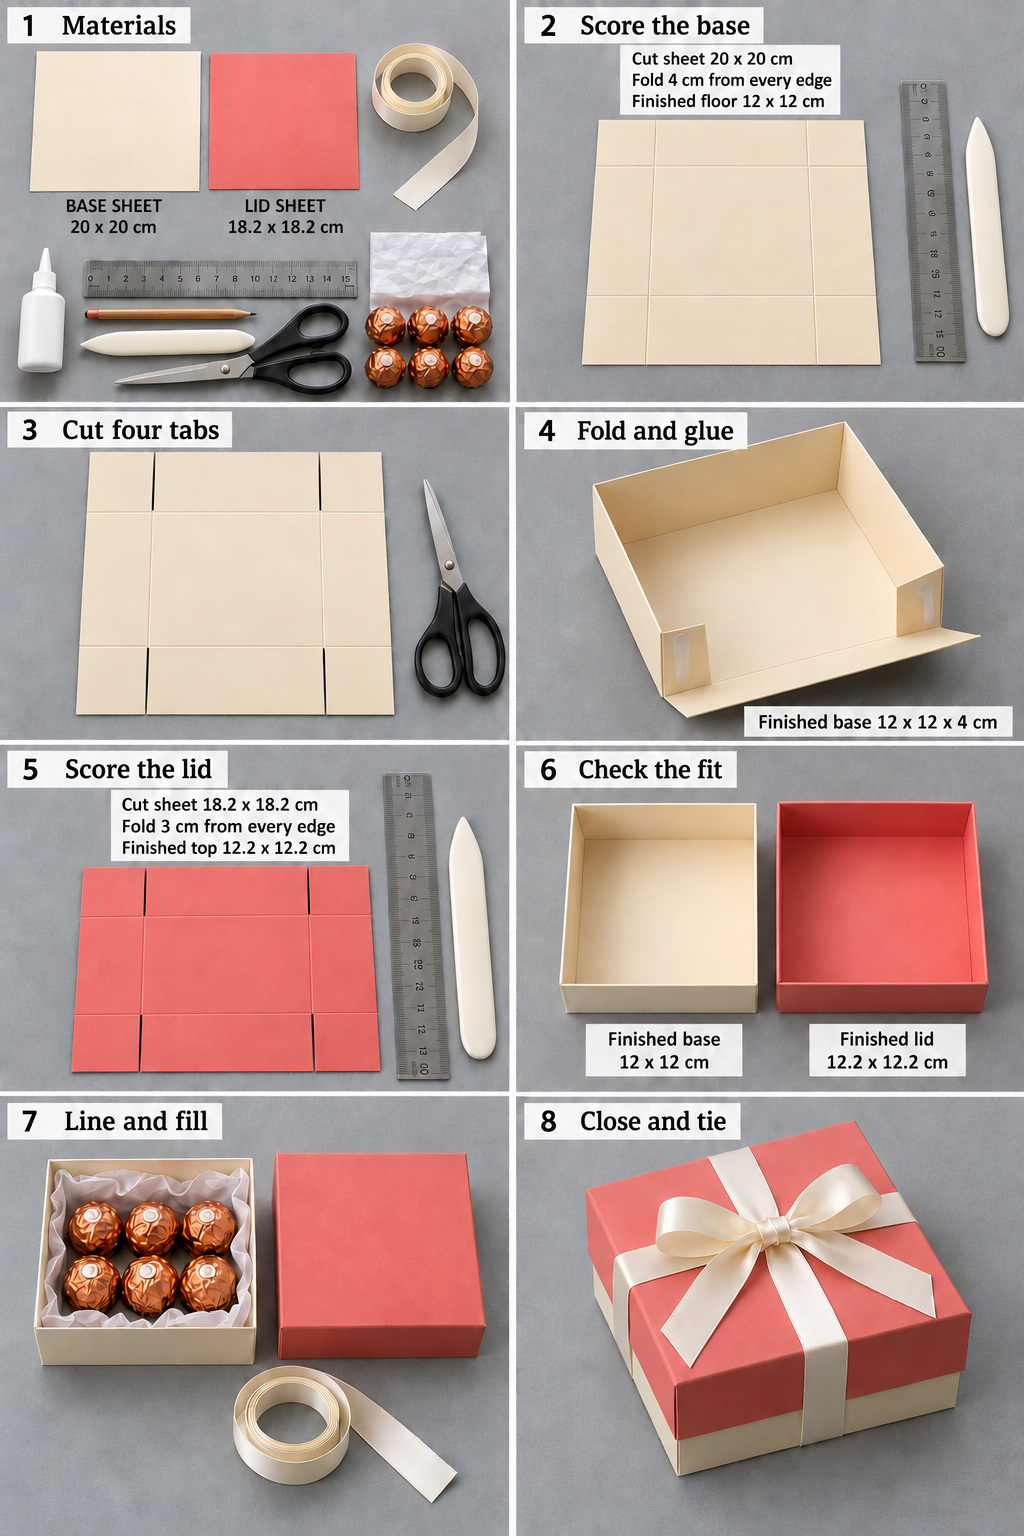
- Prepare the materials. Check that both card squares have straight edges and square corners. Set the coral piece aside while you work on the cream base. Keep the wrapped chocolates away from the gluing area.
- Score the cream base. Measure 4 cm inward from each of the four edges and score straight lines across the square. The layout is 4 cm, 12 cm, and 4 cm in each direction. Press gently enough to crease the card without cutting through it.
- Make four short cuts. Find the two vertical score lines. Cut 4 cm downward from the top edge along each one, stopping at the first horizontal fold. Then cut 4 cm upward from the bottom edge along each vertical line, stopping at the lower horizontal fold. These four slits leave the corner squares attached to the left and right side walls along their horizontal folds.
- Assemble the base. Raise the two side walls first, keeping the front and back panels flat. Fold the attached corner tabs inward by 90 degrees so they cross the future front and back openings. Apply a thin film of PVA to the tab faces pointing out of the box, then raise the front and back panels against those glued faces. Each tab ends up against the inside of the adjacent panel. Press the joins square while the glue grips. The closeup guide below follows one corner through this sequence.
- Prepare the coral lid. Score 3 cm inward from every edge of the 18.2 cm square, leaving a central square measuring 12.2 cm. Make two 3 cm cuts down from the top and two up from the bottom along the vertical score lines. The corner tabs stay attached to the side walls. Fold and join them in the same order as the cream base.
- Fit and finish the lid. Check the folded lid over the dry base before fixing its final corners. It should slide on without bowing the sides. Glue the tabs inside the lid walls and allow both pieces to dry fully before fitting them together again.
- Line and fill. Place white tissue inside the cream base and arrange the six wrapped chocolates in two rows of three. Keep the contents below the rim and fold loose tissue inward so it cannot catch beneath the lid.
- Close and tie. Seat the coral lid over the base. Wrap the ivory ribbon around the parcel in both directions and tie a bow on top. The ribbon should hold its position without denting the paper walls.
To resize a similar base, add twice the desired wall height to the intended internal floor measurement. A 12 cm floor with 4 cm walls therefore needs a 20 cm square. Allow a little additional width for the lid, checking the clearance with your chosen card. Curved, woven, and faceted containers need different patterns, while fabric pockets and wooden carriers rely on seams or structural joints rather than paper tabs.
See Exactly How a Corner Tab Closes
The closeup guide follows one corner of the cream base. Gold identifies the attached corner tab, pale blue identifies the front panel, and cream identifies the side wall. These colors clarify the parts of the same sheet. In the flat layout, the cut separates the tab from the front panel, while the fold between the tab and the side wall remains intact. The last view looks into the completed corner so you can see where the tab finishes.
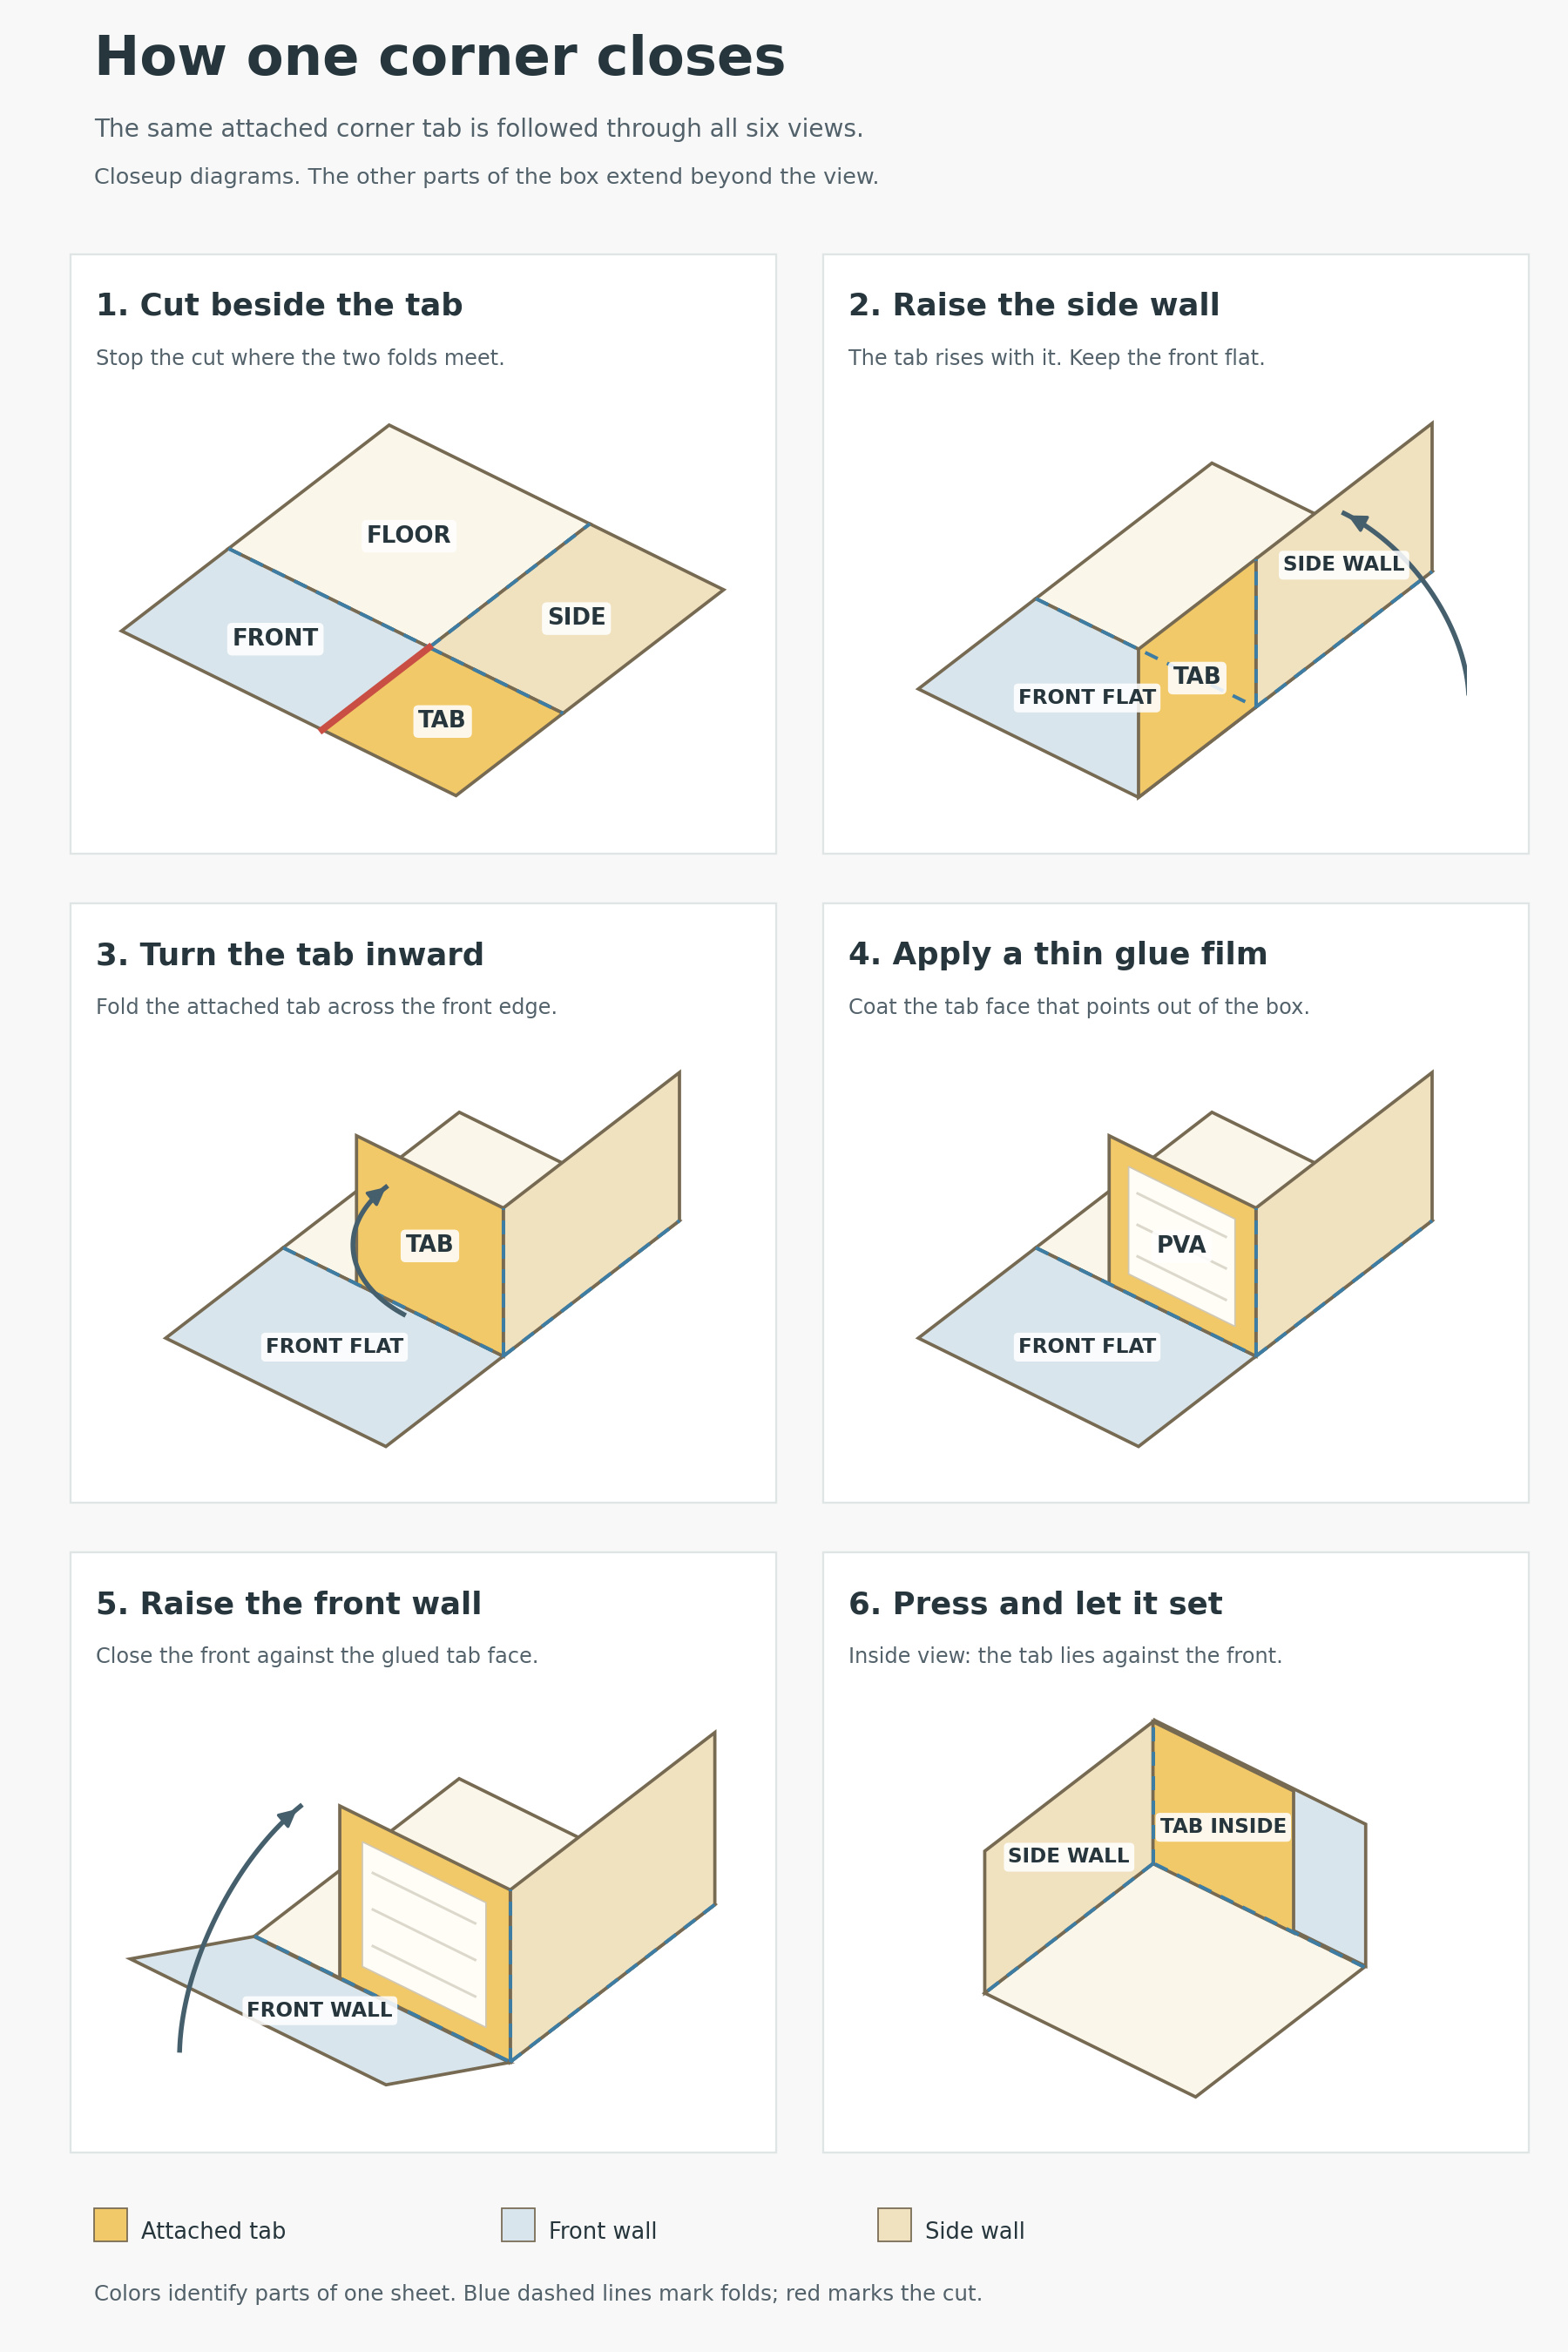
- Keep the tab attached to the side wall. Cut only from the outer edge to the crossing of the score lines. Stop at that crossing. The adjacent horizontal score line becomes the tab hinge, and the square tab stays part of the side wall.
- Raise the side wall. Fold the side upward along its floor crease until it stands at a right angle. Its attached tab rises with it. Leave the front panel flat on the table so the joint is accessible.
- Turn the tab inward. Fold the tab 90 degrees around the upright corner crease. It now extends across the front edge of the box, standing vertically where the front panel will close. Keep the tab's lower edge level with the floor.
- Apply glue to the joining face. Spread a thin, even film of PVA on the tab face pointing outward from the box. That face will touch the inside of the front panel. Keep adhesive off the floor and leave excess glue out of the fold.
- Raise the front panel. Rotate it upward on its floor crease until its inside surface meets the coated tab face. Align the top edges and bring the corner to a right angle. The front panel covers the glued face from outside.
- Press the joint from both sides. Support the outside of the front wall and press the tab against it from inside. Hold until the adhesive grips, following its instructions before filling the box. The tab remains visible against the inside wall, as shown in the final closeup.
Repeat the same movement at the other end of the front panel and at both back corners, mirroring the direction where needed. The base uses four 4 cm corner tabs; the lid uses four 3 cm tabs. A short crease test without glue helps confirm which face will meet the adjoining panel before you bond it.
With those basics in mind, explore these 34 ways to match a handmade container to a small gift. Use the paper folding method where it suits the shape, and follow the material specific suggestions for designs made from fabric, felt, glass, or wood.
1. Strawberry Balloon Sweet Basket
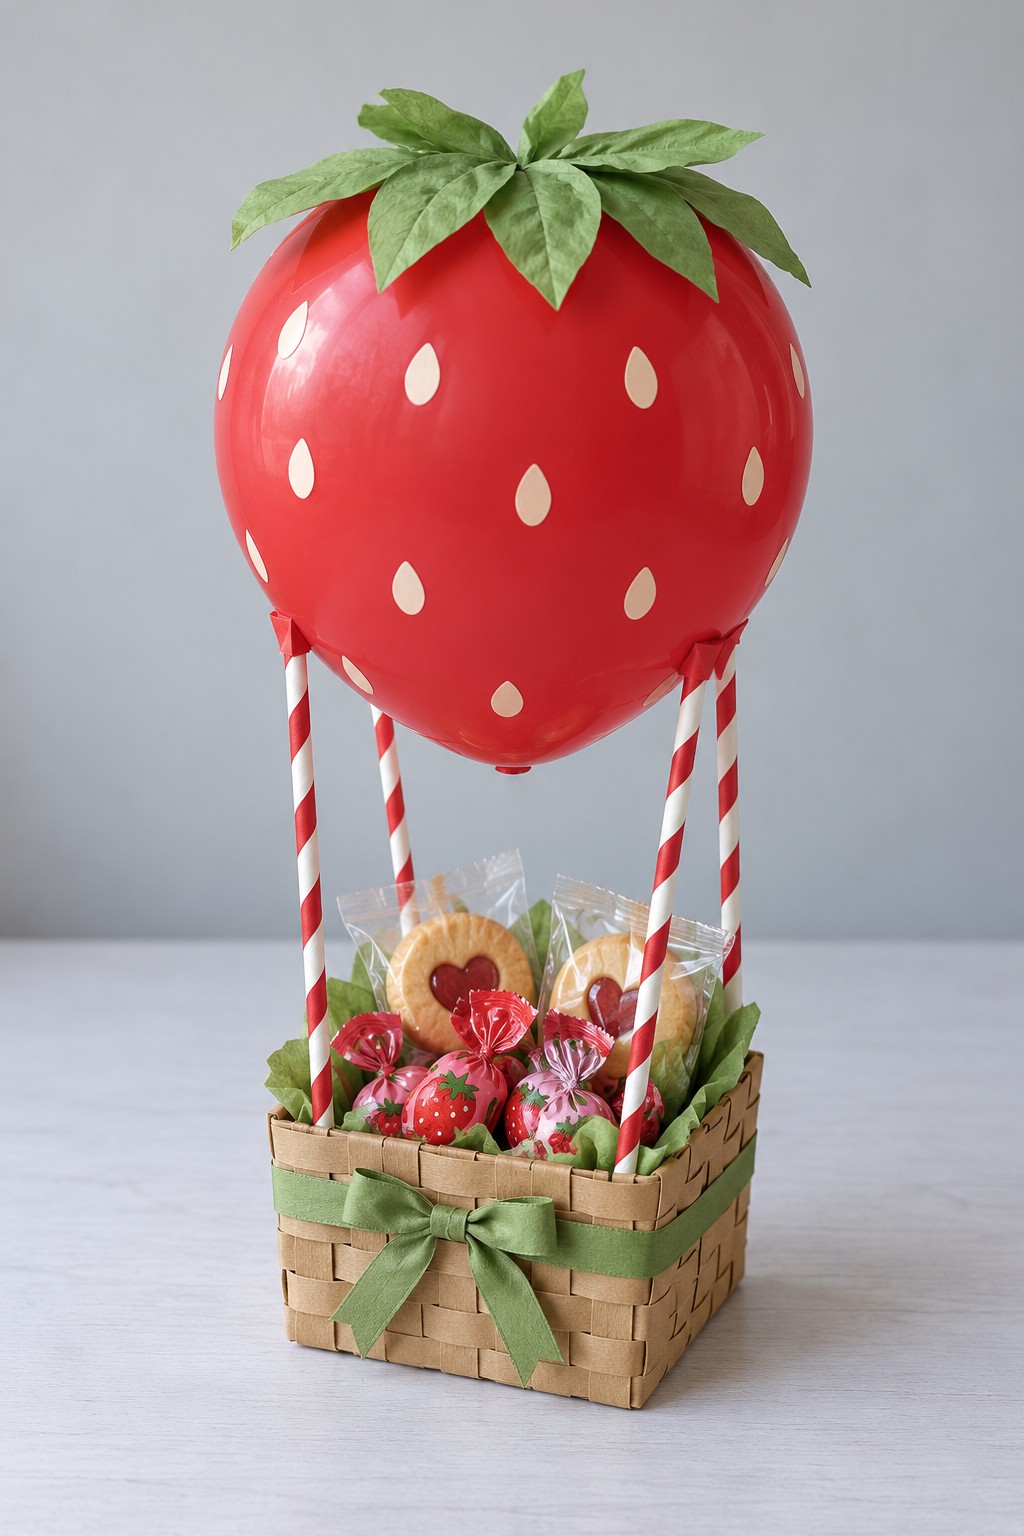
Turn a small sweet selection into a miniature balloon ride with a red strawberry balloon above a woven basket. Cream seed shapes, green paper leaves, striped supports, and a sage bow keep the fruit theme consistent from top to bottom. Choose a small, flat bottomed basket and leave the biscuit packets visible above the rim so the contents remain part of the presentation.
Build the basket first from interlaced kraft strips over a reinforced square base, or use a plain miniature basket as your starting point. Fix four striped paper straws inside reinforced corner pockets. An air filled balloon needs a lightweight support cradle or balloon cup secured to the upright structure; it should not depend on helium to stay in place. Add lightweight paper seeds and leaves with balloon suitable adhesive dots, keeping sharp ends away from the surface. Pack the treats last and carry the display from underneath the basket.
2. Friendly Ghost Balloon Candy Cup
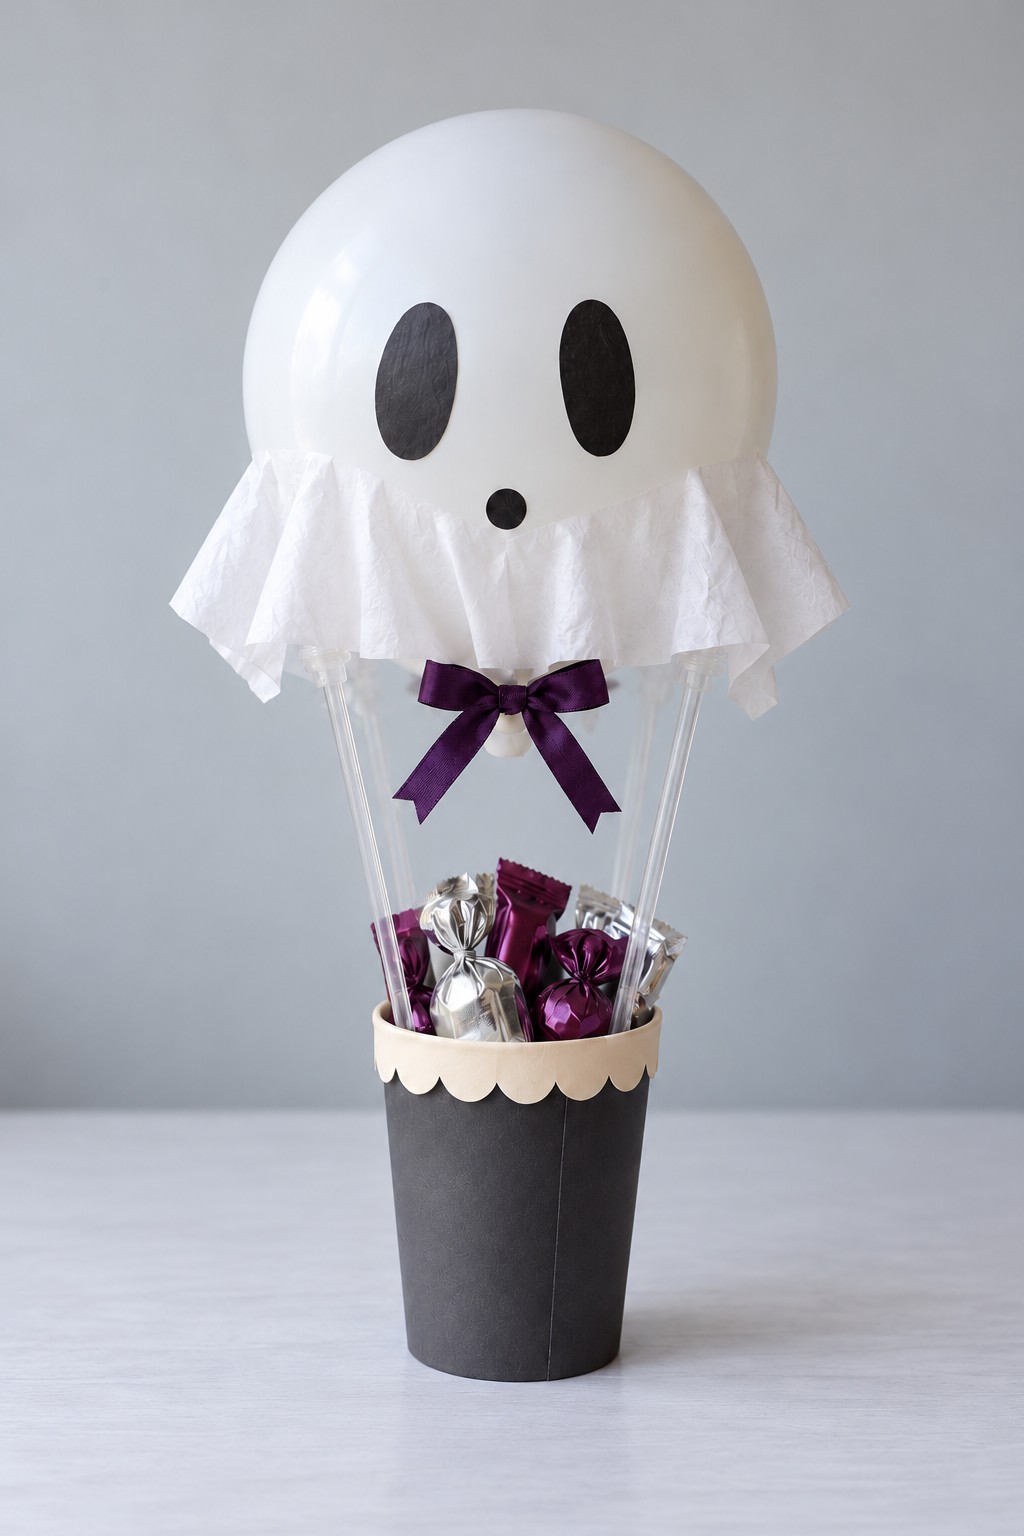
This Halloween gift combines a white ghost head, a fluttering tissue collar, and a black candy cup with a cream scalloped edge. The purple bow links the pale upper section to the silver and purple sweet wrappers below. Keep the face simple, using two dark oval eyes and one small mouth so it remains readable without adding loose decorative pieces.
Cover a sturdy paper cup with black cardstock and glue a narrow scalloped cream strip around the outside of its rim. Anchor clear craft supports inside the cup, using a fitted card insert to keep their spacing steady. Fit an air filled white balloon to a compatible support cup, then attach the light tissue collar without obstructing its fastening. Use balloon suitable face stickers rather than a sharp pen or hot glue. Keep the sweets individually wrapped, check the cup stands level, and treat the finished ghost as adult supervised decoration rather than a balloon toy.
3. Daisy Parasol Treat Pot
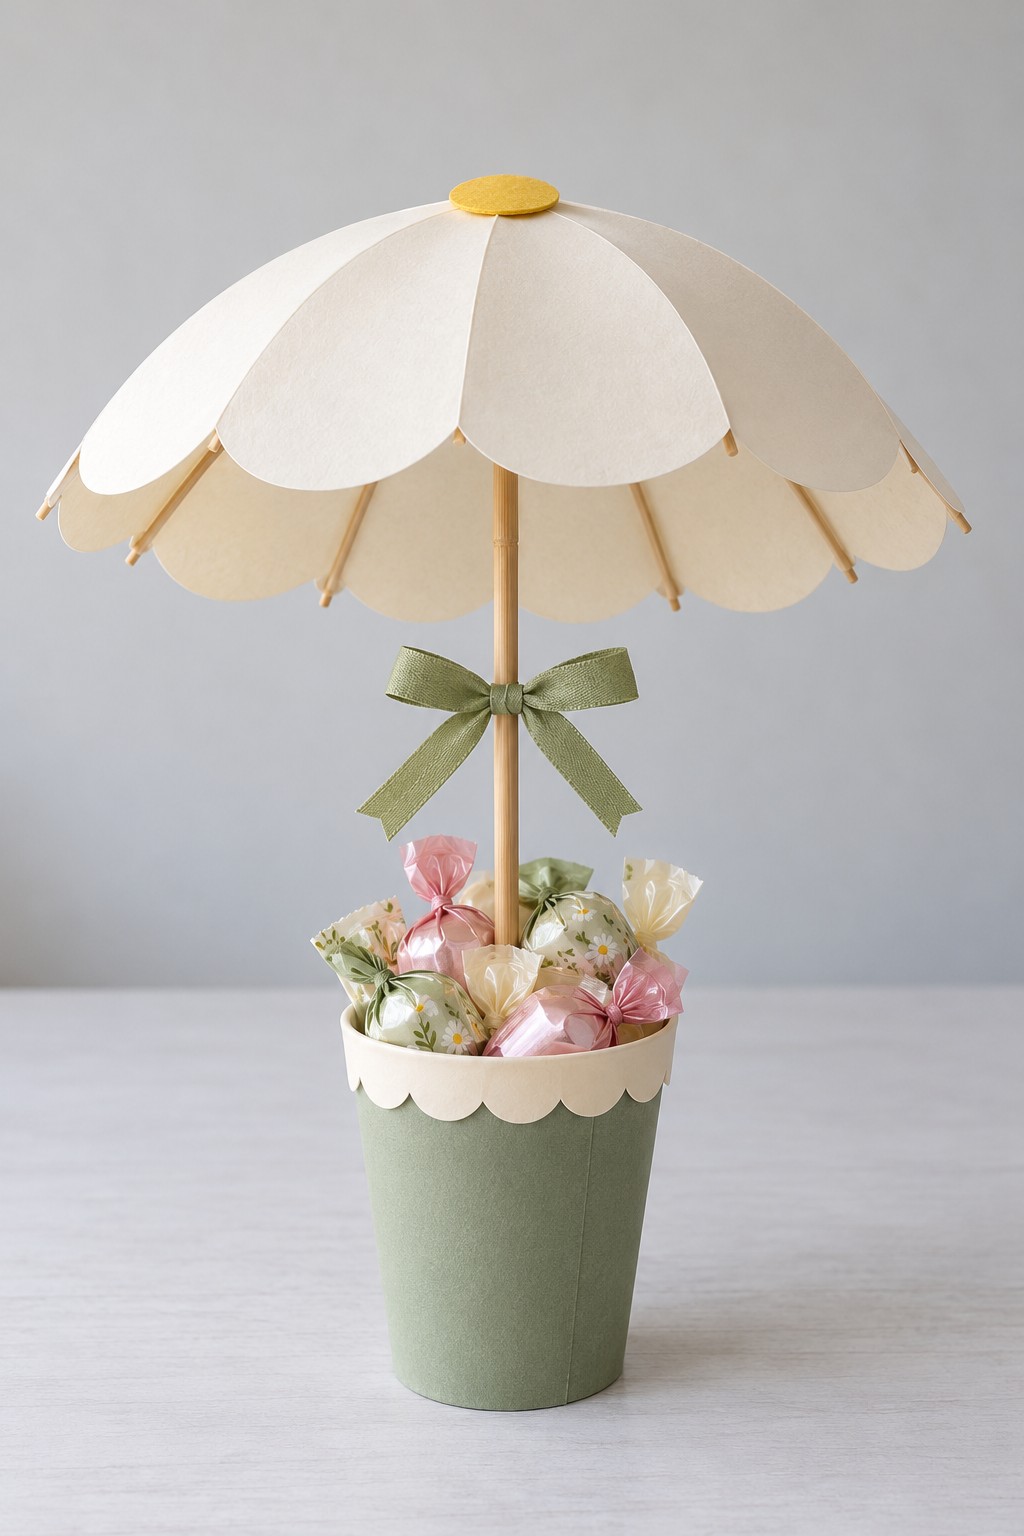
For a spring table, dress a small sage treat pot with a cream daisy canopy. Rounded petal panels overlap around a yellow center, while a green bow marks the central stem. Pastel wrapped sweets fill the pot without hiding its scalloped border. This design suits a place setting gift or a small thank you present where the full parasol can remain on display.
Begin with the pot and a securely fitted internal support block covered by a clean liner. Seat a blunt wooden dowel in the block before adding treats. Build the canopy separately around a central hub with lightweight wooden ribs, then cover the ribs with overlapping cream paper petals. Cap or sand every rib end before assembly. Fasten the canopy to the dowel and check that its weight does not make the pot tip. Use paper glue on the petal overlaps and an adhesive rated for the wooden framework. The canopy is decorative and should not be used as a handle.
4. Toadstool Chocolate Box
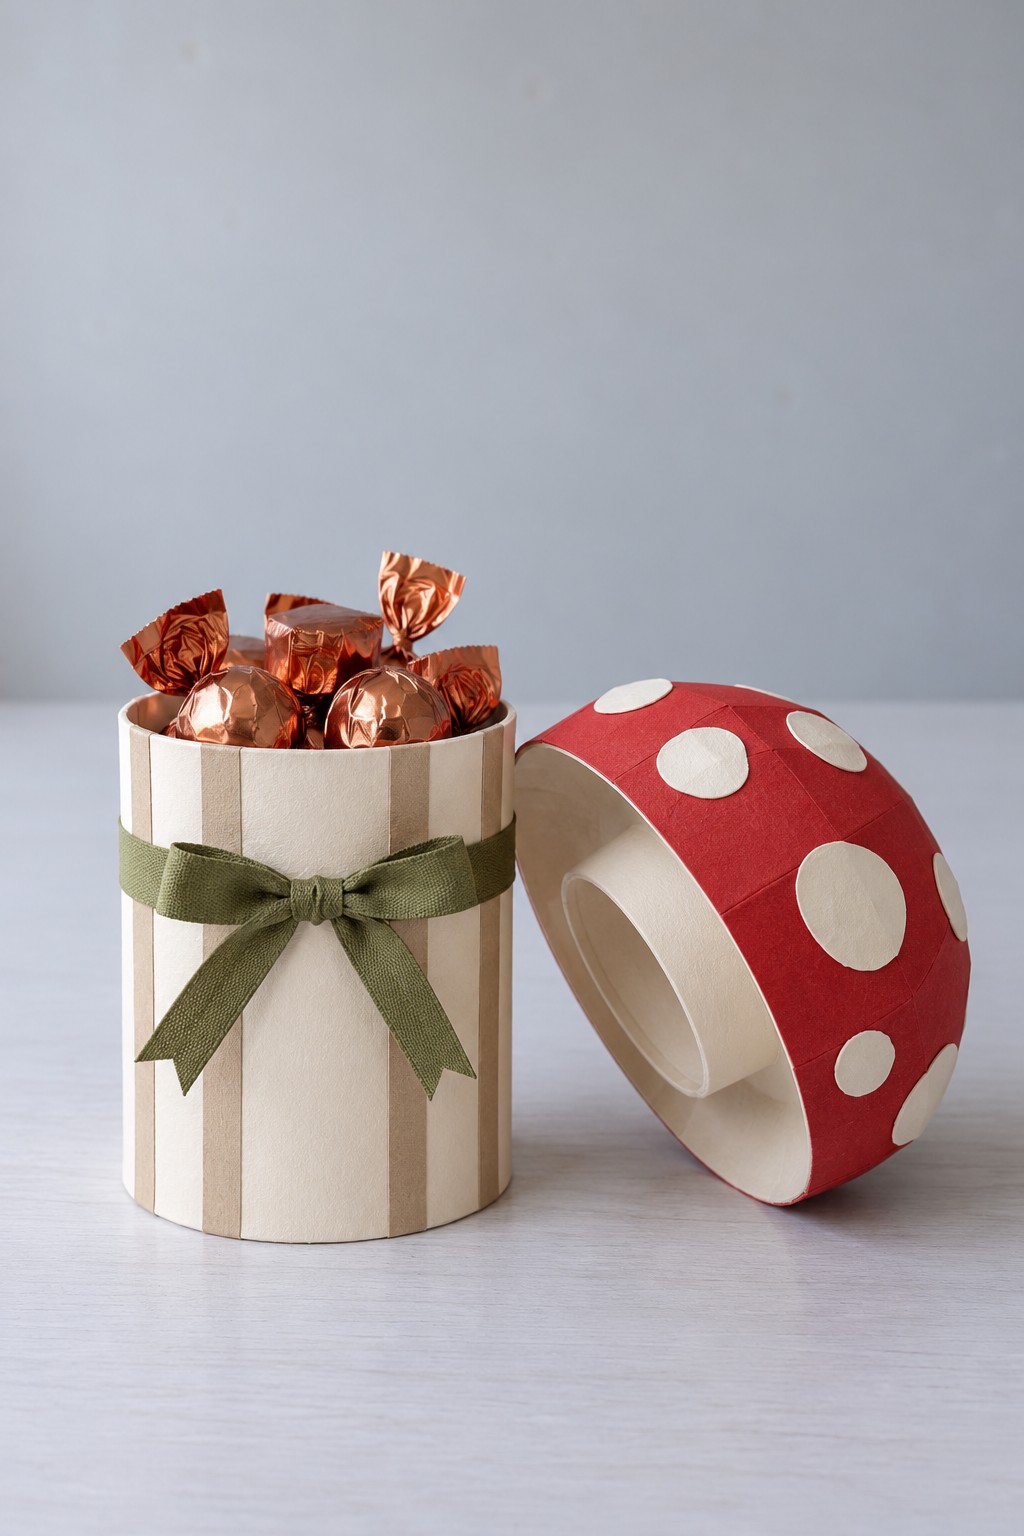
The lid gives this round chocolate box its woodland character: a broad red dome becomes the toadstool cap above a cylindrical cream stem. Vertical kraft stripes add detail without competing with the large cream spots on top. The olive ribbon stays around the body, allowing the cap to lift away separately and reveal copper wrapped chocolates inside.
Use a plain round cardboard box with a fitted lid as the core. Cover the body with cream paper and evenly spaced narrow kraft strips, keeping the opening clear. Build the shallow domed cap from shaped card segments over the original lid, adding its red covering before the cream spots. The fitted inner lid ring should remain exposed underneath so the mushroom cap still seats correctly. Apply paper adhesive sparingly to avoid ripples across the dome. Measure the chocolates before choosing the box, and leave enough headroom for the lid to close without crushing the wrappers.
5. Blue Parachute Sweet Hamper
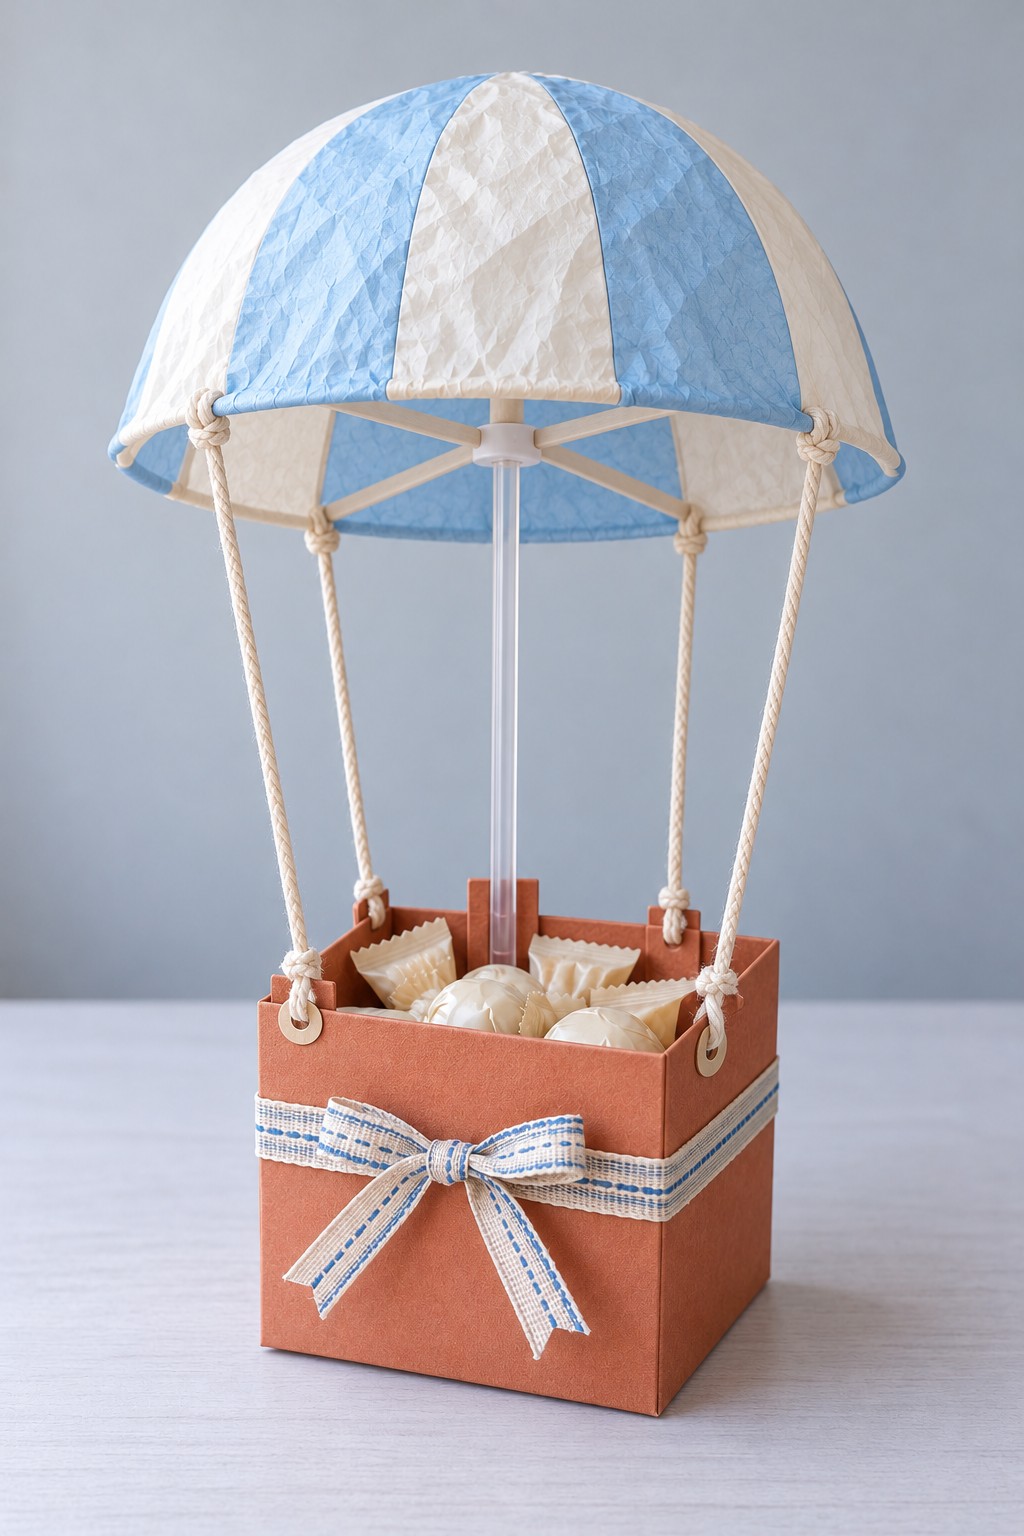
Blue and cream canopy panels, four cotton cords, and a terracotta box create a parachute inspired sweet hamper. The clear central support is an essential part of the design: it holds the canopy upright while the cords suggest suspension. A narrow woven ribbon around the box introduces a softer texture without covering the reinforced cord attachment points.
Make the square tray using folded card or covered board, then fit an internal support block beneath the lining. Seat a clear display rod in that block and attach its upper end to the canopy hub. Form the canopy over lightweight radial ribs before covering it with alternating paper panels. Reinforce four holes near the box corners with card washers or eyelets, then tie the cords between these points and the canopy rim. Keep all four lengths even so they do not pull the dome sideways. Fill the tray with wrapped sweets only after the framework is stable, and lift the hamper by its base.
6. Coral Paper Tote with a Scrunchie Pocket
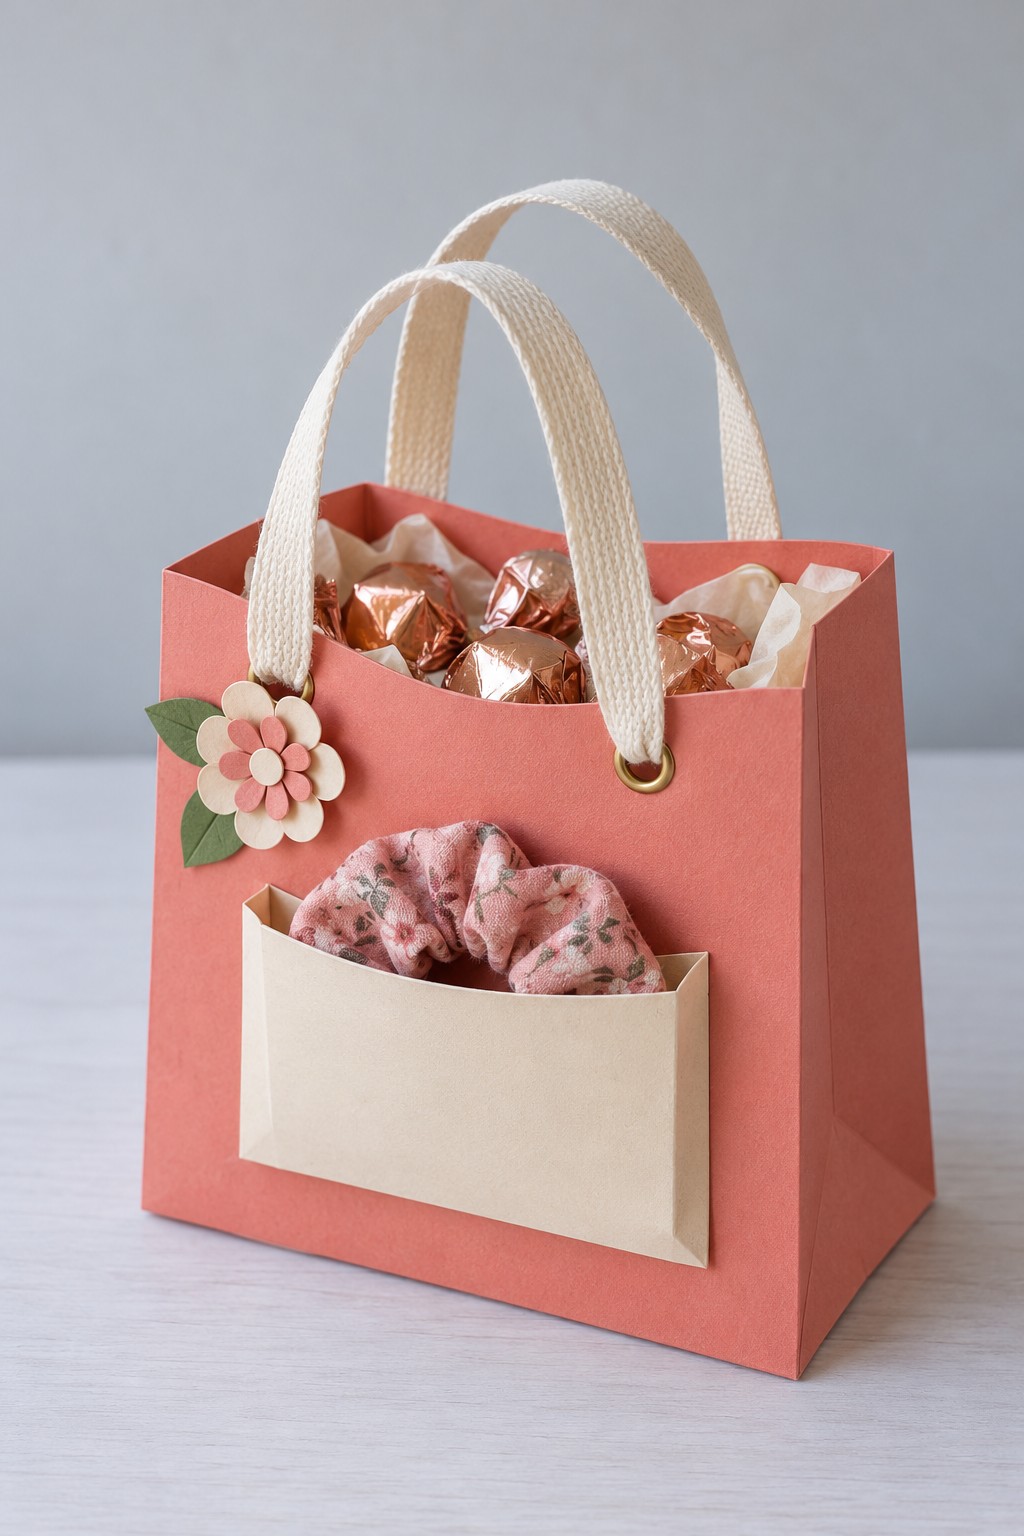
Pair wrapped treats with a floral scrunchie by giving each its own space in a coral paper tote. The separate cream front pocket keeps the soft accessory visible, while the sweets sit in the main compartment. Cotton webbing handles and a layered flower detail give the bag the character of a fabric accessory, even though its body is made from card.
Measure the contents, then draw a rectangular bag net with front and back panels, two side gussets, a joining tab, and overlapping base flaps. Score before folding, glue the side seam, and reinforce the bottom with a separate card rectangle. Make the front pocket from cream card with narrow folded side tabs that give it a little depth. Attach it before filling the bag. Reinforce the handle holes inside, set eyelets suitable for the card, and secure the webbing ends so they cannot pull through. Keep this tote for light contents and support its base when carrying it.
7. Crepe Peony Chocolate Bouquet
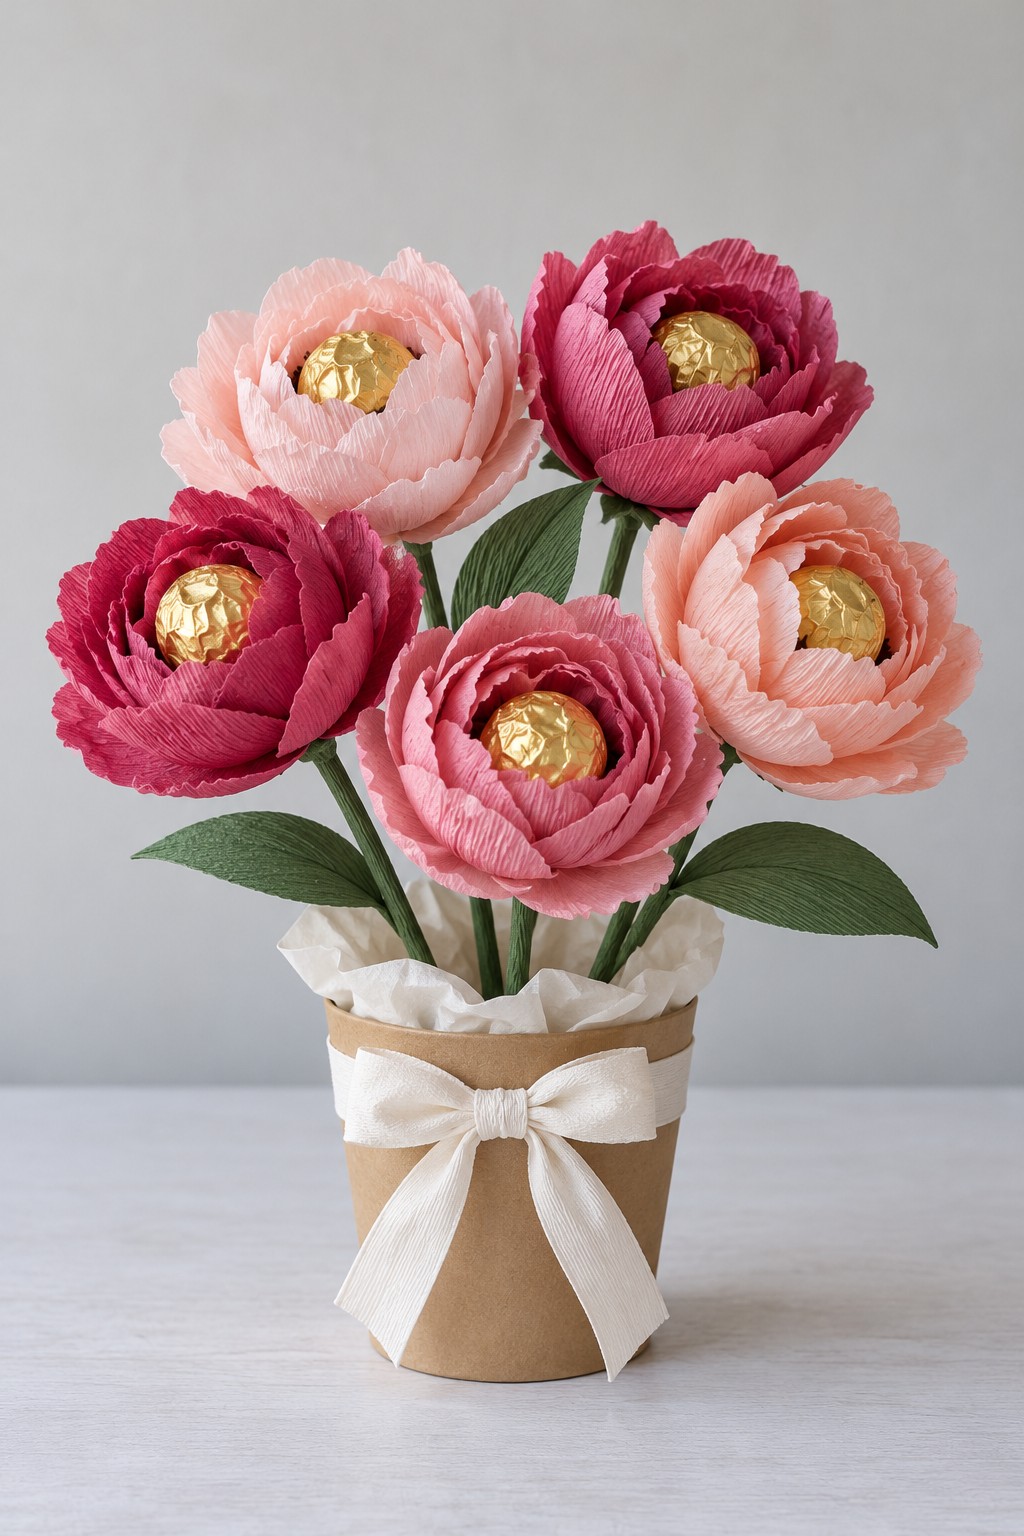
Five paper peonies with gold wrapped chocolate centers make a bouquet that can be enjoyed one flower at a time. Blush, coral pink, and deep raspberry petals give the arrangement depth, while green leaves frame the flower heads. A simple kraft pot and an ivory bow let the handmade petals remain the focus.
Cut rounded petals from floral crepe paper with its grain running from the base toward the tip. Gently stretch the middle of each petal into a cup, then overlap the layers around a separate paper cradle holding a wrapped chocolate. Attach the cradle to a blunt wooden stem without piercing the wrapper. Glue the petals to the paper structure, keeping adhesive away from the sweet itself. Cover the stem joints with green paper or floral tape, add leaves, and arrange all five stems in a stable covered insert. Make the chocolate removable from above so the recipient can take it out without pulling apart the entire flower.
8. Oversized Teacup for Tea and Biscuits
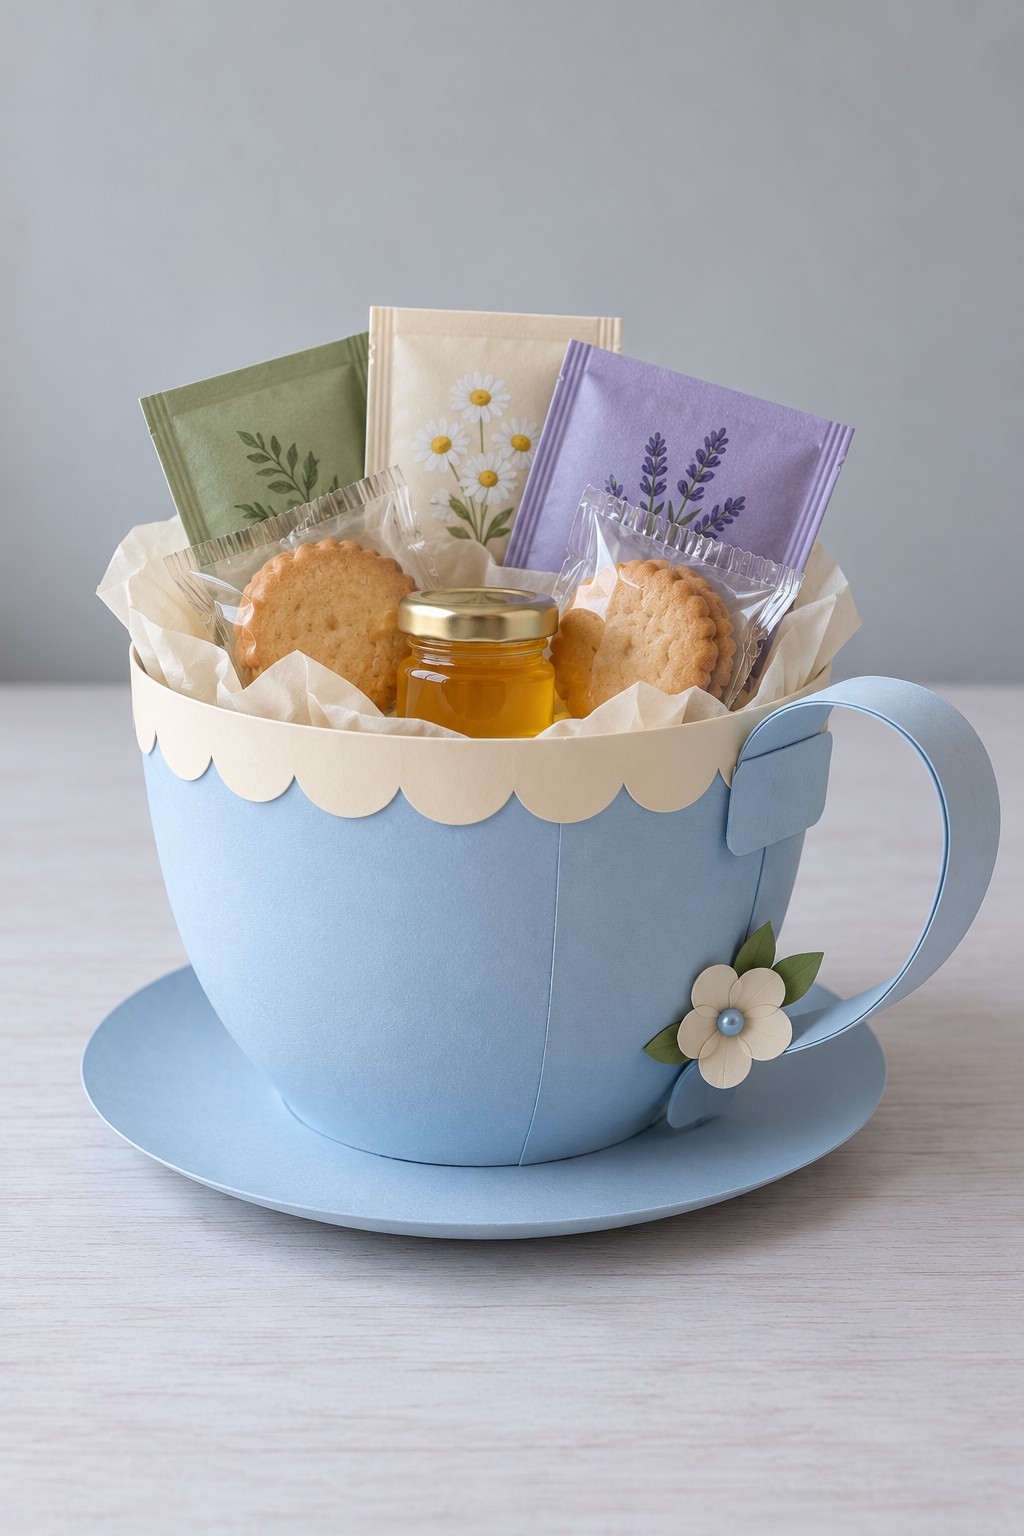
Package the ingredients for a quiet tea break inside an oversized blue paper teacup. A few tea sachets, wrapped biscuits, and a small sealed honey jar provide a useful selection without overcrowding it. Cream scalloped trim echoes the saucer and softens the wide rim. Place the taller tea packets at the back and the honey jar in front so each part is easy to see and remove.
Make a broad circular base from rigid board, then build the cup from tapered card panels with narrow joining tabs. Use a paper mockup to establish the curve before cutting the colored pieces. Attach a laminated card handle across two reinforced contact areas, keeping it decorative. Fix the cup to a saucer wide enough to support its footprint and add a fitted internal platform to keep the jar upright. The weight of the glass needs to rest on the base, not on the cup wall. Line the interior and carry the finished gift from beneath the saucer.
9. Pearl Shell Box with Coral Lining
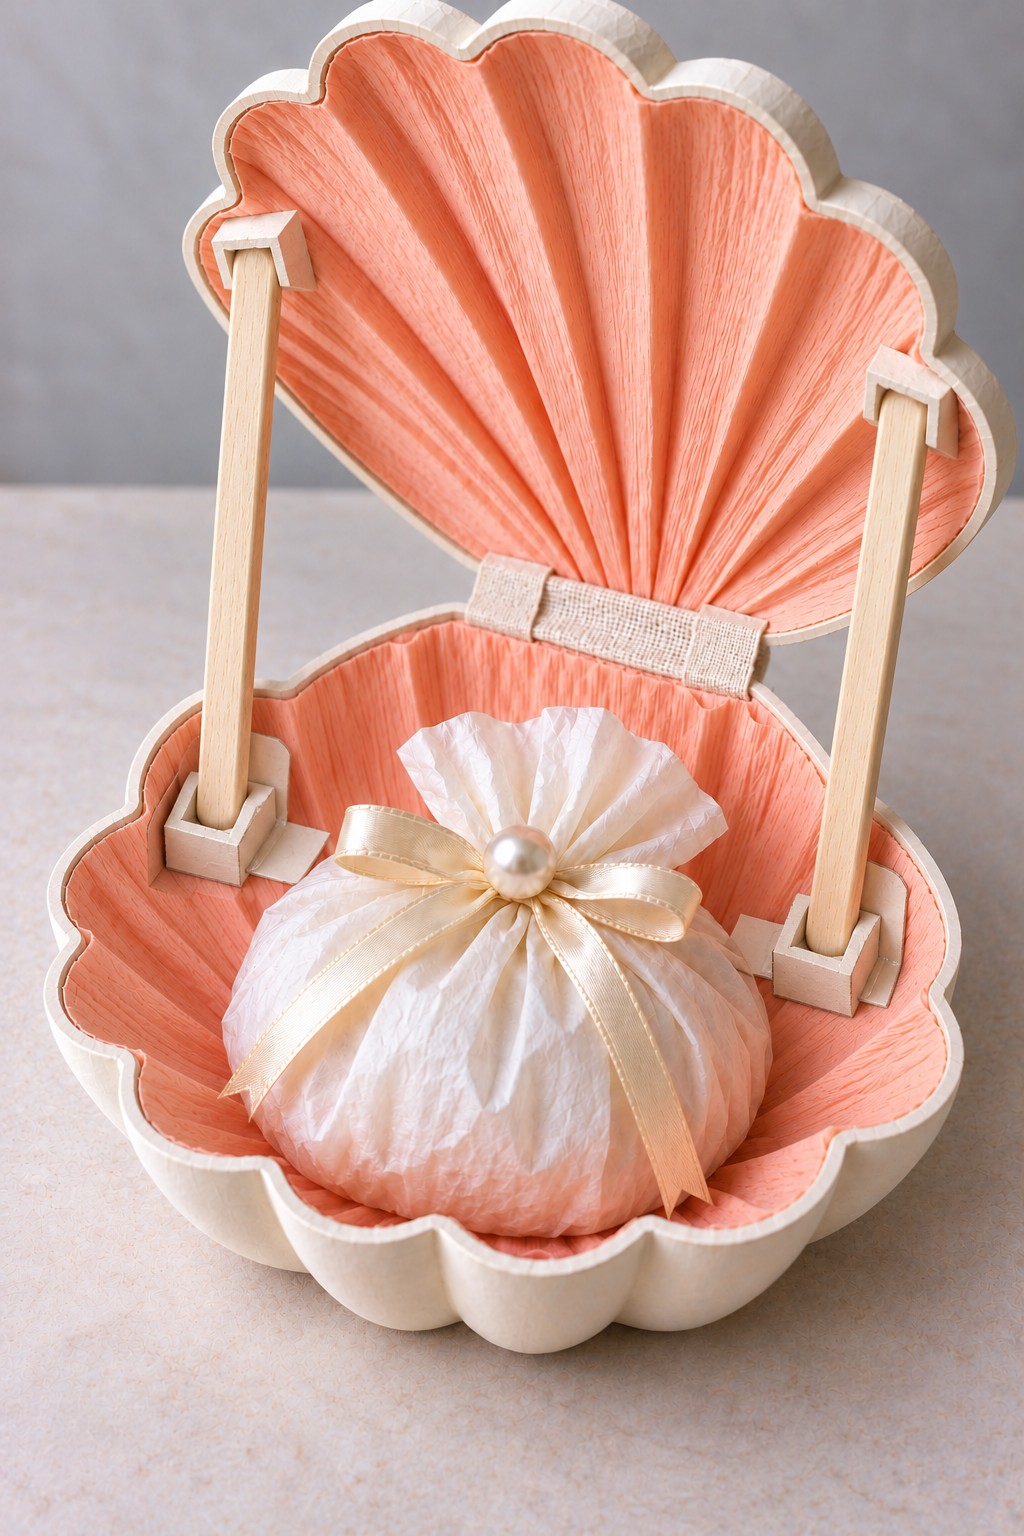
A scalloped shell box with coral lining gives a small tissue wrapped gift the appearance of a pearl. The cream outer edge, gathered paper texture, and pale ribbon all contribute to the seaside theme. Two wooden props hold the upper shell open so the contents can be displayed without relying on the hinge alone.
Trace one scalloped outline to make matching upper and lower shells from layered board. Build a shallow sidewall around the lower piece, then line both interiors with coral crepe paper, arranging the ridges toward the hinge. Join the shells with a wide fabric hinge bonded between reinforced layers. Make the two side props removable, with blunt ends seated in shallow sockets; remove them before closing the lid. This avoids forcing fixed sticks through the folding path. Wrap the actual gift separately inside the tissue parcel, and attach the pearl ornament to the bow rather than directly to the contents.
10. Thread Wrapped Sewing Gift Canister
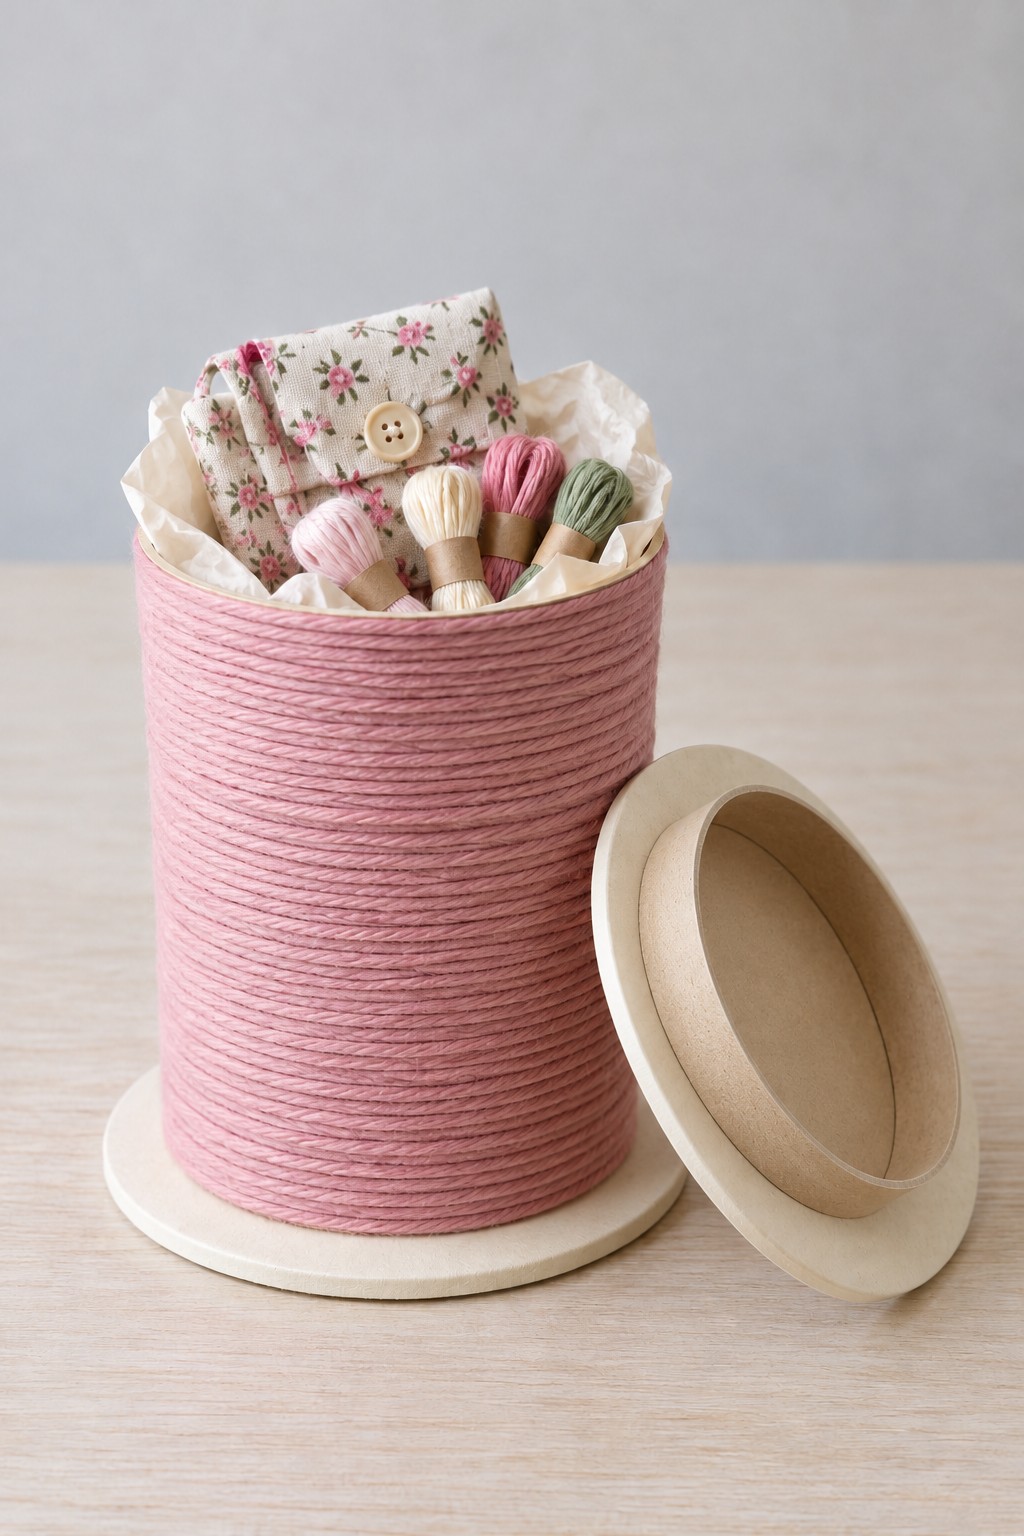
Sewing supplies suit packaging that looks like part of the craft. Wrapped in dusty pink cord, this tall cylinder resembles an oversized spool, with a floral fabric pouch and several skeins of embroidery thread rising above its tissue lining. The wide base disc strengthens the spool silhouette and helps it stand securely, while the plain lid closes the canister after the gifts are packed inside.
Start with a clean rigid cardboard canister and a matching removable lid. Add a slightly wider board disc beneath the base, then wrap the body with cotton cord, laying each turn against the previous one over a thin, even layer of PVA craft glue. Stop below the lid fitting so the extra thickness cannot jam it. Let the wrapping dry before placing textiles inside. Make the fabric pouch from cotton with a folded flap and sewn button closure. For other containers that can stay useful after gifting, explore these upcycled storage ideas.
11. Orange Slice Candy Box
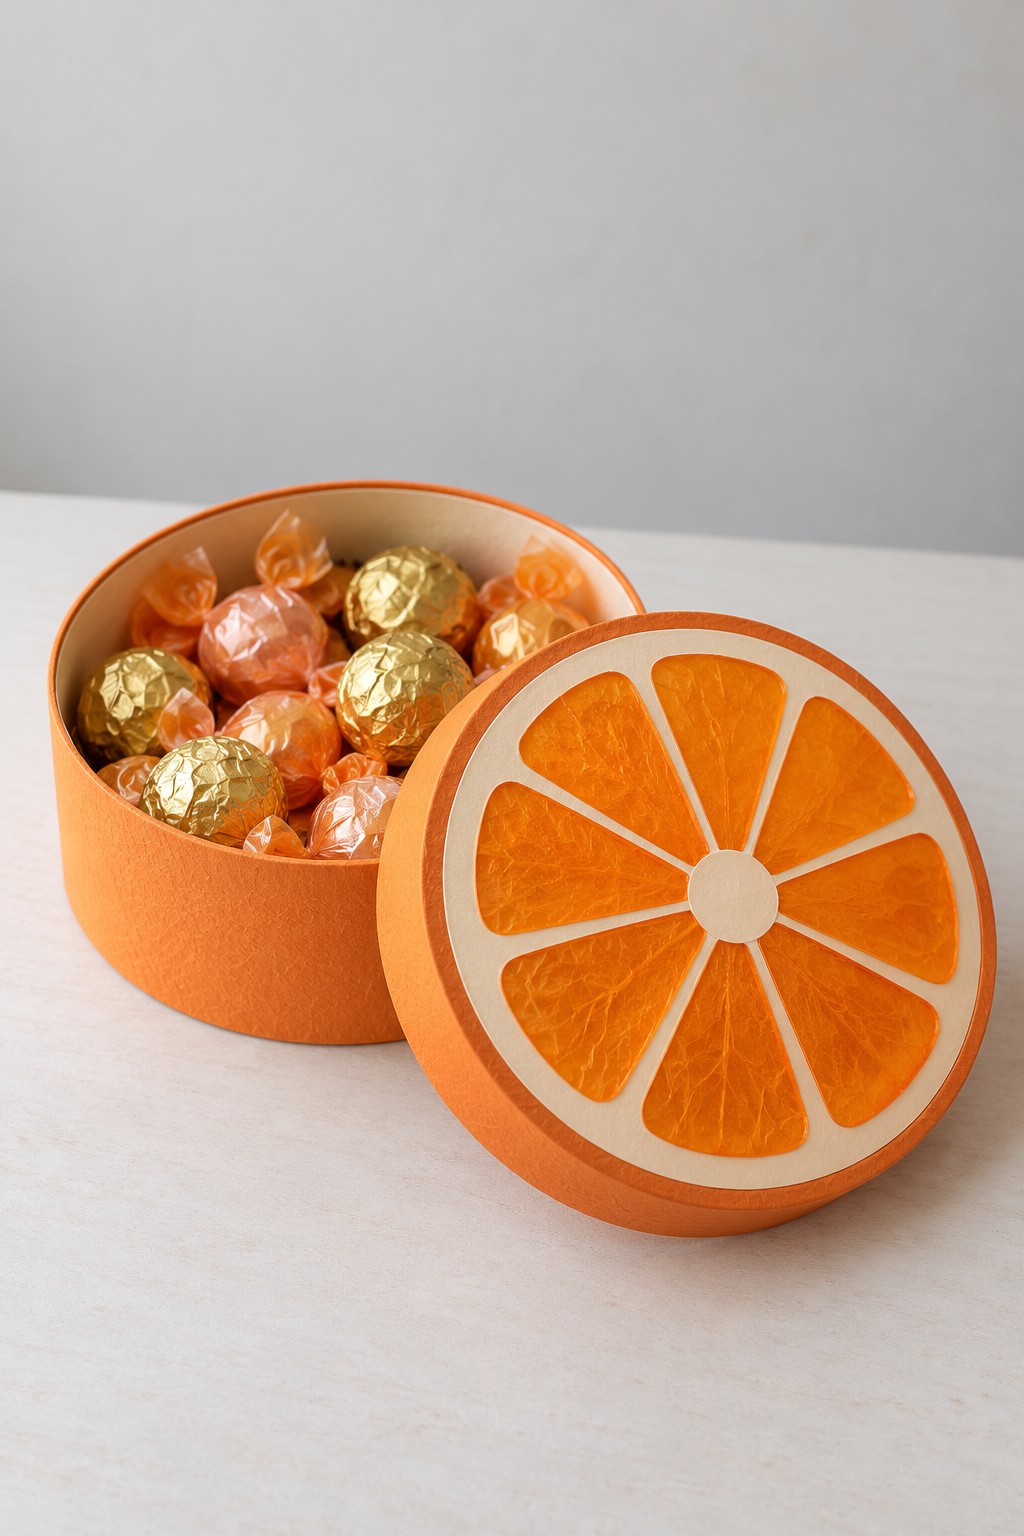
Bright orange sides and a citrus slice lid make this round box a cheerful choice for wrapped sweets. The lid uses a cream pith ring, a small pale center, and separate orange segments rather than a single flat circle. Small gaps between the segments create the recognizable fruit pattern, while the plain lower half keeps the design clear.
Cover a round cardboard box with orange paper, preserving the original lid clearance. Draw the citrus design on a paper circle that matches the lid, then cut a cream ring and a set of tapered orange wedges. Textured tissue or thin crepe paper adds a soft pulp effect when glued over the wedge shapes. Arrange every piece before attaching it, leaving narrow cream borders between segments. Keep all decoration on the top face rather than wrapping thick layers around the fitting edge. Fill the box after the adhesive has dried, and choose individually wrapped orange or chocolate sweets to complement the color.
12. Mini Market Stall Biscuit Hamper
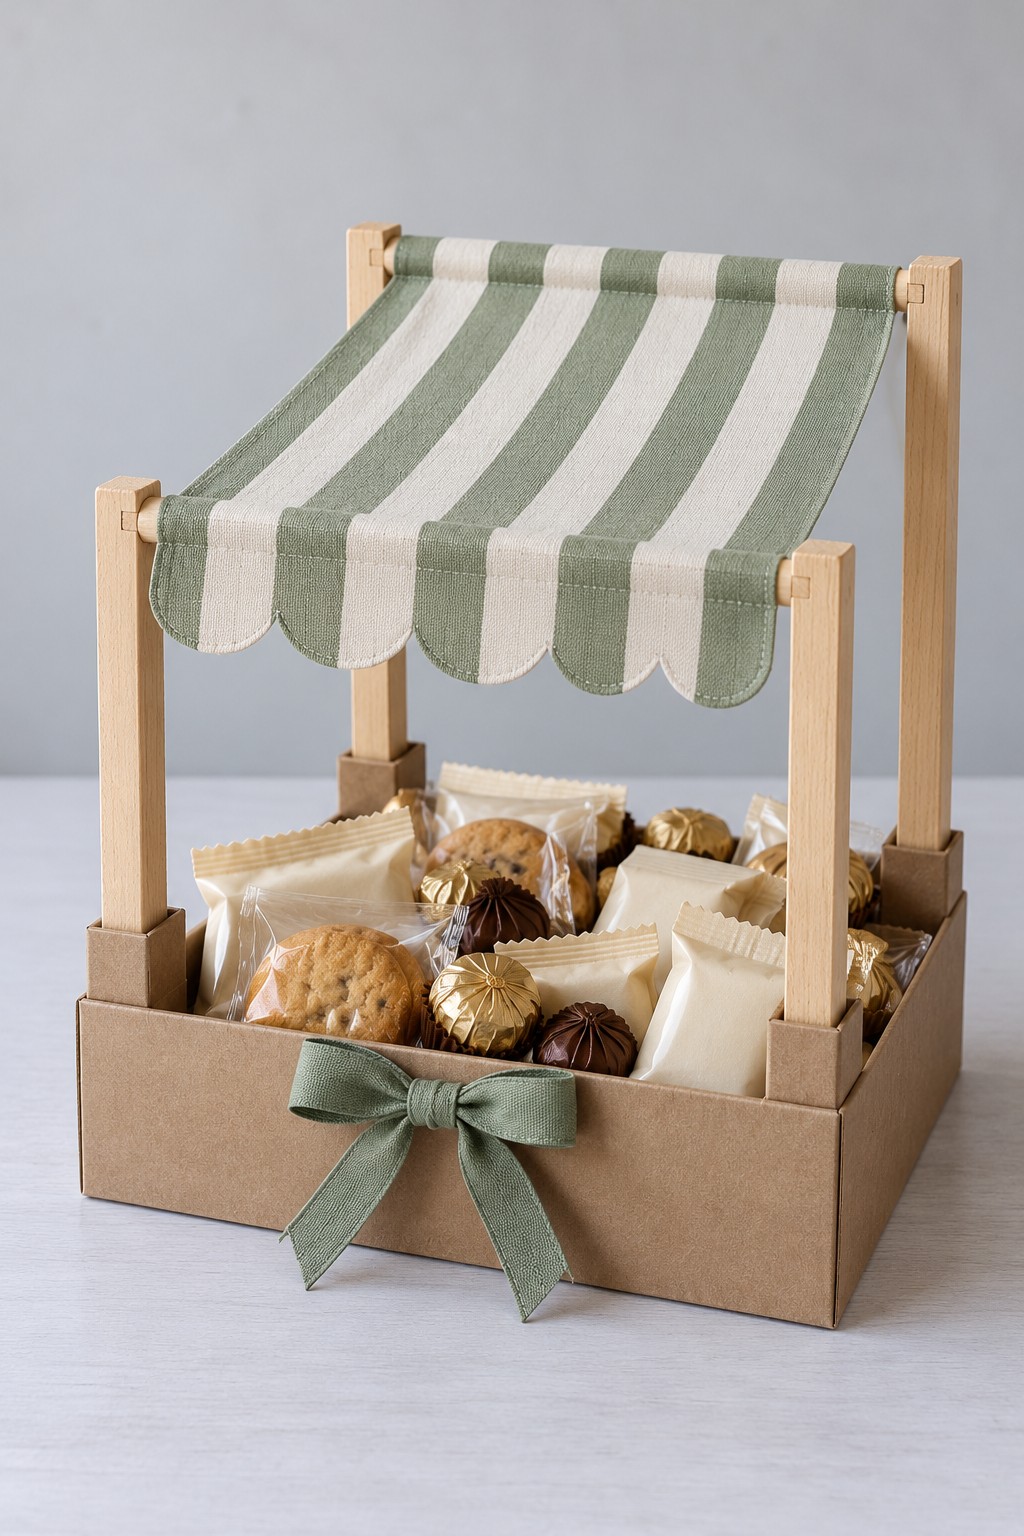
Give a biscuit selection the character of a miniature market stall with a striped fabric canopy above a shallow tray. The green and cream awning has a scalloped front edge, with taller rear posts giving it a gentle slope. The kraft base and sage bow stay simple, allowing the canopy and neatly arranged treat packets to establish the theme.
Make a reinforced tray, then fit four square wooden posts into deep card sleeves anchored to its corners. Use two matching taller posts at the back and two shorter ones at the front. Connect each pair with a crossbar before adding the awning. Sew or glue fabric channels around the bars so the canopy has clear attachment points instead of resting loose over the frame. Hem the scallops or use a backing layer to reduce fraying. Pack the biscuits in food suitable sealed bags, and keep every packet below the awning. Carry the gift beneath the tray rather than lifting the posts or fabric.
13. Felt Flower Hair Clips in a Drawer Box
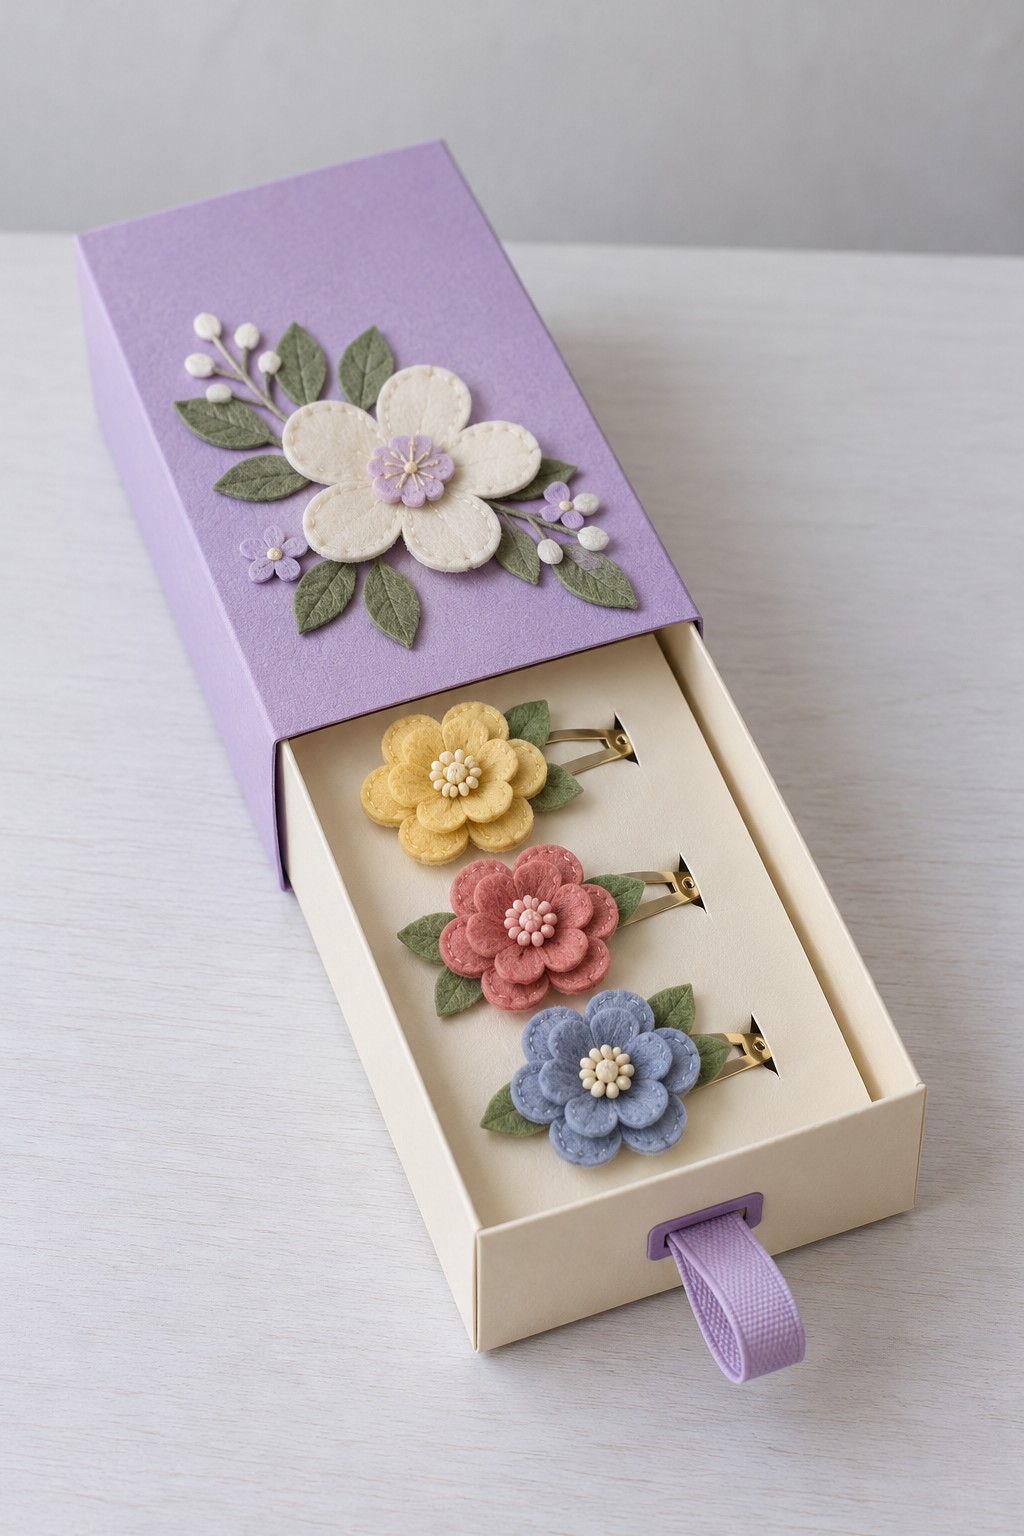
Three felt flower clips sit neatly inside a cream drawer, with a lavender sleeve decorated to match. Yellow, rose, and dusty blue flowers make the contents feel like a coordinated set without making every piece identical. The ribbon pull gives the recipient a clear way to open the package while keeping fingers away from the raised floral decoration.
Make the drawer with the folded corner tab method, then wrap a separate card sleeve around it, leaving enough clearance to slide. Secure the pull through a reinforced slot before lining the drawer. Layer felt petals and leaves, stitch their centers, and fasten each flower to a clip blank with suitable attachment holes or a securely sewn felt backing. Keep the moving clip parts clear. Cut small slots in a raised card insert to hold the clips without glue. These felt flower decorations offer more petal shapes you can adapt for a matching package.
14. Linen Book Box for a Botanical Gift Set
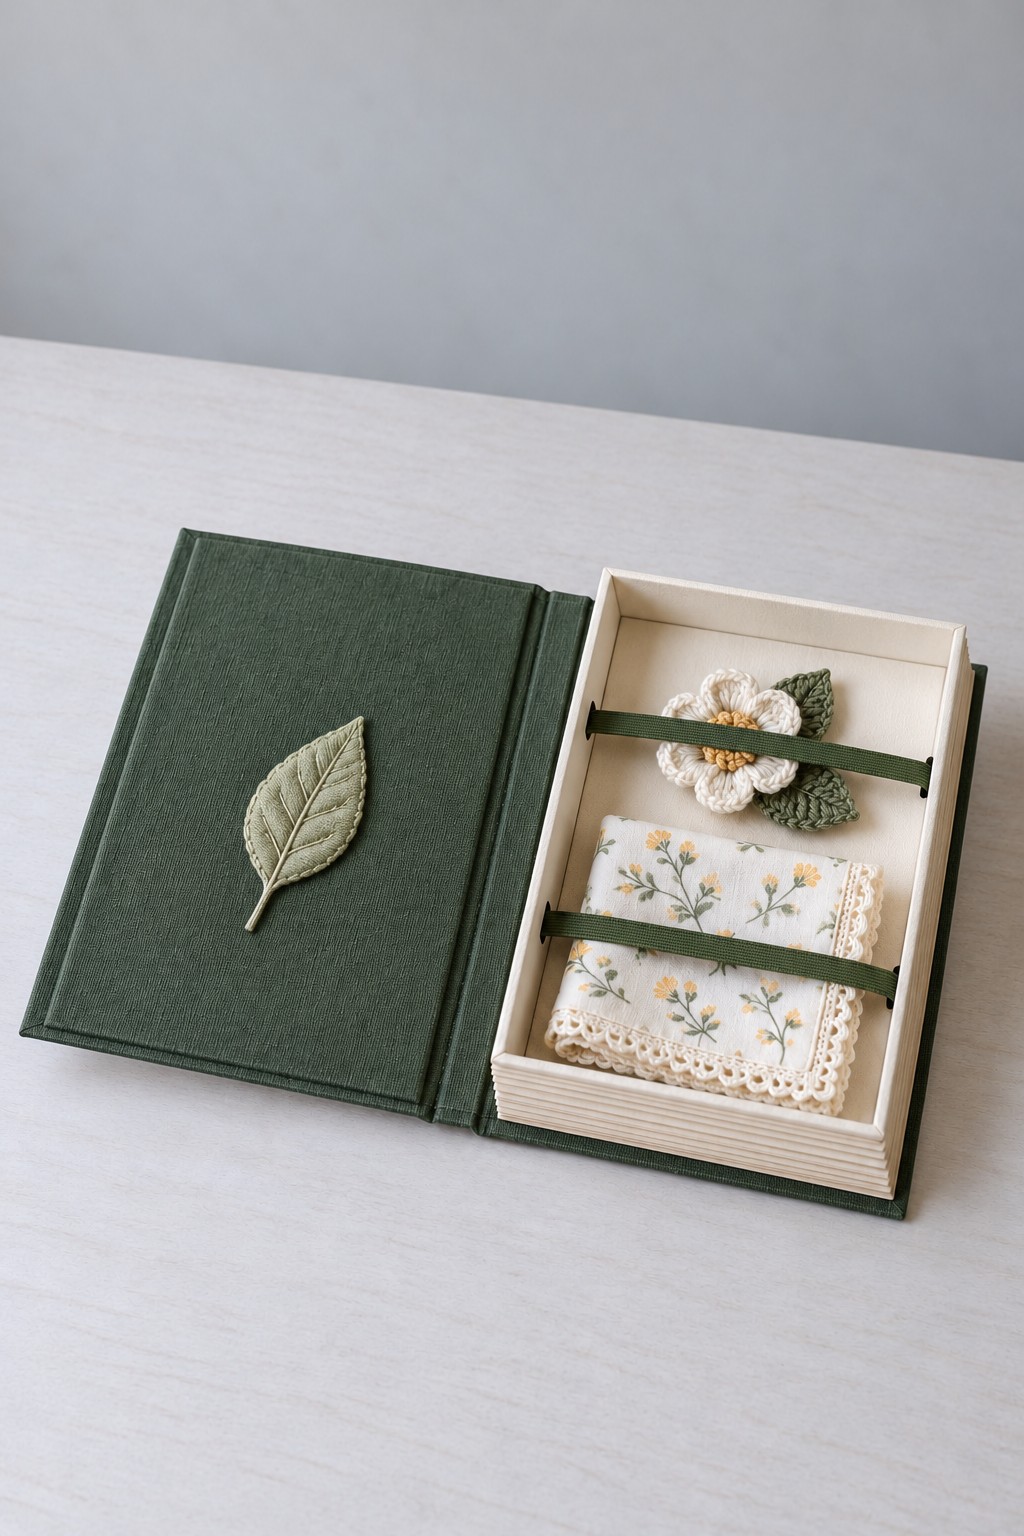
Opening this dark green book shaped box reveals a floral handkerchief and a small crocheted flower keepsake. A pale embroidered leaf decorates the cover, while cream layers along the tray edge suggest the pages of a book. Two narrow green retaining bands keep the gifts in place without covering their main details, making the presentation well suited to delicate textile pieces.
Build a shallow rectangular tray and a separate book cover from front, spine, and back board panels. Leave small hinge gaps between the boards, then cover them with book cloth or tightly woven fabric using a bookbinding adhesive suited to the materials. Attach the tray to the back cover only, keeping the spine free to move. Secure the retaining bands through reinforced slots before lining the tray floor. Add the leaf applique to the outer fabric before covering the board if you want its stitches hidden. Measure the folded handkerchief first so it lies flat and the cover closes without compressing the crochet.
15. Quilted Coasters in a Denim Envelope
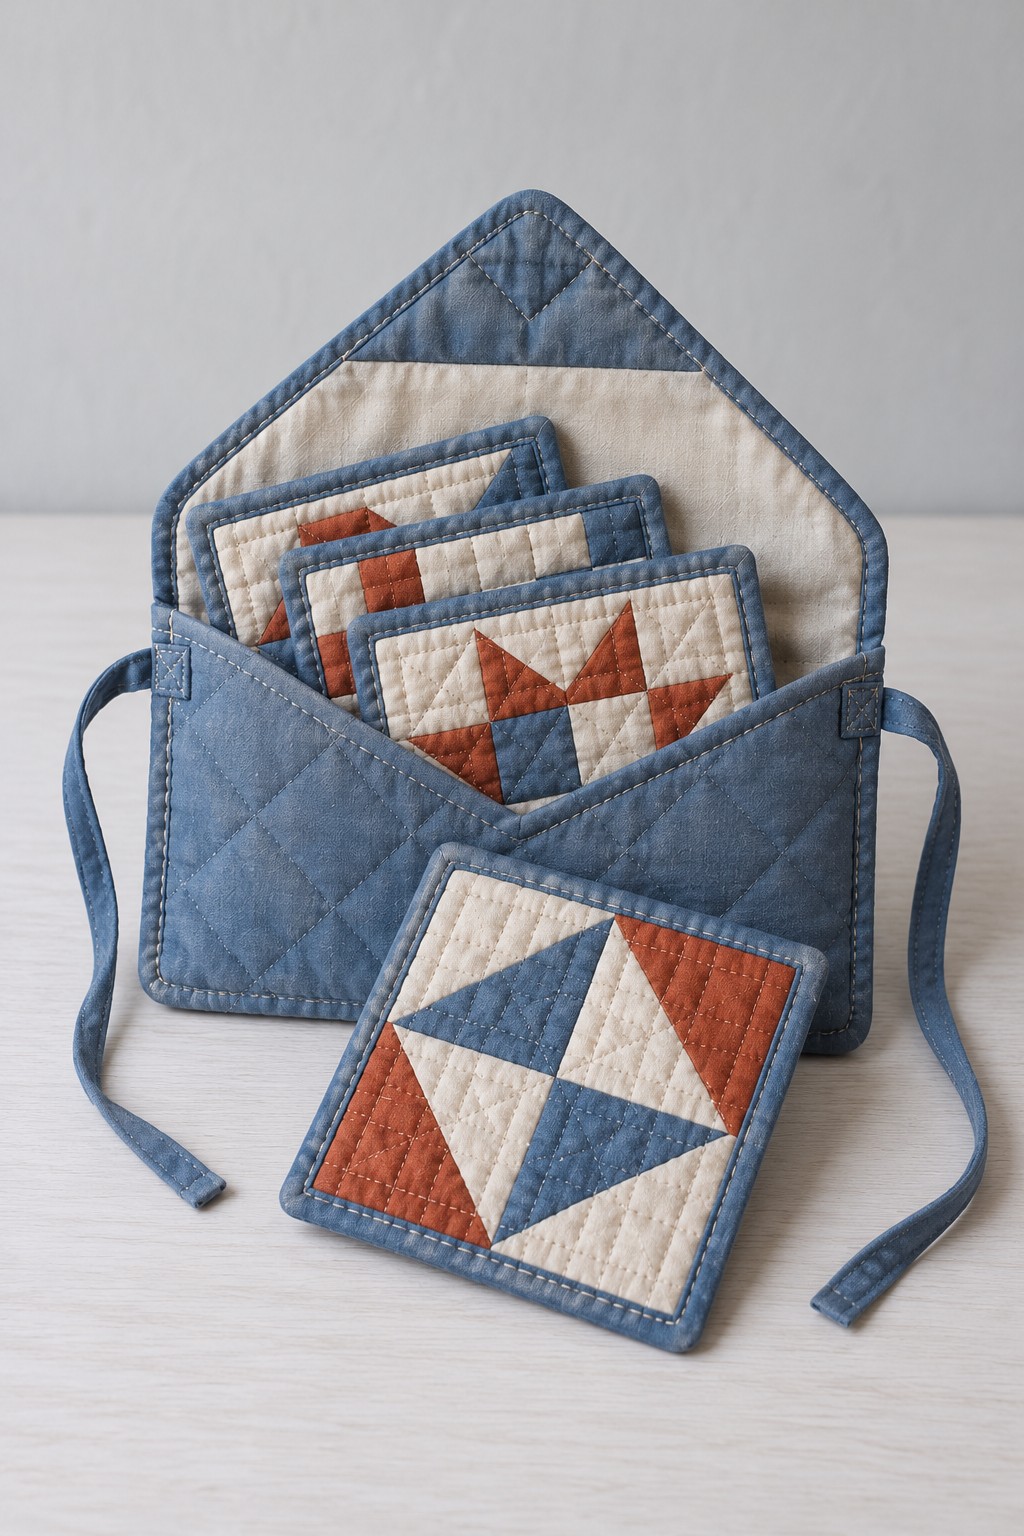
A set of patchwork coasters feels complete when it has a fabric envelope of its own. Blue, cream, and rust triangles create a repeated geometric pattern, and the denim colored binding connects the individual pieces to the quilted wrapper. Long fabric ties close the envelope without adding hard hardware that could catch on the coasters.
Piece the coaster fronts from cotton scraps, press the seams, and layer them with cotton backing and a thin suitable batting. Quilt through the layers and bind every edge before making the wrapper. Use one finished coaster to measure the envelope pocket, allowing space for the full stack and its binding. Quilt the wrapper flat, sew the side sections, and anchor both ties into reinforced seams. Prewash compatible fabrics before cutting to reduce later shrinkage differences. Use the finished set beneath cups according to the materials chosen; ordinary coaster batting does not automatically make these pieces suitable for hot cookware.
16. Honeycomb Box with a Jar and Wooden Dipper
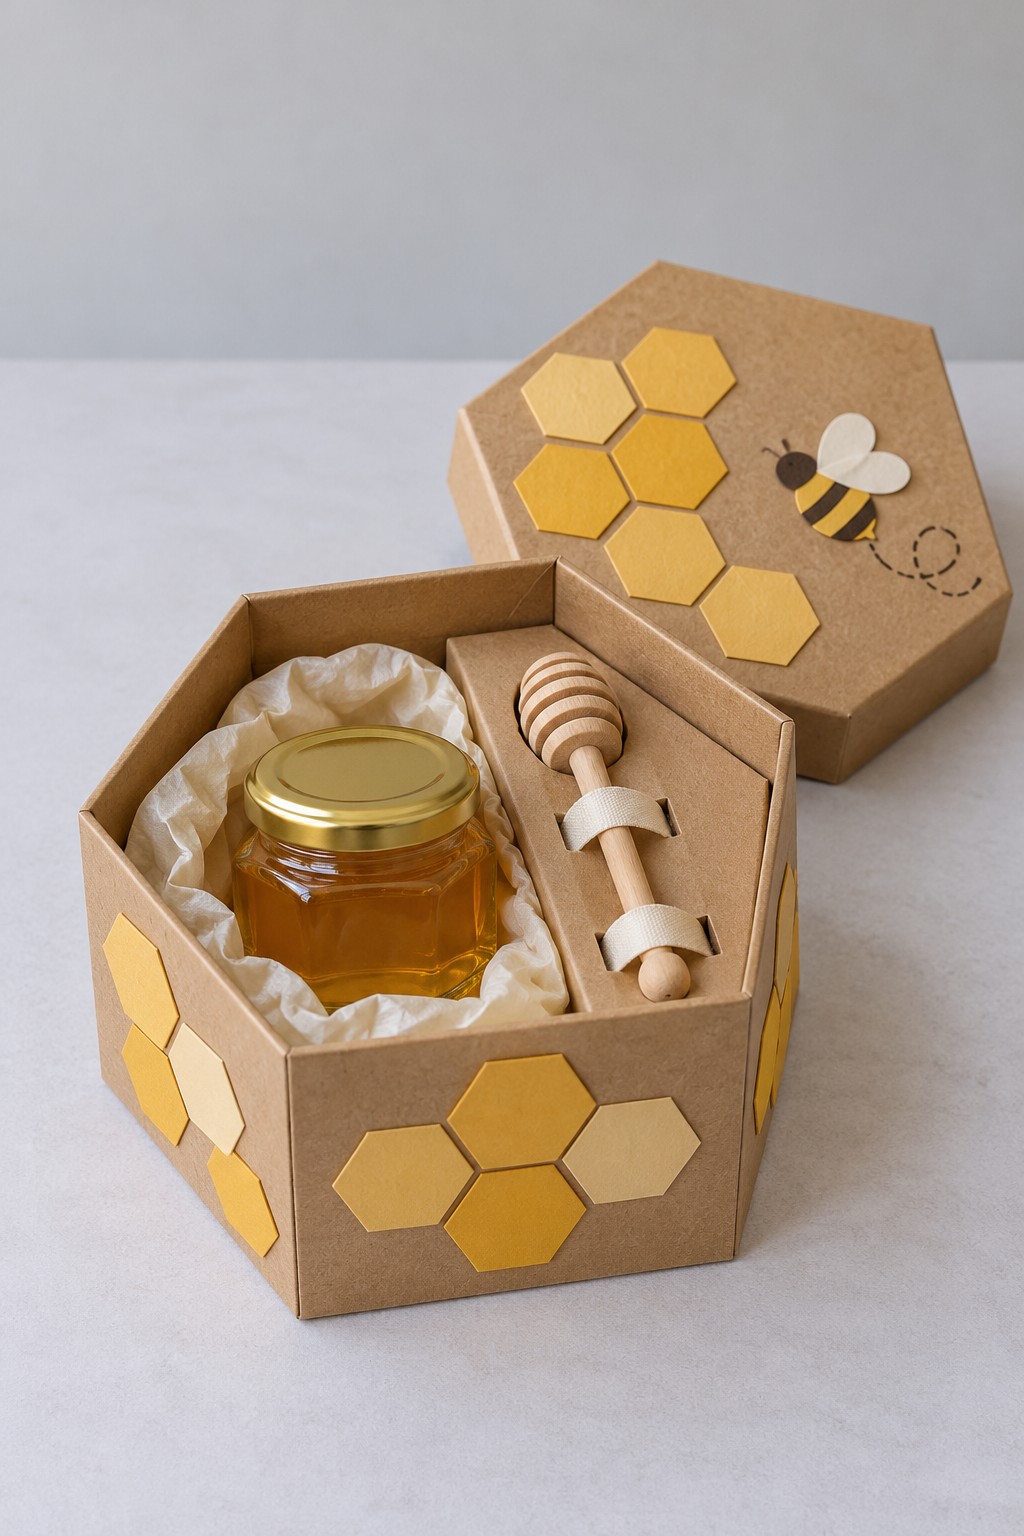
Echo the honeycomb around a honey gift by choosing a hexagonal kraft box. Yellow hexagons and a small paper bee decorate its lid, while a sealed jar sits beside a wooden dipper held by two card loops inside. The restrained decoration leaves the unusual box shape readable and makes the contents look deliberately fitted rather than loosely packed.
Draw a regular hexagon large enough for the actual jar and dipper, then build its sidewall from six scored panels with a joining tab and bottom tabs. For heavier jars, use a reinforced board floor and a fitted insert that prevents sideways movement. Make the lid separately with a little extra clearance around its inner rim. Glue the yellow hexagons to the outside after checking their arrangement. Attach the dipper loops to an insert rather than relying on tissue alone. Use a clean dipper intended for food use, retain the honey label, and carry the jar's weight from underneath the box.
17. Polka Dot Boot Box for Cozy Socks
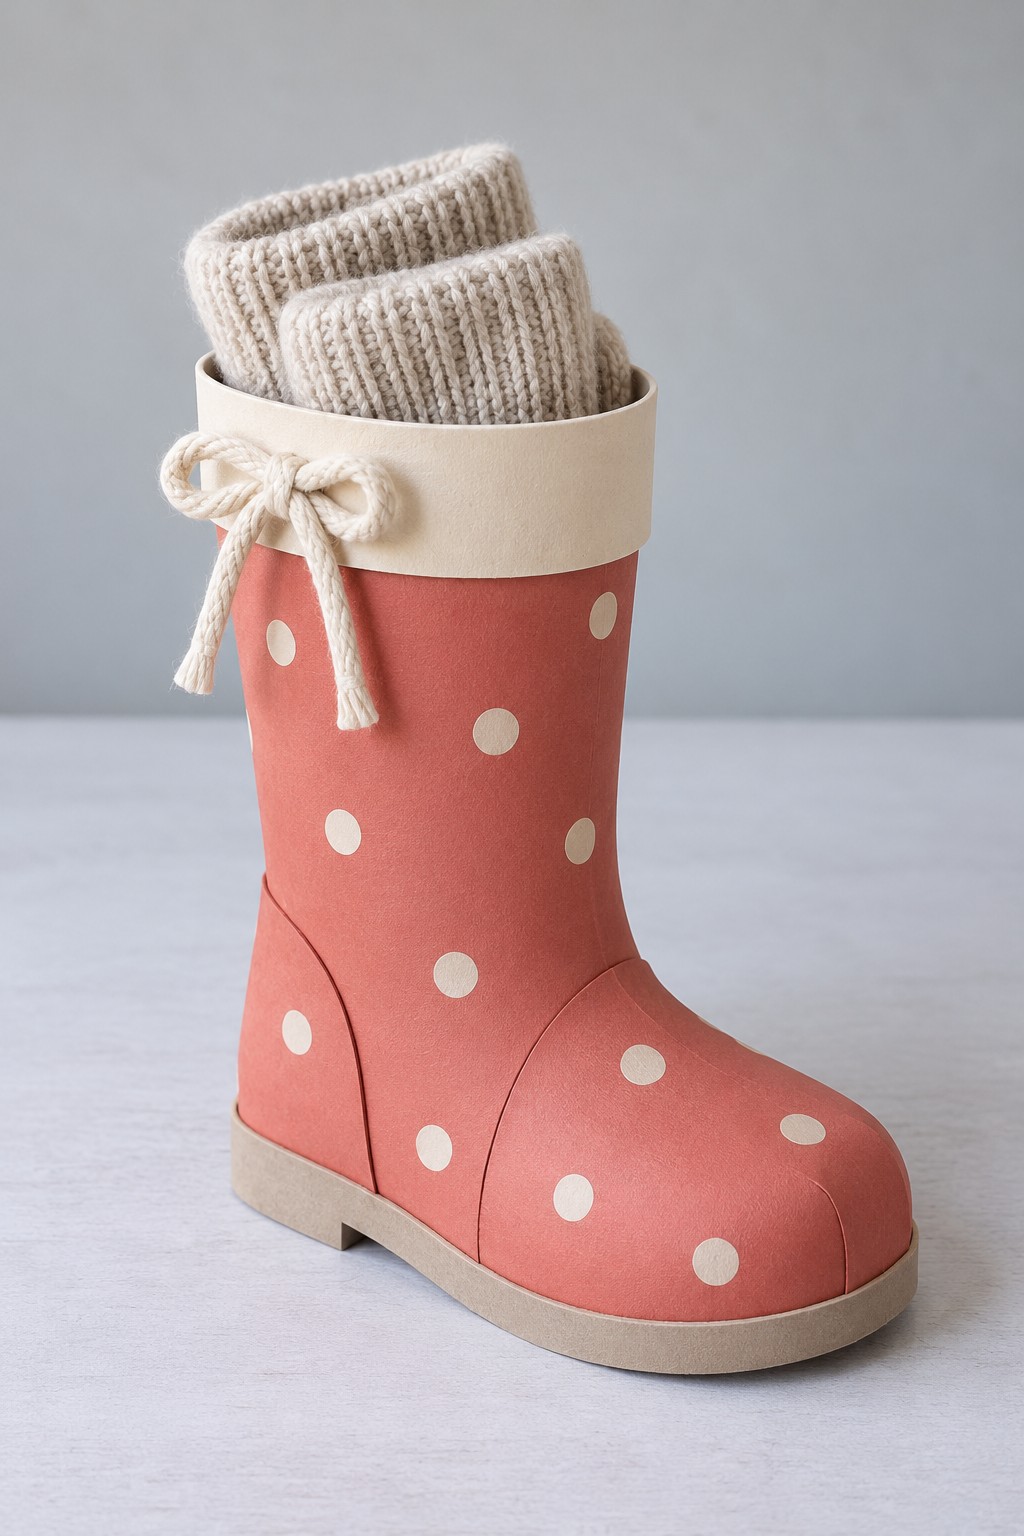
A coral boot shaped container makes a pair of neutral knitted socks feel playful without needing extra accessories. Cream dots, a broad cuff, and a small cord bow echo the soft color of the socks. The flat sole gives the packaging a stable footprint, while the open top makes the gift visible and easy to remove.
Begin with a full size paper side profile, then use it to cut two matching boot shapes from firm card. Connect them with a scored strip around the toe, sole, heel, and back, leaving the top open. Curved areas need closely spaced tabs and a flexible covering paper, so test the toe section before final assembly. Reinforce the sole with a separate rigid insert and cover the seams with thin matching paper. Add the cuff and dots after the body is square and dry. This is decorative packaging for light textiles, and its paper construction should never be worn as footwear.
18. Artist Palette Paint and Brush Tray
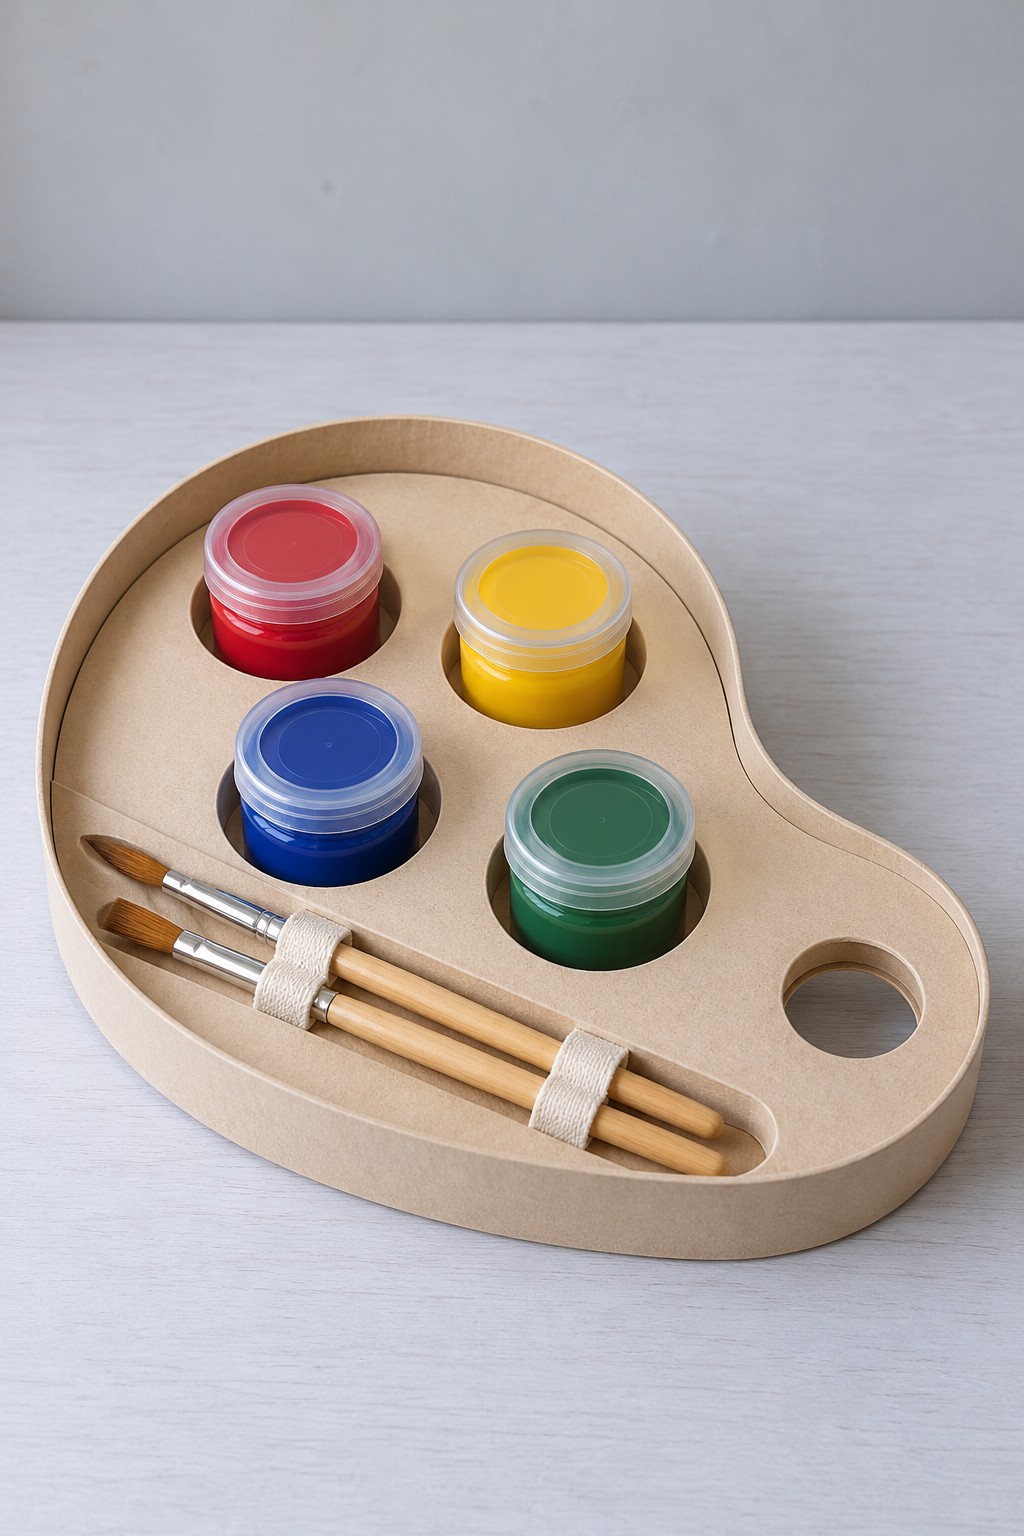
Organize four small paint pots and two brushes in a tray that borrows the outline of an artist's palette. The kraft surface has a raised edge, round recesses for the lidded pots, and a separate brush channel. Cream fabric loops hold the brushes in place, while the thumb hole makes the silhouette instantly recognizable.
Trace the outline on rigid board and cut several matching layers. Keep the bottom layer solid beneath the paint pots, then cut circular pot openings and an elongated brush channel in the upper layers. Cut the thumb hole through every layer. Build enough depth to locate the actual pots securely without trapping their lids. Glue the layers flat, add a narrow raised rim, and finish exposed edges with kraft paper. Anchor the brush loops through slots underneath the insert so their ends are concealed. Keep the paint containers sealed and preserve their product labels, especially for a child's gift. The tray organizes closed paints and is not intended as a surface for mixing wet color.
19. Wooden Garden Caddy with Seed Packets
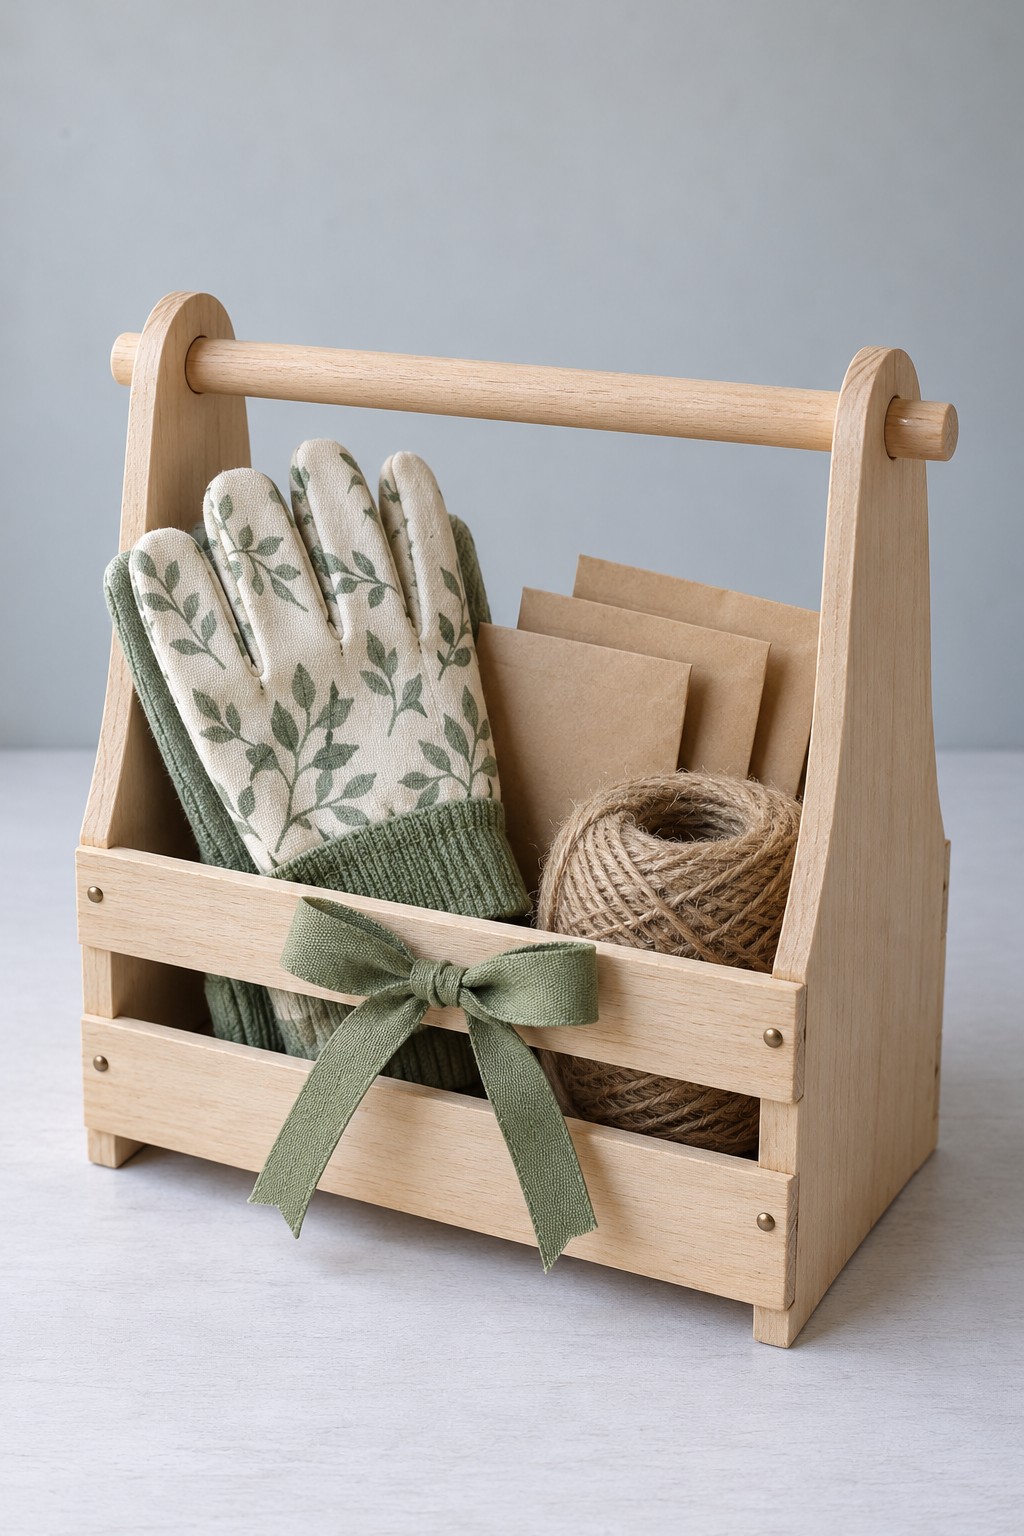
A small wooden caddy makes gloves, seed packets, and garden twine feel like a useful set. Its tall end pieces hold a round dowel handle, while open side slats reveal the contents without letting them fall forward. A sage bow is enough decoration because the natural wood and practical tools already establish the gardening theme.
Choose smooth timber or plywood thick enough for reliable joints, and size the base around the folded gloves and seed envelopes. Cut two matching end panels, drill aligned handle holes while the panels are securely clamped, and dry fit the base and side slats. Join the wooden parts with wood glue and appropriate brads or screws, keeping fasteners away from thin edges. Secure the handle so it cannot slide out, then sand every gripping surface. If using a finish, let it cure according to its label before packing textiles. Keep the seed information with each packet and avoid adding damp soil to the presentation.
20. Starry Crescent Moon Sweet Holder
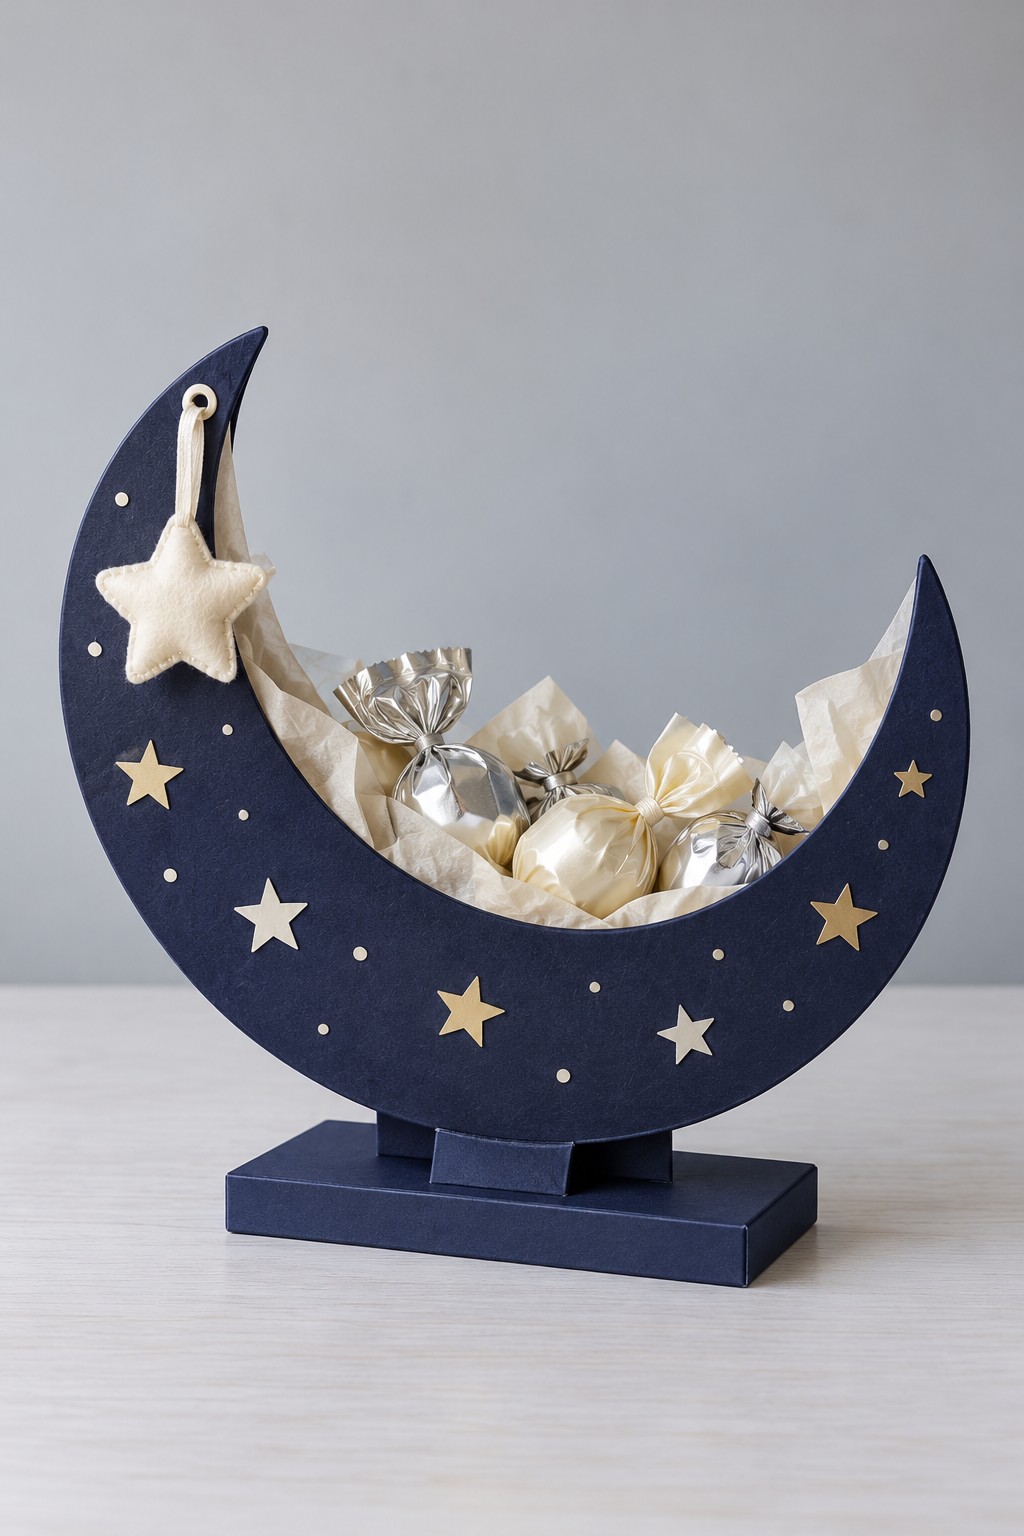
Build a little night sky around pale and silver wrapped sweets with a navy crescent holder. Gold and cream stars decorate its broad front face, and a small sewn star hangs from a reinforced hole near the upper tip. The rectangular stand keeps the moon upright instead of asking the curved lower edge to balance on the table.
Cut two identical crescents from rigid board and join them with a side strip along the outer curve to form a shallow open holder. Cover the surfaces with navy paper before attaching flat star shapes. Build a broad base and add reinforced supports that connect both moon faces to it, keeping the weight centered. Line the inside before arranging sweets. Sew the small hanging star from felt, lightly fill it, and secure its cord through the reinforced upper hole. Test the loaded holder for tipping before gifting, and carry the base rather than the thin crescent tips or decorative cord.
21. Woven Heart Treat Handbag
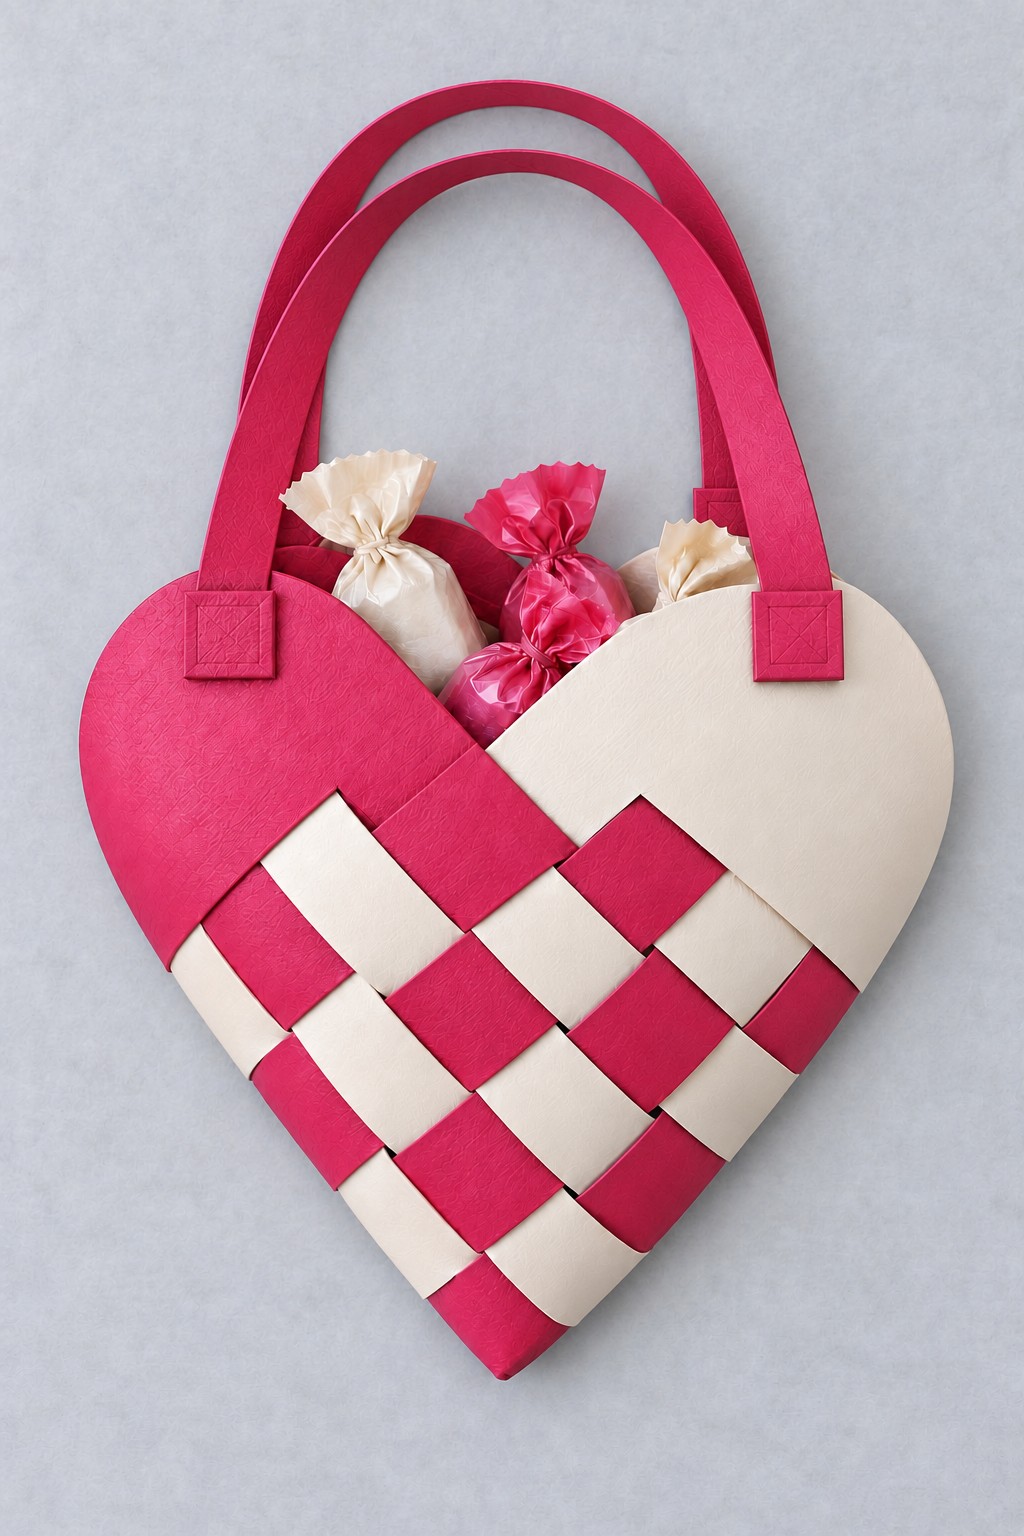
A red and cream woven heart becomes a small handbag for wrapped treats. Its checked lower section, rounded upper lobes, and two curved handles create the whole design without an extra bow or label. Use paper flexible enough to weave cleanly; very heavy card can crack where the folded strips pass through one another.
Prepare two matching elongated oval pieces in contrasting colors and fold each across its short center. Cut equal slits from the folded edge toward the rounded end, stopping before the curve. Weave the folded loops through and around the opposing loops in alternating order, checking that the center opens into a pocket rather than forming a flat mat. Work slowly and test the method on scrap paper first. Glue reinforced handle ends inside the upper lobes and cover the joints with small matching patches. Keep the filling light so the weaving can hold its shape, and leave the top open enough to remove the treats comfortably.
22. Pineapple Jar for Colorful Hair Ties
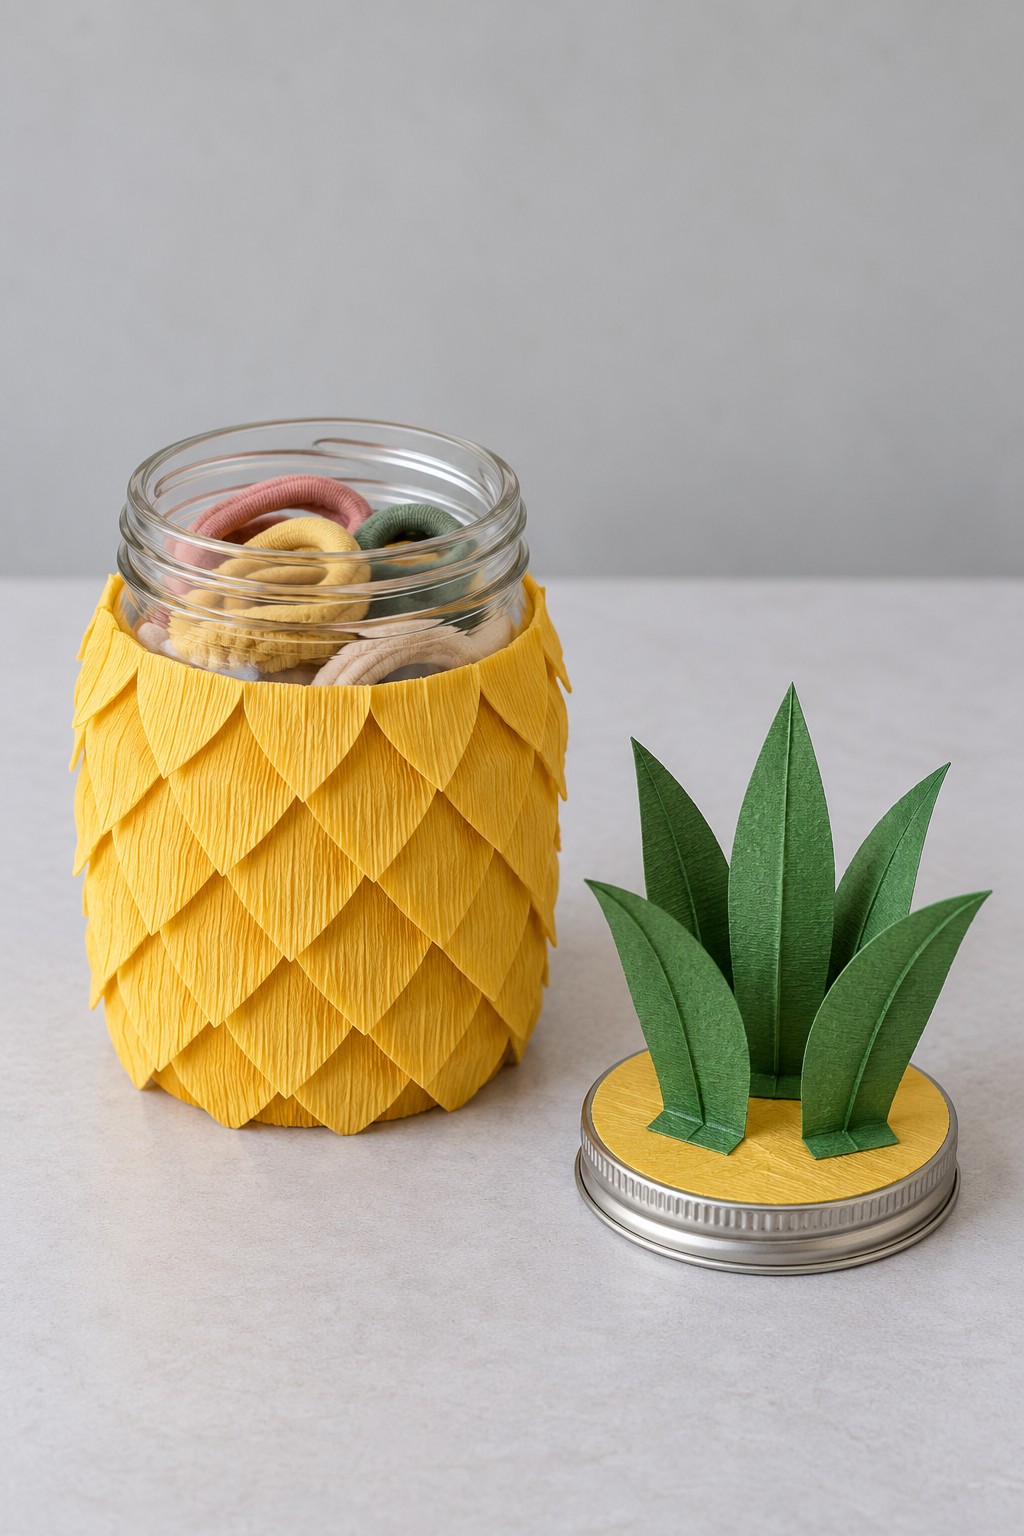
Overlapping yellow paper scales and a pointed green crown can turn a plain jar into a pineapple container for soft hair ties. The crown sits on the removable lid, leaving the jar opening clear when the gift is opened. A sleeve beneath the paper layers keeps the glass separate from the decorative work and makes later cleaning easier.
Wash and dry an undamaged jar, then make a removable paper sleeve that fits below the screw threads. Cut matching yellow crepe paper leaves or teardrops and attach them in staggered rows, starting at the bottom and overlapping upward. Glue only the upper portion of each scale so the lower tips keep a little texture. Cover the lid's top with a separate yellow circle and attach folded green leaves using small base tabs. Keep all paper clear of the sealing surface. Fill the clean jar with hair ties, then close it gently without crushing the crown. Remove the sleeve and lid decoration before washing the container again.
23. Layer Cake Slice Chocolate Box
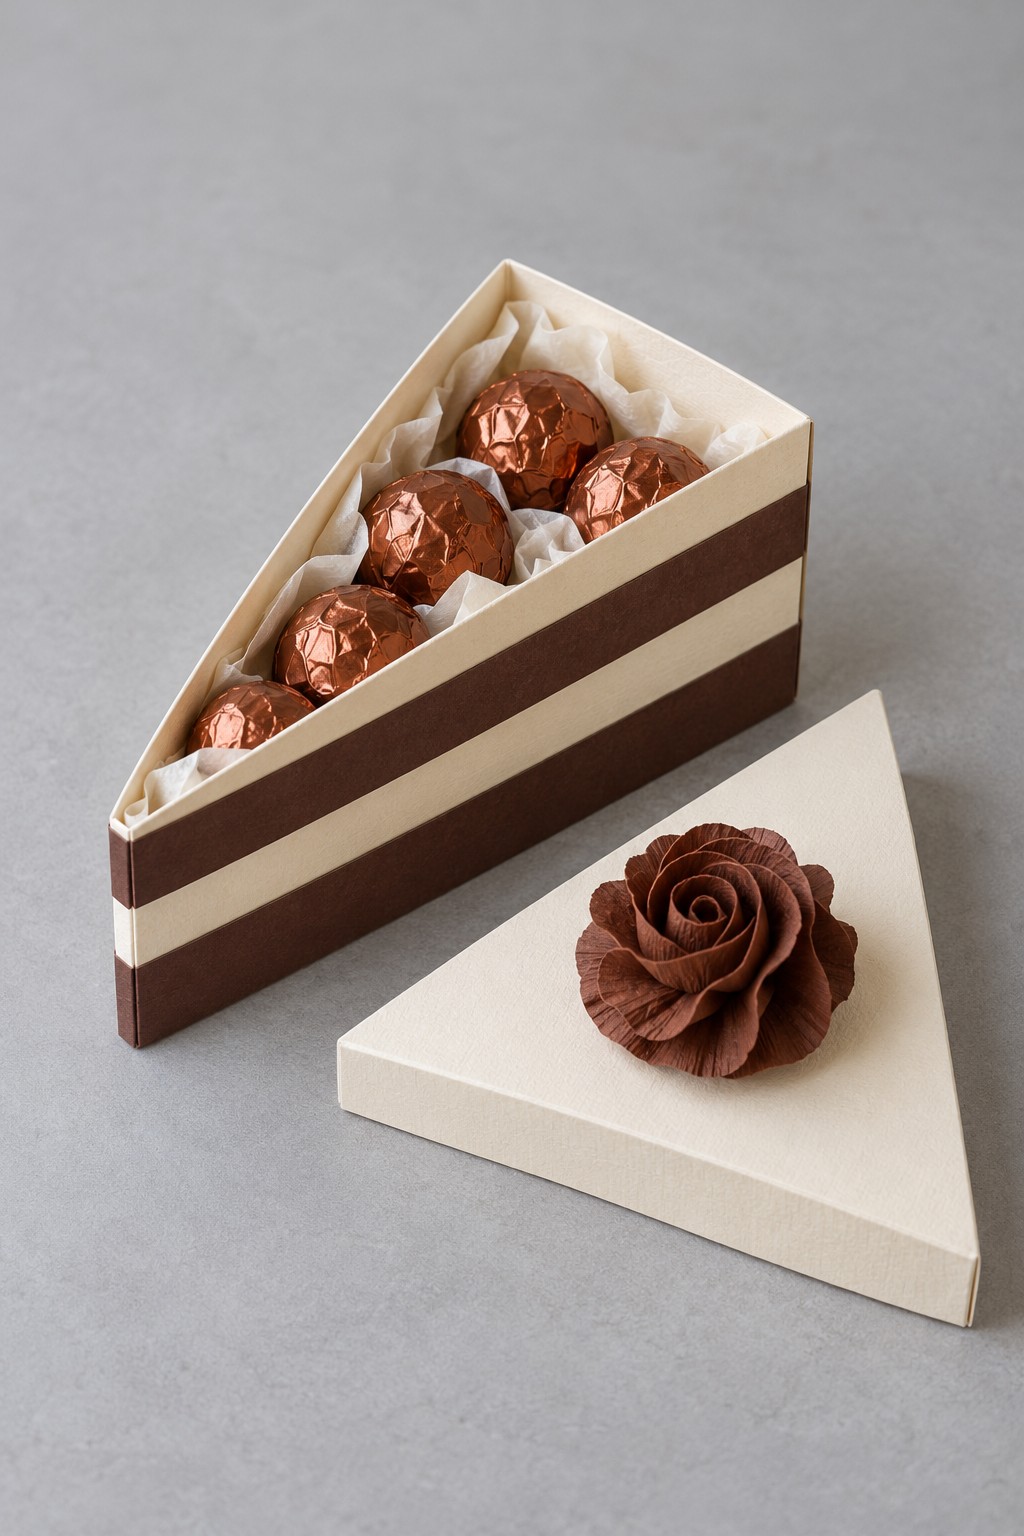
A triangular box decorated with cream and chocolate brown bands resembles a slice of layer cake. Copper wrapped chocolates sit inside, and a dimensional brown paper rose replaces a frosting swirl on the lid. The contrast between straight layered sides and the curled flower gives the package detail without obscuring its simple wedge shape.
Draw the triangular floor around the treats you want to include, leaving clearance along the narrow tip. Build the sidewalls with folded joining tabs or separate covered board panels. Make a second, slightly larger triangular lid with a shallow rim, checking the fit before attaching the decorative rose. Add the alternating brown and cream strips at matching heights across all sides so the cake layers line up at the corners. Form the rose from curled crepe petals and glue its finished base to the lid only. This box is for wrapped sweets; use a separate container intended for food contact if gifting actual cake.
24. Faceted Lavender Jewelry Box
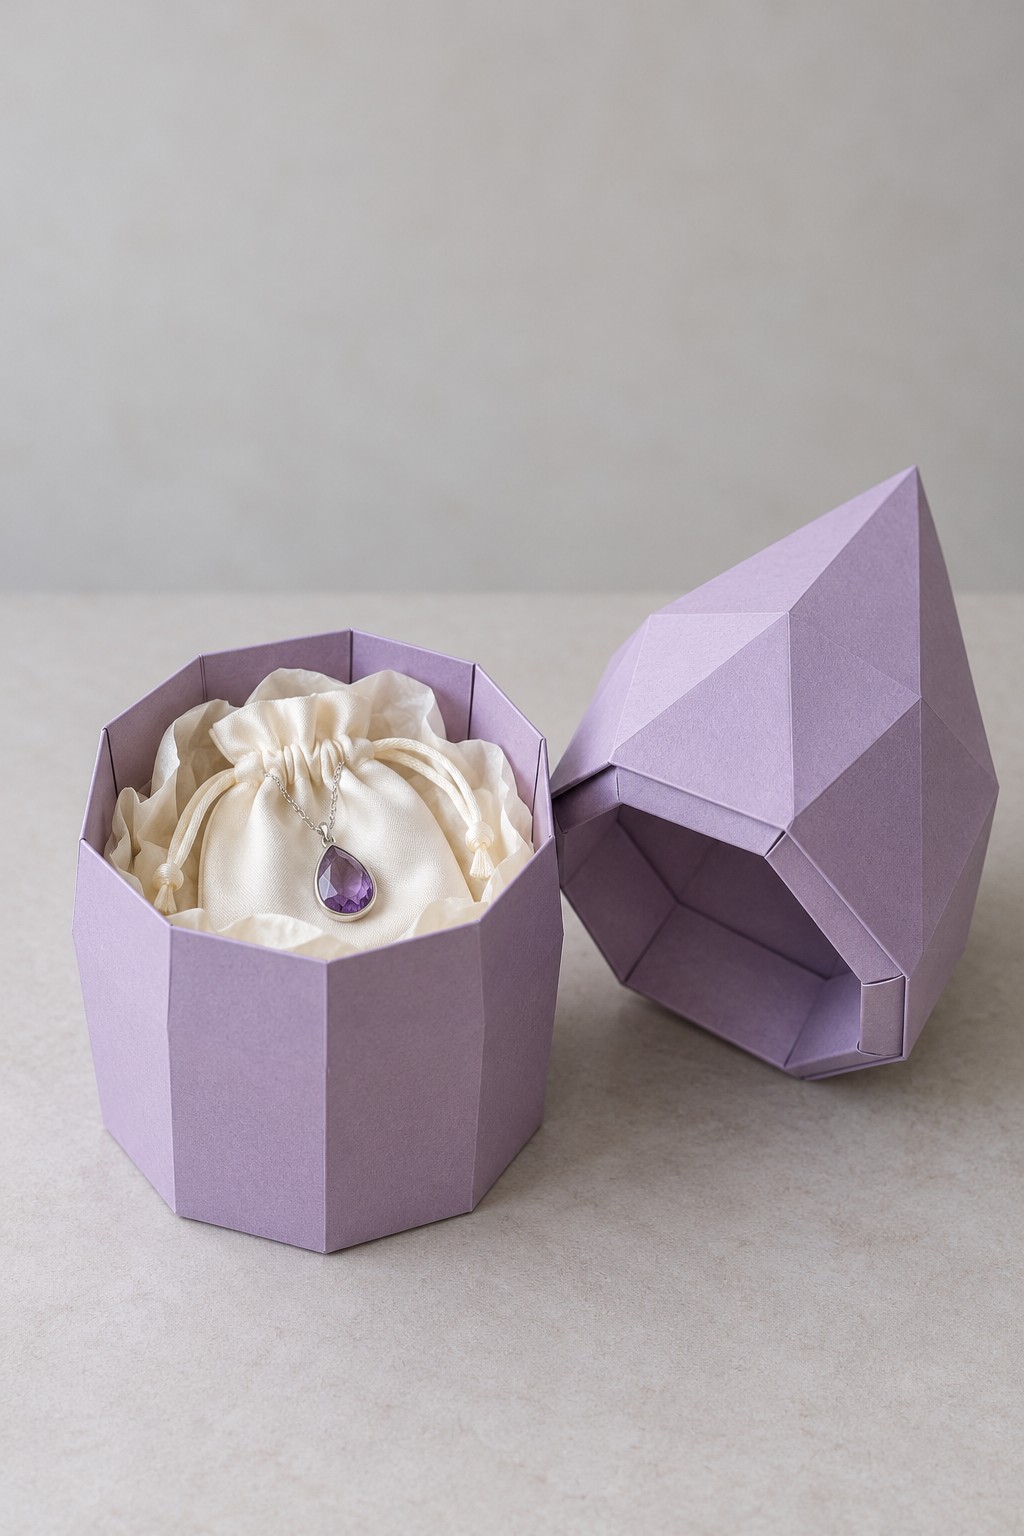
Let the packaging echo a necklace's pendant with a lavender box topped by a faceted gemstone lid. The many sided base remains simple, while triangular planes rise toward the lid's point. White tissue and a cream drawstring pouch soften the geometric structure and prevent the chain from catching against the paper folds.
Use a faceted box pattern sized around the filled pouch, beginning with a plain paper mockup. Keep the same number of sides on the base and the lid rim so their edges align. Score every fold before joining the narrow tabs, and assemble the lid from its rim toward the point without forcing the facets flat. Check that the pendant has padding beneath it and secure the chain inside the pouch before closing. For another small jewelry gift that can share this packaging, these charm bracelet ideas can help you plan a coordinated piece. Keep the finished box dry to preserve its crisp edges.
25. Baby Clothes Tray with a Sock Clothesline
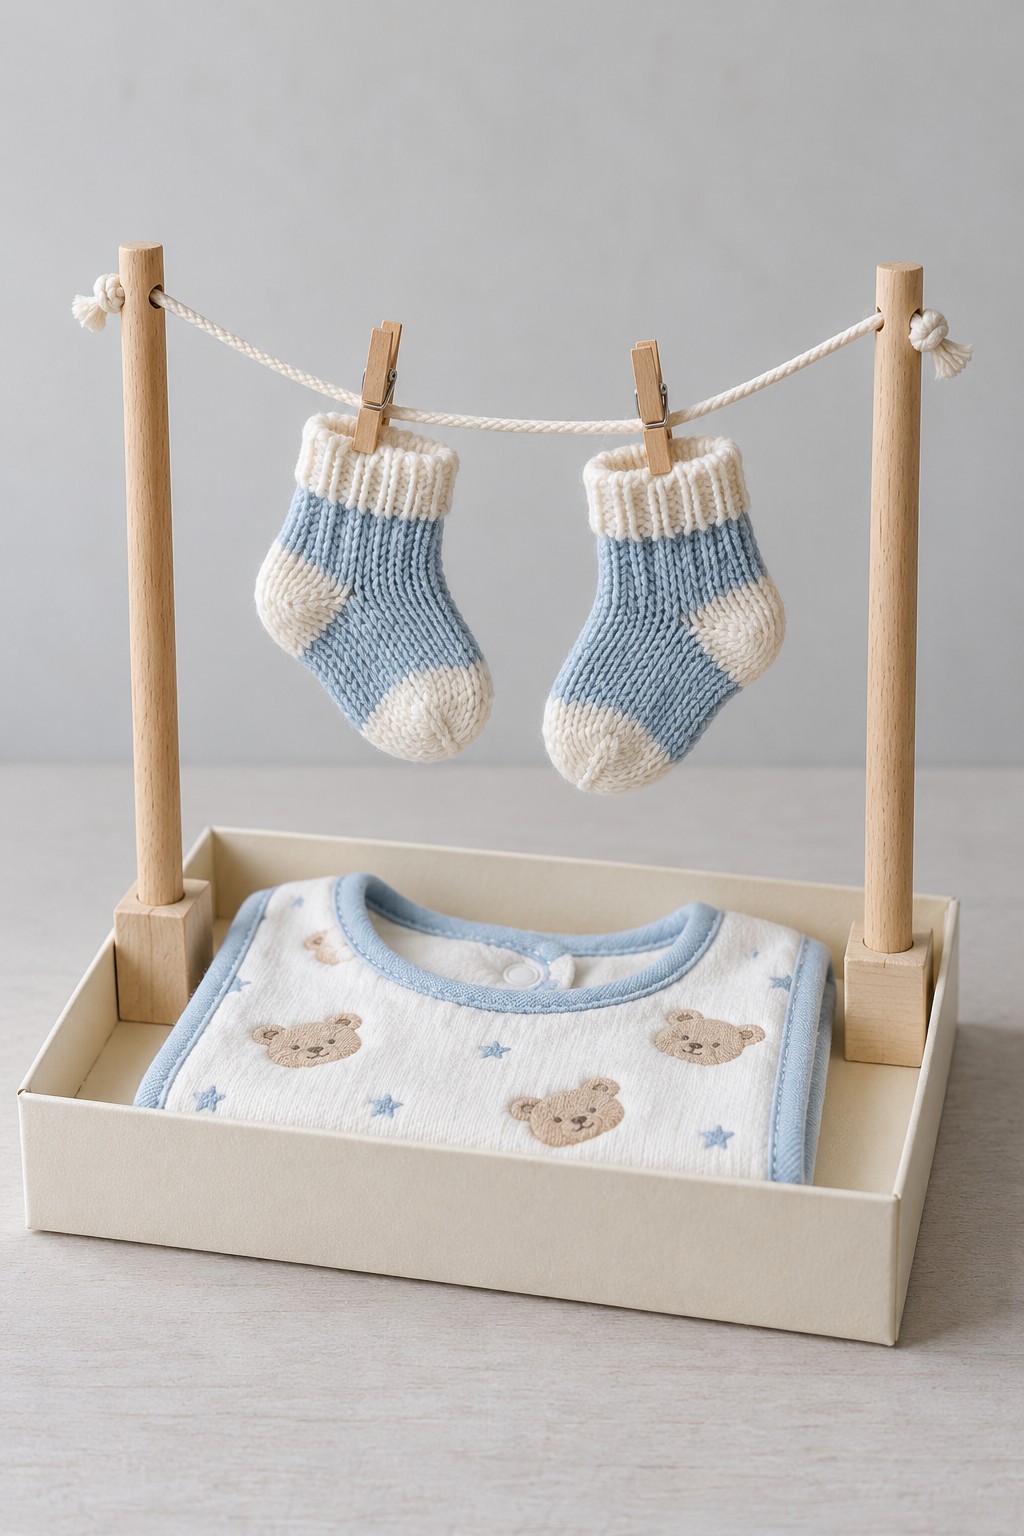
A shallow cream tray and a miniature clothesline make a baby outfit gift easy to display. Two knitted socks hang above a neatly folded garment, using the pale blue trim and cream yarn as the main color palette. The clear space between the socks and the clothing keeps the arrangement legible instead of turning it into a crowded hamper.
Make a reinforced tray around the folded garment and secure two blunt wooden uprights in deep corner blocks or sockets. Drill small smooth holes near their tops, thread cotton cord through, and knot it outside each post. Keep the line short enough to avoid excessive sagging, then attach the socks with two small wooden pegs. Ensure the posts remain upright when the socks are added. This presentation is for the adult recipient: remove the cord, pegs, posts, and all packaging before giving clothing to a baby. Transport the tray flat inside a larger box so the clothesline cannot catch on other parcels.
26. Oval Hoop Stationery Pocket
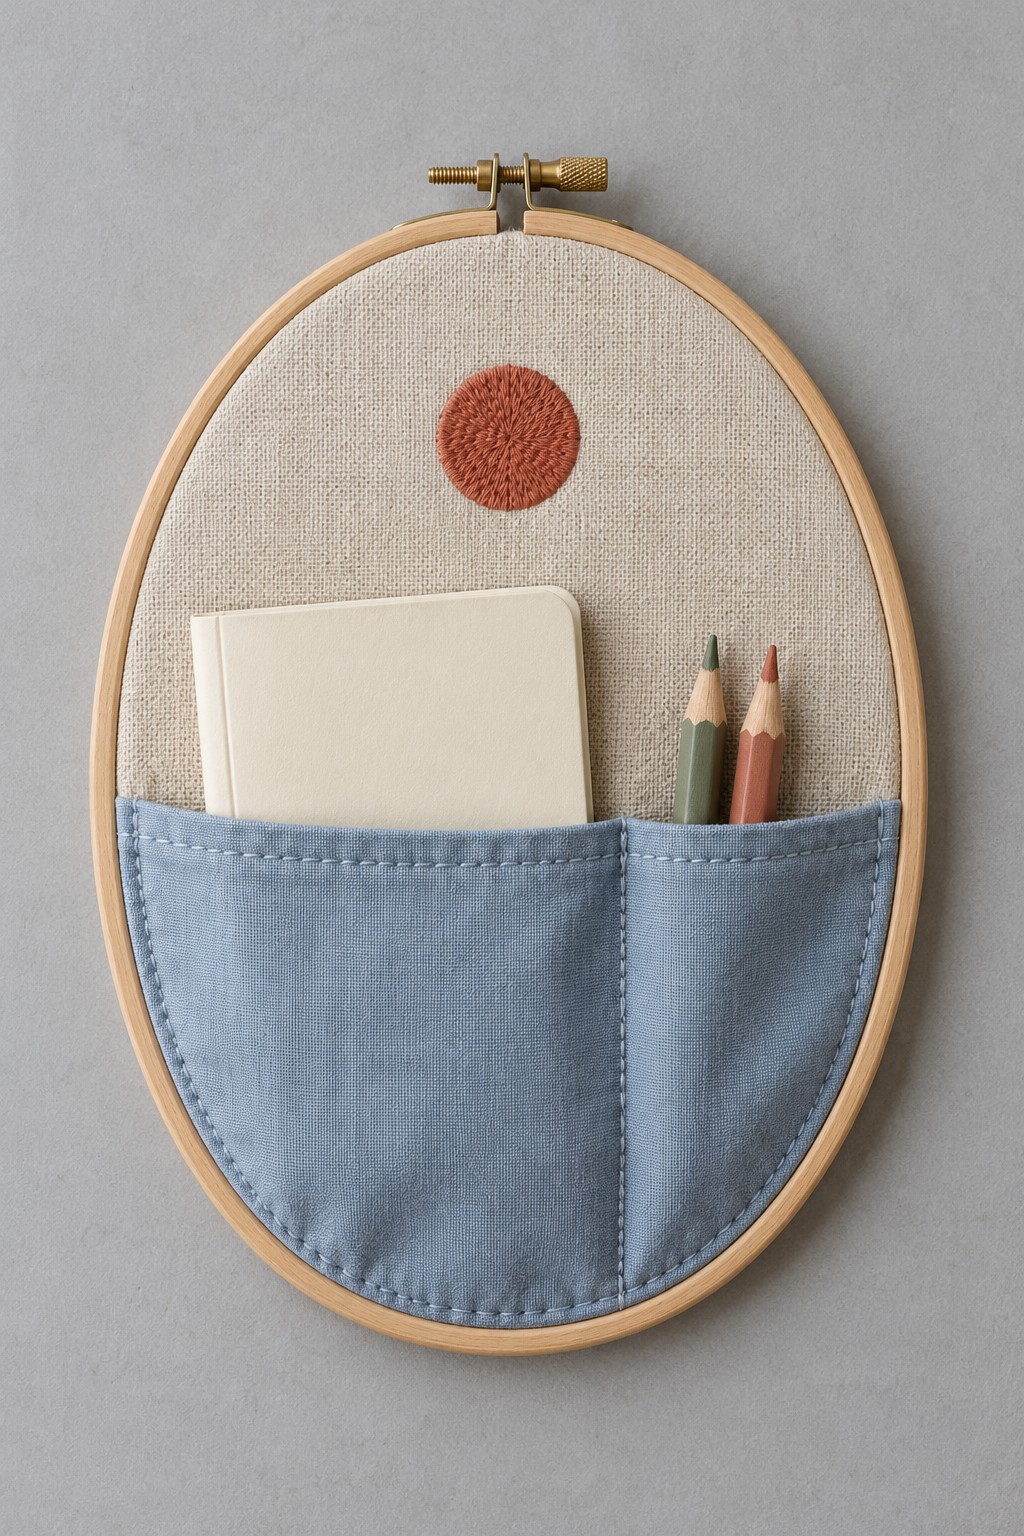
An oval embroidery hoop can present a pocket notebook and two pencils while becoming a small wall organizer afterward. Natural linen forms the backing, and a blue fabric pocket covers the lower section. One vertical seam separates the notebook space from the narrow pencil compartment, with a small rust embroidered circle adding color above.
Choose a hoop wide enough for the notebook and cut the backing fabric larger than its outer frame. Hem the top of a second fabric piece for the pocket, then stitch it to the backing along its sides, lower edge, and divider line. Reinforce the top ends of the divider before stretching the fabrics in the hoop. Tighten gradually, keeping the pocket opening level rather than pulling it into a curve. Trim and secure the excess fabric on the reverse, then add a neat backing if desired. Keep the contents light and fit an appropriate hanging point before using it as wall storage.
27. Arched Mailbox for a Tea Selection
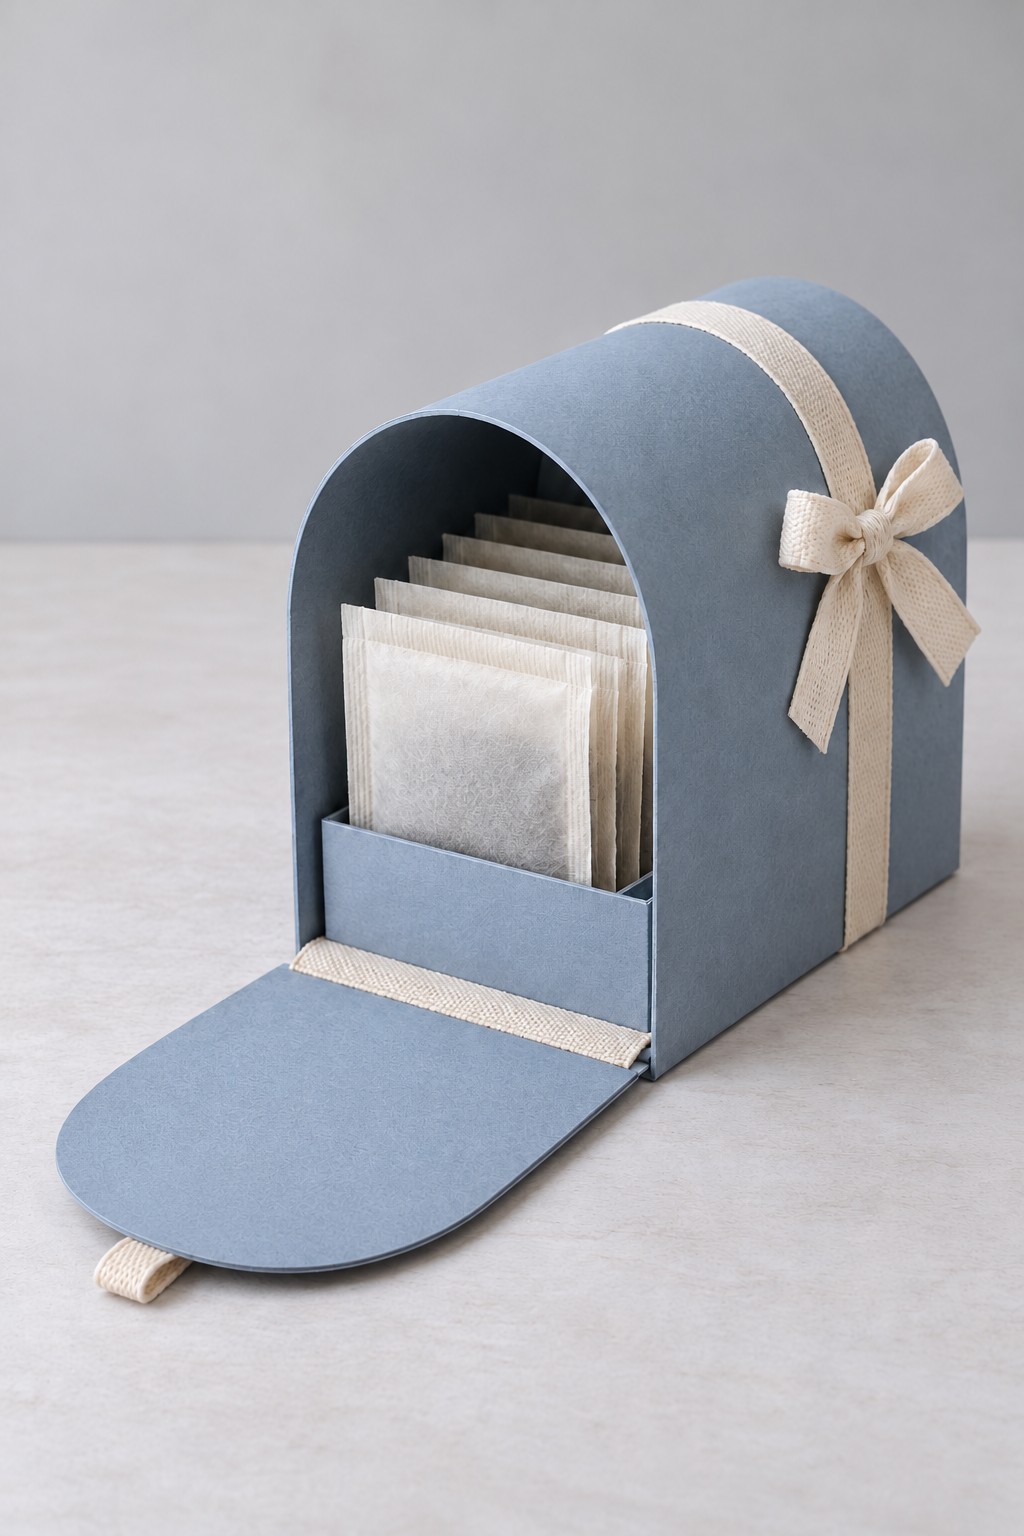
Tea envelopes fit neatly into a blue mailbox shaped package, lined up behind its fold down door. The cream ribbon across the curved top and the matching pull loop give the opening a clear visual cue. A low internal stop keeps the packets upright when the door is lowered, so the gift can be opened without everything sliding onto the table.
Measure the tallest tea envelope first and draw an arched end profile with enough room above it. Build a rectangular floor and back panel from firm card, then curve a more flexible sheet over the top to form the roof and sides. Secure it to narrow tabs rather than forcing thick board into a tight bend. Hinge the front door along the bottom using a fabric strip concealed between paper layers. Add the retaining stop inside and attach the ribbon pull before lining the door. Keep each tea sachet in its original envelope so the recipient can identify and store the selection.
28. Blue Cottage Box with a Removable Roof
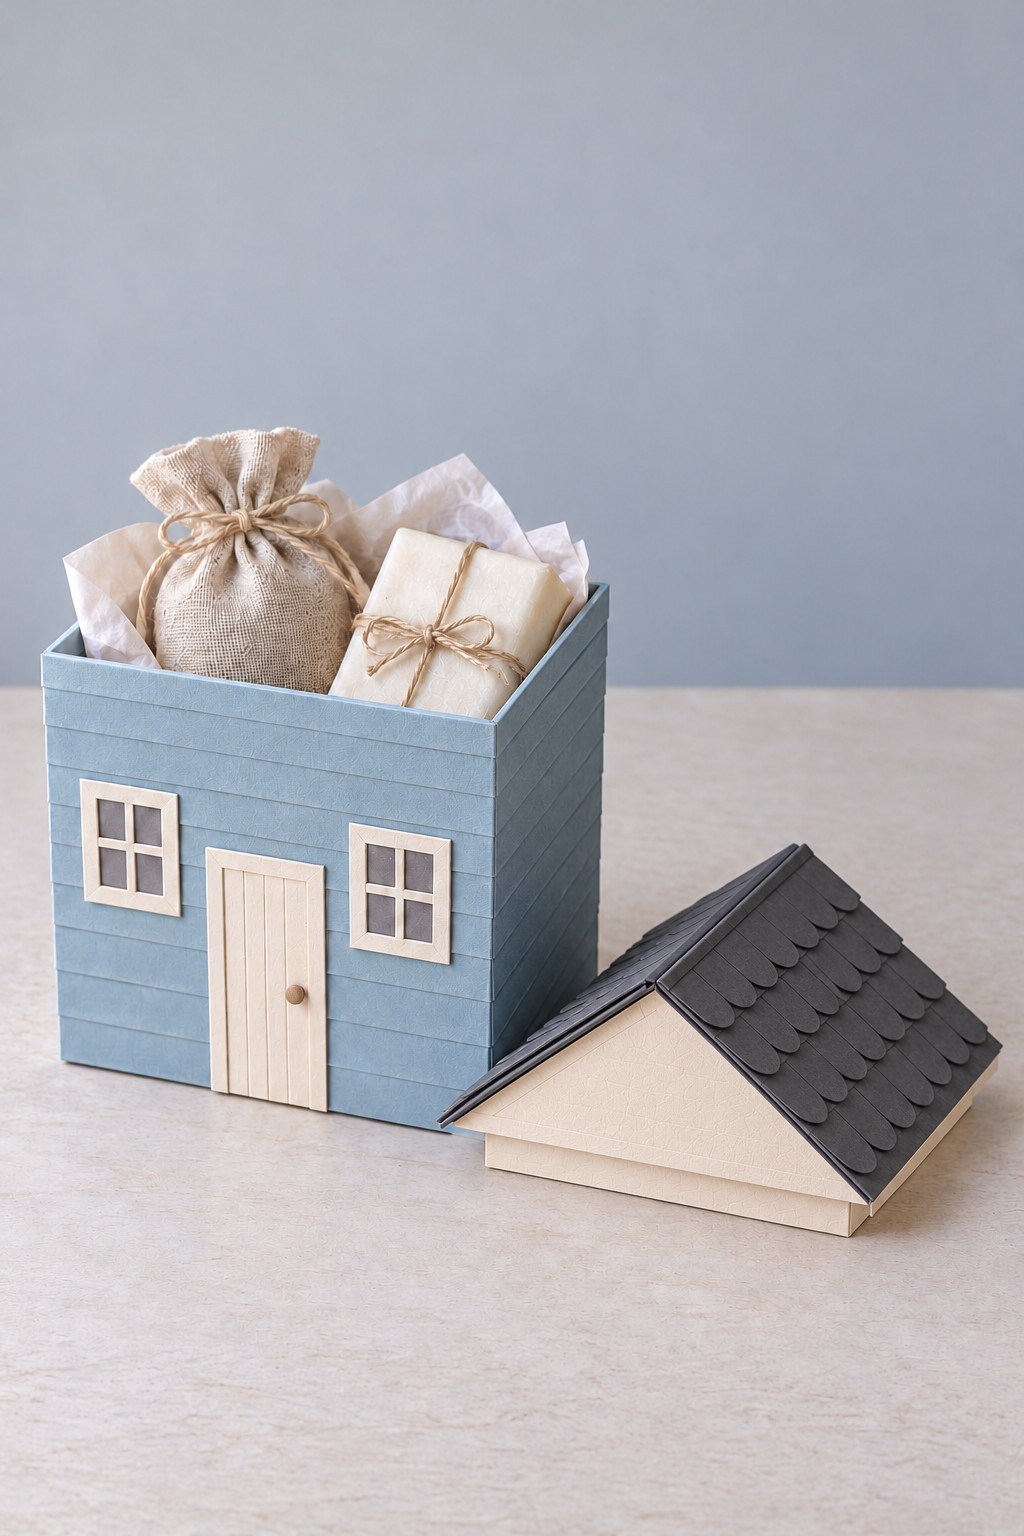
A pale blue cottage box makes a small housewarming present feel connected to its occasion. Narrow horizontal strips suggest siding, cream windows and a little door define the front, and a dark pitched roof lifts away to reveal the contents. A linen pouch and a separately wrapped parcel keep the interior calm and useful rather than filling it with loose decoration.
Build the house body as a reinforced square or rectangular box, using the opening tutorial for its corner joints where suitable. Add the siding strips and flat window frames before attaching anything that projects from the surface. Make the roof as a separate lightweight cap with triangular gable ends and a shallow locating rim that fits inside the box opening. Apply overlapping paper shingles from the eaves upward, keeping the two slopes balanced. Measure the filled pouch so it stays below the roof's internal structure. Lift the lid from its firm edges, not from the individual shingles, and carry the gift by the house base.
29. Grand Piano Chocolate Box
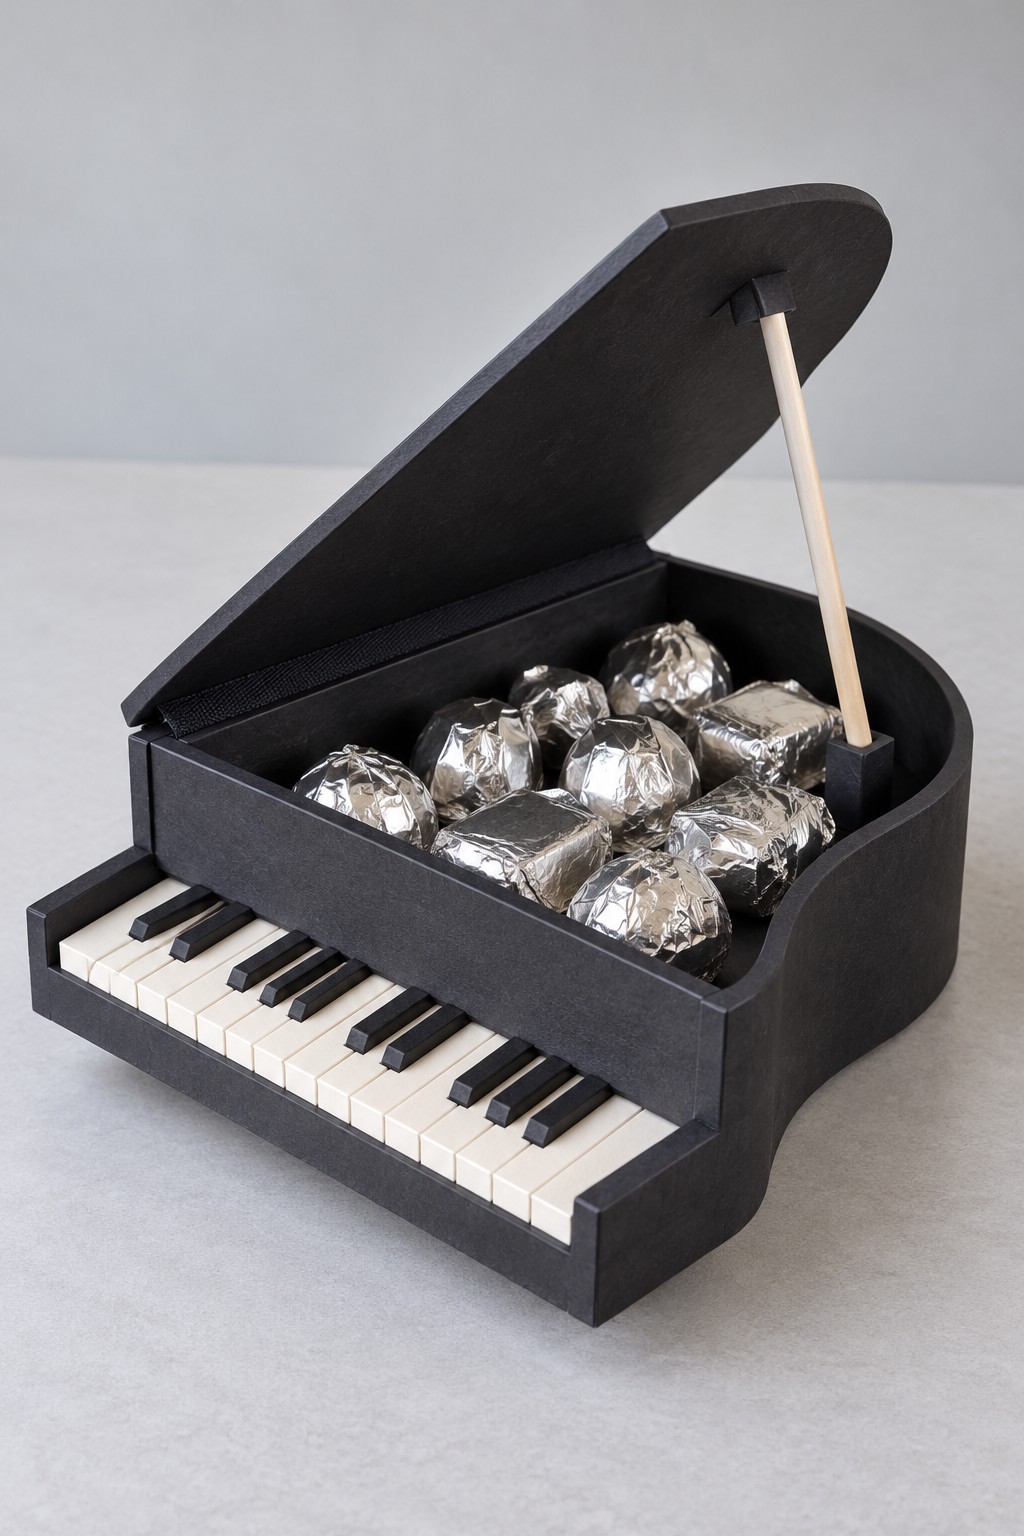
For a music lover, a grand piano silhouette can make a simple chocolate gift feel personal. The curved black body and raised lid establish the instrument shape, while a miniature keyboard defines the front. A slim wooden prop holds the lid open, leaving the main compartment accessible without adding working musical parts.
Draw a full size floor outline first, with a straight keyboard edge and a sweeping curved side. Build the body from rigid board and a flexible sidewall strip, then cover it with black paper. Join the lid along the straight rear edge with a strong fabric hinge. Fit a removable blunt prop between sockets beneath the lid and inside the body; take it out before closing. Assemble the decorative white keys in a separate shallow front recess, adding black keys in alternating groups of two and three. Keep the sweets wrapped and separate from adhesive, and transport the box closed inside a protective outer carton.
30. Mini Wardrobe Jewelry Cabinet
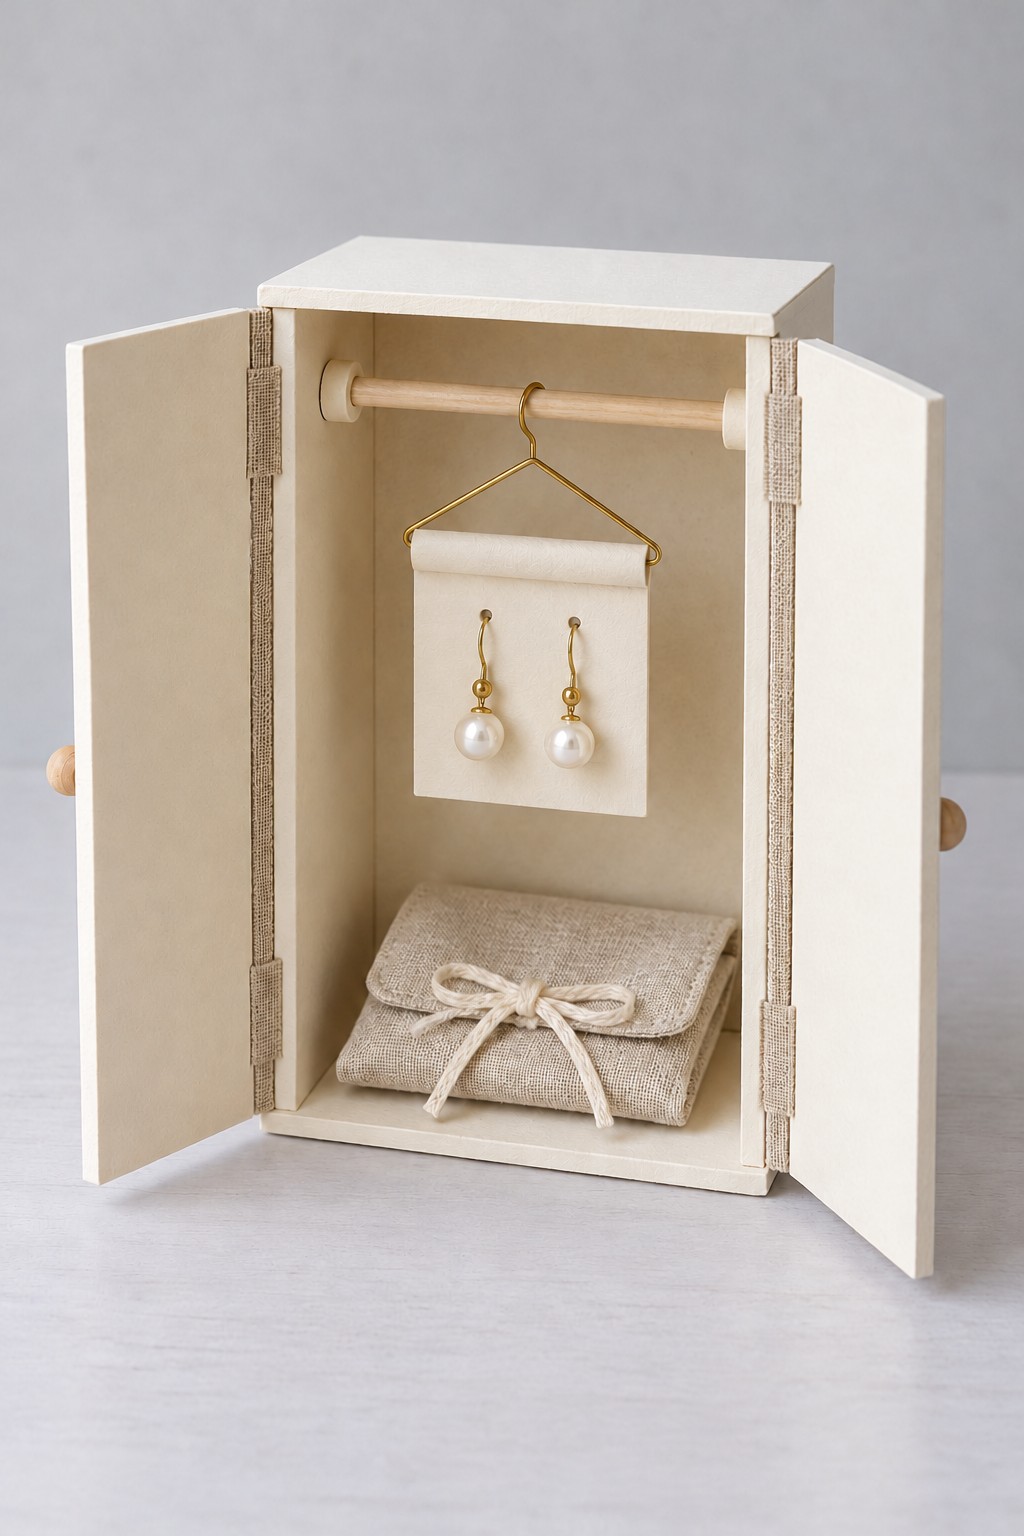
A cream miniature wardrobe gives a pair of pearl earrings its own display space. The earrings hang from a small card suspended on a wire hanger, with a folded linen pouch below. Two opening doors and a wooden rail make the container feel like a useful keepsake rather than a disposable jewelry sleeve.
Build a shallow upright cabinet from covered board, keeping the base and back square before adding the doors. Leave a small hinge gap on each side and attach the doors with fabric hinges concealed beneath the outer covering. Seat a smooth wooden rail in reinforced side sockets, with enough clearance for the hanger to lift off. Use a premade miniature hanger or bend craft wire with pliers, turning every cut end inward and smoothing it. Punch the earring card to suit the actual hooks and secure their backs. Pack the linen pouch below without pressing it against the hanging jewelry, and pad the doors during transport.
31. Felt Taco Pouch for a Charging Cable
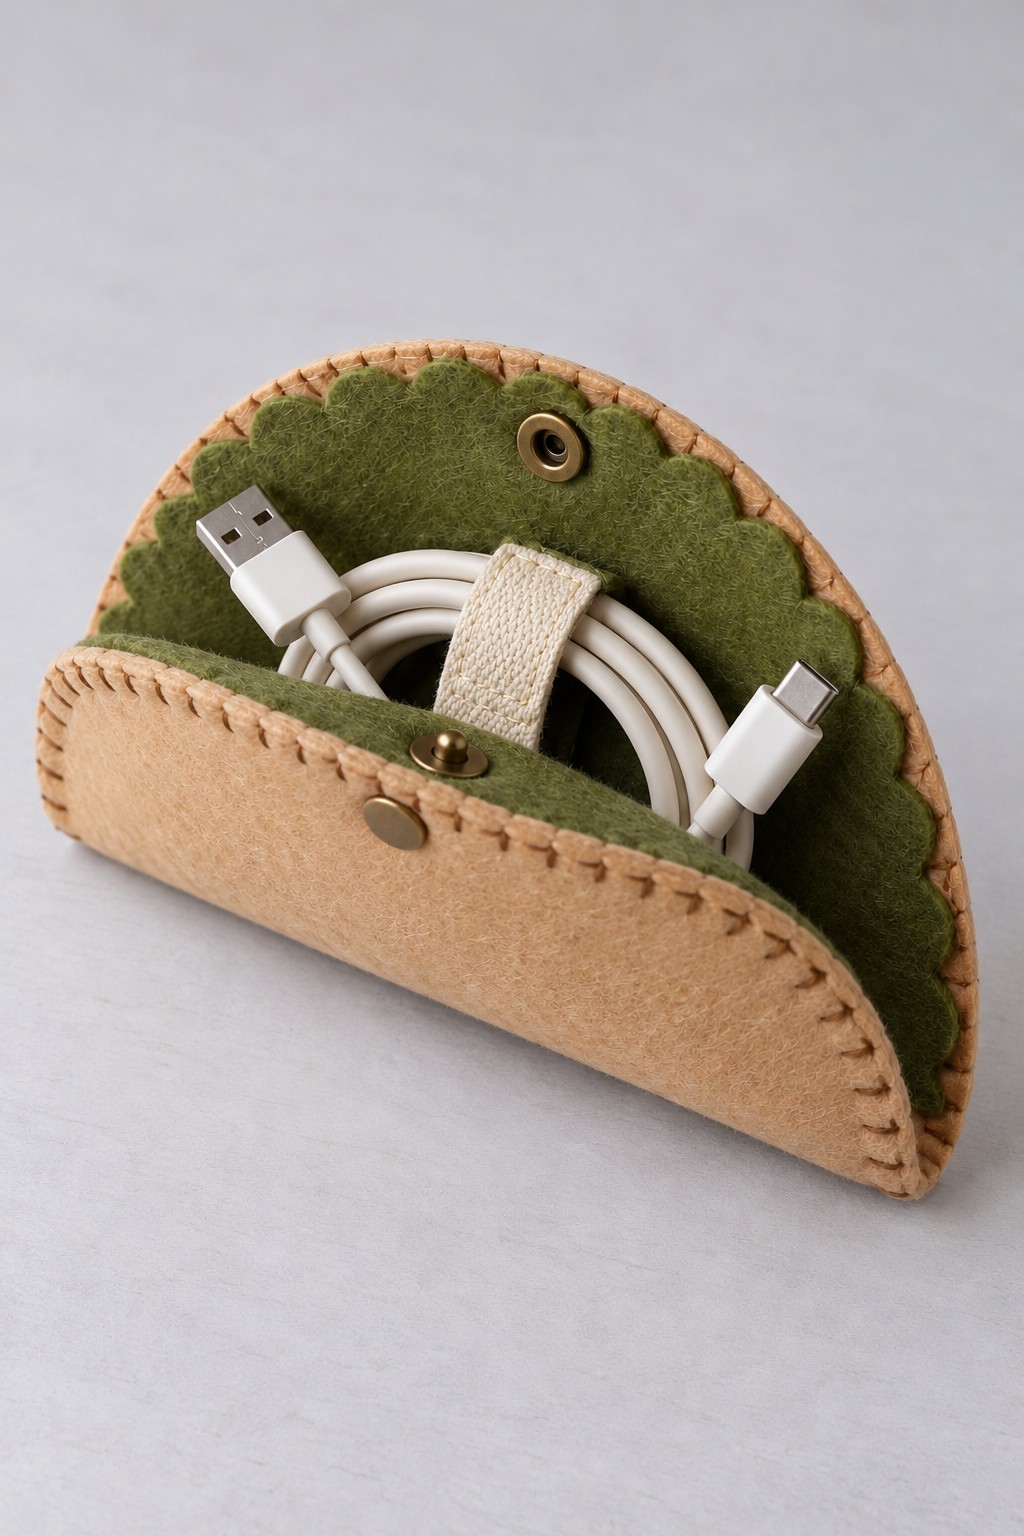
Keep a charging cable together in a tan felt taco pouch with a green lining. A press stud holds the folded shape closed, while a cream fabric loop secures the loosely coiled cable inside. Visible blanket stitches define the curved edge and make the construction part of the decoration, with no separate gift wrap needed around the finished pouch.
Lay out the loosely coiled cable first, then draw a paper circle large enough to fold around it without pressing on the connectors. Cut matching outer and lining pieces from firm felt and round every edge smoothly. Attach the cable retaining loop to the lining, then reinforce and fit the two press stud halves so they meet when the circle folds in half. Blanket stitch the perimeter after checking the closure. The hand sewn felt card holder tutorial is another small project for practicing neat felt assembly. Remove the cable from its pouch before use and avoid tight bends beside either connector.
32. Egg Carton Sewing Kit
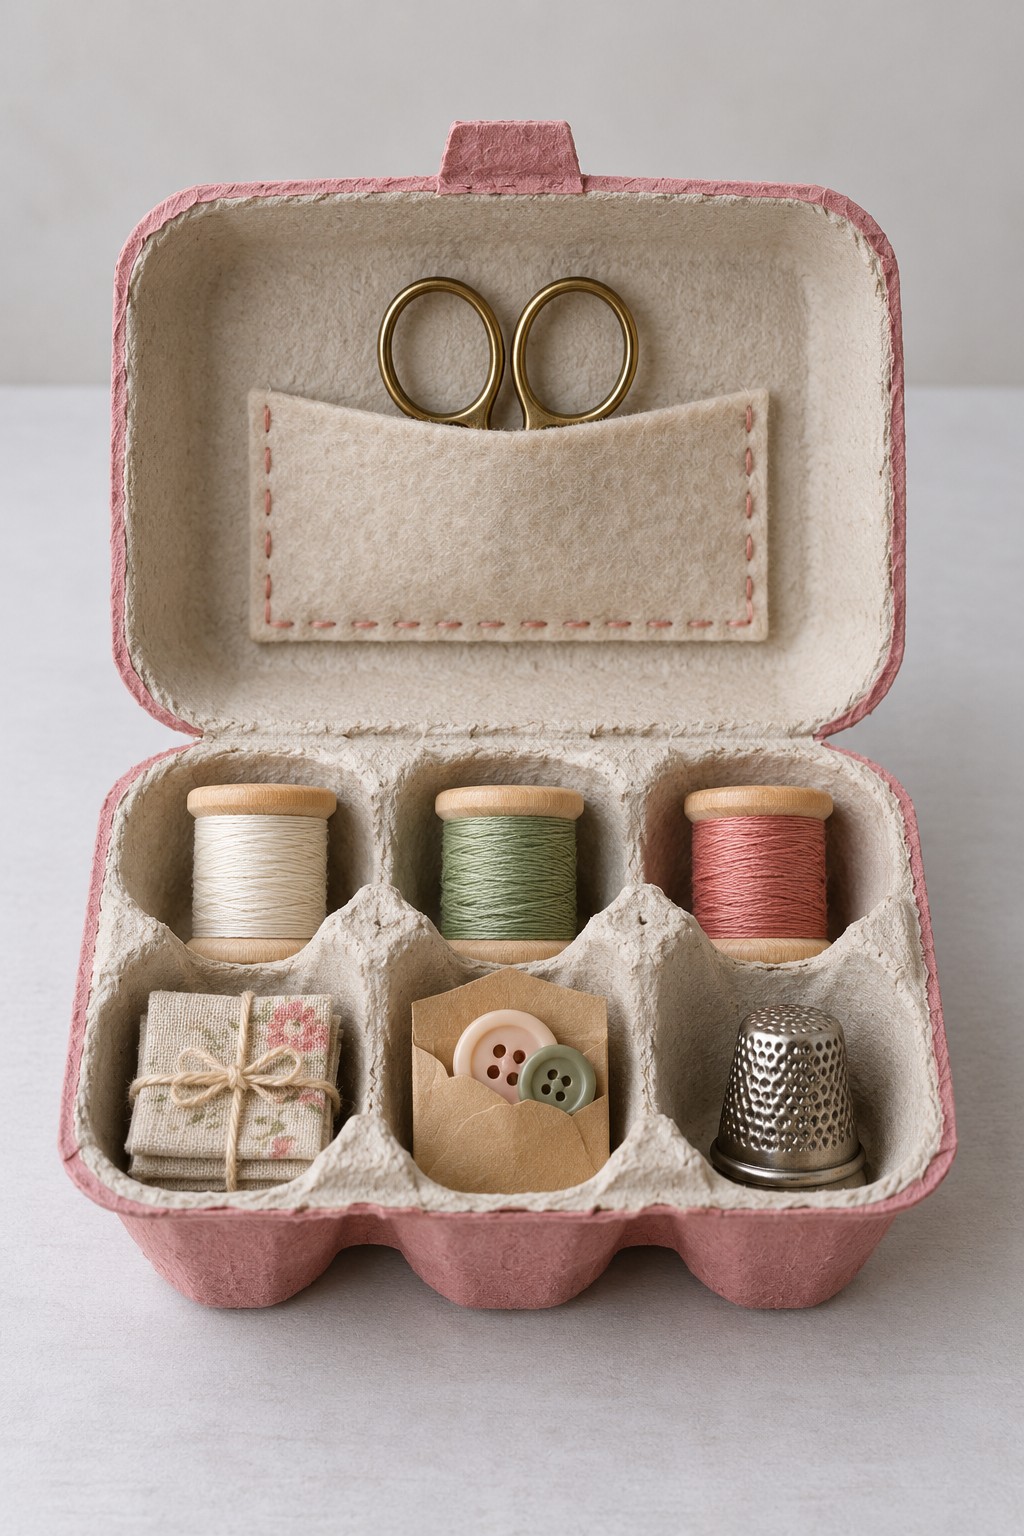
A six compartment pulp carton can organize a small sewing kit with very little added structure. Three spools sit along the back, while folded fabric, a button envelope, and a thimble occupy the front compartments. A felt pocket in the lid holds small scissors, and the dusty pink exterior connects the practical contents into one coordinated gift.
Start with a new unused carton so the textile supplies are not placed in packaging that has held raw eggs. Brush a light coat of water based craft paint onto the exterior and let it dry fully without soaking the pulp. Sew the scissor pocket to a separate felt lid panel first, then bond the panel inside the lid with an adhesive suitable for felt and card. Keep the hinge and latch clear. Fit the supplies to the actual compartments and protect sharp scissor tips inside the pocket. If you add needles, place them in a closed needle case rather than leaving them loose among the compartments.
33. Kite Shaped Box with a Ribbon Tail
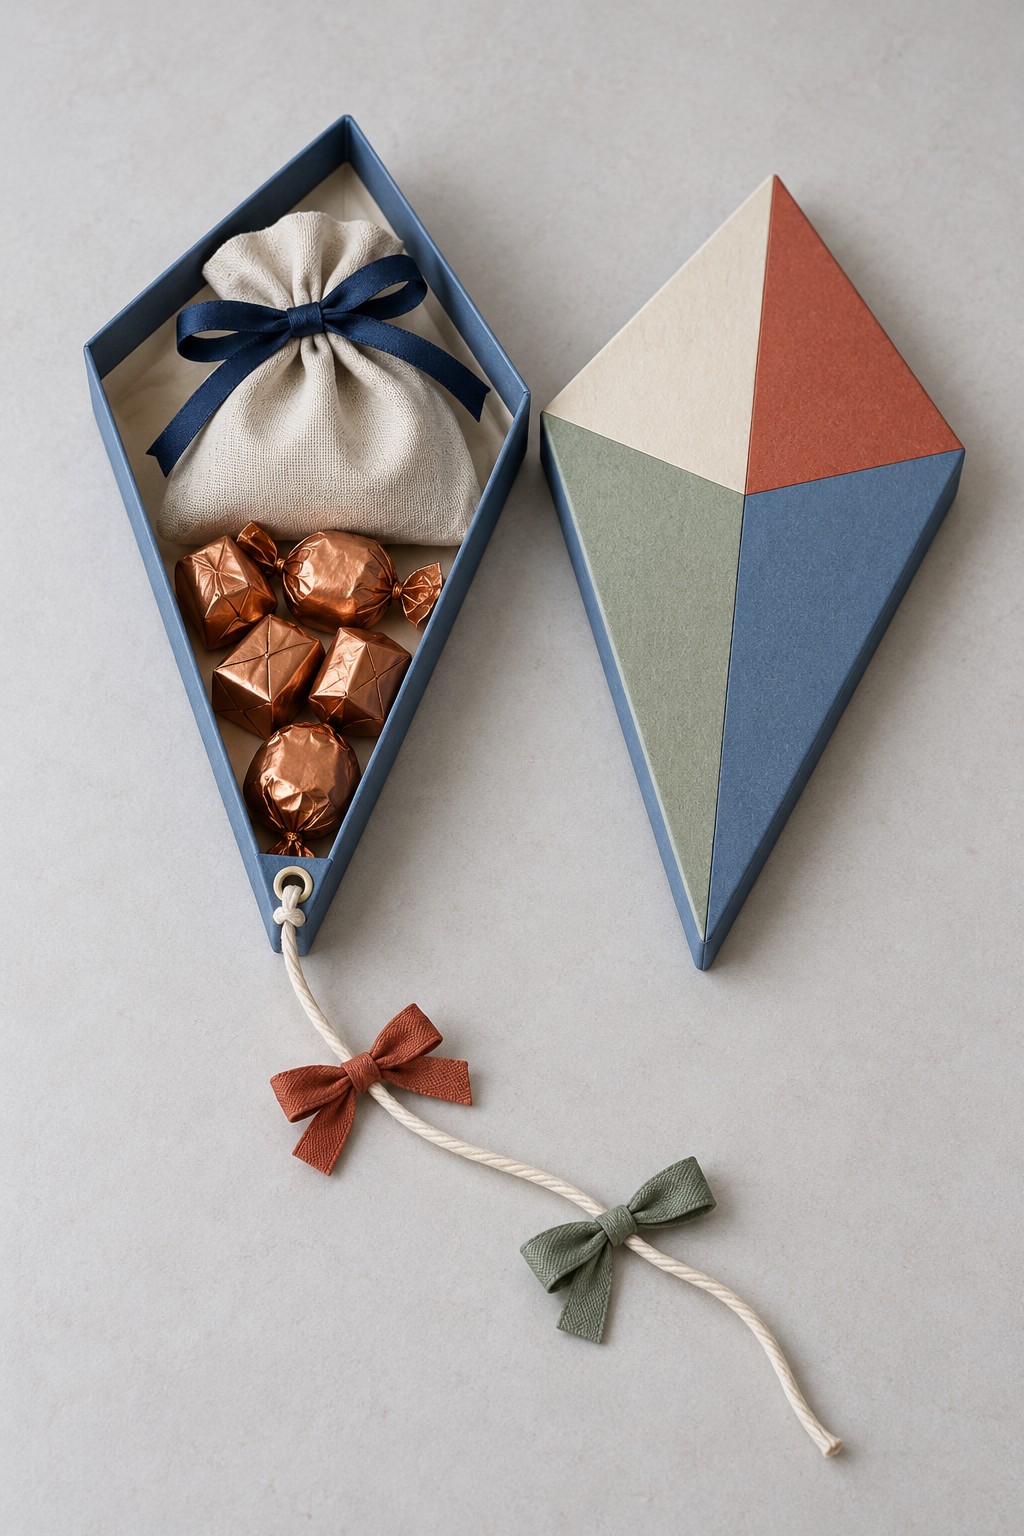
Use a long kite outline to give a small drawstring pouch and copper wrapped sweets an unexpected presentation. Cream, rust, sage, and blue paper triangles divide the lid, while a cotton tail with two fabric bows extends from the lower point. The colored panels suggest a kite's framework without needing sticks across the interior or a mechanism that moves.
Draw the kite outline around the intended pouch, allowing extra width at the broad upper section. Cut a rigid floor and construct the narrow sidewall in separate straight sections, reinforcing the pointed corners from inside. Make a fitted lid with a small clearance around the base, then arrange the four colored triangles so their tips meet cleanly near the center. Reinforce the tail hole with an eyelet and an additional card patch before threading the cord. Knot it securely inside without taking up the gift space. This is a presentation box, so keep the tail decorative and carry the container from its base.
34. Blue Backpack Gift Bag for a Reusable Care Set
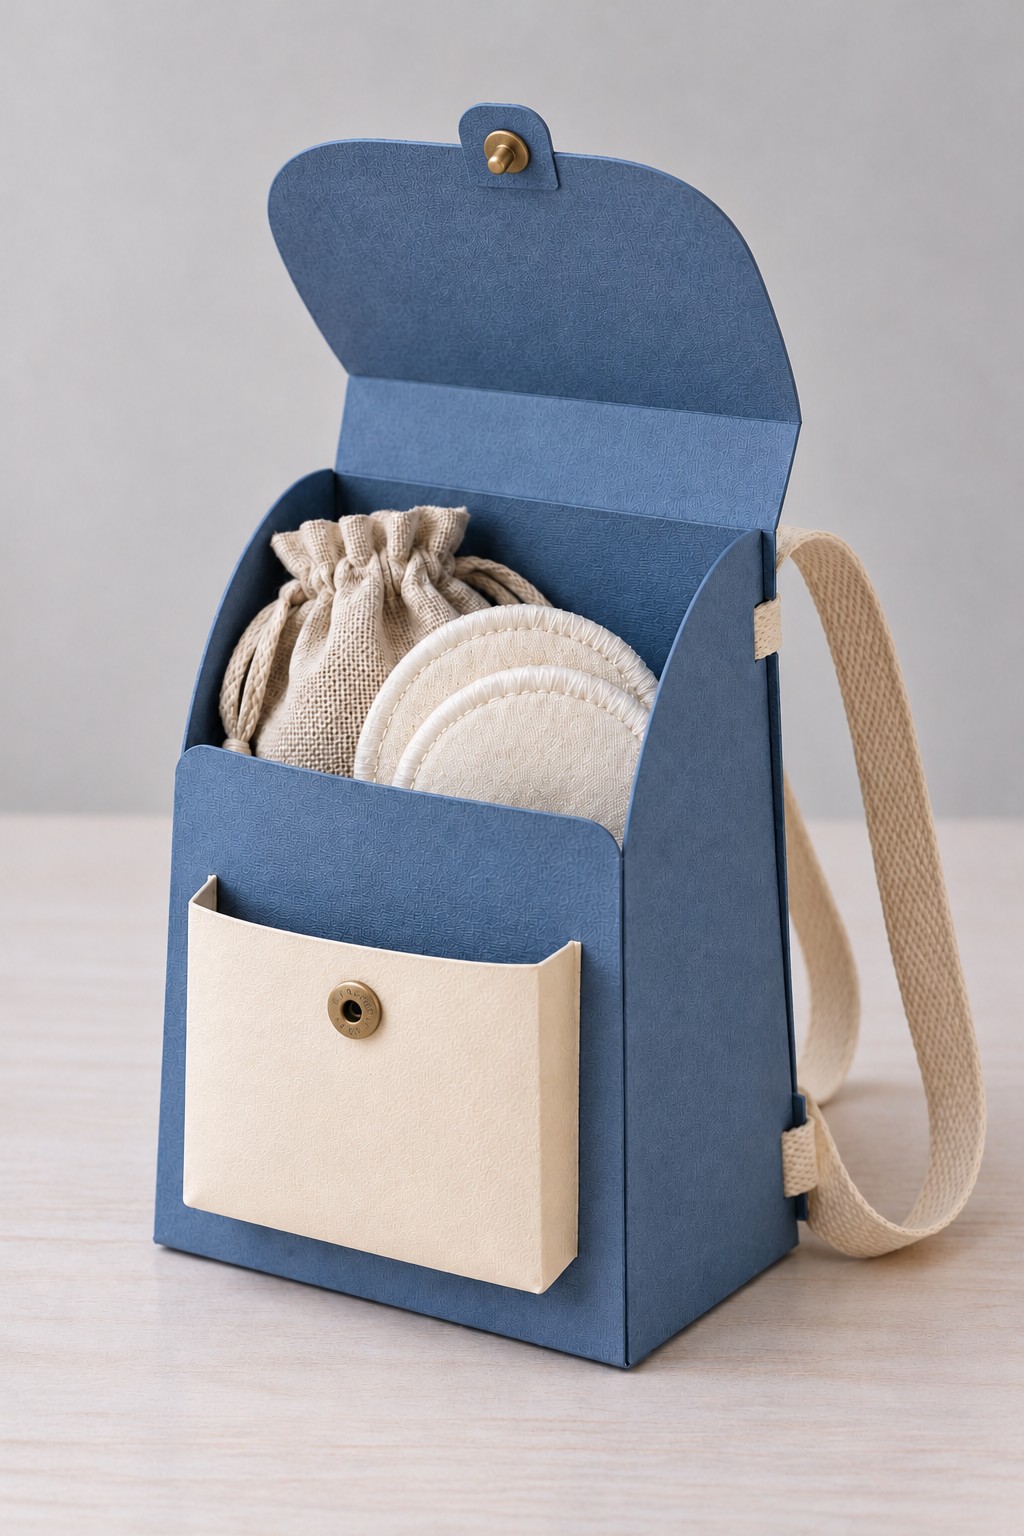
A blue paper backpack presents a small linen pouch and a stack of reusable cotton rounds with the opening folded back so the contents are visible. Cream webbing straps and a matching front pocket give the package a familiar bag shape. The brass colored press stud brings the upper flap down toward the pocket when it is time to close the gift.
Make a rectangular card body with reinforced base flaps and a long back panel that continues into the rounded closure flap. Score the lid folds before assembling the sides, allowing room for the filled pouch. Attach the webbing to reinforced sections of the back panel and cover its ends inside. Form the cream pocket with folded side tabs, then fit the press stud halves through extra card backing so opening it does not tear the paper. Use clean, washable fabrics for the rounds and include their care instructions. Keep the package dry and choose light contents so the decorative straps do not strain the card.
Check the Fit Before Giving
Close the finished package once with all the contents inside. A lid should lift without tearing, a drawer should slide without catching its ribbon, and a fabric closure should fasten without crushing the gift. Lift the container a short distance while supporting its base to check for shifting contents or loose joints. Remove sharp offcuts, excess glue, and stray threads before adding the final lining.
Open displays such as the parasol, market stall, and sock clothesline need a larger outer carton for travel. Fragile paper details, glass jars, and raised lids also need protection around them. Add a short note explaining any removable props, washing instructions, or parts the recipient should take off before use. These small checks help the packaging feel as considerate as the gift it holds.


Leave a Reply