
Stone adds texture, color and useful weight to a craft. These 32 projects range from tabletop mosaics and painted games to planted displays and garden accents. Choose the location and support first, then adapt the design to the stones you can source.
Table of Contents
- Choose Stone Craft Materials and Methods
- Plan the Materials Before Choosing Your Project
- Start with a project that suits your experience
- Check Supports and Material Compatibility
- Test the Adhesive Where It Will Be Seen
- 1. Glowing Pebble Garden Sphere
- 2. Leafy Pebble Mosaic Tray
- 3. Spiral Pebble Teapot Stand
- 4. Speckled Stone Bud Vase With a Brass Insert
- 5. Botanical Painted Slate LED Lantern
- 6. River Stone Propagation Station
- 7. Crescent Moon Pebble Mosaic Accent
- 8. Pebble River Resin Tray
- 9. A Pebble Display Bowl with a Supported Core
- 10. Pebble Trimmed Plant Saucer
- 11. Sage and White Pebble Soap Dish
- 12. Hanging Pebble Bowl With a Supported Base
- 13. Jewel Toned Pebble Pedestal Bowl
- 14. Pebble Covered Napkin Holder
- 15. Pink Stone Heart Jewelry Dish
- 16. Pebble Spiral Side Table With a Resin Finish
- 17. Pebble Glass Bottle Table Lamp
- 18. Pebble Fairy House With a Slate Roof
- 19. Long Wooden Centerpiece With a Pebble Creek
- 20. Geode Inspired Stone Display Bowl
- 21. Succulent Wall Frame With a Pebble Border
- 22. Pebble Cup Rain Chain
- 23. Macrame Stone Tablecloth Weights
- 24. Tabletop Stacked Stone Fountain
- 25. Pebble Covered Rain Boot Planter
- 26. Pebble Beehive Garden Ornament
- 27. Pebble Mosaic Garden Stair Risers
- 28. Ocean Wave Pebble Wall Art
- 29. Stone Cottage LED Lanterns
- 30. Hanging Pebble Pods for Air Plants
- 31. Sea Glass and Stone Dragonfly Stakes
- 32. Ladybug and Bee Stone Tic Tac Toe
- Care for Stone Displays
Choose Stone Craft Materials and Methods
Plan the Materials Before Choosing Your Project
Wash legally sourced stones, dry them and sort by thickness as well as color. Weigh heavy layouts before selecting the base. Match bonding products to the surfaces and actual indoor, outdoor or wet exposure.
Start with a project that suits your experience
- For a straightforward first project: Try the napkin holder in idea 14, knotted tablecloth weights in idea 23, or painted game in idea 32.
- For layout and bonding practice: Consider the leaf tray in idea 2, crescent mosaic in idea 7, or decorative beehive in idea 26. Their permanent bases support the stones.
- For more involved work: Freestanding stone shells, resin finishes, wall mounted pieces, and water features need additional planning. Use prepared components or specialist help where drilling, electrical work, or building details exceed your equipment and experience.
Check Supports and Material Compatibility
Buy drilled stones or have a stoneworker prepare them. Drilling and grinding need suitable silica dust controls. For resin, prepare the stated protection and ventilation and respect mixing, depth and cure limits.
Use permanent cores where stone shells need support, separate food contact inserts for serving and LEDs in decorated lanterns. Protect heat sensitive adhesives, resin and backing materials from hot cookware.
Test the Adhesive Where It Will Be Seen
In Sarah’s pebble art experiment at How Wee Learn, expanding glue left visible material around the stones, while the super glue trial required holding each piece in position. The twig needed longer support than the small pebbles. She reports an original $2 total in 2014 for the frame and glue, with natural pieces already available; the post does not identify the currency.
For a small 15 × 20 cm dry indoor mosaic practice panel, our allowance is 45 to 75 minutes of active layout and bonding, plus full adhesive cure, and US$8 to 18 for a firm backing, adhesive and preparation materials, with clean pebbles and tools owned. These are editorial estimates. Begin with flat stones, trial the joint on the actual finished backing and inspect the edge before committing the whole design.
1. Glowing Pebble Garden Sphere
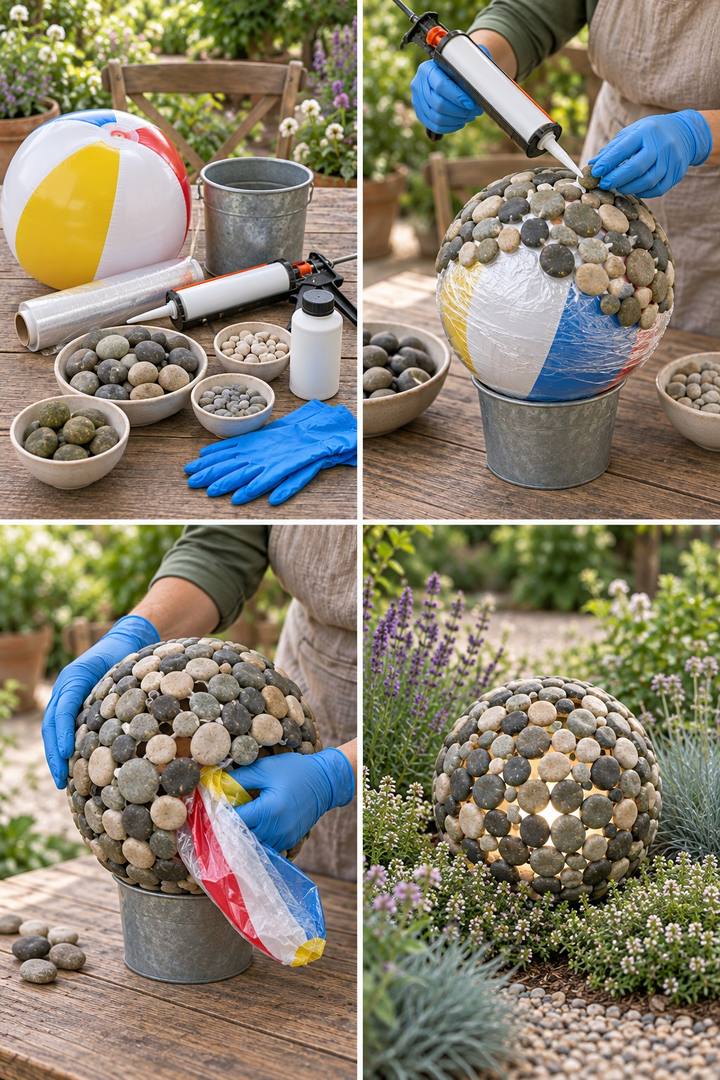
Gaps between pale pebbles let an LED glow through this garden sphere. A retained perforated rigid core simplifies support. Use a removable mold only with a bonding system confirmed for the stone joints, and leave a base opening for servicing the light. Set it on a stable ground level pad, with any solar charging panel exposed.
2. Leafy Pebble Mosaic Tray
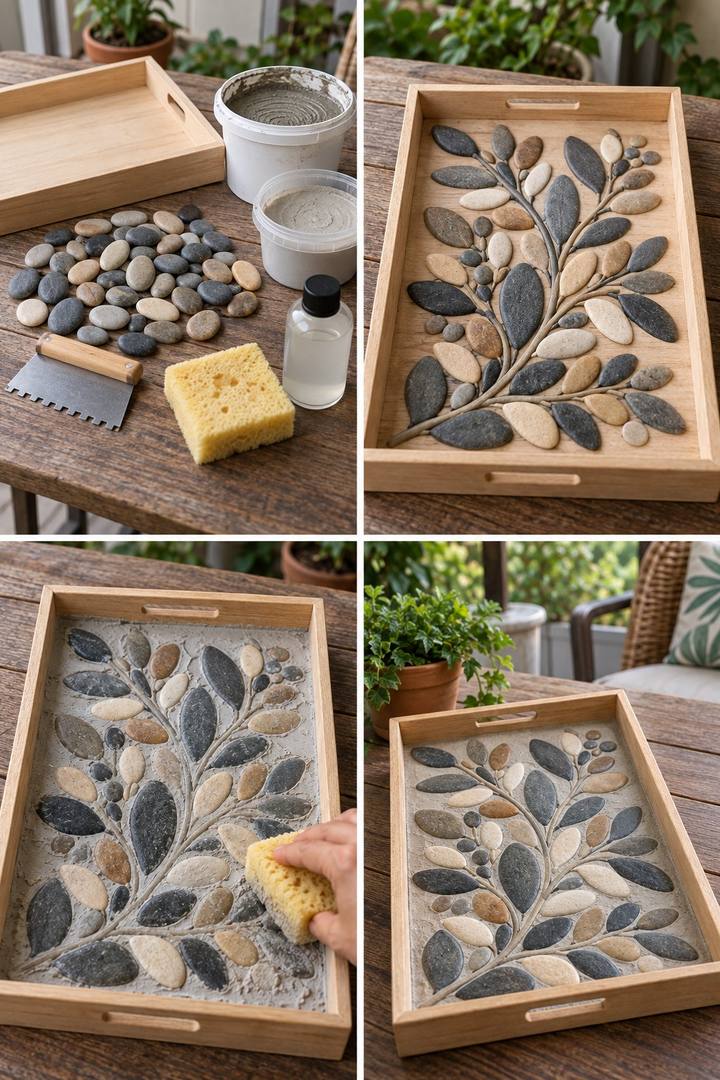
Long oval stones become leaves along a branching stem inside a wooden tray. Dry arrange the mosaic on a rigid, non flexing base, then bond and grout with a compatible system. Keep stone heights even and handles clear. Its added weight suits a stationary entry display more than carrying drinks.
3. Spiral Pebble Teapot Stand
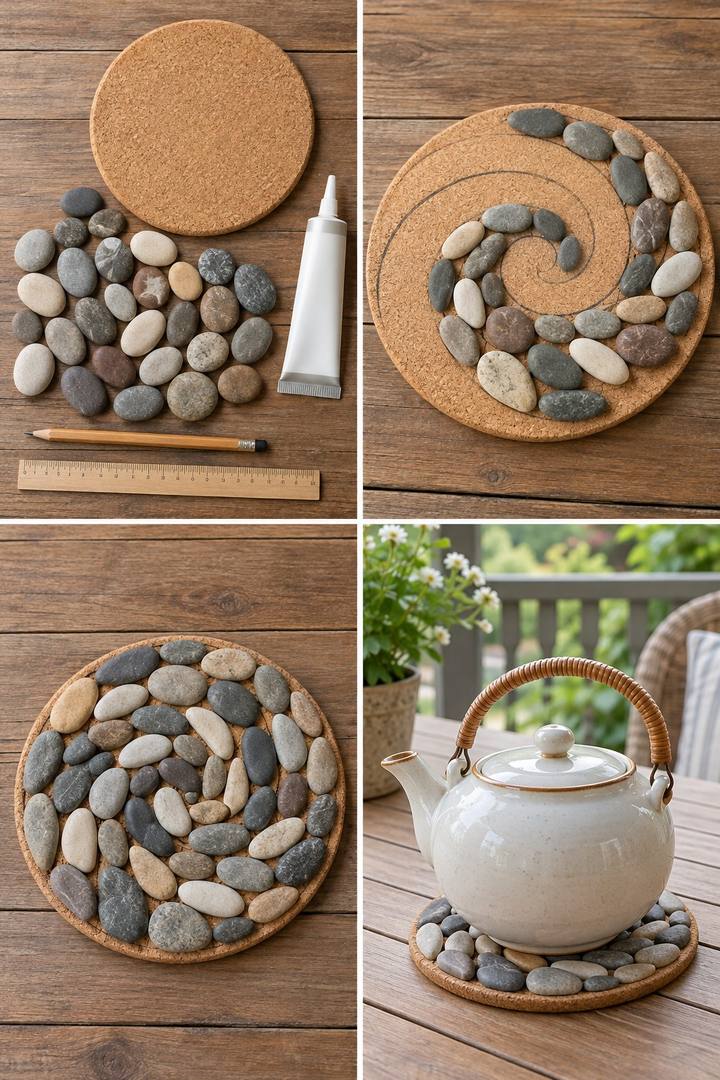
A pebble spiral gives a cork disk a clear direction. Arrange flat stones around the center and test a cool teapot for broad, level contact before bonding. Hot use requires the entire stone, cork and adhesive assembly to suit the temperature; otherwise display a cool vessel on it.
4. Speckled Stone Bud Vase With a Brass Insert
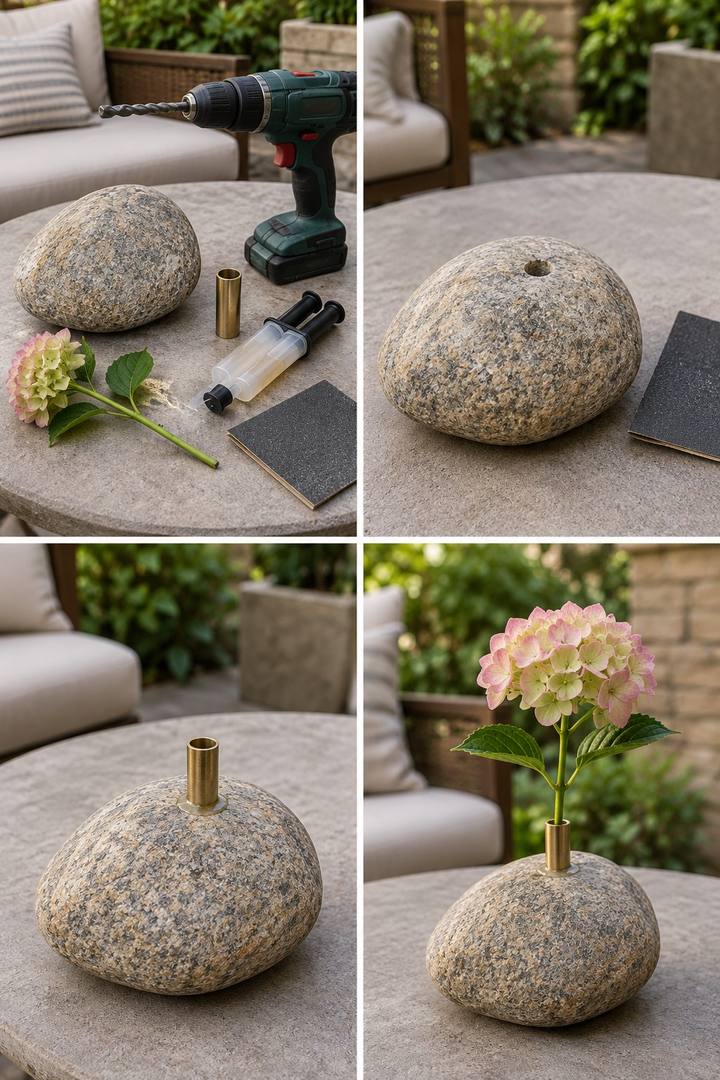
A rounded stone and narrow brass collar frame one flower. Start with a stable stone professionally drilled for the actual insert. Use a closed bottom insert or a removable glass vial, leaving room to lift it out. Leak test the water container separately and add protective pads beneath the stone.
5. Botanical Painted Slate LED Lantern
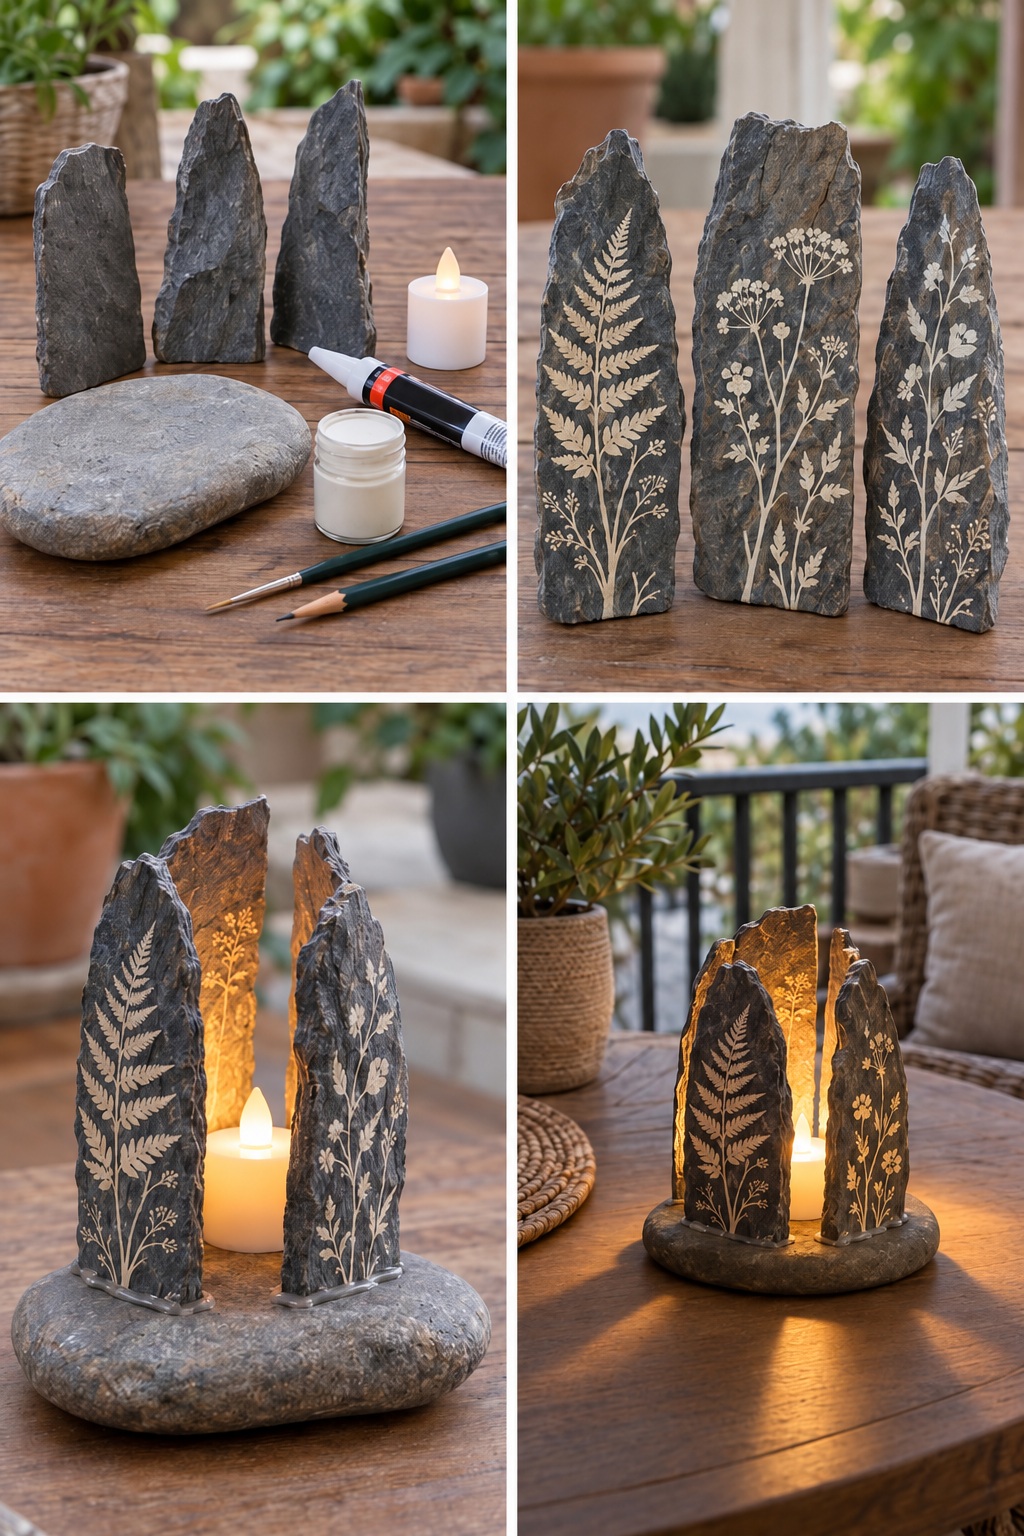
Cream botanical strokes soften three dark slate panels around an LED candle. Paint before assembly, keeping the bonding edges bare. Brace the panels on a broad stone base with one side open for access. The light shines through gaps; opaque slate will not project the painted leaf designs.
6. River Stone Propagation Station
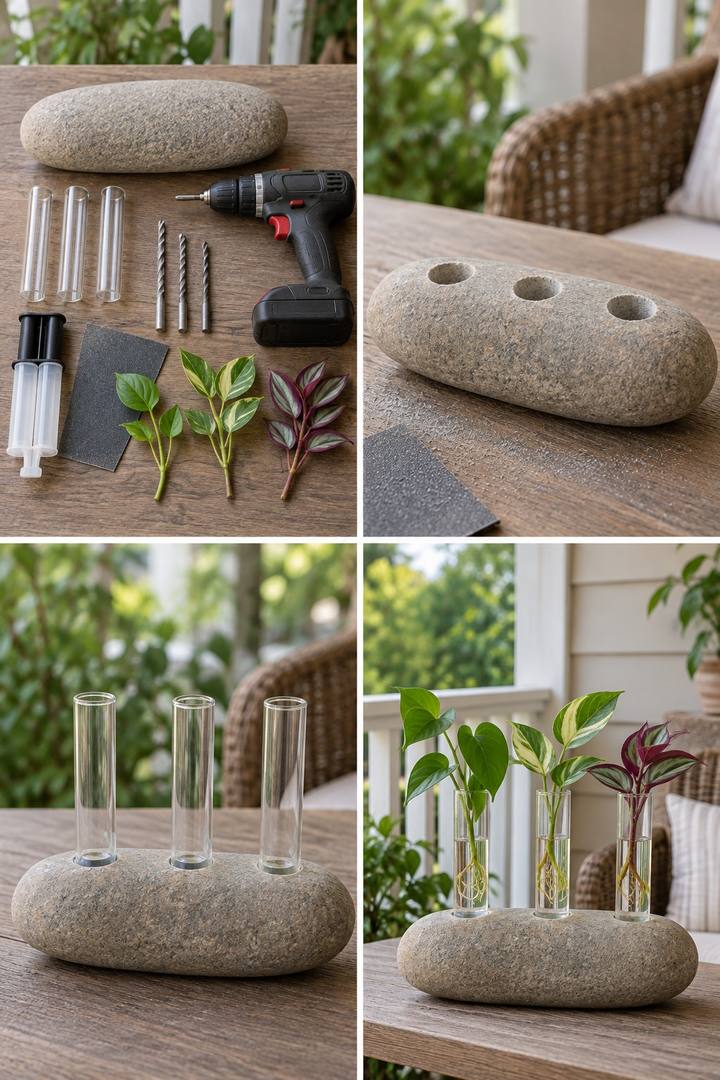
Three clear tubes show roots developing above a broad stone base. Have smooth openings prepared for the measured tubes, with enough clearance to lift them out for water changes. Keep cutting nodes underwater and leaves above it, using plants suited to water propagation and bright indirect light.
7. Crescent Moon Pebble Mosaic Accent
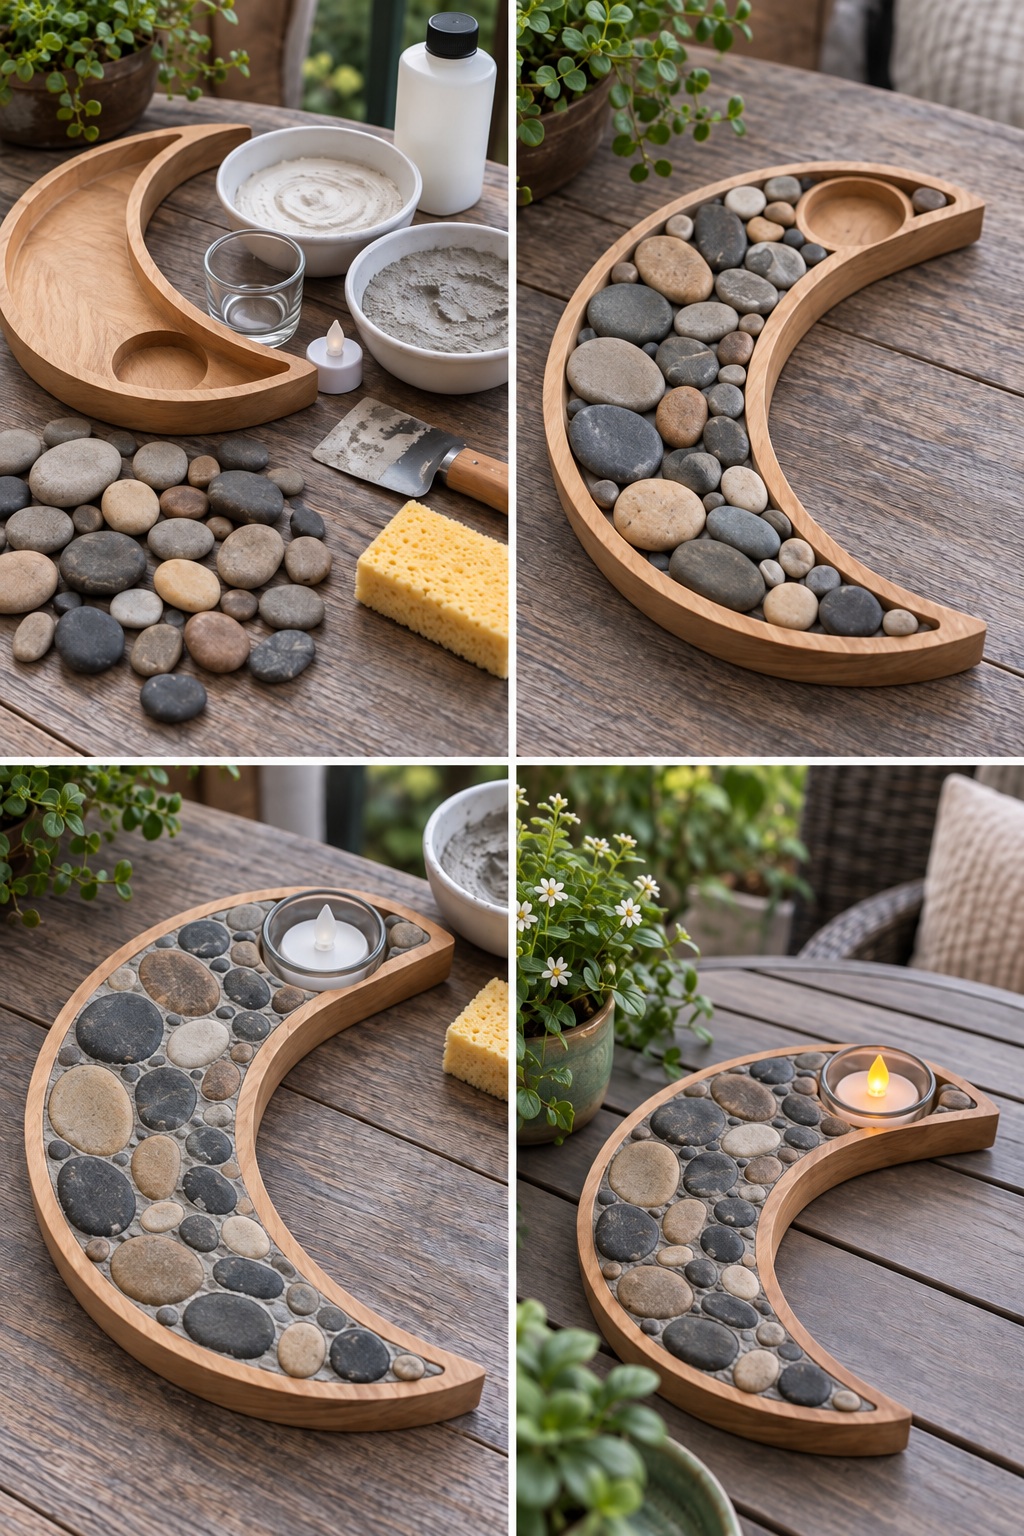
A crescent tray gives a pebble mosaic a defined moon shape. Reserve its round recess while arranging smaller stones toward the narrow tips, then bond and grout without covering the rim. Fit a removable glass cup with an LED tealight after curing, keeping flame away from the timber.
8. Pebble River Resin Tray
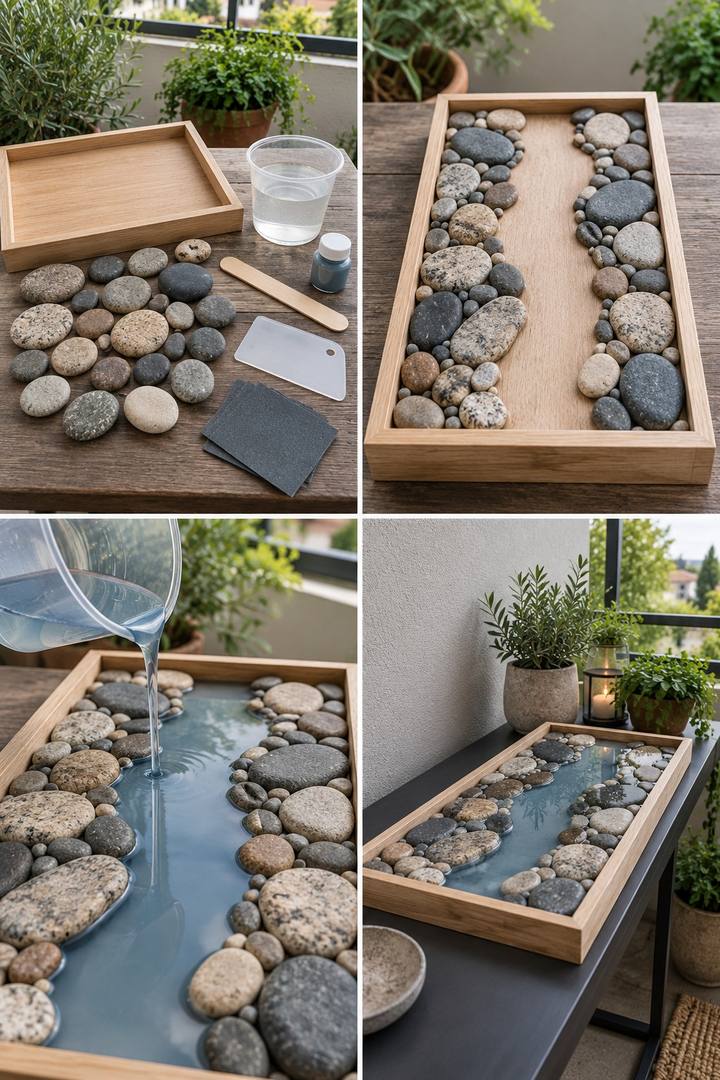
Raised pebble banks turn a pale blue resin channel into a miniature river. Use a rigid leak free tray and fix the dry stones before pouring. Select resin for the measured depth, respecting its batch and layer limits. Keep this primarily decorative and sheltered unless the complete assembly suits outdoor exposure.
9. A Pebble Display Bowl with a Supported Core
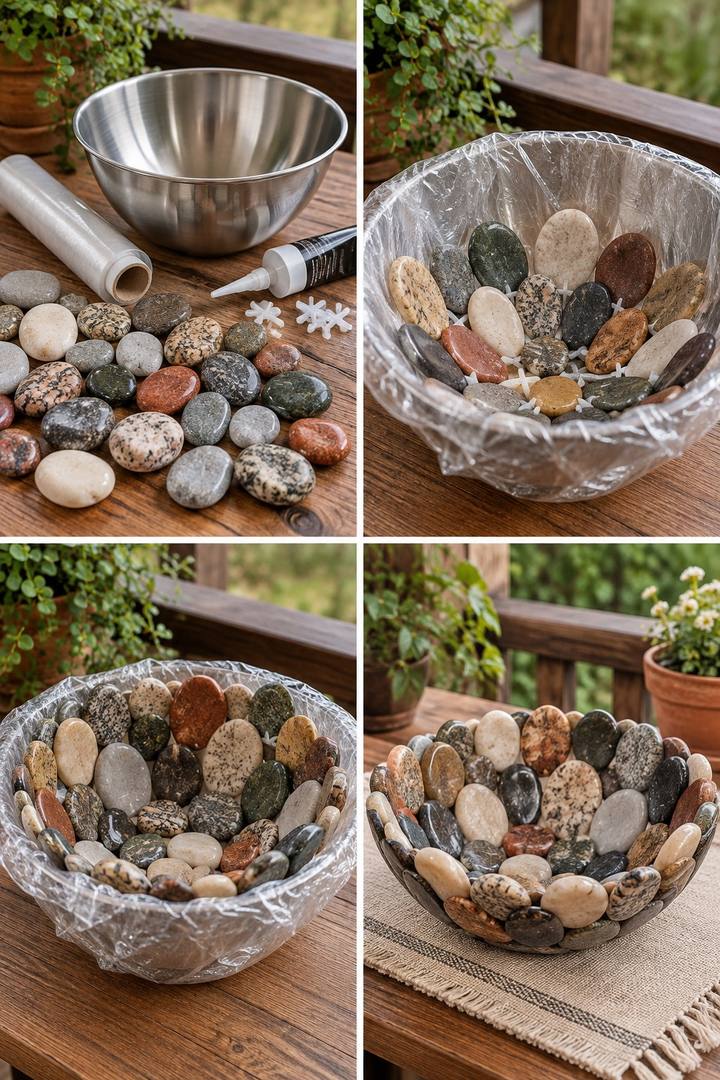
Upright oval stones create a petal like rim around a shallow bowl. Keep a thin rigid bowl as the permanent core, bonding small supported sections at a time; a removable mold alone does not establish that the finished stone joints can carry the rim. Use the piece for light dry keepsakes and lift beneath its whole base.
10. Pebble Trimmed Plant Saucer
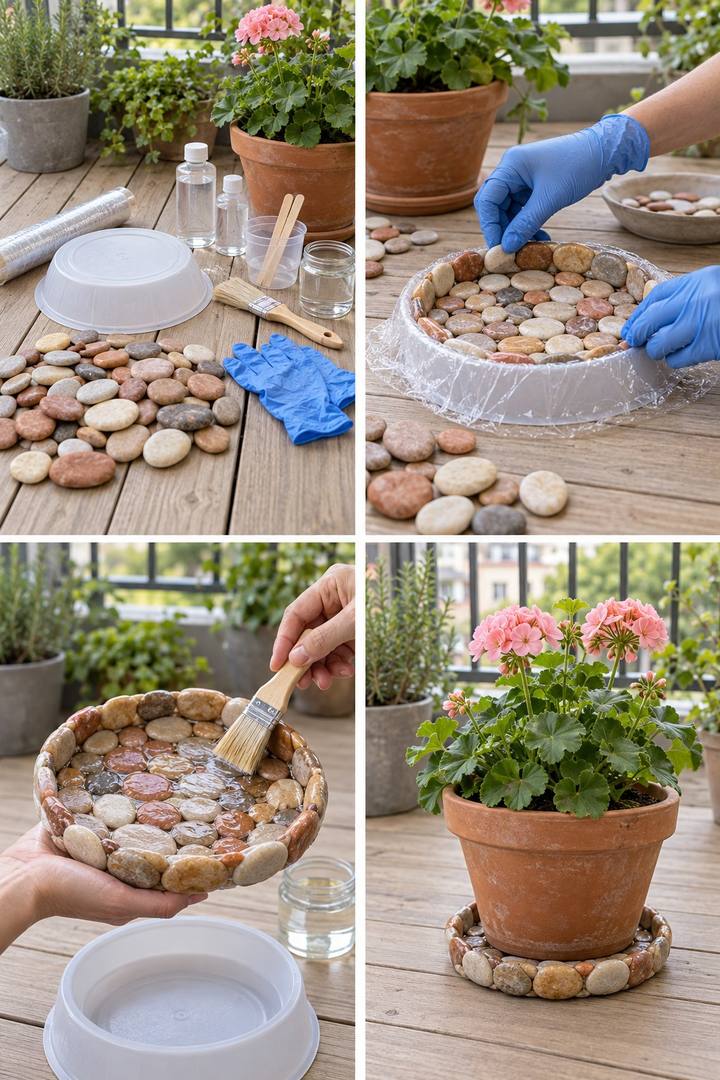
Blush and cream pebbles soften the edge beneath a terracotta pot. Retain a watertight saucer as the core or fit a removable inner saucer; glued stone joints alone do not establish water retention. Keep the pot level and empty collected drainage water after watering.
11. Sage and White Pebble Soap Dish
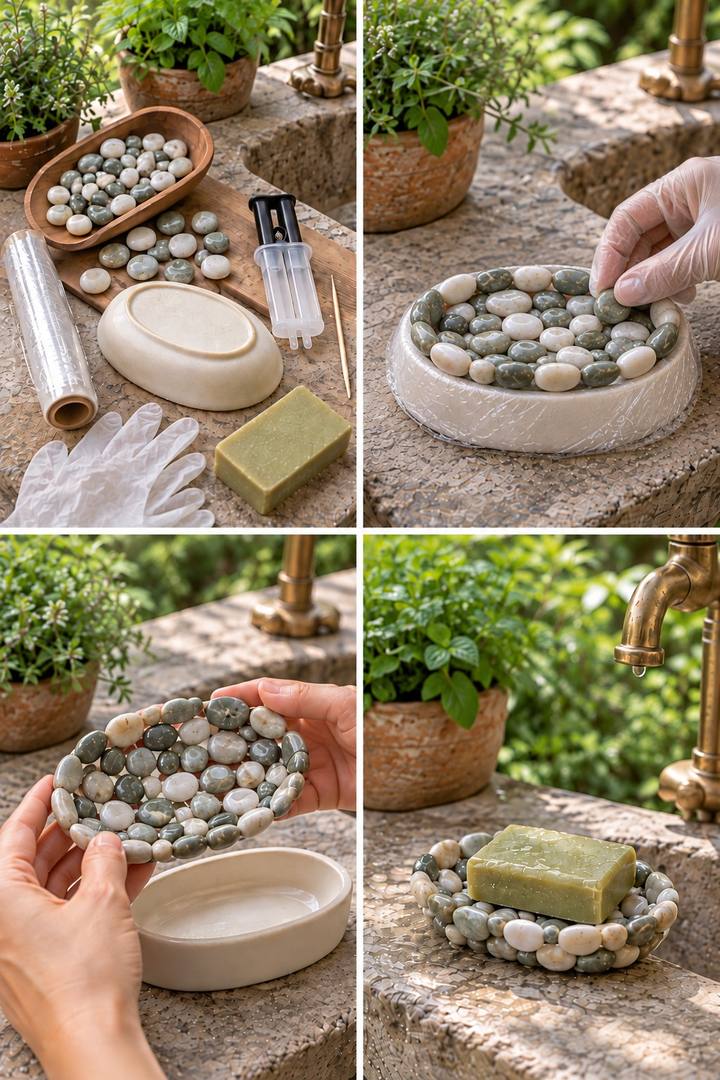
Sage and white pebbles create a low soap dish with open drainage gaps. Choose smooth support stones and a bonding system suited to repeated wet use. After full curing, set it above a removable washable drip tray so water can escape and both parts can dry between cleanings.
12. Hanging Pebble Bowl With a Supported Base
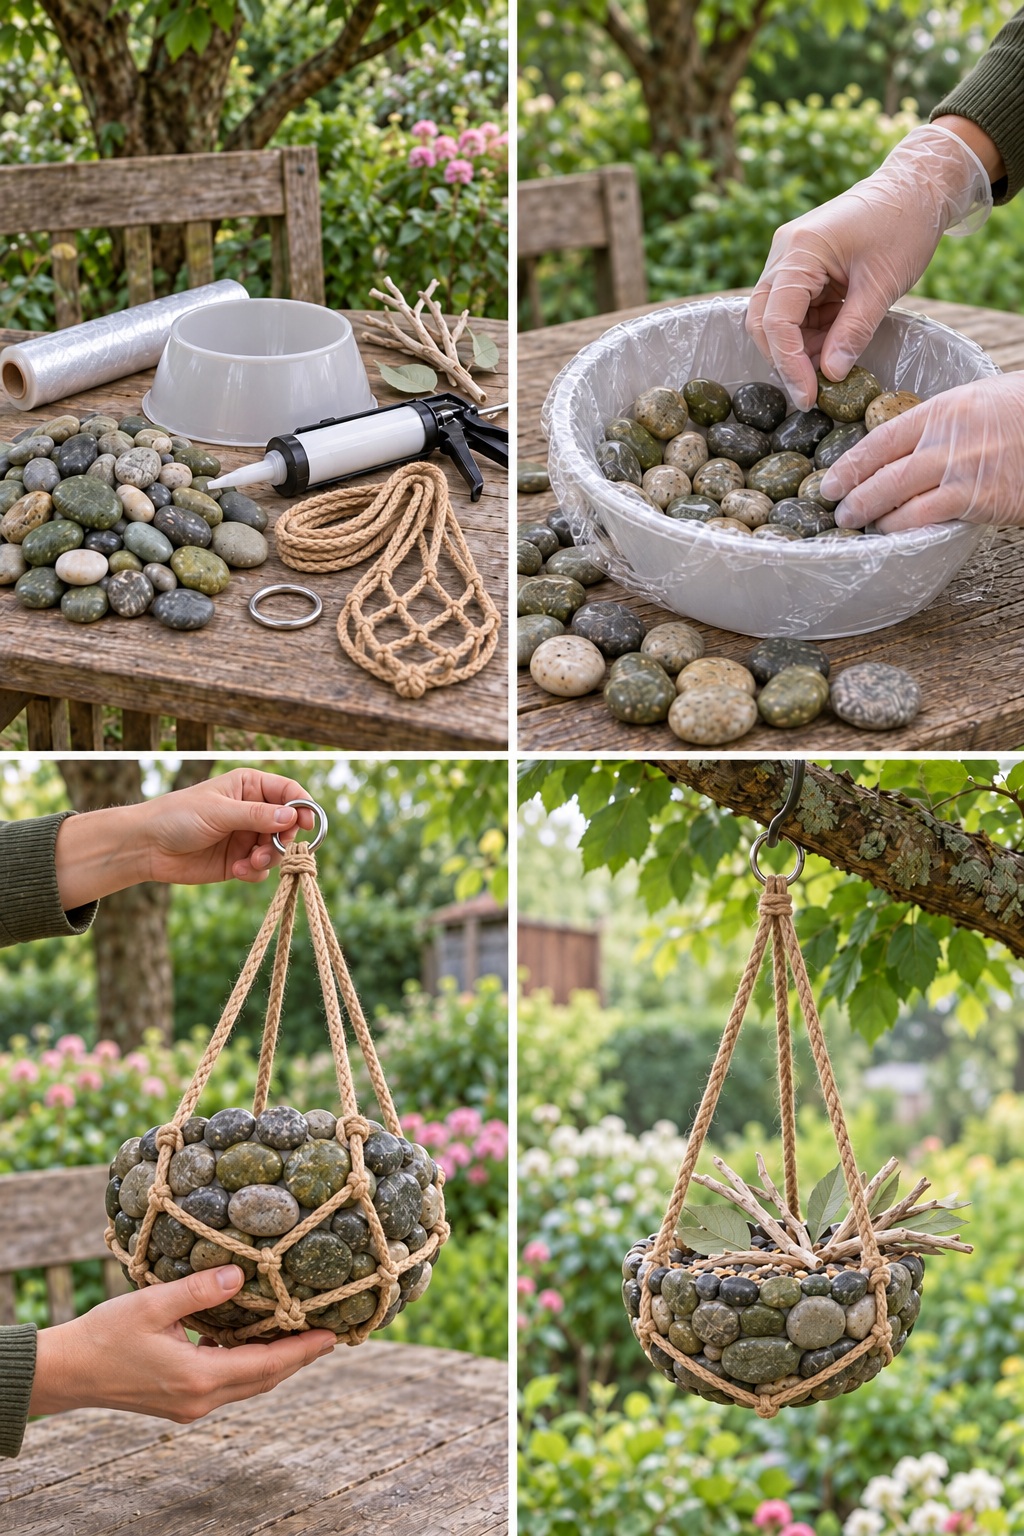
A small stone faced bowl becomes a hanging accent in a separate fitted cord cradle. Cross the cords beneath the entire base and size the side openings to prevent slipping. Select all fittings for the assembled weight, keep the bowl away from people and use light dry decoration inside.
13. Jewel Toned Pebble Pedestal Bowl
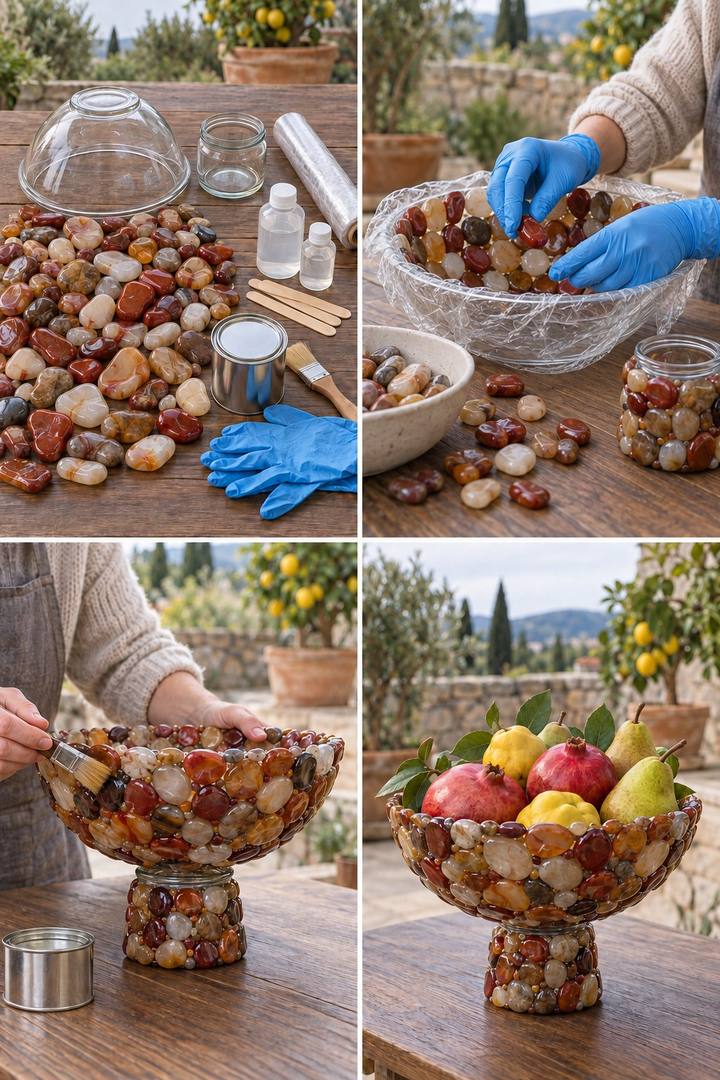
Translucent looking stones give a pedestal bowl a jewel like finish. Build or decorate the upper bowl and broad stable pedestal separately, then join their flat contact surfaces with a suitable connection. For fruit, use a removable food contact insert. Keep the centerpiece stationary and support the whole assembly when moving it.
14. Pebble Covered Napkin Holder
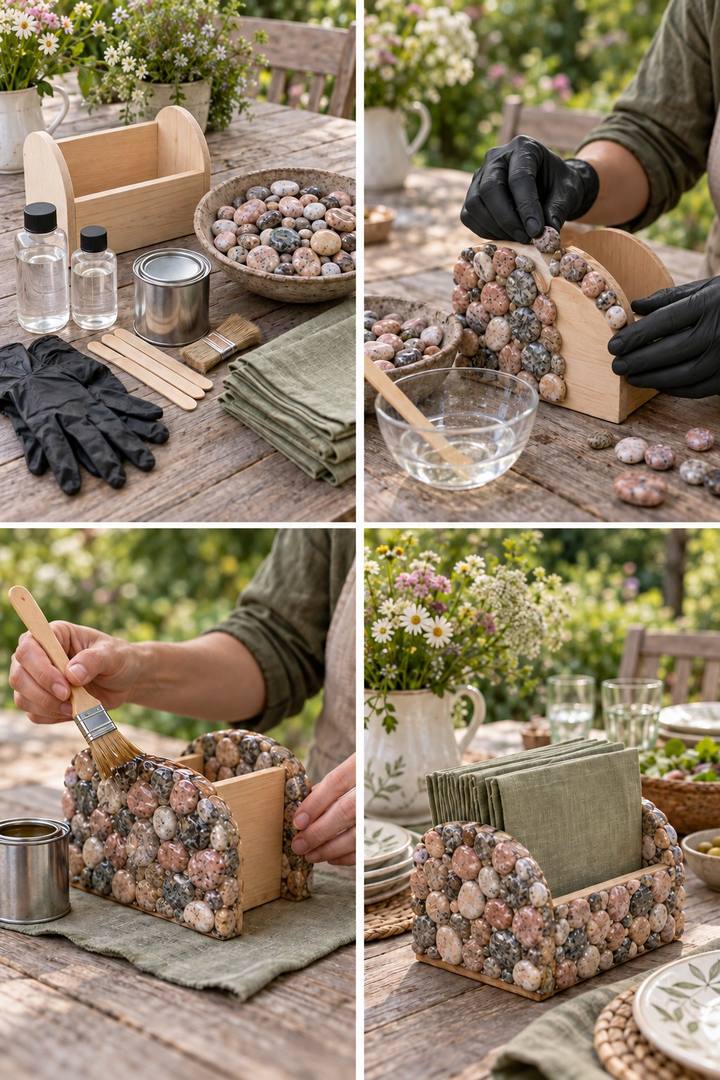
Pink and gray pebbles decorate the outside of a wooden napkin holder while the original body carries the load. Arrange the sides flat, bond one face at a time and let it set before turning. Keep the interior smooth and the opening clear for removing napkins.
15. Pink Stone Heart Jewelry Dish
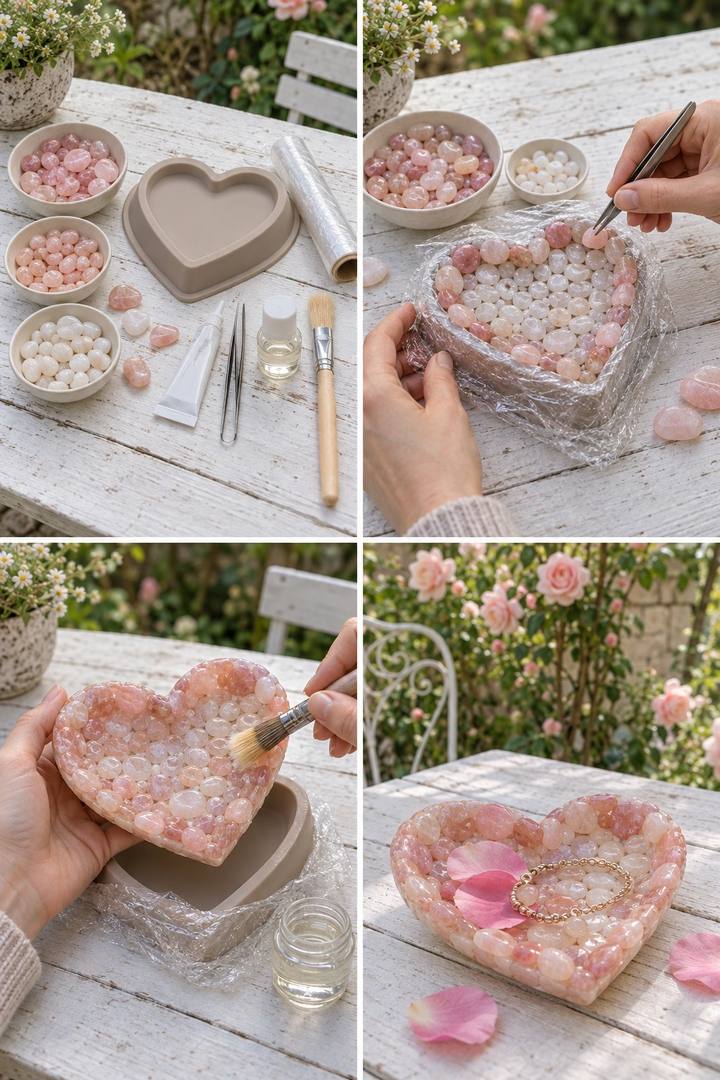
A pink outline and pale center make this heart shaped jewelry dish readable. Dry arrange smooth stones in a shallow mold, supporting the narrow point during bonding. Release only after full cure with support beneath the entire base. Add a removable soft liner where delicate chains could catch.
16. Pebble Spiral Side Table With a Resin Finish
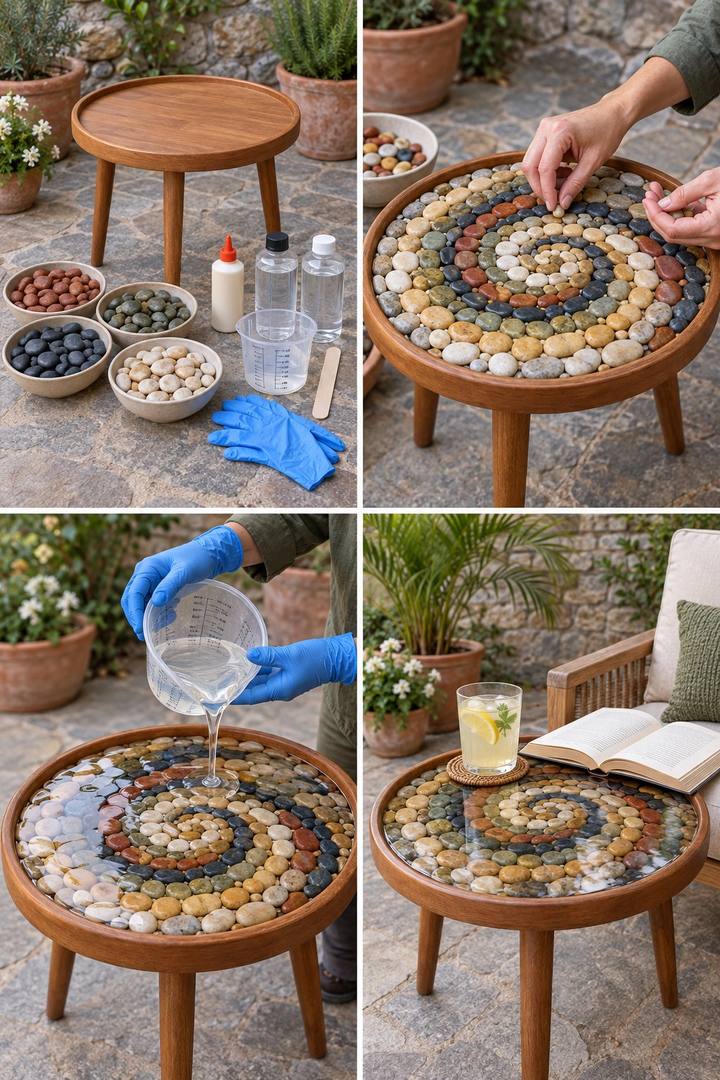
Cream, charcoal and rust bands form a spiral across a rimmed side table. Check and weigh the stone additions before bonding. Level the table and use a resin system approved for the measured depth, rather than pouring unrestricted thickness over raised stones. Allow full cure and protect the surface from heat.
17. Pebble Glass Bottle Table Lamp
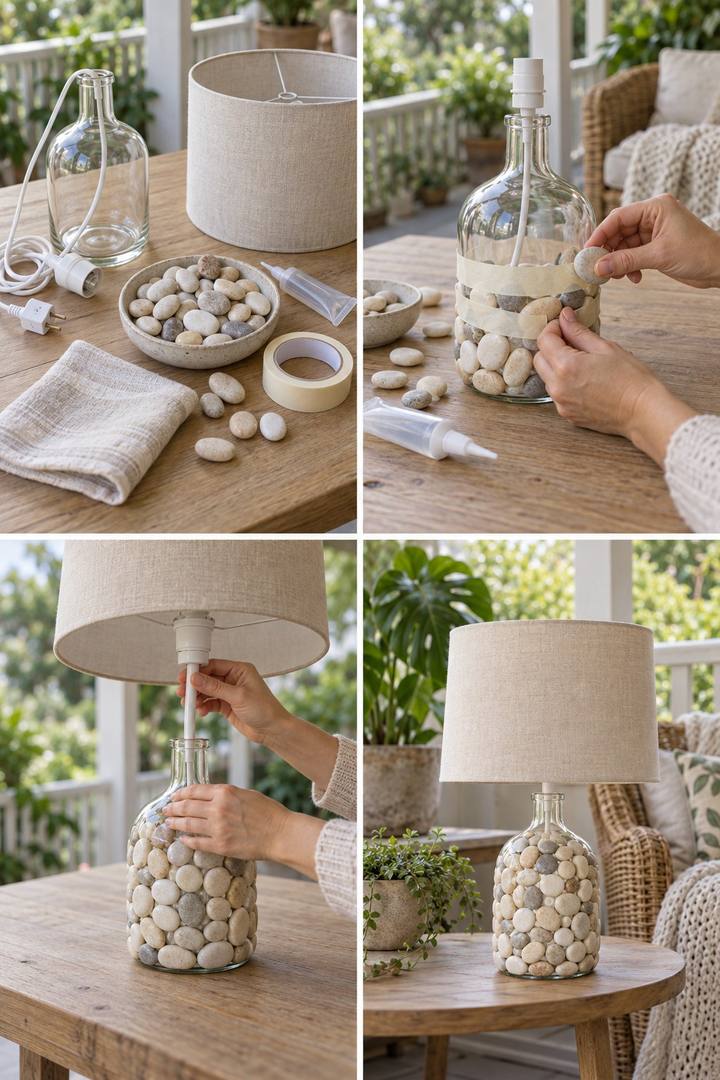
Pebbles give a glass bottle lamp a textured base beneath a plain linen shade. Use a complete compatible prewired bottle lamp kit. Keep its adapter, cable route and required clearances free while bonding the facing, then assemble after curing. Any wiring changes need a qualified electrician.
18. Pebble Fairy House With a Slate Roof
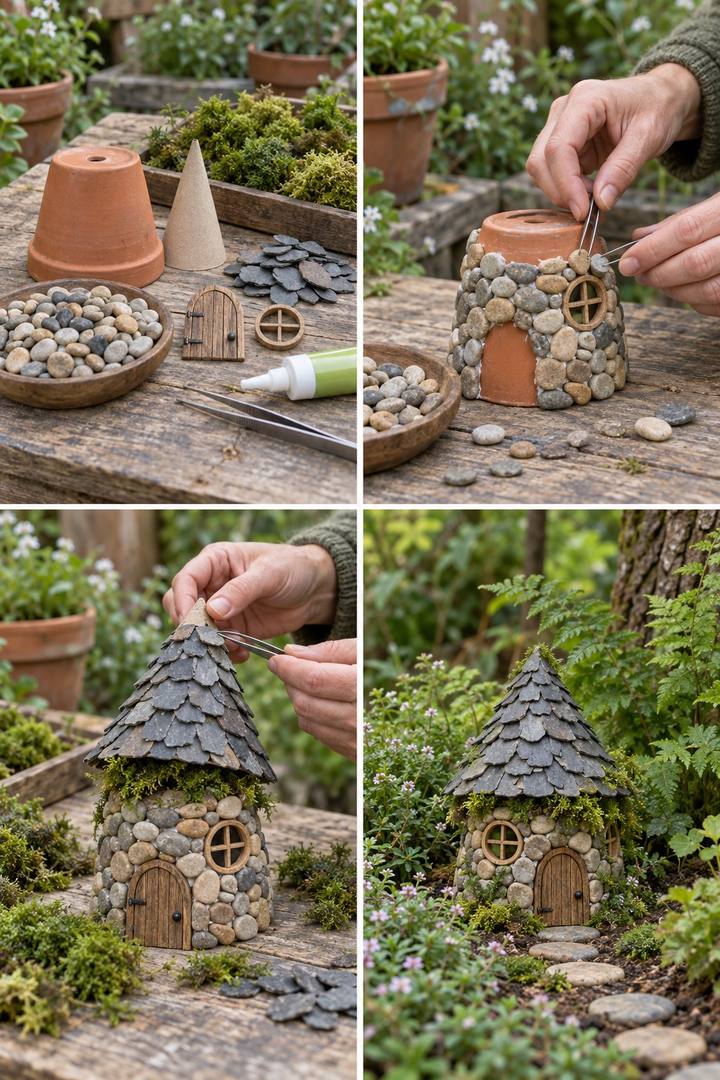
An inverted terracotta pot forms the fairy cottage’s body, with stones fitted around a separate door and window. Add an overlapping slate look roof over a supported former, starting at the eaves. Use lightweight scenic pieces on card for an indoor model; a permanent garden version needs a rigid weather resistant roof core and an exterior bonding system.
19. Long Wooden Centerpiece With a Pebble Creek
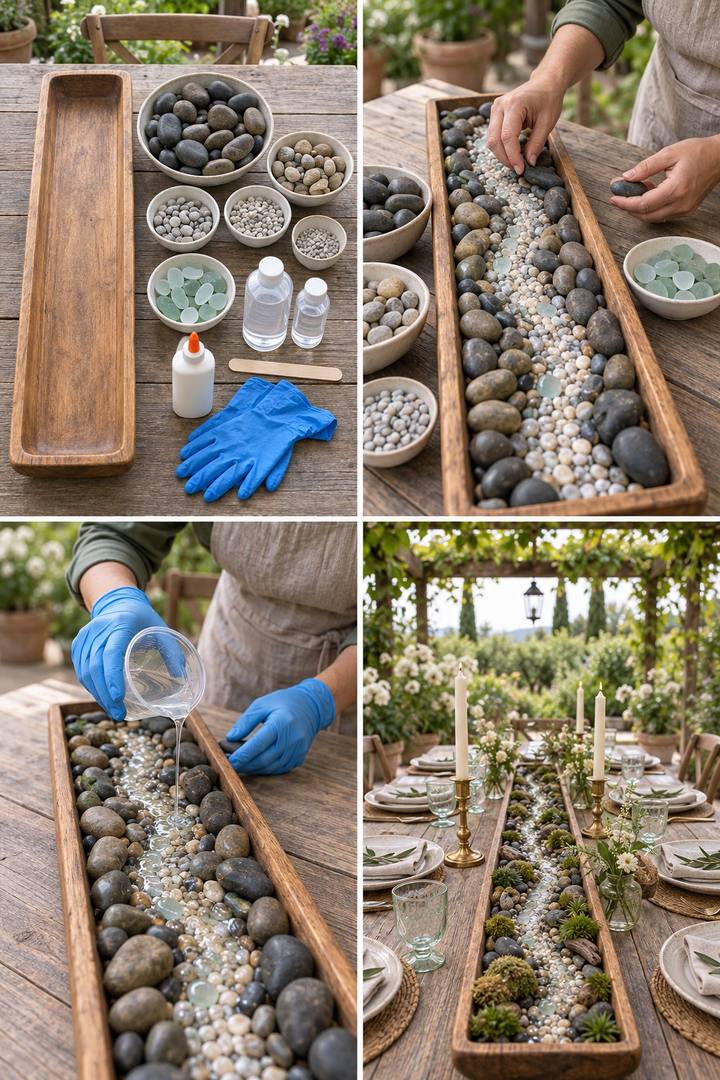
A long wooden bowl carries a low pebble creek without interrupting table sightlines. Arrange pale banks around smooth aqua craft glass and bond the pieces before adding any compatible resin finish. Keep live plants in removable containers with their own growing medium and drainage, rather than embedding roots in resin.
20. Geode Inspired Stone Display Bowl
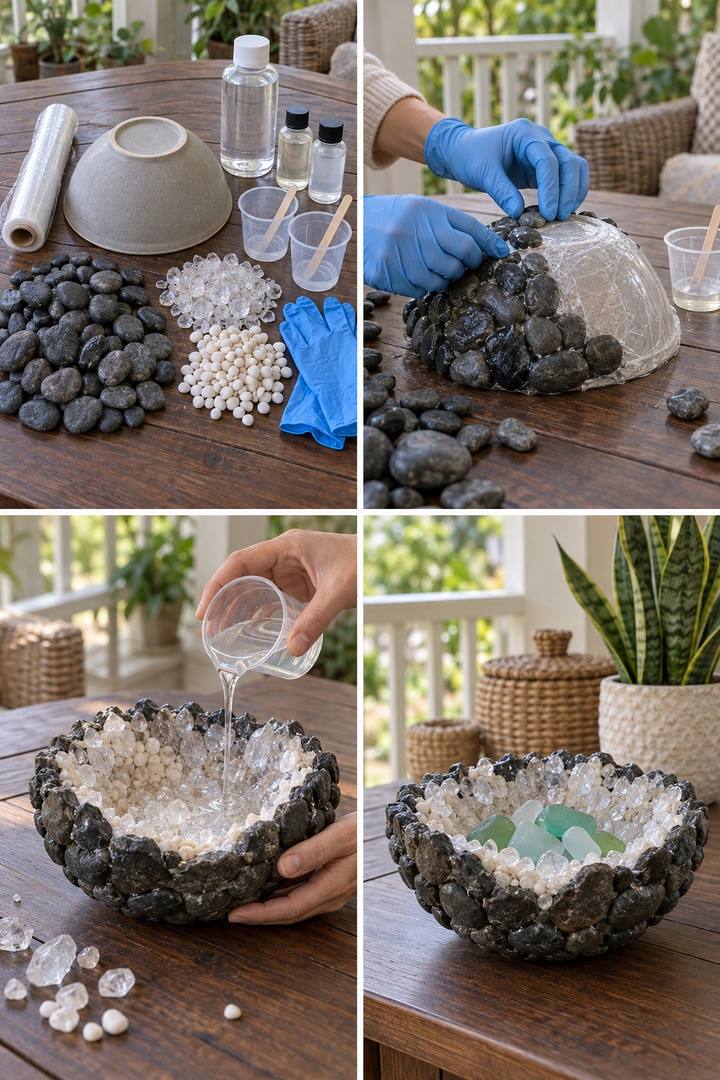
Dark outer stones and clear interior chips suggest an opened geode. Retain a rigid bowl where the stone joints cannot support a released shell. Secure the lining with finished edges, keeping the base flat. Use it for dry decorative objects, with pads beneath it and gentle cleaning around pointed details.
21. Succulent Wall Frame With a Pebble Border
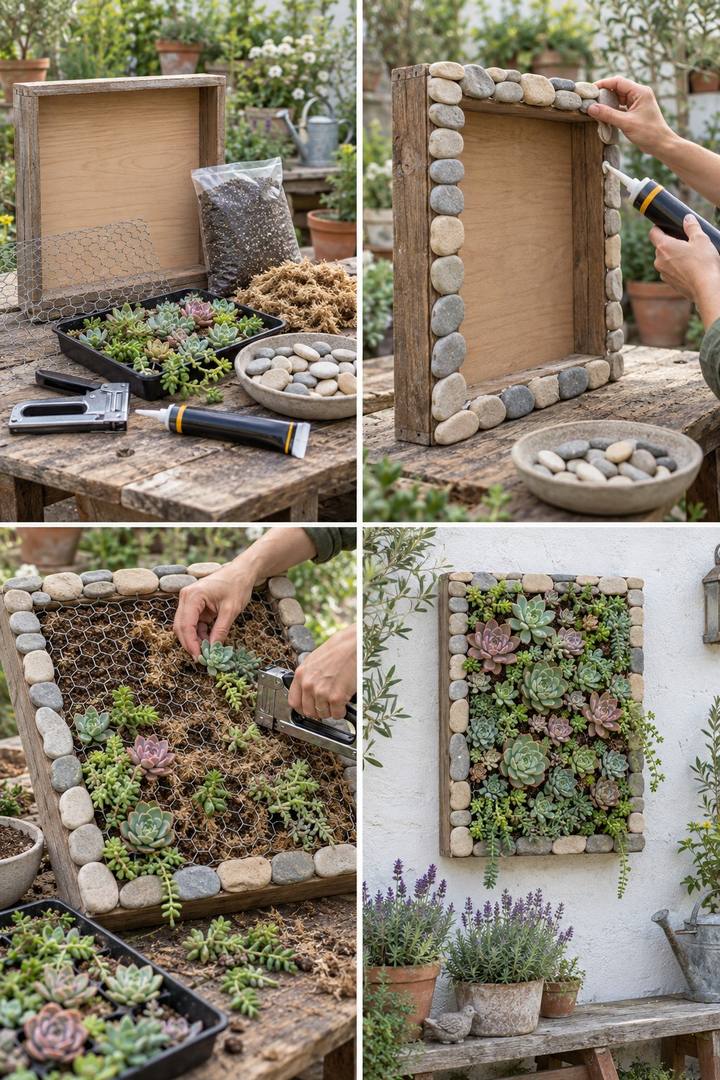
A stone border connects a planted succulent frame to the garden. Use a deep frame designed for roots, drainage and secured retaining mesh. Establish the planting flat until it stays secure during a supported tilt, then mount for the complete wet weight. Choose compatible plants and route drainage clear of the wall.
22. Pebble Cup Rain Chain
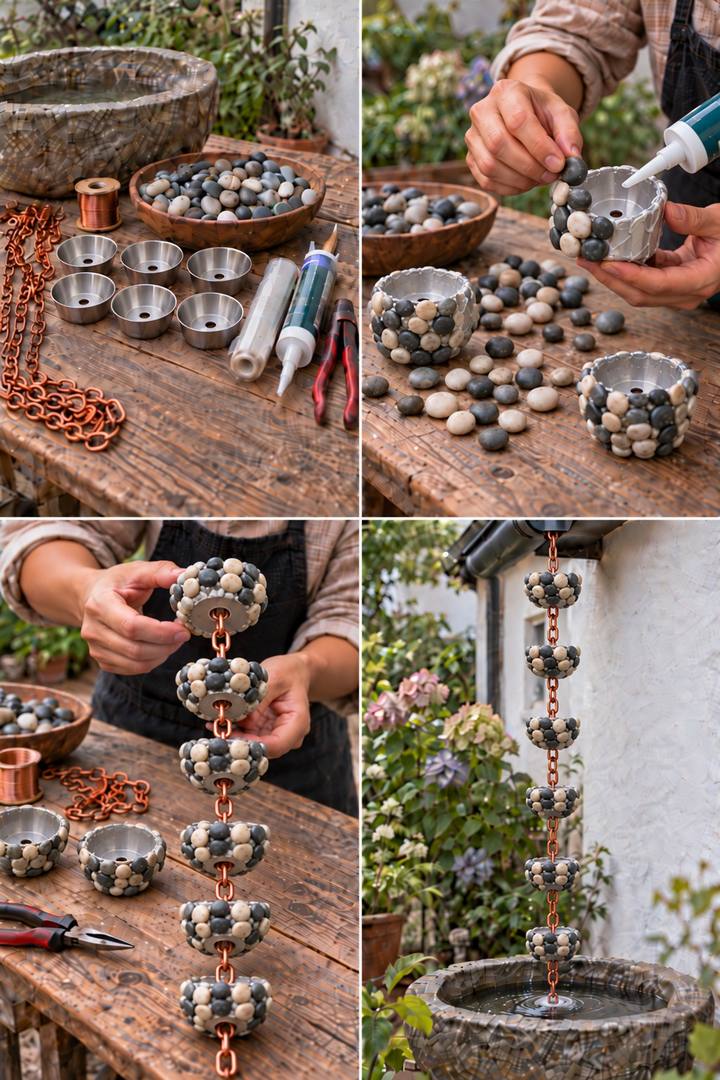
Pebble faced cups make rainwater visible as it descends. Begin with a cup chain system whose permitted load allows the facing, keeping outlets and mechanical links clear. Assess the roof catchment, suspension and overflow route before replacing a downpipe. Anchor the lower end and discharge water away from the building.
23. Macrame Stone Tablecloth Weights
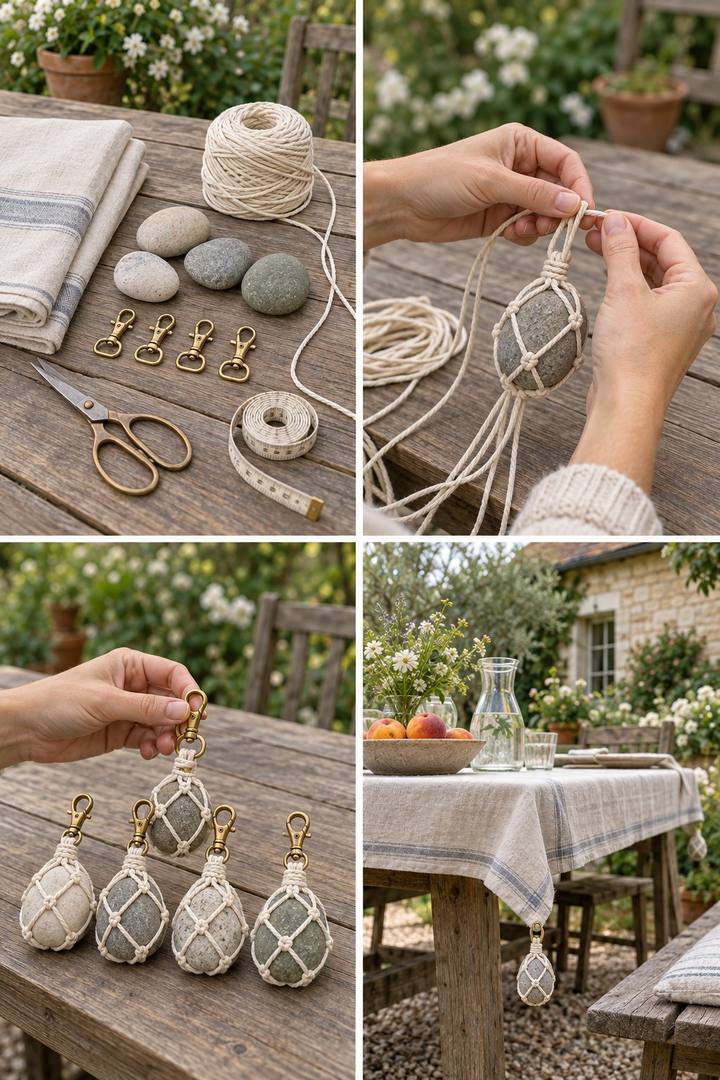
Cord cradles turn four smooth stones into removable tablecloth weights. Fold four lengths over each clip ring, then alternate neighboring pairs in rows of knots to form diamond openings. Close beneath the stone with a firm finishing knot and test retention over a supported surface. Use in gentle breezes only.
24. Tabletop Stacked Stone Fountain
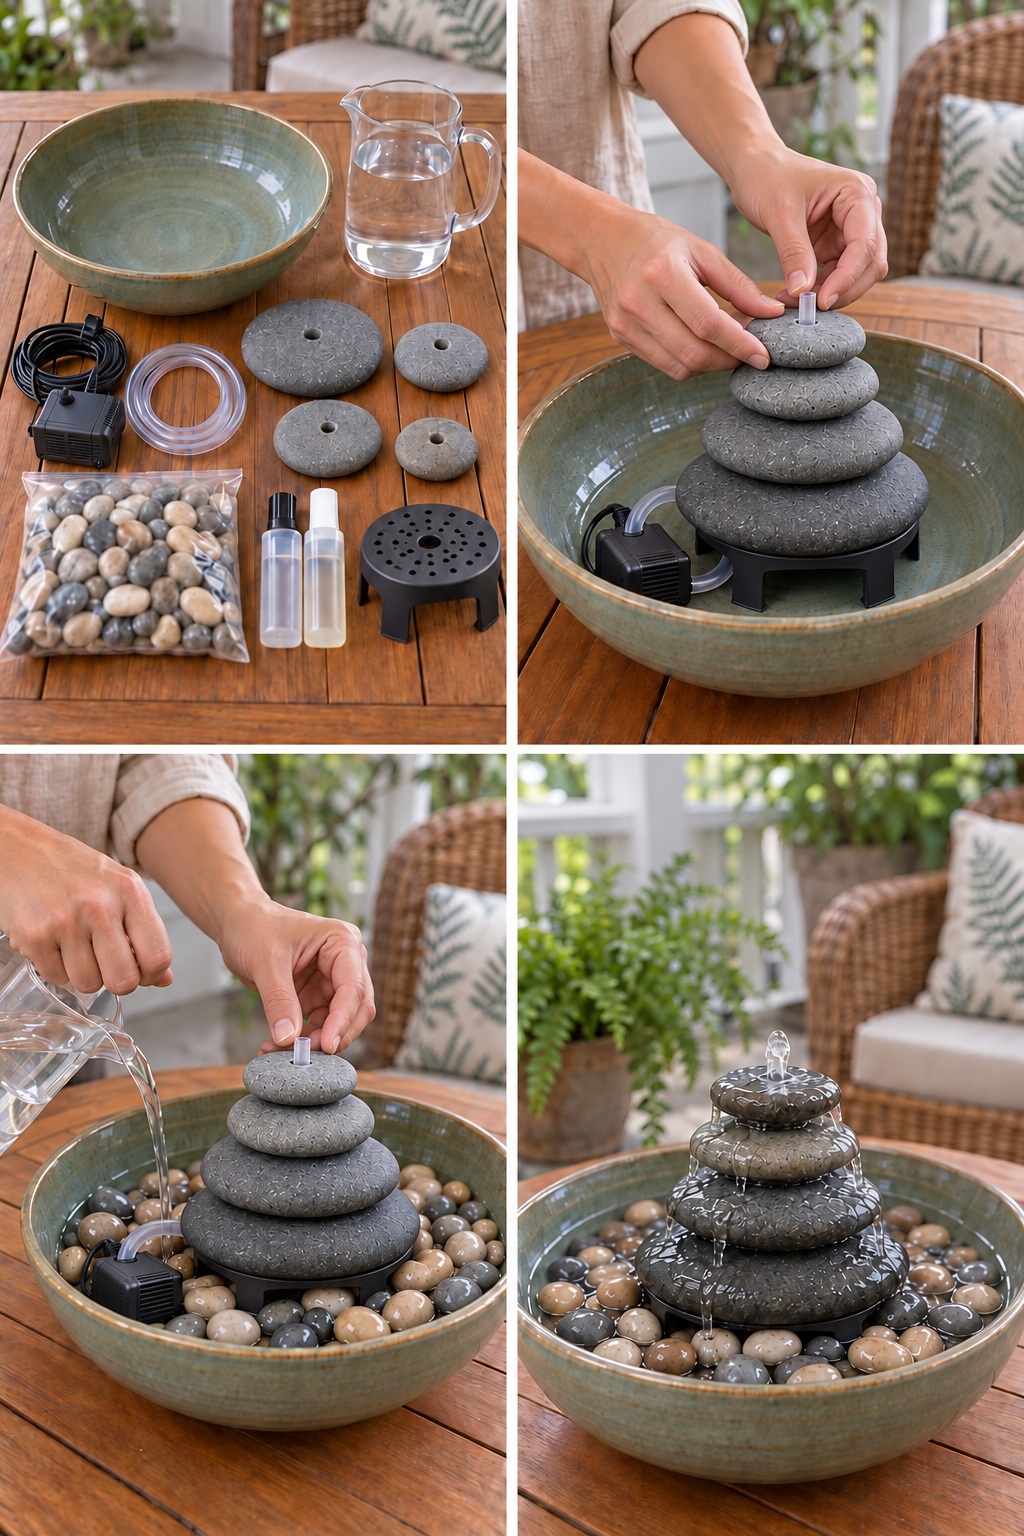
A stack of four drilled stones creates a compact recirculating fountain. Rest the largest on an independently supported load rated platform in the basin, with broad stone to stone contacts above. The tube carries water, not weight. Keep the pump removable, submerged at its operating level and disconnected before adjustment or cleaning.
25. Pebble Covered Rain Boot Planter
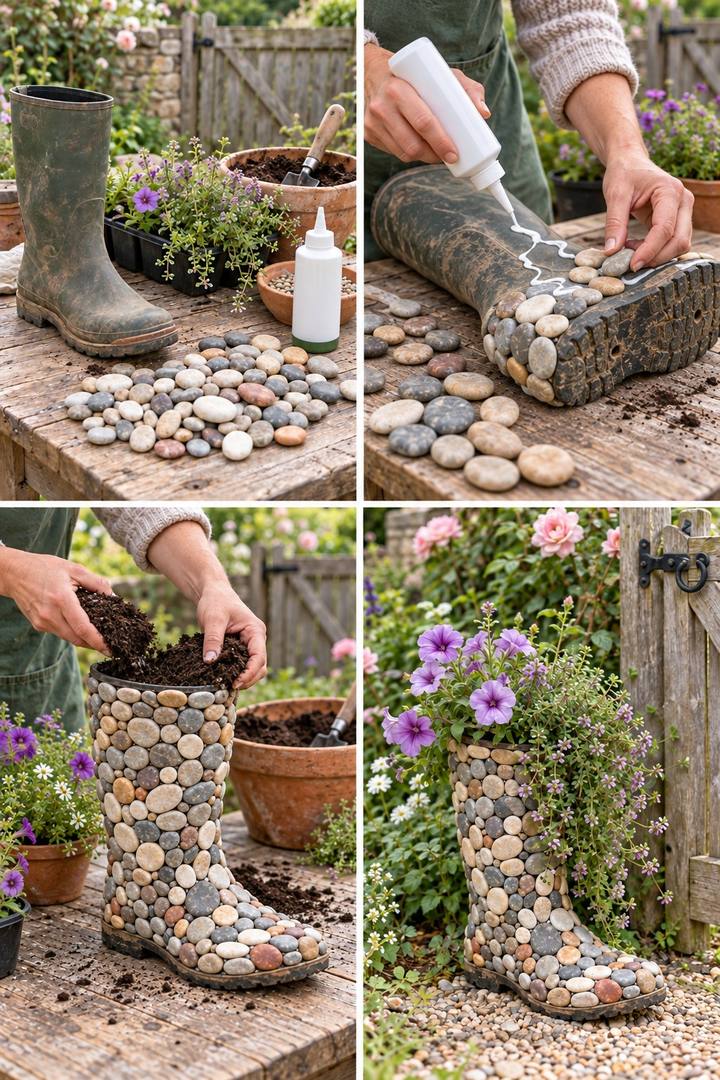
Pebbles give an old rain boot a garden texture. Test adhesive for its actual rubber or plastic, prepare drainage first and keep the sole and outlets clear while facing it in supported sections. Fit modest plants or a draining nursery pot. A gravel layer cannot repair poor container drainage.
26. Pebble Beehive Garden Ornament
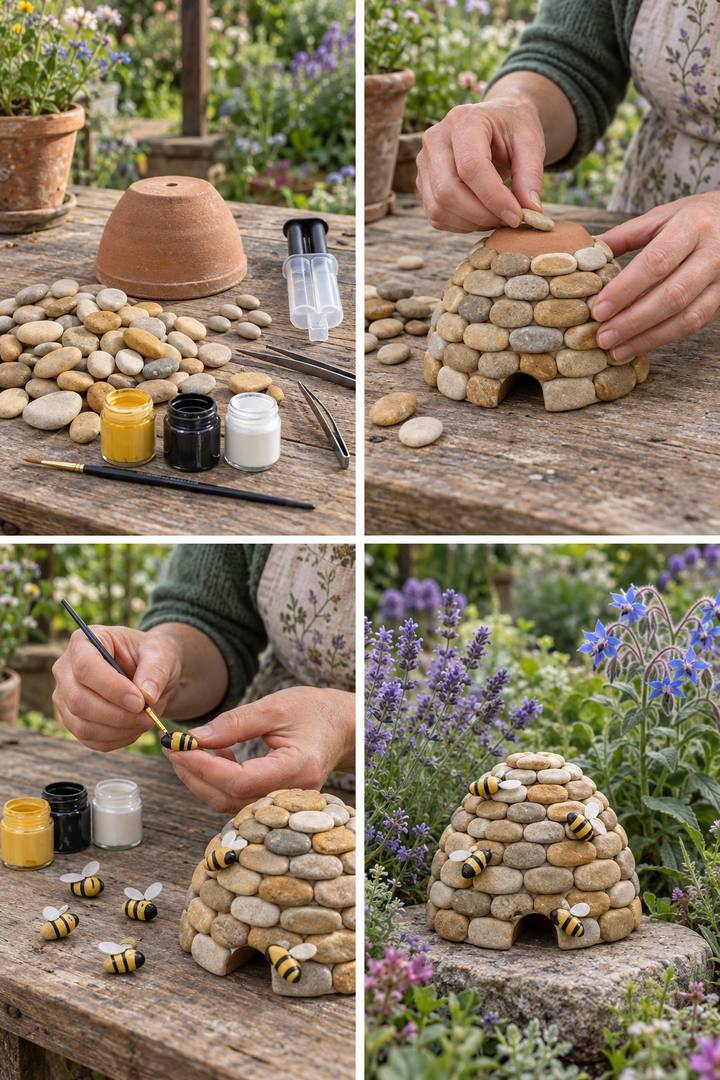
Cream stones around an inverted pot suggest a traditional beehive. Preserve the flat rim and use a dark painted doorway instead of cutting the pot. Add small painted bee stones after the facing has cured. This is a garden ornament rather than a functioning hive.
27. Pebble Mosaic Garden Stair Risers
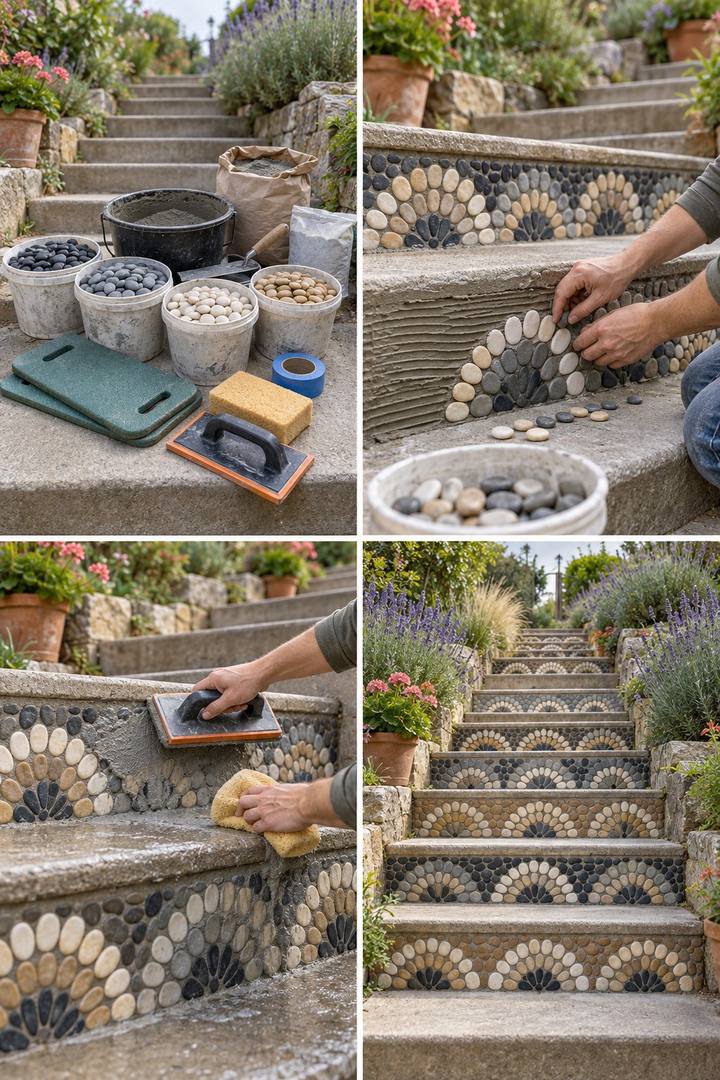
A repeated pebble fan decorates concrete stair risers while leaving walking surfaces clear. Treat it as exterior tiling: repair the substrate, specify suitable mortar and grout, and preserve movement joints. Protect treads and nosings, keep step dimensions intact and reopen the route only after the system is ready for use.
28. Ocean Wave Pebble Wall Art
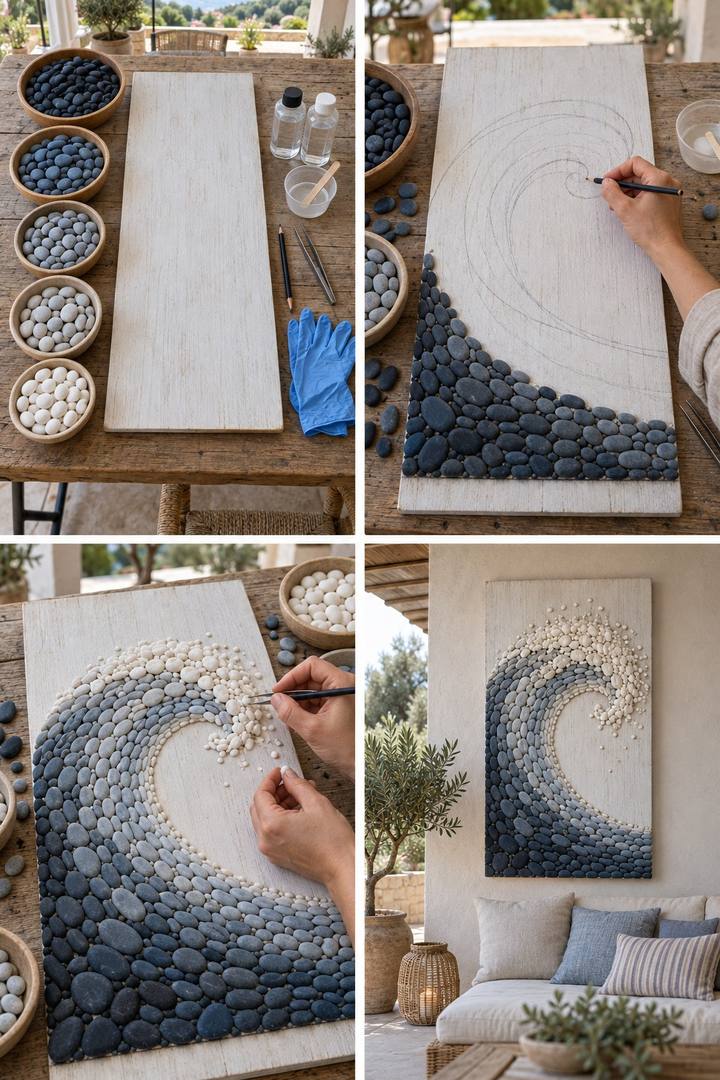
Deep blue stones rise into a pale foam crest on a timber panel. Preserve the open curl in the dry layout and weigh the complete arrangement before selecting wall hardware. Test bonding over any decorative base finish, cure the mosaic horizontally and mount through structural parts of the panel.
29. Stone Cottage LED Lanterns
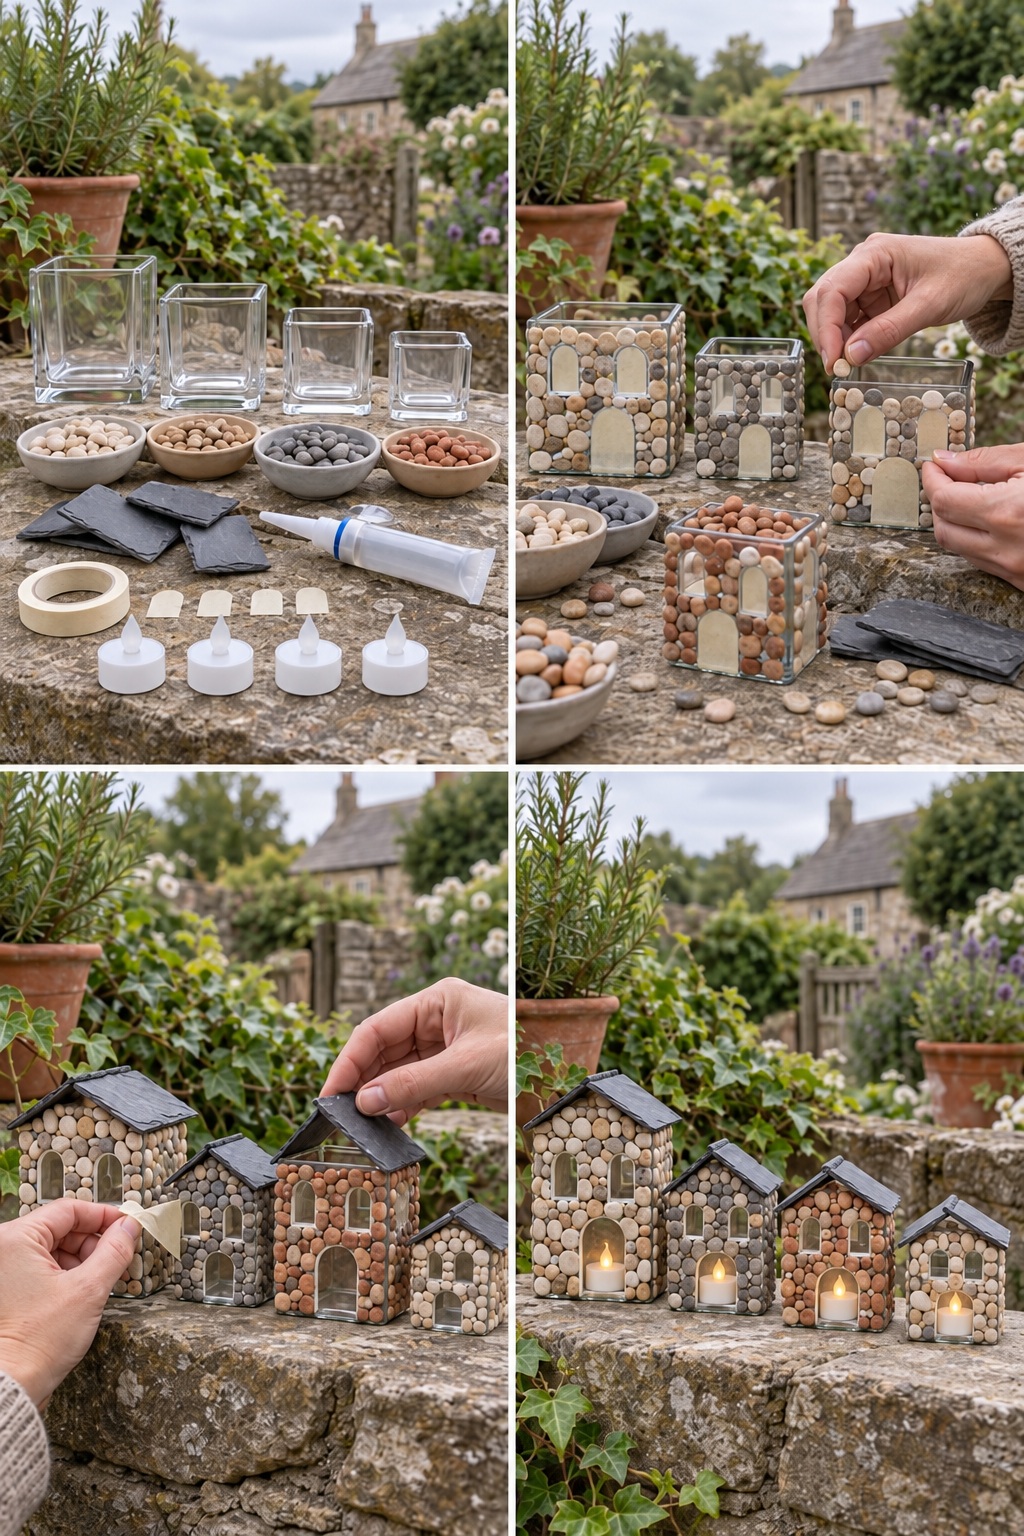
Clear glass door and window shapes let LEDs show through these stone faced cottages. Leave the glass uncut, bonding around masked openings. Form each peaked roof on a supported lightweight former and keep it removable for battery access. Use battery LEDs inside and protect vulnerable roof materials from damp.
30. Hanging Pebble Pods for Air Plants
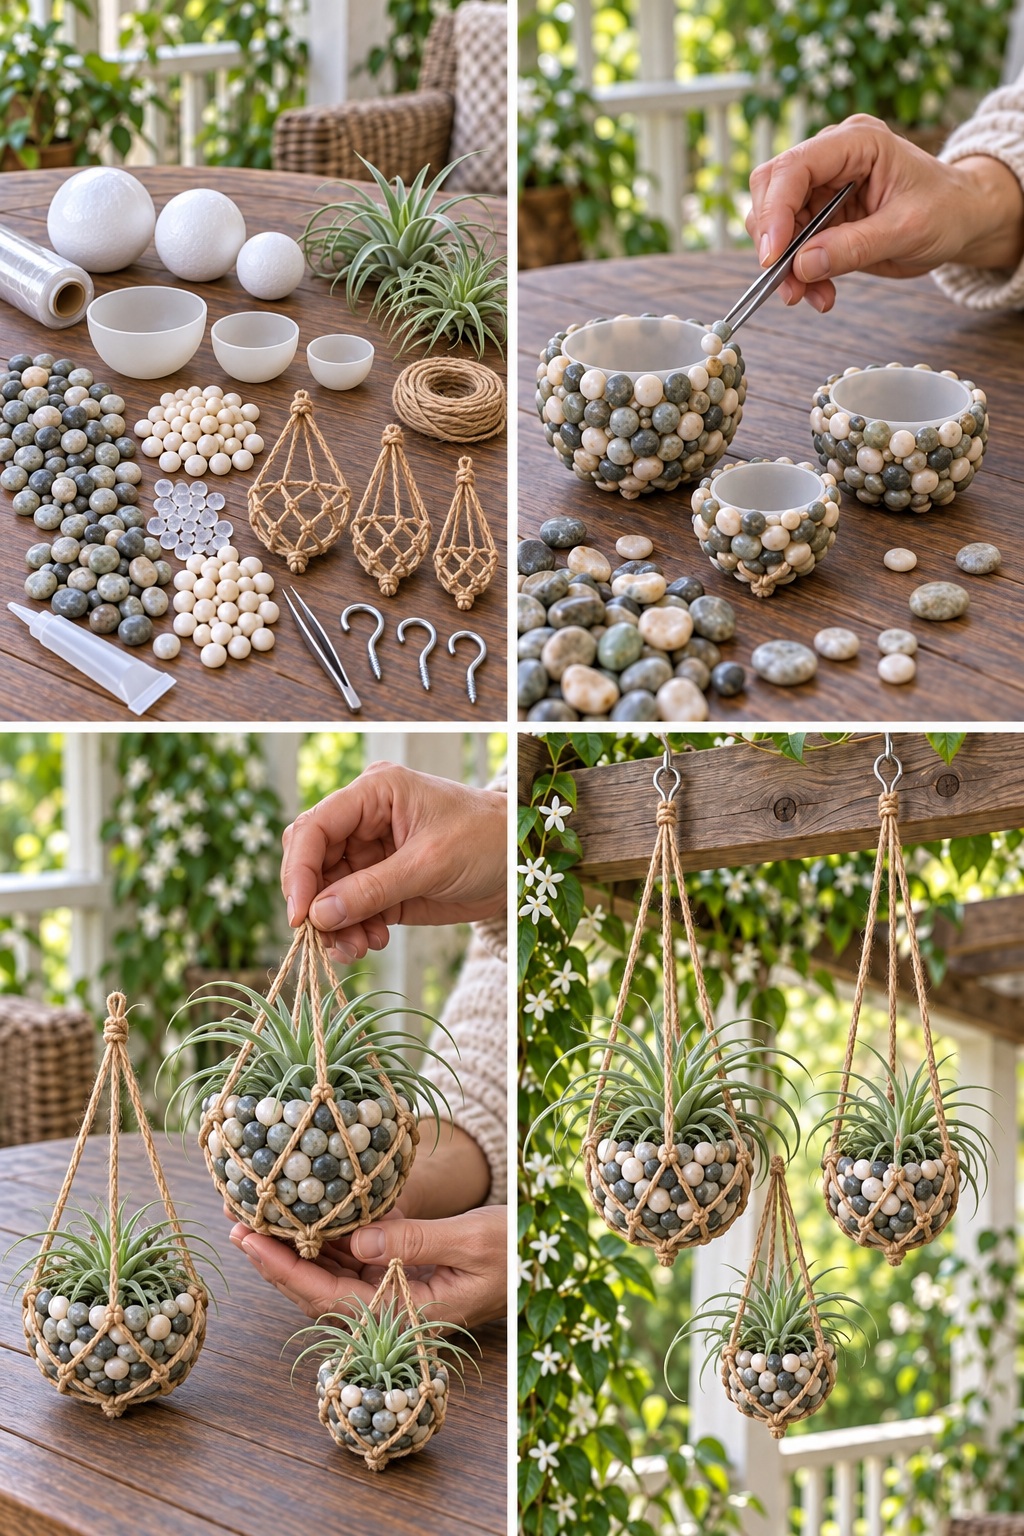
Shallow rigid cups faced with pebbles hold removable air plants. Each cup stays as a permanent core inside a separate cord net crossing beneath the full base. Keep glue out of the plant space and select supports for the complete weight. Remove plants for watering and return them only after thorough draining and drying.
31. Sea Glass and Stone Dragonfly Stakes
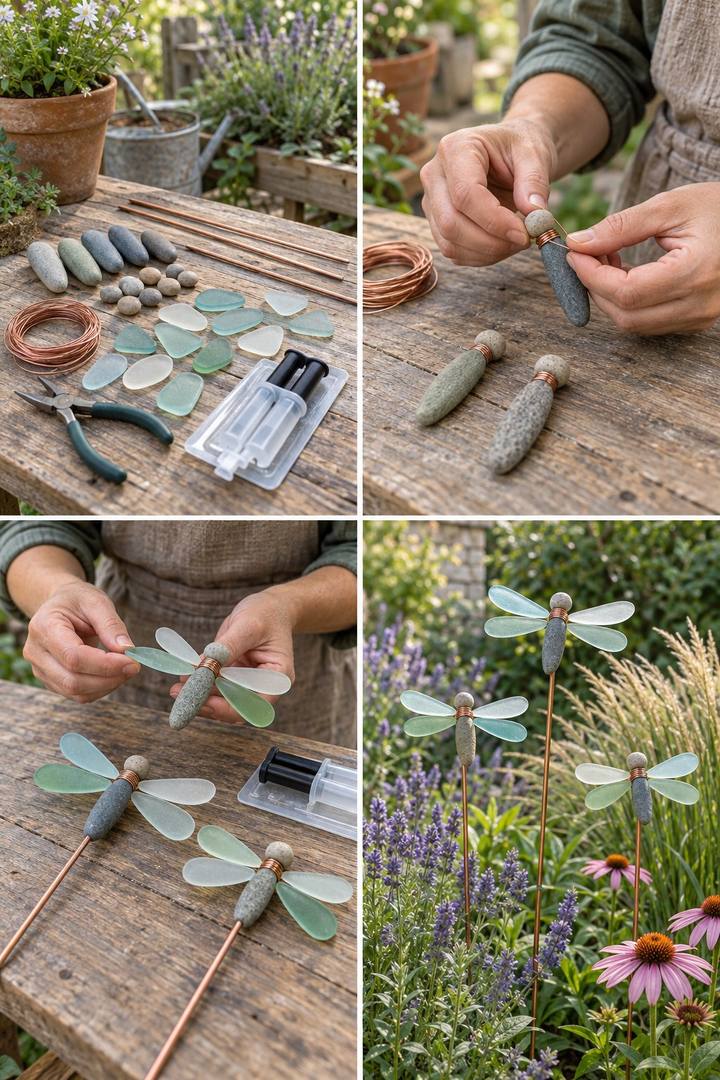
An elongated stone body and four pale glass wings form a dragonfly stake. Use smooth glass edges and a wire cradle supporting the body and wings, with turned in wire ends. Connect the stake to that structure rather than a tiny glued patch. Keep fragile wings away from paths, play areas and strong wind.
32. Ladybug and Bee Stone Tic Tac Toe
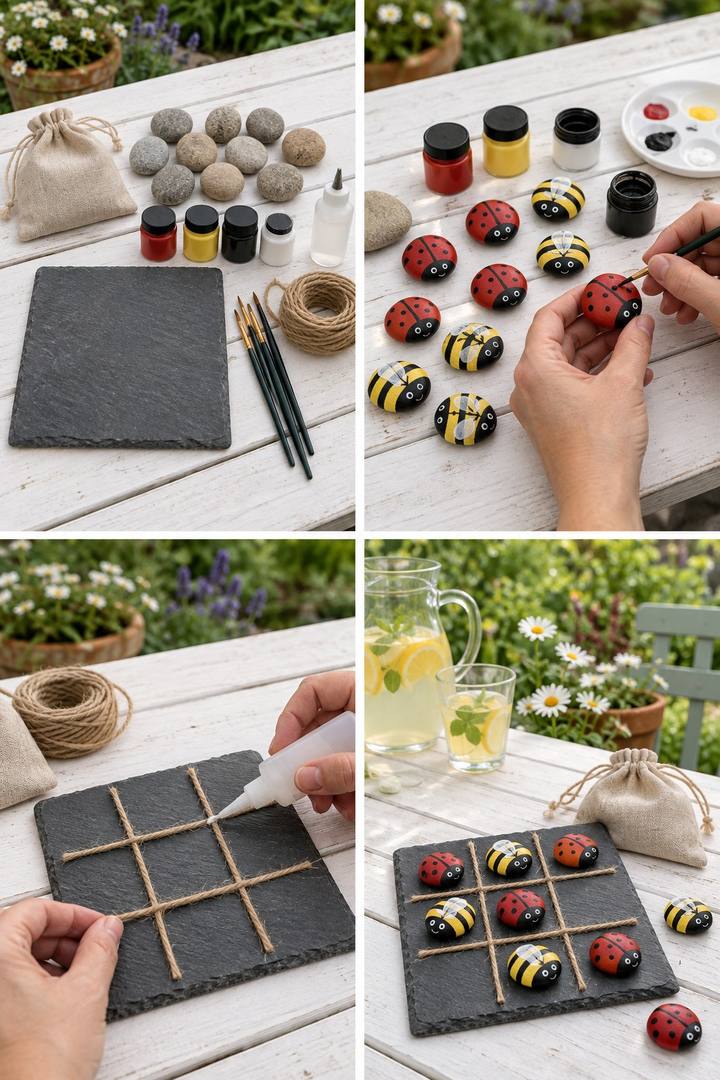
Five ladybug stones and five bee stones make two tic tac toe teams. Paint a three by three grid on sound slate or secure twine along the marked lines, leaving room for each piece. Let the finishes cure, then take turns placing an insect to make three in a row. Store all ten pieces dry and away from children who mouth objects.
Care for Stone Displays
Clean with products suited to the stone, backing and finish. Check joints, cords and supports before reusing seasonal pieces. Repair loose stones or leaking inserts before returning them to display.


Leave a Reply