
Some memories deserve a place beyond a camera roll. A family lunch can fill the front of a keepsake drawer, a favorite holiday can become a small tabletop sailboat, and a collection of everyday moments can cover a much larger display. These DIY photo projects explore 40 ways to bring printed pictures into your home, from folding frames and fabric pockets to sculptural wooden pieces.
Begin with the five panel accordion display below. Its illustrated guide explains the materials, flexible fabric joints, photo placement, and finishing checks in a clear sequence. You can carry those habits into the inspirations that follow: plan the layout first, prepare the structure, then attach the pictures. Each design also explains its own additional materials and construction approach, because a wall hanging, a tray, and a large freestanding sculpture need different forms of support.
Choose a small group of pictures with a shared story before choosing a shape. Reprinted copies make it easier to experiment with cropping, borders, and permanent attachment while keeping the original photographs safely stored.
Table of Contents
- Make a Five Panel Accordion Photo Display
- Materials and Measurements
- Choose the Right Attachment for Each Surface
- 1. Twin Photo Ladders Around a Room Corner
- 2. A Blue Accordion of Everyday Favorites
- 3. A Branch Tree with Hanging Photo Cards
- 4. A Suitcase Box for Holiday Keepsakes
- 5. Family Memories on a Six Drawer Cabinet
- 6. A Black Photo Lantern for Evening Display
- 7. Linen and Envelope Photo Pockets
- 8. A Woven Hoop of Shared Moments
- 9. A Single Portrait Inside a Glass Memory Jar
- 10. A Portrait That Steps Out of Its Background
- 11. A Family Photo Tray with a Protective Insert
- 12. A Patchwork Wall Hanging with Fabric Photographs
- 13. A Wooden Sailboat Carrying Two Photo Sails
- 14. A Three Storey Tower of Travel Pictures
- 15. A Ring Bound Desktop Photo Stand
- 16. A Photo Key Rack for the Entryway
- 17. A Fold Open Photo Box with a Portrait at Its Heart
- 18. A Shutter Frame with a Family Portrait at the Center
- 19. A Mountain Range for Outdoor Memories
- 20. Six Jigsaw Pieces That Belong Together
- 21. A Giant Bow with Photo Covered Tails
- 22. Record Sleeves for Music and Friendship Memories
- 23. A Clear Photo Panel with a Laced Border
- 24. Two Oval Portraits in a Rope Figure Eight
- 25. Painted Tube Columns with Recessed Portraits
- 26. Three Paper Flowers with Family Photo Centers
- 27. A Clear Coastal Arch with Sand and Shells
- 28. A Miniature Gallery Built Around a Room Corner
- 29. Four Portraits Around a Wooden Windmill
- 30. A Walk Around Arch Covered in Family Pictures
- 31. A Photo Mosaic Spool Table
- 32. Four Photo Tiers for a Milestone Celebration
- 33. A Crescent Moon Filled with Family Stories
- 34. A Photo Shade on a Slim Floor Stand
- 35. A Burgundy Memory Booth
- 36. An Open Book of Family Chapters
- 37. A Rolling Gallery with Three Picture Levels
- 38. A Faceted Photo Globe in a Wooden Ring
- 39. A Dress Form with a Skirt of Photographs
- 40. A Wooden Harp with Three Suspended Photo Cards
- Keep the Pictures Easy to Enjoy and Replace
Make a Five Panel Accordion Photo Display
This tabletop project is a manageable place to learn accurate spacing and neat photo mounting. Five separate blue panels are joined with linen hinges, allowing the display to fold into a compact stack or stand in a gentle zigzag. The sample uses a dog portrait, a couple, a child, a cat, and a mountain landscape. Your pictures can tell a different story, provided their finished sizes stay consistent.
Materials and Measurements
Panels: Five pieces of rigid mounting board, each 12 × 18 cm and approximately 1 mm thick, with a blue paper surface on both faces. Ask a craft supplier to cut them if needed. Ordinary thick board should remain flat; the separate fabric joints provide the movement.
Hinges: Eight strips of flexible linen bookbinding cloth, each 25 mm wide and 18 cm long. Use four on the back and four on the front. Four removable 3 mm spacing tabs keep the joints even during assembly.
Pictures: Five fresh photo copies with a finished outer size of 9 × 12 cm, including their white borders. This leaves approximately 15 mm of blue on either side and 30 mm above and below each picture.
Adhesives and tools: A small quantity of flexible neutral pH PVA bookbinding adhesive, a small flat brush, double sided photo mounting tape approved for your print type, scissors, and a ruler. The PVA joins the linen to the board. The mounting tape attaches the replaceable photo copies.
Check the board and cloth combination on offcuts before starting. Adhesive must suit both surfaces and dry without making the hinge brittle. If you are working with valuable photographs, use suitable photo corners on a separate protective mat instead of applying adhesive to the original print.
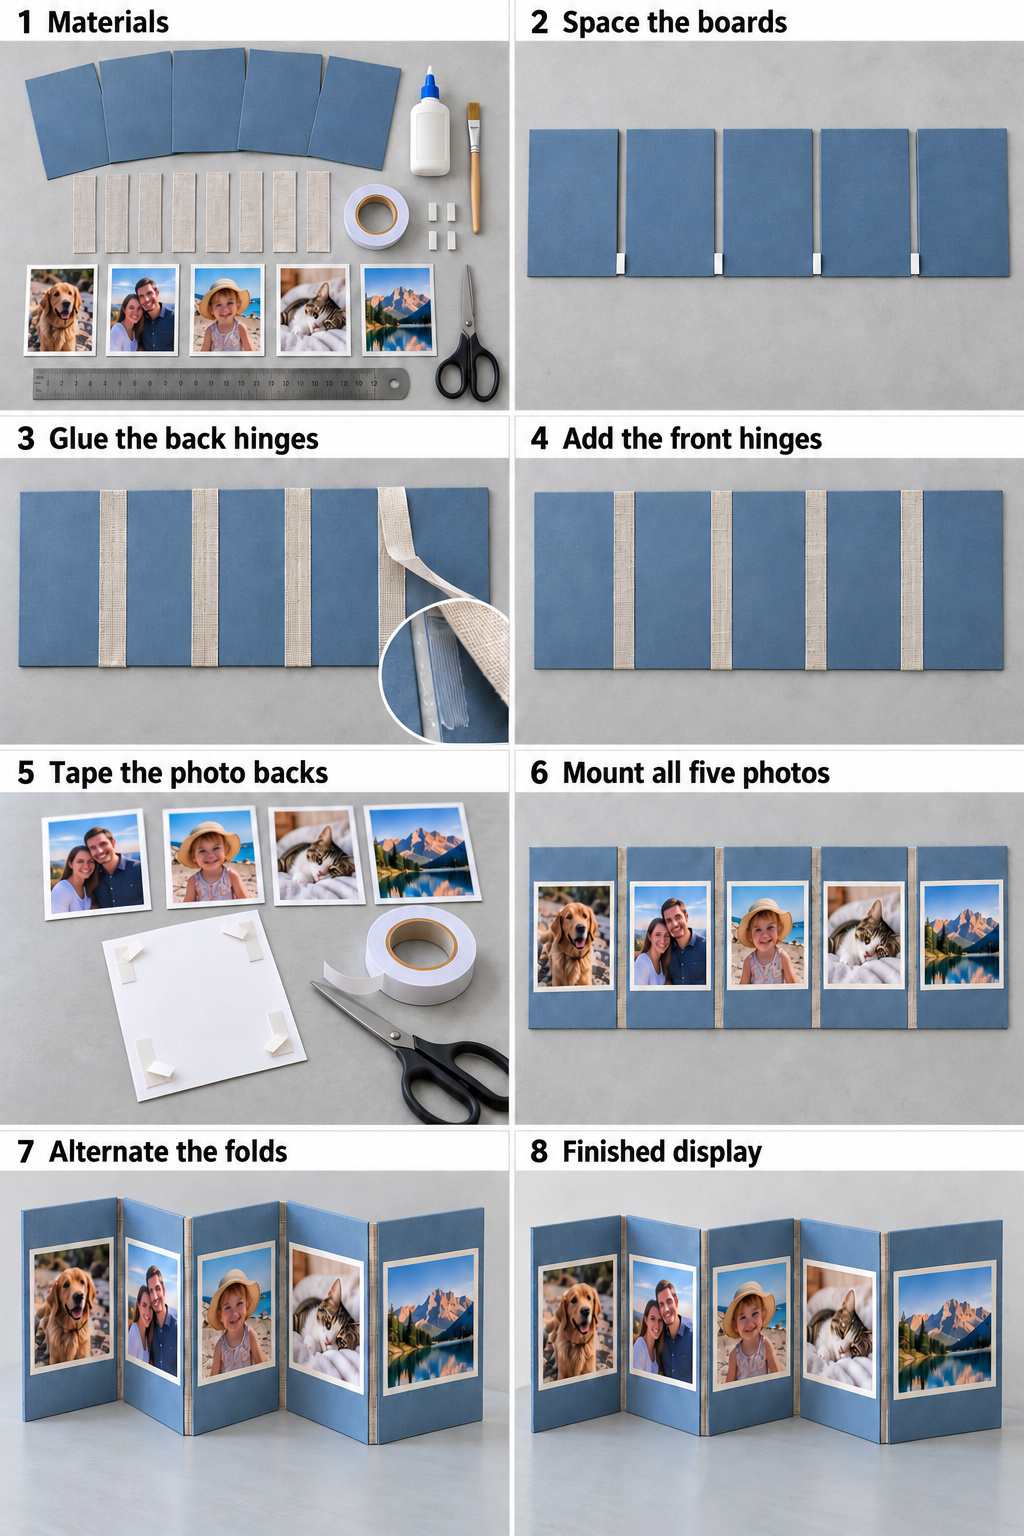
The eight views follow the same five blue panels, eight linen strips, four joints, and five photo copies from the materials layout to the finished display.
- Prepare the same set of parts. Check all five panels for straight edges and equal height. Cut the eight linen strips square at both ends. Arrange the five photos in their final order before applying adhesive, and handle them by their edges.
- Space the boards. Lay the five panels face down in one horizontal row. Align their top and bottom edges with the ruler. Put a 3 mm spacing tab into each of the four gaps. The assembled strip measures approximately 61.2 cm across before folding.
- Attach the four back hinges. Center a linen strip over each gap. With a 25 mm strip and a 3 mm gap, approximately 11 mm rests on each neighboring panel. Brush a thin, even layer of PVA onto those board contact areas, then press the cloth into place. Keep adhesive out of the open gap so its fabric bridge remains flexible. Remove the spacing tabs once the boards hold their position and leave the assembly flat until the adhesive has dried as directed.
- Reinforce the front joints. Support the full strip while turning it over. Center the remaining four linen strips over the same joints on the front, again bonding only the areas that touch board. Keep the upper and lower ends flush. Allow these joints to dry before testing movement. If a hinge pulls tight, release and reset it before adding pictures.
- Prepare the photo backs. Place one replaceable print face down on the clean work surface. Apply four short strips of photo mounting tape near its corners, keeping every strip inside the print edge. Lift the release liners only when you are ready to position the picture. Repeat with the other four copies.
- Mount one picture on each panel. Keep the display flat and center the photos in their planned order. Check the 15 mm side margins and 30 mm top and bottom margins with the ruler. Press gently from the middle toward the edges. Leave the linen joints completely clear.
- Form the alternating folds. Bend the fabric joints gently in alternating directions to make a zigzag. Each blue panel stays rigid. Open the angles enough for all five lower edges to sit on the table and for the photographs to remain visible. Stop if a joint strains rather than forcing it.
- Check the finished display. Set it on a level surface away from direct sunlight and splashes. Inspect the panel alignment, photo edges, and hinge adhesion. Carry it with both hands beneath the folded panels rather than lifting one end and letting the remaining panels hang.
Choose the Right Attachment for Each Surface
Use photo corners or suitable protective sleeves when you want to change pictures. Permanent photo tape is an option for replaceable copies when the tape maker approves the paper and finish. Wet craft glue can distort thin prints, so reserve it for compatible paper coverings, linen, and other structural craft layers.
Wooden parts need joints suited to their size, with wood glue and mechanical fasteners where required. Acrylic needs compatible hardware or an adhesive specifically approved for that plastic. Select wall screws and anchors for the wall construction and the complete loaded weight. Fit and test the supporting structure before installing photographs. Keep large pieces stable, and have advanced joinery or electrical work handled by someone with the relevant skills.
Now use the ideas below to choose a display that suits both your pictures and the space available. You can adapt the photo layout and neat mounting habits from the accordion project, then follow the material and support notes for your chosen structure.
1. Twin Photo Ladders Around a Room Corner
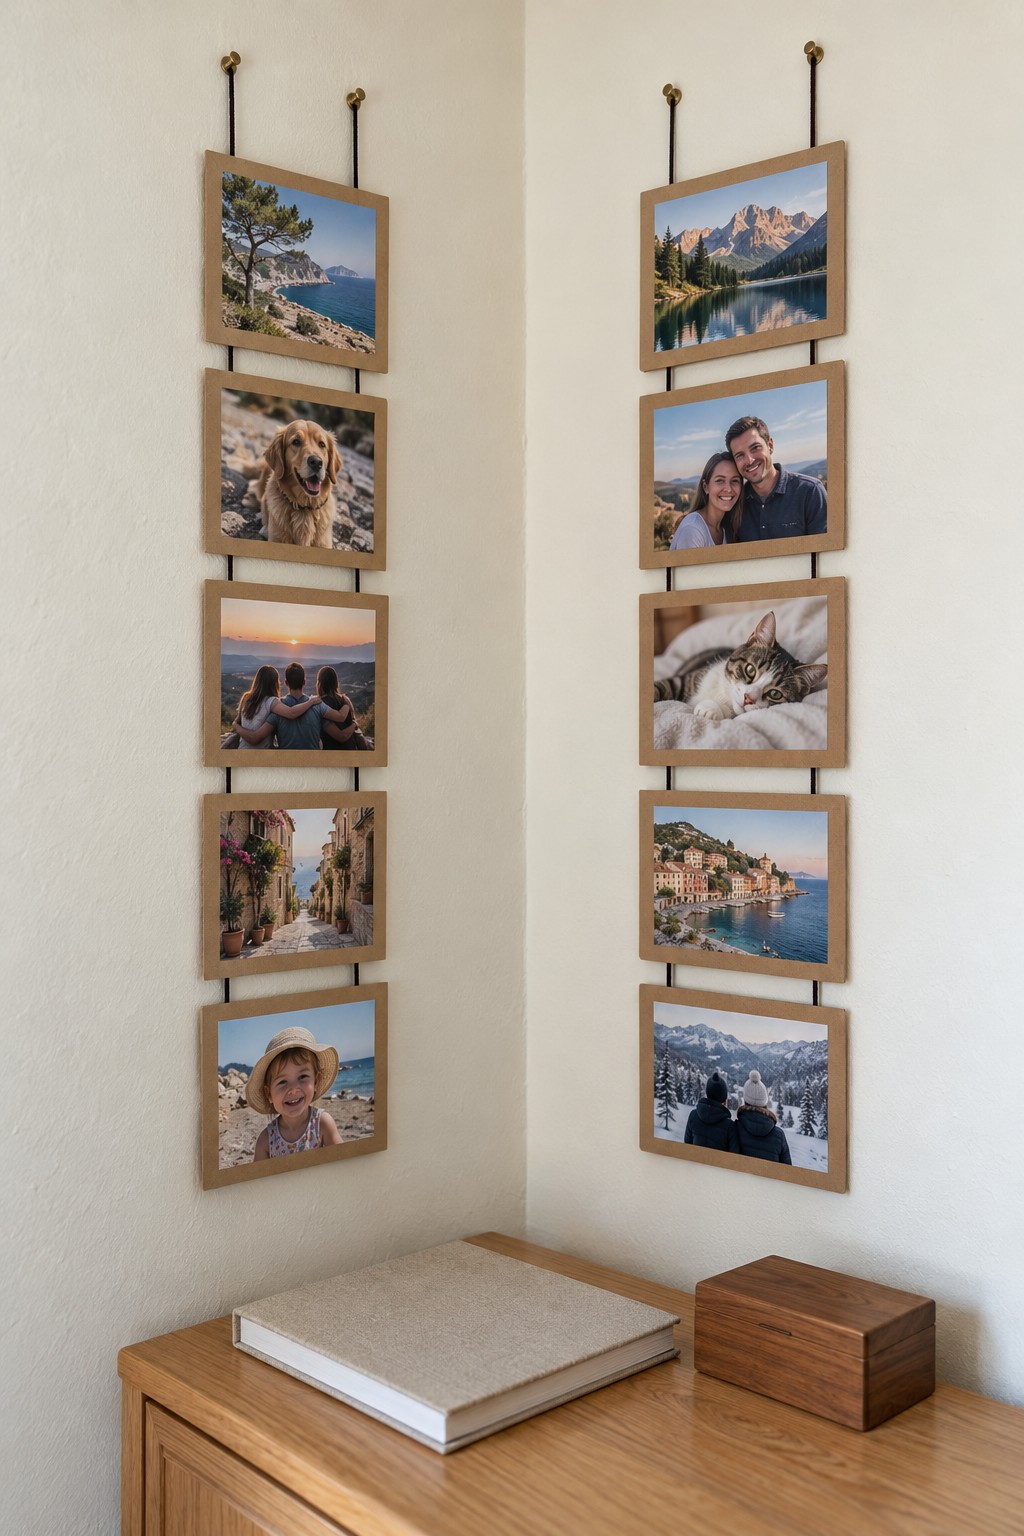
Two narrow columns of wooden frames turn an unused corner into a family gallery. Five pictures hang down each wall, with matching wood borders and dark vertical suspension cords keeping the arrangement orderly. Mixing portraits, pets, and travel pictures gives the corner a personal rhythm without needing a wide uninterrupted wall.
Start with ten lightweight frames and lay out each column on the floor. Fit two suitable rear attachment points to every frame, then connect each column with two strong cords, securing every frame at its measured position. Keep each frame supported on both sides, then hang the two upper cord loops from correctly rated wall hooks. Check the complete column while supporting its weight before leaving it suspended. Put prints into the frames through their normal backing systems, and keep all mounting hardware outside the image area.
2. A Blue Accordion of Everyday Favorites
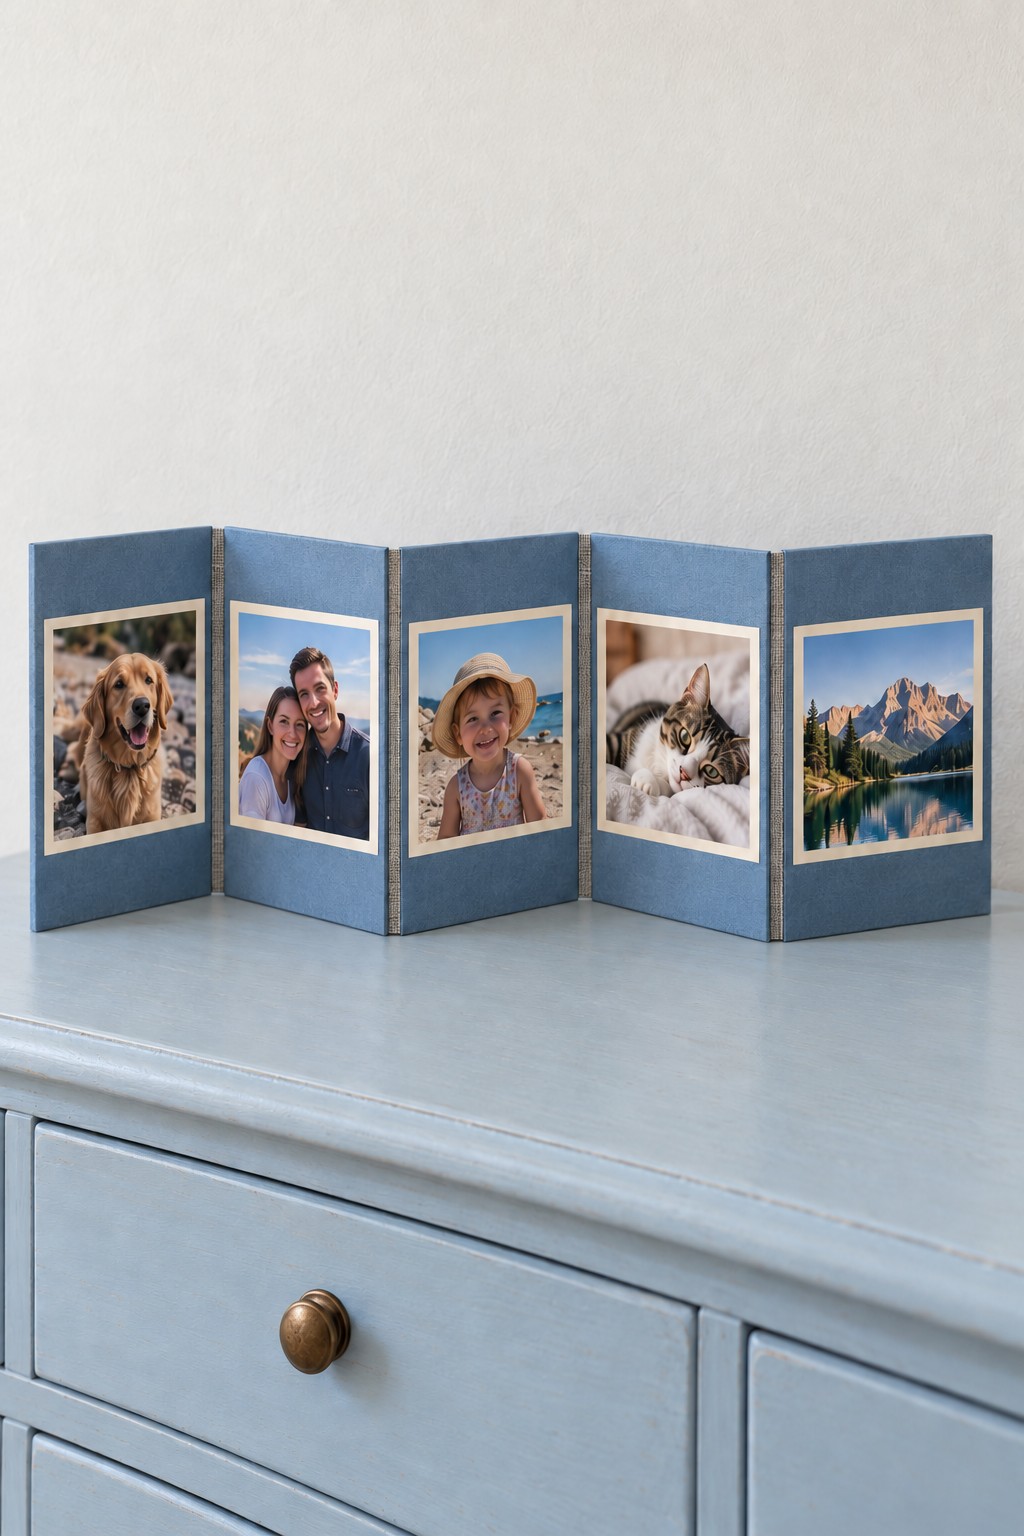
A blue folding display brings several small memories together without taking over a cabinet top. Five upright panels hold a mix of people, pets, and scenery, while pale fabric spines make the joining method part of the design. White print borders separate the pictures from the blue surface and help varied subjects feel connected.
Use the measured accordion tutorial above, keeping all five boards the same height and the four hinge gaps even. Before mounting the pictures, test the folds with the empty assembly so each panel can change direction freely. A combination of one close portrait and one wider scene adds variety without changing print sizes. Stand the finished piece in a shallow zigzag, leaving enough depth behind it to resist a light accidental nudge.
3. A Branch Tree with Hanging Photo Cards
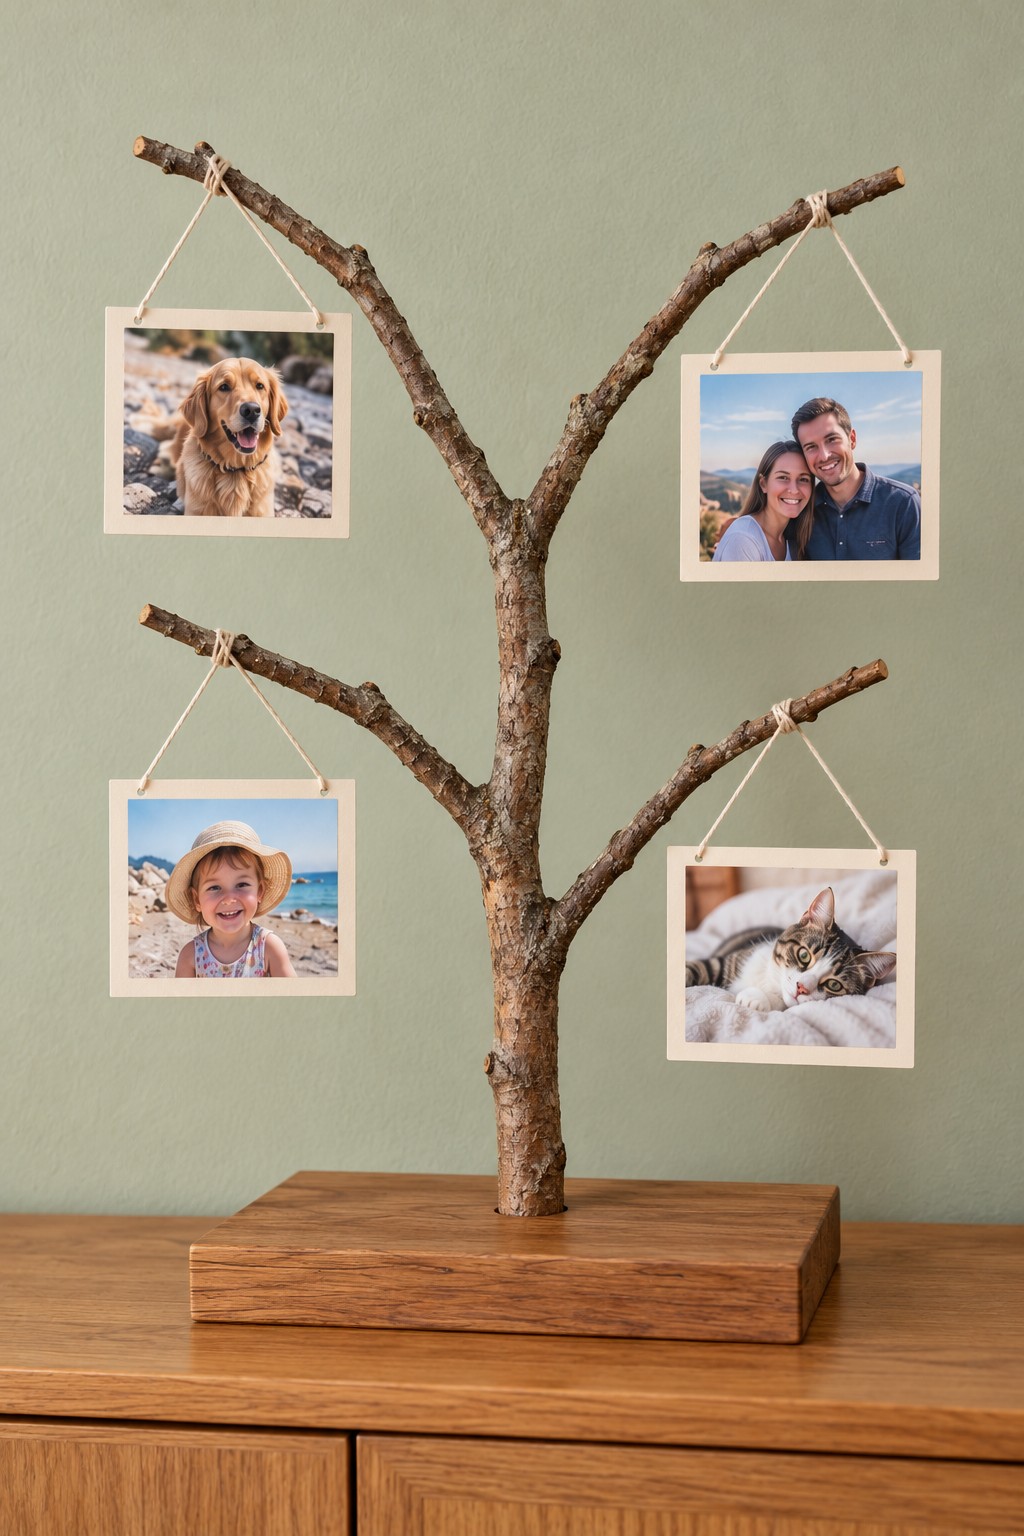
A small branch tree gives four photographs their own hanging space. Natural forks create different heights, while a rectangular wooden base gives the rough bark a more deliberate finish. The pictures sit in pale card mounts, allowing the branches and portraits to remain distinct rather than becoming a dense collage.
Choose a clean, dry branch with sound forks and trim any sharp ends. Fit its main stem into a snug drilled socket in a broad wooden base, using a compatible wood adhesive and a secure joint appropriate to the branch. Mount each photo copy on a lightweight card backing. Attach its hanging cord through reinforced holes in the card border, then loop the cord over a fork with a retaining tie. Balance the cards across the tree before placing it on a shelf.
4. A Suitcase Box for Holiday Keepsakes
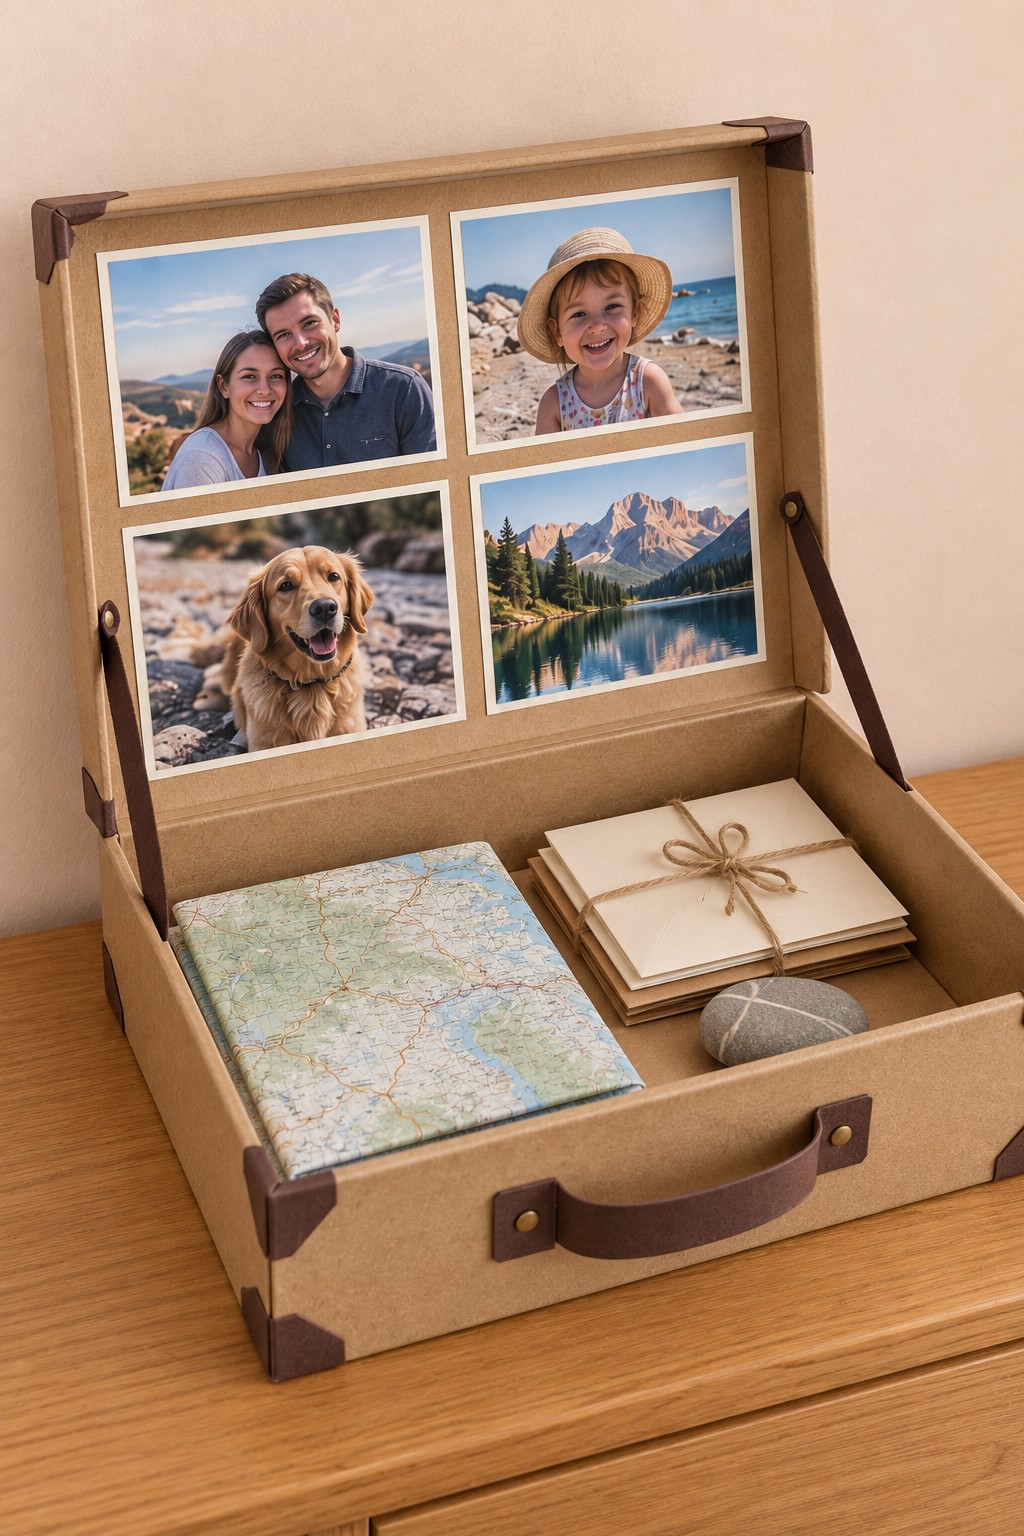
An open suitcase style box combines a four photo gallery in its lid with a shallow compartment for maps, letters, and small souvenirs. Kraft colored surfaces and brown corner details give it a travel journal character. The pictures remain the first thing you see, while the objects below add context to the trip.
Begin with a rigid hinged keepsake box rather than building a working suitcase from thin card. Cover the interior neatly, then fit a removable matboard panel inside the lid and arrange four prints in a balanced grid. Secure the liner without obstructing the hinge. Add two fabric lid stays, anchored to the box walls, to prevent the lid falling backward. Store delicate originals in suitable sleeves. For a smaller version to give away, explore these handmade gift packaging ideas.
5. Family Memories on a Six Drawer Cabinet
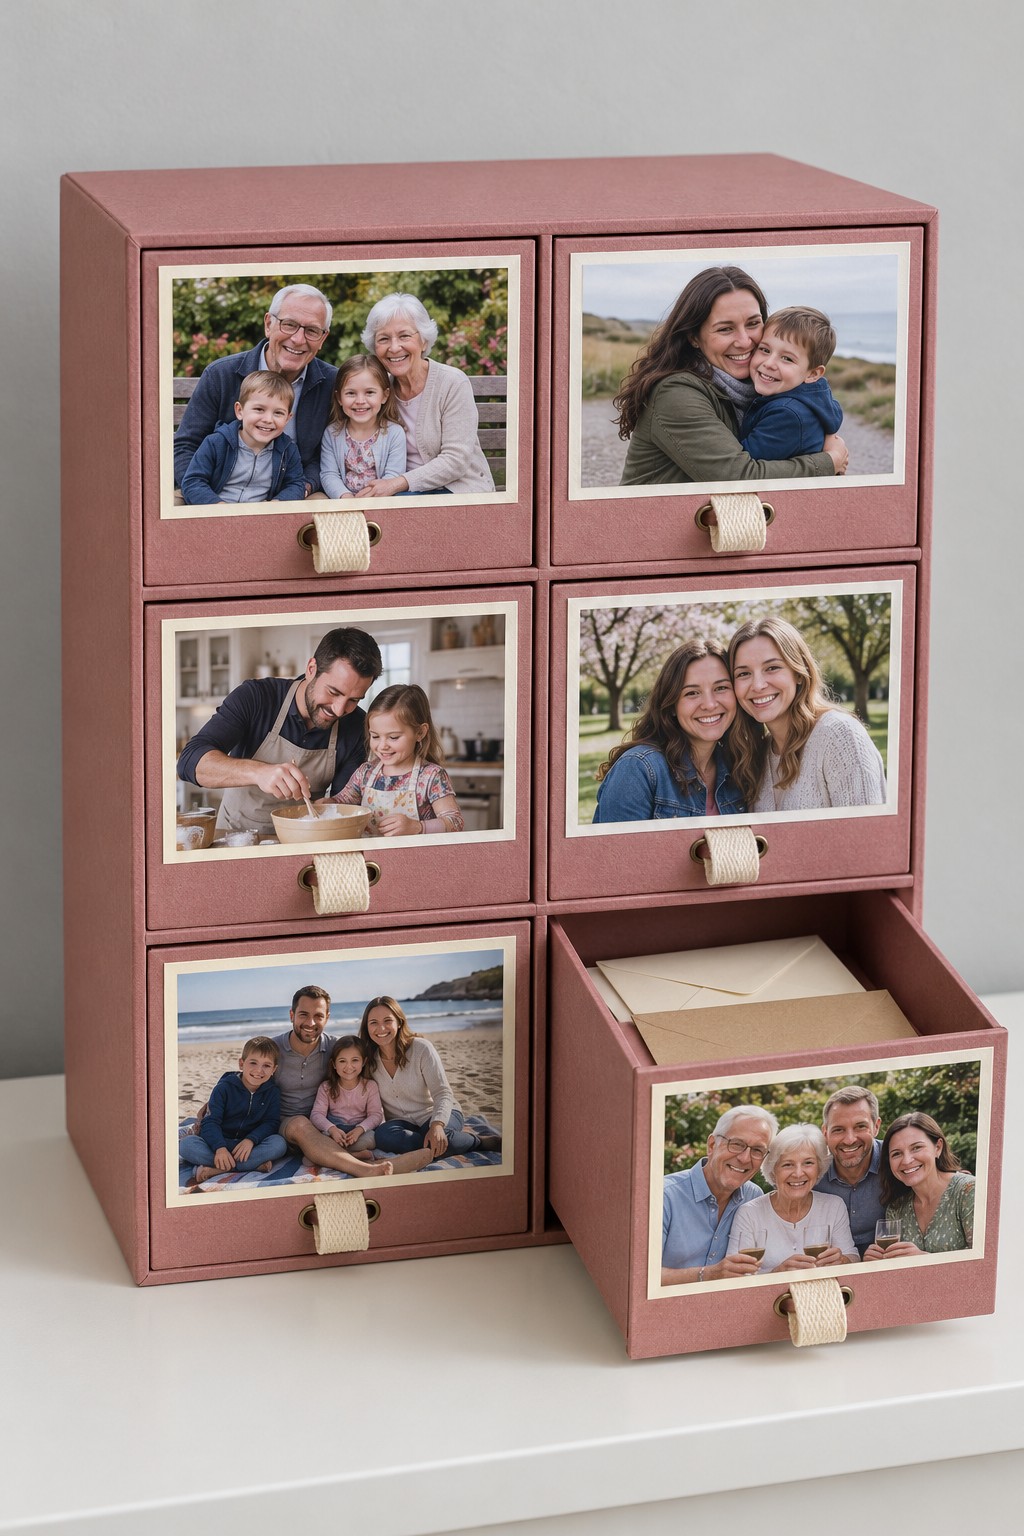
Photographs make a small drawer cabinet feel like a family archive. Six dusty rose drawer fronts each carry one picture, and cream fabric pulls keep the face of the unit soft and simple. You can use the drawers for letters, event tickets, or small mementos connected to the picture outside.
Choose a sound miniature drawer unit with fronts large enough for the prints. Remove the drawers, prepare the surfaces, and apply a compatible primer and furniture paint, preserving the sliding clearances. Let the coating cure before attaching pictures. Mount replaceable copies on thin card inserts and fix them to the fronts with a suitable dry mounting system. Anchor each ribbon pull through the drawer front with a reinforced backing inside. Keep the picture clear of that fixing so opening the drawer never pulls on the print.
6. A Black Photo Lantern for Evening Display
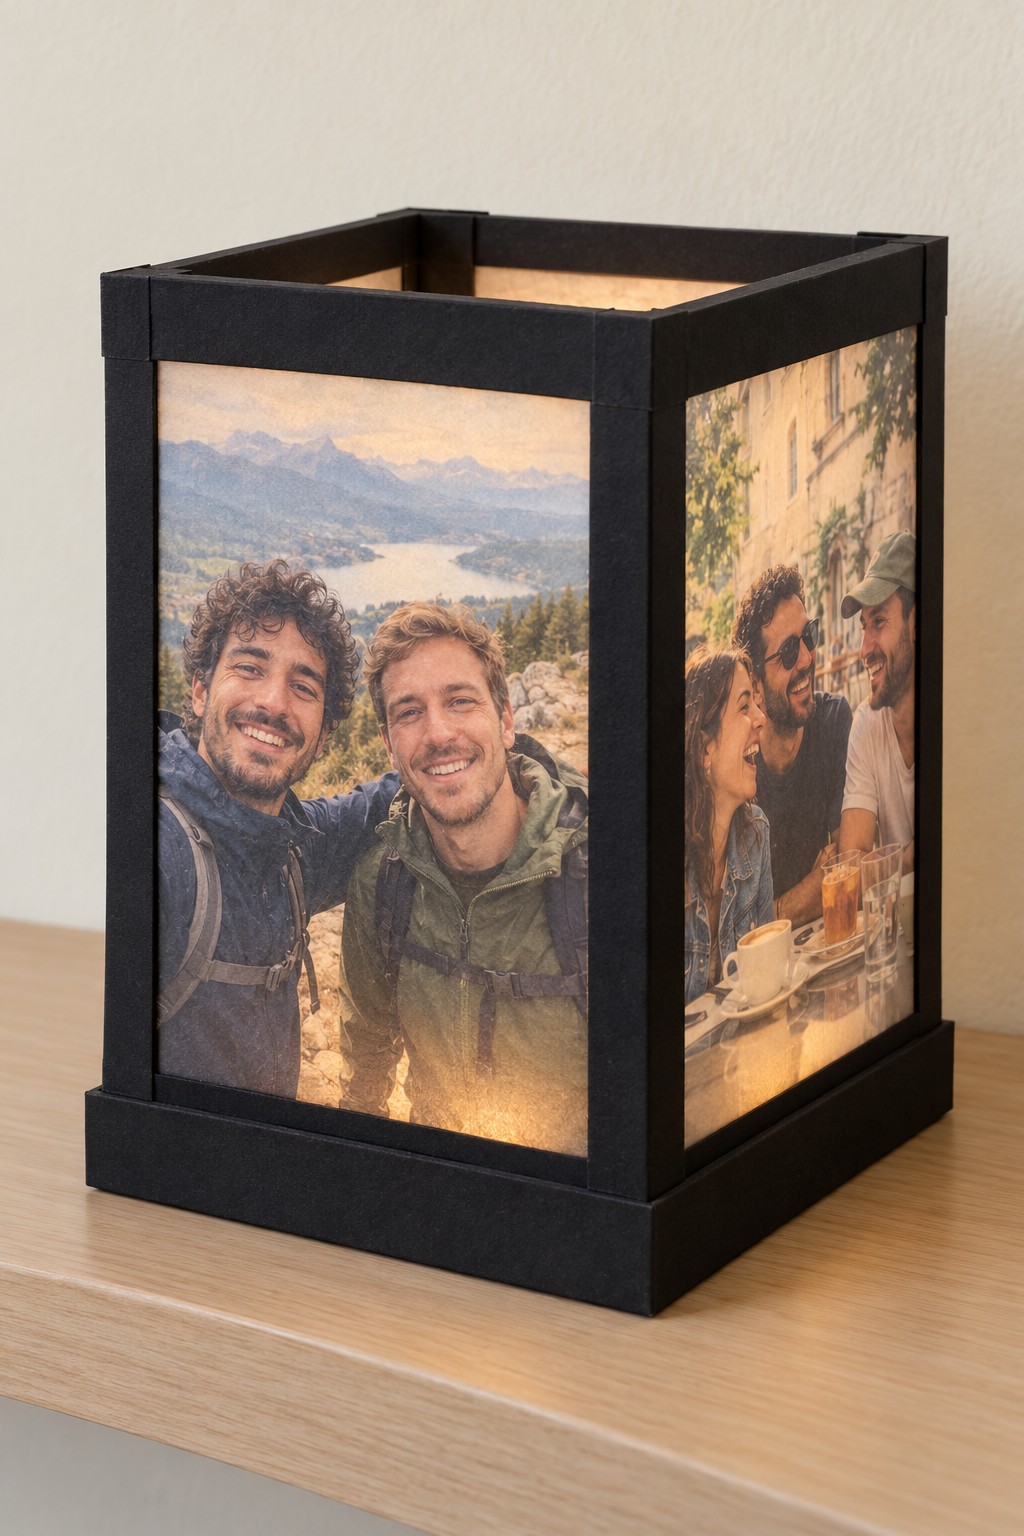
Large translucent pictures turn a black rectangular lantern into an evening memory display. Its dark uprights divide the images cleanly, while a gentle light behind them brings out the faces and scenery. The open top keeps the simple box shape visible and makes the interior accessible.
Use a rigid decorative lantern frame with removable side inserts. Print copies on translucent media suited to your printer, test the color against the chosen light, and secure each sheet inside its own frame opening. A cool running battery LED puck can provide illumination if its maker permits that enclosed use and the required clearances are maintained. Keep its battery compartment accessible. Paper photo inserts belong well away from flame and hot bulbs. Build this as a decorative light display, and leave mains electrical alterations to a qualified professional.
7. Linen and Envelope Photo Pockets
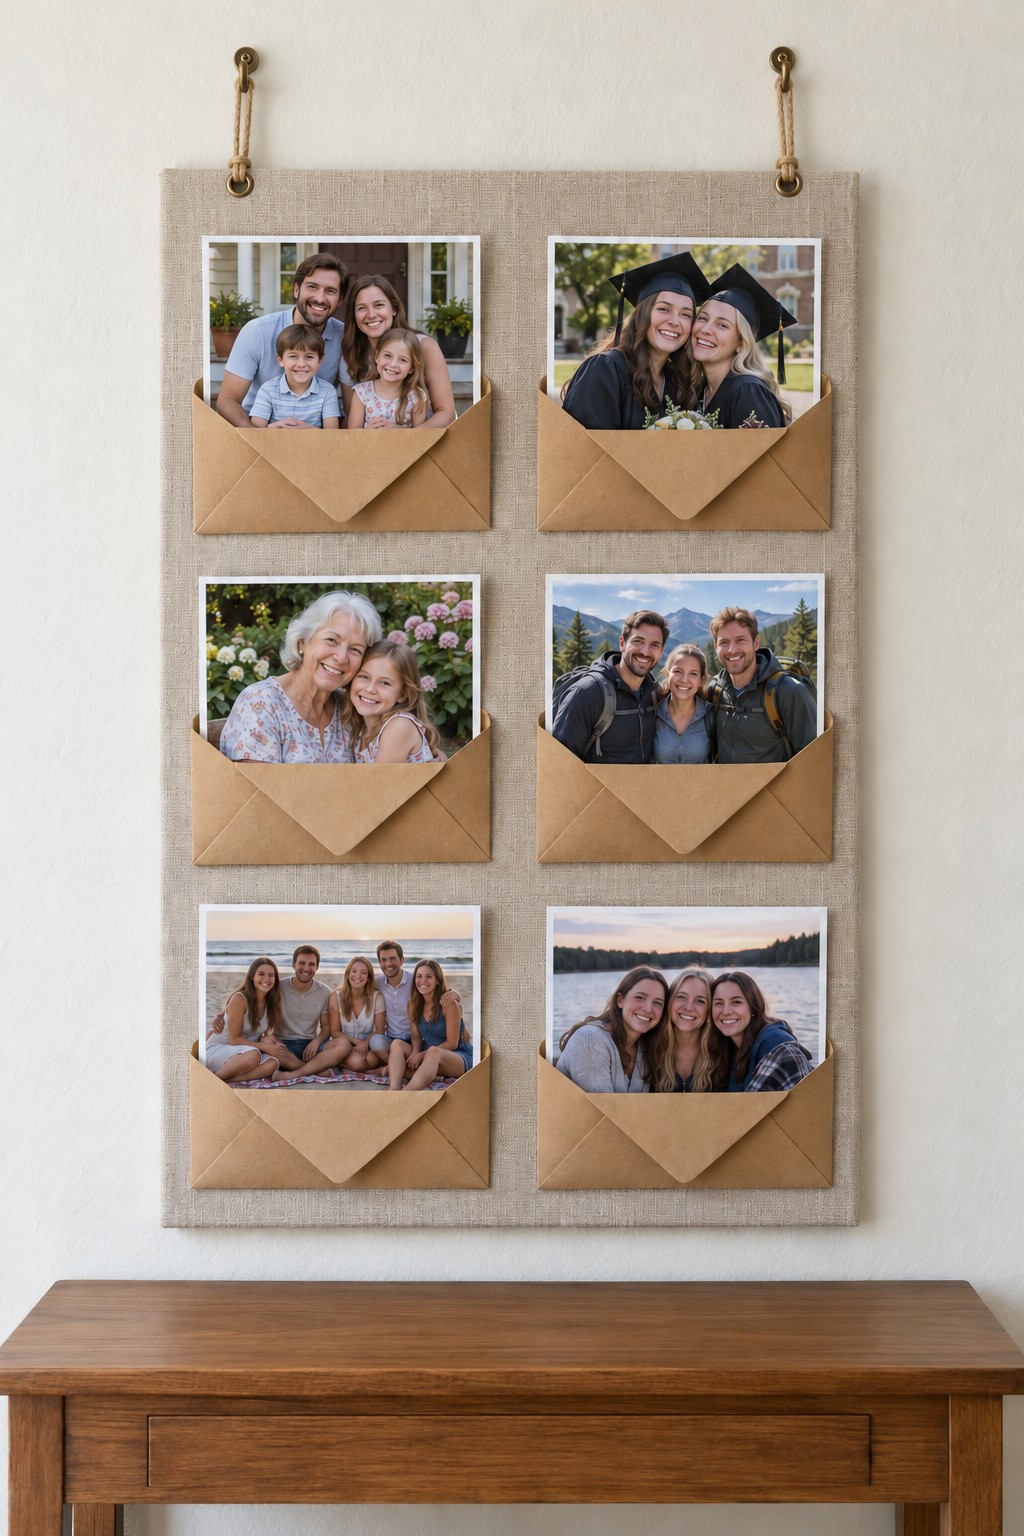
Six kraft envelope pockets create a gallery you can update without removing an entire frame. A linen covered backing softens the grid, and the triangular envelope fronts leave the upper portion of each picture visible. This is a useful format for seasonal family photos or a changing collection of recent gatherings.
Wrap a rigid board with linen, fastening the cloth securely around the back. Arrange six matching envelope pockets in two columns, checking that a photo card can slide into every opening. Apply a thin layer of PVA to the pocket backs only, keeping adhesive out of the interiors. Fit each photo copy to a protective card insert so the envelope edge does not crease it. Install two proper hanging fittings on the board and hang them from suitable wall hooks. Leave space above each pocket for easy removal.
8. A Woven Hoop of Shared Moments
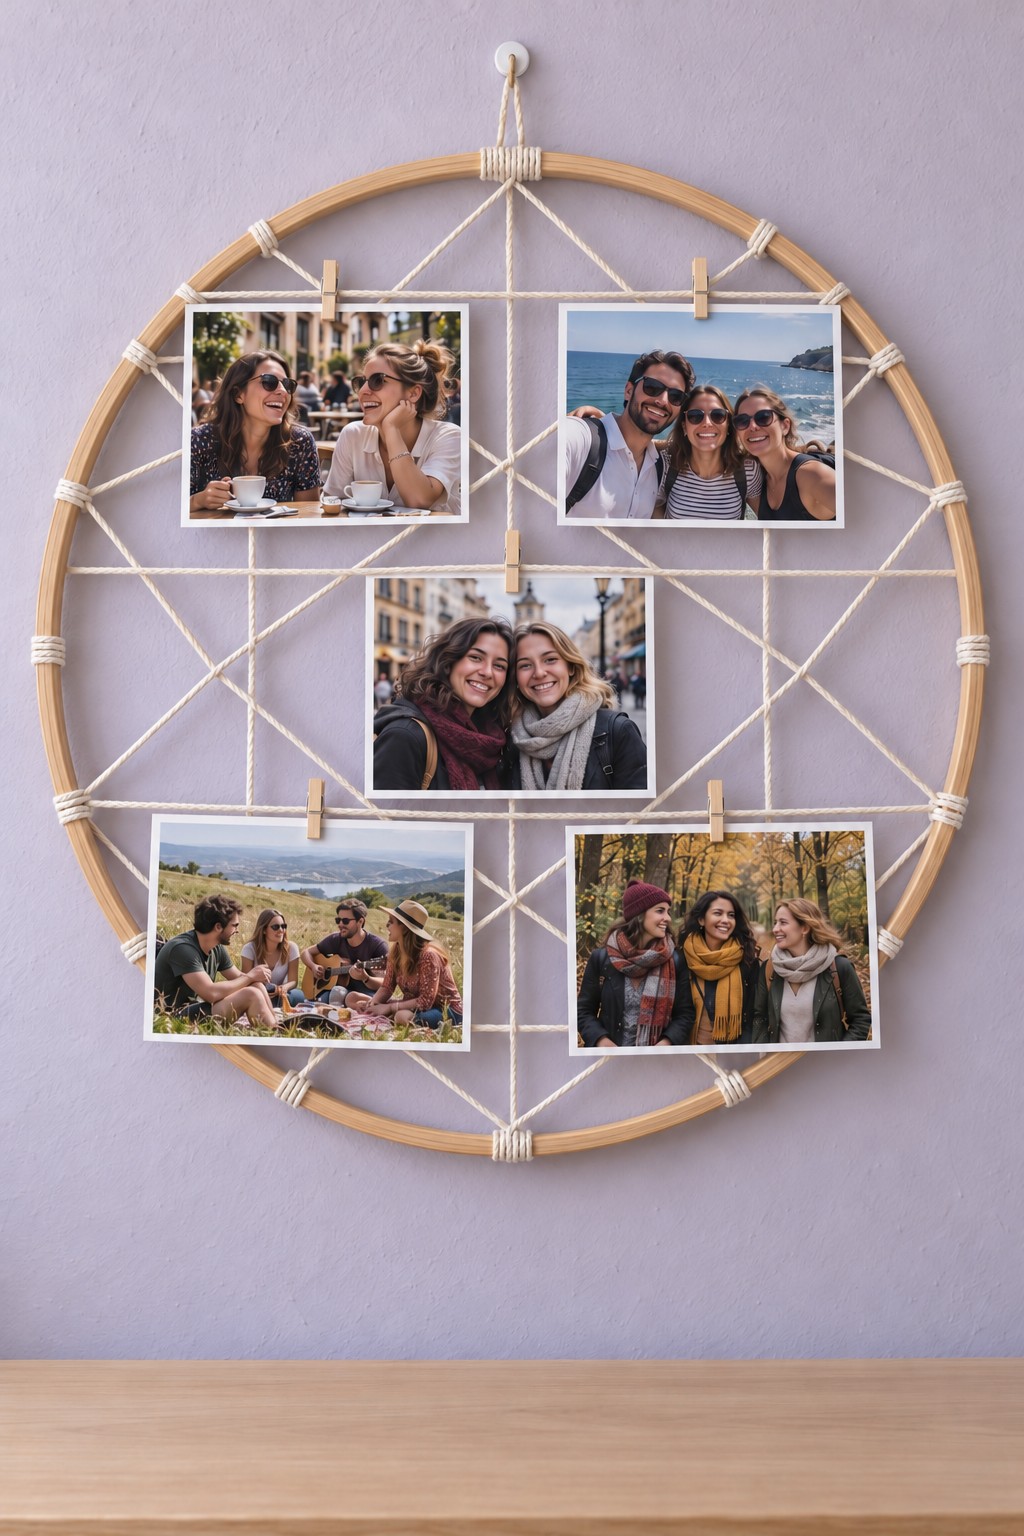
A large wooden hoop becomes an airy photo holder with a web of cream cord. Five pictures occupy different parts of the circle, and small wooden pegs make their attachment easy to understand. The open spaces between them keep the lavender wall visible, giving the whole arrangement a lighter presence than a solid noticeboard.
Use a strong craft hoop and tie the cord around its rim at several points, building the web with moderate tension. Secure every perimeter tie so the lines cannot slide together. Clip lightweight photo cards to horizontal sections, making sure each peg grips the cord and the card securely. Protect precious prints by placing them in suitable sleeves before clipping. Finish with a reinforced hanging loop at the top and a wall hook suited to the assembled weight.
9. A Single Portrait Inside a Glass Memory Jar
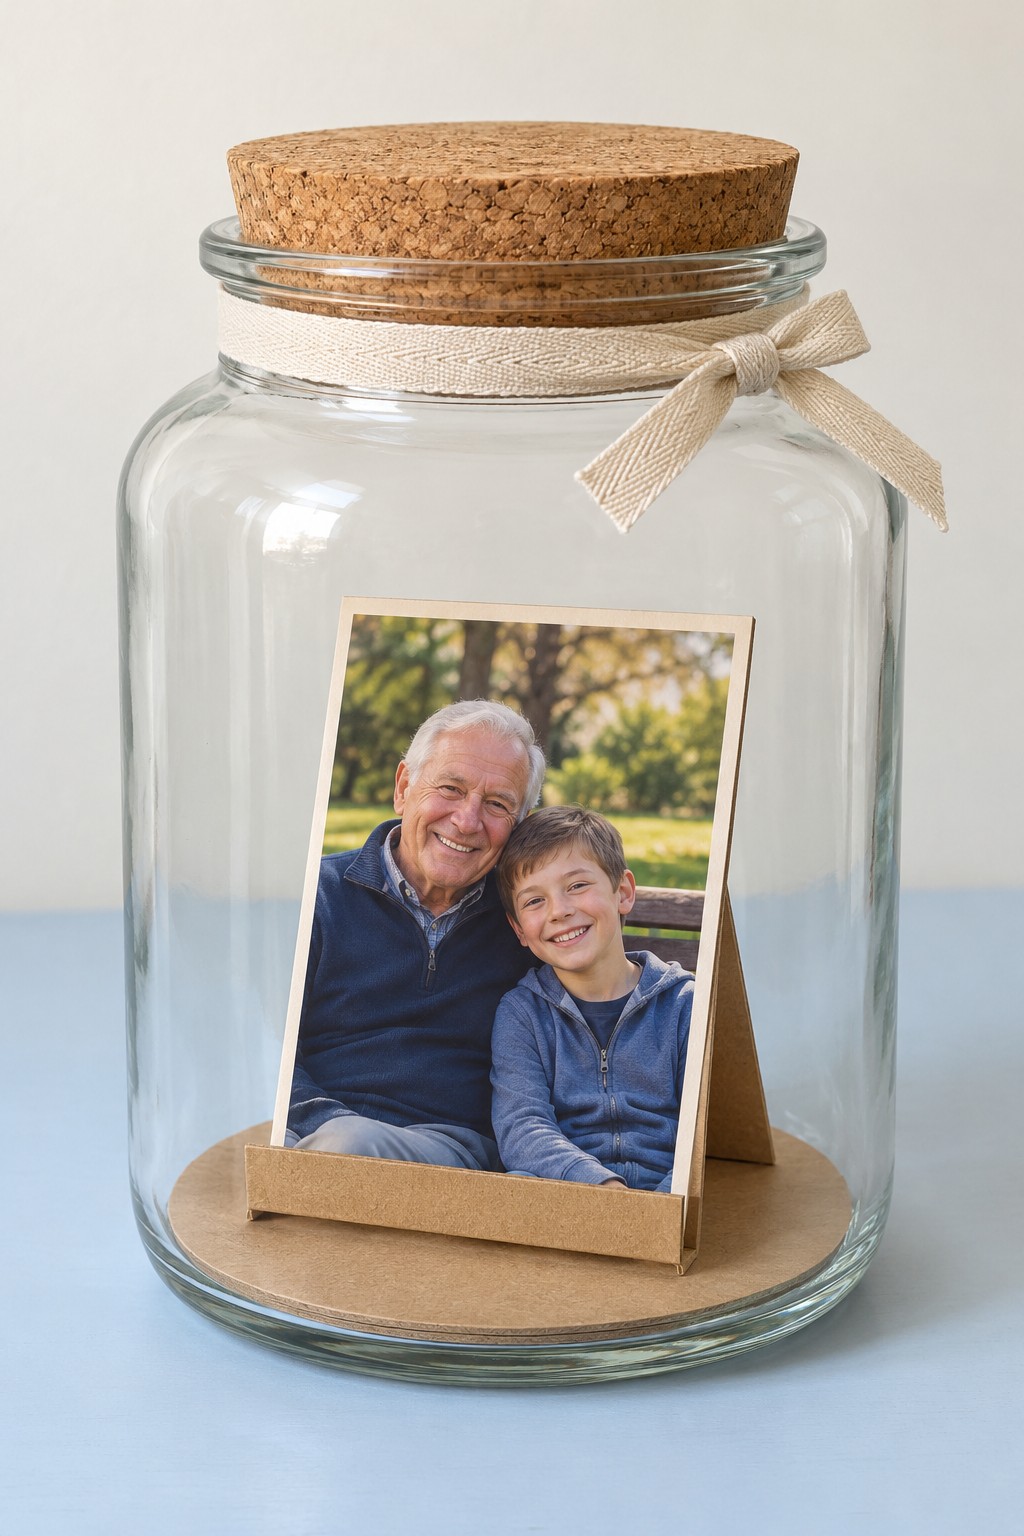
A clear jar gives one favorite portrait a quiet place of its own. The picture stands above a kraft colored circular base, with a cork lid and a small linen ribbon completing the display. Keeping the interior simple makes the relationship between the people in the picture the main subject.
Choose a clean, fully dry jar with an opening wide enough to insert the assembled holder. Cut a stiff card base slightly smaller than the jar interior, then add a small folded easel behind the mounted photo copy. Fix the easel to the base so the picture stays upright when the jar is moved. Use adhesive only on the replaceable support pieces. Close the jar after all materials are dry, and place it away from direct sunlight, cooking steam, and surfaces where it could be knocked over.
10. A Portrait That Steps Out of Its Background
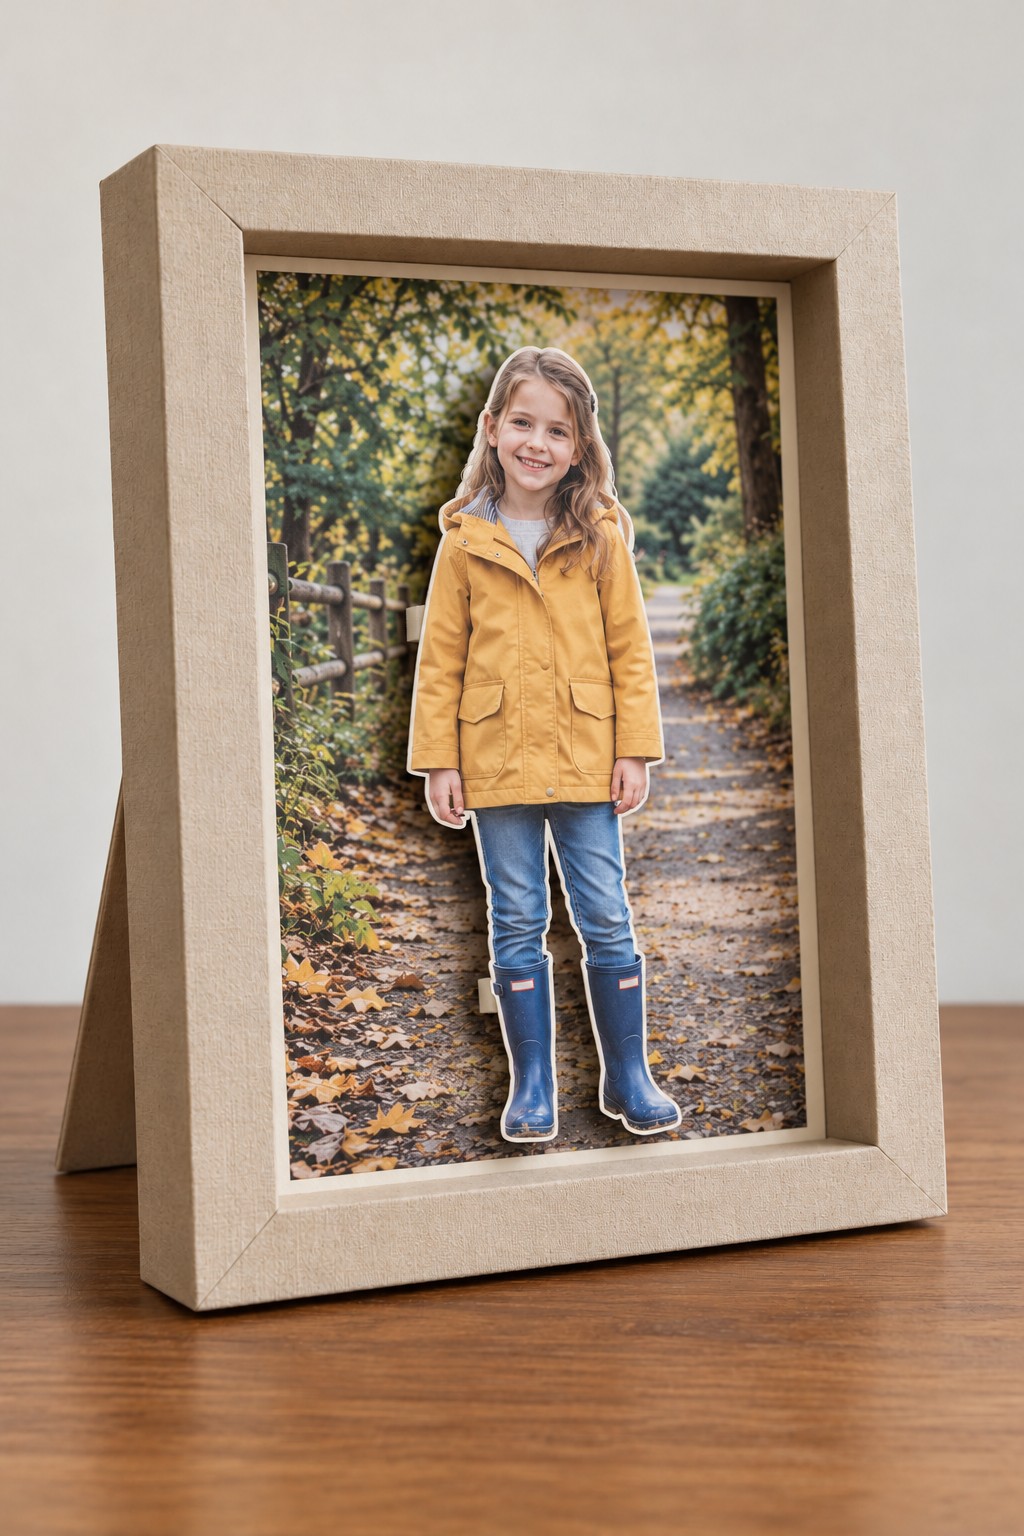
A layered portrait gives a familiar picture a little depth. Here, a child in a yellow coat appears in front of the wooded setting, while the deep neutral frame contains the whole scene. The effect works because the figure and background share the same scale and viewpoint.
Make two copies of one photograph. Keep the first intact for the background and carefully cut the subject from the second, including important details such as shoes and hair. Use small foam mounting pads behind the duplicate figure to lift it slightly, placing supports behind wider areas rather than narrow edges. Fit both layers into a shadow box with enough clearance at the front. Test the alignment before pressing the pads firmly. These DIY 3D frame ideas offer more ways to arrange separate paper layers.
11. A Family Photo Tray with a Protective Insert
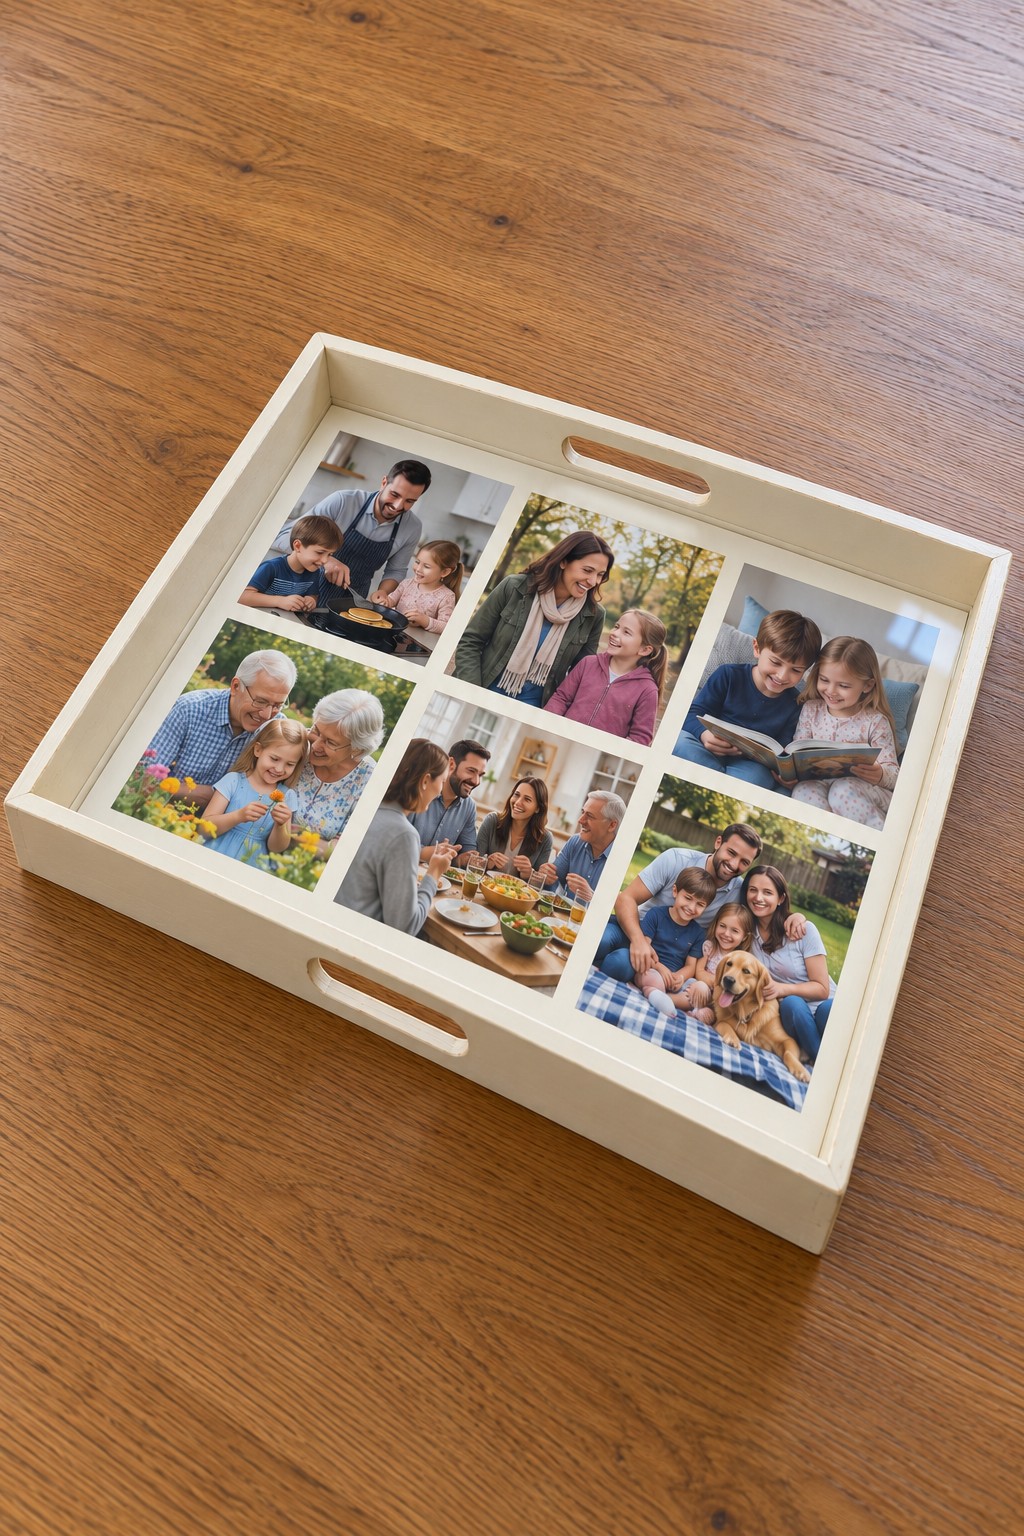
Six family pictures turn the base of a cream wooden tray into a small gallery. Equal white spaces between the images keep the arrangement calm, while the raised sides and cutout handles give it the shape of an everyday household object. It can sit on an ottoman or dresser when it is not being carried.
Start with a sturdy unfinished tray and prepare and paint it before adding pictures. Arrange six copies on a removable matboard insert, then cover them with a professionally cut clear acrylic panel that fits within the tray. Smooth finished edges and accessible removal points make cleaning easier. The protective panel should rest on the tray structure, with the prints held beneath it. Treat the surface as decorative rather than automatically waterproof, and use coasters for drinks.
12. A Patchwork Wall Hanging with Fabric Photographs
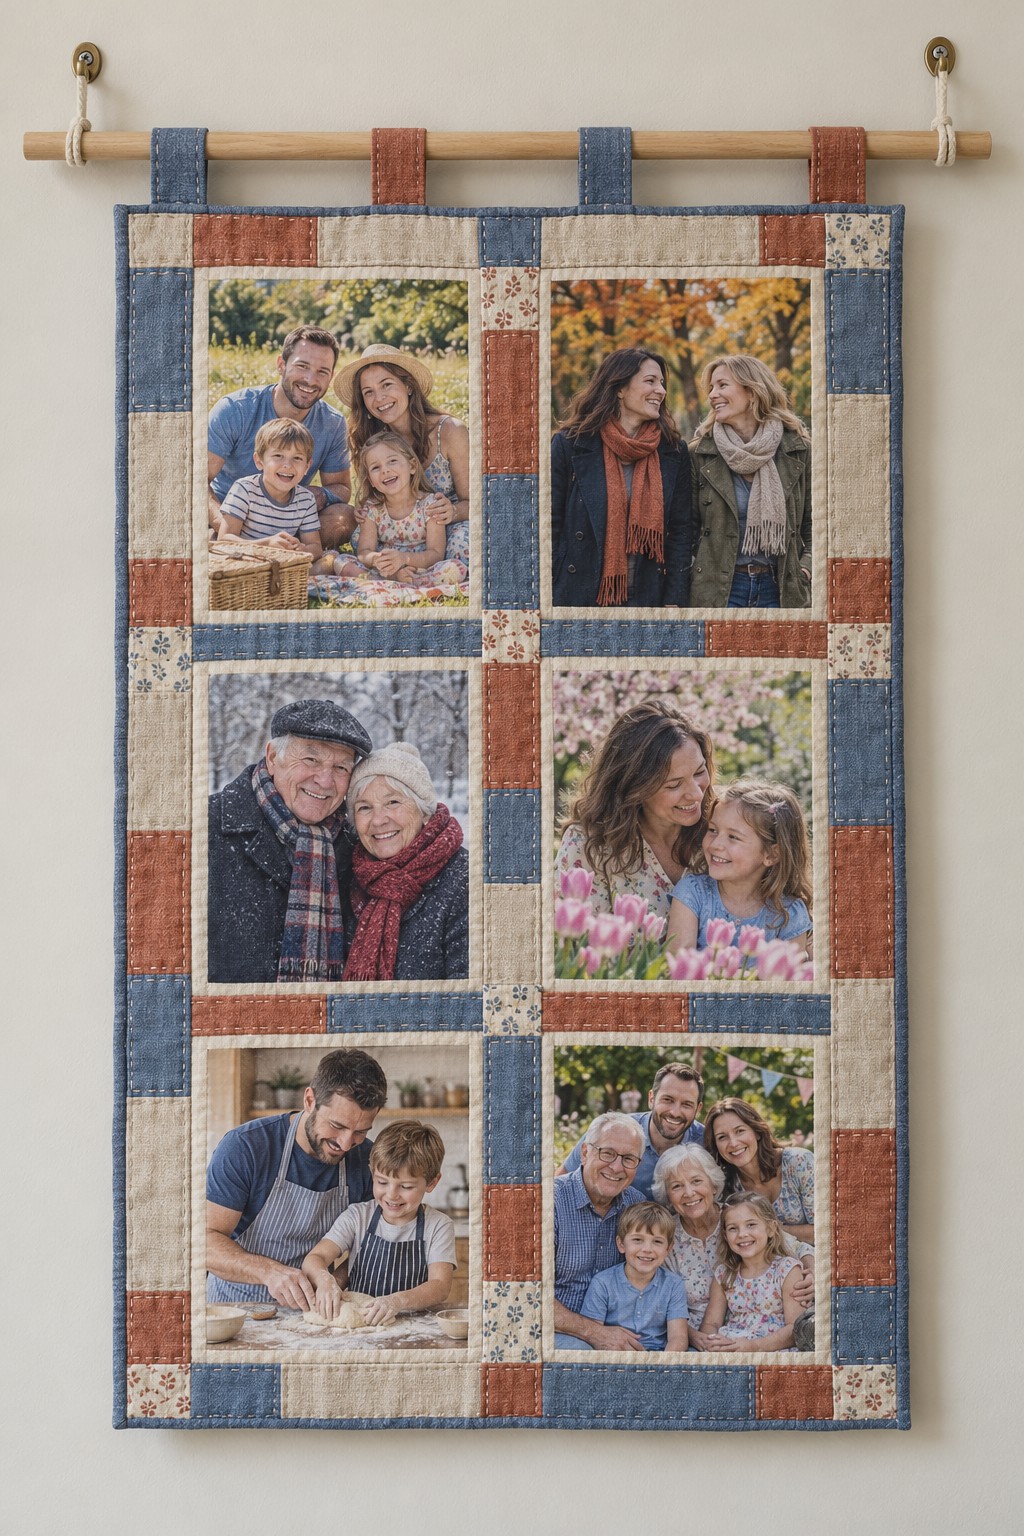
Denim blue, cream, and rust patches give six family photographs the warmth of a small quilt. Fabric tabs suspend the rectangular hanging from a wooden dowel, leaving the whole textile visible. The varied patch widths add texture without interrupting the neat two column picture layout.
Use printable cotton photo fabric that is approved for your printer, following its ink setting and finishing instructions. Print and test one image before making the full set. Piece fabric borders around six photo panels, then add a backing layer and suitable light batting if desired. Stitch around the panel boundaries to keep the layers stable, and finish the edges with binding. Sew the hanging tabs into reinforced seams before threading the dowel through them. Clean the finished piece only as permitted by the photo fabric and other materials.
13. A Wooden Sailboat Carrying Two Photo Sails
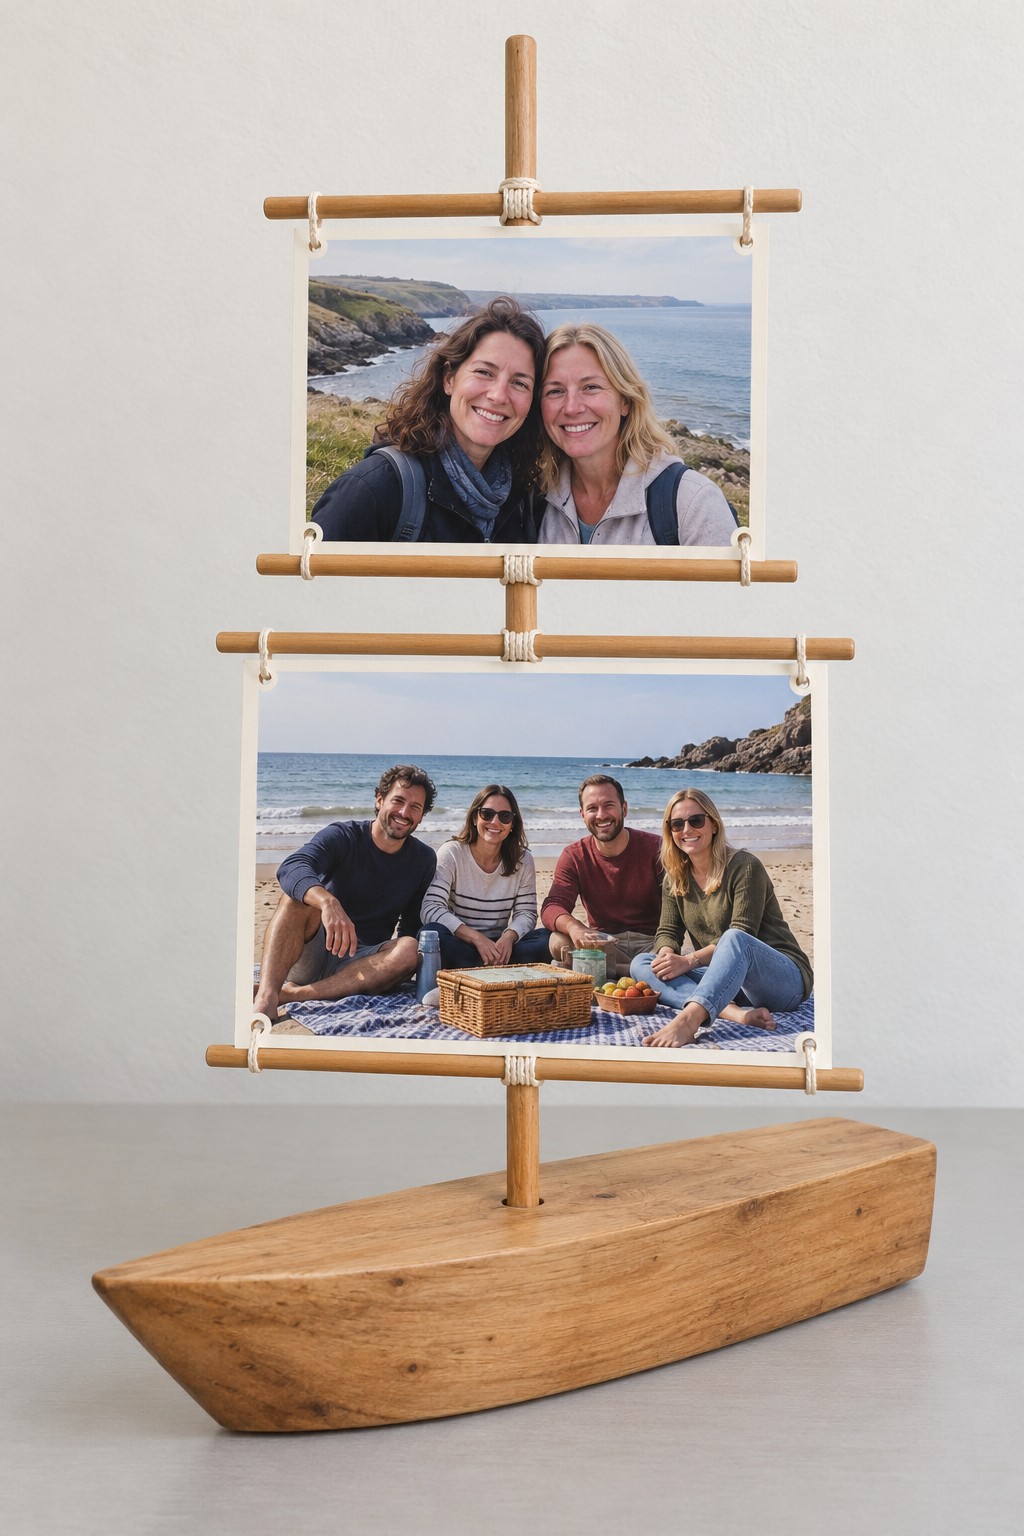
Two pictures become the sails of a small wooden boat. Slim horizontal spars support the upper and lower edges, while a central mast and visible cord ties make the construction part of the ornament. A plain wooden hull keeps the display grounded, letting seaside pictures reinforce the sailing theme.
Shape or buy a small decorative wooden hull with a flat underside. Fit a straight dowel mast into a snug socket and secure it appropriately. Bind the horizontal spars to the mast, then mount each photograph on light card and make reinforced attachment holes in its outer border. Tie those borders to the spars so the photo surfaces remain unpierced. Keep the sails light and the hull broad enough for the finished height. This belongs on a shelf as a keepsake rather than in water as a working toy.
14. A Three Storey Tower of Travel Pictures
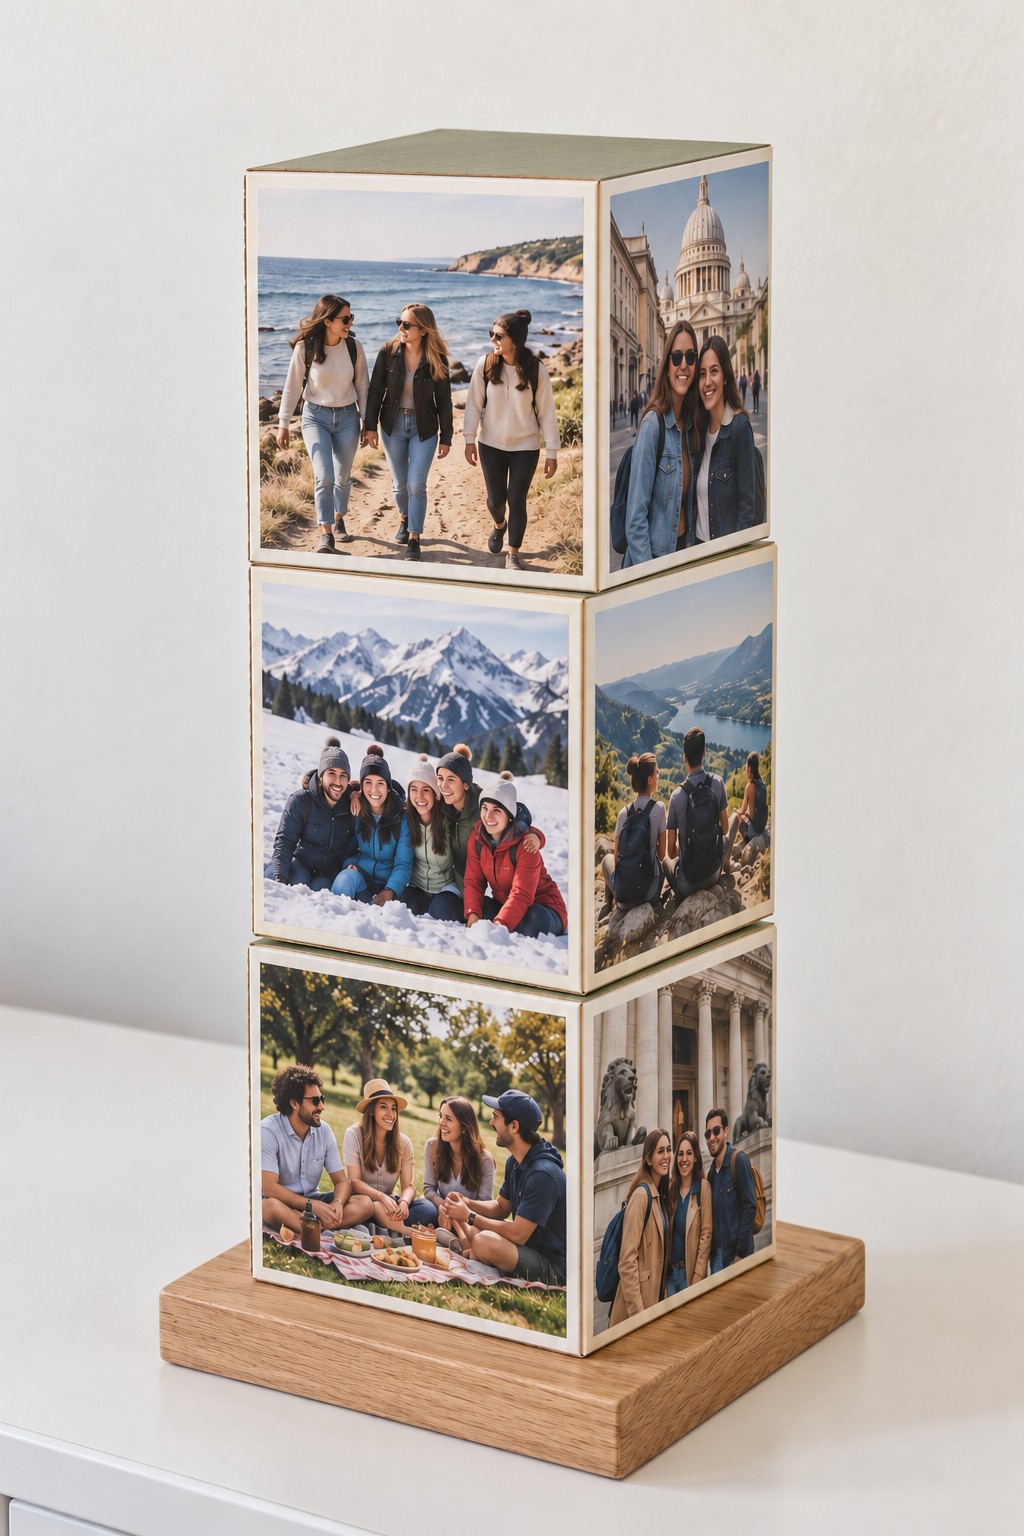
A tall stack of photo cubes lets travel memories continue around several sides. Beach walks, mountain trips, and city visits share the same pale borders, giving very different places a common structure. A broad wooden plinth provides a visual pause beneath the busy tower.
Build the display from three equal rigid cube forms, using reinforced card boxes for a small version or properly joined thin plywood for a more substantial one. Cover and finish the forms before fitting the photographs. Lay out each face separately, checking how neighboring pictures meet at the corners. Join the cubes securely to one another and to the base; a central locating dowel can help alignment but still needs an appropriate fixing system. Keep the total height proportionate to the footprint, and lift the piece beneath its plinth.
15. A Ring Bound Desktop Photo Stand
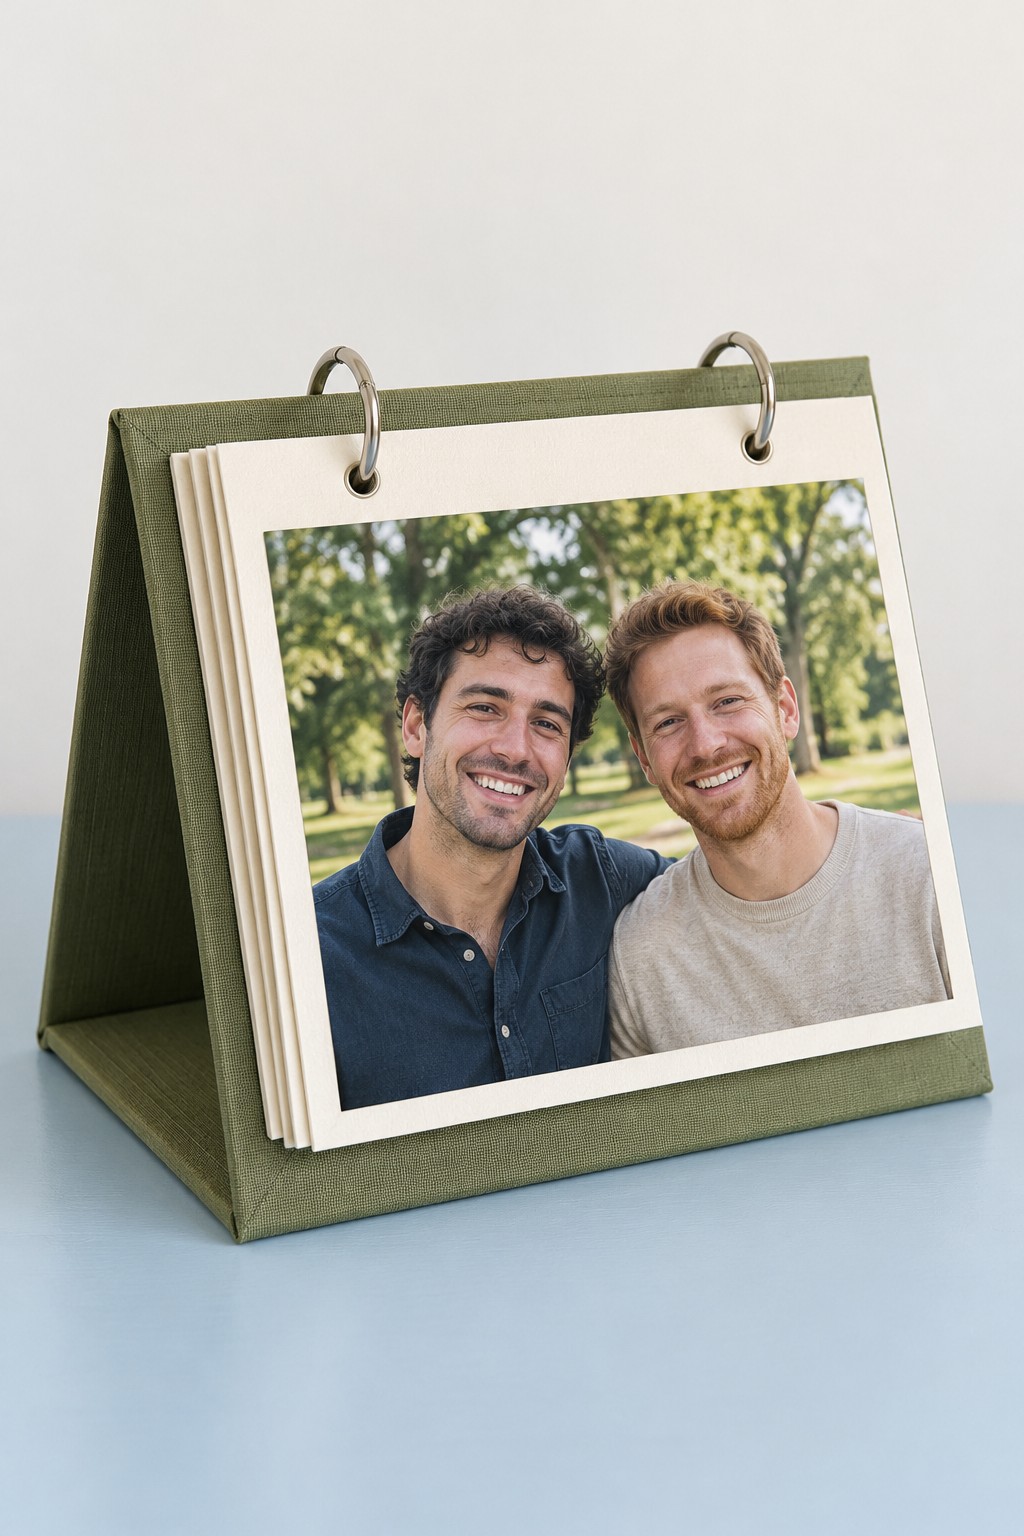
Two metal book rings turn a little desktop stand into a changeable photo album. Olive fabric covers the triangular support, and cream pages frame the pictures with a generous margin. You can leave one image facing forward for a week, then turn to another without replacing anything inside a frame.
Make the triangular support from rigid board with flexible cloth joints and a base that holds its angle. Cover the structure before fitting the ring hardware. Cut equal card pages and reinforce the two holes along their upper margins. The rings should pass through those margins and the stand, leaving the photographs untouched. Use suitable photo corners to attach each print to its page. Test the whole page stack through a complete turn so the rings, page edges, and support do not catch.
16. A Photo Key Rack for the Entryway
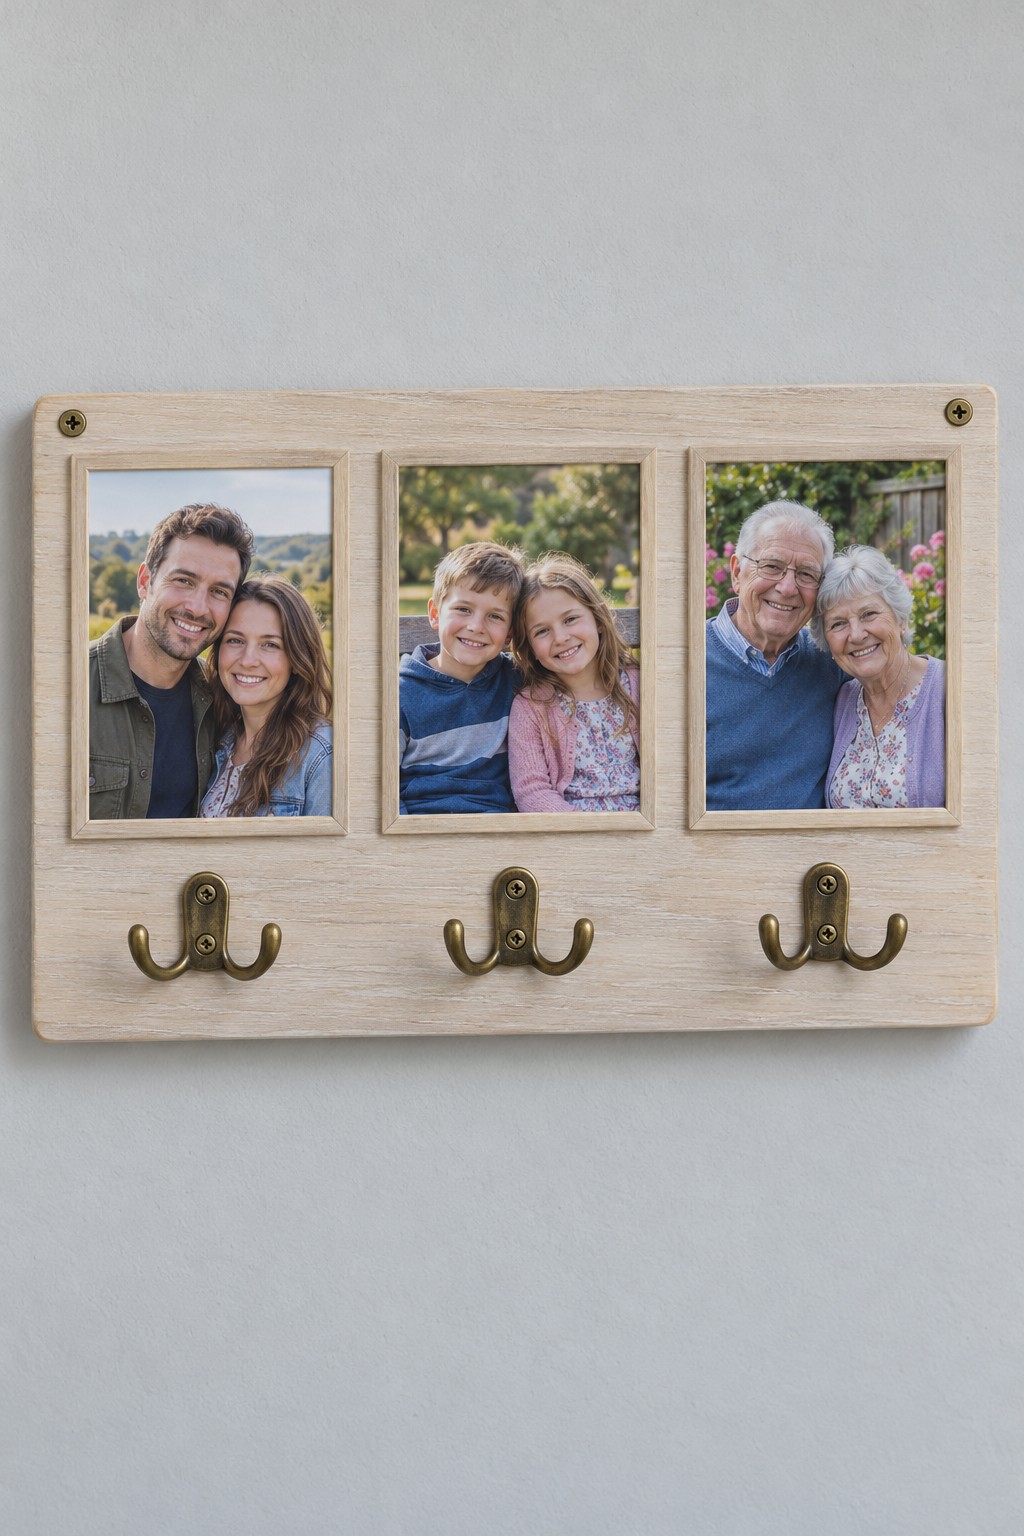
Three portraits above three brass hooks make a key rack feel like part of the family gallery. Pale wood and narrow frame borders keep the piece useful without making it visually heavy. Assigning a picture to each hook can also give everyday belongings a familiar home.
Use a solid wooden backboard and attach three small frame assemblies along its upper half. Prepare and finish the wood before adding the images. Install the hooks with screws sized for the board thickness, keeping their points away from the photo compartments. Mount the complete rack through its clear outer corners or another suitable structural fixing system, with anchors chosen for the wall and expected load. Attach the photographs through the frame backs. Leave enough space below the pictures for hands and hanging keys.
17. A Fold Open Photo Box with a Portrait at Its Heart
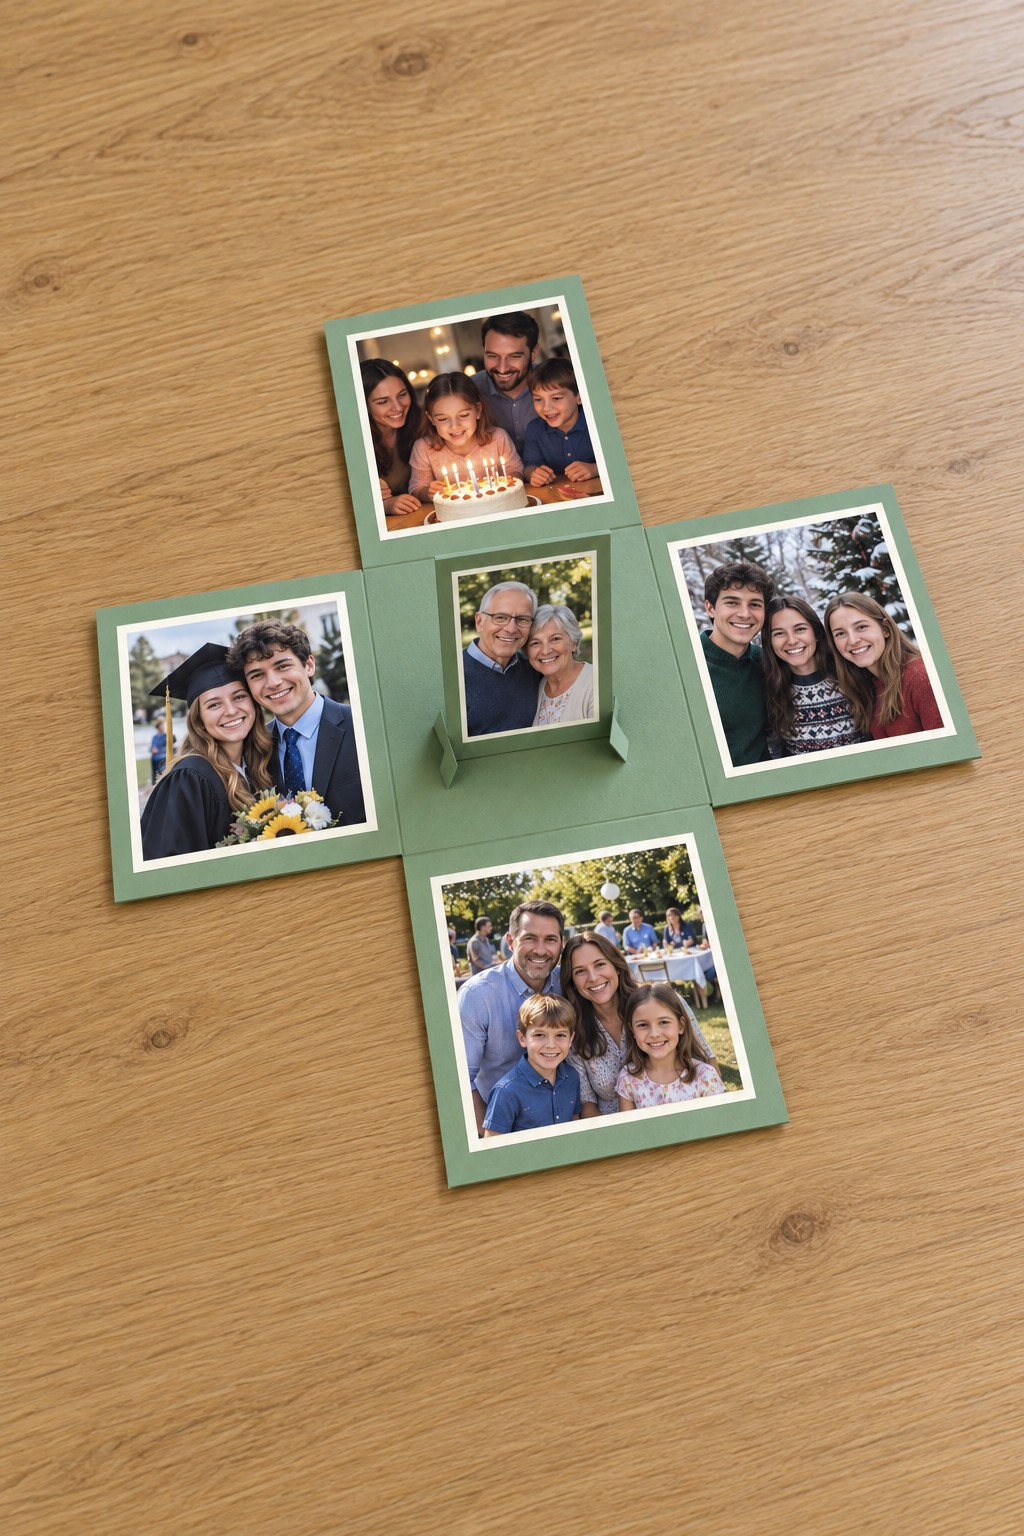
Four photo covered flaps surround a fifth picture standing in the middle of this green keepsake. When opened flat, the piece becomes a small circle of family stories around one central moment. Matching borders and a compact inner easel make it feel carefully planned rather than crowded.
Draw a cross of five equal squares on strong cardstock, then cut around the outside and score the four folds around the center square. Reinforce the flaps with separate card mats, keeping those mats clear of the fold lines. Mount one photo copy on each flap. Add a short folded card easel in the middle to hold the fifth picture, checking that it fits inside the footprint when the sides rise. Test the closure before making any additional outer cover or lid.
18. A Shutter Frame with a Family Portrait at the Center
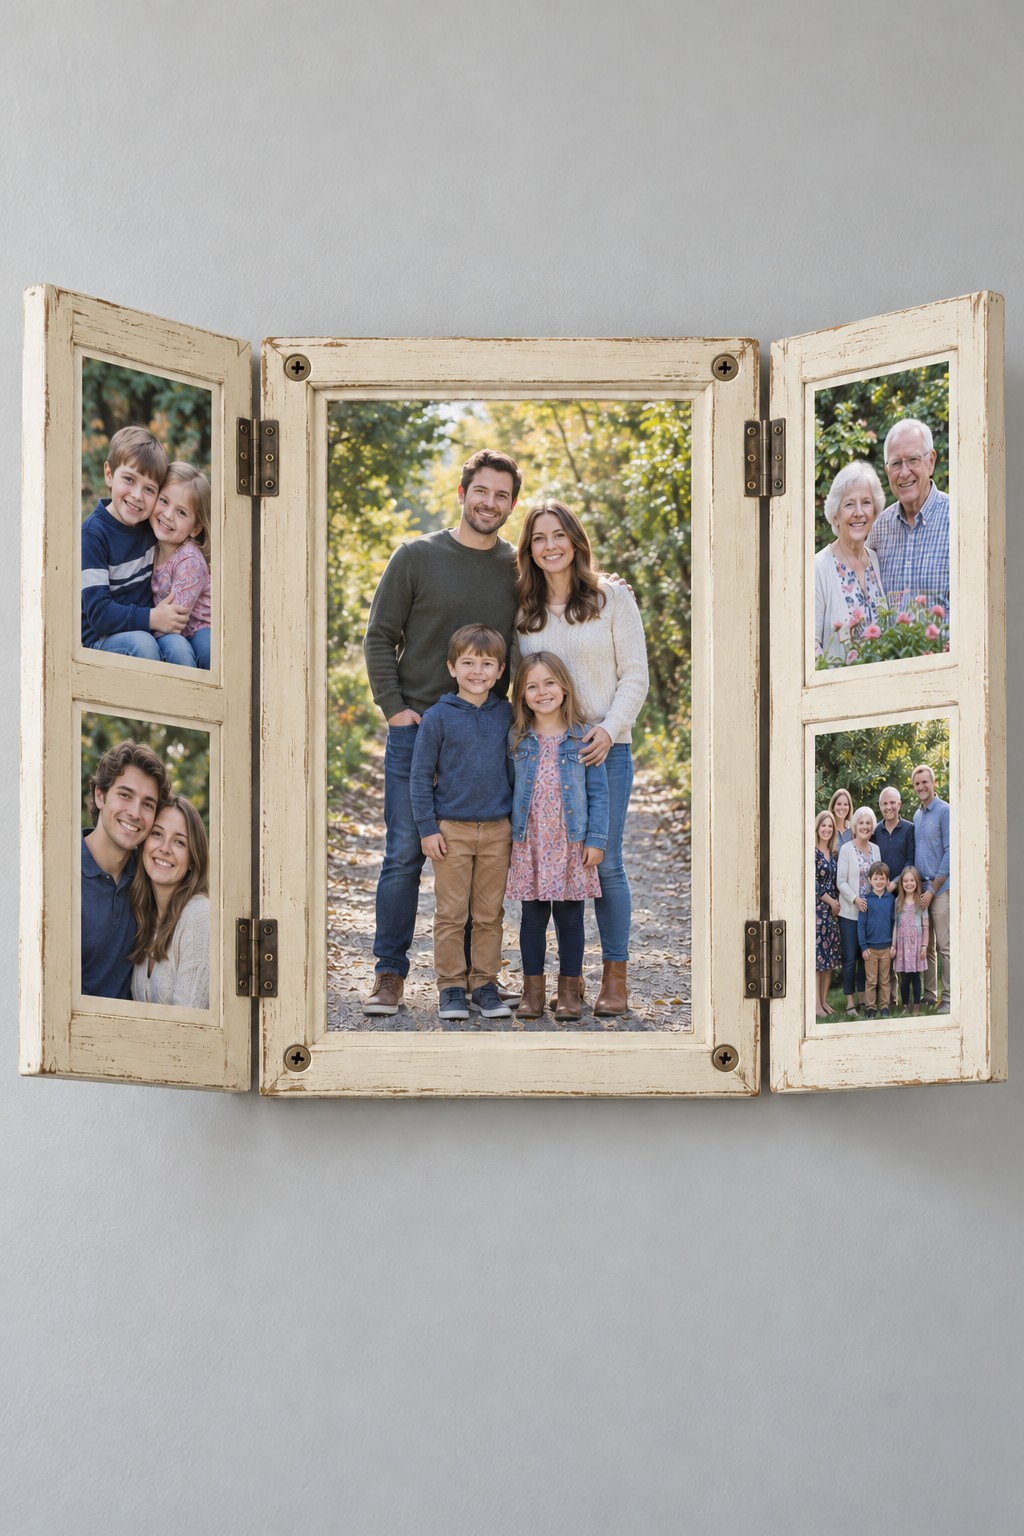
A tall central portrait and two narrower hinged wings create a miniature shutter gallery. The pale distressed finish connects the separate picture openings, while dark hinges provide a readable join between the sections. It suits a family grouping with one main portrait and four smaller companion images.
Use three sound wooden frame sections, with the central one wider than each side. Fit small hinges to the wooden rails, checking that the wings can open without the frame edges colliding. Create the aged look on new prepared timber with compatible paint layers, keeping the finish smooth around the photo openings. Mount the main section to the wall through its structure so the hinges do not carry the entire display. Add prints and protective backing panels after painting, and leave enough clearance for the wings to open.
19. A Mountain Range for Outdoor Memories
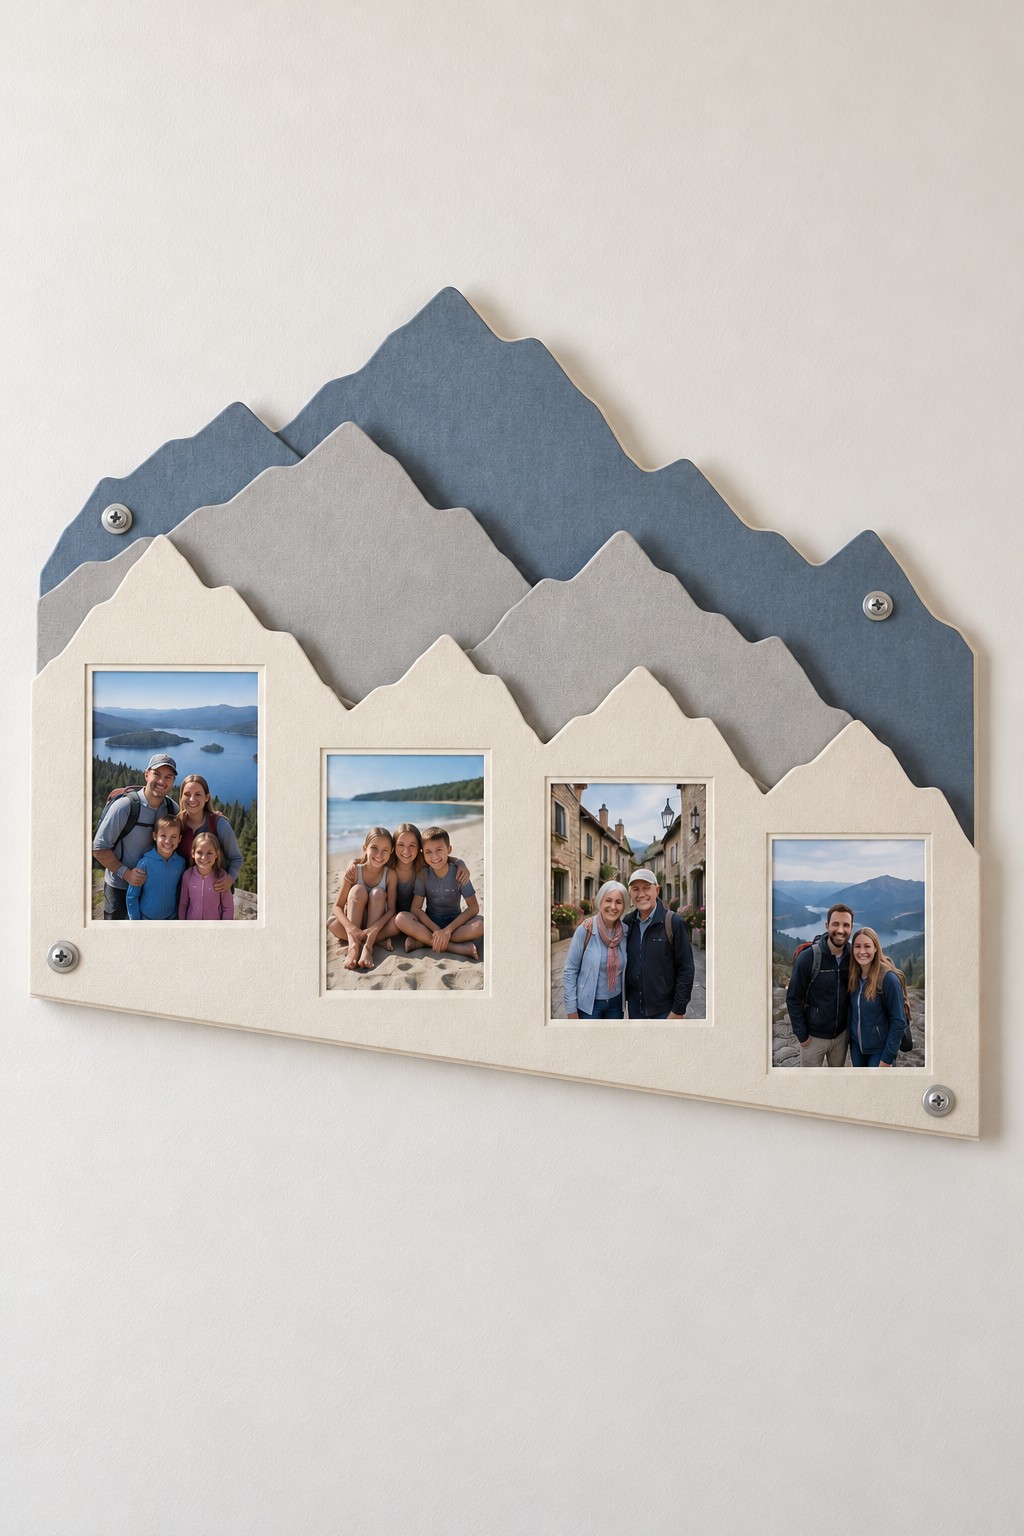
Overlapping blue, gray, and cream mountain silhouettes give four travel pictures a setting of their own. The tallest peaks rise behind the photo area, creating depth without surrounding every print with a separate frame. This arrangement works especially well for walks, camping trips, and family holidays outdoors.
Draw the full outline on paper before cutting the individual layers from thin plywood or another rigid craft board. Keep the front layer deep enough to support all four pictures. Sand cut edges and paint each layer separately with a coating suitable for the material. Join the layers to a common backing using compatible adhesive and appropriate fasteners or spacers. Install the display through its clear structural margins, then attach the prints to the front. Choose a wall position where the peaks have some empty space above them.
20. Six Jigsaw Pieces That Belong Together
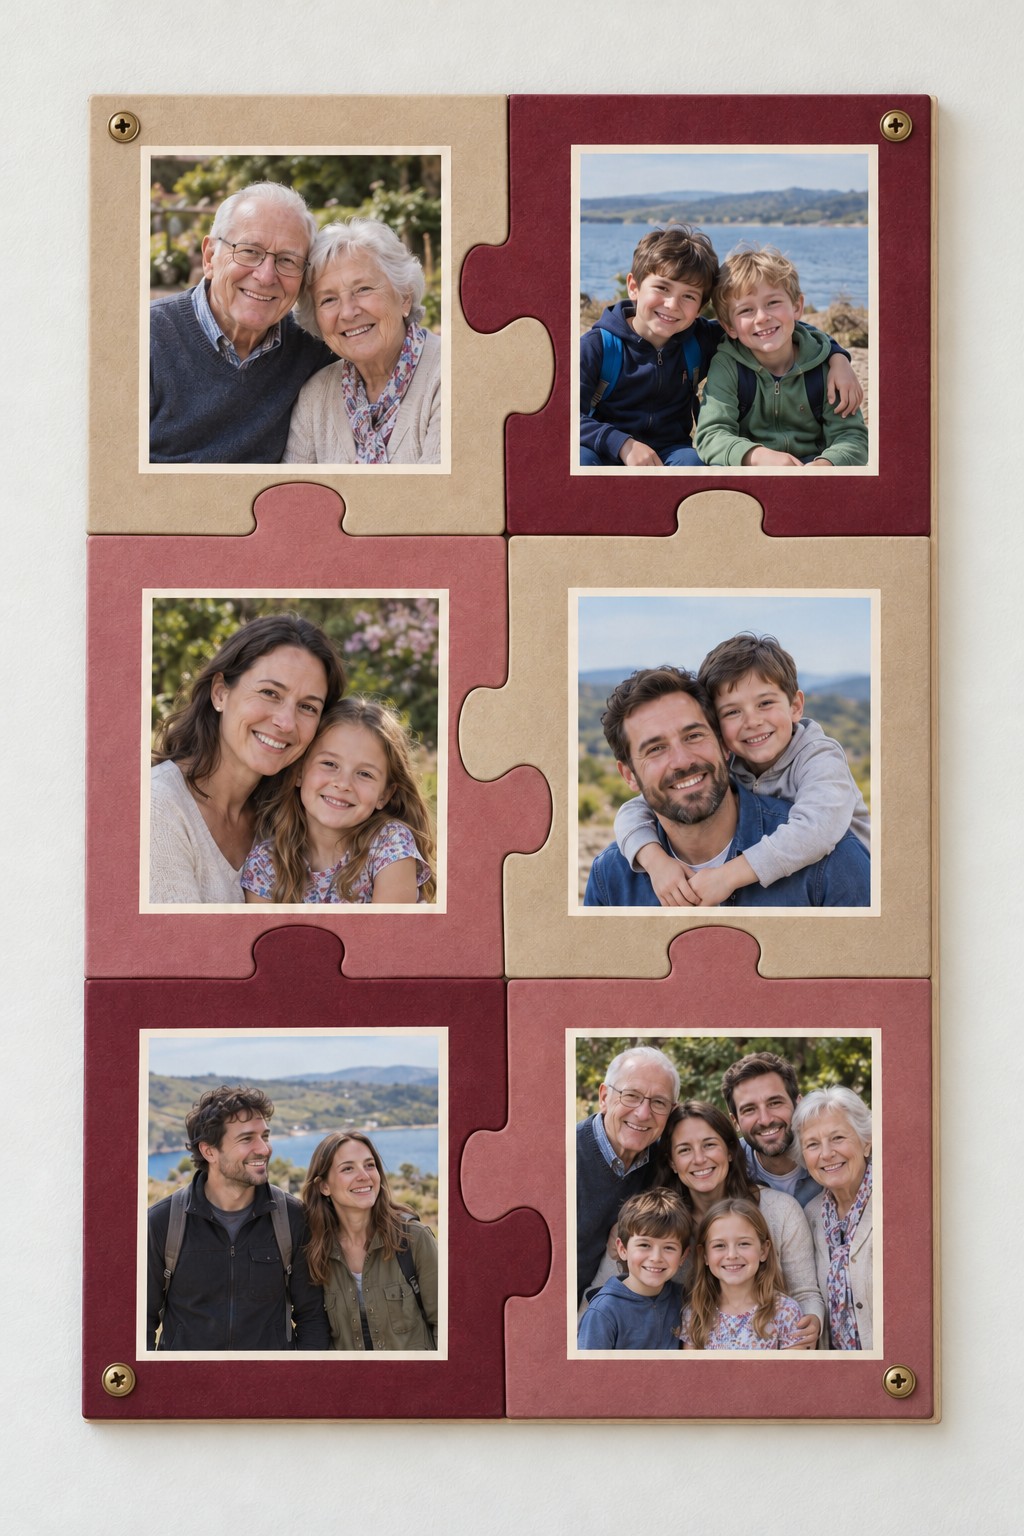
Large interlocking shapes turn six portraits into one connected family panel. Cream and muted burgundy alternate across the two column layout, while white print borders stop the darker sections from overpowering the faces. The jigsaw outline gives the display its meaning before any lettering is needed.
Plan the complete six piece pattern at full size, keeping a clear rectangular photo area within every shape. Cut the pieces from suitable rigid board, smooth their edges, and finish them separately. Arrange the dry pieces on a continuous backing panel so the connections line up without being forced. Secure each piece to that support before adding the photographs. Wall fasteners belong in the structural corners of the backing, outside the picture areas. Treat the finished assembly as wall art, with the backing carrying the load.
21. A Giant Bow with Photo Covered Tails
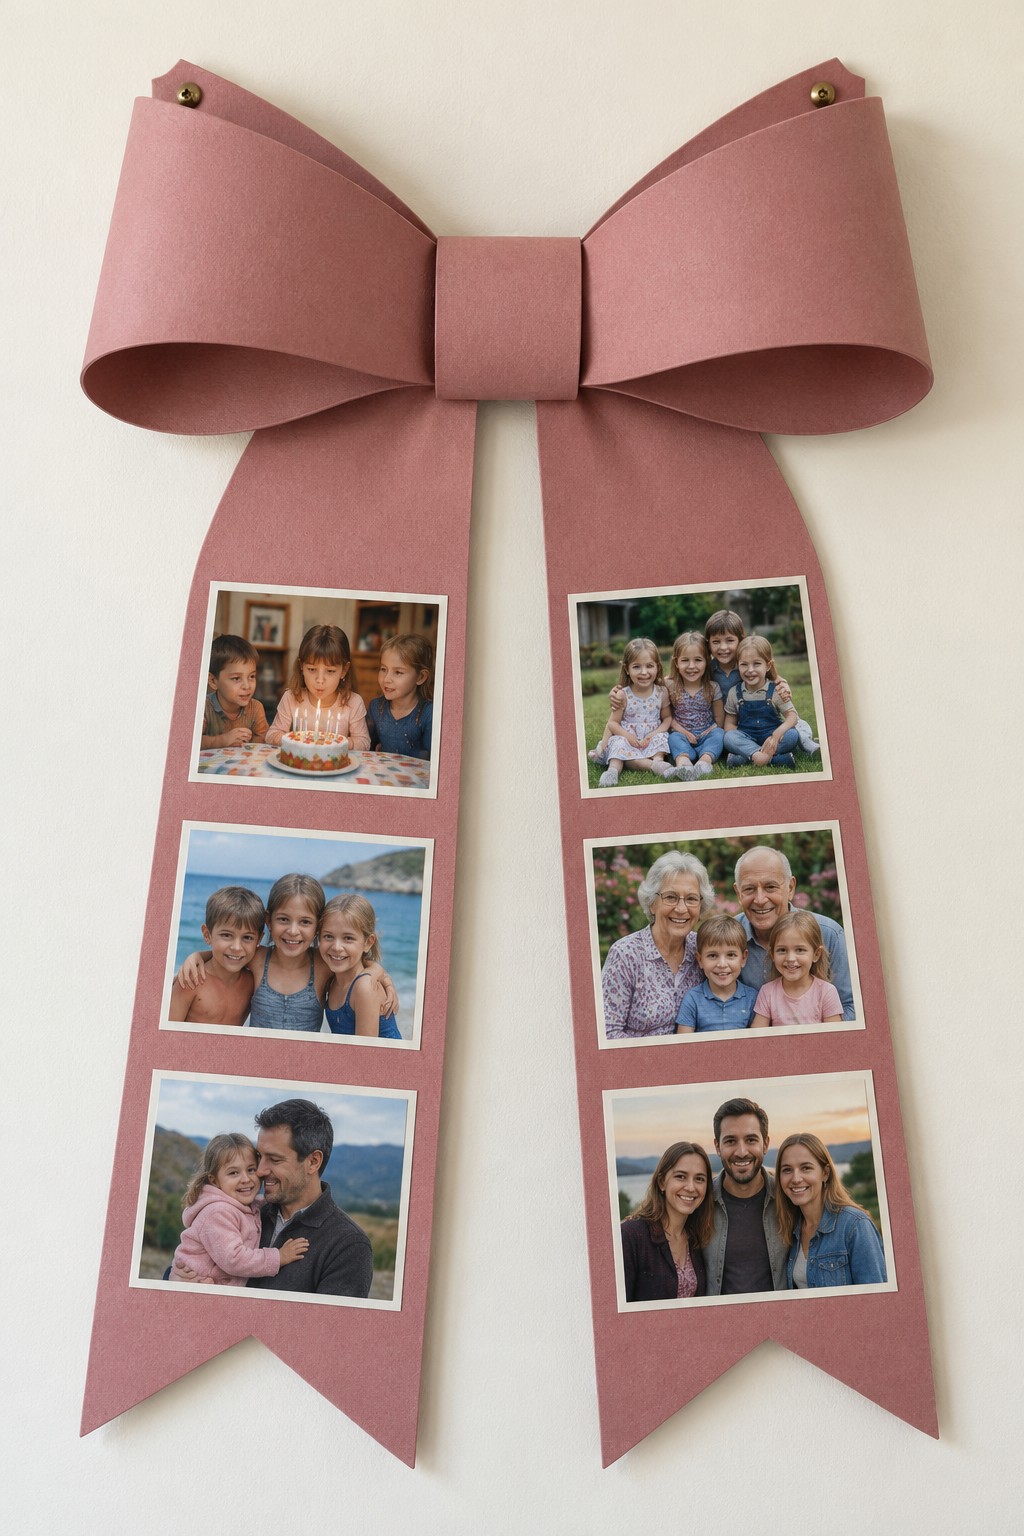
A large dusty rose bow gives six small pictures a celebratory setting. Three photographs run down each long tail, while the rounded loops above remain plain. The contrast between curved upper sections and flat hanging tails makes the design readable from across the room.
Form the bow loops from flexible heavyweight card or stiffened fabric, shaping each around an internal support so the curves hold. Make the two tails from rigid card faced with matching paper, then attach them to a common backing beneath the center wrap. Keep the photo areas flat and mount three copies along each tail after the structure has set. Wall fittings should connect to the reinforced backing behind the bow, outside the print areas. Leave enough room for the pointed tails to hang freely without brushing a shelf.
22. Record Sleeves for Music and Friendship Memories
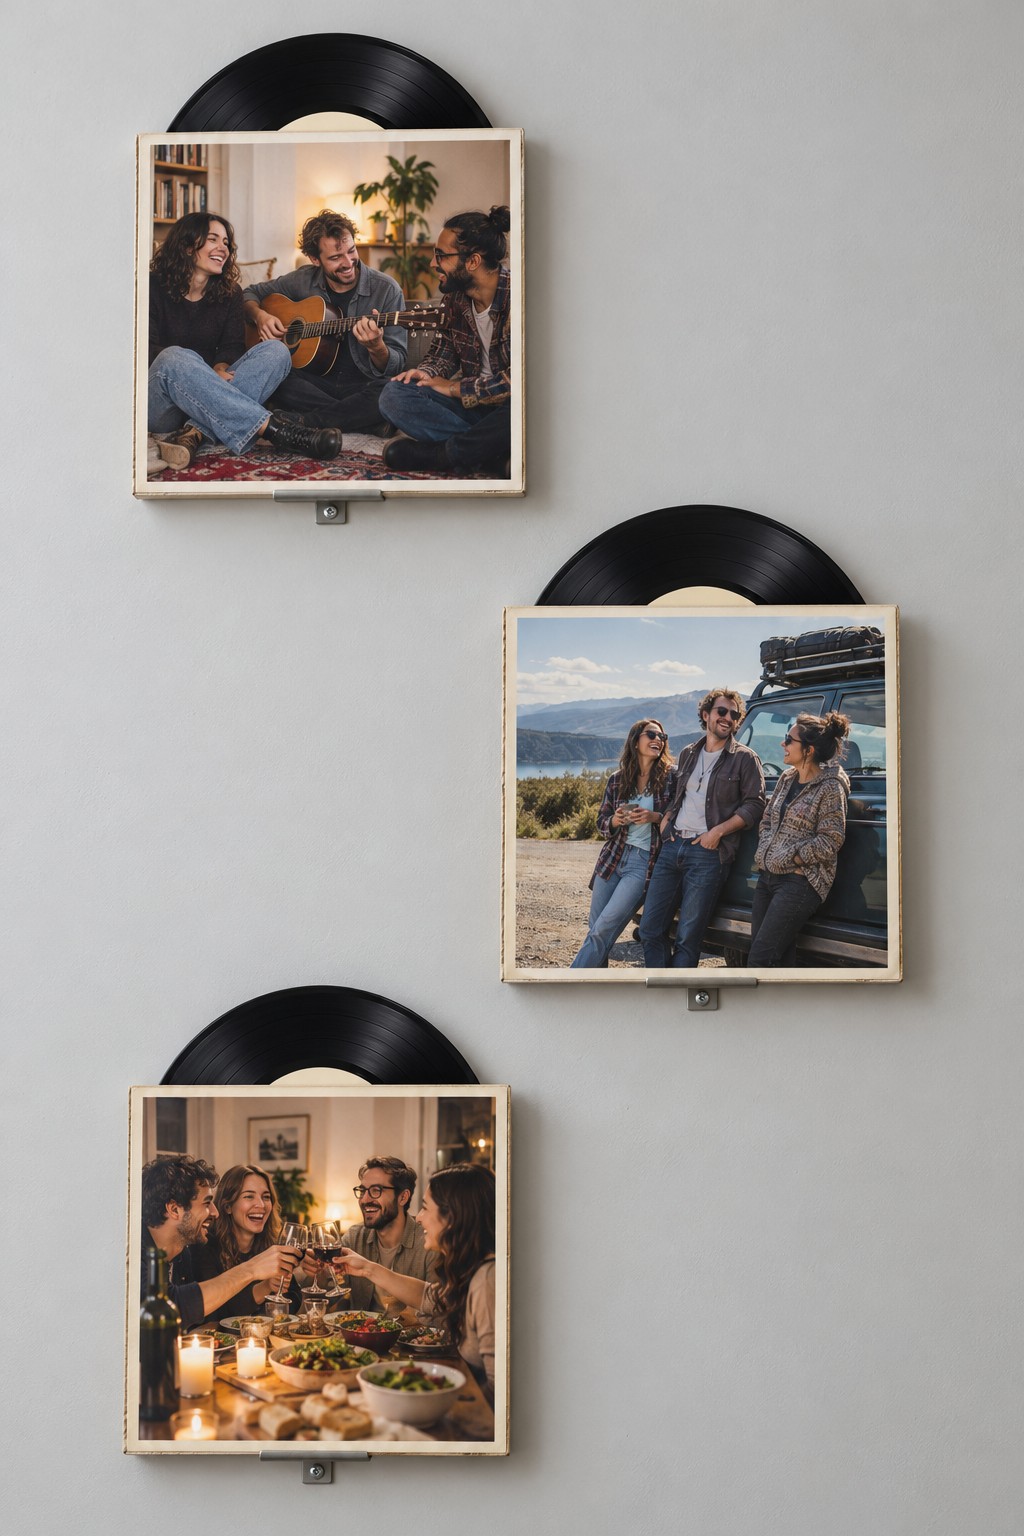
Three square photo fronts sit below exposed arcs of black vinyl, suggesting a wall of favorite record sleeves. The pictures can celebrate concerts, road trips, or evenings with friends, while the repeated circles connect otherwise different scenes. A staggered arrangement gives the small group some movement.
Use unwanted decorative records or lightweight replica discs, preserving any valuable recordings separately. Make shallow square display sleeves with a rigid back and a photo mat at the front. Secure the disc to the backing with a removable retaining arrangement so it cannot slide out above the photo. Attach the picture to its own mat rather than gluing it directly onto the grooves. Fit a proper wall hanger to every sleeve assembly and check the staggered spacing with paper templates before making the final holes.
23. A Clear Photo Panel with a Laced Border
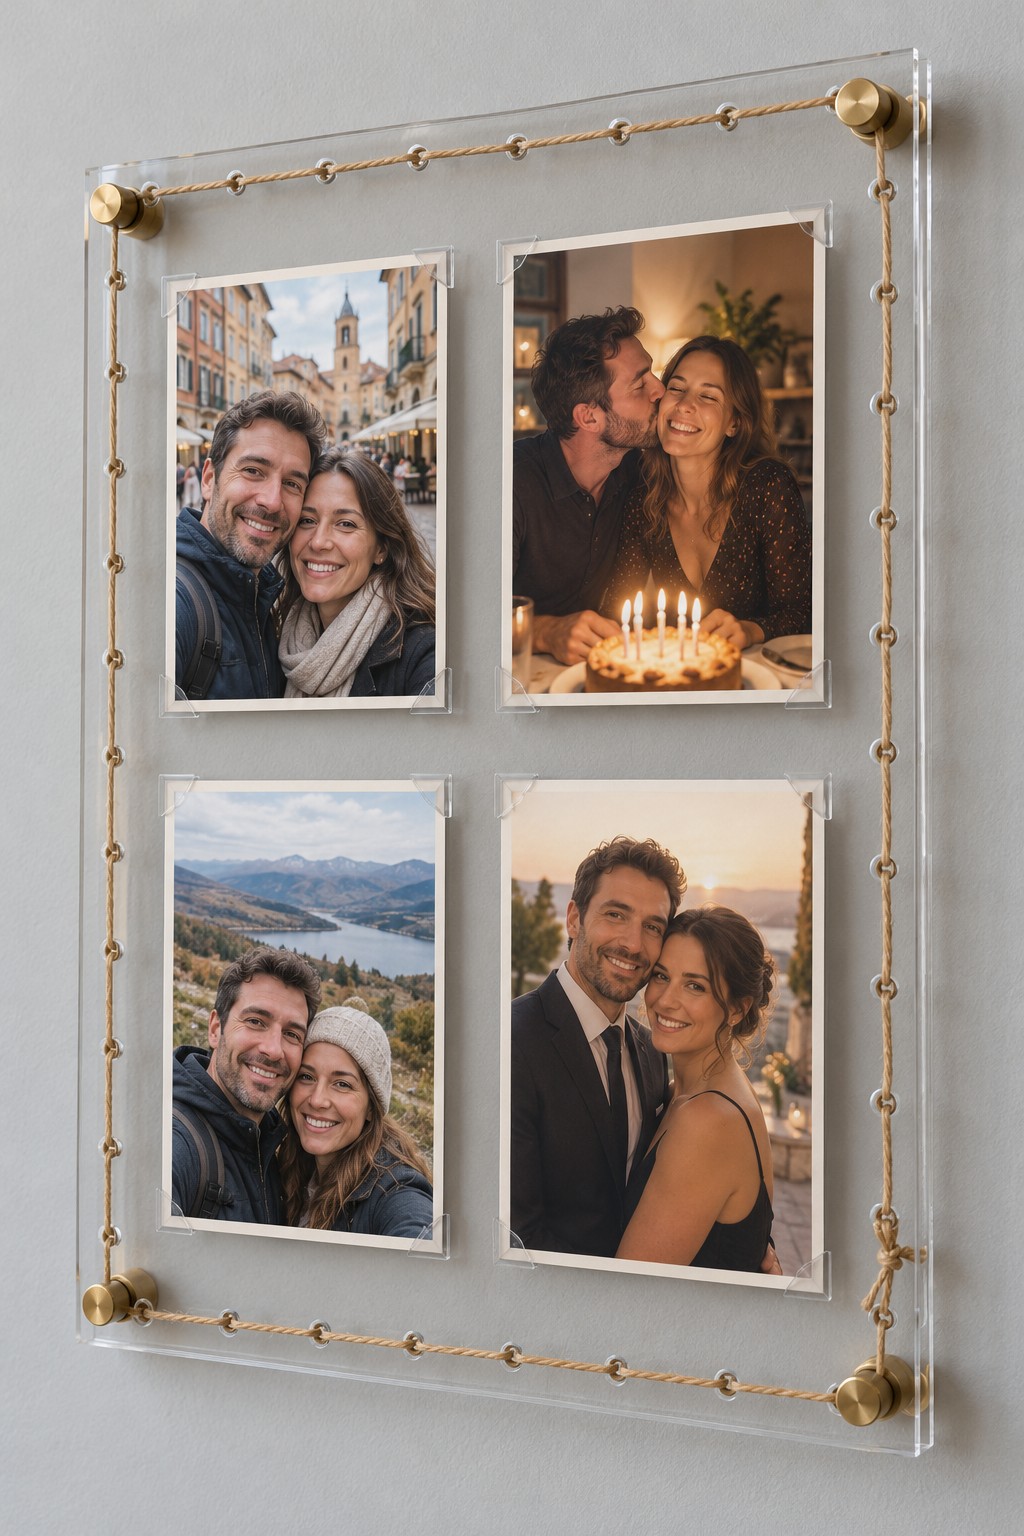
A clear acrylic panel lets four portraits appear to float in front of the wall. A thin cord travels through metal lined perimeter holes, adding texture without crossing the pictures. Brass corner standoffs give the transparent sheet a defined distance from the surface behind it.
Have a plastic fabricator cut, finish, and drill the panel for compatible standoff hardware and perimeter eyelets. Hole size, edge clearance, and cushioning need to suit the acrylic and fixings. Thread the decorative cord through the perimeter eyelets without pulling it tight enough to distort the sheet. Hold the pictures in suitable clear photo corners or pockets attached to the panel, then install the four structural standoffs using appropriate wall anchors. Keep the cord decorative, with the standoffs supporting the panel. For another way to give a wall a personal story, explore these creative wall art arrangements.
24. Two Oval Portraits in a Rope Figure Eight
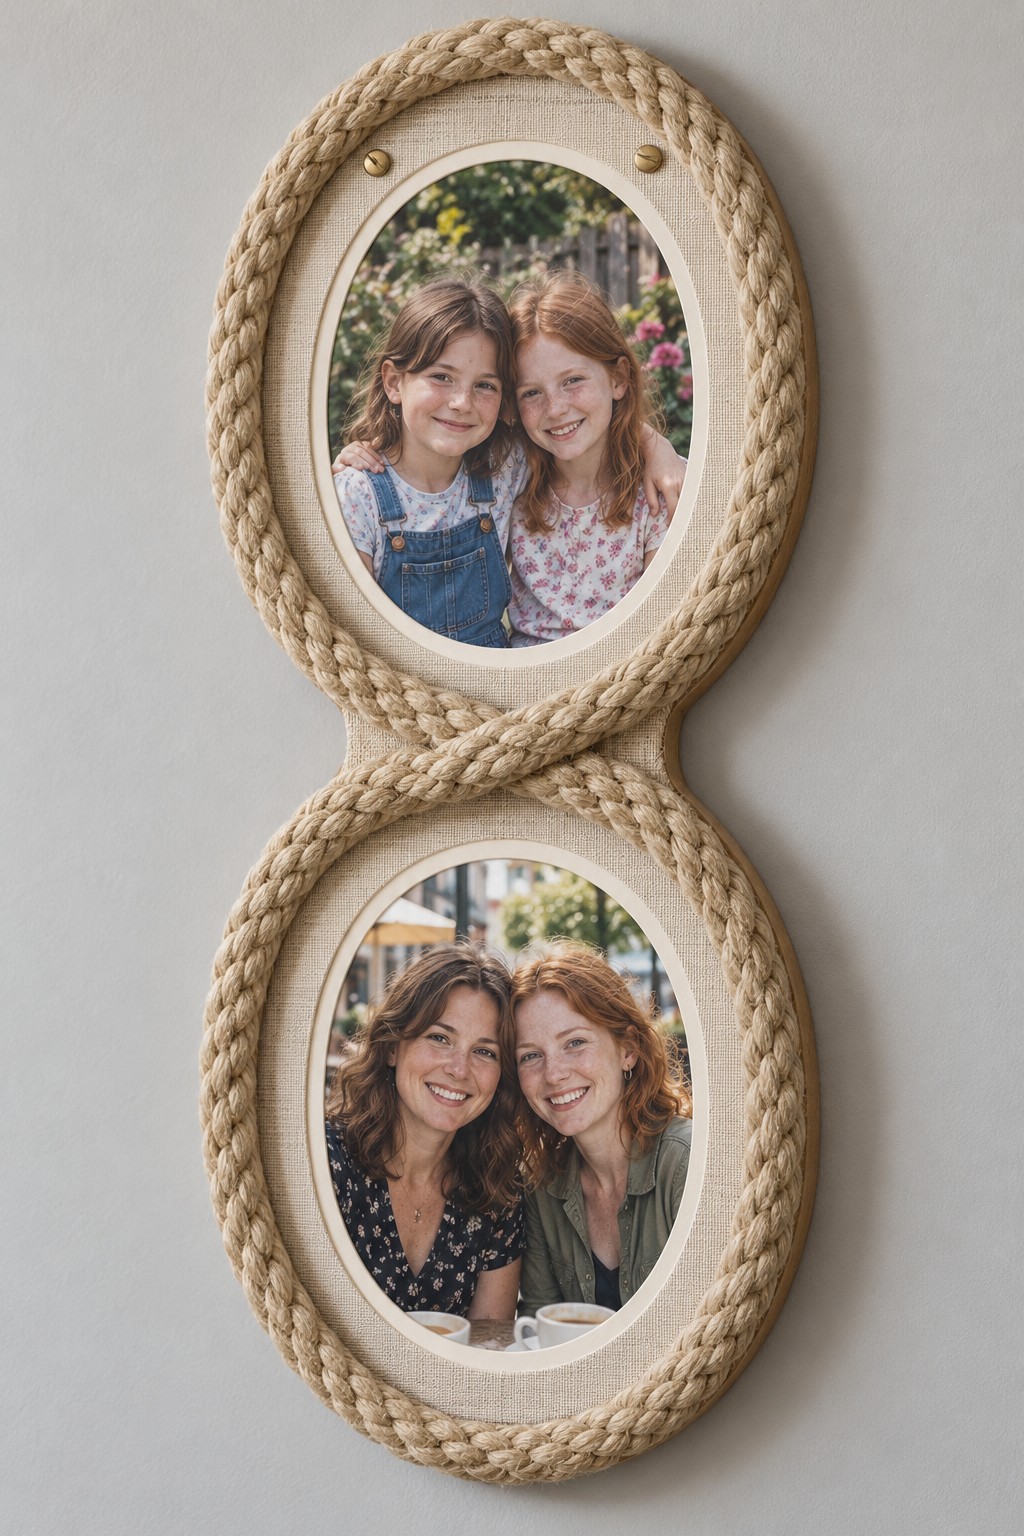
Thick braided rope surrounds two oval portraits in a vertical figure eight. Pale inner borders keep the textured rope from crowding the faces, while the crossing at the center connects the upper and lower pictures. The tall narrow shape suits a small stretch of wall beside a cabinet.
Cut a continuous figure eight backing from a suitable rigid material, then fit two oval photo mats with removable rear access. Arrange the rope around the outline before bonding it, checking that the central crossing lies flat rather than pushing the portraits forward. Use an adhesive approved for both rope and backing, and reinforce the rope ends out of sight at the rear. Install the wall fittings through the rigid support. The rope supplies the decorative border, while the backing holds the frames together.
25. Painted Tube Columns with Recessed Portraits
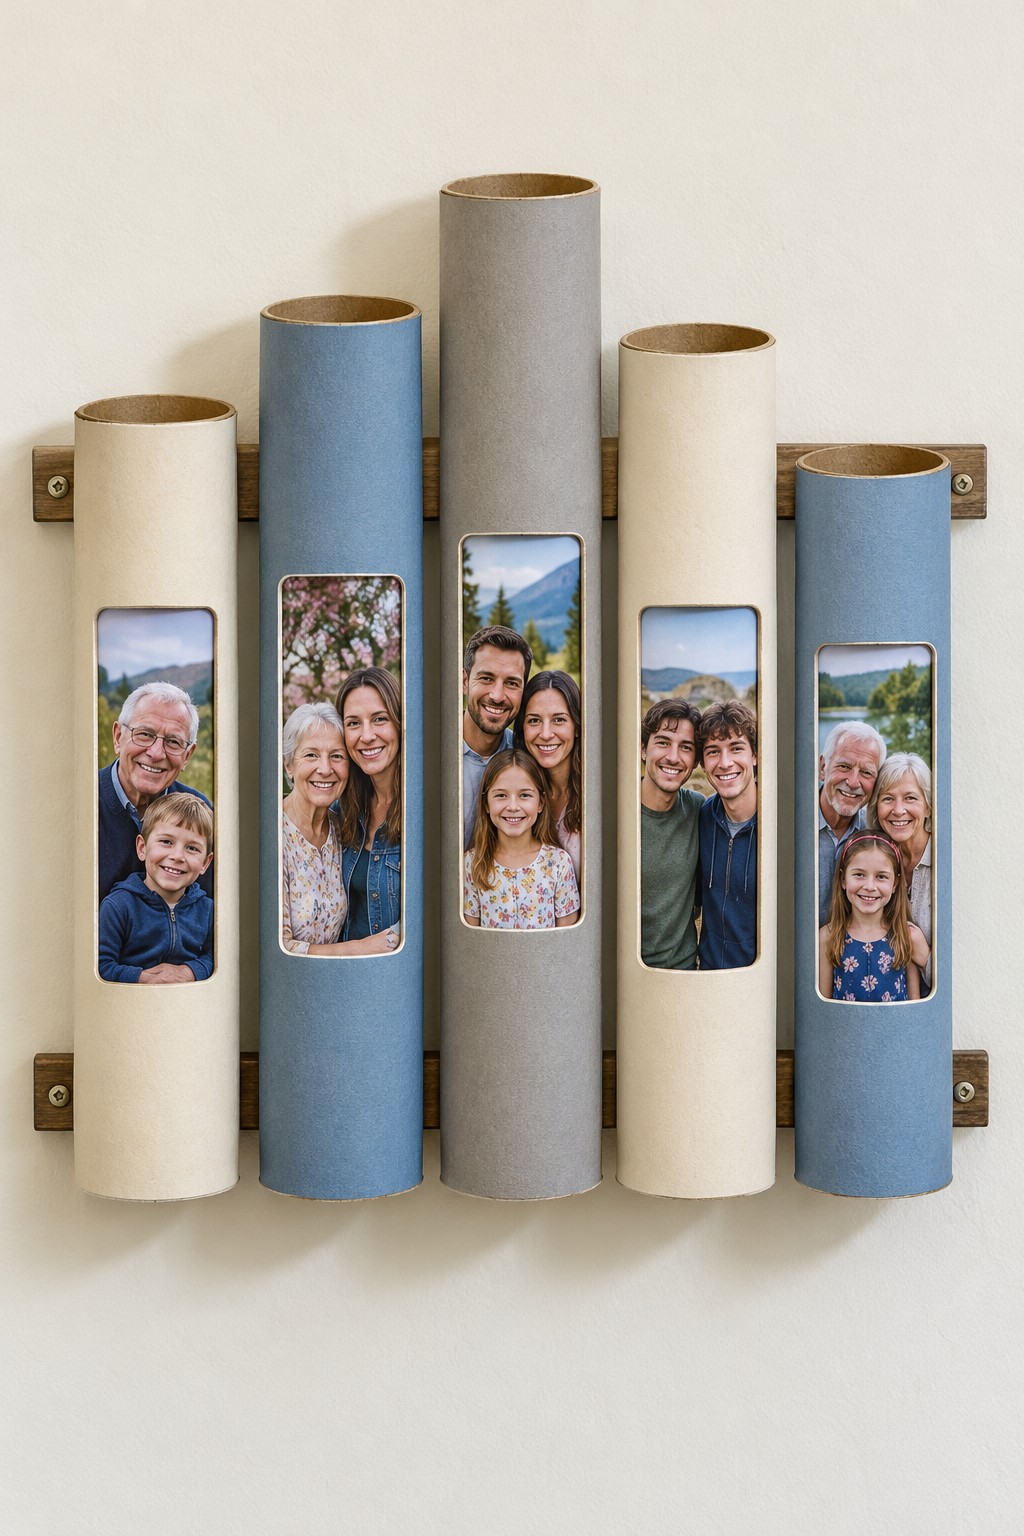
Five hollow columns turn a row of portraits into a sculptural wall piece. Cream, blue, and gray finishes alternate, and the changing tube heights create a gentle skyline. Each picture sits behind a tall rounded opening, making it feel recessed rather than simply pasted onto the front.
Use sturdy clean cardboard tubes and mark the photo windows before cutting. Leave enough intact material around every opening to maintain the tube shape, then smooth and cover the cut edges. Paint the exterior with a compatible primer and water based acrylic finish. Fit each photo copy to a separate curved or lightly flexible card carrier inside the tube, keeping the image fully visible. Secure the tubes to two rear battens through reinforced attachment areas, then mount those battens to the wall with suitable fasteners.
26. Three Paper Flowers with Family Photo Centers
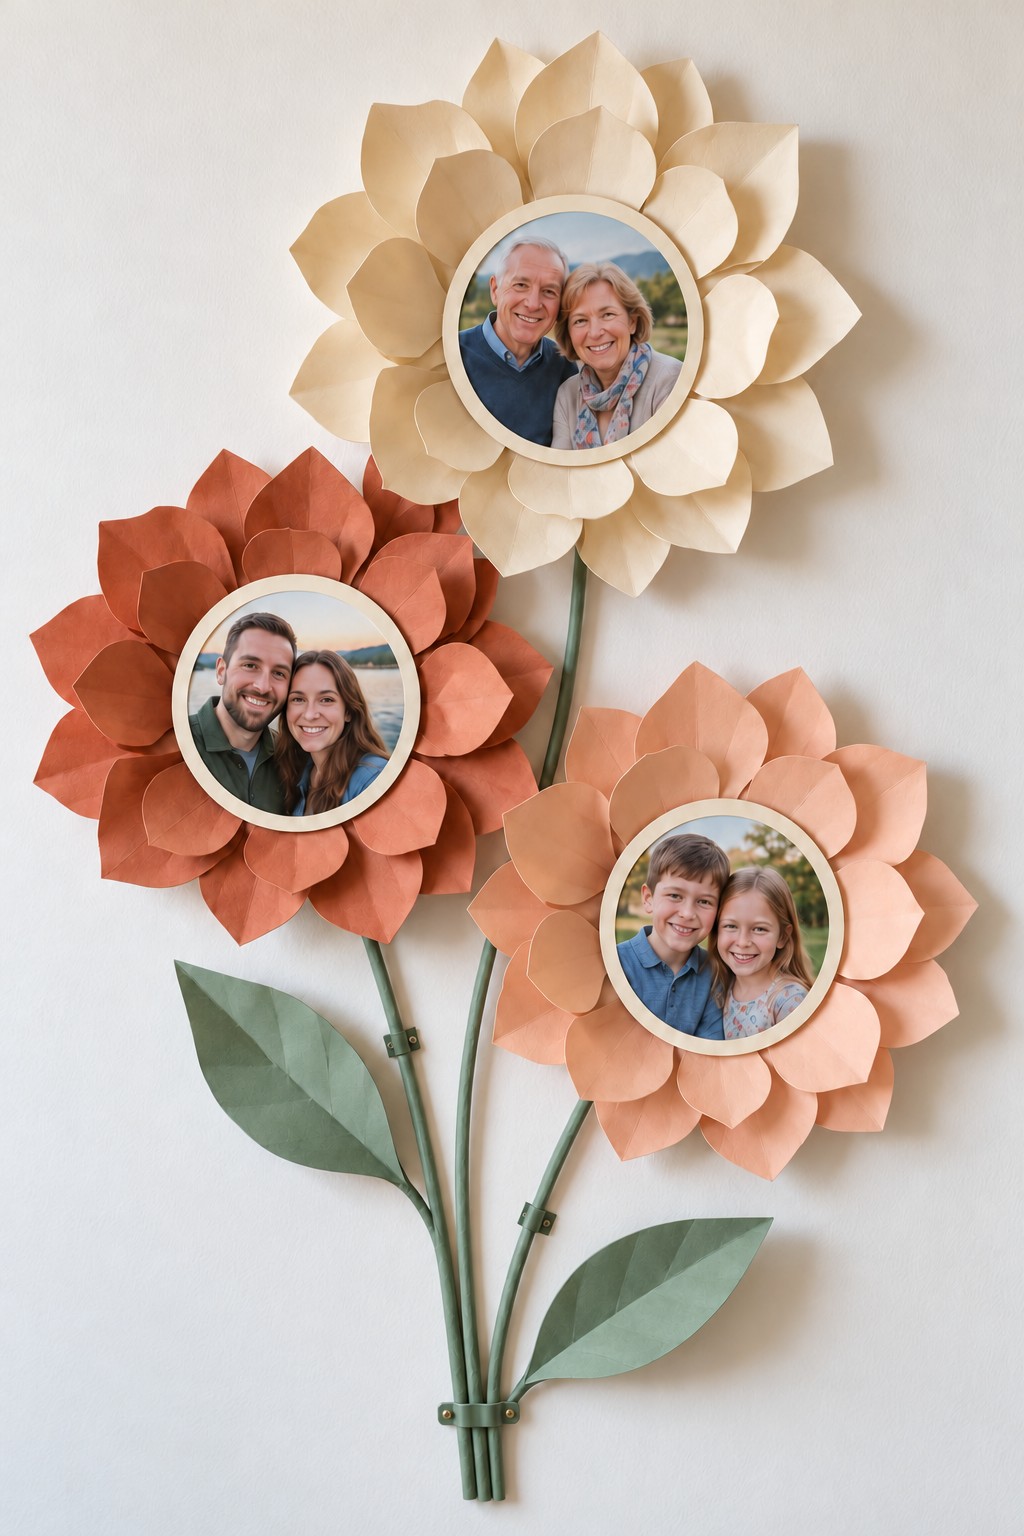
Three oversized flowers turn family portraits into the centers of a handmade wall bouquet. Cream, terracotta, and peach petals create a warm palette, while green stems connect the different flower heights. Round inner mats keep the photographs clear within the layered paper shapes.
Cut petals from sturdy colored cardstock, curling their upper edges gently before overlapping them on rigid circular flower backs. Use PVA for compatible paper joins and keep the photo recess clear. Fix a separate round mat at each center so a fresh print can be fitted without disturbing the petals. Attach the flower backs to green painted wooden stems and secure the complete assembly through proper brackets on its structural parts. These floral photo frame details offer another approach to balancing petals around a portrait.
27. A Clear Coastal Arch with Sand and Shells
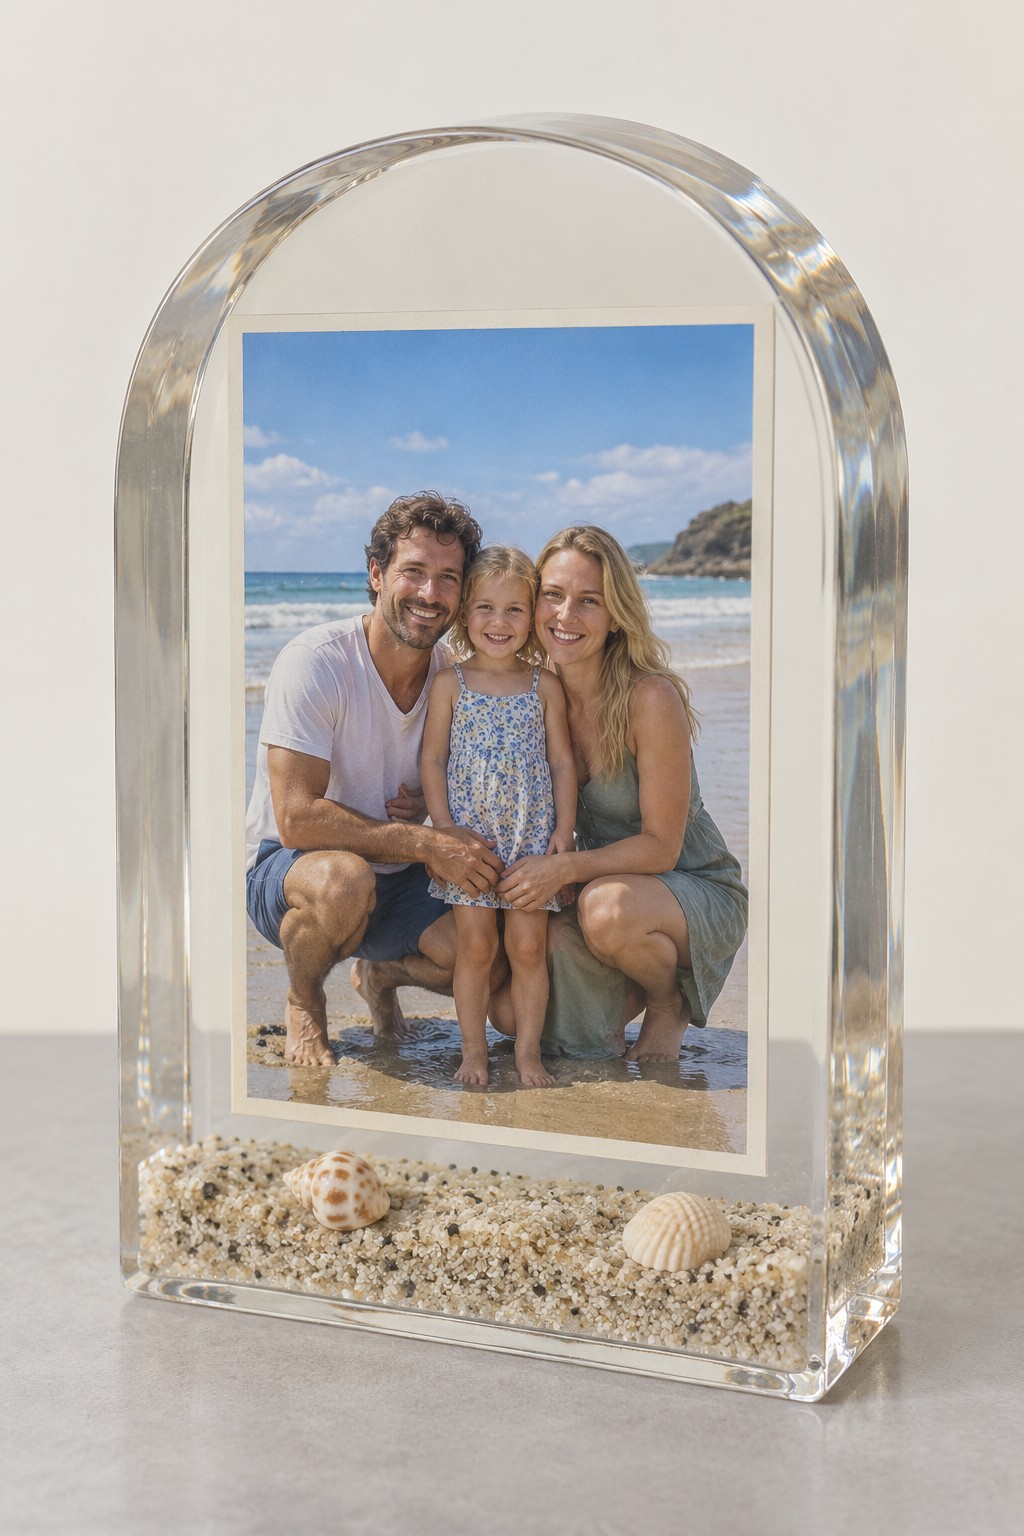
A clear arched keepsake holds a beach portrait above a shallow layer of sand and small shells. The rounded top echoes a window, while the pale material at the bottom links the object to the place in the picture. A simple border around the print helps it remain readable through the clear surround.
This is an advanced casting project. Use an arch mold and clear casting resin approved for its depth and total volume. Test a spare photo copy with the intended sealer and resin first, because paper and inks react differently. Dry the sand and shells completely and arrange them without covering the image. Follow the resin maker's mixing, layer thickness, temperature, and curing instructions; coating resin is not automatically suitable for a thick casting. Wear the protective equipment specified in the safety data sheet and work with the required ventilation. Allow full cure before handling the finished piece.
28. A Miniature Gallery Built Around a Room Corner
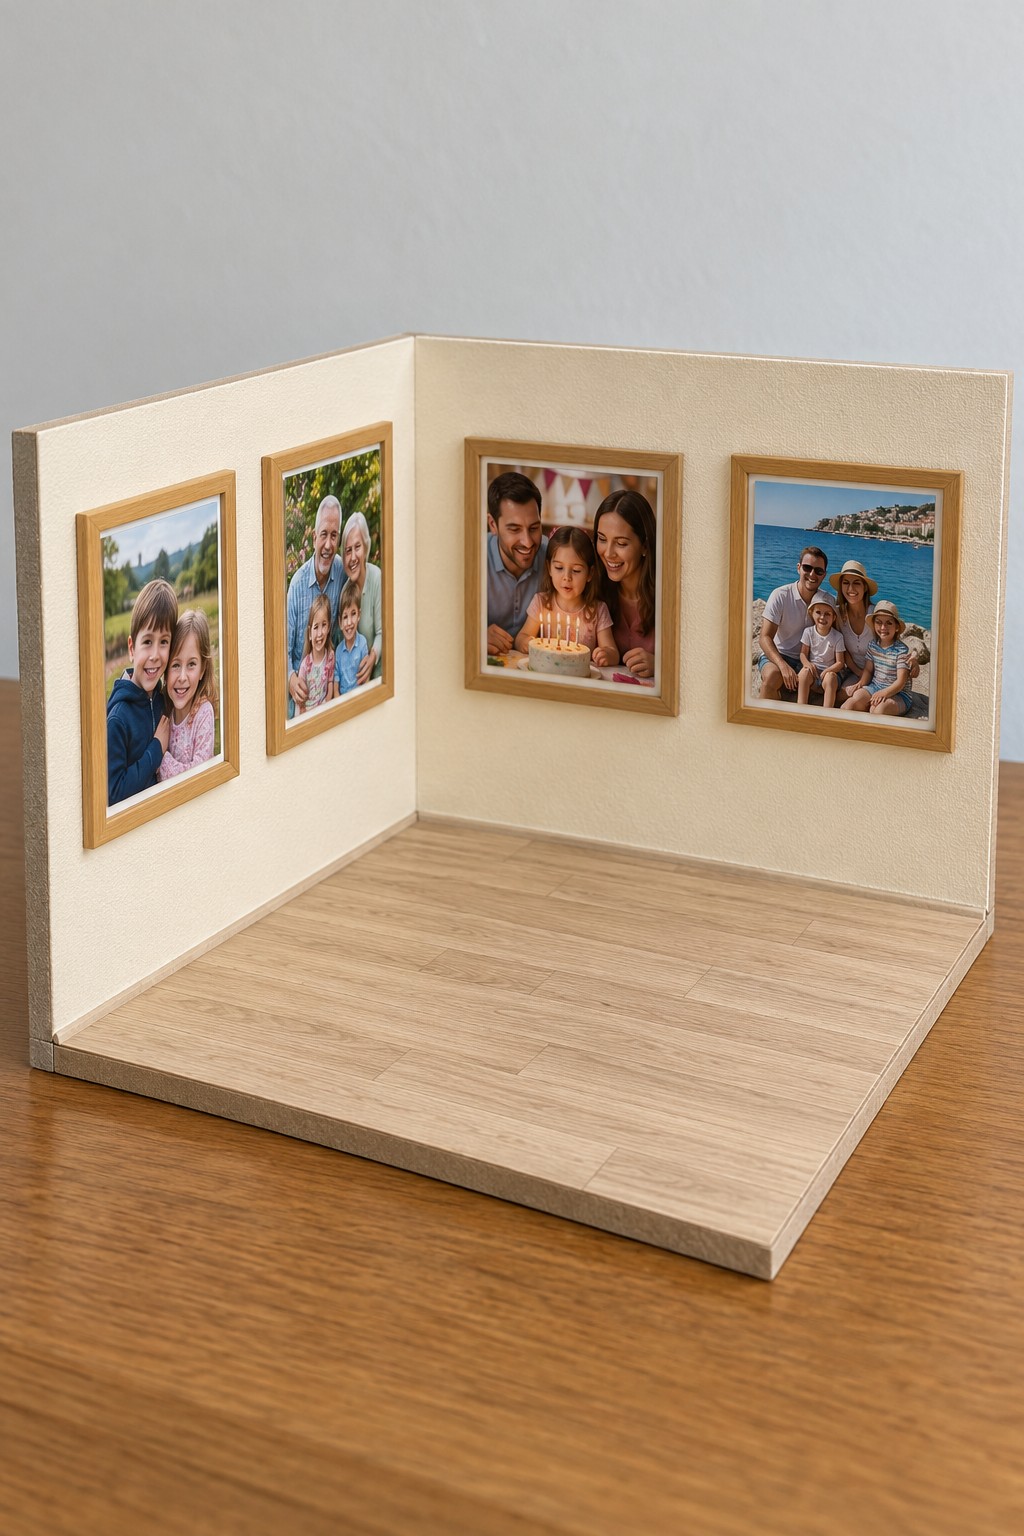
Two cream walls and a wooden floor form a small room dedicated to four family pictures. The little frames hang on both sides of the corner, creating the feeling of stepping into a gallery in miniature. Keeping the floor empty allows the photographs and architectural shape to carry the scene.
Build a square base with two rigid walls joined at a right angle. Reinforce the corner from behind and make sure both walls connect securely to the floor panel. Finish the surfaces before fitting the miniature frames. Thin wood strips or layered card can create the frame borders, with the prints mounted on separate backing pieces. Arrange two pictures on each wall at matching heights, checking their alignment from the front viewing angle. Place the finished room on a shelf where both sides remain visible.
29. Four Portraits Around a Wooden Windmill
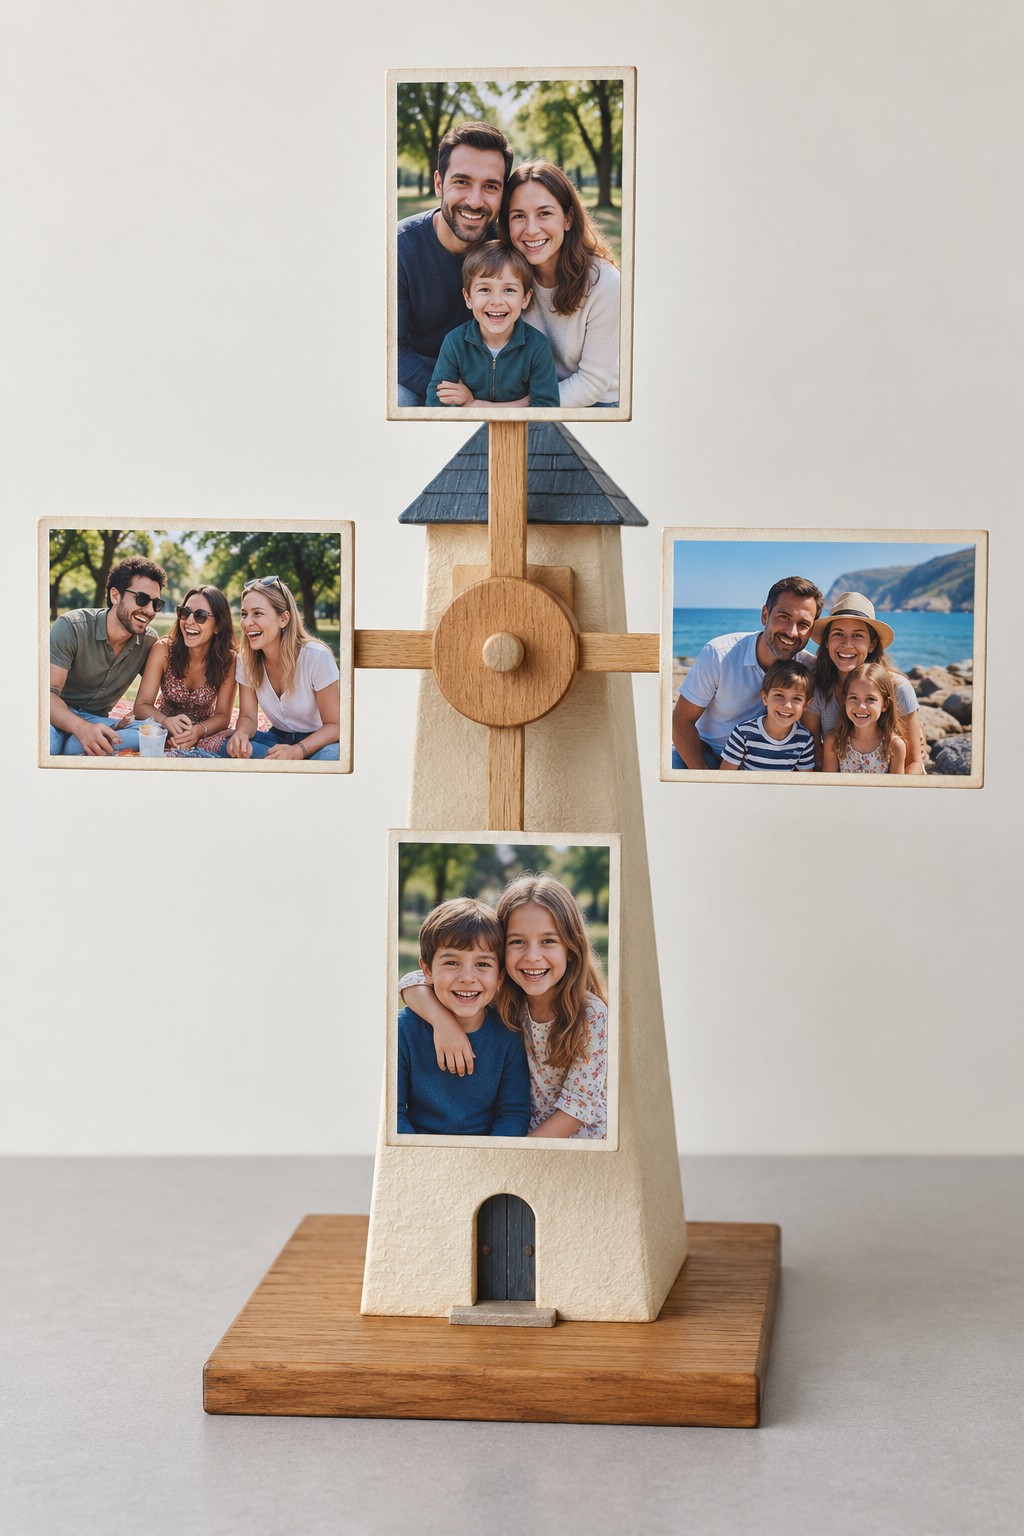
A small wooden windmill becomes a family ornament when four pictures replace the ends of its sails. A blue roof and a simple arched doorway keep the central tower recognizable, while the photographs add a playful cross shaped outline. Matching cream mounts connect portrait and landscape prints.
Begin with a stable wooden tower and broad base. Make four lightweight display arms and fix them to a central hub, then attach one mounted photo copy at each outer end. Keep the finished structure static so the cards stay balanced and visible. Use glue and appropriate small fasteners within the wooden joints, keeping their points clear of the pictures. Check that the top photo does not catch the roof and that the lower one clears the base. Place the ornament where its projecting arms cannot be brushed by passing people.
30. A Walk Around Arch Covered in Family Pictures
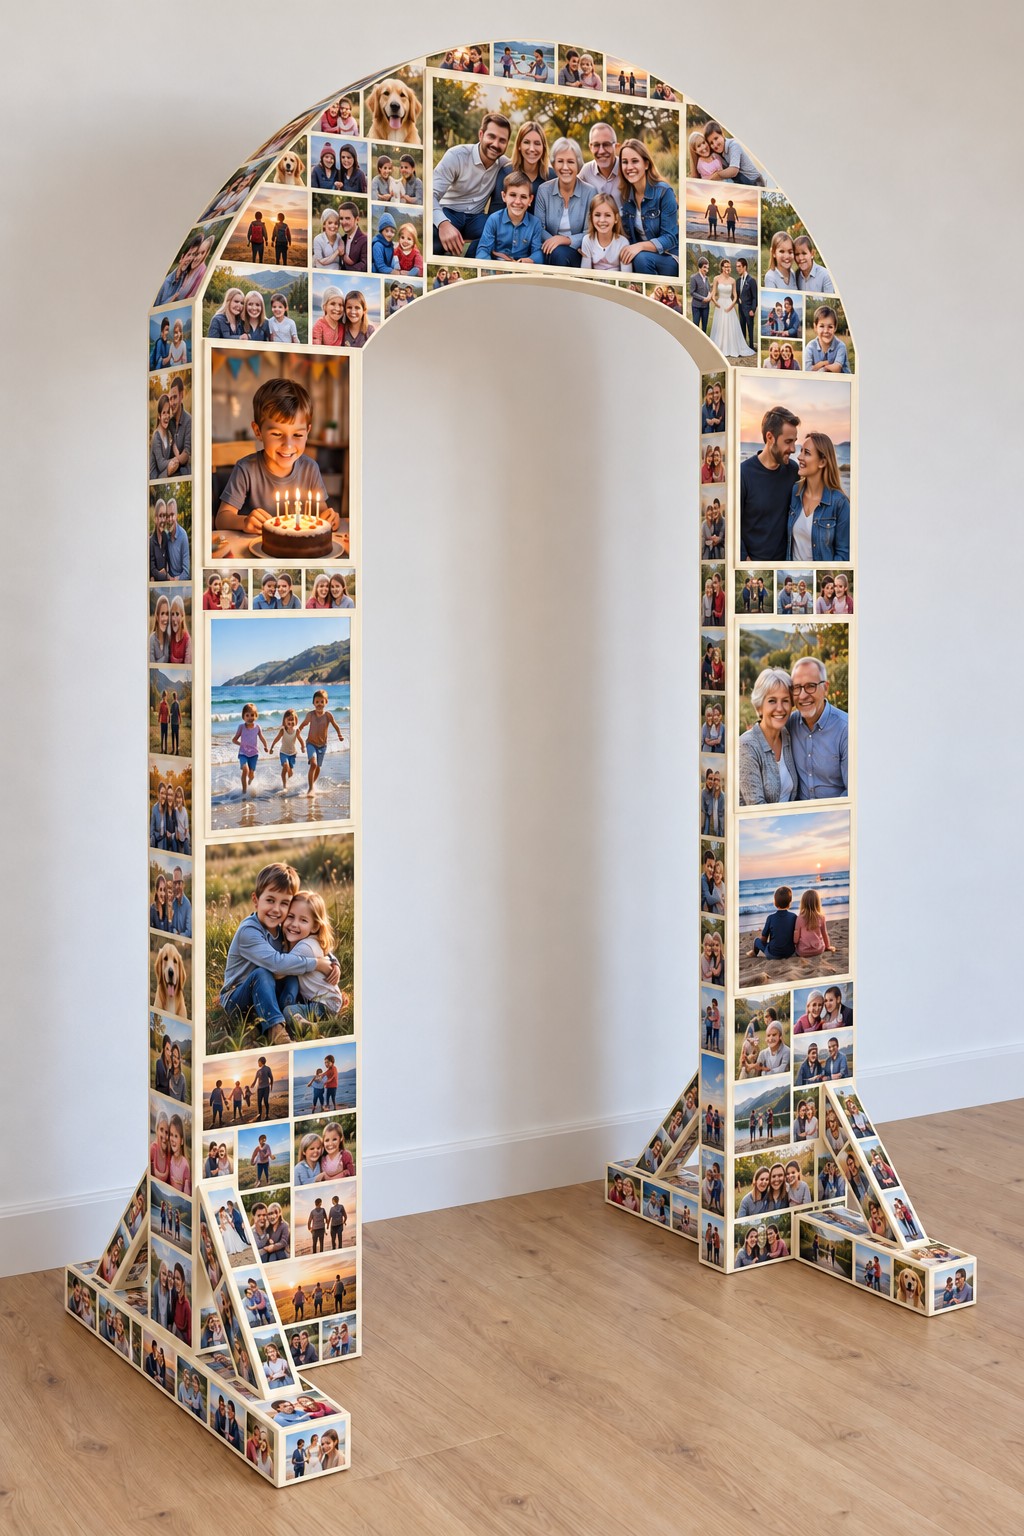
A tall arch gathers a large collection of pictures around an open center. Bigger portraits sit along the upright sections, while smaller snapshots fill the curved top and broad feet. The pale borders stop the densely arranged images from merging into a single busy surface.
For a floor sized version, start with a properly designed timber display frame or a professionally made structure with stable feet and bracing. Fit smooth lightweight facing panels to the frame, then make paper templates for the different photo zones. Place the larger pictures first and fill the remaining spaces with smaller copies, trimming only duplicates at the outer curves. Use a compatible dry mounting method on the finished panels. Check stability and any required restraint before adding the photographs, and keep the feet out of the main circulation route.
31. A Photo Mosaic Spool Table
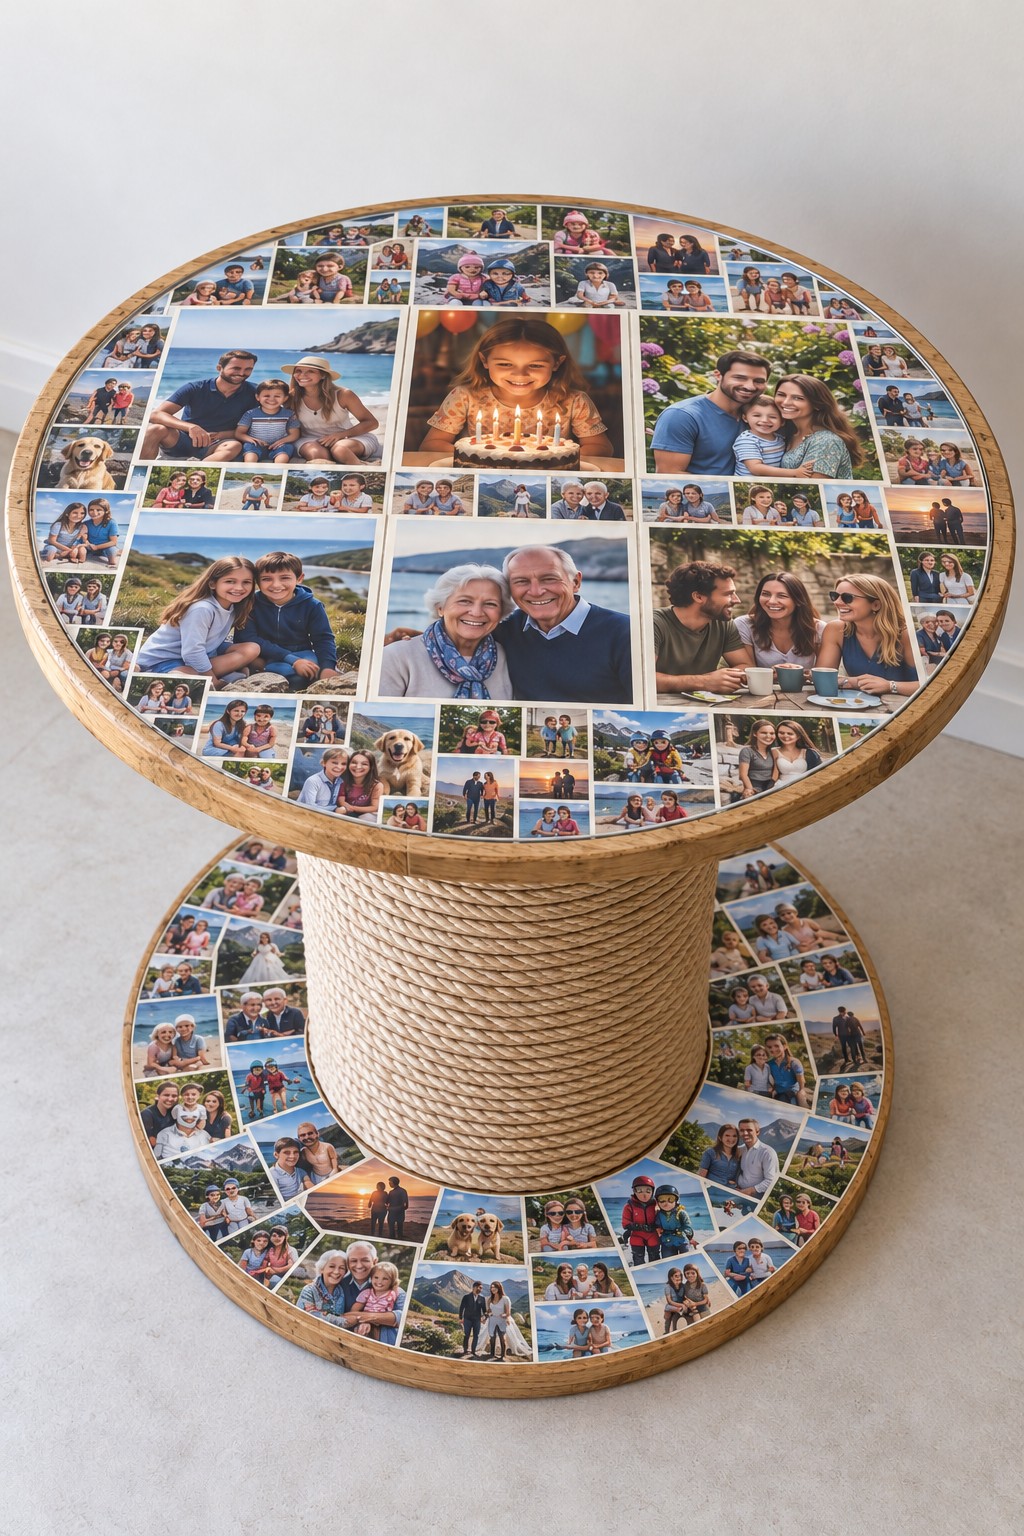
A wooden spool table offers two round surfaces for a collection of family pictures. Larger photographs occupy the center of the top, with smaller images filling the outer ring and lower disc. Rope wrapped around the central drum adds texture and gives the busy picture surfaces a plain middle section.
Choose a sound spool of suitable size, check its structural bolts, and remove any hazardous protruding fasteners before sanding and finishing. Plan the round collage on a separate paper template so faces stay clear of the edge. Mount photo copies to removable liners cut for the two discs, then fit those liners to the finished surfaces. A smoothly finished clear protective top makes the upper collage easier to look after. Secure the rope ends beneath the drum, and use coasters rather than assuming the decorated top tolerates heat or spills.
32. Four Photo Tiers for a Milestone Celebration
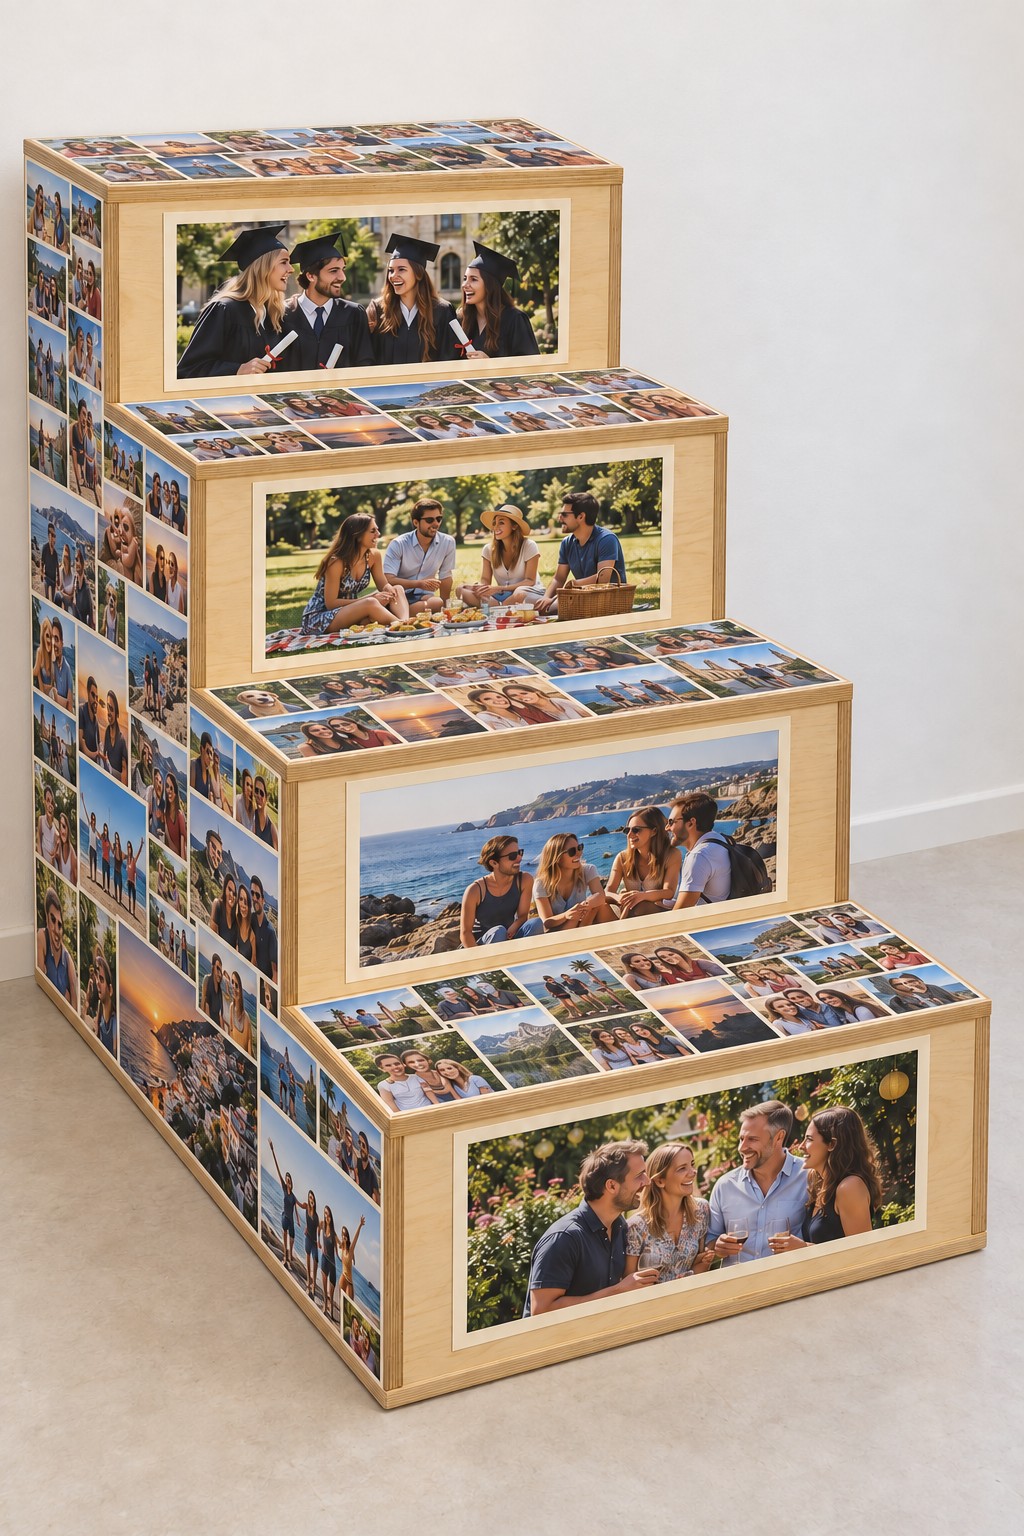
Four stepped display boxes give each milestone a larger picture at the front and smaller snapshots around it. Graduation, shared meals, holidays, and family gatherings can occupy separate levels, creating a timeline you can read from top to bottom. Natural wood borders help define the tiers.
Build four rigid box sections with progressively wider footprints and arrange them with their rear edges aligned. Use reinforced wooden joints for a substantial version and connect the tiers securely so they cannot shift independently. Prepare every surface before mounting the photo copies. Fit the large front pictures first, then arrange the smaller prints on the exposed tops and sides, preserving a consistent border. Keep this as a decorative plinth rather than a set of steps. A broad, stable lower section and an appropriate restraint are important for a tall version.
33. A Crescent Moon Filled with Family Stories
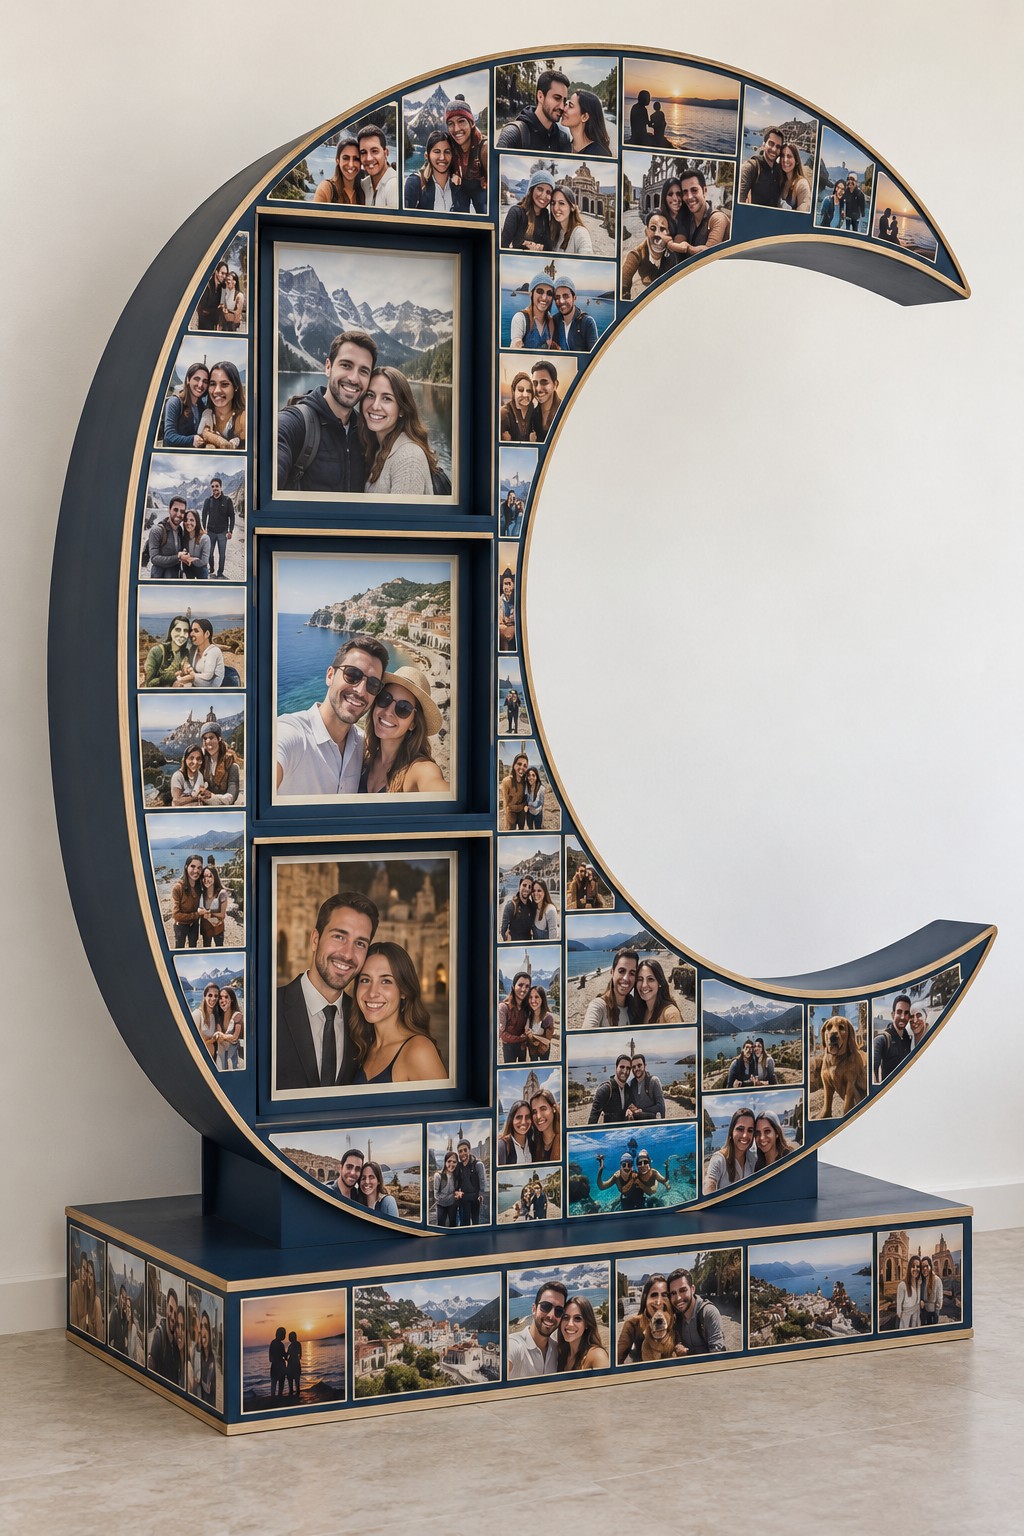
A large crescent creates room for both formal portraits and tiny everyday snapshots. Three main pictures follow the inner curve, while smaller images fill the pointed ends and outer border. Deep blue framing and a narrow gold accent make the shape clear despite the number of photographs.
For a small tabletop interpretation, cut a crescent from rigid board and support it on a broad plinth. A floor sized wooden version needs an appropriately braced framework and secure connection to its base. Make a full size paper layout before cutting or printing, choosing the main portrait positions first. Add smaller photo copies around them without slicing through faces at the curved edges. Finish the structure before mounting the images. Fit any required restraint to the framework, and move the completed piece from its base rather than its narrow upper point.
34. A Photo Shade on a Slim Floor Stand
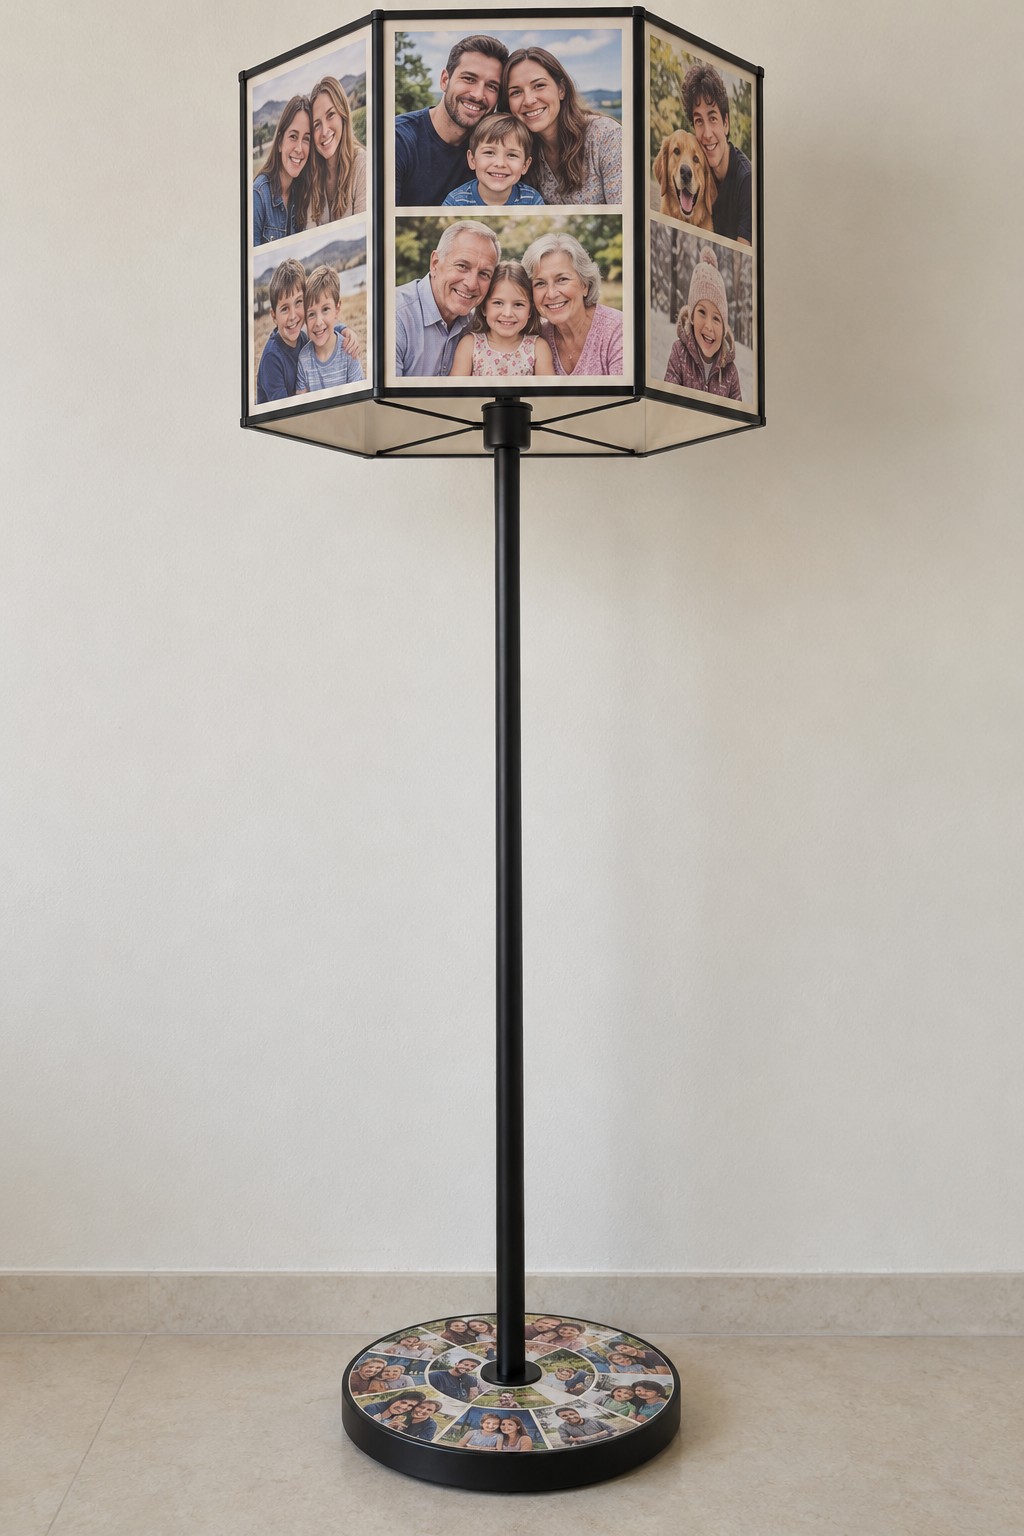
A square photo shade on a slim black stand brings memories up to eye level. Each side contains two pictures, while a circular collage on the base repeats the theme close to the floor. The narrow stem leaves the surrounding wall mostly open.
Use a stable purpose made floor display stand with a compatible top fitting. Build or fit a lightweight square frame, then attach photo panels within its four faces so their edges remain supported. Check that the stand and fitting can carry the completed frame without leaning. The piece can work as an unlit photo sculpture. If you want illumination, choose a suitable enclosed battery LED unit and follow its clearance requirements; paper inserts must stay away from hot lamps. Keep the base level and position the shade where passing shoulders will not catch it.
35. A Burgundy Memory Booth
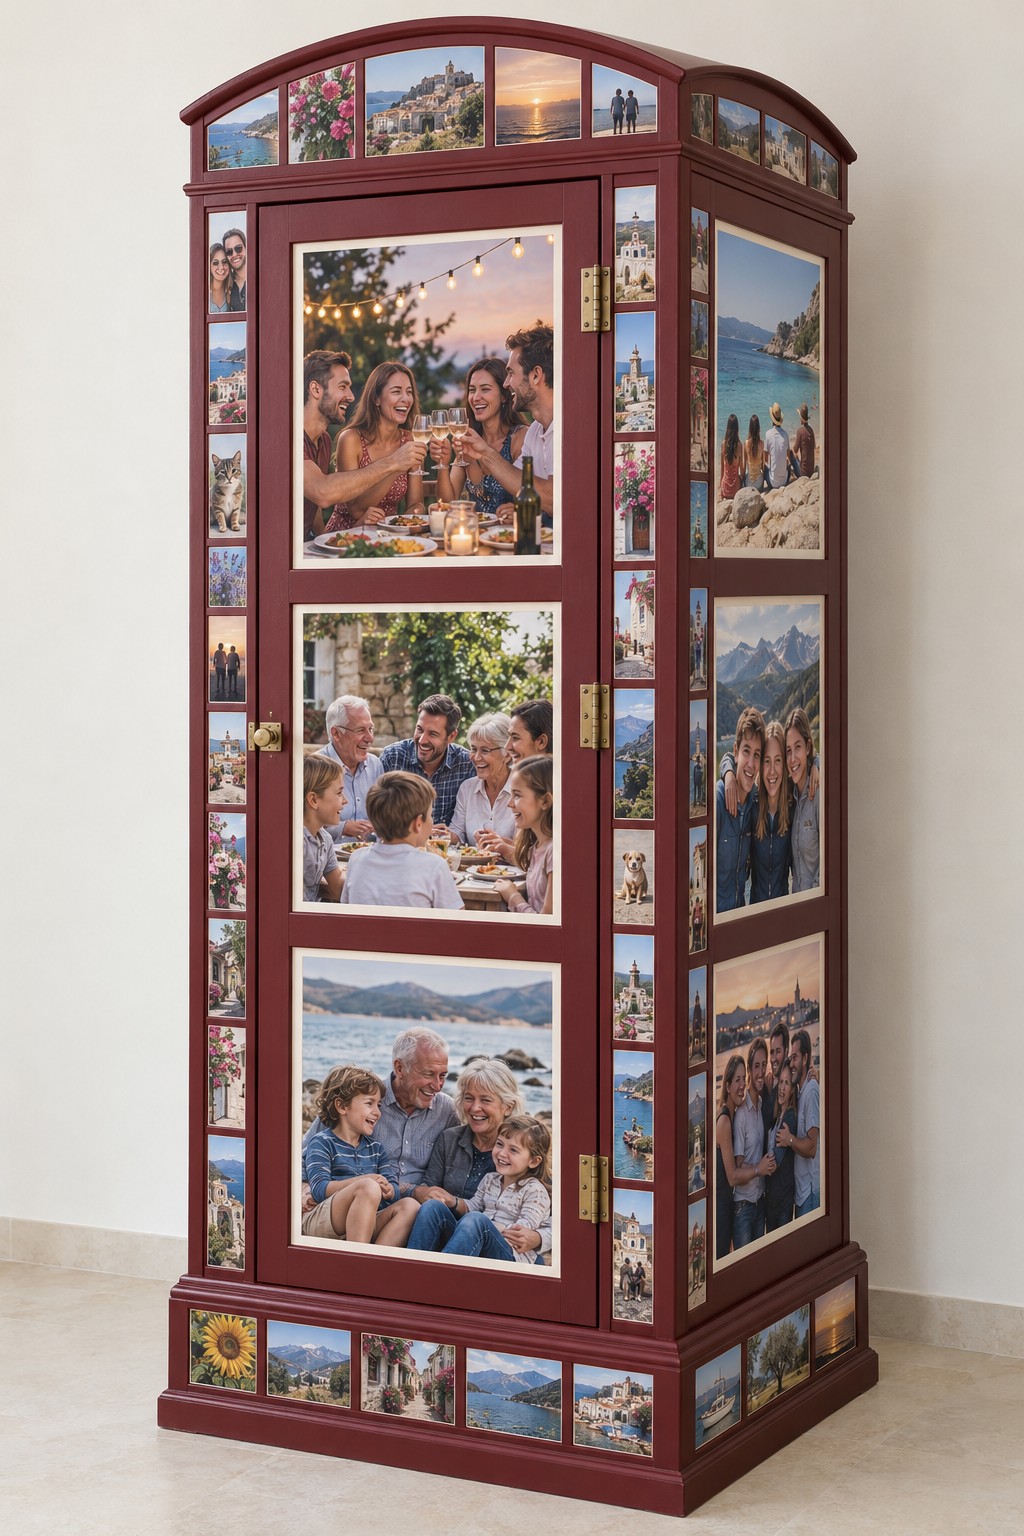
A telephone booth inspired cabinet turns a large photo collection into a room feature. Burgundy rails divide tall portrait panels, smaller prints fill the curved upper section, and a strip of pictures continues around the bottom. The repeated borders bring order to an ambitious display.
Begin with a sound cabinet structure or have the framework built from an established woodworking plan. Fit rigid photo carriers within the door and side openings, leaving hinges, handles, and any moving edges unobstructed. Paint the cabinet before inserting the pictures. Plan each panel on paper, placing the largest images at comfortable viewing heights and keeping smaller prints for the narrow rails. Secure the cabinet against tipping as its construction requires. Maintain access to the photo carriers so the collection can be changed without dismantling the frame.
36. An Open Book of Family Chapters
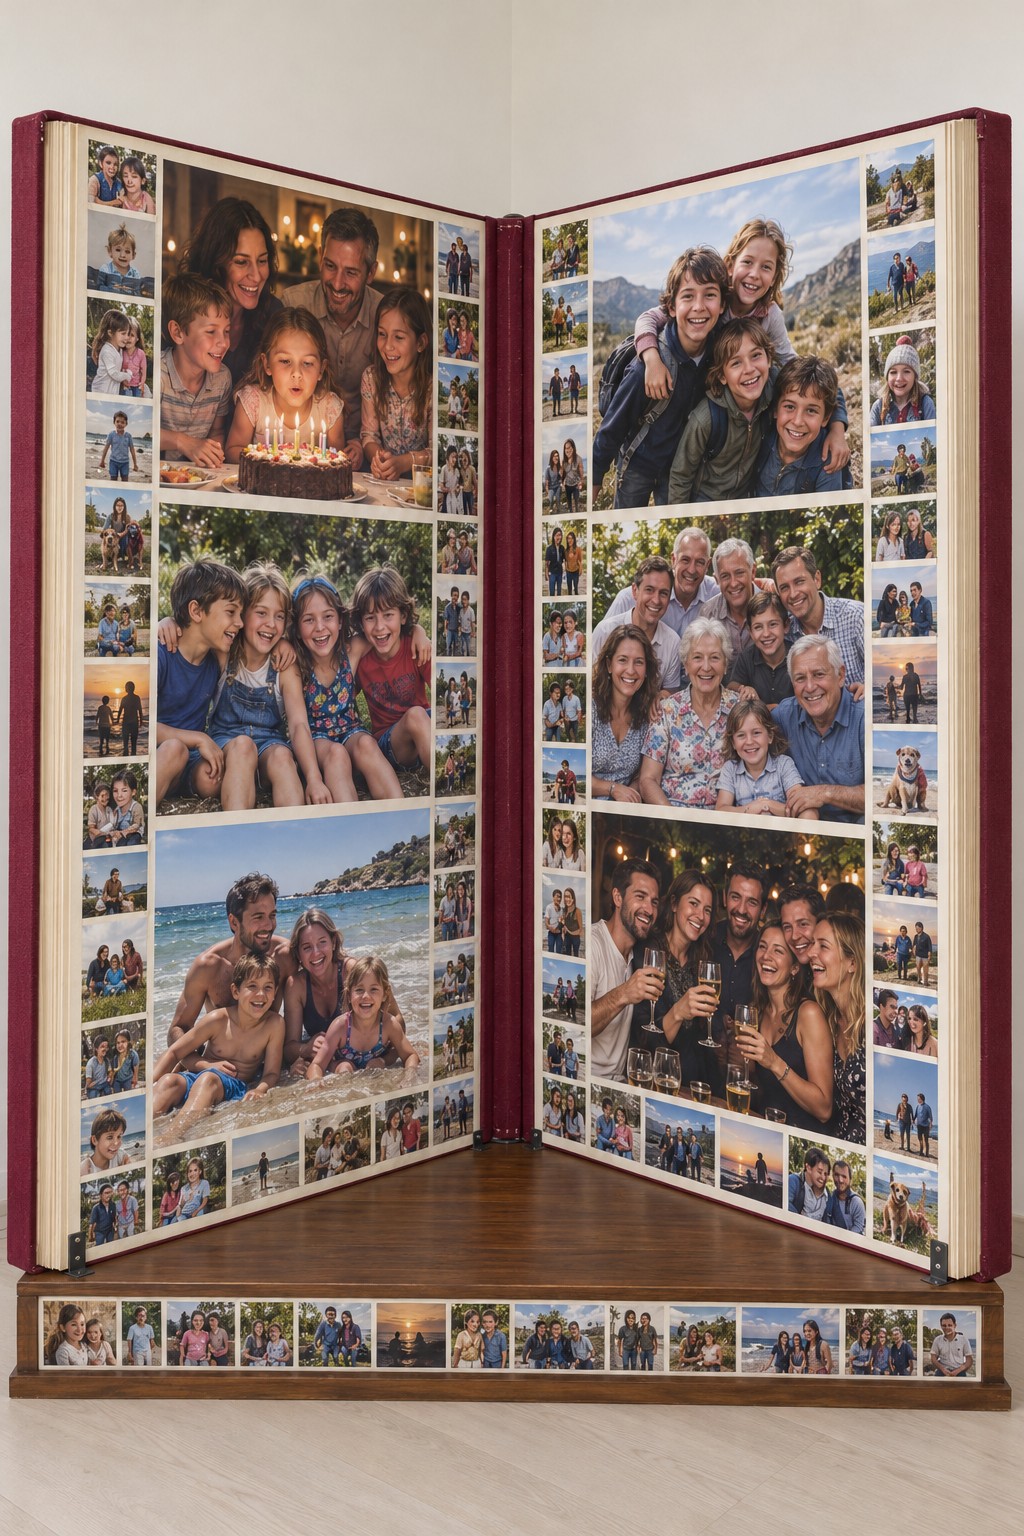
Two oversized pages open around a dark red spine, turning family pictures into chapters of a standing book. Large images occupy the central page areas, while small snapshots form border strips. A low wooden base carries another row of pictures and makes the book feel anchored in the room.
Use two rigid page panels fixed at a chosen open angle to a stable base. Reinforce the rear connections, and treat the fabric covered spine as a visual finish rather than the only structural joint. Cover the page faces with pale paper before mounting the prints. Arrange each page around three main pictures, then use smaller copies to frame the outer edges. For a large version, follow a suitable display construction plan and provide any necessary restraint. A compact shelf version can use reinforced board with the same photo layout.
37. A Rolling Gallery with Three Picture Levels
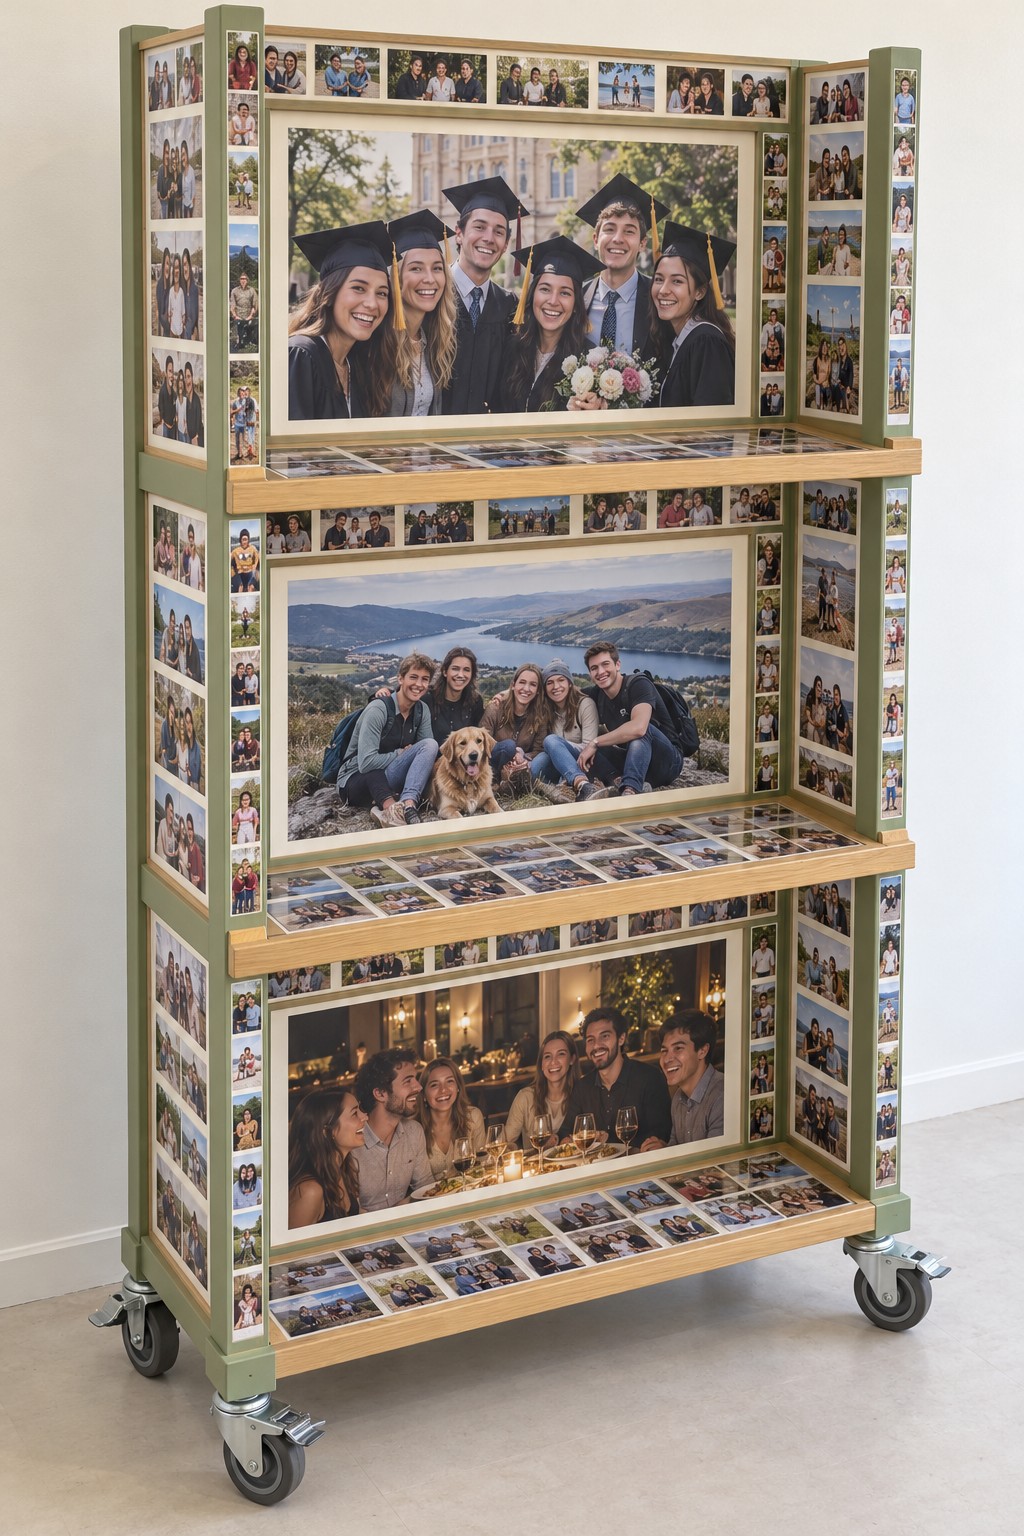
A tall wheeled gallery makes three large family pictures visible in one narrow footprint. Smaller snapshots cover the posts, side faces, and horizontal borders, while muted green uprights and warm wood rails keep the structure coherent. It can serve as a display at a gathering and then return to a quieter corner.
Use a structurally sound display cart or build the frame from plans that account for its height, weight, and caster positions. Fix the three main photo panels to the structural rails, using removable carriers for the images. Add small photo copies to separate trim strips after the frame is finished. Choose load rated locking casters and keep the unit low enough and broad enough for stable movement. Push from a structural rail on a clear level floor, then lock the wheels in its display position.
38. A Faceted Photo Globe in a Wooden Ring
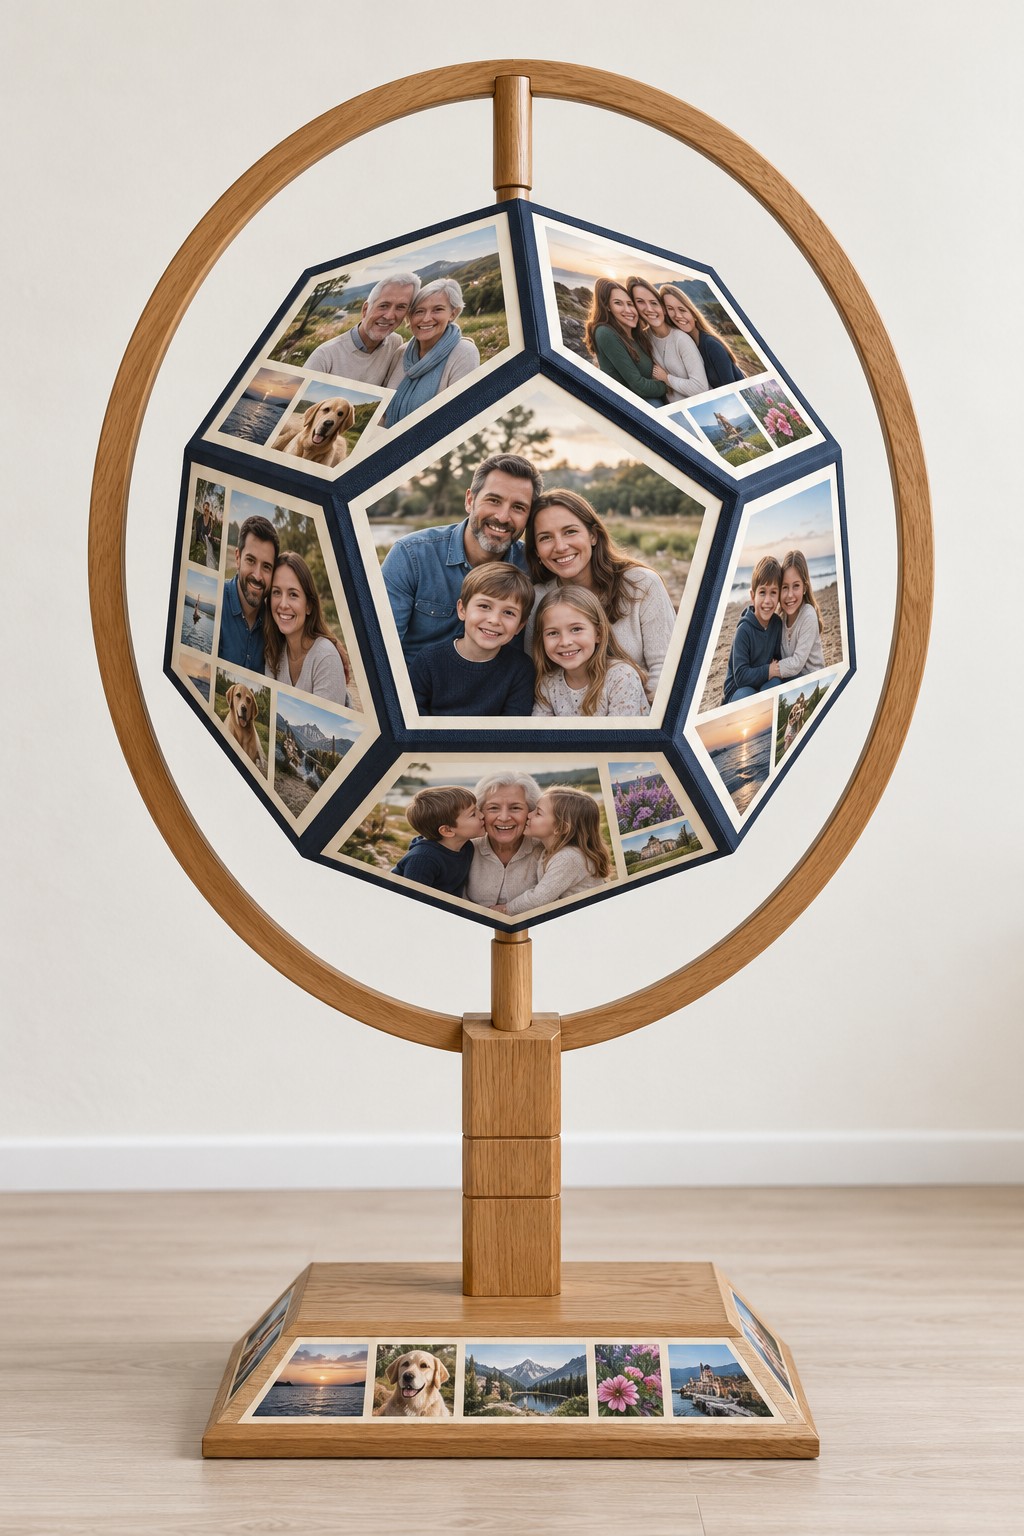
Pentagonal faces give this photo globe a different character from a square frame or cube. One larger family portrait occupies the forward face, while neighboring panels combine portraits and small scenic pictures. A wooden ring surrounds the faceted form, and the low plinth carries a final strip of images.
Make the inner shell from an accurate polygon template or use a suitable ready made display form. Join the faces with internal tabs or framing, keeping the outer seams crisp. Add dark paper or cloth borders before fitting photo copies to the individual faces. Mount the lightweight shell within a rigid wooden ring through secure upper and lower connectors, and connect the ring firmly to the base. Keeping the globe static makes the support simpler. Test the balance before attaching the finished photo panels.
39. A Dress Form with a Skirt of Photographs
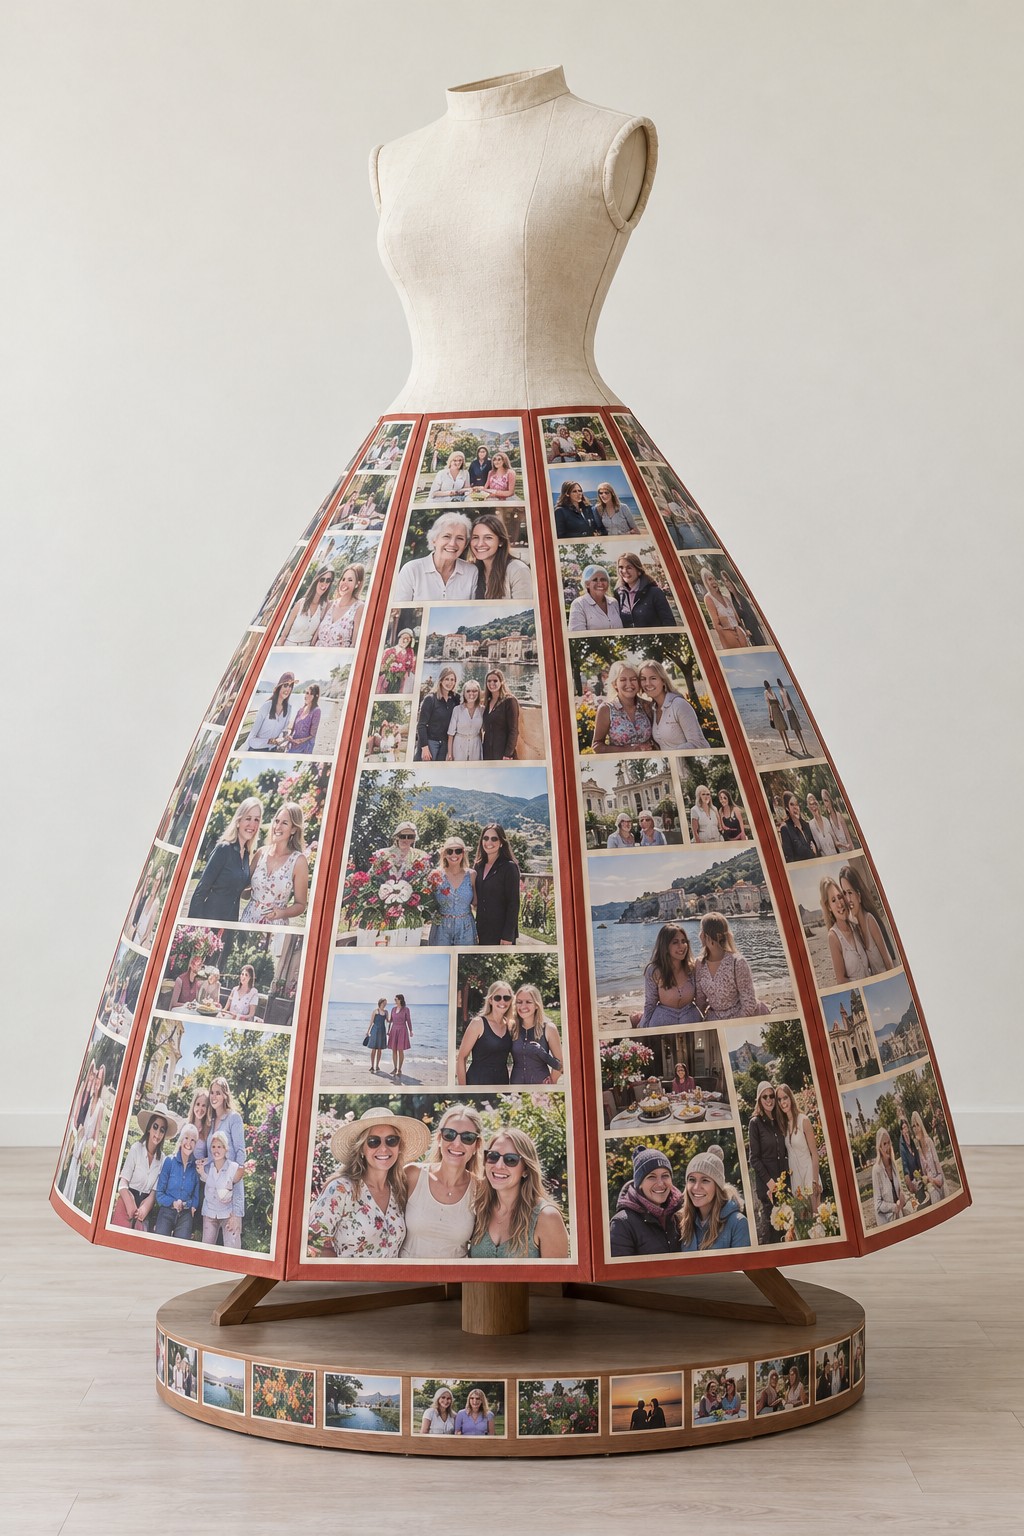
A plain linen covered torso rises above a wide skirt made from photo covered panels. The skirt gives portraits and small group pictures a repeated vertical rhythm, while the undecorated upper section keeps the silhouette recognizable. A round wooden platform provides space for a final border of snapshots.
Begin with a securely mounted decorative dress form. Make a paper pattern for the flared skirt, then divide it into tapered sections supported by light internal hoops or ribs. Transfer the sections to suitable rigid craft material and test their fit around the torso before decorating. Arrange photo copies within each section, allowing the narrow borders to define the seams. Keep important faces away from the tapered edges. Attach the skirt to the form's support structure and base so its weight is not carried by paper joins alone.
40. A Wooden Harp with Three Suspended Photo Cards
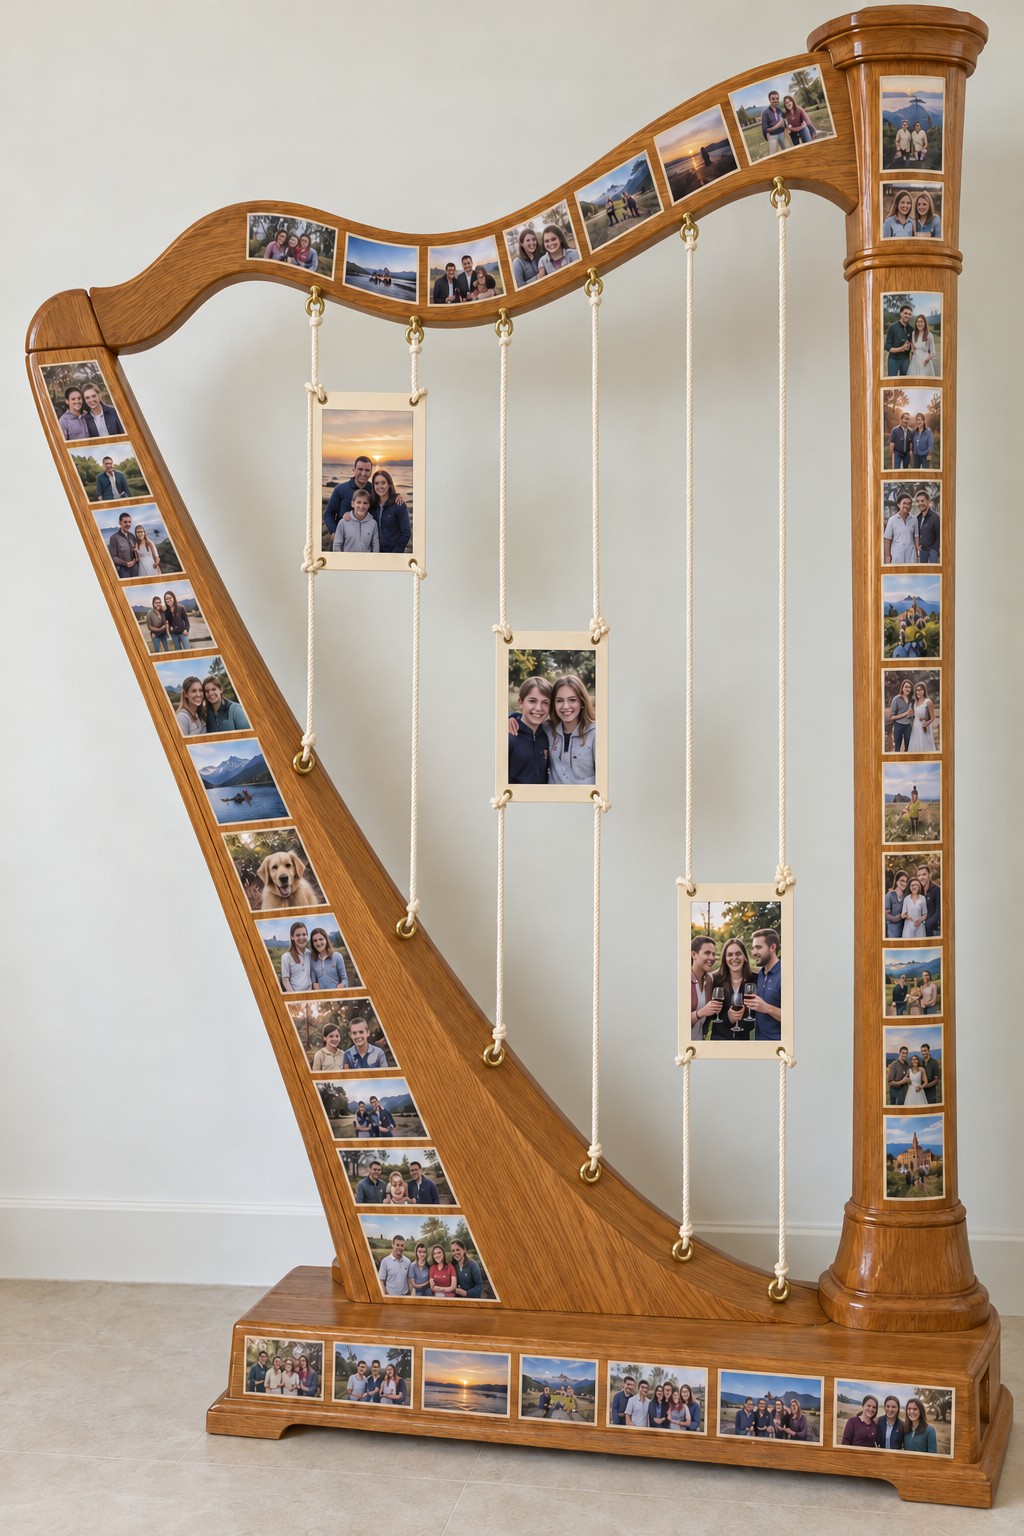
A harp shaped wooden frame combines a border collage with three pictures hanging in the open center. Small photos follow the curved neck, sloping side, upright column, and base. Cream cords and visible brass eyes connect the inner photo cards to the structure, making the suspension part of the design.
Use a stable decorative harp frame with properly joined wooden members. Mount the border photographs only after finishing the wood. For each central picture, prepare a rigid mat with four reinforced eyelets outside the print area. Tie two upper cords between its top eyelets and matching screw eyes in the harp neck, then tie two lower cords from the bottom eyelets to corresponding fittings below. Adjust the cords just enough to hold each card level, without straining the frame. The photographs attach to their mats and remain clear of the eyelets.
Keep the Pictures Easy to Enjoy and Replace
Before committing to a large project, try its layout with paper rectangles at the intended size. Check whether faces remain visible from your normal viewing position, whether neighboring pictures tell a clear story, and whether you can still reach the fixings or replace a print. A little empty border often helps more than squeezing in one extra picture.
Keep original photographs in suitable protective enclosures and use copies for projects involving cutting, permanent tape, resin, or exposed display. For storage materials, look for the supplier's photo safety information, including Photographic Activity Test suitability where relevant. Position the finished display away from strong sunlight, damp areas, and direct heat. Inspect cords, hinges, and wall fittings occasionally, particularly after moving a piece. Choose one memory group to begin with, then let the format grow only as far as your space and making skills comfortably allow.

Leave a Reply