
These 24 sock puppet character ideas range from frogs and cats to sea creatures and woodland monsters. You will find materials, illustrated making stages, simple stitching choices and ways to adapt each design for storytelling. The guide explains how a wearable puppet differs from a stuffed character, so you can plan the body before decorating it. Use the faces, colors and soft details as inspiration, then choose a comfortable structure for the person who will bring the character to life.
Table of Contents
- Choose a Character and Decide How It Will Move
- Materials and Tools to Gather
- Making the Body and Decorative Layers
- Let Children Design While Adults Handle the Assembly
- Use These Methods for the 24 Character Ideas
- 1. Colorful Patchwork Monster with Yarn Hair
- 2. Green Frog with a Fixed Smiling Face
- 3. Chef Character with a Gathered Fabric Hat
- 4. Green Frog with a Stitched Smile
- 5. Pink Cat with Embroidered Whiskers
- 6. Forest Sprite with Woodland Stitching
- 7. Blue Cloud Monster with Lightning Details
- 8. Moon Rabbit with Long Soft Ears
- 9. Striped Space Alien with Three Eyes
- 10. Coral Reef Creature with Branching Details
- 11. Candy Creature with Twisted Fabric Antennae
- 12. One Eyed Starfish Alien with Soft Points
- 13. Jellyfish Character with Soft Tubular Tentacles
- 14. Dream Monster with Crescents and a Curled Tail
- 15. Segmented Caterpillar Character for Storytelling
- 16. Purple Bat Dragon with Felt Wings
- 17. Seahorse Dragon with a Curled Tail
- 18. Forest Troll with Shaggy Yarn Hair
- 19. Blue Walrus Monster with Soft Tusks
- 20. Jellybean Monster with Mismatched Eyes
- 21. Butterfly Beast with Decorated Wings
- 22. Goblin Cat with Visible Patchwork Details
- 23. Forest Snail with a Coiled Fabric Shell
- 24. Moon Fox with Celestial Embroidery
- Give the Finished Characters a Story and a Place to Rest
Choose a Character and Decide How It Will Move
A flat face on an open sock is a manageable starting point. Shaped heads, coiled shells and segmented bodies need additional pattern work. For a working puppet, leave a hand opening and test the fit before closing the body; use a closed form for a standing display figure. Choose an open hand sleeve for wearable play or a filled body for a storytelling figure moved from outside. A fixed expression can still perform through nods, turns and different voices.
Materials and Tools to Gather
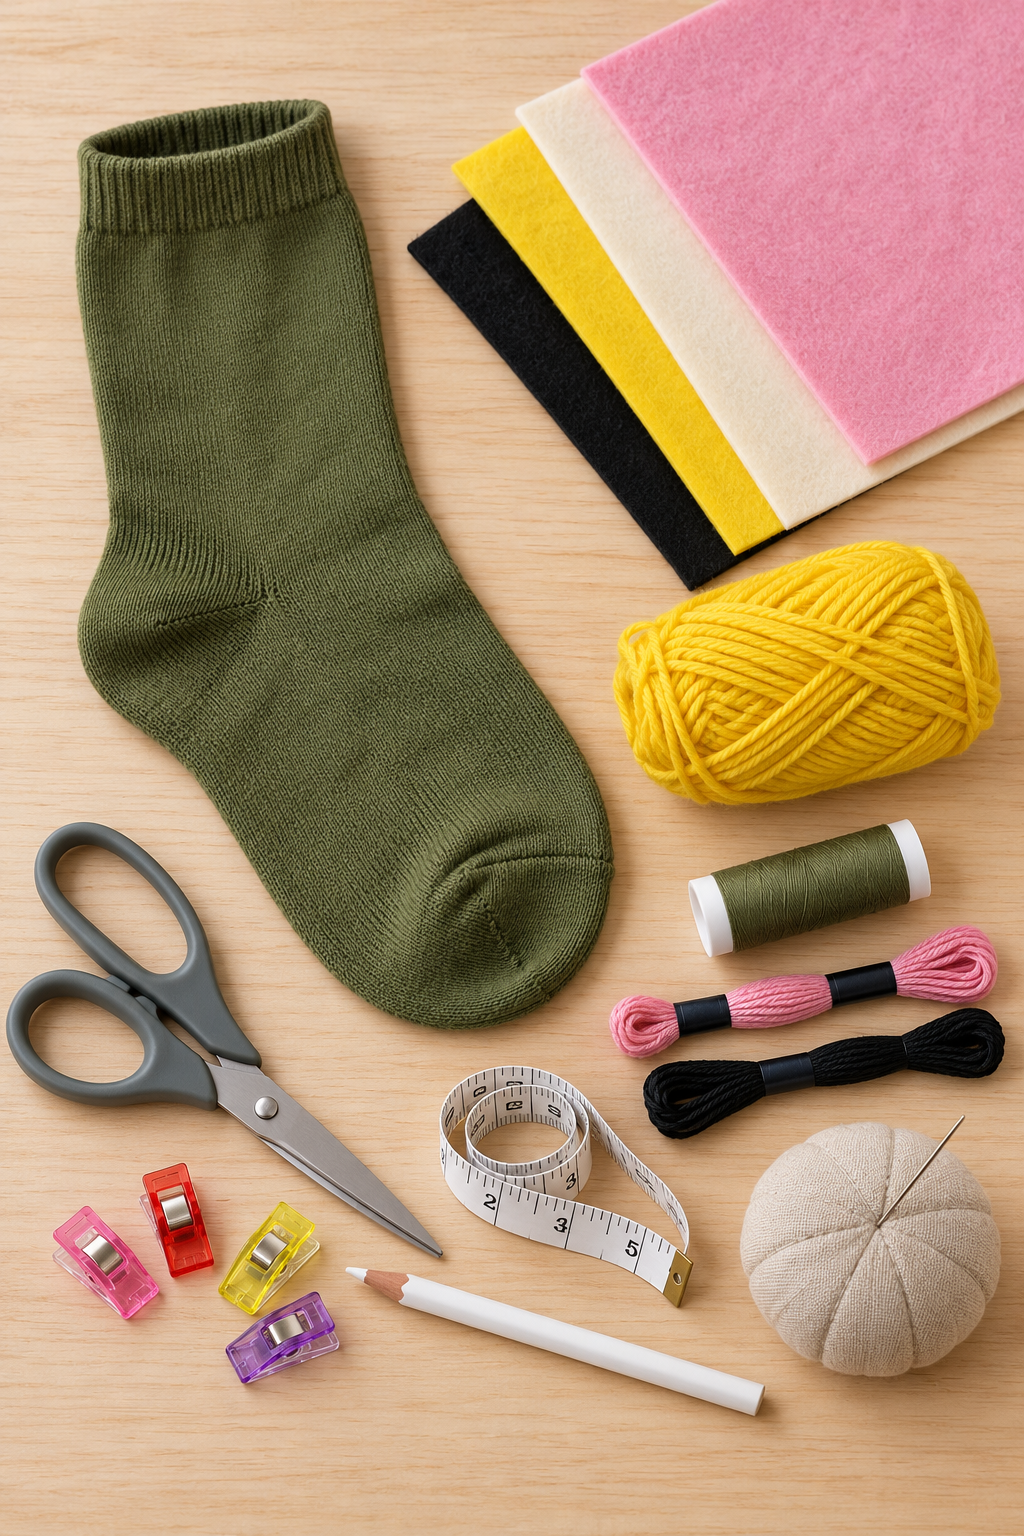
Start with one clean sock that fits the performer's hand comfortably, soft felt or fabric scraps, sewing thread, embroidery floss and a little yarn. Paper templates, a measuring tape, fabric scissors, a suitable sewing needle, clips and a removable fabric marker help with preparation. Fiber filling is optional for separate exterior parts or a stuffed figure; keep a hand sleeve empty. Compare the care instructions of the sock, felt and yarn before combining them.
Making the Body and Decorative Layers
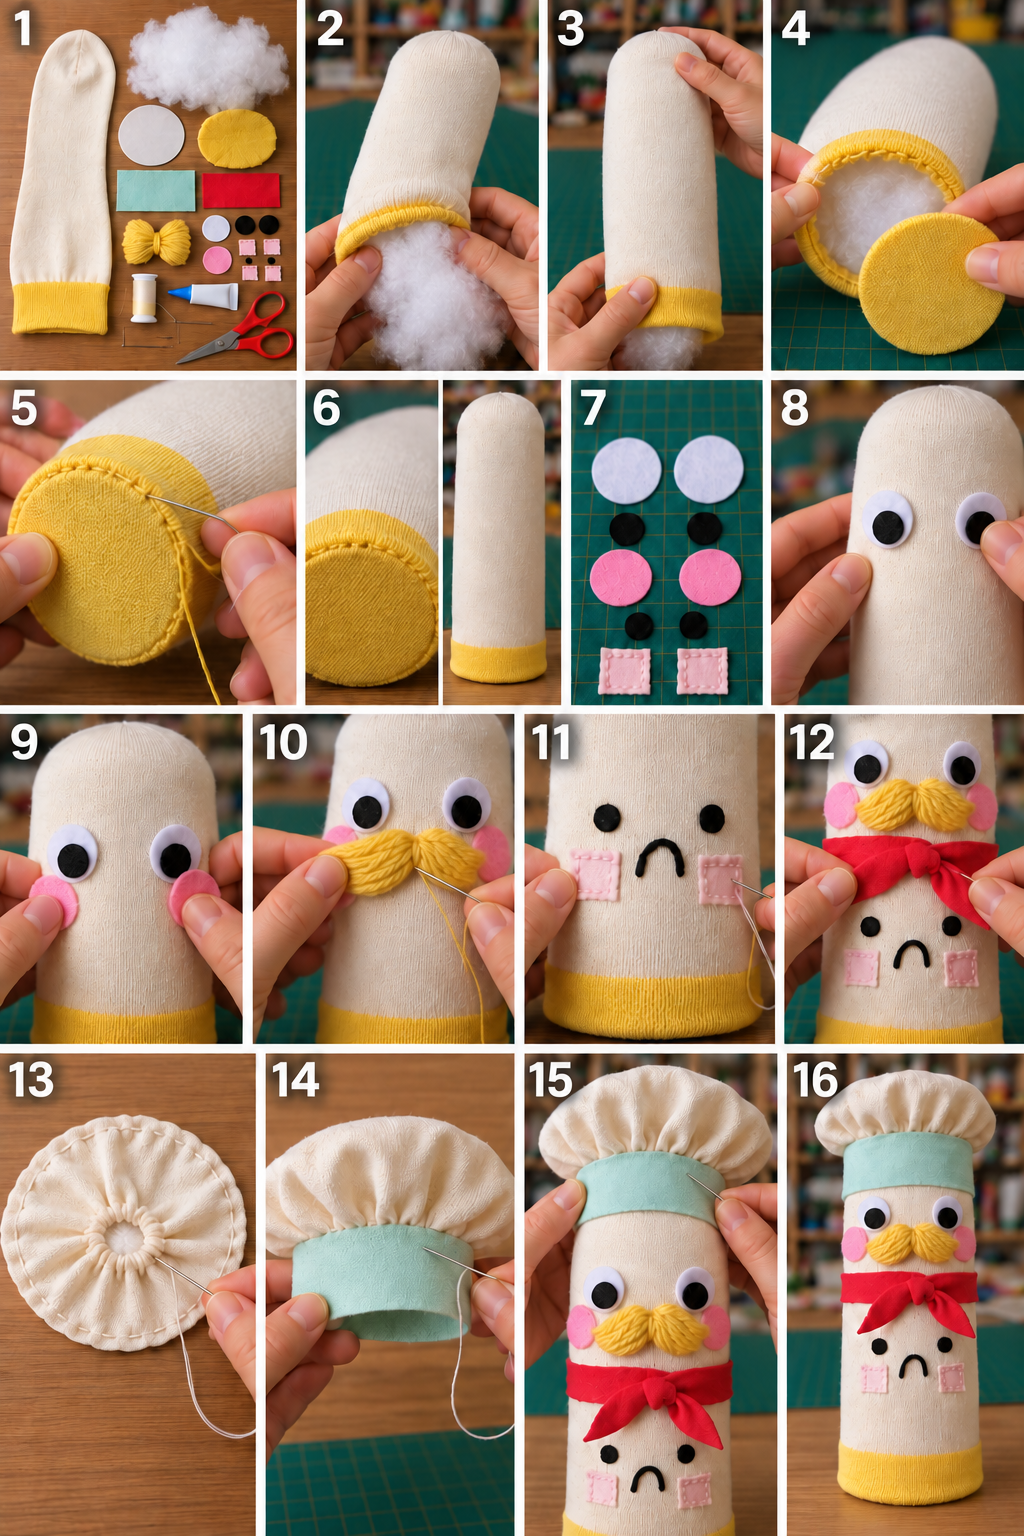
The illustrated stages show a sock being filled, a circular base sewn over its cuff, facial pieces positioned, yarn attached and a gathered hat added. Closing the base creates a stuffed character. For a hand puppet, use the same decoration sequence while leaving the cuff open and the hand space free of filling. This distinction matters more than the character's finished shape.
Try on the sock to mark the face and the areas that bend, then remove your hand before using a needle. Draw paper templates, cut the larger features and arrange them before attaching anything. Hold the front layer separately while stitching so you do not sew the sleeve shut. Prepare wings, ears, tubes or hats as separate parts, adding them after the face is readable.
Small running or edge stitches can secure felt appliqués; backstitch can outline mouths and whiskers. Keep thread tension even so stretchy fabric does not gather. If using adhesive, choose one suitable for both materials and the intended flexibility. Try it on scraps, apply it to the hidden contact surface, and follow its drying and washing instructions. Glue does not replace a secure construction plan for handled parts.
Let Children Design While Adults Handle the Assembly
Children can choose colors, arrange large shapes and invent the character's voice. An adult should manage sharp tools, needles and any adhesive requiring adult use. Favor embroidered facial details over detachable small decorations, but do not assume stitching alone makes a homemade character suitable for every age. Keep small parts away from children under three, finish loose yarn ends and check attachments before each play session.
Use These Methods for the 24 Character Ideas
Now use the making methods below to develop a character of your own. Keep the open sleeve if it will be worn, then adapt the face, hair, soft additions and colors from the designs you like. The suggestions describe ways to recreate their appearance, with specific choices for each shape. Start with one character and a short scene; a second puppet can introduce a conversation rather than more decoration.
1. Colorful Patchwork Monster with Yarn Hair
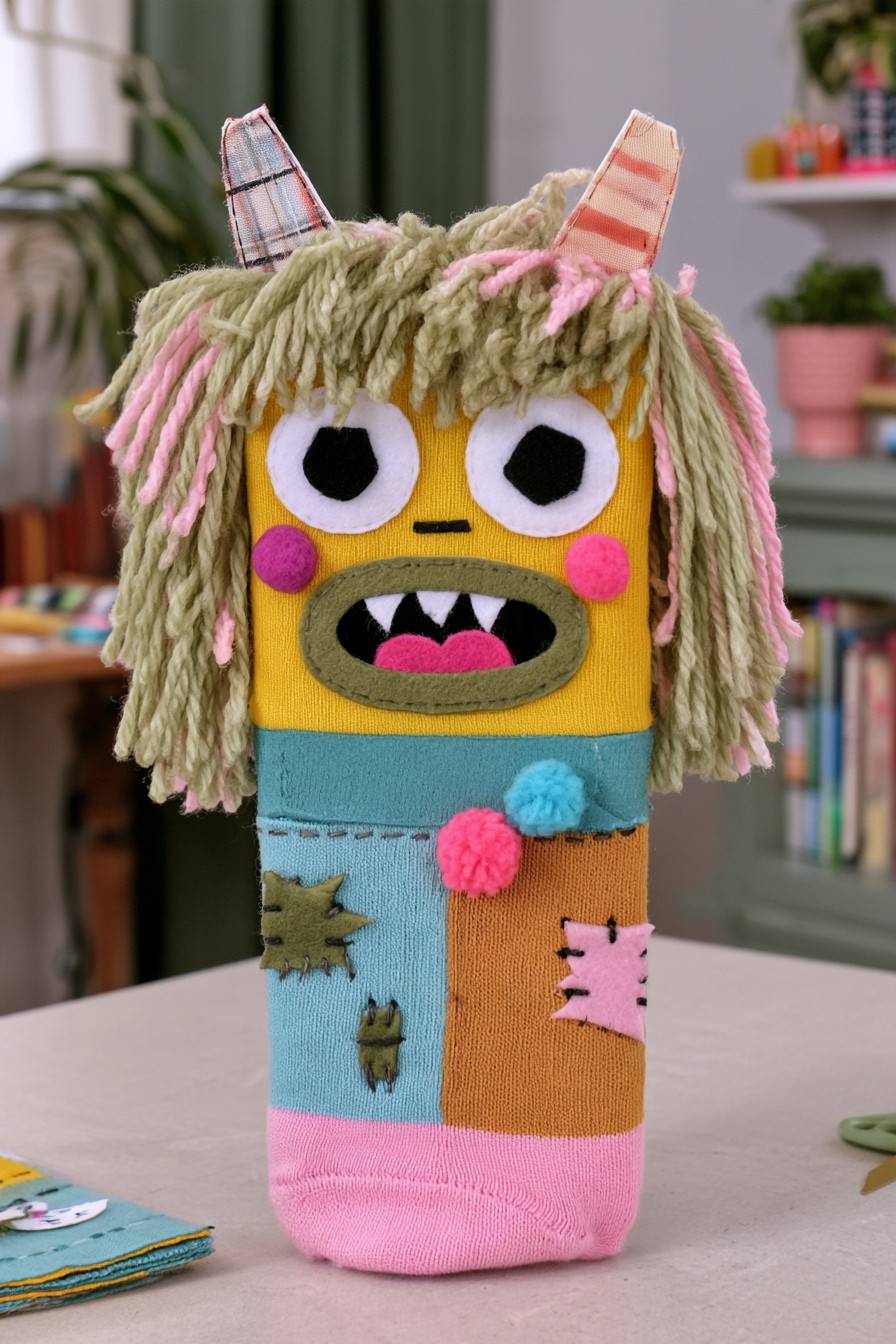
Blocks of turquoise, yellow and pink give this monster a patchwork body, while shaggy hair and striped horns make its outline recognizable. The dark mouth, soft teeth and mismatched patches suggest a cheerful troublemaker. This is a good character for using a small collection of fabric scraps, provided their weight and thickness suit the sock underneath. Choose a few large patches before adding finer decoration.
Arrange the face on the worn sock, then remove your hand before sewing. Secure patches to the front layer without stitching the hand space shut, and attach yarn bundles at their folded centers before trimming them. Keep the hair clear of the eyes. For a first performance, let the monster introduce three things it likes collecting; another puppet can help it return something it borrowed.
2. Green Frog with a Fixed Smiling Face
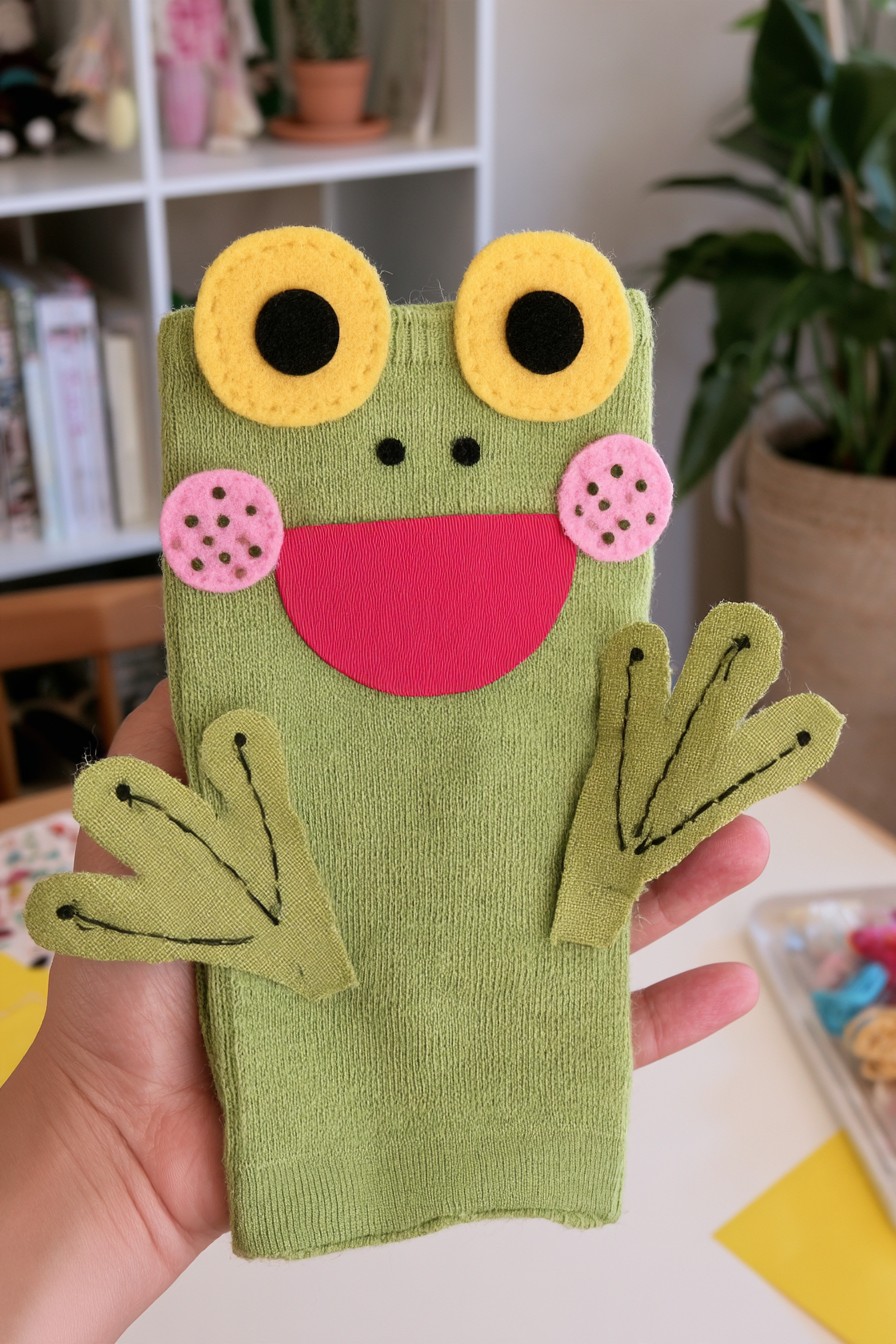
Raised yellow eyes, speckled pink cheeks and a broad flat mouth give this frog its expression. Add side arms to the silhouette and bring the character to life with a voice, nods and turns of the hand.
To adapt it, cut the mouth as one simple felt shape and place the arm bases outside the hand opening. Secure the eyes and cheeks without drawing the stretchy sock into tight folds. An opening mouth would require a separate construction plan. A pond story works immediately: the frog can ask another character where to find shade, then celebrate with a gentle hopping motion.
3. Chef Character with a Gathered Fabric Hat
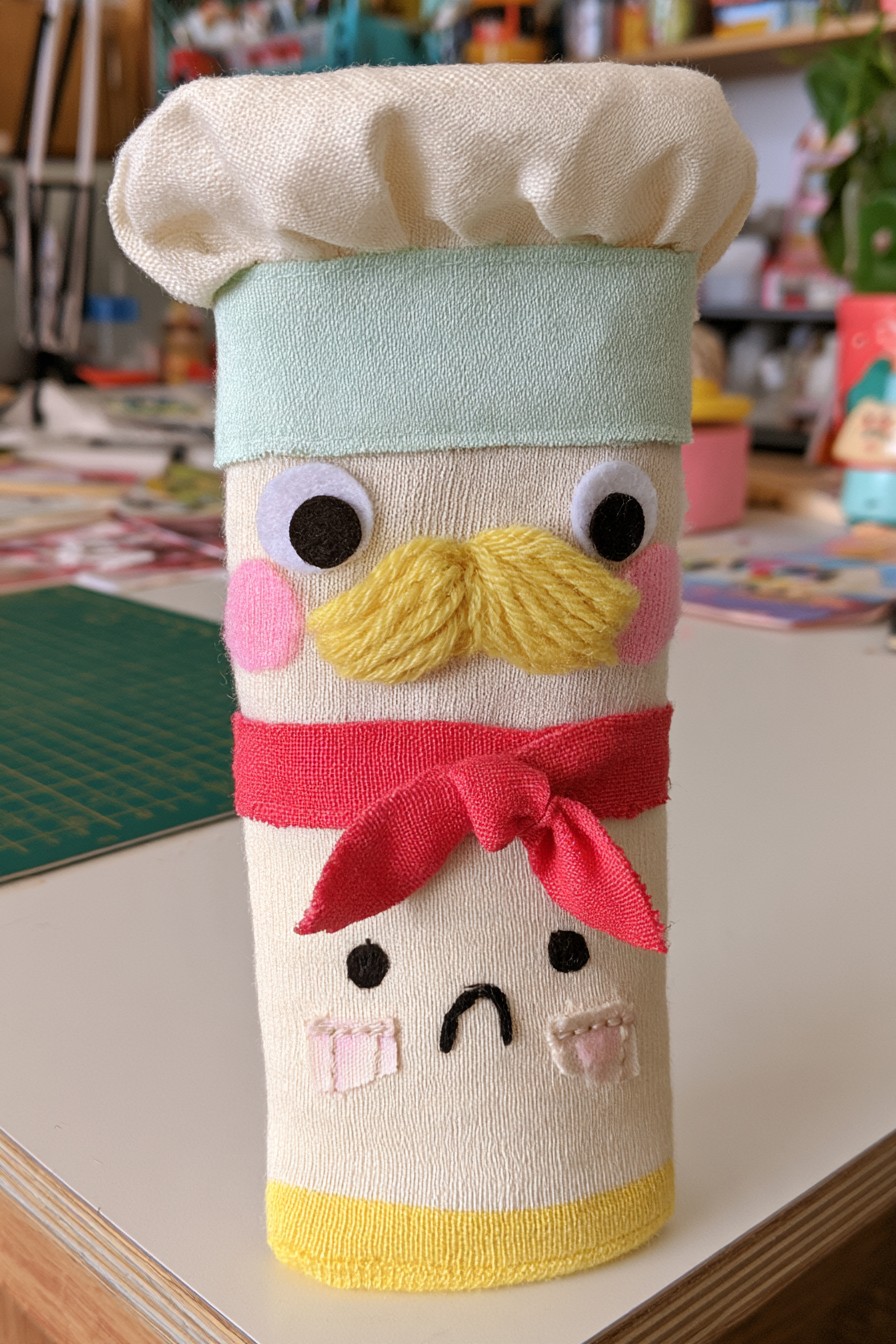
A cream body, pale green hatband and red neckerchief establish this chef before any dialogue begins. The yellow yarn mustache gives the face personality, while the gathered hat adds height. The making stages show useful methods for arranging these same kinds of details. Decide whether your version will be a stuffed storytelling figure or a wearable puppet before assembling the body; a hand puppet needs an open cuff.
Prepare the gathered hat separately, size its band to the decorated head area, and attach it without closing the hand space. Stitch the mustache through its center and shorten strands that cover the mouth. Secure the scarf in a compact shape instead of leaving long trailing ends. The chef can take imaginary orders, invent a silly recipe or ask the audience to name missing ingredients.
4. Green Frog with a Stitched Smile
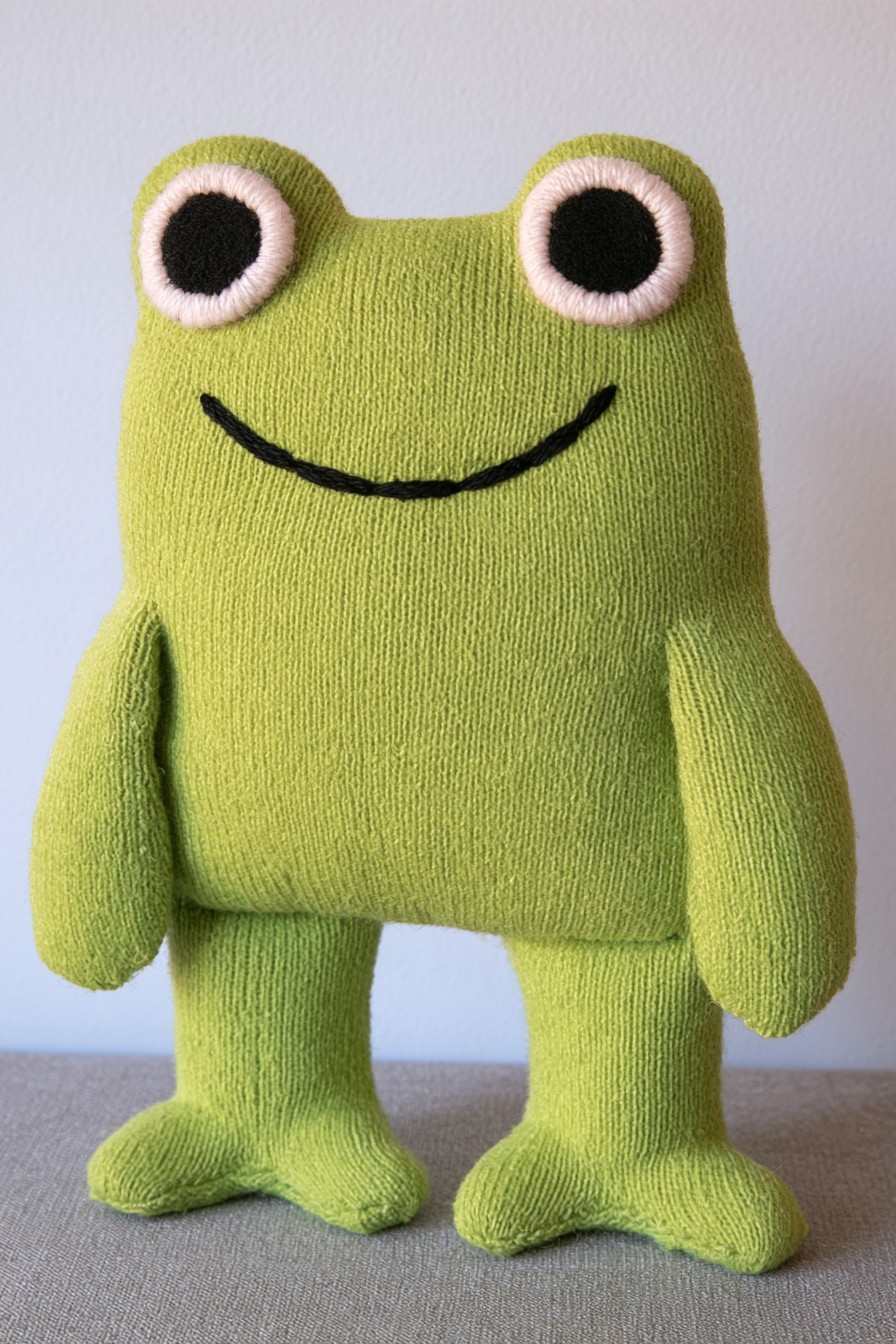
This frog uses a restrained green palette and a curved stitched smile, with rounded eyes sitting above its broad head. Arms and feet make the finished figure more shaped than a plain decorated sock. For an easier wearable adaptation, retain the face and add short side arms to an open sock sleeve. Reproducing the complete standing figure would involve separate shaped parts and a different body plan.
Begin with the smile and eye placement, checking that they remain readable when the performer turns the hand. Keep embroidery tension light enough to preserve the fabric's stretch. If you add feet, attach them as exterior details instead of joining across the cuff. Pair this calm frog with the more expressive frog in idea 2 for a conversation about waiting, sharing a pond or meeting a new friend.
5. Pink Cat with Embroidered Whiskers
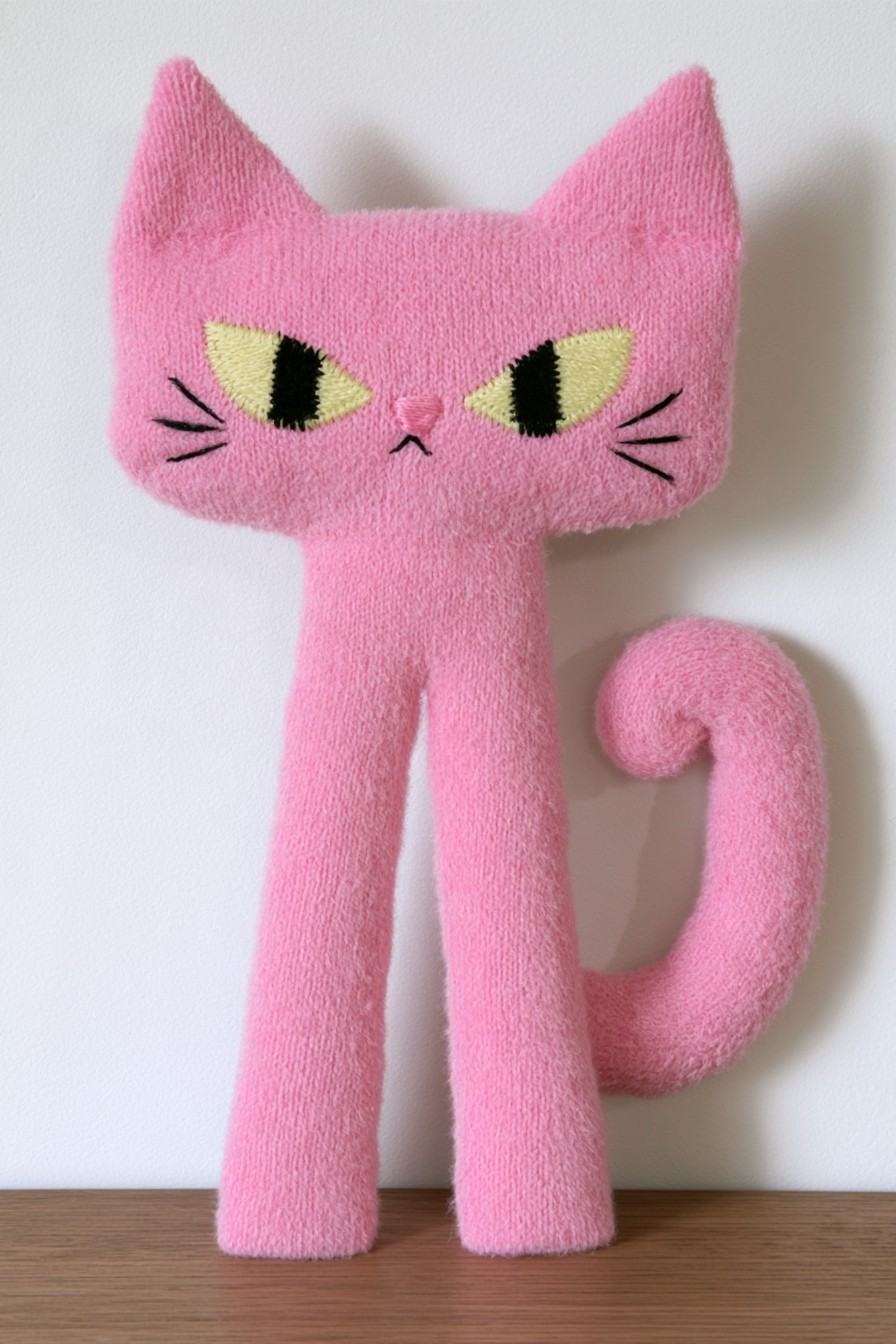
Pointed ears, narrow yellow eyes and a curled tail give this pink cat a mischievous silhouette. Dark whiskers and a tiny mouth keep the expression clear against the soft body. The long legs belong to the pictured character shape; for a hand puppet, carry the same face onto a comfortable open sock body. A slight change in the eye angle can make your version look sleepy, curious or suspicious.
Make the ear shapes before attaching their bases, and embroider facial lines while you can reach the front layer from inside. These felt appliqué and embroidery techniques offer related stitching guidance; choose proportions for your puppet. Keep the tail separate from the hand opening. Let the cat investigate an imaginary noise, asking the audience whether it belongs to a mouse, a bird or a friend.
6. Forest Sprite with Woodland Stitching
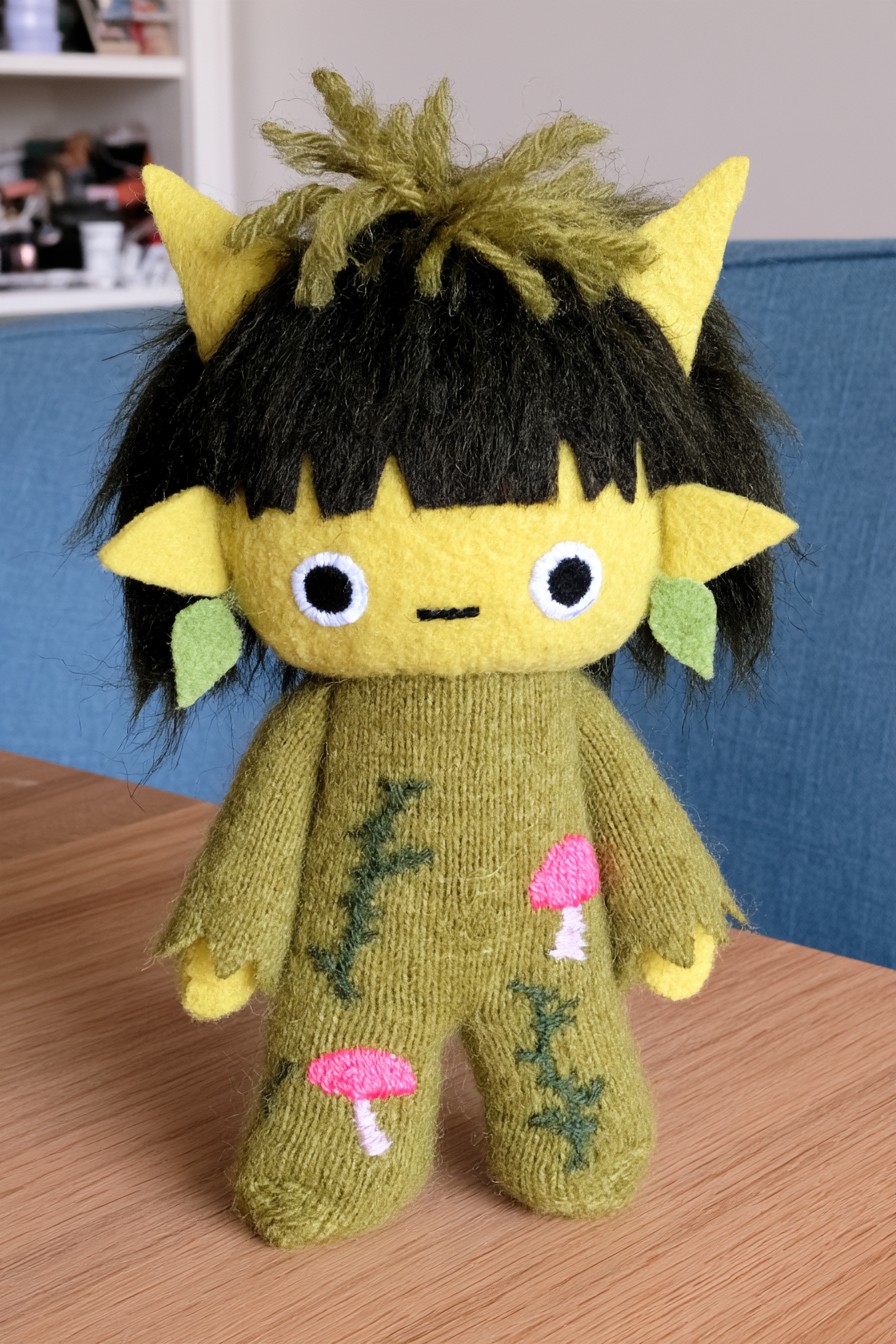
A yellow face stands out beneath dark hair, with pointed side ears, short horns and olive fabric giving this sprite a woodland identity. Mushroom and vine details carry the forest theme down the body. Rather than adding every small decoration at once, choose the face, hair and one plant motif as the essentials. That keeps the character readable and gives a beginner a manageable place to start.
Prepare hair in short stitched bundles and use soft fabric for horns and ears. Complete larger embroidered motifs before attaching any side parts that make the front harder to reach. For a wearable version, keep shaped feet and decorative padding outside the open sleeve. The sprite can lead other characters through a pretend forest, asking them to describe an imaginary leaf or identify the sound of approaching rain.
7. Blue Cloud Monster with Lightning Details
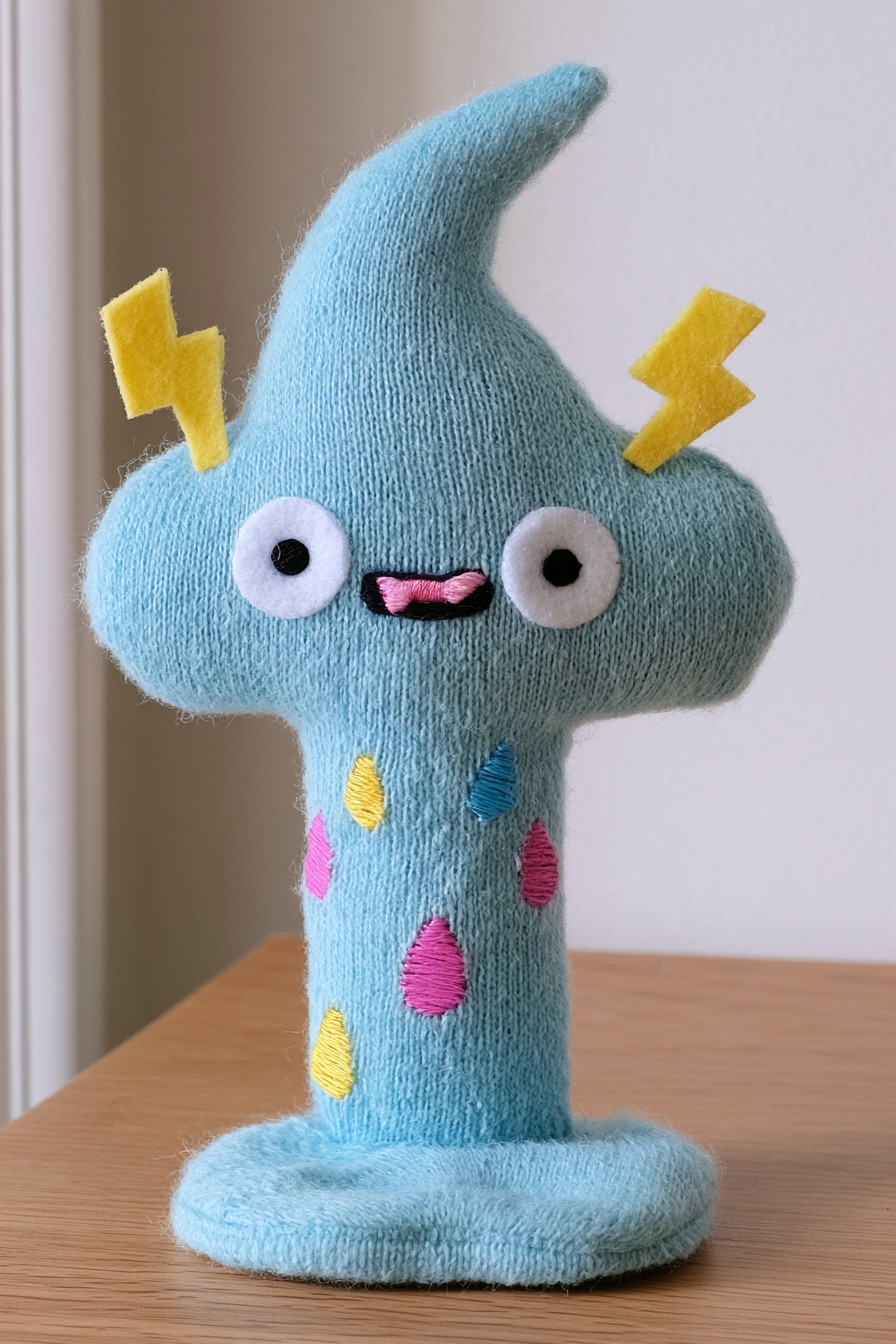
The curved blue crest gives this cloud a distinctive shape, with yellow lightning details placed above a small friendly face. Colorful raindrops continue the weather story along its narrow body. The broad bottom and shaped top are visible design features, rather than evidence of a hand opening. A simpler puppet can echo the crest with a soft exterior panel and use the raindrops as flat front appliqués.
Choose lightning pieces with enough width for their attachment stitches, and keep the upper decoration light so the face does not tilt backward. Place raindrops where the sock still bends comfortably. Decide how the character behaves before choosing colors: a nervous cloud might whisper, while a cheerful one announces a rainbow. Invite children to change its voice and motion as the imaginary weather changes during a short scene.
8. Moon Rabbit with Long Soft Ears
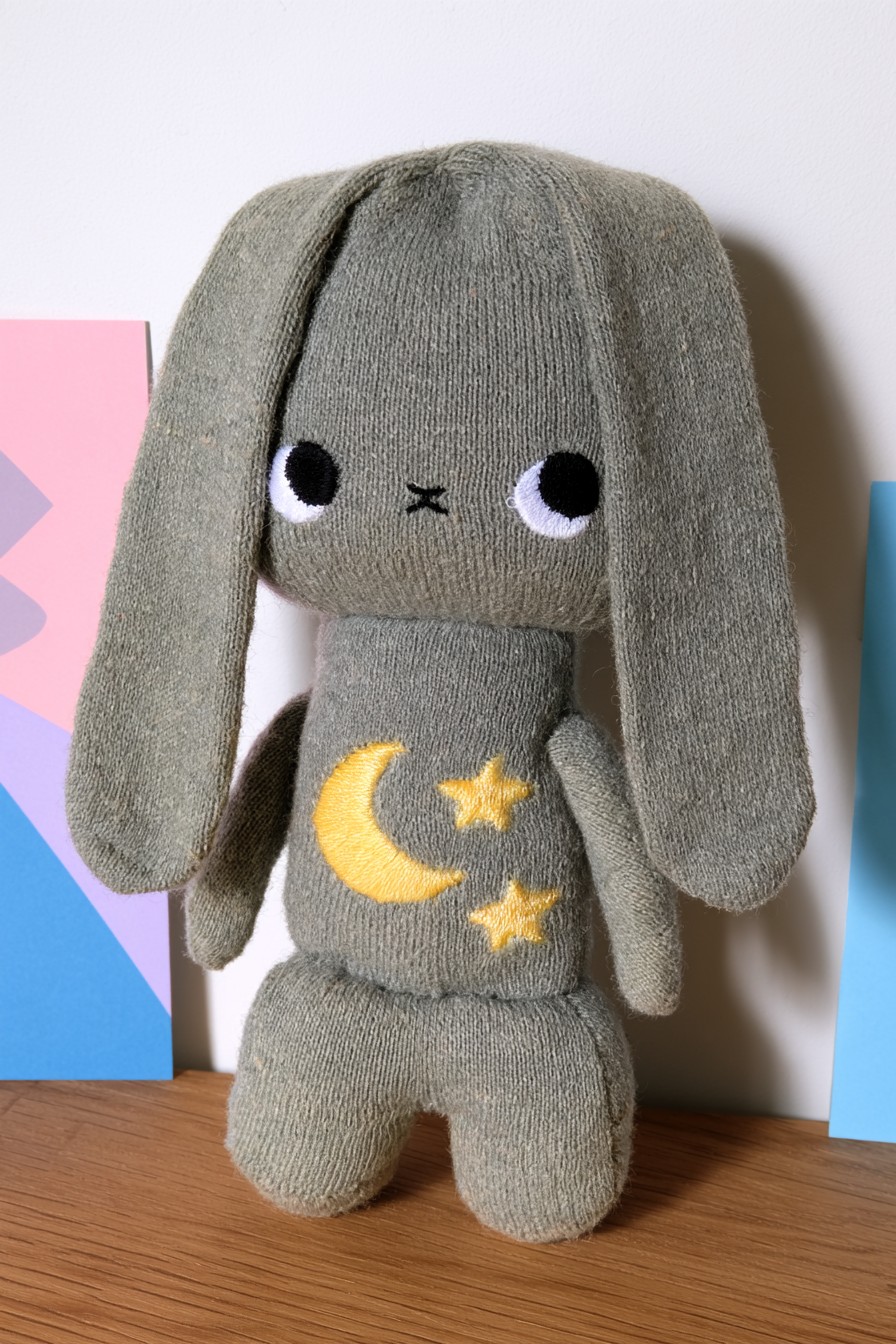
Long floppy ears frame this rabbit's gentle face, while a yellow crescent and stars create a quiet nighttime theme. The gray palette allows those small motifs to remain the focus. This character suits slower storytelling, with pauses and small head movements rather than large gestures. If you want a limited first project, use the face, ears and one moon on an open sock instead of recreating every shaped limb.
Cut matching ear pieces and compare their length before sewing; overly heavy ears can pull a soft sock out of position. A second fabric layer can give body without inserting a rigid support. Work the chest motif before attaching arms, keeping stitches out of the cuff. Give the rabbit a simple task such as finding a quiet place to rest, with another puppet offering gentle suggestions.
9. Striped Space Alien with Three Eyes
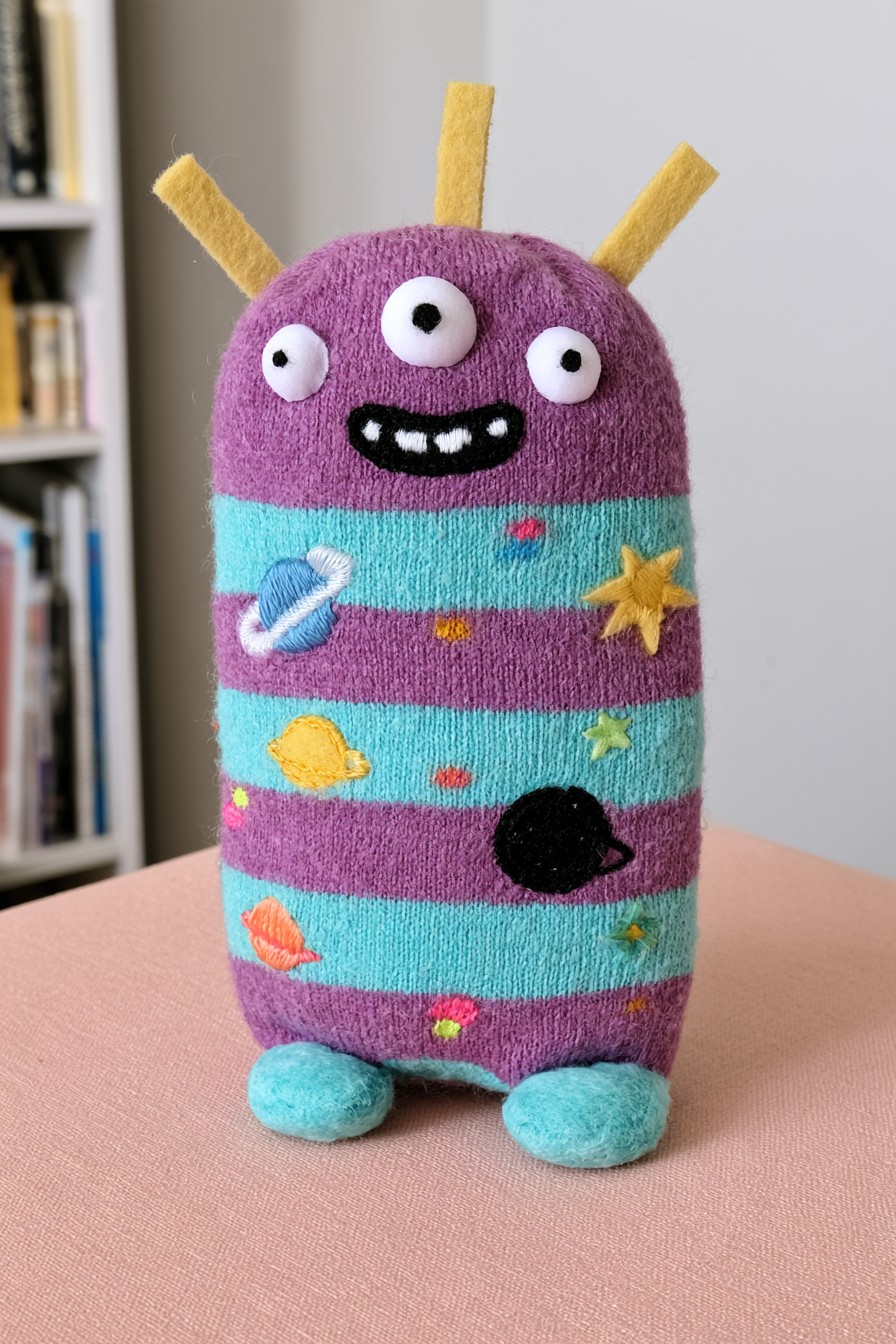
Purple and turquoise stripes create an instant space creature, with three eyes and yellow antennae providing a memorable face. Planet shapes, stars and tiny marks turn the body into a miniature sky. A striped sock can supply the main color pattern, leaving the maker to concentrate on positioning rather than piecing together many fabric bands. The pictured feet can be omitted from a simple sleeve version.
Lay out all three eyes together before fastening them, checking how much they shift as the sock stretches. Keep antenna bases broad enough for secure stitching and use soft materials throughout. Flat embroidered planets leave more flexibility than thick stacked pieces. Name the alien's home and give it one unfamiliar Earth object to investigate; the other puppets can explain what the object does while the alien guesses incorrectly.
10. Coral Reef Creature with Branching Details
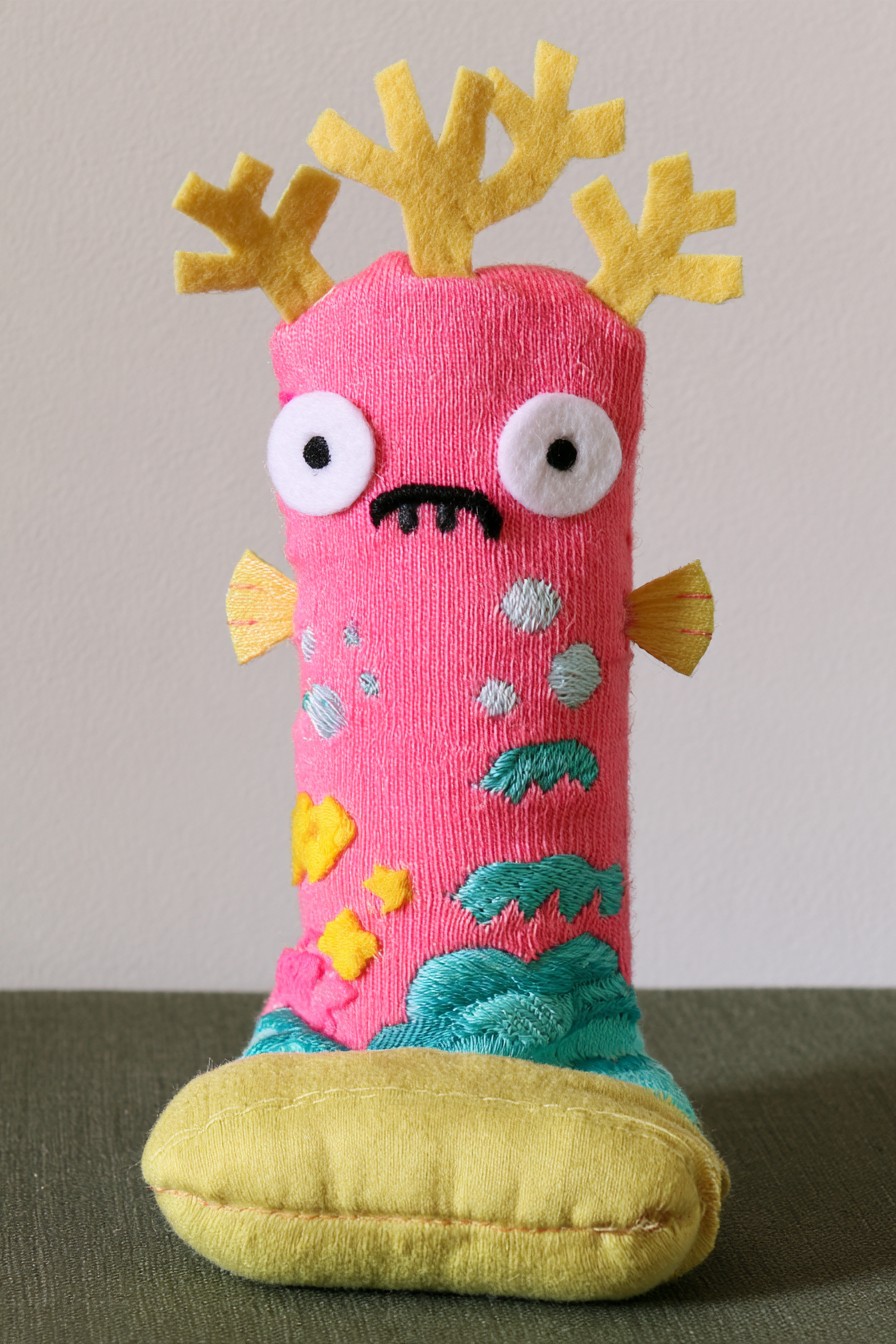
Yellow branches rise from this vivid pink character, while small fins and sea plant details establish an underwater setting. The decorative lower scene gives the body interest without competing with the large eyes. This idea works particularly well when you want one striking head feature rather than a complicated face. Choose a few broad coral branches so the top remains easy to handle and repair.
Cut the branches as soft exterior pieces with rounded ends, completing any stitching before attaching their bases. Avoid rigid internal stems. Plan the underwater decoration on the front layer of an open sock, leaving the cuff and hand bending area flexible. The raised base in the photograph can remain a display feature for a stuffed version. For play, the reef creature could welcome visiting sea characters and describe places to hide.
11. Candy Creature with Twisted Fabric Antennae
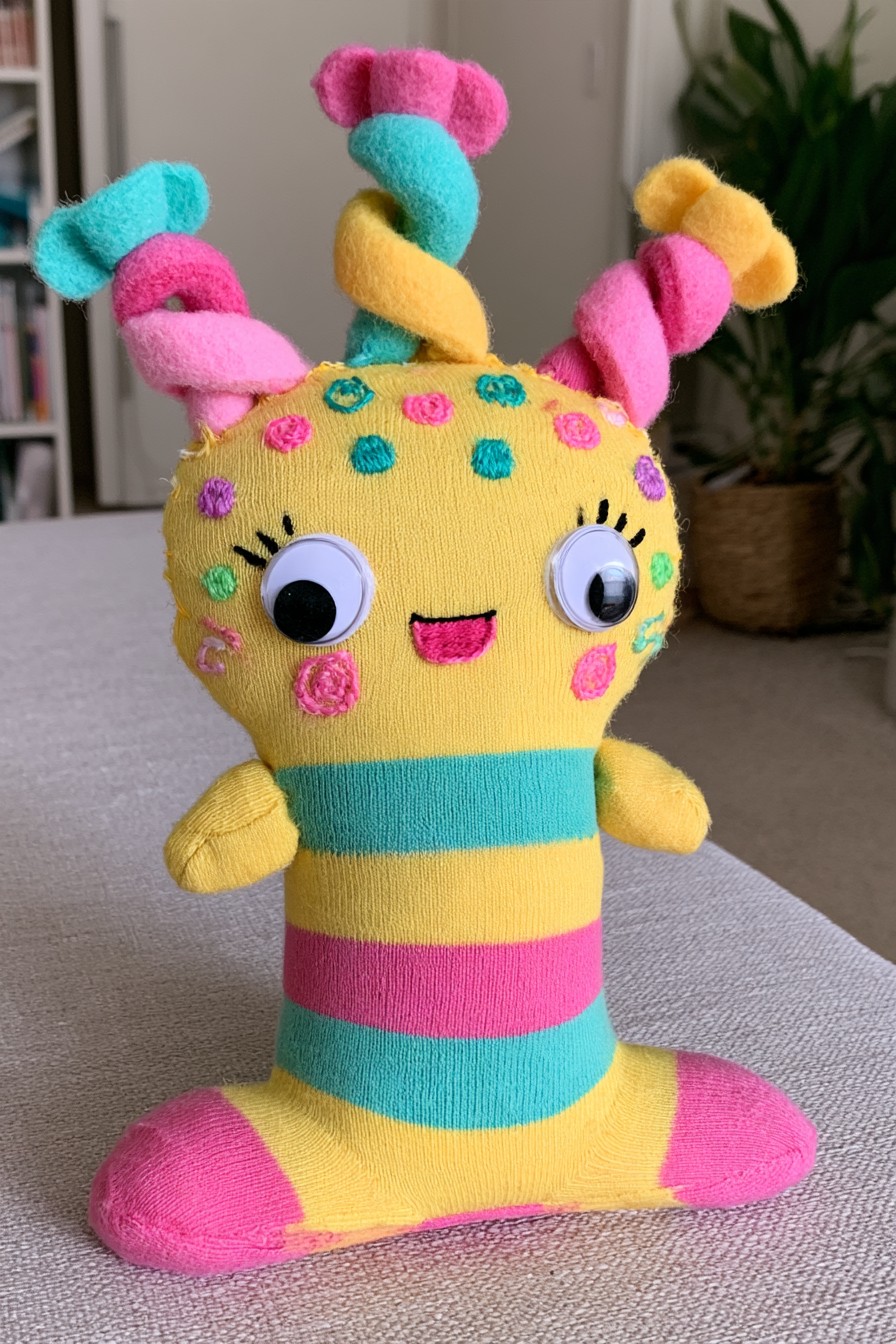
Twisted turquoise and pink antennae rise above this candy creature’s yellow face. Make them from separate softly filled fabric pieces, securing their bases inside the sock body. Keep them light enough to retain their twist without pulling the head forward.
Arrange the antennae before finalizing the eyes so they frame the face rather than cover it. Secure their bases over a usable area of fabric, and use embroidered dots for a flatter sprinkle effect. A striped sock can reduce the amount of surface decoration needed. The character might run a pretend sweet shop where each imaginary treat has an unusual name, inviting the audience to invent flavors and practice taking turns.
12. One Eyed Starfish Alien with Soft Points
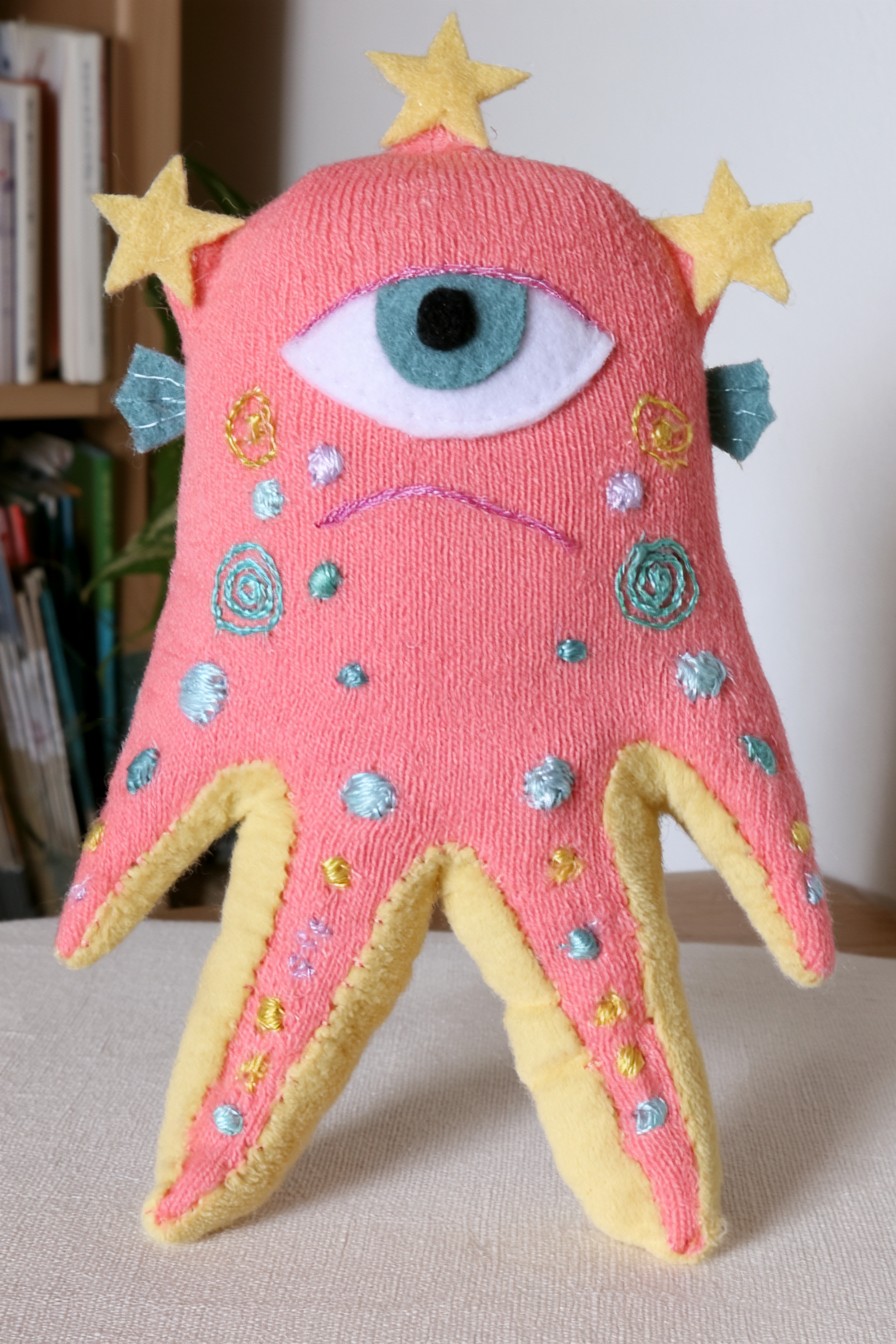
One large turquoise eye dominates this coral pink creature, with yellow edging outlining several soft lower points. Stars and stitched spirals connect a sea creature shape with a space theme. This is an expressive design without a conventional pair of eyes or a visible mouth. Let the oversized eye set the scale of the smaller details, leaving enough plain fabric around it for the face to read clearly.
For a wearable adaptation, attach the soft points around the outside of an open sleeve instead of joining them across its entrance. Prepare the eye layers together and secure their edges without making the sock front rigid. The complete shaped figure would require its own pattern. A playful scene could ask whether the character came from a rock pool or a distant planet, with the audience suggesting a home.
13. Jellyfish Character with Soft Tubular Tentacles
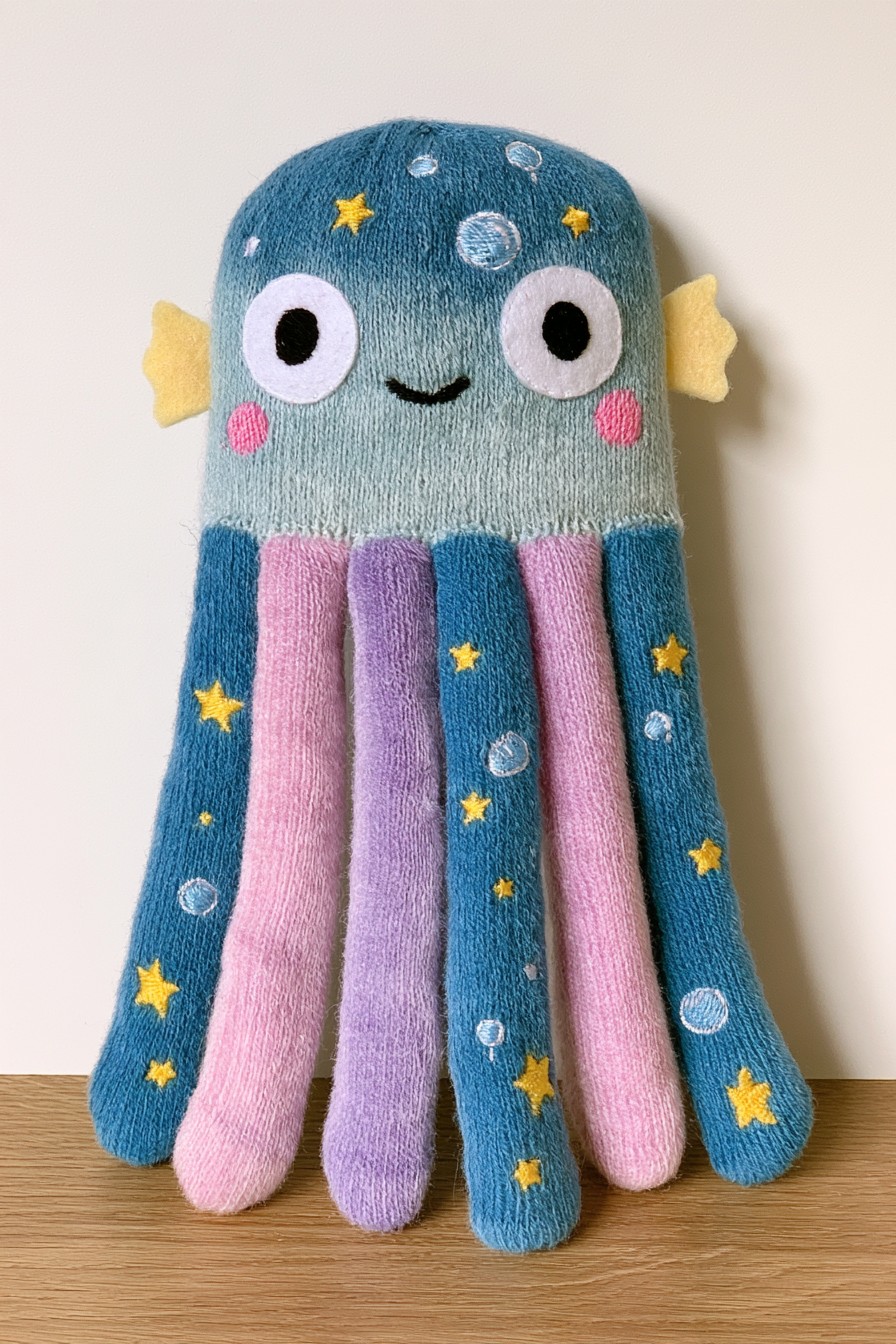
Rounded, tube shaped tentacles hang beneath a smiling blue head in alternating blue, pink and lavender. These are substantial soft forms rather than flat cut fabric strips. Their different colors provide movement and rhythm even when the character's expression stays fixed. Stars and small circular details repeat the ocean theme across the head and tentacles without needing a more elaborate face.
For a similar finish, sew separate fabric tubes with rounded ends and add light filling where the chosen puppet pattern requires it. Fasten their closed ends to an exterior band while preserving the hand opening. Flat fabric strips are a lighter alternative with a different appearance. Keep lengths manageable, and let the jellyfish drift slowly through a scene instead of spinning it into tangles.
14. Dream Monster with Crescents and a Curled Tail
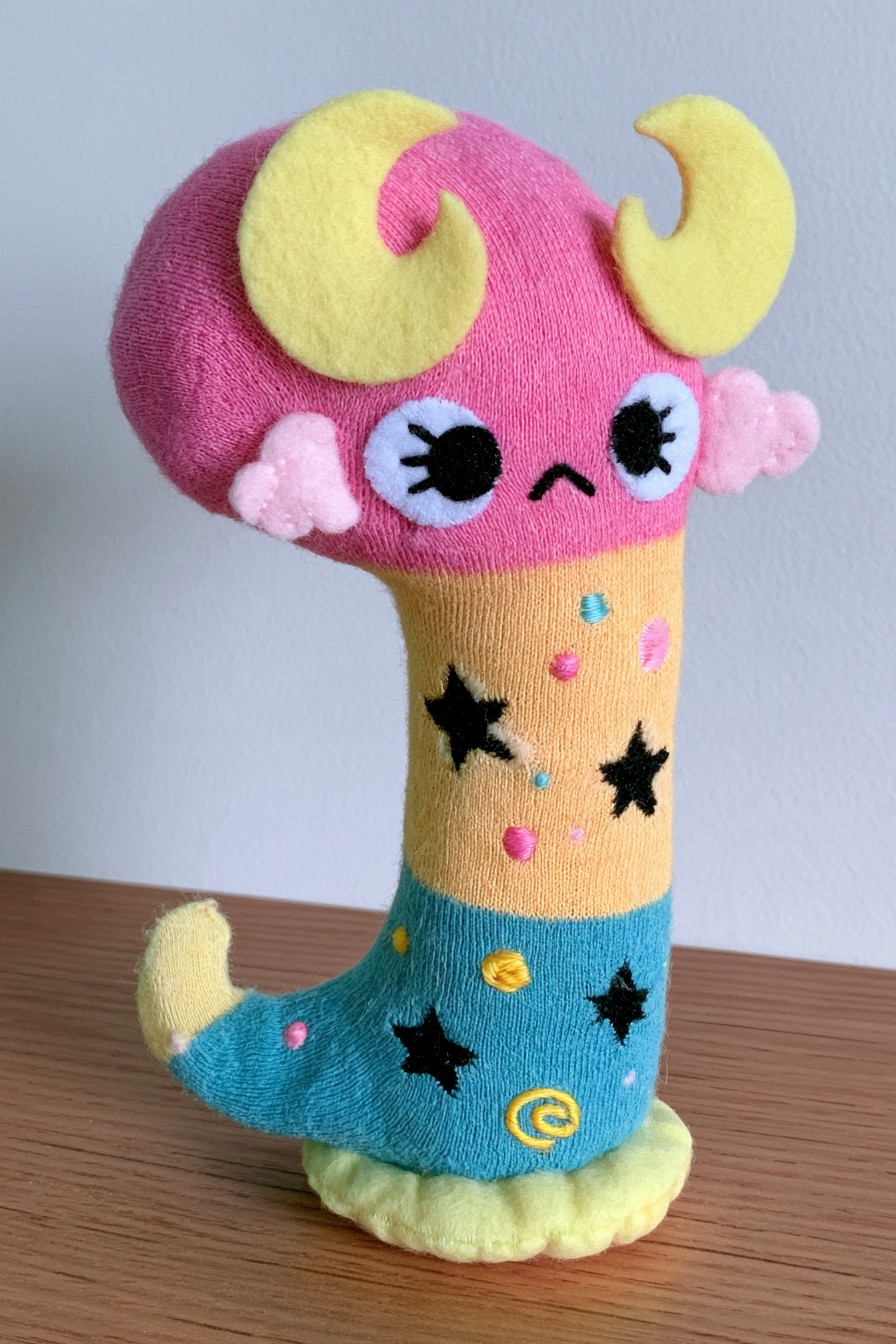
Large yellow crescents sit above this dream monster's eyes, with pink, yellow and turquoise sections leading into a curled lower body. Dark stars contrast with the cheerful colors, giving the figure a dreamlike identity. The crescents are the main visual cue, so the remaining motifs can be spaced sparingly. This idea suits makers who enjoy unusual silhouettes and want a character with a gentle, puzzled expression.
Plan the crescents as soft separate shapes, then choose whether the curl belongs to a stuffed figure or an exterior puppet tail. Keep any tail filling outside the hand sleeve. Work decorative stitching on accessible flat areas before adding the bulky shapes. For storytelling, the monster can collect strange dream descriptions from other characters, asking each one what happened first, what changed and how the dream ended.
15. Segmented Caterpillar Character for Storytelling
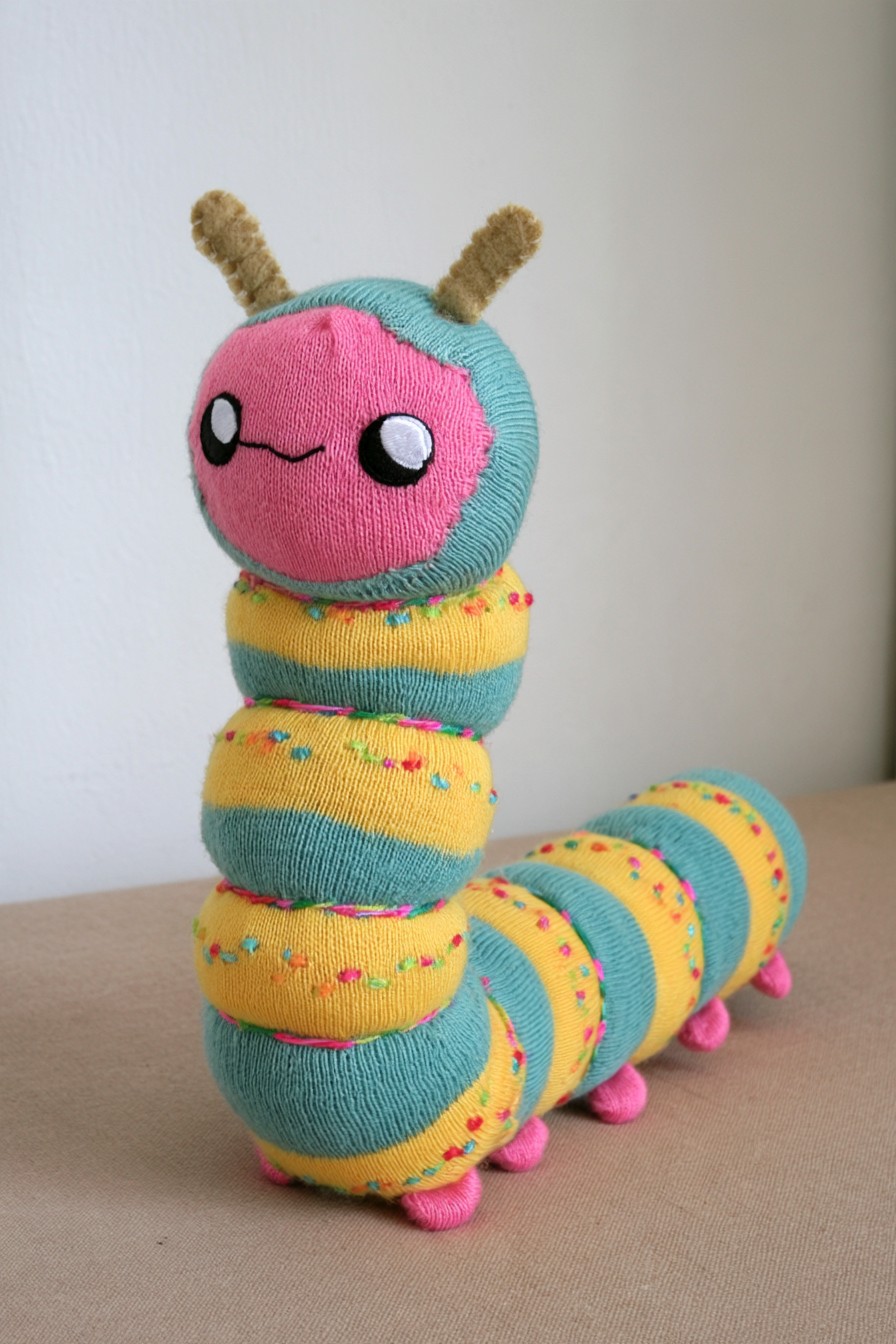
Rounded turquoise and yellow segments curve behind a pink face, with tiny pink feet following the body. Narrow joins make the caterpillar look articulated. They do not show a continuous space through which a hand could pass, and reducing the stuffing would not establish one. The complete figure can inspire a storytelling prop, while a wearable version needs a deliberately planned hand section.
For that adaptation, reserve an open sleeve for the head and attach a separate decorative segmented tail outside it. Plan segment seams, feet and any filling before joining the tail; avoid drawstrings or exposed ties used to create the divisions. Secure the hidden joins while the fabric remains accessible, then check them before closing the body. Let the caterpillar count garden stops or ask friends what happens next, moving the head while the exterior tail follows passively.
16. Purple Bat Dragon with Felt Wings
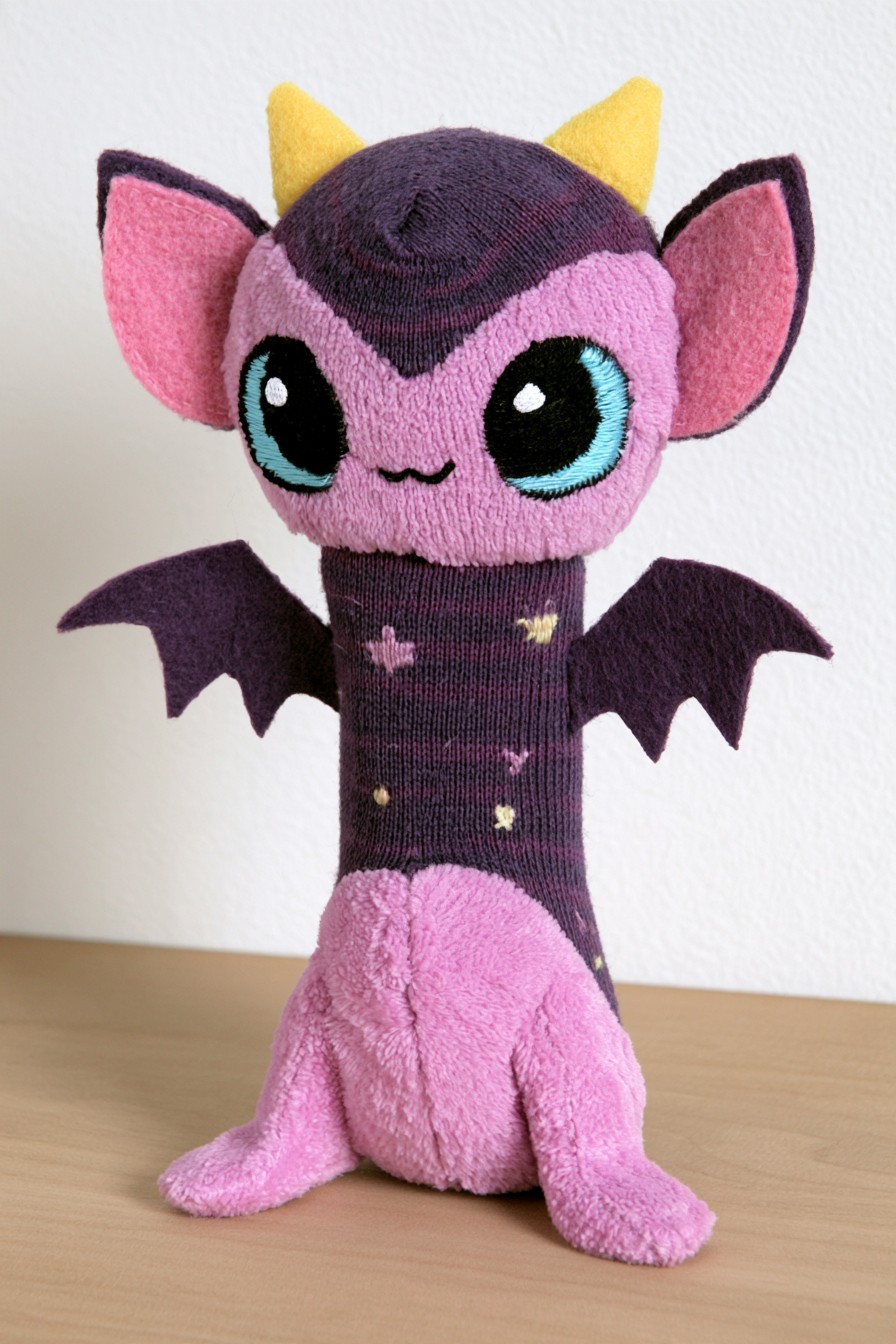
Dark wings and yellow horns give this purple character a dragon identity, while the broad pink face and large eyes keep it friendly. Pointed ears widen the head, and small stars continue a nighttime theme down the chest. The combination works when you want a dramatic silhouette that remains recognizable from a distance. Choose the wings and face as priorities before adding extra stars or shaped feet.
Decorate soft wings separately and attach their broad inner edges to the sides of the puppet sleeve. They can respond to movement of the body, without being independently controlled. Test their weight before adding horns, keeping both features clear of the hand opening. A flying lesson makes a simple scene: the dragon tries a small wing gesture, asks a friend for encouragement and announces where it wants to travel.
17. Seahorse Dragon with a Curled Tail
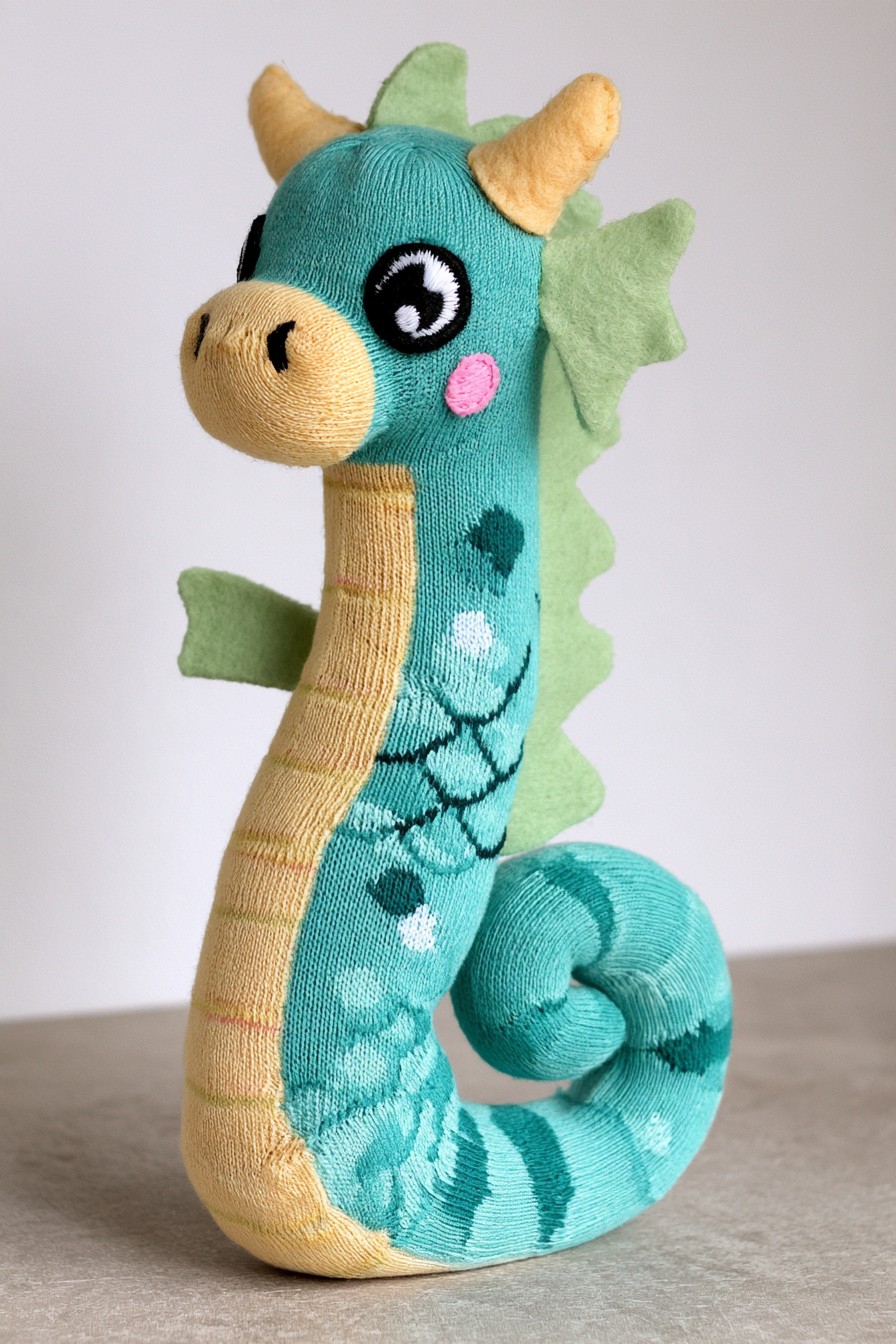
A long turquoise body, pale yellow front and curled tail combine a seahorse outline with dragon horns and fins. The side view matters as much as the face, making this a character to turn gently during a performance. The visible curved figure needs a shaped body plan if reproduced in full. For a sock puppet, concentrate on the face and back fins, with the curl added separately.
Cut and decorate the fins before joining them along the outside back, allowing the hand sleeve to remain flexible. A soft separate tail can echo the spiral without bending the cuff shut. Keep the yellow front panel light, and check whether its stitches restrict the sock's stretch. Let the sea dragon guide another puppet around an imaginary reef, pausing to describe a new color or underwater hiding place.
18. Forest Troll with Shaggy Yarn Hair
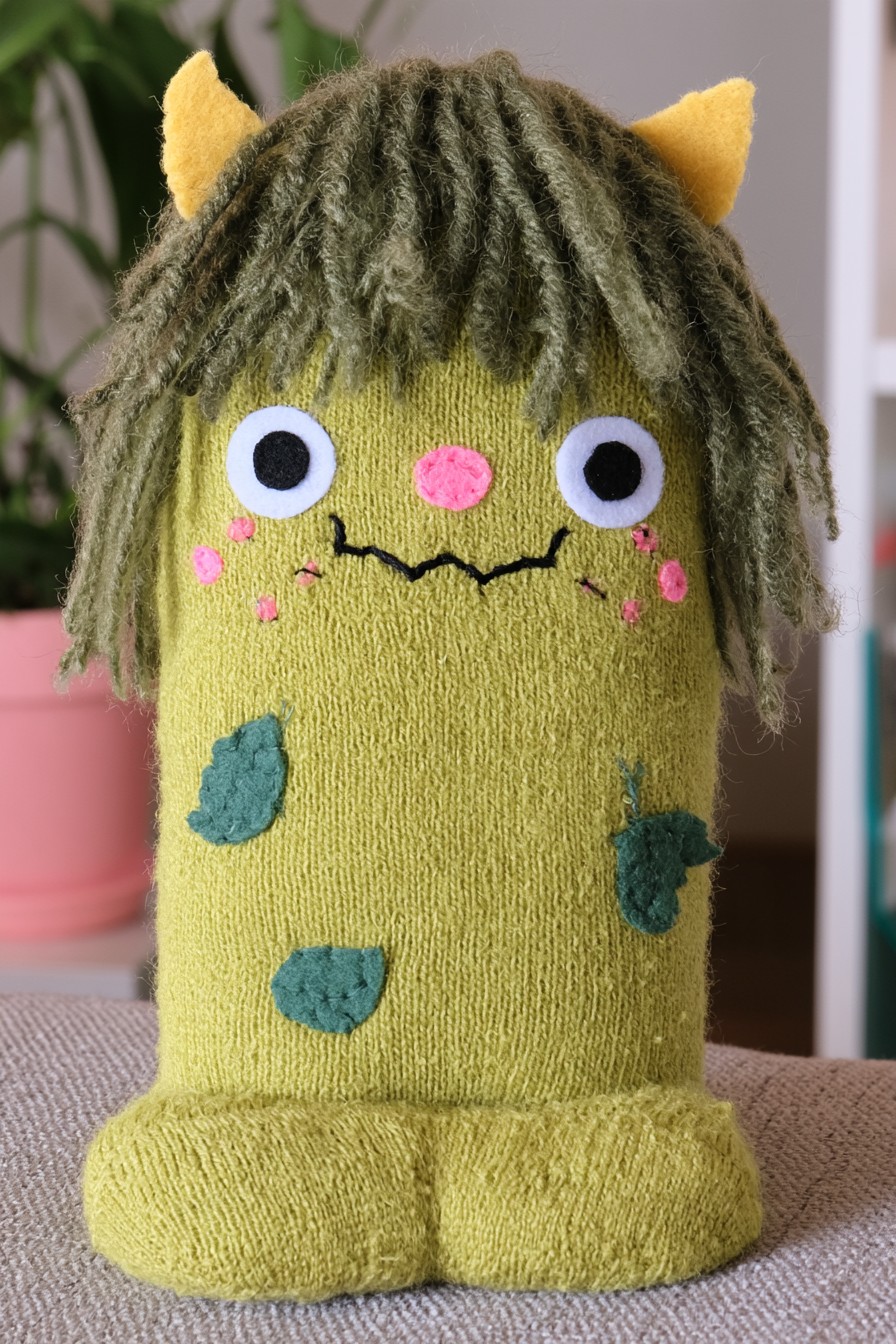
Shaggy olive hair frames a pink nose and irregular stitched mouth, with yellow horns and darker patches creating a humorous troll. Here the hair supplies most of the texture, so the body can stay comparatively simple. Choose yarn that can be trimmed and secured in compact bundles, rather than using long loose loops. A broad facial area leaves room for the eyes to remain visible beneath the fringe.
Attach bundles at several stitched points and try the hairstyle before adding the horns. Trim strands that obscure the face or catch around nearby decorations. Larger patches are easier to handle than many tiny pieces and can use contrasting edge stitches as part of the appearance. Give the troll a mild complaint, such as losing its favorite leaf, and let another character help it search and explain what it remembers.
19. Blue Walrus Monster with Soft Tusks
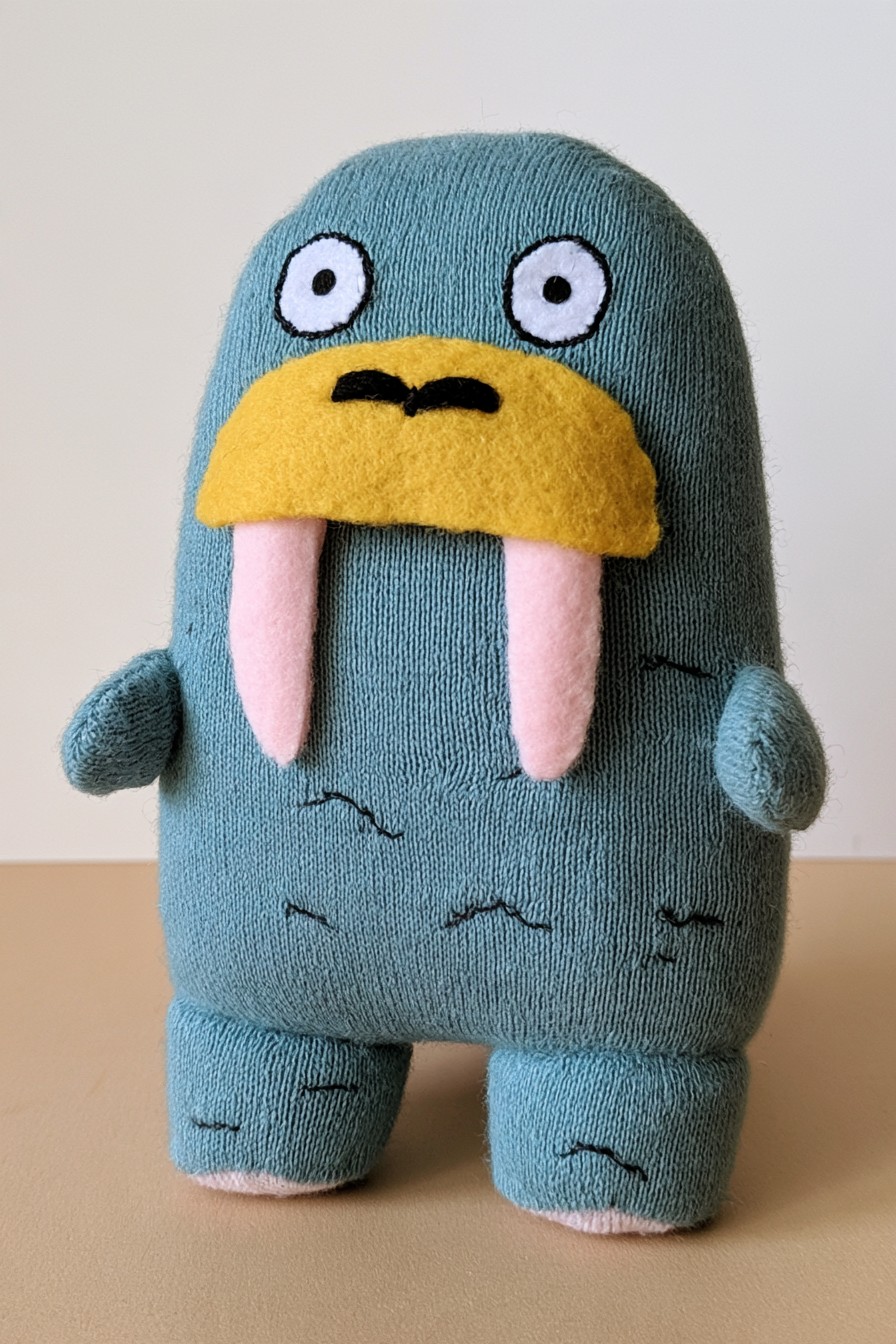
A broad yellow muzzle and two pink tusks distinguish this walrus, with short flippers and simple stitched lines completing the blue body. The face has a fixed expression; the tusks are decorative shapes rather than moving jaw parts. This design is useful when a few large details need to identify the character immediately. Keep the muzzle wider than the space between the tusks so its shape stays visually clear.
Prepare the tusks as soft fabric pieces and secure their bases beneath or alongside the muzzle without leaving rigid inserts. Place exterior flippers where they will not tighten the puppet cuff. For a lighter version, use flatter tusks and embroidered body marks. An ocean scene could have the walrus explain why it prefers a quiet resting spot, with another character asking questions and taking a turn to describe its own home.
20. Jellybean Monster with Mismatched Eyes
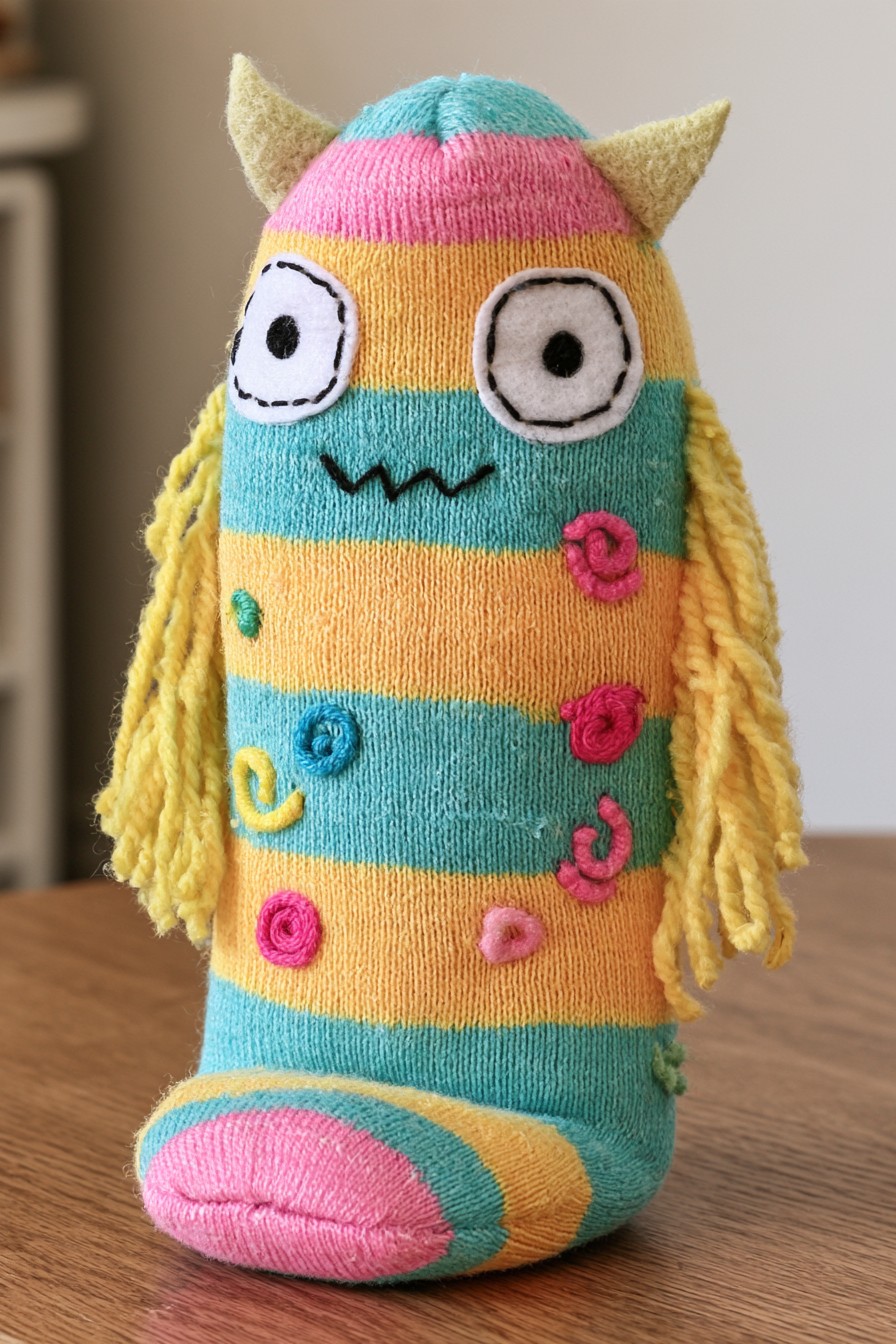
Unequal eyes and a zigzag mouth make this striped jellybean monster deliberately irregular. Yellow hair falls along the sides, while stitched spirals repeat across turquoise, pink and yellow bands. The striped base carries much of the color scheme, so the character can be adapted without adding large patchwork panels. Choose one eye as the stronger focal point and let the other look slightly surprised.
Group the side hair into short stitched bundles, keeping it away from the face and cuff. Position the spirals between facial and body features so there is still fabric free to bend. The photograph's broad shaped foot can remain a feature of a stuffed version. In a puppet scene, give the monster two contradictory preferences and invite a friend to help it make a choice, using different voices for each opinion.
21. Butterfly Beast with Decorated Wings
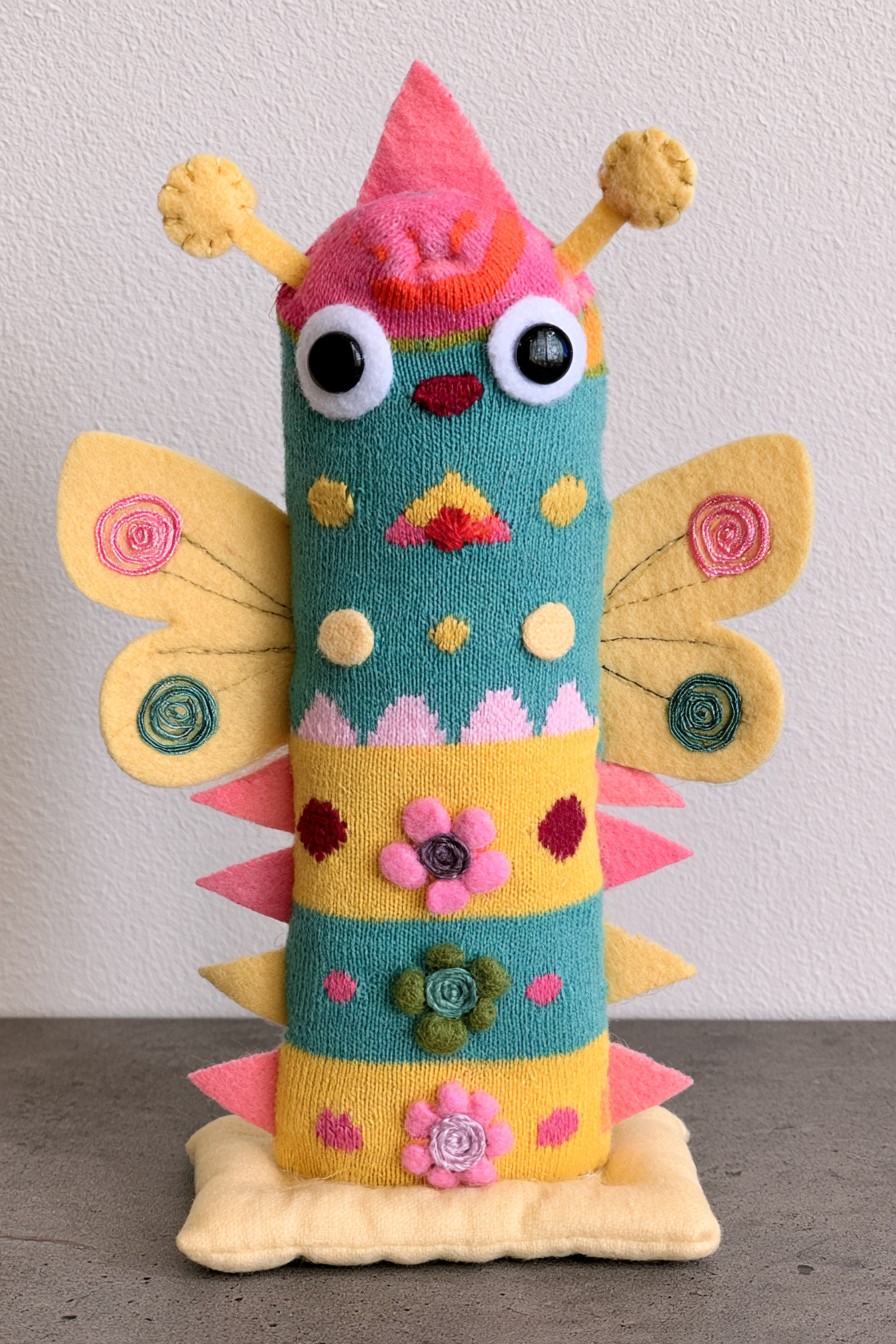
Yellow wings with spiral details frame this striped creature, while a pink crest, rounded antenna tips and side points give it a playful monster identity. The wing surfaces offer space for larger decoration than a typical sock face. This is a good choice when arranging color is the main attraction: repeat two wing colors elsewhere on the body and leave the face easy to distinguish.
Complete wing appliqués or embroidery while the pieces lie flat, then attach their inner edges to the outer sleeve. Keep the wing material soft and light enough that the performer can turn comfortably. Avoid pulling the sleeve tight while sewing across several layers. The butterfly beast can describe an imaginary garden from above, then ask another puppet to describe the same place from the ground, creating two different perspectives.
22. Goblin Cat with Visible Patchwork Details
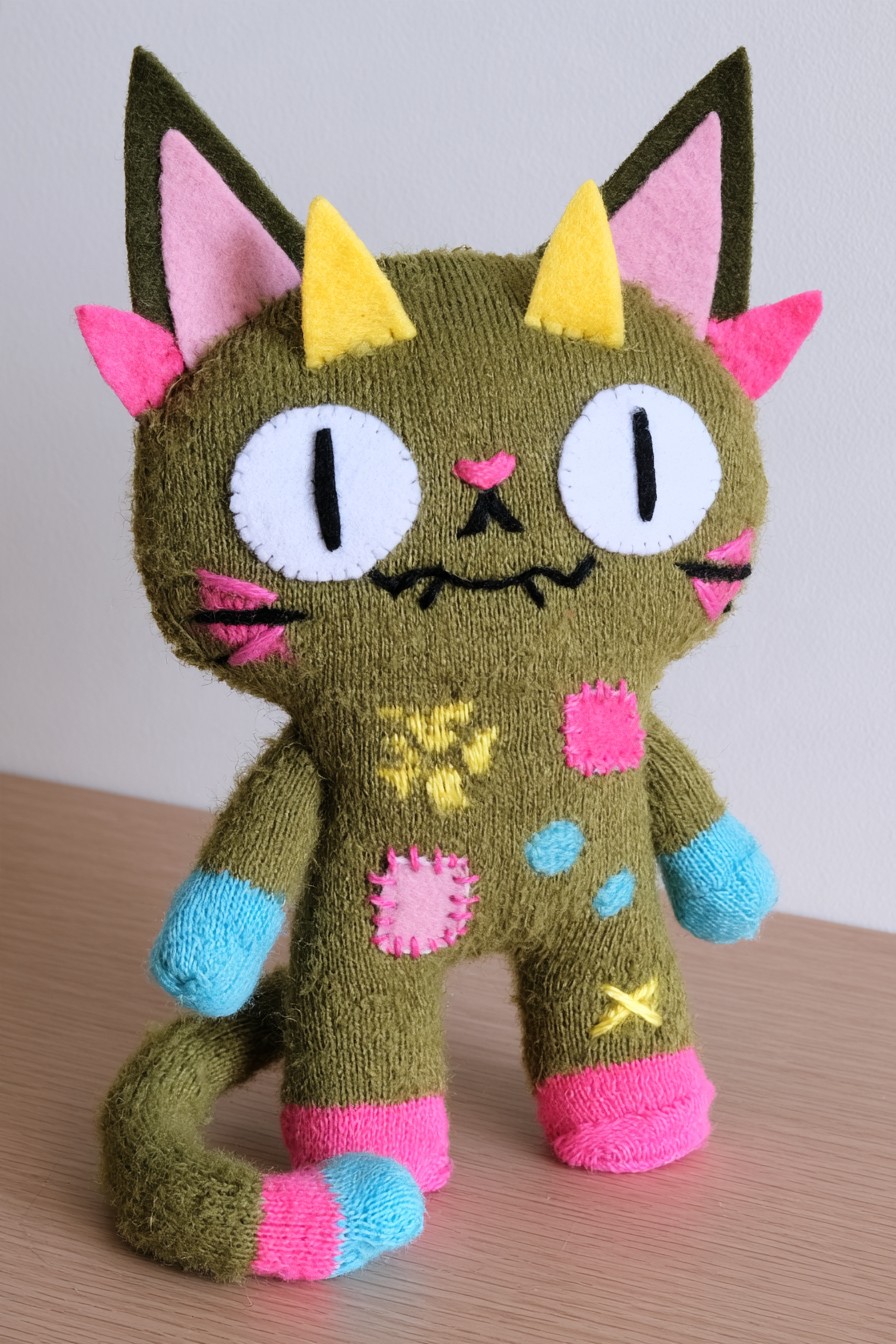
Pointed cat ears and a curled tail establish the animal silhouette, while yellow horns and small side points turn it into a fantasy creature. Large pale eyes, dark whiskers and colorful patches create a mischievous expression. The visible patch edges are part of the appeal, making this an opportunity to use contrasting stitches deliberately. Choose a small set of scraps that echo the colors in the tail and ears.
Prepare paired ears and a separate soft tail before attaching them to an open sock body. The pictured arms and legs belong to a more shaped figure and can be simplified for a wearable version. Keep patches flat where the hand bends, checking the fit after each major addition. Let the goblin cat claim an unusual talent, then ask it to demonstrate through a voice or gesture rather than needing extra props.
23. Forest Snail with a Coiled Fabric Shell
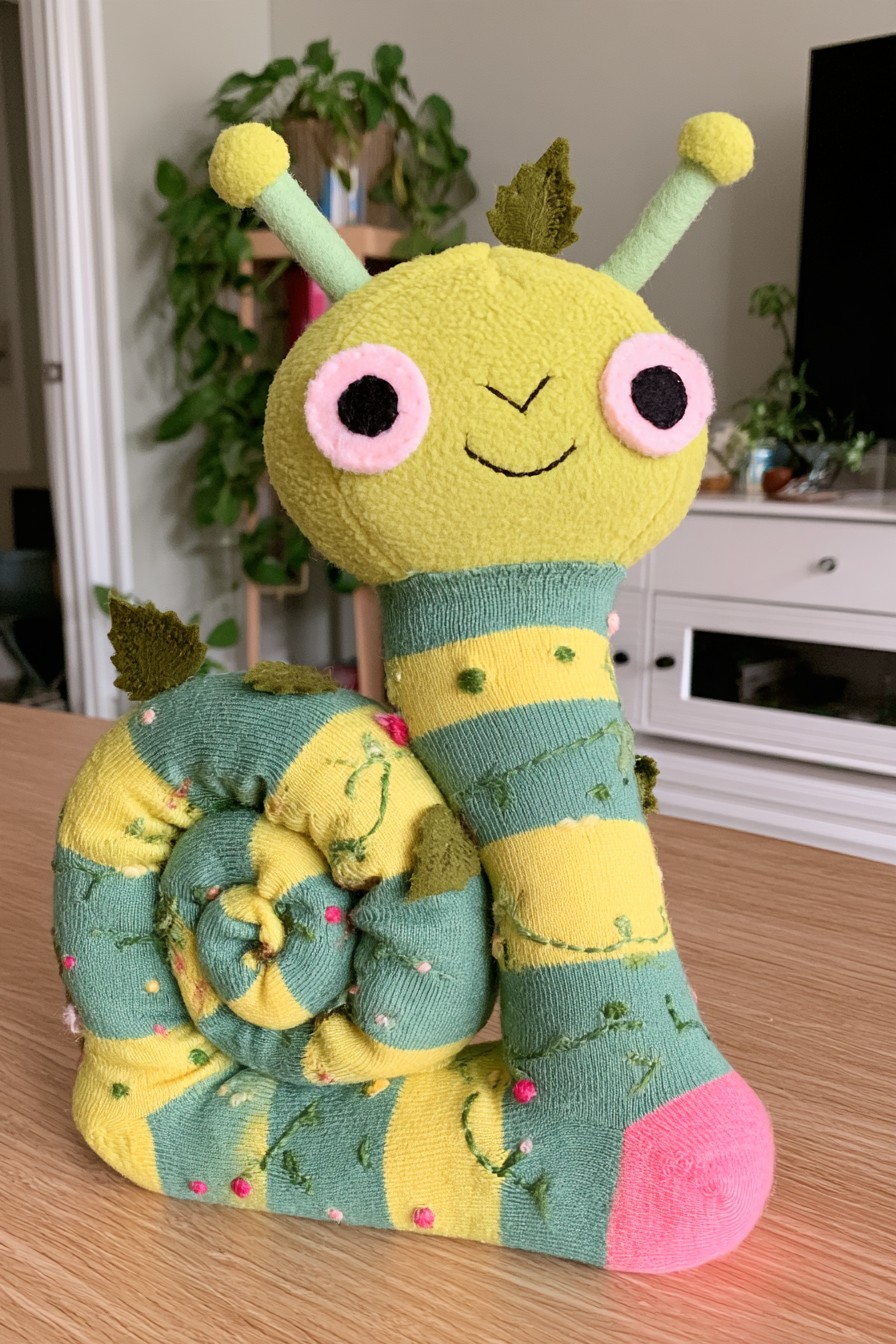
A thick spiral shell gives this green and yellow snail its defining shape, with rounded antenna tips and leafy details extending the woodland theme. The shell is a separate visual mass beside the long neck, so its size affects both the appearance and handling. Choose this design when you want a character that tells a story through slow movement rather than an opening mouth or elaborate gestures.
To adapt the shell, prepare a soft fabric tube, close its ends, and secure the coil with stitches before joining it to the outside of the sleeve. Keep any filling and shell seams separate from the hand cavity. Compare the shell's weight with the comfortable movement of the head before completing the decoration. A slow journey gives the snail a role: each pause can introduce a sound, color or imaginary obstacle.
24. Moon Fox with Celestial Embroidery
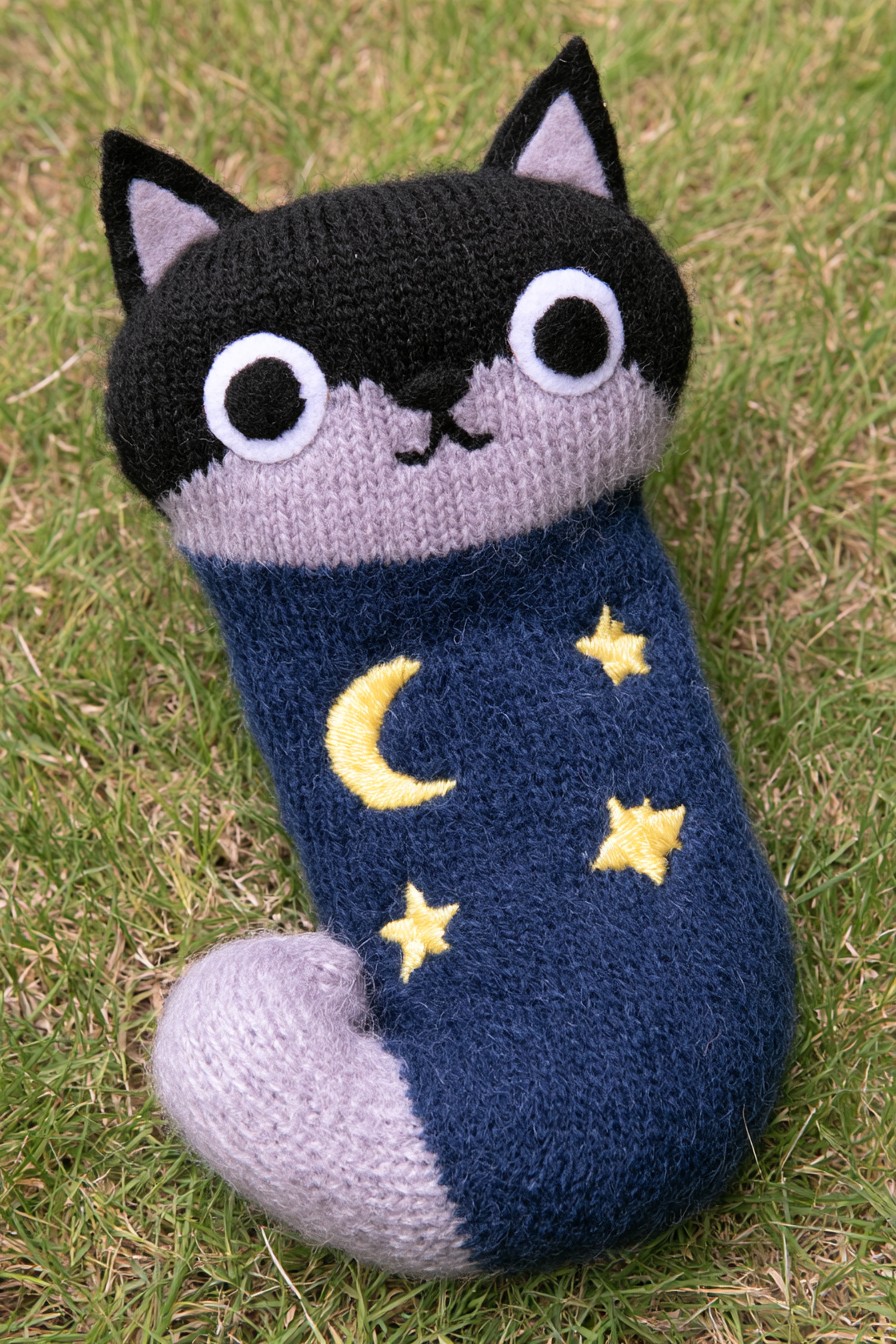
A dark head and navy body give this fox a nighttime palette, with lavender on the face and curled tail. Yellow moon and star motifs stand out clearly against the darker fabric. The shape is compact enough for a gentle bedtime character, and its small stitched mouth allows the voice to set the mood. Space the stars around the crescent rather than filling every available area.
Prepare the ears and tail as soft exterior additions, then mark the embroidery while checking the sock's fit. Remove the hand before stitching, and avoid joining the front and back layers together. Finish thread ends so they do not rub against the performer. The fox can ask each character to share one event from the day, then close the scene with a short farewell and a small nod.
Give the Finished Characters a Story and a Place to Rest
Choose a name, one personality trait and a small problem for each character. A lost object, a new neighbor or a journey gives the puppets something to discuss without an elaborate stage. Let one character speak while the other listens, then change roles. In a group activity, larger prepared felt shapes let children spend more time making choices while an adult completes the attachments.
After play, check seams, yarn bundles and soft additions for wear. Follow the combined materials' care instructions; a washable sock does not make every decoration washable. Allow cleaned fabric and any filled parts to dry fully before storage, and support long ears or a shell so they are not crushed. Remove a character from play if a part loosens, repairing it before the next performance.

Leave a Reply