
This hand sewn felt cat card holder combines a practical pocket with a soft layered appliqué design. It can hold a credit card, debit card, transit pass, gift card, or another similarly sized flat card. Two pink felt body panels form the pocket, while a cream cat face, layered ears, pink corner appliqués, embroidered features, and a small yellow flower create the decorative front.
Table of Contents
- Project Preview
- Project Size and Fit
- Materials and Tools
- Practice the Stitching First
- 1. Draw the Paper Templates
- 2. Cut the Pink Body Panels
- 3. Prepare the Cream Face
- 4. Build and Attach the Layered Ears
- 5. Add the Eyes, Nose, and Whiskers
- 6. Add the Pink Corners and Flower
- 7. Prepare the Front for Assembly
- 8. Align and Test the Pocket
- 9. Blanket Stitch the Pocket
- Final Fit and Quality Check
- Troubleshooting the Fit
- Care and Everyday Use
Project Preview
The project is suitable for a confident beginner and takes around 1 to 2 hours , depending on cutting accuracy and hand sewing experience. Running stitch secures the decorative pieces, while blanket stitch joins the finished pocket along the sides and bottom.
Project Size and Fit
A typical standard credit or debit card measures about 8.56 × 5.4 cm .
For the original deeper-pocket proportions, cut the main body panels approximately:
10.2 cm wide × 7.2 cm high
With the side and bottom blanket stitches positioned about 3 mm inside the cut edges , the usable pocket will be approximately:
9.6 cm wide × 6.9 cm deep
The width leaves roughly 5 mm of clearance on each side of a typical standard card.
The 6.9 cm pocket depth is intentionally generous. A 5.4 cm high card can sit about 1.5 cm below the upper edge when pushed fully to the bottom. If you prefer more of the card to remain exposed for easier removal, shorten the body template to approximately 6.2 to 6.4 cm high before cutting.
Always test the actual card against the paper template. Card formats vary, and a paper fit check is easier to correct than a finished felt pocket.
Materials and Tools
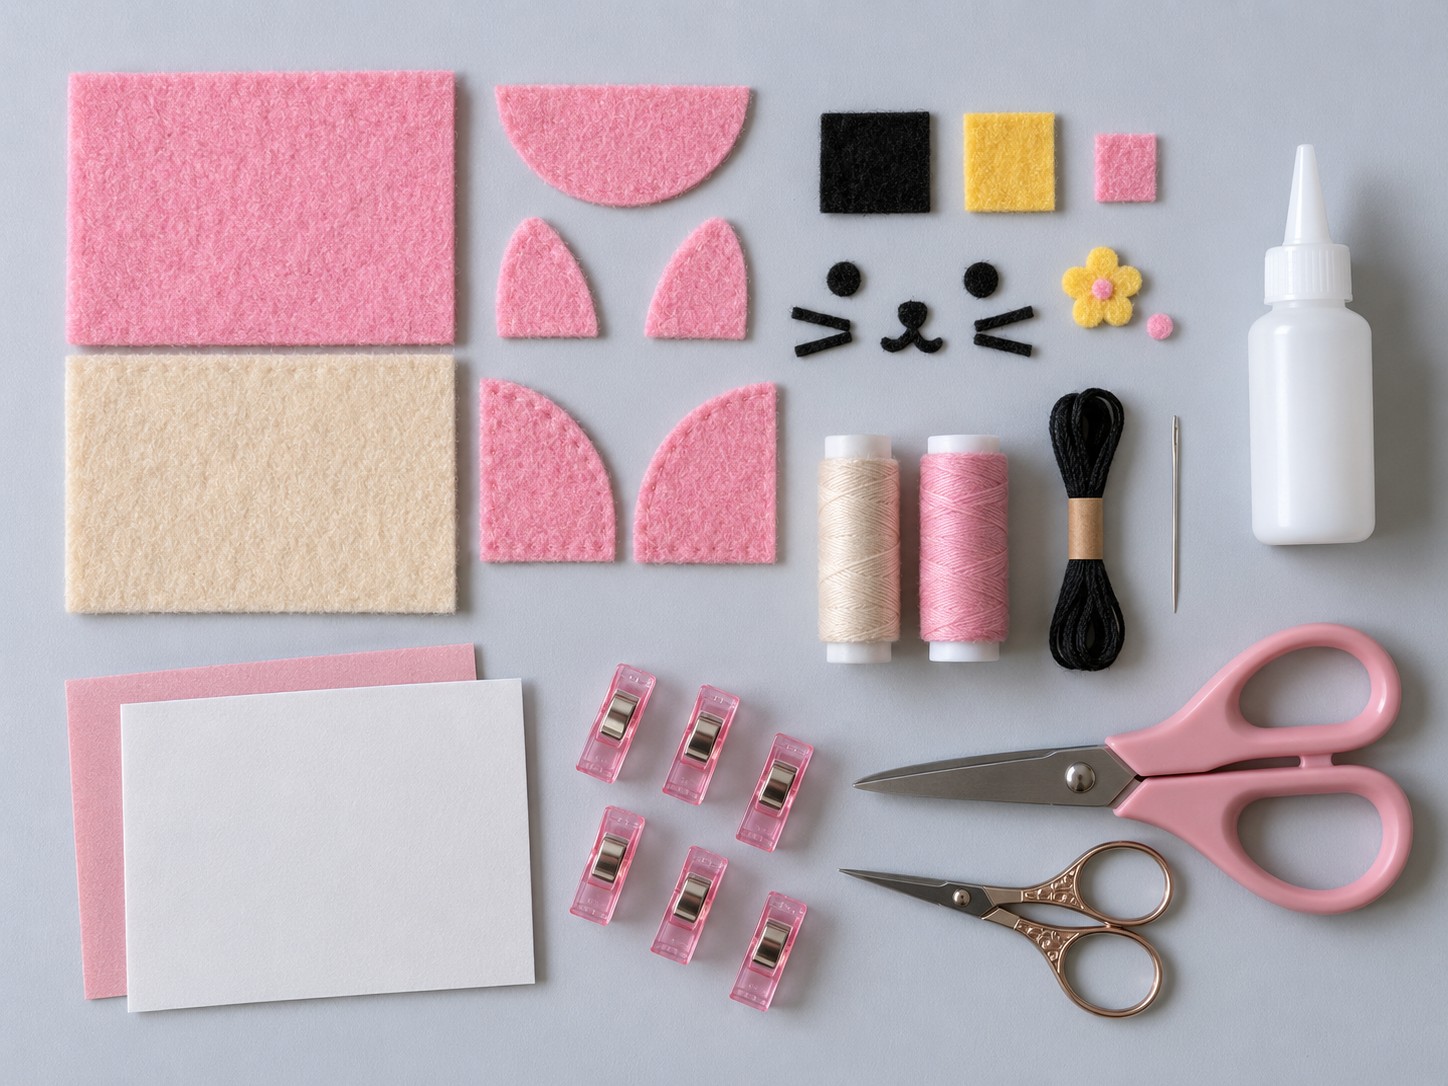
Use felt around 1 to 1.5 mm thick . It should be firm enough to maintain the pocket shape while remaining easy to pierce with a hand sewing needle.
You will need:
- Two pink felt pieces approximately 12 × 9 cm
- One cream felt piece approximately 12 × 9 cm
- Small pink felt scraps
- A small black felt scrap
- A small yellow felt scrap
- Cream sewing thread
- Pink sewing thread
- Black embroidery floss
- Hand sewing needle
- Sharp fabric scissors
- Small embroidery scissors
- Paper or lightweight cardstock
- Ruler
- Fabric marking pen or removable fabric pencil
- Small sewing clips
- Fabric glue, optional for temporary positioning
The decorative pieces require very little material, so clean felt offcuts from other projects are suitable.
Practice the Stitching First
Before beginning the actual holder, place two scraps of the same felt together and practice blanket stitch.
Insert the needle approximately 3 mm from the cut edge . Keep each stitch approximately 3 to 4 mm from the next .
These are two different measurements. The 3 mm measurement controls how far the stitch sits from the edge, while the 3 to 4 mm spacing controls the distance between individual stitches.
Use light, even thread tension. The thread should hold the felt securely without pulling the edges inward.
Practice the running stitch as well. Small, consistent stitches are enough to secure the appliqué pieces. Felt does not require excessive thread tension.
Once the test pieces remain flat and the stitch spacing feels comfortable, begin the actual project.
1. Draw the Paper Templates
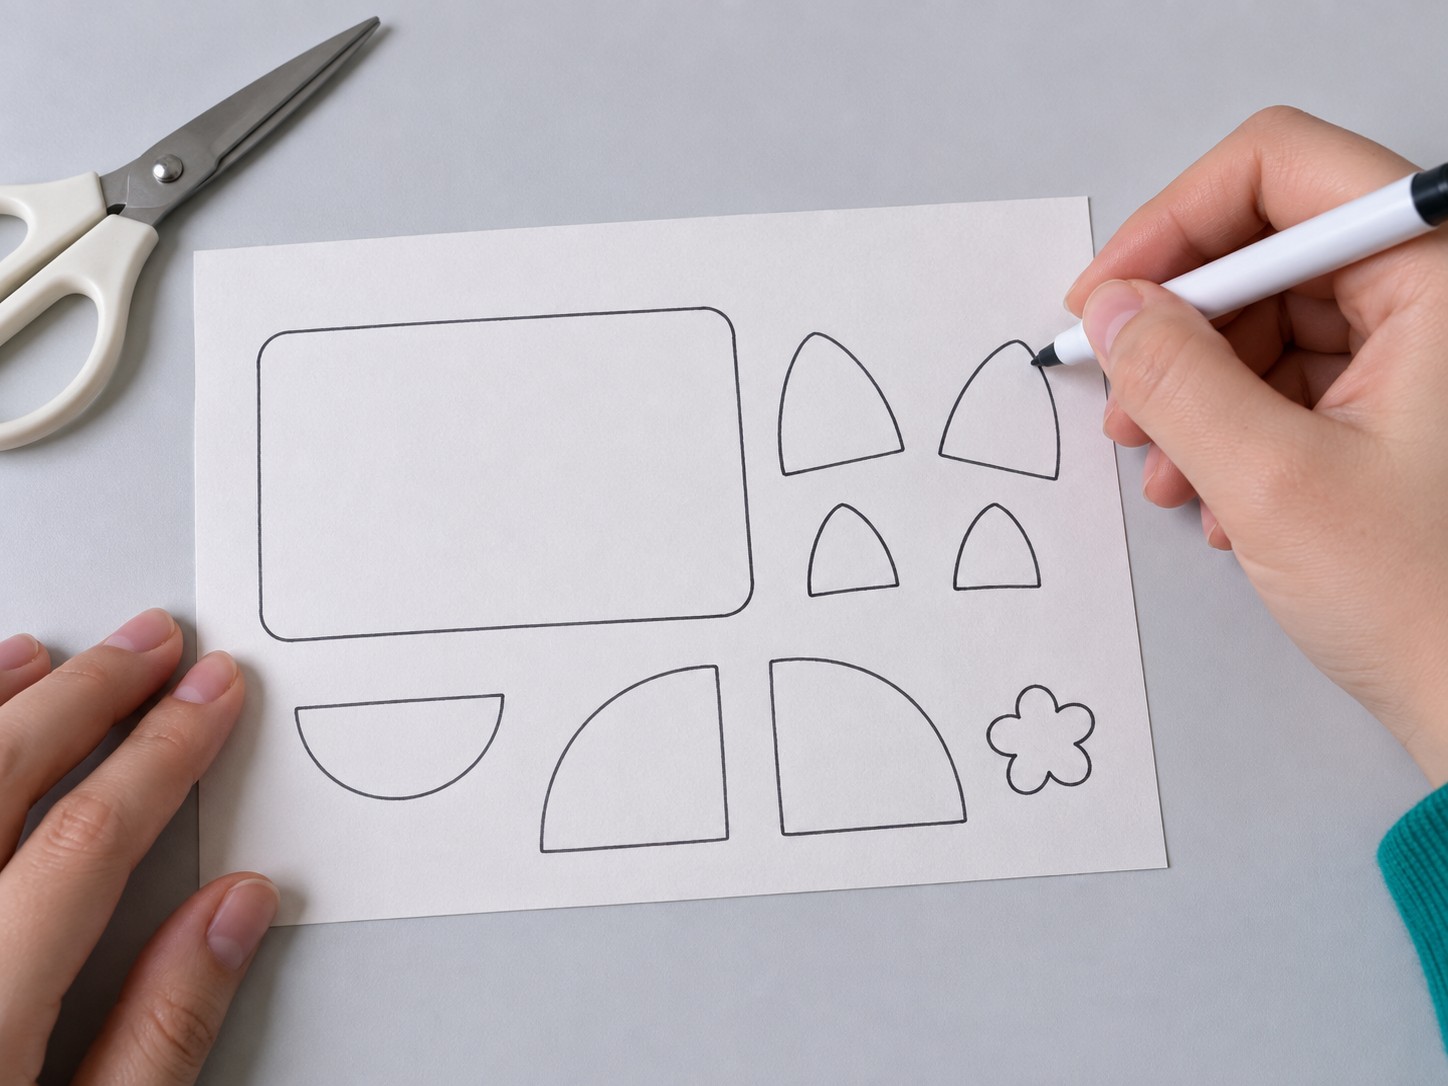
Draw a rounded rectangle approximately 10.2 × 7.2 cm for the deeper version of the card holder.
If you want a shallower pocket that leaves more of a standard card exposed, reduce the height to approximately 6.2 to 6.4 cm while keeping the width close to 10.2 cm.
Place the actual card over the paper template and imagine the side and bottom seams sitting approximately 3 mm inside the finished edges.
The card should have comfortable clearance without pressing directly against the planned stitches.
Prepare separate patterns for the decorative pieces.
Useful starting dimensions are:
- Outer ears: approximately 2.7 to 3 cm high and 2.2 to 2.5 cm wide
- Inner ears: approximately 2 to 2.3 cm high and 1.4 to 1.7 cm wide
- Upper pink semicircle: approximately 3 to 3.5 cm wide
- Lower corner appliqués: approximately 3 to 3.5 cm across
- Flower: approximately 1.5 to 2 cm across
These are proportional starting measurements rather than fixed rules. Adjust them slightly if you change the height of the main body.
Download Patterns: https://drive.google.com/file/d/1j-N201Zee8oXVCw3dr2QnHJsxRIBBMse/view
2. Cut the Pink Body Panels
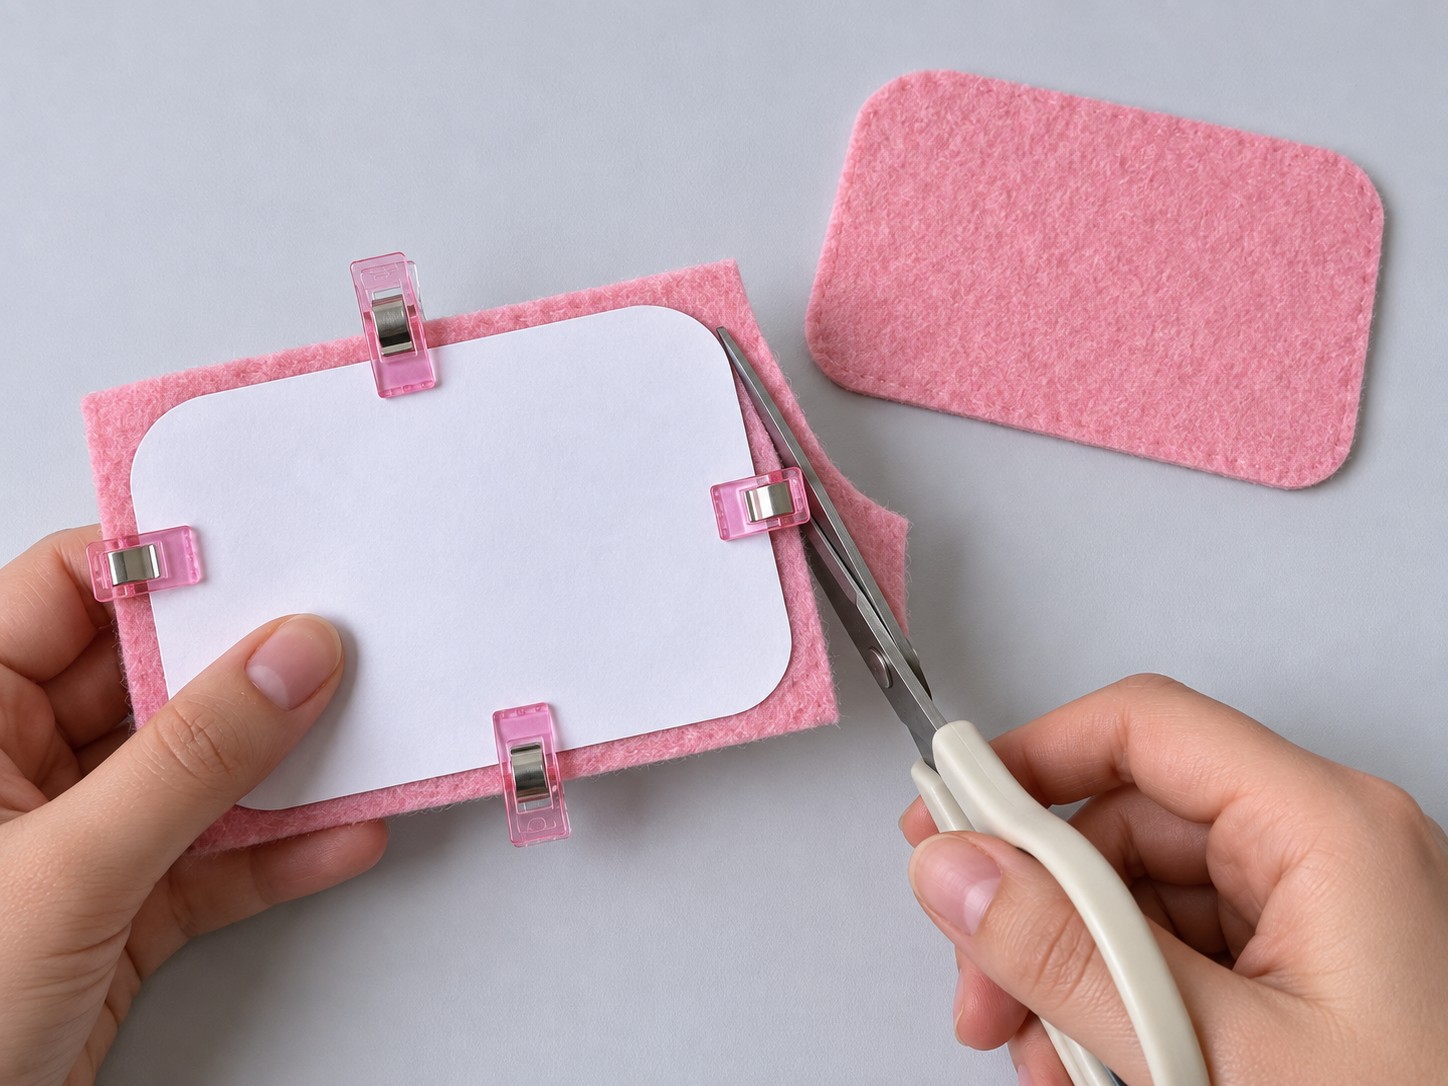
Place the main paper template on the pink felt.
Secure the paper and felt together with several sewing clips so the pattern cannot shift while cutting.
Cut around the template with sharp fabric scissors, following the rounded corners carefully.
Repeat the process for the second pink panel.
Place both panels directly on top of each other and compare the outside edges. Trim small differences while the pieces are still separate.
Set one panel aside as the back. The second will become the decorative front base.
Do not join the two body panels yet.
3. Prepare the Cream Face
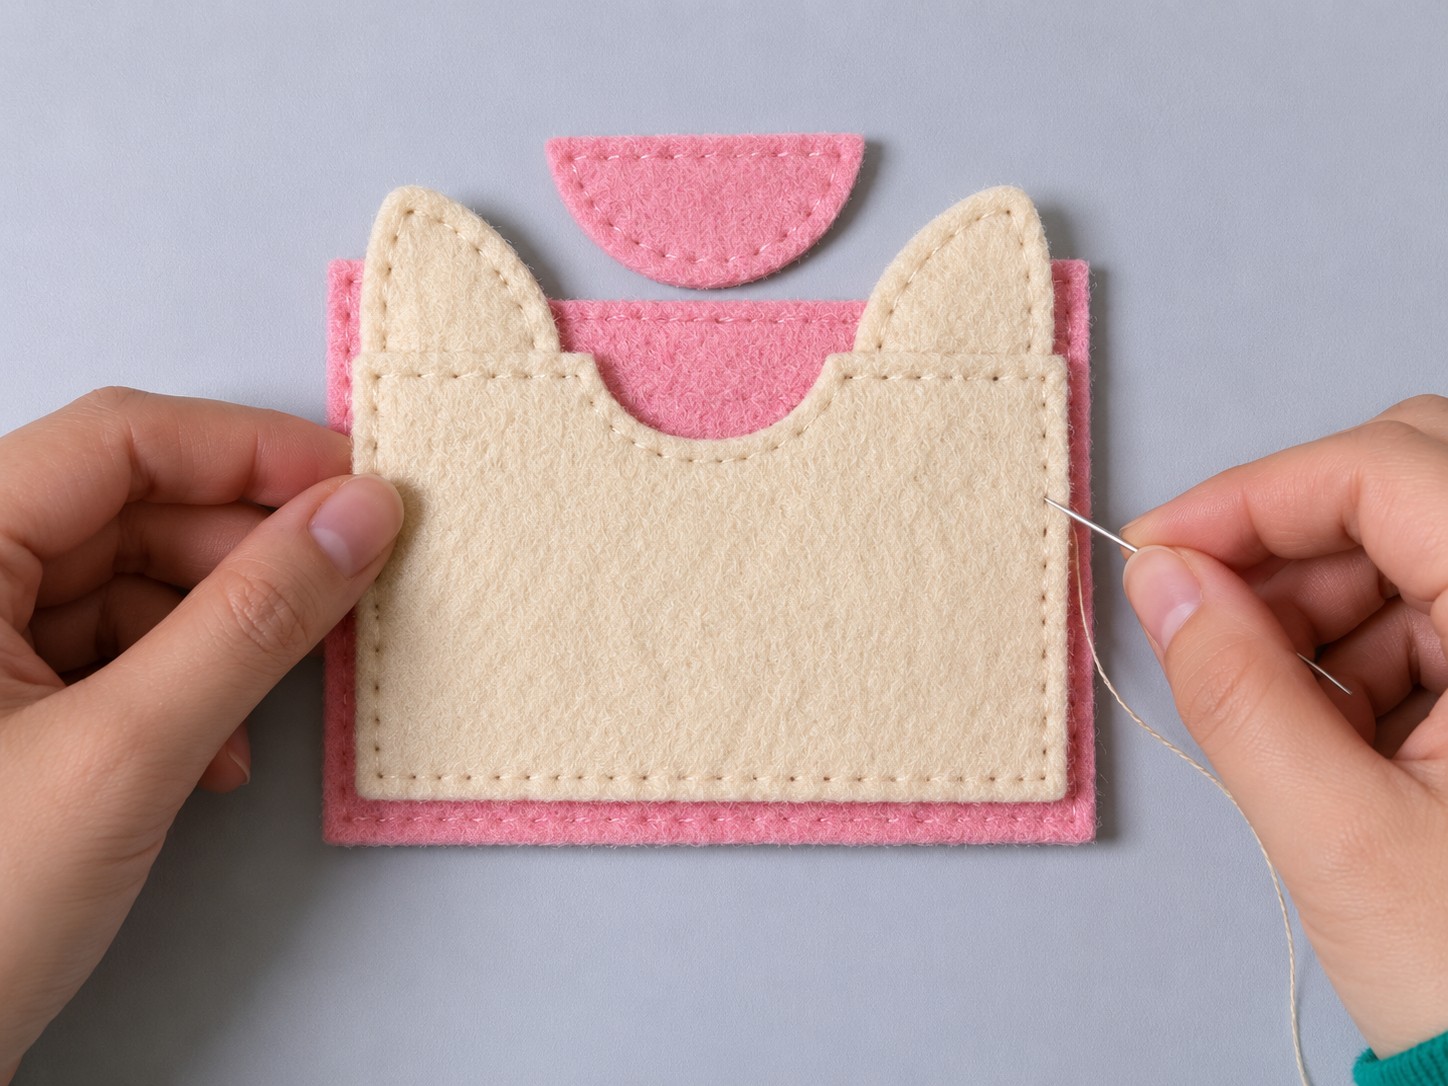
Cut the main cat face from cream felt.
Center it over the pink front panel with approximately 3 to 5 mm of visible pink felt along the left, right, and lower edges .
At the upper center of the cream piece, cut a shallow curved opening approximately:
- 3 to 3.5 cm wide
- 1.2 to 1.5 cm deep
Cut a separate pink semicircle slightly larger than the cream opening.
Position this pink piece behind the opening so the curved pink section remains visible.
Secure the pink semicircle to the back of the cream piece with a few small stitches. Keeping this attachment within the hidden overlap prevents unnecessary stitching from showing on the front.
Now position the cream face on the pink front panel.
Do not completely sew the upper corners of the cream face yet. The ears still need to slide beneath this layer in the next step.
The lower and side sections can be held temporarily with sewing clips or a very small amount of fabric glue.
4. Build and Attach the Layered Ears
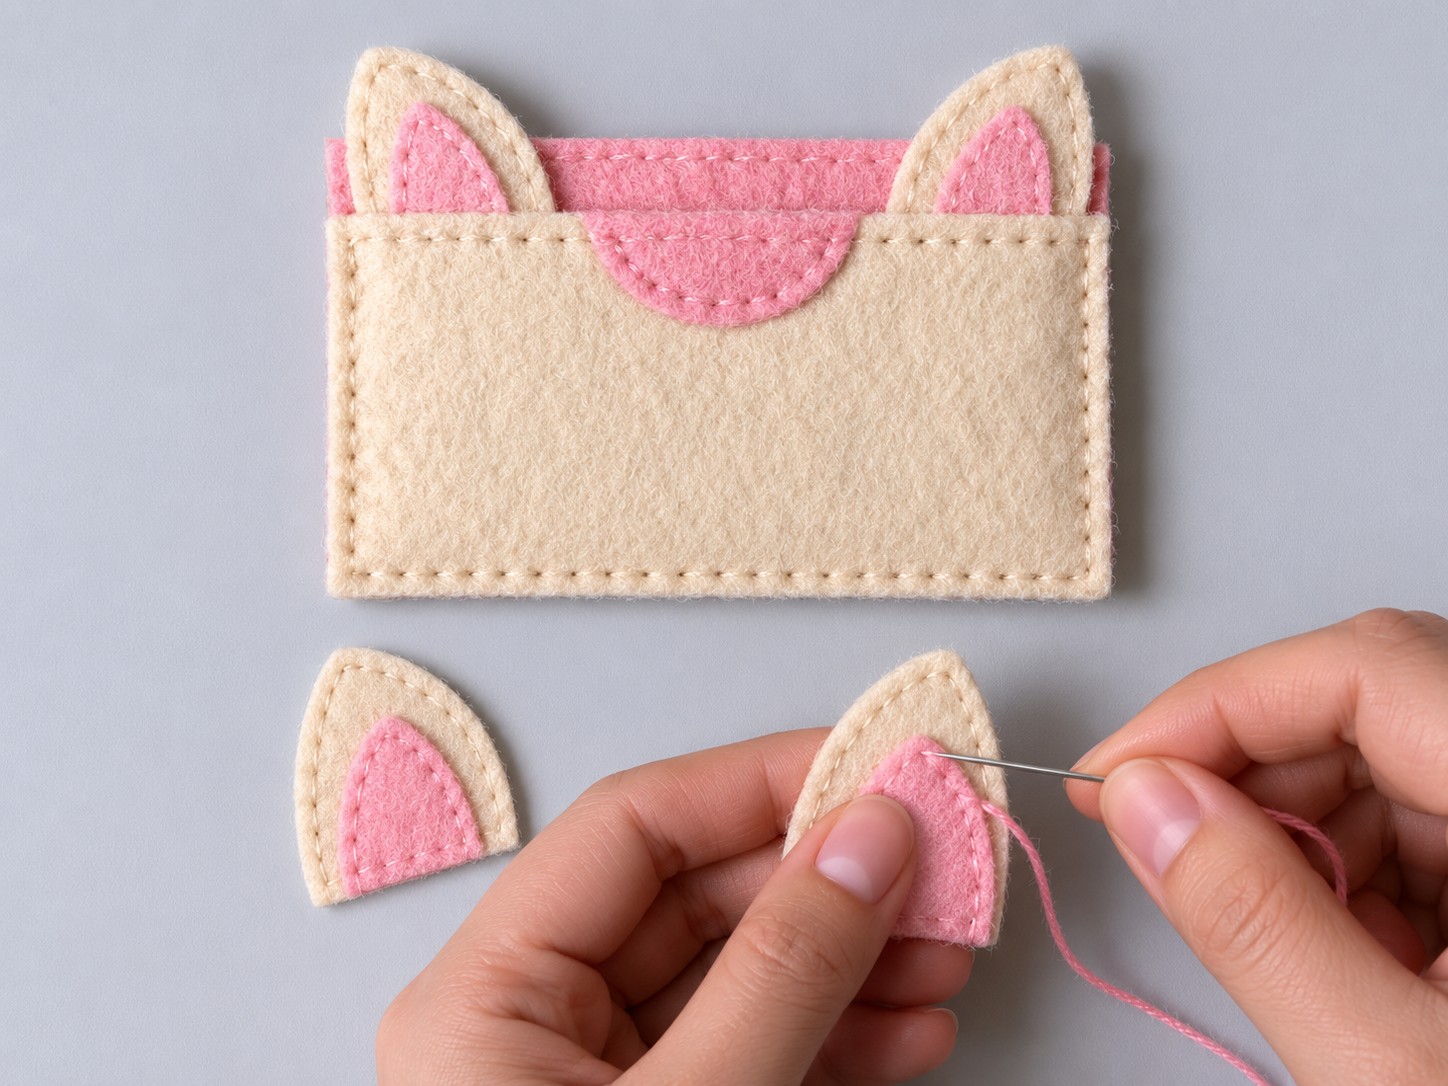
Cut two matching cream outer ears approximately 2.7 to 3 cm high and 2.2 to 2.5 cm wide .
Cut two smaller pink inner ears approximately 2 to 2.3 cm high and 1.4 to 1.7 cm wide .
Center each pink inner ear on its cream backing, leaving an even cream border around the sides and tip.
Secure each inner section with small running stitches.
Slide the lower portion of each completed ear beneath the upper corners of the cream face.
Adjust their height and angle until both sides look balanced.
Stitch the concealed lower portion of each ear securely to the pink front base. Avoid stitching unnecessarily across the visible cream ear surface.
Once the ears are fixed, finish sewing the cream face to the pink front panel with small running stitches.
Keep the thread tension light throughout. Tight stitching can make the broad cream felt ripple or pull inward.
5. Add the Eyes, Nose, and Whiskers
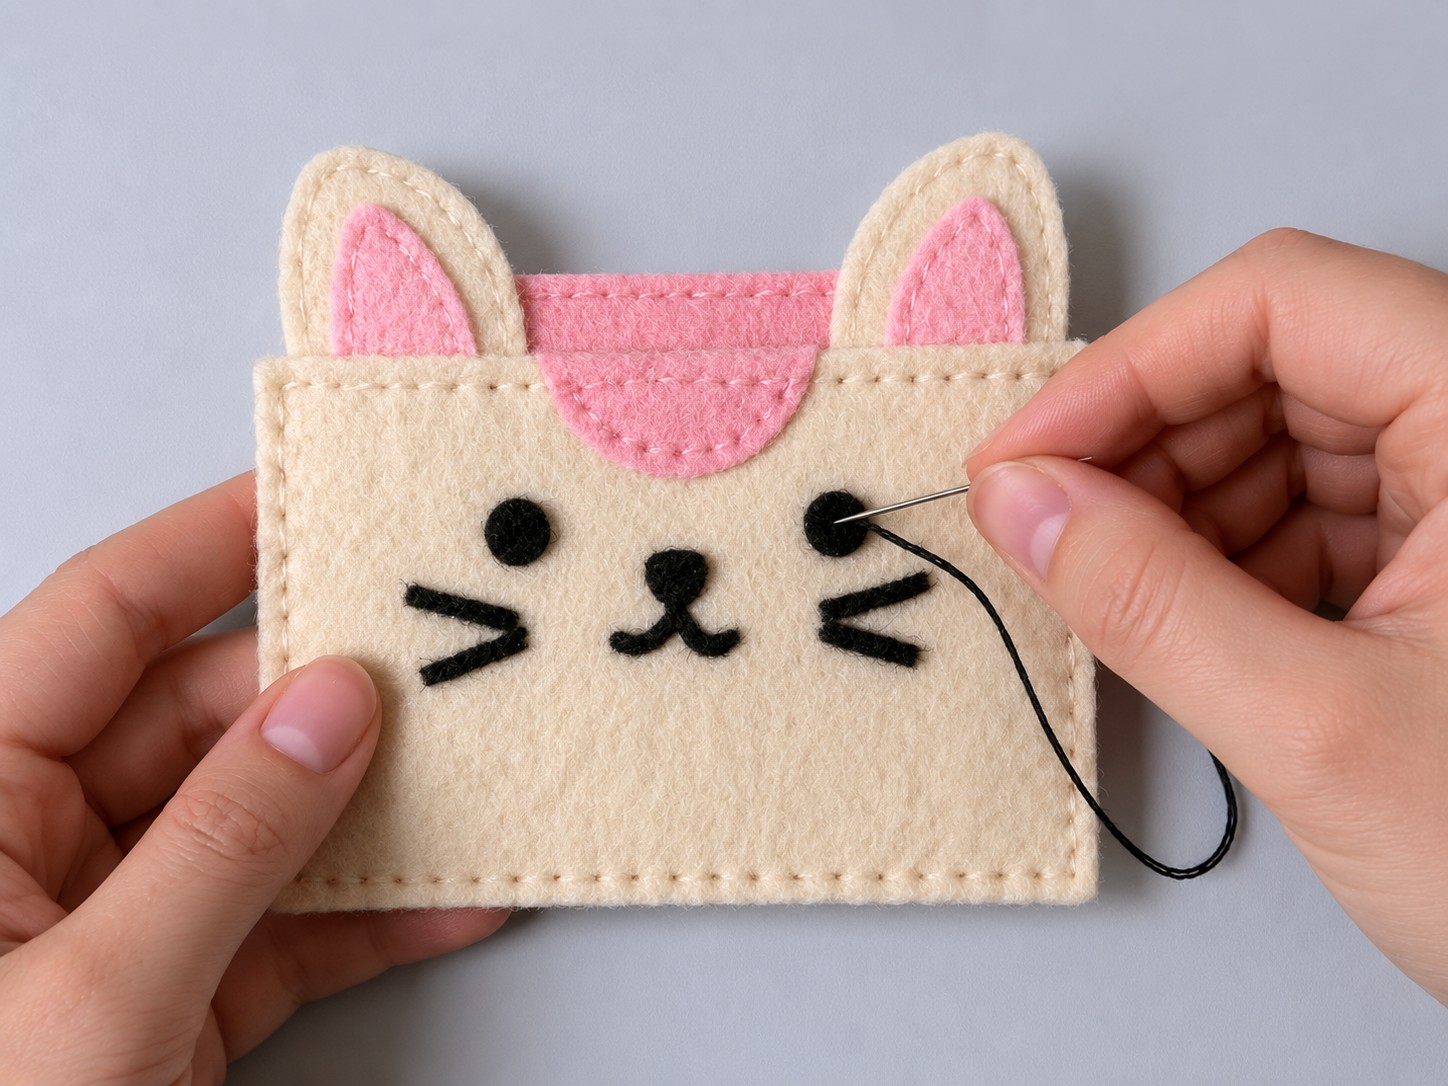
Cut two black felt circles approximately 7 to 9 mm in diameter for the eyes.
Cut a small rounded triangular nose approximately 6 to 8 mm wide and 5 to 6 mm high .
Use the vertical center of the cream face as a guide when positioning the features.
Place the eyes at roughly equal distances from the centerline, then position the nose centrally beneath them.
Arrange the entire expression before sewing. Moving an eye only a few millimeters can noticeably change the appearance of the face.
Secure the eyes and nose with tiny stitches.
Use black embroidery floss for the mouth and whiskers.
Create two short curved stitches beneath the nose to form the mouth, then add two short whisker lines on each cheek.
Keep the embroidery tension gentle so the cream face remains flat.
After sewing, press each felt eye and the nose lightly with a fingertip. Reinforce any edge that lifts.
6. Add the Pink Corners and Flower
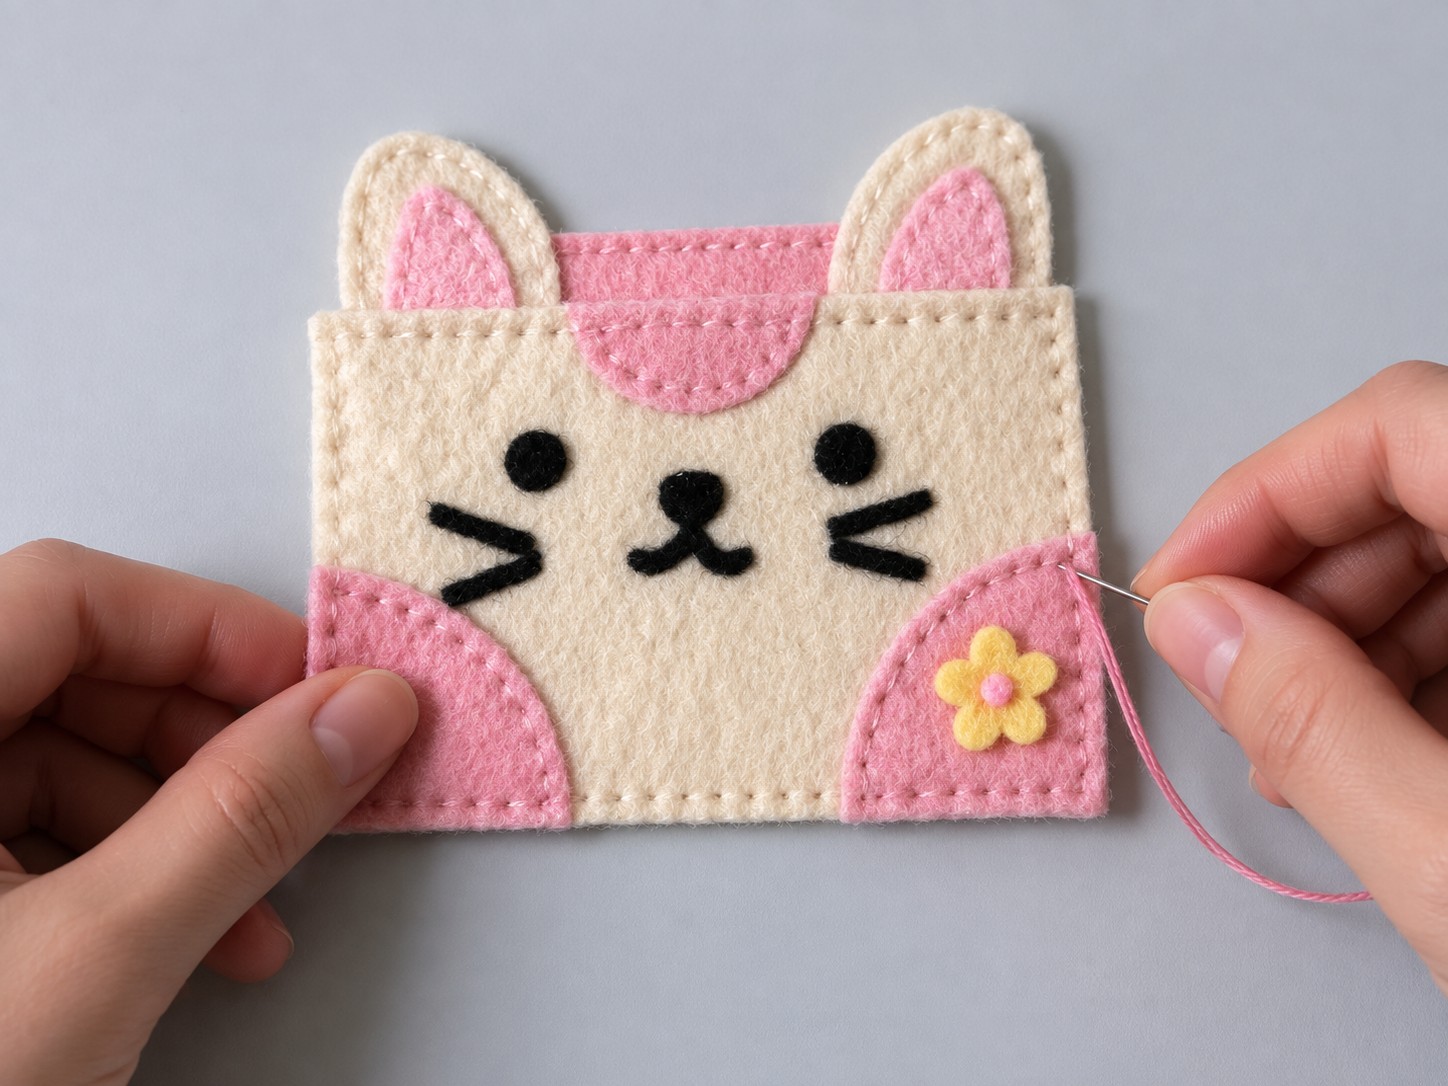
Cut two rounded pink corner appliqués approximately 3 to 3.5 cm across .
Place one at the lower left and one at the lower right of the cream face.
Their curved sections should extend inward while their straight outside edges align with the wallet perimeter.
Sew only along the visible curved inner edges with small running stitches. The straight outside edges will later be secured by the final blanket stitch.
Cut a yellow five-petal flower approximately 1.5 to 2 cm across .
Cut a pink circle approximately 4 to 5 mm in diameter for the flower center.
Position the flower on the right pink corner .
Pass several small stitches through the pink center and the yellow flower beneath it so both layers are anchored together.
Fabric glue can be used sparingly to prevent tiny pieces from shifting, but the stitches should provide the structural attachment.
7. Prepare the Front for Assembly
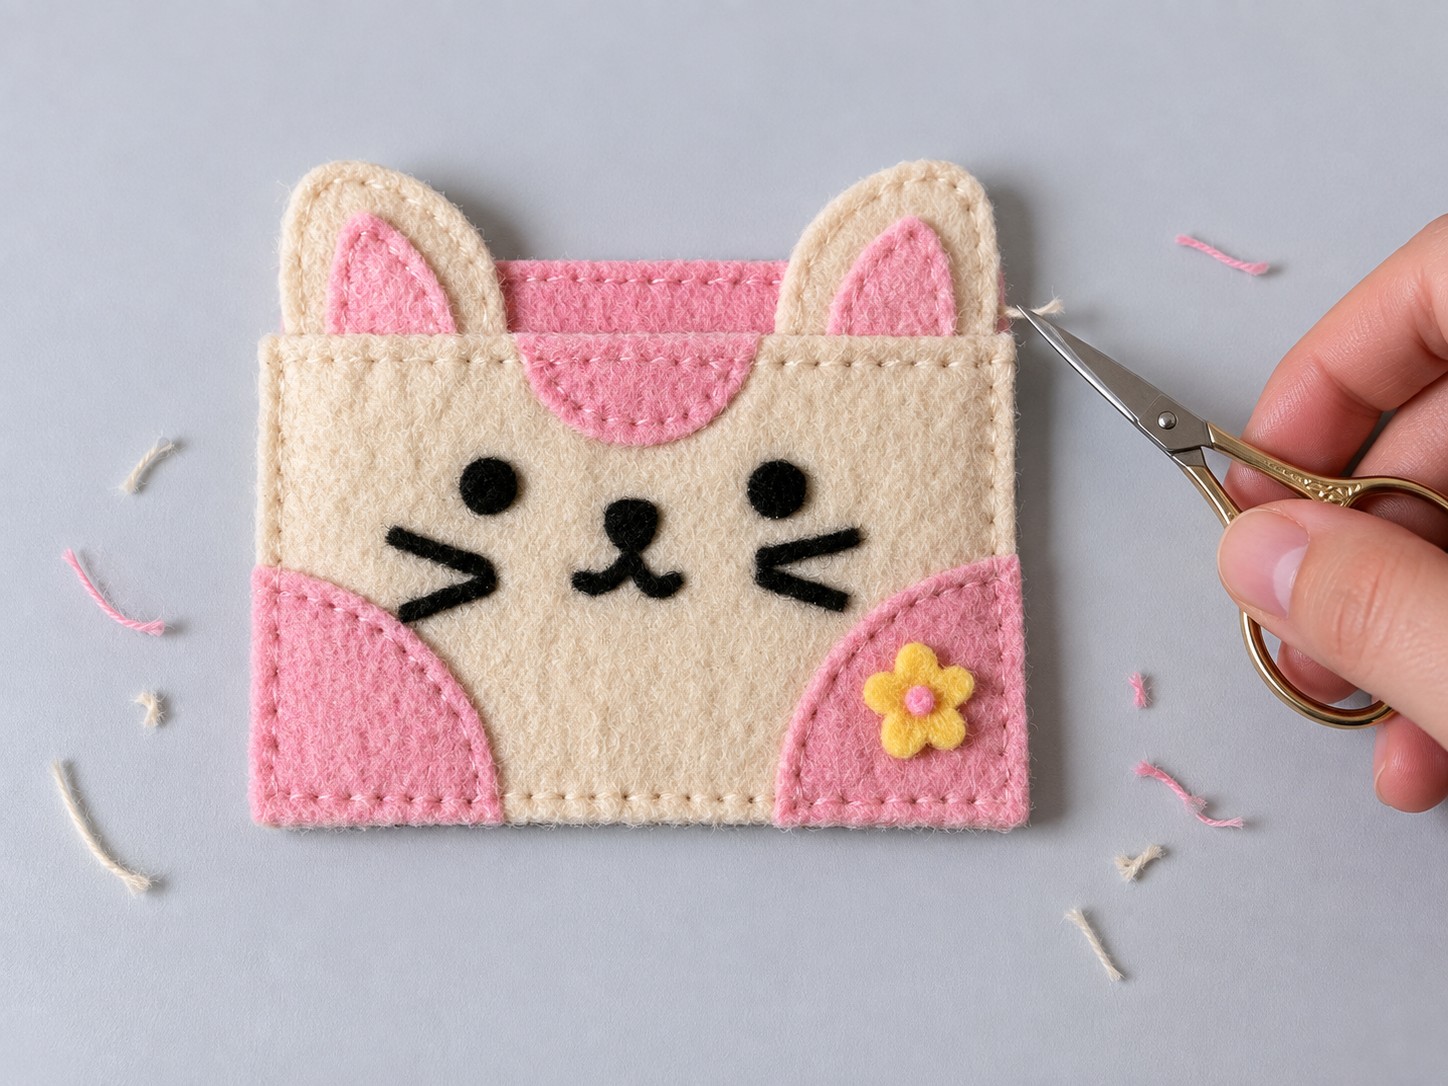
Lay the finished decorative front on a flat work surface.
Check that:
- Both ears sit at similar heights
- The cream face remains flat
- The upper pink accent is centered
- The eyes and nose are secure
- The lower corner appliqués do not lift
- The flower remains firmly attached
Turn the front panel over.
Trim long thread tails and secure any loose knots. Keep knots as flat as possible so they do not create noticeable bumps inside the pocket.
Run your fingertips lightly across the front.
If the cream face or another appliqué curls upward, inspect the nearest stitches. Excessive thread tension is usually the first thing to correct.
Loosen and resew that area before attaching the back panel.
8. Align and Test the Pocket
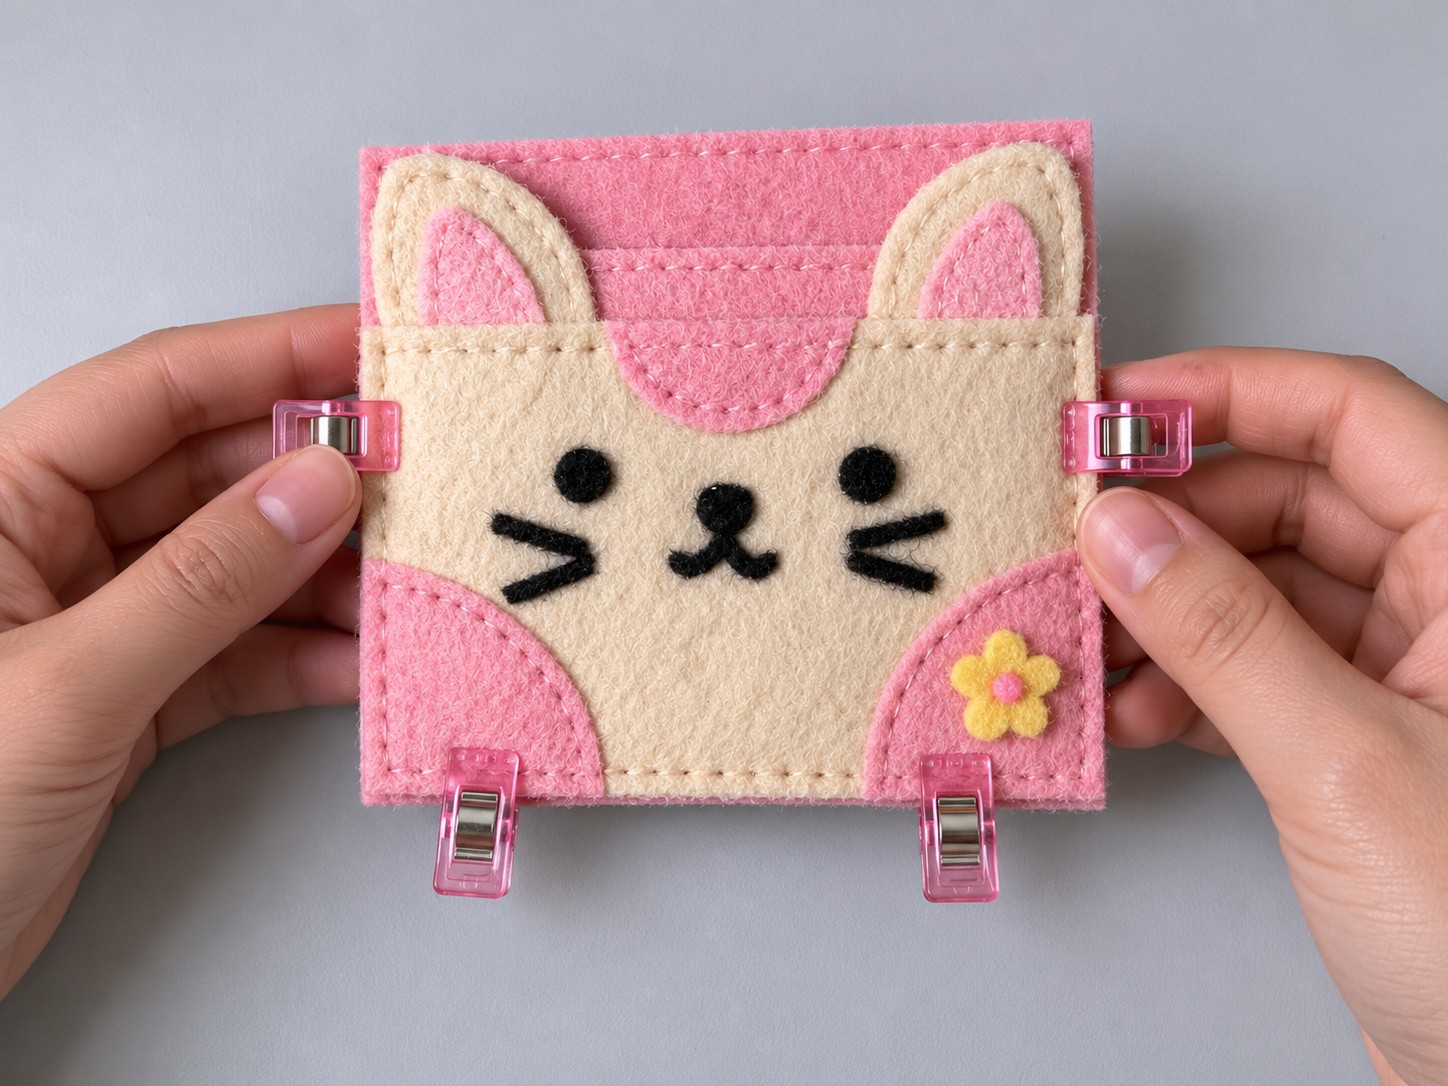
Place the plain pink back panel behind the decorated front.
Insert the card you intend to carry between the two panels.
Check both width and depth.
The card should slide between the planned side seams without forcing the felt outward. It should also be easy to grip from the upper opening.
If the card sits too deeply, shorten the pattern height before completing the project. If it feels tight from side to side, increase the body width by a few millimeters.
Remove the card once the fit is confirmed.
Align the left, right, and bottom edges of the two felt panels.
Clip the complete front and back assembly together along the sides and bottom only .
Leave the entire top edge free. This becomes the pocket opening.
Before sewing, look around the perimeter and confirm that one panel is not extending noticeably beyond the other.
9. Blanket Stitch the Pocket
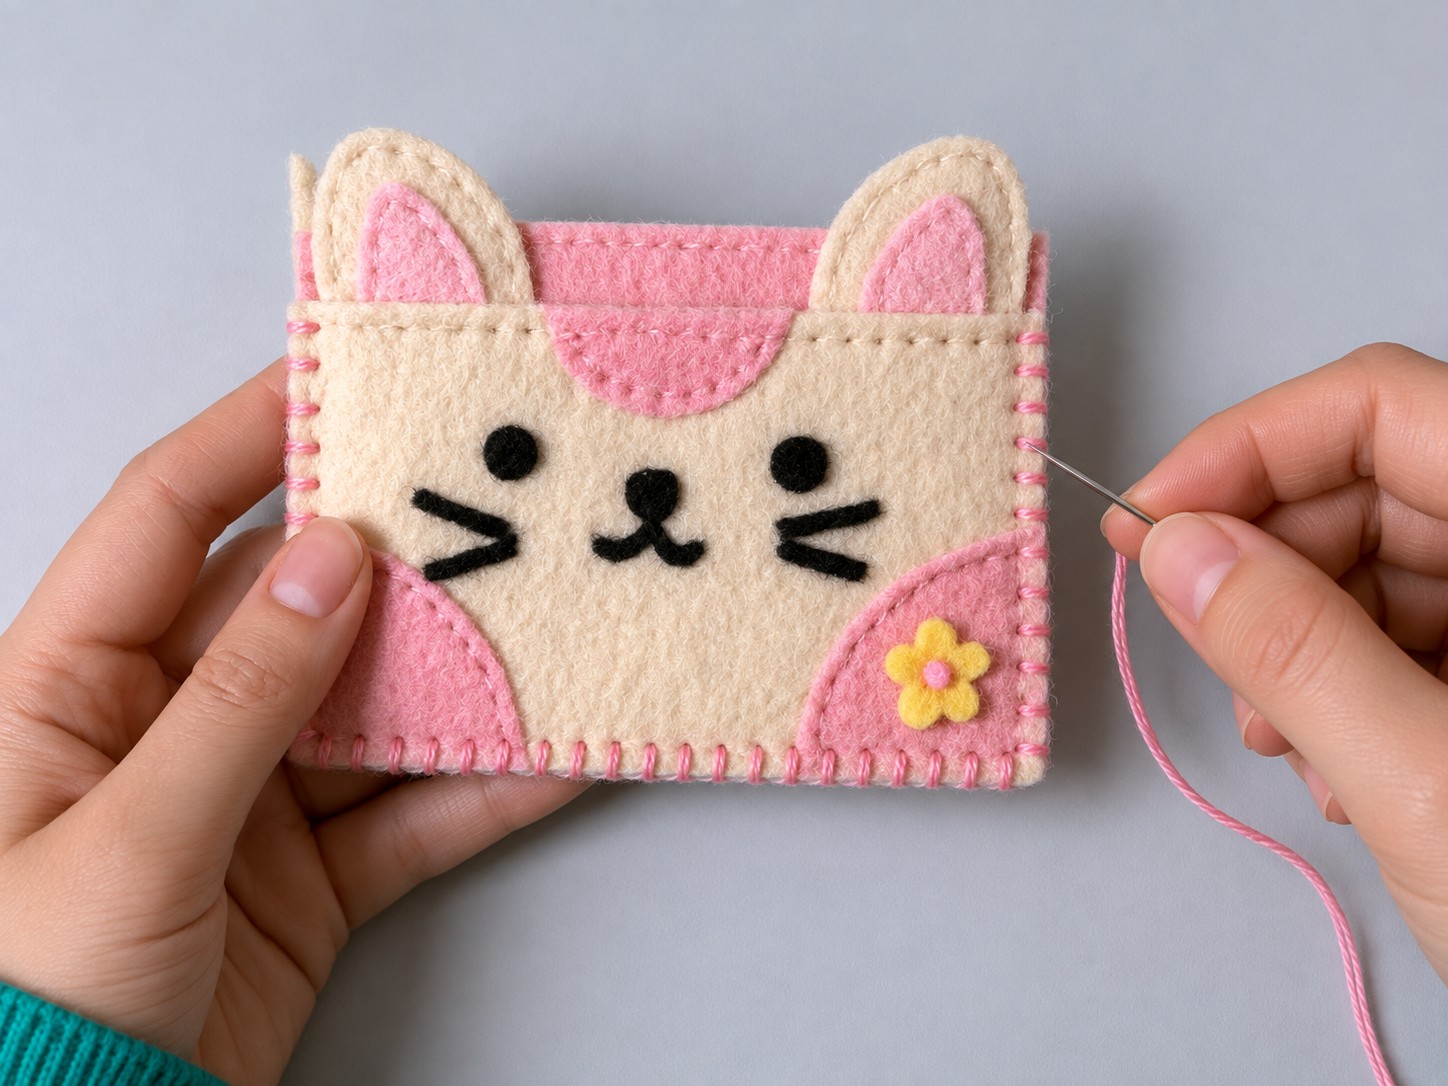
Thread the needle with pink sewing thread.
Begin near one upper side corner.
Hide the starting knot between the two felt layers and bring the needle out approximately 3 mm from the cut edge .
Form the first blanket stitch around both panels.
Continue down the first side, across the bottom, and up the opposite side.
Maintain approximately:
- 3 mm edge distance
- 3 to 4 mm stitch spacing
Remove the sewing clips gradually as the stitching approaches them.
Do not stitch across the top edge.
Use light and consistent thread tension so the seam wraps neatly around the felt without causing the holder to curl.
At the final upper corner, pass the thread through the previous stitch once or twice to secure it.
Insert the needle between the two felt layers, bring it out a short distance away, and trim the thread close to the surface. The remaining thread end will stay hidden between the layers.
Final Fit and Quality Check
Insert and remove the intended card several times.
It should move without bending, snagging on the side seams, or forcing the felt outward.
Check that:
- The entire upper opening remains free
- The card is easy to grip and remove
- Both side seams are continuous
- The bottom seam has no skipped stitches
- Blanket stitch spacing looks reasonably consistent
- Both ears remain secure
- The eyes and nose do not lift
- The flower remains firmly attached
- The empty holder lies flat without obvious puckering
If the card fits correctly but sits deeper than you prefer, shorten the body height on the next version rather than altering the safe 3 mm side seam position.
Troubleshooting the Fit
If the card is difficult to insert, first check the blanket stitch placement.
A seam positioned noticeably farther than 3 mm inward can reduce the usable width of a small pocket.
Do not solve this by moving the stitches extremely close to the cut edge. Leaving too little felt outside the stitch can weaken the seam. For a decorative companion project using similar felt and stitching skills, explore this felt flower pot tutorial.
If the seam position is correct but the card still feels tight, enlarge the paper pattern width by a few millimeters.
Check the felt thickness as well. Felt substantially thicker than 1.5 mm may require a slightly wider pattern.
If the card disappears too far below the opening, shorten the body height. A finished internal depth of roughly 5.8 to 6 cm provides easier access for a standard 5.4 cm high card.
If the card moves excessively from side to side, reduce the body width slightly while still leaving enough clearance for smooth removal.
Testing the real card against the paper pattern before cutting is the most reliable way to avoid these fit problems.
Care and Everyday Use
Use the finished holder for flat cards rather than coins, keys, or bulky objects that could stretch the seams.
For small marks, spot clean the felt with a lightly damp cloth rather than soaking the entire holder.
Avoid hot water, irons, hair dryers, and other high heat sources because excessive heat can distort synthetic felt.
If temporary fabric glue was used, avoid prolonged soaking because moisture may weaken some adhesives.
If the holder becomes wet, gently reshape it and leave it flat on a dry surface to air dry naturally.
Store the card holder flat when it is not in use and avoid placing heavy objects on top of it. This helps the ears retain their shape and prevents the pocket from becoming permanently compressed.
If an appliqué loosens after repeated use, reinforce it with matching thread rather than covering it with a thick layer of glue.


Leave a Reply