
These 19 recycled art projects turn classroom packaging and leftover craft materials into animal portraits, useful organizers, story characters and shared displays. The illustrated making stages explain how to prepare a base, build decorative layers and attach them neatly. Each idea also includes a classroom use and practical preparation advice. Choose a project for its purpose, whether children will make individual artwork, contribute to a group scene or create something that helps organize their daily supplies.
Table of Contents
- Choose a Project That Fits the Lesson
- Prepare Materials and Tools Before the Class Begins
- Build the Artwork in Layers
- Adapt the Making Methods to These 19 Ideas
- 1. Recycled Animal Garden Classroom Display
- 2. Painted Recycled Storage Box with Animal Portraits
- 3. Dinosaur Texture Board from Classroom Scraps
- 4. Monster Stool for a Classroom Display
- 5. Cardboard Animal Portrait Gallery
- 6. Tin Can Animal Pencil Holders
- 7. Cereal Box Animal Organizers
- 8. Milk Carton Animal Houses
- 9. Paper Bag Animal Story Characters
- 10. Cardboard Tube Jungle Totems
- 11. Plastic Bottle Animal Planters
- 12. Hanging Cardboard Animal Display
- 13. Paper Roll Classroom Characters
- 14. Shoebox Animal Diorama
- 15. Yogurt Cup Animal Pots
- 16. Packaging Box Robots and Animal Sculptures
- 17. Cardboard Animal Garland Flags
- 18. Shoebox Animal Storage Chest
- 19. Upcycled CD Animal Art
- Use the Finished Work and Keep the Materials Organized
Choose a Project That Fits the Lesson
Idea 5 gives each child a separate animal portrait. Ideas 1 and 12 combine contributions into a shared display, while 9 and 14 support storytelling. Boxes and pencil holders suit a classroom organization activity. Match the task to the group's cutting and assembly skills, the available drying space and where the result will be used. A large group sculpture needs more setup than one flat portrait.
Prepare Materials and Tools Before the Class Begins
Collect clean, dry cardboard, paper bags, cartons, rolls and suitable containers. Add paper or fabric scraps, soft felt, a little yarn, brushes, pencils and age appropriate scissors. Choose paints and adhesives intended for the children's use and follow their labels. Select attachment methods for both surfaces: a glue stick for paper layers is not automatically suitable for plastic or metal.
Adults should prepare difficult cuts, remove exposed staples and reject sharp, cracked or damaged containers. Follow the school's reuse and hygiene policy; keep containers that held chemicals out of the craft collection. Sort materials into base pieces and decorative scraps, and provide a place for work to dry without stacking wet surfaces together.
Build the Artwork in Layers
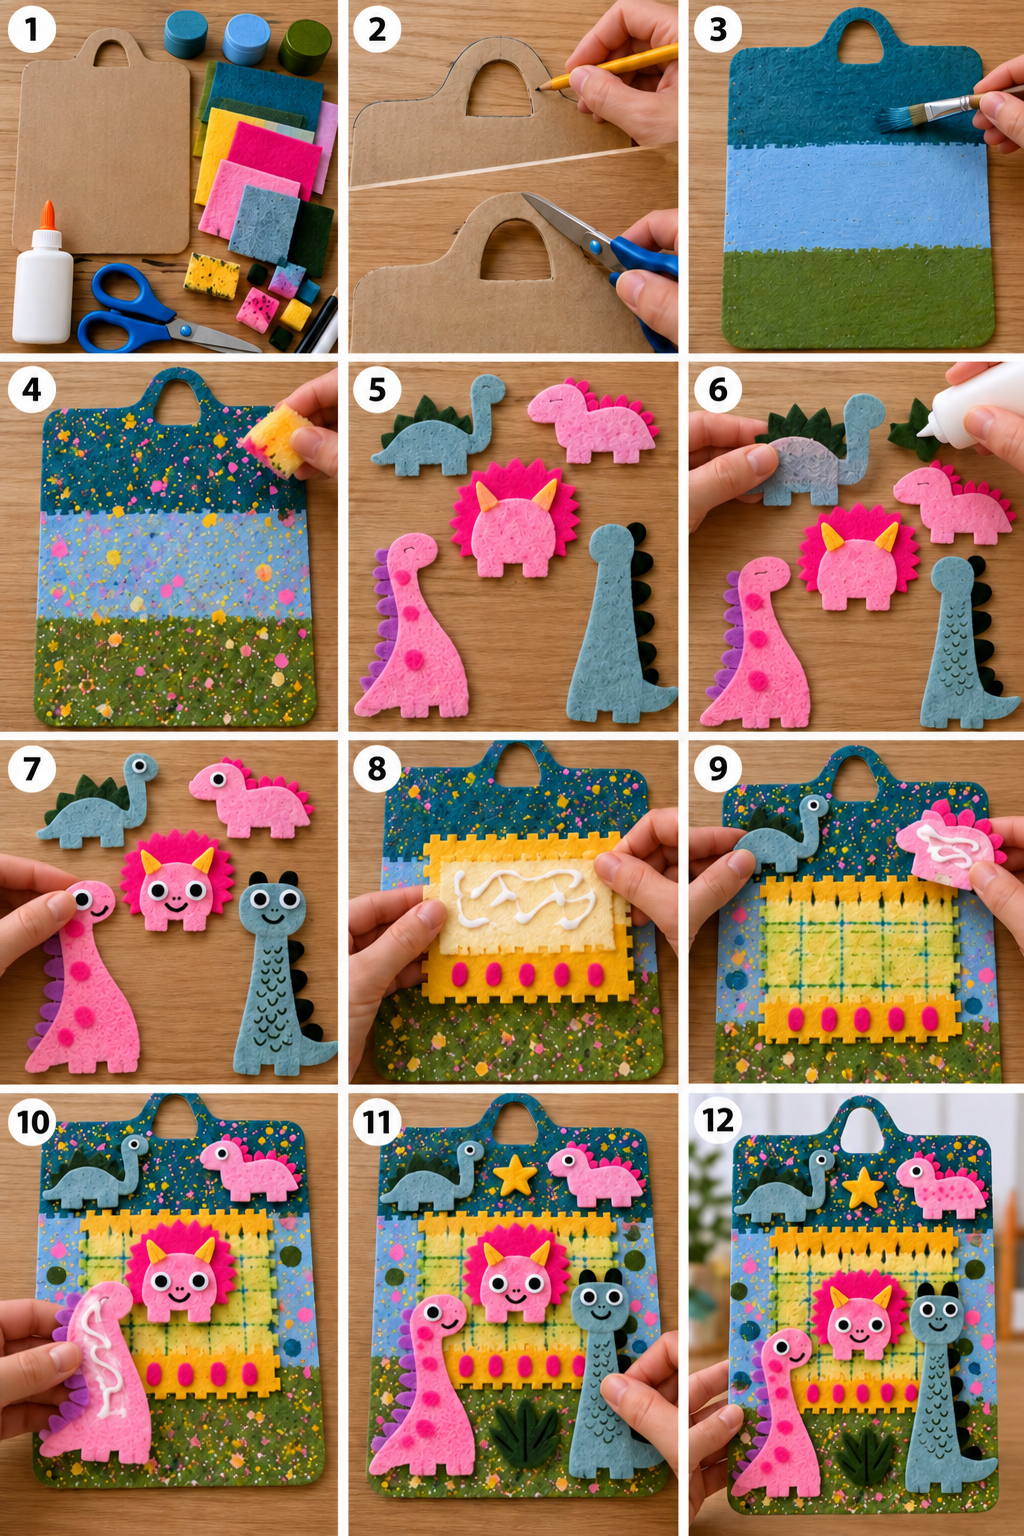
The making stages show a shaped cardboard base being outlined and trimmed, painted in color bands and decorated with sponge marks. Separate dinosaur shapes receive their smaller features before being placed around the central textured area. This sequence helps children complete manageable parts before assembling a larger composition. The same approach can guide animal portraits, box panels and other flat decorations.
Prepare a firm base first and allow its painted surface to dry as the product directs. Arrange larger shapes without glue, leaving room for smaller details. Apply a suitable adhesive to each piece's hidden back or contact surface, then press it into position. Add thin layers rather than soaking absorbent cardboard. Where material projects beyond the base, provide enough overlap for attachment; a tiny contact point may not support a large ear or tail.
Adapt the Making Methods to These 19 Ideas
Use the preparation, painting and layering sequence below as a starting point, changing the base to suit each project. A pencil holder must keep its opening clear, a storage box needs usable handles, and a story character needs the movement you intend. The following ideas explain those differences so the decorated result can serve its classroom purpose.
1. Recycled Animal Garden Classroom Display
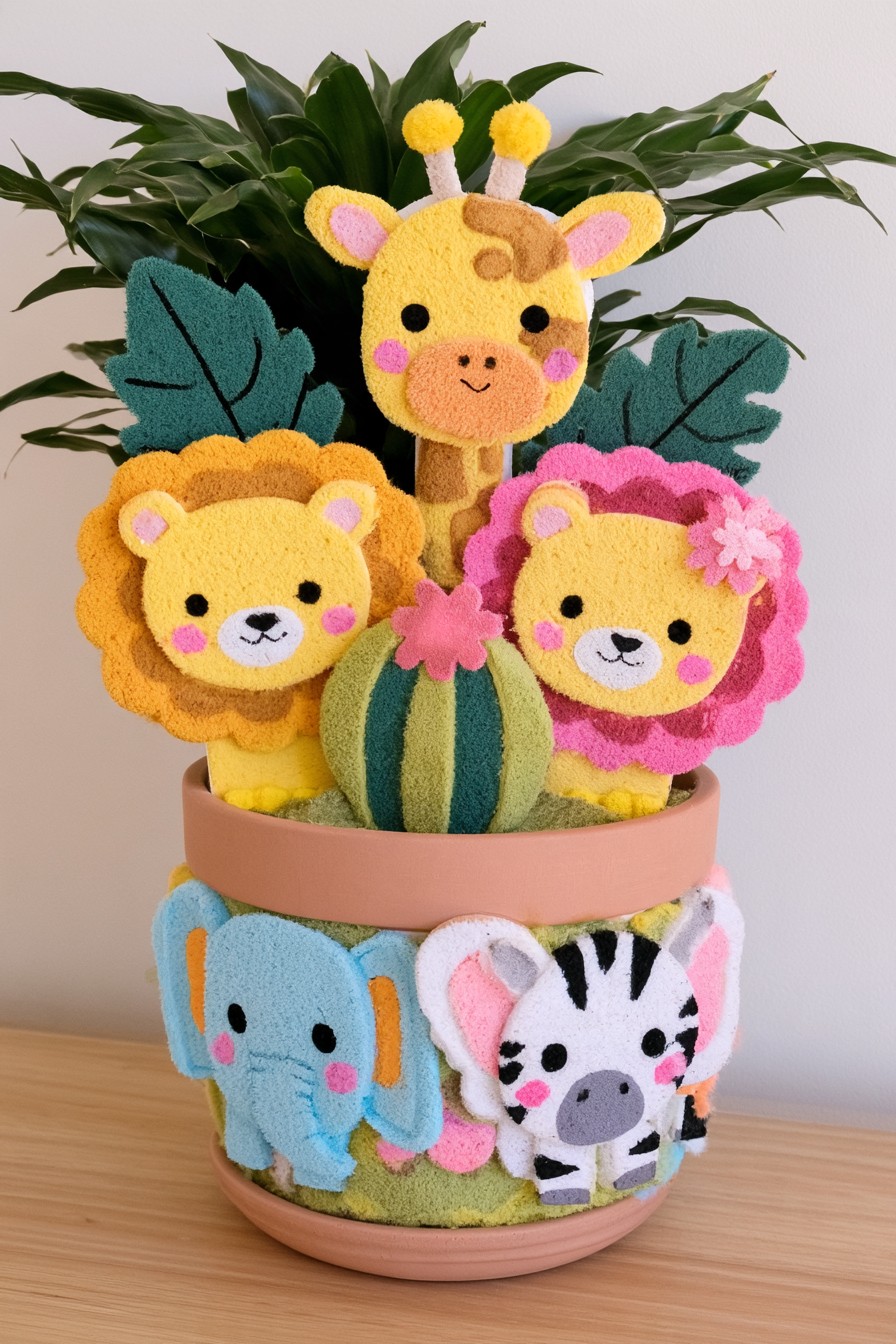
Tall animal shapes rise above a decorated pot, while an elephant and zebra face occupy the front. Flowers and leaves connect the different characters into one garden scene. Use this arrangement for a shared class display: each child can prepare one animal or plant shape, then the group can decide how the pieces fit together. Keep taller contributions behind the smaller foreground details.
For a similar result, choose a stable container and prepare the animal layers separately from lightweight scraps. An adult can cut thick bases while children arrange and paint the features. If a live plant shares the display, keep paper and textile decorations away from damp growing medium and use a suitable separate inner pot. A dry display version can remain in the reading corner without plant care.
2. Painted Recycled Storage Box with Animal Portraits
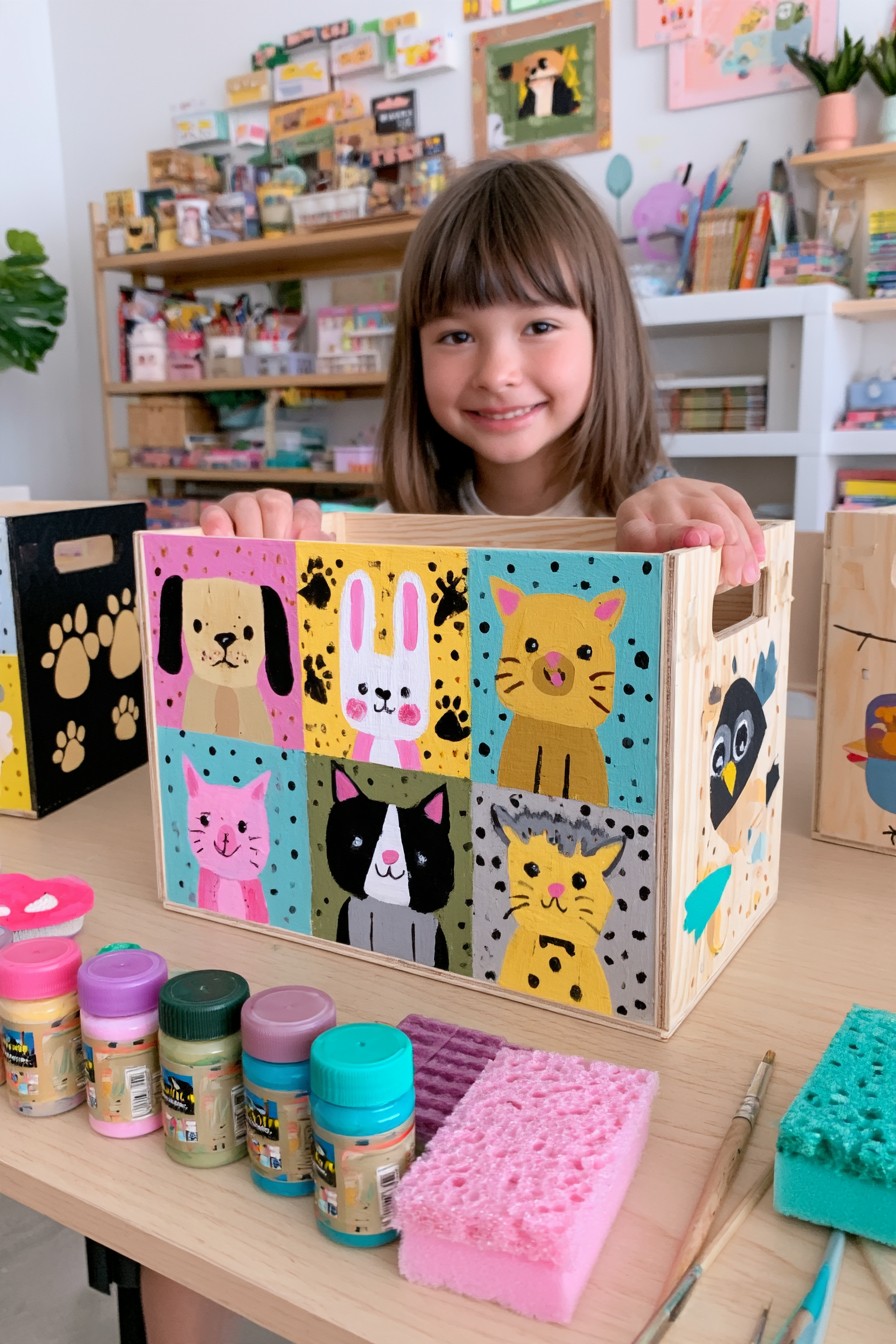
A sound crate or reinforced cardboard box offers both an art surface and a practical home for supplies. Divide its sides into panels and invite students to paint different animals. Repeating the panel size brings the portraits together even when each child chooses a different color palette or painting style.
Decide what the box will hold before decorating it; heavy books require a sturdier container than paper scraps or markers. Keep the inside and handles clear of thick paint or attached pieces. Once dry, the box can return to daily classroom use, making the purpose of the redesign easy to see. If separate animal panels are added, attach them within each side and leave the lifting points accessible to small hands.
3. Dinosaur Texture Board from Classroom Scraps
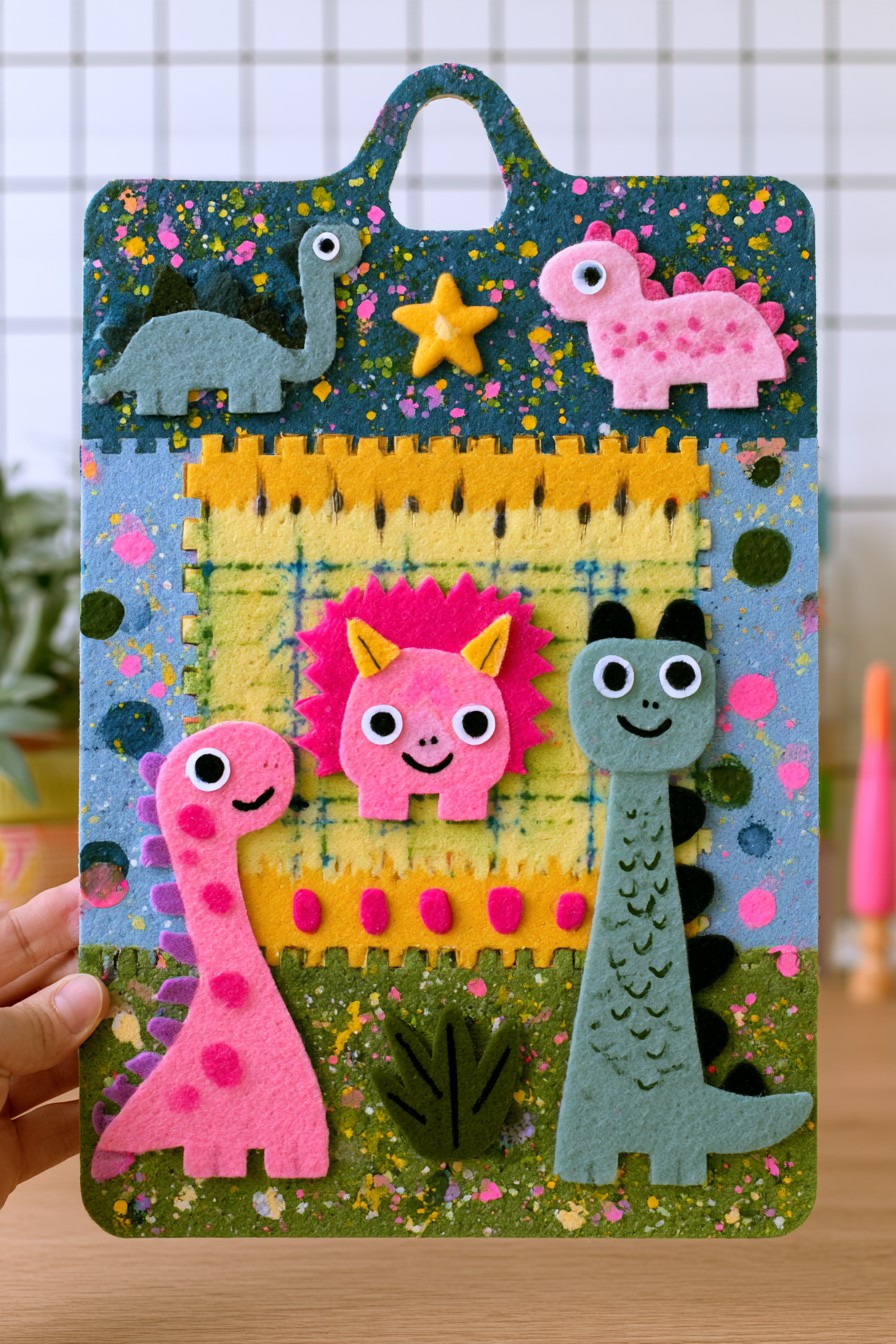
The dinosaur board combines a painted background, a yellow textured center and several raised animal shapes. Long necks, broad frills and contrasting spikes give each character a different outline. This is the project illustrated in the making stages, so it is a useful choice when the class wants to practice the same layering sequence. Plan the larger shapes around the central area before adding spots, stars or leaves.
Use sound packaging cardboard as a base and adapt clean felt or fabric scraps into separate decorations. The gridlike center can be recreated with a suitable textured scrap or a planned strip arrangement; its appearance does not specify a weaving method. Complete the small facial features while the dinosaurs lie flat, then apply adhesive to their backs. Leave open background areas so the different textures remain easy to identify.
4. Monster Stool for a Classroom Display
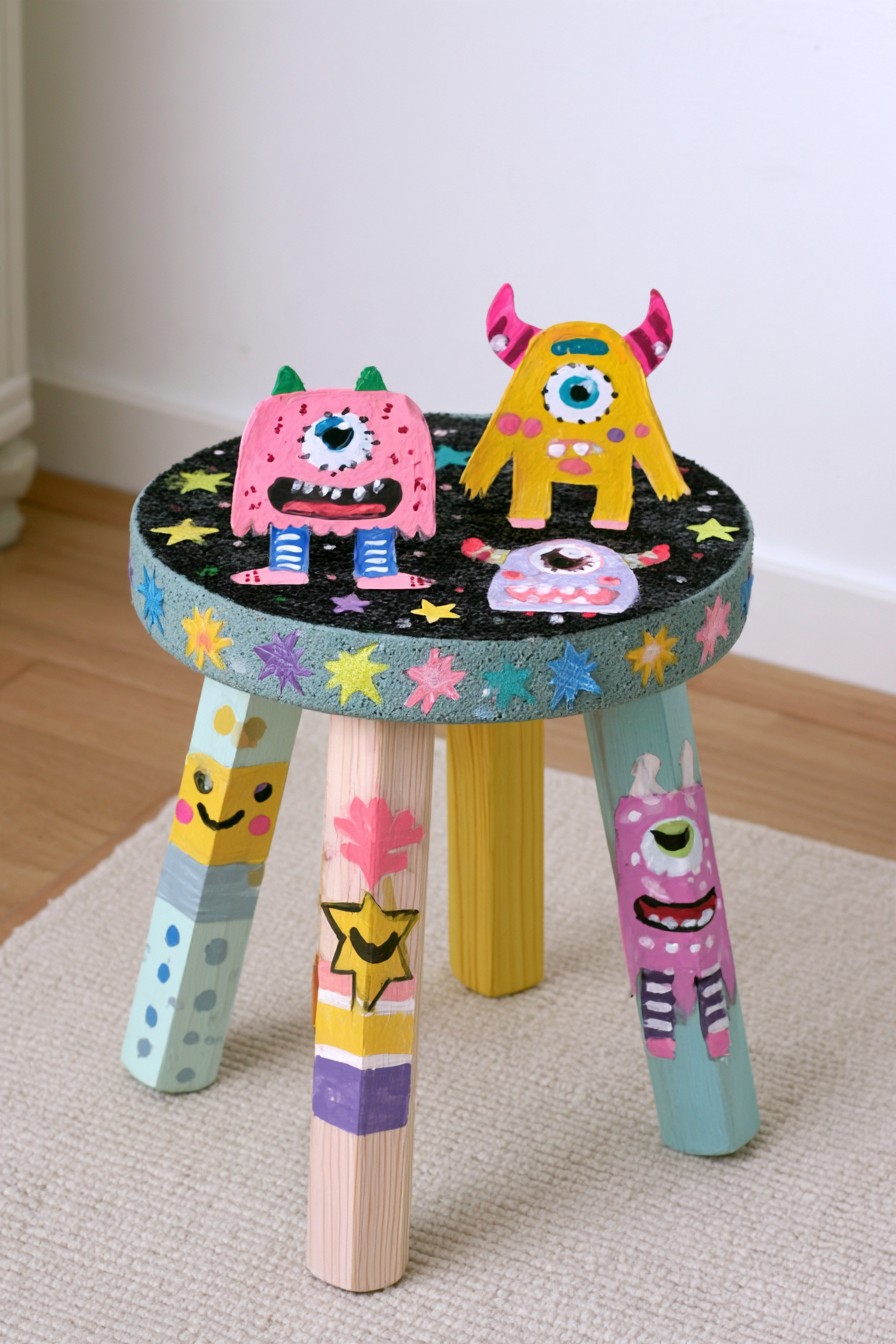
Painted legs and a patterned seat give this stool a colorful outline, but the raised monster figures on top create its main display. Those figures are separate decorative pieces added above the surface; painting alone would not reproduce their shape. Their precise materials and connections are not visible. To adapt the look, prepare lightweight figures separately and plan how their bases attach to the finished display surface.
Treat the pictured arrangement as a decorative stand, with the raised pieces occupying the seat. A version intended for sitting needs a clear seating surface with those additions removed. An adult should check the stool and assess any unknown old coating before surface preparation. Choose a compatible paint system and follow its return to use instructions. Children can design the monsters and leg patterns after the adult preparation is complete.
5. Cardboard Animal Portrait Gallery
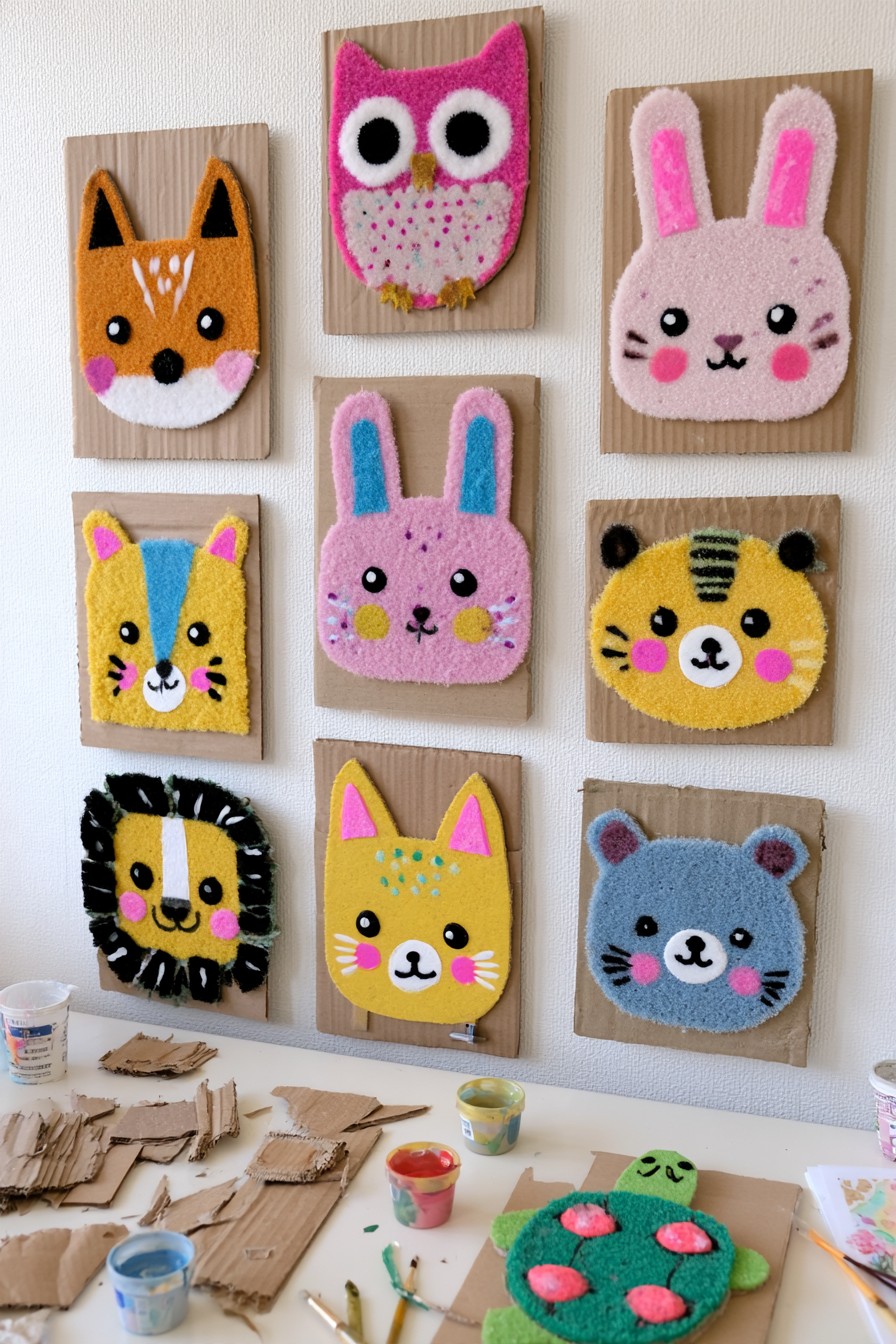
Cut shipping cardboard into similarly sized panels to create a class gallery with many different animal faces. Felt, paper, yarn, sponge, and fabric scraps can become ears, fur, feathers, and markings. An owl, fox, rabbit, and lion may all begin with the same panel shape yet look entirely different.
Ask students to arrange their pieces before attaching them, paying attention to which details make an animal recognizable. Group the finished panels together on a display board and label the materials used. The shared format gives the gallery cohesion without requiring every child to copy one design. Before mounting, ask each maker to explain one material choice and one feature that identifies the animal.
6. Tin Can Animal Pencil Holders
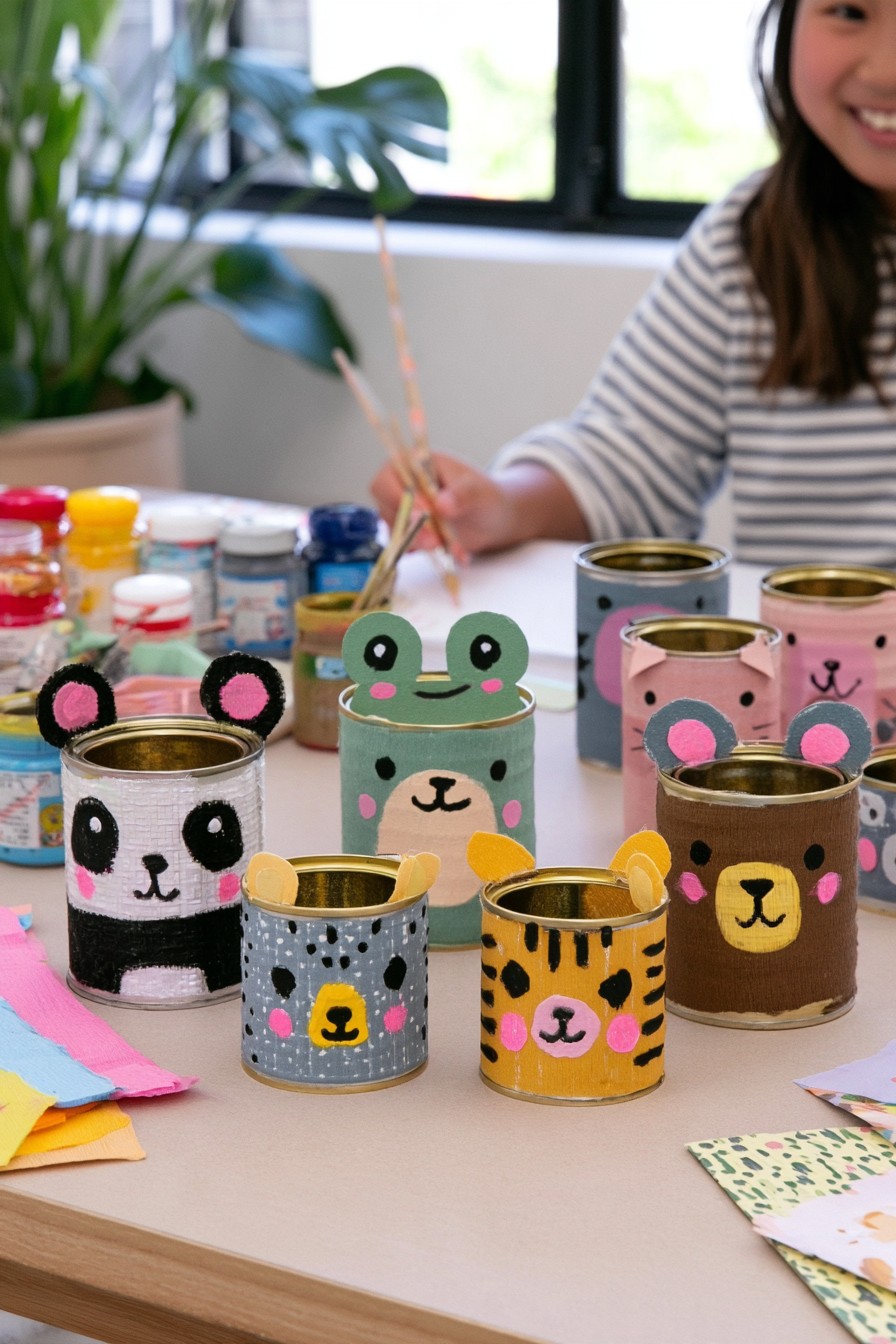
Clean food cans can become individual pencil or brush holders decorated as frogs, pandas, bears, or other animals. Painted faces establish the character, while paper or felt ears add a little dimension. Different animals can also help identify where pencils, brushes, and markers belong.
Only use cans whose rims an adult has checked and made safe; discard any container with a sharp or damaged edge. Keep decorations on the outside and away from the opening so supplies are easy to remove. If suitable cans are unavailable, sturdy cardboard cylinders can be decorated in the same way. Let the class match an animal holder to one supply category, then check that the contents do not make it unstable.
7. Cereal Box Animal Organizers
Cereal boxes are light enough to turn into a coordinated set of organizers for worksheets, flash cards, and craft paper. Cutting them to different heights creates compartments for different materials. Painted paper or leftover wrapping can cover the packaging before students add animal faces and patterned borders.
Choose each box height according to what it will store: tall sides support loose sheets, while shorter fronts make cards easier to reach. Reinforce the bottom if the contents are heavier. Students can design separate animal labels, making classroom cleanup more intuitive after the project is complete. Covering one flat side at a time can help students manage glue and alignment without collapsing an open box.
8. Milk Carton Animal Houses
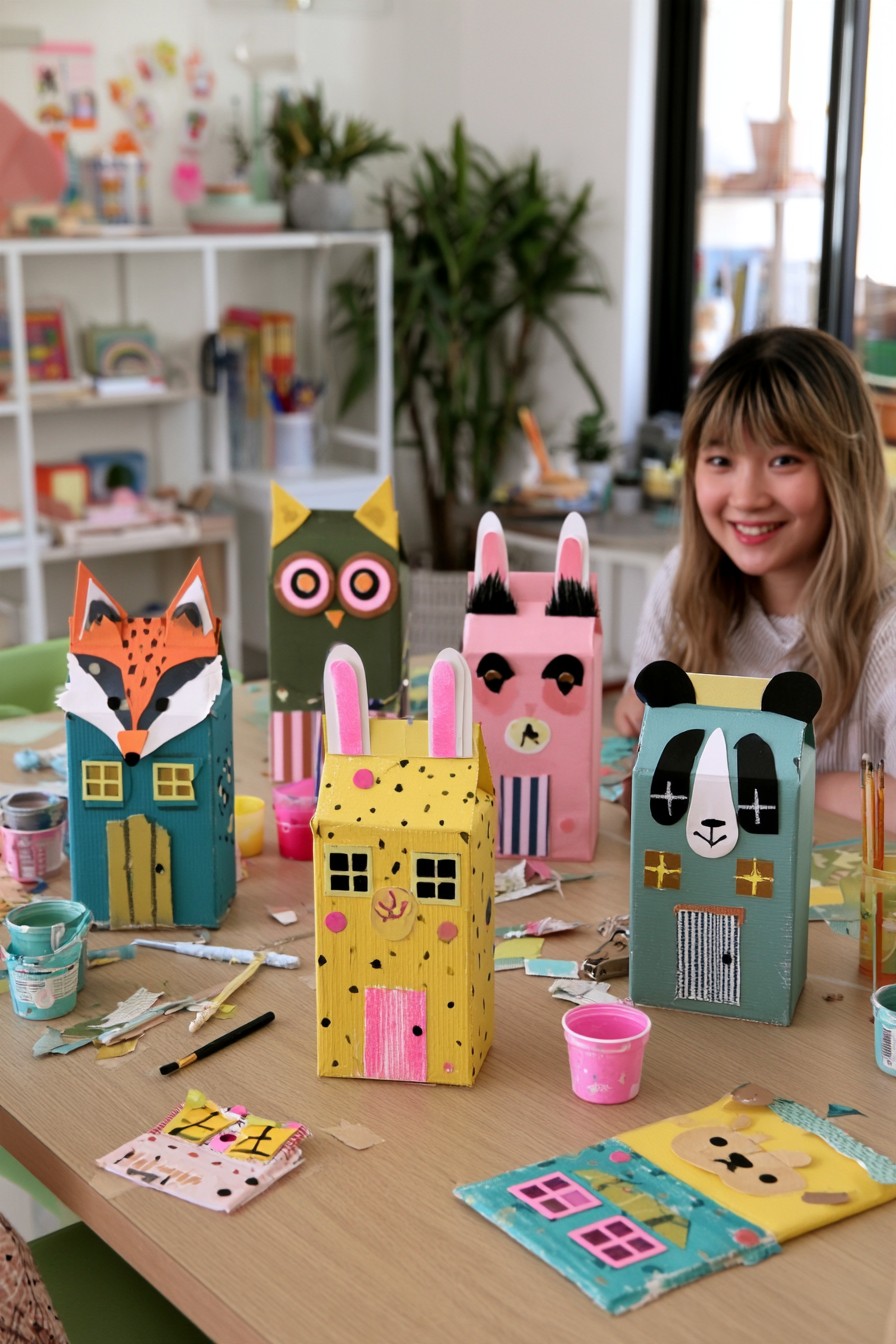
A clean, dry milk or juice carton already has the outline of a small house. Paint or paper can cover its sides, while cardboard scraps form animal faces, doors, roof details, and simple garden features. Each student can imagine who lives inside and how the house reflects that character.
Adults should prepare any openings or cuts in advance. Students can draw a door rather than cutting one if the houses will serve as display pieces. Place several cartons together to create a miniature neighborhood and use it as a setting for short stories. Try paper coverings on a clean carton first; its coated surface may not accept every classroom paint evenly.
9. Paper Bag Animal Story Characters
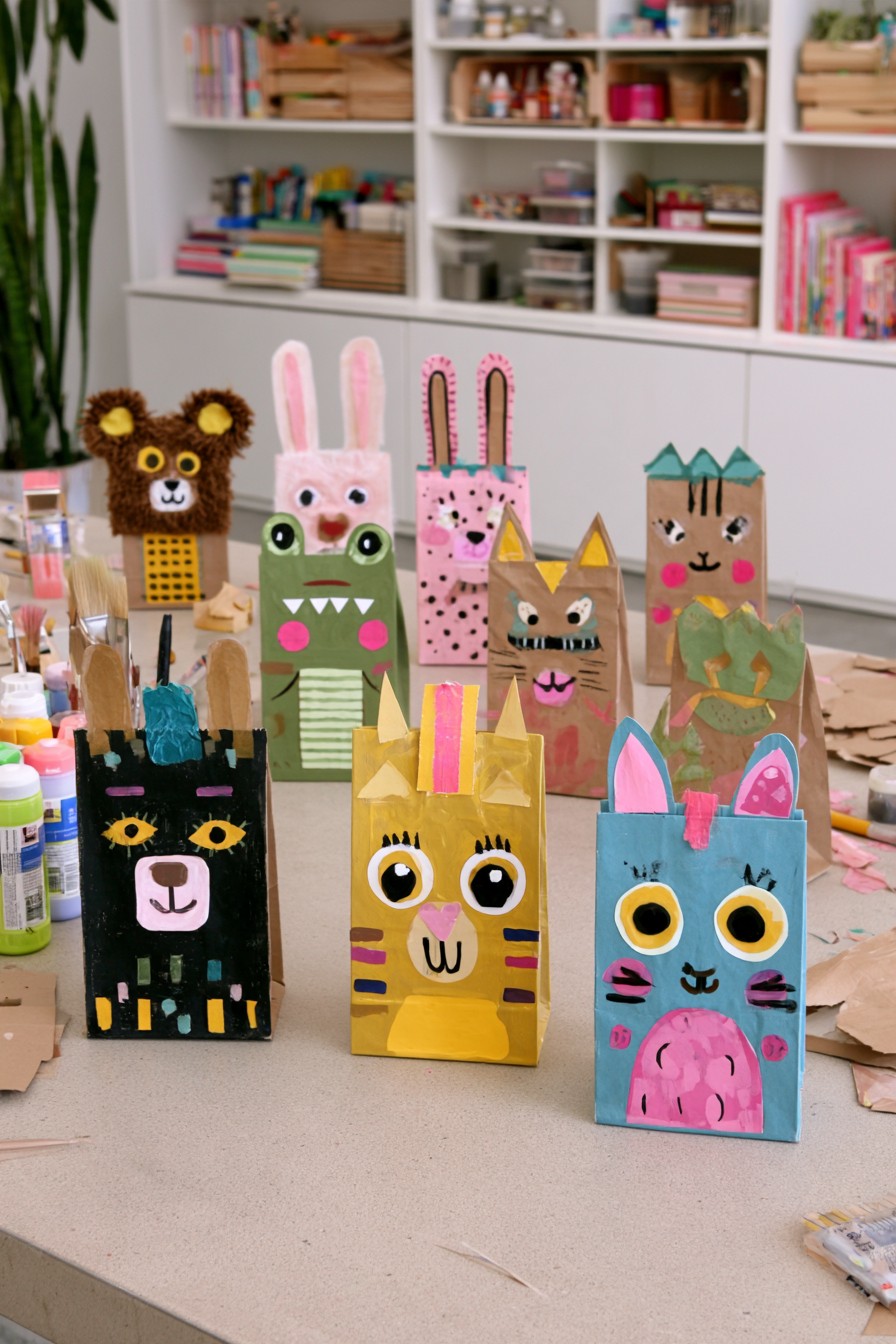
Animal faces decorate the fronts of upright paper bags, creating a varied cast with ears, whiskers and colorful body patterns. The pictured expressions are fixed; an opening mouth mechanism is not shown. These figures can stand in a story scene or be moved as complete characters, with children supplying voices and turns in the dialogue.
For a separate moving mouth adaptation, choose a bag with a folded bottom flap and lay it flat. Place the head on that flap and the body below it, keeping their decorations independent. Do not glue across the fold or attach the flap to the body; test the movement before completing the face.
Begin a story with a simple question and let another character answer. Clean, unused socks can add different characters to the same scene; these sock puppet character ideas provide an alternative material and appearance.
10. Cardboard Tube Jungle Totems
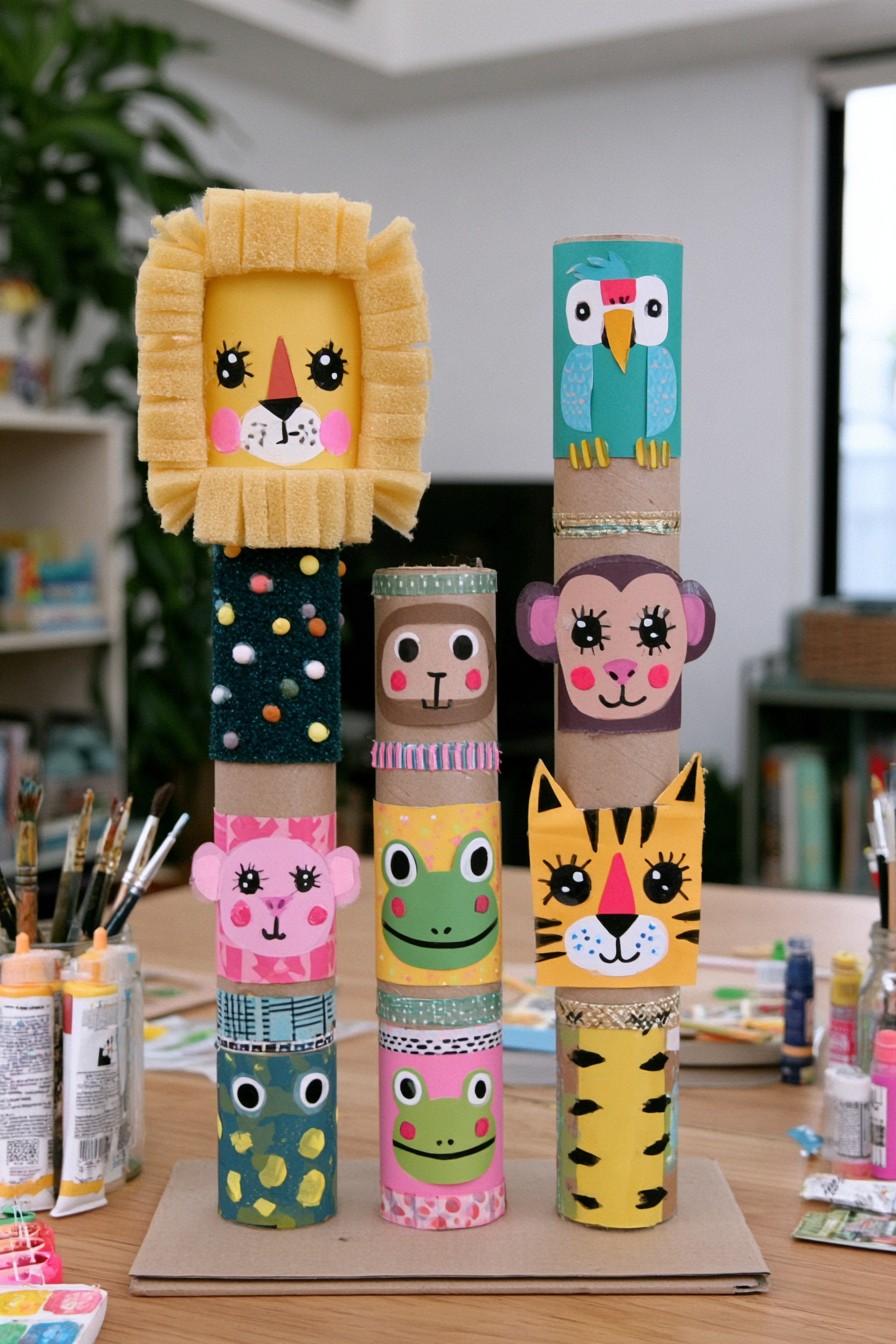
Paper towel rolls and sturdy mailing tubes can become stacked jungle characters. Each student decorates one tube section as a lion, parrot, frog, tiger, or invented animal. When assembled, the individual patterns create a tall collaborative sculpture with a clear repeated shape.
Try the arrangement on a table before fastening the sections, putting wider and sturdier tubes near the bottom. Secure the finished display so it cannot tip during classroom activities. Paper feathers, yarn manes, and painted markings add texture without placing too much weight high on the structure. Keep each tower short enough for its selected display position, with an adult arranging the joins between decorated sections.
11. Plastic Bottle Animal Planters
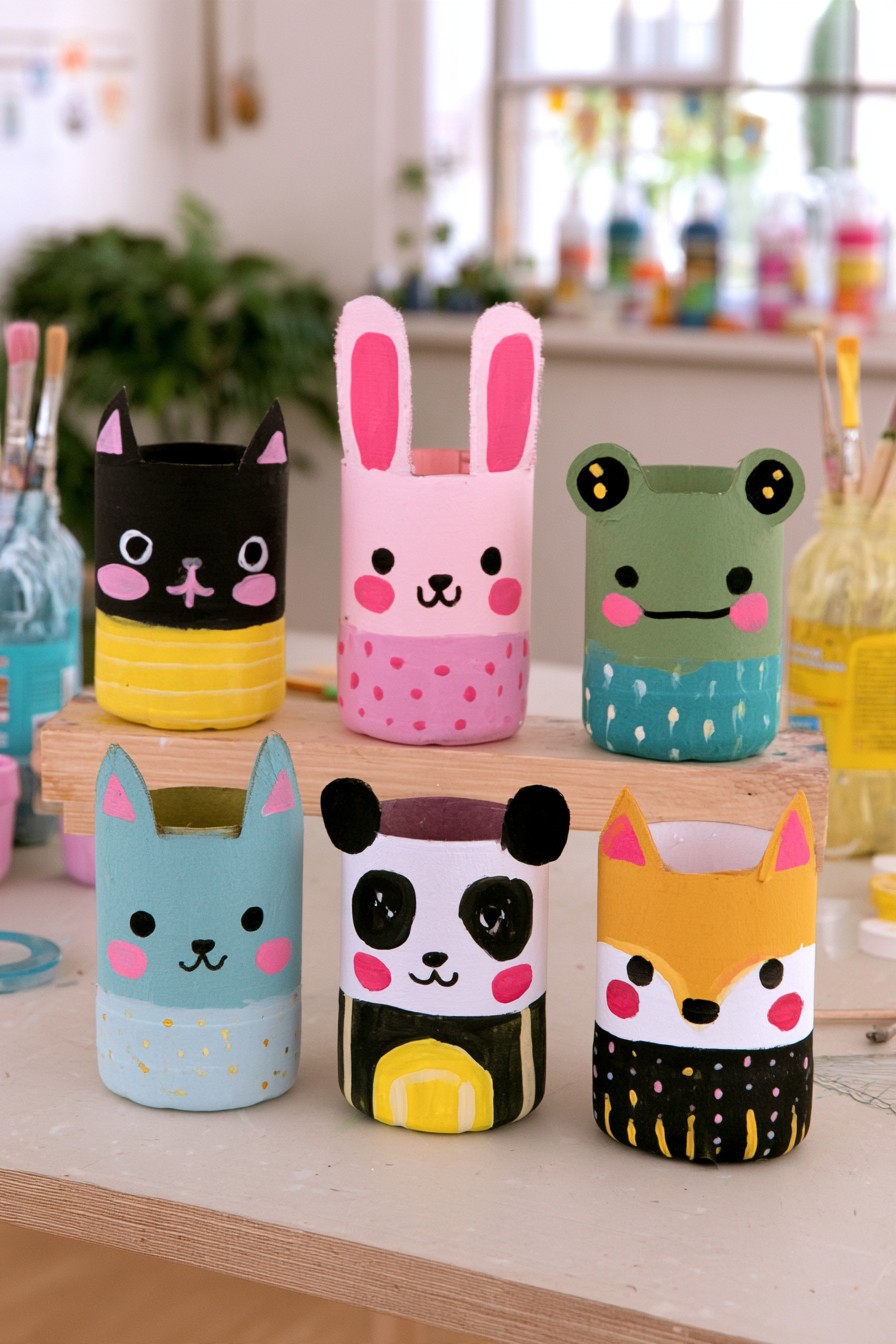
The lower half of a plastic bottle can become a small animal planter. An adult can cut the rim to include ears, while students paint faces and patterns for cats, rabbits, frogs, or foxes. A group of containers can hold a small classroom plant collection.
Adults should make every cut, smooth the edges, and prepare drainage if the containers will hold soil. Place a tray underneath to protect classroom surfaces from water. For a simpler activity, use the finished bottles as holders for dry craft supplies instead of planters. A removable inner pot can separate planting from decoration and make watering and drainage checks easier to manage.
12. Hanging Cardboard Animal Display
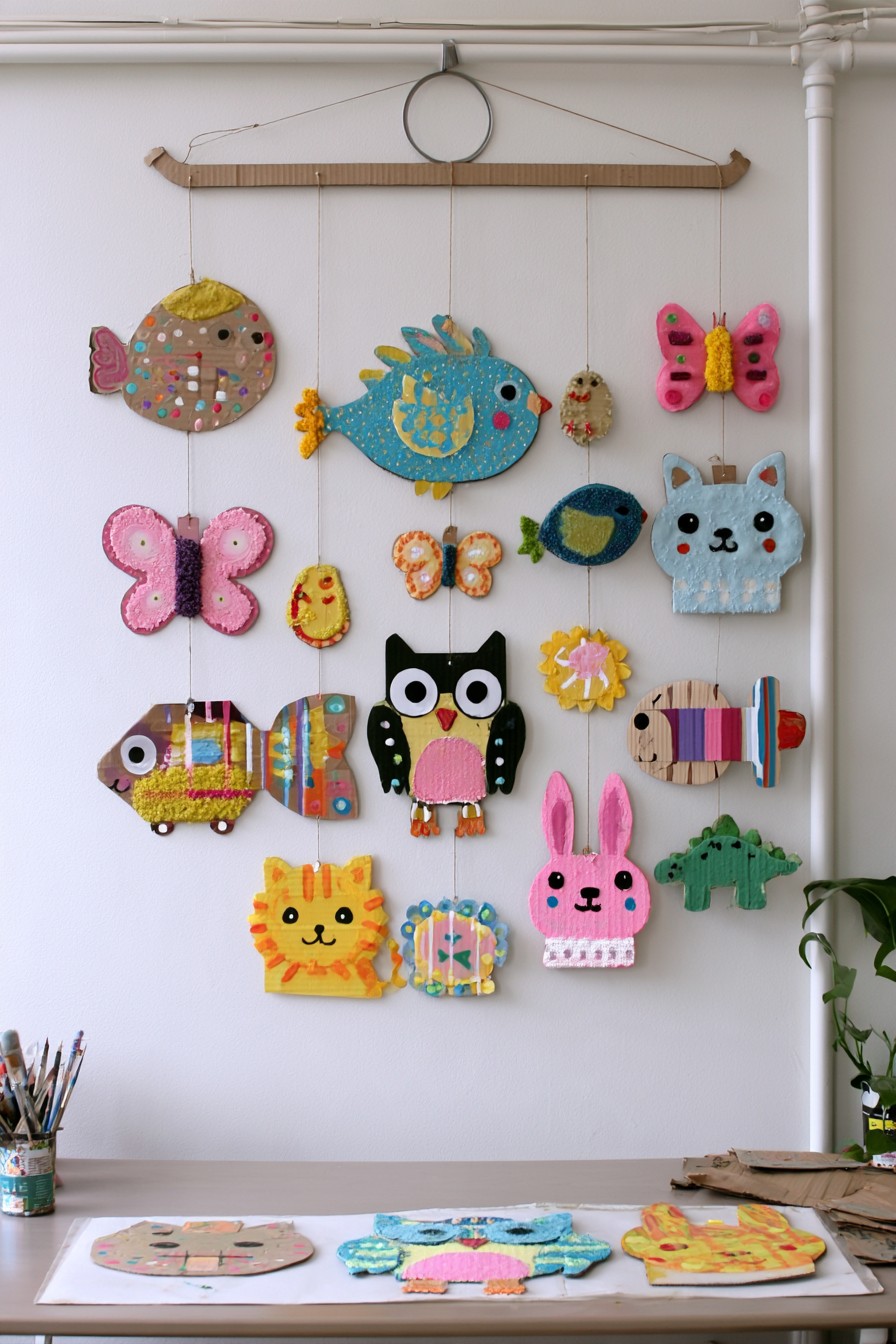
Rows of fish, butterflies and other animal shapes hang from a horizontal support, making individual pieces part of one classroom display. A shared range of sizes helps the arrangement feel connected while leaving each child free to choose a character. Compare the pieces on a table first, arranging them by color, outline or animal group before planning the hanging rows.
Use lightweight cardboard and modest surface layers so the complete display remains manageable. An adult should select the support and mounting for its total weight and position it clear of doors, lights and movement routes. Keep hanging cords out of children's reach. Short labels beside the finished artwork can identify contributions or the scraps used, giving visitors a way to understand the class's choices.
13. Paper Roll Classroom Characters
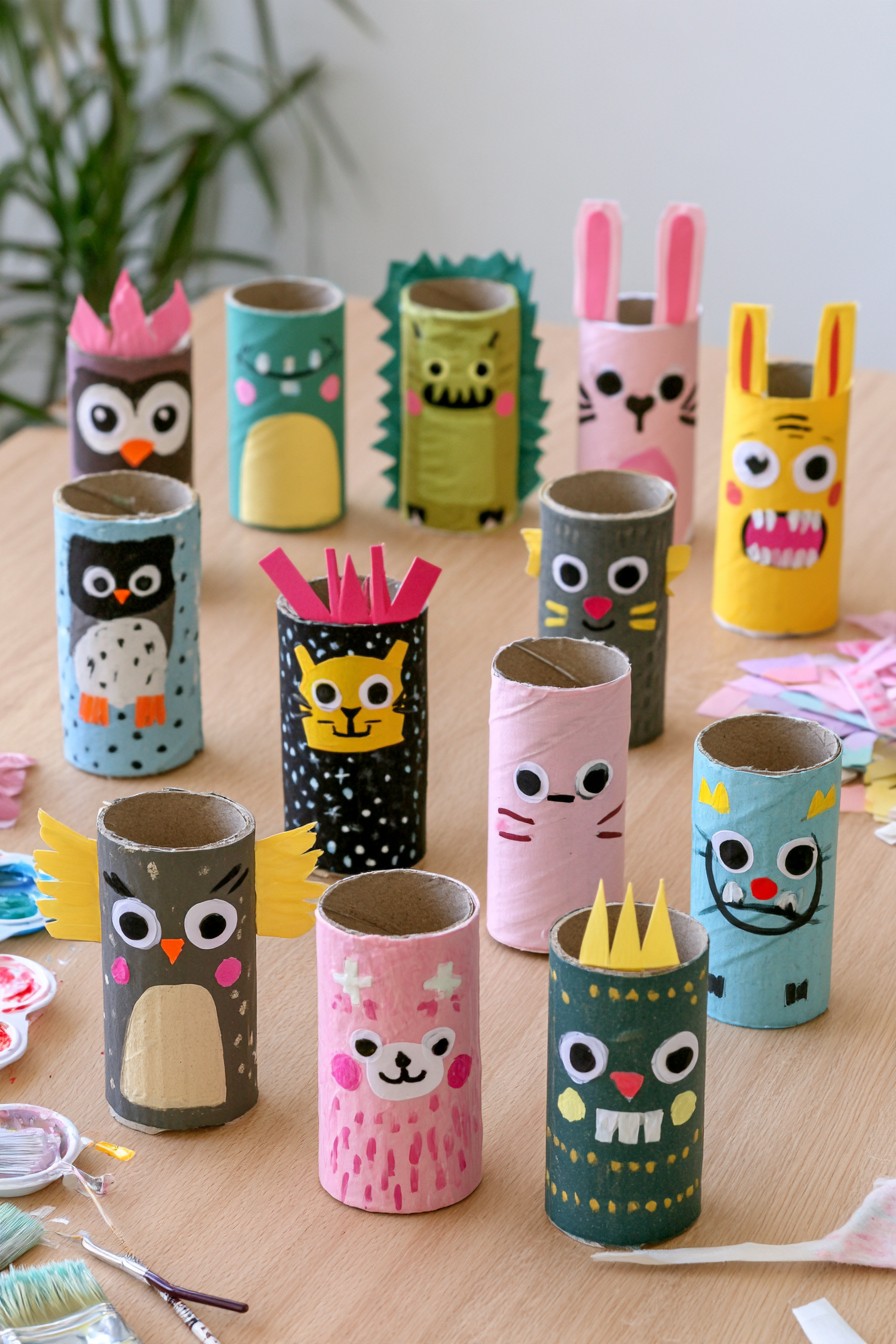
Empty paper rolls provide the same simple starting form for many different characters. Paint can define the body, while scrap paper makes ears, wings, crowns, or teeth. Students can compare how a few changed features turn one cylinder into an owl, rabbit, cat, or monster.
Use clean rolls that meet the school's hygiene preferences; paper towel tubes cut to size are an alternative. The finished figures can stand on desks for a storytelling activity or be sorted by color, shape, and animal group before going on display. Draw facial details directly where suitable, and prepare larger paper appendages separately before joining them to the cylinder.
14. Shoebox Animal Diorama
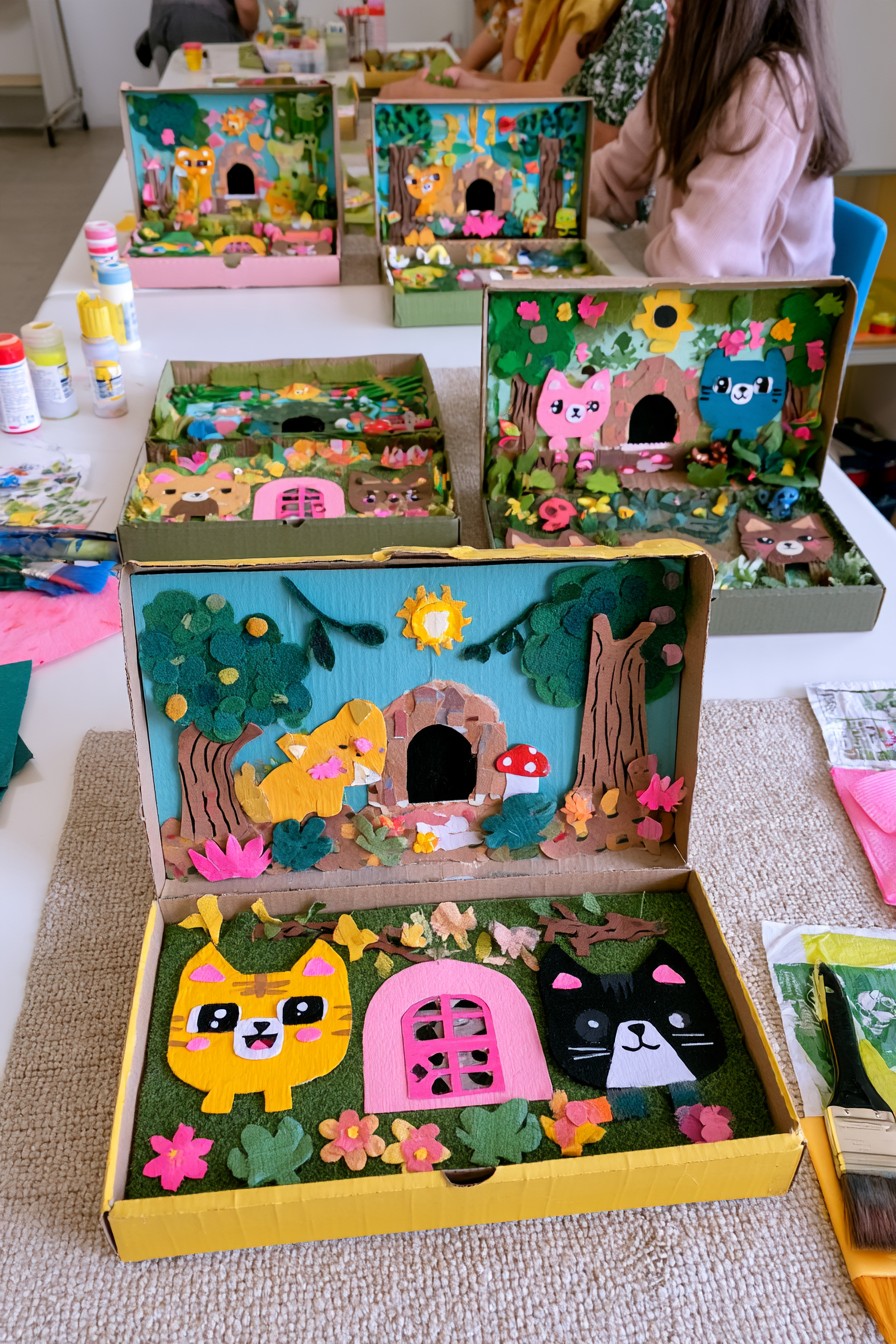
A shoebox offers a ready made frame for a small animal world. Cardboard trees, paper paths, felt plants, and animal figures can be placed at different depths to create foreground and background. The scene might show a woodland habitat, a garden, or a setting invented for a class story.
Build the background first, then test where larger scenery pieces will stand before fixing them in place. Leave enough open area to see the animals. Students can write a short caption describing who lives in their diorama and what happens there. Folded cardboard tabs can support upright scenery; choose their position before decorating the floor so they remain easy to attach.
15. Yogurt Cup Animal Pots
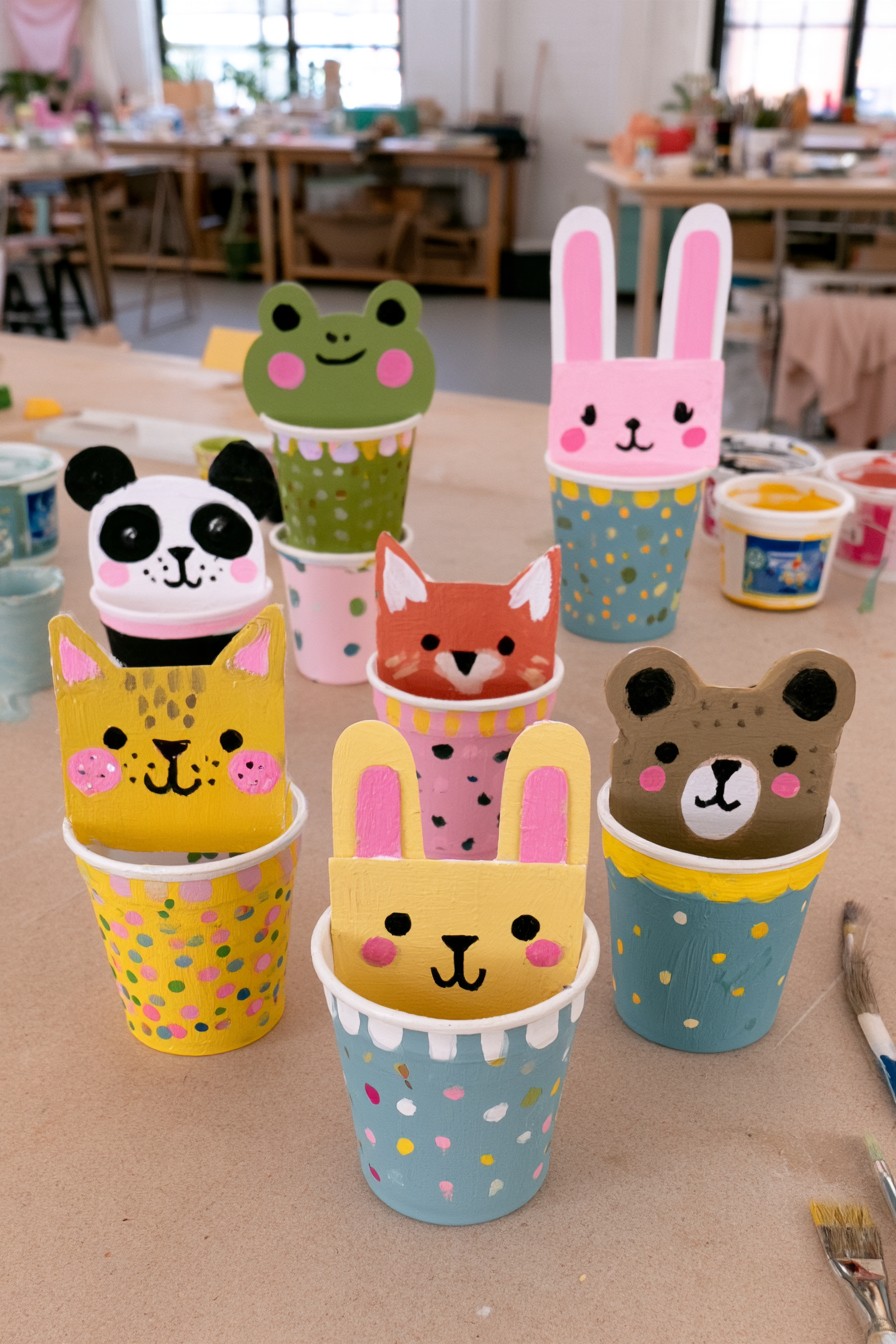
Clean yogurt cups can become small containers for pencils, paper clips, or other lightweight supplies. Painted stripes and dots provide the background, while larger cardboard faces turn each cup into a rabbit, bear, frog, or fox. The repeated container shape makes the projects look like a set despite different designs.
Test the paint or covering material on the plastic before decorating the entire cup. If using the cups for plants, an adult should arrange drainage and a tray; otherwise keep them as dry storage. Avoid filling lightweight cups with tools that could make them tip. Use the lowest cups for short supplies, keeping longer pencils in a container that remains stable when one is removed.
16. Packaging Box Robots and Animal Sculptures
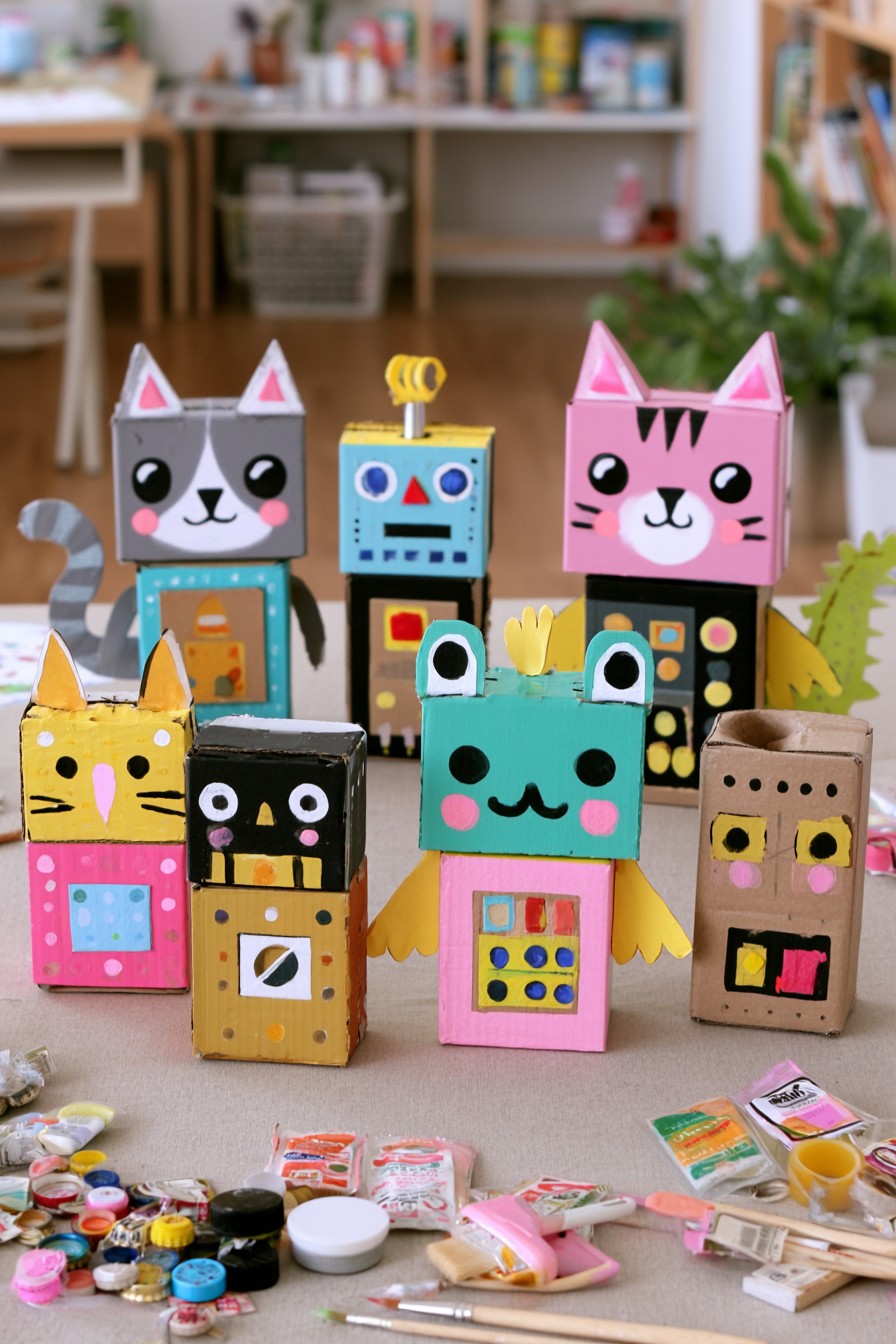
Small packaging boxes can become the head, body, and limbs of robots or animals. Students can compare square and rectangular forms while deciding how to make a sculpture stand. Painted panels, cardboard ears, paper tails, and reused caps can help distinguish each character.
Build and test the structure before adding small details. A broad box at the base often gives a sculpture more stability than a narrow one. An adult can help with joins that need extra strength, while students make the creative choices about proportions, faces, and features. Caps and other small additions should suit the students involved; painted circles offer a flat alternative for controls and eyes.
17. Cardboard Animal Garland Flags
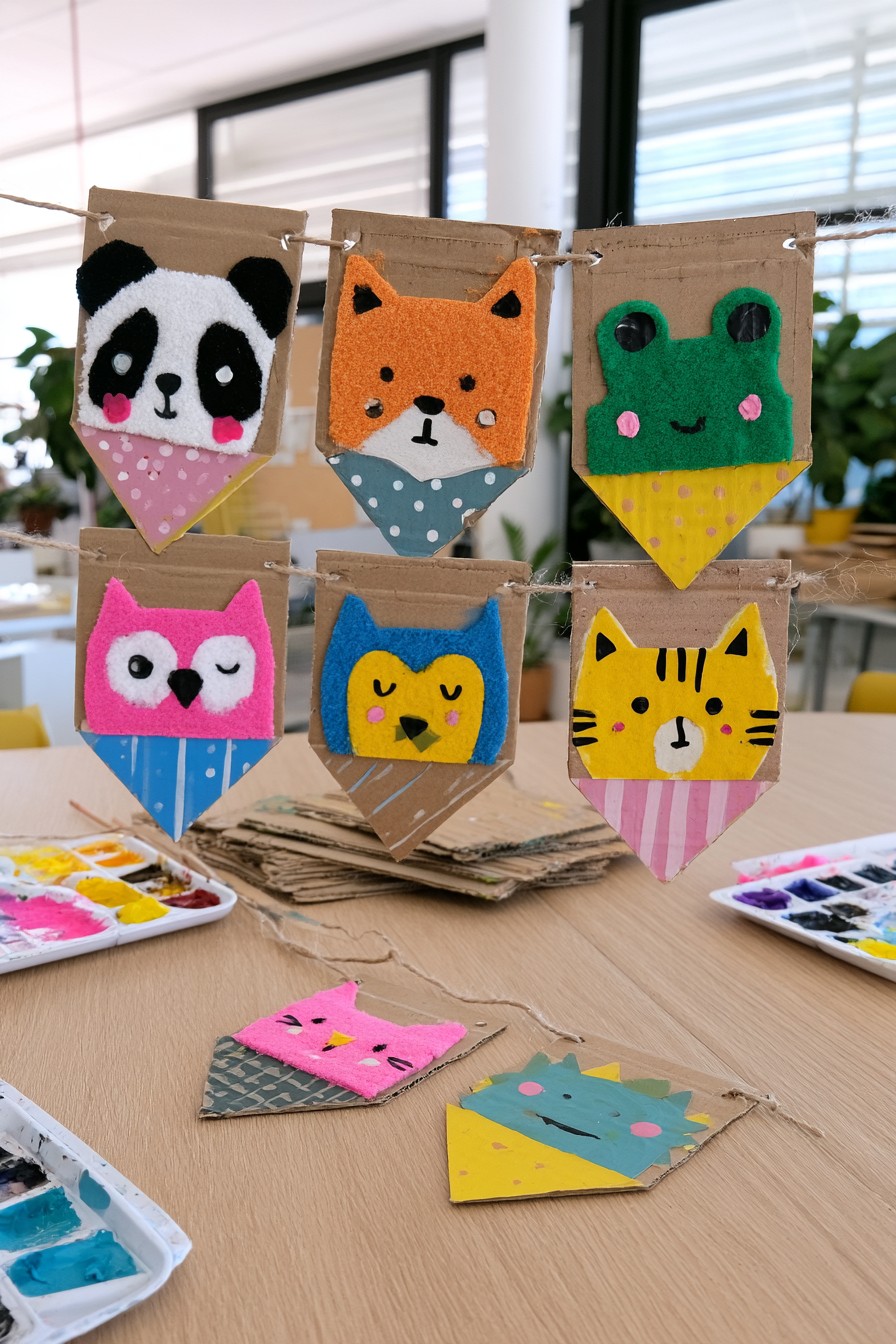
Cut packaging cardboard into matching pennants and let each student decorate one with an animal face. Felt, painted paper, and fabric scraps can create owls, pandas, foxes, or cats. The repeated flag shape gives everyone an equal part in a display that still allows individual ideas.
Before stringing the garland, arrange the flags on the floor or a table to explore color sequences and spacing. An adult can prepare holes near the top and secure the finished display where students will not pull it down. The garland suits a bulletin board or art area. Leave unpainted space for each top hole, and keep added ears or wings clear of the cord so flags hang predictably.
18. Shoebox Animal Storage Chest
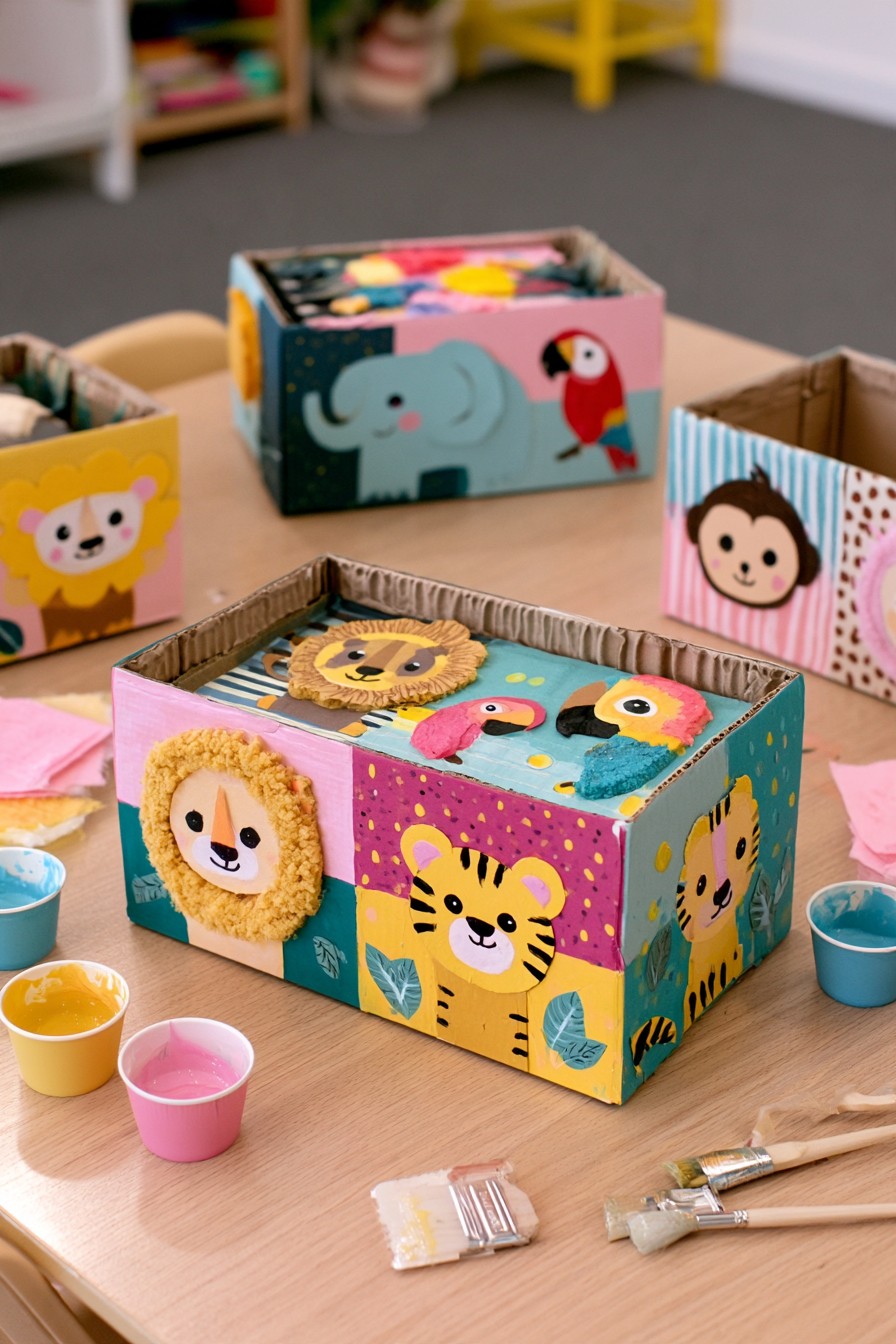
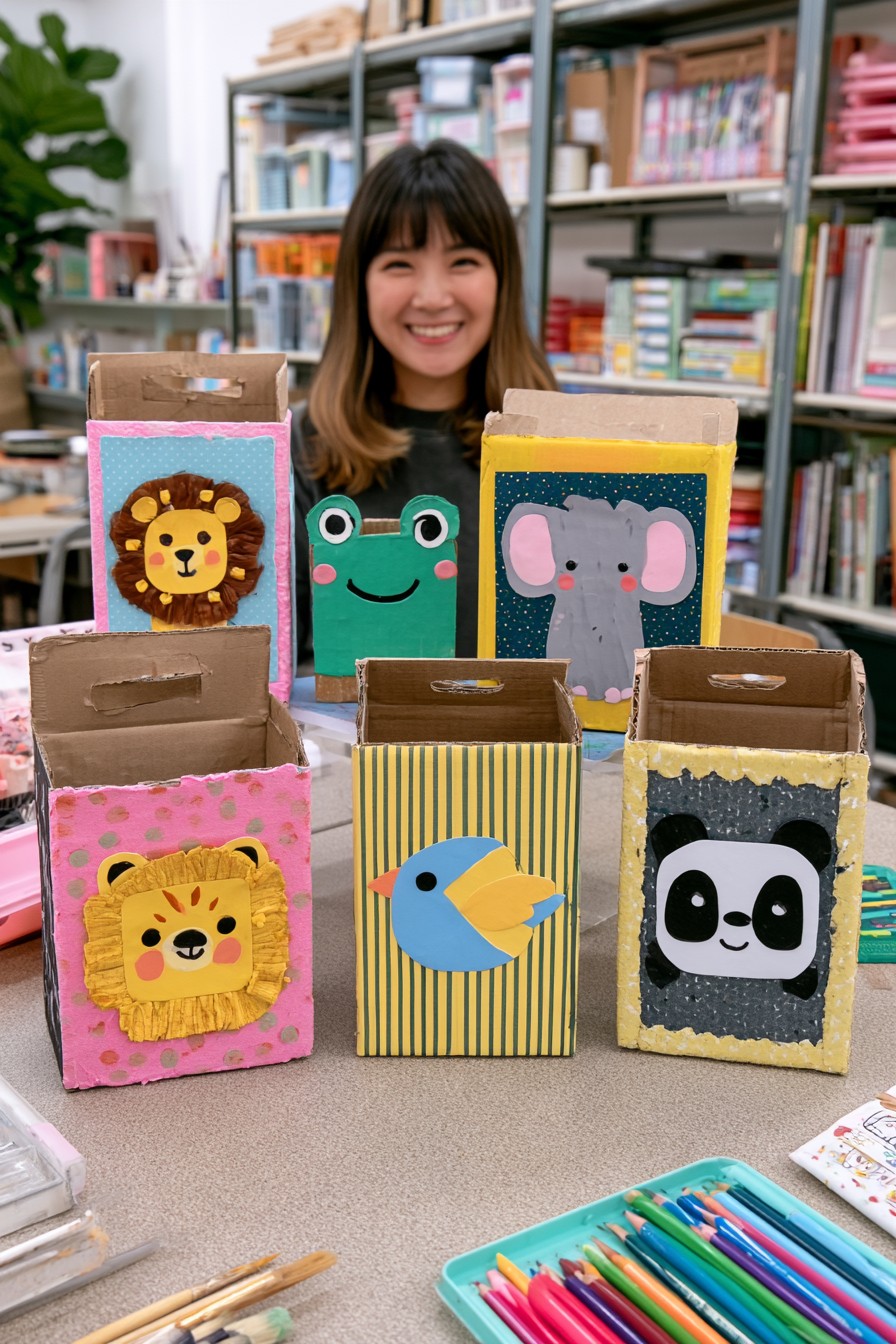
Animal panels cover the sides of this open storage box, turning a plain container into a shared class project. A sturdy shoebox or another suitable cardboard box can provide a similar base for crayons, flash cards or unfinished paper work. Divide the sides into usable portrait areas before handing them to different makers, so faces and textured details fit without crossing the corners awkwardly.
Strengthen weak corners before decoration and choose contents appropriate to the container's condition. Keep its rim and lifting points accessible. If you add a lid, allow clearance for closing rather than carrying thick decoration into the joint; the pictured box has an open top. Identify the contents with a simple label, and give students a routine for returning supplies so the redesign remains useful after the art session.
19. Upcycled CD Animal Art
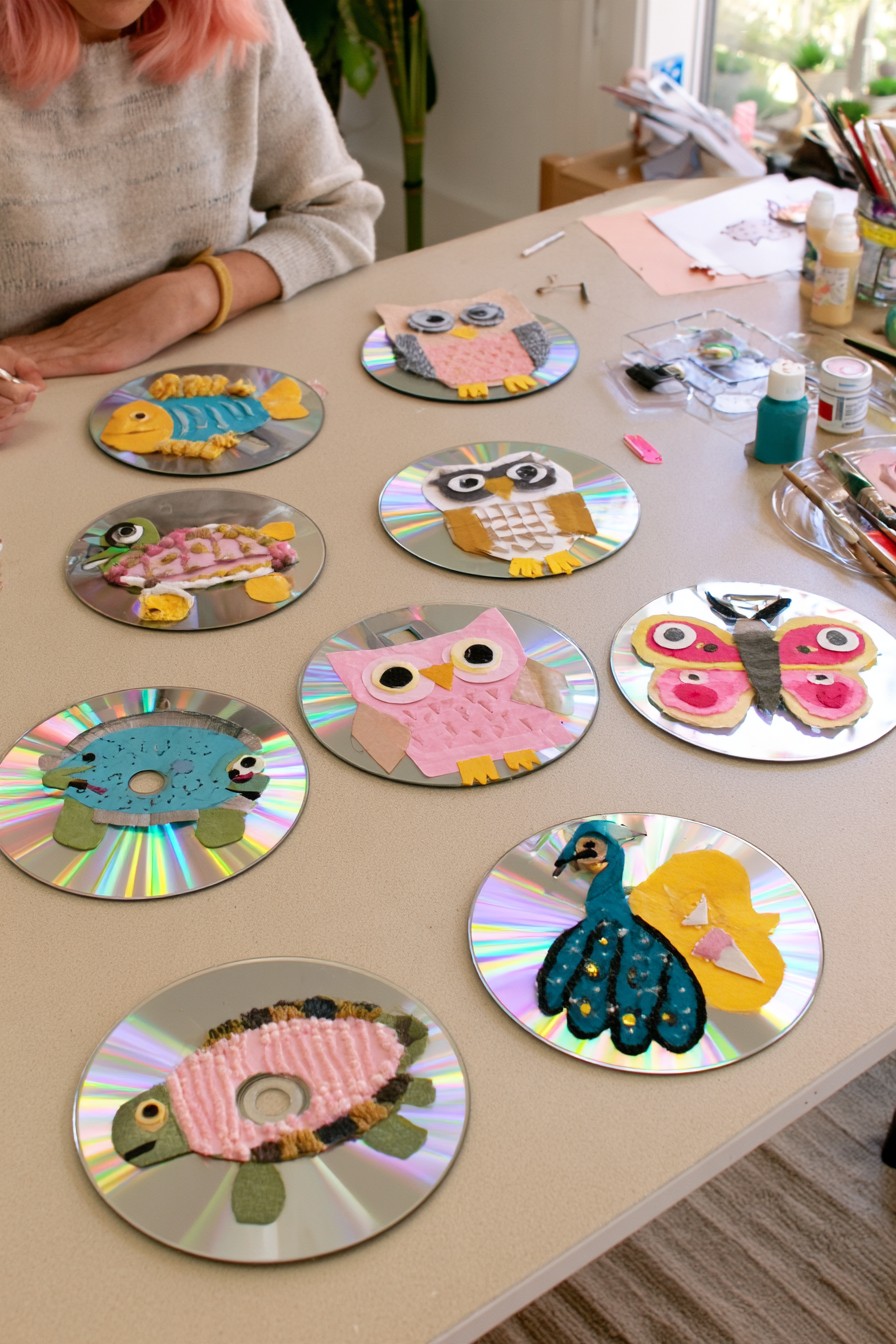
An intact old CD provides a reflective background for an owl, fish, butterfly, or bird. Cardboard wings, felt faces, and paper fins can overlap parts of the disc while leaving some of its shiny surface visible. The contrast between matte scraps and the reflective center makes each animal distinctive.
Use only unbroken discs and have an adult check their edges before the activity. Attach lightweight pieces securely, then display the artwork where it will not be handled constantly. Students can observe how the reflective colors change as they view the finished pieces from different positions. Keep the disc whole throughout the project; scratched decoration can be replaced without cutting the disc into smaller fragments.
Use the Finished Work and Keep the Materials Organized
Let the final purpose shape the last task: label a storage box, rehearse a character conversation or arrange the group's display together. Invite students to explain one change they made to the original material. Keep usable offcuts sorted for the next activity, discard sharp or damaged pieces, and check decorated containers and hanging displays as they return to classroom use.

Leave a Reply