
A floating witch, a woodland archer or a tiny film character can give a flat illustration a sense of depth. These 20 DIY 3D frame ideas combine a printed background, a separate paper figure and a folded cardstock border. Each inspiration ends with its own free PDF download. The first page contains the background, and the second contains the matching figure. Choose a scene, download its file and print the two sheets before cutting. The figures are sized individually to preserve the proportions of their finished designs, including the smaller characters that leave more of the scenery visible.
The making guide uses the broom riding witch from design 14 to explain the cardstock measurements, corner folds, reinforcement and thread attachments. Download the PDF at the end of that inspiration section to follow the tutorial with its matching artwork. The other designs use the same frame construction, with adjustments to the card color, figure outline and suspension point. Keep each figure at the size supplied in its PDF instead of enlarging every character to fill the opening. The downloads provide the artwork; mark the frame net on cardstock using the written measurements and cutting guide below.
Table of Contents
- Choose and Print a Scene
- Print the Free Background and Figure Sheets
- Make a Folded Paper Frame with a Suspended Character
- Materials for the Moonlit Witch Frame
- Mark the Backing and the Four Folding Bands
- Prepare the Artwork and Form the Lower Frame
- Reinforce the Figure and Secure Both Ends of the Thread
- Choose Adhesive for the Surface You Are Joining
- 1. Moonlit Witch above a Gothic Town
- 2. Upside Down Harlequin in a Haunted Theatre
- 3. Tattered Ghost Bride in a Ruined Cathedral
- 4. Black Veiled Nun against Gothic Windows
- 5. Gothic Dancer over an Empty Opera House
- 6. Paper Sun Lifter above a Winding River
- 7. Heart Keeper in a Warm Illustrated Home
- 8. Red Horned Acrobat in a Thorny Castle
- 9. Cliffside Adventurer with an Orange Scarf
- 10. Inverted Jester in a Spiral Stairwell
- 11. Violet Horned Figure in a Crystal Hall
- 12. Mask Bearer in a Surreal Portrait Gallery
- 13. Purple Witch beneath a Row of Moon Phases
- 14. Broom Riding Witch over a Golden Windowed Village
- 15. Black Coat Hero in a Green Digital World
- 16. Parisian Girl outside a Red Awning Café
- 17. Silent Film Comedian on a Sepia Street
- 18. Grey Wizard before a Mountain Citadel
- 19. Woodland Archer among Golden Tree Houses
- 20. White Gowned Elf in a Silver Archway
- Keep the Paper Scene Clean and Level
Choose and Print a Scene
Print the Free Background and Figure Sheets
Download the PDF linked at the end of your chosen inspiration section. Each file contains two A3 portrait pages: the background first and the matching figure second. Print at 100% or Actual size, turn off Fit to page and double sided printing, and measure the 50 mm check line on each sheet before cutting. The background trims to 240 × 350 mm, with a 200 × 310 mm visible scene and a 20 mm margin hidden beneath each frame rail. Keep the figure at its supplied size; its dimensions and intended placement are printed on the sheet. Use background paper and figure card of the weights listed below, within your printer's supported range.
Make a Folded Paper Frame with a Suspended Character
The moonlit witch design uses a single scored sheet to form four hollow frame rails around a flat background. A separate reinforced witch hangs from a fine thread secured inside the upper rail. The measurements below create a frame about 240 × 350 mm outside, with a 200 × 310 mm visible opening and a depth of 20 mm. Make a small practice fold in scrap card before using your finished artwork. Paper thickness and the accuracy of your scoring can affect the final fit, so test the corner joints before applying glue.
Materials for the Moonlit Witch Frame
- One sheet of matte charcoal cardstock, approximately 300 gsm, trimmed to 400 × 510 mm.
- One separate background illustration on approximately 160 gsm matte paper, trimmed to 240 × 350 mm. Include the sage sky, crescent, stars and village on this print.
- One separate witch and broom illustration on approximately 200 gsm card, printed at approximately 116 mm tall and 99 mm wide, plus its fine cutting border.
- One piece of approximately 160 gsm ivory card, at least 110 × 130 mm, for a matching figure backing. Keep spare card for reinforcement patches.
- One 350 mm length of fine cream cotton sewing thread, approximately 0.3 mm thick.
- Two small ivory card patches, approximately 10 × 15 mm, for the figure, plus one patch approximately 15 × 25 mm for the upper thread anchor. Trim each patch to fit its contact surface.
- A permanent paper glue stick for the broad background and figure backing, plus a small amount of clear drying PVA craft adhesive for the folded contact surfaces and reinforcement patches.
- A metal ruler, pencil, blunt bone folder, small scissors, craft knife, protective cutting mat and fine needle.
Use the two page PDF beneath design 14 for the tutorial artwork, or prepare your own background and character as separate drawings or print files. Use your own artwork or artwork you have permission to reproduce. Keep the character off the background print so there is only one witch in the completed scene. Allow ink to dry before applying adhesive. Adults should handle the craft knife and needle, and all cutting should take place on a suitable mat. The finished frame is a delicate decoration with a loose thread, so keep it beyond the reach of young children.
Mark the Backing and the Four Folding Bands
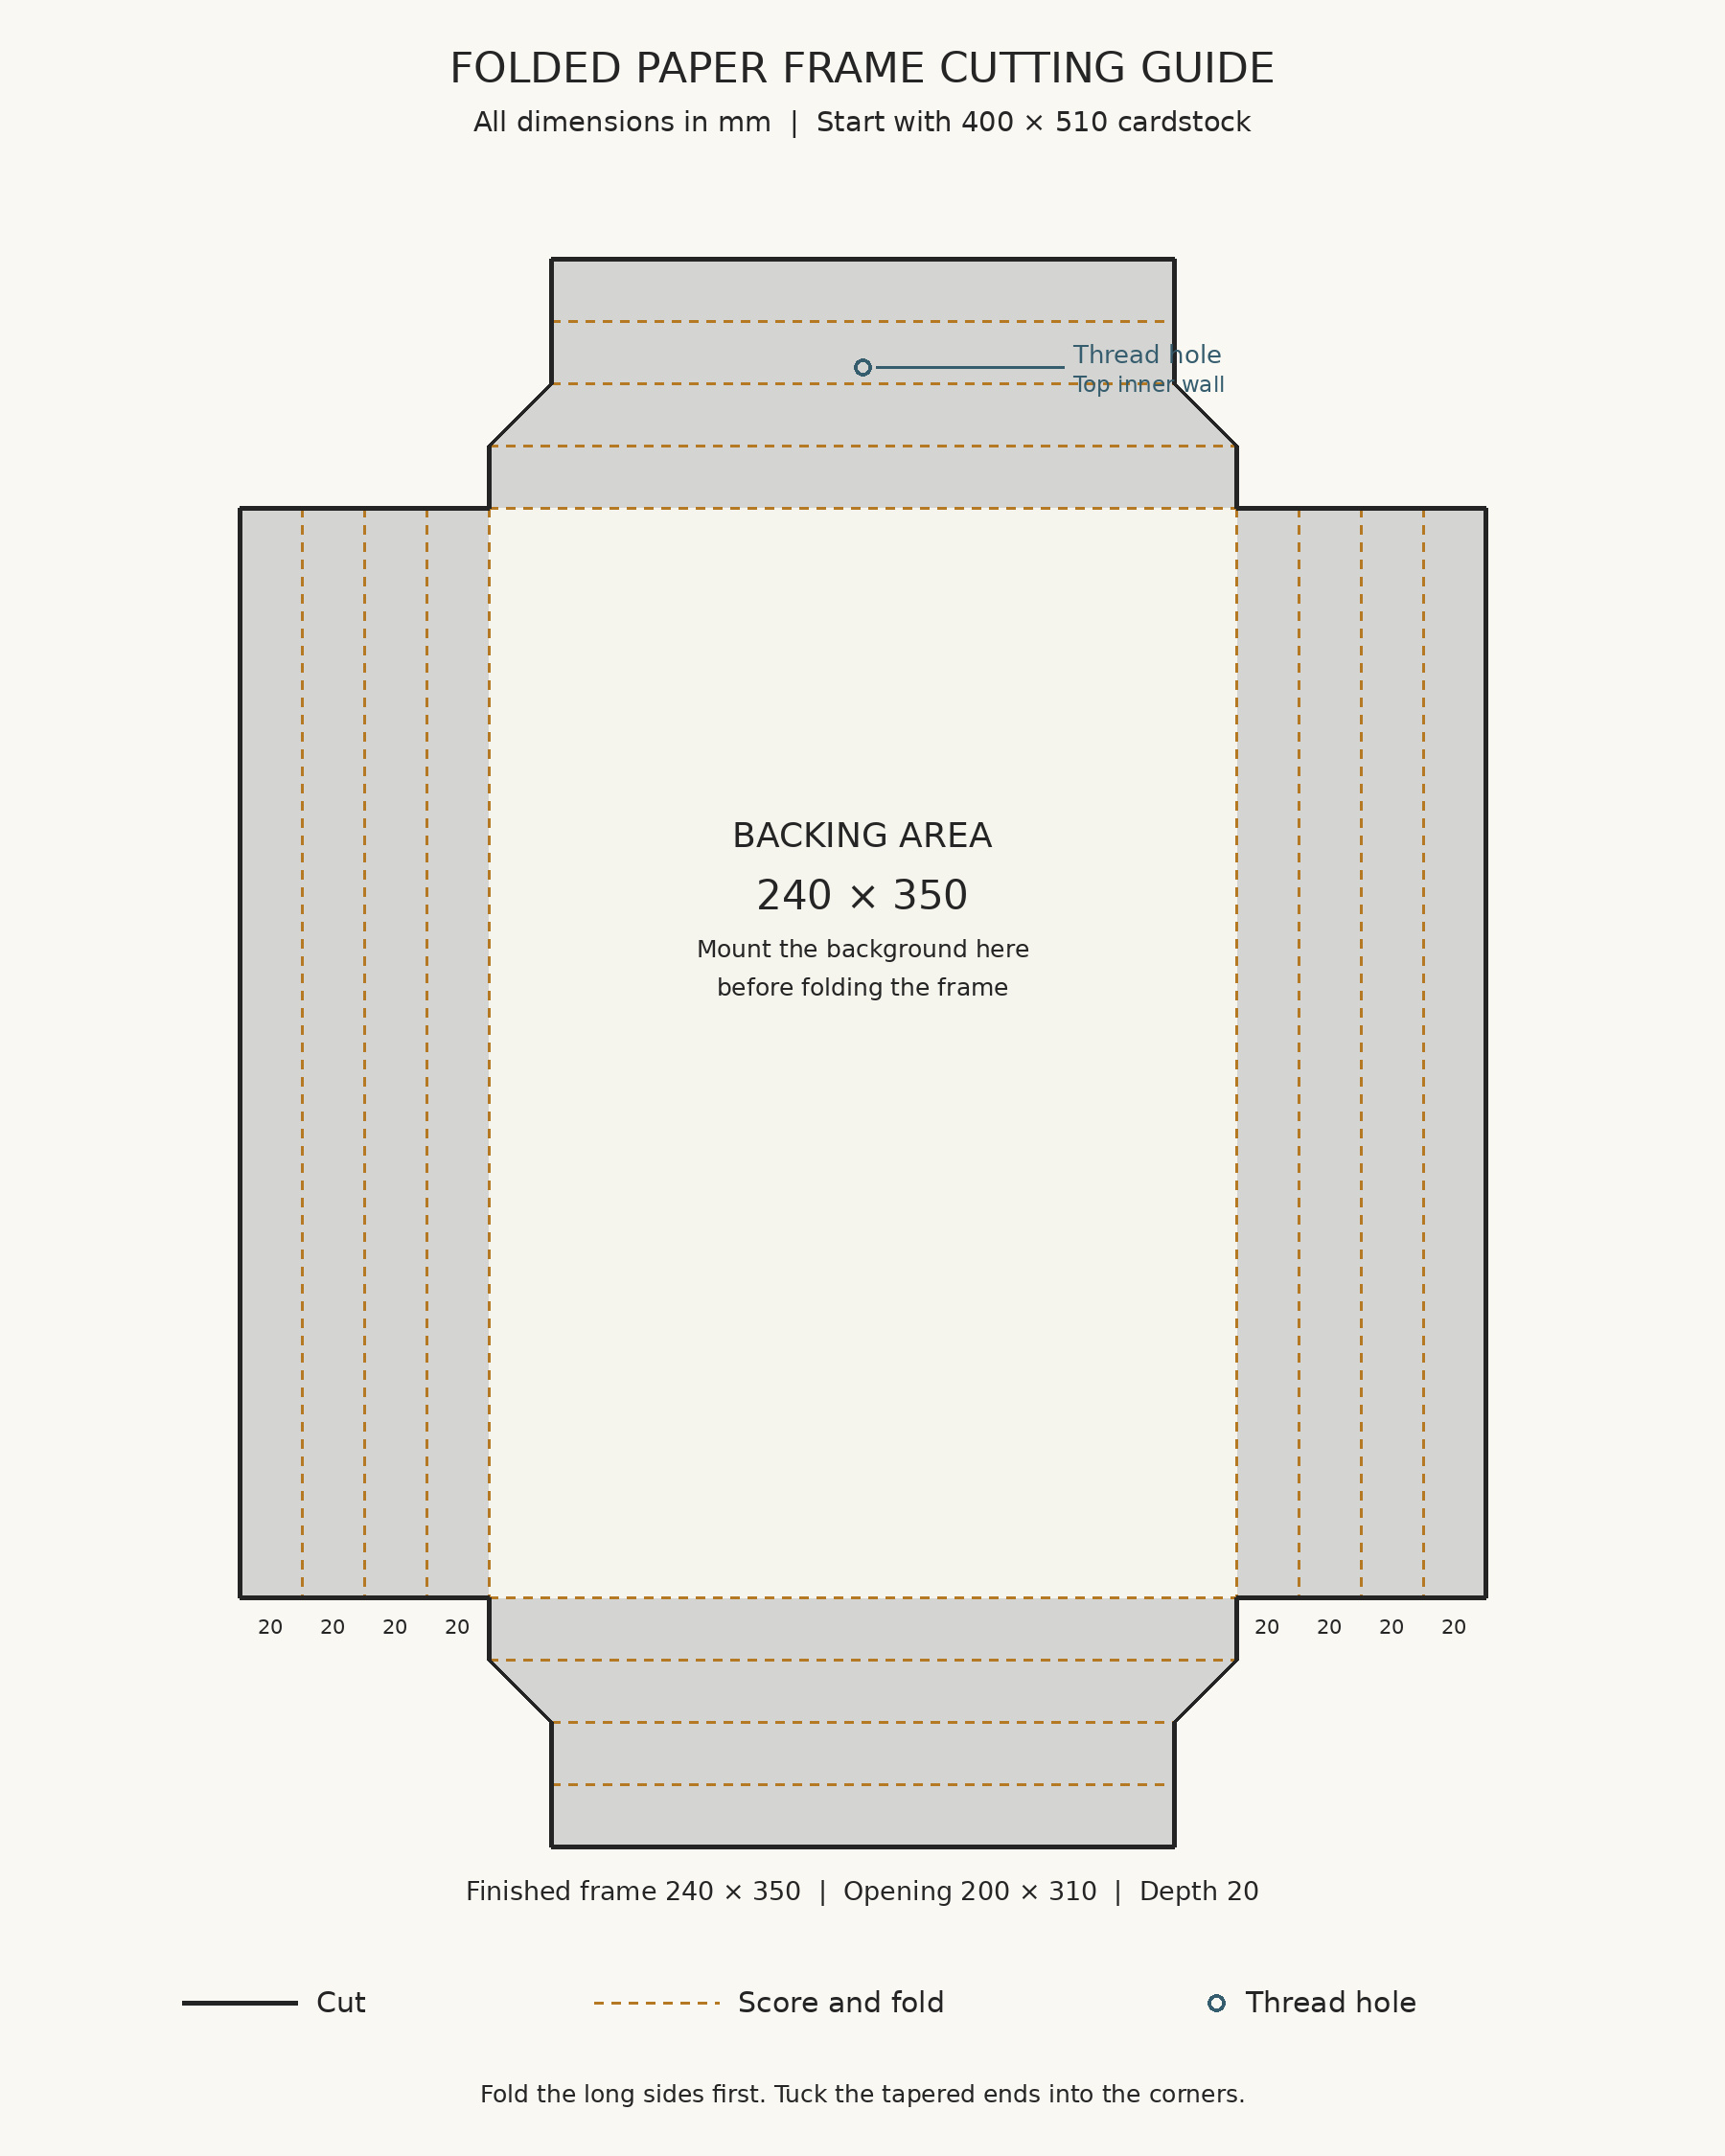
With the 400 mm edge running across the top, mark vertical lines at 20, 40, 60 and 80 mm from each side. Mark horizontal lines at 20, 40, 60 and 80 mm from the top and bottom. This leaves a central backing area measuring 240 × 350 mm. The cutting guide shows which sections remain after the corner waste is removed. Its solid outline marks the cut, and its dotted lines mark folds. Work from the written dimensions when marking your card; the displayed guide is not a template printed at actual size.
Prepare the Artwork and Form the Lower Frame
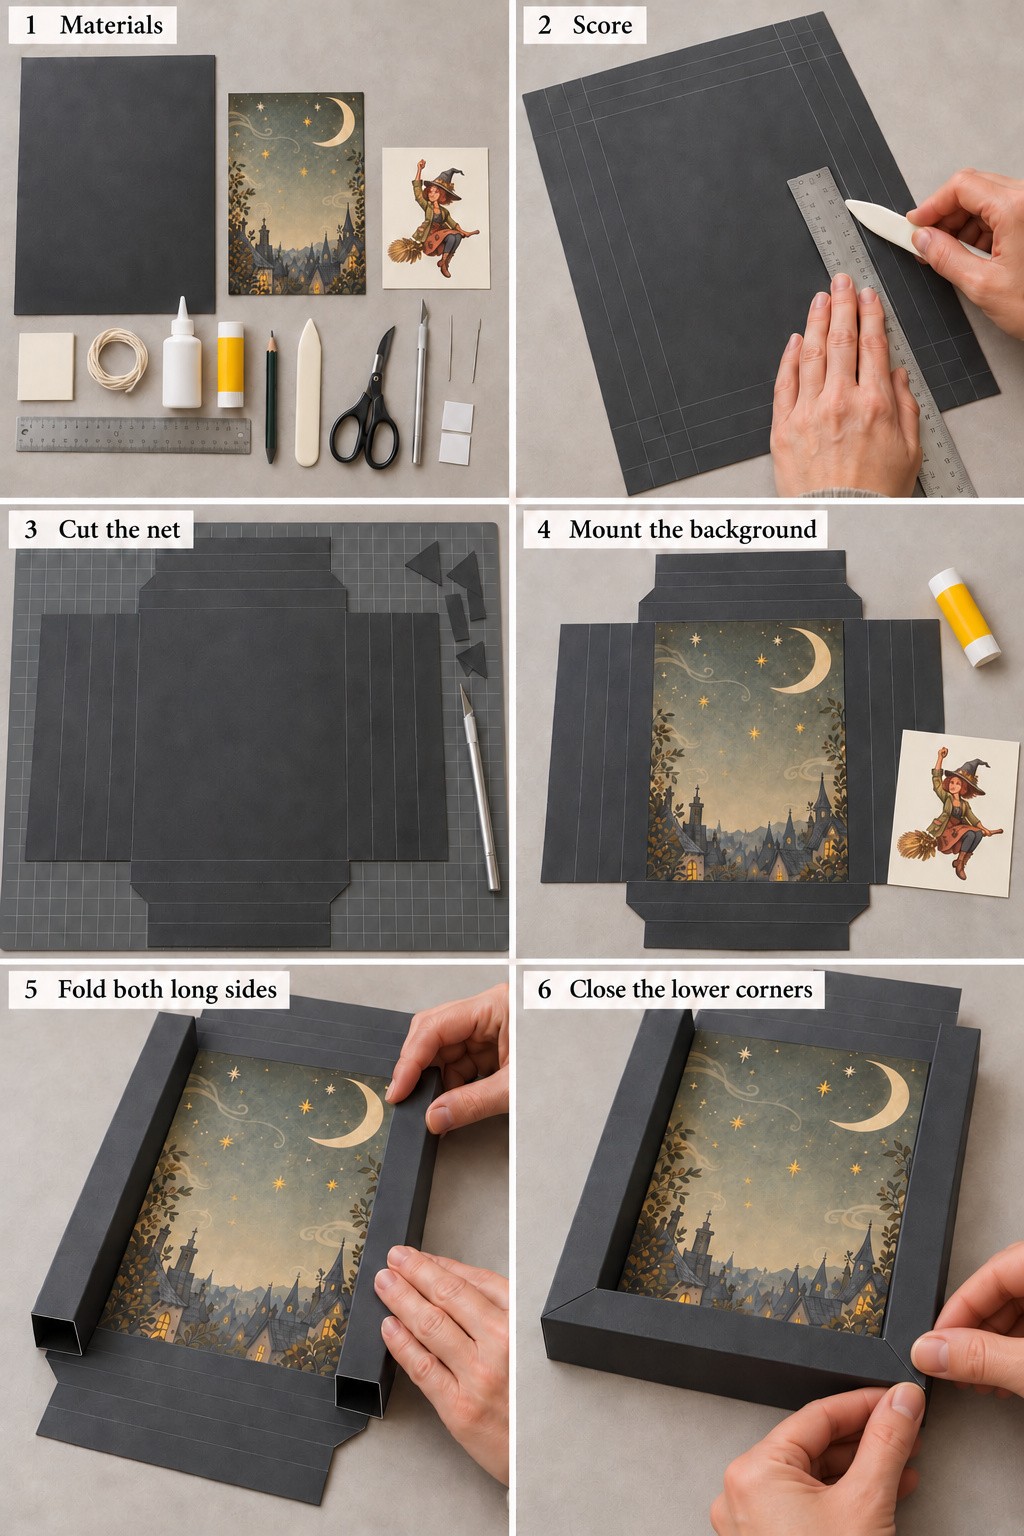
- Prepare the materials. Separate the background print, character print and reinforcement card. Check the background against the central rectangle and confirm that the entire witch, including the broom and raised hand, will fit inside the finished opening. Keep the thread and paper patches ready for the later suspension stages.
- Score the four bands. Use a blunt bone folder against a metal ruler to make the marked folds crisp. A score should compress the cardstock without slicing through it. Keep the spacing at 20 mm throughout, because uneven bands produce rails with different widths or heights.
- Cut the frame net. Remove the four 80 × 80 mm corner squares, leaving four arms around the central backing. The left and right arms stay rectangular. On each short arm, keep the first 20 mm band beside the backing at full width. Taper the next band by 20 mm at each end, then shorten the outer two bands by that same amount. Follow the cutting guide so both short arms match.
- Mount the background. Apply a light, even coat of permanent glue stick to the reverse of the background paper, including its edges. Place it within the central 240 × 350 mm rectangle, smooth it gently from the middle outward and let the bond settle flat. Keep adhesive off the illustrated face and all fold lines.
- Roll the two long sides. Prefold each long arm along its four score lines. Roll it inward to form a hollow rail with a square 20 × 20 mm cross section. The outermost band becomes a flat contact foot under the rail. After a dry fit, apply a very thin layer of PVA only to the face of that foot that meets the backing. Press the seam without crushing the hollow rail.
- Seat the lower corners. Roll the lower short arm in the same way, then gently tuck its tapered ends into the adjoining side rails. Check that the diagonal corner seams meet and the bottom rail sits level. If it needs adhesive, open it slightly and apply PVA to the hidden contact foot before closing it. The sixth photograph shows the corner being seated by hand. Keep the upper arm open for the thread attachment.
Reinforce the Figure and Secure Both Ends of the Thread
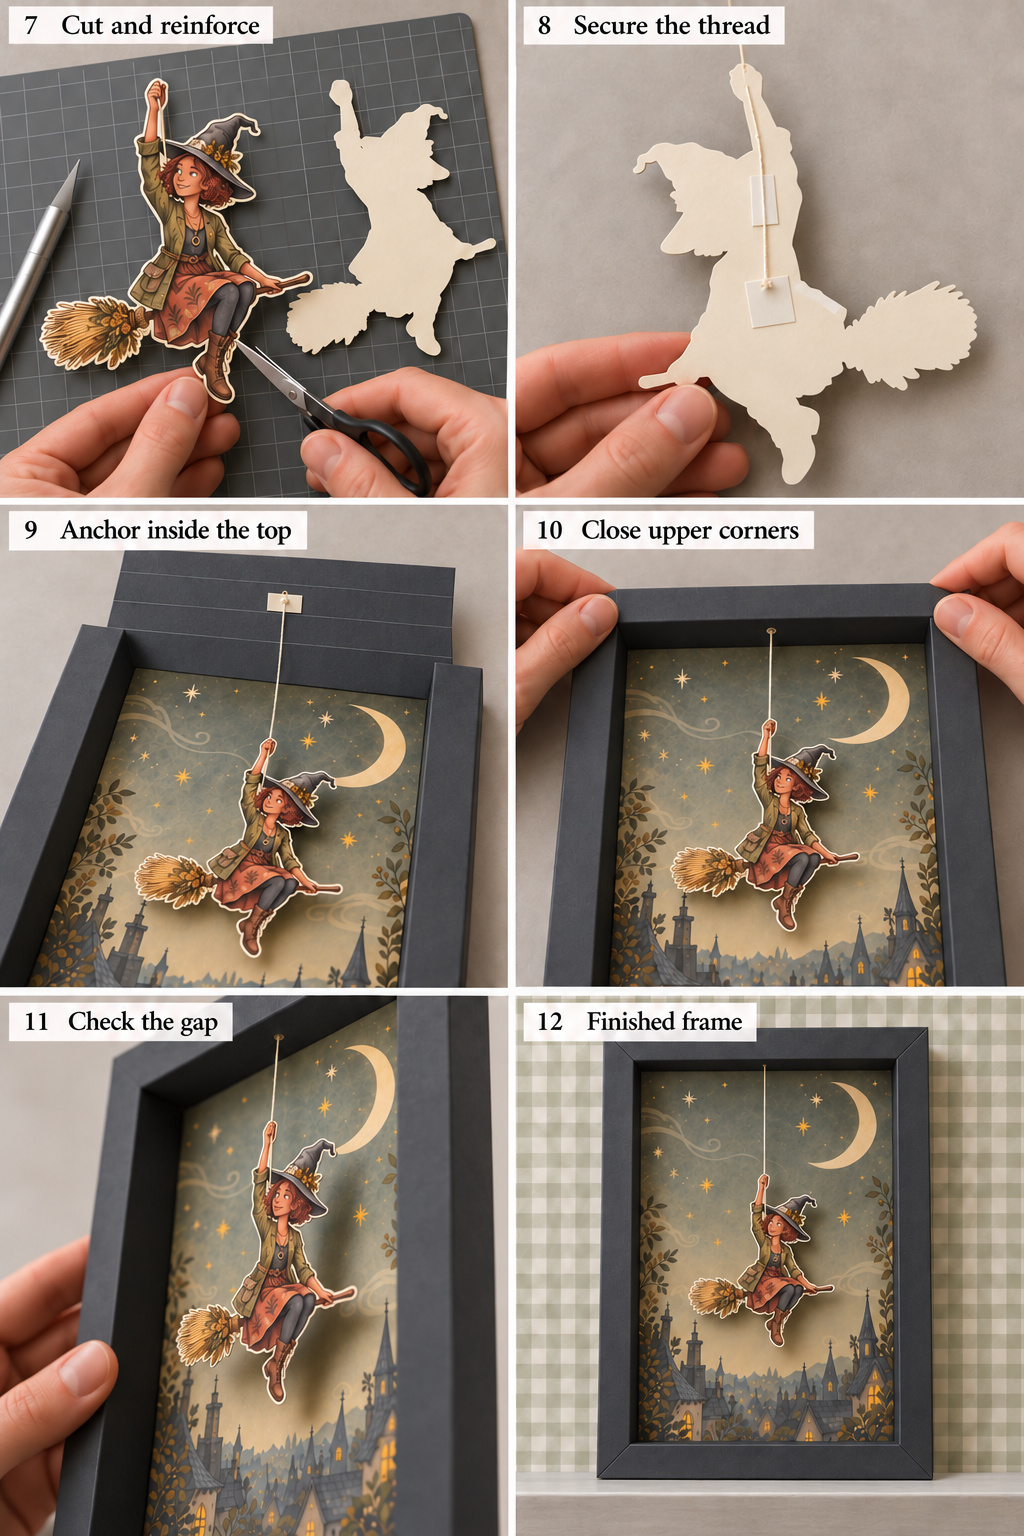
- Cut and reinforce the witch. Glue the character print to the ivory backing card, let it dry flat and cut through both layers together. Leave a narrow cream margin around the hair, fingers, broom bristles and boots. The plain backing silhouette shown in the collage illustrates this second layer. It must match the printed outline and support the raised arm as well as the broad body.
- Attach the lower thread end. Turn the reinforced figure over. Lay one end of the thread along the rear of the raised wrist and forearm, extending it onto the broader body. Tie a small stopper knot at this lower end. Trap the knot beneath a paper patch and hold the thread flat with a narrower patch along the arm. Use a thin layer of PVA on the paper contact areas and trim the patches so neither shows from the front. Let these attachments dry before lifting by the thread.
- Place the upper anchor in the correct band. Keep the top arm unrolled. Counting inward from its free outer edge, the second 20 mm band will become the inner vertical wall of the upper rail. Make a tiny needle hole at its horizontal center, around 5 mm from the score line shared with the third band. Reinforce that spot with a small card patch, reopen the hole and pass the free thread end through it. Tie a stopper knot on the face that will be enclosed inside the rail, then retain the tail beneath the larger paper patch.
- Close the upper corners. Dry fold the upper rail and hold the frame upright before fixing its contact foot. Adjust the free thread so the raised hand sits roughly 120 mm below the top of the visible opening, keeping the broom and boots clear of the border. Secure the upper knot and patch, then roll the rail closed and seat its tapered corners. Keep the thread passing freely through its hole so it is not pinched in a corner seam.
- Check the depth and balance. View the frame from the front and the side. The upper hole positions the thread around 15 mm forward of the background, creating a visible foreground gap. Confirm that the figure faces forward, the broom clears both side rails and the boots hang above the lower edge. If the figure leans noticeably, adjust the lower attachment position before making the patch permanent. A single thread allows gentle rotation, so choose a still indoor display spot.
- Display the completed scene. Let all glued areas dry for the time stated on the adhesive label. Rest the lightweight paper frame on a supported picture ledge and check that it stays upright. A folded paper rail is not a suitable place for a screwed picture hanger. If you want a wall mounted version, use a rigid backing or a ready made shadow box with suitable hardware for its finished weight.
Choose Adhesive for the Surface You Are Joining
A dry paper adhesive is useful for the broad background because added moisture can wrinkle thin prints. Use PVA sparingly at the folded feet and paper reinforcement patches, then let each bond dry before putting it under tension. The thread is secured through reinforced paper and trapped knots, giving it a defined route through the assembly. Keep wet glue away from printed faces, and avoid filling the hollow rails with adhesive. Colored cardstock provides the frame finish directly. If you prefer to decorate an existing rigid border, these upcycled frame decoration ideas offer material treatments you can adapt separately.
With the basic frame, cutout backing and two thread anchors in place, you can adapt the same construction to the 20 scenes below. Keep the foreground light, choose a background with enough clear space around the character and match the card color to the mood of the design. Each idea explains the visible materials and the assembly details that matter for that particular silhouette.
1. Moonlit Witch above a Gothic Town
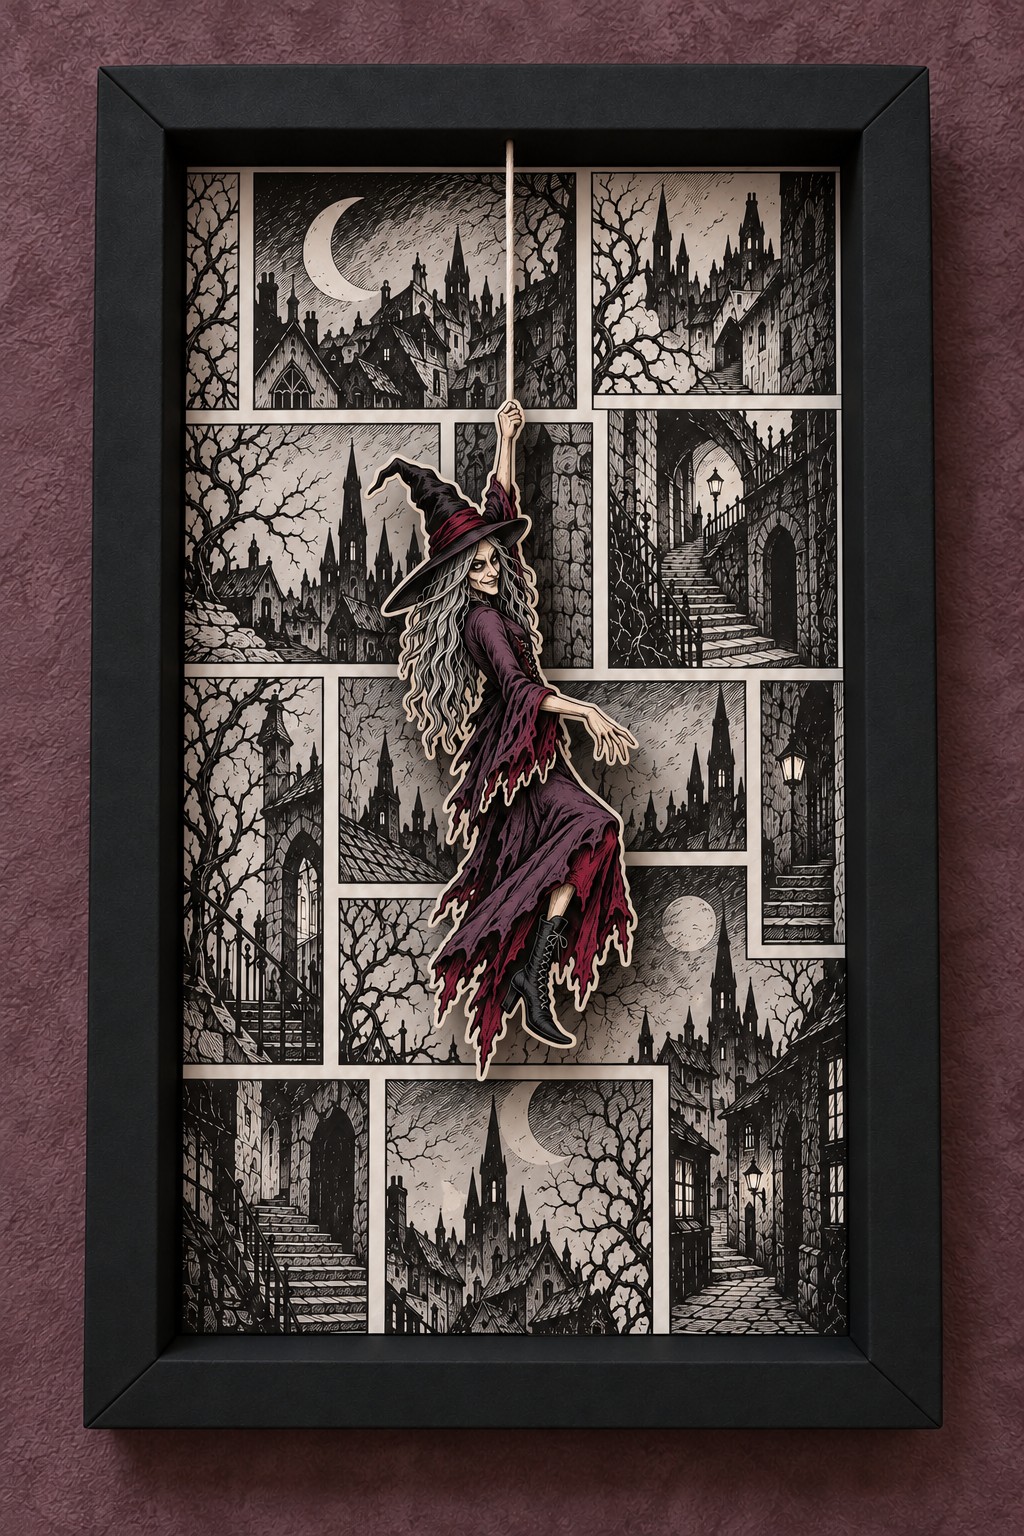
A burgundy dress gives this witch a clear place against a background of narrow streets, bare branches and distant towers. Build the frame from matte black cardstock and arrange several small monochrome drawings across a cream backing. Keep slim, even gaps between the panels so they read as a deliberate collection of scenes. The crescent moon near the upper left introduces the night setting without competing with the figure.
Print or draw the witch on sturdy card, reinforce the raised arm from behind and cut the loose hair and skirt with a narrow border. Attach fine cream thread along the back of that arm before securing it inside the upper rail. Let the boots and trailing dress stay comfortably above the lower edge. This design also pairs naturally with other handmade witchy home decorations on a reading room wall.
Moonlit Witch above a Gothic Town Free Template PDF
2. Upside Down Harlequin in a Haunted Theatre
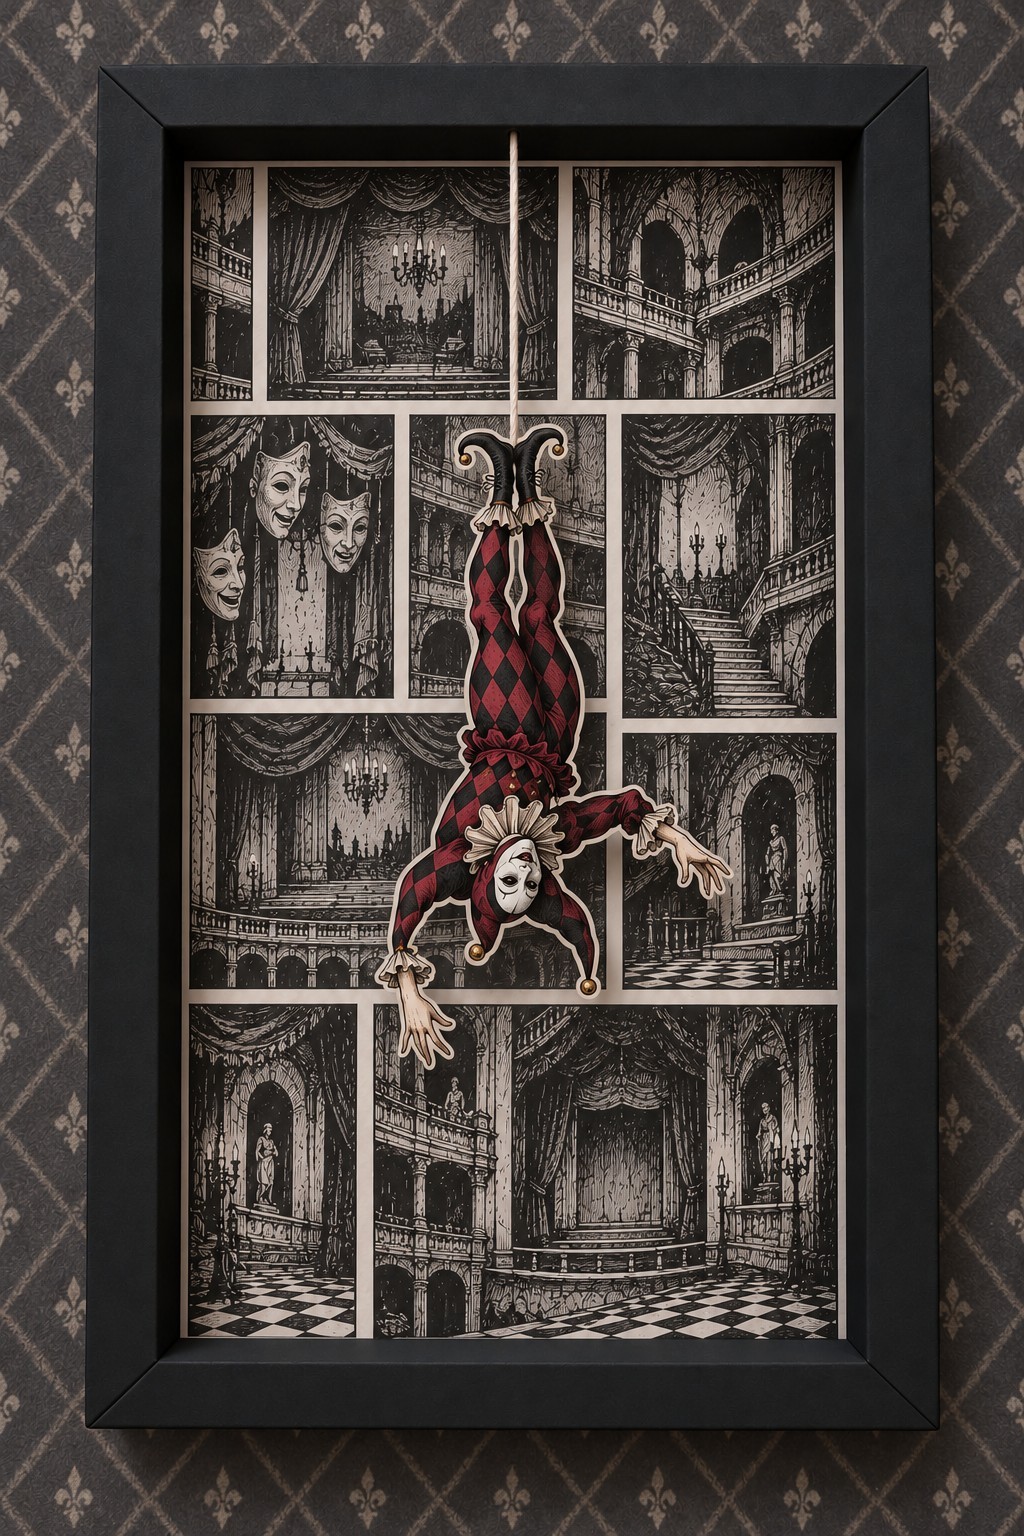
The inverted pose makes this harlequin feel as though it has dropped into an old theatre from above. Red and black diamonds on the costume stand apart from the faded background, while the curled shoes give the upper attachment a playful shape. Use black cardstock for the folded frame and a warm ivory print showing balconies, curtains, masks and tiled floors. A slightly muted print helps the small face remain readable.
Keep the two legs and shoes connected on a reinforced backing so the hanging point carries the whole cutout. Run the thread behind the joined shoes and secure its lower end beneath a card patch before suspending the figure. Cut the open spaces between the arms and torso carefully, leaving enough material around the wrists. Check the balance with the frame upright before closing the top rail, because an inverted figure can tilt when its attachment sits off center.
Upside Down Harlequin in a Haunted Theatre Free Template PDF
3. Tattered Ghost Bride in a Ruined Cathedral
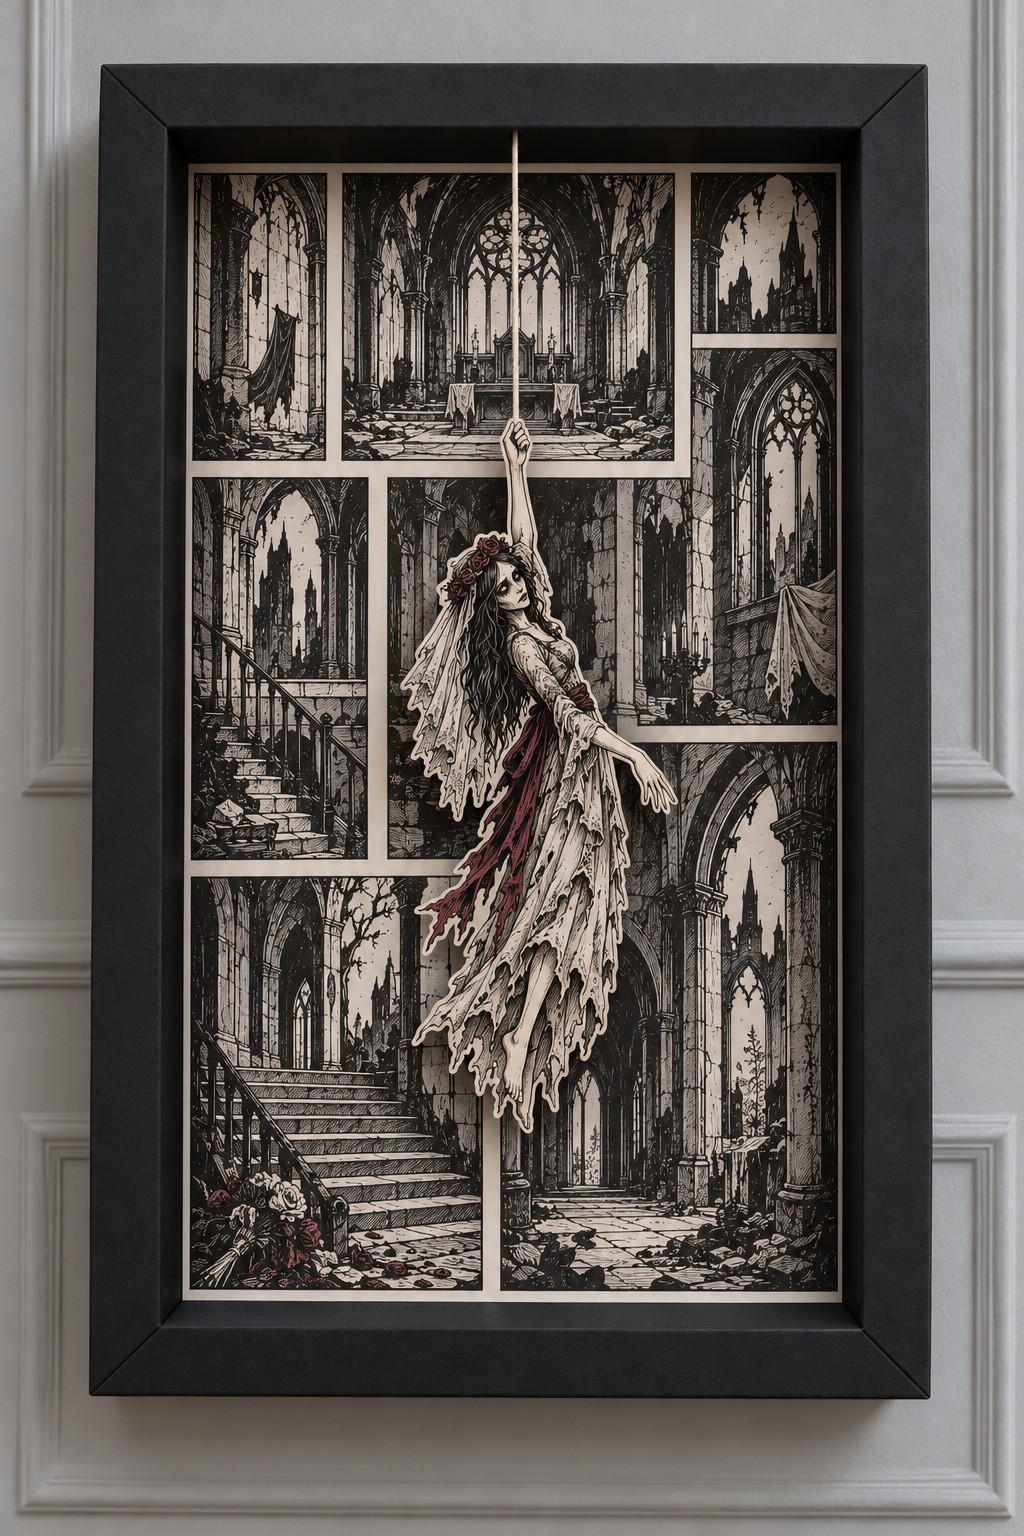
Long ivory layers and a faded burgundy underdress give this ghost bride a delicate silhouette against a ruined cathedral. The surrounding panels contain pointed windows, broken stairways and empty interiors, so keep the background close to black and cream. A matte black folded border brings those separate scenes together and gives the pale dress a strong outline.
Make the figure as one printed cardstock cutout, with the veil, hair and skirt supported by the same backing. Small enclosed gaps can be opened with a craft knife, while very thin trailing strips can retain a narrow cream margin for strength. Place the suspension thread behind the raised forearm and trap its end under a shaped card reinforcement. Keep the lower skirt away from the frame floor so its irregular edge remains visible. The dimensional effect comes from the cutout sitting forward of the cathedral print and casting a restrained shadow.
Tattered Ghost Bride in a Ruined Cathedral Free Template PDF
4. Black Veiled Nun against Gothic Windows
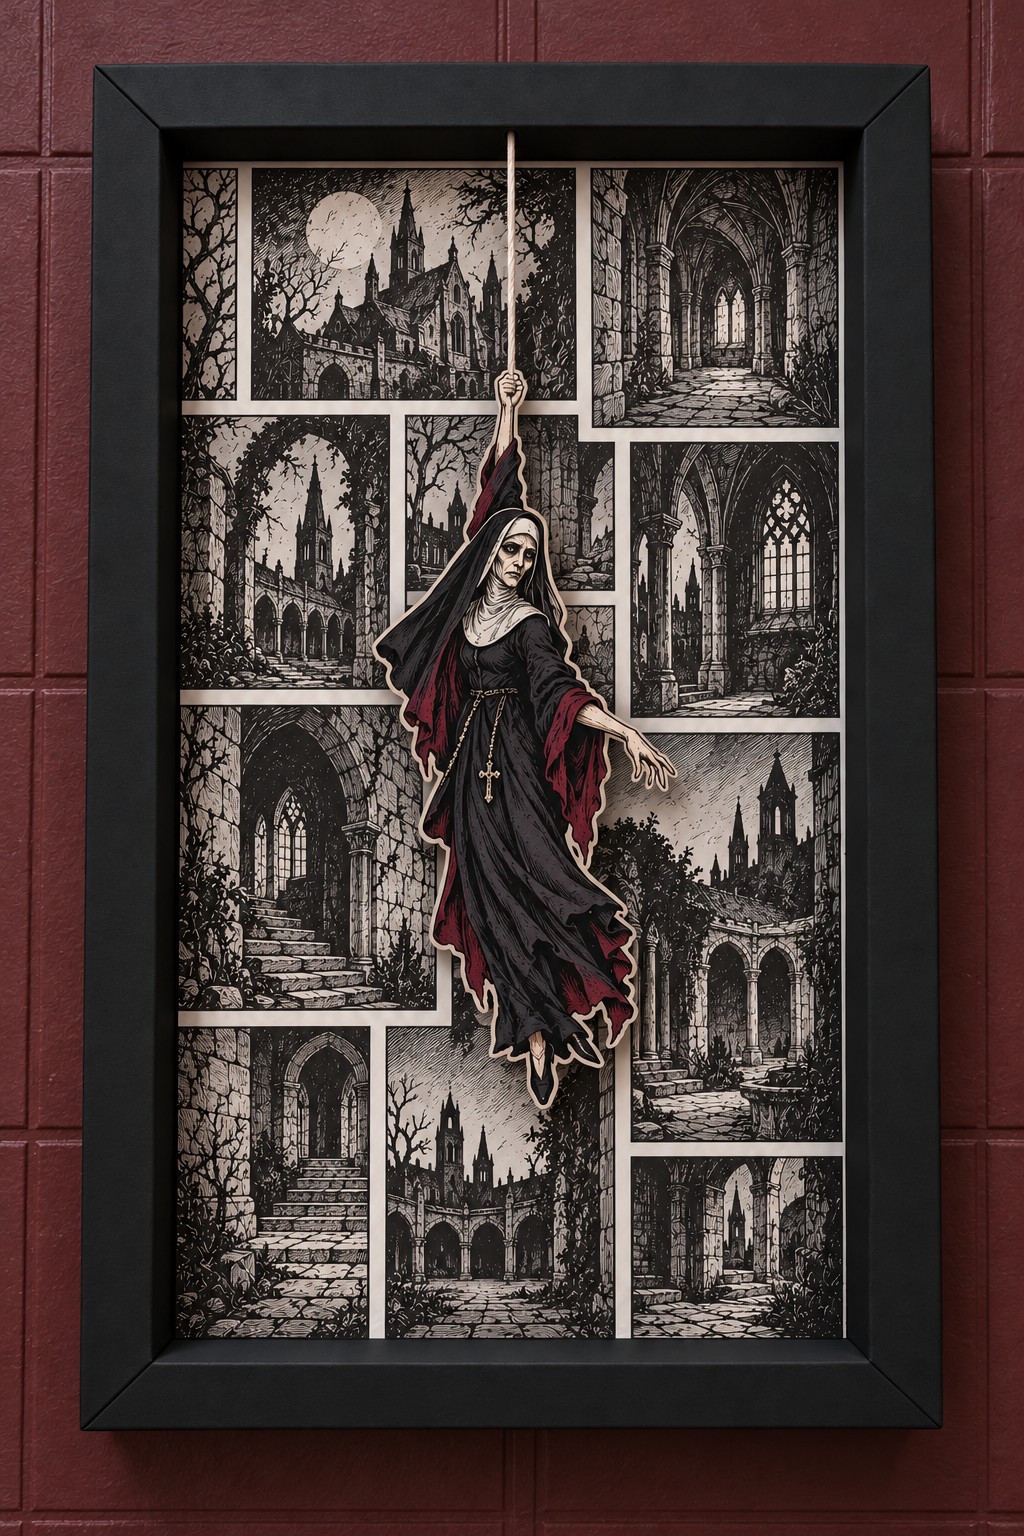
A long black habit, a pale veil edge and small burgundy accents give this Gothic figure its distinctive appearance. Choose a cream background with separate illustrations of arched windows, stone corridors and a distant castle. Keep enough pale space around the head and raised hand to prevent the dark silhouette from disappearing into the architecture. The simple black frame lets the printed details carry the atmosphere.
Use a single reinforced cardstock figure rather than attaching small fabric garments to the body. The cross, sleeve edges and folds can all remain printed details, which keeps the cutout light and easy to suspend. Extend the rear reinforcement through the raised wrist and upper body before attaching the thread. Let the free hand sit clear of any heavy black panel border behind it. This small change in placement helps the fingers remain readable and keeps the composition from looking crowded.
Black Veiled Nun against Gothic Windows Free Template PDF
5. Gothic Dancer over an Empty Opera House
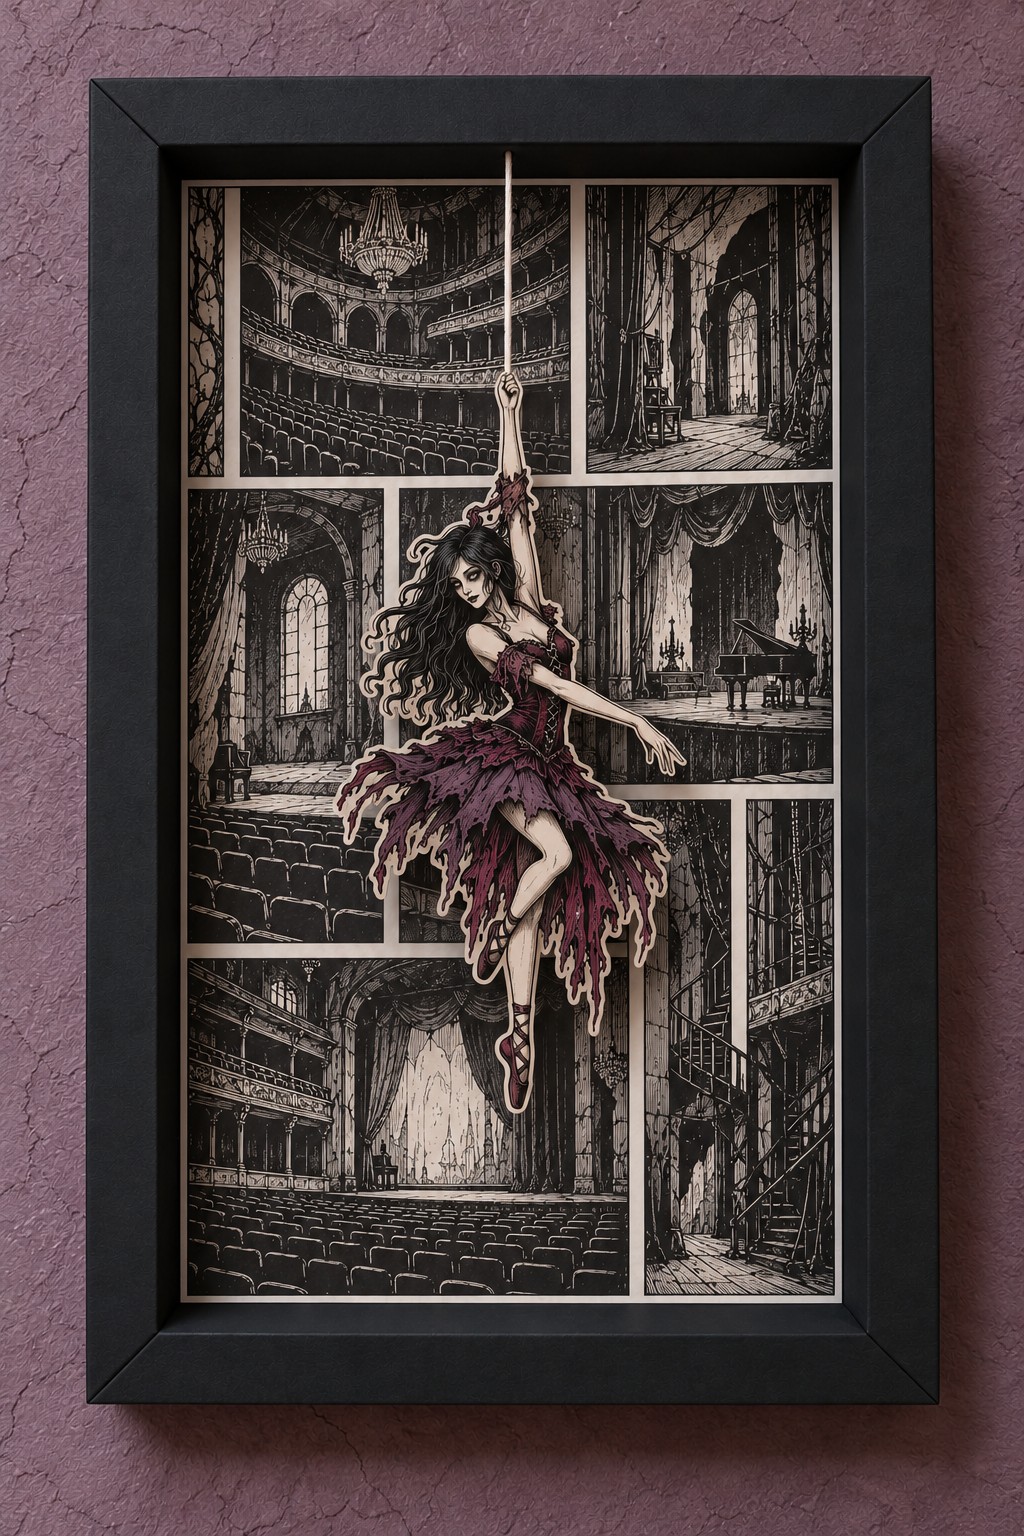
An empty opera house gives this dancer a fitting setting, with rows of seats below and curved balconies above. The plum and burgundy skirt adds movement without needing a mechanical joint. Use several architectural panels on a warm cream background, keeping their borders straight and consistent. A black folded frame gives the composition the enclosed feeling of a miniature stage.
Draw or print the dancer on firm cardstock with the extended arm, lifted leg and skirt connected to the main body. Reinforce the rear of the raised arm before adding the suspension thread, and keep the narrow shoe tips supported while trimming. Position the figure over a quieter area between the darker theatre details, then test the full arrangement upright. Leave a visible gap beneath the lowest shoe so the floating pose feels intentional. For another approach to combining a setting with a focal object, explore these clever wall art ideas.
Gothic Dancer over an Empty Opera House Free Template PDF
6. Paper Sun Lifter above a Winding River
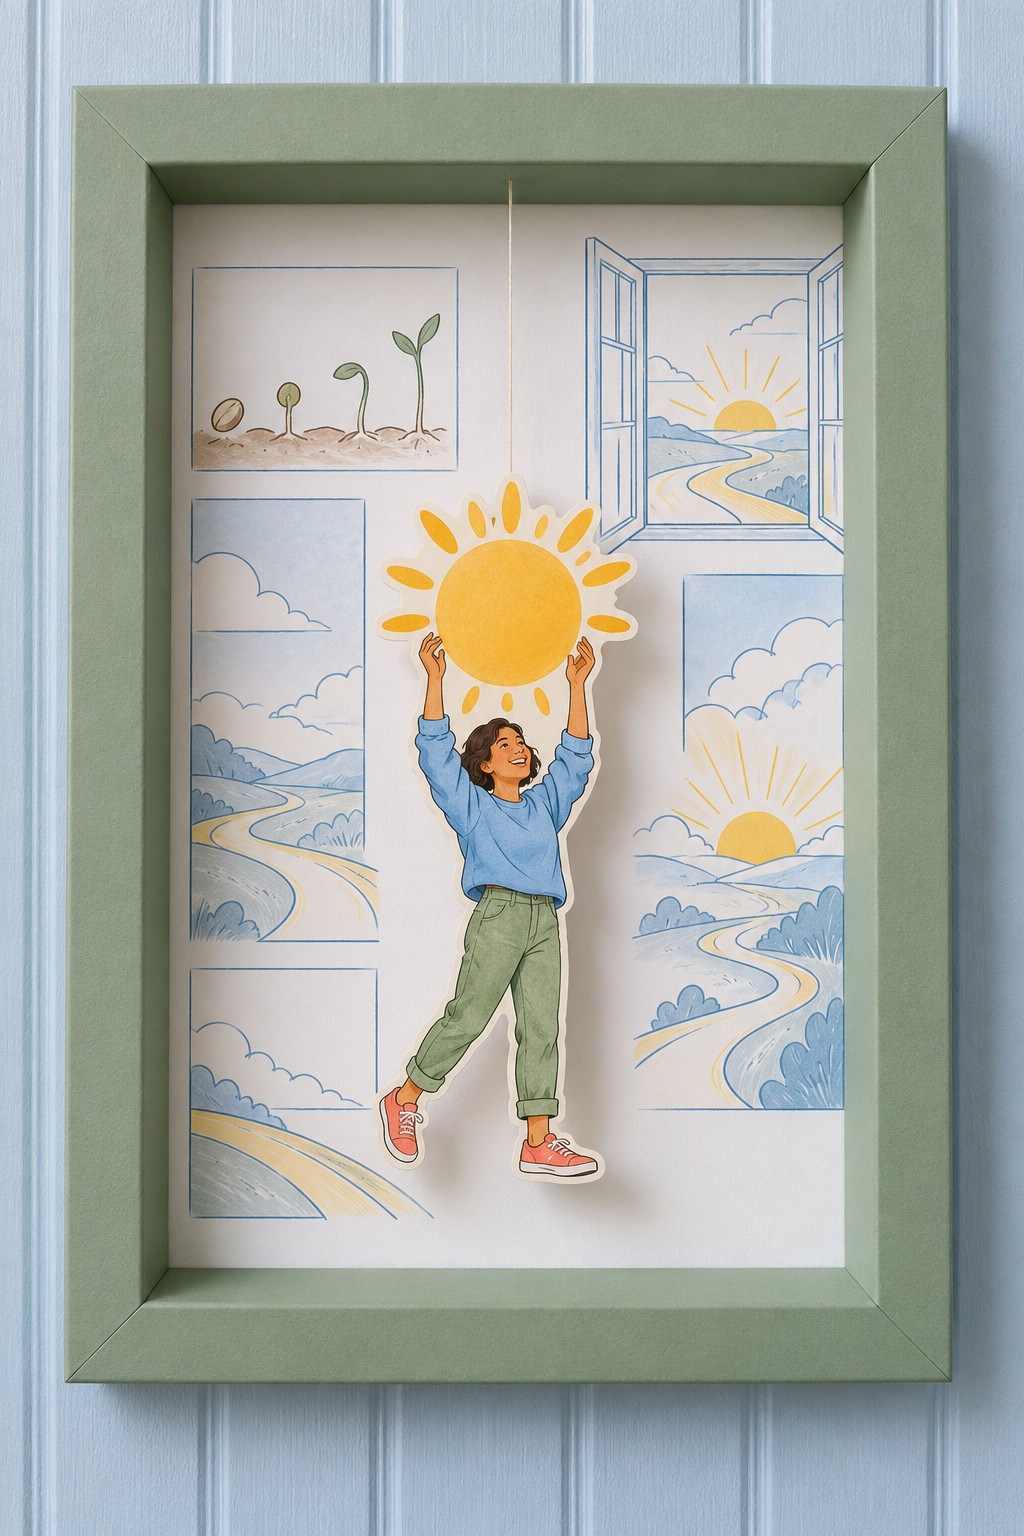
This cheerful frame brings together a yellow sun, a winding river and a small sequence of growing seeds. Pale blue linework keeps the background airy, while the blue shirt, green trousers and orange shoes give the central character enough color to stand apart. Use sage green cardstock for the border and a bright matte background print to preserve the light appearance.
Cut the character and sun as one connected cardstock unit. The wrists and sun need a continuous reinforced backing so the circular shape can carry the figure beneath it. Secure the thread behind the upper part of the sun, then bring it straight up to the top rail. Keep a narrow margin around the rays to avoid fragile points. This is a friendly design for a study corner or a personal encouragement gift. Display it where the paper stays dry and the hanging thread remains beyond the reach of small children.
Paper Sun Lifter above a Winding River Free Template PDF
7. Heart Keeper in a Warm Illustrated Home
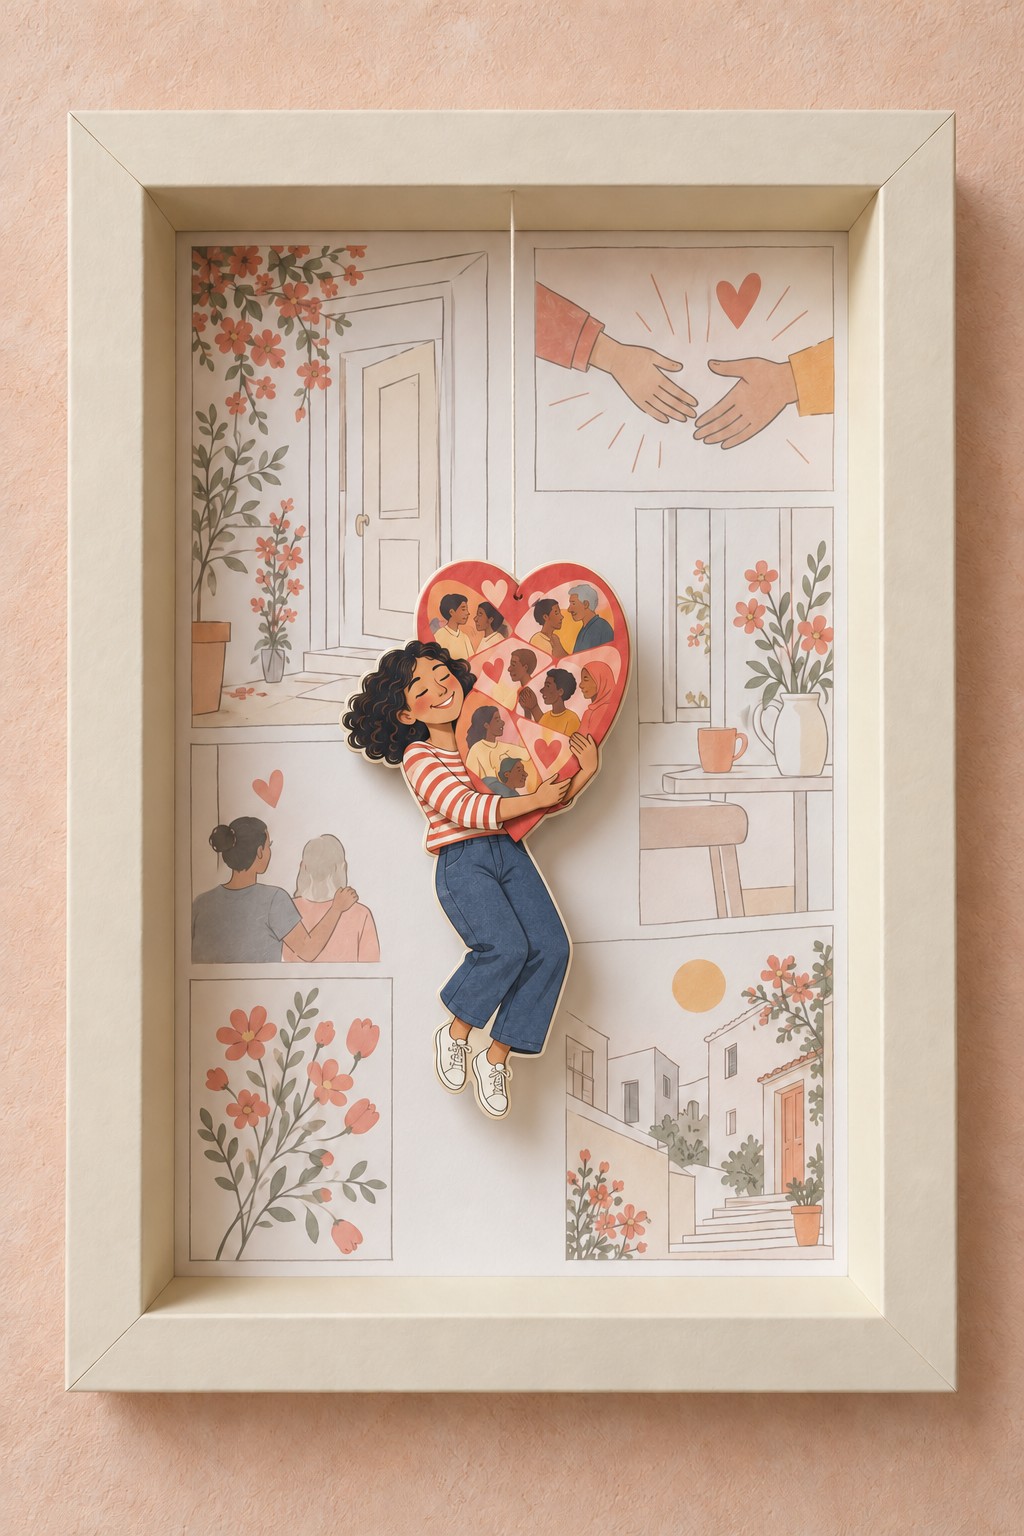
A large heart filled with small portraits makes this frame feel personal before a single word is added. The striped shirt and blue trousers keep the central figure casual, while the background combines flowers, an open doorway, helping hands and a welcoming home. Choose warm cream cardstock for the frame and soft terracotta, peach and green tones for the illustrations.
Prepare the heart and person as one reinforced cutout so the arms do not have to support a separate heavy piece. Fine cotton thread can emerge from the top of the heart, with its lower end secured across the rear backing. For a personal variation, arrange small family drawings inside the heart before printing the complete foreground. Keep the portraits large enough to recognize at the finished size, and avoid adding bulky embellishments over the faces. The result works well as a friendship or family keepsake with a light, uncluttered finish.
Heart Keeper in a Warm Illustrated Home Free Template PDF
8. Red Horned Acrobat in a Thorny Castle
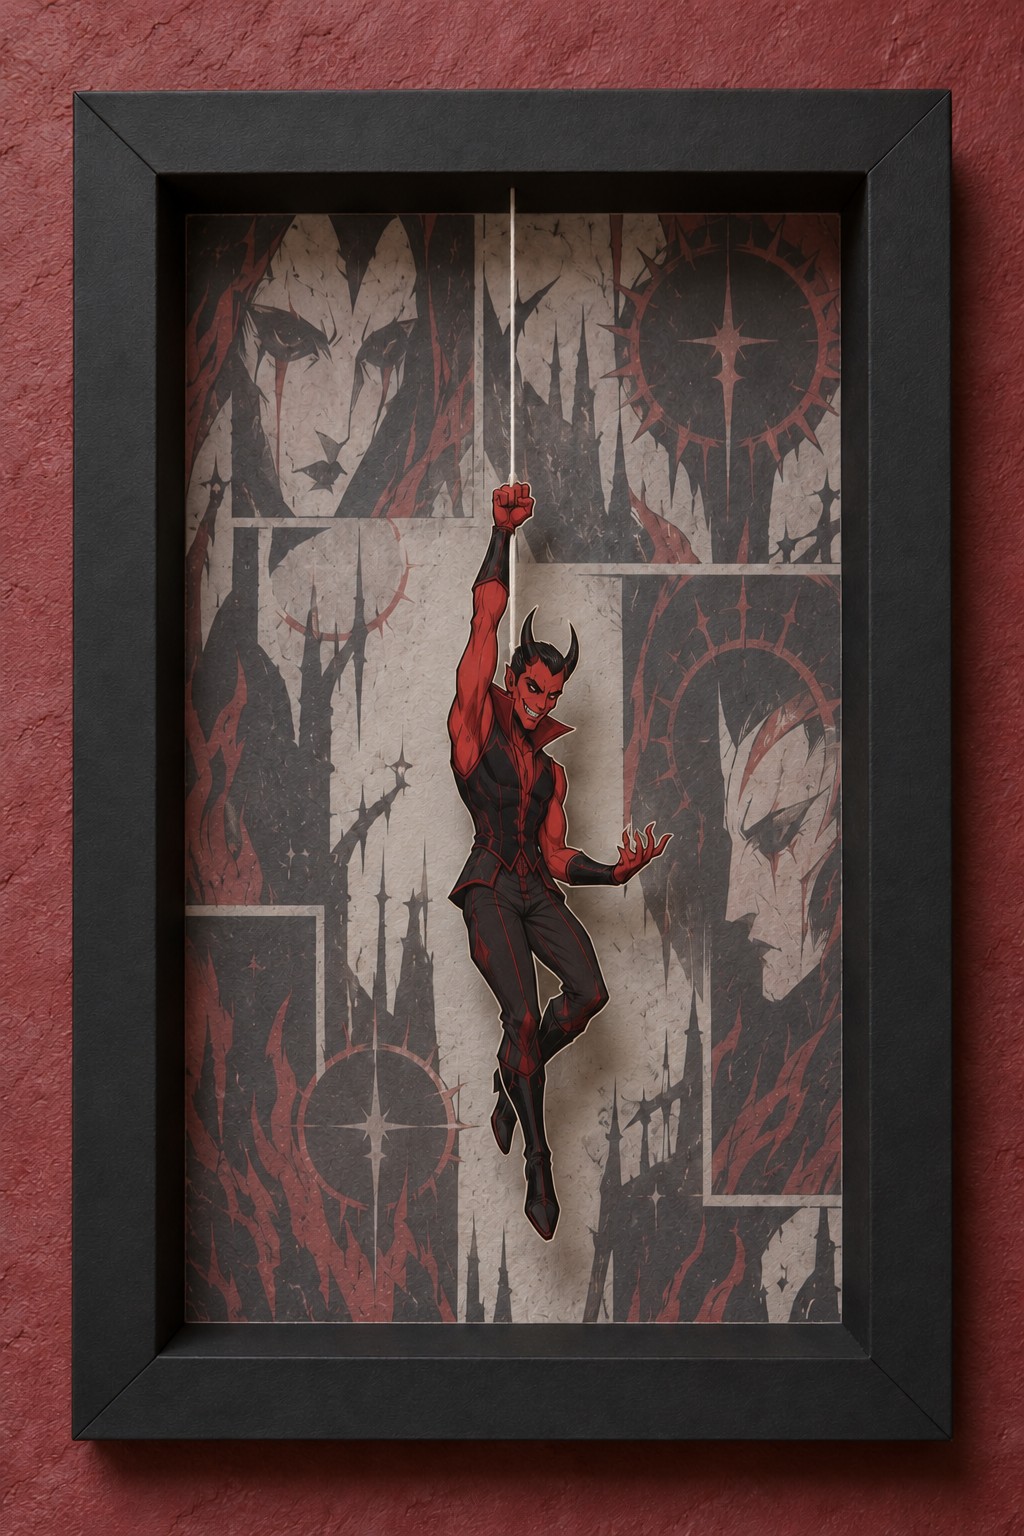
A vivid red upper body gives this horned acrobat a strong silhouette within a dark castle scene. Faded crimson circles and thorn shapes repeat the figure's color in the background without making every surface equally bright. Use matte black card for the folded rails and a gray paper print with restrained red accents. Keep the pale areas behind the face and raised fist open enough for those details to show.
Build the character from a printed cardstock layer backed with another light card layer. The horns, pointed collar and long fingers need careful trimming, so preserve a small border around their thinnest sections. Run the suspension down the rear of the raised arm and anchor it over the upper torso. Check that the free hand sits in front of a quiet background area. A dark red wall can echo the palette, while the frame itself remains the main decorative focus.
Red Horned Acrobat in a Thorny Castle Free Template PDF
9. Cliffside Adventurer with an Orange Scarf
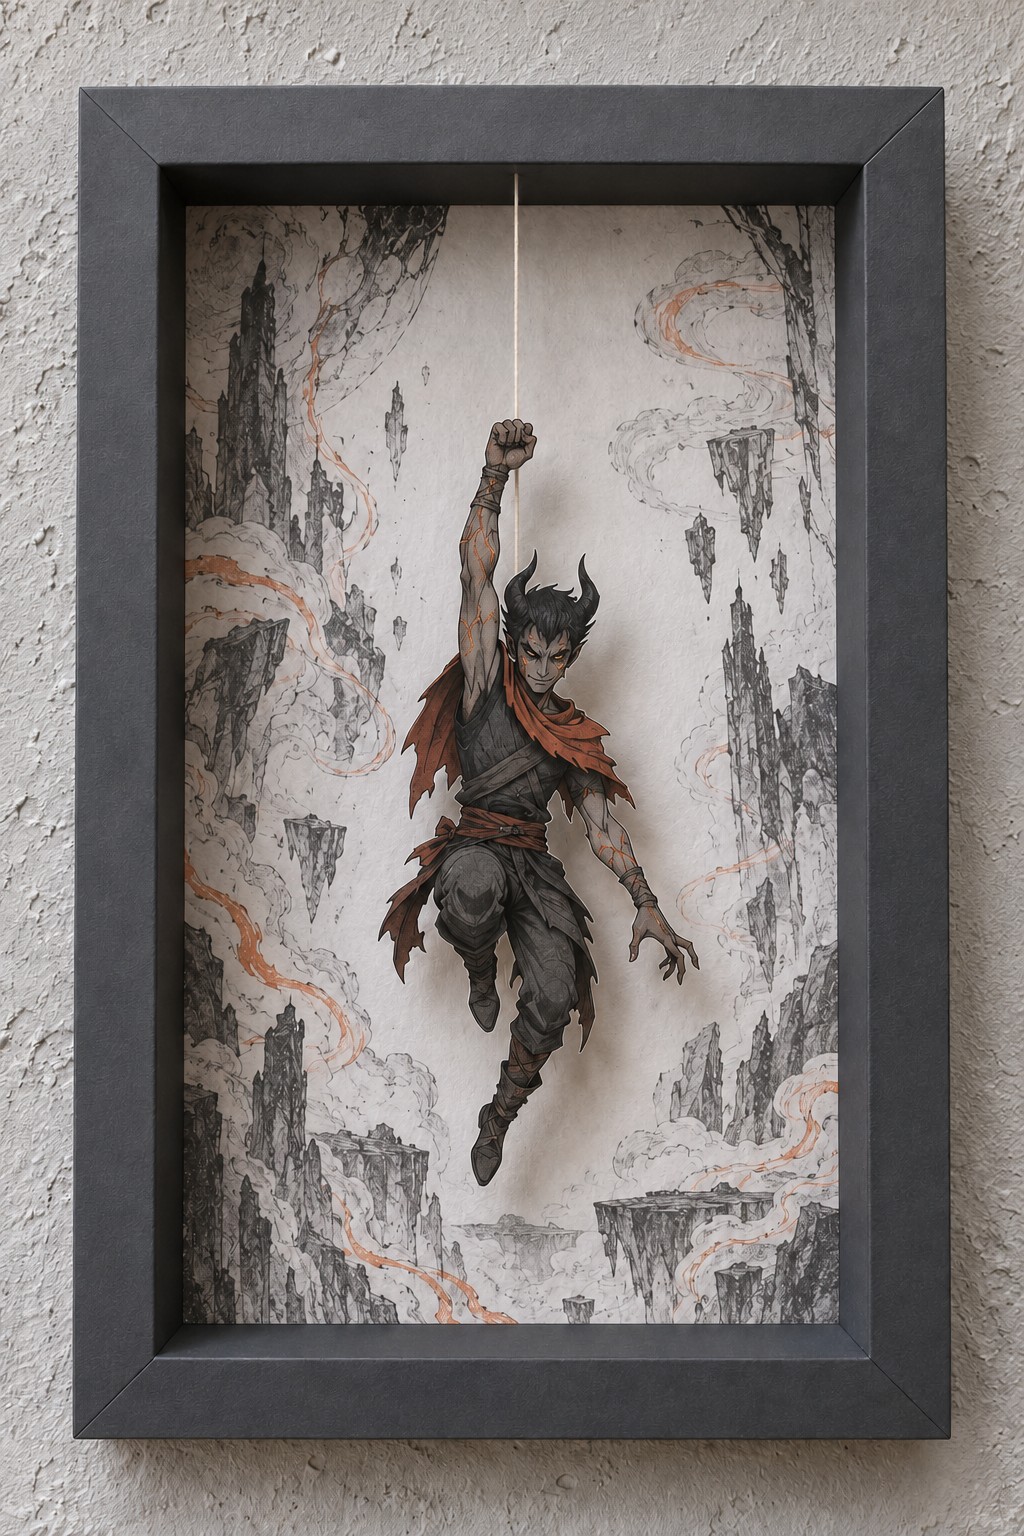
Pale cliffs and distant floating rocks give this adventurer a spacious setting. The orange scarf adds the main warm accent, while the gray clothing stays close to the stone colors behind it. Use a charcoal paper frame and a softly textured background print, placing the lightest part of the landscape behind the head and upper body. This keeps the character readable without needing a bright outline.
Print the scarf as part of the figure and reinforce the whole silhouette before cutting. Leave the narrow scarf ends and bent boot attached to the same backing so they hold their shape. Secure the thread behind the raised fist and forearm, then position the figure above the lower rock ledge. A slight separation from the background is enough to create the floating effect. Avoid placing the cutout directly over the strongest cliff edge, which can make the feet and clothing difficult to distinguish.
Cliffside Adventurer with an Orange Scarf Free Template PDF
10. Inverted Jester in a Spiral Stairwell
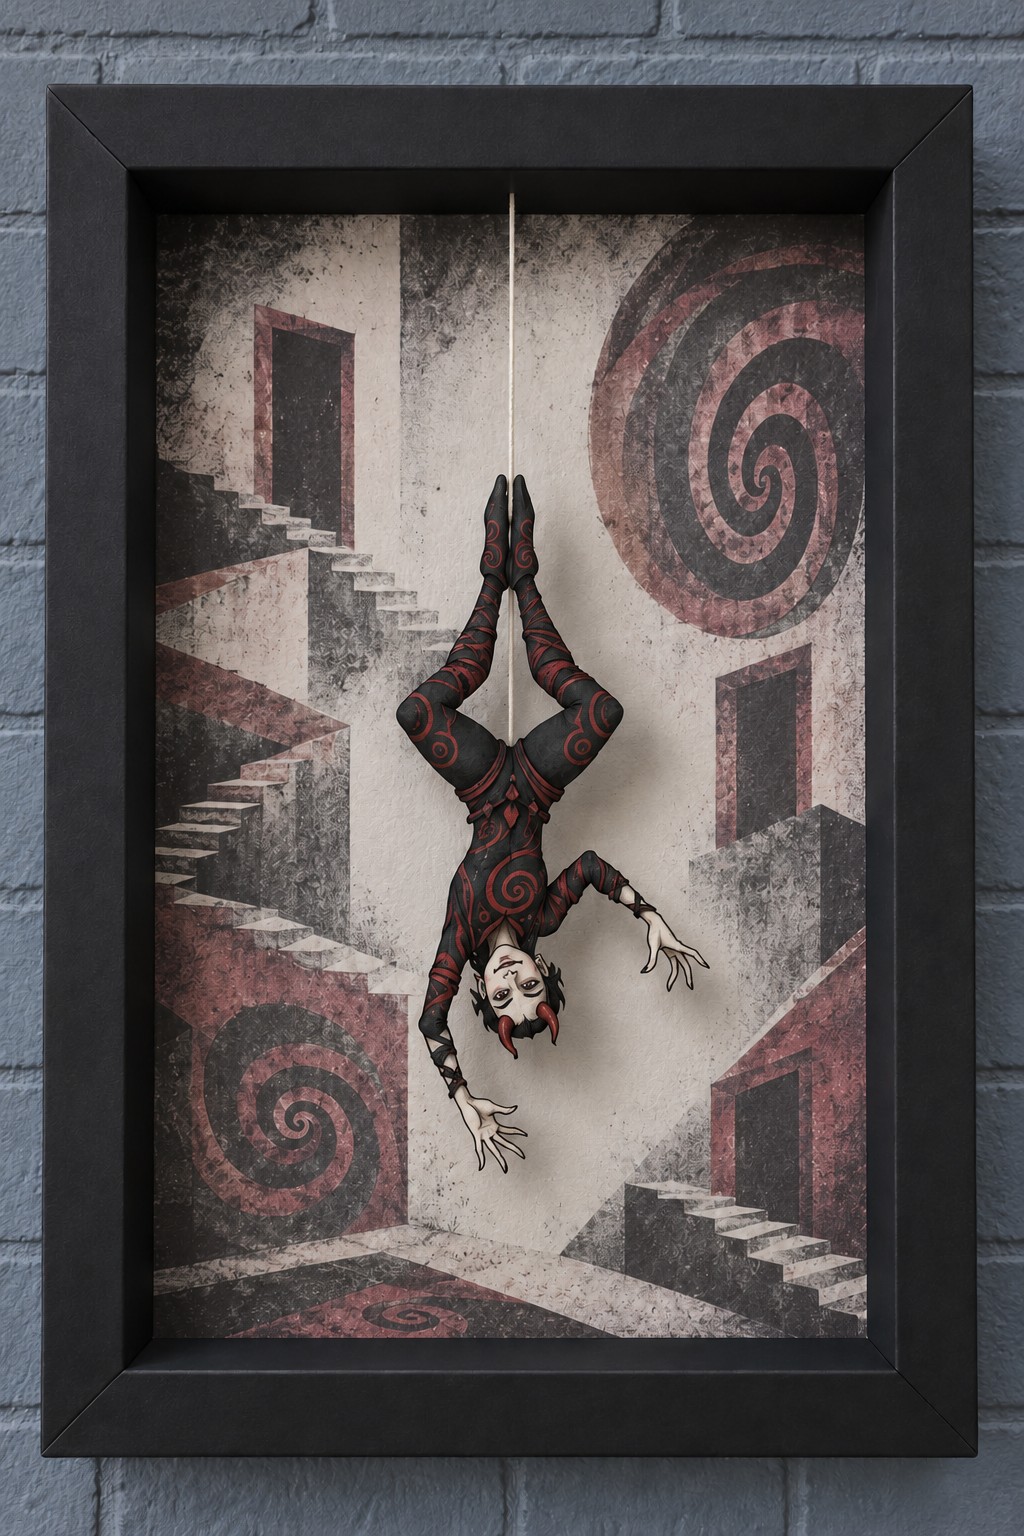
Spirals and impossible stairs turn this frame into a small optical puzzle, while the upside down jester provides a clear focal point. Keep the background in charcoal, dusty red and worn cream. Large shapes work better than many tiny panels here, because the curved graphics already create a strong sense of movement. The charcoal border gives the eye a calm edge around the busy interior.
Reinforce the joined boots and legs so the hanging thread can attach behind the top of the inverted silhouette. Keep both arms and the pointed headpiece within the central opening, leaving space around the fingers. Mount the background first, then test the thread length with the figure in front of it. The head should remain above the lower rail rather than appearing to rest on it. If the figure tilts, adjust the attachment behind the boots before sealing the reinforcement patch.
Inverted Jester in a Spiral Stairwell Free Template PDF
11. Violet Horned Figure in a Crystal Hall
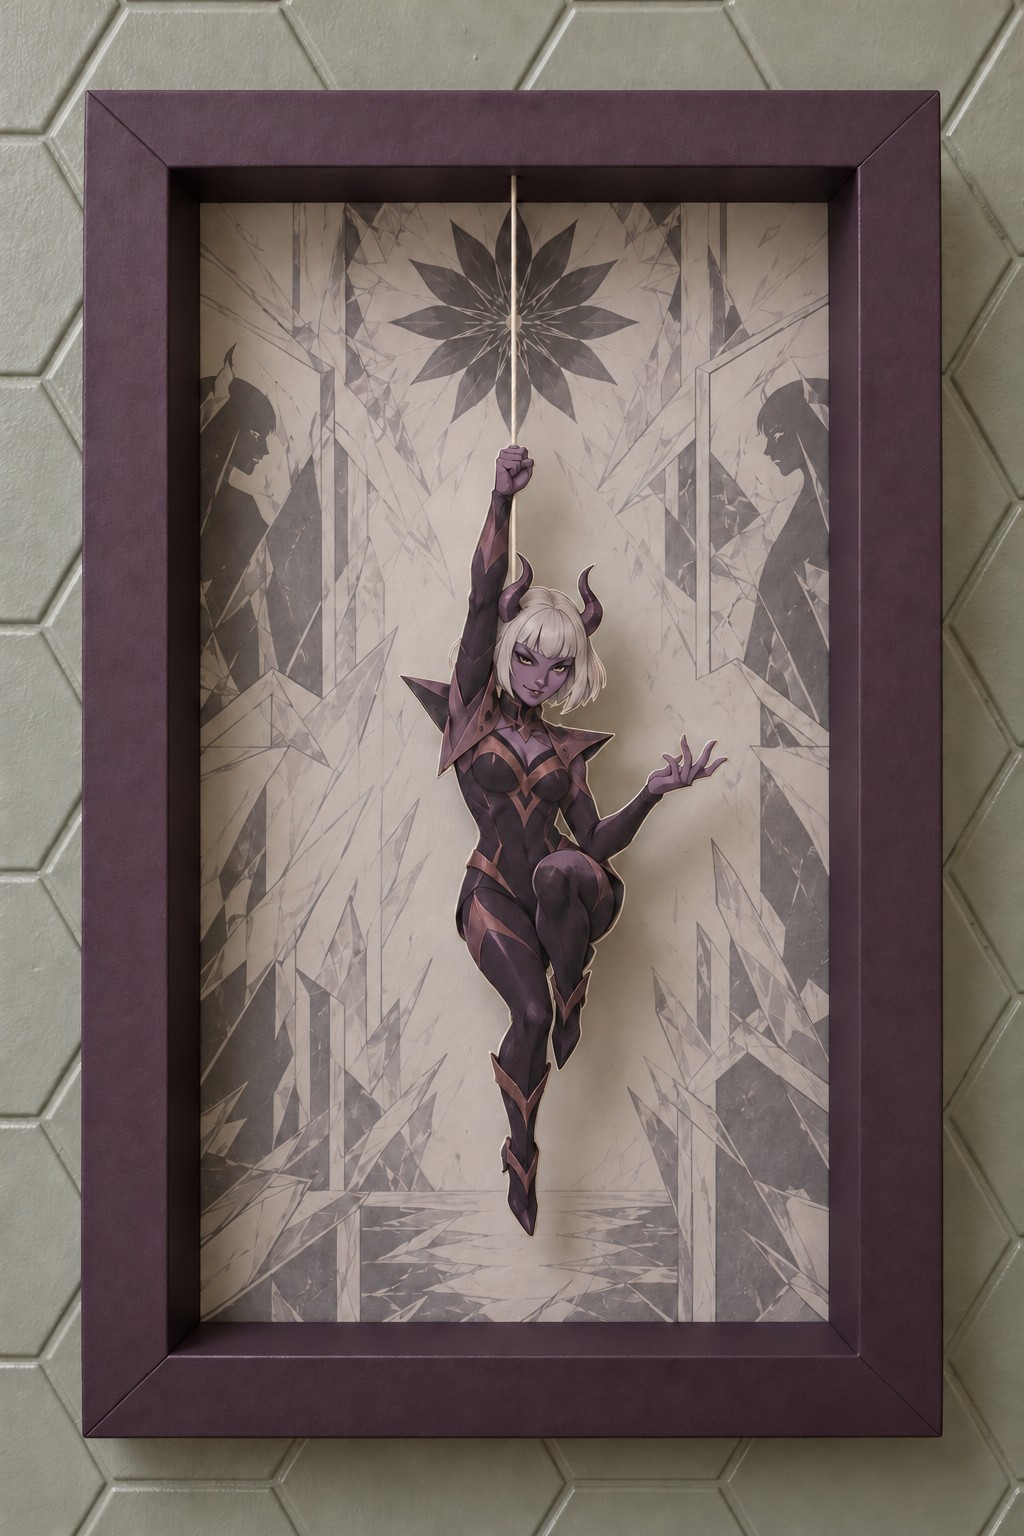
A pale geometric hall makes the violet figure appear especially crisp and sculptural. The dark plum frame picks up the costume color, while angular reflections and a star shaped motif add interest behind the character. Use colored cardstock for the border so the folds stay neat without a thick paint layer. Print the background in muted gray and cream, keeping the strongest contrast away from the face.
The horns, lifted knee and open hand can all remain part of one flat reinforced cutout. Trim slowly around the small points and support the raised arm along its full length from behind. Bring the suspension thread upward in a straight line, checking that it passes cleanly through the background motif rather than becoming lost among several competing lines. Keep the pose centered with a comfortable gap on both sides. A simple arrangement makes the subtle foreground shadow easier to notice.
Violet Horned Figure in a Crystal Hall Free Template PDF
12. Mask Bearer in a Surreal Portrait Gallery
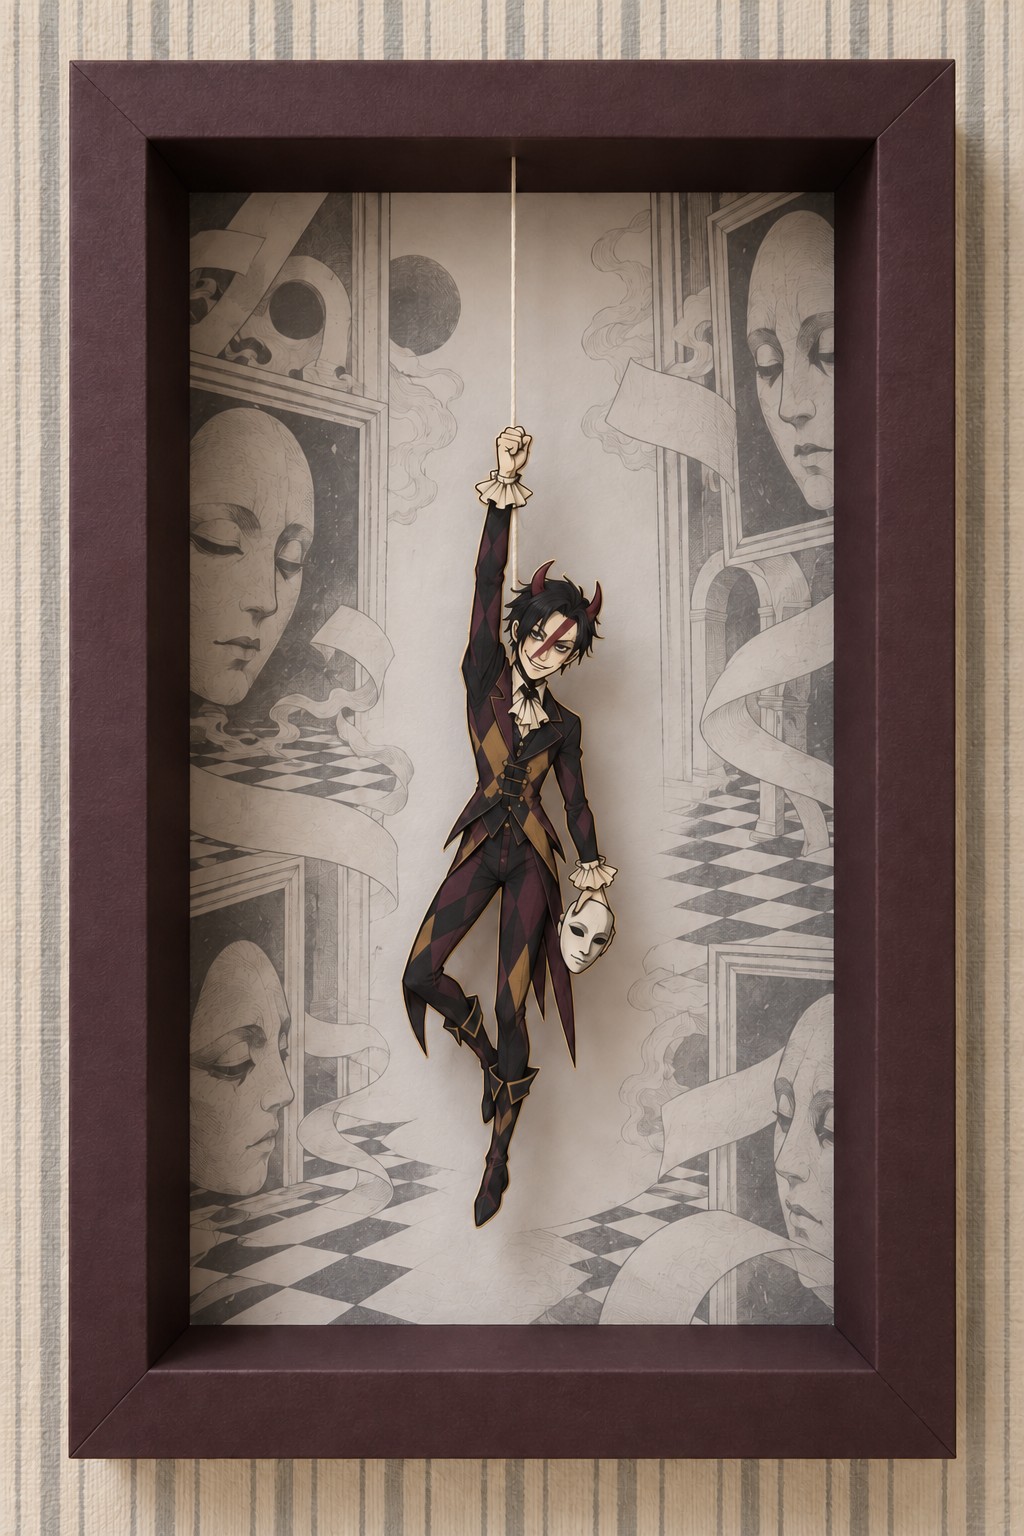
Oversized portraits, curling ribbons and a checkerboard floor give this mask bearer a dreamlike gallery setting. The deep burgundy border supports the muted gold and black clothing, while the small pale mask becomes a second focal detail near the lowered hand. Keep the background slightly faded so the face of the central character remains distinct from the larger portraits behind it.
Print the figure and held mask together on cardstock, then add a continuous backing before cutting. The small connection at the mask handle needs enough width to survive trimming and handling. Fix the suspension behind the raised wrist and upper torso, allowing the long coat tails to hang clear of the floor pattern. If you draw your own version, keep the checkerboard lines confined to the background plane. Their perspective will help suggest depth while the character's actual shadow supplies the physical separation.
Mask Bearer in a Surreal Portrait Gallery Free Template PDF
13. Purple Witch beneath a Row of Moon Phases
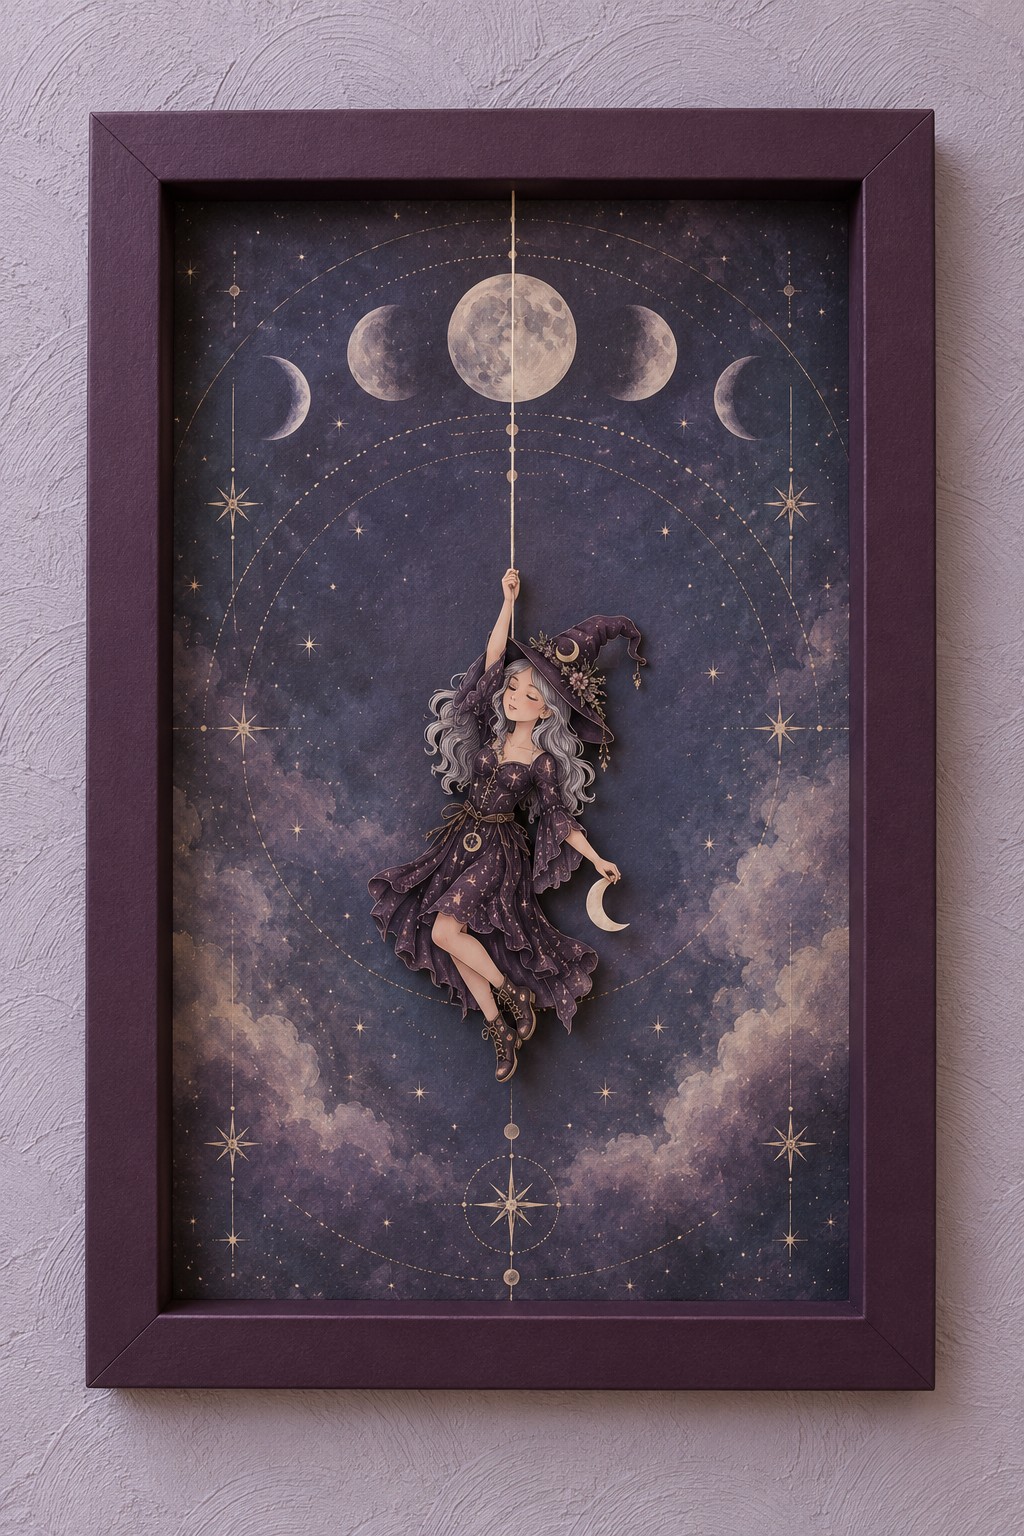
A row of moon phases gives this frame a balanced upper border, with a small purple witch hanging beneath it. The starry violet background works particularly well with a deep plum cardstock frame. Keep the moons softly textured and the stars small, allowing the figure's hat, hair and lifted arm to remain easy to see. A fine cream thread becomes part of the celestial composition.
Use one matte print for the complete moon and star background, then cut the witch separately from reinforced cardstock. The dress can show printed folds and tiny decorative marks while staying light enough for a single suspension. Attach the cord behind the raised arm, leaving the figure below the central moon rather than covering its surface. Small differences in the foreground spacing will change the shadow, so inspect the piece upright before fixing the upper knot. This design suits a quiet reading nook or a small seasonal display.
Purple Witch beneath a Row of Moon Phases Free Template PDF
14. Broom Riding Witch over a Golden Windowed Village
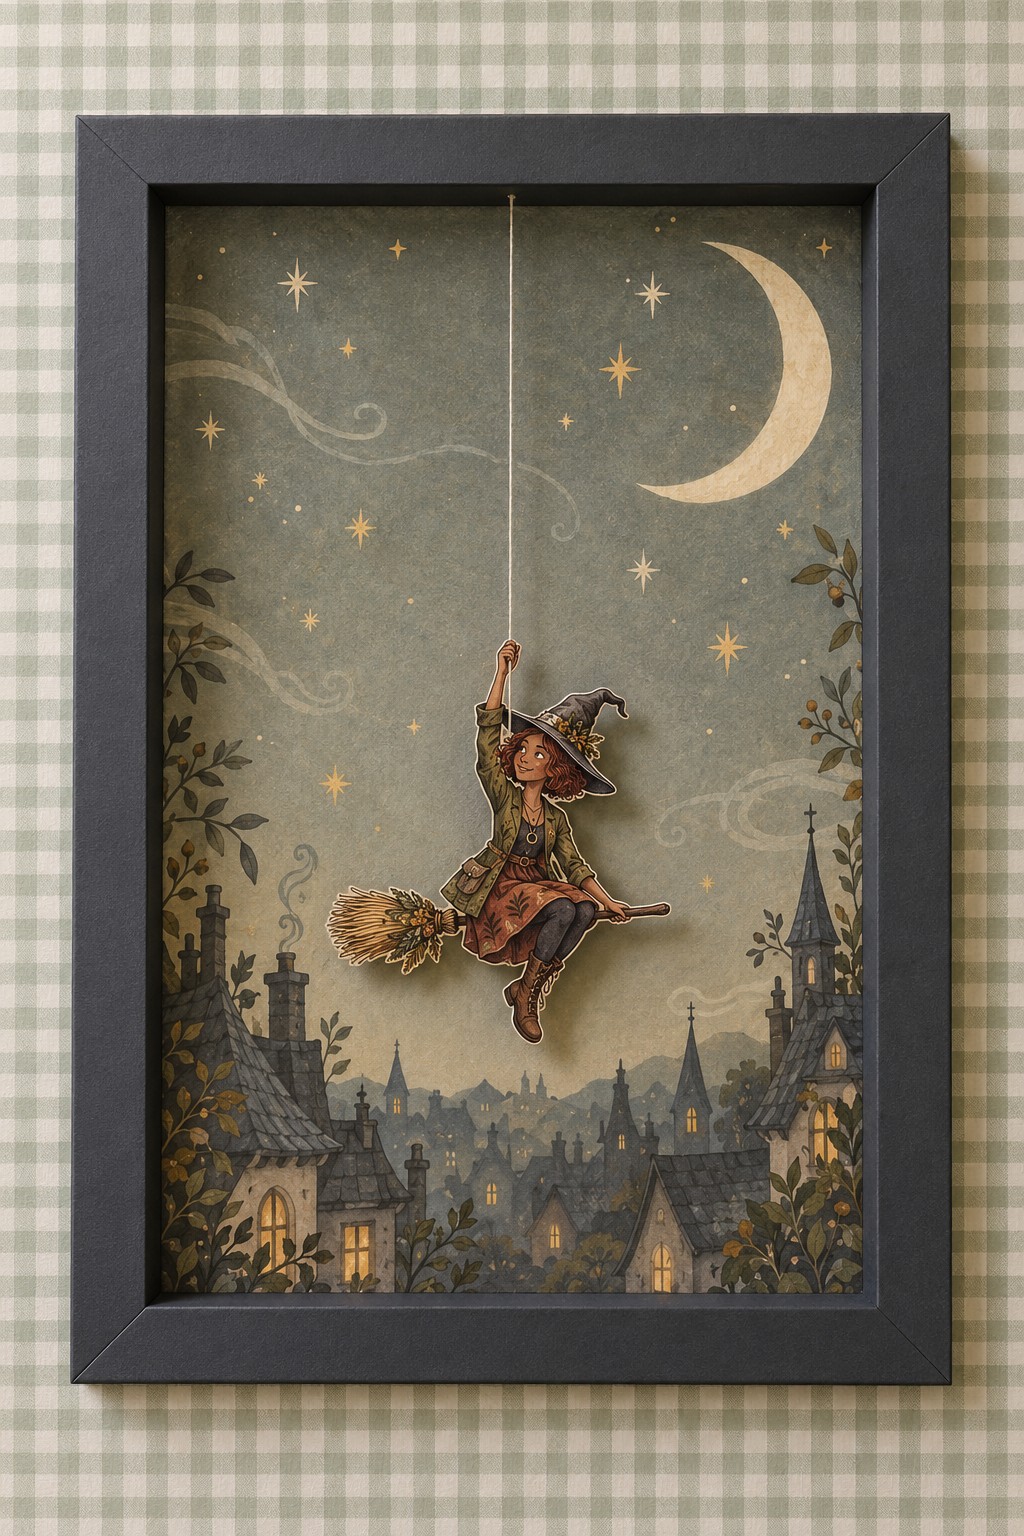
The olive jacket, rust skirt and golden broom bristles give this witch a warm woodland character. A large crescent occupies the upper right of the sage sky, while narrow roofs and glowing window illustrations fill the lower edge. Charcoal cardstock gives the frame a firm outline without making the pale thread disappear. Keep the village and moon on the background print, with the witch and broom forming the separate foreground.
This is the design used in the making guide above. Use the matching PDF figure at its supplied size, approximately 116 mm tall and 99 mm wide, and keep the broom, fingers and boots connected to a reinforced card backing. The thread should emerge directly above the raised hand, with its lower end secured along the rear arm and shoulder. Set the hand around 120 mm below the top of the visible opening, then adjust slightly for balance. The broom needs clear space on both sides so it reads as a complete shape.
Broom Riding Witch over a Golden Windowed Village Free Template PDF
15. Black Coat Hero in a Green Digital World
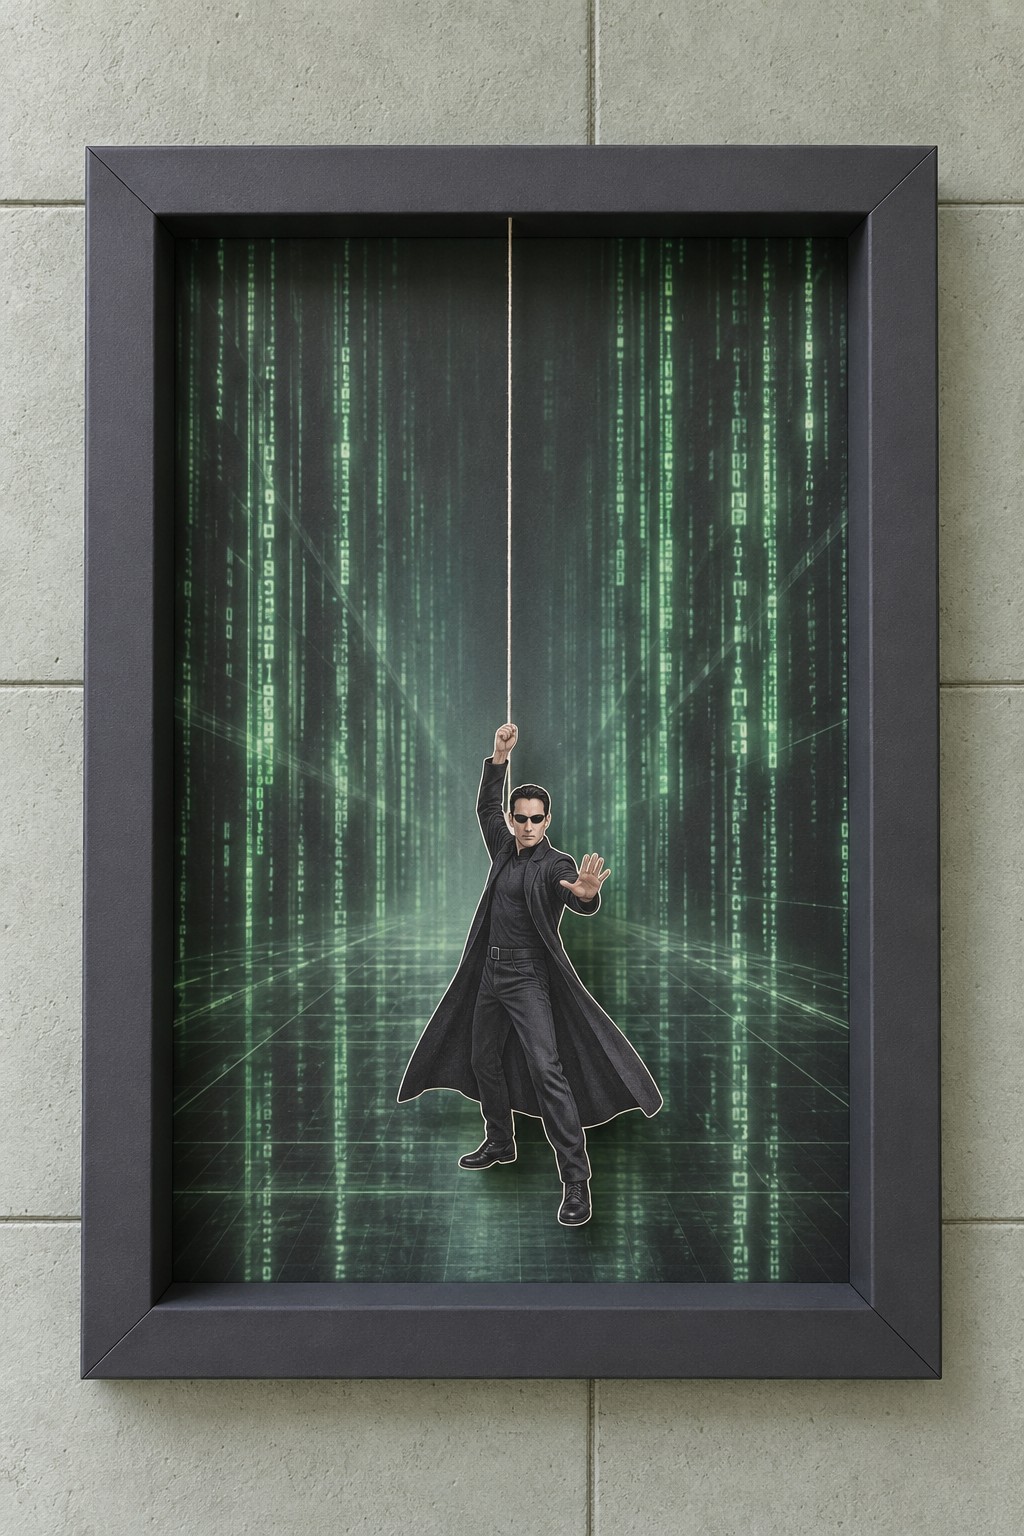
Vertical green code and a receding floor grid give this frame a digital atmosphere. The black coat creates a strong central silhouette, while the pale face and raised hand keep the figure from blending into the darkest areas. Use charcoal cardstock for the frame and a matte background print with controlled highlights. A slightly lighter green area behind the coat helps the cutout remain visible.
Reinforce the coat and both legs as one cardstock piece, keeping the free hand attached through its wrist. Secure a thin thread behind the raised arm and place the figure just above the brightest part of the floor grid. The green light effect belongs to the printed artwork, so the project stays simple to assemble. Keep the coat tails away from the side rails and check that the narrow ankles do not curl forward. A restrained shadow behind the figure will add the depth this graphic setting needs.
Black Coat Hero in a Green Digital World Free Template PDF
16. Parisian Girl outside a Red Awning Café
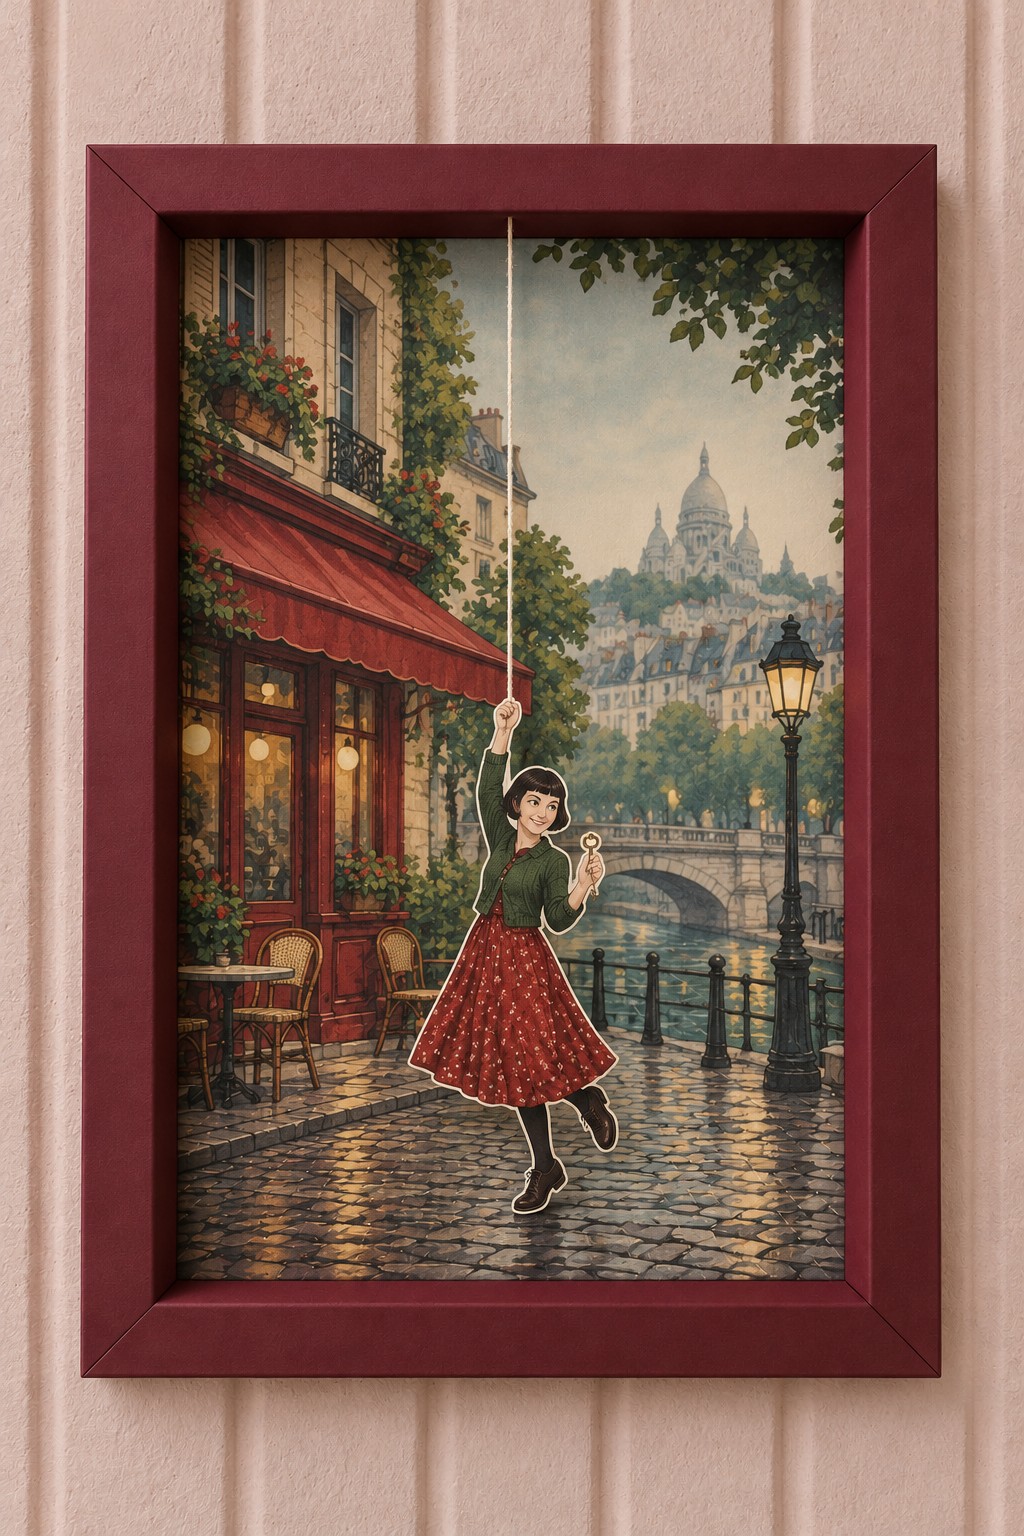
A red awning, green foliage and reflective cobblestones give this scene a warm café atmosphere. The girl's green top and red skirt repeat the background colors, while the burgundy border ties the composition together. Use a matte illustration with a quieter area of sky or distant buildings above the figure, giving the suspension thread room to run cleanly down from the top.
Make the girl as a single reinforced cardstock cutout, including the small object in her lowered hand and both boots. Cut the skirt hem with smooth curves so the white margin stays even. Attach the thread along the back of the raised wrist and position the figure over the open paving rather than over the café chairs. The printed street will supply the setting, and the gap behind the character will provide the dimensional effect. This is a charming choice for a breakfast corner or a travel themed gift.
Parisian Girl outside a Red Awning Café Free Template PDF
17. Silent Film Comedian on a Sepia Street
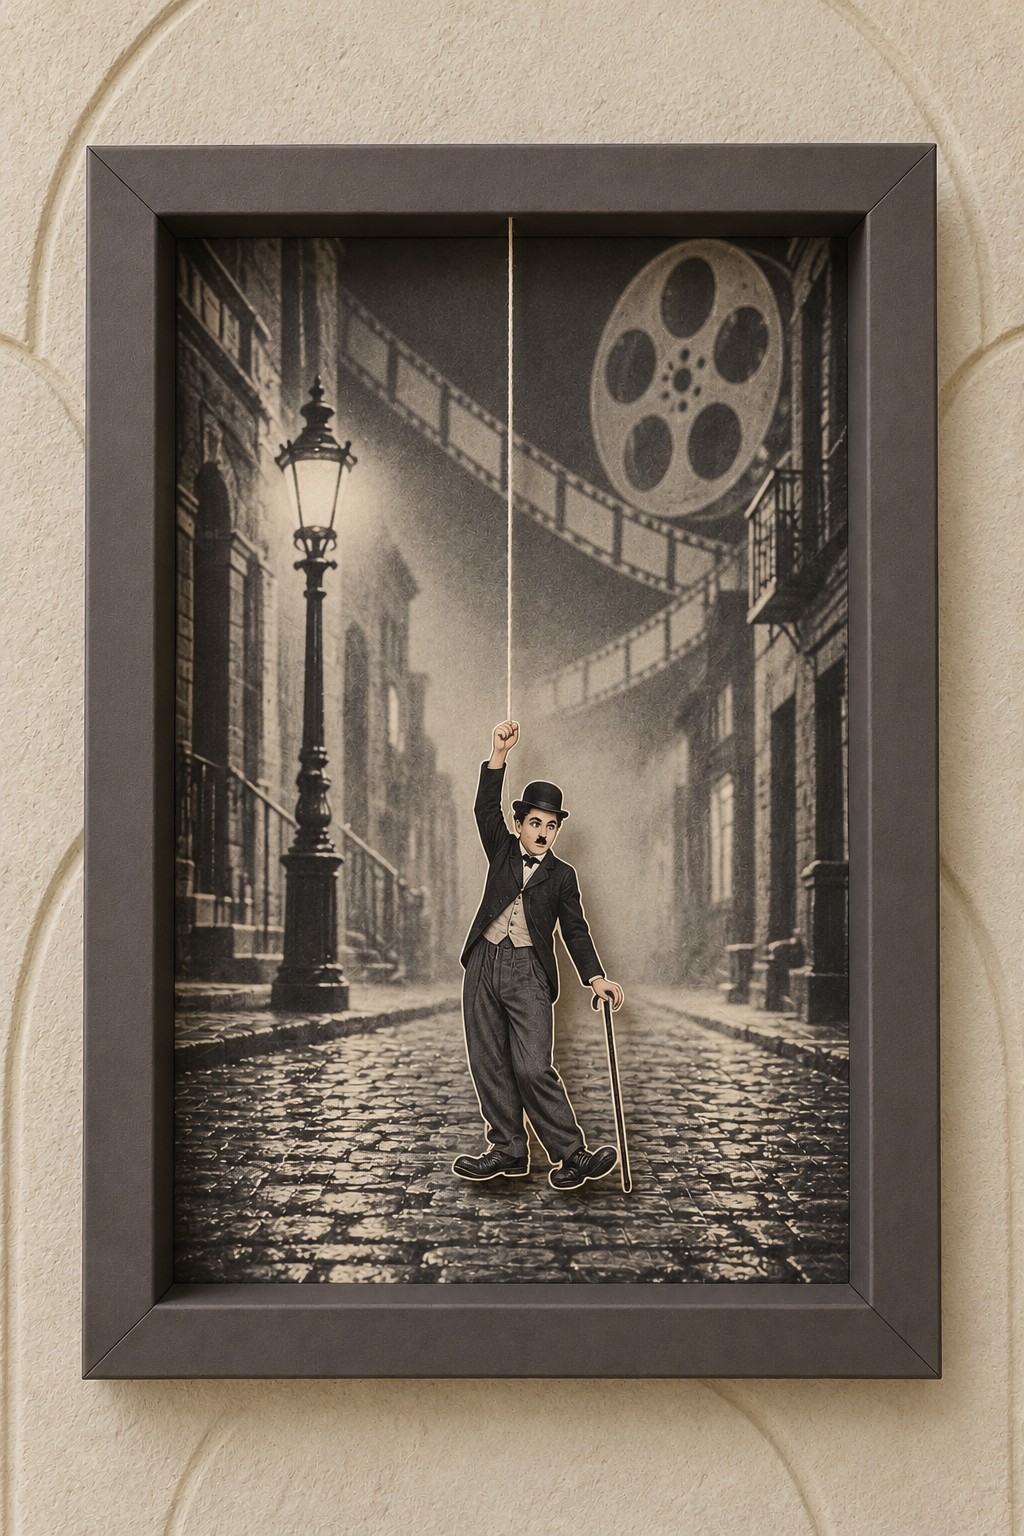
A bowler hat, cane and oversized shoes give this frame an immediately recognizable silent film mood. The sepia street and large film reel keep the palette unified, while a taupe or dark gray paper border preserves the vintage appearance. Let the background contain the lamppost, buildings and film strip so the foreground can remain a clean, light cutout.
Print the comedian and cane as one piece, reinforcing the narrow connection near the lowered hand. Leave a small card margin around the cane rather than cutting it down to a fragile line. Run the suspension behind the raised forearm and adjust the length until the shoes sit just above the illustrated street. Keep the top of the hat below the background's busiest film graphics. A level frame and a straight thread help the small figure look intentionally suspended within the scene rather than accidentally tilted.
Silent Film Comedian on a Sepia Street Free Template PDF
18. Grey Wizard before a Mountain Citadel
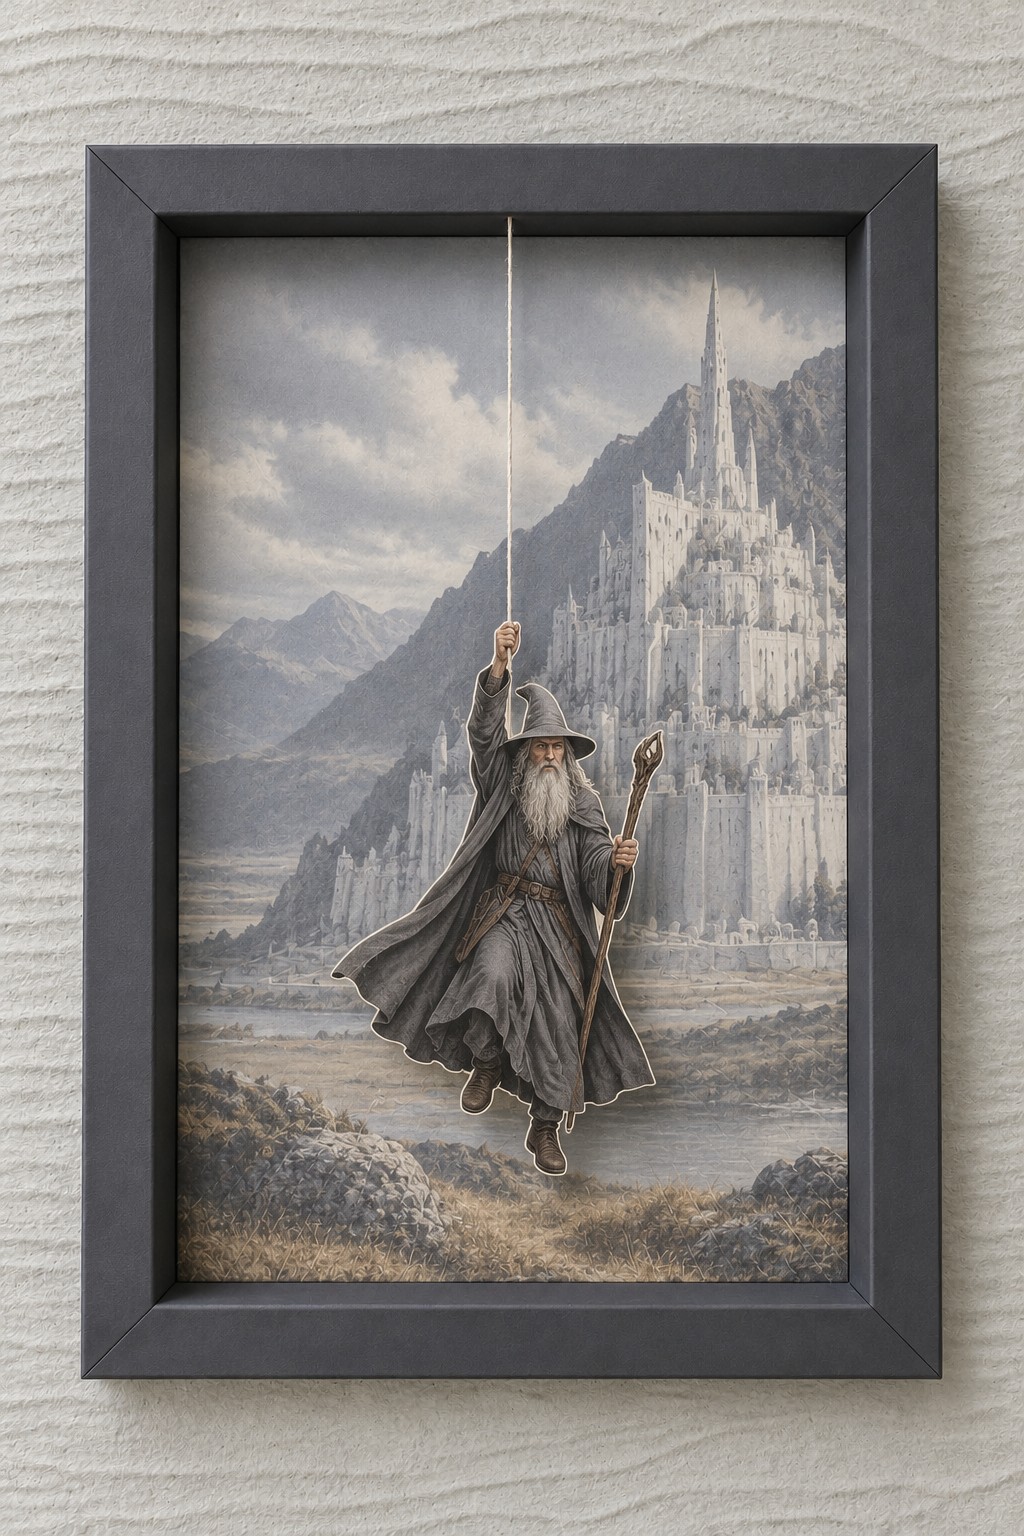
A pale mountain citadel gives this gray wizard a sweeping setting without needing extra physical layers. The robe, pointed hat and staff remain clear against a misty sky, while the dark gray border quietly contains the scene. Use a background print with soft contrast and keep the brightest architecture to one side of the character so the outline of the robe remains readable.
Back the printed wizard with firm card before trimming, allowing the beard, staff and robe to remain connected as one stable silhouette. The staff needs a slightly wider supporting margin than the main body. Attach the fine thread behind the raised hand and extend its reinforcement into the shoulder. Position the feet above the lower landscape with room for the robe to spread. If you prefer another border treatment for a related project, these floral clay frame techniques offer a different way to decorate a ready made frame.
Grey Wizard before a Mountain Citadel Free Template PDF
19. Woodland Archer among Golden Tree Houses
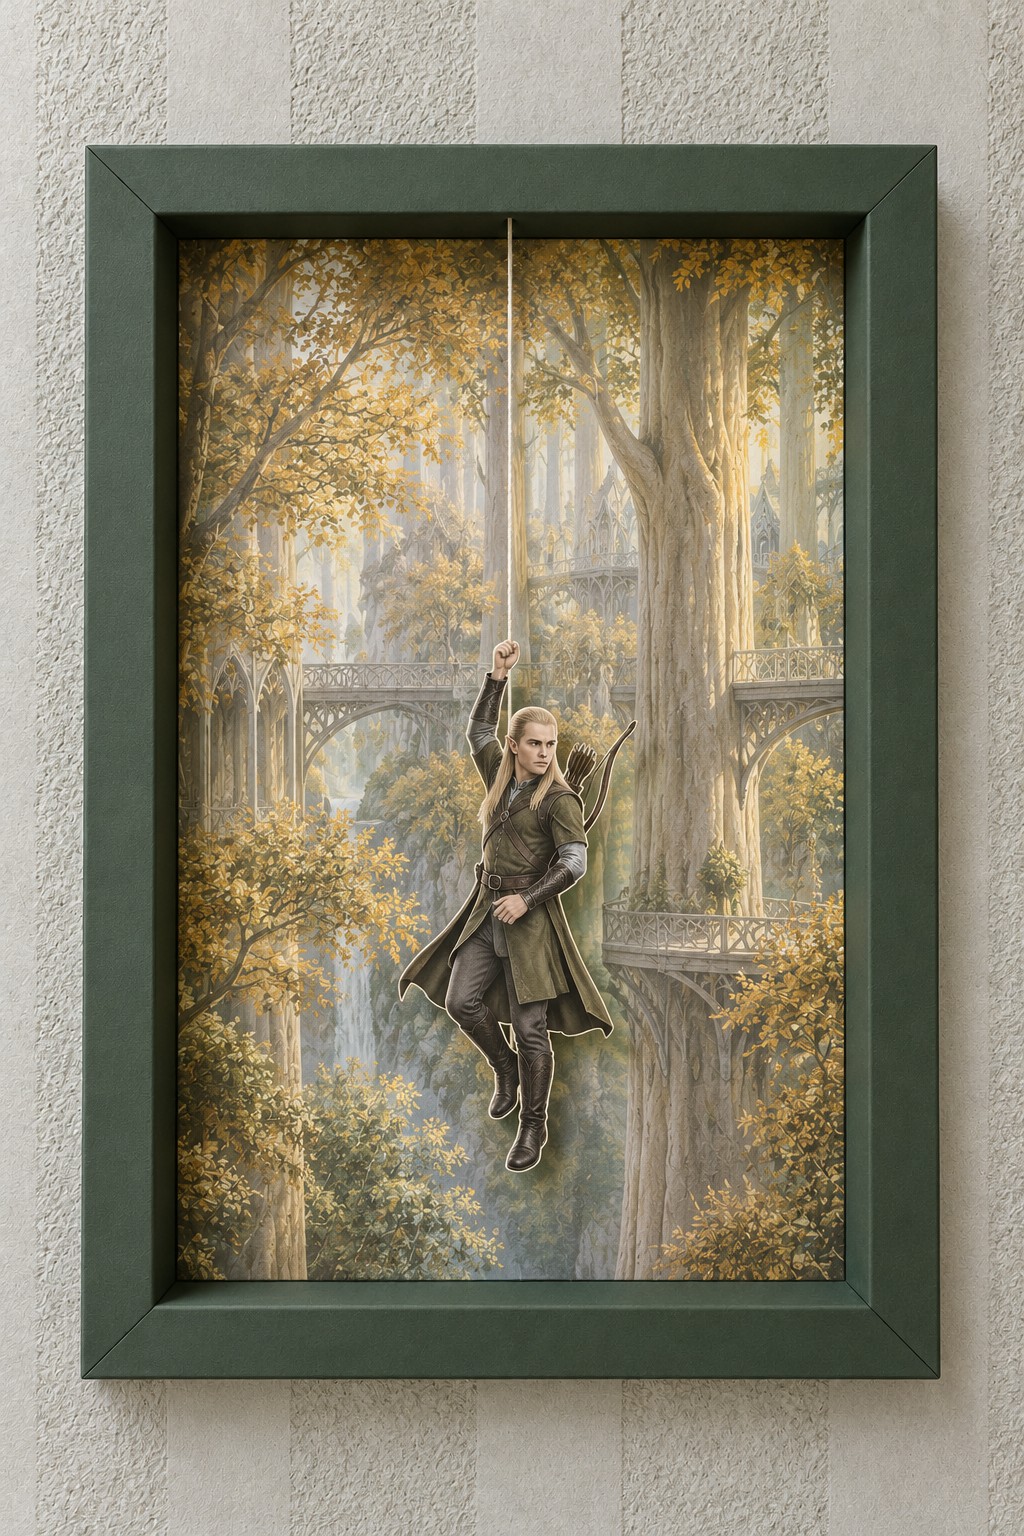
Golden leaves, tall trunks and delicate bridges give this woodland archer a richly layered setting. The dark green frame repeats the clothing color, while pale openings between the trees keep the center from becoming too dense. Use a single detailed forest print for the background and let its perspective suggest distant platforms. The actual foreground separation can stay limited to the suspended character.
Print the archer with the bow and long clothing edges connected to a reinforced card backing. Trim around the bow carefully, keeping enough support at the hand and shoulder. Run the suspension thread behind the raised arm, then position the figure in a lighter gap between the trunks. The lowest boot should remain above the bottom rail. Avoid adding real leaves inside the shallow frame, where they could obstruct the character or change the balance. The printed gold foliage already provides plenty of texture and color.
Woodland Archer among Golden Tree Houses Free Template PDF
20. White Gowned Elf in a Silver Archway
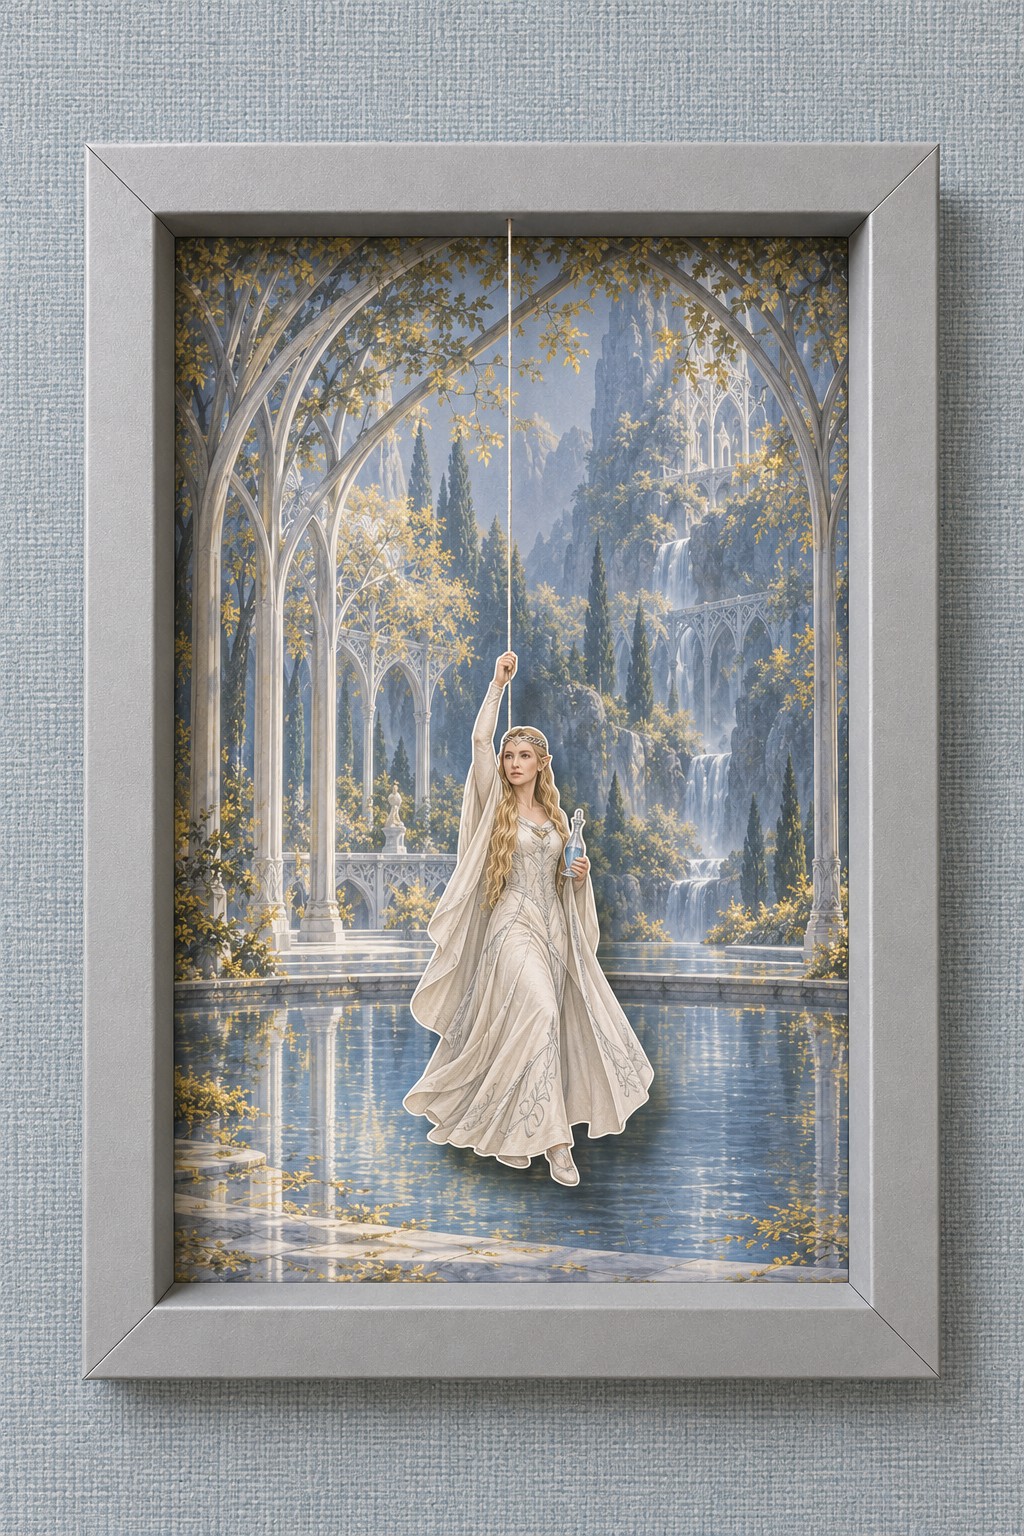
A silver gray border and flowing white gown give this final scene a softer appearance. Pointed arches, distant waterfalls and a reflecting pool create a cool, luminous background, with small gold leaves adding warmth around the edges. Choose pale gray cardstock for the frame and print the scenery with enough blue and shadow to separate the white dress from the setting.
Make the elf as one reinforced cutout, including the long hair, raised hand and small object held at the opposite side. Leave a narrow margin around the hair strands and the lowest dress folds so they resist curling. Attach cream thread behind the raised arm and place the character within the central arch, leaving the upper curve visible. The hem needs a clear gap above the frame floor. For a larger room display, keep nearby decorations simple so the delicate architecture and subtle foreground shadow can remain the focus.
White Gowned Elf in a Silver Archway Free Template PDF
Keep the Paper Scene Clean and Level
Choose a dry indoor position away from direct sun and strong drafts. Fine dust can be lifted gently with a clean, soft brush while you support the frame, taking care around the thread and thin cutout edges. Check the upper anchor if the figure begins to sit lower, and inspect the folded seams if the border starts to twist. A small repair is easier before a loose paper edge spreads.
For a coordinated group, keep the outside frame dimensions consistent and vary the card colors, artwork and foreground shapes. Allow enough space between frames for each scene to read clearly. Check them at normal viewing height, where a straight thread, visible figure outline and soft background shadow have the greatest effect.


Leave a Reply