
A shaped star cushion needs a different pattern from a removable cover with sewn petals. This collection separates those choices across 22 pillow projects, with two making collages and notes on filling, closures, fabric and washing. Choose the construction that suits the pillow’s use, then borrow the color or motif that fits your room.
Table of Contents
- Choose a New Cover, an Updated Cover, or a Shaped Pillow
- Prepare Fabric, Tools, and Filling
- Collage 1: Make a Personalized Rainbow Pillow
- Collage 2: Personalize an Existing Pillow Cover
- 22 Pillow Ideas to Adapt to Your Home
- 1. Sculptural Knot Pillow with Visible Stitch Detail
- 2. Patchwork Flower Built from Individual Quilted Petals
- 3. Mixed Textile Rainbow for Using Fabric Remnants
- 4. Woven Fabric Strips for a Rich Textured Cushion Front
- 5. Layered Pastel Flower with Soft Dimensional Petals
- 6. Diagonal Woven Padded Bands on a Neutral Base
- 7. Tactile Patchwork Mixing Fringe, Tufts, and Flat Weaves
- 8. Geometric Squares for a More Ordered Patchwork Design
- 9. Flowing Wavy Appliqué with a Retro Color Palette
- 10. Heart Appliqué Framed with Gathered Fabric Ruffles
- 11. Pleated Flower with a Rosette Finishing the Center
- 12. Heart Shaped Cushion with a Soft Ruffle Border
- 13. Gentle Rainbow Arches with Small Floral Embroidery
- 14. Crescent Moon with Embroidery and Layered Ruffle Edges
- 15. Mustard Star with Simple Visible Edge Stitching
- 16. Raised Rainbow Appliqué Against Ribbed Corduroy
- 17. Rounded Flower Cushion with Contrasting Inner Petals
- 18. Floral Patchwork Combined with a Heart Silhouette
- 19. Mushroom Cushion with a Soft Tufted Cap
- 20. Celestial Pillow with a Raised Crescent and Embroidered Stars
- 21. Plush Cat Face with Flat Embroidered Features
- 22. Quilted Yellow Star with a Quiet Grid Texture
- Change the Atmosphere with a Small Pillow Edit
- Care for Covers and Filling Separately
Choose a New Cover, an Updated Cover, or a Shaped Pillow
For a familiar square or rectangular insert, make a decorative cover or personalize one you already own. The woven, patchwork, appliqué, and celestial faces in 4, 7, 8, 9, 10, 11, 16, and 20 suit that approach. Hearts, stars, the cat, mushroom, and knot need a body and filling arrangement that fit their outlines.
A back opening made from overlapping finished fabric pieces, or an appropriate zipper, makes an insert cover removable. A directly stuffed shaped body instead needs a filling opening that is closed after the shape is established. Plan the closure before decorating, so access is not lost behind ruffles or motifs.
Prepare Fabric, Tools, and Filling
Choose the finished size and intended use first. Allow for seam allowances separately from that size. Gather fabric, suitable sewing thread and needles, scissors, a measuring tool, removable marking tools, and either an insert or loose filling appropriate to the project. A sewing machine helps with long seams and patchwork; small embellishments and the final filling opening may be finished by hand. Select the needle for the fabric and machine, not one number for every design.
Test mixed fabrics together before making a large panel. A stretchy plush fabric and a stable cotton may feed or shrink differently. Try the intended layers on scraps and check for puckering, sliding, or uneven stretching; adjust the materials or sewing approach rather than assuming color harmony is enough. Compare care instructions before combining fabrics, trims, and filling.
Loose fiber filling creates the body’s volume. Quilt batting is an intermediate sheet used with fabric layers to give a stitched surface shallow relief. Quilting a front does not replace filling the pillow itself. Complete appliqué, embroidery, and any planned quilting on accessible flat pieces before joining the final body.
Collage 1: Make a Personalized Rainbow Pillow
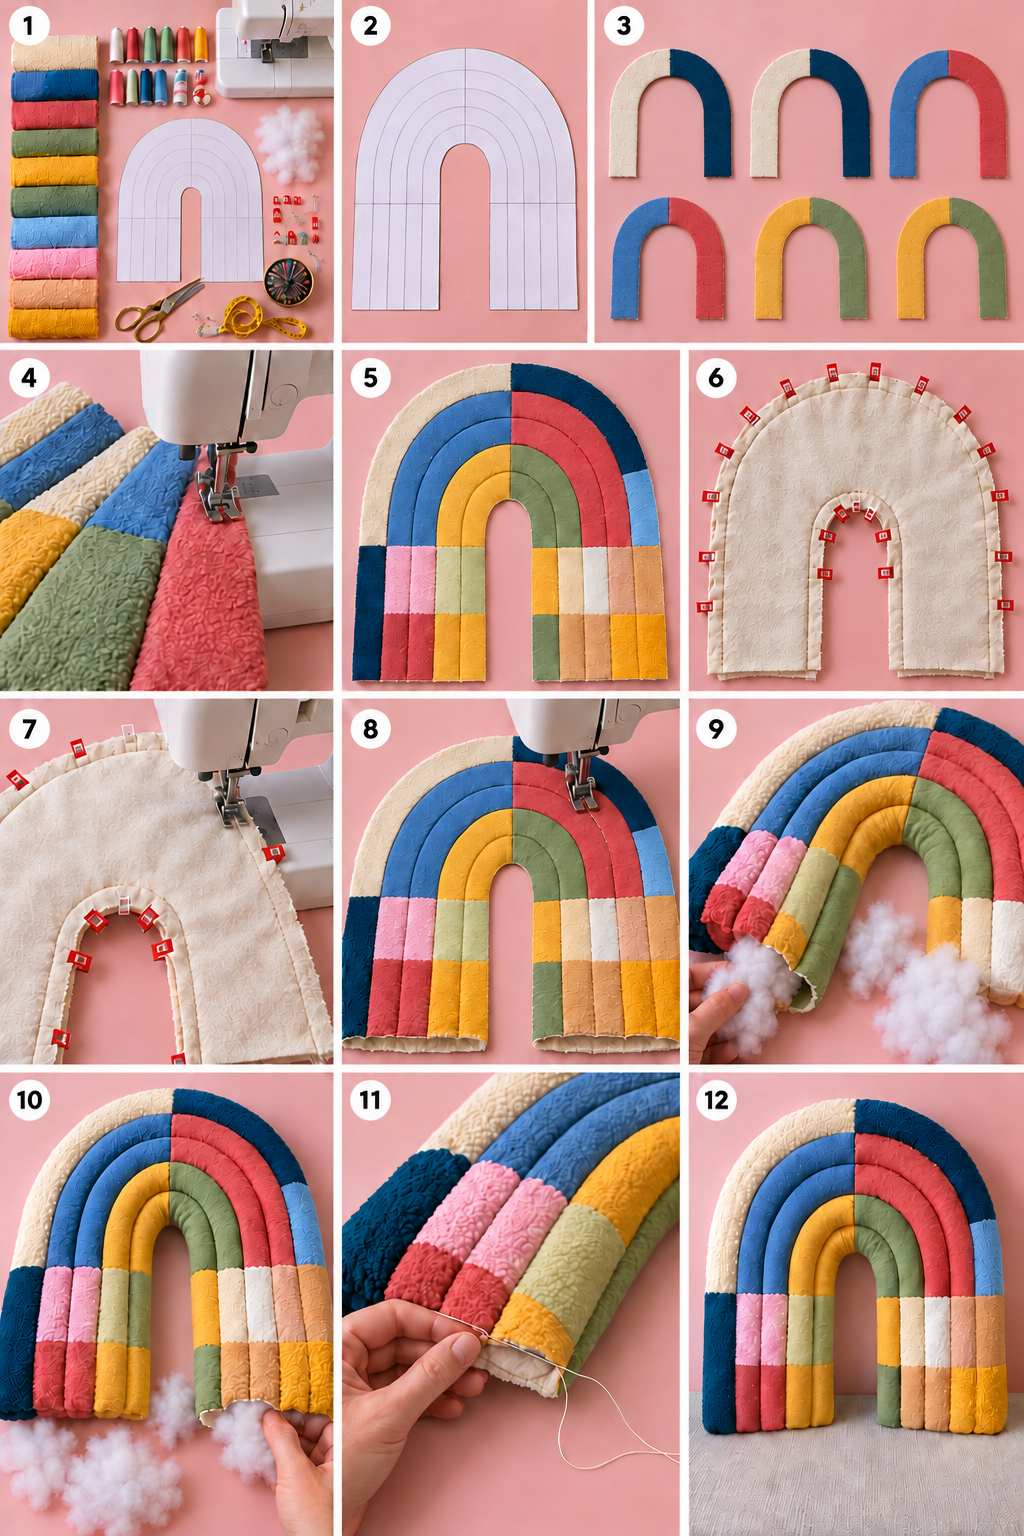
The first collage shows the template and fabric selection, separate colored arch sections, and machine stitching that joins the rainbow front. A matching back is positioned and clipped, further seams define the curved bands, and fiber filling is introduced through the lower openings. The final close view shows hand stitching after filling. The last panel presents the completed shaped pillow.
Use this as a preparation sequence, not a scaled pattern. Plan the front, back, seam allowances, and access to each area before sewing a closed body. Establish the curved divisions while the fabric is accessible, leaving the intended filling route open. Add small amounts of filling gradually so narrow bands keep a continuous shape, then close the openings after checking the profile. Choose fabric and filling for the finished pillow's size, firmness, and care needs, and make a small sample of a curved section first.
Collage 2: Personalize an Existing Pillow Cover
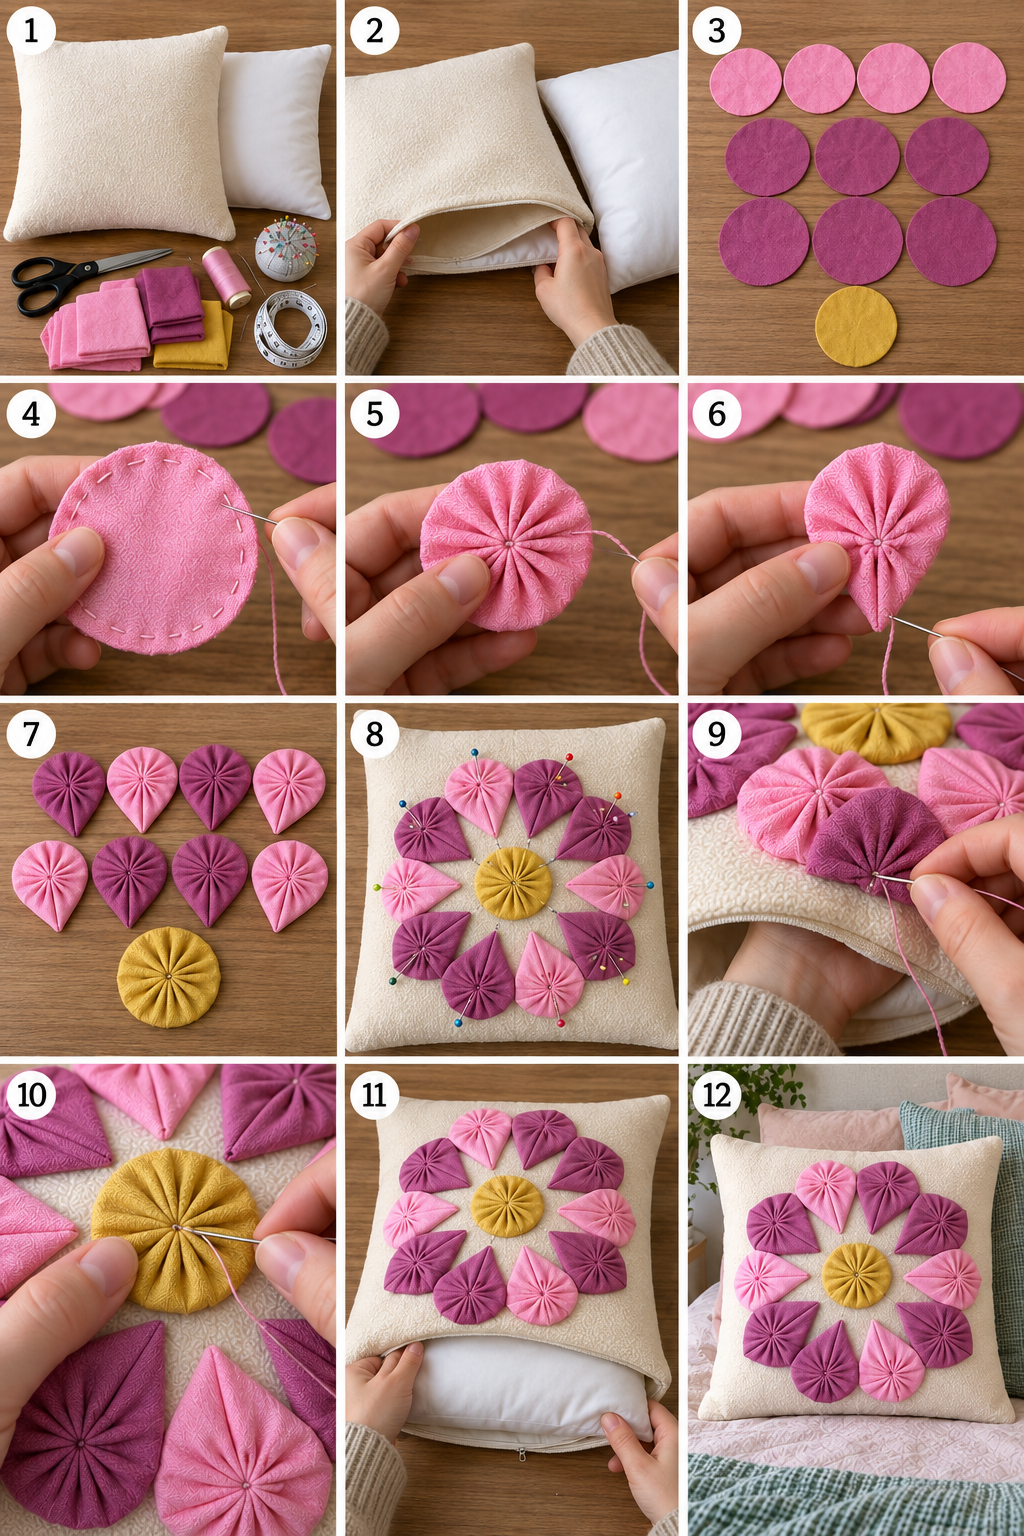
The second collage starts with a plain cover and its insert. Fabric circles receive running stitches around their edges, then the thread is drawn in to create gathered motifs. The pink and mauve pieces are shaped into petals, arranged around a yellow center, and attached to the cover by hand. The insert is returned after the decorative sewing is finished.
Remove the insert before stitching so you attach motifs only to the intended cover layer. Finish and secure each gathered piece, arrange the complete flower, and test placement before sewing it down. Small stitches through the motif’s base can hold it without flattening the folds. Remove all pins before refitting the insert. This updates a usable cover without requiring a new pillow body, and the same approach can add selected appliqué or embroidered details.
22 Pillow Ideas to Adapt to Your Home
Choose a pillow shape you enjoy, then match its construction to leaning, display, handling and cleaning. The designs below highlight the seam, filling or care decision most relevant to each shape.
1. Sculptural Knot Pillow with Visible Stitch Detail
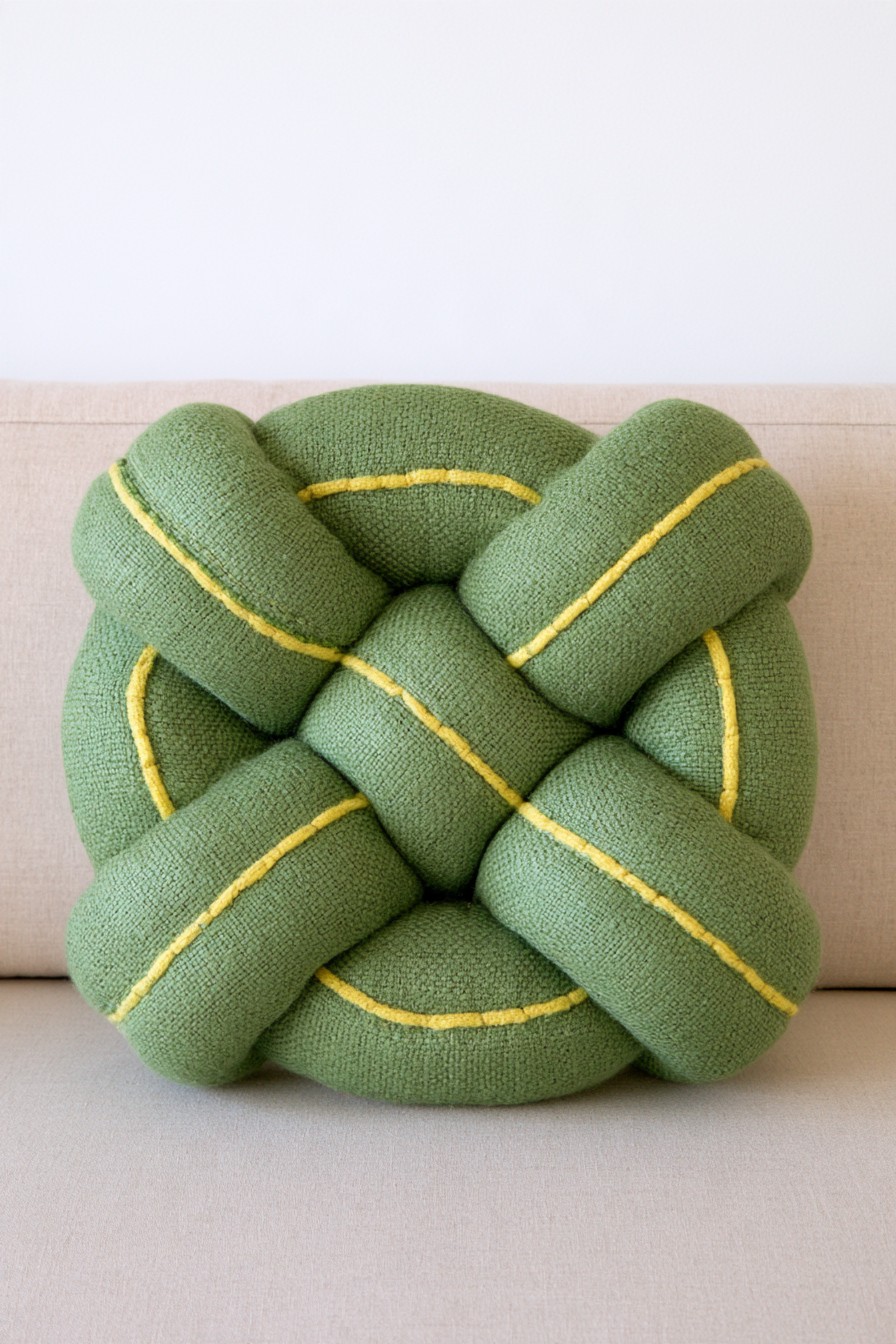
Broad green tubes loop into a sculptural knot, with yellow stitching tracing the curves. The silhouette supplies the interest without a printed motif. It can become a strong accent beside ordinary square cushions, particularly where a small amount of color needs a noticeable shape.
Fill long tubes gradually and evenly before arranging the knot, checking for thin sections that collapse at the bends. Plan how the tube ends and any necessary connecting stitches will preserve the chosen arrangement without creating hard pressure points. Those connections depend on your pattern; their hidden positions cannot be read from the photograph. Keep the result as a decorative accent if the thickness makes it uncomfortable for leaning.
2. Patchwork Flower Built from Individual Quilted Petals
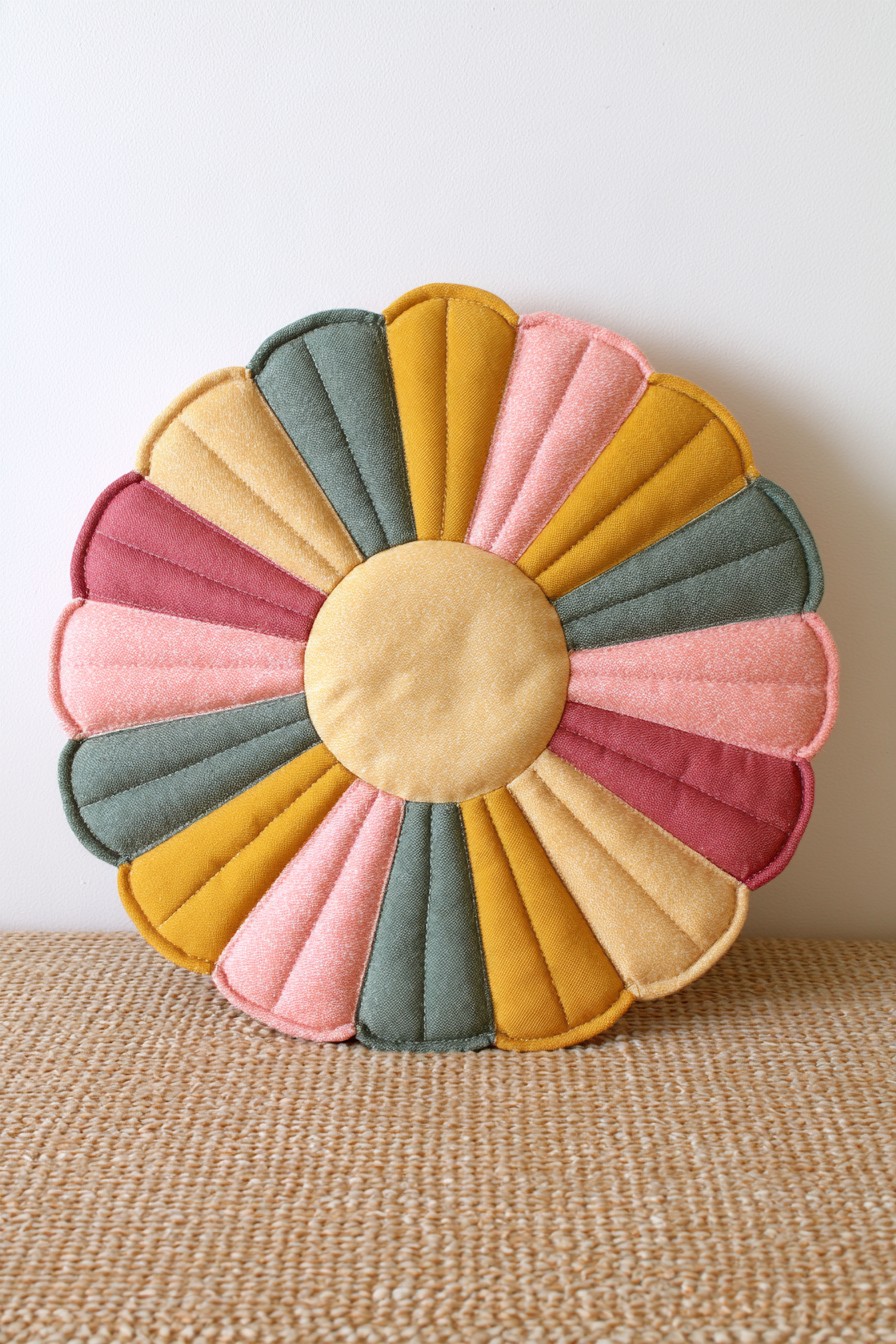
A round center anchors elongated petals in pink, cream, muted blue, and mustard. Visible lines follow each petal and emphasize the radial form. The repeated shape organizes several fabrics more clearly than a loose patchwork collage would.
Prepare the quilted petal surfaces separately if using batting between fabric layers, then construct and fill the required petal bodies. The shallow quilted layer and the main filling have different jobs. An exposed finished edge and a seam sewn inside then turned are alternative assembly choices, not one universal method. Join the petals securely to the center or a backing structure appropriate to the pattern. Check the full circumference before final closure so one heavily filled petal does not pull the flower out of balance.
3. Mixed Textile Rainbow for Using Fabric Remnants
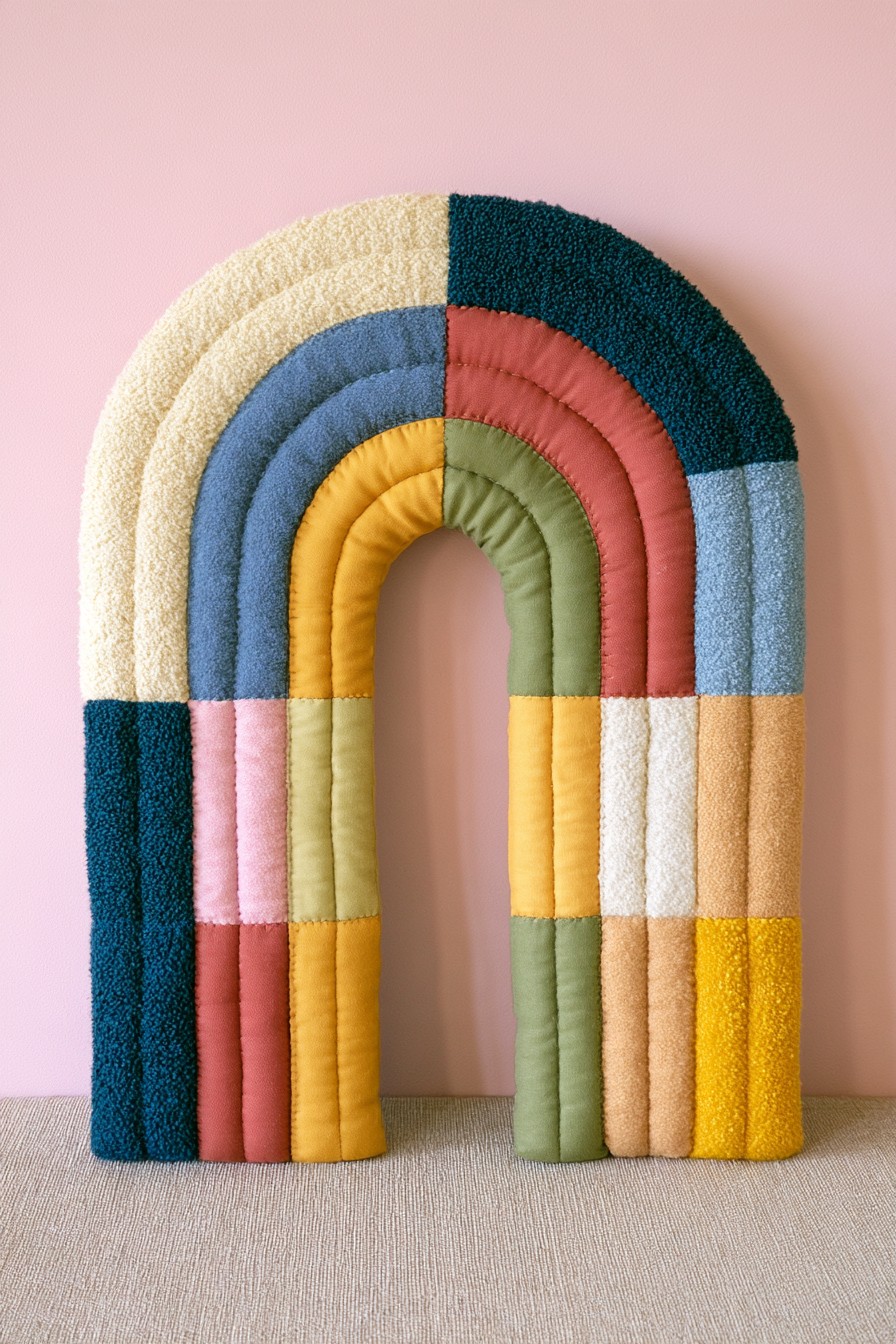
Colored bands form a freestanding rainbow silhouette, with changes of fabric texture across each arch. Cream, dark teal, blue, coral, and yellow keep the curves distinct. The design turns small remnants into an object whose outline is as important as its surface.
Follow the new pillow approach in the first collage, allowing for a shaped back and a planned filling route. Test different textiles together so contrasting textures do not introduce incompatible stretch or care requirements. Keep filling consistent through the curved bands and lower ends, checking both sides before closing. This is a shaped body rather than a standard square cover with a rainbow printed on it. Display it alongside simpler cushions if its size and profile dominate the arrangement.
4. Woven Fabric Strips for a Rich Textured Cushion Front
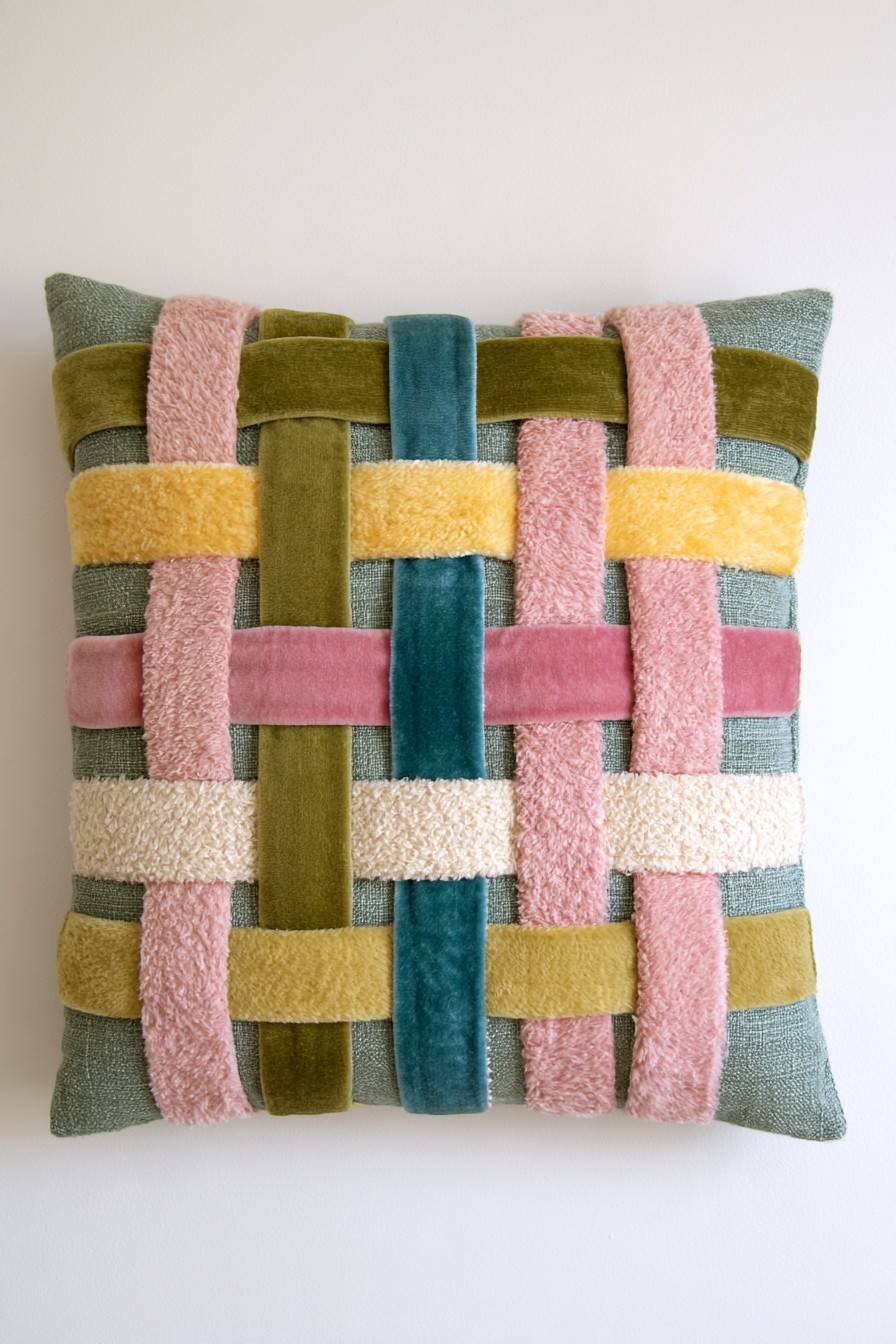
Wide strips cross at near right angles over a square cushion, using pink, mustard, teal, cream, and olive to reveal the over and under pattern. Different textures make the intersections visible. A plain border and backing keep the woven face separate from the cushion’s outline.
Lay the strips on a stable foundation before securing them, maintaining even spacing and tension. Test a small mixed fabric section first, especially where pile and smooth cloth meet. For frequent handling, consider attachment points that stop the strips sliding, based on the actual materials and intended use. Complete the front before fitting an overlapping or zipped back around an insert. Keep the reverse flatter for comfortable leaning.
5. Layered Pastel Flower with Soft Dimensional Petals
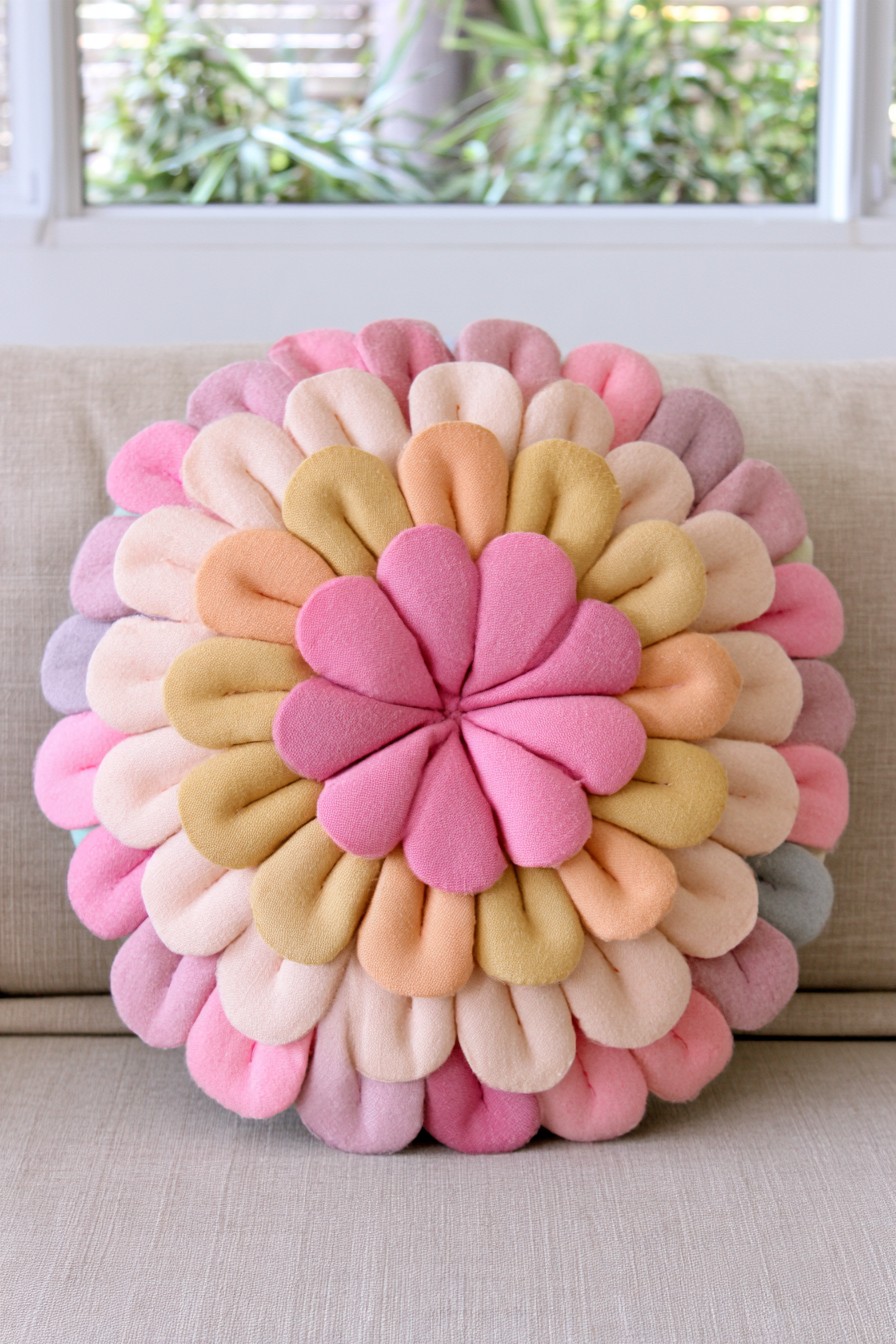
Overlapping pastel petals build a full flower with several layers, moving from larger outer forms to smaller pink petals at the center. Gentle color changes separate the layers without requiring strong contrast. The result is especially suited to a prominent decorative position.
Prepare each petal with the structure its pattern needs, using modest padding where volume is intended. Attach petal bases to a supporting foundation instead of simply stacking loose pieces. Arrange a trial layer before adding the next so the center does not become an unmanageable lump. Make the back simpler if the cushion will sit against furniture. The amount of padding and the attachment layout should support the flower’s profile while leaving it possible to handle and clean.
6. Diagonal Woven Padded Bands on a Neutral Base
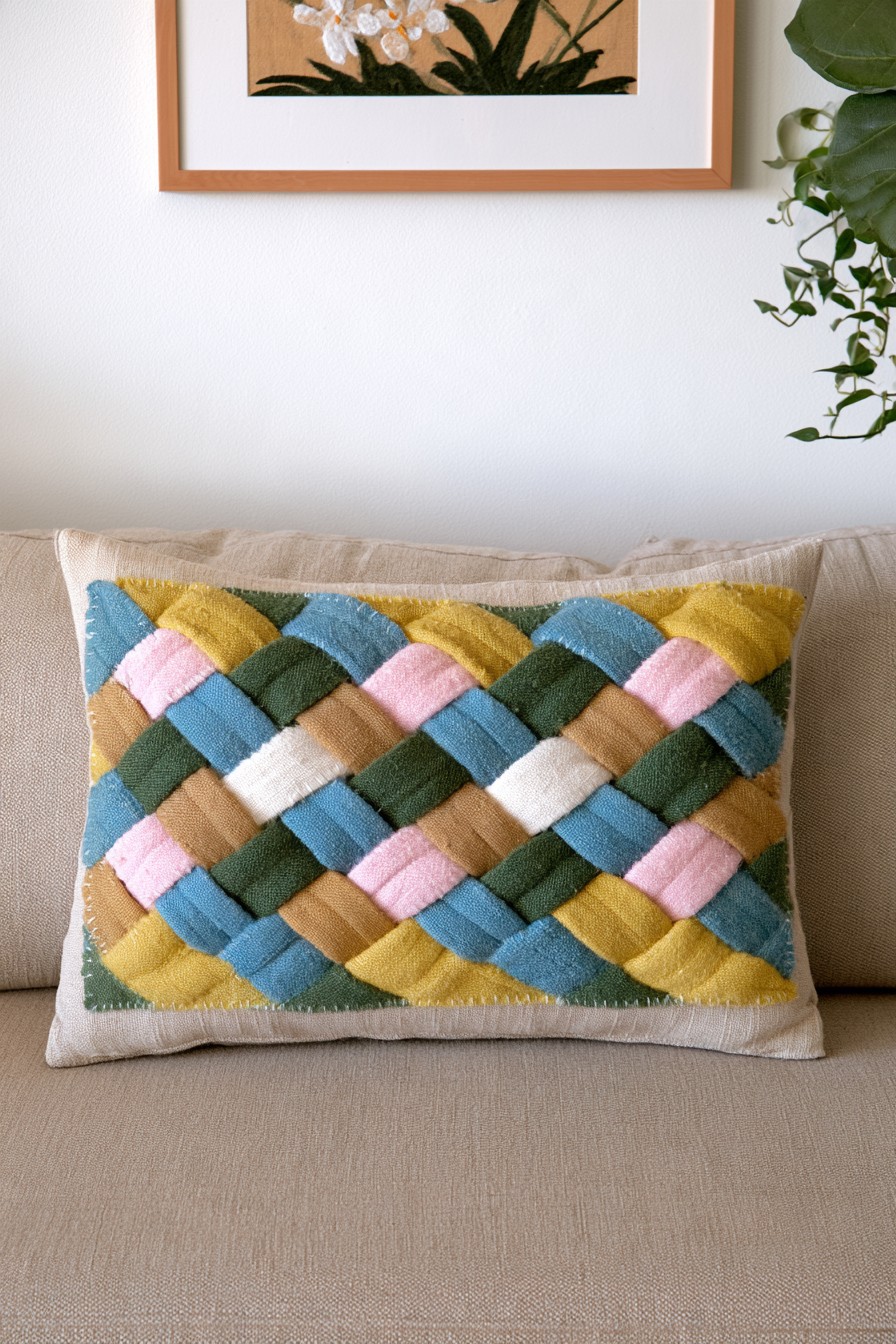
Padded looking bands cross diagonally across a rectangular cushion, passing over and under one another in a broad lattice. This is different from a classic braid made by interlacing three strands. The diagonal direction also distinguishes it from the more square grid in idea 4.
Build the layout on a stable base and check the complete pattern before attaching the ends. If the cushion will be handled often, test whether additional discreet attachment points are needed to prevent strips shifting between crossings. Sew the internal shaping lines while the fabric is accessible, then check their placement before filling and closing the pillow. Keep the padded bands evenly filled or supported, and use a smooth back with a removable opening for an ordinary cushion insert.
7. Tactile Patchwork Mixing Fringe, Tufts, and Flat Weaves
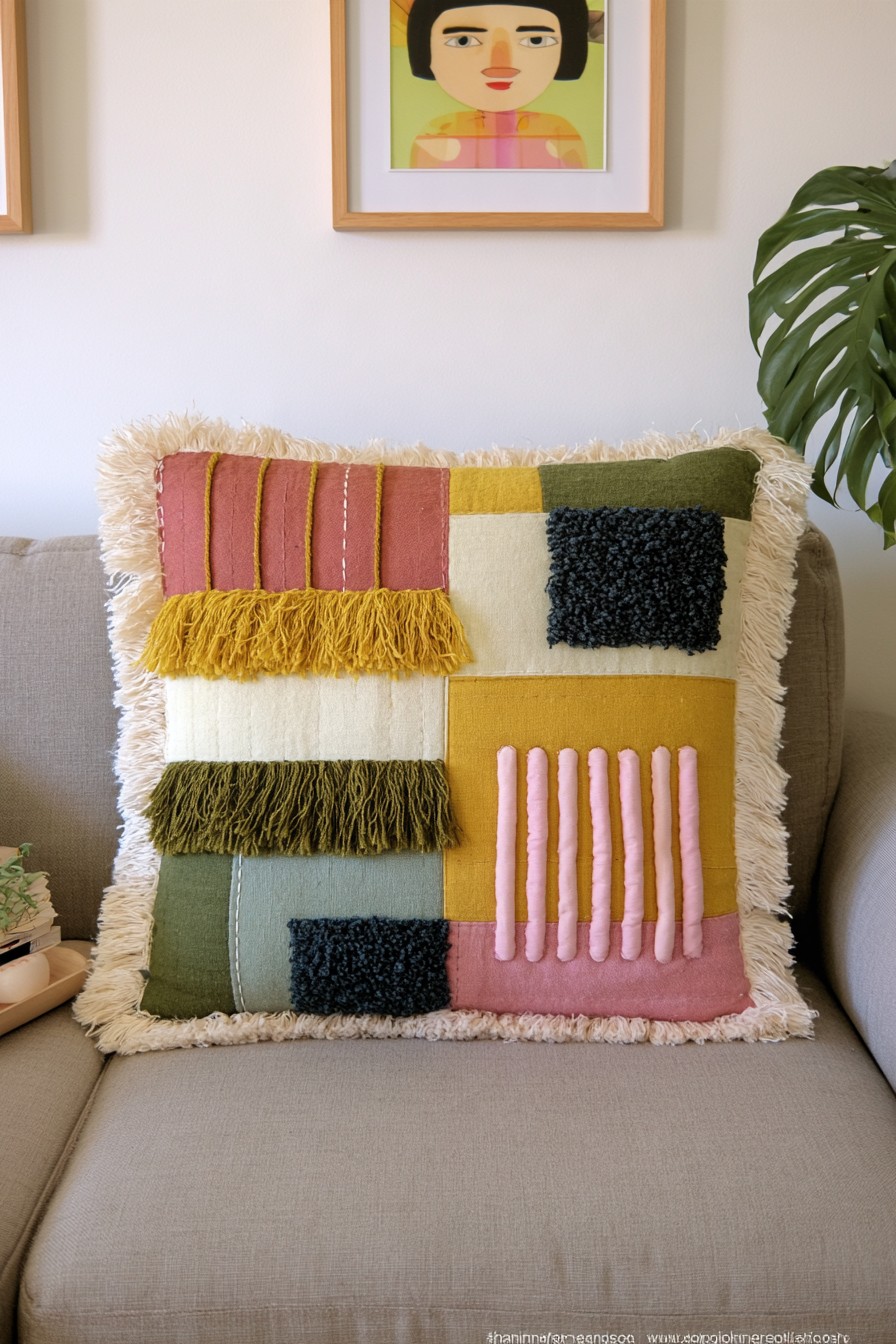
Blocks of smooth cloth, shaggy texture, fringe, and raised cords make a tactile patchwork face. Pink, green, charcoal, cream, and mustard connect the differing depths. The cushion offers texture through several small areas instead of covering the entire surface with one heavy material.
Test the intended fabric combinations for feeding and puckering before assembling the panel. Back lighter sections when the heavier blocks would otherwise distort them, and keep loose fringe clear of the closure. A smooth reverse can make the cushion more useful for leaning. For flower patches, compare these botanical crochet cushion ideas and choose a suitable written pattern, adapting the flowers to the patchwork base.
8. Geometric Squares for a More Ordered Patchwork Design
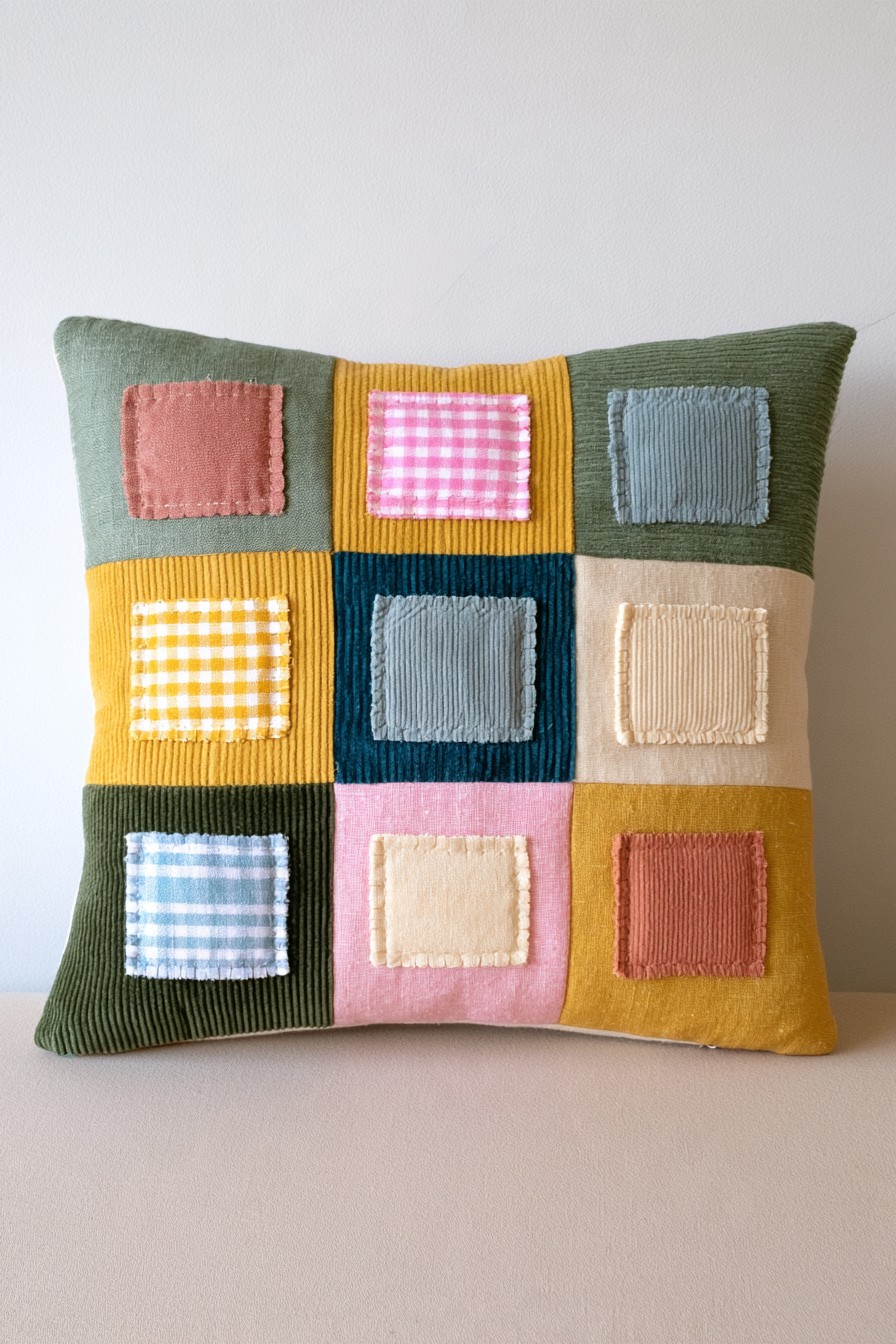
A regular grid combines plain colored squares with smaller stitched patches in the center of selected blocks. Gingham adds a second scale of pattern while ribbed and smooth areas supply texture. The geometry gives remnants a clear order.
Set the finished front dimensions before cutting the foundation pieces, keeping seam allowance separate from the visible square size. Position the smaller appliqué patches before assembling the cover so their borders remain accessible to sew. Test thick seams where several fabrics meet, then add a back opening appropriate to the insert. Use compatible care materials if the pillow will be washed regularly. A limited group of fabrics can retain the grid effect without needing a different texture in every block.
9. Flowing Wavy Appliqué with a Retro Color Palette
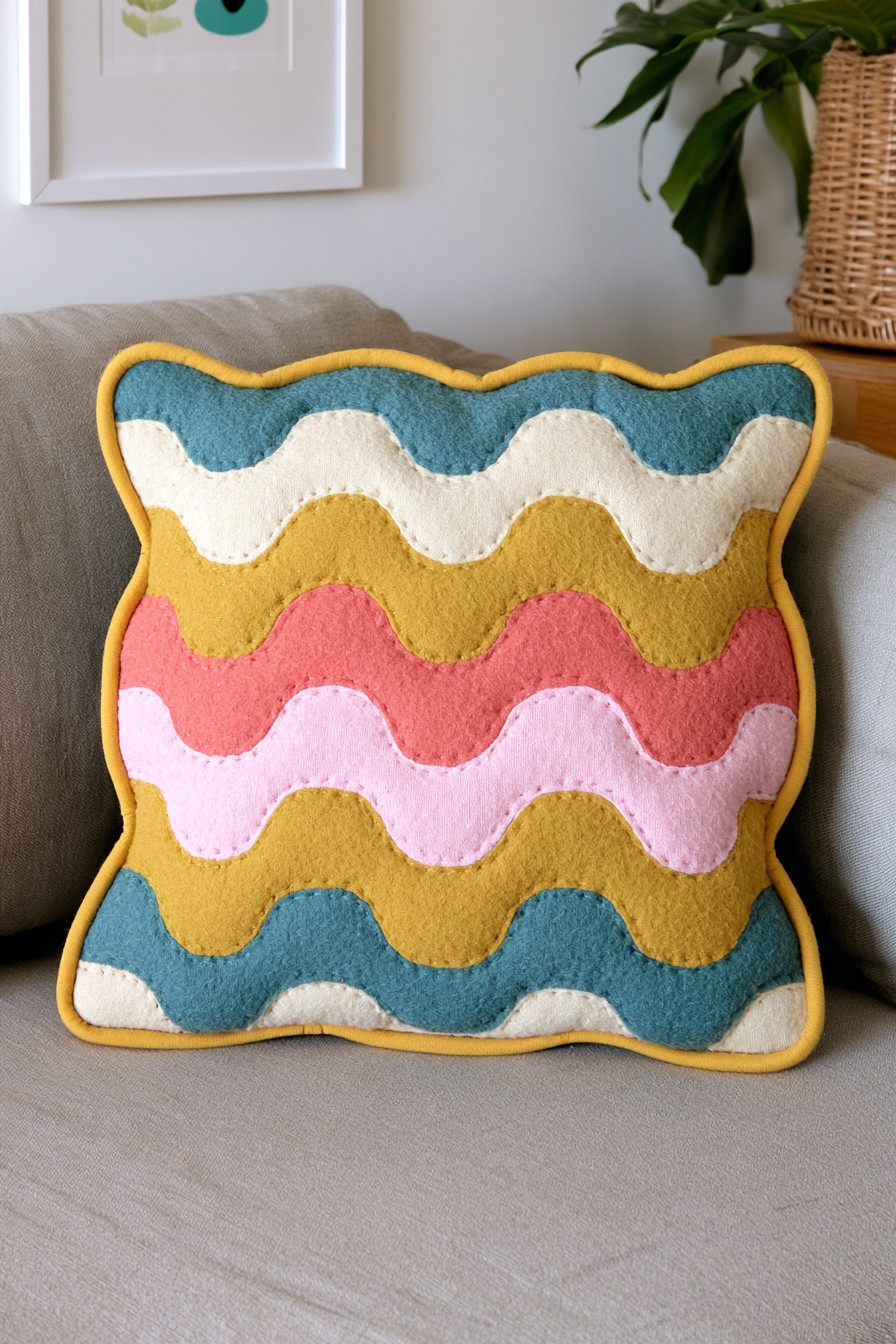
Broad wavy bands stack across the cushion in teal, cream, mustard, pink, and pale blush. The undulating edge echoes the internal curves, while a contrasting border finishes the shape. It brings a retro graphic character without relying on printed fabric.
Arrange the complete set of curves on the front before stitching, checking how their widths change near the edges. Choose an edge finish suited to each material; a cut felt edge behaves differently from woven cotton that can fray. Keep the bands from becoming stretched during attachment. This can be a decorated insert cover, with the opening kept on the back. Pair it with a quieter solid cushion when you want the waves to remain the main pattern.
10. Heart Appliqué Framed with Gathered Fabric Ruffles
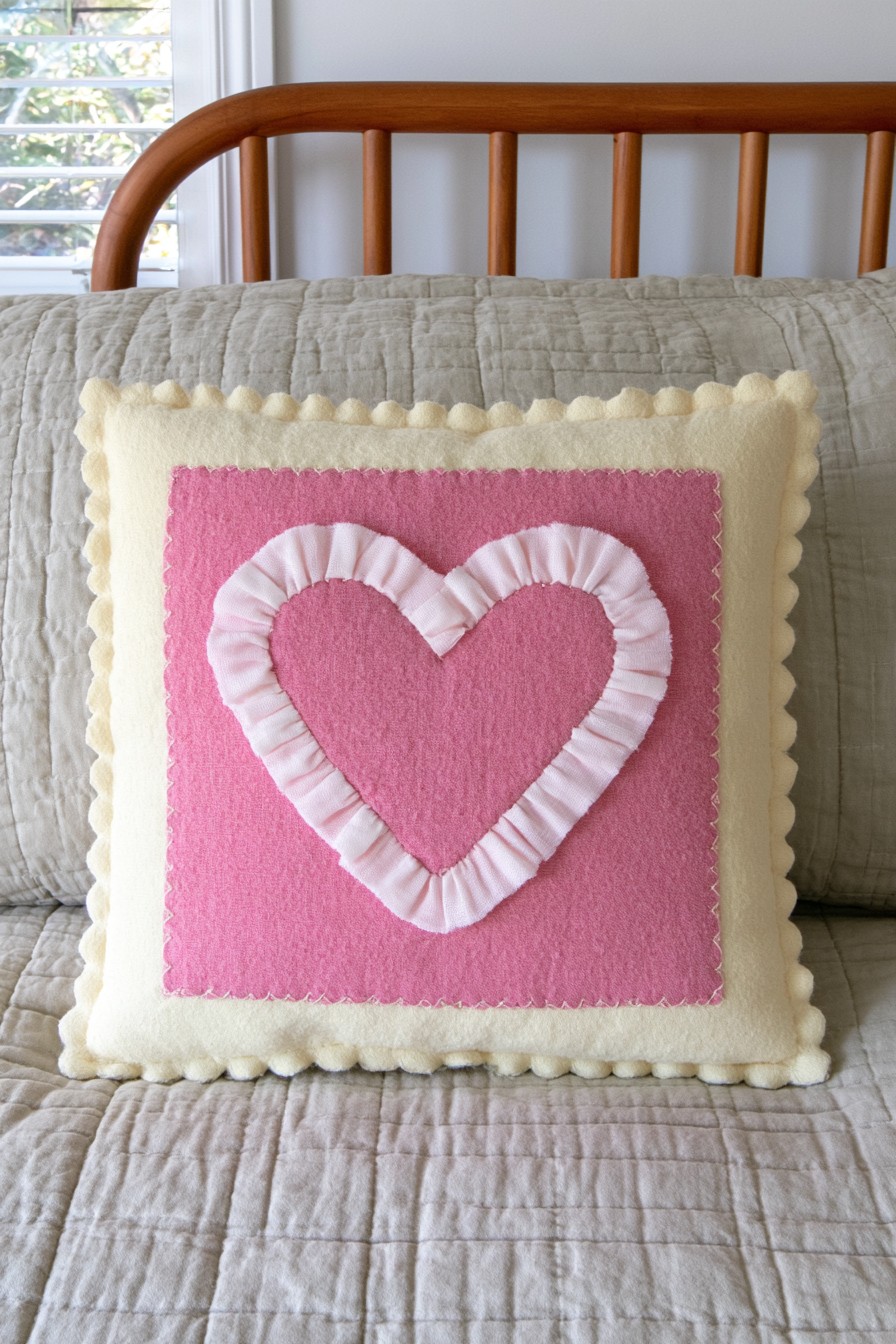
A pink heart sits within gathered pale trim on a square cushion, with a larger pink panel behind it. The repeated heart outline gives the decoration a romantic focus while the familiar cushion shape stays practical. The tonal palette lets folds supply much of the depth.
Mark the heart position on the empty front and distribute the gathered trim before sewing. Secure the motif and trim before putting the cover around an insert, keeping the back opening accessible. A smoother reverse is useful if the gathered face is mainly for display. Compare fabric and trim care so washing the main cover does not damage its decoration. For a softer adaptation, reduce the ruffle fullness while keeping the same central heart.
11. Pleated Flower with a Rosette Finishing the Center
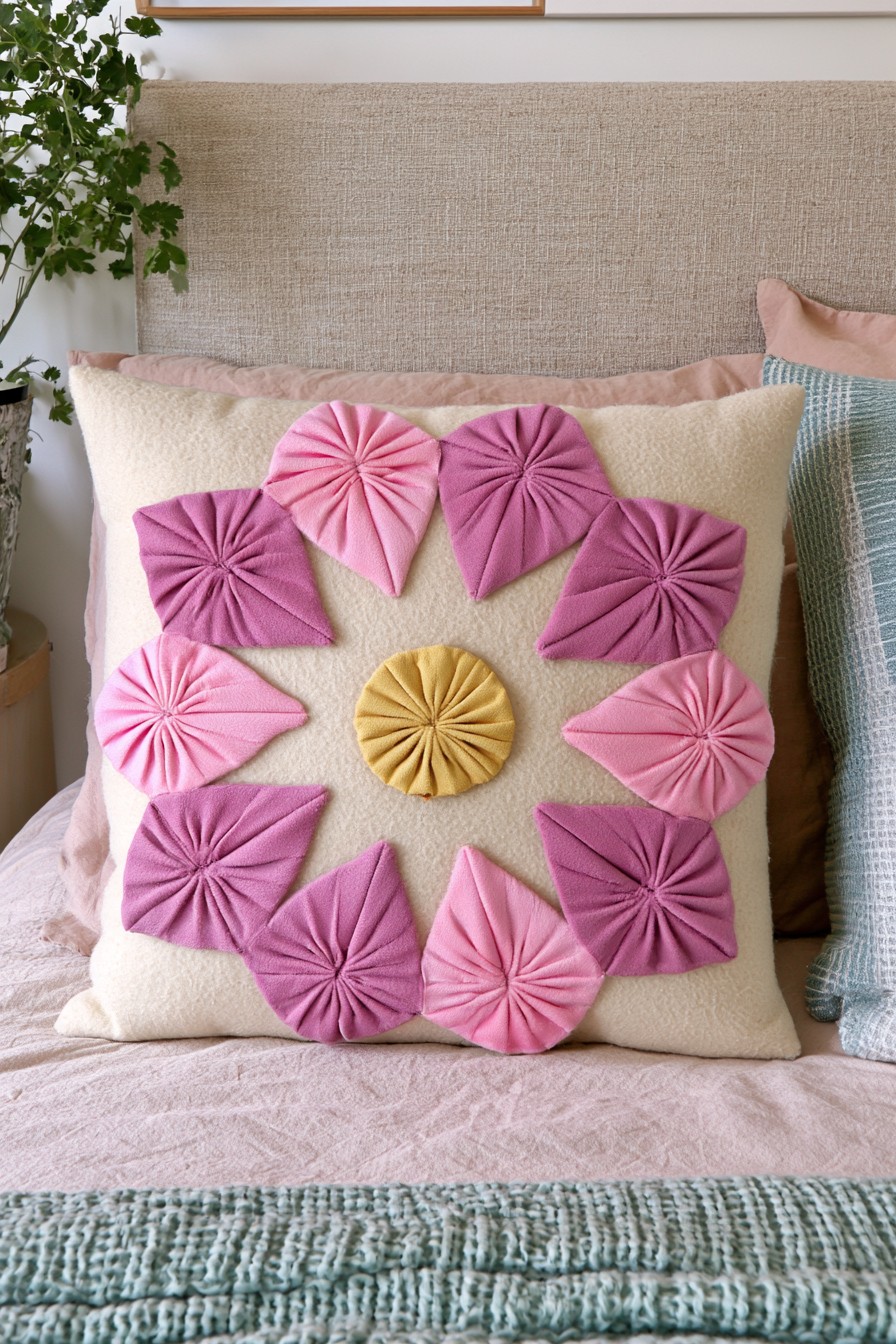
Gathered pink and mauve petals form a ring around a mustard rosette on a cream square cover. The folds provide dimension without needing individually stuffed petals. Open cream areas make the flower readable against the surrounding bedding.
Use the second collage’s existing cover approach: remove the insert, prepare the gathered motifs, and arrange the whole ring before attachment. Anchor each base and the center with stitches suited to the fabric rather than relying on the rosette to conceal unsecured ends. Check that the opening still functions after decorating. Choose petal material that holds its folds under the planned cleaning method, and test the gathered motif together with the base fabric.
12. Heart Shaped Cushion with a Soft Ruffle Border
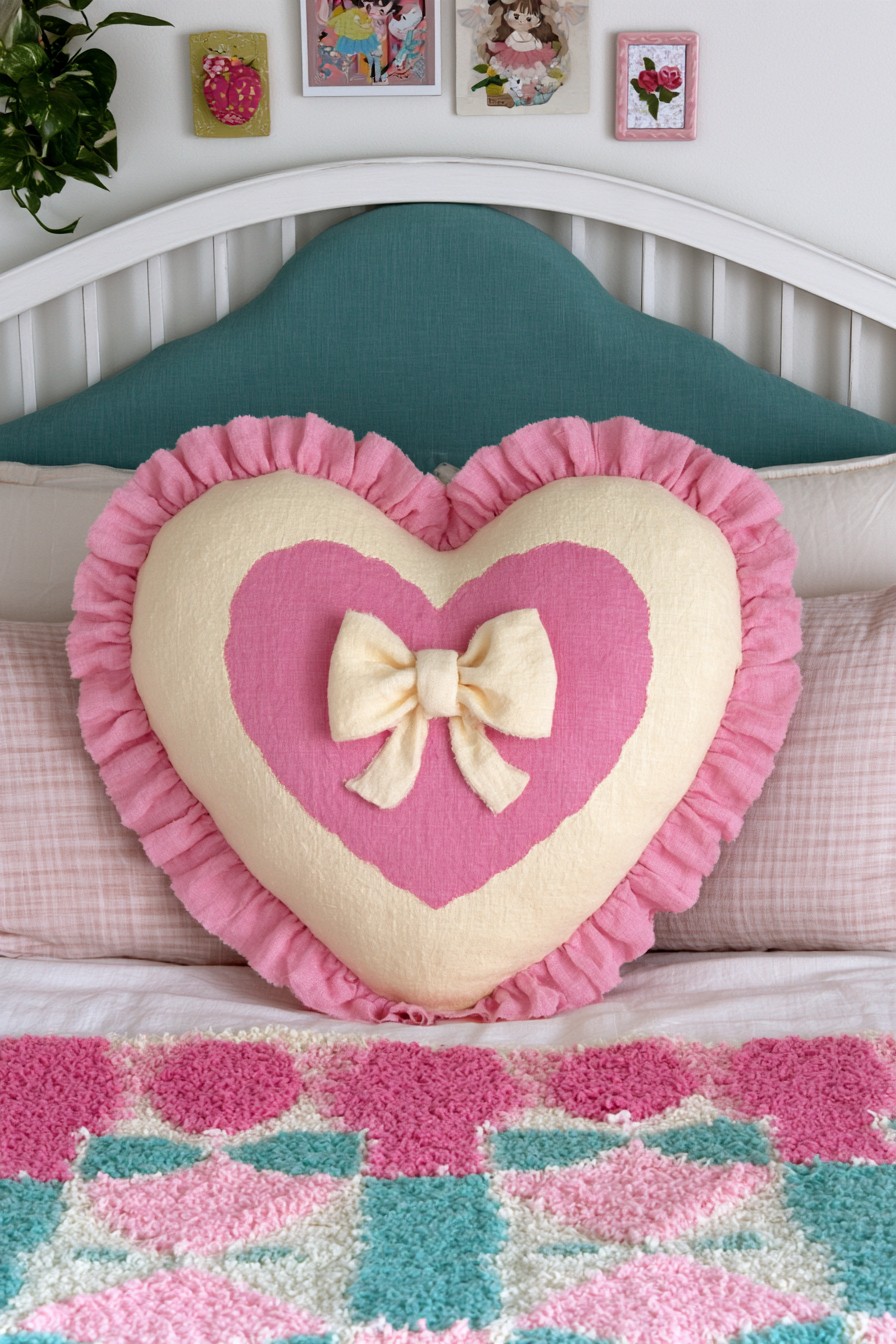
A cream heart outline is emphasized by a pink inner motif, ruffled border, and small bow. The shaped silhouette provides variation beside rectangular bedding cushions. Its restrained center contrasts with the more detailed edge.
Prepare a matching shaped back and decide where a filling opening will remain before joining the body. Position the ruffle within the intended seam arrangement without excessive bulk at the upper dip. Fill the upper curves and lower point in small amounts before balancing the center. Close the opening only after the heart’s outline is supported. If the bow is added separately, attach it securely for the anticipated handling, keeping raised knots away from any surface used for leaning.
13. Gentle Rainbow Arches with Small Floral Embroidery
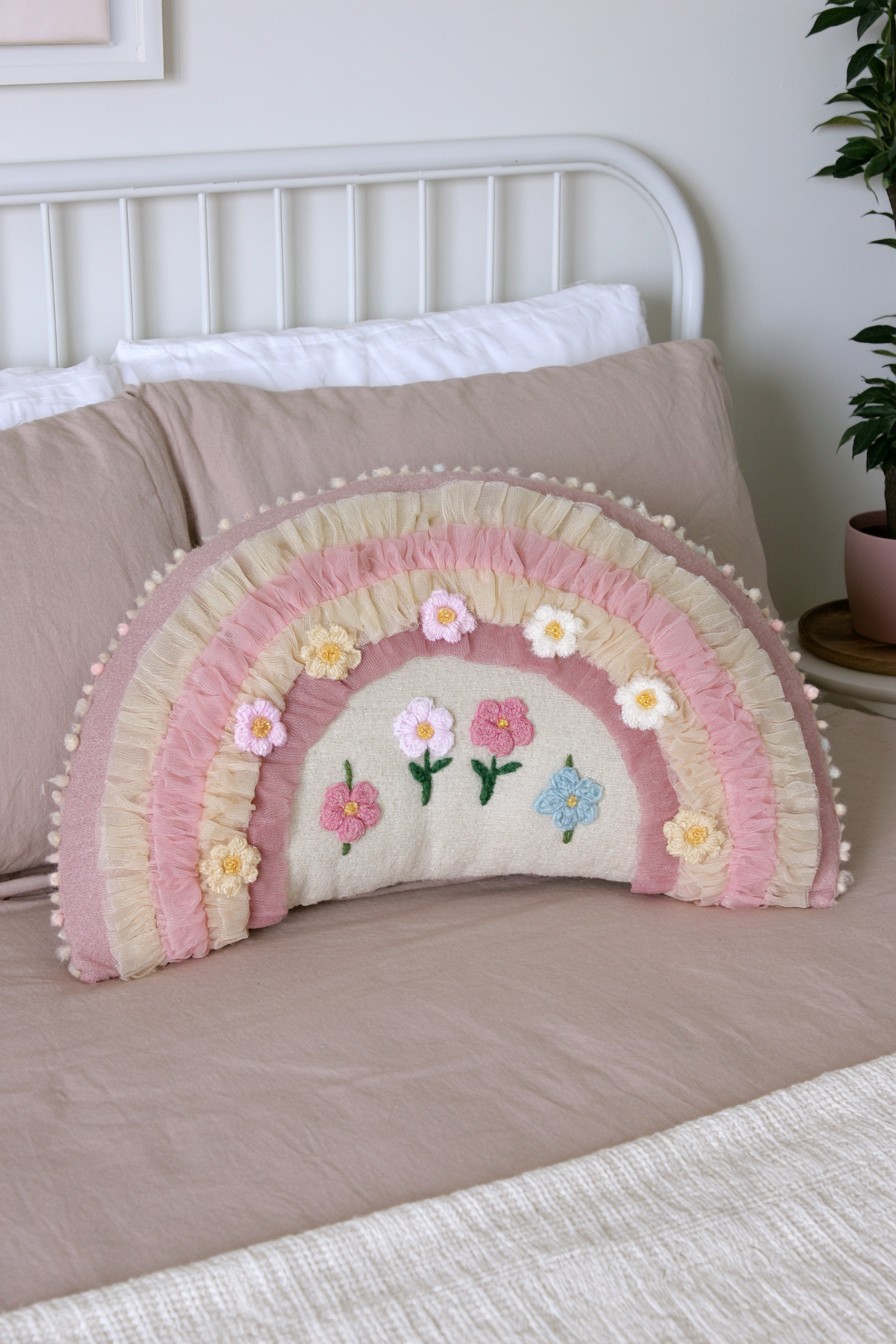
Pale pink and cream arches form a gentle rainbow with small flowers and stitched botanical details around the inner area. Gathered bands distinguish it from the stronger color blocks in idea 3. Its muted palette suits bedding that already contains soft checks or cottage floral patterns.
Choose the shaped body and backing first, then add the floral work while the front is flat and accessible. Test gathered trim with the base fabric before attaching several bands; excess tension can pull the arch unevenly. Plan filling access around the narrowed inner curve so the lower ends and top stay balanced. A few floral motifs can carry the theme without filling every strip. Match the embroidered and trim materials to the intended cleaning process.
14. Crescent Moon with Embroidery and Layered Ruffle Edges
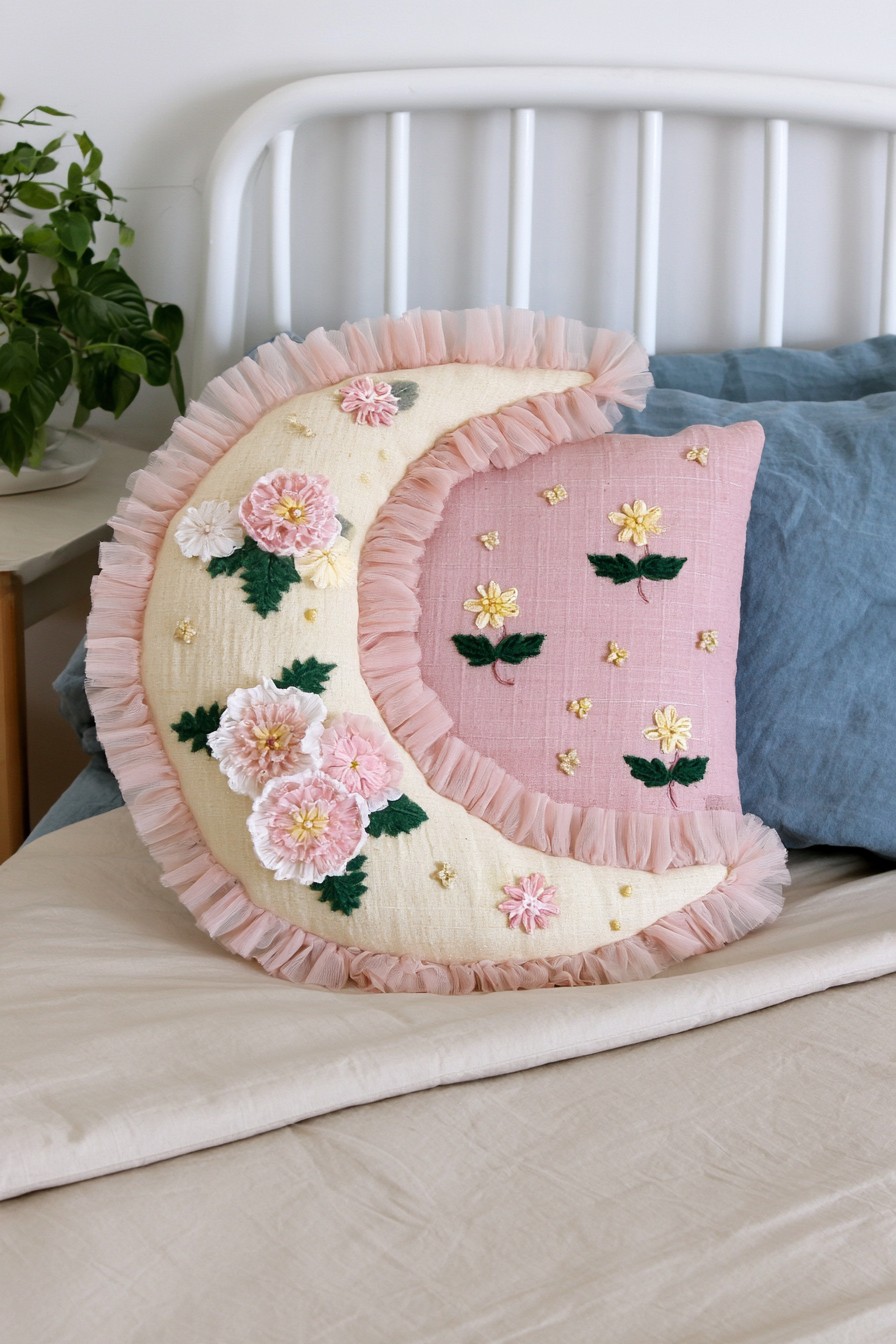
A cream crescent carries embroidered flowers and pink floral accents, with ruffles following its curved edges. The narrow tips contrast with a fuller central body. It can introduce a storybook or floral theme without covering a whole cushion arrangement in the same pattern.
Work the embroidery and attach the selected motifs before joining the crescent body. Leave decorative density lighter near the tips, where seam space is limited. Distribute small amounts of filling toward those ends before adding central volume, keeping the curve recognizable. Plan the ruffle and filling opening together so closing stitches remain accessible. Delicate blossoms and gathered edges may make this more appropriate for display than constant leaning; assess care across all components.
15. Mustard Star with Simple Visible Edge Stitching
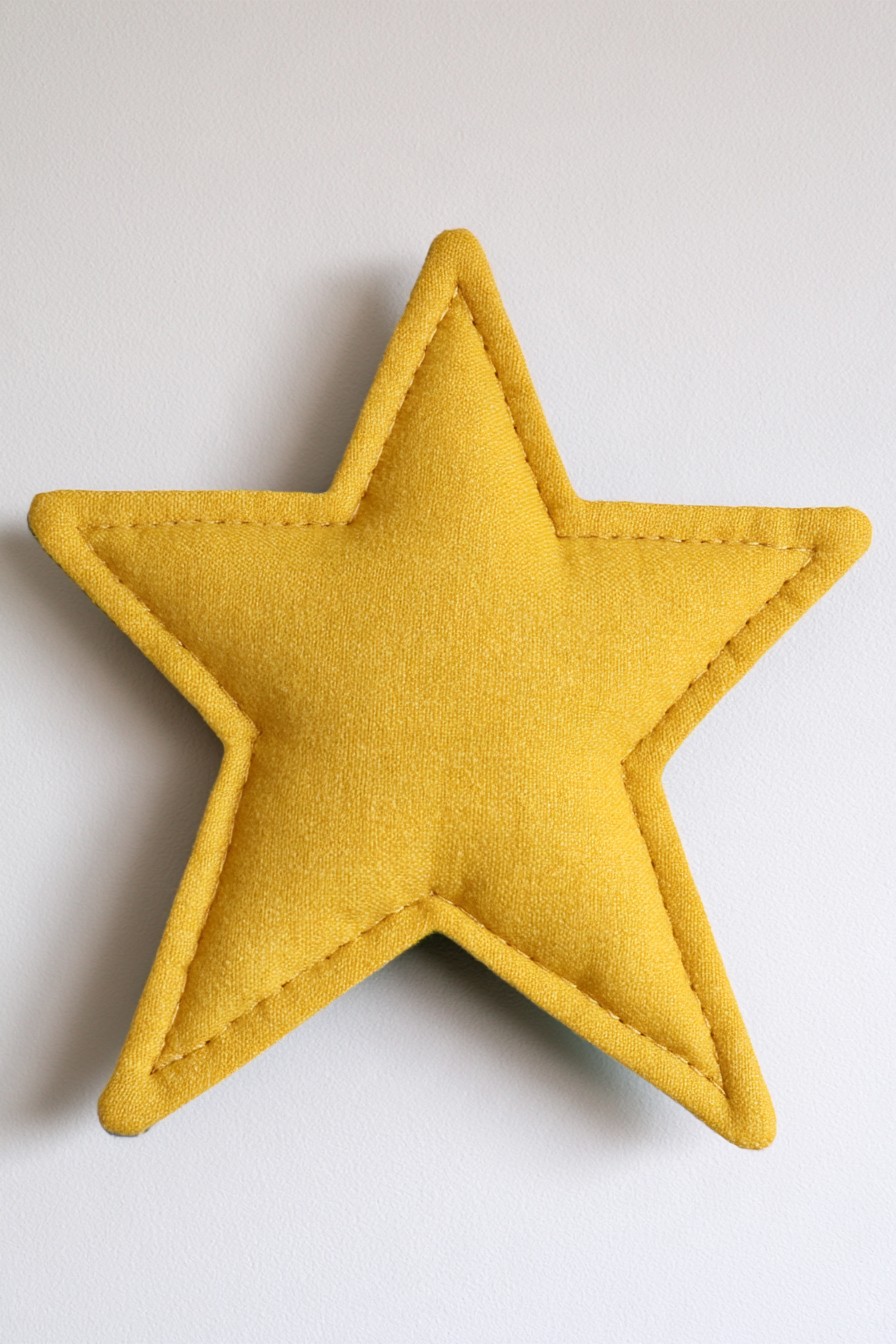
A simple mustard star relies on its silhouette and visible edge stitching. The unpatterned surface lets it sit beside more elaborate floral or patchwork designs. Each point contributes to the outline, so even filling matters more than another surface ornament.
Use a star pattern with seam allowances and a workable filling opening. Fill the points in small amounts before building up the center. Reinforce the inward corners, check both sides for folded or empty points and close the opening securely. Add visible topstitching if it suits the fabric and design.
16. Raised Rainbow Appliqué Against Ribbed Corduroy
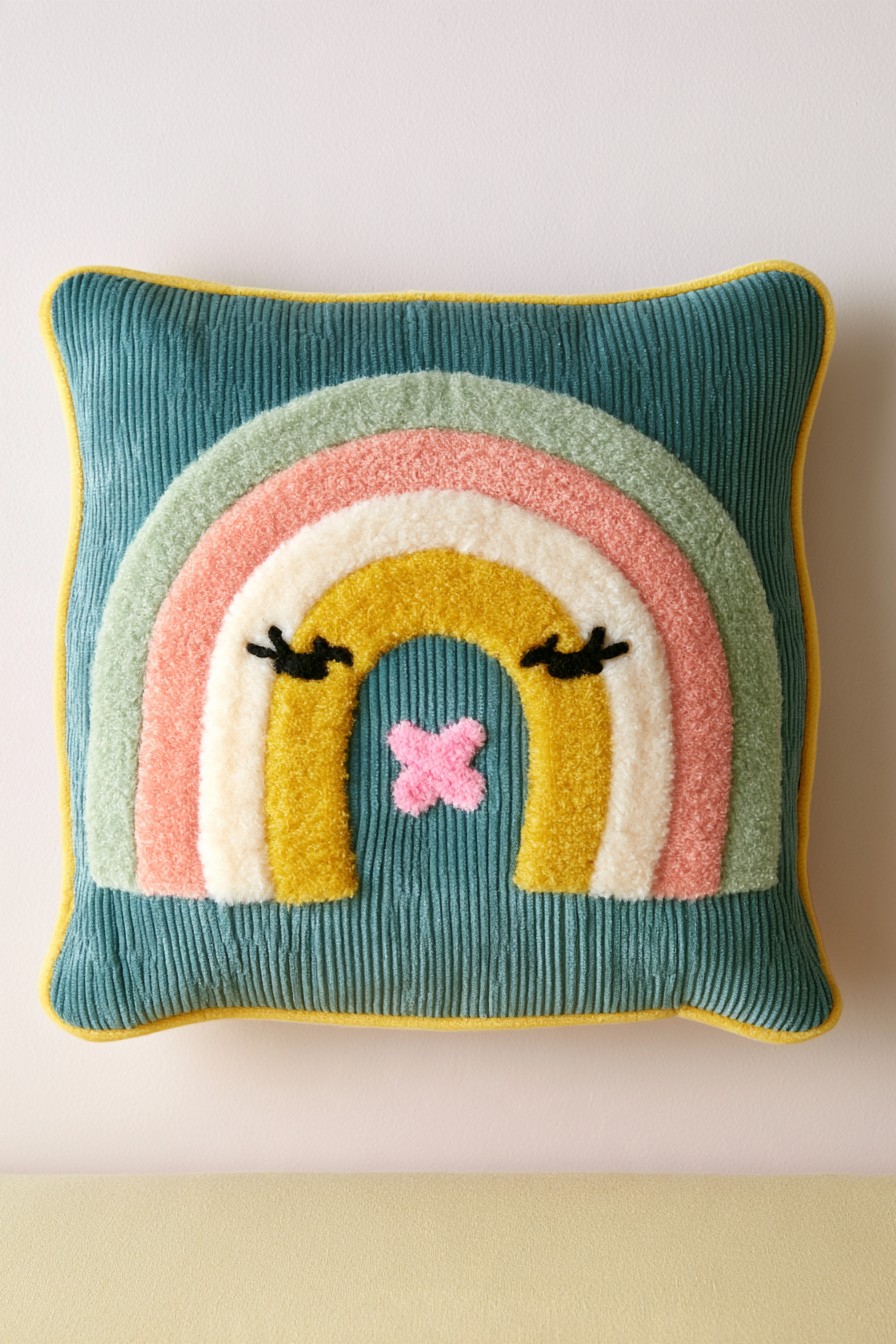
Raised pastel arches stand out from a dark teal ribbed cushion face, with a yellow border connecting the motif to the edge. Small facial details add a playful character. The contrast works through texture as well as color.
Prepare the rainbow pieces as a front decoration and leave an accessible back closure for an ordinary insert. Test the stretch and thickness of textured arch fabrics against the ribbed background before sewing the full design. Keep the facial features flat and securely stitched if the cushion will be handled often. Choose pile direction consistently where it affects appearance. A plainer reverse can preserve comfort, letting the more sculptural face serve as the visible decorative side.
17. Rounded Flower Cushion with Contrasting Inner Petals
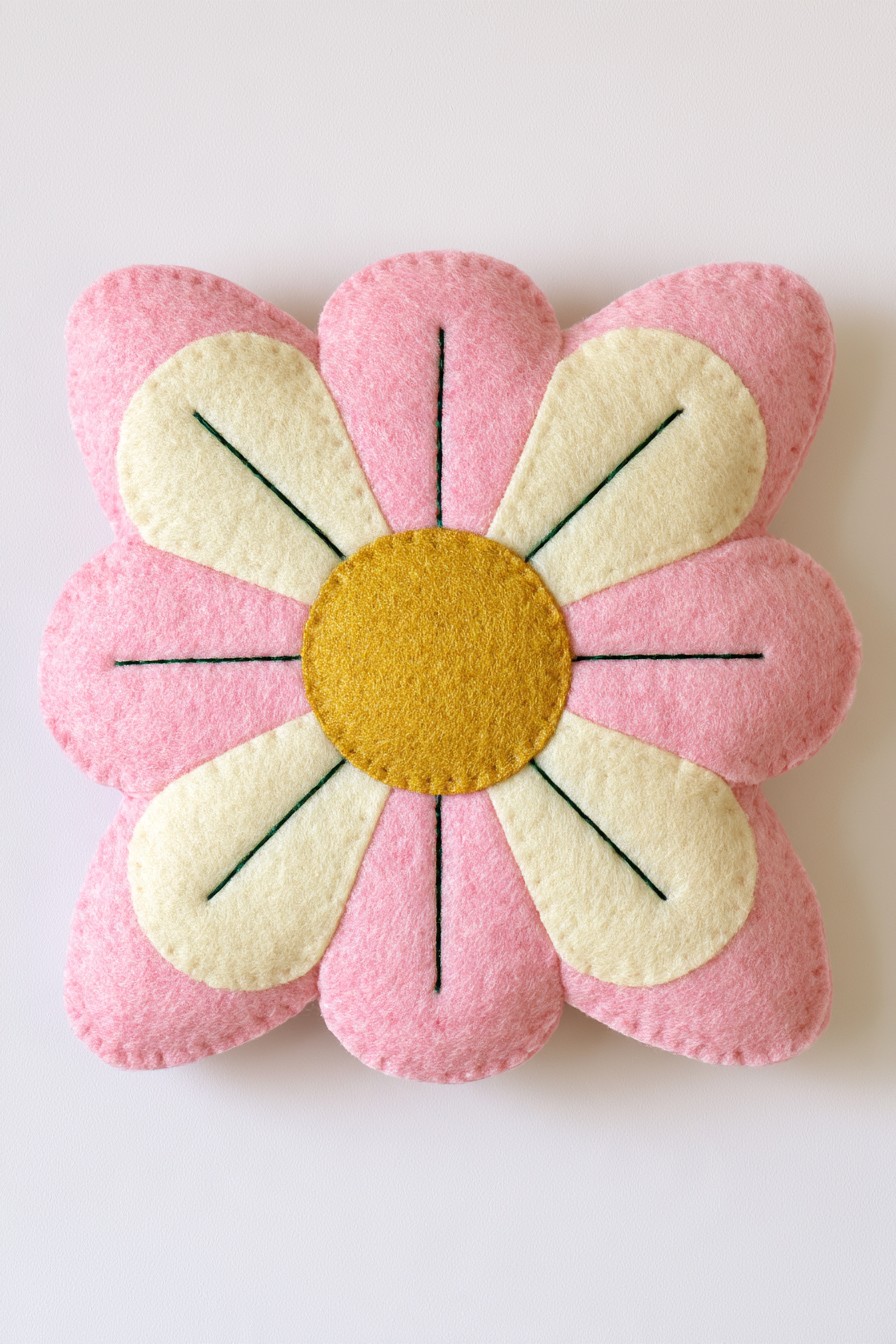
Pink rounded petals define the entire flower silhouette, with cream inner shapes and a mustard center. Dark stitched lines suggest botanical structure without requiring detailed embroidered stems. The large petal outline makes the flower visible even at a distance.
Attach the inner appliqué and decorative lines while the front is flat. The completed pillow still needs a shaped back, seam arrangement, and filling access separate from those surface details. Spread filling toward each petal before balancing the center so the outline stays consistent. Keep the joining around the center secure according to the chosen construction. This form can be the main accent beside simple rectangular cushions, reducing the need for several additional floral pieces.
18. Floral Patchwork Combined with a Heart Silhouette
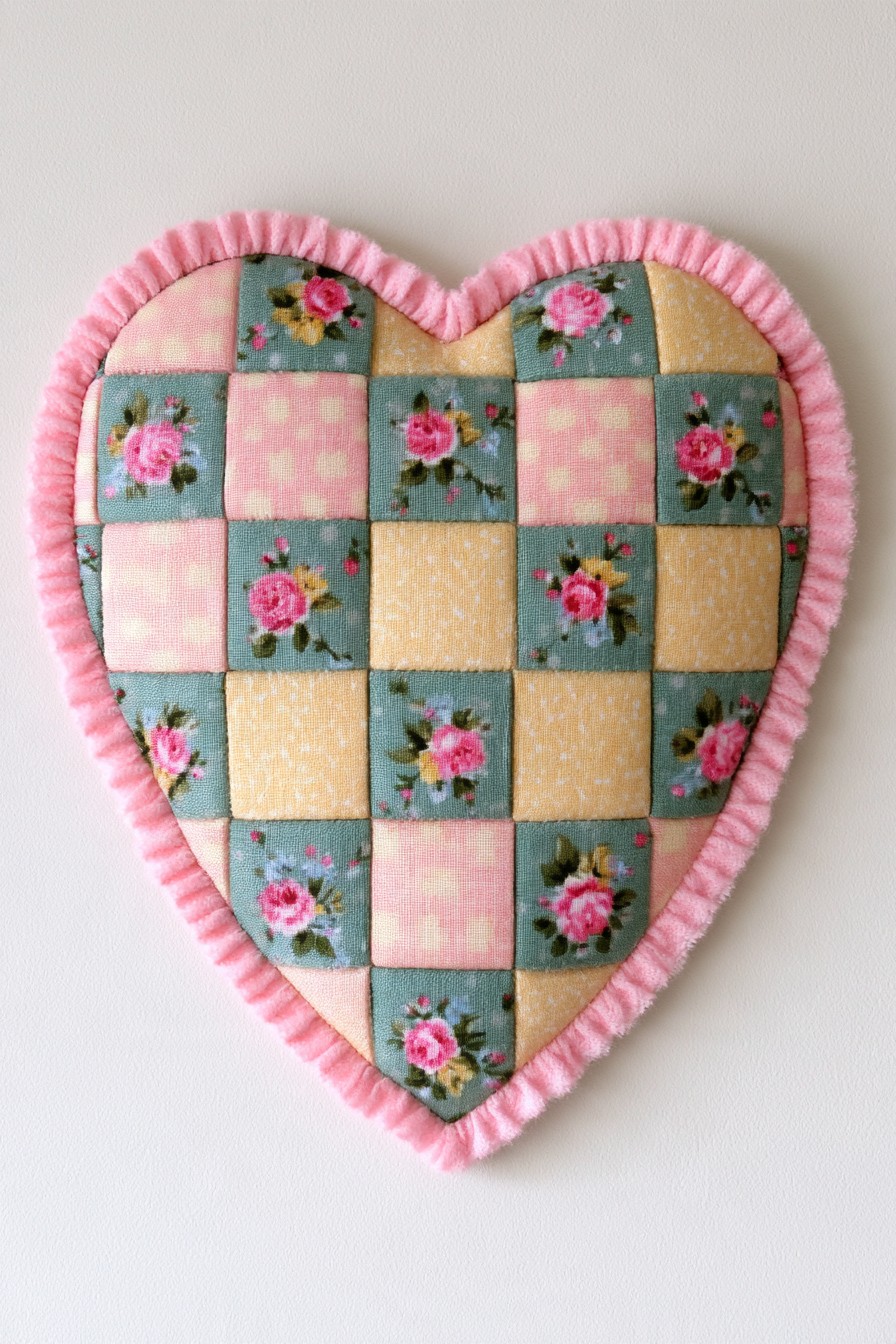
A heart silhouette surrounds a grid of floral, checked, and plain squares, finished with a pink gathered edge. The straight patchwork gives structure while the curved border softens it. Repeated green, blush, and cream connect fabrics that have different small patterns.
Make a sample patchwork panel before cutting the heart, allowing for seams near the curved edge. Combine fabrics with similar stretch and care needs. Include the ruffle in the body seam, leave a filling opening and shape the upper dip and lower point gradually as you add filling.
19. Mushroom Cushion with a Soft Tufted Cap
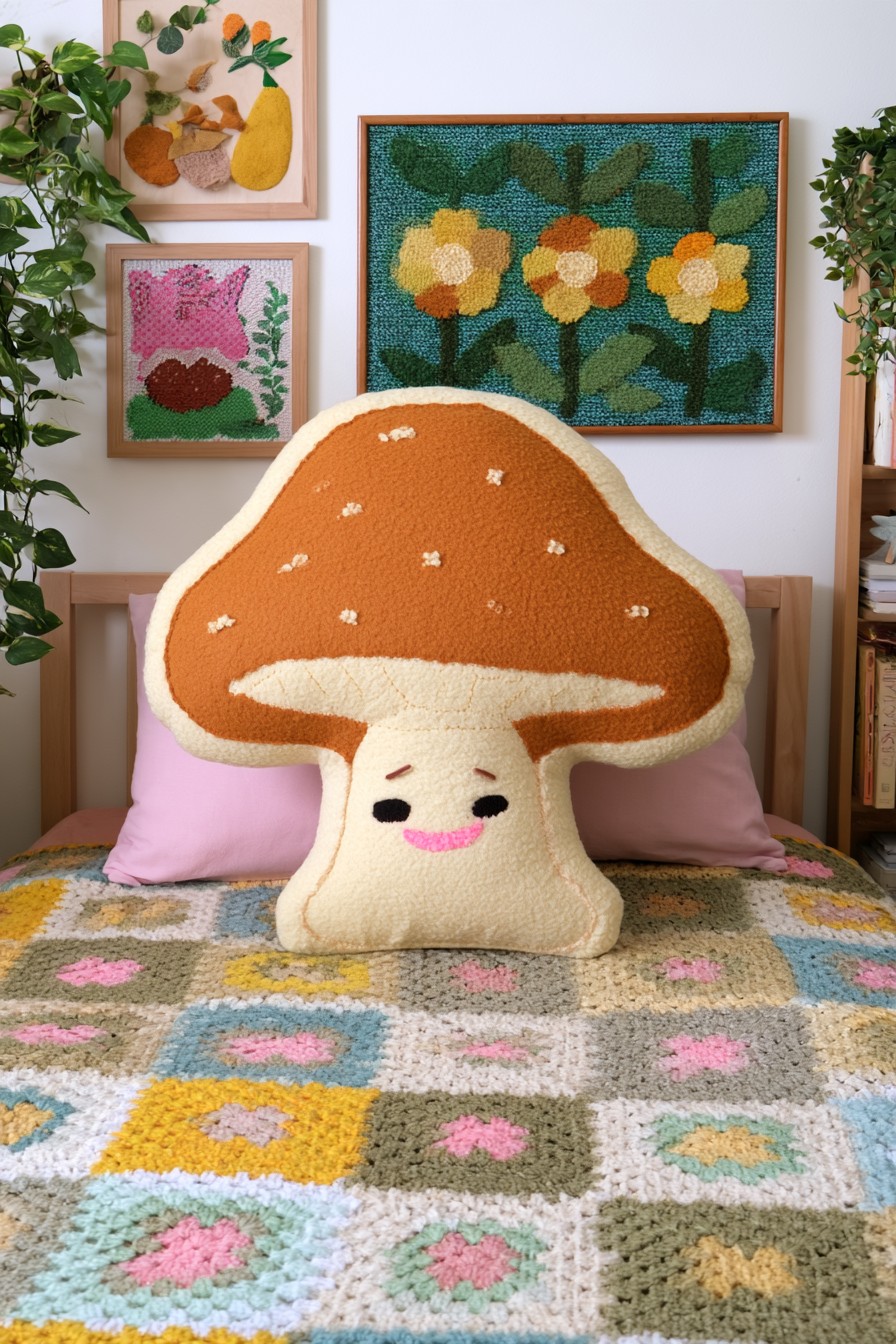
A broad rust colored cap sits above a pale mushroom stem, with small markings and a friendly face. The upper texture supplies fullness while the lighter stem keeps the silhouette readable. It introduces a woodland character distinct from ordinary floral appliqué.
Plan the cap and stem as connected shaped sections, deciding whether their filling compartments remain separate or communicate through the join. That decision affects how filling shifts during handling. Secure the connection according to the chosen pattern and balance the cap’s volume against the narrower stem. Apply markings and facial stitching before final assembly when possible. Keep the mushroom as a decorative pillow appropriate to its materials and construction rather than assuming it is a toy from its character alone.
20. Celestial Pillow with a Raised Crescent and Embroidered Stars
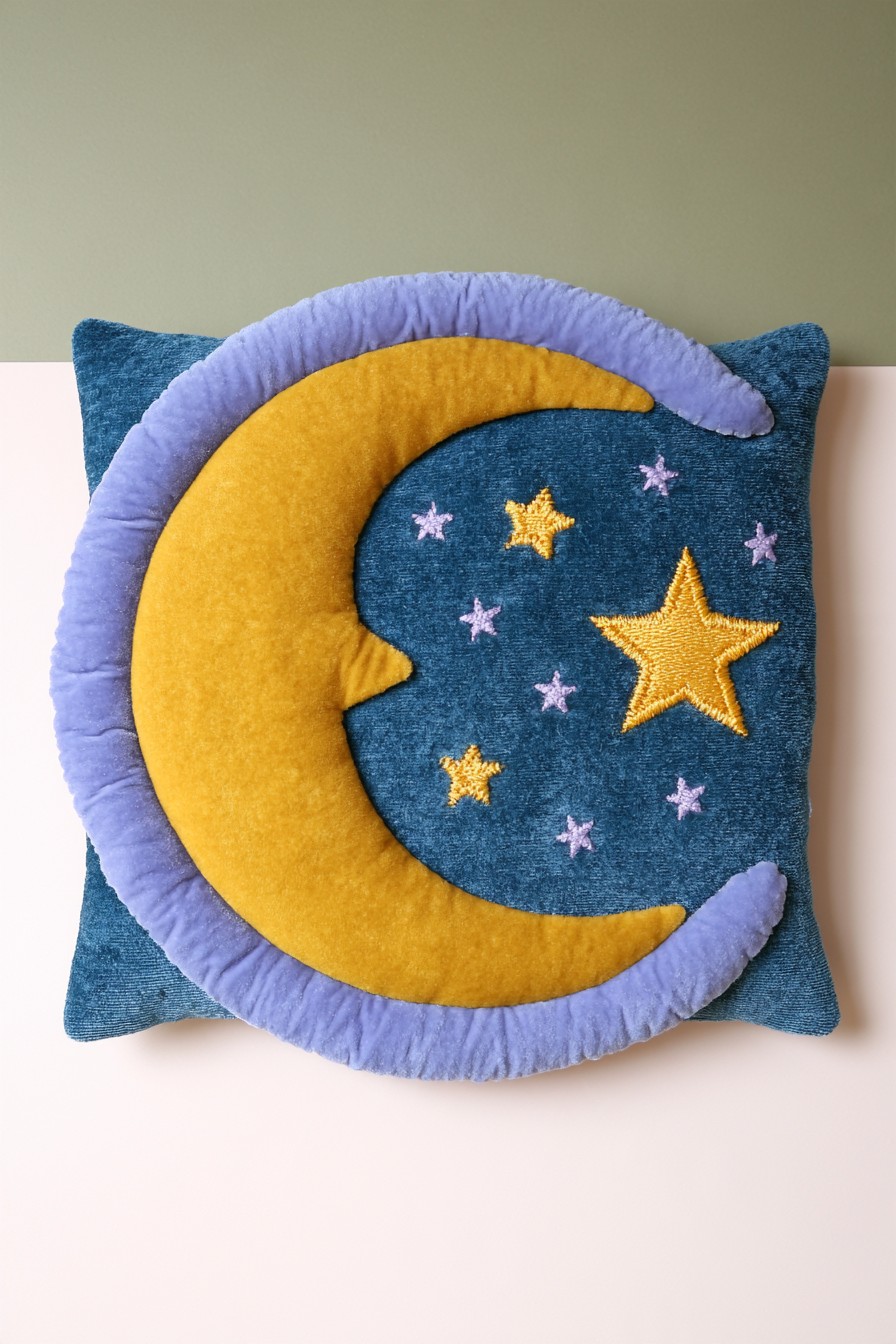
A large padded mustard crescent occupies a dark blue square, bordered by a lavender curved detail and scattered stars. The dark background gives the lighter shapes contrast while open space separates the small stitched motifs. It can carry a celestial theme with only one prominent cushion.
Attach the crescent and embroider the stars before closing the cover around an insert. Surface padding under the crescent is separate from the pillow’s main filling. Check that the curved border stays flexible and the appliqué does not pull the base fabric. Keep a removable back opening if regular cleaning is important. Use fewer stars for a quieter appearance, or repeat one star color in a plain companion pillow instead of adding another complex celestial design.
21. Plush Cat Face with Flat Embroidered Features
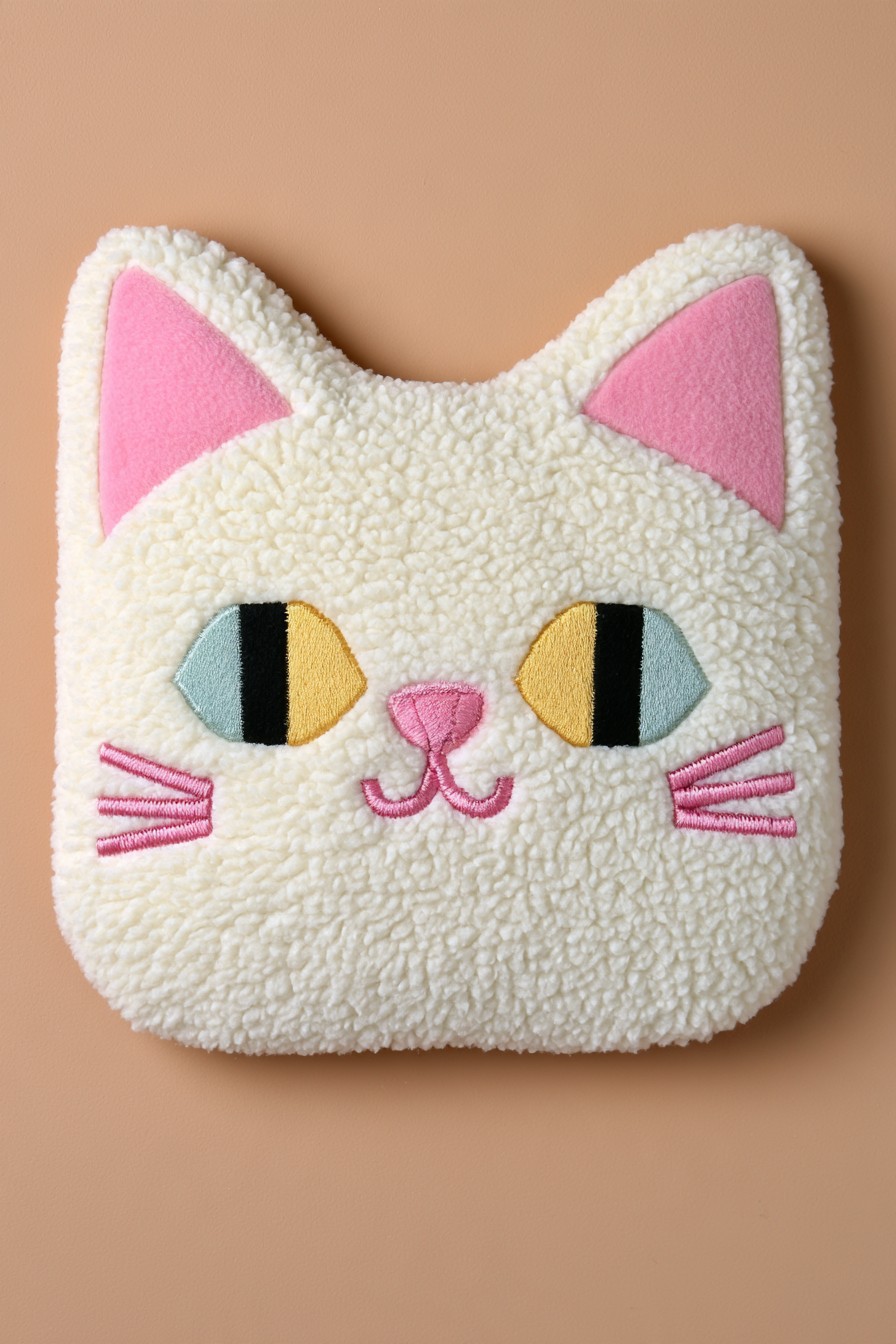
Pointed ears define a pale plush cat face, with pink inner panels and flat stitched facial details. The textured fabric does much of the decorative work. The simple outline makes the subject recognizable without a large number of attached accessories.
Choose a plush fabric and needle arrangement that suits the material, then test seams on scraps before shaping the body. Complete the face while the front is accessible. Fill the ears before adding most of the central stuffing, distributing it so the ear points keep their shape. Finish the filling opening securely. If the pillow is intended for a child, assess materials, attachments, and intended use separately; its friendly face is not evidence of toy suitability.
22. Quilted Yellow Star with a Quiet Grid Texture
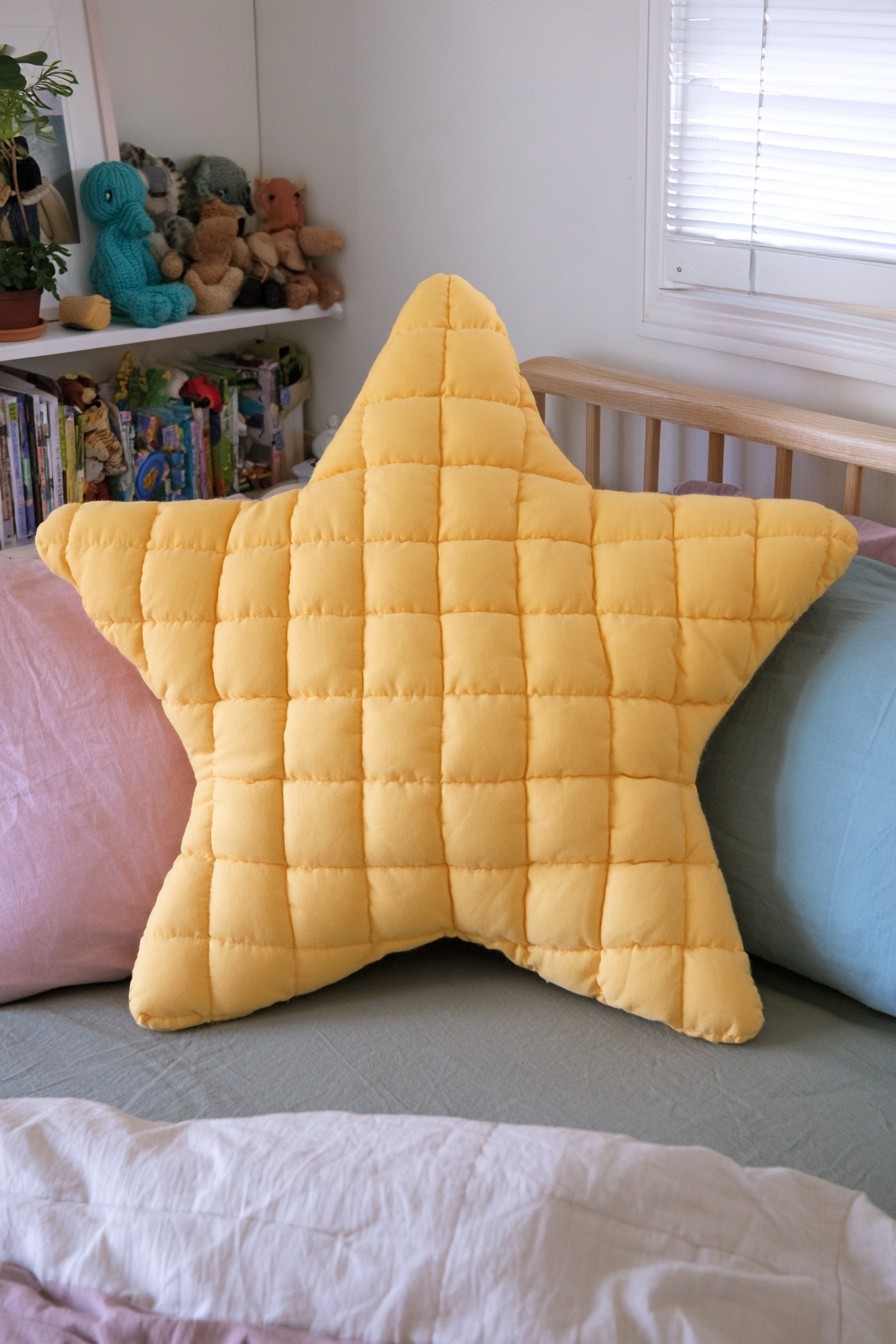
A yellow star combines a familiar silhouette with a regular stitched grid. Shallow raised areas create texture without adding another color or motif. It works as a quieter companion to the more layered designs in the selection.
Prepare the quilted front with its intended fabric and batting layers before assembling the body. The quilt stitches shape that surface layer; separate loose filling or an appropriate inner structure provides the pillow’s overall volume. Plan seams and access around the star outline, then fill the points gradually before the center. Keep the grid from becoming distorted through uneven stuffing. Choose a care process compatible with both the quilted surface and the finished filling.
Change the Atmosphere with a Small Pillow Edit
For a softer visual mood, combine cream and blush with one gathered floral accent. For a more energetic room, let a rainbow, wave pattern, or colorful patchwork lead the group. Leaf shapes and greens can suggest a botanical theme, while a moon and simple star give a quieter celestial direction. These are styling choices, not guaranteed effects on someone’s emotions.
Keep a few useful inserts and change removable covers when you want a seasonal or thematic update. Combine one sculptural shape, one patterned surface, and a simpler cushion so each stays visible. Repeat a selected color in another textile, such as these patchwork yarn pouf ideas, using the designs for coordination rather than as a shared sewing pattern.
Care for Covers and Filling Separately
Follow the instructions for the actual fabrics, trims, and filling. A washable main fabric does not make every tassel, folded petal, or insert compatible with the same process. Check decorative seams and shape after cleaning, and dry components as directed before refitting a cover. Store unused covers clean and dry, protecting raised folds and motifs from heavy compression.

Leave a Reply